Embed Size (px)
Citation preview
USER’S GUIDE
SOFTWARE
IP_AXES
Cod. 97854I V05_16
1
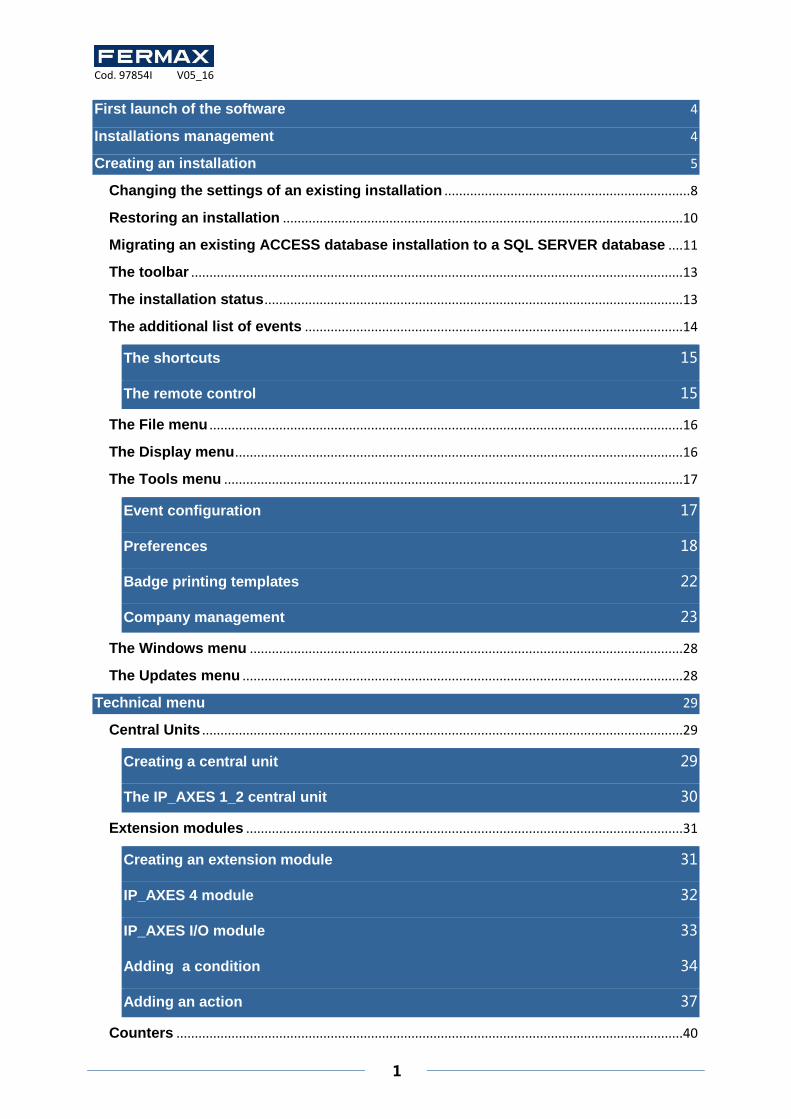
First launch of the software 4
Installations management 4
Creating an installation 5
Changing the settings of an existing installation ................................................................... 8
Restoring an installation .............................................................................................................10
Migrating an existing ACCESS database installation to a SQL SERVER database ....11
The toolbar ......................................................................................................................................13
The installation status ..................................................................................................................13
The additional list of events .......................................................................................................14
The shortcuts 15
The remote control 15
The File menu .................................................................................................................................16
The Display menu ..........................................................................................................................16
The Tools menu .............................................................................................................................17
Event configuration 17
Preferences 18
Badge printing templates 22
Company management 23
The Windows menu ......................................................................................................................28
The Updates menu ........................................................................................................................28
Technical menu 29
Central Units ...................................................................................................................................29
Creating a central unit 29
The IP_AXES 1_2 central unit 30
Extension modules .......................................................................................................................31
Creating an extension module 31
IP_AXES 4 module 32
IP_AXES I/O module 33
Adding a condition 34
Adding an action 37
Counters ..........................................................................................................................................40
Cod. 97854I V05_16
2
Online automatic devices ............................................................................................................41
Zones management ......................................................................................................................42
Video servers ..................................................................................................................................43
Creating a video server 44
Configuring records 45
Creating a video matrix 45
Wiegand keypad 53
Clock & data reader 53
Personalised Clock & Data 54
Deister Clock & Data reader 56
Reader with keypad (Ref. 5278 keypad MINI or other equivalent product) 56
Wiegand reader 57
26 bits Wiegand reader 57
30 bits wiegand reader 57
Wiegand decimal reader 58
Personalised Wiegand 59
Lifts management ..........................................................................................................................62
Schedules and access groups menu 64
Managing time ranges ..................................................................................................................64
Managing public holidays ...........................................................................................................66
Managing special days ................................................................................................................66
Managing access groups ............................................................................................................67
Managing an access group 68
Exporting the access groups settings 70
Users menu 71
Creating users ................................................................................................................................71
Modifying users .............................................................................................................................75
User list ............................................................................................................................................81
Managing a query 82
Remise en cycle des utilisateurs ..............................................................................................84
Cod. 97854I V05_16
3
Importing a list of users ...............................................................................................................84
Presence time .................................................................................................................................86
Managing the present user .........................................................................................................86
Events menu 87
Events display ................................................................................................................................87
Event history and reports ............................................................................................................88
Managing a query 89
Maps menu 90
Editing the maps ............................................................................................................................90
Opening the maps .........................................................................................................................91
Administration menu 92
Creating a manager .......................................................................................................................92
Managing shortcuts 94
Types of shortcuts ........................................................................................................................95
Cod. 97854I V05_16
4
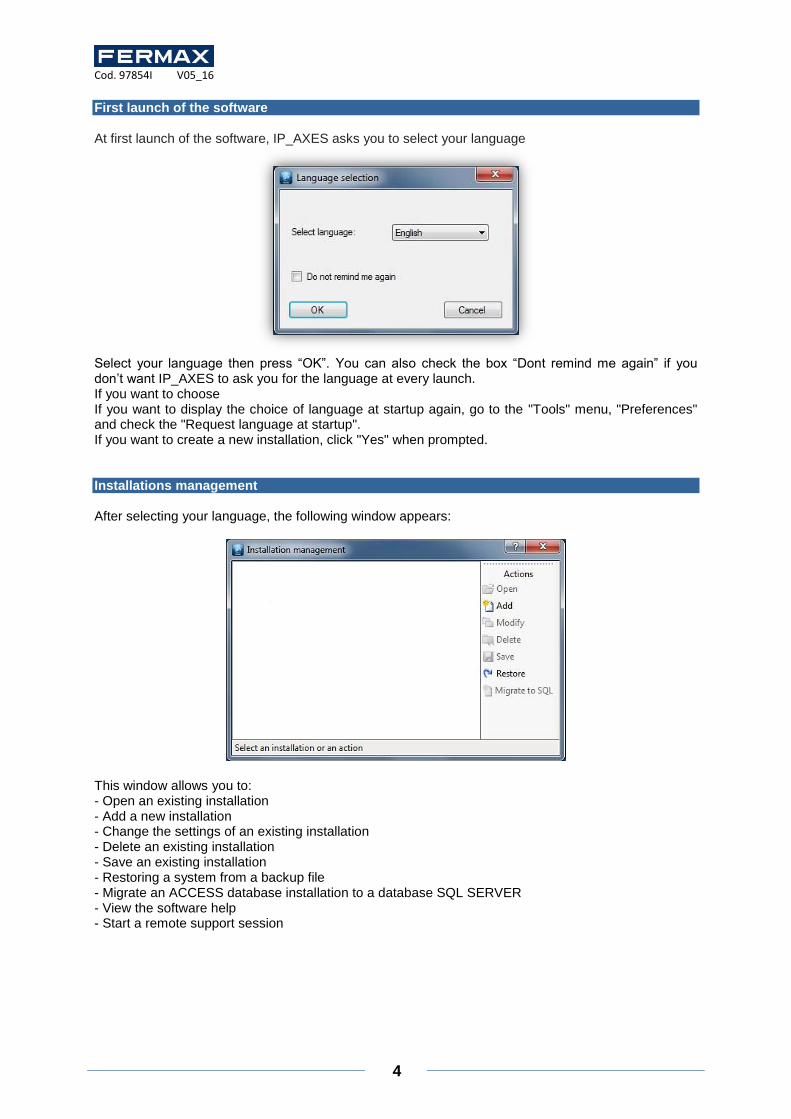
First launch of the software At first launch of the software, IP_AXES asks you to select your language
Select your language then press “OK”. You can also check the box “Dont remind me again” if you don’t want IP_AXES to ask you for the language at every launch. If you want to choose If you want to display the choice of language at startup again, go to the "Tools" menu, "Preferences" and check the "Request language at startup". If you want to create a new installation, click "Yes" when prompted. Installations management After selecting your language, the following window appears:
This window allows you to: - Open an existing installation - Add a new installation - Change the settings of an existing installation - Delete an existing installation - Save an existing installation - Restoring a system from a backup file - Migrate an ACCESS database installation to a database SQL SERVER - View the software help - Start a remote support session
Cod. 97854I V05_16
5
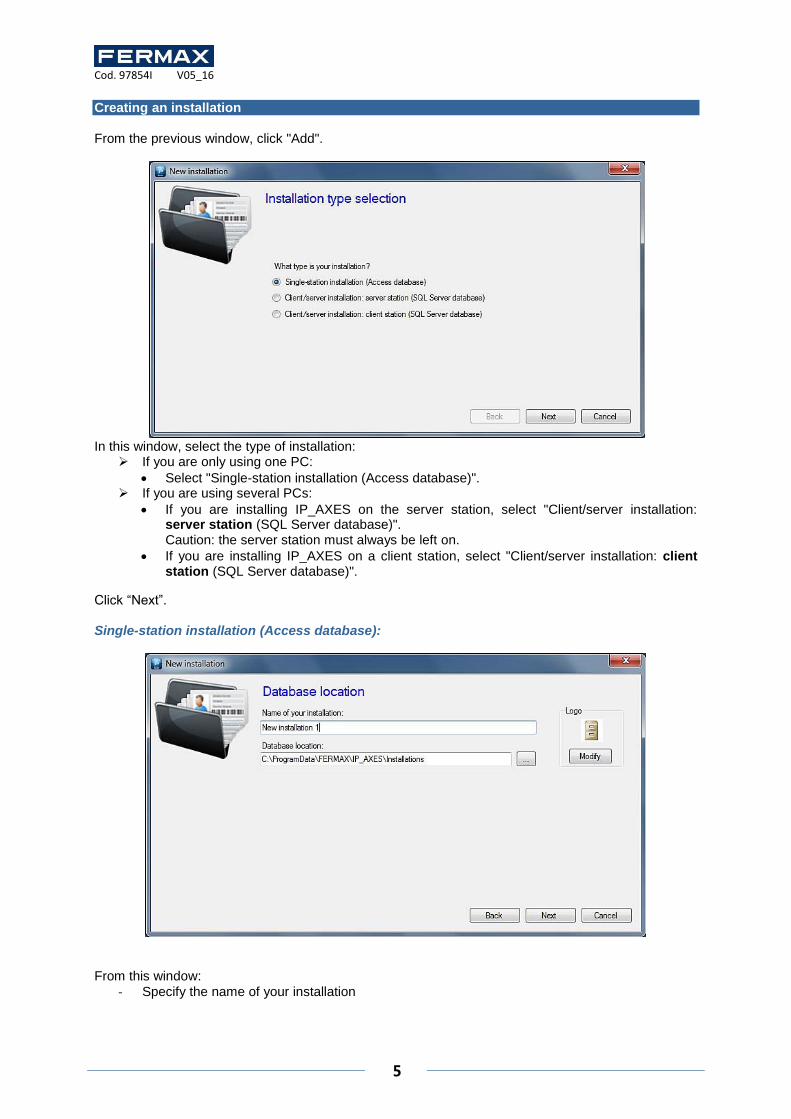
Creating an installation From the previous window, click "Add".
In this window, select the type of installation:
If you are only using one PC:
Select "Single-station installation (Access database)". If you are using several PCs:
If you are installing IP_AXES on the server station, select "Client/server installation: server station (SQL Server database)". Caution: the server station must always be left on.
If you are installing IP_AXES on a client station, select "Client/server installation: client station (SQL Server database)".
Click “Next”. Single-station installation (Access database):
From this window:
- Specify the name of your installation

Cod. 97854I V05_16
6
- Specify the location of the database. You can use the button to display the file system of your computer. The default directory is in the “ProgramData” folder of Windows. Be careful if you change this folder, make sure IP_AXES has access rights to read and write on it.
- Change the image of the installation. To do this, click the “Modify” button.
Client/server installation: server station (SQL Server database) :
From this window:
- Specify the name of your installation
- Specify the path to your SQL Server. You can use the button to display the list of the SQL servers on your network.
- Specify the name of your database (default is “IP_AXES”) - Specify the authentication mode of your SQL Server (Windows authentication - using the user
of the Windows session currently opened on the computer - or SQL authentication - using the login “sa” or another and the password defined during the installation of the SQL Server instance). If you do not have a Windows domain and / or the user of the currently opened Windows session is not allowed on the database, use SQL Authentication.
- Specify to use the Windows service: This allows to close the computer Windows session while maintaining active the dialogue with the central units (eg the use of global anti-pass-back between several central units, online automation, management of Galaxy HoneyWell central units - Additional license required in this case). If you use the Windows service, using SQL authentication is mandatory.
- Specify the image of the installation. To do this, click the “Modify” button.

Cod. 97854I V05_16
7
Client/server installation: client station (SQL Server database) :
From this window:
- Specify the name of your installation
- Specify the path to your SQL Server. You can use the button to display the list of the SQL servers on your network. Warning, if you want to access a remote SQL Server instance (eg VPN or NAT rule), scanning the server will not work. You must then specify the path to your database as follows: IPAddress,Port (eg 192.168.1.1,1433).
- Specify the name of your database (default is “IP_AXES”) - Specify the authentication mode of your SQL Server (Windows authentication - using the user
of the Windows session currently opened on the computer - or SQL authentication - using the login “sa” or another and the password defined during the installation of the SQL Server instance). If you do not have a Windows domain and / or the user of the currently opened Windows session is not allowed on the database, use SQL Authentication.
- Specify the image of the installation. To do this, click the “Modify” button. Click “Next”.
From this window, if you have the same type of reader for all your access, check the option “Yes, I use the following type of reader” and select your type or reader in the list. This will prevent you to set the type of reader for all central units and extension modules of your installation. Click "Next".
Cod. 97854I V05_16
8
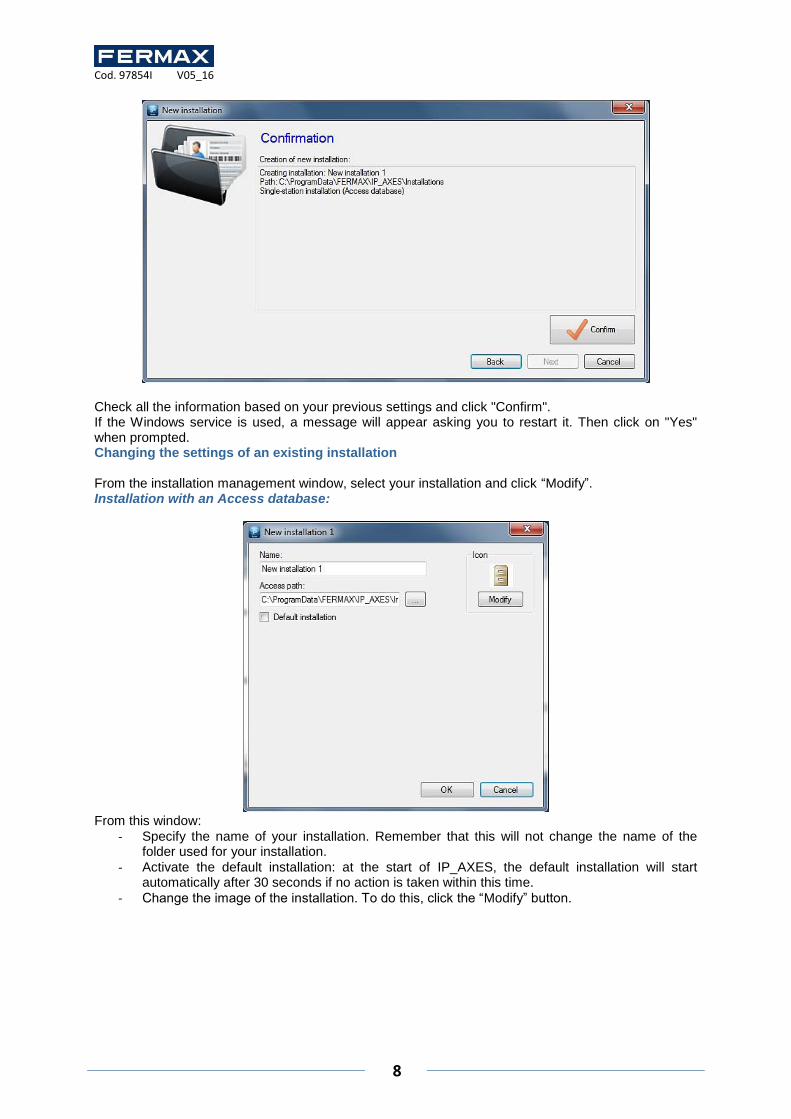
Check all the information based on your previous settings and click "Confirm". If the Windows service is used, a message will appear asking you to restart it. Then click on "Yes" when prompted. Changing the settings of an existing installation From the installation management window, select your installation and click “Modify”. Installation with an Access database:
From this window:
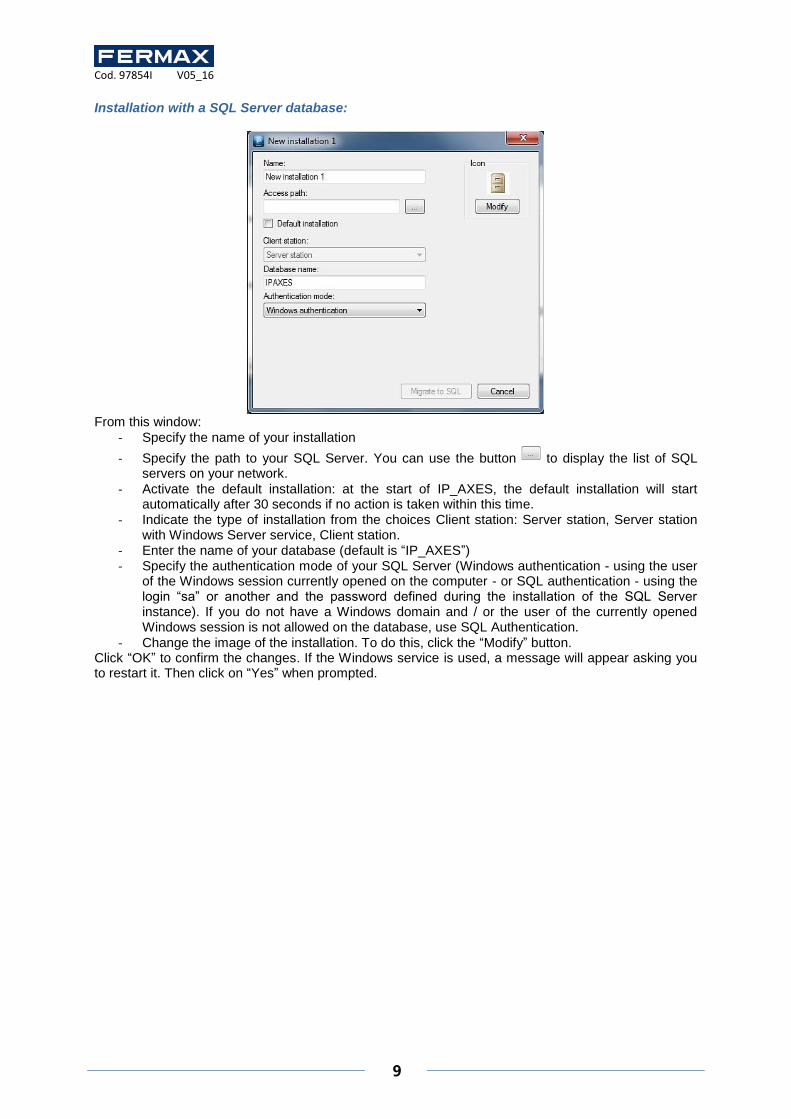
- Specify the name of your installation. Remember that this will not change the name of the folder used for your installation.
- Activate the default installation: at the start of IP_AXES, the default installation will start automatically after 30 seconds if no action is taken within this time.
- Change the image of the installation. To do this, click the “Modify” button.
Cod. 97854I V05_16
9
Installation with a SQL Server database:
From this window:
- Specify the name of your installation
- Specify the path to your SQL Server. You can use the button to display the list of SQL servers on your network.
- Activate the default installation: at the start of IP_AXES, the default installation will start automatically after 30 seconds if no action is taken within this time.
- Indicate the type of installation from the choices Client station: Server station, Server station with Windows Server service, Client station.
- Enter the name of your database (default is “IP_AXES”) - Specify the authentication mode of your SQL Server (Windows authentication - using the user
of the Windows session currently opened on the computer - or SQL authentication - using the login “sa” or another and the password defined during the installation of the SQL Server instance). If you do not have a Windows domain and / or the user of the currently opened Windows session is not allowed on the database, use SQL Authentication.
- Change the image of the installation. To do this, click the “Modify” button. Click “OK” to confirm the changes. If the Windows service is used, a message will appear asking you to restart it. Then click on “Yes” when prompted.

Cod. 97854I V05_16
10
Removing an existing installation
From the installations management window, select the installation to remove and click “Delete”.
Confirm the deletion by clicking “Yes”. When a SQL Server database is used, you will be prompted to confirm the deletion of the database on your SQL instance. Click "Yes" if you are sure to delete the database. If the Windows service is used, a message will appear asking you to restart it. Then click on “Yes” when prompted. Caution: Deleting will automatically destroy all data on your computer according to the selected installation. Reading the parameters from our central units is impossible, so this operation is irreversible. Make sure you have a backup before performing this operation. Saving an existing installation From the installations management window, select the installation to save and click “Save”. Choose the location of the backup file and click “Save”. Enter the password of the administrator of your installation and click “OK”. Make sure you have write access rights to the selected location. Restoring an installation From the installations management window, click "Restore." Select the file to be restored in ZIP format and click “Open”. Restoring an installation using a SQL database:
From this window:
- Specify the name of your installation
- Specify the path to your SQL Server. You can use the button to display the list of SQL servers on your network.
- Activate the default installation: at the start of IP_AXES, the default installation will start automatically after 30 seconds if no action is taken within this time.
- Indicate the type of installation from the choices Server station, Server station with Windows Server service, Client station.
- Enter the name of your database (default is “IP_AXES”)
Cod. 97854I V05_16
11
- Specify the authentication mode of your SQL Server (Windows authentication - using the user of the Windows session currently opened on the computer - or SQL authentication - using the login “sa” or another and the password defined during the installation of the SQL Server instance). If you do not have a Windows domain and / or the user of the currently opened Windows session is not allowed on the database, use SQL Authentication.
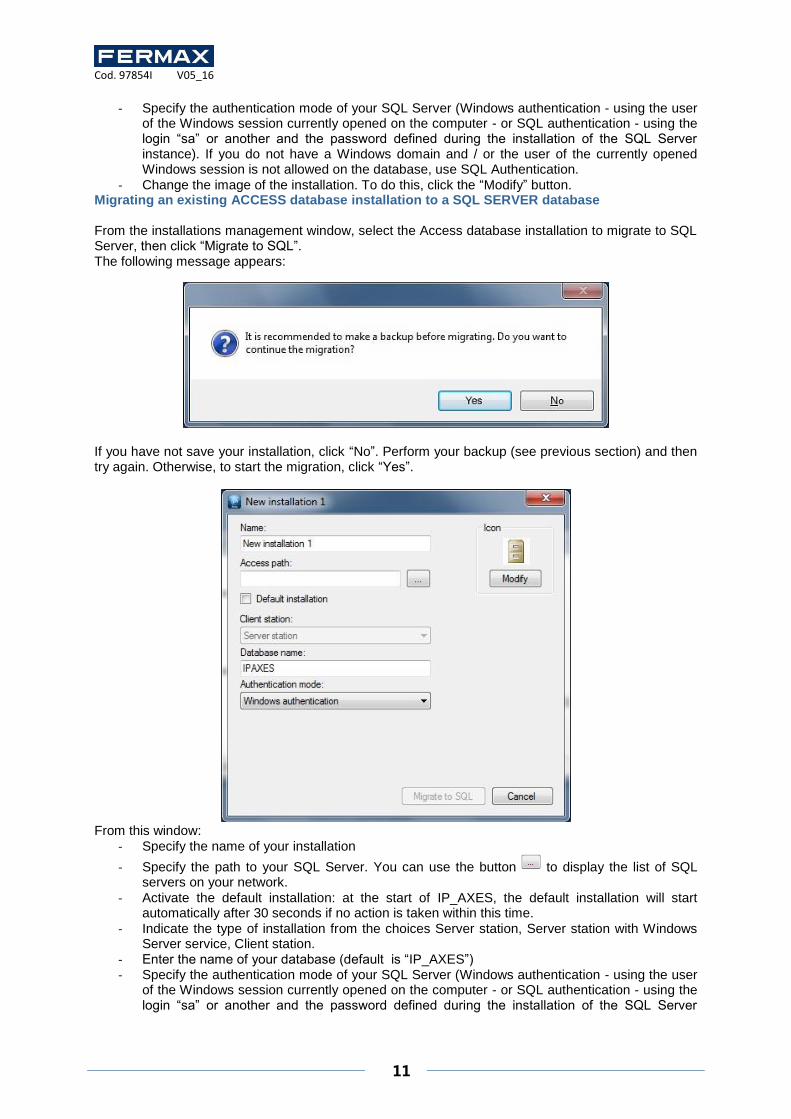
- Change the image of the installation. To do this, click the “Modify” button. Migrating an existing ACCESS database installation to a SQL SERVER database From the installations management window, select the Access database installation to migrate to SQL Server, then click “Migrate to SQL”. The following message appears:
If you have not save your installation, click “No”. Perform your backup (see previous section) and then try again. Otherwise, to start the migration, click “Yes”.
From this window:
- Specify the name of your installation
- Specify the path to your SQL Server. You can use the button to display the list of SQL servers on your network.
- Activate the default installation: at the start of IP_AXES, the default installation will start automatically after 30 seconds if no action is taken within this time.
- Indicate the type of installation from the choices Server station, Server station with Windows Server service, Client station.
- Enter the name of your database (default is “IP_AXES”) - Specify the authentication mode of your SQL Server (Windows authentication - using the user
of the Windows session currently opened on the computer - or SQL authentication - using the login “sa” or another and the password defined during the installation of the SQL Server

Cod. 97854I V05_16
12
instance). If you do not have a Windows domain and / or the user of the currently opened Windows session is not allowed on the database, use SQL Authentication.
- Change the image of the installation. To do this, click the “Edit” button. Click “Migrate to SQL” to start the migration Opening an existing installation From the installations management window, select the installation to open, then click “Open”.
From this window, select the manager. If the selected manager has protected his session with a password, enter it. Click “OK”. First opening of an installation: If you open an installation for the first time, IP_AXES will ask you to enter the password for the Administrator manager as follows:
If you do not want to protect the Administrator with a password, click “OK”. Otherwise, enter the password, confirm it and click “OK”. We recommend to enter a password to the Administrator Manager because this manager has unrestricted access to the software functions.Managing the menus

Cod. 97854I V05_16
13
This window provides several menus for using the software. Throughout this technical guide, you will receive all the information needed for getting started with the IP_AXES software. The toolbar
This toolbar represents all the functions of the software
- Technical: display all system configuration and status of each security element (central units, extension modules, readers, ...)
- Schedules and access groups: management of users access rights, users access schedules but also free access (open maintained doors), holidays and special days (not holidays but different access times from usual hours)
- Users: management of users accessing the facility and their identifiers (cards, transmitters, codes...), listing tool (creating custom lists of users based on many customizable filter lists), calculating the time of attendance, and display of users current location.
- Events: Display of events occurring in the facility and history tool (creating custom events list depending on many customizable filter lists)
- Maps: Creating an interactive map of the facility to view and control the status of various elements graphically
- Administration: Management of the Managers allowed to access IP_AXES software and visualization of their logs
To show or hide the toolbar, click the “Display” menu and then “Toolbar”. Tip: To hide this bar each time you start IP_AXES, go to the “Tools” menu, “Preferences”, “Configuration” tab and uncheck the “Display toolbar on startup”. The installation status
This status allows you to easily know the global status of the equipment of your installation. The statuses can be:
- Nominal Installation: No fault of the equipment. The system is working properly.
Additional list
of events
Shortcuts
Status bar
Installation
status
Toolbar
Cod. 97854I V05_16
14
- Check dongle: No fault of the equipment. However, no dongle is detected which means that no updates and no collection of events can be done. This error can occur if you use more than 2 readers on your system and no central unit is equipped with a dongle.
- Check status of equipment: At least one device is not connected properly. In this case, open the equipment status from the "Technical" menu, "State of equipment" and check the status of all equipment. At least one of them must be connection failure or disconnected.
- Main station disconnected: In case of a client / server installation, IP_AXES should not be launched on the server. To continue the upgrade of the central units and collect events, IP_AXES must be launched on the server.
- Database access problem: the database is no longer available. Restart IP_AXES and make sure the database is functional.
- Check status of equipment (no dongle detected): At least one device is not connected properly. In this case, open the equipment status from the "Technical" menu, "Equipment status" and check the status of all equipment. At least one of them must be in connection failure or disconnected. Furthermore no dongle is detected. Very often, this status appears when the central unit with the dongle is disconnected. Check its status.
The additional list of events
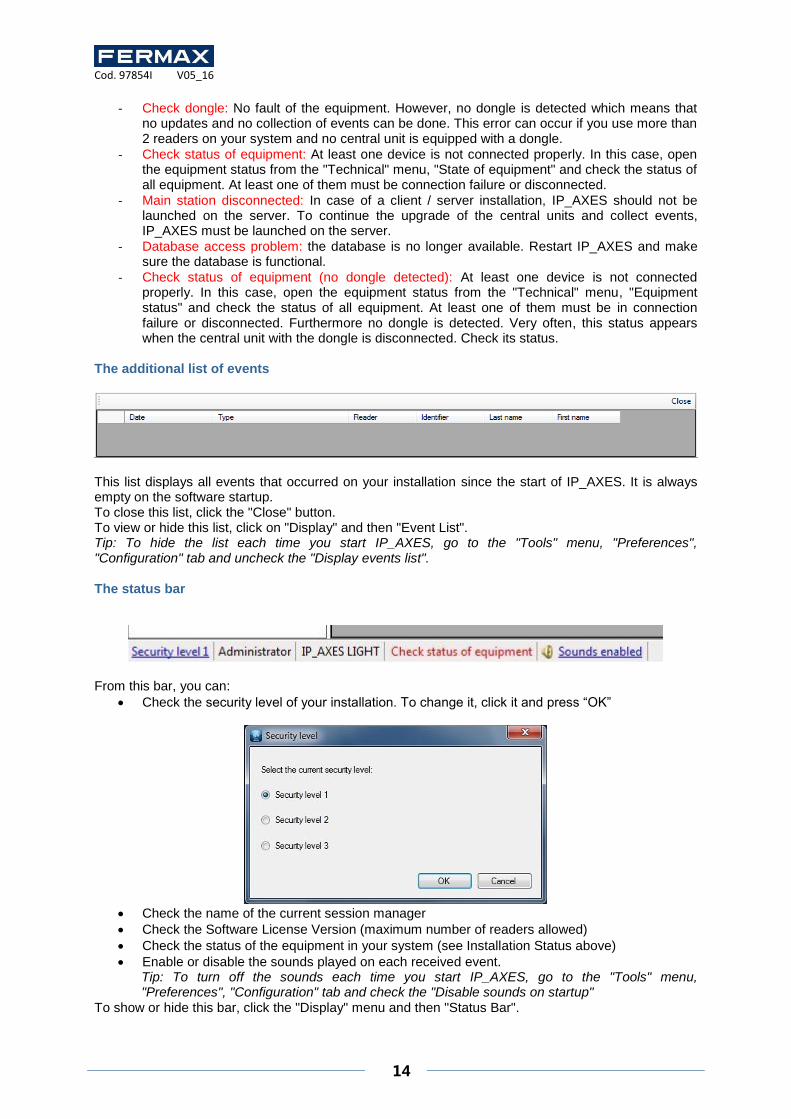
This list displays all events that occurred on your installation since the start of IP_AXES. It is always empty on the software startup. To close this list, click the "Close" button. To view or hide this list, click on "Display" and then "Event List". Tip: To hide the list each time you start IP_AXES, go to the "Tools" menu, "Preferences", "Configuration" tab and uncheck the "Display events list". The status bar
From this bar, you can:
Check the security level of your installation. To change it, click it and press “OK”
Check the name of the current session manager
Check the Software License Version (maximum number of readers allowed)
Check the status of the equipment in your system (see Installation Status above)
Enable or disable the sounds played on each received event. Tip: To turn off the sounds each time you start IP_AXES, go to the "Tools" menu, "Preferences", "Configuration" tab and check the "Disable sounds on startup"
To show or hide this bar, click the "Display" menu and then "Status Bar".
Cod. 97854I V05_16
15
The shortcuts and the remote control
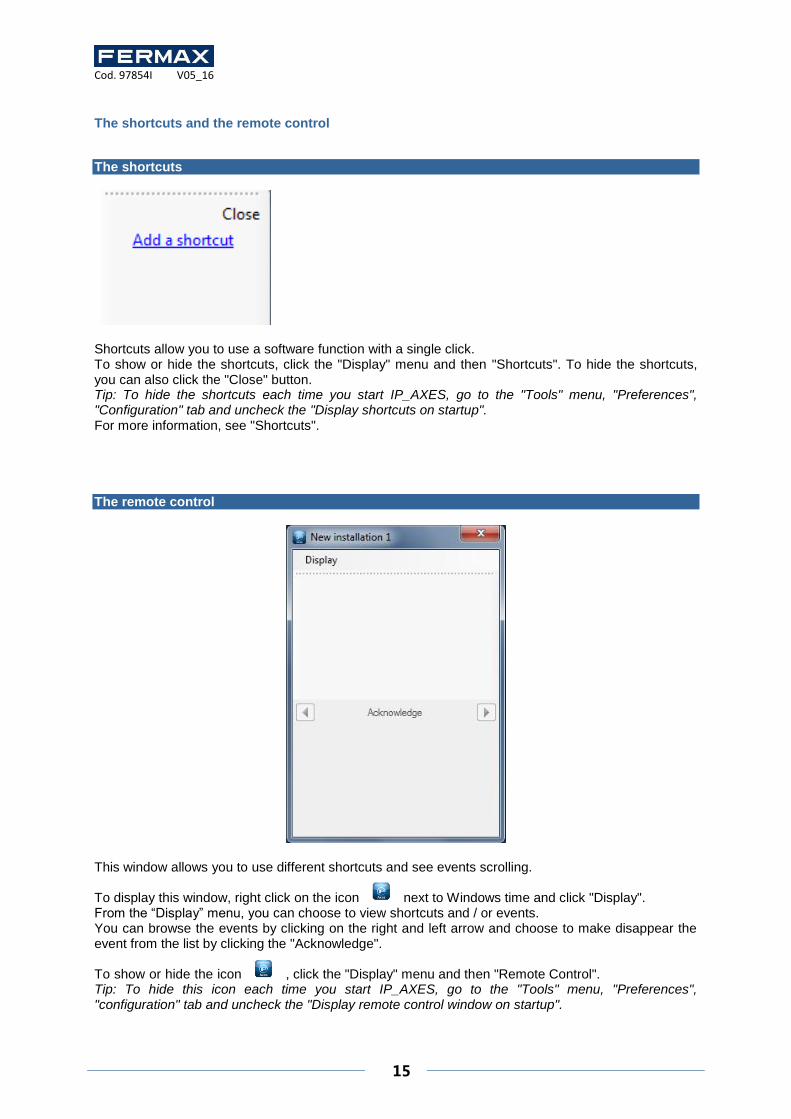
The shortcuts
Shortcuts allow you to use a software function with a single click. To show or hide the shortcuts, click the "Display" menu and then "Shortcuts". To hide the shortcuts, you can also click the "Close" button. Tip: To hide the shortcuts each time you start IP_AXES, go to the "Tools" menu, "Preferences", "Configuration" tab and uncheck the "Display shortcuts on startup". For more information, see "Shortcuts". The remote control
This window allows you to use different shortcuts and see events scrolling. To display this window, right click on the icon next to Windows time and click "Display". From the “Display” menu, you can choose to view shortcuts and / or events. You can browse the events by clicking on the right and left arrow and choose to make disappear the event from the list by clicking the "Acknowledge". To show or hide the icon , click the "Display" menu and then "Remote Control". Tip: To hide this icon each time you start IP_AXES, go to the "Tools" menu, "Preferences", "configuration" tab and uncheck the "Display remote control window on startup".
Cod. 97854I V05_16
16
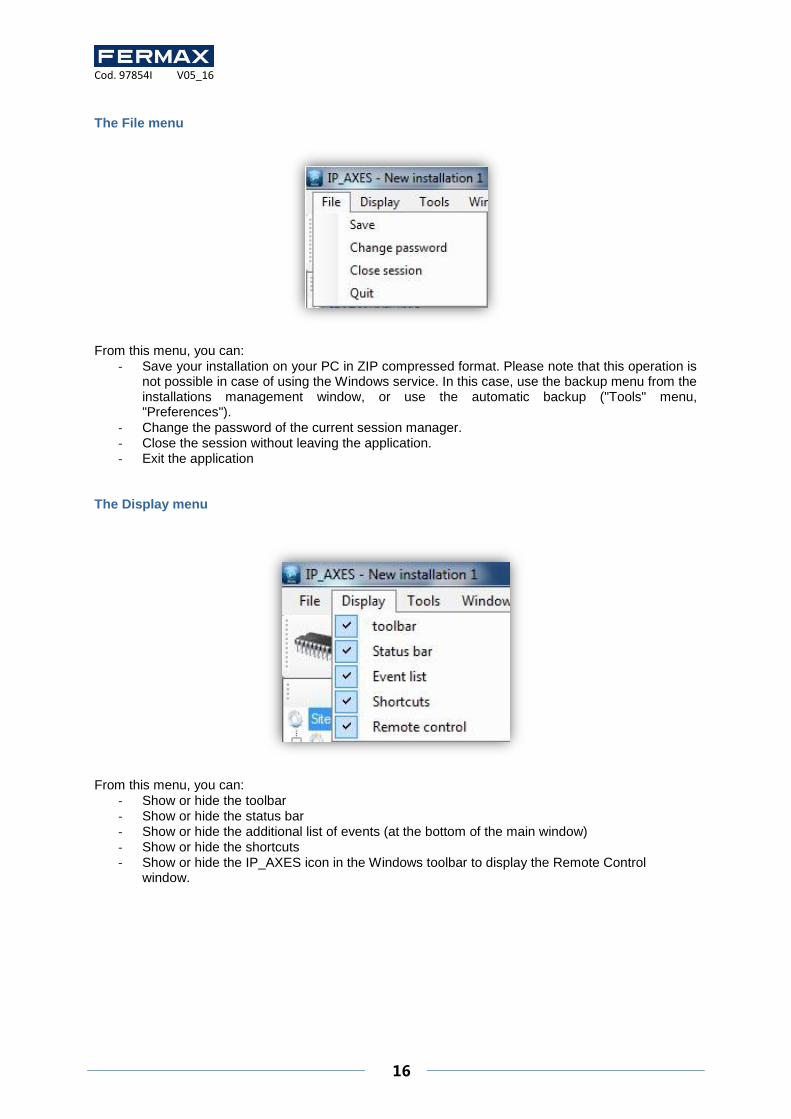
The File menu
From this menu, you can:
- Save your installation on your PC in ZIP compressed format. Please note that this operation is not possible in case of using the Windows service. In this case, use the backup menu from the installations management window, or use the automatic backup ("Tools" menu, "Preferences").
- Change the password of the current session manager. - Close the session without leaving the application. - Exit the application
The Display menu
From this menu, you can:
- Show or hide the toolbar - Show or hide the status bar - Show or hide the additional list of events (at the bottom of the main window) - Show or hide the shortcuts - Show or hide the IP_AXES icon in the Windows toolbar to display the Remote Control
window.
Cod. 97854I V05_16
17
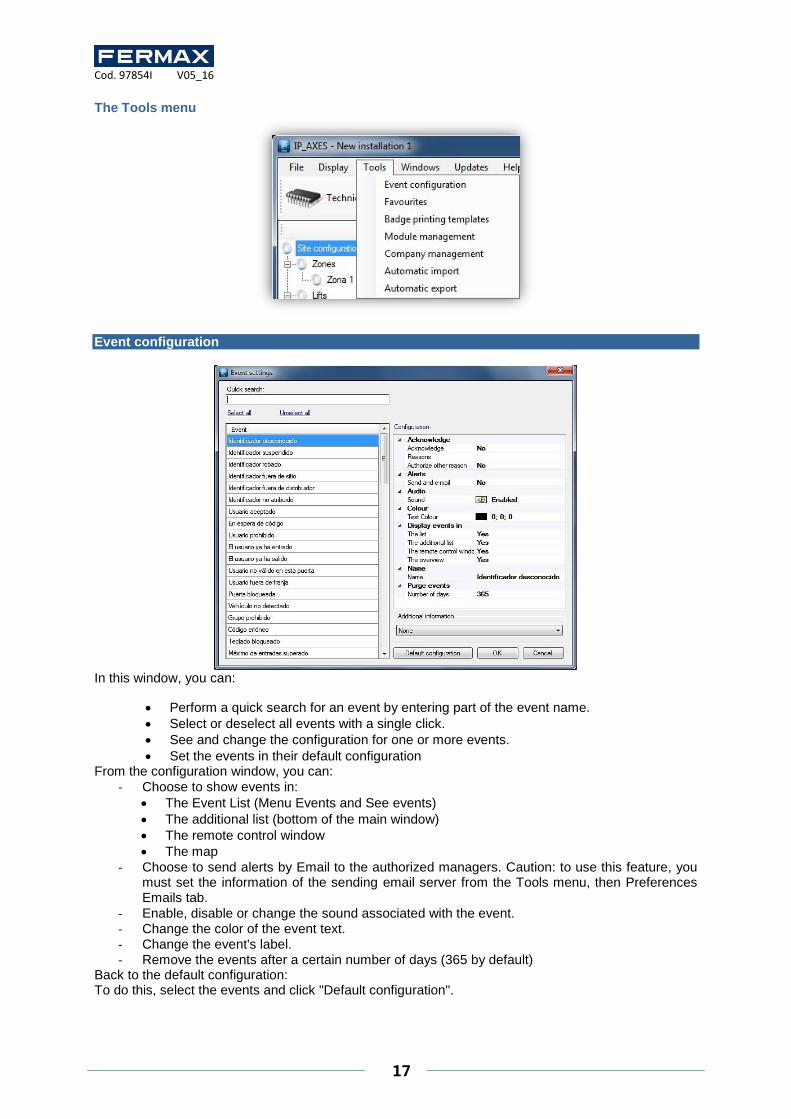
The Tools menu
Event configuration
In this window, you can:
Perform a quick search for an event by entering part of the event name.
Select or deselect all events with a single click.
See and change the configuration for one or more events.
Set the events in their default configuration From the configuration window, you can:
- Choose to show events in:
The Event List (Menu Events and See events)
The additional list (bottom of the main window)
The remote control window
The map
- Choose to send alerts by Email to the authorized managers. Caution: to use this feature, you must set the information of the sending email server from the Tools menu, then Preferences Emails tab.
- Enable, disable or change the sound associated with the event. - Change the color of the event text. - Change the event's label. - Remove the events after a certain number of days (365 by default)
Back to the default configuration: To do this, select the events and click "Default configuration".

Cod. 97854I V05_16
18
Check the items to restore default settings and click "OK".
Preferences Configuration tab
In this tab, you can:
- Display the remote control window on start-up in the Windows taskbar. - Display the shortcuts when the software starts. - Display toolbar on start-up. - Display the event list. - Ask for the language when the software starts. - Manage badge numbers in hexadecimal. - Use the number written on the badges, instead of the number read by our central units (useful
when the logical number is different to the physical number).
- Disable the sounds when the software starts. - Load the sounds onto the client stations in case of a client/server installation (SQL SERVER
database). This function can be useful for reducing the IP_AXES start-up time on client stations.
- Enable global anti-passback: this function is useful if the installation comprises several entry or exit readers connected to several IP central units. Caution: to use this function, IP_AXES must be running continuously on the PC or use the Windows service.
- Delete users that have reached their maximum number of passages. The number of passages or times that badges can be used is defined in the user's record in the Options tab. The passage count setting is configured in the reader via the Configuration tab. Caution: users will only be deleted every midnight. If you use this function, ensure that IP_AXES is running at midnight.
- Delete expired users. The user's validity period is configured in the user's record in the Authorisation tab. Caution: users will only be deleted every midnight. If you use this function, ensure that IP_AXES is running at midnight or use the Windows service.
- Enable the I/O module, where eight inputs for a IP_AXES 1_2 central unit can be used to control a IP_AXES shortcut according to the input status.
- Allow multiple users and identifiers to be deleted. As such, managers can delete several users and identifiers in just a few clicks
Cod. 97854I V05_16
19
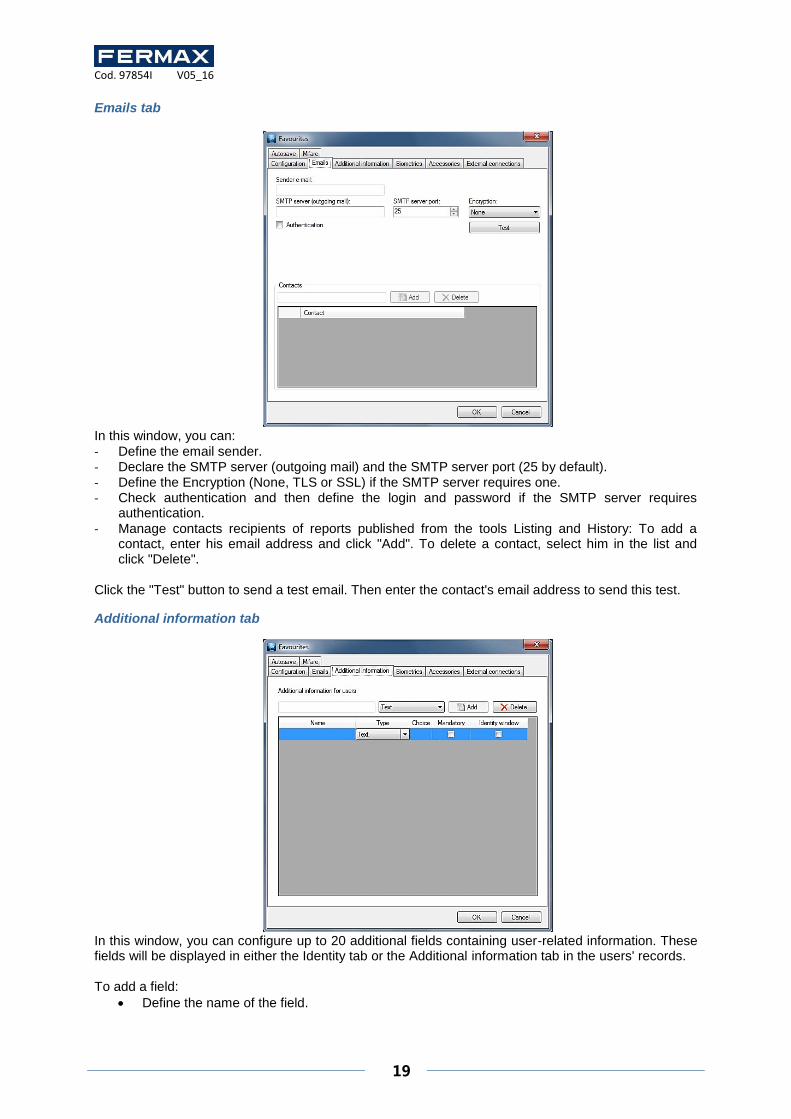
Emails tab
In this window, you can:
- Define the email sender. - Declare the SMTP server (outgoing mail) and the SMTP server port (25 by default). - Define the Encryption (None, TLS or SSL) if the SMTP server requires one. - Check authentication and then define the login and password if the SMTP server requires
authentication.
- Manage contacts recipients of reports published from the tools Listing and History: To add a contact, enter his email address and click "Add". To delete a contact, select him in the list and click "Delete".
Click the "Test" button to send a test email. Then enter the contact's email address to send this test.
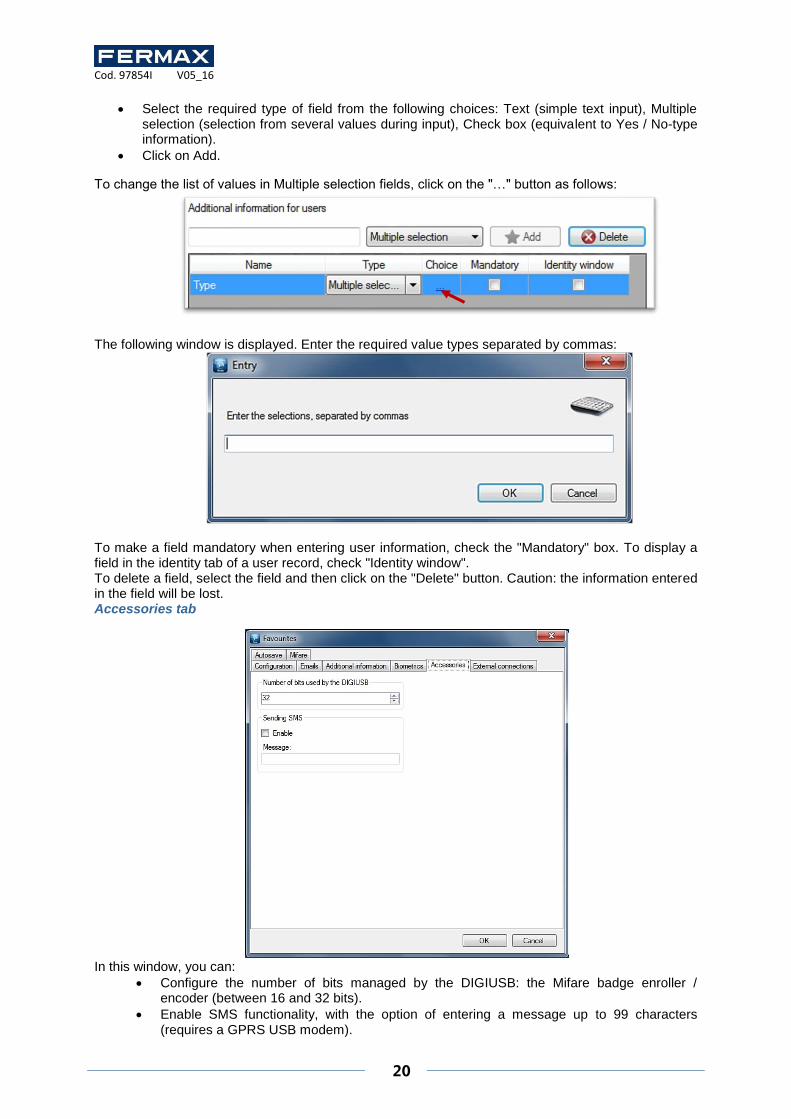
Additional information tab
In this window, you can configure up to 20 additional fields containing user-related information. These fields will be displayed in either the Identity tab or the Additional information tab in the users' records. To add a field:
Define the name of the field.
Cod. 97854I V05_16
20
Select the required type of field from the following choices: Text (simple text input), Multiple selection (selection from several values during input), Check box (equivalent to Yes / No-type information).
Click on Add.
To change the list of values in Multiple selection fields, click on the "…" button as follows:
The following window is displayed. Enter the required value types separated by commas:
To make a field mandatory when entering user information, check the "Mandatory" box. To display a field in the identity tab of a user record, check "Identity window". To delete a field, select the field and then click on the "Delete" button. Caution: the information entered in the field will be lost. Accessories tab
In this window, you can:
Configure the number of bits managed by the DIGIUSB: the Mifare badge enroller / encoder (between 16 and 32 bits).
Enable SMS functionality, with the option of entering a message up to 99 characters (requires a GPRS USB modem).

Cod. 97854I V05_16
21
Autosave tab
In this window, you can:
- Enable the autosave feature. To do this, check the box “Enable autosave”. - Configure the save frequency (expressed in hours) and then specify the start time. - View the time of the next save. - Force the save, which will be performed as soon as you click on OK. - Specify the save directory. If you use a SQL SERVER database installed on another PC, you
will have to set the path to a readable / writable directory accessible by the SQL instance and by IP_AXES.
- Choose to export the save to an FTP server and define the login and password in case of a secure server.
- Choose to send the save by email. Caution: ensure that you configure the email server settings in the "Emails" tab and ensure sending "big" files is permitted.
- Choose to send a report on the save process by email. In this case, enter the email address of the recipient of this report. Caution: Be sure to set the sending mail server from "Emails" tab.
Cod. 97854I V05_16
22
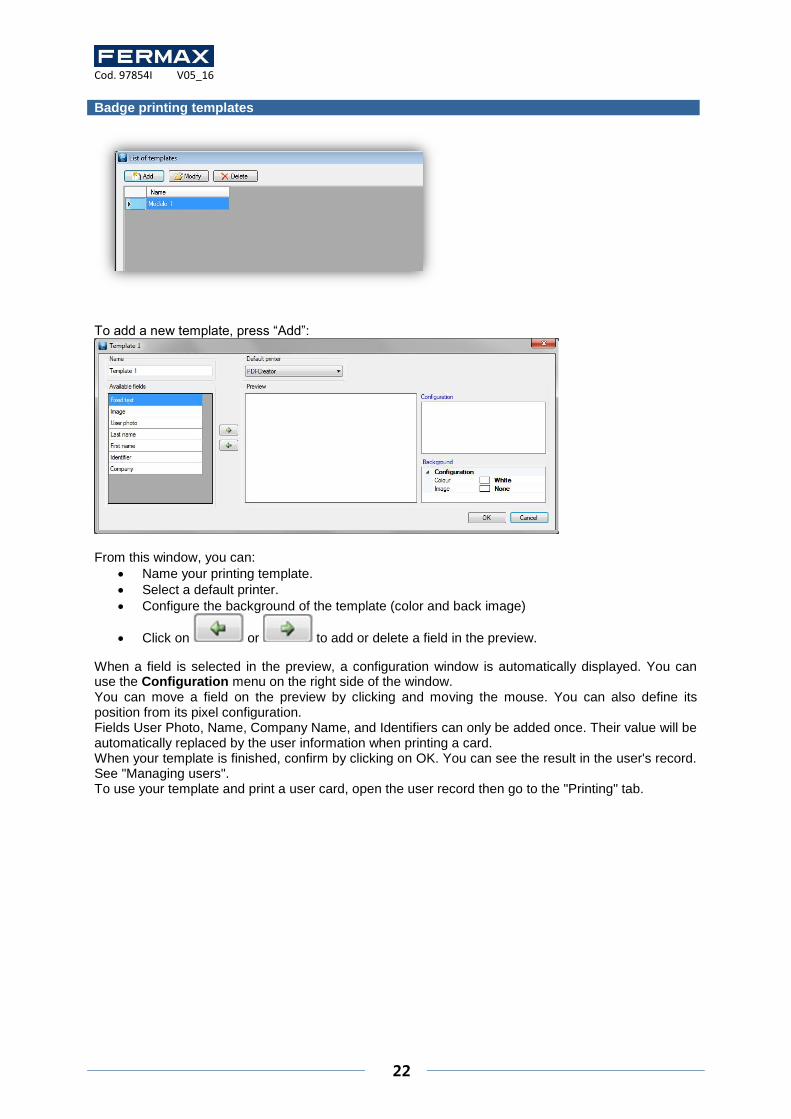
Badge printing templates
To add a new template, press “Add”:
From this window, you can:
Name your printing template.
Select a default printer.
Configure the background of the template (color and back image)
Click on or to add or delete a field in the preview.
When a field is selected in the preview, a configuration window is automatically displayed. You can use the Configuration menu on the right side of the window. You can move a field on the preview by clicking and moving the mouse. You can also define its position from its pixel configuration. Fields User Photo, Name, Company Name, and Identifiers can only be added once. Their value will be automatically replaced by the user information when printing a card. When your template is finished, confirm by clicking on OK. You can see the result in the user's record. See "Managing users". To use your template and print a user card, open the user record then go to the "Printing" tab.
Cod. 97854I V05_16
23
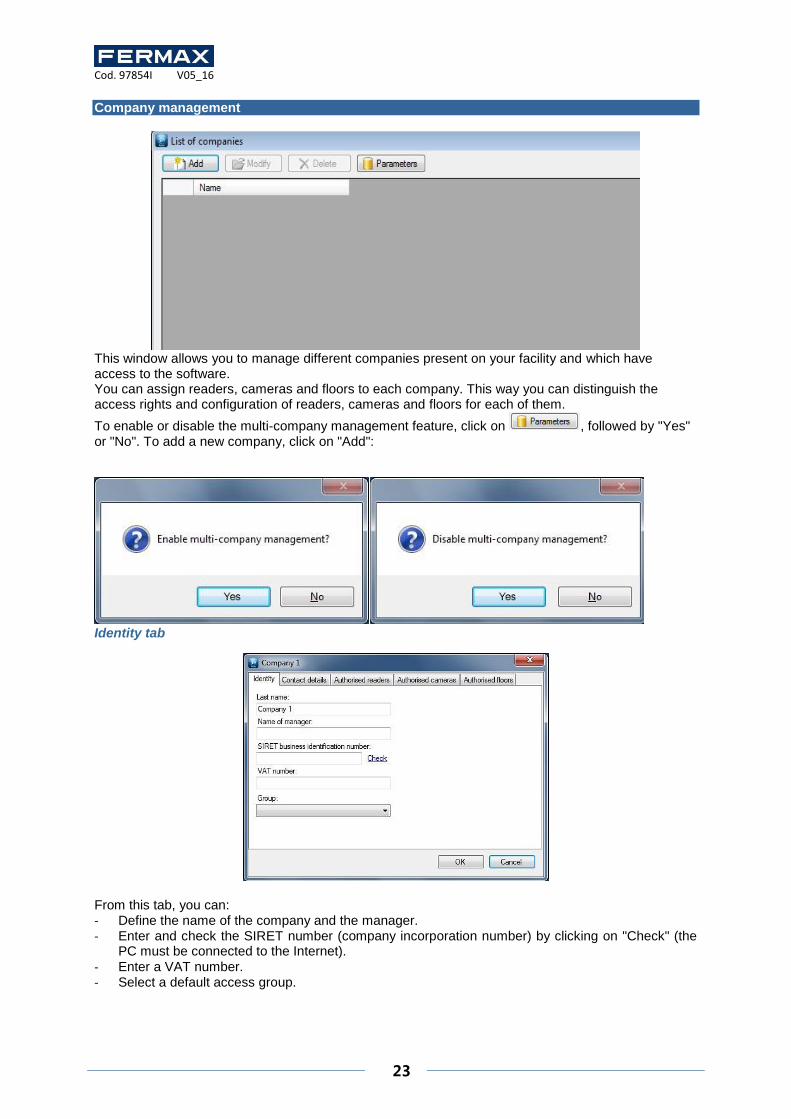
Company management
This window allows you to manage different companies present on your facility and which have access to the software. You can assign readers, cameras and floors to each company. This way you can distinguish the access rights and configuration of readers, cameras and floors for each of them.
To enable or disable the multi-company management feature, click on , followed by "Yes" or "No". To add a new company, click on "Add":
Identity tab
From this tab, you can: - Define the name of the company and the manager. - Enter and check the SIRET number (company incorporation number) by clicking on "Check" (the
PC must be connected to the Internet).
- Enter a VAT number. - Select a default access group.
Cod. 97854I V05_16
24
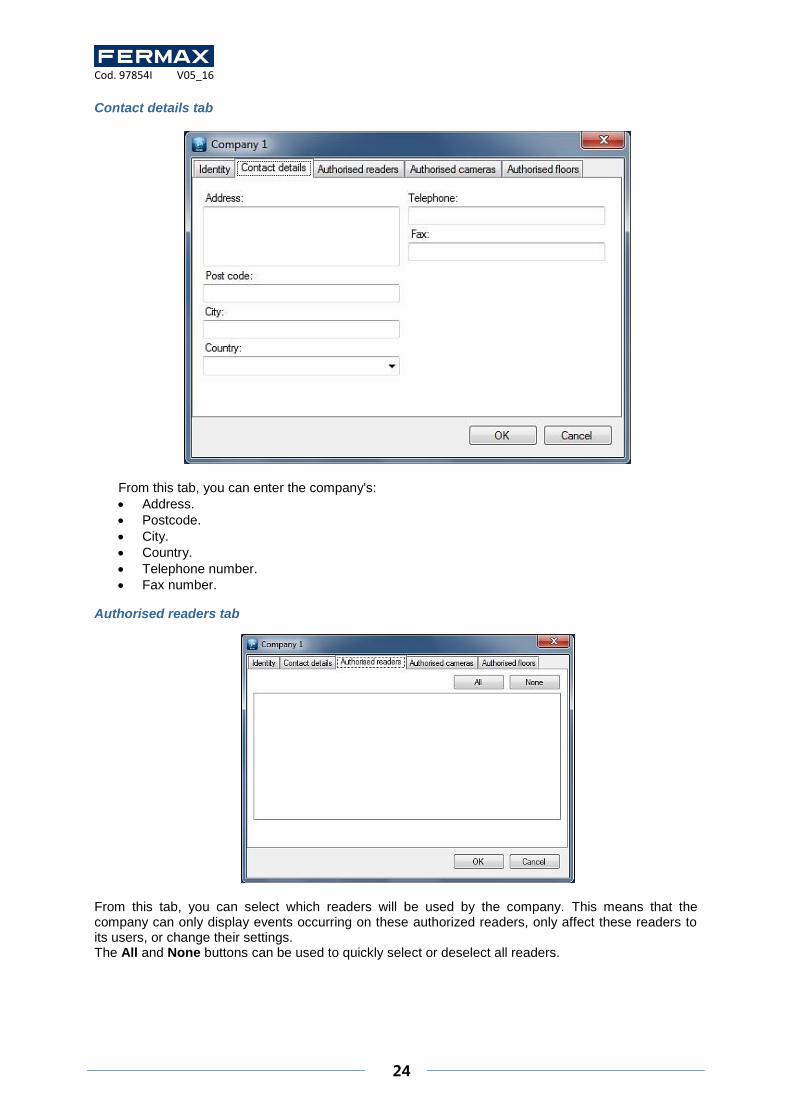
Contact details tab
From this tab, you can enter the company's:
Address.
Postcode.
City.
Country.
Telephone number.
Fax number.
Authorised readers tab
From this tab, you can select which readers will be used by the company. This means that the company can only display events occurring on these authorized readers, only affect these readers to its users, or change their settings. The All and None buttons can be used to quickly select or deselect all readers.

Cod. 97854I V05_16
25
Authorised cameras tab
From this tab, you can select which cameras will be used by the company. This means that the company can only display and/or drive these authorised cameras. The All and None buttons can be used to quickly select or deselect all cameras. Authorised floors tab
From this tab and in case of lifts, you can select for which floors the company has authorised access. This means that the company can only only affect these floors to its users.

Cod. 97854I V05_16
26
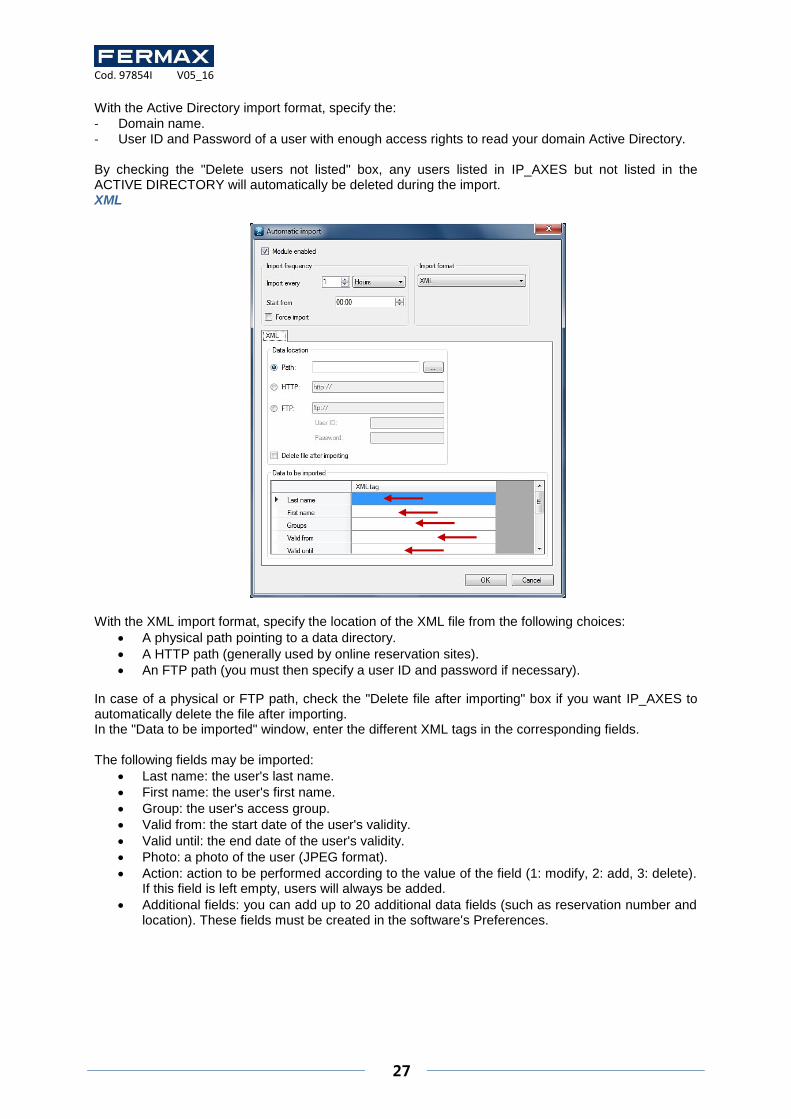
Automatic imports With the IP_AXES software, you can import data for one or more users from the Active Directory application or an XML file. Global configuration
To enable the module, check the "Module enabled" box and then select the:
Import frequency. You can specify a value between 1 second and 60 days.
Start time for the next import.
Import format.
The Force import option is used to immediately import the data after clicking on OK. Active Directory
Cod. 97854I V05_16
27
With the Active Directory import format, specify the:
- Domain name. - User ID and Password of a user with enough access rights to read your domain Active Directory. By checking the "Delete users not listed" box, any users listed in IP_AXES but not listed in the ACTIVE DIRECTORY will automatically be deleted during the import. XML
With the XML import format, specify the location of the XML file from the following choices:
A physical path pointing to a data directory.
A HTTP path (generally used by online reservation sites).
An FTP path (you must then specify a user ID and password if necessary).
In case of a physical or FTP path, check the "Delete file after importing" box if you want IP_AXES to automatically delete the file after importing. In the "Data to be imported" window, enter the different XML tags in the corresponding fields. The following fields may be imported:
Last name: the user's last name.
First name: the user's first name.
Group: the user's access group.
Valid from: the start date of the user's validity.
Valid until: the end date of the user's validity.
Photo: a photo of the user (JPEG format).
Action: action to be performed according to the value of the field (1: modify, 2: add, 3: delete). If this field is left empty, users will always be added.
Additional fields: you can add up to 20 additional data fields (such as reservation number and location). These fields must be created in the software's Preferences.
Cod. 97854I V05_16
28
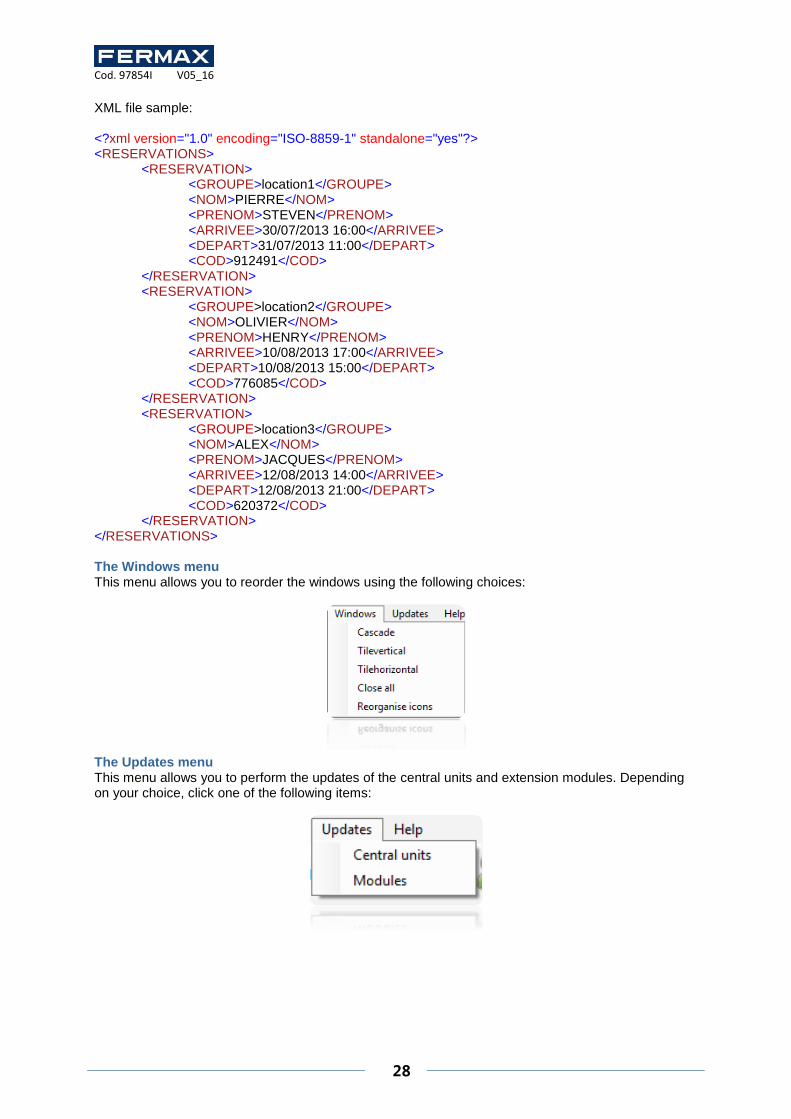
XML file sample: <?xml version="1.0" encoding="ISO-8859-1" standalone="yes"?> <RESERVATIONS>
<RESERVATION> <GROUPE>location1</GROUPE> <NOM>PIERRE</NOM> <PRENOM>STEVEN</PRENOM> <ARRIVEE>30/07/2013 16:00</ARRIVEE> <DEPART>31/07/2013 11:00</DEPART> <COD>912491</COD>
</RESERVATION> <RESERVATION>
<GROUPE>location2</GROUPE> <NOM>OLIVIER</NOM> <PRENOM>HENRY</PRENOM> <ARRIVEE>10/08/2013 17:00</ARRIVEE> <DEPART>10/08/2013 15:00</DEPART> <COD>776085</COD>
</RESERVATION> <RESERVATION>
<GROUPE>location3</GROUPE> <NOM>ALEX</NOM> <PRENOM>JACQUES</PRENOM> <ARRIVEE>12/08/2013 14:00</ARRIVEE> <DEPART>12/08/2013 21:00</DEPART> <COD>620372</COD>
</RESERVATION> </RESERVATIONS> The Windows menu This menu allows you to reorder the windows using the following choices:
The Updates menu This menu allows you to perform the updates of the central units and extension modules. Depending on your choice, click one of the following items:
Cod. 97854I V05_16
29
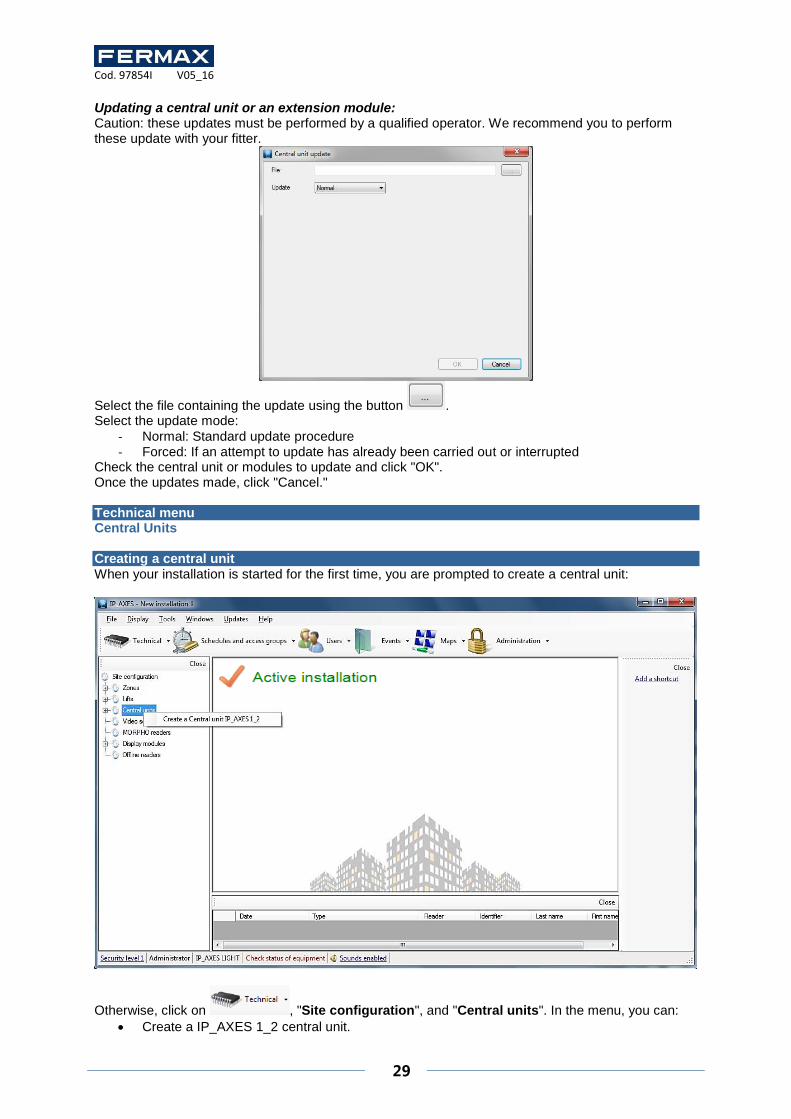
Updating a central unit or an extension module: Caution: these updates must be performed by a qualified operator. We recommend you to perform these update with your fitter.
Select the file containing the update using the button . Select the update mode:
- Normal: Standard update procedure - Forced: If an attempt to update has already been carried out or interrupted
Check the central unit or modules to update and click "OK". Once the updates made, click "Cancel." Technical menu Central Units Creating a central unit When your installation is started for the first time, you are prompted to create a central unit:
Otherwise, click on , "Site configuration", and "Central units". In the menu, you can:
Create a IP_AXES 1_2 central unit.
Cod. 97854I V05_16
30
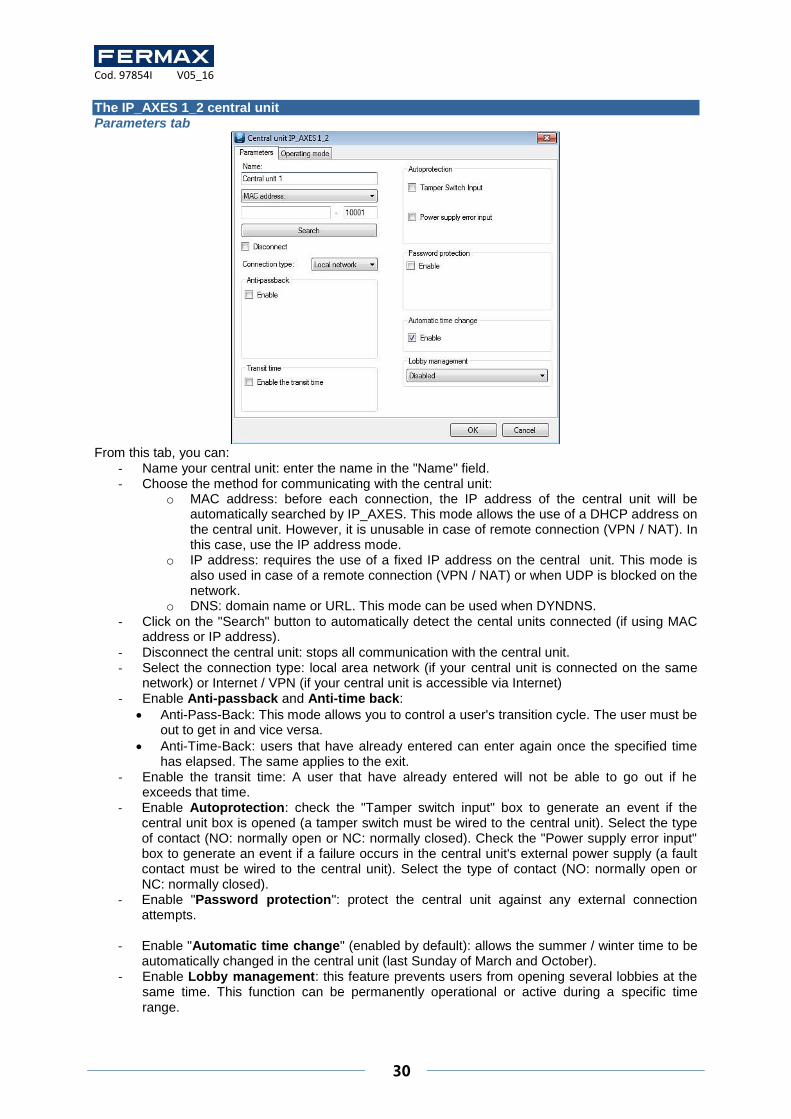
The IP_AXES 1_2 central unit Parameters tab
From this tab, you can:
- Name your central unit: enter the name in the "Name" field. - Choose the method for communicating with the central unit:
o MAC address: before each connection, the IP address of the central unit will be automatically searched by IP_AXES. This mode allows the use of a DHCP address on the central unit. However, it is unusable in case of remote connection (VPN / NAT). In this case, use the IP address mode.
o IP address: requires the use of a fixed IP address on the central unit. This mode is also used in case of a remote connection (VPN / NAT) or when UDP is blocked on the network.
o DNS: domain name or URL. This mode can be used when DYNDNS.
- Click on the "Search" button to automatically detect the cental units connected (if using MAC address or IP address).
- Disconnect the central unit: stops all communication with the central unit. - Select the connection type: local area network (if your central unit is connected on the same
network) or Internet / VPN (if your central unit is accessible via Internet) - Enable Anti-passback and Anti-time back:
Anti-Pass-Back: This mode allows you to control a user's transition cycle. The user must be out to get in and vice versa.
Anti-Time-Back: users that have already entered can enter again once the specified time has elapsed. The same applies to the exit.
- Enable the transit time: A user that have already entered will not be able to go out if he exceeds that time.
- Enable Autoprotection: check the "Tamper switch input" box to generate an event if the central unit box is opened (a tamper switch must be wired to the central unit). Select the type of contact (NO: normally open or NC: normally closed). Check the "Power supply error input" box to generate an event if a failure occurs in the central unit's external power supply (a fault contact must be wired to the central unit). Select the type of contact (NO: normally open or NC: normally closed).
- Enable "Password protection": protect the central unit against any external connection attempts.
- Enable "Automatic time change" (enabled by default): allows the summer / winter time to be
automatically changed in the central unit (last Sunday of March and October). - Enable Lobby management: this feature prevents users from opening several lobbies at the
same time. This function can be permanently operational or active during a specific time range.

Cod. 97854I V05_16
31
Operating mode tab
From this tab, you can:
Select the one reader per door mode.
Select the two readers for one door mode.
Name the doors associated with each reader.
Extension modules Creating an extension module To add an extension module, click on "Extension modules" and then the type of module to be added as follows:

Cod. 97854I V05_16
32
IP_AXES 4 module Parameters tab
From this tab, you can:
- Name your module: enter the name in the "Name" field. - Define the module's identifier, which can be found on a label affixed to the module (e.g. ID:
00051).
- Enable Autoprotection with the "Box break-in input" or "Power supply failure" options. - Select the required type of fail-safe behaviour from the following choices:
o Disable the pushbutton: the pushbutton will not work in this mode if the option is not checked.
o Refuse all identifiers (no badges will be accepted). o Accept all identifiers (all badges will be accepted). o Check site code (only badges with authorised site codes will be accepted). o Switch to maintained opening (blocks all open doors).
This mode becomes effective 30 seconds after a communication failure with the IP_AXES 1_2 central unit. Caution: in fail-soft mode, no events will be recorded by the module.

Cod. 97854I V05_16
33
Readers 1 & 2 and Readers 3 & 4 tabs
From these tabs, you can:
Select the one reader per door mode.
Select the two readers for one door mode.
Name the doors associated with each reader.
IP_AXES I/O module
From this window, you can:
Name your module: enter the name in the "Name" field.
Define the module's identifier, which can be found on a label affixed to the module (e.g. ID: 00051).
Specify the tolerance of the four-state inputs (if applicable) between 0.20V and 1.20V.
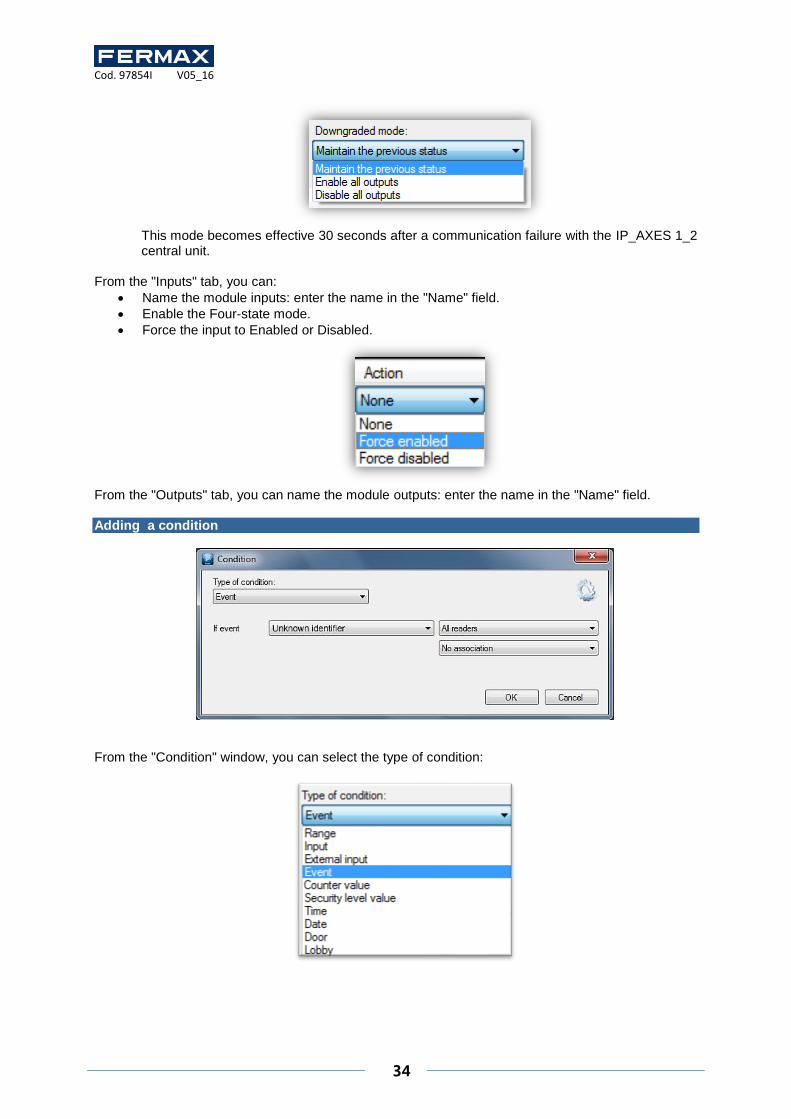
In fail-soft mode, enable / disable all outputs or maintain the previous status.
Cod. 97854I V05_16
34
This mode becomes effective 30 seconds after a communication failure with the IP_AXES 1_2 central unit.
From the "Inputs" tab, you can:
Name the module inputs: enter the name in the "Name" field.
Enable the Four-state mode.
Force the input to Enabled or Disabled.
From the "Outputs" tab, you can name the module outputs: enter the name in the "Name" field. Adding a condition
From the "Condition" window, you can select the type of condition:

Cod. 97854I V05_16
35
For a "Range" condition, select the time range to be tested and then select its status (enabled or disabled).
For an "Input" condition, select the input to be tested (only those in the IP_AXES 1_2 central unit) and then select its status (enabled or disabled).
For an "External input" condition, select the input to be tested (only those in IP_AXES I/O modules) and then select its status (enabled, disabled or sabotaged for the four-state inputs of the IP_AXES I/O modules).
For an "Automatic device" condition, select the automatic device to be tested and then select its status (enabled or disabled).
For an "Event" condition, select the type of event to be tested.
Cod. 97854I V05_16
36
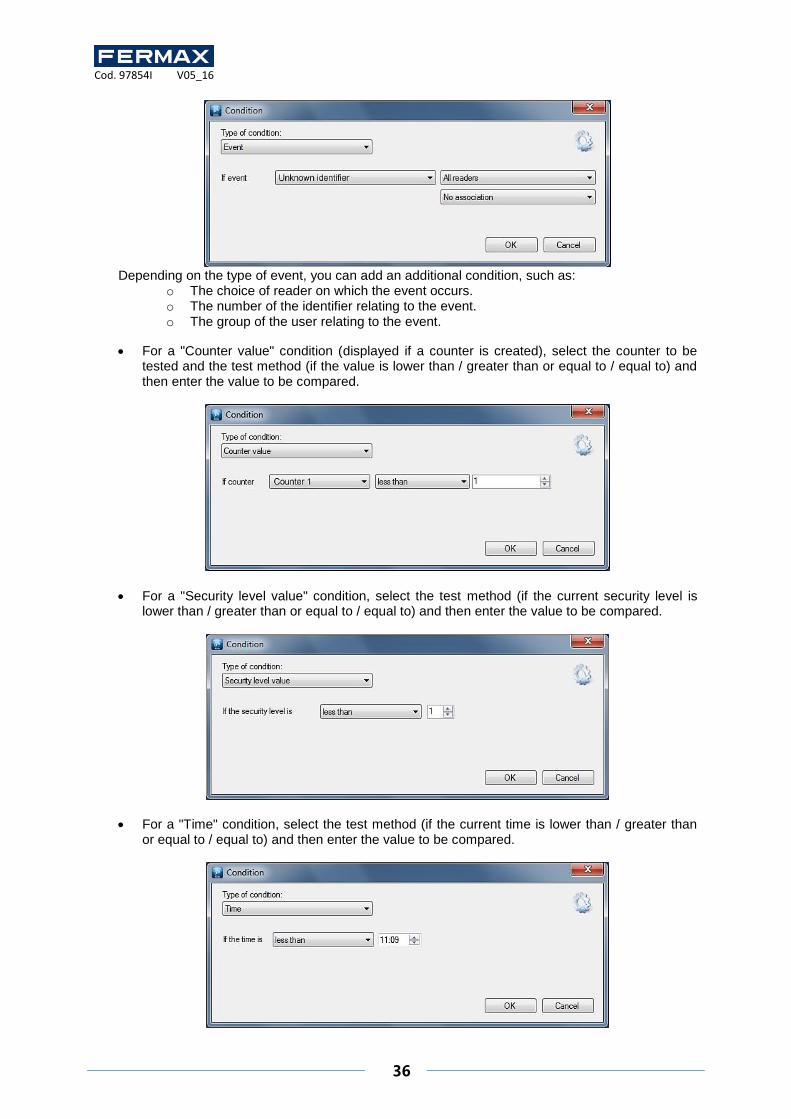
Depending on the type of event, you can add an additional condition, such as:
o The choice of reader on which the event occurs. o The number of the identifier relating to the event. o The group of the user relating to the event.
For a "Counter value" condition (displayed if a counter is created), select the counter to be tested and the test method (if the value is lower than / greater than or equal to / equal to) and then enter the value to be compared.
For a "Security level value" condition, select the test method (if the current security level is lower than / greater than or equal to / equal to) and then enter the value to be compared.
For a "Time" condition, select the test method (if the current time is lower than / greater than or equal to / equal to) and then enter the value to be compared.

Cod. 97854I V05_16
37
For a "Date" condition, select the test method (if the current date is lower than / greater than / equal to) and then enter the date to be compared.
For a "Door" condition, select the door to be tested and then select its status (Closed or Open).
For a "Lobby" condition, select its status (Closed or Open).
Adding an action
Cod. 97854I V05_16
38
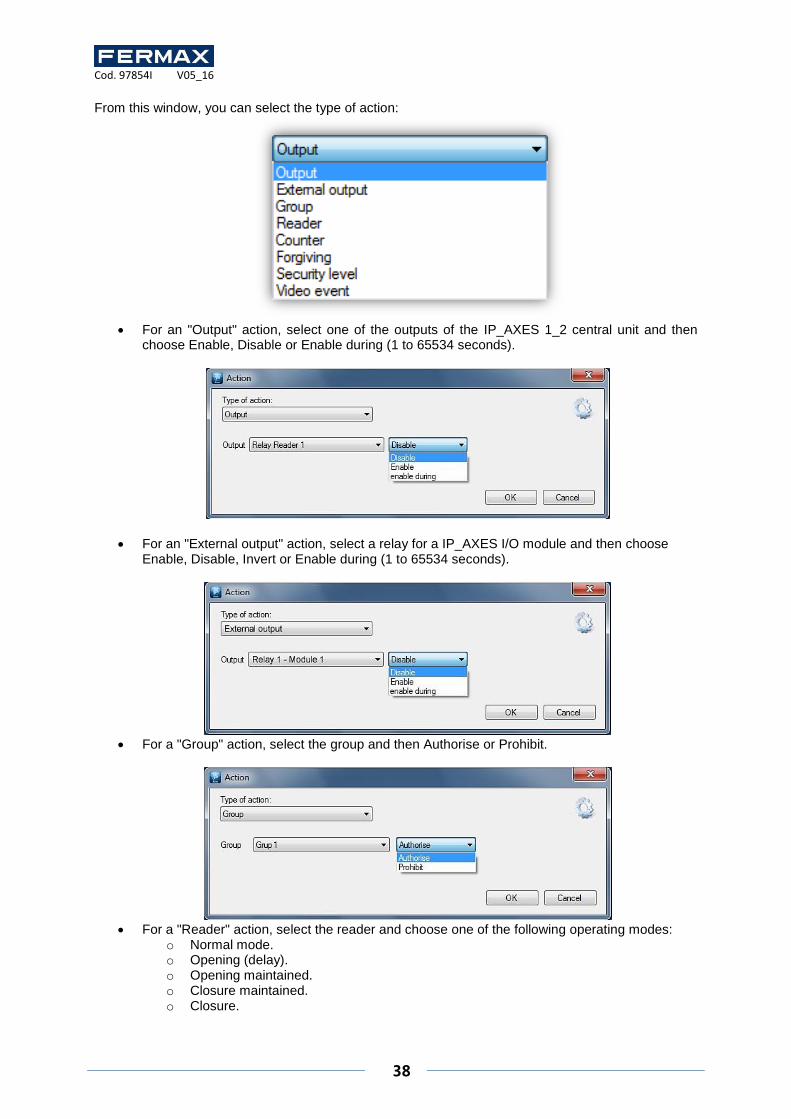
From this window, you can select the type of action:
For an "Output" action, select one of the outputs of the IP_AXES 1_2 central unit and then
choose Enable, Disable or Enable during (1 to 65534 seconds).
For an "External output" action, select a relay for a IP_AXES I/O module and then choose Enable, Disable, Invert or Enable during (1 to 65534 seconds).
For a "Group" action, select the group and then Authorise or Prohibit.
For a "Reader" action, select the reader and choose one of the following operating modes:
o Normal mode. o Opening (delay). o Opening maintained. o Closure maintained. o Closure.
Cod. 97854I V05_16
39
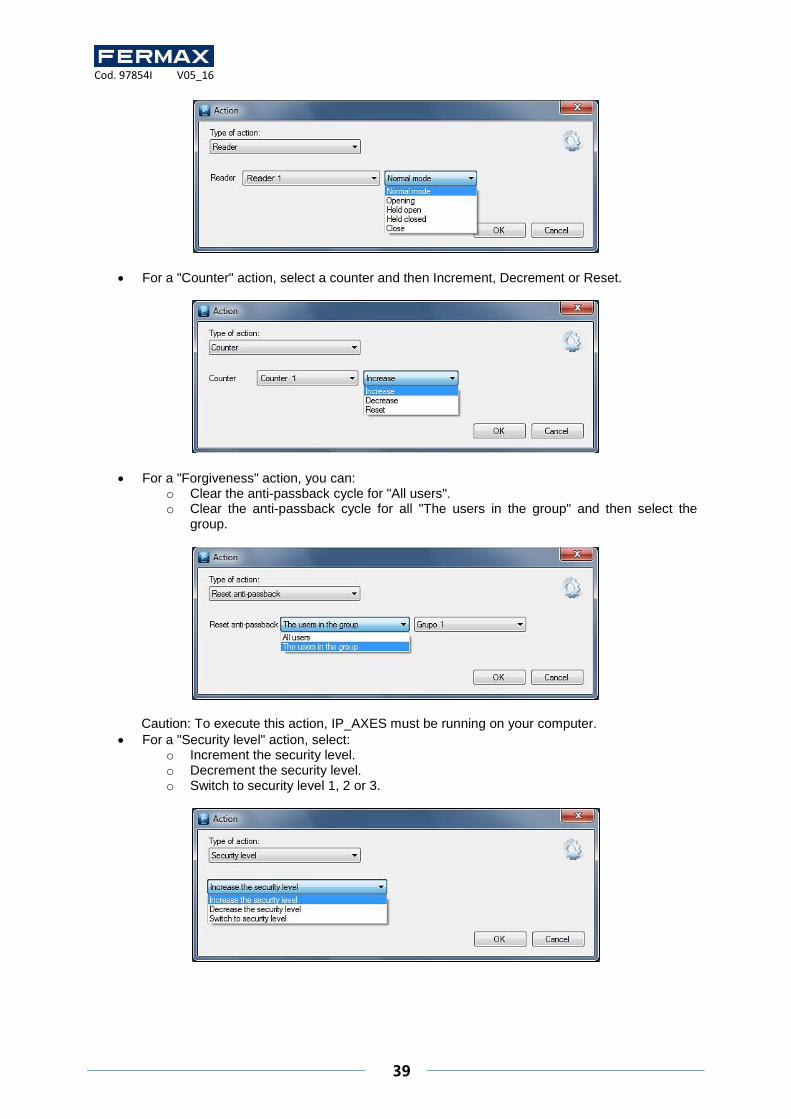
For a "Counter" action, select a counter and then Increment, Decrement or Reset.
For a "Forgiveness" action, you can: o Clear the anti-passback cycle for "All users". o Clear the anti-passback cycle for all "The users in the group" and then select the
group.
Caution: To execute this action, IP_AXES must be running on your computer.
For a "Security level" action, select: o Increment the security level. o Decrement the security level. o Switch to security level 1, 2 or 3.
Cod. 97854I V05_16
40
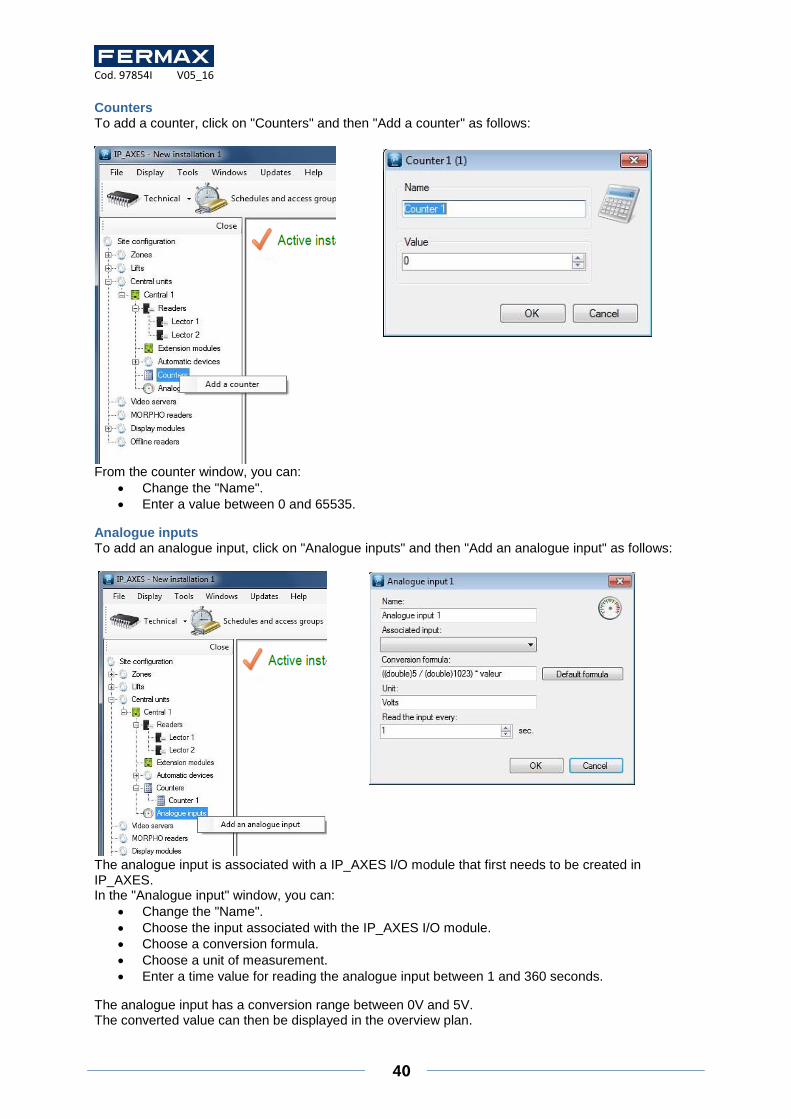
Counters To add a counter, click on "Counters" and then "Add a counter" as follows:
From the counter window, you can:
Change the "Name".
Enter a value between 0 and 65535.
Analogue inputs To add an analogue input, click on "Analogue inputs" and then "Add an analogue input" as follows:
The analogue input is associated with a IP_AXES I/O module that first needs to be created in IP_AXES. In the "Analogue input" window, you can:
Change the "Name".
Choose the input associated with the IP_AXES I/O module.
Choose a conversion formula.
Choose a unit of measurement.
Enter a time value for reading the analogue input between 1 and 360 seconds.
The analogue input has a conversion range between 0V and 5V. The converted value can then be displayed in the overview plan.

Cod. 97854I V05_16
41
Online automatic devices Online automatic devices are only available in case of using a client / server installation (SQL database) with the Windows service. Under another type of installation, these devices do not appear. They are only managed by IP_AXES. So make sure that the server machine is constantly running.
To add an automatic, click on "Online Automation" and then "Create an automatism" as follows: From the window of the automatic device, you can:
Give a name to your device: Type in the "Name" field
Disable the device
Add up to four conditions associated with an "AND" or "OR" logical operator.
Add up to two actions, which will be executed when the conditions are true.
Add up to two opposing actions, which will be executed when the conditions are false.
Choose to send an email to all managers authorized to receive alerts when the device starts
Choose to send an email to all managers authorized to receive alerts when the device stops
Adding a condition:
From the "Condition" window, you can select the type of condition:
Cod. 97854I V05_16
42
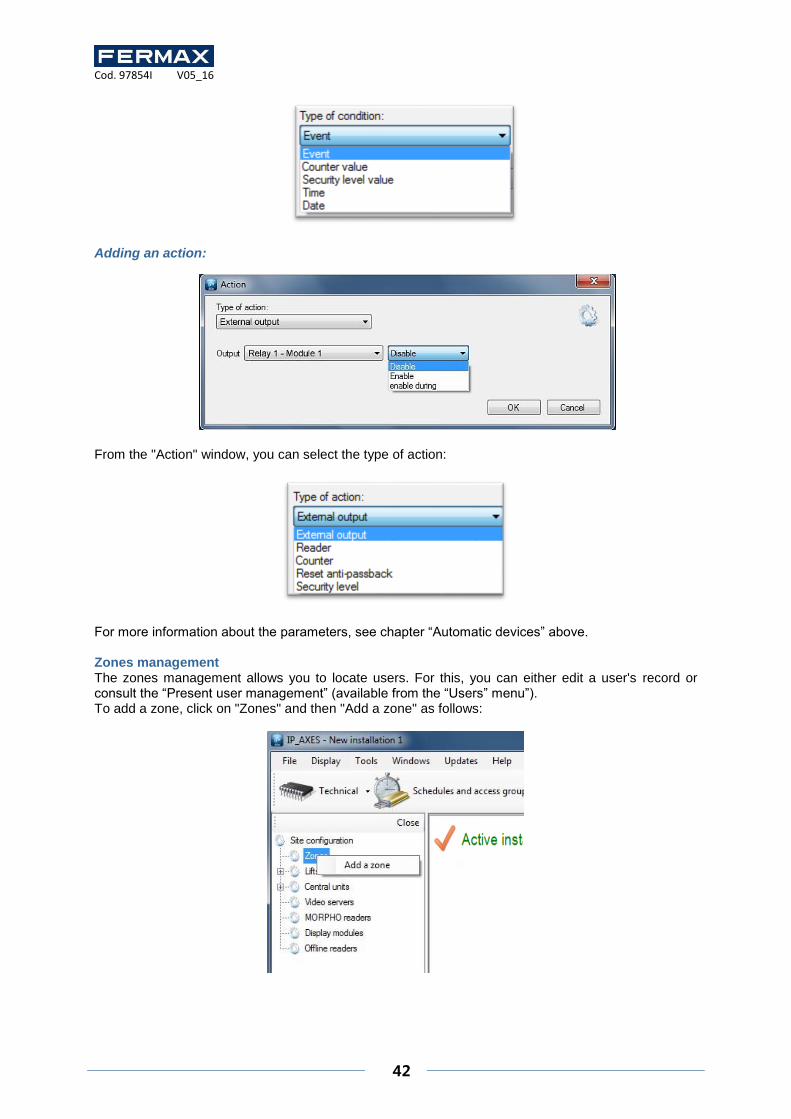
Adding an action:
From the "Action" window, you can select the type of action:
For more information about the parameters, see chapter “Automatic devices” above. Zones management The zones management allows you to locate users. For this, you can either edit a user's record or consult the “Present user management” (available from the “Users” menu”). To add a zone, click on "Zones" and then "Add a zone" as follows:
Cod. 97854I V05_16
43
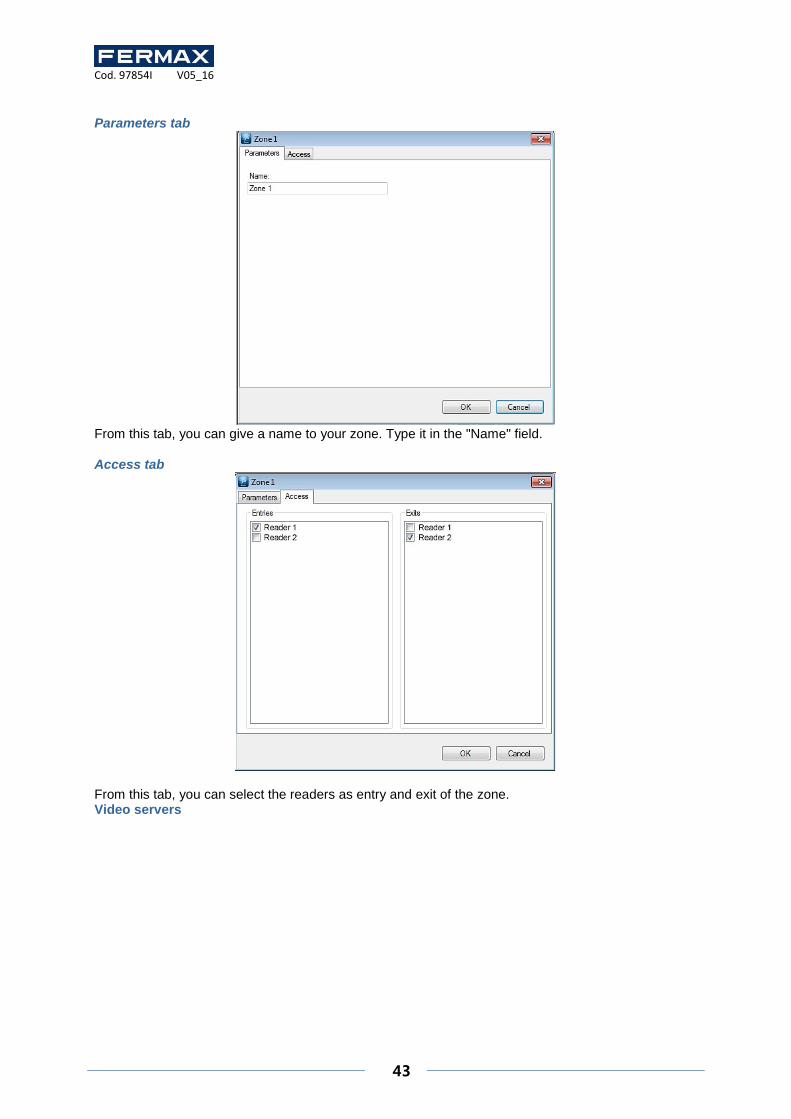
Parameters tab
From this tab, you can give a name to your zone. Type it in the "Name" field. Access tab
From this tab, you can select the readers as entry and exit of the zone. Video servers
Cod. 97854I V05_16
44
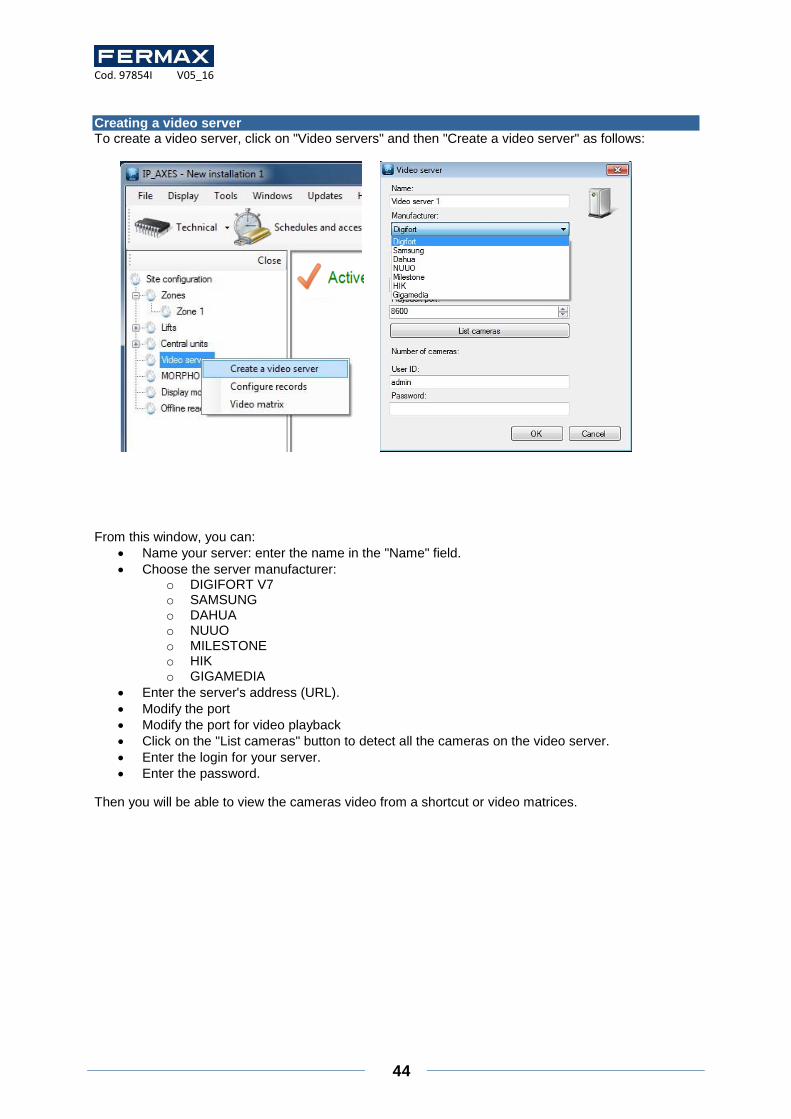
Creating a video server To create a video server, click on "Video servers" and then "Create a video server" as follows:
From this window, you can:
Name your server: enter the name in the "Name" field.
Choose the server manufacturer: o DIGIFORT V7 o SAMSUNG o DAHUA o NUUO o MILESTONE o HIK o GIGAMEDIA
Enter the server's address (URL).
Modify the port
Modify the port for video playback
Click on the "List cameras" button to detect all the cameras on the video server.
Enter the login for your server.
Enter the password.
Then you will be able to view the cameras video from a shortcut or video matrices.

Cod. 97854I V05_16
45
Configuring records To configure video recordings, click on "Video servers" and then "Configure records" as follows:
In the "Video recordings" window, you can:
Select the display duration before and after the event from 0 to 60 seconds.
Associate one or more readers with a camera.
Select one or more types of events for triggering the video.
To watch the video according to an event, display the list of events (“Events” then “See Events”) and
click the image in front of the desired event. A window will open and you will be able to watch the video. Caution: this feature only allows to view a video from a recorder. IP_AXES will never trigger the video recording on the recorder. This recorder will have to be configured accordingly (permanent recording, motion detection ...). Creating a video matrix To create a video matrix, click "Video Servers" and then "Video Matrix" as follows:
From this window, you can:
- Add a new matrix by clicking the "Add" button - Modify an existing matrix by selecting the desired matrix and clicking "Modify" - Delete an existing matrix by selecting the desired matrix and clicking "Delete"

Cod. 97854I V05_16
46
Configuring a video matrix
From this window, you can:
Give a name to your matrix
Change the number of cameras to display in the matrix (1, 4 or 16)
Create or delete pages
Show or hide the configuration menu To add a camera, select it in the right list and drag it into an available slot (gray rectangle). To remove a camera from the current page, click the button on the camera top right corner and then click "Close" as follows:
If your camera is motorized, click the button on the camera top right corner, then click "PTZ" as follows:

Cod. 97854I V05_16
47
Then use the arrow and magnifiers to control your camera. To hide the controls of the camera, click again on the button in the upper right corner, then click "PTZ". To view a camera in full screen, click the button in the upper right corner of the camera and click "Full Screen" as follows:
To return to the normal display, click again on the button in the upper right corner and click "Full Screen". Tip: You can use a shortcut to display your matrix. Configuring a central unit reader From the Technical menu then Site configuration, click on the central unit reader then "Modify":
From this window, you can:
- Name your reader: enter the name in the "Name" field. - Disable the reader (it will no longer be taken into account in the calculation of the license).

Cod. 97854I V05_16
48
Configuration tab In the Configuration tab, you can: Choose the Type of reader:
Wiegand keypad
Clock & Data
Personalised Clock & Data
Deister Clock&Data
Digitouch
Reader with keypad (HID RK40)
PROEM Clock&Data receiver
Signal S
Wiegand
Wiegand 26 bits
Wiegand 30 bits
32-bit Wiegand
Personalised decimal Wiegand
Enable the Anti-passback function by selecting the reader either as an "Input" or an "Output".
Check the "Manage the maximum per group" box if you wish to restrict the number of users per access group for a given reader. The maximum number is specified in the group - refer to the chapter entitled "Managing access groups". Enable passage confirmation to validate when users operate a reader. To use this function, the "Door contact" input must be connected to a door contact and the parameter for the input must also be enabled; refer to the "Opening command and inputs" tab.
Enable the passage count function. You can select:
Test: used to test the number of times that a user has operated a reader without counting and block the user if the reader is equal to 0.
Test and count: used to test the number of times that a user has operated a reader by counting and block the user if the reader is equal to 0.
Enable Lobby mode: used to integrate a reader into a lobby. Only one of the readers belonging to
the lobby can be enabled at any one time.
Cod. 97854I V05_16
49
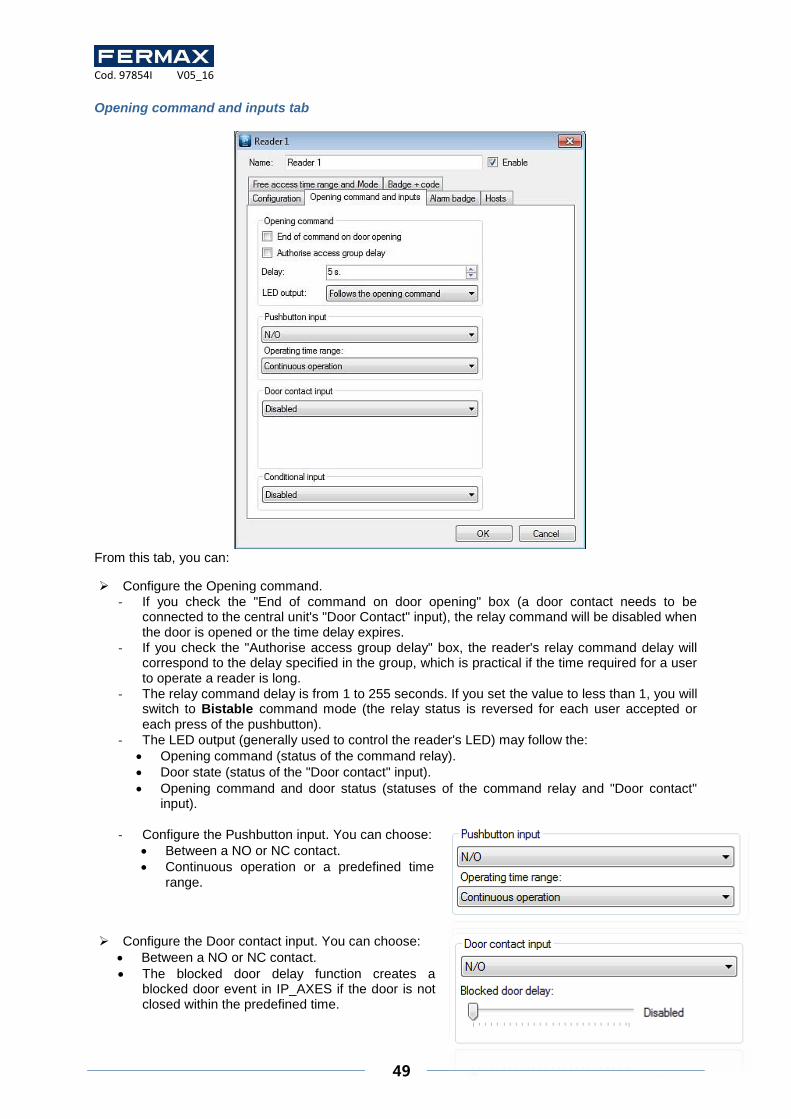
Opening command and inputs tab
From this tab, you can:
Configure the Opening command.
- If you check the "End of command on door opening" box (a door contact needs to be connected to the central unit's "Door Contact" input), the relay command will be disabled when the door is opened or the time delay expires.
- If you check the "Authorise access group delay" box, the reader's relay command delay will correspond to the delay specified in the group, which is practical if the time required for a user to operate a reader is long.
- The relay command delay is from 1 to 255 seconds. If you set the value to less than 1, you will switch to Bistable command mode (the relay status is reversed for each user accepted or each press of the pushbutton).
- The LED output (generally used to control the reader's LED) may follow the:
Opening command (status of the command relay).
Door state (status of the "Door contact" input).
Opening command and door status (statuses of the command relay and "Door contact" input).
- Configure the Pushbutton input. You can choose:
Between a NO or NC contact.
Continuous operation or a predefined time range.
Configure the Door contact input. You can choose:
Between a NO or NC contact.
The blocked door delay function creates a blocked door event in IP_AXES if the door is not closed within the predefined time.
Cod. 97854I V05_16
50
Configure the Conditional input. You choose:
NO or NC vehicle detection When a badge is swiped at the reader, a vehicle must be detected to confirm the opening command.
NO or NC alarm in service When a badge is swiped at the reader, users will be refused entry unless they have been assigned the alarm management authorisation.
Glass break monitoring green NO or NC This will create a simple event in IP_AXES for enabling or disabling the break-glass functionality.
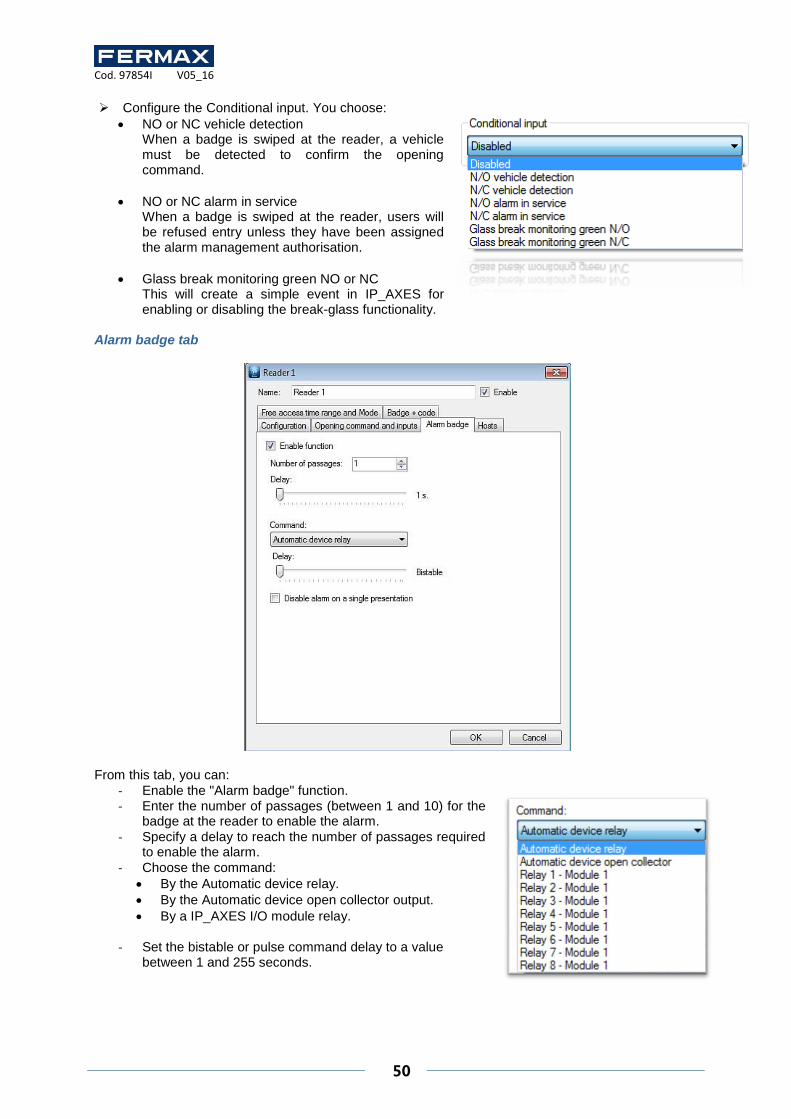
Alarm badge tab
From this tab, you can:
- Enable the "Alarm badge" function. - Enter the number of passages (between 1 and 10) for the
badge at the reader to enable the alarm.
- Specify a delay to reach the number of passages required to enable the alarm.
- Choose the command:
By the Automatic device relay.
By the Automatic device open collector output.
By a IP_AXES I/O module relay.
- Set the bistable or pulse command delay to a value between 1 and 255 seconds.

Cod. 97854I V05_16
51
Hosts tab
From this tab, you can: - Enable the visitor user management function. - Select a predefined hosting time range.
- Set a delay for waiting for the host after the visitor user.
Free access time range and Mode

Cod. 97854I V05_16
52
From this tab, you can:
- Set the free access range for each security level • Select <Permanent control> to apply no free access to the reader
Select a time range so that the reader will remain opened until the selected range will remained active
Click "Add a time Range" to create a new time range
Click "See time range" to edit the selected time
- Start free access at the first accepted user. - Select the operating mode for 3 security levels
• Either continuous monitoring, or • Opening maintained, or • Closure maintained.
Badge + Code tab
From this tab, you can:
- Enable the badge + code function. - Select the keypad associated with the reader. - Set a delay for the code waiting time (between 1 and 255 seconds) after a badge is swiped at
the reader. - Enter a predefined code request time range.
- Authorise users without a code.
Cod. 97854I V05_16
53
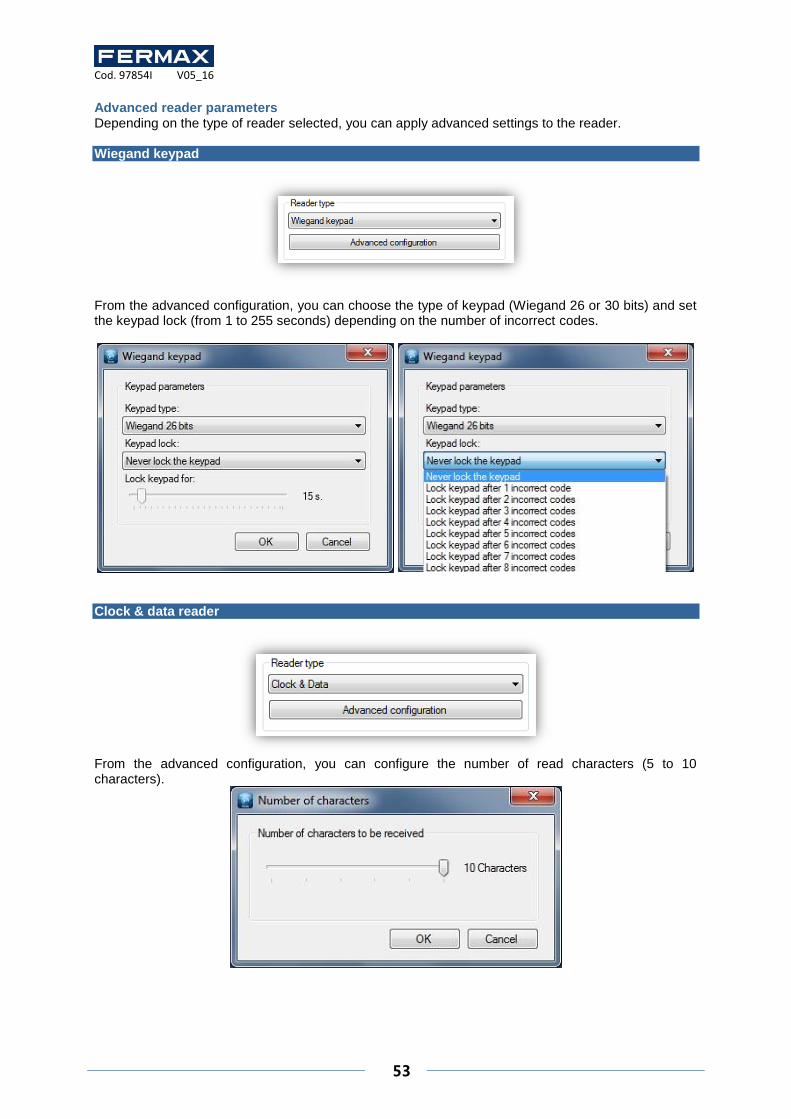
Advanced reader parameters Depending on the type of reader selected, you can apply advanced settings to the reader. Wiegand keypad
From the advanced configuration, you can choose the type of keypad (Wiegand 26 or 30 bits) and set the keypad lock (from 1 to 255 seconds) depending on the number of incorrect codes.
Clock & data reader
From the advanced configuration, you can configure the number of read characters (5 to 10 characters).
Cod. 97854I V05_16
54
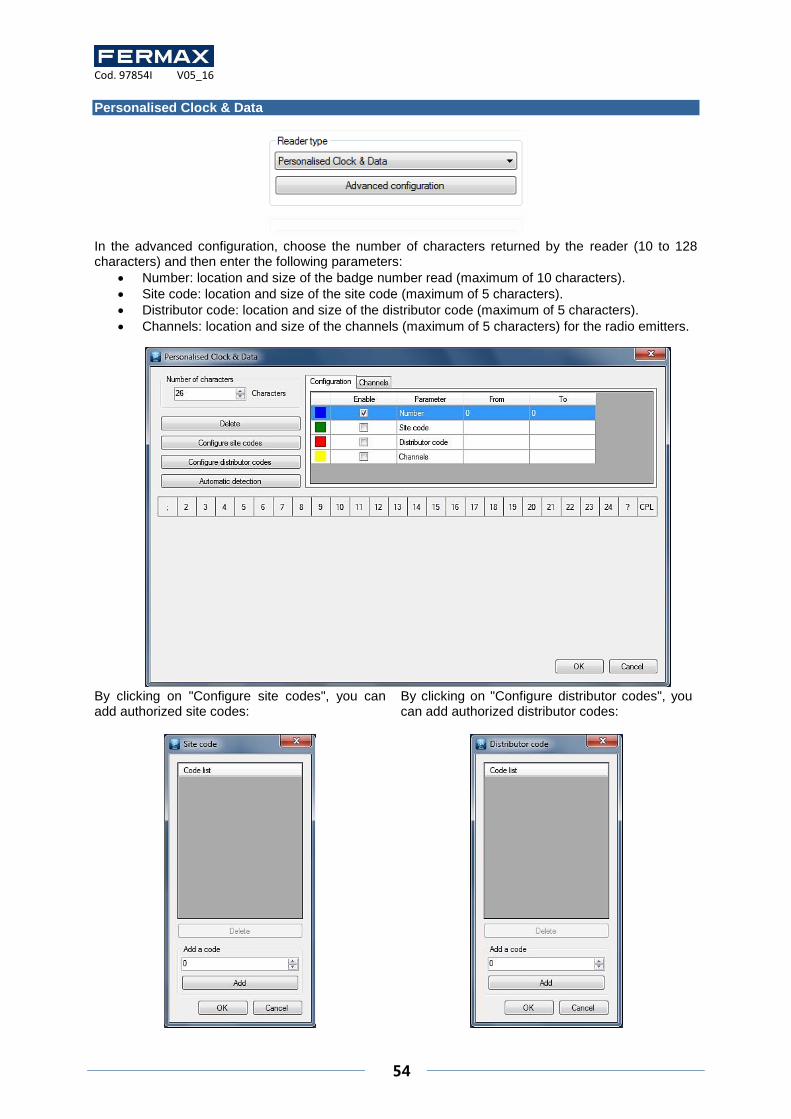
Personalised Clock & Data
In the advanced configuration, choose the number of characters returned by the reader (10 to 128 characters) and then enter the following parameters:
Number: location and size of the badge number read (maximum of 10 characters).
Site code: location and size of the site code (maximum of 5 characters).
Distributor code: location and size of the distributor code (maximum of 5 characters).
Channels: location and size of the channels (maximum of 5 characters) for the radio emitters.
By clicking on "Configure site codes", you can add authorized site codes:
By clicking on "Configure distributor codes", you can add authorized distributor codes:
Cod. 97854I V05_16
55
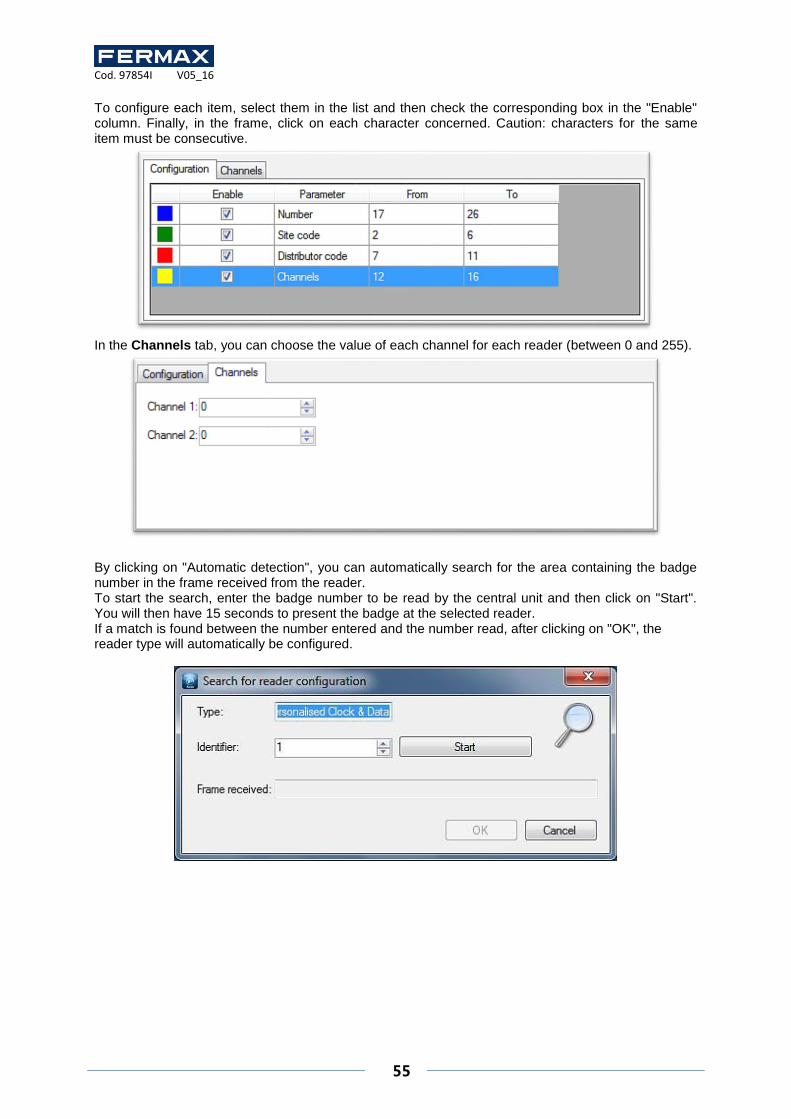
To configure each item, select them in the list and then check the corresponding box in the "Enable" column. Finally, in the frame, click on each character concerned. Caution: characters for the same item must be consecutive.
In the Channels tab, you can choose the value of each channel for each reader (between 0 and 255).
By clicking on "Automatic detection", you can automatically search for the area containing the badge number in the frame received from the reader. To start the search, enter the badge number to be read by the central unit and then click on "Start". You will then have 15 seconds to present the badge at the selected reader. If a match is found between the number entered and the number read, after clicking on "OK", the reader type will automatically be configured.
Cod. 97854I V05_16
56
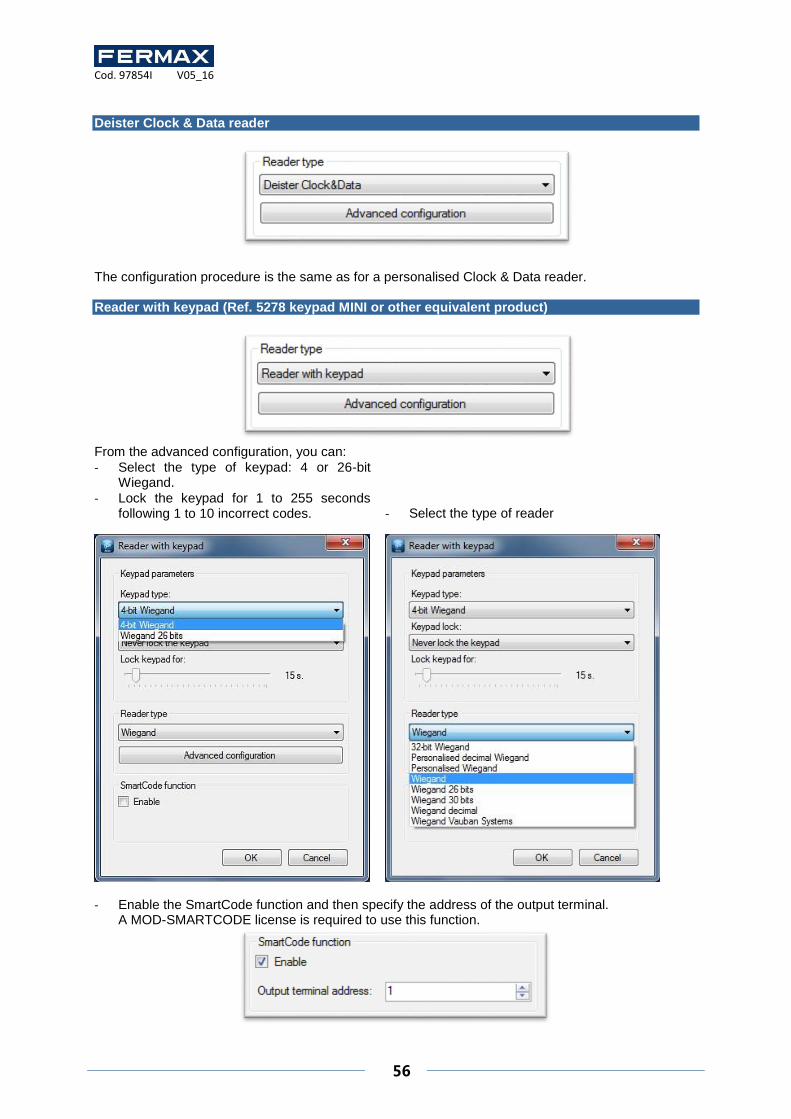
Deister Clock & Data reader
The configuration procedure is the same as for a personalised Clock & Data reader. Reader with keypad (Ref. 5278 keypad MINI or other equivalent product)
From the advanced configuration, you can:
- Select the type of keypad: 4 or 26-bit Wiegand.
- Lock the keypad for 1 to 255 seconds following 1 to 10 incorrect codes.
- Select the type of reader
- Enable the SmartCode function and then specify the address of the output terminal. A MOD-SMARTCODE license is required to use this function.
Cod. 97854I V05_16
57
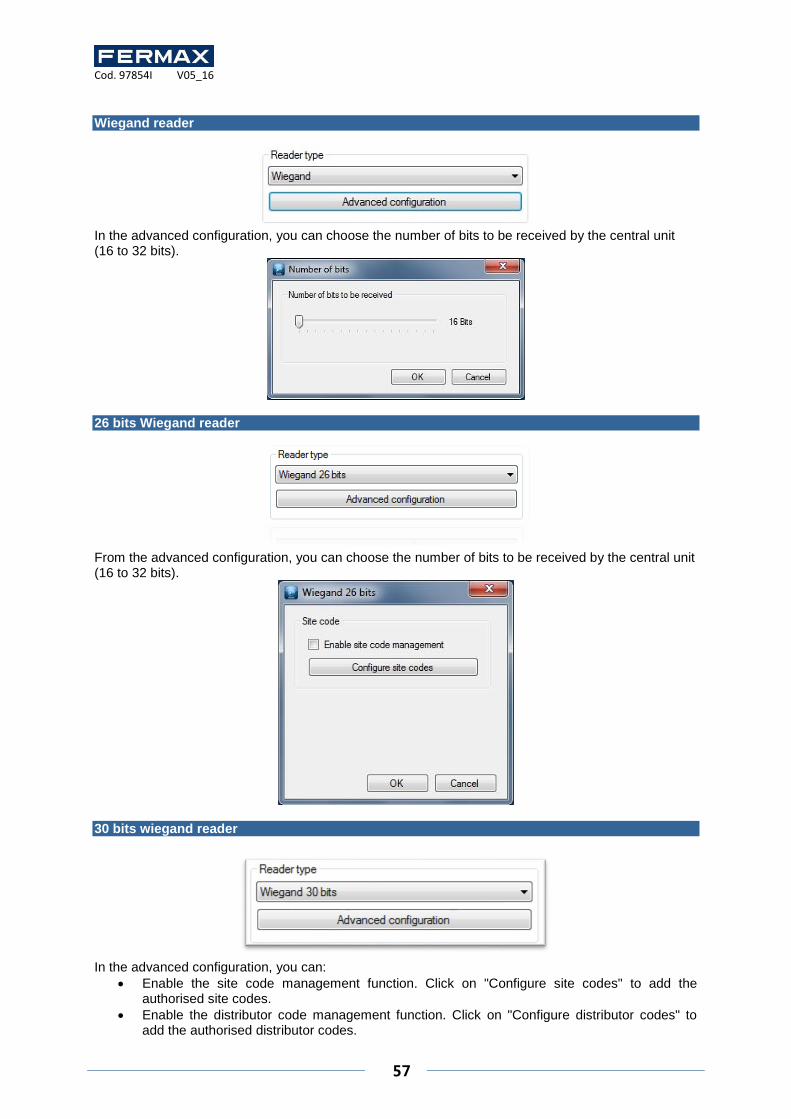
Wiegand reader
In the advanced configuration, you can choose the number of bits to be received by the central unit (16 to 32 bits).
26 bits Wiegand reader
From the advanced configuration, you can choose the number of bits to be received by the central unit (16 to 32 bits).
30 bits wiegand reader
In the advanced configuration, you can:
Enable the site code management function. Click on "Configure site codes" to add the authorised site codes.
Enable the distributor code management function. Click on "Configure distributor codes" to add the authorised distributor codes.
Cod. 97854I V05_16
58
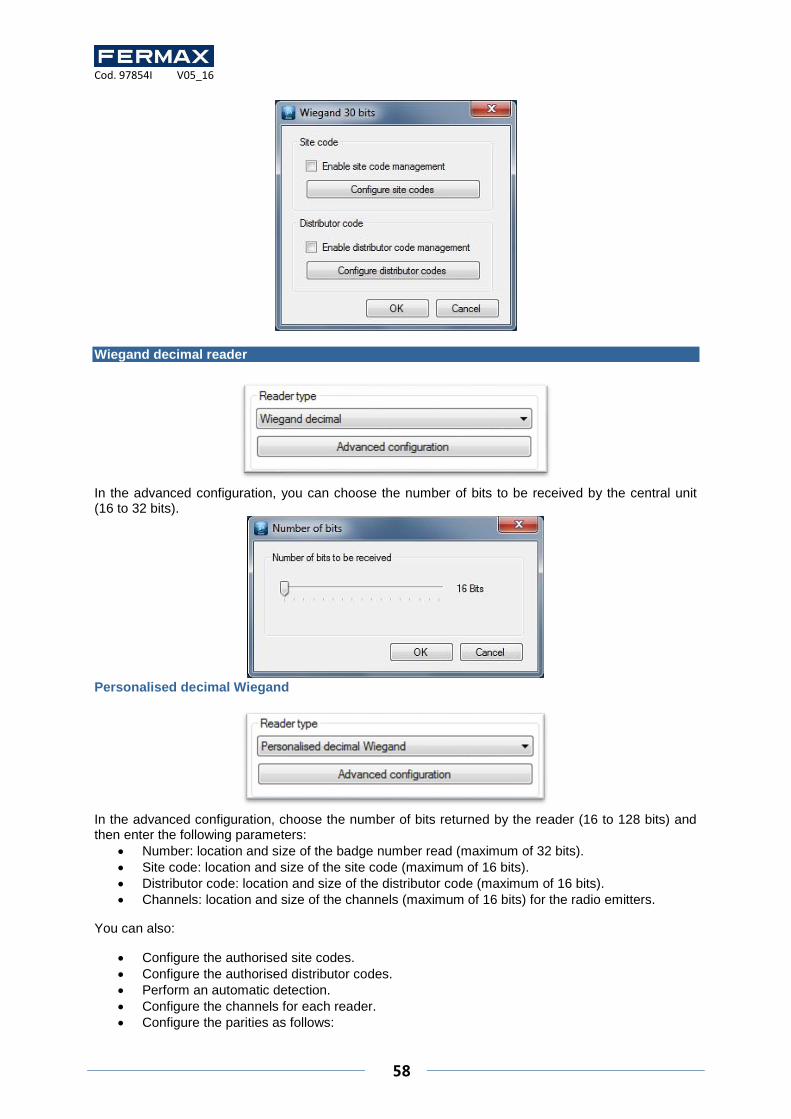
Wiegand decimal reader
In the advanced configuration, you can choose the number of bits to be received by the central unit (16 to 32 bits).
Personalised decimal Wiegand
In the advanced configuration, choose the number of bits returned by the reader (16 to 128 bits) and then enter the following parameters:
Number: location and size of the badge number read (maximum of 32 bits).
Site code: location and size of the site code (maximum of 16 bits).
Distributor code: location and size of the distributor code (maximum of 16 bits).
Channels: location and size of the channels (maximum of 16 bits) for the radio emitters.
You can also:
Configure the authorised site codes.
Configure the authorised distributor codes.
Perform an automatic detection.
Configure the channels for each reader.
Configure the parities as follows:

Cod. 97854I V05_16
59
Personalised Wiegand
The configuration is the same as for a personalised decimal Wiegand reader. Display modules management
These modules allow you to display information on a screen. A HDMI connection is mandatory on the screen. To add a new module, click "Display modules" and then "Create a display module" as follows:
From this window, you can:
- Give a name to your module, type it in the "Name" field - Configure the IP address or DNS address of your module - Search your module on the network - Disconnect the module: stops all communication with the module. - Set a password: the password is used to prevent access to the module's configuration by
another computer - Set the resolution of the screen connected to the module (in pixels) - Configure the update frequency (from 1 to 65535 minutes) if you display dynamic lists (eg past
events, present list ...)
Cod. 97854I V05_16
60
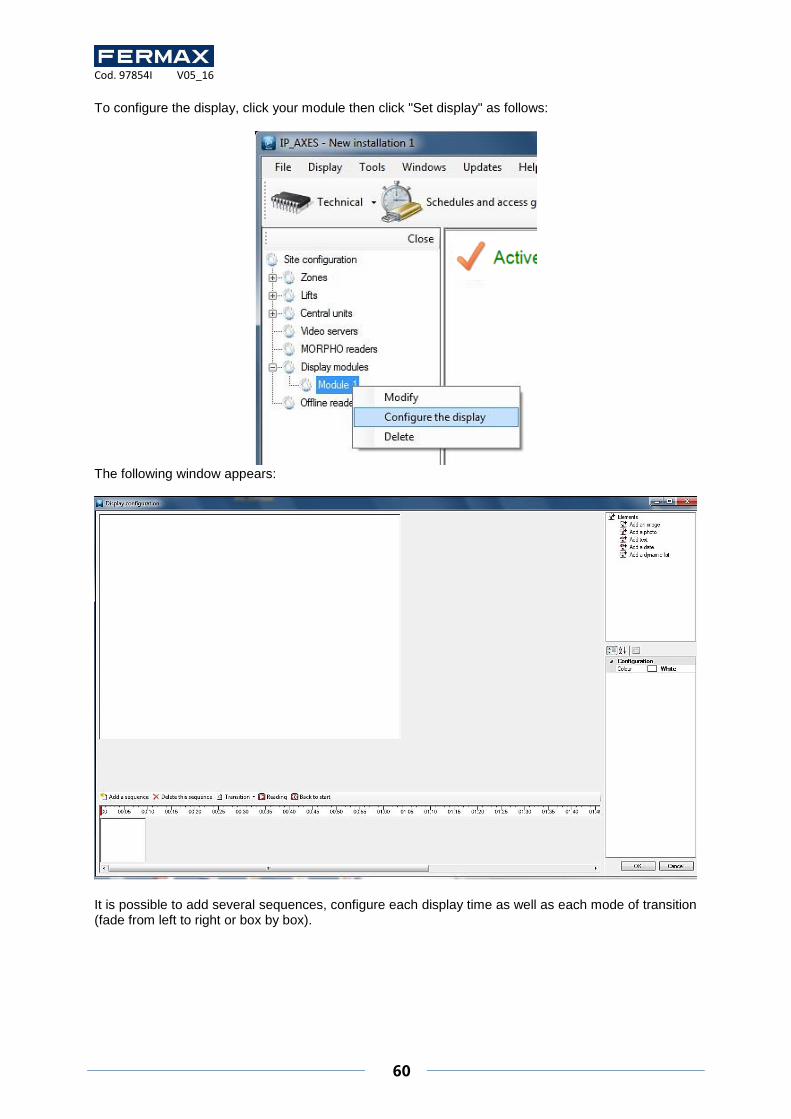
To configure the display, click your module then click "Set display" as follows:
The following window appears:
It is possible to add several sequences, configure each display time as well as each mode of transition (fade from left to right or box by box).
Cod. 97854I V05_16
61
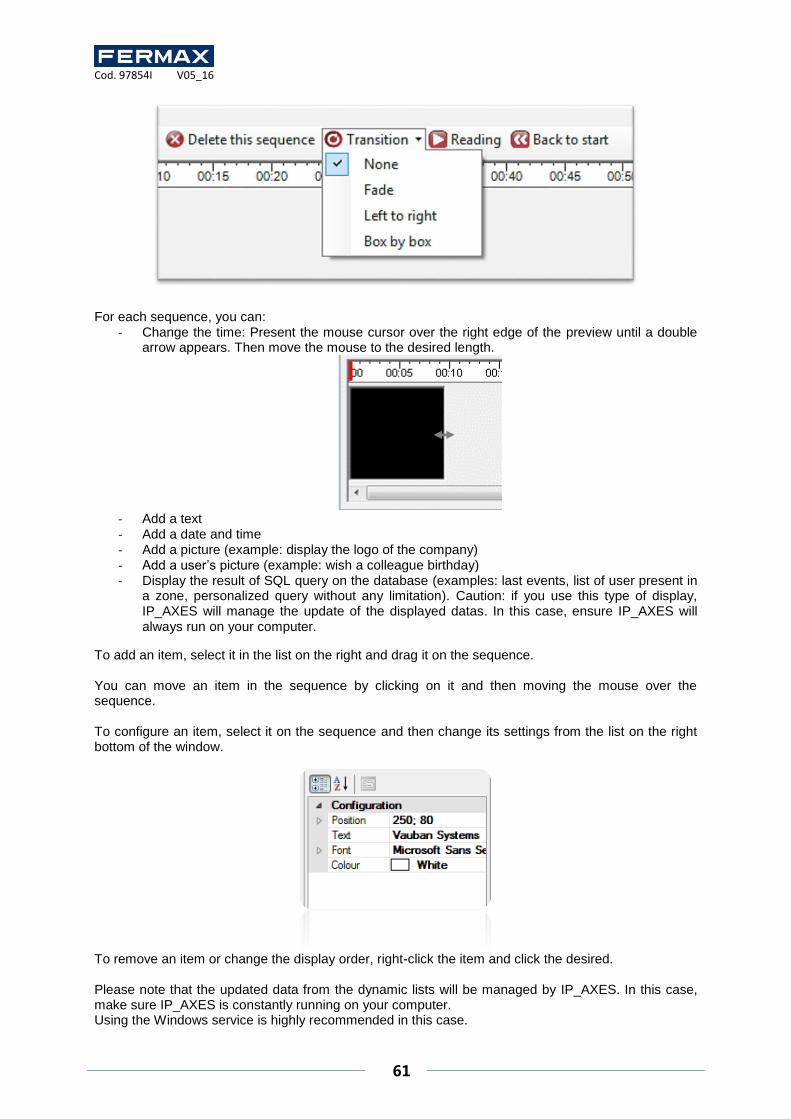
For each sequence, you can:
- Change the time: Present the mouse cursor over the right edge of the preview until a double arrow appears. Then move the mouse to the desired length.
- Add a text - Add a date and time - Add a picture (example: display the logo of the company) - Add a user’s picture (example: wish a colleague birthday) - Display the result of SQL query on the database (examples: last events, list of user present in
a zone, personalized query without any limitation). Caution: if you use this type of display, IP_AXES will manage the update of the displayed datas. In this case, ensure IP_AXES will always run on your computer.
To add an item, select it in the list on the right and drag it on the sequence. You can move an item in the sequence by clicking on it and then moving the mouse over the sequence. To configure an item, select it on the sequence and then change its settings from the list on the right bottom of the window.
To remove an item or change the display order, right-click the item and click the desired. Please note that the updated data from the dynamic lists will be managed by IP_AXES. In this case, make sure IP_AXES is constantly running on your computer. Using the Windows service is highly recommended in this case.

Cod. 97854I V05_16
62
Lifts management The lifts are managed by the IP_AXES I/O extension modules. These must be declared before you can set up your lifts. To add a lift, click "Lifts" and then "Create a lift" as follows:
The following window appears:
From this window, you can:
- Give a name to your lift: type it in the "Name" field - Select the reader associated to the lift - From the "Outputs used" tab, select the relay that will be used to activate the buttons in the lift:
use the arrows for it
Cod. 97854I V05_16
63
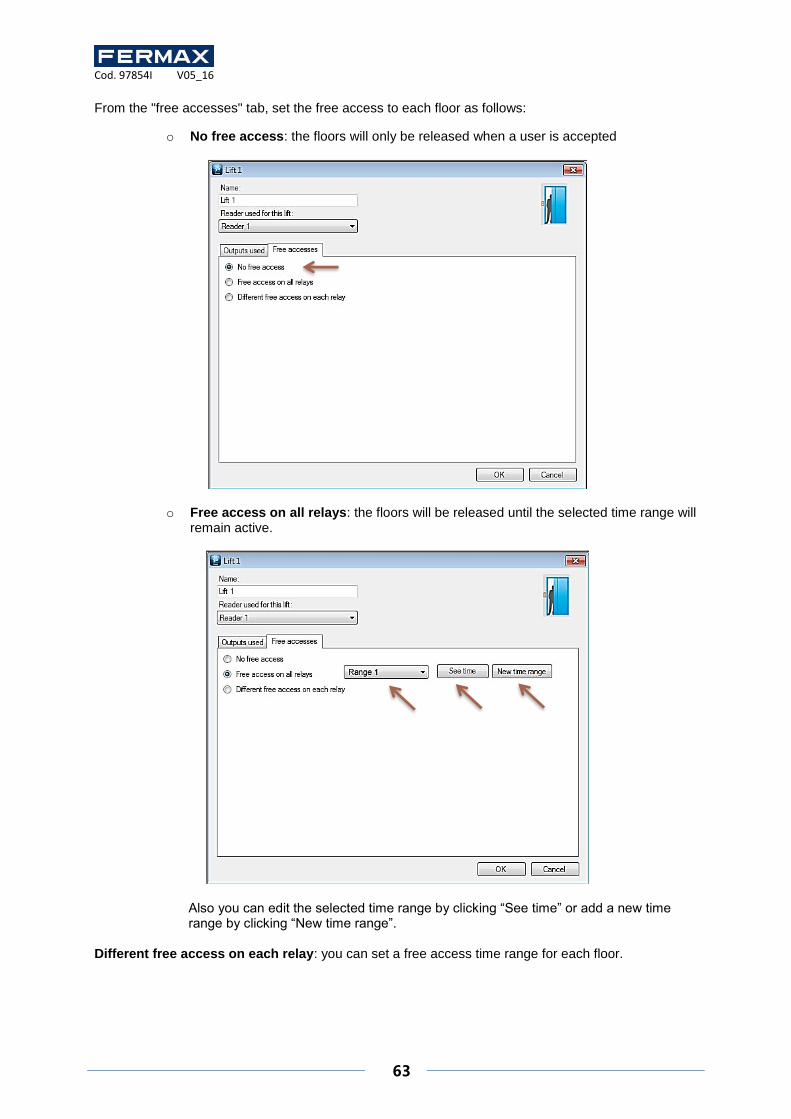
From the "free accesses" tab, set the free access to each floor as follows:
o No free access: the floors will only be released when a user is accepted
o Free access on all relays: the floors will be released until the selected time range will remain active.
Also you can edit the selected time range by clicking “See time” or add a new time range by clicking “New time range”.
Different free access on each relay: you can set a free access time range for each floor.

Cod. 97854I V05_16
64
Also you can add a new time range by clicking “Add time range”.
Then you will be able to grant users access on each floor using the access groups. Schedules and access groups menu Managing time ranges
From the menu, click on "Time ranges". The list of time ranges is displayed. Click on "Add" to add a new time range. Click on "Modify" to modify the selected time range. Click on "Delete" to delete the selected time range.
Time range management:
In this window, you can:
- Name your time range. Caution: the name must be unique (the same name cannot be used for more than one time range).

Cod. 97854I V05_16
65
- Configure the type of display: o Every day: if your times are different every day. o Monday to Friday / Weekend: if your times are identical from Monday to Friday, but
different at the weekend. o Monday to Sunday: if your times are identical from Monday to Sunday.
- Enter your schedules o Graphic entry
Adding a time slot: click in a red area and hold down the left mouse button
while moving the pointer until the required time slot is obtained.
Modifying a time slot: click on the time slot and move it. You can also double-click on a time slot and then click on "Modify to enter schedules manually".
Deleting a time slot: click on the time slot and then press the "Delete" key on
your keyboard or double-click on the time slot and then click on the "Delete" button.
o Manual entry:
Adding a time slot: click on an empty time slot, enter your times in the
"Modifying the selected time slot" area and then click on the "Apply" button. Modifying a time slot: click on the time slot to be modified, enter your new
times in the "Modifying the selected time slot" area and then click on the "Apply" button.
Deleting a time slot: click on the time slot to be deleted and then click on the "Delete" button.
Cod. 97854I V05_16
66
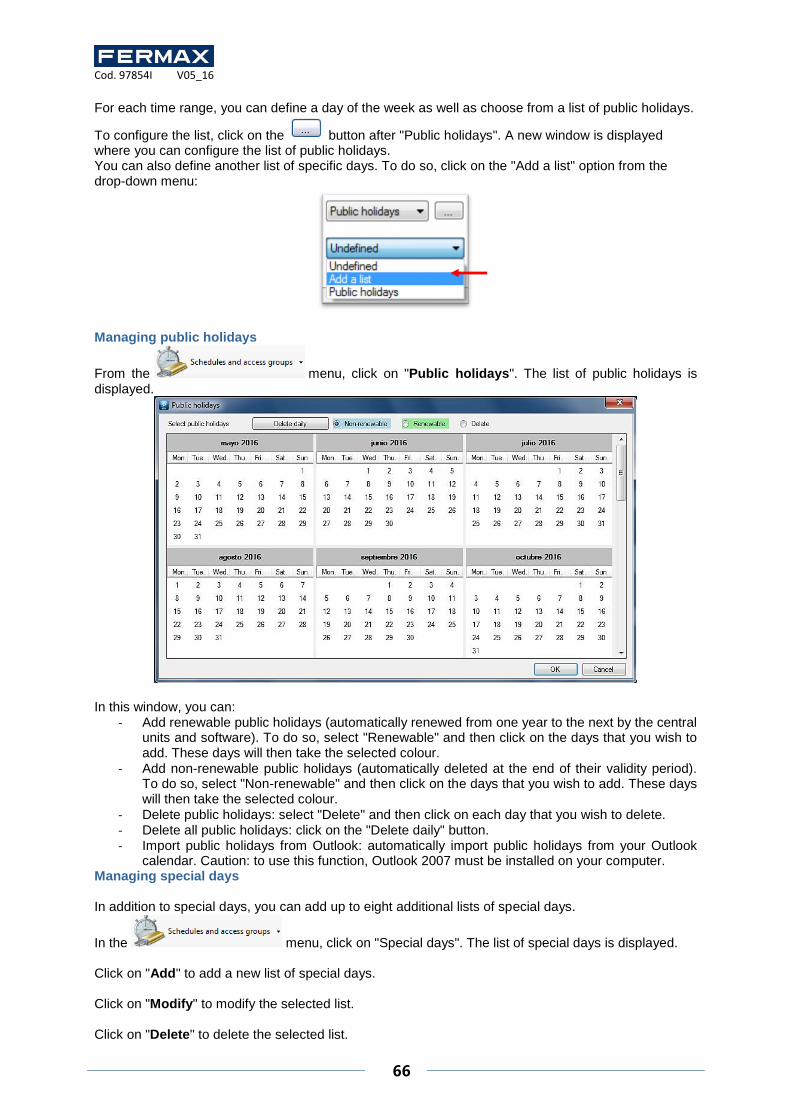
For each time range, you can define a day of the week as well as choose from a list of public holidays.
To configure the list, click on the button after "Public holidays". A new window is displayed where you can configure the list of public holidays. You can also define another list of specific days. To do so, click on the "Add a list" option from the drop-down menu:
Managing public holidays
From the menu, click on "Public holidays". The list of public holidays is displayed.
In this window, you can:
- Add renewable public holidays (automatically renewed from one year to the next by the central units and software). To do so, select "Renewable" and then click on the days that you wish to add. These days will then take the selected colour.
- Add non-renewable public holidays (automatically deleted at the end of their validity period). To do so, select "Non-renewable" and then click on the days that you wish to add. These days will then take the selected colour.
- Delete public holidays: select "Delete" and then click on each day that you wish to delete. - Delete all public holidays: click on the "Delete daily" button. - Import public holidays from Outlook: automatically import public holidays from your Outlook
calendar. Caution: to use this function, Outlook 2007 must be installed on your computer. Managing special days In addition to special days, you can add up to eight additional lists of special days.
In the menu, click on "Special days". The list of special days is displayed. Click on "Add" to add a new list of special days. Click on "Modify" to modify the selected list. Click on "Delete" to delete the selected list.
Cod. 97854I V05_16
67
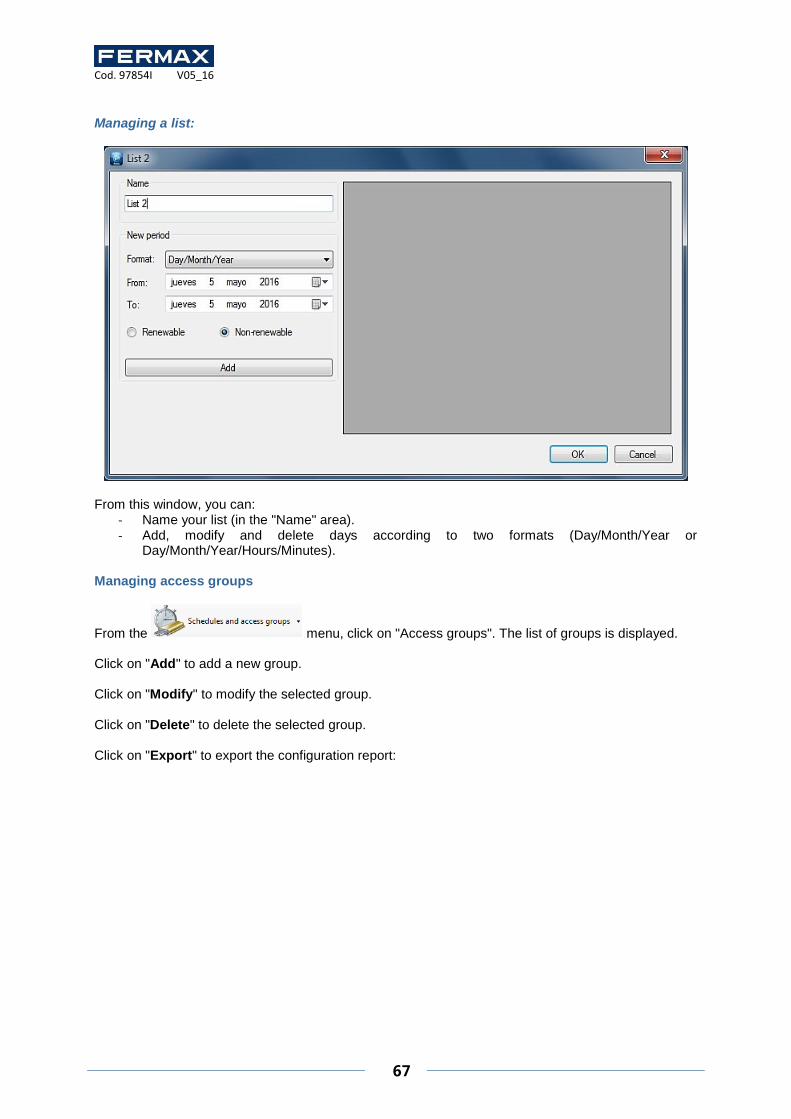
Managing a list:
From this window, you can:
- Name your list (in the "Name" area). - Add, modify and delete days according to two formats (Day/Month/Year or
Day/Month/Year/Hours/Minutes). Managing access groups
From the menu, click on "Access groups". The list of groups is displayed. Click on "Add" to add a new group. Click on "Modify" to modify the selected group. Click on "Delete" to delete the selected group. Click on "Export" to export the configuration report:
Cod. 97854I V05_16
68
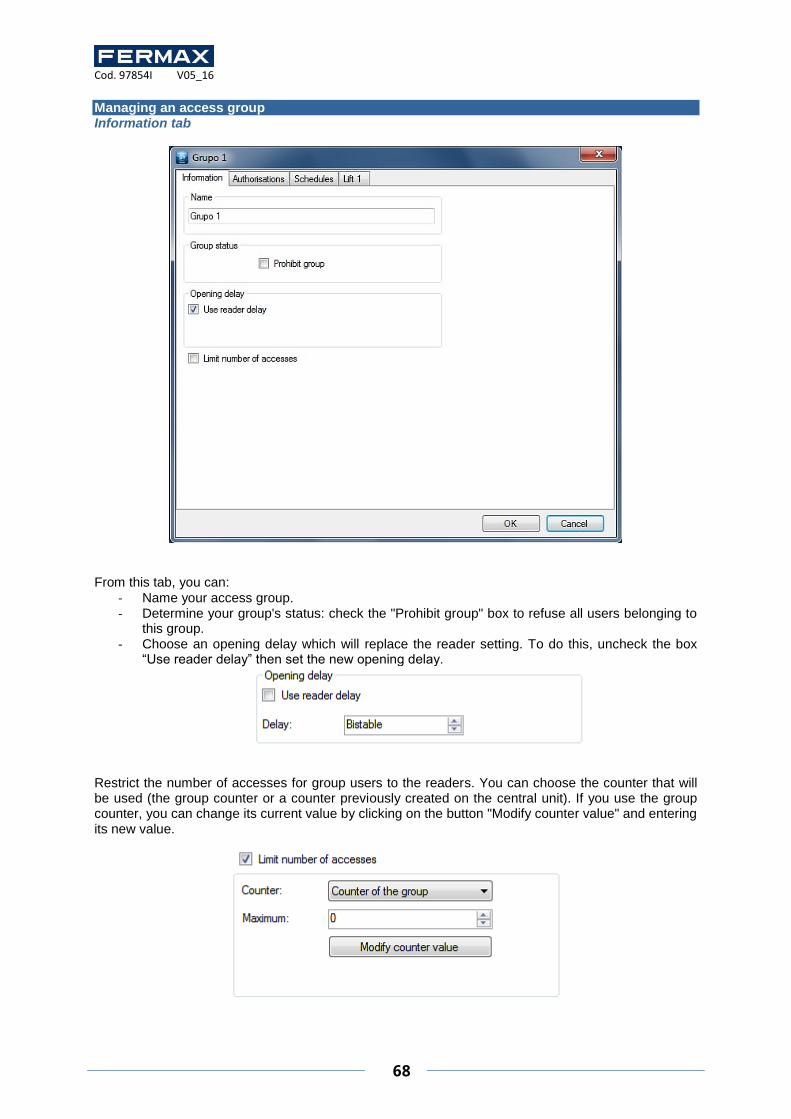
Managing an access group Information tab
From this tab, you can:
- Name your access group. - Determine your group's status: check the "Prohibit group" box to refuse all users belonging to
this group. - Choose an opening delay which will replace the reader setting. To do this, uncheck the box
“Use reader delay” then set the new opening delay.
Restrict the number of accesses for group users to the readers. You can choose the counter that will be used (the group counter or a counter previously created on the central unit). If you use the group counter, you can change its current value by clicking on the button "Modify counter value" and entering its new value.
Cod. 97854I V05_16
69
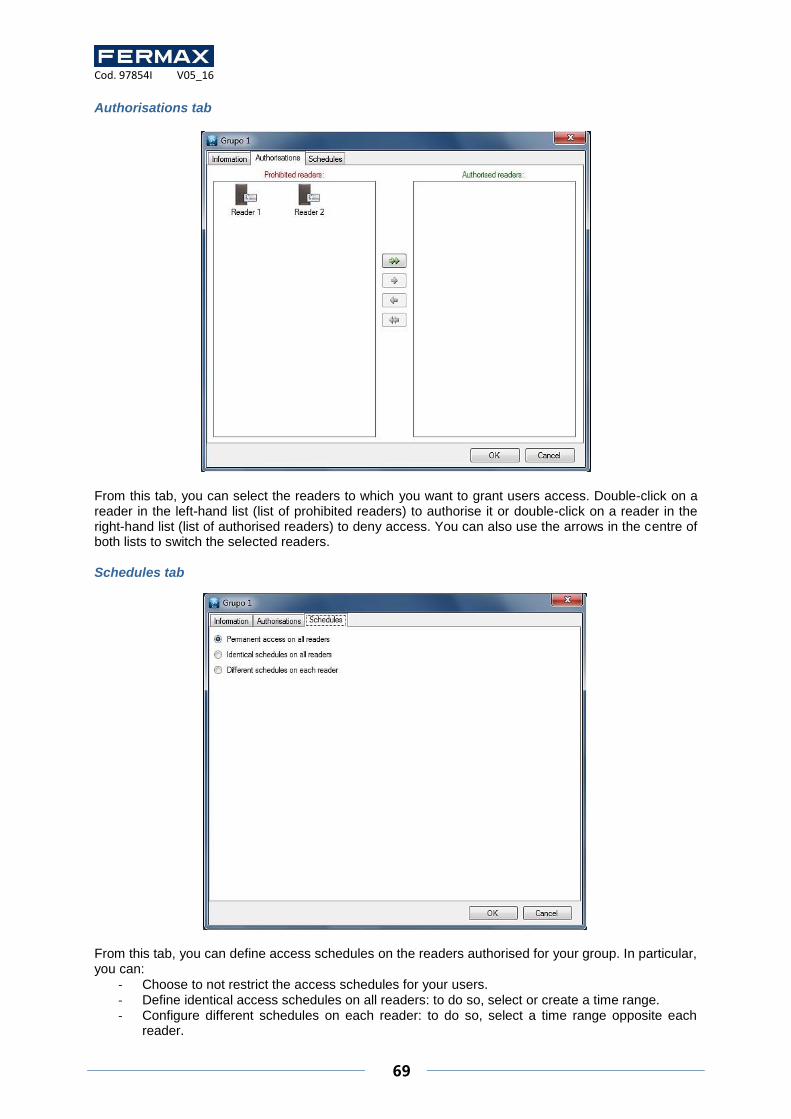
Authorisations tab
From this tab, you can select the readers to which you want to grant users access. Double-click on a reader in the left-hand list (list of prohibited readers) to authorise it or double-click on a reader in the right-hand list (list of authorised readers) to deny access. You can also use the arrows in the centre of both lists to switch the selected readers. Schedules tab
From this tab, you can define access schedules on the readers authorised for your group. In particular, you can:
- Choose to not restrict the access schedules for your users. - Define identical access schedules on all readers: to do so, select or create a time range. - Configure different schedules on each reader: to do so, select a time range opposite each
reader.
Cod. 97854I V05_16
70
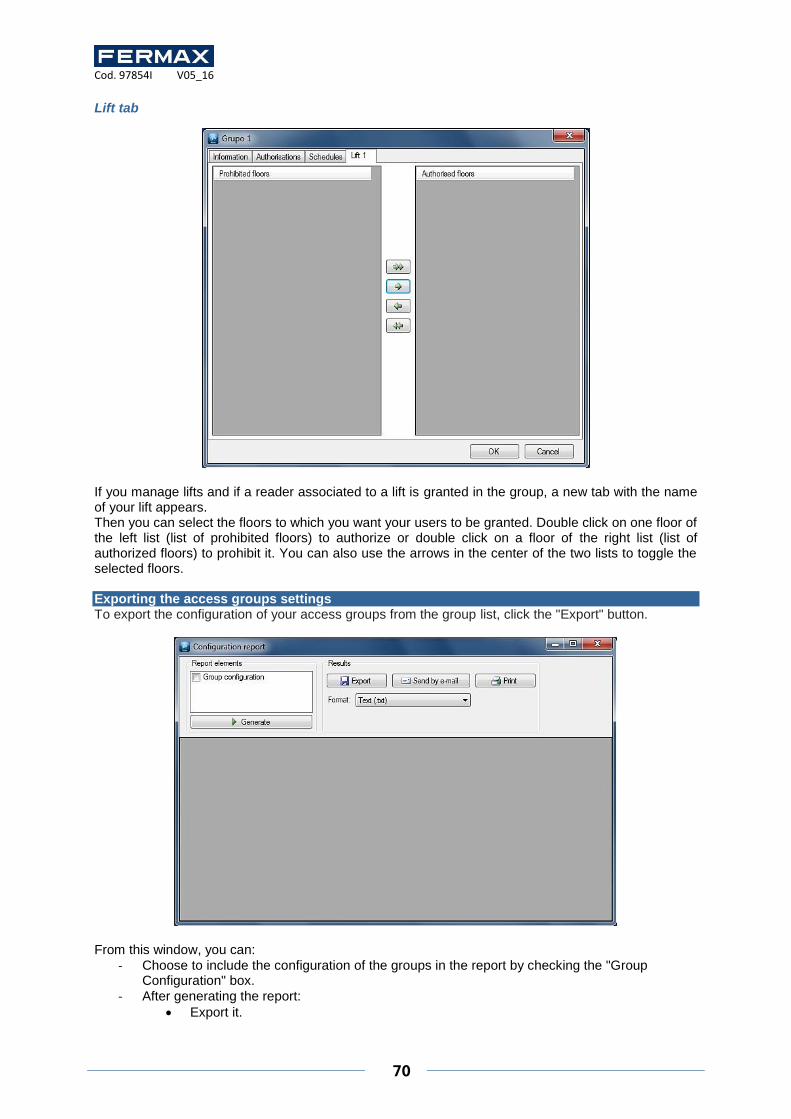
Lift tab
If you manage lifts and if a reader associated to a lift is granted in the group, a new tab with the name of your lift appears. Then you can select the floors to which you want your users to be granted. Double click on one floor of the left list (list of prohibited floors) to authorize or double click on a floor of the right list (list of authorized floors) to prohibit it. You can also use the arrows in the center of the two lists to toggle the selected floors. Exporting the access groups settings To export the configuration of your access groups from the group list, click the "Export" button.
From this window, you can:
- Choose to include the configuration of the groups in the report by checking the "Group Configuration" box.
- After generating the report:
Export it.

Cod. 97854I V05_16
71
Email it to a contact selected in a list or enter the contact directly with the option of zipping the file. This option depends on the email settings in Tools > Preferences > Emails.
Print it.
- Choose the format for the report:
Text (.txt).
Comma-separated text (.csv).
Access 2007 (.accdb).
Excel (.xls).
XML (.xml).
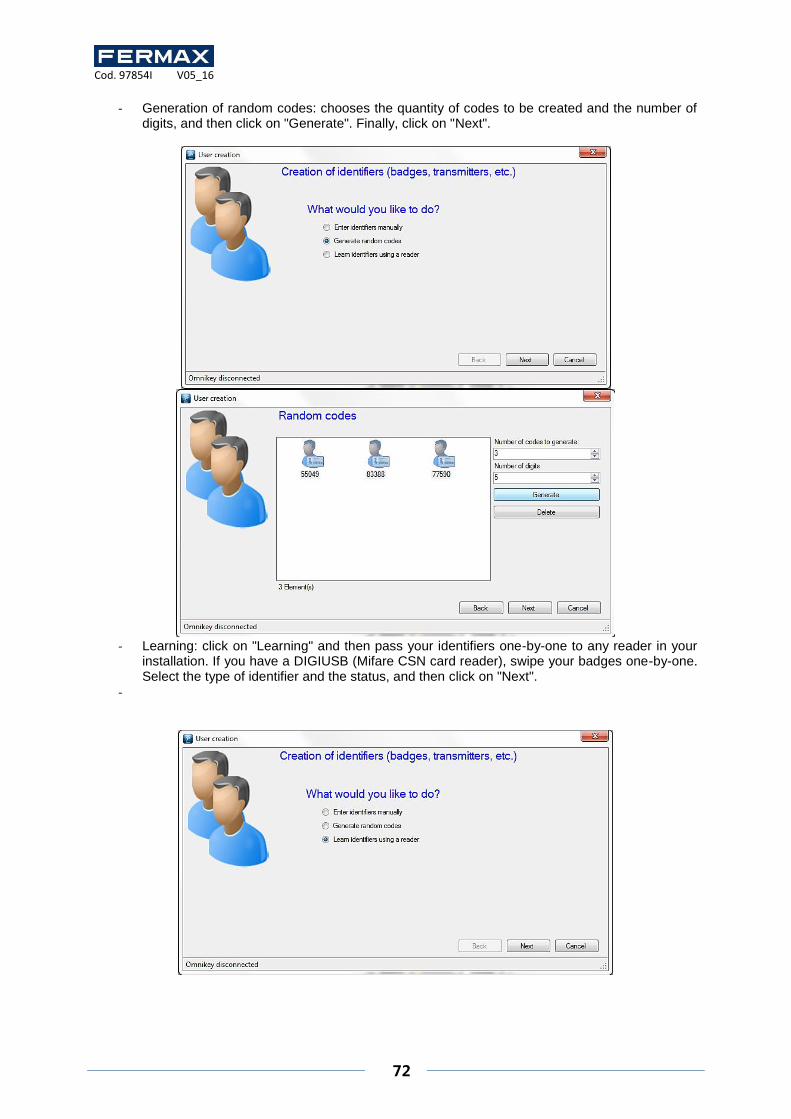
Users menu Creating users The first method for creating users involves using a wizard, which will create the identifiers (badges, emitters, application badges, and so on), users (physical people accessing the site) and access groups (schedules and access rights for the site's different readers).
To do so, click on and then “Create users”. The following wizard is displayed:
There are three different ways to enter your identifiers:
- Manual entry: enter the first number of your identifiers, the quantity to be created, the identifier type and the status, and then click on "Next".
-
Cod. 97854I V05_16
72
- Generation of random codes: chooses the quantity of codes to be created and the number of digits, and then click on "Generate". Finally, click on "Next".
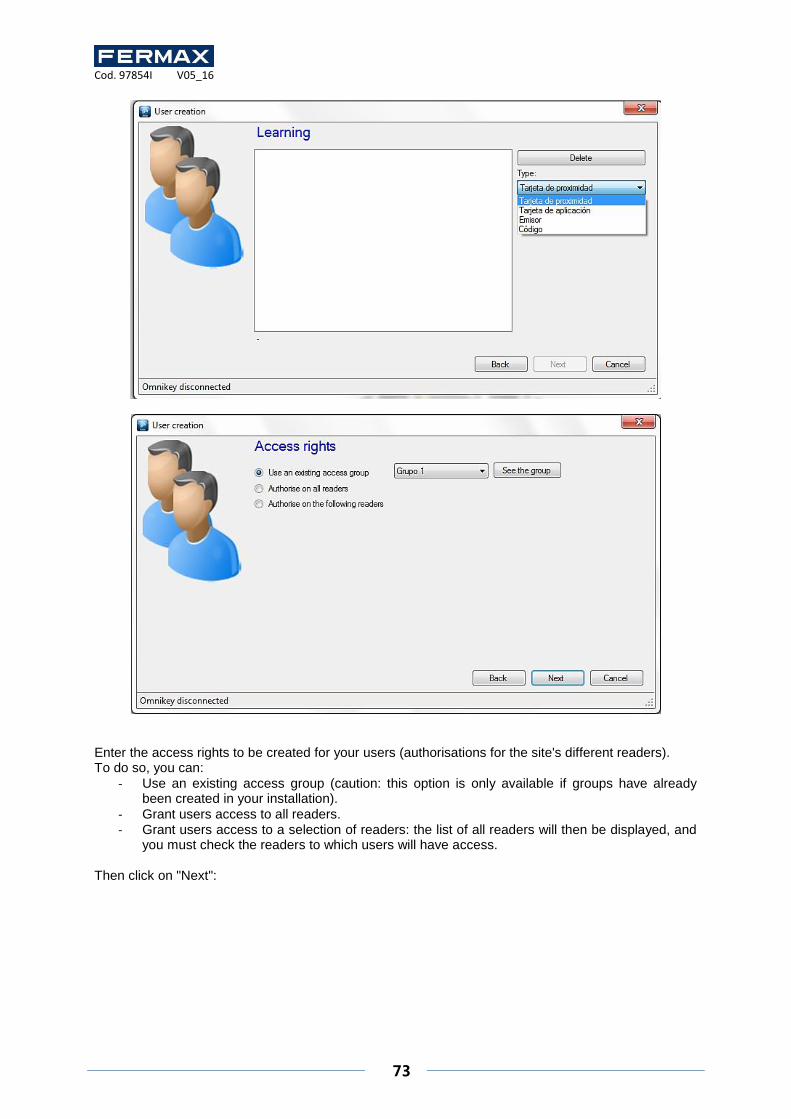
- Learning: click on "Learning" and then pass your identifiers one-by-one to any reader in your
installation. If you have a DIGIUSB (Mifare CSN card reader), swipe your badges one-by-one. Select the type of identifier and the status, and then click on "Next".
-
Cod. 97854I V05_16
73
Enter the access rights to be created for your users (authorisations for the site's different readers). To do so, you can:
- Use an existing access group (caution: this option is only available if groups have already been created in your installation).
- Grant users access to all readers. - Grant users access to a selection of readers: the list of all readers will then be displayed, and
you must check the readers to which users will have access. Then click on "Next":

Cod. 97854I V05_16
74
Enter the access schedules for your new users. To do so, you can:
- Use the schedules for the selected access group: if you have chosen an existing access group, your only option will be to use the schedules for that group.
- Choose to not restrict the access schedules for your users. - Define identical access schedules on all readers: to do so, select or create a time range. - Configure different schedules on each reader: to do so, select a time range opposite each
reader. -
Then click on "Next":
Enter the different options for your users:
- Their status (Authorised or Suspended). - The "Alarm management" option: users authorised to activate / deactivate an alarm system
connected to the central unit (your installation must already be correctly configured).
- The "Without checking cycle" option: if your installation is configured to use the Anti-passback function and this box is checked, all users created with this option will not be subject to the Anti-passback mechanism.
- The "Anti-passback forgiveness" option: whenever users operate a reader, all anti-passback cycles for all users will be cleared (all users can enter or exit again).
- The "Limit the number of passages to" option will restrict a user's maximum number of passages to the value entered.
- The validity start and end dates. Then click on "Next":
Cod. 97854I V05_16
75
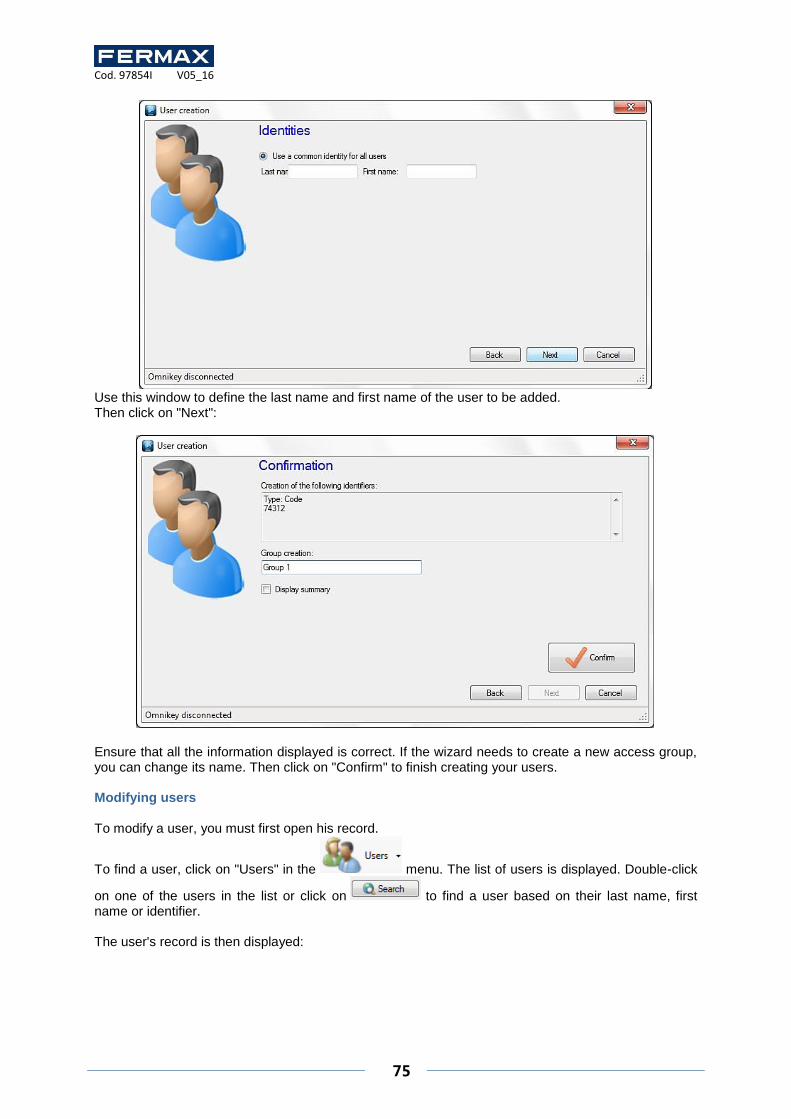
Use this window to define the last name and first name of the user to be added. Then click on "Next":
Ensure that all the information displayed is correct. If the wizard needs to create a new access group, you can change its name. Then click on "Confirm" to finish creating your users. Modifying users To modify a user, you must first open his record.
To find a user, click on "Users" in the menu. The list of users is displayed. Double-click
on one of the users in the list or click on to find a user based on their last name, first name or identifier. The user's record is then displayed:

Cod. 97854I V05_16
76
Tip: at the bottom of the window, you will see information about the user's presence (Unknown if your site has not implemented the anti-passback function or if the user has not yet operated one of your site's readers, in or out, the date of his last passage and the zone in which he is if you manage the zones). Identity tab From this tab, you can:
- Configure a last name and first name for your user. - Add an image file that has already been saved on your computer or network. - Take a photo using a webcam connected to your computer. - Delete the user's photo.
If you click on "Take a photo", the following window is displayed:
Select the required webcam from the list in the top-left corner. Click on the "Capture" button to take a photo. Finally, when the photo suits you, click on "OK".
Cod. 97854I V05_16
77
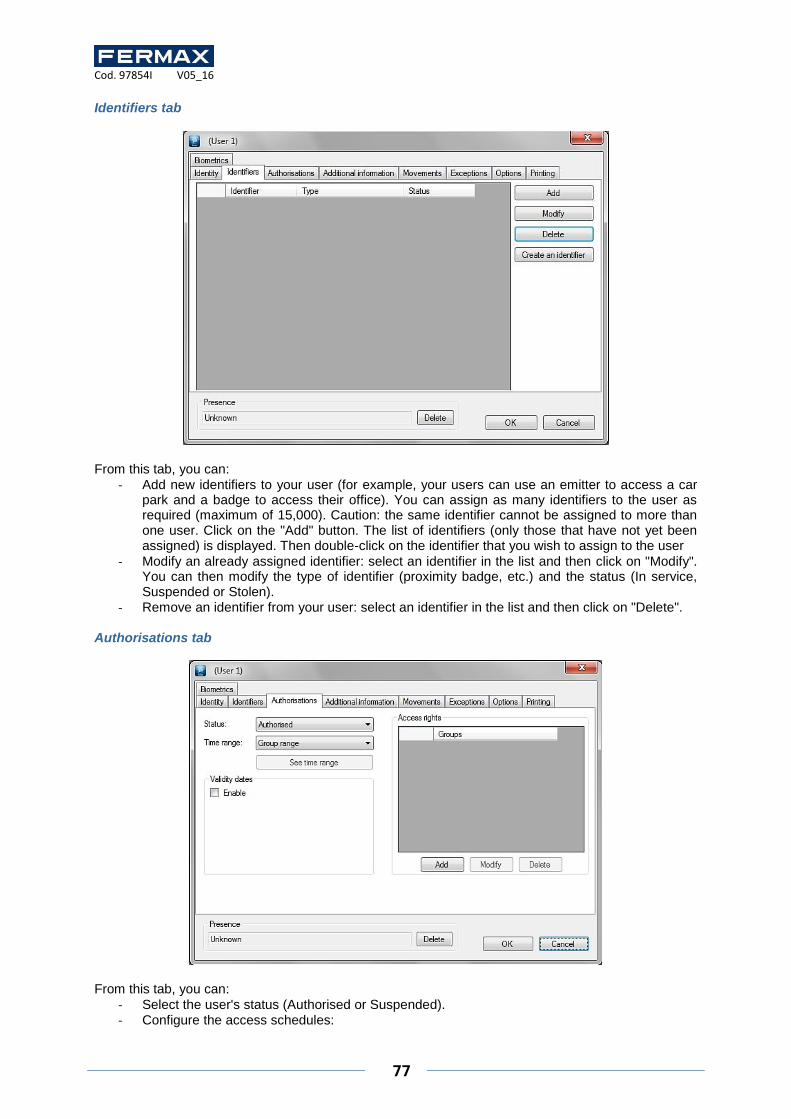
Identifiers tab
From this tab, you can:
- Add new identifiers to your user (for example, your users can use an emitter to access a car park and a badge to access their office). You can assign as many identifiers to the user as required (maximum of 15,000). Caution: the same identifier cannot be assigned to more than one user. Click on the "Add" button. The list of identifiers (only those that have not yet been assigned) is displayed. Then double-click on the identifier that you wish to assign to the user
- Modify an already assigned identifier: select an identifier in the list and then click on "Modify". You can then modify the type of identifier (proximity badge, etc.) and the status (In service, Suspended or Stolen).
- Remove an identifier from your user: select an identifier in the list and then click on "Delete".
Authorisations tab
From this tab, you can:
- Select the user's status (Authorised or Suspended). - Configure the access schedules:
Cod. 97854I V05_16
78
Group range (use the schedules configured in the access groups).
Permanent access: no schedule restrictions for all readers, regardless of the schedules configured for your access groups.
Predefined time range: use this time range for all readers, regardless of the time ranges configured for your access groups.
- Configure the validity start and end dates and times. - Configure the access groups:
Add a group from those already created: click on the "Add" button. The list of groups is displayed. Double-click on the required access group. You can add up to three access groups for the same user.
Modify the access group selected in the list.
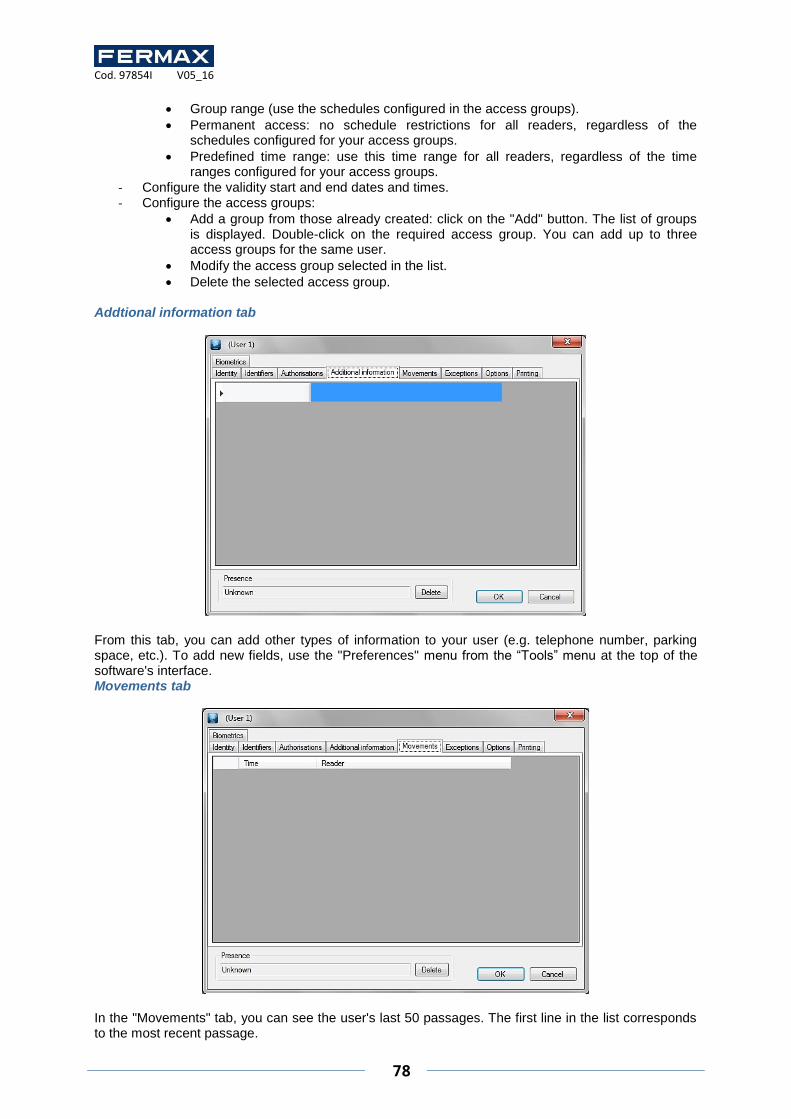
Delete the selected access group. Addtional information tab
From this tab, you can add other types of information to your user (e.g. telephone number, parking space, etc.). To add new fields, use the "Preferences" menu from the “Tools” menu at the top of the software's interface. Movements tab
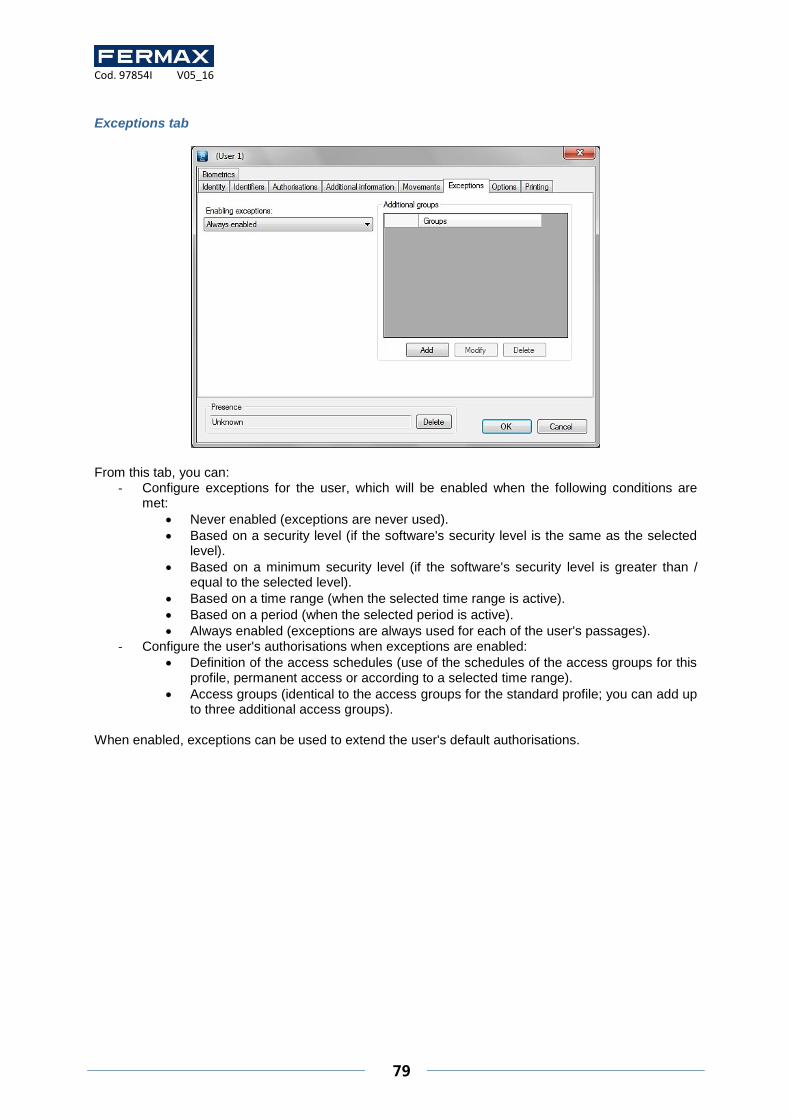
In the "Movements" tab, you can see the user's last 50 passages. The first line in the list corresponds to the most recent passage.
Cod. 97854I V05_16
79
Exceptions tab
From this tab, you can:
- Configure exceptions for the user, which will be enabled when the following conditions are met:
Never enabled (exceptions are never used).
Based on a security level (if the software's security level is the same as the selected level).
Based on a minimum security level (if the software's security level is greater than / equal to the selected level).
Based on a time range (when the selected time range is active).
Based on a period (when the selected period is active).
Always enabled (exceptions are always used for each of the user's passages). - Configure the user's authorisations when exceptions are enabled:
Definition of the access schedules (use of the schedules of the access groups for this profile, permanent access or according to a selected time range).
Access groups (identical to the access groups for the standard profile; you can add up to three additional access groups).
When enabled, exceptions can be used to extend the user's default authorisations.
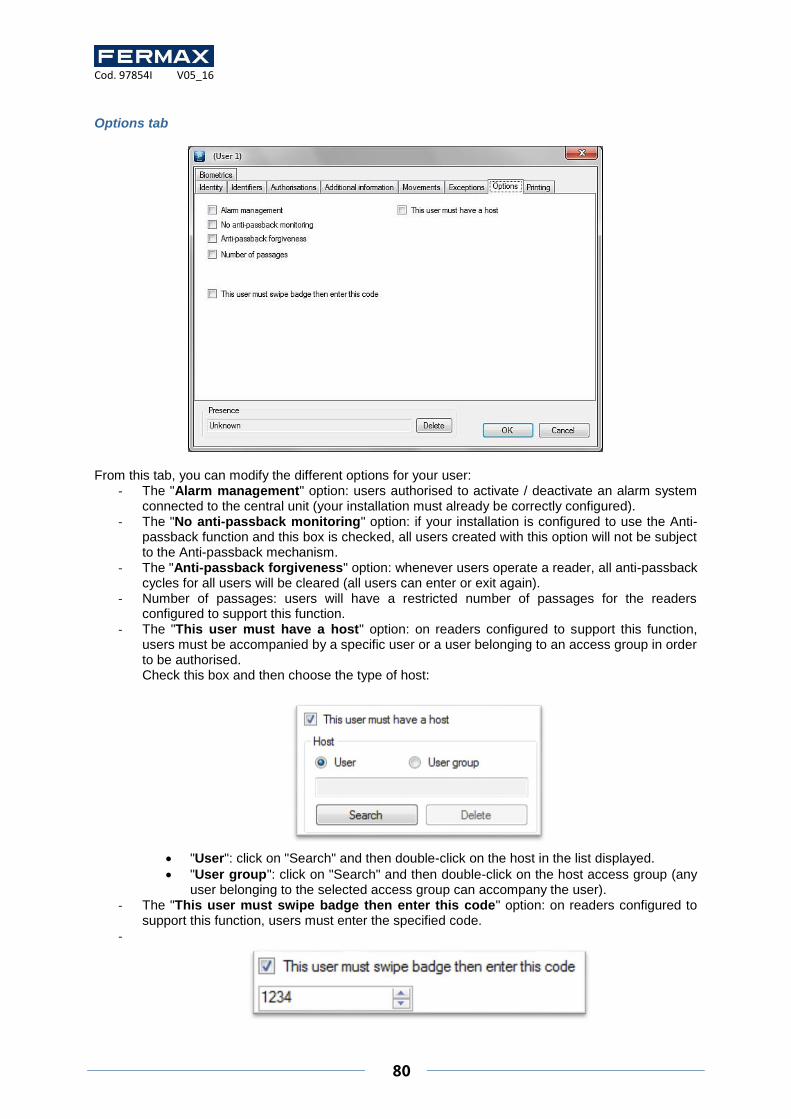
Cod. 97854I V05_16
80
Options tab
From this tab, you can modify the different options for your user:
- The "Alarm management" option: users authorised to activate / deactivate an alarm system connected to the central unit (your installation must already be correctly configured).
- The "No anti-passback monitoring" option: if your installation is configured to use the Anti-passback function and this box is checked, all users created with this option will not be subject to the Anti-passback mechanism.
- The "Anti-passback forgiveness" option: whenever users operate a reader, all anti-passback cycles for all users will be cleared (all users can enter or exit again).
- Number of passages: users will have a restricted number of passages for the readers configured to support this function.
- The "This user must have a host" option: on readers configured to support this function, users must be accompanied by a specific user or a user belonging to an access group in order to be authorised. Check this box and then choose the type of host:
"User": click on "Search" and then double-click on the host in the list displayed.
"User group": click on "Search" and then double-click on the host access group (any user belonging to the selected access group can accompany the user).
- The "This user must swipe badge then enter this code" option: on readers configured to support this function, users must enter the specified code.
-
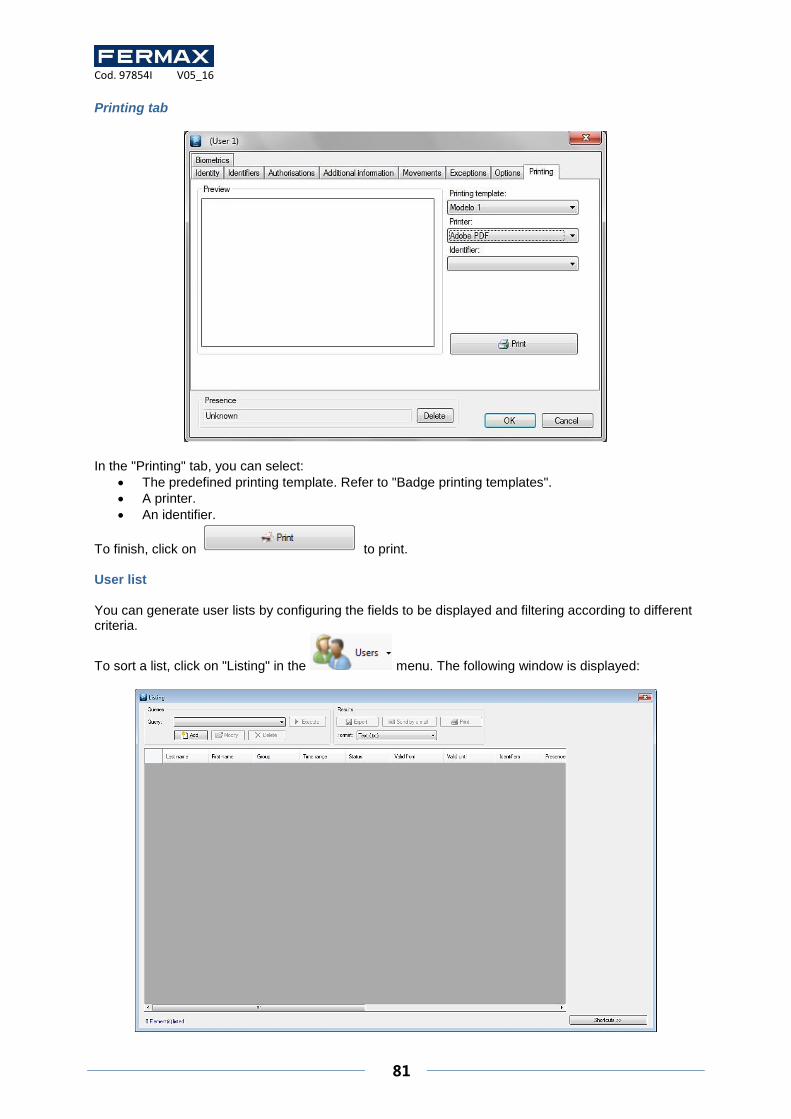
Cod. 97854I V05_16
81
Printing tab
In the "Printing" tab, you can select:
The predefined printing template. Refer to "Badge printing templates".
A printer.
An identifier.
To finish, click on to print. User list You can generate user lists by configuring the fields to be displayed and filtering according to different criteria.
To sort a list, click on "Listing" in the menu. The following window is displayed:
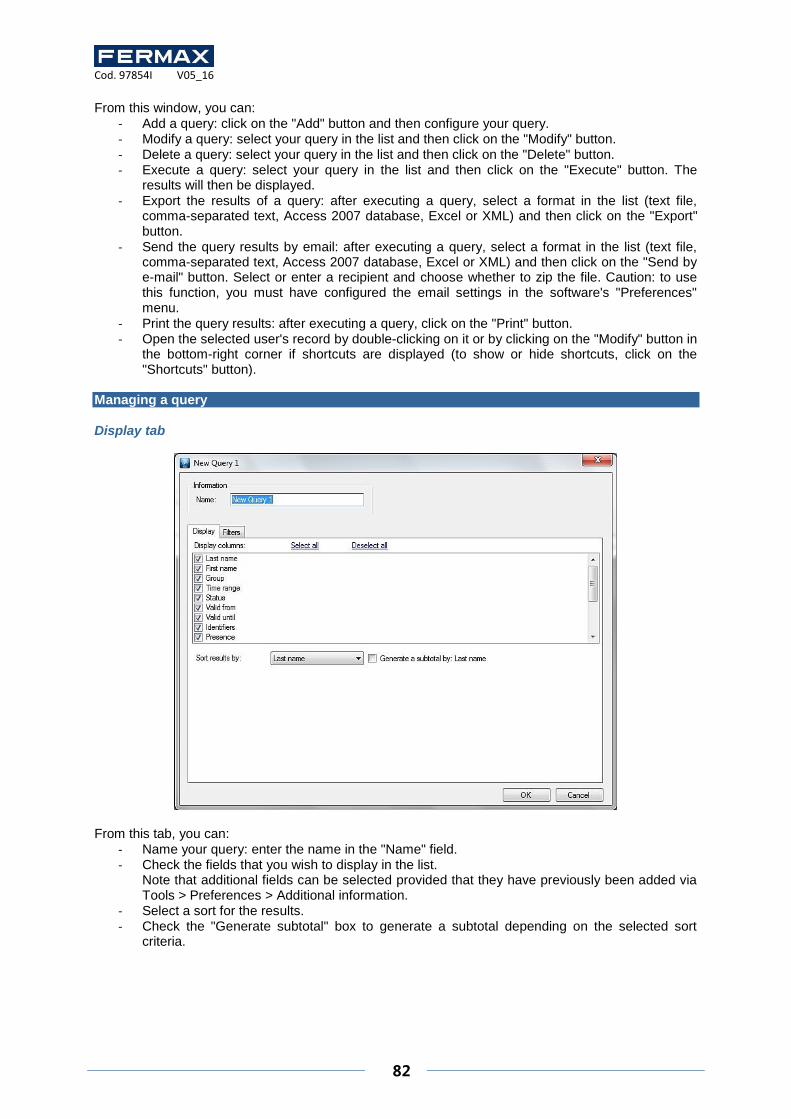
Cod. 97854I V05_16
82
From this window, you can:
- Add a query: click on the "Add" button and then configure your query. - Modify a query: select your query in the list and then click on the "Modify" button. - Delete a query: select your query in the list and then click on the "Delete" button. - Execute a query: select your query in the list and then click on the "Execute" button. The
results will then be displayed.
- Export the results of a query: after executing a query, select a format in the list (text file, comma-separated text, Access 2007 database, Excel or XML) and then click on the "Export" button.
- Send the query results by email: after executing a query, select a format in the list (text file, comma-separated text, Access 2007 database, Excel or XML) and then click on the "Send by e-mail" button. Select or enter a recipient and choose whether to zip the file. Caution: to use this function, you must have configured the email settings in the software's "Preferences" menu.
- Print the query results: after executing a query, click on the "Print" button. - Open the selected user's record by double-clicking on it or by clicking on the "Modify" button in
the bottom-right corner if shortcuts are displayed (to show or hide shortcuts, click on the "Shortcuts" button).
Managing a query Display tab
From this tab, you can:
- Name your query: enter the name in the "Name" field. - Check the fields that you wish to display in the list.
Note that additional fields can be selected provided that they have previously been added via Tools > Preferences > Additional information.
- Select a sort for the results. - Check the "Generate subtotal" box to generate a subtotal depending on the selected sort
criteria.
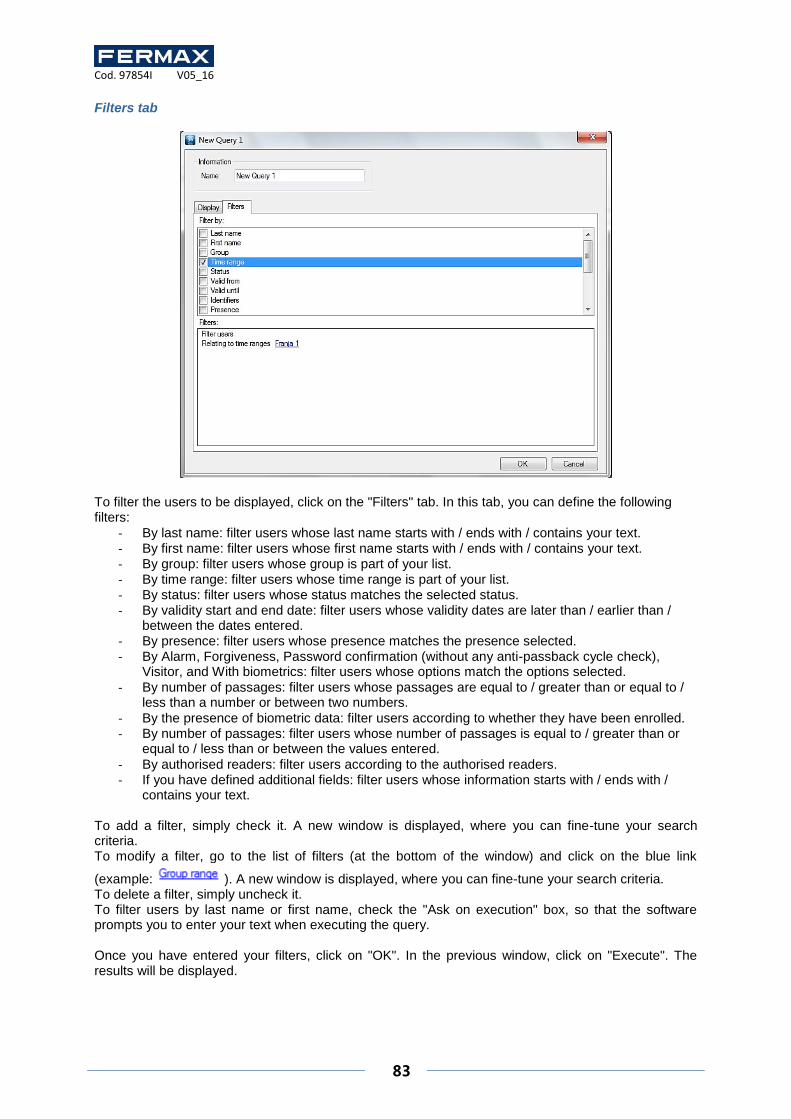
Cod. 97854I V05_16
83
Filters tab
To filter the users to be displayed, click on the "Filters" tab. In this tab, you can define the following filters:
- By last name: filter users whose last name starts with / ends with / contains your text. - By first name: filter users whose first name starts with / ends with / contains your text. - By group: filter users whose group is part of your list. - By time range: filter users whose time range is part of your list. - By status: filter users whose status matches the selected status. - By validity start and end date: filter users whose validity dates are later than / earlier than /
between the dates entered. - By presence: filter users whose presence matches the presence selected. - By Alarm, Forgiveness, Password confirmation (without any anti-passback cycle check),
Visitor, and With biometrics: filter users whose options match the options selected.
- By number of passages: filter users whose passages are equal to / greater than or equal to / less than a number or between two numbers.
- By the presence of biometric data: filter users according to whether they have been enrolled. - By number of passages: filter users whose number of passages is equal to / greater than or
equal to / less than or between the values entered.
- By authorised readers: filter users according to the authorised readers. - If you have defined additional fields: filter users whose information starts with / ends with /
contains your text. To add a filter, simply check it. A new window is displayed, where you can fine-tune your search criteria. To modify a filter, go to the list of filters (at the bottom of the window) and click on the blue link
(example: ). A new window is displayed, where you can fine-tune your search criteria. To delete a filter, simply uncheck it. To filter users by last name or first name, check the "Ask on execution" box, so that the software prompts you to enter your text when executing the query. Once you have entered your filters, click on "OK". In the previous window, click on "Execute". The results will be displayed.
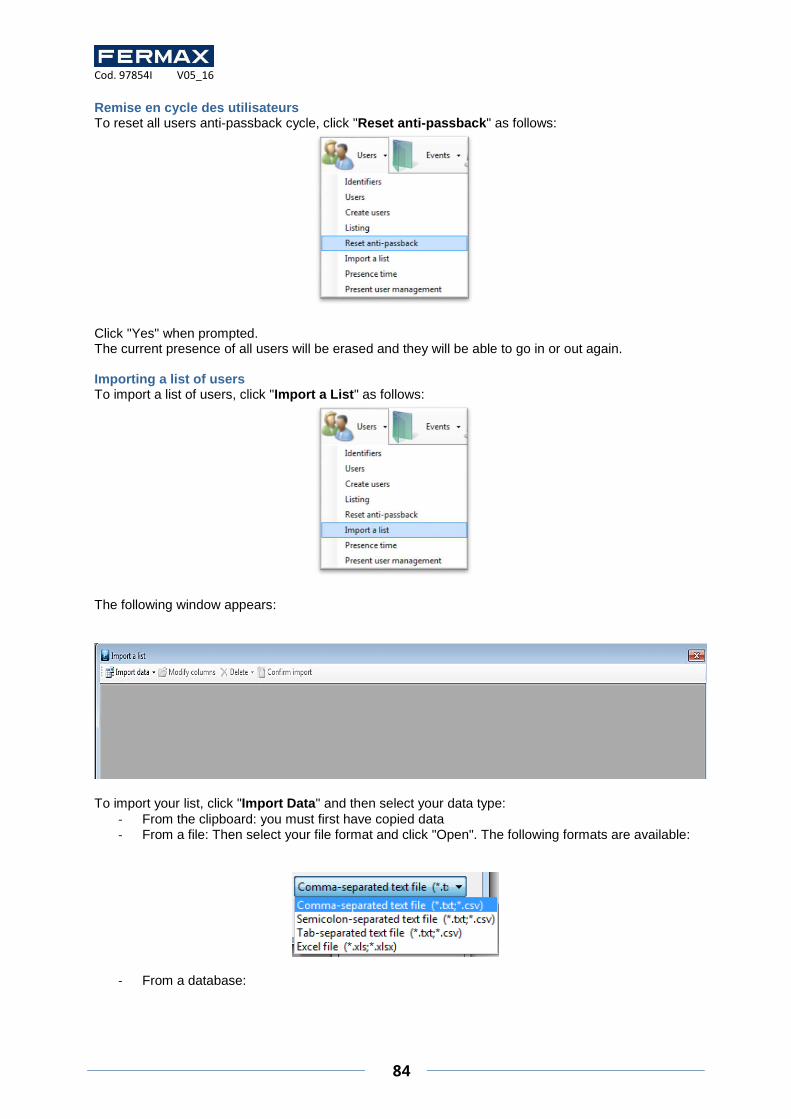
Cod. 97854I V05_16
84
Remise en cycle des utilisateurs To reset all users anti-passback cycle, click "Reset anti-passback" as follows:
Click "Yes" when prompted. The current presence of all users will be erased and they will be able to go in or out again. Importing a list of users To import a list of users, click "Import a List" as follows:
The following window appears:
To import your list, click "Import Data" and then select your data type:
- From the clipboard: you must first have copied data - From a file: Then select your file format and click "Open". The following formats are available:
- From a database:
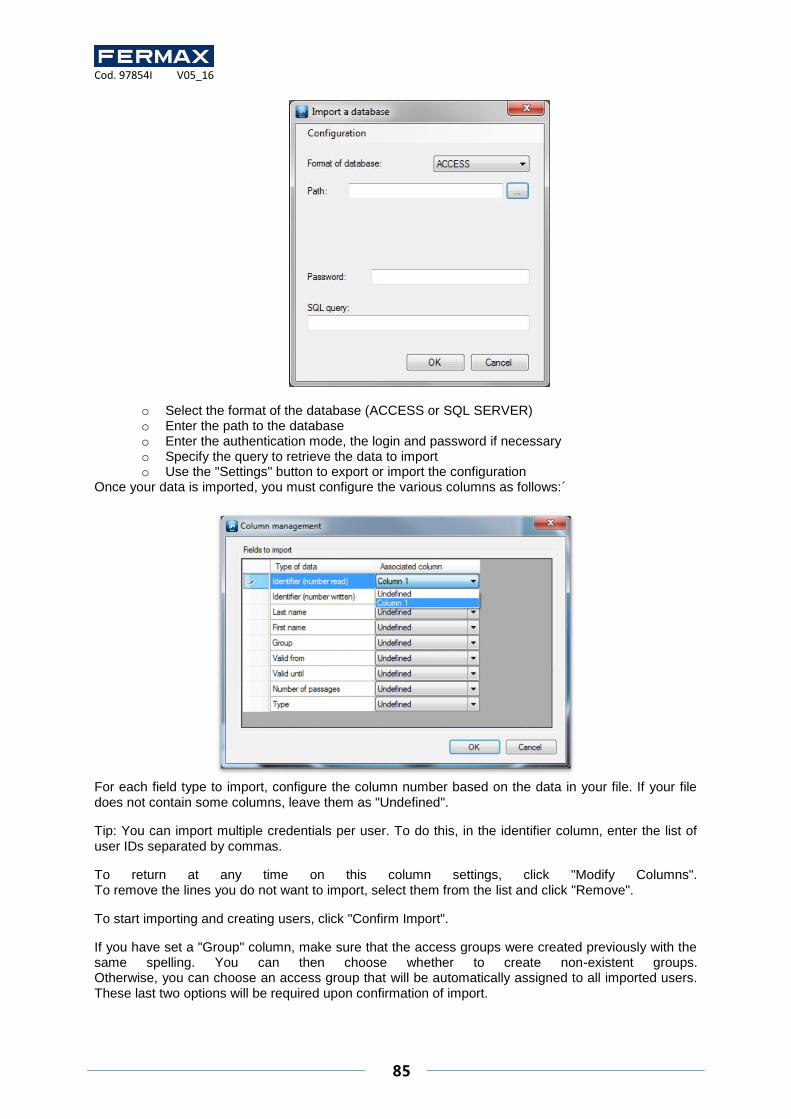
Cod. 97854I V05_16
85
o Select the format of the database (ACCESS or SQL SERVER) o Enter the path to the database o Enter the authentication mode, the login and password if necessary o Specify the query to retrieve the data to import o Use the "Settings" button to export or import the configuration
Once your data is imported, you must configure the various columns as follows:´
For each field type to import, configure the column number based on the data in your file. If your file does not contain some columns, leave them as "Undefined".
Tip: You can import multiple credentials per user. To do this, in the identifier column, enter the list of user IDs separated by commas.
To return at any time on this column settings, click "Modify Columns". To remove the lines you do not want to import, select them from the list and click "Remove".
To start importing and creating users, click "Confirm Import".
If you have set a "Group" column, make sure that the access groups were created previously with the same spelling. You can then choose whether to create non-existent groups. Otherwise, you can choose an access group that will be automatically assigned to all imported users. These last two options will be required upon confirmation of import.

Cod. 97854I V05_16
86
Presence time To calculate the user presence time, click "presence time" as follows:
The following window appears:
From this window, you can:
- Select the entries and exists readers. You can also use the shortcuts "All" and "None" to check or uncheck all readers within one click.
- Select the calculation period: month predefined or custom period - Select users to calculate either the users of all groups, users of a group or a specific user - View the details of the user passages by checking the box "Display passages" - Start the calculation by clicking on "Calculate" - Export results: after running the calculation, select a format from the list (text file, text
separated by commas, Access 2007 database, Excel or XML) and click the "Export" button. - Send results by email: after running the calculation, select a format from the list (text file, text
separated by commas, Access 2007 database, Excel or XML) then click "Send by e-mail". Select or enter a recipient and choose whether to compress the file. Caution: to use this feature, you must have configured the mail settings from the "Preferences" menu of the software.
- Print the results: after running the calculation, click the "Print" button Managing the present user To view the list of users in one or more areas, click "Present user management" as follows:

Cod. 97854I V05_16
87
To use this feature, you must have configured your areas first. The following window appears:
From this window, you can:
- Select the areas used for the report. You can also use the shortcuts "All" and "None" to check or uncheck all zones in one click.
- Start the calculation by clicking on "Calculate" - Export results: after running the calculation, select a format from the list (text file, text
separated by commas, Access 2007 database, Excel or XML) and click the "Export" button
- Send results by email: after running the calculation, select a format from the list (text file, text separated by commas, Access 2007 database, Excel or XML) and then click "Send by e-mail". Select or enter a recipient and choose whether to compress the file. Caution: to use this feature, you must have configured the mail settings from the "Preferences" menu of the software.
- Print the results: after running the calculation, click the "Print" button - Select to generate a subtotal per area in the report by checking the box "Generate one
subtotal per area"
- Select the sort criterion of users by selecting it in the list (Name or Access Group) Events menu Events display
You can display a list of events in real time at the bottom of your screen by clicking on the "Display" menu and then "Event list".
Caution: this list only contains events that have occurred since you started IP_AXES. To close the list, click on the "Close" button at the top-right of the list.
To view the last 2,000 events, click on the menu and then "See list". Note: to display more events, refer to the "History" tool. The following window is displayed:
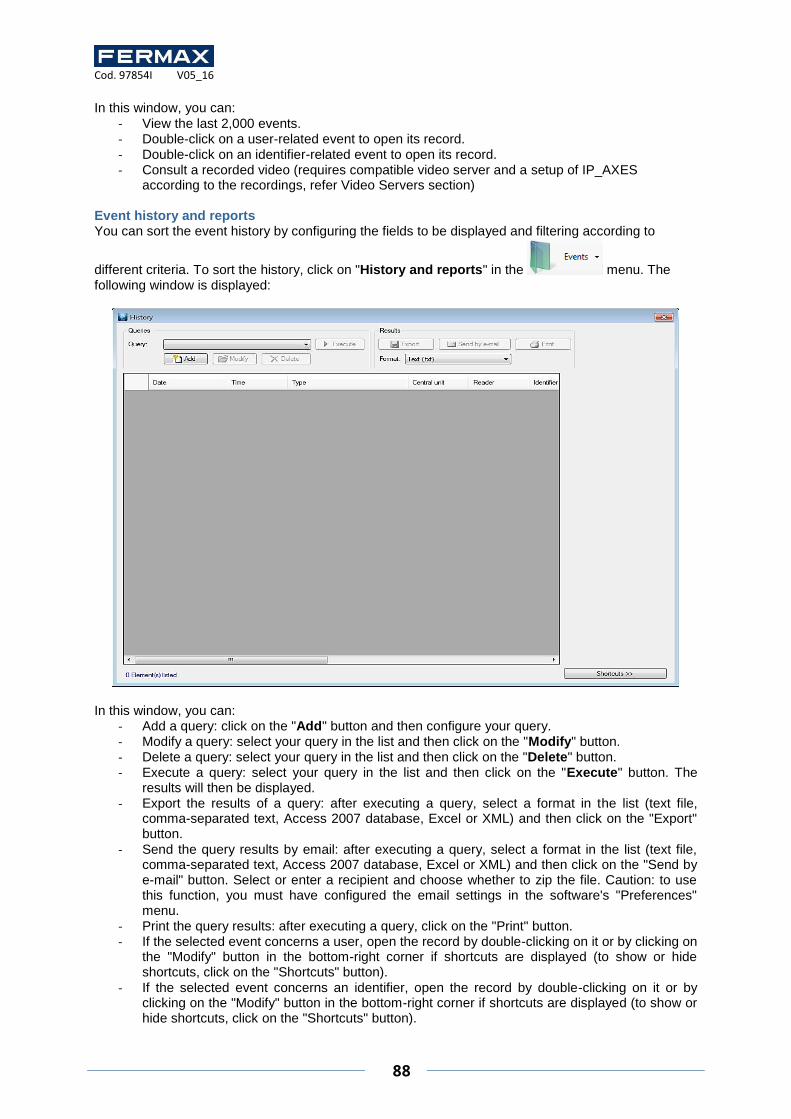
Cod. 97854I V05_16
88
In this window, you can:
- View the last 2,000 events. - Double-click on a user-related event to open its record. - Double-click on an identifier-related event to open its record. - Consult a recorded video (requires compatible video server and a setup of IP_AXES
according to the recordings, refer Video Servers section) Event history and reports You can sort the event history by configuring the fields to be displayed and filtering according to
different criteria. To sort the history, click on "History and reports" in the menu. The following window is displayed:
In this window, you can:
- Add a query: click on the "Add" button and then configure your query. - Modify a query: select your query in the list and then click on the "Modify" button. - Delete a query: select your query in the list and then click on the "Delete" button. - Execute a query: select your query in the list and then click on the "Execute" button. The
results will then be displayed. - Export the results of a query: after executing a query, select a format in the list (text file,
comma-separated text, Access 2007 database, Excel or XML) and then click on the "Export" button.
- Send the query results by email: after executing a query, select a format in the list (text file, comma-separated text, Access 2007 database, Excel or XML) and then click on the "Send by e-mail" button. Select or enter a recipient and choose whether to zip the file. Caution: to use this function, you must have configured the email settings in the software's "Preferences" menu.
- Print the query results: after executing a query, click on the "Print" button. - If the selected event concerns a user, open the record by double-clicking on it or by clicking on
the "Modify" button in the bottom-right corner if shortcuts are displayed (to show or hide shortcuts, click on the "Shortcuts" button).
- If the selected event concerns an identifier, open the record by double-clicking on it or by clicking on the "Modify" button in the bottom-right corner if shortcuts are displayed (to show or hide shortcuts, click on the "Shortcuts" button).
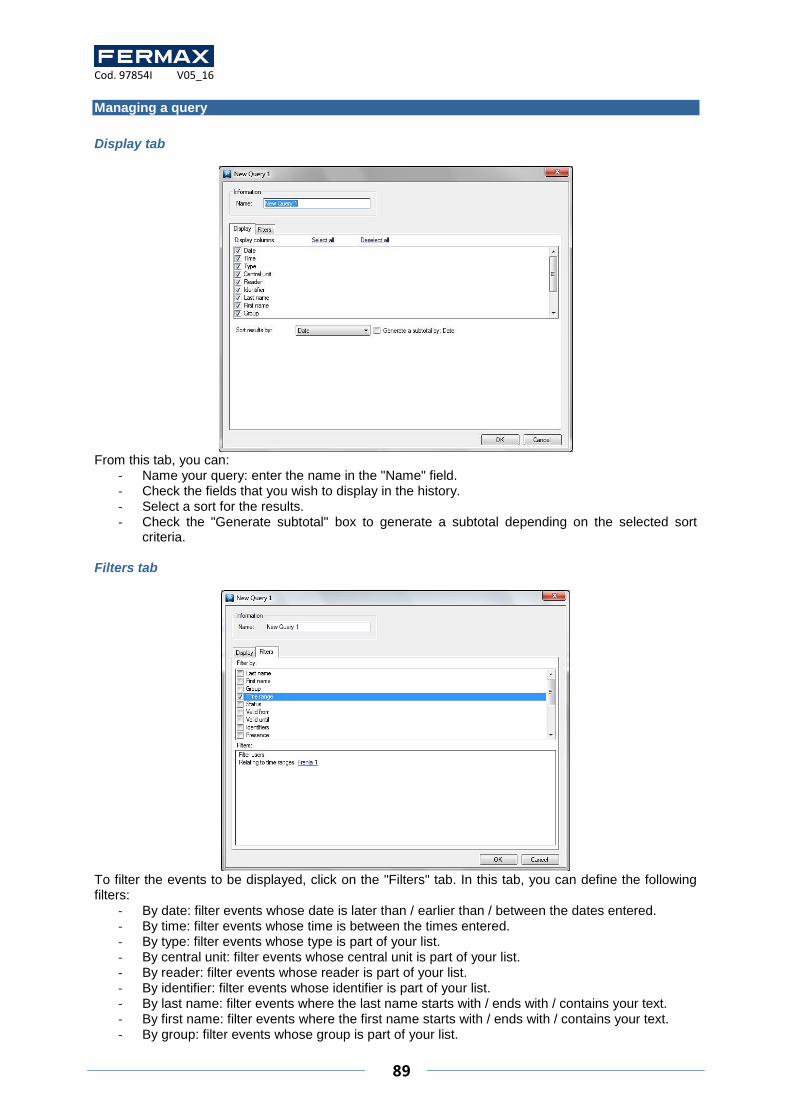
Cod. 97854I V05_16
89
Managing a query
Display tab
From this tab, you can:
- Name your query: enter the name in the "Name" field. - Check the fields that you wish to display in the history. - Select a sort for the results. - Check the "Generate subtotal" box to generate a subtotal depending on the selected sort
criteria.
Filters tab
To filter the events to be displayed, click on the "Filters" tab. In this tab, you can define the following filters:
- By date: filter events whose date is later than / earlier than / between the dates entered. - By time: filter events whose time is between the times entered. - By type: filter events whose type is part of your list. - By central unit: filter events whose central unit is part of your list. - By reader: filter events whose reader is part of your list. - By identifier: filter events whose identifier is part of your list. - By last name: filter events where the last name starts with / ends with / contains your text. - By first name: filter events where the first name starts with / ends with / contains your text. - By group: filter events whose group is part of your list.
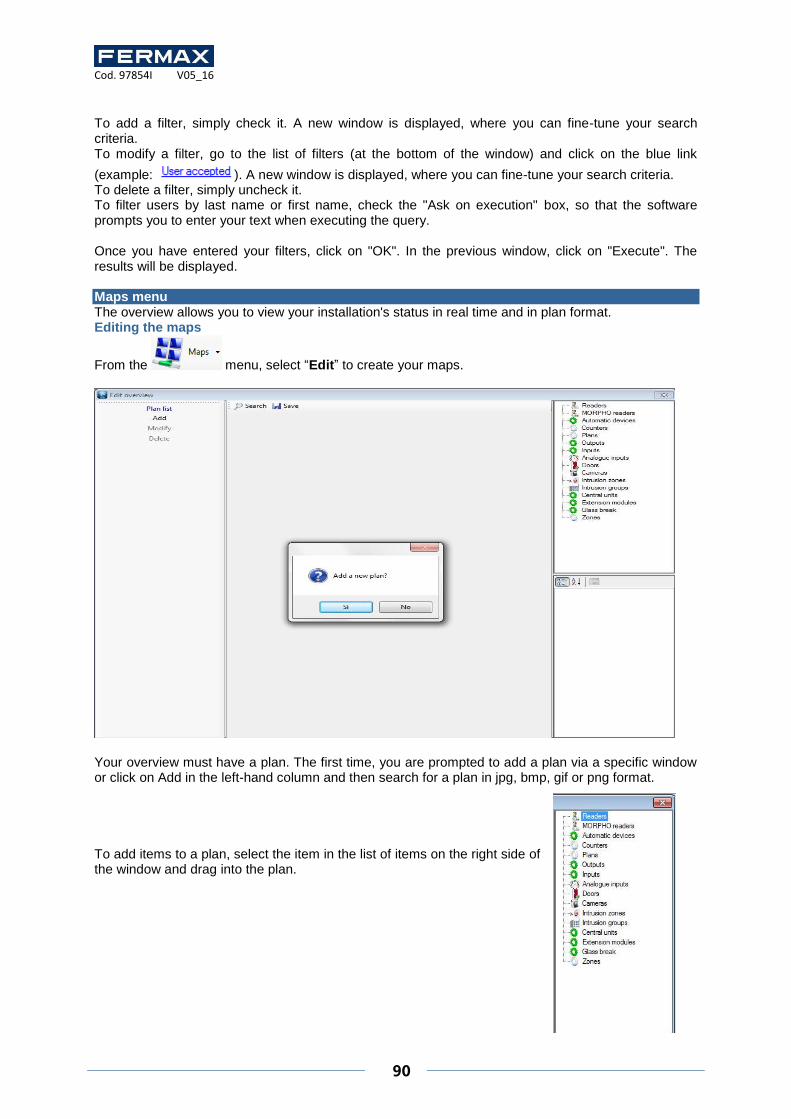
Cod. 97854I V05_16
90
To add a filter, simply check it. A new window is displayed, where you can fine-tune your search criteria. To modify a filter, go to the list of filters (at the bottom of the window) and click on the blue link
(example: ). A new window is displayed, where you can fine-tune your search criteria. To delete a filter, simply uncheck it. To filter users by last name or first name, check the "Ask on execution" box, so that the software prompts you to enter your text when executing the query. Once you have entered your filters, click on "OK". In the previous window, click on "Execute". The results will be displayed. Maps menu The overview allows you to view your installation's status in real time and in plan format. Editing the maps
From the menu, select “Edit” to create your maps.
Your overview must have a plan. The first time, you are prompted to add a plan via a specific window or click on Add in the left-hand column and then search for a plan in jpg, bmp, gif or png format. To add items to a plan, select the item in the list of items on the right side of the window and drag into the plan.

Cod. 97854I V05_16
91
In the plan, you can right-click on the icon to see a preview of the item's different statuses or delete the item. By selecting an icon in the plan, you can edit its parameters in the lower part of the right-hand column. For a reader, you can:
- Choose a background colour. - Show or hide an event window as soon as an
event occurs on the reader.
- Select the window position:
- Change the image size. - Change the image. - Change the name. - Change the font.
Opening the maps
From the menu, select “Open” to open your maps.
If you have several plans, you can select the required plan in the left-hand column:
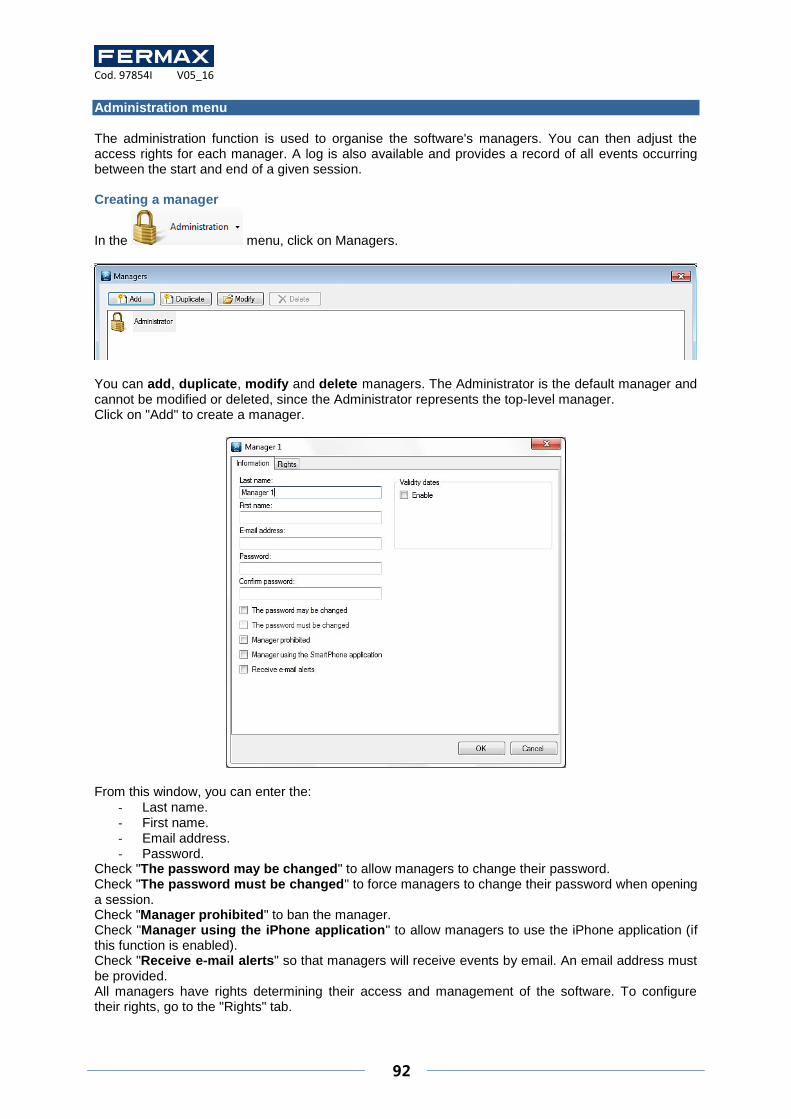
Cod. 97854I V05_16
92
Administration menu The administration function is used to organise the software's managers. You can then adjust the access rights for each manager. A log is also available and provides a record of all events occurring between the start and end of a given session. Creating a manager
In the menu, click on Managers.
You can add, duplicate, modify and delete managers. The Administrator is the default manager and cannot be modified or deleted, since the Administrator represents the top-level manager. Click on "Add" to create a manager.
From this window, you can enter the:
- Last name. - First name. - Email address. - Password.
Check "The password may be changed" to allow managers to change their password. Check "The password must be changed" to force managers to change their password when opening a session. Check "Manager prohibited" to ban the manager. Check "Manager using the iPhone application" to allow managers to use the iPhone application (if this function is enabled). Check "Receive e-mail alerts" so that managers will receive events by email. An email address must be provided. All managers have rights determining their access and management of the software. To configure their rights, go to the "Rights" tab.
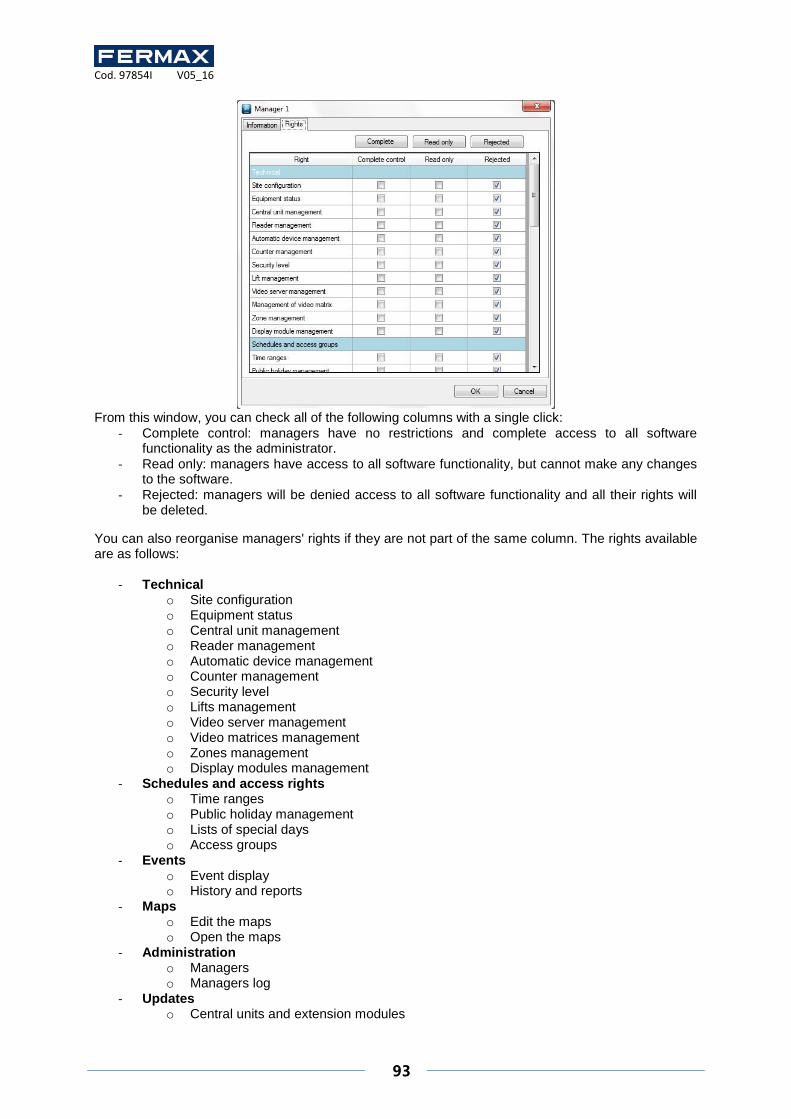
Cod. 97854I V05_16
93
From this window, you can check all of the following columns with a single click:
- Complete control: managers have no restrictions and complete access to all software functionality as the administrator.
- Read only: managers have access to all software functionality, but cannot make any changes to the software.
- Rejected: managers will be denied access to all software functionality and all their rights will be deleted.
You can also reorganise managers' rights if they are not part of the same column. The rights available are as follows:
- Technical o Site configuration o Equipment status o Central unit management o Reader management o Automatic device management o Counter management o Security level o Lifts management o Video server management o Video matrices management o Zones management o Display modules management
- Schedules and access rights o Time ranges o Public holiday management o Lists of special days o Access groups
- Events o Event display o History and reports
- Maps o Edit the maps o Open the maps
- Administration o Managers o Managers log
- Updates o Central units and extension modules
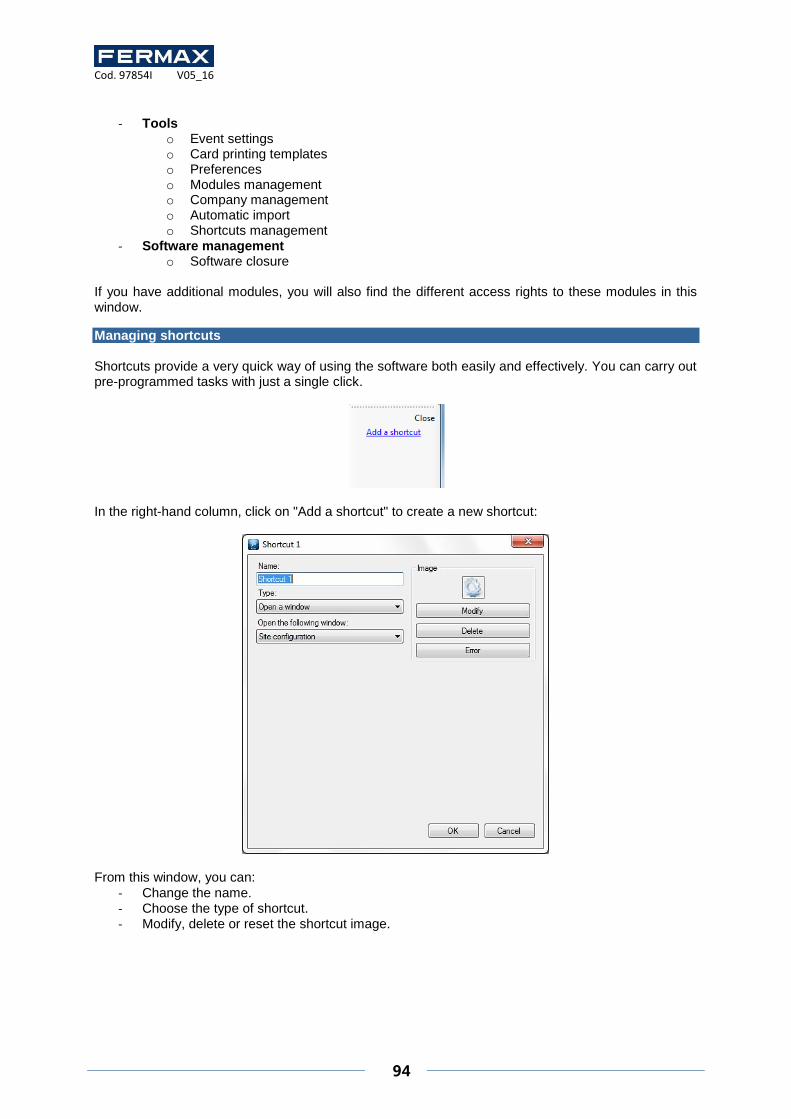
Cod. 97854I V05_16
94
- Tools
o Event settings o Card printing templates o Preferences o Modules management o Company management o Automatic import o Shortcuts management
- Software management o Software closure
If you have additional modules, you will also find the different access rights to these modules in this window.
Managing shortcuts Shortcuts provide a very quick way of using the software both easily and effectively. You can carry out pre-programmed tasks with just a single click.
In the right-hand column, click on "Add a shortcut" to create a new shortcut:
From this window, you can:
- Change the name. - Choose the type of shortcut. - Modify, delete or reset the shortcut image.

Cod. 97854I V05_16
95
Types of shortcuts 1. Open a window: with this shortcut, you can open the following functions:
Site configuration
Equipment status
Time ranges
Public holidays
Special days list
Access groups
Identifiers
Users
User creation
User list
Event list
History and report
Edit overview
Overview
Presence time
Managers
Security level
Data import
2. Create: with this shortcut, you can create:
A group.
A time range.
A list of special days.
An identifier.
A user.
A manager.
3. Learn an identifier: with this shortcut, you can open the identifier learning window by using
one of your site's readers or a DIGIUSB (Mifare® table reader).
4. History: with this shortcut, you can execute a predefined query in the Event history. This shortcut enables you to:
Display the results.
Print the results.
Export the results in the following format: Text (.txt), Comma-separated text (.csv), Access (.accdb), Excel (.xls) and XML (.xml).
Define the location of the results on your PC.
Email the file to a recipient. The file can be zipped and/or deleted after sending.
5. User list: with this shortcut, you can execute the same operations as the History, and the query must be predefined in the Listing.
6. Control readers: with this shortcut, you can control one or more readers:
Simple opening
Return to Normal mode
Opening maintained
Closure maintained The command can be executed on all readers or just specific readers.
7. Search for a user: with this shortcut, you can display the following window:

96
In this window, you can select one of the following search criteria:
Last name
First name
Identifier Then click on "Search". In case of search results, you can double-click on users to edit them.
8. Video servers: with this shortcut, you can Display a camera that has been selected in a list or a Global event from a Digifort video server that has been pre-declared in your site's configuration.
9. Launch a program: with this shortcut, you can launch another program on your PC. To do so, define the path pointing to the program.
10. Force the importing of a module: with this shortcut, you can automatically import a module. To do so, first configure the settings in Tools > Preferences > Automatic import.
11. Drive an output: with this shortcut, you can control the output for a IP_AXES I/O module relay. The command is either to enable the relay or disable the relay.
12. Change security level: with this shortcut, you can change the software security level. You can choose between security levels 1, 2 and 3.