Embed Size (px)
Citation preview

Large Format Printer
User's GuideBasic Printing Workflow 1 1
Working With Various Print Jobs 18 2
Enhanced Printing Options 45 3
Windows Software 201 4
Mac OS X Software 424 5
Print Jobs 562 6
Handling Paper 616 7
Adjustments for Better Print Quality 667 8
Printer Parts 684 9
Network Setting 770 10
Maintenance 802 11
Troubleshooting 849 12
Error Message 890 13
Appendix 920 14
ver1.00 2010-09-10 ENG

Note
In order to be printed easily, this PDF-format manual is converted from the HTML-format instruction manual included onthe "User Manuals CD-ROM" supplied with the printer. Thus, there are descriptions that are applied only in HTML format,and functions (video display function, etc.) that cannot be used. We appreciate your understanding.
Contents
Basic Printing Workflow 1Printing procedure 2Printing Options Using Rolls and Sheets ......................................................................................................................... 2Loading and Printing on Rolls .......................................................................................................................................... 3Loading and Printing on Sheets ........................................................................................................................................ 8Printing in Windows ....................................................................................................................................................... 10Printing from Mac OS X ................................................................................................................................................ 11
Canceling print jobs 13Canceling Print Jobs from the Control Panel ................................................................................................................. 13Canceling Print Jobs from Windows .............................................................................................................................. 14Canceling Print Jobs from Mac OS X ............................................................................................................................ 15
Working With Various Print Jobs 18Printing CAD Drawings 19Printing CAD Drawings ................................................................................................................................................. 19Printing Line Drawings and Text ................................................................................................................................... 19
Printing Line Drawings and Text (Windows) ............................................................................................................. 20Printing Line Drawings and Text (Mac OS X) ........................................................................................................... 22
Specifying Colors and Printing CAD Drawings ............................................................................................................ 26Specifying Colors and Printing CAD Drawings (Windows) ...................................................................................... 27
HP-GL/2 Printing ........................................................................................................................................................... 28
Printing Photos and Images 30Printing Photos and Images ............................................................................................................................................ 30
Printing Photos and Images (Windows) ...................................................................................................................... 31Printing Photos and Images (Mac OS X) .................................................................................................................... 33
Printing Office Documents 38Printing Office Documents ............................................................................................................................................. 38
Printing Office Documents (Windows) ...................................................................................................................... 39Printing Office Documents (Mac OS X) ..................................................................................................................... 40
Enhanced Printing Options 45Adjusting Images 46Adjusting the Color in the Printer Driver ....................................................................................................................... 46
Fine-Tuning Colors of Photos and Images (Windows) .............................................................................................. 48Fine-Tuning Colors of Photos and Images (Mac OS X) ............................................................................................. 52
Giving Priority to Particular Graphic Elements and Colors for Printing ....................................................................... 55Choosing the Document Type and Printing Conditions (Windows) .......................................................................... 58Choosing the Document Type and Printing Conditions (Mac OS X) ......................................................................... 61
Choosing Paper for Printing 64Choosing a Paper for Printing ........................................................................................................................................ 64Specifying Paper in the Printer Driver ........................................................................................................................... 64
Printing enlargements or reductions 65Resizing Originals to Match the Paper Size ................................................................................................................... 65
Resizing Originals to Match the Paper Size (Windows) ............................................................................................. 65Resizing Originals to Match the Paper Size (Mac OS X) ........................................................................................... 67
Resizing Originals to Fit the Roll Width ........................................................................................................................ 71Resizing Originals to Fit the Roll Width (Windows) ................................................................................................. 71Resizing Originals to Fit the Roll Width (Mac OS X) ................................................................................................ 74
Resizing Originals by Entering a Scaling Value ............................................................................................................ 77Resizing Originals by Entering a Scaling Value (Windows) ...................................................................................... 78Resizing Originals by Entering a Scaling Value (Mac OS X) .................................................................................... 80
Printing at full size 85Printing on Oversized Paper ........................................................................................................................................... 85
Printing at Full Size (Windows) .................................................................................................................................. 86Printing at Full Size (Mac OS X) ................................................................................................................................ 87
Borderless Printing at Actual Size .................................................................................................................................. 91Borderless Printing at Actual Size (Windows) ........................................................................................................... 92Borderless Printing at Actual Size (Mac OS X) ......................................................................................................... 95
Borderless Printing 100Borderless Printing on Paper of Equivalent Size ......................................................................................................... 100
Borderless Printing by Resizing Originals to Match the Paper Size (Windows) ...................................................... 101Borderless Printing by Resizing Originals to Match the Paper Size (Mac OS X) .................................................... 103
Borderless Printing by Resizing Originals to Fit the Roll Width ................................................................................. 107Borderless Printing by Resizing Originals to Fit the Roll Width (Windows) .......................................................... 108Borderless Printing by Resizing Originals to Fit the Roll Width (Mac OS X) ......................................................... 110
Printing banners or at other non-standard sizes 115Printing Vertical or Horizontal Banners (Large-Format Printing) ............................................................................... 115
Printing Vertical or Horizontal Banners (Large-Format Printing; Windows) .......................................................... 116Printing Vertical or Horizontal Banners (Large-Format Printing; Mac OS X) ........................................................ 120
Printing on Non-Standard Paper Sizes ......................................................................................................................... 124Printing on Non-Standard Paper Sizes (Windows) ................................................................................................... 124Printing on Non-Standard Paper Sizes (Mac OS X) ................................................................................................. 129
Tiling and multiple pages per sheet 133Printing Multiple Originals Next to Each Other .......................................................................................................... 133
Printing Multiple Originals Next to Each Other (Windows) .................................................................................... 134Printing Multiple Originals Next to Each Other (Mac OS X) .................................................................................. 136
Printing Multiple Pages Continuously ......................................................................................................................... 138Printing Multiple Pages Continuously (Windows) ................................................................................................... 139Printing Multiple Pages Continuously (Mac OS X) ................................................................................................. 141
Printing Multiple Pages Per Sheet ................................................................................................................................ 143Printing Multiple Pages Per Sheet (Windows) ......................................................................................................... 143Printing Multiple Pages Per Sheet (Mac OS X) ........................................................................................................ 146
Printing Posters in Sections .......................................................................................................................................... 150Printing Large Posters (Windows) ............................................................................................................................ 151
Centering originals 154Printing Originals Centered on Rolls ........................................................................................................................... 154
Printing Originals Centered on Rolls (Windows) ..................................................................................................... 154Printing Originals Centered on Rolls (Mac OS X) ................................................................................................... 156
Printing Originals Centered on Sheets ......................................................................................................................... 160Printing Originals Centered on Sheets (Windows) ................................................................................................... 160Printing Originals Centered on Sheets (Mac OS X) ................................................................................................. 163
Conserving roll paper 167Conserving Roll Paper by Rotating Originals 90 Degrees ........................................................................................... 167
Conserving Roll Paper by Rotating Originals 90 Degrees (Windows) .................................................................... 167Conserving Roll Paper by Rotating Originals 90 Degrees (Mac OS X) ................................................................... 169
Conserving Roll Paper by Printing Originals Without Top and Bottom Margins ....................................................... 173Conserving Roll Paper by Printing Originals Without Top and Bottom Margins (Windows) ................................. 173Conserving Roll Paper by Printing Originals Without Top and Bottom Margins (Mac OS X) ............................... 176
Using PosterArtist to Compose Originals 181Using PosterArtist to Compose Originals .................................................................................................................... 181
Checking Images Before Printing 184Checking the Layout in a Preview Before Printing ...................................................................................................... 184
Other useful settings 186Printing With Watermarks ............................................................................................................................................ 186
Printing with Watermarks— COPY, FILE COPY, and so on (Windows) ............................................................... 187Making the Original Orientation Match the Paper Orientation .................................................................................... 190
Making the Original Orientation Match the Paper Orientation (Windows) ............................................................. 190Making the Original Orientation Match the Paper Orientation (Mac OS X) ............................................................ 192
Using Favorites ............................................................................................................................................................. 196Cutting Roll Paper After Printing ................................................................................................................................. 196
Cutting Roll Paper After Printing (Windows) .......................................................................................................... 196Cutting Roll Paper After Printing (Mac OS X) ......................................................................................................... 198
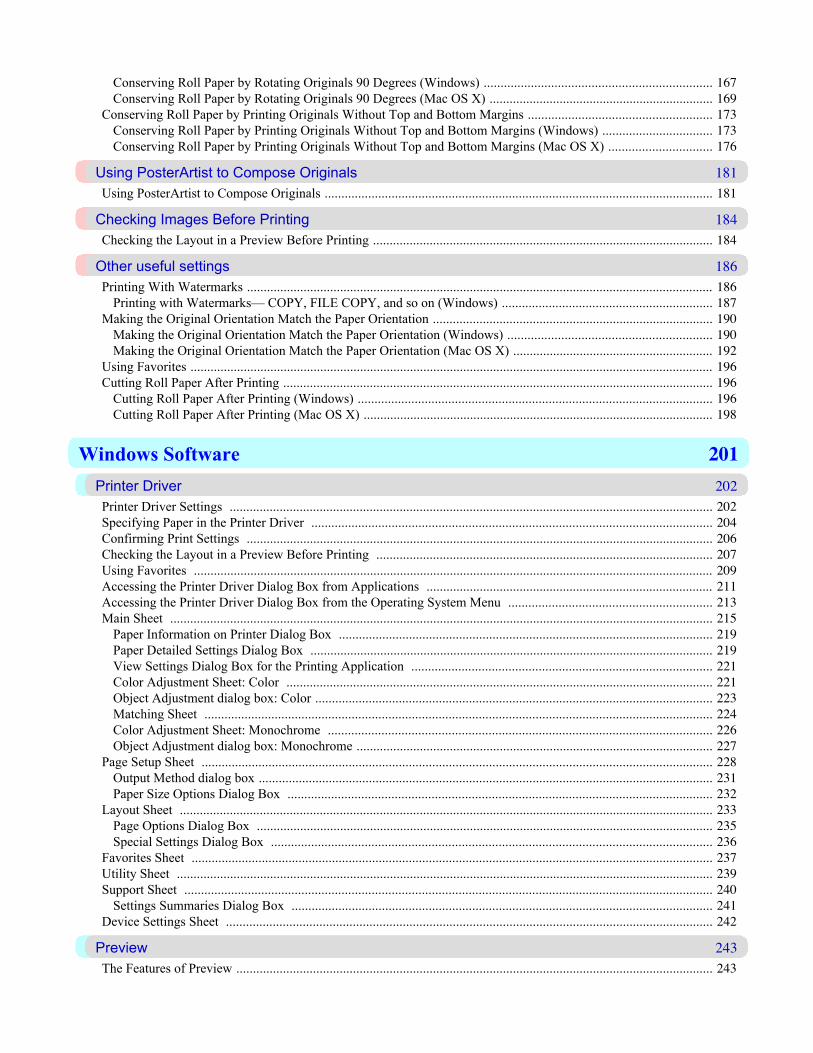
Windows Software 201Printer Driver 202Printer Driver Settings ................................................................................................................................................. 202Specifying Paper in the Printer Driver ........................................................................................................................ 204Confirming Print Settings ............................................................................................................................................ 206Checking the Layout in a Preview Before Printing ..................................................................................................... 207Using Favorites ............................................................................................................................................................ 209Accessing the Printer Driver Dialog Box from Applications ...................................................................................... 211Accessing the Printer Driver Dialog Box from the Operating System Menu ............................................................. 213Main Sheet ................................................................................................................................................................... 215
Paper Information on Printer Dialog Box ................................................................................................................ 219Paper Detailed Settings Dialog Box ......................................................................................................................... 219View Settings Dialog Box for the Printing Application .......................................................................................... 221Color Adjustment Sheet: Color ................................................................................................................................ 221Object Adjustment dialog box: Color ....................................................................................................................... 223Matching Sheet ........................................................................................................................................................ 224Color Adjustment Sheet: Monochrome ................................................................................................................... 226Object Adjustment dialog box: Monochrome ........................................................................................................... 227
Page Setup Sheet ......................................................................................................................................................... 228Output Method dialog box ........................................................................................................................................ 231Paper Size Options Dialog Box ............................................................................................................................... 232
Layout Sheet ................................................................................................................................................................ 233Page Options Dialog Box ......................................................................................................................................... 235Special Settings Dialog Box .................................................................................................................................... 236
Favorites Sheet ............................................................................................................................................................ 237Utility Sheet ................................................................................................................................................................. 239Support Sheet .............................................................................................................................................................. 240
Settings Summaries Dialog Box .............................................................................................................................. 241Device Settings Sheet .................................................................................................................................................. 242
Preview 243The Features of Preview ............................................................................................................................................... 243
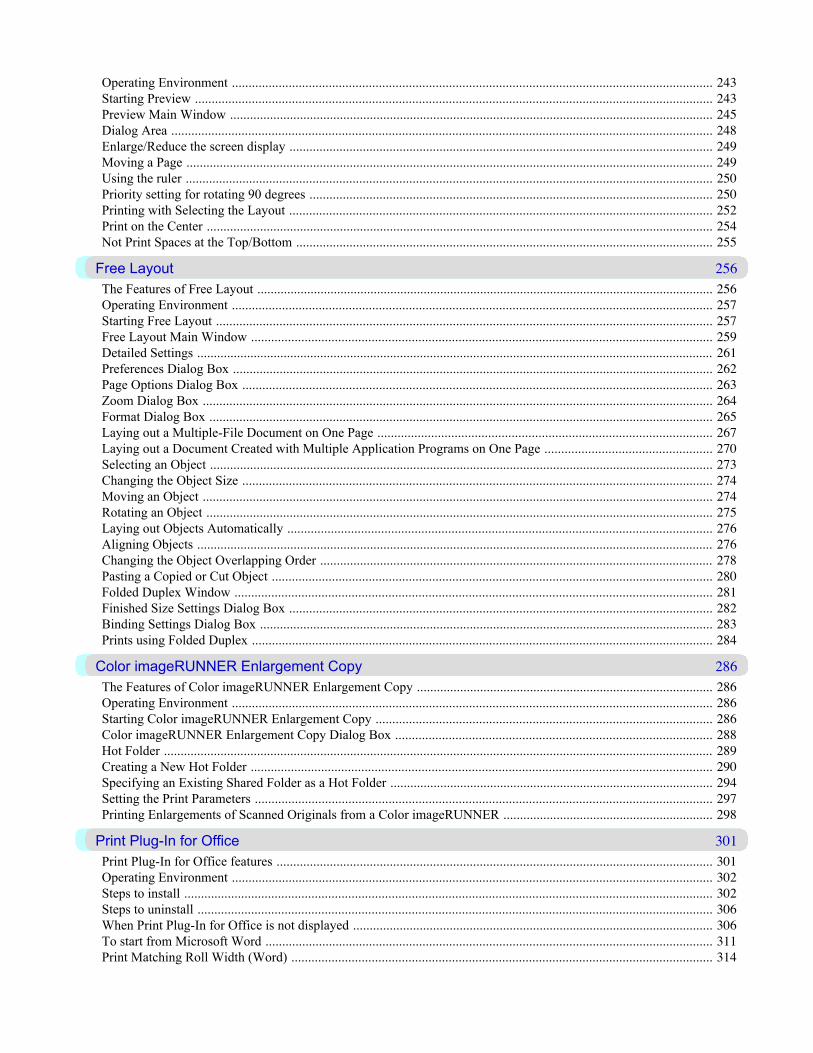
Operating Environment ................................................................................................................................................ 243Starting Preview ........................................................................................................................................................... 243Preview Main Window ................................................................................................................................................. 245Dialog Area .................................................................................................................................................................. 248Enlarge/Reduce the screen display ............................................................................................................................... 249Moving a Page .............................................................................................................................................................. 249Using the ruler .............................................................................................................................................................. 250Priority setting for rotating 90 degrees ......................................................................................................................... 250Printing with Selecting the Layout ............................................................................................................................... 252Print on the Center ........................................................................................................................................................ 254Not Print Spaces at the Top/Bottom ............................................................................................................................. 255
Free Layout 256The Features of Free Layout ......................................................................................................................................... 256Operating Environment ................................................................................................................................................ 257Starting Free Layout ..................................................................................................................................................... 257Free Layout Main Window .......................................................................................................................................... 259Detailed Settings ........................................................................................................................................................... 261Preferences Dialog Box ................................................................................................................................................ 262Page Options Dialog Box ............................................................................................................................................. 263Zoom Dialog Box ......................................................................................................................................................... 264Format Dialog Box ....................................................................................................................................................... 265Laying out a Multiple-File Document on One Page .................................................................................................... 267Laying out a Document Created with Multiple Application Programs on One Page .................................................. 270Selecting an Object ....................................................................................................................................................... 273Changing the Object Size ............................................................................................................................................. 274Moving an Object ......................................................................................................................................................... 274Rotating an Object ........................................................................................................................................................ 275Laying out Objects Automatically ............................................................................................................................... 276Aligning Objects ........................................................................................................................................................... 276Changing the Object Overlapping Order ...................................................................................................................... 278Pasting a Copied or Cut Object .................................................................................................................................... 280Folded Duplex Window ............................................................................................................................................... 281Finished Size Settings Dialog Box ............................................................................................................................... 282Binding Settings Dialog Box ........................................................................................................................................ 283Prints using Folded Duplex .......................................................................................................................................... 284
Color imageRUNNER Enlargement Copy 286The Features of Color imageRUNNER Enlargement Copy ......................................................................................... 286Operating Environment ................................................................................................................................................ 286Starting Color imageRUNNER Enlargement Copy ..................................................................................................... 286Color imageRUNNER Enlargement Copy Dialog Box ............................................................................................... 288Hot Folder ..................................................................................................................................................................... 289Creating a New Hot Folder .......................................................................................................................................... 290Specifying an Existing Shared Folder as a Hot Folder ................................................................................................. 294Setting the Print Parameters ......................................................................................................................................... 297Printing Enlargements of Scanned Originals from a Color imageRUNNER ............................................................... 298
Print Plug-In for Office 301Print Plug-In for Office features ................................................................................................................................... 301Operating Environment ................................................................................................................................................ 302Steps to install .............................................................................................................................................................. 302Steps to uninstall .......................................................................................................................................................... 306When Print Plug-In for Office is not displayed ............................................................................................................ 306To start from Microsoft Word ...................................................................................................................................... 311Print Matching Roll Width (Word) .............................................................................................................................. 314
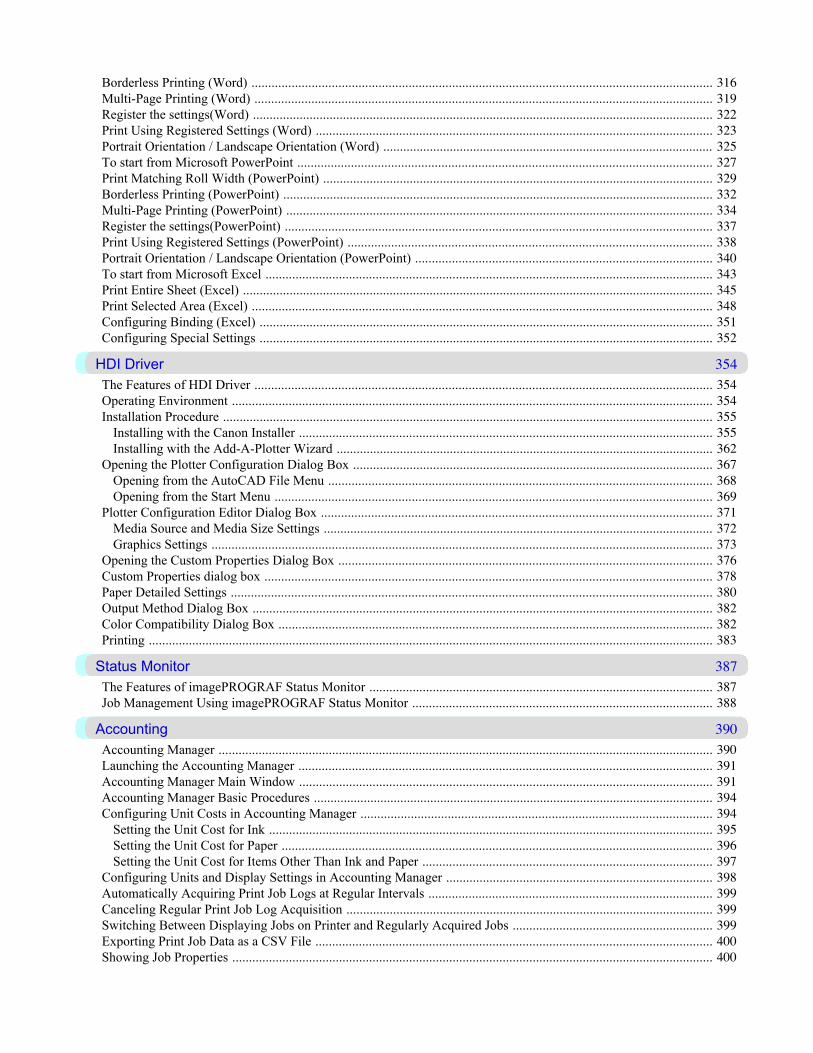
Borderless Printing (Word) .......................................................................................................................................... 316Multi-Page Printing (Word) ......................................................................................................................................... 319Register the settings(Word) .......................................................................................................................................... 322Print Using Registered Settings (Word) ....................................................................................................................... 323Portrait Orientation / Landscape Orientation (Word) ................................................................................................... 325To start from Microsoft PowerPoint ............................................................................................................................ 327Print Matching Roll Width (PowerPoint) ..................................................................................................................... 329Borderless Printing (PowerPoint) ................................................................................................................................. 332Multi-Page Printing (PowerPoint) ................................................................................................................................ 334Register the settings(PowerPoint) ................................................................................................................................ 337Print Using Registered Settings (PowerPoint) ............................................................................................................. 338Portrait Orientation / Landscape Orientation (PowerPoint) ......................................................................................... 340To start from Microsoft Excel ...................................................................................................................................... 343Print Entire Sheet (Excel) ............................................................................................................................................. 345Print Selected Area (Excel) .......................................................................................................................................... 348Configuring Binding (Excel) ........................................................................................................................................ 351Configuring Special Settings ........................................................................................................................................ 352
HDI Driver 354The Features of HDI Driver ......................................................................................................................................... 354Operating Environment ................................................................................................................................................ 354Installation Procedure ................................................................................................................................................... 355
Installing with the Canon Installer ............................................................................................................................ 355Installing with the Add-A-Plotter Wizard ................................................................................................................. 362
Opening the Plotter Configuration Dialog Box ............................................................................................................ 367Opening from the AutoCAD File Menu ................................................................................................................... 368Opening from the Start Menu ................................................................................................................................... 369
Plotter Configuration Editor Dialog Box ..................................................................................................................... 371Media Source and Media Size Settings ..................................................................................................................... 372Graphics Settings ...................................................................................................................................................... 373
Opening the Custom Properties Dialog Box ................................................................................................................ 376Custom Properties dialog box ...................................................................................................................................... 378Paper Detailed Settings ................................................................................................................................................ 380Output Method Dialog Box .......................................................................................................................................... 382Color Compatibility Dialog Box .................................................................................................................................. 382Printing ......................................................................................................................................................................... 383
Status Monitor 387The Features of imagePROGRAF Status Monitor ....................................................................................................... 387Job Management Using imagePROGRAF Status Monitor .......................................................................................... 388
Accounting 390Accounting Manager .................................................................................................................................................... 390Launching the Accounting Manager ............................................................................................................................ 391Accounting Manager Main Window ............................................................................................................................ 391Accounting Manager Basic Procedures ........................................................................................................................ 394Configuring Unit Costs in Accounting Manager ......................................................................................................... 394
Setting the Unit Cost for Ink ..................................................................................................................................... 395Setting the Unit Cost for Paper ................................................................................................................................. 396Setting the Unit Cost for Items Other Than Ink and Paper ....................................................................................... 397
Configuring Units and Display Settings in Accounting Manager ................................................................................ 398Automatically Acquiring Print Job Logs at Regular Intervals ..................................................................................... 399Canceling Regular Print Job Log Acquisition .............................................................................................................. 399Switching Between Displaying Jobs on Printer and Regularly Acquired Jobs ............................................................ 399Exporting Print Job Data as a CSV File ....................................................................................................................... 400Showing Job Properties ................................................................................................................................................ 400
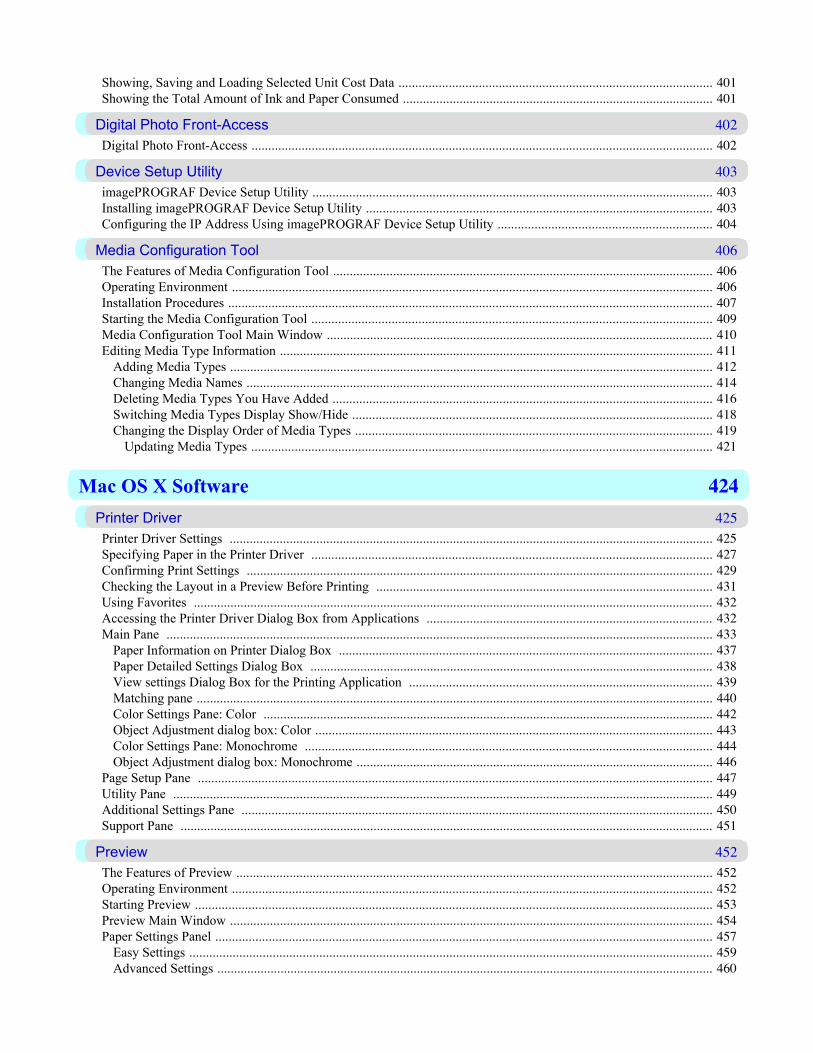
Showing, Saving and Loading Selected Unit Cost Data .............................................................................................. 401Showing the Total Amount of Ink and Paper Consumed ............................................................................................. 401
Digital Photo Front-Access 402Digital Photo Front-Access .......................................................................................................................................... 402
Device Setup Utility 403imagePROGRAF Device Setup Utility ........................................................................................................................ 403Installing imagePROGRAF Device Setup Utility ........................................................................................................ 403Configuring the IP Address Using imagePROGRAF Device Setup Utility ................................................................ 404
Media Configuration Tool 406The Features of Media Configuration Tool .................................................................................................................. 406Operating Environment ................................................................................................................................................ 406Installation Procedures ................................................................................................................................................. 407Starting the Media Configuration Tool ........................................................................................................................ 409Media Configuration Tool Main Window .................................................................................................................... 410Editing Media Type Information .................................................................................................................................. 411
Adding Media Types ................................................................................................................................................. 412Changing Media Names ............................................................................................................................................ 414Deleting Media Types You Have Added .................................................................................................................. 416Switching Media Types Display Show/Hide ............................................................................................................ 418Changing the Display Order of Media Types ........................................................................................................... 419
Updating Media Types .......................................................................................................................................... 421
Mac OS X Software 424Printer Driver 425Printer Driver Settings ................................................................................................................................................. 425Specifying Paper in the Printer Driver ........................................................................................................................ 427Confirming Print Settings ............................................................................................................................................ 429Checking the Layout in a Preview Before Printing ..................................................................................................... 431Using Favorites ............................................................................................................................................................ 432Accessing the Printer Driver Dialog Box from Applications ...................................................................................... 432Main Pane .................................................................................................................................................................... 433
Paper Information on Printer Dialog Box ................................................................................................................ 437Paper Detailed Settings Dialog Box ......................................................................................................................... 438View settings Dialog Box for the Printing Application ........................................................................................... 439Matching pane ........................................................................................................................................................... 440Color Settings Pane: Color ....................................................................................................................................... 442Object Adjustment dialog box: Color ....................................................................................................................... 443Color Settings Pane: Monochrome .......................................................................................................................... 444Object Adjustment dialog box: Monochrome ........................................................................................................... 446
Page Setup Pane .......................................................................................................................................................... 447Utility Pane .................................................................................................................................................................. 449Additional Settings Pane ............................................................................................................................................. 450Support Pane ................................................................................................................................................................ 451
Preview 452The Features of Preview ............................................................................................................................................... 452Operating Environment ................................................................................................................................................ 452Starting Preview ........................................................................................................................................................... 453Preview Main Window ................................................................................................................................................. 454Paper Settings Panel ..................................................................................................................................................... 457
Easy Settings ............................................................................................................................................................. 459Advanced Settings ..................................................................................................................................................... 460

Output Settings Panel ................................................................................................................................................... 462Color Settings Panel ..................................................................................................................................................... 464
Color Adjustment ...................................................................................................................................................... 465Matching ................................................................................................................................................................... 468
Driver Matching Mode .......................................................................................................................................... 470ICC Matching Mode .............................................................................................................................................. 471ColorSync .............................................................................................................................................................. 472
Preferences Dialog Box ................................................................................................................................................ 472Zoom Dialog Box ......................................................................................................................................................... 473Go to Page Dialog Box ................................................................................................................................................. 473Print with No Borders ................................................................................................................................................... 473Print on the Center ........................................................................................................................................................ 474Not Print Spaces at the Top/Bottom ............................................................................................................................. 475Print Page Rotated 90 Degrees ..................................................................................................................................... 476Display with Fitting to the Width of the Paper ............................................................................................................ 477Display with All ........................................................................................................................................................... 478Display with Actual Size .............................................................................................................................................. 479Moving a Page .............................................................................................................................................................. 479
Free Layout 481The Features of Free Layout ......................................................................................................................................... 481Operating Environment ................................................................................................................................................ 481Starting Free Layout ..................................................................................................................................................... 482Free Layout Main Window .......................................................................................................................................... 483Paper Settings Panel ..................................................................................................................................................... 486
Easy Settings ............................................................................................................................................................. 488Advanced Settings ..................................................................................................................................................... 489
Color Settings Panel ..................................................................................................................................................... 491Color Adjustment ...................................................................................................................................................... 492Matching ................................................................................................................................................................... 495
Driver Matching Mode .......................................................................................................................................... 497ICC Matching Mode .............................................................................................................................................. 498ColorSync .............................................................................................................................................................. 499
Preferences Dialog Box ................................................................................................................................................ 500Page Setup Dialog Box ................................................................................................................................................. 501Zoom Dialog Box ......................................................................................................................................................... 502Format Dialog Box ....................................................................................................................................................... 503Laying out a Multiple-File Document on One Page .................................................................................................... 504Laying out a Document Created with Multiple Application Programs on One Page .................................................. 504Selecting an Object ....................................................................................................................................................... 505Changing the Object Size ............................................................................................................................................. 505Moving an Object ......................................................................................................................................................... 506Rotating an Object ........................................................................................................................................................ 507Laying out Objects Automatically ............................................................................................................................... 508Aligning Objects ........................................................................................................................................................... 508Changing the Object Overlapping Order ...................................................................................................................... 510Pasting a Copied or Cut Object .................................................................................................................................... 512
Color imageRUNNER Enlargement Copy 513The Features of Color imageRUNNER Enlargement Copy ......................................................................................... 513Operating Environment ................................................................................................................................................ 513Starting Color imageRUNNER Enlargement Copy ..................................................................................................... 514Color imageRUNNER Enlargement Copy Dialog Box ............................................................................................... 515Hot Folder ..................................................................................................................................................................... 516Creating a New Hot Folder .......................................................................................................................................... 517Editing a Hot Folder (Setting Print Conditions) ........................................................................................................... 519
Deleting a Hot Folder ................................................................................................................................................... 523Setting the Print Parameters ......................................................................................................................................... 523Paper Settings Panel ..................................................................................................................................................... 524
Easy Settings ............................................................................................................................................................. 526Advanced Settings ..................................................................................................................................................... 527
Output Settings Panel ................................................................................................................................................... 529Color Settings Panel ..................................................................................................................................................... 531
Driver Matching Mode .............................................................................................................................................. 533ICC Matching Mode ................................................................................................................................................. 534ColorSync .................................................................................................................................................................. 535
Printing Enlargements of Scanned Originals from a Color imageRUNNER ............................................................... 535
Printmonitor 538imagePROGRAF Printmonitor ................................................................................................................................... 538
Media Configuration Tool 539The Features of Media Configuration Tool .................................................................................................................. 539Operating Environment ................................................................................................................................................ 539Procedures for Installing .............................................................................................................................................. 540Procedures for Uninstalling .......................................................................................................................................... 542Starting the Media Configuration Tool ........................................................................................................................ 546Media Configuration Tool main window ..................................................................................................................... 547Editing Media Type Information .................................................................................................................................. 548
Adding Media Types ................................................................................................................................................. 549Changing Media Names ............................................................................................................................................ 551Deleting Media Types You Have Added .................................................................................................................. 553Switching Media Types Display Show/Hide ............................................................................................................ 555Changing the Display Order of Media Types ........................................................................................................... 557
Updating Media Types .......................................................................................................................................... 559
Print Jobs 562Basic Print Job Operations 563Saved Print Jobs ........................................................................................................................................................... 563Saving Print Jobs .......................................................................................................................................................... 565Managing Queued Jobs (Deleting or Preempting Other Jobs) ..................................................................................... 568Printing Saved Jobs ...................................................................................................................................................... 572Deleting Saved Jobs ..................................................................................................................................................... 577Moving Saved Jobs ...................................................................................................................................................... 582
Advanced Print Job Operations 589Saving Print Jobs Sent from Sources Other than the Printer Driver ............................................................................ 589Printing Without Saving Jobs in the Common Box ..................................................................................................... 590Setting Passwords for Personal Boxes ......................................................................................................................... 591Naming Personal Boxes ............................................................................................................................................... 596Displaying a List of Saved Jobs ................................................................................................................................... 601Printing a List of Saved Jobs ........................................................................................................................................ 605Displaying Details of Saved Jobs ................................................................................................................................. 605Renaming Saved Jobs ................................................................................................................................................... 609
Handling Paper 616Paper 617Types of Paper .............................................................................................................................................................. 617Paper Sizes ................................................................................................................................................................... 620
Handling rolls 623Attaching the Roll Holder to Rolls ............................................................................................................................... 623Loading Rolls in the Printer ......................................................................................................................................... 628Selecting the Paper Source ........................................................................................................................................... 631Selecting the Paper Type (Roll) ................................................................................................................................... 632Specifying the Paper Length (Roll) .............................................................................................................................. 633Removing the Roll from the Printer ............................................................................................................................. 634Removing the Roll Holder from Rolls ......................................................................................................................... 637Feeding Roll Paper Manually ....................................................................................................................................... 638Keeping Track of the Amount of Roll Paper Left ........................................................................................................ 639Specifying the Ink Drying Time for Rolls .................................................................................................................... 640Specifying the Cutting Method for Rolls ..................................................................................................................... 642Cutting the Leading Edge of Roll Paper Automatically ............................................................................................... 647Reducing Dust from Cutting Rolls ............................................................................................................................... 648Roll Holder Set ............................................................................................................................................................. 649
Handling sheets 650Selecting the Paper Type (Sheet) ................................................................................................................................. 650Loading Sheets in the Printer ....................................................................................................................................... 651Manually Loading Paper to the Position for Printing ................................................................................................... 654Removing Sheets .......................................................................................................................................................... 656
Output Stacker 658Stationary Output Stacker ............................................................................................................................................ 658Using the Stationary Output Stacker ............................................................................................................................ 659Stowing the Stationary Output Stacker ........................................................................................................................ 661Wheeled Output Stacker ............................................................................................................................................... 663
Using the Wheeled Output Stacker ........................................................................................................................... 663
Adjustments for Better Print Quality 667Adjusting the Printhead 668Adjusting the Printhead ................................................................................................................................................ 668
Automatic Straightening of Lines and Colors (Auto Head Adj.) ............................................................................. 668Manual Straightening of Lines and Colors (Manual Head Adj) ............................................................................... 670
Adjusting Line Misalignment (Head Inc. Adj.) ............................................................................................................ 672Troubleshooting Paper Abrasion and Blurry Images (Head Height) ........................................................................... 675
Adjusting the feed amount 676Adjusting the Feed Amount ......................................................................................................................................... 676
Selecting a Feed Amount Adjustment Method (Feed Priority) ................................................................................ 676Auto Band Adjustment (Auto Band Adj.) ................................................................................................................ 677Manual Band Adjustment (Manual Band Adj) ......................................................................................................... 678Banding Adjustment During Printing (Fine Band Adj.) ........................................................................................... 680Adjusting Line Length (Adjust Length) .................................................................................................................... 681
Adjusting the Vacuum Strength (VacuumStrngth) ...................................................................................................... 683
Printer Parts 684Printer parts 685Front ............................................................................................................................................................................. 685Back .............................................................................................................................................................................. 687Top Cover (Inside) ....................................................................................................................................................... 688Carriage ........................................................................................................................................................................ 689
Ink Tank Cover (Inside) ............................................................................................................................................... 690
Control Panel 692Control Panel ................................................................................................................................................................ 692Turning the Printer On and Off .................................................................................................................................... 694Printer Modes ............................................................................................................................................................... 696Switching Modes .......................................................................................................................................................... 702Printer Menu Operations .............................................................................................................................................. 704Main Menu Operations ................................................................................................................................................. 705Menu Structure ............................................................................................................................................................. 709Main Menu Settings ..................................................................................................................................................... 722Main Menu Settings (During Printing) ........................................................................................................................ 734Submenu Display ......................................................................................................................................................... 735Status Print ................................................................................................................................................................... 736Checking Instructions During Printer Operations ........................................................................................................ 743
Hard Disk 746Printer Hard Disk Operations ....................................................................................................................................... 746Checking the Free Hard Disk Space ............................................................................................................................. 747Erasing Data on the Printer's Hard Disk ....................................................................................................................... 750
Optional accessories 752Media Take-up Unit ..................................................................................................................................................... 752
Using the Media Take-up Unit .................................................................................................................................. 754Removing Printed Documents from the Media Take-up Unit .................................................................................. 761
Printer Specifications 765Specifications ............................................................................................................................................................... 765Print Area ..................................................................................................................................................................... 768
Network Setting 770Network Setting 771Network Environment .................................................................................................................................................. 771Configuring the IP Address on the Printer ................................................................................................................... 773
Configuring the IP Address Using the Printer Control Panel ................................................................................... 774Configuring the IP Address Using ARP and PING Commands ............................................................................... 775
Using RemoteUI ........................................................................................................................................................... 776Configuring the Printer's TCP/IP Network Settings ................................................................................................. 777Specifying Printer-Related Information .................................................................................................................... 778
Configuring the Communication Mode Manually ....................................................................................................... 780Email Notification When Printing is Finished or Errors Occur ................................................................................... 781Initializing the Network Settings .................................................................................................................................. 781
Network Setting (Windows) 783Configuring the Printer Driver Destination ................................................................................................................. 783Configuring the Printer's NetWare Network Settings .................................................................................................. 784Specifying the Printer's Frame Type ............................................................................................................................ 785Specifying NetWare Print Services .............................................................................................................................. 787Specifying NetWare Protocols ..................................................................................................................................... 789Configuring NetWare Network Settings ...................................................................................................................... 791
Network Setting (Mac OS X) 793Configuring the Printer Driver Destination ................................................................................................................. 793Configuring the Printer's AppleTalk Network Settings ............................................................................................... 793Configuring the Destination for AppleTalk Networks ................................................................................................ 794
Configuring the Destination for TCP/IP Network ...................................................................................................... 797Configuring the Destination for Bonjour Network ..................................................................................................... 800
Maintenance 802Ink Tanks 803Ink Tanks ...................................................................................................................................................................... 803Replacing Ink Tanks ..................................................................................................................................................... 803Checking Ink Tank Levels ........................................................................................................................................... 815When to Replace Ink Tanks ......................................................................................................................................... 815
Printheads 817Printhead ....................................................................................................................................................................... 817Checking for Nozzle Clogging ..................................................................................................................................... 817Cleaning the Printhead ................................................................................................................................................. 819Replacing the Printhead ................................................................................................................................................ 820
Maintenance Cartridge 827Maintenance Cartridge ................................................................................................................................................. 827Replacing the Maintenance Cartridge .......................................................................................................................... 827Checking the Remaining Maintenance Cartridge Capacity ......................................................................................... 835When to Replace the Maintenance Cartridge ............................................................................................................... 835
Cleaning the Printer 837Cleaning the Printer Exterior ........................................................................................................................................ 837Cleaning Inside the Top Cover ..................................................................................................................................... 837
Other Maintenance 841Preparing to Transfer the Printer .................................................................................................................................. 841Updating the Firmware ................................................................................................................................................. 847
Troubleshooting 849Frequently Asked Questions 850Frequently Asked Questions ........................................................................................................................................ 850
Problems Regarding Paper 852Clearing Jammed Roll Paper ........................................................................................................................................ 852Clearing a Jammed Sheet ............................................................................................................................................. 856Troubleshooting When Paper Jams are not Found ....................................................................................................... 858Roll paper cannot be inserted into the Paper Feed Slot ................................................................................................ 860Cannot Load Sheets ...................................................................................................................................................... 861Paper is not cut straight ................................................................................................................................................ 861Paper is not cut ............................................................................................................................................................. 861The Media Take-up Unit Continues Rotating .............................................................................................................. 861The size of clear film cannot be detected ..................................................................................................................... 862
Printing does not start 863The Data lamp on the Control Panel does not light up ................................................................................................. 863The printer does not respond even if print jobs are sent ............................................................................................... 863Ink Filling.. is displayed ............................................................................................................................................... 863The display screen indicates Agitating ......................................................................................................................... 864
The printer stops during a print job 865An error message is shown on the Display Screen ....................................................................................................... 865
The printer ejects blank, unprinted paper ..................................................................................................................... 865
Problems with the printing quality 866Printing is faint ............................................................................................................................................................. 866Paper rubs against the printhead ................................................................................................................................... 867The edges of the paper are dirty ................................................................................................................................... 868The surface of the paper is dirty ................................................................................................................................... 868The back side of the paper is dirty ................................................................................................................................ 869Printed colors are inaccurate ........................................................................................................................................ 869Banding in different colors occurs ............................................................................................................................... 870Colors in printed images are uneven ............................................................................................................................ 870Image Edges are Blurred or White Banding Occurs .................................................................................................... 871
Setting the Blue Switch on the Platen ....................................................................................................................... 872The contrast becomes uneven during printing .............................................................................................................. 875The length of printed images is inaccurate ................................................................................................................... 875Documents are printed crooked .................................................................................................................................... 875Documents are printed in monochrome ....................................................................................................................... 875Line thickness is not uniform ....................................................................................................................................... 876Lines are misaligned ..................................................................................................................................................... 876Problems with the printing quality caused by the type of paper .................................................................................. 877
Cannot print over a network 878Cannot connect the printer to the network ................................................................................................................... 878Cannot print over a TCP/IP network ............................................................................................................................ 878Cannot print over a NetWare network .......................................................................................................................... 879Cannot print over AppleTalk or Bonjour networks ...................................................................................................... 879
Installation problems 880Removing Installed Printer Drivers .............................................................................................................................. 880
HP-GL/2 problems 882Lines or images are missing in the HP-GL/2 data that was printed. ............................................................................ 882Lines Are Printed Too Thick or Thin During HP-GL/2 Printing ................................................................................. 882HP-GL/2 jobs are printed in monochrome (or color). .................................................................................................. 882Printed Colors in Line Drawings are Inaccurate During HP-GL/2 Printing ................................................................ 882HP-GL/2 jobs are printed 6 mm larger than specified ................................................................................................. 883HP-GL/2 jobs are printed at maximum size, even if a standard size is specified ........................................................ 883HP-GL/2 printing takes a long time. ............................................................................................................................ 883The printer stops when printing a HP-GL/2 job (the carriage stops moving) .............................................................. 883
Other problems 884The printer does not go on ............................................................................................................................................ 884If the Printer Makes a Strange Sound ........................................................................................................................... 885Messages advising to check the maintenance cartridge are not cleared ....................................................................... 885The printer consumes a lot of ink ................................................................................................................................. 886Ink level detection ........................................................................................................................................................ 886
Error Message 890Error Messages 891
Messages regarding paper 893Papr Type Mismatch .................................................................................................................................................... 893PaprTypeMismatch ...................................................................................................................................................... 893The paper is too small. ................................................................................................................................................. 894RollWdthMismatch ...................................................................................................................................................... 894
Paper size not detected. ............................................................................................................................................... 895Insufficient paper for job .............................................................................................................................................. 896This paper cannot be used. ........................................................................................................................................... 897Roll printing is selected. ............................................................................................................................................... 897Roll printing is selected, but sheets are loaded. ........................................................................................................... 897The roll is empty. .......................................................................................................................................................... 897Sheet removed. ............................................................................................................................................................. 899Sheet printing is selected. ............................................................................................................................................. 899Regular printing is selected, but a roll is loaded. ........................................................................................................ 899Paper jam. ..................................................................................................................................................................... 900Paper loaded askew. ..................................................................................................................................................... 900Paper cutting failed. ...................................................................................................................................................... 901End of paper feed. ......................................................................................................................................................... 902Rel lever is in wrong position. ...................................................................................................................................... 902Rewinding error. ........................................................................................................................................................... 902Media take-up unit ready. ............................................................................................................................................. 902Turn on the media take-up unit. ................................................................................................................................... 903Borderless printng not possible. ................................................................................................................................... 903
Messages regarding ink 904Ink insufficient. ............................................................................................................................................................ 904No ink left. .................................................................................................................................................................... 904Remaining level of the ink cannot be correctly detected. ............................................................................................ 904Close Ink Tank Cover ................................................................................................................................................... 905Ink tank is empty. ......................................................................................................................................................... 905Not much ink is left. ..................................................................................................................................................... 905No ink tank loaded. ...................................................................................................................................................... 906Wrong ink tank. ............................................................................................................................................................ 906
Messages regarding printing or adjustment 907Use another paper. ........................................................................................................................................................ 907Cannot print as specified. ............................................................................................................................................. 907Borderless printng not possible. Paper stretched or shrank. ......................................................................................... 907Before borderless printing, move the blue platen switch. ............................................................................................ 908Blue platen switch is dirty. ........................................................................................................................................... 908
Messages regarding printheads 909Cannot adjust printhead. ............................................................................................................................................... 909Cannot adjust band. ...................................................................................................................................................... 909PHead needs cleaning. .................................................................................................................................................. 910Wrong printhead. .......................................................................................................................................................... 910Problem with Printhead ................................................................................................................................................ 910Printhead error .............................................................................................................................................................. 910No printhead ................................................................................................................................................................. 910Execute printhead cleaning. .......................................................................................................................................... 911
Messages regarding the maintenance cartridge 912Insert the maintenance cartridge. .................................................................................................................................. 912Wrong maintenance cartridge. ...................................................................................................................................... 912Prepare for maint cart replacement. .............................................................................................................................. 912No Maintenance Cartridge capacity. ............................................................................................................................ 912Maintenance cartridge full. ........................................................................................................................................... 912Maintenance cartridge problem. ................................................................................................................................... 913
Messages regarding the hard disk 914Hard disk error. ............................................................................................................................................................. 914
File read error. .............................................................................................................................................................. 914The mail box is full. ..................................................................................................................................................... 914Mail box full. Now printing without saving data. ........................................................................................................ 914Mail box nearly full. ..................................................................................................................................................... 915Maximum jobs stored. .................................................................................................................................................. 915Too many jobs for mail box. ........................................................................................................................................ 915
Messages regarding HP-GL/2 916This type of paper is not compatible with HP-GL/2. ................................................................................................... 916GL2: Wxxxx The memory is full. (xxxx is 0501, 0903, or 0904) ............................................................................... 916GL2: W0502 The parameter is out of range. ................................................................................................................ 916GL2: W0504 This command is not supported. ............................................................................................................ 916
Other Messages 917GARO Wxxxx (x represents a number) ....................................................................................................................... 917ERROR Exxx-xxxx (x represents a letter or number) .................................................................................................. 917Hardware error. xxxxxxxx-xxxx (x represents a letter or number) .............................................................................. 917Top cover is open. ........................................................................................................................................................ 918Prepare for parts replacement. ...................................................................................................................................... 918Parts replacement time has passed. .............................................................................................................................. 918Unknown file. ............................................................................................................................................................... 918Multi-sensor error ......................................................................................................................................................... 919
Appendix 920How to use this manual 921About This User Manual .............................................................................................................................................. 921Searching Topics .......................................................................................................................................................... 922HTML Version of the Manual for Printing .................................................................................................................. 924
Disposal of the product 931WEEE Directive ........................................................................................................................................................... 932
Basic Printing Workflow
Printing procedure 2
Canceling print jobs 13
Basic Printing Workflow >
iPF815
1
1
Printing procedurePrinting Options Using Rolls and Sheets ............................................................................................................ 2
Loading and Printing on Rolls ............................................................................................................................. 3Loading and Printing on Sheets .......................................................................................................................... 8
Printing in Windows ........................................................................................................................................... 10Printing from Mac OS X .................................................................................................................................... 11
Printing Options Using Rolls and SheetsThe printer supports both rolls and sheets.This section introduces the main features of each, as well as the main printing methods available. Select rolls or sheets tosuit your particular printing application.
Note• For information on the types of paper the printer supports, refer to the Paper Reference Guide. (See "Types
of Paper.") →P.617
• A variety of other ways to print are available besides those introduced here. Choose the printing method thatsuits your particular printing application, referring to "Working with Various Print Jobs" and "EnhancedPrinting Options" from the table of contents.
Roll printingMedia in spooled rolls is generally called Roll Media. Rolls are loaded on the Roll Holder, which are in turn loaded in theprinter.Rolls can be used to print large photos or create posters or banners that cannot be printed on regular sheets.
• Large-format printingEasily print vertical or horizontal banners from familiar applications such as Microsoft Office applications. (See "Printing Vertical or Horizontal Banners (Large-Format Printing).") →P.115
• Borderless printingPrint without a margin (border) around posters or photos. (See "Borderless Printing on Paper of Equivalent Size.") →P.100 (See "Borderless Printing by Resizing Originals to Fit the Roll Width.") →P.107 (See "Borderless Printing at Actual Size.") →P.91
• Banner printingYou can print multiple pages as a single continuous image, without margins between pages. (See "Printing Multiple Pages Continuously.") →P.138
• 90-degree rotation before printingOriginals in portrait orientation are rotated 90 degrees when possible to use paper more efficiently. (See "Conserving Roll Paper by Rotating Originals 90 Degrees.") →P.167
• Enlarged/reduced printingYou can freely adjust the size of originals by enlarging or reducing originals before printing. (See "Resizing Originals to Match the Paper Size.") →P.65 (See "Resizing Originals to Fit the Roll Width.") →P.71 (See "Resizing Originals by Entering a Scaling Value.") →P.77
• Free Layout functionPrint multiple documents from multiple applications (such as word-processing programs, spreadsheet programs, and soon) next to each other. (See "Printing Multiple Originals Next to Each Other.") →P.133
Basic Printing Workflow > Printing procedure >
Printing Options Using Rolls and Sheets iPF815
1
2
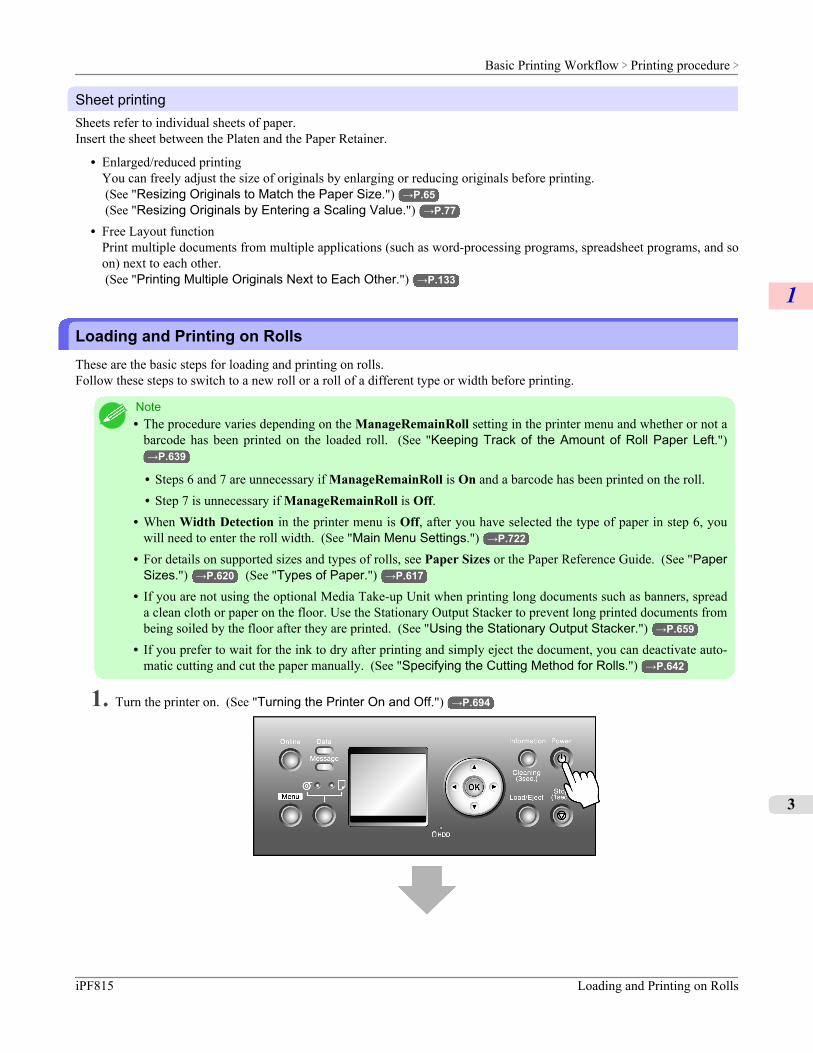
Sheet printingSheets refer to individual sheets of paper.Insert the sheet between the Platen and the Paper Retainer.
• Enlarged/reduced printingYou can freely adjust the size of originals by enlarging or reducing originals before printing. (See "Resizing Originals to Match the Paper Size.") →P.65 (See "Resizing Originals by Entering a Scaling Value.") →P.77
• Free Layout functionPrint multiple documents from multiple applications (such as word-processing programs, spreadsheet programs, and soon) next to each other. (See "Printing Multiple Originals Next to Each Other.") →P.133
Loading and Printing on RollsThese are the basic steps for loading and printing on rolls.Follow these steps to switch to a new roll or a roll of a different type or width before printing.
Note• The procedure varies depending on the ManageRemainRoll setting in the printer menu and whether or not a
barcode has been printed on the loaded roll. (See "Keeping Track of the Amount of Roll Paper Left.")→P.639
• Steps 6 and 7 are unnecessary if ManageRemainRoll is On and a barcode has been printed on the roll.• Step 7 is unnecessary if ManageRemainRoll is Off.
• When Width Detection in the printer menu is Off, after you have selected the type of paper in step 6, youwill need to enter the roll width. (See "Main Menu Settings.") →P.722
• For details on supported sizes and types of rolls, see Paper Sizes or the Paper Reference Guide. (See "PaperSizes.") →P.620 (See "Types of Paper.") →P.617
• If you are not using the optional Media Take-up Unit when printing long documents such as banners, spreada clean cloth or paper on the floor. Use the Stationary Output Stacker to prevent long printed documents frombeing soiled by the floor after they are printed. (See "Using the Stationary Output Stacker.") →P.659
• If you prefer to wait for the ink to dry after printing and simply eject the document, you can deactivate auto-matic cutting and cut the paper manually. (See "Specifying the Cutting Method for Rolls.") →P.642
1. Turn the printer on. (See "Turning the Printer On and Off.") →P.694
Basic Printing Workflow > Printing procedure >
iPF815 Loading and Printing on Rolls
1
3
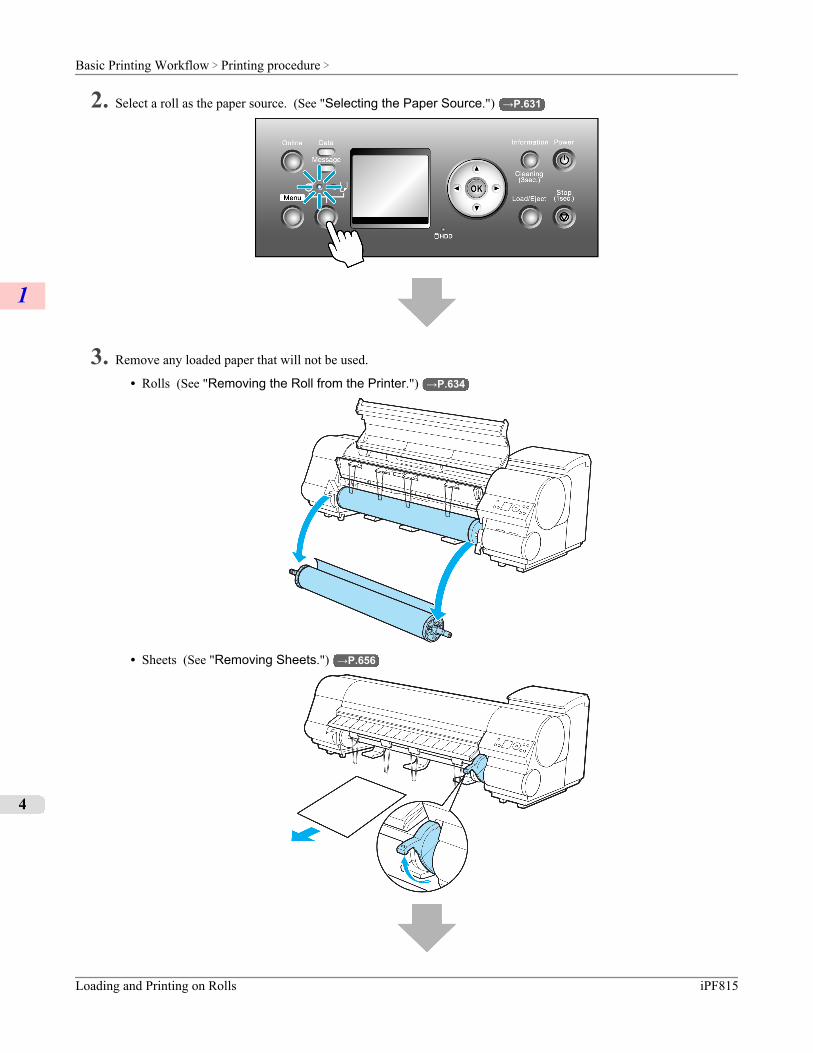
2. Select a roll as the paper source. (See "Selecting the Paper Source.") →P.631
3. Remove any loaded paper that will not be used.
• Rolls (See "Removing the Roll from the Printer.") →P.634
• Sheets (See "Removing Sheets.") →P.656
Basic Printing Workflow > Printing procedure >
Loading and Printing on Rolls iPF815
1
4
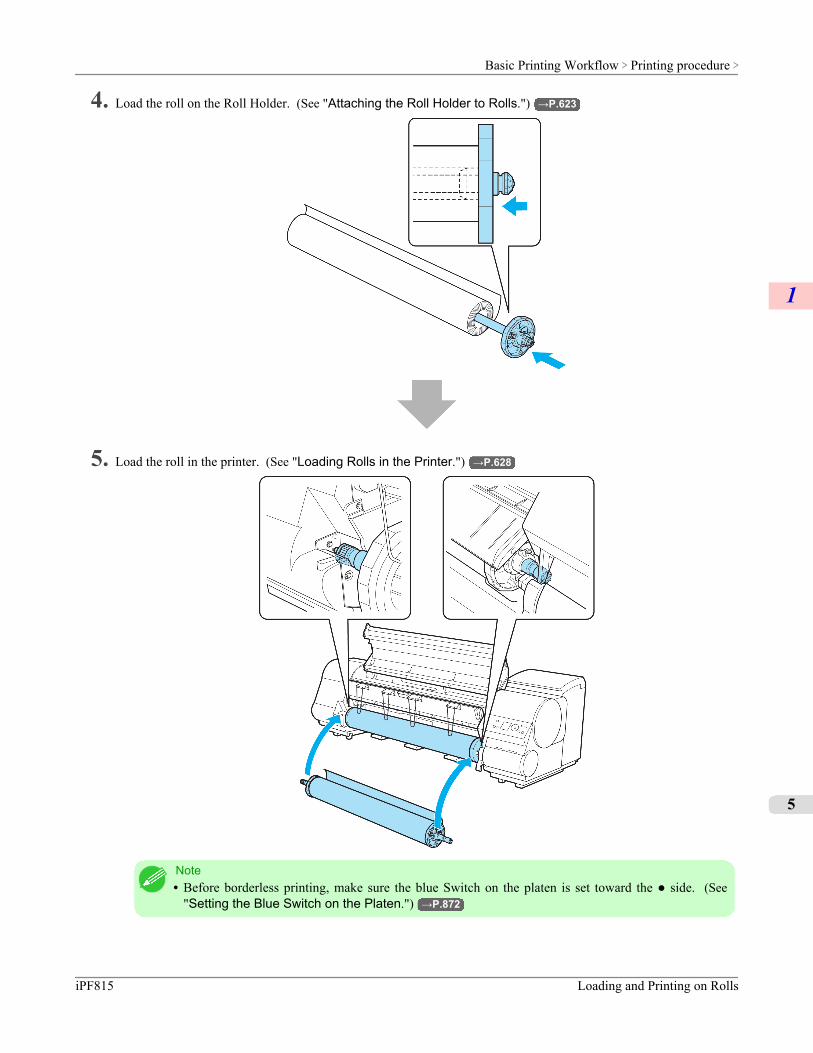
4. Load the roll on the Roll Holder. (See "Attaching the Roll Holder to Rolls.") →P.623
5. Load the roll in the printer. (See "Loading Rolls in the Printer.") →P.628
Note• Before borderless printing, make sure the blue Switch on the platen is set toward the ● side. (See
"Setting the Blue Switch on the Platen.") →P.872
Basic Printing Workflow > Printing procedure >
iPF815 Loading and Printing on Rolls
1
5

6. Select the type of paper. (See "Selecting the Paper Type (Roll).") →P.632
7. Specify the paper length. (See "Specifying the Paper Length (Roll).") →P.633
8. Complete settings in the printer driver for the type of paper and other details.
• Specifying Paper in the Printer Driver (Windows) →P.204
• Specifying Paper in the Printer Driver (Mac OS X) →P.427
Basic Printing Workflow > Printing procedure >
Loading and Printing on Rolls iPF815
1
6
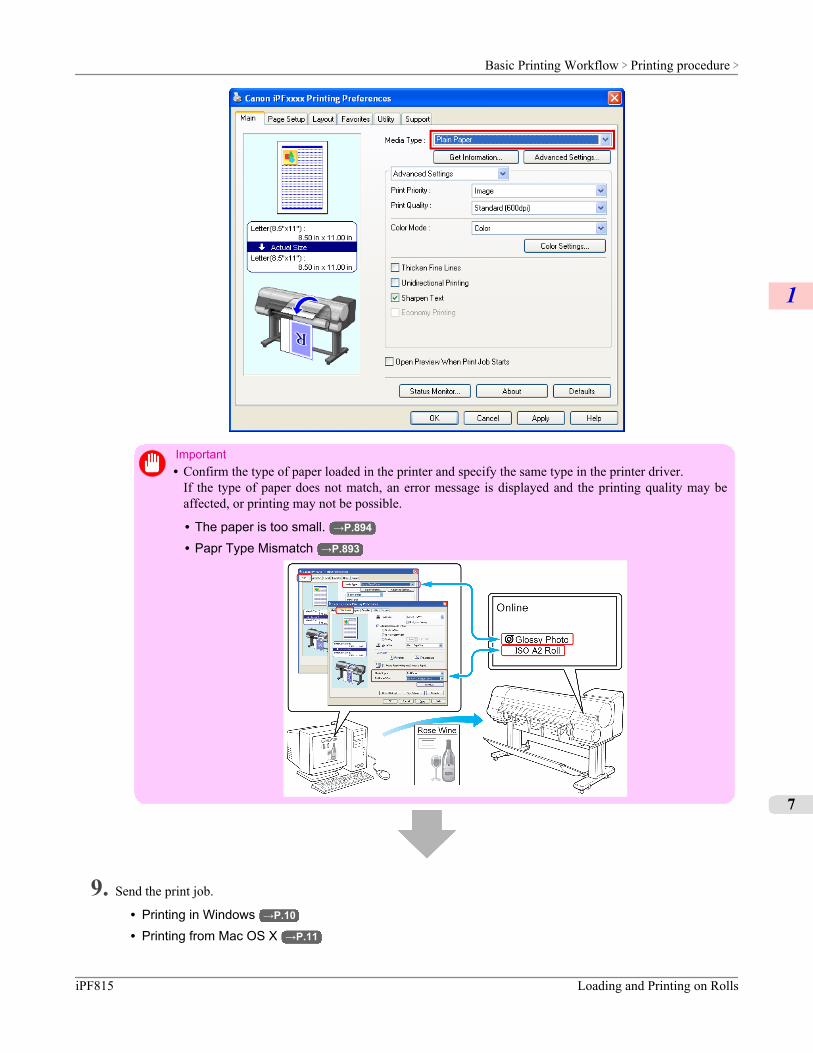
Important• Confirm the type of paper loaded in the printer and specify the same type in the printer driver.
If the type of paper does not match, an error message is displayed and the printing quality may beaffected, or printing may not be possible.
• The paper is too small. →P.894
• Papr Type Mismatch →P.893
9. Send the print job.
• Printing in Windows →P.10
• Printing from Mac OS X →P.11
Basic Printing Workflow > Printing procedure >
iPF815 Loading and Printing on Rolls
1
7
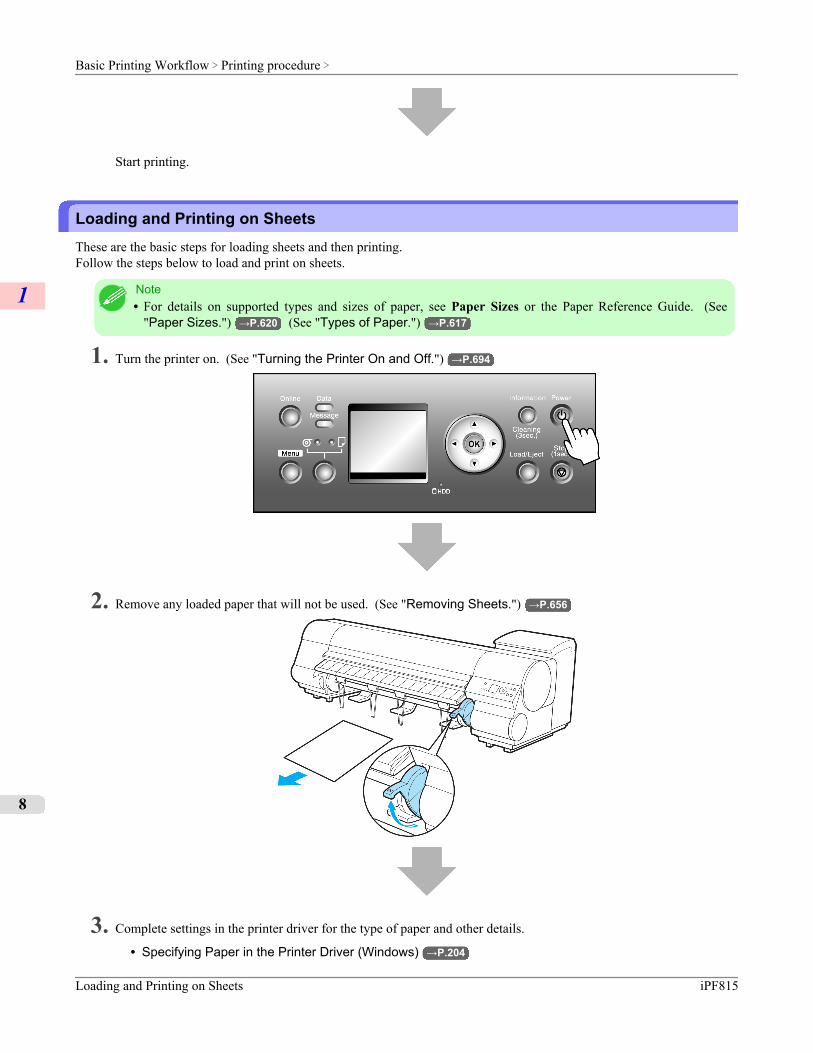
Start printing.
Loading and Printing on SheetsThese are the basic steps for loading sheets and then printing.Follow the steps below to load and print on sheets.
Note• For details on supported types and sizes of paper, see Paper Sizes or the Paper Reference Guide. (See
"Paper Sizes.") →P.620 (See "Types of Paper.") →P.617
1. Turn the printer on. (See "Turning the Printer On and Off.") →P.694
2. Remove any loaded paper that will not be used. (See "Removing Sheets.") →P.656
3. Complete settings in the printer driver for the type of paper and other details.
• Specifying Paper in the Printer Driver (Windows) →P.204
Basic Printing Workflow > Printing procedure >
Loading and Printing on Sheets iPF815
1
8
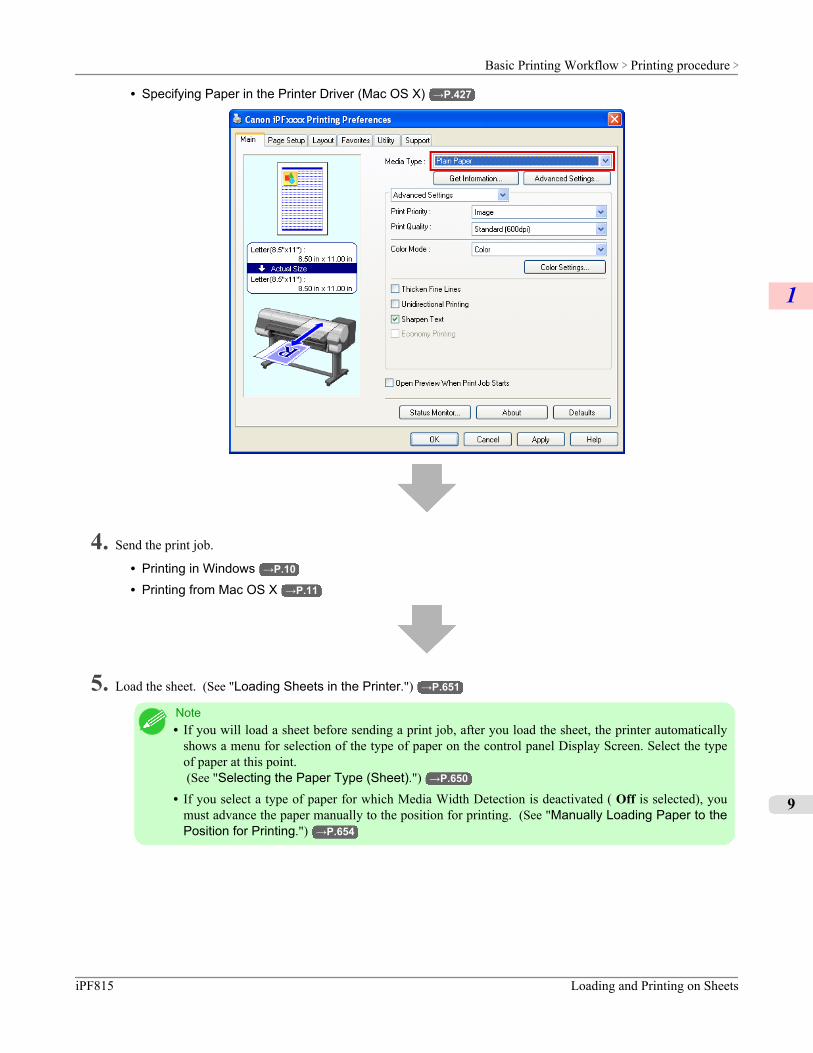
• Specifying Paper in the Printer Driver (Mac OS X) →P.427
4. Send the print job.
• Printing in Windows →P.10
• Printing from Mac OS X →P.11
5. Load the sheet. (See "Loading Sheets in the Printer.") →P.651
Note• If you will load a sheet before sending a print job, after you load the sheet, the printer automatically
shows a menu for selection of the type of paper on the control panel Display Screen. Select the typeof paper at this point. (See "Selecting the Paper Type (Sheet).") →P.650
• If you select a type of paper for which Media Width Detection is deactivated ( Off is selected), youmust advance the paper manually to the position for printing. (See "Manually Loading Paper to thePosition for Printing.") →P.654
Basic Printing Workflow > Printing procedure >
iPF815 Loading and Printing on Sheets
1
9
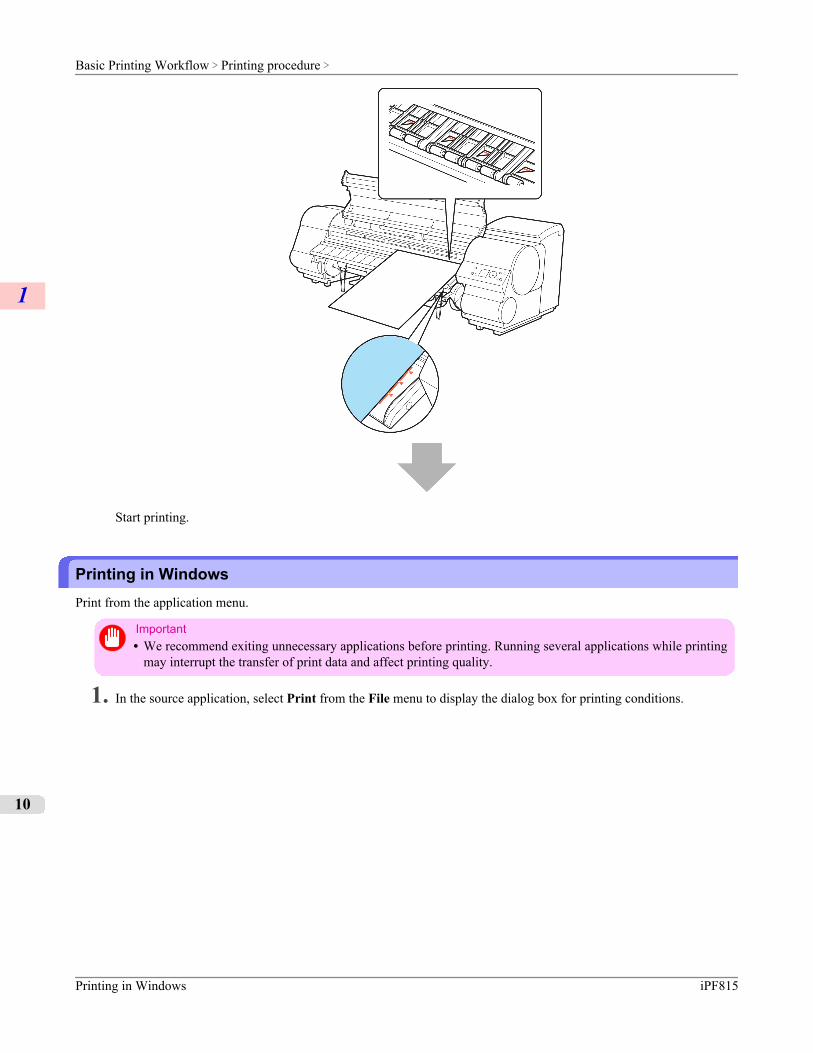
Start printing.
Printing in WindowsPrint from the application menu.
Important• We recommend exiting unnecessary applications before printing. Running several applications while printing
may interrupt the transfer of print data and affect printing quality.
1. In the source application, select Print from the File menu to display the dialog box for printing conditions.
Basic Printing Workflow > Printing procedure >
Printing in Windows iPF815
1
10
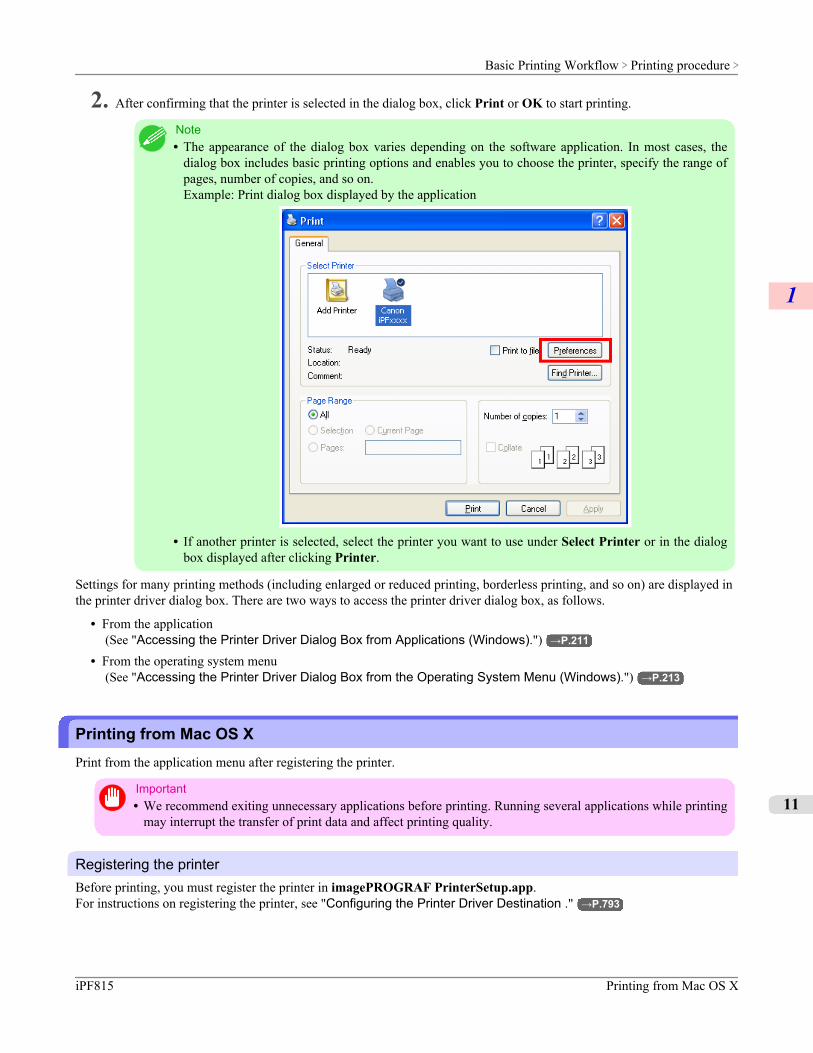
2. After confirming that the printer is selected in the dialog box, click Print or OK to start printing.
Note• The appearance of the dialog box varies depending on the software application. In most cases, the
dialog box includes basic printing options and enables you to choose the printer, specify the range ofpages, number of copies, and so on.Example: Print dialog box displayed by the application
• If another printer is selected, select the printer you want to use under Select Printer or in the dialogbox displayed after clicking Printer.
Settings for many printing methods (including enlarged or reduced printing, borderless printing, and so on) are displayed inthe printer driver dialog box. There are two ways to access the printer driver dialog box, as follows.
• From the application (See "Accessing the Printer Driver Dialog Box from Applications (Windows).") →P.211
• From the operating system menu (See "Accessing the Printer Driver Dialog Box from the Operating System Menu (Windows).") →P.213
Printing from Mac OS XPrint from the application menu after registering the printer.
Important• We recommend exiting unnecessary applications before printing. Running several applications while printing
may interrupt the transfer of print data and affect printing quality.
Registering the printerBefore printing, you must register the printer in imagePROGRAF PrinterSetup.app.For instructions on registering the printer, see "Configuring the Printer Driver Destination ." →P.793
Basic Printing Workflow > Printing procedure >
iPF815 Printing from Mac OS X
1
11
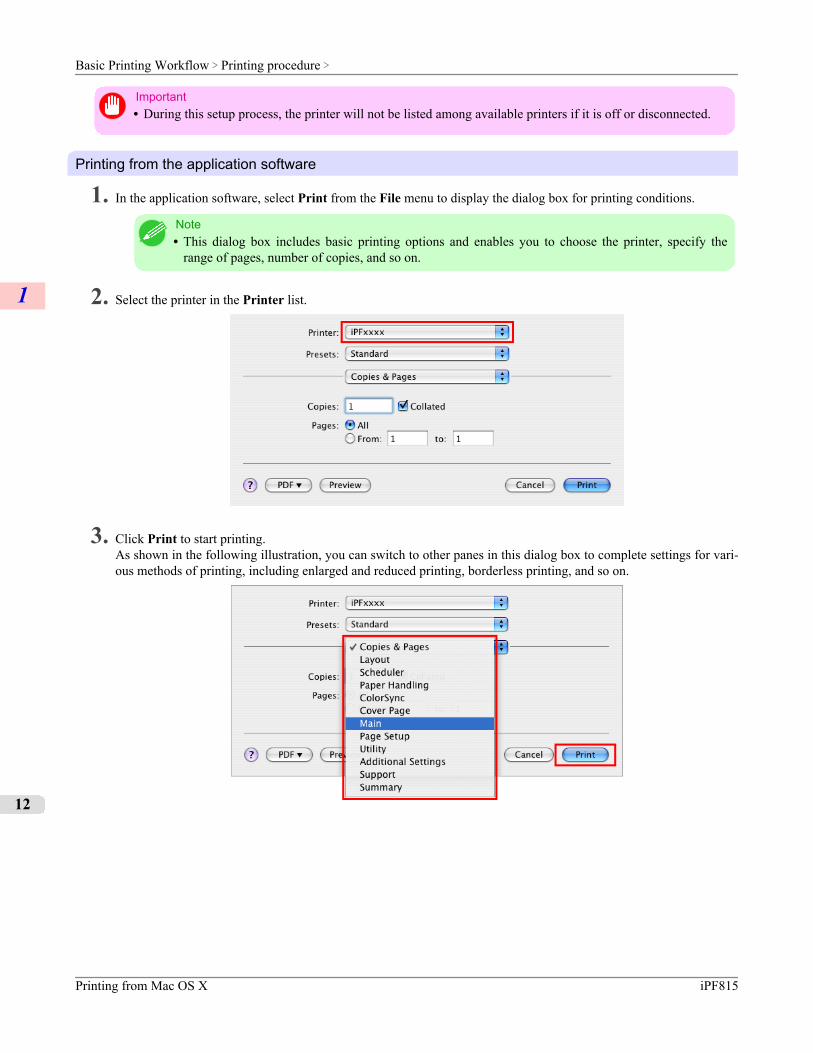
Important• During this setup process, the printer will not be listed among available printers if it is off or disconnected.
Printing from the application software
1. In the application software, select Print from the File menu to display the dialog box for printing conditions.
Note• This dialog box includes basic printing options and enables you to choose the printer, specify the
range of pages, number of copies, and so on.
2. Select the printer in the Printer list.
3. Click Print to start printing.As shown in the following illustration, you can switch to other panes in this dialog box to complete settings for vari-ous methods of printing, including enlarged and reduced printing, borderless printing, and so on.
Basic Printing Workflow > Printing procedure >
Printing from Mac OS X iPF815
1
12
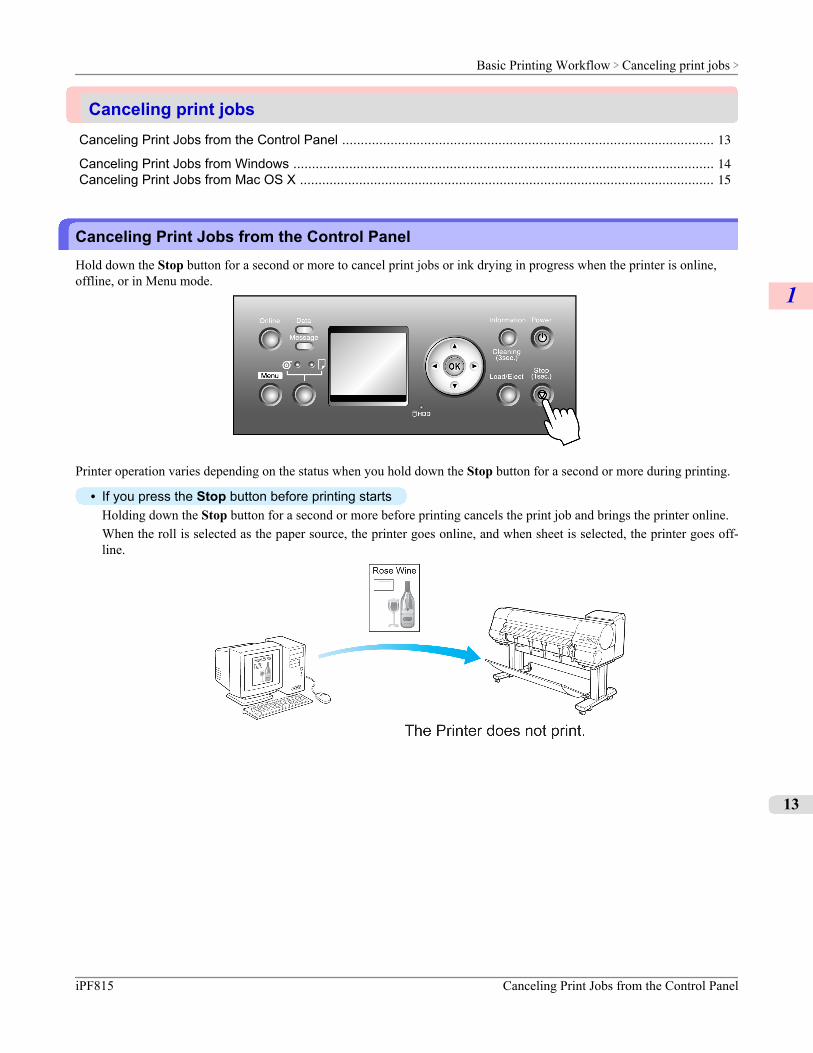
Canceling print jobsCanceling Print Jobs from the Control Panel .................................................................................................... 13
Canceling Print Jobs from Windows ................................................................................................................. 14Canceling Print Jobs from Mac OS X ................................................................................................................ 15
Canceling Print Jobs from the Control PanelHold down the Stop button for a second or more to cancel print jobs or ink drying in progress when the printer is online,offline, or in Menu mode.
Printer operation varies depending on the status when you hold down the Stop button for a second or more during printing.
• If you press the Stop button before printing startsHolding down the Stop button for a second or more before printing cancels the print job and brings the printer online.When the roll is selected as the paper source, the printer goes online, and when sheet is selected, the printer goes off-line.
Basic Printing Workflow > Canceling print jobs >
iPF815 Canceling Print Jobs from the Control Panel
1
13
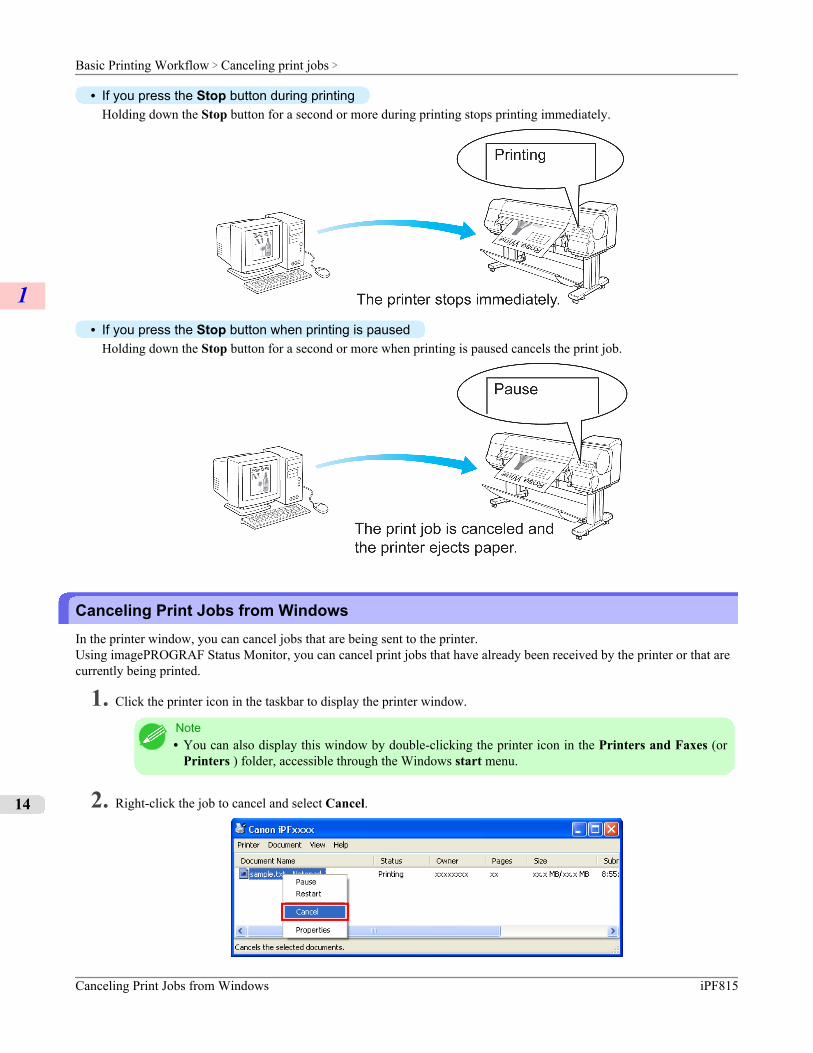
• If you press the Stop button during printingHolding down the Stop button for a second or more during printing stops printing immediately.
• If you press the Stop button when printing is pausedHolding down the Stop button for a second or more when printing is paused cancels the print job.
Canceling Print Jobs from WindowsIn the printer window, you can cancel jobs that are being sent to the printer.Using imagePROGRAF Status Monitor, you can cancel print jobs that have already been received by the printer or that arecurrently being printed.
1. Click the printer icon in the taskbar to display the printer window.
Note• You can also display this window by double-clicking the printer icon in the Printers and Faxes (or
Printers ) folder, accessible through the Windows start menu.
2. Right-click the job to cancel and select Cancel.
Basic Printing Workflow > Canceling print jobs >
Canceling Print Jobs from Windows iPF815
1
14
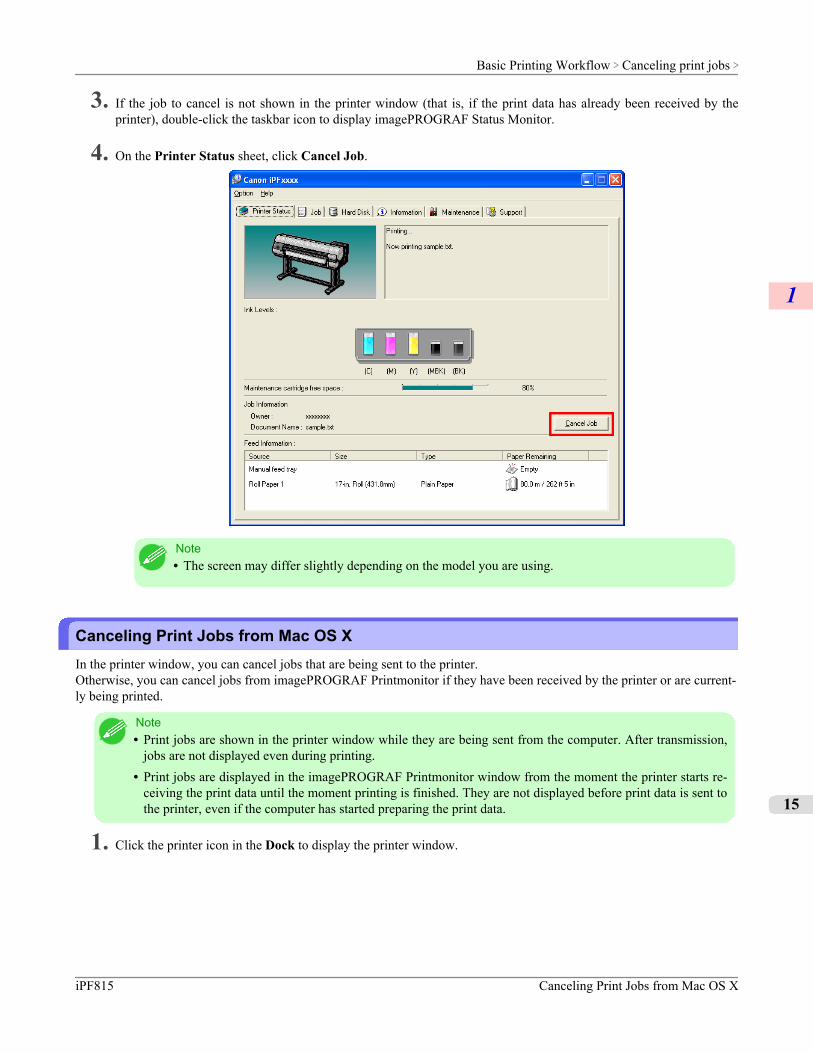
3. If the job to cancel is not shown in the printer window (that is, if the print data has already been received by theprinter), double-click the taskbar icon to display imagePROGRAF Status Monitor.
4. On the Printer Status sheet, click Cancel Job.
Note• The screen may differ slightly depending on the model you are using.
Canceling Print Jobs from Mac OS XIn the printer window, you can cancel jobs that are being sent to the printer.Otherwise, you can cancel jobs from imagePROGRAF Printmonitor if they have been received by the printer or are current-ly being printed.
Note• Print jobs are shown in the printer window while they are being sent from the computer. After transmission,
jobs are not displayed even during printing.• Print jobs are displayed in the imagePROGRAF Printmonitor window from the moment the printer starts re-
ceiving the print data until the moment printing is finished. They are not displayed before print data is sent tothe printer, even if the computer has started preparing the print data.
1. Click the printer icon in the Dock to display the printer window.
Basic Printing Workflow > Canceling print jobs >
iPF815 Canceling Print Jobs from Mac OS X
1
15
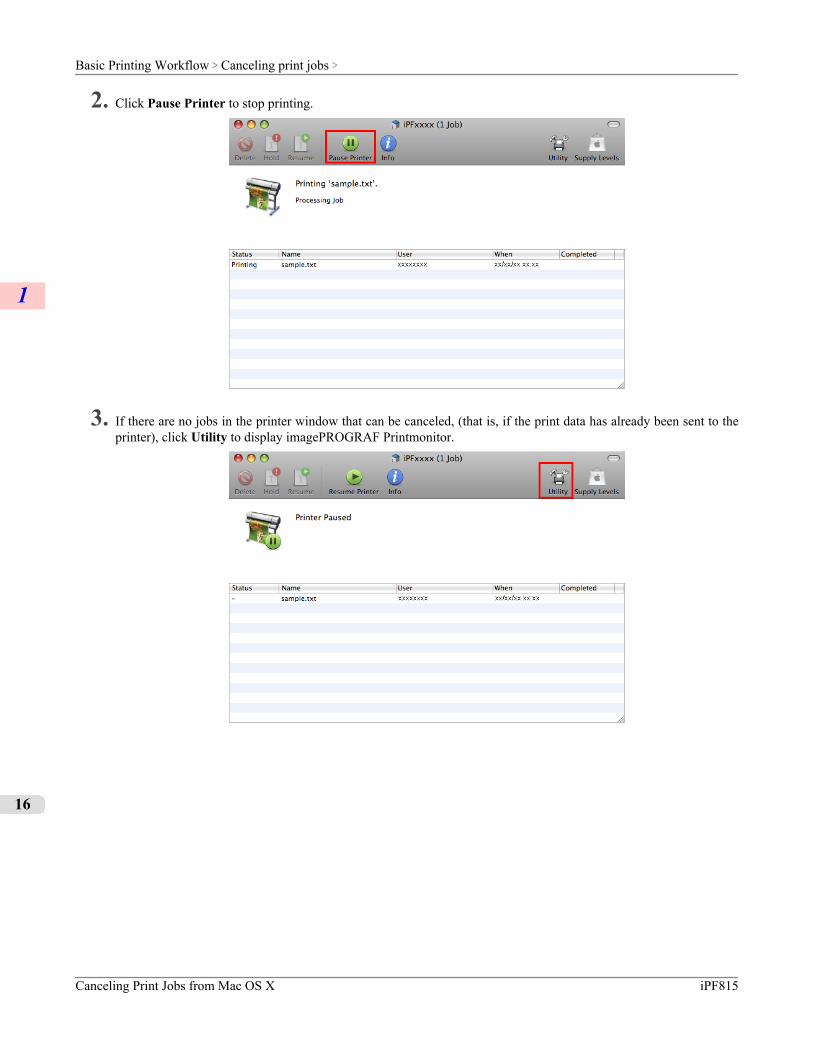
2. Click Pause Printer to stop printing.
3. If there are no jobs in the printer window that can be canceled, (that is, if the print data has already been sent to theprinter), click Utility to display imagePROGRAF Printmonitor.
Basic Printing Workflow > Canceling print jobs >
Canceling Print Jobs from Mac OS X iPF815
1
16
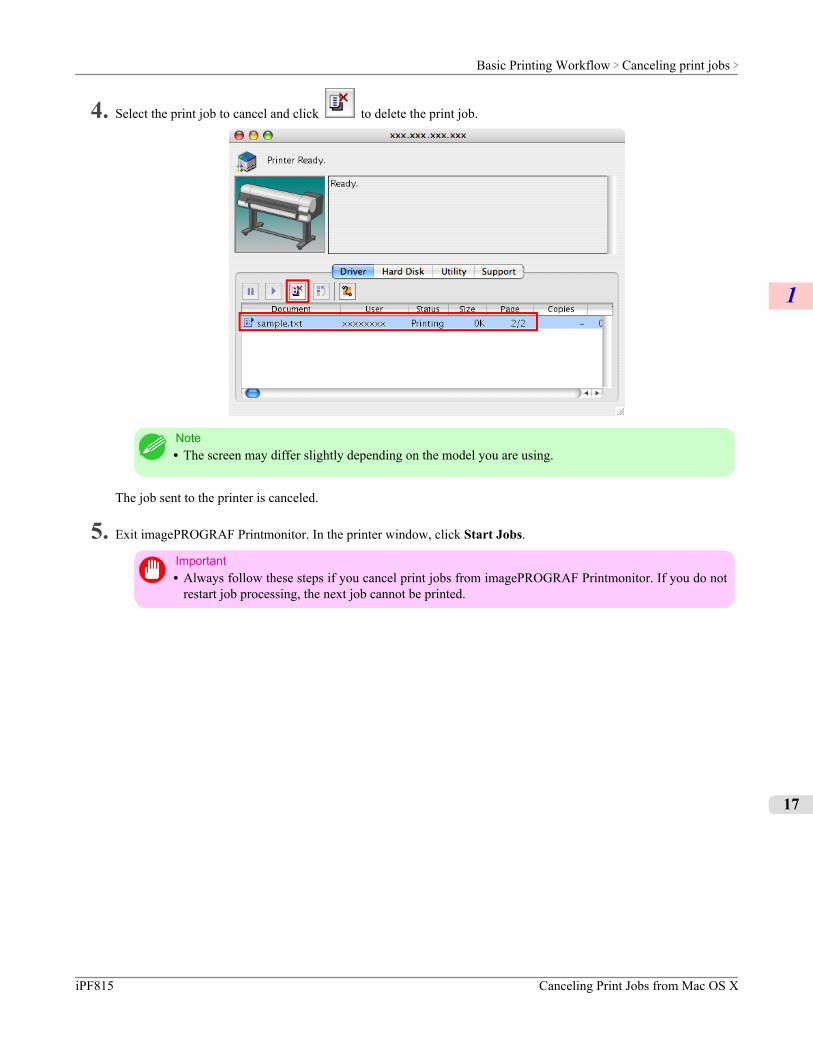
4. Select the print job to cancel and click to delete the print job.
Note• The screen may differ slightly depending on the model you are using.
The job sent to the printer is canceled.
5. Exit imagePROGRAF Printmonitor. In the printer window, click Start Jobs.
Important• Always follow these steps if you cancel print jobs from imagePROGRAF Printmonitor. If you do not
restart job processing, the next job cannot be printed.
Basic Printing Workflow > Canceling print jobs >
iPF815 Canceling Print Jobs from Mac OS X
1
17
Working With Various Print Jobs
Printing CAD Drawings 19
Printing Photos and Images 30
Printing Office Documents 38
Working With Various Print Jobs >
iPF815
2
18
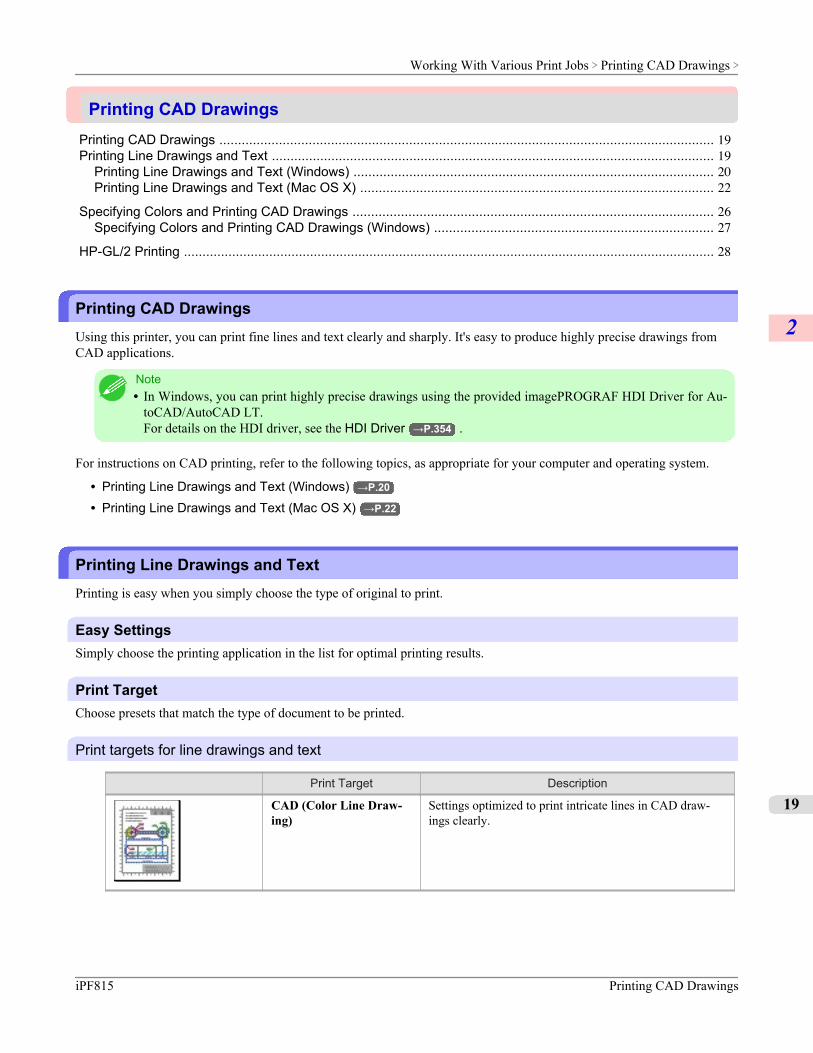
Printing CAD DrawingsPrinting CAD Drawings ..................................................................................................................................... 19Printing Line Drawings and Text ....................................................................................................................... 19
Printing Line Drawings and Text (Windows) ................................................................................................. 20Printing Line Drawings and Text (Mac OS X) ............................................................................................... 22
Specifying Colors and Printing CAD Drawings ................................................................................................. 26Specifying Colors and Printing CAD Drawings (Windows) ........................................................................... 27
HP-GL/2 Printing ............................................................................................................................................... 28
Printing CAD DrawingsUsing this printer, you can print fine lines and text clearly and sharply. It's easy to produce highly precise drawings fromCAD applications.
Note• In Windows, you can print highly precise drawings using the provided imagePROGRAF HDI Driver for Au-
toCAD/AutoCAD LT.For details on the HDI driver, see the HDI Driver →P.354 .
For instructions on CAD printing, refer to the following topics, as appropriate for your computer and operating system.
• Printing Line Drawings and Text (Windows) →P.20
• Printing Line Drawings and Text (Mac OS X) →P.22
Printing Line Drawings and TextPrinting is easy when you simply choose the type of original to print.
Easy SettingsSimply choose the printing application in the list for optimal printing results.
Print TargetChoose presets that match the type of document to be printed.
Print targets for line drawings and text
Print Target Description
CAD (Color Line Draw-ing)
Settings optimized to print intricate lines in CAD draw-ings clearly.
Working With Various Print Jobs > Printing CAD Drawings >
iPF815 Printing CAD Drawings
2
19
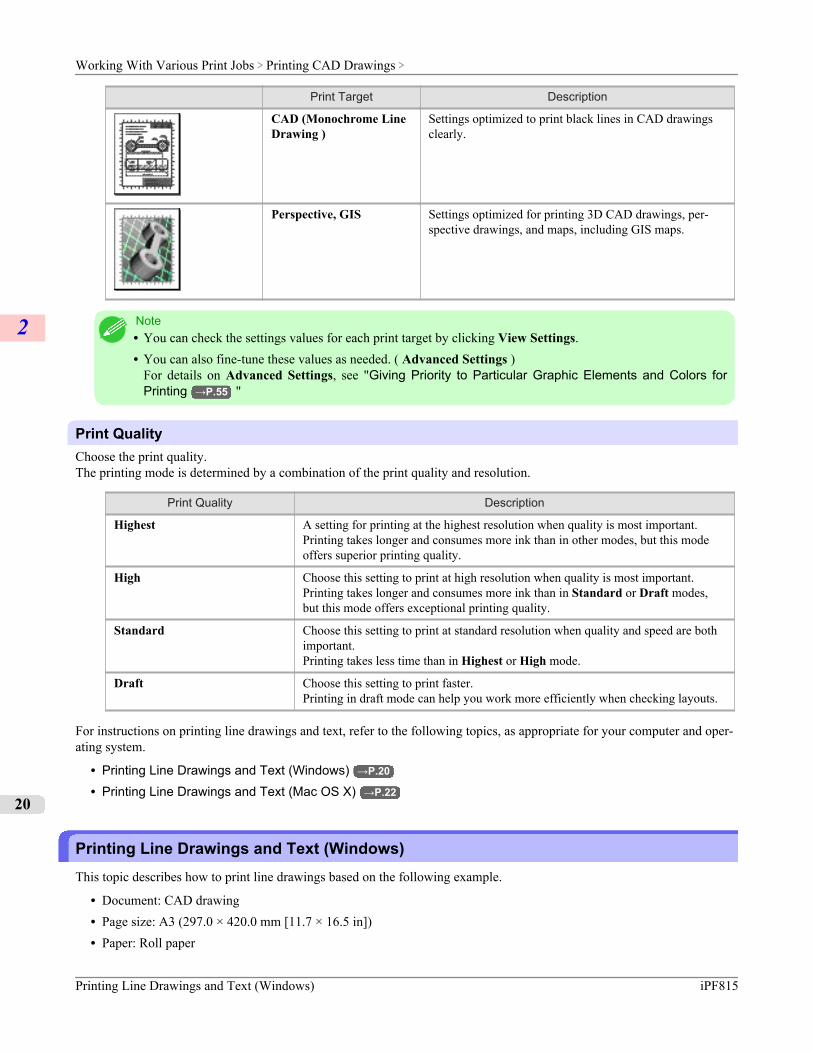
Print Target Description
CAD (Monochrome LineDrawing )
Settings optimized to print black lines in CAD drawingsclearly.
Perspective, GIS Settings optimized for printing 3D CAD drawings, per-spective drawings, and maps, including GIS maps.
Note• You can check the settings values for each print target by clicking View Settings.• You can also fine-tune these values as needed. ( Advanced Settings )
For details on Advanced Settings, see "Giving Priority to Particular Graphic Elements and Colors forPrinting →P.55 "
Print QualityChoose the print quality.The printing mode is determined by a combination of the print quality and resolution.
Print Quality Description
Highest A setting for printing at the highest resolution when quality is most important.Printing takes longer and consumes more ink than in other modes, but this modeoffers superior printing quality.
High Choose this setting to print at high resolution when quality is most important.Printing takes longer and consumes more ink than in Standard or Draft modes,but this mode offers exceptional printing quality.
Standard Choose this setting to print at standard resolution when quality and speed are bothimportant.Printing takes less time than in Highest or High mode.
Draft Choose this setting to print faster.Printing in draft mode can help you work more efficiently when checking layouts.
For instructions on printing line drawings and text, refer to the following topics, as appropriate for your computer and oper-ating system.
• Printing Line Drawings and Text (Windows) →P.20
• Printing Line Drawings and Text (Mac OS X) →P.22
Printing Line Drawings and Text (Windows)This topic describes how to print line drawings based on the following example.
• Document: CAD drawing• Page size: A3 (297.0 × 420.0 mm [11.7 × 16.5 in])• Paper: Roll paper
Working With Various Print Jobs > Printing CAD Drawings >
Printing Line Drawings and Text (Windows) iPF815
2
20
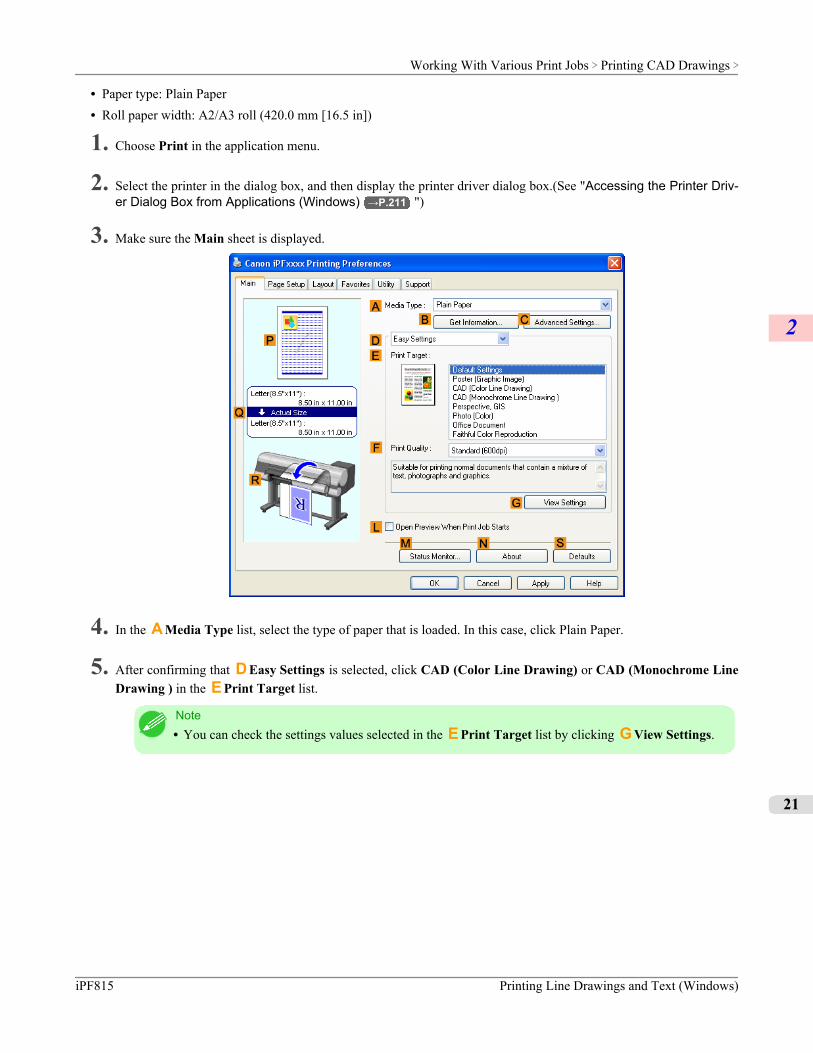
• Paper type: Plain Paper• Roll paper width: A2/A3 roll (420.0 mm [16.5 in])
1. Choose Print in the application menu.
2. Select the printer in the dialog box, and then display the printer driver dialog box.(See "Accessing the Printer Driv-er Dialog Box from Applications (Windows) →P.211 ")
3. Make sure the Main sheet is displayed.
4. In the A Media Type list, select the type of paper that is loaded. In this case, click Plain Paper.
5. After confirming that D Easy Settings is selected, click CAD (Color Line Drawing) or CAD (Monochrome LineDrawing ) in the E Print Target list.
Note• You can check the settings values selected in the E Print Target list by clicking G View Settings.
Working With Various Print Jobs > Printing CAD Drawings >
iPF815 Printing Line Drawings and Text (Windows)
2
21
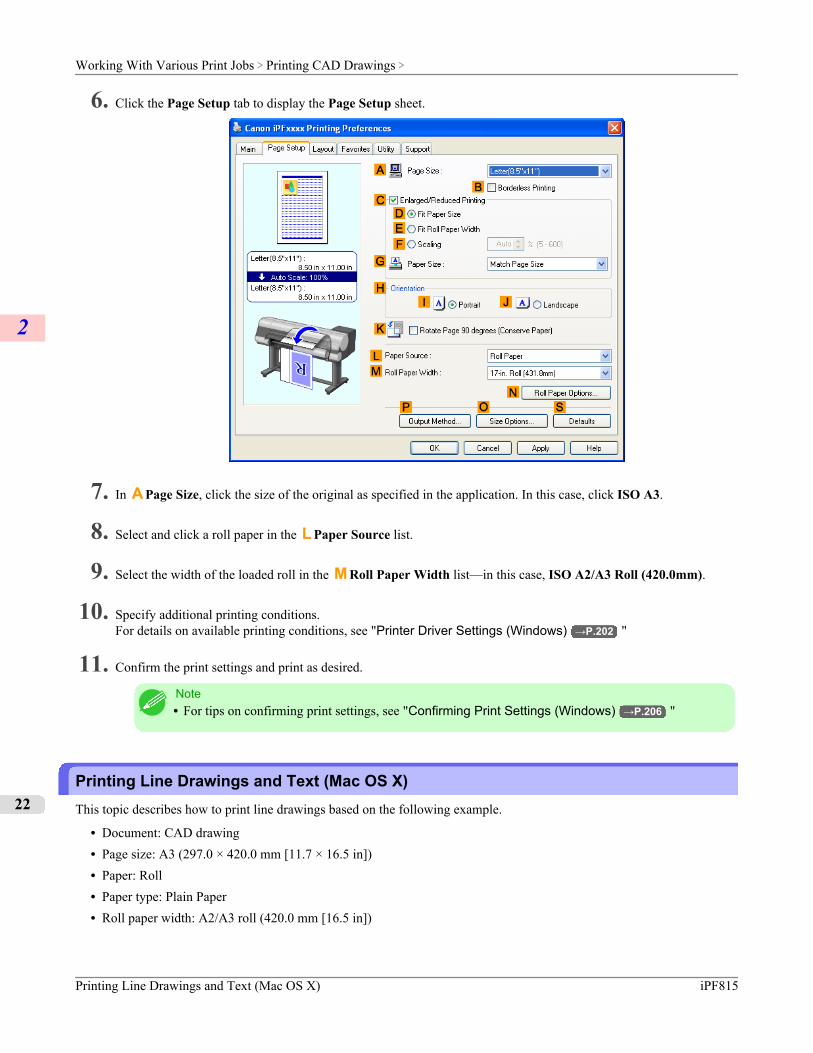
6. Click the Page Setup tab to display the Page Setup sheet.
7. In A Page Size, click the size of the original as specified in the application. In this case, click ISO A3.
8. Select and click a roll paper in the L Paper Source list.
9. Select the width of the loaded roll in the M Roll Paper Width list—in this case, ISO A2/A3 Roll (420.0mm).
10. Specify additional printing conditions.For details on available printing conditions, see "Printer Driver Settings (Windows) →P.202 "
11. Confirm the print settings and print as desired.
Note• For tips on confirming print settings, see "Confirming Print Settings (Windows) →P.206 "
Printing Line Drawings and Text (Mac OS X)This topic describes how to print line drawings based on the following example.
• Document: CAD drawing• Page size: A3 (297.0 × 420.0 mm [11.7 × 16.5 in])• Paper: Roll• Paper type: Plain Paper• Roll paper width: A2/A3 roll (420.0 mm [16.5 in])
Working With Various Print Jobs > Printing CAD Drawings >
Printing Line Drawings and Text (Mac OS X) iPF815
2
22

1. This sets the B Format for and C Paper Size.
Note• The configuration method varies depending on the OS and application software you are using.
If Page Setup is displayed in the application menu, the settings are configured by opening the PageAttributes dialog box from Page Setup.
If it is not displayed, the settings are configured in the upper part of the printer driver displayed whenyou select Print from the application software menu.
2. Select the printer in the A Printer list.
3. In the F Paper Size list, click the size of the original. In this case, click ISO A3.
4. If you configured the settings using the Page Attributes dialog box, click F OK to close the dialog box, and thenselect Print from the application software menu.
Working With Various Print Jobs > Printing CAD Drawings >
iPF815 Printing Line Drawings and Text (Mac OS X)
2
23
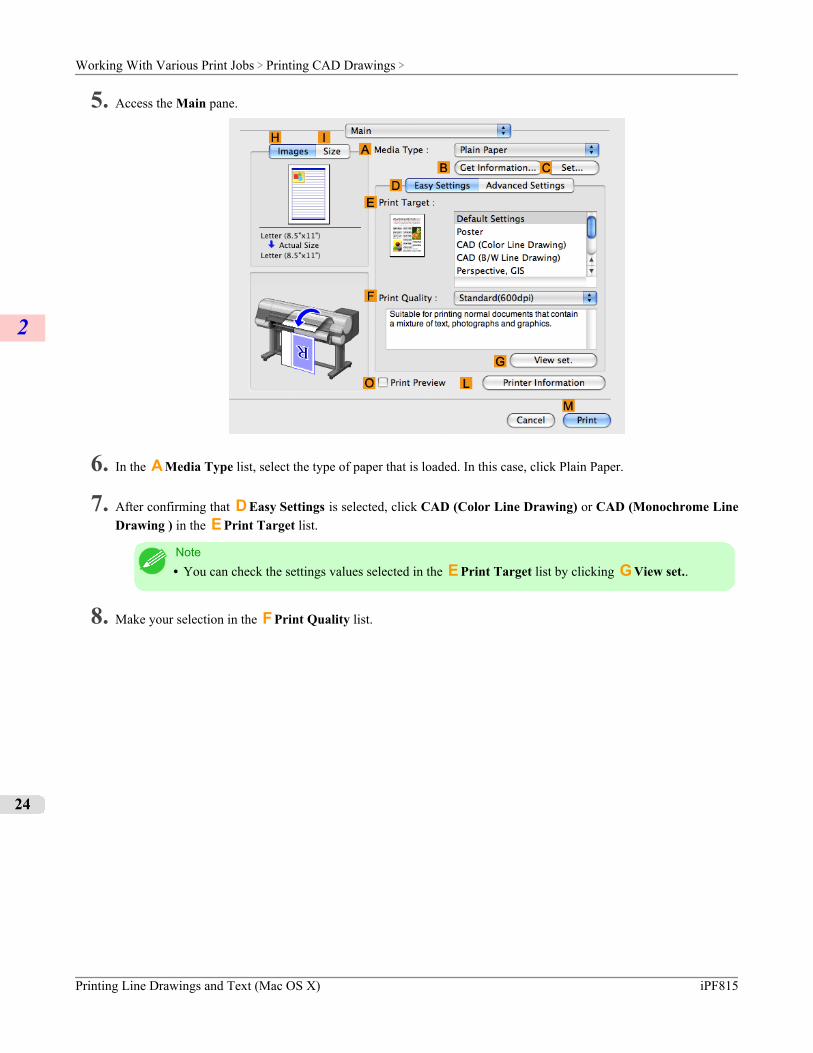
5. Access the Main pane.
6. In the A Media Type list, select the type of paper that is loaded. In this case, click Plain Paper.
7. After confirming that D Easy Settings is selected, click CAD (Color Line Drawing) or CAD (Monochrome LineDrawing ) in the E Print Target list.
Note• You can check the settings values selected in the E Print Target list by clicking G View set..
8. Make your selection in the F Print Quality list.
Working With Various Print Jobs > Printing CAD Drawings >
Printing Line Drawings and Text (Mac OS X) iPF815
2
24
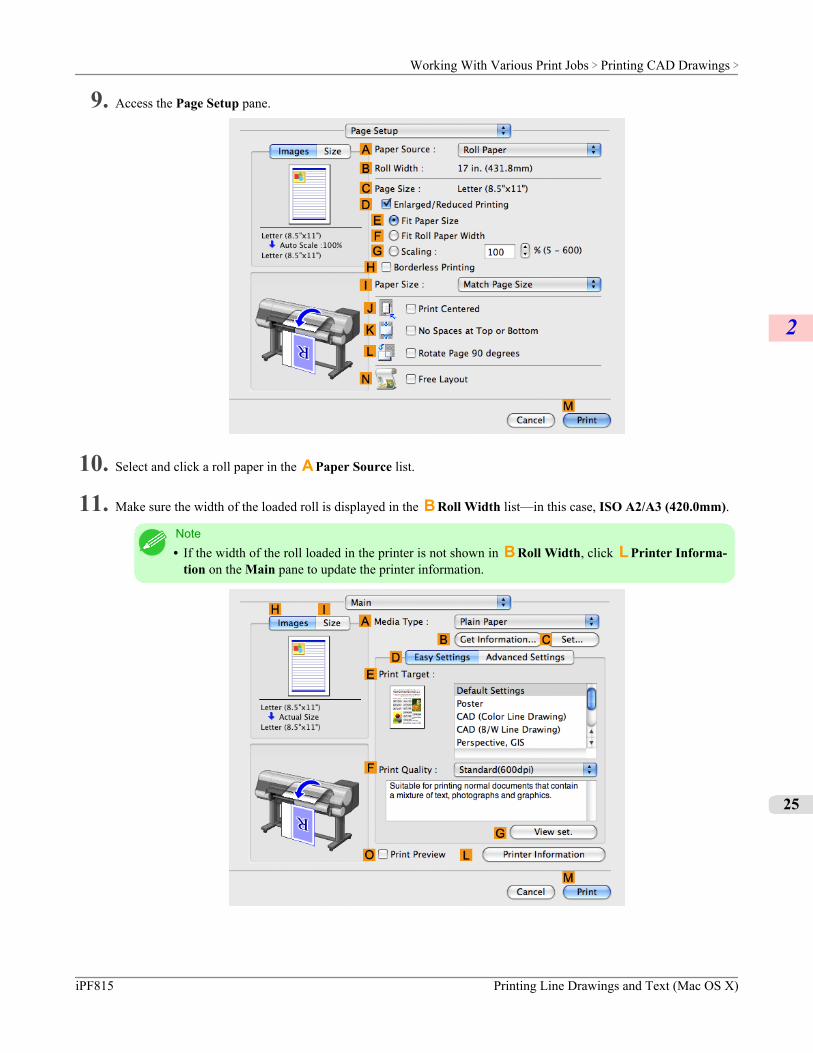
9. Access the Page Setup pane.
10. Select and click a roll paper in the A Paper Source list.
11. Make sure the width of the loaded roll is displayed in the B Roll Width list—in this case, ISO A2/A3 (420.0mm).
Note• If the width of the roll loaded in the printer is not shown in B Roll Width, click L Printer Informa-
tion on the Main pane to update the printer information.
Working With Various Print Jobs > Printing CAD Drawings >
iPF815 Printing Line Drawings and Text (Mac OS X)
2
25
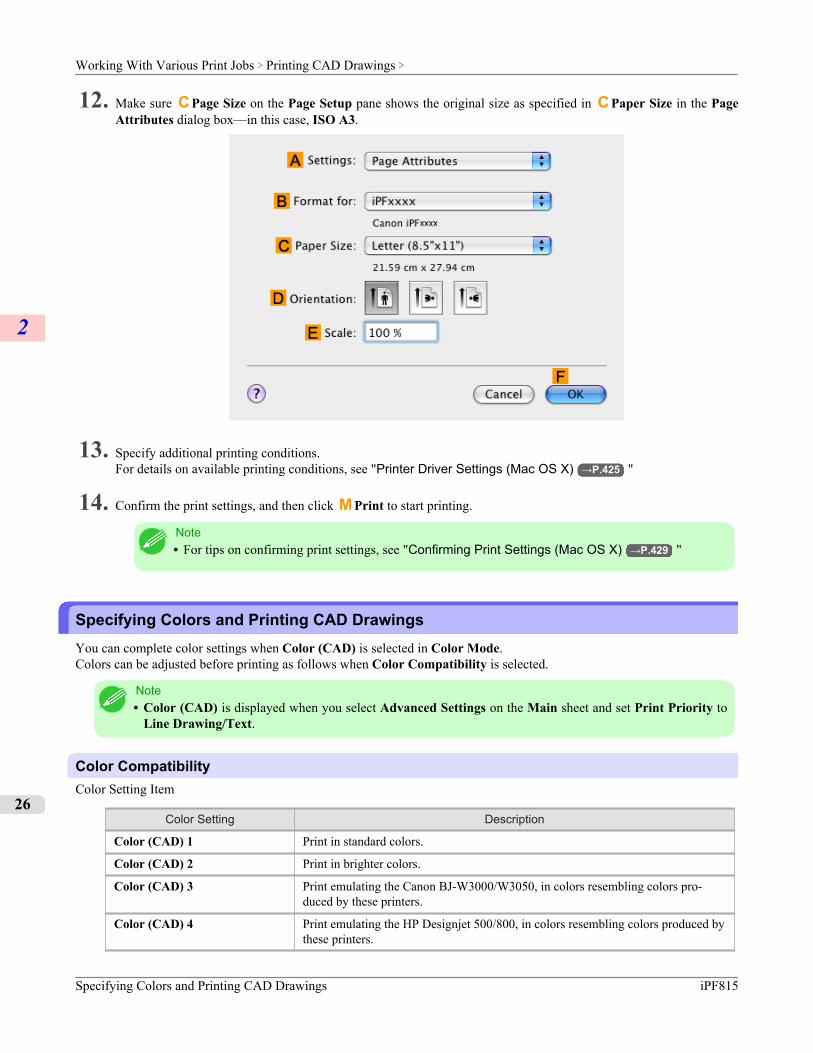
12. Make sure C Page Size on the Page Setup pane shows the original size as specified in C Paper Size in the PageAttributes dialog box—in this case, ISO A3.
13. Specify additional printing conditions.For details on available printing conditions, see "Printer Driver Settings (Mac OS X) →P.425 "
14. Confirm the print settings, and then click M Print to start printing.
Note• For tips on confirming print settings, see "Confirming Print Settings (Mac OS X) →P.429 "
Specifying Colors and Printing CAD DrawingsYou can complete color settings when Color (CAD) is selected in Color Mode.Colors can be adjusted before printing as follows when Color Compatibility is selected.
Note• Color (CAD) is displayed when you select Advanced Settings on the Main sheet and set Print Priority to
Line Drawing/Text.
Color CompatibilityColor Setting Item
Color Setting Description
Color (CAD) 1 Print in standard colors.
Color (CAD) 2 Print in brighter colors.
Color (CAD) 3 Print emulating the Canon BJ-W3000/W3050, in colors resembling colors pro-duced by these printers.
Color (CAD) 4 Print emulating the HP Designjet 500/800, in colors resembling colors produced bythese printers.
Working With Various Print Jobs > Printing CAD Drawings >
Specifying Colors and Printing CAD Drawings iPF815
2
26
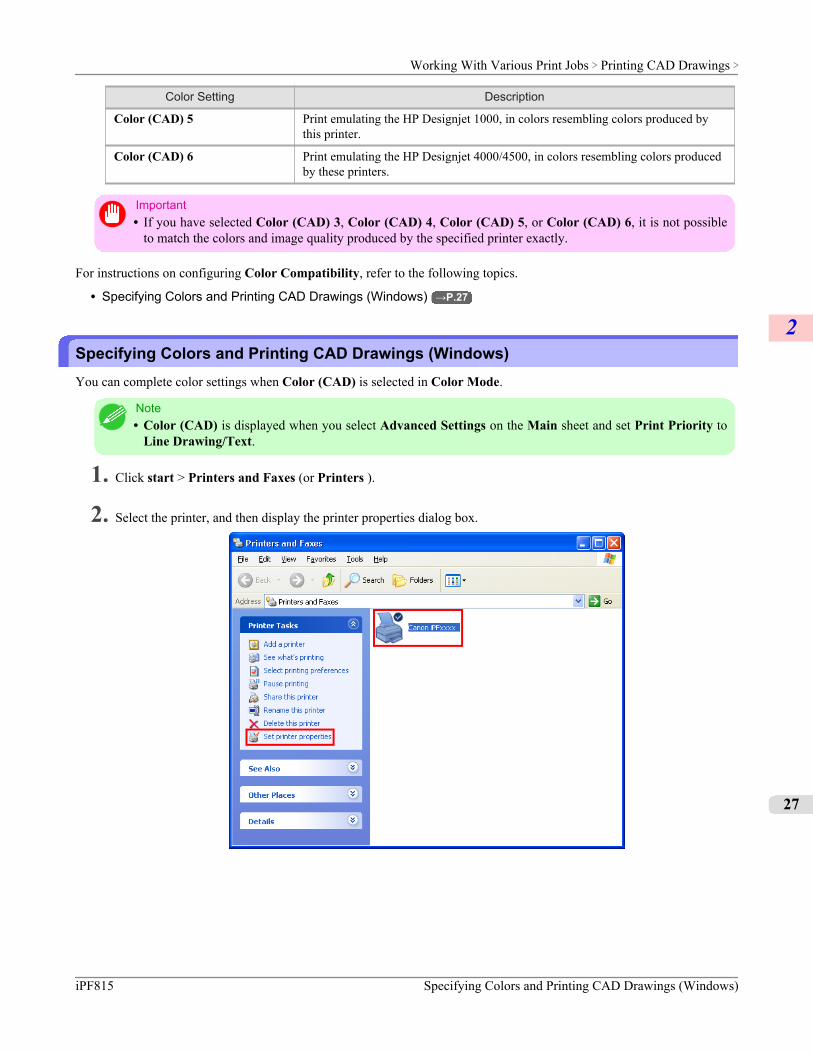
Color Setting Description
Color (CAD) 5 Print emulating the HP Designjet 1000, in colors resembling colors produced bythis printer.
Color (CAD) 6 Print emulating the HP Designjet 4000/4500, in colors resembling colors producedby these printers.
Important• If you have selected Color (CAD) 3, Color (CAD) 4, Color (CAD) 5, or Color (CAD) 6, it is not possible
to match the colors and image quality produced by the specified printer exactly.
For instructions on configuring Color Compatibility, refer to the following topics.
• Specifying Colors and Printing CAD Drawings (Windows) →P.27
Specifying Colors and Printing CAD Drawings (Windows)You can complete color settings when Color (CAD) is selected in Color Mode.
Note• Color (CAD) is displayed when you select Advanced Settings on the Main sheet and set Print Priority to
Line Drawing/Text.
1. Click start > Printers and Faxes (or Printers ).
2. Select the printer, and then display the printer properties dialog box.
Working With Various Print Jobs > Printing CAD Drawings >
iPF815 Specifying Colors and Printing CAD Drawings (Windows)
2
27
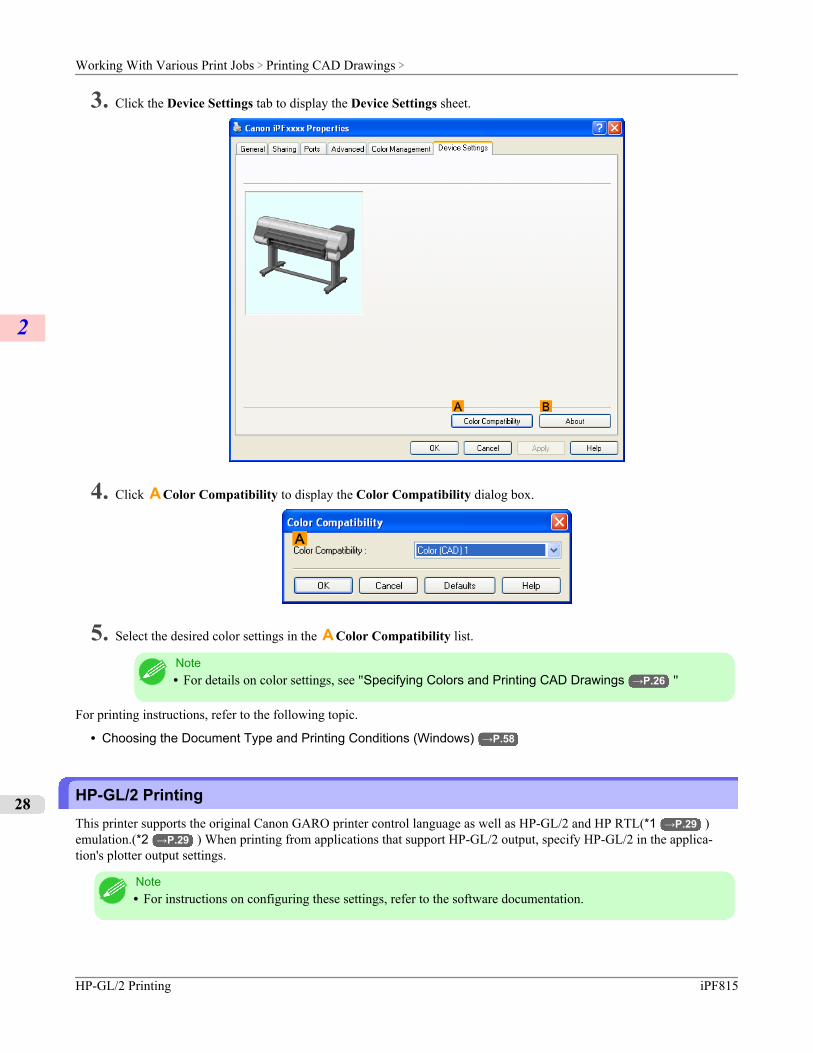
3. Click the Device Settings tab to display the Device Settings sheet.
4. Click A Color Compatibility to display the Color Compatibility dialog box.
5. Select the desired color settings in the A Color Compatibility list.
Note• For details on color settings, see "Specifying Colors and Printing CAD Drawings →P.26 "
For printing instructions, refer to the following topic.
• Choosing the Document Type and Printing Conditions (Windows) →P.58
HP-GL/2 PrintingThis printer supports the original Canon GARO printer control language as well as HP-GL/2 and HP RTL(*1 →P.29 )emulation.(*2 →P.29 ) When printing from applications that support HP-GL/2 output, specify HP-GL/2 in the applica-tion's plotter output settings.
Note• For instructions on configuring these settings, refer to the software documentation.
Working With Various Print Jobs > Printing CAD Drawings >
HP-GL/2 Printing iPF815
2
28
The printer automatically switches to the corresponding processing depending on whether a GARO, HP-GL/2, or HP RTLjob is received. Configure the optional settings for HP-GL/2 emulation on the printer control panel. (See "Main Menu Set-tings.") →P.722This printer can emulate the following printers using HP-GL/2 emulation.
Emulated Printers
Canon W3000 and W3050(*3 →P.29 )
Hewlett-Packard Designjet 450c, Designjet 750c Plus, and Designjet 750c
*1: HP-GL/2: Hewlett-Packard Graphics Language 2; HP RTL: Hewlett-Packard Raster Transfer Language*2: It may not be possible to print jobs with excessively large amounts of data correctly.*3: Layout templates are not supported.
Working With Various Print Jobs > Printing CAD Drawings >
iPF815 HP-GL/2 Printing
2
29
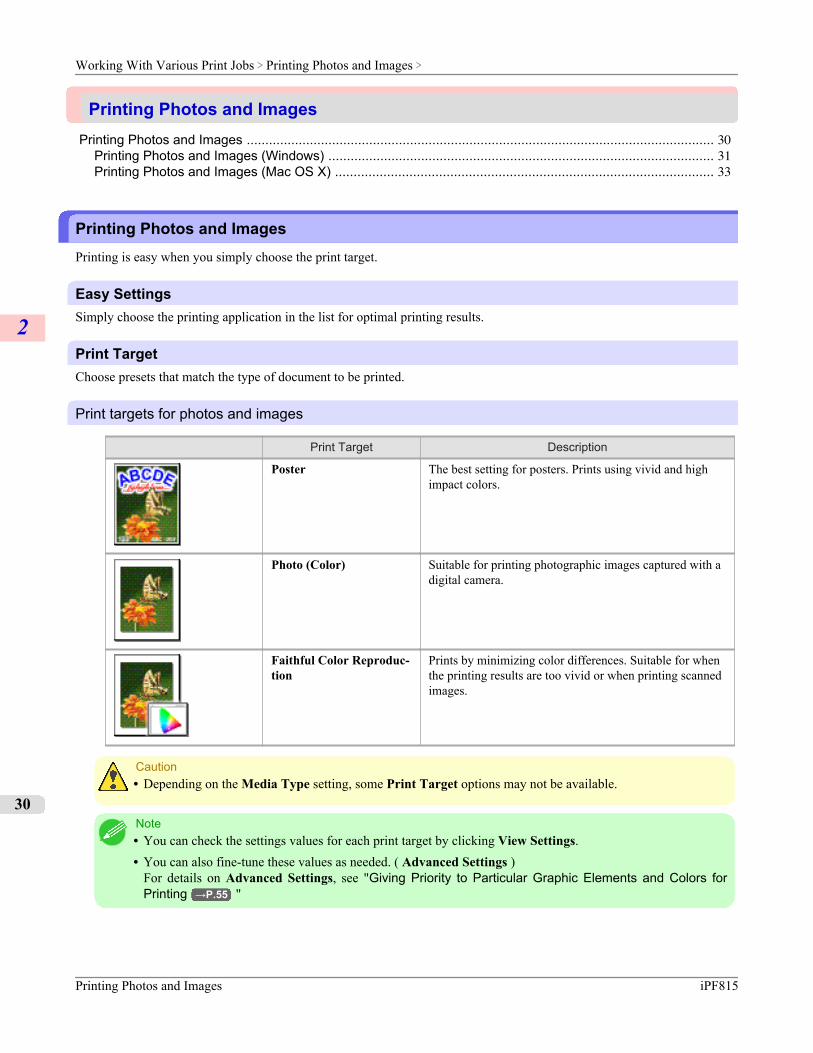
Printing Photos and ImagesPrinting Photos and Images .............................................................................................................................. 30
Printing Photos and Images (Windows) ........................................................................................................ 31Printing Photos and Images (Mac OS X) ...................................................................................................... 33
Printing Photos and ImagesPrinting is easy when you simply choose the print target.
Easy SettingsSimply choose the printing application in the list for optimal printing results.
Print TargetChoose presets that match the type of document to be printed.
Print targets for photos and images
Print Target Description
Poster The best setting for posters. Prints using vivid and highimpact colors.
Photo (Color) Suitable for printing photographic images captured with adigital camera.
Faithful Color Reproduc-tion
Prints by minimizing color differences. Suitable for whenthe printing results are too vivid or when printing scannedimages.
Caution• Depending on the Media Type setting, some Print Target options may not be available.
Note• You can check the settings values for each print target by clicking View Settings.• You can also fine-tune these values as needed. ( Advanced Settings )
For details on Advanced Settings, see "Giving Priority to Particular Graphic Elements and Colors forPrinting →P.55 "
Working With Various Print Jobs > Printing Photos and Images >
Printing Photos and Images iPF815
2
30
Print QualityChoose the print quality.The printing mode is determined by a combination of the print quality and resolution.
Print Quality Description
Highest A setting for printing at the highest resolution when quality is most important.Printing takes longer and consumes more ink than in other modes, but this modeoffers superior printing quality.
High Choose this setting to print at high resolution when quality is most important.Printing takes longer and consumes more ink than in Standard or Draft modes,but this mode offers exceptional printing quality.
Standard Choose this setting to print at standard resolution when quality and speed are bothimportant.Printing takes less time than in Highest or High mode.
Draft Choose this setting to print faster.Printing in draft mode can help you work more efficiently when checking layouts.
For instructions on printing photos and images, refer to the following topics, as appropriate for your computer and operatingsystem.
• Printing Photos and Images (Windows) →P.31
• Printing Photos and Images (Mac OS X) →P.33
Printing Photos and Images (Windows)This topic describes how to print photos based on the following example.
• Document: Photo image from a digital camera• Page size: 10×12 inches (254.0×304.8 mm)• Paper: Roll• Paper type: Premium Glossy Paper 200• Roll paper width: 10 inches (254.0 mm)
1. Choose Print in the application menu.
2. Select the printer in the dialog box, and then display the printer driver dialog box.(See "Accessing the Printer Driv-er Dialog Box from Applications (Windows) →P.211 ")
Working With Various Print Jobs > Printing Photos and Images >
iPF815 Printing Photos and Images (Windows)
2
31
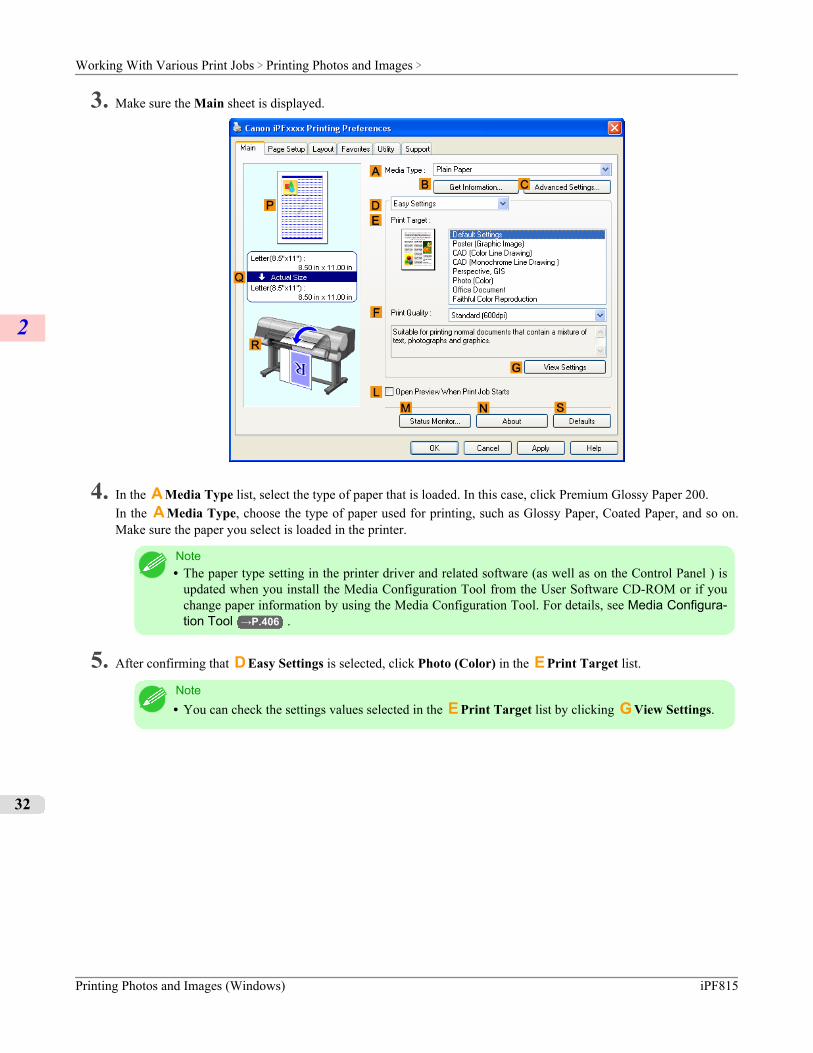
3. Make sure the Main sheet is displayed.
4. In the A Media Type list, select the type of paper that is loaded. In this case, click Premium Glossy Paper 200.In the A Media Type, choose the type of paper used for printing, such as Glossy Paper, Coated Paper, and so on.Make sure the paper you select is loaded in the printer.
Note• The paper type setting in the printer driver and related software (as well as on the Control Panel ) is
updated when you install the Media Configuration Tool from the User Software CD-ROM or if youchange paper information by using the Media Configuration Tool. For details, see Media Configura-tion Tool →P.406 .
5. After confirming that D Easy Settings is selected, click Photo (Color) in the E Print Target list.
Note• You can check the settings values selected in the E Print Target list by clicking G View Settings.
Working With Various Print Jobs > Printing Photos and Images >
Printing Photos and Images (Windows) iPF815
2
32
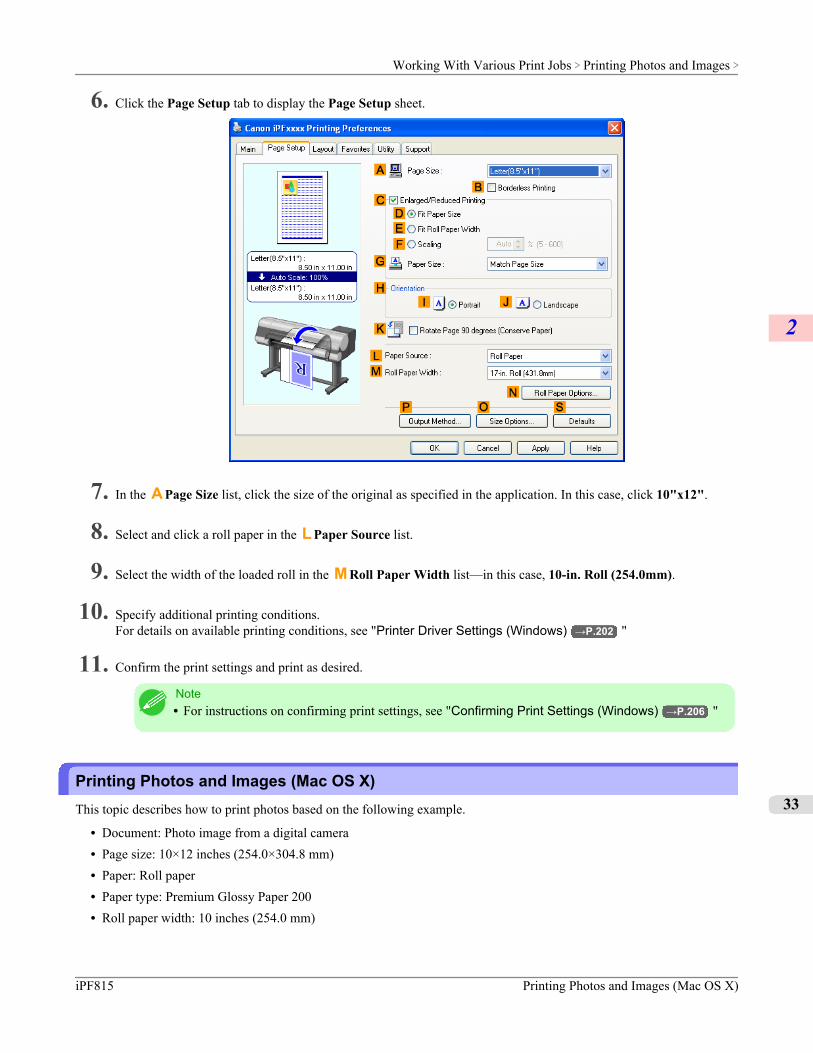
6. Click the Page Setup tab to display the Page Setup sheet.
7. In the A Page Size list, click the size of the original as specified in the application. In this case, click 10"x12".
8. Select and click a roll paper in the L Paper Source list.
9. Select the width of the loaded roll in the M Roll Paper Width list—in this case, 10-in. Roll (254.0mm).
10. Specify additional printing conditions.For details on available printing conditions, see "Printer Driver Settings (Windows) →P.202 "
11. Confirm the print settings and print as desired.
Note• For instructions on confirming print settings, see "Confirming Print Settings (Windows) →P.206 "
Printing Photos and Images (Mac OS X)This topic describes how to print photos based on the following example.
• Document: Photo image from a digital camera• Page size: 10×12 inches (254.0×304.8 mm)• Paper: Roll paper• Paper type: Premium Glossy Paper 200• Roll paper width: 10 inches (254.0 mm)
Working With Various Print Jobs > Printing Photos and Images >
iPF815 Printing Photos and Images (Mac OS X)
2
33
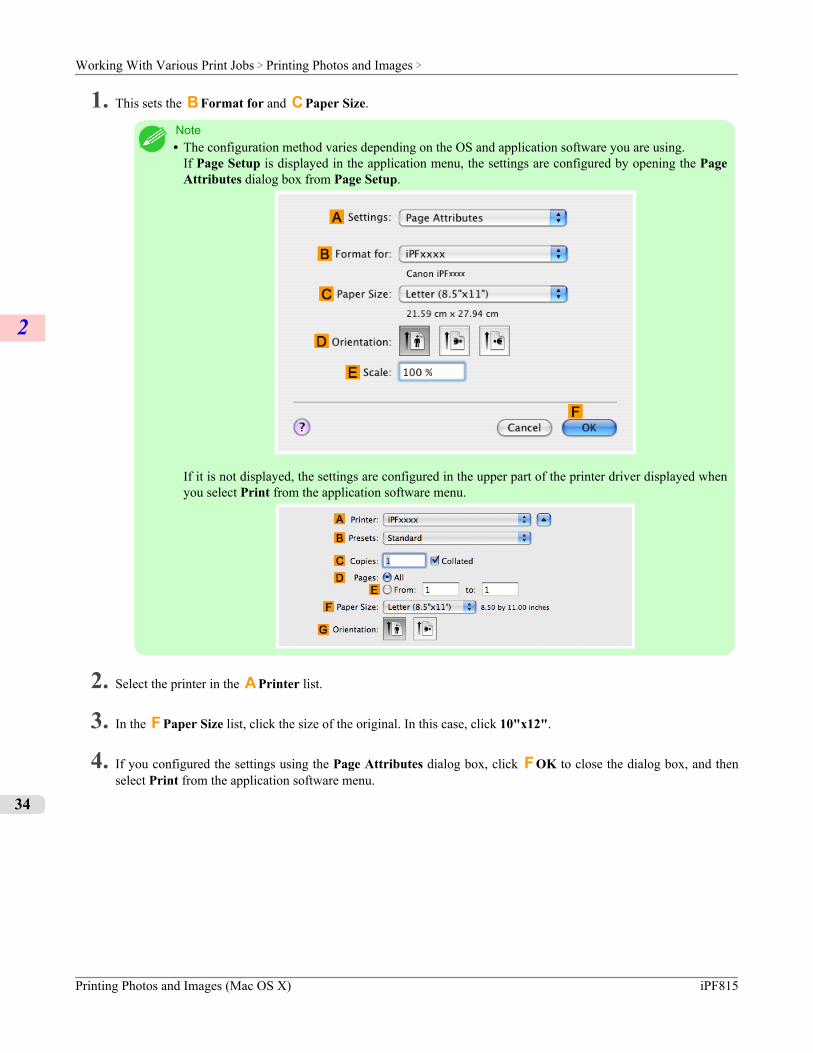
1. This sets the B Format for and C Paper Size.
Note• The configuration method varies depending on the OS and application software you are using.
If Page Setup is displayed in the application menu, the settings are configured by opening the PageAttributes dialog box from Page Setup.
If it is not displayed, the settings are configured in the upper part of the printer driver displayed whenyou select Print from the application software menu.
2. Select the printer in the A Printer list.
3. In the F Paper Size list, click the size of the original. In this case, click 10"x12".
4. If you configured the settings using the Page Attributes dialog box, click F OK to close the dialog box, and thenselect Print from the application software menu.
Working With Various Print Jobs > Printing Photos and Images >
Printing Photos and Images (Mac OS X) iPF815
2
34
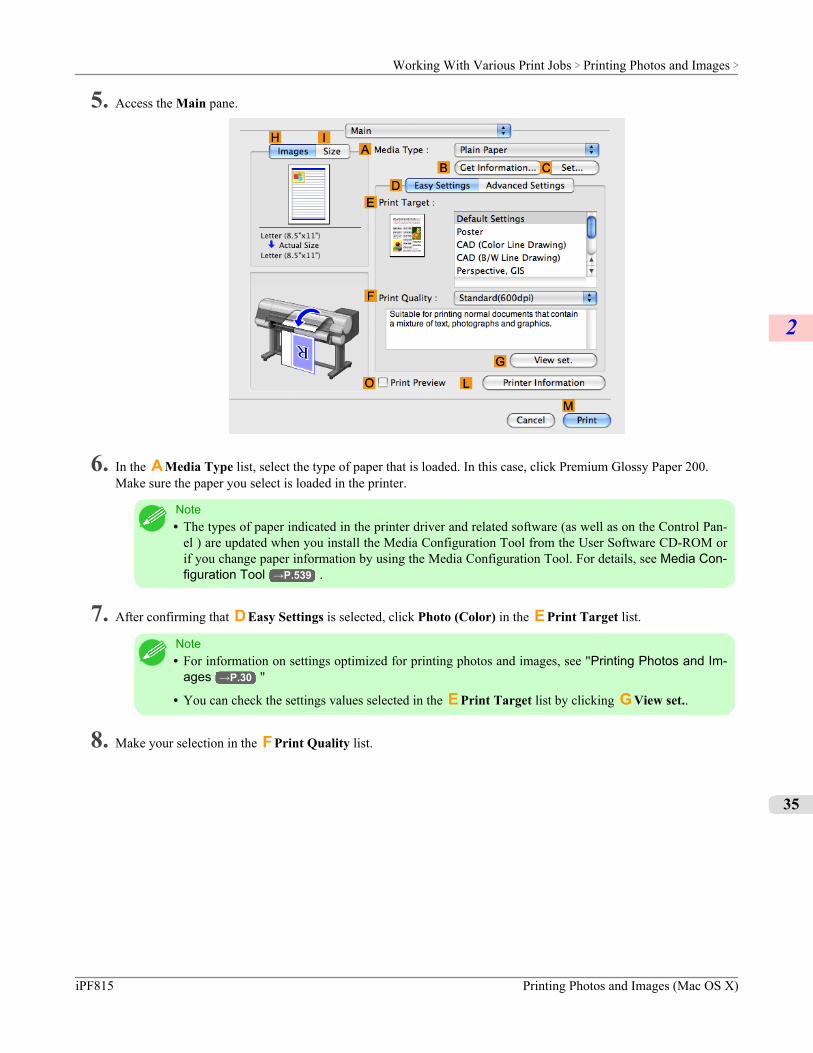
5. Access the Main pane.
6. In the A Media Type list, select the type of paper that is loaded. In this case, click Premium Glossy Paper 200.Make sure the paper you select is loaded in the printer.
Note• The types of paper indicated in the printer driver and related software (as well as on the Control Pan-
el ) are updated when you install the Media Configuration Tool from the User Software CD-ROM orif you change paper information by using the Media Configuration Tool. For details, see Media Con-figuration Tool →P.539 .
7. After confirming that D Easy Settings is selected, click Photo (Color) in the E Print Target list.
Note• For information on settings optimized for printing photos and images, see "Printing Photos and Im-
ages →P.30 "
• You can check the settings values selected in the E Print Target list by clicking G View set..
8. Make your selection in the F Print Quality list.
Working With Various Print Jobs > Printing Photos and Images >
iPF815 Printing Photos and Images (Mac OS X)
2
35
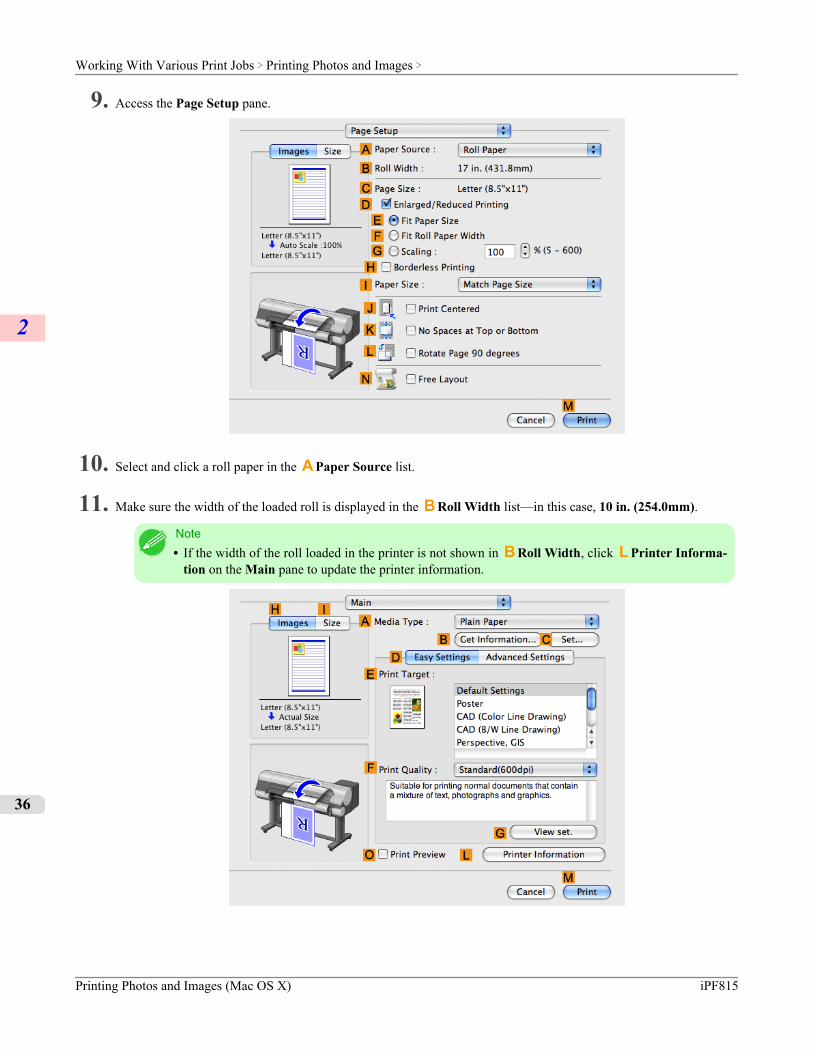
9. Access the Page Setup pane.
10. Select and click a roll paper in the A Paper Source list.
11. Make sure the width of the loaded roll is displayed in the B Roll Width list—in this case, 10 in. (254.0mm).
Note• If the width of the roll loaded in the printer is not shown in B Roll Width, click L Printer Informa-
tion on the Main pane to update the printer information.
Working With Various Print Jobs > Printing Photos and Images >
Printing Photos and Images (Mac OS X) iPF815
2
36
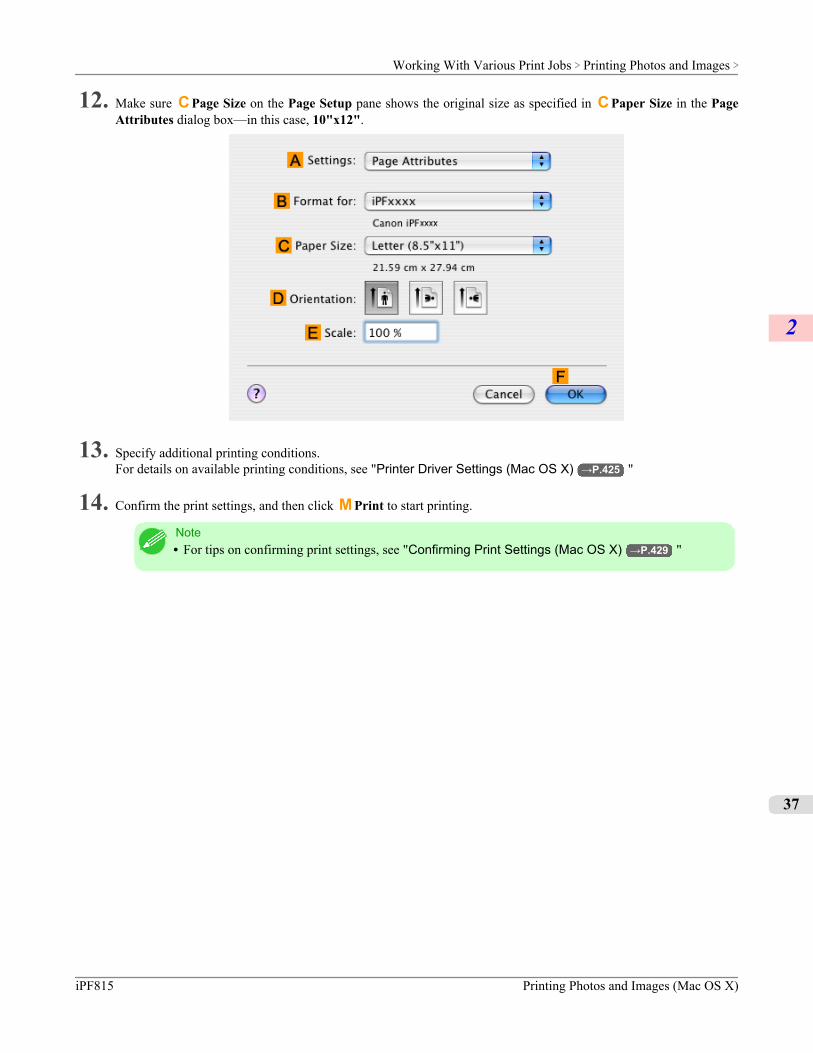
12. Make sure C Page Size on the Page Setup pane shows the original size as specified in C Paper Size in the PageAttributes dialog box—in this case, 10"x12".
13. Specify additional printing conditions.For details on available printing conditions, see "Printer Driver Settings (Mac OS X) →P.425 "
14. Confirm the print settings, and then click M Print to start printing.
Note• For tips on confirming print settings, see "Confirming Print Settings (Mac OS X) →P.429 "
Working With Various Print Jobs > Printing Photos and Images >
iPF815 Printing Photos and Images (Mac OS X)
2
37
Printing Office DocumentsPrinting Office Documents ................................................................................................................................ 38
Printing Office Documents (Windows) .......................................................................................................... 39Printing Office Documents (Mac OS X) ........................................................................................................ 40
Printing Office DocumentsPrinting is easy when you simply choose the type of original to print.
Easy SettingsSimply choose the printing application in the list for optimal printing results.
Print TargetChoose presets that match the type of document to be printed.
Print targets for office documents
Print Target Description
Office Document Settings optimized for clear printing of office documentssuch as handouts.
Note• You can check the settings values for each print target by clicking View Settings.• You can also fine-tune these values as needed. (Advanced Settings)
For details on Advanced Settings, see "Giving Priority to Particular Graphic Elements and Colors forPrinting →P.55 "
Print QualityChoose the print quality.The printing mode is determined by a combination of the print quality and resolution.
Print Quality Description
Highest A setting for printing at the highest resolution when quality is most important.Printing takes longer and consumes more ink than in other modes, but this modeoffers superior printing quality.
High Choose this setting to print at high resolution when quality is most important.Printing takes longer and consumes more ink than in Standard or Draft modes,but this mode offers exceptional printing quality.
Standard Choose this setting to print at standard resolution when quality and speed are bothimportant.Printing takes less time than in Highest or High mode.
Draft Choose this setting to print faster.Printing in draft mode can help you work more efficiently when checking layouts.
Working With Various Print Jobs > Printing Office Documents >
Printing Office Documents iPF815
2
38
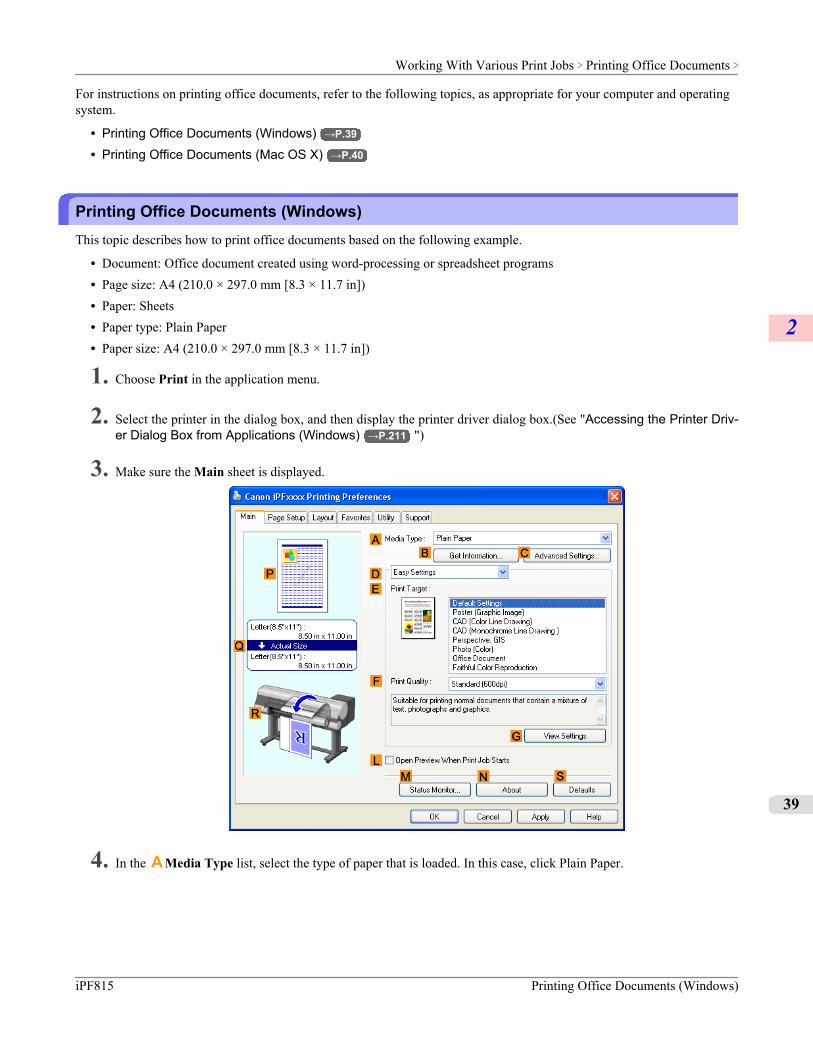
For instructions on printing office documents, refer to the following topics, as appropriate for your computer and operatingsystem.
• Printing Office Documents (Windows) →P.39
• Printing Office Documents (Mac OS X) →P.40
Printing Office Documents (Windows)This topic describes how to print office documents based on the following example.
• Document: Office document created using word-processing or spreadsheet programs• Page size: A4 (210.0 × 297.0 mm [8.3 × 11.7 in])• Paper: Sheets• Paper type: Plain Paper• Paper size: A4 (210.0 × 297.0 mm [8.3 × 11.7 in])
1. Choose Print in the application menu.
2. Select the printer in the dialog box, and then display the printer driver dialog box.(See "Accessing the Printer Driv-er Dialog Box from Applications (Windows) →P.211 ")
3. Make sure the Main sheet is displayed.
4. In the A Media Type list, select the type of paper that is loaded. In this case, click Plain Paper.
Working With Various Print Jobs > Printing Office Documents >
iPF815 Printing Office Documents (Windows)
2
39
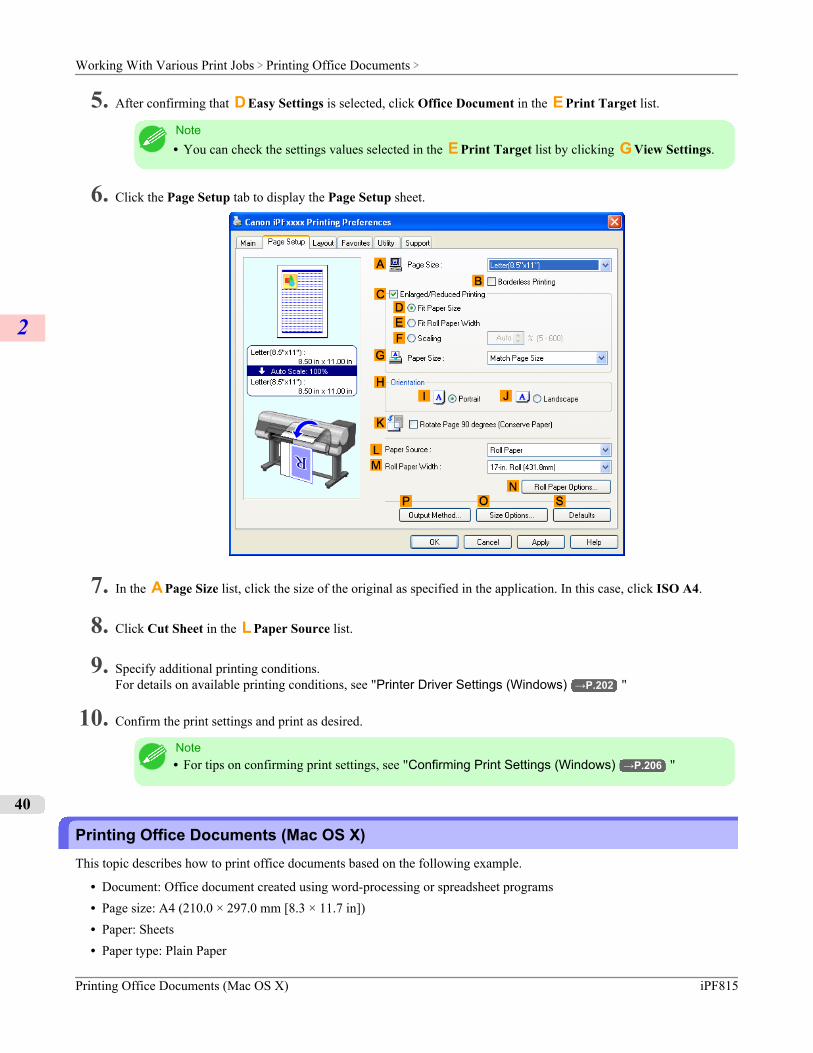
5. After confirming that D Easy Settings is selected, click Office Document in the E Print Target list.
Note• You can check the settings values selected in the E Print Target list by clicking G View Settings.
6. Click the Page Setup tab to display the Page Setup sheet.
7. In the A Page Size list, click the size of the original as specified in the application. In this case, click ISO A4.
8. Click Cut Sheet in the L Paper Source list.
9. Specify additional printing conditions.For details on available printing conditions, see "Printer Driver Settings (Windows) →P.202 "
10. Confirm the print settings and print as desired.
Note• For tips on confirming print settings, see "Confirming Print Settings (Windows) →P.206 "
Printing Office Documents (Mac OS X)This topic describes how to print office documents based on the following example.
• Document: Office document created using word-processing or spreadsheet programs• Page size: A4 (210.0 × 297.0 mm [8.3 × 11.7 in])• Paper: Sheets• Paper type: Plain Paper
Working With Various Print Jobs > Printing Office Documents >
Printing Office Documents (Mac OS X) iPF815
2
40
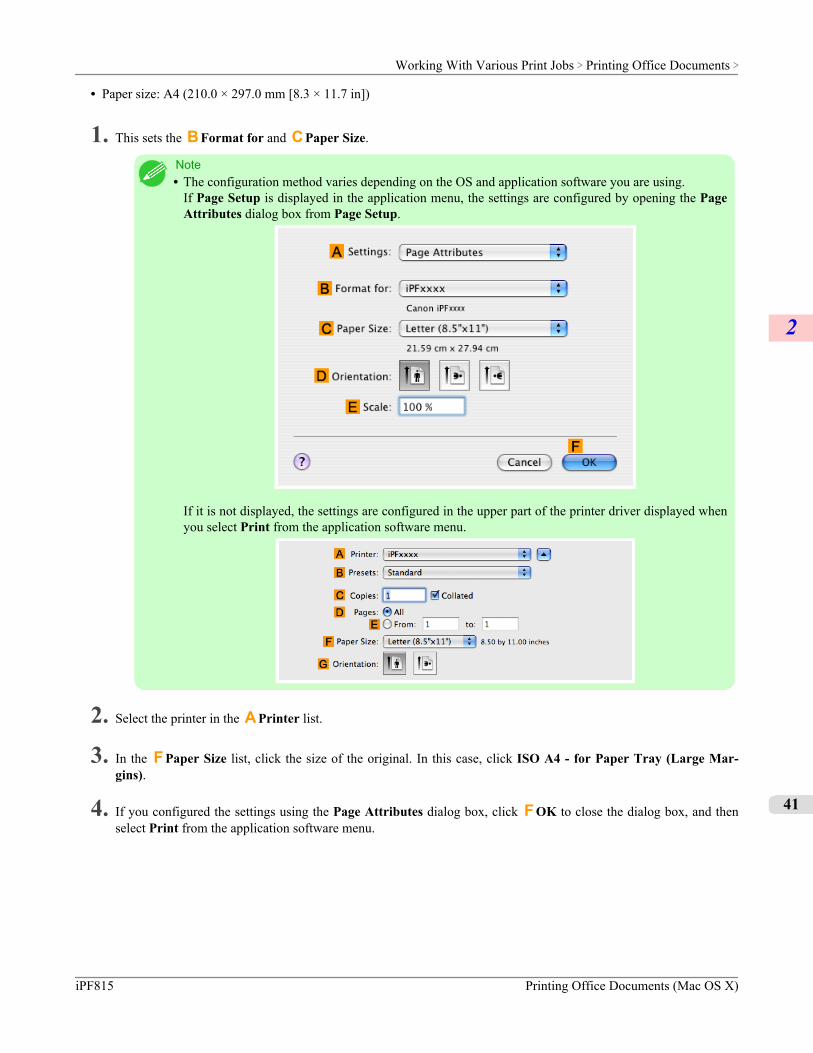
• Paper size: A4 (210.0 × 297.0 mm [8.3 × 11.7 in])
1. This sets the B Format for and C Paper Size.
Note• The configuration method varies depending on the OS and application software you are using.
If Page Setup is displayed in the application menu, the settings are configured by opening the PageAttributes dialog box from Page Setup.
If it is not displayed, the settings are configured in the upper part of the printer driver displayed whenyou select Print from the application software menu.
2. Select the printer in the A Printer list.
3. In the F Paper Size list, click the size of the original. In this case, click ISO A4 - for Paper Tray (Large Mar-gins).
4. If you configured the settings using the Page Attributes dialog box, click F OK to close the dialog box, and thenselect Print from the application software menu.
Working With Various Print Jobs > Printing Office Documents >
iPF815 Printing Office Documents (Mac OS X)
2
41

5. Access the Main pane.
6. In the A Media Type list, select the type of paper that is loaded. In this case, click Plain Paper.
7. After confirming that D Easy Settings is selected, click Office Document in the E Print Target list.
Note• You can check the settings values selected in the E Print Target list by clicking G View set..
8. Make your selection in the F Print Quality list.
Working With Various Print Jobs > Printing Office Documents >
Printing Office Documents (Mac OS X) iPF815
2
42
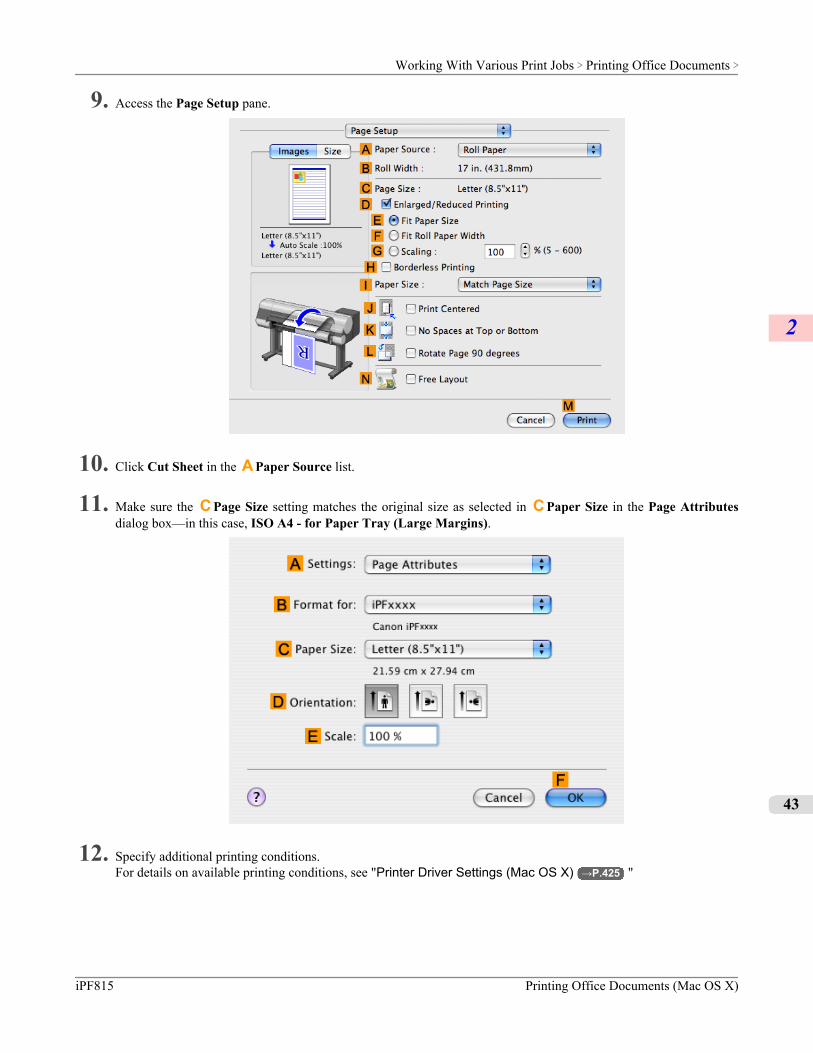
9. Access the Page Setup pane.
10. Click Cut Sheet in the A Paper Source list.
11. Make sure the C Page Size setting matches the original size as selected in C Paper Size in the Page Attributesdialog box—in this case, ISO A4 - for Paper Tray (Large Margins).
12. Specify additional printing conditions.For details on available printing conditions, see "Printer Driver Settings (Mac OS X) →P.425 "
Working With Various Print Jobs > Printing Office Documents >
iPF815 Printing Office Documents (Mac OS X)
2
43
13. Confirm the print settings, and then click M Print to start printing.
Note• For tips on confirming print settings, see "Confirming Print Settings (Mac OS X) →P.429 "
Working With Various Print Jobs > Printing Office Documents >
Printing Office Documents (Mac OS X) iPF815
2
44
Enhanced Printing Options
Adjusting Images 46
Choosing Paper for Printing 64
Printing enlargements or reductions 65
Printing at full size 85
Borderless Printing 100
Printing banners or at other non-standard sizes 115
Tiling and multiple pages per sheet 133
Centering originals 154
Conserving roll paper 167
Using PosterArtist to Compose Originals 181
Checking Images Before Printing 184
Other useful settings 186
Enhanced Printing Options >
iPF815
3
45

Adjusting ImagesAdjusting the Color in the Printer Driver ............................................................................................................ 46
Fine-Tuning Colors of Photos and Images (Windows) ................................................................................. 48Fine-Tuning Colors of Photos and Images (Mac OS X) ................................................................................ 52
Giving Priority to Particular Graphic Elements and Colors for Printing ............................................................. 55Choosing the Document Type and Printing Conditions (Windows) .............................................................. 58Choosing the Document Type and Printing Conditions (Mac OS X) ............................................................ 61
Adjusting the Color in the Printer DriverColor settings specified in the application for your documents are essentially given priority over other settings for each printjob, but further color adjustment is possible in the printer driver.
Color ModeChoose how the printer driver processes color, as desired.The available options vary depending on the color mode.
Color Mode Description Color Adjustment
Color Print in color. You can adjust the color balance and color-matching method.
Monochrome Print in grayscale. You can adjust the color balance.
Color (CAD) A color mode optimized for linedrawings (2D-CAD). Lines inred, yellow, and other colors areprinted especially clearly.
You can adjust the color balance.
Monochrome (BK ink) A color mode for printing linedrawings. Only Black ink is used.
You can adjust the color balance.
Monochrome Bitmap Print in a color mode for CAD,using Color Ink, with all non-white portions printed in black.
No color adjustment is supported.
No color correction (*1) Prints without performing color-matching in the printer driver.
You can adjust the color balance.
*1: If No color correction is selected, the Matching sheet / Matching pane is not displayed.
Color AdjustmentYou can adjust colors separately for images, graphics, and text documents.
Adjustment Item Description
Cyan Fine-tune color tones by adjusting the levels of Cyan, Magenta, and Yellow.
Magenta
Yellow
Gray Tone Adjust the grayscale, in a range from cool, blue tones to warm, red tones.
Brightness Adjust the brightness of printed images while keeping the darkest and lightest por-tions intact.
Enhanced Printing Options > Adjusting Images >
Adjusting the Color in the Printer Driver iPF815
3
46
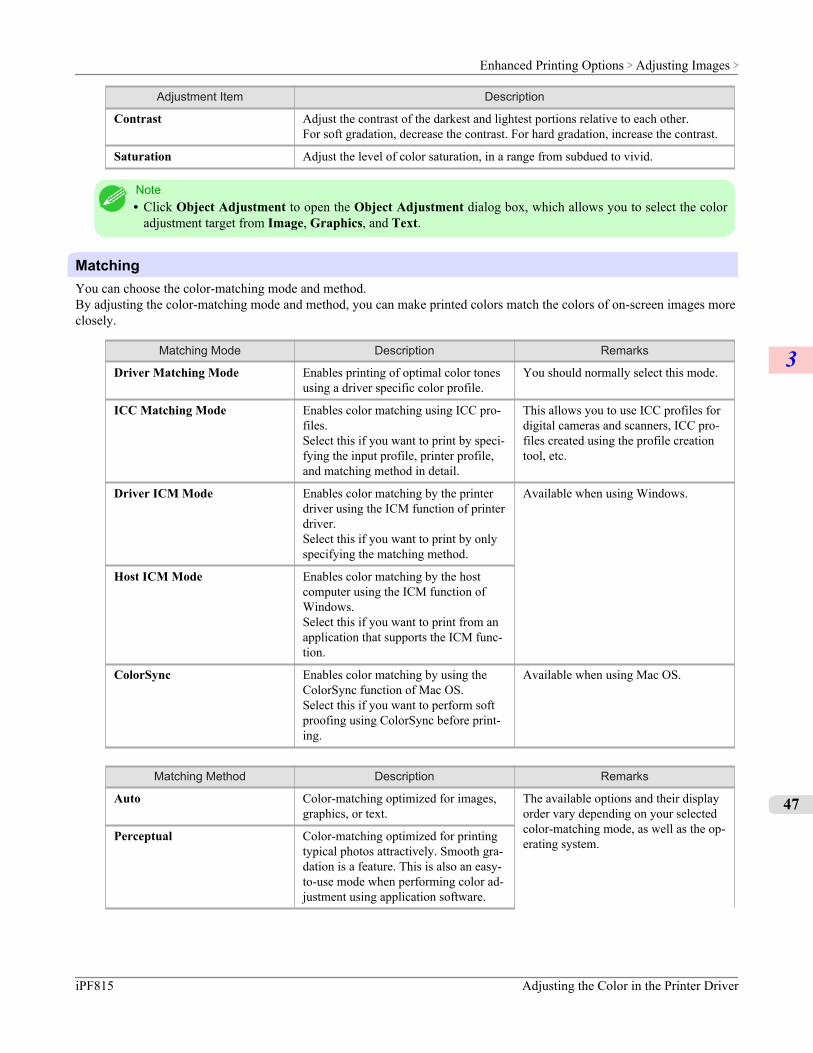
Adjustment Item Description
Contrast Adjust the contrast of the darkest and lightest portions relative to each other.For soft gradation, decrease the contrast. For hard gradation, increase the contrast.
Saturation Adjust the level of color saturation, in a range from subdued to vivid.
Note• Click Object Adjustment to open the Object Adjustment dialog box, which allows you to select the color
adjustment target from Image, Graphics, and Text.
MatchingYou can choose the color-matching mode and method.By adjusting the color-matching mode and method, you can make printed colors match the colors of on-screen images moreclosely.
Matching Mode Description Remarks
Driver Matching Mode Enables printing of optimal color tonesusing a driver specific color profile.
You should normally select this mode.
ICC Matching Mode Enables color matching using ICC pro-files.Select this if you want to print by speci-fying the input profile, printer profile,and matching method in detail.
This allows you to use ICC profiles fordigital cameras and scanners, ICC pro-files created using the profile creationtool, etc.
Driver ICM Mode Enables color matching by the printerdriver using the ICM function of printerdriver.Select this if you want to print by onlyspecifying the matching method.
Available when using Windows.
Host ICM Mode Enables color matching by the hostcomputer using the ICM function ofWindows.Select this if you want to print from anapplication that supports the ICM func-tion.
ColorSync Enables color matching by using theColorSync function of Mac OS.Select this if you want to perform softproofing using ColorSync before print-ing.
Available when using Mac OS.
Matching Method Description Remarks
Auto Color-matching optimized for images,graphics, or text.
The available options and their displayorder vary depending on your selectedcolor-matching mode, as well as the op-erating system.Perceptual Color-matching optimized for printing
typical photos attractively. Smooth gra-dation is a feature. This is also an easy-to-use mode when performing color ad-justment using application software.
Enhanced Printing Options > Adjusting Images >
iPF815 Adjusting the Color in the Printer Driver
3
47
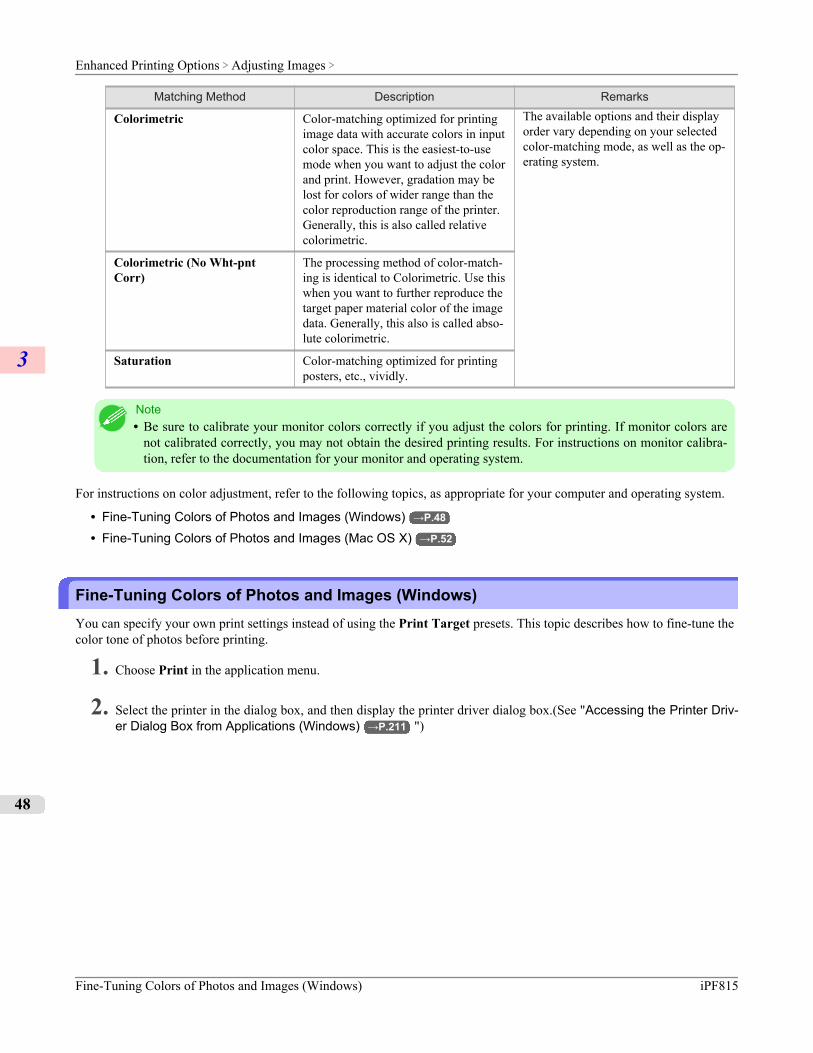
Matching Method Description Remarks
Colorimetric Color-matching optimized for printingimage data with accurate colors in inputcolor space. This is the easiest-to-usemode when you want to adjust the colorand print. However, gradation may belost for colors of wider range than thecolor reproduction range of the printer.Generally, this is also called relativecolorimetric.
The available options and their displayorder vary depending on your selectedcolor-matching mode, as well as the op-erating system.
Colorimetric (No Wht-pntCorr)
The processing method of color-match-ing is identical to Colorimetric. Use thiswhen you want to further reproduce thetarget paper material color of the imagedata. Generally, this also is called abso-lute colorimetric.
Saturation Color-matching optimized for printingposters, etc., vividly.
Note• Be sure to calibrate your monitor colors correctly if you adjust the colors for printing. If monitor colors are
not calibrated correctly, you may not obtain the desired printing results. For instructions on monitor calibra-tion, refer to the documentation for your monitor and operating system.
For instructions on color adjustment, refer to the following topics, as appropriate for your computer and operating system.
• Fine-Tuning Colors of Photos and Images (Windows) →P.48
• Fine-Tuning Colors of Photos and Images (Mac OS X) →P.52
Fine-Tuning Colors of Photos and Images (Windows)You can specify your own print settings instead of using the Print Target presets. This topic describes how to fine-tune thecolor tone of photos before printing.
1. Choose Print in the application menu.
2. Select the printer in the dialog box, and then display the printer driver dialog box.(See "Accessing the Printer Driv-er Dialog Box from Applications (Windows) →P.211 ")
Enhanced Printing Options > Adjusting Images >
Fine-Tuning Colors of Photos and Images (Windows) iPF815
3
48

3. Make sure the Main sheet is displayed.
4. In the A Media Type list, select the type of paper that is loaded.
5. Click D Advanced Settings to switch the print mode.
6. Click Color in the G Color Mode list.
Enhanced Printing Options > Adjusting Images >
iPF815 Fine-Tuning Colors of Photos and Images (Windows)
3
49
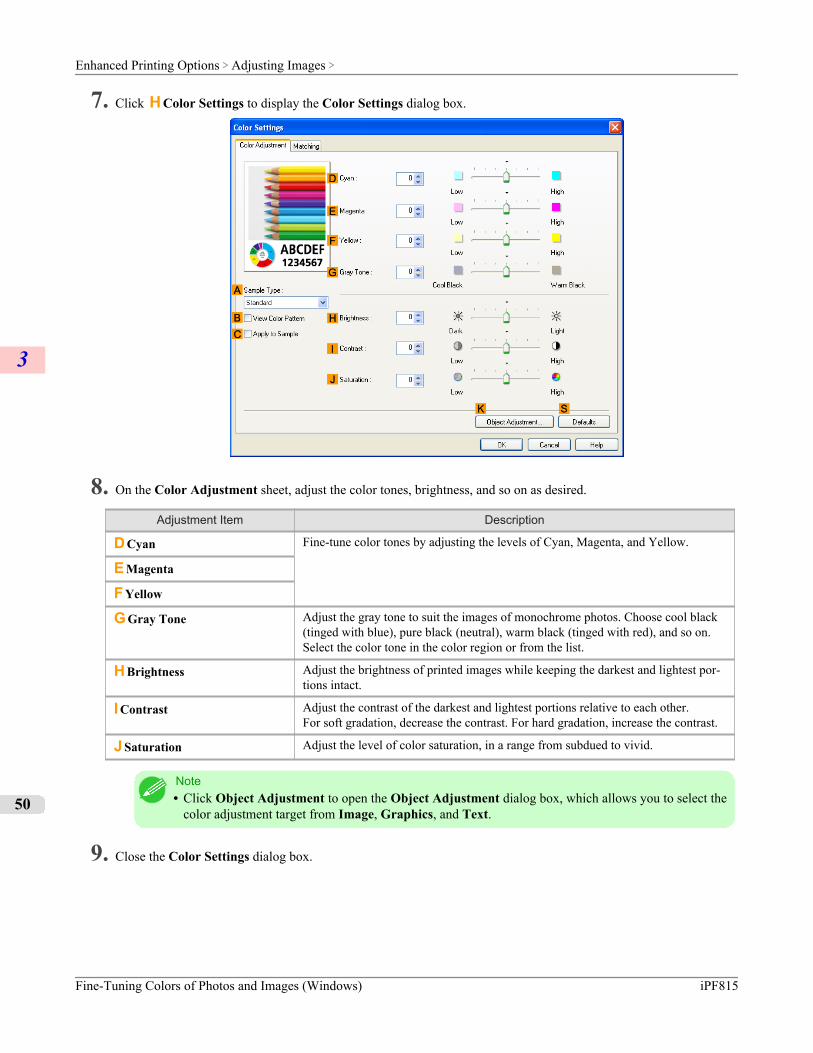
7. Click H Color Settings to display the Color Settings dialog box.
8. On the Color Adjustment sheet, adjust the color tones, brightness, and so on as desired.
Adjustment Item Description
D Cyan Fine-tune color tones by adjusting the levels of Cyan, Magenta, and Yellow.
E Magenta
F Yellow
G Gray Tone Adjust the gray tone to suit the images of monochrome photos. Choose cool black(tinged with blue), pure black (neutral), warm black (tinged with red), and so on.Select the color tone in the color region or from the list.
H Brightness Adjust the brightness of printed images while keeping the darkest and lightest por-tions intact.
I Contrast Adjust the contrast of the darkest and lightest portions relative to each other.For soft gradation, decrease the contrast. For hard gradation, increase the contrast.
J Saturation Adjust the level of color saturation, in a range from subdued to vivid.
Note• Click Object Adjustment to open the Object Adjustment dialog box, which allows you to select the
color adjustment target from Image, Graphics, and Text.
9. Close the Color Settings dialog box.
Enhanced Printing Options > Adjusting Images >
Fine-Tuning Colors of Photos and Images (Windows) iPF815
3
50
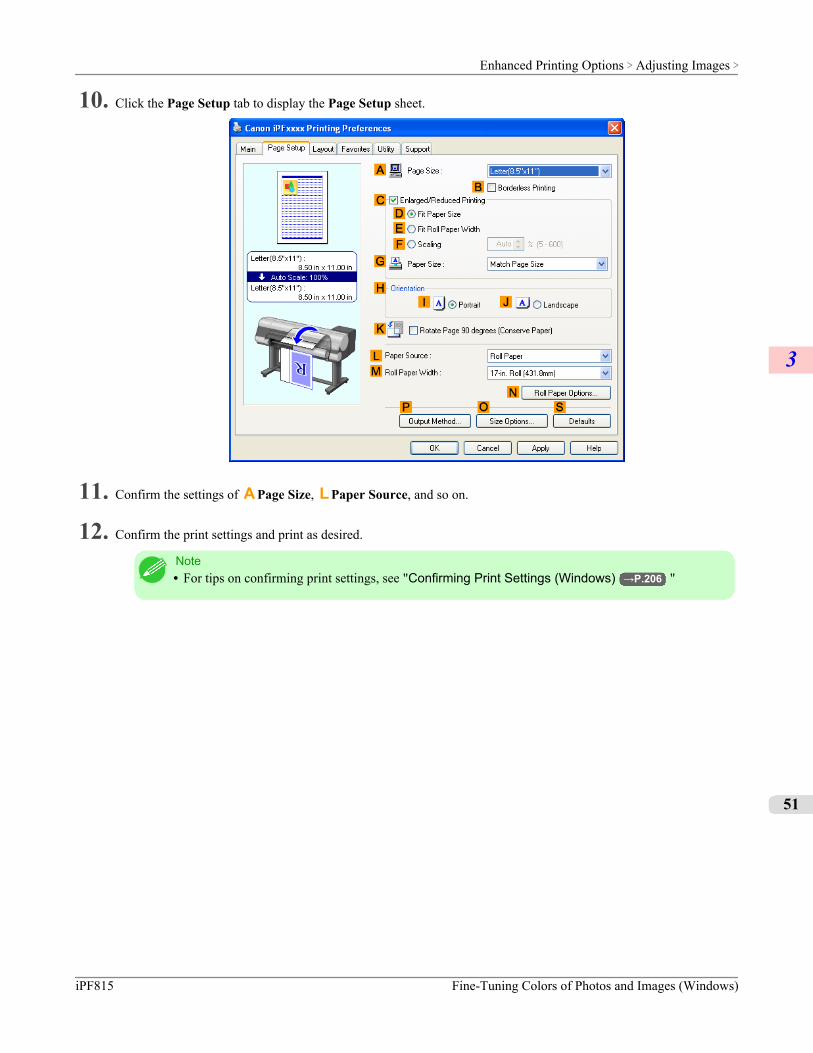
10. Click the Page Setup tab to display the Page Setup sheet.
11. Confirm the settings of A Page Size, L Paper Source, and so on.
12. Confirm the print settings and print as desired.
Note• For tips on confirming print settings, see "Confirming Print Settings (Windows) →P.206 "
Enhanced Printing Options > Adjusting Images >
iPF815 Fine-Tuning Colors of Photos and Images (Windows)
3
51
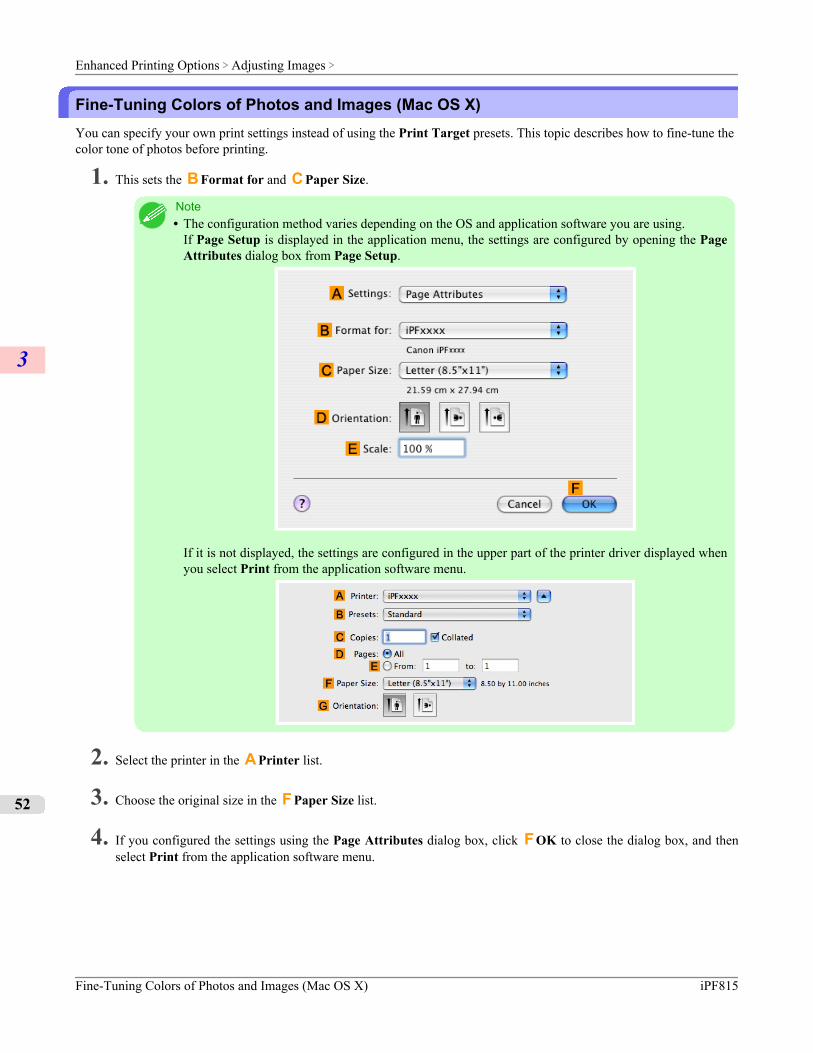
Fine-Tuning Colors of Photos and Images (Mac OS X)You can specify your own print settings instead of using the Print Target presets. This topic describes how to fine-tune thecolor tone of photos before printing.
1. This sets the B Format for and C Paper Size.
Note• The configuration method varies depending on the OS and application software you are using.
If Page Setup is displayed in the application menu, the settings are configured by opening the PageAttributes dialog box from Page Setup.
If it is not displayed, the settings are configured in the upper part of the printer driver displayed whenyou select Print from the application software menu.
2. Select the printer in the A Printer list.
3. Choose the original size in the F Paper Size list.
4. If you configured the settings using the Page Attributes dialog box, click F OK to close the dialog box, and thenselect Print from the application software menu.
Enhanced Printing Options > Adjusting Images >
Fine-Tuning Colors of Photos and Images (Mac OS X) iPF815
3
52
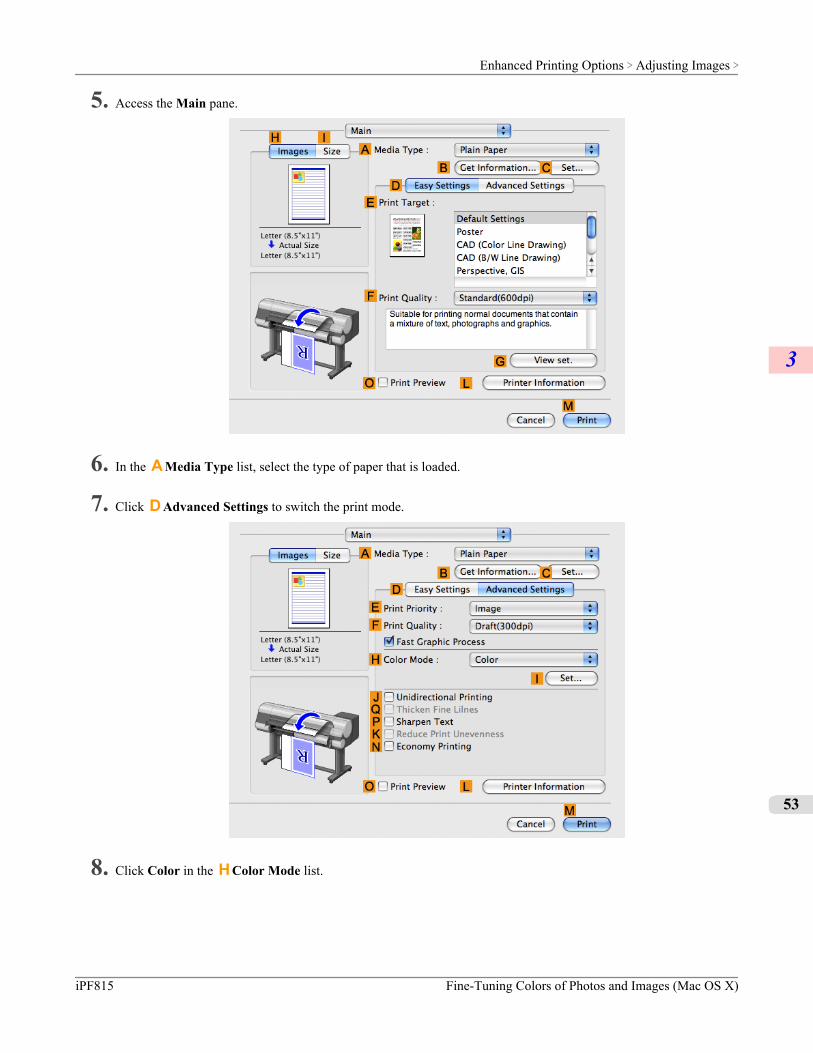
5. Access the Main pane.
6. In the A Media Type list, select the type of paper that is loaded.
7. Click D Advanced Settings to switch the print mode.
8. Click Color in the H Color Mode list.
Enhanced Printing Options > Adjusting Images >
iPF815 Fine-Tuning Colors of Photos and Images (Mac OS X)
3
53
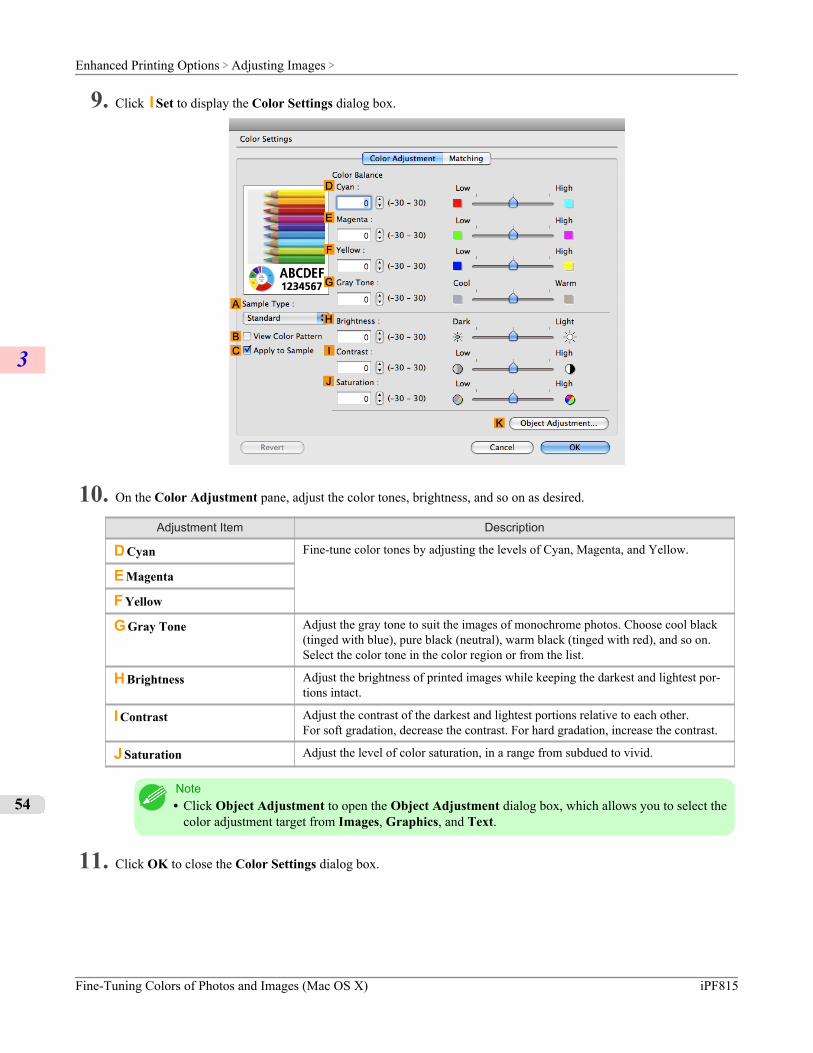
9. Click I Set to display the Color Settings dialog box.
10. On the Color Adjustment pane, adjust the color tones, brightness, and so on as desired.
Adjustment Item Description
D Cyan Fine-tune color tones by adjusting the levels of Cyan, Magenta, and Yellow.
E Magenta
F Yellow
G Gray Tone Adjust the gray tone to suit the images of monochrome photos. Choose cool black(tinged with blue), pure black (neutral), warm black (tinged with red), and so on.Select the color tone in the color region or from the list.
H Brightness Adjust the brightness of printed images while keeping the darkest and lightest por-tions intact.
I Contrast Adjust the contrast of the darkest and lightest portions relative to each other.For soft gradation, decrease the contrast. For hard gradation, increase the contrast.
J Saturation Adjust the level of color saturation, in a range from subdued to vivid.
Note• Click Object Adjustment to open the Object Adjustment dialog box, which allows you to select the
color adjustment target from Images, Graphics, and Text.
11. Click OK to close the Color Settings dialog box.
Enhanced Printing Options > Adjusting Images >
Fine-Tuning Colors of Photos and Images (Mac OS X) iPF815
3
54
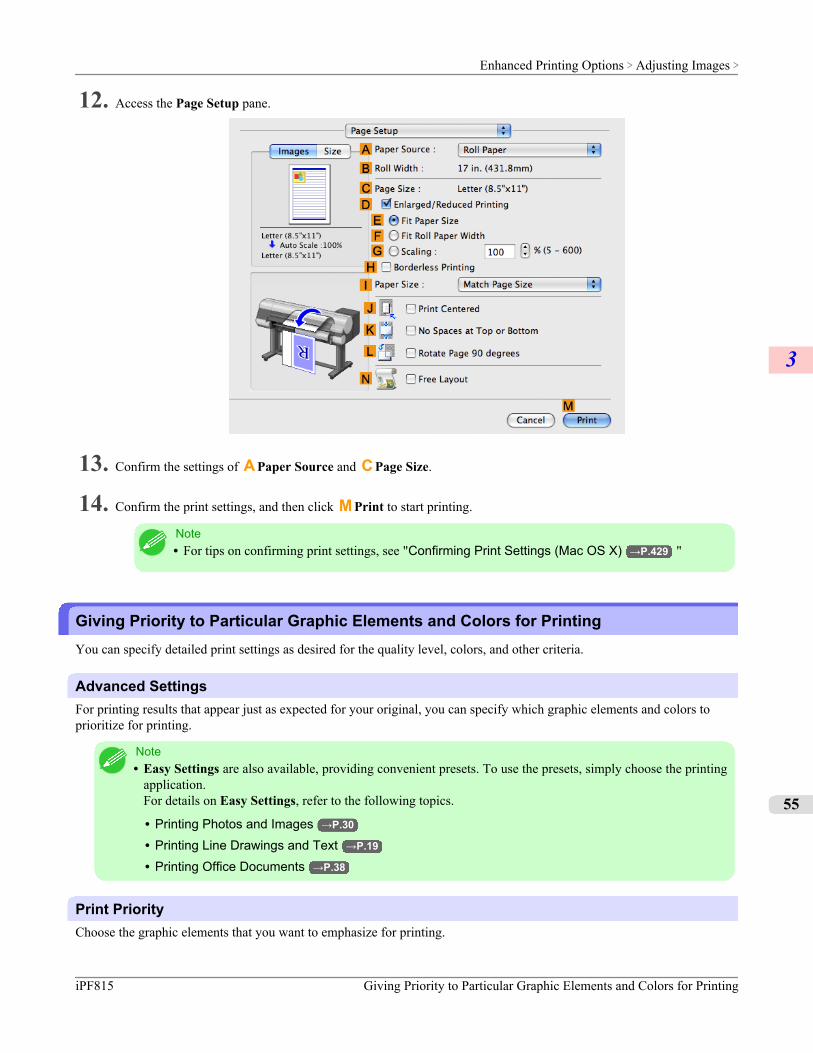
12. Access the Page Setup pane.
13. Confirm the settings of A Paper Source and C Page Size.
14. Confirm the print settings, and then click M Print to start printing.
Note• For tips on confirming print settings, see "Confirming Print Settings (Mac OS X) →P.429 "
Giving Priority to Particular Graphic Elements and Colors for PrintingYou can specify detailed print settings as desired for the quality level, colors, and other criteria.
Advanced SettingsFor printing results that appear just as expected for your original, you can specify which graphic elements and colors toprioritize for printing.
Note• Easy Settings are also available, providing convenient presets. To use the presets, simply choose the printing
application.For details on Easy Settings, refer to the following topics.
• Printing Photos and Images →P.30
• Printing Line Drawings and Text →P.19
• Printing Office Documents →P.38
Print PriorityChoose the graphic elements that you want to emphasize for printing.
Enhanced Printing Options > Adjusting Images >
iPF815 Giving Priority to Particular Graphic Elements and Colors for Printing
3
55
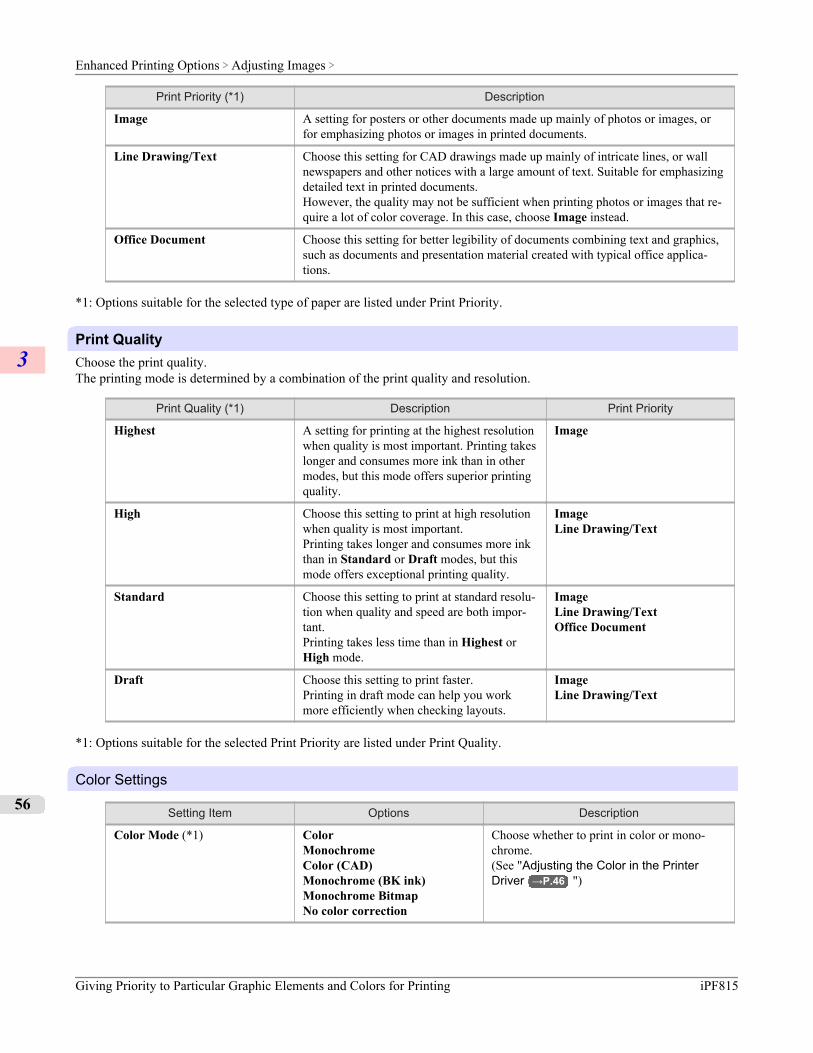
Print Priority (*1) Description
Image A setting for posters or other documents made up mainly of photos or images, orfor emphasizing photos or images in printed documents.
Line Drawing/Text Choose this setting for CAD drawings made up mainly of intricate lines, or wallnewspapers and other notices with a large amount of text. Suitable for emphasizingdetailed text in printed documents.However, the quality may not be sufficient when printing photos or images that re-quire a lot of color coverage. In this case, choose Image instead.
Office Document Choose this setting for better legibility of documents combining text and graphics,such as documents and presentation material created with typical office applica-tions.
*1: Options suitable for the selected type of paper are listed under Print Priority.
Print QualityChoose the print quality.The printing mode is determined by a combination of the print quality and resolution.
Print Quality (*1) Description Print Priority
Highest A setting for printing at the highest resolutionwhen quality is most important. Printing takeslonger and consumes more ink than in othermodes, but this mode offers superior printingquality.
Image
High Choose this setting to print at high resolutionwhen quality is most important.Printing takes longer and consumes more inkthan in Standard or Draft modes, but thismode offers exceptional printing quality.
ImageLine Drawing/Text
Standard Choose this setting to print at standard resolu-tion when quality and speed are both impor-tant.Printing takes less time than in Highest orHigh mode.
ImageLine Drawing/TextOffice Document
Draft Choose this setting to print faster.Printing in draft mode can help you workmore efficiently when checking layouts.
ImageLine Drawing/Text
*1: Options suitable for the selected Print Priority are listed under Print Quality.
Color Settings
Setting Item Options Description
Color Mode (*1) ColorMonochromeColor (CAD)Monochrome (BK ink)Monochrome BitmapNo color correction
Choose whether to print in color or mono-chrome.(See "Adjusting the Color in the PrinterDriver →P.46 ")
Enhanced Printing Options > Adjusting Images >
Giving Priority to Particular Graphic Elements and Colors for Printing iPF815
3
56
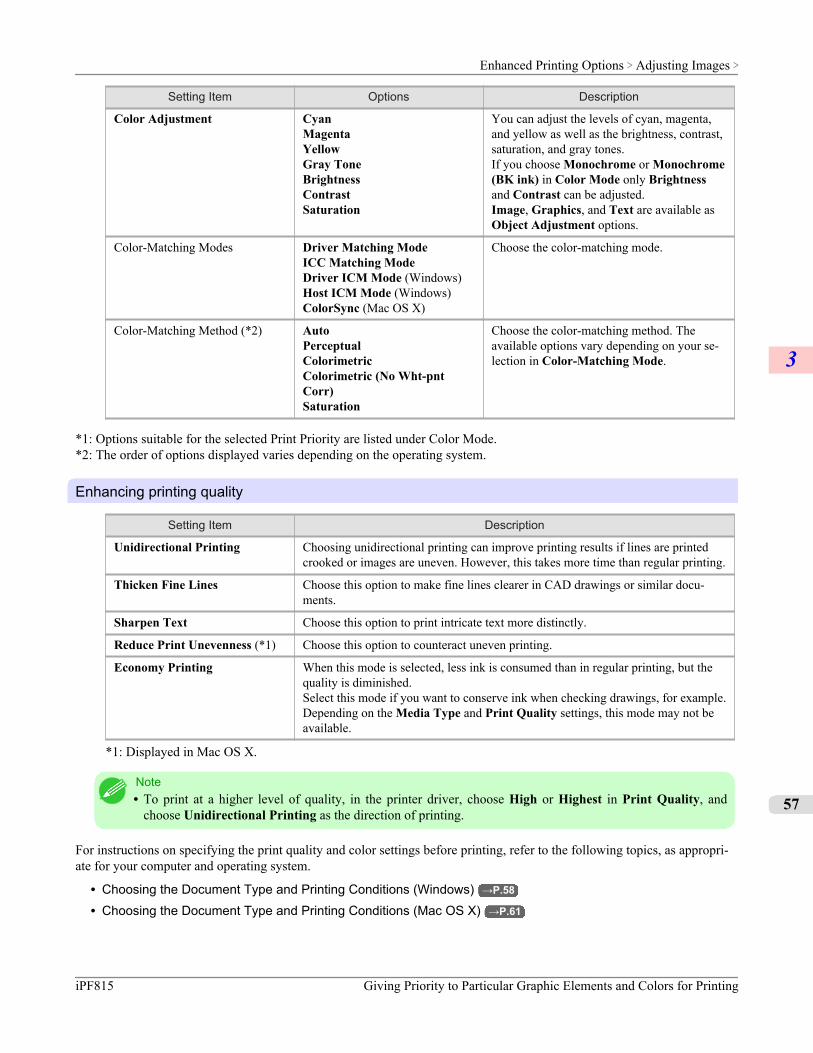
Setting Item Options Description
Color Adjustment CyanMagentaYellowGray ToneBrightnessContrastSaturation
You can adjust the levels of cyan, magenta,and yellow as well as the brightness, contrast,saturation, and gray tones.If you choose Monochrome or Monochrome(BK ink) in Color Mode only Brightnessand Contrast can be adjusted.Image, Graphics, and Text are available asObject Adjustment options.
Color-Matching Modes Driver Matching ModeICC Matching ModeDriver ICM Mode (Windows)Host ICM Mode (Windows)ColorSync (Mac OS X)
Choose the color-matching mode.
Color-Matching Method (*2) AutoPerceptualColorimetricColorimetric (No Wht-pntCorr)Saturation
Choose the color-matching method. Theavailable options vary depending on your se-lection in Color-Matching Mode.
*1: Options suitable for the selected Print Priority are listed under Color Mode.*2: The order of options displayed varies depending on the operating system.
Enhancing printing quality
Setting Item Description
Unidirectional Printing Choosing unidirectional printing can improve printing results if lines are printedcrooked or images are uneven. However, this takes more time than regular printing.
Thicken Fine Lines Choose this option to make fine lines clearer in CAD drawings or similar docu-ments.
Sharpen Text Choose this option to print intricate text more distinctly.
Reduce Print Unevenness (*1) Choose this option to counteract uneven printing.
Economy Printing When this mode is selected, less ink is consumed than in regular printing, but thequality is diminished.Select this mode if you want to conserve ink when checking drawings, for example.Depending on the Media Type and Print Quality settings, this mode may not beavailable.
*1: Displayed in Mac OS X.
Note• To print at a higher level of quality, in the printer driver, choose High or Highest in Print Quality, and
choose Unidirectional Printing as the direction of printing.
For instructions on specifying the print quality and color settings before printing, refer to the following topics, as appropri-ate for your computer and operating system.
• Choosing the Document Type and Printing Conditions (Windows) →P.58
• Choosing the Document Type and Printing Conditions (Mac OS X) →P.61
Enhanced Printing Options > Adjusting Images >
iPF815 Giving Priority to Particular Graphic Elements and Colors for Printing
3
57
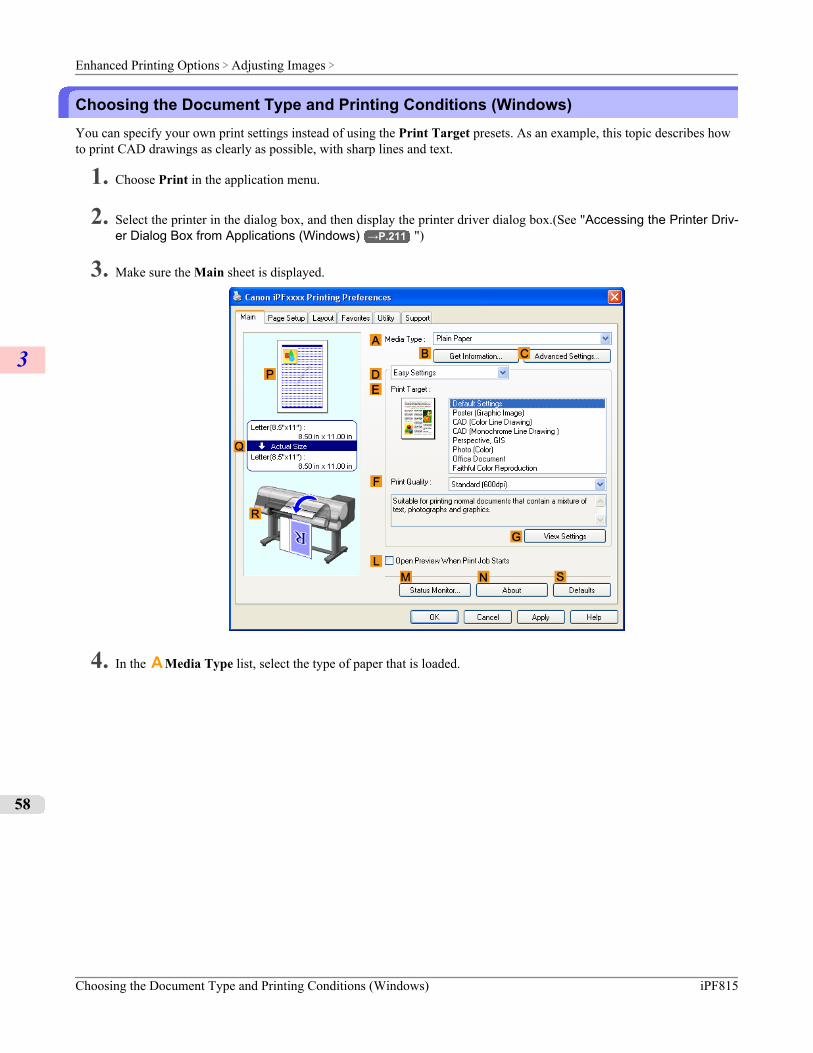
Choosing the Document Type and Printing Conditions (Windows)You can specify your own print settings instead of using the Print Target presets. As an example, this topic describes howto print CAD drawings as clearly as possible, with sharp lines and text.
1. Choose Print in the application menu.
2. Select the printer in the dialog box, and then display the printer driver dialog box.(See "Accessing the Printer Driv-er Dialog Box from Applications (Windows) →P.211 ")
3. Make sure the Main sheet is displayed.
4. In the A Media Type list, select the type of paper that is loaded.
Enhanced Printing Options > Adjusting Images >
Choosing the Document Type and Printing Conditions (Windows) iPF815
3
58
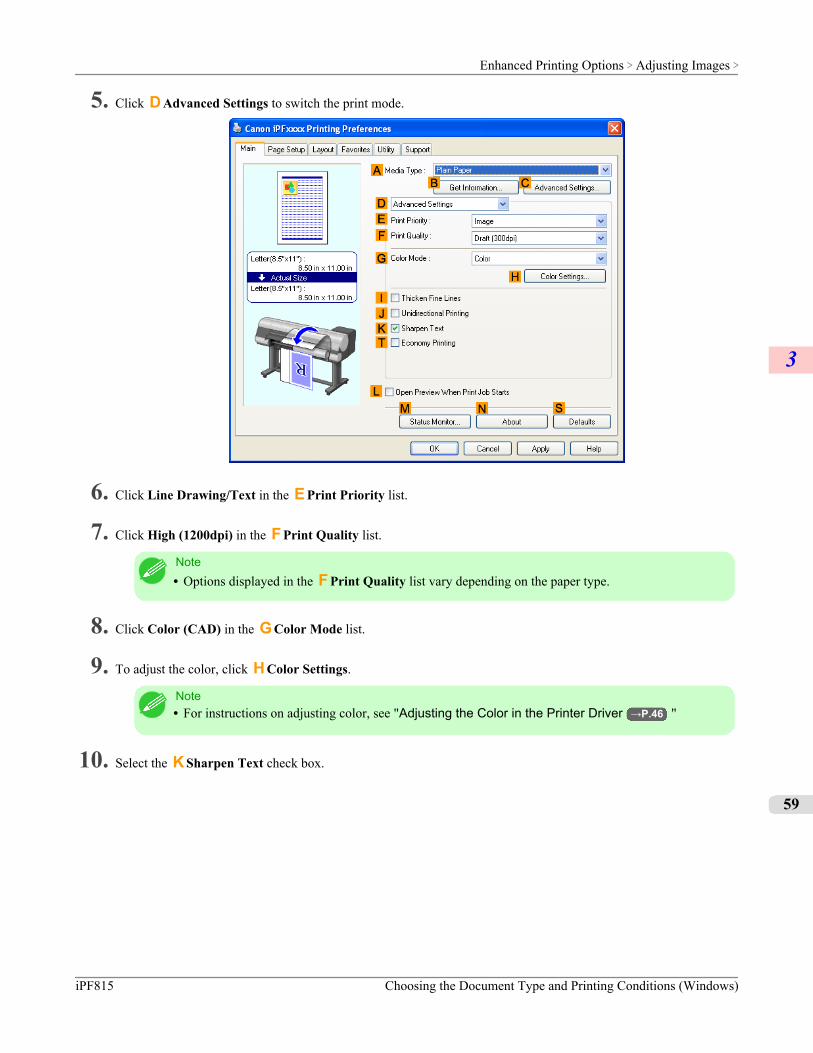
5. Click D Advanced Settings to switch the print mode.
6. Click Line Drawing/Text in the E Print Priority list.
7. Click High (1200dpi) in the F Print Quality list.
Note• Options displayed in the F Print Quality list vary depending on the paper type.
8. Click Color (CAD) in the G Color Mode list.
9. To adjust the color, click H Color Settings.
Note• For instructions on adjusting color, see "Adjusting the Color in the Printer Driver →P.46 "
10. Select the K Sharpen Text check box.
Enhanced Printing Options > Adjusting Images >
iPF815 Choosing the Document Type and Printing Conditions (Windows)
3
59
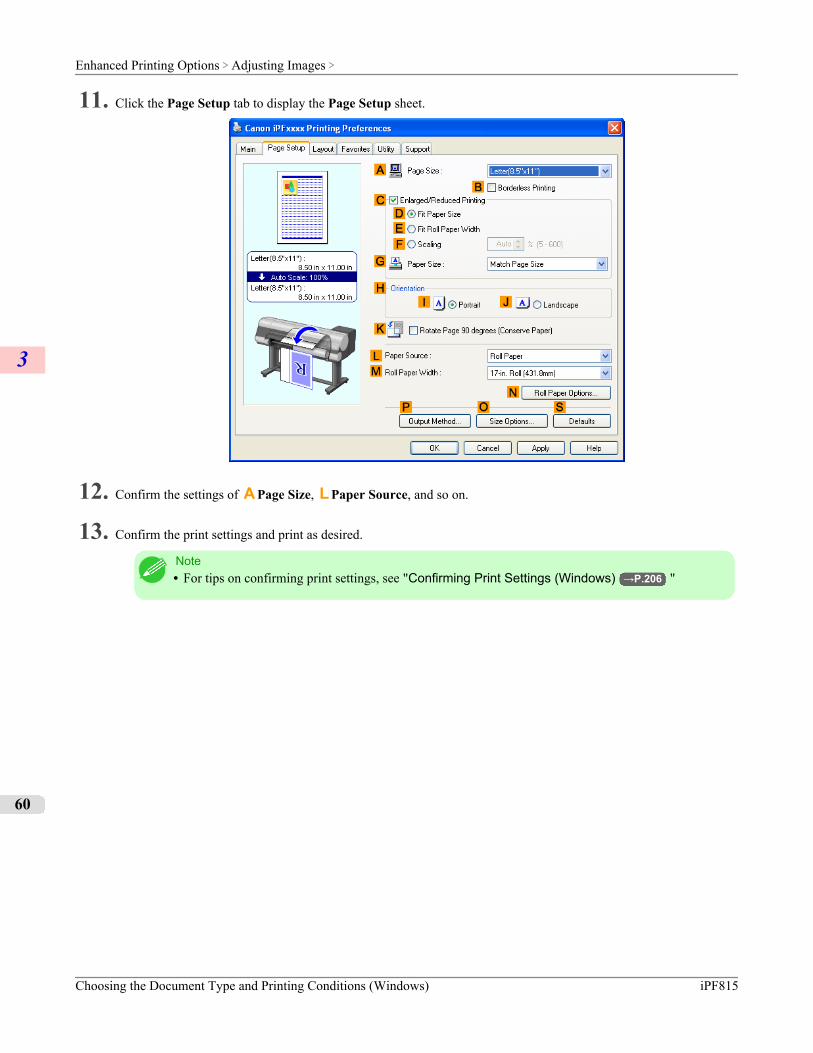
11. Click the Page Setup tab to display the Page Setup sheet.
12. Confirm the settings of A Page Size, L Paper Source, and so on.
13. Confirm the print settings and print as desired.
Note• For tips on confirming print settings, see "Confirming Print Settings (Windows) →P.206 "
Enhanced Printing Options > Adjusting Images >
Choosing the Document Type and Printing Conditions (Windows) iPF815
3
60
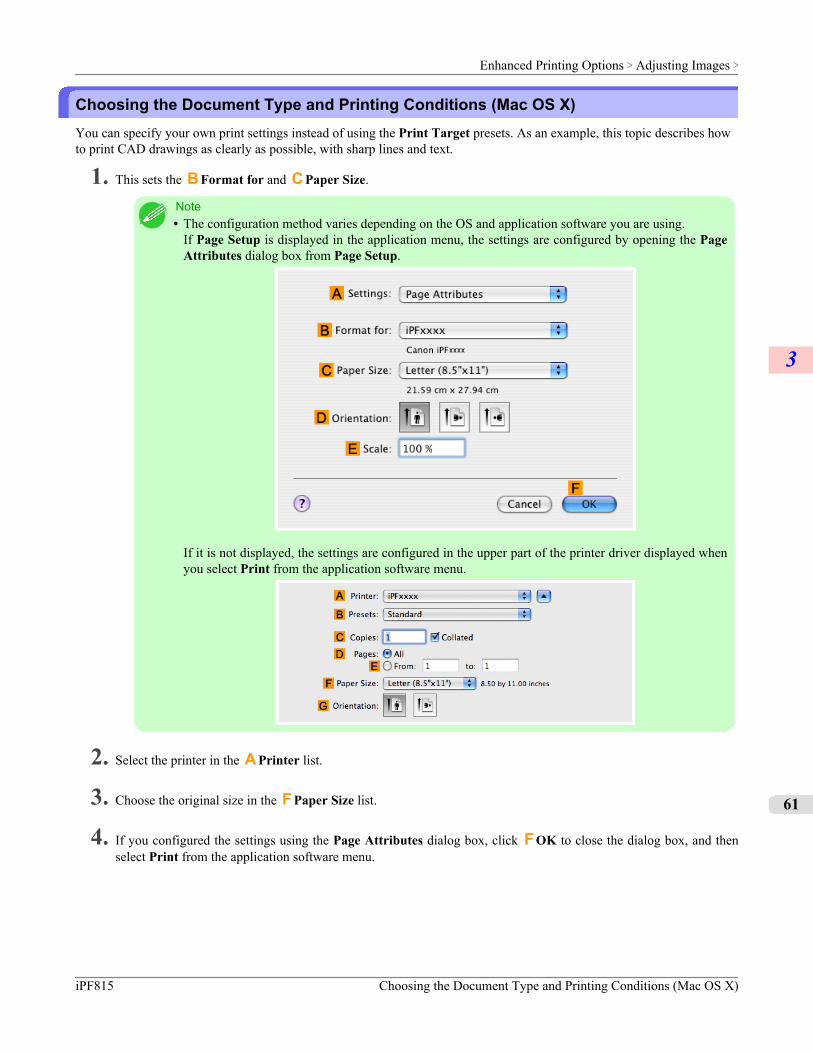
Choosing the Document Type and Printing Conditions (Mac OS X)You can specify your own print settings instead of using the Print Target presets. As an example, this topic describes howto print CAD drawings as clearly as possible, with sharp lines and text.
1. This sets the B Format for and C Paper Size.
Note• The configuration method varies depending on the OS and application software you are using.
If Page Setup is displayed in the application menu, the settings are configured by opening the PageAttributes dialog box from Page Setup.
If it is not displayed, the settings are configured in the upper part of the printer driver displayed whenyou select Print from the application software menu.
2. Select the printer in the A Printer list.
3. Choose the original size in the F Paper Size list.
4. If you configured the settings using the Page Attributes dialog box, click F OK to close the dialog box, and thenselect Print from the application software menu.
Enhanced Printing Options > Adjusting Images >
iPF815 Choosing the Document Type and Printing Conditions (Mac OS X)
3
61
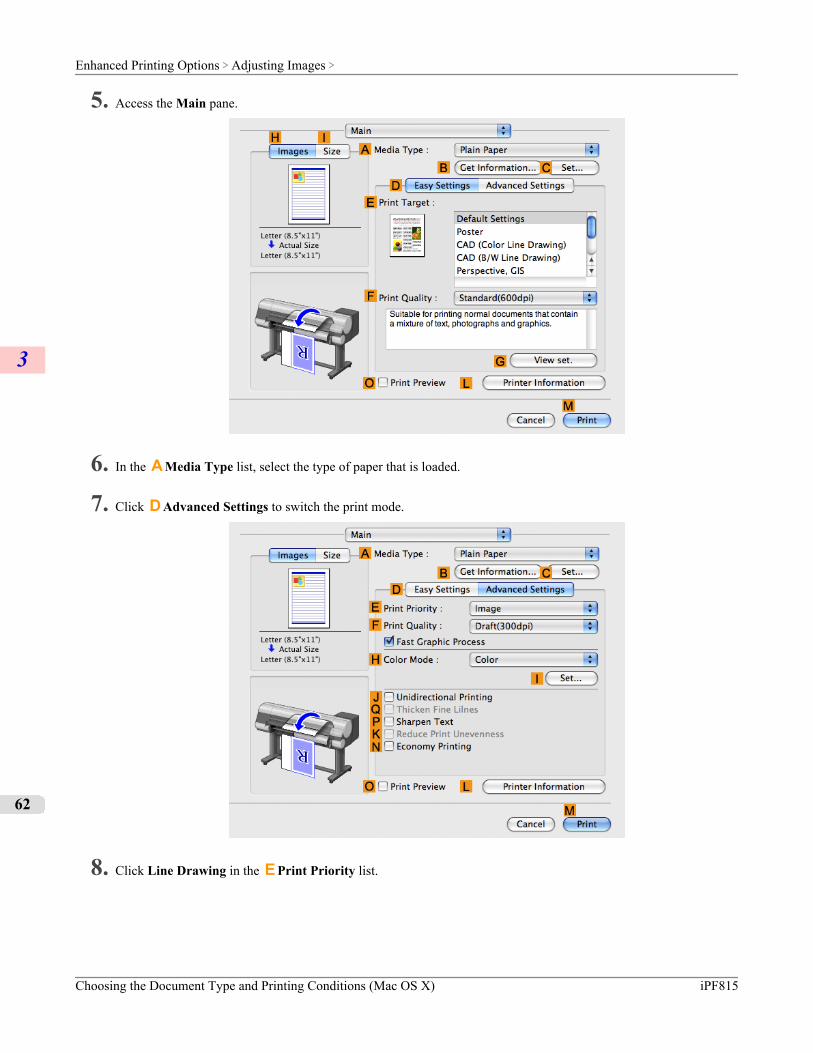
5. Access the Main pane.
6. In the A Media Type list, select the type of paper that is loaded.
7. Click D Advanced Settings to switch the print mode.
8. Click Line Drawing in the E Print Priority list.
Enhanced Printing Options > Adjusting Images >
Choosing the Document Type and Printing Conditions (Mac OS X) iPF815
3
62
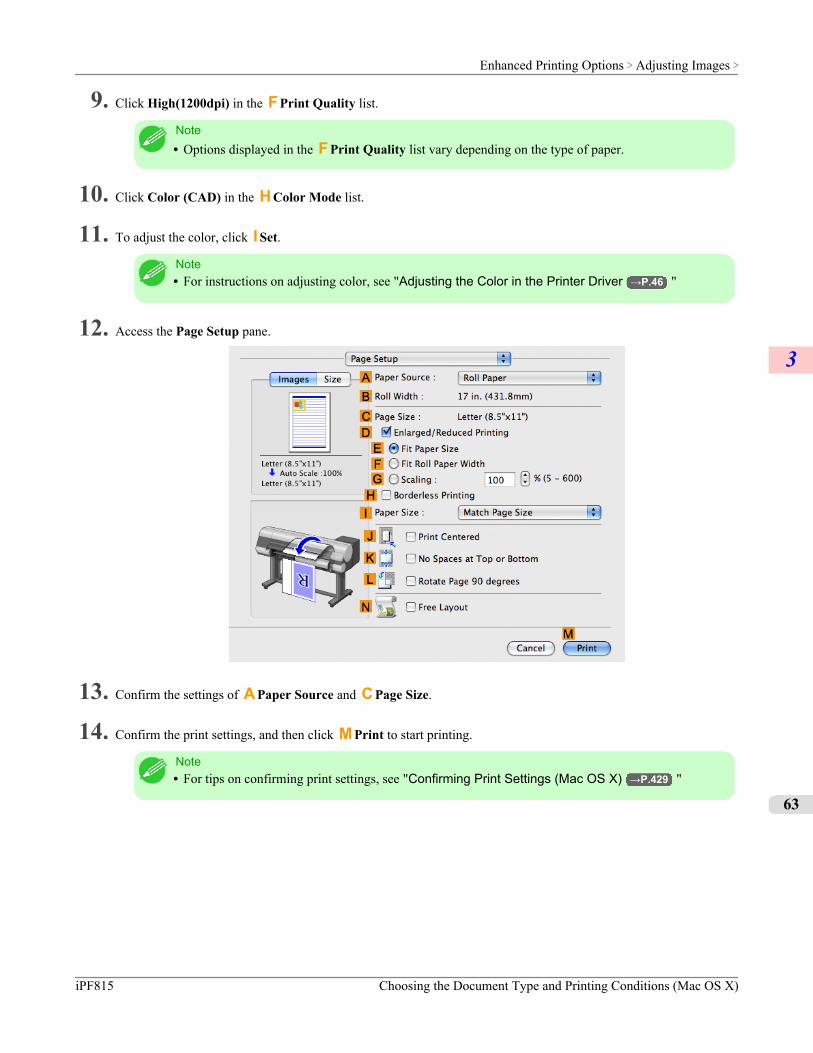
9. Click High(1200dpi) in the F Print Quality list.
Note• Options displayed in the F Print Quality list vary depending on the type of paper.
10. Click Color (CAD) in the H Color Mode list.
11. To adjust the color, click I Set.
Note• For instructions on adjusting color, see "Adjusting the Color in the Printer Driver →P.46 "
12. Access the Page Setup pane.
13. Confirm the settings of A Paper Source and C Page Size.
14. Confirm the print settings, and then click M Print to start printing.
Note• For tips on confirming print settings, see "Confirming Print Settings (Mac OS X) →P.429 "
Enhanced Printing Options > Adjusting Images >
iPF815 Choosing the Document Type and Printing Conditions (Mac OS X)
3
63
Choosing Paper for PrintingChoosing a Paper for Printing ........................................................................................................................... 64
Specifying Paper in the Printer Driver ............................................................................................................... 64
Choosing a Paper for PrintingChoosing the right paper for your particular printing application will give you the best printing results.
Media TypeThe printer and printer driver offer print settings optimized for various paper characteristics.
Note• For information on the types of paper the printer supports, refer to the Paper Reference Guide.(See "Types of
Paper →P.617 ")• The types of paper indicated in the printer driver and related software (as well as on the Control Panel ) are
updated when you install the Media Configuration Tool from the User Software CD-ROM or if you changepaper information by using the Media Configuration Tool. For information about the Media ConfigurationTool, see the Media Configuration Tool →P.406 (Windows) or Media Configuration Tool →P.539(Macintosh).
• An error message may be displayed on the printer Control Panel if the type of paper as specified in the print-er driver does not match the type specified on the printer. Although you can print under these conditions, theprinting results may not be suitable.
If the paper type is not listed for selectionIf the type of paper loaded cannot be selected, try specifying glossy paper or proofing paper as a special paper (Special 1 toSpecial 5, in this order). BK ( Black Ink ) is used as the black ink. Try specifying other types of paper as Special 6 to Spe-cial 10. MBK ( Matte Black Ink ) is used as the black ink. Note that higher numbers in this setting enable more vivid colorsbut may also cause colors to run together.
For instructions on specifying the type of paper before printing, refer to the following topics.
• Selecting the Paper Type (Roll) →P.632
• Selecting the Paper Type (Sheet) →P.650
Specifying Paper in the Printer DriverIf you replace the paper, complete the printer driver settings for the paper type and size.For instructions on configuring paper settings in the printer driver, refer to the following topics, as appropriate for yourcomputer and operating system.
• Specifying Paper in the Printer Driver (Windows) →P.204
• Specifying Paper in the Printer Driver (Mac OS X) →P.427
Enhanced Printing Options > Choosing Paper for Printing >
Choosing a Paper for Printing iPF815
3
64
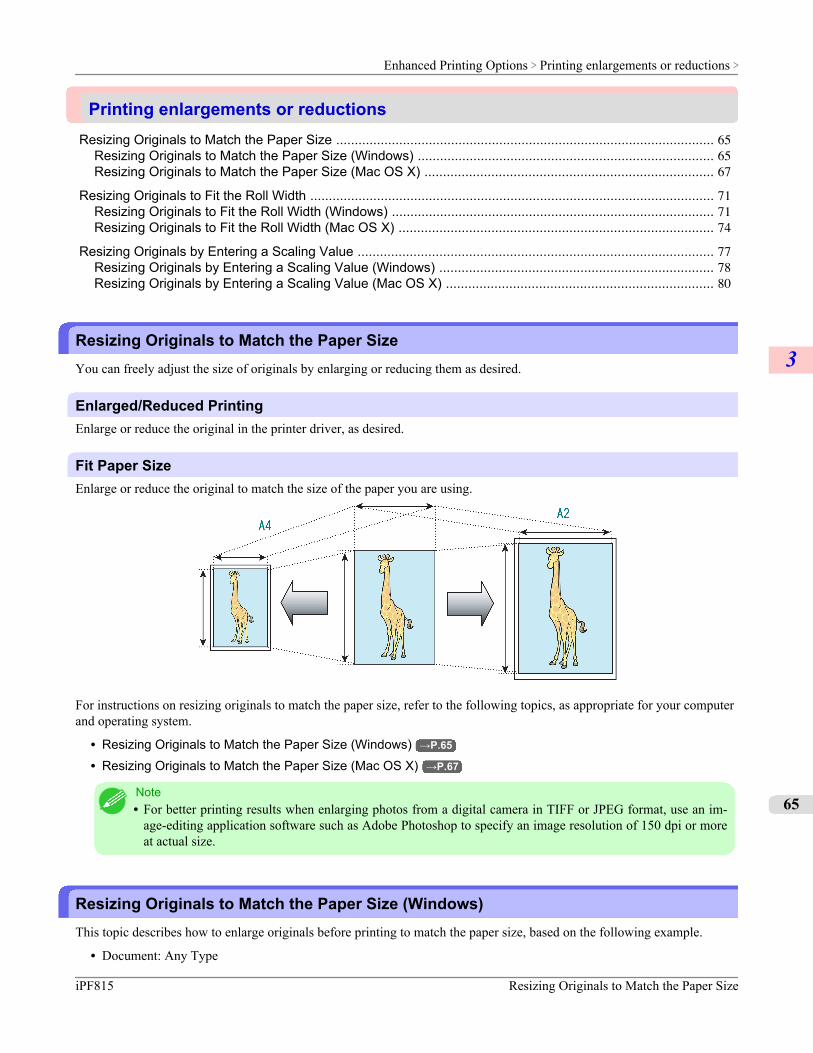
Printing enlargements or reductionsResizing Originals to Match the Paper Size ...................................................................................................... 65
Resizing Originals to Match the Paper Size (Windows) ................................................................................ 65Resizing Originals to Match the Paper Size (Mac OS X) .............................................................................. 67
Resizing Originals to Fit the Roll Width ............................................................................................................. 71Resizing Originals to Fit the Roll Width (Windows) ....................................................................................... 71Resizing Originals to Fit the Roll Width (Mac OS X) ..................................................................................... 74
Resizing Originals by Entering a Scaling Value ................................................................................................ 77Resizing Originals by Entering a Scaling Value (Windows) .......................................................................... 78Resizing Originals by Entering a Scaling Value (Mac OS X) ........................................................................ 80
Resizing Originals to Match the Paper SizeYou can freely adjust the size of originals by enlarging or reducing them as desired.
Enlarged/Reduced PrintingEnlarge or reduce the original in the printer driver, as desired.
Fit Paper SizeEnlarge or reduce the original to match the size of the paper you are using.
For instructions on resizing originals to match the paper size, refer to the following topics, as appropriate for your computerand operating system.
• Resizing Originals to Match the Paper Size (Windows) →P.65
• Resizing Originals to Match the Paper Size (Mac OS X) →P.67
Note• For better printing results when enlarging photos from a digital camera in TIFF or JPEG format, use an im-
age-editing application software such as Adobe Photoshop to specify an image resolution of 150 dpi or moreat actual size.
Resizing Originals to Match the Paper Size (Windows)This topic describes how to enlarge originals before printing to match the paper size, based on the following example.
• Document: Any Type
Enhanced Printing Options > Printing enlargements or reductions >
iPF815 Resizing Originals to Match the Paper Size
3
65
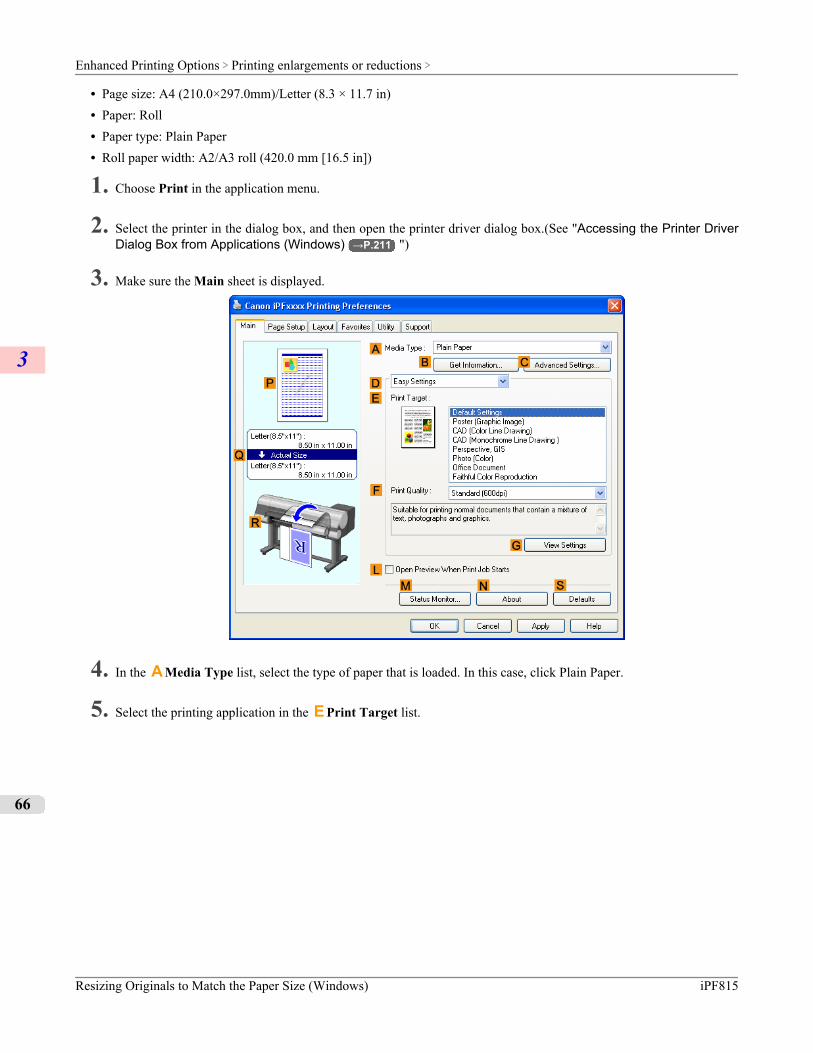
• Page size: A4 (210.0×297.0mm)/Letter (8.3 × 11.7 in)• Paper: Roll• Paper type: Plain Paper• Roll paper width: A2/A3 roll (420.0 mm [16.5 in])
1. Choose Print in the application menu.
2. Select the printer in the dialog box, and then open the printer driver dialog box.(See "Accessing the Printer DriverDialog Box from Applications (Windows) →P.211 ")
3. Make sure the Main sheet is displayed.
4. In the A Media Type list, select the type of paper that is loaded. In this case, click Plain Paper.
5. Select the printing application in the E Print Target list.
Enhanced Printing Options > Printing enlargements or reductions >
Resizing Originals to Match the Paper Size (Windows) iPF815
3
66
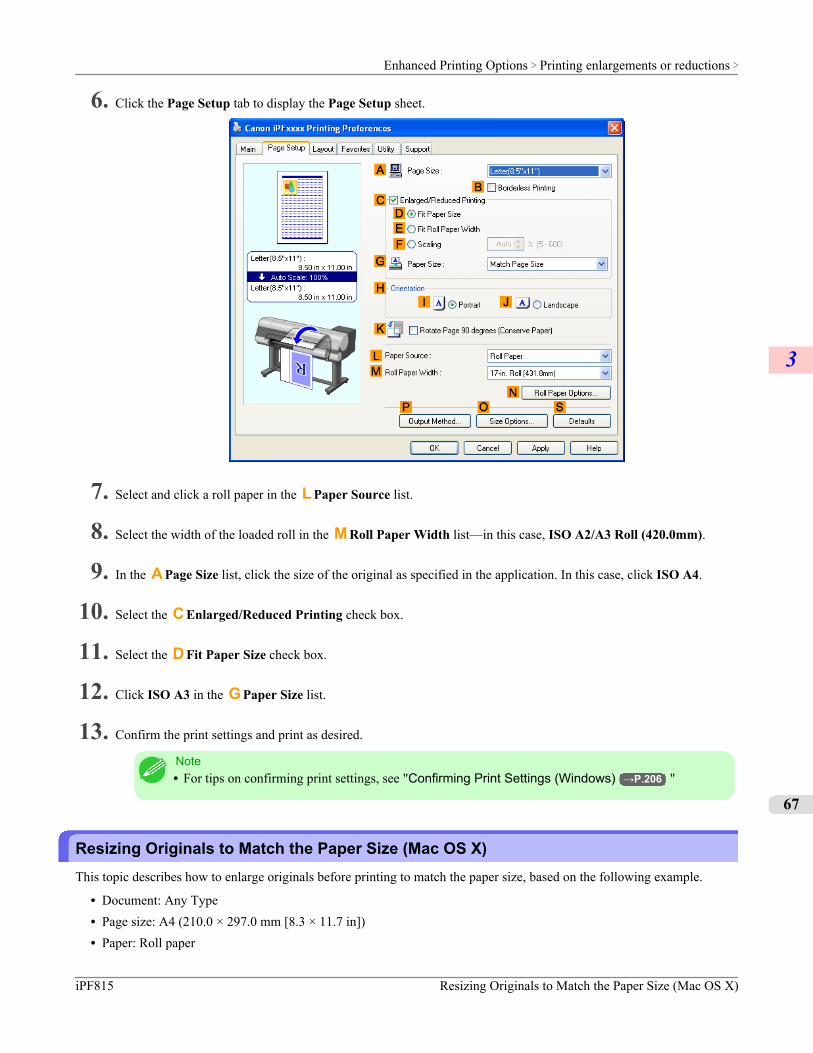
6. Click the Page Setup tab to display the Page Setup sheet.
7. Select and click a roll paper in the L Paper Source list.
8. Select the width of the loaded roll in the M Roll Paper Width list—in this case, ISO A2/A3 Roll (420.0mm).
9. In the A Page Size list, click the size of the original as specified in the application. In this case, click ISO A4.
10. Select the C Enlarged/Reduced Printing check box.
11. Select the D Fit Paper Size check box.
12. Click ISO A3 in the G Paper Size list.
13. Confirm the print settings and print as desired.
Note• For tips on confirming print settings, see "Confirming Print Settings (Windows) →P.206 "
Resizing Originals to Match the Paper Size (Mac OS X)This topic describes how to enlarge originals before printing to match the paper size, based on the following example.
• Document: Any Type• Page size: A4 (210.0 × 297.0 mm [8.3 × 11.7 in])• Paper: Roll paper
Enhanced Printing Options > Printing enlargements or reductions >
iPF815 Resizing Originals to Match the Paper Size (Mac OS X)
3
67
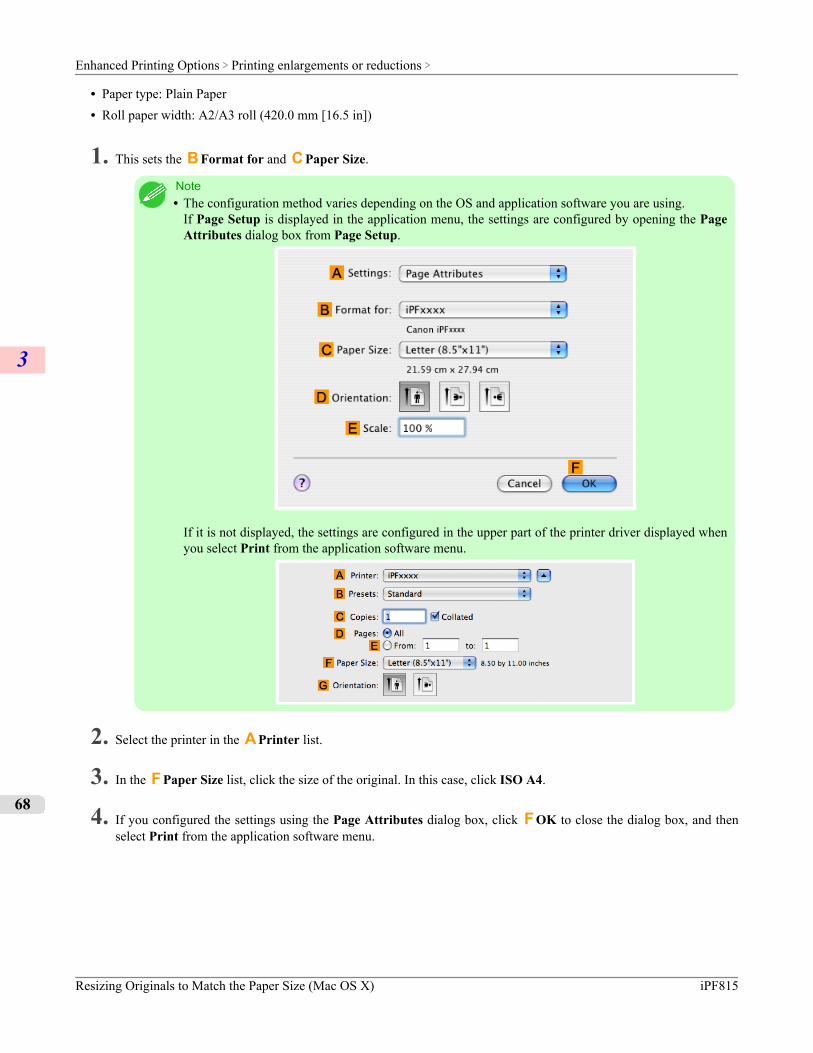
• Paper type: Plain Paper• Roll paper width: A2/A3 roll (420.0 mm [16.5 in])
1. This sets the B Format for and C Paper Size.
Note• The configuration method varies depending on the OS and application software you are using.
If Page Setup is displayed in the application menu, the settings are configured by opening the PageAttributes dialog box from Page Setup.
If it is not displayed, the settings are configured in the upper part of the printer driver displayed whenyou select Print from the application software menu.
2. Select the printer in the A Printer list.
3. In the F Paper Size list, click the size of the original. In this case, click ISO A4.
4. If you configured the settings using the Page Attributes dialog box, click F OK to close the dialog box, and thenselect Print from the application software menu.
Enhanced Printing Options > Printing enlargements or reductions >
Resizing Originals to Match the Paper Size (Mac OS X) iPF815
3
68
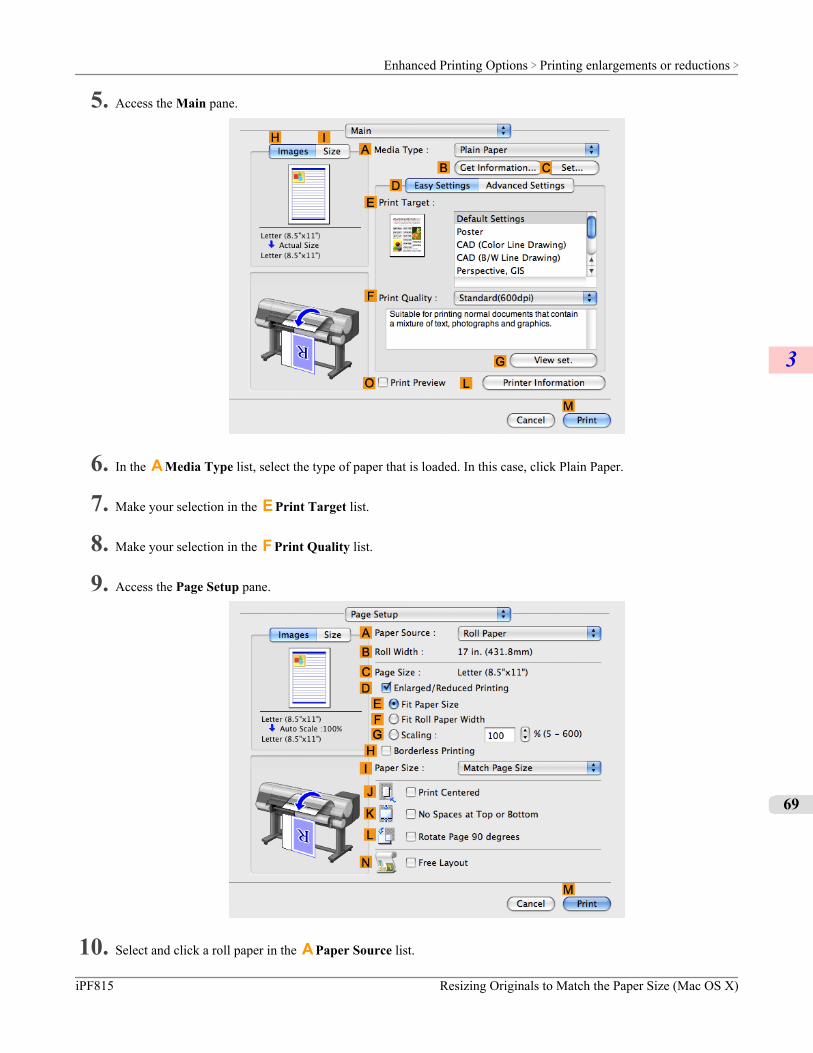
5. Access the Main pane.
6. In the A Media Type list, select the type of paper that is loaded. In this case, click Plain Paper.
7. Make your selection in the E Print Target list.
8. Make your selection in the F Print Quality list.
9. Access the Page Setup pane.
10. Select and click a roll paper in the A Paper Source list.
Enhanced Printing Options > Printing enlargements or reductions >
iPF815 Resizing Originals to Match the Paper Size (Mac OS X)
3
69
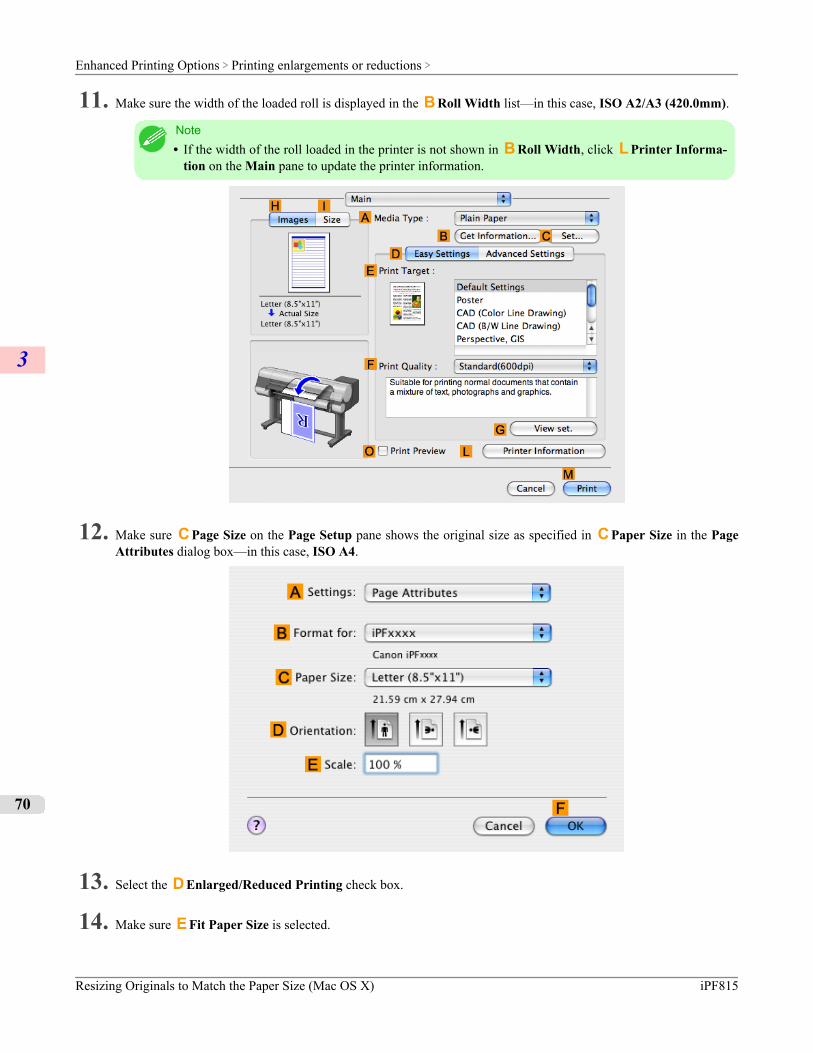
11. Make sure the width of the loaded roll is displayed in the B Roll Width list—in this case, ISO A2/A3 (420.0mm).
Note• If the width of the roll loaded in the printer is not shown in B Roll Width, click L Printer Informa-
tion on the Main pane to update the printer information.
12. Make sure C Page Size on the Page Setup pane shows the original size as specified in C Paper Size in the PageAttributes dialog box—in this case, ISO A4.
13. Select the D Enlarged/Reduced Printing check box.
14. Make sure E Fit Paper Size is selected.
Enhanced Printing Options > Printing enlargements or reductions >
Resizing Originals to Match the Paper Size (Mac OS X) iPF815
3
70
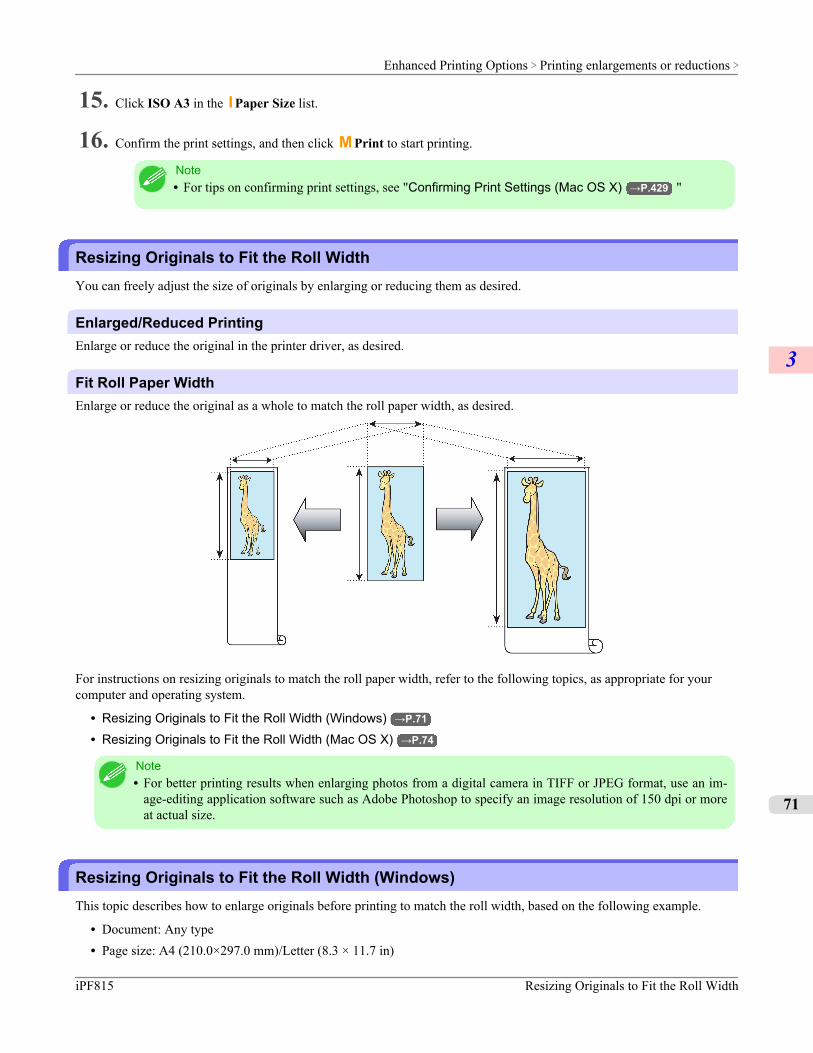
15. Click ISO A3 in the I Paper Size list.
16. Confirm the print settings, and then click M Print to start printing.
Note• For tips on confirming print settings, see "Confirming Print Settings (Mac OS X) →P.429 "
Resizing Originals to Fit the Roll WidthYou can freely adjust the size of originals by enlarging or reducing them as desired.
Enlarged/Reduced PrintingEnlarge or reduce the original in the printer driver, as desired.
Fit Roll Paper WidthEnlarge or reduce the original as a whole to match the roll paper width, as desired.
For instructions on resizing originals to match the roll paper width, refer to the following topics, as appropriate for yourcomputer and operating system.
• Resizing Originals to Fit the Roll Width (Windows) →P.71
• Resizing Originals to Fit the Roll Width (Mac OS X) →P.74
Note• For better printing results when enlarging photos from a digital camera in TIFF or JPEG format, use an im-
age-editing application software such as Adobe Photoshop to specify an image resolution of 150 dpi or moreat actual size.
Resizing Originals to Fit the Roll Width (Windows)This topic describes how to enlarge originals before printing to match the roll width, based on the following example.
• Document: Any type• Page size: A4 (210.0×297.0 mm)/Letter (8.3 × 11.7 in)
Enhanced Printing Options > Printing enlargements or reductions >
iPF815 Resizing Originals to Fit the Roll Width
3
71

• Paper: Roll• Paper type: Plain Paper• Roll paper width: 16 inches (406.4 mm)
1. Choose Print in the application menu.
2. Select the printer in the dialog box, and then display the printer driver dialog box.(See "Accessing the Printer Driv-er Dialog Box from Applications (Windows) →P.211 ")
3. Make sure the Main sheet is displayed.
4. In the A Media Type list, select the type of paper that is loaded. In this case, click Plain Paper.
5. Select the printing application in the E Print Target list.
Enhanced Printing Options > Printing enlargements or reductions >
Resizing Originals to Fit the Roll Width (Windows) iPF815
3
72
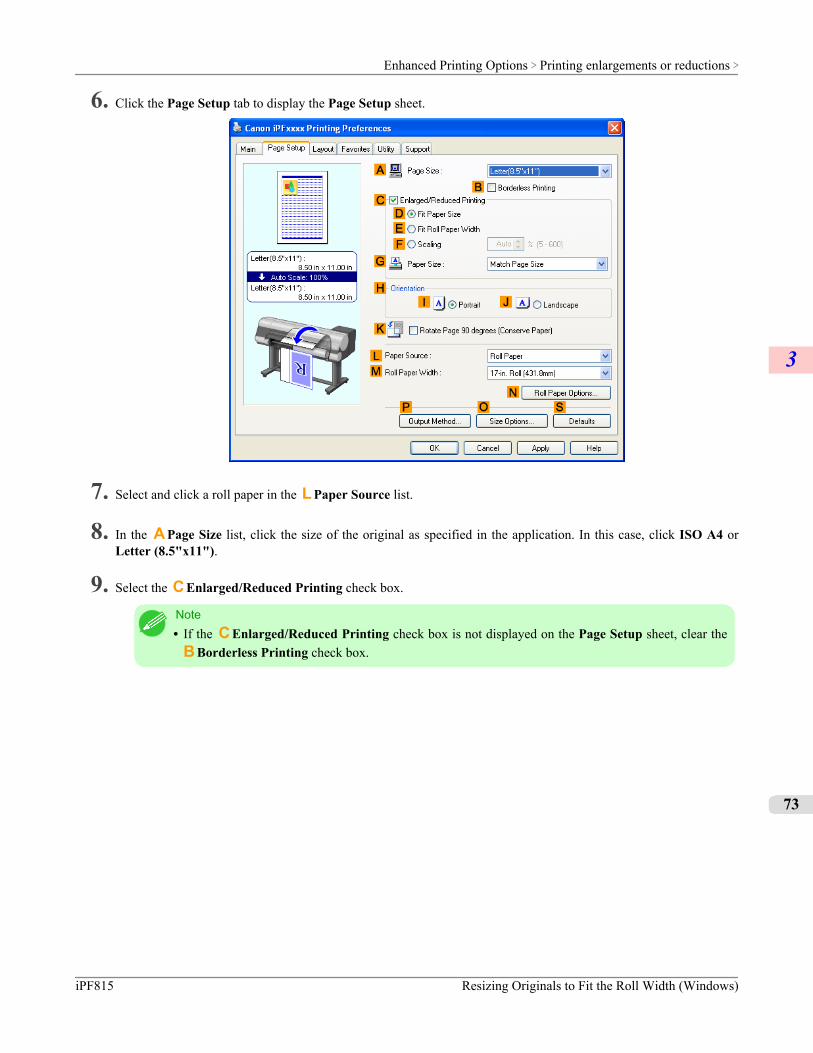
6. Click the Page Setup tab to display the Page Setup sheet.
7. Select and click a roll paper in the L Paper Source list.
8. In the A Page Size list, click the size of the original as specified in the application. In this case, click ISO A4 orLetter (8.5"x11").
9. Select the C Enlarged/Reduced Printing check box.
Note• If the C Enlarged/Reduced Printing check box is not displayed on the Page Setup sheet, clear the
B Borderless Printing check box.
Enhanced Printing Options > Printing enlargements or reductions >
iPF815 Resizing Originals to Fit the Roll Width (Windows)
3
73
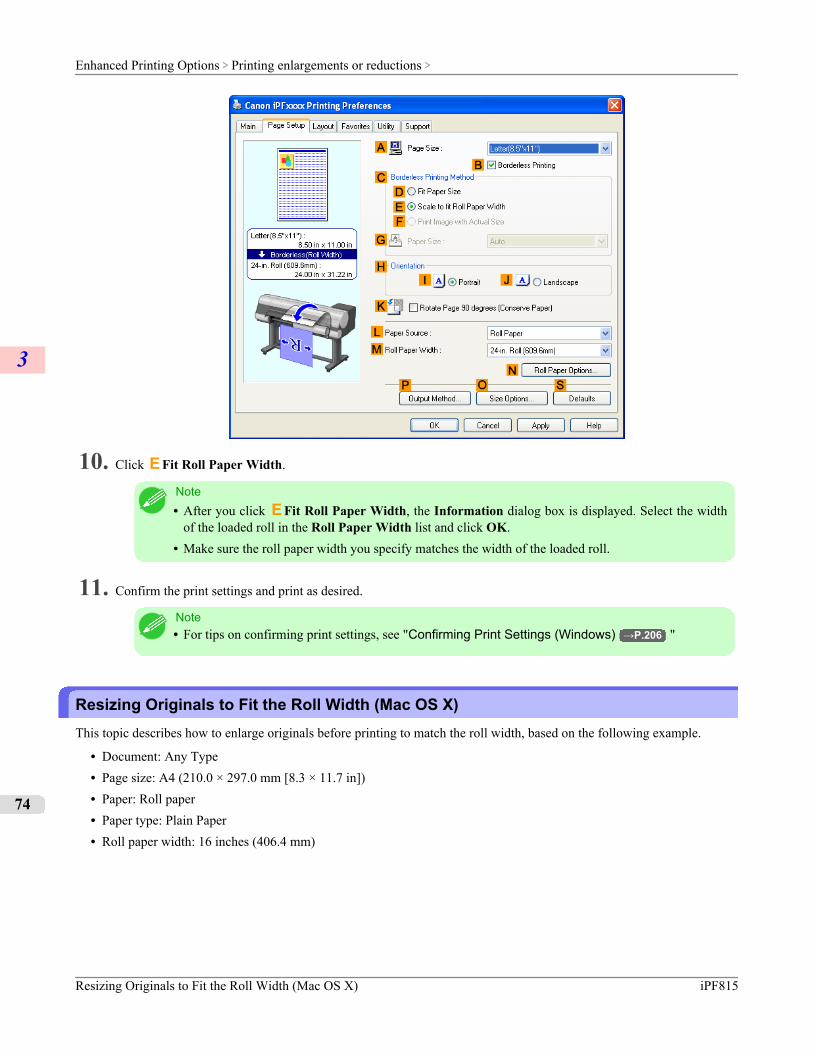
10. Click E Fit Roll Paper Width.
Note• After you click E Fit Roll Paper Width, the Information dialog box is displayed. Select the width
of the loaded roll in the Roll Paper Width list and click OK.• Make sure the roll paper width you specify matches the width of the loaded roll.
11. Confirm the print settings and print as desired.
Note• For tips on confirming print settings, see "Confirming Print Settings (Windows) →P.206 "
Resizing Originals to Fit the Roll Width (Mac OS X)This topic describes how to enlarge originals before printing to match the roll width, based on the following example.
• Document: Any Type• Page size: A4 (210.0 × 297.0 mm [8.3 × 11.7 in])• Paper: Roll paper• Paper type: Plain Paper• Roll paper width: 16 inches (406.4 mm)
Enhanced Printing Options > Printing enlargements or reductions >
Resizing Originals to Fit the Roll Width (Mac OS X) iPF815
3
74

1. This sets the B Format for and C Paper Size.
Note• The configuration method varies depending on the OS and application software you are using.
If Page Setup is displayed in the application menu, the settings are configured by opening the PageAttributes dialog box from Page Setup.
If it is not displayed, the settings are configured in the upper part of the printer driver displayed whenyou select Print from the application software menu.
2. Select the printer in the A Printer list.
3. In the F Paper Size list, click the size of the original. In this case, click ISO A4.
4. If you configured the settings using the Page Attributes dialog box, click F OK to close the dialog box, and thenselect Print from the application software menu.
Enhanced Printing Options > Printing enlargements or reductions >
iPF815 Resizing Originals to Fit the Roll Width (Mac OS X)
3
75
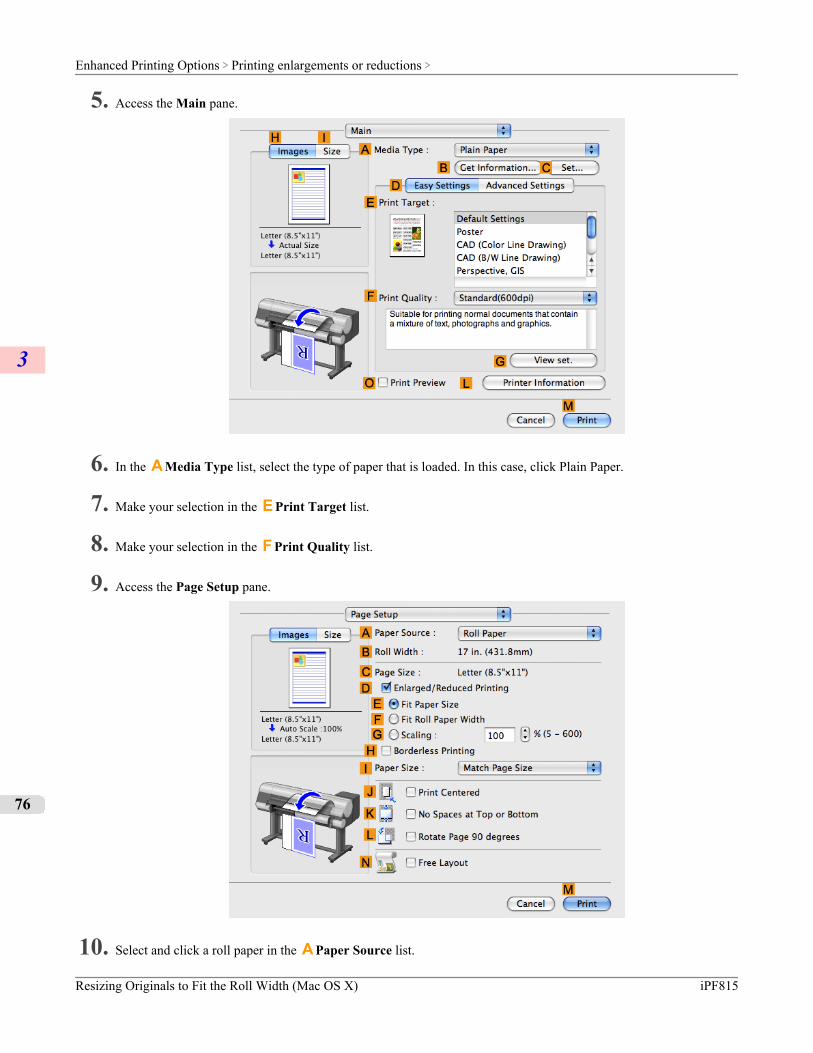
5. Access the Main pane.
6. In the A Media Type list, select the type of paper that is loaded. In this case, click Plain Paper.
7. Make your selection in the E Print Target list.
8. Make your selection in the F Print Quality list.
9. Access the Page Setup pane.
10. Select and click a roll paper in the A Paper Source list.
Enhanced Printing Options > Printing enlargements or reductions >
Resizing Originals to Fit the Roll Width (Mac OS X) iPF815
3
76
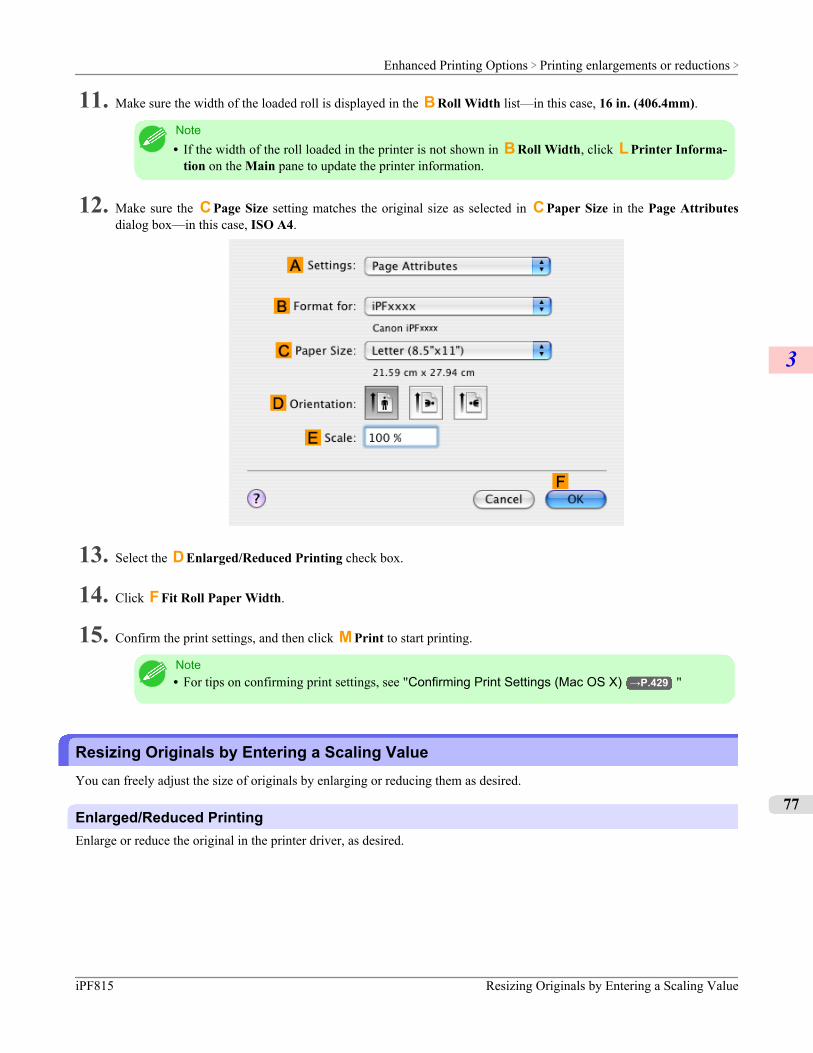
11. Make sure the width of the loaded roll is displayed in the B Roll Width list—in this case, 16 in. (406.4mm).
Note• If the width of the roll loaded in the printer is not shown in B Roll Width, click L Printer Informa-
tion on the Main pane to update the printer information.
12. Make sure the C Page Size setting matches the original size as selected in C Paper Size in the Page Attributesdialog box—in this case, ISO A4.
13. Select the D Enlarged/Reduced Printing check box.
14. Click F Fit Roll Paper Width.
15. Confirm the print settings, and then click M Print to start printing.
Note• For tips on confirming print settings, see "Confirming Print Settings (Mac OS X) →P.429 "
Resizing Originals by Entering a Scaling ValueYou can freely adjust the size of originals by enlarging or reducing them as desired.
Enlarged/Reduced PrintingEnlarge or reduce the original in the printer driver, as desired.
Enhanced Printing Options > Printing enlargements or reductions >
iPF815 Resizing Originals by Entering a Scaling Value
3
77
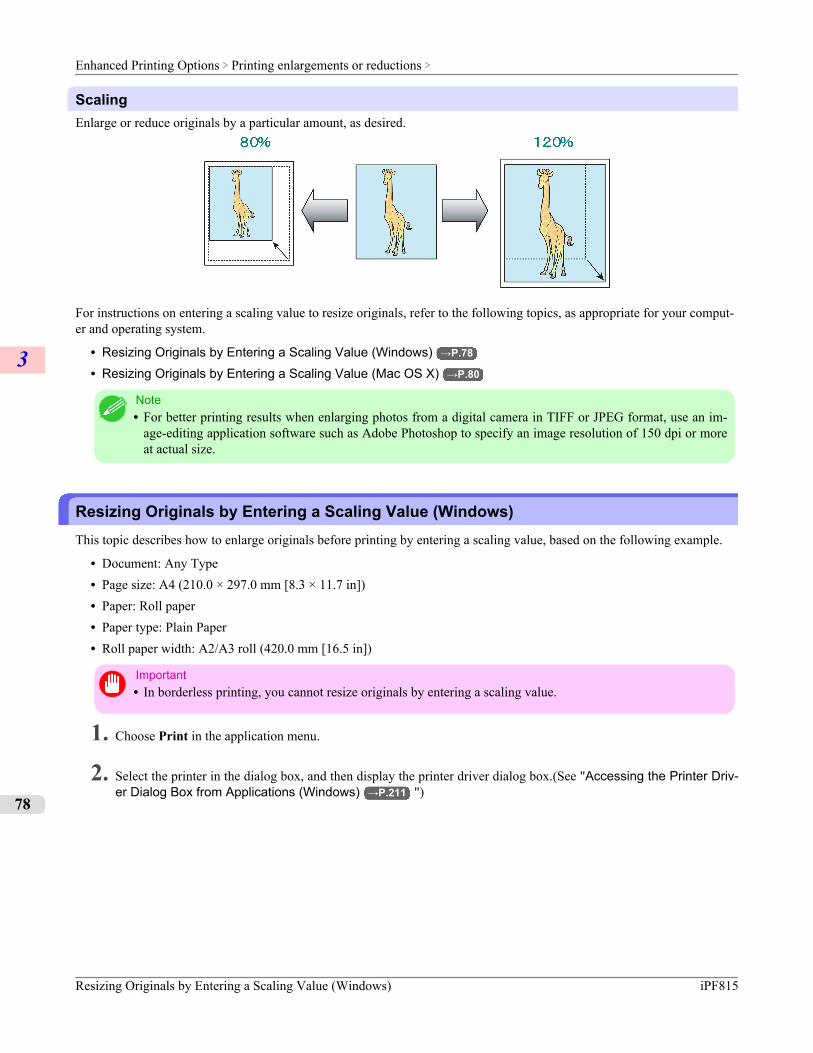
ScalingEnlarge or reduce originals by a particular amount, as desired.
For instructions on entering a scaling value to resize originals, refer to the following topics, as appropriate for your comput-er and operating system.
• Resizing Originals by Entering a Scaling Value (Windows) →P.78
• Resizing Originals by Entering a Scaling Value (Mac OS X) →P.80
Note• For better printing results when enlarging photos from a digital camera in TIFF or JPEG format, use an im-
age-editing application software such as Adobe Photoshop to specify an image resolution of 150 dpi or moreat actual size.
Resizing Originals by Entering a Scaling Value (Windows)This topic describes how to enlarge originals before printing by entering a scaling value, based on the following example.
• Document: Any Type• Page size: A4 (210.0 × 297.0 mm [8.3 × 11.7 in])• Paper: Roll paper• Paper type: Plain Paper• Roll paper width: A2/A3 roll (420.0 mm [16.5 in])
Important• In borderless printing, you cannot resize originals by entering a scaling value.
1. Choose Print in the application menu.
2. Select the printer in the dialog box, and then display the printer driver dialog box.(See "Accessing the Printer Driv-er Dialog Box from Applications (Windows) →P.211 ")
Enhanced Printing Options > Printing enlargements or reductions >
Resizing Originals by Entering a Scaling Value (Windows) iPF815
3
78
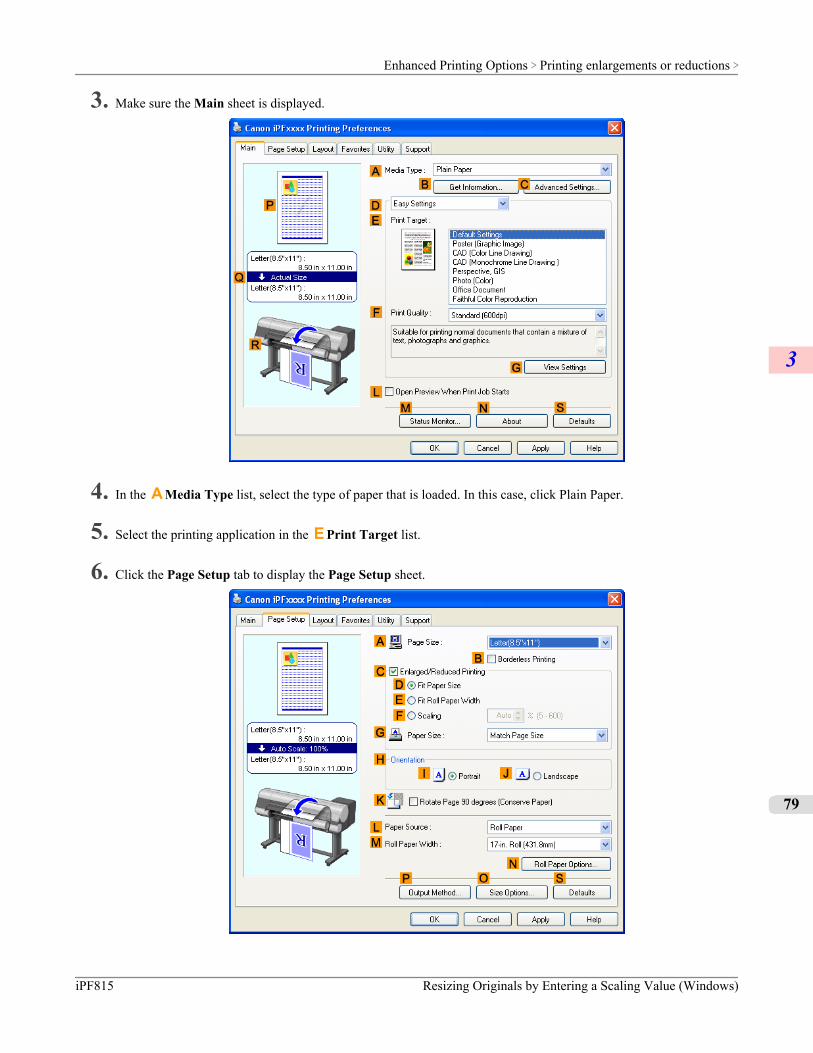
3. Make sure the Main sheet is displayed.
4. In the A Media Type list, select the type of paper that is loaded. In this case, click Plain Paper.
5. Select the printing application in the E Print Target list.
6. Click the Page Setup tab to display the Page Setup sheet.
Enhanced Printing Options > Printing enlargements or reductions >
iPF815 Resizing Originals by Entering a Scaling Value (Windows)
3
79
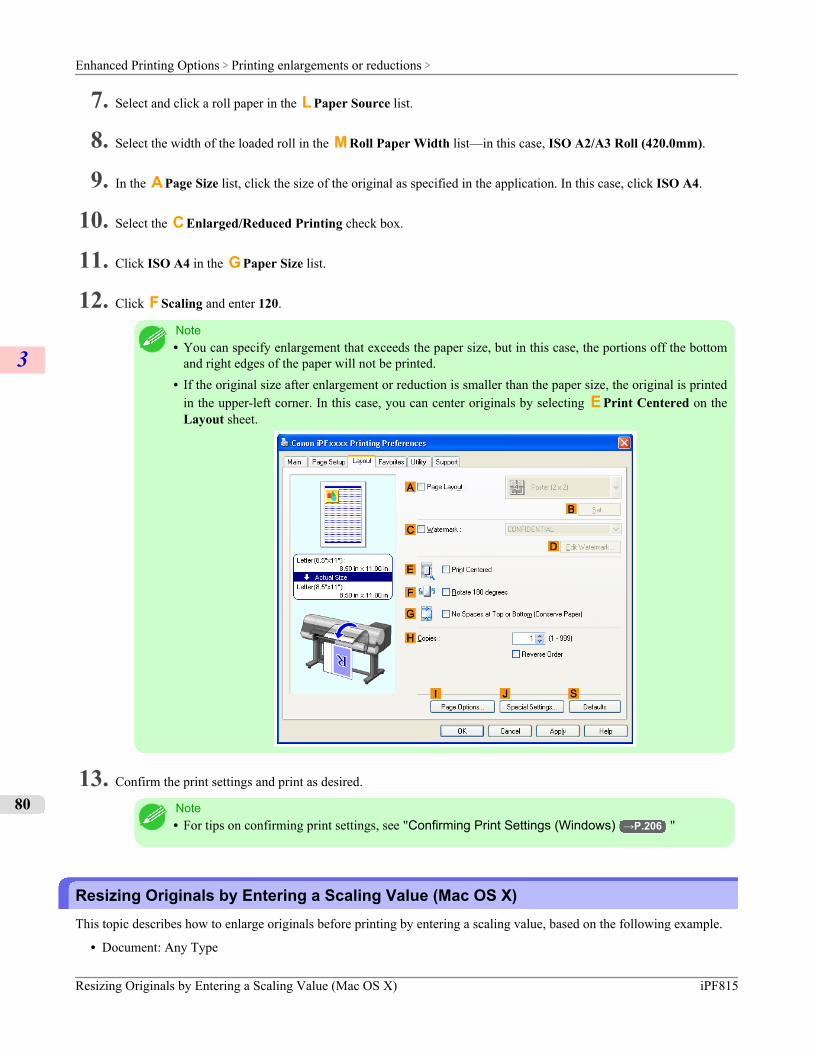
7. Select and click a roll paper in the L Paper Source list.
8. Select the width of the loaded roll in the M Roll Paper Width list—in this case, ISO A2/A3 Roll (420.0mm).
9. In the A Page Size list, click the size of the original as specified in the application. In this case, click ISO A4.
10. Select the C Enlarged/Reduced Printing check box.
11. Click ISO A4 in the G Paper Size list.
12. Click F Scaling and enter 120.
Note• You can specify enlargement that exceeds the paper size, but in this case, the portions off the bottom
and right edges of the paper will not be printed.• If the original size after enlargement or reduction is smaller than the paper size, the original is printed
in the upper-left corner. In this case, you can center originals by selecting E Print Centered on theLayout sheet.
13. Confirm the print settings and print as desired.
Note• For tips on confirming print settings, see "Confirming Print Settings (Windows) →P.206 "
Resizing Originals by Entering a Scaling Value (Mac OS X)This topic describes how to enlarge originals before printing by entering a scaling value, based on the following example.
• Document: Any Type
Enhanced Printing Options > Printing enlargements or reductions >
Resizing Originals by Entering a Scaling Value (Mac OS X) iPF815
3
80
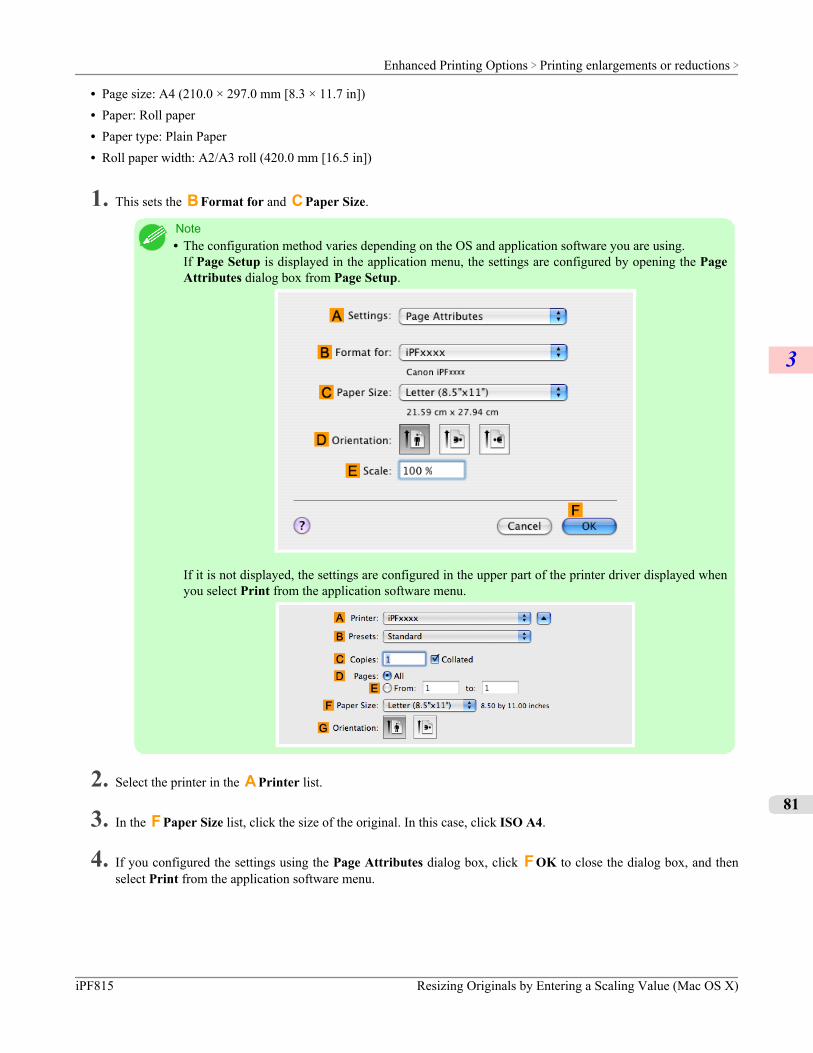
• Page size: A4 (210.0 × 297.0 mm [8.3 × 11.7 in])• Paper: Roll paper• Paper type: Plain Paper• Roll paper width: A2/A3 roll (420.0 mm [16.5 in])
1. This sets the B Format for and C Paper Size.
Note• The configuration method varies depending on the OS and application software you are using.
If Page Setup is displayed in the application menu, the settings are configured by opening the PageAttributes dialog box from Page Setup.
If it is not displayed, the settings are configured in the upper part of the printer driver displayed whenyou select Print from the application software menu.
2. Select the printer in the A Printer list.
3. In the F Paper Size list, click the size of the original. In this case, click ISO A4.
4. If you configured the settings using the Page Attributes dialog box, click F OK to close the dialog box, and thenselect Print from the application software menu.
Enhanced Printing Options > Printing enlargements or reductions >
iPF815 Resizing Originals by Entering a Scaling Value (Mac OS X)
3
81

5. Access the Main pane.
6. In the A Media Type list, select the type of paper that is loaded. In this case, click Plain Paper.
7. Make your selection in the E Print Target list.
8. Make your selection in the F Print Quality list.
9. Access the Page Setup pane.
10. Select and click a roll paper in the A Paper Source list.
Enhanced Printing Options > Printing enlargements or reductions >
Resizing Originals by Entering a Scaling Value (Mac OS X) iPF815
3
82
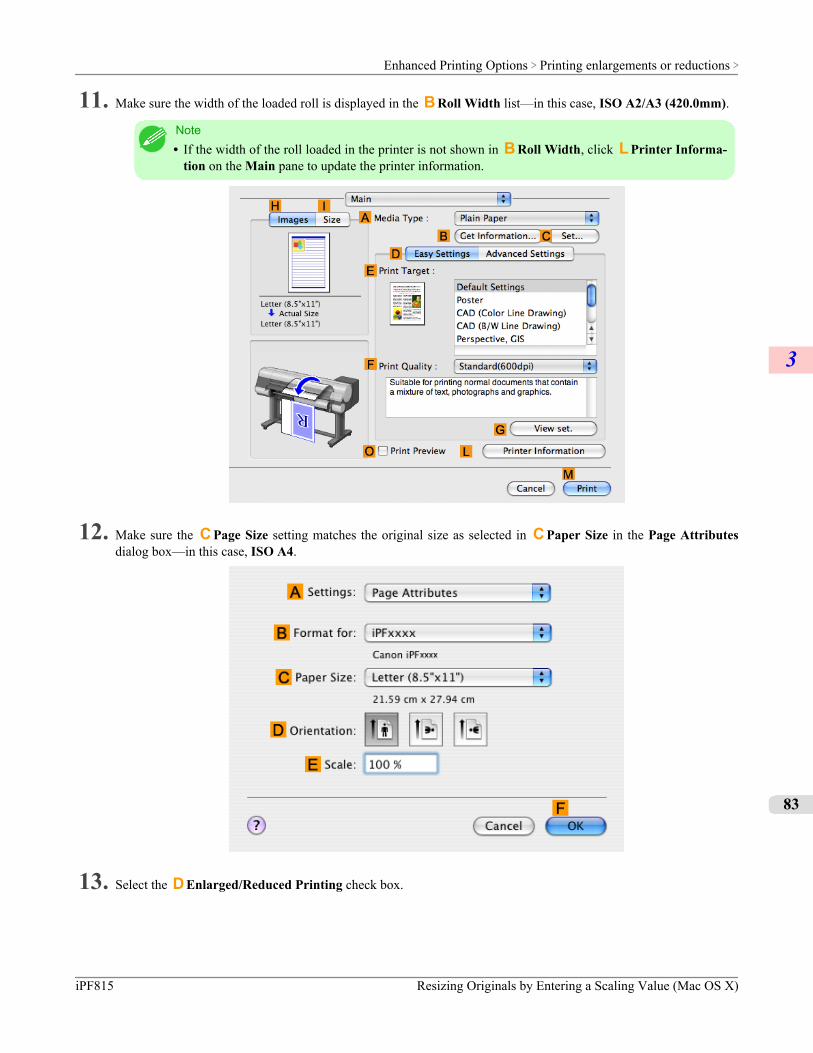
11. Make sure the width of the loaded roll is displayed in the B Roll Width list—in this case, ISO A2/A3 (420.0mm).
Note• If the width of the roll loaded in the printer is not shown in B Roll Width, click L Printer Informa-
tion on the Main pane to update the printer information.
12. Make sure the C Page Size setting matches the original size as selected in C Paper Size in the Page Attributesdialog box—in this case, ISO A4.
13. Select the D Enlarged/Reduced Printing check box.
Enhanced Printing Options > Printing enlargements or reductions >
iPF815 Resizing Originals by Entering a Scaling Value (Mac OS X)
3
83
14. Click G Scaling and enter 120.
Note• You can specify enlargement that exceeds the paper size, but in this case, the portion off the edge of
the paper will not be printed.• If the original size after enlargement or reduction is smaller than the paper size, the original is printed
in the upper-left corner. In this case, you can center originals by selecting the J Print Centeredcheck box.
15. Confirm the print settings, and then click M Print to start printing.
Note• For tips on confirming print settings, see "Confirming Print Settings (Mac OS X) →P.429 "
Enhanced Printing Options > Printing enlargements or reductions >
Resizing Originals by Entering a Scaling Value (Mac OS X) iPF815
3
84
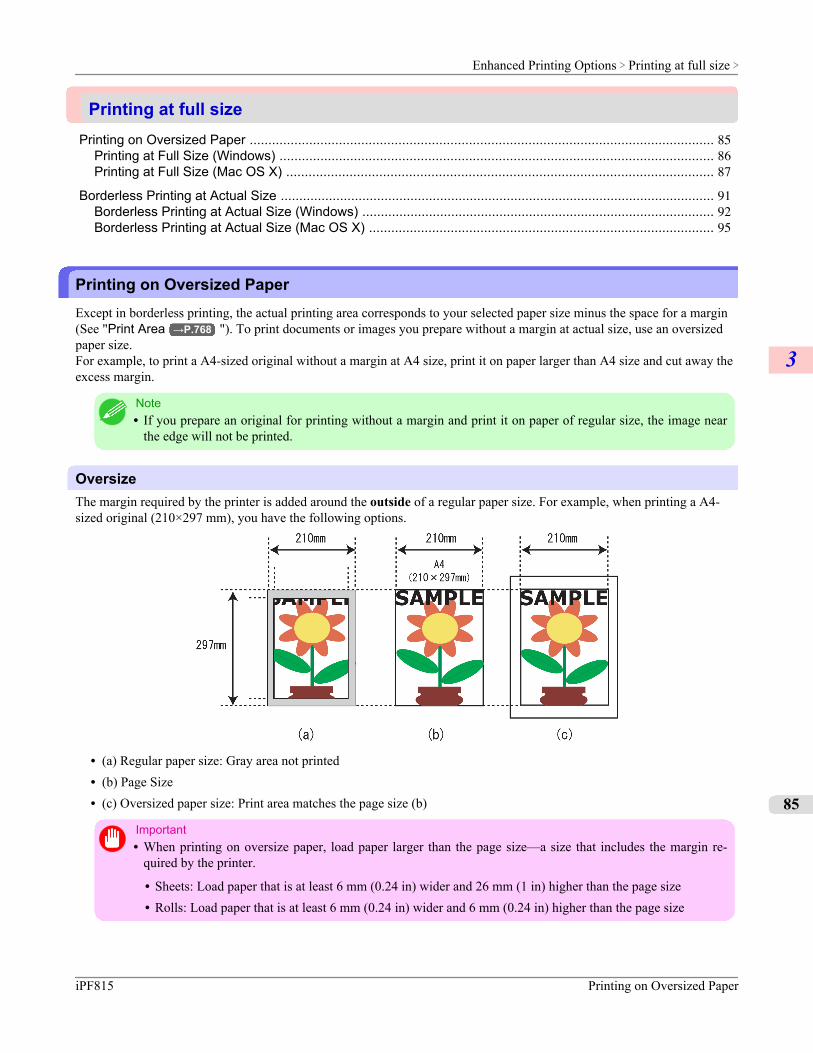
Printing at full sizePrinting on Oversized Paper ............................................................................................................................. 85
Printing at Full Size (Windows) ..................................................................................................................... 86Printing at Full Size (Mac OS X) ................................................................................................................... 87
Borderless Printing at Actual Size ..................................................................................................................... 91Borderless Printing at Actual Size (Windows) ............................................................................................... 92Borderless Printing at Actual Size (Mac OS X) ............................................................................................. 95
Printing on Oversized PaperExcept in borderless printing, the actual printing area corresponds to your selected paper size minus the space for a margin(See "Print Area →P.768 "). To print documents or images you prepare without a margin at actual size, use an oversizedpaper size.For example, to print a A4-sized original without a margin at A4 size, print it on paper larger than A4 size and cut away theexcess margin.
Note• If you prepare an original for printing without a margin and print it on paper of regular size, the image near
the edge will not be printed.
OversizeThe margin required by the printer is added around the outside of a regular paper size. For example, when printing a A4-sized original (210×297 mm), you have the following options.
• (a) Regular paper size: Gray area not printed• (b) Page Size• (c) Oversized paper size: Print area matches the page size (b)
Important• When printing on oversize paper, load paper larger than the page size—a size that includes the margin re-
quired by the printer.
• Sheets: Load paper that is at least 6 mm (0.24 in) wider and 26 mm (1 in) higher than the page size• Rolls: Load paper that is at least 6 mm (0.24 in) wider and 6 mm (0.24 in) higher than the page size
Enhanced Printing Options > Printing at full size >
iPF815 Printing on Oversized Paper
3
85
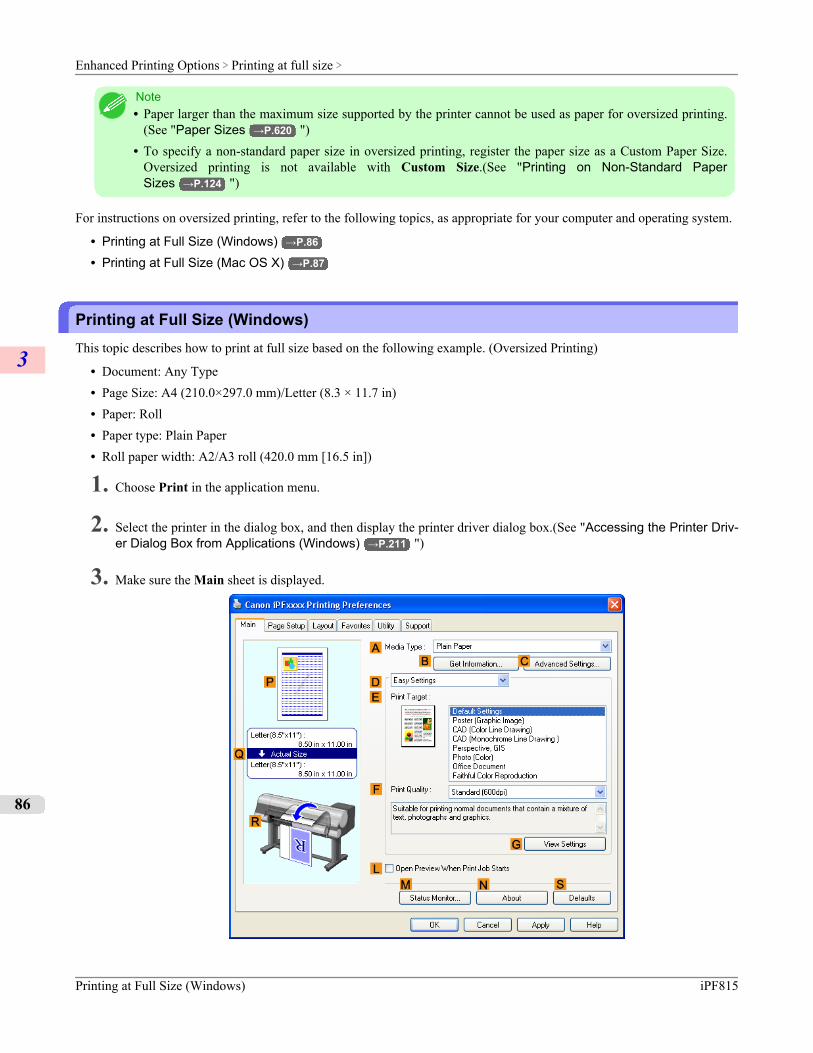
Note• Paper larger than the maximum size supported by the printer cannot be used as paper for oversized printing.
(See "Paper Sizes →P.620 ")• To specify a non-standard paper size in oversized printing, register the paper size as a Custom Paper Size.
Oversized printing is not available with Custom Size.(See "Printing on Non-Standard PaperSizes →P.124 ")
For instructions on oversized printing, refer to the following topics, as appropriate for your computer and operating system.
• Printing at Full Size (Windows) →P.86
• Printing at Full Size (Mac OS X) →P.87
Printing at Full Size (Windows)This topic describes how to print at full size based on the following example. (Oversized Printing)
• Document: Any Type• Page Size: A4 (210.0×297.0 mm)/Letter (8.3 × 11.7 in)• Paper: Roll• Paper type: Plain Paper• Roll paper width: A2/A3 roll (420.0 mm [16.5 in])
1. Choose Print in the application menu.
2. Select the printer in the dialog box, and then display the printer driver dialog box.(See "Accessing the Printer Driv-er Dialog Box from Applications (Windows) →P.211 ")
3. Make sure the Main sheet is displayed.
Enhanced Printing Options > Printing at full size >
Printing at Full Size (Windows) iPF815
3
86
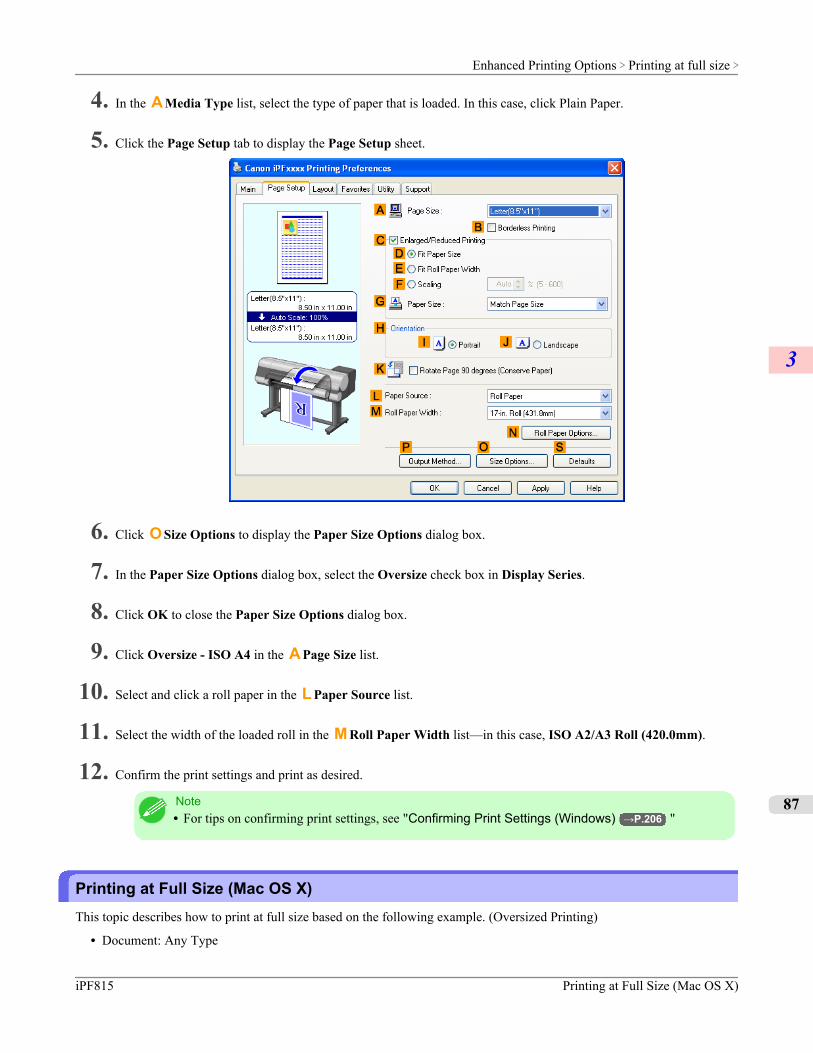
4. In the A Media Type list, select the type of paper that is loaded. In this case, click Plain Paper.
5. Click the Page Setup tab to display the Page Setup sheet.
6. Click O Size Options to display the Paper Size Options dialog box.
7. In the Paper Size Options dialog box, select the Oversize check box in Display Series.
8. Click OK to close the Paper Size Options dialog box.
9. Click Oversize - ISO A4 in the A Page Size list.
10. Select and click a roll paper in the L Paper Source list.
11. Select the width of the loaded roll in the M Roll Paper Width list—in this case, ISO A2/A3 Roll (420.0mm).
12. Confirm the print settings and print as desired.
Note• For tips on confirming print settings, see "Confirming Print Settings (Windows) →P.206 "
Printing at Full Size (Mac OS X)This topic describes how to print at full size based on the following example. (Oversized Printing)
• Document: Any Type
Enhanced Printing Options > Printing at full size >
iPF815 Printing at Full Size (Mac OS X)
3
87
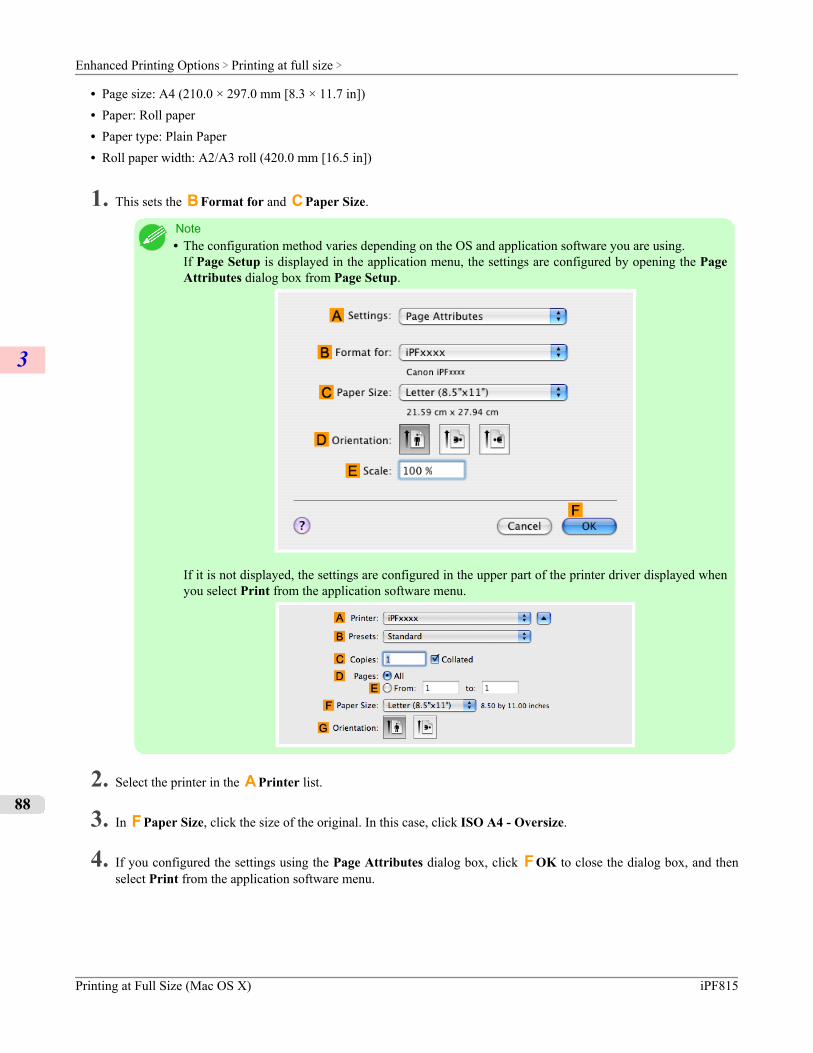
• Page size: A4 (210.0 × 297.0 mm [8.3 × 11.7 in])• Paper: Roll paper• Paper type: Plain Paper• Roll paper width: A2/A3 roll (420.0 mm [16.5 in])
1. This sets the B Format for and C Paper Size.
Note• The configuration method varies depending on the OS and application software you are using.
If Page Setup is displayed in the application menu, the settings are configured by opening the PageAttributes dialog box from Page Setup.
If it is not displayed, the settings are configured in the upper part of the printer driver displayed whenyou select Print from the application software menu.
2. Select the printer in the A Printer list.
3. In F Paper Size, click the size of the original. In this case, click ISO A4 - Oversize.
4. If you configured the settings using the Page Attributes dialog box, click F OK to close the dialog box, and thenselect Print from the application software menu.
Enhanced Printing Options > Printing at full size >
Printing at Full Size (Mac OS X) iPF815
3
88
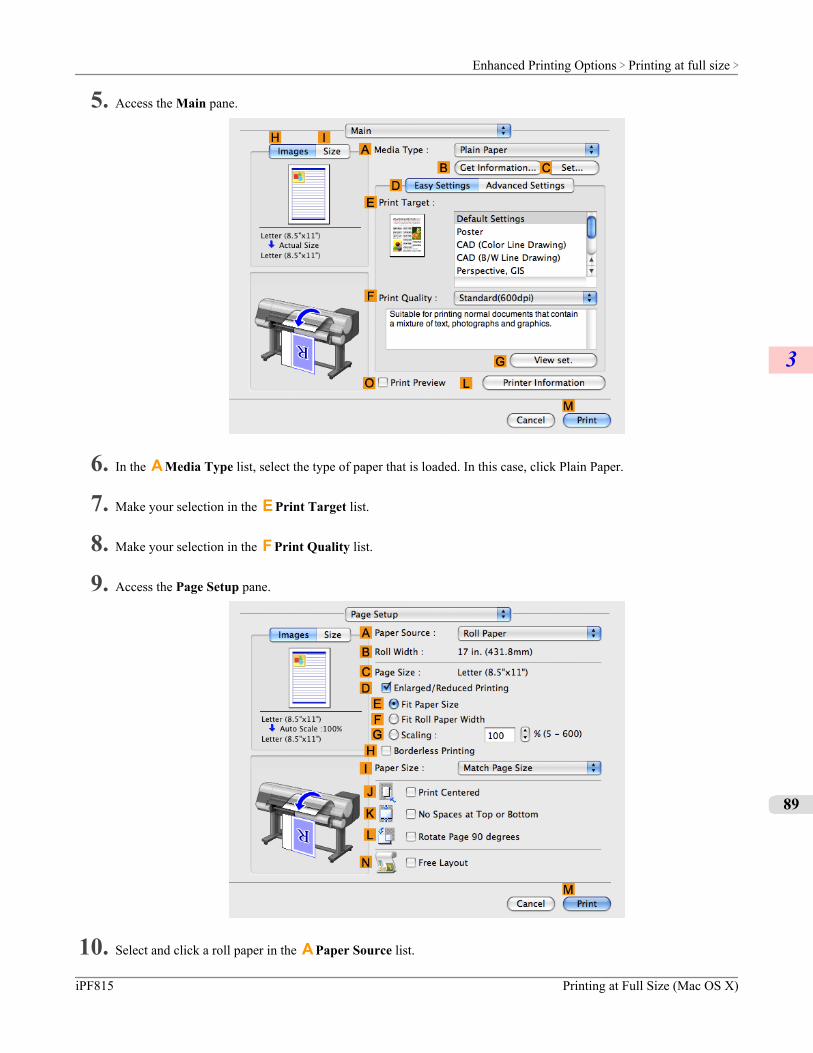
5. Access the Main pane.
6. In the A Media Type list, select the type of paper that is loaded. In this case, click Plain Paper.
7. Make your selection in the E Print Target list.
8. Make your selection in the F Print Quality list.
9. Access the Page Setup pane.
10. Select and click a roll paper in the A Paper Source list.
Enhanced Printing Options > Printing at full size >
iPF815 Printing at Full Size (Mac OS X)
3
89

11. Make sure the width of the loaded roll is displayed in the B Roll Width list—in this case, ISO A2/A3 (420.0mm).
Note• If the width of the roll loaded in the printer is not shown in B Roll Width, click L Printer Informa-
tion on the Main pane to update the printer information.
12. Make sure C Page Size shows the original size as specified in C Paper Size in the Page Attributes dialog box—inthis case, ISO A4 - Oversize.
13. Confirm the print settings, and then click M Print to start printing.
Note• For tips on confirming print settings, see "Confirming Print Settings (Mac OS X) →P.429 "
Enhanced Printing Options > Printing at full size >
Printing at Full Size (Mac OS X) iPF815
3
90
Borderless Printing at Actual SizeTake advantage of borderless printing to print documents such as posters (made up mainly of photos or images) without asurrounding margin, or border.
Borderless PrintingIn regular printing, a margin required by the printer is added around the original. With borderless printing, you can printdocuments without the margin, so that the printed image covers the entire surface of the paper.
Important• Borderless printing is only available with rolls.• Paper you can use for borderless printing is restricted to particular types of paper and rolls of particular
widths. For information on types of paper compatible with borderless printing, refer to the Paper ReferenceGuide. (See "Types of Paper →P.617 ")
• Paper incompatible with the printer's auto cut function can be printed without borders on the left and rightsides only.
• These features cannot be used in combination with borderless printing: special page layouts, centering origi-nals, and printing cut lines on rolls.
• If Fit Paper Size or Print Image with Actual Size (Windows only) is selected when performing borderlessprinting, Rotate Page 90 degrees (Conserve Paper) cannot be selected.
• When borderless printing is used, the edge of the paper is cut during printing. Thus, ink density may be un-even at the edges. If you require higher image quality, specify No in Auto Cut in the printer driver. In thiscase, the paper can be printed without borders on the left and right sides only. After ejecting and cutting theprinted document, use scissors to cut away the top and bottom edges.
• By factory default, the ink drying time is disabled for all paper. When you are using paper that takes longerfor ink to adhere for borderless printing and the Cutter Unit touches printing surfaces that are not dry yet, itmay damage the paper or the edge of the document that is cut, depending on frequency of use. In this case,follow these steps to change the ink drying time.
1. On the Main sheet of the printer driver, click Settings in Media Type.2. Select the ink drying time in the Between Pages list of Drying Time.
• Before borderless printing, make sure the blue Switch on the platen is set toward the ● side. (See "Settingthe Blue Switch on the Platen.") →P.872
Borderless Printing MethodChoose the method of borderless printing that suits the original, as desired.
Enhanced Printing Options > Printing at full size >
iPF815 Borderless Printing at Actual Size
3
91
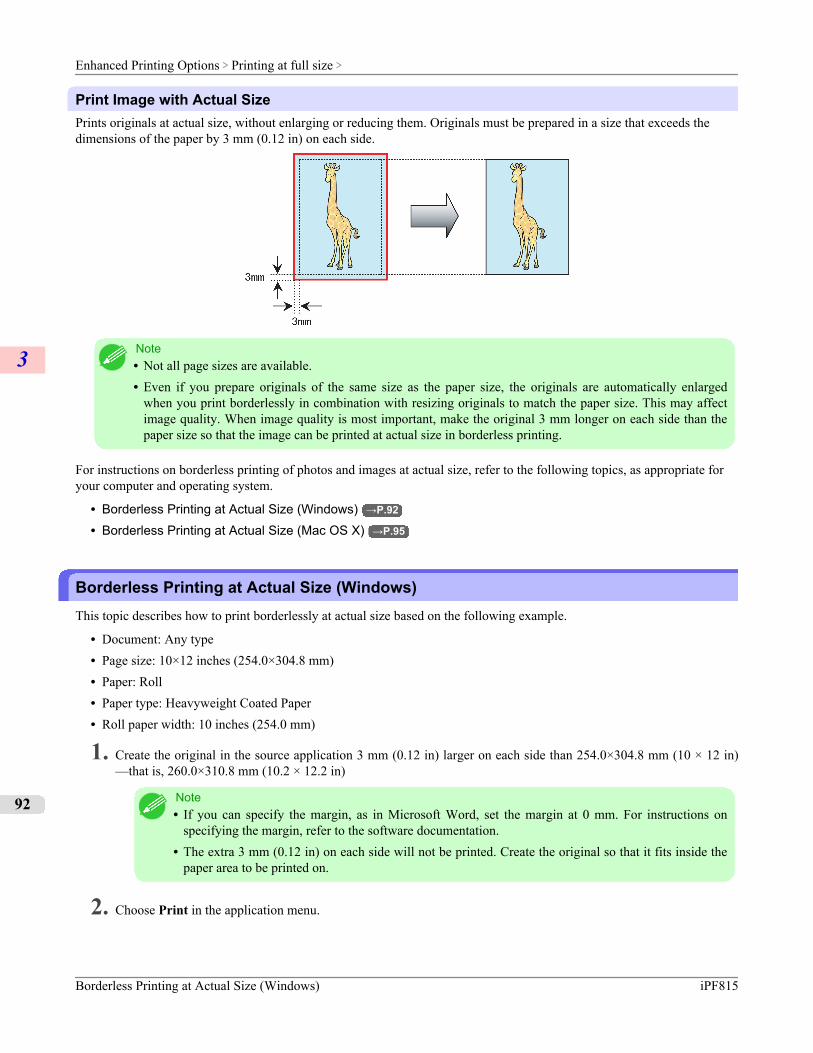
Print Image with Actual SizePrints originals at actual size, without enlarging or reducing them. Originals must be prepared in a size that exceeds thedimensions of the paper by 3 mm (0.12 in) on each side.
Note• Not all page sizes are available.• Even if you prepare originals of the same size as the paper size, the originals are automatically enlarged
when you print borderlessly in combination with resizing originals to match the paper size. This may affectimage quality. When image quality is most important, make the original 3 mm longer on each side than thepaper size so that the image can be printed at actual size in borderless printing.
For instructions on borderless printing of photos and images at actual size, refer to the following topics, as appropriate foryour computer and operating system.
• Borderless Printing at Actual Size (Windows) →P.92
• Borderless Printing at Actual Size (Mac OS X) →P.95
Borderless Printing at Actual Size (Windows)This topic describes how to print borderlessly at actual size based on the following example.
• Document: Any type• Page size: 10×12 inches (254.0×304.8 mm)• Paper: Roll• Paper type: Heavyweight Coated Paper• Roll paper width: 10 inches (254.0 mm)
1. Create the original in the source application 3 mm (0.12 in) larger on each side than 254.0×304.8 mm (10 × 12 in)—that is, 260.0×310.8 mm (10.2 × 12.2 in)
Note• If you can specify the margin, as in Microsoft Word, set the margin at 0 mm. For instructions on
specifying the margin, refer to the software documentation.• The extra 3 mm (0.12 in) on each side will not be printed. Create the original so that it fits inside the
paper area to be printed on.
2. Choose Print in the application menu.
Enhanced Printing Options > Printing at full size >
Borderless Printing at Actual Size (Windows) iPF815
3
92
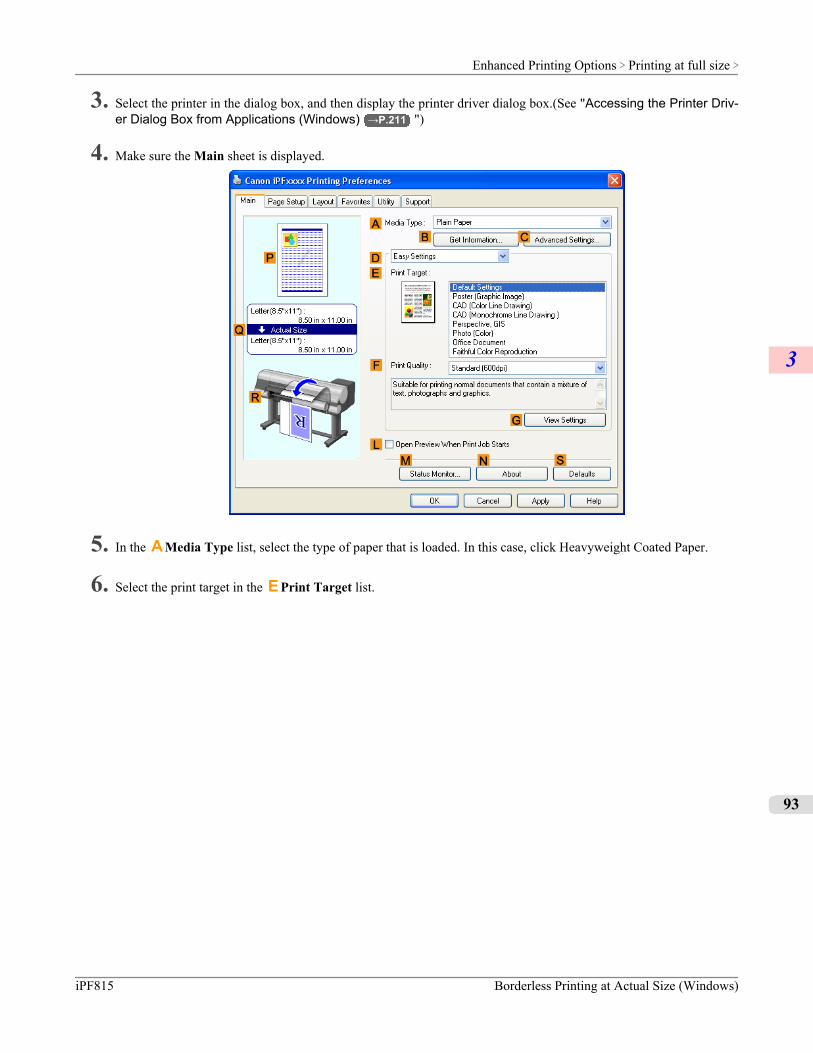
3. Select the printer in the dialog box, and then display the printer driver dialog box.(See "Accessing the Printer Driv-er Dialog Box from Applications (Windows) →P.211 ")
4. Make sure the Main sheet is displayed.
5. In the A Media Type list, select the type of paper that is loaded. In this case, click Heavyweight Coated Paper.
6. Select the print target in the E Print Target list.
Enhanced Printing Options > Printing at full size >
iPF815 Borderless Printing at Actual Size (Windows)
3
93
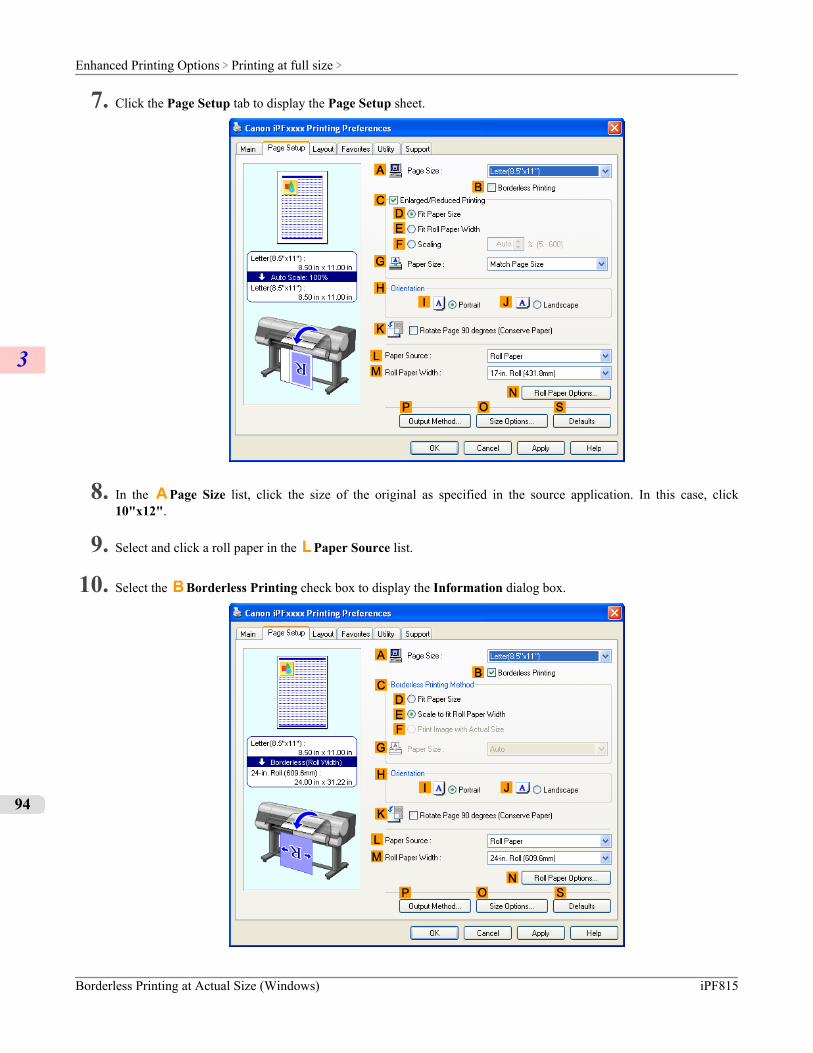
7. Click the Page Setup tab to display the Page Setup sheet.
8. In the A Page Size list, click the size of the original as specified in the source application. In this case, click10"x12".
9. Select and click a roll paper in the L Paper Source list.
10. Select the B Borderless Printing check box to display the Information dialog box.
Enhanced Printing Options > Printing at full size >
Borderless Printing at Actual Size (Windows) iPF815
3
94
11. Select the width of the loaded roll in the Roll Paper Width list—in this case, click 10-in. Roll (254.0mm).
12. Click OK to close the Information dialog box.
13. In C Borderless Printing Method, click F Print Image with Actual Size.
14. Confirm the print settings and print as desired.
Note• For tips on confirming print settings, see "Confirming Print Settings (Windows) →P.206 "
Borderless Printing at Actual Size (Mac OS X)This topic describes how to print borderlessly at actual size based on the following example.
• Document: Any Type• Page size: 10 × 12 inches (254.0×304.8 mm)–Borderless• Paper: Roll paper• Paper type: Heavyweight Coated Paper• Roll paper width: 10 inches (254.0 mm)
Enhanced Printing Options > Printing at full size >
iPF815 Borderless Printing at Actual Size (Mac OS X)
3
95
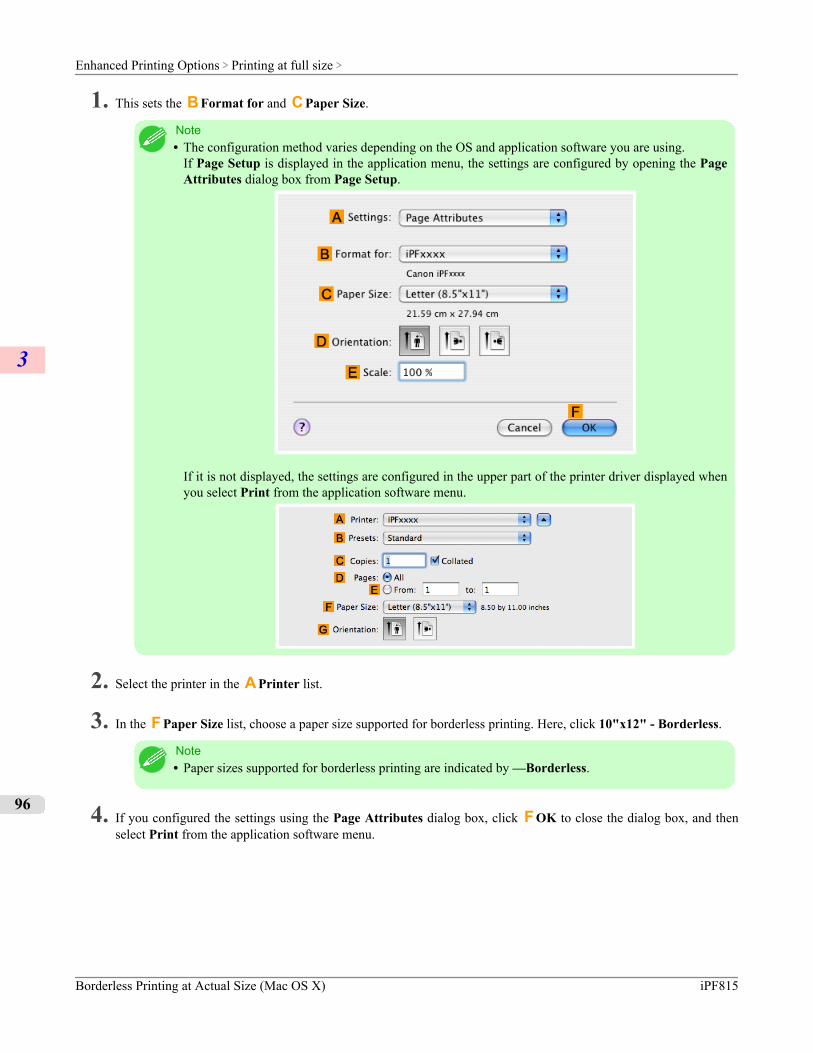
1. This sets the B Format for and C Paper Size.
Note• The configuration method varies depending on the OS and application software you are using.
If Page Setup is displayed in the application menu, the settings are configured by opening the PageAttributes dialog box from Page Setup.
If it is not displayed, the settings are configured in the upper part of the printer driver displayed whenyou select Print from the application software menu.
2. Select the printer in the A Printer list.
3. In the F Paper Size list, choose a paper size supported for borderless printing. Here, click 10"x12" - Borderless.
Note• Paper sizes supported for borderless printing are indicated by —Borderless.
4. If you configured the settings using the Page Attributes dialog box, click F OK to close the dialog box, and thenselect Print from the application software menu.
Enhanced Printing Options > Printing at full size >
Borderless Printing at Actual Size (Mac OS X) iPF815
3
96
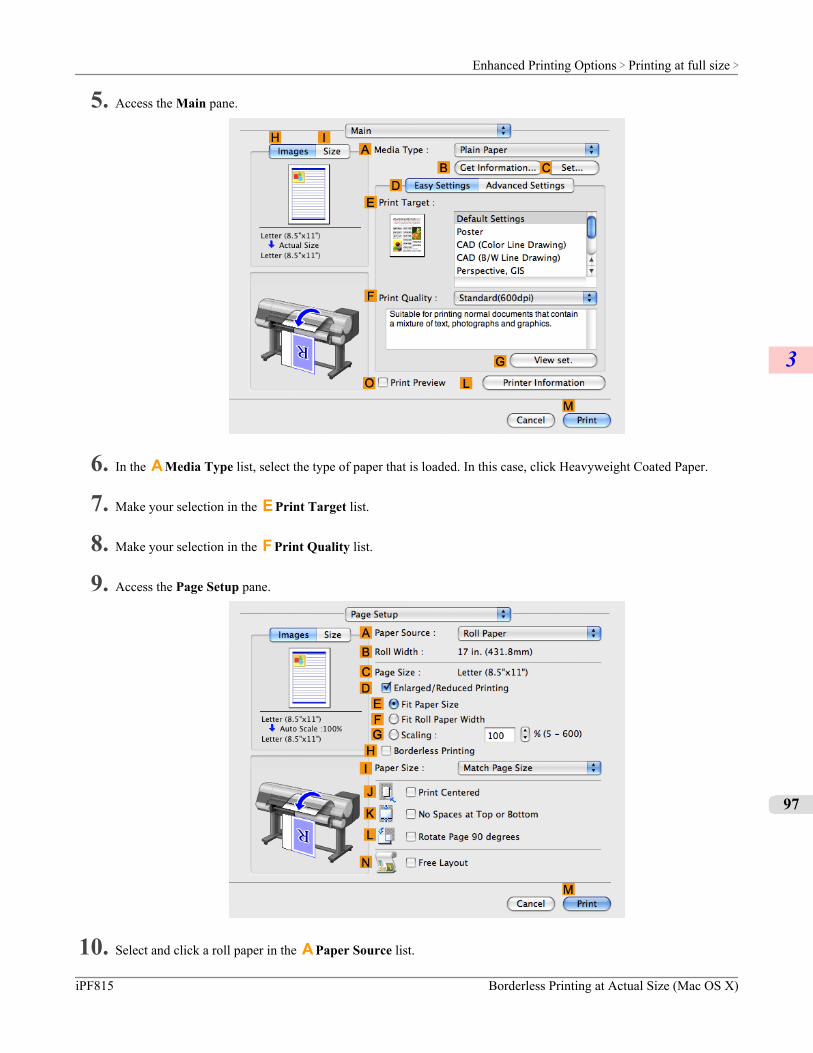
5. Access the Main pane.
6. In the A Media Type list, select the type of paper that is loaded. In this case, click Heavyweight Coated Paper.
7. Make your selection in the E Print Target list.
8. Make your selection in the F Print Quality list.
9. Access the Page Setup pane.
10. Select and click a roll paper in the A Paper Source list.
Enhanced Printing Options > Printing at full size >
iPF815 Borderless Printing at Actual Size (Mac OS X)
3
97
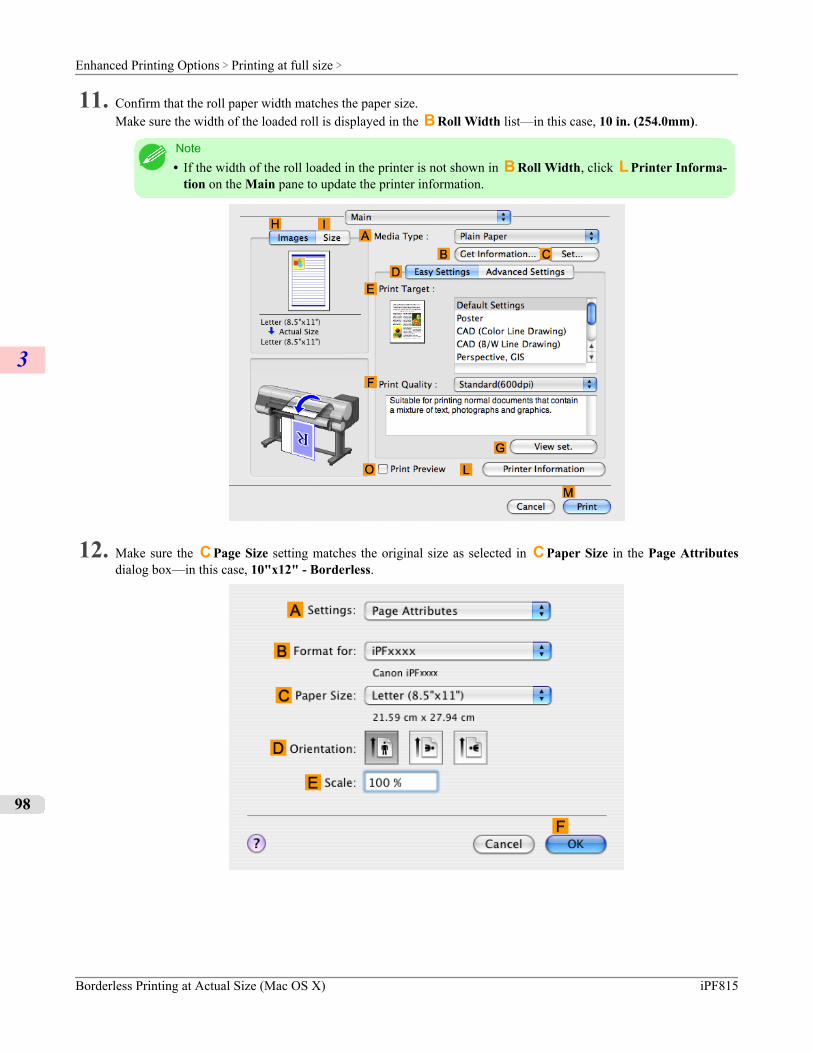
11. Confirm that the roll paper width matches the paper size.Make sure the width of the loaded roll is displayed in the B Roll Width list—in this case, 10 in. (254.0mm).
Note• If the width of the roll loaded in the printer is not shown in B Roll Width, click L Printer Informa-
tion on the Main pane to update the printer information.
12. Make sure the C Page Size setting matches the original size as selected in C Paper Size in the Page Attributesdialog box—in this case, 10"x12" - Borderless.
Enhanced Printing Options > Printing at full size >
Borderless Printing at Actual Size (Mac OS X) iPF815
3
98
13. Confirm the print settings, and then click M Print to start printing.
Note• For tips on confirming print settings, see "Confirming Print Settings (Mac OS X) →P.429 "
Enhanced Printing Options > Printing at full size >
iPF815 Borderless Printing at Actual Size (Mac OS X)
3
99
Borderless PrintingBorderless Printing on Paper of Equivalent Size ............................................................................................. 100
Borderless Printing by Resizing Originals to Match the Paper Size (Windows) .......................................... 101Borderless Printing by Resizing Originals to Match the Paper Size (Mac OS X) ........................................ 103
Borderless Printing by Resizing Originals to Fit the Roll Width ....................................................................... 107Borderless Printing by Resizing Originals to Fit the Roll Width (Windows) ................................................. 108Borderless Printing by Resizing Originals to Fit the Roll Width (Mac OS X) ............................................... 110
Borderless Printing on Paper of Equivalent SizeTake advantage of borderless printing to print documents such as posters (made up mainly of photos or images) without asurrounding margin, or border.
Borderless PrintingIn regular printing, a margin required by the printer is added around the original. With borderless printing, you can printdocuments without the margin, so that the printed image covers the entire surface of the paper.
Important• Borderless printing is only available with rolls.• Paper you can use for borderless printing is restricted to particular types of paper and rolls of particular
widths. For information on types of paper compatible with borderless printing, refer to the Paper ReferenceGuide. (Refer to "Types of Paper →P.617 ")
• Paper incompatible with the printer's auto cut function can be printed without borders on the left and rightsides only.
• These features cannot be used in combination with borderless printing: special page layouts, centering origi-nals, and printing cut lines on rolls.
• If Fit Paper Size or Print Image with Actual Size (Windows only) is selected when performing borderlessprinting, Rotate Page 90 degrees (Conserve Paper) cannot be selected.
• When borderless printing is used, the edge of the paper is cut during printing. Thus, ink density may beslightly uneven at the edges. If you require higher image quality, specify No in Auto Cut in the printer driv-er. In this case, the paper can be printed without borders on the left and right sides only. Cut the printed docu-ment ejected from the printer, then use scissors to cut away the edges on the top and bottom.
• By factory default, the ink drying time is disabled for all paper. When you are using paper that takes longerfor ink to adhere for borderless printing and the Cutter Unit touches printing surfaces that are not dry yet, itmay damage the paper or the edge of the document that is cut, depending on frequency of use. In this case,follow these steps to change the ink drying time.
1. On the Main sheet of the printer driver, click Settings in Media Type.2. Select the ink drying time in the Between Pages list of Drying Time.
• Before borderless printing, make sure the blue Switch on the platen is set toward the ● side. (See "Settingthe Blue Switch on the Platen.") →P.872
Borderless Printing MethodChoose the method of borderless printing that suits the original, as desired.
Enhanced Printing Options > Borderless Printing >
Borderless Printing on Paper of Equivalent Size iPF815
3
100
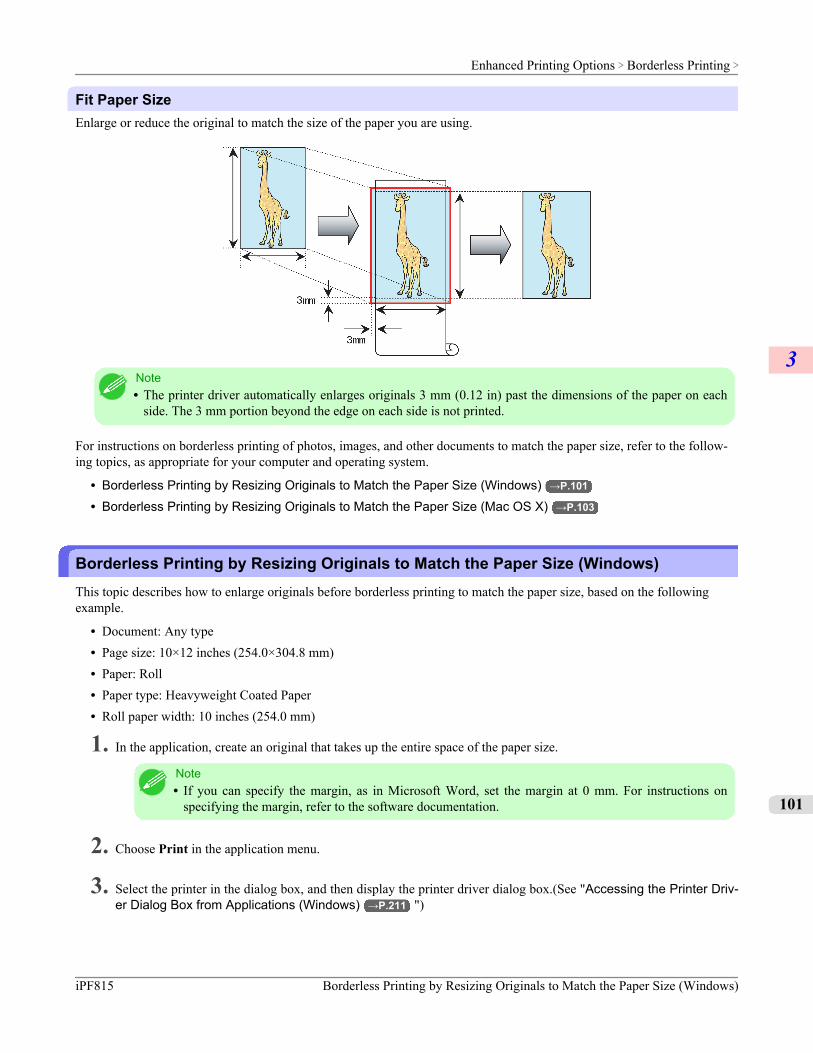
Fit Paper SizeEnlarge or reduce the original to match the size of the paper you are using.
Note• The printer driver automatically enlarges originals 3 mm (0.12 in) past the dimensions of the paper on each
side. The 3 mm portion beyond the edge on each side is not printed.
For instructions on borderless printing of photos, images, and other documents to match the paper size, refer to the follow-ing topics, as appropriate for your computer and operating system.
• Borderless Printing by Resizing Originals to Match the Paper Size (Windows) →P.101
• Borderless Printing by Resizing Originals to Match the Paper Size (Mac OS X) →P.103
Borderless Printing by Resizing Originals to Match the Paper Size (Windows)This topic describes how to enlarge originals before borderless printing to match the paper size, based on the followingexample.
• Document: Any type• Page size: 10×12 inches (254.0×304.8 mm)• Paper: Roll• Paper type: Heavyweight Coated Paper• Roll paper width: 10 inches (254.0 mm)
1. In the application, create an original that takes up the entire space of the paper size.
Note• If you can specify the margin, as in Microsoft Word, set the margin at 0 mm. For instructions on
specifying the margin, refer to the software documentation.
2. Choose Print in the application menu.
3. Select the printer in the dialog box, and then display the printer driver dialog box.(See "Accessing the Printer Driv-er Dialog Box from Applications (Windows) →P.211 ")
Enhanced Printing Options > Borderless Printing >
iPF815 Borderless Printing by Resizing Originals to Match the Paper Size (Windows)
3
101
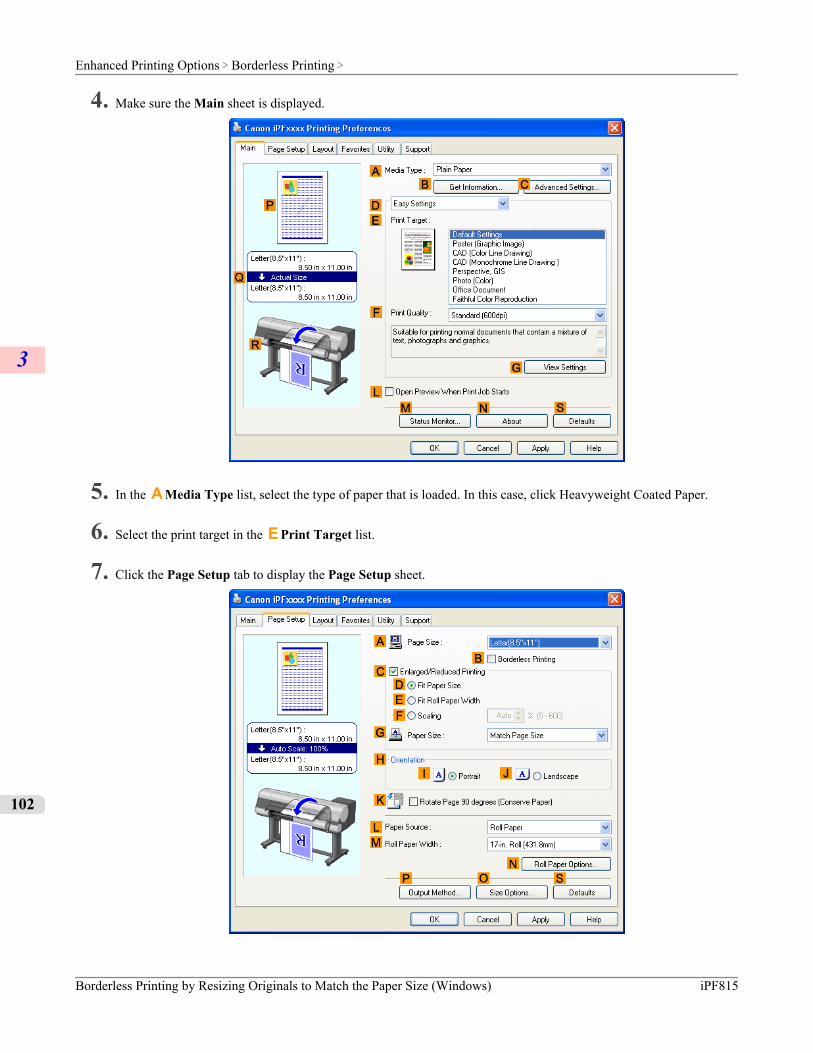
4. Make sure the Main sheet is displayed.
5. In the A Media Type list, select the type of paper that is loaded. In this case, click Heavyweight Coated Paper.
6. Select the print target in the E Print Target list.
7. Click the Page Setup tab to display the Page Setup sheet.
Enhanced Printing Options > Borderless Printing >
Borderless Printing by Resizing Originals to Match the Paper Size (Windows) iPF815
3
102
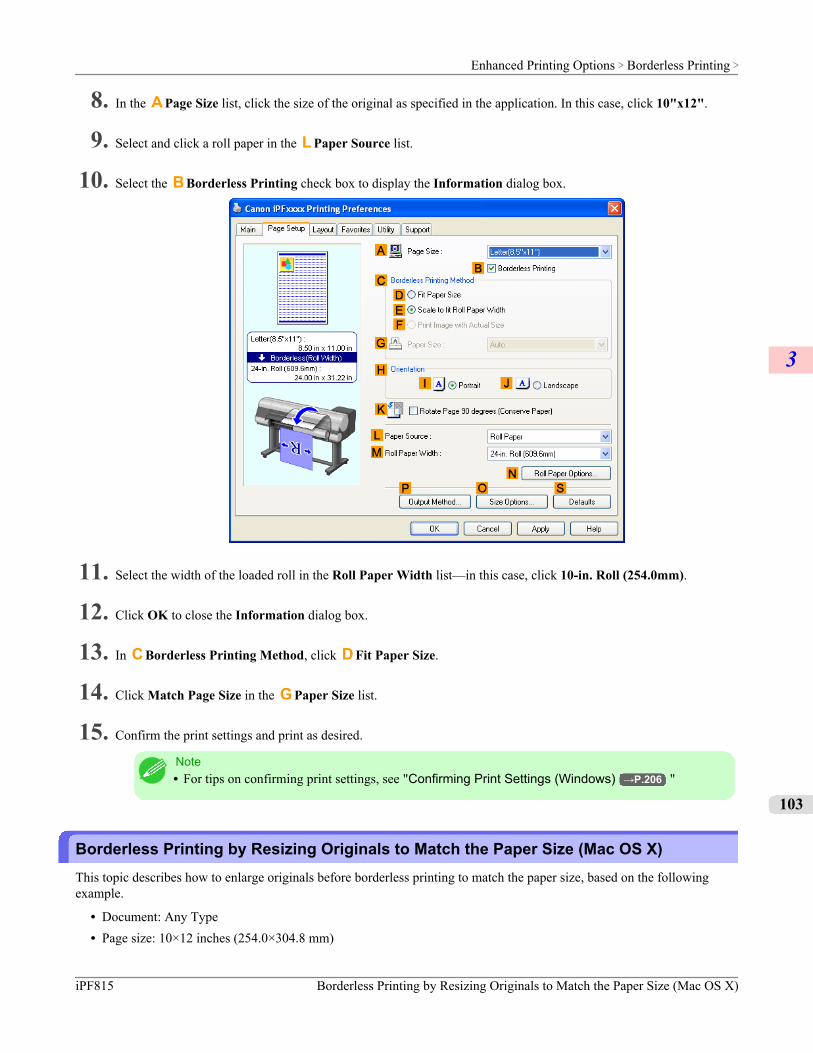
8. In the A Page Size list, click the size of the original as specified in the application. In this case, click 10"x12".
9. Select and click a roll paper in the L Paper Source list.
10. Select the B Borderless Printing check box to display the Information dialog box.
11. Select the width of the loaded roll in the Roll Paper Width list—in this case, click 10-in. Roll (254.0mm).
12. Click OK to close the Information dialog box.
13. In C Borderless Printing Method, click D Fit Paper Size.
14. Click Match Page Size in the G Paper Size list.
15. Confirm the print settings and print as desired.
Note• For tips on confirming print settings, see "Confirming Print Settings (Windows) →P.206 "
Borderless Printing by Resizing Originals to Match the Paper Size (Mac OS X)This topic describes how to enlarge originals before borderless printing to match the paper size, based on the followingexample.
• Document: Any Type• Page size: 10×12 inches (254.0×304.8 mm)
Enhanced Printing Options > Borderless Printing >
iPF815 Borderless Printing by Resizing Originals to Match the Paper Size (Mac OS X)
3
103
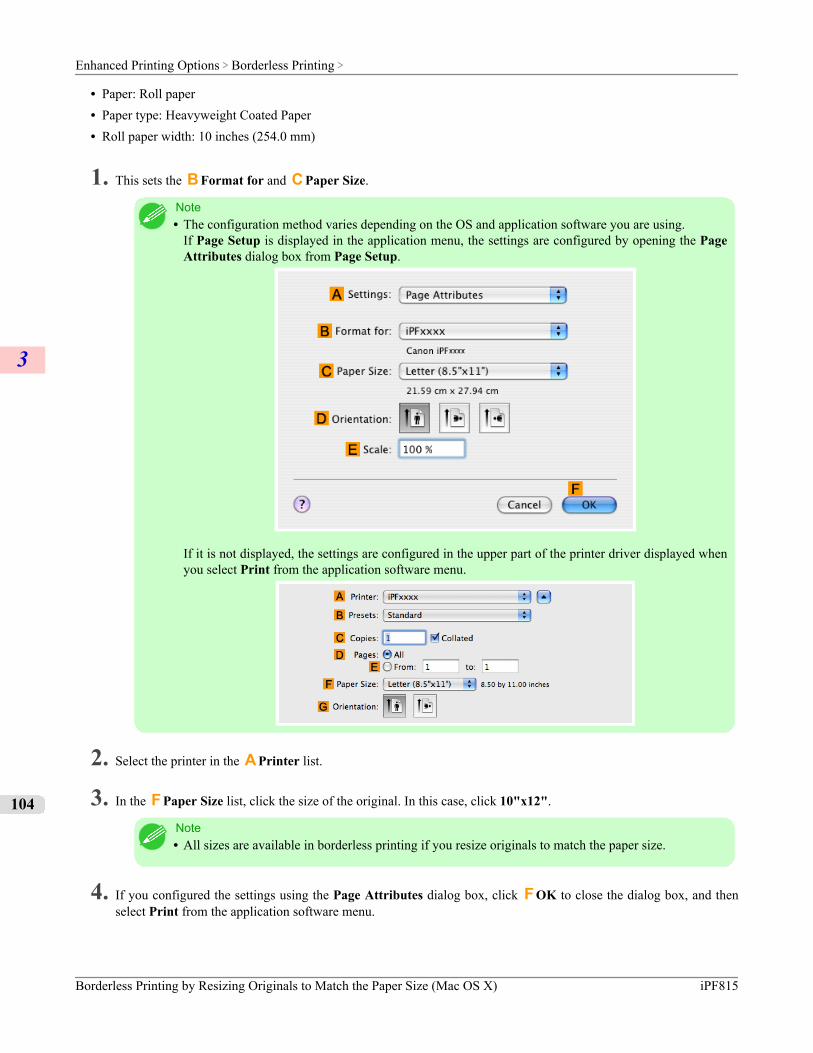
• Paper: Roll paper• Paper type: Heavyweight Coated Paper• Roll paper width: 10 inches (254.0 mm)
1. This sets the B Format for and C Paper Size.
Note• The configuration method varies depending on the OS and application software you are using.
If Page Setup is displayed in the application menu, the settings are configured by opening the PageAttributes dialog box from Page Setup.
If it is not displayed, the settings are configured in the upper part of the printer driver displayed whenyou select Print from the application software menu.
2. Select the printer in the A Printer list.
3. In the F Paper Size list, click the size of the original. In this case, click 10"x12".
Note• All sizes are available in borderless printing if you resize originals to match the paper size.
4. If you configured the settings using the Page Attributes dialog box, click F OK to close the dialog box, and thenselect Print from the application software menu.
Enhanced Printing Options > Borderless Printing >
Borderless Printing by Resizing Originals to Match the Paper Size (Mac OS X) iPF815
3
104
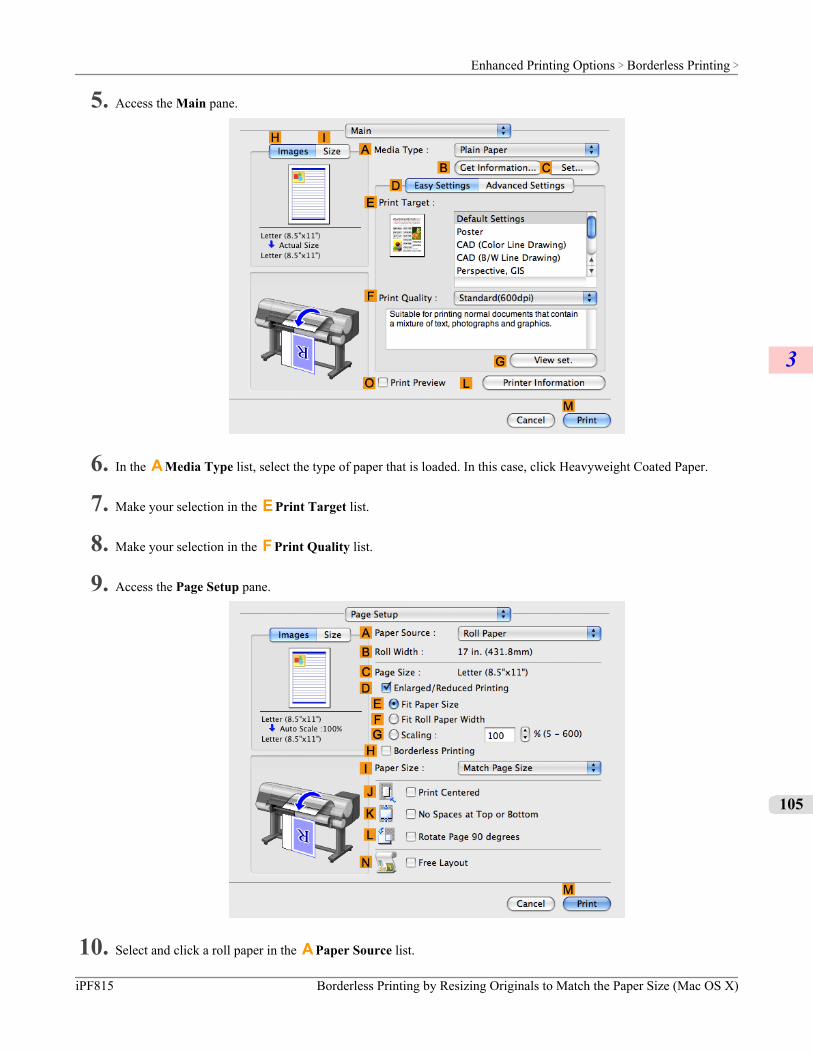
5. Access the Main pane.
6. In the A Media Type list, select the type of paper that is loaded. In this case, click Heavyweight Coated Paper.
7. Make your selection in the E Print Target list.
8. Make your selection in the F Print Quality list.
9. Access the Page Setup pane.
10. Select and click a roll paper in the A Paper Source list.
Enhanced Printing Options > Borderless Printing >
iPF815 Borderless Printing by Resizing Originals to Match the Paper Size (Mac OS X)
3
105

11. Make sure the width of the loaded roll is displayed in the B Roll Width list—in this case, 10 in. (254.0mm).
Note• If the width of the roll loaded in the printer is not shown in B Roll Width, click L Printer Informa-
tion on the Main pane to update the printer information.
12. Make sure the C Page Size setting matches the original size as selected in C Paper Size in the Page Attributesdialog box—in this case, 10"x12".
13. On the Page Setup pane, select the D Enlarged/Reduced Printing check box.
14. Select the H Borderless Printing check box.
Enhanced Printing Options > Borderless Printing >
Borderless Printing by Resizing Originals to Match the Paper Size (Mac OS X) iPF815
3
106
15. Click E Fit Paper Size under D Enlarged/Reduced Printing.
16. In I Paper Size, click the paper size. In this case, click 10"x12" - Borderless.
17. Confirm the print settings, and then click M Print to start printing.
Note• For tips on confirming print settings, see "Confirming Print Settings (Mac OS X) →P.429 "
Borderless Printing by Resizing Originals to Fit the Roll WidthTake advantage of borderless printing to print documents such as posters (made up mainly of photos or images) without asurrounding margin, or border.
Borderless PrintingIn regular printing, a margin required by the printer is added around the original. With borderless printing, you can printdocuments without the margin, so that the printed image covers the entire surface of the paper.
Important• Borderless printing is only available with rolls.• Paper you can use for borderless printing is restricted to particular types of paper and rolls of particular
widths. For information on types of paper compatible with borderless printing, refer to the Paper ReferenceGuide. (See "Types of Paper →P.617 ")
• Paper incompatible with the printer's auto cut function can be printed without borders on the left and rightsides only.
• These features cannot be used in combination with borderless printing: special page layouts, centering origi-nals, and printing cut lines on rolls.
• If Fit Paper Size or Print Image with Actual Size (Windows only) is selected when performing borderlessprinting, Rotate Page 90 degrees (Conserve Paper) cannot be selected.
• When borderless printing is used, the edge of the paper is cut during printing. Thus, ink density may be un-even at the edges. If you require higher image quality, specify No in Auto Cut in the printer driver. In thiscase, the paper can be printed without borders on the left and right sides only. After ejecting and cutting theprinted document, use scissors to cut away the top and bottom edges.
• By factory default, the ink drying time is disabled for all paper. When you are using paper that takes longerfor ink to adhere for borderless printing and the Cutter Unit touches printing surfaces that are not dry yet, itmay damage the paper or the edge of the document that is cut, depending on frequency of use. In this case,follow these steps to change the ink drying time.
1. On the Main sheet of the printer driver, click Settings in Media Type.2. Select the ink drying time in the Between Pages list of Drying Time.
• Before borderless printing, make sure the blue Switch on the platen is set toward the ● side. (See "Settingthe Blue Switch on the Platen.") →P.872
Borderless Printing MethodChoose the method of borderless printing that suits the original, as desired.
Enhanced Printing Options > Borderless Printing >
iPF815 Borderless Printing by Resizing Originals to Fit the Roll Width
3
107
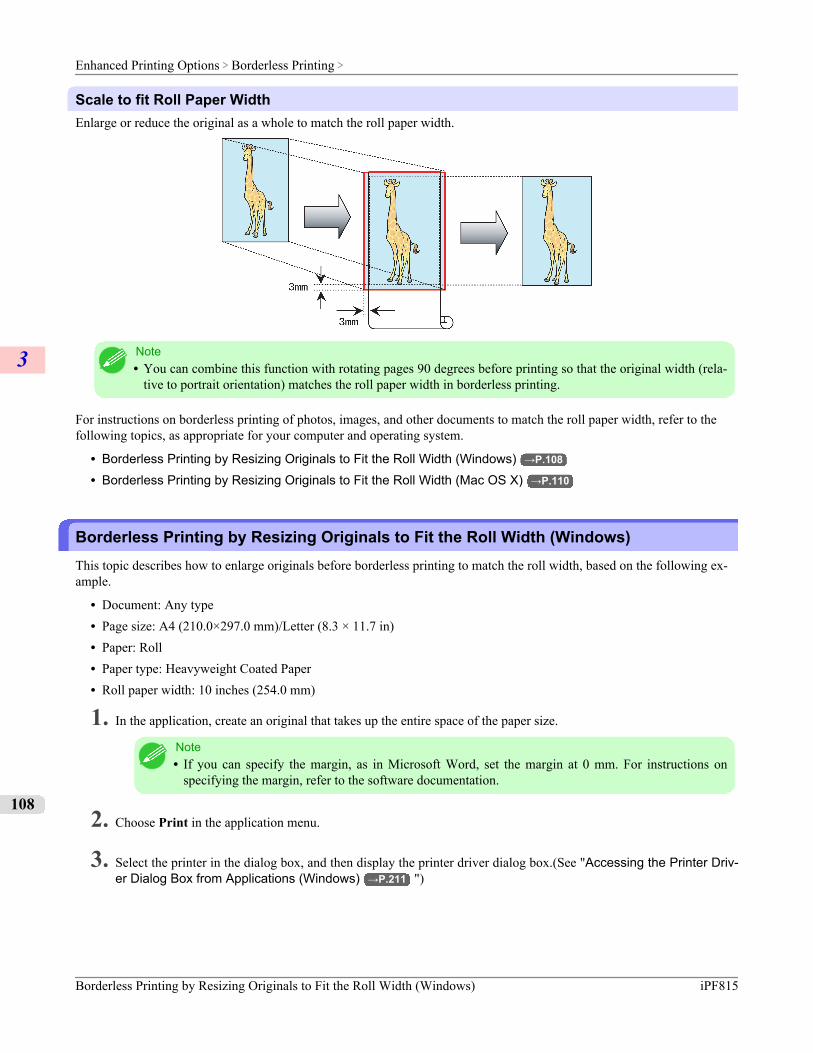
Scale to fit Roll Paper WidthEnlarge or reduce the original as a whole to match the roll paper width.
Note• You can combine this function with rotating pages 90 degrees before printing so that the original width (rela-
tive to portrait orientation) matches the roll paper width in borderless printing.
For instructions on borderless printing of photos, images, and other documents to match the roll paper width, refer to thefollowing topics, as appropriate for your computer and operating system.
• Borderless Printing by Resizing Originals to Fit the Roll Width (Windows) →P.108
• Borderless Printing by Resizing Originals to Fit the Roll Width (Mac OS X) →P.110
Borderless Printing by Resizing Originals to Fit the Roll Width (Windows)This topic describes how to enlarge originals before borderless printing to match the roll width, based on the following ex-ample.
• Document: Any type• Page size: A4 (210.0×297.0 mm)/Letter (8.3 × 11.7 in)• Paper: Roll• Paper type: Heavyweight Coated Paper• Roll paper width: 10 inches (254.0 mm)
1. In the application, create an original that takes up the entire space of the paper size.
Note• If you can specify the margin, as in Microsoft Word, set the margin at 0 mm. For instructions on
specifying the margin, refer to the software documentation.
2. Choose Print in the application menu.
3. Select the printer in the dialog box, and then display the printer driver dialog box.(See "Accessing the Printer Driv-er Dialog Box from Applications (Windows) →P.211 ")
Enhanced Printing Options > Borderless Printing >
Borderless Printing by Resizing Originals to Fit the Roll Width (Windows) iPF815
3
108
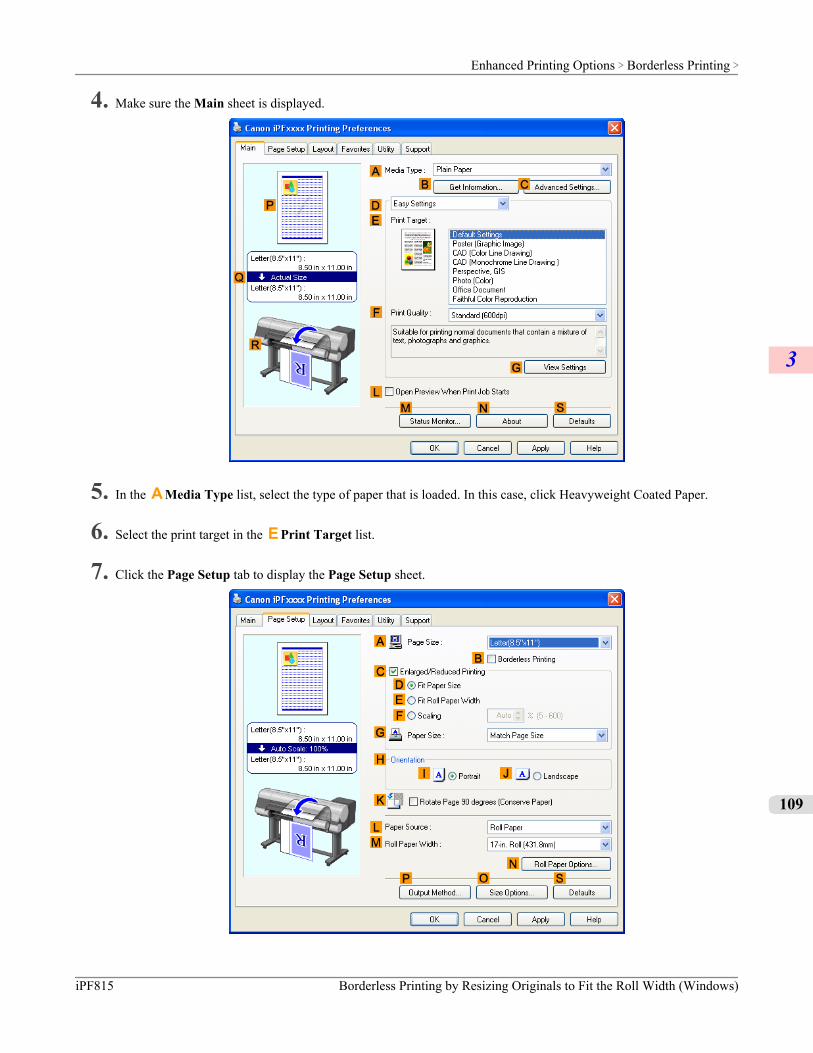
4. Make sure the Main sheet is displayed.
5. In the A Media Type list, select the type of paper that is loaded. In this case, click Heavyweight Coated Paper.
6. Select the print target in the E Print Target list.
7. Click the Page Setup tab to display the Page Setup sheet.
Enhanced Printing Options > Borderless Printing >
iPF815 Borderless Printing by Resizing Originals to Fit the Roll Width (Windows)
3
109
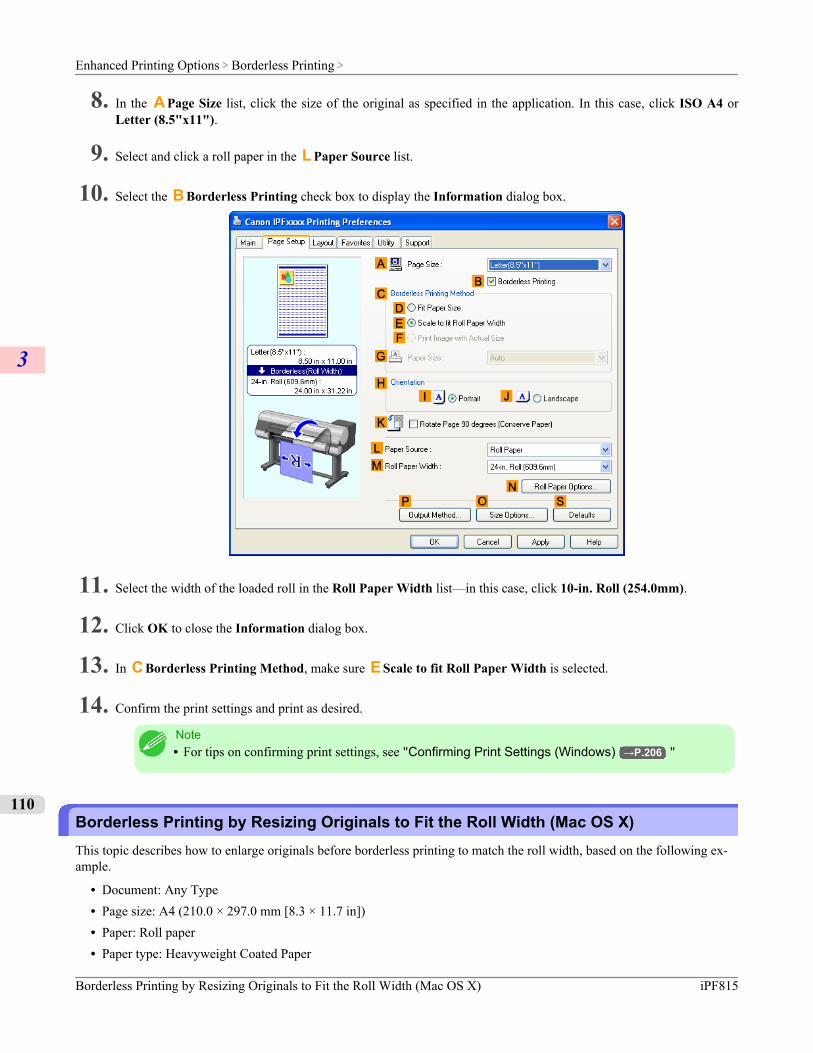
8. In the A Page Size list, click the size of the original as specified in the application. In this case, click ISO A4 orLetter (8.5"x11").
9. Select and click a roll paper in the L Paper Source list.
10. Select the B Borderless Printing check box to display the Information dialog box.
11. Select the width of the loaded roll in the Roll Paper Width list—in this case, click 10-in. Roll (254.0mm).
12. Click OK to close the Information dialog box.
13. In C Borderless Printing Method, make sure E Scale to fit Roll Paper Width is selected.
14. Confirm the print settings and print as desired.
Note• For tips on confirming print settings, see "Confirming Print Settings (Windows) →P.206 "
Borderless Printing by Resizing Originals to Fit the Roll Width (Mac OS X)This topic describes how to enlarge originals before borderless printing to match the roll width, based on the following ex-ample.
• Document: Any Type• Page size: A4 (210.0 × 297.0 mm [8.3 × 11.7 in])• Paper: Roll paper• Paper type: Heavyweight Coated Paper
Enhanced Printing Options > Borderless Printing >
Borderless Printing by Resizing Originals to Fit the Roll Width (Mac OS X) iPF815
3
110
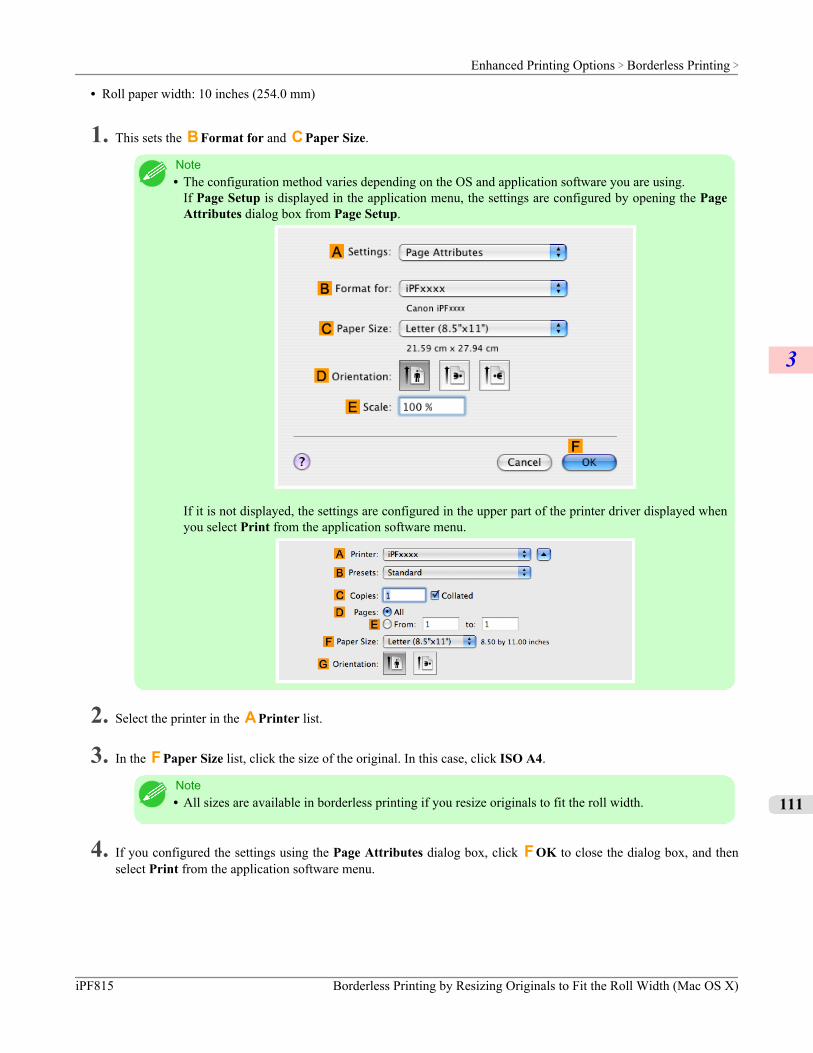
• Roll paper width: 10 inches (254.0 mm)
1. This sets the B Format for and C Paper Size.
Note• The configuration method varies depending on the OS and application software you are using.
If Page Setup is displayed in the application menu, the settings are configured by opening the PageAttributes dialog box from Page Setup.
If it is not displayed, the settings are configured in the upper part of the printer driver displayed whenyou select Print from the application software menu.
2. Select the printer in the A Printer list.
3. In the F Paper Size list, click the size of the original. In this case, click ISO A4.
Note• All sizes are available in borderless printing if you resize originals to fit the roll width.
4. If you configured the settings using the Page Attributes dialog box, click F OK to close the dialog box, and thenselect Print from the application software menu.
Enhanced Printing Options > Borderless Printing >
iPF815 Borderless Printing by Resizing Originals to Fit the Roll Width (Mac OS X)
3
111

5. Access the Main pane.
6. In the A Media Type list, select the type of paper that is loaded. In this case, click Heavyweight Coated Paper.
7. Make your selection in the E Print Target list.
8. Make your selection in the F Print Quality list.
9. Access the Page Setup pane.
10. Select and click a roll paper in the A Paper Source list.
Enhanced Printing Options > Borderless Printing >
Borderless Printing by Resizing Originals to Fit the Roll Width (Mac OS X) iPF815
3
112
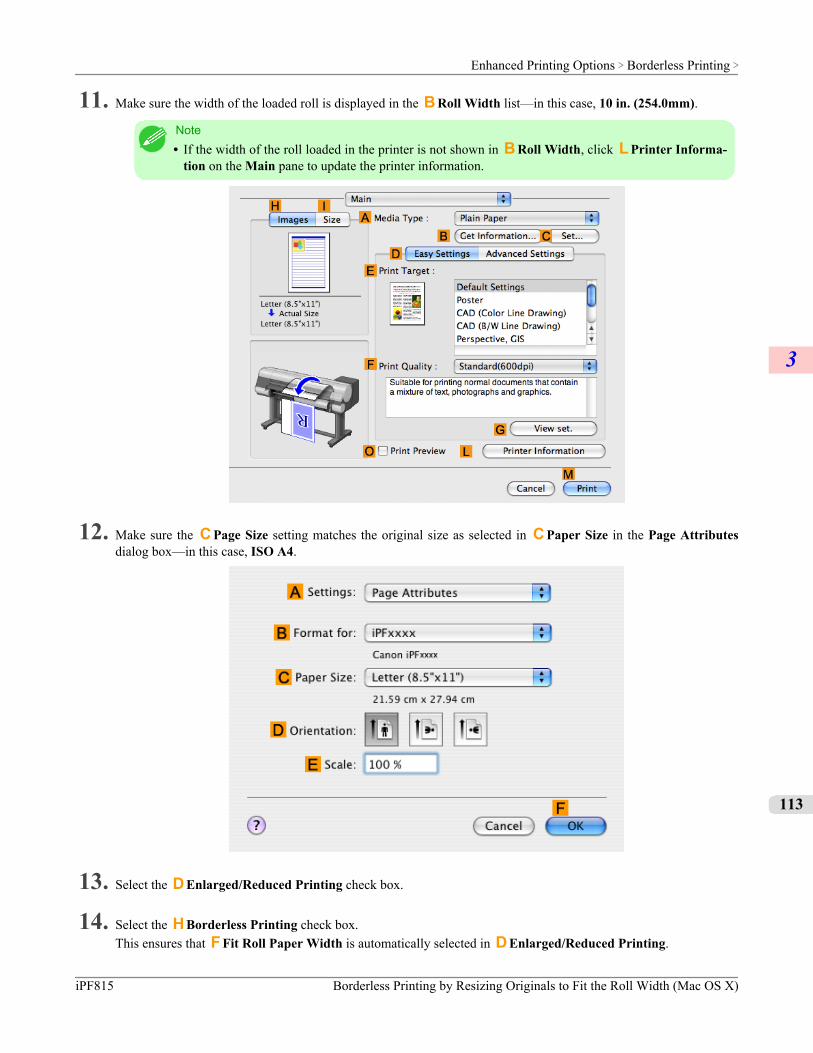
11. Make sure the width of the loaded roll is displayed in the B Roll Width list—in this case, 10 in. (254.0mm).
Note• If the width of the roll loaded in the printer is not shown in B Roll Width, click L Printer Informa-
tion on the Main pane to update the printer information.
12. Make sure the C Page Size setting matches the original size as selected in C Paper Size in the Page Attributesdialog box—in this case, ISO A4.
13. Select the D Enlarged/Reduced Printing check box.
14. Select the H Borderless Printing check box.This ensures that F Fit Roll Paper Width is automatically selected in D Enlarged/Reduced Printing.
Enhanced Printing Options > Borderless Printing >
iPF815 Borderless Printing by Resizing Originals to Fit the Roll Width (Mac OS X)
3
113
15. Confirm the print settings, and then click M Print to start printing.
Note• For tips on confirming print settings, see "Confirming Print Settings (Mac OS X) →P.429 "
Enhanced Printing Options > Borderless Printing >
Borderless Printing by Resizing Originals to Fit the Roll Width (Mac OS X) iPF815
3
114
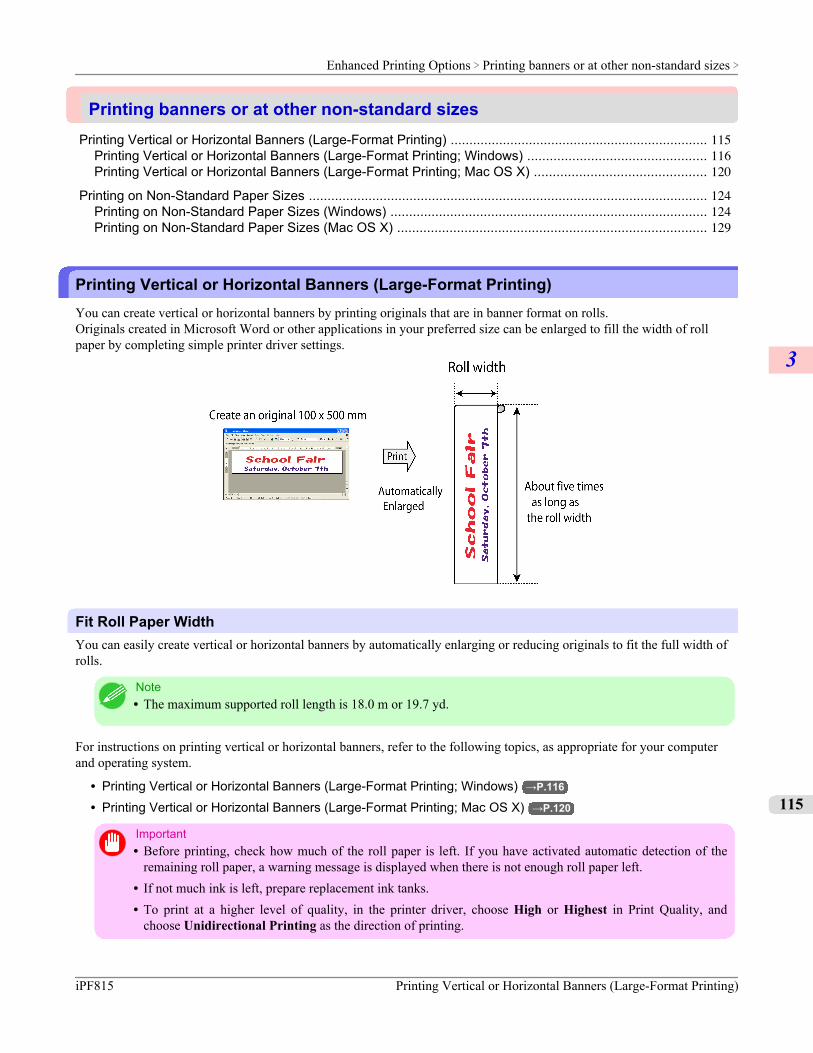
Printing banners or at other non-standard sizesPrinting Vertical or Horizontal Banners (Large-Format Printing) ..................................................................... 115
Printing Vertical or Horizontal Banners (Large-Format Printing; Windows) ................................................ 116Printing Vertical or Horizontal Banners (Large-Format Printing; Mac OS X) .............................................. 120
Printing on Non-Standard Paper Sizes ........................................................................................................... 124Printing on Non-Standard Paper Sizes (Windows) ..................................................................................... 124Printing on Non-Standard Paper Sizes (Mac OS X) ................................................................................... 129
Printing Vertical or Horizontal Banners (Large-Format Printing)You can create vertical or horizontal banners by printing originals that are in banner format on rolls.Originals created in Microsoft Word or other applications in your preferred size can be enlarged to fill the width of rollpaper by completing simple printer driver settings.
Fit Roll Paper WidthYou can easily create vertical or horizontal banners by automatically enlarging or reducing originals to fit the full width ofrolls.
Note• The maximum supported roll length is 18.0 m or 19.7 yd.
For instructions on printing vertical or horizontal banners, refer to the following topics, as appropriate for your computerand operating system.
• Printing Vertical or Horizontal Banners (Large-Format Printing; Windows) →P.116
• Printing Vertical or Horizontal Banners (Large-Format Printing; Mac OS X) →P.120
Important• Before printing, check how much of the roll paper is left. If you have activated automatic detection of the
remaining roll paper, a warning message is displayed when there is not enough roll paper left.• If not much ink is left, prepare replacement ink tanks.• To print at a higher level of quality, in the printer driver, choose High or Highest in Print Quality, and
choose Unidirectional Printing as the direction of printing.
Enhanced Printing Options > Printing banners or at other non-standard sizes >
iPF815 Printing Vertical or Horizontal Banners (Large-Format Printing)
3
115
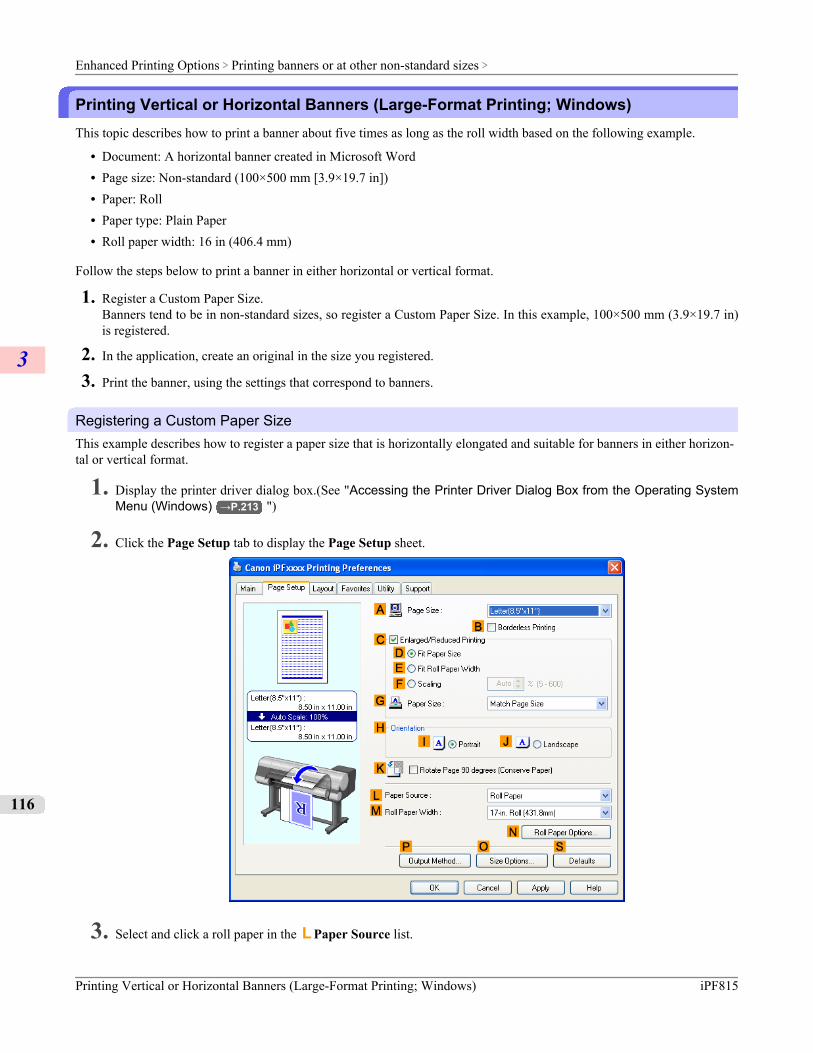
Printing Vertical or Horizontal Banners (Large-Format Printing; Windows)This topic describes how to print a banner about five times as long as the roll width based on the following example.
• Document: A horizontal banner created in Microsoft Word• Page size: Non-standard (100×500 mm [3.9×19.7 in])• Paper: Roll• Paper type: Plain Paper• Roll paper width: 16 in (406.4 mm)
Follow the steps below to print a banner in either horizontal or vertical format.
1. Register a Custom Paper Size.Banners tend to be in non-standard sizes, so register a Custom Paper Size. In this example, 100×500 mm (3.9×19.7 in)is registered.
2. In the application, create an original in the size you registered.
3. Print the banner, using the settings that correspond to banners.
Registering a Custom Paper SizeThis example describes how to register a paper size that is horizontally elongated and suitable for banners in either horizon-tal or vertical format.
1. Display the printer driver dialog box.(See "Accessing the Printer Driver Dialog Box from the Operating SystemMenu (Windows) →P.213 ")
2. Click the Page Setup tab to display the Page Setup sheet.
3. Select and click a roll paper in the L Paper Source list.
Enhanced Printing Options > Printing banners or at other non-standard sizes >
Printing Vertical or Horizontal Banners (Large-Format Printing; Windows) iPF815
3
116
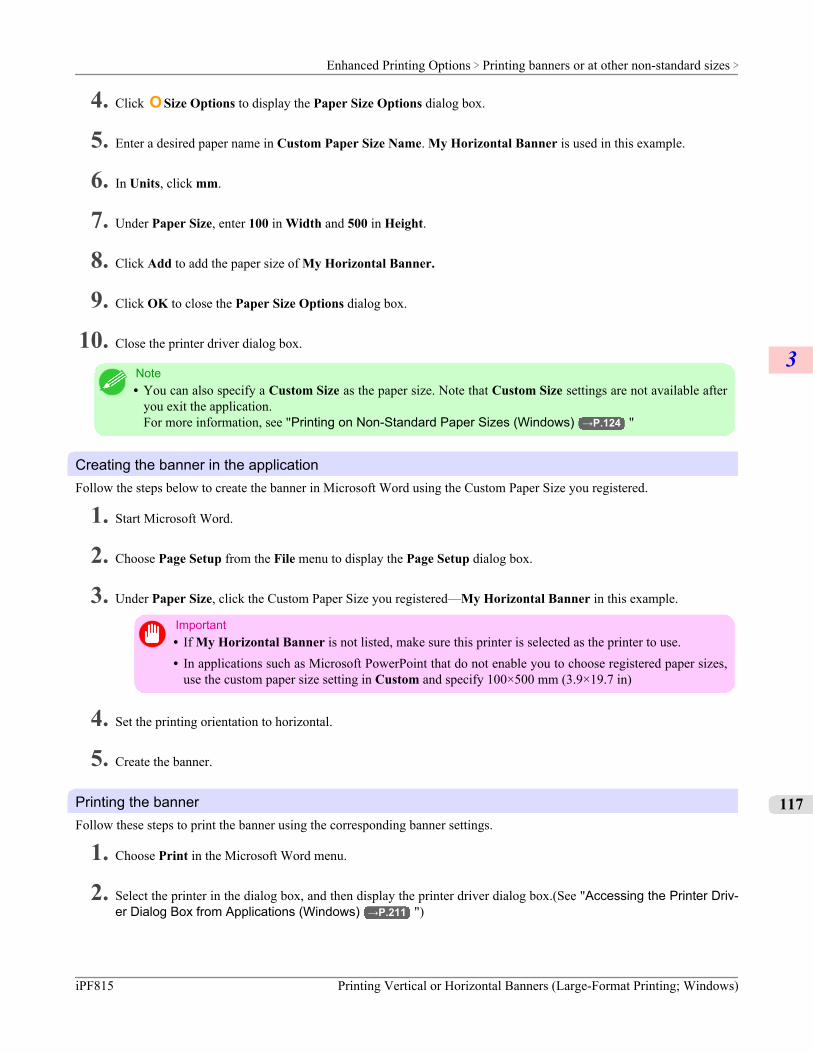
4. Click O Size Options to display the Paper Size Options dialog box.
5. Enter a desired paper name in Custom Paper Size Name. My Horizontal Banner is used in this example.
6. In Units, click mm.
7. Under Paper Size, enter 100 in Width and 500 in Height.
8. Click Add to add the paper size of My Horizontal Banner.
9. Click OK to close the Paper Size Options dialog box.
10. Close the printer driver dialog box.
Note• You can also specify a Custom Size as the paper size. Note that Custom Size settings are not available after
you exit the application.For more information, see "Printing on Non-Standard Paper Sizes (Windows) →P.124 "
Creating the banner in the applicationFollow the steps below to create the banner in Microsoft Word using the Custom Paper Size you registered.
1. Start Microsoft Word.
2. Choose Page Setup from the File menu to display the Page Setup dialog box.
3. Under Paper Size, click the Custom Paper Size you registered—My Horizontal Banner in this example.
Important• If My Horizontal Banner is not listed, make sure this printer is selected as the printer to use.• In applications such as Microsoft PowerPoint that do not enable you to choose registered paper sizes,
use the custom paper size setting in Custom and specify 100×500 mm (3.9×19.7 in)
4. Set the printing orientation to horizontal.
5. Create the banner.
Printing the bannerFollow these steps to print the banner using the corresponding banner settings.
1. Choose Print in the Microsoft Word menu.
2. Select the printer in the dialog box, and then display the printer driver dialog box.(See "Accessing the Printer Driv-er Dialog Box from Applications (Windows) →P.211 ")
Enhanced Printing Options > Printing banners or at other non-standard sizes >
iPF815 Printing Vertical or Horizontal Banners (Large-Format Printing; Windows)
3
117
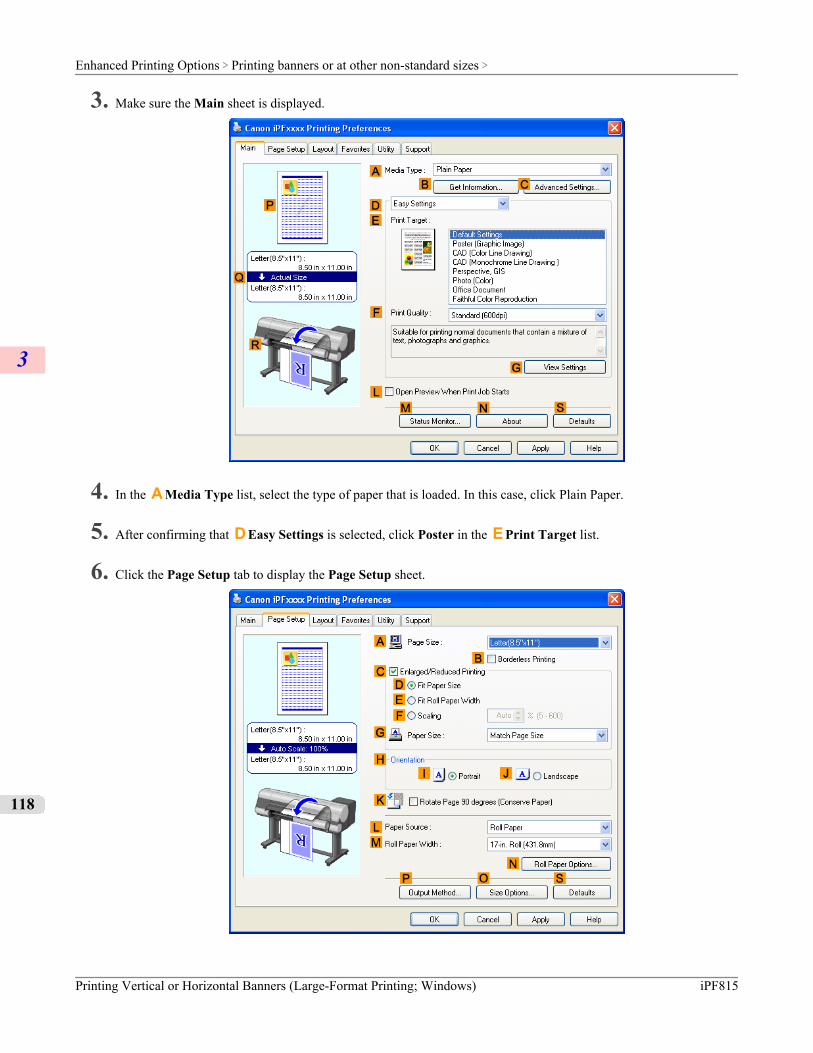
3. Make sure the Main sheet is displayed.
4. In the A Media Type list, select the type of paper that is loaded. In this case, click Plain Paper.
5. After confirming that D Easy Settings is selected, click Poster in the E Print Target list.
6. Click the Page Setup tab to display the Page Setup sheet.
Enhanced Printing Options > Printing banners or at other non-standard sizes >
Printing Vertical or Horizontal Banners (Large-Format Printing; Windows) iPF815
3
118
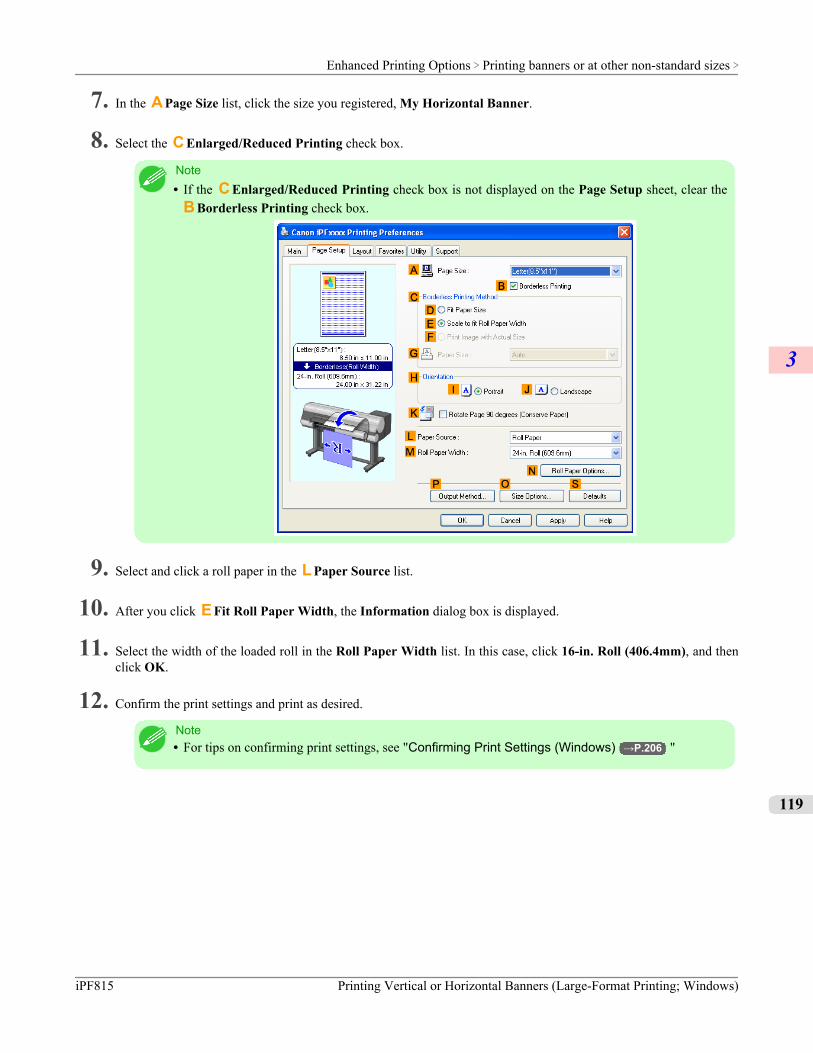
7. In the A Page Size list, click the size you registered, My Horizontal Banner.
8. Select the C Enlarged/Reduced Printing check box.
Note• If the C Enlarged/Reduced Printing check box is not displayed on the Page Setup sheet, clear the
B Borderless Printing check box.
9. Select and click a roll paper in the L Paper Source list.
10. After you click E Fit Roll Paper Width, the Information dialog box is displayed.
11. Select the width of the loaded roll in the Roll Paper Width list. In this case, click 16-in. Roll (406.4mm), and thenclick OK.
12. Confirm the print settings and print as desired.
Note• For tips on confirming print settings, see "Confirming Print Settings (Windows) →P.206 "
Enhanced Printing Options > Printing banners or at other non-standard sizes >
iPF815 Printing Vertical or Horizontal Banners (Large-Format Printing; Windows)
3
119
If printing is unsuccessful, you may be able to print after completing the following setting.
1. On the Layout sheet, click J Special Settings to display the Special Settings dialog box.
2. In the FineZoom Settings list, click Yes.
Printing Vertical or Horizontal Banners (Large-Format Printing; Mac OS X)This topic describes how to print a banner about five times as long as the roll width based on the following example.
• Document: An original designed for a horizontal banner• Page Size: Non-standard (100×500 mm [3.9×19.7 in])• Paper: Roll• Paper type: Plain Paper• Roll paper width: 16 inches (406.4 mm)
Enhanced Printing Options > Printing banners or at other non-standard sizes >
Printing Vertical or Horizontal Banners (Large-Format Printing; Mac OS X) iPF815
3
120
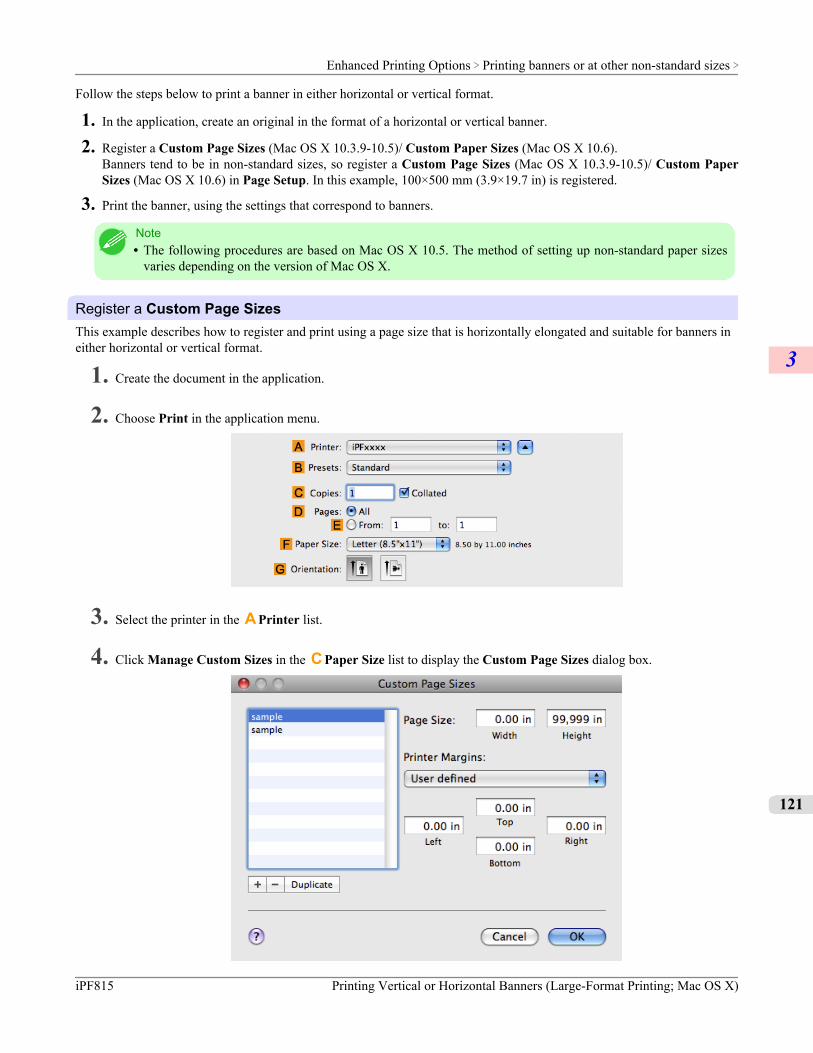
Follow the steps below to print a banner in either horizontal or vertical format.
1. In the application, create an original in the format of a horizontal or vertical banner.
2. Register a Custom Page Sizes (Mac OS X 10.3.9-10.5)/ Custom Paper Sizes (Mac OS X 10.6).Banners tend to be in non-standard sizes, so register a Custom Page Sizes (Mac OS X 10.3.9-10.5)/ Custom PaperSizes (Mac OS X 10.6) in Page Setup. In this example, 100×500 mm (3.9×19.7 in) is registered.
3. Print the banner, using the settings that correspond to banners.
Note• The following procedures are based on Mac OS X 10.5. The method of setting up non-standard paper sizes
varies depending on the version of Mac OS X.
Register a Custom Page SizesThis example describes how to register and print using a page size that is horizontally elongated and suitable for banners ineither horizontal or vertical format.
1. Create the document in the application.
2. Choose Print in the application menu.
3. Select the printer in the A Printer list.
4. Click Manage Custom Sizes in the C Paper Size list to display the Custom Page Sizes dialog box.
Enhanced Printing Options > Printing banners or at other non-standard sizes >
iPF815 Printing Vertical or Horizontal Banners (Large-Format Printing; Mac OS X)
3
121

5. Double-click Untitled in the list at left, and then enter a name for the page size you want to register. Here, enter100*500.If the Untitled size is not listed at left, click + below the list.
6. Under Page Size, enter 10 in Width and 50 in Height. Here, measurements are entered in centimeters.
7. Specify the margins by entering 0.3 in Printer Margins. Here, too, measurements are entered in centimeters.
8. Click OK to close the Custom Page Sizes dialog box.
9. In the C Paper Size list, click the size of the original. In this case, click 100*500, the size you registered.
10. In D Orientation, click the icon of the document in landscape orientation.
11. Click F OK to close the dialog box.
Print the bannerFollow the steps below to print the banner using the corresponding banner settings.
1. Choose Print in the application menu.
2. Access the Main pane.
3. In the A Media Type list, select the type of paper that is loaded. In this case, click Plain Paper.
4. Make your selection in the E Print Target list.
5. Make your selection in the F Print Quality list.
Enhanced Printing Options > Printing banners or at other non-standard sizes >
Printing Vertical or Horizontal Banners (Large-Format Printing; Mac OS X) iPF815
3
122
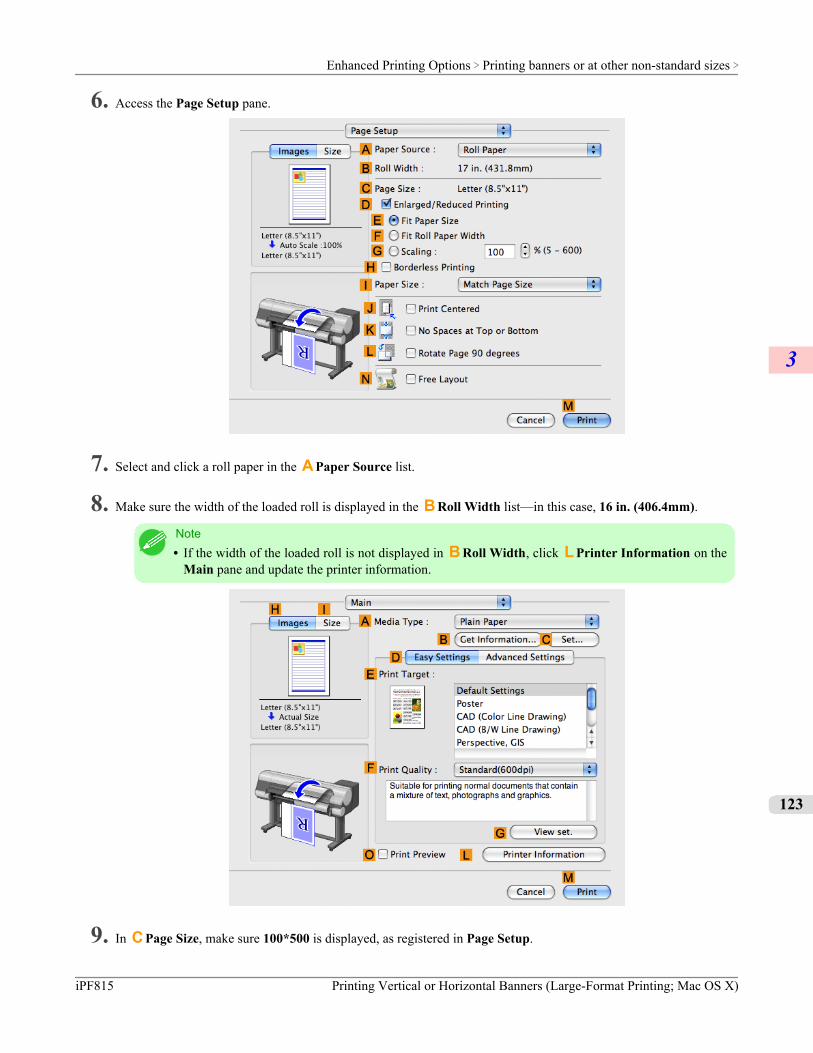
6. Access the Page Setup pane.
7. Select and click a roll paper in the A Paper Source list.
8. Make sure the width of the loaded roll is displayed in the B Roll Width list—in this case, 16 in. (406.4mm).
Note• If the width of the loaded roll is not displayed in B Roll Width, click L Printer Information on the
Main pane and update the printer information.
9. In C Page Size, make sure 100*500 is displayed, as registered in Page Setup.
Enhanced Printing Options > Printing banners or at other non-standard sizes >
iPF815 Printing Vertical or Horizontal Banners (Large-Format Printing; Mac OS X)
3
123
10. Select the D Enlarged/Reduced Printing check box.
11. Click F Fit Roll Paper Width.
12. Confirm the print settings, and click M Print to start printing.
Note• For tips on confirming print settings, see "Confirming Print Settings (Mac OS X) →P.429 "
Printing on Non-Standard Paper SizesBy specifying the paper size, you can print on non-standard sizes of paper.There are two ways to print on non-standard paper sizes, as follows.
Registering non-standard paper size in the printer driverAfter you register non-standard paper sizes, they are listed with standard sizes so that you can choose them anytime as nee-ded.
Note• These non-standard paper sizes you register in the printer driver are called Custom Paper Size in Windows
and Custom Sizes in Mac OS X.
Specifying custom paper sizes for temporary useBecause these are sizes you specify temporarily in the printer driver, the sizes will not be available after you exit the appli-cation. If you want to set up a non-standard paper size so that it will always be available, we recommend registering thepaper size in the printer driver.
Note• These temporary paper sizes you register on the printer are called Custom Sizes in Windows.• This can only be configured in Windows.
For instructions on specifying non-standard paper sizes for printing, refer to the following topics, as appropriate for yourcomputer and operating system.
• Printing on Non-Standard Paper Sizes (Windows) →P.124
• Printing on Non-Standard Paper Sizes (Mac OS X) →P.129
Printing on Non-Standard Paper Sizes (Windows)This topic describes two ways to print on non-standard paper sizes.
• Printing by using Custom Size• Printing by using Custom Paper Size
Printing by using Custom SizeThis section describes how to print using Custom Size based on the following example.
• Document: Any Type
Enhanced Printing Options > Printing banners or at other non-standard sizes >
Printing on Non-Standard Paper Sizes iPF815
3
124
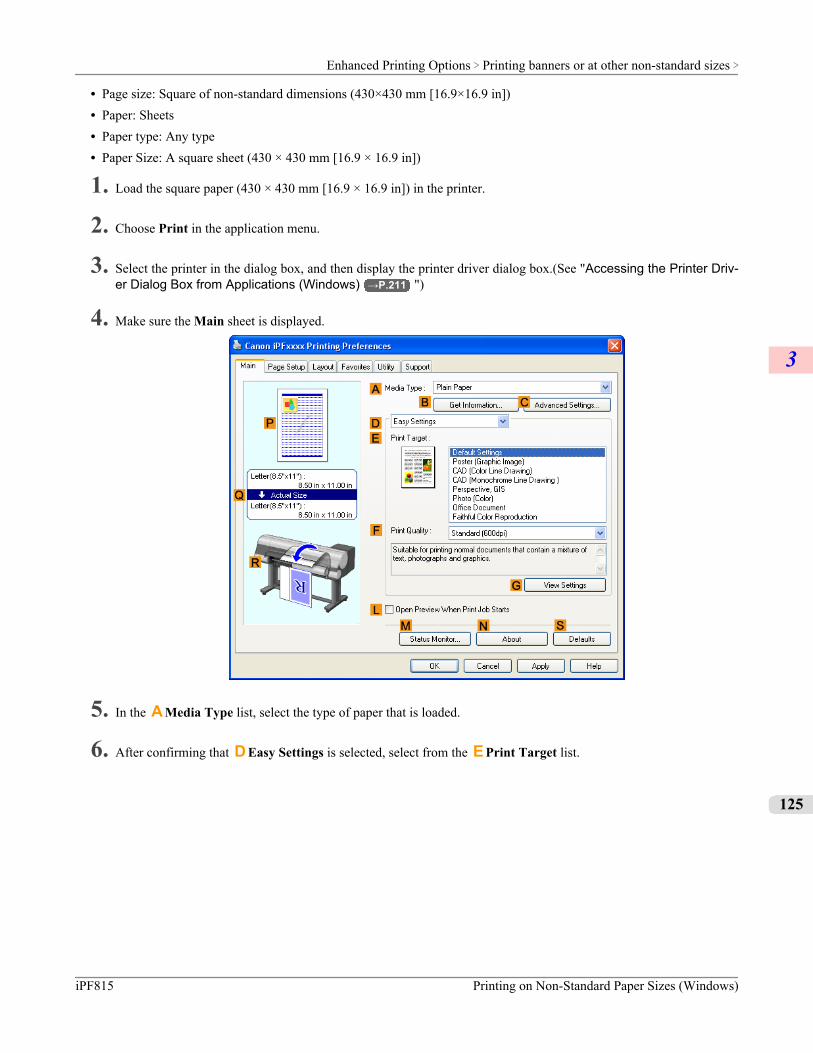
• Page size: Square of non-standard dimensions (430×430 mm [16.9×16.9 in])• Paper: Sheets• Paper type: Any type• Paper Size: A square sheet (430 × 430 mm [16.9 × 16.9 in])
1. Load the square paper (430 × 430 mm [16.9 × 16.9 in]) in the printer.
2. Choose Print in the application menu.
3. Select the printer in the dialog box, and then display the printer driver dialog box.(See "Accessing the Printer Driv-er Dialog Box from Applications (Windows) →P.211 ")
4. Make sure the Main sheet is displayed.
5. In the A Media Type list, select the type of paper that is loaded.
6. After confirming that D Easy Settings is selected, select from the E Print Target list.
Enhanced Printing Options > Printing banners or at other non-standard sizes >
iPF815 Printing on Non-Standard Paper Sizes (Windows)
3
125
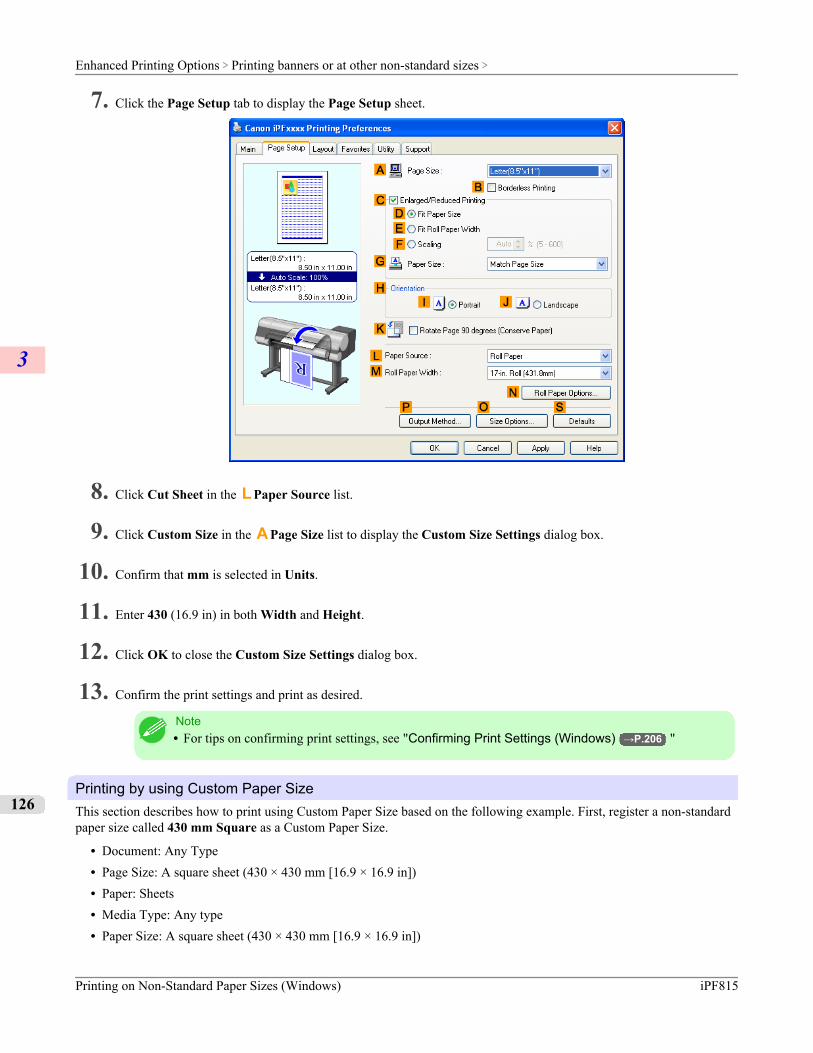
7. Click the Page Setup tab to display the Page Setup sheet.
8. Click Cut Sheet in the L Paper Source list.
9. Click Custom Size in the A Page Size list to display the Custom Size Settings dialog box.
10. Confirm that mm is selected in Units.
11. Enter 430 (16.9 in) in both Width and Height.
12. Click OK to close the Custom Size Settings dialog box.
13. Confirm the print settings and print as desired.
Note• For tips on confirming print settings, see "Confirming Print Settings (Windows) →P.206 "
Printing by using Custom Paper SizeThis section describes how to print using Custom Paper Size based on the following example. First, register a non-standardpaper size called 430 mm Square as a Custom Paper Size.
• Document: Any Type• Page Size: A square sheet (430 × 430 mm [16.9 × 16.9 in])• Paper: Sheets• Media Type: Any type• Paper Size: A square sheet (430 × 430 mm [16.9 × 16.9 in])
Enhanced Printing Options > Printing banners or at other non-standard sizes >
Printing on Non-Standard Paper Sizes (Windows) iPF815
3
126
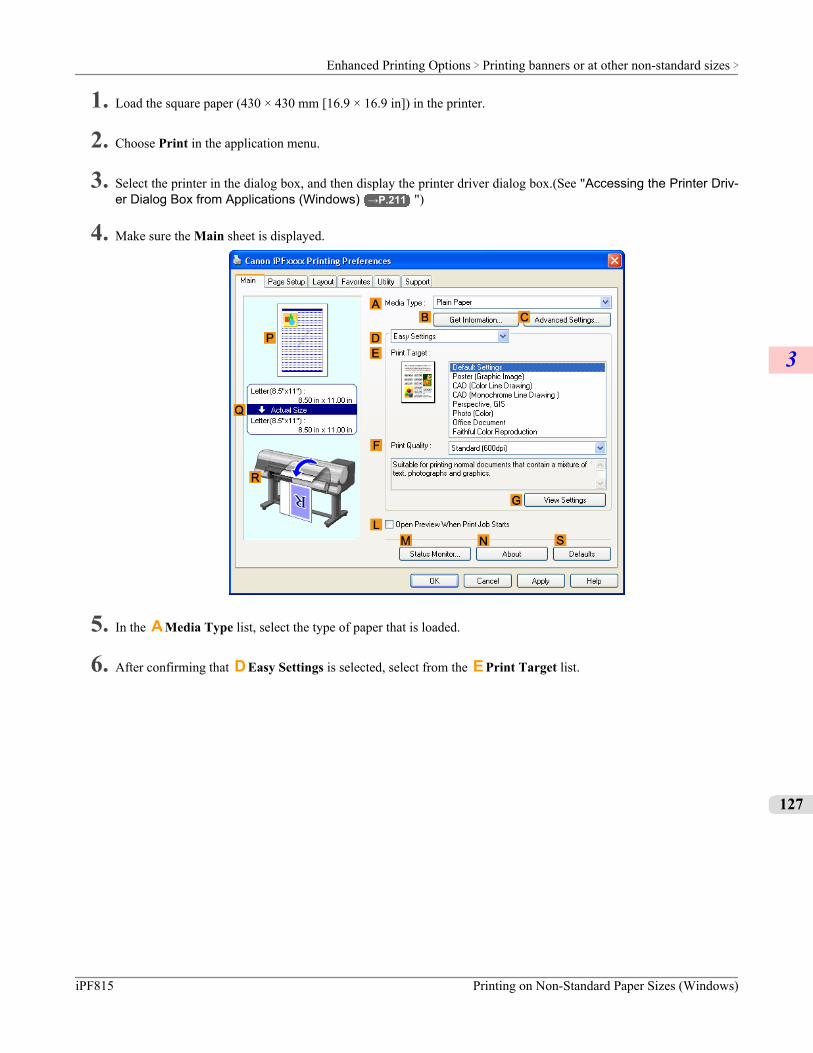
1. Load the square paper (430 × 430 mm [16.9 × 16.9 in]) in the printer.
2. Choose Print in the application menu.
3. Select the printer in the dialog box, and then display the printer driver dialog box.(See "Accessing the Printer Driv-er Dialog Box from Applications (Windows) →P.211 ")
4. Make sure the Main sheet is displayed.
5. In the A Media Type list, select the type of paper that is loaded.
6. After confirming that D Easy Settings is selected, select from the E Print Target list.
Enhanced Printing Options > Printing banners or at other non-standard sizes >
iPF815 Printing on Non-Standard Paper Sizes (Windows)
3
127
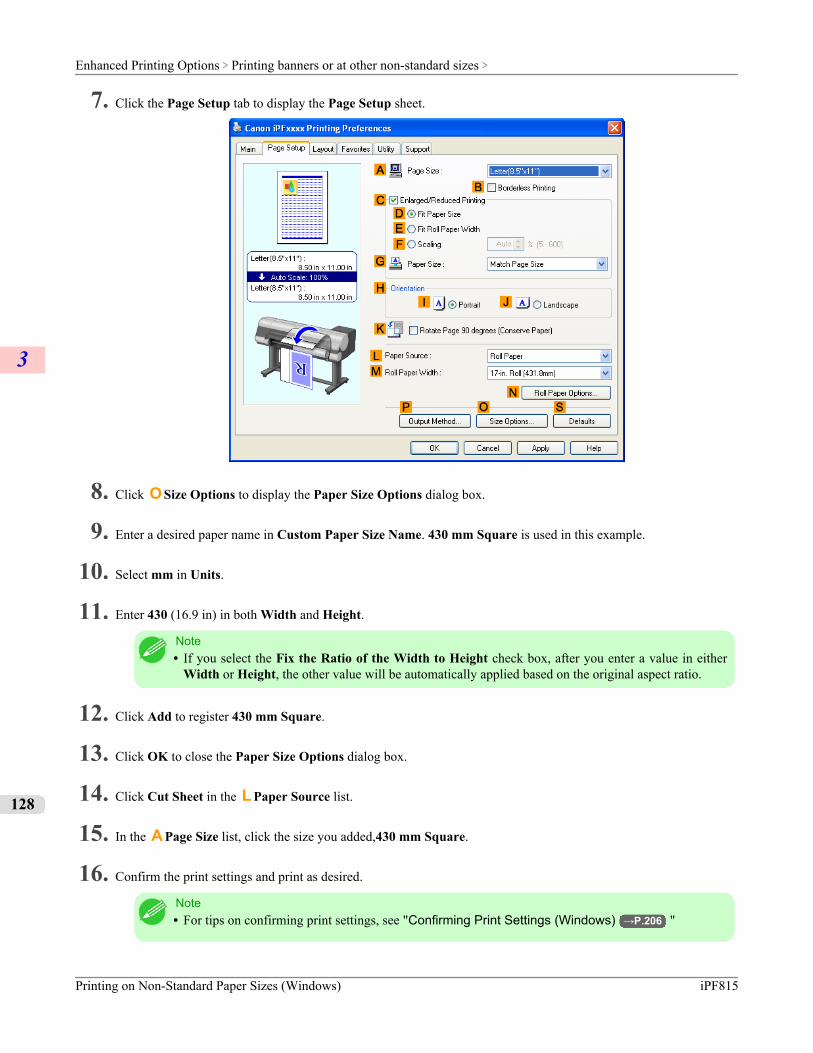
7. Click the Page Setup tab to display the Page Setup sheet.
8. Click O Size Options to display the Paper Size Options dialog box.
9. Enter a desired paper name in Custom Paper Size Name. 430 mm Square is used in this example.
10. Select mm in Units.
11. Enter 430 (16.9 in) in both Width and Height.
Note• If you select the Fix the Ratio of the Width to Height check box, after you enter a value in either
Width or Height, the other value will be automatically applied based on the original aspect ratio.
12. Click Add to register 430 mm Square.
13. Click OK to close the Paper Size Options dialog box.
14. Click Cut Sheet in the L Paper Source list.
15. In the A Page Size list, click the size you added,430 mm Square.
16. Confirm the print settings and print as desired.
Note• For tips on confirming print settings, see "Confirming Print Settings (Windows) →P.206 "
Enhanced Printing Options > Printing banners or at other non-standard sizes >
Printing on Non-Standard Paper Sizes (Windows) iPF815
3
128
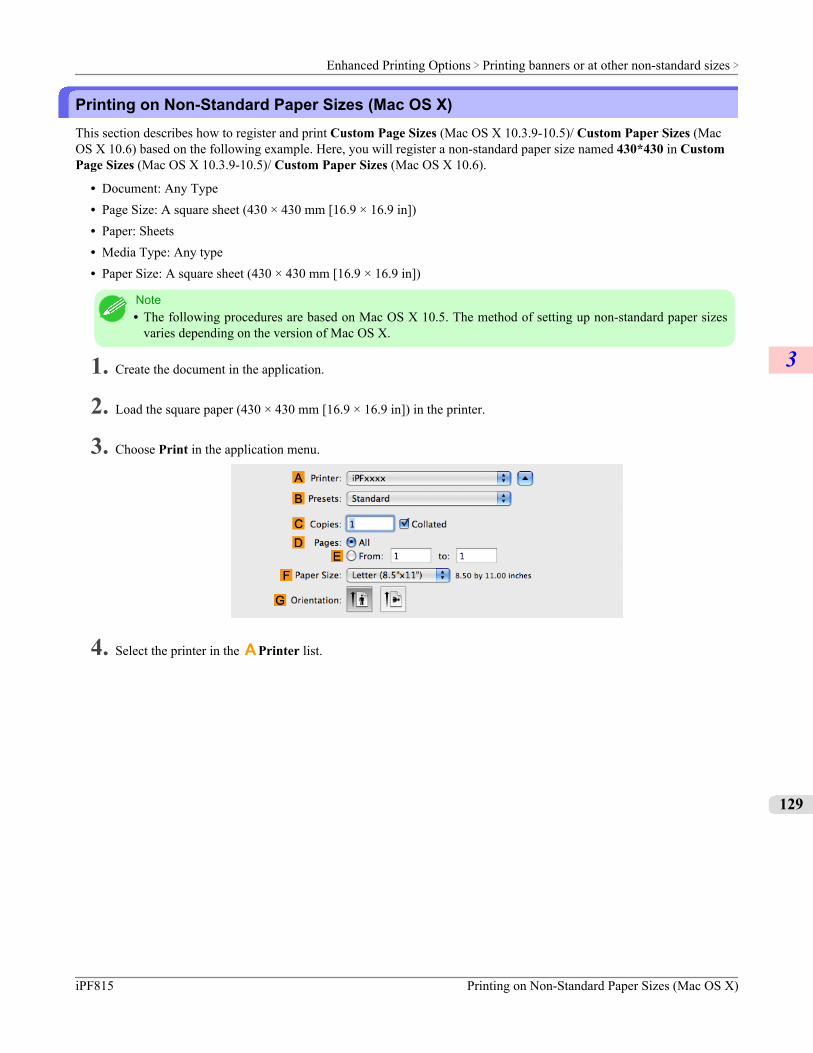
Printing on Non-Standard Paper Sizes (Mac OS X)This section describes how to register and print Custom Page Sizes (Mac OS X 10.3.9-10.5)/ Custom Paper Sizes (MacOS X 10.6) based on the following example. Here, you will register a non-standard paper size named 430*430 in CustomPage Sizes (Mac OS X 10.3.9-10.5)/ Custom Paper Sizes (Mac OS X 10.6).
• Document: Any Type• Page Size: A square sheet (430 × 430 mm [16.9 × 16.9 in])• Paper: Sheets• Media Type: Any type• Paper Size: A square sheet (430 × 430 mm [16.9 × 16.9 in])
Note• The following procedures are based on Mac OS X 10.5. The method of setting up non-standard paper sizes
varies depending on the version of Mac OS X.
1. Create the document in the application.
2. Load the square paper (430 × 430 mm [16.9 × 16.9 in]) in the printer.
3. Choose Print in the application menu.
4. Select the printer in the A Printer list.
Enhanced Printing Options > Printing banners or at other non-standard sizes >
iPF815 Printing on Non-Standard Paper Sizes (Mac OS X)
3
129
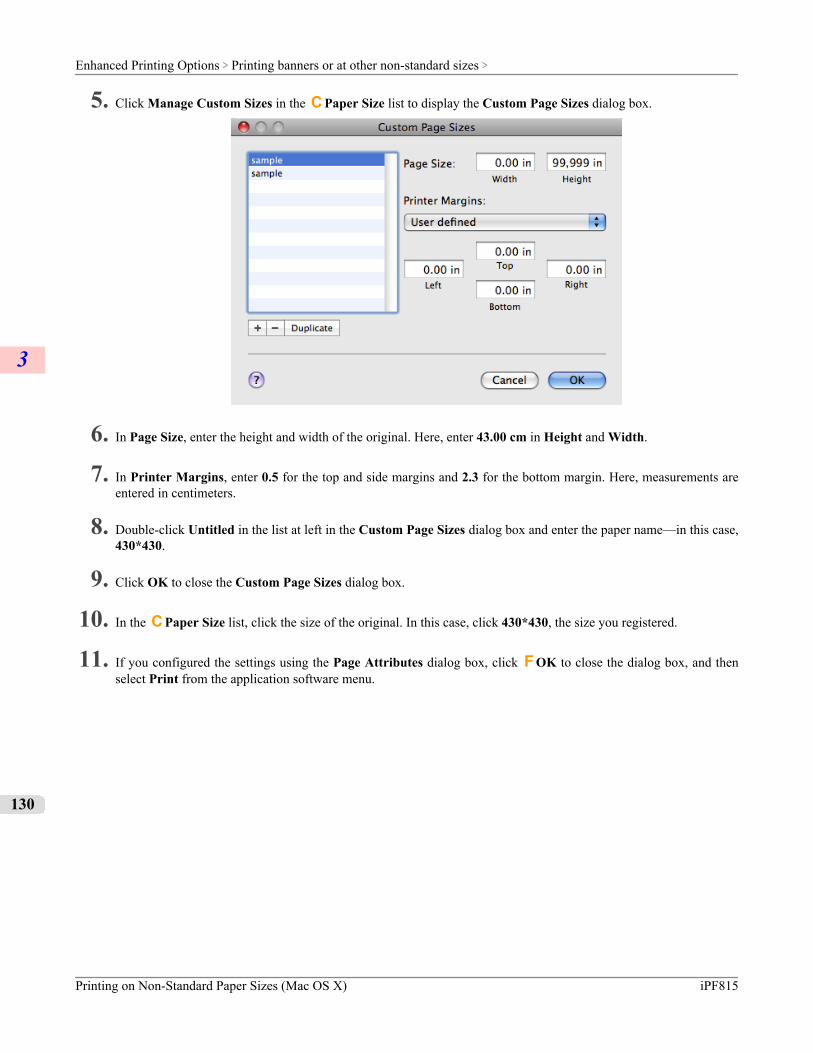
5. Click Manage Custom Sizes in the C Paper Size list to display the Custom Page Sizes dialog box.
6. In Page Size, enter the height and width of the original. Here, enter 43.00 cm in Height and Width.
7. In Printer Margins, enter 0.5 for the top and side margins and 2.3 for the bottom margin. Here, measurements areentered in centimeters.
8. Double-click Untitled in the list at left in the Custom Page Sizes dialog box and enter the paper name—in this case,430*430.
9. Click OK to close the Custom Page Sizes dialog box.
10. In the C Paper Size list, click the size of the original. In this case, click 430*430, the size you registered.
11. If you configured the settings using the Page Attributes dialog box, click F OK to close the dialog box, and thenselect Print from the application software menu.
Enhanced Printing Options > Printing banners or at other non-standard sizes >
Printing on Non-Standard Paper Sizes (Mac OS X) iPF815
3
130
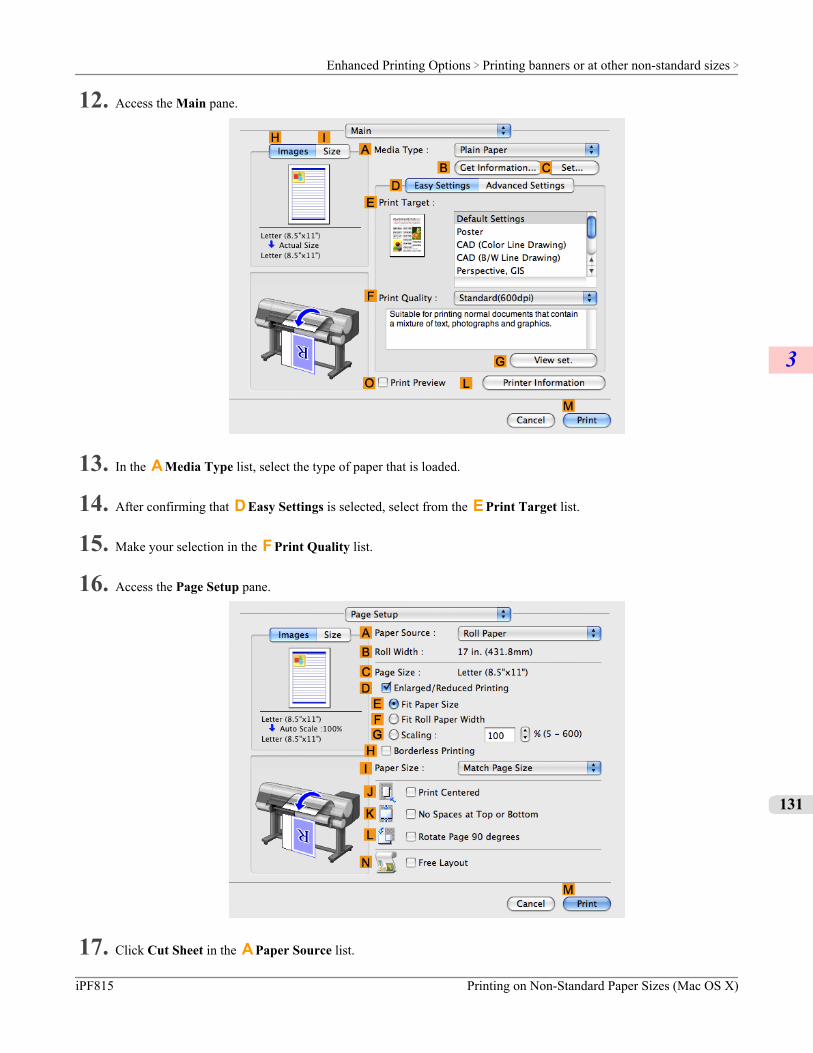
12. Access the Main pane.
13. In the A Media Type list, select the type of paper that is loaded.
14. After confirming that D Easy Settings is selected, select from the E Print Target list.
15. Make your selection in the F Print Quality list.
16. Access the Page Setup pane.
17. Click Cut Sheet in the A Paper Source list.
Enhanced Printing Options > Printing banners or at other non-standard sizes >
iPF815 Printing on Non-Standard Paper Sizes (Mac OS X)
3
131
18. In C Page Size, make sure 430*430 is displayed, as registered in Page Setup.
19. Confirm the print settings, and then click M Print to start printing.
Note• For tips on confirming print settings, see "Confirming Print Settings (Mac OS X) →P.429 "
Enhanced Printing Options > Printing banners or at other non-standard sizes >
Printing on Non-Standard Paper Sizes (Mac OS X) iPF815
3
132

Tiling and multiple pages per sheetPrinting Multiple Originals Next to Each Other ................................................................................................ 133
Printing Multiple Originals Next to Each Other (Windows) .......................................................................... 134Printing Multiple Originals Next to Each Other (Mac OS X) ........................................................................ 136
Printing Multiple Pages Continuously .............................................................................................................. 138Printing Multiple Pages Continuously (Windows) ........................................................................................ 139Printing Multiple Pages Continuously (Mac OS X) ...................................................................................... 141
Printing Multiple Pages Per Sheet ................................................................................................................... 143Printing Multiple Pages Per Sheet (Windows) ............................................................................................ 143Printing Multiple Pages Per Sheet (Mac OS X) ........................................................................................... 146
Printing Posters in Sections ............................................................................................................................ 150Printing Large Posters (Windows) ............................................................................................................... 151
Printing Multiple Originals Next to Each OtherBy arranging originals from word-processing or spreadsheet programs or web browser screen shots next to each other onsingle sheets, you can create highly expressive presentation materials, easy-to-understand meeting materials, and a varietyof other printed documents.
Free Layout (Windows)Besides combining multiple pages in a single-page layout, you can combine originals from multiple files—even multiplesource applications—in a single-page layout.
Enhanced Printing Options > Tiling and multiple pages per sheet >
iPF815 Printing Multiple Originals Next to Each Other
3
133
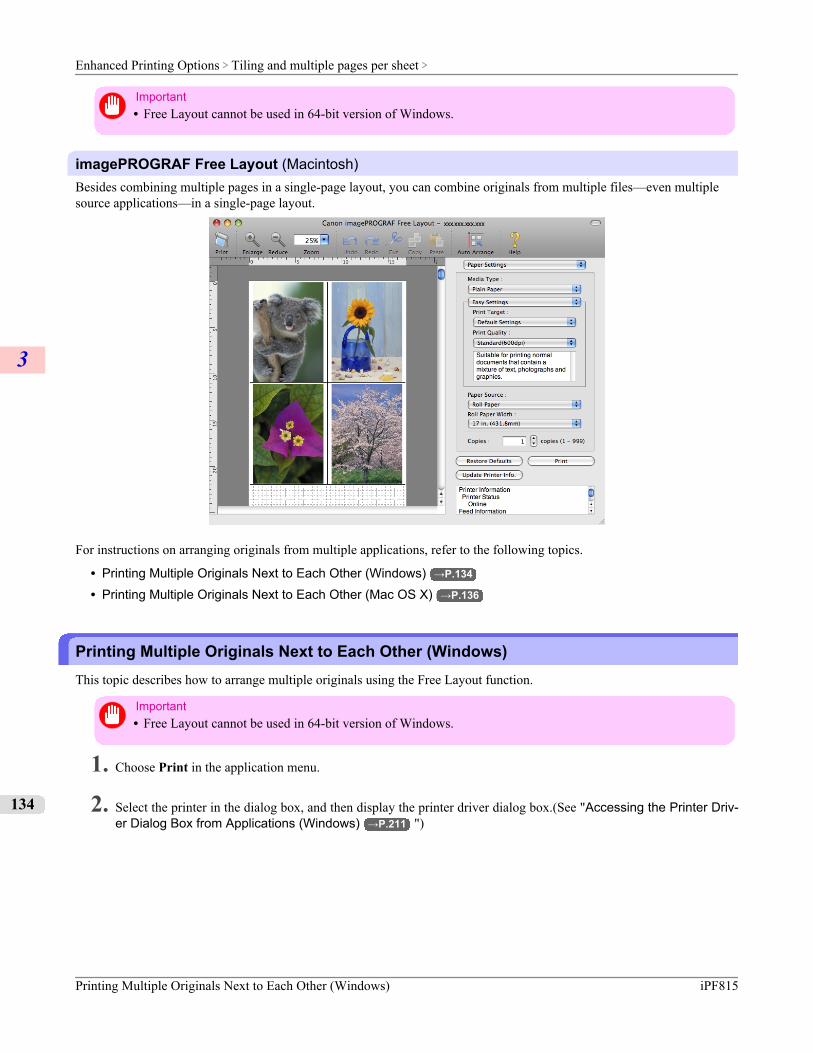
Important• Free Layout cannot be used in 64-bit version of Windows.
imagePROGRAF Free Layout (Macintosh)Besides combining multiple pages in a single-page layout, you can combine originals from multiple files—even multiplesource applications—in a single-page layout.
For instructions on arranging originals from multiple applications, refer to the following topics.
• Printing Multiple Originals Next to Each Other (Windows) →P.134
• Printing Multiple Originals Next to Each Other (Mac OS X) →P.136
Printing Multiple Originals Next to Each Other (Windows)This topic describes how to arrange multiple originals using the Free Layout function.
Important• Free Layout cannot be used in 64-bit version of Windows.
1. Choose Print in the application menu.
2. Select the printer in the dialog box, and then display the printer driver dialog box.(See "Accessing the Printer Driv-er Dialog Box from Applications (Windows) →P.211 ")
Enhanced Printing Options > Tiling and multiple pages per sheet >
Printing Multiple Originals Next to Each Other (Windows) iPF815
3
134
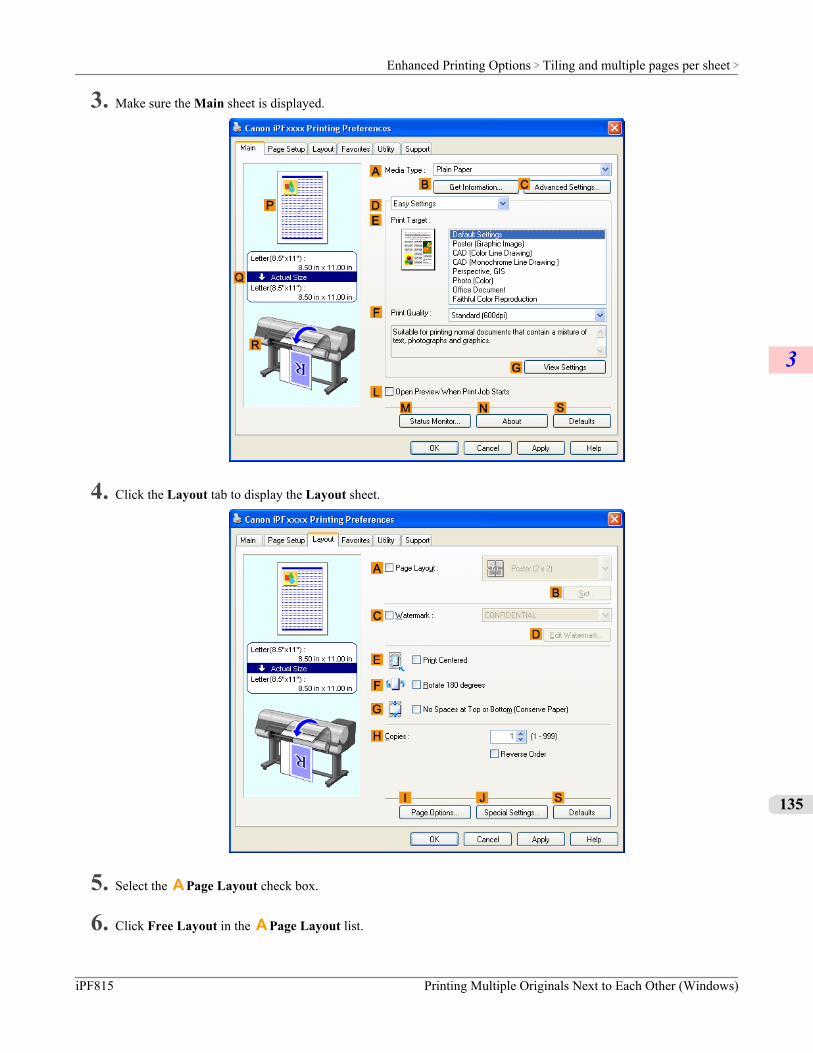
3. Make sure the Main sheet is displayed.
4. Click the Layout tab to display the Layout sheet.
5. Select the A Page Layout check box.
6. Click Free Layout in the A Page Layout list.
Enhanced Printing Options > Tiling and multiple pages per sheet >
iPF815 Printing Multiple Originals Next to Each Other (Windows)
3
135
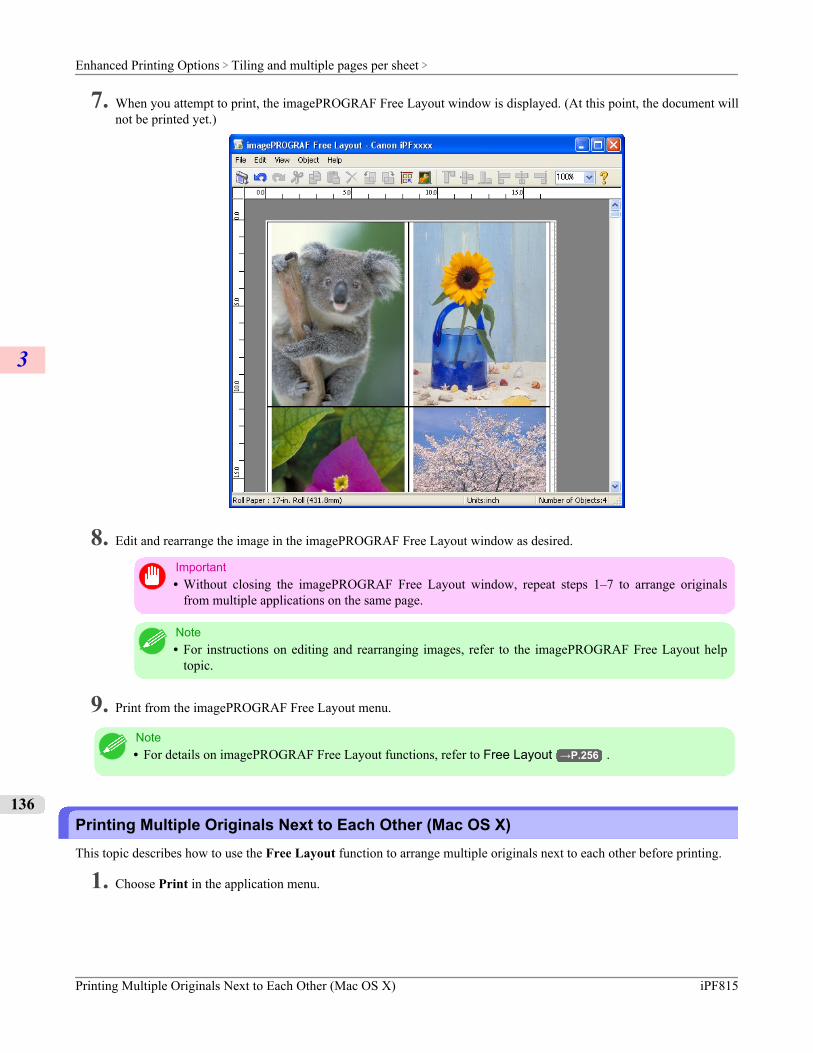
7. When you attempt to print, the imagePROGRAF Free Layout window is displayed. (At this point, the document willnot be printed yet.)
8. Edit and rearrange the image in the imagePROGRAF Free Layout window as desired.
Important• Without closing the imagePROGRAF Free Layout window, repeat steps 1–7 to arrange originals
from multiple applications on the same page.
Note• For instructions on editing and rearranging images, refer to the imagePROGRAF Free Layout help
topic.
9. Print from the imagePROGRAF Free Layout menu.
Note• For details on imagePROGRAF Free Layout functions, refer to Free Layout →P.256 .
Printing Multiple Originals Next to Each Other (Mac OS X)This topic describes how to use the Free Layout function to arrange multiple originals next to each other before printing.
1. Choose Print in the application menu.
Enhanced Printing Options > Tiling and multiple pages per sheet >
Printing Multiple Originals Next to Each Other (Mac OS X) iPF815
3
136
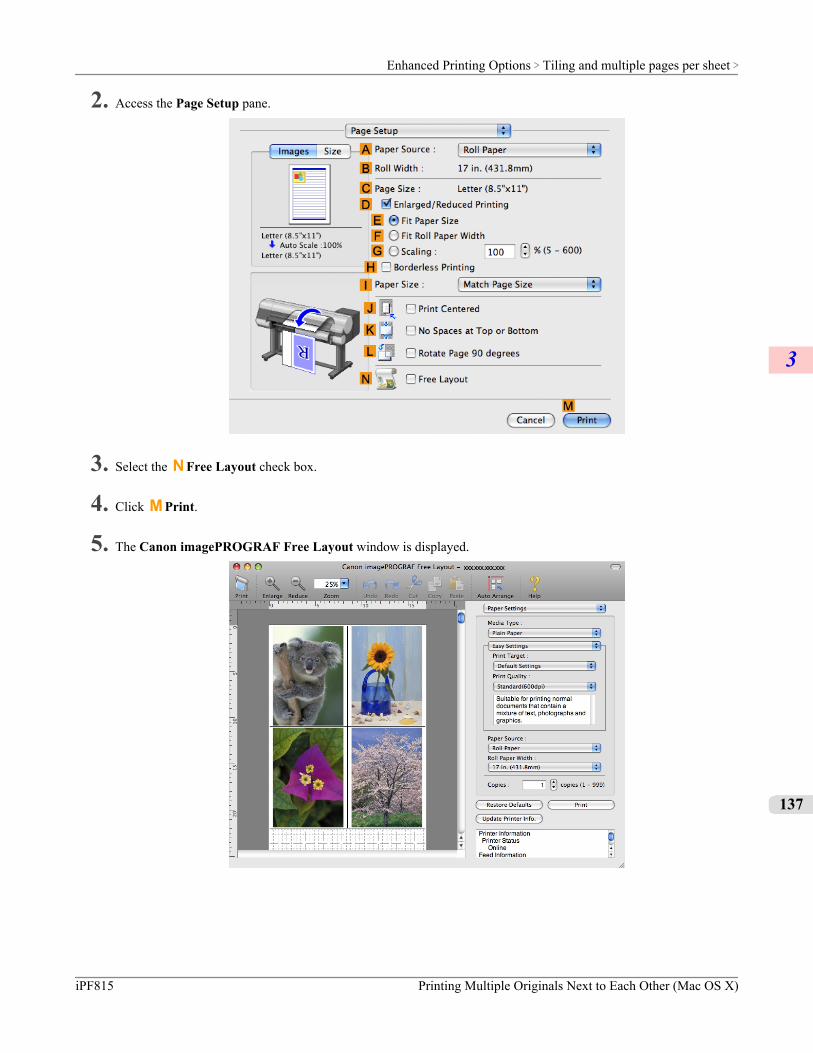
2. Access the Page Setup pane.
3. Select the N Free Layout check box.
4. Click M Print.
5. The Canon imagePROGRAF Free Layout window is displayed.
Enhanced Printing Options > Tiling and multiple pages per sheet >
iPF815 Printing Multiple Originals Next to Each Other (Mac OS X)
3
137
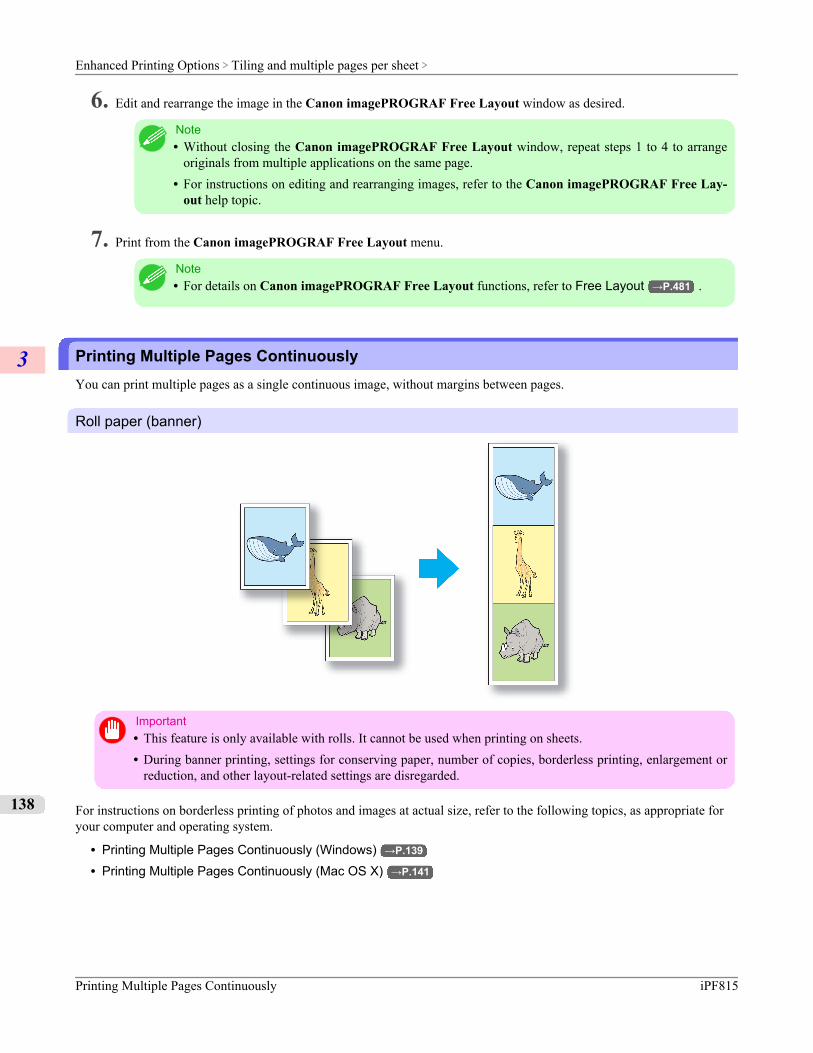
6. Edit and rearrange the image in the Canon imagePROGRAF Free Layout window as desired.
Note• Without closing the Canon imagePROGRAF Free Layout window, repeat steps 1 to 4 to arrange
originals from multiple applications on the same page.• For instructions on editing and rearranging images, refer to the Canon imagePROGRAF Free Lay-
out help topic.
7. Print from the Canon imagePROGRAF Free Layout menu.
Note• For details on Canon imagePROGRAF Free Layout functions, refer to Free Layout →P.481 .
Printing Multiple Pages ContinuouslyYou can print multiple pages as a single continuous image, without margins between pages.
Roll paper (banner)
Important• This feature is only available with rolls. It cannot be used when printing on sheets.• During banner printing, settings for conserving paper, number of copies, borderless printing, enlargement or
reduction, and other layout-related settings are disregarded.
For instructions on borderless printing of photos and images at actual size, refer to the following topics, as appropriate foryour computer and operating system.
• Printing Multiple Pages Continuously (Windows) →P.139
• Printing Multiple Pages Continuously (Mac OS X) →P.141
Enhanced Printing Options > Tiling and multiple pages per sheet >
Printing Multiple Pages Continuously iPF815
3
138
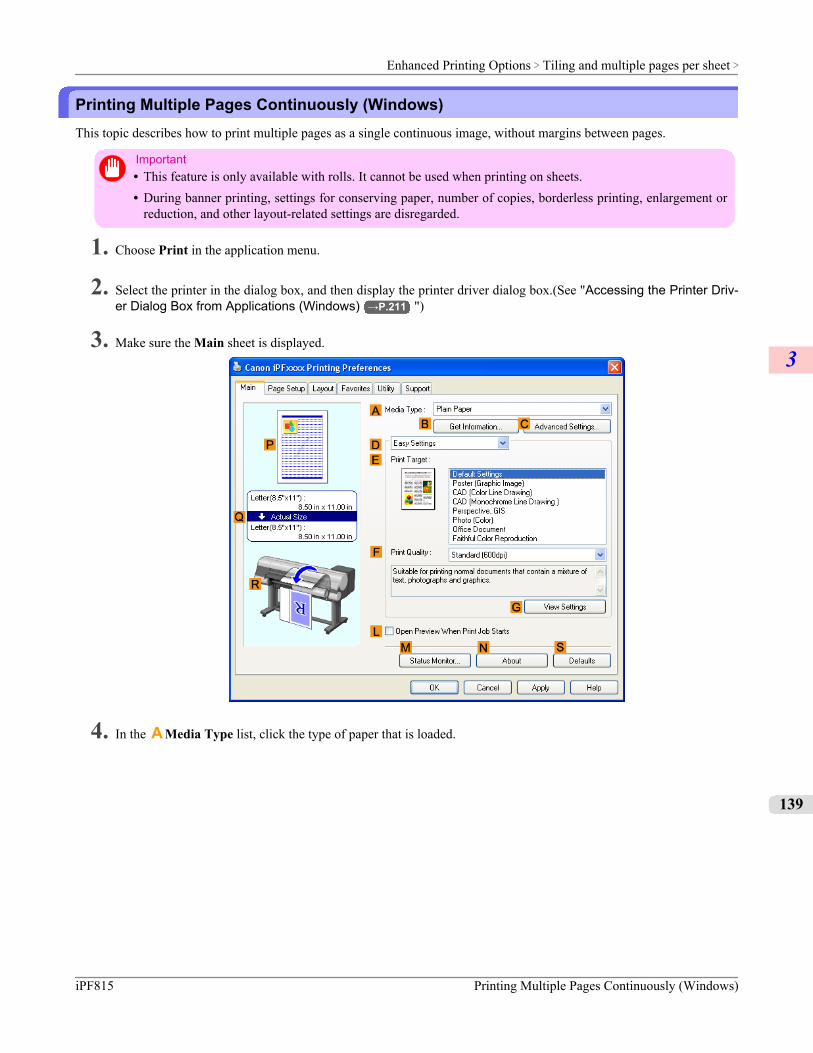
Printing Multiple Pages Continuously (Windows)This topic describes how to print multiple pages as a single continuous image, without margins between pages.
Important• This feature is only available with rolls. It cannot be used when printing on sheets.• During banner printing, settings for conserving paper, number of copies, borderless printing, enlargement or
reduction, and other layout-related settings are disregarded.
1. Choose Print in the application menu.
2. Select the printer in the dialog box, and then display the printer driver dialog box.(See "Accessing the Printer Driv-er Dialog Box from Applications (Windows) →P.211 ")
3. Make sure the Main sheet is displayed.
4. In the A Media Type list, click the type of paper that is loaded.
Enhanced Printing Options > Tiling and multiple pages per sheet >
iPF815 Printing Multiple Pages Continuously (Windows)
3
139
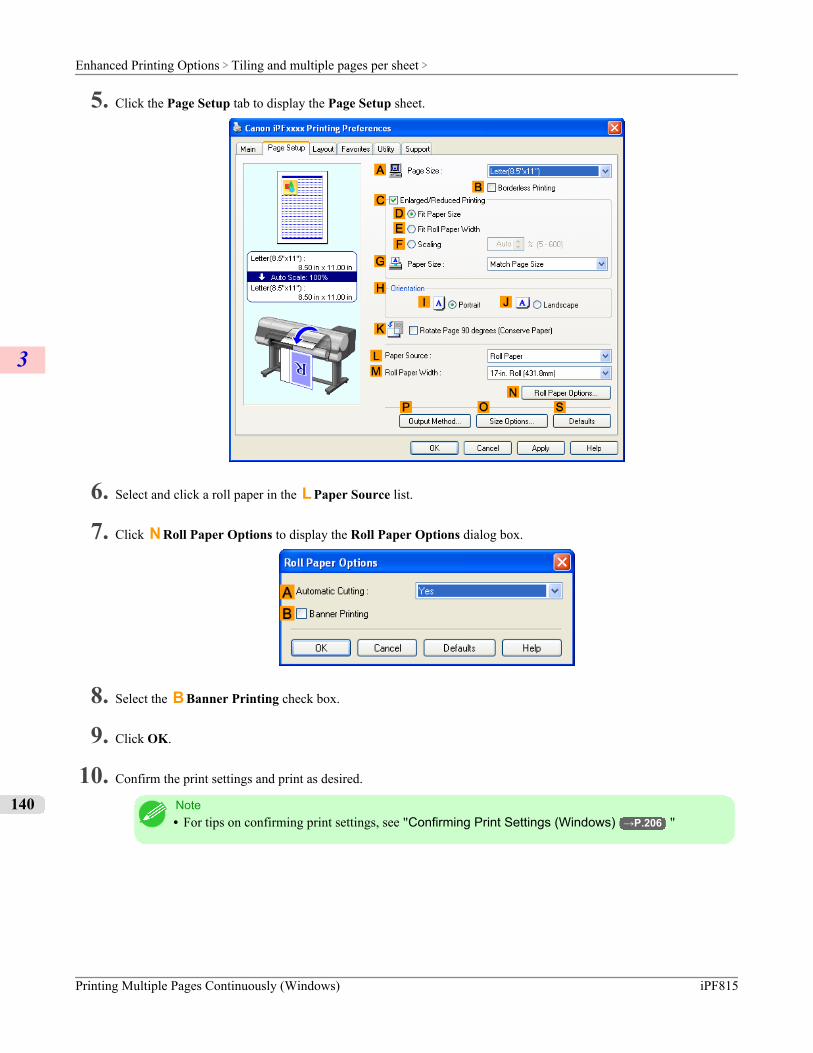
5. Click the Page Setup tab to display the Page Setup sheet.
6. Select and click a roll paper in the L Paper Source list.
7. Click N Roll Paper Options to display the Roll Paper Options dialog box.
8. Select the B Banner Printing check box.
9. Click OK.
10. Confirm the print settings and print as desired.
Note• For tips on confirming print settings, see "Confirming Print Settings (Windows) →P.206 "
Enhanced Printing Options > Tiling and multiple pages per sheet >
Printing Multiple Pages Continuously (Windows) iPF815
3
140
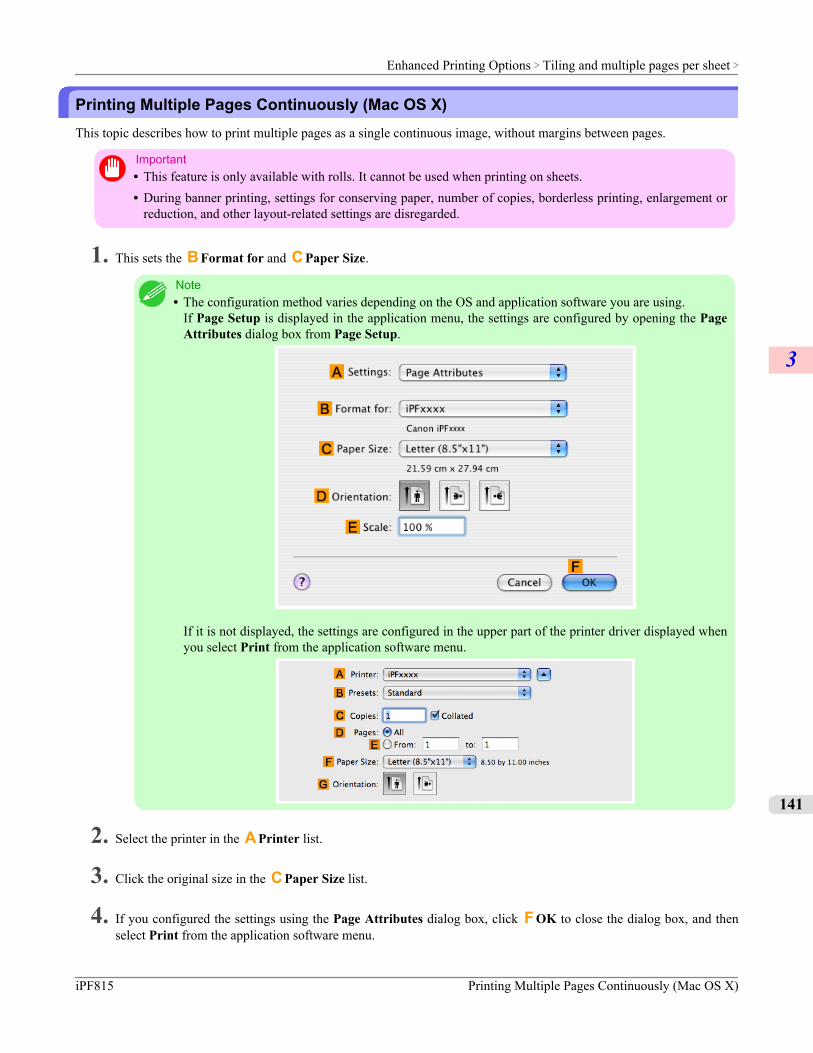
Printing Multiple Pages Continuously (Mac OS X)This topic describes how to print multiple pages as a single continuous image, without margins between pages.
Important• This feature is only available with rolls. It cannot be used when printing on sheets.• During banner printing, settings for conserving paper, number of copies, borderless printing, enlargement or
reduction, and other layout-related settings are disregarded.
1. This sets the B Format for and C Paper Size.
Note• The configuration method varies depending on the OS and application software you are using.
If Page Setup is displayed in the application menu, the settings are configured by opening the PageAttributes dialog box from Page Setup.
If it is not displayed, the settings are configured in the upper part of the printer driver displayed whenyou select Print from the application software menu.
2. Select the printer in the A Printer list.
3. Click the original size in the C Paper Size list.
4. If you configured the settings using the Page Attributes dialog box, click F OK to close the dialog box, and thenselect Print from the application software menu.
Enhanced Printing Options > Tiling and multiple pages per sheet >
iPF815 Printing Multiple Pages Continuously (Mac OS X)
3
141
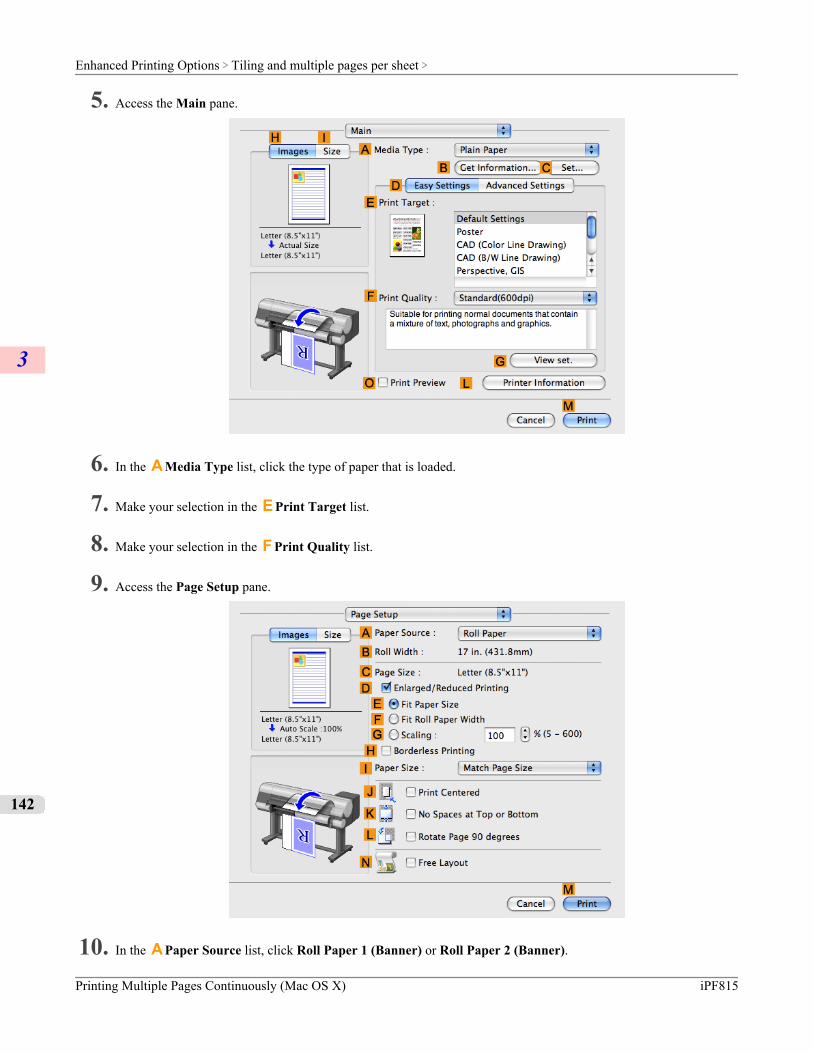
5. Access the Main pane.
6. In the A Media Type list, click the type of paper that is loaded.
7. Make your selection in the E Print Target list.
8. Make your selection in the F Print Quality list.
9. Access the Page Setup pane.
10. In the A Paper Source list, click Roll Paper 1 (Banner) or Roll Paper 2 (Banner).
Enhanced Printing Options > Tiling and multiple pages per sheet >
Printing Multiple Pages Continuously (Mac OS X) iPF815
3
142
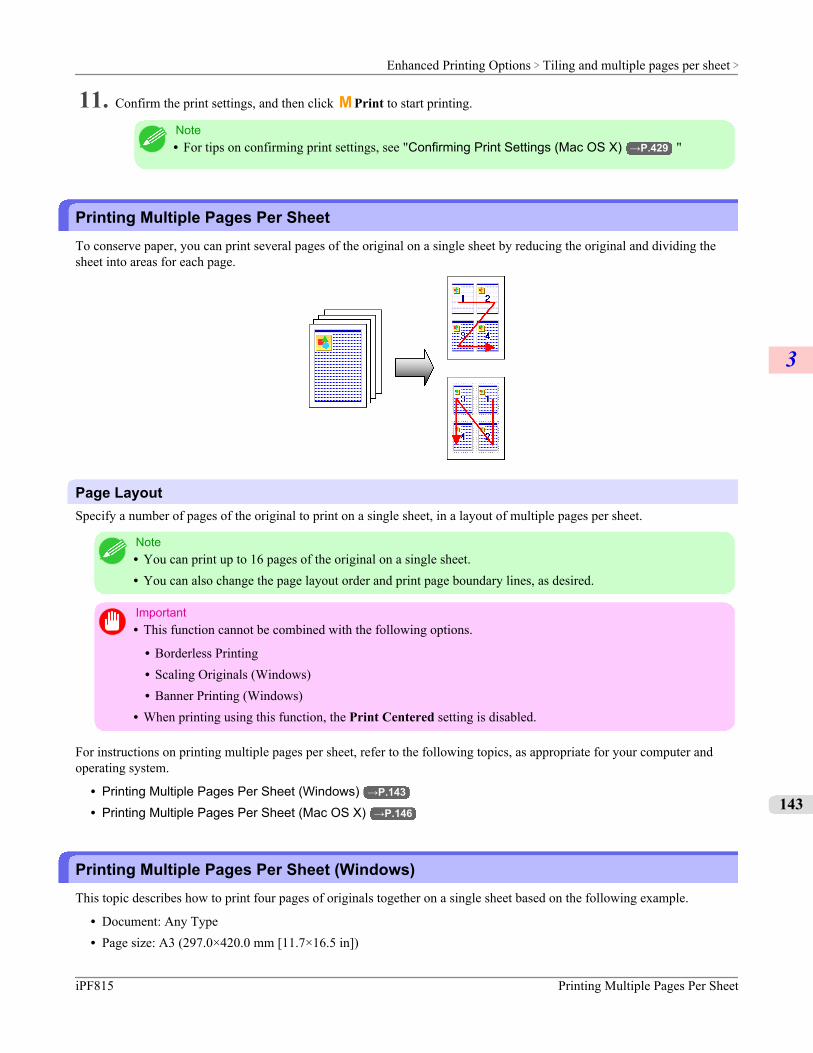
11. Confirm the print settings, and then click M Print to start printing.
Note• For tips on confirming print settings, see "Confirming Print Settings (Mac OS X) →P.429 "
Printing Multiple Pages Per SheetTo conserve paper, you can print several pages of the original on a single sheet by reducing the original and dividing thesheet into areas for each page.
Page LayoutSpecify a number of pages of the original to print on a single sheet, in a layout of multiple pages per sheet.
Note• You can print up to 16 pages of the original on a single sheet.• You can also change the page layout order and print page boundary lines, as desired.
Important• This function cannot be combined with the following options.
• Borderless Printing• Scaling Originals (Windows)• Banner Printing (Windows)
• When printing using this function, the Print Centered setting is disabled.
For instructions on printing multiple pages per sheet, refer to the following topics, as appropriate for your computer andoperating system.
• Printing Multiple Pages Per Sheet (Windows) →P.143
• Printing Multiple Pages Per Sheet (Mac OS X) →P.146
Printing Multiple Pages Per Sheet (Windows)This topic describes how to print four pages of originals together on a single sheet based on the following example.
• Document: Any Type• Page size: A3 (297.0×420.0 mm [11.7×16.5 in])
Enhanced Printing Options > Tiling and multiple pages per sheet >
iPF815 Printing Multiple Pages Per Sheet
3
143
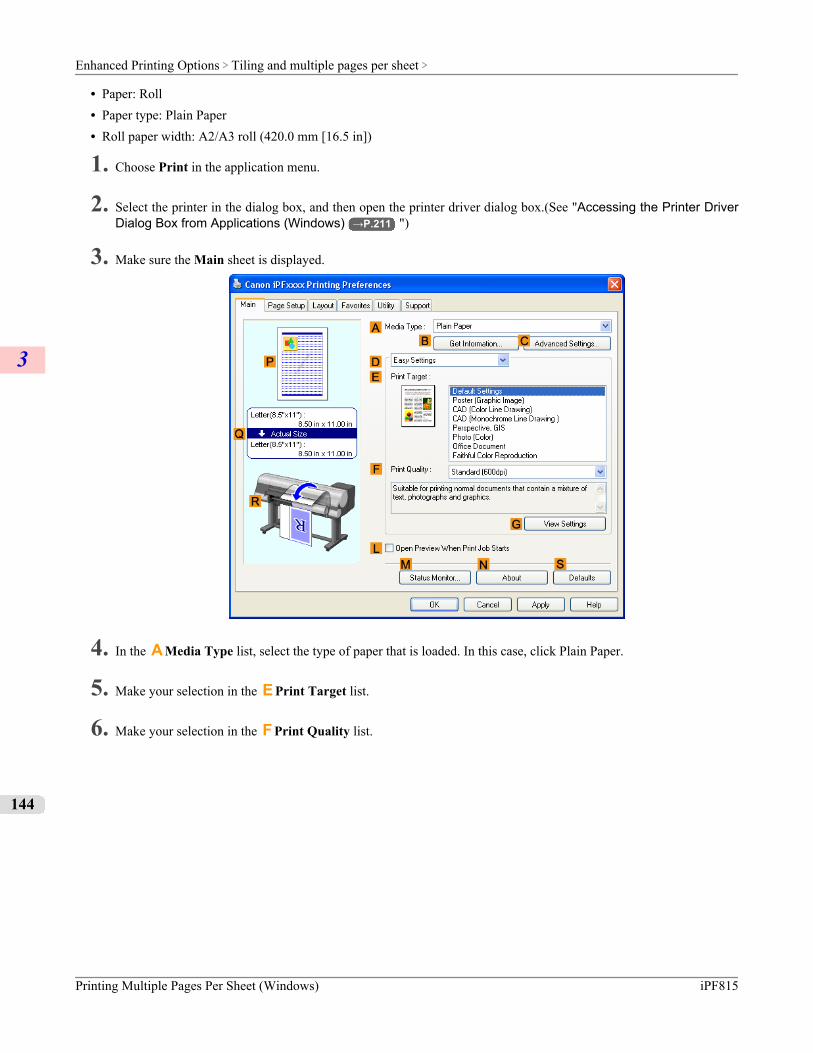
• Paper: Roll• Paper type: Plain Paper• Roll paper width: A2/A3 roll (420.0 mm [16.5 in])
1. Choose Print in the application menu.
2. Select the printer in the dialog box, and then open the printer driver dialog box.(See "Accessing the Printer DriverDialog Box from Applications (Windows) →P.211 ")
3. Make sure the Main sheet is displayed.
4. In the A Media Type list, select the type of paper that is loaded. In this case, click Plain Paper.
5. Make your selection in the E Print Target list.
6. Make your selection in the F Print Quality list.
Enhanced Printing Options > Tiling and multiple pages per sheet >
Printing Multiple Pages Per Sheet (Windows) iPF815
3
144
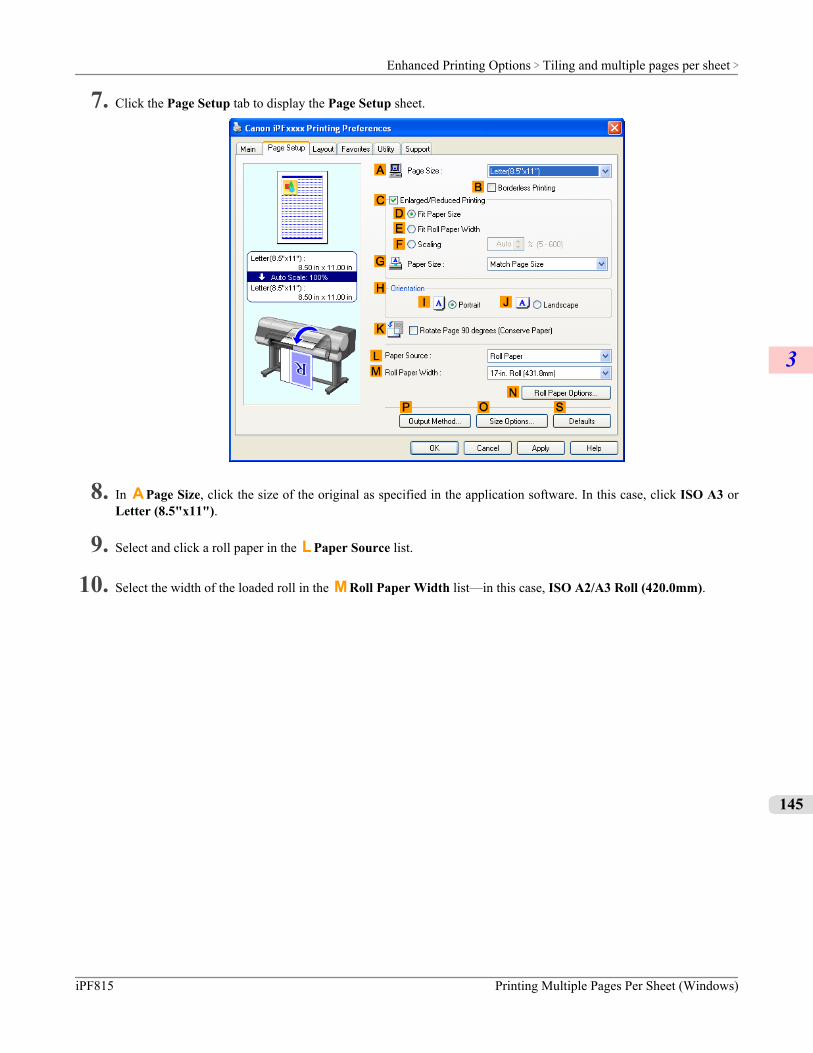
7. Click the Page Setup tab to display the Page Setup sheet.
8. In A Page Size, click the size of the original as specified in the application software. In this case, click ISO A3 orLetter (8.5"x11").
9. Select and click a roll paper in the L Paper Source list.
10. Select the width of the loaded roll in the M Roll Paper Width list—in this case, ISO A2/A3 Roll (420.0mm).
Enhanced Printing Options > Tiling and multiple pages per sheet >
iPF815 Printing Multiple Pages Per Sheet (Windows)
3
145
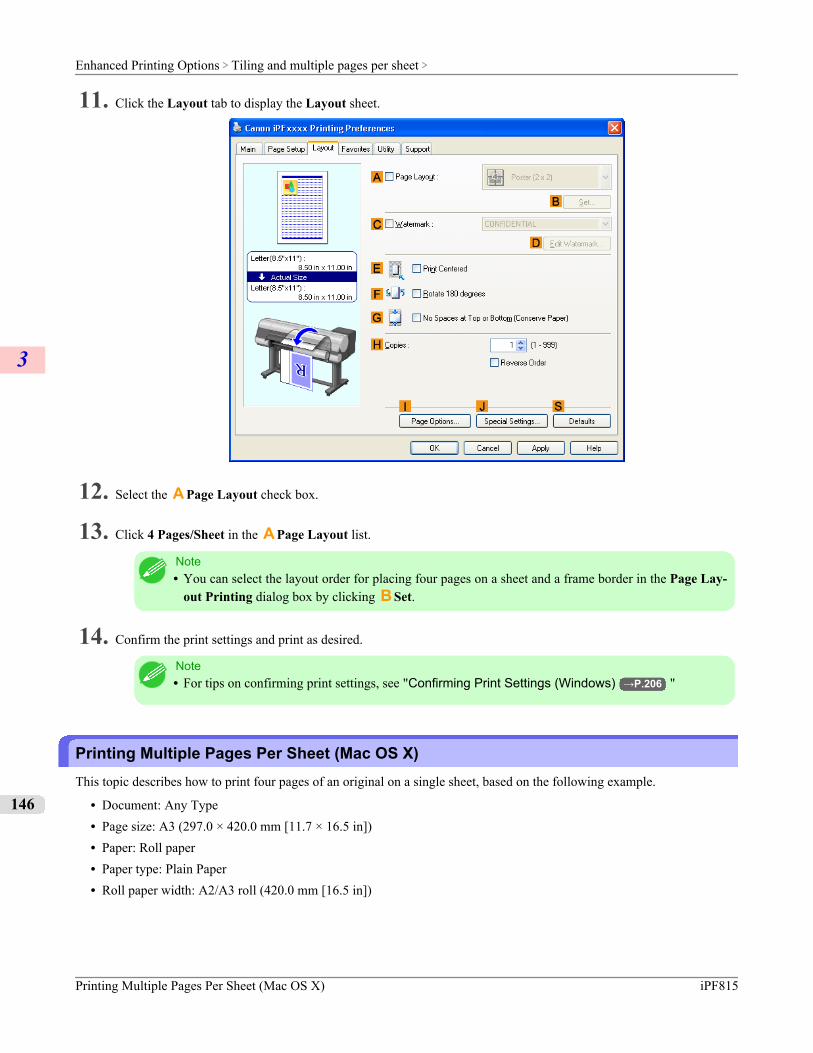
11. Click the Layout tab to display the Layout sheet.
12. Select the A Page Layout check box.
13. Click 4 Pages/Sheet in the A Page Layout list.
Note• You can select the layout order for placing four pages on a sheet and a frame border in the Page Lay-
out Printing dialog box by clicking B Set.
14. Confirm the print settings and print as desired.
Note• For tips on confirming print settings, see "Confirming Print Settings (Windows) →P.206 "
Printing Multiple Pages Per Sheet (Mac OS X)This topic describes how to print four pages of an original on a single sheet, based on the following example.
• Document: Any Type• Page size: A3 (297.0 × 420.0 mm [11.7 × 16.5 in])• Paper: Roll paper• Paper type: Plain Paper• Roll paper width: A2/A3 roll (420.0 mm [16.5 in])
Enhanced Printing Options > Tiling and multiple pages per sheet >
Printing Multiple Pages Per Sheet (Mac OS X) iPF815
3
146

1. This sets the B Format for and C Paper Size.
Note• The configuration method varies depending on the OS and application software you are using.
If Page Setup is displayed in the application menu, the settings are configured by opening the PageAttributes dialog box from Page Setup.
If it is not displayed, the settings are configured in the upper part of the printer driver displayed whenyou select Print from the application software menu.
2. Select the printer in the A Printer list.
3. In the F Paper Size list, click the size of the original. In this case, click ISO A3.
4. If you configured the settings using the Page Attributes dialog box, click F OK to close the dialog box, and thenselect Print from the application software menu.
Enhanced Printing Options > Tiling and multiple pages per sheet >
iPF815 Printing Multiple Pages Per Sheet (Mac OS X)
3
147
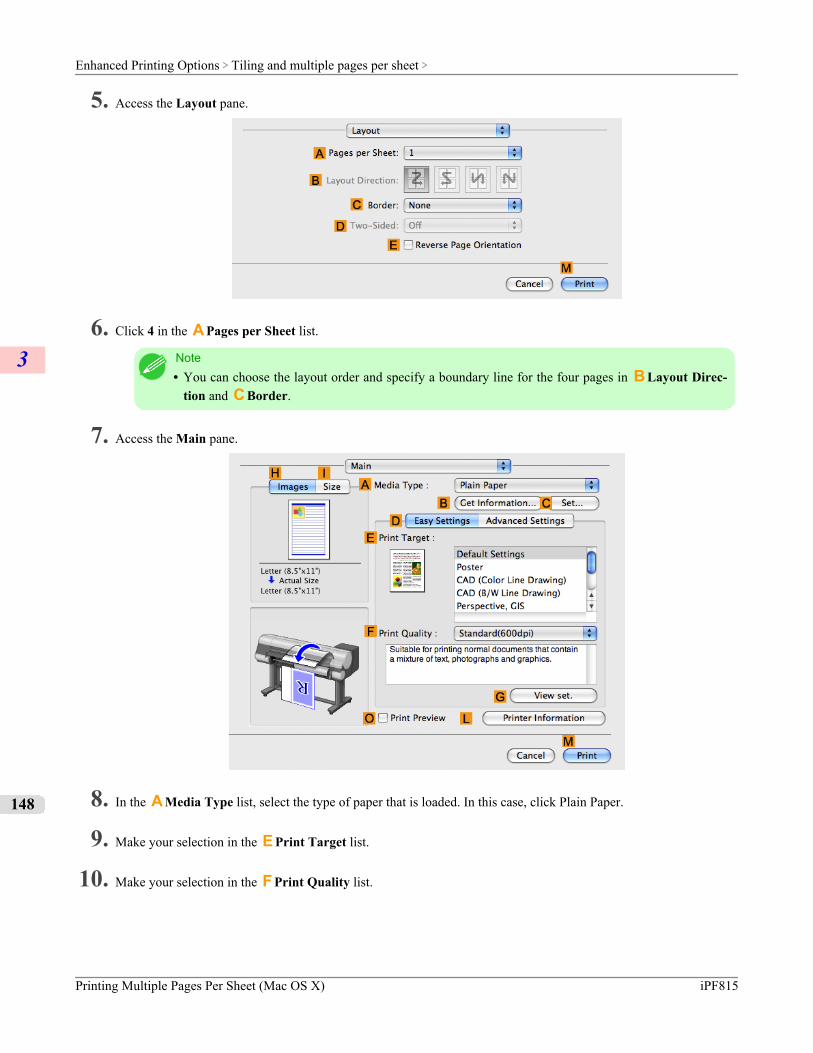
5. Access the Layout pane.
6. Click 4 in the A Pages per Sheet list.
Note• You can choose the layout order and specify a boundary line for the four pages in B Layout Direc-
tion and C Border.
7. Access the Main pane.
8. In the A Media Type list, select the type of paper that is loaded. In this case, click Plain Paper.
9. Make your selection in the E Print Target list.
10. Make your selection in the F Print Quality list.
Enhanced Printing Options > Tiling and multiple pages per sheet >
Printing Multiple Pages Per Sheet (Mac OS X) iPF815
3
148
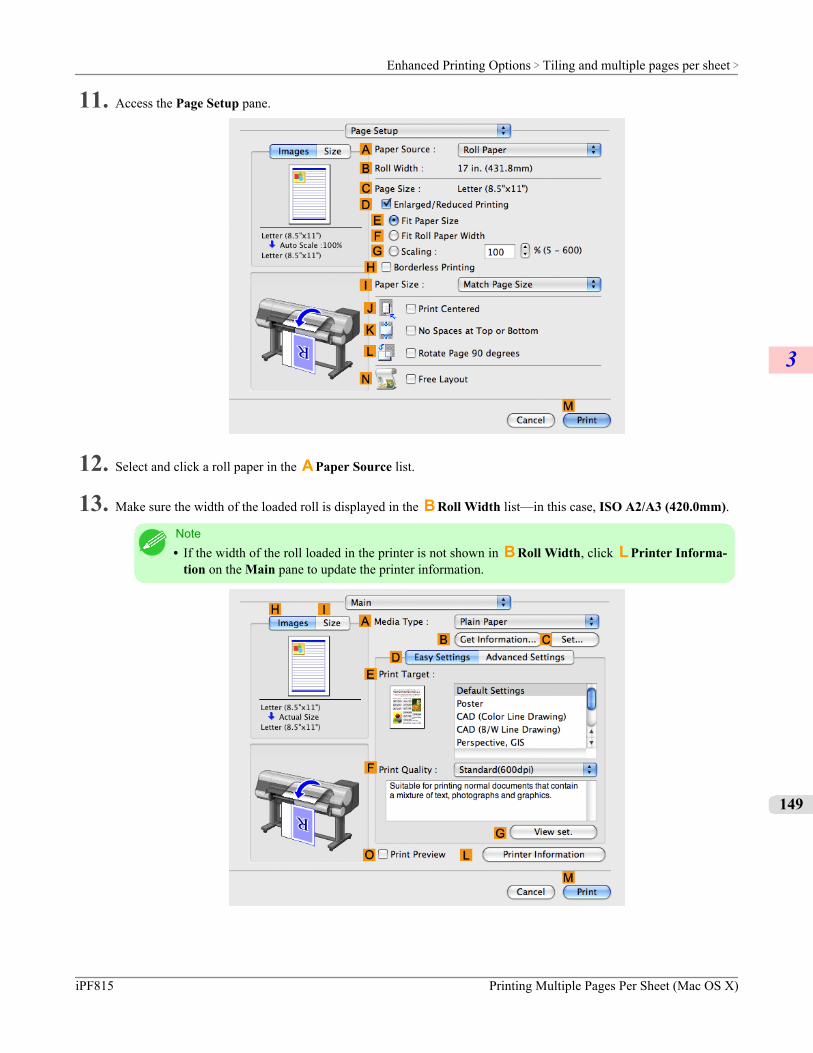
11. Access the Page Setup pane.
12. Select and click a roll paper in the A Paper Source list.
13. Make sure the width of the loaded roll is displayed in the B Roll Width list—in this case, ISO A2/A3 (420.0mm).
Note• If the width of the roll loaded in the printer is not shown in B Roll Width, click L Printer Informa-
tion on the Main pane to update the printer information.
Enhanced Printing Options > Tiling and multiple pages per sheet >
iPF815 Printing Multiple Pages Per Sheet (Mac OS X)
3
149
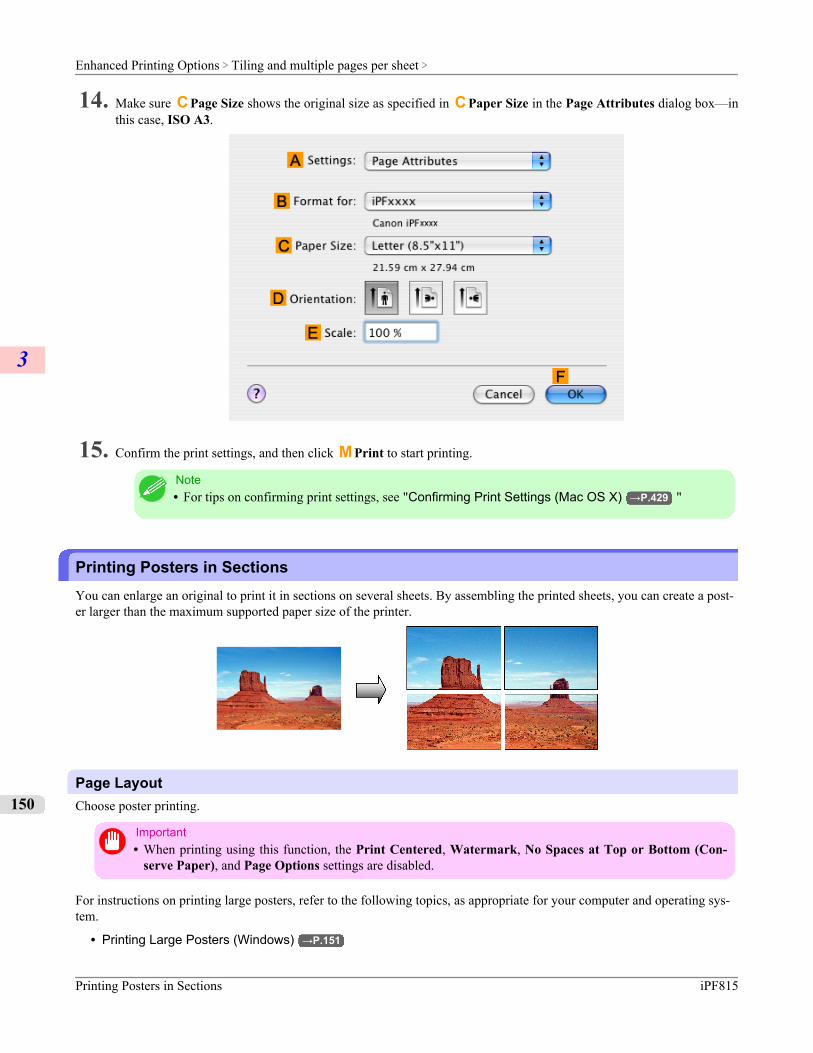
14. Make sure C Page Size shows the original size as specified in C Paper Size in the Page Attributes dialog box—inthis case, ISO A3.
15. Confirm the print settings, and then click M Print to start printing.
Note• For tips on confirming print settings, see "Confirming Print Settings (Mac OS X) →P.429 "
Printing Posters in SectionsYou can enlarge an original to print it in sections on several sheets. By assembling the printed sheets, you can create a post-er larger than the maximum supported paper size of the printer.
Page LayoutChoose poster printing.
Important• When printing using this function, the Print Centered, Watermark, No Spaces at Top or Bottom (Con-
serve Paper), and Page Options settings are disabled.
For instructions on printing large posters, refer to the following topics, as appropriate for your computer and operating sys-tem.
• Printing Large Posters (Windows) →P.151
Enhanced Printing Options > Tiling and multiple pages per sheet >
Printing Posters in Sections iPF815
3
150
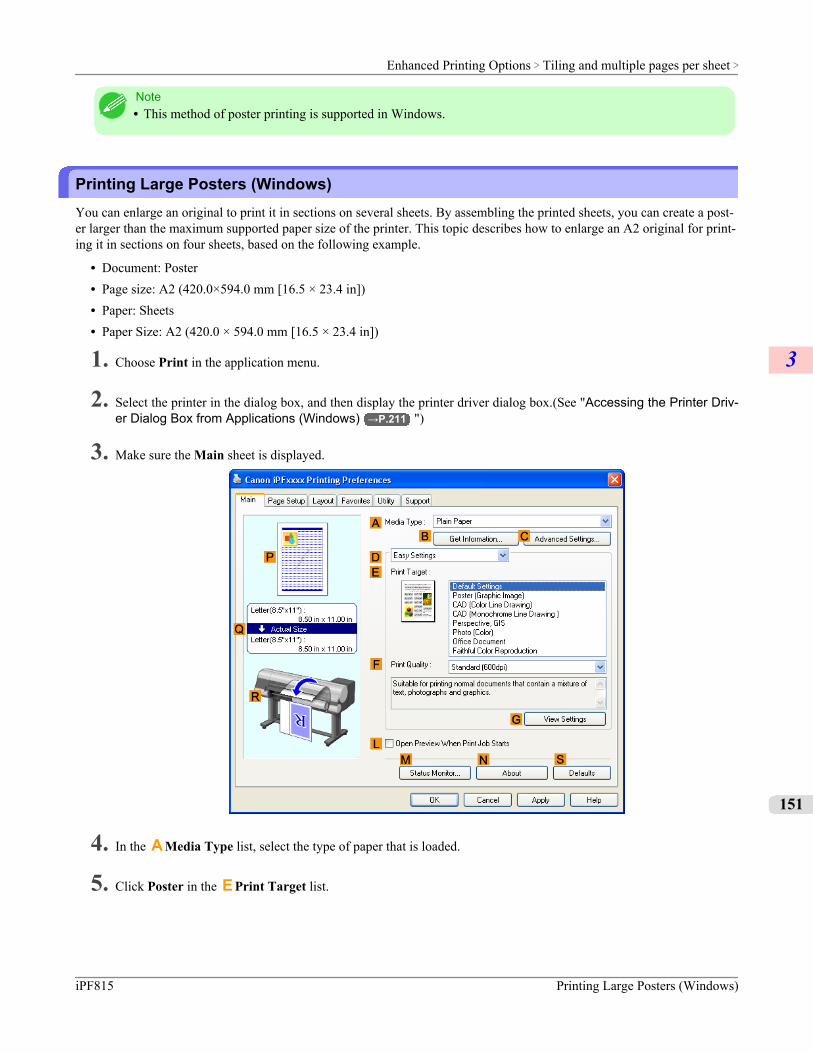
Note• This method of poster printing is supported in Windows.
Printing Large Posters (Windows)You can enlarge an original to print it in sections on several sheets. By assembling the printed sheets, you can create a post-er larger than the maximum supported paper size of the printer. This topic describes how to enlarge an A2 original for print-ing it in sections on four sheets, based on the following example.
• Document: Poster• Page size: A2 (420.0×594.0 mm [16.5 × 23.4 in])• Paper: Sheets• Paper Size: A2 (420.0 × 594.0 mm [16.5 × 23.4 in])
1. Choose Print in the application menu.
2. Select the printer in the dialog box, and then display the printer driver dialog box.(See "Accessing the Printer Driv-er Dialog Box from Applications (Windows) →P.211 ")
3. Make sure the Main sheet is displayed.
4. In the A Media Type list, select the type of paper that is loaded.
5. Click Poster in the E Print Target list.
Enhanced Printing Options > Tiling and multiple pages per sheet >
iPF815 Printing Large Posters (Windows)
3
151
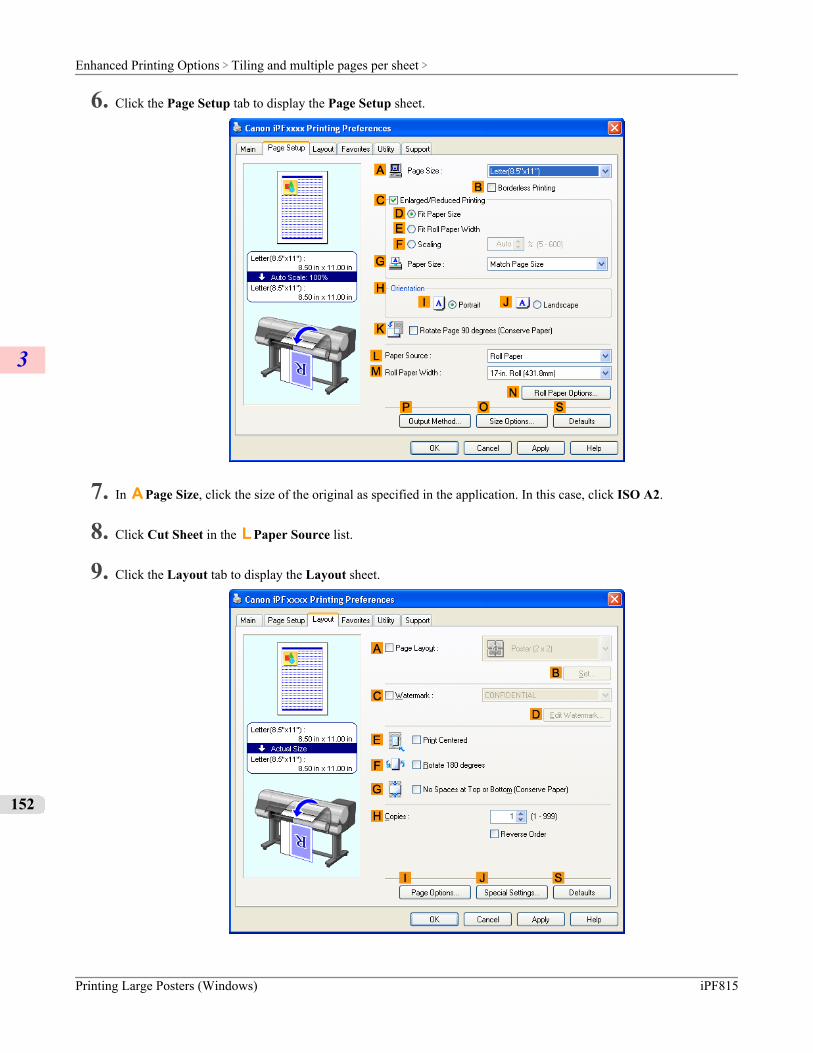
6. Click the Page Setup tab to display the Page Setup sheet.
7. In A Page Size, click the size of the original as specified in the application. In this case, click ISO A2.
8. Click Cut Sheet in the L Paper Source list.
9. Click the Layout tab to display the Layout sheet.
Enhanced Printing Options > Tiling and multiple pages per sheet >
Printing Large Posters (Windows) iPF815
3
152
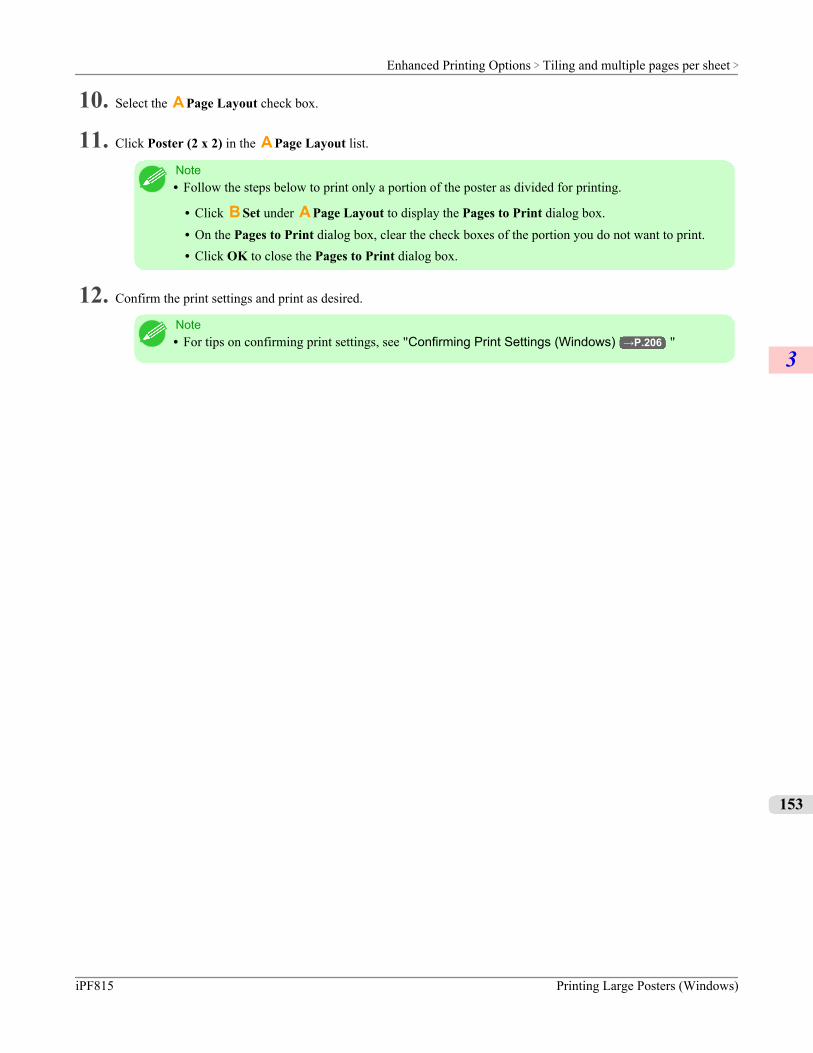
10. Select the A Page Layout check box.
11. Click Poster (2 x 2) in the A Page Layout list.
Note• Follow the steps below to print only a portion of the poster as divided for printing.
• Click B Set under A Page Layout to display the Pages to Print dialog box.• On the Pages to Print dialog box, clear the check boxes of the portion you do not want to print.• Click OK to close the Pages to Print dialog box.
12. Confirm the print settings and print as desired.
Note• For tips on confirming print settings, see "Confirming Print Settings (Windows) →P.206 "
Enhanced Printing Options > Tiling and multiple pages per sheet >
iPF815 Printing Large Posters (Windows)
3
153
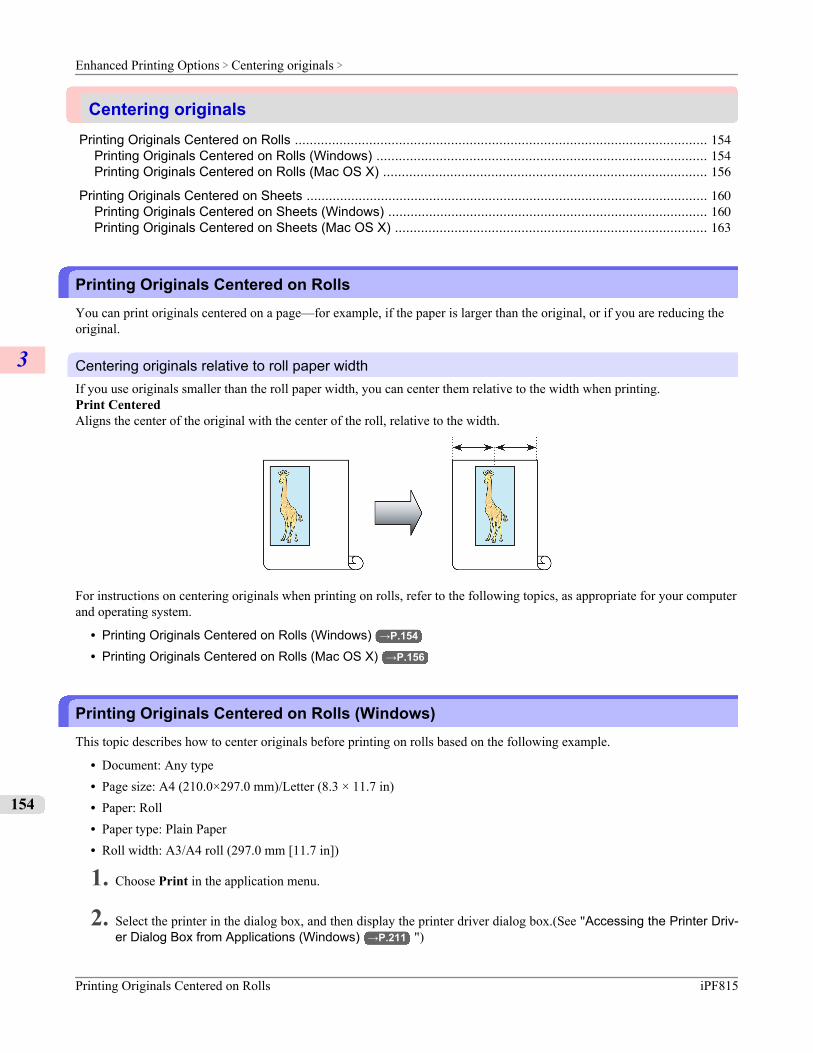
Centering originalsPrinting Originals Centered on Rolls ............................................................................................................... 154
Printing Originals Centered on Rolls (Windows) ......................................................................................... 154Printing Originals Centered on Rolls (Mac OS X) ....................................................................................... 156
Printing Originals Centered on Sheets ............................................................................................................ 160Printing Originals Centered on Sheets (Windows) ...................................................................................... 160Printing Originals Centered on Sheets (Mac OS X) .................................................................................... 163
Printing Originals Centered on RollsYou can print originals centered on a page—for example, if the paper is larger than the original, or if you are reducing theoriginal.
Centering originals relative to roll paper widthIf you use originals smaller than the roll paper width, you can center them relative to the width when printing.Print CenteredAligns the center of the original with the center of the roll, relative to the width.
For instructions on centering originals when printing on rolls, refer to the following topics, as appropriate for your computerand operating system.
• Printing Originals Centered on Rolls (Windows) →P.154
• Printing Originals Centered on Rolls (Mac OS X) →P.156
Printing Originals Centered on Rolls (Windows)This topic describes how to center originals before printing on rolls based on the following example.
• Document: Any type• Page size: A4 (210.0×297.0 mm)/Letter (8.3 × 11.7 in)• Paper: Roll• Paper type: Plain Paper• Roll width: A3/A4 roll (297.0 mm [11.7 in])
1. Choose Print in the application menu.
2. Select the printer in the dialog box, and then display the printer driver dialog box.(See "Accessing the Printer Driv-er Dialog Box from Applications (Windows) →P.211 ")
Enhanced Printing Options > Centering originals >
Printing Originals Centered on Rolls iPF815
3
154

3. Make sure the Main sheet is displayed.
4. In the A Media Type list, select the type of paper that is loaded. In this case, click Plain Paper.
5. Select the print target in the E Print Target list.
6. Click the Page Setup tab to display the Page Setup sheet.
Enhanced Printing Options > Centering originals >
iPF815 Printing Originals Centered on Rolls (Windows)
3
155
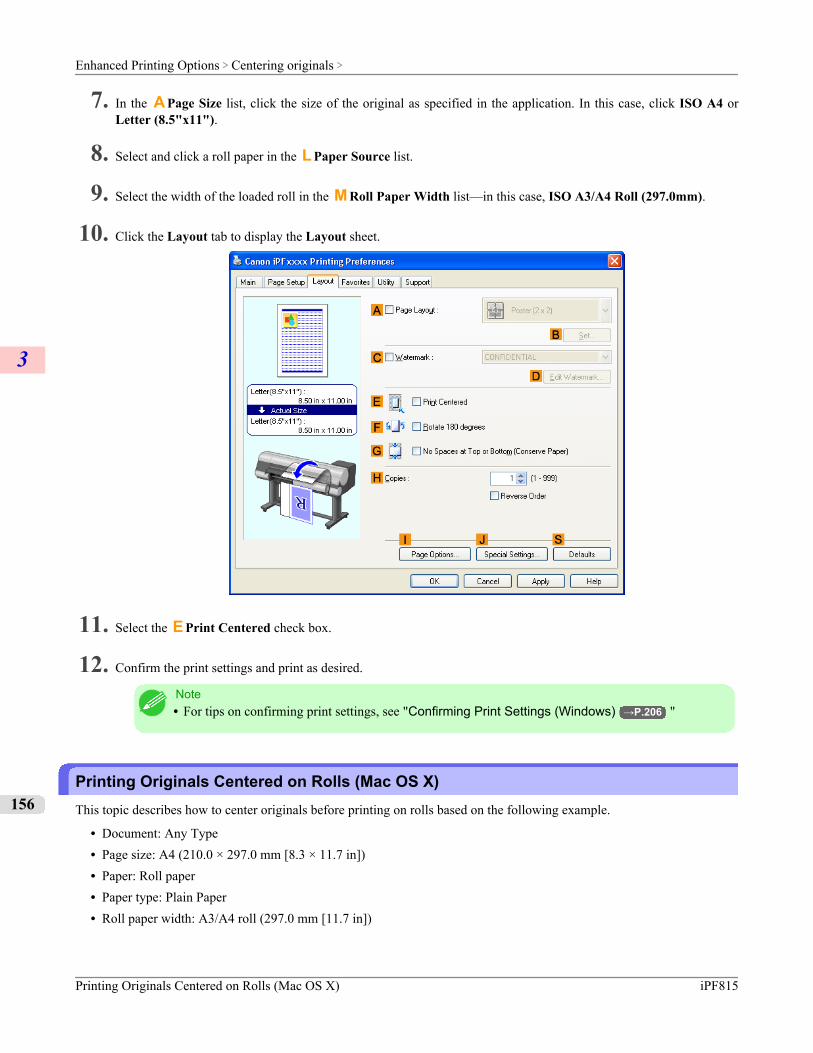
7. In the A Page Size list, click the size of the original as specified in the application. In this case, click ISO A4 orLetter (8.5"x11").
8. Select and click a roll paper in the L Paper Source list.
9. Select the width of the loaded roll in the M Roll Paper Width list—in this case, ISO A3/A4 Roll (297.0mm).
10. Click the Layout tab to display the Layout sheet.
11. Select the E Print Centered check box.
12. Confirm the print settings and print as desired.
Note• For tips on confirming print settings, see "Confirming Print Settings (Windows) →P.206 "
Printing Originals Centered on Rolls (Mac OS X)This topic describes how to center originals before printing on rolls based on the following example.
• Document: Any Type• Page size: A4 (210.0 × 297.0 mm [8.3 × 11.7 in])• Paper: Roll paper• Paper type: Plain Paper• Roll paper width: A3/A4 roll (297.0 mm [11.7 in])
Enhanced Printing Options > Centering originals >
Printing Originals Centered on Rolls (Mac OS X) iPF815
3
156
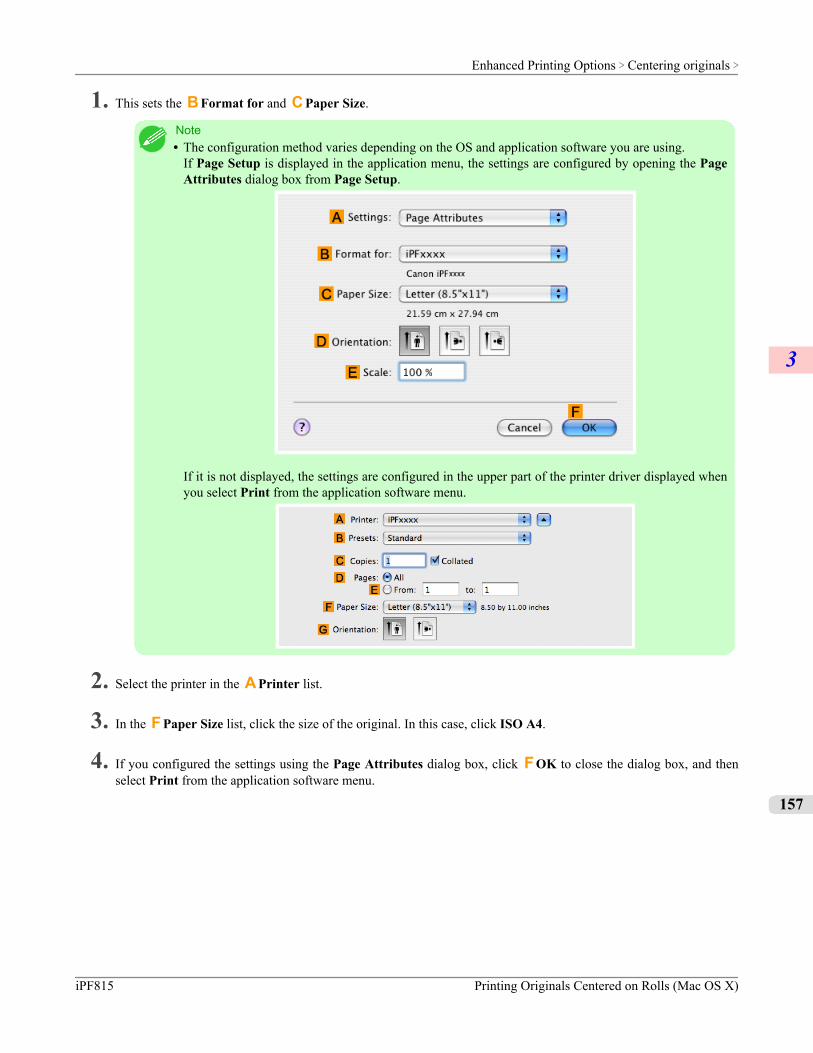
1. This sets the B Format for and C Paper Size.
Note• The configuration method varies depending on the OS and application software you are using.
If Page Setup is displayed in the application menu, the settings are configured by opening the PageAttributes dialog box from Page Setup.
If it is not displayed, the settings are configured in the upper part of the printer driver displayed whenyou select Print from the application software menu.
2. Select the printer in the A Printer list.
3. In the F Paper Size list, click the size of the original. In this case, click ISO A4.
4. If you configured the settings using the Page Attributes dialog box, click F OK to close the dialog box, and thenselect Print from the application software menu.
Enhanced Printing Options > Centering originals >
iPF815 Printing Originals Centered on Rolls (Mac OS X)
3
157

5. Access the Main pane.
6. In the A Media Type list, select the type of paper that is loaded. In this case, click Plain Paper.
7. Make your selection in the E Print Target list.
8. Make your selection in the F Print Quality list.
9. Access the Page Setup pane.
10. Select and click a roll paper in the A Paper Source list.
Enhanced Printing Options > Centering originals >
Printing Originals Centered on Rolls (Mac OS X) iPF815
3
158

11. Make sure the width of the loaded roll is displayed in B Roll Width —in this case, ISO A3/A4 (297.0mm).
Note• If the width of the roll loaded in the printer is not shown in B Roll Width, click L Printer Informa-
tion on the Main pane to update the printer information.
12. Make sure the C Page Size setting matches the original size as selected in C Paper Size in the Page Attributesdialog box—in this case, ISO A4.
13. Select the J Print Centered check box.
Enhanced Printing Options > Centering originals >
iPF815 Printing Originals Centered on Rolls (Mac OS X)
3
159
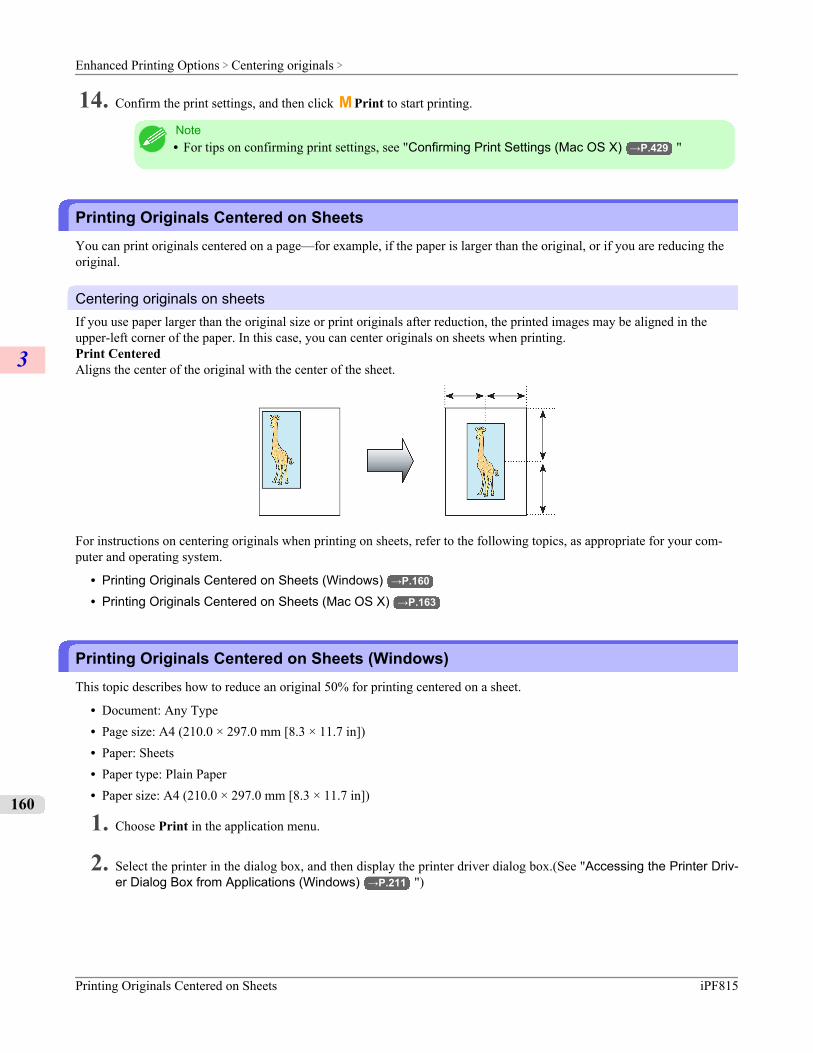
14. Confirm the print settings, and then click M Print to start printing.
Note• For tips on confirming print settings, see "Confirming Print Settings (Mac OS X) →P.429 "
Printing Originals Centered on SheetsYou can print originals centered on a page—for example, if the paper is larger than the original, or if you are reducing theoriginal.
Centering originals on sheetsIf you use paper larger than the original size or print originals after reduction, the printed images may be aligned in theupper-left corner of the paper. In this case, you can center originals on sheets when printing.Print CenteredAligns the center of the original with the center of the sheet.
For instructions on centering originals when printing on sheets, refer to the following topics, as appropriate for your com-puter and operating system.
• Printing Originals Centered on Sheets (Windows) →P.160
• Printing Originals Centered on Sheets (Mac OS X) →P.163
Printing Originals Centered on Sheets (Windows)This topic describes how to reduce an original 50% for printing centered on a sheet.
• Document: Any Type• Page size: A4 (210.0 × 297.0 mm [8.3 × 11.7 in])• Paper: Sheets• Paper type: Plain Paper• Paper size: A4 (210.0 × 297.0 mm [8.3 × 11.7 in])
1. Choose Print in the application menu.
2. Select the printer in the dialog box, and then display the printer driver dialog box.(See "Accessing the Printer Driv-er Dialog Box from Applications (Windows) →P.211 ")
Enhanced Printing Options > Centering originals >
Printing Originals Centered on Sheets iPF815
3
160
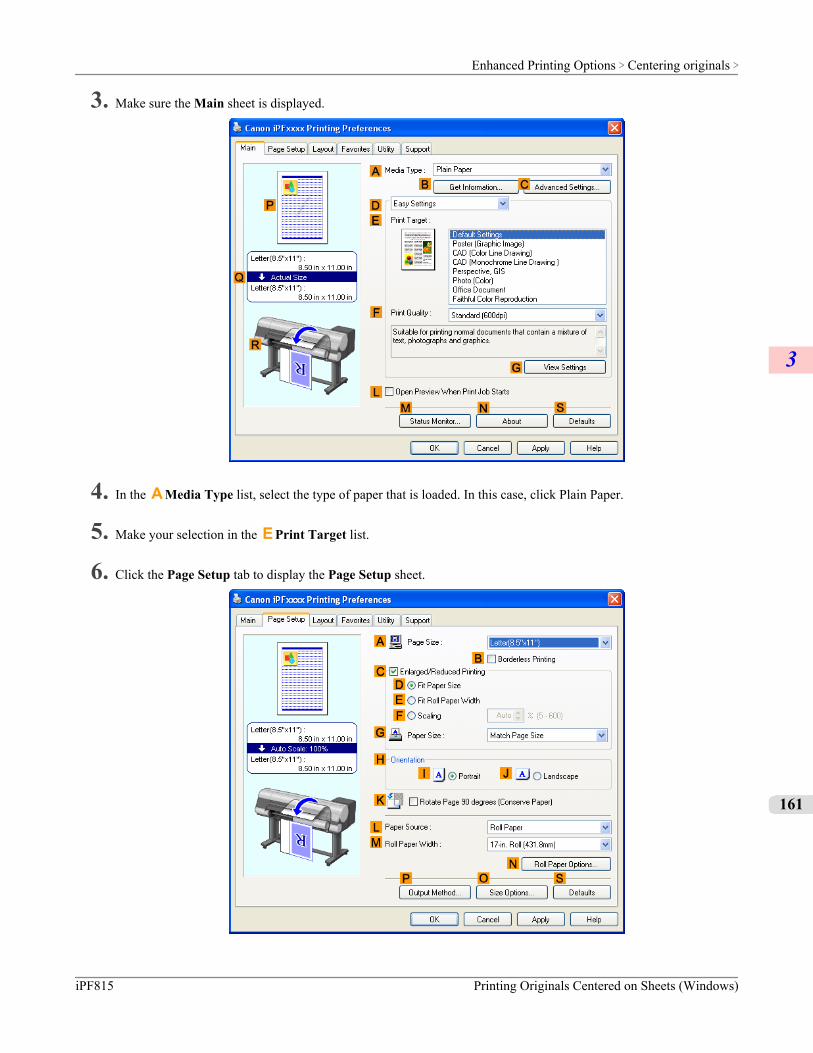
3. Make sure the Main sheet is displayed.
4. In the A Media Type list, select the type of paper that is loaded. In this case, click Plain Paper.
5. Make your selection in the E Print Target list.
6. Click the Page Setup tab to display the Page Setup sheet.
Enhanced Printing Options > Centering originals >
iPF815 Printing Originals Centered on Sheets (Windows)
3
161
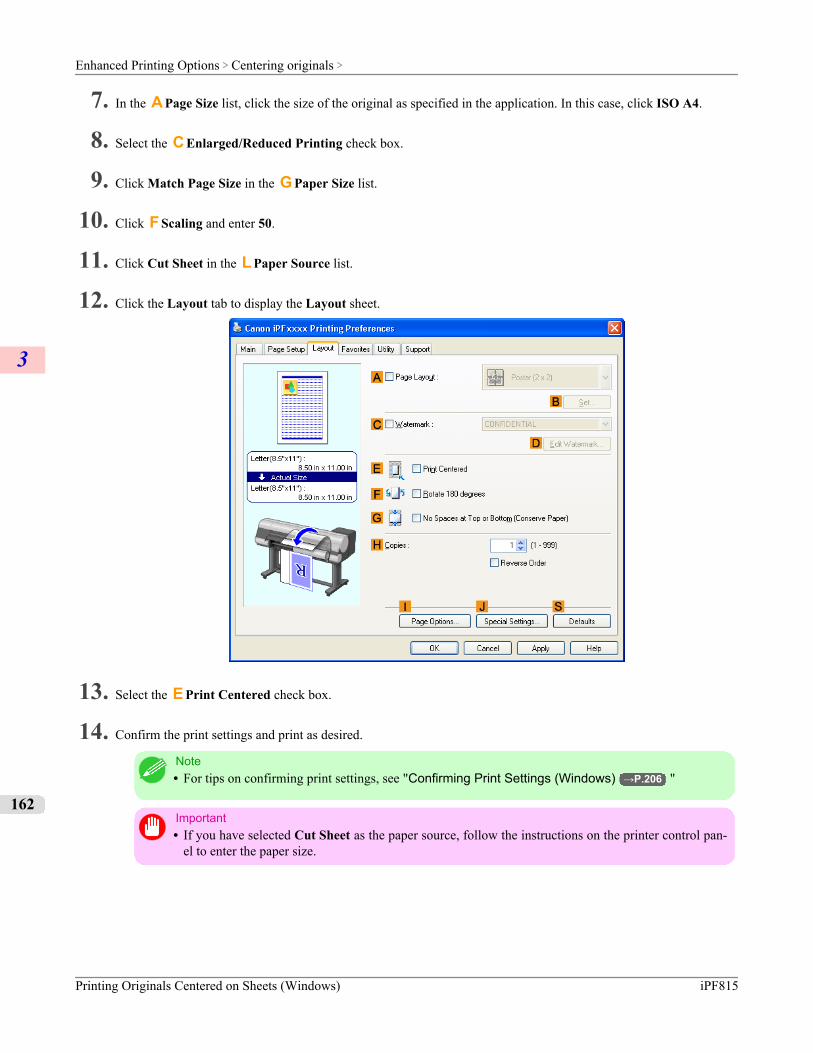
7. In the A Page Size list, click the size of the original as specified in the application. In this case, click ISO A4.
8. Select the C Enlarged/Reduced Printing check box.
9. Click Match Page Size in the G Paper Size list.
10. Click F Scaling and enter 50.
11. Click Cut Sheet in the L Paper Source list.
12. Click the Layout tab to display the Layout sheet.
13. Select the E Print Centered check box.
14. Confirm the print settings and print as desired.
Note• For tips on confirming print settings, see "Confirming Print Settings (Windows) →P.206 "
Important• If you have selected Cut Sheet as the paper source, follow the instructions on the printer control pan-
el to enter the paper size.
Enhanced Printing Options > Centering originals >
Printing Originals Centered on Sheets (Windows) iPF815
3
162

Printing Originals Centered on Sheets (Mac OS X)This topic describes how to center originals for printing on sheets, based on the following example.
• Document: Any Type• Page size: A4• Paper: Sheets• Paper type: Plain Paper• Paper size: Non-standard
1. This sets the B Format for and C Paper Size.
Note• The configuration method varies depending on the OS and application software you are using.
If Page Setup is displayed in the application menu, the settings are configured by opening the PageAttributes dialog box from Page Setup.
If it is not displayed, the settings are configured in the upper part of the printer driver displayed whenyou select Print from the application software menu.
2. Select the printer in the A Printer list.
3. In the F Paper Size list, click the size of the original. In this case, click ISO A4 - Cut Sheet.
Enhanced Printing Options > Centering originals >
iPF815 Printing Originals Centered on Sheets (Mac OS X)
3
163
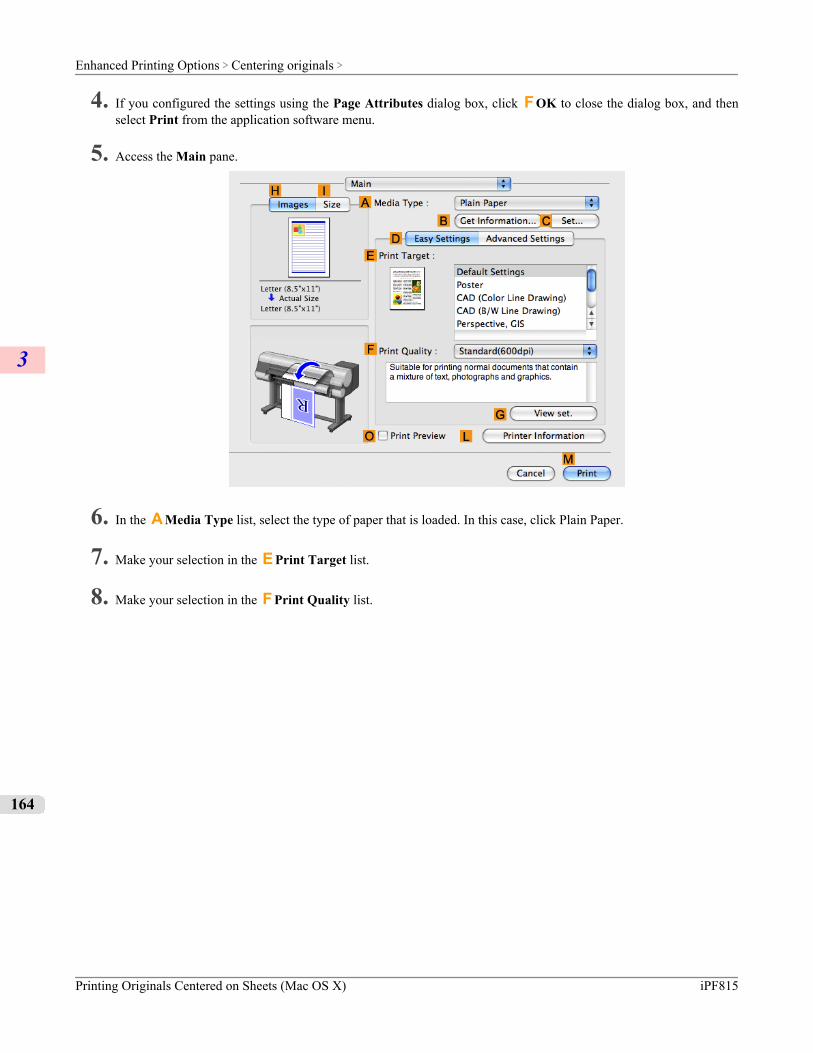
4. If you configured the settings using the Page Attributes dialog box, click F OK to close the dialog box, and thenselect Print from the application software menu.
5. Access the Main pane.
6. In the A Media Type list, select the type of paper that is loaded. In this case, click Plain Paper.
7. Make your selection in the E Print Target list.
8. Make your selection in the F Print Quality list.
Enhanced Printing Options > Centering originals >
Printing Originals Centered on Sheets (Mac OS X) iPF815
3
164
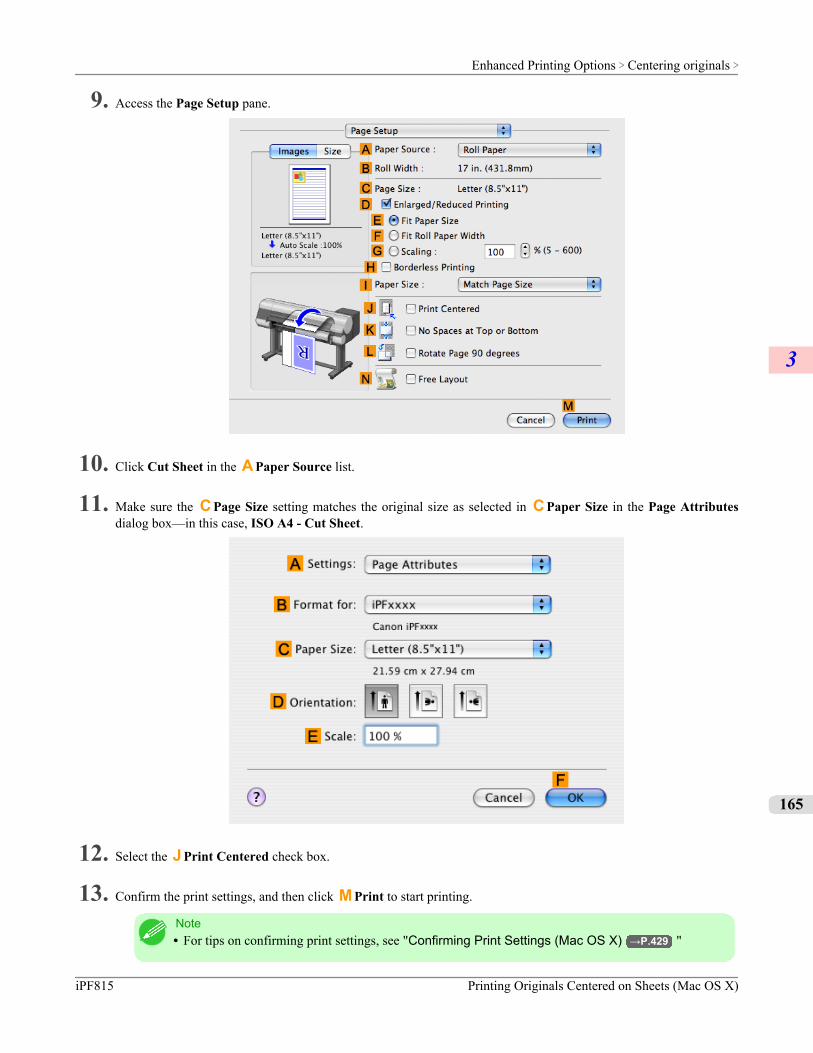
9. Access the Page Setup pane.
10. Click Cut Sheet in the A Paper Source list.
11. Make sure the C Page Size setting matches the original size as selected in C Paper Size in the Page Attributesdialog box—in this case, ISO A4 - Cut Sheet.
12. Select the J Print Centered check box.
13. Confirm the print settings, and then click M Print to start printing.
Note• For tips on confirming print settings, see "Confirming Print Settings (Mac OS X) →P.429 "
Enhanced Printing Options > Centering originals >
iPF815 Printing Originals Centered on Sheets (Mac OS X)
3
165
Important• If you have selected Cut Sheet as the paper source, follow the instructions on the printer control panel to
enter the paper size.
Enhanced Printing Options > Centering originals >
Printing Originals Centered on Sheets (Mac OS X) iPF815
3
166
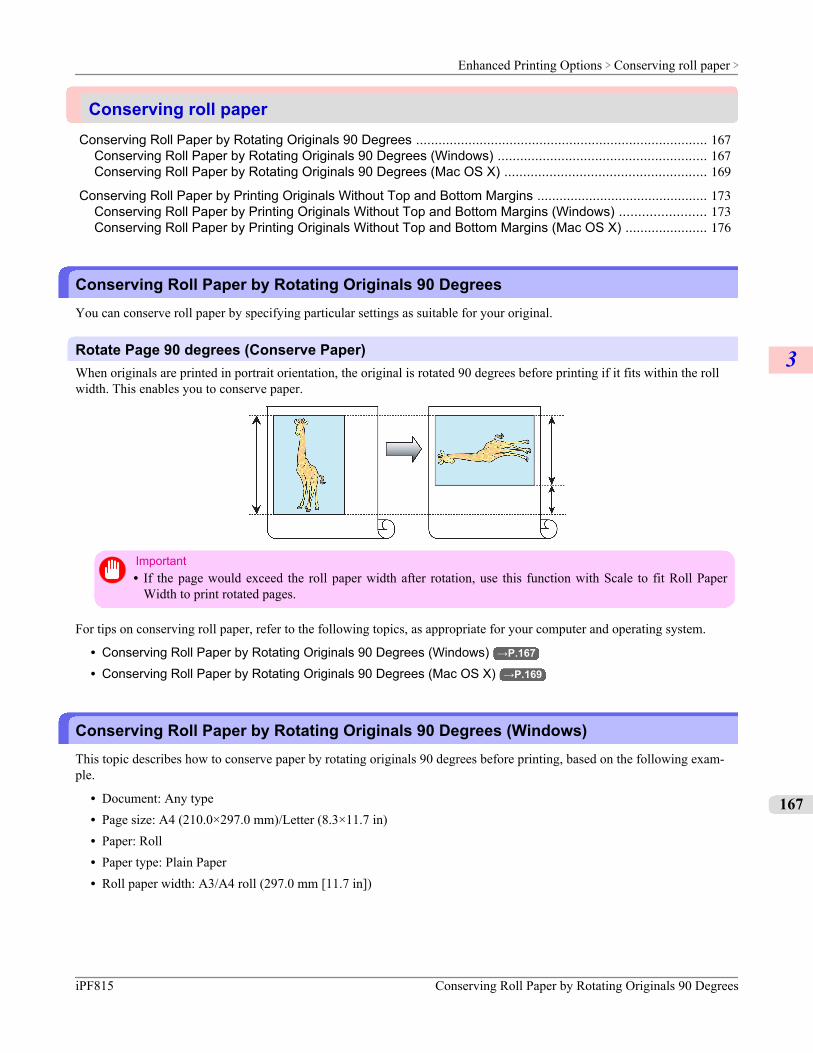
Conserving roll paperConserving Roll Paper by Rotating Originals 90 Degrees .............................................................................. 167
Conserving Roll Paper by Rotating Originals 90 Degrees (Windows) ........................................................ 167Conserving Roll Paper by Rotating Originals 90 Degrees (Mac OS X) ...................................................... 169
Conserving Roll Paper by Printing Originals Without Top and Bottom Margins .............................................. 173Conserving Roll Paper by Printing Originals Without Top and Bottom Margins (Windows) ....................... 173Conserving Roll Paper by Printing Originals Without Top and Bottom Margins (Mac OS X) ...................... 176
Conserving Roll Paper by Rotating Originals 90 DegreesYou can conserve roll paper by specifying particular settings as suitable for your original.
Rotate Page 90 degrees (Conserve Paper)When originals are printed in portrait orientation, the original is rotated 90 degrees before printing if it fits within the rollwidth. This enables you to conserve paper.
Important• If the page would exceed the roll paper width after rotation, use this function with Scale to fit Roll Paper
Width to print rotated pages.
For tips on conserving roll paper, refer to the following topics, as appropriate for your computer and operating system.
• Conserving Roll Paper by Rotating Originals 90 Degrees (Windows) →P.167
• Conserving Roll Paper by Rotating Originals 90 Degrees (Mac OS X) →P.169
Conserving Roll Paper by Rotating Originals 90 Degrees (Windows)This topic describes how to conserve paper by rotating originals 90 degrees before printing, based on the following exam-ple.
• Document: Any type• Page size: A4 (210.0×297.0 mm)/Letter (8.3×11.7 in)• Paper: Roll• Paper type: Plain Paper• Roll paper width: A3/A4 roll (297.0 mm [11.7 in])
Enhanced Printing Options > Conserving roll paper >
iPF815 Conserving Roll Paper by Rotating Originals 90 Degrees
3
167
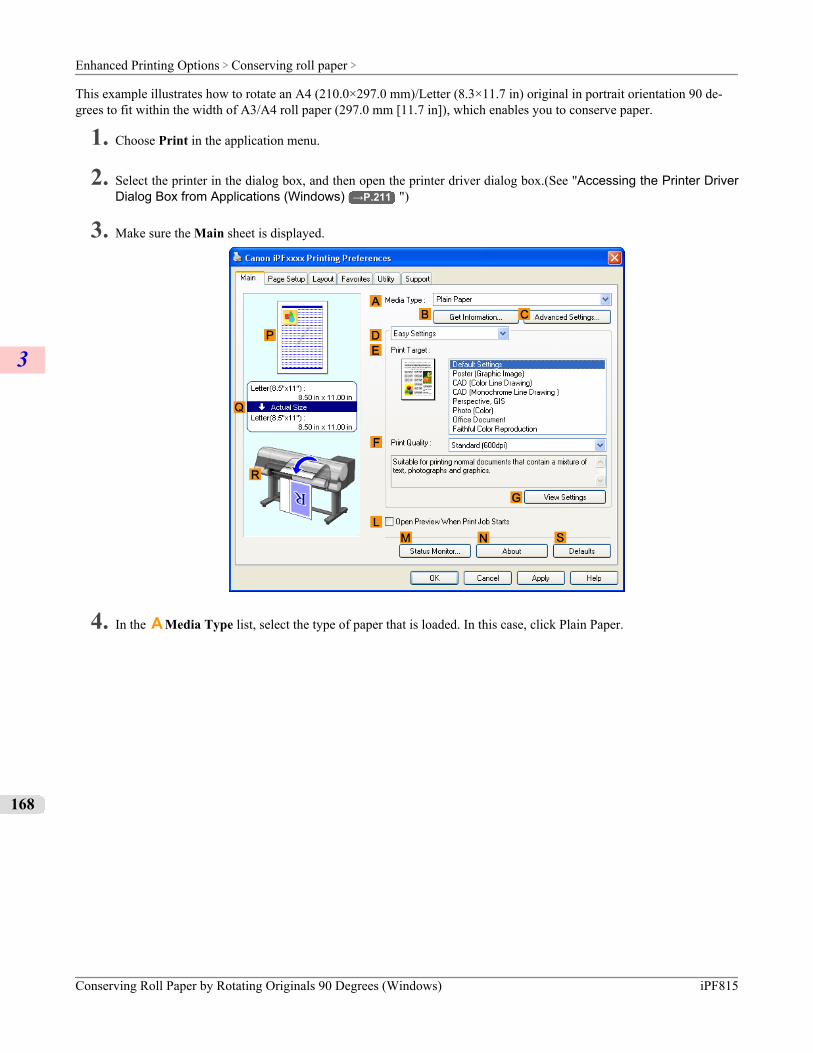
This example illustrates how to rotate an A4 (210.0×297.0 mm)/Letter (8.3×11.7 in) original in portrait orientation 90 de-grees to fit within the width of A3/A4 roll paper (297.0 mm [11.7 in]), which enables you to conserve paper.
1. Choose Print in the application menu.
2. Select the printer in the dialog box, and then open the printer driver dialog box.(See "Accessing the Printer DriverDialog Box from Applications (Windows) →P.211 ")
3. Make sure the Main sheet is displayed.
4. In the A Media Type list, select the type of paper that is loaded. In this case, click Plain Paper.
Enhanced Printing Options > Conserving roll paper >
Conserving Roll Paper by Rotating Originals 90 Degrees (Windows) iPF815
3
168
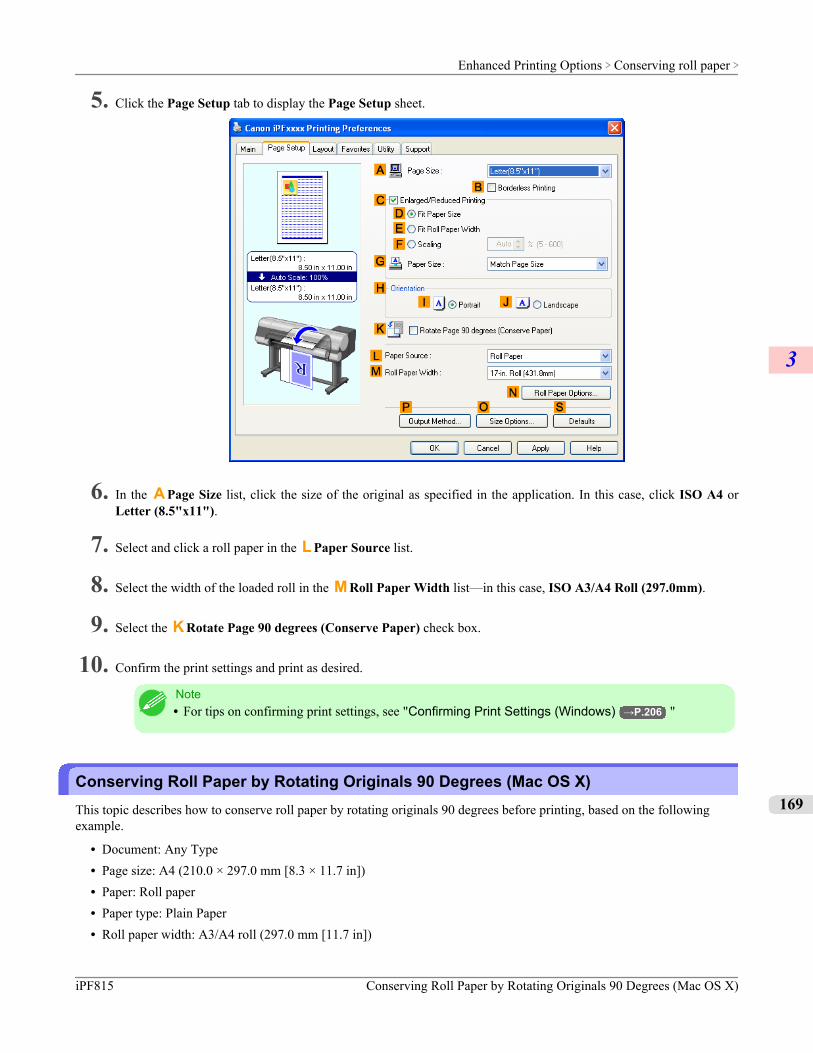
5. Click the Page Setup tab to display the Page Setup sheet.
6. In the A Page Size list, click the size of the original as specified in the application. In this case, click ISO A4 orLetter (8.5"x11").
7. Select and click a roll paper in the L Paper Source list.
8. Select the width of the loaded roll in the M Roll Paper Width list—in this case, ISO A3/A4 Roll (297.0mm).
9. Select the K Rotate Page 90 degrees (Conserve Paper) check box.
10. Confirm the print settings and print as desired.
Note• For tips on confirming print settings, see "Confirming Print Settings (Windows) →P.206 "
Conserving Roll Paper by Rotating Originals 90 Degrees (Mac OS X)This topic describes how to conserve roll paper by rotating originals 90 degrees before printing, based on the followingexample.
• Document: Any Type• Page size: A4 (210.0 × 297.0 mm [8.3 × 11.7 in])• Paper: Roll paper• Paper type: Plain Paper• Roll paper width: A3/A4 roll (297.0 mm [11.7 in])
Enhanced Printing Options > Conserving roll paper >
iPF815 Conserving Roll Paper by Rotating Originals 90 Degrees (Mac OS X)
3
169
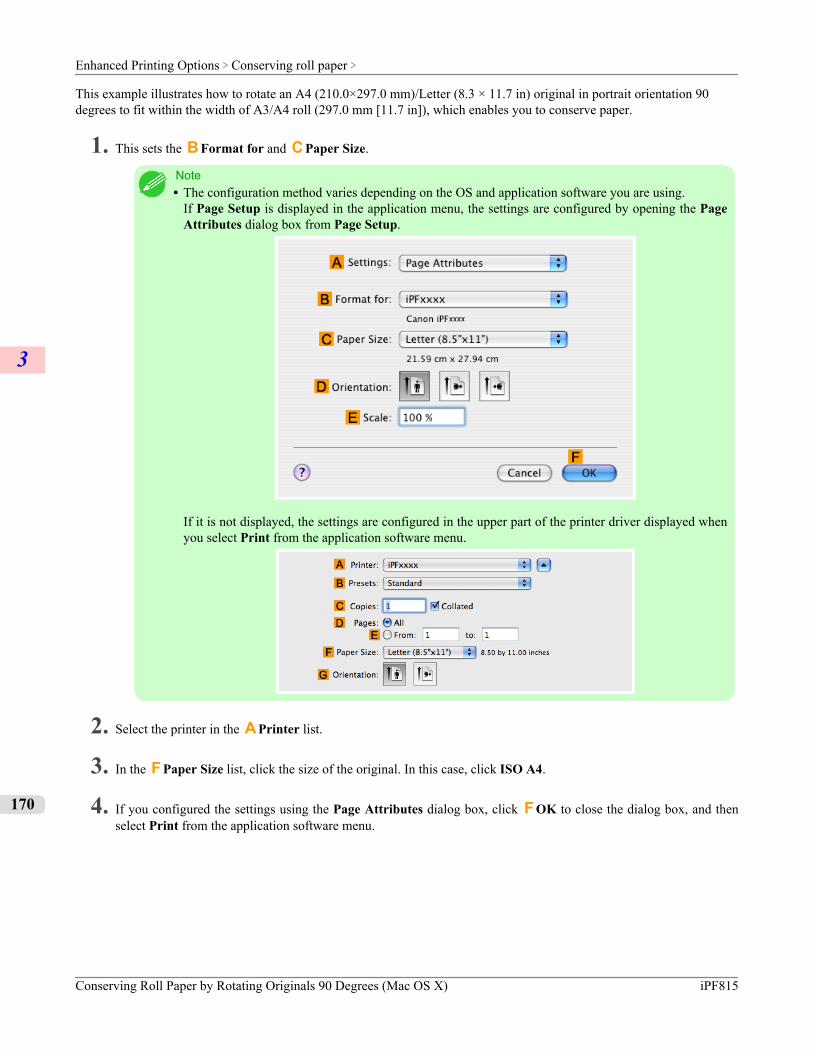
This example illustrates how to rotate an A4 (210.0×297.0 mm)/Letter (8.3 × 11.7 in) original in portrait orientation 90degrees to fit within the width of A3/A4 roll (297.0 mm [11.7 in]), which enables you to conserve paper.
1. This sets the B Format for and C Paper Size.
Note• The configuration method varies depending on the OS and application software you are using.
If Page Setup is displayed in the application menu, the settings are configured by opening the PageAttributes dialog box from Page Setup.
If it is not displayed, the settings are configured in the upper part of the printer driver displayed whenyou select Print from the application software menu.
2. Select the printer in the A Printer list.
3. In the F Paper Size list, click the size of the original. In this case, click ISO A4.
4. If you configured the settings using the Page Attributes dialog box, click F OK to close the dialog box, and thenselect Print from the application software menu.
Enhanced Printing Options > Conserving roll paper >
Conserving Roll Paper by Rotating Originals 90 Degrees (Mac OS X) iPF815
3
170

5. Access the Main pane.
6. In the A Media Type list, select the type of paper that is loaded. In this case, click Plain Paper.
7. Access the Page Setup pane.
8. Select and click a roll paper in the A Paper Source list.
Enhanced Printing Options > Conserving roll paper >
iPF815 Conserving Roll Paper by Rotating Originals 90 Degrees (Mac OS X)
3
171
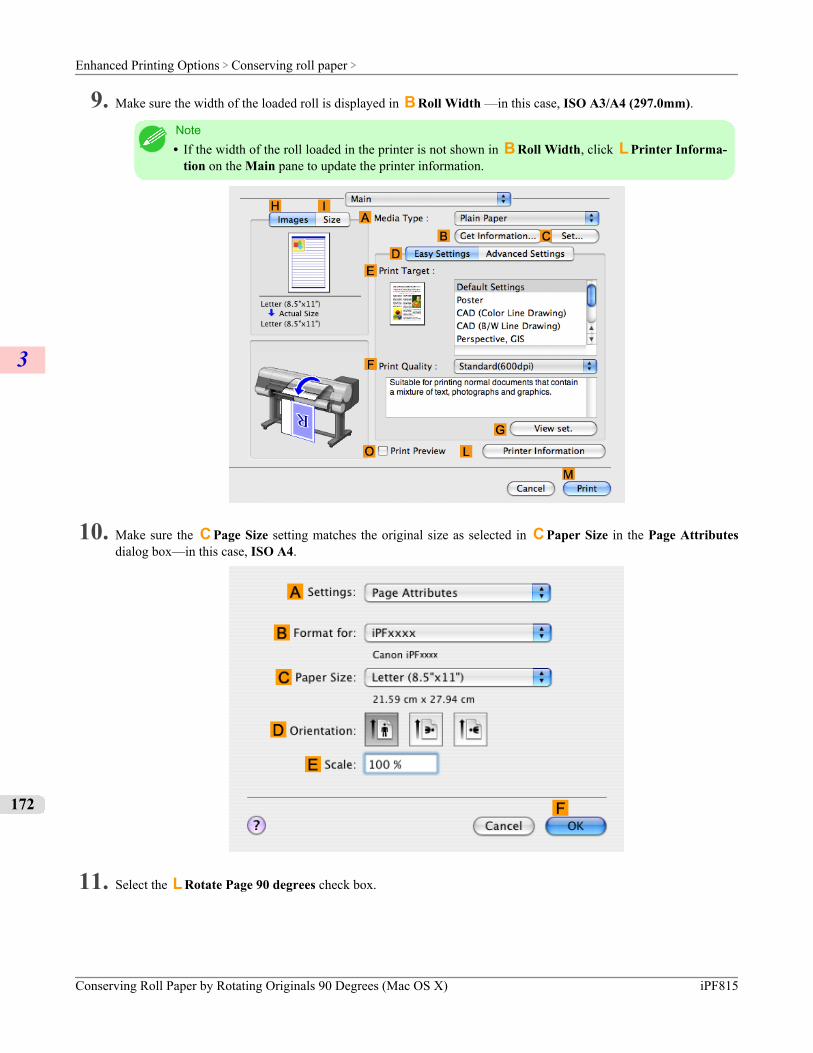
9. Make sure the width of the loaded roll is displayed in B Roll Width —in this case, ISO A3/A4 (297.0mm).
Note• If the width of the roll loaded in the printer is not shown in B Roll Width, click L Printer Informa-
tion on the Main pane to update the printer information.
10. Make sure the C Page Size setting matches the original size as selected in C Paper Size in the Page Attributesdialog box—in this case, ISO A4.
11. Select the L Rotate Page 90 degrees check box.
Enhanced Printing Options > Conserving roll paper >
Conserving Roll Paper by Rotating Originals 90 Degrees (Mac OS X) iPF815
3
172

12. Confirm the print settings, and then click M Print to start printing.
Note• For tips on confirming print settings, see "Confirming Print Settings (Mac OS X) →P.429 "
Conserving Roll Paper by Printing Originals Without Top and Bottom MarginsYou can conserve roll paper by specifying particular settings as suitable for your original.
No Spaces at Top or Bottom (Conserve Paper)You can print without feeding the paper for blank portions of originals if there are top and bottom margins in originals. Thisenables you to conserve as much paper as the size of the margins.
Important• Printing without the top and bottom margins is not supported in the following cases.
• Banner printing• If you have chosen poster as the type of page layout
Note• Even during borderless printing, you can print without the top and bottom margins.• Printing without the top and bottom margins may cause inconsistency in the size of printed documents, de-
pending on the layout of images or text in your originals.
For tips on conserving roll paper, refer to the following topics, as appropriate for your computer and operating system.
• Conserving Roll Paper by Printing Originals Without Top and Bottom Margins (Windows) →P.173
• Conserving Roll Paper by Printing Originals Without Top and Bottom Margins (Mac OS X) →P.176
Conserving Roll Paper by Printing Originals Without Top and Bottom Margins(Windows)This topic describes how to conserve roll paper when printing originals that have a top and bottom margin, based on thefollowing example.
• Document: Any type• Page size: A4 (210.0×297.0mm)/Letter (8.3 × 11.7 in)• Paper: Roll• Paper type: Plain Paper• Roll paper width: A3/A4 roll (297.0 mm [11.7 in])
Enhanced Printing Options > Conserving roll paper >
iPF815 Conserving Roll Paper by Printing Originals Without Top and Bottom Margins
3
173
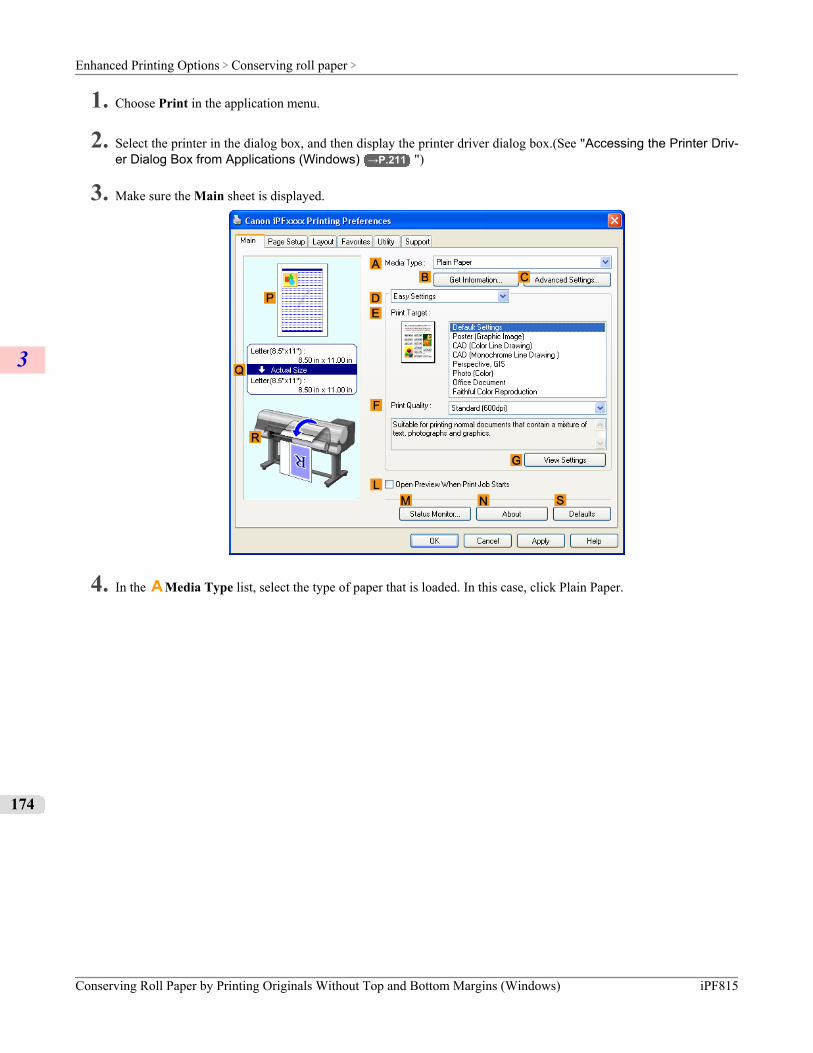
1. Choose Print in the application menu.
2. Select the printer in the dialog box, and then display the printer driver dialog box.(See "Accessing the Printer Driv-er Dialog Box from Applications (Windows) →P.211 ")
3. Make sure the Main sheet is displayed.
4. In the A Media Type list, select the type of paper that is loaded. In this case, click Plain Paper.
Enhanced Printing Options > Conserving roll paper >
Conserving Roll Paper by Printing Originals Without Top and Bottom Margins (Windows) iPF815
3
174
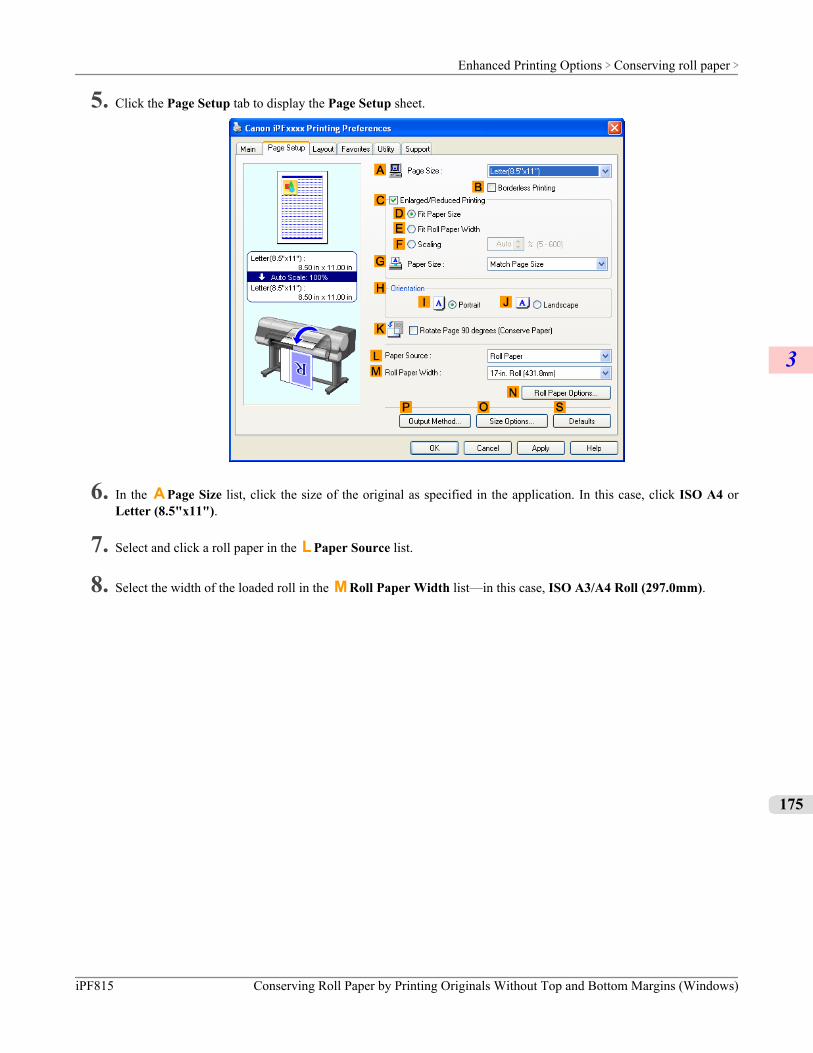
5. Click the Page Setup tab to display the Page Setup sheet.
6. In the A Page Size list, click the size of the original as specified in the application. In this case, click ISO A4 orLetter (8.5"x11").
7. Select and click a roll paper in the L Paper Source list.
8. Select the width of the loaded roll in the M Roll Paper Width list—in this case, ISO A3/A4 Roll (297.0mm).
Enhanced Printing Options > Conserving roll paper >
iPF815 Conserving Roll Paper by Printing Originals Without Top and Bottom Margins (Windows)
3
175
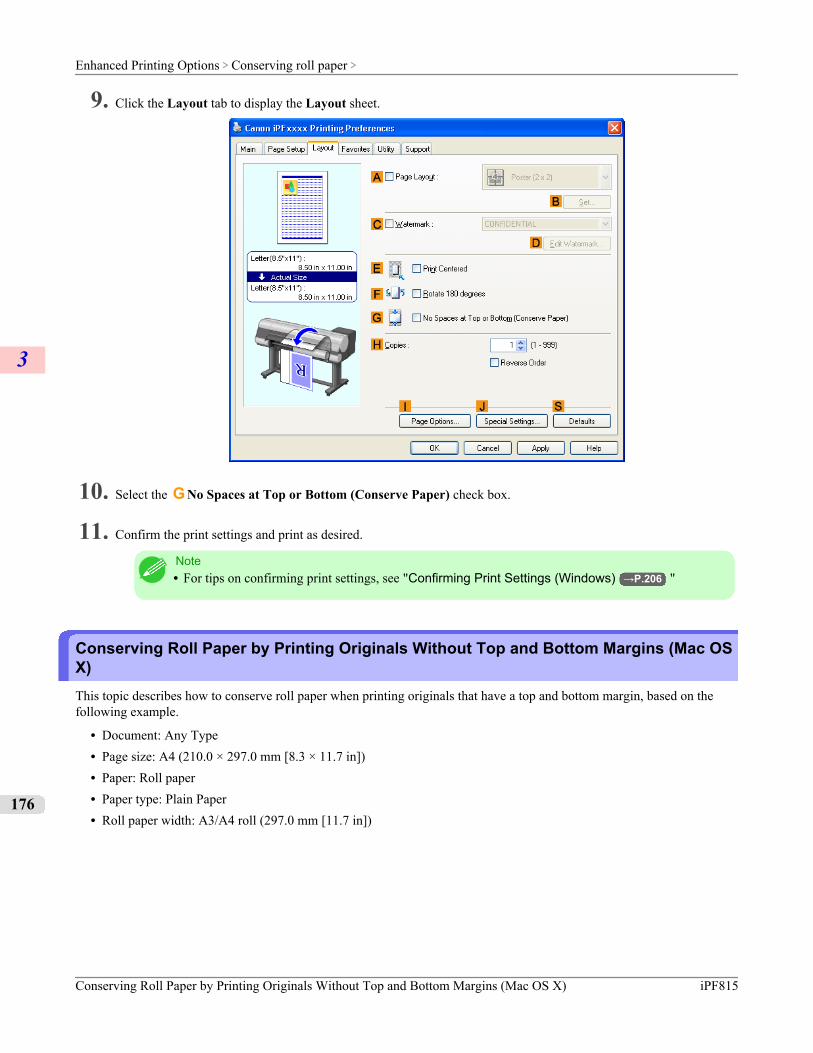
9. Click the Layout tab to display the Layout sheet.
10. Select the G No Spaces at Top or Bottom (Conserve Paper) check box.
11. Confirm the print settings and print as desired.
Note• For tips on confirming print settings, see "Confirming Print Settings (Windows) →P.206 "
Conserving Roll Paper by Printing Originals Without Top and Bottom Margins (Mac OSX)This topic describes how to conserve roll paper when printing originals that have a top and bottom margin, based on thefollowing example.
• Document: Any Type• Page size: A4 (210.0 × 297.0 mm [8.3 × 11.7 in])• Paper: Roll paper• Paper type: Plain Paper• Roll paper width: A3/A4 roll (297.0 mm [11.7 in])
Enhanced Printing Options > Conserving roll paper >
Conserving Roll Paper by Printing Originals Without Top and Bottom Margins (Mac OS X) iPF815
3
176
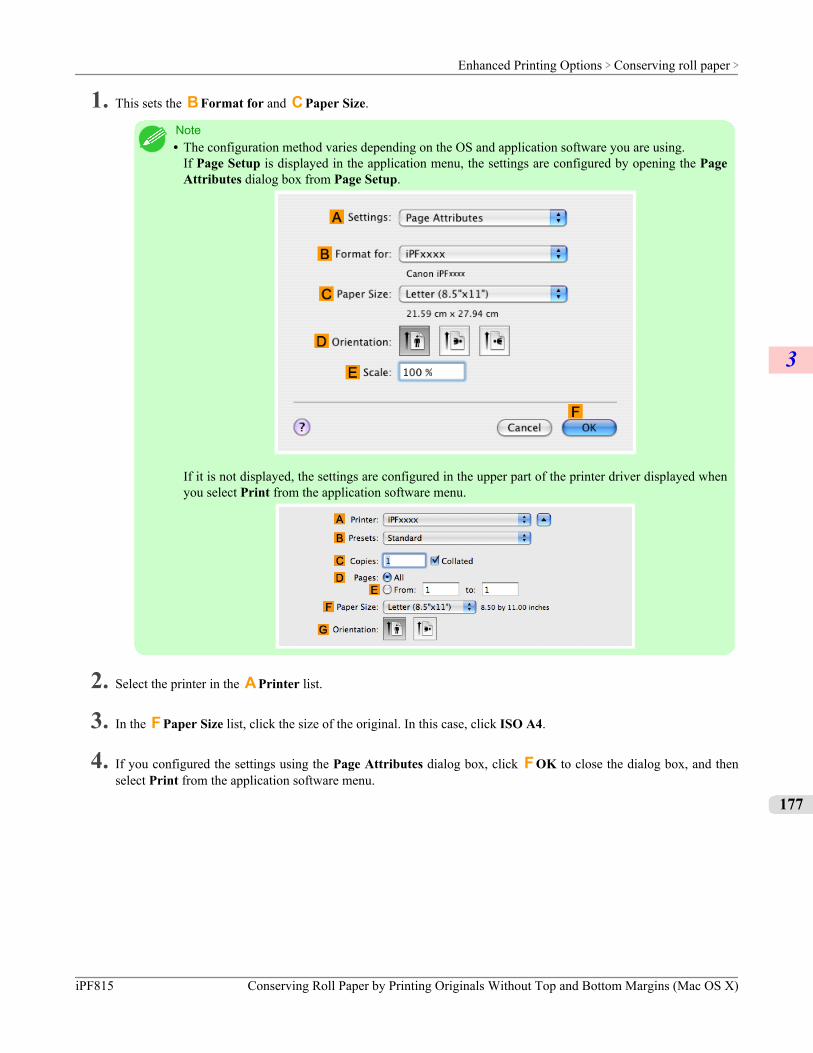
1. This sets the B Format for and C Paper Size.
Note• The configuration method varies depending on the OS and application software you are using.
If Page Setup is displayed in the application menu, the settings are configured by opening the PageAttributes dialog box from Page Setup.
If it is not displayed, the settings are configured in the upper part of the printer driver displayed whenyou select Print from the application software menu.
2. Select the printer in the A Printer list.
3. In the F Paper Size list, click the size of the original. In this case, click ISO A4.
4. If you configured the settings using the Page Attributes dialog box, click F OK to close the dialog box, and thenselect Print from the application software menu.
Enhanced Printing Options > Conserving roll paper >
iPF815 Conserving Roll Paper by Printing Originals Without Top and Bottom Margins (Mac OS X)
3
177
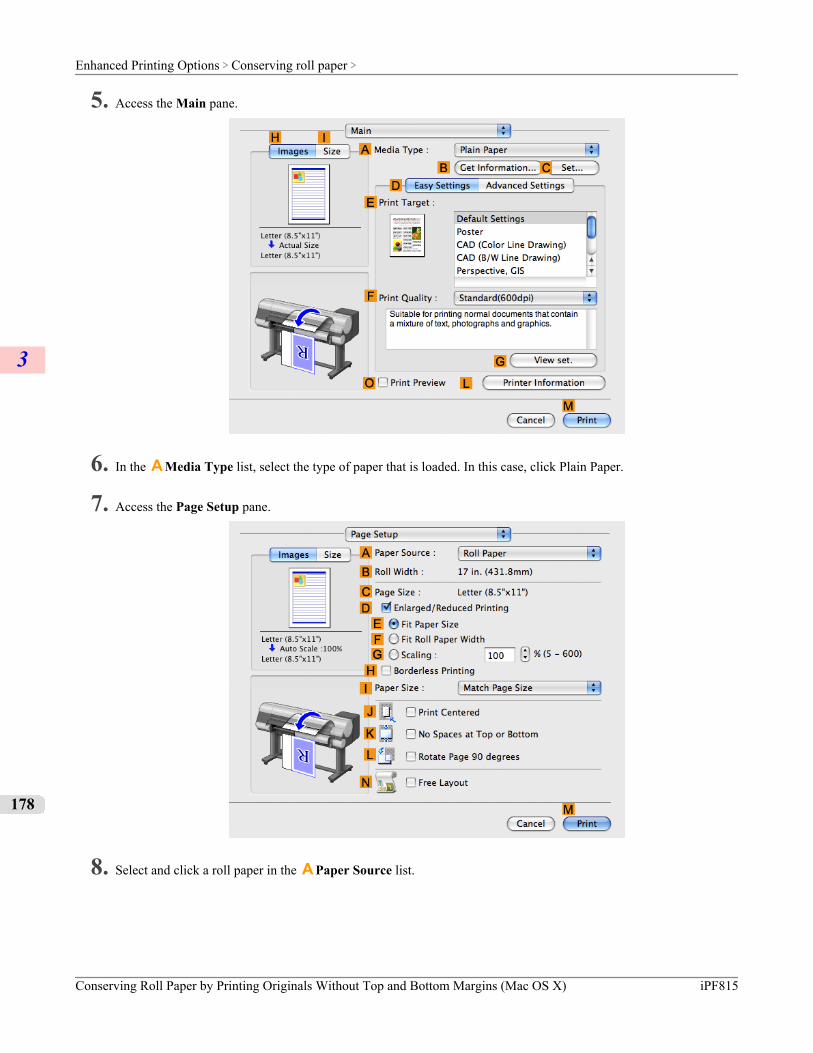
5. Access the Main pane.
6. In the A Media Type list, select the type of paper that is loaded. In this case, click Plain Paper.
7. Access the Page Setup pane.
8. Select and click a roll paper in the A Paper Source list.
Enhanced Printing Options > Conserving roll paper >
Conserving Roll Paper by Printing Originals Without Top and Bottom Margins (Mac OS X) iPF815
3
178
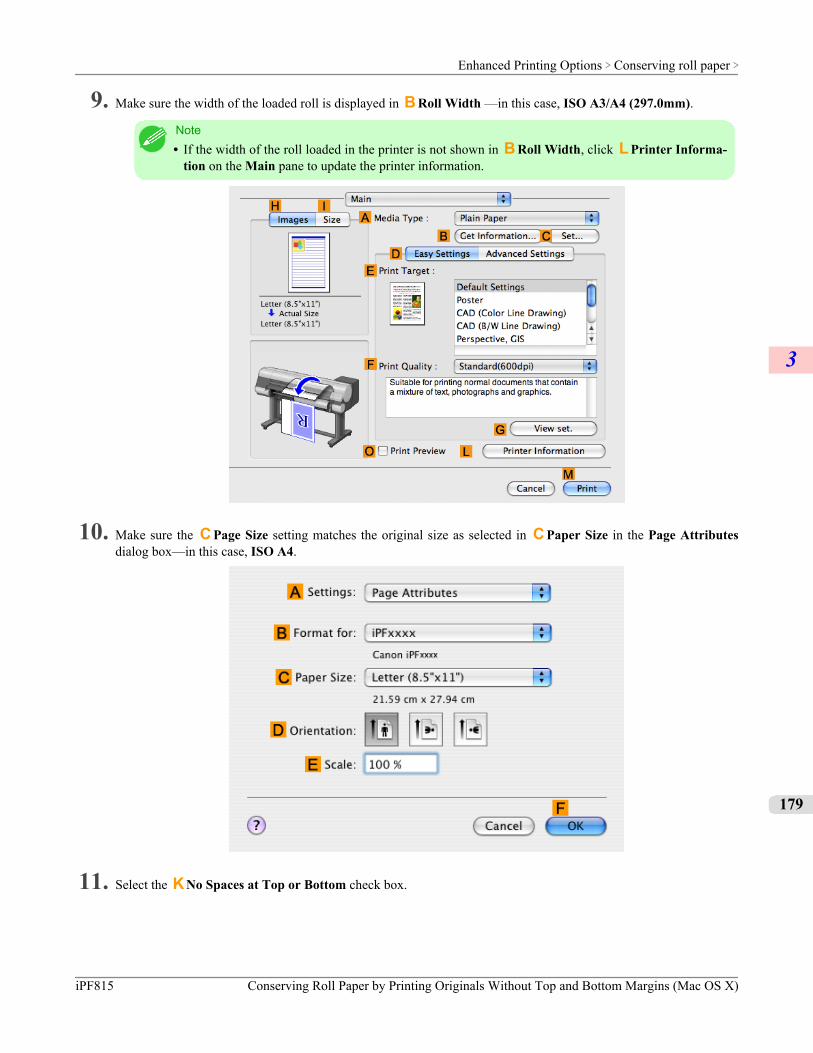
9. Make sure the width of the loaded roll is displayed in B Roll Width —in this case, ISO A3/A4 (297.0mm).
Note• If the width of the roll loaded in the printer is not shown in B Roll Width, click L Printer Informa-
tion on the Main pane to update the printer information.
10. Make sure the C Page Size setting matches the original size as selected in C Paper Size in the Page Attributesdialog box—in this case, ISO A4.
11. Select the K No Spaces at Top or Bottom check box.
Enhanced Printing Options > Conserving roll paper >
iPF815 Conserving Roll Paper by Printing Originals Without Top and Bottom Margins (Mac OS X)
3
179

12. Confirm the print settings, and then click M Print to start printing.
Note• For tips on confirming print settings, see "Confirming Print Settings (Mac OS X) →P.429 "
Enhanced Printing Options > Conserving roll paper >
Conserving Roll Paper by Printing Originals Without Top and Bottom Margins (Mac OS X) iPF815
3
180
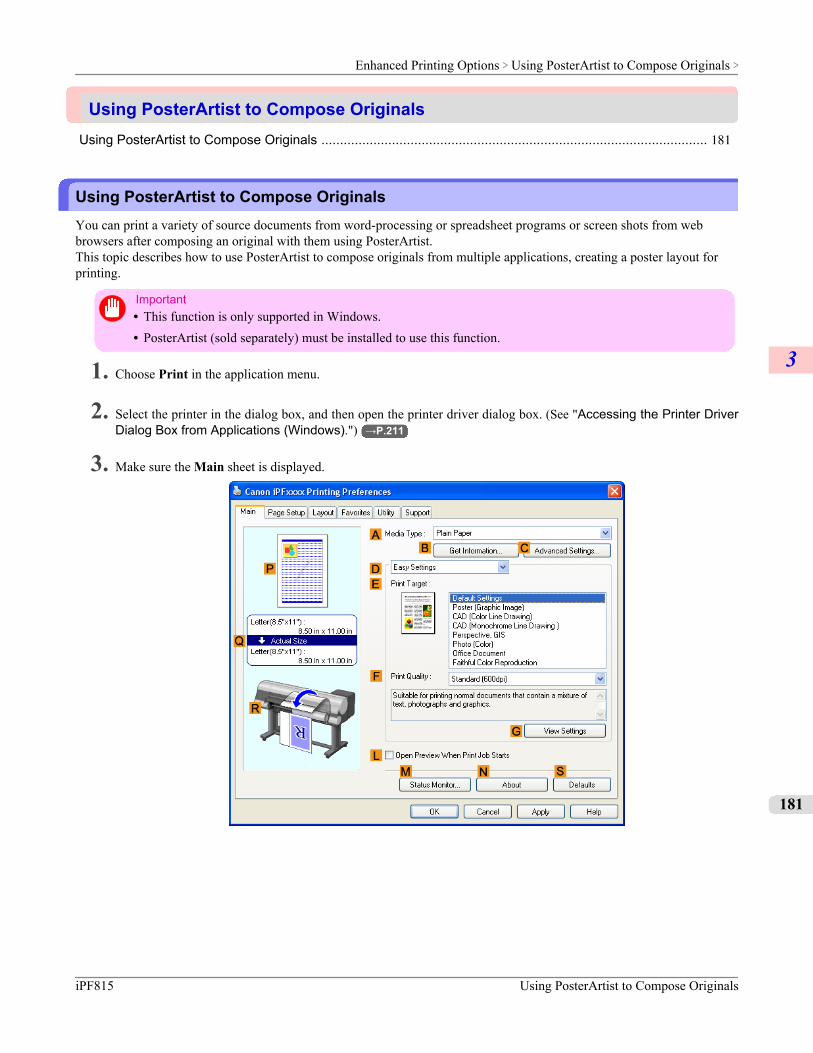
Using PosterArtist to Compose OriginalsUsing PosterArtist to Compose Originals ........................................................................................................ 181
Using PosterArtist to Compose OriginalsYou can print a variety of source documents from word-processing or spreadsheet programs or screen shots from webbrowsers after composing an original with them using PosterArtist.This topic describes how to use PosterArtist to compose originals from multiple applications, creating a poster layout forprinting.
Important• This function is only supported in Windows.• PosterArtist (sold separately) must be installed to use this function.
1. Choose Print in the application menu.
2. Select the printer in the dialog box, and then open the printer driver dialog box. (See "Accessing the Printer DriverDialog Box from Applications (Windows).") →P.211
3. Make sure the Main sheet is displayed.
Enhanced Printing Options > Using PosterArtist to Compose Originals >
iPF815 Using PosterArtist to Compose Originals
3
181
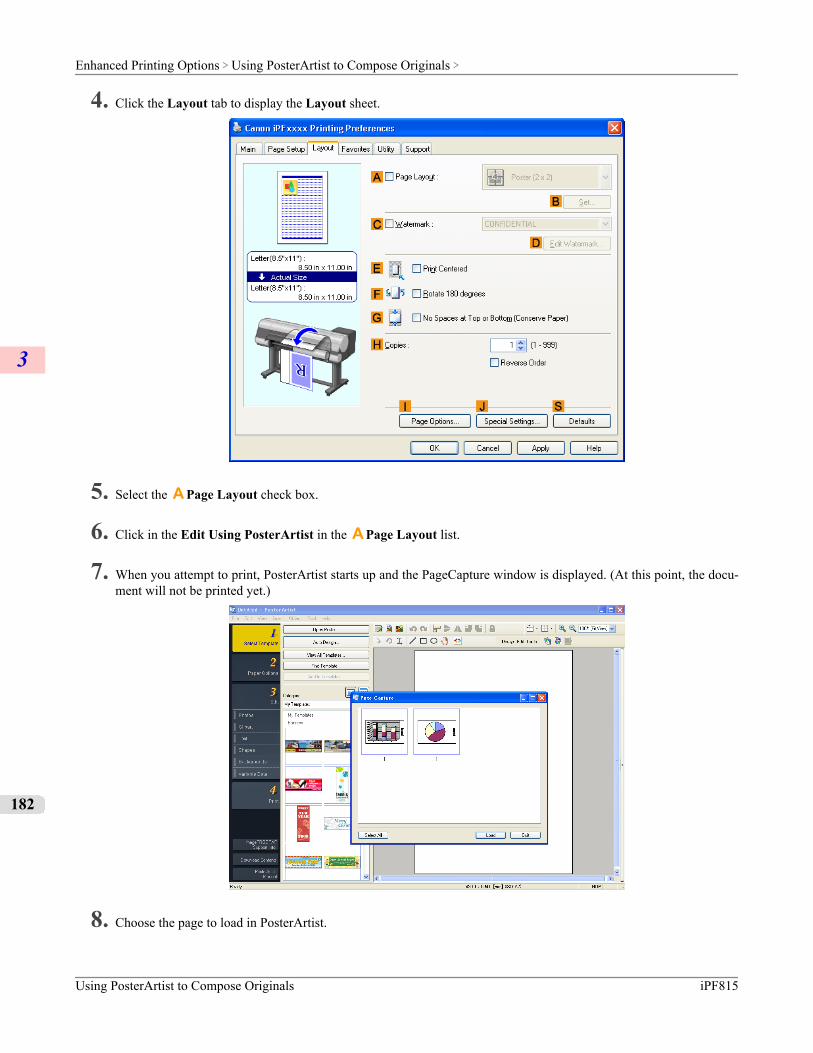
4. Click the Layout tab to display the Layout sheet.
5. Select the A Page Layout check box.
6. Click in the Edit Using PosterArtist in the A Page Layout list.
7. When you attempt to print, PosterArtist starts up and the PageCapture window is displayed. (At this point, the docu-ment will not be printed yet.)
8. Choose the page to load in PosterArtist.
Enhanced Printing Options > Using PosterArtist to Compose Originals >
Using PosterArtist to Compose Originals iPF815
3
182
9. Edit and rearrange the image in the PosterArtist window as desired.
Important• Without closing the PosterArtist window, repeat steps 1-8 to arrange originals from multiple applica-
tions on the same page.
Note• For instructions on editing and rearranging images, refer to the PosterArtist Manual.
10. Print from the PosterArtist menu.
Enhanced Printing Options > Using PosterArtist to Compose Originals >
iPF815 Using PosterArtist to Compose Originals
3
183
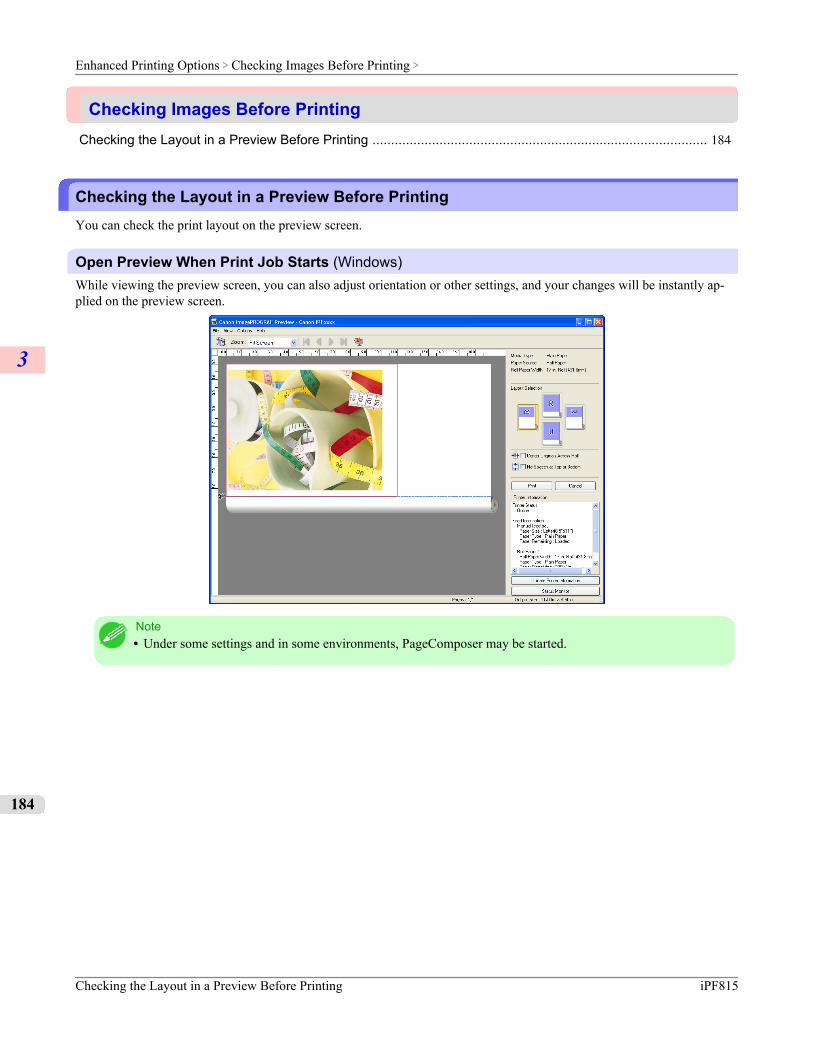
Checking Images Before PrintingChecking the Layout in a Preview Before Printing .......................................................................................... 184
Checking the Layout in a Preview Before PrintingYou can check the print layout on the preview screen.
Open Preview When Print Job Starts (Windows)While viewing the preview screen, you can also adjust orientation or other settings, and your changes will be instantly ap-plied on the preview screen.
Note• Under some settings and in some environments, PageComposer may be started.
Enhanced Printing Options > Checking Images Before Printing >
Checking the Layout in a Preview Before Printing iPF815
3
184
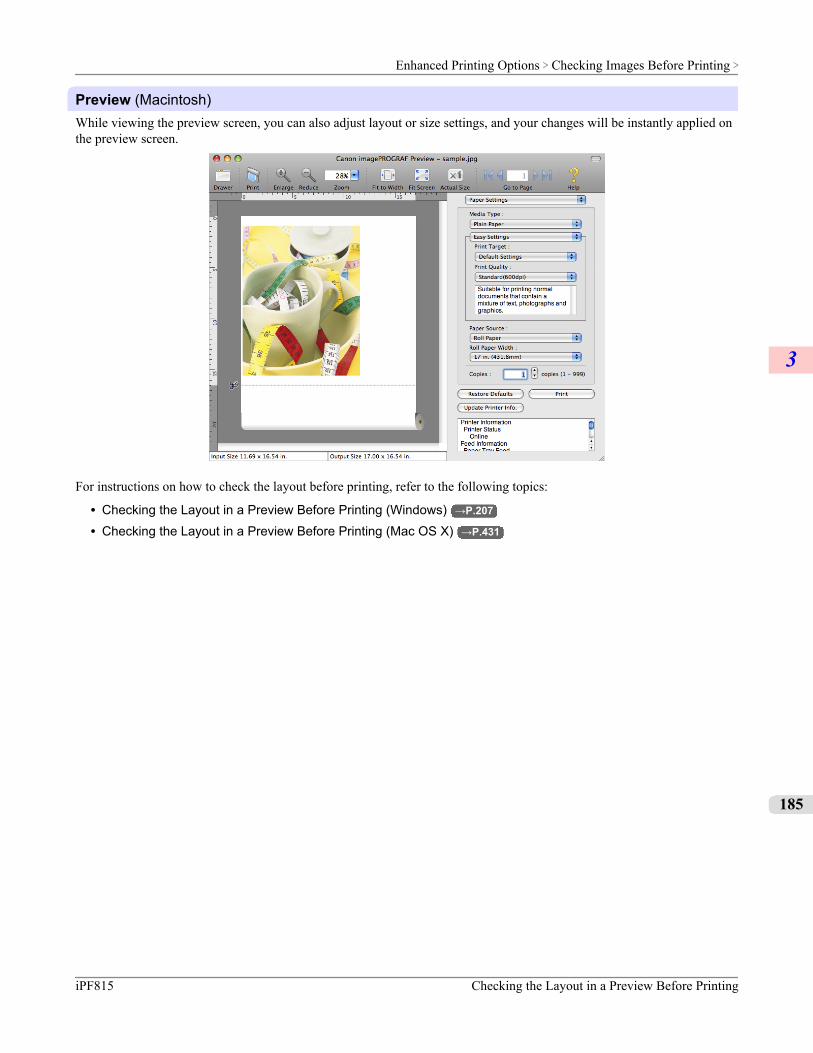
Preview (Macintosh)While viewing the preview screen, you can also adjust layout or size settings, and your changes will be instantly applied onthe preview screen.
For instructions on how to check the layout before printing, refer to the following topics:
• Checking the Layout in a Preview Before Printing (Windows) →P.207
• Checking the Layout in a Preview Before Printing (Mac OS X) →P.431
Enhanced Printing Options > Checking Images Before Printing >
iPF815 Checking the Layout in a Preview Before Printing
3
185
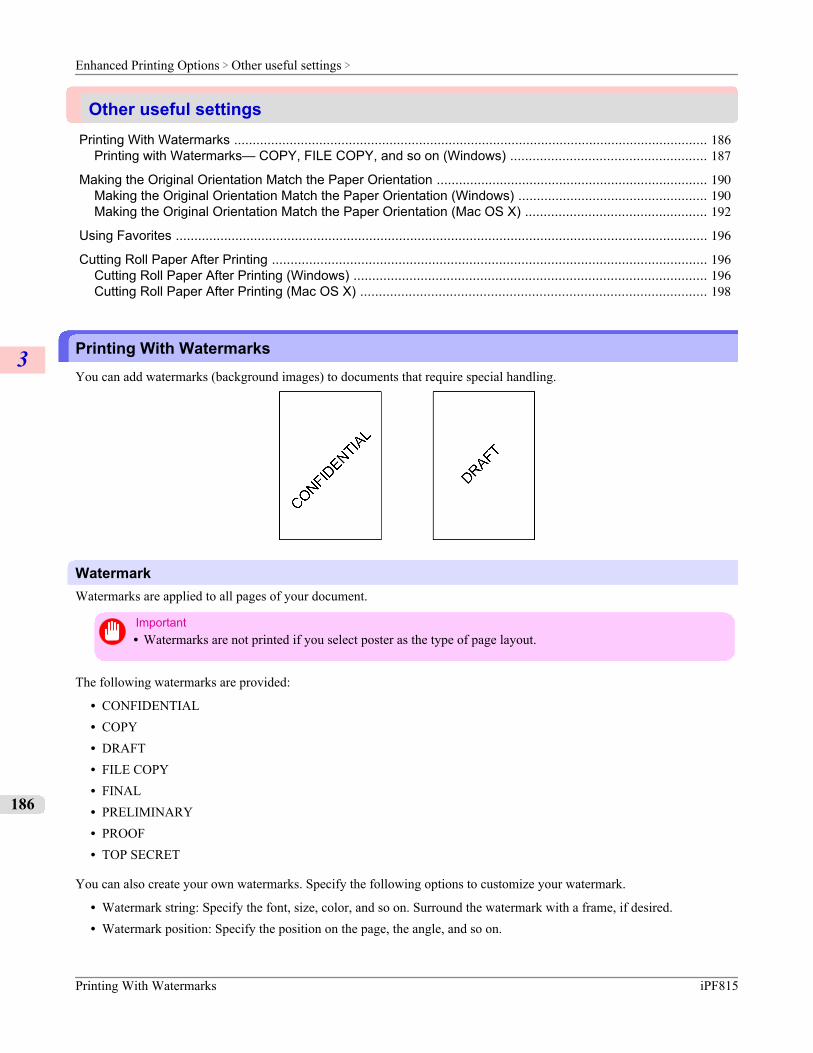
Other useful settingsPrinting With Watermarks ................................................................................................................................ 186
Printing with Watermarks— COPY, FILE COPY, and so on (Windows) ..................................................... 187
Making the Original Orientation Match the Paper Orientation ......................................................................... 190Making the Original Orientation Match the Paper Orientation (Windows) ................................................... 190Making the Original Orientation Match the Paper Orientation (Mac OS X) ................................................. 192
Using Favorites ............................................................................................................................................... 196
Cutting Roll Paper After Printing ..................................................................................................................... 196Cutting Roll Paper After Printing (Windows) ............................................................................................... 196Cutting Roll Paper After Printing (Mac OS X) ............................................................................................. 198
Printing With WatermarksYou can add watermarks (background images) to documents that require special handling.
WatermarkWatermarks are applied to all pages of your document.
Important• Watermarks are not printed if you select poster as the type of page layout.
The following watermarks are provided:
• CONFIDENTIAL• COPY• DRAFT• FILE COPY• FINAL• PRELIMINARY• PROOF• TOP SECRET
You can also create your own watermarks. Specify the following options to customize your watermark.
• Watermark string: Specify the font, size, color, and so on. Surround the watermark with a frame, if desired.• Watermark position: Specify the position on the page, the angle, and so on.
Enhanced Printing Options > Other useful settings >
Printing With Watermarks iPF815
3
186
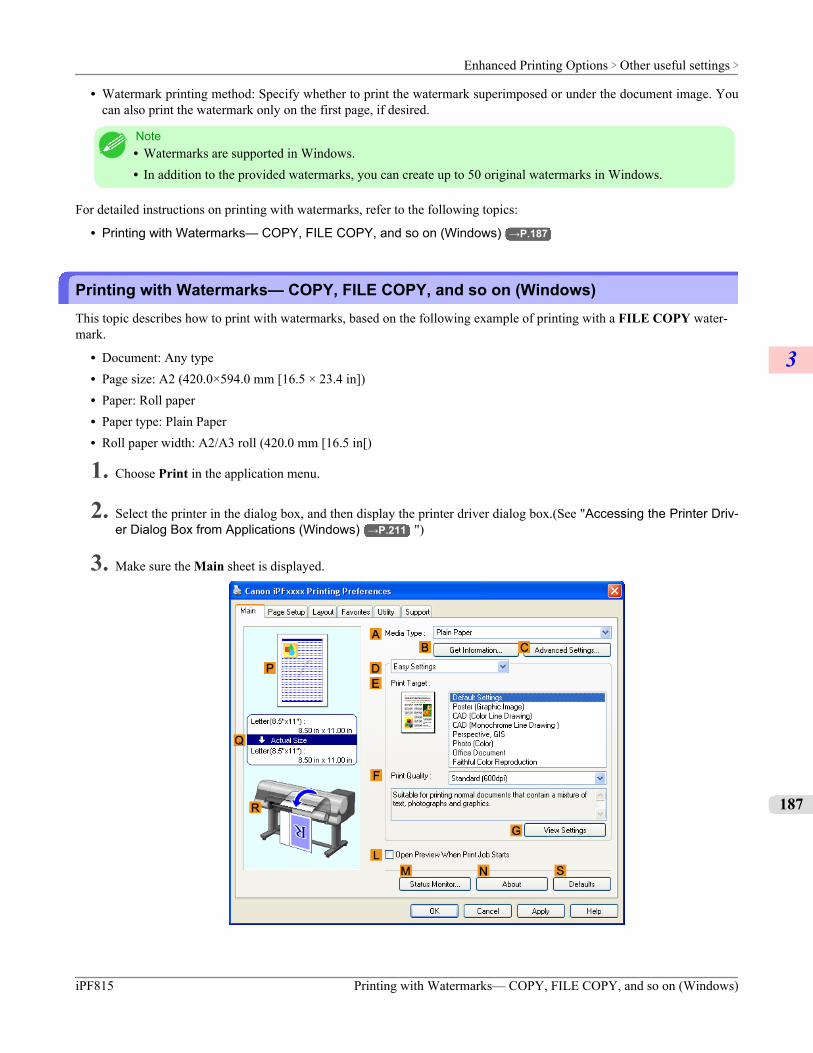
• Watermark printing method: Specify whether to print the watermark superimposed or under the document image. Youcan also print the watermark only on the first page, if desired.
Note• Watermarks are supported in Windows.• In addition to the provided watermarks, you can create up to 50 original watermarks in Windows.
For detailed instructions on printing with watermarks, refer to the following topics:
• Printing with Watermarks— COPY, FILE COPY, and so on (Windows) →P.187
Printing with Watermarks— COPY, FILE COPY, and so on (Windows)This topic describes how to print with watermarks, based on the following example of printing with a FILE COPY water-mark.
• Document: Any type• Page size: A2 (420.0×594.0 mm [16.5 × 23.4 in])• Paper: Roll paper• Paper type: Plain Paper• Roll paper width: A2/A3 roll (420.0 mm [16.5 in[)
1. Choose Print in the application menu.
2. Select the printer in the dialog box, and then display the printer driver dialog box.(See "Accessing the Printer Driv-er Dialog Box from Applications (Windows) →P.211 ")
3. Make sure the Main sheet is displayed.
Enhanced Printing Options > Other useful settings >
iPF815 Printing with Watermarks— COPY, FILE COPY, and so on (Windows)
3
187
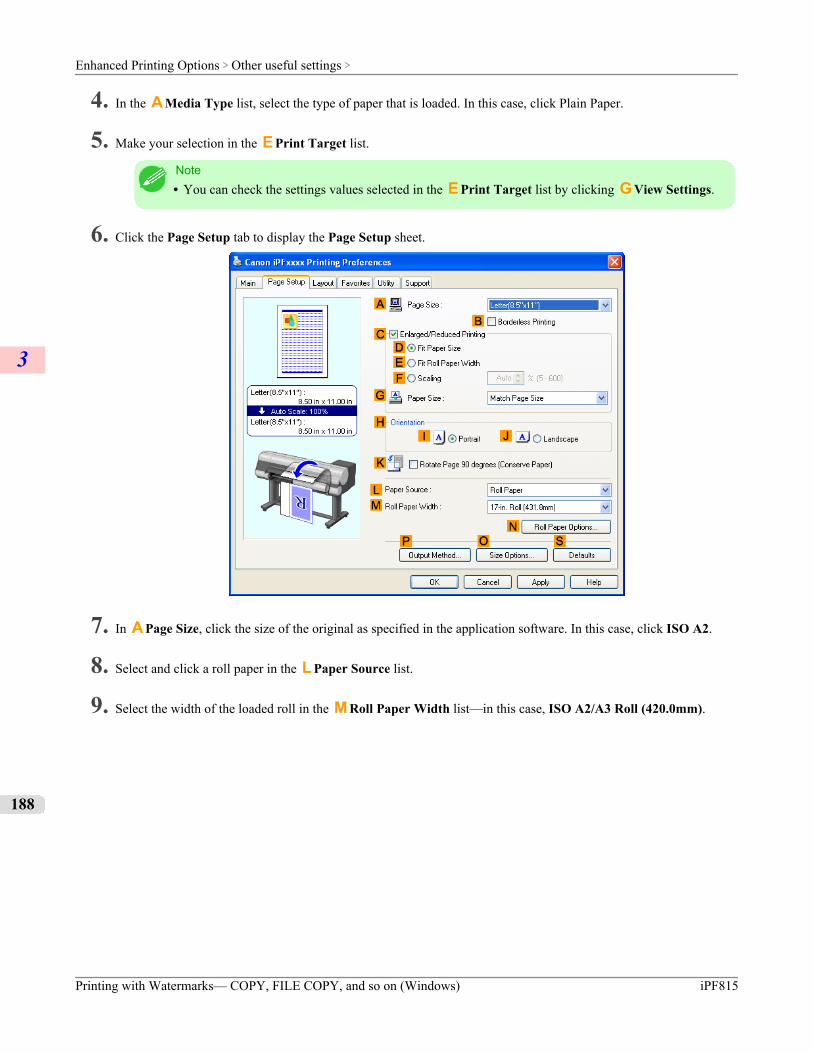
4. In the A Media Type list, select the type of paper that is loaded. In this case, click Plain Paper.
5. Make your selection in the E Print Target list.
Note• You can check the settings values selected in the E Print Target list by clicking G View Settings.
6. Click the Page Setup tab to display the Page Setup sheet.
7. In A Page Size, click the size of the original as specified in the application software. In this case, click ISO A2.
8. Select and click a roll paper in the L Paper Source list.
9. Select the width of the loaded roll in the M Roll Paper Width list—in this case, ISO A2/A3 Roll (420.0mm).
Enhanced Printing Options > Other useful settings >
Printing with Watermarks— COPY, FILE COPY, and so on (Windows) iPF815
3
188
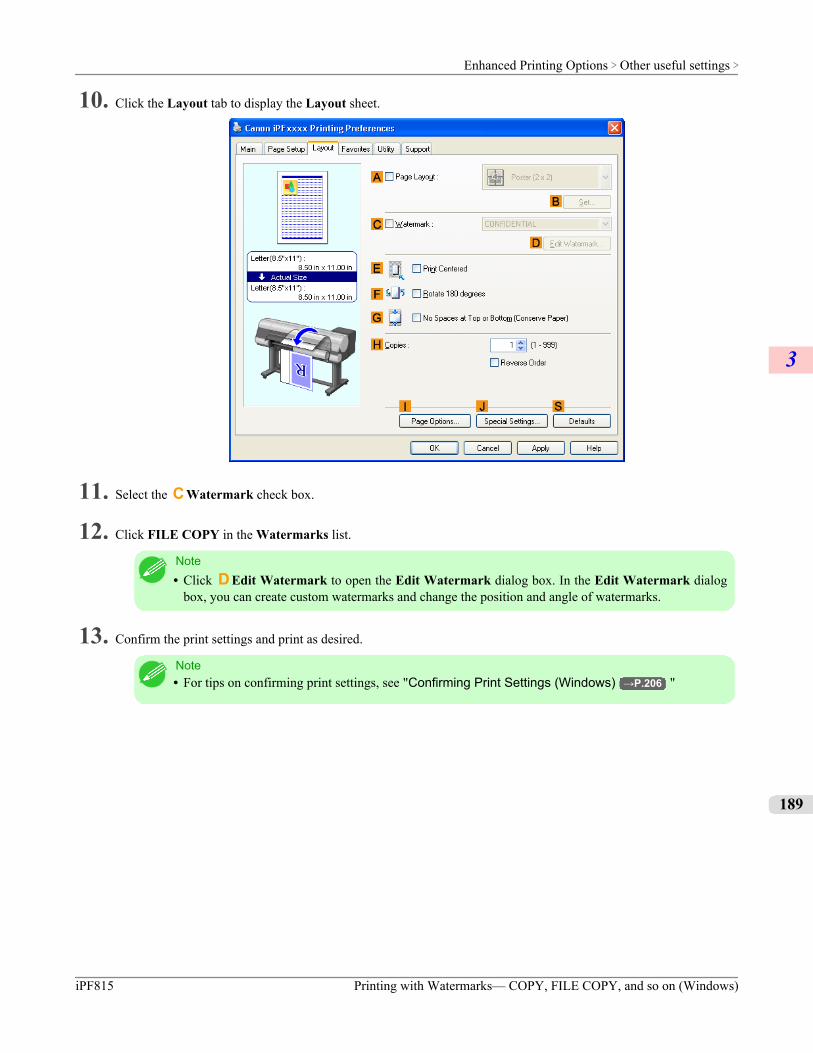
10. Click the Layout tab to display the Layout sheet.
11. Select the C Watermark check box.
12. Click FILE COPY in the Watermarks list.
Note• Click D Edit Watermark to open the Edit Watermark dialog box. In the Edit Watermark dialog
box, you can create custom watermarks and change the position and angle of watermarks.
13. Confirm the print settings and print as desired.
Note• For tips on confirming print settings, see "Confirming Print Settings (Windows) →P.206 "
Enhanced Printing Options > Other useful settings >
iPF815 Printing with Watermarks— COPY, FILE COPY, and so on (Windows)
3
189
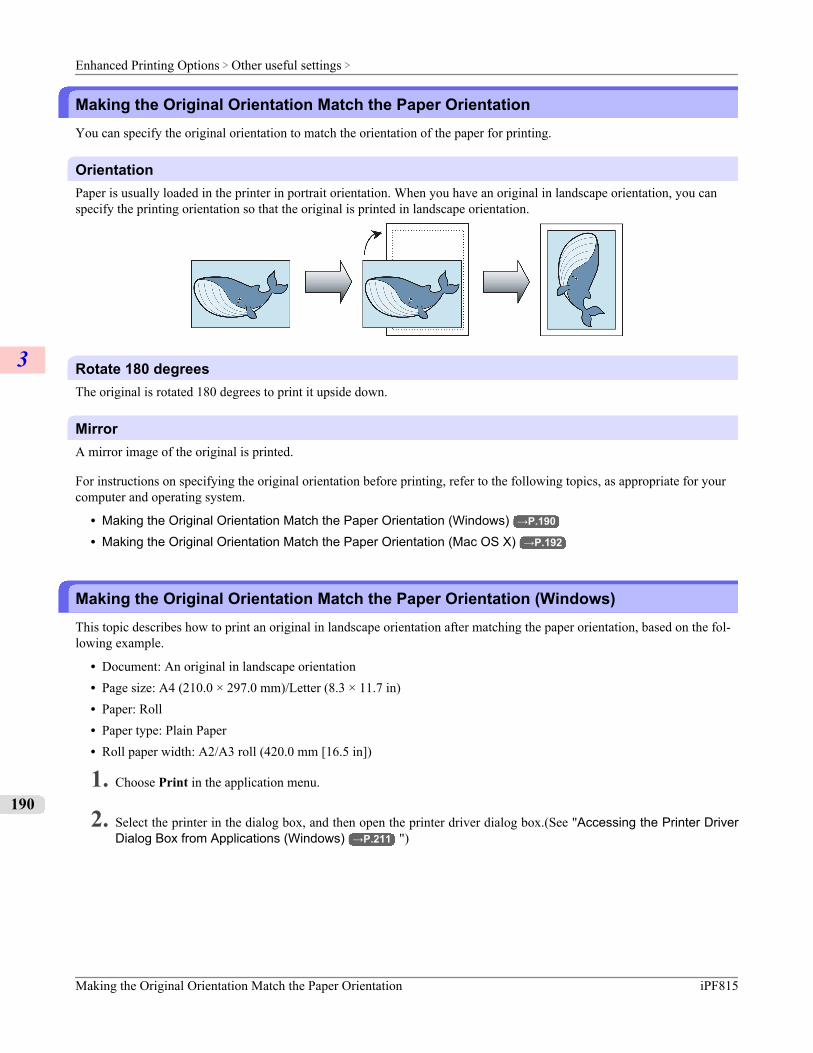
Making the Original Orientation Match the Paper OrientationYou can specify the original orientation to match the orientation of the paper for printing.
OrientationPaper is usually loaded in the printer in portrait orientation. When you have an original in landscape orientation, you canspecify the printing orientation so that the original is printed in landscape orientation.
Rotate 180 degreesThe original is rotated 180 degrees to print it upside down.
MirrorA mirror image of the original is printed.
For instructions on specifying the original orientation before printing, refer to the following topics, as appropriate for yourcomputer and operating system.
• Making the Original Orientation Match the Paper Orientation (Windows) →P.190
• Making the Original Orientation Match the Paper Orientation (Mac OS X) →P.192
Making the Original Orientation Match the Paper Orientation (Windows)This topic describes how to print an original in landscape orientation after matching the paper orientation, based on the fol-lowing example.
• Document: An original in landscape orientation• Page size: A4 (210.0 × 297.0 mm)/Letter (8.3 × 11.7 in)• Paper: Roll• Paper type: Plain Paper• Roll paper width: A2/A3 roll (420.0 mm [16.5 in])
1. Choose Print in the application menu.
2. Select the printer in the dialog box, and then open the printer driver dialog box.(See "Accessing the Printer DriverDialog Box from Applications (Windows) →P.211 ")
Enhanced Printing Options > Other useful settings >
Making the Original Orientation Match the Paper Orientation iPF815
3
190

3. Make sure the Main sheet is displayed.
4. In the A Media Type list, select the type of paper that is loaded. In this case, click Plain Paper.
5. Make your selection in the E Print Target list.
6. Make your selection in the F Print Quality list.
Enhanced Printing Options > Other useful settings >
iPF815 Making the Original Orientation Match the Paper Orientation (Windows)
3
191
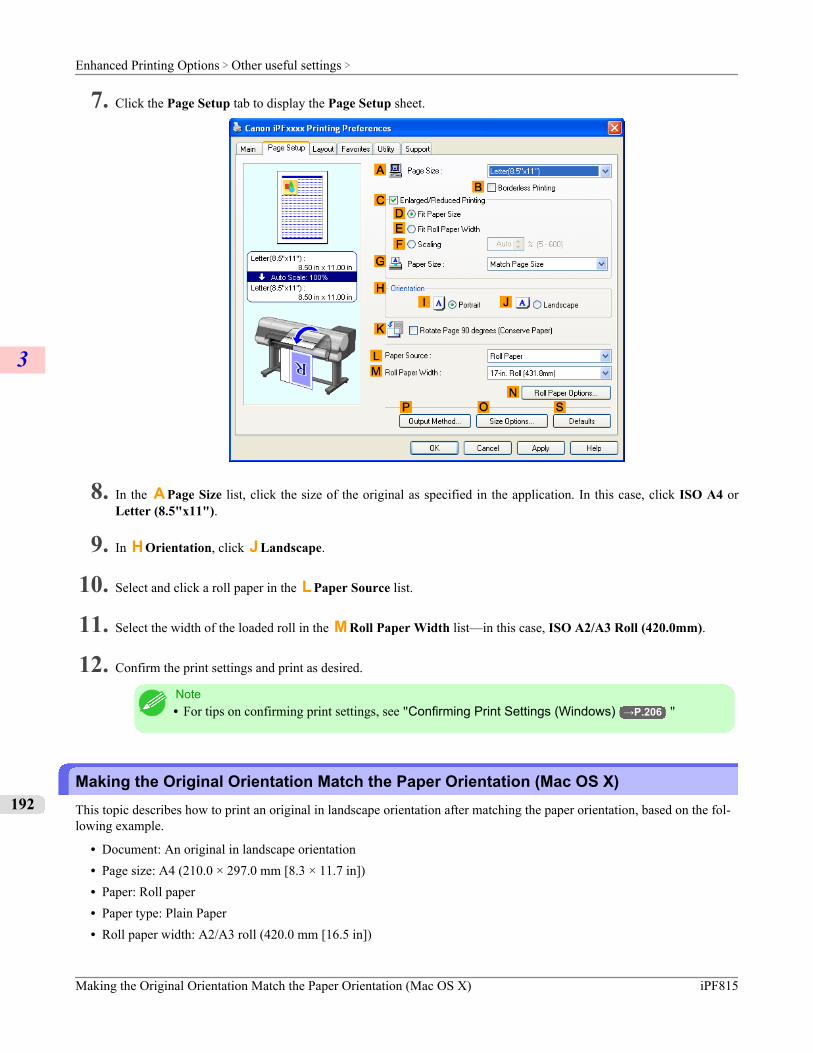
7. Click the Page Setup tab to display the Page Setup sheet.
8. In the A Page Size list, click the size of the original as specified in the application. In this case, click ISO A4 orLetter (8.5"x11").
9. In H Orientation, click J Landscape.
10. Select and click a roll paper in the L Paper Source list.
11. Select the width of the loaded roll in the M Roll Paper Width list—in this case, ISO A2/A3 Roll (420.0mm).
12. Confirm the print settings and print as desired.
Note• For tips on confirming print settings, see "Confirming Print Settings (Windows) →P.206 "
Making the Original Orientation Match the Paper Orientation (Mac OS X)This topic describes how to print an original in landscape orientation after matching the paper orientation, based on the fol-lowing example.
• Document: An original in landscape orientation• Page size: A4 (210.0 × 297.0 mm [8.3 × 11.7 in])• Paper: Roll paper• Paper type: Plain Paper• Roll paper width: A2/A3 roll (420.0 mm [16.5 in])
Enhanced Printing Options > Other useful settings >
Making the Original Orientation Match the Paper Orientation (Mac OS X) iPF815
3
192
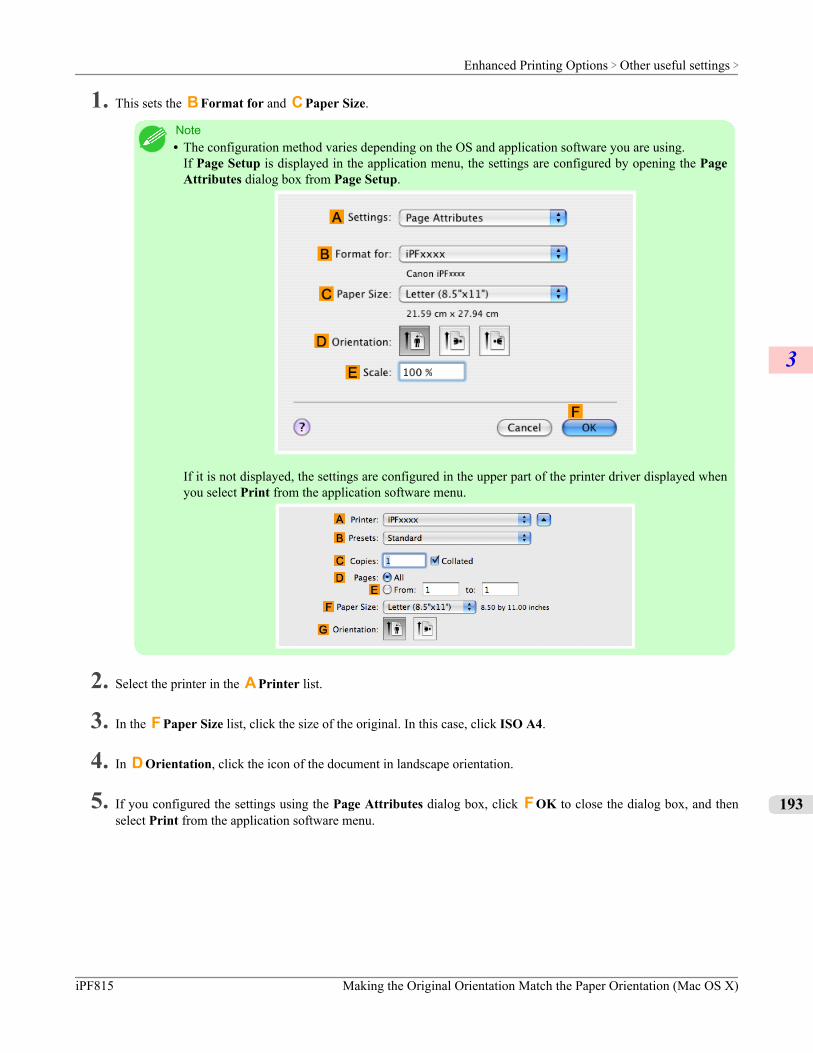
1. This sets the B Format for and C Paper Size.
Note• The configuration method varies depending on the OS and application software you are using.
If Page Setup is displayed in the application menu, the settings are configured by opening the PageAttributes dialog box from Page Setup.
If it is not displayed, the settings are configured in the upper part of the printer driver displayed whenyou select Print from the application software menu.
2. Select the printer in the A Printer list.
3. In the F Paper Size list, click the size of the original. In this case, click ISO A4.
4. In D Orientation, click the icon of the document in landscape orientation.
5. If you configured the settings using the Page Attributes dialog box, click F OK to close the dialog box, and thenselect Print from the application software menu.
Enhanced Printing Options > Other useful settings >
iPF815 Making the Original Orientation Match the Paper Orientation (Mac OS X)
3
193
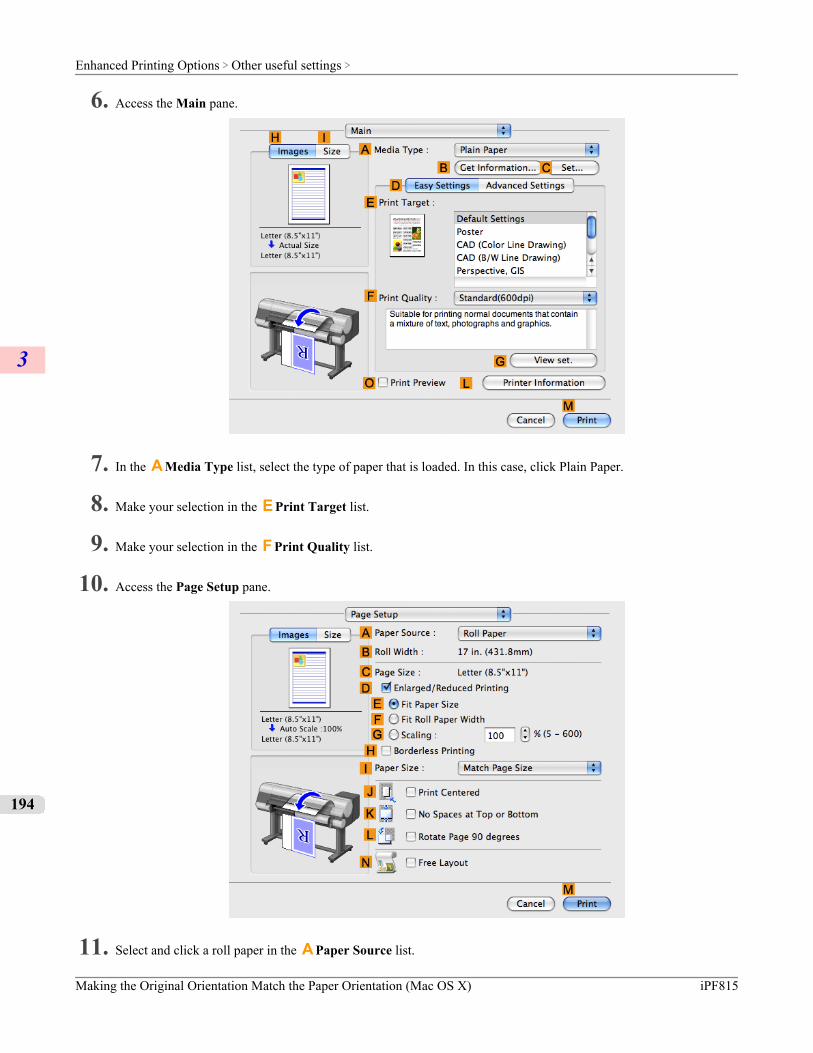
6. Access the Main pane.
7. In the A Media Type list, select the type of paper that is loaded. In this case, click Plain Paper.
8. Make your selection in the E Print Target list.
9. Make your selection in the F Print Quality list.
10. Access the Page Setup pane.
11. Select and click a roll paper in the A Paper Source list.
Enhanced Printing Options > Other useful settings >
Making the Original Orientation Match the Paper Orientation (Mac OS X) iPF815
3
194
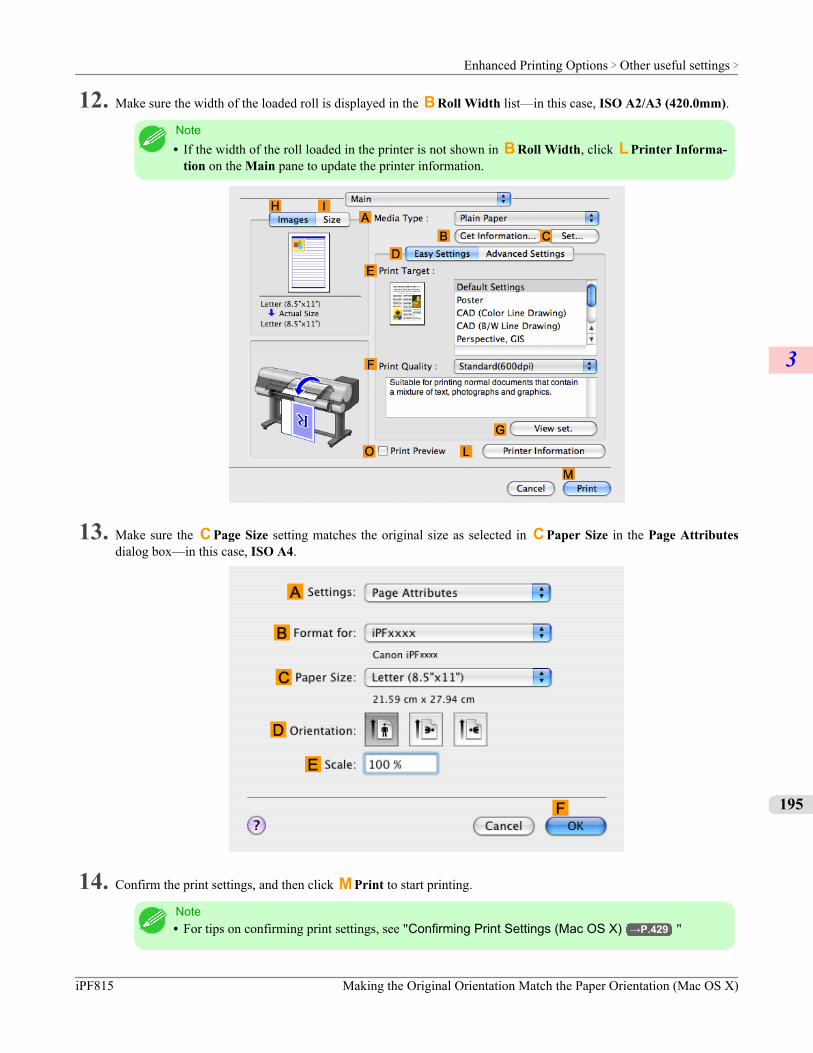
12. Make sure the width of the loaded roll is displayed in the B Roll Width list—in this case, ISO A2/A3 (420.0mm).
Note• If the width of the roll loaded in the printer is not shown in B Roll Width, click L Printer Informa-
tion on the Main pane to update the printer information.
13. Make sure the C Page Size setting matches the original size as selected in C Paper Size in the Page Attributesdialog box—in this case, ISO A4.
14. Confirm the print settings, and then click M Print to start printing.
Note• For tips on confirming print settings, see "Confirming Print Settings (Mac OS X) →P.429 "
Enhanced Printing Options > Other useful settings >
iPF815 Making the Original Orientation Match the Paper Orientation (Mac OS X)
3
195
Using FavoritesYou can register print settings as Favorites to reuse settings from a particular job that met your expectations, or settings fora particular page size that you will use repeatedly.
FavoritesRegistering a favorite for later use. You can choose the settings you have registered from a list before printing, and you cancheck the settings details.
Note• You can also save the favorite settings as files. Using these files is a convenient way to print under the same
conditions on another computer. (In Windows.)
For instructions on using favorites to print, refer to the following topics, as appropriate for your computer and operatingsystem.
• Using Favorites (Windows) →P.209
• Using Favorites (Mac OS X) →P.432
Cutting Roll Paper After PrintingRoll paper can be automatically cut after printing.
Note• It may not be possible to cut certain types of paper, such as adhesive paper. For details on types of paper that
cannot be used with the auto cut feature, see the Paper Reference Guide. (See "Types of Paper →P.617 ")
Automatic CuttingRoll paper is cut automatically after printing. If you prefer, you can print continuously without cutting the roll, or you canprint a cut line.
For instructions on cutting roll paper after printing, refer to the following topics, as appropriate for your computer and oper-ating system.
• Cutting Roll Paper After Printing (Windows) →P.196
• Cutting Roll Paper After Printing (Mac OS X) →P.198
Cutting Roll Paper After Printing (Windows)This topic describes how to cut roll paper automatically after printing (using the auto cut function), as well as how to print acut line for manual cutting.
Note• The auto cut function is activated on the printer by default and when the printer driver is installed. Follow the
steps below to reactivate the function if it is disabled, or to select the setting for printing a cut line instead.
1. Choose Print in the application menu.
2. Select the printer in the dialog box, and then display the printer driver dialog box.(See "Accessing the Printer Driv-er Dialog Box from Applications (Windows) →P.211 ")
Enhanced Printing Options > Other useful settings >
Using Favorites iPF815
3
196
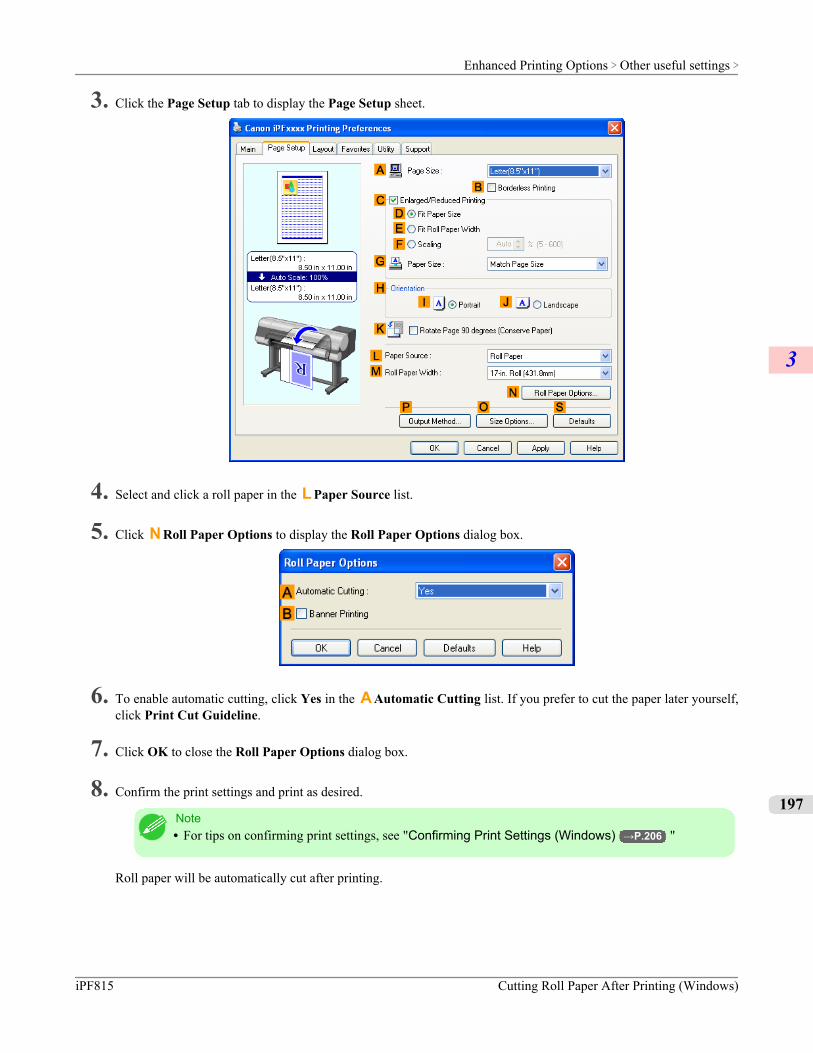
3. Click the Page Setup tab to display the Page Setup sheet.
4. Select and click a roll paper in the L Paper Source list.
5. Click N Roll Paper Options to display the Roll Paper Options dialog box.
6. To enable automatic cutting, click Yes in the A Automatic Cutting list. If you prefer to cut the paper later yourself,click Print Cut Guideline.
7. Click OK to close the Roll Paper Options dialog box.
8. Confirm the print settings and print as desired.
Note• For tips on confirming print settings, see "Confirming Print Settings (Windows) →P.206 "
Roll paper will be automatically cut after printing.
Enhanced Printing Options > Other useful settings >
iPF815 Cutting Roll Paper After Printing (Windows)
3
197
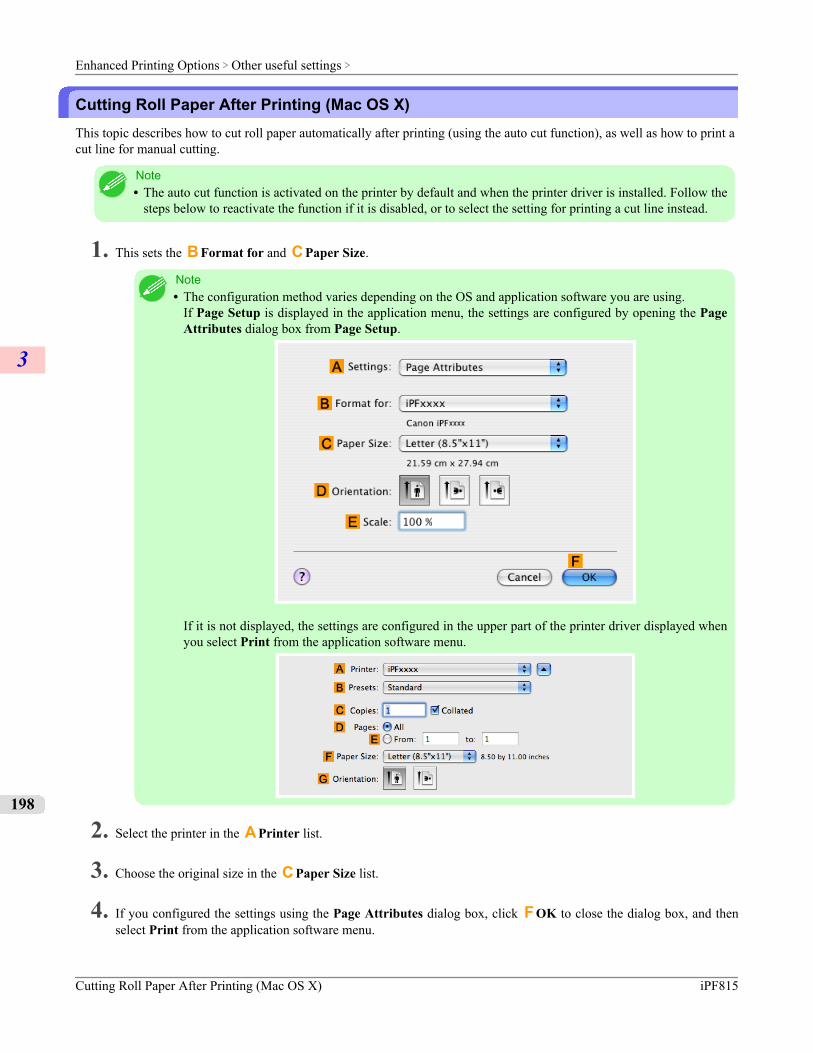
Cutting Roll Paper After Printing (Mac OS X)This topic describes how to cut roll paper automatically after printing (using the auto cut function), as well as how to print acut line for manual cutting.
Note• The auto cut function is activated on the printer by default and when the printer driver is installed. Follow the
steps below to reactivate the function if it is disabled, or to select the setting for printing a cut line instead.
1. This sets the B Format for and C Paper Size.
Note• The configuration method varies depending on the OS and application software you are using.
If Page Setup is displayed in the application menu, the settings are configured by opening the PageAttributes dialog box from Page Setup.
If it is not displayed, the settings are configured in the upper part of the printer driver displayed whenyou select Print from the application software menu.
2. Select the printer in the A Printer list.
3. Choose the original size in the C Paper Size list.
4. If you configured the settings using the Page Attributes dialog box, click F OK to close the dialog box, and thenselect Print from the application software menu.
Enhanced Printing Options > Other useful settings >
Cutting Roll Paper After Printing (Mac OS X) iPF815
3
198
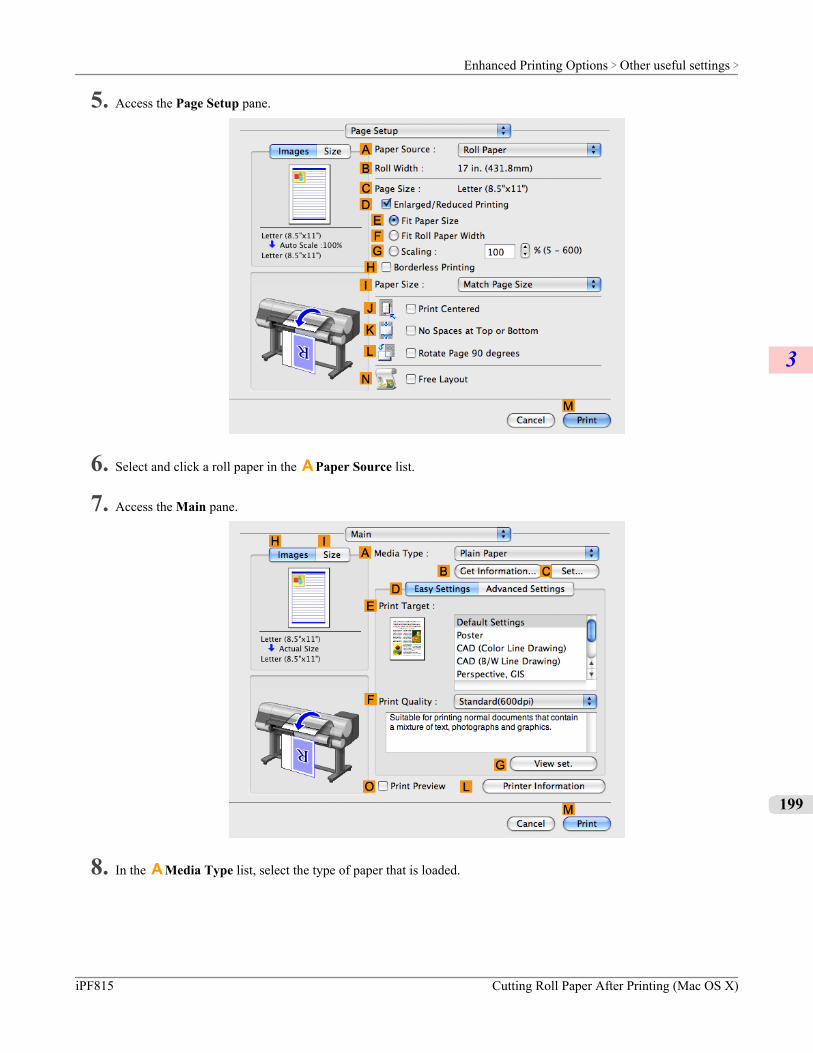
5. Access the Page Setup pane.
6. Select and click a roll paper in the A Paper Source list.
7. Access the Main pane.
8. In the A Media Type list, select the type of paper that is loaded.
Enhanced Printing Options > Other useful settings >
iPF815 Cutting Roll Paper After Printing (Mac OS X)
3
199
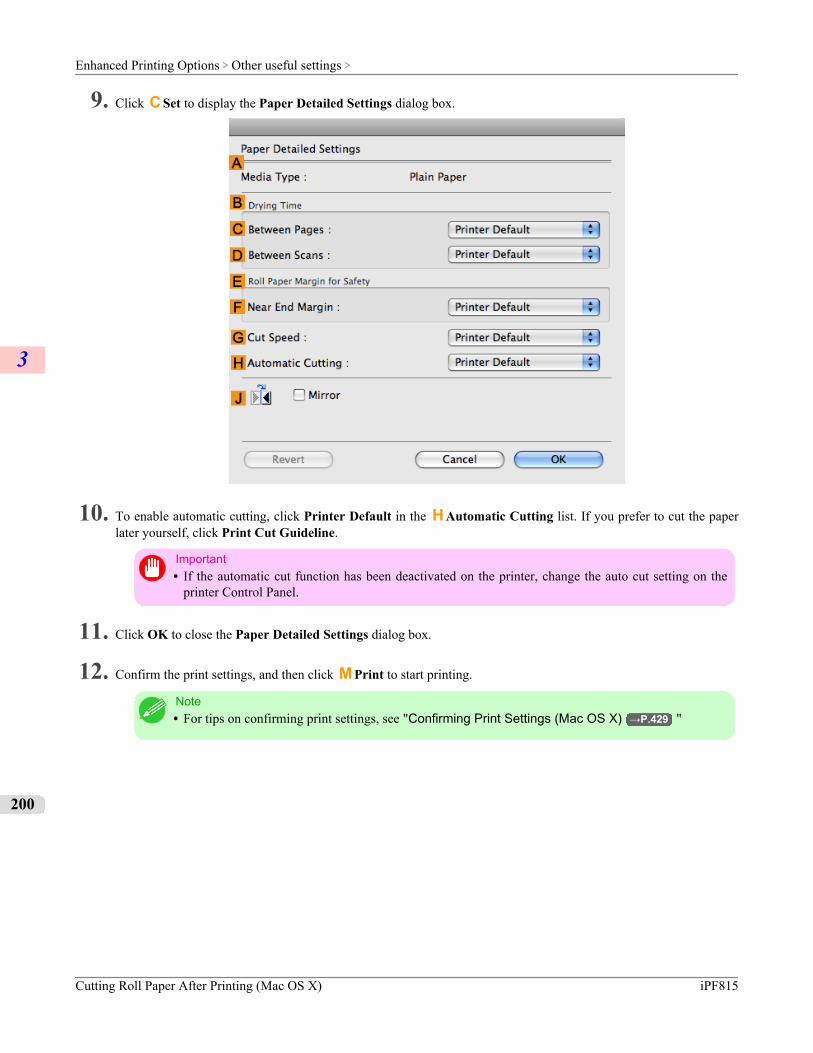
9. Click C Set to display the Paper Detailed Settings dialog box.
10. To enable automatic cutting, click Printer Default in the H Automatic Cutting list. If you prefer to cut the paperlater yourself, click Print Cut Guideline.
Important• If the automatic cut function has been deactivated on the printer, change the auto cut setting on the
printer Control Panel.
11. Click OK to close the Paper Detailed Settings dialog box.
12. Confirm the print settings, and then click M Print to start printing.
Note• For tips on confirming print settings, see "Confirming Print Settings (Mac OS X) →P.429 "
Enhanced Printing Options > Other useful settings >
Cutting Roll Paper After Printing (Mac OS X) iPF815
3
200
Windows Software
Printer Driver 202
Preview 243
Free Layout 256
Color imageRUNNER Enlargement Copy 286
Print Plug-In for Office 301
HDI Driver 354
Status Monitor 387
Accounting 390
Digital Photo Front-Access 402
Device Setup Utility 403
Media Configuration Tool 406
Windows Software >
iPF815
4
201

Printer DriverPrinter Driver Settings .................................................................................................................................... 202
Specifying Paper in the Printer Driver ............................................................................................................ 204Confirming Print Settings ................................................................................................................................ 206Checking the Layout in a Preview Before Printing ......................................................................................... 207Using Favorites .............................................................................................................................................. 209
Accessing the Printer Driver Dialog Box from Applications ............................................................................ 211Accessing the Printer Driver Dialog Box from the Operating System Menu .................................................. 213
Main Sheet ..................................................................................................................................................... 215Paper Information on Printer Dialog Box .................................................................................................... 219Paper Detailed Settings Dialog Box ........................................................................................................... 219View Settings Dialog Box for the Printing Application ................................................................................ 221Color Adjustment Sheet: Color ................................................................................................................... 221Object Adjustment dialog box: Color ........................................................................................................... 223Matching Sheet .......................................................................................................................................... 224Color Adjustment Sheet: Monochrome ...................................................................................................... 226Object Adjustment dialog box: Monochrome .............................................................................................. 227
Page Setup Sheet .......................................................................................................................................... 228Output Method dialog box ........................................................................................................................... 231Paper Size Options Dialog Box .................................................................................................................. 232
Layout Sheet .................................................................................................................................................. 233Page Options Dialog Box ........................................................................................................................... 235Special Settings Dialog Box ....................................................................................................................... 236
Favorites Sheet .............................................................................................................................................. 237Utility Sheet .................................................................................................................................................... 239Support Sheet ................................................................................................................................................ 240
Settings Summaries Dialog Box ................................................................................................................. 241Device Settings Sheet .................................................................................................................................... 242
Printer Driver SettingsFor instructions on accessing the Windows printer driver, refer to the following topics.
• Accessing the Printer Driver Dialog Box from Applications →P.211
• Accessing the Printer Driver Dialog Box from the Operating System Menu →P.213
Windows Software > Printer Driver >
Printer Driver Settings iPF815
4
202
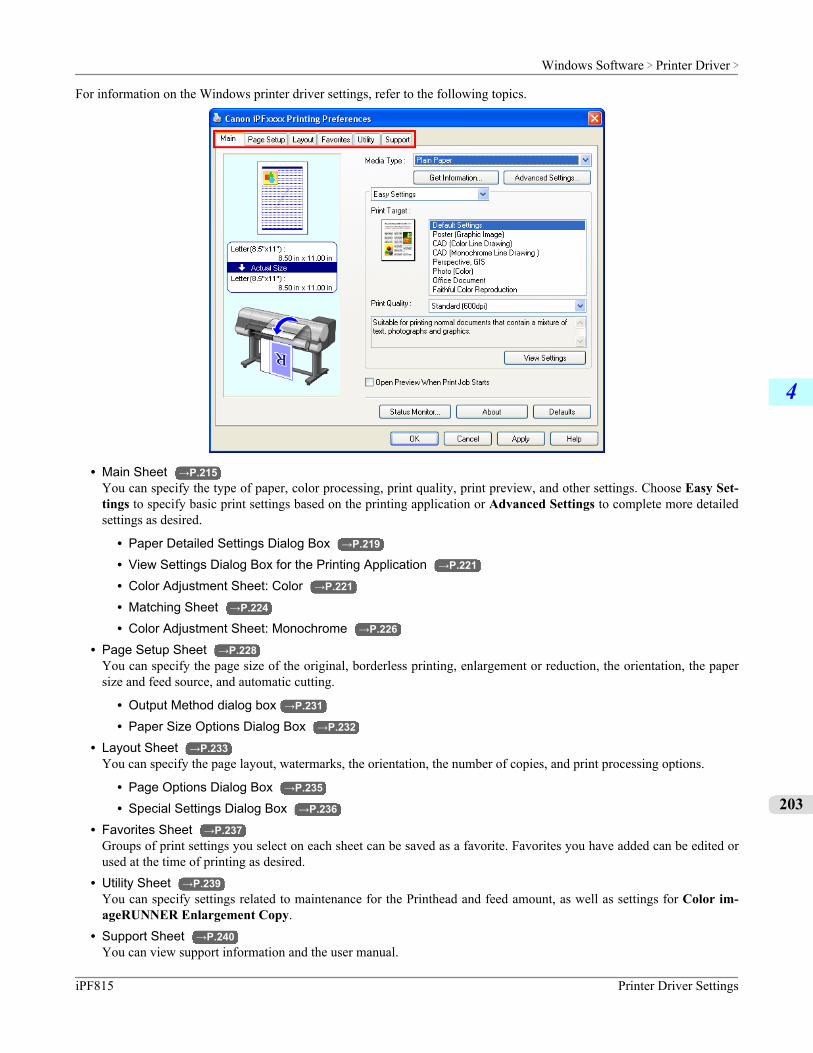
For information on the Windows printer driver settings, refer to the following topics.
• Main Sheet →P.215You can specify the type of paper, color processing, print quality, print preview, and other settings. Choose Easy Set-tings to specify basic print settings based on the printing application or Advanced Settings to complete more detailedsettings as desired.
• Paper Detailed Settings Dialog Box →P.219
• View Settings Dialog Box for the Printing Application →P.221
• Color Adjustment Sheet: Color →P.221
• Matching Sheet →P.224
• Color Adjustment Sheet: Monochrome →P.226
• Page Setup Sheet →P.228You can specify the page size of the original, borderless printing, enlargement or reduction, the orientation, the papersize and feed source, and automatic cutting.
• Output Method dialog box →P.231
• Paper Size Options Dialog Box →P.232
• Layout Sheet →P.233You can specify the page layout, watermarks, the orientation, the number of copies, and print processing options.
• Page Options Dialog Box →P.235
• Special Settings Dialog Box →P.236
• Favorites Sheet →P.237Groups of print settings you select on each sheet can be saved as a favorite. Favorites you have added can be edited orused at the time of printing as desired.
• Utility Sheet →P.239You can specify settings related to maintenance for the Printhead and feed amount, as well as settings for Color im-ageRUNNER Enlargement Copy.
• Support Sheet →P.240You can view support information and the user manual.
Windows Software > Printer Driver >
iPF815 Printer Driver Settings
4
203
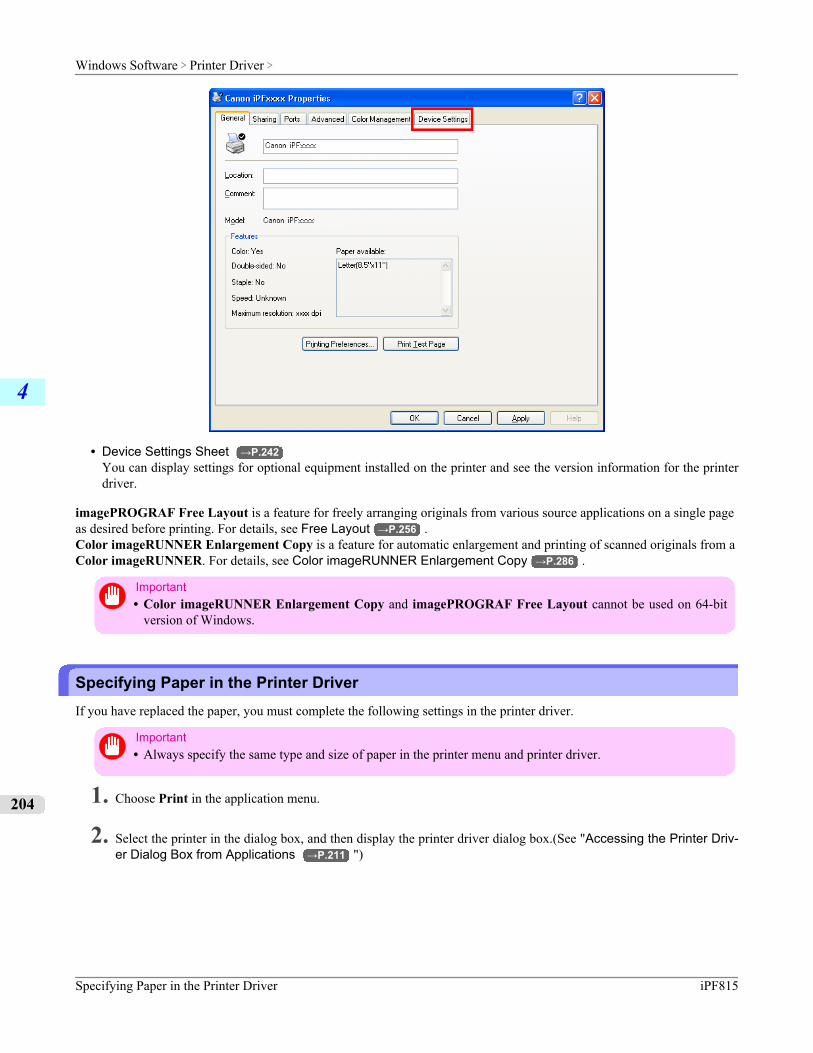
• Device Settings Sheet →P.242You can display settings for optional equipment installed on the printer and see the version information for the printerdriver.
imagePROGRAF Free Layout is a feature for freely arranging originals from various source applications on a single pageas desired before printing. For details, see Free Layout →P.256 .Color imageRUNNER Enlargement Copy is a feature for automatic enlargement and printing of scanned originals from aColor imageRUNNER. For details, see Color imageRUNNER Enlargement Copy →P.286 .
Important• Color imageRUNNER Enlargement Copy and imagePROGRAF Free Layout cannot be used on 64-bit
version of Windows.
Specifying Paper in the Printer DriverIf you have replaced the paper, you must complete the following settings in the printer driver.
Important• Always specify the same type and size of paper in the printer menu and printer driver.
1. Choose Print in the application menu.
2. Select the printer in the dialog box, and then display the printer driver dialog box.(See "Accessing the Printer Driv-er Dialog Box from Applications →P.211 ")
Windows Software > Printer Driver >
Specifying Paper in the Printer Driver iPF815
4
204
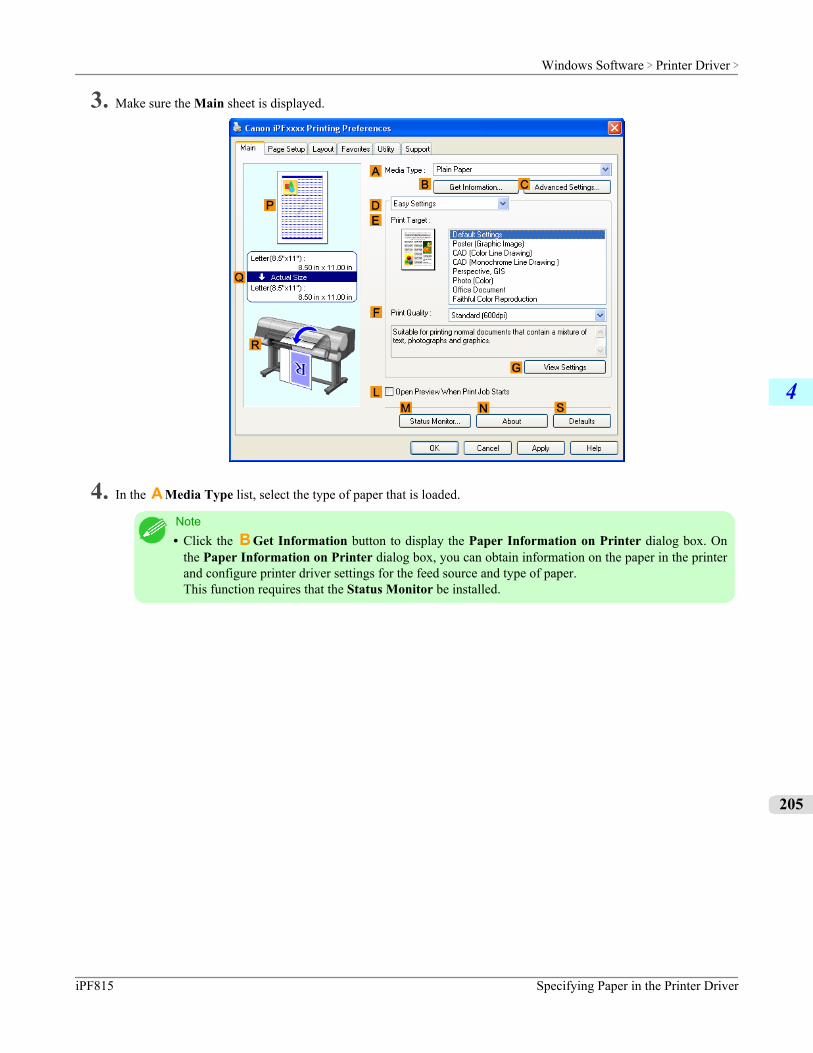
3. Make sure the Main sheet is displayed.
4. In the A Media Type list, select the type of paper that is loaded.
Note• Click the B Get Information button to display the Paper Information on Printer dialog box. On
the Paper Information on Printer dialog box, you can obtain information on the paper in the printerand configure printer driver settings for the feed source and type of paper.This function requires that the Status Monitor be installed.
Windows Software > Printer Driver >
iPF815 Specifying Paper in the Printer Driver
4
205
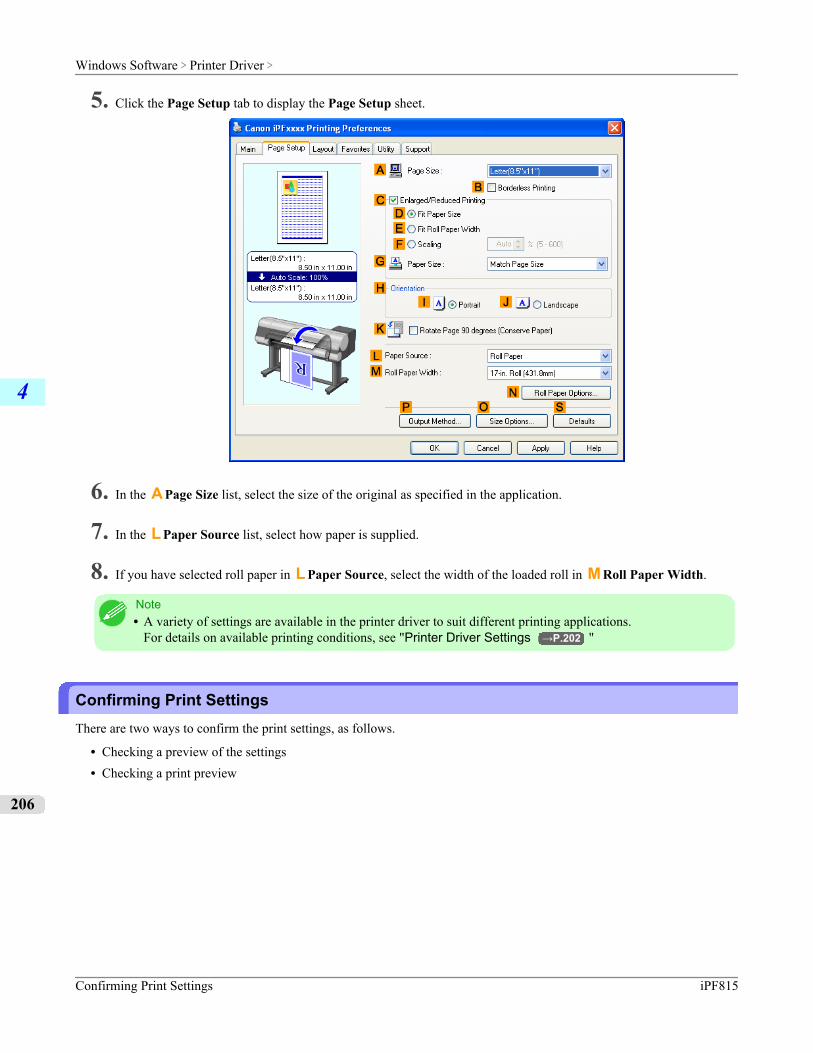
5. Click the Page Setup tab to display the Page Setup sheet.
6. In the A Page Size list, select the size of the original as specified in the application.
7. In the L Paper Source list, select how paper is supplied.
8. If you have selected roll paper in L Paper Source, select the width of the loaded roll in M Roll Paper Width.
Note• A variety of settings are available in the printer driver to suit different printing applications.
For details on available printing conditions, see "Printer Driver Settings →P.202 "
Confirming Print SettingsThere are two ways to confirm the print settings, as follows.
• Checking a preview of the settings• Checking a print preview
Windows Software > Printer Driver >
Confirming Print Settings iPF815
4
206
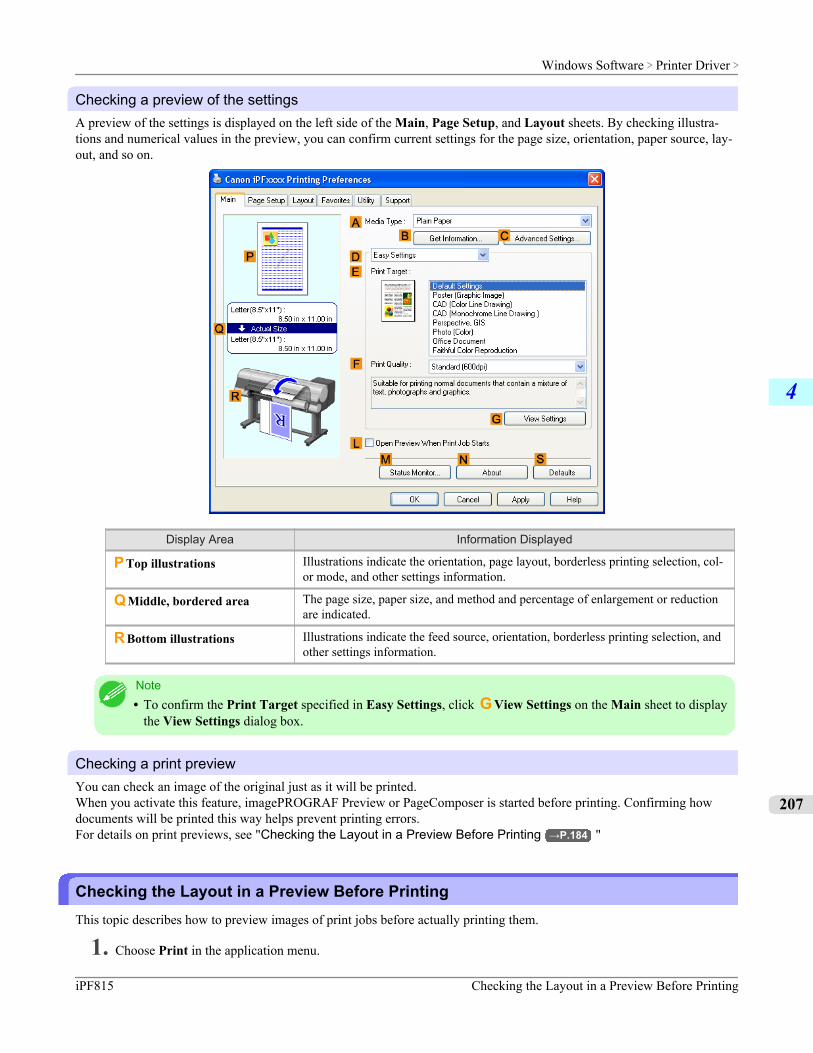
Checking a preview of the settingsA preview of the settings is displayed on the left side of the Main, Page Setup, and Layout sheets. By checking illustra-tions and numerical values in the preview, you can confirm current settings for the page size, orientation, paper source, lay-out, and so on.
Display Area Information Displayed
P Top illustrations Illustrations indicate the orientation, page layout, borderless printing selection, col-or mode, and other settings information.
Q Middle, bordered area The page size, paper size, and method and percentage of enlargement or reductionare indicated.
R Bottom illustrations Illustrations indicate the feed source, orientation, borderless printing selection, andother settings information.
Note• To confirm the Print Target specified in Easy Settings, click G View Settings on the Main sheet to display
the View Settings dialog box.
Checking a print previewYou can check an image of the original just as it will be printed.When you activate this feature, imagePROGRAF Preview or PageComposer is started before printing. Confirming howdocuments will be printed this way helps prevent printing errors.For details on print previews, see "Checking the Layout in a Preview Before Printing →P.184 "
Checking the Layout in a Preview Before PrintingThis topic describes how to preview images of print jobs before actually printing them.
1. Choose Print in the application menu.
Windows Software > Printer Driver >
iPF815 Checking the Layout in a Preview Before Printing
4
207

2. Select the printer in the dialog box, and then display the printer driver dialog box.(See "Accessing the Printer Driv-er Dialog Box from Applications →P.211 ")
3. Make sure the Main sheet is displayed.
4. Select the L Open Preview When Print Job Starts check box.
5. After you click OK, when you print a job, the imagePROGRAF Preview window will be displayed.
Note• If PageComposer is running, access the Special Settings dialog box from the Layout sheet and clear
Enable Preview Switching.
Windows Software > Printer Driver >
Checking the Layout in a Preview Before Printing iPF815
4
208
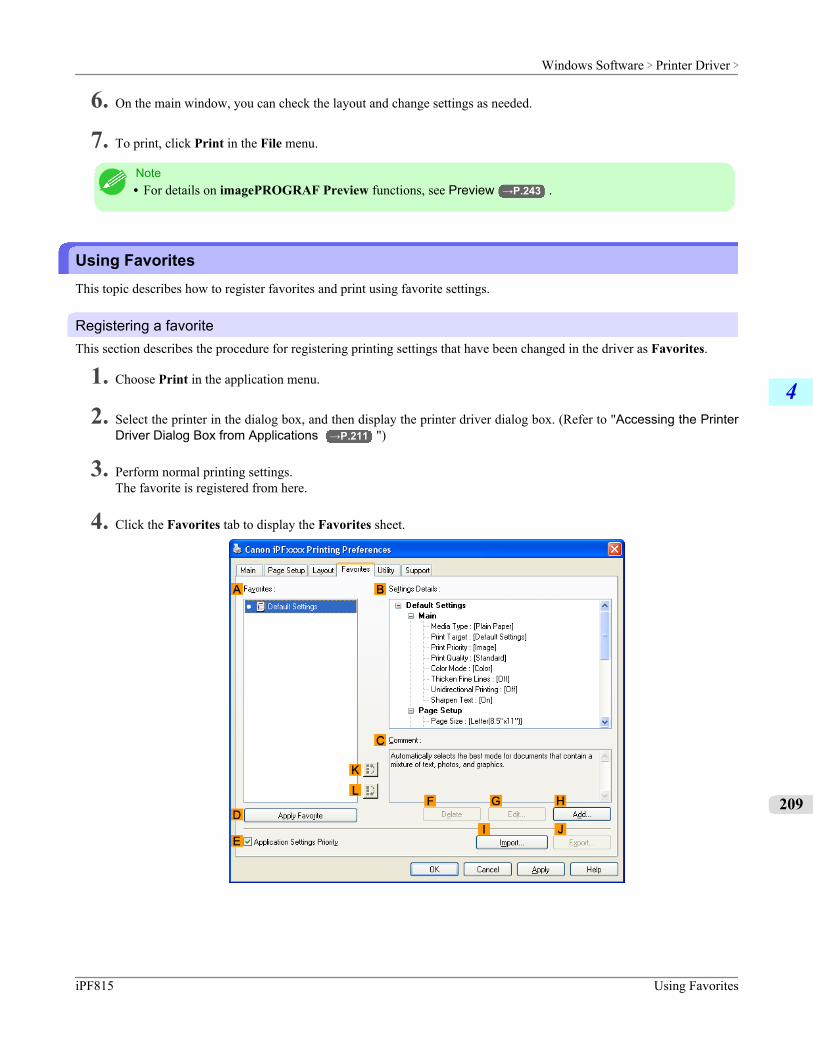
6. On the main window, you can check the layout and change settings as needed.
7. To print, click Print in the File menu.
Note• For details on imagePROGRAF Preview functions, see Preview →P.243 .
Using FavoritesThis topic describes how to register favorites and print using favorite settings.
Registering a favoriteThis section describes the procedure for registering printing settings that have been changed in the driver as Favorites.
1. Choose Print in the application menu.
2. Select the printer in the dialog box, and then display the printer driver dialog box. (Refer to "Accessing the PrinterDriver Dialog Box from Applications →P.211 ")
3. Perform normal printing settings.The favorite is registered from here.
4. Click the Favorites tab to display the Favorites sheet.
Windows Software > Printer Driver >
iPF815 Using Favorites
4
209
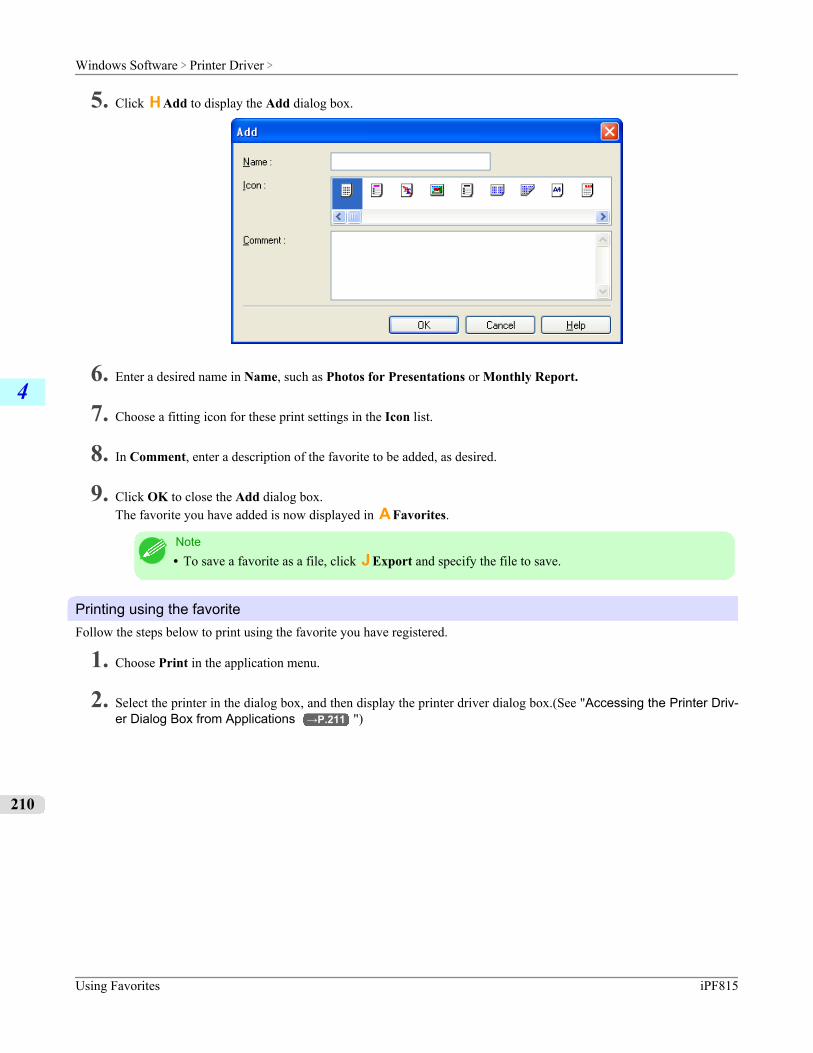
5. Click H Add to display the Add dialog box.
6. Enter a desired name in Name, such as Photos for Presentations or Monthly Report.
7. Choose a fitting icon for these print settings in the Icon list.
8. In Comment, enter a description of the favorite to be added, as desired.
9. Click OK to close the Add dialog box.The favorite you have added is now displayed in A Favorites.
Note• To save a favorite as a file, click J Export and specify the file to save.
Printing using the favoriteFollow the steps below to print using the favorite you have registered.
1. Choose Print in the application menu.
2. Select the printer in the dialog box, and then display the printer driver dialog box.(See "Accessing the Printer Driv-er Dialog Box from Applications →P.211 ")
Windows Software > Printer Driver >
Using Favorites iPF815
4
210
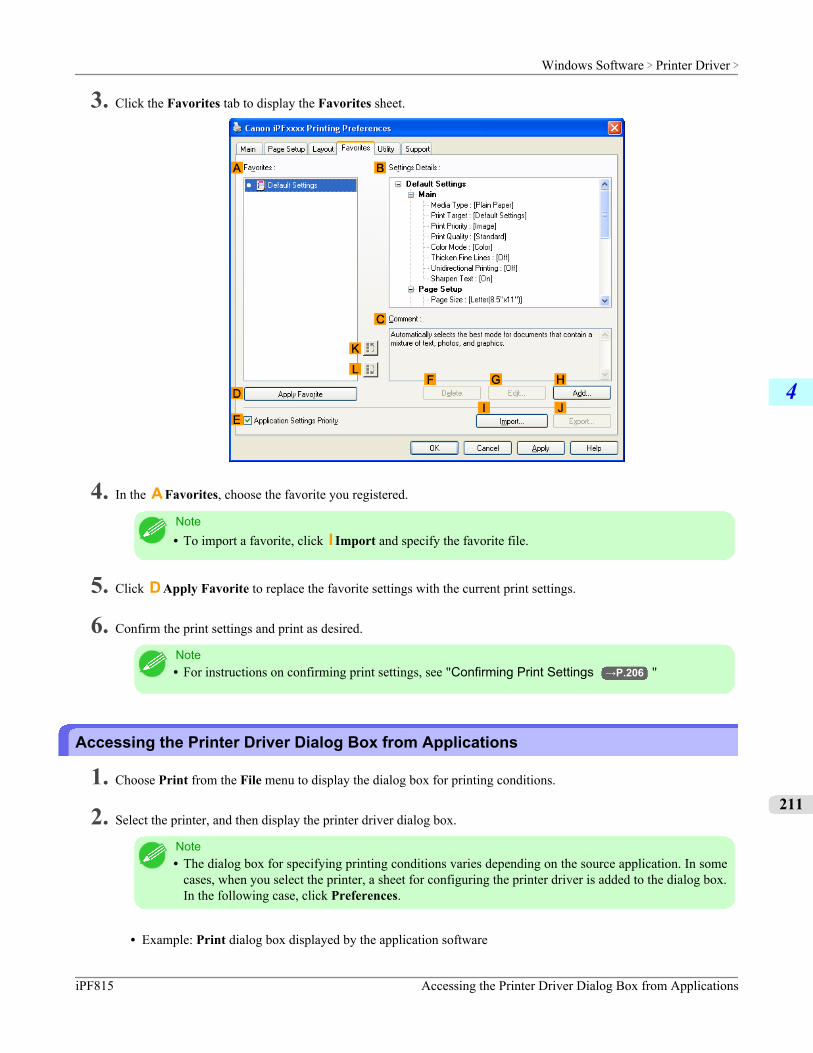
3. Click the Favorites tab to display the Favorites sheet.
4. In the A Favorites, choose the favorite you registered.
Note• To import a favorite, click I Import and specify the favorite file.
5. Click D Apply Favorite to replace the favorite settings with the current print settings.
6. Confirm the print settings and print as desired.
Note• For instructions on confirming print settings, see "Confirming Print Settings →P.206 "
Accessing the Printer Driver Dialog Box from Applications
1. Choose Print from the File menu to display the dialog box for printing conditions.
2. Select the printer, and then display the printer driver dialog box.
Note• The dialog box for specifying printing conditions varies depending on the source application. In some
cases, when you select the printer, a sheet for configuring the printer driver is added to the dialog box.In the following case, click Preferences.
• Example: Print dialog box displayed by the application software
Windows Software > Printer Driver >
iPF815 Accessing the Printer Driver Dialog Box from Applications
4
211
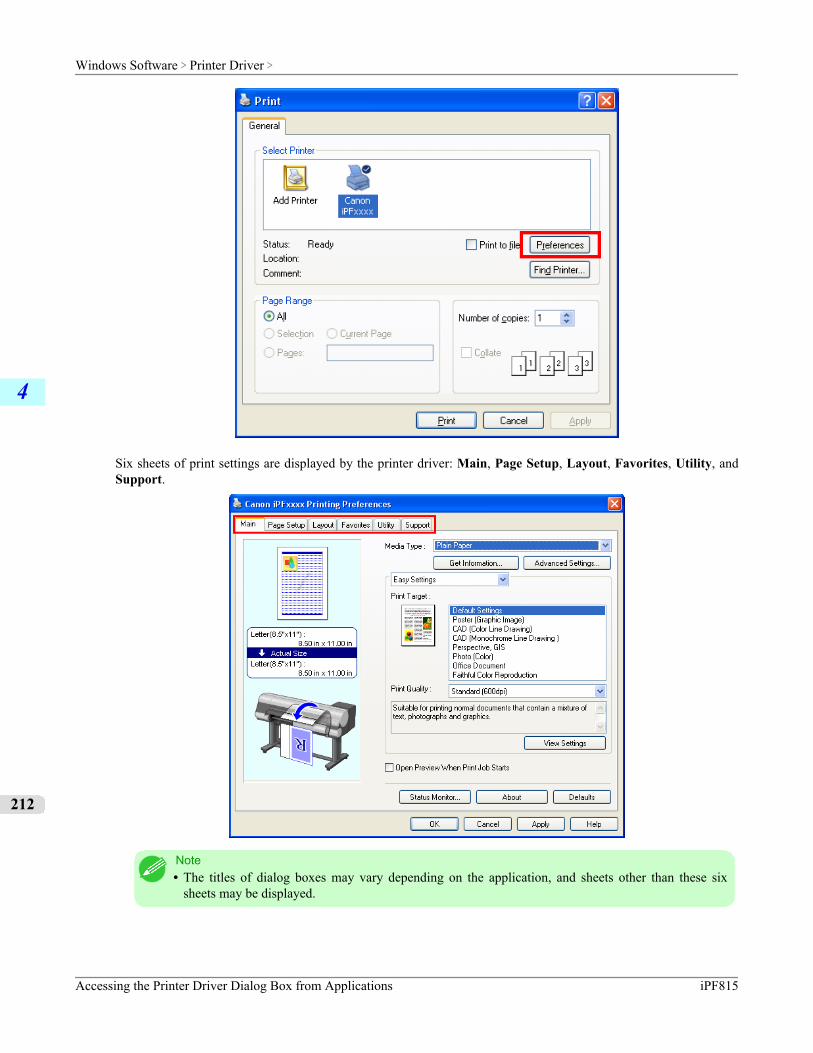
Six sheets of print settings are displayed by the printer driver: Main, Page Setup, Layout, Favorites, Utility, andSupport.
Note• The titles of dialog boxes may vary depending on the application, and sheets other than these six
sheets may be displayed.
Windows Software > Printer Driver >
Accessing the Printer Driver Dialog Box from Applications iPF815
4
212
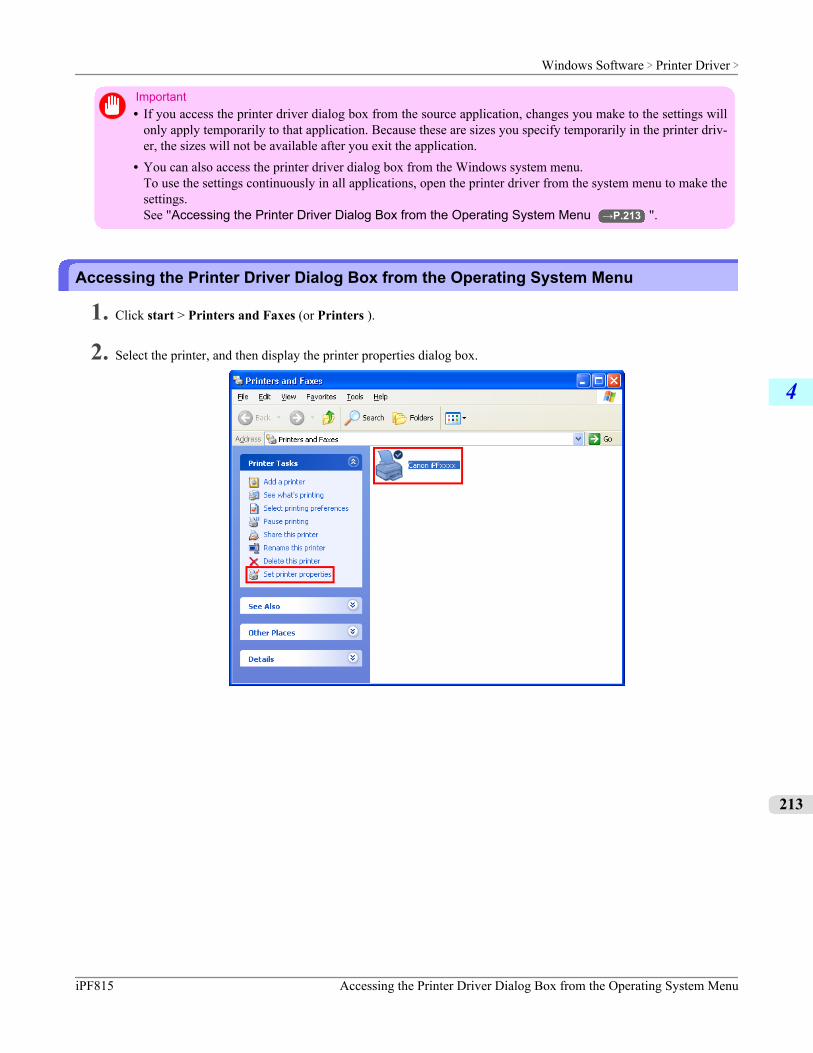
Important• If you access the printer driver dialog box from the source application, changes you make to the settings will
only apply temporarily to that application. Because these are sizes you specify temporarily in the printer driv-er, the sizes will not be available after you exit the application.
• You can also access the printer driver dialog box from the Windows system menu.To use the settings continuously in all applications, open the printer driver from the system menu to make thesettings.See "Accessing the Printer Driver Dialog Box from the Operating System Menu →P.213 ".
Accessing the Printer Driver Dialog Box from the Operating System Menu
1. Click start > Printers and Faxes (or Printers ).
2. Select the printer, and then display the printer properties dialog box.
Windows Software > Printer Driver >
iPF815 Accessing the Printer Driver Dialog Box from the Operating System Menu
4
213
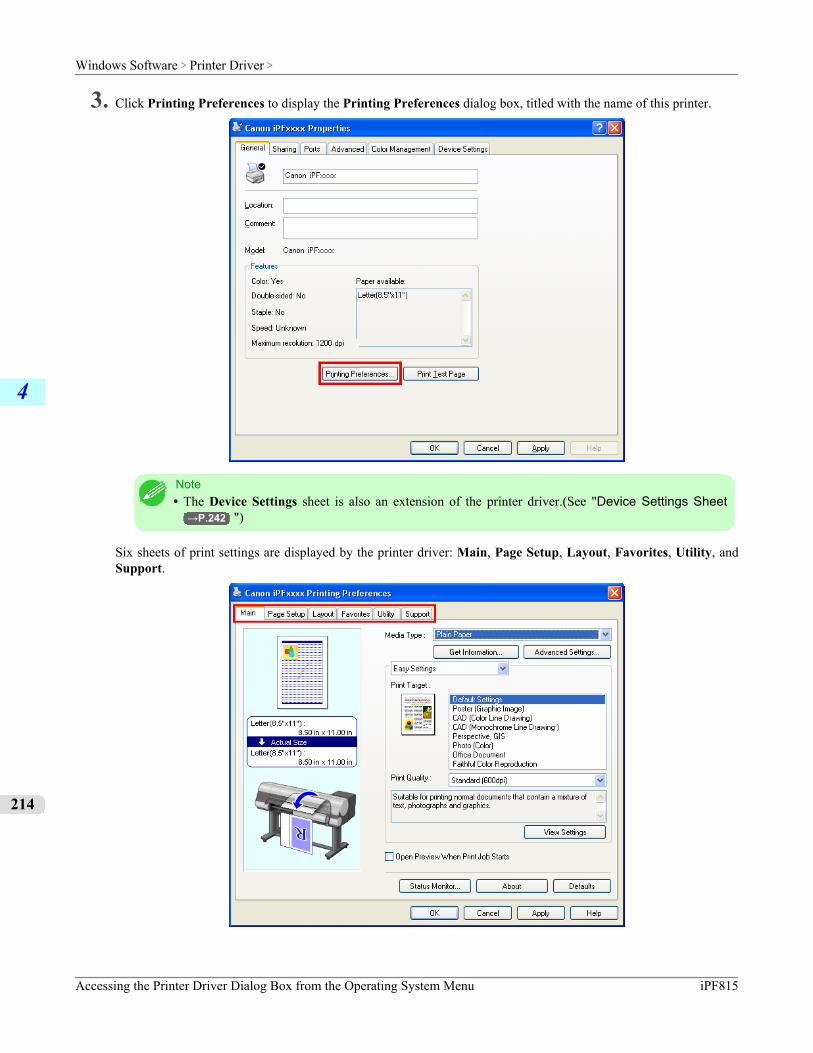
3. Click Printing Preferences to display the Printing Preferences dialog box, titled with the name of this printer.
Note• The Device Settings sheet is also an extension of the printer driver.(See "Device Settings Sheet
→P.242 ")
Six sheets of print settings are displayed by the printer driver: Main, Page Setup, Layout, Favorites, Utility, andSupport.
Windows Software > Printer Driver >
Accessing the Printer Driver Dialog Box from the Operating System Menu iPF815
4
214
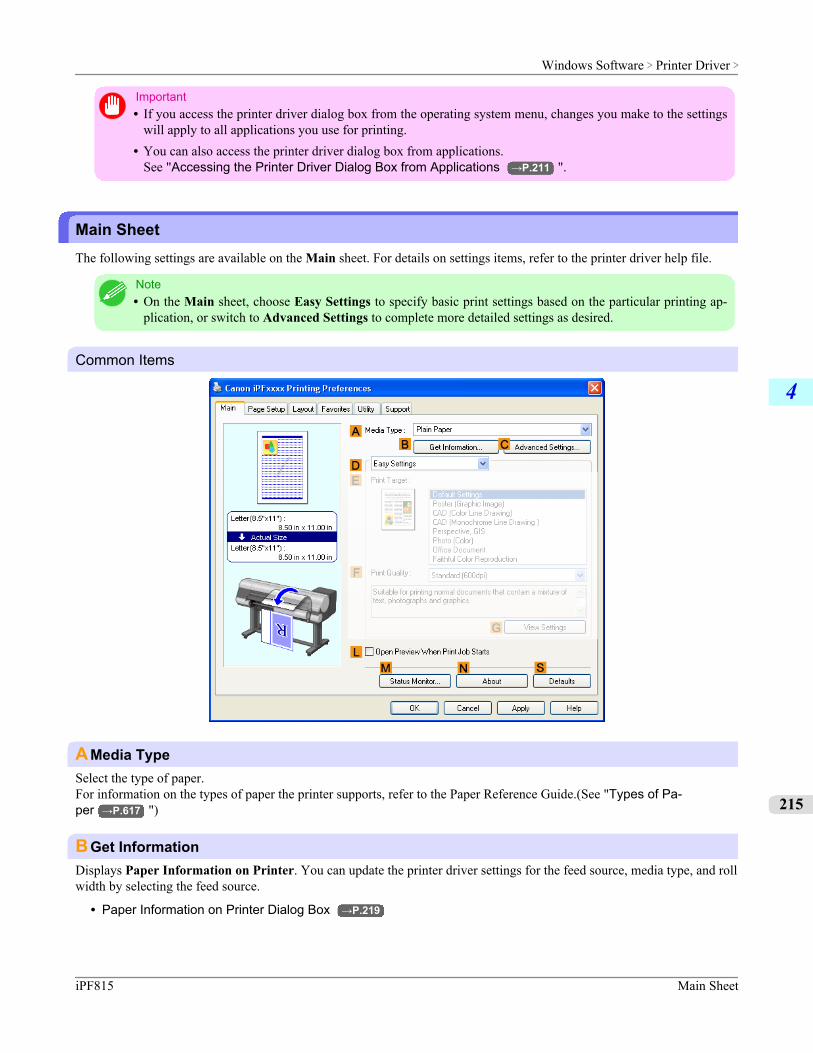
Important• If you access the printer driver dialog box from the operating system menu, changes you make to the settings
will apply to all applications you use for printing.• You can also access the printer driver dialog box from applications.
See "Accessing the Printer Driver Dialog Box from Applications →P.211 ".
Main SheetThe following settings are available on the Main sheet. For details on settings items, refer to the printer driver help file.
Note• On the Main sheet, choose Easy Settings to specify basic print settings based on the particular printing ap-
plication, or switch to Advanced Settings to complete more detailed settings as desired.
Common Items
AMedia TypeSelect the type of paper.For information on the types of paper the printer supports, refer to the Paper Reference Guide.(See "Types of Pa-per →P.617 ")
BGet InformationDisplays Paper Information on Printer. You can update the printer driver settings for the feed source, media type, and rollwidth by selecting the feed source.
• Paper Information on Printer Dialog Box →P.219
Windows Software > Printer Driver >
iPF815 Main Sheet
4
215
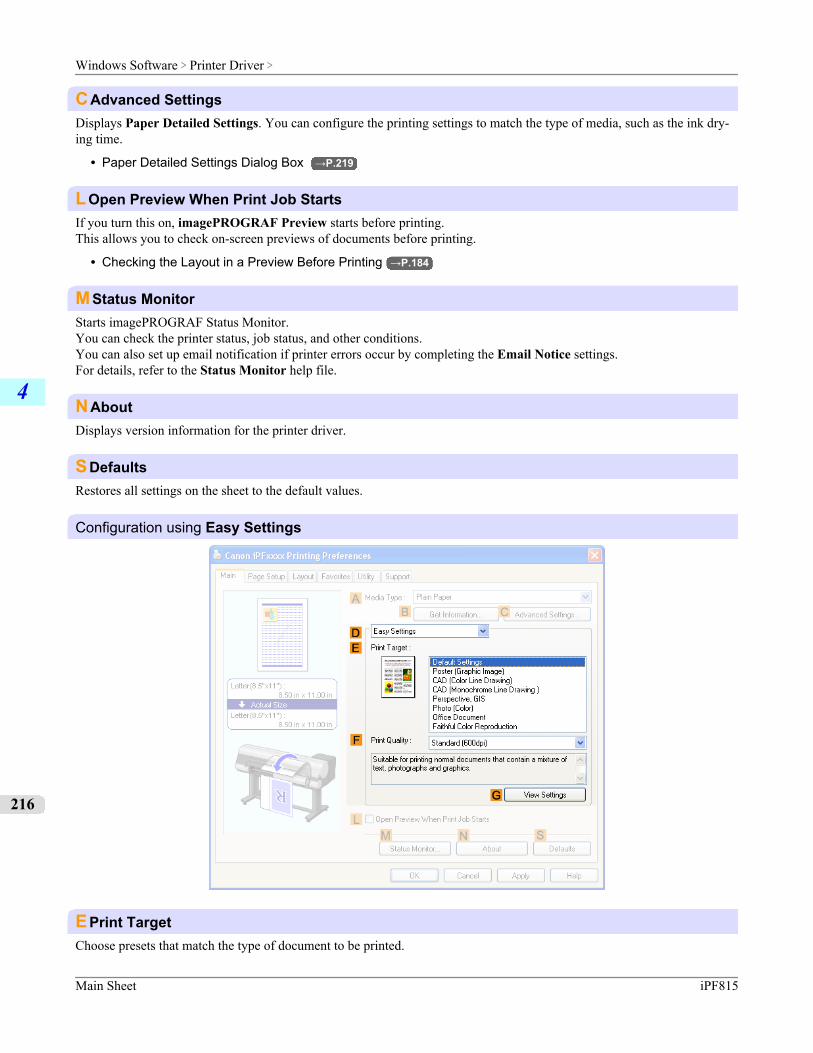
CAdvanced SettingsDisplays Paper Detailed Settings. You can configure the printing settings to match the type of media, such as the ink dry-ing time.
• Paper Detailed Settings Dialog Box →P.219
LOpen Preview When Print Job StartsIf you turn this on, imagePROGRAF Preview starts before printing.This allows you to check on-screen previews of documents before printing.
• Checking the Layout in a Preview Before Printing →P.184
MStatus MonitorStarts imagePROGRAF Status Monitor.You can check the printer status, job status, and other conditions.You can also set up email notification if printer errors occur by completing the Email Notice settings.For details, refer to the Status Monitor help file.
NAboutDisplays version information for the printer driver.
SDefaultsRestores all settings on the sheet to the default values.
Configuration using Easy Settings
EPrint TargetChoose presets that match the type of document to be printed.
Windows Software > Printer Driver >
Main Sheet iPF815
4
216
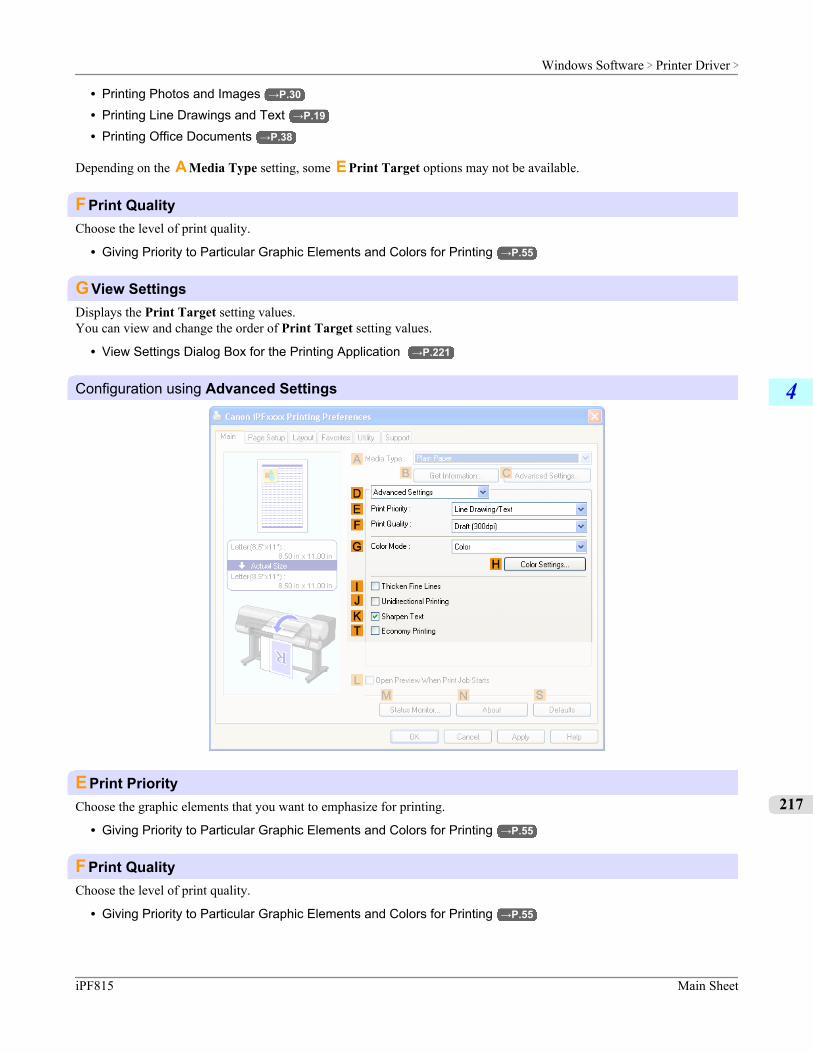
• Printing Photos and Images →P.30
• Printing Line Drawings and Text →P.19
• Printing Office Documents →P.38
Depending on the A Media Type setting, some E Print Target options may not be available.
FPrint QualityChoose the level of print quality.
• Giving Priority to Particular Graphic Elements and Colors for Printing →P.55
GView SettingsDisplays the Print Target setting values.You can view and change the order of Print Target setting values.
• View Settings Dialog Box for the Printing Application →P.221
Configuration using Advanced Settings
EPrint PriorityChoose the graphic elements that you want to emphasize for printing.
• Giving Priority to Particular Graphic Elements and Colors for Printing →P.55
FPrint QualityChoose the level of print quality.
• Giving Priority to Particular Graphic Elements and Colors for Printing →P.55
Windows Software > Printer Driver >
iPF815 Main Sheet
4
217
GColor ModeChoose the color mode.
• Giving Priority to Particular Graphic Elements and Colors for Printing →P.55
Note• Depending on the A Media Type setting, some G Color Mode options may not be available.
HColor SettingsClick to display the Color Settings dialog box for more advanced color settings.
• Adjusting the Color in the Printer Driver →P.46
IThicken Fine LinesActivate this option to print fine lines more distinctly.
JUnidirectional PrintingSelect this checkbox to prevent problems such as misaligned lines and improve the print quality. However, the printingspeed becomes slower.
KSharpen TextActivate this option to print text more sharply.
TEconomy PrintingSelect this checkbox to reduce the amount of ink consumed during printing. However, the print quality is worse than fornormal printing.Select this mode if you want to conserve ink when checking drawings, for example. Depending on the A Media Type andF Print Quality settings, this mode may not be available.
Windows Software > Printer Driver >
Main Sheet iPF815
4
218
Paper Information on Printer Dialog BoxOn the Paper Information on Printer dialog box, you can obtain information on the paper in the printer and configureprinter driver settings for the paper source and media type.
Note• To display the Paper Information on Printer dialog box, on the Main sheet, click Get Information by
Media Type.(See "Main Sheet →P.215 ")
APaper SourceShows the paper source supported by the printer, as well as information about the loaded paper. To update the paper sourceand media type settings in the printer driver, select the desired Paper Source option and click OK.
Paper Detailed Settings Dialog BoxThe Paper Detailed Settings dialog box offers the following settings. For details on settings items, refer to the printer driv-er help.
Windows Software > Printer Driver >
iPF815 Paper Information on Printer Dialog Box
4
219
Note• To display the Paper Detailed Settings dialog box, on the Main sheet, click Settings by Media Type.(See
"Main Sheet →P.215 ")
ADrying TimeSpecify the time that the printer waits for ink to dry, as needed. The Drying Time setting is only valid for rolls.
• (See "Specifying the Ink Drying Time for Rolls →P.640 ")
BBetween PagesSpecify the time the printer waits after printing a page until ejecting the paper, as needed.
CBetween ScansSpecify the time the printer waits after printing a line on the page until printing the next line, as needed.
DRoll Paper Margin for SafetyYou can specify the length of a margin on the leading edge of paper to ensure that paper susceptible to curling is held firmlyagainst the Platen.
ENear End MarginSpecify the length of the Near End Margin (the leading edge margin) of the roll, as needed.
FCut SpeedSelect the speed of automatic cutting, as needed. You can adjust this setting if paper is not cut well when automatic cuttingis used.
GMirrorSpecify whether to print a mirror image, as needed. Select this option to print a version of the document or image with theleft and right sides inverted.
Windows Software > Printer Driver >
Paper Detailed Settings Dialog Box iPF815
4
220
View Settings Dialog Box for the Printing ApplicationIn the View Settings dialog box, you can check details of the selected printing application.
Note• To display the View Settings dialog box, on the Main sheet, click View Settings by Print Target.(See
"Main Sheet →P.215 ")
APrint TargetShows all Print Target options (settings items for the printing application).
BNameIdentifies the item selected in Print Target by its name and an icon.
CDetailsHere, you can confirm detailed settings values for each listed item for the selected Print Target.
Color Adjustment Sheet: ColorIf the color tone as printed is not as you expected, you can adjust it on the Color Adjustment sheet.
Windows Software > Printer Driver >
iPF815 View Settings Dialog Box for the Printing Application
4
221
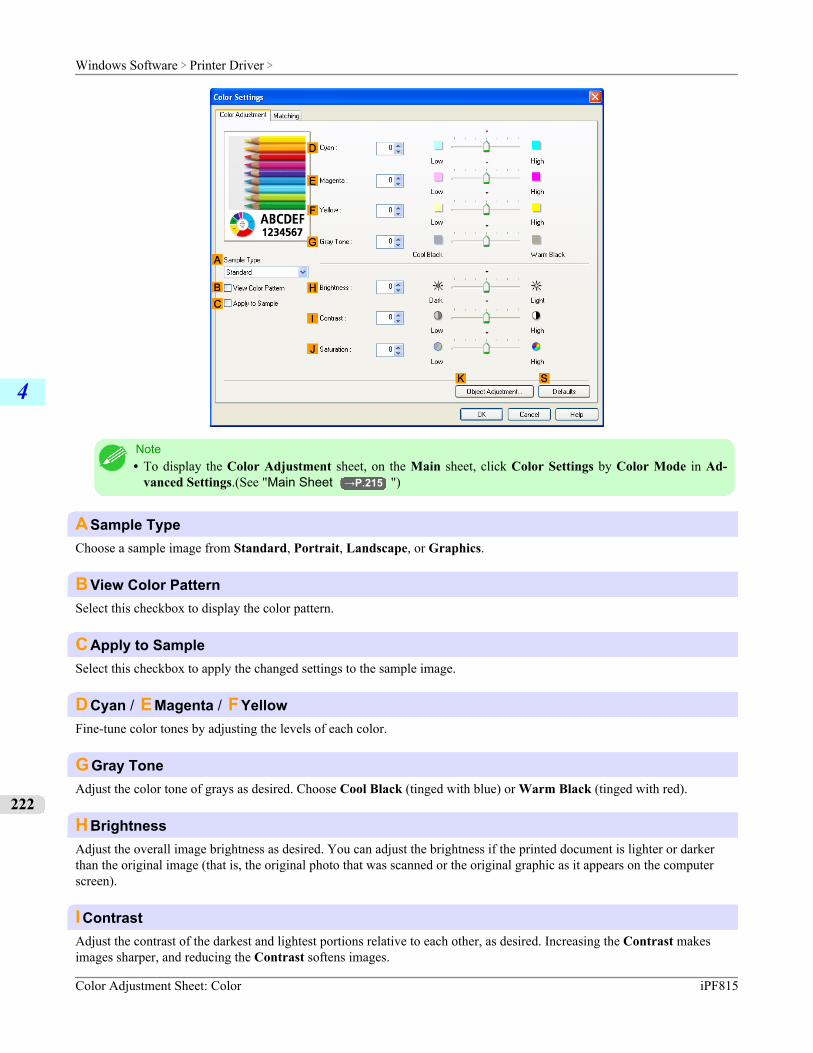
Note• To display the Color Adjustment sheet, on the Main sheet, click Color Settings by Color Mode in Ad-
vanced Settings.(See "Main Sheet →P.215 ")
ASample TypeChoose a sample image from Standard, Portrait, Landscape, or Graphics.
BView Color PatternSelect this checkbox to display the color pattern.
CApply to SampleSelect this checkbox to apply the changed settings to the sample image.
DCyan / EMagenta / FYellowFine-tune color tones by adjusting the levels of each color.
GGray ToneAdjust the color tone of grays as desired. Choose Cool Black (tinged with blue) or Warm Black (tinged with red).
HBrightnessAdjust the overall image brightness as desired. You can adjust the brightness if the printed document is lighter or darkerthan the original image (that is, the original photo that was scanned or the original graphic as it appears on the computerscreen).
IContrastAdjust the contrast of the darkest and lightest portions relative to each other, as desired. Increasing the Contrast makesimages sharper, and reducing the Contrast softens images.
Windows Software > Printer Driver >
Color Adjustment Sheet: Color iPF815
4
222
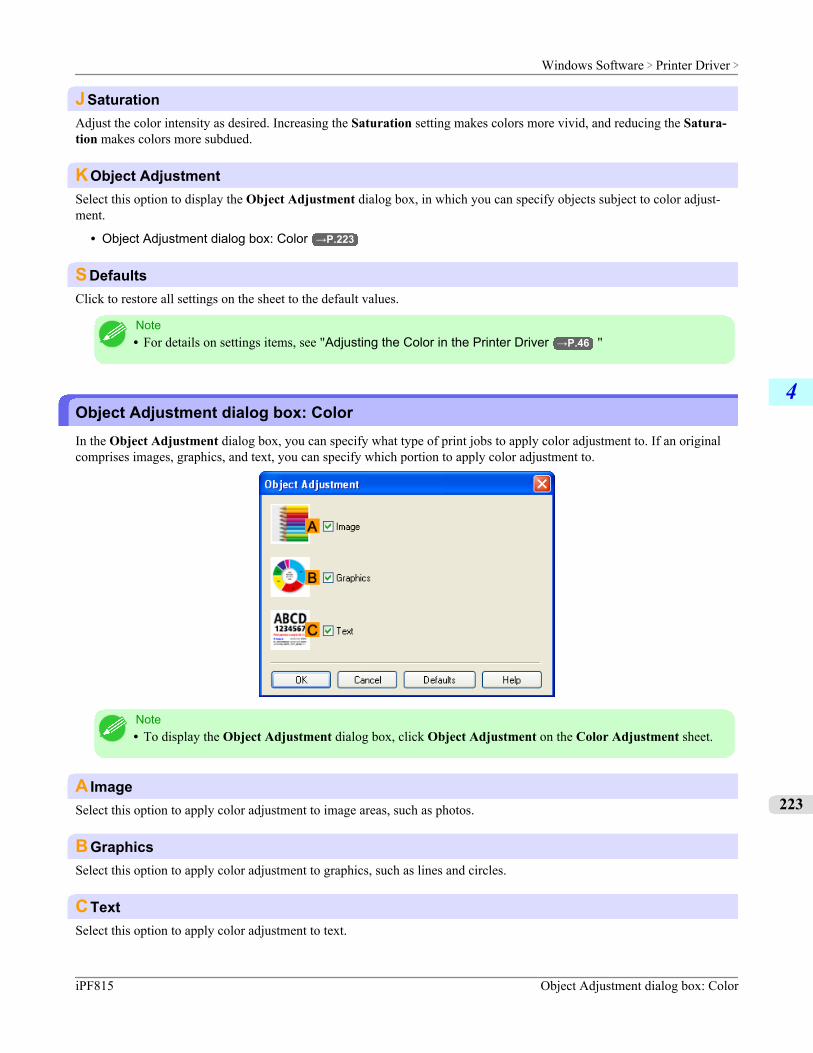
JSaturationAdjust the color intensity as desired. Increasing the Saturation setting makes colors more vivid, and reducing the Satura-tion makes colors more subdued.
KObject AdjustmentSelect this option to display the Object Adjustment dialog box, in which you can specify objects subject to color adjust-ment.
• Object Adjustment dialog box: Color →P.223
SDefaultsClick to restore all settings on the sheet to the default values.
Note• For details on settings items, see "Adjusting the Color in the Printer Driver →P.46 "
Object Adjustment dialog box: ColorIn the Object Adjustment dialog box, you can specify what type of print jobs to apply color adjustment to. If an originalcomprises images, graphics, and text, you can specify which portion to apply color adjustment to.
Note• To display the Object Adjustment dialog box, click Object Adjustment on the Color Adjustment sheet.
A ImageSelect this option to apply color adjustment to image areas, such as photos.
BGraphicsSelect this option to apply color adjustment to graphics, such as lines and circles.
CTextSelect this option to apply color adjustment to text.
Windows Software > Printer Driver >
iPF815 Object Adjustment dialog box: Color
4
223

Matching SheetOn the Matching sheet, you can specify color matching to compensate for differences in the appearance of colors on vari-ous devices.
Note• To display the Matching sheet, on the Main sheet, click Color Settings in Color Mode in Advanced Set-
tings, and then click the Matching sheet. (Refer to "Main Sheet →P.215 ")
Important• If No color correction is selected under Color Mode, the Matching sheet is not displayed.
Driver Matching ModeThe following options are available when you select Driver Matching Mode in the A Matching Mode list.
AMatching ModeSelect the color matching mode to use, as desired.Normally, select Driver Matching Mode. For color matching based on ICC profiles, select ICC Matching Mode, DriverICM Mode, or Host ICM Mode, depending on your color matching system.
BMatching MethodSelect the color matching method that suits the document to be printed. Various Matching Method options are availabledepending on your selection in Matching Mode.
Windows Software > Printer Driver >
Matching Sheet iPF815
4
224
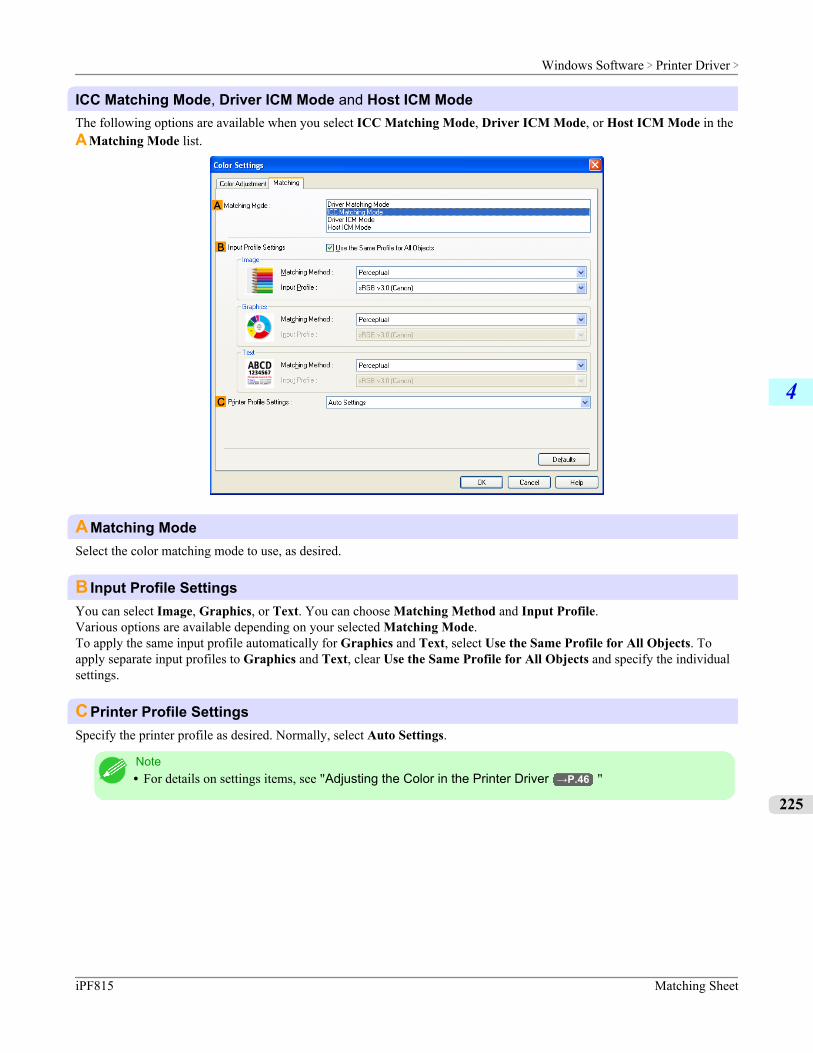
ICC Matching Mode, Driver ICM Mode and Host ICM ModeThe following options are available when you select ICC Matching Mode, Driver ICM Mode, or Host ICM Mode in theA Matching Mode list.
AMatching ModeSelect the color matching mode to use, as desired.
B Input Profile SettingsYou can select Image, Graphics, or Text. You can choose Matching Method and Input Profile.Various options are available depending on your selected Matching Mode.To apply the same input profile automatically for Graphics and Text, select Use the Same Profile for All Objects. Toapply separate input profiles to Graphics and Text, clear Use the Same Profile for All Objects and specify the individualsettings.
CPrinter Profile SettingsSpecify the printer profile as desired. Normally, select Auto Settings.
Note• For details on settings items, see "Adjusting the Color in the Printer Driver →P.46 "
Windows Software > Printer Driver >
iPF815 Matching Sheet
4
225
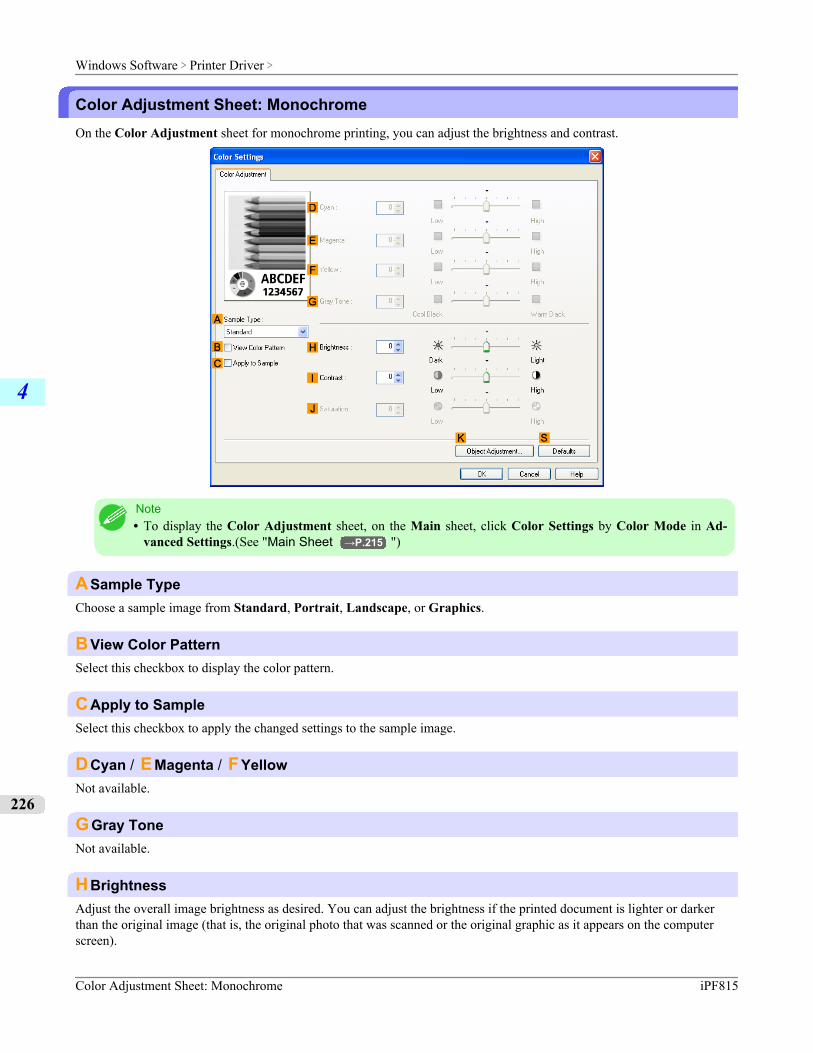
Color Adjustment Sheet: MonochromeOn the Color Adjustment sheet for monochrome printing, you can adjust the brightness and contrast.
Note• To display the Color Adjustment sheet, on the Main sheet, click Color Settings by Color Mode in Ad-
vanced Settings.(See "Main Sheet →P.215 ")
ASample TypeChoose a sample image from Standard, Portrait, Landscape, or Graphics.
BView Color PatternSelect this checkbox to display the color pattern.
CApply to SampleSelect this checkbox to apply the changed settings to the sample image.
DCyan / EMagenta / FYellowNot available.
GGray ToneNot available.
HBrightnessAdjust the overall image brightness as desired. You can adjust the brightness if the printed document is lighter or darkerthan the original image (that is, the original photo that was scanned or the original graphic as it appears on the computerscreen).
Windows Software > Printer Driver >
Color Adjustment Sheet: Monochrome iPF815
4
226
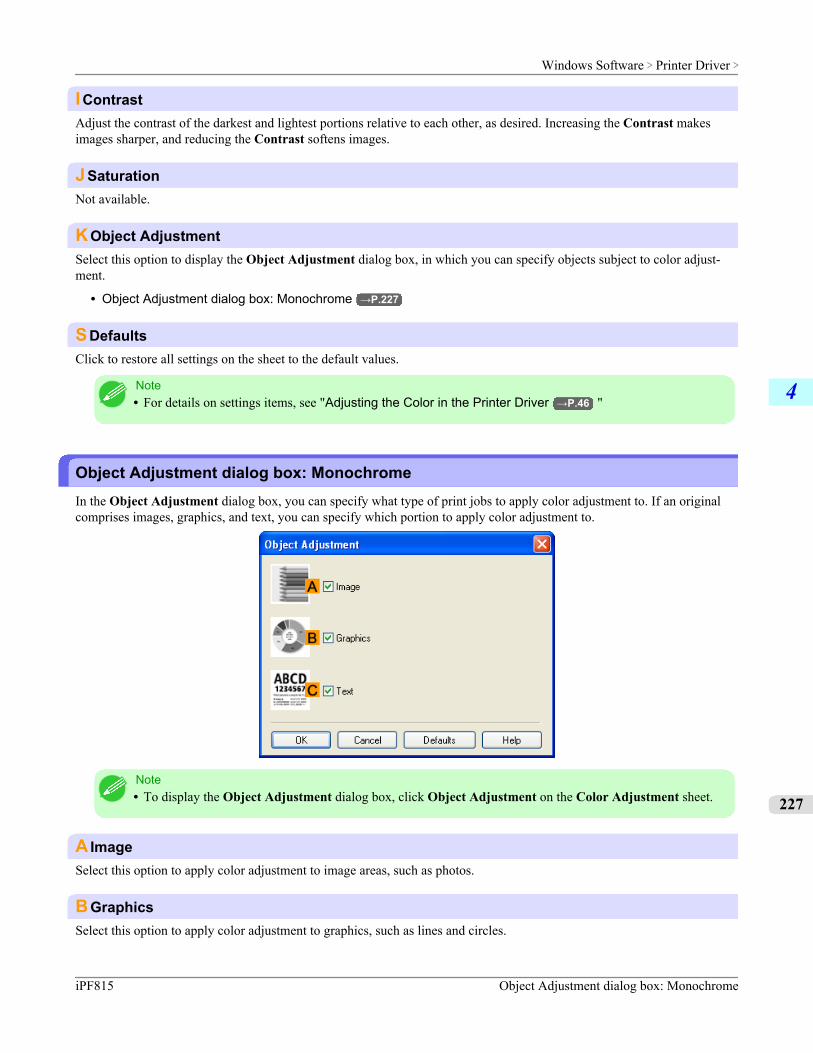
IContrastAdjust the contrast of the darkest and lightest portions relative to each other, as desired. Increasing the Contrast makesimages sharper, and reducing the Contrast softens images.
JSaturationNot available.
KObject AdjustmentSelect this option to display the Object Adjustment dialog box, in which you can specify objects subject to color adjust-ment.
• Object Adjustment dialog box: Monochrome →P.227
SDefaultsClick to restore all settings on the sheet to the default values.
Note• For details on settings items, see "Adjusting the Color in the Printer Driver →P.46 "
Object Adjustment dialog box: MonochromeIn the Object Adjustment dialog box, you can specify what type of print jobs to apply color adjustment to. If an originalcomprises images, graphics, and text, you can specify which portion to apply color adjustment to.
Note• To display the Object Adjustment dialog box, click Object Adjustment on the Color Adjustment sheet.
A ImageSelect this option to apply color adjustment to image areas, such as photos.
BGraphicsSelect this option to apply color adjustment to graphics, such as lines and circles.
Windows Software > Printer Driver >
iPF815 Object Adjustment dialog box: Monochrome
4
227
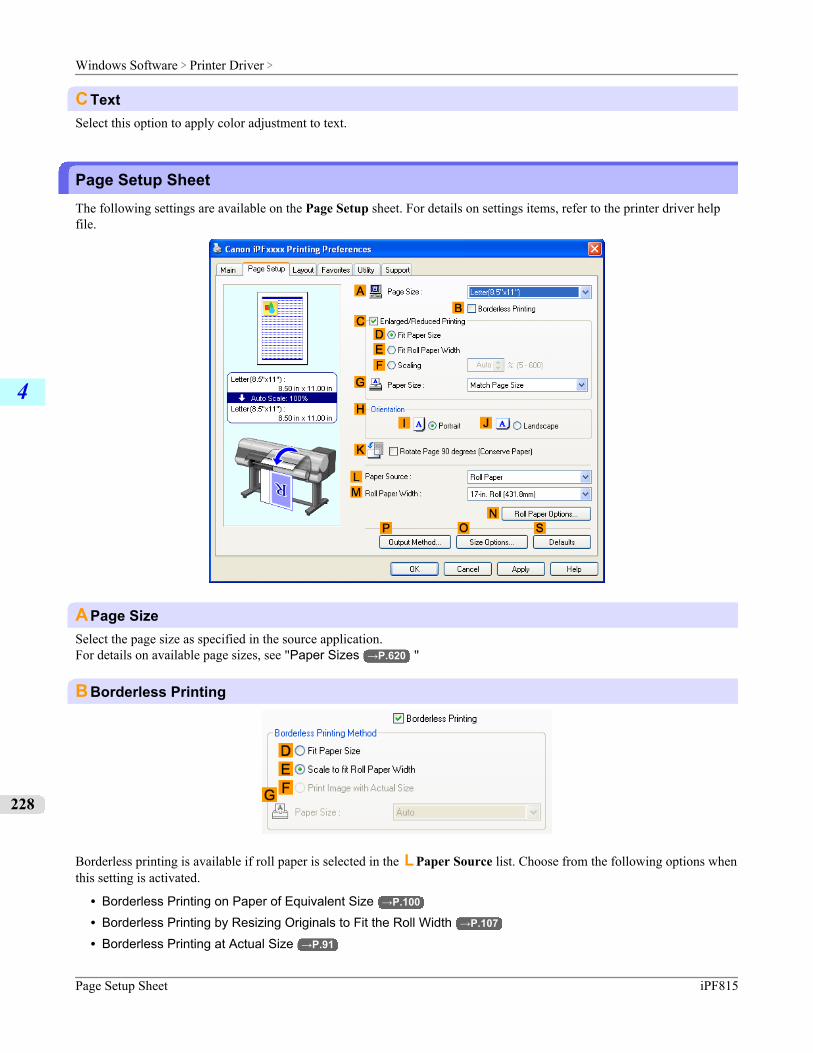
CTextSelect this option to apply color adjustment to text.
Page Setup SheetThe following settings are available on the Page Setup sheet. For details on settings items, refer to the printer driver helpfile.
APage SizeSelect the page size as specified in the source application.For details on available page sizes, see "Paper Sizes →P.620 "
BBorderless Printing
Borderless printing is available if roll paper is selected in the L Paper Source list. Choose from the following options whenthis setting is activated.
• Borderless Printing on Paper of Equivalent Size →P.100
• Borderless Printing by Resizing Originals to Fit the Roll Width →P.107
• Borderless Printing at Actual Size →P.91
Windows Software > Printer Driver >
Page Setup Sheet iPF815
4
228
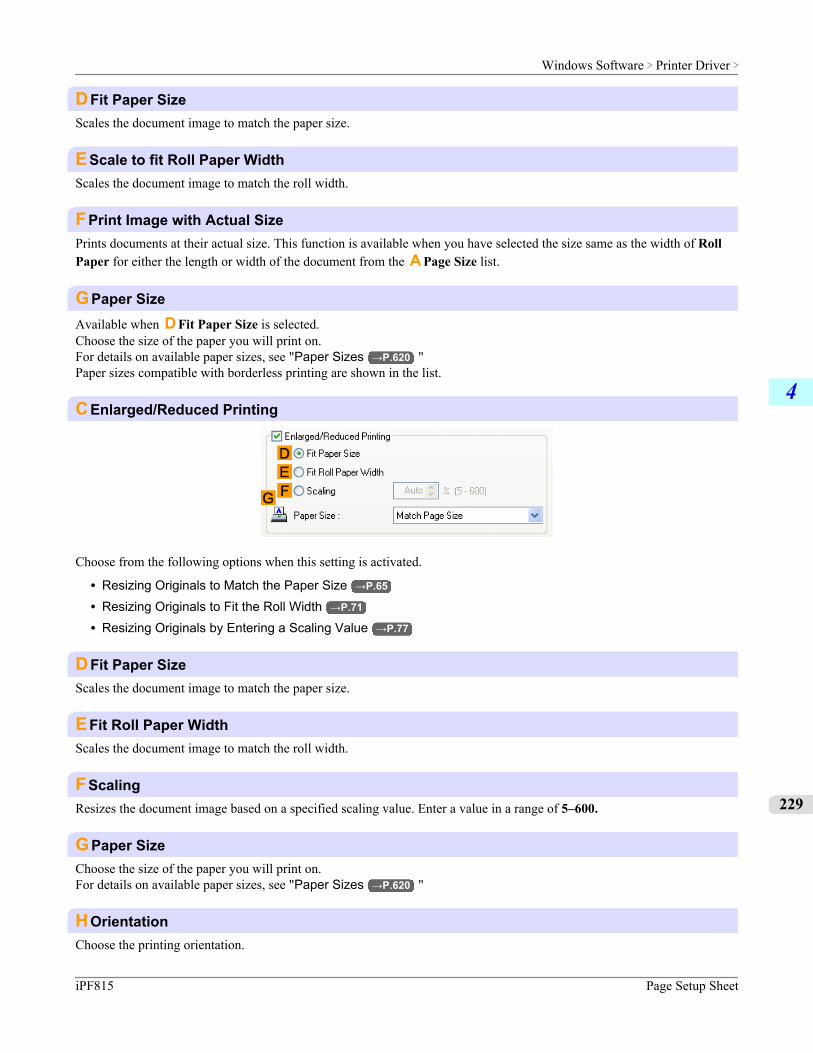
DFit Paper SizeScales the document image to match the paper size.
EScale to fit Roll Paper WidthScales the document image to match the roll width.
FPrint Image with Actual SizePrints documents at their actual size. This function is available when you have selected the size same as the width of RollPaper for either the length or width of the document from the A Page Size list.
GPaper SizeAvailable when D Fit Paper Size is selected.Choose the size of the paper you will print on.For details on available paper sizes, see "Paper Sizes →P.620 "Paper sizes compatible with borderless printing are shown in the list.
CEnlarged/Reduced Printing
Choose from the following options when this setting is activated.
• Resizing Originals to Match the Paper Size →P.65
• Resizing Originals to Fit the Roll Width →P.71
• Resizing Originals by Entering a Scaling Value →P.77
DFit Paper SizeScales the document image to match the paper size.
EFit Roll Paper WidthScales the document image to match the roll width.
FScalingResizes the document image based on a specified scaling value. Enter a value in a range of 5–600.
GPaper SizeChoose the size of the paper you will print on.For details on available paper sizes, see "Paper Sizes →P.620 "
HOrientationChoose the printing orientation.
Windows Software > Printer Driver >
iPF815 Page Setup Sheet
4
229
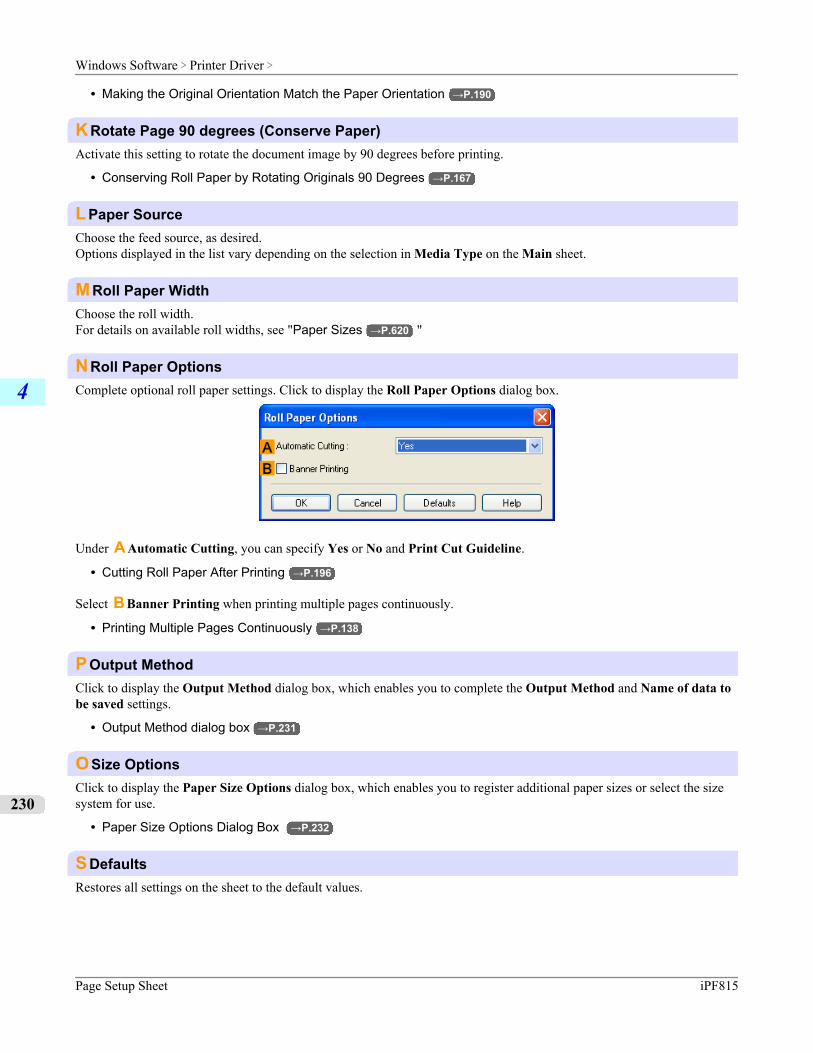
• Making the Original Orientation Match the Paper Orientation →P.190
KRotate Page 90 degrees (Conserve Paper)Activate this setting to rotate the document image by 90 degrees before printing.
• Conserving Roll Paper by Rotating Originals 90 Degrees →P.167
LPaper SourceChoose the feed source, as desired.Options displayed in the list vary depending on the selection in Media Type on the Main sheet.
MRoll Paper WidthChoose the roll width.For details on available roll widths, see "Paper Sizes →P.620 "
NRoll Paper OptionsComplete optional roll paper settings. Click to display the Roll Paper Options dialog box.
Under A Automatic Cutting, you can specify Yes or No and Print Cut Guideline.
• Cutting Roll Paper After Printing →P.196
Select B Banner Printing when printing multiple pages continuously.
• Printing Multiple Pages Continuously →P.138
POutput MethodClick to display the Output Method dialog box, which enables you to complete the Output Method and Name of data tobe saved settings.
• Output Method dialog box →P.231
OSize OptionsClick to display the Paper Size Options dialog box, which enables you to register additional paper sizes or select the sizesystem for use.
• Paper Size Options Dialog Box →P.232
SDefaultsRestores all settings on the sheet to the default values.
Windows Software > Printer Driver >
Page Setup Sheet iPF815
4
230
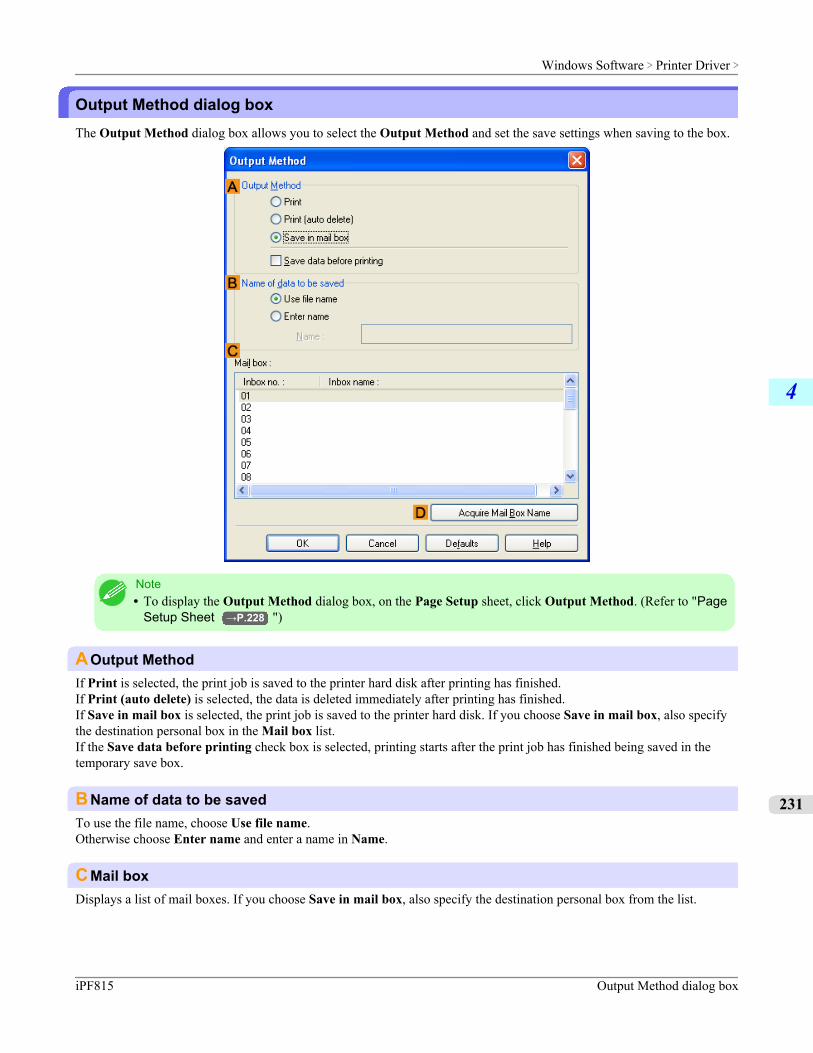
Output Method dialog boxThe Output Method dialog box allows you to select the Output Method and set the save settings when saving to the box.
Note• To display the Output Method dialog box, on the Page Setup sheet, click Output Method. (Refer to "Page
Setup Sheet →P.228 ")
AOutput MethodIf Print is selected, the print job is saved to the printer hard disk after printing has finished.If Print (auto delete) is selected, the data is deleted immediately after printing has finished.If Save in mail box is selected, the print job is saved to the printer hard disk. If you choose Save in mail box, also specifythe destination personal box in the Mail box list.If the Save data before printing check box is selected, printing starts after the print job has finished being saved in thetemporary save box.
BName of data to be savedTo use the file name, choose Use file name.Otherwise choose Enter name and enter a name in Name.
CMail boxDisplays a list of mail boxes. If you choose Save in mail box, also specify the destination personal box from the list.
Windows Software > Printer Driver >
iPF815 Output Method dialog box
4
231
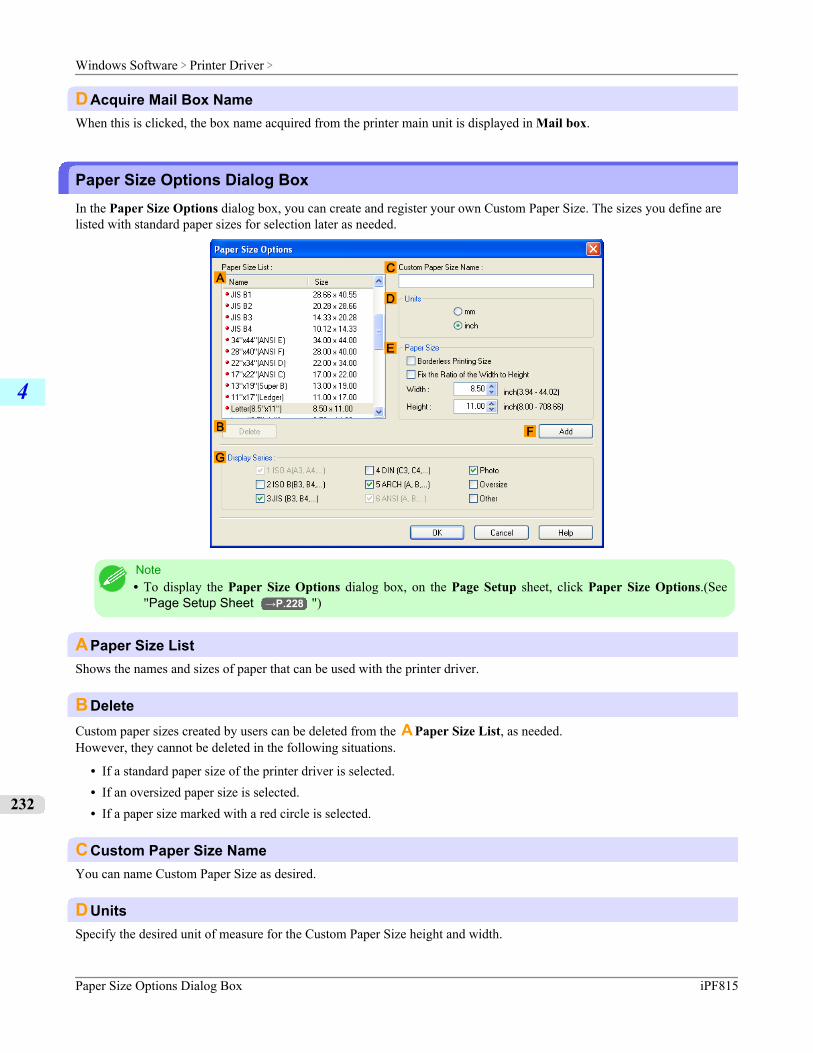
DAcquire Mail Box NameWhen this is clicked, the box name acquired from the printer main unit is displayed in Mail box.
Paper Size Options Dialog BoxIn the Paper Size Options dialog box, you can create and register your own Custom Paper Size. The sizes you define arelisted with standard paper sizes for selection later as needed.
Note• To display the Paper Size Options dialog box, on the Page Setup sheet, click Paper Size Options.(See
"Page Setup Sheet →P.228 ")
APaper Size ListShows the names and sizes of paper that can be used with the printer driver.
BDeleteCustom paper sizes created by users can be deleted from the A Paper Size List, as needed.However, they cannot be deleted in the following situations.
• If a standard paper size of the printer driver is selected.• If an oversized paper size is selected.• If a paper size marked with a red circle is selected.
CCustom Paper Size NameYou can name Custom Paper Size as desired.
DUnitsSpecify the desired unit of measure for the Custom Paper Size height and width.
Windows Software > Printer Driver >
Paper Size Options Dialog Box iPF815
4
232
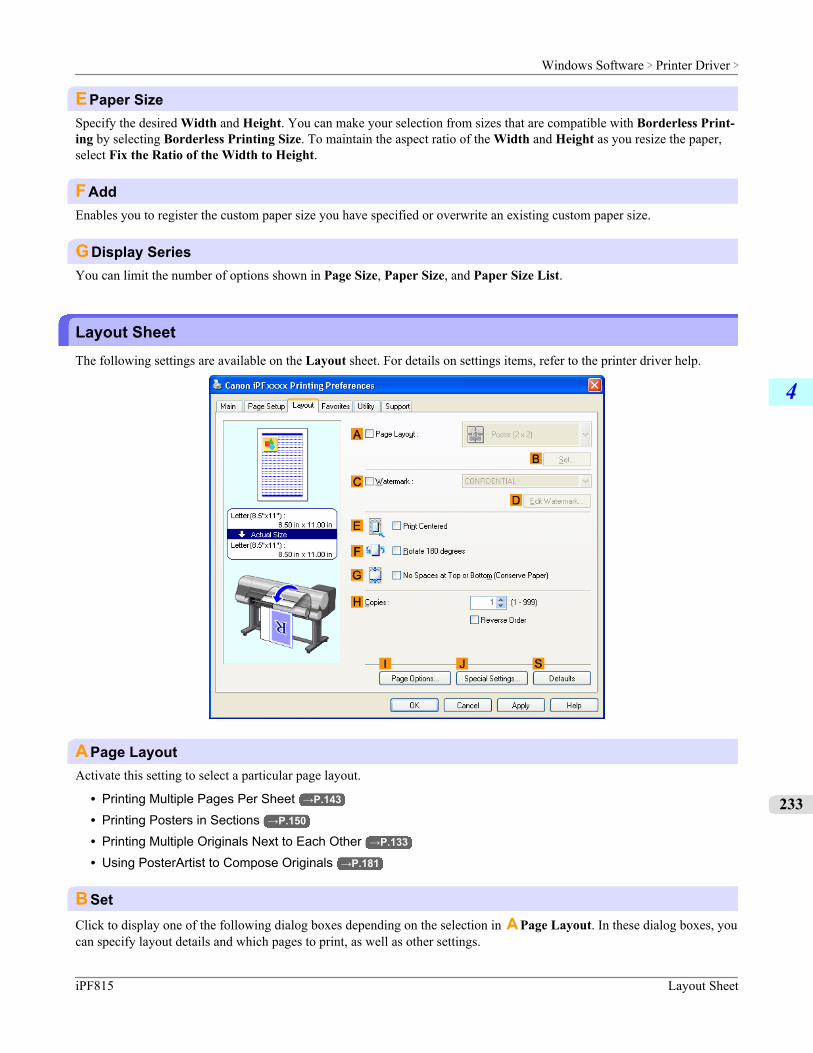
EPaper SizeSpecify the desired Width and Height. You can make your selection from sizes that are compatible with Borderless Print-ing by selecting Borderless Printing Size. To maintain the aspect ratio of the Width and Height as you resize the paper,select Fix the Ratio of the Width to Height.
FAddEnables you to register the custom paper size you have specified or overwrite an existing custom paper size.
GDisplay SeriesYou can limit the number of options shown in Page Size, Paper Size, and Paper Size List.
Layout SheetThe following settings are available on the Layout sheet. For details on settings items, refer to the printer driver help.
APage LayoutActivate this setting to select a particular page layout.
• Printing Multiple Pages Per Sheet →P.143
• Printing Posters in Sections →P.150
• Printing Multiple Originals Next to Each Other →P.133
• Using PosterArtist to Compose Originals →P.181
BSetClick to display one of the following dialog boxes depending on the selection in A Page Layout. In these dialog boxes, youcan specify layout details and which pages to print, as well as other settings.
Windows Software > Printer Driver >
iPF815 Layout Sheet
4
233

• Page Layout Printing• Pages to Print• Free Layout Settings
CWatermarkActivating this option makes two settings available, Watermarks and D Edit Watermark.
• Printing With Watermarks →P.186
WatermarksLists the provided watermarks. Choose the watermark to print.
DEdit WatermarkClick to display the Edit Watermark dialog box for creating your own, original watermark.
EPrint CenteredActivate this setting to print document images in the center of the paper.
• Printing Originals Centered on Rolls →P.154
• Printing Originals Centered on Sheets →P.160
FRotate 180 degreesActivate this option to rotate document images by 180 degrees before printing.
GNo Spaces at Top or Bottom (Conserve Paper)Activate this setting to print the next image skipping blank areas above and below printable data in documents, which ena-bles you to conserve the paper.
• Conserving Roll Paper by Printing Originals Without Top and Bottom Margins →P.173
HCopiesEnter the number of copies to print, in a range of 1–999.
Reverse OrderActivate this option to print pages in reverse order.
IPage OptionsClick to display the Page Options dialog box, which enables you to complete settings for printing the user name, date, orpage number in the header or footer.
• Page Options Dialog Box →P.235
JSpecial SettingsIf the printing results are not as you expected, click this option to change how printing is processed.
• Special Settings Dialog Box →P.236
Windows Software > Printer Driver >
Layout Sheet iPF815
4
234
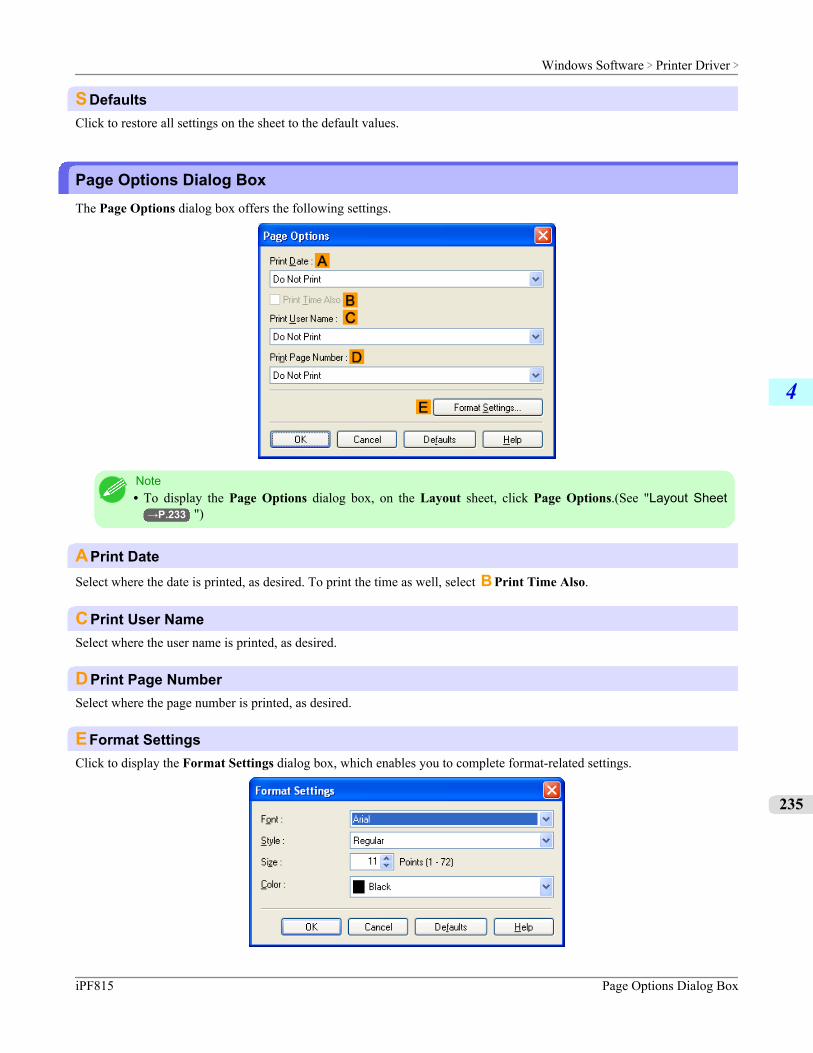
SDefaultsClick to restore all settings on the sheet to the default values.
Page Options Dialog BoxThe Page Options dialog box offers the following settings.
Note• To display the Page Options dialog box, on the Layout sheet, click Page Options.(See "Layout Sheet
→P.233 ")
APrint DateSelect where the date is printed, as desired. To print the time as well, select B Print Time Also.
CPrint User NameSelect where the user name is printed, as desired.
DPrint Page NumberSelect where the page number is printed, as desired.
EFormat SettingsClick to display the Format Settings dialog box, which enables you to complete format-related settings.
Windows Software > Printer Driver >
iPF815 Page Options Dialog Box
4
235
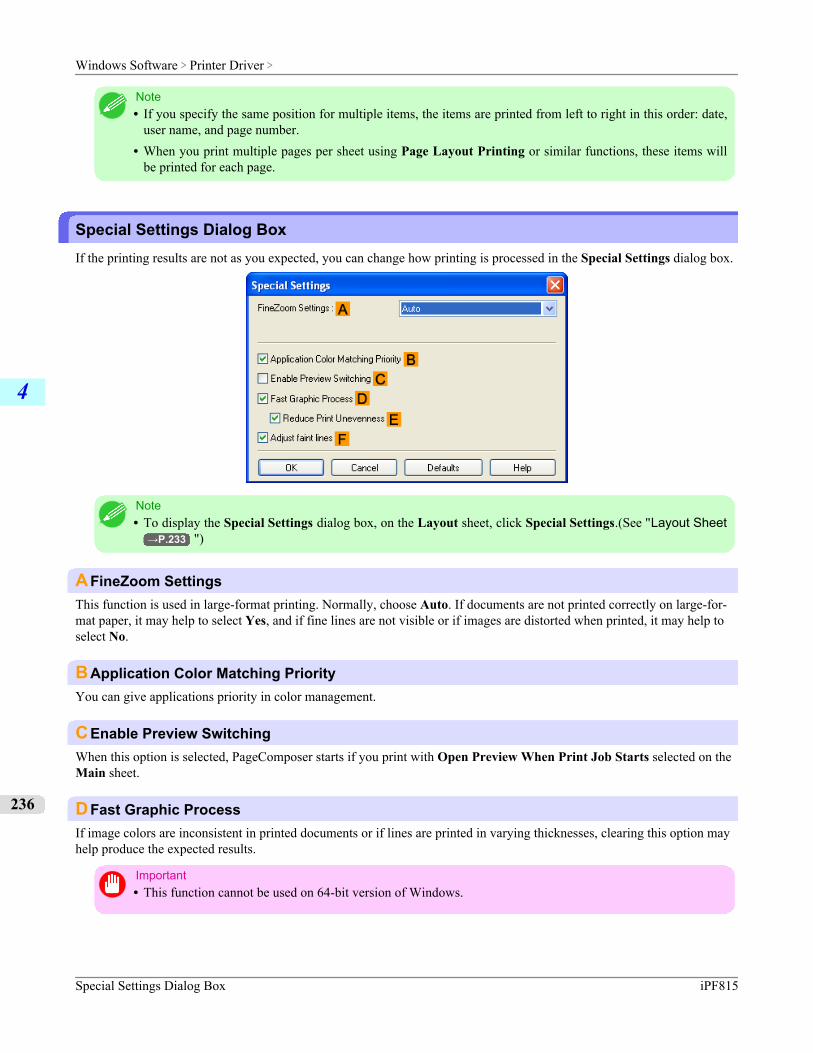
Note• If you specify the same position for multiple items, the items are printed from left to right in this order: date,
user name, and page number.• When you print multiple pages per sheet using Page Layout Printing or similar functions, these items will
be printed for each page.
Special Settings Dialog BoxIf the printing results are not as you expected, you can change how printing is processed in the Special Settings dialog box.
Note• To display the Special Settings dialog box, on the Layout sheet, click Special Settings.(See "Layout Sheet
→P.233 ")
AFineZoom SettingsThis function is used in large-format printing. Normally, choose Auto. If documents are not printed correctly on large-for-mat paper, it may help to select Yes, and if fine lines are not visible or if images are distorted when printed, it may help toselect No.
BApplication Color Matching PriorityYou can give applications priority in color management.
CEnable Preview SwitchingWhen this option is selected, PageComposer starts if you print with Open Preview When Print Job Starts selected on theMain sheet.
DFast Graphic ProcessIf image colors are inconsistent in printed documents or if lines are printed in varying thicknesses, clearing this option mayhelp produce the expected results.
Important• This function cannot be used on 64-bit version of Windows.
Windows Software > Printer Driver >
Special Settings Dialog Box iPF815
4
236
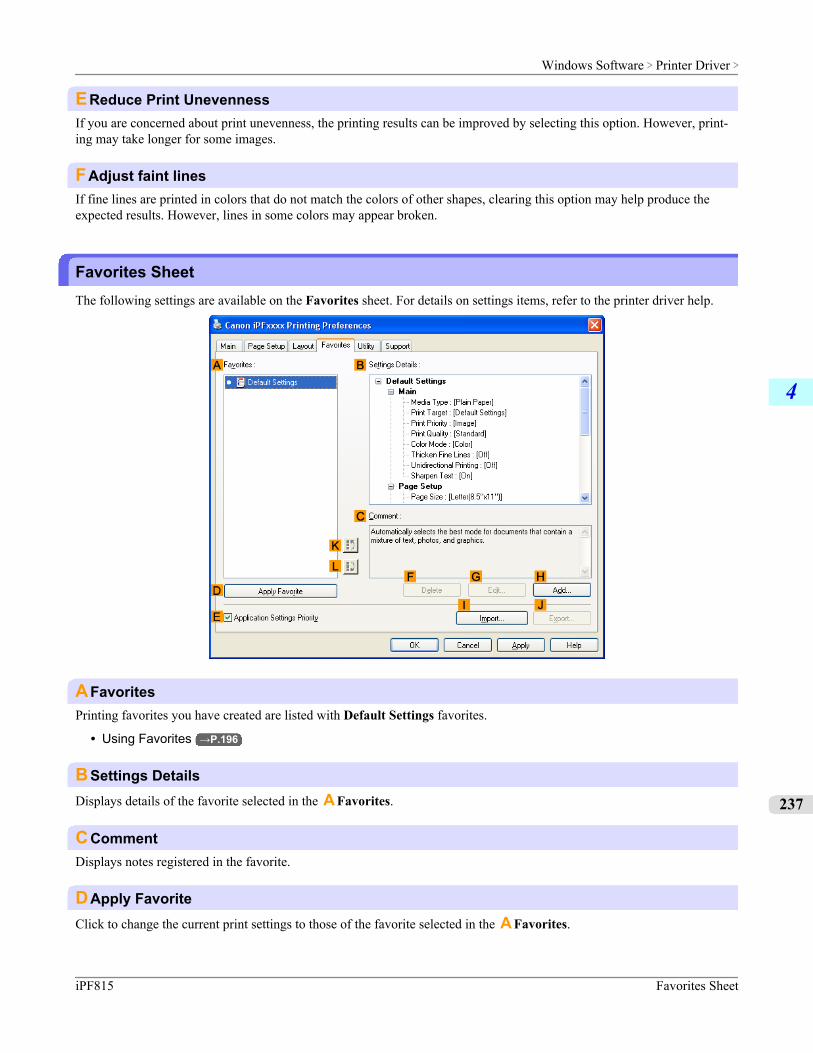
EReduce Print UnevennessIf you are concerned about print unevenness, the printing results can be improved by selecting this option. However, print-ing may take longer for some images.
FAdjust faint linesIf fine lines are printed in colors that do not match the colors of other shapes, clearing this option may help produce theexpected results. However, lines in some colors may appear broken.
Favorites SheetThe following settings are available on the Favorites sheet. For details on settings items, refer to the printer driver help.
AFavoritesPrinting favorites you have created are listed with Default Settings favorites.
• Using Favorites →P.196
BSettings DetailsDisplays details of the favorite selected in the A Favorites.
CCommentDisplays notes registered in the favorite.
DApply FavoriteClick to change the current print settings to those of the favorite selected in the A Favorites.
Windows Software > Printer Driver >
iPF815 Favorites Sheet
4
237
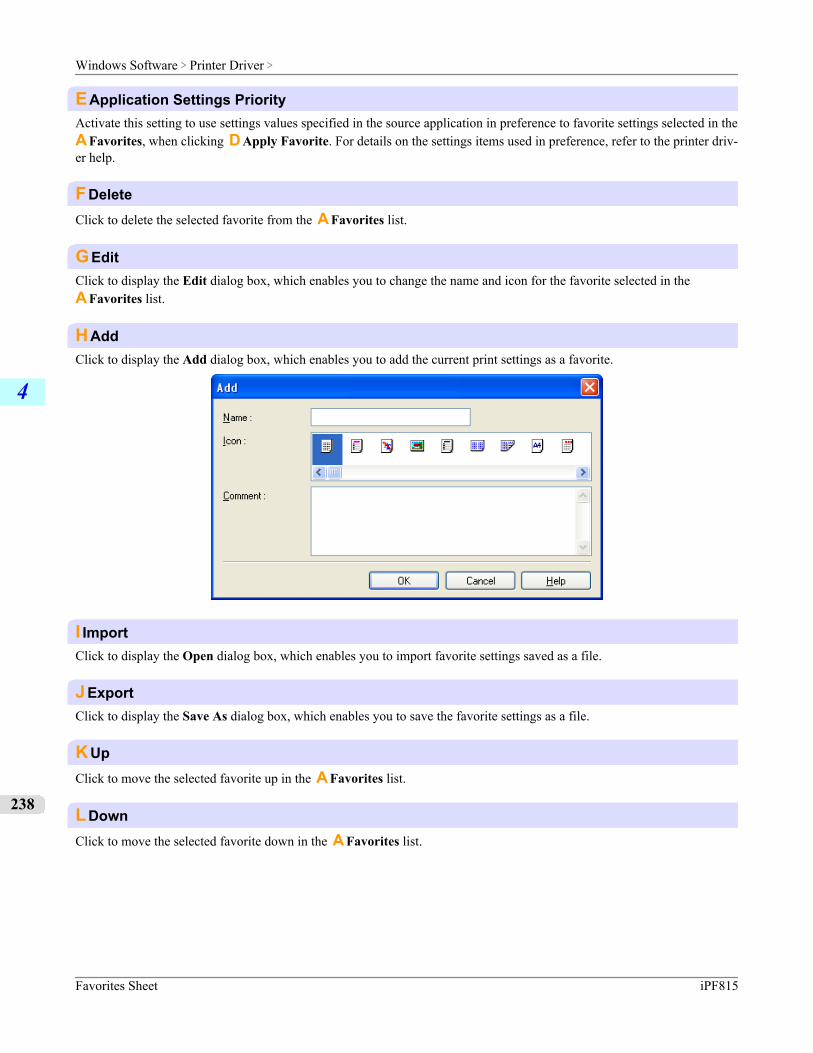
EApplication Settings PriorityActivate this setting to use settings values specified in the source application in preference to favorite settings selected in theA Favorites, when clicking D Apply Favorite. For details on the settings items used in preference, refer to the printer driv-er help.
FDeleteClick to delete the selected favorite from the A Favorites list.
GEditClick to display the Edit dialog box, which enables you to change the name and icon for the favorite selected in theA Favorites list.
HAddClick to display the Add dialog box, which enables you to add the current print settings as a favorite.
I ImportClick to display the Open dialog box, which enables you to import favorite settings saved as a file.
JExportClick to display the Save As dialog box, which enables you to save the favorite settings as a file.
KUpClick to move the selected favorite up in the A Favorites list.
LDownClick to move the selected favorite down in the A Favorites list.
Windows Software > Printer Driver >
Favorites Sheet iPF815
4
238
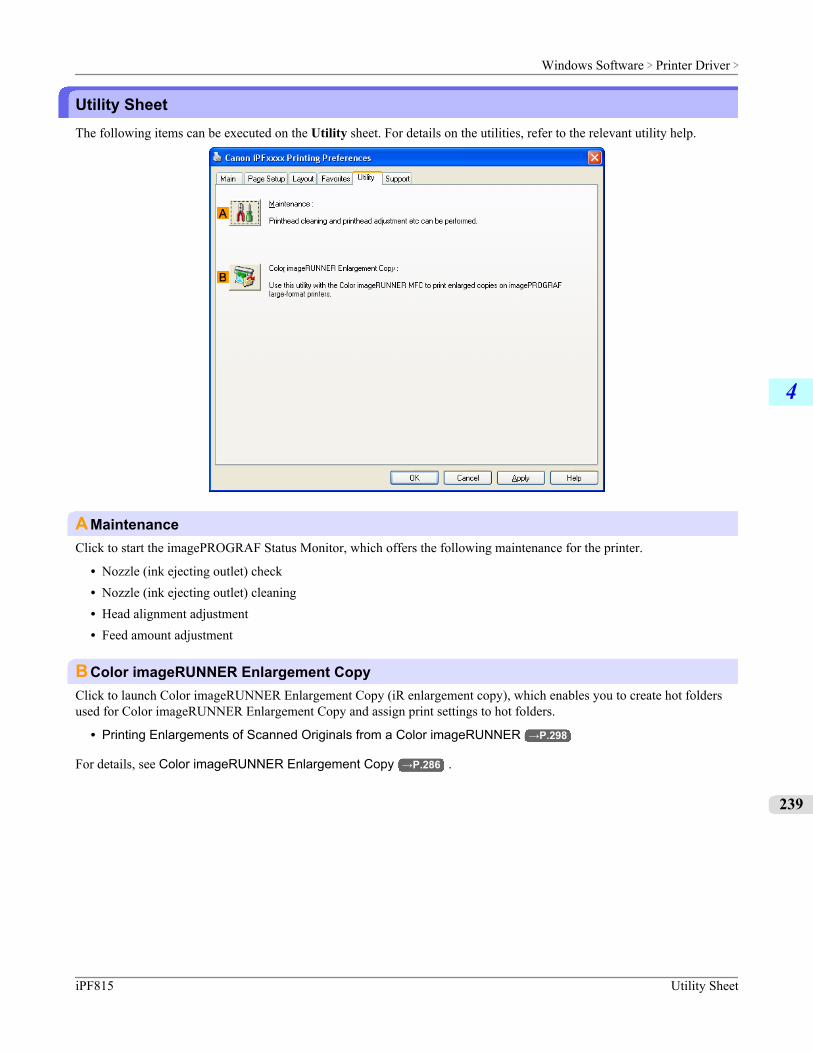
Utility SheetThe following items can be executed on the Utility sheet. For details on the utilities, refer to the relevant utility help.
AMaintenanceClick to start the imagePROGRAF Status Monitor, which offers the following maintenance for the printer.
• Nozzle (ink ejecting outlet) check• Nozzle (ink ejecting outlet) cleaning• Head alignment adjustment• Feed amount adjustment
BColor imageRUNNER Enlargement CopyClick to launch Color imageRUNNER Enlargement Copy (iR enlargement copy), which enables you to create hot foldersused for Color imageRUNNER Enlargement Copy and assign print settings to hot folders.
• Printing Enlargements of Scanned Originals from a Color imageRUNNER →P.298
For details, see Color imageRUNNER Enlargement Copy →P.286 .
Windows Software > Printer Driver >
iPF815 Utility Sheet
4
239
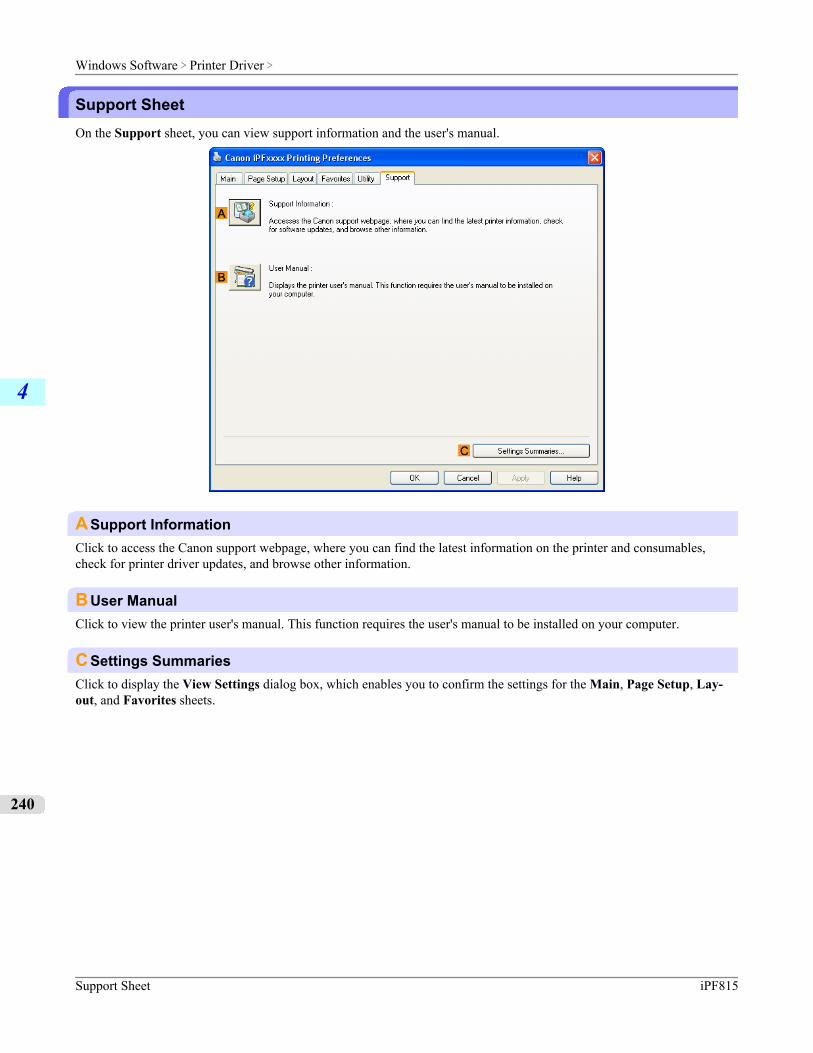
Support SheetOn the Support sheet, you can view support information and the user's manual.
ASupport InformationClick to access the Canon support webpage, where you can find the latest information on the printer and consumables,check for printer driver updates, and browse other information.
BUser ManualClick to view the printer user's manual. This function requires the user's manual to be installed on your computer.
CSettings SummariesClick to display the View Settings dialog box, which enables you to confirm the settings for the Main, Page Setup, Lay-out, and Favorites sheets.
Windows Software > Printer Driver >
Support Sheet iPF815
4
240

Settings Summaries Dialog BoxThe Settings Summaries dialog box enables you to confirm the settings for the Main, Page Setup, Layout, and Favoritessheets.
ACopyClick to copy the settings information to the clipboard. You can paste the settings information into a file created with a texteditor or similar application.
Windows Software > Printer Driver >
iPF815 Settings Summaries Dialog Box
4
241
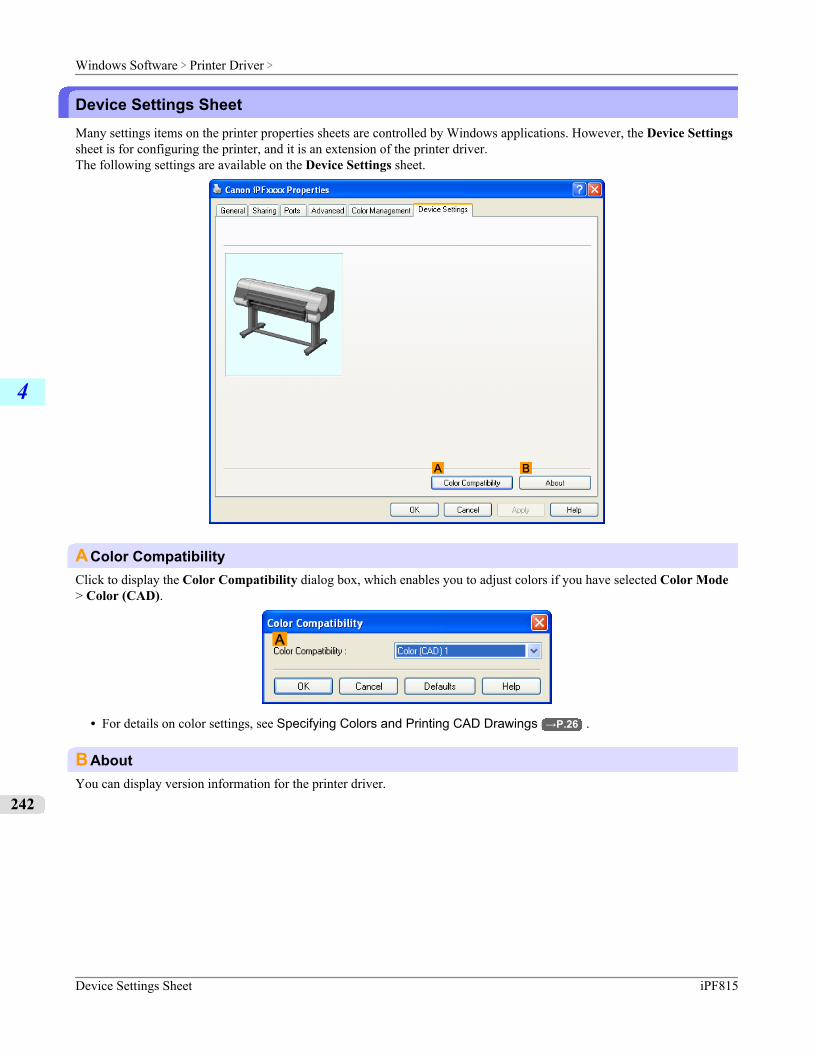
Device Settings SheetMany settings items on the printer properties sheets are controlled by Windows applications. However, the Device Settingssheet is for configuring the printer, and it is an extension of the printer driver.The following settings are available on the Device Settings sheet.
AColor CompatibilityClick to display the Color Compatibility dialog box, which enables you to adjust colors if you have selected Color Mode> Color (CAD).
• For details on color settings, see Specifying Colors and Printing CAD Drawings →P.26 .
BAboutYou can display version information for the printer driver.
Windows Software > Printer Driver >
Device Settings Sheet iPF815
4
242
PreviewThe Features of Preview ................................................................................................................................. 243Operating Environment ................................................................................................................................... 243Starting Preview .............................................................................................................................................. 243
Preview Main Window ..................................................................................................................................... 245Dialog Area ...................................................................................................................................................... 248
Enlarge/Reduce the screen display ................................................................................................................. 249Moving a Page ................................................................................................................................................ 249Using the ruler ................................................................................................................................................. 250Priority setting for rotating 90 degrees ............................................................................................................ 250Printing with Selecting the Layout ................................................................................................................... 252Print on the Center .......................................................................................................................................... 254Not Print Spaces at the Top/Bottom ................................................................................................................ 255
The Features of PreviewThe main features of Preview are as follows.
• While viewing this screen, you can adjust layout settings of a document created with application software.• You can not only adjust layout settings but also your changes will be instantly applied on the preview screen, and you
can print the preview screen as it is seen.
Note• The media type, image size, detailed media settings, and the printer settings can cause the actual print output
to differ from the Preview settings.
Operating EnvironmentYou can use the Preview in the following environments.
• Compatible Operating SystemWindows 2000, Windows XP, Windows Server 2003, Windows Vista, Windows Server 2008, Windows 7
• Software that requires installationimagePROGRAF Printer Driver
Starting PreviewFollow the procedure below to start the Preview.
1. Start the apllication software which you use.
2. From the application software's File menu, select the printer setup menu to open the Print dialog box.
Note• Normally, select Print from the File menu.
Windows Software > Preview >
iPF815 The Features of Preview
4
243
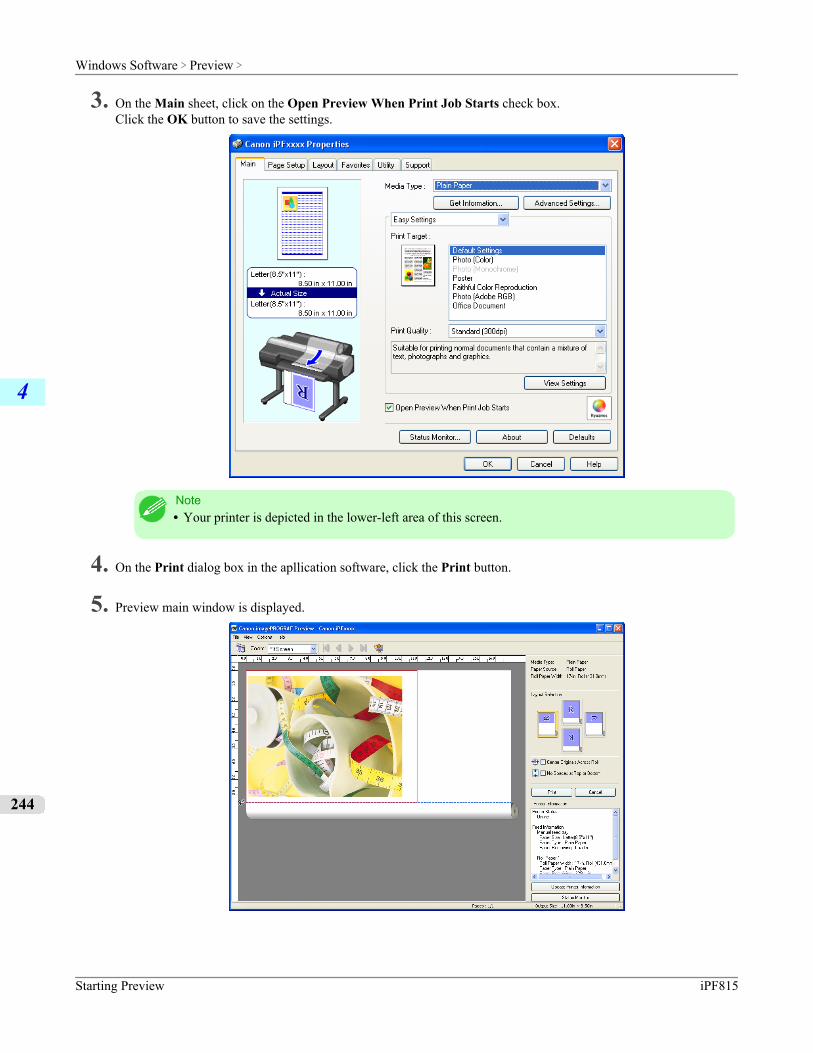
3. On the Main sheet, click on the Open Preview When Print Job Starts check box.Click the OK button to save the settings.
Note• Your printer is depicted in the lower-left area of this screen.
4. On the Print dialog box in the apllication software, click the Print button.
5. Preview main window is displayed.
Windows Software > Preview >
Starting Preview iPF815
4
244
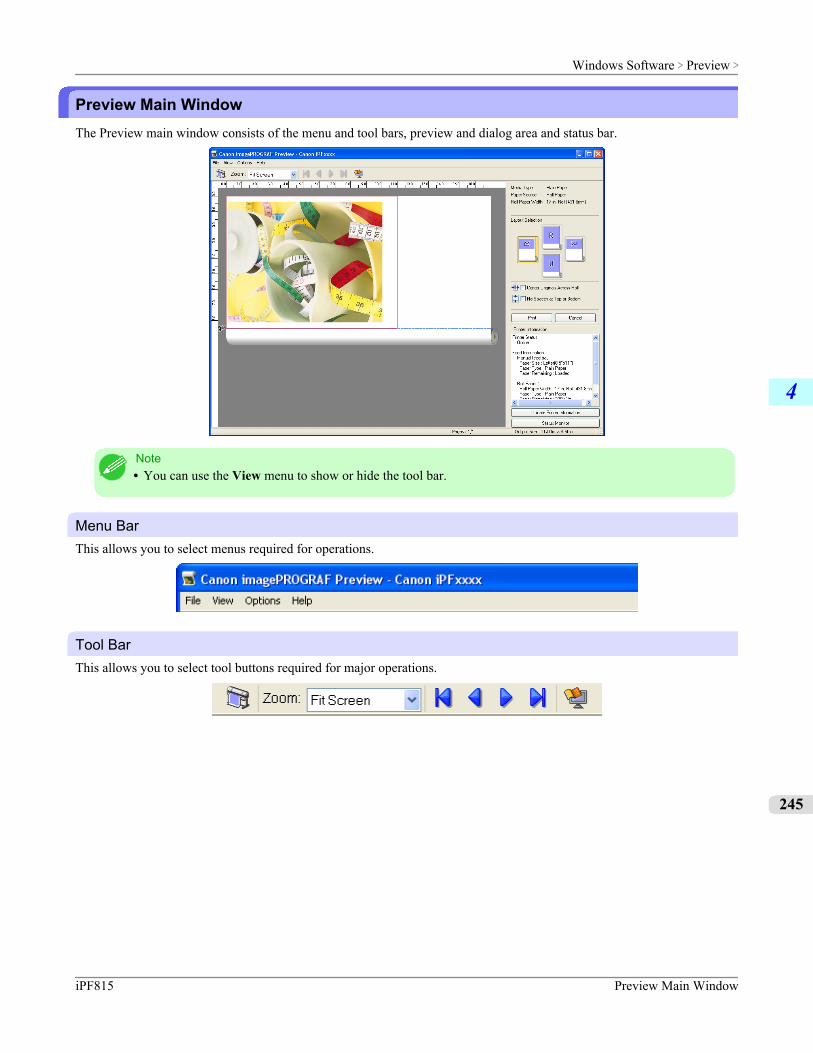
Preview Main WindowThe Preview main window consists of the menu and tool bars, preview and dialog area and status bar.
Note• You can use the View menu to show or hide the tool bar.
Menu BarThis allows you to select menus required for operations.
Tool BarThis allows you to select tool buttons required for major operations.
Windows Software > Preview >
iPF815 Preview Main Window
4
245
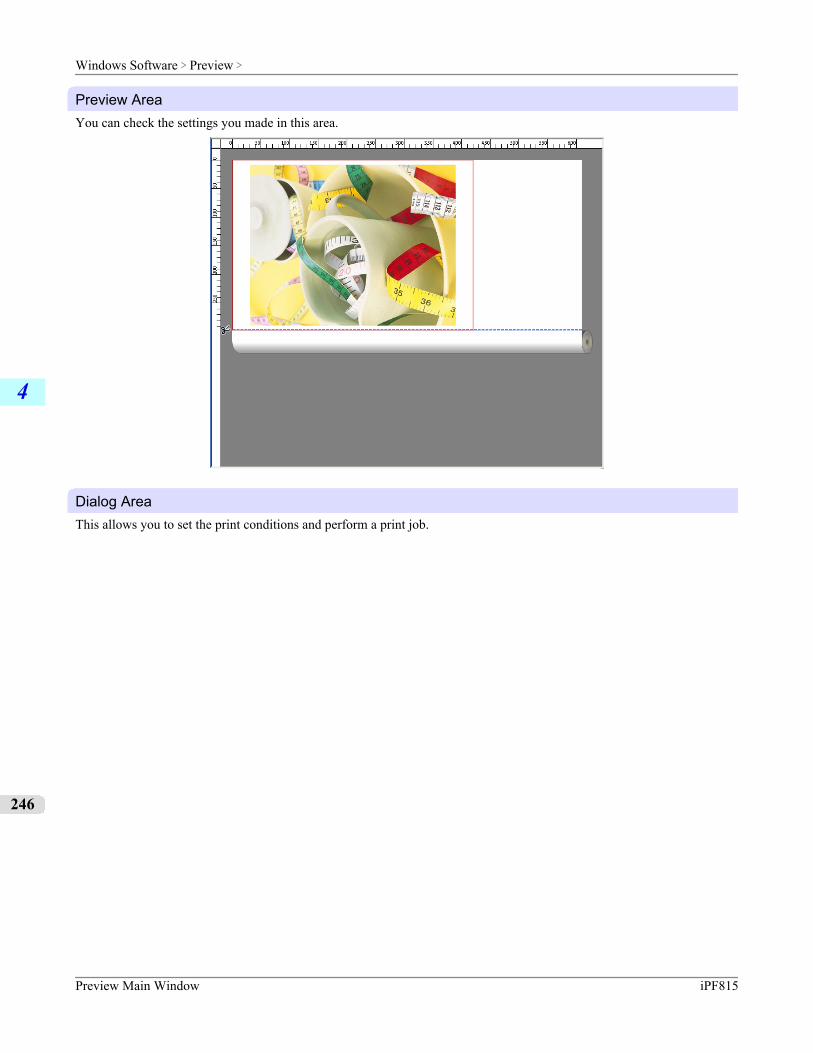
Preview AreaYou can check the settings you made in this area.
Dialog AreaThis allows you to set the print conditions and perform a print job.
Windows Software > Preview >
Preview Main Window iPF815
4
246
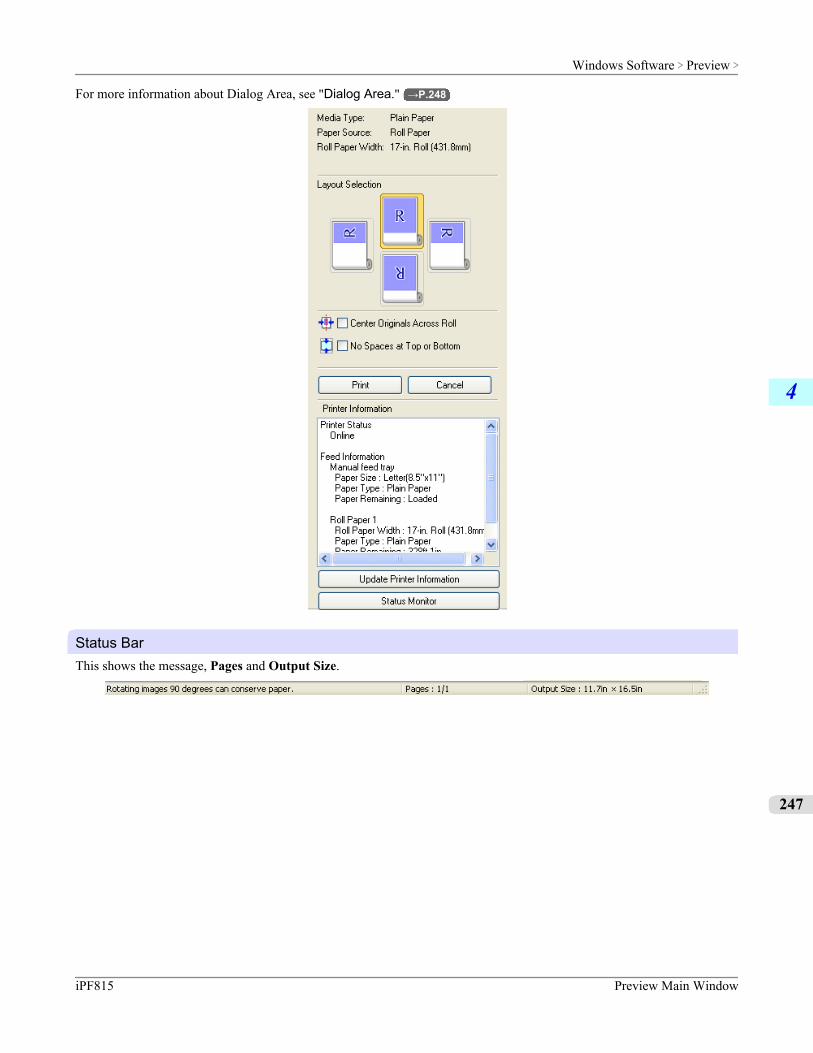
For more information about Dialog Area, see "Dialog Area." →P.248
Status BarThis shows the message, Pages and Output Size.
Windows Software > Preview >
iPF815 Preview Main Window
4
247
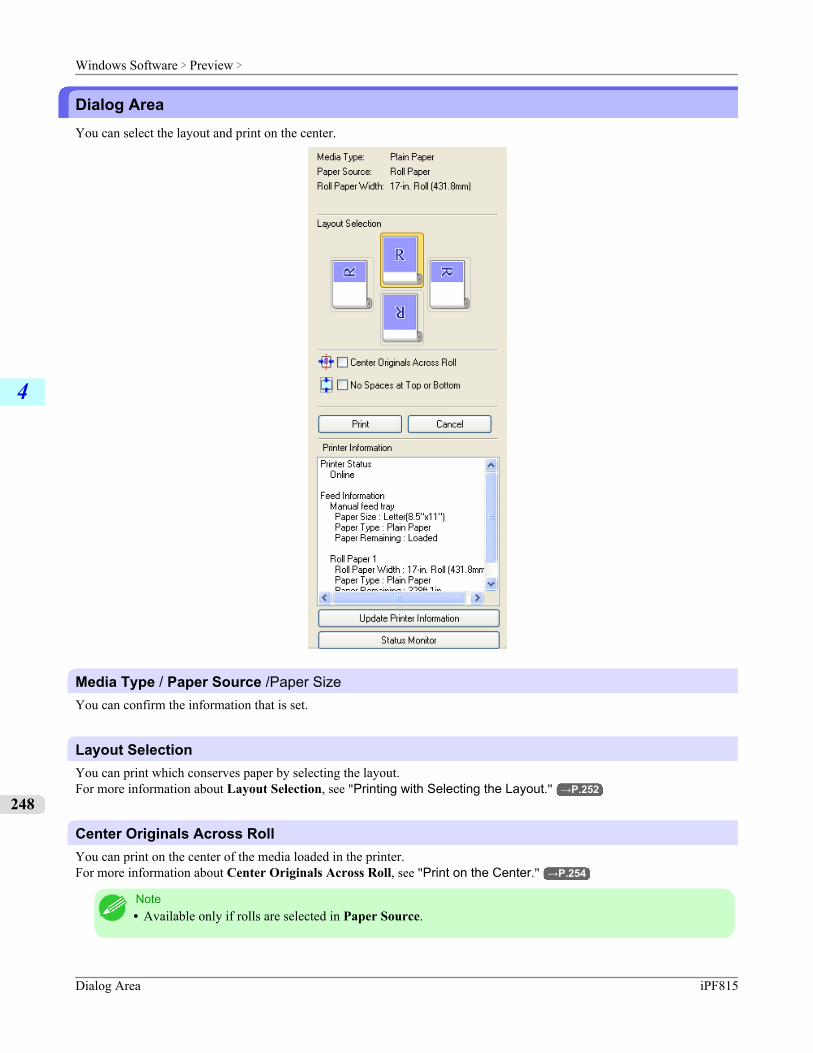
Dialog AreaYou can select the layout and print on the center.
Media Type / Paper Source /Paper SizeYou can confirm the information that is set.
Layout SelectionYou can print which conserves paper by selecting the layout.For more information about Layout Selection, see "Printing with Selecting the Layout." →P.252
Center Originals Across RollYou can print on the center of the media loaded in the printer.For more information about Center Originals Across Roll, see "Print on the Center." →P.254
Note• Available only if rolls are selected in Paper Source.
Windows Software > Preview >
Dialog Area iPF815
4
248
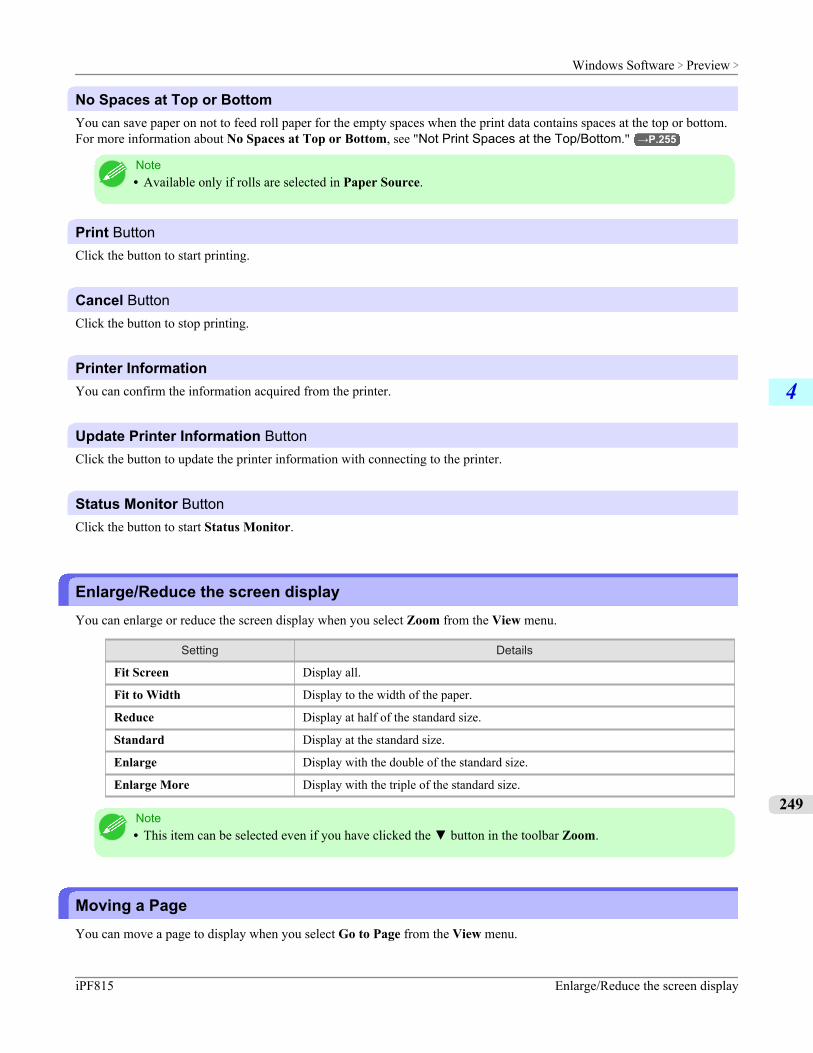
No Spaces at Top or BottomYou can save paper on not to feed roll paper for the empty spaces when the print data contains spaces at the top or bottom.For more information about No Spaces at Top or Bottom, see "Not Print Spaces at the Top/Bottom." →P.255
Note• Available only if rolls are selected in Paper Source.
Print ButtonClick the button to start printing.
Cancel ButtonClick the button to stop printing.
Printer InformationYou can confirm the information acquired from the printer.
Update Printer Information ButtonClick the button to update the printer information with connecting to the printer.
Status Monitor ButtonClick the button to start Status Monitor.
Enlarge/Reduce the screen displayYou can enlarge or reduce the screen display when you select Zoom from the View menu.
Setting Details
Fit Screen Display all.
Fit to Width Display to the width of the paper.
Reduce Display at half of the standard size.
Standard Display at the standard size.
Enlarge Display with the double of the standard size.
Enlarge More Display with the triple of the standard size.
Note• This item can be selected even if you have clicked the ▼ button in the toolbar Zoom.
Moving a PageYou can move a page to display when you select Go to Page from the View menu.
Windows Software > Preview >
iPF815 Enlarge/Reduce the screen display
4
249
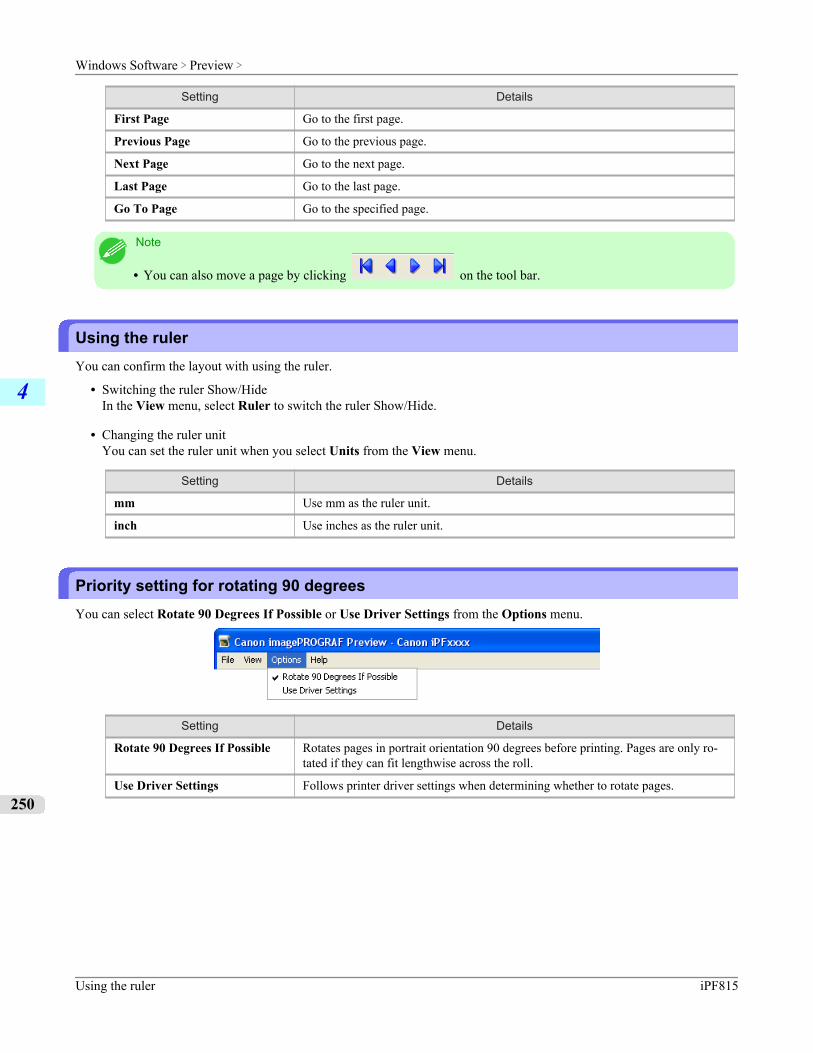
Setting Details
First Page Go to the first page.
Previous Page Go to the previous page.
Next Page Go to the next page.
Last Page Go to the last page.
Go To Page Go to the specified page.
Note
• You can also move a page by clicking on the tool bar.
Using the rulerYou can confirm the layout with using the ruler.
• Switching the ruler Show/HideIn the View menu, select Ruler to switch the ruler Show/Hide.
• Changing the ruler unitYou can set the ruler unit when you select Units from the View menu.
Setting Details
mm Use mm as the ruler unit.
inch Use inches as the ruler unit.
Priority setting for rotating 90 degreesYou can select Rotate 90 Degrees If Possible or Use Driver Settings from the Options menu.
Setting Details
Rotate 90 Degrees If Possible Rotates pages in portrait orientation 90 degrees before printing. Pages are only ro-tated if they can fit lengthwise across the roll.
Use Driver Settings Follows printer driver settings when determining whether to rotate pages.
Windows Software > Preview >
Using the ruler iPF815
4
250
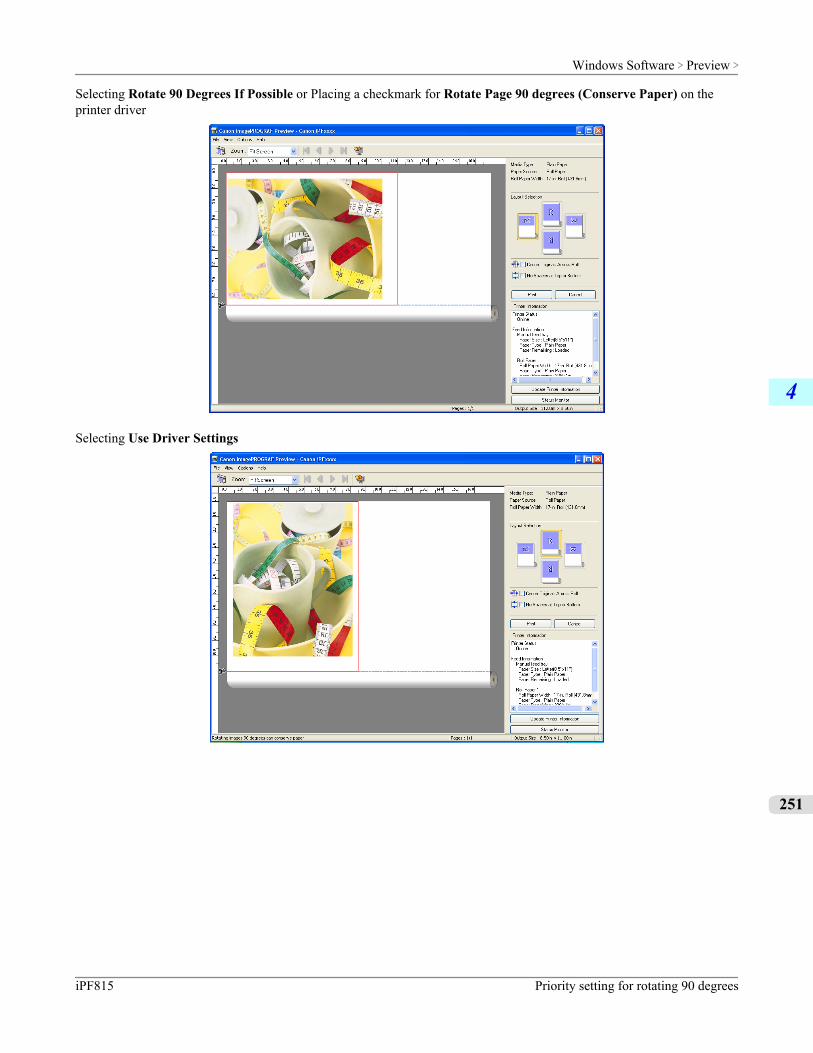
Selecting Rotate 90 Degrees If Possible or Placing a checkmark for Rotate Page 90 degrees (Conserve Paper) on theprinter driver
Selecting Use Driver Settings
Windows Software > Preview >
iPF815 Priority setting for rotating 90 degrees
4
251
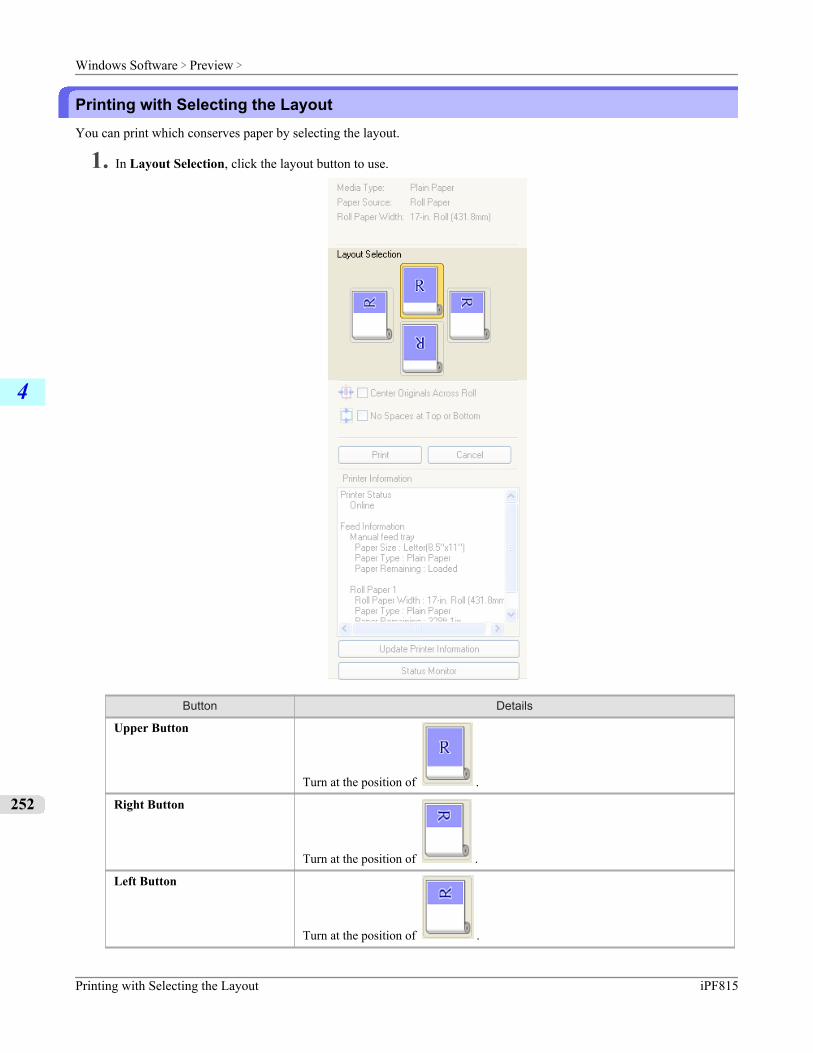
Printing with Selecting the LayoutYou can print which conserves paper by selecting the layout.
1. In Layout Selection, click the layout button to use.
Button Details
Upper Button
Turn at the position of .
Right Button
Turn at the position of .
Left Button
Turn at the position of .
Windows Software > Preview >
Printing with Selecting the Layout iPF815
4
252
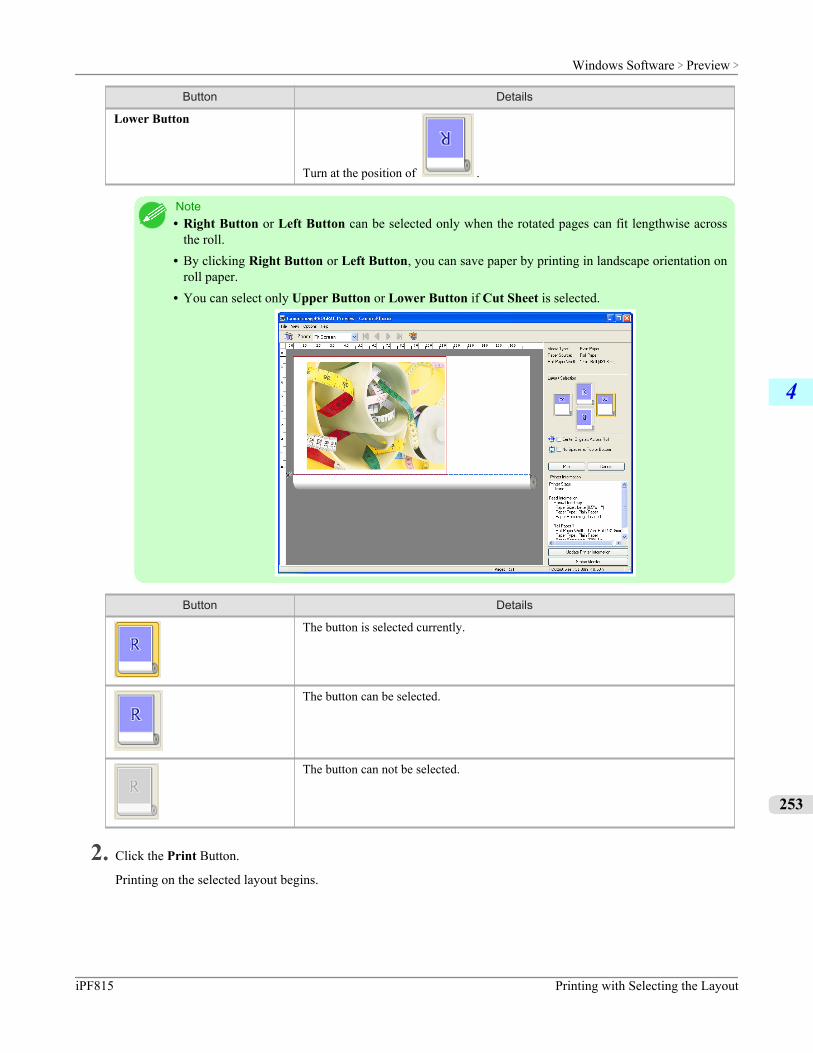
Button Details
Lower Button
Turn at the position of .
Note• Right Button or Left Button can be selected only when the rotated pages can fit lengthwise across
the roll.• By clicking Right Button or Left Button, you can save paper by printing in landscape orientation on
roll paper.• You can select only Upper Button or Lower Button if Cut Sheet is selected.
Button Details
The button is selected currently.
The button can be selected.
The button can not be selected.
2. Click the Print Button.
Printing on the selected layout begins.
Windows Software > Preview >
iPF815 Printing with Selecting the Layout
4
253
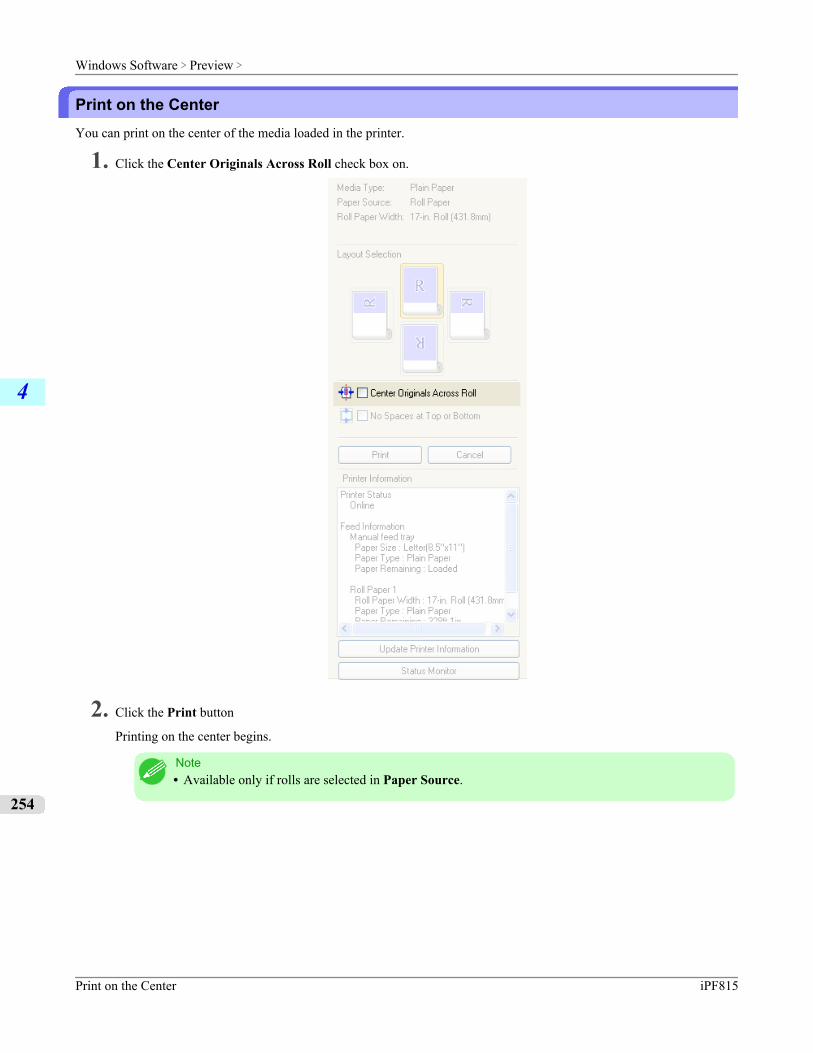
Print on the CenterYou can print on the center of the media loaded in the printer.
1. Click the Center Originals Across Roll check box on.
2. Click the Print button
Printing on the center begins.
Note• Available only if rolls are selected in Paper Source.
Windows Software > Preview >
Print on the Center iPF815
4
254
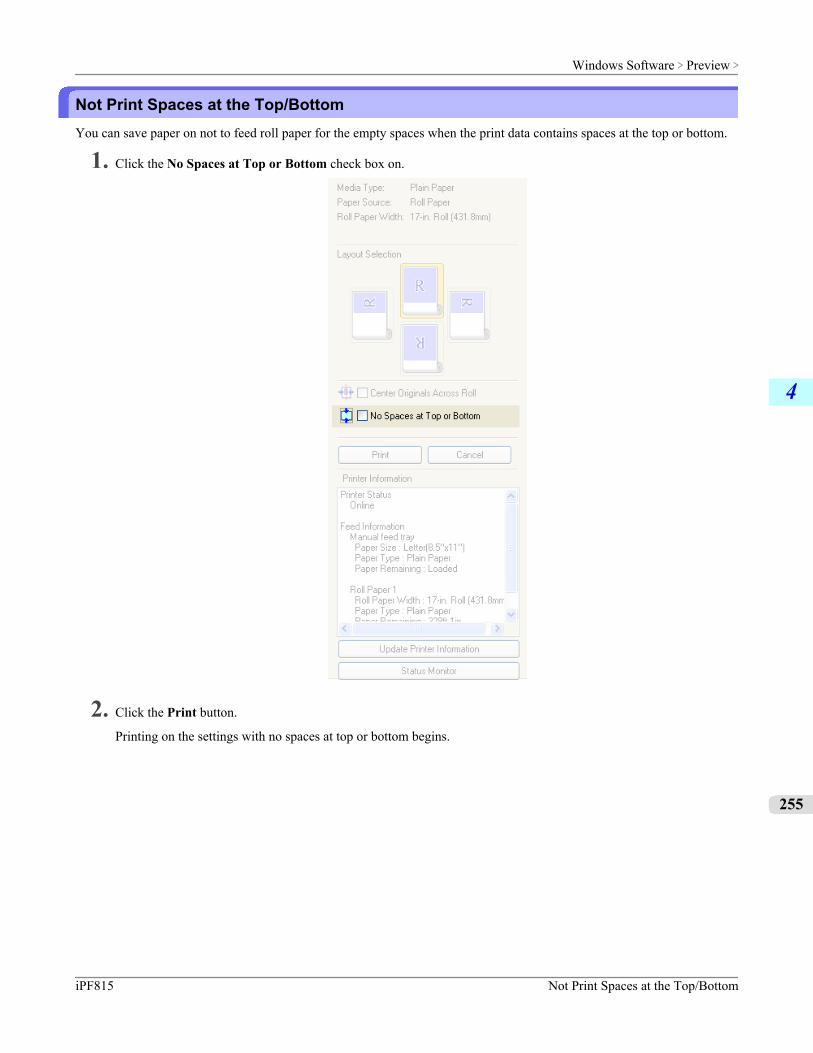
Not Print Spaces at the Top/BottomYou can save paper on not to feed roll paper for the empty spaces when the print data contains spaces at the top or bottom.
1. Click the No Spaces at Top or Bottom check box on.
2. Click the Print button.
Printing on the settings with no spaces at top or bottom begins.
Windows Software > Preview >
iPF815 Not Print Spaces at the Top/Bottom
4
255
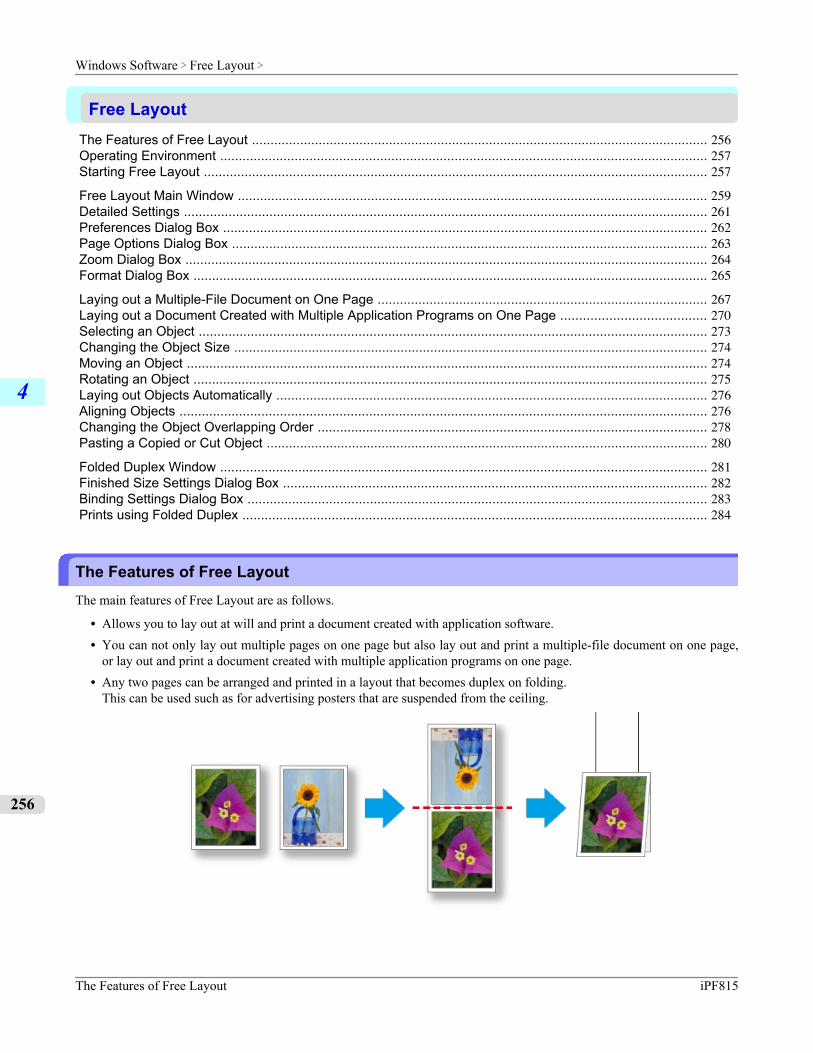
Free LayoutThe Features of Free Layout ........................................................................................................................... 256Operating Environment ................................................................................................................................... 257Starting Free Layout ........................................................................................................................................ 257
Free Layout Main Window ............................................................................................................................... 259Detailed Settings ............................................................................................................................................. 261Preferences Dialog Box ................................................................................................................................... 262Page Options Dialog Box ................................................................................................................................ 263Zoom Dialog Box ............................................................................................................................................. 264Format Dialog Box ........................................................................................................................................... 265
Laying out a Multiple-File Document on One Page ......................................................................................... 267Laying out a Document Created with Multiple Application Programs on One Page ....................................... 270Selecting an Object ......................................................................................................................................... 273Changing the Object Size ................................................................................................................................ 274Moving an Object ............................................................................................................................................ 274Rotating an Object ........................................................................................................................................... 275Laying out Objects Automatically .................................................................................................................... 276Aligning Objects .............................................................................................................................................. 276Changing the Object Overlapping Order ......................................................................................................... 278Pasting a Copied or Cut Object ....................................................................................................................... 280
Folded Duplex Window ................................................................................................................................... 281Finished Size Settings Dialog Box .................................................................................................................. 282Binding Settings Dialog Box ............................................................................................................................ 283Prints using Folded Duplex ............................................................................................................................. 284
The Features of Free LayoutThe main features of Free Layout are as follows.
• Allows you to lay out at will and print a document created with application software.• You can not only lay out multiple pages on one page but also lay out and print a multiple-file document on one page,
or lay out and print a document created with multiple application programs on one page.• Any two pages can be arranged and printed in a layout that becomes duplex on folding.
This can be used such as for advertising posters that are suspended from the ceiling.
Windows Software > Free Layout >
The Features of Free Layout iPF815
4
256
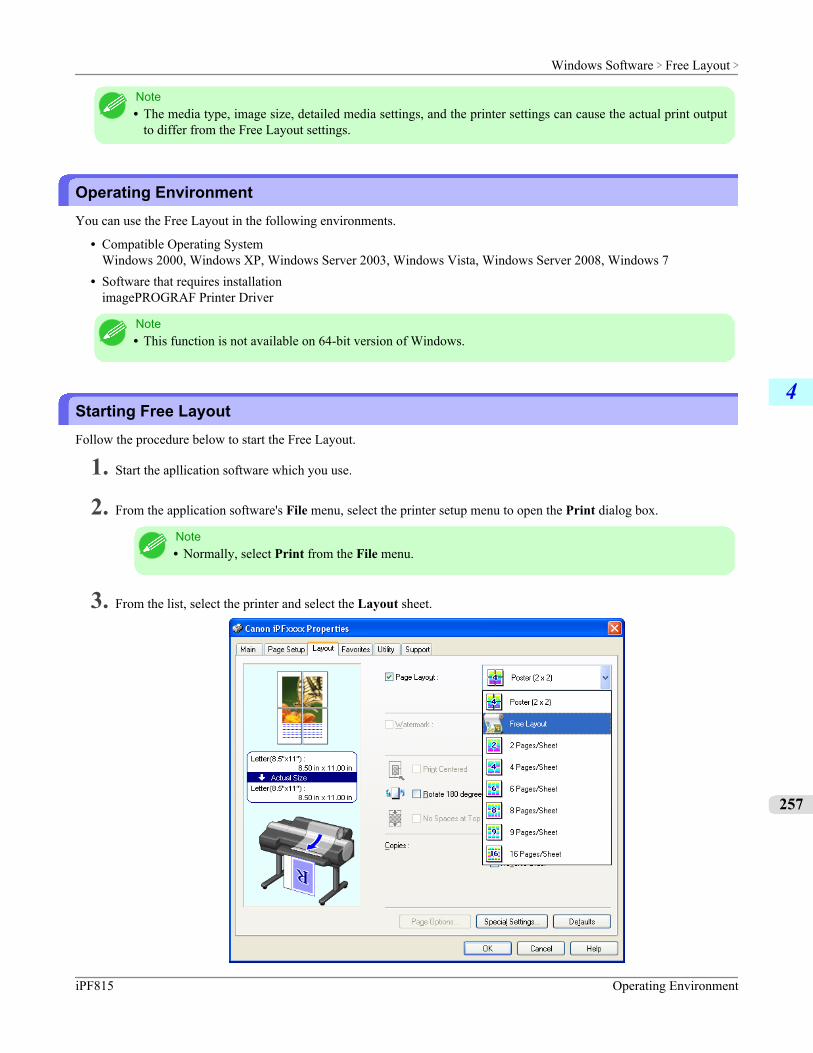
Note• The media type, image size, detailed media settings, and the printer settings can cause the actual print output
to differ from the Free Layout settings.
Operating EnvironmentYou can use the Free Layout in the following environments.
• Compatible Operating SystemWindows 2000, Windows XP, Windows Server 2003, Windows Vista, Windows Server 2008, Windows 7
• Software that requires installationimagePROGRAF Printer Driver
Note• This function is not available on 64-bit version of Windows.
Starting Free LayoutFollow the procedure below to start the Free Layout.
1. Start the apllication software which you use.
2. From the application software's File menu, select the printer setup menu to open the Print dialog box.
Note• Normally, select Print from the File menu.
3. From the list, select the printer and select the Layout sheet.
Windows Software > Free Layout >
iPF815 Operating Environment
4
257
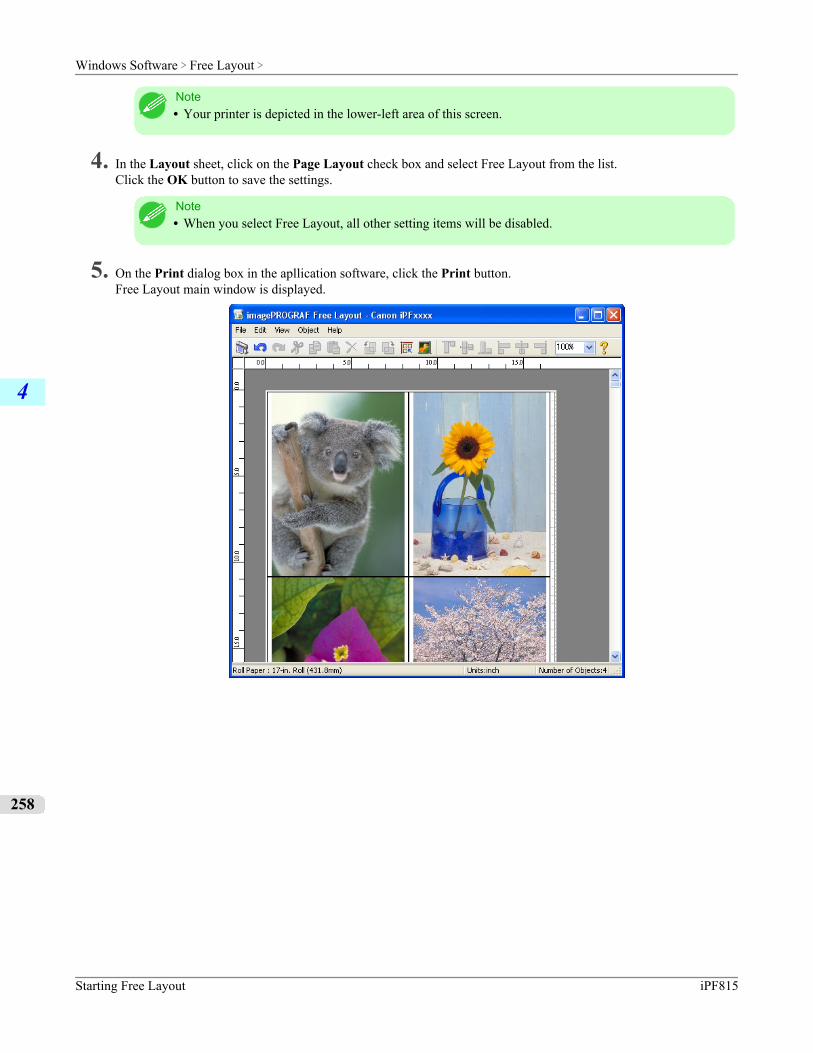
Note• Your printer is depicted in the lower-left area of this screen.
4. In the Layout sheet, click on the Page Layout check box and select Free Layout from the list.Click the OK button to save the settings.
Note• When you select Free Layout, all other setting items will be disabled.
5. On the Print dialog box in the apllication software, click the Print button.Free Layout main window is displayed.
Windows Software > Free Layout >
Starting Free Layout iPF815
4
258
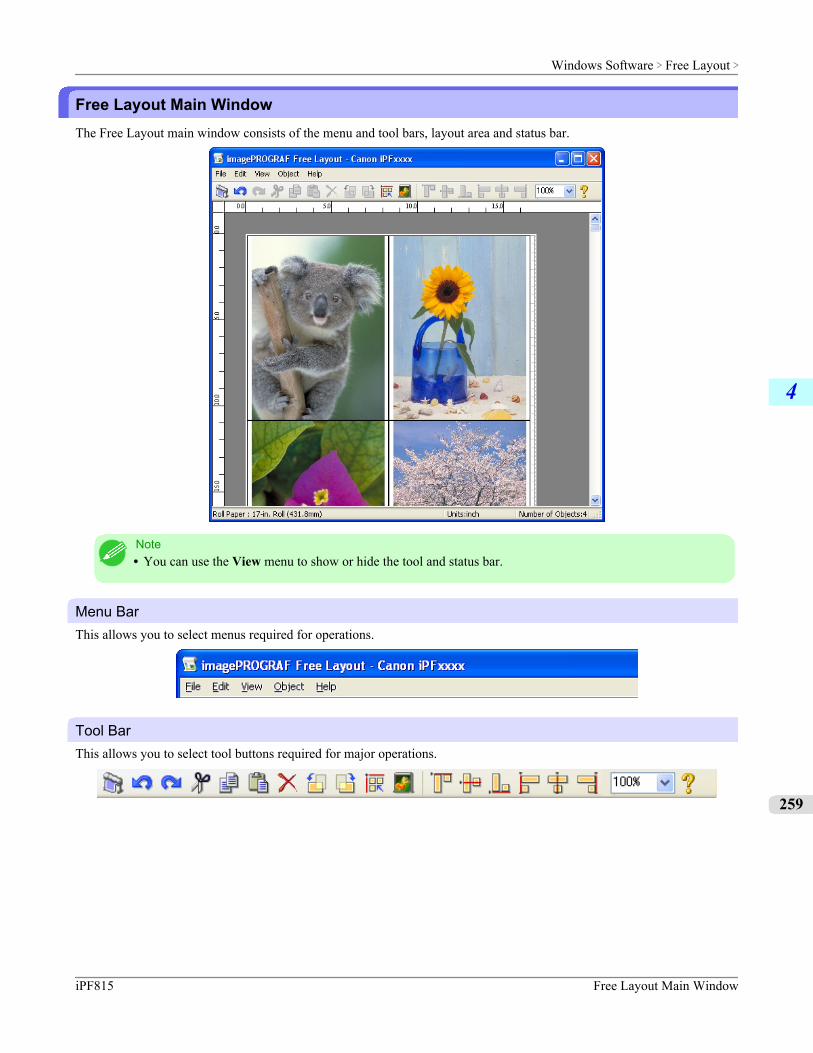
Free Layout Main WindowThe Free Layout main window consists of the menu and tool bars, layout area and status bar.
Note• You can use the View menu to show or hide the tool and status bar.
Menu BarThis allows you to select menus required for operations.
Tool BarThis allows you to select tool buttons required for major operations.
Windows Software > Free Layout >
iPF815 Free Layout Main Window
4
259
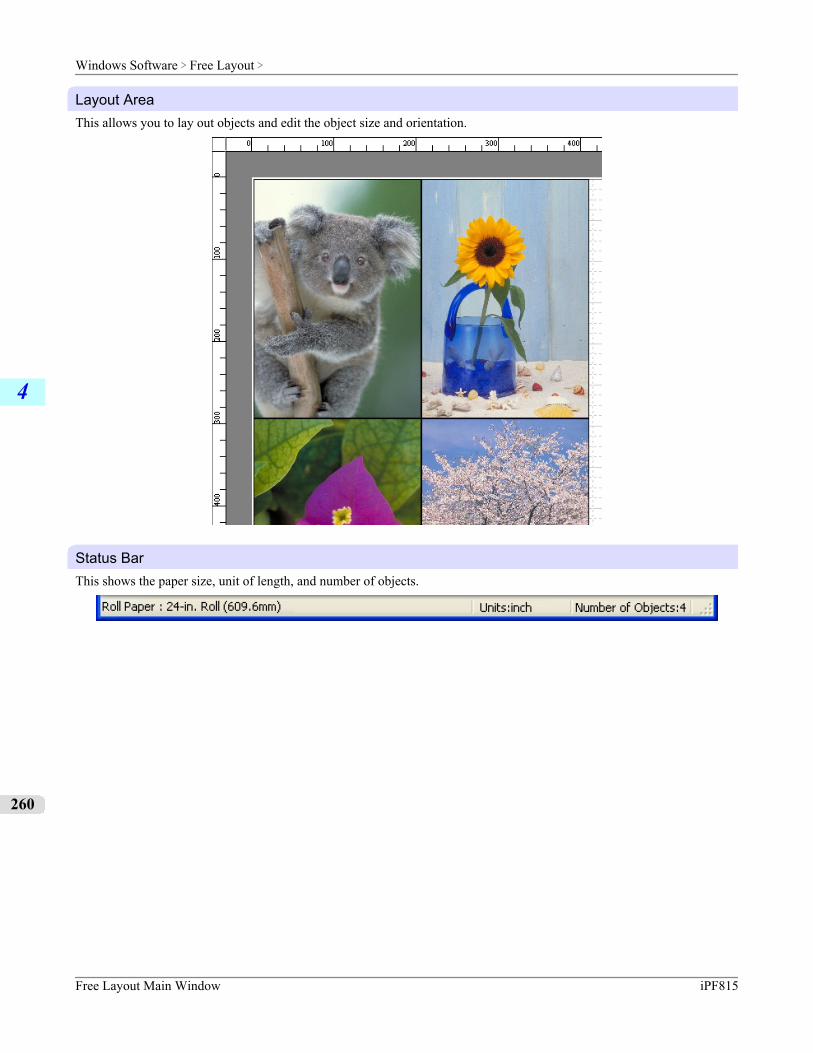
Layout AreaThis allows you to lay out objects and edit the object size and orientation.
Status BarThis shows the paper size, unit of length, and number of objects.
Windows Software > Free Layout >
Free Layout Main Window iPF815
4
260
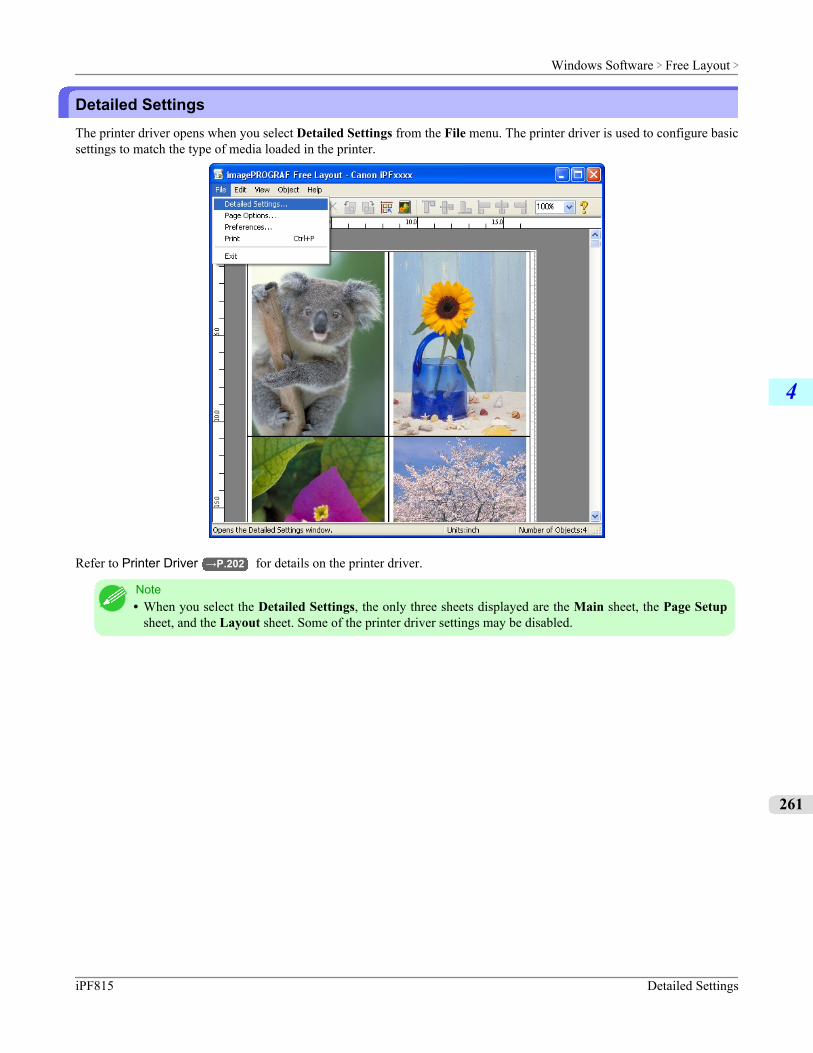
Detailed SettingsThe printer driver opens when you select Detailed Settings from the File menu. The printer driver is used to configure basicsettings to match the type of media loaded in the printer.
Refer to Printer Driver →P.202 for details on the printer driver.
Note• When you select the Detailed Settings, the only three sheets displayed are the Main sheet, the Page Setup
sheet, and the Layout sheet. Some of the printer driver settings may be disabled.
Windows Software > Free Layout >
iPF815 Detailed Settings
4
261
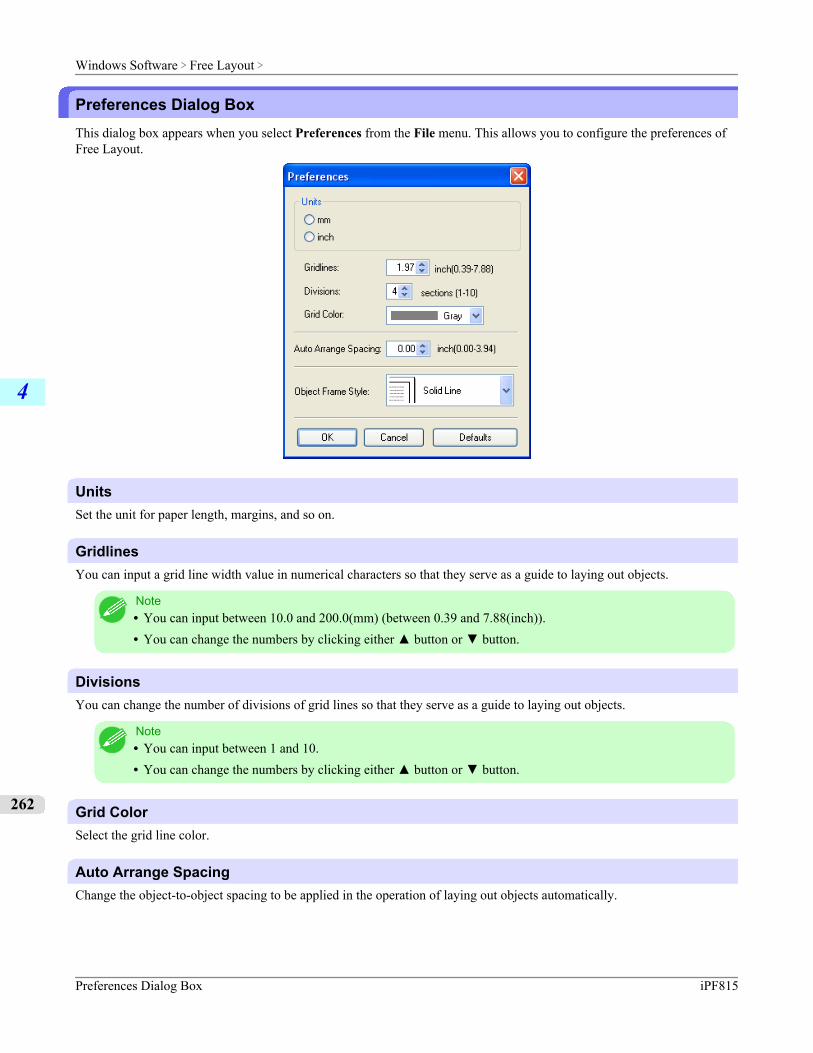
Preferences Dialog BoxThis dialog box appears when you select Preferences from the File menu. This allows you to configure the preferences ofFree Layout.
UnitsSet the unit for paper length, margins, and so on.
GridlinesYou can input a grid line width value in numerical characters so that they serve as a guide to laying out objects.
Note• You can input between 10.0 and 200.0(mm) (between 0.39 and 7.88(inch)).• You can change the numbers by clicking either ▲ button or ▼ button.
DivisionsYou can change the number of divisions of grid lines so that they serve as a guide to laying out objects.
Note• You can input between 1 and 10.• You can change the numbers by clicking either ▲ button or ▼ button.
Grid ColorSelect the grid line color.
Auto Arrange SpacingChange the object-to-object spacing to be applied in the operation of laying out objects automatically.
Windows Software > Free Layout >
Preferences Dialog Box iPF815
4
262
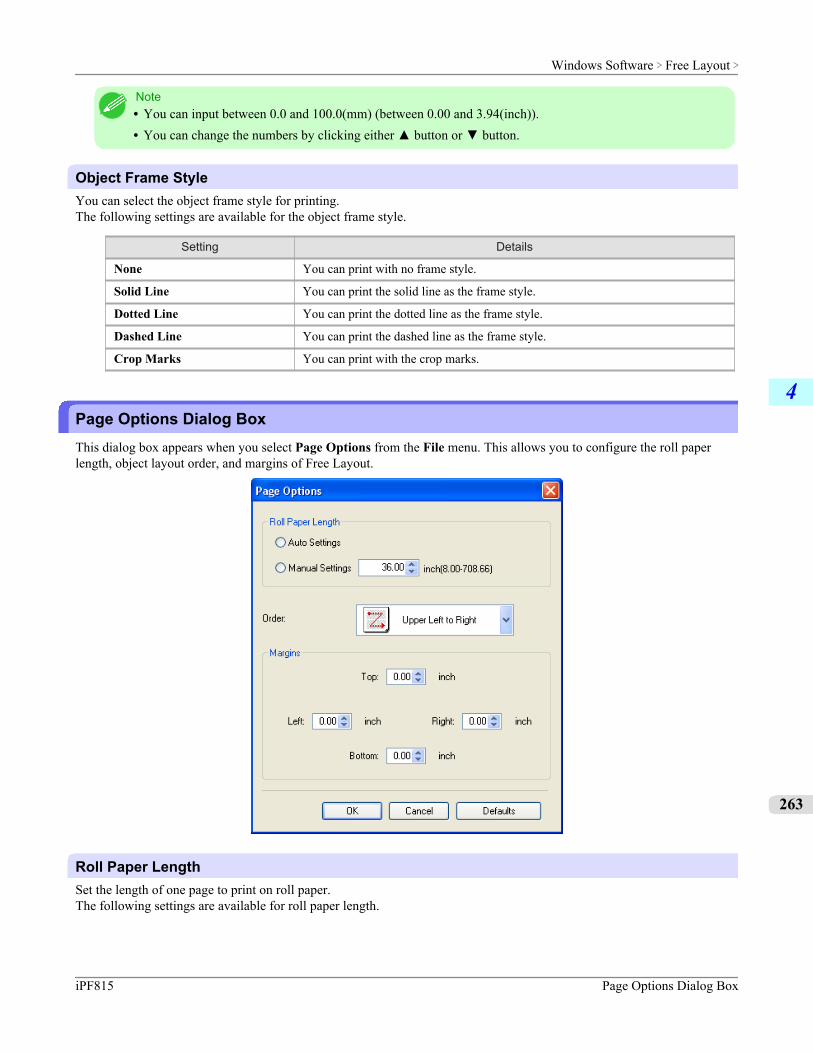
Note• You can input between 0.0 and 100.0(mm) (between 0.00 and 3.94(inch)).• You can change the numbers by clicking either ▲ button or ▼ button.
Object Frame StyleYou can select the object frame style for printing.The following settings are available for the object frame style.
Setting Details
None You can print with no frame style.
Solid Line You can print the solid line as the frame style.
Dotted Line You can print the dotted line as the frame style.
Dashed Line You can print the dashed line as the frame style.
Crop Marks You can print with the crop marks.
Page Options Dialog BoxThis dialog box appears when you select Page Options from the File menu. This allows you to configure the roll paperlength, object layout order, and margins of Free Layout.
Roll Paper LengthSet the length of one page to print on roll paper.The following settings are available for roll paper length.
Windows Software > Free Layout >
iPF815 Page Options Dialog Box
4
263
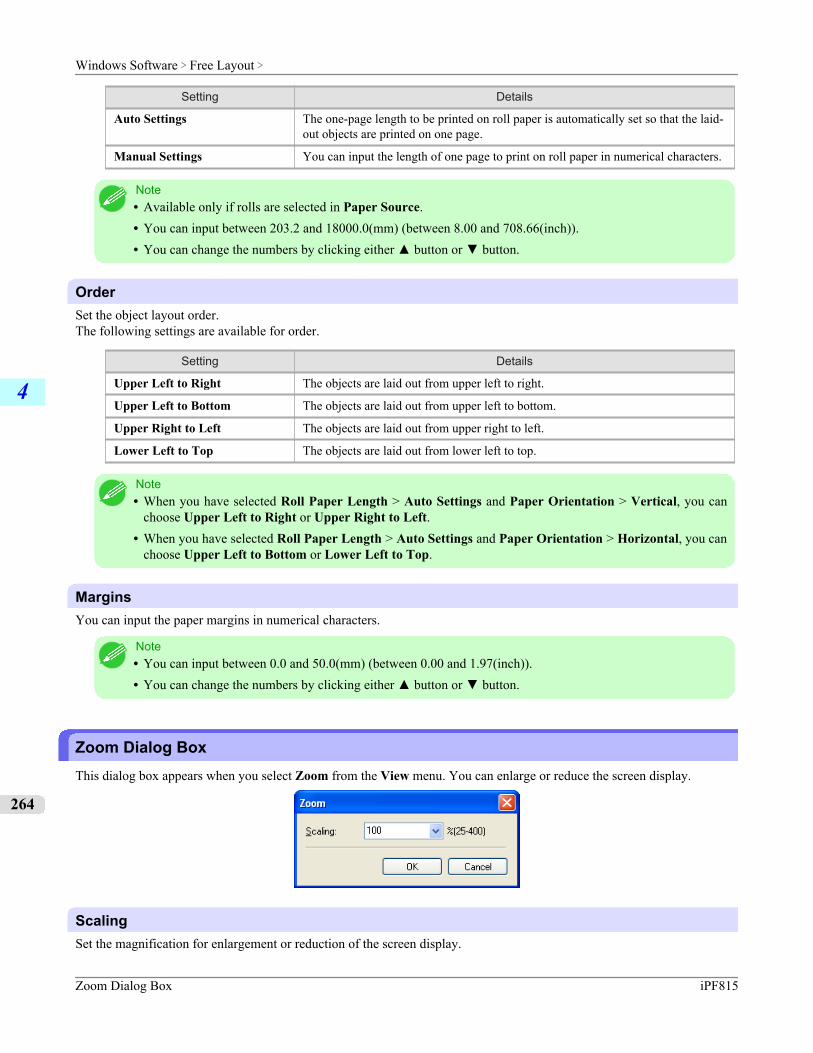
Setting Details
Auto Settings The one-page length to be printed on roll paper is automatically set so that the laid-out objects are printed on one page.
Manual Settings You can input the length of one page to print on roll paper in numerical characters.
Note• Available only if rolls are selected in Paper Source.• You can input between 203.2 and 18000.0(mm) (between 8.00 and 708.66(inch)).• You can change the numbers by clicking either ▲ button or ▼ button.
OrderSet the object layout order.The following settings are available for order.
Setting Details
Upper Left to Right The objects are laid out from upper left to right.
Upper Left to Bottom The objects are laid out from upper left to bottom.
Upper Right to Left The objects are laid out from upper right to left.
Lower Left to Top The objects are laid out from lower left to top.
Note• When you have selected Roll Paper Length > Auto Settings and Paper Orientation > Vertical, you can
choose Upper Left to Right or Upper Right to Left.• When you have selected Roll Paper Length > Auto Settings and Paper Orientation > Horizontal, you can
choose Upper Left to Bottom or Lower Left to Top.
MarginsYou can input the paper margins in numerical characters.
Note• You can input between 0.0 and 50.0(mm) (between 0.00 and 1.97(inch)).• You can change the numbers by clicking either ▲ button or ▼ button.
Zoom Dialog BoxThis dialog box appears when you select Zoom from the View menu. You can enlarge or reduce the screen display.
ScalingSet the magnification for enlargement or reduction of the screen display.
Windows Software > Free Layout >
Zoom Dialog Box iPF815
4
264
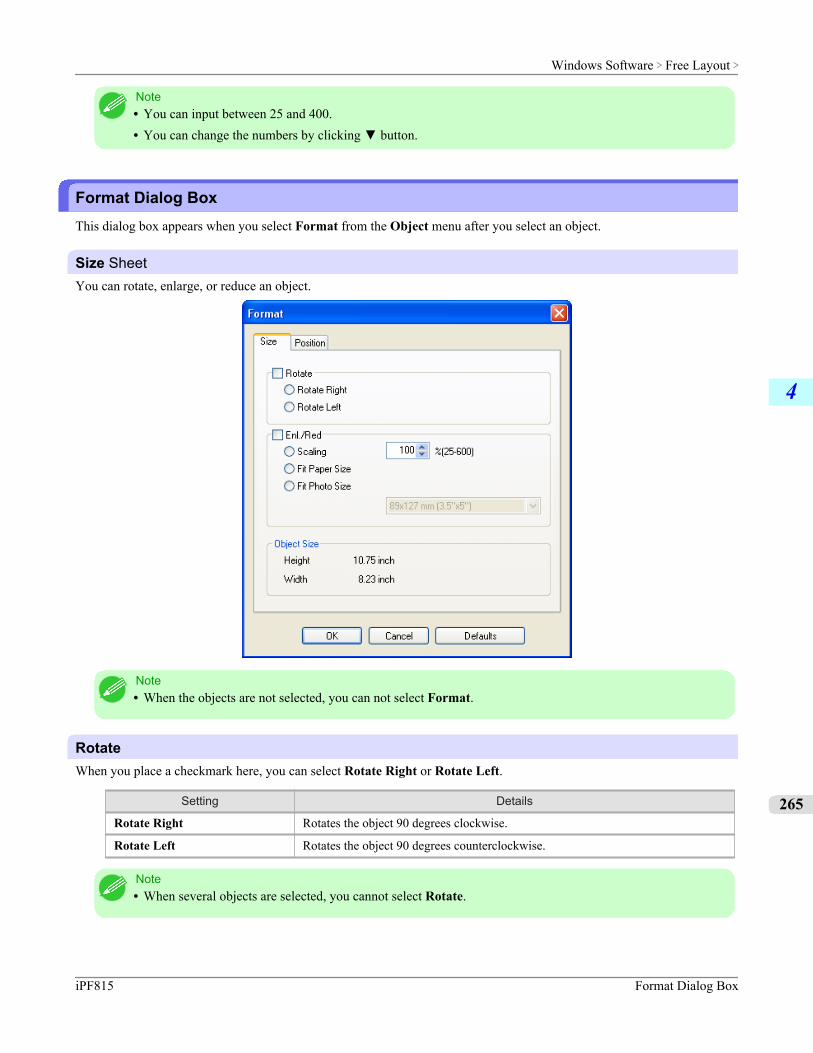
Note• You can input between 25 and 400.• You can change the numbers by clicking ▼ button.
Format Dialog BoxThis dialog box appears when you select Format from the Object menu after you select an object.
Size SheetYou can rotate, enlarge, or reduce an object.
Note• When the objects are not selected, you can not select Format.
RotateWhen you place a checkmark here, you can select Rotate Right or Rotate Left.
Setting Details
Rotate Right Rotates the object 90 degrees clockwise.
Rotate Left Rotates the object 90 degrees counterclockwise.
Note• When several objects are selected, you cannot select Rotate.
Windows Software > Free Layout >
iPF815 Format Dialog Box
4
265
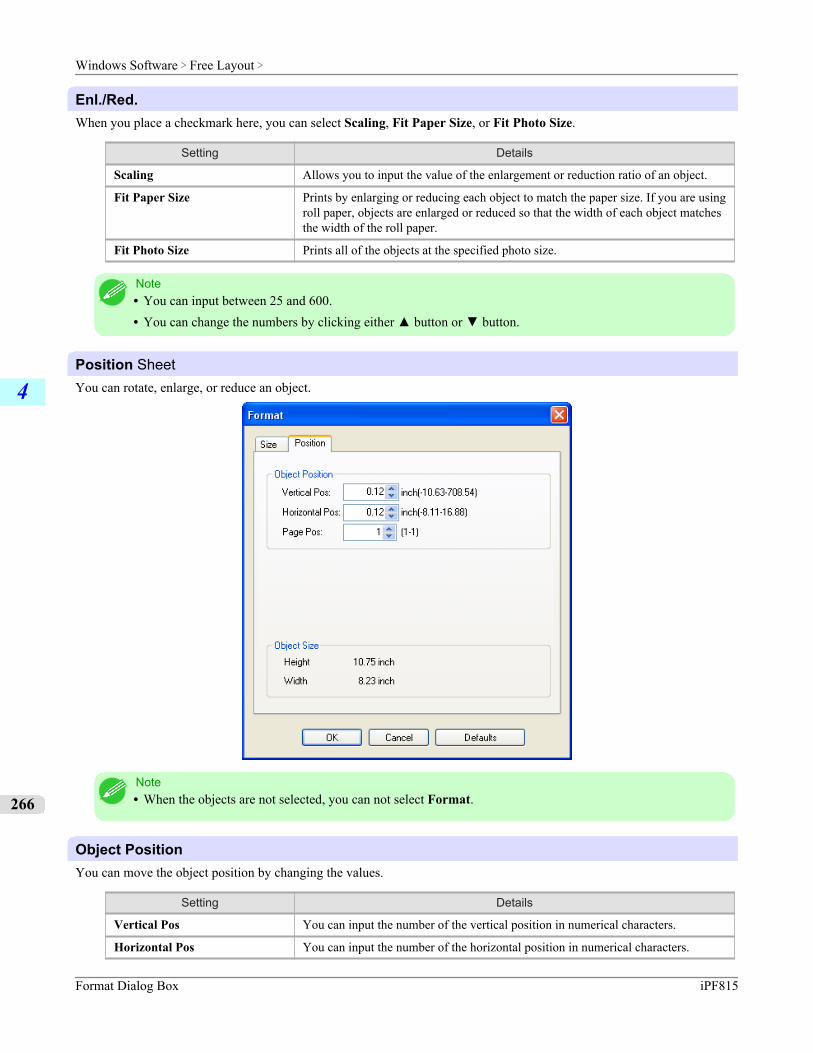
Enl./Red.When you place a checkmark here, you can select Scaling, Fit Paper Size, or Fit Photo Size.
Setting Details
Scaling Allows you to input the value of the enlargement or reduction ratio of an object.
Fit Paper Size Prints by enlarging or reducing each object to match the paper size. If you are usingroll paper, objects are enlarged or reduced so that the width of each object matchesthe width of the roll paper.
Fit Photo Size Prints all of the objects at the specified photo size.
Note• You can input between 25 and 600.• You can change the numbers by clicking either ▲ button or ▼ button.
Position SheetYou can rotate, enlarge, or reduce an object.
Note• When the objects are not selected, you can not select Format.
Object PositionYou can move the object position by changing the values.
Setting Details
Vertical Pos You can input the number of the vertical position in numerical characters.
Horizontal Pos You can input the number of the horizontal position in numerical characters.
Windows Software > Free Layout >
Format Dialog Box iPF815
4
266
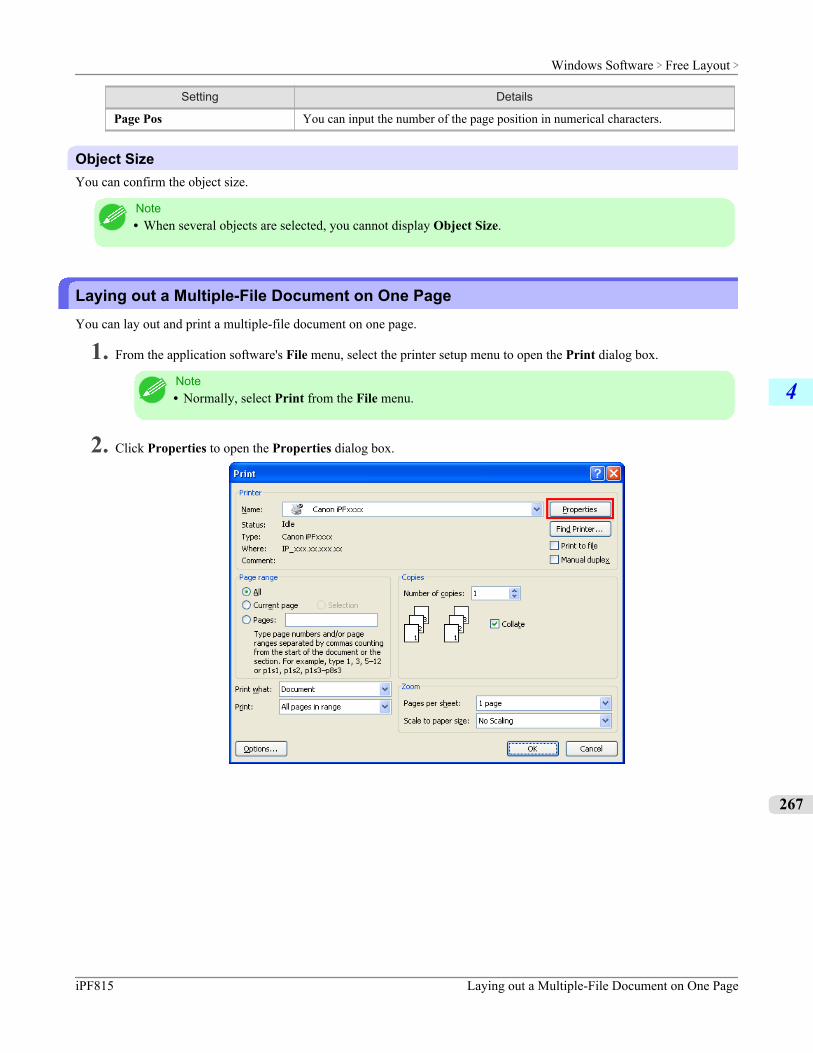
Setting Details
Page Pos You can input the number of the page position in numerical characters.
Object SizeYou can confirm the object size.
Note• When several objects are selected, you cannot display Object Size.
Laying out a Multiple-File Document on One PageYou can lay out and print a multiple-file document on one page.
1. From the application software's File menu, select the printer setup menu to open the Print dialog box.
Note• Normally, select Print from the File menu.
2. Click Properties to open the Properties dialog box.
Windows Software > Free Layout >
iPF815 Laying out a Multiple-File Document on One Page
4
267
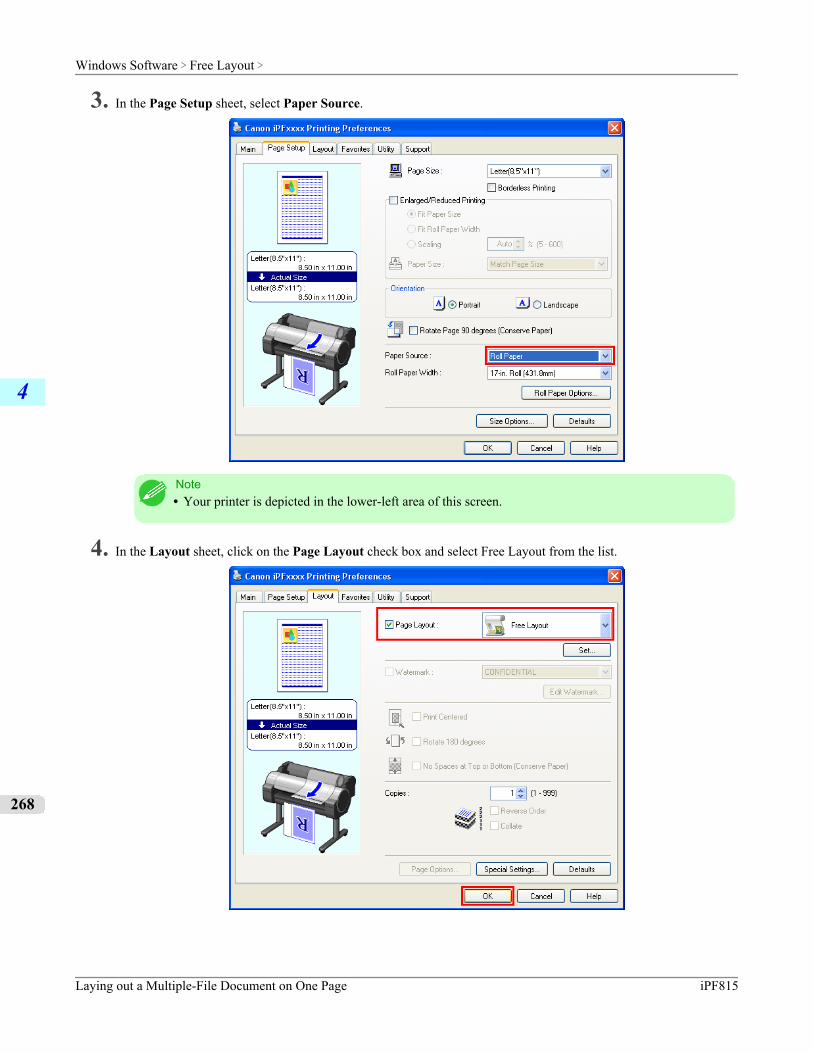
3. In the Page Setup sheet, select Paper Source.
Note• Your printer is depicted in the lower-left area of this screen.
4. In the Layout sheet, click on the Page Layout check box and select Free Layout from the list.
Windows Software > Free Layout >
Laying out a Multiple-File Document on One Page iPF815
4
268
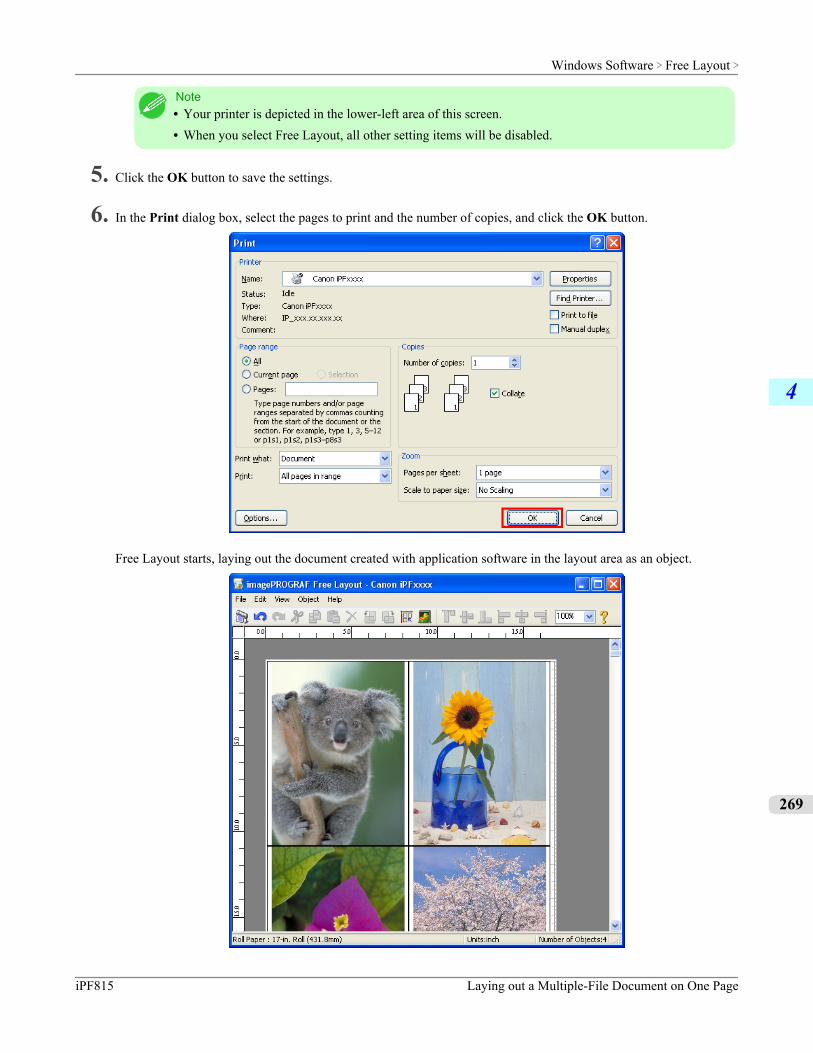
Note• Your printer is depicted in the lower-left area of this screen.• When you select Free Layout, all other setting items will be disabled.
5. Click the OK button to save the settings.
6. In the Print dialog box, select the pages to print and the number of copies, and click the OK button.
Free Layout starts, laying out the document created with application software in the layout area as an object.
Windows Software > Free Layout >
iPF815 Laying out a Multiple-File Document on One Page
4
269
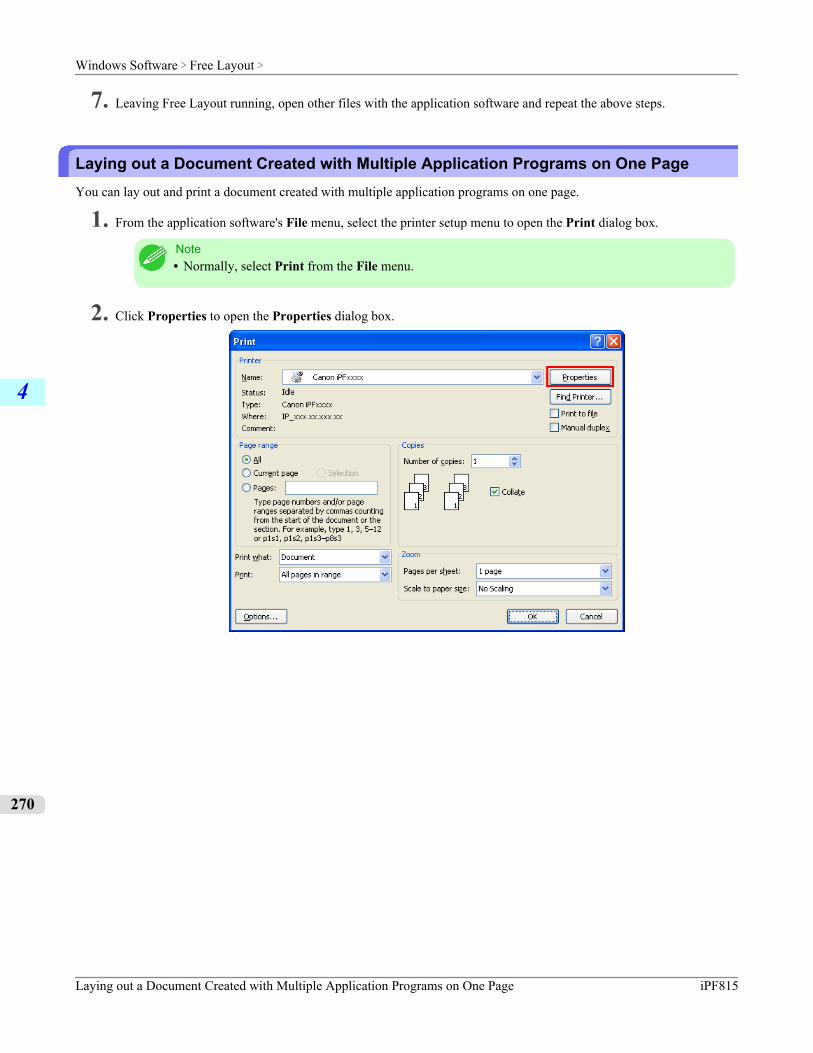
7. Leaving Free Layout running, open other files with the application software and repeat the above steps.
Laying out a Document Created with Multiple Application Programs on One PageYou can lay out and print a document created with multiple application programs on one page.
1. From the application software's File menu, select the printer setup menu to open the Print dialog box.
Note• Normally, select Print from the File menu.
2. Click Properties to open the Properties dialog box.
Windows Software > Free Layout >
Laying out a Document Created with Multiple Application Programs on One Page iPF815
4
270
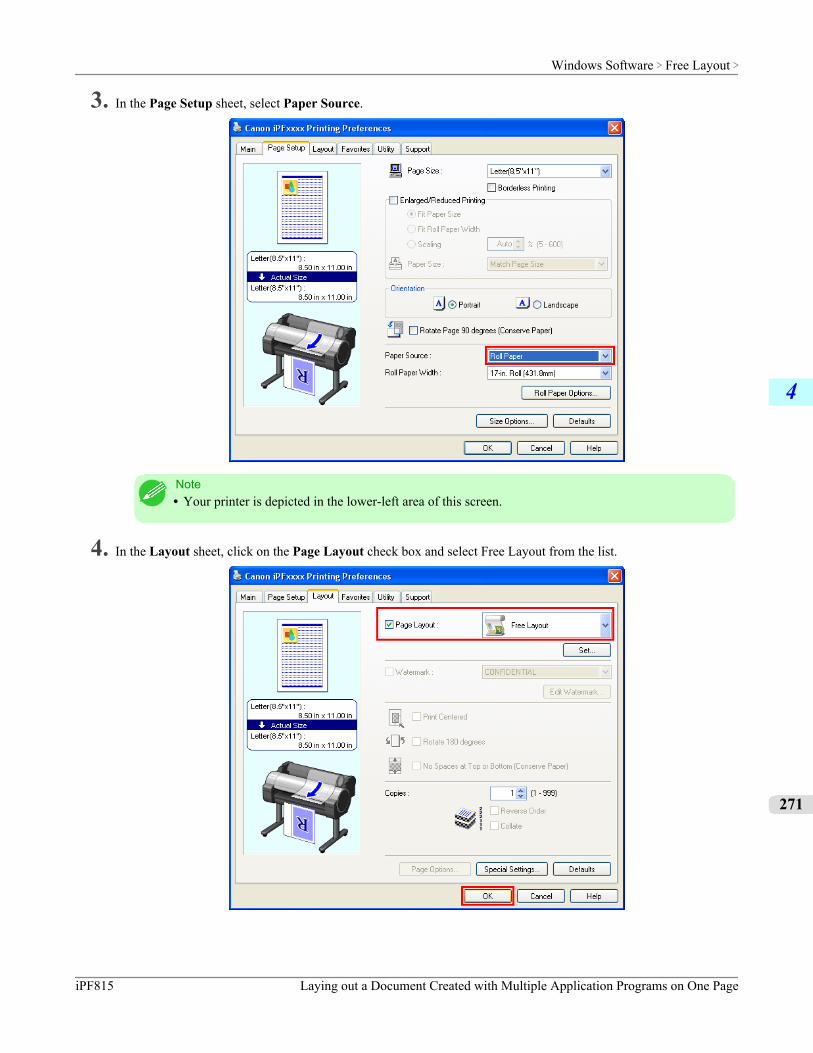
3. In the Page Setup sheet, select Paper Source.
Note• Your printer is depicted in the lower-left area of this screen.
4. In the Layout sheet, click on the Page Layout check box and select Free Layout from the list.
Windows Software > Free Layout >
iPF815 Laying out a Document Created with Multiple Application Programs on One Page
4
271
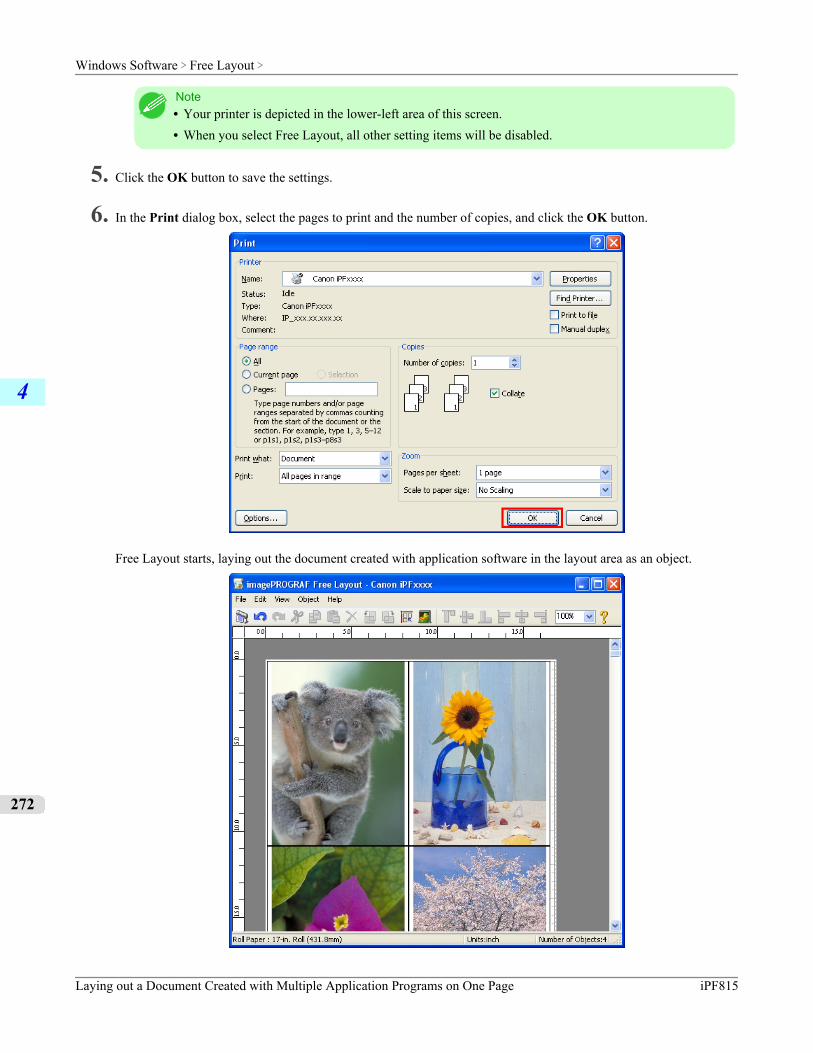
Note• Your printer is depicted in the lower-left area of this screen.• When you select Free Layout, all other setting items will be disabled.
5. Click the OK button to save the settings.
6. In the Print dialog box, select the pages to print and the number of copies, and click the OK button.
Free Layout starts, laying out the document created with application software in the layout area as an object.
Windows Software > Free Layout >
Laying out a Document Created with Multiple Application Programs on One Page iPF815
4
272
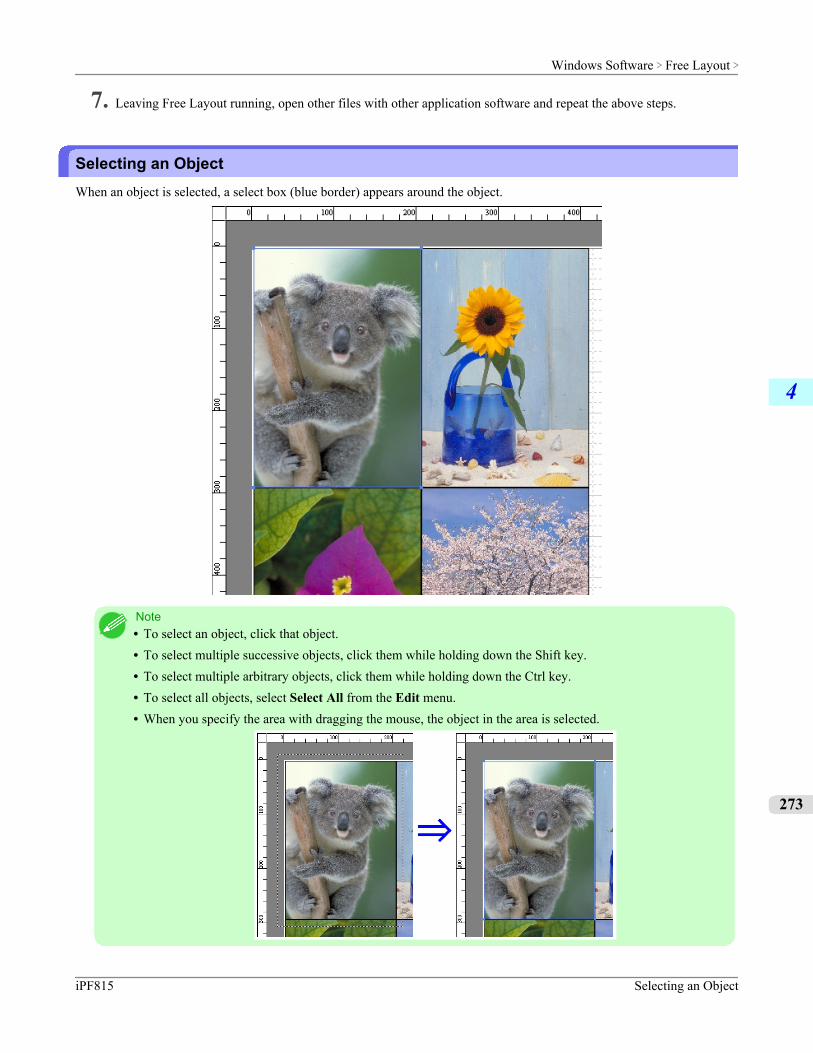
7. Leaving Free Layout running, open other files with other application software and repeat the above steps.
Selecting an ObjectWhen an object is selected, a select box (blue border) appears around the object.
Note• To select an object, click that object.• To select multiple successive objects, click them while holding down the Shift key.• To select multiple arbitrary objects, click them while holding down the Ctrl key.• To select all objects, select Select All from the Edit menu.• When you specify the area with dragging the mouse, the object in the area is selected.
Windows Software > Free Layout >
iPF815 Selecting an Object
4
273
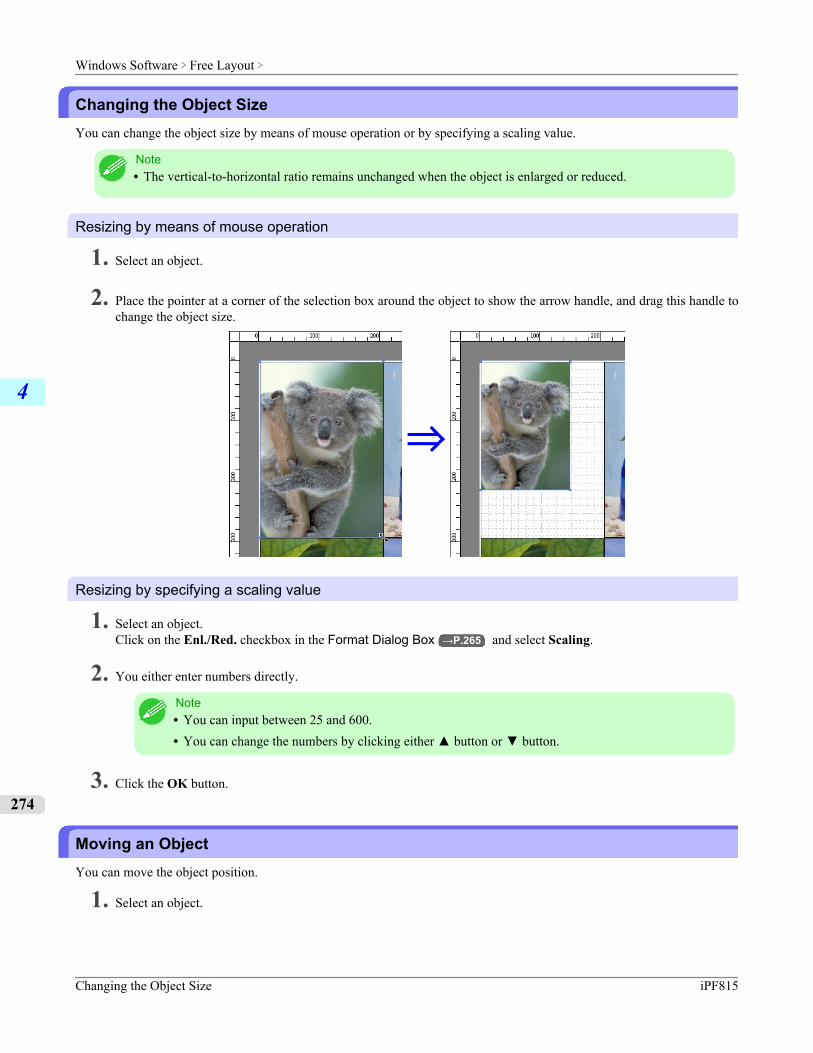
Changing the Object SizeYou can change the object size by means of mouse operation or by specifying a scaling value.
Note• The vertical-to-horizontal ratio remains unchanged when the object is enlarged or reduced.
Resizing by means of mouse operation
1. Select an object.
2. Place the pointer at a corner of the selection box around the object to show the arrow handle, and drag this handle tochange the object size.
Resizing by specifying a scaling value
1. Select an object.Click on the Enl./Red. checkbox in the Format Dialog Box →P.265 and select Scaling.
2. You either enter numbers directly.
Note• You can input between 25 and 600.• You can change the numbers by clicking either ▲ button or ▼ button.
3. Click the OK button.
Moving an ObjectYou can move the object position.
1. Select an object.
Windows Software > Free Layout >
Changing the Object Size iPF815
4
274
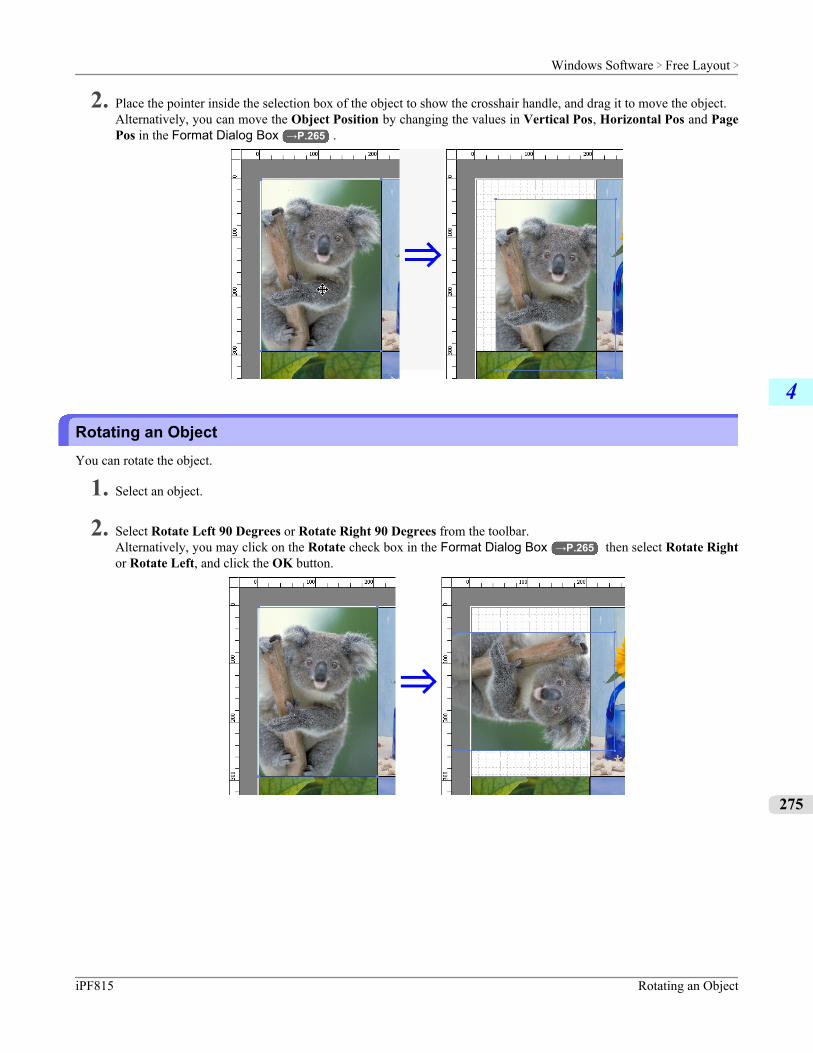
2. Place the pointer inside the selection box of the object to show the crosshair handle, and drag it to move the object.Alternatively, you can move the Object Position by changing the values in Vertical Pos, Horizontal Pos and PagePos in the Format Dialog Box →P.265 .
Rotating an ObjectYou can rotate the object.
1. Select an object.
2. Select Rotate Left 90 Degrees or Rotate Right 90 Degrees from the toolbar.Alternatively, you may click on the Rotate check box in the Format Dialog Box →P.265 then select Rotate Rightor Rotate Left, and click the OK button.
Windows Software > Free Layout >
iPF815 Rotating an Object
4
275
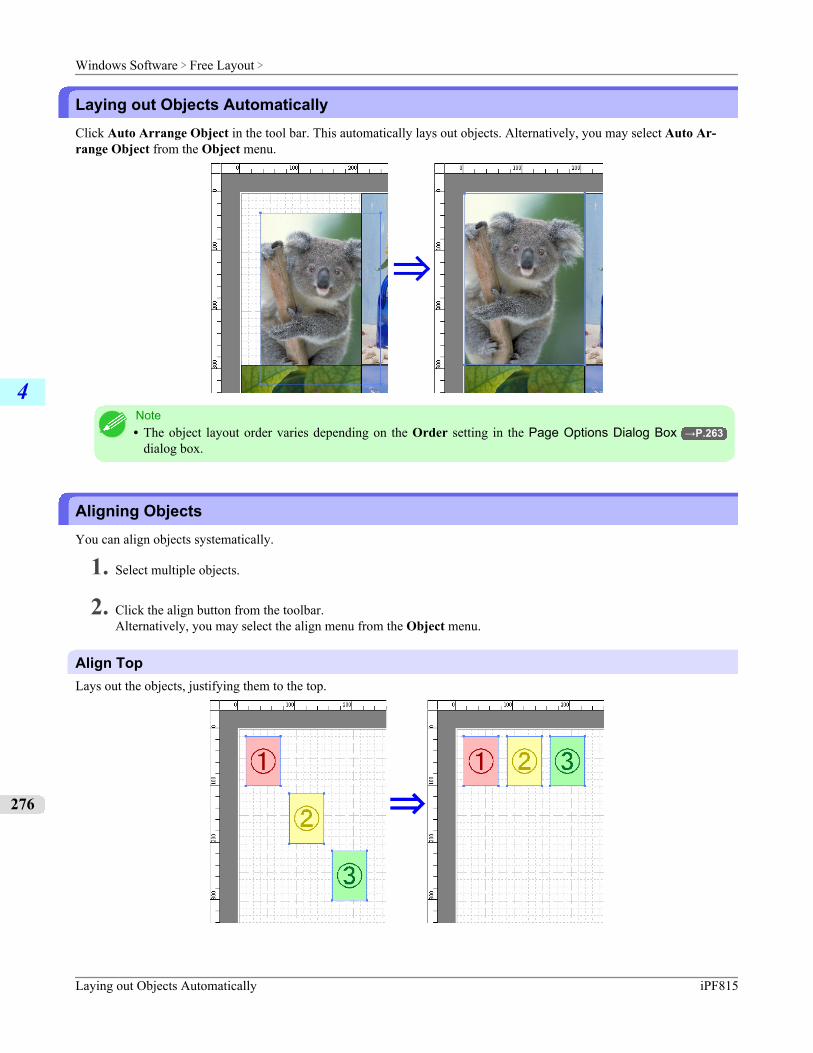
Laying out Objects AutomaticallyClick Auto Arrange Object in the tool bar. This automatically lays out objects. Alternatively, you may select Auto Ar-range Object from the Object menu.
Note• The object layout order varies depending on the Order setting in the Page Options Dialog Box →P.263
dialog box.
Aligning ObjectsYou can align objects systematically.
1. Select multiple objects.
2. Click the align button from the toolbar.Alternatively, you may select the align menu from the Object menu.
Align TopLays out the objects, justifying them to the top.
Windows Software > Free Layout >
Laying out Objects Automatically iPF815
4
276
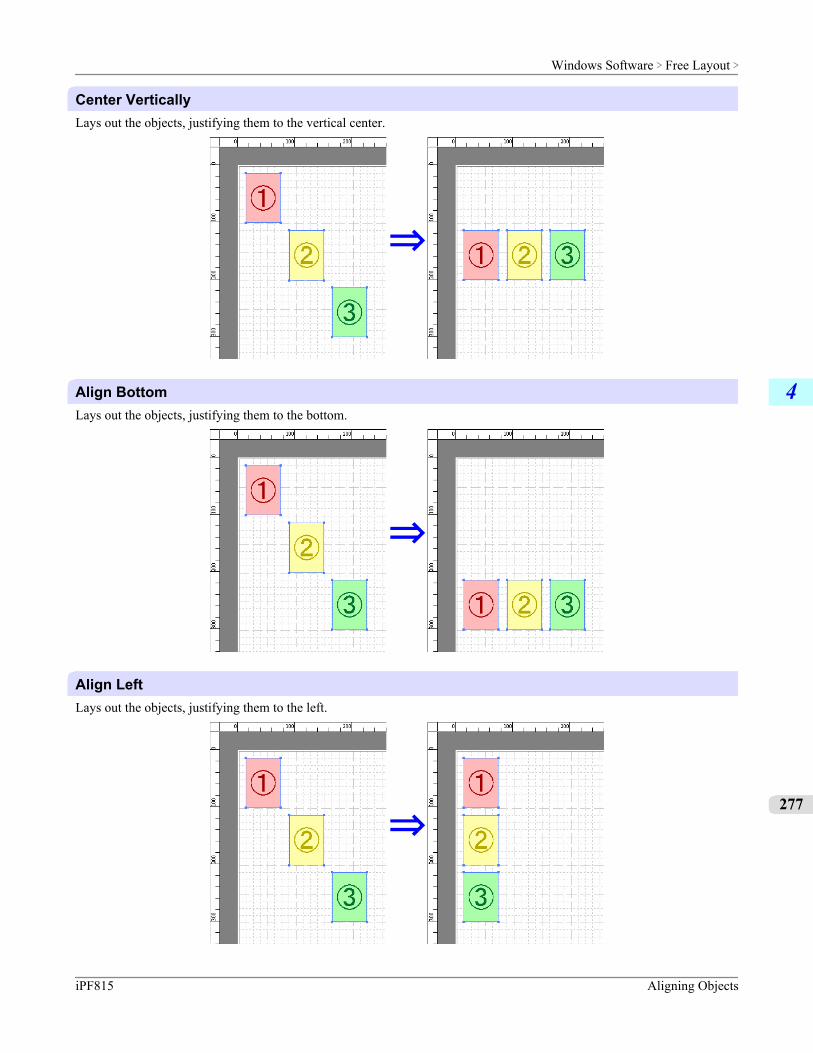
Center VerticallyLays out the objects, justifying them to the vertical center.
Align BottomLays out the objects, justifying them to the bottom.
Align LeftLays out the objects, justifying them to the left.
Windows Software > Free Layout >
iPF815 Aligning Objects
4
277
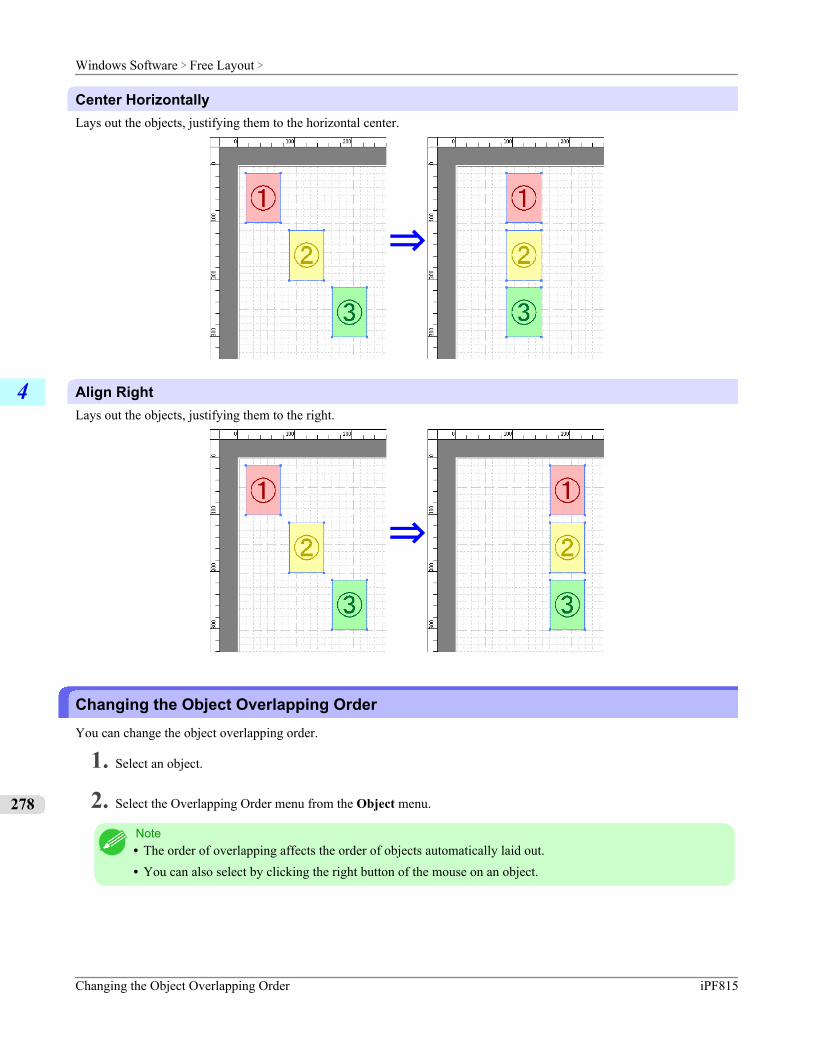
Center HorizontallyLays out the objects, justifying them to the horizontal center.
Align RightLays out the objects, justifying them to the right.
Changing the Object Overlapping OrderYou can change the object overlapping order.
1. Select an object.
2. Select the Overlapping Order menu from the Object menu.
Note• The order of overlapping affects the order of objects automatically laid out.• You can also select by clicking the right button of the mouse on an object.
Windows Software > Free Layout >
Changing the Object Overlapping Order iPF815
4
278
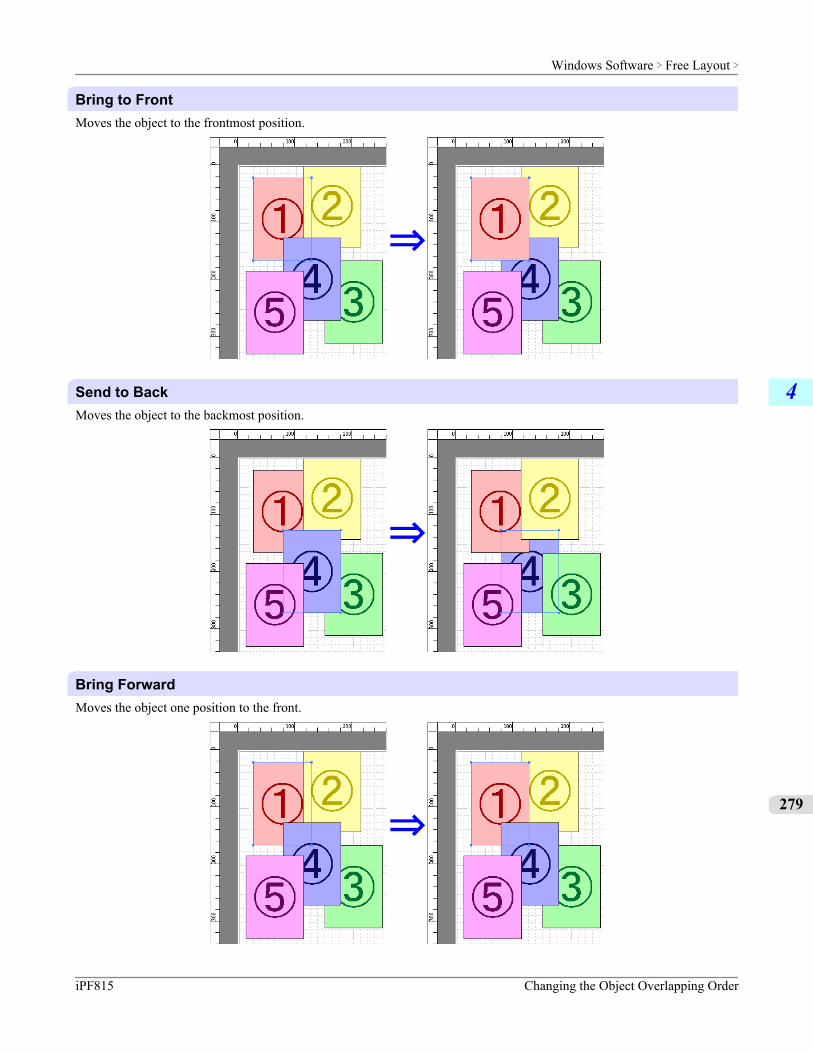
Bring to FrontMoves the object to the frontmost position.
Send to BackMoves the object to the backmost position.
Bring ForwardMoves the object one position to the front.
Windows Software > Free Layout >
iPF815 Changing the Object Overlapping Order
4
279
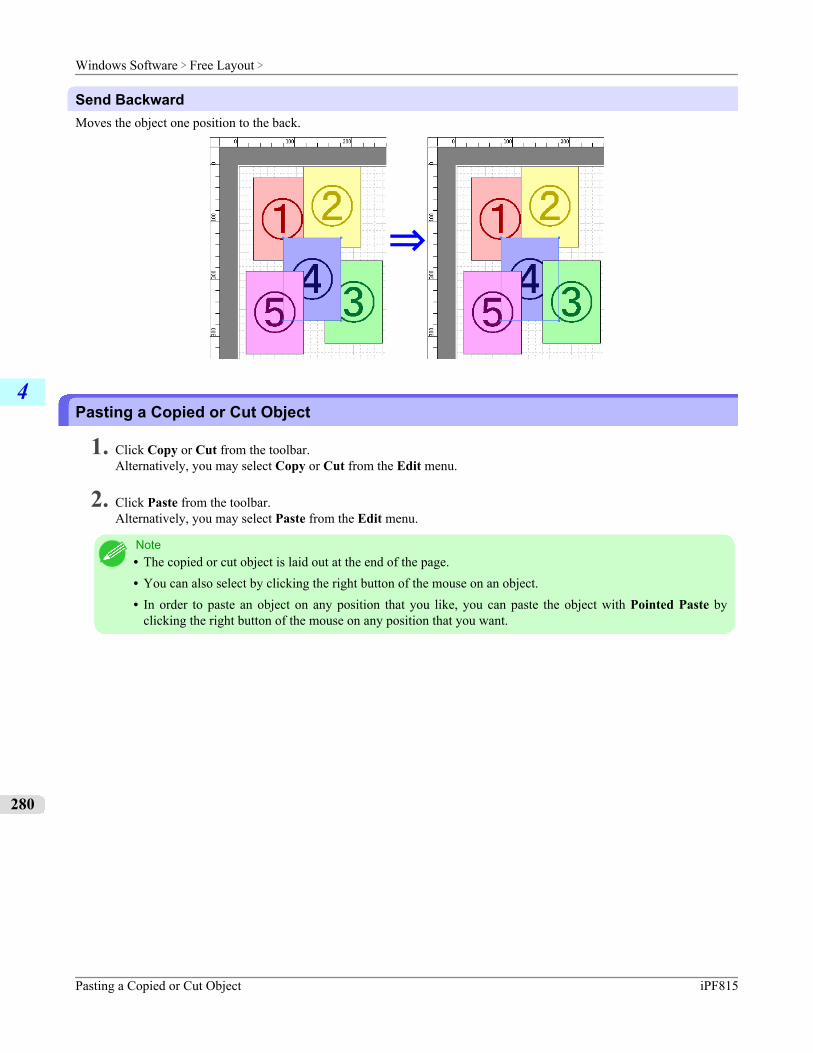
Send BackwardMoves the object one position to the back.
Pasting a Copied or Cut Object
1. Click Copy or Cut from the toolbar.Alternatively, you may select Copy or Cut from the Edit menu.
2. Click Paste from the toolbar.Alternatively, you may select Paste from the Edit menu.
Note• The copied or cut object is laid out at the end of the page.• You can also select by clicking the right button of the mouse on an object.• In order to paste an object on any position that you like, you can paste the object with Pointed Paste by
clicking the right button of the mouse on any position that you want.
Windows Software > Free Layout >
Pasting a Copied or Cut Object iPF815
4
280
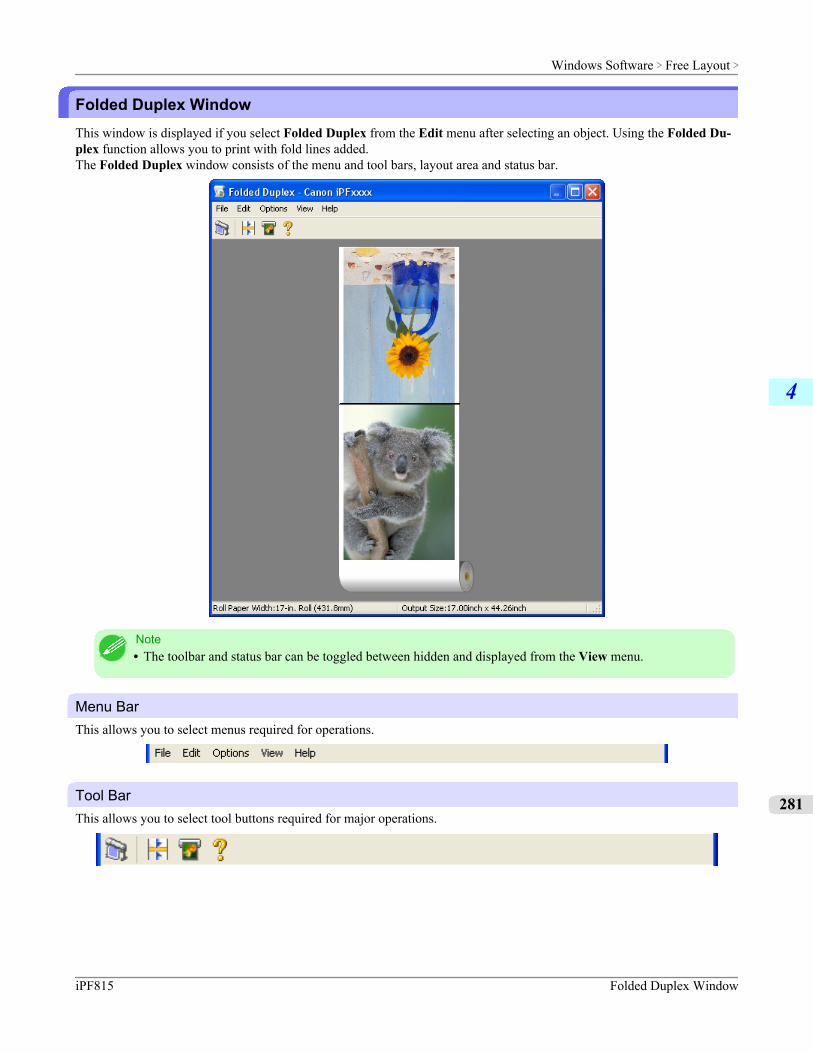
Folded Duplex WindowThis window is displayed if you select Folded Duplex from the Edit menu after selecting an object. Using the Folded Du-plex function allows you to print with fold lines added.The Folded Duplex window consists of the menu and tool bars, layout area and status bar.
Note• The toolbar and status bar can be toggled between hidden and displayed from the View menu.
Menu BarThis allows you to select menus required for operations.
Tool BarThis allows you to select tool buttons required for major operations.
Windows Software > Free Layout >
iPF815 Folded Duplex Window
4
281
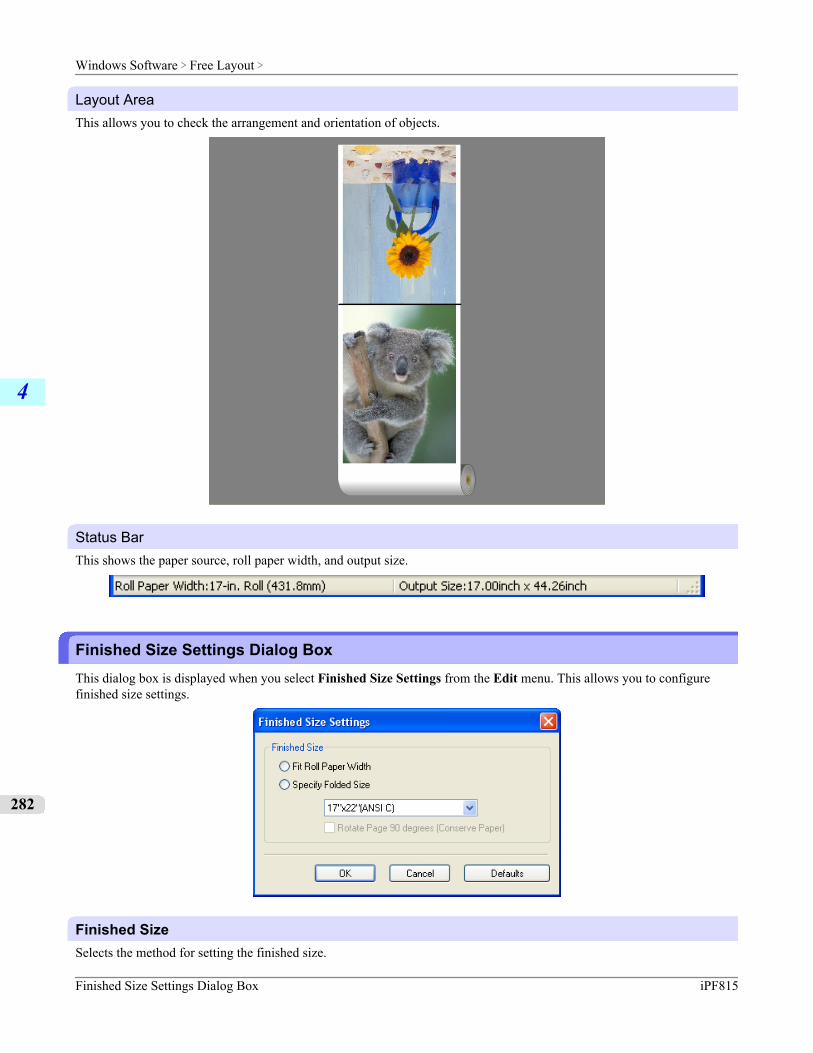
Layout AreaThis allows you to check the arrangement and orientation of objects.
Status BarThis shows the paper source, roll paper width, and output size.
Finished Size Settings Dialog BoxThis dialog box is displayed when you select Finished Size Settings from the Edit menu. This allows you to configurefinished size settings.
Finished SizeSelects the method for setting the finished size.
Windows Software > Free Layout >
Finished Size Settings Dialog Box iPF815
4
282
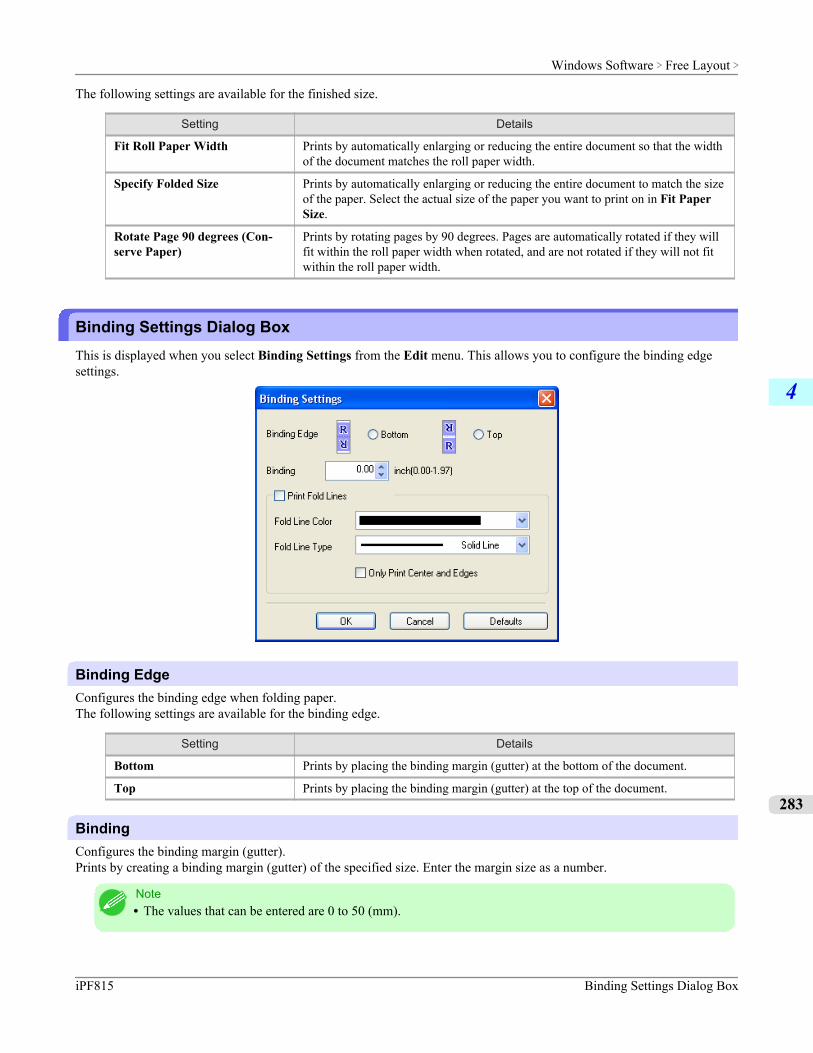
The following settings are available for the finished size.
Setting Details
Fit Roll Paper Width Prints by automatically enlarging or reducing the entire document so that the widthof the document matches the roll paper width.
Specify Folded Size Prints by automatically enlarging or reducing the entire document to match the sizeof the paper. Select the actual size of the paper you want to print on in Fit PaperSize.
Rotate Page 90 degrees (Con-serve Paper)
Prints by rotating pages by 90 degrees. Pages are automatically rotated if they willfit within the roll paper width when rotated, and are not rotated if they will not fitwithin the roll paper width.
Binding Settings Dialog BoxThis is displayed when you select Binding Settings from the Edit menu. This allows you to configure the binding edgesettings.
Binding EdgeConfigures the binding edge when folding paper.The following settings are available for the binding edge.
Setting Details
Bottom Prints by placing the binding margin (gutter) at the bottom of the document.
Top Prints by placing the binding margin (gutter) at the top of the document.
BindingConfigures the binding margin (gutter).Prints by creating a binding margin (gutter) of the specified size. Enter the margin size as a number.
Note• The values that can be entered are 0 to 50 (mm).
Windows Software > Free Layout >
iPF815 Binding Settings Dialog Box
4
283

Print Fold LinesConfigures the color and type of fold lines.
Note• To not print fold lines, clear the Print Fold Lines checkbox.
Fold Line ColorYou can select the fold lines.
Fold Line TypeYou can select the fold lines.The following settings are available for the fold line type.
Setting Details
Solid Line You can print the solid line as the frame style.
Dotted Line You can print the dotted line as the frame style.
Dashed Line You can print the dashed line as the frame style.
Only Print Center and EdgesTo print fold lines at the center and both edges, select the Only Print Center and Edges checkbox.
Prints using Folded DuplexAllows you to produce duplex printing by combining two pages and folding them.
1. Select two objects from the layout area of Free Layout.
2. Select Folded Duplex from the Edit menu of Free Layout.Open the Folded Duplex window and arrange the selected objects in the layout area.
3. Open the Finished Size Settings dialog box from the Edit menu.
4. Select Fit Roll Paper Width or Specify Folded Size in Finished Size.
Note• Rotate Page 90 degrees (Conserve Paper) is also available when Specify Folded Size is selected.
5. Click OK to save the settings.
6. Open the Binding Settings dialog box from the Edit menu.
7. Select Bottom or Top in Binding Edge.
8. Specify the Binding width in Binding.
Windows Software > Free Layout >
Prints using Folded Duplex iPF815
4
284
9. Configure the Fold Line Color and Fold Line Type from Print Fold Lines.
Note• When the Only Print Center and Edges checkbox is selected, fold lines are only printed at the three
locations of the center and both edges.
10. Click OK to save the settings.
11. Confirm the print setting and begin printing.
Windows Software > Free Layout >
iPF815 Prints using Folded Duplex
4
285
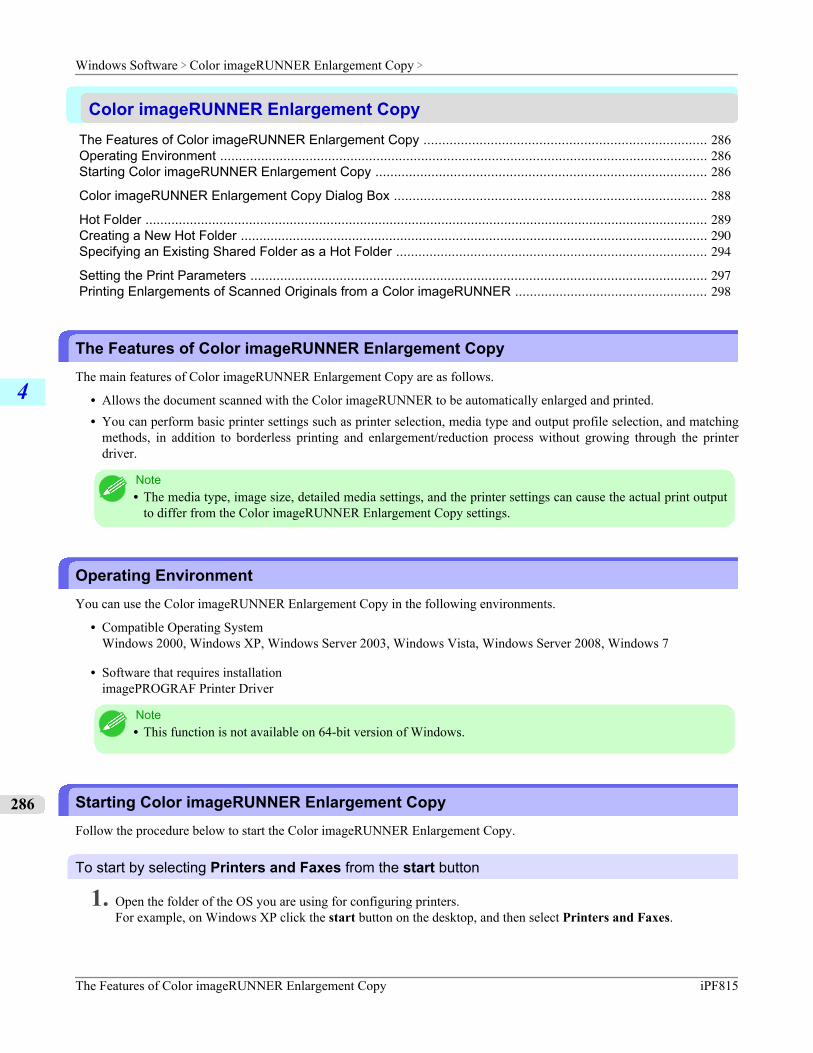
Color imageRUNNER Enlargement CopyThe Features of Color imageRUNNER Enlargement Copy ............................................................................ 286Operating Environment ................................................................................................................................... 286Starting Color imageRUNNER Enlargement Copy ......................................................................................... 286
Color imageRUNNER Enlargement Copy Dialog Box .................................................................................... 288
Hot Folder ........................................................................................................................................................ 289Creating a New Hot Folder .............................................................................................................................. 290Specifying an Existing Shared Folder as a Hot Folder .................................................................................... 294
Setting the Print Parameters ........................................................................................................................... 297Printing Enlargements of Scanned Originals from a Color imageRUNNER .................................................... 298
The Features of Color imageRUNNER Enlargement CopyThe main features of Color imageRUNNER Enlargement Copy are as follows.
• Allows the document scanned with the Color imageRUNNER to be automatically enlarged and printed.• You can perform basic printer settings such as printer selection, media type and output profile selection, and matching
methods, in addition to borderless printing and enlargement/reduction process without growing through the printerdriver.
Note• The media type, image size, detailed media settings, and the printer settings can cause the actual print output
to differ from the Color imageRUNNER Enlargement Copy settings.
Operating EnvironmentYou can use the Color imageRUNNER Enlargement Copy in the following environments.
• Compatible Operating SystemWindows 2000, Windows XP, Windows Server 2003, Windows Vista, Windows Server 2008, Windows 7
• Software that requires installationimagePROGRAF Printer Driver
Note• This function is not available on 64-bit version of Windows.
Starting Color imageRUNNER Enlargement CopyFollow the procedure below to start the Color imageRUNNER Enlargement Copy.
To start by selecting Printers and Faxes from the start button
1. Open the folder of the OS you are using for configuring printers.For example, on Windows XP click the start button on the desktop, and then select Printers and Faxes.
Windows Software > Color imageRUNNER Enlargement Copy >
The Features of Color imageRUNNER Enlargement Copy iPF815
4
286
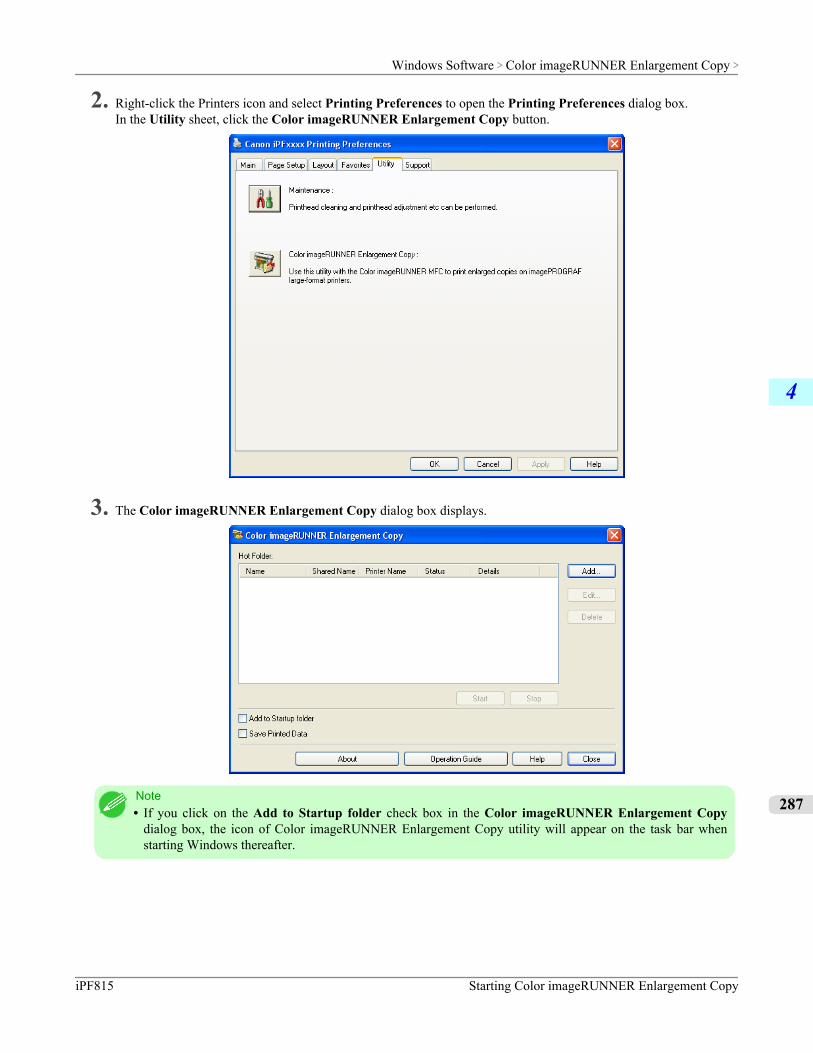
2. Right-click the Printers icon and select Printing Preferences to open the Printing Preferences dialog box.In the Utility sheet, click the Color imageRUNNER Enlargement Copy button.
3. The Color imageRUNNER Enlargement Copy dialog box displays.
Note• If you click on the Add to Startup folder check box in the Color imageRUNNER Enlargement Copy
dialog box, the icon of Color imageRUNNER Enlargement Copy utility will appear on the task bar whenstarting Windows thereafter.
Windows Software > Color imageRUNNER Enlargement Copy >
iPF815 Starting Color imageRUNNER Enlargement Copy
4
287
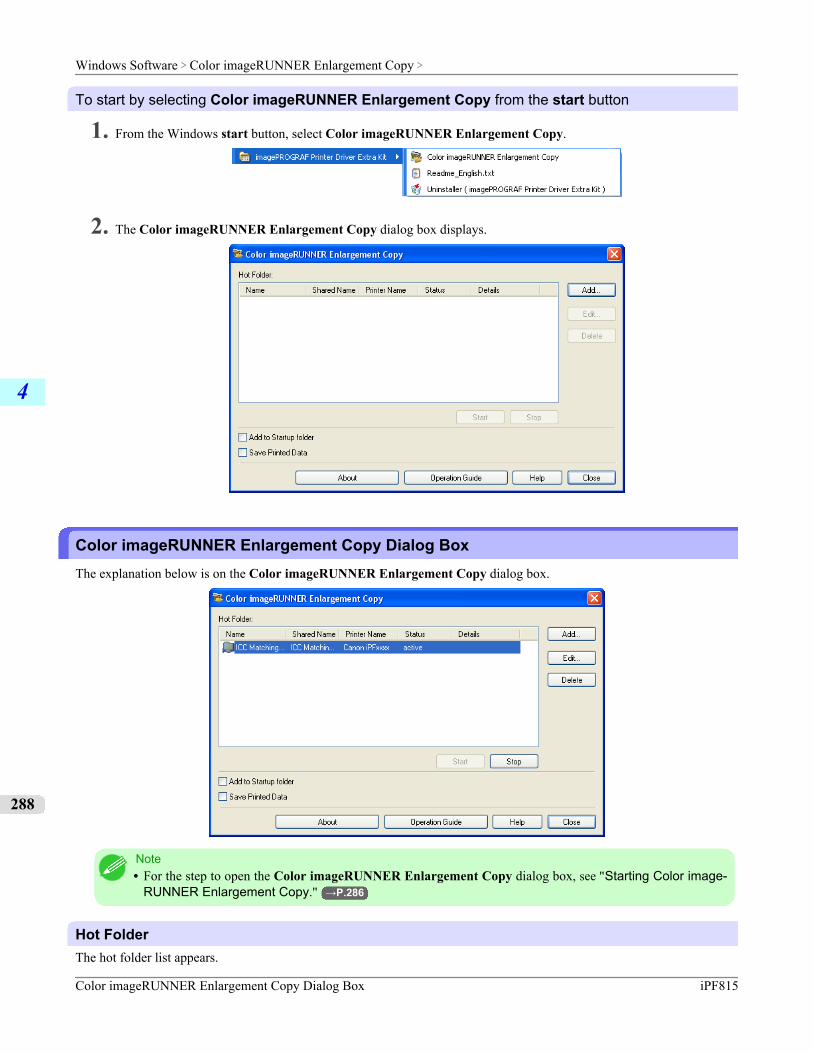
To start by selecting Color imageRUNNER Enlargement Copy from the start button
1. From the Windows start button, select Color imageRUNNER Enlargement Copy.
2. The Color imageRUNNER Enlargement Copy dialog box displays.
Color imageRUNNER Enlargement Copy Dialog BoxThe explanation below is on the Color imageRUNNER Enlargement Copy dialog box.
Note• For the step to open the Color imageRUNNER Enlargement Copy dialog box, see "Starting Color image-
RUNNER Enlargement Copy." →P.286
Hot FolderThe hot folder list appears.
Windows Software > Color imageRUNNER Enlargement Copy >
Color imageRUNNER Enlargement Copy Dialog Box iPF815
4
288
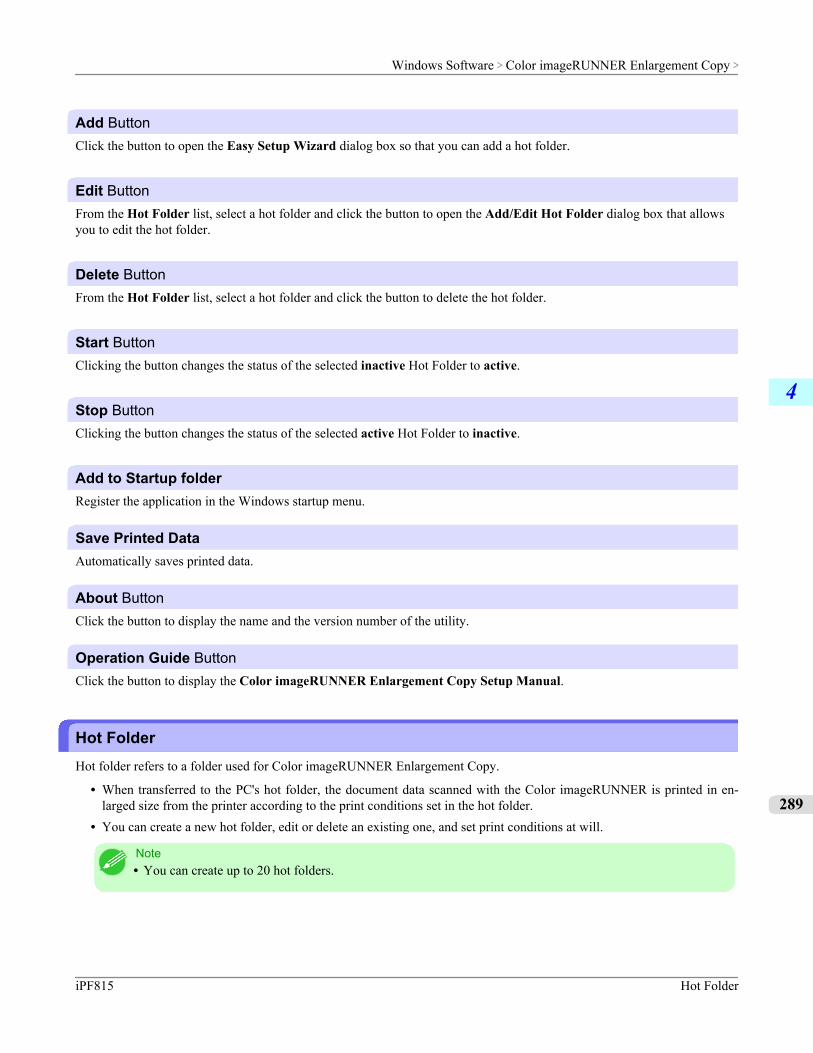
Add ButtonClick the button to open the Easy Setup Wizard dialog box so that you can add a hot folder.
Edit ButtonFrom the Hot Folder list, select a hot folder and click the button to open the Add/Edit Hot Folder dialog box that allowsyou to edit the hot folder.
Delete ButtonFrom the Hot Folder list, select a hot folder and click the button to delete the hot folder.
Start ButtonClicking the button changes the status of the selected inactive Hot Folder to active.
Stop ButtonClicking the button changes the status of the selected active Hot Folder to inactive.
Add to Startup folderRegister the application in the Windows startup menu.
Save Printed DataAutomatically saves printed data.
About ButtonClick the button to display the name and the version number of the utility.
Operation Guide ButtonClick the button to display the Color imageRUNNER Enlargement Copy Setup Manual.
Hot FolderHot folder refers to a folder used for Color imageRUNNER Enlargement Copy.
• When transferred to the PC's hot folder, the document data scanned with the Color imageRUNNER is printed in en-larged size from the printer according to the print conditions set in the hot folder.
• You can create a new hot folder, edit or delete an existing one, and set print conditions at will.
Note• You can create up to 20 hot folders.
Windows Software > Color imageRUNNER Enlargement Copy >
iPF815 Hot Folder
4
289
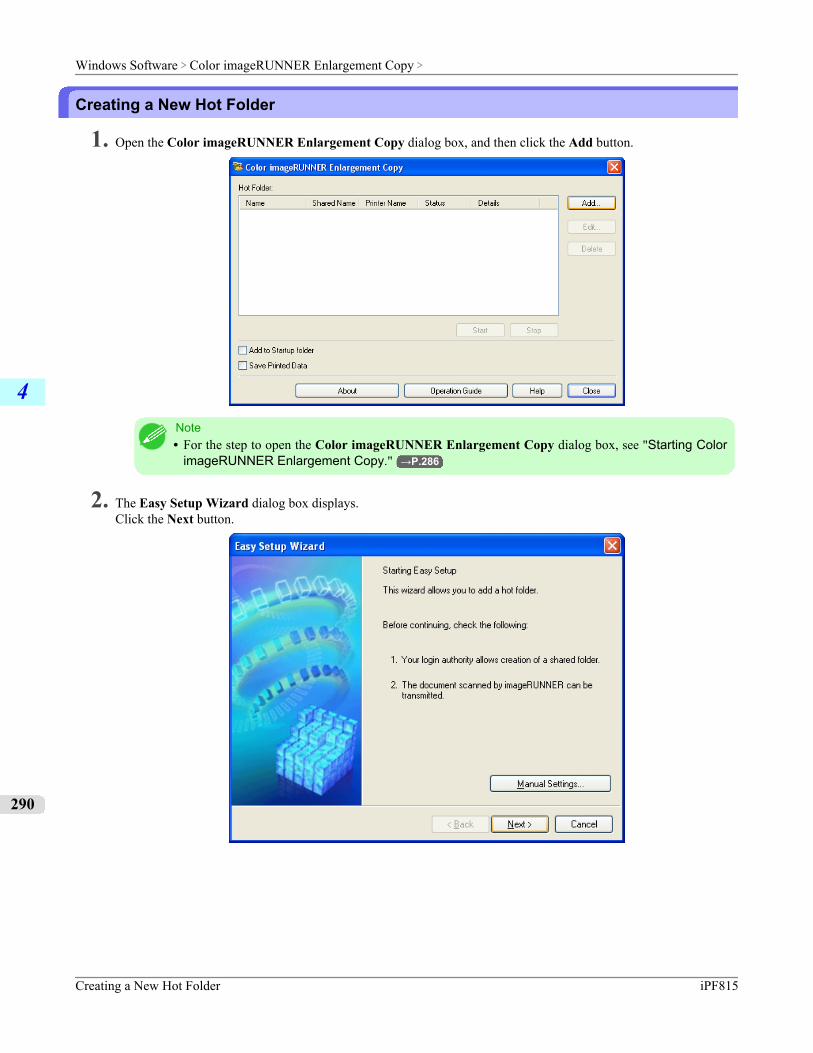
Creating a New Hot Folder
1. Open the Color imageRUNNER Enlargement Copy dialog box, and then click the Add button.
Note• For the step to open the Color imageRUNNER Enlargement Copy dialog box, see "Starting Color
imageRUNNER Enlargement Copy." →P.286
2. The Easy Setup Wizard dialog box displays.Click the Next button.
Windows Software > Color imageRUNNER Enlargement Copy >
Creating a New Hot Folder iPF815
4
290
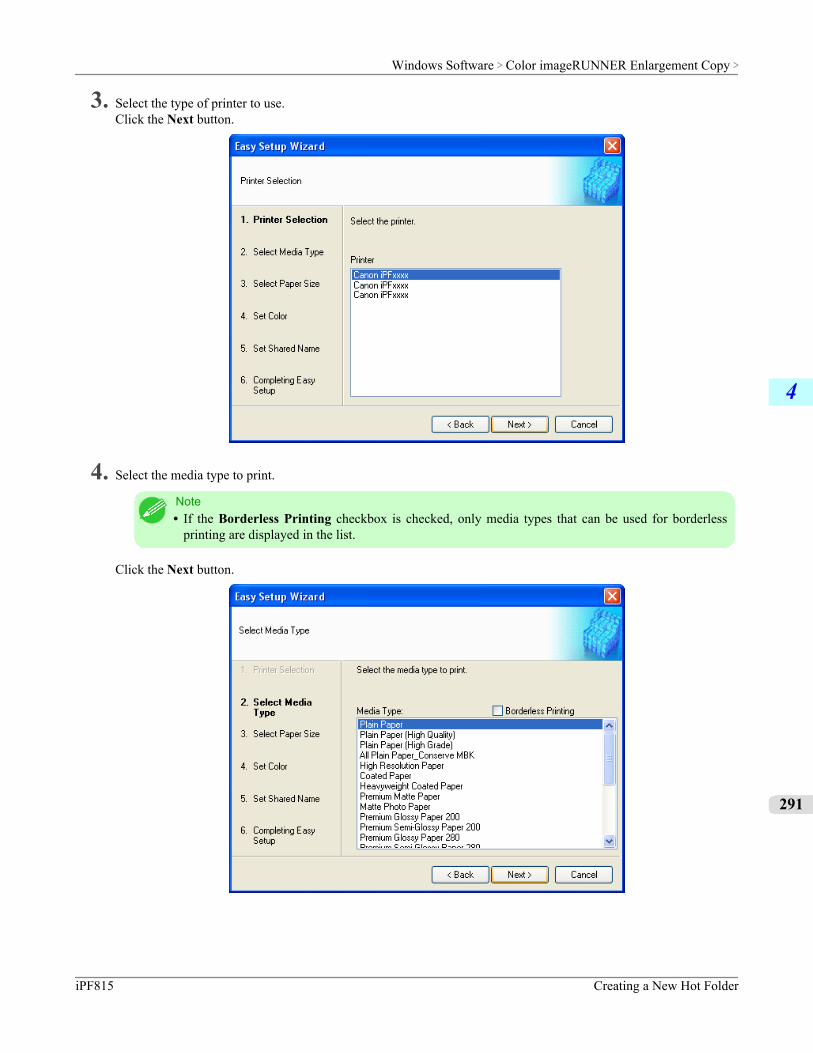
3. Select the type of printer to use.Click the Next button.
4. Select the media type to print.
Note• If the Borderless Printing checkbox is checked, only media types that can be used for borderless
printing are displayed in the list.
Click the Next button.
Windows Software > Color imageRUNNER Enlargement Copy >
iPF815 Creating a New Hot Folder
4
291
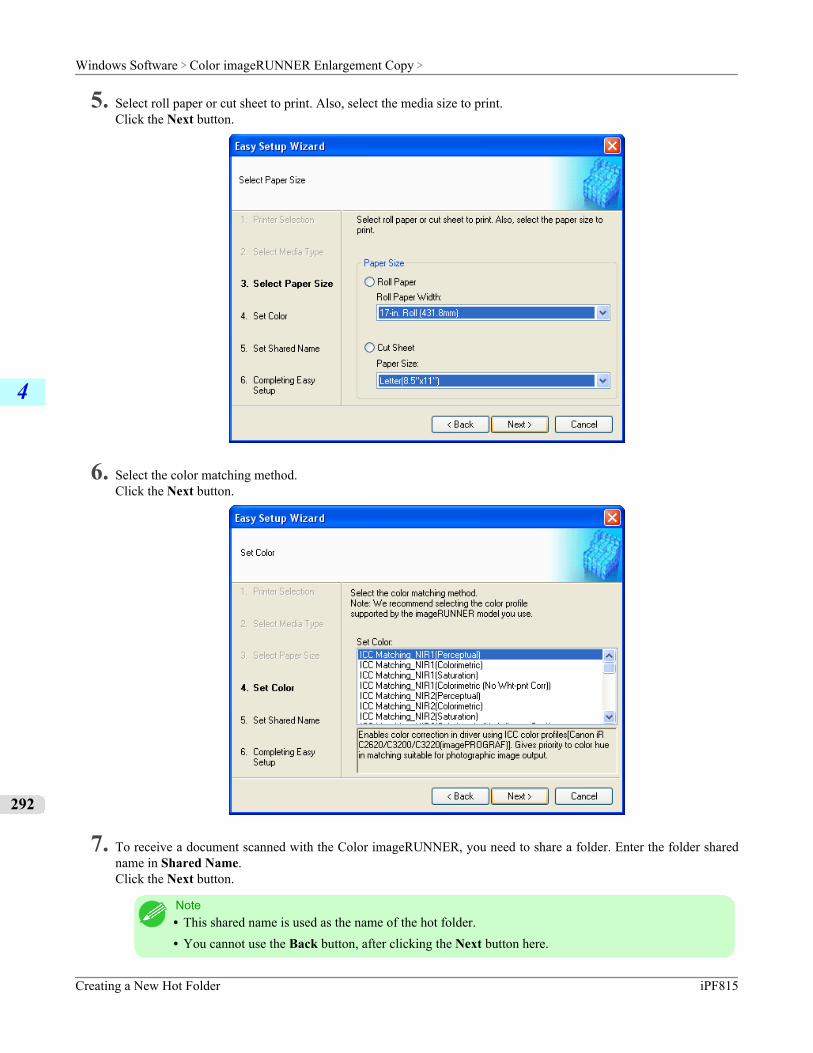
5. Select roll paper or cut sheet to print. Also, select the media size to print.Click the Next button.
6. Select the color matching method.Click the Next button.
7. To receive a document scanned with the Color imageRUNNER, you need to share a folder. Enter the folder sharedname in Shared Name.Click the Next button.
Note• This shared name is used as the name of the hot folder.• You cannot use the Back button, after clicking the Next button here.
Windows Software > Color imageRUNNER Enlargement Copy >
Creating a New Hot Folder iPF815
4
292
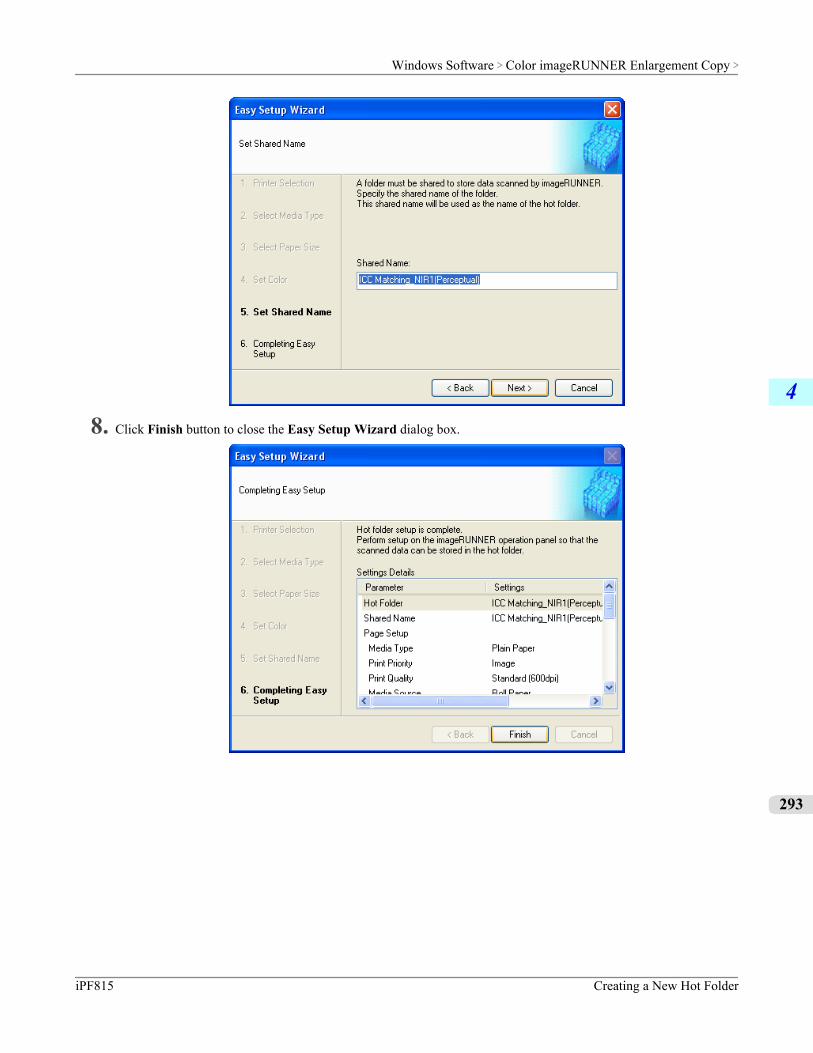
8. Click Finish button to close the Easy Setup Wizard dialog box.
Windows Software > Color imageRUNNER Enlargement Copy >
iPF815 Creating a New Hot Folder
4
293
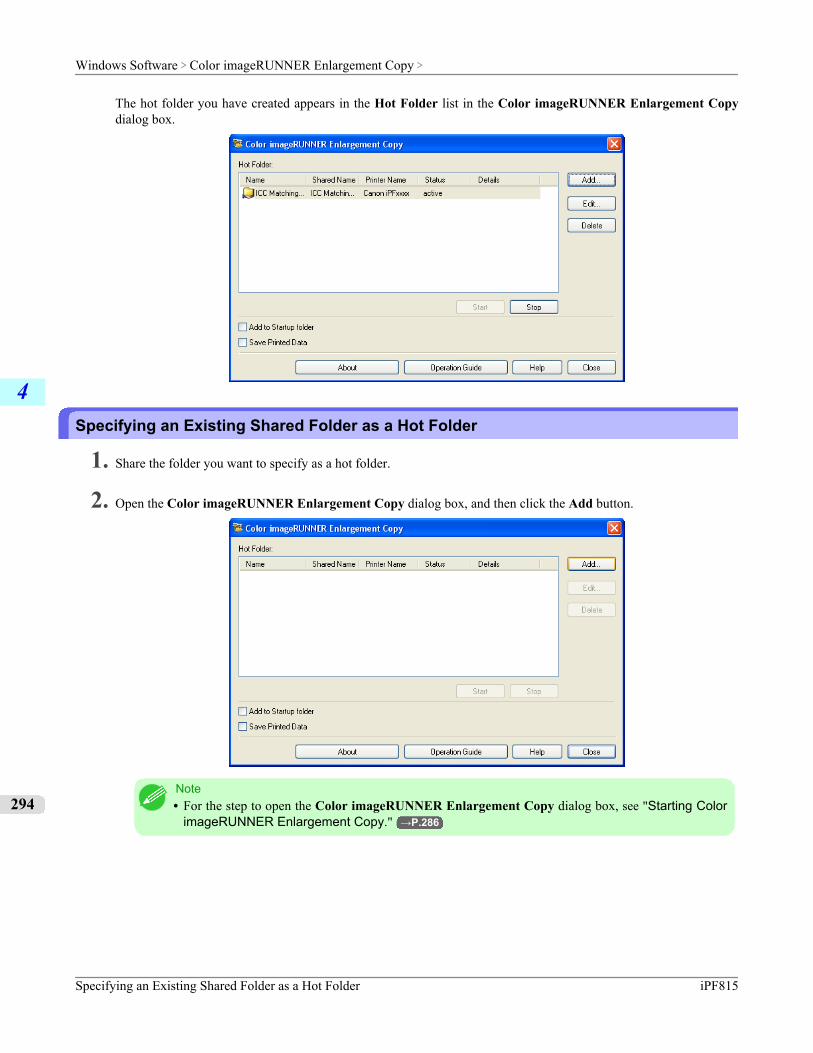
The hot folder you have created appears in the Hot Folder list in the Color imageRUNNER Enlargement Copydialog box.
Specifying an Existing Shared Folder as a Hot Folder
1. Share the folder you want to specify as a hot folder.
2. Open the Color imageRUNNER Enlargement Copy dialog box, and then click the Add button.
Note• For the step to open the Color imageRUNNER Enlargement Copy dialog box, see "Starting Color
imageRUNNER Enlargement Copy." →P.286
Windows Software > Color imageRUNNER Enlargement Copy >
Specifying an Existing Shared Folder as a Hot Folder iPF815
4
294
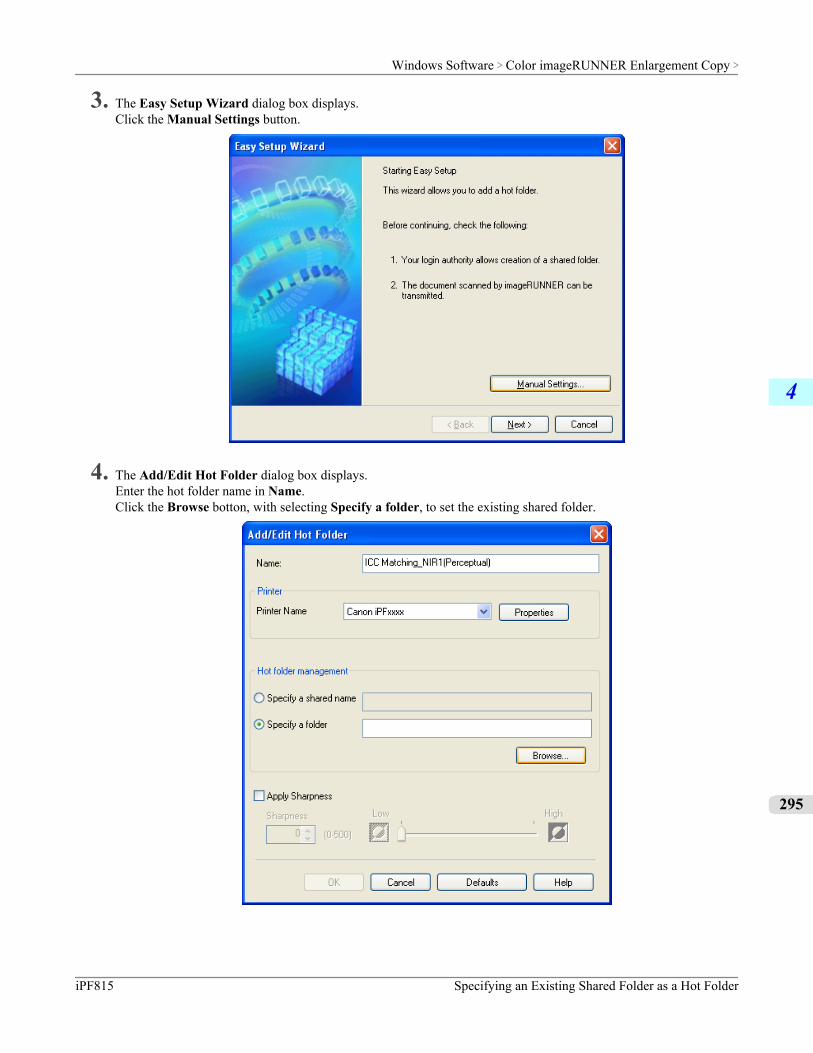
3. The Easy Setup Wizard dialog box displays.Click the Manual Settings button.
4. The Add/Edit Hot Folder dialog box displays.Enter the hot folder name in Name.Click the Browse botton, with selecting Specify a folder, to set the existing shared folder.
Windows Software > Color imageRUNNER Enlargement Copy >
iPF815 Specifying an Existing Shared Folder as a Hot Folder
4
295
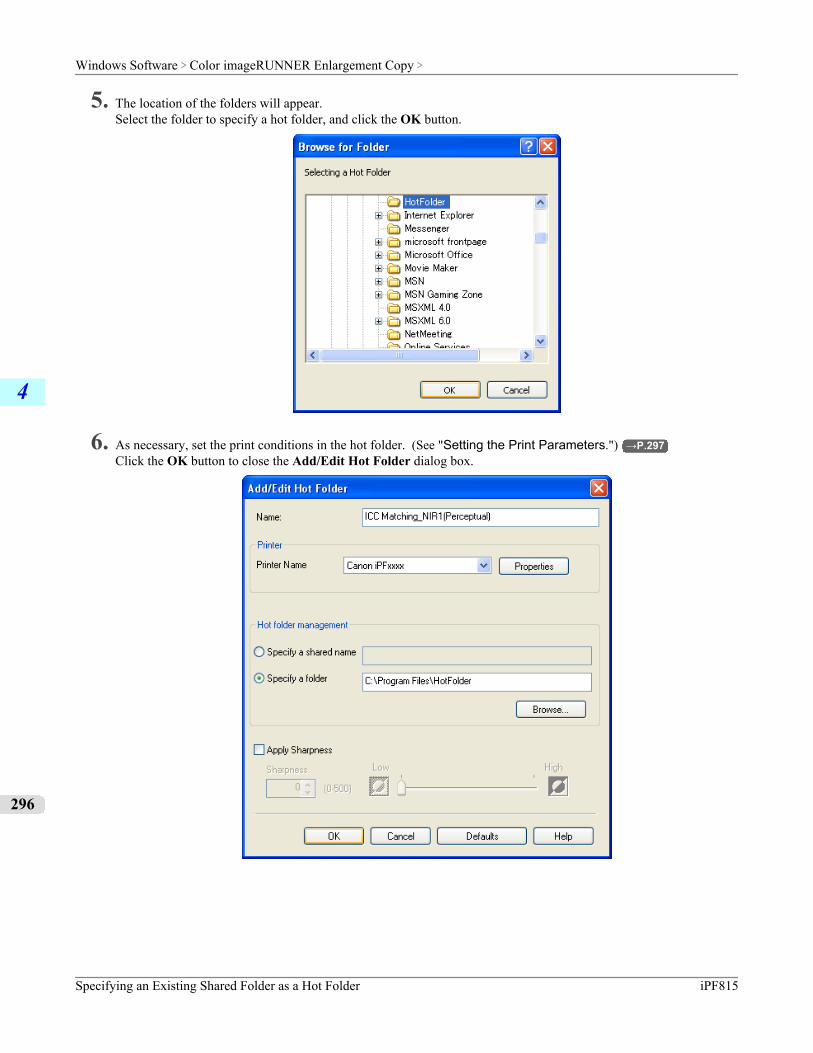
5. The location of the folders will appear.Select the folder to specify a hot folder, and click the OK button.
6. As necessary, set the print conditions in the hot folder. (See "Setting the Print Parameters.") →P.297Click the OK button to close the Add/Edit Hot Folder dialog box.
Windows Software > Color imageRUNNER Enlargement Copy >
Specifying an Existing Shared Folder as a Hot Folder iPF815
4
296
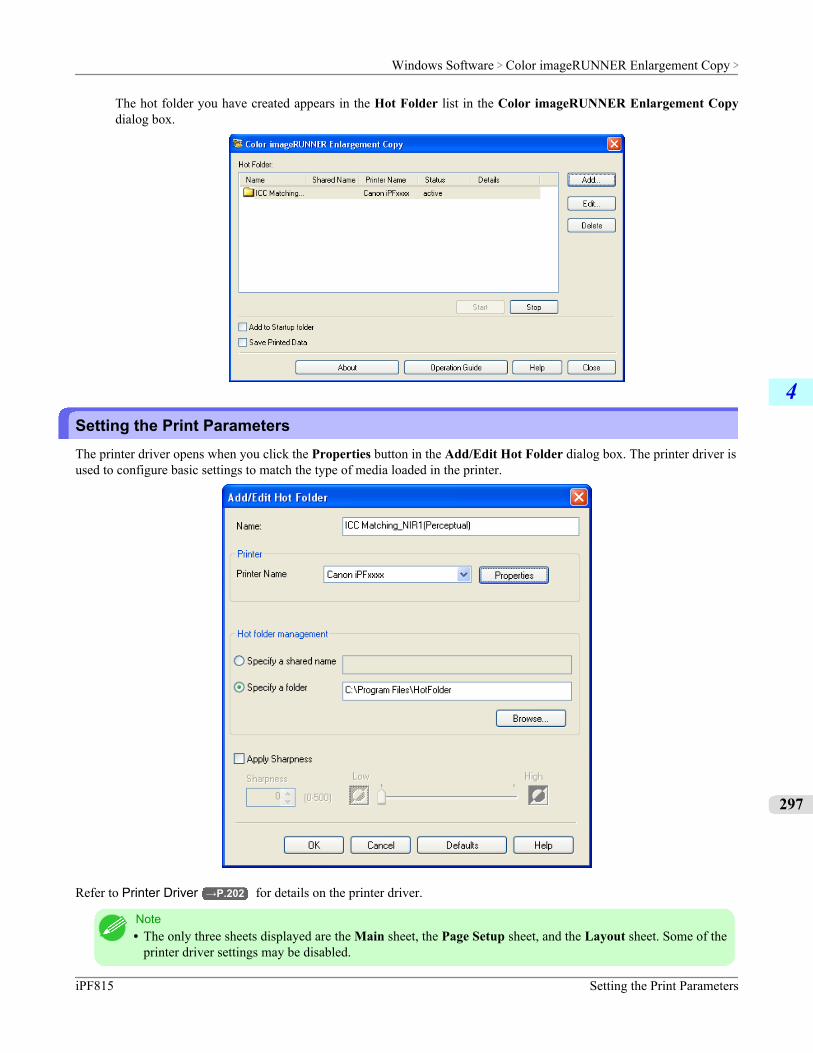
The hot folder you have created appears in the Hot Folder list in the Color imageRUNNER Enlargement Copydialog box.
Setting the Print ParametersThe printer driver opens when you click the Properties button in the Add/Edit Hot Folder dialog box. The printer driver isused to configure basic settings to match the type of media loaded in the printer.
Refer to Printer Driver →P.202 for details on the printer driver.
Note• The only three sheets displayed are the Main sheet, the Page Setup sheet, and the Layout sheet. Some of the
printer driver settings may be disabled.
Windows Software > Color imageRUNNER Enlargement Copy >
iPF815 Setting the Print Parameters
4
297
Apply SharpnessPlace a checkmark here to set the sharpness.Drag the slider bar to the left or right to adjust. You can also adjust by directly entering a number in the numeric input field.
Note• You can input between 0 and 500.• You can change the numbers by clicking either ▲ button or ▼ button.• You cannot be applied to PDF files.
Printing Enlargements of Scanned Originals from a Color imageRUNNERScanned originals from a Color imageRUNNER can be enlarged and printed automatically.Originals you create by scanning with a Color imageRUNNER are transferred to a "hot folder" and printed automaticallyafter enlargement according to printing conditions you specify for that folder.This processing sequence is called the Color imageRUNNER Enlargement Copy function.To use Color imageRUNNER Enlargement Copy, first complete these settings in the following order.
1. Register a hot folder on your computer.Register a hot folder on your computer for storing scanned originals from the Color imageRUNNER and complete thesettings for enlargement copy.
2. Complete the scanning settings on the Color imageRUNNER.Configure the Color imageRUNNER to send scanned originals to the hot folder.
After these settings are complete, you can print enlarged copies of scanned originals from the Color imageRUNNER.
Registering a hot folder on your computerFolders used for Color imageRUNNER Enlargement Copy (iR enlargement copy) are called hot folders. Register a hotfolder on your computer for storing scanned originals from the Color imageRUNNER. You can specify printing conditions(such as the image quality and paper size), based on which originals transferred to the hot folder will be printed. Followthese steps to register and modify hot folders.
1. Display the printer driver dialog box. (See "Accessing the Printer Driver Dialog Box from the Operating SystemMenu .") →P.213
Windows Software > Color imageRUNNER Enlargement Copy >
Printing Enlargements of Scanned Originals from a Color imageRUNNER iPF815
4
298
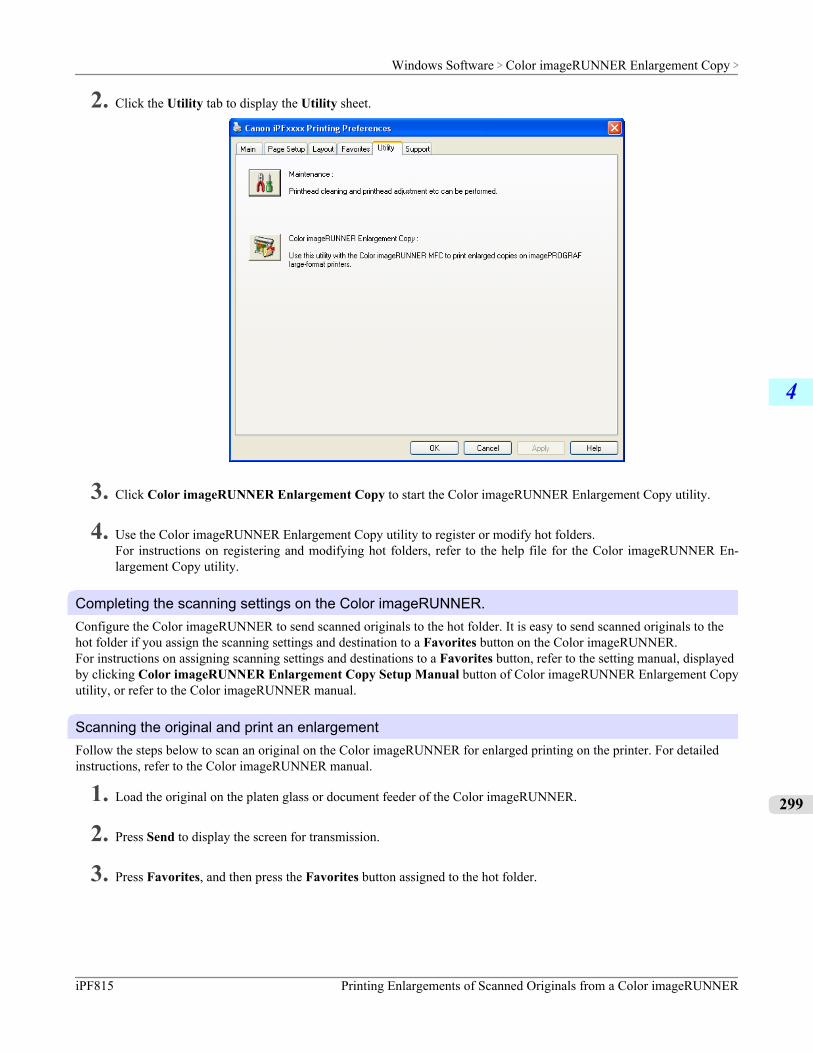
2. Click the Utility tab to display the Utility sheet.
3. Click Color imageRUNNER Enlargement Copy to start the Color imageRUNNER Enlargement Copy utility.
4. Use the Color imageRUNNER Enlargement Copy utility to register or modify hot folders.For instructions on registering and modifying hot folders, refer to the help file for the Color imageRUNNER En-largement Copy utility.
Completing the scanning settings on the Color imageRUNNER.Configure the Color imageRUNNER to send scanned originals to the hot folder. It is easy to send scanned originals to thehot folder if you assign the scanning settings and destination to a Favorites button on the Color imageRUNNER.For instructions on assigning scanning settings and destinations to a Favorites button, refer to the setting manual, displayedby clicking Color imageRUNNER Enlargement Copy Setup Manual button of Color imageRUNNER Enlargement Copyutility, or refer to the Color imageRUNNER manual.
Scanning the original and print an enlargementFollow the steps below to scan an original on the Color imageRUNNER for enlarged printing on the printer. For detailedinstructions, refer to the Color imageRUNNER manual.
1. Load the original on the platen glass or document feeder of the Color imageRUNNER.
2. Press Send to display the screen for transmission.
3. Press Favorites, and then press the Favorites button assigned to the hot folder.
Windows Software > Color imageRUNNER Enlargement Copy >
iPF815 Printing Enlargements of Scanned Originals from a Color imageRUNNER
4
299
4. Press Start on the control panel. If you scan originals on the platen glass, after scanning all originals, press Done onthe touch-panel display.Scanned originals are sent to the hot folder and automatically enlarged and printed following the conditions youspecified for the folder.
Windows Software > Color imageRUNNER Enlargement Copy >
Printing Enlargements of Scanned Originals from a Color imageRUNNER iPF815
4
300
Print Plug-In for OfficePrint Plug-In for Office features ....................................................................................................................... 301Operating Environment ................................................................................................................................... 302Steps to install ................................................................................................................................................. 302Steps to uninstall ............................................................................................................................................. 306When Print Plug-In for Office is not displayed ................................................................................................. 306
To start from Microsoft Word ........................................................................................................................... 311Print Matching Roll Width (Word) .................................................................................................................... 314Borderless Printing (Word) .............................................................................................................................. 316Multi-Page Printing (Word) .............................................................................................................................. 319Register the settings(Word) ............................................................................................................................. 322Print Using Registered Settings (Word) .......................................................................................................... 323Portrait Orientation / Landscape Orientation (Word) ....................................................................................... 325
To start from Microsoft PowerPoint ................................................................................................................. 327Print Matching Roll Width (PowerPoint) .......................................................................................................... 329Borderless Printing (PowerPoint) .................................................................................................................... 332Multi-Page Printing (PowerPoint) .................................................................................................................... 334Register the settings(PowerPoint) ................................................................................................................... 337Print Using Registered Settings (PowerPoint) ................................................................................................. 338Portrait Orientation / Landscape Orientation (PowerPoint) ............................................................................. 340
To start from Microsoft Excel ........................................................................................................................... 343Print Entire Sheet (Excel) ................................................................................................................................ 345Print Selected Area (Excel) ............................................................................................................................. 348Configuring Binding (Excel) ............................................................................................................................. 351
Configuring Special Settings ........................................................................................................................... 352
Print Plug-In for Office featuresPrint Plug-In for Office is a Plug-In that enables easy printing from Microsoft Office.
• It is displayed on the toolbar/ribbon, so it is easily accessible.• It can be set by just selecting from the Wizard.• Large-Format Printing custom media size can also be set in the Wizard from Microsoft Word or Microsoft Power-
Point.• Custom media size can be set automatically from Microsoft Excel.• The layout can be checked before printing by starting the preview screen.
Important• The Print Plug-In for Office toolbar/ribbon might not be displayed in Microsoft Office after installing im-
agePROGRAF Print Plug-In for Office.Refer to the following topic for details on how to display the imagePROGRAF Print Plug-In for Officetoolbar/ribbon.
• When Print Plug-In for Office is not displayed →P.306
Windows Software > Print Plug-In for Office >
iPF815 Print Plug-In for Office features
4
301

Operating EnvironmentPrint Plug-In for Office 's operating environment is as below.
• Compatible Operating SystemWindows XP, Windows Server 2003, Windows Vista, Windows Server 2008, Windows 7
• Software that requires installationMicrosoft Office XP/2003/2007/2010imagePROGRAF Printer Driver Ver. 3.95 or later
• HardwareCPU 2.0 GHz Pentium 4 or betterRAM 512 MB or more
Important• If you opened the Office document from Internet Explorer, the software will not run correctly.• If you are editing an embedded object or link object, the software will not run correctly.• If you added the imagePROGRAF Print Plug-In ribbon to the Microsoft Office 2007/2010 Quick Access
toolbar, the software will not run correctly.
Steps to installBelow are the steps to install Print Plug-In for Office.
Note• You must log into Windows as an Administrator before the installation.
1. Insert "User Software CD-ROM" into the CD-ROM drive and start the installer.
Note• If the installer screen does not display, open the CD-ROM icon from My Computer, click setup.exe,
and open the icon.
Windows Software > Print Plug-In for Office >
Operating Environment iPF815
4
302
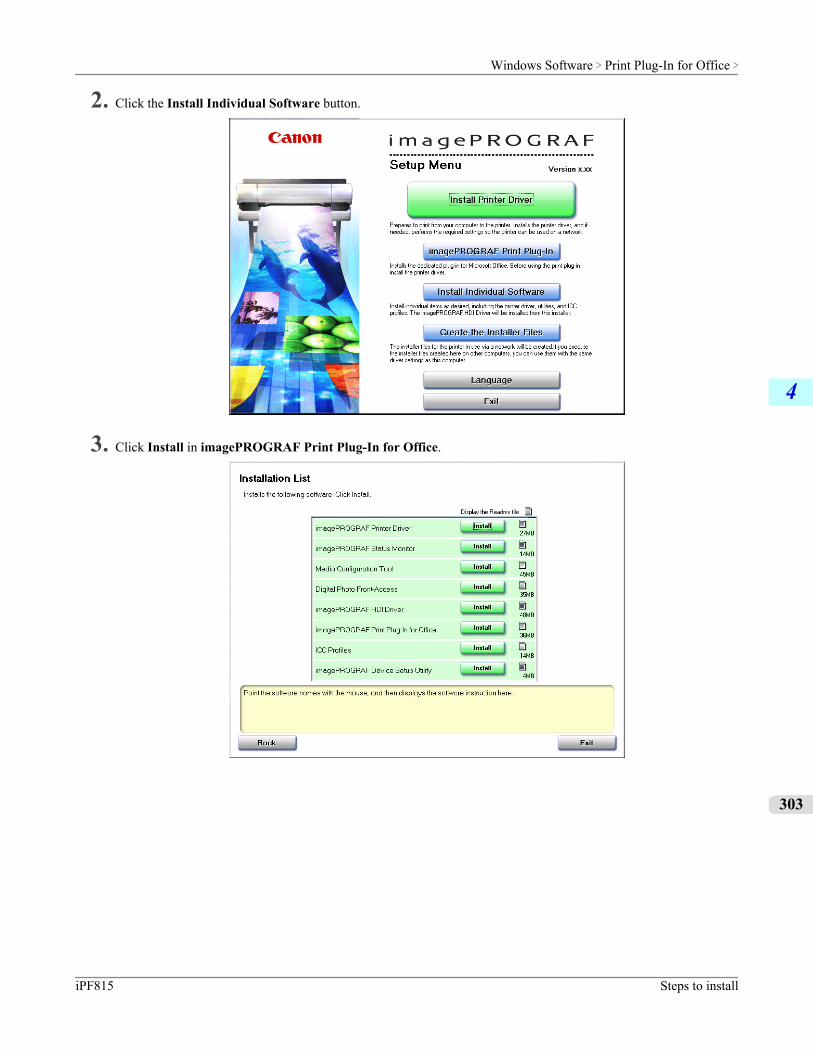
2. Click the Install Individual Software button.
3. Click Install in imagePROGRAF Print Plug-In for Office.
Windows Software > Print Plug-In for Office >
iPF815 Steps to install
4
303
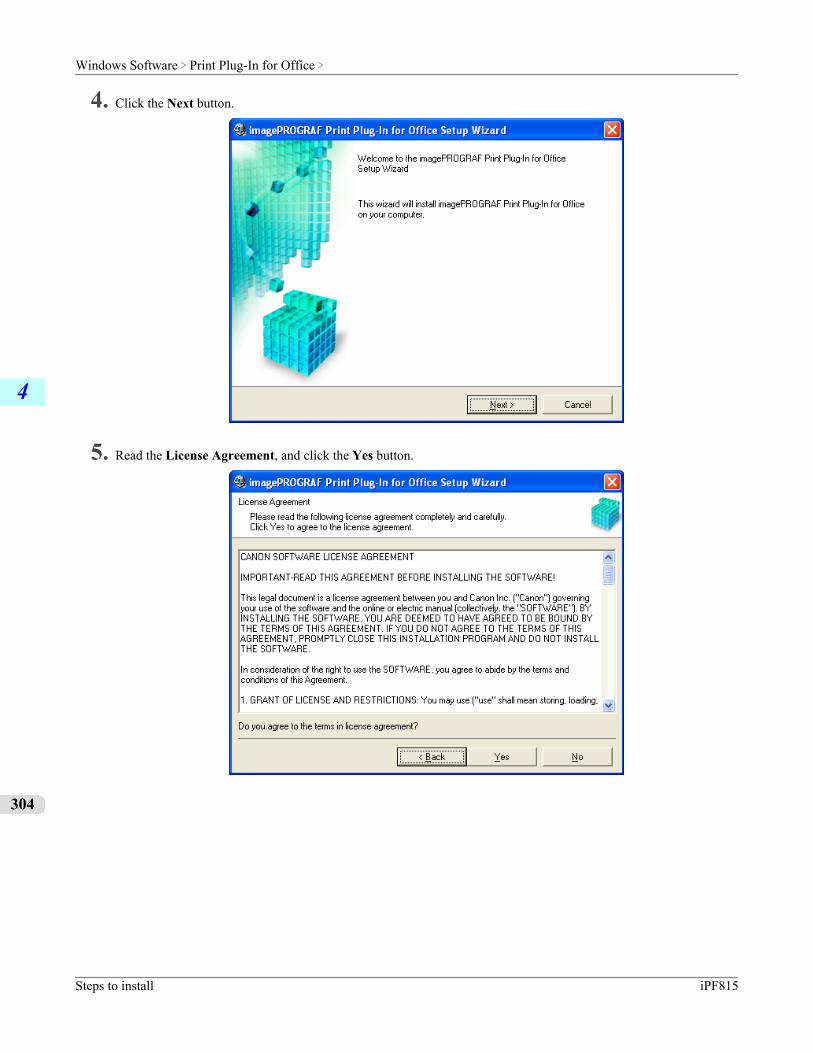
4. Click the Next button.
5. Read the License Agreement, and click the Yes button.
Windows Software > Print Plug-In for Office >
Steps to install iPF815
4
304
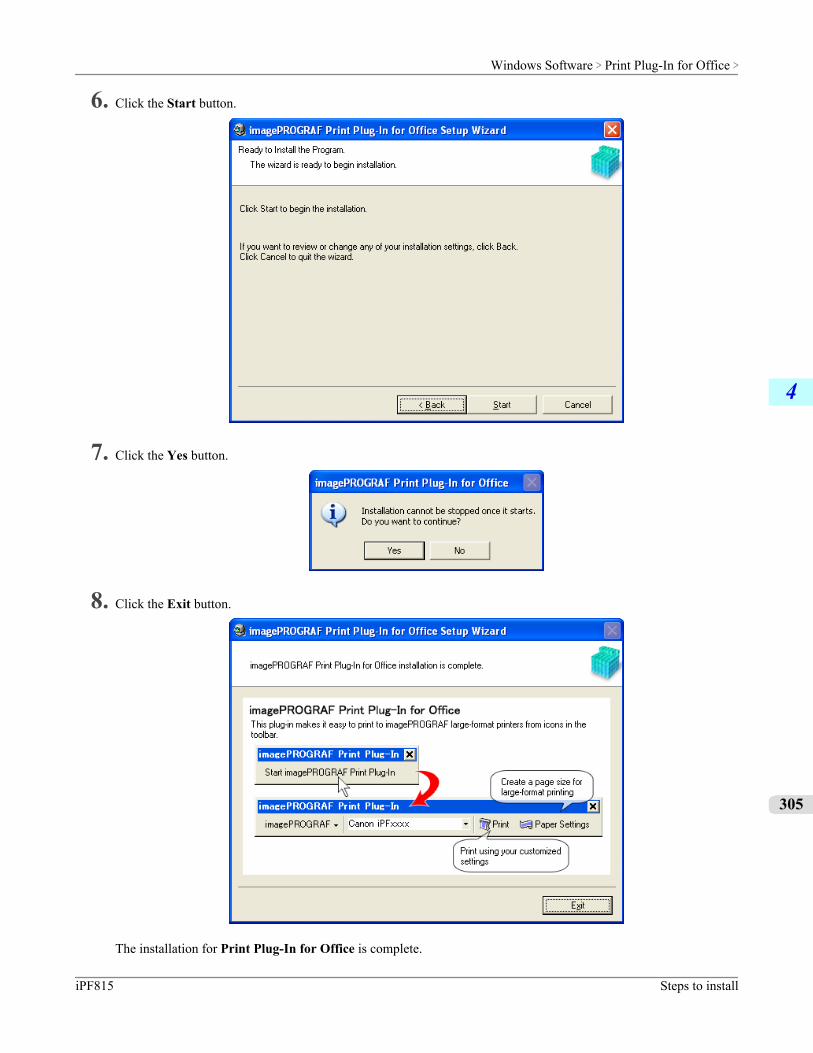
6. Click the Start button.
7. Click the Yes button.
8. Click the Exit button.
The installation for Print Plug-In for Office is complete.
Windows Software > Print Plug-In for Office >
iPF815 Steps to install
4
305
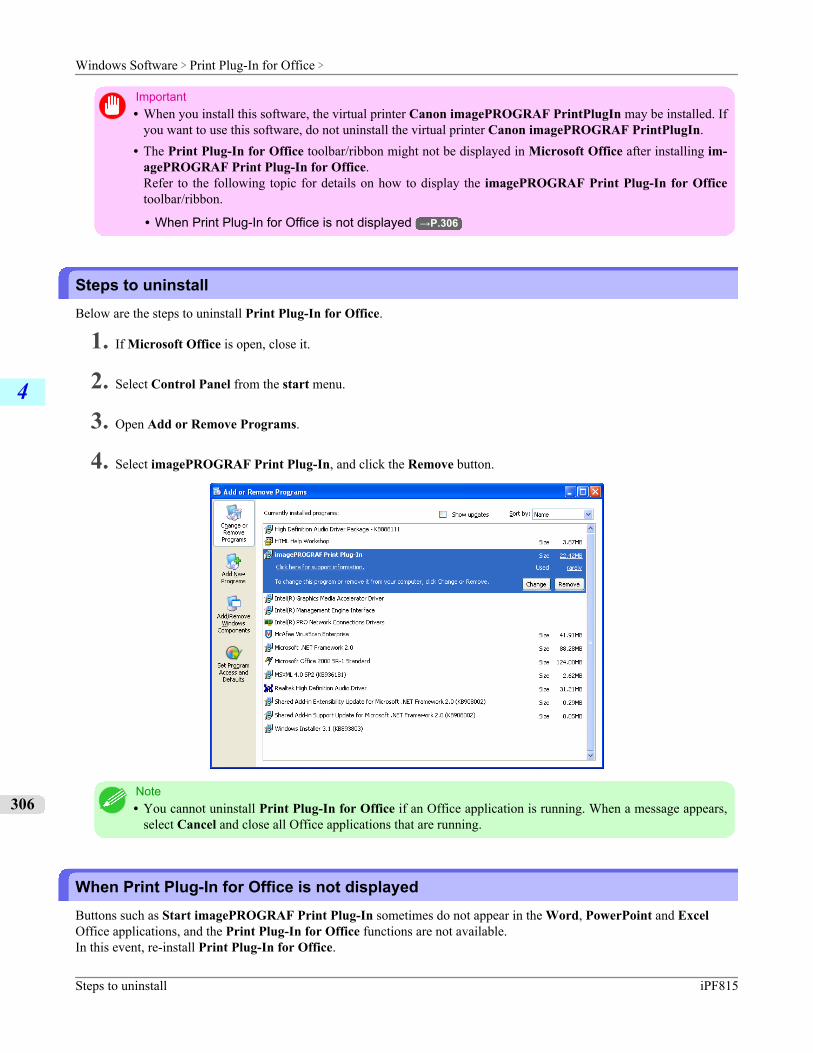
Important• When you install this software, the virtual printer Canon imagePROGRAF PrintPlugIn may be installed. If
you want to use this software, do not uninstall the virtual printer Canon imagePROGRAF PrintPlugIn.• The Print Plug-In for Office toolbar/ribbon might not be displayed in Microsoft Office after installing im-
agePROGRAF Print Plug-In for Office.Refer to the following topic for details on how to display the imagePROGRAF Print Plug-In for Officetoolbar/ribbon.
• When Print Plug-In for Office is not displayed →P.306
Steps to uninstallBelow are the steps to uninstall Print Plug-In for Office.
1. If Microsoft Office is open, close it.
2. Select Control Panel from the start menu.
3. Open Add or Remove Programs.
4. Select imagePROGRAF Print Plug-In, and click the Remove button.
Note• You cannot uninstall Print Plug-In for Office if an Office application is running. When a message appears,
select Cancel and close all Office applications that are running.
When Print Plug-In for Office is not displayedButtons such as Start imagePROGRAF Print Plug-In sometimes do not appear in the Word, PowerPoint and ExcelOffice applications, and the Print Plug-In for Office functions are not available.In this event, re-install Print Plug-In for Office.
Windows Software > Print Plug-In for Office >
Steps to uninstall iPF815
4
306
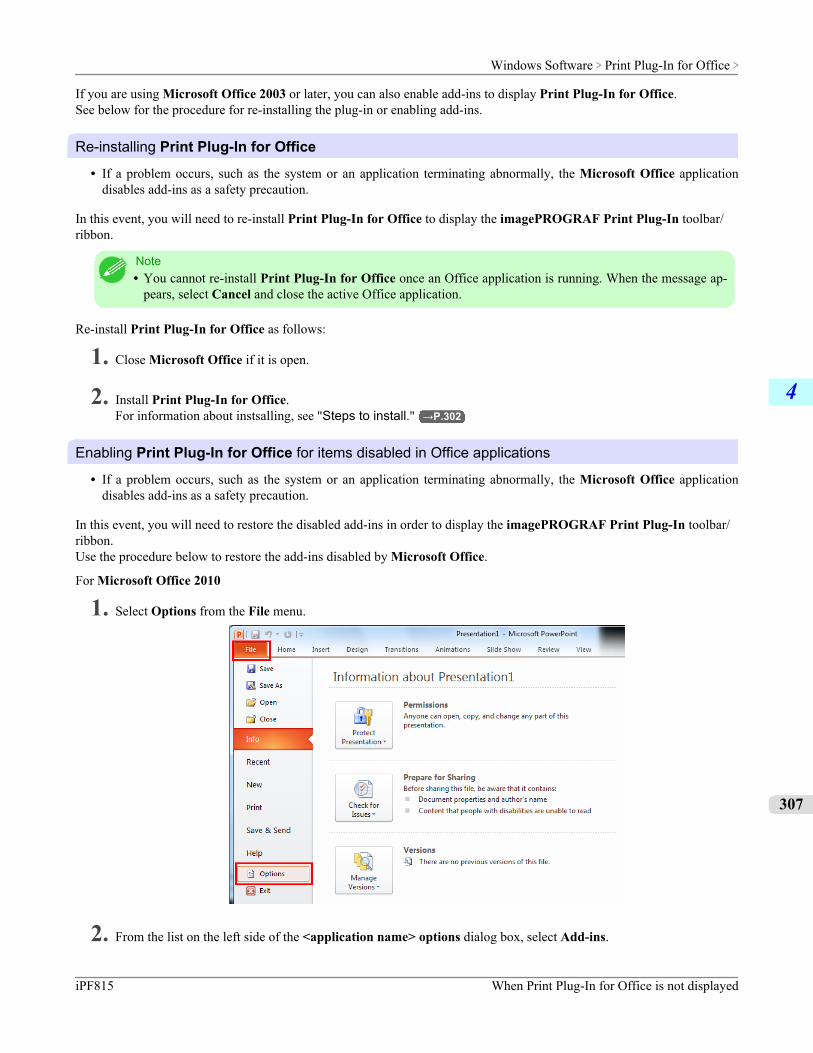
If you are using Microsoft Office 2003 or later, you can also enable add-ins to display Print Plug-In for Office.See below for the procedure for re-installing the plug-in or enabling add-ins.
Re-installing Print Plug-In for Office
• If a problem occurs, such as the system or an application terminating abnormally, the Microsoft Office applicationdisables add-ins as a safety precaution.
In this event, you will need to re-install Print Plug-In for Office to display the imagePROGRAF Print Plug-In toolbar/ribbon.
Note• You cannot re-install Print Plug-In for Office once an Office application is running. When the message ap-
pears, select Cancel and close the active Office application.
Re-install Print Plug-In for Office as follows:
1. Close Microsoft Office if it is open.
2. Install Print Plug-In for Office.For information about instsalling, see "Steps to install." →P.302
Enabling Print Plug-In for Office for items disabled in Office applications
• If a problem occurs, such as the system or an application terminating abnormally, the Microsoft Office applicationdisables add-ins as a safety precaution.
In this event, you will need to restore the disabled add-ins in order to display the imagePROGRAF Print Plug-In toolbar/ribbon.Use the procedure below to restore the add-ins disabled by Microsoft Office.
For Microsoft Office 2010
1. Select Options from the File menu.
2. From the list on the left side of the <application name> options dialog box, select Add-ins.
Windows Software > Print Plug-In for Office >
iPF815 When Print Plug-In for Office is not displayed
4
307

3. Select Disabled Items in the Manage combo box and click the Go button.
4. If Addin imageprograf print plug-in (ipfaddinif.dll) is displayed in the Disabled Items dialog box, select it andclick the Enable button.
5. Close all the dialog boxes and restart the Office application.
Windows Software > Print Plug-In for Office >
When Print Plug-In for Office is not displayed iPF815
4
308
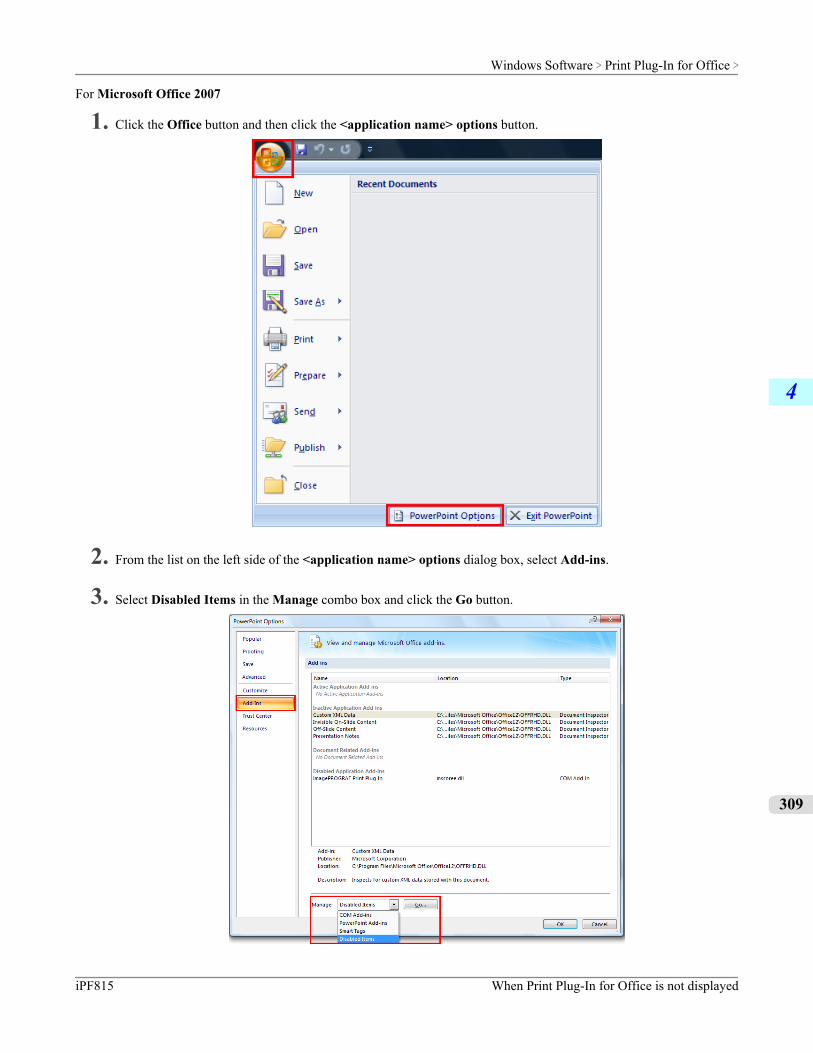
For Microsoft Office 2007
1. Click the Office button and then click the <application name> options button.
2. From the list on the left side of the <application name> options dialog box, select Add-ins.
3. Select Disabled Items in the Manage combo box and click the Go button.
Windows Software > Print Plug-In for Office >
iPF815 When Print Plug-In for Office is not displayed
4
309
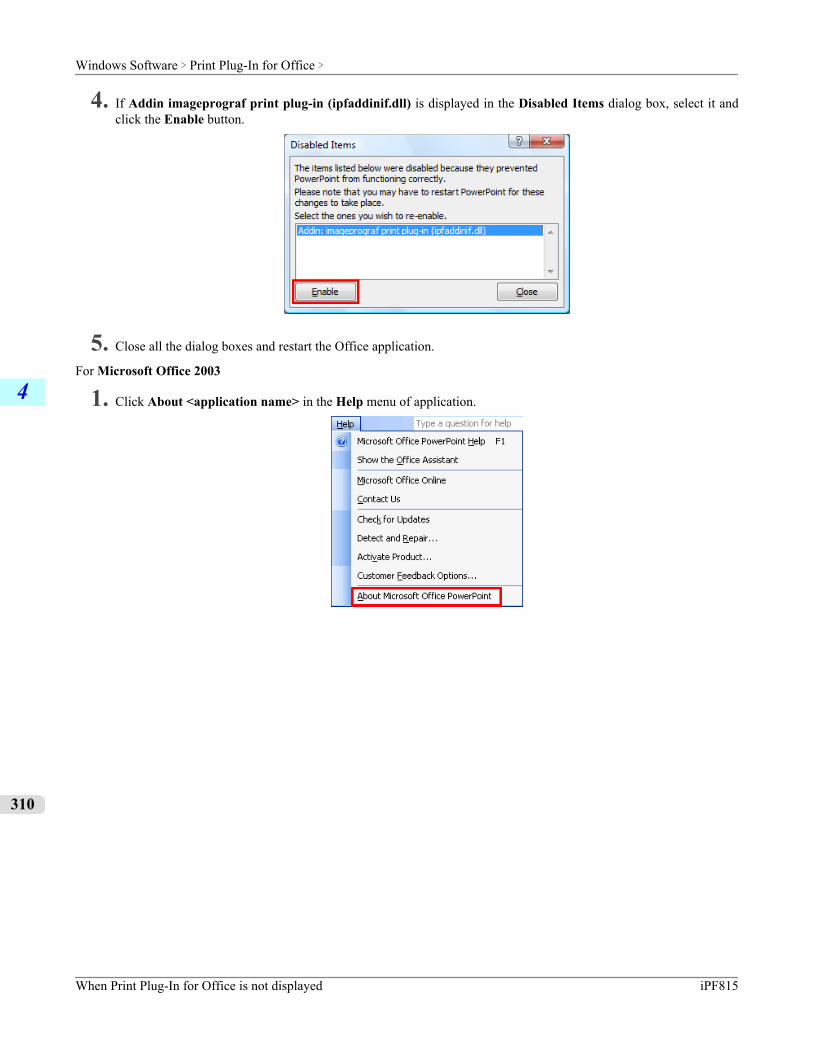
4. If Addin imageprograf print plug-in (ipfaddinif.dll) is displayed in the Disabled Items dialog box, select it andclick the Enable button.
5. Close all the dialog boxes and restart the Office application.
For Microsoft Office 2003
1. Click About <application name> in the Help menu of application.
Windows Software > Print Plug-In for Office >
When Print Plug-In for Office is not displayed iPF815
4
310
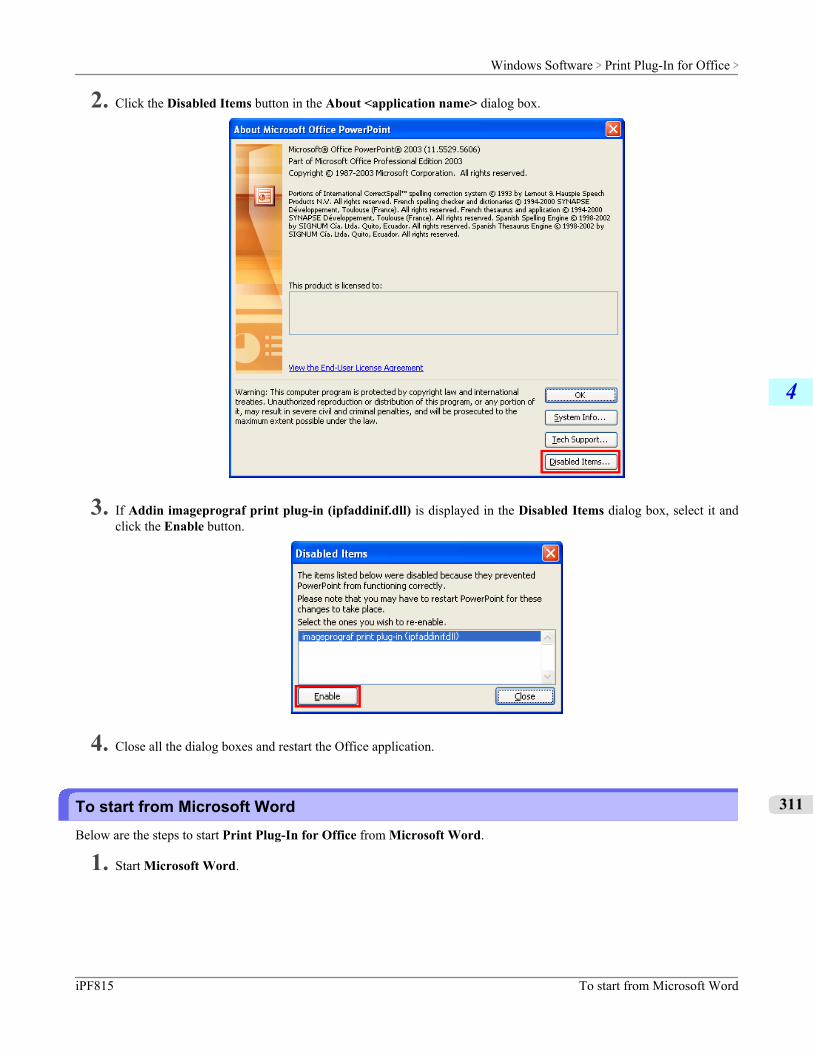
2. Click the Disabled Items button in the About <application name> dialog box.
3. If Addin imageprograf print plug-in (ipfaddinif.dll) is displayed in the Disabled Items dialog box, select it andclick the Enable button.
4. Close all the dialog boxes and restart the Office application.
To start from Microsoft WordBelow are the steps to start Print Plug-In for Office from Microsoft Word.
1. Start Microsoft Word.
Windows Software > Print Plug-In for Office >
iPF815 To start from Microsoft Word
4
311
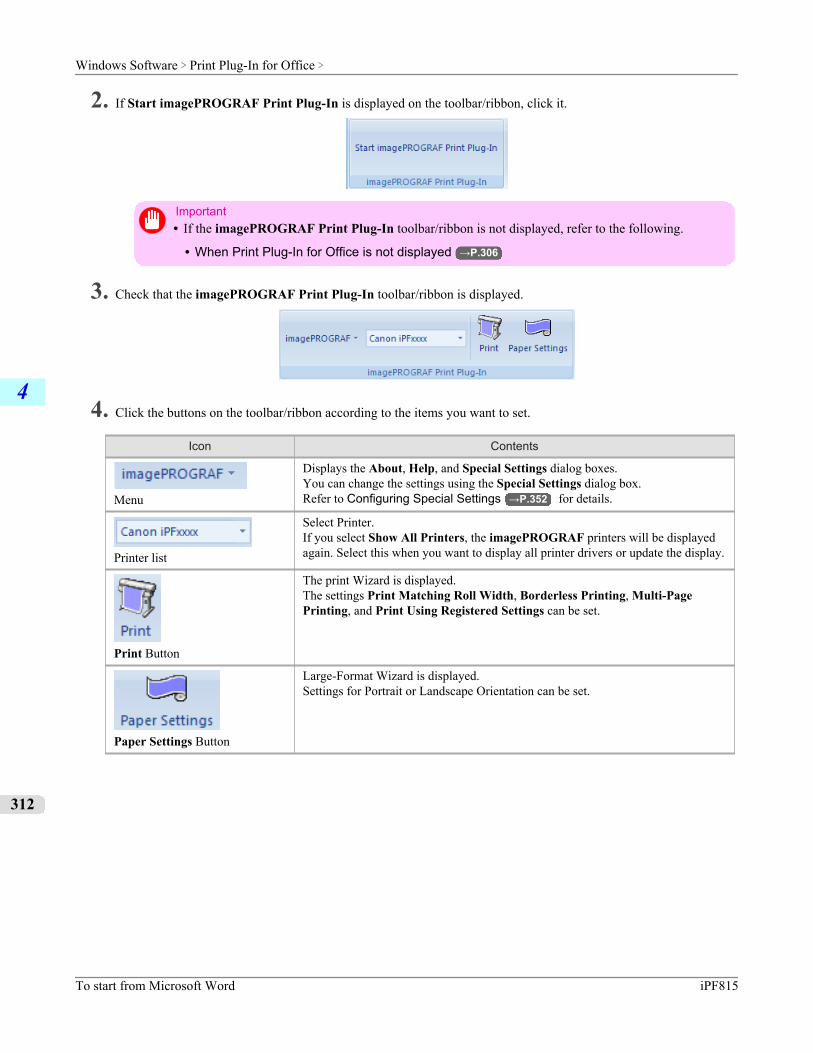
2. If Start imagePROGRAF Print Plug-In is displayed on the toolbar/ribbon, click it.
Important• If the imagePROGRAF Print Plug-In toolbar/ribbon is not displayed, refer to the following.
• When Print Plug-In for Office is not displayed →P.306
3. Check that the imagePROGRAF Print Plug-In toolbar/ribbon is displayed.
4. Click the buttons on the toolbar/ribbon according to the items you want to set.
Icon Contents
Menu
Displays the About, Help, and Special Settings dialog boxes.You can change the settings using the Special Settings dialog box.Refer to Configuring Special Settings →P.352 for details.
Printer list
Select Printer.If you select Show All Printers, the imagePROGRAF printers will be displayedagain. Select this when you want to display all printer drivers or update the display.
Print Button
The print Wizard is displayed.The settings Print Matching Roll Width, Borderless Printing, Multi-PagePrinting, and Print Using Registered Settings can be set.
Paper Settings Button
Large-Format Wizard is displayed.Settings for Portrait or Landscape Orientation can be set.
Windows Software > Print Plug-In for Office >
To start from Microsoft Word iPF815
4
312
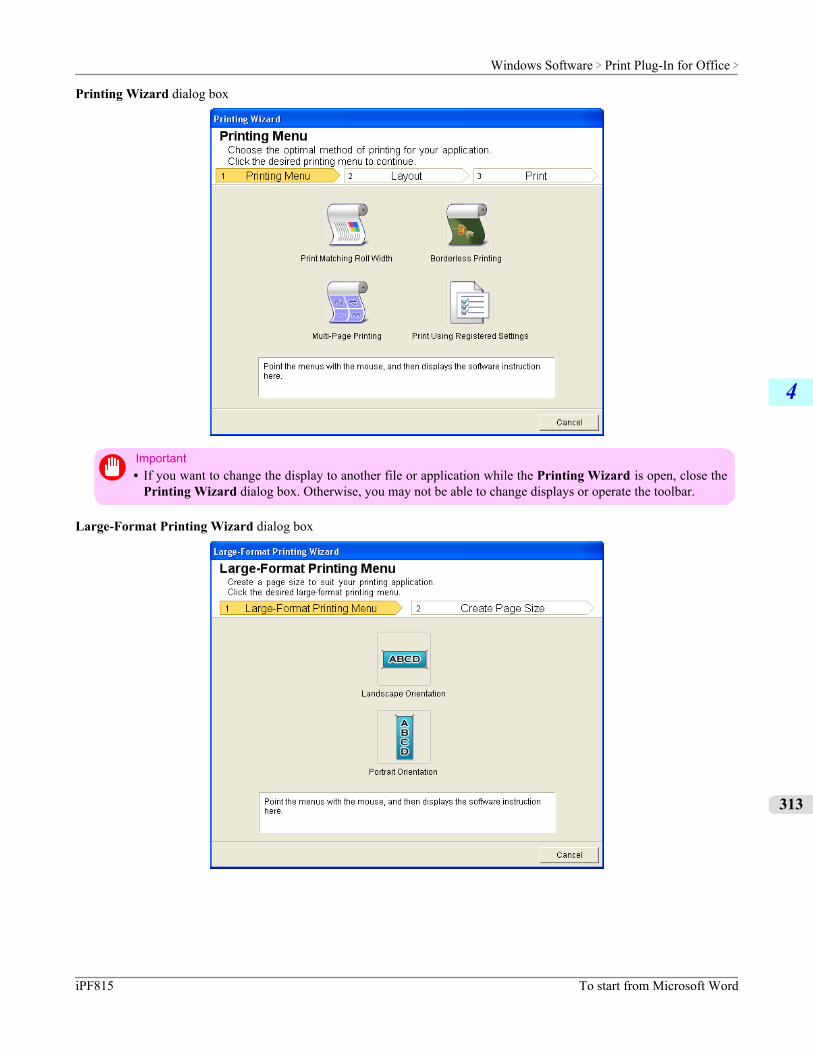
Printing Wizard dialog box
Important• If you want to change the display to another file or application while the Printing Wizard is open, close the
Printing Wizard dialog box. Otherwise, you may not be able to change displays or operate the toolbar.
Large-Format Printing Wizard dialog box
Windows Software > Print Plug-In for Office >
iPF815 To start from Microsoft Word
4
313
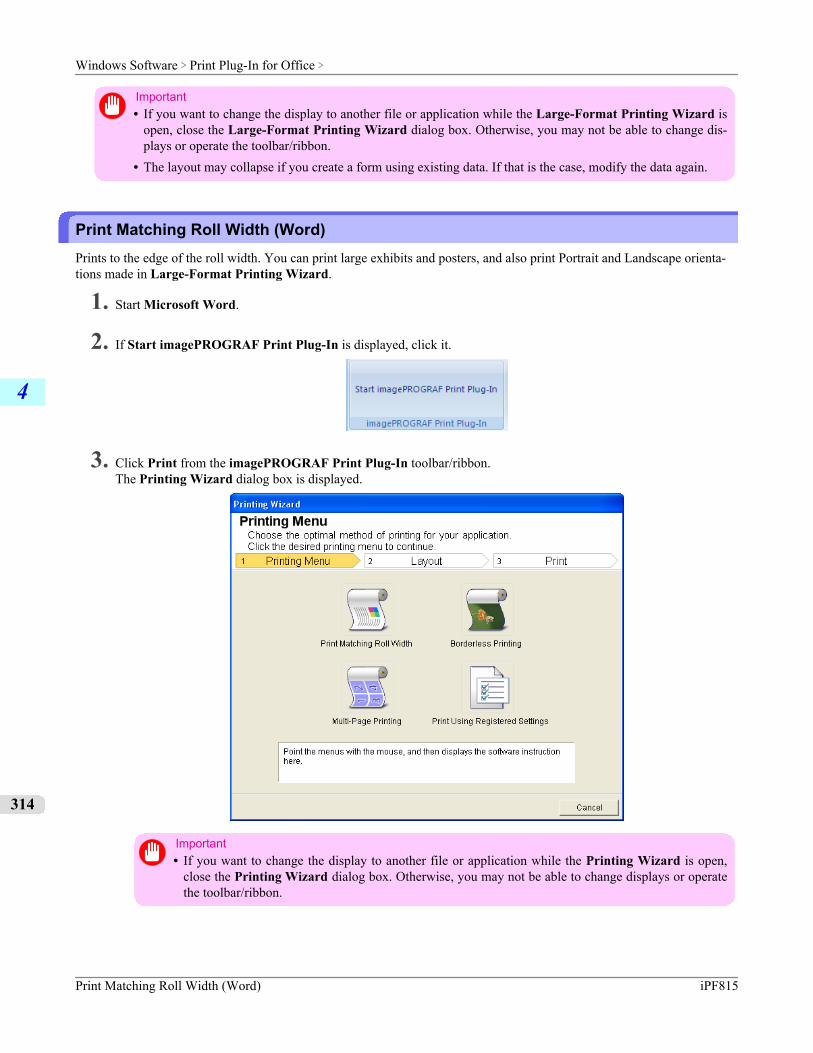
Important• If you want to change the display to another file or application while the Large-Format Printing Wizard is
open, close the Large-Format Printing Wizard dialog box. Otherwise, you may not be able to change dis-plays or operate the toolbar/ribbon.
• The layout may collapse if you create a form using existing data. If that is the case, modify the data again.
Print Matching Roll Width (Word)Prints to the edge of the roll width. You can print large exhibits and posters, and also print Portrait and Landscape orienta-tions made in Large-Format Printing Wizard.
1. Start Microsoft Word.
2. If Start imagePROGRAF Print Plug-In is displayed, click it.
3. Click Print from the imagePROGRAF Print Plug-In toolbar/ribbon.The Printing Wizard dialog box is displayed.
Important• If you want to change the display to another file or application while the Printing Wizard is open,
close the Printing Wizard dialog box. Otherwise, you may not be able to change displays or operatethe toolbar/ribbon.
Windows Software > Print Plug-In for Office >
Print Matching Roll Width (Word) iPF815
4
314
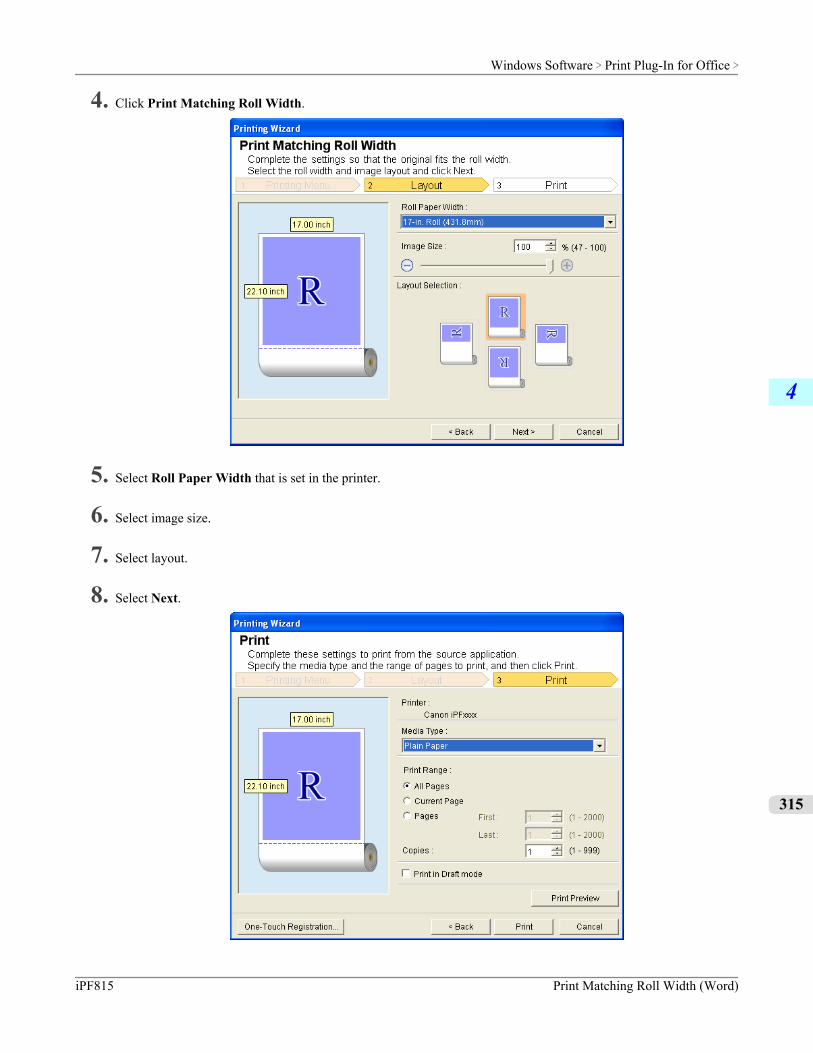
4. Click Print Matching Roll Width.
5. Select Roll Paper Width that is set in the printer.
6. Select image size.
7. Select layout.
8. Select Next.
Windows Software > Print Plug-In for Office >
iPF815 Print Matching Roll Width (Word)
4
315
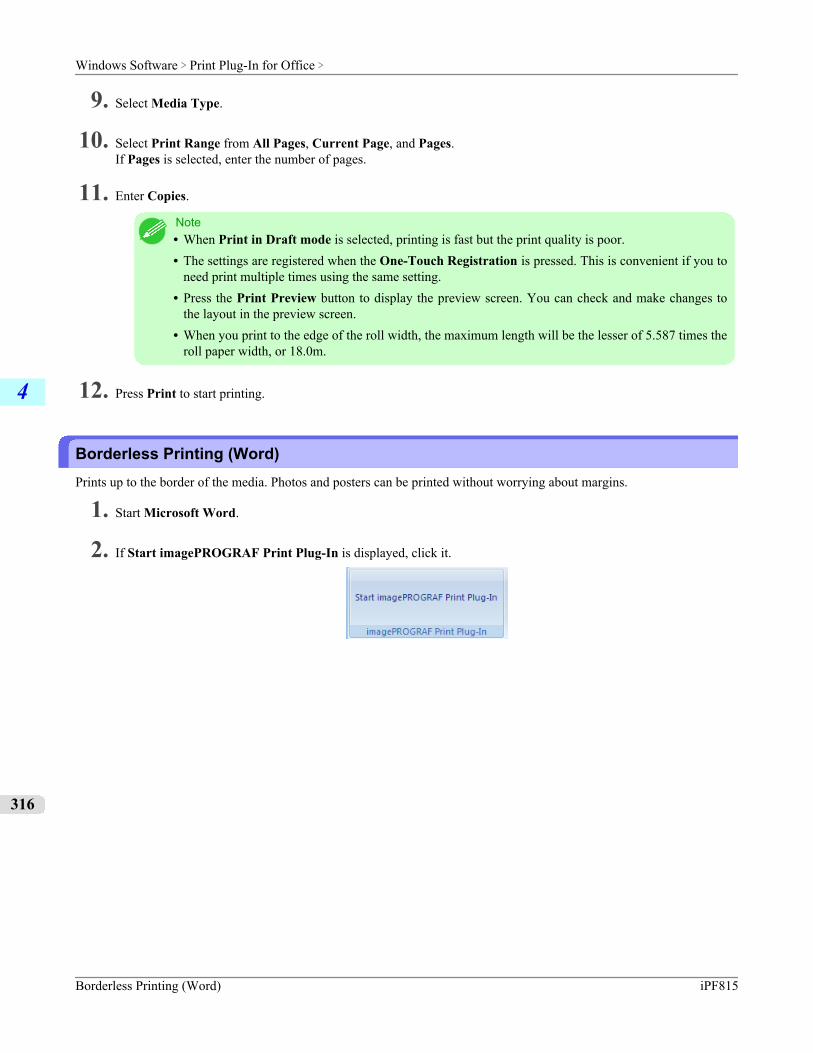
9. Select Media Type.
10. Select Print Range from All Pages, Current Page, and Pages.If Pages is selected, enter the number of pages.
11. Enter Copies.
Note• When Print in Draft mode is selected, printing is fast but the print quality is poor.• The settings are registered when the One-Touch Registration is pressed. This is convenient if you to
need print multiple times using the same setting.• Press the Print Preview button to display the preview screen. You can check and make changes to
the layout in the preview screen.• When you print to the edge of the roll width, the maximum length will be the lesser of 5.587 times the
roll paper width, or 18.0m.
12. Press Print to start printing.
Borderless Printing (Word)Prints up to the border of the media. Photos and posters can be printed without worrying about margins.
1. Start Microsoft Word.
2. If Start imagePROGRAF Print Plug-In is displayed, click it.
Windows Software > Print Plug-In for Office >
Borderless Printing (Word) iPF815
4
316
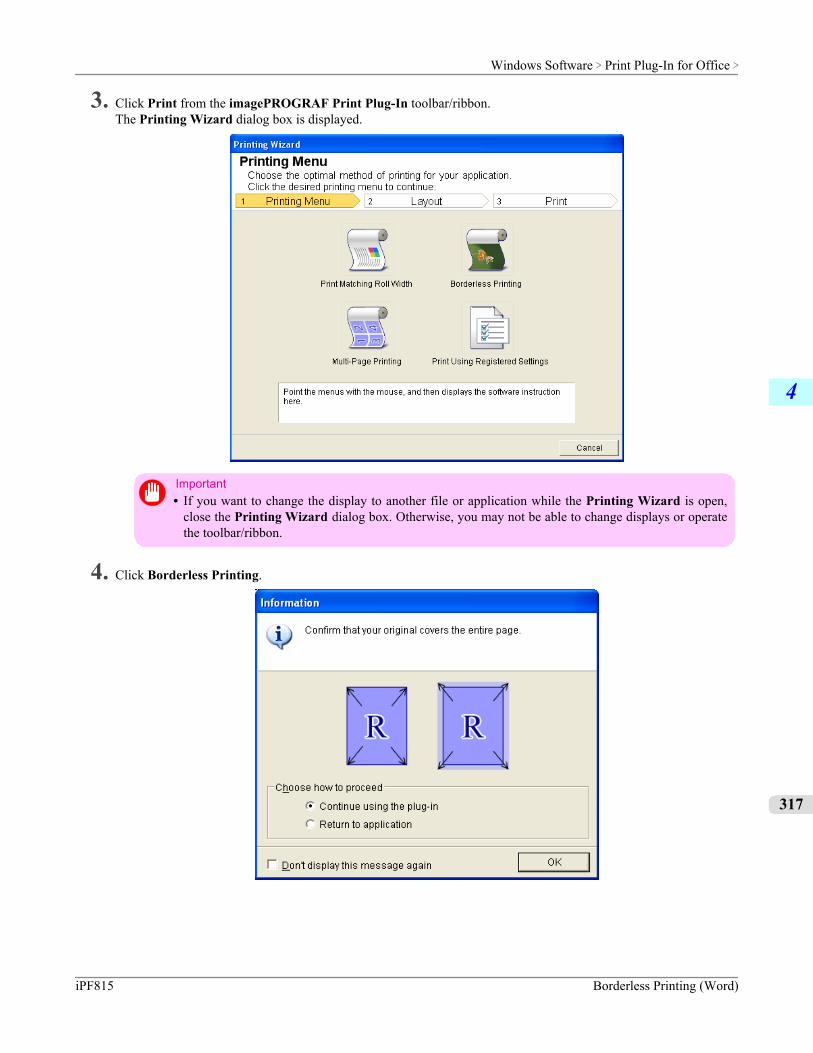
3. Click Print from the imagePROGRAF Print Plug-In toolbar/ribbon.The Printing Wizard dialog box is displayed.
Important• If you want to change the display to another file or application while the Printing Wizard is open,
close the Printing Wizard dialog box. Otherwise, you may not be able to change displays or operatethe toolbar/ribbon.
4. Click Borderless Printing.
Windows Software > Print Plug-In for Office >
iPF815 Borderless Printing (Word)
4
317
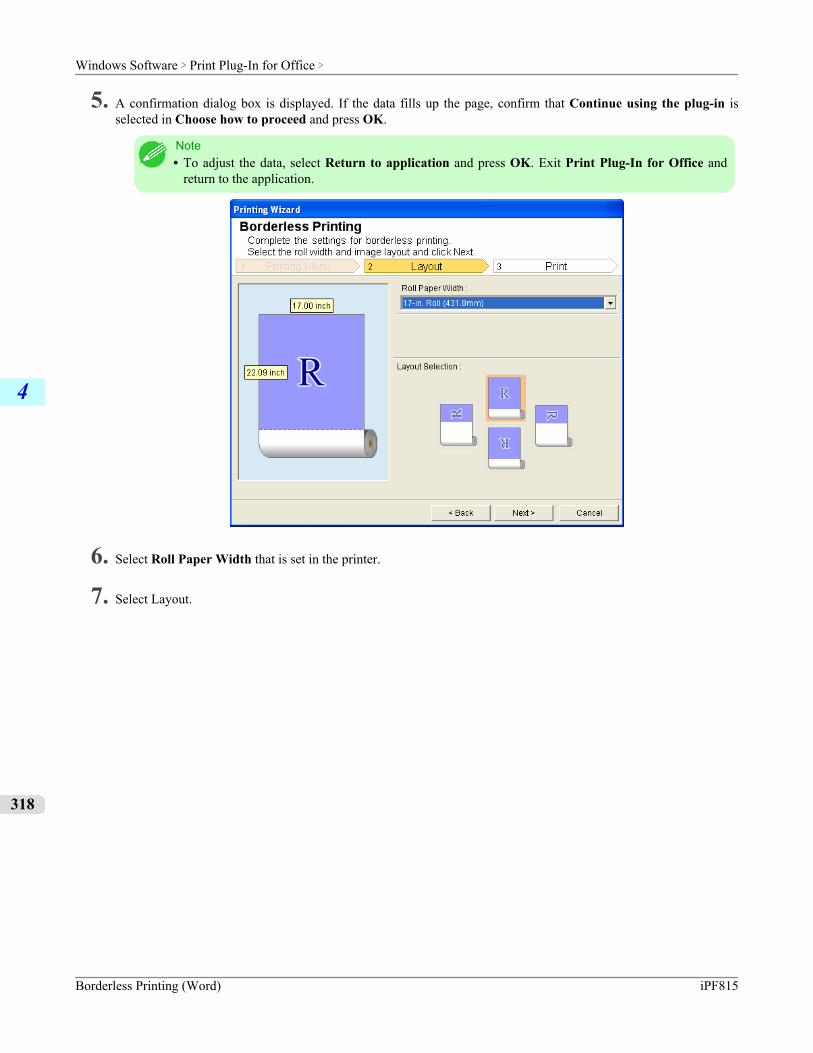
5. A confirmation dialog box is displayed. If the data fills up the page, confirm that Continue using the plug-in isselected in Choose how to proceed and press OK.
Note• To adjust the data, select Return to application and press OK. Exit Print Plug-In for Office and
return to the application.
6. Select Roll Paper Width that is set in the printer.
7. Select Layout.
Windows Software > Print Plug-In for Office >
Borderless Printing (Word) iPF815
4
318
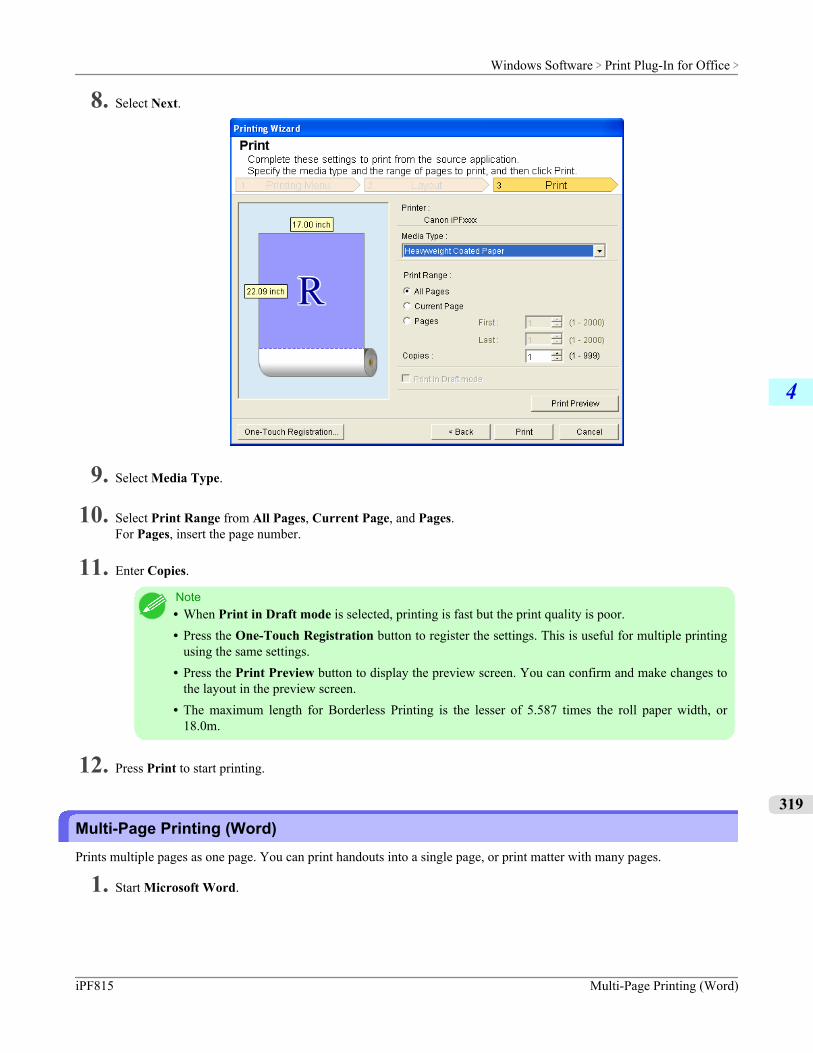
8. Select Next.
9. Select Media Type.
10. Select Print Range from All Pages, Current Page, and Pages.For Pages, insert the page number.
11. Enter Copies.
Note• When Print in Draft mode is selected, printing is fast but the print quality is poor.• Press the One-Touch Registration button to register the settings. This is useful for multiple printing
using the same settings.• Press the Print Preview button to display the preview screen. You can confirm and make changes to
the layout in the preview screen.• The maximum length for Borderless Printing is the lesser of 5.587 times the roll paper width, or
18.0m.
12. Press Print to start printing.
Multi-Page Printing (Word)Prints multiple pages as one page. You can print handouts into a single page, or print matter with many pages.
1. Start Microsoft Word.
Windows Software > Print Plug-In for Office >
iPF815 Multi-Page Printing (Word)
4
319
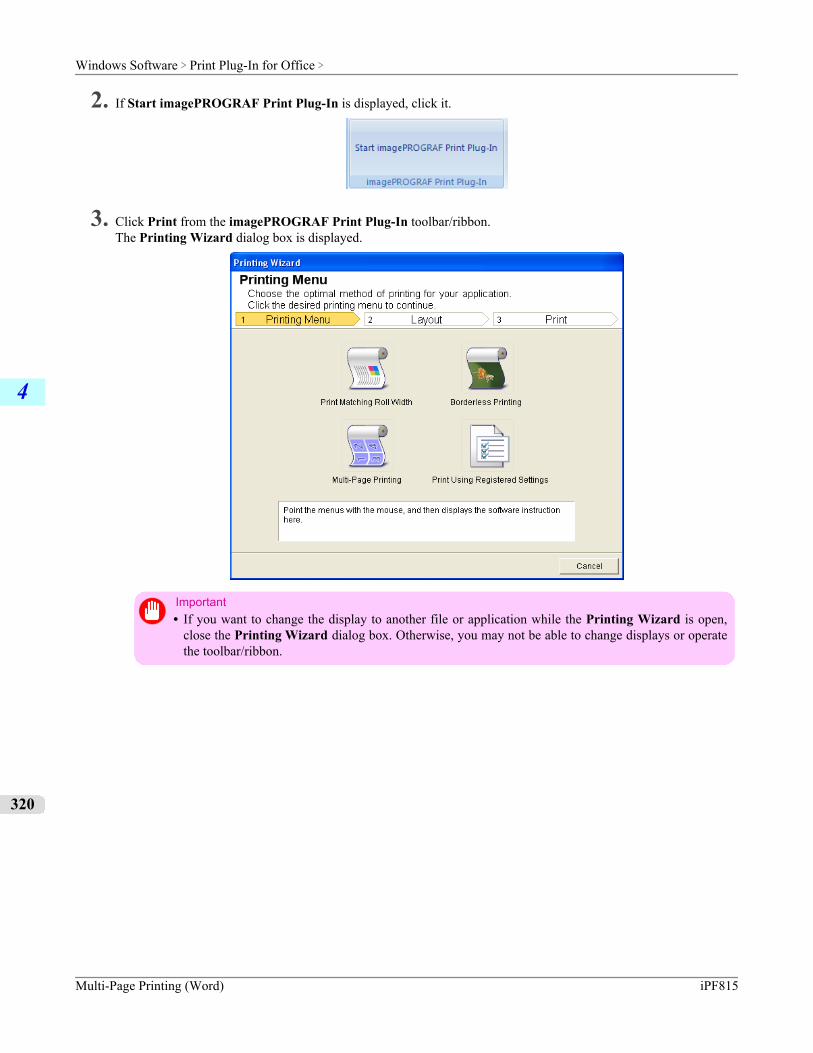
2. If Start imagePROGRAF Print Plug-In is displayed, click it.
3. Click Print from the imagePROGRAF Print Plug-In toolbar/ribbon.The Printing Wizard dialog box is displayed.
Important• If you want to change the display to another file or application while the Printing Wizard is open,
close the Printing Wizard dialog box. Otherwise, you may not be able to change displays or operatethe toolbar/ribbon.
Windows Software > Print Plug-In for Office >
Multi-Page Printing (Word) iPF815
4
320
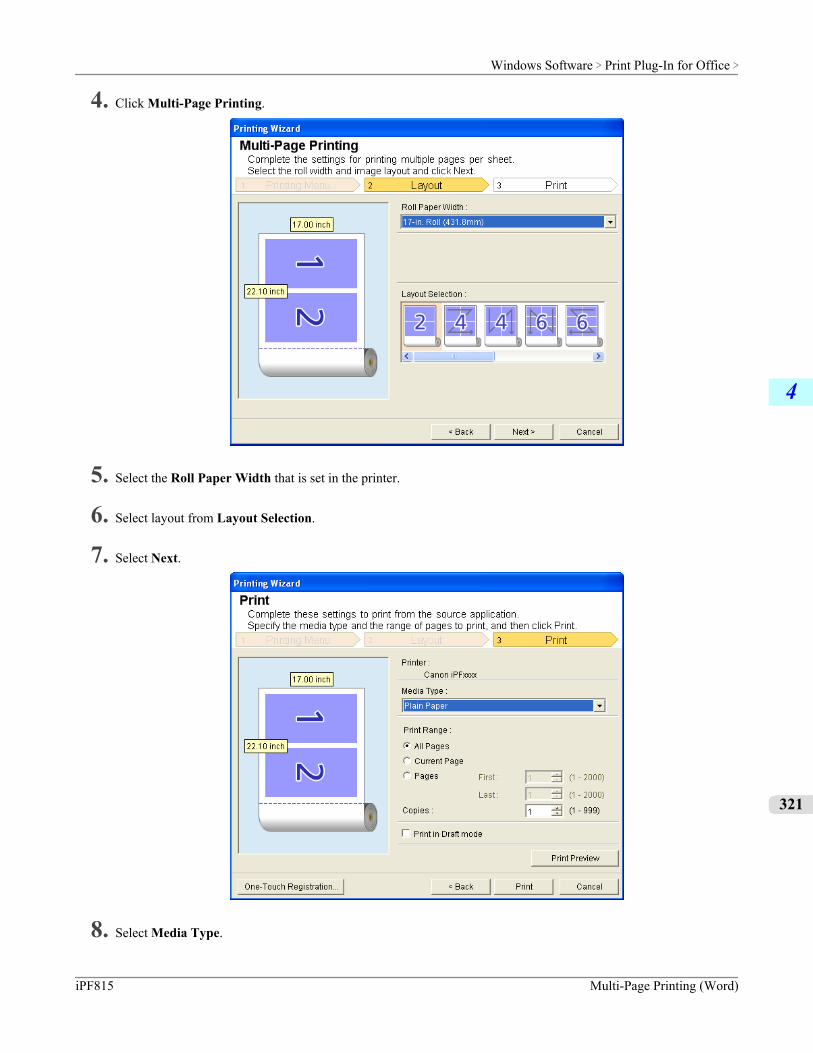
4. Click Multi-Page Printing.
5. Select the Roll Paper Width that is set in the printer.
6. Select layout from Layout Selection.
7. Select Next.
8. Select Media Type.
Windows Software > Print Plug-In for Office >
iPF815 Multi-Page Printing (Word)
4
321
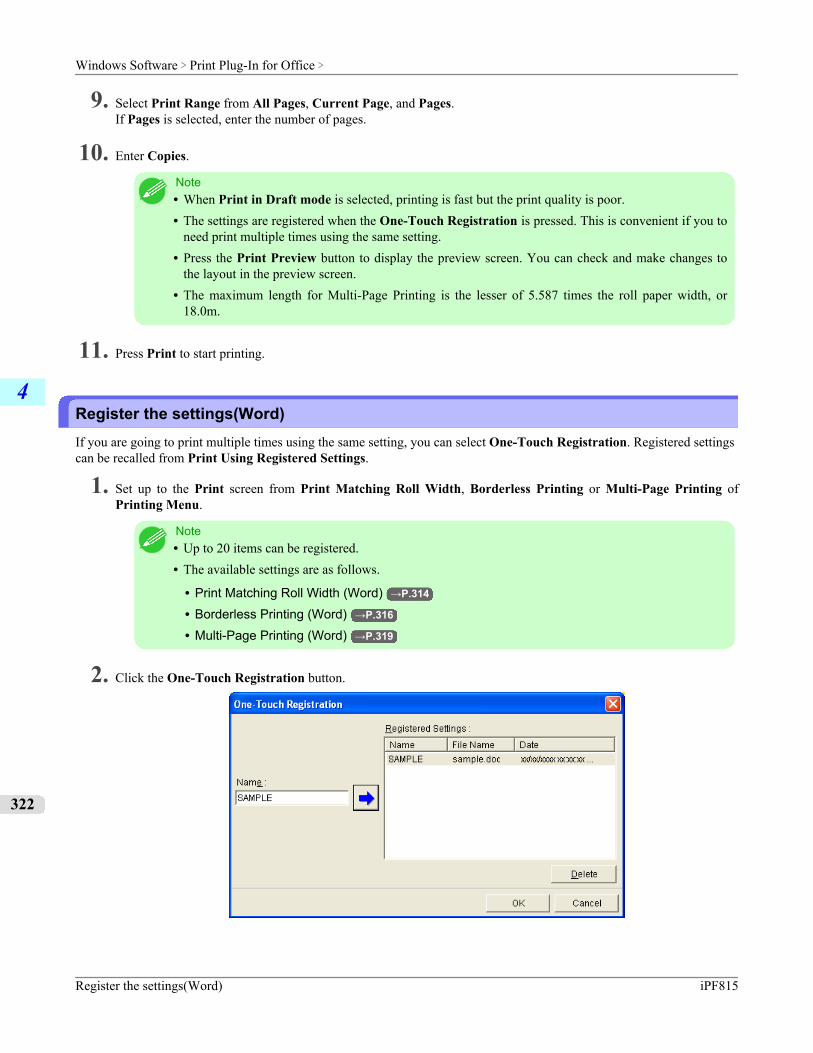
9. Select Print Range from All Pages, Current Page, and Pages.If Pages is selected, enter the number of pages.
10. Enter Copies.
Note• When Print in Draft mode is selected, printing is fast but the print quality is poor.• The settings are registered when the One-Touch Registration is pressed. This is convenient if you to
need print multiple times using the same setting.• Press the Print Preview button to display the preview screen. You can check and make changes to
the layout in the preview screen.• The maximum length for Multi-Page Printing is the lesser of 5.587 times the roll paper width, or
18.0m.
11. Press Print to start printing.
Register the settings(Word)If you are going to print multiple times using the same setting, you can select One-Touch Registration. Registered settingscan be recalled from Print Using Registered Settings.
1. Set up to the Print screen from Print Matching Roll Width, Borderless Printing or Multi-Page Printing ofPrinting Menu.
Note• Up to 20 items can be registered.• The available settings are as follows.
• Print Matching Roll Width (Word) →P.314
• Borderless Printing (Word) →P.316
• Multi-Page Printing (Word) →P.319
2. Click the One-Touch Registration button.
Windows Software > Print Plug-In for Office >
Register the settings(Word) iPF815
4
322
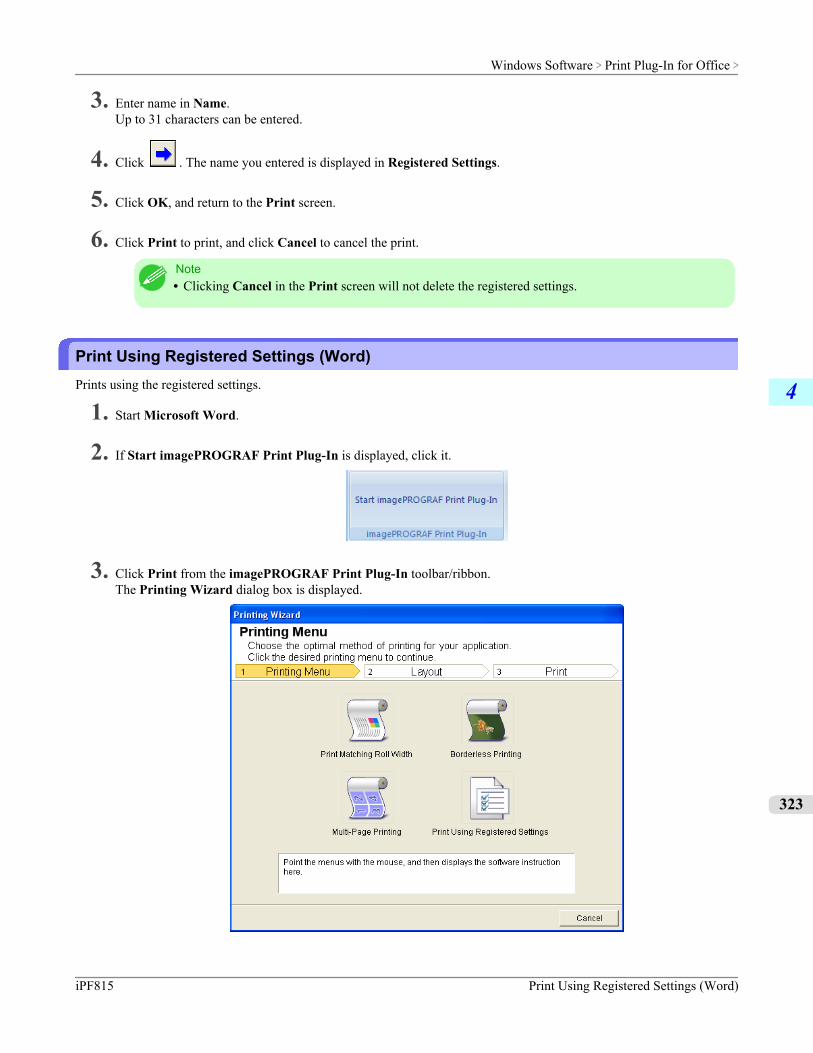
3. Enter name in Name.Up to 31 characters can be entered.
4. Click . The name you entered is displayed in Registered Settings.
5. Click OK, and return to the Print screen.
6. Click Print to print, and click Cancel to cancel the print.
Note• Clicking Cancel in the Print screen will not delete the registered settings.
Print Using Registered Settings (Word)Prints using the registered settings.
1. Start Microsoft Word.
2. If Start imagePROGRAF Print Plug-In is displayed, click it.
3. Click Print from the imagePROGRAF Print Plug-In toolbar/ribbon.The Printing Wizard dialog box is displayed.
Windows Software > Print Plug-In for Office >
iPF815 Print Using Registered Settings (Word)
4
323
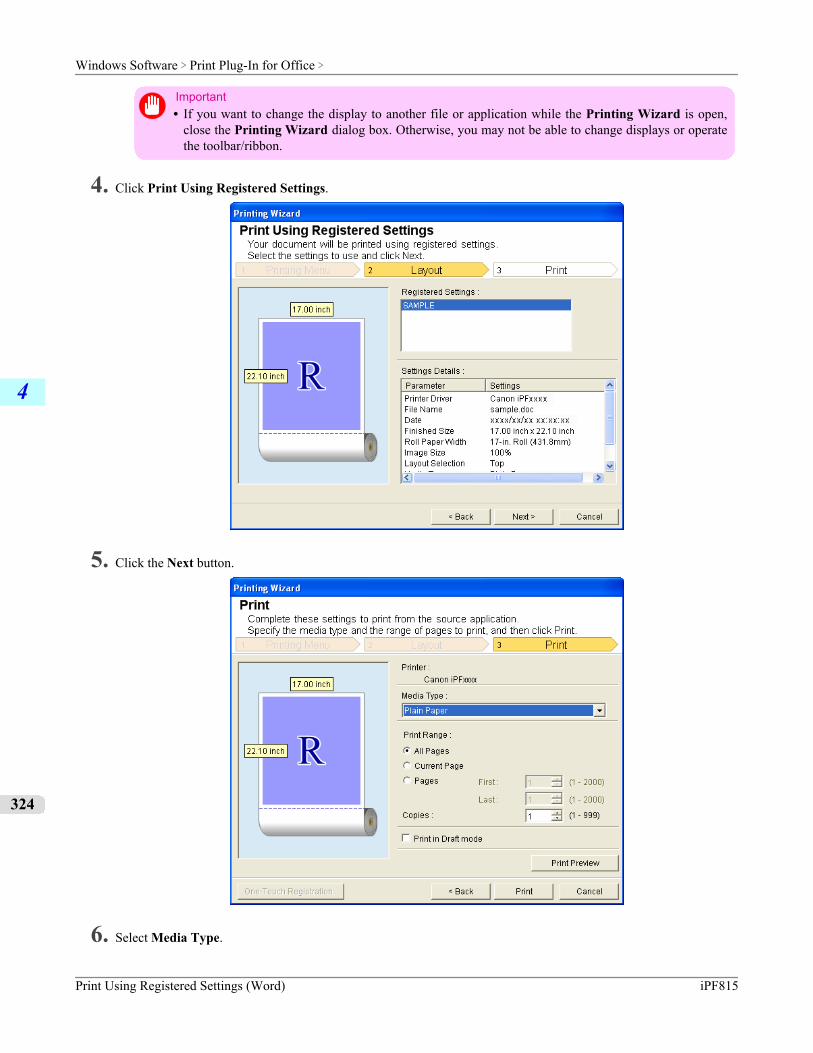
Important• If you want to change the display to another file or application while the Printing Wizard is open,
close the Printing Wizard dialog box. Otherwise, you may not be able to change displays or operatethe toolbar/ribbon.
4. Click Print Using Registered Settings.
5. Click the Next button.
6. Select Media Type.
Windows Software > Print Plug-In for Office >
Print Using Registered Settings (Word) iPF815
4
324
7. Select Print Range from All Pages, Current Page, or Pages.If Pages is selected, enter the number of pages.
8. Enter Copies.
Note• When Print in Draft mode is selected, printing is fast but the print quality is poor.• Press the Print Preview button to display the preview screen. You can check and make changes to
the layout in the preview screen.• The maximum print length when printing with the registered settings is the lesser of 5.587 times the
roll paper width, or 18.0m.
9. Press Print to start printing.
Portrait Orientation / Landscape Orientation (Word)Print to the edge of the roll width. You can print large exhibits and posters, or print the Landscape or Portrait OrientationPage Sizes made in the Large-Format Printing Wizard.
Create Page Size in Portrait or Landscape Orientation.Use the Large-Format Printing Wizard to create portrait page sizes for Potrait Orientation, and landscape page sizes forLandscape Orientation.
1. Start Microsoft Word.
2. If Start imagePROGRAF Print Plug-In is displayed, click it.
3. Click Paper Settings from the imagePROGRAF Print Plug-In toolbar/ribbon.The Large-Format Printing Wizard dialog box is displayed.
Note• If you want to change the display to another file or application while the Large-Format Printing
Wizard is open, close the Large-Format Printing Wizard dialog box. Otherwise, you may not beable to change displays or operate the toolbar/ribbon.
Windows Software > Print Plug-In for Office >
iPF815 Portrait Orientation / Landscape Orientation (Word)
4
325
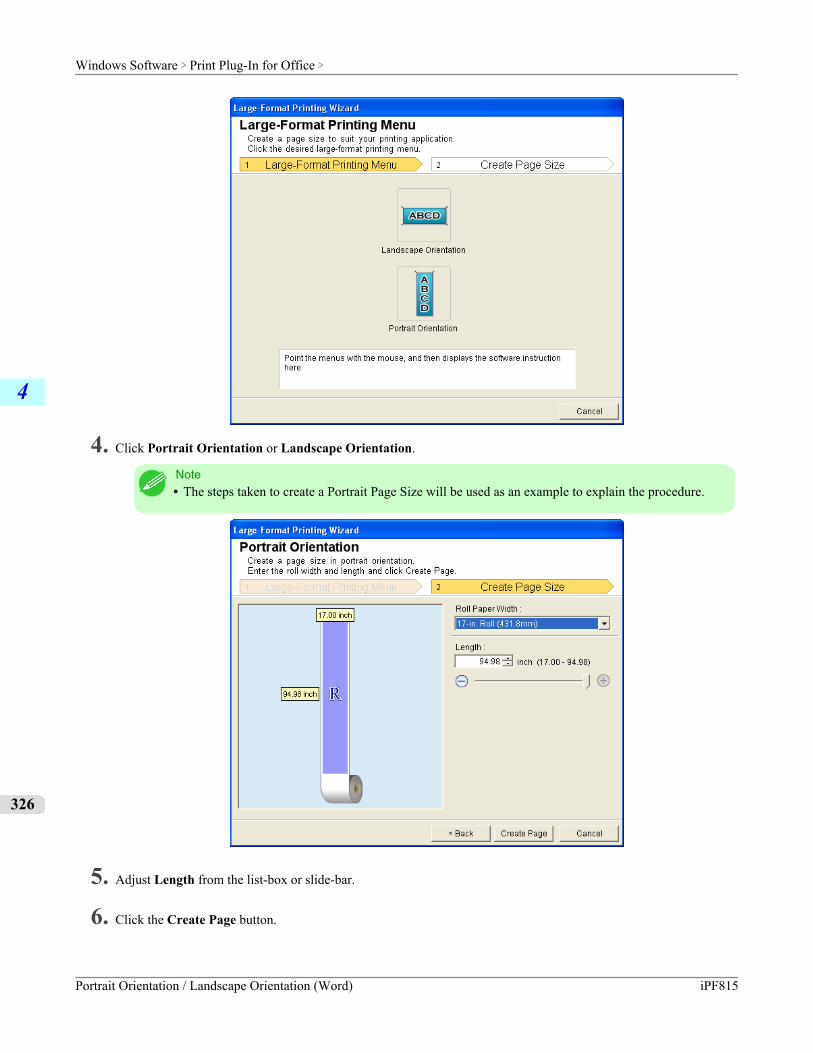
4. Click Portrait Orientation or Landscape Orientation.
Note• The steps taken to create a Portrait Page Size will be used as an example to explain the procedure.
5. Adjust Length from the list-box or slide-bar.
6. Click the Create Page button.
Windows Software > Print Plug-In for Office >
Portrait Orientation / Landscape Orientation (Word) iPF815
4
326
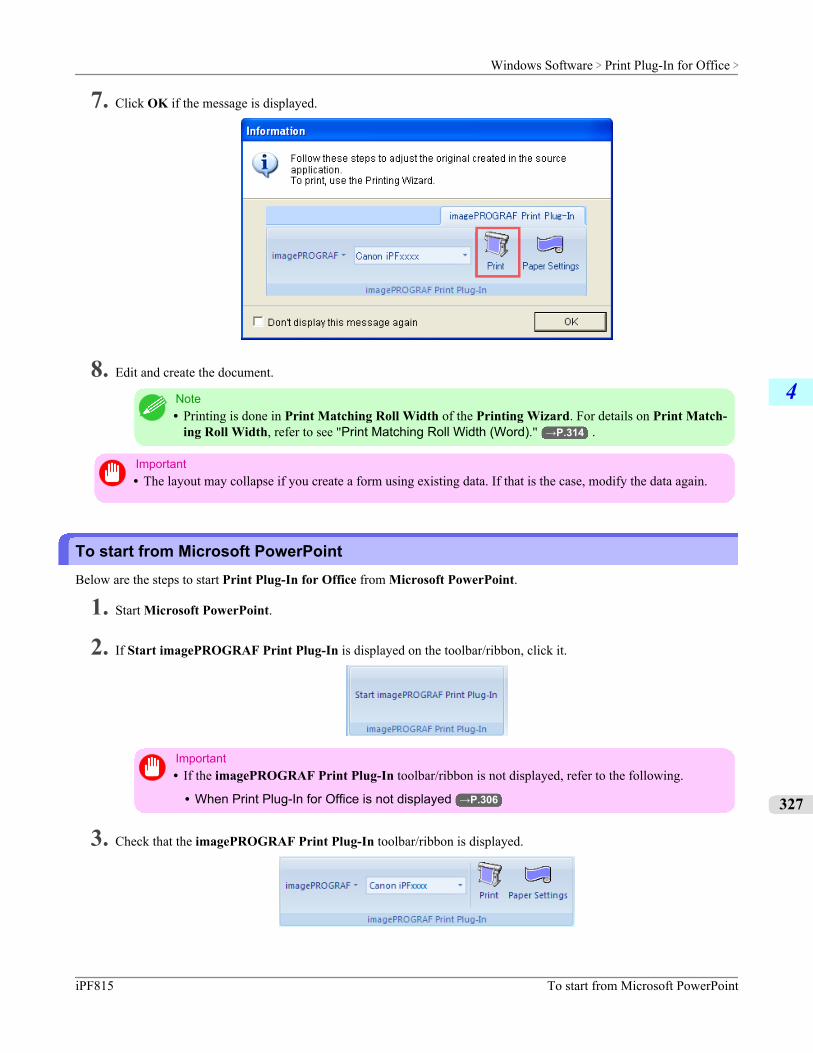
7. Click OK if the message is displayed.
8. Edit and create the document.
Note• Printing is done in Print Matching Roll Width of the Printing Wizard. For details on Print Match-
ing Roll Width, refer to see "Print Matching Roll Width (Word)." →P.314 .
Important• The layout may collapse if you create a form using existing data. If that is the case, modify the data again.
To start from Microsoft PowerPointBelow are the steps to start Print Plug-In for Office from Microsoft PowerPoint.
1. Start Microsoft PowerPoint.
2. If Start imagePROGRAF Print Plug-In is displayed on the toolbar/ribbon, click it.
Important• If the imagePROGRAF Print Plug-In toolbar/ribbon is not displayed, refer to the following.
• When Print Plug-In for Office is not displayed →P.306
3. Check that the imagePROGRAF Print Plug-In toolbar/ribbon is displayed.
Windows Software > Print Plug-In for Office >
iPF815 To start from Microsoft PowerPoint
4
327
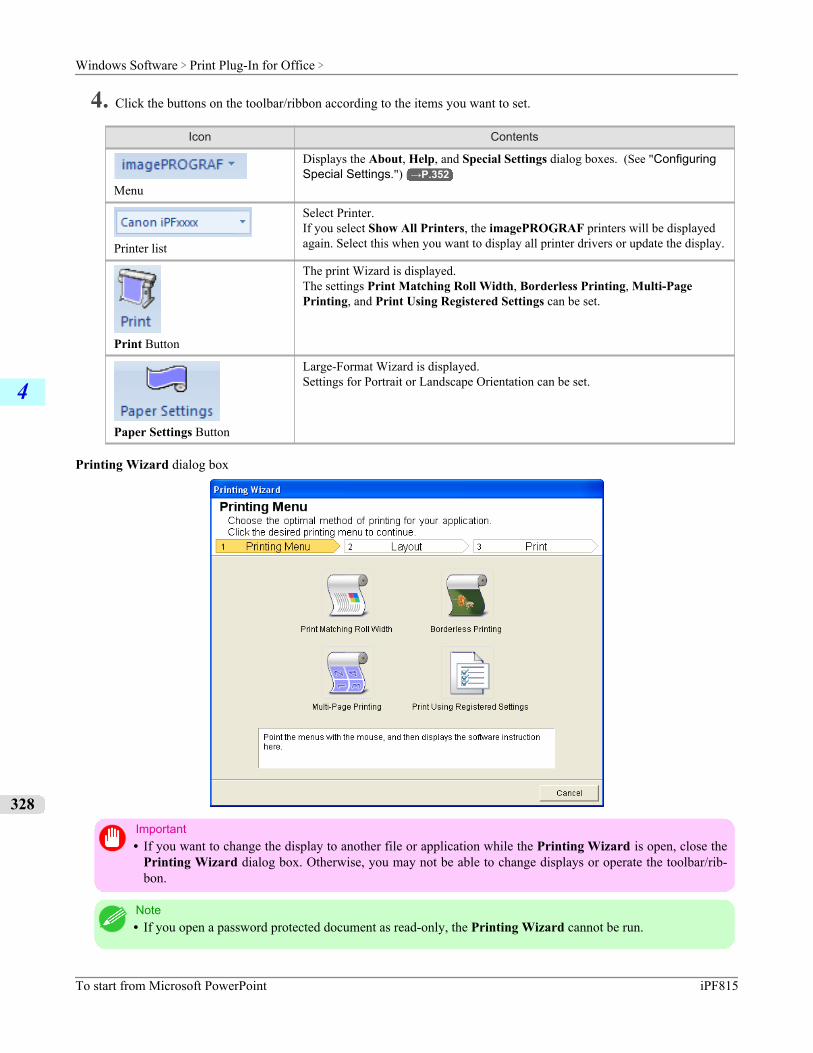
4. Click the buttons on the toolbar/ribbon according to the items you want to set.
Icon Contents
Menu
Displays the About, Help, and Special Settings dialog boxes. (See "ConfiguringSpecial Settings.") →P.352
Printer list
Select Printer.If you select Show All Printers, the imagePROGRAF printers will be displayedagain. Select this when you want to display all printer drivers or update the display.
Print Button
The print Wizard is displayed.The settings Print Matching Roll Width, Borderless Printing, Multi-PagePrinting, and Print Using Registered Settings can be set.
Paper Settings Button
Large-Format Wizard is displayed.Settings for Portrait or Landscape Orientation can be set.
Printing Wizard dialog box
Important• If you want to change the display to another file or application while the Printing Wizard is open, close the
Printing Wizard dialog box. Otherwise, you may not be able to change displays or operate the toolbar/rib-bon.
Note• If you open a password protected document as read-only, the Printing Wizard cannot be run.
Windows Software > Print Plug-In for Office >
To start from Microsoft PowerPoint iPF815
4
328
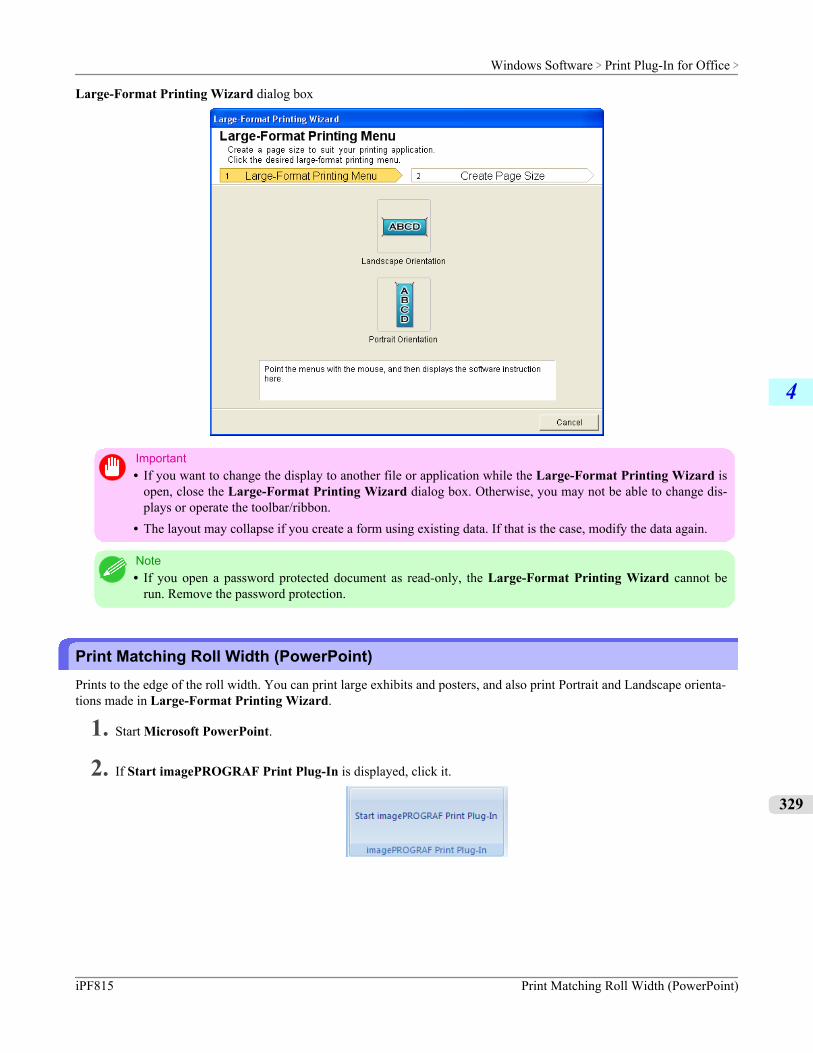
Large-Format Printing Wizard dialog box
Important• If you want to change the display to another file or application while the Large-Format Printing Wizard is
open, close the Large-Format Printing Wizard dialog box. Otherwise, you may not be able to change dis-plays or operate the toolbar/ribbon.
• The layout may collapse if you create a form using existing data. If that is the case, modify the data again.
Note• If you open a password protected document as read-only, the Large-Format Printing Wizard cannot be
run. Remove the password protection.
Print Matching Roll Width (PowerPoint)Prints to the edge of the roll width. You can print large exhibits and posters, and also print Portrait and Landscape orienta-tions made in Large-Format Printing Wizard.
1. Start Microsoft PowerPoint.
2. If Start imagePROGRAF Print Plug-In is displayed, click it.
Windows Software > Print Plug-In for Office >
iPF815 Print Matching Roll Width (PowerPoint)
4
329
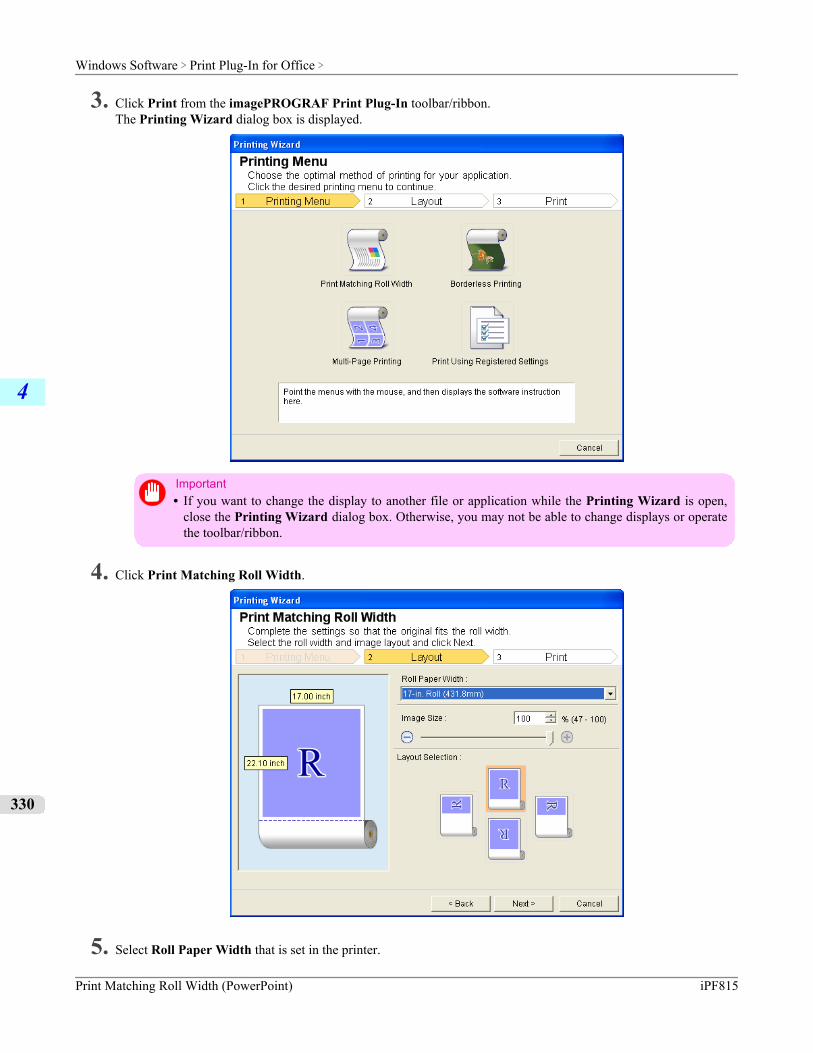
3. Click Print from the imagePROGRAF Print Plug-In toolbar/ribbon.The Printing Wizard dialog box is displayed.
Important• If you want to change the display to another file or application while the Printing Wizard is open,
close the Printing Wizard dialog box. Otherwise, you may not be able to change displays or operatethe toolbar/ribbon.
4. Click Print Matching Roll Width.
5. Select Roll Paper Width that is set in the printer.
Windows Software > Print Plug-In for Office >
Print Matching Roll Width (PowerPoint) iPF815
4
330
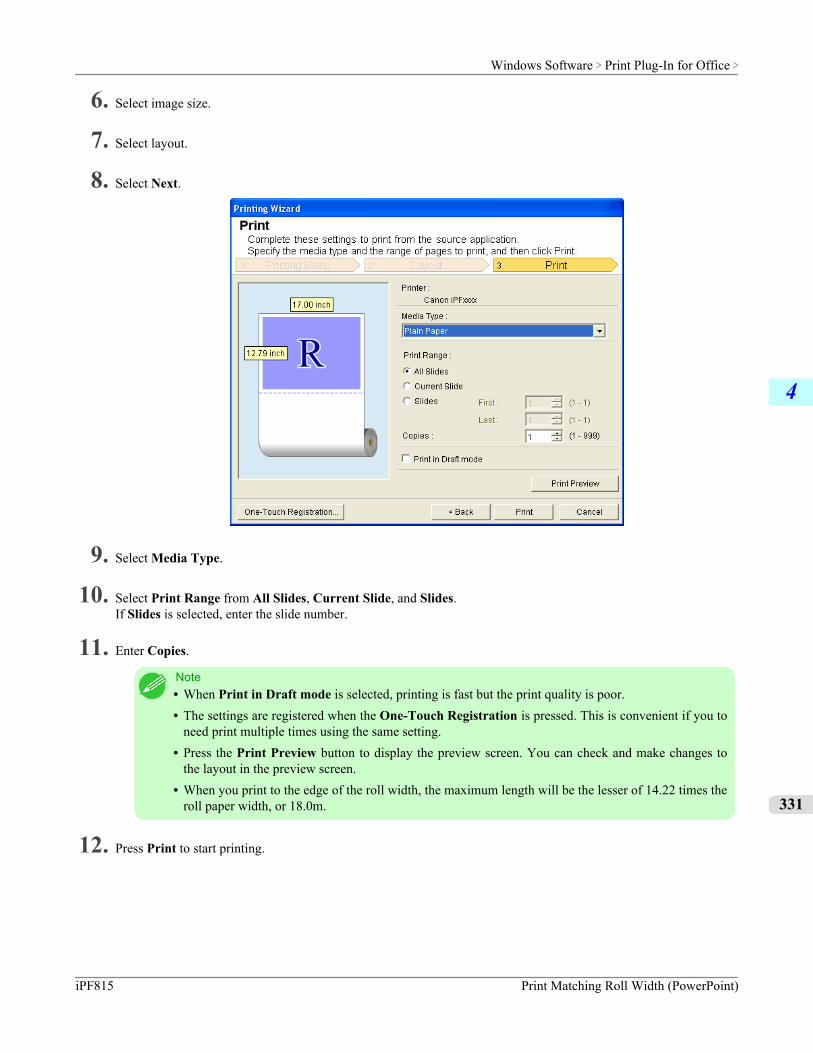
6. Select image size.
7. Select layout.
8. Select Next.
9. Select Media Type.
10. Select Print Range from All Slides, Current Slide, and Slides.If Slides is selected, enter the slide number.
11. Enter Copies.
Note• When Print in Draft mode is selected, printing is fast but the print quality is poor.• The settings are registered when the One-Touch Registration is pressed. This is convenient if you to
need print multiple times using the same setting.• Press the Print Preview button to display the preview screen. You can check and make changes to
the layout in the preview screen.• When you print to the edge of the roll width, the maximum length will be the lesser of 14.22 times the
roll paper width, or 18.0m.
12. Press Print to start printing.
Windows Software > Print Plug-In for Office >
iPF815 Print Matching Roll Width (PowerPoint)
4
331
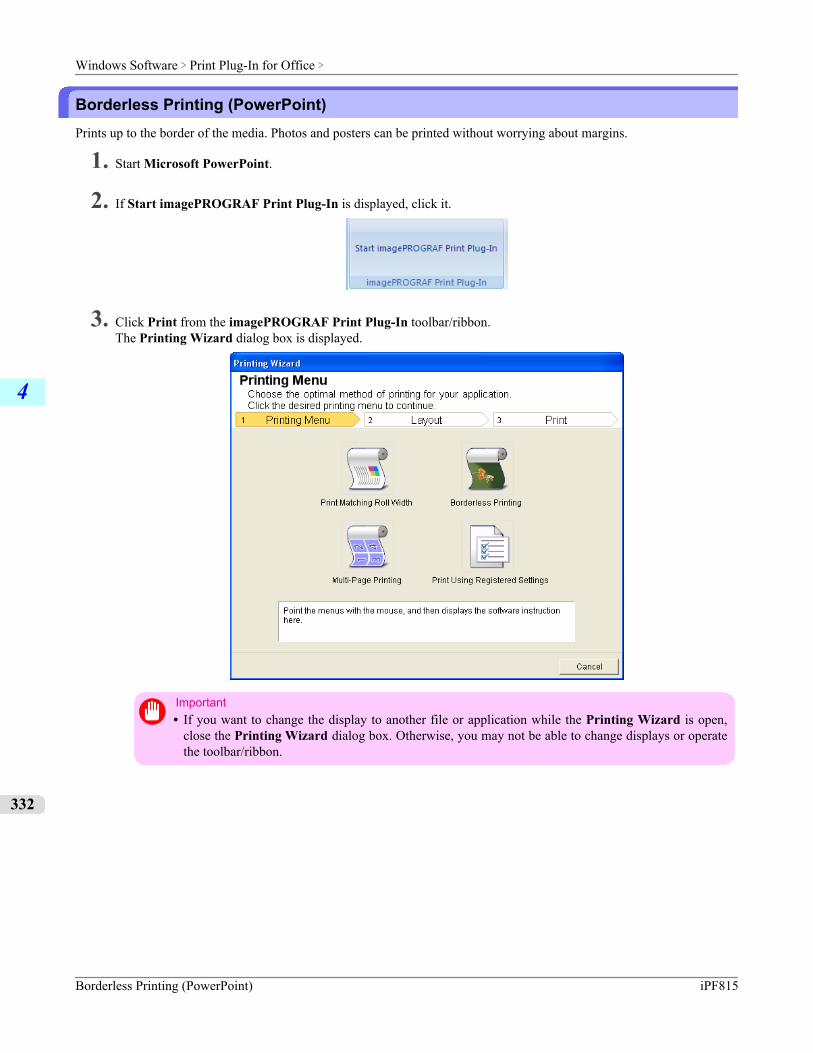
Borderless Printing (PowerPoint)Prints up to the border of the media. Photos and posters can be printed without worrying about margins.
1. Start Microsoft PowerPoint.
2. If Start imagePROGRAF Print Plug-In is displayed, click it.
3. Click Print from the imagePROGRAF Print Plug-In toolbar/ribbon.The Printing Wizard dialog box is displayed.
Important• If you want to change the display to another file or application while the Printing Wizard is open,
close the Printing Wizard dialog box. Otherwise, you may not be able to change displays or operatethe toolbar/ribbon.
Windows Software > Print Plug-In for Office >
Borderless Printing (PowerPoint) iPF815
4
332
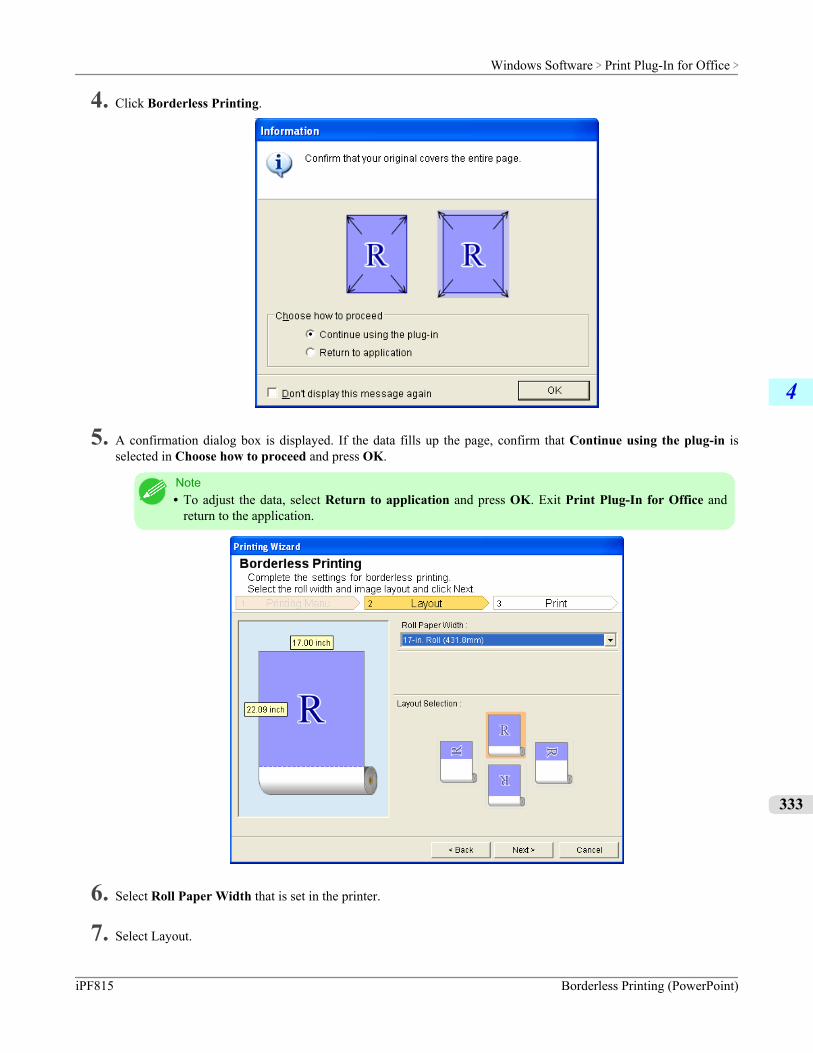
4. Click Borderless Printing.
5. A confirmation dialog box is displayed. If the data fills up the page, confirm that Continue using the plug-in isselected in Choose how to proceed and press OK.
Note• To adjust the data, select Return to application and press OK. Exit Print Plug-In for Office and
return to the application.
6. Select Roll Paper Width that is set in the printer.
7. Select Layout.
Windows Software > Print Plug-In for Office >
iPF815 Borderless Printing (PowerPoint)
4
333
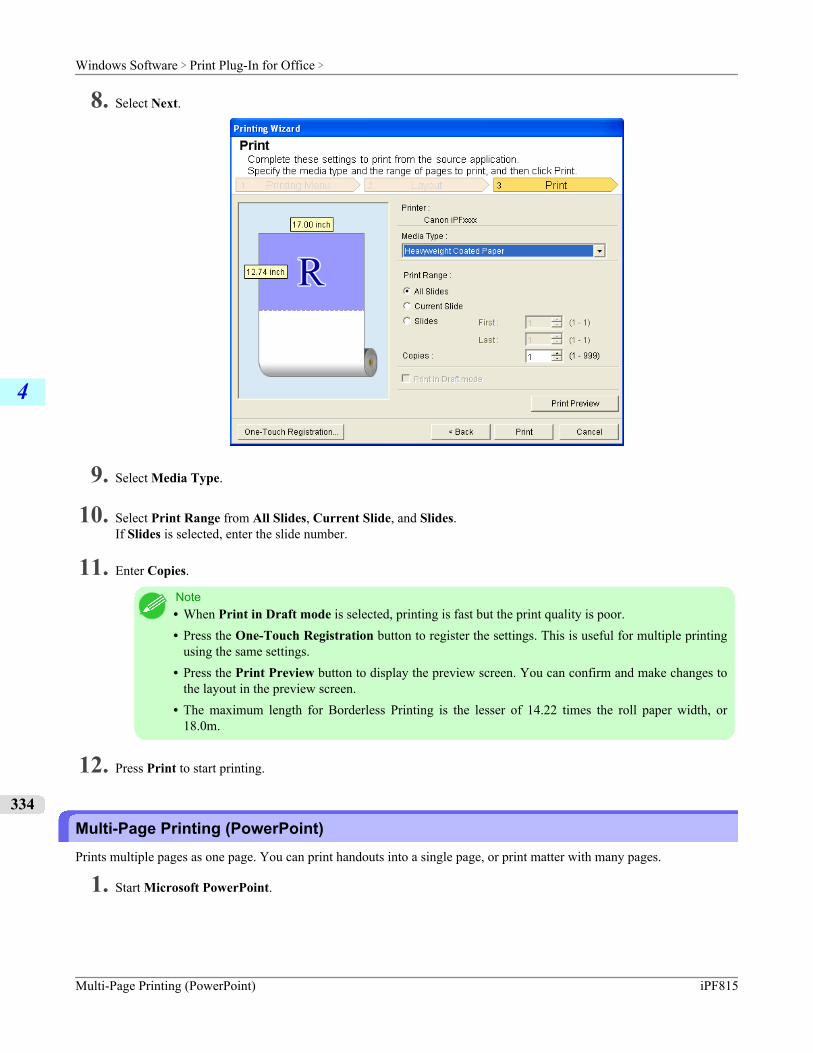
8. Select Next.
9. Select Media Type.
10. Select Print Range from All Slides, Current Slide, and Slides.If Slides is selected, enter the slide number.
11. Enter Copies.
Note• When Print in Draft mode is selected, printing is fast but the print quality is poor.• Press the One-Touch Registration button to register the settings. This is useful for multiple printing
using the same settings.• Press the Print Preview button to display the preview screen. You can confirm and make changes to
the layout in the preview screen.• The maximum length for Borderless Printing is the lesser of 14.22 times the roll paper width, or
18.0m.
12. Press Print to start printing.
Multi-Page Printing (PowerPoint)Prints multiple pages as one page. You can print handouts into a single page, or print matter with many pages.
1. Start Microsoft PowerPoint.
Windows Software > Print Plug-In for Office >
Multi-Page Printing (PowerPoint) iPF815
4
334
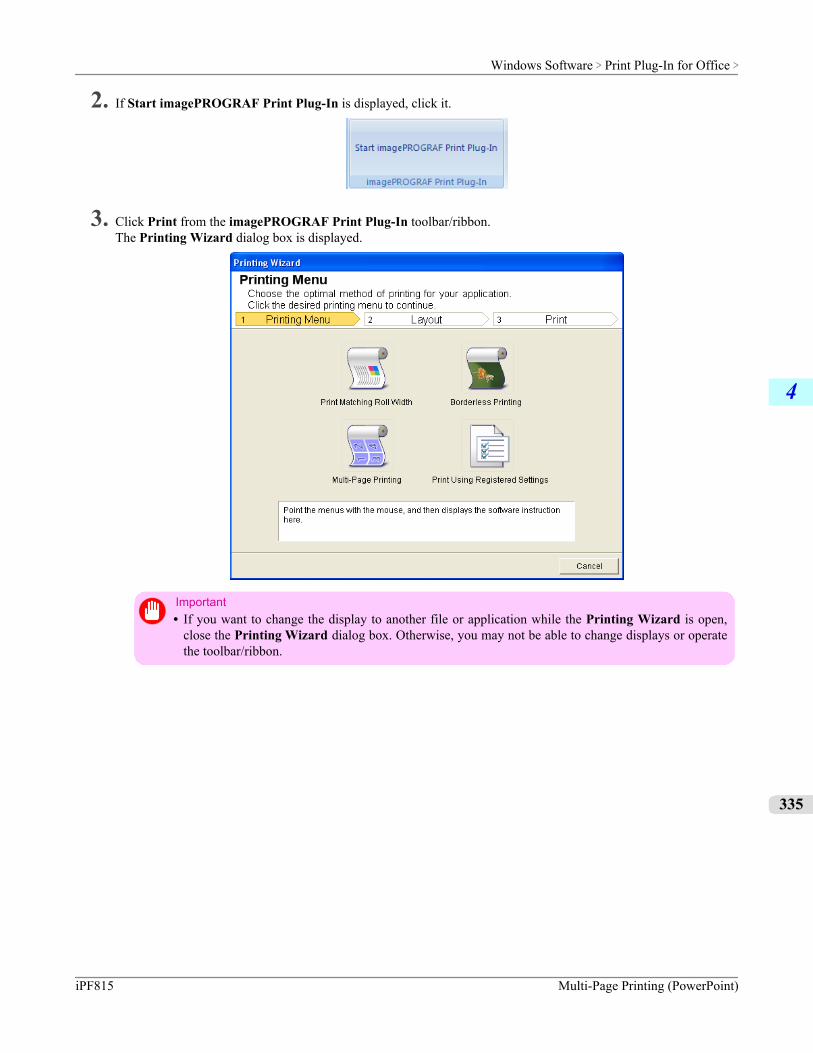
2. If Start imagePROGRAF Print Plug-In is displayed, click it.
3. Click Print from the imagePROGRAF Print Plug-In toolbar/ribbon.The Printing Wizard dialog box is displayed.
Important• If you want to change the display to another file or application while the Printing Wizard is open,
close the Printing Wizard dialog box. Otherwise, you may not be able to change displays or operatethe toolbar/ribbon.
Windows Software > Print Plug-In for Office >
iPF815 Multi-Page Printing (PowerPoint)
4
335

4. Click Multi-Page Printing.
5. Select the Roll Paper Width that is set in the printer.
6. Select layout from Layout Selection.
7. Select Next.
8. Select Media Type.
Windows Software > Print Plug-In for Office >
Multi-Page Printing (PowerPoint) iPF815
4
336
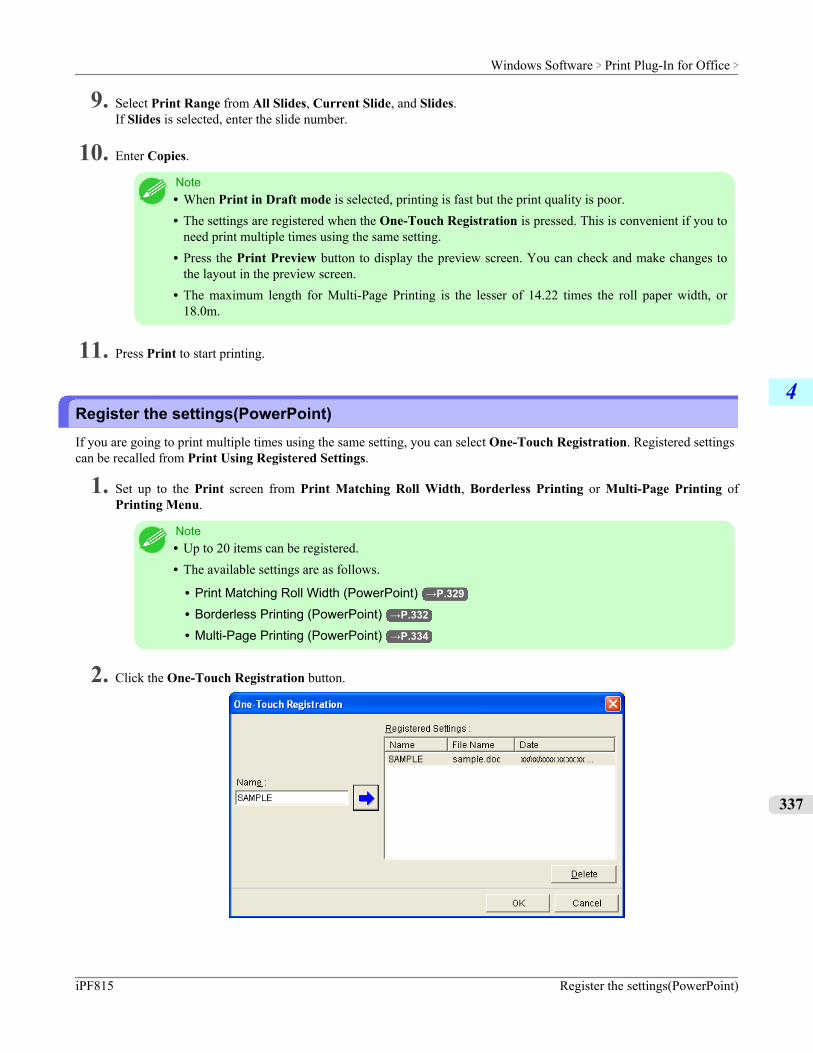
9. Select Print Range from All Slides, Current Slide, and Slides.If Slides is selected, enter the slide number.
10. Enter Copies.
Note• When Print in Draft mode is selected, printing is fast but the print quality is poor.• The settings are registered when the One-Touch Registration is pressed. This is convenient if you to
need print multiple times using the same setting.• Press the Print Preview button to display the preview screen. You can check and make changes to
the layout in the preview screen.• The maximum length for Multi-Page Printing is the lesser of 14.22 times the roll paper width, or
18.0m.
11. Press Print to start printing.
Register the settings(PowerPoint)If you are going to print multiple times using the same setting, you can select One-Touch Registration. Registered settingscan be recalled from Print Using Registered Settings.
1. Set up to the Print screen from Print Matching Roll Width, Borderless Printing or Multi-Page Printing ofPrinting Menu.
Note• Up to 20 items can be registered.• The available settings are as follows.
• Print Matching Roll Width (PowerPoint) →P.329
• Borderless Printing (PowerPoint) →P.332
• Multi-Page Printing (PowerPoint) →P.334
2. Click the One-Touch Registration button.
Windows Software > Print Plug-In for Office >
iPF815 Register the settings(PowerPoint)
4
337
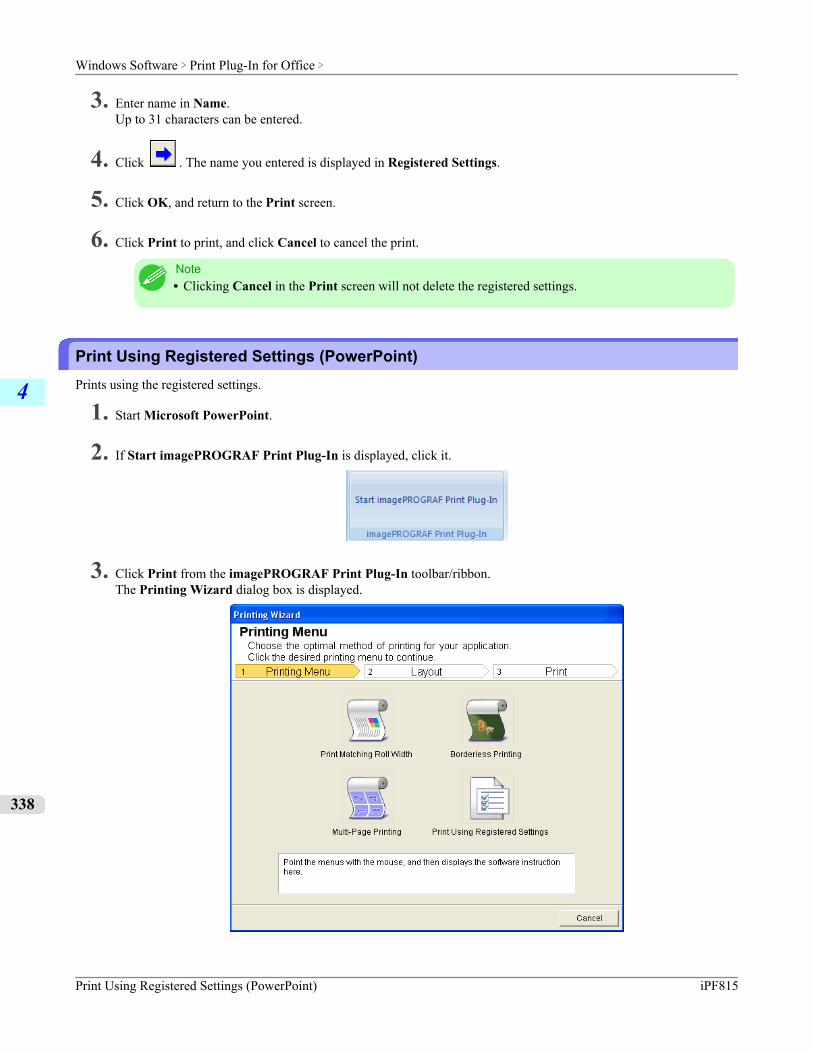
3. Enter name in Name.Up to 31 characters can be entered.
4. Click . The name you entered is displayed in Registered Settings.
5. Click OK, and return to the Print screen.
6. Click Print to print, and click Cancel to cancel the print.
Note• Clicking Cancel in the Print screen will not delete the registered settings.
Print Using Registered Settings (PowerPoint)Prints using the registered settings.
1. Start Microsoft PowerPoint.
2. If Start imagePROGRAF Print Plug-In is displayed, click it.
3. Click Print from the imagePROGRAF Print Plug-In toolbar/ribbon.The Printing Wizard dialog box is displayed.
Windows Software > Print Plug-In for Office >
Print Using Registered Settings (PowerPoint) iPF815
4
338
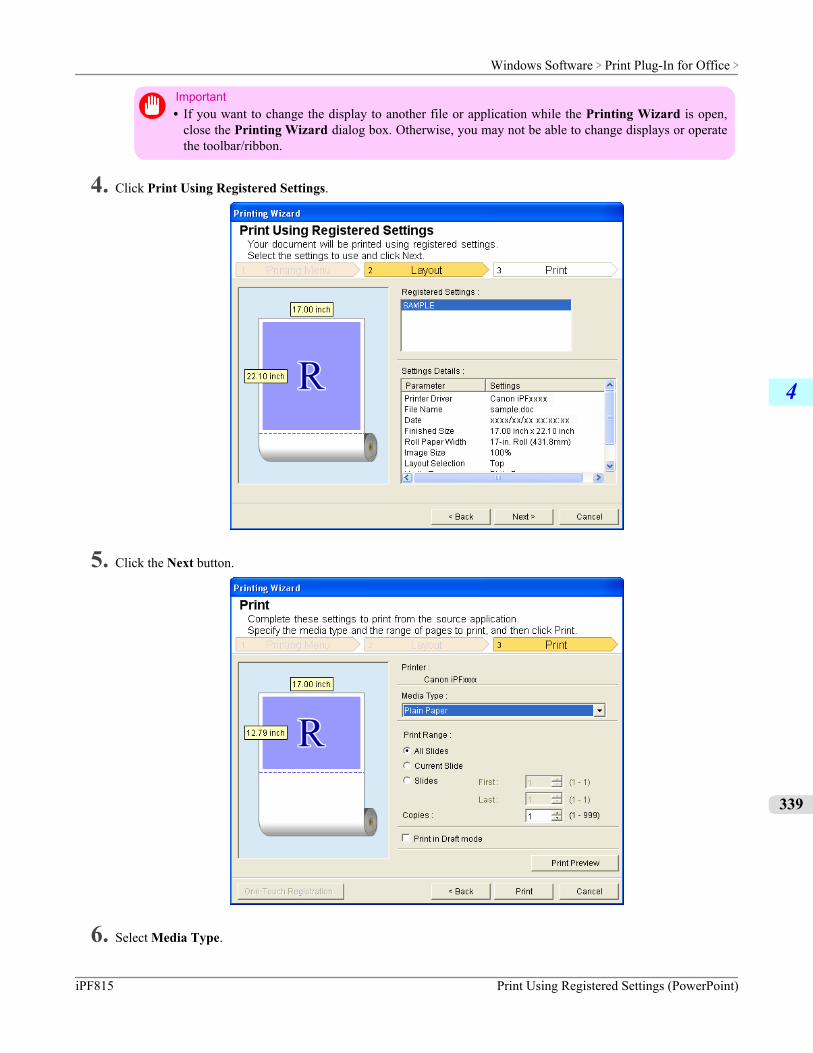
Important• If you want to change the display to another file or application while the Printing Wizard is open,
close the Printing Wizard dialog box. Otherwise, you may not be able to change displays or operatethe toolbar/ribbon.
4. Click Print Using Registered Settings.
5. Click the Next button.
6. Select Media Type.
Windows Software > Print Plug-In for Office >
iPF815 Print Using Registered Settings (PowerPoint)
4
339
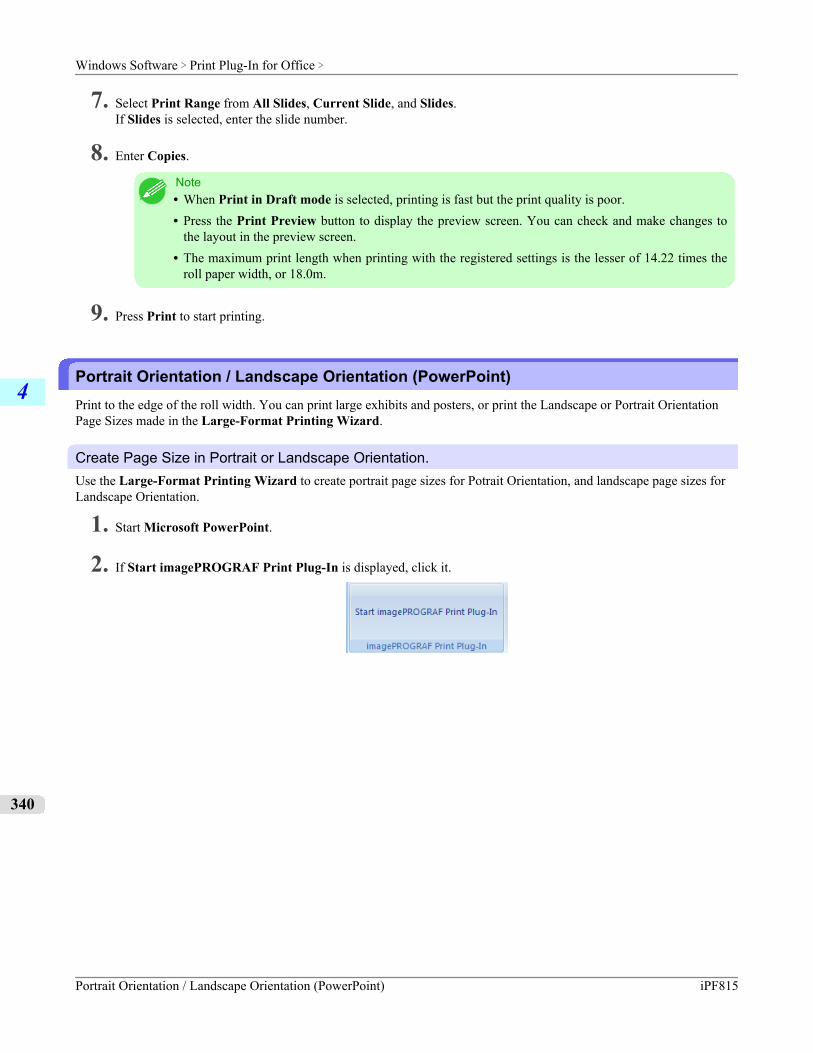
7. Select Print Range from All Slides, Current Slide, and Slides.If Slides is selected, enter the slide number.
8. Enter Copies.
Note• When Print in Draft mode is selected, printing is fast but the print quality is poor.• Press the Print Preview button to display the preview screen. You can check and make changes to
the layout in the preview screen.• The maximum print length when printing with the registered settings is the lesser of 14.22 times the
roll paper width, or 18.0m.
9. Press Print to start printing.
Portrait Orientation / Landscape Orientation (PowerPoint)Print to the edge of the roll width. You can print large exhibits and posters, or print the Landscape or Portrait OrientationPage Sizes made in the Large-Format Printing Wizard.
Create Page Size in Portrait or Landscape Orientation.Use the Large-Format Printing Wizard to create portrait page sizes for Potrait Orientation, and landscape page sizes forLandscape Orientation.
1. Start Microsoft PowerPoint.
2. If Start imagePROGRAF Print Plug-In is displayed, click it.
Windows Software > Print Plug-In for Office >
Portrait Orientation / Landscape Orientation (PowerPoint) iPF815
4
340
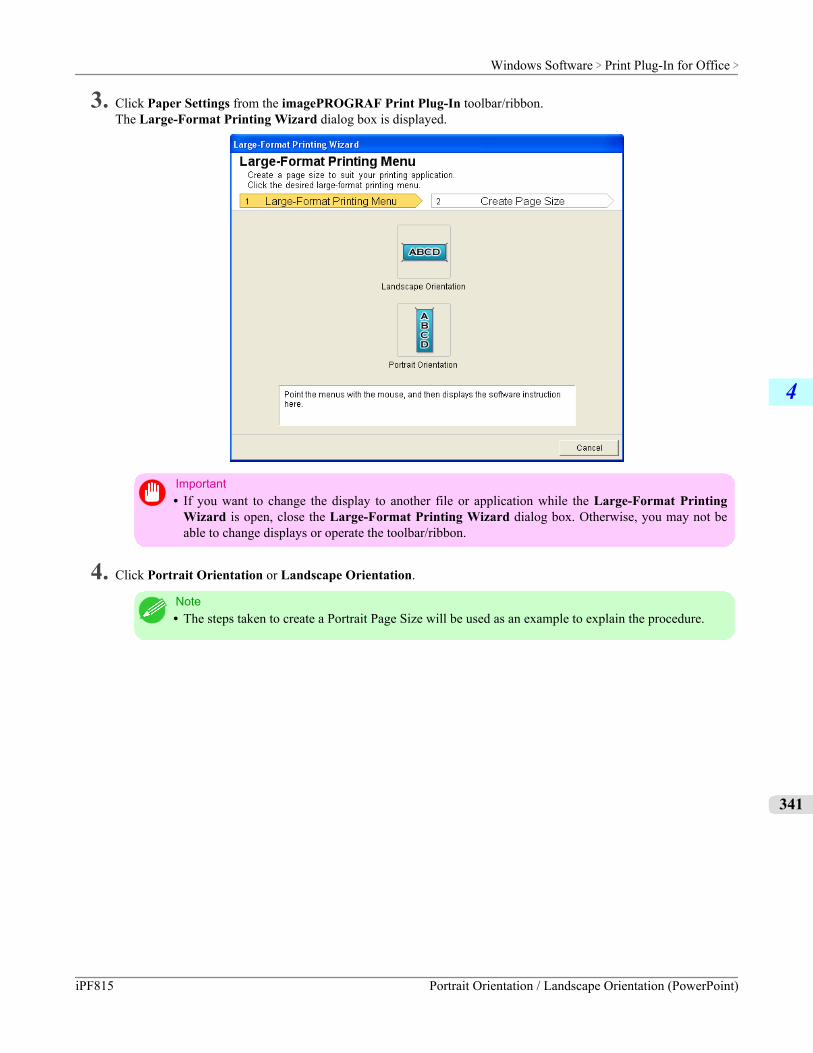
3. Click Paper Settings from the imagePROGRAF Print Plug-In toolbar/ribbon.The Large-Format Printing Wizard dialog box is displayed.
Important• If you want to change the display to another file or application while the Large-Format Printing
Wizard is open, close the Large-Format Printing Wizard dialog box. Otherwise, you may not beable to change displays or operate the toolbar/ribbon.
4. Click Portrait Orientation or Landscape Orientation.
Note• The steps taken to create a Portrait Page Size will be used as an example to explain the procedure.
Windows Software > Print Plug-In for Office >
iPF815 Portrait Orientation / Landscape Orientation (PowerPoint)
4
341
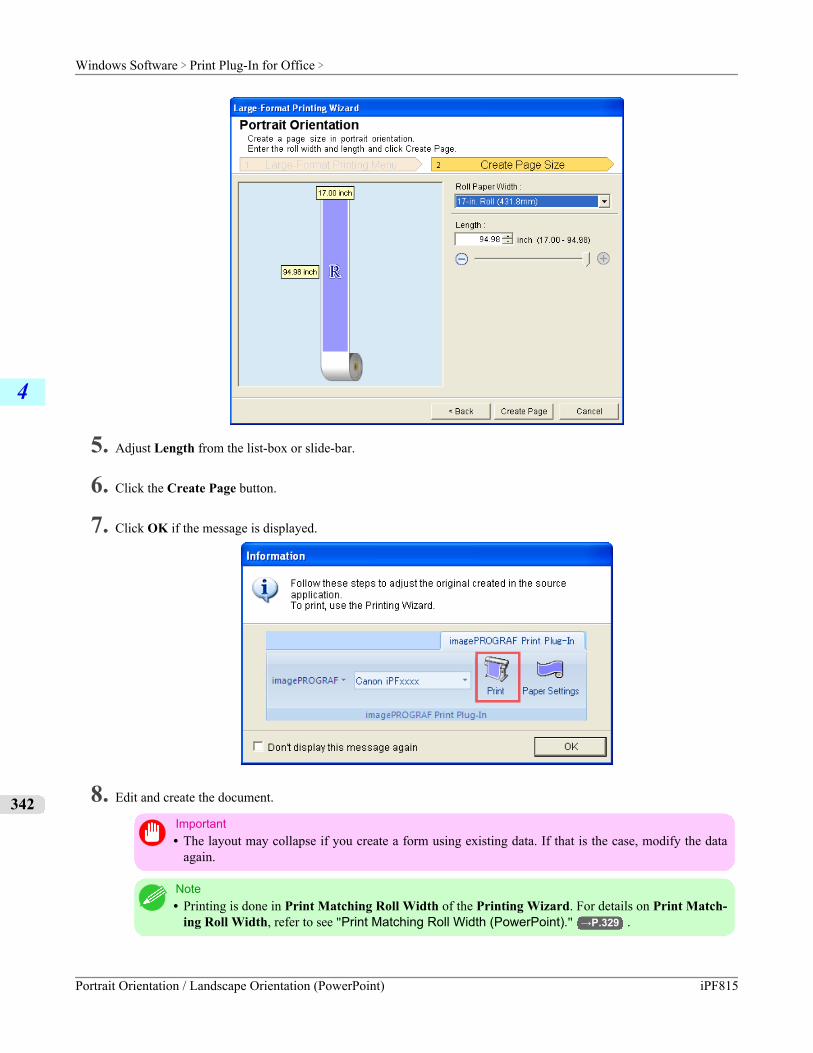
5. Adjust Length from the list-box or slide-bar.
6. Click the Create Page button.
7. Click OK if the message is displayed.
8. Edit and create the document.
Important• The layout may collapse if you create a form using existing data. If that is the case, modify the data
again.
Note• Printing is done in Print Matching Roll Width of the Printing Wizard. For details on Print Match-
ing Roll Width, refer to see "Print Matching Roll Width (PowerPoint)." →P.329 .
Windows Software > Print Plug-In for Office >
Portrait Orientation / Landscape Orientation (PowerPoint) iPF815
4
342
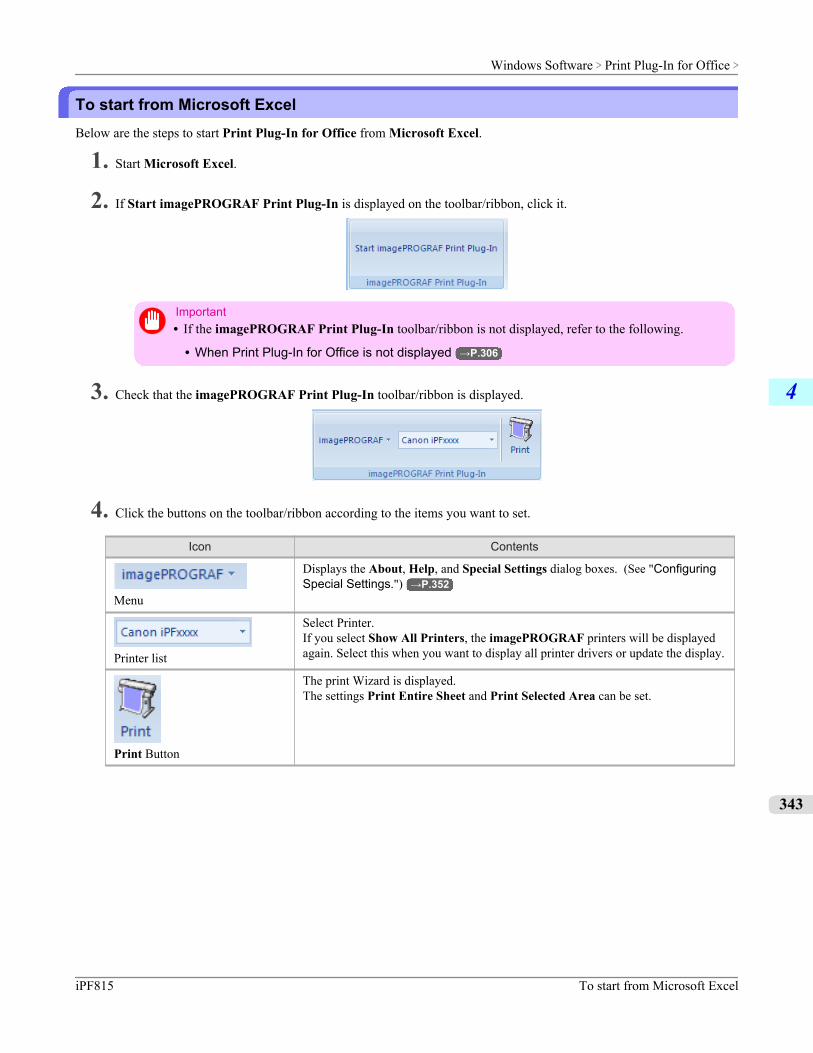
To start from Microsoft ExcelBelow are the steps to start Print Plug-In for Office from Microsoft Excel.
1. Start Microsoft Excel.
2. If Start imagePROGRAF Print Plug-In is displayed on the toolbar/ribbon, click it.
Important• If the imagePROGRAF Print Plug-In toolbar/ribbon is not displayed, refer to the following.
• When Print Plug-In for Office is not displayed →P.306
3. Check that the imagePROGRAF Print Plug-In toolbar/ribbon is displayed.
4. Click the buttons on the toolbar/ribbon according to the items you want to set.
Icon Contents
Menu
Displays the About, Help, and Special Settings dialog boxes. (See "ConfiguringSpecial Settings.") →P.352
Printer list
Select Printer.If you select Show All Printers, the imagePROGRAF printers will be displayedagain. Select this when you want to display all printer drivers or update the display.
Print Button
The print Wizard is displayed.The settings Print Entire Sheet and Print Selected Area can be set.
Windows Software > Print Plug-In for Office >
iPF815 To start from Microsoft Excel
4
343
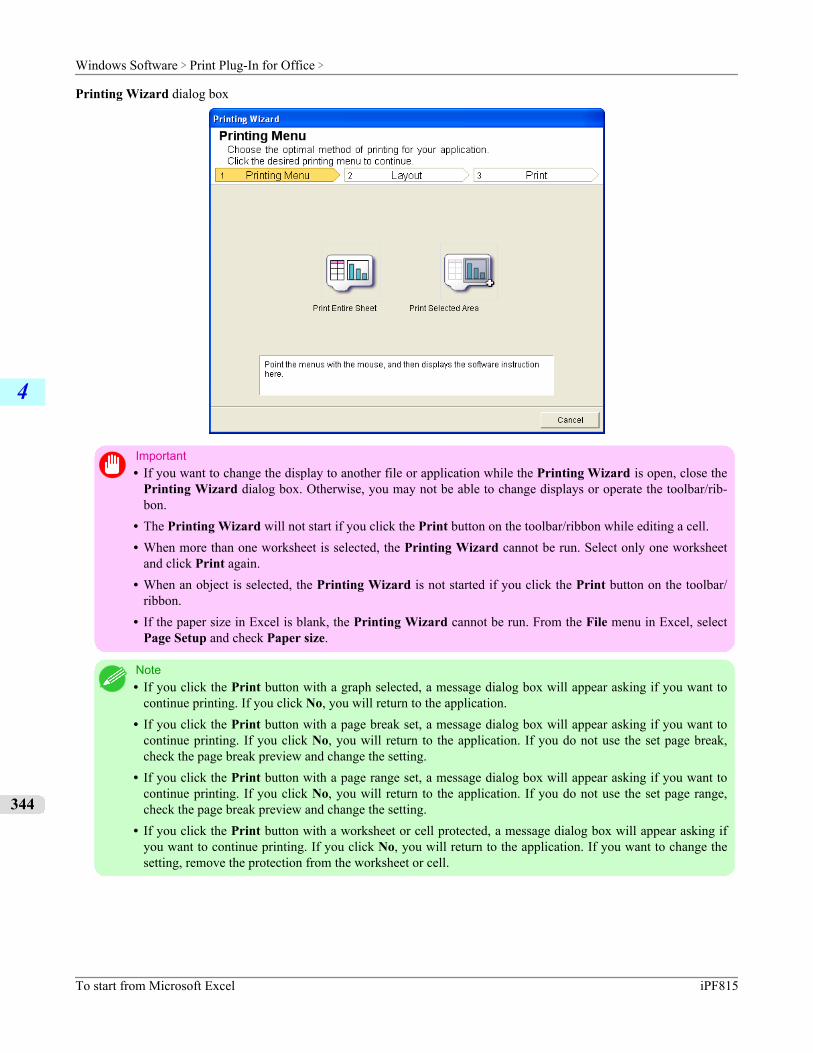
Printing Wizard dialog box
Important• If you want to change the display to another file or application while the Printing Wizard is open, close the
Printing Wizard dialog box. Otherwise, you may not be able to change displays or operate the toolbar/rib-bon.
• The Printing Wizard will not start if you click the Print button on the toolbar/ribbon while editing a cell.• When more than one worksheet is selected, the Printing Wizard cannot be run. Select only one worksheet
and click Print again.• When an object is selected, the Printing Wizard is not started if you click the Print button on the toolbar/
ribbon.• If the paper size in Excel is blank, the Printing Wizard cannot be run. From the File menu in Excel, select
Page Setup and check Paper size.
Note• If you click the Print button with a graph selected, a message dialog box will appear asking if you want to
continue printing. If you click No, you will return to the application.• If you click the Print button with a page break set, a message dialog box will appear asking if you want to
continue printing. If you click No, you will return to the application. If you do not use the set page break,check the page break preview and change the setting.
• If you click the Print button with a page range set, a message dialog box will appear asking if you want tocontinue printing. If you click No, you will return to the application. If you do not use the set page range,check the page break preview and change the setting.
• If you click the Print button with a worksheet or cell protected, a message dialog box will appear asking ifyou want to continue printing. If you click No, you will return to the application. If you want to change thesetting, remove the protection from the worksheet or cell.
Windows Software > Print Plug-In for Office >
To start from Microsoft Excel iPF815
4
344
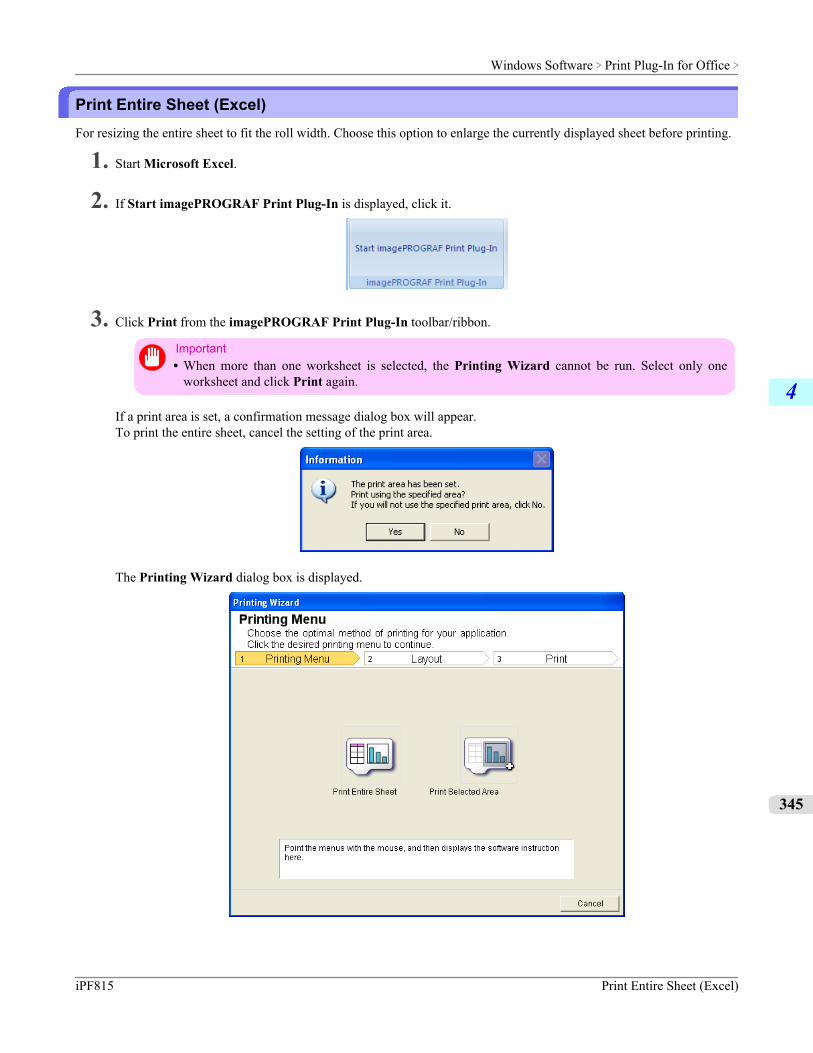
Print Entire Sheet (Excel)For resizing the entire sheet to fit the roll width. Choose this option to enlarge the currently displayed sheet before printing.
1. Start Microsoft Excel.
2. If Start imagePROGRAF Print Plug-In is displayed, click it.
3. Click Print from the imagePROGRAF Print Plug-In toolbar/ribbon.
Important• When more than one worksheet is selected, the Printing Wizard cannot be run. Select only one
worksheet and click Print again.
If a print area is set, a confirmation message dialog box will appear.To print the entire sheet, cancel the setting of the print area.
The Printing Wizard dialog box is displayed.
Windows Software > Print Plug-In for Office >
iPF815 Print Entire Sheet (Excel)
4
345
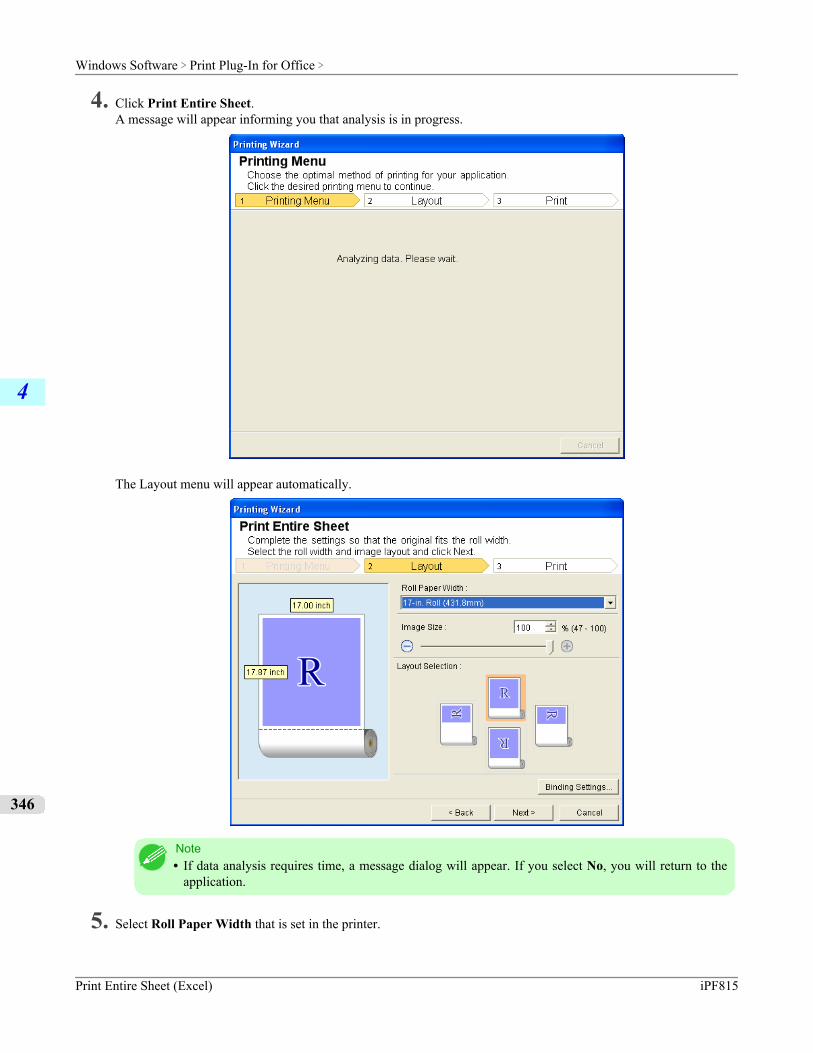
4. Click Print Entire Sheet.A message will appear informing you that analysis is in progress.
The Layout menu will appear automatically.
Note• If data analysis requires time, a message dialog will appear. If you select No, you will return to the
application.
5. Select Roll Paper Width that is set in the printer.
Windows Software > Print Plug-In for Office >
Print Entire Sheet (Excel) iPF815
4
346
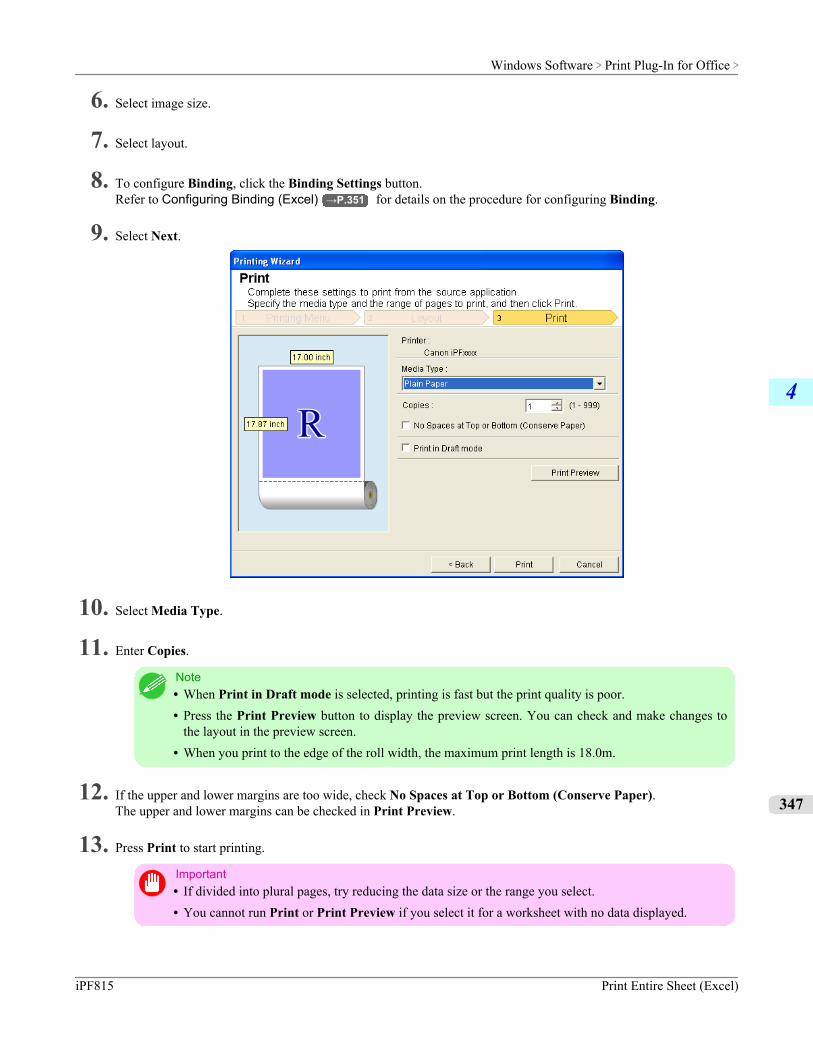
6. Select image size.
7. Select layout.
8. To configure Binding, click the Binding Settings button.Refer to Configuring Binding (Excel) →P.351 for details on the procedure for configuring Binding.
9. Select Next.
10. Select Media Type.
11. Enter Copies.
Note• When Print in Draft mode is selected, printing is fast but the print quality is poor.• Press the Print Preview button to display the preview screen. You can check and make changes to
the layout in the preview screen.• When you print to the edge of the roll width, the maximum print length is 18.0m.
12. If the upper and lower margins are too wide, check No Spaces at Top or Bottom (Conserve Paper).The upper and lower margins can be checked in Print Preview.
13. Press Print to start printing.
Important• If divided into plural pages, try reducing the data size or the range you select.• You cannot run Print or Print Preview if you select it for a worksheet with no data displayed.
Windows Software > Print Plug-In for Office >
iPF815 Print Entire Sheet (Excel)
4
347
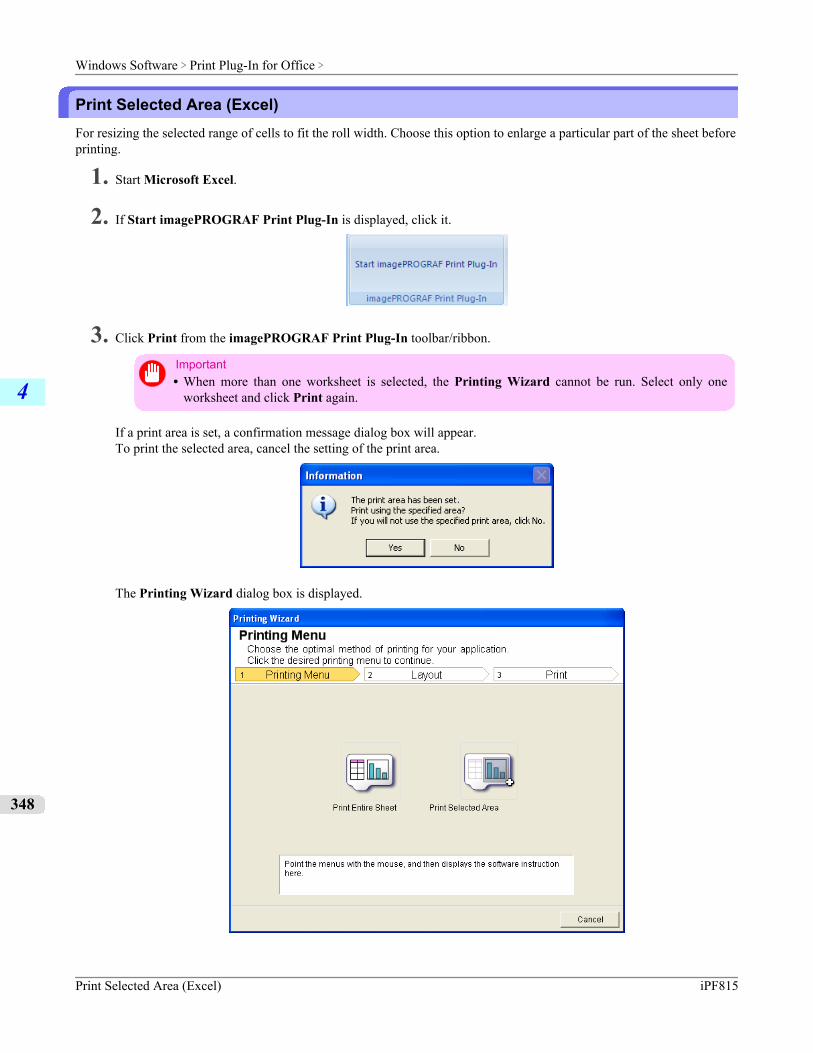
Print Selected Area (Excel)For resizing the selected range of cells to fit the roll width. Choose this option to enlarge a particular part of the sheet beforeprinting.
1. Start Microsoft Excel.
2. If Start imagePROGRAF Print Plug-In is displayed, click it.
3. Click Print from the imagePROGRAF Print Plug-In toolbar/ribbon.
Important• When more than one worksheet is selected, the Printing Wizard cannot be run. Select only one
worksheet and click Print again.
If a print area is set, a confirmation message dialog box will appear.To print the selected area, cancel the setting of the print area.
The Printing Wizard dialog box is displayed.
Windows Software > Print Plug-In for Office >
Print Selected Area (Excel) iPF815
4
348
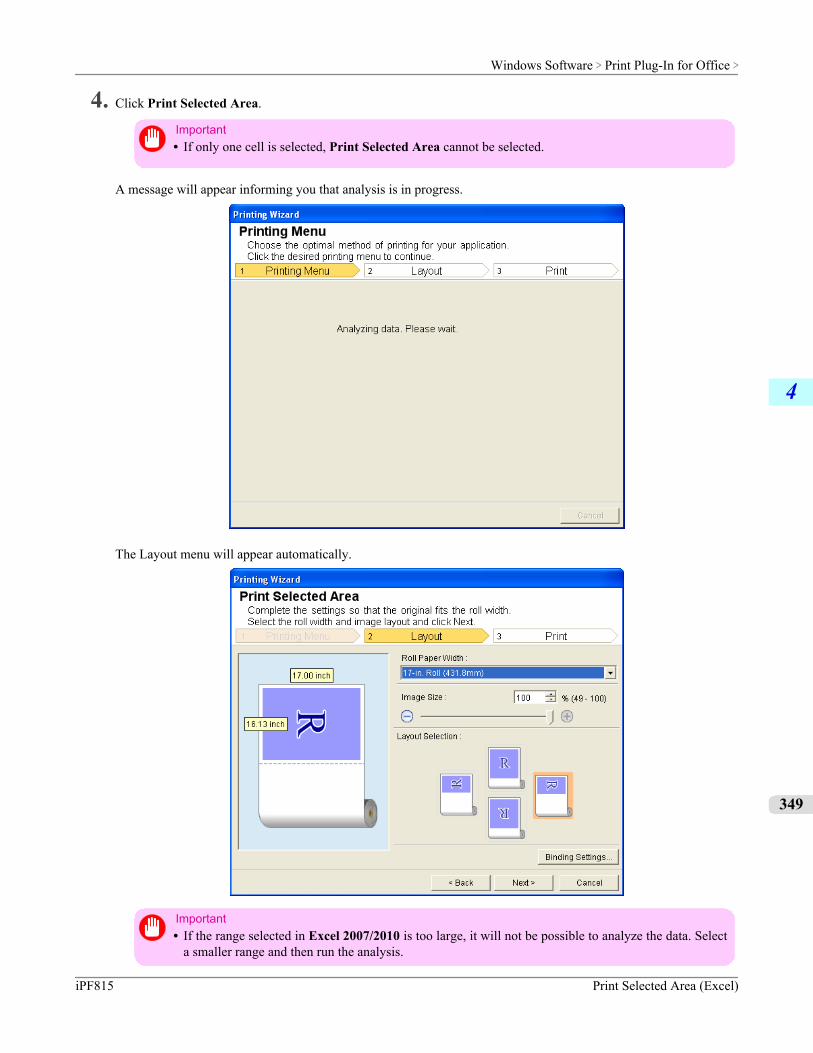
4. Click Print Selected Area.
Important• If only one cell is selected, Print Selected Area cannot be selected.
A message will appear informing you that analysis is in progress.
The Layout menu will appear automatically.
Important• If the range selected in Excel 2007/2010 is too large, it will not be possible to analyze the data. Select
a smaller range and then run the analysis.
Windows Software > Print Plug-In for Office >
iPF815 Print Selected Area (Excel)
4
349
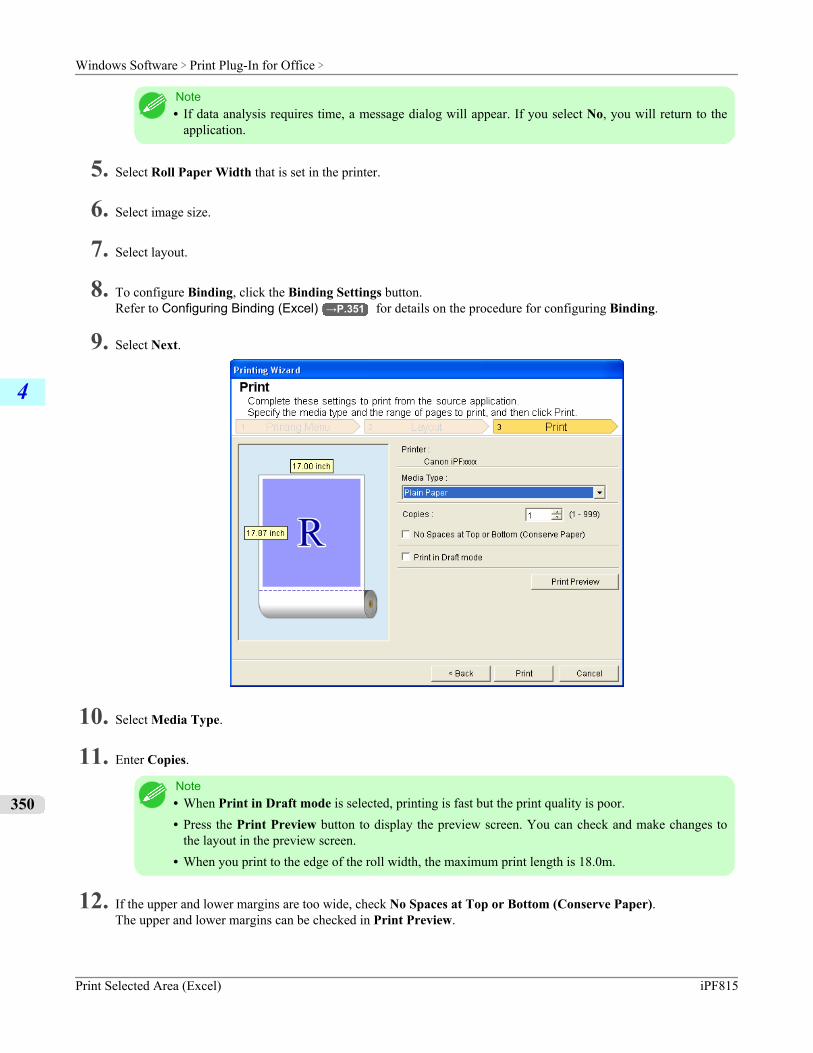
Note• If data analysis requires time, a message dialog will appear. If you select No, you will return to the
application.
5. Select Roll Paper Width that is set in the printer.
6. Select image size.
7. Select layout.
8. To configure Binding, click the Binding Settings button.Refer to Configuring Binding (Excel) →P.351 for details on the procedure for configuring Binding.
9. Select Next.
10. Select Media Type.
11. Enter Copies.
Note• When Print in Draft mode is selected, printing is fast but the print quality is poor.• Press the Print Preview button to display the preview screen. You can check and make changes to
the layout in the preview screen.• When you print to the edge of the roll width, the maximum print length is 18.0m.
12. If the upper and lower margins are too wide, check No Spaces at Top or Bottom (Conserve Paper).The upper and lower margins can be checked in Print Preview.
Windows Software > Print Plug-In for Office >
Print Selected Area (Excel) iPF815
4
350
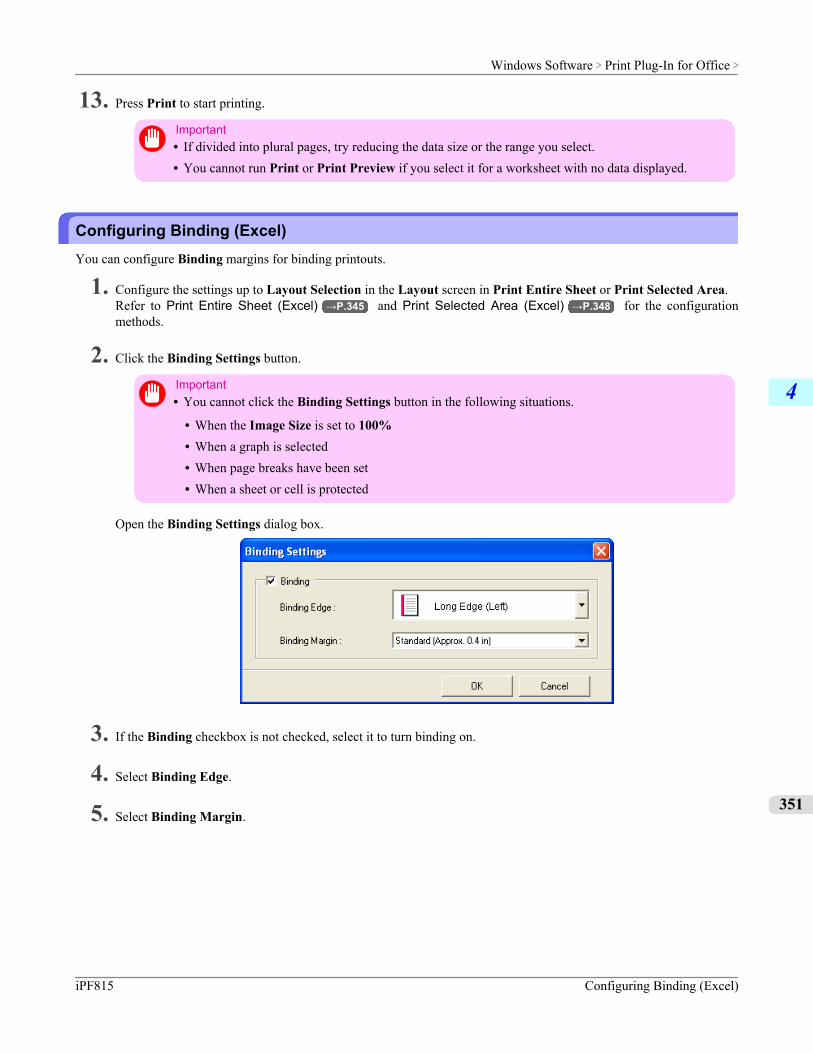
13. Press Print to start printing.
Important• If divided into plural pages, try reducing the data size or the range you select.• You cannot run Print or Print Preview if you select it for a worksheet with no data displayed.
Configuring Binding (Excel)You can configure Binding margins for binding printouts.
1. Configure the settings up to Layout Selection in the Layout screen in Print Entire Sheet or Print Selected Area.Refer to Print Entire Sheet (Excel) →P.345 and Print Selected Area (Excel) →P.348 for the configurationmethods.
2. Click the Binding Settings button.
Important• You cannot click the Binding Settings button in the following situations.
• When the Image Size is set to 100%• When a graph is selected• When page breaks have been set• When a sheet or cell is protected
Open the Binding Settings dialog box.
3. If the Binding checkbox is not checked, select it to turn binding on.
4. Select Binding Edge.
5. Select Binding Margin.
Windows Software > Print Plug-In for Office >
iPF815 Configuring Binding (Excel)
4
351
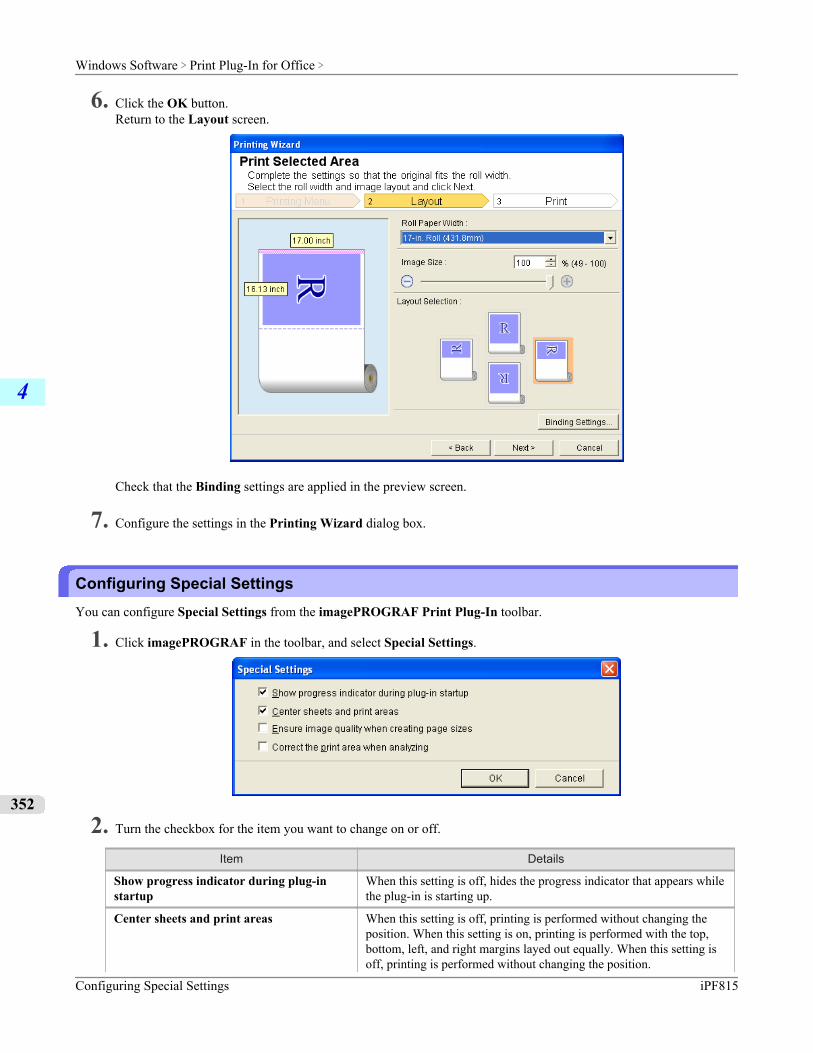
6. Click the OK button.Return to the Layout screen.
Check that the Binding settings are applied in the preview screen.
7. Configure the settings in the Printing Wizard dialog box.
Configuring Special SettingsYou can configure Special Settings from the imagePROGRAF Print Plug-In toolbar.
1. Click imagePROGRAF in the toolbar, and select Special Settings.
2. Turn the checkbox for the item you want to change on or off.
Item Details
Show progress indicator during plug-instartup
When this setting is off, hides the progress indicator that appears whilethe plug-in is starting up.
Center sheets and print areas When this setting is off, printing is performed without changing theposition. When this setting is on, printing is performed with the top,bottom, left, and right margins layed out equally. When this setting isoff, printing is performed without changing the position.
Windows Software > Print Plug-In for Office >
Configuring Special Settings iPF815
4
352
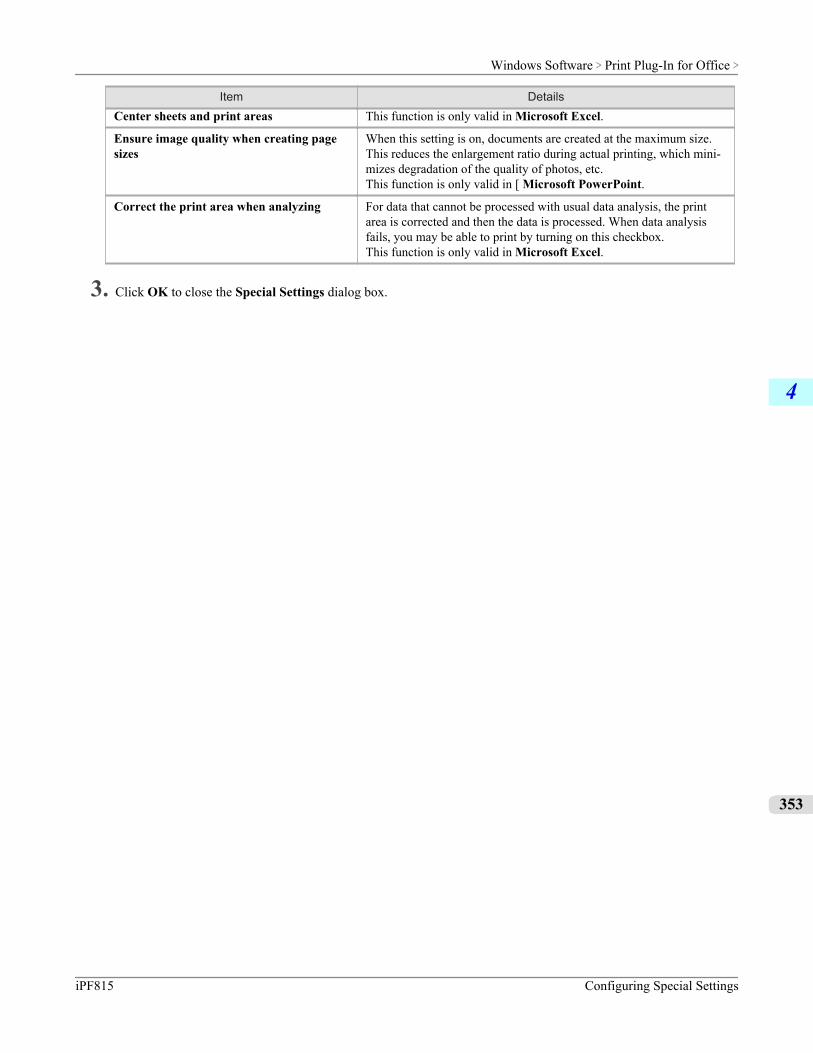
Item DetailsCenter sheets and print areas This function is only valid in Microsoft Excel.
Ensure image quality when creating pagesizes
When this setting is on, documents are created at the maximum size.This reduces the enlargement ratio during actual printing, which mini-mizes degradation of the quality of photos, etc.This function is only valid in [ Microsoft PowerPoint.
Correct the print area when analyzing For data that cannot be processed with usual data analysis, the printarea is corrected and then the data is processed. When data analysisfails, you may be able to print by turning on this checkbox.This function is only valid in Microsoft Excel.
3. Click OK to close the Special Settings dialog box.
Windows Software > Print Plug-In for Office >
iPF815 Configuring Special Settings
4
353

HDI DriverThe Features of HDI Driver ............................................................................................................................. 354Operating Environment ................................................................................................................................... 354Installation Procedure ...................................................................................................................................... 355
Installing with the Canon Installer ............................................................................................................... 355Installing with the Add-A-Plotter Wizard ...................................................................................................... 362
Opening the Plotter Configuration Dialog Box ................................................................................................. 367Opening from the AutoCAD File Menu ........................................................................................................ 368Opening from the Start Menu ...................................................................................................................... 369
Plotter Configuration Editor Dialog Box ........................................................................................................... 371Media Source and Media Size Settings ...................................................................................................... 372Graphics Settings ........................................................................................................................................ 373
Opening the Custom Properties Dialog Box .................................................................................................... 376Custom Properties dialog box ......................................................................................................................... 378Paper Detailed Settings ................................................................................................................................... 380Output Method Dialog Box .............................................................................................................................. 382Color Compatibility Dialog Box ........................................................................................................................ 382
Printing ............................................................................................................................................................ 383
The Features of HDI DriverThe main features of HDI Driver are as follows.
• A special HDI (Heidi Device Interface) compatible printer driver for the Autodesk, Inc. software applications for Auto-CAD and AutoCAD LT architecture (hereafter referred to together as "AutoCAD").
• You can set up the print job with the most appropriate settings for the media and print clear, sharp printouts of plansand diagrams created with AutoCAD.
Operating EnvironmentThe HDI driver operating environment is as follows.
• Compatible Operating SystemWindows XP, Windows Vista, Windows 7
• Compatible AutoCAD VersionAutoCAD 2005, AutoCAD LT2005, AutoCAD 2006, AutoCAD LT2006,AutoCAD 2007, AutoCAD LT2007, DWG TrueView 2007, AutoCAD 2008, AutoCAD LT2008, DWG TrueView2008,AutoCAD 2009, AutoCAD LT2009, DWG TrueView 2009, AutoCAD 2010, AutoCAD LT2010, DWG TrueView2010,AutoCAD 2011, AutoCAD LT2011, DWG TrueView 2011,AutoCAD 2008(x64), DWG TrueView 2008(x64), AutoCAD 2009(x64), AutoCAD LT2009(x64), DWG TrueView2009(x64),AutoCAD 2010(x64), AutoCAD LT2010(x64), DWG TrueView 2010(x64)AutoCAD 2011(x64), AutoCAD LT2011(x64), DWG TrueView 2011(x64)
Note• The supported OS version differs for each version of AutoCAD. Check with Autodesk for details.
Windows Software > HDI Driver >
The Features of HDI Driver iPF815
4
354
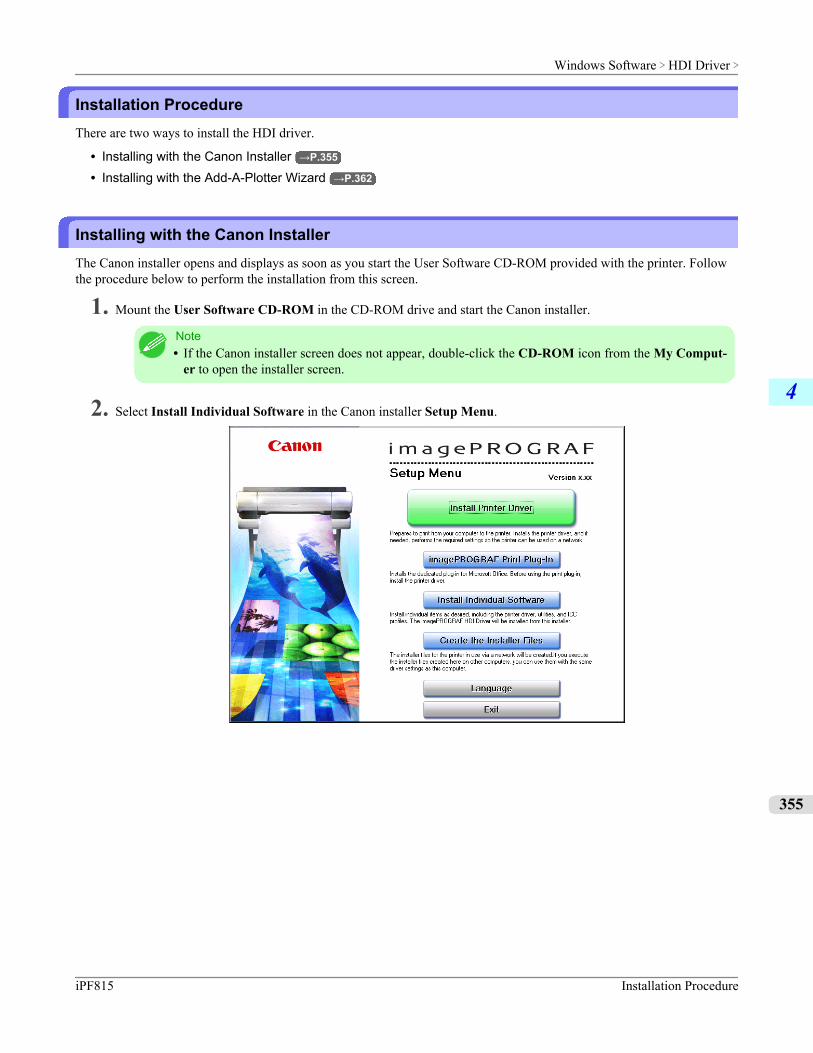
Installation ProcedureThere are two ways to install the HDI driver.
• Installing with the Canon Installer →P.355
• Installing with the Add-A-Plotter Wizard →P.362
Installing with the Canon InstallerThe Canon installer opens and displays as soon as you start the User Software CD-ROM provided with the printer. Followthe procedure below to perform the installation from this screen.
1. Mount the User Software CD-ROM in the CD-ROM drive and start the Canon installer.
Note• If the Canon installer screen does not appear, double-click the CD-ROM icon from the My Comput-
er to open the installer screen.
2. Select Install Individual Software in the Canon installer Setup Menu.
Windows Software > HDI Driver >
iPF815 Installation Procedure
4
355
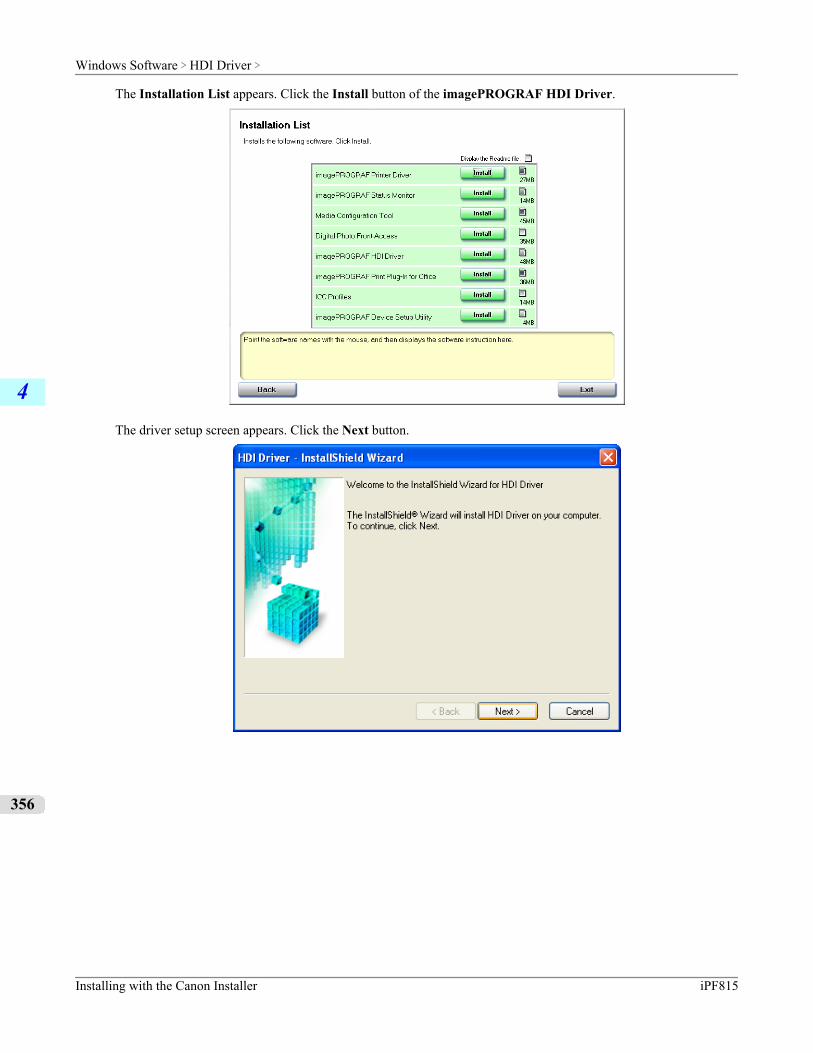
The Installation List appears. Click the Install button of the imagePROGRAF HDI Driver.
The driver setup screen appears. Click the Next button.
Windows Software > HDI Driver >
Installing with the Canon Installer iPF815
4
356
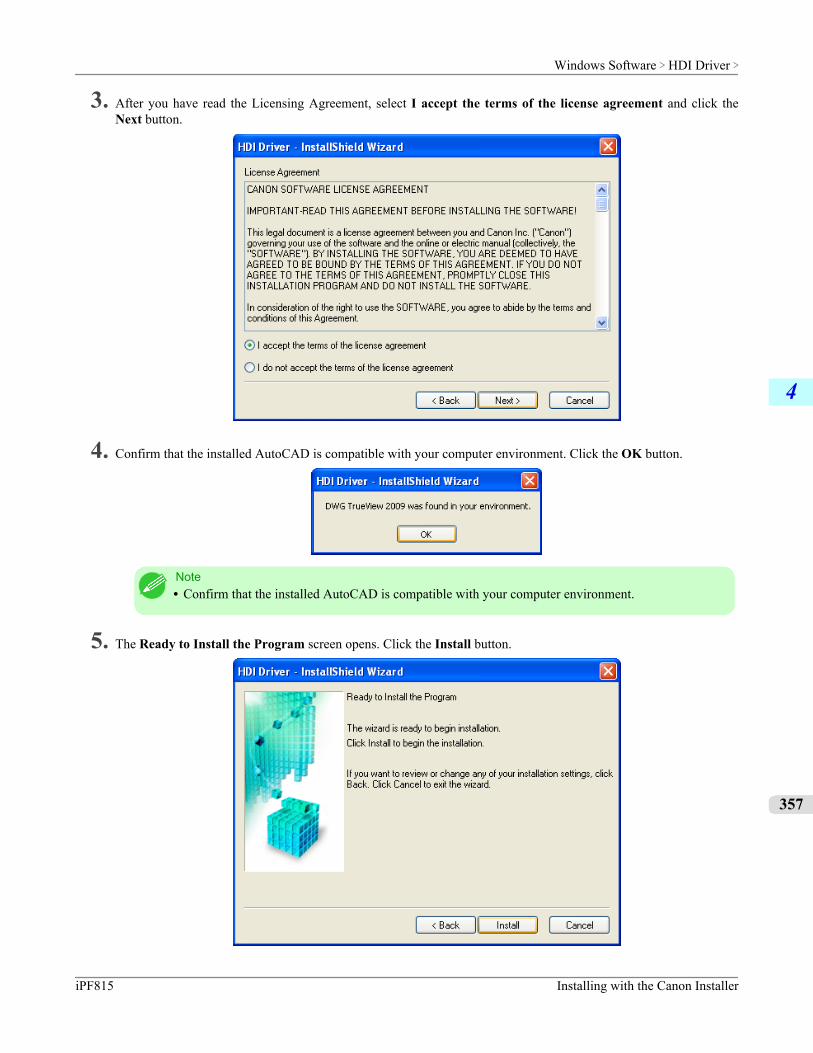
3. After you have read the Licensing Agreement, select I accept the terms of the license agreement and click theNext button.
4. Confirm that the installed AutoCAD is compatible with your computer environment. Click the OK button.
Note• Confirm that the installed AutoCAD is compatible with your computer environment.
5. The Ready to Install the Program screen opens. Click the Install button.
Windows Software > HDI Driver >
iPF815 Installing with the Canon Installer
4
357
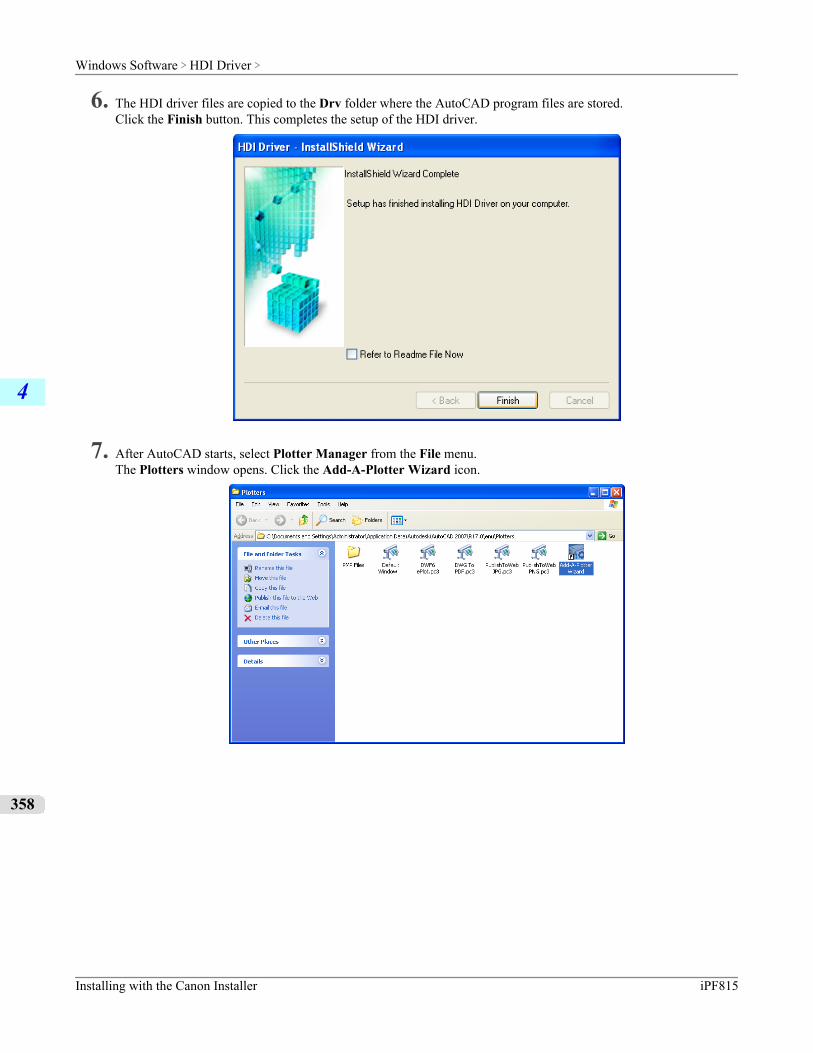
6. The HDI driver files are copied to the Drv folder where the AutoCAD program files are stored.Click the Finish button. This completes the setup of the HDI driver.
7. After AutoCAD starts, select Plotter Manager from the File menu.The Plotters window opens. Click the Add-A-Plotter Wizard icon.
Windows Software > HDI Driver >
Installing with the Canon Installer iPF815
4
358
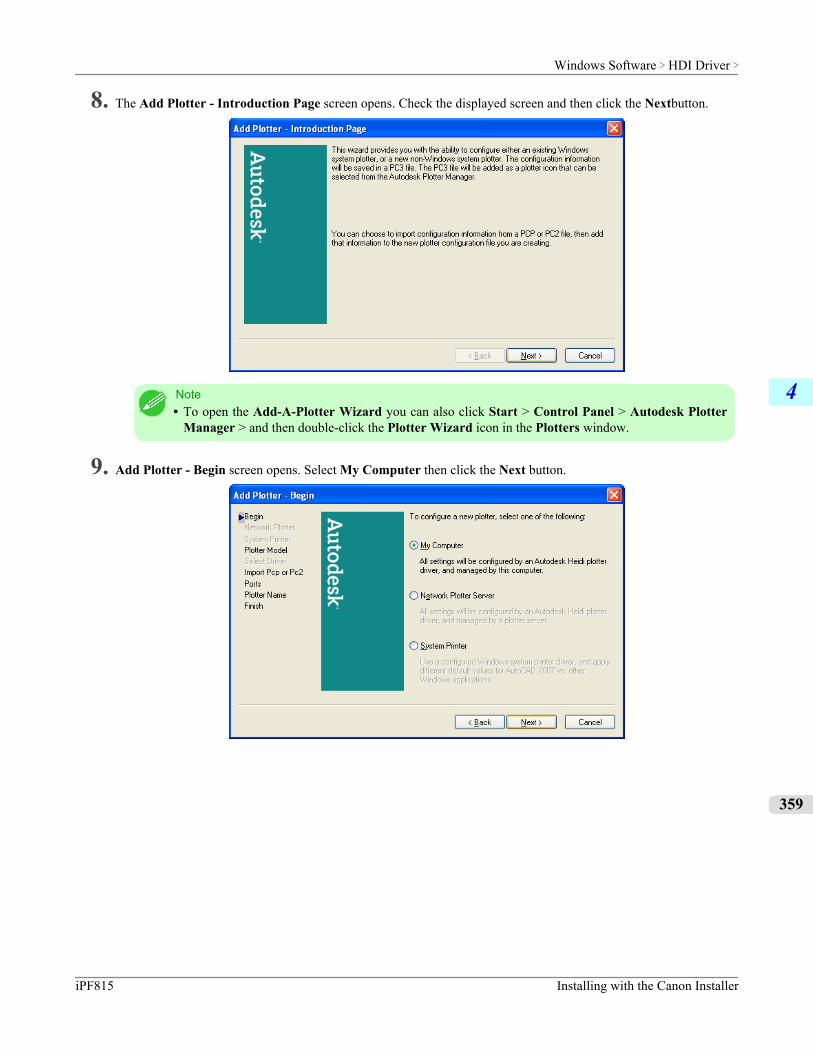
8. The Add Plotter - Introduction Page screen opens. Check the displayed screen and then click the Nextbutton.
Note• To open the Add-A-Plotter Wizard you can also click Start > Control Panel > Autodesk Plotter
Manager > and then double-click the Plotter Wizard icon in the Plotters window.
9. Add Plotter - Begin screen opens. Select My Computer then click the Next button.
Windows Software > HDI Driver >
iPF815 Installing with the Canon Installer
4
359
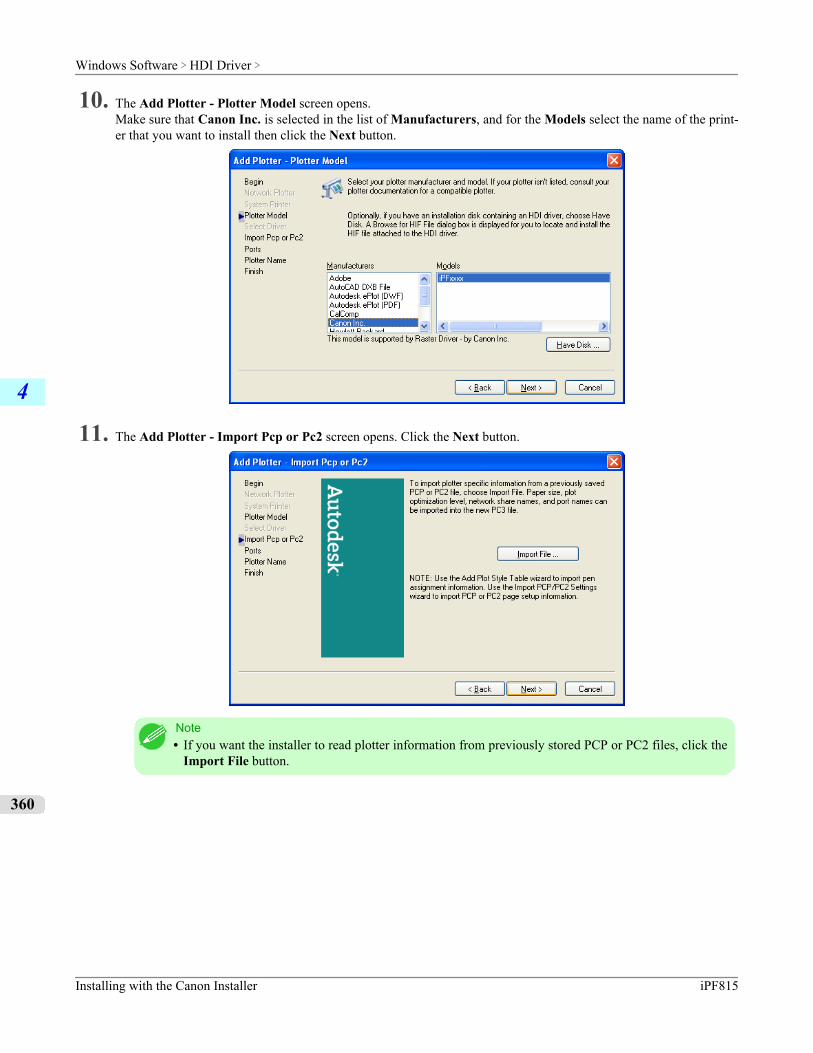
10. The Add Plotter - Plotter Model screen opens.Make sure that Canon Inc. is selected in the list of Manufacturers, and for the Models select the name of the print-er that you want to install then click the Next button.
11. The Add Plotter - Import Pcp or Pc2 screen opens. Click the Next button.
Note• If you want the installer to read plotter information from previously stored PCP or PC2 files, click the
Import File button.
Windows Software > HDI Driver >
Installing with the Canon Installer iPF815
4
360
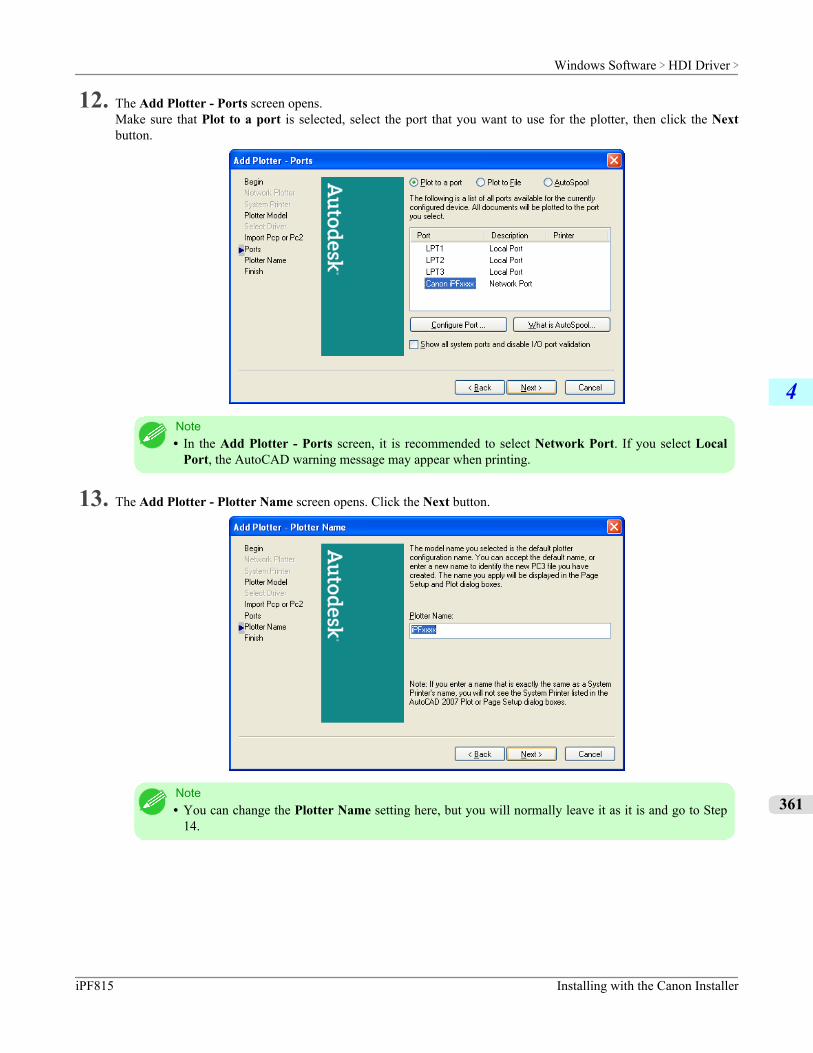
12. The Add Plotter - Ports screen opens.Make sure that Plot to a port is selected, select the port that you want to use for the plotter, then click the Nextbutton.
Note• In the Add Plotter - Ports screen, it is recommended to select Network Port. If you select Local
Port, the AutoCAD warning message may appear when printing.
13. The Add Plotter - Plotter Name screen opens. Click the Next button.
Note• You can change the Plotter Name setting here, but you will normally leave it as it is and go to Step
14.
Windows Software > HDI Driver >
iPF815 Installing with the Canon Installer
4
361
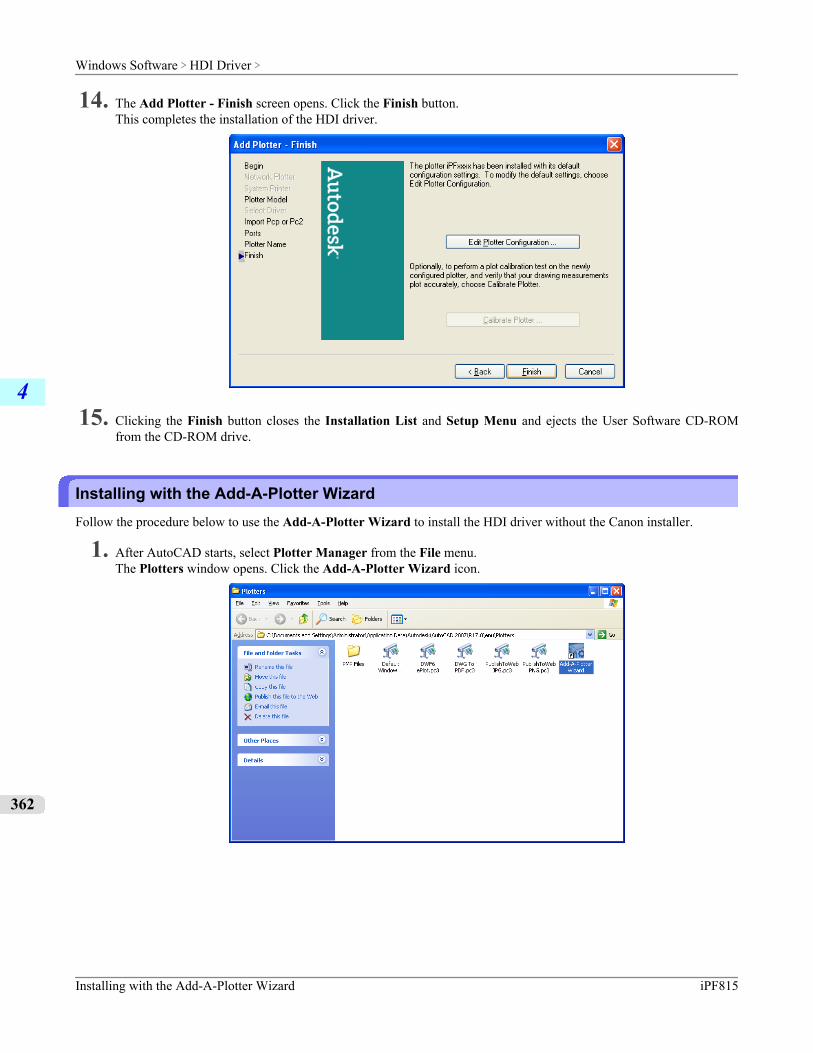
14. The Add Plotter - Finish screen opens. Click the Finish button.This completes the installation of the HDI driver.
15. Clicking the Finish button closes the Installation List and Setup Menu and ejects the User Software CD-ROMfrom the CD-ROM drive.
Installing with the Add-A-Plotter WizardFollow the procedure below to use the Add-A-Plotter Wizard to install the HDI driver without the Canon installer.
1. After AutoCAD starts, select Plotter Manager from the File menu.The Plotters window opens. Click the Add-A-Plotter Wizard icon.
Windows Software > HDI Driver >
Installing with the Add-A-Plotter Wizard iPF815
4
362
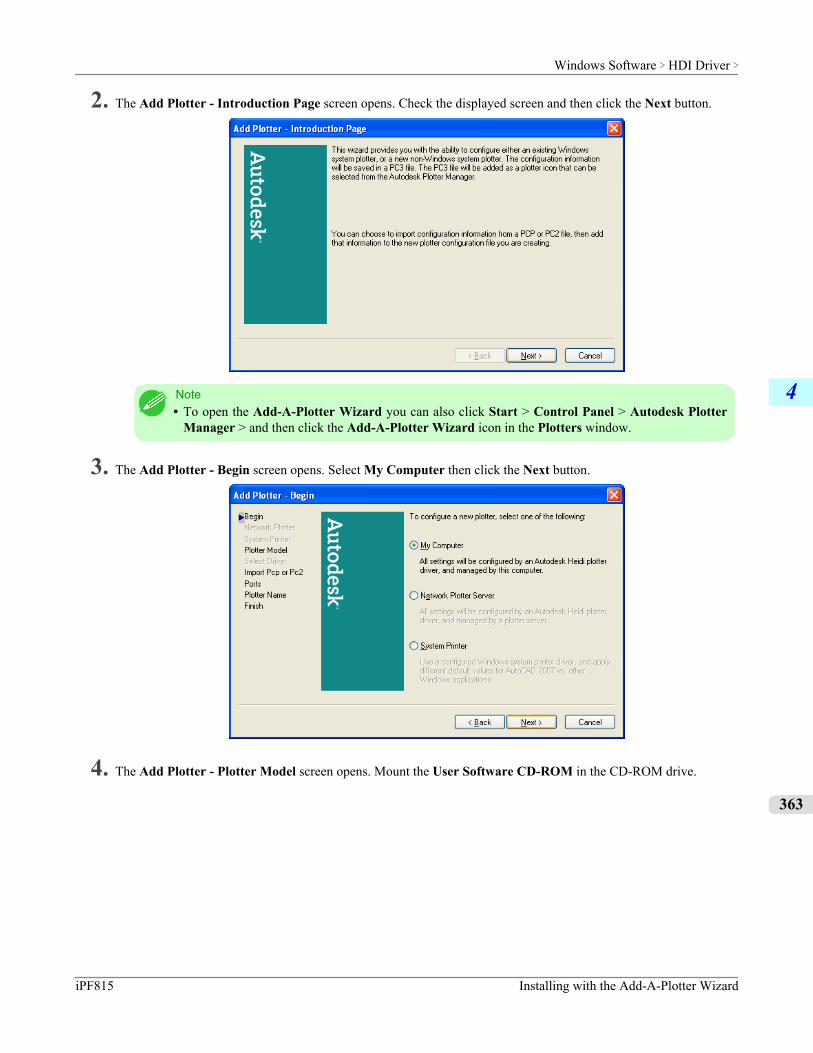
2. The Add Plotter - Introduction Page screen opens. Check the displayed screen and then click the Next button.
Note• To open the Add-A-Plotter Wizard you can also click Start > Control Panel > Autodesk Plotter
Manager > and then click the Add-A-Plotter Wizard icon in the Plotters window.
3. The Add Plotter - Begin screen opens. Select My Computer then click the Next button.
4. The Add Plotter - Plotter Model screen opens. Mount the User Software CD-ROM in the CD-ROM drive.
Windows Software > HDI Driver >
iPF815 Installing with the Add-A-Plotter Wizard
4
363
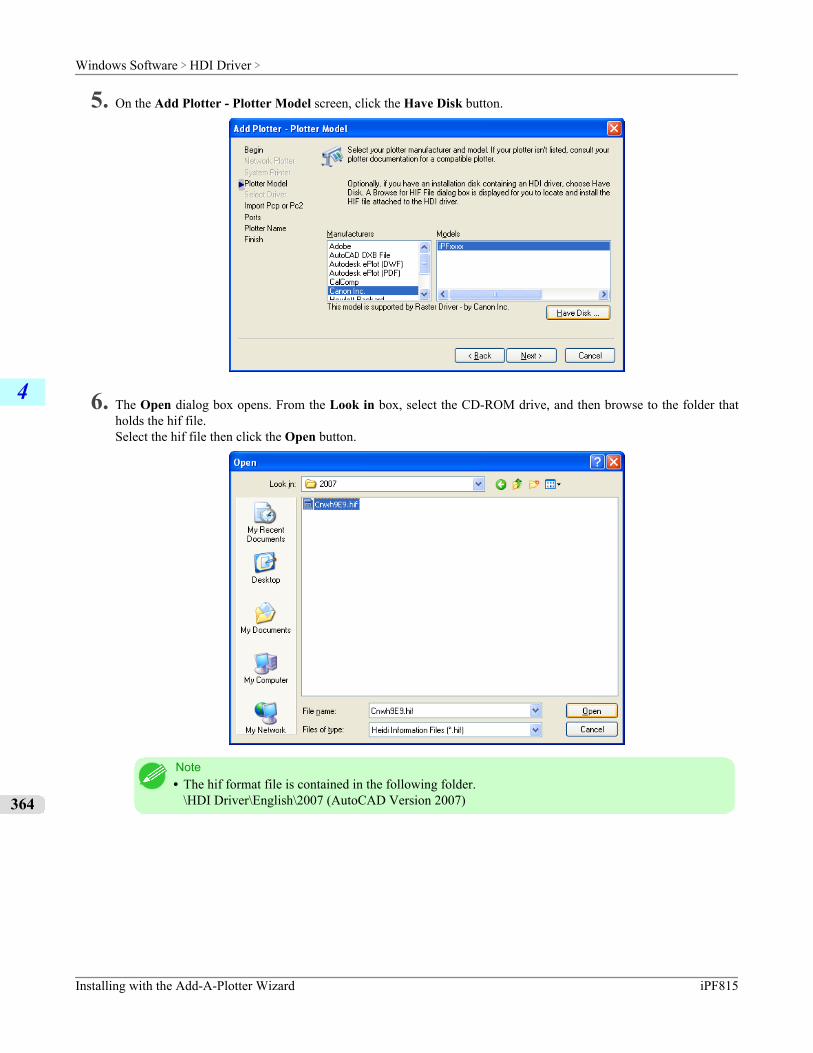
5. On the Add Plotter - Plotter Model screen, click the Have Disk button.
6. The Open dialog box opens. From the Look in box, select the CD-ROM drive, and then browse to the folder thatholds the hif file.Select the hif file then click the Open button.
Note• The hif format file is contained in the following folder.
\HDI Driver\English\2007 (AutoCAD Version 2007)
Windows Software > HDI Driver >
Installing with the Add-A-Plotter Wizard iPF815
4
364
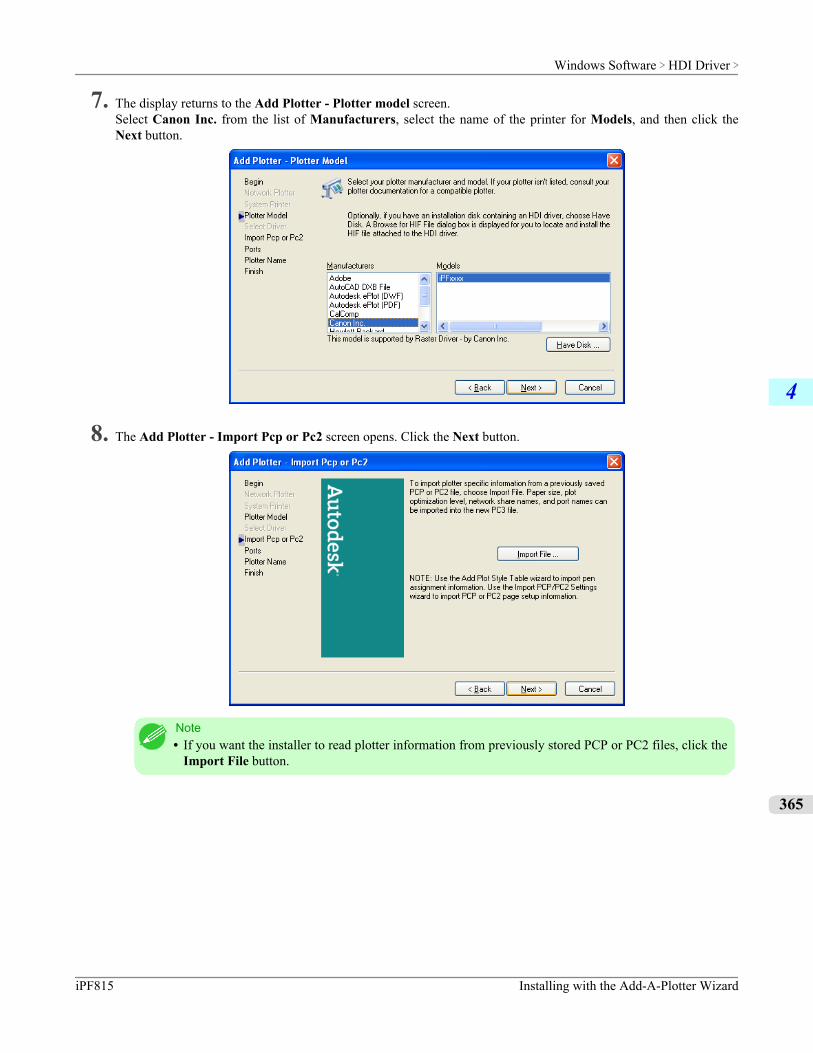
7. The display returns to the Add Plotter - Plotter model screen.Select Canon Inc. from the list of Manufacturers, select the name of the printer for Models, and then click theNext button.
8. The Add Plotter - Import Pcp or Pc2 screen opens. Click the Next button.
Note• If you want the installer to read plotter information from previously stored PCP or PC2 files, click the
Import File button.
Windows Software > HDI Driver >
iPF815 Installing with the Add-A-Plotter Wizard
4
365
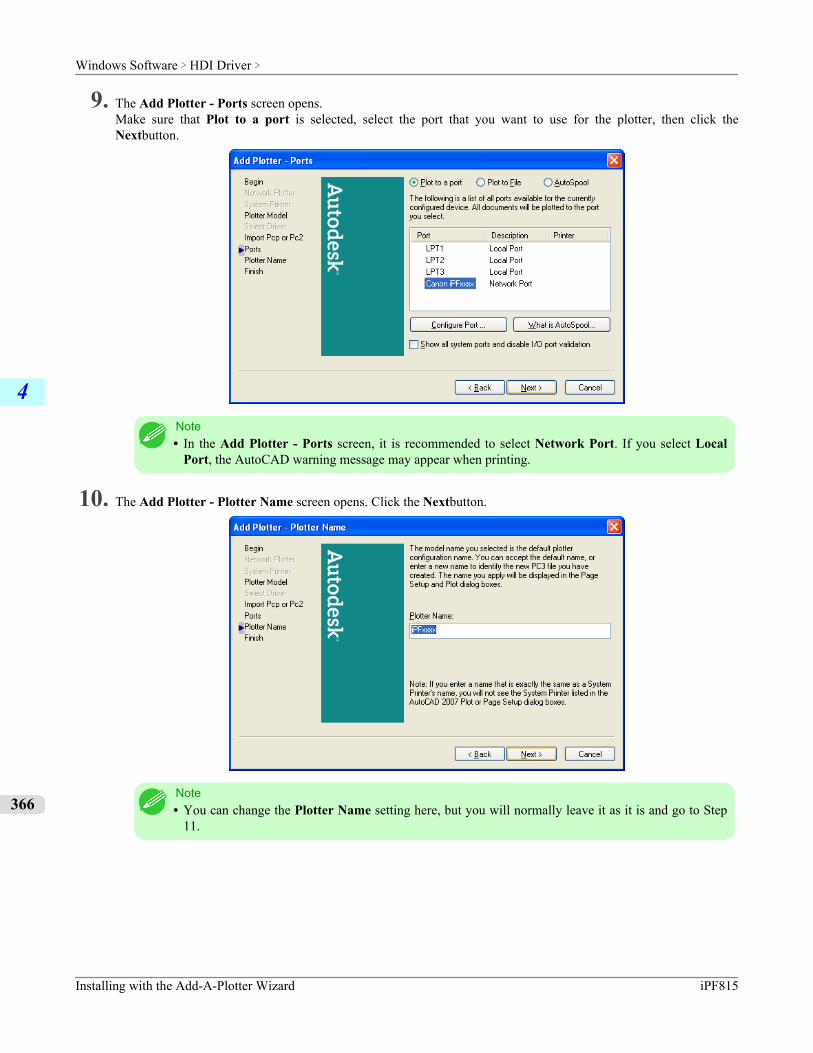
9. The Add Plotter - Ports screen opens.Make sure that Plot to a port is selected, select the port that you want to use for the plotter, then click theNextbutton.
Note• In the Add Plotter - Ports screen, it is recommended to select Network Port. If you select Local
Port, the AutoCAD warning message may appear when printing.
10. The Add Plotter - Plotter Name screen opens. Click the Nextbutton.
Note• You can change the Plotter Name setting here, but you will normally leave it as it is and go to Step
11.
Windows Software > HDI Driver >
Installing with the Add-A-Plotter Wizard iPF815
4
366
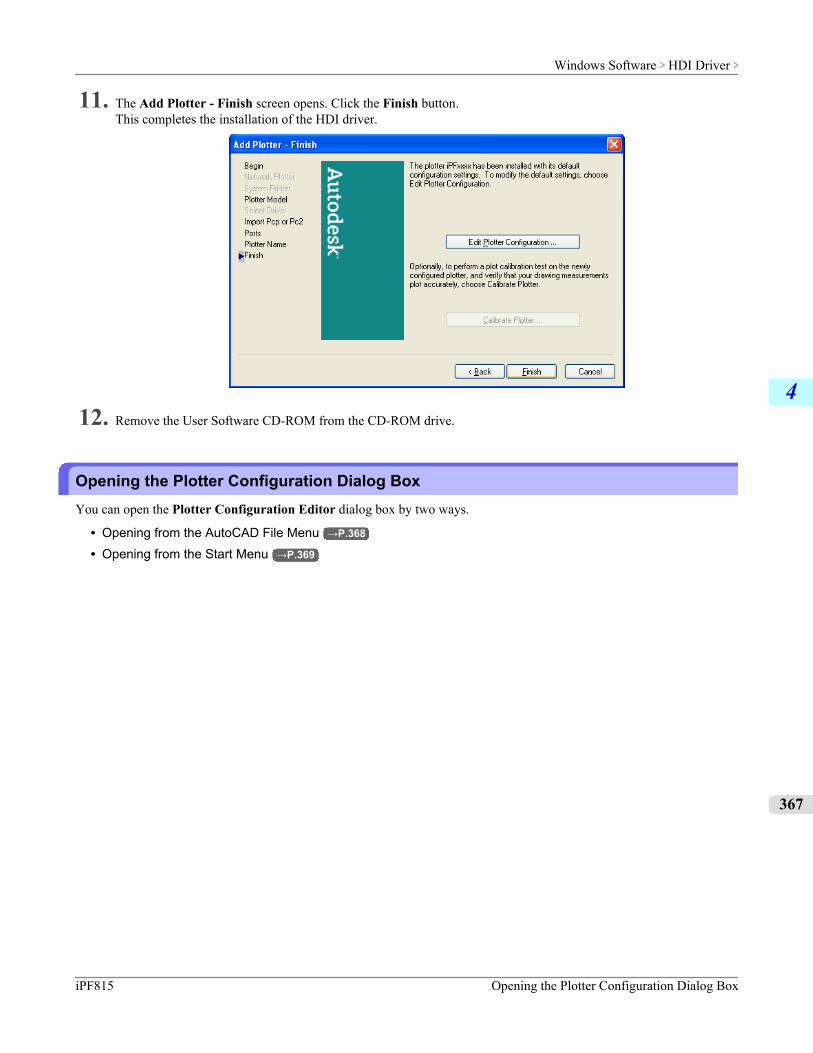
11. The Add Plotter - Finish screen opens. Click the Finish button.This completes the installation of the HDI driver.
12. Remove the User Software CD-ROM from the CD-ROM drive.
Opening the Plotter Configuration Dialog BoxYou can open the Plotter Configuration Editor dialog box by two ways.
• Opening from the AutoCAD File Menu →P.368
• Opening from the Start Menu →P.369
Windows Software > HDI Driver >
iPF815 Opening the Plotter Configuration Dialog Box
4
367
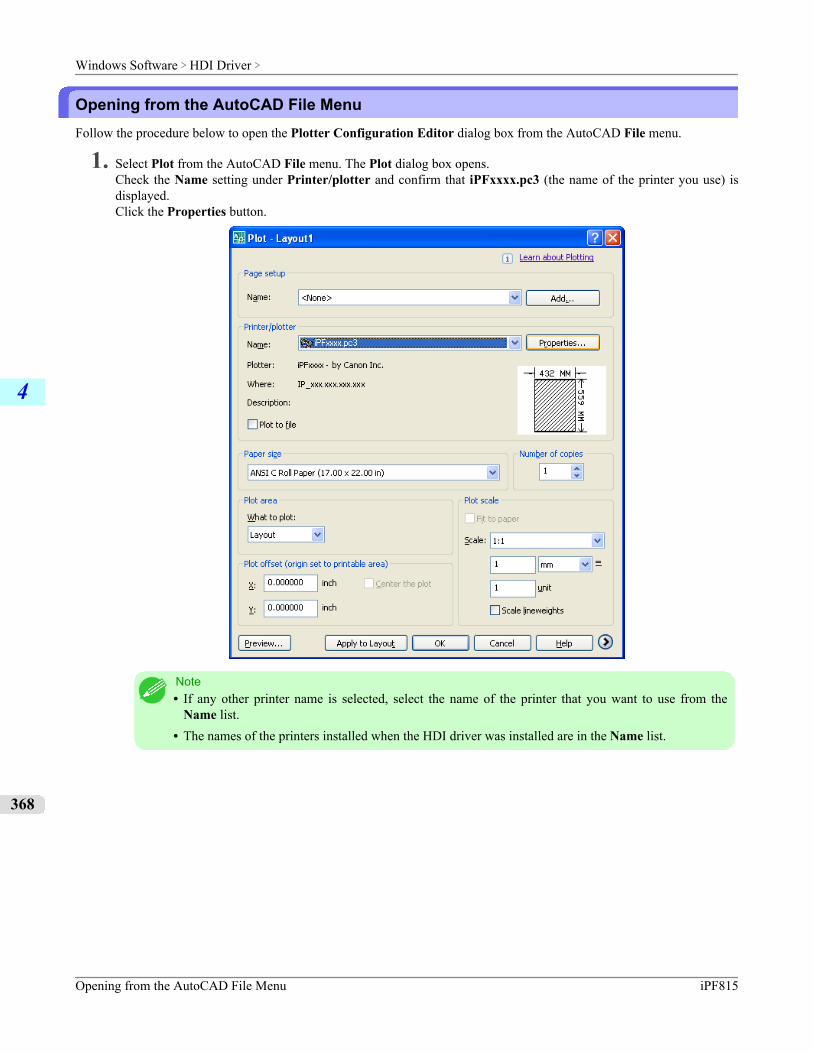
Opening from the AutoCAD File MenuFollow the procedure below to open the Plotter Configuration Editor dialog box from the AutoCAD File menu.
1. Select Plot from the AutoCAD File menu. The Plot dialog box opens.Check the Name setting under Printer/plotter and confirm that iPFxxxx.pc3 (the name of the printer you use) isdisplayed.Click the Properties button.
Note• If any other printer name is selected, select the name of the printer that you want to use from the
Name list.• The names of the printers installed when the HDI driver was installed are in the Name list.
Windows Software > HDI Driver >
Opening from the AutoCAD File Menu iPF815
4
368
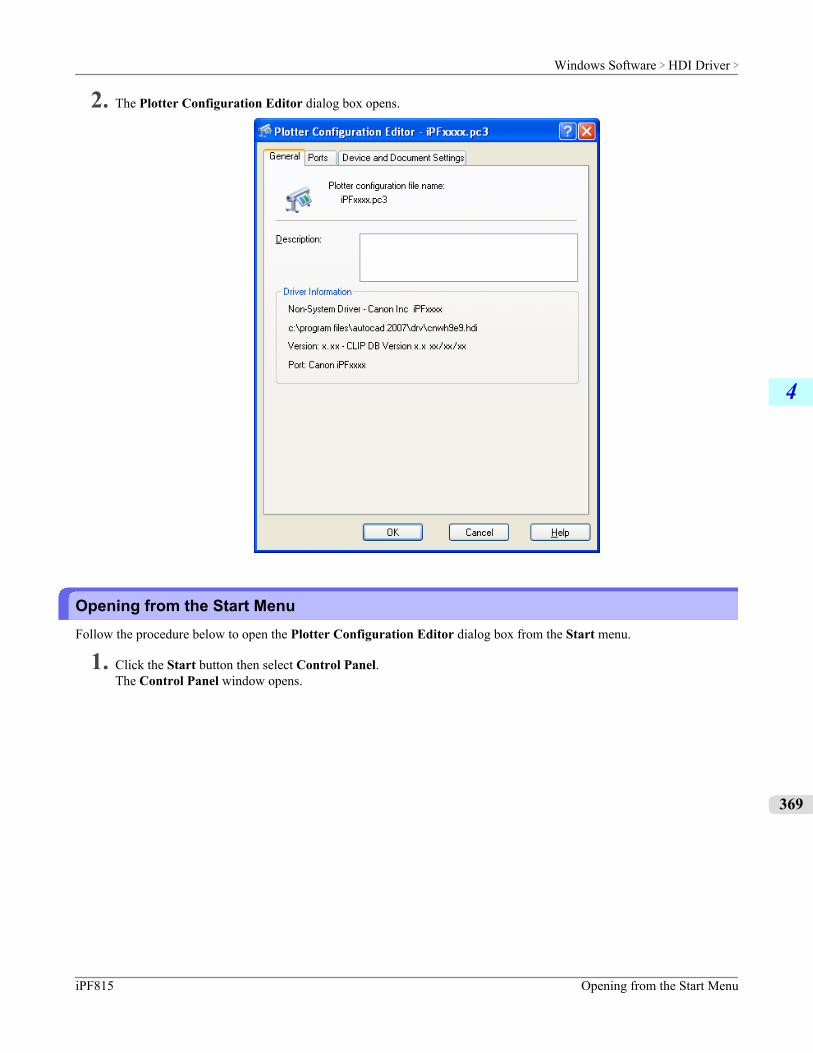
2. The Plotter Configuration Editor dialog box opens.
Opening from the Start MenuFollow the procedure below to open the Plotter Configuration Editor dialog box from the Start menu.
1. Click the Start button then select Control Panel.The Control Panel window opens.
Windows Software > HDI Driver >
iPF815 Opening from the Start Menu
4
369
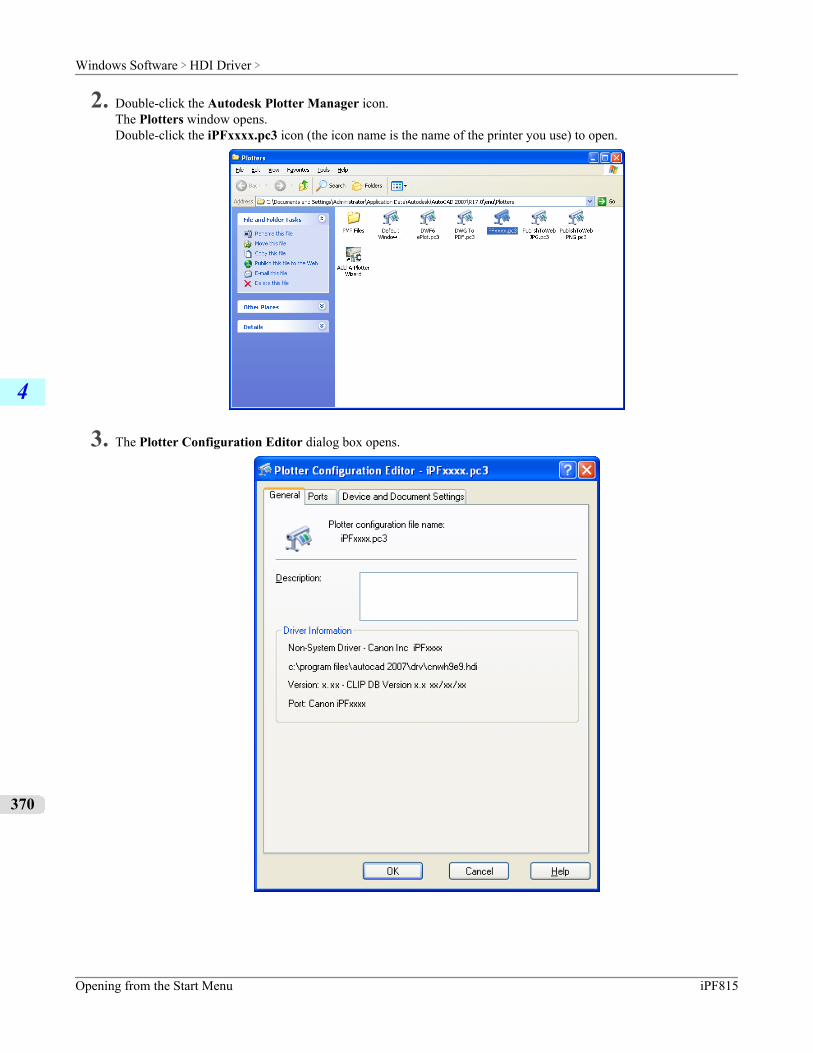
2. Double-click the Autodesk Plotter Manager icon.The Plotters window opens.Double-click the iPFxxxx.pc3 icon (the icon name is the name of the printer you use) to open.
3. The Plotter Configuration Editor dialog box opens.
Windows Software > HDI Driver >
Opening from the Start Menu iPF815
4
370
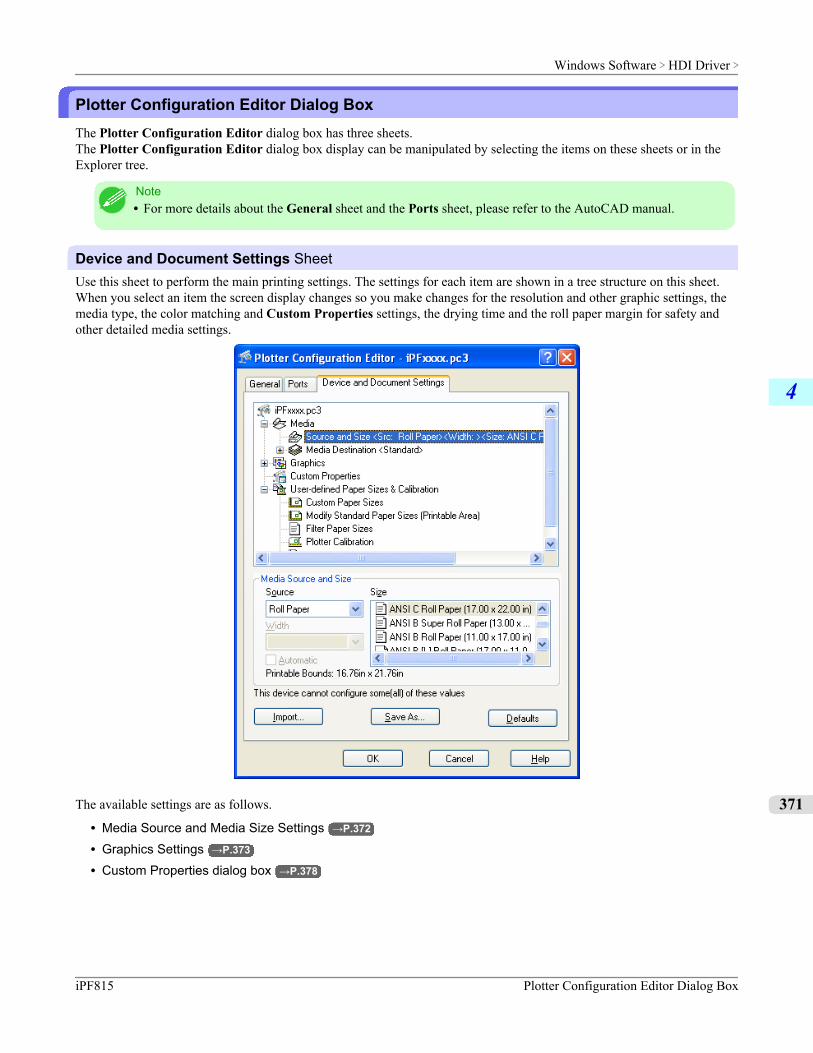
Plotter Configuration Editor Dialog BoxThe Plotter Configuration Editor dialog box has three sheets.The Plotter Configuration Editor dialog box display can be manipulated by selecting the items on these sheets or in theExplorer tree.
Note• For more details about the General sheet and the Ports sheet, please refer to the AutoCAD manual.
Device and Document Settings SheetUse this sheet to perform the main printing settings. The settings for each item are shown in a tree structure on this sheet.When you select an item the screen display changes so you make changes for the resolution and other graphic settings, themedia type, the color matching and Custom Properties settings, the drying time and the roll paper margin for safety andother detailed media settings.
The available settings are as follows.
• Media Source and Media Size Settings →P.372
• Graphics Settings →P.373
• Custom Properties dialog box →P.378
Windows Software > HDI Driver >
iPF815 Plotter Configuration Editor Dialog Box
4
371

Media Source and Media Size SettingsFollow this procedure to select the media source and the media size.
1. Press the Source and Size below Media.The Device and Document Settings sheet opens and switches to the display that presents the media source and sizesettings.
2. From the Source list, select the media source.
3. From the Size list, select the media size.
Note• When you change the Source setting, the Size setting returns automatically to its default settings. Ev-
ery time you adjust the Source setting, you should also re-adjust the Size setting.
4. Click the OK button.
Windows Software > HDI Driver >
Media Source and Media Size Settings iPF815
4
372
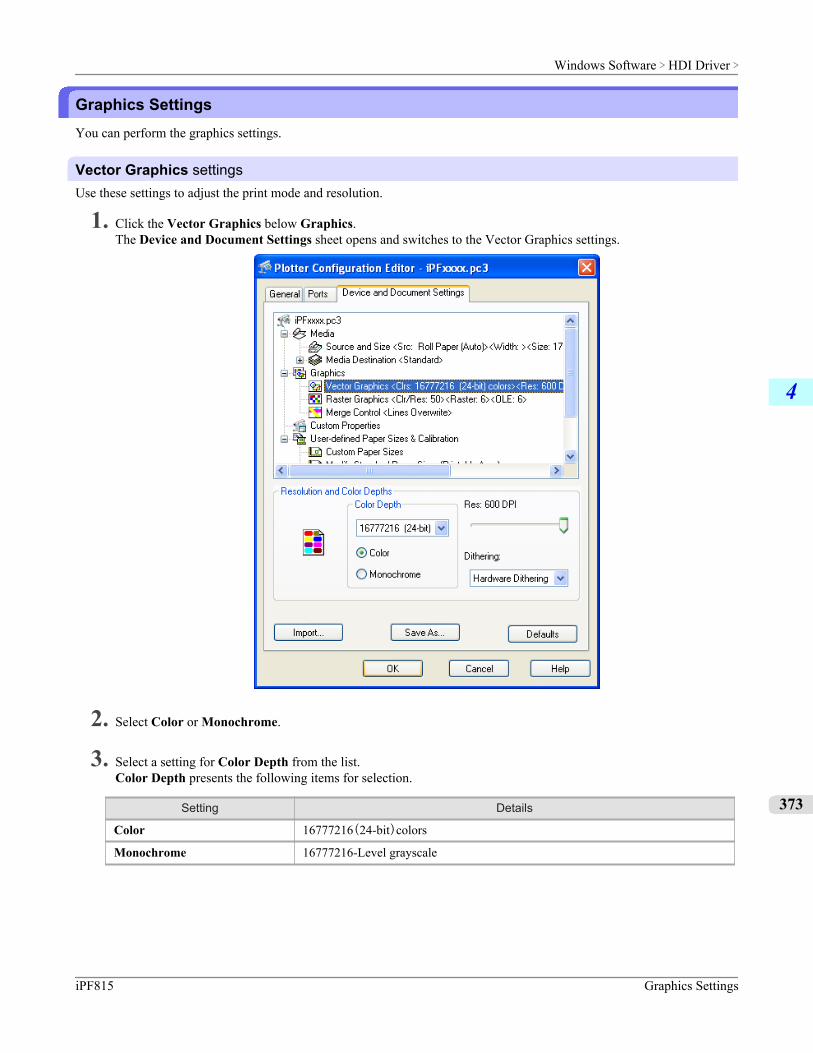
Graphics SettingsYou can perform the graphics settings.
Vector Graphics settingsUse these settings to adjust the print mode and resolution.
1. Click the Vector Graphics below Graphics.The Device and Document Settings sheet opens and switches to the Vector Graphics settings.
2. Select Color or Monochrome.
3. Select a setting for Color Depth from the list.Color Depth presents the following items for selection.
Setting Details
Color 16777216(24-bit)colors
Monochrome 16777216-Level grayscale
Windows Software > HDI Driver >
iPF815 Graphics Settings
4
373
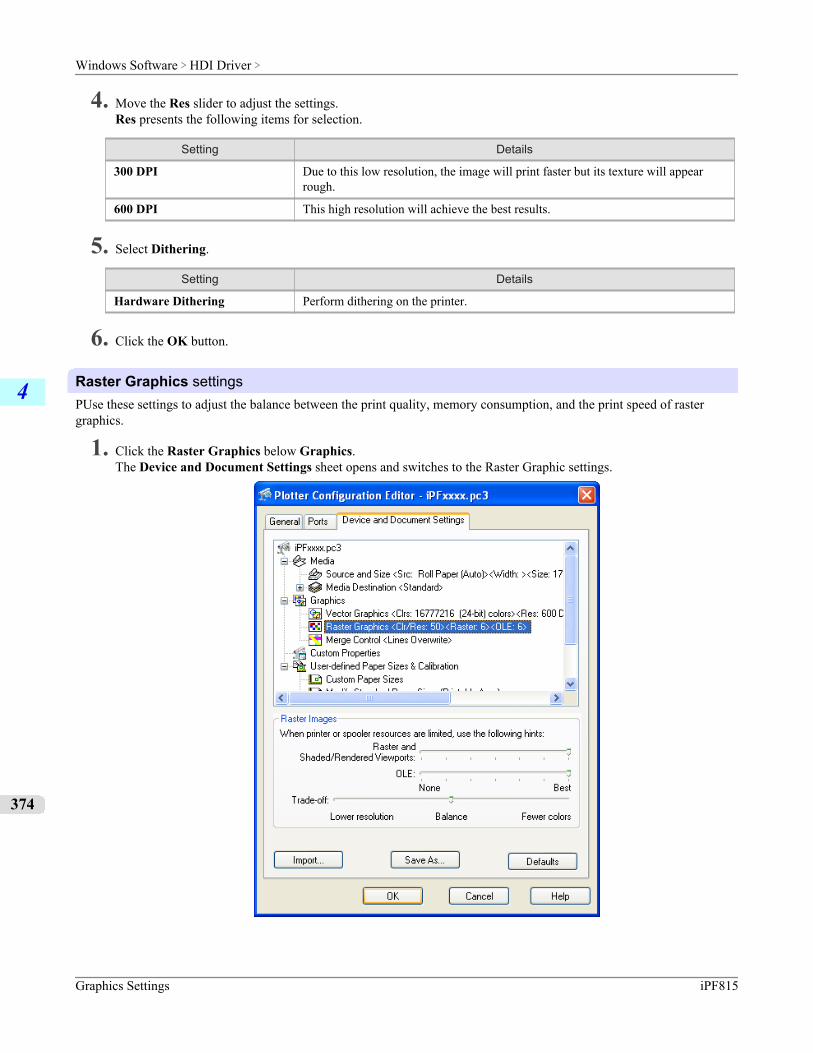
4. Move the Res slider to adjust the settings.Res presents the following items for selection.
Setting Details
300 DPI Due to this low resolution, the image will print faster but its texture will appearrough.
600 DPI This high resolution will achieve the best results.
5. Select Dithering.
Setting Details
Hardware Dithering Perform dithering on the printer.
6. Click the OK button.
Raster Graphics settingsPUse these settings to adjust the balance between the print quality, memory consumption, and the print speed of rastergraphics.
1. Click the Raster Graphics below Graphics.The Device and Document Settings sheet opens and switches to the Raster Graphic settings.
Windows Software > HDI Driver >
Graphics Settings iPF815
4
374
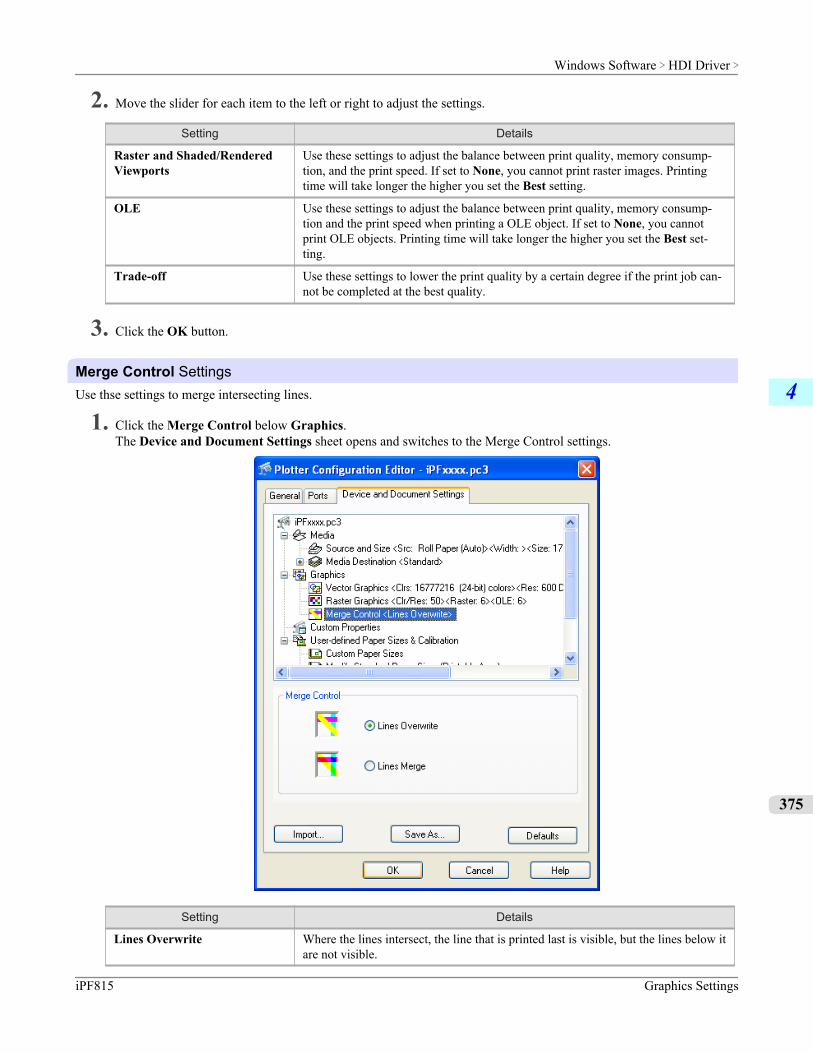
2. Move the slider for each item to the left or right to adjust the settings.
Setting Details
Raster and Shaded/RenderedViewports
Use these settings to adjust the balance between print quality, memory consump-tion, and the print speed. If set to None, you cannot print raster images. Printingtime will take longer the higher you set the Best setting.
OLE Use these settings to adjust the balance between print quality, memory consump-tion and the print speed when printing a OLE object. If set to None, you cannotprint OLE objects. Printing time will take longer the higher you set the Best set-ting.
Trade-off Use these settings to lower the print quality by a certain degree if the print job can-not be completed at the best quality.
3. Click the OK button.
Merge Control SettingsUse thse settings to merge intersecting lines.
1. Click the Merge Control below Graphics.The Device and Document Settings sheet opens and switches to the Merge Control settings.
Setting Details
Lines Overwrite Where the lines intersect, the line that is printed last is visible, but the lines below itare not visible.
Windows Software > HDI Driver >
iPF815 Graphics Settings
4
375
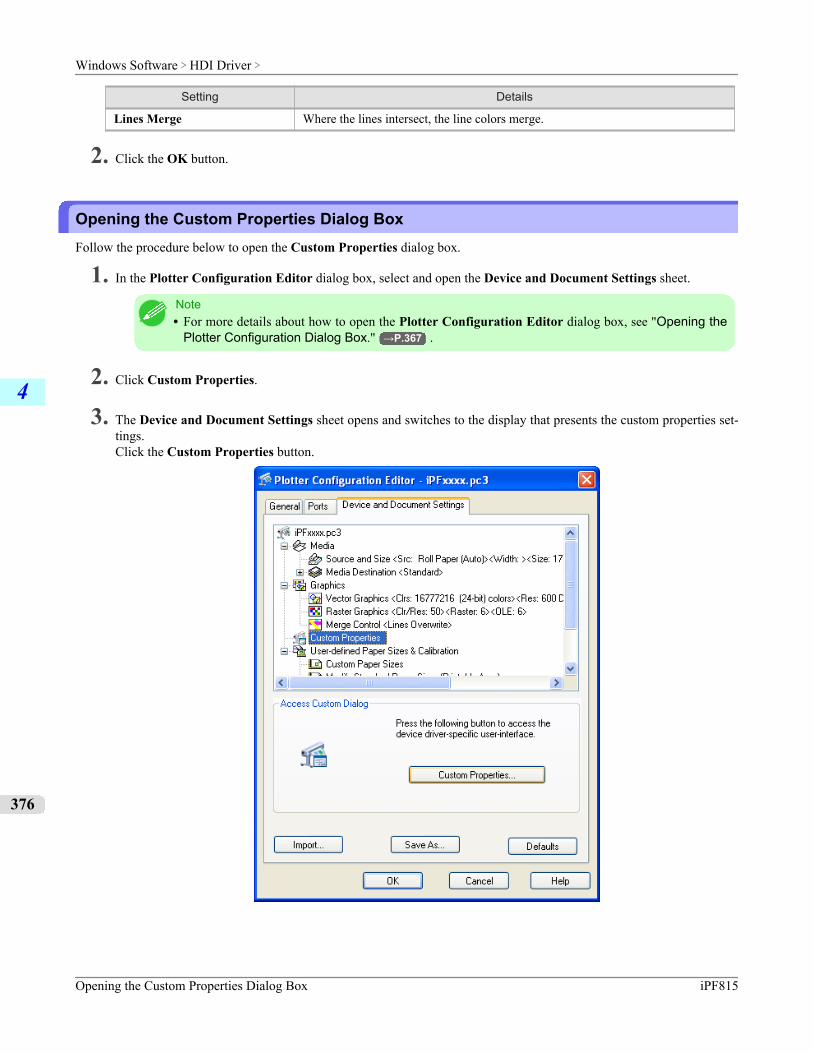
Setting Details
Lines Merge Where the lines intersect, the line colors merge.
2. Click the OK button.
Opening the Custom Properties Dialog BoxFollow the procedure below to open the Custom Properties dialog box.
1. In the Plotter Configuration Editor dialog box, select and open the Device and Document Settings sheet.
Note• For more details about how to open the Plotter Configuration Editor dialog box, see "Opening the
Plotter Configuration Dialog Box." →P.367 .
2. Click Custom Properties.
3. The Device and Document Settings sheet opens and switches to the display that presents the custom properties set-tings.Click the Custom Properties button.
Windows Software > HDI Driver >
Opening the Custom Properties Dialog Box iPF815
4
376
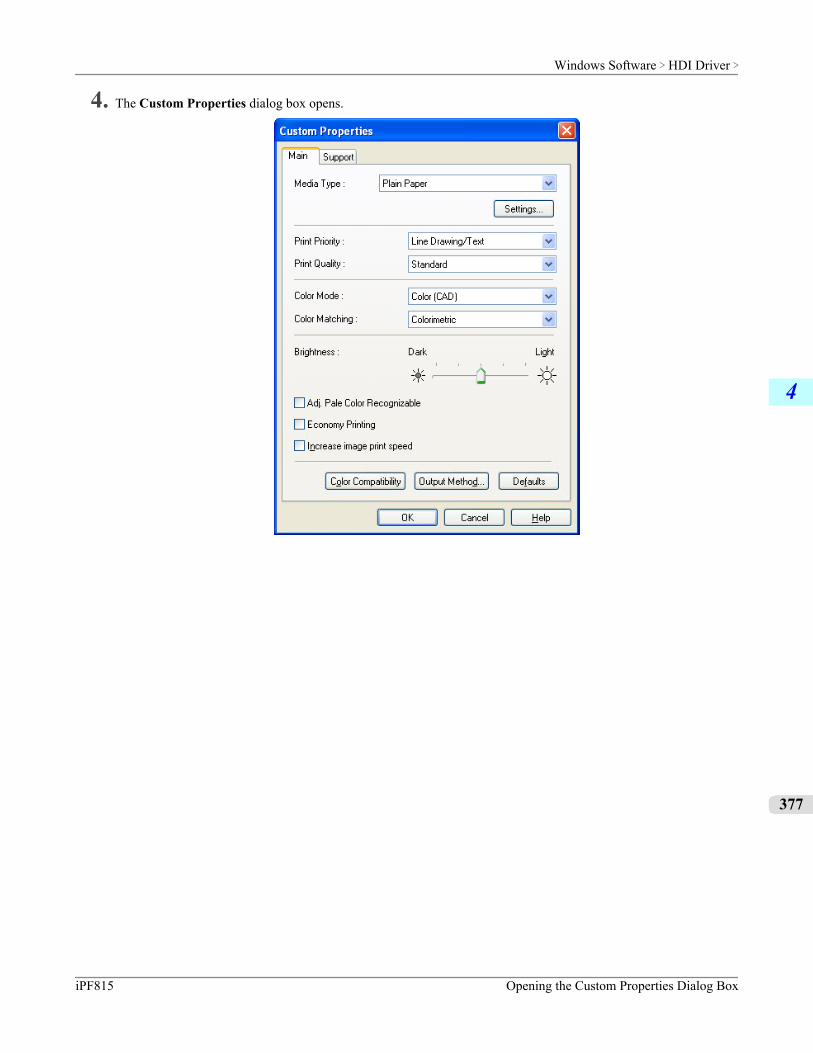
4. The Custom Properties dialog box opens.
Windows Software > HDI Driver >
iPF815 Opening the Custom Properties Dialog Box
4
377
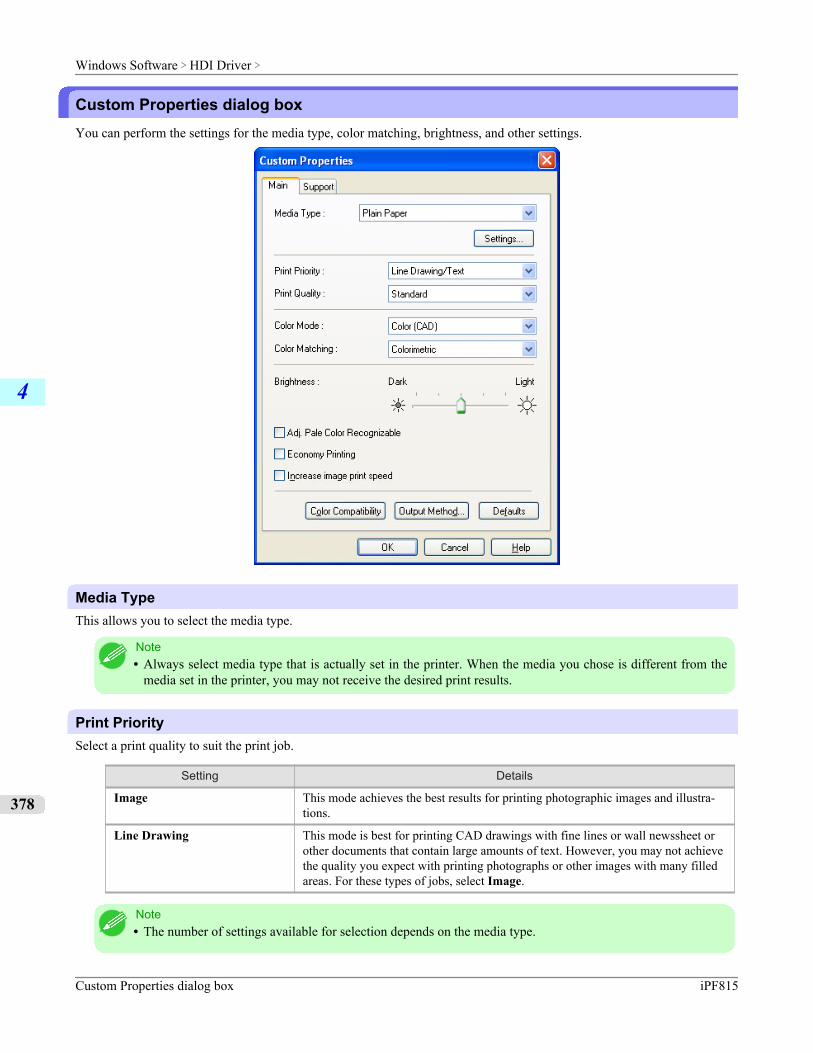
Custom Properties dialog boxYou can perform the settings for the media type, color matching, brightness, and other settings.
Media TypeThis allows you to select the media type.
Note• Always select media type that is actually set in the printer. When the media you chose is different from the
media set in the printer, you may not receive the desired print results.
Print PrioritySelect a print quality to suit the print job.
Setting Details
Image This mode achieves the best results for printing photographic images and illustra-tions.
Line Drawing This mode is best for printing CAD drawings with fine lines or wall newssheet orother documents that contain large amounts of text. However, you may not achievethe quality you expect with printing photographs or other images with many filledareas. For these types of jobs, select Image.
Note• The number of settings available for selection depends on the media type.
Windows Software > HDI Driver >
Custom Properties dialog box iPF815
4
378
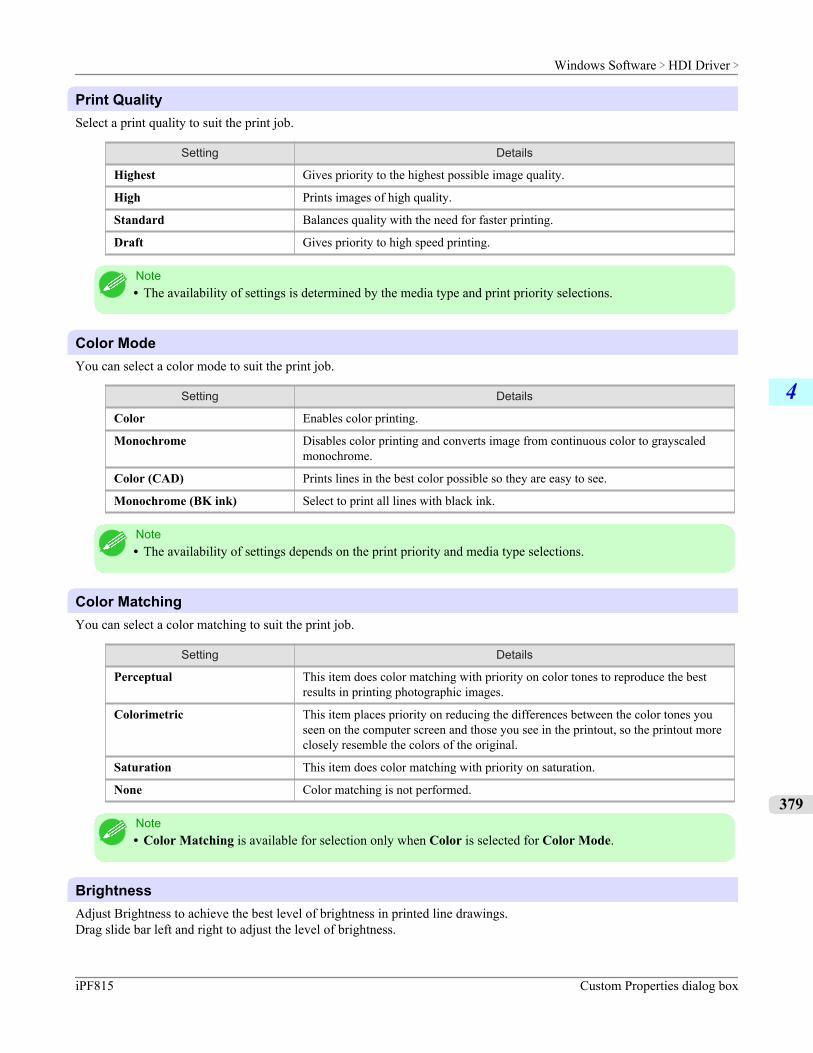
Print QualitySelect a print quality to suit the print job.
Setting Details
Highest Gives priority to the highest possible image quality.
High Prints images of high quality.
Standard Balances quality with the need for faster printing.
Draft Gives priority to high speed printing.
Note• The availability of settings is determined by the media type and print priority selections.
Color ModeYou can select a color mode to suit the print job.
Setting Details
Color Enables color printing.
Monochrome Disables color printing and converts image from continuous color to grayscaledmonochrome.
Color (CAD) Prints lines in the best color possible so they are easy to see.
Monochrome (BK ink) Select to print all lines with black ink.
Note• The availability of settings depends on the print priority and media type selections.
Color MatchingYou can select a color matching to suit the print job.
Setting Details
Perceptual This item does color matching with priority on color tones to reproduce the bestresults in printing photographic images.
Colorimetric This item places priority on reducing the differences between the color tones youseen on the computer screen and those you see in the printout, so the printout moreclosely resemble the colors of the original.
Saturation This item does color matching with priority on saturation.
None Color matching is not performed.
Note• Color Matching is available for selection only when Color is selected for Color Mode.
BrightnessAdjust Brightness to achieve the best level of brightness in printed line drawings.Drag slide bar left and right to adjust the level of brightness.
Windows Software > HDI Driver >
iPF815 Custom Properties dialog box
4
379
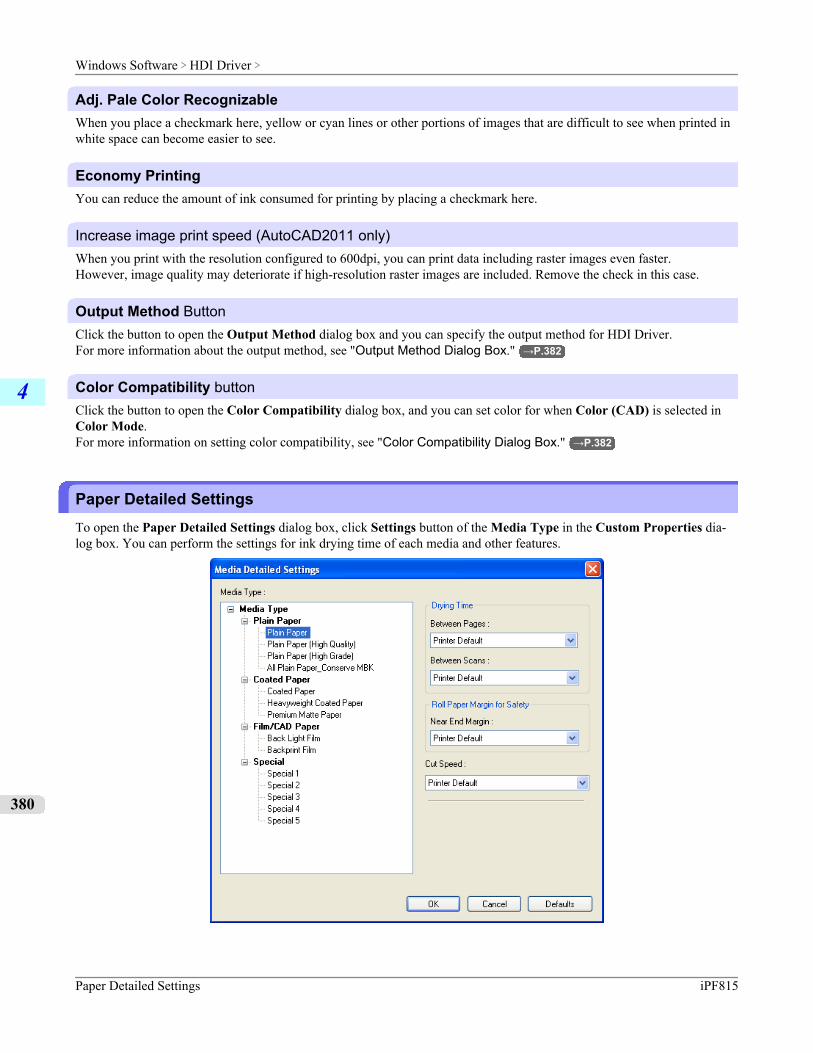
Adj. Pale Color RecognizableWhen you place a checkmark here, yellow or cyan lines or other portions of images that are difficult to see when printed inwhite space can become easier to see.
Economy PrintingYou can reduce the amount of ink consumed for printing by placing a checkmark here.
Increase image print speed (AutoCAD2011 only)When you print with the resolution configured to 600dpi, you can print data including raster images even faster.However, image quality may deteriorate if high-resolution raster images are included. Remove the check in this case.
Output Method ButtonClick the button to open the Output Method dialog box and you can specify the output method for HDI Driver.For more information about the output method, see "Output Method Dialog Box." →P.382
Color Compatibility buttonClick the button to open the Color Compatibility dialog box, and you can set color for when Color (CAD) is selected inColor Mode.For more information on setting color compatibility, see "Color Compatibility Dialog Box." →P.382
Paper Detailed SettingsTo open the Paper Detailed Settings dialog box, click Settings button of the Media Type in the Custom Properties dia-log box. You can perform the settings for ink drying time of each media and other features.
Windows Software > HDI Driver >
Paper Detailed Settings iPF815
4
380
Note• The settings in the Paper Detailed Settings dialog box are temporary; after the print job finishes the settings
of the printer operation panel are restored.
Drying TimeBetween PagesThis sets the wait time for the ink to dry between each completely printed sheet and the output of the sheet.
Setting Details
Printer Default The settings of the printer operating panel are applied.
None The paper is ejected immediately after printing.
30sec. / 1min. / 3min. / 5min. /10min. / 30min. / 60min.
The sheet is ejected when the specified time after printing has elapsed.
Between ScansThis sets the wait time between line scans during printing.
Setting Details
Printer Default The settings of the printer operating panel are applied.
None The printing continues to the next line immediately after the last line.
1sec. / 3sec. / 5sec. / 7sec. / 9sec. The printing continues to the next line after the set time.
*For the media type that has problems, such as ink smears on the page or colorsthat seem uneven during borderless printing etc., increase the value for this setting.
Roll Paper Margin for SafetyNear End MarginThis sets the length of the near end margin of the roll paper.
Setting Details
Printer Default The settings of the printer operating panel are applied.
3mm Print at a standard size.
*Select for Media Type that has no problem when printing with a standard sizemargin.
20mm This setting sets the margin about 17 mm (in the feed direction) longer than thestandard margin for the media size.
*This is for Media Type that has a strong tendency to curl, causing the printhead toscratch the surface.
Important• If you make the margin (white space) too small, this could disturb the print image or cause the printhead to
scour the surface of some types of media. If the printhead scours the surface of the media, adjust the height ofthe printhead.
Cut SpeedThis selects the auto cut speed.
Windows Software > HDI Driver >
iPF815 Paper Detailed Settings
4
381
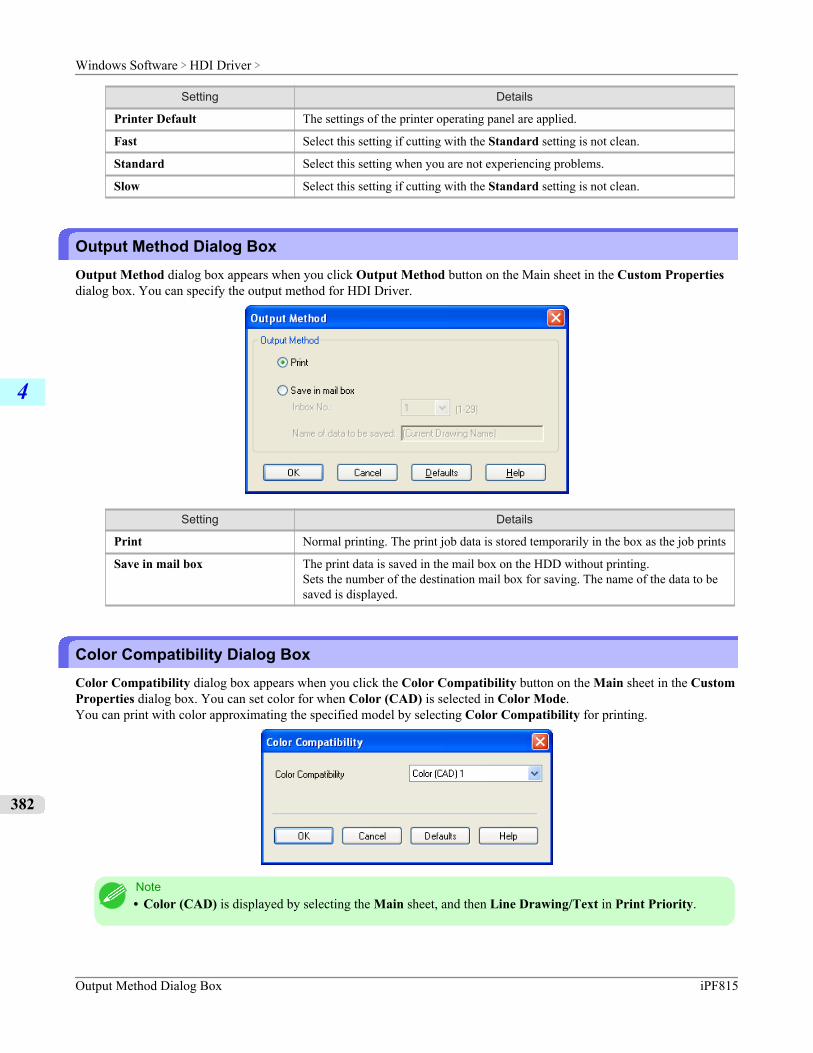
Setting Details
Printer Default The settings of the printer operating panel are applied.
Fast Select this setting if cutting with the Standard setting is not clean.
Standard Select this setting when you are not experiencing problems.
Slow Select this setting if cutting with the Standard setting is not clean.
Output Method Dialog BoxOutput Method dialog box appears when you click Output Method button on the Main sheet in the Custom Propertiesdialog box. You can specify the output method for HDI Driver.
Setting Details
Print Normal printing. The print job data is stored temporarily in the box as the job prints
Save in mail box The print data is saved in the mail box on the HDD without printing.Sets the number of the destination mail box for saving. The name of the data to besaved is displayed.
Color Compatibility Dialog BoxColor Compatibility dialog box appears when you click the Color Compatibility button on the Main sheet in the CustomProperties dialog box. You can set color for when Color (CAD) is selected in Color Mode.You can print with color approximating the specified model by selecting Color Compatibility for printing.
Note• Color (CAD) is displayed by selecting the Main sheet, and then Line Drawing/Text in Print Priority.
Windows Software > HDI Driver >
Output Method Dialog Box iPF815
4
382
Important• The color and quality of the specified model cannot be perfectly matched.
Color CompatibilityColor settings and compatible models are listed below.
Color settings Compatible models
Color (CAD) 1 Standard
Color (CAD) 2 Color (CAD) Light
Color (CAD) 3 Canon BJ-W3000/W3050 (BJ-W3000/W3050 are not sold domestically in Japan.)Color (CAD) 4 HP Designjet 500/800
Color (CAD) 5 HP Designjet 1000
Color (CAD) 6 HP Designjet 4000/4500
PrintingThis section describes how to execute a print job with the HDI driver.
Note• The description below uses printing with the AutoCAD 2007 as an example.
1. Start AutoCAD and open the image file.
Windows Software > HDI Driver >
iPF815 Printing
4
383

2. Select Plot from the File menu. The Plot dialog box opens.Check the Name setting under Printer/plotter and confirm that iPFxxxx.pc3 (the name of the printer you use) isdisplayed.Click the Properties button.
Note• If any other printer name is selected, select the name of the printer that you want to use from the
Name list.• The names of the printers installed when the HDI driver was installed are in the Name list.
Windows Software > HDI Driver >
Printing iPF815
4
384
3. The Plotter Configuration Editor dialog box opens. Perform the settings that you need for the print job.Click the OK button to close the Plotter Configuration Editor dialog box.
Note• For more details about how to perform the settings in the Plotter Configuration Editor dialog box,
see "Plotter Configuration Editor Dialog Box." →P.371
Windows Software > HDI Driver >
iPF815 Printing
4
385
4. The Plot dialog box opens.Perform the settings that you need on the Plot dialog box, then click the OK button.
Note• The content of the settings done in the Plotter Configuration Editor dialog box are reflected in the
Paper size settings on the Plot dialog box.• For more details about the Plot dialog box, please refer to the AutoCAD manual.
5. The print job begins.
Note• If the output exceeds the number of pixels prescribed for the media, in order to prevent AutoCAD
from hanging up during the print job a warning dialog box opens and asks if you want to lower theresolution or reduce the number of colors. If this occurs, click the OK button to cancel the print joband then lower the resolution or reduce the number of colors.
• Some media may not allow printing with certain resolution settings. If you have selected a resolutionsetting that cannot be used for printing, then a dialog box will open and prompt you to change theresolution. If this occurs, click the OK button to cancel the print job and then lower the resolution.
• A message from AutoCAD is displayed when printing starts. Press the OK button to execute the printjob. This message display can be disabled with the Options setting in the AutoCAD Tools menu. Formore details, please refer to the AutoCAD manual.
Windows Software > HDI Driver >
Printing iPF815
4
386
Status MonitorThe Features of imagePROGRAF Status Monitor .......................................................................................... 387Job Management Using imagePROGRAF Status Monitor .............................................................................. 388
The Features of imagePROGRAF Status MonitorimagePROGRAF Status Monitor is a utility for checking the printer status and managing print jobs.Two screens are available in imagePROGRAF Status Monitor : Printer List shows a list of printers, and Status Monitorshows details for each printer.
• You can view a list of the printers for which printer drivers have been installed on your computer, printers connected toyour computer, and printers found on the network.
Windows Software > Status Monitor >
iPF815 The Features of imagePROGRAF Status Monitor
4
387
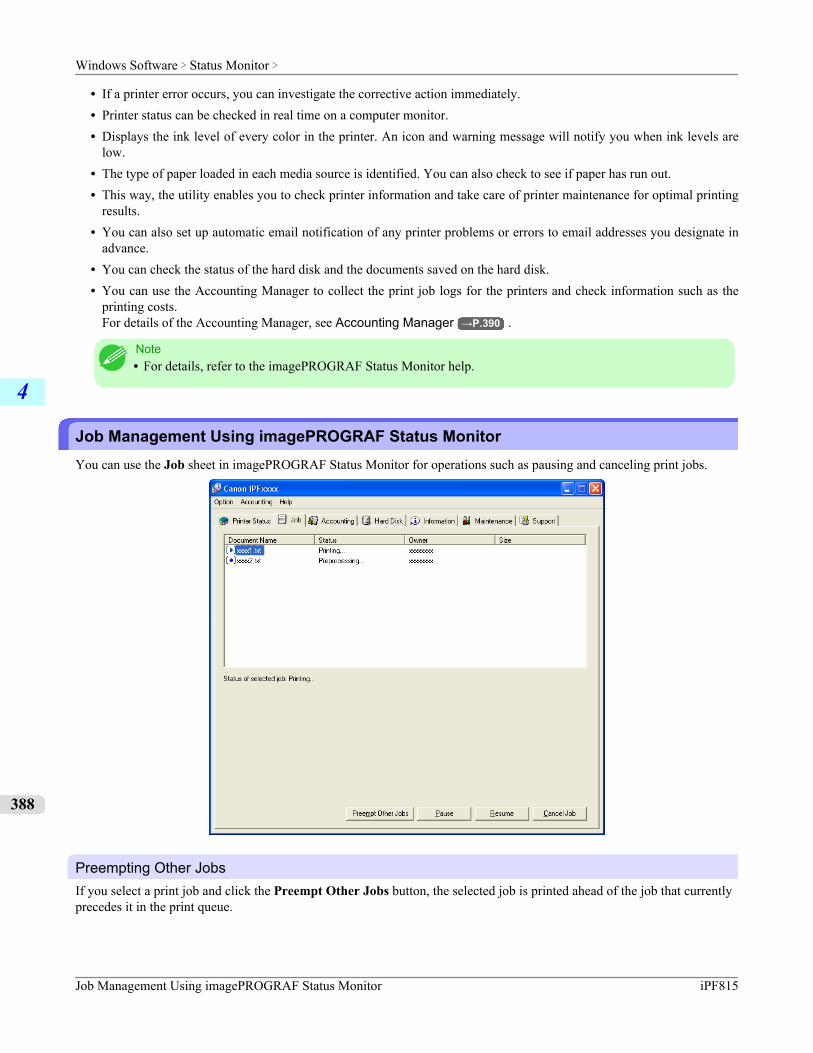
• If a printer error occurs, you can investigate the corrective action immediately.• Printer status can be checked in real time on a computer monitor.• Displays the ink level of every color in the printer. An icon and warning message will notify you when ink levels are
low.• The type of paper loaded in each media source is identified. You can also check to see if paper has run out.• This way, the utility enables you to check printer information and take care of printer maintenance for optimal printing
results.• You can also set up automatic email notification of any printer problems or errors to email addresses you designate in
advance.• You can check the status of the hard disk and the documents saved on the hard disk.• You can use the Accounting Manager to collect the print job logs for the printers and check information such as the
printing costs.For details of the Accounting Manager, see Accounting Manager →P.390 .
Note• For details, refer to the imagePROGRAF Status Monitor help.
Job Management Using imagePROGRAF Status MonitorYou can use the Job sheet in imagePROGRAF Status Monitor for operations such as pausing and canceling print jobs.
Preempting Other JobsIf you select a print job and click the Preempt Other Jobs button, the selected job is printed ahead of the job that currentlyprecedes it in the print queue.
Windows Software > Status Monitor >
Job Management Using imagePROGRAF Status Monitor iPF815
4
388
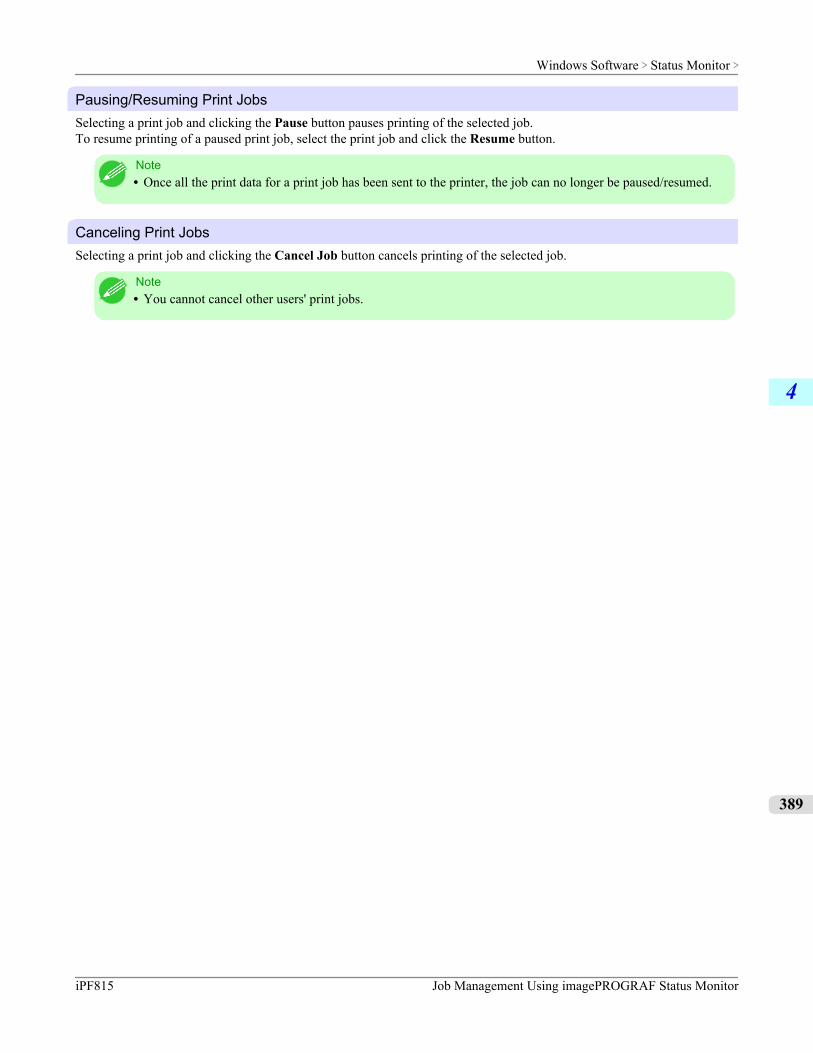
Pausing/Resuming Print JobsSelecting a print job and clicking the Pause button pauses printing of the selected job.To resume printing of a paused print job, select the print job and click the Resume button.
Note• Once all the print data for a print job has been sent to the printer, the job can no longer be paused/resumed.
Canceling Print JobsSelecting a print job and clicking the Cancel Job button cancels printing of the selected job.
Note• You cannot cancel other users' print jobs.
Windows Software > Status Monitor >
iPF815 Job Management Using imagePROGRAF Status Monitor
4
389
AccountingAccounting Manager ....................................................................................................................................... 390Launching the Accounting Manager ................................................................................................................ 391Accounting Manager Main Window ................................................................................................................. 391
Accounting Manager Basic Procedures .......................................................................................................... 394Configuring Unit Costs in Accounting Manager ............................................................................................... 394
Setting the Unit Cost for Ink ........................................................................................................................ 395Setting the Unit Cost for Paper ................................................................................................................... 396Setting the Unit Cost for Items Other Than Ink and Paper .......................................................................... 397
Configuring Units and Display Settings in Accounting Manager ..................................................................... 398
Automatically Acquiring Print Job Logs at Regular Intervals ........................................................................... 399Canceling Regular Print Job Log Acquisition .................................................................................................. 399Switching Between Displaying Jobs on Printer and Regularly Acquired Jobs ................................................ 399
Exporting Print Job Data as a CSV File .......................................................................................................... 400Showing Job Properties .................................................................................................................................. 400Showing, Saving and Loading Selected Unit Cost Data ................................................................................. 401Showing the Total Amount of Ink and Paper Consumed ................................................................................ 401
Accounting ManagerThe Accounting Manager stores the printer's print job logs so that you can use the information for checking printing costs,etc.The benefits of using the Accounting Manager are outlined below.
• Print Job Log CollectionThis allows you to check which documents were printed from each printer, who printed them and when.
• Calculation of the Total Pages Used and the Total CostThis allows you to use the collected print job logs to calculate totals for items such as the number of pages printed, theamount of paper used and the printing costs incurred.
• Regular Data Acquisition for Print JobsThis automatically logs print jobs at regular intervals.
• Exporting Print Job DataThis allows you to export collected print job data as a CSV file.
Important• The Accounting Manager in Status Monitor displays approximate estimates of the amount of paper con-
sumed and the ink consumed per job. Canon cannot guarantee the accuracy of these estimates. These esti-mates will also vary depending on the conditions of printer use.
• Print job log collection is not performed when Set./Adj. Menu-> Printer Info-> Show Job Log of the con-trol panel is Off. However,
• even if Show Job Log is set to Off, regularly acquired jobs that already have been retrieved at that time aredisplayed.
• When Show Job Log has been set to On again, all jobs within the printer at that time are displayed.
Windows Software > Accounting >
Accounting Manager iPF815
4
390
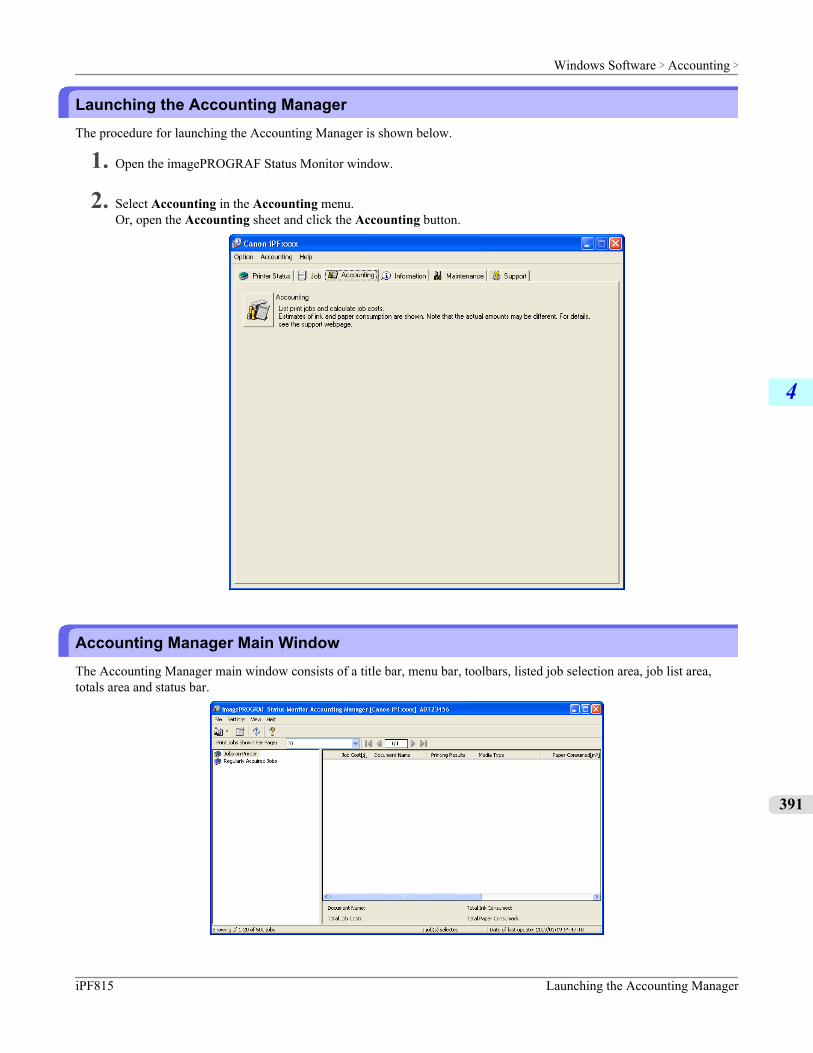
Launching the Accounting ManagerThe procedure for launching the Accounting Manager is shown below.
1. Open the imagePROGRAF Status Monitor window.
2. Select Accounting in the Accounting menu.Or, open the Accounting sheet and click the Accounting button.
Accounting Manager Main WindowThe Accounting Manager main window consists of a title bar, menu bar, toolbars, listed job selection area, job list area,totals area and status bar.
Windows Software > Accounting >
iPF815 Launching the Accounting Manager
4
391
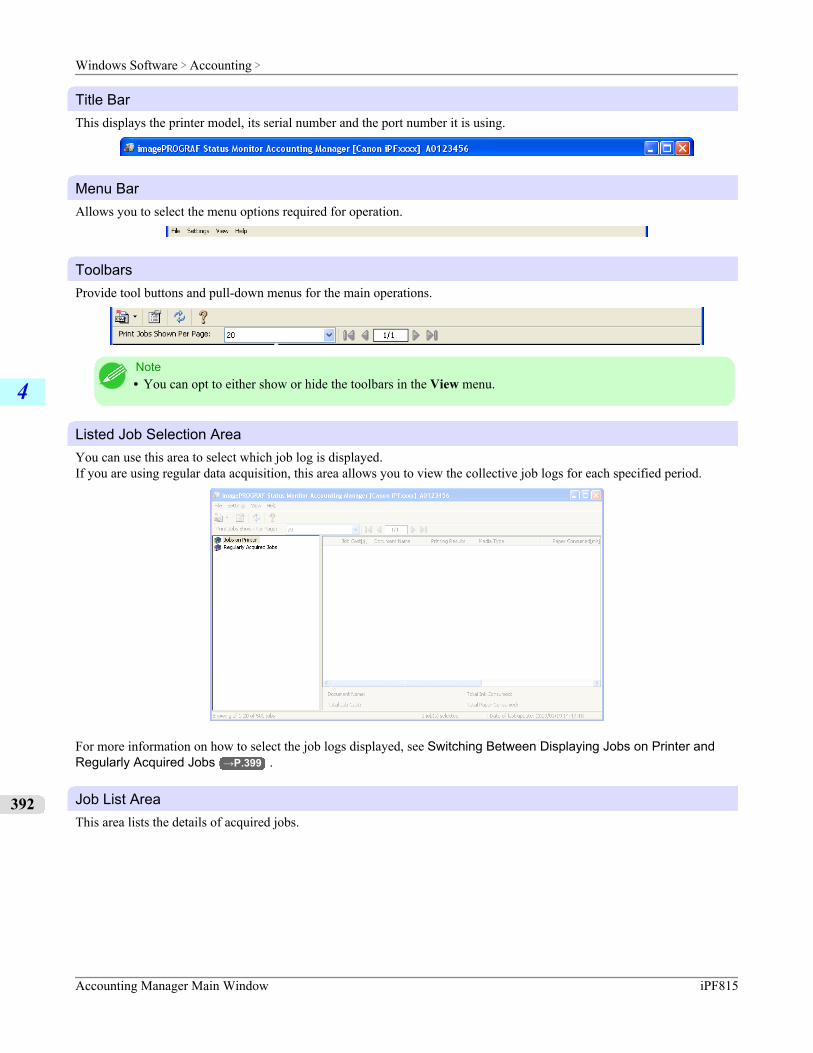
Title BarThis displays the printer model, its serial number and the port number it is using.
Menu BarAllows you to select the menu options required for operation.
ToolbarsProvide tool buttons and pull-down menus for the main operations.
Note• You can opt to either show or hide the toolbars in the View menu.
Listed Job Selection AreaYou can use this area to select which job log is displayed.If you are using regular data acquisition, this area allows you to view the collective job logs for each specified period.
For more information on how to select the job logs displayed, see Switching Between Displaying Jobs on Printer andRegularly Acquired Jobs →P.399 .
Job List AreaThis area lists the details of acquired jobs.
Windows Software > Accounting >
Accounting Manager Main Window iPF815
4
392
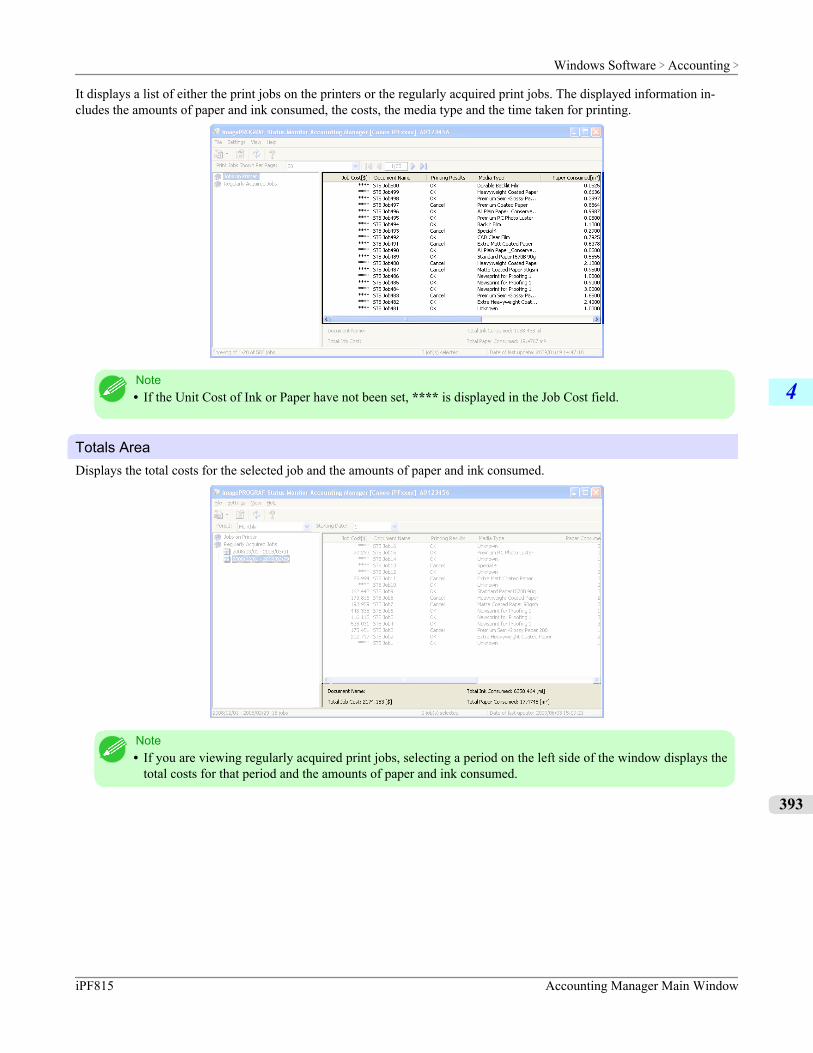
It displays a list of either the print jobs on the printers or the regularly acquired print jobs. The displayed information in-cludes the amounts of paper and ink consumed, the costs, the media type and the time taken for printing.
Note• If the Unit Cost of Ink or Paper have not been set, **** is displayed in the Job Cost field.
Totals AreaDisplays the total costs for the selected job and the amounts of paper and ink consumed.
Note• If you are viewing regularly acquired print jobs, selecting a period on the left side of the window displays the
total costs for that period and the amounts of paper and ink consumed.
Windows Software > Accounting >
iPF815 Accounting Manager Main Window
4
393
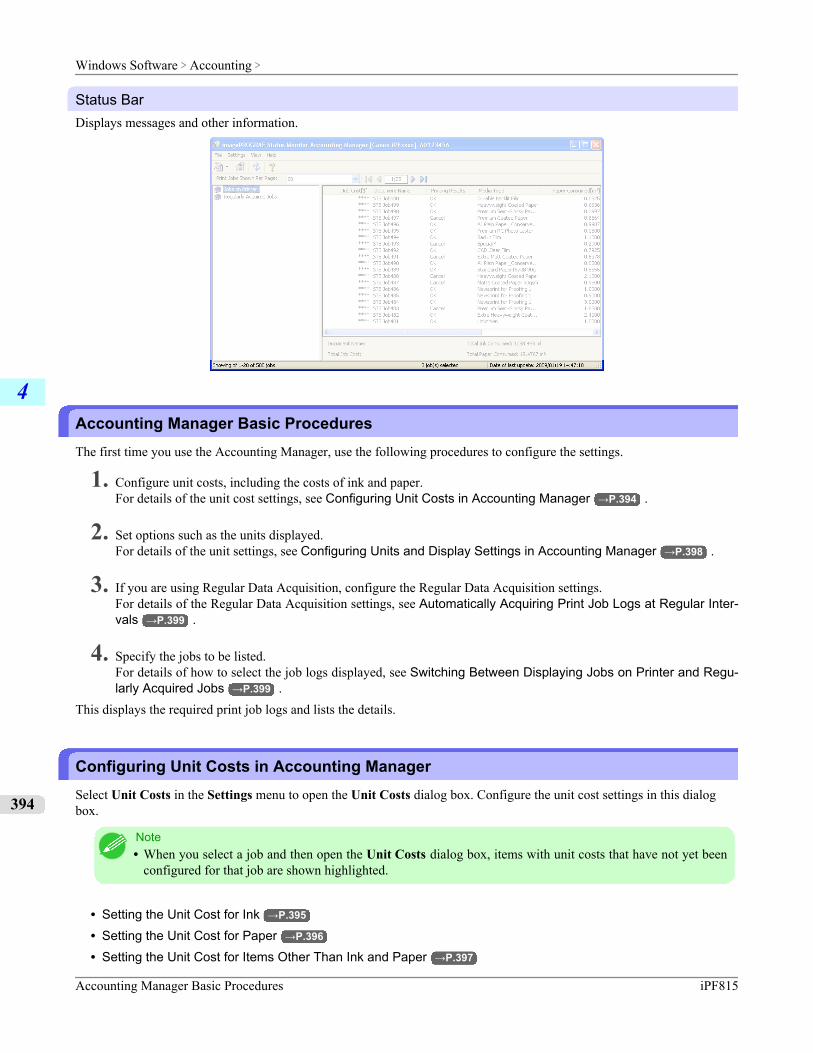
Status BarDisplays messages and other information.
Accounting Manager Basic ProceduresThe first time you use the Accounting Manager, use the following procedures to configure the settings.
1. Configure unit costs, including the costs of ink and paper.For details of the unit cost settings, see Configuring Unit Costs in Accounting Manager →P.394 .
2. Set options such as the units displayed.For details of the unit settings, see Configuring Units and Display Settings in Accounting Manager →P.398 .
3. If you are using Regular Data Acquisition, configure the Regular Data Acquisition settings.For details of the Regular Data Acquisition settings, see Automatically Acquiring Print Job Logs at Regular Inter-vals →P.399 .
4. Specify the jobs to be listed.For details of how to select the job logs displayed, see Switching Between Displaying Jobs on Printer and Regu-larly Acquired Jobs →P.399 .
This displays the required print job logs and lists the details.
Configuring Unit Costs in Accounting ManagerSelect Unit Costs in the Settings menu to open the Unit Costs dialog box. Configure the unit cost settings in this dialogbox.
Note• When you select a job and then open the Unit Costs dialog box, items with unit costs that have not yet been
configured for that job are shown highlighted.
• Setting the Unit Cost for Ink →P.395
• Setting the Unit Cost for Paper →P.396
• Setting the Unit Cost for Items Other Than Ink and Paper →P.397
Windows Software > Accounting >
Accounting Manager Basic Procedures iPF815
4
394
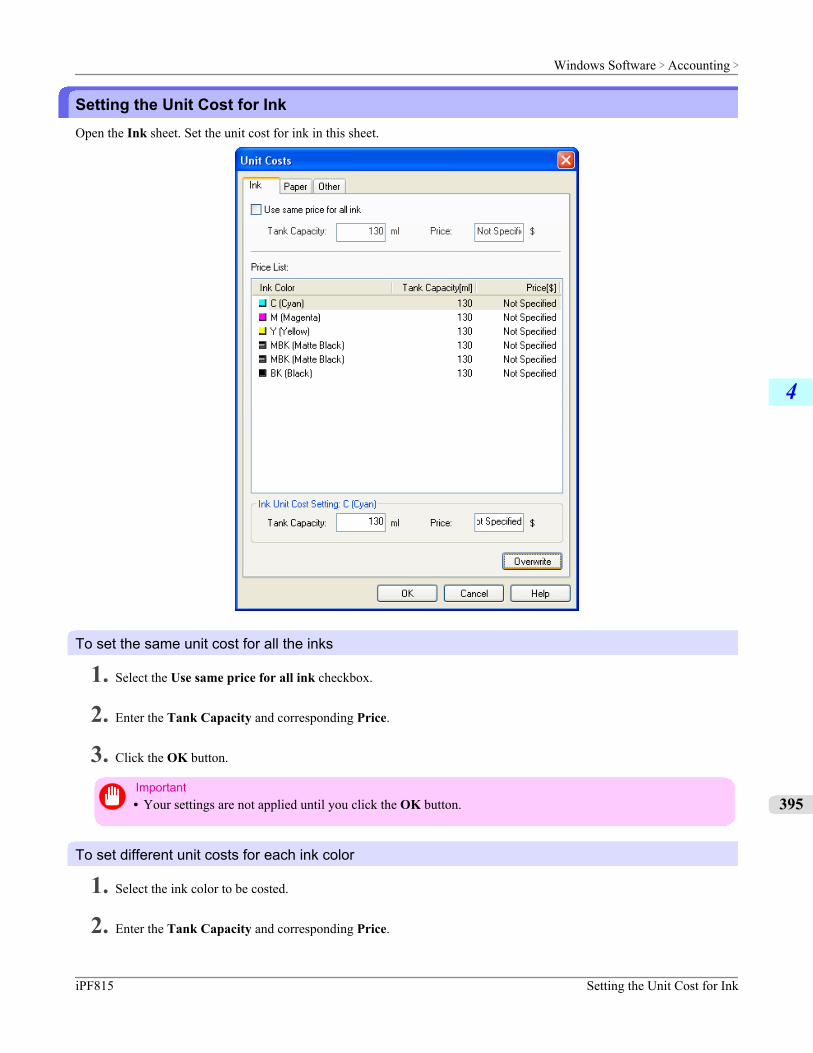
Setting the Unit Cost for InkOpen the Ink sheet. Set the unit cost for ink in this sheet.
To set the same unit cost for all the inks
1. Select the Use same price for all ink checkbox.
2. Enter the Tank Capacity and corresponding Price.
3. Click the OK button.
Important• Your settings are not applied until you click the OK button.
To set different unit costs for each ink color
1. Select the ink color to be costed.
2. Enter the Tank Capacity and corresponding Price.
Windows Software > Accounting >
iPF815 Setting the Unit Cost for Ink
4
395
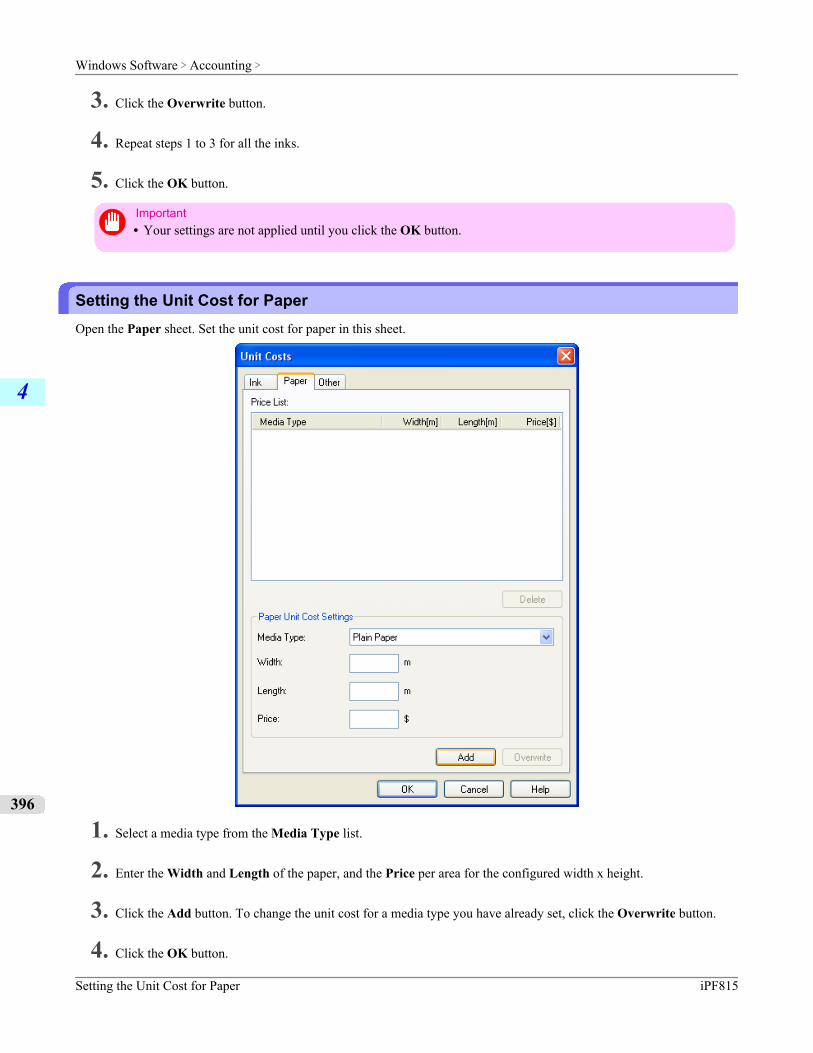
3. Click the Overwrite button.
4. Repeat steps 1 to 3 for all the inks.
5. Click the OK button.
Important• Your settings are not applied until you click the OK button.
Setting the Unit Cost for PaperOpen the Paper sheet. Set the unit cost for paper in this sheet.
1. Select a media type from the Media Type list.
2. Enter the Width and Length of the paper, and the Price per area for the configured width x height.
3. Click the Add button. To change the unit cost for a media type you have already set, click the Overwrite button.
4. Click the OK button.
Windows Software > Accounting >
Setting the Unit Cost for Paper iPF815
4
396
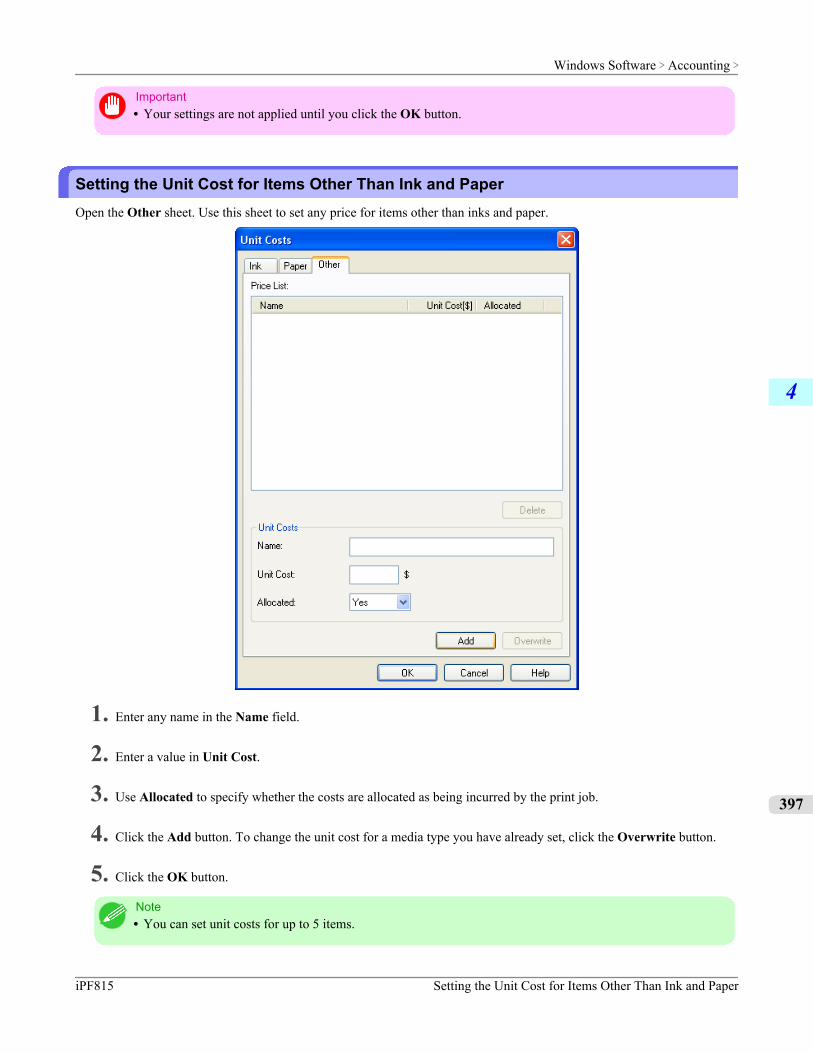
Important• Your settings are not applied until you click the OK button.
Setting the Unit Cost for Items Other Than Ink and PaperOpen the Other sheet. Use this sheet to set any price for items other than inks and paper.
1. Enter any name in the Name field.
2. Enter a value in Unit Cost.
3. Use Allocated to specify whether the costs are allocated as being incurred by the print job.
4. Click the Add button. To change the unit cost for a media type you have already set, click the Overwrite button.
5. Click the OK button.
Note• You can set unit costs for up to 5 items.
Windows Software > Accounting >
iPF815 Setting the Unit Cost for Items Other Than Ink and Paper
4
397
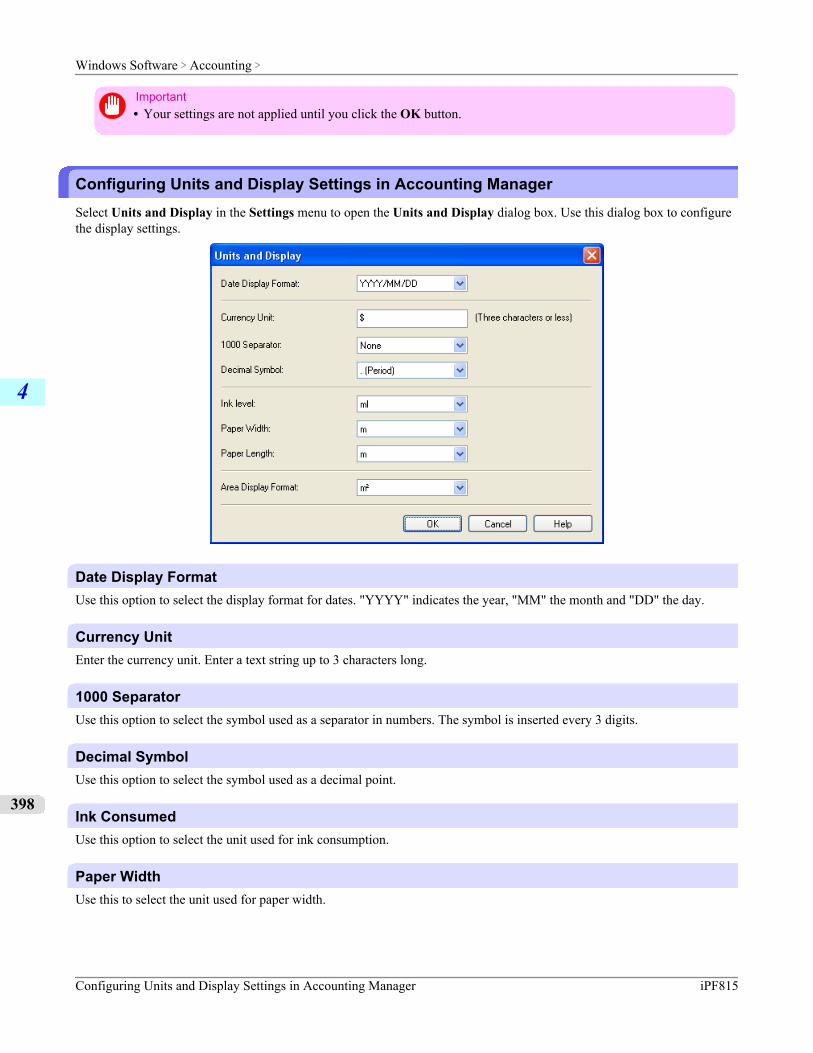
Important• Your settings are not applied until you click the OK button.
Configuring Units and Display Settings in Accounting ManagerSelect Units and Display in the Settings menu to open the Units and Display dialog box. Use this dialog box to configurethe display settings.
Date Display FormatUse this option to select the display format for dates. "YYYY" indicates the year, "MM" the month and "DD" the day.
Currency UnitEnter the currency unit. Enter a text string up to 3 characters long.
1000 SeparatorUse this option to select the symbol used as a separator in numbers. The symbol is inserted every 3 digits.
Decimal SymbolUse this option to select the symbol used as a decimal point.
Ink ConsumedUse this option to select the unit used for ink consumption.
Paper WidthUse this to select the unit used for paper width.
Windows Software > Accounting >
Configuring Units and Display Settings in Accounting Manager iPF815
4
398
Paper LengthUse this to select the unit used for paper length.
Area Display FormatUse this to select the unit used for paper area.
Automatically Acquiring Print Job Logs at Regular IntervalsThis feature collects print job logs from the printer at regular intervals and saves the logs on your computer.
1. Select Regular Data Acquisition in the Settings menu.
2. Select Acquire print job logs regularly.
3. Click the OK button to close the dialog box.
Note• Immediately after you configure Regular Data Acquisition, no print jobs are displayed. Wait a few moments
and then select Refresh in the View menu to display the print jobs.• A maximum of 10,000 records are saved in a print job log. If this number is exceeded, jobs are deleted from
the log starting from the oldest record. To save old data, it is recommended that you export the data as a CSVfile.For details of how to export print job logs as CSV files, see Exporting Print Job Data as a CSVFile →P.400 .
Important• Print job log collection is not performed when Set./Adj. Menu-> Printer Info-> Show Job Log of the con-
trol panel is Off. However, even if Show Job Log is set to Off, regularly acquired jobs that already havebeen retrieved at that time are displayed.
Canceling Regular Print Job Log AcquisitionYou can use this procedure to cancel the regular acquisition of print job logs from printers.
1. Select Regular Data Acquisition in the Settings menu.
2. Uncheck the Acquire print job logs regularly option.
3. Click the OK button to close the dialog box.
Switching Between Displaying Jobs on Printer and Regularly Acquired JobsThe print job logs displayed by the Status Monitor Accounting Manager contain two types of job: Jobs on Printer and Regu-larly Acquired Jobs.You can select whether to display Jobs on Printer or Regularly Acquired Jobs in the Listed Job Selection Area on the leftside of the window.
Windows Software > Accounting >
iPF815 Automatically Acquiring Print Job Logs at Regular Intervals
4
399
Jobs on PrinterThis shows a list of the print jobs currently held on printers.You can change the number of jobs displayed per page using the Print Jobs Shown Per Page setting in the View menu orthe toolbar.You can skip to a particular page using the Go to option in the View menu or the toolbar.
Note• For printers with built-in hard disks, you can view up to 500 print jobs per printer.• For printers without built-in hard disks, you can view up to 32 print jobs per printer. However, only 10 jobs
can be displayed if the printer is switched off.
Regularly Acquired JobsThis shows a list of regularly acquired print jobs.To view all the jobs in a set period, specify the period using Period and then Starting Date (or Starting Day of Week orStarting Month) in the View menu or the toolbar.For example, to view monthly job logs starting on the 1st of each month, set Period to Monthly and set Starting Date to 1.
Note• Up to 10,000 regularly acquired jobs are displayed for each printer.
Exporting Print Job Data as a CSV FileYou can export the collected print job data in the form of a CSV file by selecting Export Job Cost Data in the File menu.
Note• You can also select Export Job Cost Data using the icon in the toolbar.
Selected JobsExports the data for the selected print jobs in the job list as a CSV file.
Note• You can select multiple jobs by holding down the Shift key or Ctrl key as you click the job names.
Listed JobsExports the data for the print jobs currently displayed in the list as a CSV file.
Showing Job PropertiesIf you select a job in the job list and then select Show Job Properties in the File menu, the Job Properties dialog boxappears, allowing you to check information such as detailed cost data.You can copy text-based information in this dialog box to the clipboard by clicking the Copy button.
Windows Software > Accounting >
Exporting Print Job Data as a CSV File iPF815
4
400

Note• You can also open this dialog box by right-clicking the selected job and selecting Show Job Properties. Or
you can also use the toolbar icon to open the dialog box.• If you select multiple jobs and open the Job Properties dialog box, the total costs for the selected jobs are
displayed.
Showing, Saving and Loading Selected Unit Cost Data
Show Unit Cost DataSelect Show Unit Cost Data in the File menu to open the Unit Cost Data dialog box. This lists the unit costs for itemssuch as the selected ink and paper.You can copy text-based information in this dialog box to the clipboard by clicking the Copy button.
Save Unit Cost DataSelect a destination folder using Save Unit Cost Data in the File menu. The unit cost data for items such as the selected inkand paper is saved as a file.
Load Unit Cost DataSelecting Load Unit Cost Data in the File menu loads saved unit cost data.
Showing the Total Amount of Ink and Paper ConsumedSelect Show Ink and Paper Consumed in the File menu to open the Show Ink and Paper Consumed dialog box.This lists the total amounts of ink and paper consumed by the printer so far.You can copy text-based information in this dialog box to the clipboard by clicking the Copy button.
Note• Up to 7 types of media are listed in order of the amount consumed. The total consumption for other media
types is shown as Other.
Windows Software > Accounting >
iPF815 Showing, Saving and Loading Selected Unit Cost Data
4
401
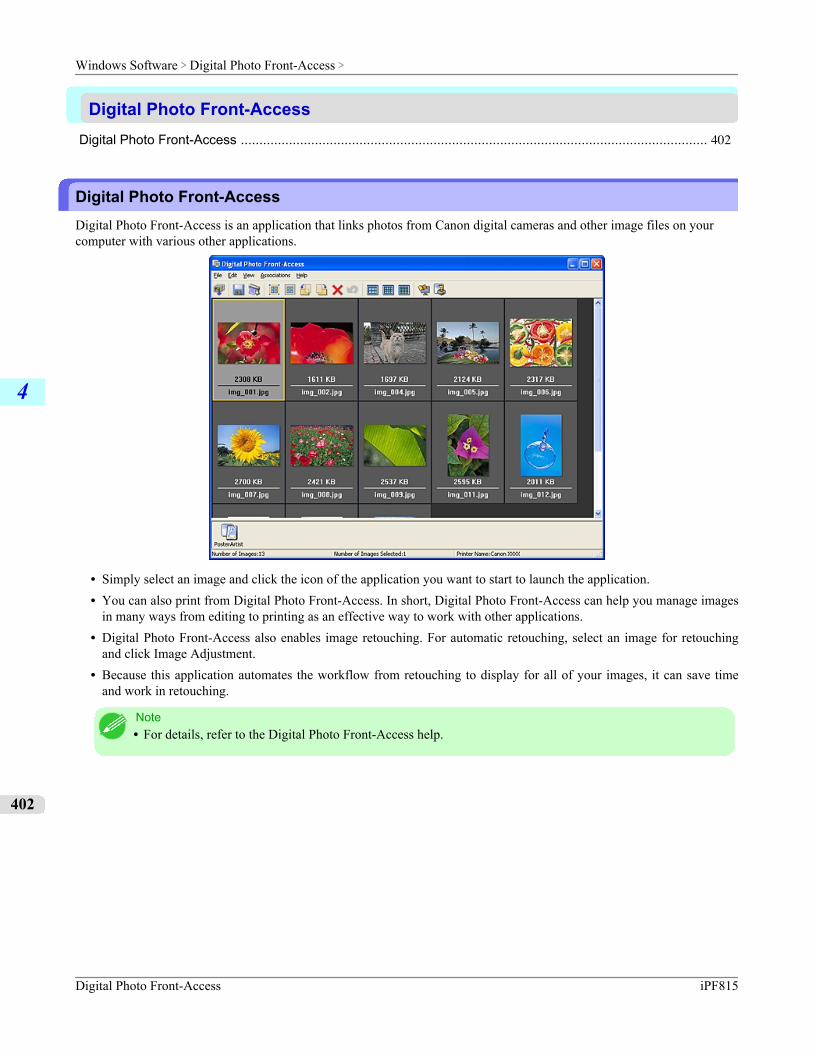
Digital Photo Front-AccessDigital Photo Front-Access .............................................................................................................................. 402
Digital Photo Front-AccessDigital Photo Front-Access is an application that links photos from Canon digital cameras and other image files on yourcomputer with various other applications.
• Simply select an image and click the icon of the application you want to start to launch the application.• You can also print from Digital Photo Front-Access. In short, Digital Photo Front-Access can help you manage images
in many ways from editing to printing as an effective way to work with other applications.• Digital Photo Front-Access also enables image retouching. For automatic retouching, select an image for retouching
and click Image Adjustment.• Because this application automates the workflow from retouching to display for all of your images, it can save time
and work in retouching.
Note• For details, refer to the Digital Photo Front-Access help.
Windows Software > Digital Photo Front-Access >
Digital Photo Front-Access iPF815
4
402
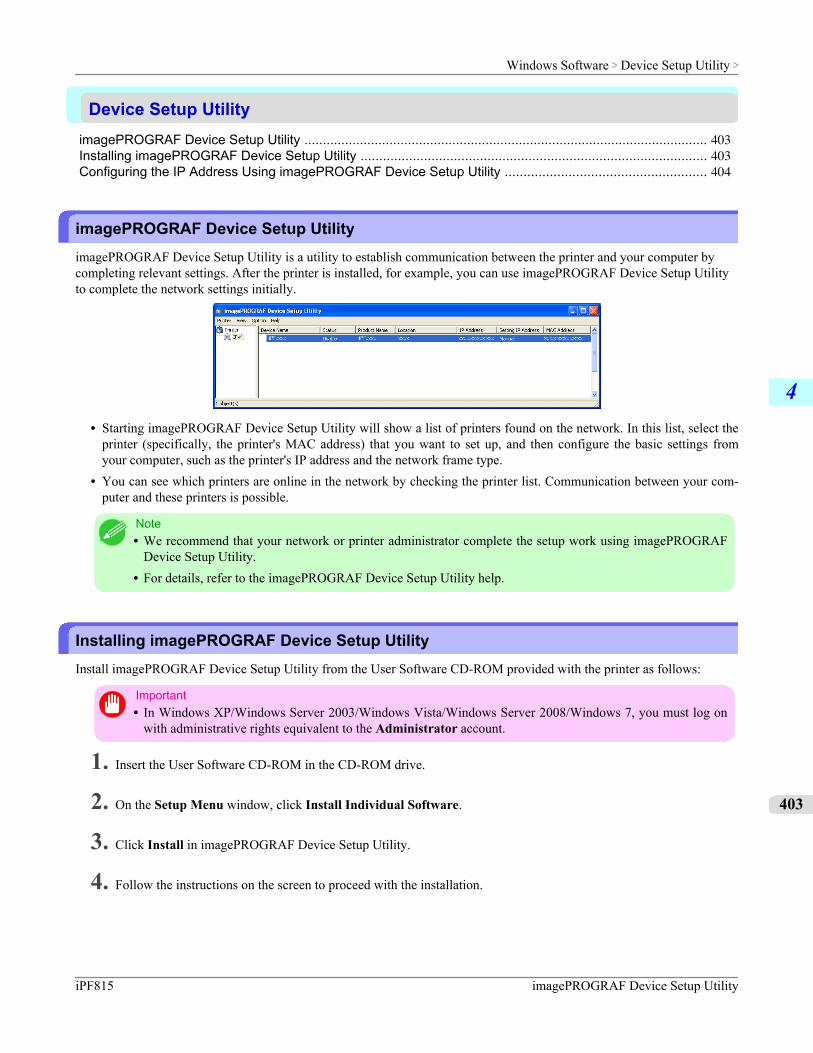
Device Setup UtilityimagePROGRAF Device Setup Utility ............................................................................................................. 403Installing imagePROGRAF Device Setup Utility ............................................................................................. 403Configuring the IP Address Using imagePROGRAF Device Setup Utility ...................................................... 404
imagePROGRAF Device Setup UtilityimagePROGRAF Device Setup Utility is a utility to establish communication between the printer and your computer bycompleting relevant settings. After the printer is installed, for example, you can use imagePROGRAF Device Setup Utilityto complete the network settings initially.
• Starting imagePROGRAF Device Setup Utility will show a list of printers found on the network. In this list, select theprinter (specifically, the printer's MAC address) that you want to set up, and then configure the basic settings fromyour computer, such as the printer's IP address and the network frame type.
• You can see which printers are online in the network by checking the printer list. Communication between your com-puter and these printers is possible.
Note• We recommend that your network or printer administrator complete the setup work using imagePROGRAF
Device Setup Utility.• For details, refer to the imagePROGRAF Device Setup Utility help.
Installing imagePROGRAF Device Setup UtilityInstall imagePROGRAF Device Setup Utility from the User Software CD-ROM provided with the printer as follows:
Important• In Windows XP/Windows Server 2003/Windows Vista/Windows Server 2008/Windows 7, you must log on
with administrative rights equivalent to the Administrator account.
1. Insert the User Software CD-ROM in the CD-ROM drive.
2. On the Setup Menu window, click Install Individual Software.
3. Click Install in imagePROGRAF Device Setup Utility.
4. Follow the instructions on the screen to proceed with the installation.
Windows Software > Device Setup Utility >
iPF815 imagePROGRAF Device Setup Utility
4
403
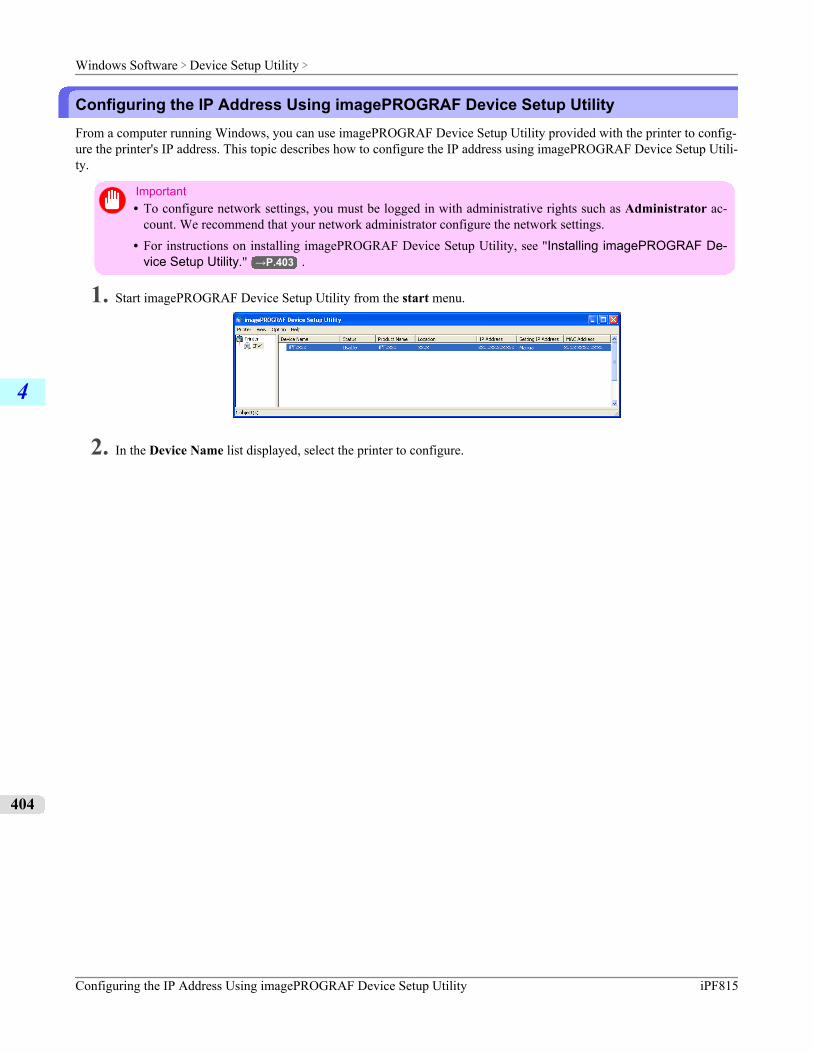
Configuring the IP Address Using imagePROGRAF Device Setup UtilityFrom a computer running Windows, you can use imagePROGRAF Device Setup Utility provided with the printer to config-ure the printer's IP address. This topic describes how to configure the IP address using imagePROGRAF Device Setup Utili-ty.
Important• To configure network settings, you must be logged in with administrative rights such as Administrator ac-
count. We recommend that your network administrator configure the network settings.• For instructions on installing imagePROGRAF Device Setup Utility, see "Installing imagePROGRAF De-
vice Setup Utility." →P.403 .
1. Start imagePROGRAF Device Setup Utility from the start menu.
2. In the Device Name list displayed, select the printer to configure.
Windows Software > Device Setup Utility >
Configuring the IP Address Using imagePROGRAF Device Setup Utility iPF815
4
404
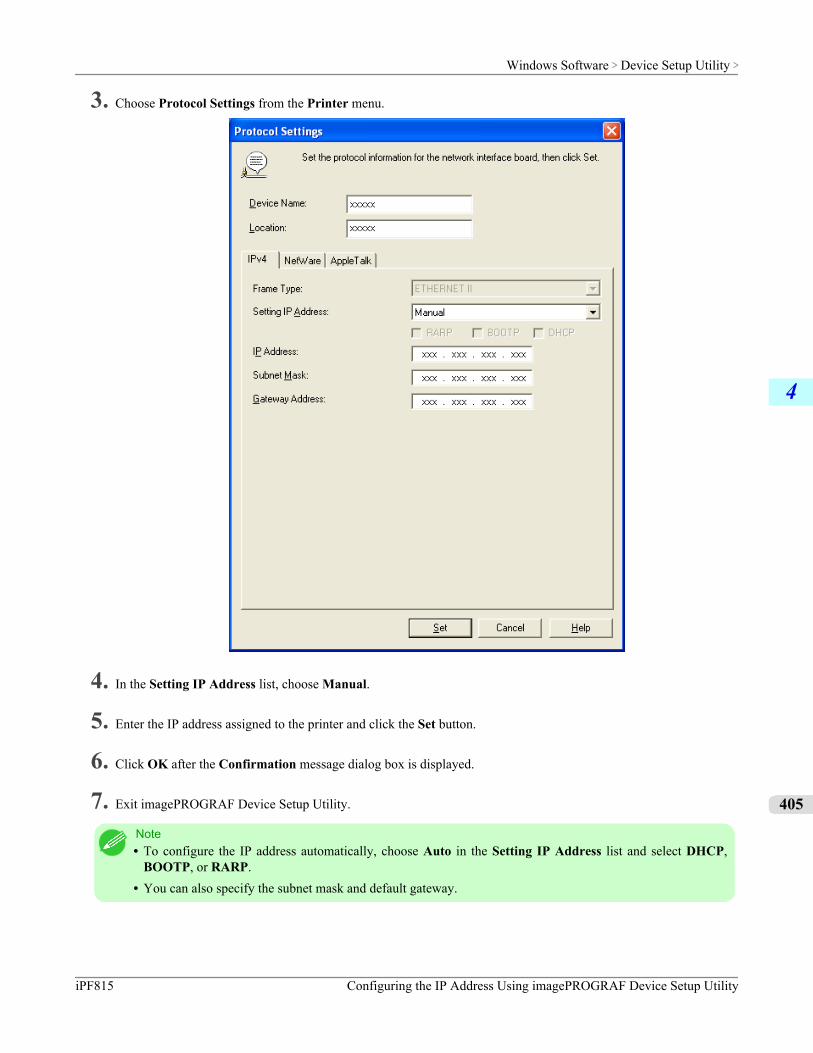
3. Choose Protocol Settings from the Printer menu.
4. In the Setting IP Address list, choose Manual.
5. Enter the IP address assigned to the printer and click the Set button.
6. Click OK after the Confirmation message dialog box is displayed.
7. Exit imagePROGRAF Device Setup Utility.
Note• To configure the IP address automatically, choose Auto in the Setting IP Address list and select DHCP,
BOOTP, or RARP.• You can also specify the subnet mask and default gateway.
Windows Software > Device Setup Utility >
iPF815 Configuring the IP Address Using imagePROGRAF Device Setup Utility
4
405
Media Configuration ToolThe Features of Media Configuration Tool ...................................................................................................... 406Operating Environment ................................................................................................................................... 406Installation Procedures .................................................................................................................................... 407Starting the Media Configuration Tool ............................................................................................................. 409
Media Configuration Tool Main Window .......................................................................................................... 410
Editing Media Type Information ....................................................................................................................... 411Adding Media Types ................................................................................................................................... 412Changing Media Names .............................................................................................................................. 414Deleting Media Types You Have Added ..................................................................................................... 416Switching Media Types Display Show/Hide ................................................................................................ 418Changing the Display Order of Media Types .............................................................................................. 419
Updating Media Types ............................................................................................................................ 421
The Features of Media Configuration ToolThe Media Configuration Tool offers the following features.
• Enables information about additional media (types of paper) supported by the printer to be registered on the printercontrol panel and in the printer driver, through the use of relevant media information files (.amf and .med files).
• You can rearrange lists of the types of paper on the printer control panel and in printer driver dialog boxes and renamethem, in addition to other functions.
Important• The Media Configuration Tool is normally installed when you install the printer driver from the User Soft-
ware CD-ROM by selecting Install Printer Driver and media information is registered at this time. The toolcan be used later to add or edit media information as desired.
Drivers Applicable with Media Configuration Tool
• imagePROGRAF Printer Driver• imagePROGRAF HDI Driver
Operating EnvironmentYou can use Media Configuration Tool in the following environments.
• Compatible Operating SystemWindows 2000, Windows XP, Windows Server 2003, Windows Vista, Windows Server 2008, Windows 7
• Software that requires installationimagePROGRAF Printer Driver
Windows Software > Media Configuration Tool >
The Features of Media Configuration Tool iPF815
4
406
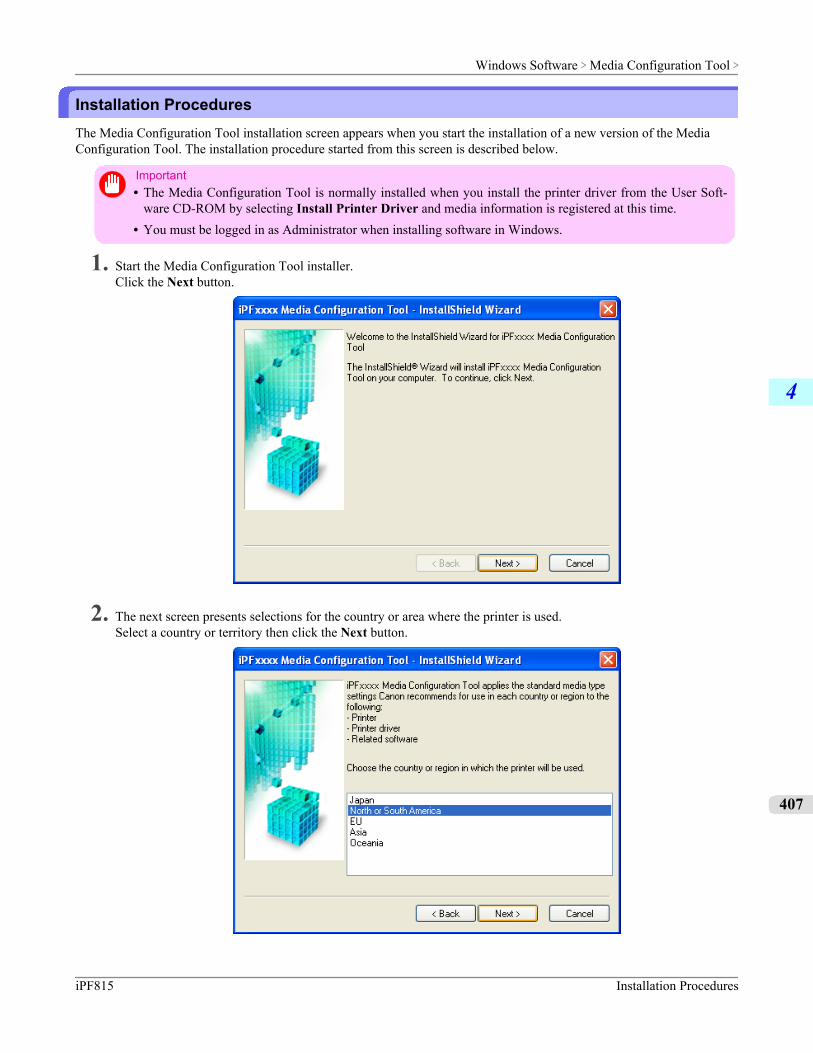
Installation ProceduresThe Media Configuration Tool installation screen appears when you start the installation of a new version of the MediaConfiguration Tool. The installation procedure started from this screen is described below.
Important• The Media Configuration Tool is normally installed when you install the printer driver from the User Soft-
ware CD-ROM by selecting Install Printer Driver and media information is registered at this time.• You must be logged in as Administrator when installing software in Windows.
1. Start the Media Configuration Tool installer.Click the Next button.
2. The next screen presents selections for the country or area where the printer is used.Select a country or territory then click the Next button.
Windows Software > Media Configuration Tool >
iPF815 Installation Procedures
4
407
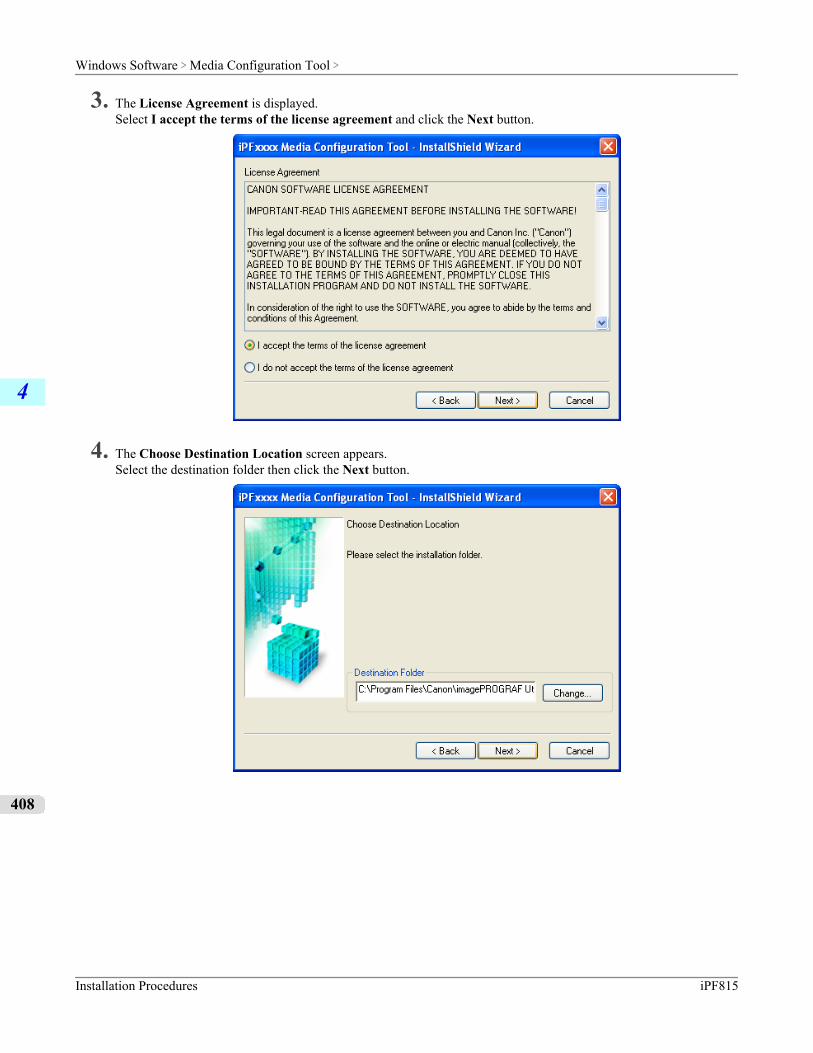
3. The License Agreement is displayed.Select I accept the terms of the license agreement and click the Next button.
4. The Choose Destination Location screen appears.Select the destination folder then click the Next button.
Windows Software > Media Configuration Tool >
Installation Procedures iPF815
4
408
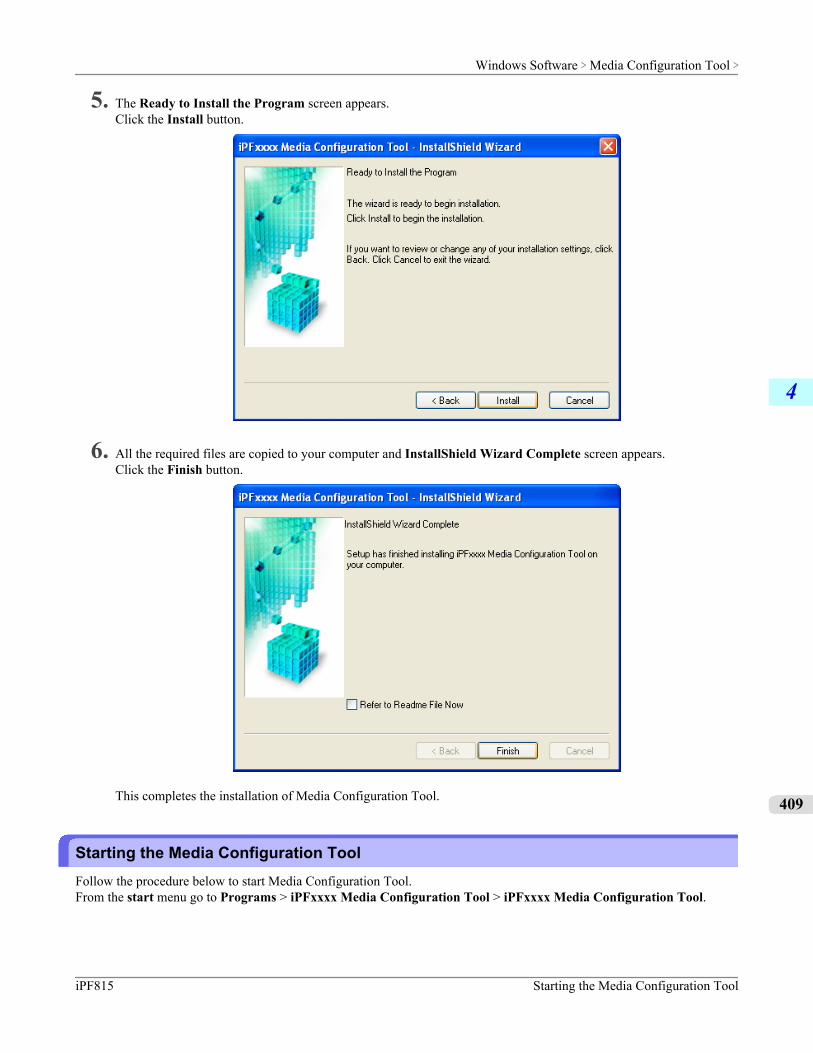
5. The Ready to Install the Program screen appears.Click the Install button.
6. All the required files are copied to your computer and InstallShield Wizard Complete screen appears.Click the Finish button.
This completes the installation of Media Configuration Tool.
Starting the Media Configuration ToolFollow the procedure below to start Media Configuration Tool.From the start menu go to Programs > iPFxxxx Media Configuration Tool > iPFxxxx Media Configuration Tool.
Windows Software > Media Configuration Tool >
iPF815 Starting the Media Configuration Tool
4
409
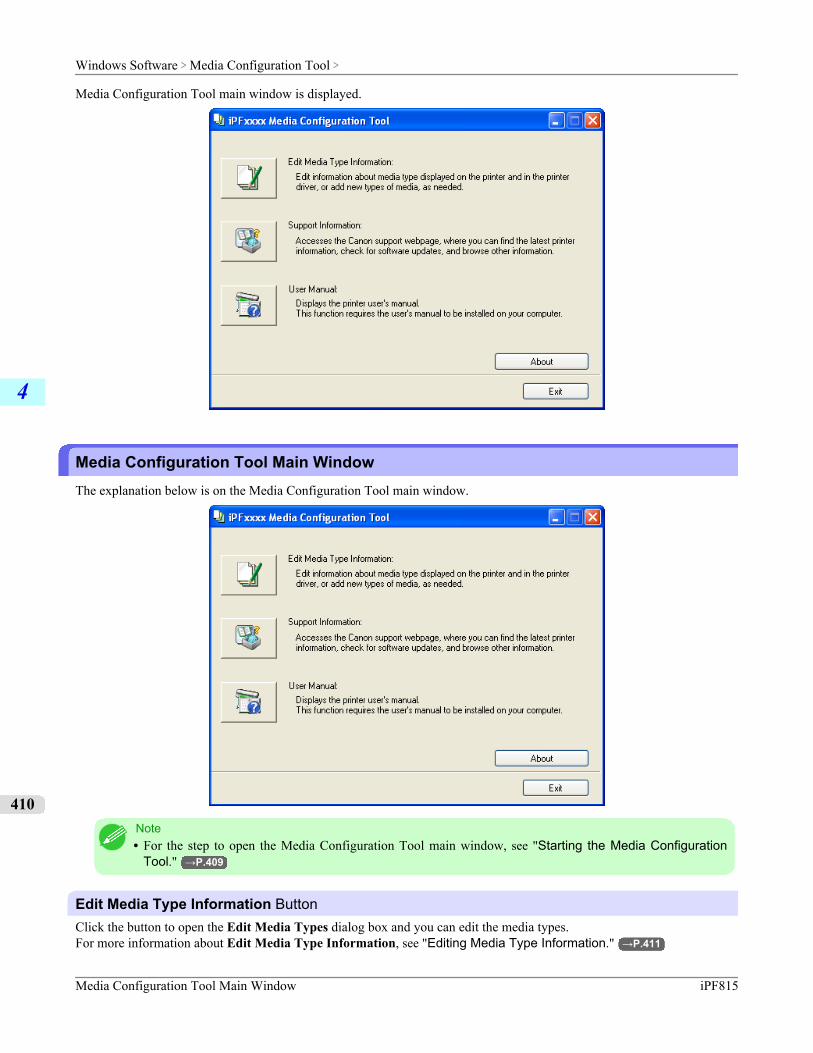
Media Configuration Tool main window is displayed.
Media Configuration Tool Main WindowThe explanation below is on the Media Configuration Tool main window.
Note• For the step to open the Media Configuration Tool main window, see "Starting the Media Configuration
Tool." →P.409
Edit Media Type Information ButtonClick the button to open the Edit Media Types dialog box and you can edit the media types.For more information about Edit Media Type Information, see "Editing Media Type Information." →P.411
Windows Software > Media Configuration Tool >
Media Configuration Tool Main Window iPF815
4
410
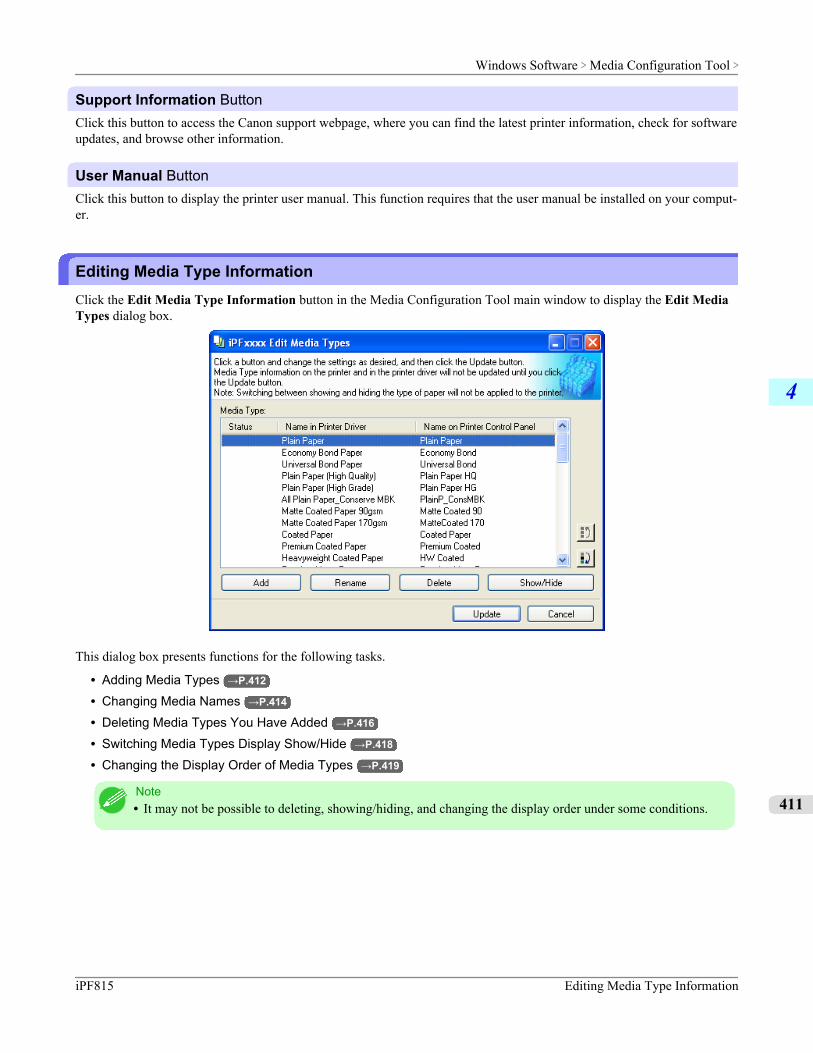
Support Information ButtonClick this button to access the Canon support webpage, where you can find the latest printer information, check for softwareupdates, and browse other information.
User Manual ButtonClick this button to display the printer user manual. This function requires that the user manual be installed on your comput-er.
Editing Media Type InformationClick the Edit Media Type Information button in the Media Configuration Tool main window to display the Edit MediaTypes dialog box.
This dialog box presents functions for the following tasks.
• Adding Media Types →P.412
• Changing Media Names →P.414
• Deleting Media Types You Have Added →P.416
• Switching Media Types Display Show/Hide →P.418
• Changing the Display Order of Media Types →P.419
Note• It may not be possible to deleting, showing/hiding, and changing the display order under some conditions.
Windows Software > Media Configuration Tool >
iPF815 Editing Media Type Information
4
411
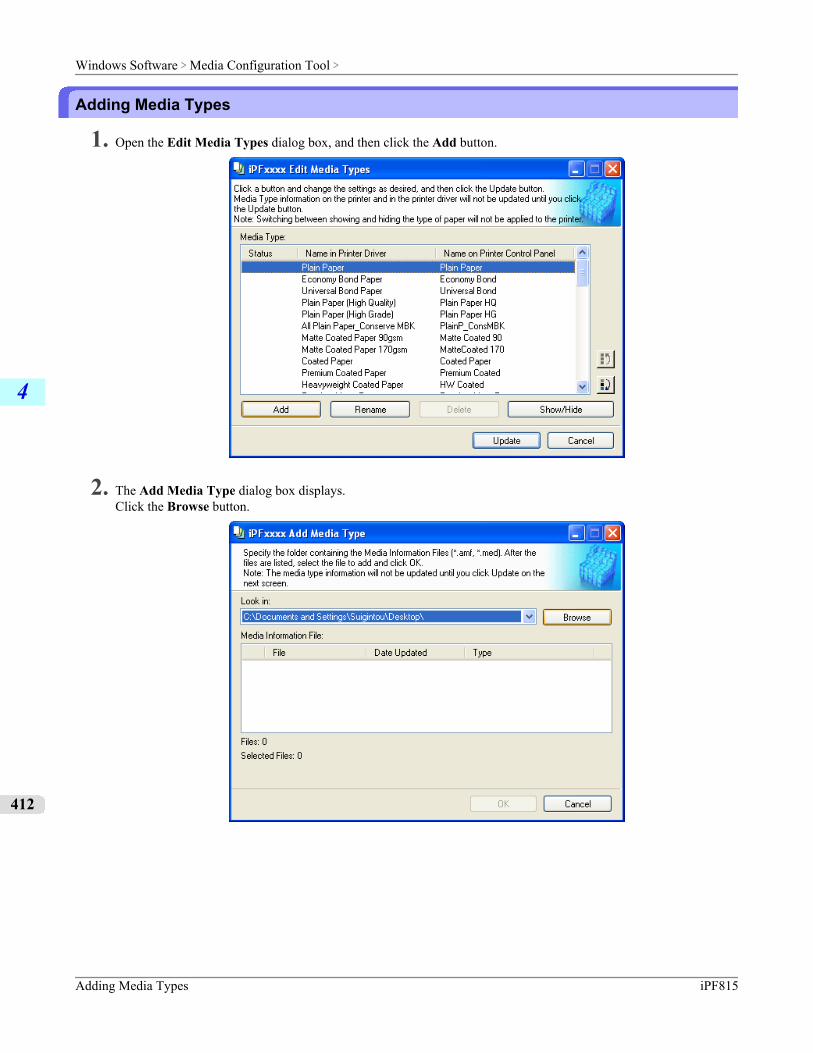
Adding Media Types
1. Open the Edit Media Types dialog box, and then click the Add button.
2. The Add Media Type dialog box displays.Click the Browse button.
Windows Software > Media Configuration Tool >
Adding Media Types iPF815
4
412
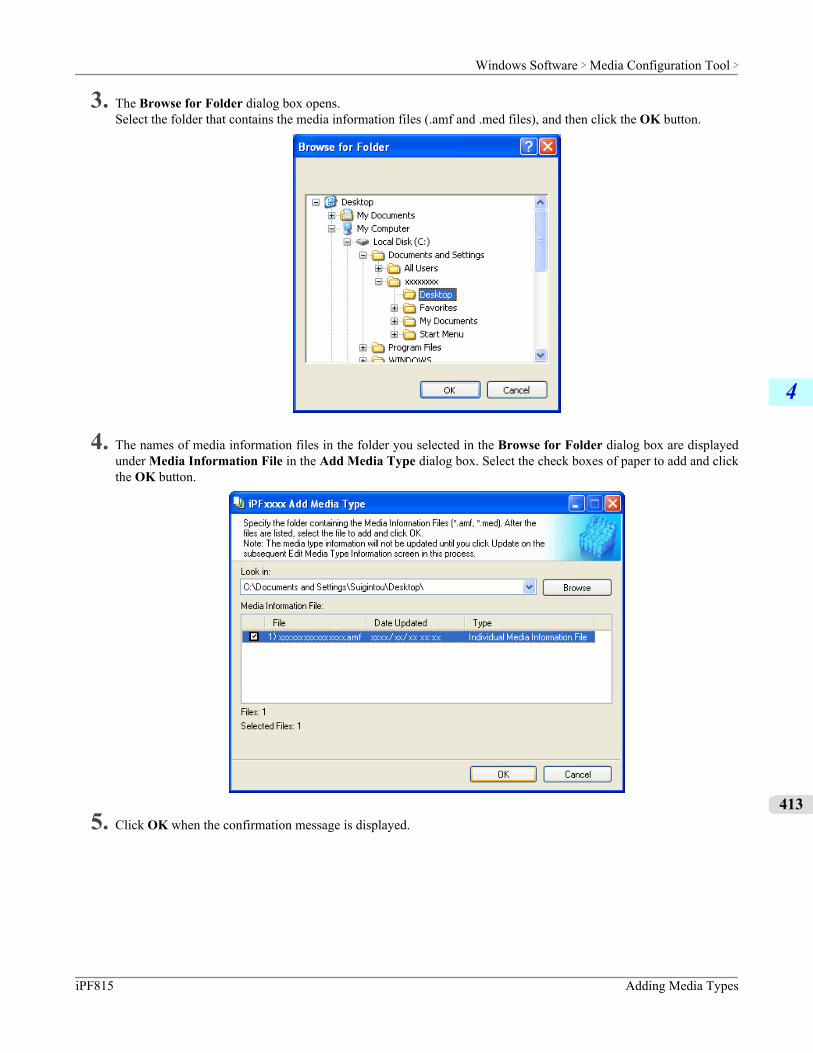
3. The Browse for Folder dialog box opens.Select the folder that contains the media information files (.amf and .med files), and then click the OK button.
4. The names of media information files in the folder you selected in the Browse for Folder dialog box are displayedunder Media Information File in the Add Media Type dialog box. Select the check boxes of paper to add and clickthe OK button.
5. Click OK when the confirmation message is displayed.
Windows Software > Media Configuration Tool >
iPF815 Adding Media Types
4
413
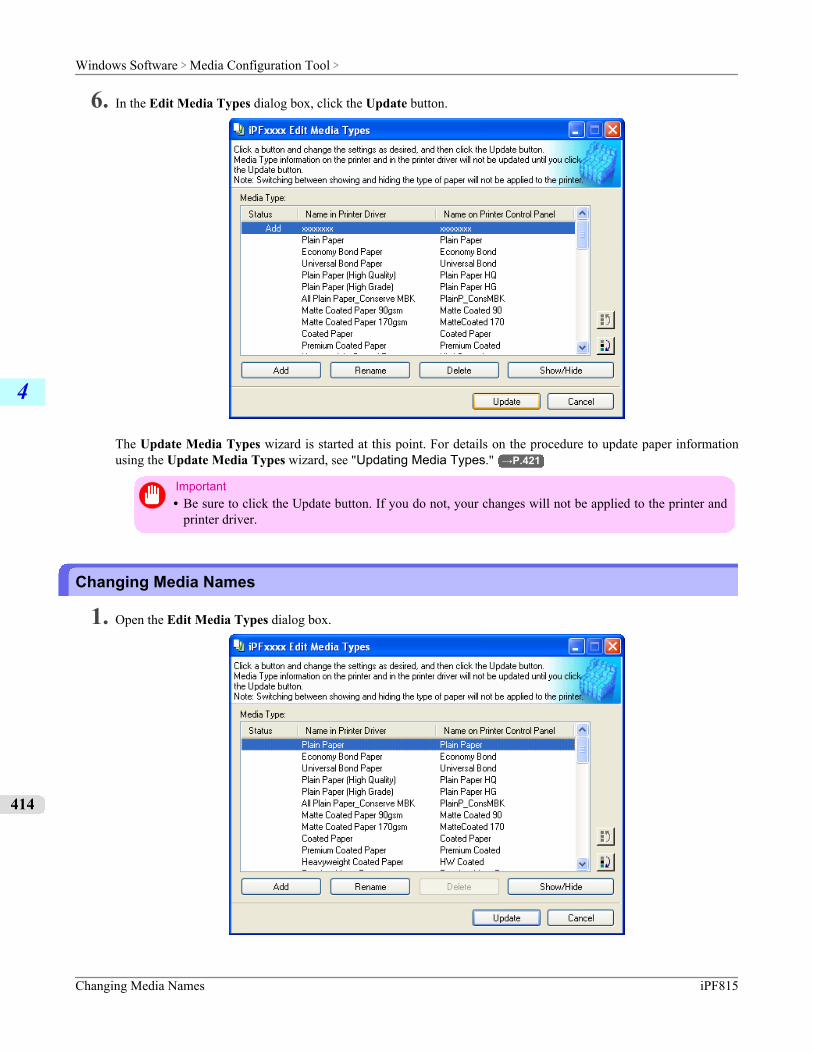
6. In the Edit Media Types dialog box, click the Update button.
The Update Media Types wizard is started at this point. For details on the procedure to update paper informationusing the Update Media Types wizard, see "Updating Media Types." →P.421
Important• Be sure to click the Update button. If you do not, your changes will not be applied to the printer and
printer driver.
Changing Media Names
1. Open the Edit Media Types dialog box.
Windows Software > Media Configuration Tool >
Changing Media Names iPF815
4
414
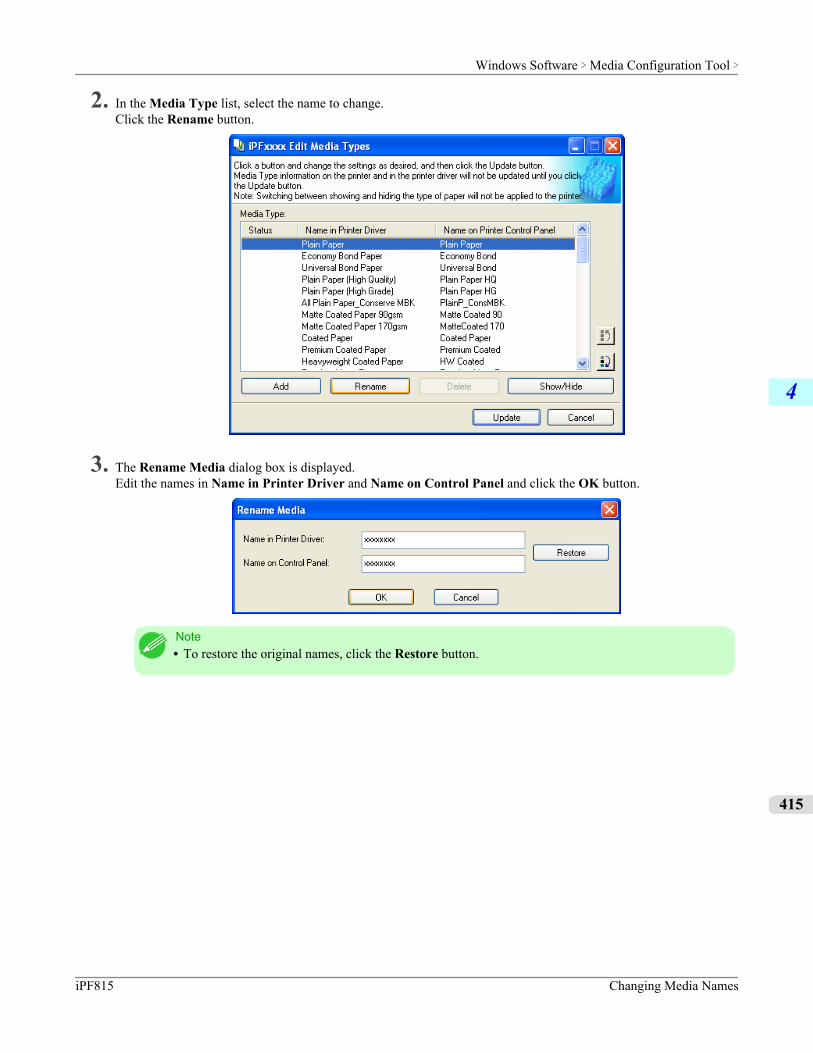
2. In the Media Type list, select the name to change.Click the Rename button.
3. The Rename Media dialog box is displayed.Edit the names in Name in Printer Driver and Name on Control Panel and click the OK button.
Note• To restore the original names, click the Restore button.
Windows Software > Media Configuration Tool >
iPF815 Changing Media Names
4
415
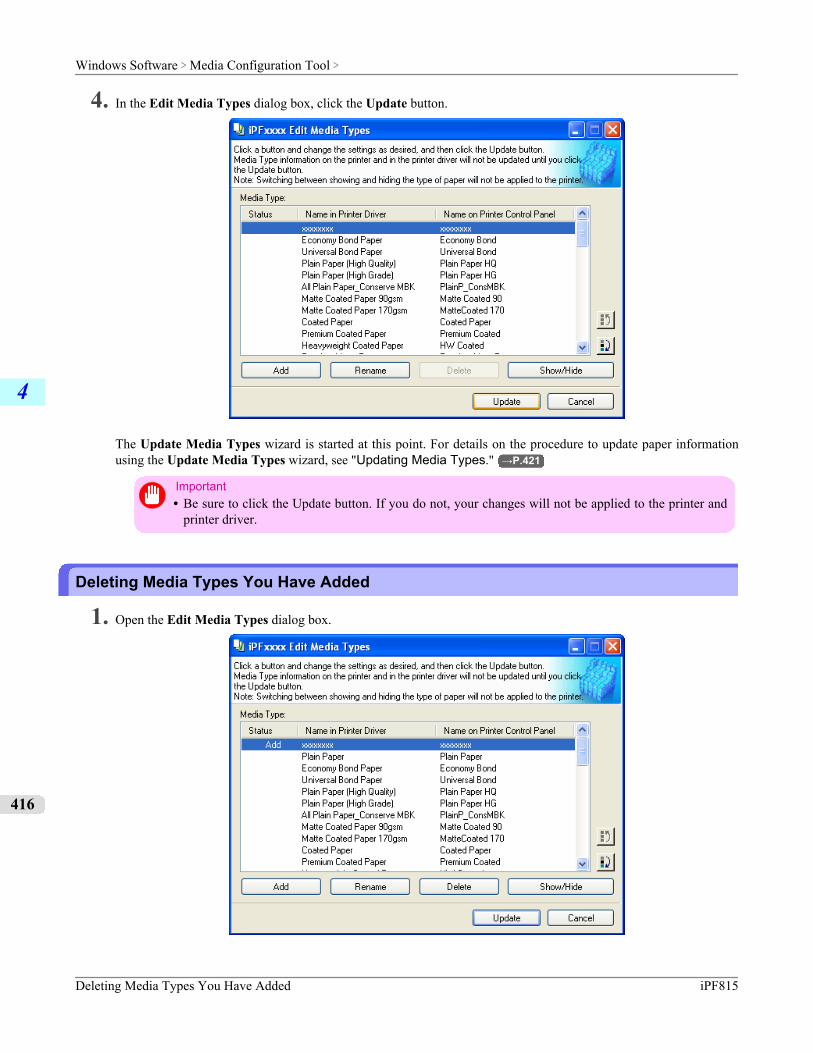
4. In the Edit Media Types dialog box, click the Update button.
The Update Media Types wizard is started at this point. For details on the procedure to update paper informationusing the Update Media Types wizard, see "Updating Media Types." →P.421
Important• Be sure to click the Update button. If you do not, your changes will not be applied to the printer and
printer driver.
Deleting Media Types You Have Added
1. Open the Edit Media Types dialog box.
Windows Software > Media Configuration Tool >
Deleting Media Types You Have Added iPF815
4
416

2. In the Media Type list, select the name of the media to delete.Click the Delete button.
Note• Only paper for which Status in the Media Type is Add can be deleted.
3. In the Edit Media Types dialog box, click the Update button.
The Update Media Types wizard is started at this point. For details on the procedure to update paper informationusing the Update Media Types wizard, see "Updating Media Types." →P.421
Important• Be sure to click the Update button. If you do not, your changes will not be applied to the printer and
printer driver.
Windows Software > Media Configuration Tool >
iPF815 Deleting Media Types You Have Added
4
417
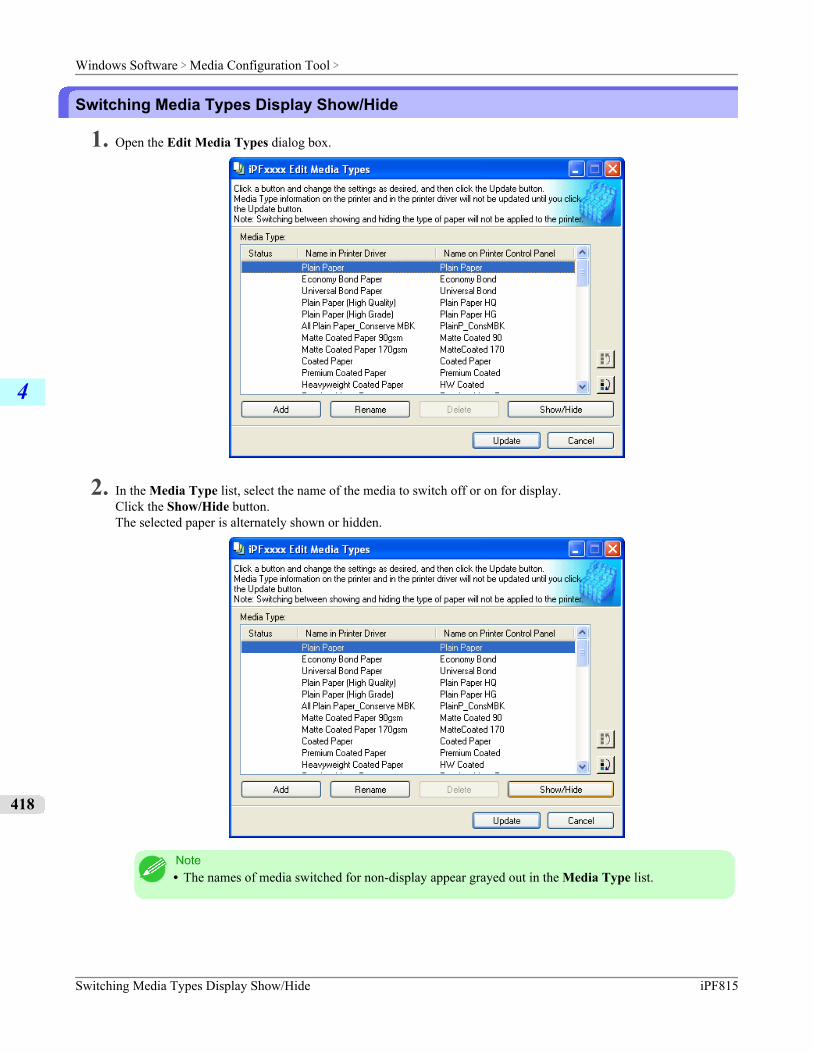
Switching Media Types Display Show/Hide
1. Open the Edit Media Types dialog box.
2. In the Media Type list, select the name of the media to switch off or on for display.Click the Show/Hide button.The selected paper is alternately shown or hidden.
Note• The names of media switched for non-display appear grayed out in the Media Type list.
Windows Software > Media Configuration Tool >
Switching Media Types Display Show/Hide iPF815
4
418
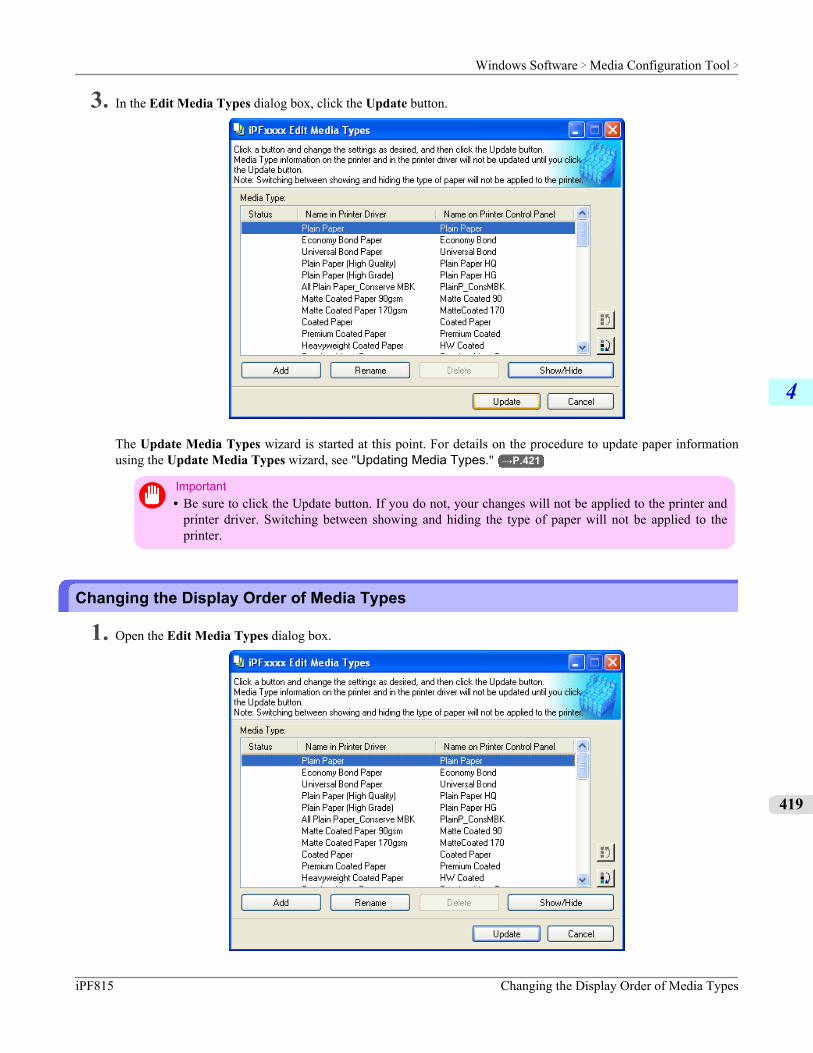
3. In the Edit Media Types dialog box, click the Update button.
The Update Media Types wizard is started at this point. For details on the procedure to update paper informationusing the Update Media Types wizard, see "Updating Media Types." →P.421
Important• Be sure to click the Update button. If you do not, your changes will not be applied to the printer and
printer driver. Switching between showing and hiding the type of paper will not be applied to theprinter.
Changing the Display Order of Media Types
1. Open the Edit Media Types dialog box.
Windows Software > Media Configuration Tool >
iPF815 Changing the Display Order of Media Types
4
419
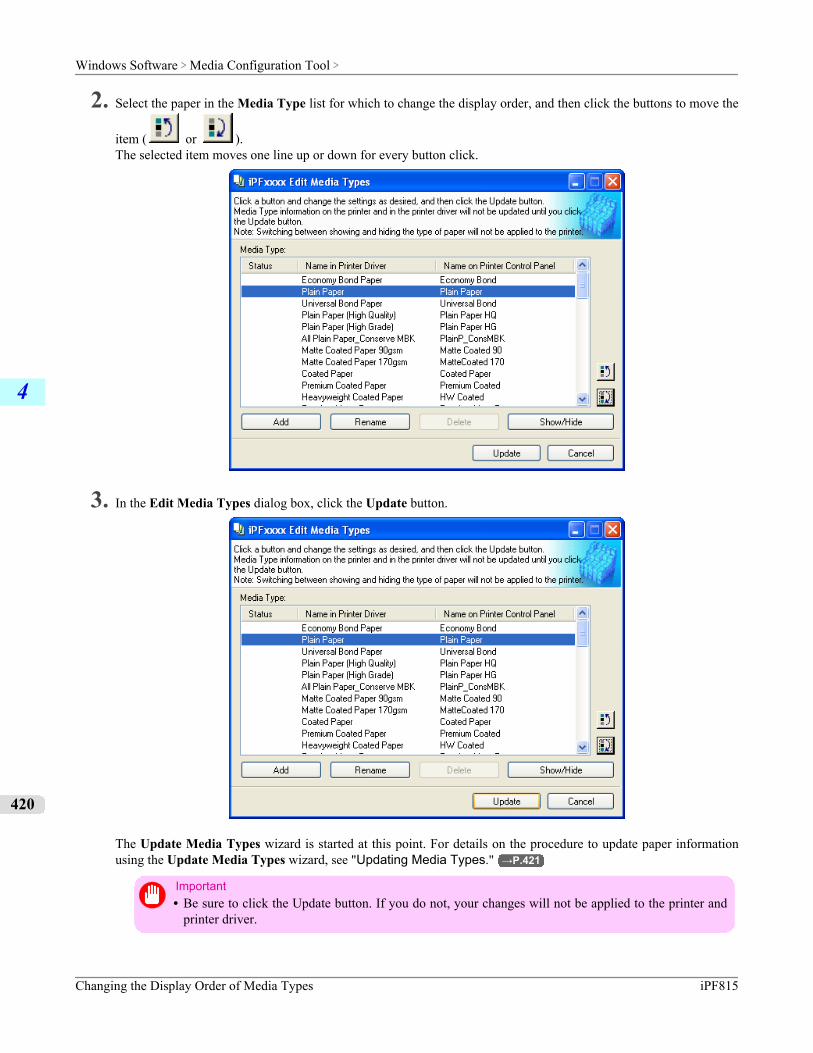
2. Select the paper in the Media Type list for which to change the display order, and then click the buttons to move the
item ( or ).The selected item moves one line up or down for every button click.
3. In the Edit Media Types dialog box, click the Update button.
The Update Media Types wizard is started at this point. For details on the procedure to update paper informationusing the Update Media Types wizard, see "Updating Media Types." →P.421
Important• Be sure to click the Update button. If you do not, your changes will not be applied to the printer and
printer driver.
Windows Software > Media Configuration Tool >
Changing the Display Order of Media Types iPF815
4
420
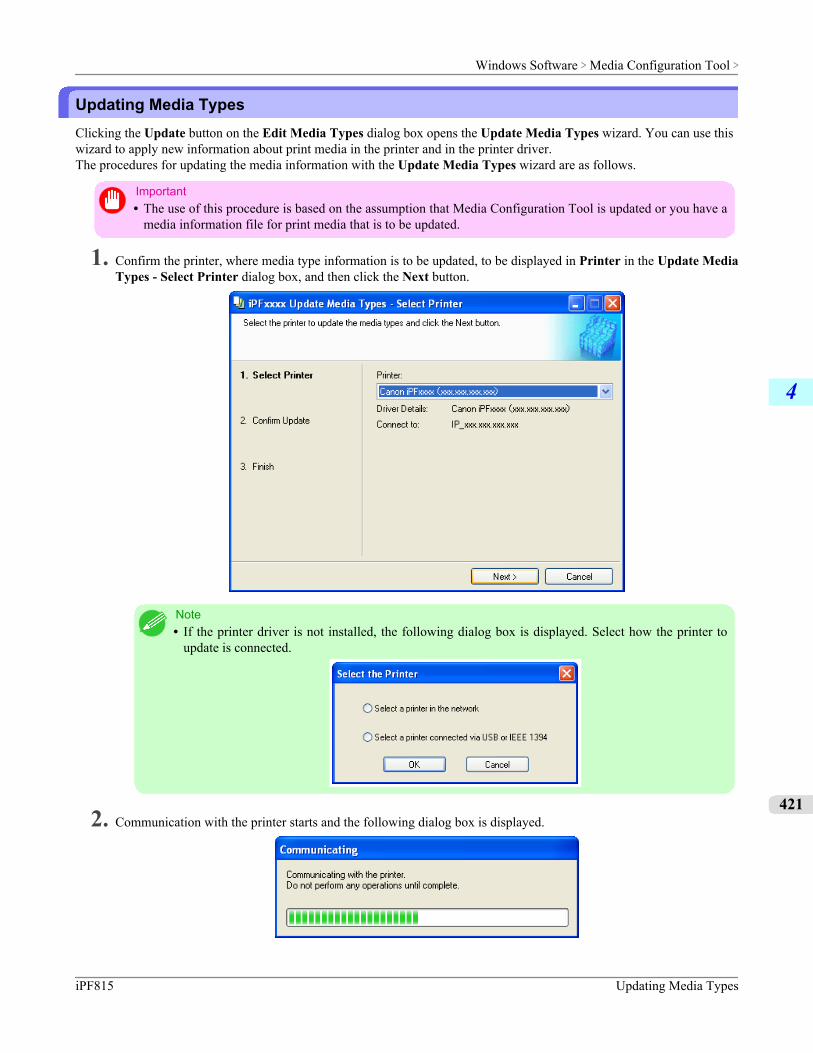
Updating Media TypesClicking the Update button on the Edit Media Types dialog box opens the Update Media Types wizard. You can use thiswizard to apply new information about print media in the printer and in the printer driver.The procedures for updating the media information with the Update Media Types wizard are as follows.
Important• The use of this procedure is based on the assumption that Media Configuration Tool is updated or you have a
media information file for print media that is to be updated.
1. Confirm the printer, where media type information is to be updated, to be displayed in Printer in the Update MediaTypes - Select Printer dialog box, and then click the Next button.
Note• If the printer driver is not installed, the following dialog box is displayed. Select how the printer to
update is connected.
2. Communication with the printer starts and the following dialog box is displayed.
Windows Software > Media Configuration Tool >
iPF815 Updating Media Types
4
421
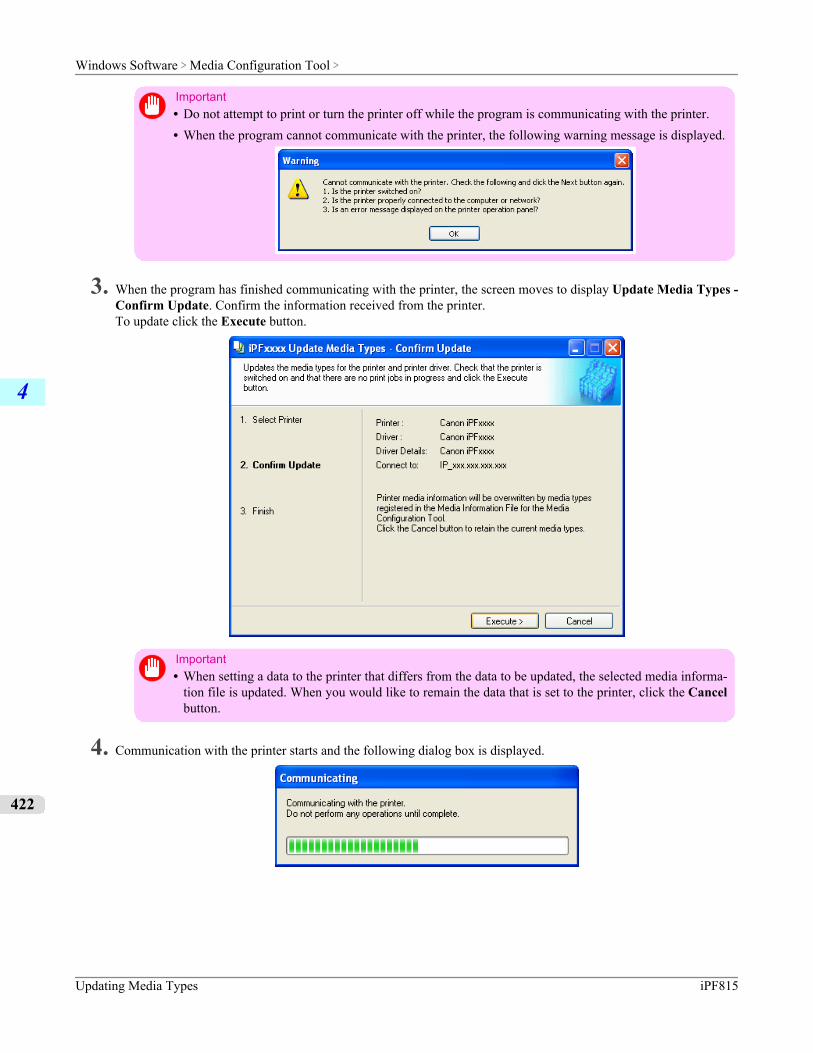
Important• Do not attempt to print or turn the printer off while the program is communicating with the printer.• When the program cannot communicate with the printer, the following warning message is displayed.
3. When the program has finished communicating with the printer, the screen moves to display Update Media Types -Confirm Update. Confirm the information received from the printer.To update click the Execute button.
Important• When setting a data to the printer that differs from the data to be updated, the selected media informa-
tion file is updated. When you would like to remain the data that is set to the printer, click the Cancelbutton.
4. Communication with the printer starts and the following dialog box is displayed.
Windows Software > Media Configuration Tool >
Updating Media Types iPF815
4
422
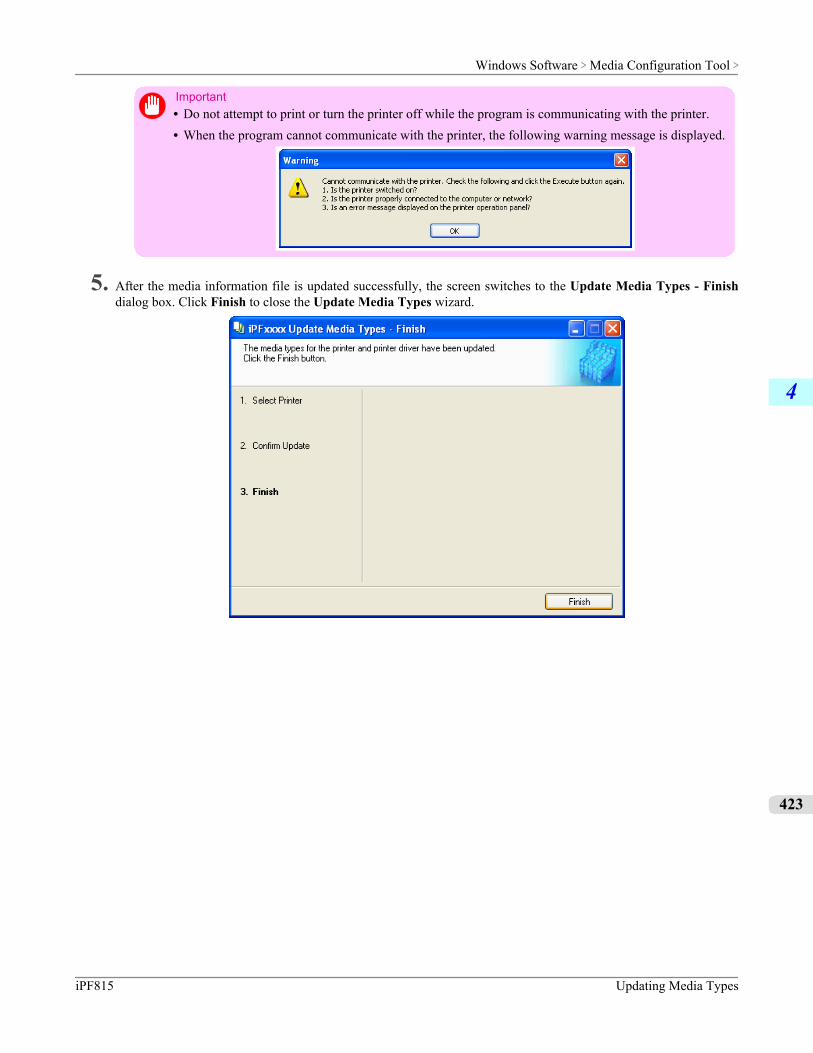
Important• Do not attempt to print or turn the printer off while the program is communicating with the printer.• When the program cannot communicate with the printer, the following warning message is displayed.
5. After the media information file is updated successfully, the screen switches to the Update Media Types - Finishdialog box. Click Finish to close the Update Media Types wizard.
Windows Software > Media Configuration Tool >
iPF815 Updating Media Types
4
423
Mac OS X Software
Printer Driver 425
Preview 452
Free Layout 481
Color imageRUNNER Enlargement Copy 513
Printmonitor 538
Media Configuration Tool 539
Mac OS X Software >
iPF815
5
424
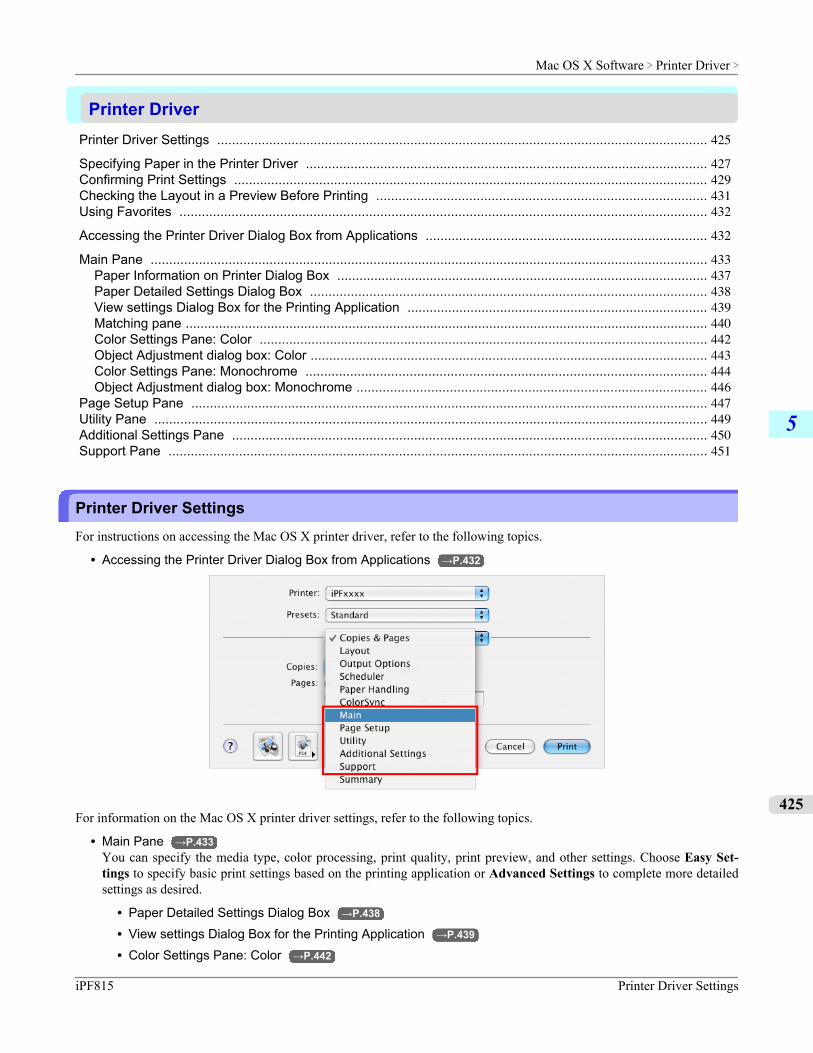
Printer DriverPrinter Driver Settings .................................................................................................................................... 425
Specifying Paper in the Printer Driver ............................................................................................................ 427Confirming Print Settings ................................................................................................................................ 429Checking the Layout in a Preview Before Printing ......................................................................................... 431Using Favorites .............................................................................................................................................. 432
Accessing the Printer Driver Dialog Box from Applications ............................................................................ 432
Main Pane ...................................................................................................................................................... 433Paper Information on Printer Dialog Box .................................................................................................... 437Paper Detailed Settings Dialog Box ........................................................................................................... 438View settings Dialog Box for the Printing Application ................................................................................. 439Matching pane ............................................................................................................................................. 440Color Settings Pane: Color ......................................................................................................................... 442Object Adjustment dialog box: Color ........................................................................................................... 443Color Settings Pane: Monochrome ............................................................................................................ 444Object Adjustment dialog box: Monochrome .............................................................................................. 446
Page Setup Pane ........................................................................................................................................... 447Utility Pane ..................................................................................................................................................... 449Additional Settings Pane ................................................................................................................................ 450Support Pane ................................................................................................................................................. 451
Printer Driver SettingsFor instructions on accessing the Mac OS X printer driver, refer to the following topics.
• Accessing the Printer Driver Dialog Box from Applications →P.432
For information on the Mac OS X printer driver settings, refer to the following topics.
• Main Pane →P.433You can specify the media type, color processing, print quality, print preview, and other settings. Choose Easy Set-tings to specify basic print settings based on the printing application or Advanced Settings to complete more detailedsettings as desired.
• Paper Detailed Settings Dialog Box →P.438
• View settings Dialog Box for the Printing Application →P.439
• Color Settings Pane: Color →P.442
Mac OS X Software > Printer Driver >
iPF815 Printer Driver Settings
5
425
• Color Settings Pane: Monochrome →P.444
• Page Setup Pane →P.447You can specify the page size of the original, borderless printing, enlargement or reduction, the orientation, the papersize and source, and automatic cutting.
• Utility Pane →P.449You can specify settings related to maintenance for the Printhead and feed amount, as well as settings for Color im-ageRUNNER Enlargement Copy.
• Additional Settings Pane →P.450You can specify settings for how print jobs are sent to the printer.
• Support Pane →P.451You can view support information and the user's manual.
With the imagePROGRAF Free Layout feature, you can arrange originals from various source applications on a singlepage before printing. For details, see Free Layout →P.481 .With the imagePROGRAF Preview feature, you can check the layout before printing and adjust layout or size settingswhile viewing a preview screen. For details, see Preview →P.452 .With the Color imageRUNNER Enlargement Copy feature, you can automatically enlarge and print scanned originalsfrom a Color imageRUNNER. For details, see Color imageRUNNER Enlargement Copy →P.513 .
Mac OS X Software > Printer Driver >
Printer Driver Settings iPF815
5
426
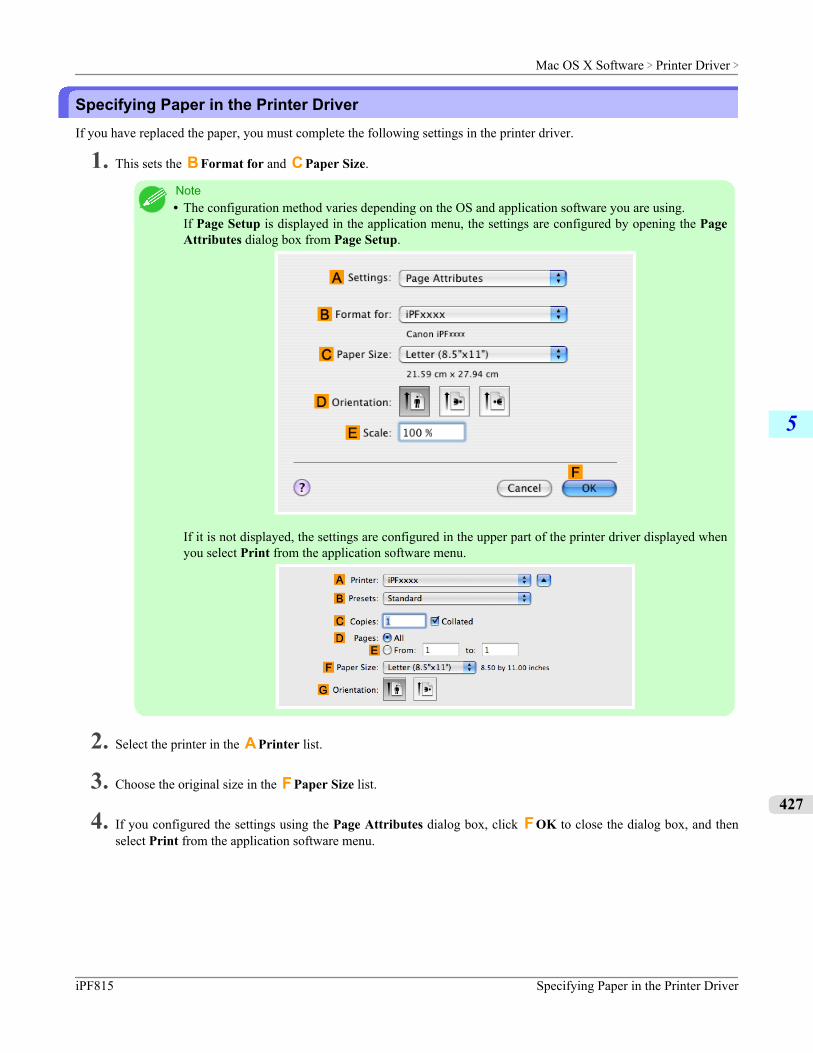
Specifying Paper in the Printer DriverIf you have replaced the paper, you must complete the following settings in the printer driver.
1. This sets the B Format for and C Paper Size.
Note• The configuration method varies depending on the OS and application software you are using.
If Page Setup is displayed in the application menu, the settings are configured by opening the PageAttributes dialog box from Page Setup.
If it is not displayed, the settings are configured in the upper part of the printer driver displayed whenyou select Print from the application software menu.
2. Select the printer in the A Printer list.
3. Choose the original size in the F Paper Size list.
4. If you configured the settings using the Page Attributes dialog box, click F OK to close the dialog box, and thenselect Print from the application software menu.
Mac OS X Software > Printer Driver >
iPF815 Specifying Paper in the Printer Driver
5
427
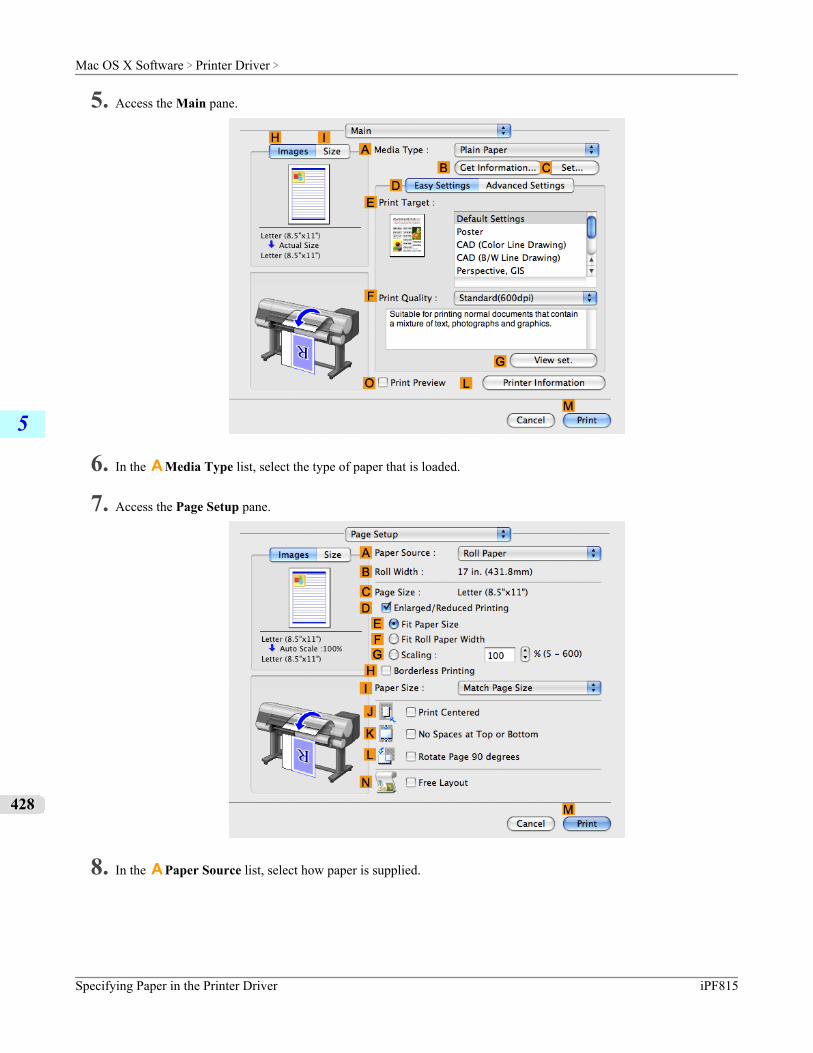
5. Access the Main pane.
6. In the A Media Type list, select the type of paper that is loaded.
7. Access the Page Setup pane.
8. In the A Paper Source list, select how paper is supplied.
Mac OS X Software > Printer Driver >
Specifying Paper in the Printer Driver iPF815
5
428

9. If you have selected Cut Sheet in A Paper Source, make sure the size as selected in Page Setup is displayed inC Page Size. If you have selected roll paper in A Paper Source, make sure the width of the loaded roll is displayedin B Roll Width.
Note• If the width of the roll loaded in the printer is not shown in B Roll Width, click L Printer Informa-
tion on the Main pane to update the printer information.
Note• A variety of settings are available in the printer driver to suit different printing applications.
For details on available printing conditions, see "Printer Driver Settings →P.425 "
Confirming Print SettingsThere are two ways to confirm what printing conditions have been specified, as follows.
• Checking a preview of the settings• Checking a print preview
Mac OS X Software > Printer Driver >
iPF815 Confirming Print Settings
5
429
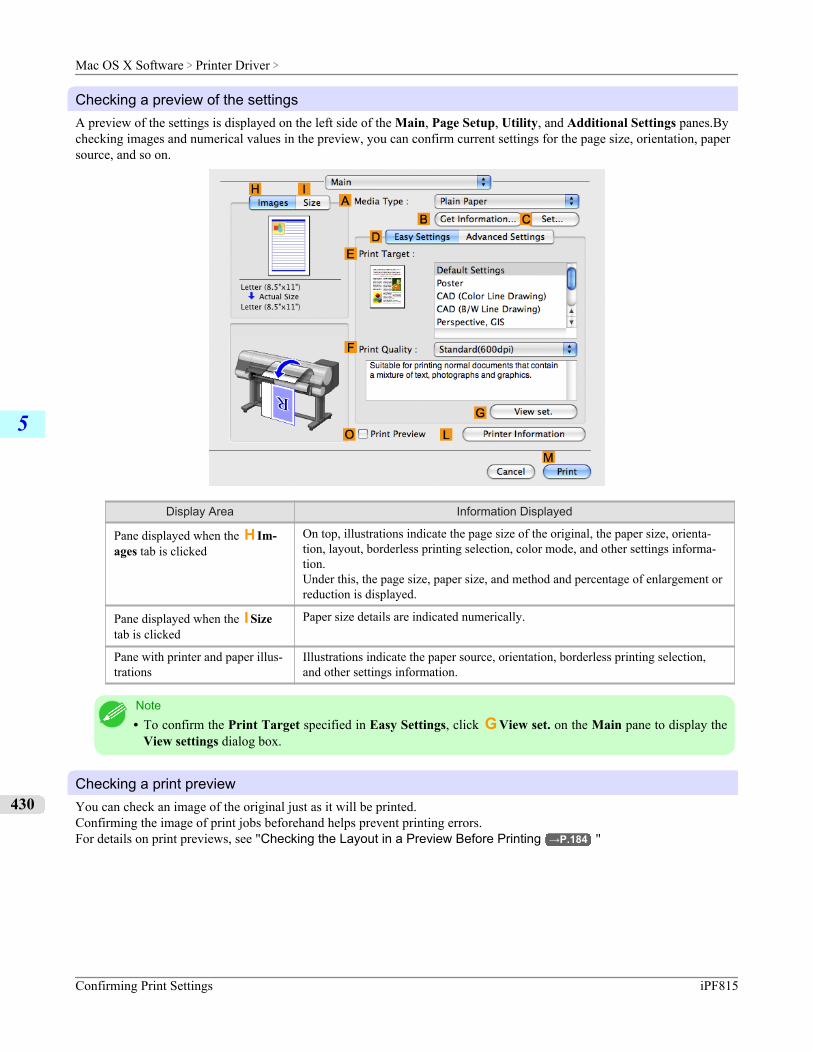
Checking a preview of the settingsA preview of the settings is displayed on the left side of the Main, Page Setup, Utility, and Additional Settings panes.Bychecking images and numerical values in the preview, you can confirm current settings for the page size, orientation, papersource, and so on.
Display Area Information Displayed
Pane displayed when the H Im-ages tab is clicked
On top, illustrations indicate the page size of the original, the paper size, orienta-tion, layout, borderless printing selection, color mode, and other settings informa-tion.Under this, the page size, paper size, and method and percentage of enlargement orreduction is displayed.
Pane displayed when the I Sizetab is clicked
Paper size details are indicated numerically.
Pane with printer and paper illus-trations
Illustrations indicate the paper source, orientation, borderless printing selection,and other settings information.
Note• To confirm the Print Target specified in Easy Settings, click G View set. on the Main pane to display the
View settings dialog box.
Checking a print previewYou can check an image of the original just as it will be printed.Confirming the image of print jobs beforehand helps prevent printing errors.For details on print previews, see "Checking the Layout in a Preview Before Printing →P.184 "
Mac OS X Software > Printer Driver >
Confirming Print Settings iPF815
5
430

Checking the Layout in a Preview Before PrintingThis topic describes how to check the layout before printing using the Canon imagePROGRAF Preview function.
1. Choose Print in the application menu.
2. Access the Main pane.
3. Select the O Print Preview check box.
4. Click M Print.
Mac OS X Software > Printer Driver >
iPF815 Checking the Layout in a Preview Before Printing
5
431
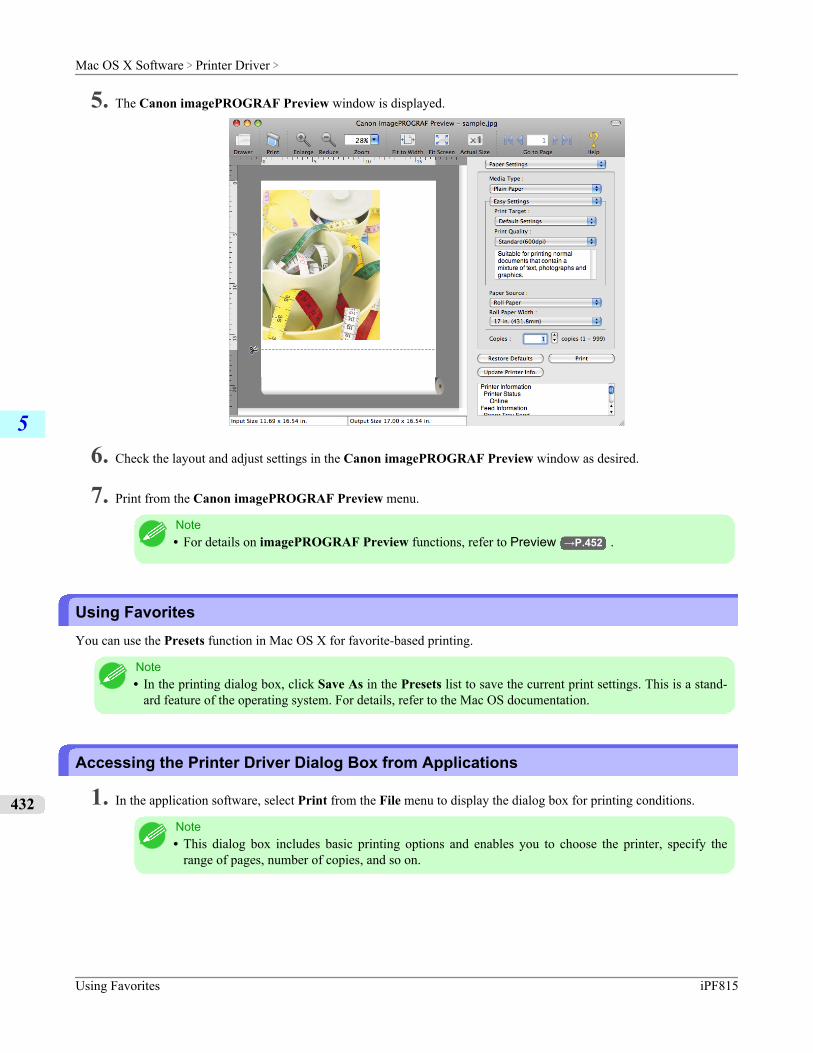
5. The Canon imagePROGRAF Preview window is displayed.
6. Check the layout and adjust settings in the Canon imagePROGRAF Preview window as desired.
7. Print from the Canon imagePROGRAF Preview menu.
Note• For details on imagePROGRAF Preview functions, refer to Preview →P.452 .
Using FavoritesYou can use the Presets function in Mac OS X for favorite-based printing.
Note• In the printing dialog box, click Save As in the Presets list to save the current print settings. This is a stand-
ard feature of the operating system. For details, refer to the Mac OS documentation.
Accessing the Printer Driver Dialog Box from Applications
1. In the application software, select Print from the File menu to display the dialog box for printing conditions.
Note• This dialog box includes basic printing options and enables you to choose the printer, specify the
range of pages, number of copies, and so on.
Mac OS X Software > Printer Driver >
Using Favorites iPF815
5
432

2. Select the printer in the Printer list.
3. Click Print to start printing.As shown in the following illustration, you can switch to other panes in this dialog box to complete settings for vari-ous methods of printing, including enlarged and reduced printing, borderless printing, and so on.
Main PaneThe following settings are available on the Main pane. For details on settings items, refer to the printer driver help.
Note• On the Main pane, choose Easy Settings to specify basic print settings based on the print target, or switch to
Advanced Settings to complete more detailed settings as desired.
Mac OS X Software > Printer Driver >
iPF815 Main Pane
5
433
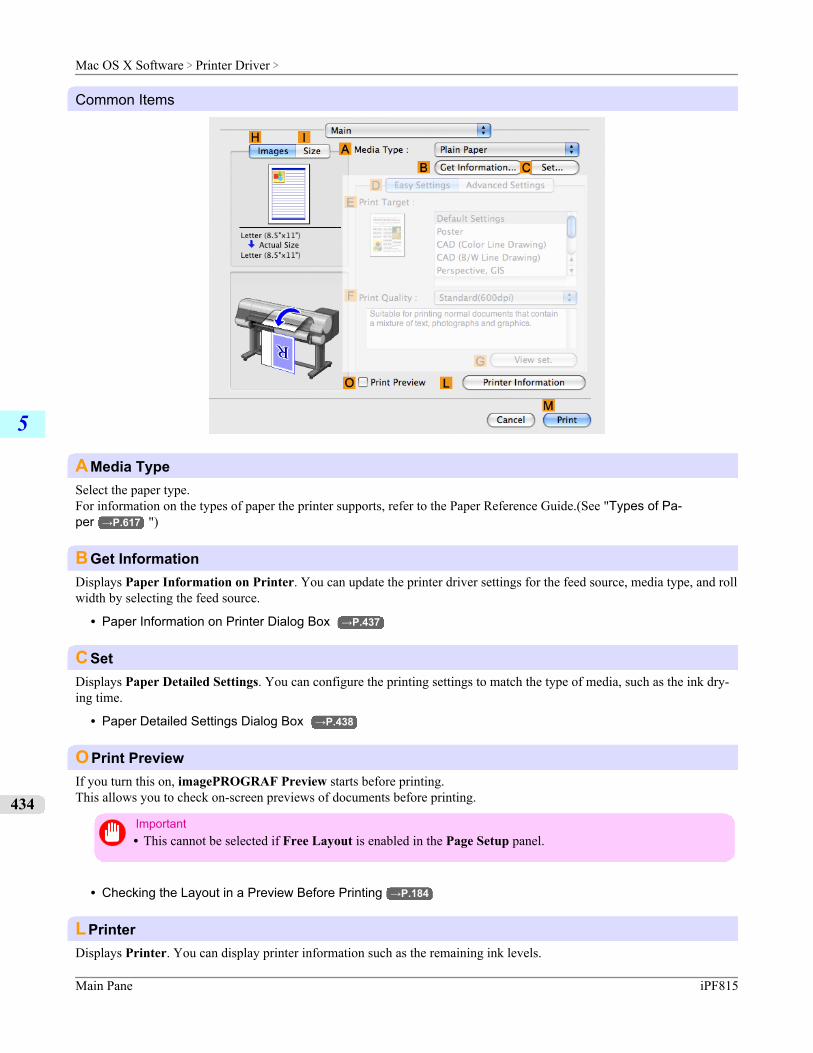
Common Items
AMedia TypeSelect the paper type.For information on the types of paper the printer supports, refer to the Paper Reference Guide.(See "Types of Pa-per →P.617 ")
BGet InformationDisplays Paper Information on Printer. You can update the printer driver settings for the feed source, media type, and rollwidth by selecting the feed source.
• Paper Information on Printer Dialog Box →P.437
CSetDisplays Paper Detailed Settings. You can configure the printing settings to match the type of media, such as the ink dry-ing time.
• Paper Detailed Settings Dialog Box →P.438
OPrint PreviewIf you turn this on, imagePROGRAF Preview starts before printing.This allows you to check on-screen previews of documents before printing.
Important• This cannot be selected if Free Layout is enabled in the Page Setup panel.
• Checking the Layout in a Preview Before Printing →P.184
LPrinterDisplays Printer. You can display printer information such as the remaining ink levels.
Mac OS X Software > Printer Driver >
Main Pane iPF815
5
434
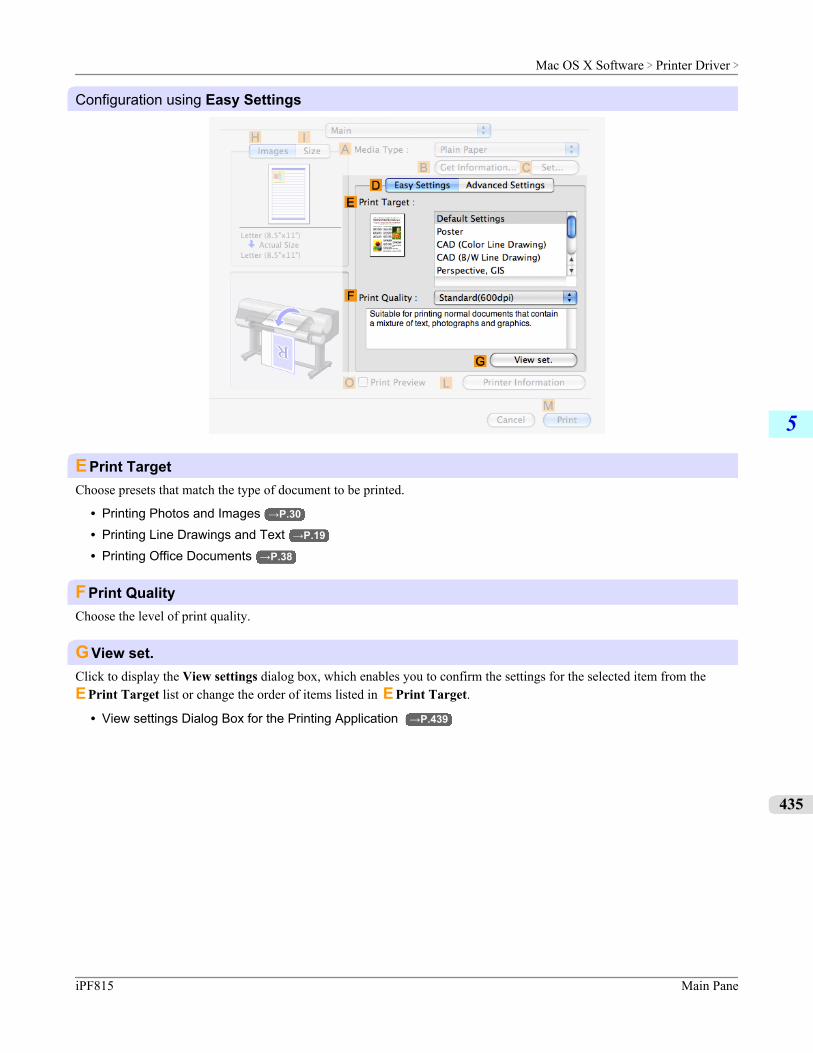
Configuration using Easy Settings
EPrint TargetChoose presets that match the type of document to be printed.
• Printing Photos and Images →P.30
• Printing Line Drawings and Text →P.19
• Printing Office Documents →P.38
FPrint QualityChoose the level of print quality.
GView set.Click to display the View settings dialog box, which enables you to confirm the settings for the selected item from theE Print Target list or change the order of items listed in E Print Target.
• View settings Dialog Box for the Printing Application →P.439
Mac OS X Software > Printer Driver >
iPF815 Main Pane
5
435
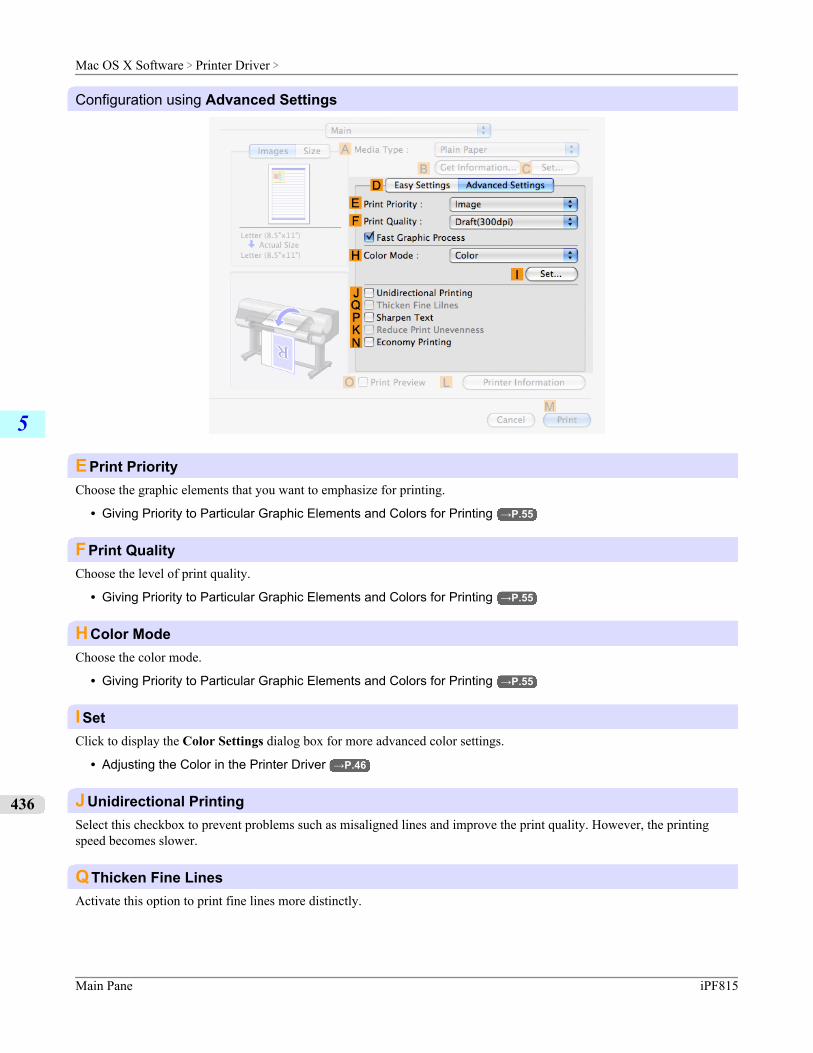
Configuration using Advanced Settings
EPrint PriorityChoose the graphic elements that you want to emphasize for printing.
• Giving Priority to Particular Graphic Elements and Colors for Printing →P.55
FPrint QualityChoose the level of print quality.
• Giving Priority to Particular Graphic Elements and Colors for Printing →P.55
HColor ModeChoose the color mode.
• Giving Priority to Particular Graphic Elements and Colors for Printing →P.55
ISetClick to display the Color Settings dialog box for more advanced color settings.
• Adjusting the Color in the Printer Driver →P.46
JUnidirectional PrintingSelect this checkbox to prevent problems such as misaligned lines and improve the print quality. However, the printingspeed becomes slower.
QThicken Fine LinesActivate this option to print fine lines more distinctly.
Mac OS X Software > Printer Driver >
Main Pane iPF815
5
436
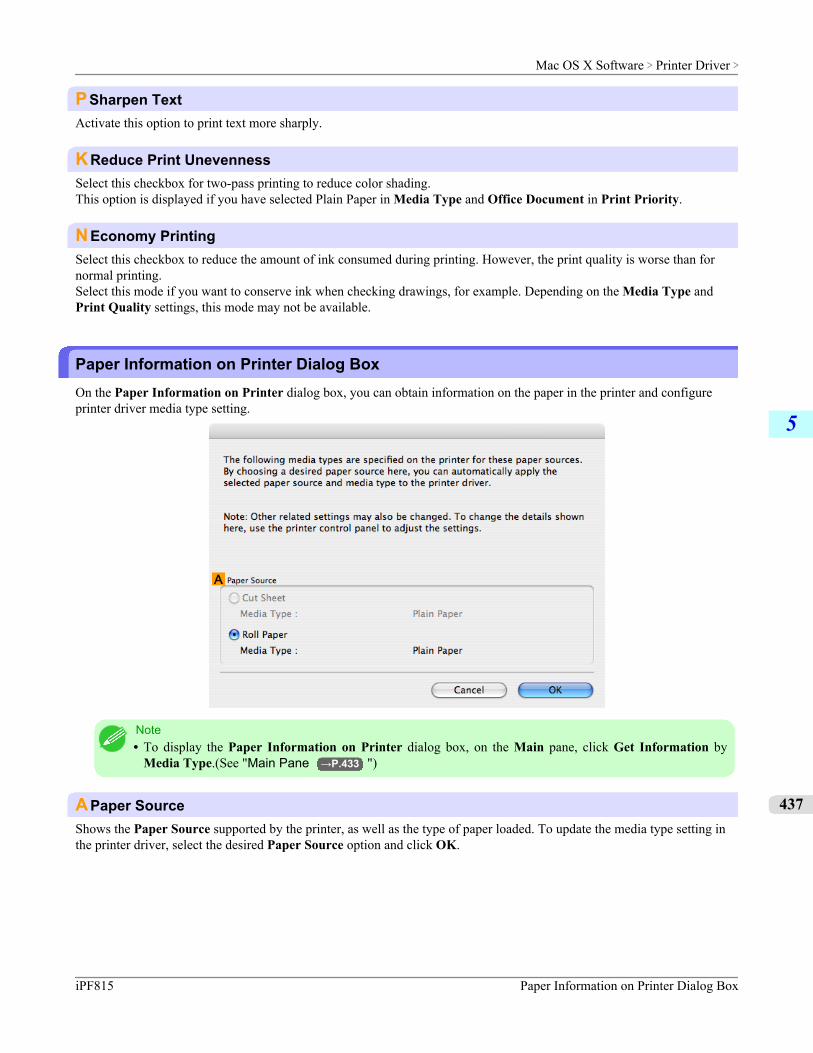
PSharpen TextActivate this option to print text more sharply.
KReduce Print UnevennessSelect this checkbox for two-pass printing to reduce color shading.This option is displayed if you have selected Plain Paper in Media Type and Office Document in Print Priority.
NEconomy PrintingSelect this checkbox to reduce the amount of ink consumed during printing. However, the print quality is worse than fornormal printing.Select this mode if you want to conserve ink when checking drawings, for example. Depending on the Media Type andPrint Quality settings, this mode may not be available.
Paper Information on Printer Dialog BoxOn the Paper Information on Printer dialog box, you can obtain information on the paper in the printer and configureprinter driver media type setting.
Note• To display the Paper Information on Printer dialog box, on the Main pane, click Get Information by
Media Type.(See "Main Pane →P.433 ")
APaper SourceShows the Paper Source supported by the printer, as well as the type of paper loaded. To update the media type setting inthe printer driver, select the desired Paper Source option and click OK.
Mac OS X Software > Printer Driver >
iPF815 Paper Information on Printer Dialog Box
5
437
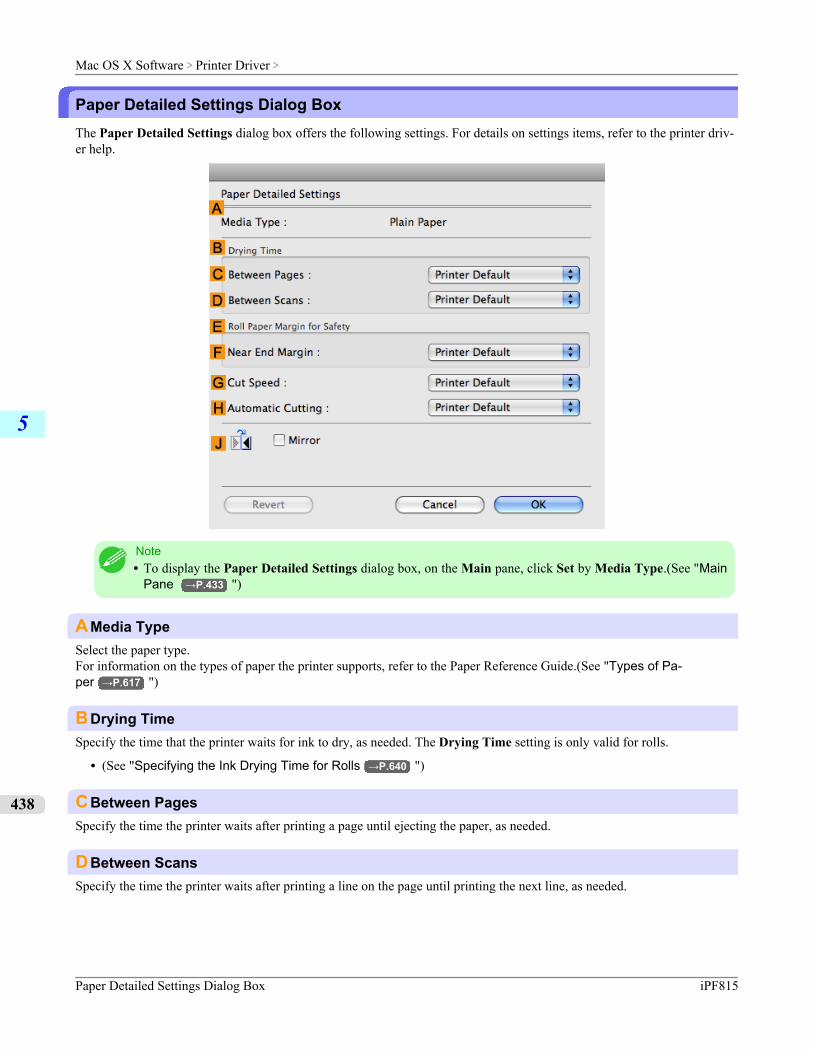
Paper Detailed Settings Dialog BoxThe Paper Detailed Settings dialog box offers the following settings. For details on settings items, refer to the printer driv-er help.
Note• To display the Paper Detailed Settings dialog box, on the Main pane, click Set by Media Type.(See "Main
Pane →P.433 ")
AMedia TypeSelect the paper type.For information on the types of paper the printer supports, refer to the Paper Reference Guide.(See "Types of Pa-per →P.617 ")
BDrying TimeSpecify the time that the printer waits for ink to dry, as needed. The Drying Time setting is only valid for rolls.
• (See "Specifying the Ink Drying Time for Rolls →P.640 ")
CBetween PagesSpecify the time the printer waits after printing a page until ejecting the paper, as needed.
DBetween ScansSpecify the time the printer waits after printing a line on the page until printing the next line, as needed.
Mac OS X Software > Printer Driver >
Paper Detailed Settings Dialog Box iPF815
5
438
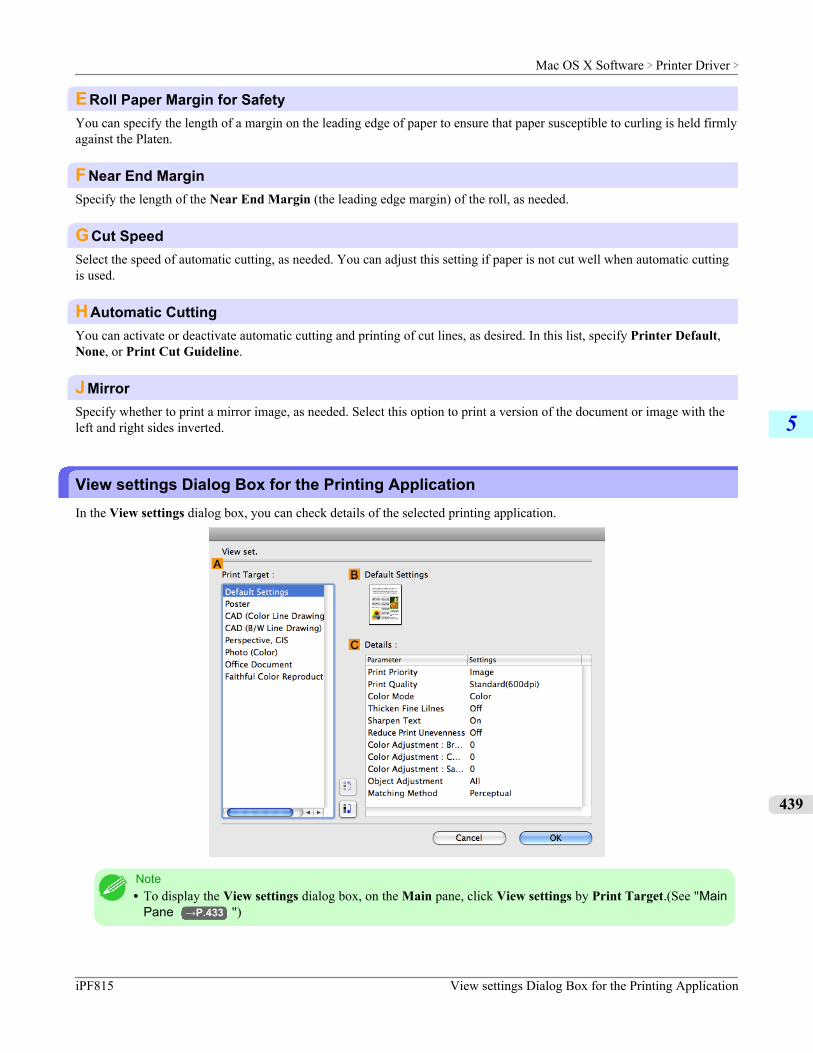
ERoll Paper Margin for SafetyYou can specify the length of a margin on the leading edge of paper to ensure that paper susceptible to curling is held firmlyagainst the Platen.
FNear End MarginSpecify the length of the Near End Margin (the leading edge margin) of the roll, as needed.
GCut SpeedSelect the speed of automatic cutting, as needed. You can adjust this setting if paper is not cut well when automatic cuttingis used.
HAutomatic CuttingYou can activate or deactivate automatic cutting and printing of cut lines, as desired. In this list, specify Printer Default,None, or Print Cut Guideline.
JMirrorSpecify whether to print a mirror image, as needed. Select this option to print a version of the document or image with theleft and right sides inverted.
View settings Dialog Box for the Printing ApplicationIn the View settings dialog box, you can check details of the selected printing application.
Note• To display the View settings dialog box, on the Main pane, click View settings by Print Target.(See "Main
Pane →P.433 ")
Mac OS X Software > Printer Driver >
iPF815 View settings Dialog Box for the Printing Application
5
439
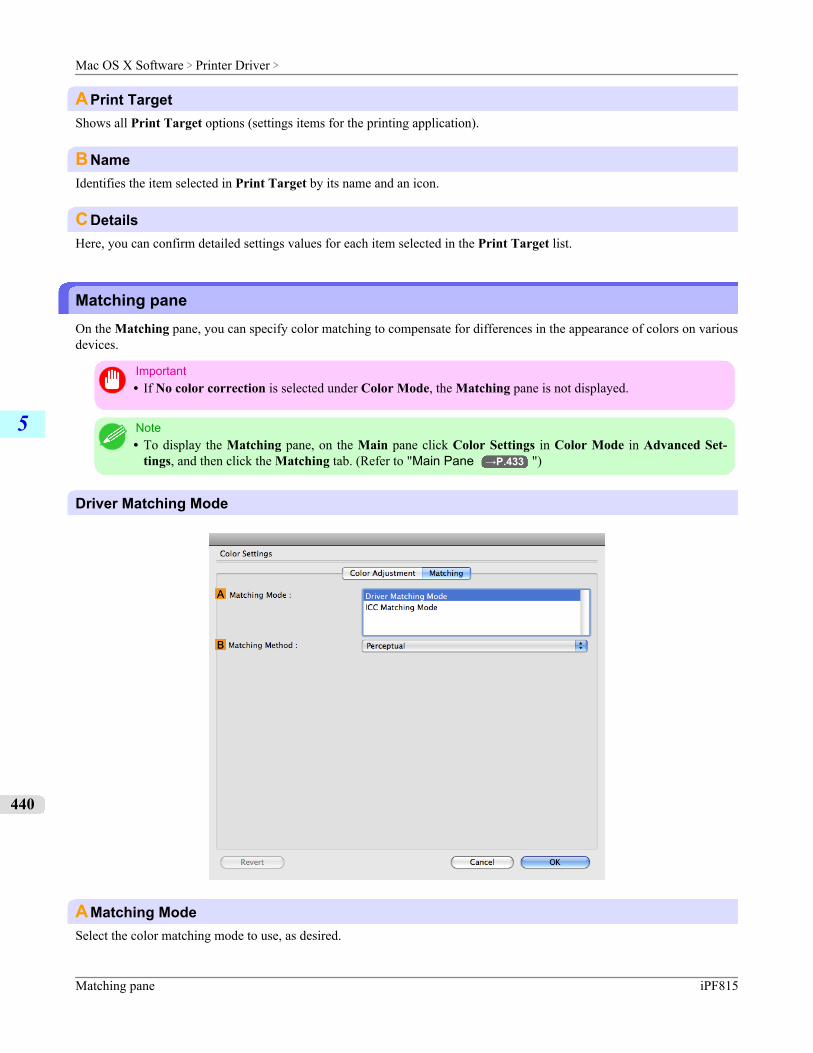
APrint TargetShows all Print Target options (settings items for the printing application).
BNameIdentifies the item selected in Print Target by its name and an icon.
CDetailsHere, you can confirm detailed settings values for each item selected in the Print Target list.
Matching paneOn the Matching pane, you can specify color matching to compensate for differences in the appearance of colors on variousdevices.
Important• If No color correction is selected under Color Mode, the Matching pane is not displayed.
Note• To display the Matching pane, on the Main pane click Color Settings in Color Mode in Advanced Set-
tings, and then click the Matching tab. (Refer to "Main Pane →P.433 ")
Driver Matching Mode
AMatching ModeSelect the color matching mode to use, as desired.
Mac OS X Software > Printer Driver >
Matching pane iPF815
5
440
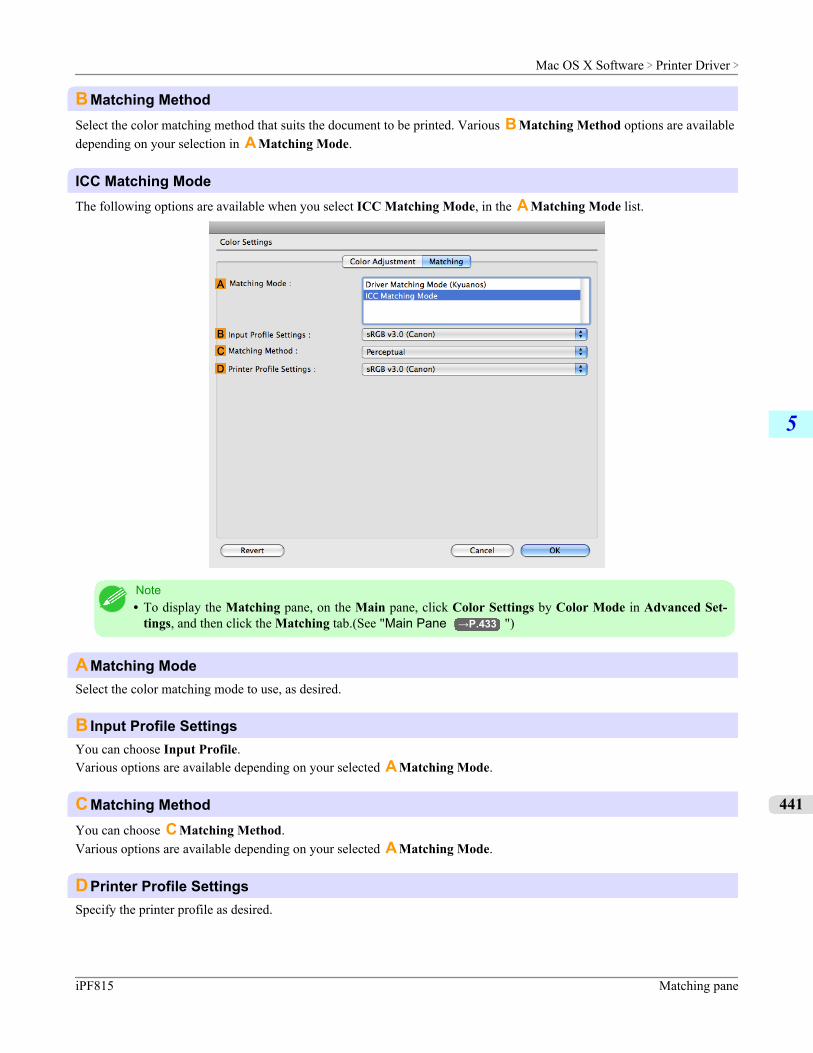
BMatching MethodSelect the color matching method that suits the document to be printed. Various B Matching Method options are availabledepending on your selection in A Matching Mode.
ICC Matching ModeThe following options are available when you select ICC Matching Mode, in the A Matching Mode list.
Note• To display the Matching pane, on the Main pane, click Color Settings by Color Mode in Advanced Set-
tings, and then click the Matching tab.(See "Main Pane →P.433 ")
AMatching ModeSelect the color matching mode to use, as desired.
B Input Profile SettingsYou can choose Input Profile.Various options are available depending on your selected A Matching Mode.
CMatching MethodYou can choose C Matching Method.Various options are available depending on your selected A Matching Mode.
DPrinter Profile SettingsSpecify the printer profile as desired.
Mac OS X Software > Printer Driver >
iPF815 Matching pane
5
441
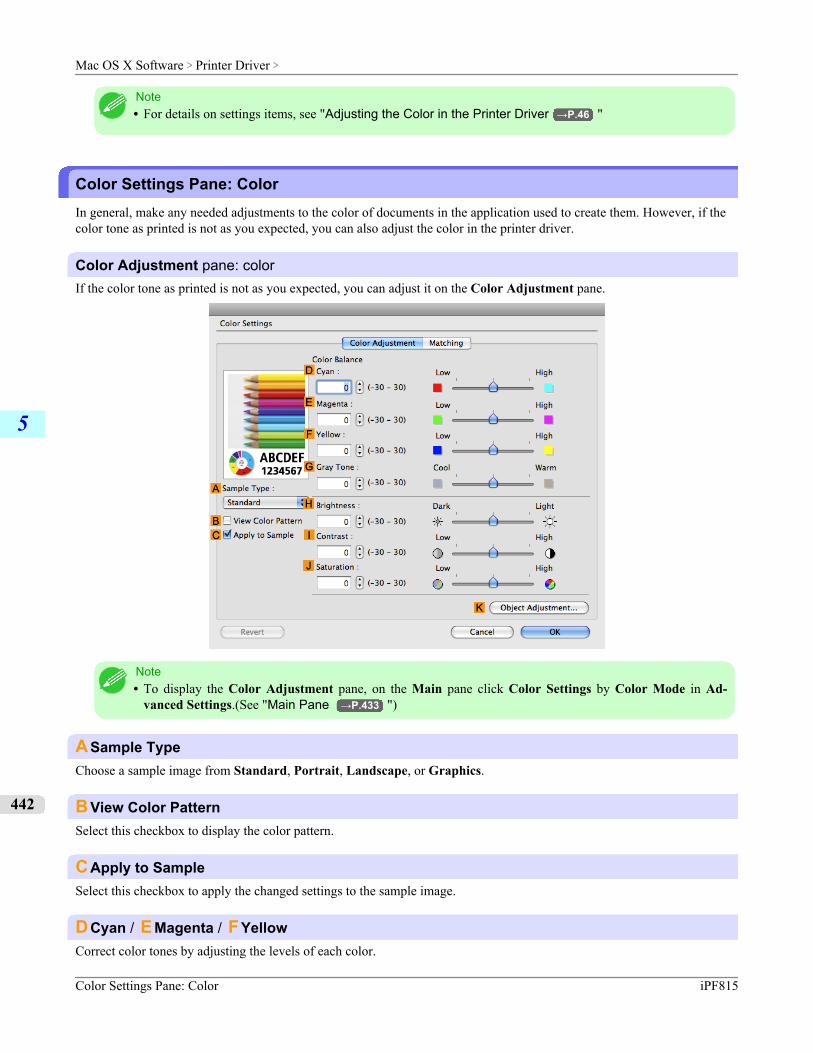
Note• For details on settings items, see "Adjusting the Color in the Printer Driver →P.46 "
Color Settings Pane: ColorIn general, make any needed adjustments to the color of documents in the application used to create them. However, if thecolor tone as printed is not as you expected, you can also adjust the color in the printer driver.
Color Adjustment pane: colorIf the color tone as printed is not as you expected, you can adjust it on the Color Adjustment pane.
Note• To display the Color Adjustment pane, on the Main pane click Color Settings by Color Mode in Ad-
vanced Settings.(See "Main Pane →P.433 ")
ASample TypeChoose a sample image from Standard, Portrait, Landscape, or Graphics.
BView Color PatternSelect this checkbox to display the color pattern.
CApply to SampleSelect this checkbox to apply the changed settings to the sample image.
DCyan / EMagenta / FYellowCorrect color tones by adjusting the levels of each color.
Mac OS X Software > Printer Driver >
Color Settings Pane: Color iPF815
5
442
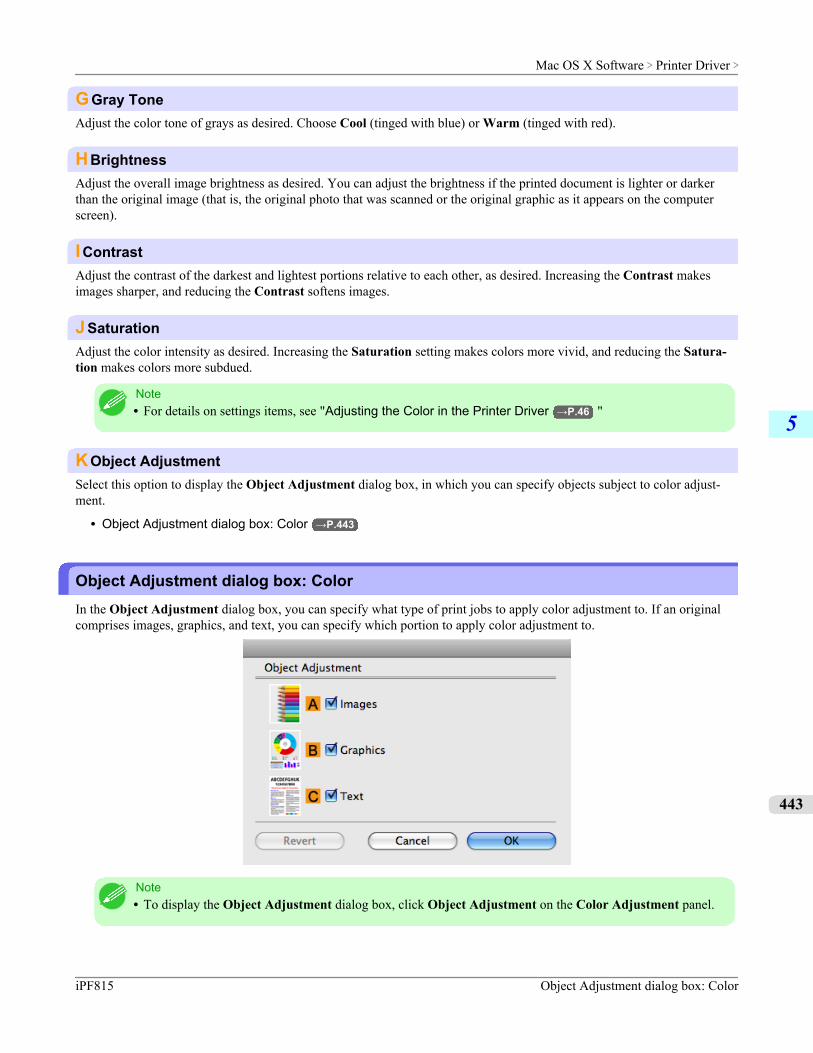
GGray ToneAdjust the color tone of grays as desired. Choose Cool (tinged with blue) or Warm (tinged with red).
HBrightnessAdjust the overall image brightness as desired. You can adjust the brightness if the printed document is lighter or darkerthan the original image (that is, the original photo that was scanned or the original graphic as it appears on the computerscreen).
IContrastAdjust the contrast of the darkest and lightest portions relative to each other, as desired. Increasing the Contrast makesimages sharper, and reducing the Contrast softens images.
JSaturationAdjust the color intensity as desired. Increasing the Saturation setting makes colors more vivid, and reducing the Satura-tion makes colors more subdued.
Note• For details on settings items, see "Adjusting the Color in the Printer Driver →P.46 "
KObject AdjustmentSelect this option to display the Object Adjustment dialog box, in which you can specify objects subject to color adjust-ment.
• Object Adjustment dialog box: Color →P.443
Object Adjustment dialog box: ColorIn the Object Adjustment dialog box, you can specify what type of print jobs to apply color adjustment to. If an originalcomprises images, graphics, and text, you can specify which portion to apply color adjustment to.
Note• To display the Object Adjustment dialog box, click Object Adjustment on the Color Adjustment panel.
Mac OS X Software > Printer Driver >
iPF815 Object Adjustment dialog box: Color
5
443

A ImagesSelect this option to apply color adjustment to image areas, such as photos.
BGraphicsSelect this option to apply color adjustment to graphics, such as lines and circles.
CTextSelect this option to apply color adjustment to text.
Color Settings Pane: MonochromeThe following settings are available on the Color Settings pane for monochrome printing.
Color Adjustment pane: MonochromeOn the Color Adjustment pane for monochrome printing, you can adjust the brightness and contrast.
Note• To display the Color Adjustment pane, on the Main pane, click Color Settings in Advanced Settings.(See
"Main Pane →P.433 ")
ASample TypeChoose a sample image from Standard, Portrait, Landscape, or Graphics.
BView Color PatternSelect this checkbox to display the color pattern.
Mac OS X Software > Printer Driver >
Color Settings Pane: Monochrome iPF815
5
444
CApply to SampleSelect this checkbox to apply the changed settings to the sample image.
DCyan / EMagenta / FYellowNot available.
GGray ToneNot available.
HBrightnessAdjust the overall image brightness as desired. You can adjust the brightness if the printed document is lighter or darkerthan the original image (that is, the original photo that was scanned or the original graphic as it appears on the computerscreen).
IContrastAdjust the contrast of the darkest and lightest portions relative to each other, as desired. Increasing the I Contrast makesimages sharper, and reducing the I Contrast softens images.
JSaturationNot available.
Note• For details on settings items, see "Adjusting the Color in the Printer Driver →P.46 "
KObject AdjustmentSelect this option to display the Object Adjustment dialog box, in which you can specify objects subject to color adjust-ment.(Only supported in Mac OS X 10.3.9-10.6)
• Object Adjustment dialog box: Monochrome →P.446
Mac OS X Software > Printer Driver >
iPF815 Color Settings Pane: Monochrome
5
445
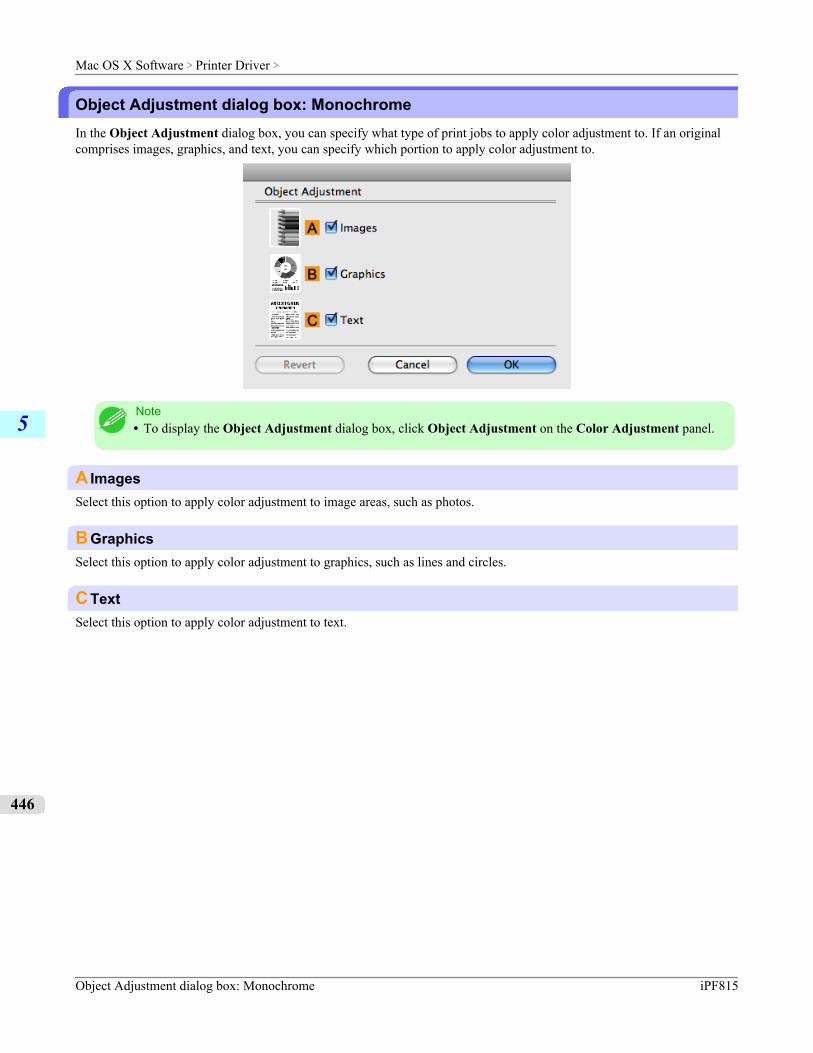
Object Adjustment dialog box: MonochromeIn the Object Adjustment dialog box, you can specify what type of print jobs to apply color adjustment to. If an originalcomprises images, graphics, and text, you can specify which portion to apply color adjustment to.
Note• To display the Object Adjustment dialog box, click Object Adjustment on the Color Adjustment panel.
A ImagesSelect this option to apply color adjustment to image areas, such as photos.
BGraphicsSelect this option to apply color adjustment to graphics, such as lines and circles.
CTextSelect this option to apply color adjustment to text.
Mac OS X Software > Printer Driver >
Object Adjustment dialog box: Monochrome iPF815
5
446
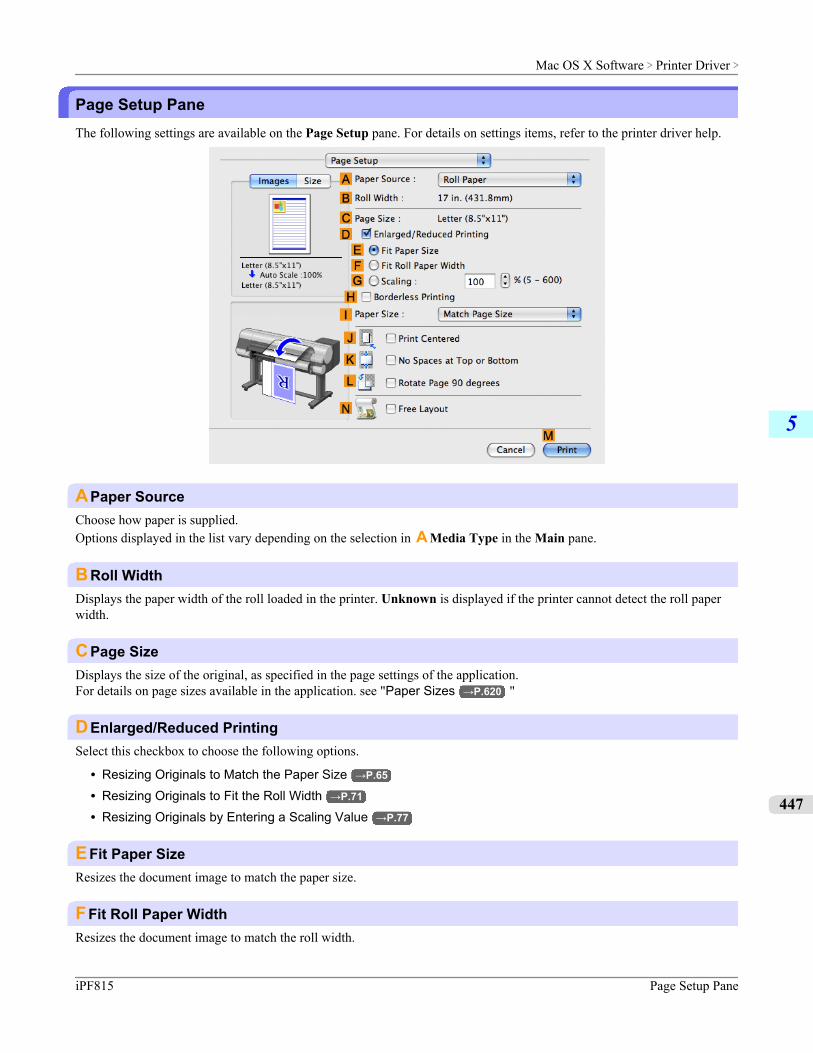
Page Setup PaneThe following settings are available on the Page Setup pane. For details on settings items, refer to the printer driver help.
APaper SourceChoose how paper is supplied.Options displayed in the list vary depending on the selection in A Media Type in the Main pane.
BRoll WidthDisplays the paper width of the roll loaded in the printer. Unknown is displayed if the printer cannot detect the roll paperwidth.
CPage SizeDisplays the size of the original, as specified in the page settings of the application.For details on page sizes available in the application. see "Paper Sizes →P.620 "
DEnlarged/Reduced PrintingSelect this checkbox to choose the following options.
• Resizing Originals to Match the Paper Size →P.65
• Resizing Originals to Fit the Roll Width →P.71
• Resizing Originals by Entering a Scaling Value →P.77
EFit Paper SizeResizes the document image to match the paper size.
FFit Roll Paper WidthResizes the document image to match the roll width.
Mac OS X Software > Printer Driver >
iPF815 Page Setup Pane
5
447
GScalingResizes the document image based on a specified scaling value. Enter a value in a range of 5–600.
HBorderless PrintingBorderless printing is available if roll paper is selected in the A Paper Source list.Activate this setting for borderless printing to match the size and width of the paper.
• Borderless Printing on Paper of Equivalent Size →P.100
• Borderless Printing by Resizing Originals to Fit the Roll Width →P.107
• Borderless Printing at Actual Size →P.91
IPaper SizeChoose the size of the paper you will print on.Click Display all selections for Paper Size to list available sizes.For details on available paper sizes, see "Paper Sizes →P.620 "
JPrint CenteredSelect this checkbox to print document images in the center of the paper.
• Printing Originals Centered on Rolls →P.154
• Printing Originals Centered on Sheets →P.160
KNo Spaces at Top or BottomSelect this checkbox to print the next image skipping blank areas above and below printable data in documents, which ena-bles you to conserve the paper.
• Conserving Roll Paper by Printing Originals Without Top and Bottom Margins →P.173
LRotate Page 90 degreesSelect this checkbox to rotate the document image by 90 degrees before printing.
• Conserving Roll Paper by Rotating Originals 90 Degrees →P.167
NFree LayoutSelect this checkbox to start imagePROGRAF Free Layout before printing.This allows you to print multiple documents next to each other.
Important• This cannot be selected if Print Preview is enabled in the Main panel.
• Printing Multiple Originals Next to Each Other →P.133
Mac OS X Software > Printer Driver >
Page Setup Pane iPF815
5
448
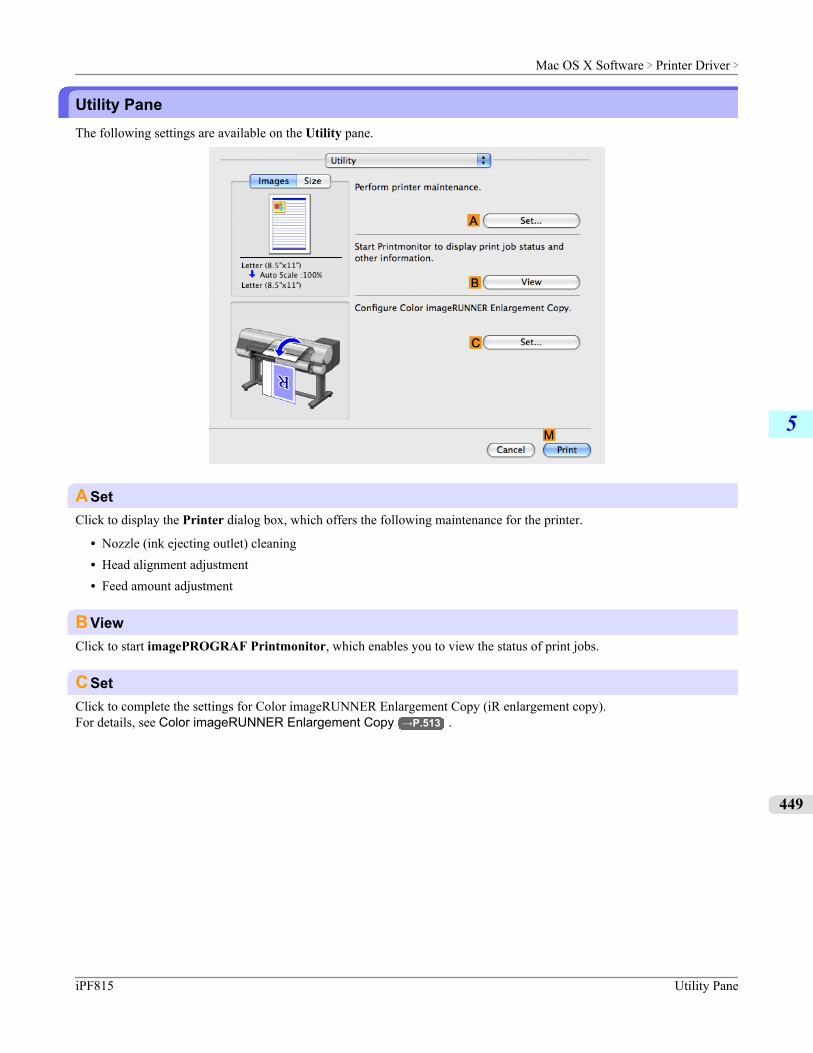
Utility PaneThe following settings are available on the Utility pane.
ASetClick to display the Printer dialog box, which offers the following maintenance for the printer.
• Nozzle (ink ejecting outlet) cleaning• Head alignment adjustment• Feed amount adjustment
BViewClick to start imagePROGRAF Printmonitor, which enables you to view the status of print jobs.
CSetClick to complete the settings for Color imageRUNNER Enlargement Copy (iR enlargement copy).For details, see Color imageRUNNER Enlargement Copy →P.513 .
Mac OS X Software > Printer Driver >
iPF815 Utility Pane
5
449

Additional Settings PaneThe following settings are available on the Additional Settings pane.
AData Send MethodChoose how print data is sent to the printer.
• B Send Print Data Immediately to Printer
• C Send All Print Data as Batch to Printer
DSend job toYou can configure the method for saving print jobs to the printer hard disk.
• E Print
• F Print (auto delete)
• G Save in mail box
HSave data before printingJobs are printed after they are saved on the hard disk.
Mac OS X Software > Printer Driver >
Additional Settings Pane iPF815
5
450
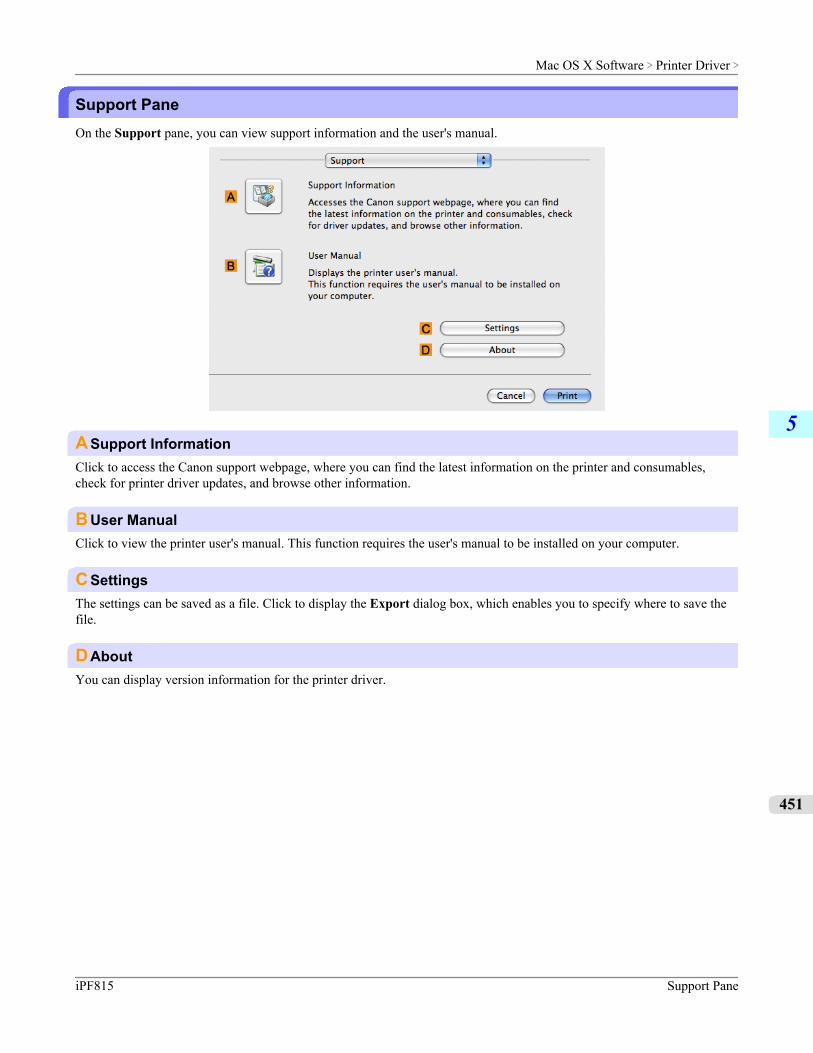
Support PaneOn the Support pane, you can view support information and the user's manual.
ASupport InformationClick to access the Canon support webpage, where you can find the latest information on the printer and consumables,check for printer driver updates, and browse other information.
BUser ManualClick to view the printer user's manual. This function requires the user's manual to be installed on your computer.
CSettingsThe settings can be saved as a file. Click to display the Export dialog box, which enables you to specify where to save thefile.
DAboutYou can display version information for the printer driver.
Mac OS X Software > Printer Driver >
iPF815 Support Pane
5
451
PreviewThe Features of Preview ................................................................................................................................. 452Operating Environment ................................................................................................................................... 452Starting Preview .............................................................................................................................................. 453
Preview Main Window ..................................................................................................................................... 454Paper Settings Panel ....................................................................................................................................... 457
Easy Settings .............................................................................................................................................. 459Advanced Settings ...................................................................................................................................... 460
Output Settings Panel ..................................................................................................................................... 462Color Settings Panel ........................................................................................................................................ 464
Color Adjustment ......................................................................................................................................... 465Matching ...................................................................................................................................................... 468
Driver Matching Mode ............................................................................................................................. 470ICC Matching Mode ................................................................................................................................ 471ColorSync ................................................................................................................................................ 472
Preferences Dialog Box ................................................................................................................................... 472Zoom Dialog Box ............................................................................................................................................. 473Go to Page Dialog Box .................................................................................................................................... 473
Print with No Borders ...................................................................................................................................... 473Print on the Center .......................................................................................................................................... 474Not Print Spaces at the Top/Bottom ................................................................................................................ 475Print Page Rotated 90 Degrees ...................................................................................................................... 476Display with Fitting to the Width of the Paper .................................................................................................. 477Display with All ................................................................................................................................................ 478Display with Actual Size .................................................................................................................................. 479Moving a Page ................................................................................................................................................ 479
The Features of PreviewThe main features of Preview are as follows.
• While viewing this screen, you can adjust layout settings of a document created with application software.• You can not only adjust layout settings but also your changes will be instantly applied on the preview screen, and you
can print the preview screen as it is seen.
Note• The media type, image size, detailed media settings, and the printer settings can cause the actual print output
to differ from the Preview settings.
Operating EnvironmentYou can use the Preview in the following environments.
• Compatible Operating SystemMac OS X (10.3.9 to 10.6)
• Software that requires installationimagePROGRAF Printer Driver
Mac OS X Software > Preview >
The Features of Preview iPF815
5
452
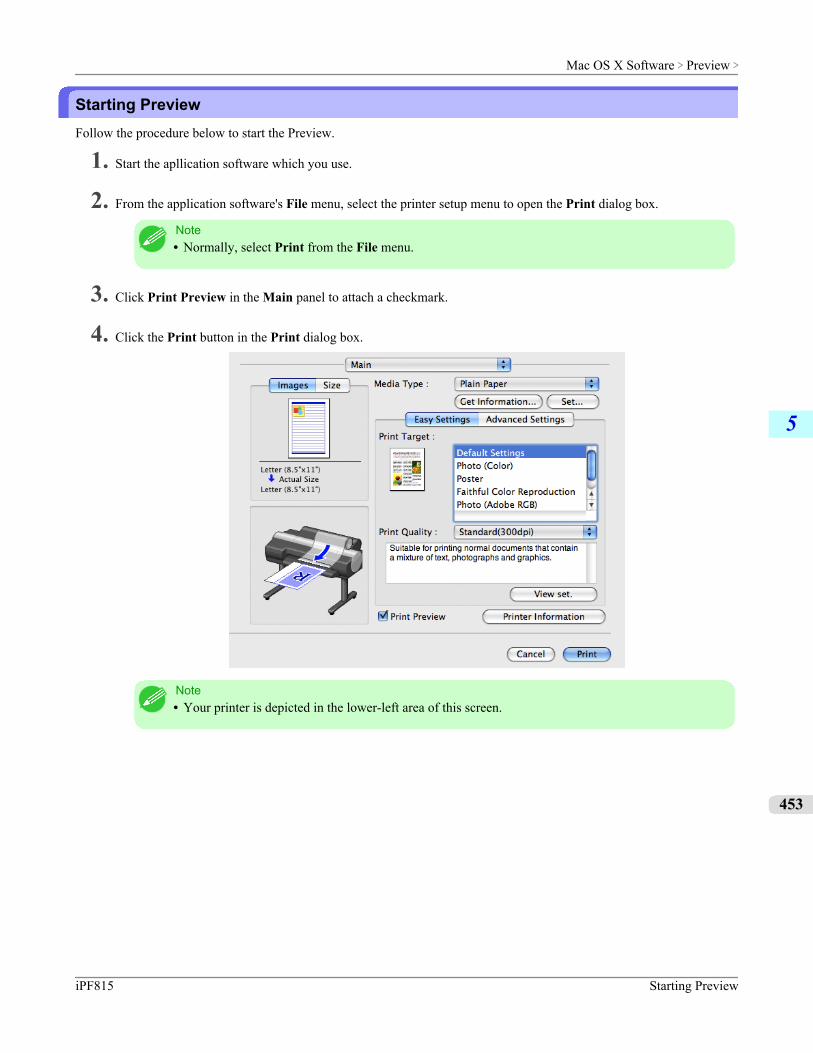
Starting PreviewFollow the procedure below to start the Preview.
1. Start the apllication software which you use.
2. From the application software's File menu, select the printer setup menu to open the Print dialog box.
Note• Normally, select Print from the File menu.
3. Click Print Preview in the Main panel to attach a checkmark.
4. Click the Print button in the Print dialog box.
Note• Your printer is depicted in the lower-left area of this screen.
Mac OS X Software > Preview >
iPF815 Starting Preview
5
453
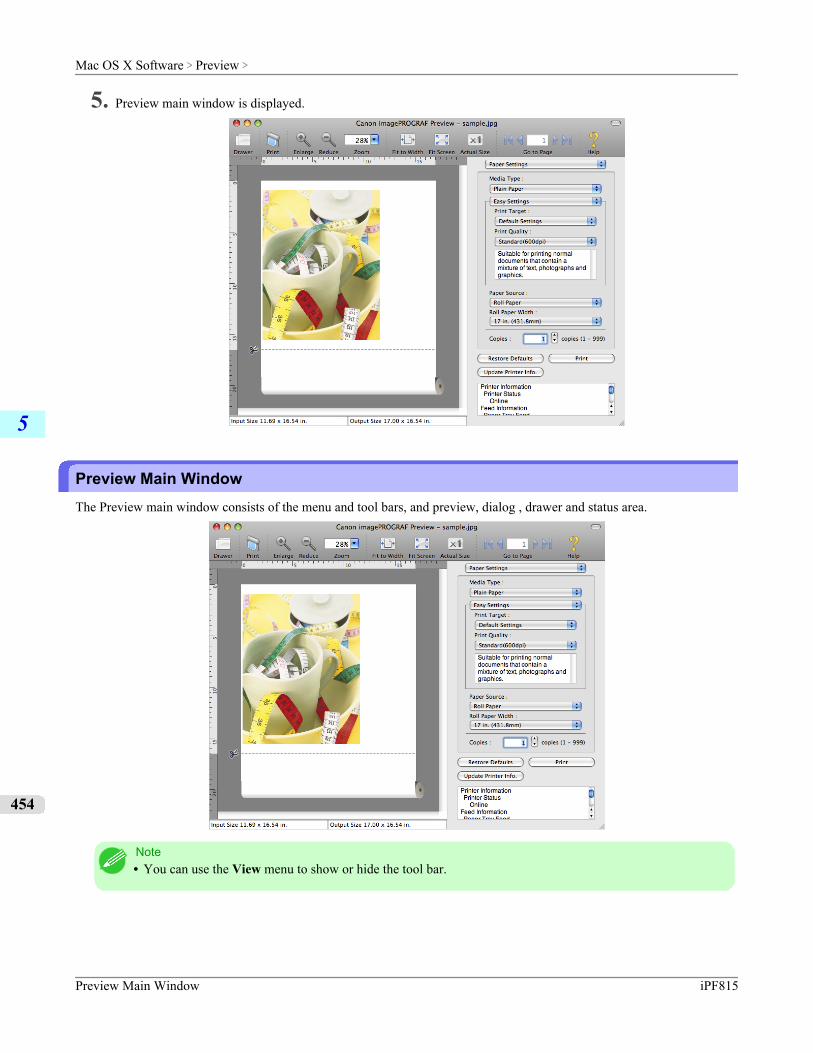
5. Preview main window is displayed.
Preview Main WindowThe Preview main window consists of the menu and tool bars, and preview, dialog , drawer and status area.
Note• You can use the View menu to show or hide the tool bar.
Mac OS X Software > Preview >
Preview Main Window iPF815
5
454
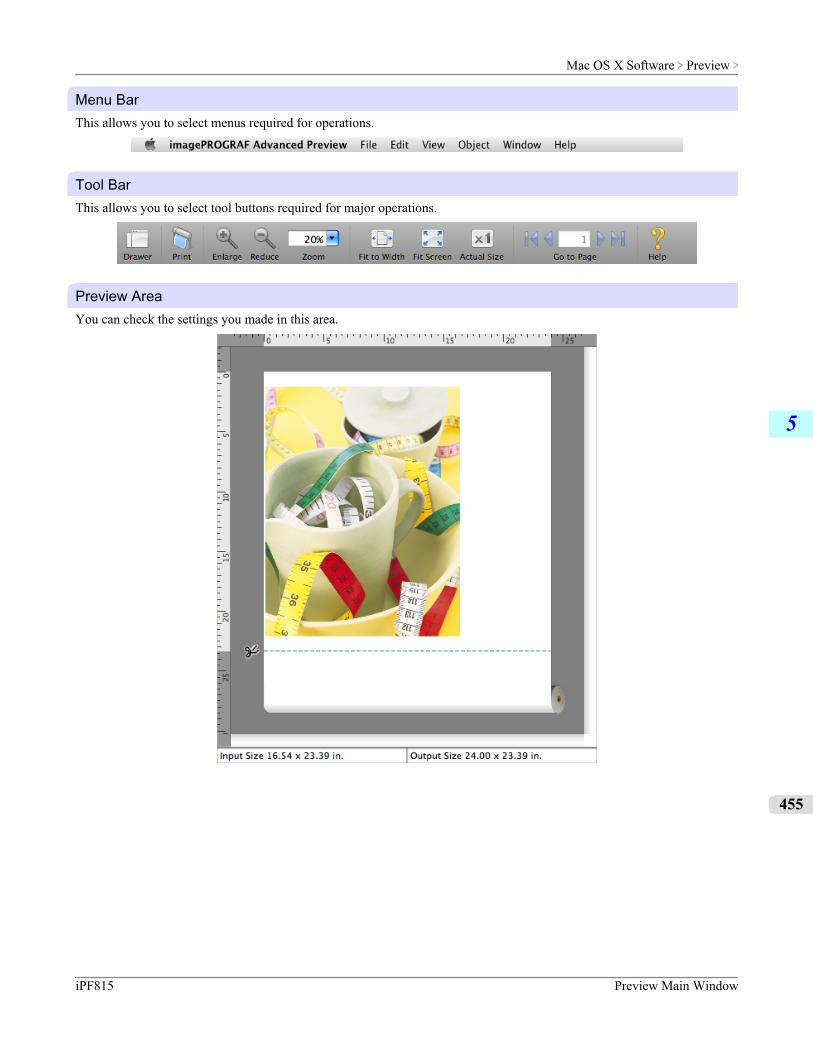
Menu BarThis allows you to select menus required for operations.
Tool BarThis allows you to select tool buttons required for major operations.
Preview AreaYou can check the settings you made in this area.
Mac OS X Software > Preview >
iPF815 Preview Main Window
5
455
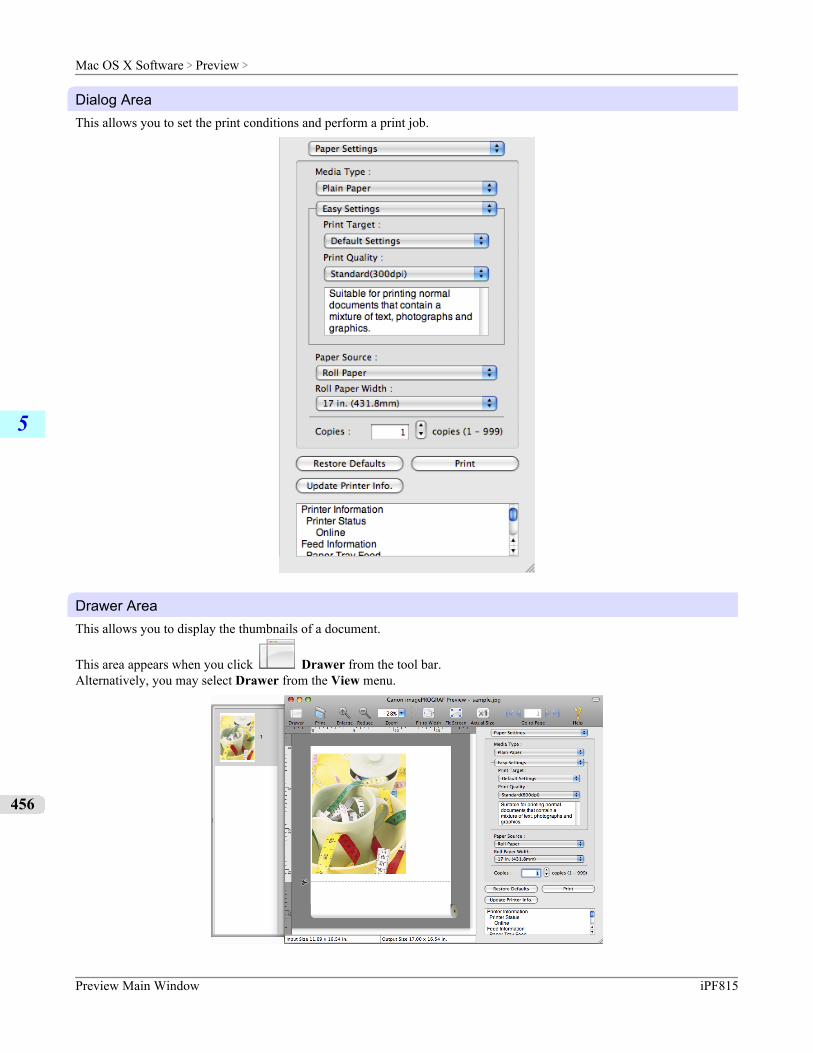
Dialog AreaThis allows you to set the print conditions and perform a print job.
Drawer AreaThis allows you to display the thumbnails of a document.
This area appears when you click Drawer from the tool bar.Alternatively, you may select Drawer from the View menu.
Mac OS X Software > Preview >
Preview Main Window iPF815
5
456
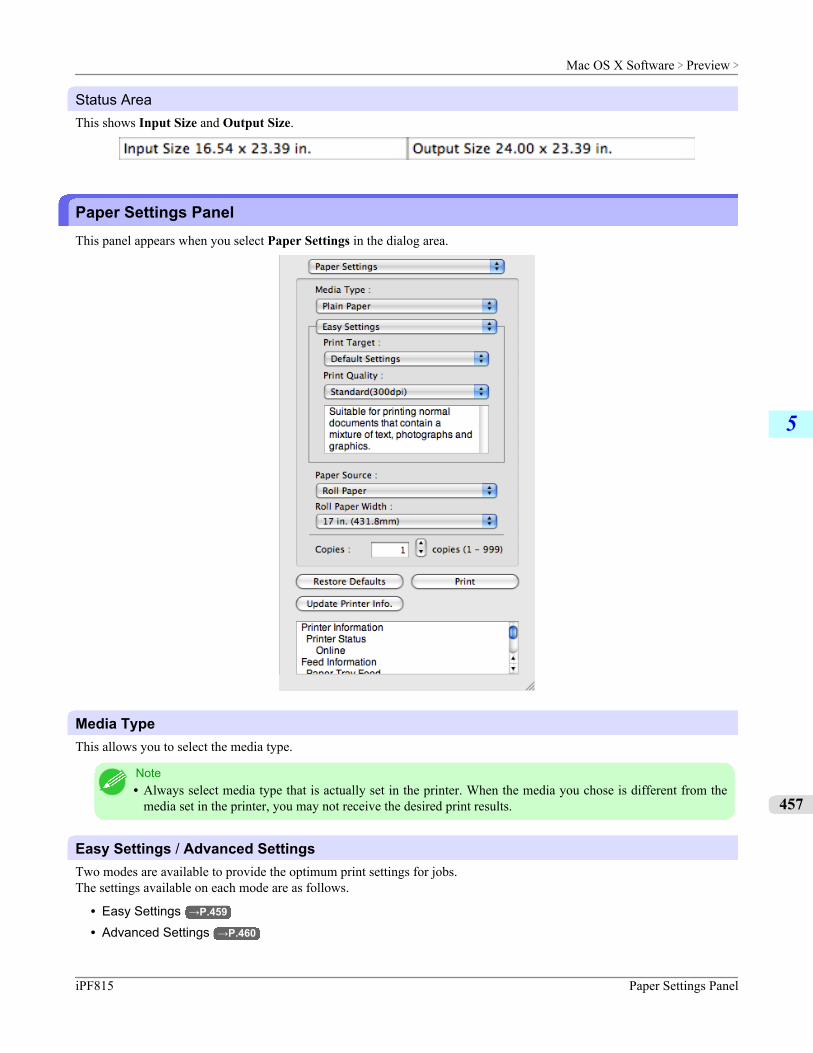
Status AreaThis shows Input Size and Output Size.
Paper Settings PanelThis panel appears when you select Paper Settings in the dialog area.
Media TypeThis allows you to select the media type.
Note• Always select media type that is actually set in the printer. When the media you chose is different from the
media set in the printer, you may not receive the desired print results.
Easy Settings / Advanced SettingsTwo modes are available to provide the optimum print settings for jobs.The settings available on each mode are as follows.
• Easy Settings →P.459
• Advanced Settings →P.460
Mac OS X Software > Preview >
iPF815 Paper Settings Panel
5
457
Paper SourceYou can select the paper source.The following settings are available for paper source.
Setting Details
Cut Sheet Select to print on the cut sheet.
Roll Paper Select to print on roll paper.
Roll Paper WidthThis selects the width of the roll media set to the printer.
Note• Available only if rolls are selected in Paper Source.
CopiesYou can input the number of print copies in numerical characters.
Note• The maximum value is 999.• You can change the numbers by clicking either ▲ button or ▼ button.
Restore Defaults ButtonClick the button to reset to the setting when starting Preview.
Print ButtonClick the button to begin printing.
Update Printer Info. ButtonClick the button to acquire printer information.
Mac OS X Software > Preview >
Paper Settings Panel iPF815
5
458
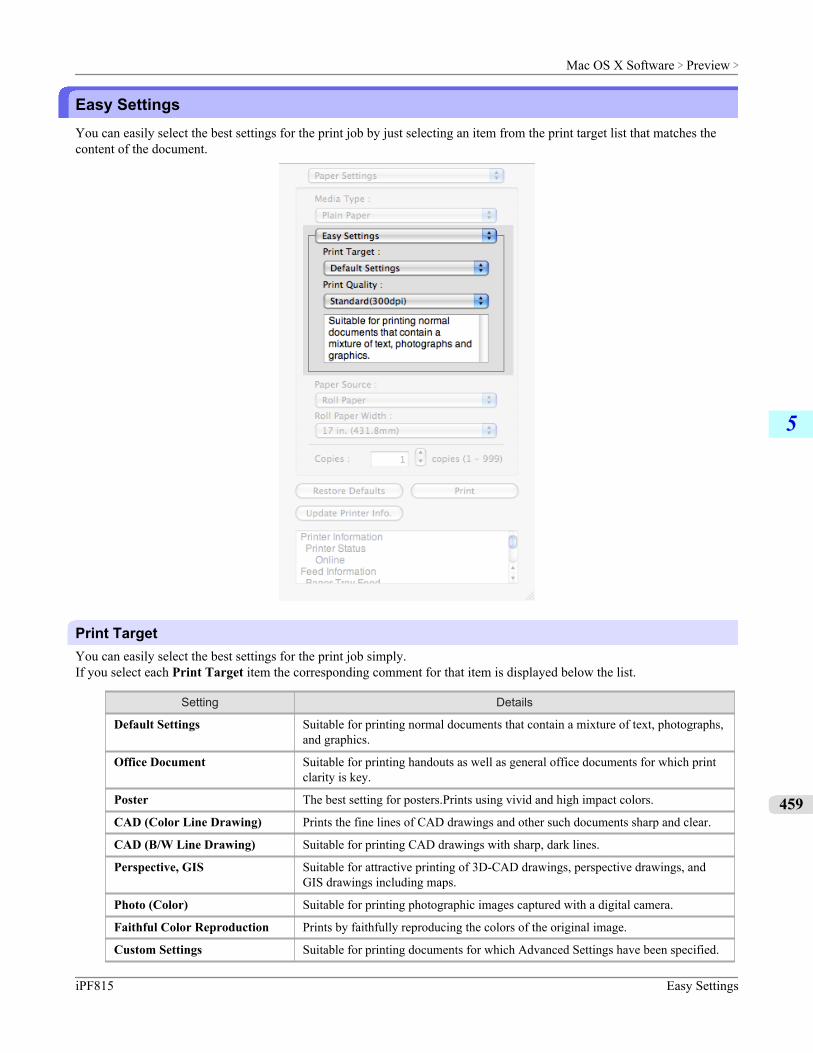
Easy SettingsYou can easily select the best settings for the print job by just selecting an item from the print target list that matches thecontent of the document.
Print TargetYou can easily select the best settings for the print job simply.If you select each Print Target item the corresponding comment for that item is displayed below the list.
Setting Details
Default Settings Suitable for printing normal documents that contain a mixture of text, photographs,and graphics.
Office Document Suitable for printing handouts as well as general office documents for which printclarity is key.
Poster The best setting for posters.Prints using vivid and high impact colors.
CAD (Color Line Drawing) Prints the fine lines of CAD drawings and other such documents sharp and clear.
CAD (B/W Line Drawing) Suitable for printing CAD drawings with sharp, dark lines.
Perspective, GIS Suitable for attractive printing of 3D-CAD drawings, perspective drawings, andGIS drawings including maps.
Photo (Color) Suitable for printing photographic images captured with a digital camera.
Faithful Color Reproduction Prints by faithfully reproducing the colors of the original image.
Custom Settings Suitable for printing documents for which Advanced Settings have been specified.
Mac OS X Software > Preview >
iPF815 Easy Settings
5
459
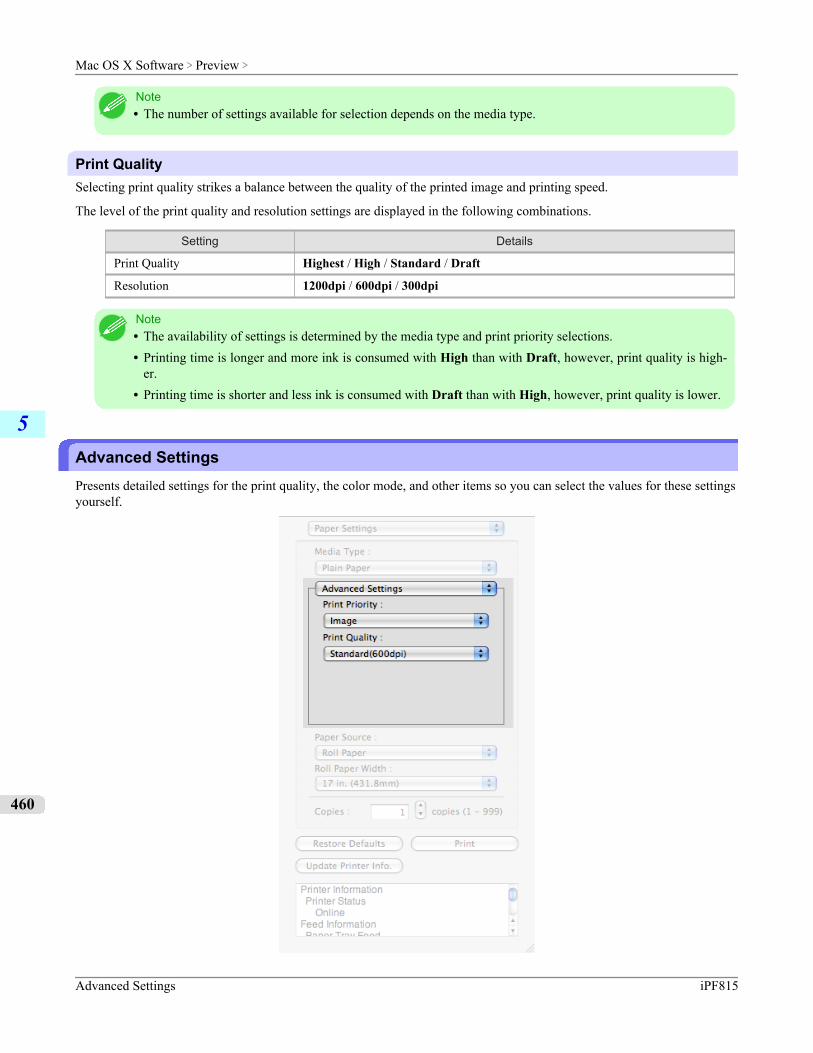
Note• The number of settings available for selection depends on the media type.
Print QualitySelecting print quality strikes a balance between the quality of the printed image and printing speed.
The level of the print quality and resolution settings are displayed in the following combinations.
Setting Details
Print Quality Highest / High / Standard / Draft
Resolution 1200dpi / 600dpi / 300dpi
Note• The availability of settings is determined by the media type and print priority selections.• Printing time is longer and more ink is consumed with High than with Draft, however, print quality is high-
er.• Printing time is shorter and less ink is consumed with Draft than with High, however, print quality is lower.
Advanced SettingsPresents detailed settings for the print quality, the color mode, and other items so you can select the values for these settingsyourself.
Mac OS X Software > Preview >
Advanced Settings iPF815
5
460
Print PrioritySelect a print quality mode that is appropriate for the print job.
Setting Details
Image This mode achieves the best results for printing photographic images and illustra-tions.
Line Drawing This mode is best for printing CAD drawings with fine lines or wall newssheet orother documents that contain large amounts of text. However, you may not achievethe quality you expect with printing photographs or other images with many filledareas. For these types of jobs, select Image.
Office Document Prints common office documents, such as proposals, memos for distribution, etc.,so they are easy to read.
Note• The number of settings available for selection depends on the media type.
Print QualitySelecting print quality strikes a balance between the quality of the printed image and printing speed.
The level of the print quality and resolution settings are displayed in the following combinations.
Setting Details
Print Quality Highest / High / Standard / Draft
Resolution 1200dpi / 600dpi / 300dpi
Note• The availability of settings is determined by the media type and print priority selections.• Printing time is longer and more ink is consumed with High than with Draft, however, print quality is high-
er.• Printing time is shorter and less ink is consumed with Draft than with High, however, print quality is lower.
Mac OS X Software > Preview >
iPF815 Advanced Settings
5
461
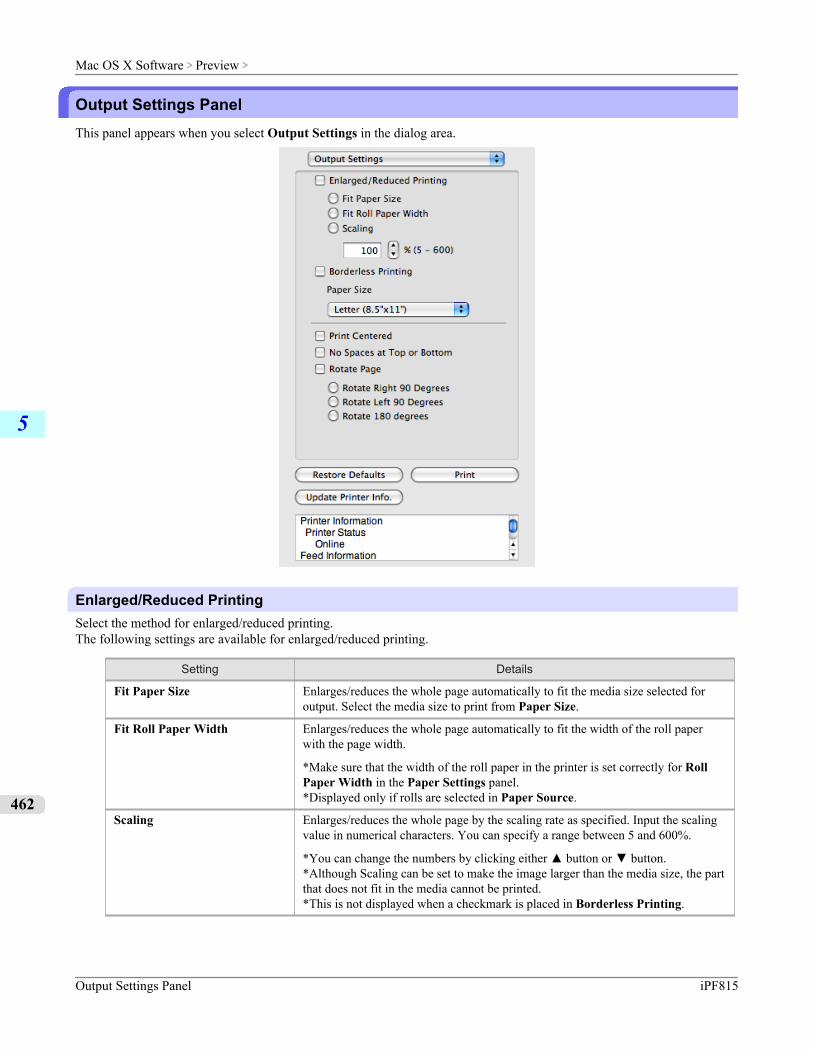
Output Settings PanelThis panel appears when you select Output Settings in the dialog area.
Enlarged/Reduced PrintingSelect the method for enlarged/reduced printing.The following settings are available for enlarged/reduced printing.
Setting Details
Fit Paper Size Enlarges/reduces the whole page automatically to fit the media size selected foroutput. Select the media size to print from Paper Size.
Fit Roll Paper Width Enlarges/reduces the whole page automatically to fit the width of the roll paperwith the page width.
*Make sure that the width of the roll paper in the printer is set correctly for RollPaper Width in the Paper Settings panel.*Displayed only if rolls are selected in Paper Source.
Scaling Enlarges/reduces the whole page by the scaling rate as specified. Input the scalingvalue in numerical characters. You can specify a range between 5 and 600%.
*You can change the numbers by clicking either ▲ button or ▼ button.*Although Scaling can be set to make the image larger than the media size, the partthat does not fit in the media cannot be printed.*This is not displayed when a checkmark is placed in Borderless Printing.
Mac OS X Software > Preview >
Output Settings Panel iPF815
5
462
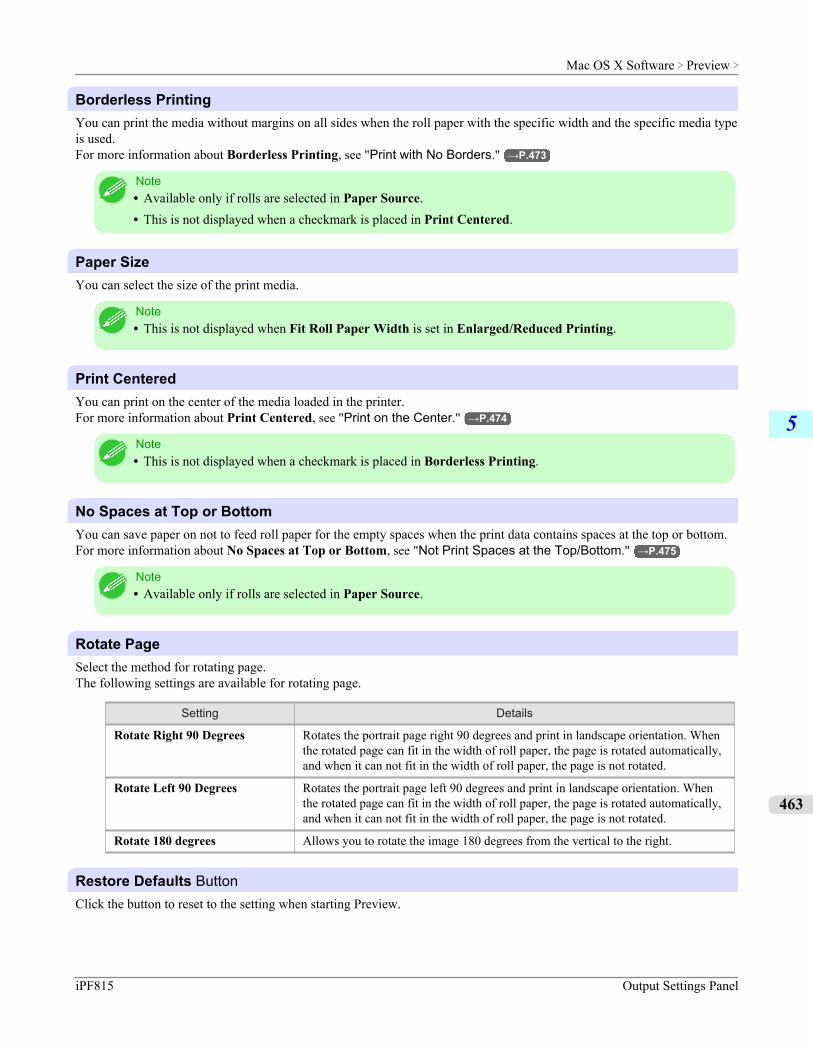
Borderless PrintingYou can print the media without margins on all sides when the roll paper with the specific width and the specific media typeis used.For more information about Borderless Printing, see "Print with No Borders." →P.473
Note• Available only if rolls are selected in Paper Source.• This is not displayed when a checkmark is placed in Print Centered.
Paper SizeYou can select the size of the print media.
Note• This is not displayed when Fit Roll Paper Width is set in Enlarged/Reduced Printing.
Print CenteredYou can print on the center of the media loaded in the printer.For more information about Print Centered, see "Print on the Center." →P.474
Note• This is not displayed when a checkmark is placed in Borderless Printing.
No Spaces at Top or BottomYou can save paper on not to feed roll paper for the empty spaces when the print data contains spaces at the top or bottom.For more information about No Spaces at Top or Bottom, see "Not Print Spaces at the Top/Bottom." →P.475
Note• Available only if rolls are selected in Paper Source.
Rotate PageSelect the method for rotating page.The following settings are available for rotating page.
Setting Details
Rotate Right 90 Degrees Rotates the portrait page right 90 degrees and print in landscape orientation. Whenthe rotated page can fit in the width of roll paper, the page is rotated automatically,and when it can not fit in the width of roll paper, the page is not rotated.
Rotate Left 90 Degrees Rotates the portrait page left 90 degrees and print in landscape orientation. Whenthe rotated page can fit in the width of roll paper, the page is rotated automatically,and when it can not fit in the width of roll paper, the page is not rotated.
Rotate 180 degrees Allows you to rotate the image 180 degrees from the vertical to the right.
Restore Defaults ButtonClick the button to reset to the setting when starting Preview.
Mac OS X Software > Preview >
iPF815 Output Settings Panel
5
463
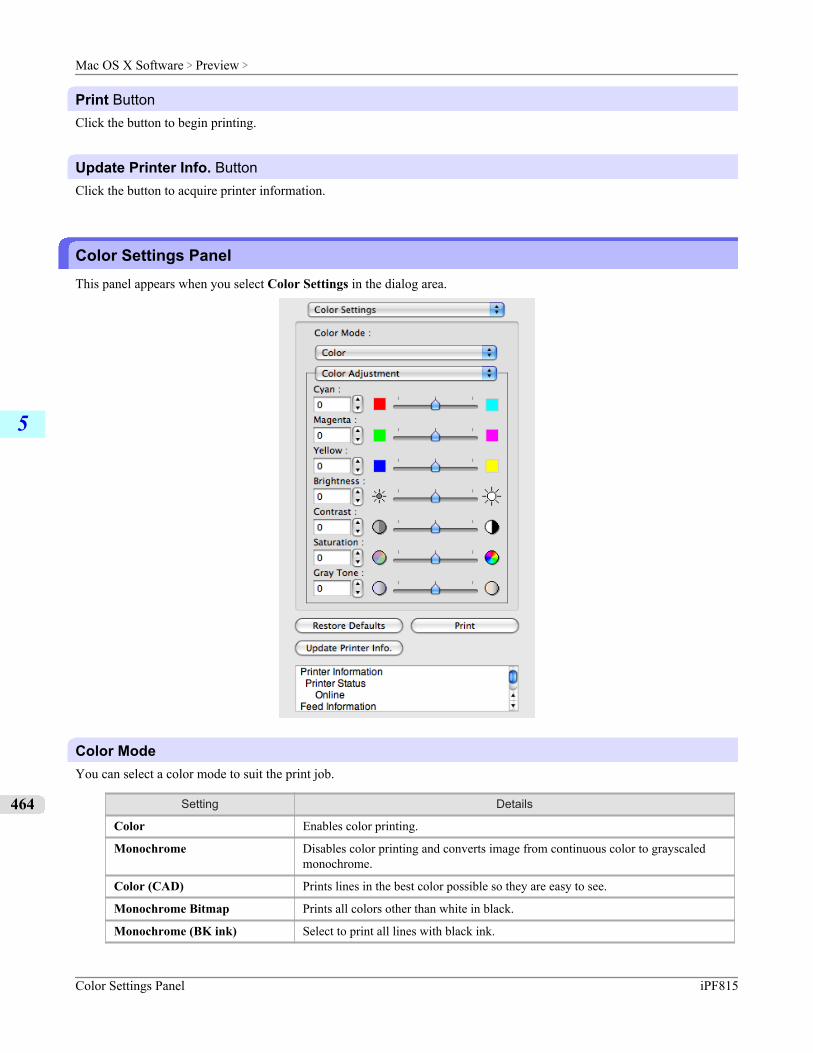
Print ButtonClick the button to begin printing.
Update Printer Info. ButtonClick the button to acquire printer information.
Color Settings PanelThis panel appears when you select Color Settings in the dialog area.
Color ModeYou can select a color mode to suit the print job.
Setting Details
Color Enables color printing.
Monochrome Disables color printing and converts image from continuous color to grayscaledmonochrome.
Color (CAD) Prints lines in the best color possible so they are easy to see.
Monochrome Bitmap Prints all colors other than white in black.
Monochrome (BK ink) Select to print all lines with black ink.
Mac OS X Software > Preview >
Color Settings Panel iPF815
5
464
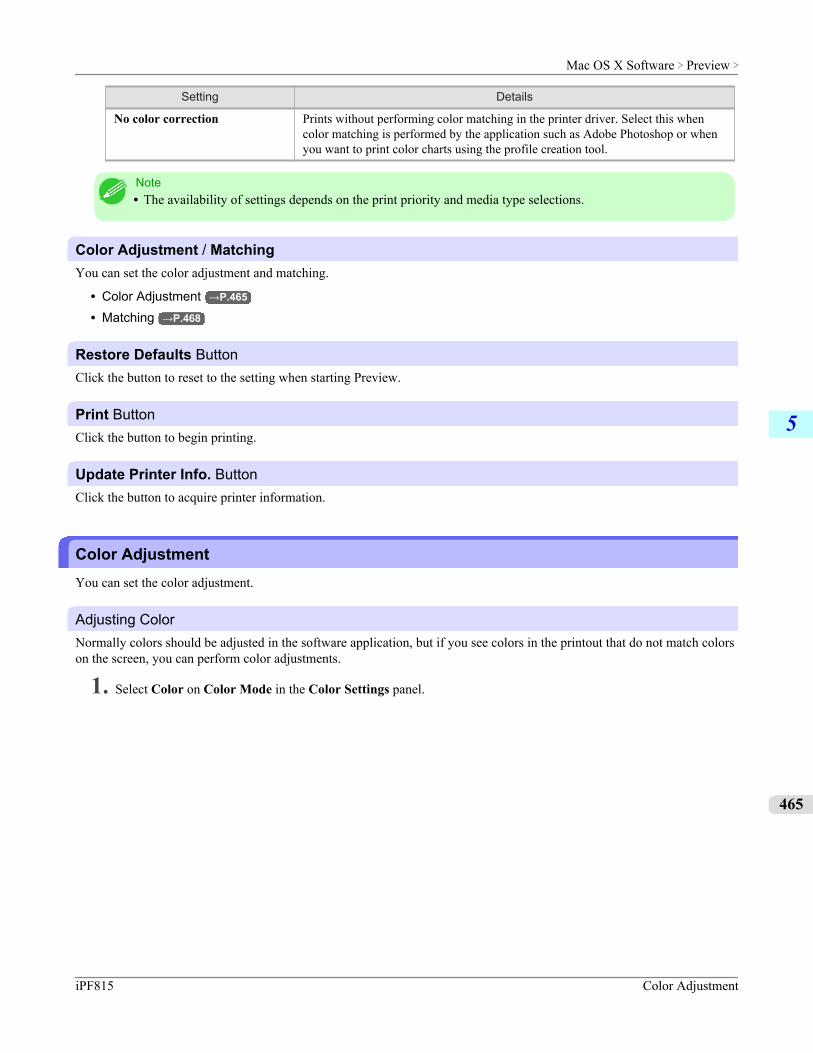
Setting Details
No color correction Prints without performing color matching in the printer driver. Select this whencolor matching is performed by the application such as Adobe Photoshop or whenyou want to print color charts using the profile creation tool.
Note• The availability of settings depends on the print priority and media type selections.
Color Adjustment / MatchingYou can set the color adjustment and matching.
• Color Adjustment →P.465
• Matching →P.468
Restore Defaults ButtonClick the button to reset to the setting when starting Preview.
Print ButtonClick the button to begin printing.
Update Printer Info. ButtonClick the button to acquire printer information.
Color AdjustmentYou can set the color adjustment.
Adjusting ColorNormally colors should be adjusted in the software application, but if you see colors in the printout that do not match colorson the screen, you can perform color adjustments.
1. Select Color on Color Mode in the Color Settings panel.
Mac OS X Software > Preview >
iPF815 Color Adjustment
5
465
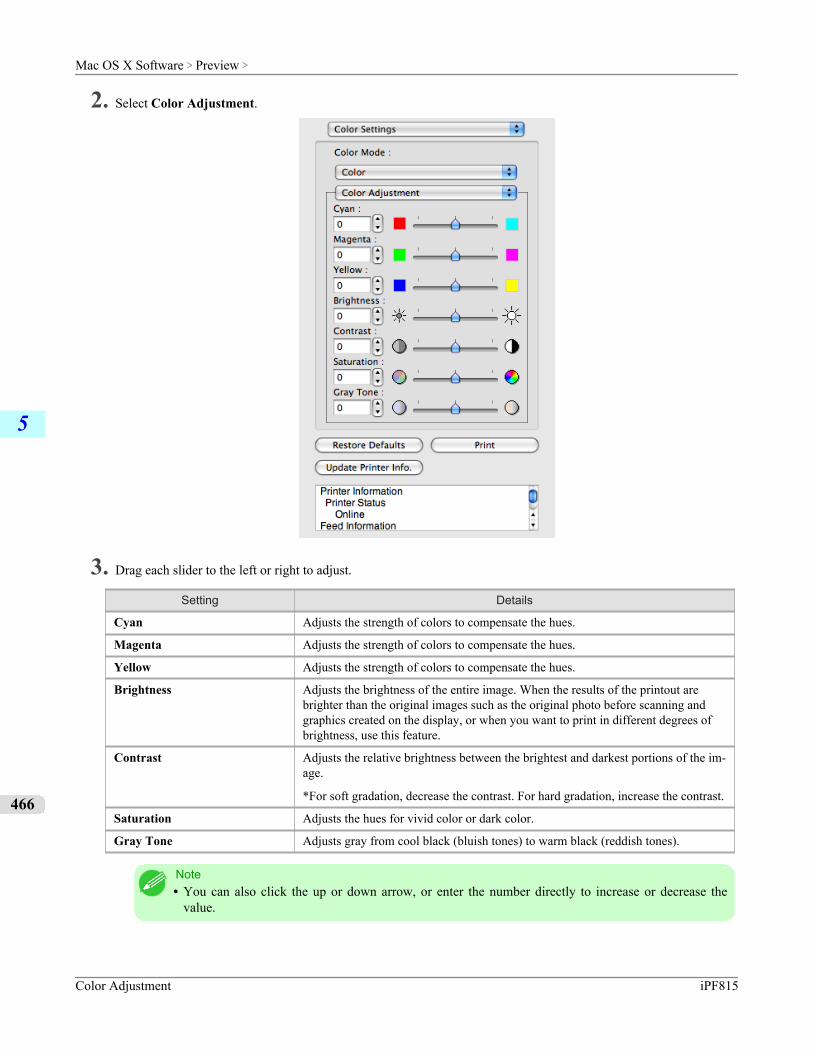
2. Select Color Adjustment.
3. Drag each slider to the left or right to adjust.
Setting Details
Cyan Adjusts the strength of colors to compensate the hues.
Magenta Adjusts the strength of colors to compensate the hues.
Yellow Adjusts the strength of colors to compensate the hues.
Brightness Adjusts the brightness of the entire image. When the results of the printout arebrighter than the original images such as the original photo before scanning andgraphics created on the display, or when you want to print in different degrees ofbrightness, use this feature.
Contrast Adjusts the relative brightness between the brightest and darkest portions of the im-age.
*For soft gradation, decrease the contrast. For hard gradation, increase the contrast.
Saturation Adjusts the hues for vivid color or dark color.
Gray Tone Adjusts gray from cool black (bluish tones) to warm black (reddish tones).
Note• You can also click the up or down arrow, or enter the number directly to increase or decrease the
value.
Mac OS X Software > Preview >
Color Adjustment iPF815
5
466
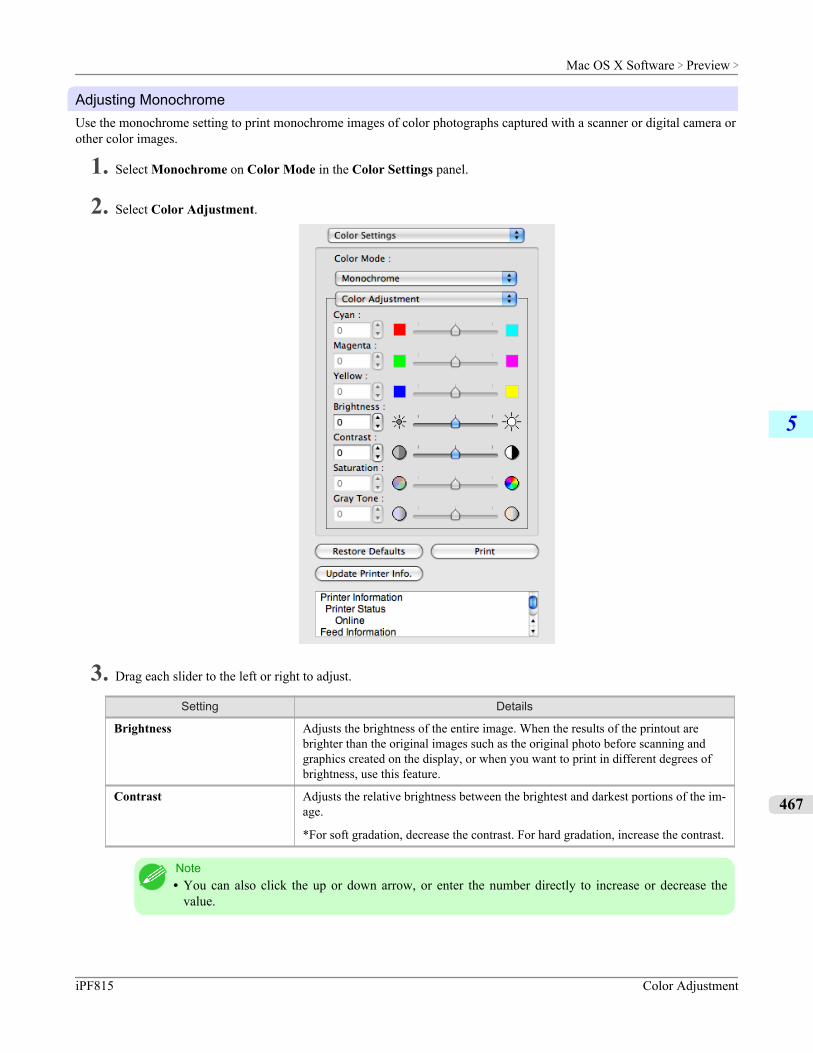
Adjusting MonochromeUse the monochrome setting to print monochrome images of color photographs captured with a scanner or digital camera orother color images.
1. Select Monochrome on Color Mode in the Color Settings panel.
2. Select Color Adjustment.
3. Drag each slider to the left or right to adjust.
Setting Details
Brightness Adjusts the brightness of the entire image. When the results of the printout arebrighter than the original images such as the original photo before scanning andgraphics created on the display, or when you want to print in different degrees ofbrightness, use this feature.
Contrast Adjusts the relative brightness between the brightest and darkest portions of the im-age.
*For soft gradation, decrease the contrast. For hard gradation, increase the contrast.
Note• You can also click the up or down arrow, or enter the number directly to increase or decrease the
value.
Mac OS X Software > Preview >
iPF815 Color Adjustment
5
467
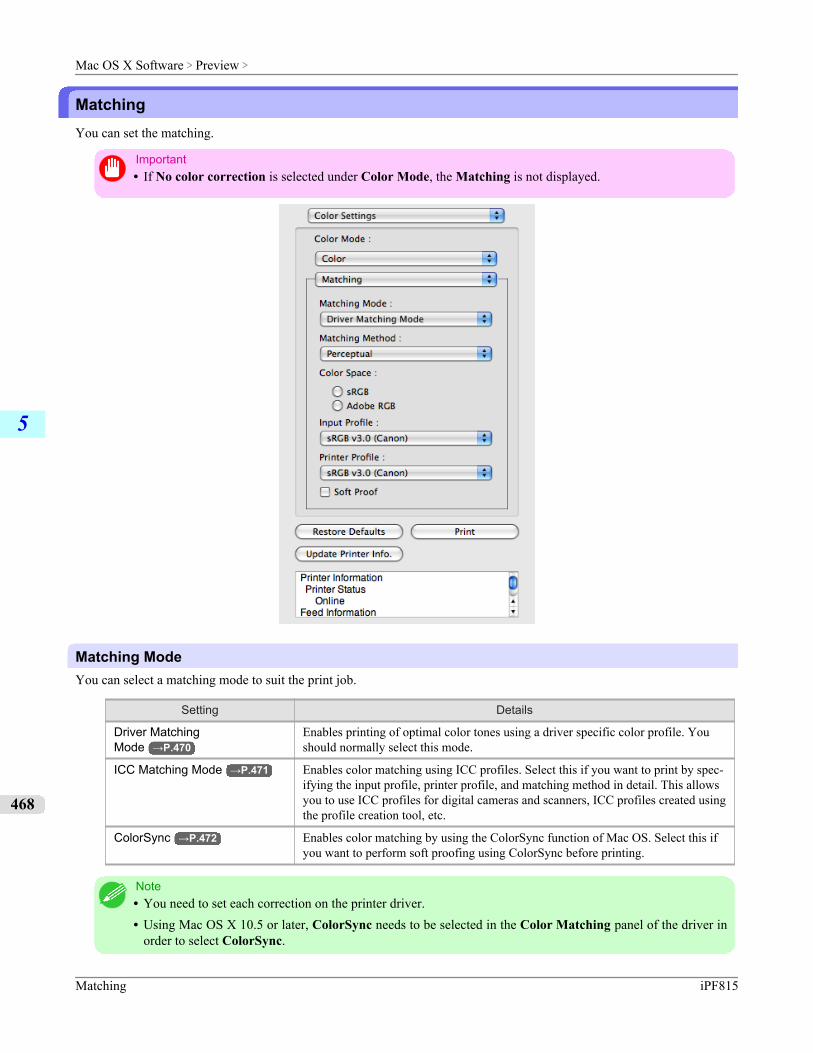
MatchingYou can set the matching.
Important• If No color correction is selected under Color Mode, the Matching is not displayed.
Matching ModeYou can select a matching mode to suit the print job.
Setting Details
Driver MatchingMode →P.470
Enables printing of optimal color tones using a driver specific color profile. Youshould normally select this mode.
ICC Matching Mode →P.471 Enables color matching using ICC profiles. Select this if you want to print by spec-ifying the input profile, printer profile, and matching method in detail. This allowsyou to use ICC profiles for digital cameras and scanners, ICC profiles created usingthe profile creation tool, etc.
ColorSync →P.472 Enables color matching by using the ColorSync function of Mac OS. Select this ifyou want to perform soft proofing using ColorSync before printing.
Note• You need to set each correction on the printer driver.• Using Mac OS X 10.5 or later, ColorSync needs to be selected in the Color Matching panel of the driver in
order to select ColorSync.
Mac OS X Software > Preview >
Matching iPF815
5
468
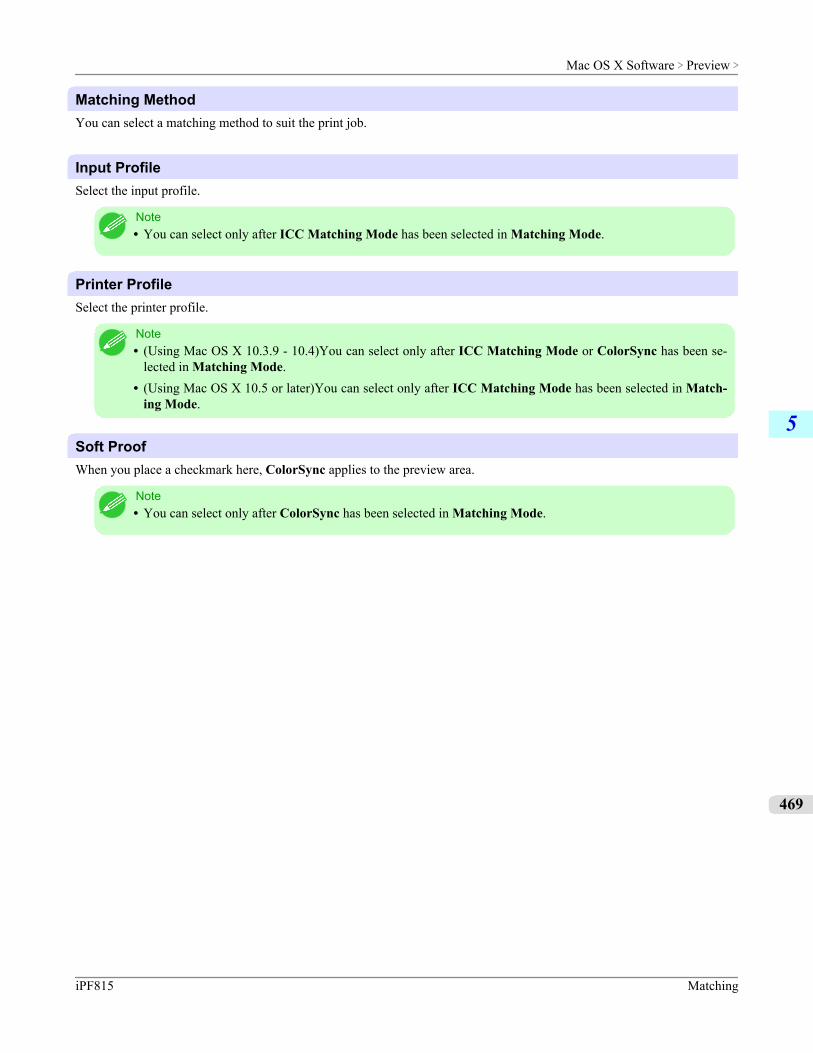
Matching MethodYou can select a matching method to suit the print job.
Input ProfileSelect the input profile.
Note• You can select only after ICC Matching Mode has been selected in Matching Mode.
Printer ProfileSelect the printer profile.
Note• (Using Mac OS X 10.3.9 - 10.4)You can select only after ICC Matching Mode or ColorSync has been se-
lected in Matching Mode.• (Using Mac OS X 10.5 or later)You can select only after ICC Matching Mode has been selected in Match-
ing Mode.
Soft ProofWhen you place a checkmark here, ColorSync applies to the preview area.
Note• You can select only after ColorSync has been selected in Matching Mode.
Mac OS X Software > Preview >
iPF815 Matching
5
469
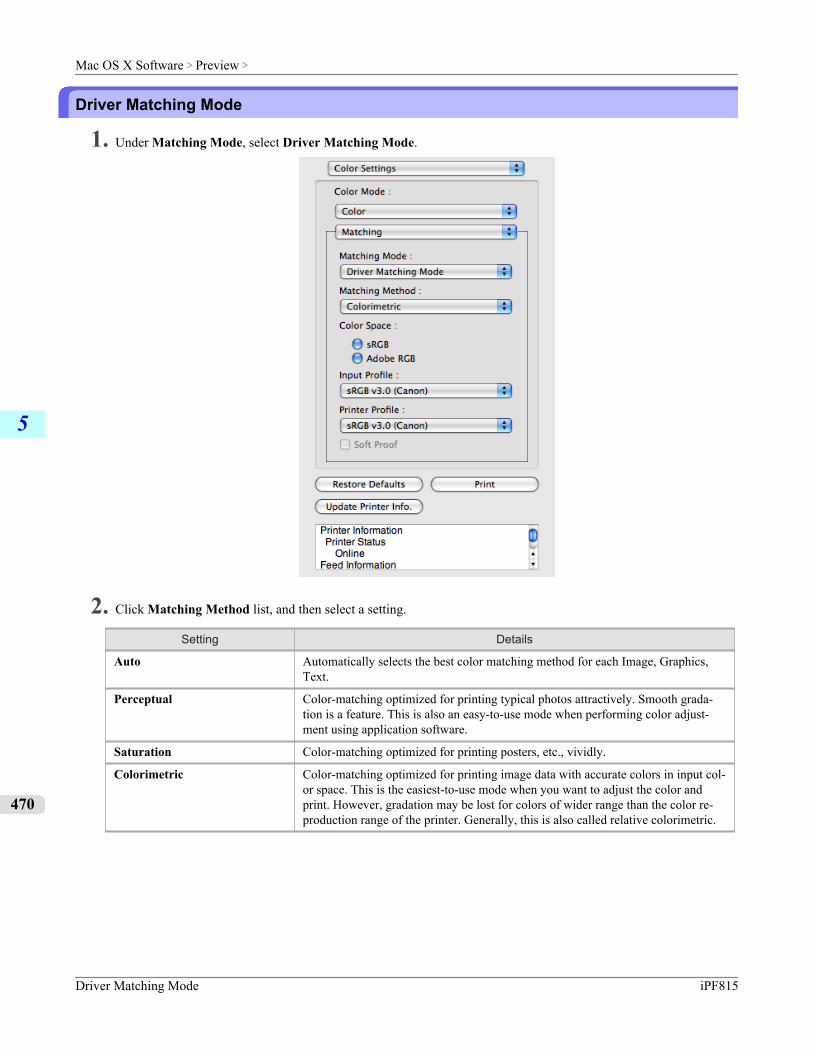
Driver Matching Mode
1. Under Matching Mode, select Driver Matching Mode.
2. Click Matching Method list, and then select a setting.
Setting Details
Auto Automatically selects the best color matching method for each Image, Graphics,Text.
Perceptual Color-matching optimized for printing typical photos attractively. Smooth grada-tion is a feature. This is also an easy-to-use mode when performing color adjust-ment using application software.
Saturation Color-matching optimized for printing posters, etc., vividly.
Colorimetric Color-matching optimized for printing image data with accurate colors in input col-or space. This is the easiest-to-use mode when you want to adjust the color andprint. However, gradation may be lost for colors of wider range than the color re-production range of the printer. Generally, this is also called relative colorimetric.
Mac OS X Software > Preview >
Driver Matching Mode iPF815
5
470
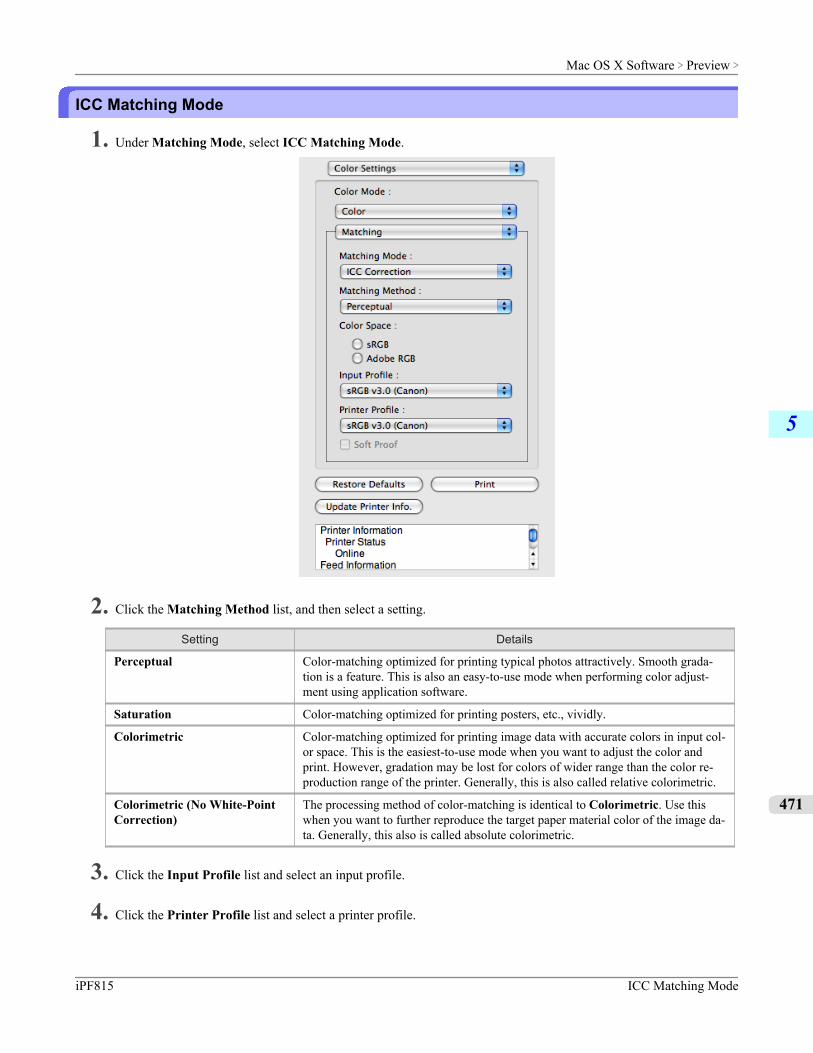
ICC Matching Mode
1. Under Matching Mode, select ICC Matching Mode.
2. Click the Matching Method list, and then select a setting.
Setting Details
Perceptual Color-matching optimized for printing typical photos attractively. Smooth grada-tion is a feature. This is also an easy-to-use mode when performing color adjust-ment using application software.
Saturation Color-matching optimized for printing posters, etc., vividly.
Colorimetric Color-matching optimized for printing image data with accurate colors in input col-or space. This is the easiest-to-use mode when you want to adjust the color andprint. However, gradation may be lost for colors of wider range than the color re-production range of the printer. Generally, this is also called relative colorimetric.
Colorimetric (No White-PointCorrection)
The processing method of color-matching is identical to Colorimetric. Use thiswhen you want to further reproduce the target paper material color of the image da-ta. Generally, this also is called absolute colorimetric.
3. Click the Input Profile list and select an input profile.
4. Click the Printer Profile list and select a printer profile.
Mac OS X Software > Preview >
iPF815 ICC Matching Mode
5
471
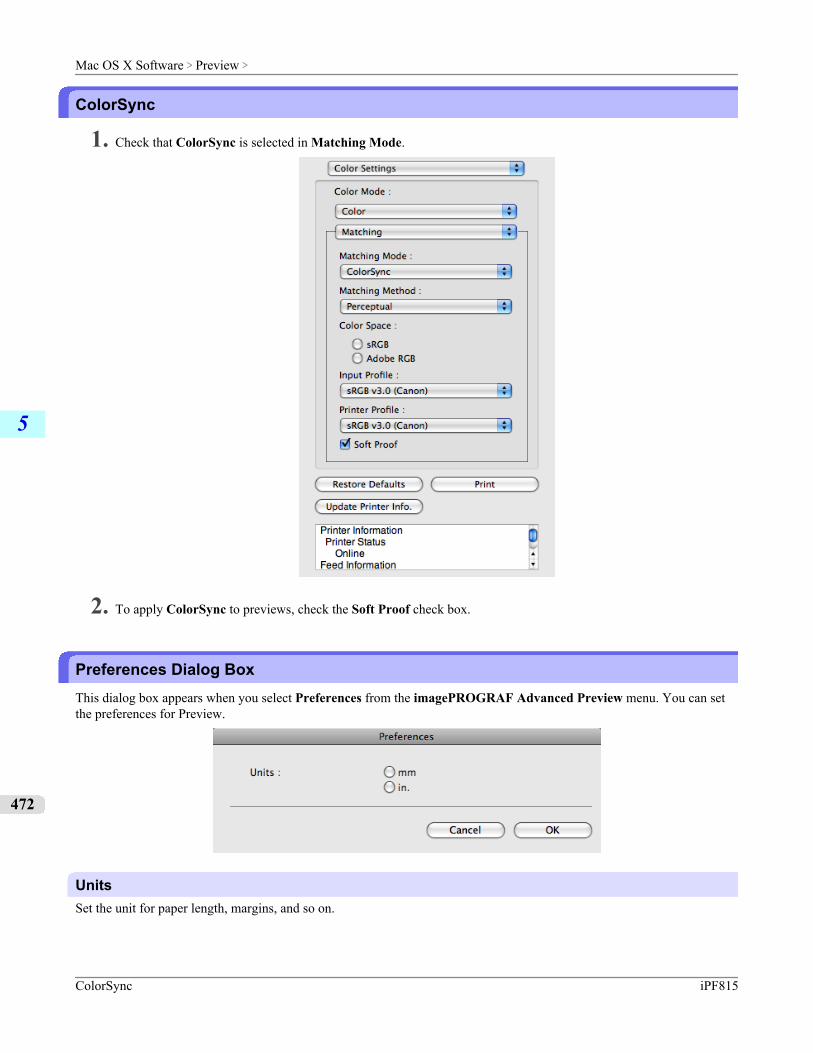
ColorSync
1. Check that ColorSync is selected in Matching Mode.
2. To apply ColorSync to previews, check the Soft Proof check box.
Preferences Dialog BoxThis dialog box appears when you select Preferences from the imagePROGRAF Advanced Preview menu. You can setthe preferences for Preview.
UnitsSet the unit for paper length, margins, and so on.
Mac OS X Software > Preview >
ColorSync iPF815
5
472

Zoom Dialog BoxThis dialog box appears when you select Zoom from the View menu. You can enlarge or reduce the screen display.
ScalingSet the magnification for enlargement or reduction of the screen display.
Note• You can input between 10 and 400.• You can change the numbers by clicking ▼ button.
Go to Page Dialog BoxThis dialog box appears when you select Go to Page from the View menu.
Note• You can not select Go to Page if the document is only one page.
PageInput the page number in numerical characters to display in the preview area.
Note• You can change the numbers in the range of the page of the documents.
Print with No BordersYou can use the borderless printing function to print without margins surrounding the image.
Note• With some media borderless printing can be performed only between two edges.• To use the borderless printing function, the specified media must be set to the printer.
1. On the Paper Settings Panel →P.457 , select Roll Paper in Paper Source.
Mac OS X Software > Preview >
iPF815 Zoom Dialog Box
5
473
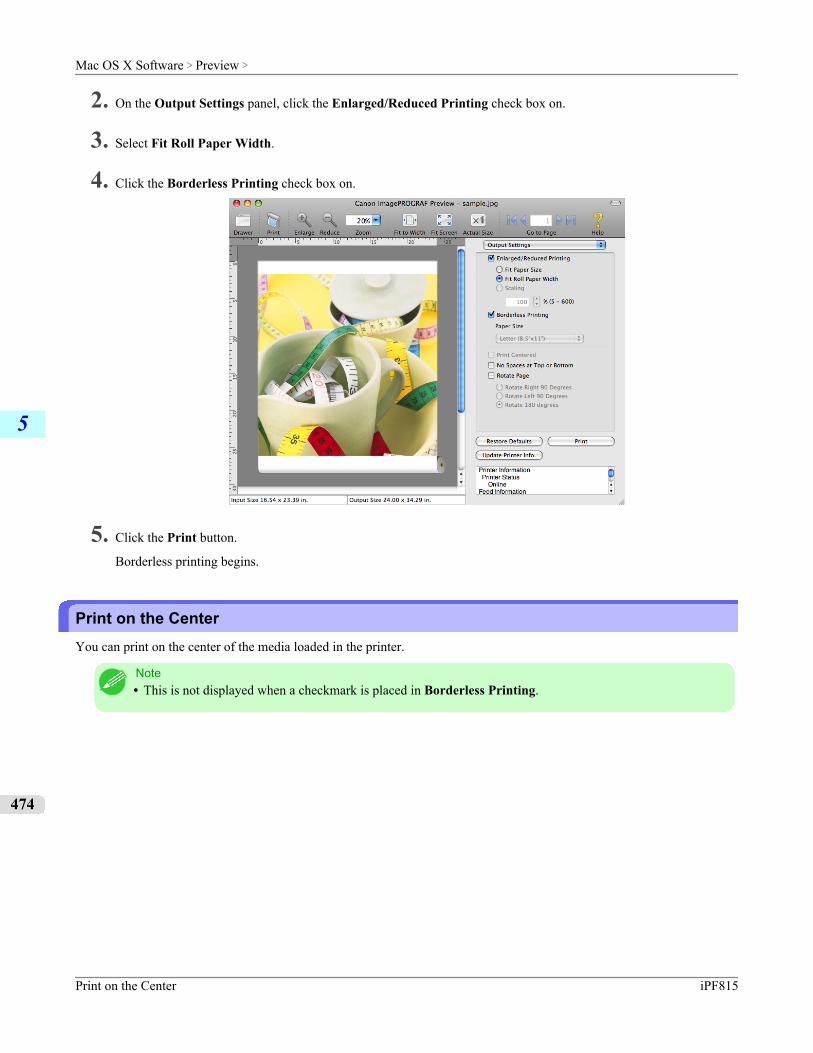
2. On the Output Settings panel, click the Enlarged/Reduced Printing check box on.
3. Select Fit Roll Paper Width.
4. Click the Borderless Printing check box on.
5. Click the Print button.
Borderless printing begins.
Print on the CenterYou can print on the center of the media loaded in the printer.
Note• This is not displayed when a checkmark is placed in Borderless Printing.
Mac OS X Software > Preview >
Print on the Center iPF815
5
474
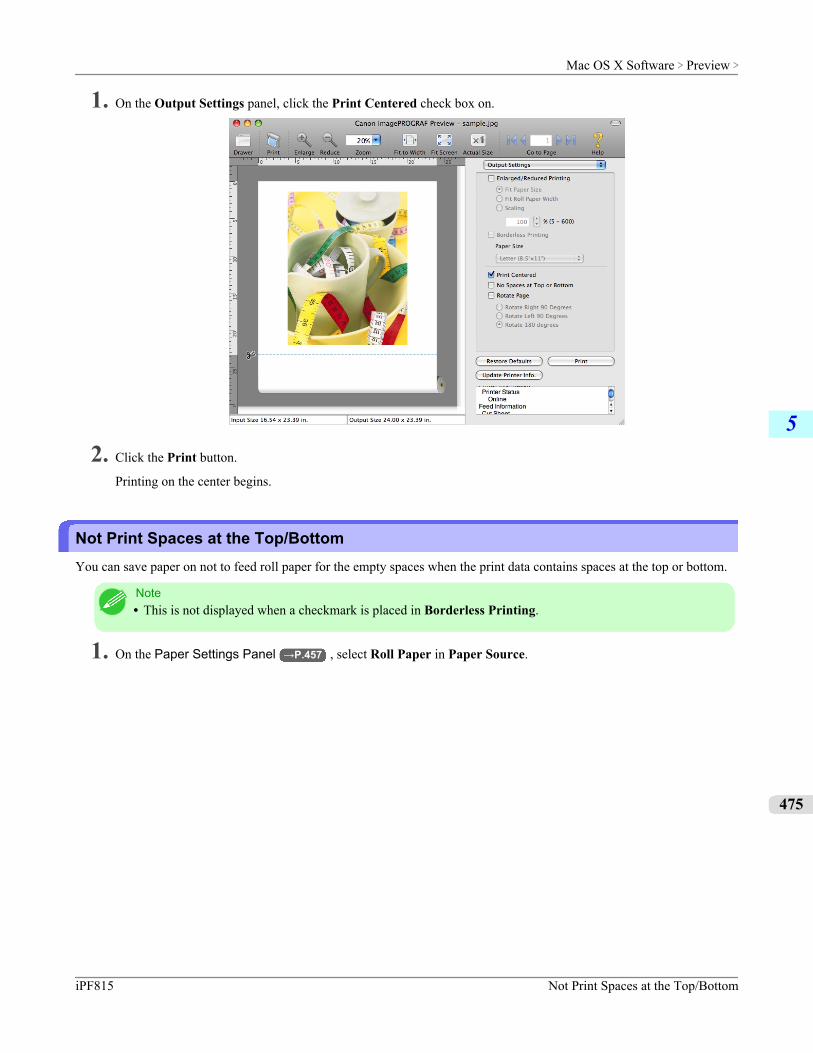
1. On the Output Settings panel, click the Print Centered check box on.
2. Click the Print button.
Printing on the center begins.
Not Print Spaces at the Top/BottomYou can save paper on not to feed roll paper for the empty spaces when the print data contains spaces at the top or bottom.
Note• This is not displayed when a checkmark is placed in Borderless Printing.
1. On the Paper Settings Panel →P.457 , select Roll Paper in Paper Source.
Mac OS X Software > Preview >
iPF815 Not Print Spaces at the Top/Bottom
5
475
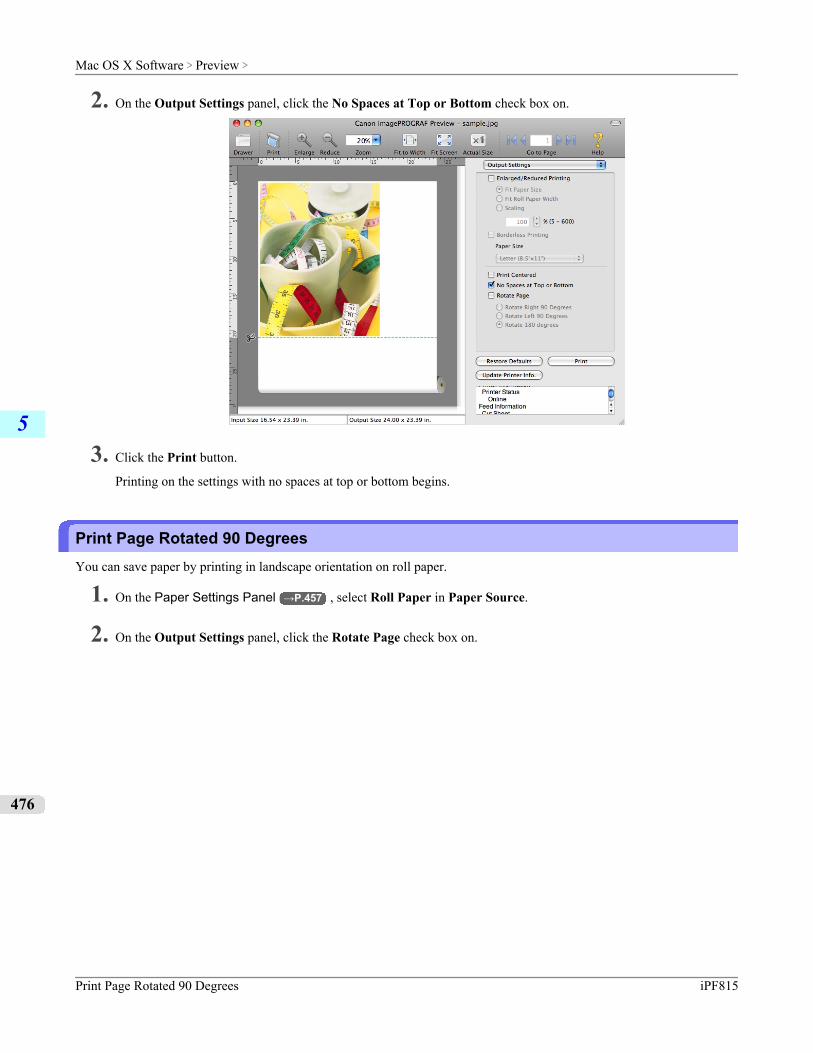
2. On the Output Settings panel, click the No Spaces at Top or Bottom check box on.
3. Click the Print button.
Printing on the settings with no spaces at top or bottom begins.
Print Page Rotated 90 DegreesYou can save paper by printing in landscape orientation on roll paper.
1. On the Paper Settings Panel →P.457 , select Roll Paper in Paper Source.
2. On the Output Settings panel, click the Rotate Page check box on.
Mac OS X Software > Preview >
Print Page Rotated 90 Degrees iPF815
5
476

3. Select Rotate Right 90 Degrees or Rotate Left 90 Degrees.
4. Click the Print button.
Printing on rotating 90 degrees begins.
Display with Fitting to the Width of the PaperIn the preview area, you can display to the width of the paper.
1. Select Fit Roll Paper Width from the tool bar.
Mac OS X Software > Preview >
iPF815 Display with Fitting to the Width of the Paper
5
477
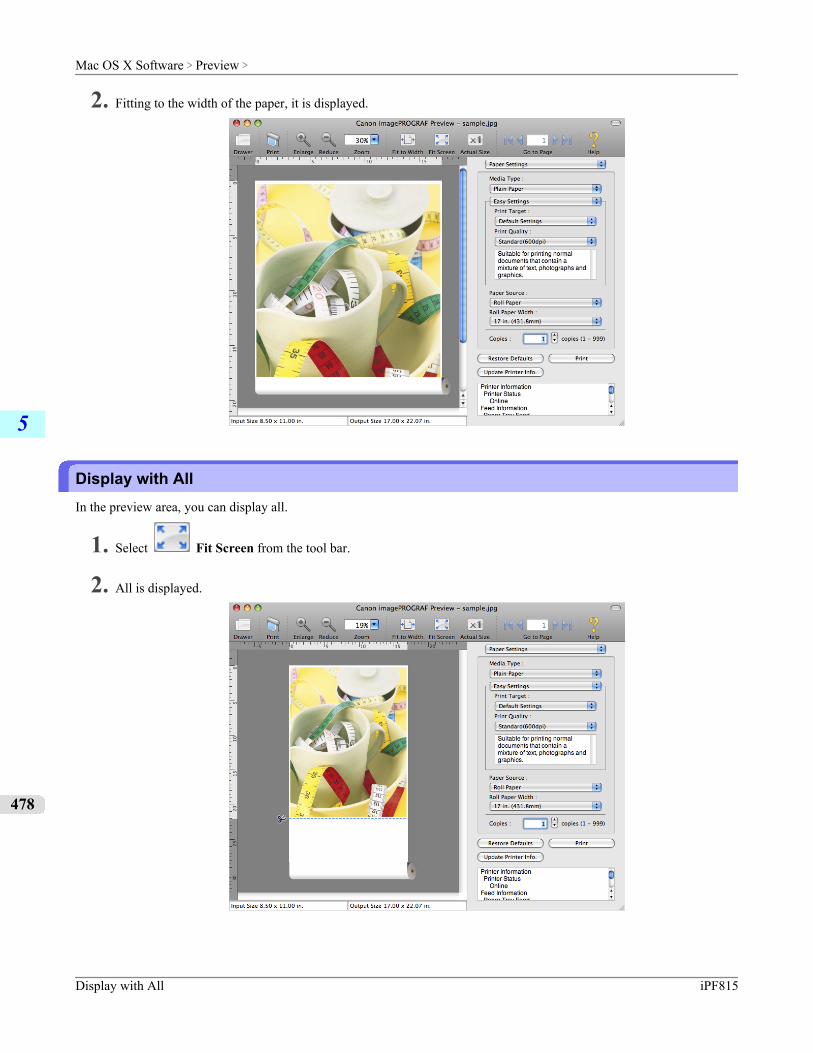
2. Fitting to the width of the paper, it is displayed.
Display with AllIn the preview area, you can display all.
1. Select Fit Screen from the tool bar.
2. All is displayed.
Mac OS X Software > Preview >
Display with All iPF815
5
478
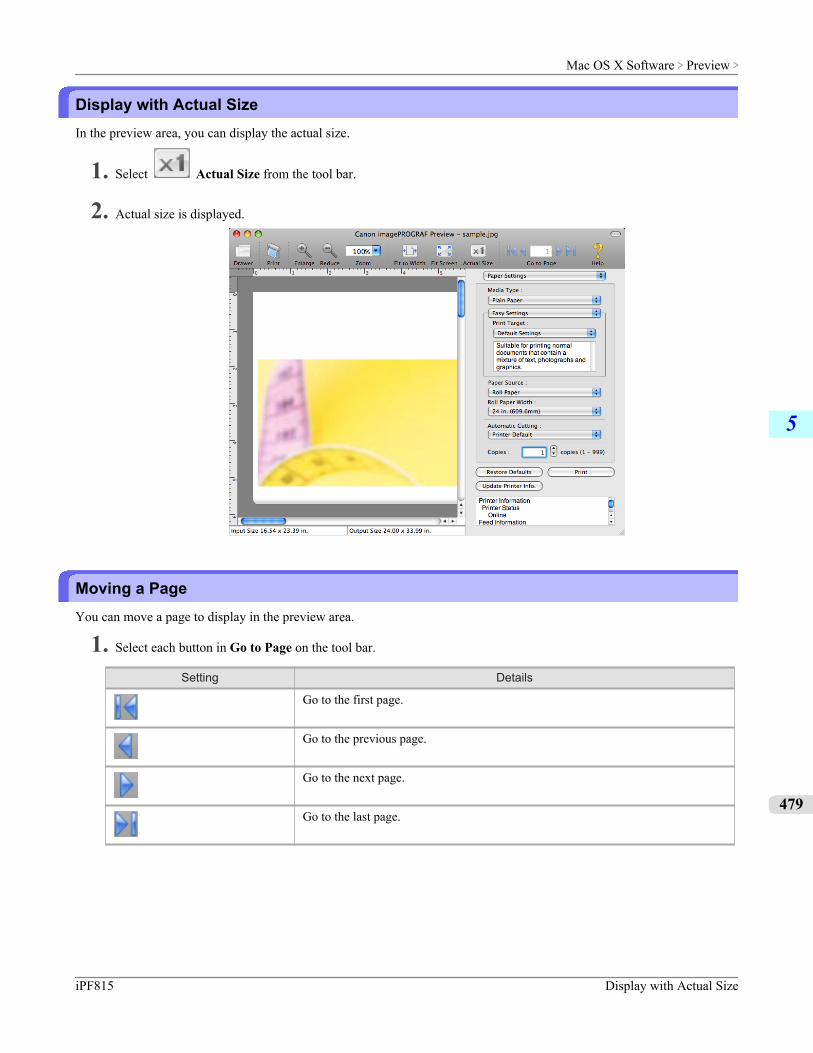
Display with Actual SizeIn the preview area, you can display the actual size.
1. Select Actual Size from the tool bar.
2. Actual size is displayed.
Moving a PageYou can move a page to display in the preview area.
1. Select each button in Go to Page on the tool bar.
Setting Details
Go to the first page.
Go to the previous page.
Go to the next page.
Go to the last page.
Mac OS X Software > Preview >
iPF815 Display with Actual Size
5
479

2. The target page appears.
Note• You can also move a page by clicking the page on the thumbnails.
Mac OS X Software > Preview >
Moving a Page iPF815
5
480
Free LayoutThe Features of Free Layout ........................................................................................................................... 481Operating Environment ................................................................................................................................... 481Starting Free Layout ........................................................................................................................................ 482
Free Layout Main Window ............................................................................................................................... 483Paper Settings Panel ....................................................................................................................................... 486
Easy Settings .............................................................................................................................................. 488Advanced Settings ...................................................................................................................................... 489
Color Settings Panel ........................................................................................................................................ 491Color Adjustment ......................................................................................................................................... 492Matching ...................................................................................................................................................... 495
Driver Matching Mode ............................................................................................................................. 497ICC Matching Mode ................................................................................................................................ 498ColorSync ................................................................................................................................................ 499
Preferences Dialog Box ................................................................................................................................... 500Page Setup Dialog Box ................................................................................................................................... 501Zoom Dialog Box ............................................................................................................................................. 502Format Dialog Box ........................................................................................................................................... 503
Laying out a Multiple-File Document on One Page ......................................................................................... 504Laying out a Document Created with Multiple Application Programs on One Page ....................................... 504Selecting an Object ......................................................................................................................................... 505Changing the Object Size ................................................................................................................................ 505Moving an Object ............................................................................................................................................ 506Rotating an Object ........................................................................................................................................... 507Laying out Objects Automatically .................................................................................................................... 508Aligning Objects .............................................................................................................................................. 508Changing the Object Overlapping Order ......................................................................................................... 510Pasting a Copied or Cut Object ....................................................................................................................... 512
The Features of Free LayoutThe main features of Free Layout are as follows.
• Allows you to lay out at will and print a document created with application software.• You can not only lay out multiple pages on one page but also lay out and print a multiple-file document on one page,
or lay out and print a document created with multiple application programs on one page.
Note• The media type, image size, detailed media settings, and the printer settings can cause the actual print output
to differ from the Free Layout settings.
Operating EnvironmentYou can use the Free Layout in the following environments.
• Compatible Operating SystemMac OS X (10.3.9 to 10.6)
• Software that requires installationimagePROGRAF Printer Driver
Mac OS X Software > Free Layout >
iPF815 The Features of Free Layout
5
481
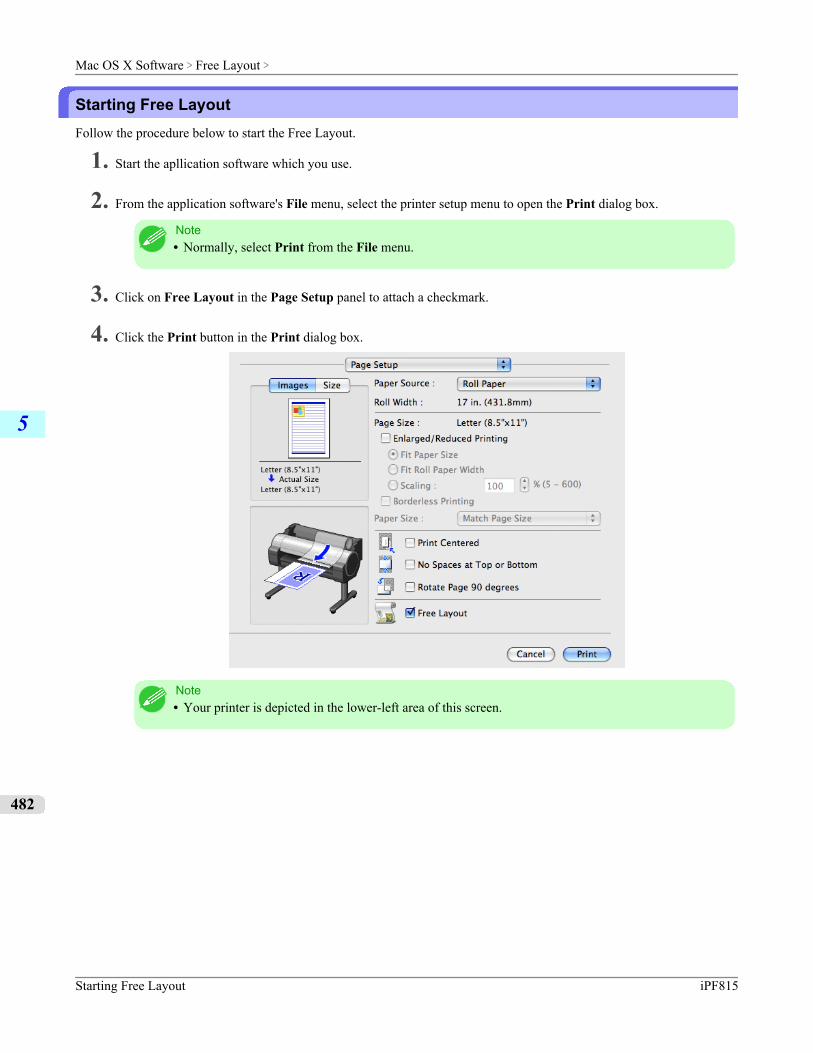
Starting Free LayoutFollow the procedure below to start the Free Layout.
1. Start the apllication software which you use.
2. From the application software's File menu, select the printer setup menu to open the Print dialog box.
Note• Normally, select Print from the File menu.
3. Click on Free Layout in the Page Setup panel to attach a checkmark.
4. Click the Print button in the Print dialog box.
Note• Your printer is depicted in the lower-left area of this screen.
Mac OS X Software > Free Layout >
Starting Free Layout iPF815
5
482
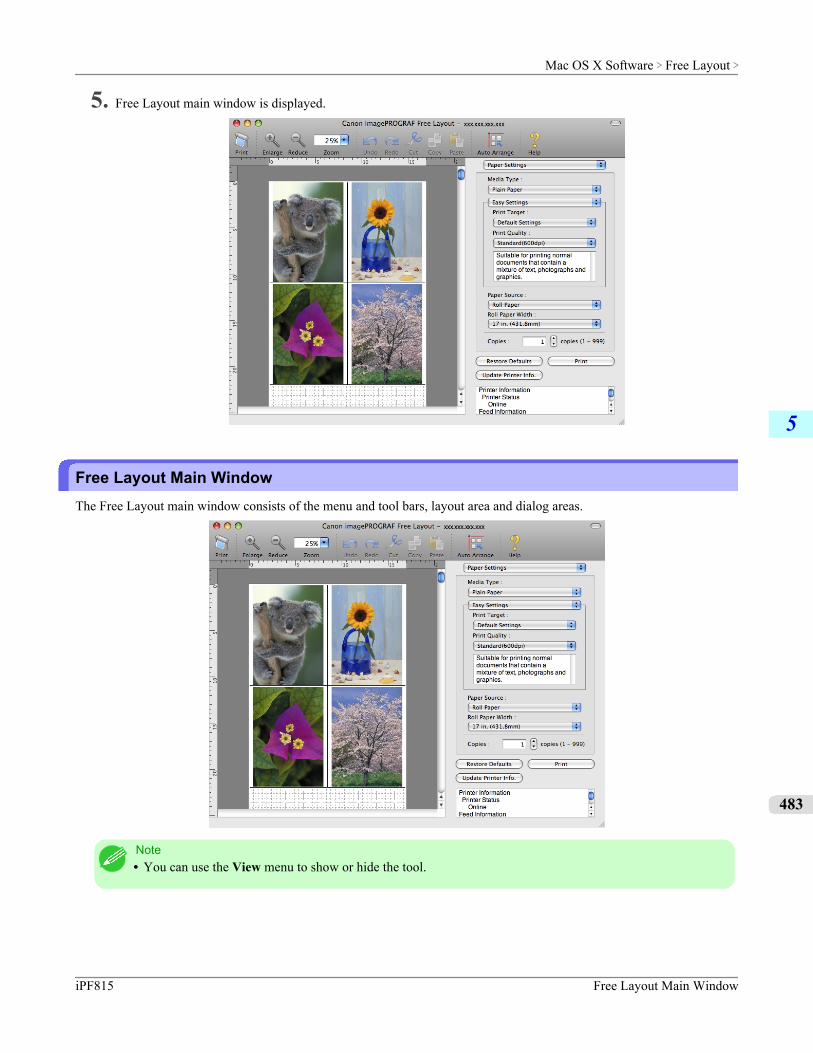
5. Free Layout main window is displayed.
Free Layout Main WindowThe Free Layout main window consists of the menu and tool bars, layout area and dialog areas.
Note• You can use the View menu to show or hide the tool.
Mac OS X Software > Free Layout >
iPF815 Free Layout Main Window
5
483
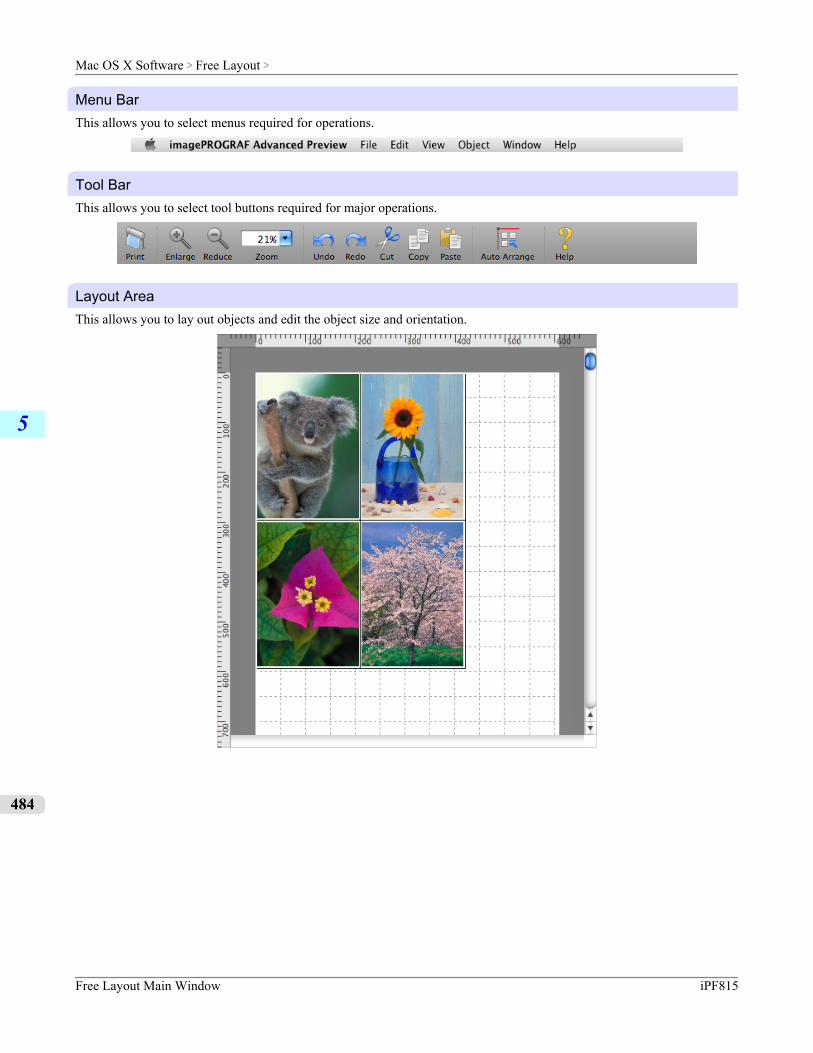
Menu BarThis allows you to select menus required for operations.
Tool BarThis allows you to select tool buttons required for major operations.
Layout AreaThis allows you to lay out objects and edit the object size and orientation.
Mac OS X Software > Free Layout >
Free Layout Main Window iPF815
5
484
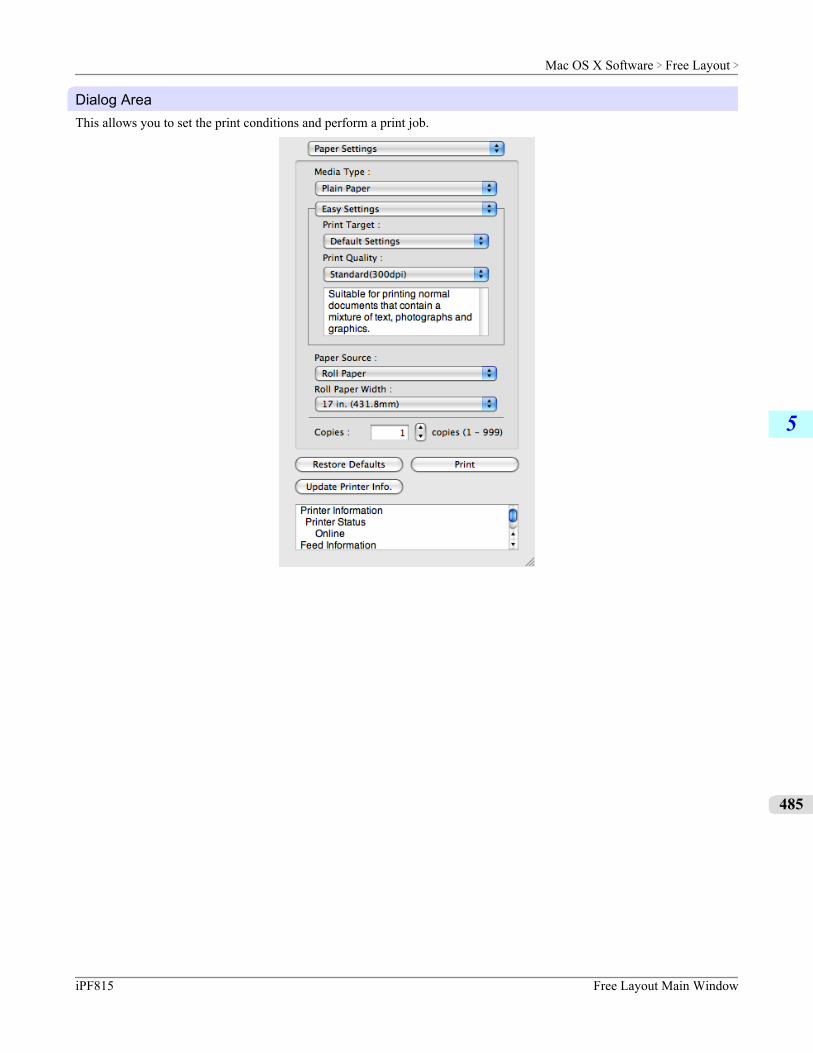
Dialog AreaThis allows you to set the print conditions and perform a print job.
Mac OS X Software > Free Layout >
iPF815 Free Layout Main Window
5
485
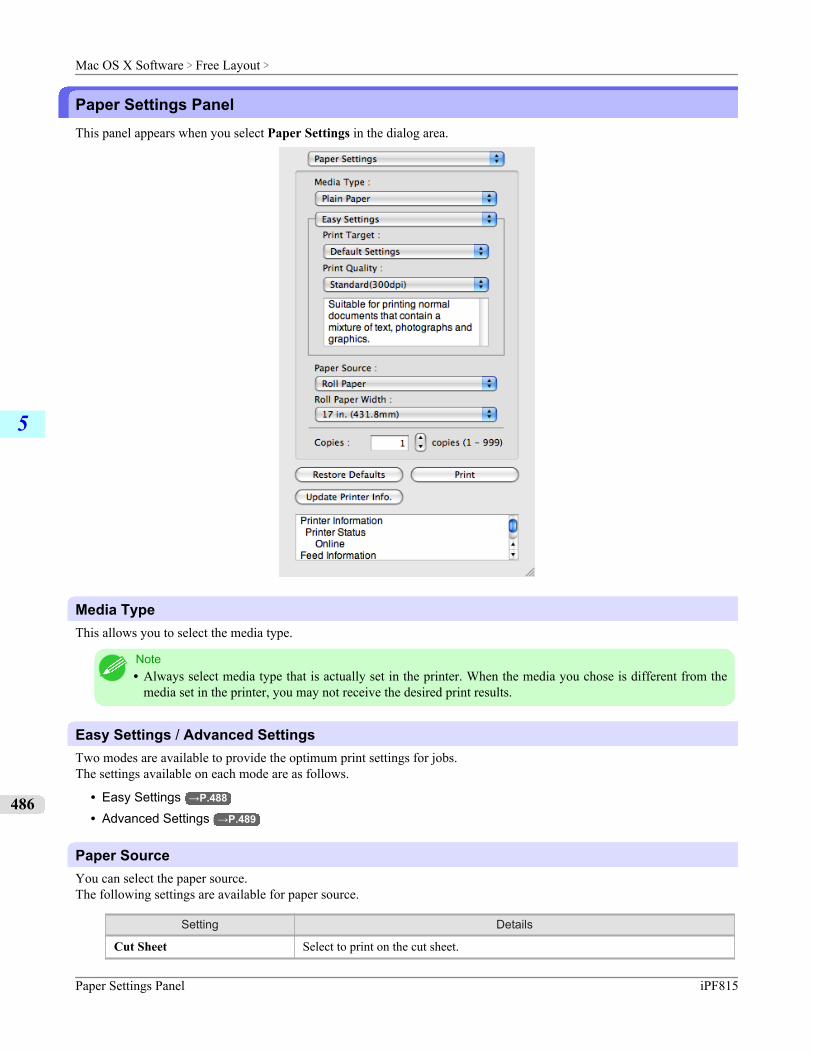
Paper Settings PanelThis panel appears when you select Paper Settings in the dialog area.
Media TypeThis allows you to select the media type.
Note• Always select media type that is actually set in the printer. When the media you chose is different from the
media set in the printer, you may not receive the desired print results.
Easy Settings / Advanced SettingsTwo modes are available to provide the optimum print settings for jobs.The settings available on each mode are as follows.
• Easy Settings →P.488
• Advanced Settings →P.489
Paper SourceYou can select the paper source.The following settings are available for paper source.
Setting Details
Cut Sheet Select to print on the cut sheet.
Mac OS X Software > Free Layout >
Paper Settings Panel iPF815
5
486
Setting Details
Roll Paper Select to print on roll paper.
Roll Paper WidthThis selects the width of the roll media set to the printer.
Note• Available only if rolls are selected in Paper Source.
CopiesYou can input the number of print copies in numerical characters.
Note• The maximum value is 999.• You can change the numbers by clicking either ▲ button or ▼ button.
Restore Defaults ButtonClick the button to reset to the setting when starting Free Layout.
Print ButtonClick the button to begin printing.
Update Printer Info. ButtonClick the button to acquire printer information.
Mac OS X Software > Free Layout >
iPF815 Paper Settings Panel
5
487
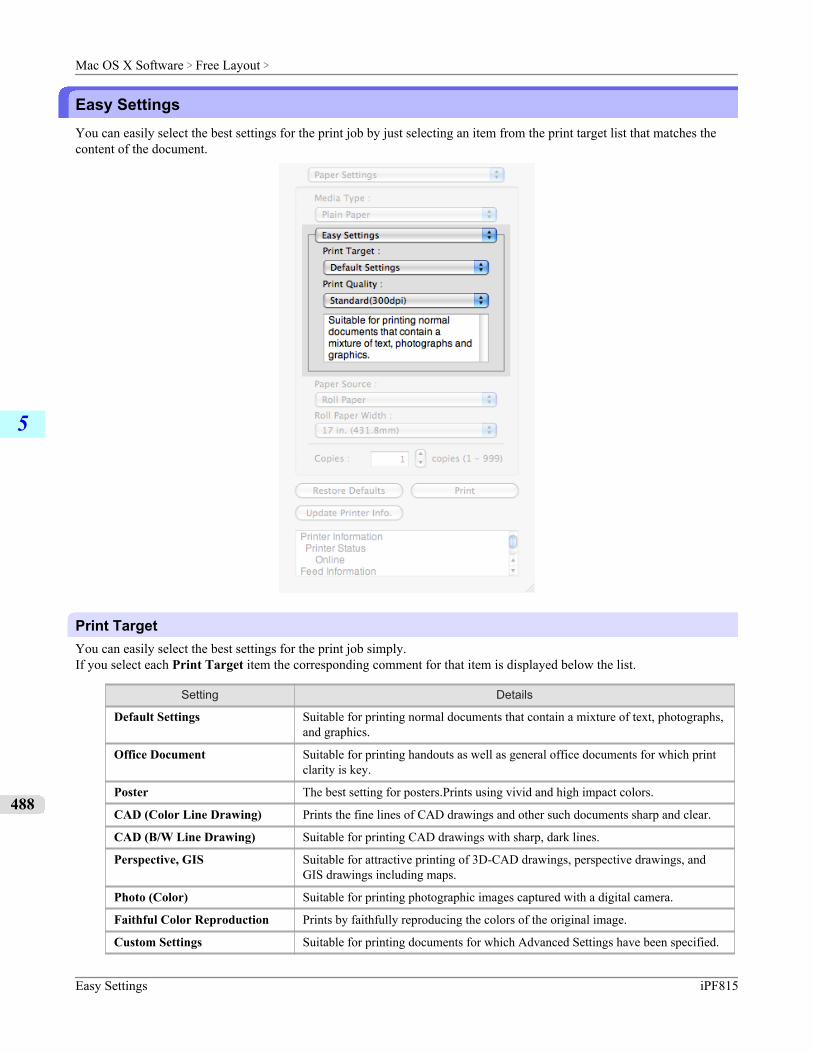
Easy SettingsYou can easily select the best settings for the print job by just selecting an item from the print target list that matches thecontent of the document.
Print TargetYou can easily select the best settings for the print job simply.If you select each Print Target item the corresponding comment for that item is displayed below the list.
Setting Details
Default Settings Suitable for printing normal documents that contain a mixture of text, photographs,and graphics.
Office Document Suitable for printing handouts as well as general office documents for which printclarity is key.
Poster The best setting for posters.Prints using vivid and high impact colors.
CAD (Color Line Drawing) Prints the fine lines of CAD drawings and other such documents sharp and clear.
CAD (B/W Line Drawing) Suitable for printing CAD drawings with sharp, dark lines.
Perspective, GIS Suitable for attractive printing of 3D-CAD drawings, perspective drawings, andGIS drawings including maps.
Photo (Color) Suitable for printing photographic images captured with a digital camera.
Faithful Color Reproduction Prints by faithfully reproducing the colors of the original image.
Custom Settings Suitable for printing documents for which Advanced Settings have been specified.
Mac OS X Software > Free Layout >
Easy Settings iPF815
5
488
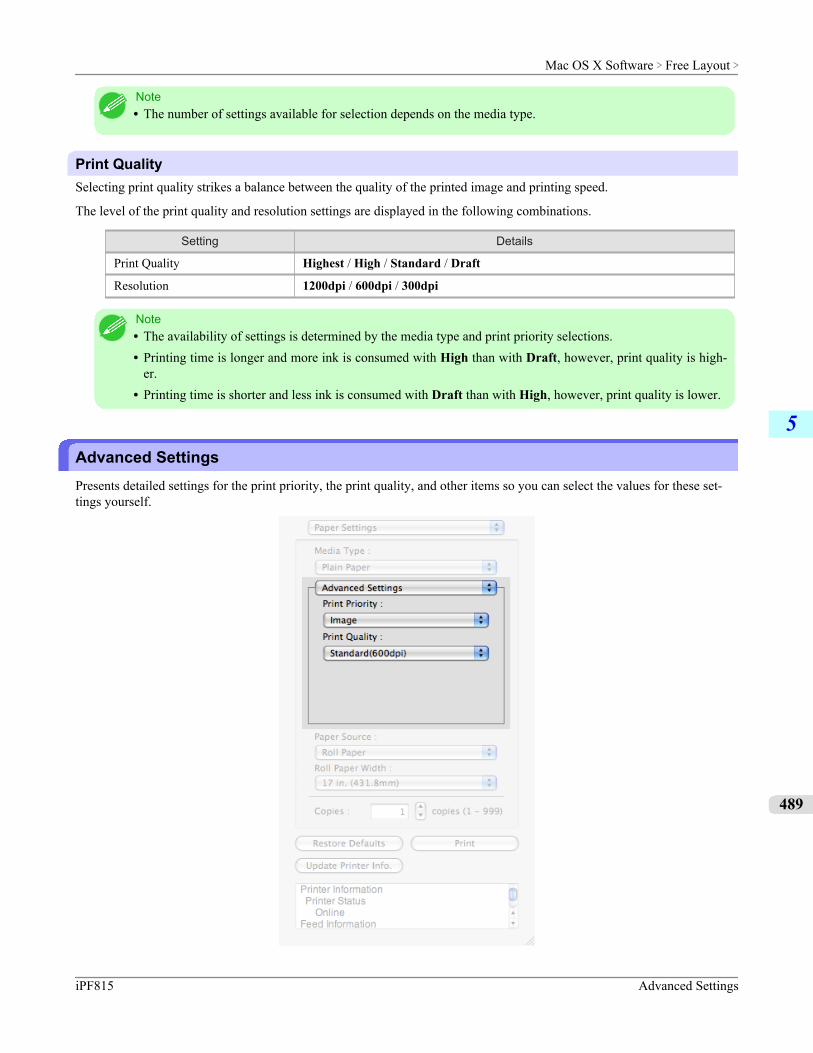
Note• The number of settings available for selection depends on the media type.
Print QualitySelecting print quality strikes a balance between the quality of the printed image and printing speed.
The level of the print quality and resolution settings are displayed in the following combinations.
Setting Details
Print Quality Highest / High / Standard / Draft
Resolution 1200dpi / 600dpi / 300dpi
Note• The availability of settings is determined by the media type and print priority selections.• Printing time is longer and more ink is consumed with High than with Draft, however, print quality is high-
er.• Printing time is shorter and less ink is consumed with Draft than with High, however, print quality is lower.
Advanced SettingsPresents detailed settings for the print priority, the print quality, and other items so you can select the values for these set-tings yourself.
Mac OS X Software > Free Layout >
iPF815 Advanced Settings
5
489
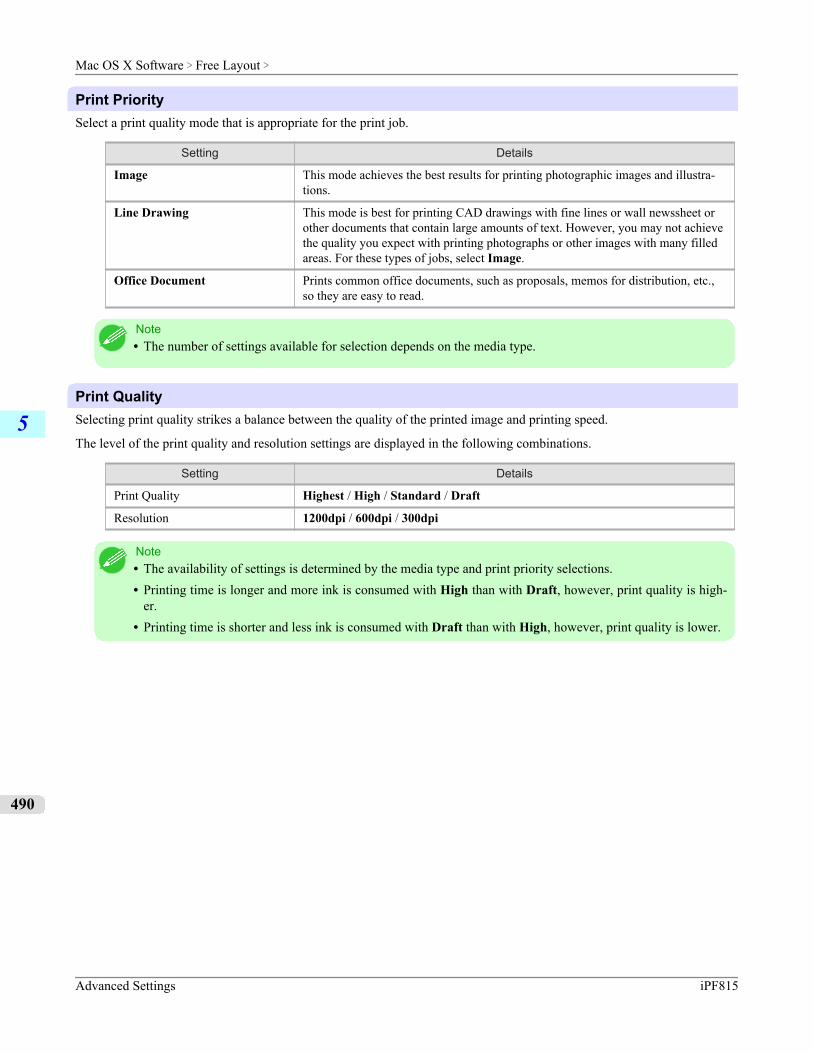
Print PrioritySelect a print quality mode that is appropriate for the print job.
Setting Details
Image This mode achieves the best results for printing photographic images and illustra-tions.
Line Drawing This mode is best for printing CAD drawings with fine lines or wall newssheet orother documents that contain large amounts of text. However, you may not achievethe quality you expect with printing photographs or other images with many filledareas. For these types of jobs, select Image.
Office Document Prints common office documents, such as proposals, memos for distribution, etc.,so they are easy to read.
Note• The number of settings available for selection depends on the media type.
Print QualitySelecting print quality strikes a balance between the quality of the printed image and printing speed.
The level of the print quality and resolution settings are displayed in the following combinations.
Setting Details
Print Quality Highest / High / Standard / Draft
Resolution 1200dpi / 600dpi / 300dpi
Note• The availability of settings is determined by the media type and print priority selections.• Printing time is longer and more ink is consumed with High than with Draft, however, print quality is high-
er.• Printing time is shorter and less ink is consumed with Draft than with High, however, print quality is lower.
Mac OS X Software > Free Layout >
Advanced Settings iPF815
5
490
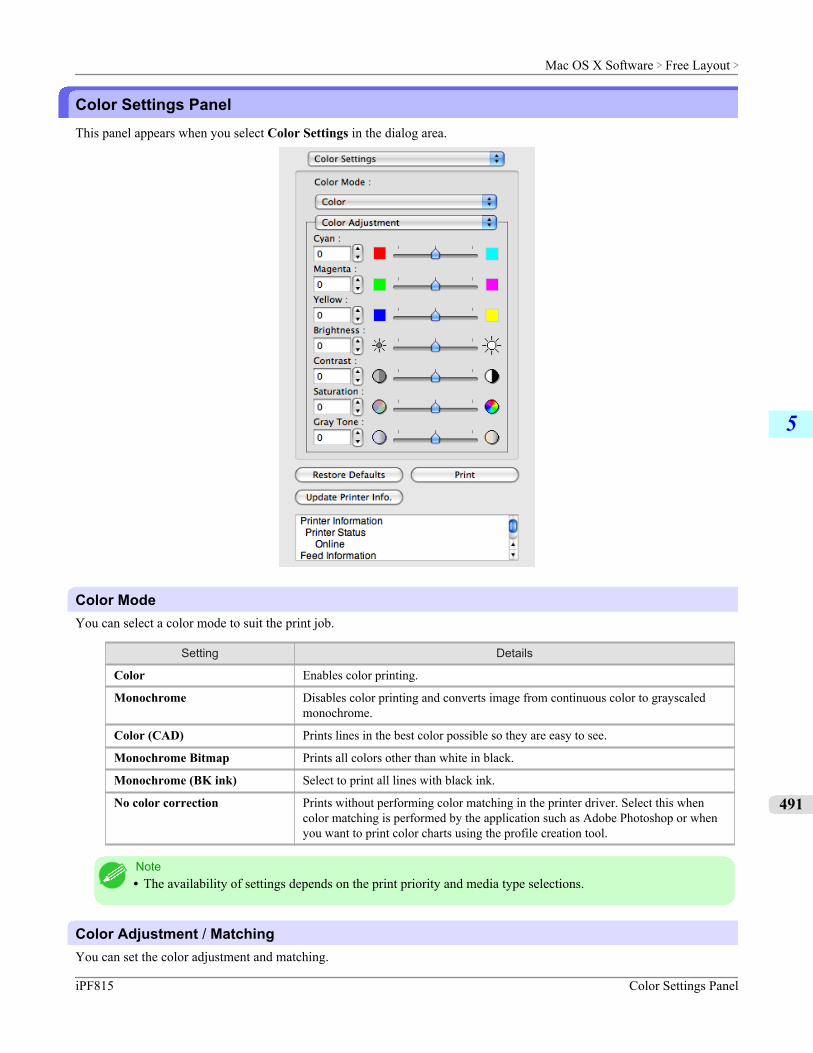
Color Settings PanelThis panel appears when you select Color Settings in the dialog area.
Color ModeYou can select a color mode to suit the print job.
Setting Details
Color Enables color printing.
Monochrome Disables color printing and converts image from continuous color to grayscaledmonochrome.
Color (CAD) Prints lines in the best color possible so they are easy to see.
Monochrome Bitmap Prints all colors other than white in black.
Monochrome (BK ink) Select to print all lines with black ink.
No color correction Prints without performing color matching in the printer driver. Select this whencolor matching is performed by the application such as Adobe Photoshop or whenyou want to print color charts using the profile creation tool.
Note• The availability of settings depends on the print priority and media type selections.
Color Adjustment / MatchingYou can set the color adjustment and matching.
Mac OS X Software > Free Layout >
iPF815 Color Settings Panel
5
491

• Color Adjustment →P.492
• Matching →P.495
Note• Matching is not displayed if No color correction has been selected in Color Mode.
Restore Defaults ButtonClick the button to reset to the setting when starting Free Layout.
Print ButtonClick the button to begin printing.
Update Printer Info. ButtonClick the button to acquire printer information.
Color AdjustmentYou can set the color adjustment.
Adjusting ColorNormally colors should be adjusted in the software application, but if you see colors in the printout that do not match colorson the screen, you can perform color adjustments.
1. Select Color on Color Mode in the Color Settings panel.
Mac OS X Software > Free Layout >
Color Adjustment iPF815
5
492
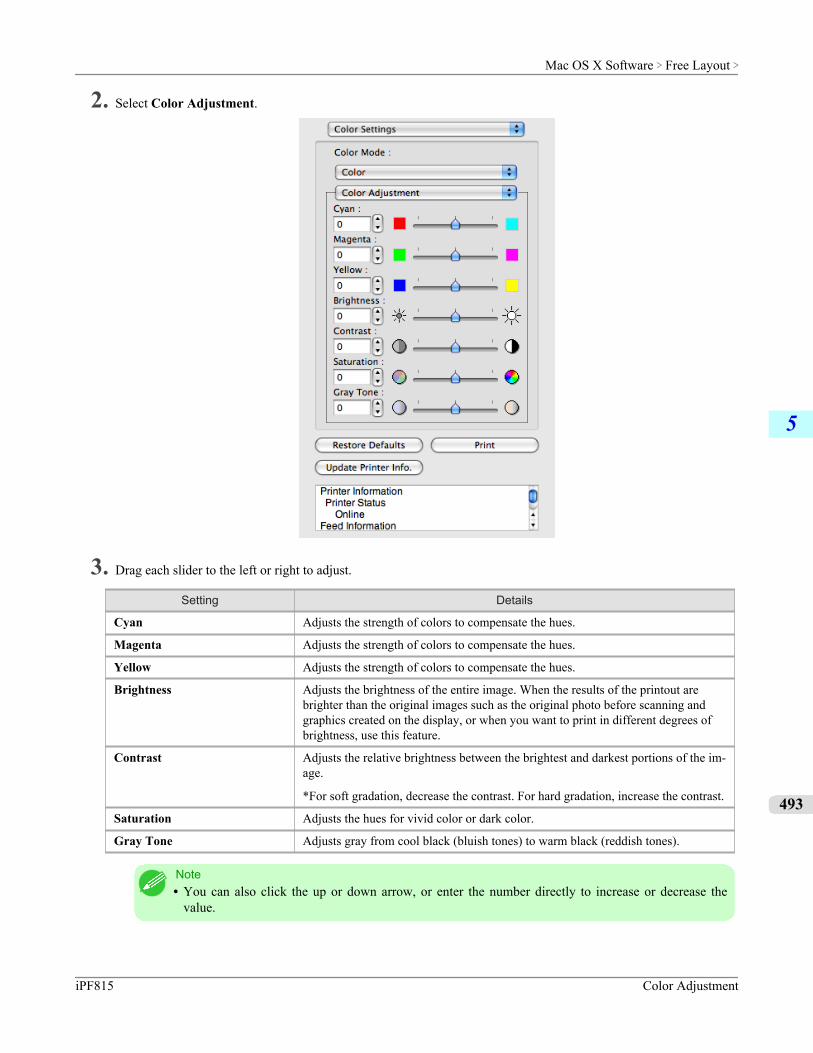
2. Select Color Adjustment.
3. Drag each slider to the left or right to adjust.
Setting Details
Cyan Adjusts the strength of colors to compensate the hues.
Magenta Adjusts the strength of colors to compensate the hues.
Yellow Adjusts the strength of colors to compensate the hues.
Brightness Adjusts the brightness of the entire image. When the results of the printout arebrighter than the original images such as the original photo before scanning andgraphics created on the display, or when you want to print in different degrees ofbrightness, use this feature.
Contrast Adjusts the relative brightness between the brightest and darkest portions of the im-age.
*For soft gradation, decrease the contrast. For hard gradation, increase the contrast.
Saturation Adjusts the hues for vivid color or dark color.
Gray Tone Adjusts gray from cool black (bluish tones) to warm black (reddish tones).
Note• You can also click the up or down arrow, or enter the number directly to increase or decrease the
value.
Mac OS X Software > Free Layout >
iPF815 Color Adjustment
5
493
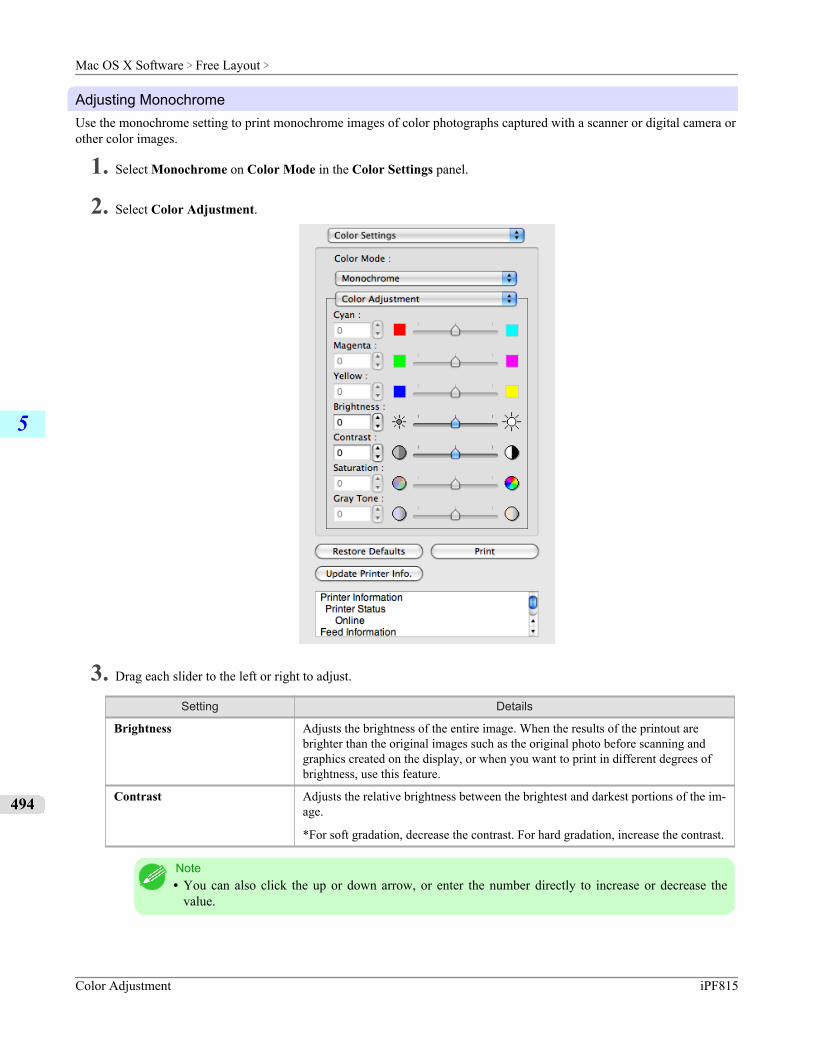
Adjusting MonochromeUse the monochrome setting to print monochrome images of color photographs captured with a scanner or digital camera orother color images.
1. Select Monochrome on Color Mode in the Color Settings panel.
2. Select Color Adjustment.
3. Drag each slider to the left or right to adjust.
Setting Details
Brightness Adjusts the brightness of the entire image. When the results of the printout arebrighter than the original images such as the original photo before scanning andgraphics created on the display, or when you want to print in different degrees ofbrightness, use this feature.
Contrast Adjusts the relative brightness between the brightest and darkest portions of the im-age.
*For soft gradation, decrease the contrast. For hard gradation, increase the contrast.
Note• You can also click the up or down arrow, or enter the number directly to increase or decrease the
value.
Mac OS X Software > Free Layout >
Color Adjustment iPF815
5
494
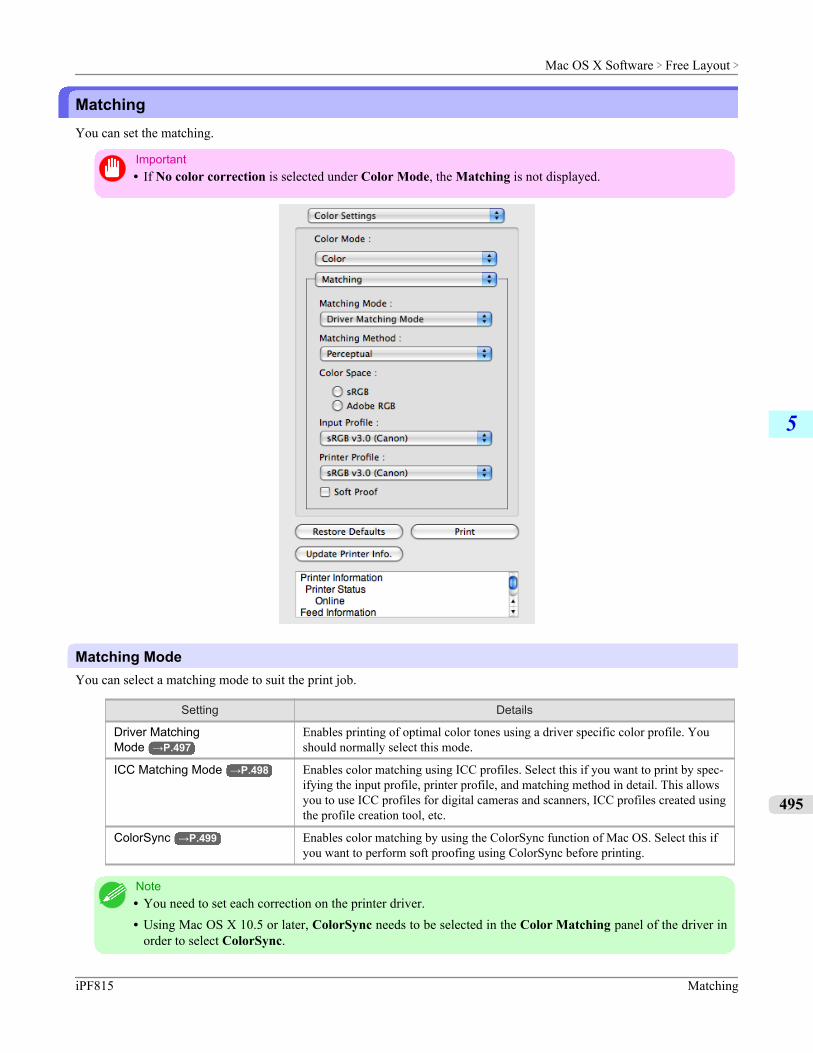
MatchingYou can set the matching.
Important• If No color correction is selected under Color Mode, the Matching is not displayed.
Matching ModeYou can select a matching mode to suit the print job.
Setting Details
Driver MatchingMode →P.497
Enables printing of optimal color tones using a driver specific color profile. Youshould normally select this mode.
ICC Matching Mode →P.498 Enables color matching using ICC profiles. Select this if you want to print by spec-ifying the input profile, printer profile, and matching method in detail. This allowsyou to use ICC profiles for digital cameras and scanners, ICC profiles created usingthe profile creation tool, etc.
ColorSync →P.499 Enables color matching by using the ColorSync function of Mac OS. Select this ifyou want to perform soft proofing using ColorSync before printing.
Note• You need to set each correction on the printer driver.• Using Mac OS X 10.5 or later, ColorSync needs to be selected in the Color Matching panel of the driver in
order to select ColorSync.
Mac OS X Software > Free Layout >
iPF815 Matching
5
495
Matching MethodYou can select a matching method to suit the print job.
Input ProfileSelect the input profile.
Note• You can select only after ICC Matching Mode has been selected in Matching Mode.
Printer ProfileSelect the printer profile.
Note• (Using Mac OS X 10.3.9 - 10.4)You can select only after ICC Matching Mode or ColorSync has been se-
lected in Matching Mode.• (Using Mac OS X 10.5 or later)You can select only after ICC Matching Mode has been selected in Match-
ing Mode.
Soft ProofWhen you place a checkmark here, ColorSync applies to the layout area.
Note• You can select only after ColorSync has been selected in Matching Mode.
Mac OS X Software > Free Layout >
Matching iPF815
5
496
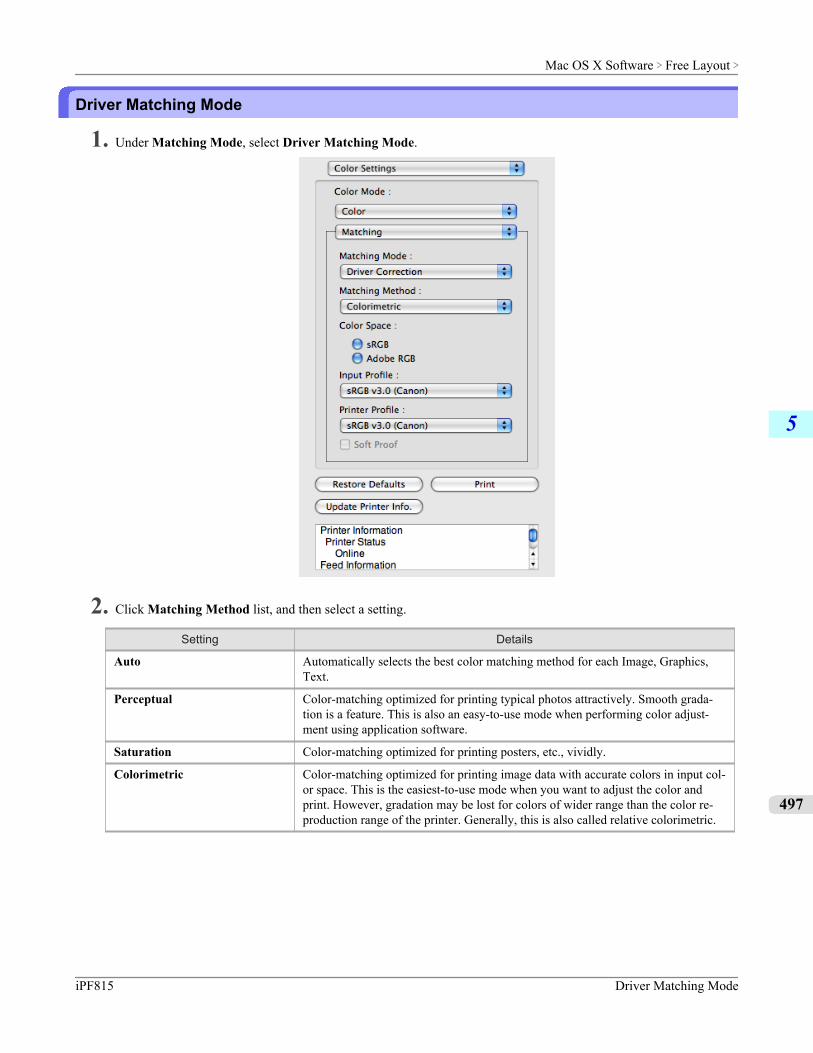
Driver Matching Mode
1. Under Matching Mode, select Driver Matching Mode.
2. Click Matching Method list, and then select a setting.
Setting Details
Auto Automatically selects the best color matching method for each Image, Graphics,Text.
Perceptual Color-matching optimized for printing typical photos attractively. Smooth grada-tion is a feature. This is also an easy-to-use mode when performing color adjust-ment using application software.
Saturation Color-matching optimized for printing posters, etc., vividly.
Colorimetric Color-matching optimized for printing image data with accurate colors in input col-or space. This is the easiest-to-use mode when you want to adjust the color andprint. However, gradation may be lost for colors of wider range than the color re-production range of the printer. Generally, this is also called relative colorimetric.
Mac OS X Software > Free Layout >
iPF815 Driver Matching Mode
5
497
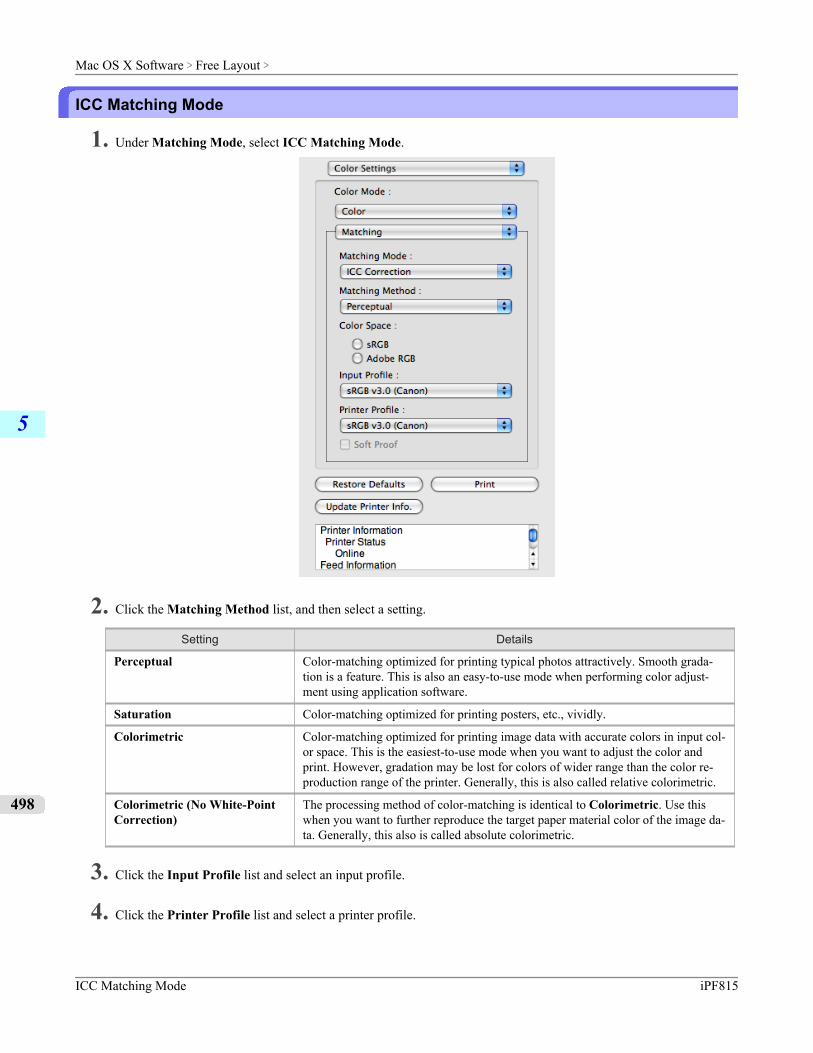
ICC Matching Mode
1. Under Matching Mode, select ICC Matching Mode.
2. Click the Matching Method list, and then select a setting.
Setting Details
Perceptual Color-matching optimized for printing typical photos attractively. Smooth grada-tion is a feature. This is also an easy-to-use mode when performing color adjust-ment using application software.
Saturation Color-matching optimized for printing posters, etc., vividly.
Colorimetric Color-matching optimized for printing image data with accurate colors in input col-or space. This is the easiest-to-use mode when you want to adjust the color andprint. However, gradation may be lost for colors of wider range than the color re-production range of the printer. Generally, this is also called relative colorimetric.
Colorimetric (No White-PointCorrection)
The processing method of color-matching is identical to Colorimetric. Use thiswhen you want to further reproduce the target paper material color of the image da-ta. Generally, this also is called absolute colorimetric.
3. Click the Input Profile list and select an input profile.
4. Click the Printer Profile list and select a printer profile.
Mac OS X Software > Free Layout >
ICC Matching Mode iPF815
5
498
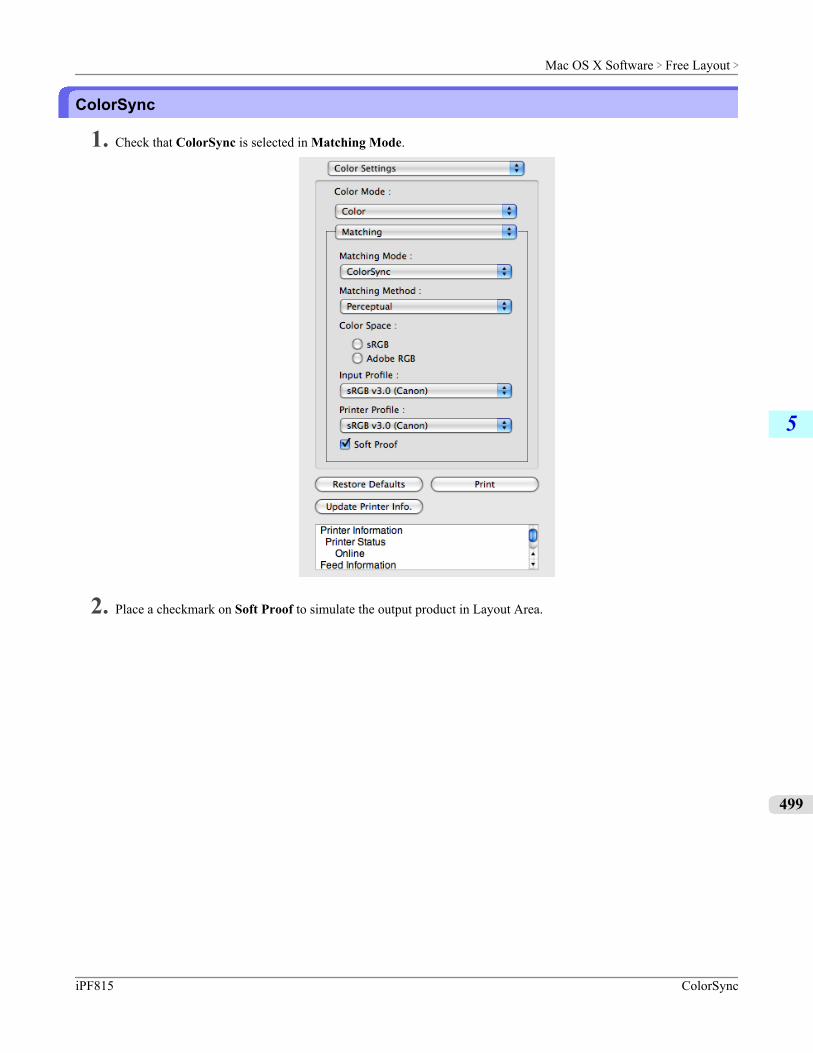
ColorSync
1. Check that ColorSync is selected in Matching Mode.
2. Place a checkmark on Soft Proof to simulate the output product in Layout Area.
Mac OS X Software > Free Layout >
iPF815 ColorSync
5
499
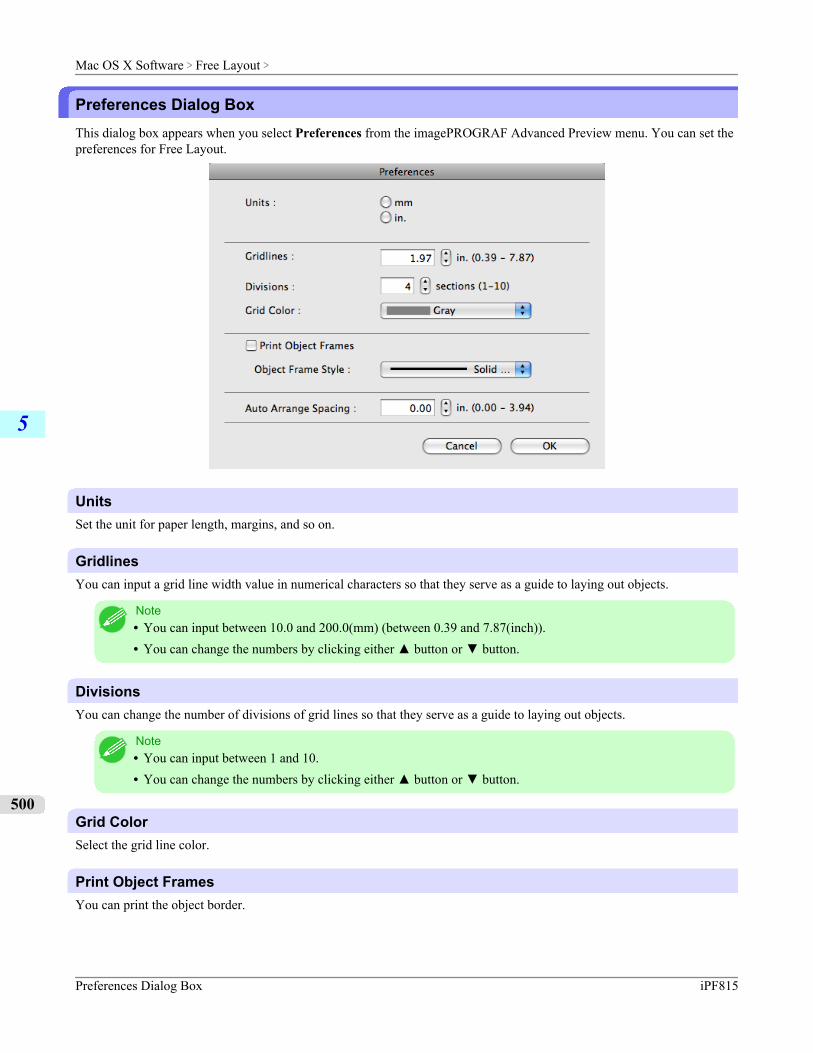
Preferences Dialog BoxThis dialog box appears when you select Preferences from the imagePROGRAF Advanced Preview menu. You can set thepreferences for Free Layout.
UnitsSet the unit for paper length, margins, and so on.
GridlinesYou can input a grid line width value in numerical characters so that they serve as a guide to laying out objects.
Note• You can input between 10.0 and 200.0(mm) (between 0.39 and 7.87(inch)).• You can change the numbers by clicking either ▲ button or ▼ button.
DivisionsYou can change the number of divisions of grid lines so that they serve as a guide to laying out objects.
Note• You can input between 1 and 10.• You can change the numbers by clicking either ▲ button or ▼ button.
Grid ColorSelect the grid line color.
Print Object FramesYou can print the object border.
Mac OS X Software > Free Layout >
Preferences Dialog Box iPF815
5
500
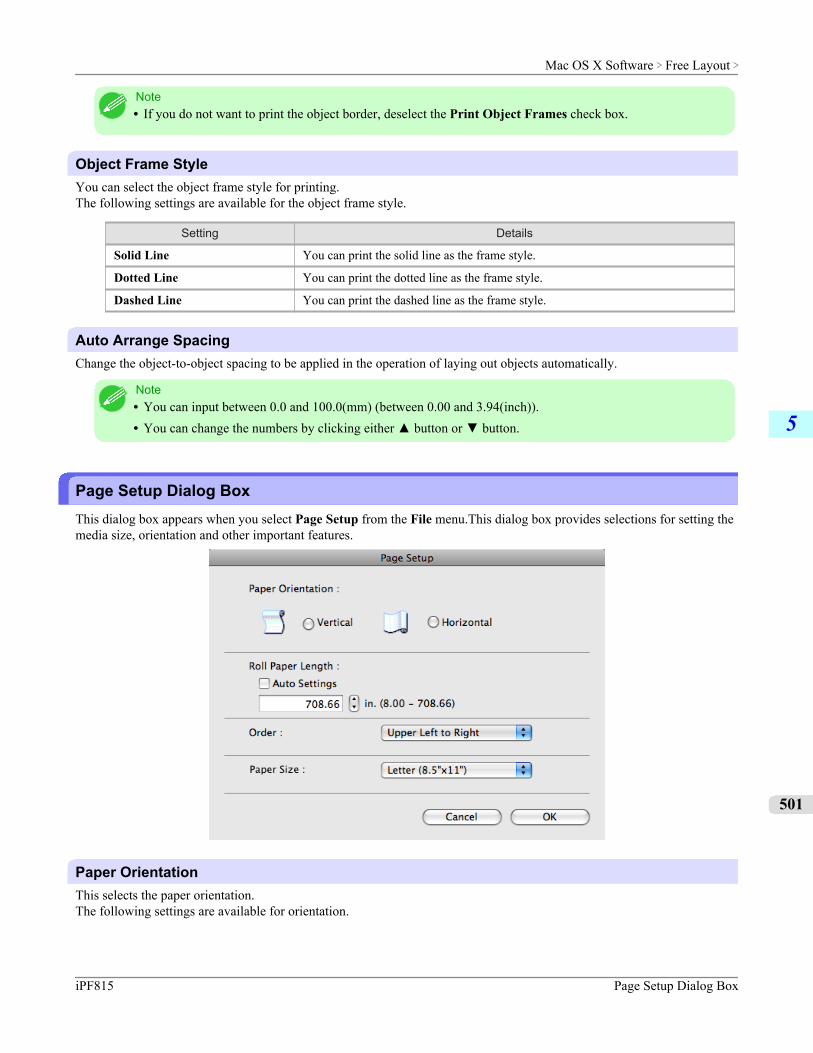
Note• If you do not want to print the object border, deselect the Print Object Frames check box.
Object Frame StyleYou can select the object frame style for printing.The following settings are available for the object frame style.
Setting Details
Solid Line You can print the solid line as the frame style.
Dotted Line You can print the dotted line as the frame style.
Dashed Line You can print the dashed line as the frame style.
Auto Arrange SpacingChange the object-to-object spacing to be applied in the operation of laying out objects automatically.
Note• You can input between 0.0 and 100.0(mm) (between 0.00 and 3.94(inch)).• You can change the numbers by clicking either ▲ button or ▼ button.
Page Setup Dialog BoxThis dialog box appears when you select Page Setup from the File menu.This dialog box provides selections for setting themedia size, orientation and other important features.
Paper OrientationThis selects the paper orientation.The following settings are available for orientation.
Mac OS X Software > Free Layout >
iPF815 Page Setup Dialog Box
5
501
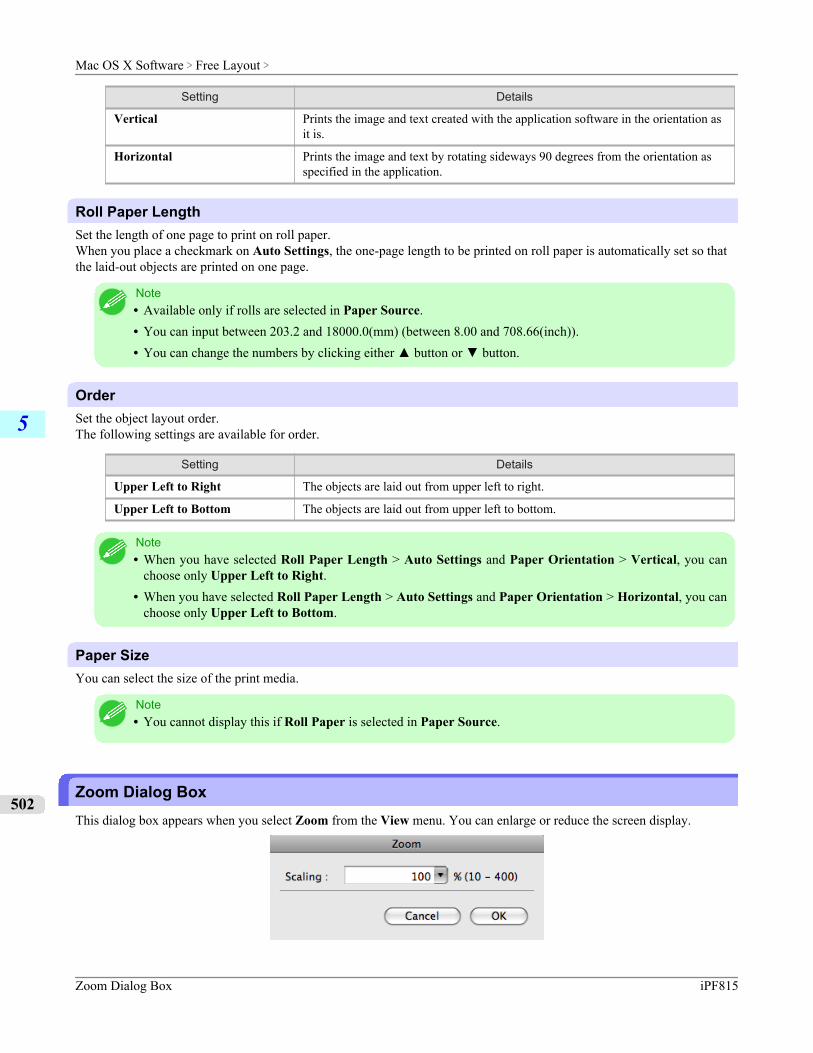
Setting Details
Vertical Prints the image and text created with the application software in the orientation asit is.
Horizontal Prints the image and text by rotating sideways 90 degrees from the orientation asspecified in the application.
Roll Paper LengthSet the length of one page to print on roll paper.When you place a checkmark on Auto Settings, the one-page length to be printed on roll paper is automatically set so thatthe laid-out objects are printed on one page.
Note• Available only if rolls are selected in Paper Source.• You can input between 203.2 and 18000.0(mm) (between 8.00 and 708.66(inch)).• You can change the numbers by clicking either ▲ button or ▼ button.
OrderSet the object layout order.The following settings are available for order.
Setting Details
Upper Left to Right The objects are laid out from upper left to right.
Upper Left to Bottom The objects are laid out from upper left to bottom.
Note• When you have selected Roll Paper Length > Auto Settings and Paper Orientation > Vertical, you can
choose only Upper Left to Right.• When you have selected Roll Paper Length > Auto Settings and Paper Orientation > Horizontal, you can
choose only Upper Left to Bottom.
Paper SizeYou can select the size of the print media.
Note• You cannot display this if Roll Paper is selected in Paper Source.
Zoom Dialog BoxThis dialog box appears when you select Zoom from the View menu. You can enlarge or reduce the screen display.
Mac OS X Software > Free Layout >
Zoom Dialog Box iPF815
5
502
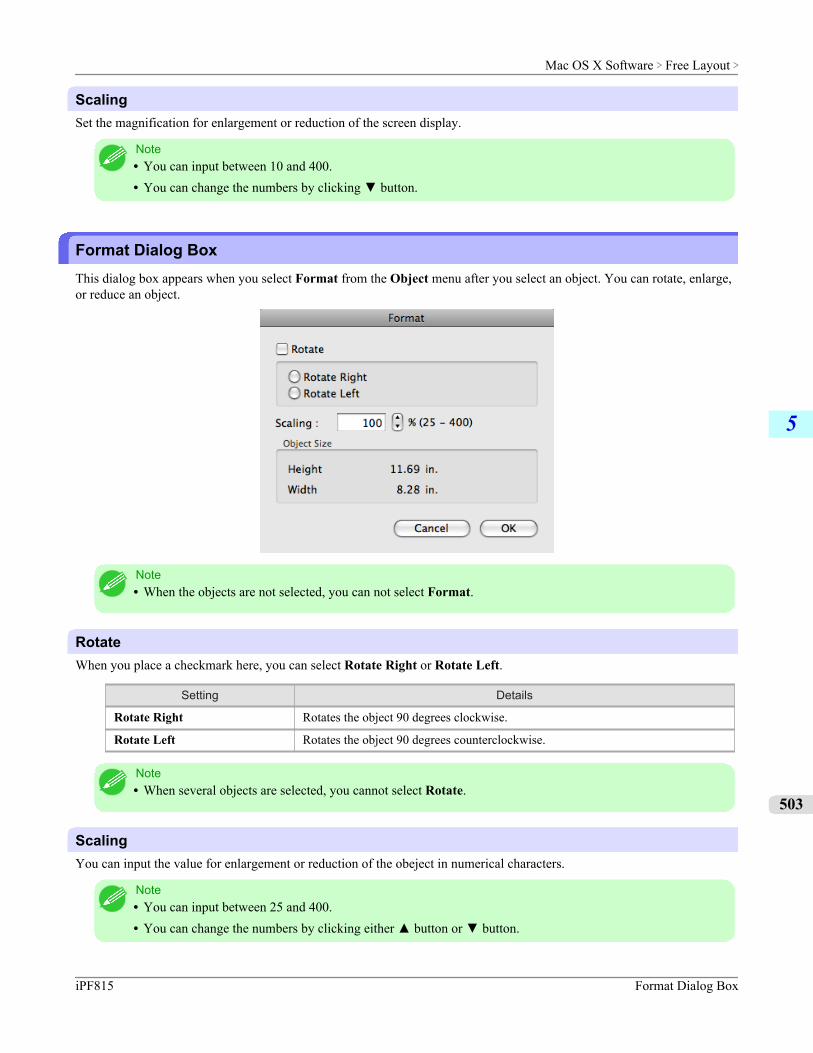
ScalingSet the magnification for enlargement or reduction of the screen display.
Note• You can input between 10 and 400.• You can change the numbers by clicking ▼ button.
Format Dialog BoxThis dialog box appears when you select Format from the Object menu after you select an object. You can rotate, enlarge,or reduce an object.
Note• When the objects are not selected, you can not select Format.
RotateWhen you place a checkmark here, you can select Rotate Right or Rotate Left.
Setting Details
Rotate Right Rotates the object 90 degrees clockwise.
Rotate Left Rotates the object 90 degrees counterclockwise.
Note• When several objects are selected, you cannot select Rotate.
ScalingYou can input the value for enlargement or reduction of the obeject in numerical characters.
Note• You can input between 25 and 400.• You can change the numbers by clicking either ▲ button or ▼ button.
Mac OS X Software > Free Layout >
iPF815 Format Dialog Box
5
503
Object SizeYou can confirm the object size.
Note• When several objects are selected, you cannot display Object Size.
Laying out a Multiple-File Document on One PageYou can lay out and print a multiple-file document on one page.
1. From the application software's File menu, select the printer setup menu to open the Print dialog box.
Note• Normally, select Print from the File menu.
2. Click on Free Layout in the Page Setup panel to attach a checkmark.
3. In the Print dialog box, select the pages to print and the number of copies, and click the Print button.Free Layout starts, laying out the document created with application software in the layout area as an object.
4. Leaving Free Layout running, open other files with the application software and repeat the above steps.
Laying out a Document Created with Multiple Application Programs on One PageYou can lay out and print a document created with multiple application programs on one page.
1. From the application software's File menu, select the printer setup menu to open the Print dialog box.
Note• Normally, select Print from the File menu.
2. Click on Free Layout in the Page Setup panel to attach a checkmark.
3. In the Print dialog box, select the pages to print and the number of copies, and click the Print button.Free Layout starts, laying out the document created with application software in the layout area as an object.
4. Leaving Free Layout running, open the files with other application software and repeat the above steps.
Mac OS X Software > Free Layout >
Laying out a Multiple-File Document on One Page iPF815
5
504
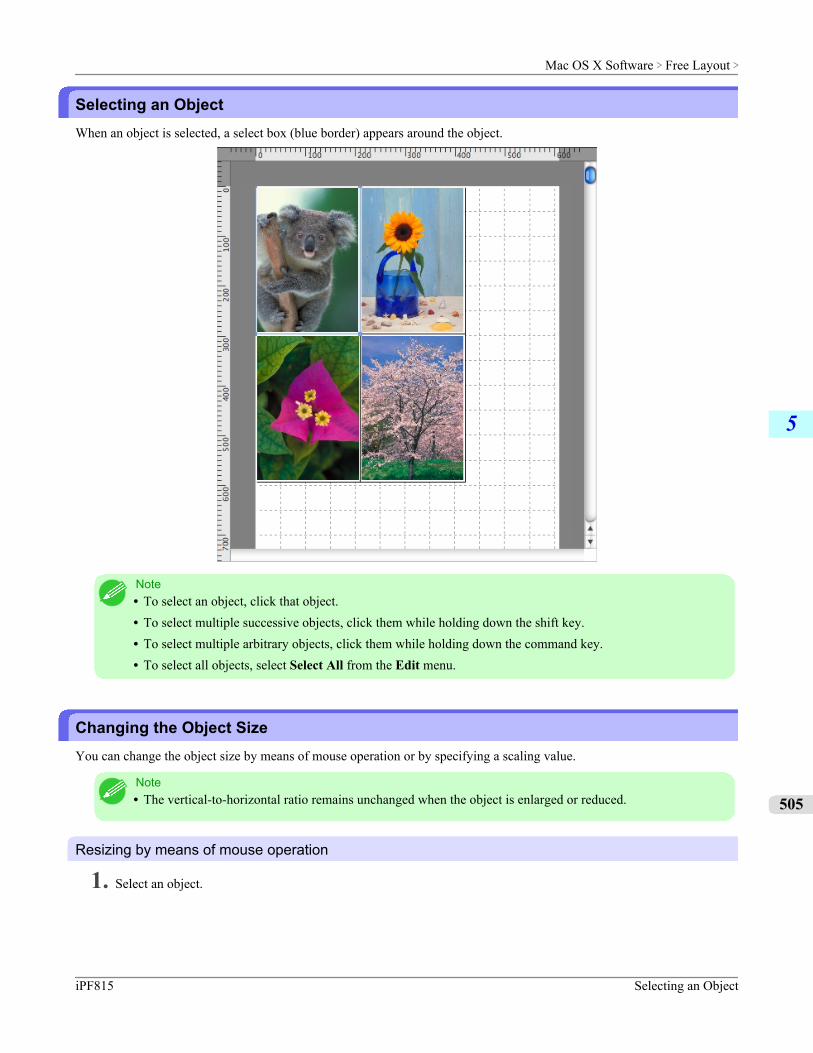
Selecting an ObjectWhen an object is selected, a select box (blue border) appears around the object.
Note• To select an object, click that object.• To select multiple successive objects, click them while holding down the shift key.• To select multiple arbitrary objects, click them while holding down the command key.• To select all objects, select Select All from the Edit menu.
Changing the Object SizeYou can change the object size by means of mouse operation or by specifying a scaling value.
Note• The vertical-to-horizontal ratio remains unchanged when the object is enlarged or reduced.
Resizing by means of mouse operation
1. Select an object.
Mac OS X Software > Free Layout >
iPF815 Selecting an Object
5
505
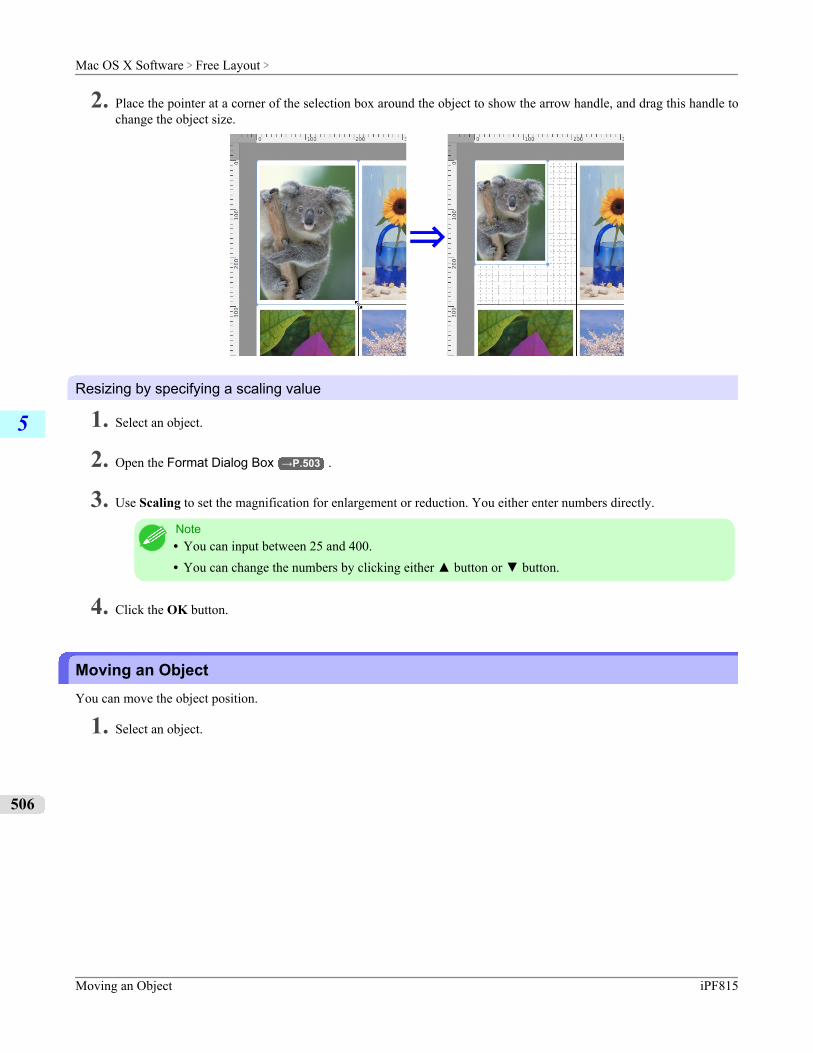
2. Place the pointer at a corner of the selection box around the object to show the arrow handle, and drag this handle tochange the object size.
Resizing by specifying a scaling value
1. Select an object.
2. Open the Format Dialog Box →P.503 .
3. Use Scaling to set the magnification for enlargement or reduction. You either enter numbers directly.
Note• You can input between 25 and 400.• You can change the numbers by clicking either ▲ button or ▼ button.
4. Click the OK button.
Moving an ObjectYou can move the object position.
1. Select an object.
Mac OS X Software > Free Layout >
Moving an Object iPF815
5
506

2. Place the pointer inside the selection box of the object to show the crosshair handle, and drag it to move the object.
Rotating an ObjectYou can rotate the object.
1. Select an object.
2. Select Rotate Left or Rotate Right from the toolbar.Alternatively, you may click on the Rotate check box in the Format Dialog Box →P.503 then select Rotate Rightor Rotate Left, and click the OK button.
Note• When several objects are selected, you cannot select Rotate.
Mac OS X Software > Free Layout >
iPF815 Rotating an Object
5
507
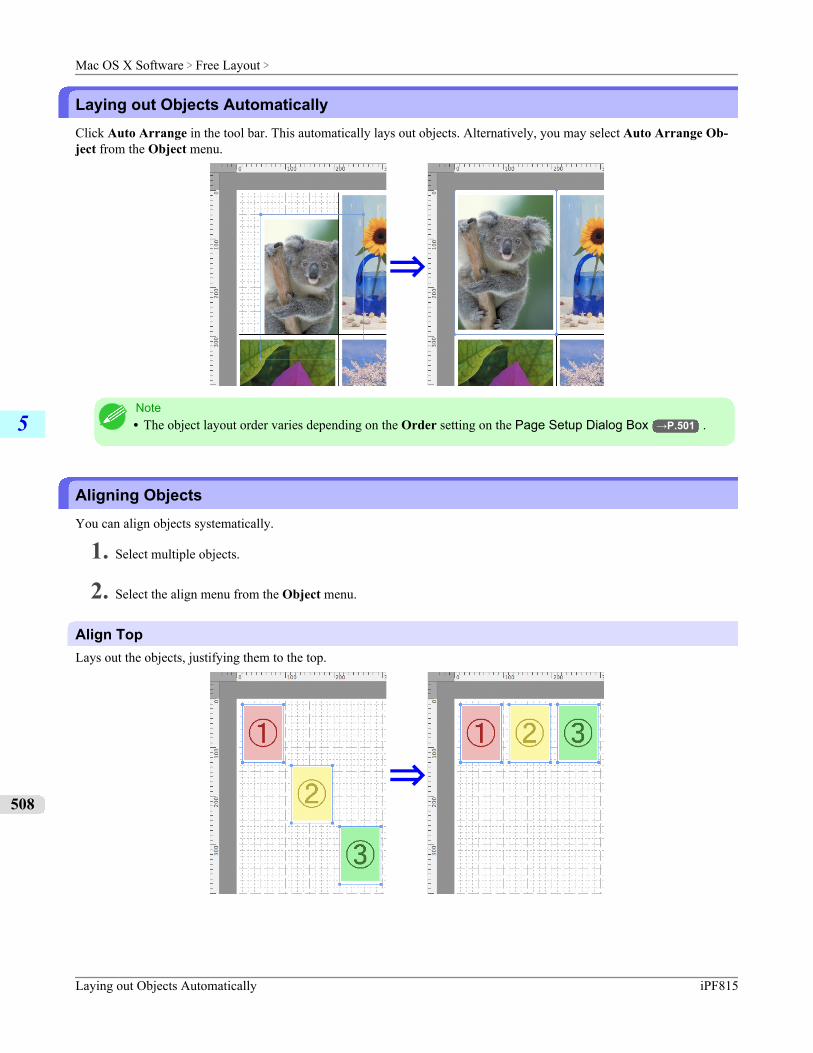
Laying out Objects AutomaticallyClick Auto Arrange in the tool bar. This automatically lays out objects. Alternatively, you may select Auto Arrange Ob-ject from the Object menu.
Note• The object layout order varies depending on the Order setting on the Page Setup Dialog Box →P.501 .
Aligning ObjectsYou can align objects systematically.
1. Select multiple objects.
2. Select the align menu from the Object menu.
Align TopLays out the objects, justifying them to the top.
Mac OS X Software > Free Layout >
Laying out Objects Automatically iPF815
5
508
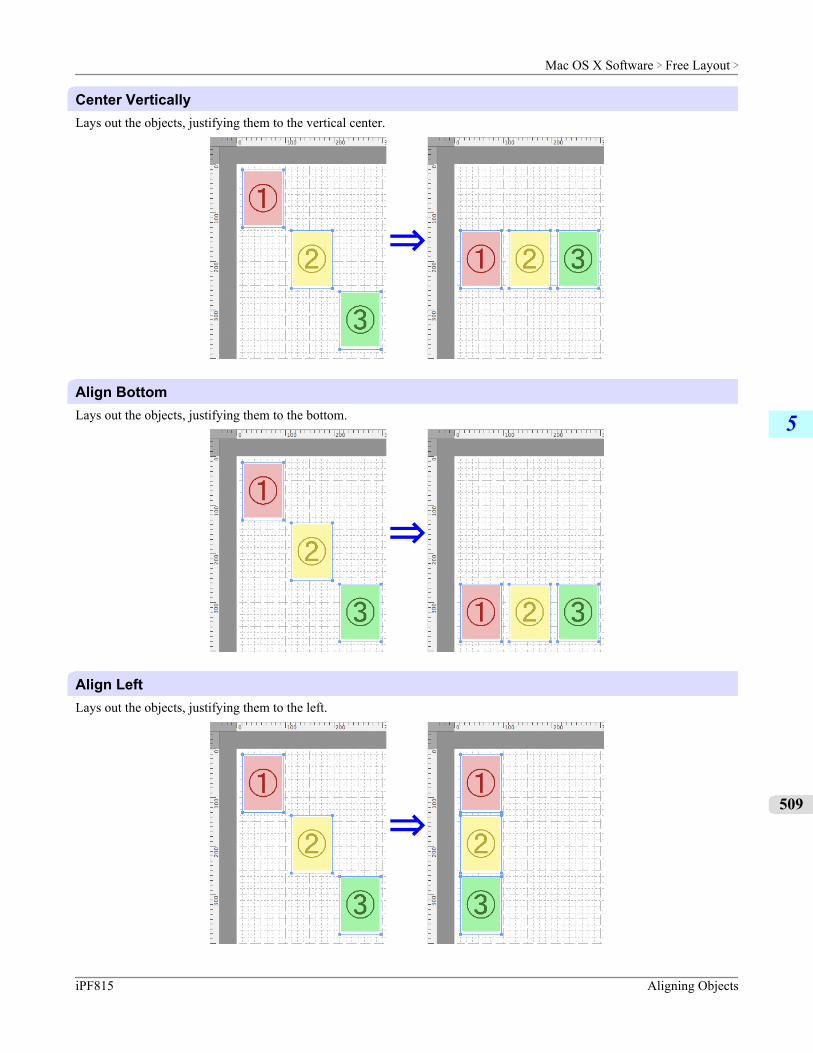
Center VerticallyLays out the objects, justifying them to the vertical center.
Align BottomLays out the objects, justifying them to the bottom.
Align LeftLays out the objects, justifying them to the left.
Mac OS X Software > Free Layout >
iPF815 Aligning Objects
5
509
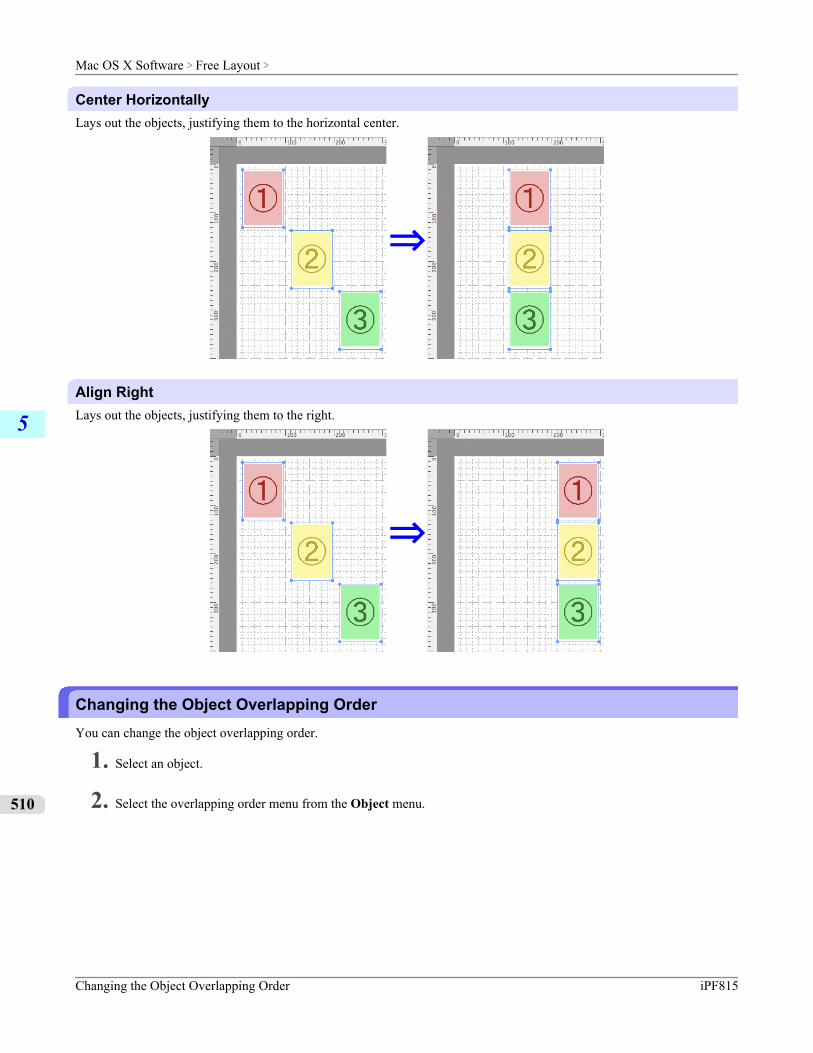
Center HorizontallyLays out the objects, justifying them to the horizontal center.
Align RightLays out the objects, justifying them to the right.
Changing the Object Overlapping OrderYou can change the object overlapping order.
1. Select an object.
2. Select the overlapping order menu from the Object menu.
Mac OS X Software > Free Layout >
Changing the Object Overlapping Order iPF815
5
510
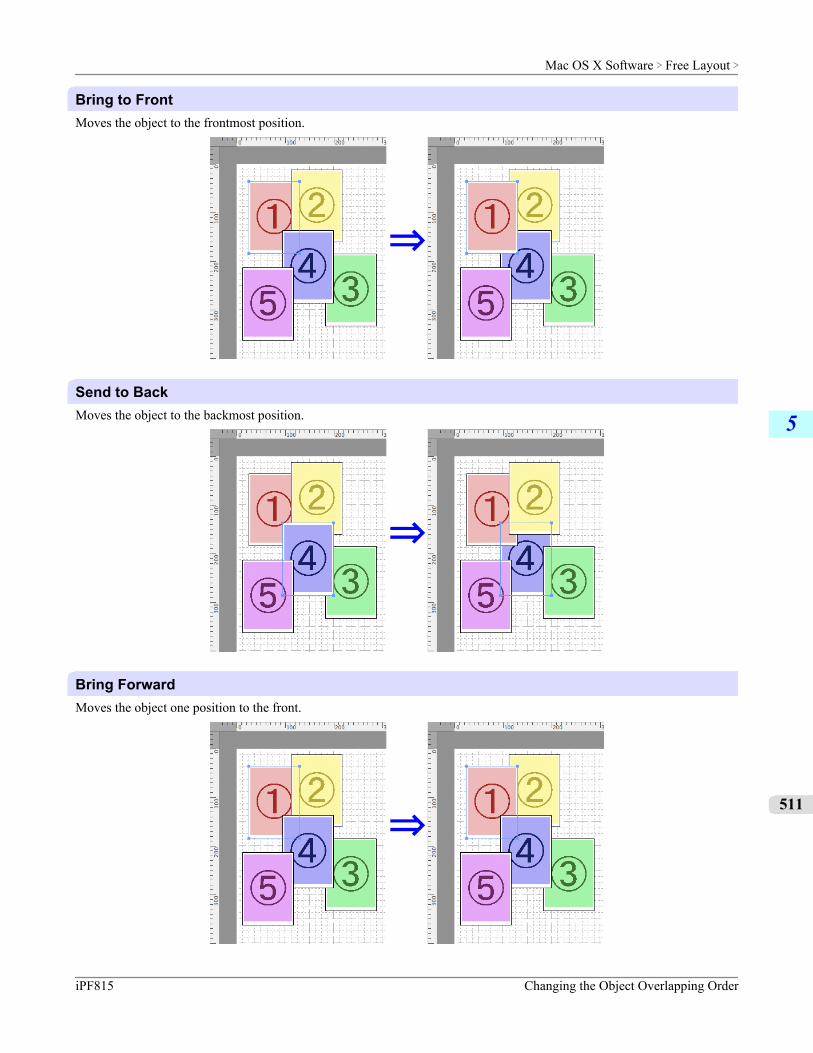
Bring to FrontMoves the object to the frontmost position.
Send to BackMoves the object to the backmost position.
Bring ForwardMoves the object one position to the front.
Mac OS X Software > Free Layout >
iPF815 Changing the Object Overlapping Order
5
511
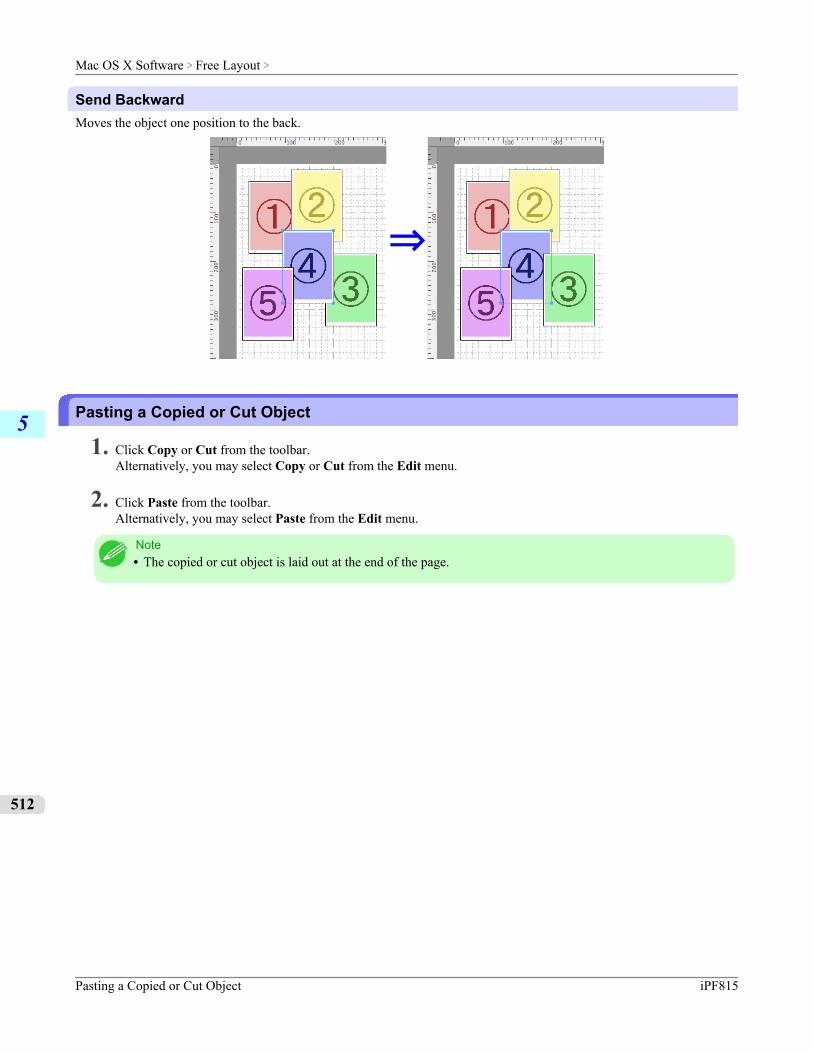
Send BackwardMoves the object one position to the back.
Pasting a Copied or Cut Object
1. Click Copy or Cut from the toolbar.Alternatively, you may select Copy or Cut from the Edit menu.
2. Click Paste from the toolbar.Alternatively, you may select Paste from the Edit menu.
Note• The copied or cut object is laid out at the end of the page.
Mac OS X Software > Free Layout >
Pasting a Copied or Cut Object iPF815
5
512
Color imageRUNNER Enlargement CopyThe Features of Color imageRUNNER Enlargement Copy ............................................................................ 513Operating Environment ................................................................................................................................... 513Starting Color imageRUNNER Enlargement Copy ......................................................................................... 514
Color imageRUNNER Enlargement Copy Dialog Box .................................................................................... 515
Hot Folder ........................................................................................................................................................ 516Creating a New Hot Folder .............................................................................................................................. 517Editing a Hot Folder (Setting Print Conditions) ................................................................................................ 519Deleting a Hot Folder ...................................................................................................................................... 523
Setting the Print Parameters ........................................................................................................................... 523Paper Settings Panel ....................................................................................................................................... 524
Easy Settings .............................................................................................................................................. 526Advanced Settings ...................................................................................................................................... 527
Output Settings Panel ..................................................................................................................................... 529Color Settings Panel ........................................................................................................................................ 531
Driver Matching Mode ................................................................................................................................. 533ICC Matching Mode .................................................................................................................................... 534ColorSync .................................................................................................................................................... 535
Printing Enlargements of Scanned Originals from a Color imageRUNNER .................................................... 535
The Features of Color imageRUNNER Enlargement CopyThe main features of Color imageRUNNER Enlargement Copy are as follows.
• Allows the document scanned with the Color imageRUNNER to be automatically enlarged and printed.• You can perform basic printer settings such as printer selection, media type and output profile selection, and matching
methods, in addition to borderless printing and enlargement/reduction process without growing through the printerdriver.
Note• The media type, image size, detailed media settings, and the printer settings can cause the actual print output
to differ from the Color imageRUNNER Enlargement Copy settings.
Operating EnvironmentYou can use the Color imageRUNNER Enlargement Copy in the following environments.
• Compatible Operating SystemMac OS X (10.3.9 to 10.6)
• Software that requires installationimagePROGRAF Printer Driver
Mac OS X Software > Color imageRUNNER Enlargement Copy >
iPF815 The Features of Color imageRUNNER Enlargement Copy
5
513
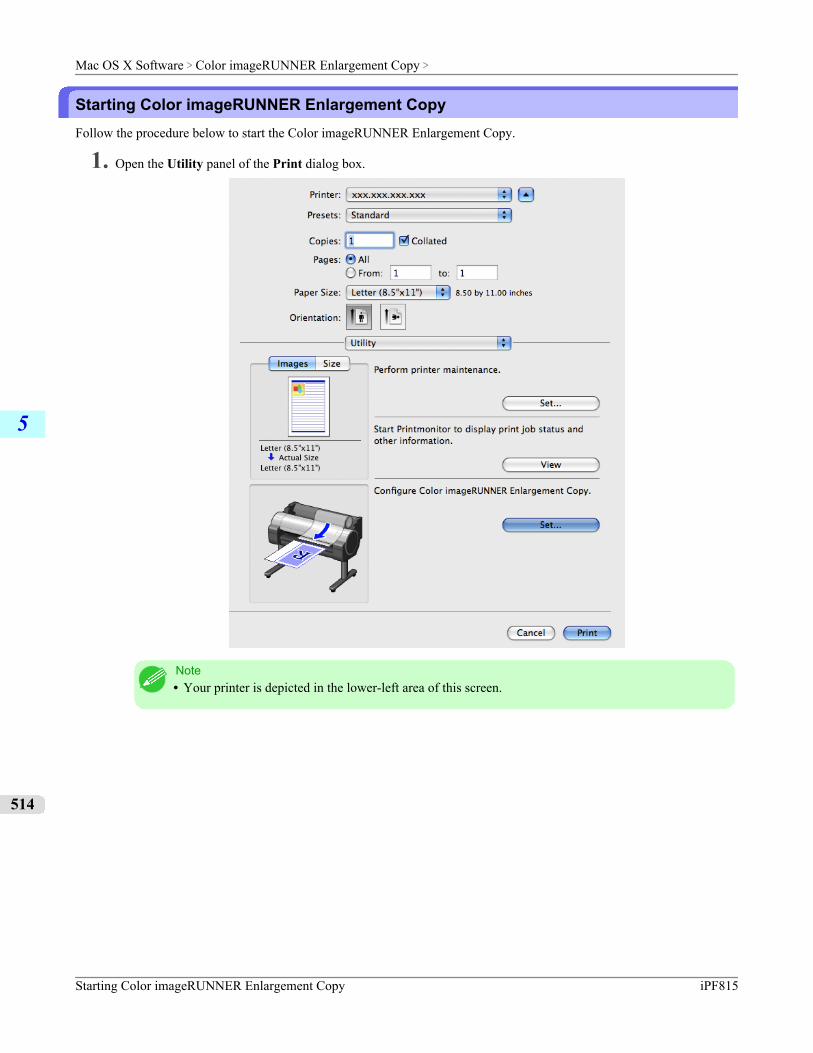
Starting Color imageRUNNER Enlargement CopyFollow the procedure below to start the Color imageRUNNER Enlargement Copy.
1. Open the Utility panel of the Print dialog box.
Note• Your printer is depicted in the lower-left area of this screen.
Mac OS X Software > Color imageRUNNER Enlargement Copy >
Starting Color imageRUNNER Enlargement Copy iPF815
5
514
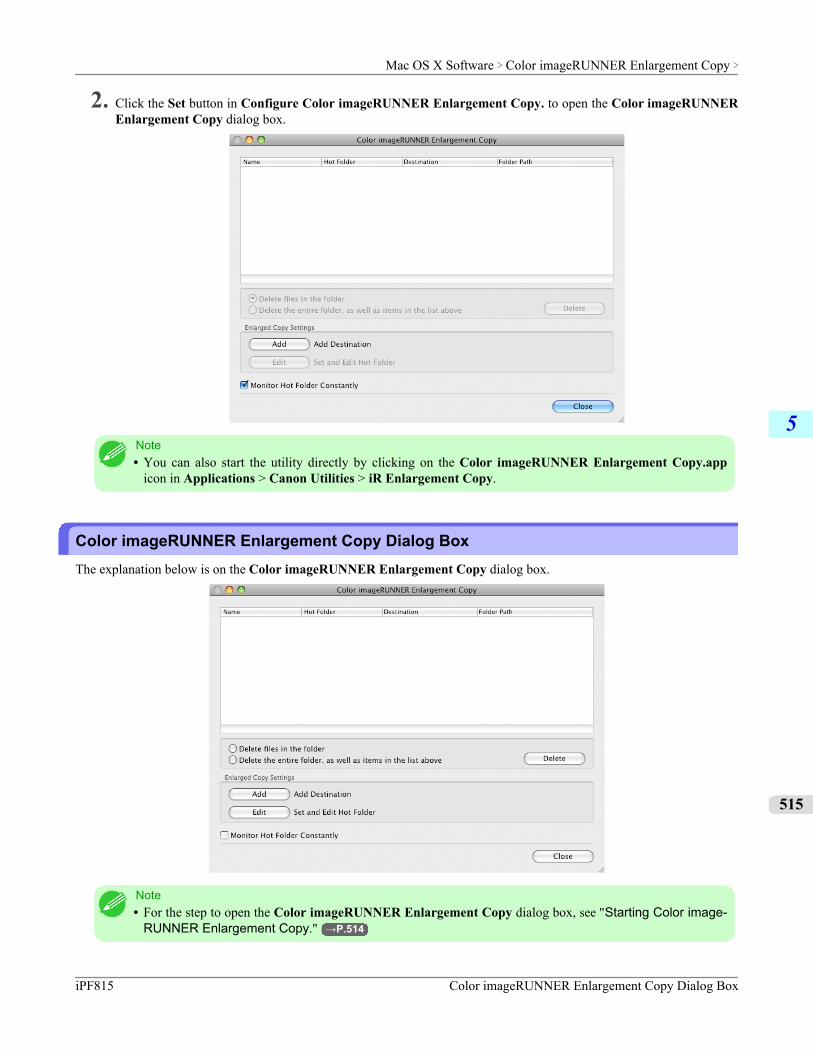
2. Click the Set button in Configure Color imageRUNNER Enlargement Copy. to open the Color imageRUNNEREnlargement Copy dialog box.
Note• You can also start the utility directly by clicking on the Color imageRUNNER Enlargement Copy.app
icon in Applications > Canon Utilities > iR Enlargement Copy.
Color imageRUNNER Enlargement Copy Dialog BoxThe explanation below is on the Color imageRUNNER Enlargement Copy dialog box.
Note• For the step to open the Color imageRUNNER Enlargement Copy dialog box, see "Starting Color image-
RUNNER Enlargement Copy." →P.514
Mac OS X Software > Color imageRUNNER Enlargement Copy >
iPF815 Color imageRUNNER Enlargement Copy Dialog Box
5
515
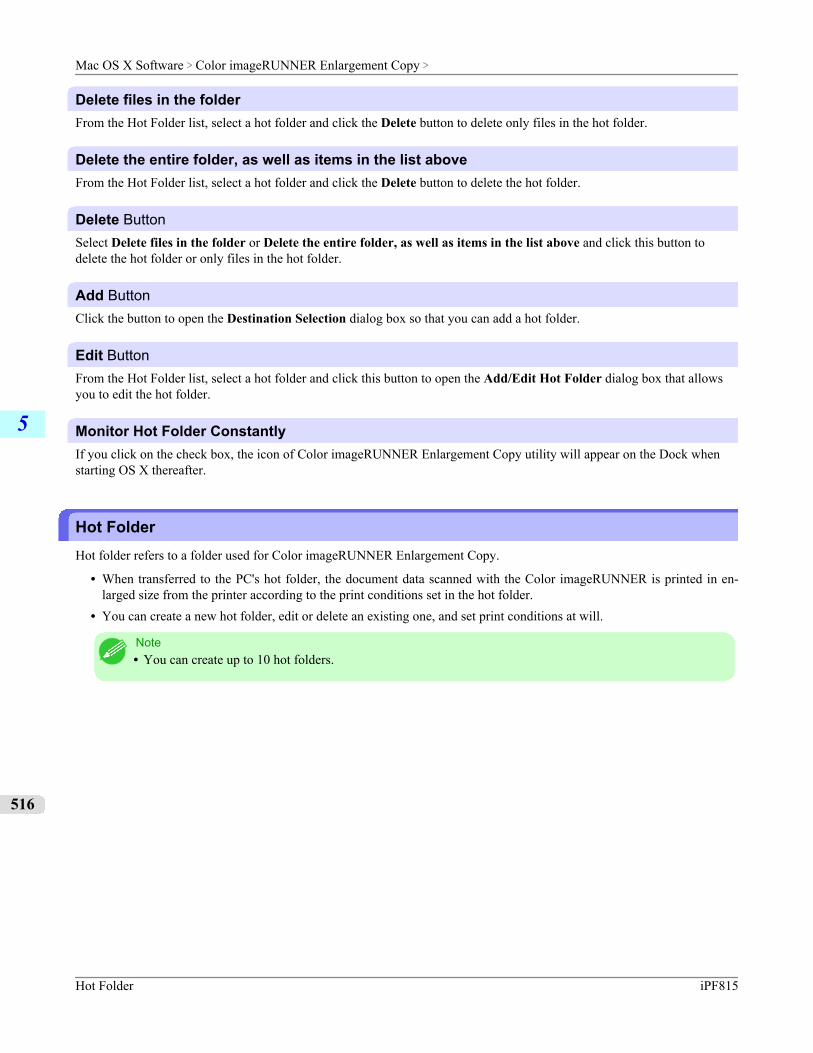
Delete files in the folderFrom the Hot Folder list, select a hot folder and click the Delete button to delete only files in the hot folder.
Delete the entire folder, as well as items in the list aboveFrom the Hot Folder list, select a hot folder and click the Delete button to delete the hot folder.
Delete ButtonSelect Delete files in the folder or Delete the entire folder, as well as items in the list above and click this button todelete the hot folder or only files in the hot folder.
Add ButtonClick the button to open the Destination Selection dialog box so that you can add a hot folder.
Edit ButtonFrom the Hot Folder list, select a hot folder and click this button to open the Add/Edit Hot Folder dialog box that allowsyou to edit the hot folder.
Monitor Hot Folder ConstantlyIf you click on the check box, the icon of Color imageRUNNER Enlargement Copy utility will appear on the Dock whenstarting OS X thereafter.
Hot FolderHot folder refers to a folder used for Color imageRUNNER Enlargement Copy.
• When transferred to the PC's hot folder, the document data scanned with the Color imageRUNNER is printed in en-larged size from the printer according to the print conditions set in the hot folder.
• You can create a new hot folder, edit or delete an existing one, and set print conditions at will.
Note• You can create up to 10 hot folders.
Mac OS X Software > Color imageRUNNER Enlargement Copy >
Hot Folder iPF815
5
516
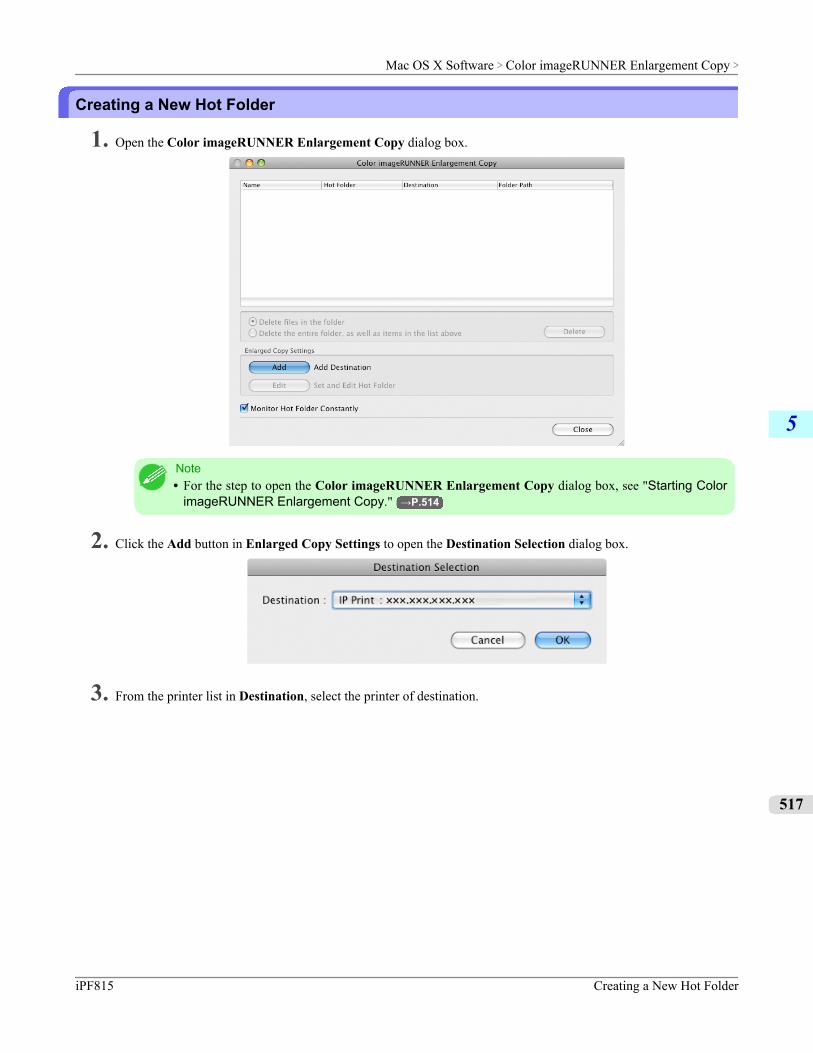
Creating a New Hot Folder
1. Open the Color imageRUNNER Enlargement Copy dialog box.
Note• For the step to open the Color imageRUNNER Enlargement Copy dialog box, see "Starting Color
imageRUNNER Enlargement Copy." →P.514
2. Click the Add button in Enlarged Copy Settings to open the Destination Selection dialog box.
3. From the printer list in Destination, select the printer of destination.
Mac OS X Software > Color imageRUNNER Enlargement Copy >
iPF815 Creating a New Hot Folder
5
517
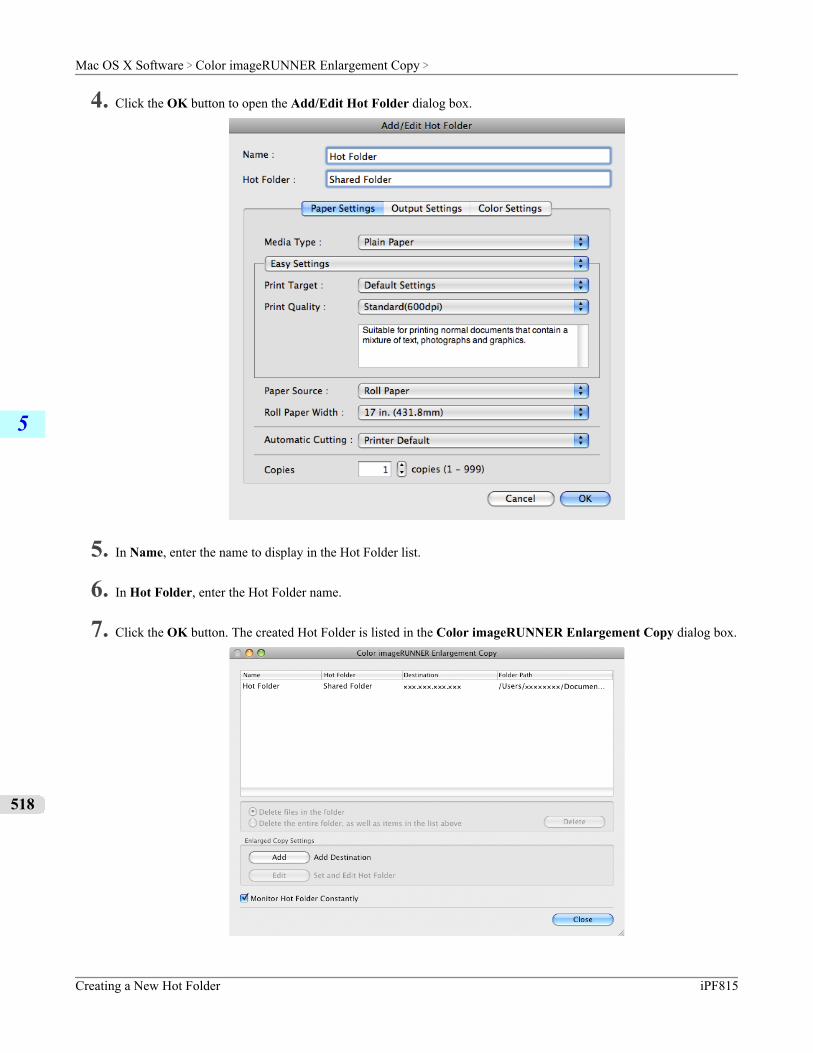
4. Click the OK button to open the Add/Edit Hot Folder dialog box.
5. In Name, enter the name to display in the Hot Folder list.
6. In Hot Folder, enter the Hot Folder name.
7. Click the OK button. The created Hot Folder is listed in the Color imageRUNNER Enlargement Copy dialog box.
Mac OS X Software > Color imageRUNNER Enlargement Copy >
Creating a New Hot Folder iPF815
5
518
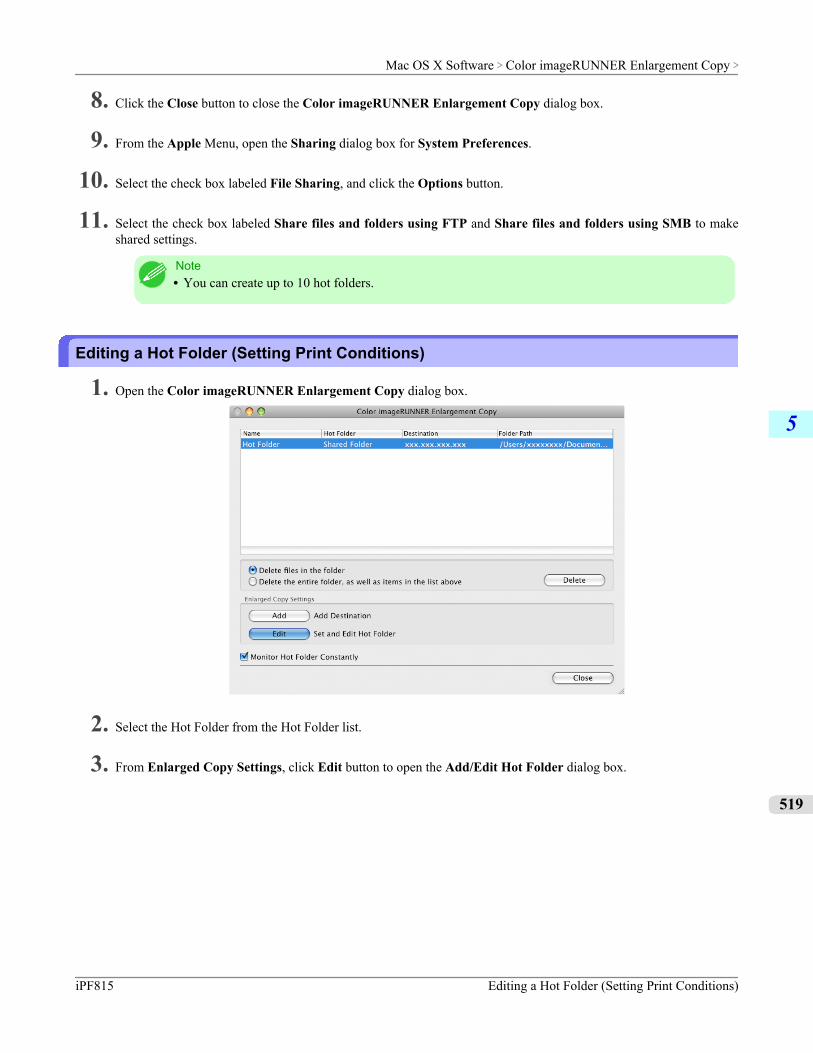
8. Click the Close button to close the Color imageRUNNER Enlargement Copy dialog box.
9. From the Apple Menu, open the Sharing dialog box for System Preferences.
10. Select the check box labeled File Sharing, and click the Options button.
11. Select the check box labeled Share files and folders using FTP and Share files and folders using SMB to makeshared settings.
Note• You can create up to 10 hot folders.
Editing a Hot Folder (Setting Print Conditions)
1. Open the Color imageRUNNER Enlargement Copy dialog box.
2. Select the Hot Folder from the Hot Folder list.
3. From Enlarged Copy Settings, click Edit button to open the Add/Edit Hot Folder dialog box.
Mac OS X Software > Color imageRUNNER Enlargement Copy >
iPF815 Editing a Hot Folder (Setting Print Conditions)
5
519
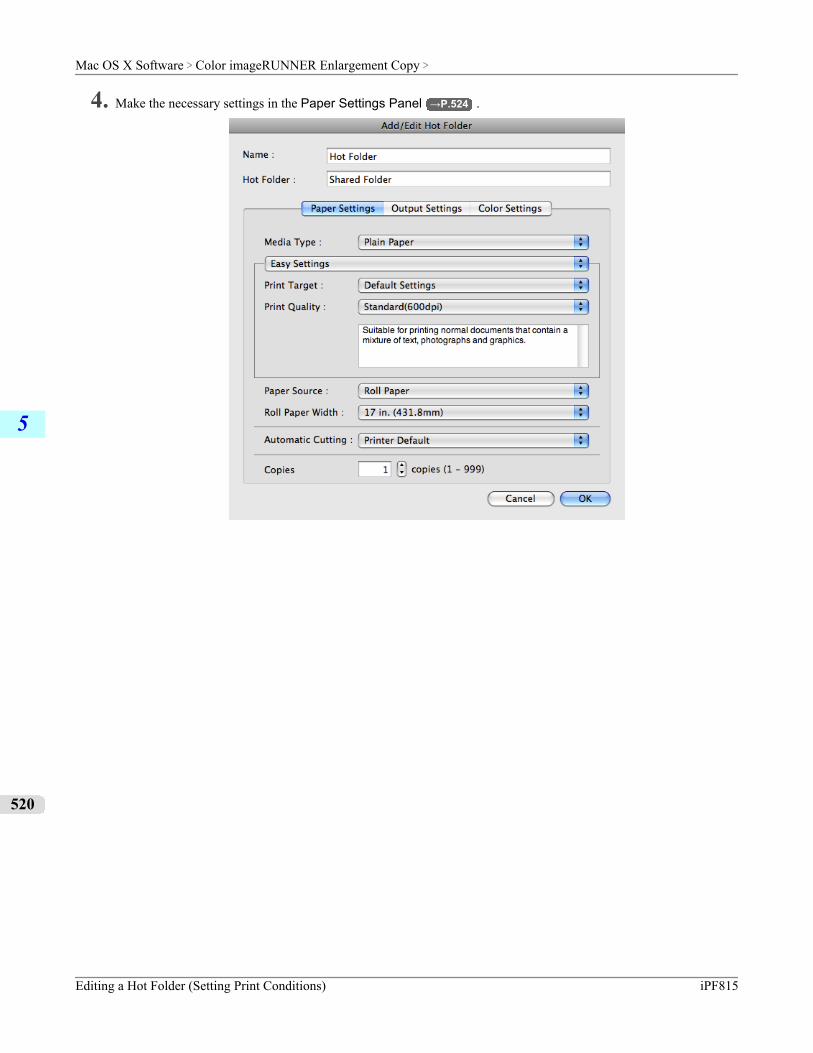
4. Make the necessary settings in the Paper Settings Panel →P.524 .
Mac OS X Software > Color imageRUNNER Enlargement Copy >
Editing a Hot Folder (Setting Print Conditions) iPF815
5
520
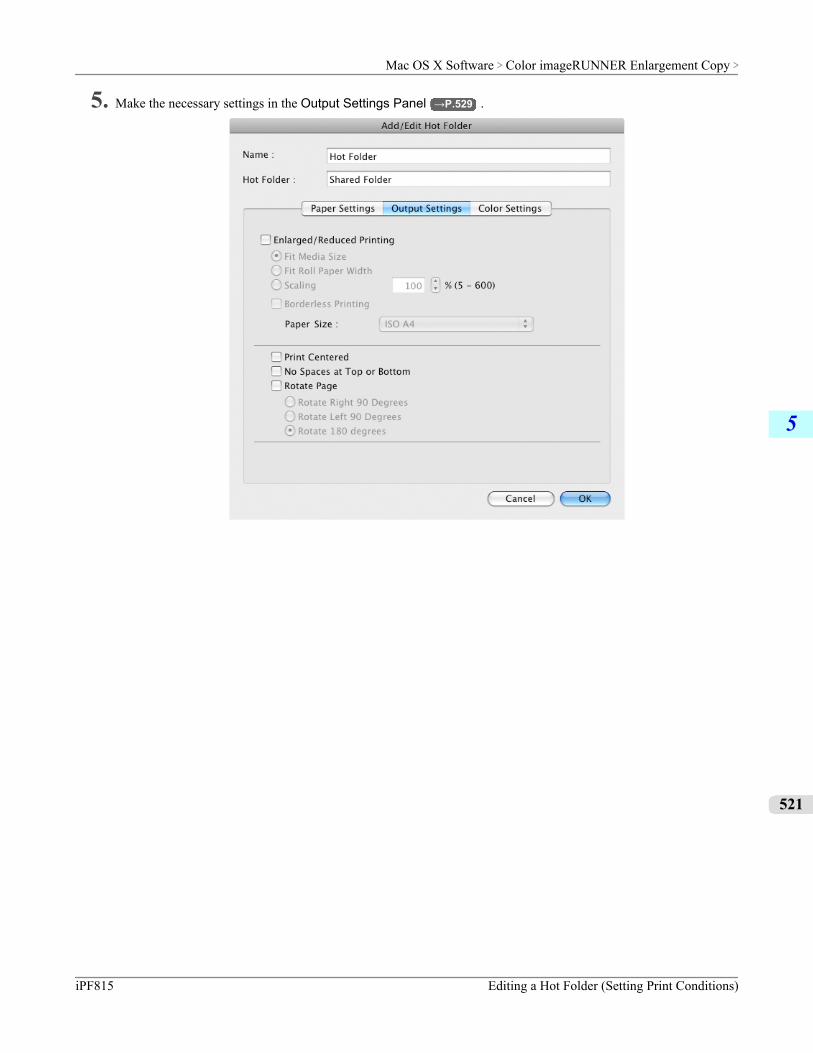
5. Make the necessary settings in the Output Settings Panel →P.529 .
Mac OS X Software > Color imageRUNNER Enlargement Copy >
iPF815 Editing a Hot Folder (Setting Print Conditions)
5
521
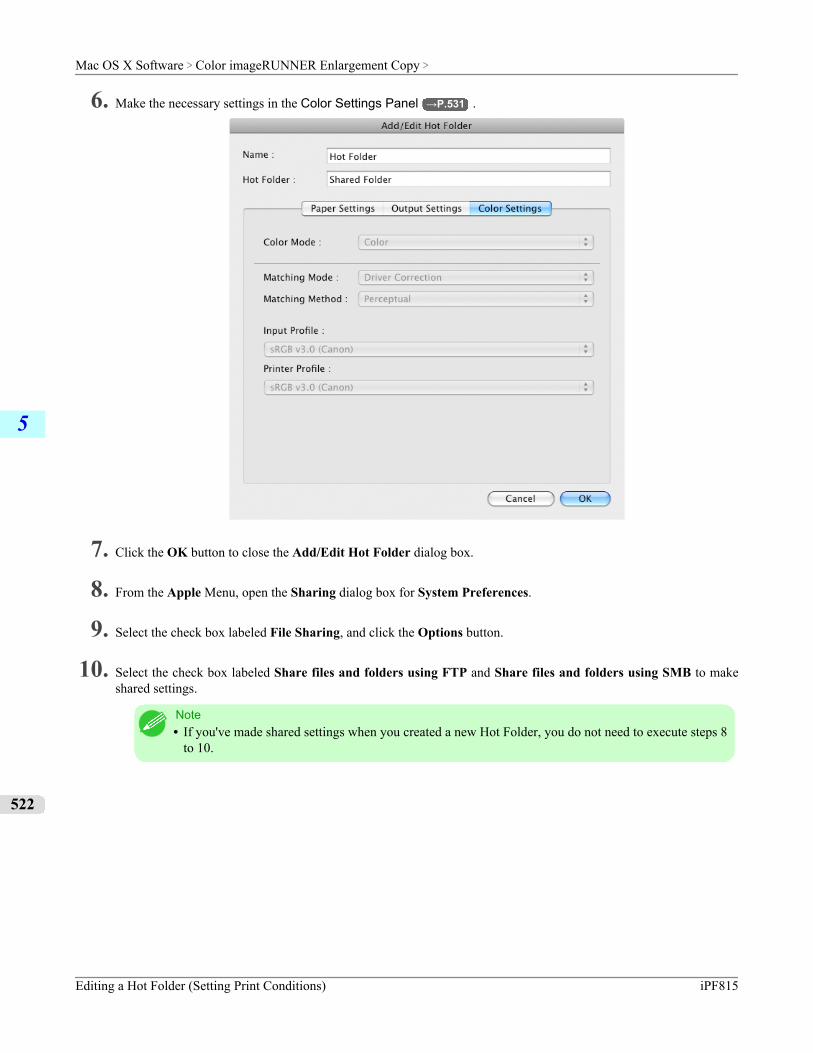
6. Make the necessary settings in the Color Settings Panel →P.531 .
7. Click the OK button to close the Add/Edit Hot Folder dialog box.
8. From the Apple Menu, open the Sharing dialog box for System Preferences.
9. Select the check box labeled File Sharing, and click the Options button.
10. Select the check box labeled Share files and folders using FTP and Share files and folders using SMB to makeshared settings.
Note• If you've made shared settings when you created a new Hot Folder, you do not need to execute steps 8
to 10.
Mac OS X Software > Color imageRUNNER Enlargement Copy >
Editing a Hot Folder (Setting Print Conditions) iPF815
5
522
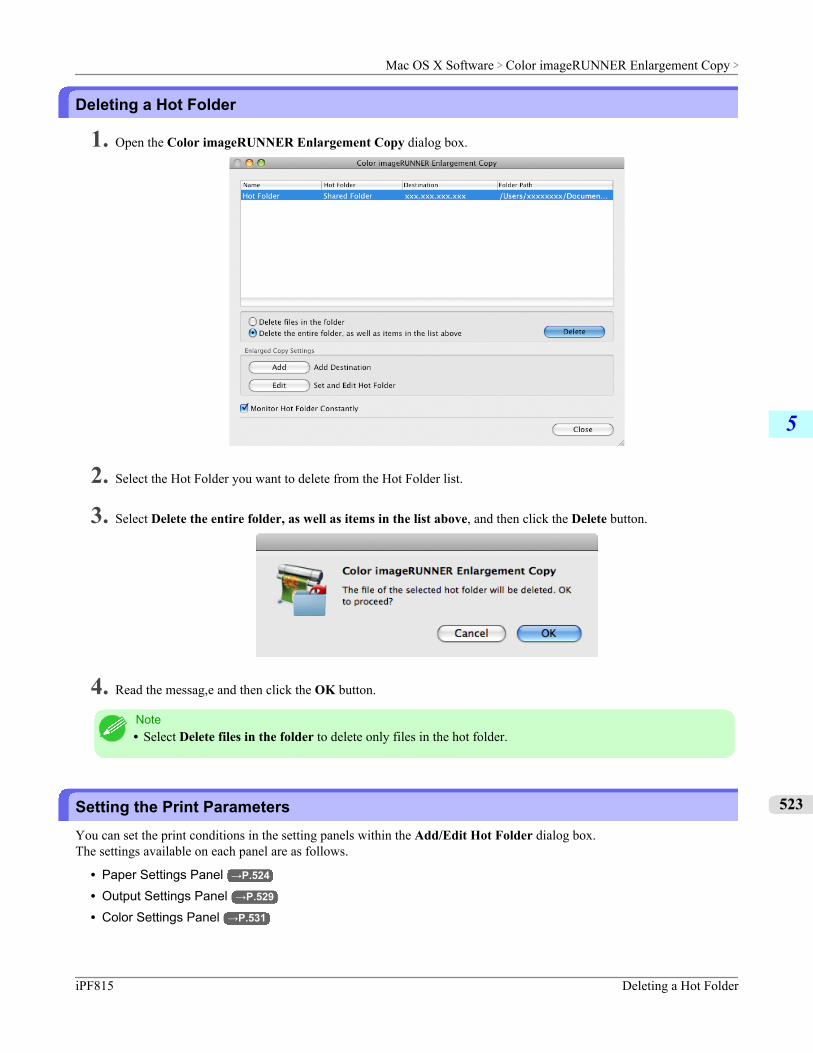
Deleting a Hot Folder
1. Open the Color imageRUNNER Enlargement Copy dialog box.
2. Select the Hot Folder you want to delete from the Hot Folder list.
3. Select Delete the entire folder, as well as items in the list above, and then click the Delete button.
4. Read the messag,e and then click the OK button.
Note• Select Delete files in the folder to delete only files in the hot folder.
Setting the Print ParametersYou can set the print conditions in the setting panels within the Add/Edit Hot Folder dialog box.The settings available on each panel are as follows.
• Paper Settings Panel →P.524
• Output Settings Panel →P.529
• Color Settings Panel →P.531
Mac OS X Software > Color imageRUNNER Enlargement Copy >
iPF815 Deleting a Hot Folder
5
523
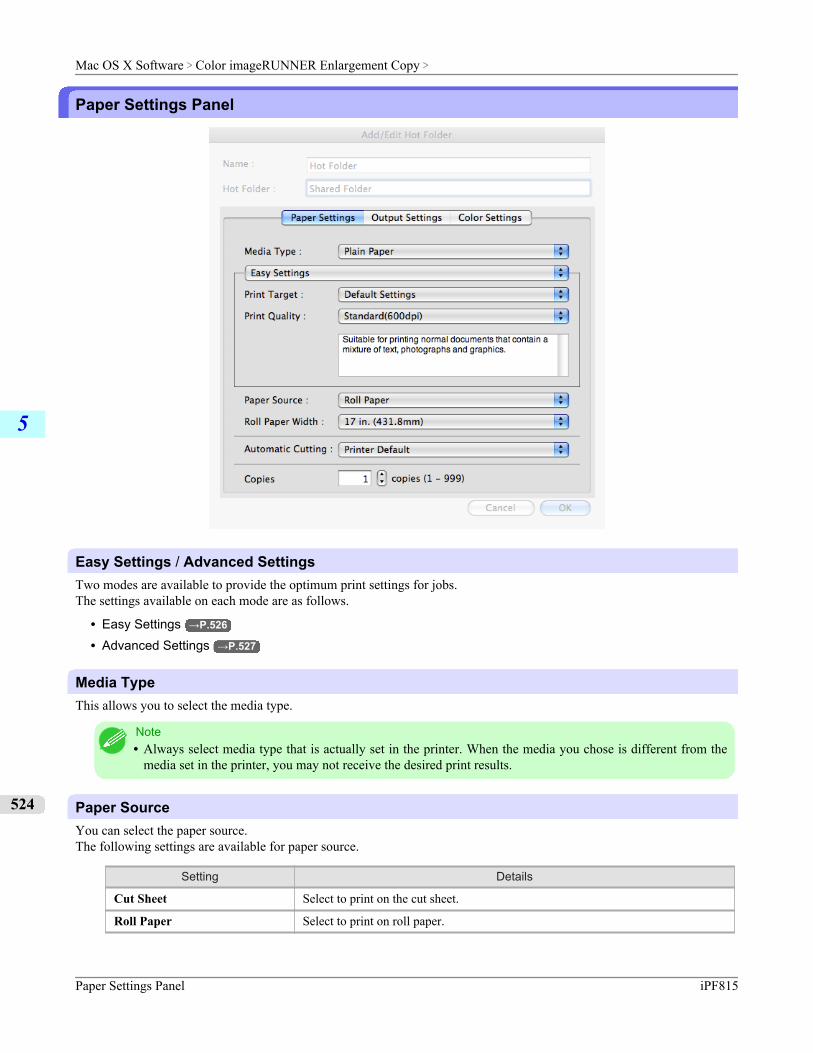
Paper Settings Panel
Easy Settings / Advanced SettingsTwo modes are available to provide the optimum print settings for jobs.The settings available on each mode are as follows.
• Easy Settings →P.526
• Advanced Settings →P.527
Media TypeThis allows you to select the media type.
Note• Always select media type that is actually set in the printer. When the media you chose is different from the
media set in the printer, you may not receive the desired print results.
Paper SourceYou can select the paper source.The following settings are available for paper source.
Setting Details
Cut Sheet Select to print on the cut sheet.
Roll Paper Select to print on roll paper.
Mac OS X Software > Color imageRUNNER Enlargement Copy >
Paper Settings Panel iPF815
5
524
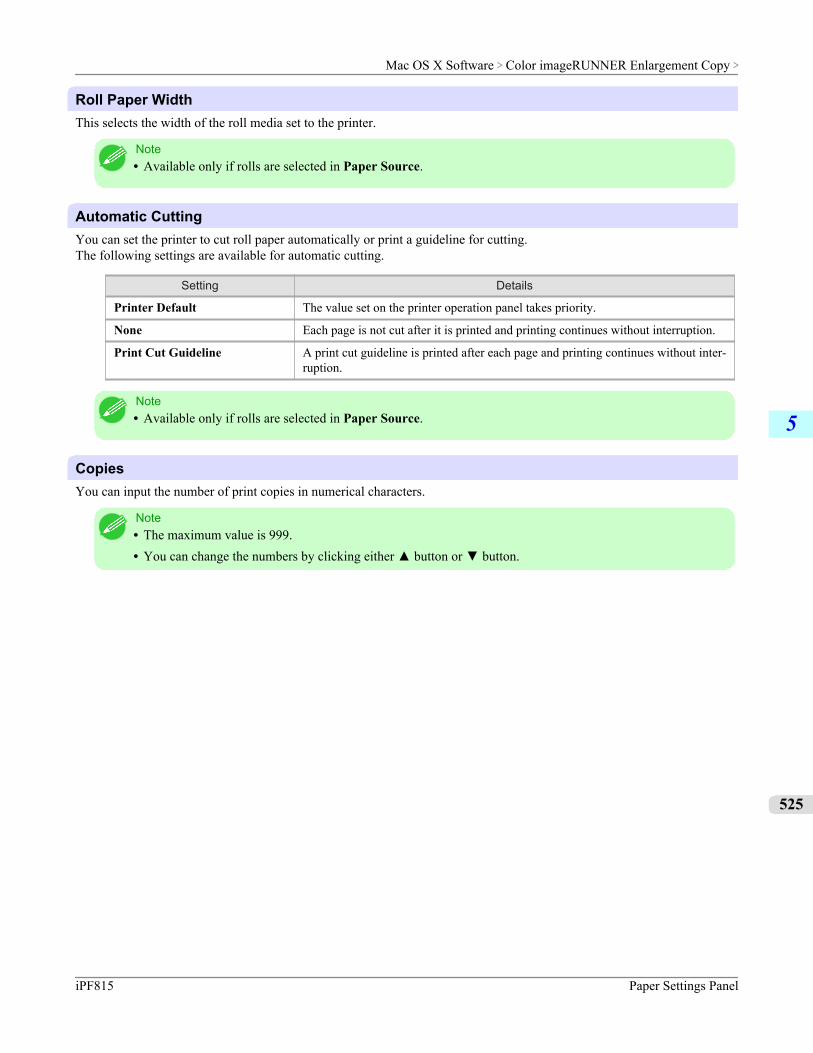
Roll Paper WidthThis selects the width of the roll media set to the printer.
Note• Available only if rolls are selected in Paper Source.
Automatic CuttingYou can set the printer to cut roll paper automatically or print a guideline for cutting.The following settings are available for automatic cutting.
Setting Details
Printer Default The value set on the printer operation panel takes priority.
None Each page is not cut after it is printed and printing continues without interruption.
Print Cut Guideline A print cut guideline is printed after each page and printing continues without inter-ruption.
Note• Available only if rolls are selected in Paper Source.
CopiesYou can input the number of print copies in numerical characters.
Note• The maximum value is 999.• You can change the numbers by clicking either ▲ button or ▼ button.
Mac OS X Software > Color imageRUNNER Enlargement Copy >
iPF815 Paper Settings Panel
5
525
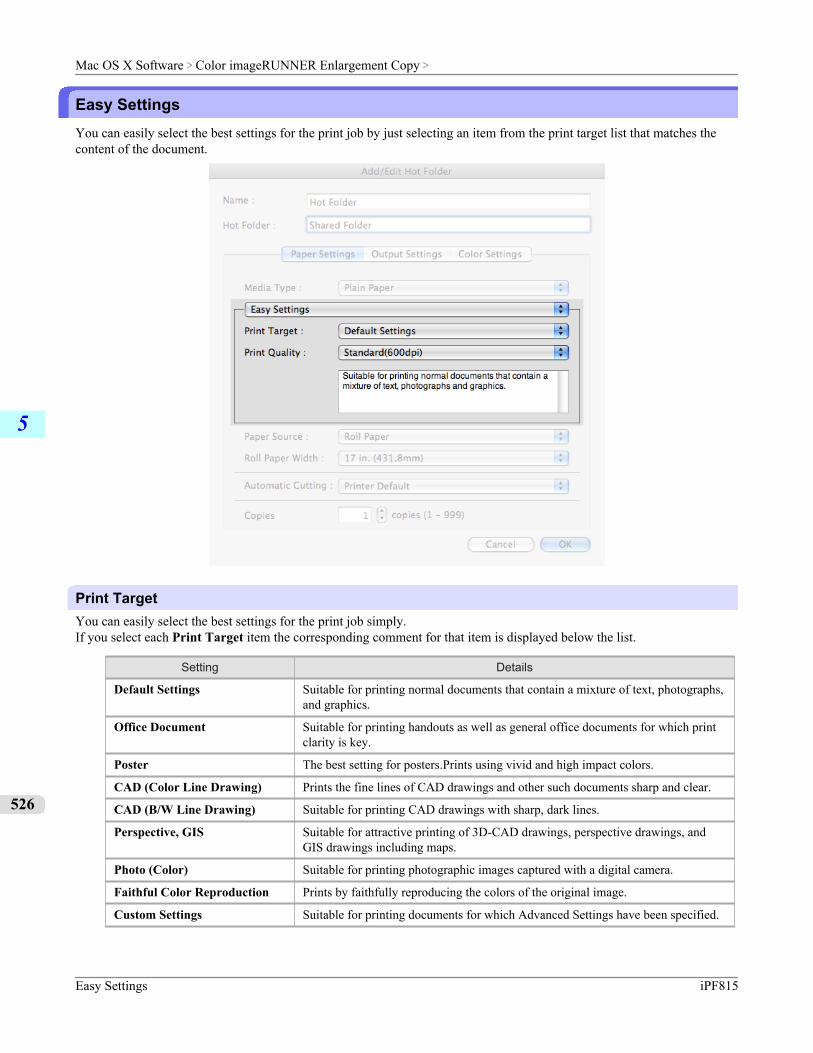
Easy SettingsYou can easily select the best settings for the print job by just selecting an item from the print target list that matches thecontent of the document.
Print TargetYou can easily select the best settings for the print job simply.If you select each Print Target item the corresponding comment for that item is displayed below the list.
Setting Details
Default Settings Suitable for printing normal documents that contain a mixture of text, photographs,and graphics.
Office Document Suitable for printing handouts as well as general office documents for which printclarity is key.
Poster The best setting for posters.Prints using vivid and high impact colors.
CAD (Color Line Drawing) Prints the fine lines of CAD drawings and other such documents sharp and clear.
CAD (B/W Line Drawing) Suitable for printing CAD drawings with sharp, dark lines.
Perspective, GIS Suitable for attractive printing of 3D-CAD drawings, perspective drawings, andGIS drawings including maps.
Photo (Color) Suitable for printing photographic images captured with a digital camera.
Faithful Color Reproduction Prints by faithfully reproducing the colors of the original image.
Custom Settings Suitable for printing documents for which Advanced Settings have been specified.
Mac OS X Software > Color imageRUNNER Enlargement Copy >
Easy Settings iPF815
5
526

Note• The number of settings available for selection depends on the media type.
Print QualitySelecting print quality strikes a balance between the quality of the printed image and printing speed.
The level of the print quality and resolution settings are displayed in the following combinations.
Setting Details
Print Quality Highest / High / Standard / Draft
Resolution 1200dpi / 600dpi / 300dpi
Note• The availability of settings is determined by the media type and print priority selections.• Printing time is longer and more ink is consumed with High than with Draft, however, print quality is high-
er.• Printing time is shorter and less ink is consumed with Draft than with High, however, print quality is lower.
Advanced SettingsPresents detailed settings for the print priority, the print quality, and other items so you can select the values for these set-tings yourself.
Mac OS X Software > Color imageRUNNER Enlargement Copy >
iPF815 Advanced Settings
5
527

Print PrioritySelect a print quality mode that is appropriate for the print job.
Setting Details
Image This mode achieves the best results for printing photographic images and illustra-tions.
Line Drawing This mode is best for printing CAD drawings with fine lines or wall newssheet orother documents that contain large amounts of text. However, you may not achievethe quality you expect with printing photographs or other images with many filledareas. For these types of jobs, select Image.
Office Document Prints common office documents, such as proposals, memos for distribution, etc.,so they are easy to read.
Note• The number of settings available for selection depends on the media type.
Print QualitySelecting print quality strikes a balance between the quality of the printed image and printing speed.
The level of the print quality and resolution settings are displayed in the following combinations.
Setting Details
Print Quality Highest / High / Standard / Draft
Resolution 1200dpi / 600dpi / 300dpi
Note• The availability of settings is determined by the media type and print priority selections.• Printing time is longer and more ink is consumed with High than with Draft, however, print quality is high-
er.• Printing time is shorter and less ink is consumed with Draft than with High, however, print quality is lower.
Mac OS X Software > Color imageRUNNER Enlargement Copy >
Advanced Settings iPF815
5
528
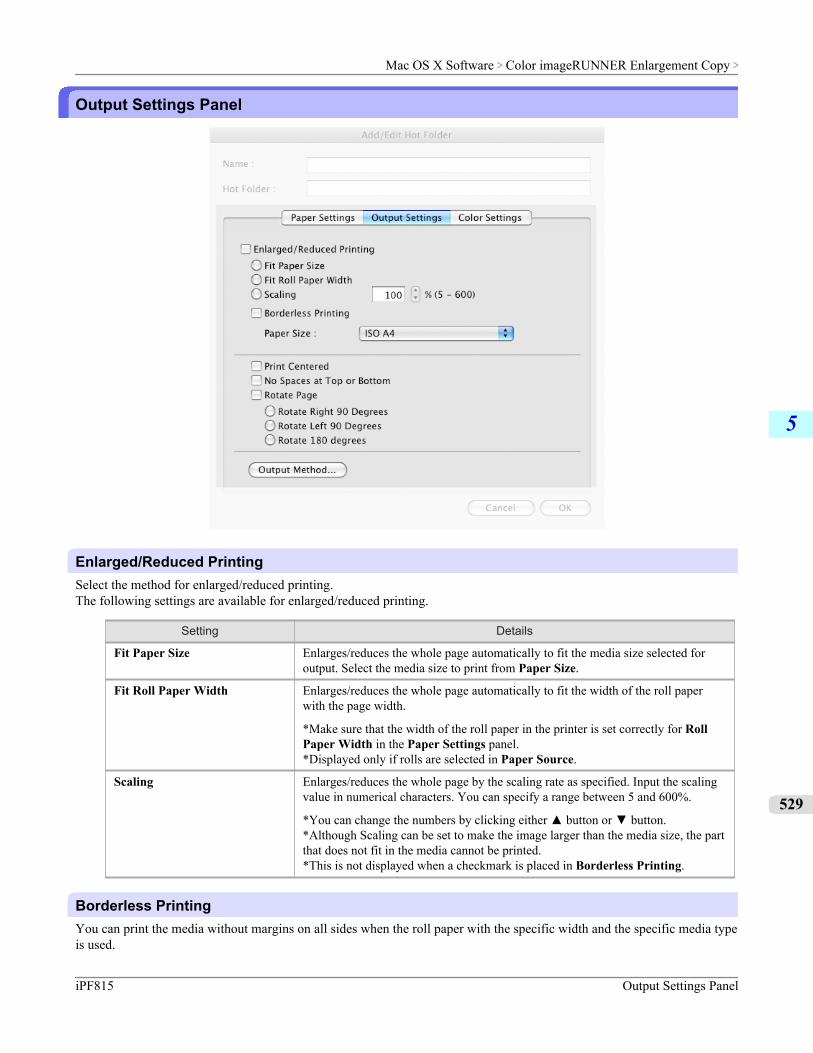
Output Settings Panel
Enlarged/Reduced PrintingSelect the method for enlarged/reduced printing.The following settings are available for enlarged/reduced printing.
Setting Details
Fit Paper Size Enlarges/reduces the whole page automatically to fit the media size selected foroutput. Select the media size to print from Paper Size.
Fit Roll Paper Width Enlarges/reduces the whole page automatically to fit the width of the roll paperwith the page width.
*Make sure that the width of the roll paper in the printer is set correctly for RollPaper Width in the Paper Settings panel.*Displayed only if rolls are selected in Paper Source.
Scaling Enlarges/reduces the whole page by the scaling rate as specified. Input the scalingvalue in numerical characters. You can specify a range between 5 and 600%.
*You can change the numbers by clicking either ▲ button or ▼ button.*Although Scaling can be set to make the image larger than the media size, the partthat does not fit in the media cannot be printed.*This is not displayed when a checkmark is placed in Borderless Printing.
Borderless PrintingYou can print the media without margins on all sides when the roll paper with the specific width and the specific media typeis used.
Mac OS X Software > Color imageRUNNER Enlargement Copy >
iPF815 Output Settings Panel
5
529
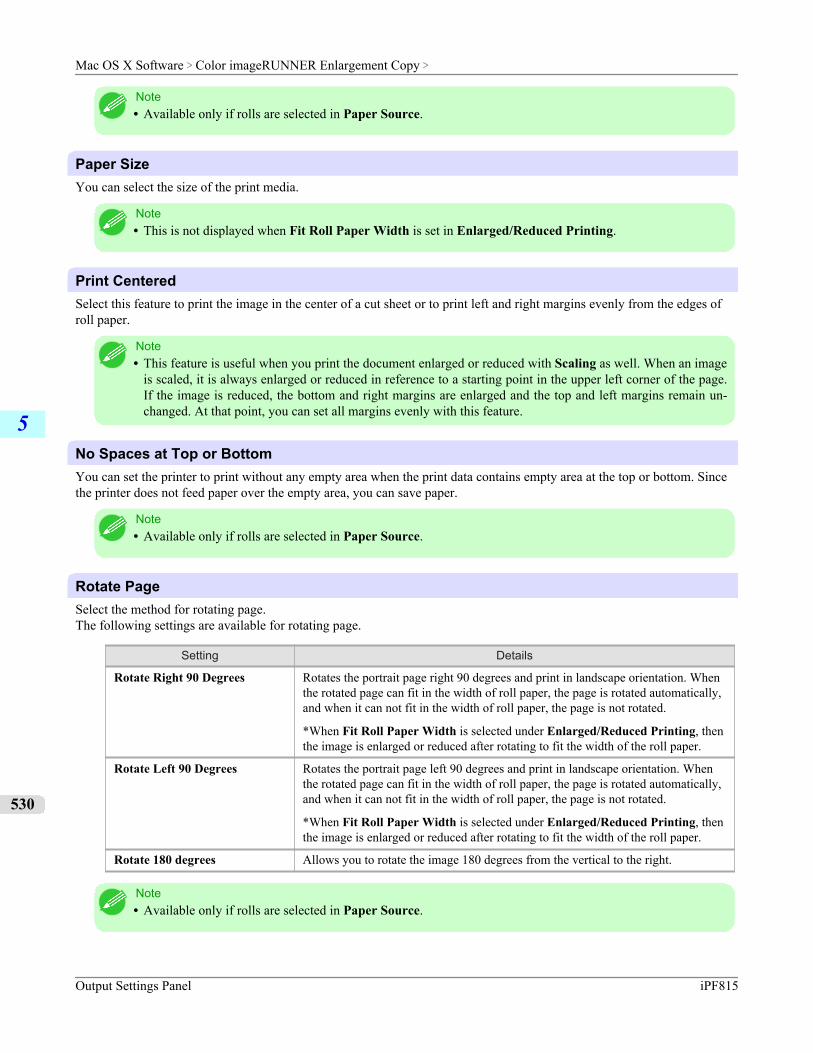
Note• Available only if rolls are selected in Paper Source.
Paper SizeYou can select the size of the print media.
Note• This is not displayed when Fit Roll Paper Width is set in Enlarged/Reduced Printing.
Print CenteredSelect this feature to print the image in the center of a cut sheet or to print left and right margins evenly from the edges ofroll paper.
Note• This feature is useful when you print the document enlarged or reduced with Scaling as well. When an image
is scaled, it is always enlarged or reduced in reference to a starting point in the upper left corner of the page.If the image is reduced, the bottom and right margins are enlarged and the top and left margins remain un-changed. At that point, you can set all margins evenly with this feature.
No Spaces at Top or BottomYou can set the printer to print without any empty area when the print data contains empty area at the top or bottom. Sincethe printer does not feed paper over the empty area, you can save paper.
Note• Available only if rolls are selected in Paper Source.
Rotate PageSelect the method for rotating page.The following settings are available for rotating page.
Setting Details
Rotate Right 90 Degrees Rotates the portrait page right 90 degrees and print in landscape orientation. Whenthe rotated page can fit in the width of roll paper, the page is rotated automatically,and when it can not fit in the width of roll paper, the page is not rotated.
*When Fit Roll Paper Width is selected under Enlarged/Reduced Printing, thenthe image is enlarged or reduced after rotating to fit the width of the roll paper.
Rotate Left 90 Degrees Rotates the portrait page left 90 degrees and print in landscape orientation. Whenthe rotated page can fit in the width of roll paper, the page is rotated automatically,and when it can not fit in the width of roll paper, the page is not rotated.
*When Fit Roll Paper Width is selected under Enlarged/Reduced Printing, thenthe image is enlarged or reduced after rotating to fit the width of the roll paper.
Rotate 180 degrees Allows you to rotate the image 180 degrees from the vertical to the right.
Note• Available only if rolls are selected in Paper Source.
Mac OS X Software > Color imageRUNNER Enlargement Copy >
Output Settings Panel iPF815
5
530
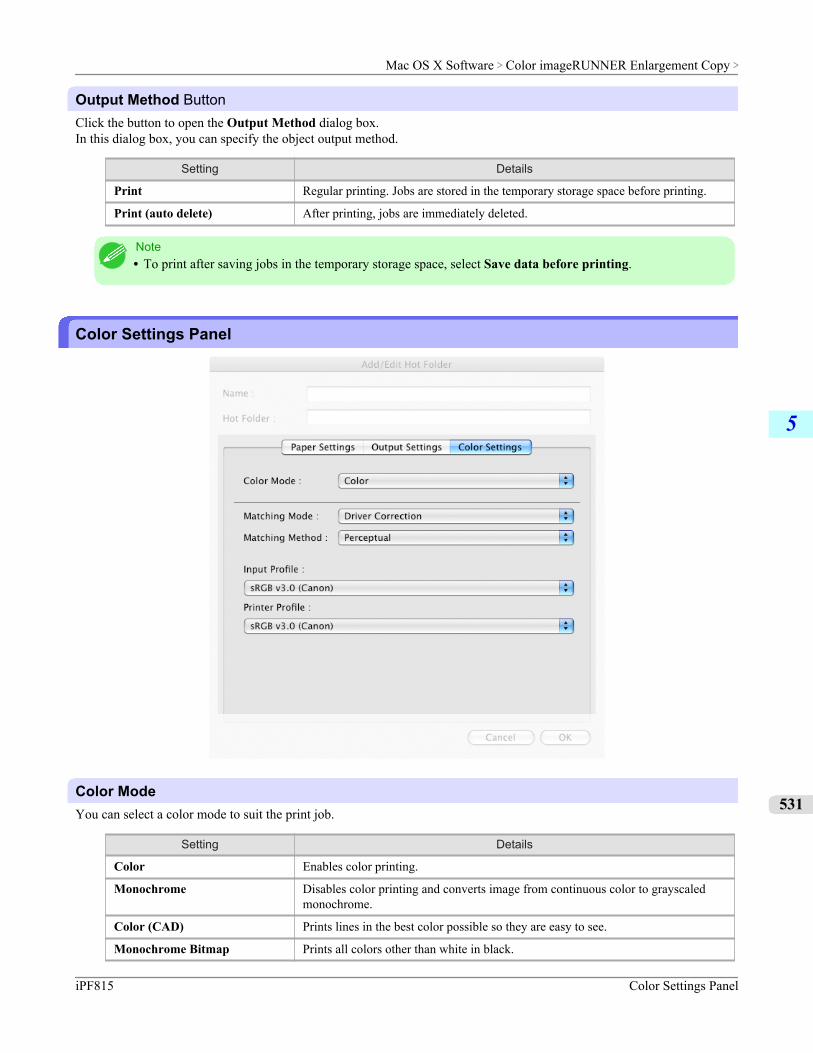
Output Method ButtonClick the button to open the Output Method dialog box.In this dialog box, you can specify the object output method.
Setting Details
Print Regular printing. Jobs are stored in the temporary storage space before printing.
Print (auto delete) After printing, jobs are immediately deleted.
Note• To print after saving jobs in the temporary storage space, select Save data before printing.
Color Settings Panel
Color ModeYou can select a color mode to suit the print job.
Setting Details
Color Enables color printing.
Monochrome Disables color printing and converts image from continuous color to grayscaledmonochrome.
Color (CAD) Prints lines in the best color possible so they are easy to see.
Monochrome Bitmap Prints all colors other than white in black.
Mac OS X Software > Color imageRUNNER Enlargement Copy >
iPF815 Color Settings Panel
5
531
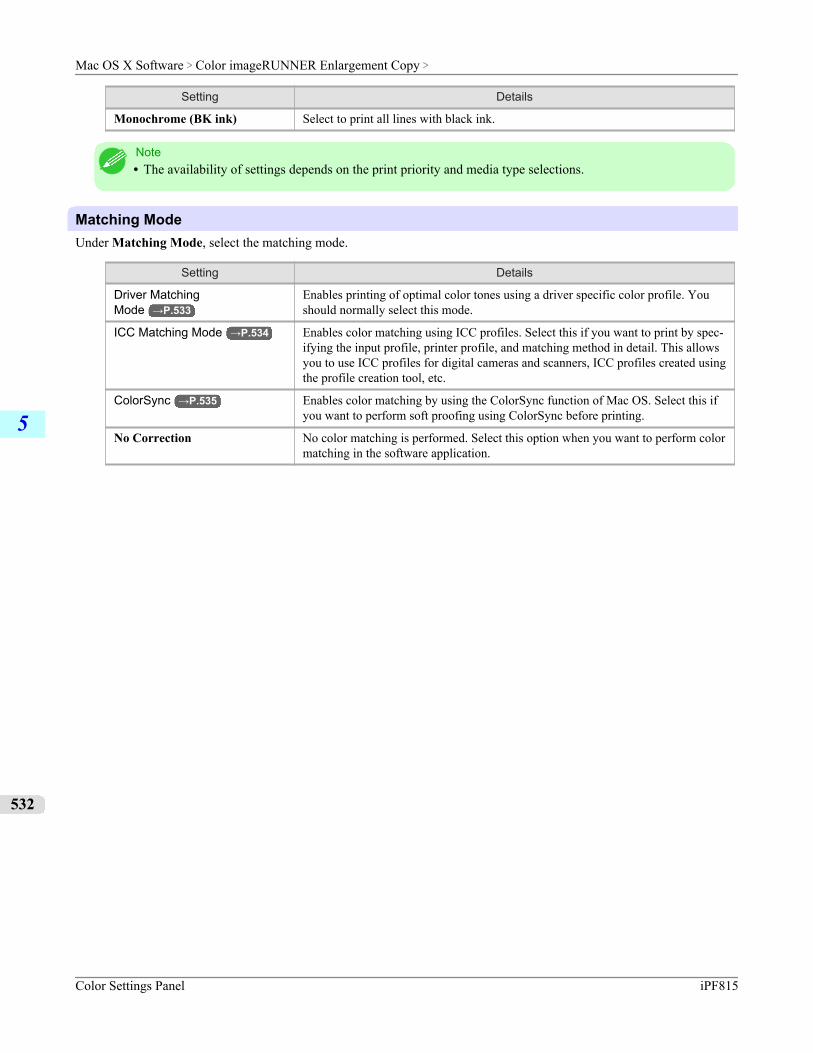
Setting Details
Monochrome (BK ink) Select to print all lines with black ink.
Note• The availability of settings depends on the print priority and media type selections.
Matching ModeUnder Matching Mode, select the matching mode.
Setting Details
Driver MatchingMode →P.533
Enables printing of optimal color tones using a driver specific color profile. Youshould normally select this mode.
ICC Matching Mode →P.534 Enables color matching using ICC profiles. Select this if you want to print by spec-ifying the input profile, printer profile, and matching method in detail. This allowsyou to use ICC profiles for digital cameras and scanners, ICC profiles created usingthe profile creation tool, etc.
ColorSync →P.535 Enables color matching by using the ColorSync function of Mac OS. Select this ifyou want to perform soft proofing using ColorSync before printing.
No Correction No color matching is performed. Select this option when you want to perform colormatching in the software application.
Mac OS X Software > Color imageRUNNER Enlargement Copy >
Color Settings Panel iPF815
5
532

Driver Matching Mode
1. Under Matching Mode, select Driver Matching Mode.
2. Click Matching Method list, and then select a setting.
Setting Details
Auto Automatically selects the best color matching method for each Image, Graphics,Text.
Perceptual Color-matching optimized for printing typical photos attractively. Smooth grada-tion is a feature. This is also an easy-to-use mode when performing color adjust-ment using application software.
Saturation Color-matching optimized for printing posters, etc., vividly.
Colorimetric Color-matching optimized for printing image data with accurate colors in input col-or space. This is the easiest-to-use mode when you want to adjust the color andprint. However, gradation may be lost for colors of wider range than the color re-production range of the printer. Generally, this is also called relative colorimetric.
Mac OS X Software > Color imageRUNNER Enlargement Copy >
iPF815 Driver Matching Mode
5
533
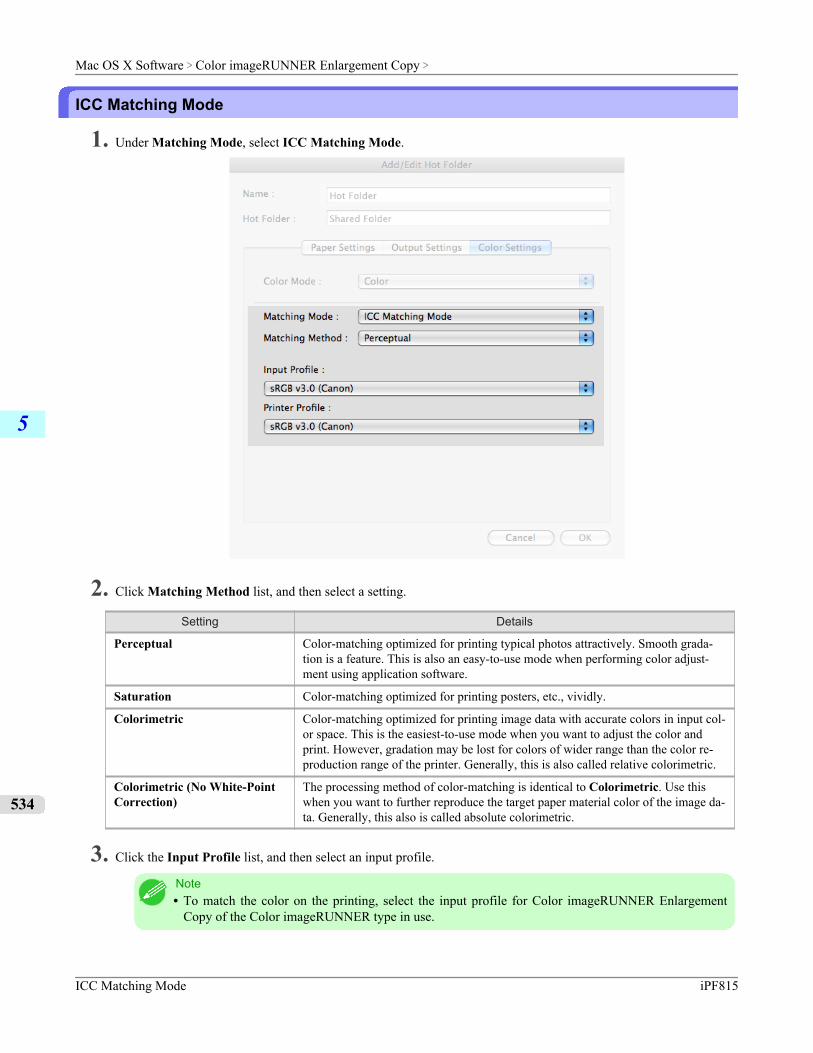
ICC Matching Mode
1. Under Matching Mode, select ICC Matching Mode.
2. Click Matching Method list, and then select a setting.
Setting Details
Perceptual Color-matching optimized for printing typical photos attractively. Smooth grada-tion is a feature. This is also an easy-to-use mode when performing color adjust-ment using application software.
Saturation Color-matching optimized for printing posters, etc., vividly.
Colorimetric Color-matching optimized for printing image data with accurate colors in input col-or space. This is the easiest-to-use mode when you want to adjust the color andprint. However, gradation may be lost for colors of wider range than the color re-production range of the printer. Generally, this is also called relative colorimetric.
Colorimetric (No White-PointCorrection)
The processing method of color-matching is identical to Colorimetric. Use thiswhen you want to further reproduce the target paper material color of the image da-ta. Generally, this also is called absolute colorimetric.
3. Click the Input Profile list, and then select an input profile.
Note• To match the color on the printing, select the input profile for Color imageRUNNER Enlargement
Copy of the Color imageRUNNER type in use.
Mac OS X Software > Color imageRUNNER Enlargement Copy >
ICC Matching Mode iPF815
5
534
4. Click the Printer Profile list, and then select a printer profile.
ColorSync
1. Under Matching Mode, select ColorSync.
2. Click the Printer Profile list, and then select a printer profile.
Note• Available when using Mac OS X 10.3.9-10.4.
Printing Enlargements of Scanned Originals from a Color imageRUNNERScanned originals from a Color imageRUNNER can be enlarged and printed automatically.Originals you create by scanning with a Color imageRUNNER are transferred to a "hot folder" and printed automaticallyafter enlargement according to printing conditions you specify for that folder.This processing sequence is called the Color imageRUNNER Enlargement Copy function.To use Color imageRUNNER Enlargement Copy, first complete these settings in the following order.
1. Register a hot folder on your computer.Register a hot folder on your computer for storing scanned originals from the Color imageRUNNER and complete thesettings for enlargement copy.
2. Complete the scanning settings on the Color imageRUNNER.Configure the Color imageRUNNER to send scanned originals to the hot folder.
Mac OS X Software > Color imageRUNNER Enlargement Copy >
iPF815 ColorSync
5
535
After these settings are complete, you can print enlarged copies of scanned originals from the Color imageRUNNER.
Registering a hot folder on your computerFolders used for Color imageRUNNER Enlargement Copy (iR enlargement copy) are called hot folders. Register a hotfolder on your computer for storing scanned originals from the Color imageRUNNER. You can specify printing conditions(such as the image quality and paper size), based on which originals transferred to the hot folder will be printed. Followthese steps to register and modify hot folders.
1. To display the Color imageRUNNER Enlargement Copy dialog box, either double-click the Color imageRUN-NER Enlargement Copy.app icon after navigating to Canon Utilities — iR Enlargement Copy in the Applica-tions folder or click Set in the Utility pane
Note• Your printer is depicted in the lower-left area of this screen.
2. In Enlarged Copy Settings, click Add or Edit and either create or modify the hot folder.For instructions on registering and modifying hot folders, refer to the help file for Color imageRUNNER Enlarge-ment Copy.
Completing the scanning settings on the Color imageRUNNER.Configure the Color imageRUNNER to send scanned originals to the hot folder. It is easy to send scanned originals to thehot folder if you assign the scanning settings and destination to a Favorites button on the Color imageRUNNER.
Mac OS X Software > Color imageRUNNER Enlargement Copy >
Printing Enlargements of Scanned Originals from a Color imageRUNNER iPF815
5
536
For instructions on assigning scanning and sending settings to the Favorites button, refer to the Color imageRUNNER man-ual.
Scanning the original and print an enlargementFollow the steps below to scan an original on the Color imageRUNNER for enlarged printing on the printer. For detailedinstructions, refer to the Color imageRUNNER manual.
1. Load the original on the platen glass or document feeder of the Color imageRUNNER.
2. Press Send to display the screen for transmission.
3. Press Favorites, and then press the Favorites button assigned to the hot folder.
4. Press Start on the control panel. If you scan originals on the platen glass, after scanning all originals, press Done onthe touch-panel display.Scanned originals are sent to the hot folder and automatically enlarged and printed following the conditions youspecified for the folder.
Mac OS X Software > Color imageRUNNER Enlargement Copy >
iPF815 Printing Enlargements of Scanned Originals from a Color imageRUNNER
5
537
PrintmonitorimagePROGRAF Printmonitor ....................................................................................................................... 538
imagePROGRAF PrintmonitorimagePROGRAF Printmonitor is a utility for checking the printer status and managing print jobs.
• Printer status can be checked in real time on a computer monitor.• You can check the status of print jobs, cancel jobs, and manage them as needed.• If a printer error occurs, you can investigate the corrective action immediately.• You can also set up automatic email notification of any printer problems or errors to email addresses you designate in
advance.
Note• If the status of the desired printer is not shown in imagePROGRAF Printmonitor, select the printer again
as follows.
1. Make sure the printer is on and connected to the network or to a local port.2. In the Printer menu, select the name of the desired printer.
After the printer is detected, the printer status is shown.3. If information about the printer is not shown in step 2, choose Search Printer in the Printer menu.4. Select the zone to search (or select *(My Zone) if no zones have been set up) and click the Search button.
Printer names listed in the Printer menu are updated with the printers that are now detected.5. In the Printer menu, select the name of the desired printer.
After the printer is detected, the printer status is shown.
Mac OS X Software > Printmonitor >
imagePROGRAF Printmonitor iPF815
5
538
Media Configuration ToolThe Features of Media Configuration Tool ...................................................................................................... 539Operating Environment ................................................................................................................................... 539Procedures for Installing .................................................................................................................................. 540Procedures for Uninstalling ............................................................................................................................. 542Starting the Media Configuration Tool ............................................................................................................. 546
Media Configuration Tool main window .......................................................................................................... 547
Editing Media Type Information ....................................................................................................................... 548Adding Media Types ................................................................................................................................... 549Changing Media Names .............................................................................................................................. 551Deleting Media Types You Have Added ..................................................................................................... 553Switching Media Types Display Show/Hide ................................................................................................ 555Changing the Display Order of Media Types .............................................................................................. 557
Updating Media Types ............................................................................................................................ 559
The Features of Media Configuration ToolThe Media Configuration Tool offers the following features.
• Enables information about additional media (types of paper) supported by the printer to be registered on the printercontrol panel and in the printer driver, through the use of relevant media information files (.amf and .med files).
• You can rearrange lists of the types of paper on the printer control panel and in printer driver dialog boxes and renamethem, in addition to other functions.
Important• The Media Configuration Tool is normally installed when you install the printer driver from the User Soft-
ware CD-ROM, and media information is configured. The tool can be used later to add or edit media infor-mation as desired.
Drivers Applicable with Media Configuration Tool
• imagePROGRAF Printer Driver
Operating EnvironmentYou can use Media Configuration Tool in the following environments.
• Compatible Operating SystemMac OS X (10.2.8 or later)
• Software that requires installationimagePROGRAF Printer Driver
Mac OS X Software > Media Configuration Tool >
iPF815 The Features of Media Configuration Tool
5
539
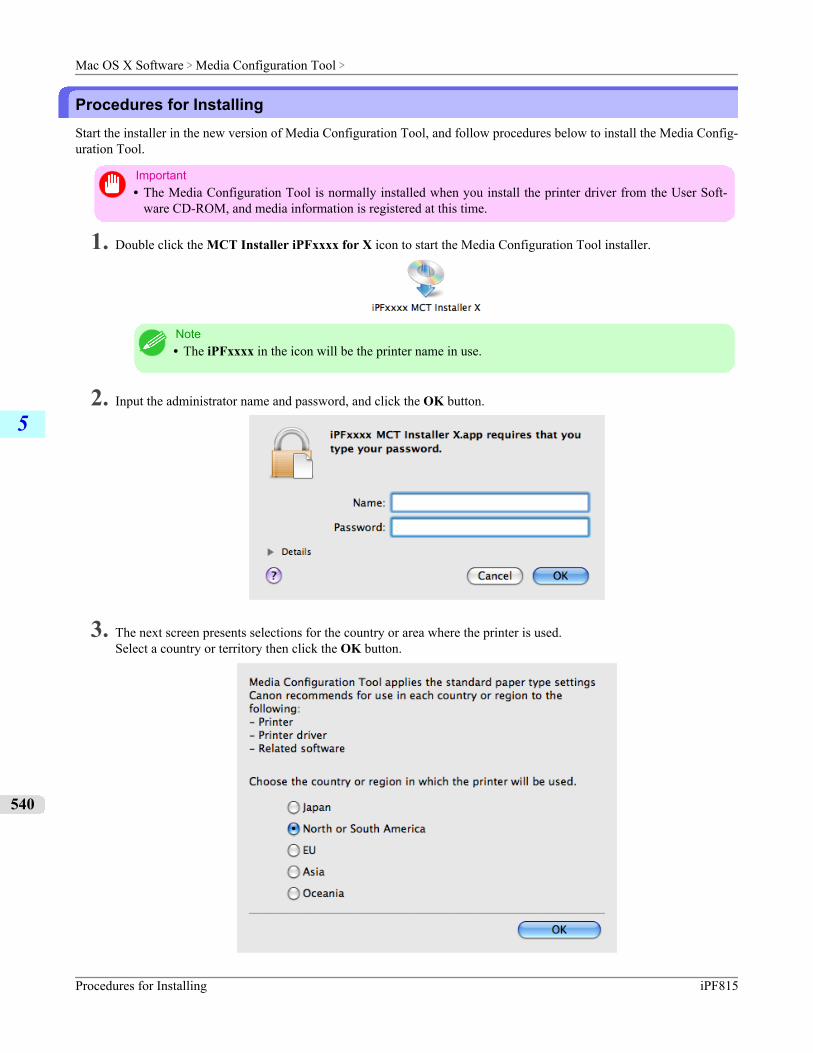
Procedures for InstallingStart the installer in the new version of Media Configuration Tool, and follow procedures below to install the Media Config-uration Tool.
Important• The Media Configuration Tool is normally installed when you install the printer driver from the User Soft-
ware CD-ROM, and media information is registered at this time.
1. Double click the MCT Installer iPFxxxx for X icon to start the Media Configuration Tool installer.
Note• The iPFxxxx in the icon will be the printer name in use.
2. Input the administrator name and password, and click the OK button.
3. The next screen presents selections for the country or area where the printer is used.Select a country or territory then click the OK button.
Mac OS X Software > Media Configuration Tool >
Procedures for Installing iPF815
5
540
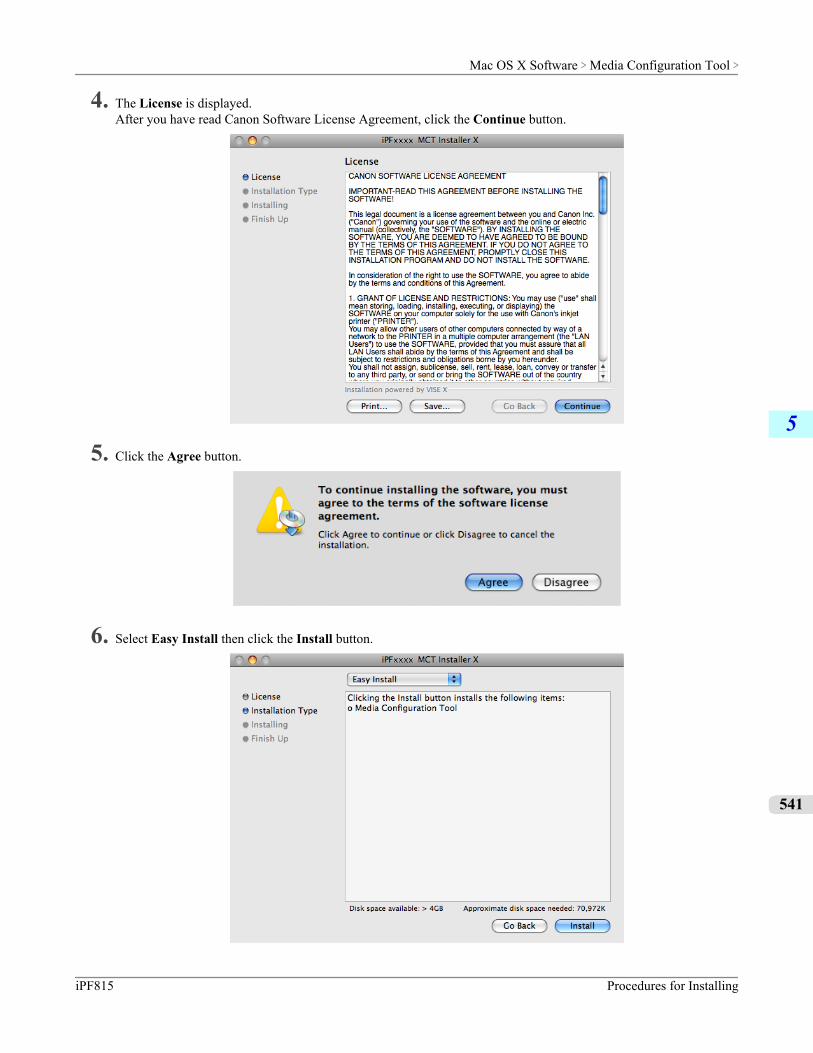
4. The License is displayed.After you have read Canon Software License Agreement, click the Continue button.
5. Click the Agree button.
6. Select Easy Install then click the Install button.
Mac OS X Software > Media Configuration Tool >
iPF815 Procedures for Installing
5
541
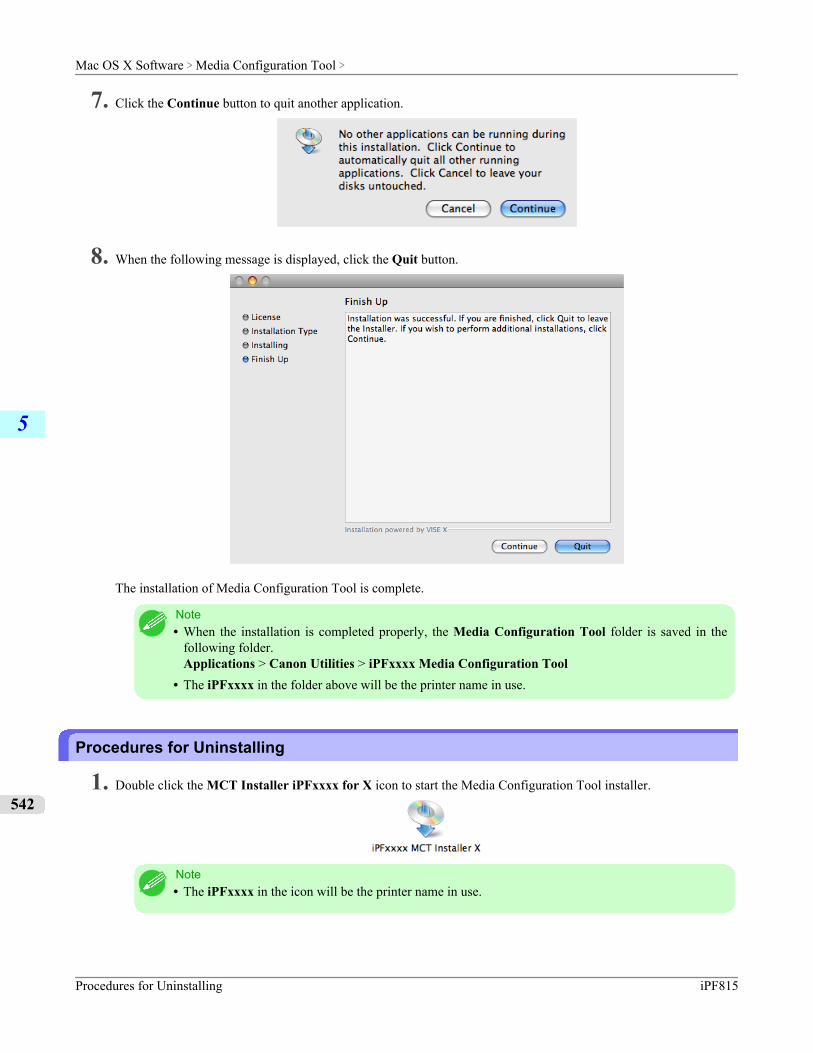
7. Click the Continue button to quit another application.
8. When the following message is displayed, click the Quit button.
The installation of Media Configuration Tool is complete.
Note• When the installation is completed properly, the Media Configuration Tool folder is saved in the
following folder.Applications > Canon Utilities > iPFxxxx Media Configuration Tool
• The iPFxxxx in the folder above will be the printer name in use.
Procedures for Uninstalling
1. Double click the MCT Installer iPFxxxx for X icon to start the Media Configuration Tool installer.
Note• The iPFxxxx in the icon will be the printer name in use.
Mac OS X Software > Media Configuration Tool >
Procedures for Uninstalling iPF815
5
542
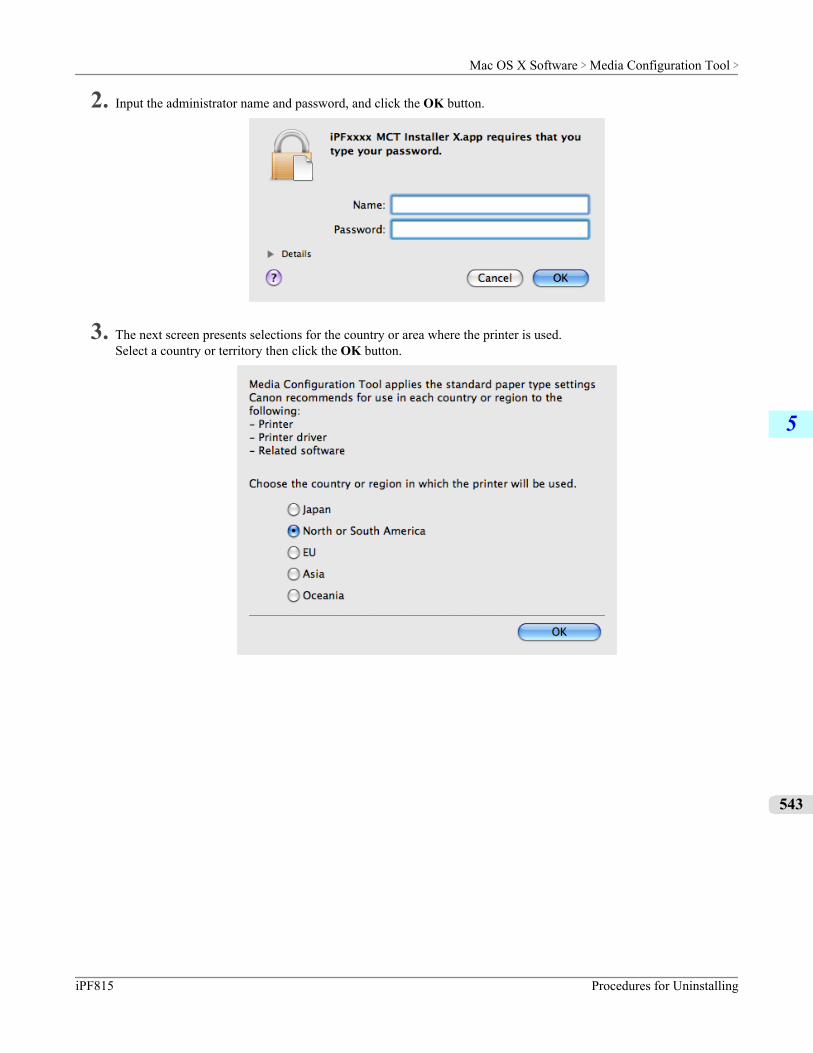
2. Input the administrator name and password, and click the OK button.
3. The next screen presents selections for the country or area where the printer is used.Select a country or territory then click the OK button.
Mac OS X Software > Media Configuration Tool >
iPF815 Procedures for Uninstalling
5
543
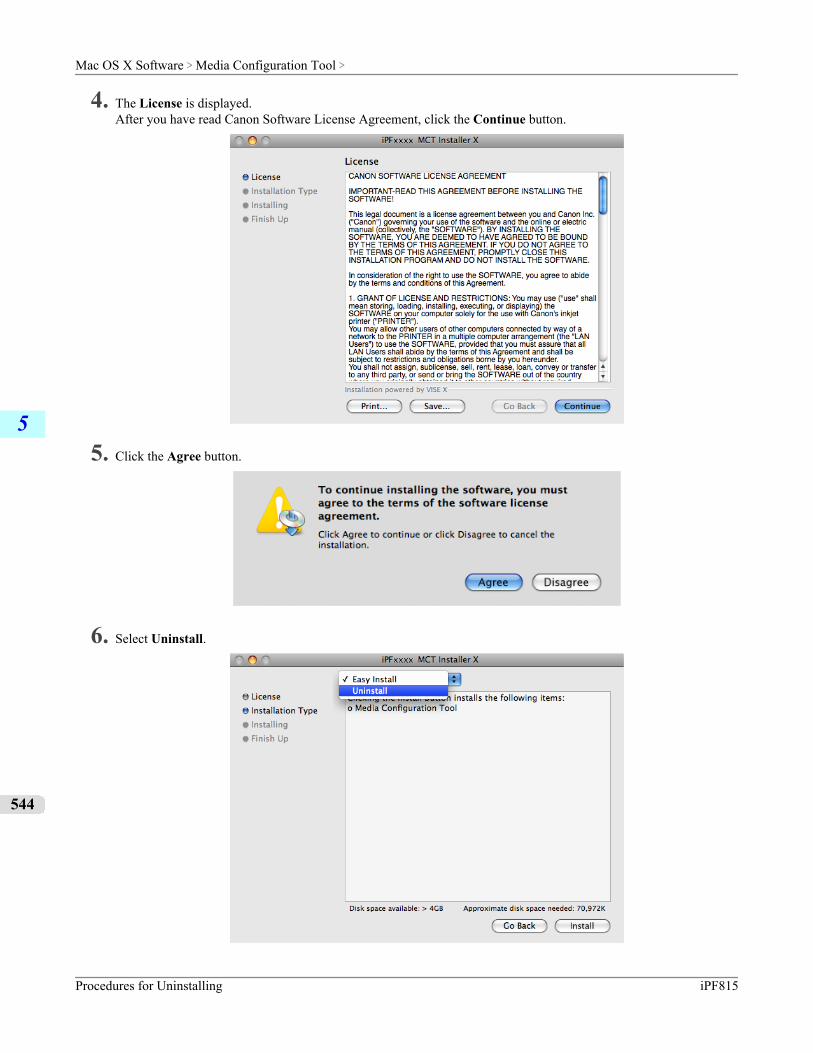
4. The License is displayed.After you have read Canon Software License Agreement, click the Continue button.
5. Click the Agree button.
6. Select Uninstall.
Mac OS X Software > Media Configuration Tool >
Procedures for Uninstalling iPF815
5
544
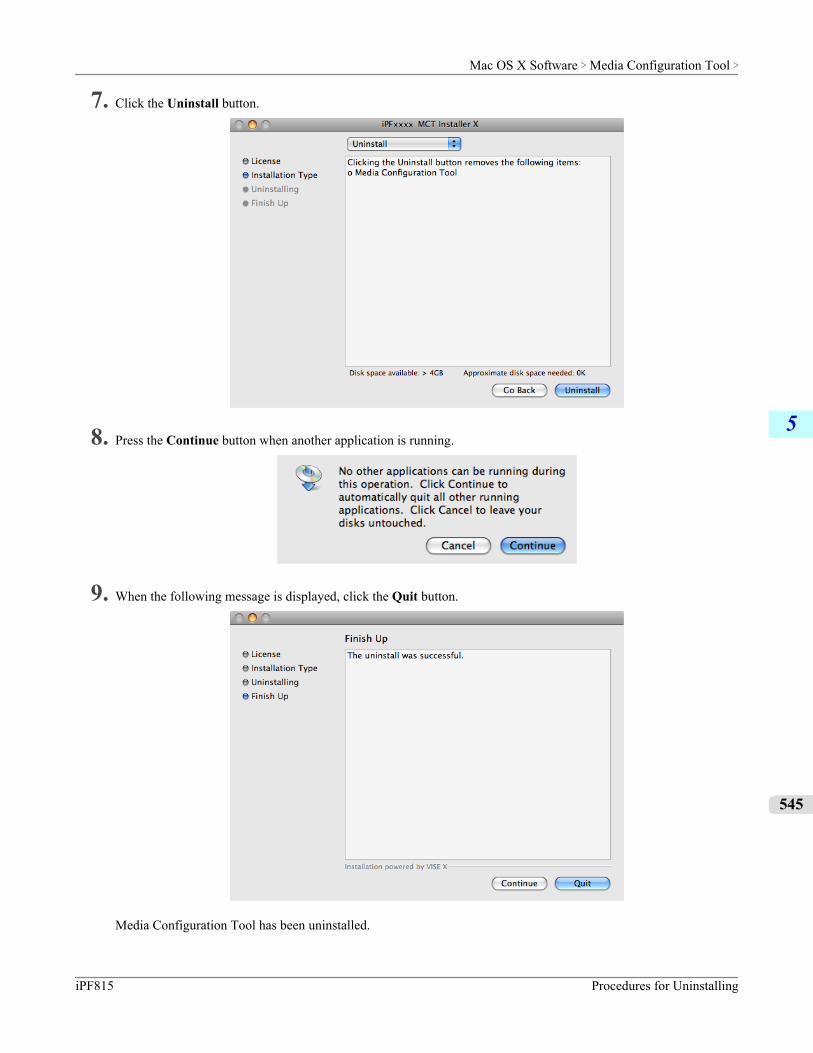
7. Click the Uninstall button.
8. Press the Continue button when another application is running.
9. When the following message is displayed, click the Quit button.
Media Configuration Tool has been uninstalled.
Mac OS X Software > Media Configuration Tool >
iPF815 Procedures for Uninstalling
5
545
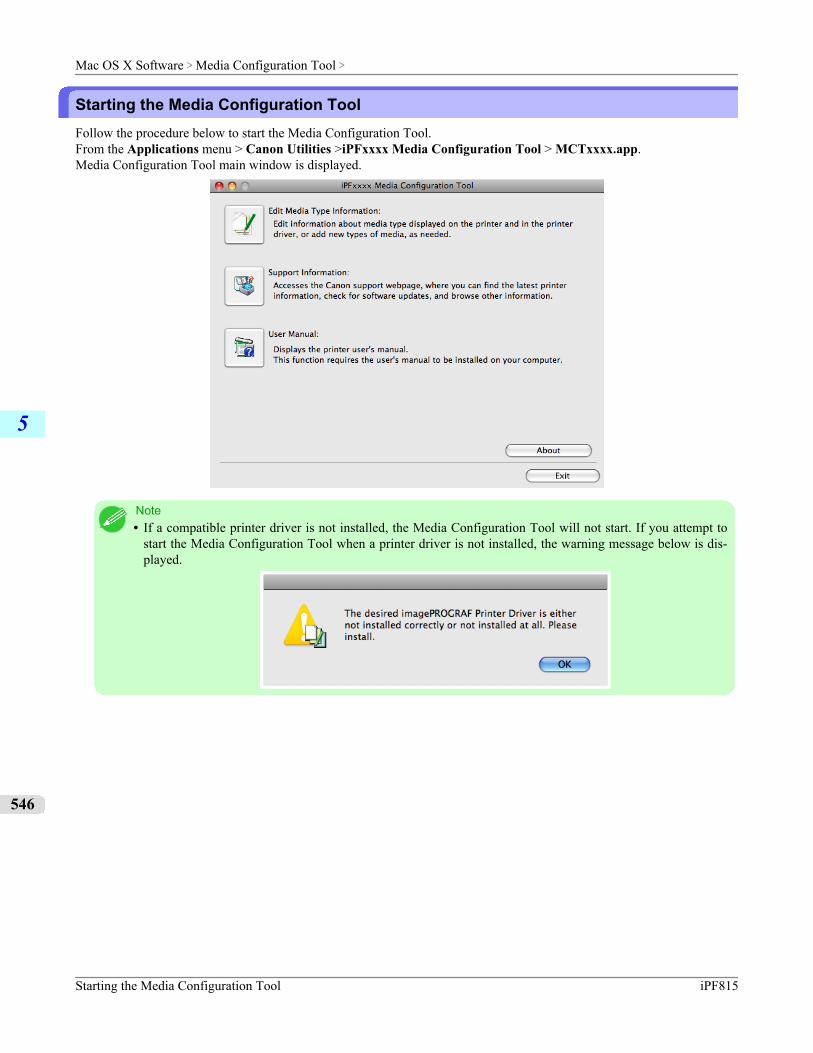
Starting the Media Configuration ToolFollow the procedure below to start the Media Configuration Tool.From the Applications menu > Canon Utilities >iPFxxxx Media Configuration Tool > MCTxxxx.app.Media Configuration Tool main window is displayed.
Note• If a compatible printer driver is not installed, the Media Configuration Tool will not start. If you attempt to
start the Media Configuration Tool when a printer driver is not installed, the warning message below is dis-played.
Mac OS X Software > Media Configuration Tool >
Starting the Media Configuration Tool iPF815
5
546
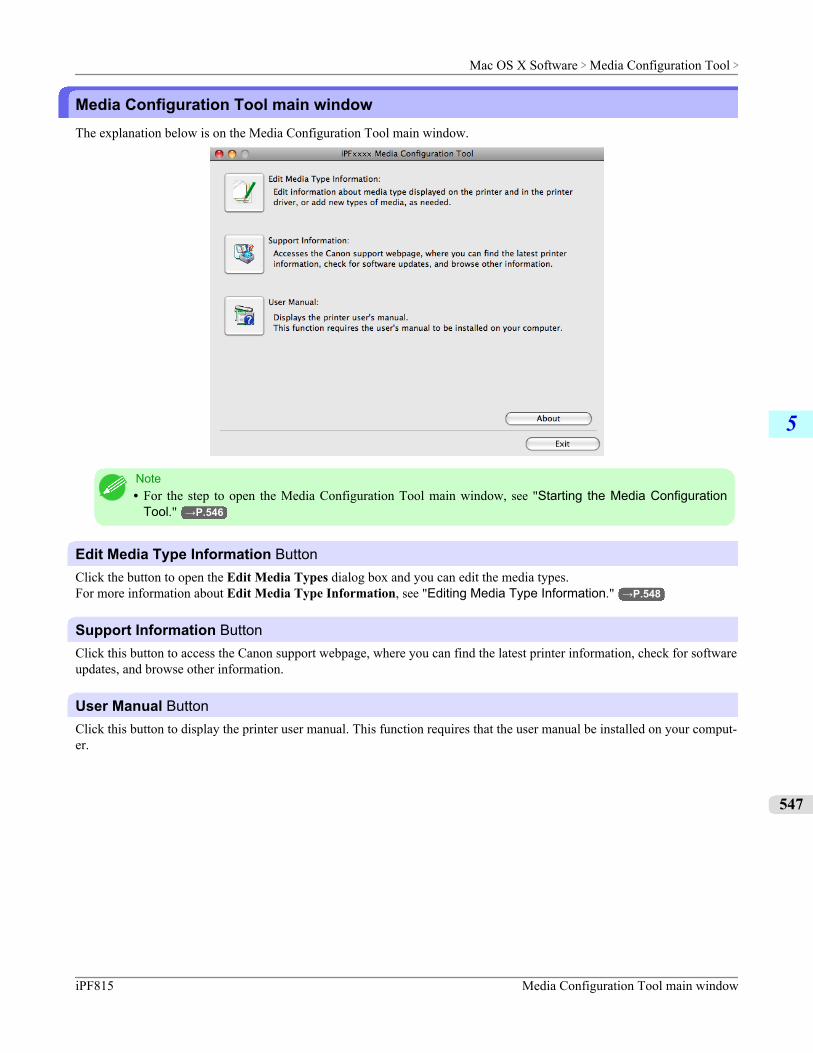
Media Configuration Tool main windowThe explanation below is on the Media Configuration Tool main window.
Note• For the step to open the Media Configuration Tool main window, see "Starting the Media Configuration
Tool." →P.546
Edit Media Type Information ButtonClick the button to open the Edit Media Types dialog box and you can edit the media types.For more information about Edit Media Type Information, see "Editing Media Type Information." →P.548
Support Information ButtonClick this button to access the Canon support webpage, where you can find the latest printer information, check for softwareupdates, and browse other information.
User Manual ButtonClick this button to display the printer user manual. This function requires that the user manual be installed on your comput-er.
Mac OS X Software > Media Configuration Tool >
iPF815 Media Configuration Tool main window
5
547
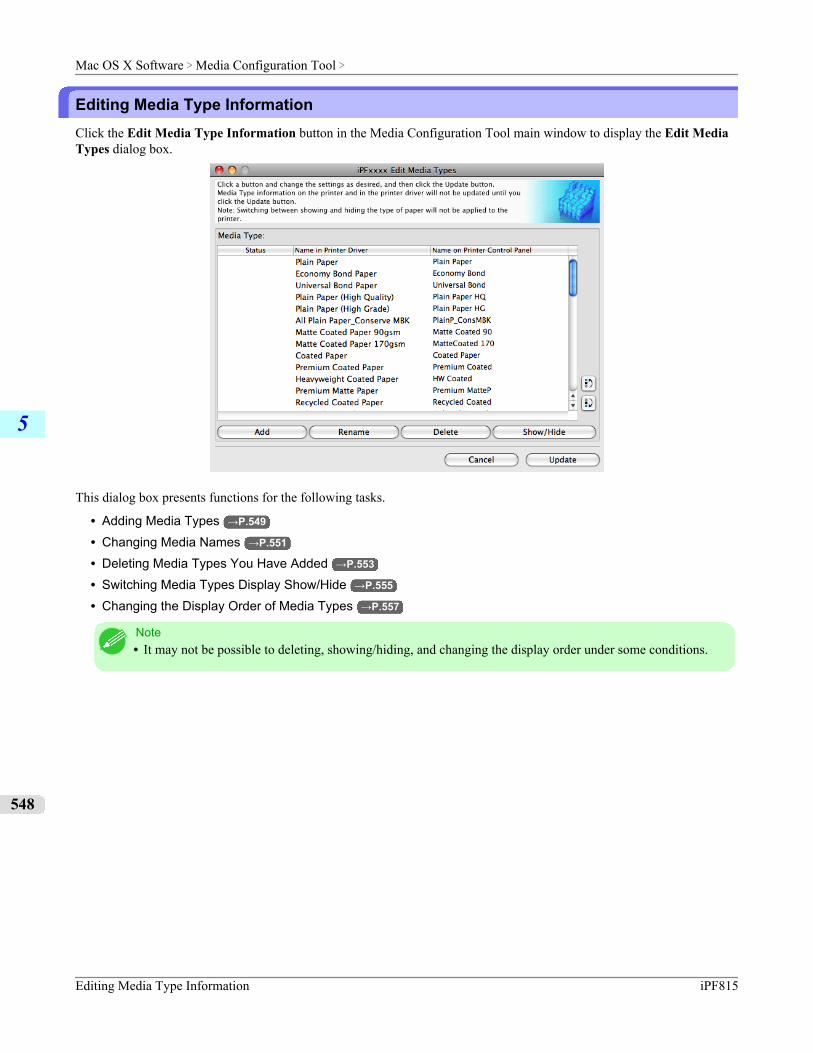
Editing Media Type InformationClick the Edit Media Type Information button in the Media Configuration Tool main window to display the Edit MediaTypes dialog box.
This dialog box presents functions for the following tasks.
• Adding Media Types →P.549
• Changing Media Names →P.551
• Deleting Media Types You Have Added →P.553
• Switching Media Types Display Show/Hide →P.555
• Changing the Display Order of Media Types →P.557
Note• It may not be possible to deleting, showing/hiding, and changing the display order under some conditions.
Mac OS X Software > Media Configuration Tool >
Editing Media Type Information iPF815
5
548
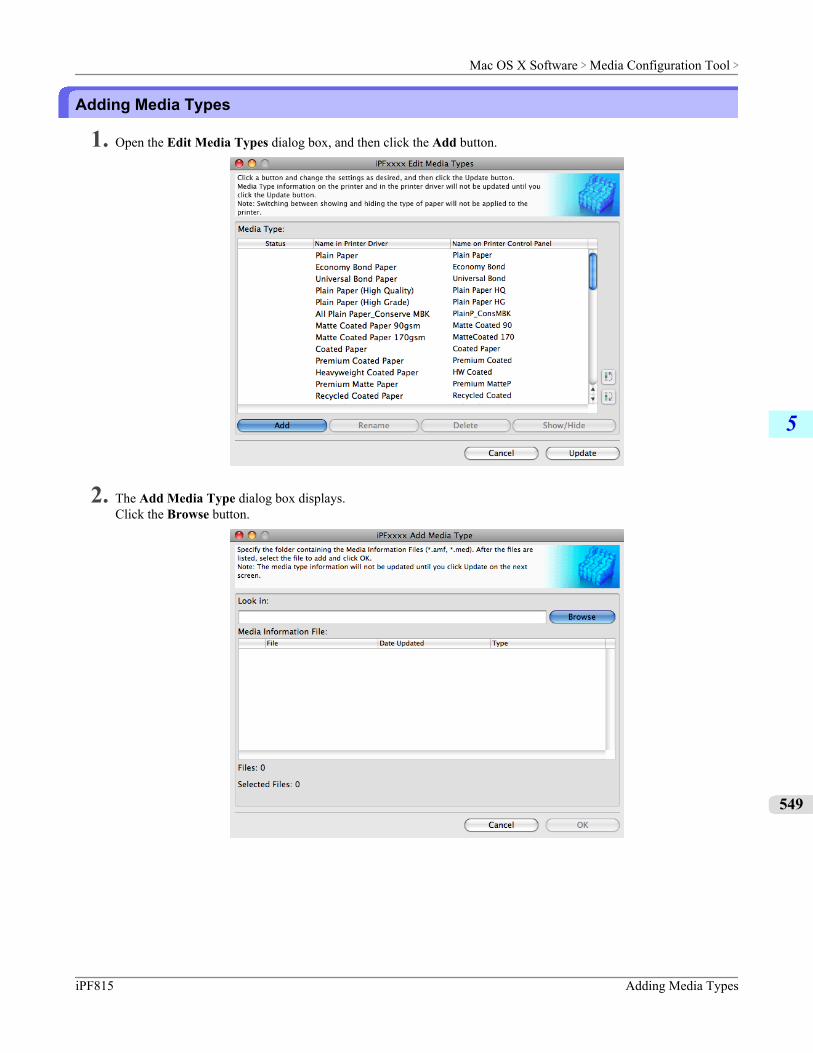
Adding Media Types
1. Open the Edit Media Types dialog box, and then click the Add button.
2. The Add Media Type dialog box displays.Click the Browse button.
Mac OS X Software > Media Configuration Tool >
iPF815 Adding Media Types
5
549
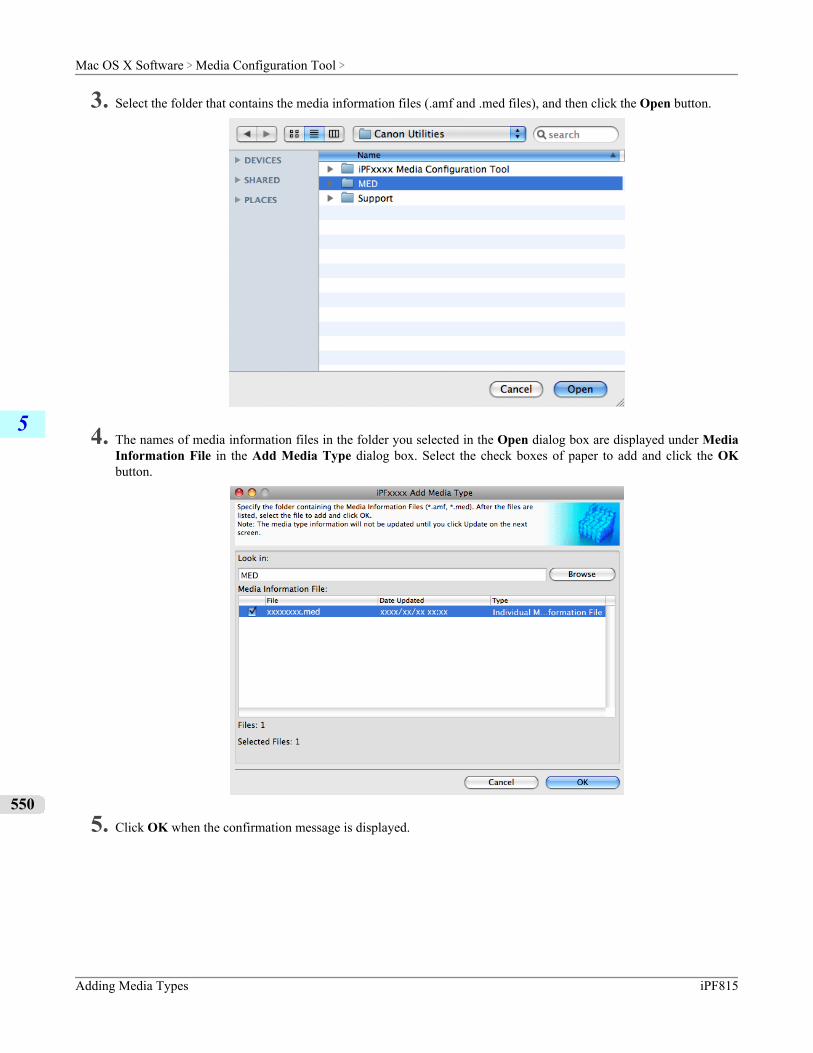
3. Select the folder that contains the media information files (.amf and .med files), and then click the Open button.
4. The names of media information files in the folder you selected in the Open dialog box are displayed under MediaInformation File in the Add Media Type dialog box. Select the check boxes of paper to add and click the OKbutton.
5. Click OK when the confirmation message is displayed.
Mac OS X Software > Media Configuration Tool >
Adding Media Types iPF815
5
550
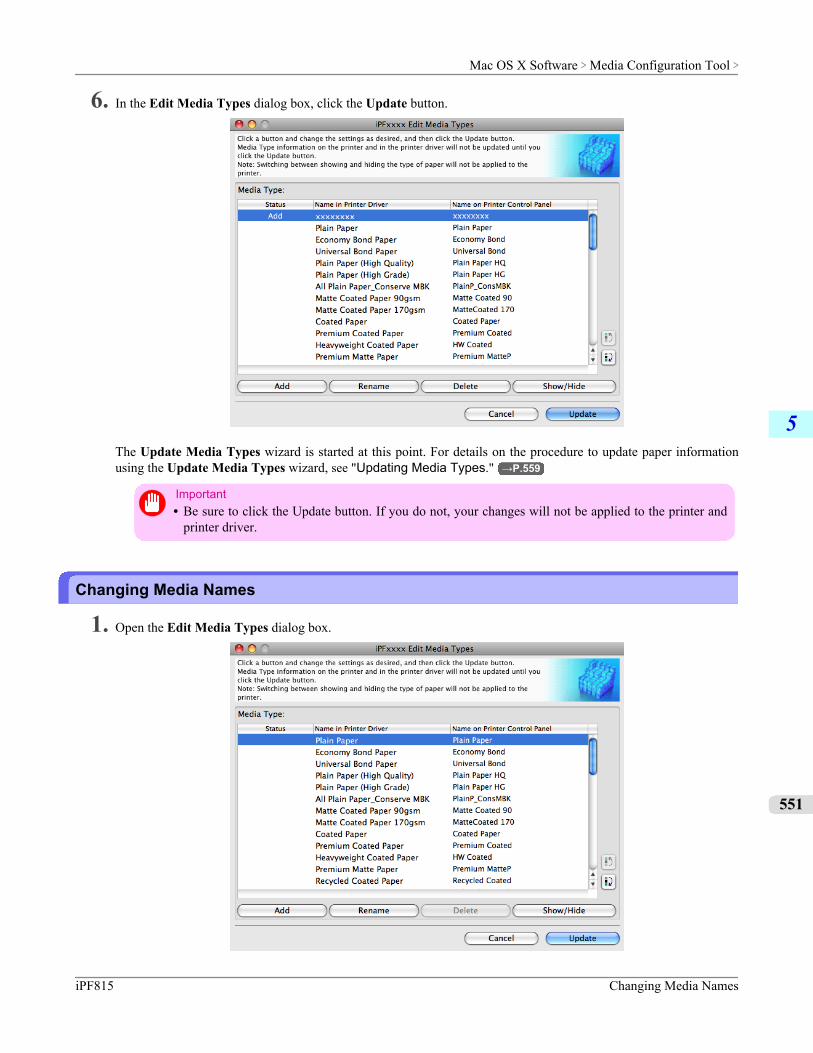
6. In the Edit Media Types dialog box, click the Update button.
The Update Media Types wizard is started at this point. For details on the procedure to update paper informationusing the Update Media Types wizard, see "Updating Media Types." →P.559
Important• Be sure to click the Update button. If you do not, your changes will not be applied to the printer and
printer driver.
Changing Media Names
1. Open the Edit Media Types dialog box.
Mac OS X Software > Media Configuration Tool >
iPF815 Changing Media Names
5
551
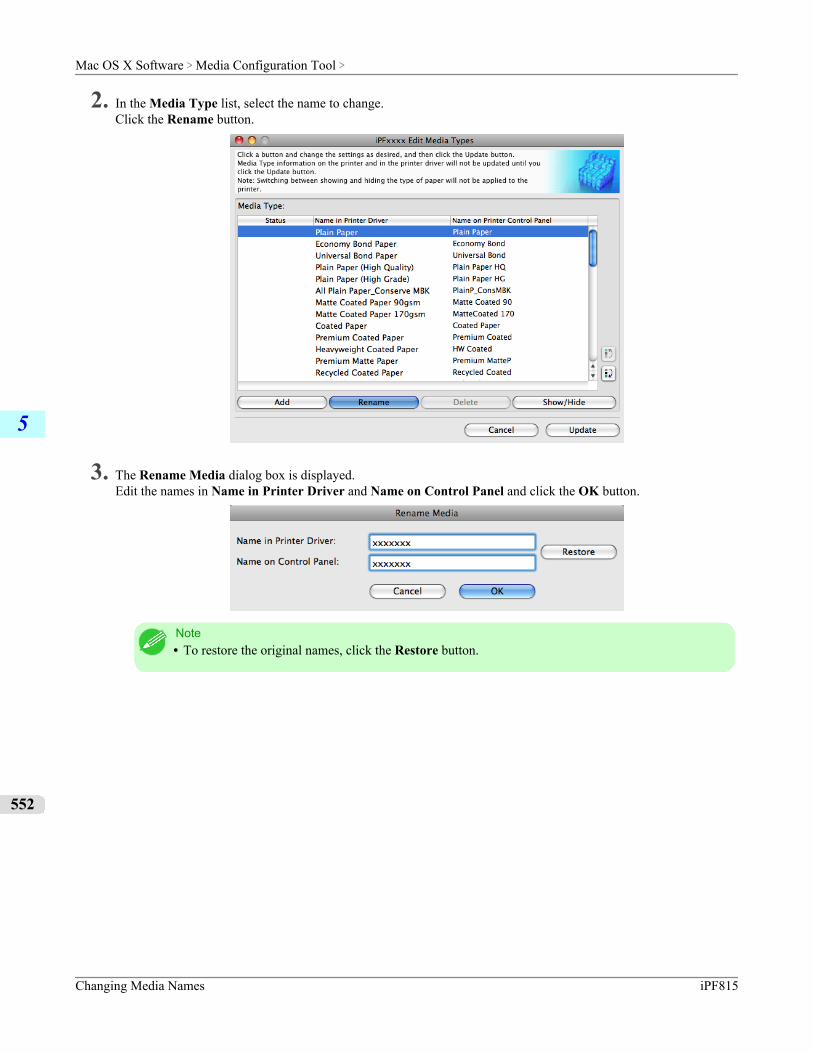
2. In the Media Type list, select the name to change.Click the Rename button.
3. The Rename Media dialog box is displayed.Edit the names in Name in Printer Driver and Name on Control Panel and click the OK button.
Note• To restore the original names, click the Restore button.
Mac OS X Software > Media Configuration Tool >
Changing Media Names iPF815
5
552
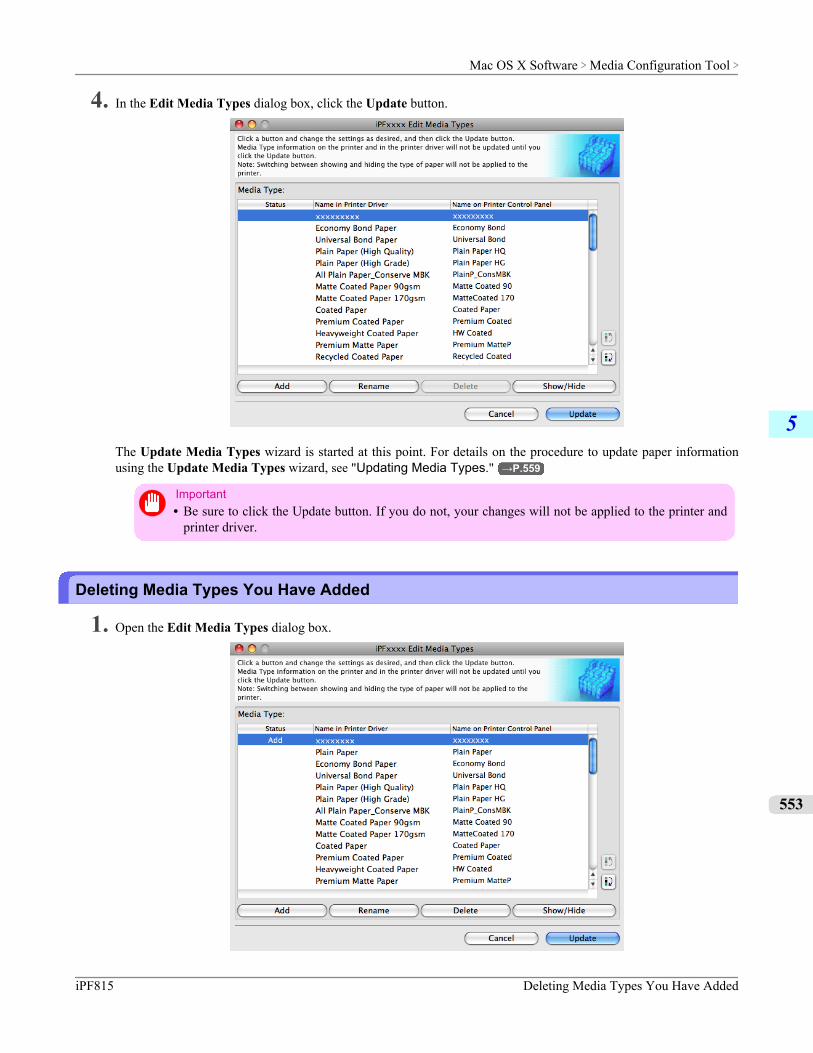
4. In the Edit Media Types dialog box, click the Update button.
The Update Media Types wizard is started at this point. For details on the procedure to update paper informationusing the Update Media Types wizard, see "Updating Media Types." →P.559
Important• Be sure to click the Update button. If you do not, your changes will not be applied to the printer and
printer driver.
Deleting Media Types You Have Added
1. Open the Edit Media Types dialog box.
Mac OS X Software > Media Configuration Tool >
iPF815 Deleting Media Types You Have Added
5
553
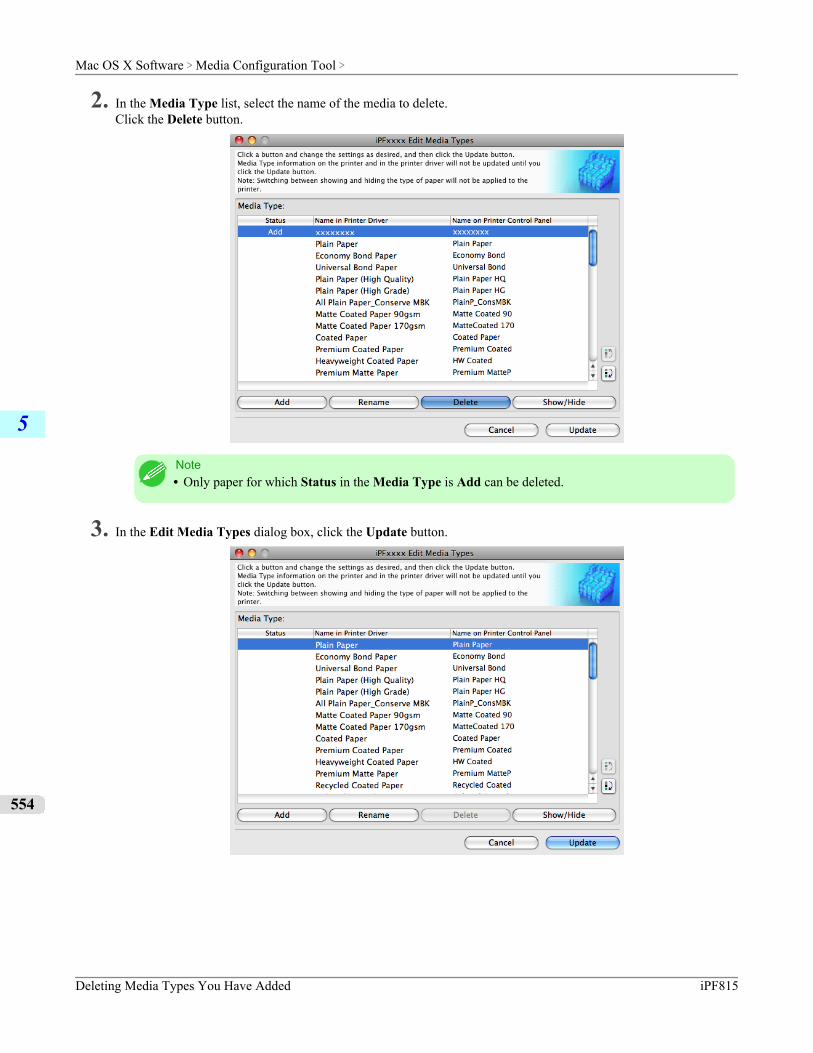
2. In the Media Type list, select the name of the media to delete.Click the Delete button.
Note• Only paper for which Status in the Media Type is Add can be deleted.
3. In the Edit Media Types dialog box, click the Update button.
Mac OS X Software > Media Configuration Tool >
Deleting Media Types You Have Added iPF815
5
554
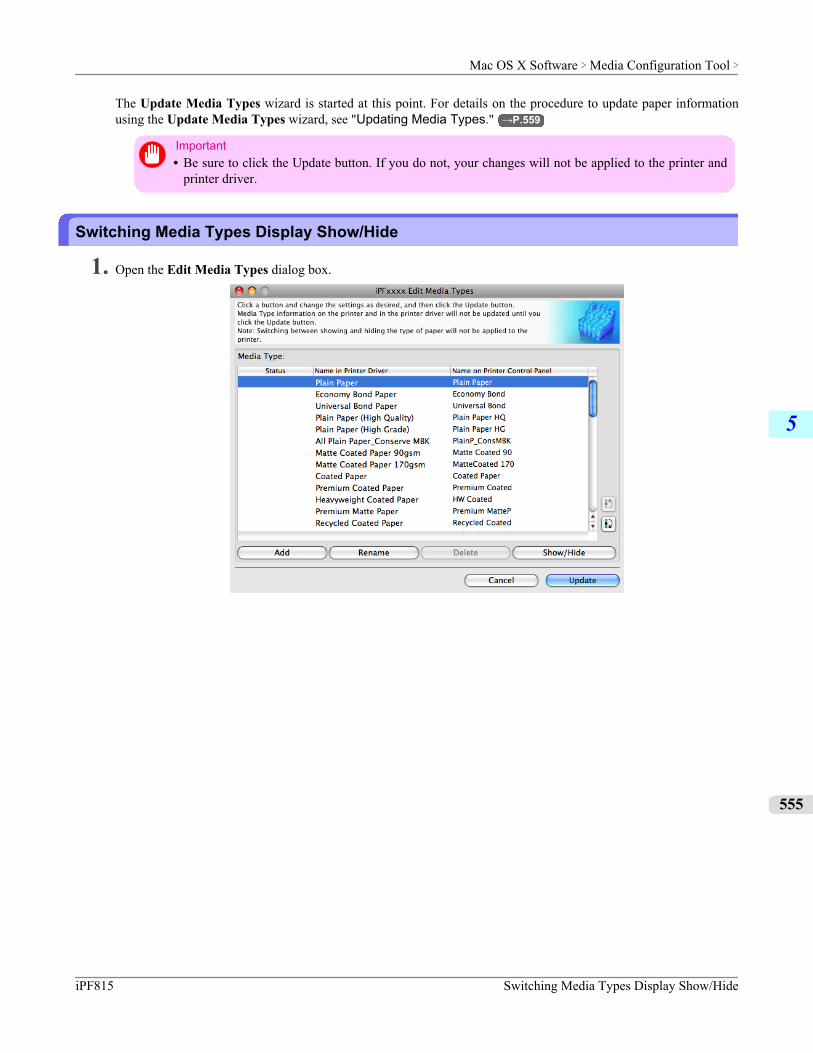
The Update Media Types wizard is started at this point. For details on the procedure to update paper informationusing the Update Media Types wizard, see "Updating Media Types." →P.559
Important• Be sure to click the Update button. If you do not, your changes will not be applied to the printer and
printer driver.
Switching Media Types Display Show/Hide
1. Open the Edit Media Types dialog box.
Mac OS X Software > Media Configuration Tool >
iPF815 Switching Media Types Display Show/Hide
5
555
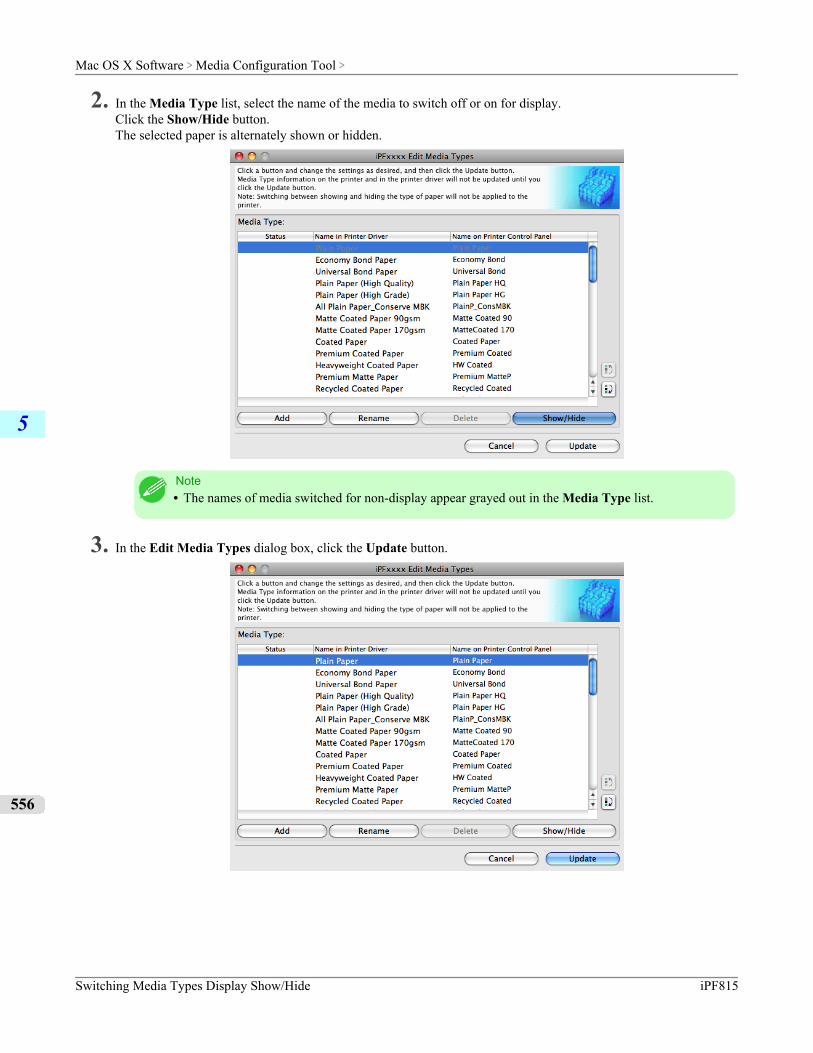
2. In the Media Type list, select the name of the media to switch off or on for display.Click the Show/Hide button.The selected paper is alternately shown or hidden.
Note• The names of media switched for non-display appear grayed out in the Media Type list.
3. In the Edit Media Types dialog box, click the Update button.
Mac OS X Software > Media Configuration Tool >
Switching Media Types Display Show/Hide iPF815
5
556
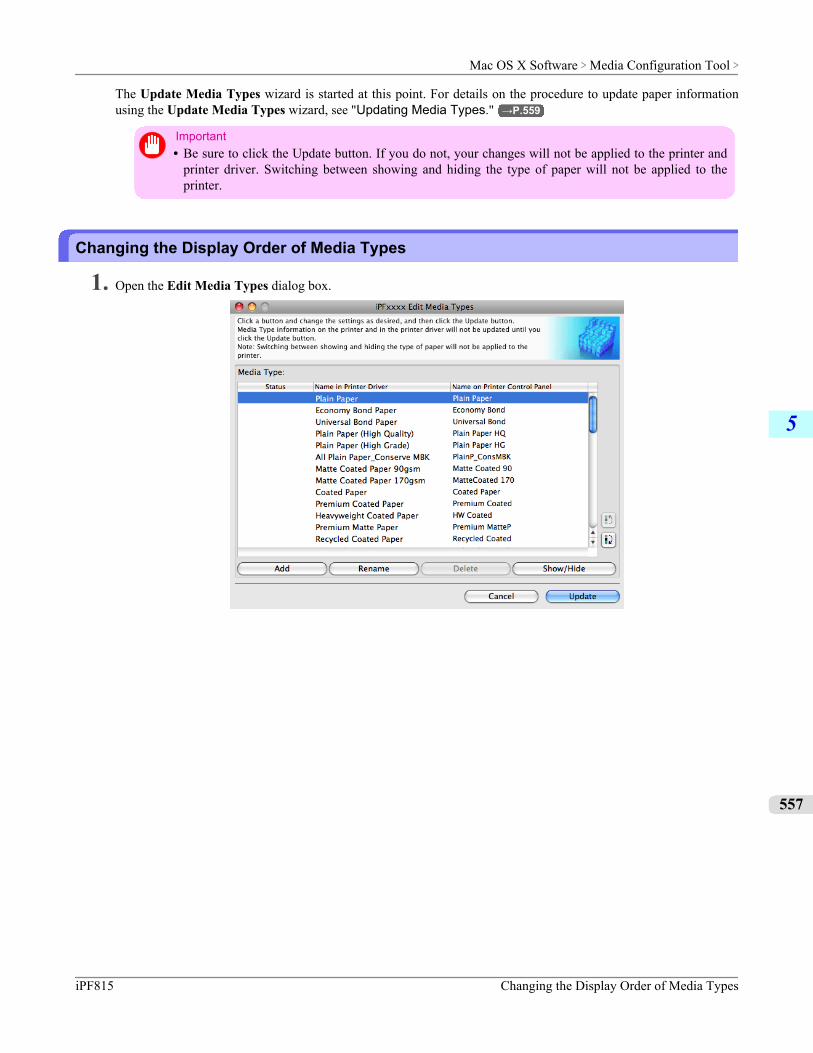
The Update Media Types wizard is started at this point. For details on the procedure to update paper informationusing the Update Media Types wizard, see "Updating Media Types." →P.559
Important• Be sure to click the Update button. If you do not, your changes will not be applied to the printer and
printer driver. Switching between showing and hiding the type of paper will not be applied to theprinter.
Changing the Display Order of Media Types
1. Open the Edit Media Types dialog box.
Mac OS X Software > Media Configuration Tool >
iPF815 Changing the Display Order of Media Types
5
557
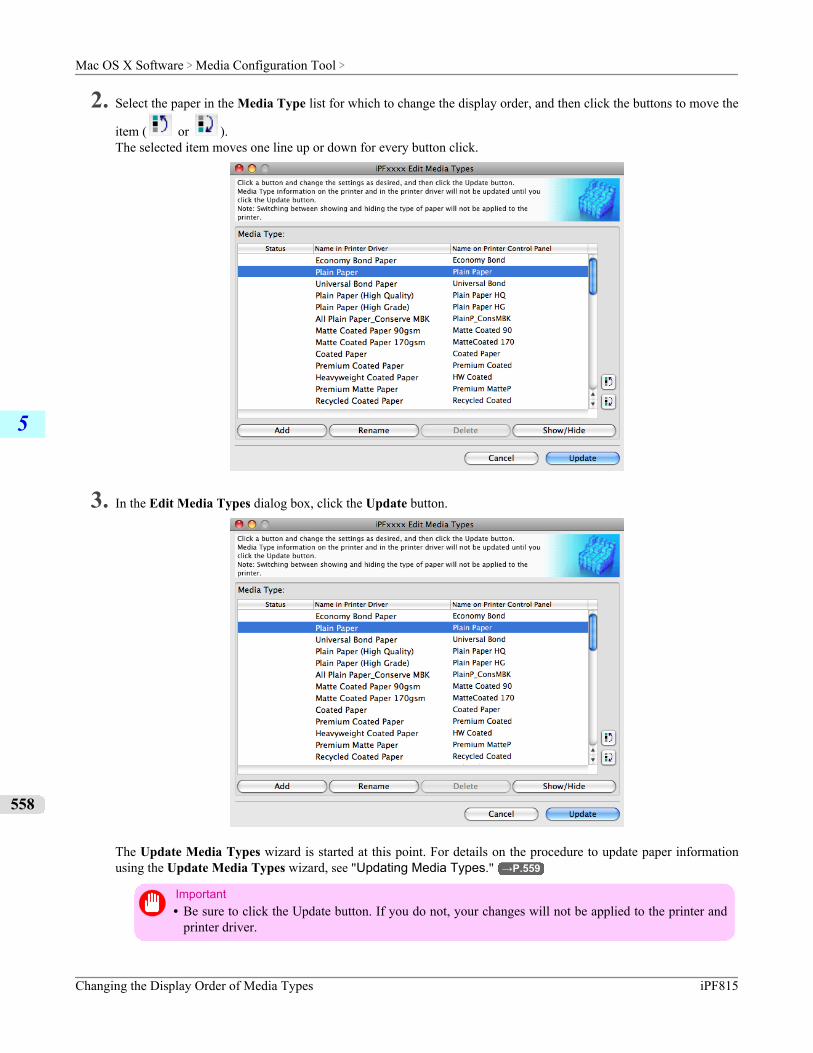
2. Select the paper in the Media Type list for which to change the display order, and then click the buttons to move the
item ( or ).The selected item moves one line up or down for every button click.
3. In the Edit Media Types dialog box, click the Update button.
The Update Media Types wizard is started at this point. For details on the procedure to update paper informationusing the Update Media Types wizard, see "Updating Media Types." →P.559
Important• Be sure to click the Update button. If you do not, your changes will not be applied to the printer and
printer driver.
Mac OS X Software > Media Configuration Tool >
Changing the Display Order of Media Types iPF815
5
558
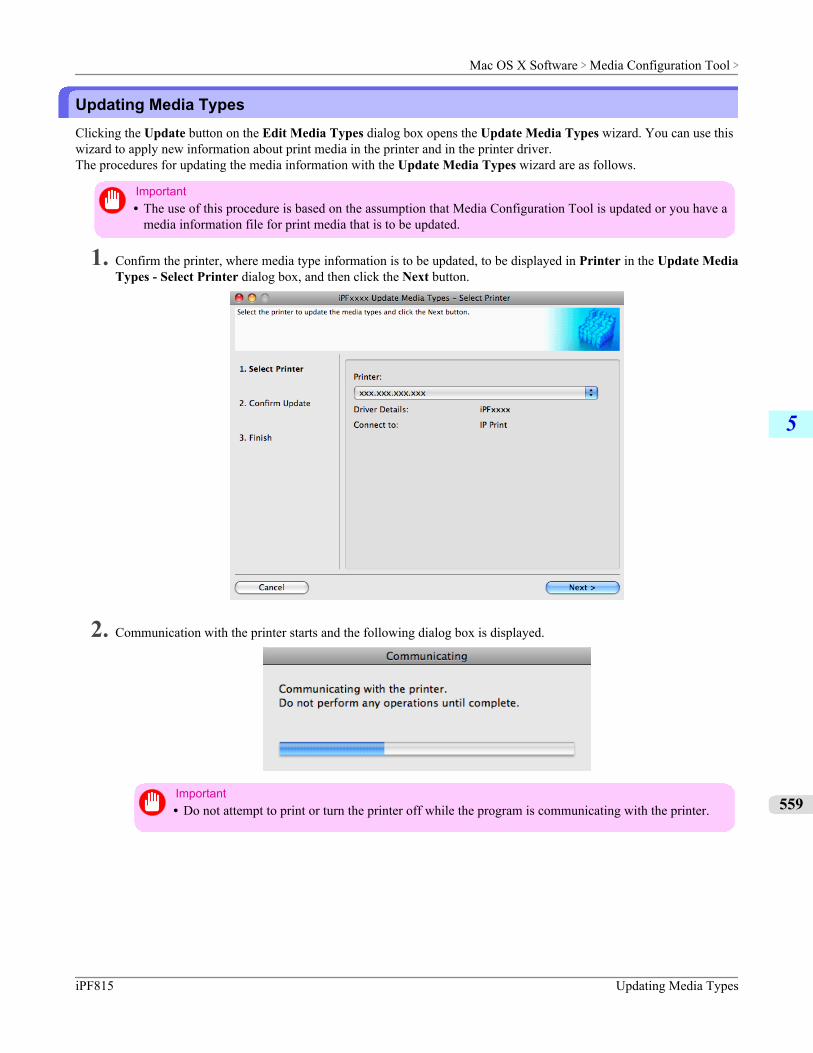
Updating Media TypesClicking the Update button on the Edit Media Types dialog box opens the Update Media Types wizard. You can use thiswizard to apply new information about print media in the printer and in the printer driver.The procedures for updating the media information with the Update Media Types wizard are as follows.
Important• The use of this procedure is based on the assumption that Media Configuration Tool is updated or you have a
media information file for print media that is to be updated.
1. Confirm the printer, where media type information is to be updated, to be displayed in Printer in the Update MediaTypes - Select Printer dialog box, and then click the Next button.
2. Communication with the printer starts and the following dialog box is displayed.
Important• Do not attempt to print or turn the printer off while the program is communicating with the printer.
Mac OS X Software > Media Configuration Tool >
iPF815 Updating Media Types
5
559
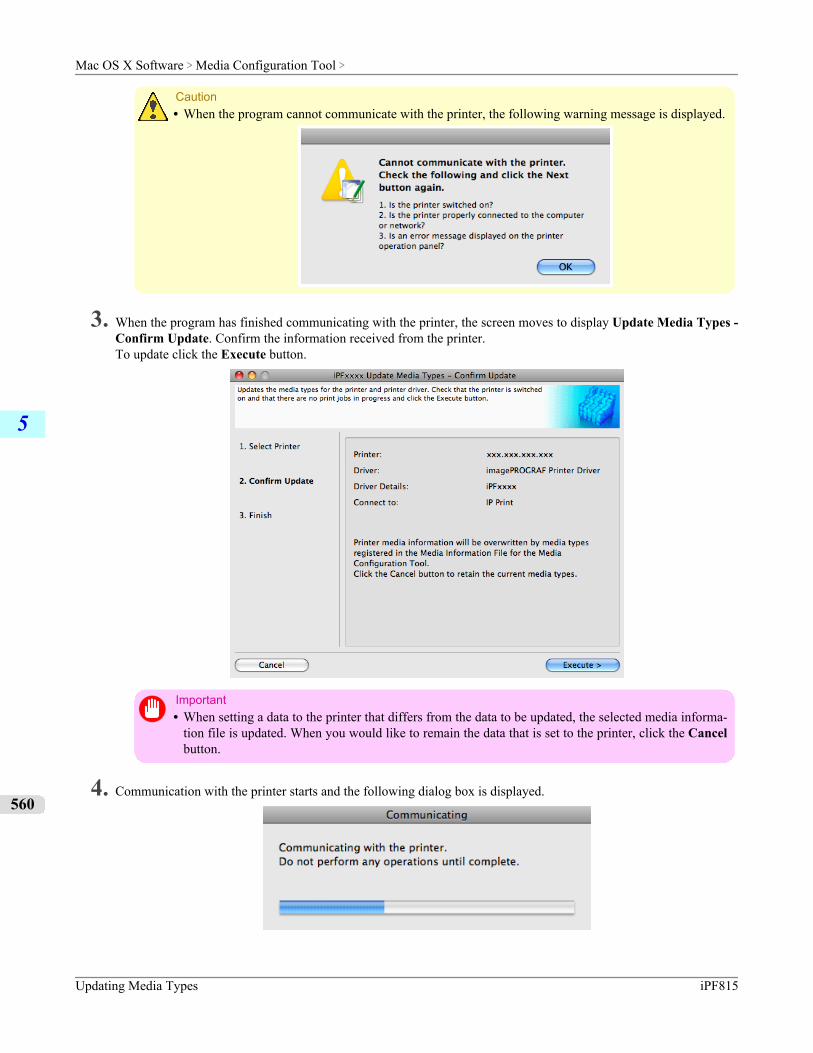
Caution• When the program cannot communicate with the printer, the following warning message is displayed.
3. When the program has finished communicating with the printer, the screen moves to display Update Media Types -Confirm Update. Confirm the information received from the printer.To update click the Execute button.
Important• When setting a data to the printer that differs from the data to be updated, the selected media informa-
tion file is updated. When you would like to remain the data that is set to the printer, click the Cancelbutton.
4. Communication with the printer starts and the following dialog box is displayed.
Mac OS X Software > Media Configuration Tool >
Updating Media Types iPF815
5
560
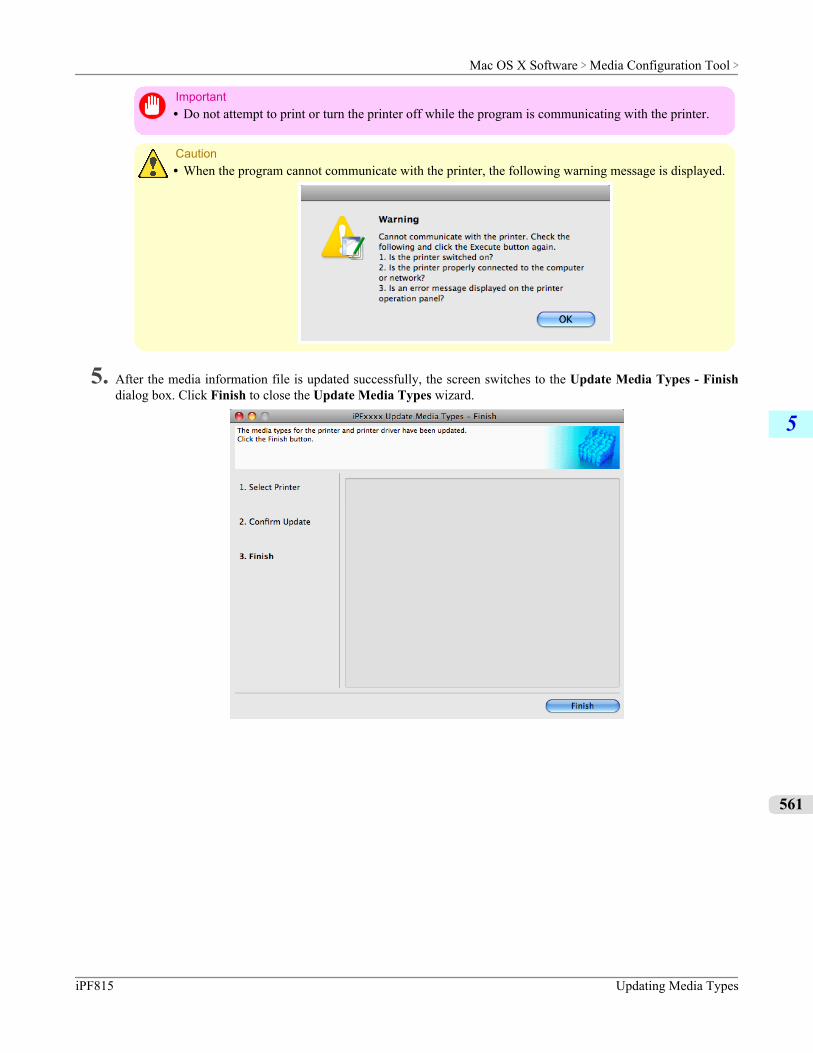
Important• Do not attempt to print or turn the printer off while the program is communicating with the printer.
Caution• When the program cannot communicate with the printer, the following warning message is displayed.
5. After the media information file is updated successfully, the screen switches to the Update Media Types - Finishdialog box. Click Finish to close the Update Media Types wizard.
Mac OS X Software > Media Configuration Tool >
iPF815 Updating Media Types
5
561
Print Jobs
Basic Print Job Operations 563
Advanced Print Job Operations 589
Print Jobs >
iPF815
6
562
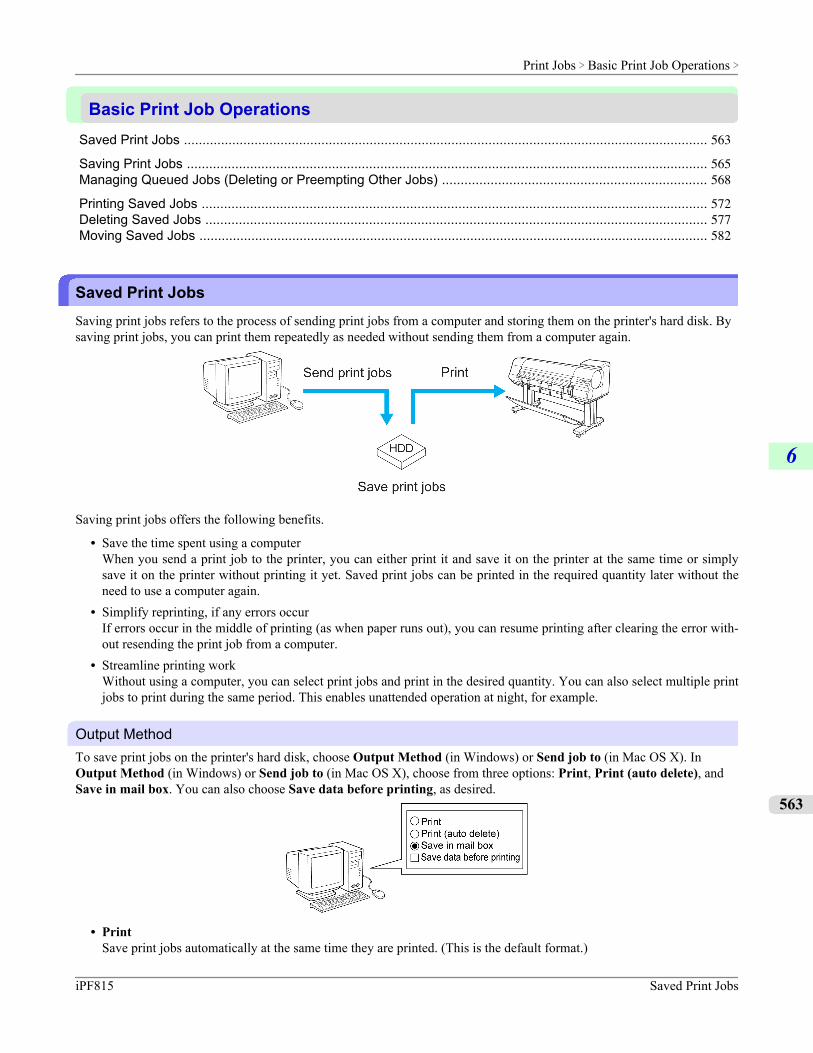
Basic Print Job OperationsSaved Print Jobs ............................................................................................................................................. 563
Saving Print Jobs ............................................................................................................................................ 565Managing Queued Jobs (Deleting or Preempting Other Jobs) ....................................................................... 568
Printing Saved Jobs ........................................................................................................................................ 572Deleting Saved Jobs ....................................................................................................................................... 577Moving Saved Jobs ......................................................................................................................................... 582
Saved Print JobsSaving print jobs refers to the process of sending print jobs from a computer and storing them on the printer's hard disk. Bysaving print jobs, you can print them repeatedly as needed without sending them from a computer again.
Saving print jobs offers the following benefits.
• Save the time spent using a computerWhen you send a print job to the printer, you can either print it and save it on the printer at the same time or simplysave it on the printer without printing it yet. Saved print jobs can be printed in the required quantity later without theneed to use a computer again.
• Simplify reprinting, if any errors occurIf errors occur in the middle of printing (as when paper runs out), you can resume printing after clearing the error with-out resending the print job from a computer.
• Streamline printing workWithout using a computer, you can select print jobs and print in the desired quantity. You can also select multiple printjobs to print during the same period. This enables unattended operation at night, for example.
Output MethodTo save print jobs on the printer's hard disk, choose Output Method (in Windows) or Send job to (in Mac OS X). InOutput Method (in Windows) or Send job to (in Mac OS X), choose from three options: Print, Print (auto delete), andSave in mail box. You can also choose Save data before printing, as desired.
• PrintSave print jobs automatically at the same time they are printed. (This is the default format.)
Print Jobs > Basic Print Job Operations >
iPF815 Saved Print Jobs
6
563
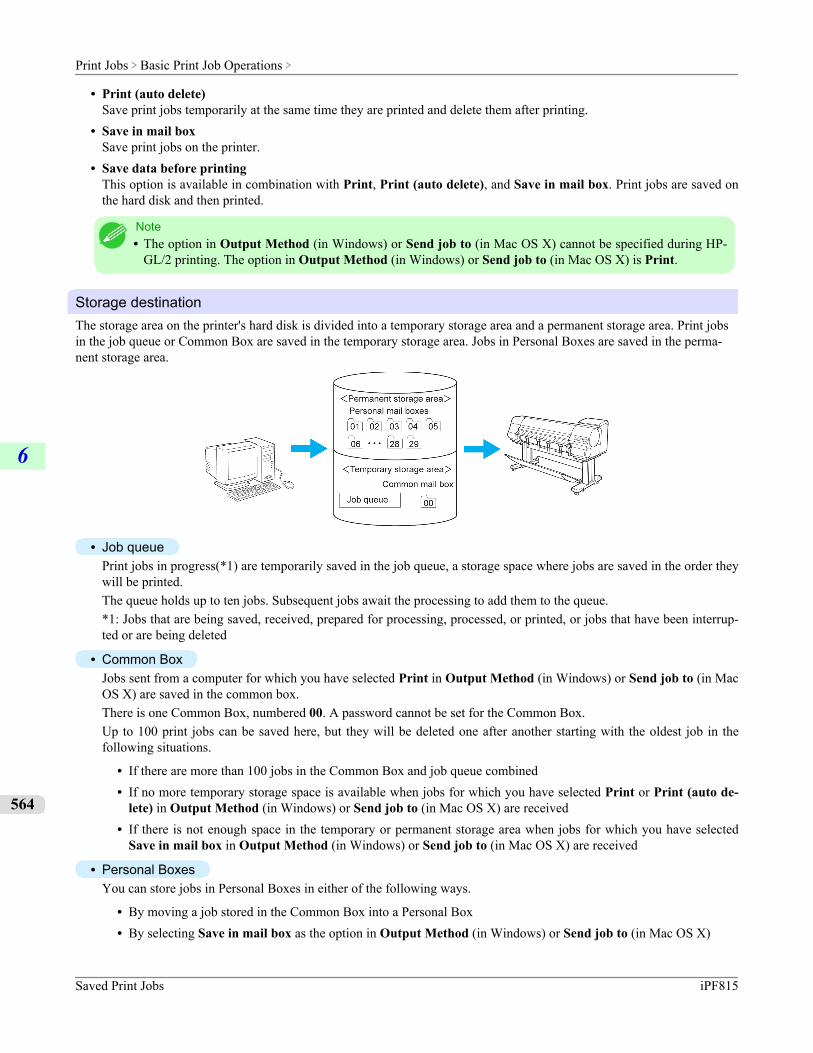
• Print (auto delete)Save print jobs temporarily at the same time they are printed and delete them after printing.
• Save in mail boxSave print jobs on the printer.
• Save data before printingThis option is available in combination with Print, Print (auto delete), and Save in mail box. Print jobs are saved onthe hard disk and then printed.
Note• The option in Output Method (in Windows) or Send job to (in Mac OS X) cannot be specified during HP-
GL/2 printing. The option in Output Method (in Windows) or Send job to (in Mac OS X) is Print.
Storage destinationThe storage area on the printer's hard disk is divided into a temporary storage area and a permanent storage area. Print jobsin the job queue or Common Box are saved in the temporary storage area. Jobs in Personal Boxes are saved in the perma-nent storage area.
• Job queuePrint jobs in progress(*1) are temporarily saved in the job queue, a storage space where jobs are saved in the order theywill be printed.The queue holds up to ten jobs. Subsequent jobs await the processing to add them to the queue.*1: Jobs that are being saved, received, prepared for processing, processed, or printed, or jobs that have been interrup-ted or are being deleted
• Common BoxJobs sent from a computer for which you have selected Print in Output Method (in Windows) or Send job to (in MacOS X) are saved in the common box.There is one Common Box, numbered 00. A password cannot be set for the Common Box.Up to 100 print jobs can be saved here, but they will be deleted one after another starting with the oldest job in thefollowing situations.
• If there are more than 100 jobs in the Common Box and job queue combined• If no more temporary storage space is available when jobs for which you have selected Print or Print (auto de-
lete) in Output Method (in Windows) or Send job to (in Mac OS X) are received• If there is not enough space in the temporary or permanent storage area when jobs for which you have selected
Save in mail box in Output Method (in Windows) or Send job to (in Mac OS X) are received
• Personal BoxesYou can store jobs in Personal Boxes in either of the following ways.
• By moving a job stored in the Common Box into a Personal Box• By selecting Save in mail box as the option in Output Method (in Windows) or Send job to (in Mac OS X)
Print Jobs > Basic Print Job Operations >
Saved Print Jobs iPF815
6
564
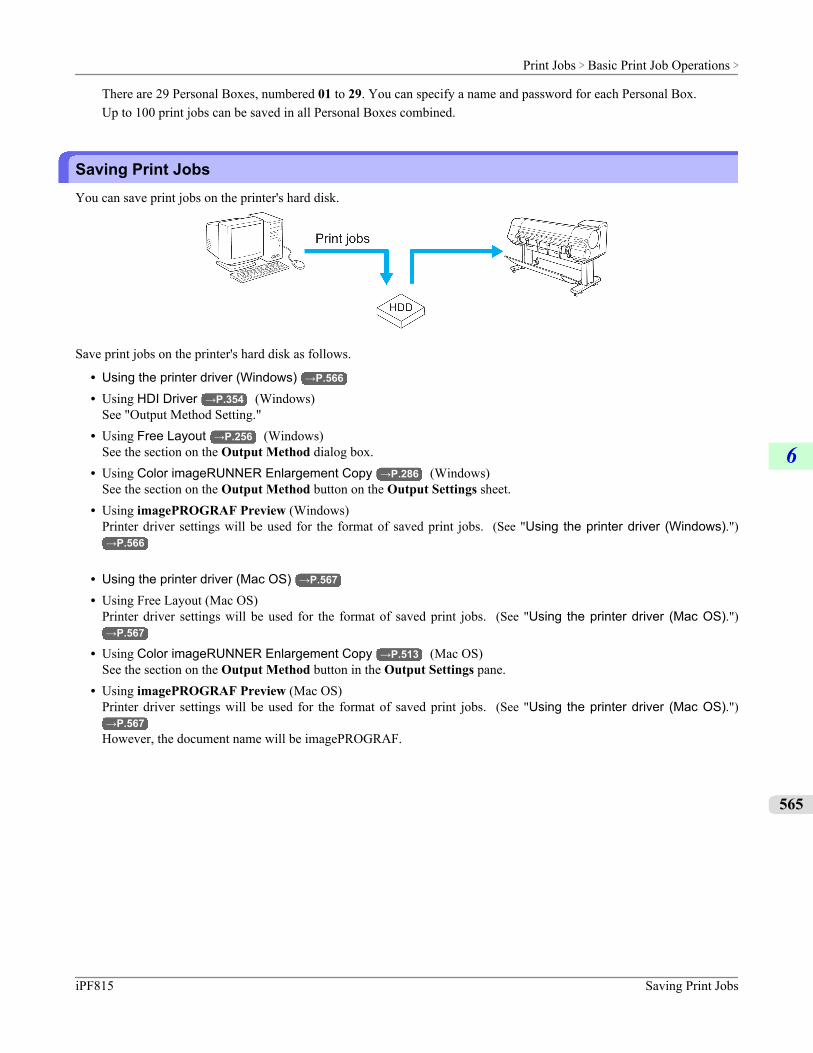
There are 29 Personal Boxes, numbered 01 to 29. You can specify a name and password for each Personal Box.Up to 100 print jobs can be saved in all Personal Boxes combined.
Saving Print JobsYou can save print jobs on the printer's hard disk.
Save print jobs on the printer's hard disk as follows.
• Using the printer driver (Windows) →P.566
• Using HDI Driver →P.354 (Windows)See "Output Method Setting."
• Using Free Layout →P.256 (Windows)See the section on the Output Method dialog box.
• Using Color imageRUNNER Enlargement Copy →P.286 (Windows)See the section on the Output Method button on the Output Settings sheet.
• Using imagePROGRAF Preview (Windows)Printer driver settings will be used for the format of saved print jobs. (See "Using the printer driver (Windows).")→P.566
• Using the printer driver (Mac OS) →P.567
• Using Free Layout (Mac OS)Printer driver settings will be used for the format of saved print jobs. (See "Using the printer driver (Mac OS).")→P.567
• Using Color imageRUNNER Enlargement Copy →P.513 (Mac OS)See the section on the Output Method button in the Output Settings pane.
• Using imagePROGRAF Preview (Mac OS)Printer driver settings will be used for the format of saved print jobs. (See "Using the printer driver (Mac OS).")→P.567
However, the document name will be imagePROGRAF.
Print Jobs > Basic Print Job Operations >
iPF815 Saving Print Jobs
6
565
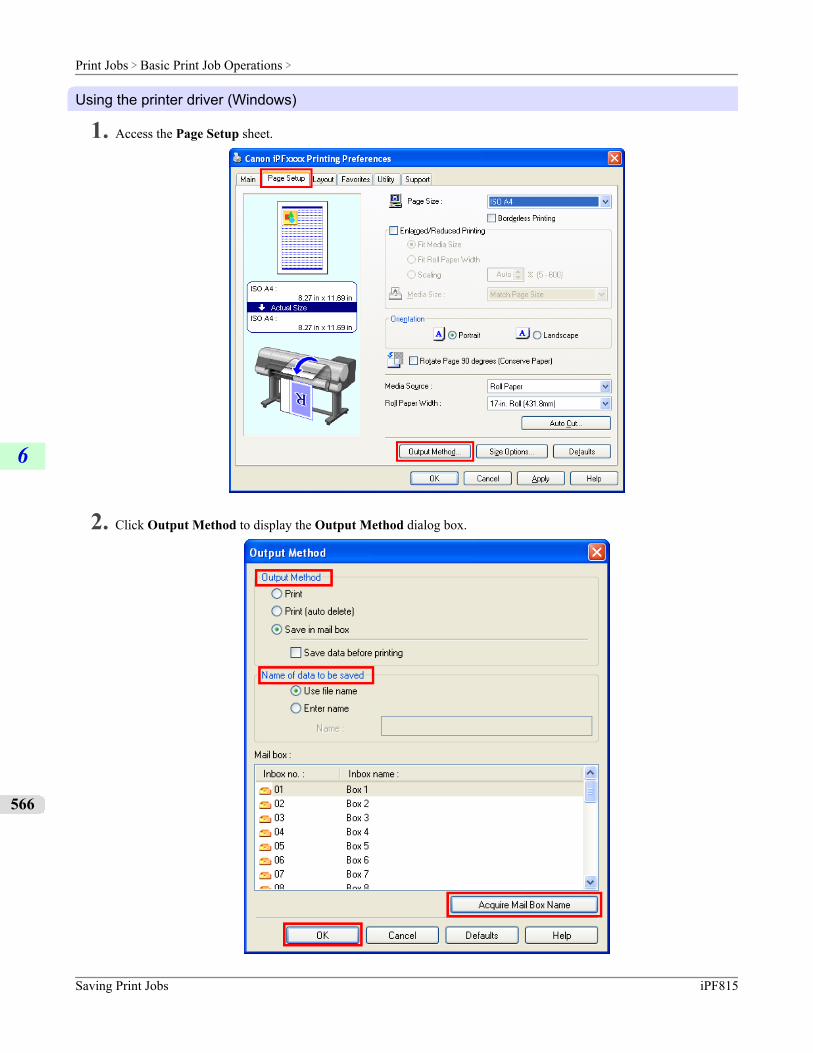
Using the printer driver (Windows)
1. Access the Page Setup sheet.
2. Click Output Method to display the Output Method dialog box.
Print Jobs > Basic Print Job Operations >
Saving Print Jobs iPF815
6
566
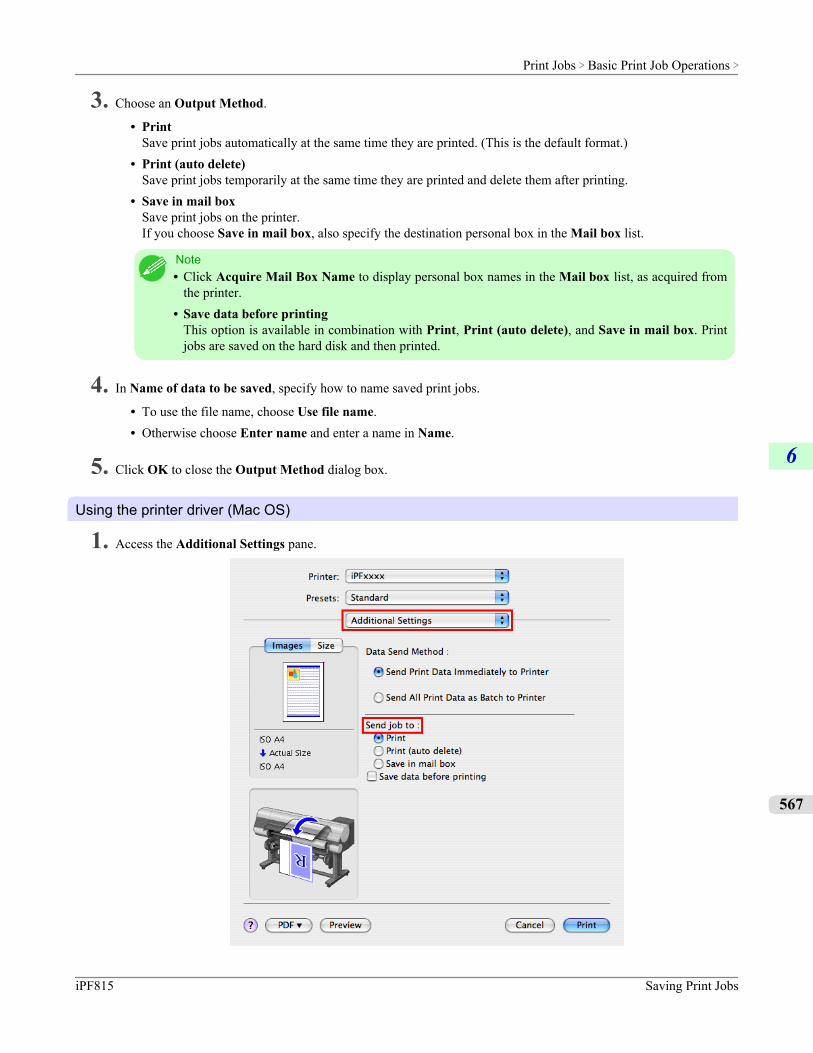
3. Choose an Output Method.
• PrintSave print jobs automatically at the same time they are printed. (This is the default format.)
• Print (auto delete)Save print jobs temporarily at the same time they are printed and delete them after printing.
• Save in mail boxSave print jobs on the printer.If you choose Save in mail box, also specify the destination personal box in the Mail box list.
Note• Click Acquire Mail Box Name to display personal box names in the Mail box list, as acquired from
the printer.• Save data before printing
This option is available in combination with Print, Print (auto delete), and Save in mail box. Printjobs are saved on the hard disk and then printed.
4. In Name of data to be saved, specify how to name saved print jobs.
• To use the file name, choose Use file name.• Otherwise choose Enter name and enter a name in Name.
5. Click OK to close the Output Method dialog box.
Using the printer driver (Mac OS)
1. Access the Additional Settings pane.
Print Jobs > Basic Print Job Operations >
iPF815 Saving Print Jobs
6
567
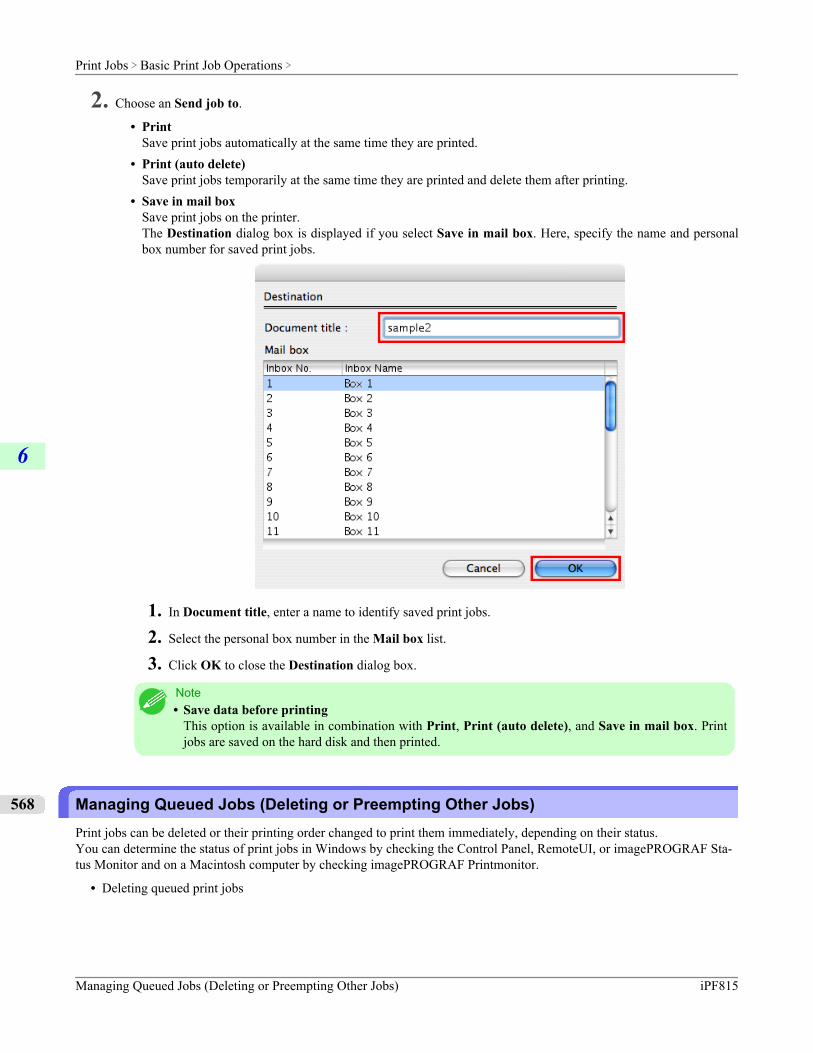
2. Choose an Send job to.
• PrintSave print jobs automatically at the same time they are printed.
• Print (auto delete)Save print jobs temporarily at the same time they are printed and delete them after printing.
• Save in mail boxSave print jobs on the printer.The Destination dialog box is displayed if you select Save in mail box. Here, specify the name and personalbox number for saved print jobs.
1. In Document title, enter a name to identify saved print jobs.
2. Select the personal box number in the Mail box list.
3. Click OK to close the Destination dialog box.
Note• Save data before printing
This option is available in combination with Print, Print (auto delete), and Save in mail box. Printjobs are saved on the hard disk and then printed.
Managing Queued Jobs (Deleting or Preempting Other Jobs)Print jobs can be deleted or their printing order changed to print them immediately, depending on their status.You can determine the status of print jobs in Windows by checking the Control Panel, RemoteUI, or imagePROGRAF Sta-tus Monitor and on a Macintosh computer by checking imagePROGRAF Printmonitor.
• Deleting queued print jobs
Print Jobs > Basic Print Job Operations >
Managing Queued Jobs (Deleting or Preempting Other Jobs) iPF815
6
568
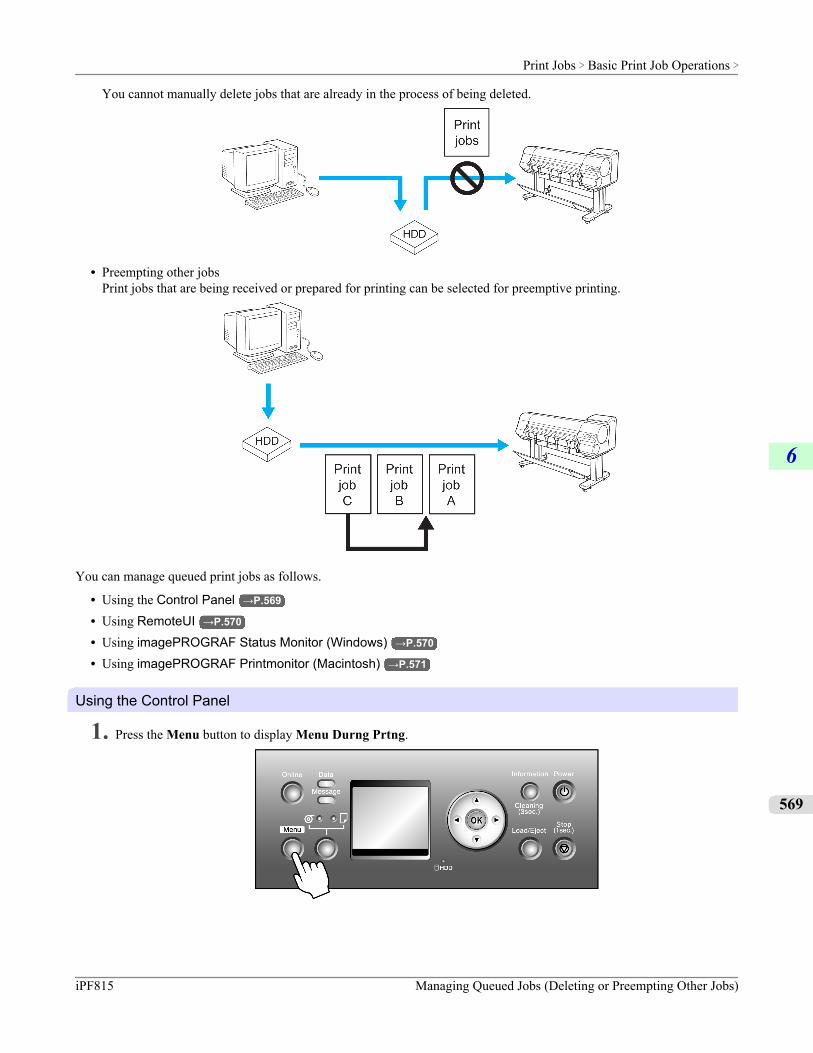
You cannot manually delete jobs that are already in the process of being deleted.
• Preempting other jobsPrint jobs that are being received or prepared for printing can be selected for preemptive printing.
You can manage queued print jobs as follows.
• Using the Control Panel →P.569
• Using RemoteUI →P.570
• Using imagePROGRAF Status Monitor (Windows) →P.570
• Using imagePROGRAF Printmonitor (Macintosh) →P.571
Using the Control Panel
1. Press the Menu button to display Menu Durng Prtng.
Print Jobs > Basic Print Job Operations >
iPF815 Managing Queued Jobs (Deleting or Preempting Other Jobs)
6
569
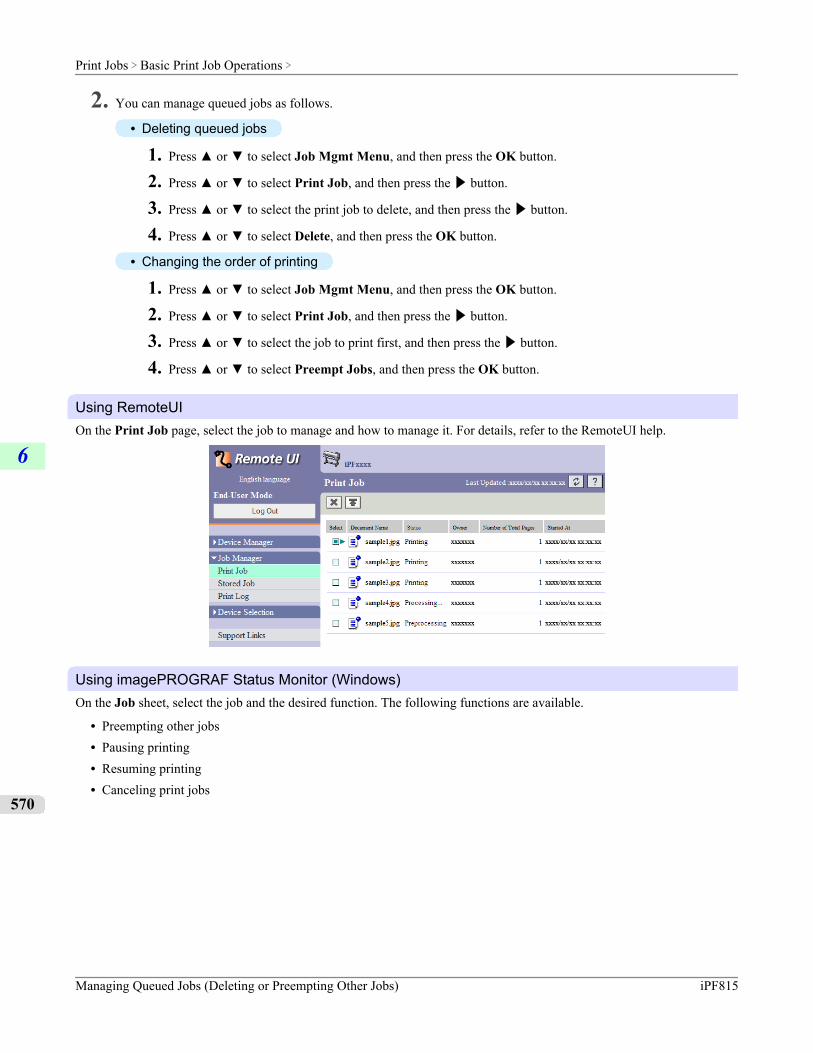
2. You can manage queued jobs as follows.
• Deleting queued jobs
1. Press ▲ or ▼ to select Job Mgmt Menu, and then press the OK button.
2. Press ▲ or ▼ to select Print Job, and then press the ▶ button.
3. Press ▲ or ▼ to select the print job to delete, and then press the ▶ button.
4. Press ▲ or ▼ to select Delete, and then press the OK button.
• Changing the order of printing
1. Press ▲ or ▼ to select Job Mgmt Menu, and then press the OK button.
2. Press ▲ or ▼ to select Print Job, and then press the ▶ button.
3. Press ▲ or ▼ to select the job to print first, and then press the ▶ button.
4. Press ▲ or ▼ to select Preempt Jobs, and then press the OK button.
Using RemoteUIOn the Print Job page, select the job to manage and how to manage it. For details, refer to the RemoteUI help.
Using imagePROGRAF Status Monitor (Windows)On the Job sheet, select the job and the desired function. The following functions are available.
• Preempting other jobs• Pausing printing• Resuming printing• Canceling print jobs
Print Jobs > Basic Print Job Operations >
Managing Queued Jobs (Deleting or Preempting Other Jobs) iPF815
6
570
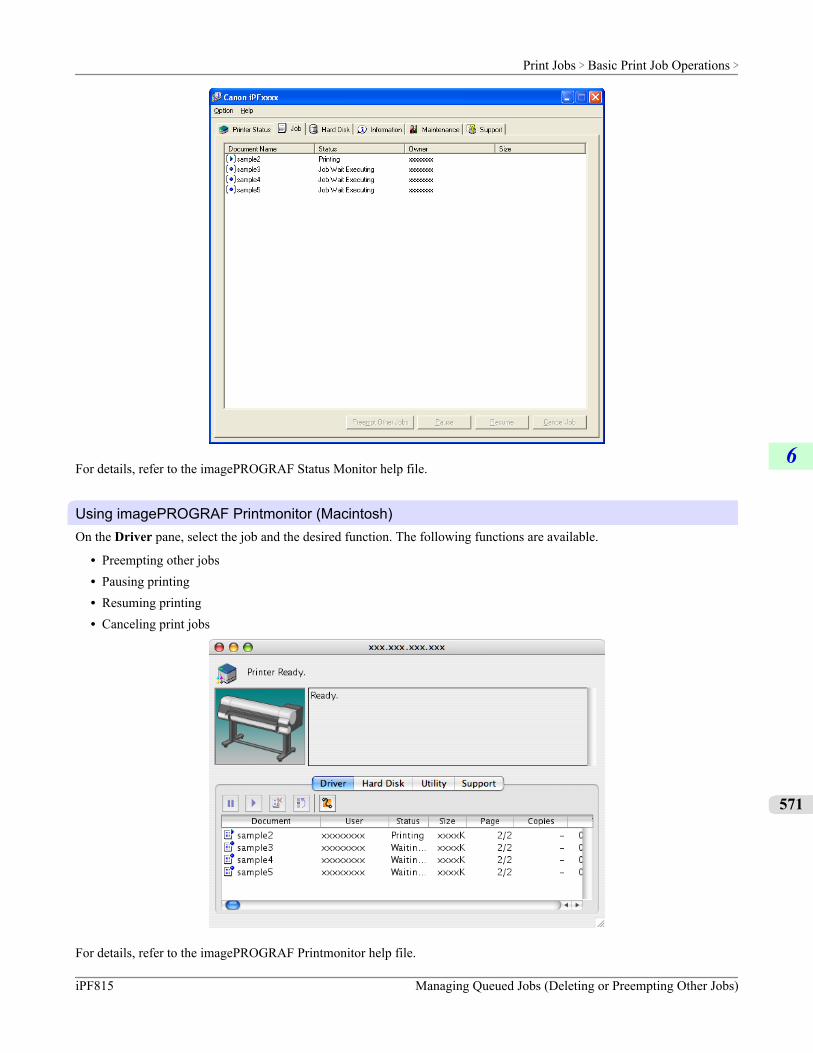
For details, refer to the imagePROGRAF Status Monitor help file.
Using imagePROGRAF Printmonitor (Macintosh)On the Driver pane, select the job and the desired function. The following functions are available.
• Preempting other jobs• Pausing printing• Resuming printing• Canceling print jobs
For details, refer to the imagePROGRAF Printmonitor help file.
Print Jobs > Basic Print Job Operations >
iPF815 Managing Queued Jobs (Deleting or Preempting Other Jobs)
6
571
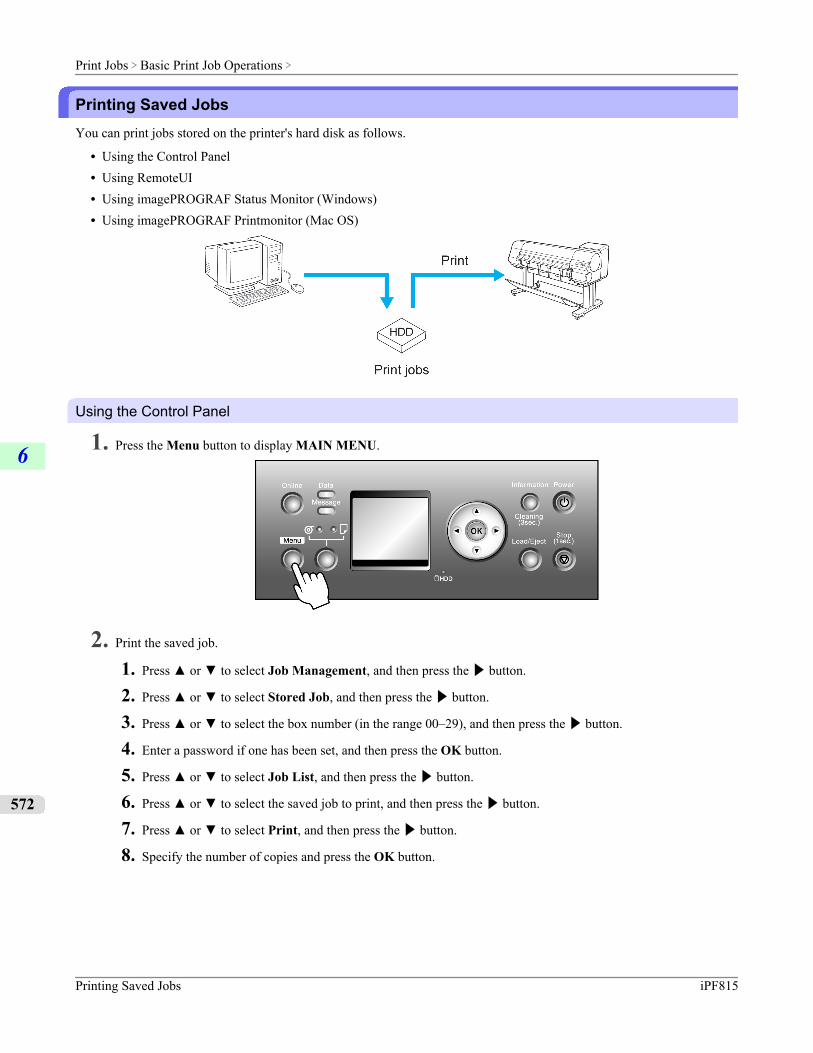
Printing Saved JobsYou can print jobs stored on the printer's hard disk as follows.
• Using the Control Panel• Using RemoteUI• Using imagePROGRAF Status Monitor (Windows)• Using imagePROGRAF Printmonitor (Mac OS)
Using the Control Panel
1. Press the Menu button to display MAIN MENU.
2. Print the saved job.
1. Press ▲ or ▼ to select Job Management, and then press the ▶ button.
2. Press ▲ or ▼ to select Stored Job, and then press the ▶ button.
3. Press ▲ or ▼ to select the box number (in the range 00–29), and then press the ▶ button.
4. Enter a password if one has been set, and then press the OK button.
5. Press ▲ or ▼ to select Job List, and then press the ▶ button.
6. Press ▲ or ▼ to select the saved job to print, and then press the ▶ button.
7. Press ▲ or ▼ to select Print, and then press the ▶ button.
8. Specify the number of copies and press the OK button.
Print Jobs > Basic Print Job Operations >
Printing Saved Jobs iPF815
6
572
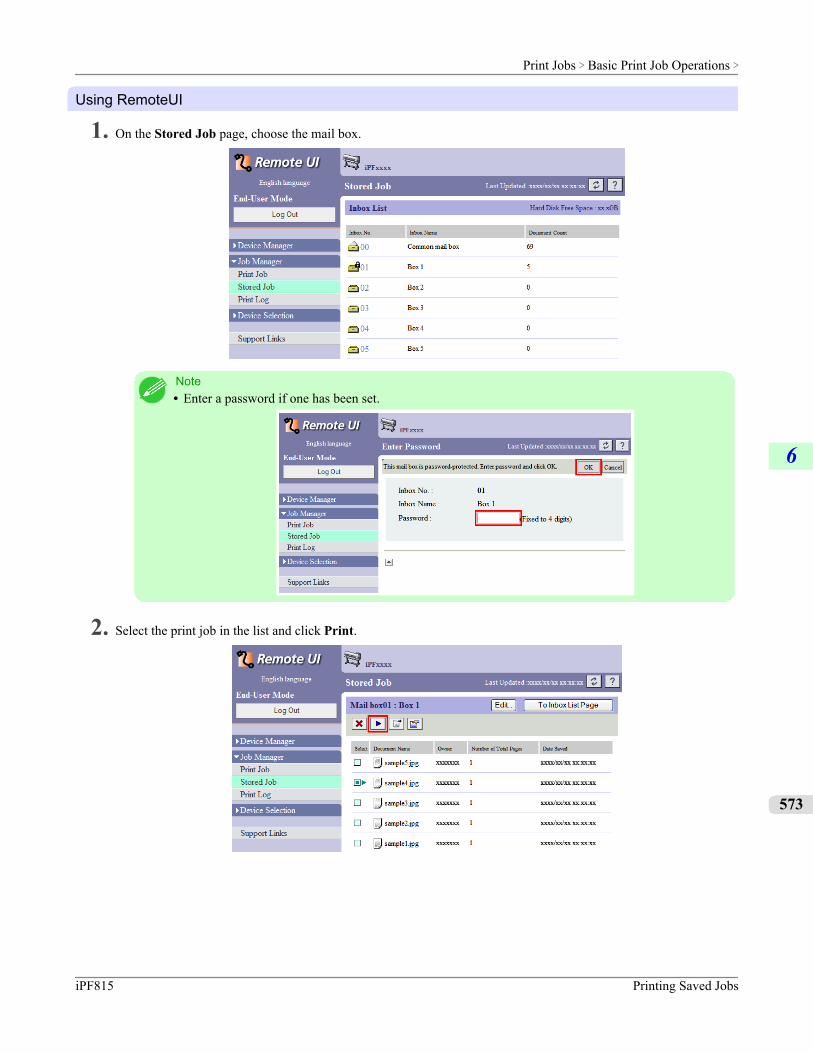
Using RemoteUI
1. On the Stored Job page, choose the mail box.
Note• Enter a password if one has been set.
2. Select the print job in the list and click Print.
Print Jobs > Basic Print Job Operations >
iPF815 Printing Saved Jobs
6
573
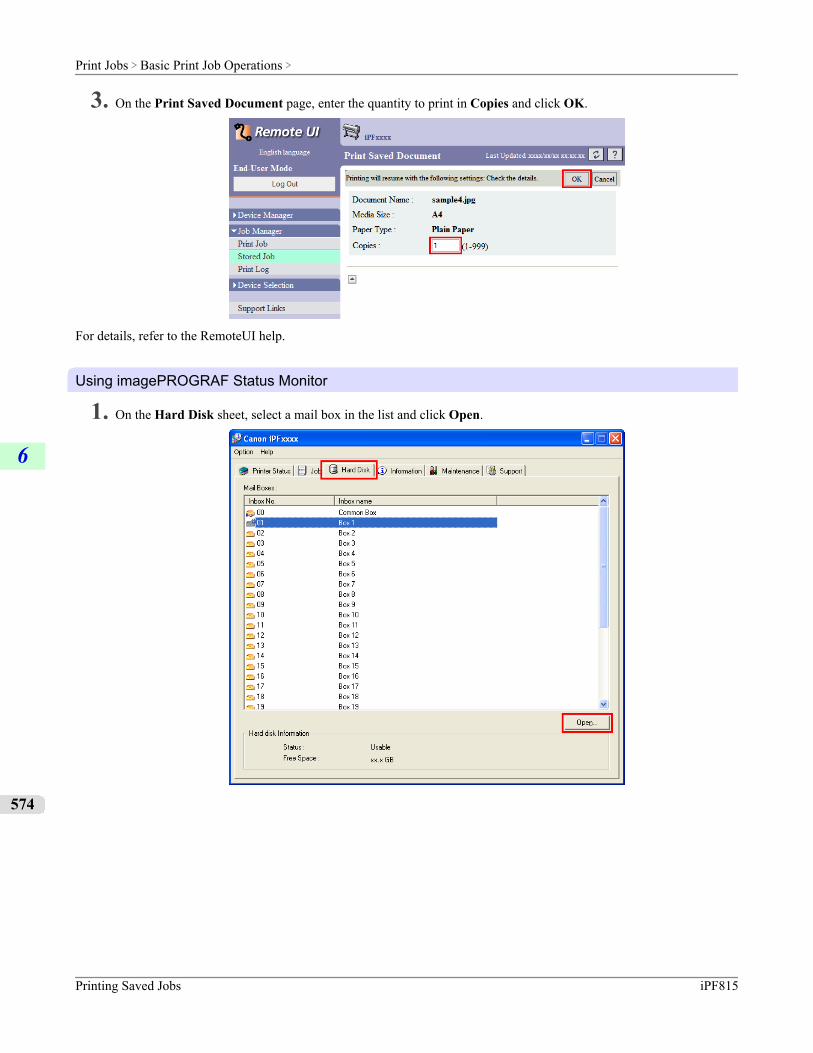
3. On the Print Saved Document page, enter the quantity to print in Copies and click OK.
For details, refer to the RemoteUI help.
Using imagePROGRAF Status Monitor
1. On the Hard Disk sheet, select a mail box in the list and click Open.
Print Jobs > Basic Print Job Operations >
Printing Saved Jobs iPF815
6
574
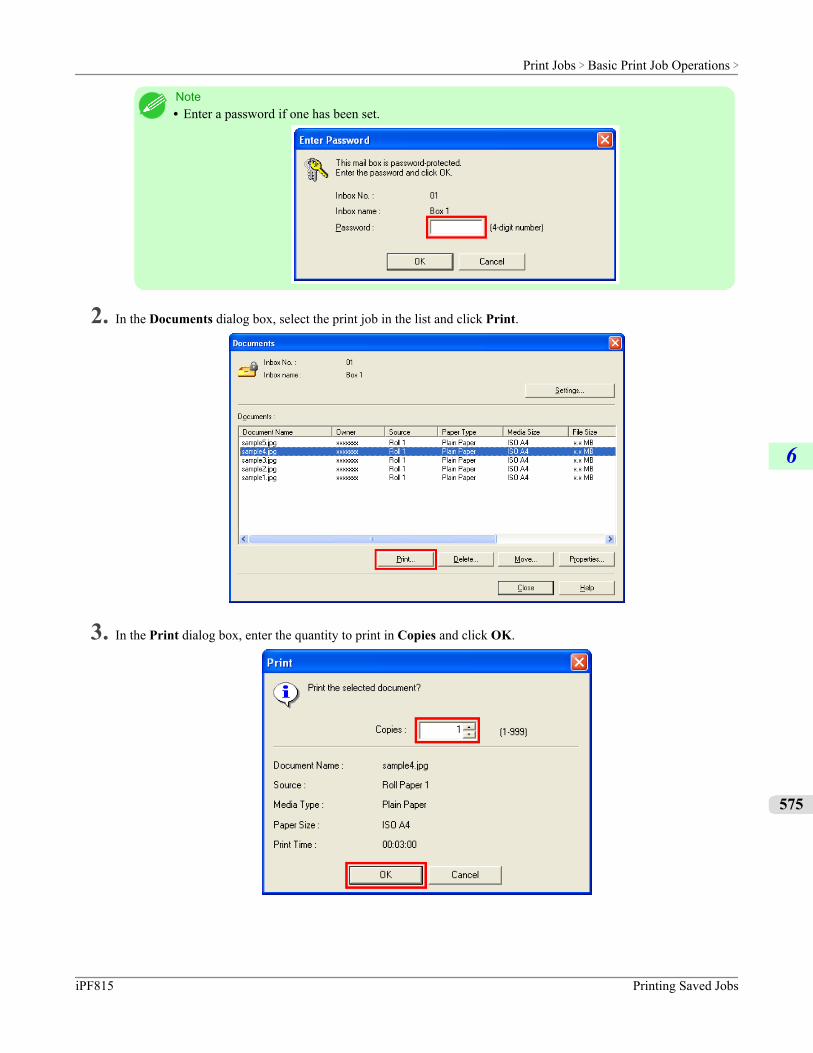
Note• Enter a password if one has been set.
2. In the Documents dialog box, select the print job in the list and click Print.
3. In the Print dialog box, enter the quantity to print in Copies and click OK.
Print Jobs > Basic Print Job Operations >
iPF815 Printing Saved Jobs
6
575
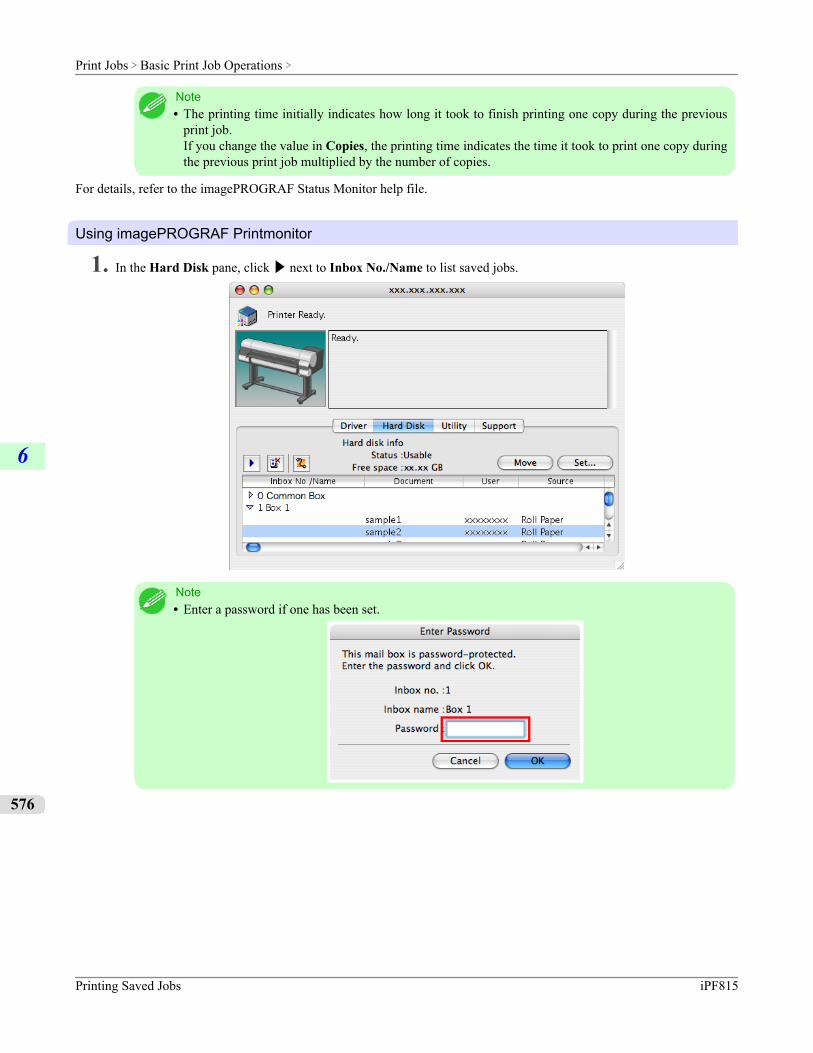
Note• The printing time initially indicates how long it took to finish printing one copy during the previous
print job.If you change the value in Copies, the printing time indicates the time it took to print one copy duringthe previous print job multiplied by the number of copies.
For details, refer to the imagePROGRAF Status Monitor help file.
Using imagePROGRAF Printmonitor
1. In the Hard Disk pane, click ▶ next to Inbox No./Name to list saved jobs.
Note• Enter a password if one has been set.
Print Jobs > Basic Print Job Operations >
Printing Saved Jobs iPF815
6
576
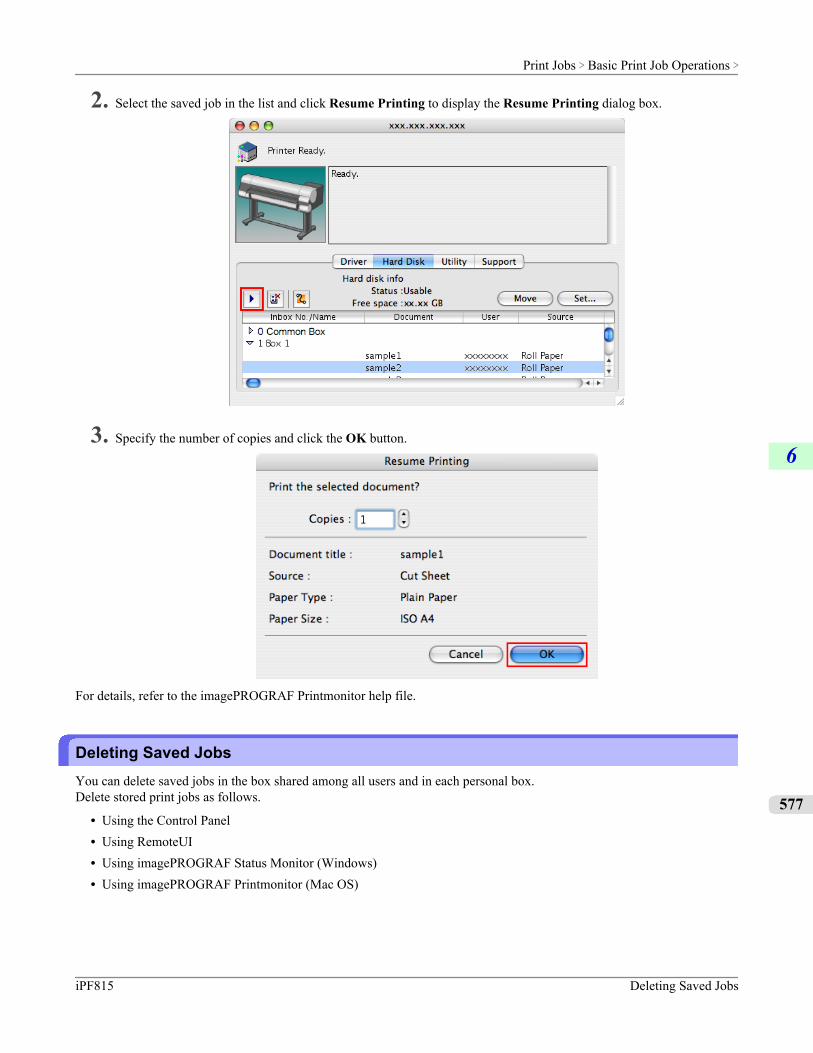
2. Select the saved job in the list and click Resume Printing to display the Resume Printing dialog box.
3. Specify the number of copies and click the OK button.
For details, refer to the imagePROGRAF Printmonitor help file.
Deleting Saved JobsYou can delete saved jobs in the box shared among all users and in each personal box.Delete stored print jobs as follows.
• Using the Control Panel• Using RemoteUI• Using imagePROGRAF Status Monitor (Windows)• Using imagePROGRAF Printmonitor (Mac OS)
Print Jobs > Basic Print Job Operations >
iPF815 Deleting Saved Jobs
6
577
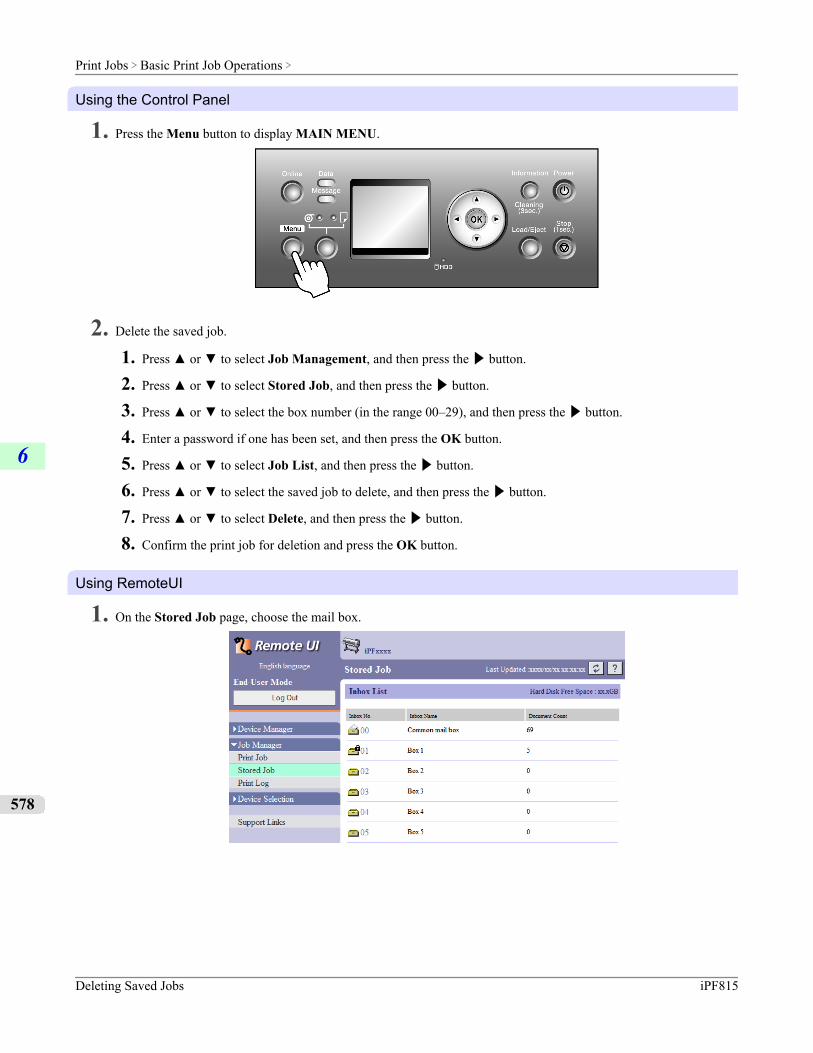
Using the Control Panel
1. Press the Menu button to display MAIN MENU.
2. Delete the saved job.
1. Press ▲ or ▼ to select Job Management, and then press the ▶ button.
2. Press ▲ or ▼ to select Stored Job, and then press the ▶ button.
3. Press ▲ or ▼ to select the box number (in the range 00–29), and then press the ▶ button.
4. Enter a password if one has been set, and then press the OK button.
5. Press ▲ or ▼ to select Job List, and then press the ▶ button.
6. Press ▲ or ▼ to select the saved job to delete, and then press the ▶ button.
7. Press ▲ or ▼ to select Delete, and then press the ▶ button.
8. Confirm the print job for deletion and press the OK button.
Using RemoteUI
1. On the Stored Job page, choose the mail box.
Print Jobs > Basic Print Job Operations >
Deleting Saved Jobs iPF815
6
578
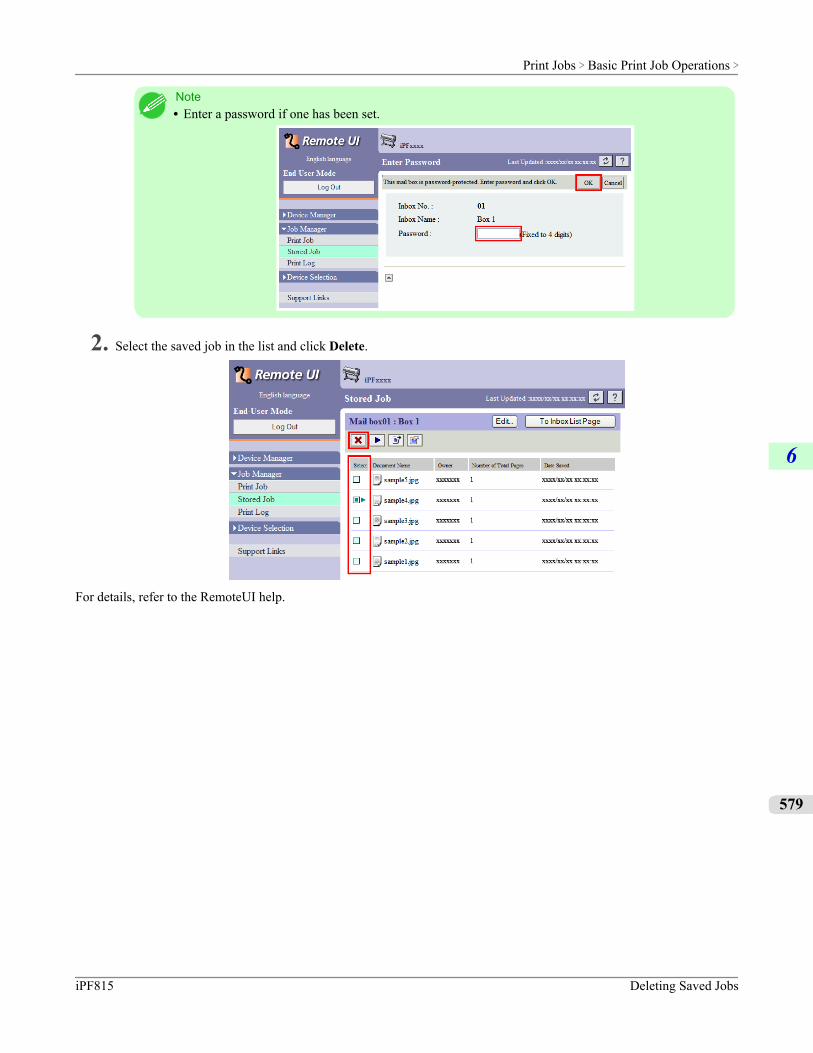
Note• Enter a password if one has been set.
2. Select the saved job in the list and click Delete.
For details, refer to the RemoteUI help.
Print Jobs > Basic Print Job Operations >
iPF815 Deleting Saved Jobs
6
579

Using imagePROGRAF Status Monitor
1. On the Hard Disk sheet, select a mail box in the list and click Open.
Note• Enter a password if one has been set.
Print Jobs > Basic Print Job Operations >
Deleting Saved Jobs iPF815
6
580
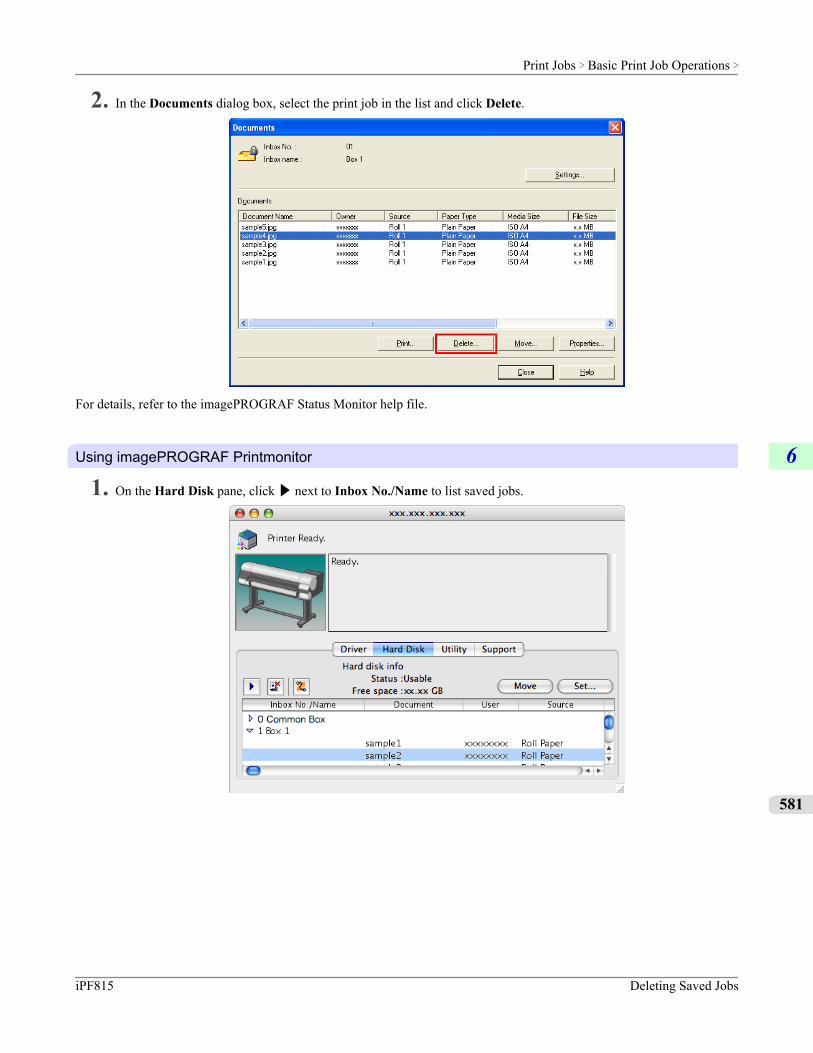
2. In the Documents dialog box, select the print job in the list and click Delete.
For details, refer to the imagePROGRAF Status Monitor help file.
Using imagePROGRAF Printmonitor
1. On the Hard Disk pane, click ▶ next to Inbox No./Name to list saved jobs.
Print Jobs > Basic Print Job Operations >
iPF815 Deleting Saved Jobs
6
581
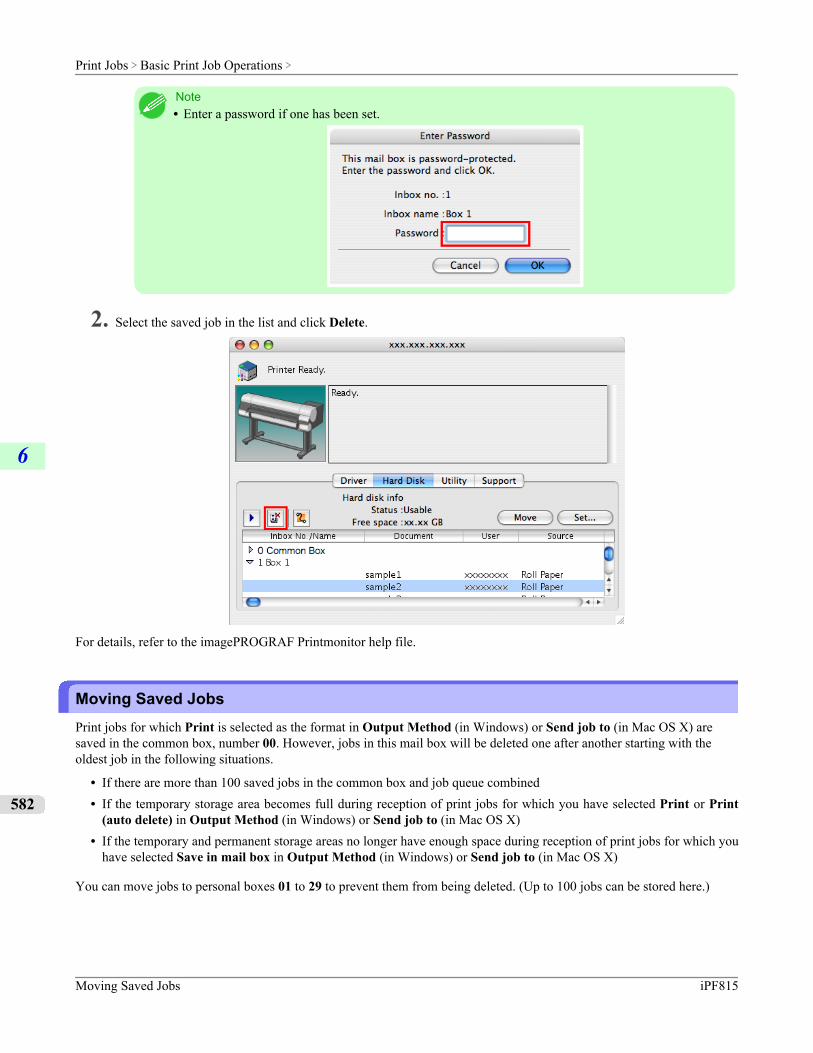
Note• Enter a password if one has been set.
2. Select the saved job in the list and click Delete.
For details, refer to the imagePROGRAF Printmonitor help file.
Moving Saved JobsPrint jobs for which Print is selected as the format in Output Method (in Windows) or Send job to (in Mac OS X) aresaved in the common box, number 00. However, jobs in this mail box will be deleted one after another starting with theoldest job in the following situations.
• If there are more than 100 saved jobs in the common box and job queue combined• If the temporary storage area becomes full during reception of print jobs for which you have selected Print or Print
(auto delete) in Output Method (in Windows) or Send job to (in Mac OS X)• If the temporary and permanent storage areas no longer have enough space during reception of print jobs for which you
have selected Save in mail box in Output Method (in Windows) or Send job to (in Mac OS X)
You can move jobs to personal boxes 01 to 29 to prevent them from being deleted. (Up to 100 jobs can be stored here.)
Print Jobs > Basic Print Job Operations >
Moving Saved Jobs iPF815
6
582
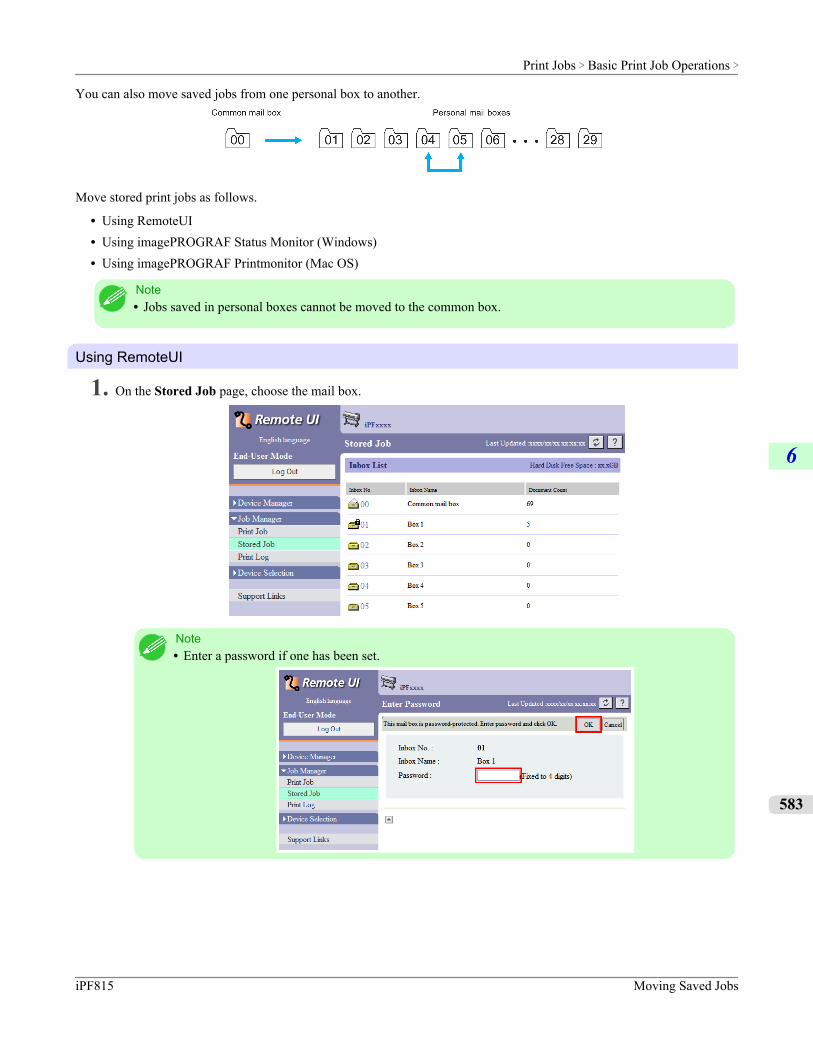
You can also move saved jobs from one personal box to another.
Move stored print jobs as follows.
• Using RemoteUI• Using imagePROGRAF Status Monitor (Windows)• Using imagePROGRAF Printmonitor (Mac OS)
Note• Jobs saved in personal boxes cannot be moved to the common box.
Using RemoteUI
1. On the Stored Job page, choose the mail box.
Note• Enter a password if one has been set.
Print Jobs > Basic Print Job Operations >
iPF815 Moving Saved Jobs
6
583
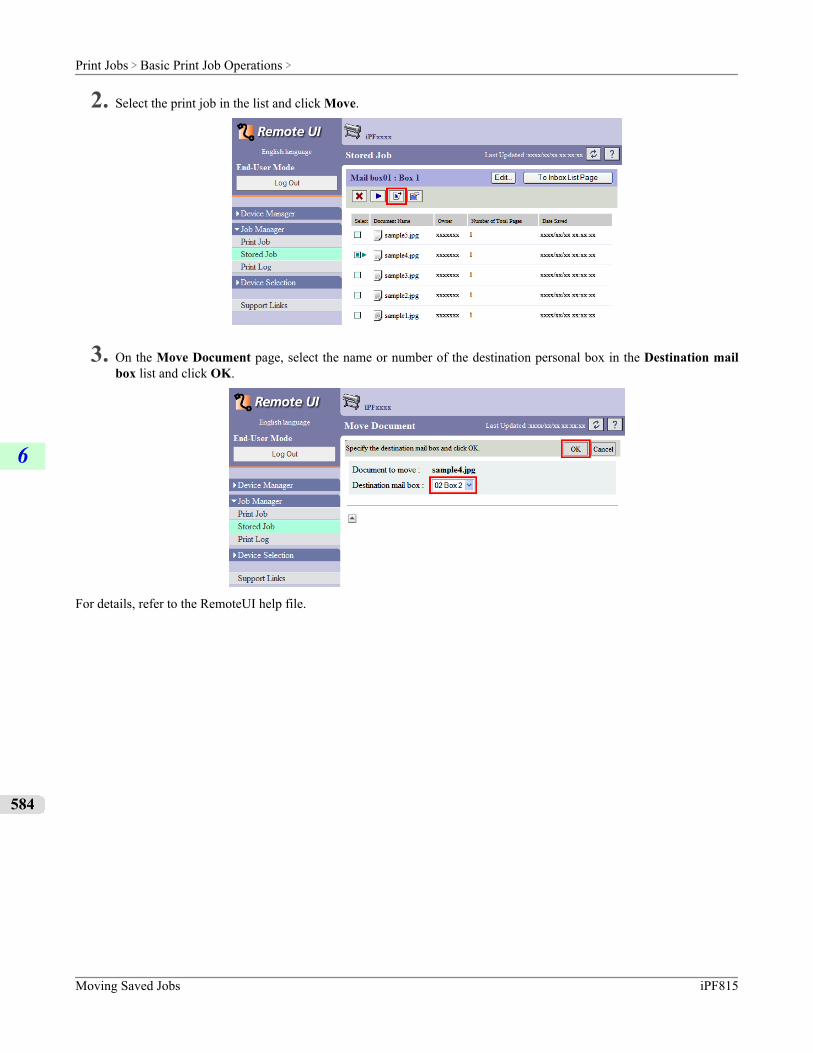
2. Select the print job in the list and click Move.
3. On the Move Document page, select the name or number of the destination personal box in the Destination mailbox list and click OK.
For details, refer to the RemoteUI help file.
Print Jobs > Basic Print Job Operations >
Moving Saved Jobs iPF815
6
584
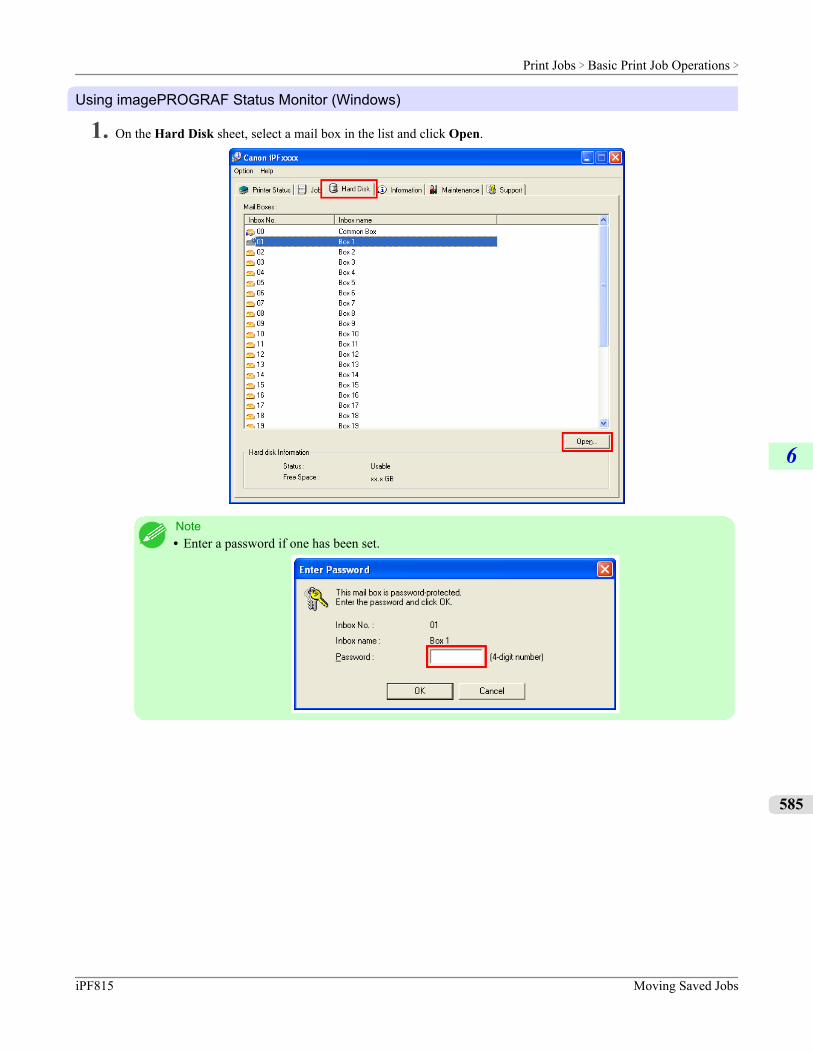
Using imagePROGRAF Status Monitor (Windows)
1. On the Hard Disk sheet, select a mail box in the list and click Open.
Note• Enter a password if one has been set.
Print Jobs > Basic Print Job Operations >
iPF815 Moving Saved Jobs
6
585
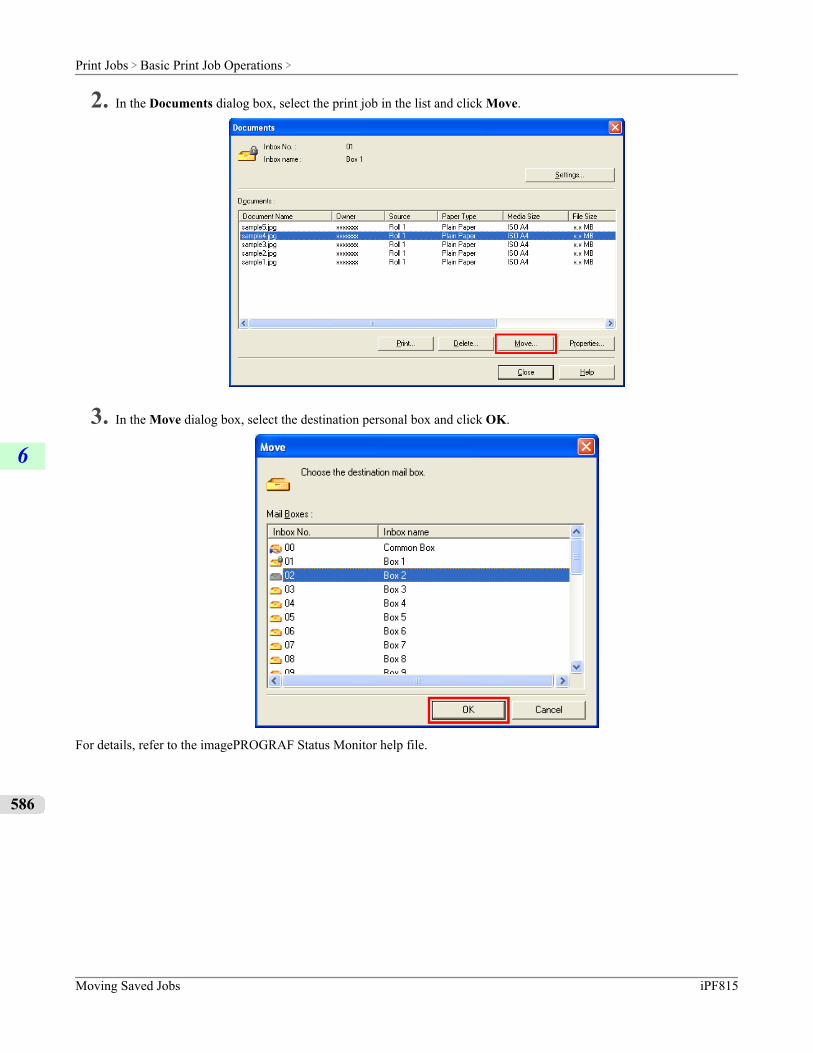
2. In the Documents dialog box, select the print job in the list and click Move.
3. In the Move dialog box, select the destination personal box and click OK.
For details, refer to the imagePROGRAF Status Monitor help file.
Print Jobs > Basic Print Job Operations >
Moving Saved Jobs iPF815
6
586

Using imagePROGRAF Printmonitor (Mac OS)
1. In the Hard Disk pane, click ▶ next to Inbox No./Name to list saved jobs.
Note• Enter a password if one has been set.
The password is a four-digit number.
Print Jobs > Basic Print Job Operations >
iPF815 Moving Saved Jobs
6
587
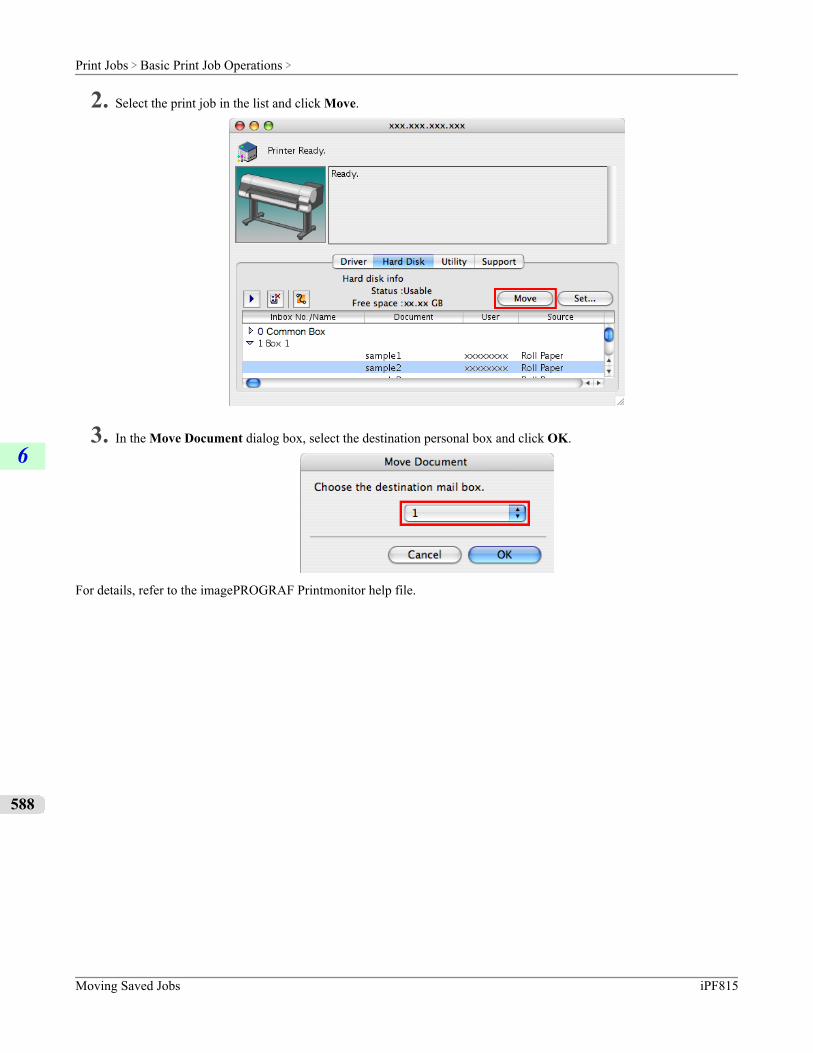
2. Select the print job in the list and click Move.
3. In the Move Document dialog box, select the destination personal box and click OK.
For details, refer to the imagePROGRAF Printmonitor help file.
Print Jobs > Basic Print Job Operations >
Moving Saved Jobs iPF815
6
588
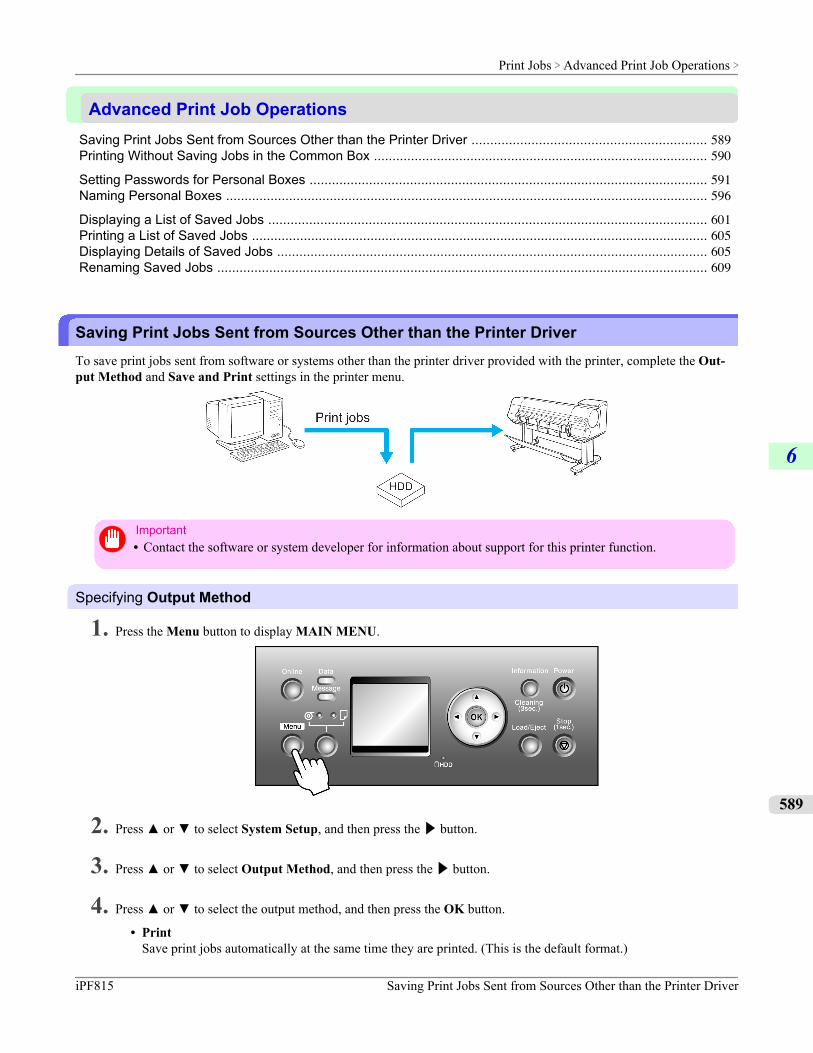
Advanced Print Job OperationsSaving Print Jobs Sent from Sources Other than the Printer Driver ............................................................... 589Printing Without Saving Jobs in the Common Box .......................................................................................... 590
Setting Passwords for Personal Boxes ........................................................................................................... 591Naming Personal Boxes .................................................................................................................................. 596
Displaying a List of Saved Jobs ...................................................................................................................... 601Printing a List of Saved Jobs ........................................................................................................................... 605Displaying Details of Saved Jobs .................................................................................................................... 605Renaming Saved Jobs .................................................................................................................................... 609
Saving Print Jobs Sent from Sources Other than the Printer DriverTo save print jobs sent from software or systems other than the printer driver provided with the printer, complete the Out-put Method and Save and Print settings in the printer menu.
Important• Contact the software or system developer for information about support for this printer function.
Specifying Output Method
1. Press the Menu button to display MAIN MENU.
2. Press ▲ or ▼ to select System Setup, and then press the ▶ button.
3. Press ▲ or ▼ to select Output Method, and then press the ▶ button.
4. Press ▲ or ▼ to select the output method, and then press the OK button.
• PrintSave print jobs automatically at the same time they are printed. (This is the default format.)
Print Jobs > Advanced Print Job Operations >
iPF815 Saving Print Jobs Sent from Sources Other than the Printer Driver
6
589
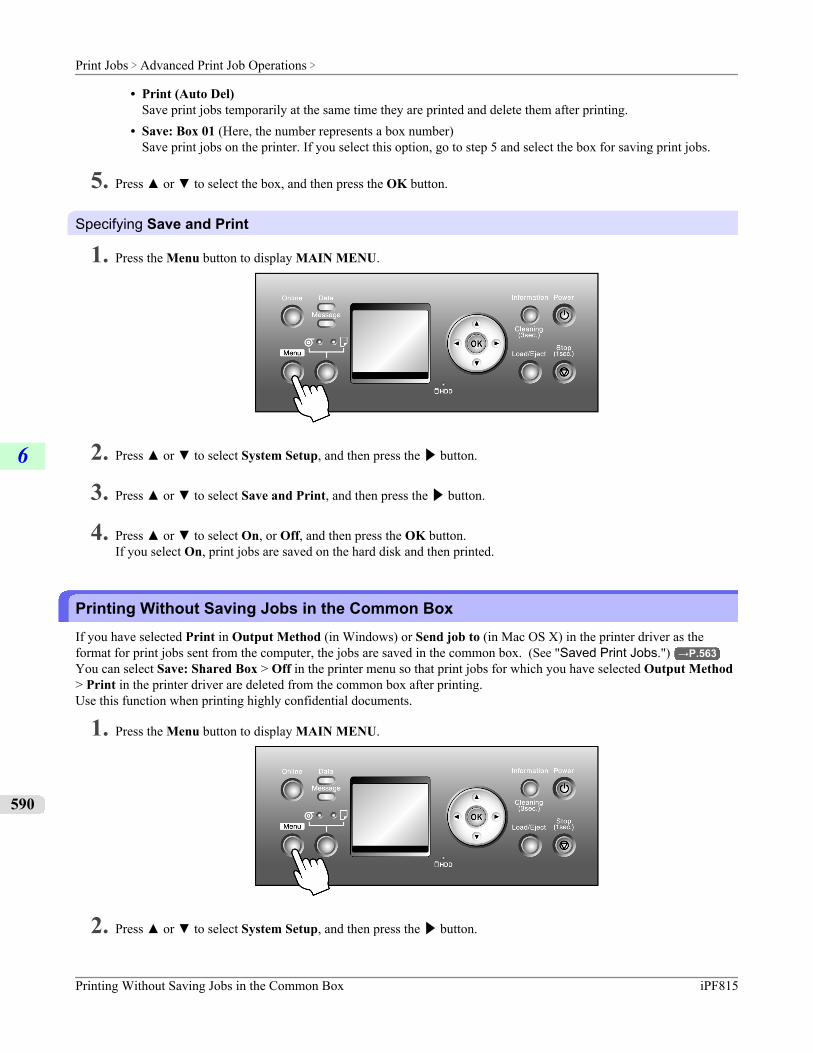
• Print (Auto Del)Save print jobs temporarily at the same time they are printed and delete them after printing.
• Save: Box 01 (Here, the number represents a box number)Save print jobs on the printer. If you select this option, go to step 5 and select the box for saving print jobs.
5. Press ▲ or ▼ to select the box, and then press the OK button.
Specifying Save and Print
1. Press the Menu button to display MAIN MENU.
2. Press ▲ or ▼ to select System Setup, and then press the ▶ button.
3. Press ▲ or ▼ to select Save and Print, and then press the ▶ button.
4. Press ▲ or ▼ to select On, or Off, and then press the OK button.If you select On, print jobs are saved on the hard disk and then printed.
Printing Without Saving Jobs in the Common BoxIf you have selected Print in Output Method (in Windows) or Send job to (in Mac OS X) in the printer driver as theformat for print jobs sent from the computer, the jobs are saved in the common box. (See "Saved Print Jobs.") →P.563You can select Save: Shared Box > Off in the printer menu so that print jobs for which you have selected Output Method> Print in the printer driver are deleted from the common box after printing.Use this function when printing highly confidential documents.
1. Press the Menu button to display MAIN MENU.
2. Press ▲ or ▼ to select System Setup, and then press the ▶ button.
Print Jobs > Advanced Print Job Operations >
Printing Without Saving Jobs in the Common Box iPF815
6
590
3. Press ▲ or ▼ to select Save: Shared Box, and then press the ▶ button.
Note• If a password has been set on the printer, the Logon screen is displayed.
To change the setting, select Administrator and press the OK button. Enter the password when Ad-min.Pswd is displayed and press the OK button before going to the next procedure.If you select User and press the OK button, you can check settings values but cannot change them.
4. Press ▲ or ▼ to select Off, and then press the OK button.
Setting Passwords for Personal BoxesBy default, no passwords are set for personal boxes. For greater security, you can set passwords for each personal box. Afteryou set a password, it will be required to modify the personal box settings, as well as to display, print, delete, move, andmodify jobs saved in the personal box.
Note• A password cannot be set for the common box.• Enter a four-digit number as the password, in the range 0001–9999.• Even if you have set passwords, they are not required to access personal boxes in Administrator Mode in
RemoteUI.
You can set a password for a personal box as follows.
• Using RemoteUI• Using imagePROGRAF Status Monitor (Windows)• Using imagePROGRAF Printmonitor (Mac OS)
Using RemoteUI
1. On the Stored Job page, select the personal box for a password.
Print Jobs > Advanced Print Job Operations >
iPF815 Setting Passwords for Personal Boxes
6
591
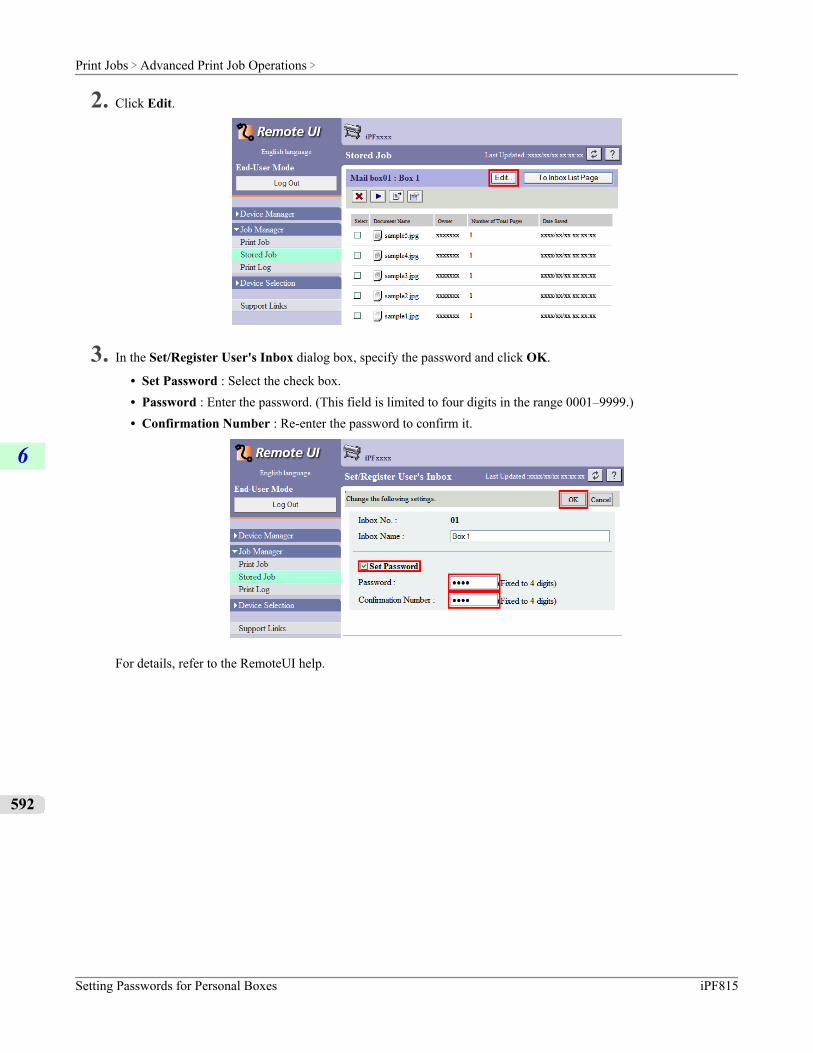
2. Click Edit.
3. In the Set/Register User's Inbox dialog box, specify the password and click OK.
• Set Password : Select the check box.• Password : Enter the password. (This field is limited to four digits in the range 0001–9999.)• Confirmation Number : Re-enter the password to confirm it.
For details, refer to the RemoteUI help.
Print Jobs > Advanced Print Job Operations >
Setting Passwords for Personal Boxes iPF815
6
592
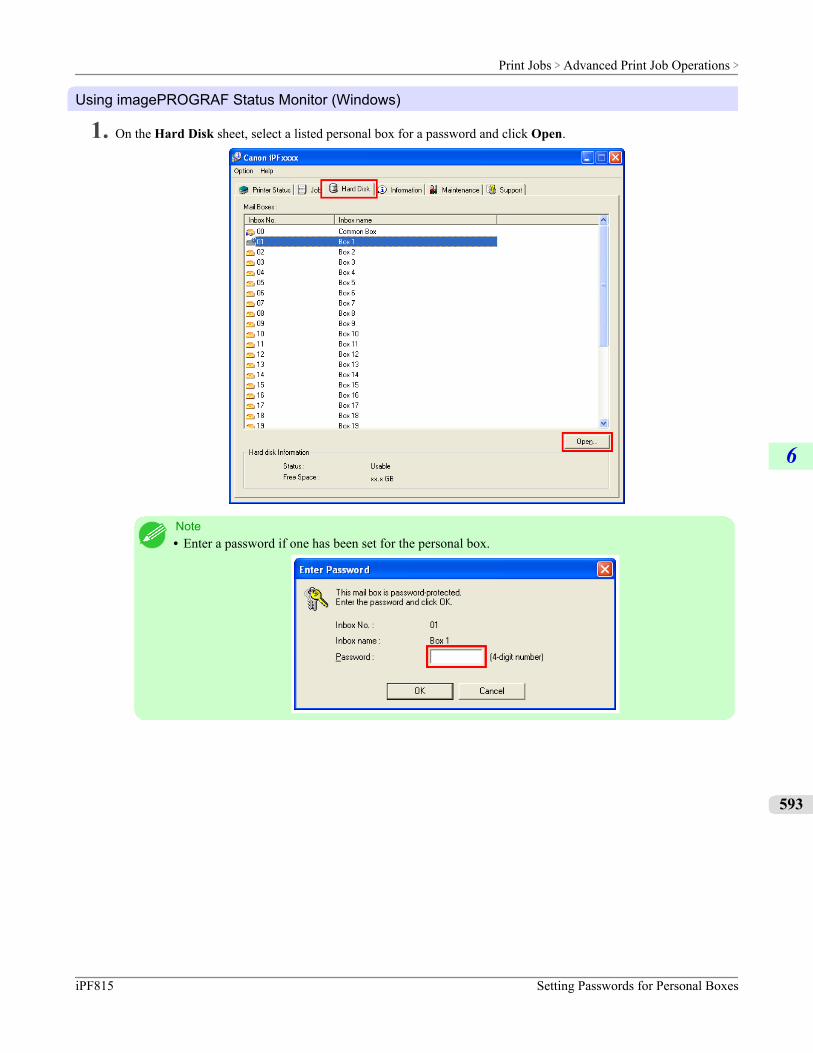
Using imagePROGRAF Status Monitor (Windows)
1. On the Hard Disk sheet, select a listed personal box for a password and click Open.
Note• Enter a password if one has been set for the personal box.
Print Jobs > Advanced Print Job Operations >
iPF815 Setting Passwords for Personal Boxes
6
593
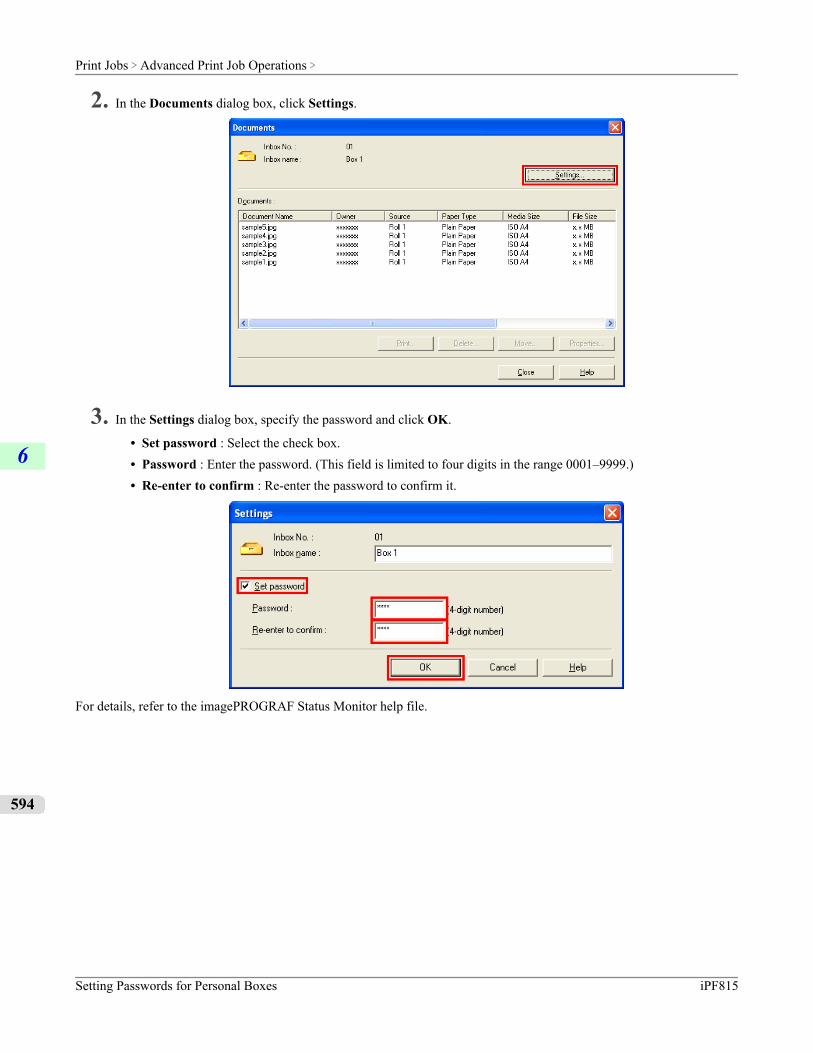
2. In the Documents dialog box, click Settings.
3. In the Settings dialog box, specify the password and click OK.
• Set password : Select the check box.• Password : Enter the password. (This field is limited to four digits in the range 0001–9999.)• Re-enter to confirm : Re-enter the password to confirm it.
For details, refer to the imagePROGRAF Status Monitor help file.
Print Jobs > Advanced Print Job Operations >
Setting Passwords for Personal Boxes iPF815
6
594
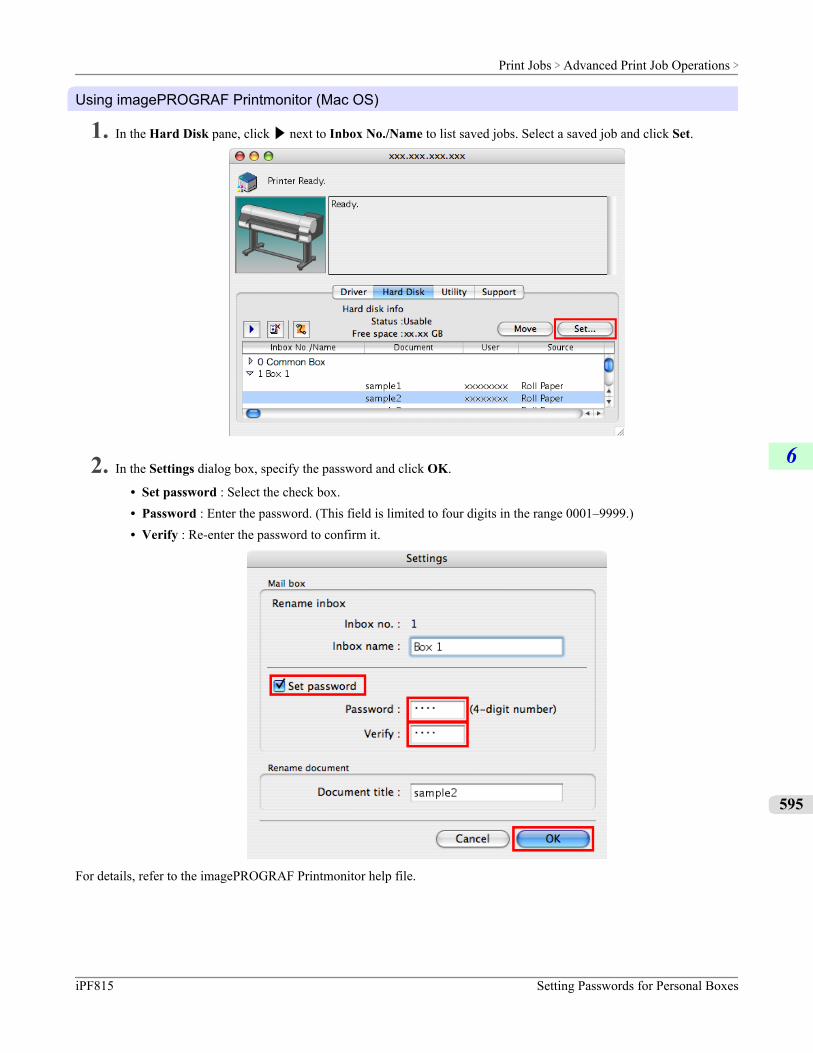
Using imagePROGRAF Printmonitor (Mac OS)
1. In the Hard Disk pane, click ▶ next to Inbox No./Name to list saved jobs. Select a saved job and click Set.
2. In the Settings dialog box, specify the password and click OK.
• Set password : Select the check box.• Password : Enter the password. (This field is limited to four digits in the range 0001–9999.)• Verify : Re-enter the password to confirm it.
For details, refer to the imagePROGRAF Printmonitor help file.
Print Jobs > Advanced Print Job Operations >
iPF815 Setting Passwords for Personal Boxes
6
595
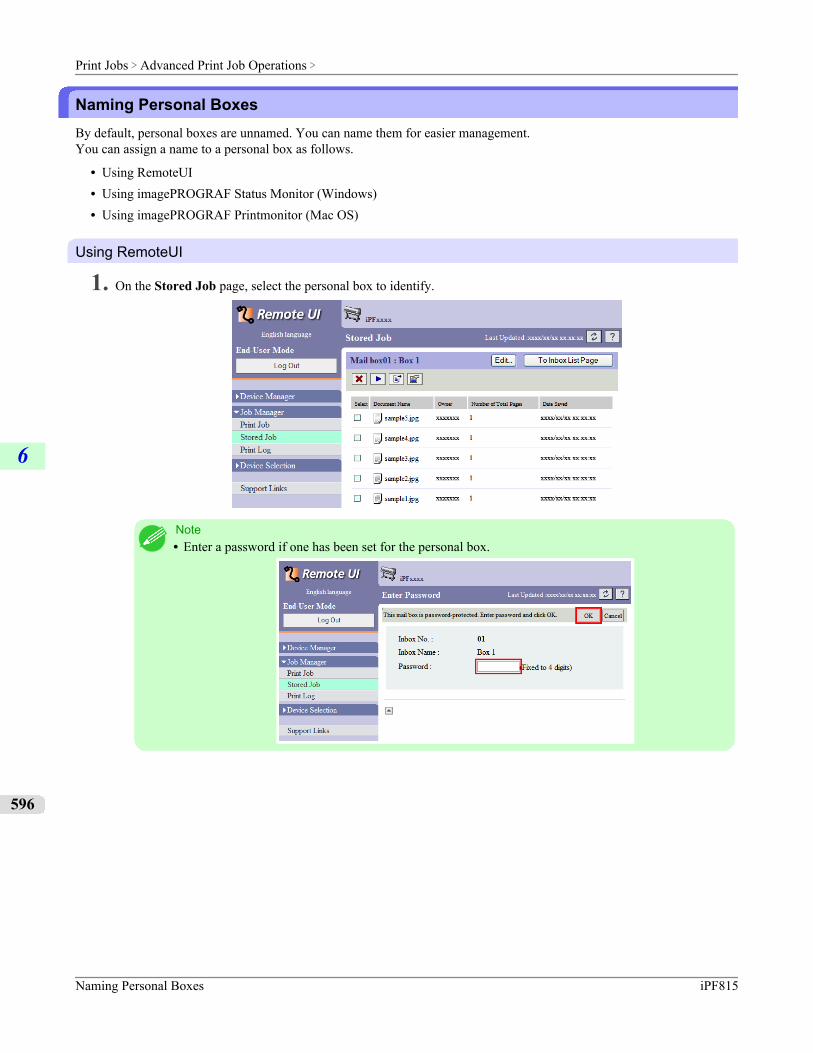
Naming Personal BoxesBy default, personal boxes are unnamed. You can name them for easier management.You can assign a name to a personal box as follows.
• Using RemoteUI• Using imagePROGRAF Status Monitor (Windows)• Using imagePROGRAF Printmonitor (Mac OS)
Using RemoteUI
1. On the Stored Job page, select the personal box to identify.
Note• Enter a password if one has been set for the personal box.
Print Jobs > Advanced Print Job Operations >
Naming Personal Boxes iPF815
6
596
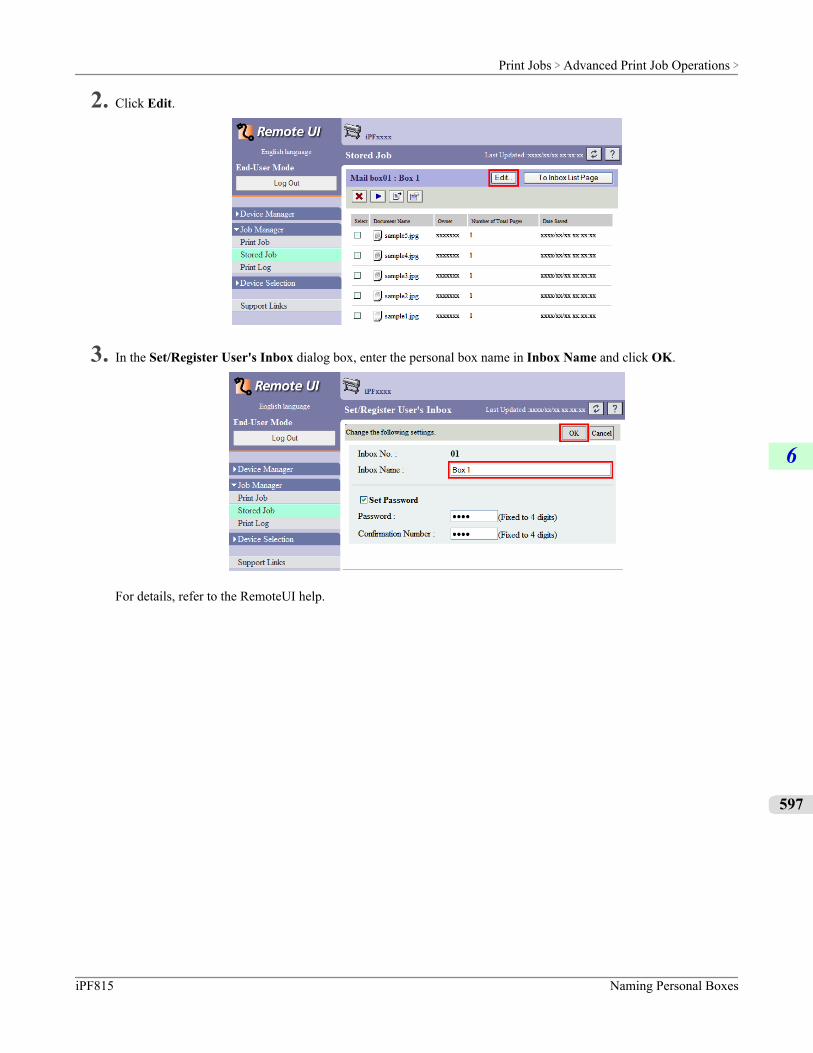
2. Click Edit.
3. In the Set/Register User's Inbox dialog box, enter the personal box name in Inbox Name and click OK.
For details, refer to the RemoteUI help.
Print Jobs > Advanced Print Job Operations >
iPF815 Naming Personal Boxes
6
597

Using imagePROGRAF Status Monitor (Windows)
1. On the Hard Disk sheet, select a listed personal box to identify and click Open.
Note• Enter a password if one has been set for the personal box.
Print Jobs > Advanced Print Job Operations >
Naming Personal Boxes iPF815
6
598
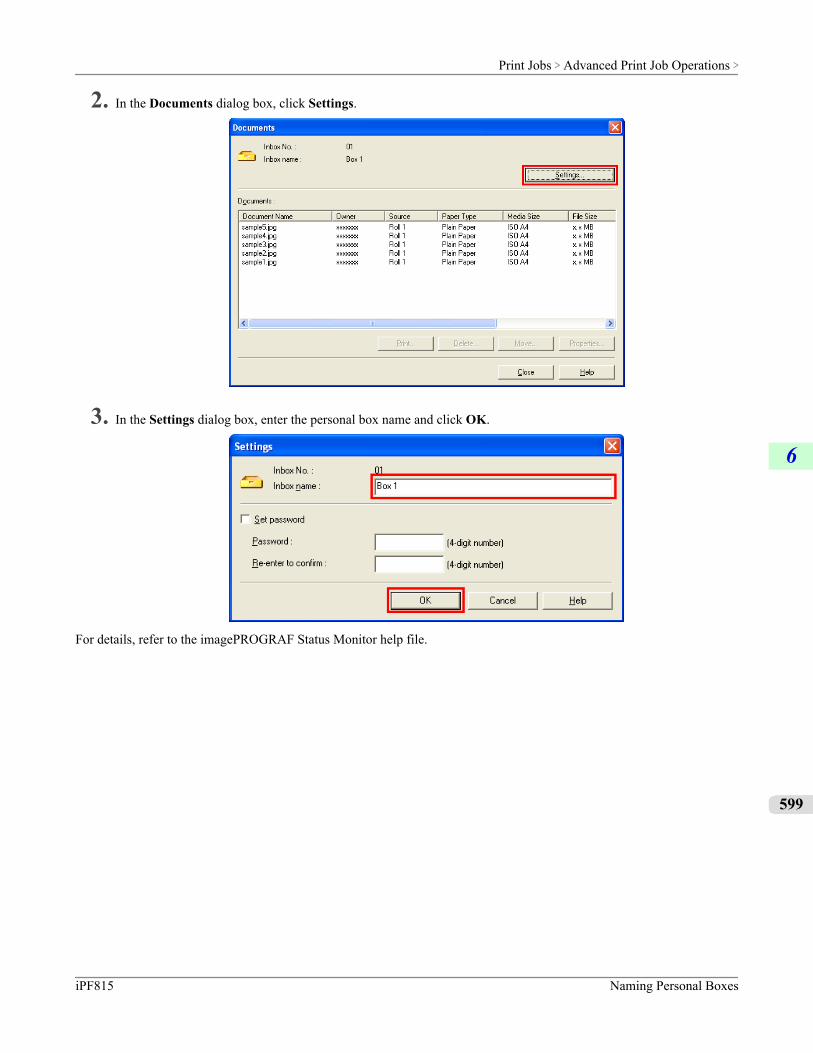
2. In the Documents dialog box, click Settings.
3. In the Settings dialog box, enter the personal box name and click OK.
For details, refer to the imagePROGRAF Status Monitor help file.
Print Jobs > Advanced Print Job Operations >
iPF815 Naming Personal Boxes
6
599
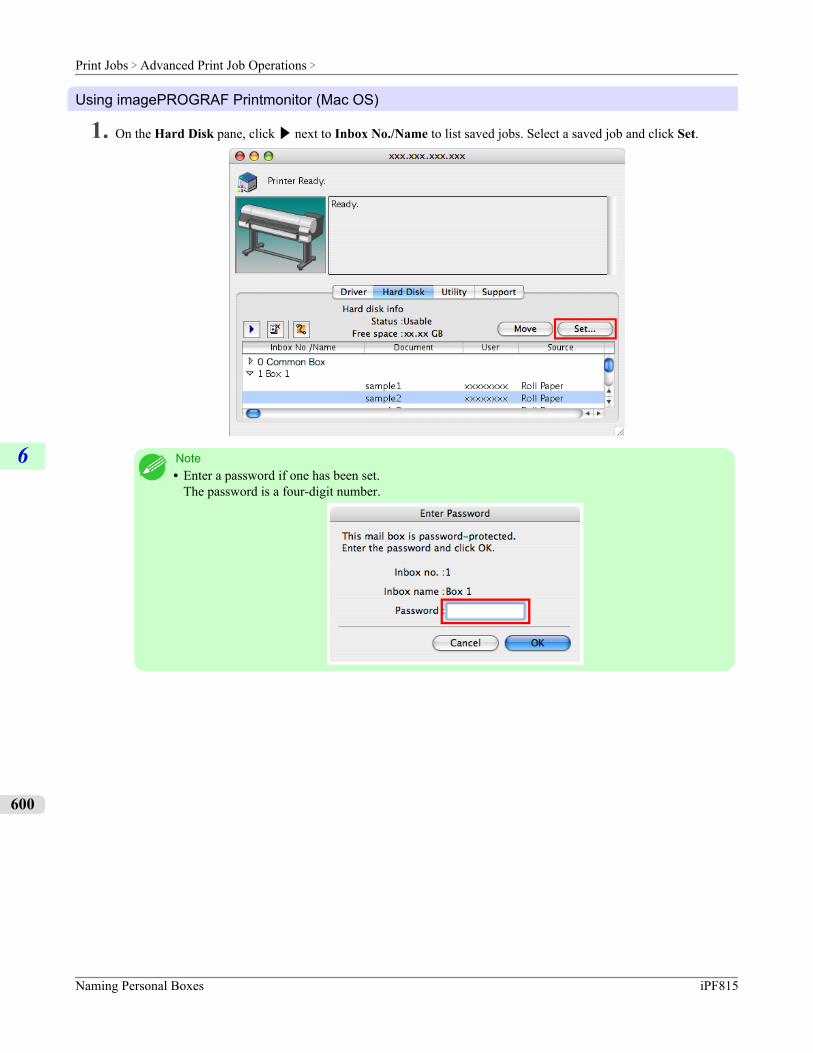
Using imagePROGRAF Printmonitor (Mac OS)
1. On the Hard Disk pane, click ▶ next to Inbox No./Name to list saved jobs. Select a saved job and click Set.
Note• Enter a password if one has been set.
The password is a four-digit number.
Print Jobs > Advanced Print Job Operations >
Naming Personal Boxes iPF815
6
600
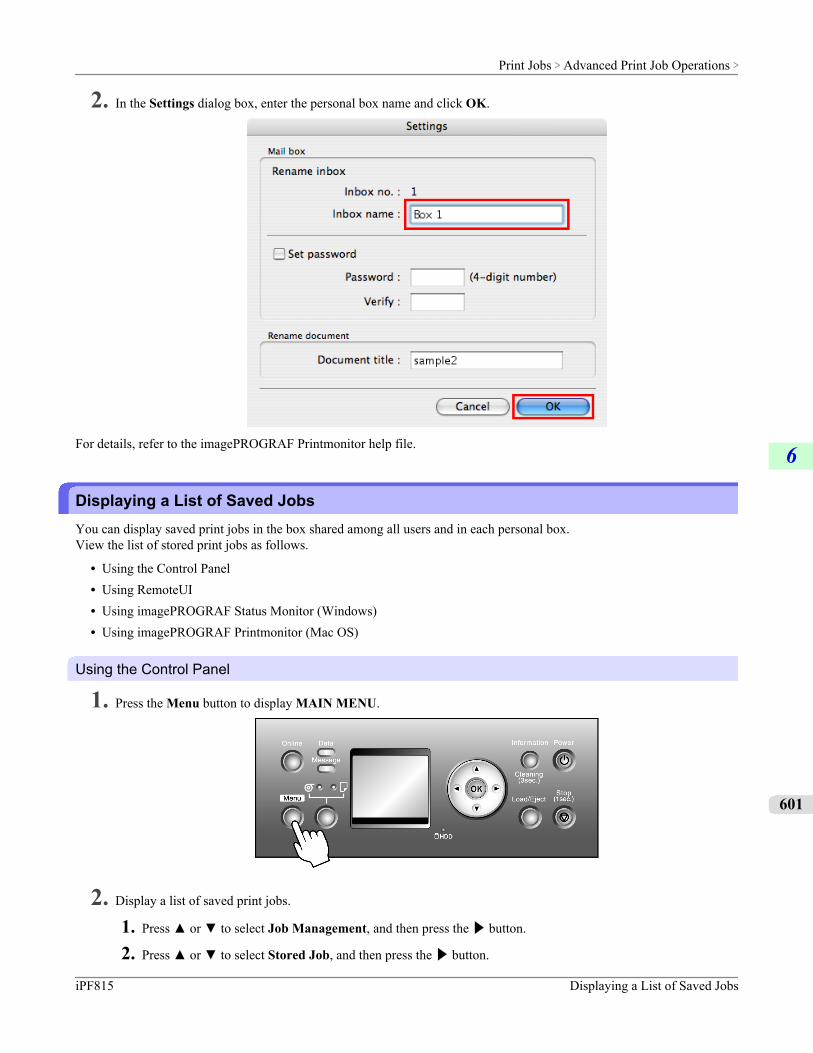
2. In the Settings dialog box, enter the personal box name and click OK.
For details, refer to the imagePROGRAF Printmonitor help file.
Displaying a List of Saved JobsYou can display saved print jobs in the box shared among all users and in each personal box.View the list of stored print jobs as follows.
• Using the Control Panel• Using RemoteUI• Using imagePROGRAF Status Monitor (Windows)• Using imagePROGRAF Printmonitor (Mac OS)
Using the Control Panel
1. Press the Menu button to display MAIN MENU.
2. Display a list of saved print jobs.
1. Press ▲ or ▼ to select Job Management, and then press the ▶ button.
2. Press ▲ or ▼ to select Stored Job, and then press the ▶ button.
Print Jobs > Advanced Print Job Operations >
iPF815 Displaying a List of Saved Jobs
6
601
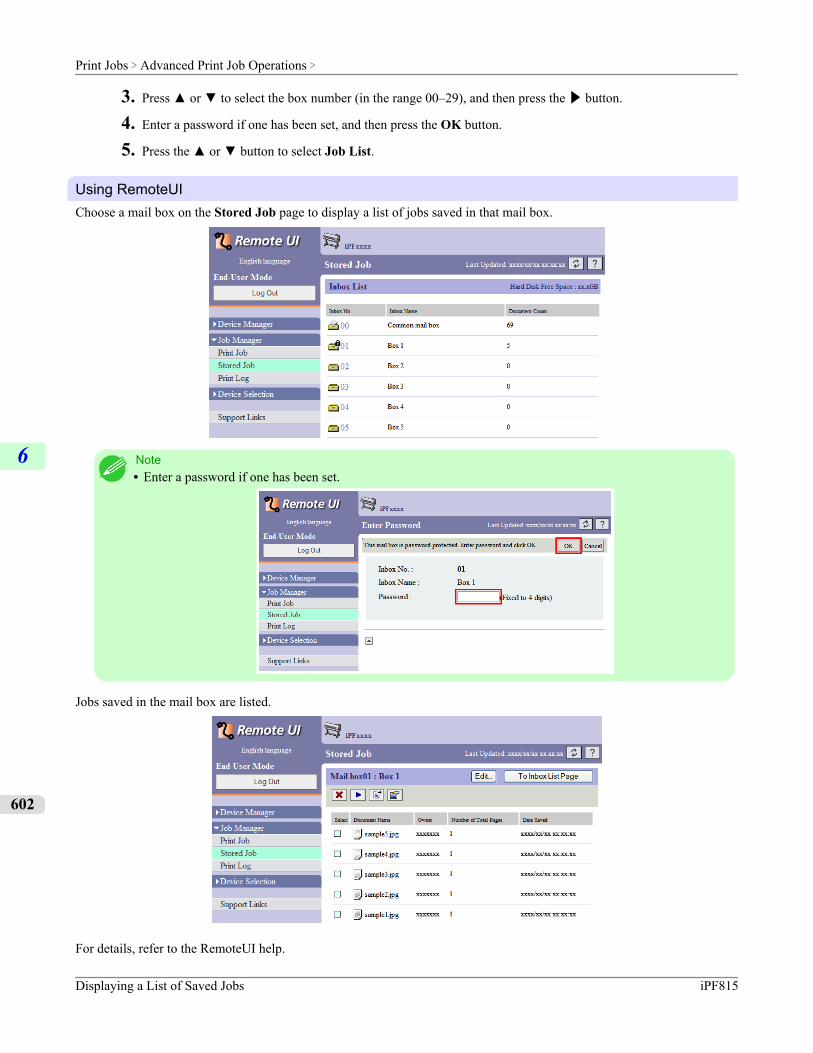
3. Press ▲ or ▼ to select the box number (in the range 00–29), and then press the ▶ button.
4. Enter a password if one has been set, and then press the OK button.
5. Press the ▲ or ▼ button to select Job List.
Using RemoteUIChoose a mail box on the Stored Job page to display a list of jobs saved in that mail box.
Note• Enter a password if one has been set.
Jobs saved in the mail box are listed.
For details, refer to the RemoteUI help.
Print Jobs > Advanced Print Job Operations >
Displaying a List of Saved Jobs iPF815
6
602
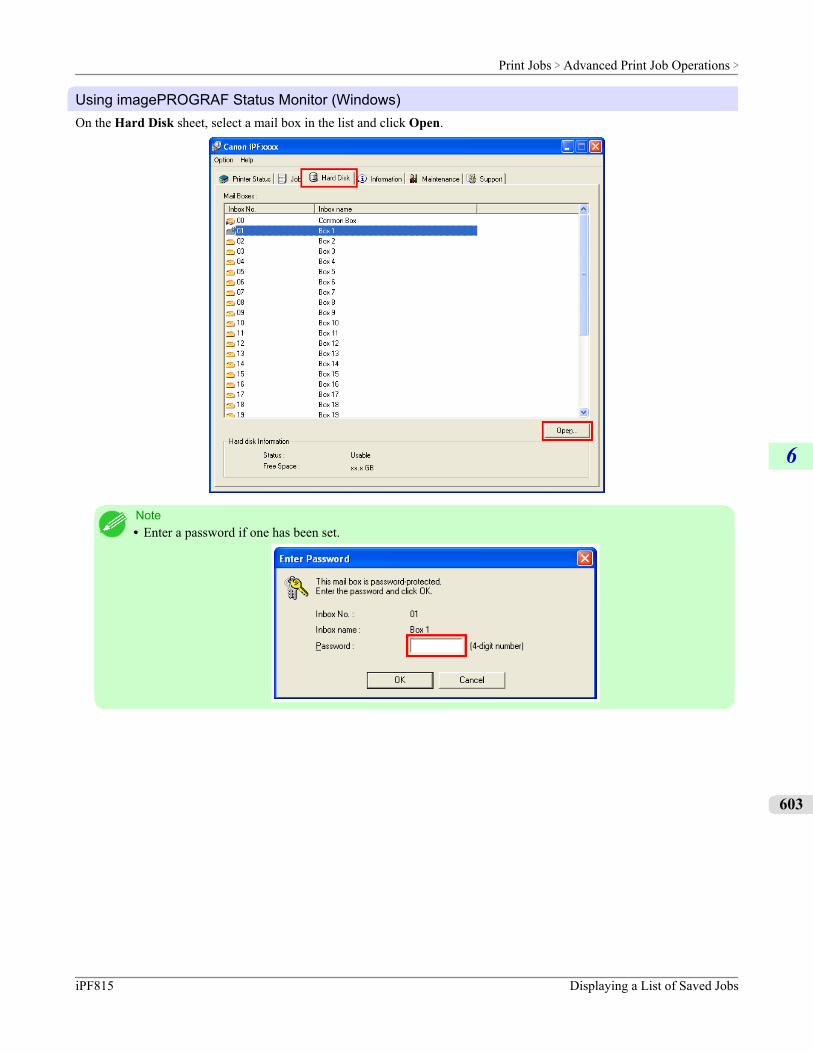
Using imagePROGRAF Status Monitor (Windows)On the Hard Disk sheet, select a mail box in the list and click Open.
Note• Enter a password if one has been set.
Print Jobs > Advanced Print Job Operations >
iPF815 Displaying a List of Saved Jobs
6
603
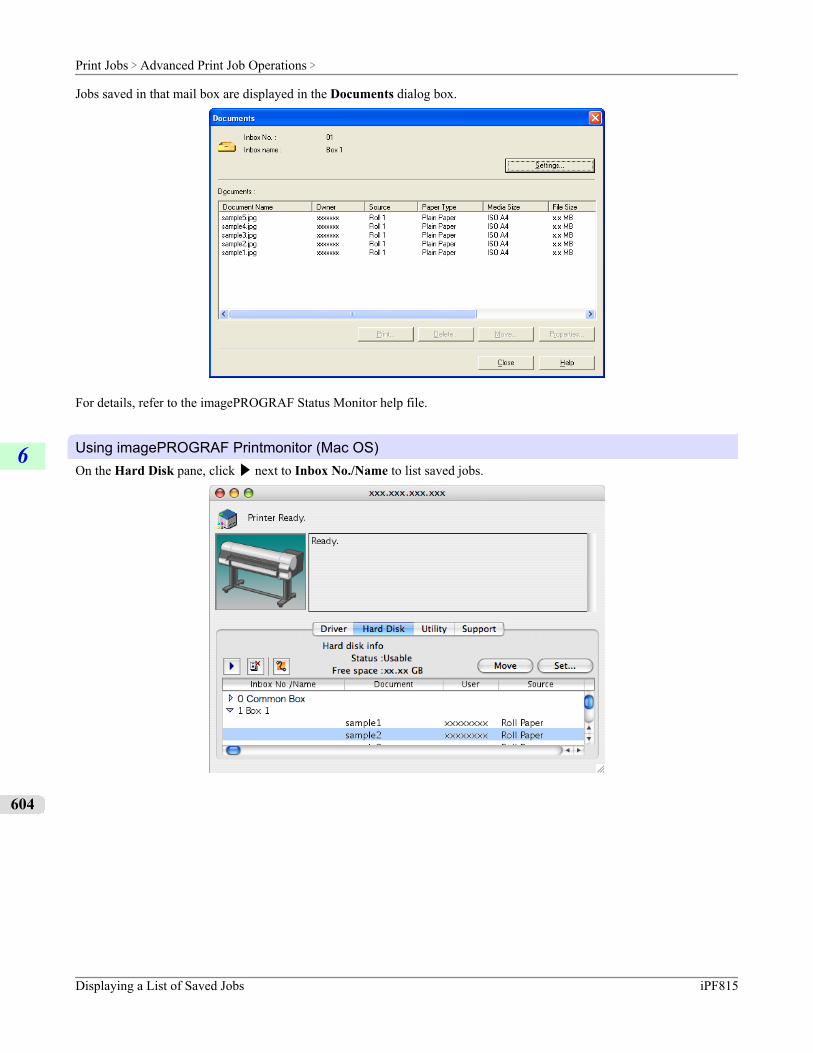
Jobs saved in that mail box are displayed in the Documents dialog box.
For details, refer to the imagePROGRAF Status Monitor help file.
Using imagePROGRAF Printmonitor (Mac OS)On the Hard Disk pane, click ▶ next to Inbox No./Name to list saved jobs.
Print Jobs > Advanced Print Job Operations >
Displaying a List of Saved Jobs iPF815
6
604
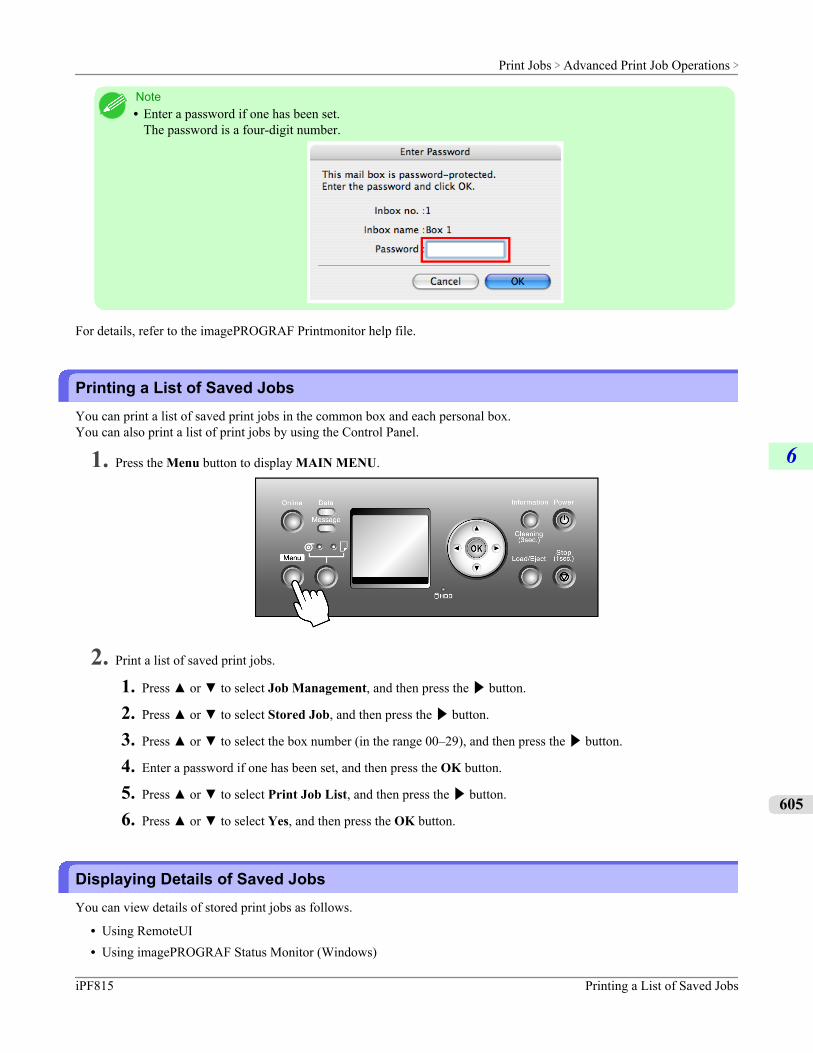
Note• Enter a password if one has been set.
The password is a four-digit number.
For details, refer to the imagePROGRAF Printmonitor help file.
Printing a List of Saved JobsYou can print a list of saved print jobs in the common box and each personal box.You can also print a list of print jobs by using the Control Panel.
1. Press the Menu button to display MAIN MENU.
2. Print a list of saved print jobs.
1. Press ▲ or ▼ to select Job Management, and then press the ▶ button.
2. Press ▲ or ▼ to select Stored Job, and then press the ▶ button.
3. Press ▲ or ▼ to select the box number (in the range 00–29), and then press the ▶ button.
4. Enter a password if one has been set, and then press the OK button.
5. Press ▲ or ▼ to select Print Job List, and then press the ▶ button.
6. Press ▲ or ▼ to select Yes, and then press the OK button.
Displaying Details of Saved JobsYou can view details of stored print jobs as follows.
• Using RemoteUI• Using imagePROGRAF Status Monitor (Windows)
Print Jobs > Advanced Print Job Operations >
iPF815 Printing a List of Saved Jobs
6
605
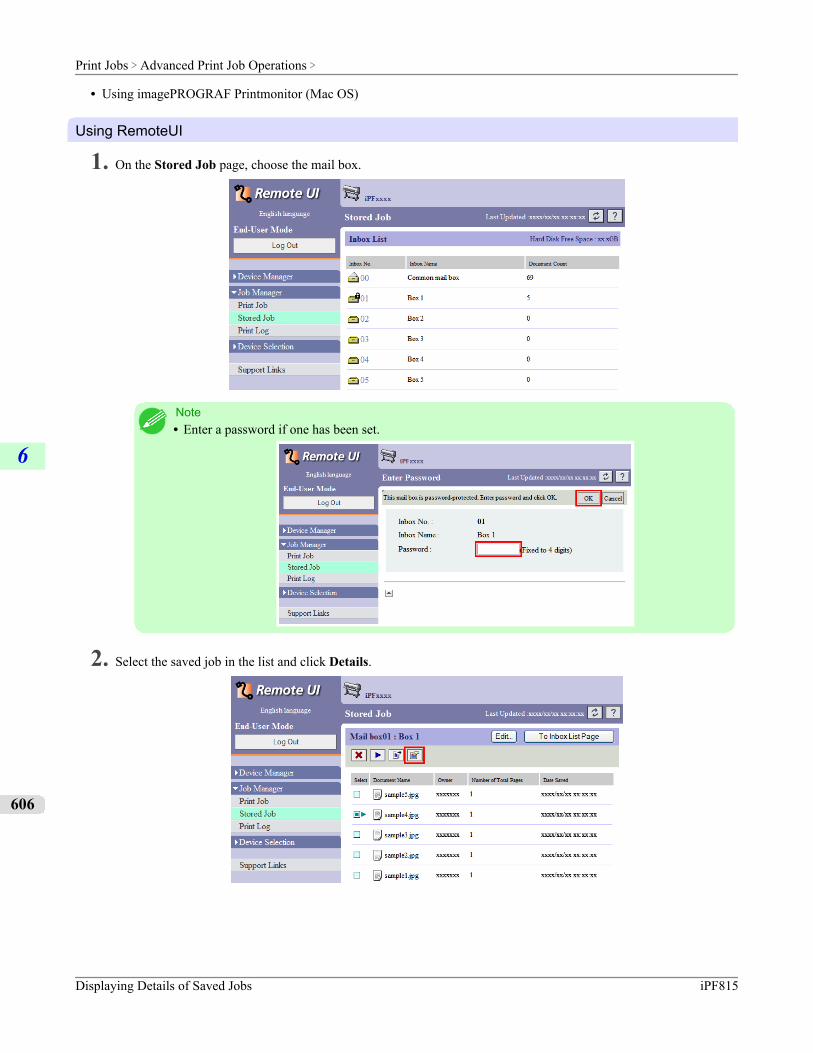
• Using imagePROGRAF Printmonitor (Mac OS)
Using RemoteUI
1. On the Stored Job page, choose the mail box.
Note• Enter a password if one has been set.
2. Select the saved job in the list and click Details.
Print Jobs > Advanced Print Job Operations >
Displaying Details of Saved Jobs iPF815
6
606

The Details of the saved document page is displayed.
For details, refer to the RemoteUI help.
Using imagePROGRAF Status Monitor (Windows)
1. On the Hard Disk sheet, select a mail box in the list and click Open.
Print Jobs > Advanced Print Job Operations >
iPF815 Displaying Details of Saved Jobs
6
607
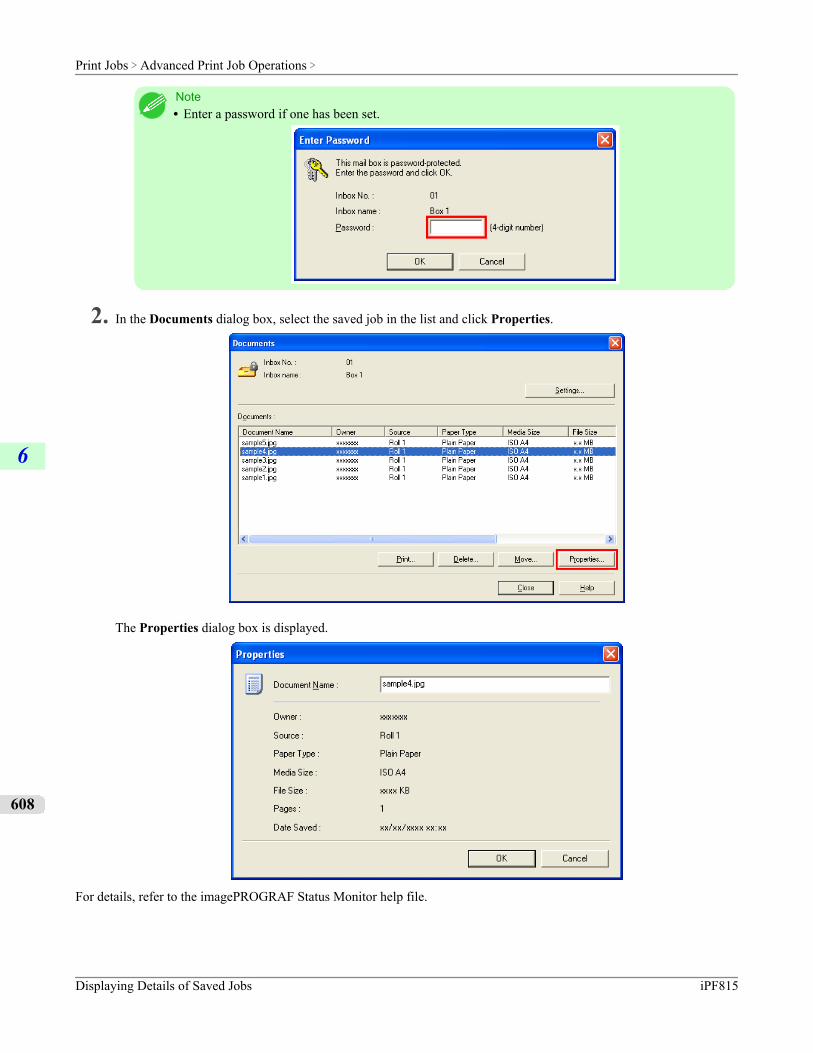
Note• Enter a password if one has been set.
2. In the Documents dialog box, select the saved job in the list and click Properties.
The Properties dialog box is displayed.
For details, refer to the imagePROGRAF Status Monitor help file.
Print Jobs > Advanced Print Job Operations >
Displaying Details of Saved Jobs iPF815
6
608

Using imagePROGRAF Printmonitor (Mac OS)
1. On the Hard Disk pane, click ▶ next to Inbox No./Name to list saved jobs.
Note• Enter a password if one has been set.
The password is a four-digit number.
For details, refer to the imagePROGRAF Printmonitor help file.
Renaming Saved JobsYou can rename stored print jobs as follows.
• Using RemoteUI• Using imagePROGRAF Status Monitor (Windows)• Using imagePROGRAF Printmonitor (Mac OS)
Print Jobs > Advanced Print Job Operations >
iPF815 Renaming Saved Jobs
6
609
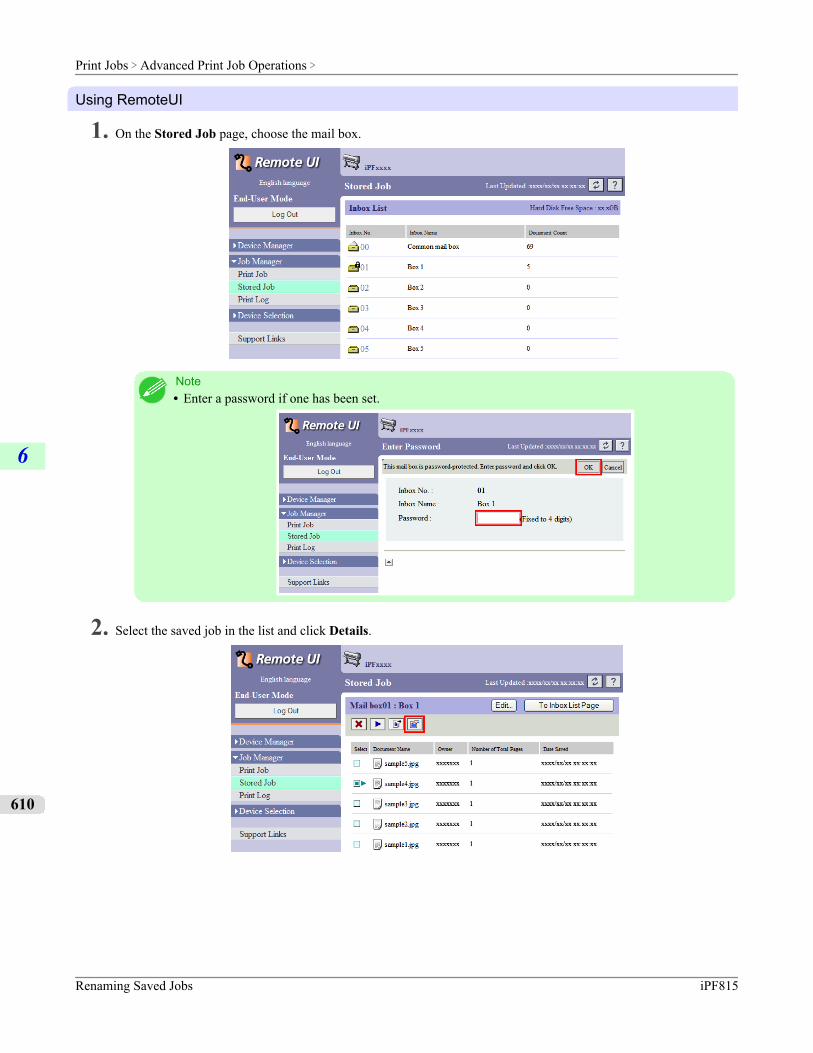
Using RemoteUI
1. On the Stored Job page, choose the mail box.
Note• Enter a password if one has been set.
2. Select the saved job in the list and click Details.
Print Jobs > Advanced Print Job Operations >
Renaming Saved Jobs iPF815
6
610
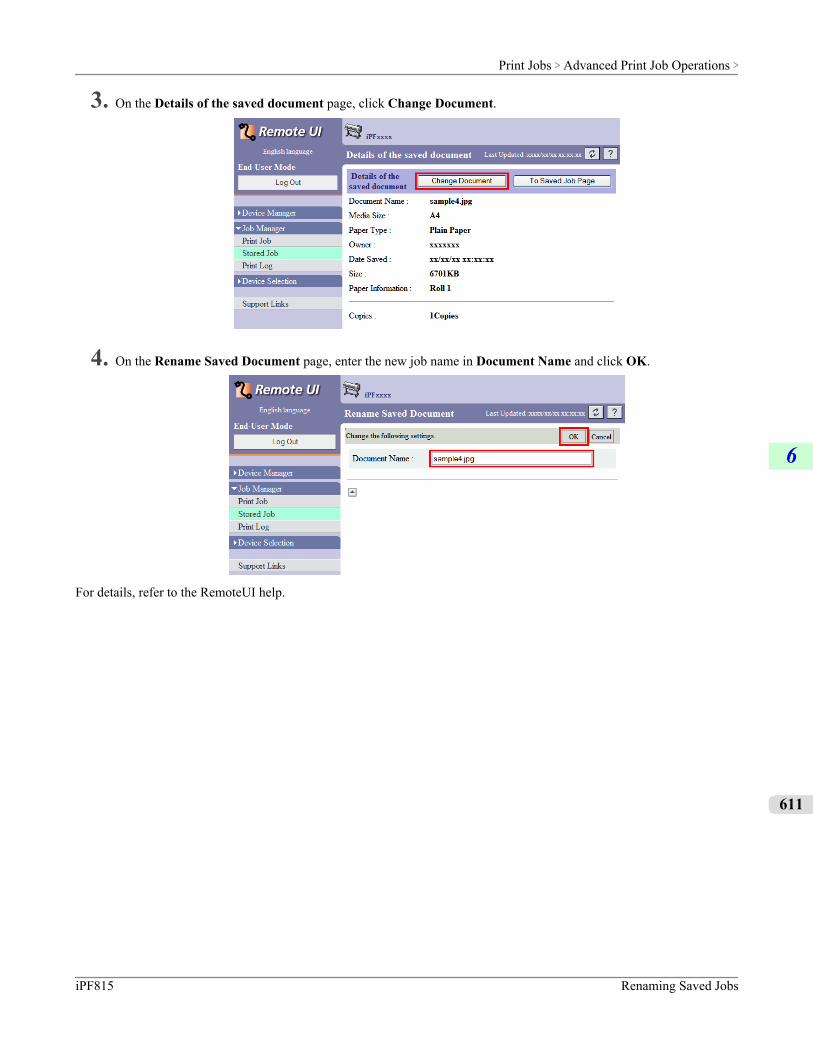
3. On the Details of the saved document page, click Change Document.
4. On the Rename Saved Document page, enter the new job name in Document Name and click OK.
For details, refer to the RemoteUI help.
Print Jobs > Advanced Print Job Operations >
iPF815 Renaming Saved Jobs
6
611

Using imagePROGRAF Status Monitor (Windows)
1. On the Hard Disk sheet, select a mail box in the list and click Open.
Note• Enter a password if one has been set.
Print Jobs > Advanced Print Job Operations >
Renaming Saved Jobs iPF815
6
612
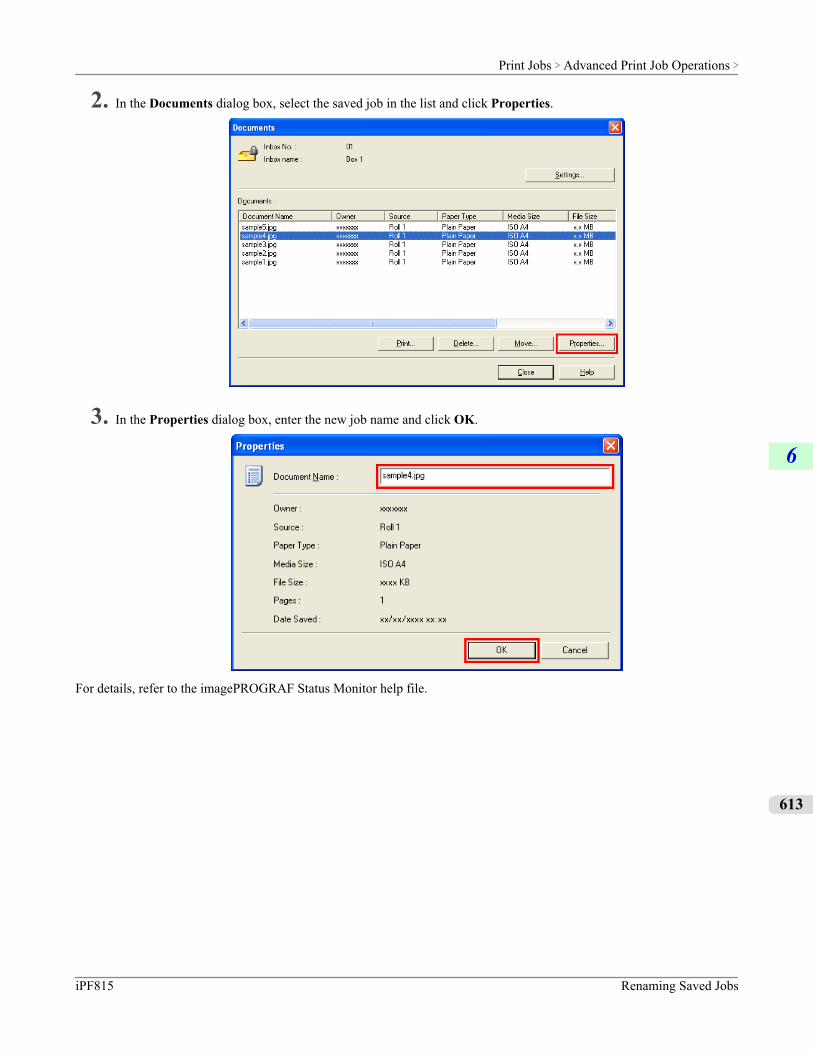
2. In the Documents dialog box, select the saved job in the list and click Properties.
3. In the Properties dialog box, enter the new job name and click OK.
For details, refer to the imagePROGRAF Status Monitor help file.
Print Jobs > Advanced Print Job Operations >
iPF815 Renaming Saved Jobs
6
613
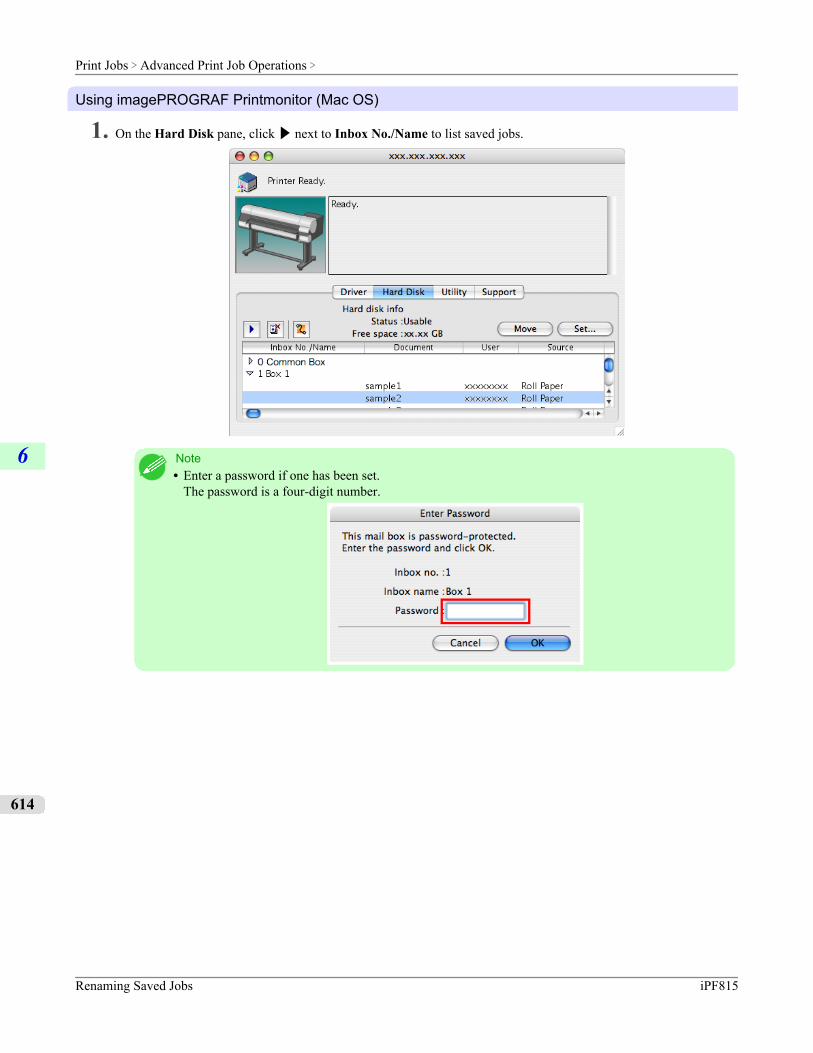
Using imagePROGRAF Printmonitor (Mac OS)
1. On the Hard Disk pane, click ▶ next to Inbox No./Name to list saved jobs.
Note• Enter a password if one has been set.
The password is a four-digit number.
Print Jobs > Advanced Print Job Operations >
Renaming Saved Jobs iPF815
6
614
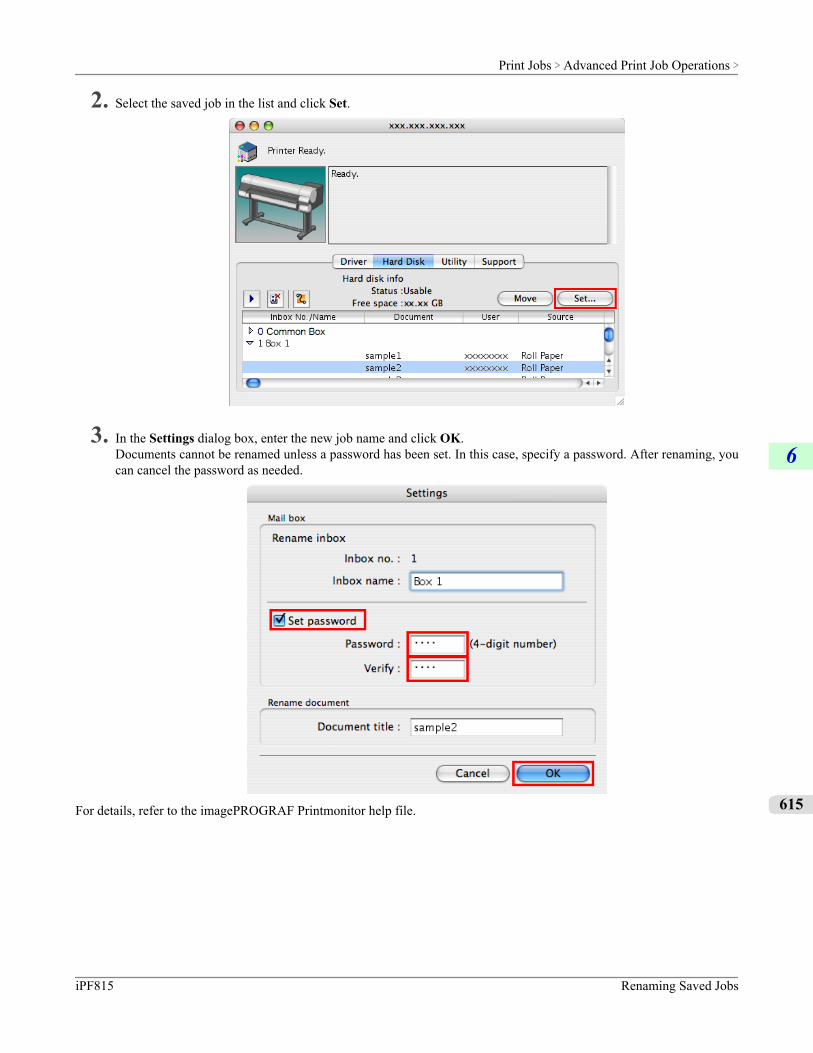
2. Select the saved job in the list and click Set.
3. In the Settings dialog box, enter the new job name and click OK.Documents cannot be renamed unless a password has been set. In this case, specify a password. After renaming, youcan cancel the password as needed.
For details, refer to the imagePROGRAF Printmonitor help file.
Print Jobs > Advanced Print Job Operations >
iPF815 Renaming Saved Jobs
6
615
Handling Paper
Paper 617
Handling rolls 623
Handling sheets 650
Output Stacker 658
Handling Paper >
iPF815
7
616
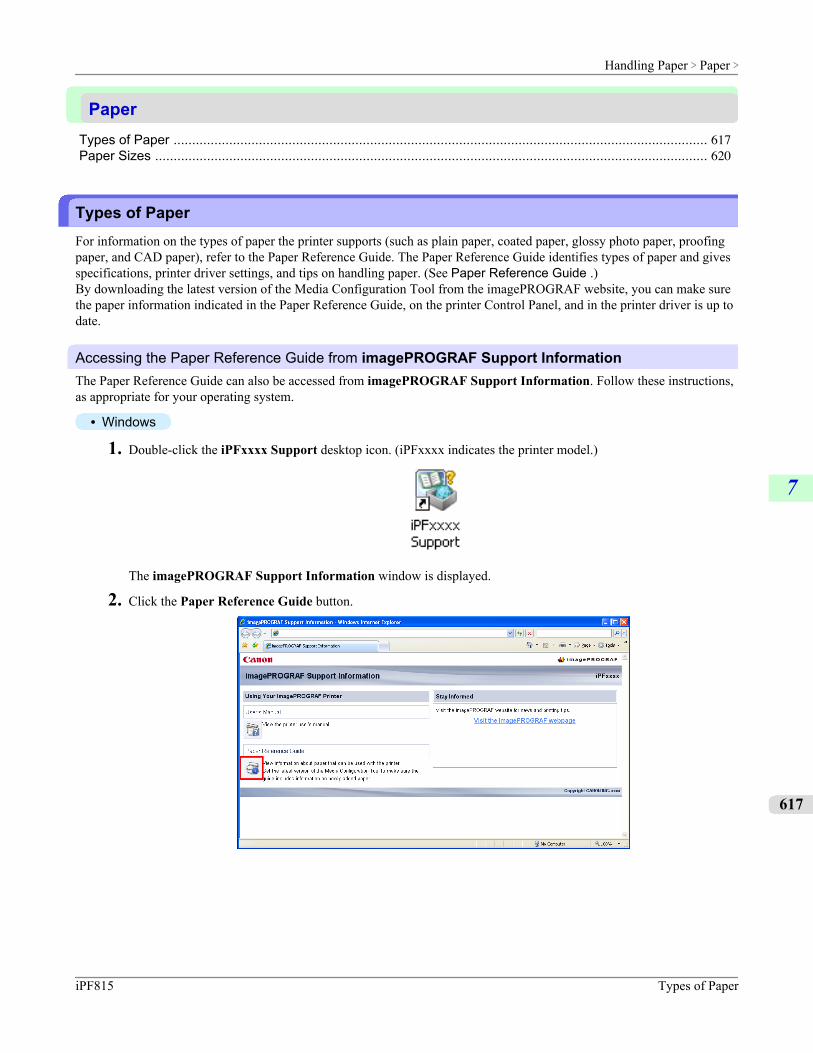
PaperTypes of Paper ................................................................................................................................................ 617Paper Sizes ..................................................................................................................................................... 620
Types of PaperFor information on the types of paper the printer supports (such as plain paper, coated paper, glossy photo paper, proofingpaper, and CAD paper), refer to the Paper Reference Guide. The Paper Reference Guide identifies types of paper and givesspecifications, printer driver settings, and tips on handling paper. (See Paper Reference Guide .)By downloading the latest version of the Media Configuration Tool from the imagePROGRAF website, you can make surethe paper information indicated in the Paper Reference Guide, on the printer Control Panel, and in the printer driver is up todate.
Accessing the Paper Reference Guide from imagePROGRAF Support InformationThe Paper Reference Guide can also be accessed from imagePROGRAF Support Information. Follow these instructions,as appropriate for your operating system.
• Windows
1. Double-click the iPFxxxx Support desktop icon. (iPFxxxx indicates the printer model.)
The imagePROGRAF Support Information window is displayed.
2. Click the Paper Reference Guide button.
Handling Paper > Paper >
iPF815 Types of Paper
7
617
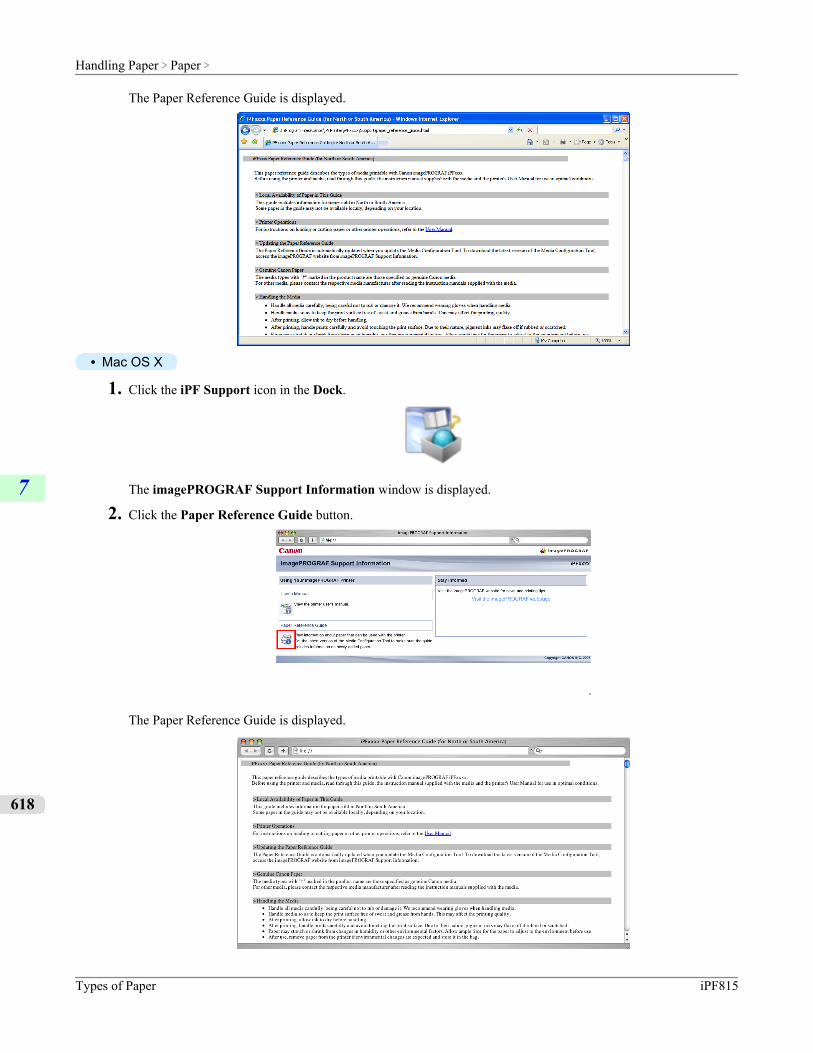
The Paper Reference Guide is displayed.
• Mac OS X
1. Click the iPF Support icon in the Dock.
The imagePROGRAF Support Information window is displayed.
2. Click the Paper Reference Guide button.
The Paper Reference Guide is displayed.
Handling Paper > Paper >
Types of Paper iPF815
7
618
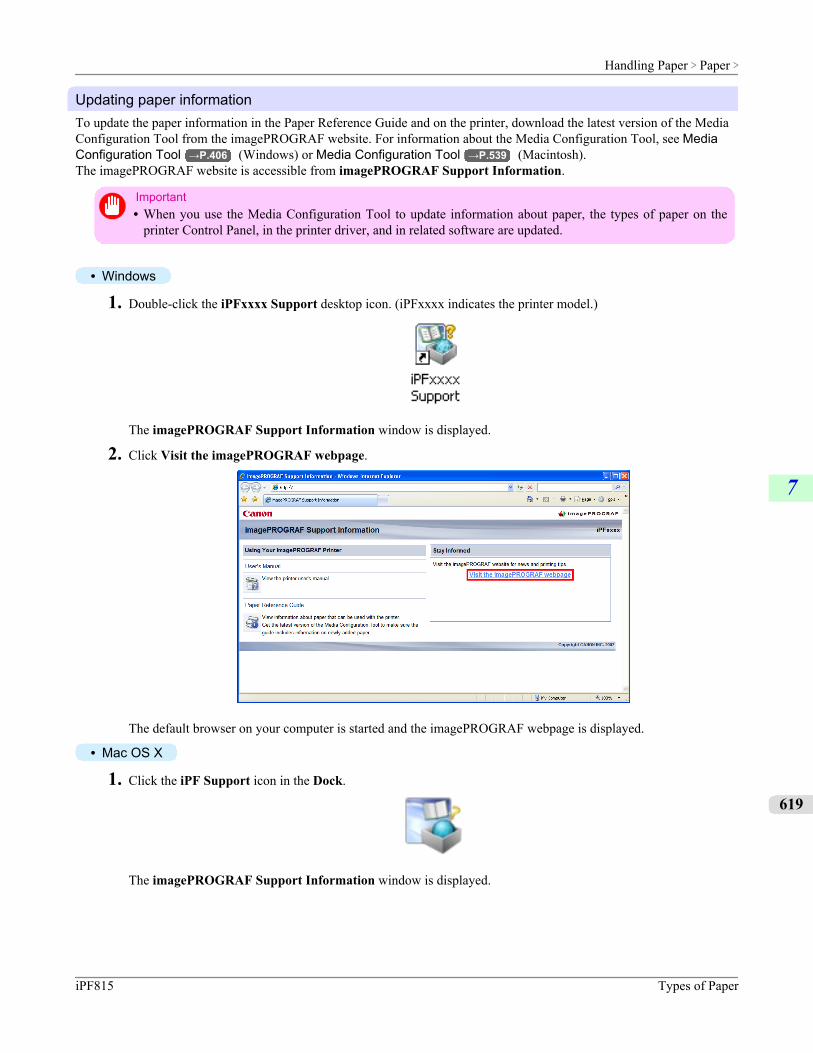
Updating paper informationTo update the paper information in the Paper Reference Guide and on the printer, download the latest version of the MediaConfiguration Tool from the imagePROGRAF website. For information about the Media Configuration Tool, see MediaConfiguration Tool →P.406 (Windows) or Media Configuration Tool →P.539 (Macintosh).The imagePROGRAF website is accessible from imagePROGRAF Support Information.
Important• When you use the Media Configuration Tool to update information about paper, the types of paper on the
printer Control Panel, in the printer driver, and in related software are updated.
• Windows
1. Double-click the iPFxxxx Support desktop icon. (iPFxxxx indicates the printer model.)
The imagePROGRAF Support Information window is displayed.
2. Click Visit the imagePROGRAF webpage.
The default browser on your computer is started and the imagePROGRAF webpage is displayed.
• Mac OS X
1. Click the iPF Support icon in the Dock.
The imagePROGRAF Support Information window is displayed.
Handling Paper > Paper >
iPF815 Types of Paper
7
619
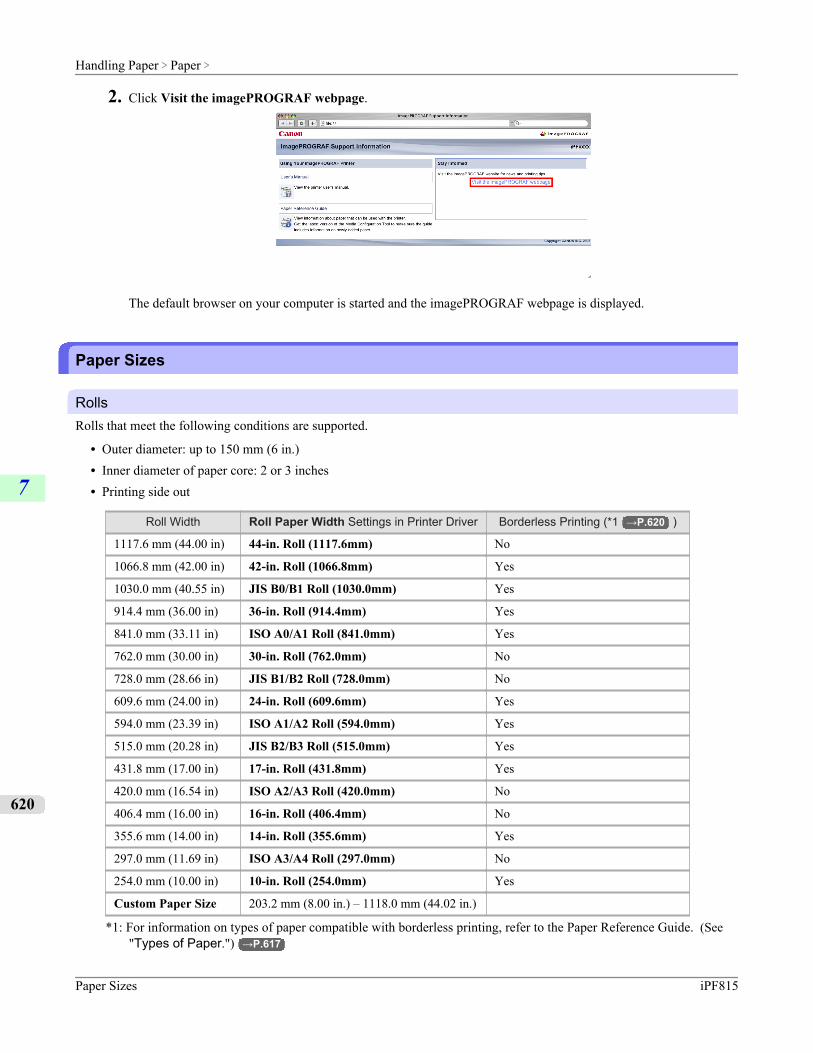
2. Click Visit the imagePROGRAF webpage.
The default browser on your computer is started and the imagePROGRAF webpage is displayed.
Paper Sizes
RollsRolls that meet the following conditions are supported.
• Outer diameter: up to 150 mm (6 in.)• Inner diameter of paper core: 2 or 3 inches• Printing side out
Roll Width Roll Paper Width Settings in Printer Driver Borderless Printing (*1 →P.620 )
1117.6 mm (44.00 in) 44-in. Roll (1117.6mm) No
1066.8 mm (42.00 in) 42-in. Roll (1066.8mm) Yes
1030.0 mm (40.55 in) JIS B0/B1 Roll (1030.0mm) Yes
914.4 mm (36.00 in) 36-in. Roll (914.4mm) Yes
841.0 mm (33.11 in) ISO A0/A1 Roll (841.0mm) Yes
762.0 mm (30.00 in) 30-in. Roll (762.0mm) No
728.0 mm (28.66 in) JIS B1/B2 Roll (728.0mm) No
609.6 mm (24.00 in) 24-in. Roll (609.6mm) Yes
594.0 mm (23.39 in) ISO A1/A2 Roll (594.0mm) Yes
515.0 mm (20.28 in) JIS B2/B3 Roll (515.0mm) Yes
431.8 mm (17.00 in) 17-in. Roll (431.8mm) Yes
420.0 mm (16.54 in) ISO A2/A3 Roll (420.0mm) No
406.4 mm (16.00 in) 16-in. Roll (406.4mm) No
355.6 mm (14.00 in) 14-in. Roll (355.6mm) Yes
297.0 mm (11.69 in) ISO A3/A4 Roll (297.0mm) No
254.0 mm (10.00 in) 10-in. Roll (254.0mm) Yes
Custom Paper Size 203.2 mm (8.00 in.) – 1118.0 mm (44.02 in.)
*1: For information on types of paper compatible with borderless printing, refer to the Paper Reference Guide. (See"Types of Paper.") →P.617
Handling Paper > Paper >
Paper Sizes iPF815
7
620
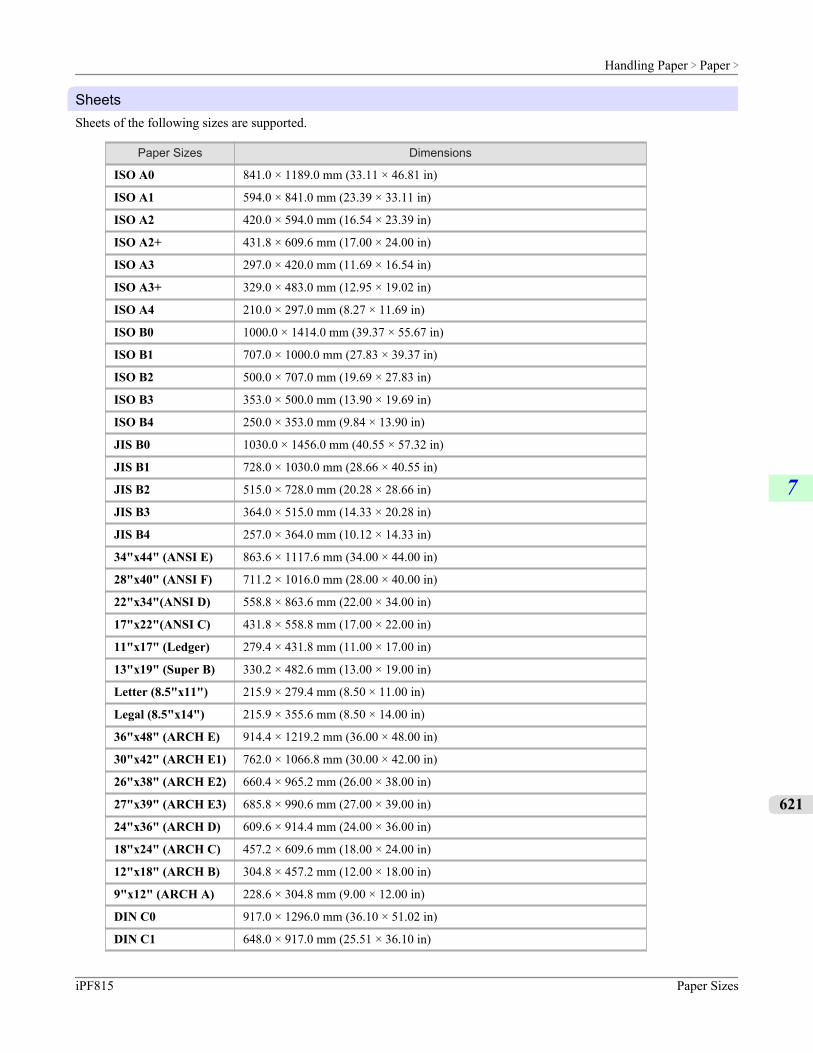
SheetsSheets of the following sizes are supported.
Paper Sizes Dimensions
ISO A0 841.0 × 1189.0 mm (33.11 × 46.81 in)
ISO A1 594.0 × 841.0 mm (23.39 × 33.11 in)
ISO A2 420.0 × 594.0 mm (16.54 × 23.39 in)
ISO A2+ 431.8 × 609.6 mm (17.00 × 24.00 in)
ISO A3 297.0 × 420.0 mm (11.69 × 16.54 in)
ISO A3+ 329.0 × 483.0 mm (12.95 × 19.02 in)
ISO A4 210.0 × 297.0 mm (8.27 × 11.69 in)
ISO B0 1000.0 × 1414.0 mm (39.37 × 55.67 in)
ISO B1 707.0 × 1000.0 mm (27.83 × 39.37 in)
ISO B2 500.0 × 707.0 mm (19.69 × 27.83 in)
ISO B3 353.0 × 500.0 mm (13.90 × 19.69 in)
ISO B4 250.0 × 353.0 mm (9.84 × 13.90 in)
JIS B0 1030.0 × 1456.0 mm (40.55 × 57.32 in)
JIS B1 728.0 × 1030.0 mm (28.66 × 40.55 in)
JIS B2 515.0 × 728.0 mm (20.28 × 28.66 in)
JIS B3 364.0 × 515.0 mm (14.33 × 20.28 in)
JIS B4 257.0 × 364.0 mm (10.12 × 14.33 in)
34"x44" (ANSI E) 863.6 × 1117.6 mm (34.00 × 44.00 in)
28"x40" (ANSI F) 711.2 × 1016.0 mm (28.00 × 40.00 in)
22"x34"(ANSI D) 558.8 × 863.6 mm (22.00 × 34.00 in)
17"x22"(ANSI C) 431.8 × 558.8 mm (17.00 × 22.00 in)
11"x17" (Ledger) 279.4 × 431.8 mm (11.00 × 17.00 in)
13"x19" (Super B) 330.2 × 482.6 mm (13.00 × 19.00 in)
Letter (8.5"x11") 215.9 × 279.4 mm (8.50 × 11.00 in)
Legal (8.5"x14") 215.9 × 355.6 mm (8.50 × 14.00 in)
36"x48" (ARCH E) 914.4 × 1219.2 mm (36.00 × 48.00 in)
30"x42" (ARCH E1) 762.0 × 1066.8 mm (30.00 × 42.00 in)
26"x38" (ARCH E2) 660.4 × 965.2 mm (26.00 × 38.00 in)
27"x39" (ARCH E3) 685.8 × 990.6 mm (27.00 × 39.00 in)
24"x36" (ARCH D) 609.6 × 914.4 mm (24.00 × 36.00 in)
18"x24" (ARCH C) 457.2 × 609.6 mm (18.00 × 24.00 in)
12"x18" (ARCH B) 304.8 × 457.2 mm (12.00 × 18.00 in)
9"x12" (ARCH A) 228.6 × 304.8 mm (9.00 × 12.00 in)
DIN C0 917.0 × 1296.0 mm (36.10 × 51.02 in)
DIN C1 648.0 × 917.0 mm (25.51 × 36.10 in)
Handling Paper > Paper >
iPF815 Paper Sizes
7
621
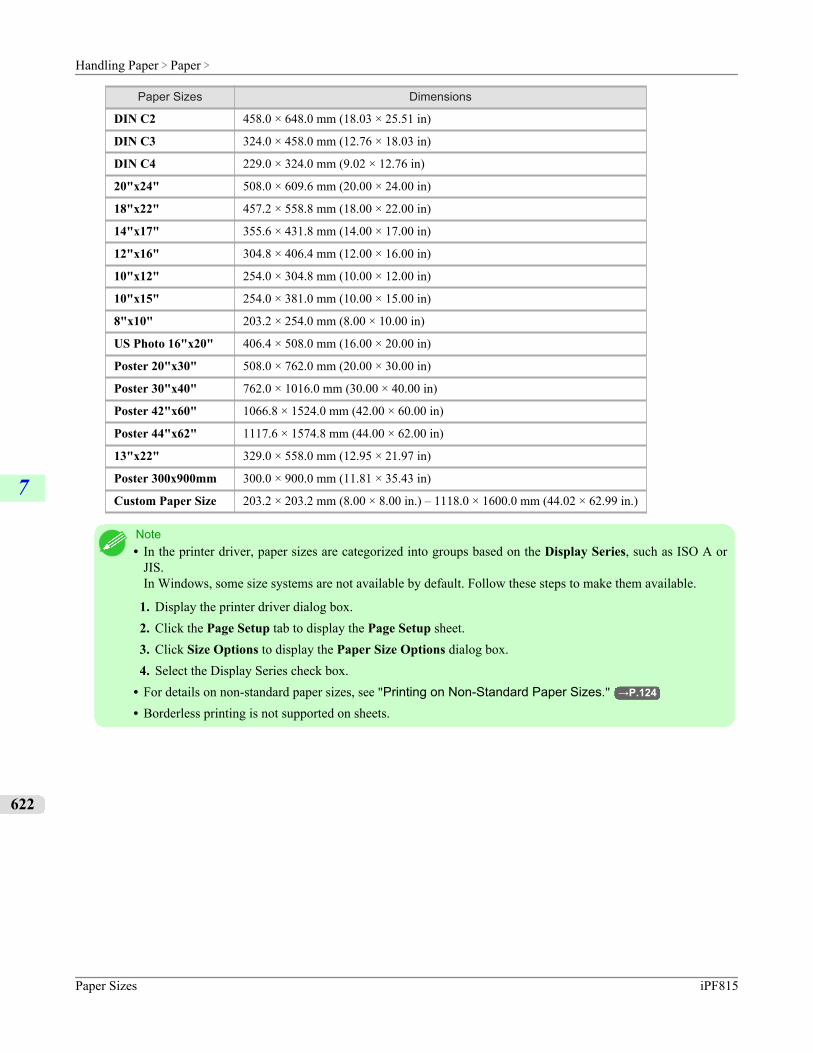
Paper Sizes Dimensions
DIN C2 458.0 × 648.0 mm (18.03 × 25.51 in)
DIN C3 324.0 × 458.0 mm (12.76 × 18.03 in)
DIN C4 229.0 × 324.0 mm (9.02 × 12.76 in)
20"x24" 508.0 × 609.6 mm (20.00 × 24.00 in)
18"x22" 457.2 × 558.8 mm (18.00 × 22.00 in)
14"x17" 355.6 × 431.8 mm (14.00 × 17.00 in)
12"x16" 304.8 × 406.4 mm (12.00 × 16.00 in)
10"x12" 254.0 × 304.8 mm (10.00 × 12.00 in)
10"x15" 254.0 × 381.0 mm (10.00 × 15.00 in)
8"x10" 203.2 × 254.0 mm (8.00 × 10.00 in)
US Photo 16"x20" 406.4 × 508.0 mm (16.00 × 20.00 in)
Poster 20"x30" 508.0 × 762.0 mm (20.00 × 30.00 in)
Poster 30"x40" 762.0 × 1016.0 mm (30.00 × 40.00 in)
Poster 42"x60" 1066.8 × 1524.0 mm (42.00 × 60.00 in)
Poster 44"x62" 1117.6 × 1574.8 mm (44.00 × 62.00 in)
13"x22" 329.0 × 558.0 mm (12.95 × 21.97 in)
Poster 300x900mm 300.0 × 900.0 mm (11.81 × 35.43 in)
Custom Paper Size 203.2 × 203.2 mm (8.00 × 8.00 in.) – 1118.0 × 1600.0 mm (44.02 × 62.99 in.)
Note• In the printer driver, paper sizes are categorized into groups based on the Display Series, such as ISO A or
JIS.In Windows, some size systems are not available by default. Follow these steps to make them available.
1. Display the printer driver dialog box.2. Click the Page Setup tab to display the Page Setup sheet.3. Click Size Options to display the Paper Size Options dialog box.4. Select the Display Series check box.
• For details on non-standard paper sizes, see "Printing on Non-Standard Paper Sizes." →P.124
• Borderless printing is not supported on sheets.
Handling Paper > Paper >
Paper Sizes iPF815
7
622
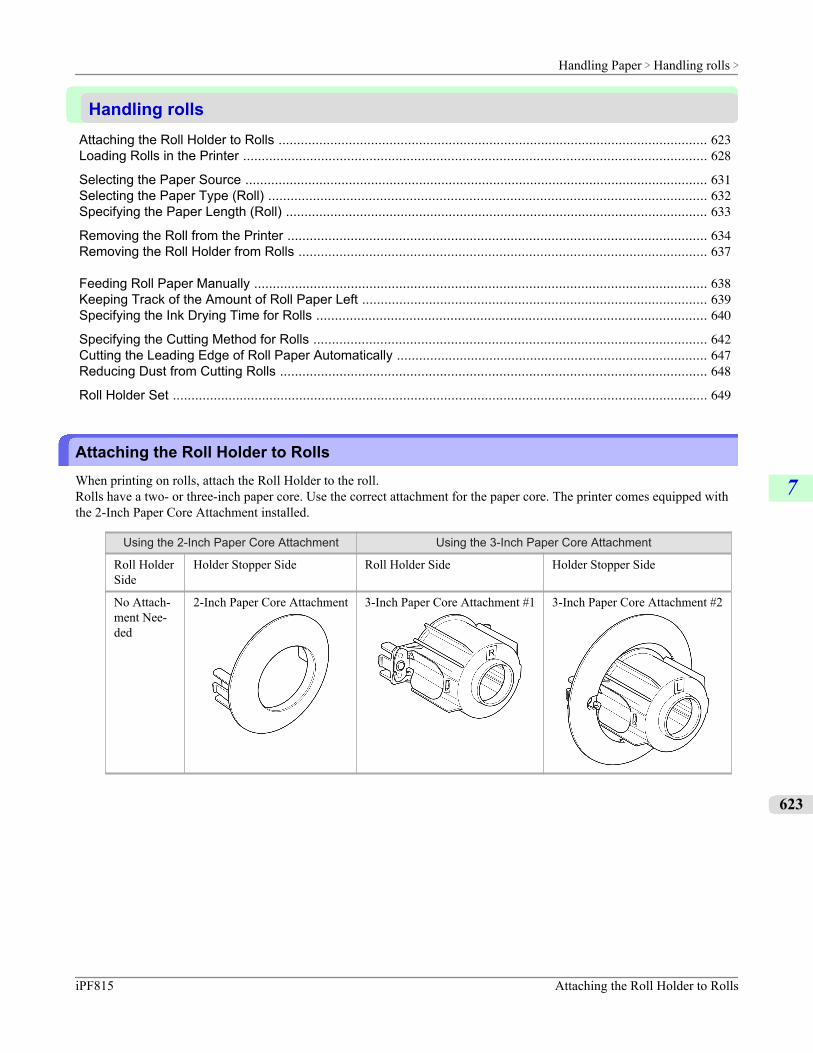
Handling rollsAttaching the Roll Holder to Rolls .................................................................................................................... 623Loading Rolls in the Printer ............................................................................................................................. 628
Selecting the Paper Source ............................................................................................................................. 631Selecting the Paper Type (Roll) ...................................................................................................................... 632Specifying the Paper Length (Roll) .................................................................................................................. 633
Removing the Roll from the Printer ................................................................................................................. 634Removing the Roll Holder from Rolls .............................................................................................................. 637
Feeding Roll Paper Manually .......................................................................................................................... 638Keeping Track of the Amount of Roll Paper Left ............................................................................................. 639Specifying the Ink Drying Time for Rolls ......................................................................................................... 640
Specifying the Cutting Method for Rolls .......................................................................................................... 642Cutting the Leading Edge of Roll Paper Automatically .................................................................................... 647Reducing Dust from Cutting Rolls ................................................................................................................... 648
Roll Holder Set ................................................................................................................................................ 649
Attaching the Roll Holder to RollsWhen printing on rolls, attach the Roll Holder to the roll.Rolls have a two- or three-inch paper core. Use the correct attachment for the paper core. The printer comes equipped withthe 2-Inch Paper Core Attachment installed.
Using the 2-Inch Paper Core Attachment Using the 3-Inch Paper Core Attachment
Roll HolderSide
Holder Stopper Side Roll Holder Side Holder Stopper Side
No Attach-ment Nee-ded
2-Inch Paper Core Attachment 3-Inch Paper Core Attachment #1 3-Inch Paper Core Attachment #2
Handling Paper > Handling rolls >
iPF815 Attaching the Roll Holder to Rolls
7
623
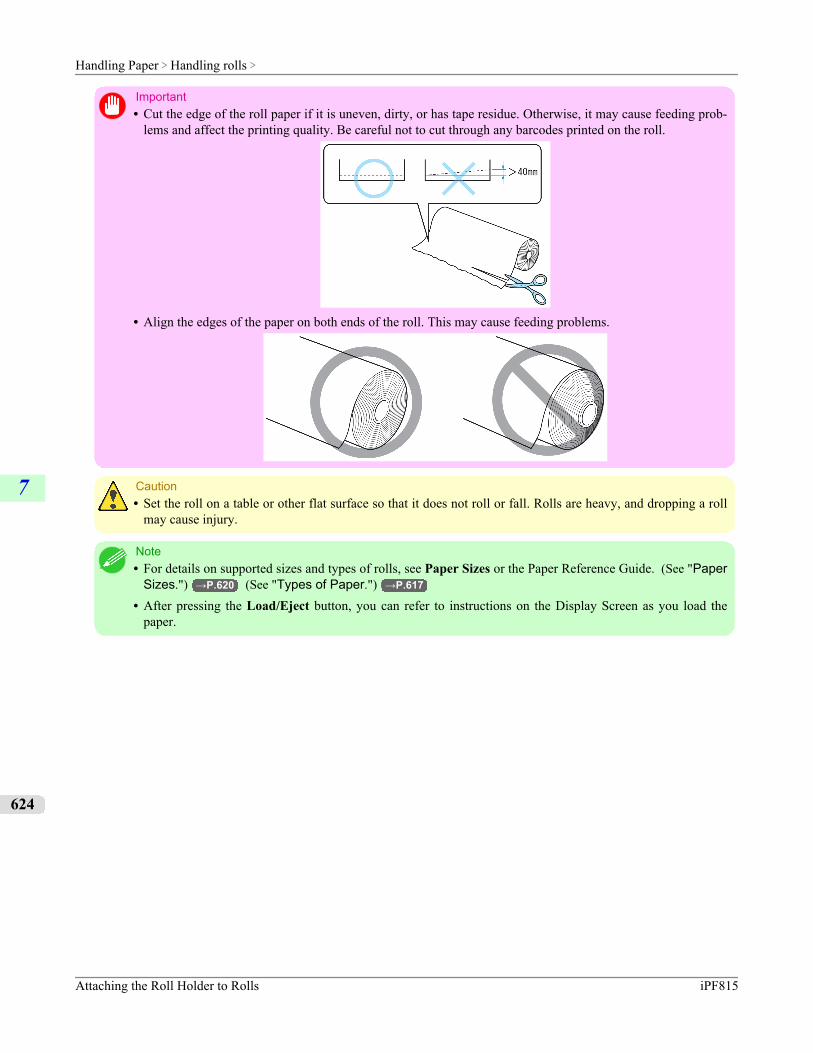
Important• Cut the edge of the roll paper if it is uneven, dirty, or has tape residue. Otherwise, it may cause feeding prob-
lems and affect the printing quality. Be careful not to cut through any barcodes printed on the roll.
• Align the edges of the paper on both ends of the roll. This may cause feeding problems.
Caution• Set the roll on a table or other flat surface so that it does not roll or fall. Rolls are heavy, and dropping a roll
may cause injury.
Note• For details on supported sizes and types of rolls, see Paper Sizes or the Paper Reference Guide. (See "Paper
Sizes.") →P.620 (See "Types of Paper.") →P.617
• After pressing the Load/Eject button, you can refer to instructions on the Display Screen as you load thepaper.
Handling Paper > Handling rolls >
Attaching the Roll Holder to Rolls iPF815
7
624
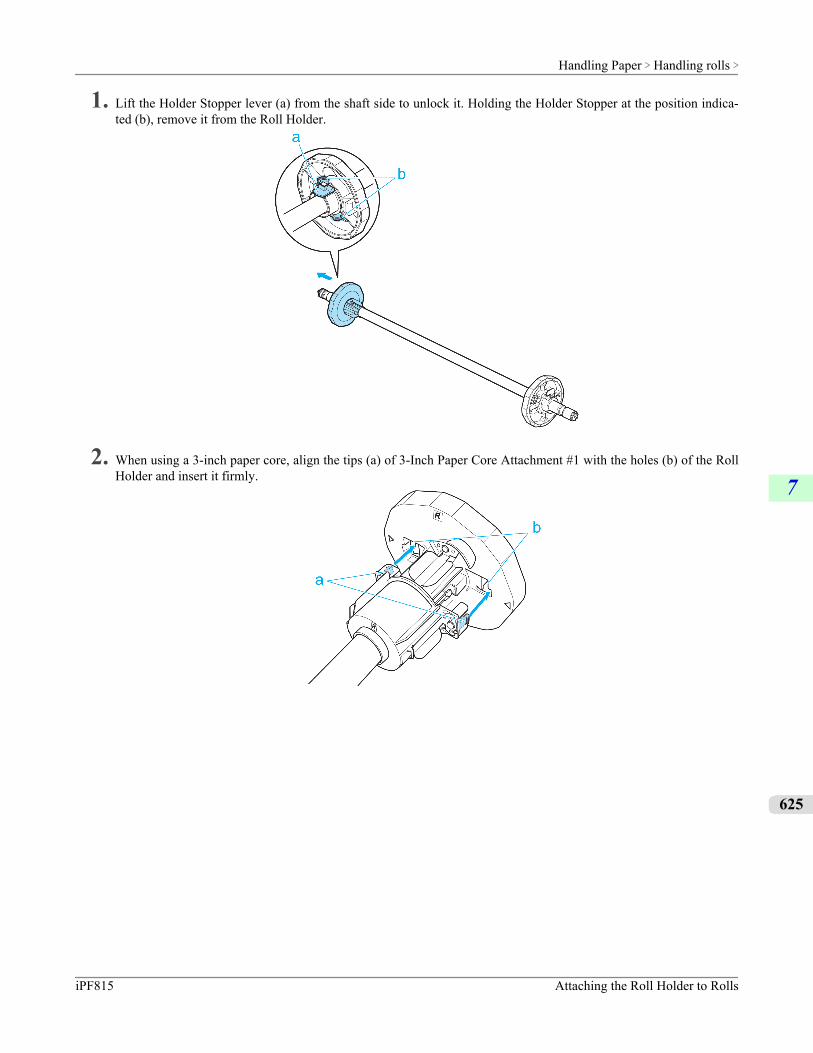
1. Lift the Holder Stopper lever (a) from the shaft side to unlock it. Holding the Holder Stopper at the position indica-ted (b), remove it from the Roll Holder.
2. When using a 3-inch paper core, align the tips (a) of 3-Inch Paper Core Attachment #1 with the holes (b) of the RollHolder and insert it firmly.
Handling Paper > Handling rolls >
iPF815 Attaching the Roll Holder to Rolls
7
625
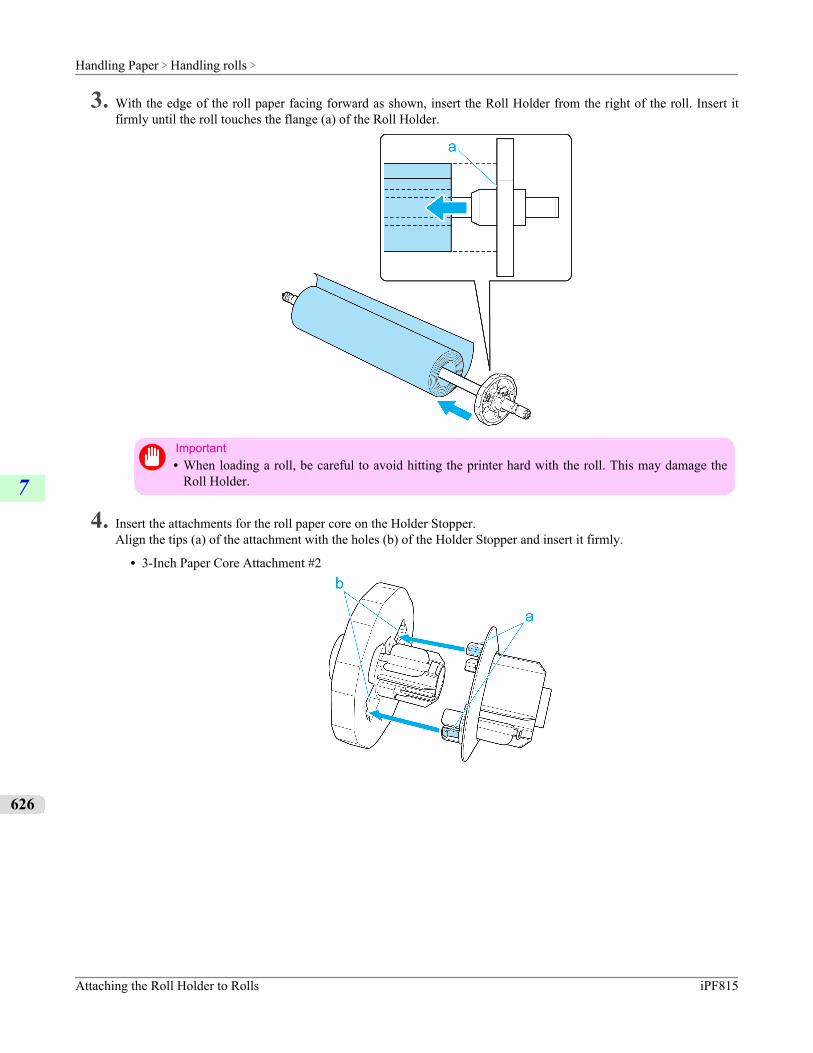
3. With the edge of the roll paper facing forward as shown, insert the Roll Holder from the right of the roll. Insert itfirmly until the roll touches the flange (a) of the Roll Holder.
Important• When loading a roll, be careful to avoid hitting the printer hard with the roll. This may damage the
Roll Holder.
4. Insert the attachments for the roll paper core on the Holder Stopper.Align the tips (a) of the attachment with the holes (b) of the Holder Stopper and insert it firmly.
• 3-Inch Paper Core Attachment #2
Handling Paper > Handling rolls >
Attaching the Roll Holder to Rolls iPF815
7
626
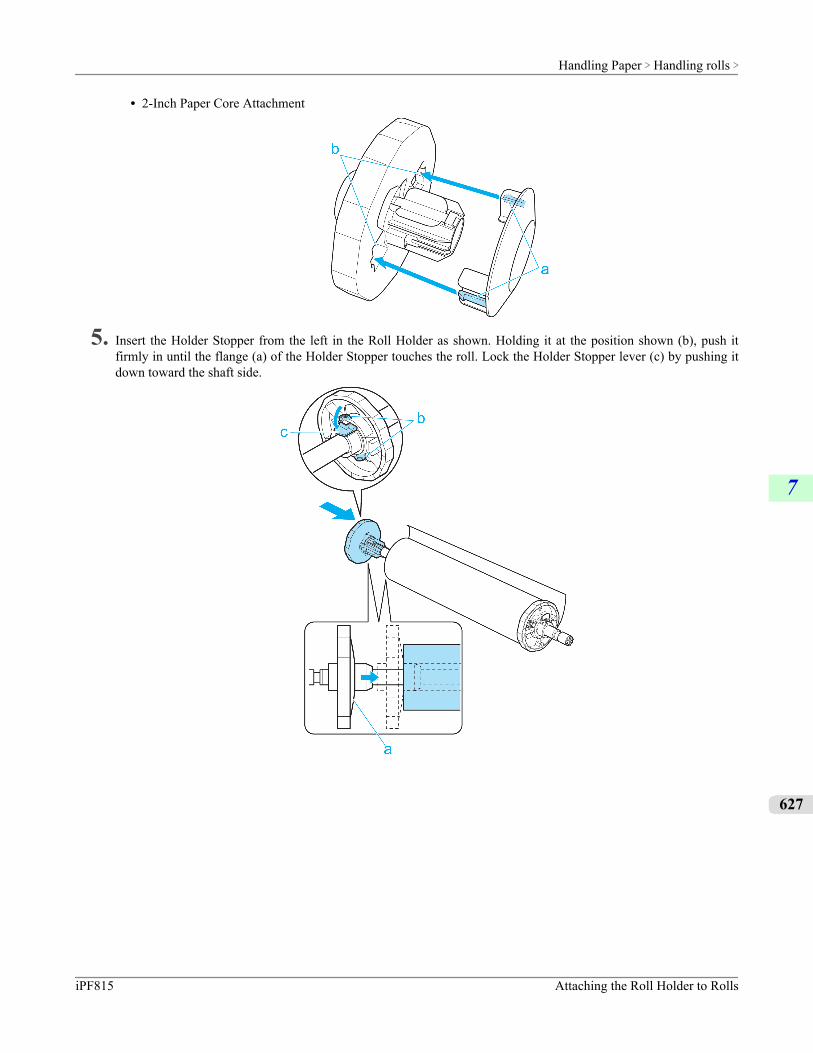
• 2-Inch Paper Core Attachment
5. Insert the Holder Stopper from the left in the Roll Holder as shown. Holding it at the position shown (b), push itfirmly in until the flange (a) of the Holder Stopper touches the roll. Lock the Holder Stopper lever (c) by pushing itdown toward the shaft side.
Handling Paper > Handling rolls >
iPF815 Attaching the Roll Holder to Rolls
7
627
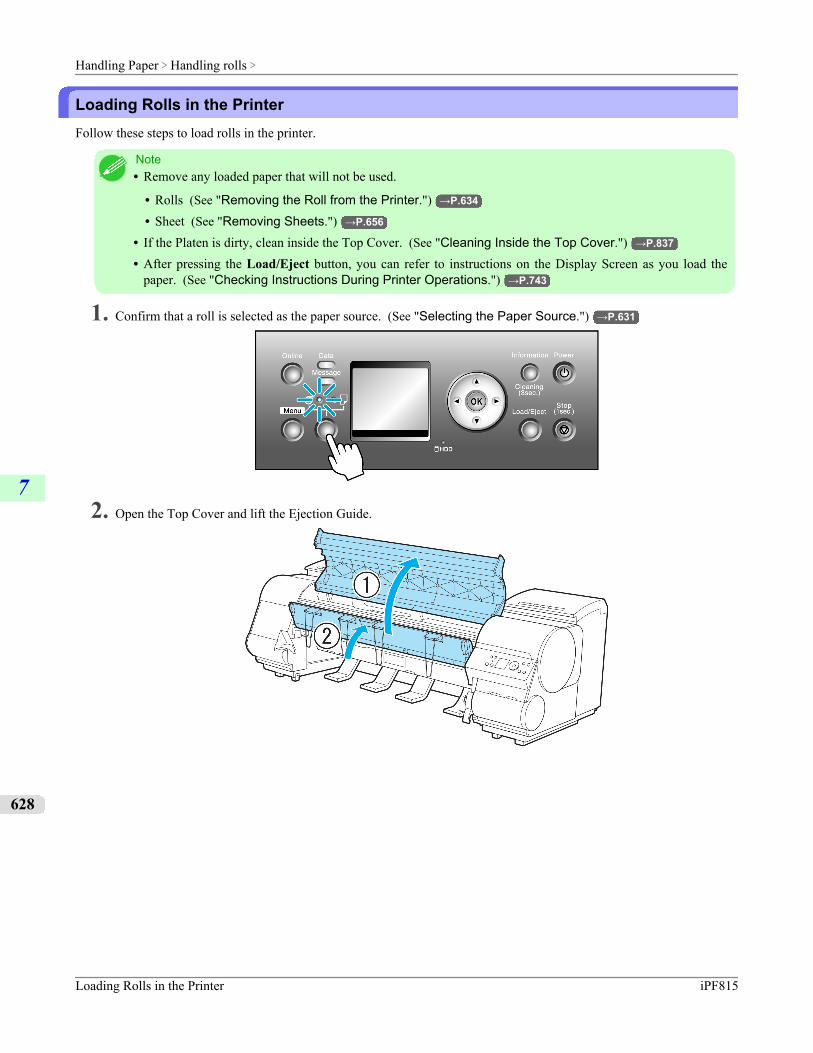
Loading Rolls in the PrinterFollow these steps to load rolls in the printer.
Note• Remove any loaded paper that will not be used.
• Rolls (See "Removing the Roll from the Printer.") →P.634
• Sheet (See "Removing Sheets.") →P.656
• If the Platen is dirty, clean inside the Top Cover. (See "Cleaning Inside the Top Cover.") →P.837
• After pressing the Load/Eject button, you can refer to instructions on the Display Screen as you load thepaper. (See "Checking Instructions During Printer Operations.") →P.743
1. Confirm that a roll is selected as the paper source. (See "Selecting the Paper Source.") →P.631
2. Open the Top Cover and lift the Ejection Guide.
Handling Paper > Handling rolls >
Loading Rolls in the Printer iPF815
7
628
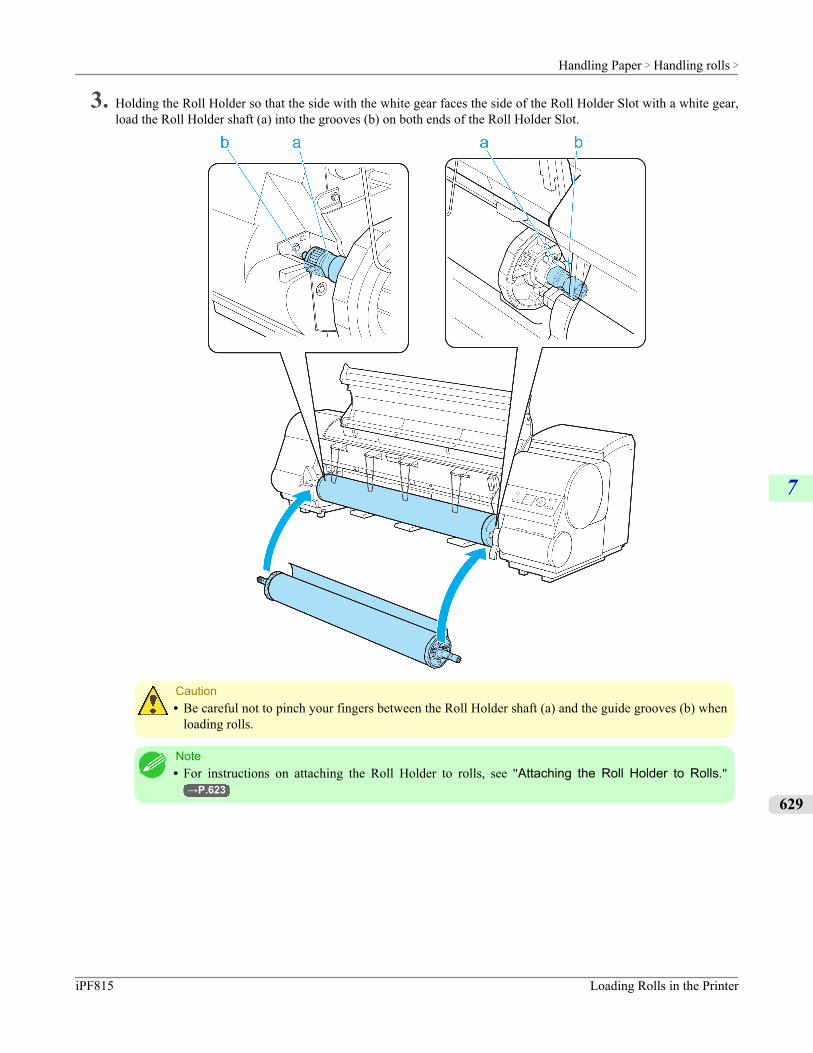
3. Holding the Roll Holder so that the side with the white gear faces the side of the Roll Holder Slot with a white gear,load the Roll Holder shaft (a) into the grooves (b) on both ends of the Roll Holder Slot.
Caution• Be careful not to pinch your fingers between the Roll Holder shaft (a) and the guide grooves (b) when
loading rolls.
Note• For instructions on attaching the Roll Holder to rolls, see "Attaching the Roll Holder to Rolls."
→P.623
Handling Paper > Handling rolls >
iPF815 Loading Rolls in the Printer
7
629
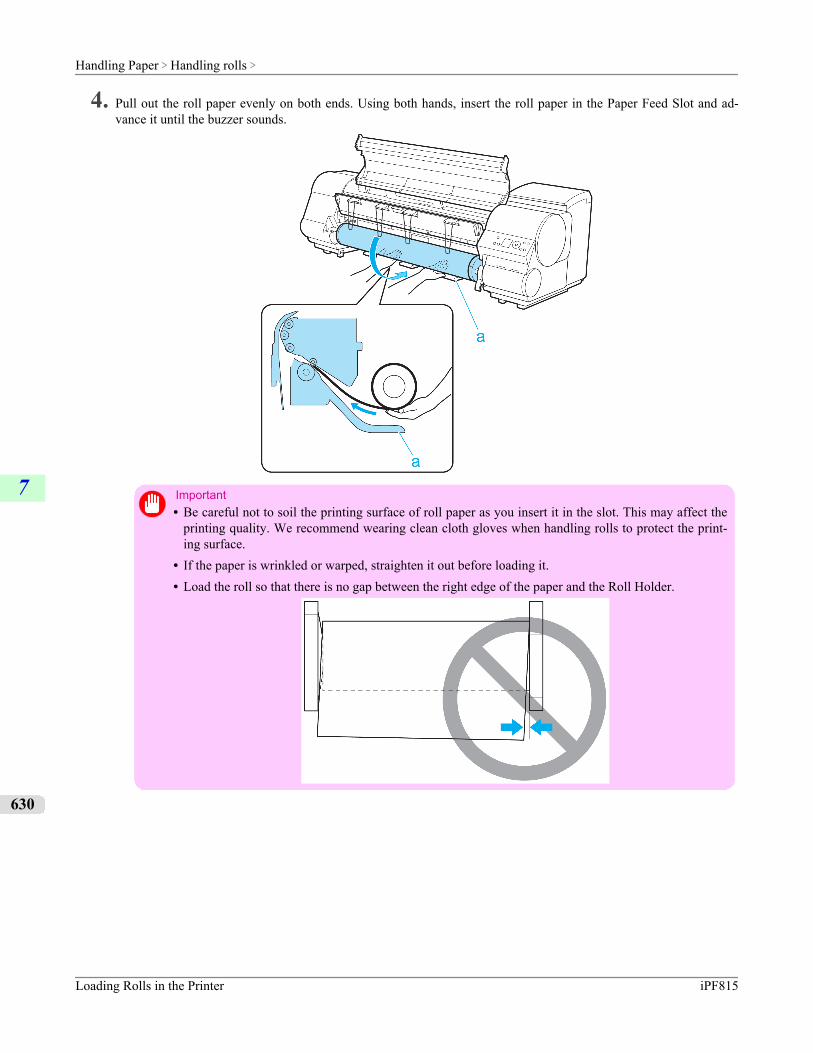
4. Pull out the roll paper evenly on both ends. Using both hands, insert the roll paper in the Paper Feed Slot and ad-vance it until the buzzer sounds.
Important• Be careful not to soil the printing surface of roll paper as you insert it in the slot. This may affect the
printing quality. We recommend wearing clean cloth gloves when handling rolls to protect the print-ing surface.
• If the paper is wrinkled or warped, straighten it out before loading it.• Load the roll so that there is no gap between the right edge of the paper and the Roll Holder.
Handling Paper > Handling rolls >
Loading Rolls in the Printer iPF815
7
630
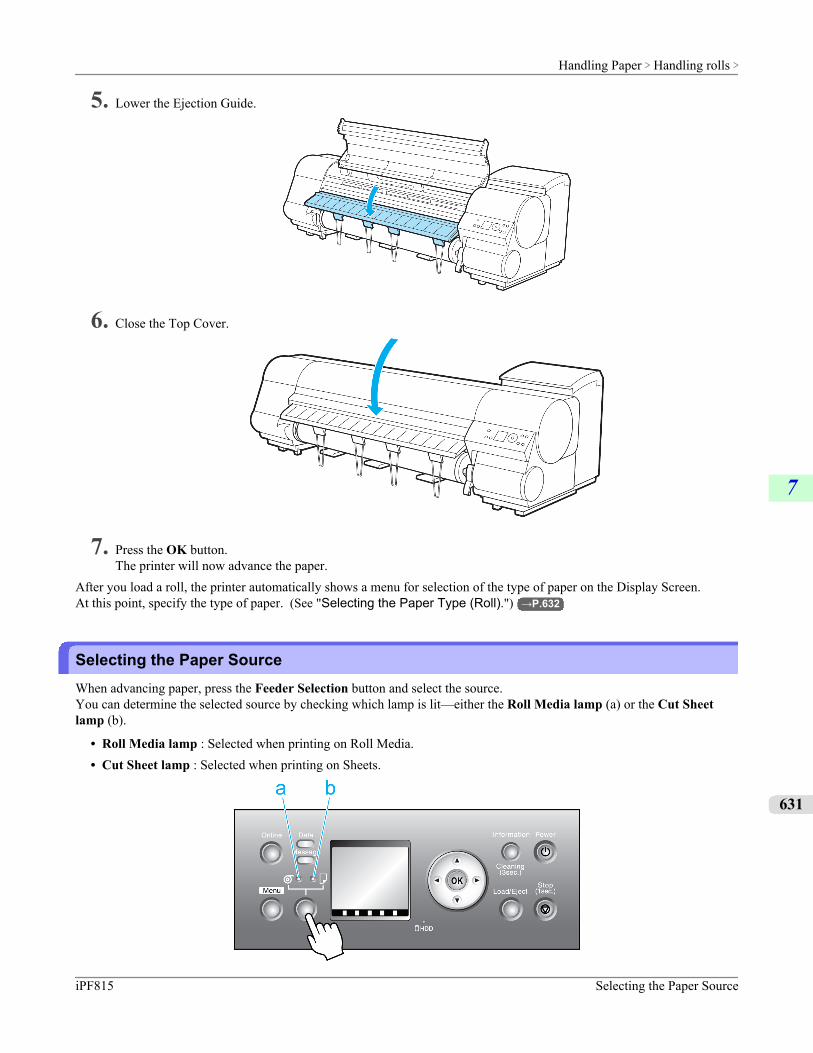
5. Lower the Ejection Guide.
6. Close the Top Cover.
7. Press the OK button.The printer will now advance the paper.
After you load a roll, the printer automatically shows a menu for selection of the type of paper on the Display Screen.At this point, specify the type of paper. (See "Selecting the Paper Type (Roll).") →P.632
Selecting the Paper SourceWhen advancing paper, press the Feeder Selection button and select the source.You can determine the selected source by checking which lamp is lit—either the Roll Media lamp (a) or the Cut Sheetlamp (b).
• Roll Media lamp : Selected when printing on Roll Media.• Cut Sheet lamp : Selected when printing on Sheets.
Handling Paper > Handling rolls >
iPF815 Selecting the Paper Source
7
631
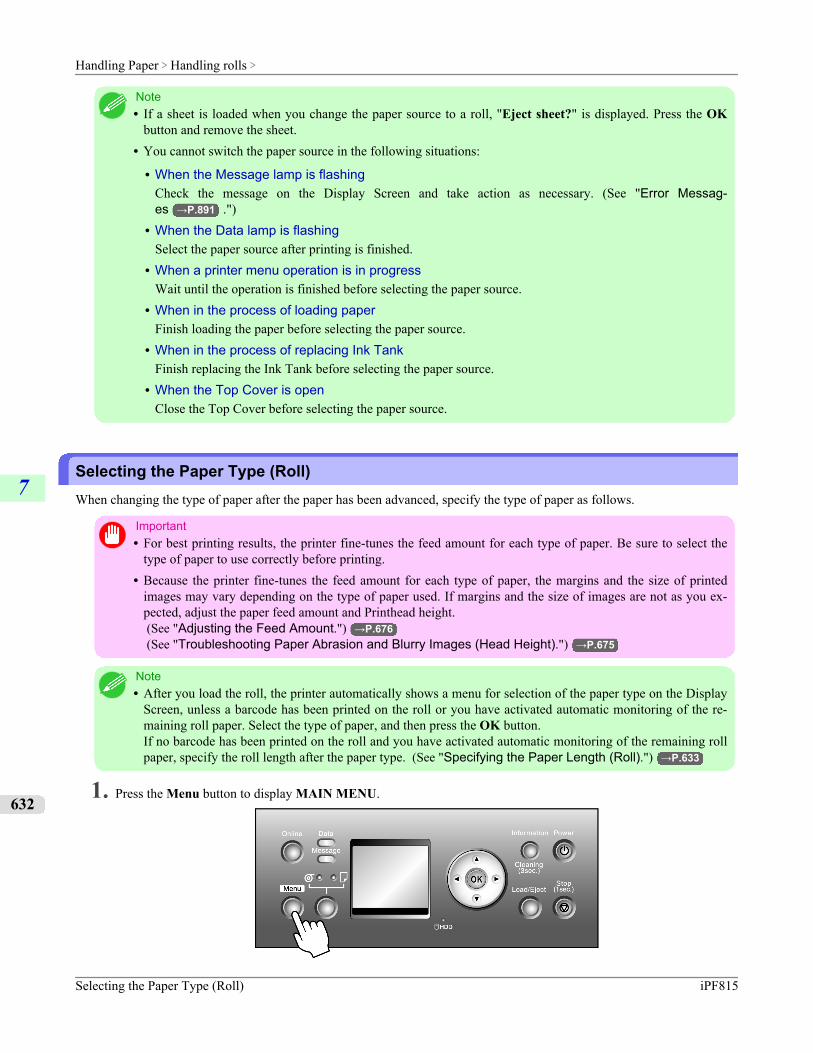
Note• If a sheet is loaded when you change the paper source to a roll, "Eject sheet?" is displayed. Press the OK
button and remove the sheet.• You cannot switch the paper source in the following situations:
• When the Message lamp is flashingCheck the message on the Display Screen and take action as necessary. (See "Error Messag-es →P.891 .")
• When the Data lamp is flashingSelect the paper source after printing is finished.
• When a printer menu operation is in progressWait until the operation is finished before selecting the paper source.
• When in the process of loading paperFinish loading the paper before selecting the paper source.
• When in the process of replacing Ink TankFinish replacing the Ink Tank before selecting the paper source.
• When the Top Cover is openClose the Top Cover before selecting the paper source.
Selecting the Paper Type (Roll)When changing the type of paper after the paper has been advanced, specify the type of paper as follows.
Important• For best printing results, the printer fine-tunes the feed amount for each type of paper. Be sure to select the
type of paper to use correctly before printing.• Because the printer fine-tunes the feed amount for each type of paper, the margins and the size of printed
images may vary depending on the type of paper used. If margins and the size of images are not as you ex-pected, adjust the paper feed amount and Printhead height. (See "Adjusting the Feed Amount.") →P.676 (See "Troubleshooting Paper Abrasion and Blurry Images (Head Height).") →P.675
Note• After you load the roll, the printer automatically shows a menu for selection of the paper type on the Display
Screen, unless a barcode has been printed on the roll or you have activated automatic monitoring of the re-maining roll paper. Select the type of paper, and then press the OK button.If no barcode has been printed on the roll and you have activated automatic monitoring of the remaining rollpaper, specify the roll length after the paper type. (See "Specifying the Paper Length (Roll).") →P.633
1. Press the Menu button to display MAIN MENU.
Handling Paper > Handling rolls >
Selecting the Paper Type (Roll) iPF815
7
632
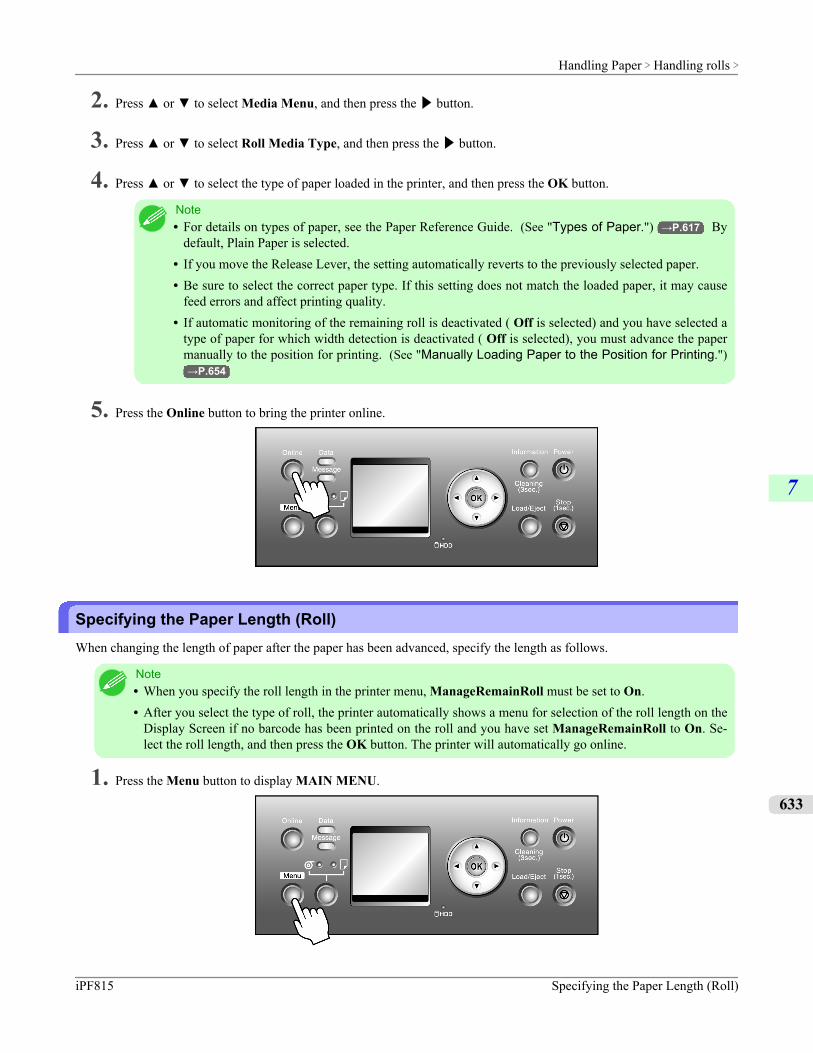
2. Press ▲ or ▼ to select Media Menu, and then press the ▶ button.
3. Press ▲ or ▼ to select Roll Media Type, and then press the ▶ button.
4. Press ▲ or ▼ to select the type of paper loaded in the printer, and then press the OK button.
Note• For details on types of paper, see the Paper Reference Guide. (See "Types of Paper.") →P.617 By
default, Plain Paper is selected.• If you move the Release Lever, the setting automatically reverts to the previously selected paper.• Be sure to select the correct paper type. If this setting does not match the loaded paper, it may cause
feed errors and affect printing quality.• If automatic monitoring of the remaining roll is deactivated ( Off is selected) and you have selected a
type of paper for which width detection is deactivated ( Off is selected), you must advance the papermanually to the position for printing. (See "Manually Loading Paper to the Position for Printing.")→P.654
5. Press the Online button to bring the printer online.
Specifying the Paper Length (Roll)When changing the length of paper after the paper has been advanced, specify the length as follows.
Note• When you specify the roll length in the printer menu, ManageRemainRoll must be set to On.• After you select the type of roll, the printer automatically shows a menu for selection of the roll length on the
Display Screen if no barcode has been printed on the roll and you have set ManageRemainRoll to On. Se-lect the roll length, and then press the OK button. The printer will automatically go online.
1. Press the Menu button to display MAIN MENU.
Handling Paper > Handling rolls >
iPF815 Specifying the Paper Length (Roll)
7
633
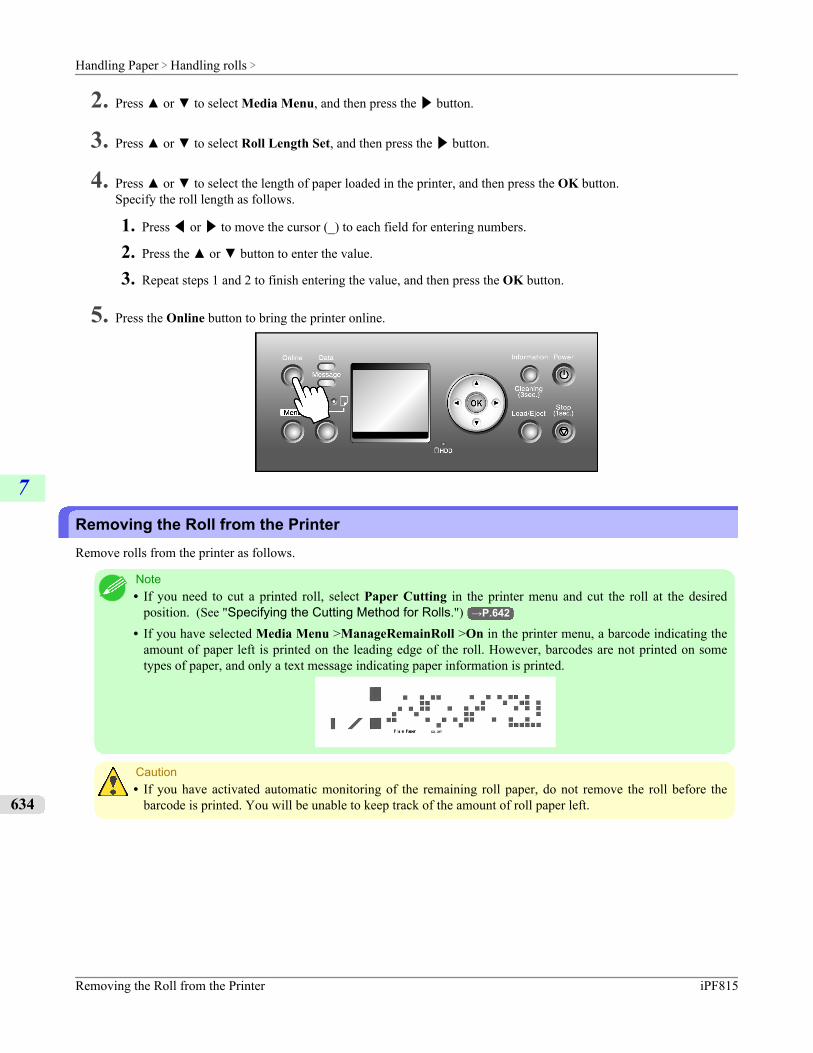
2. Press ▲ or ▼ to select Media Menu, and then press the ▶ button.
3. Press ▲ or ▼ to select Roll Length Set, and then press the ▶ button.
4. Press ▲ or ▼ to select the length of paper loaded in the printer, and then press the OK button.Specify the roll length as follows.
1. Press ◀ or ▶ to move the cursor (_) to each field for entering numbers.
2. Press the ▲ or ▼ button to enter the value.
3. Repeat steps 1 and 2 to finish entering the value, and then press the OK button.
5. Press the Online button to bring the printer online.
Removing the Roll from the PrinterRemove rolls from the printer as follows.
Note• If you need to cut a printed roll, select Paper Cutting in the printer menu and cut the roll at the desired
position. (See "Specifying the Cutting Method for Rolls.") →P.642
• If you have selected Media Menu >ManageRemainRoll >On in the printer menu, a barcode indicating theamount of paper left is printed on the leading edge of the roll. However, barcodes are not printed on sometypes of paper, and only a text message indicating paper information is printed.
Caution• If you have activated automatic monitoring of the remaining roll paper, do not remove the roll before the
barcode is printed. You will be unable to keep track of the amount of roll paper left.
Handling Paper > Handling rolls >
Removing the Roll from the Printer iPF815
7
634
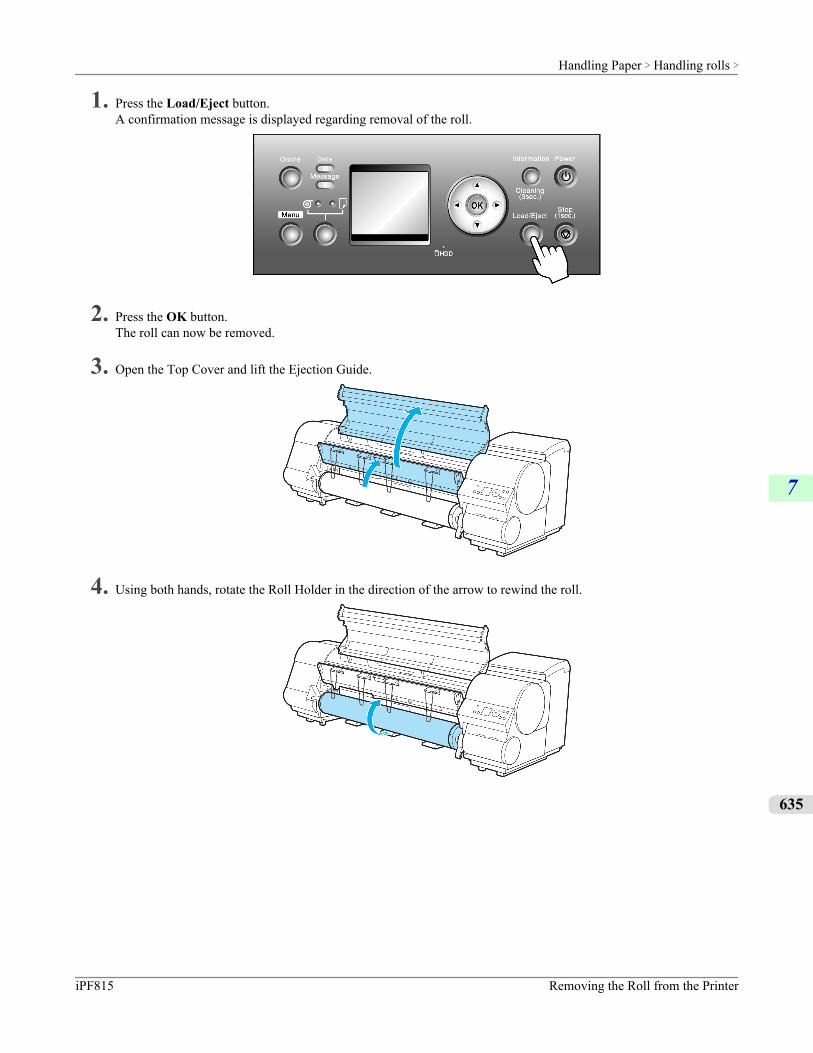
1. Press the Load/Eject button.A confirmation message is displayed regarding removal of the roll.
2. Press the OK button.The roll can now be removed.
3. Open the Top Cover and lift the Ejection Guide.
4. Using both hands, rotate the Roll Holder in the direction of the arrow to rewind the roll.
Handling Paper > Handling rolls >
iPF815 Removing the Roll from the Printer
7
635
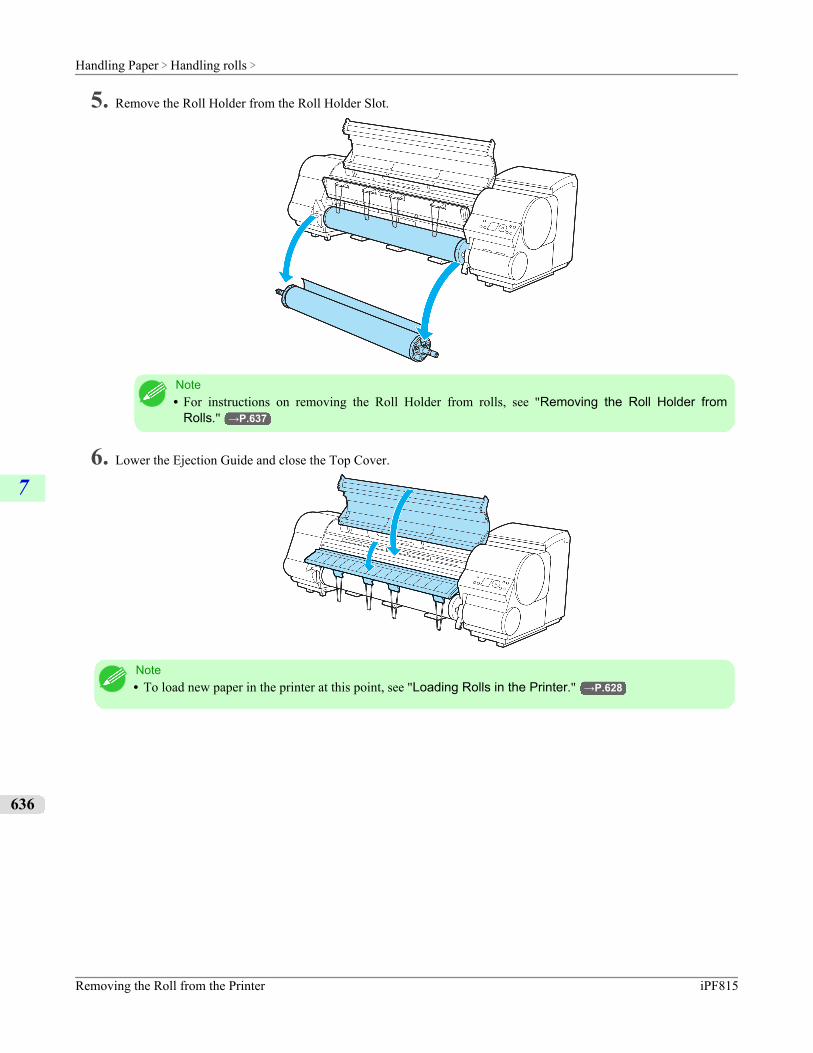
5. Remove the Roll Holder from the Roll Holder Slot.
Note• For instructions on removing the Roll Holder from rolls, see "Removing the Roll Holder from
Rolls." →P.637
6. Lower the Ejection Guide and close the Top Cover.
Note• To load new paper in the printer at this point, see "Loading Rolls in the Printer." →P.628
Handling Paper > Handling rolls >
Removing the Roll from the Printer iPF815
7
636
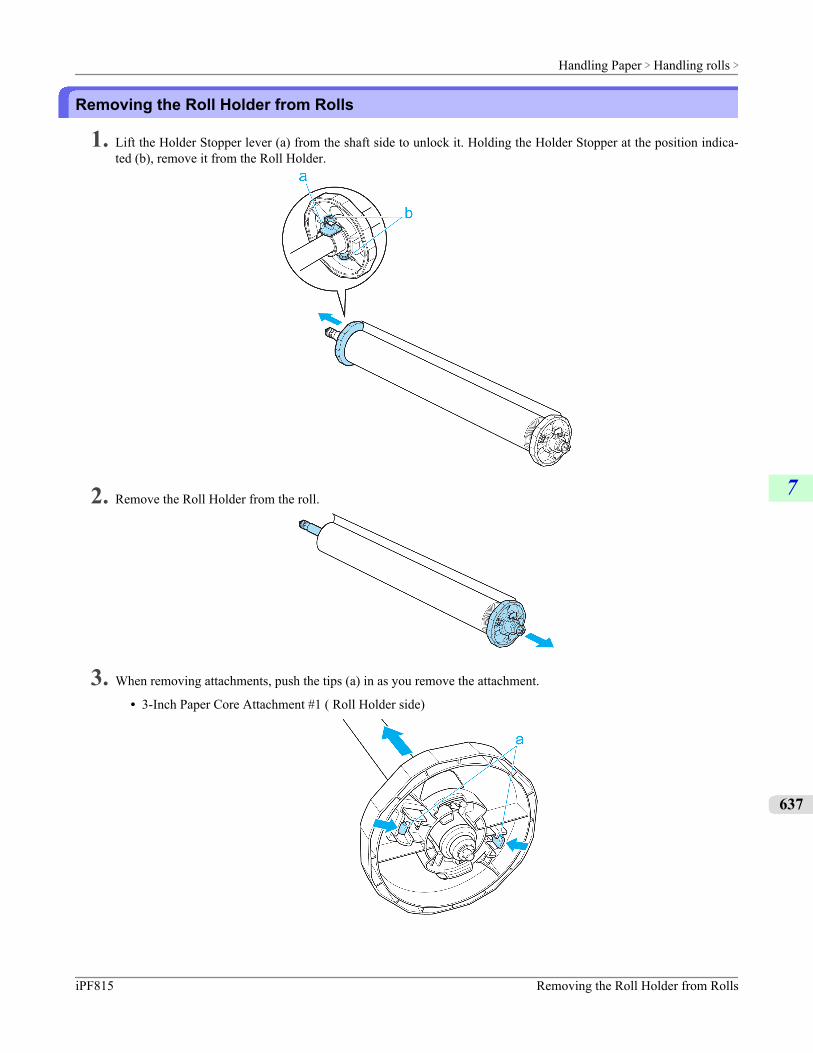
Removing the Roll Holder from Rolls
1. Lift the Holder Stopper lever (a) from the shaft side to unlock it. Holding the Holder Stopper at the position indica-ted (b), remove it from the Roll Holder.
2. Remove the Roll Holder from the roll.
3. When removing attachments, push the tips (a) in as you remove the attachment.
• 3-Inch Paper Core Attachment #1 ( Roll Holder side)
Handling Paper > Handling rolls >
iPF815 Removing the Roll Holder from Rolls
7
637

• 3-Inch Paper Core Attachment #2 ( Holder Stopper side)
• 2-Inch Paper Core Attachment
Important• Store the roll in the original bag or box, away from high temperature, humidity, and direct sunlight. If paper
is not stored properly, the printing surface may become scratched, which may affect the printing qualitywhen you use it again.
Feeding Roll Paper ManuallyWhen the printer is offline, you can advance or retract the roll on the Platen by pressing ▲ or ▼.
1. Press the Online button to bring the printer offline.
2. Confirm that a roll is selected as the paper source. (See "Selecting the Paper Source.") →P.631
Handling Paper > Handling rolls >
Feeding Roll Paper Manually iPF815
7
638
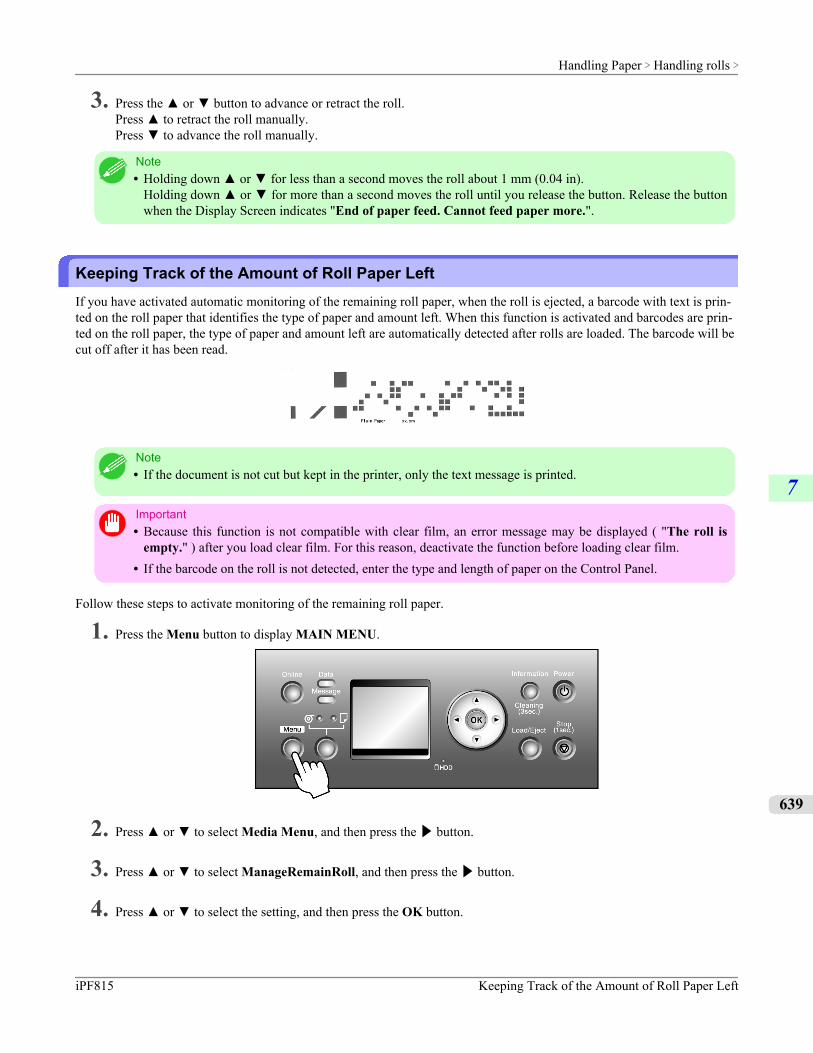
3. Press the ▲ or ▼ button to advance or retract the roll.Press ▲ to retract the roll manually.Press ▼ to advance the roll manually.
Note• Holding down ▲ or ▼ for less than a second moves the roll about 1 mm (0.04 in).
Holding down ▲ or ▼ for more than a second moves the roll until you release the button. Release the buttonwhen the Display Screen indicates "End of paper feed. Cannot feed paper more.".
Keeping Track of the Amount of Roll Paper LeftIf you have activated automatic monitoring of the remaining roll paper, when the roll is ejected, a barcode with text is prin-ted on the roll paper that identifies the type of paper and amount left. When this function is activated and barcodes are prin-ted on the roll paper, the type of paper and amount left are automatically detected after rolls are loaded. The barcode will becut off after it has been read.
Note• If the document is not cut but kept in the printer, only the text message is printed.
Important• Because this function is not compatible with clear film, an error message may be displayed ( "The roll is
empty." ) after you load clear film. For this reason, deactivate the function before loading clear film.• If the barcode on the roll is not detected, enter the type and length of paper on the Control Panel.
Follow these steps to activate monitoring of the remaining roll paper.
1. Press the Menu button to display MAIN MENU.
2. Press ▲ or ▼ to select Media Menu, and then press the ▶ button.
3. Press ▲ or ▼ to select ManageRemainRoll, and then press the ▶ button.
4. Press ▲ or ▼ to select the setting, and then press the OK button.
Handling Paper > Handling rolls >
iPF815 Keeping Track of the Amount of Roll Paper Left
7
639
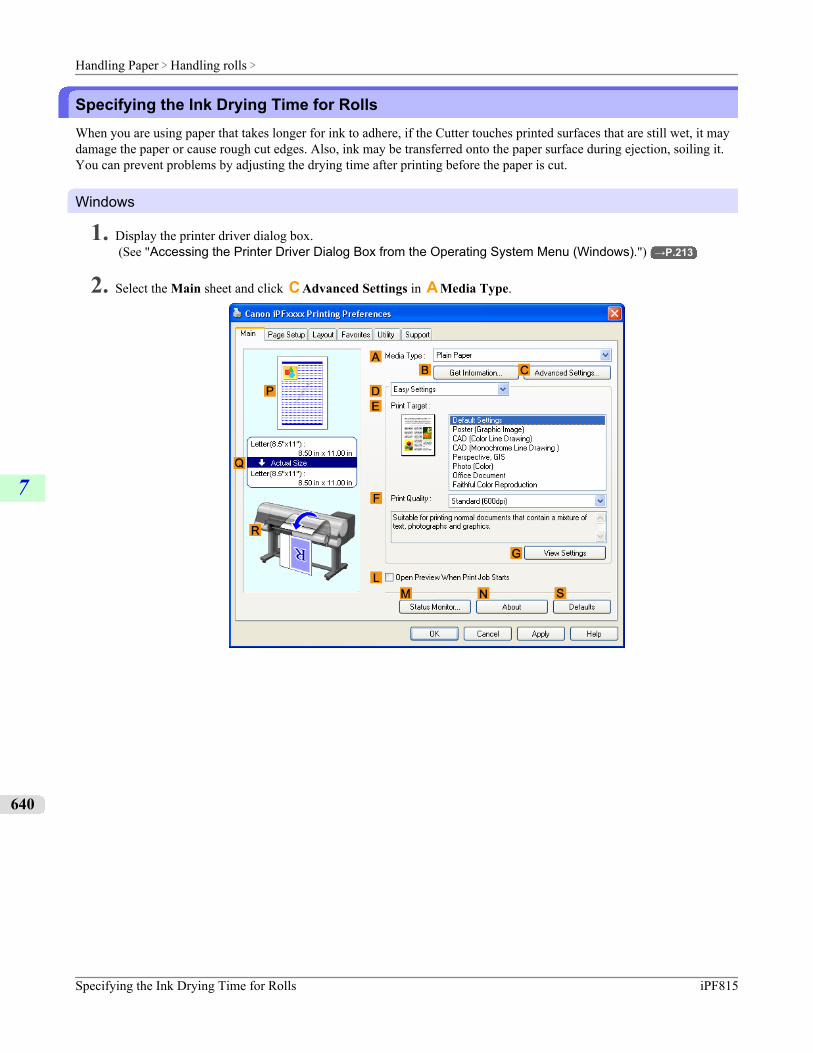
Specifying the Ink Drying Time for RollsWhen you are using paper that takes longer for ink to adhere, if the Cutter touches printed surfaces that are still wet, it maydamage the paper or cause rough cut edges. Also, ink may be transferred onto the paper surface during ejection, soiling it.You can prevent problems by adjusting the drying time after printing before the paper is cut.
Windows
1. Display the printer driver dialog box. (See "Accessing the Printer Driver Dialog Box from the Operating System Menu (Windows).") →P.213
2. Select the Main sheet and click C Advanced Settings in A Media Type.
Handling Paper > Handling rolls >
Specifying the Ink Drying Time for Rolls iPF815
7
640
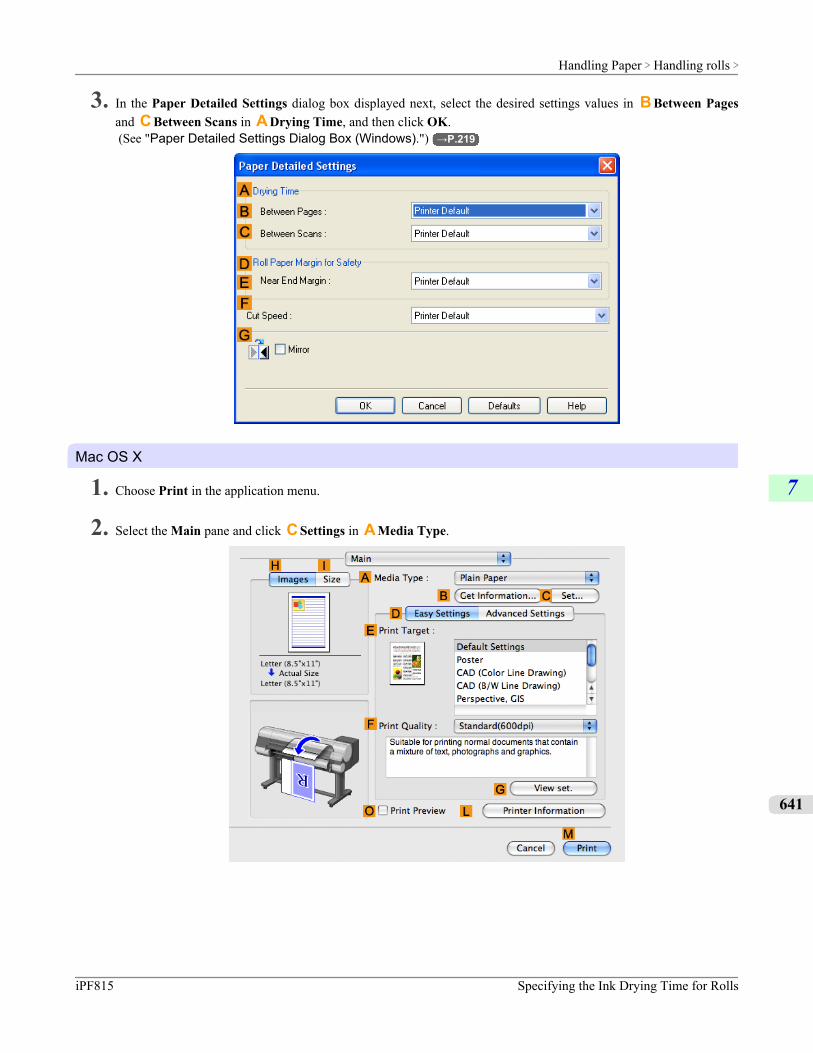
3. In the Paper Detailed Settings dialog box displayed next, select the desired settings values in B Between Pagesand C Between Scans in A Drying Time, and then click OK. (See "Paper Detailed Settings Dialog Box (Windows).") →P.219
Mac OS X
1. Choose Print in the application menu.
2. Select the Main pane and click C Settings in A Media Type.
Handling Paper > Handling rolls >
iPF815 Specifying the Ink Drying Time for Rolls
7
641
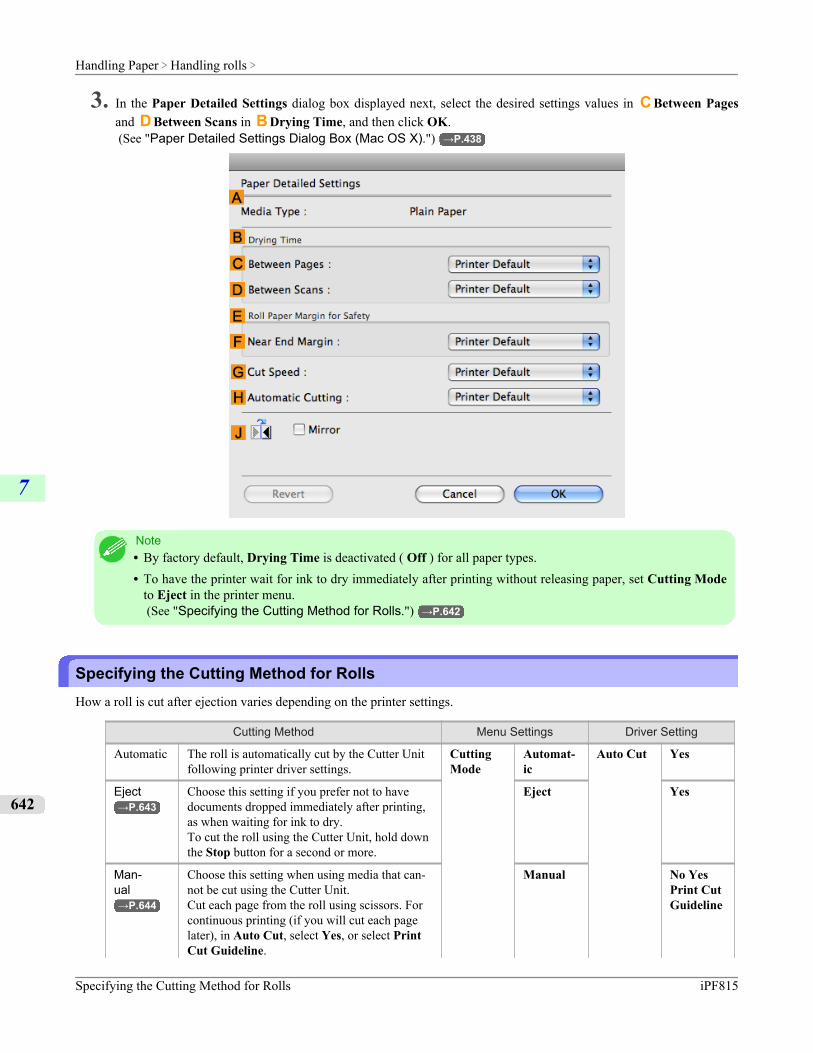
3. In the Paper Detailed Settings dialog box displayed next, select the desired settings values in C Between Pagesand D Between Scans in B Drying Time, and then click OK. (See "Paper Detailed Settings Dialog Box (Mac OS X).") →P.438
Note• By factory default, Drying Time is deactivated ( Off ) for all paper types.• To have the printer wait for ink to dry immediately after printing without releasing paper, set Cutting Mode
to Eject in the printer menu. (See "Specifying the Cutting Method for Rolls.") →P.642
Specifying the Cutting Method for RollsHow a roll is cut after ejection varies depending on the printer settings.
Cutting Method Menu Settings Driver Setting
Automatic The roll is automatically cut by the Cutter Unitfollowing printer driver settings.
CuttingMode
Automat-ic
Auto Cut Yes
Eject→P.643
Choose this setting if you prefer not to havedocuments dropped immediately after printing,as when waiting for ink to dry.To cut the roll using the Cutter Unit, hold downthe Stop button for a second or more.
Eject Yes
Man-ual→P.644
Choose this setting when using media that can-not be cut using the Cutter Unit.Cut each page from the roll using scissors. Forcontinuous printing (if you will cut each pagelater), in Auto Cut, select Yes, or select PrintCut Guideline.
Manual No YesPrint CutGuideline
Handling Paper > Handling rolls >
Specifying the Cutting Method for Rolls iPF815
7
642

Cutting Method Menu Settings Driver SettingMan-ual→P.644
(See "Cutting Roll Paper After Printing.")→P.196
CuttingMode
Auto CutManual No YesPrint CutGuideline
PaperCut-ting→P.646
Choose this option if you want to cut pages bypressing Cutter Unit buttons for manual cuttingafter printing when the printer driver is config-ured to Auto Cut > No or Print Cut Guideline.Otherwise choose this option if you want to cutthe roll edge after loading a roll.
PaperCutting
Yes No PrintCutGuideline
Note• Automatic and Eject are valid only when you have specified Auto Cut > Yes in the printer driver.• With Eject, printing does not resume after a series of jobs have been printed continuously until the roll is cut.
Cut rolls manually in the following cases:
Eject (waiting for ink to dry after printing)
Important• When cutting wide printed documents after ejection, have two people support the documents. If the paper
drops, printed documents may be damaged.• Do not lift the paper when holding printed documents before cutting. If the paper rises, it may affect the
printing quality.
1. Press the Menu button to display MAIN MENU.
2. Press ▲ or ▼ to select Paper Details, and then press the ▶ button.
Handling Paper > Handling rolls >
iPF815 Specifying the Cutting Method for Rolls
7
643
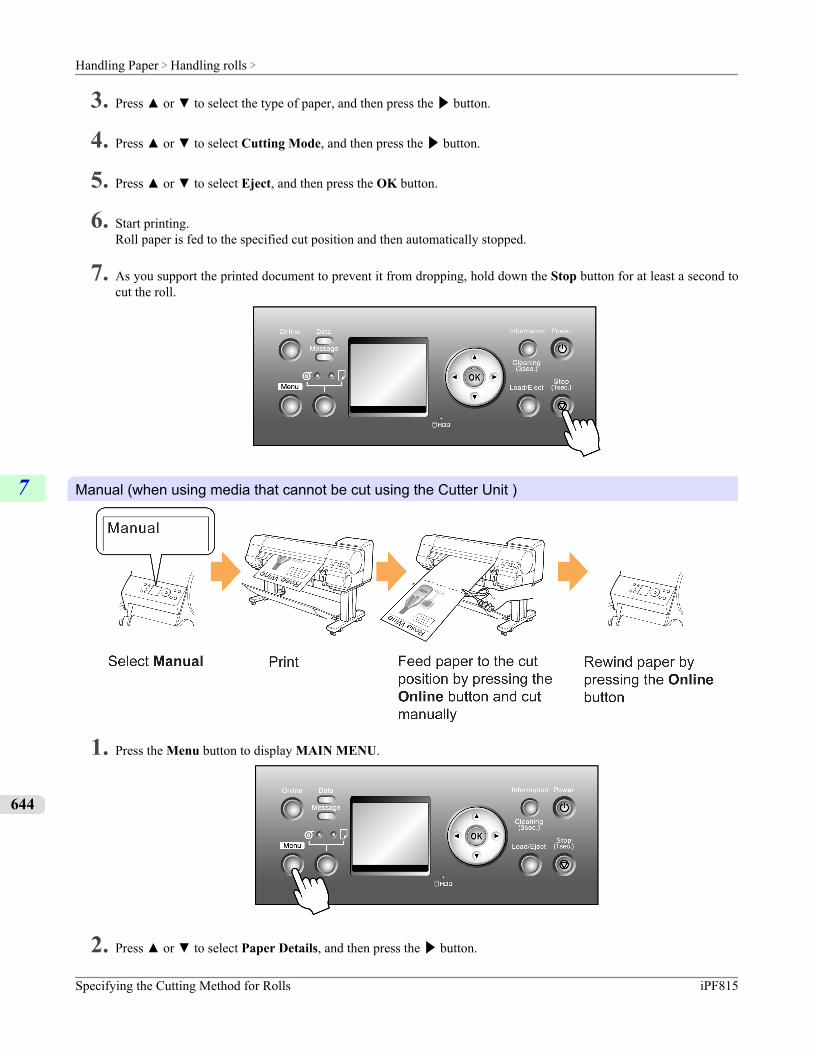
3. Press ▲ or ▼ to select the type of paper, and then press the ▶ button.
4. Press ▲ or ▼ to select Cutting Mode, and then press the ▶ button.
5. Press ▲ or ▼ to select Eject, and then press the OK button.
6. Start printing.Roll paper is fed to the specified cut position and then automatically stopped.
7. As you support the printed document to prevent it from dropping, hold down the Stop button for at least a second tocut the roll.
Manual (when using media that cannot be cut using the Cutter Unit )
1. Press the Menu button to display MAIN MENU.
2. Press ▲ or ▼ to select Paper Details, and then press the ▶ button.
Handling Paper > Handling rolls >
Specifying the Cutting Method for Rolls iPF815
7
644
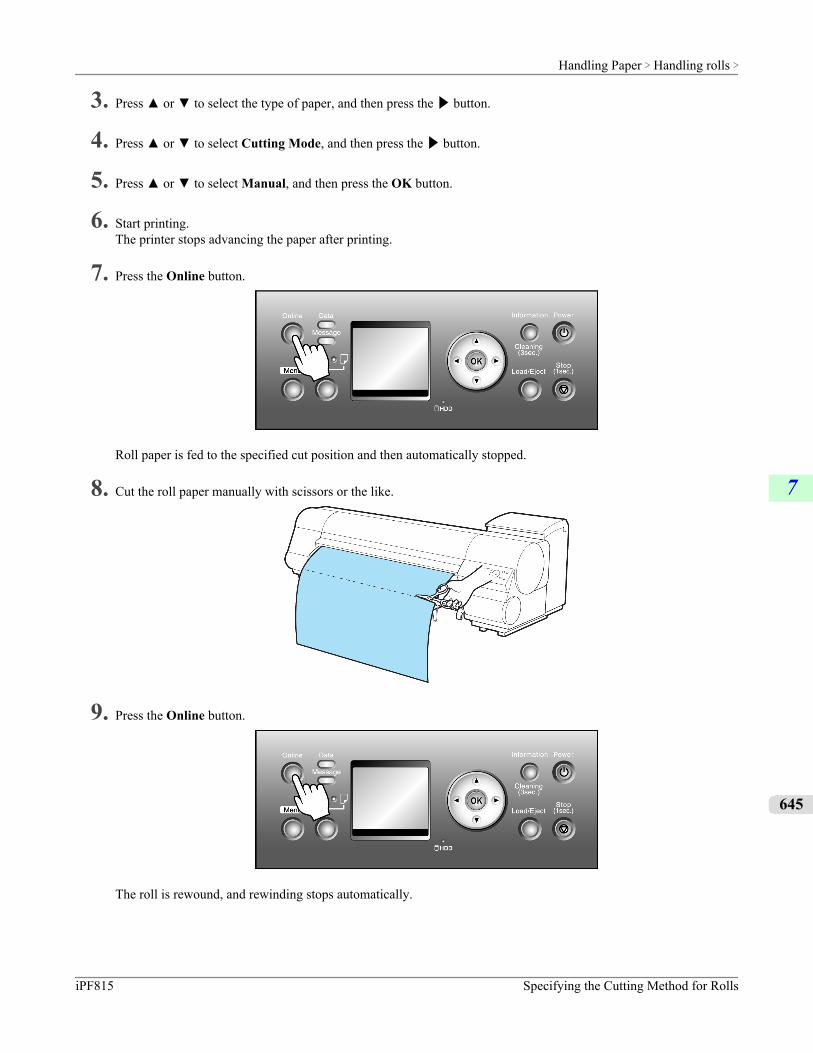
3. Press ▲ or ▼ to select the type of paper, and then press the ▶ button.
4. Press ▲ or ▼ to select Cutting Mode, and then press the ▶ button.
5. Press ▲ or ▼ to select Manual, and then press the OK button.
6. Start printing.The printer stops advancing the paper after printing.
7. Press the Online button.
Roll paper is fed to the specified cut position and then automatically stopped.
8. Cut the roll paper manually with scissors or the like.
9. Press the Online button.
The roll is rewound, and rewinding stops automatically.
Handling Paper > Handling rolls >
iPF815 Specifying the Cutting Method for Rolls
7
645
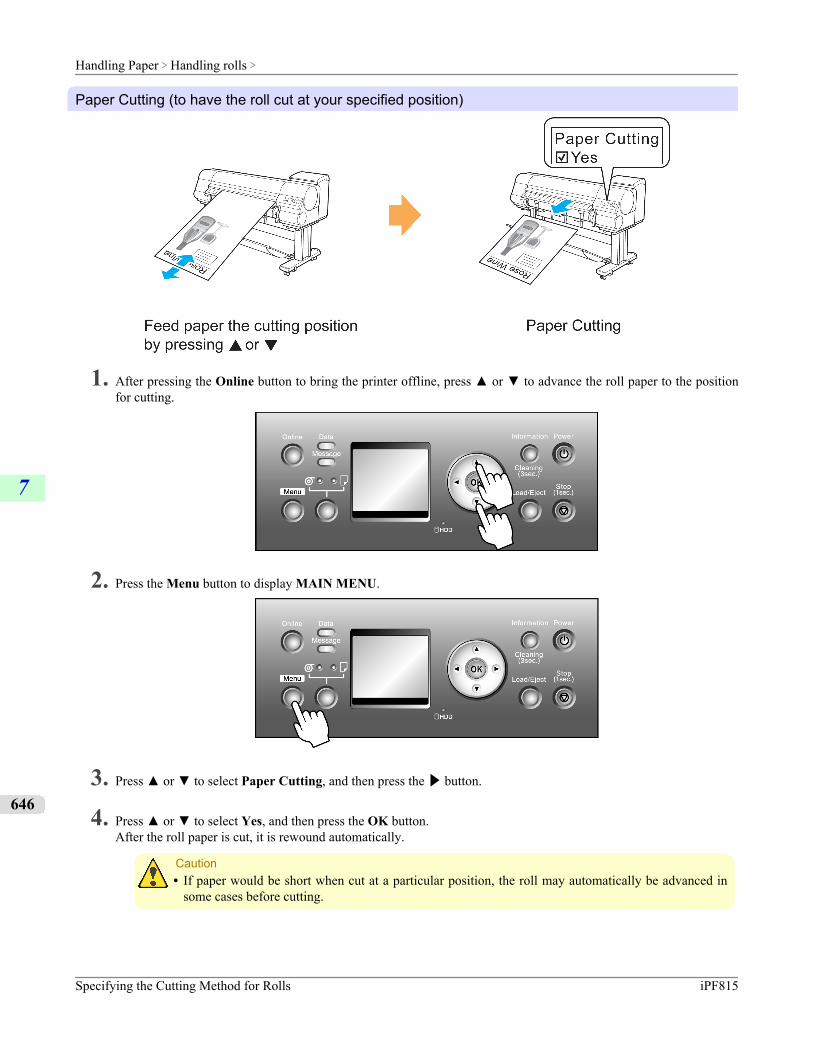
Paper Cutting (to have the roll cut at your specified position)
1. After pressing the Online button to bring the printer offline, press ▲ or ▼ to advance the roll paper to the positionfor cutting.
2. Press the Menu button to display MAIN MENU.
3. Press ▲ or ▼ to select Paper Cutting, and then press the ▶ button.
4. Press ▲ or ▼ to select Yes, and then press the OK button.After the roll paper is cut, it is rewound automatically.
Caution• If paper would be short when cut at a particular position, the roll may automatically be advanced in
some cases before cutting.
Handling Paper > Handling rolls >
Specifying the Cutting Method for Rolls iPF815
7
646
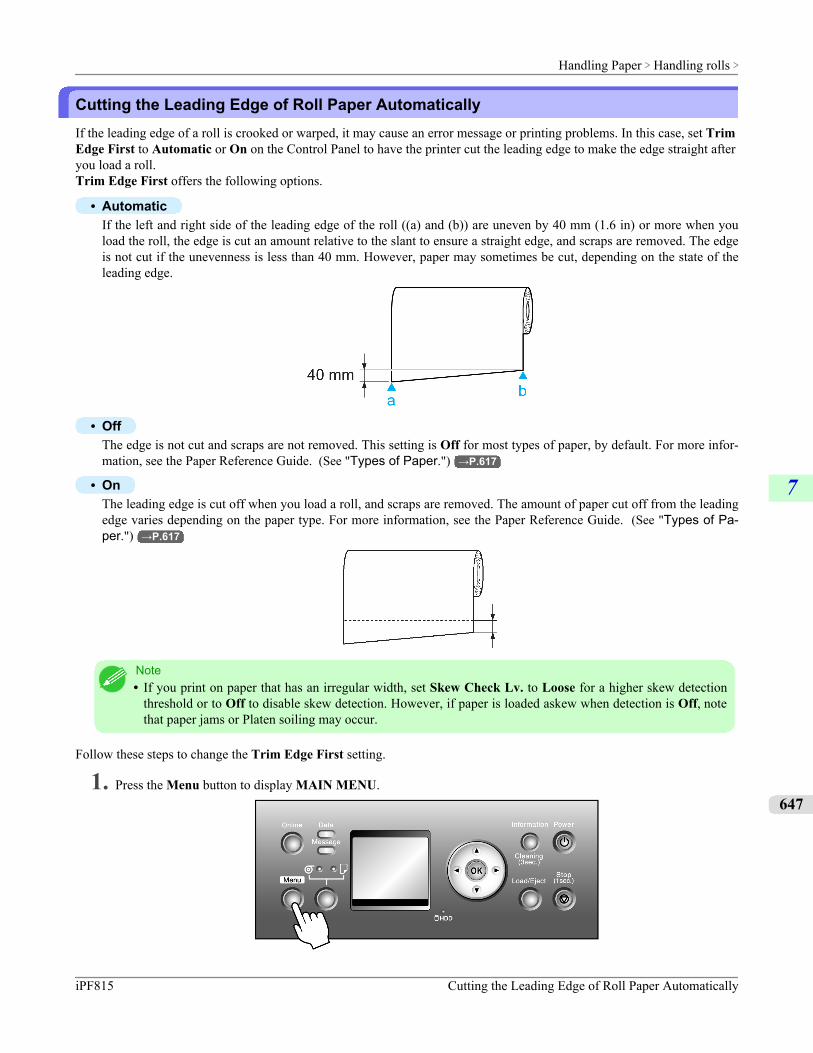
Cutting the Leading Edge of Roll Paper AutomaticallyIf the leading edge of a roll is crooked or warped, it may cause an error message or printing problems. In this case, set TrimEdge First to Automatic or On on the Control Panel to have the printer cut the leading edge to make the edge straight afteryou load a roll.Trim Edge First offers the following options.
• AutomaticIf the left and right side of the leading edge of the roll ((a) and (b)) are uneven by 40 mm (1.6 in) or more when youload the roll, the edge is cut an amount relative to the slant to ensure a straight edge, and scraps are removed. The edgeis not cut if the unevenness is less than 40 mm. However, paper may sometimes be cut, depending on the state of theleading edge.
• OffThe edge is not cut and scraps are not removed. This setting is Off for most types of paper, by default. For more infor-mation, see the Paper Reference Guide. (See "Types of Paper.") →P.617
• OnThe leading edge is cut off when you load a roll, and scraps are removed. The amount of paper cut off from the leadingedge varies depending on the paper type. For more information, see the Paper Reference Guide. (See "Types of Pa-per.") →P.617
Note• If you print on paper that has an irregular width, set Skew Check Lv. to Loose for a higher skew detection
threshold or to Off to disable skew detection. However, if paper is loaded askew when detection is Off, notethat paper jams or Platen soiling may occur.
Follow these steps to change the Trim Edge First setting.
1. Press the Menu button to display MAIN MENU.
Handling Paper > Handling rolls >
iPF815 Cutting the Leading Edge of Roll Paper Automatically
7
647
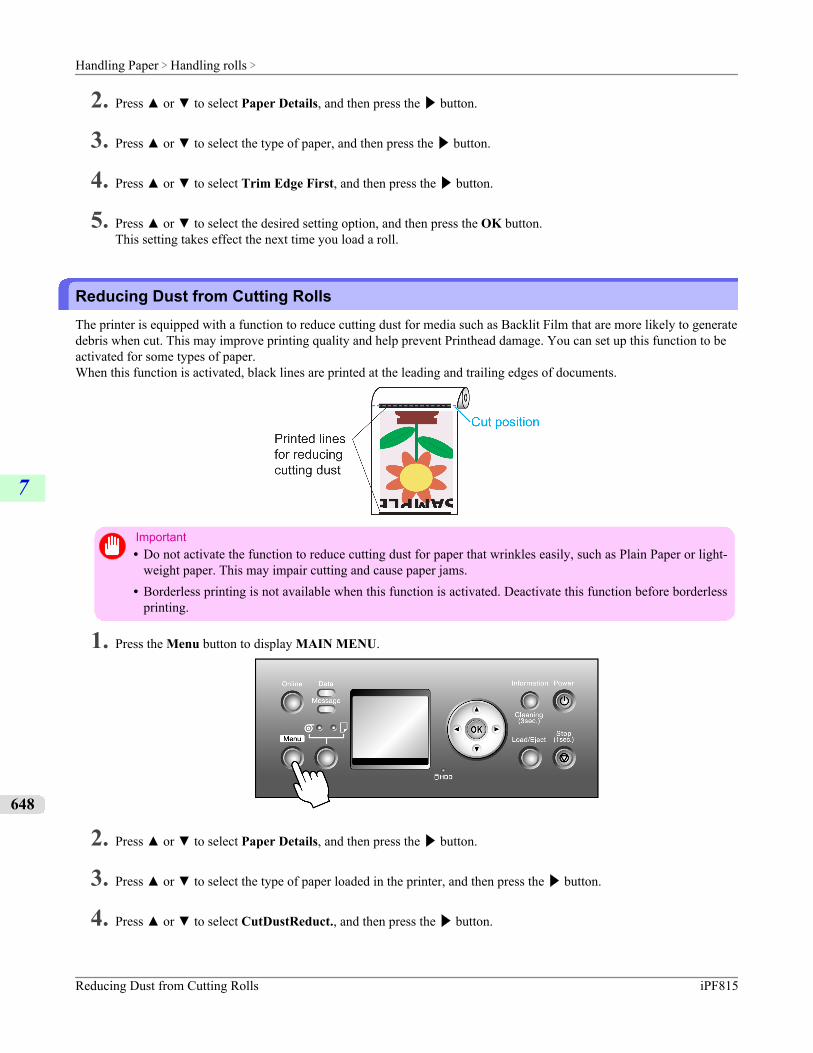
2. Press ▲ or ▼ to select Paper Details, and then press the ▶ button.
3. Press ▲ or ▼ to select the type of paper, and then press the ▶ button.
4. Press ▲ or ▼ to select Trim Edge First, and then press the ▶ button.
5. Press ▲ or ▼ to select the desired setting option, and then press the OK button.This setting takes effect the next time you load a roll.
Reducing Dust from Cutting RollsThe printer is equipped with a function to reduce cutting dust for media such as Backlit Film that are more likely to generatedebris when cut. This may improve printing quality and help prevent Printhead damage. You can set up this function to beactivated for some types of paper.When this function is activated, black lines are printed at the leading and trailing edges of documents.
Important• Do not activate the function to reduce cutting dust for paper that wrinkles easily, such as Plain Paper or light-
weight paper. This may impair cutting and cause paper jams.• Borderless printing is not available when this function is activated. Deactivate this function before borderless
printing.
1. Press the Menu button to display MAIN MENU.
2. Press ▲ or ▼ to select Paper Details, and then press the ▶ button.
3. Press ▲ or ▼ to select the type of paper loaded in the printer, and then press the ▶ button.
4. Press ▲ or ▼ to select CutDustReduct., and then press the ▶ button.
Handling Paper > Handling rolls >
Reducing Dust from Cutting Rolls iPF815
7
648
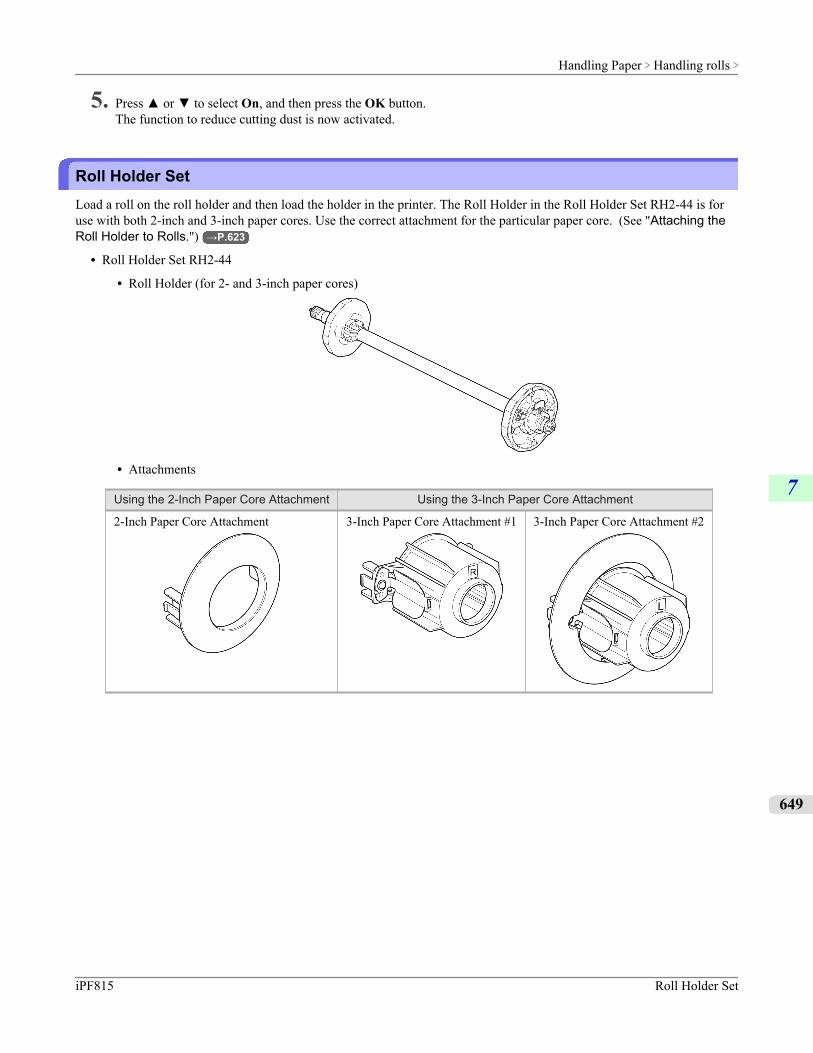
5. Press ▲ or ▼ to select On, and then press the OK button.The function to reduce cutting dust is now activated.
Roll Holder SetLoad a roll on the roll holder and then load the holder in the printer. The Roll Holder in the Roll Holder Set RH2-44 is foruse with both 2-inch and 3-inch paper cores. Use the correct attachment for the particular paper core. (See "Attaching theRoll Holder to Rolls.") →P.623
• Roll Holder Set RH2-44
• Roll Holder (for 2- and 3-inch paper cores)
• Attachments
Using the 2-Inch Paper Core Attachment Using the 3-Inch Paper Core Attachment
2-Inch Paper Core Attachment 3-Inch Paper Core Attachment #1 3-Inch Paper Core Attachment #2
Handling Paper > Handling rolls >
iPF815 Roll Holder Set
7
649
Handling sheetsSelecting the Paper Type (Sheet) ................................................................................................................... 650
Loading Sheets in the Printer .......................................................................................................................... 651
Manually Loading Paper to the Position for Printing ....................................................................................... 654
Removing Sheets ............................................................................................................................................ 656
Selecting the Paper Type (Sheet)When changing the type of paper after the paper has been advanced, specify the type of paper as follows.
Note• After you load the sheet, the printer automatically shows a menu for selection of the paper type on the Dis-
play Screen. In this case, select the paper type, and then press the OK button. The printer will automaticallygo online.
1. Press the Menu button to display MAIN MENU.
2. Press ▲ or ▼ to select Media Menu, and then press the ▶ button.
3. Press ▲ or ▼ to select Cut Sheet Type, and then press the ▶ button.
4. Press ▲ or ▼ to select the type of paper loaded in the printer, and then press the OK button.
Note• For details on paper types, see the Paper Reference Guide. (See "Types of Paper.") →P.617 Plain
Paper is selected by factory default.If you move the Release Lever, the setting automatically reverts to Plain Paper.
• Be sure to select the correct paper type. If this setting does not match the loaded paper, it may causefeed errors and affect the printing quality.
• If you select a type of paper for which Media Width Detection is deactivated ( Off is selected), youmust advance the paper manually to the position for printing. (See "Manually Loading Paper to thePosition for Printing.") →P.654
Handling Paper > Handling sheets >
Selecting the Paper Type (Sheet) iPF815
7
650
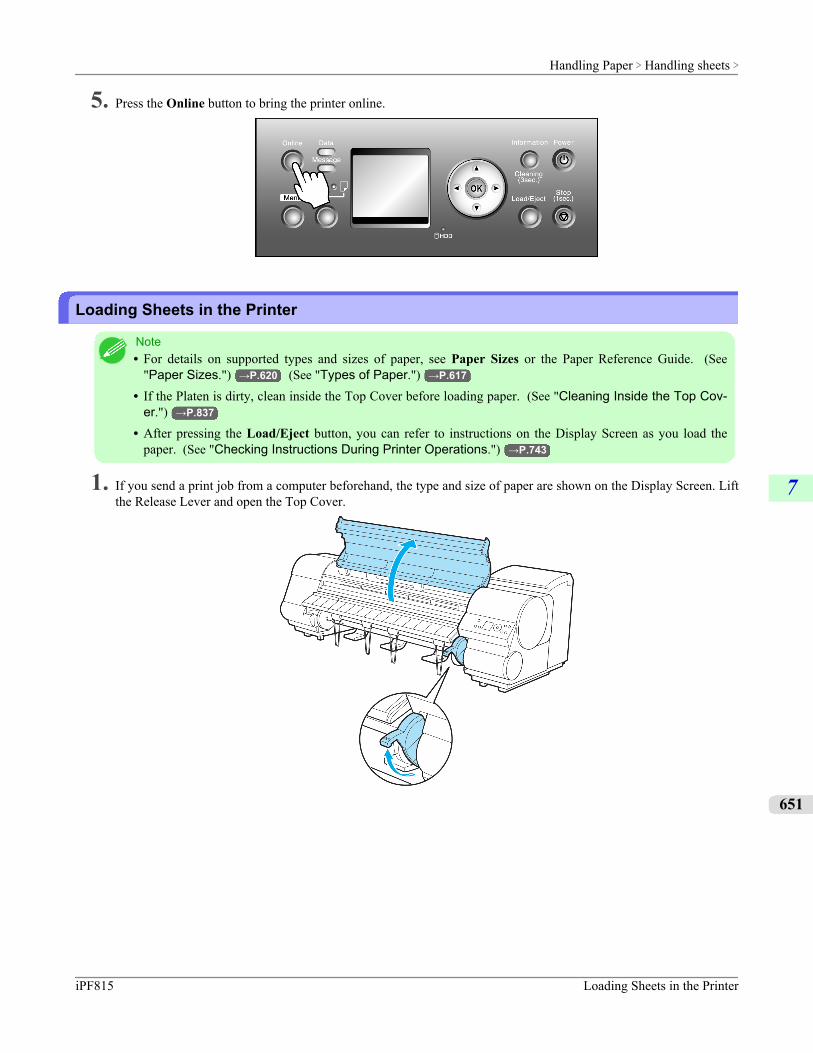
5. Press the Online button to bring the printer online.
Loading Sheets in the Printer
Note• For details on supported types and sizes of paper, see Paper Sizes or the Paper Reference Guide. (See
"Paper Sizes.") →P.620 (See "Types of Paper.") →P.617
• If the Platen is dirty, clean inside the Top Cover before loading paper. (See "Cleaning Inside the Top Cov-er.") →P.837
• After pressing the Load/Eject button, you can refer to instructions on the Display Screen as you load thepaper. (See "Checking Instructions During Printer Operations.") →P.743
1. If you send a print job from a computer beforehand, the type and size of paper are shown on the Display Screen. Liftthe Release Lever and open the Top Cover.
Handling Paper > Handling sheets >
iPF815 Loading Sheets in the Printer
7
651
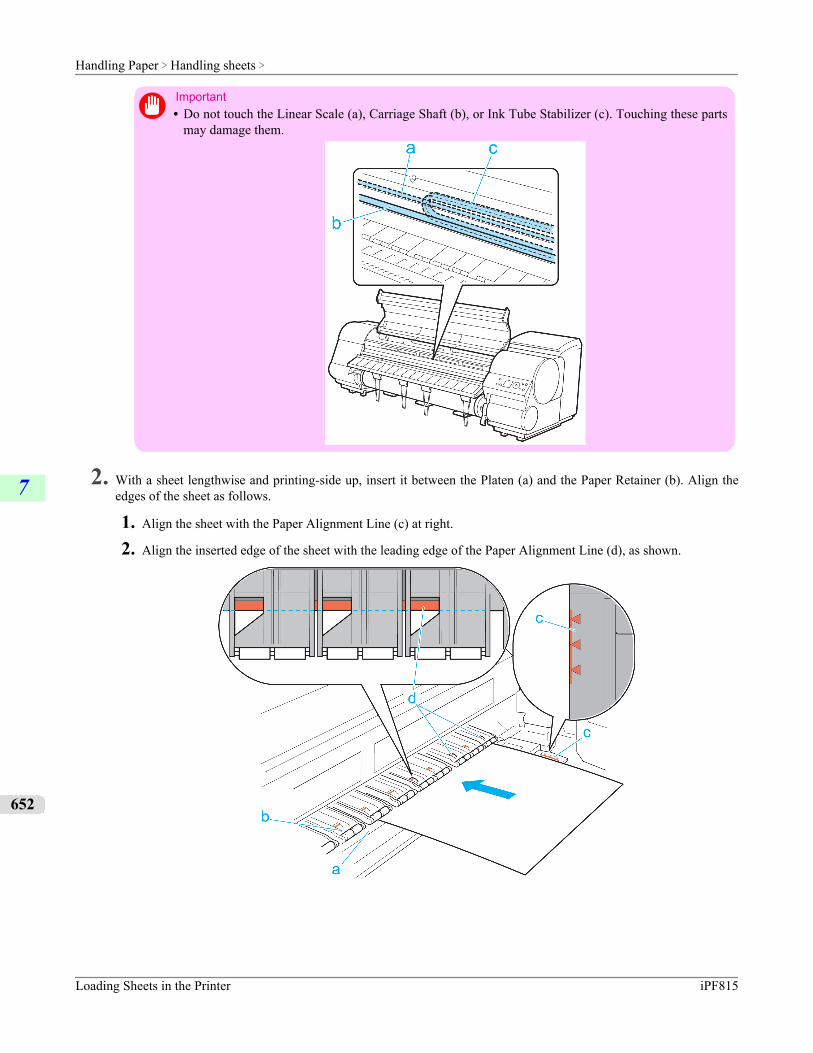
Important• Do not touch the Linear Scale (a), Carriage Shaft (b), or Ink Tube Stabilizer (c). Touching these parts
may damage them.
2. With a sheet lengthwise and printing-side up, insert it between the Platen (a) and the Paper Retainer (b). Align theedges of the sheet as follows.
1. Align the sheet with the Paper Alignment Line (c) at right.
2. Align the inserted edge of the sheet with the leading edge of the Paper Alignment Line (d), as shown.
Handling Paper > Handling sheets >
Loading Sheets in the Printer iPF815
7
652
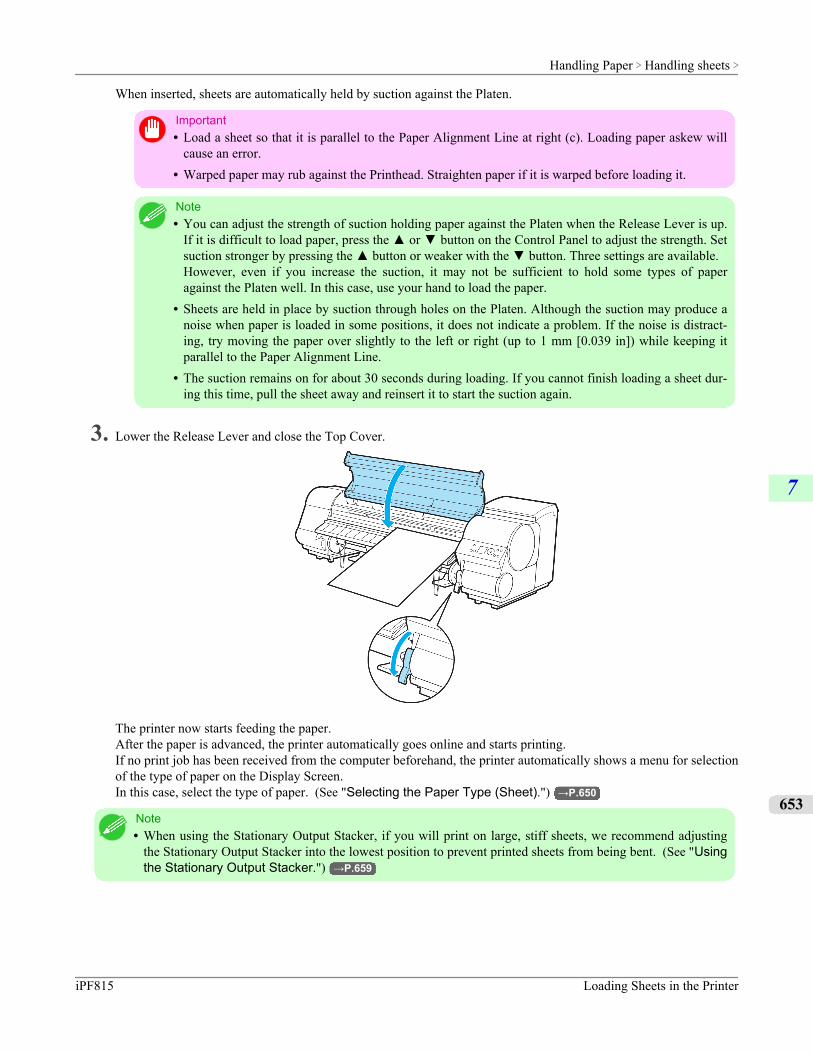
When inserted, sheets are automatically held by suction against the Platen.
Important• Load a sheet so that it is parallel to the Paper Alignment Line at right (c). Loading paper askew will
cause an error.• Warped paper may rub against the Printhead. Straighten paper if it is warped before loading it.
Note• You can adjust the strength of suction holding paper against the Platen when the Release Lever is up.
If it is difficult to load paper, press the ▲ or ▼ button on the Control Panel to adjust the strength. Setsuction stronger by pressing the ▲ button or weaker with the ▼ button. Three settings are available.However, even if you increase the suction, it may not be sufficient to hold some types of paperagainst the Platen well. In this case, use your hand to load the paper.
• Sheets are held in place by suction through holes on the Platen. Although the suction may produce anoise when paper is loaded in some positions, it does not indicate a problem. If the noise is distract-ing, try moving the paper over slightly to the left or right (up to 1 mm [0.039 in]) while keeping itparallel to the Paper Alignment Line.
• The suction remains on for about 30 seconds during loading. If you cannot finish loading a sheet dur-ing this time, pull the sheet away and reinsert it to start the suction again.
3. Lower the Release Lever and close the Top Cover.
The printer now starts feeding the paper.After the paper is advanced, the printer automatically goes online and starts printing.If no print job has been received from the computer beforehand, the printer automatically shows a menu for selectionof the type of paper on the Display Screen.In this case, select the type of paper. (See "Selecting the Paper Type (Sheet).") →P.650
Note• When using the Stationary Output Stacker, if you will print on large, stiff sheets, we recommend adjusting
the Stationary Output Stacker into the lowest position to prevent printed sheets from being bent. (See "Usingthe Stationary Output Stacker.") →P.659
Handling Paper > Handling sheets >
iPF815 Loading Sheets in the Printer
7
653
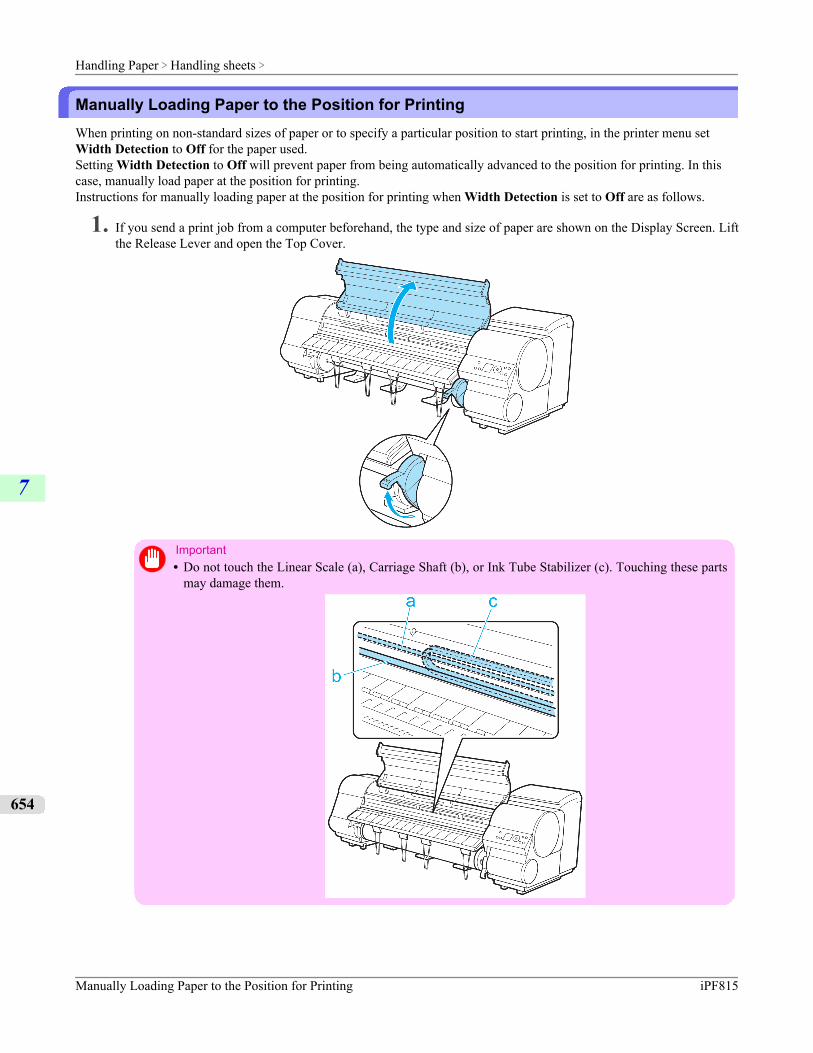
Manually Loading Paper to the Position for PrintingWhen printing on non-standard sizes of paper or to specify a particular position to start printing, in the printer menu setWidth Detection to Off for the paper used.Setting Width Detection to Off will prevent paper from being automatically advanced to the position for printing. In thiscase, manually load paper at the position for printing.Instructions for manually loading paper at the position for printing when Width Detection is set to Off are as follows.
1. If you send a print job from a computer beforehand, the type and size of paper are shown on the Display Screen. Liftthe Release Lever and open the Top Cover.
Important• Do not touch the Linear Scale (a), Carriage Shaft (b), or Ink Tube Stabilizer (c). Touching these parts
may damage them.
Handling Paper > Handling sheets >
Manually Loading Paper to the Position for Printing iPF815
7
654
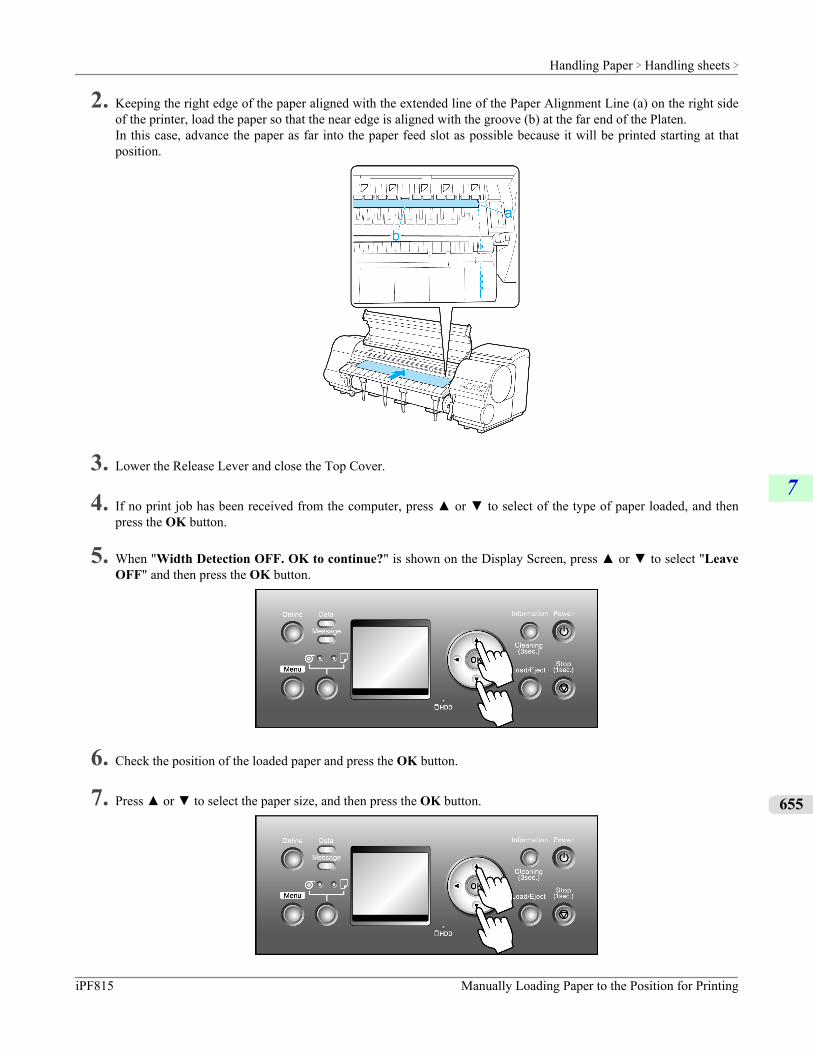
2. Keeping the right edge of the paper aligned with the extended line of the Paper Alignment Line (a) on the right sideof the printer, load the paper so that the near edge is aligned with the groove (b) at the far end of the Platen.In this case, advance the paper as far into the paper feed slot as possible because it will be printed starting at thatposition.
3. Lower the Release Lever and close the Top Cover.
4. If no print job has been received from the computer, press ▲ or ▼ to select of the type of paper loaded, and thenpress the OK button.
5. When "Width Detection OFF. OK to continue?" is shown on the Display Screen, press ▲ or ▼ to select "LeaveOFF" and then press the OK button.
6. Check the position of the loaded paper and press the OK button.
7. Press ▲ or ▼ to select the paper size, and then press the OK button.
Handling Paper > Handling sheets >
iPF815 Manually Loading Paper to the Position for Printing
7
655
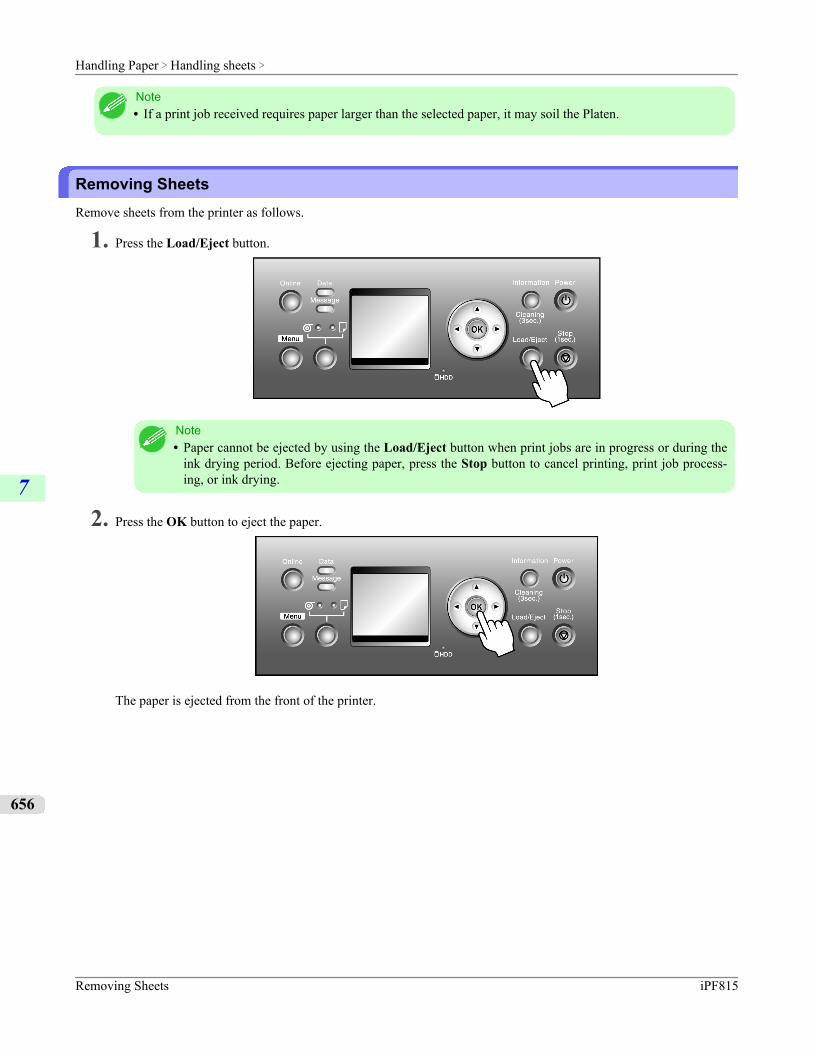
Note• If a print job received requires paper larger than the selected paper, it may soil the Platen.
Removing SheetsRemove sheets from the printer as follows.
1. Press the Load/Eject button.
Note• Paper cannot be ejected by using the Load/Eject button when print jobs are in progress or during the
ink drying period. Before ejecting paper, press the Stop button to cancel printing, print job process-ing, or ink drying.
2. Press the OK button to eject the paper.
The paper is ejected from the front of the printer.
Handling Paper > Handling sheets >
Removing Sheets iPF815
7
656
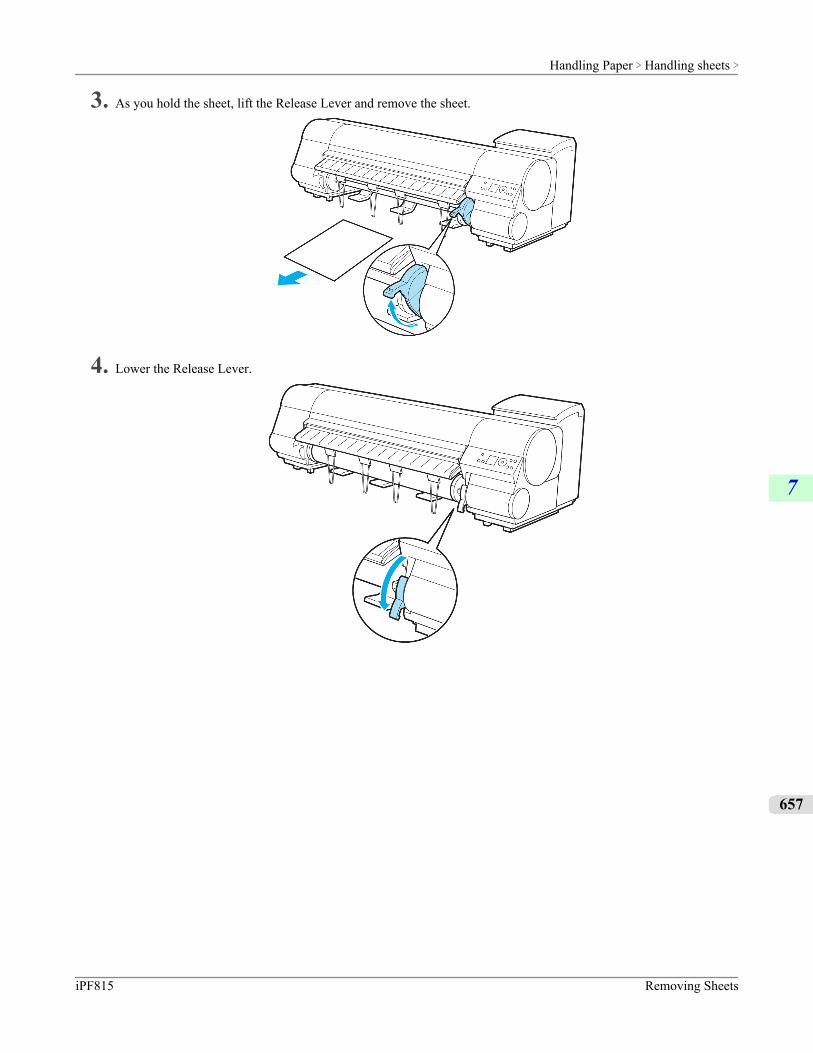
3. As you hold the sheet, lift the Release Lever and remove the sheet.
4. Lower the Release Lever.
Handling Paper > Handling sheets >
iPF815 Removing Sheets
7
657
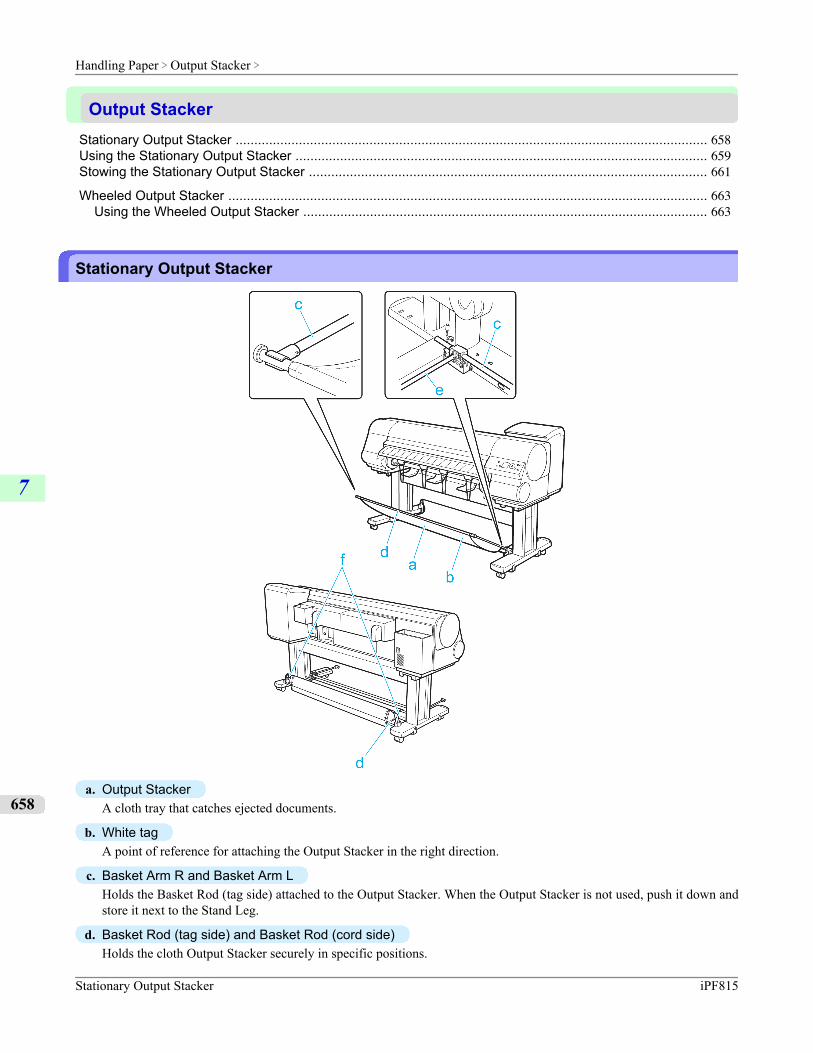
Output StackerStationary Output Stacker ............................................................................................................................... 658Using the Stationary Output Stacker ............................................................................................................... 659Stowing the Stationary Output Stacker ........................................................................................................... 661
Wheeled Output Stacker ................................................................................................................................. 663Using the Wheeled Output Stacker ............................................................................................................. 663
Stationary Output Stacker
a. Output StackerA cloth tray that catches ejected documents.
b. White tagA point of reference for attaching the Output Stacker in the right direction.
c. Basket Arm R and Basket Arm LHolds the Basket Rod (tag side) attached to the Output Stacker. When the Output Stacker is not used, push it down andstore it next to the Stand Leg.
d. Basket Rod (tag side) and Basket Rod (cord side)Holds the cloth Output Stacker securely in specific positions.
Handling Paper > Output Stacker >
Stationary Output Stacker iPF815
7
658
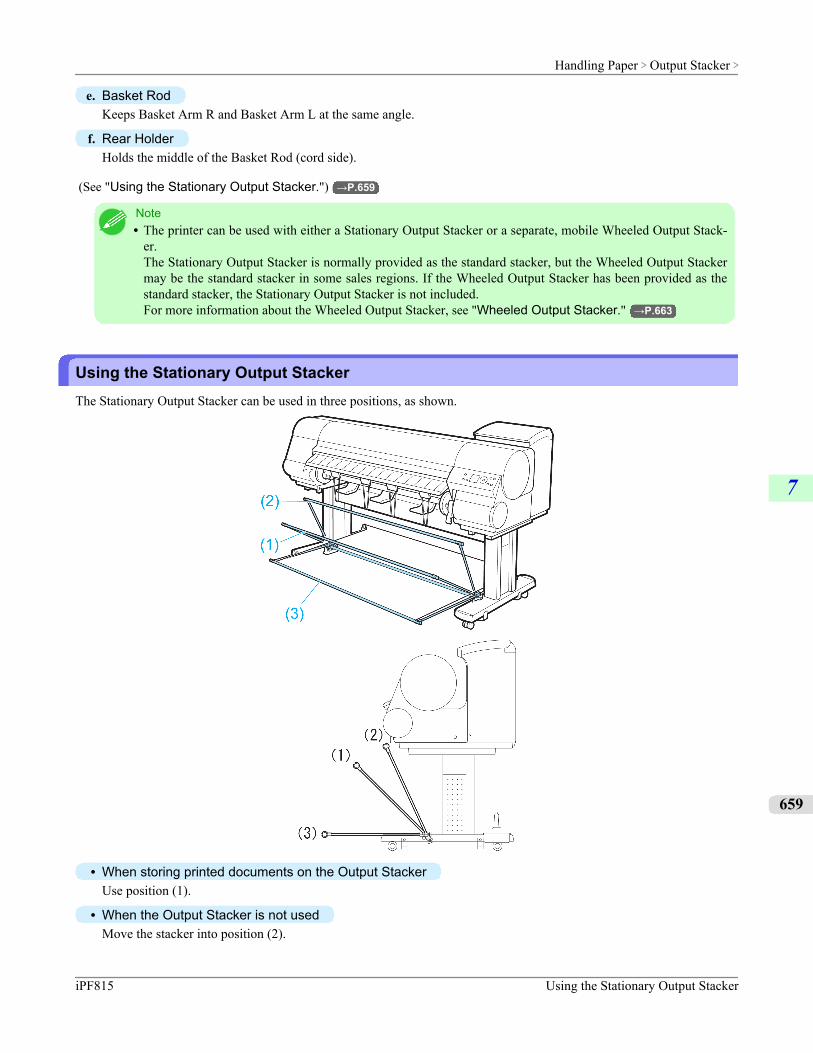
e. Basket RodKeeps Basket Arm R and Basket Arm L at the same angle.
f. Rear HolderHolds the middle of the Basket Rod (cord side).
(See "Using the Stationary Output Stacker.") →P.659
Note• The printer can be used with either a Stationary Output Stacker or a separate, mobile Wheeled Output Stack-
er.The Stationary Output Stacker is normally provided as the standard stacker, but the Wheeled Output Stackermay be the standard stacker in some sales regions. If the Wheeled Output Stacker has been provided as thestandard stacker, the Stationary Output Stacker is not included.For more information about the Wheeled Output Stacker, see "Wheeled Output Stacker." →P.663
Using the Stationary Output StackerThe Stationary Output Stacker can be used in three positions, as shown.
• When storing printed documents on the Output StackerUse position (1).
• When the Output Stacker is not usedMove the stacker into position (2).
Handling Paper > Output Stacker >
iPF815 Using the Stationary Output Stacker
7
659
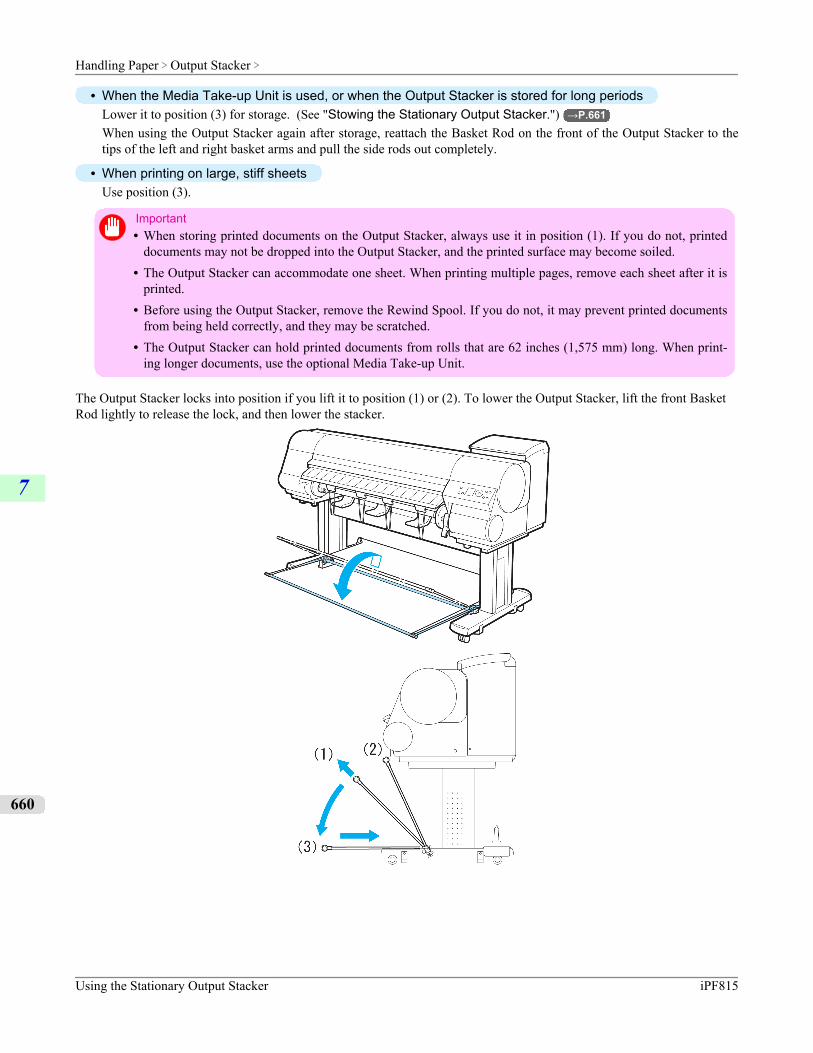
• When the Media Take-up Unit is used, or when the Output Stacker is stored for long periodsLower it to position (3) for storage. (See "Stowing the Stationary Output Stacker.") →P.661
When using the Output Stacker again after storage, reattach the Basket Rod on the front of the Output Stacker to thetips of the left and right basket arms and pull the side rods out completely.
• When printing on large, stiff sheetsUse position (3).
Important• When storing printed documents on the Output Stacker, always use it in position (1). If you do not, printed
documents may not be dropped into the Output Stacker, and the printed surface may become soiled.• The Output Stacker can accommodate one sheet. When printing multiple pages, remove each sheet after it is
printed.• Before using the Output Stacker, remove the Rewind Spool. If you do not, it may prevent printed documents
from being held correctly, and they may be scratched.• The Output Stacker can hold printed documents from rolls that are 62 inches (1,575 mm) long. When print-
ing longer documents, use the optional Media Take-up Unit.
The Output Stacker locks into position if you lift it to position (1) or (2). To lower the Output Stacker, lift the front BasketRod lightly to release the lock, and then lower the stacker.
Handling Paper > Output Stacker >
Using the Stationary Output Stacker iPF815
7
660
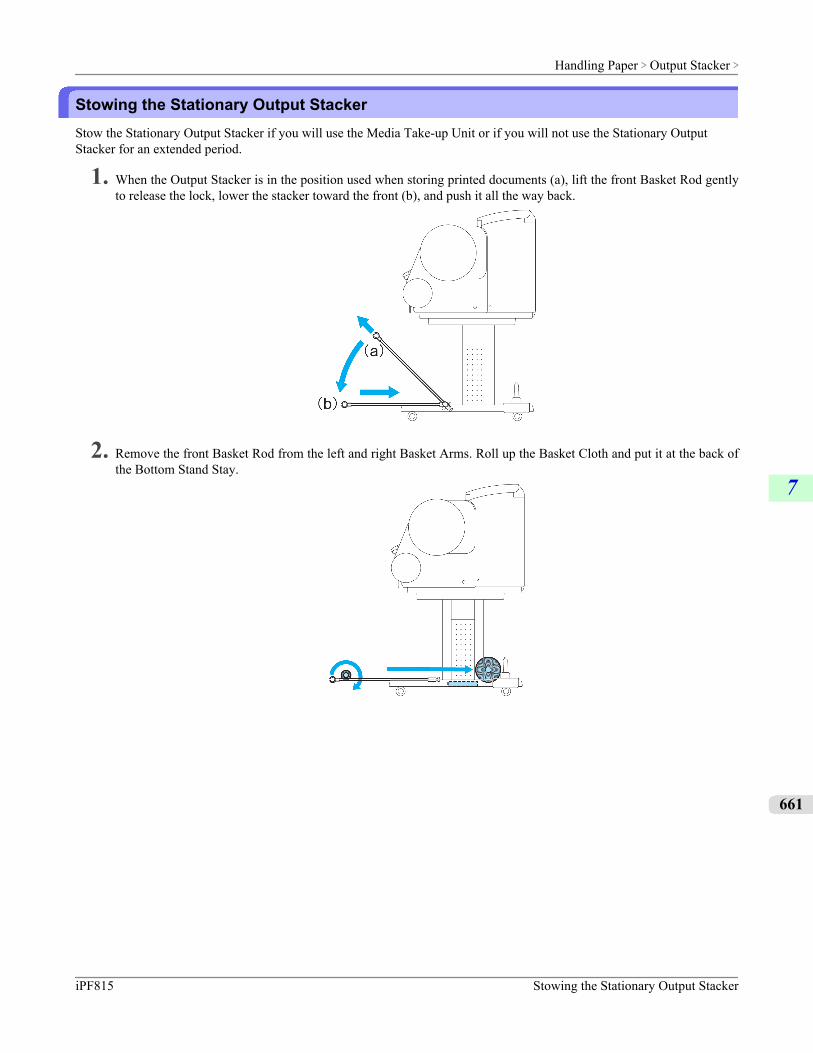
Stowing the Stationary Output StackerStow the Stationary Output Stacker if you will use the Media Take-up Unit or if you will not use the Stationary OutputStacker for an extended period.
1. When the Output Stacker is in the position used when storing printed documents (a), lift the front Basket Rod gentlyto release the lock, lower the stacker toward the front (b), and push it all the way back.
2. Remove the front Basket Rod from the left and right Basket Arms. Roll up the Basket Cloth and put it at the back ofthe Bottom Stand Stay.
Handling Paper > Output Stacker >
iPF815 Stowing the Stationary Output Stacker
7
661
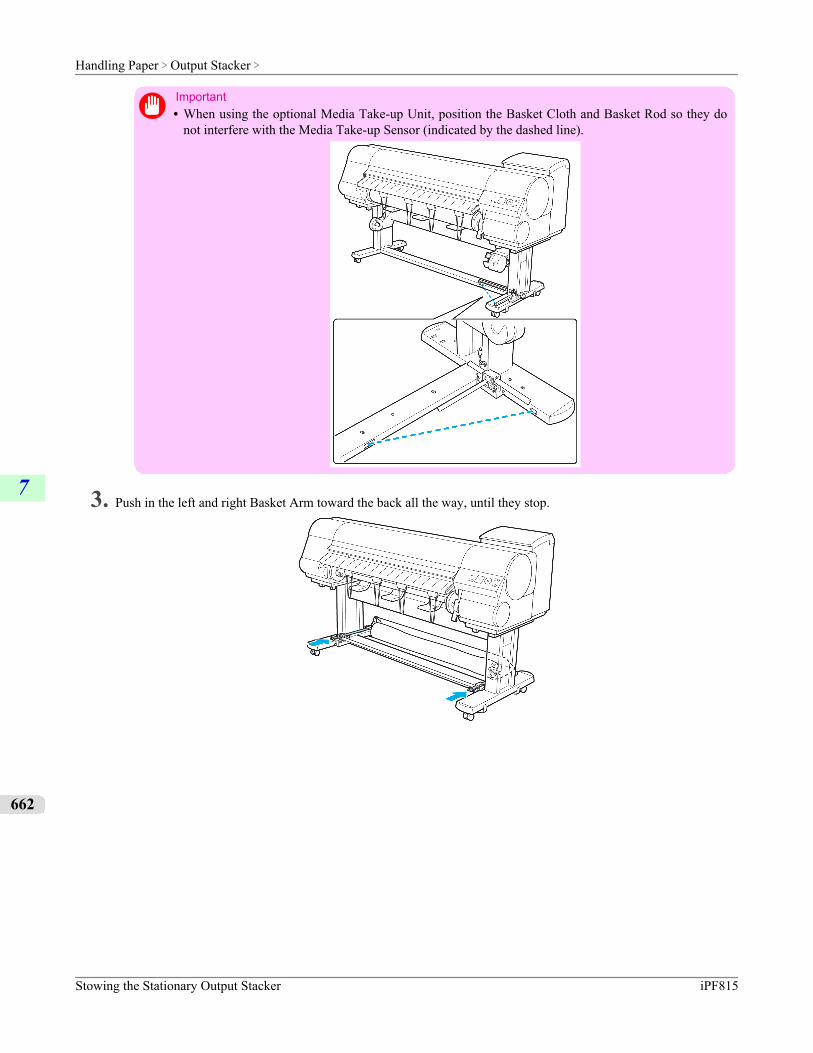
Important• When using the optional Media Take-up Unit, position the Basket Cloth and Basket Rod so they do
not interfere with the Media Take-up Sensor (indicated by the dashed line).
3. Push in the left and right Basket Arm toward the back all the way, until they stop.
Handling Paper > Output Stacker >
Stowing the Stationary Output Stacker iPF815
7
662
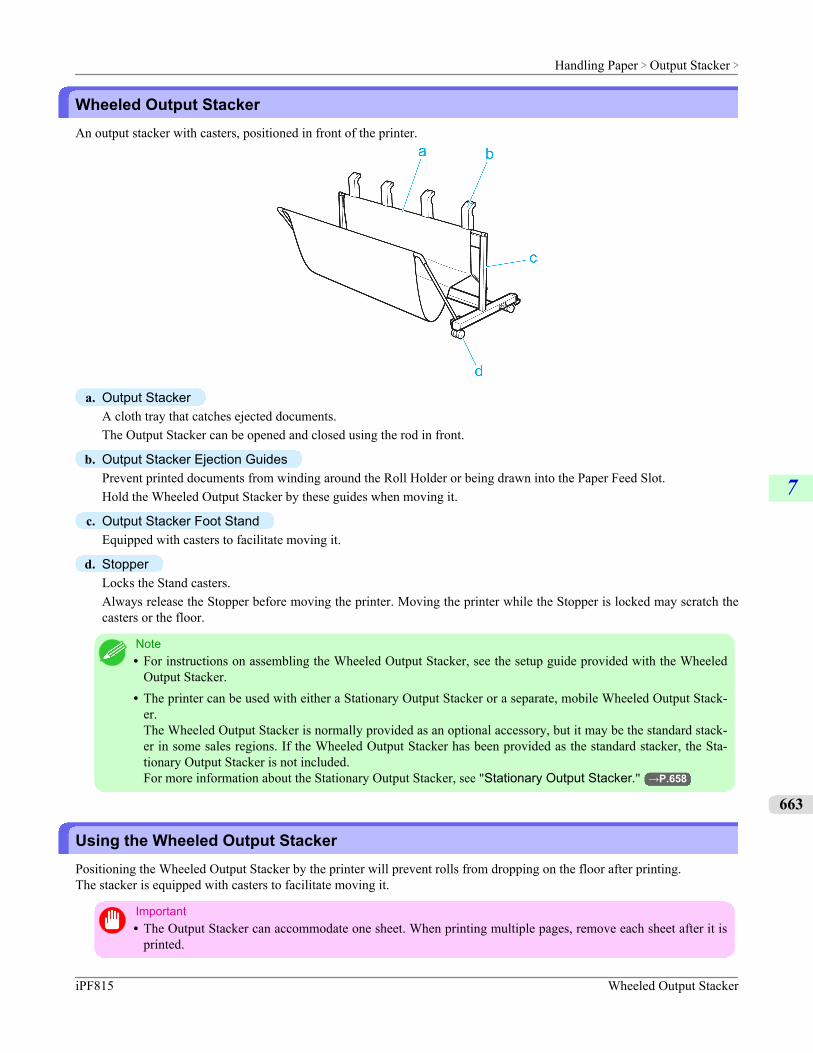
Wheeled Output StackerAn output stacker with casters, positioned in front of the printer.
a. Output StackerA cloth tray that catches ejected documents.The Output Stacker can be opened and closed using the rod in front.
b. Output Stacker Ejection GuidesPrevent printed documents from winding around the Roll Holder or being drawn into the Paper Feed Slot.Hold the Wheeled Output Stacker by these guides when moving it.
c. Output Stacker Foot StandEquipped with casters to facilitate moving it.
d. StopperLocks the Stand casters.Always release the Stopper before moving the printer. Moving the printer while the Stopper is locked may scratch thecasters or the floor.
Note• For instructions on assembling the Wheeled Output Stacker, see the setup guide provided with the Wheeled
Output Stacker.• The printer can be used with either a Stationary Output Stacker or a separate, mobile Wheeled Output Stack-
er.The Wheeled Output Stacker is normally provided as an optional accessory, but it may be the standard stack-er in some sales regions. If the Wheeled Output Stacker has been provided as the standard stacker, the Sta-tionary Output Stacker is not included.For more information about the Stationary Output Stacker, see "Stationary Output Stacker." →P.658
Using the Wheeled Output StackerPositioning the Wheeled Output Stacker by the printer will prevent rolls from dropping on the floor after printing.The stacker is equipped with casters to facilitate moving it.
Important• The Output Stacker can accommodate one sheet. When printing multiple pages, remove each sheet after it is
printed.
Handling Paper > Output Stacker >
iPF815 Wheeled Output Stacker
7
663
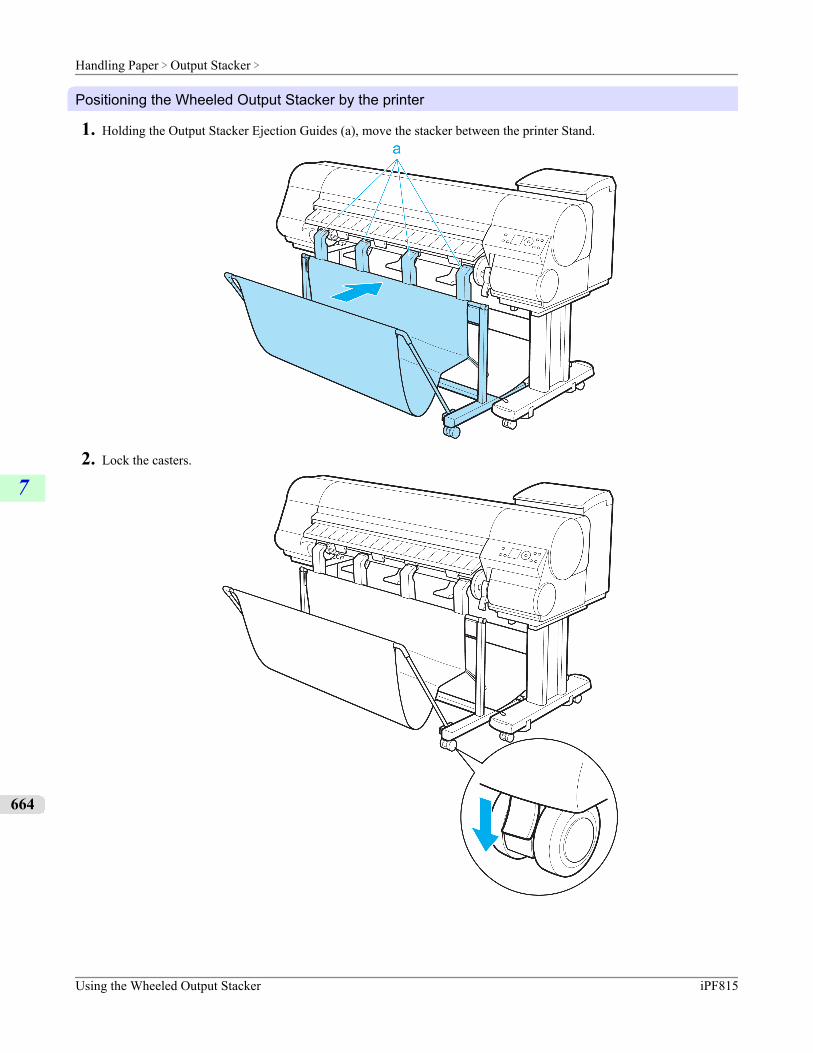
Positioning the Wheeled Output Stacker by the printer
1. Holding the Output Stacker Ejection Guides (a), move the stacker between the printer Stand.
2. Lock the casters.
Handling Paper > Output Stacker >
Using the Wheeled Output Stacker iPF815
7
664
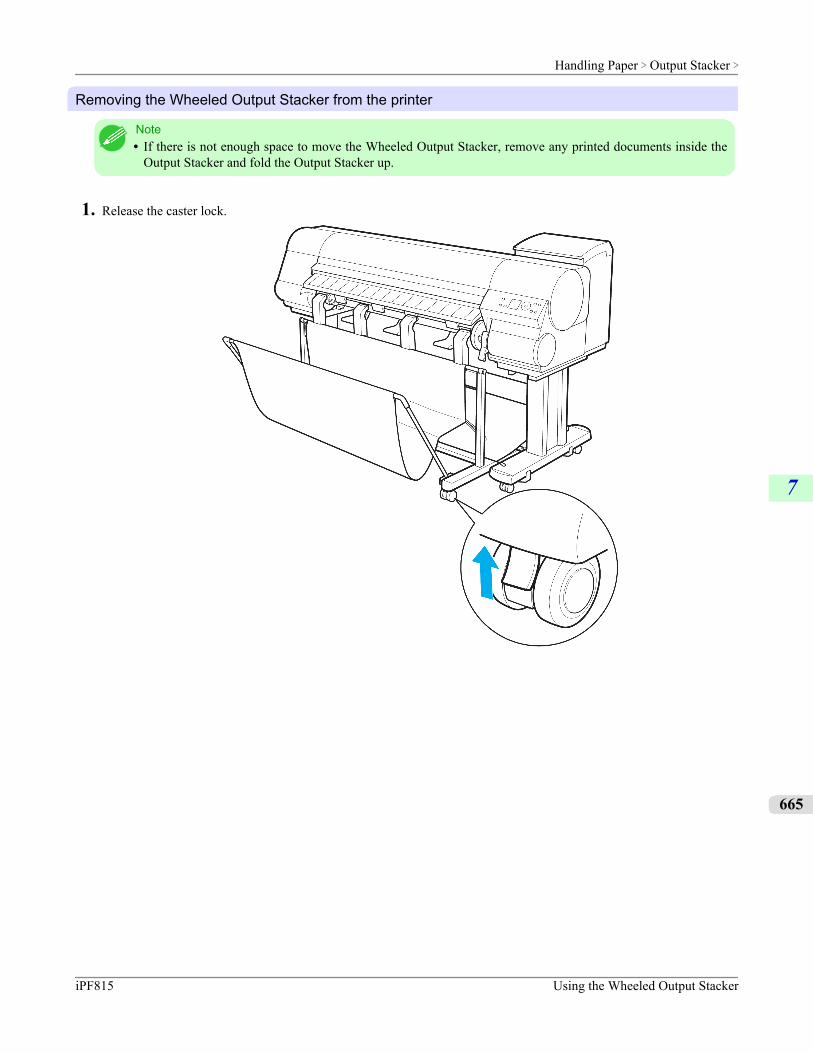
Removing the Wheeled Output Stacker from the printer
Note• If there is not enough space to move the Wheeled Output Stacker, remove any printed documents inside the
Output Stacker and fold the Output Stacker up.
1. Release the caster lock.
Handling Paper > Output Stacker >
iPF815 Using the Wheeled Output Stacker
7
665
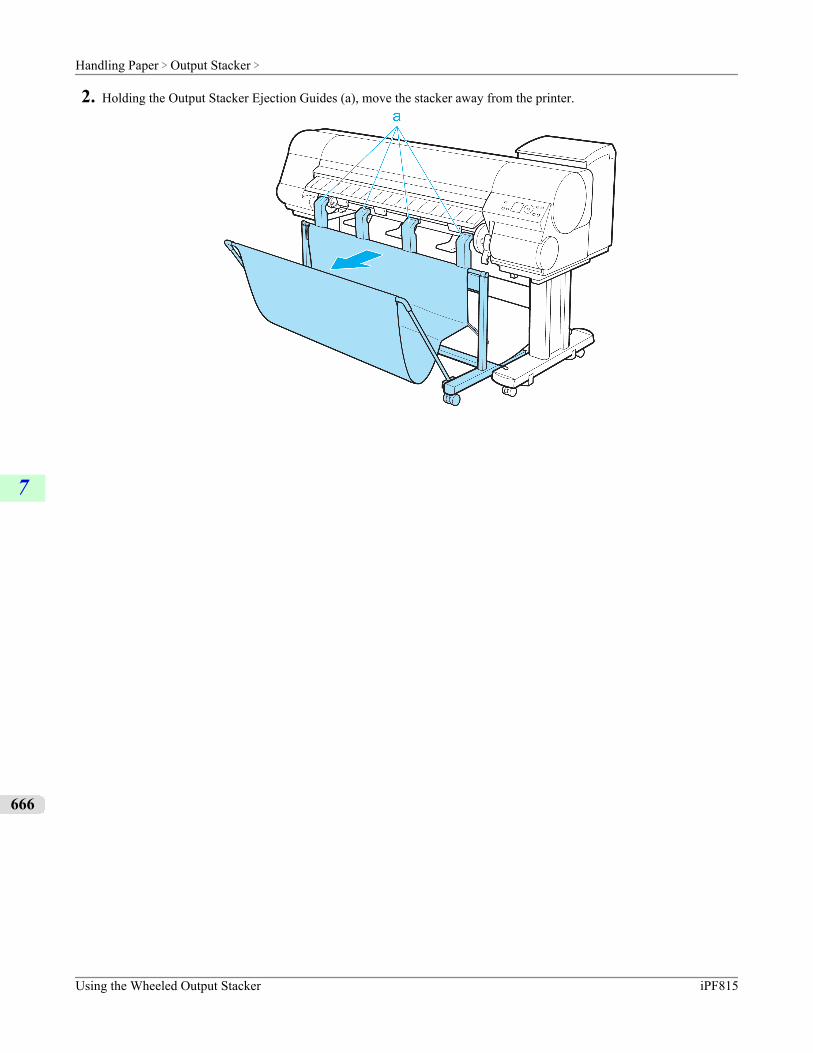
2. Holding the Output Stacker Ejection Guides (a), move the stacker away from the printer.
Handling Paper > Output Stacker >
Using the Wheeled Output Stacker iPF815
7
666
Adjustments for Better Print Quality
Adjusting the Printhead 668
Adjusting the feed amount 676
Adjustments for Better Print Quality >
iPF815
8
667
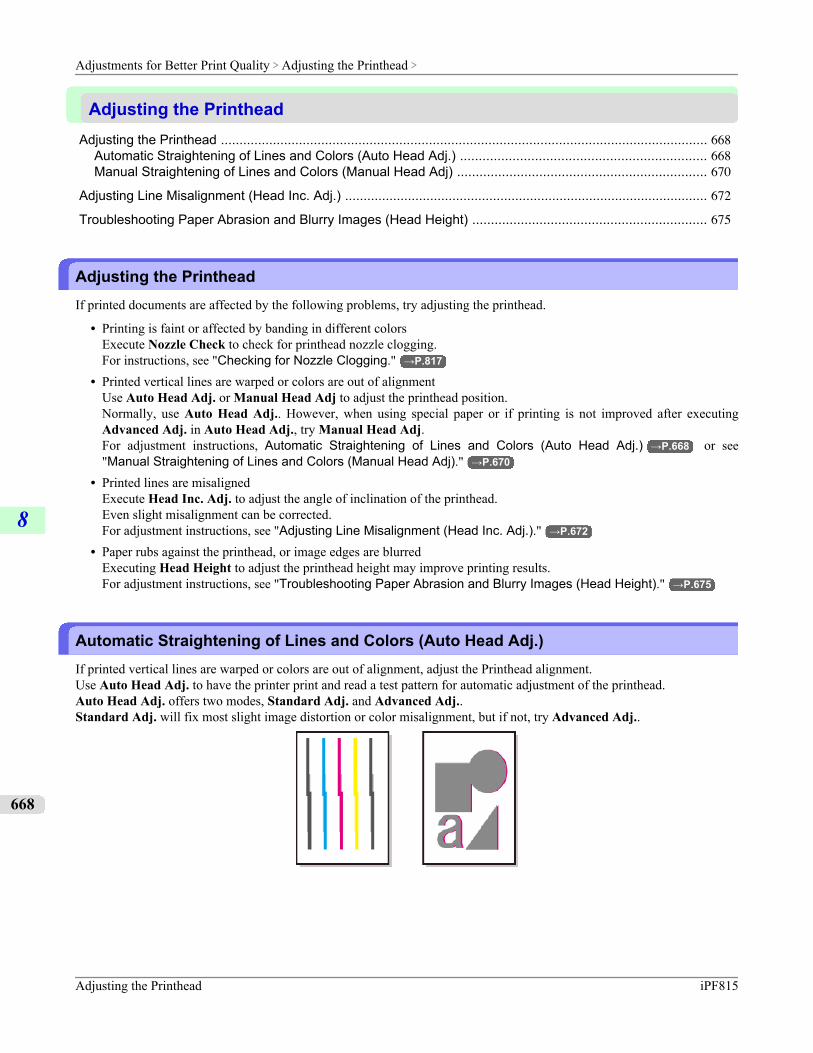
Adjusting the PrintheadAdjusting the Printhead ................................................................................................................................... 668
Automatic Straightening of Lines and Colors (Auto Head Adj.) .................................................................. 668Manual Straightening of Lines and Colors (Manual Head Adj) ................................................................... 670
Adjusting Line Misalignment (Head Inc. Adj.) .................................................................................................. 672
Troubleshooting Paper Abrasion and Blurry Images (Head Height) ............................................................... 675
Adjusting the PrintheadIf printed documents are affected by the following problems, try adjusting the printhead.
• Printing is faint or affected by banding in different colorsExecute Nozzle Check to check for printhead nozzle clogging.For instructions, see "Checking for Nozzle Clogging." →P.817
• Printed vertical lines are warped or colors are out of alignmentUse Auto Head Adj. or Manual Head Adj to adjust the printhead position.Normally, use Auto Head Adj.. However, when using special paper or if printing is not improved after executingAdvanced Adj. in Auto Head Adj., try Manual Head Adj.For adjustment instructions, Automatic Straightening of Lines and Colors (Auto Head Adj.) →P.668 or see"Manual Straightening of Lines and Colors (Manual Head Adj)." →P.670
• Printed lines are misalignedExecute Head Inc. Adj. to adjust the angle of inclination of the printhead.Even slight misalignment can be corrected.For adjustment instructions, see "Adjusting Line Misalignment (Head Inc. Adj.)." →P.672
• Paper rubs against the printhead, or image edges are blurredExecuting Head Height to adjust the printhead height may improve printing results.For adjustment instructions, see "Troubleshooting Paper Abrasion and Blurry Images (Head Height)." →P.675
Automatic Straightening of Lines and Colors (Auto Head Adj.)If printed vertical lines are warped or colors are out of alignment, adjust the Printhead alignment.Use Auto Head Adj. to have the printer print and read a test pattern for automatic adjustment of the printhead.Auto Head Adj. offers two modes, Standard Adj. and Advanced Adj..Standard Adj. will fix most slight image distortion or color misalignment, but if not, try Advanced Adj..
Adjustments for Better Print Quality > Adjusting the Printhead >
Adjusting the Printhead iPF815
8
668
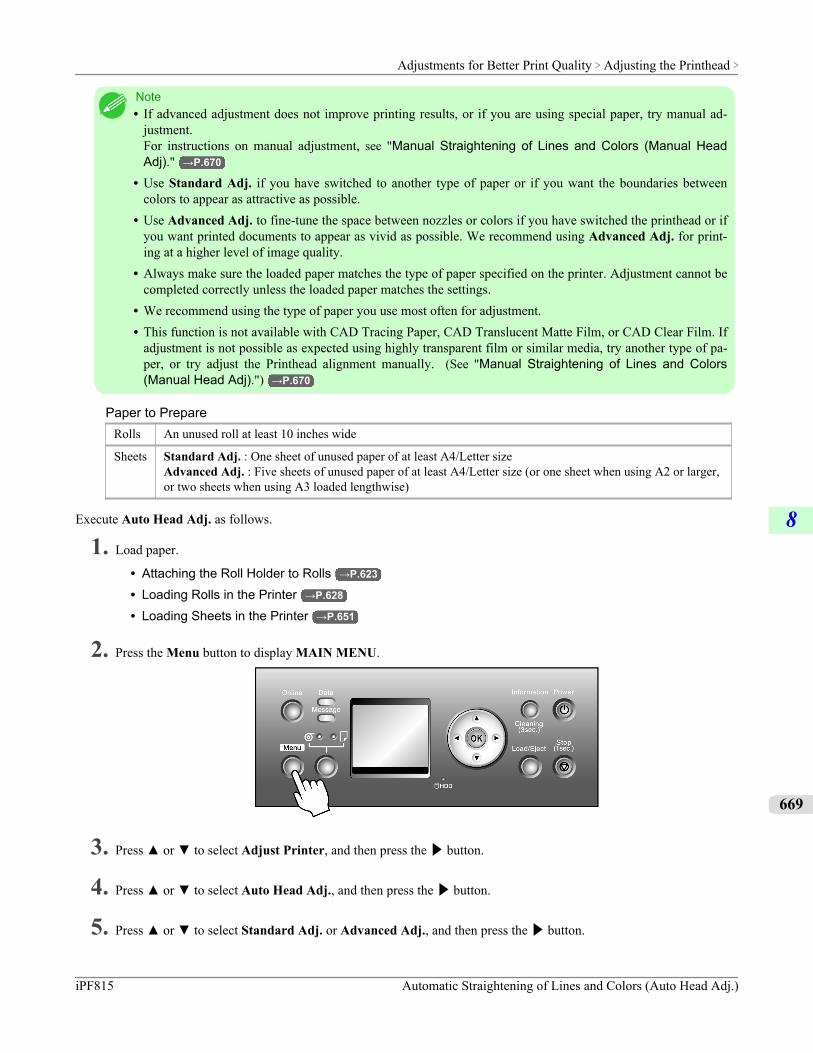
Note• If advanced adjustment does not improve printing results, or if you are using special paper, try manual ad-
justment.For instructions on manual adjustment, see "Manual Straightening of Lines and Colors (Manual HeadAdj)." →P.670
• Use Standard Adj. if you have switched to another type of paper or if you want the boundaries betweencolors to appear as attractive as possible.
• Use Advanced Adj. to fine-tune the space between nozzles or colors if you have switched the printhead or ifyou want printed documents to appear as vivid as possible. We recommend using Advanced Adj. for print-ing at a higher level of image quality.
• Always make sure the loaded paper matches the type of paper specified on the printer. Adjustment cannot becompleted correctly unless the loaded paper matches the settings.
• We recommend using the type of paper you use most often for adjustment.• This function is not available with CAD Tracing Paper, CAD Translucent Matte Film, or CAD Clear Film. If
adjustment is not possible as expected using highly transparent film or similar media, try another type of pa-per, or try adjust the Printhead alignment manually. (See "Manual Straightening of Lines and Colors(Manual Head Adj).") →P.670
Paper to PrepareRolls An unused roll at least 10 inches wide
Sheets Standard Adj. : One sheet of unused paper of at least A4/Letter sizeAdvanced Adj. : Five sheets of unused paper of at least A4/Letter size (or one sheet when using A2 or larger,or two sheets when using A3 loaded lengthwise)
Execute Auto Head Adj. as follows.
1. Load paper.
• Attaching the Roll Holder to Rolls →P.623
• Loading Rolls in the Printer →P.628
• Loading Sheets in the Printer →P.651
2. Press the Menu button to display MAIN MENU.
3. Press ▲ or ▼ to select Adjust Printer, and then press the ▶ button.
4. Press ▲ or ▼ to select Auto Head Adj., and then press the ▶ button.
5. Press ▲ or ▼ to select Standard Adj. or Advanced Adj., and then press the ▶ button.
Adjustments for Better Print Quality > Adjusting the Printhead >
iPF815 Automatic Straightening of Lines and Colors (Auto Head Adj.)
8
669
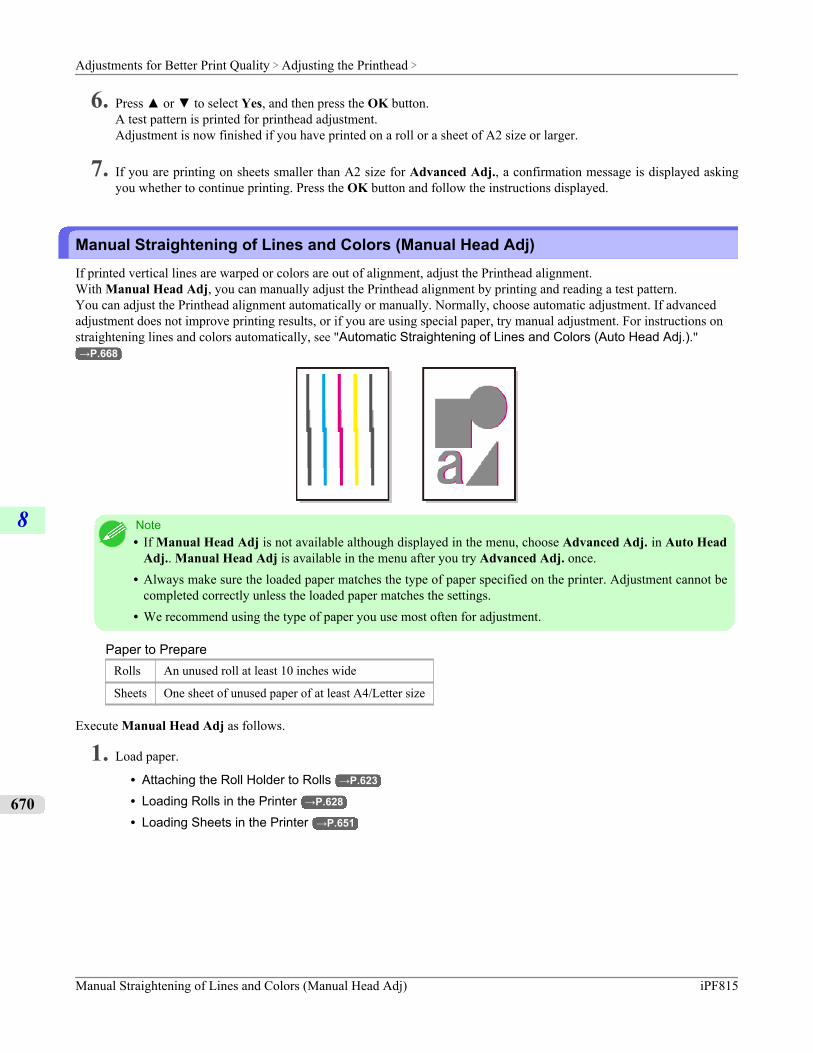
6. Press ▲ or ▼ to select Yes, and then press the OK button.A test pattern is printed for printhead adjustment.Adjustment is now finished if you have printed on a roll or a sheet of A2 size or larger.
7. If you are printing on sheets smaller than A2 size for Advanced Adj., a confirmation message is displayed askingyou whether to continue printing. Press the OK button and follow the instructions displayed.
Manual Straightening of Lines and Colors (Manual Head Adj)If printed vertical lines are warped or colors are out of alignment, adjust the Printhead alignment.With Manual Head Adj, you can manually adjust the Printhead alignment by printing and reading a test pattern.You can adjust the Printhead alignment automatically or manually. Normally, choose automatic adjustment. If advancedadjustment does not improve printing results, or if you are using special paper, try manual adjustment. For instructions onstraightening lines and colors automatically, see "Automatic Straightening of Lines and Colors (Auto Head Adj.)."→P.668
Note• If Manual Head Adj is not available although displayed in the menu, choose Advanced Adj. in Auto Head
Adj.. Manual Head Adj is available in the menu after you try Advanced Adj. once.• Always make sure the loaded paper matches the type of paper specified on the printer. Adjustment cannot be
completed correctly unless the loaded paper matches the settings.• We recommend using the type of paper you use most often for adjustment.
Paper to PrepareRolls An unused roll at least 10 inches wide
Sheets One sheet of unused paper of at least A4/Letter size
Execute Manual Head Adj as follows.
1. Load paper.
• Attaching the Roll Holder to Rolls →P.623
• Loading Rolls in the Printer →P.628
• Loading Sheets in the Printer →P.651
Adjustments for Better Print Quality > Adjusting the Printhead >
Manual Straightening of Lines and Colors (Manual Head Adj) iPF815
8
670
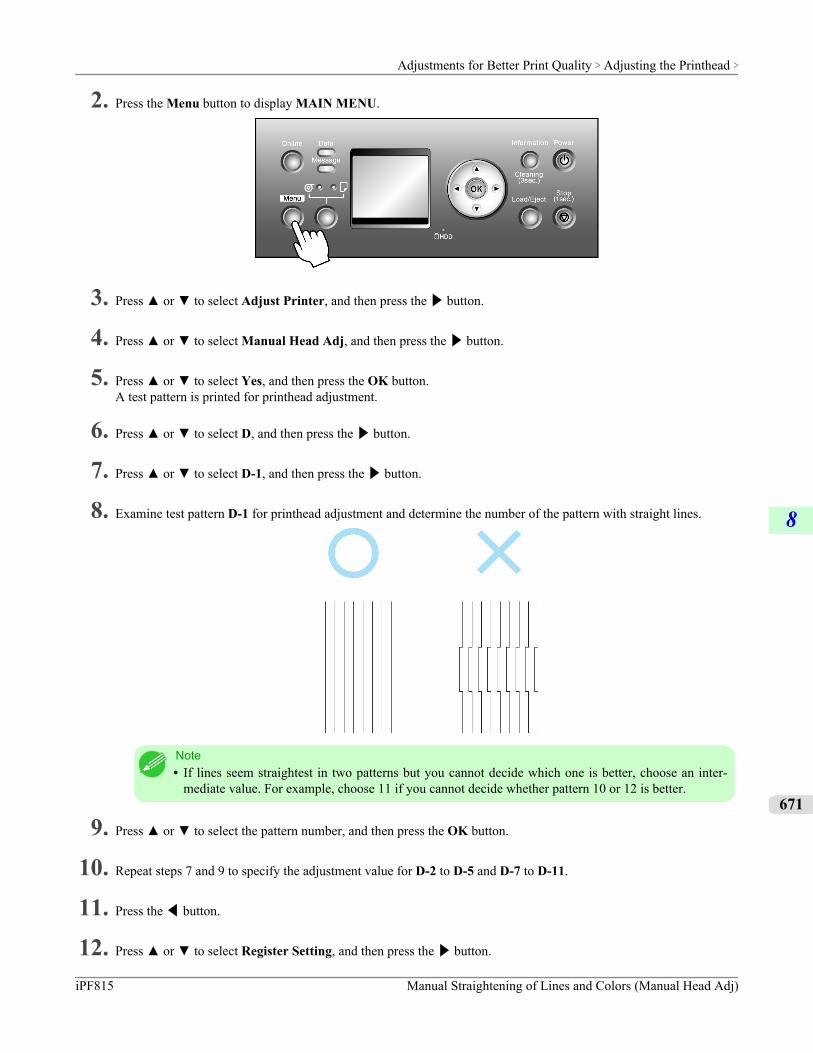
2. Press the Menu button to display MAIN MENU.
3. Press ▲ or ▼ to select Adjust Printer, and then press the ▶ button.
4. Press ▲ or ▼ to select Manual Head Adj, and then press the ▶ button.
5. Press ▲ or ▼ to select Yes, and then press the OK button.A test pattern is printed for printhead adjustment.
6. Press ▲ or ▼ to select D, and then press the ▶ button.
7. Press ▲ or ▼ to select D-1, and then press the ▶ button.
8. Examine test pattern D-1 for printhead adjustment and determine the number of the pattern with straight lines.
Note• If lines seem straightest in two patterns but you cannot decide which one is better, choose an inter-
mediate value. For example, choose 11 if you cannot decide whether pattern 10 or 12 is better.
9. Press ▲ or ▼ to select the pattern number, and then press the OK button.
10. Repeat steps 7 and 9 to specify the adjustment value for D-2 to D-5 and D-7 to D-11.
11. Press the ◀ button.
12. Press ▲ or ▼ to select Register Setting, and then press the ▶ button.
Adjustments for Better Print Quality > Adjusting the Printhead >
iPF815 Manual Straightening of Lines and Colors (Manual Head Adj)
8
671
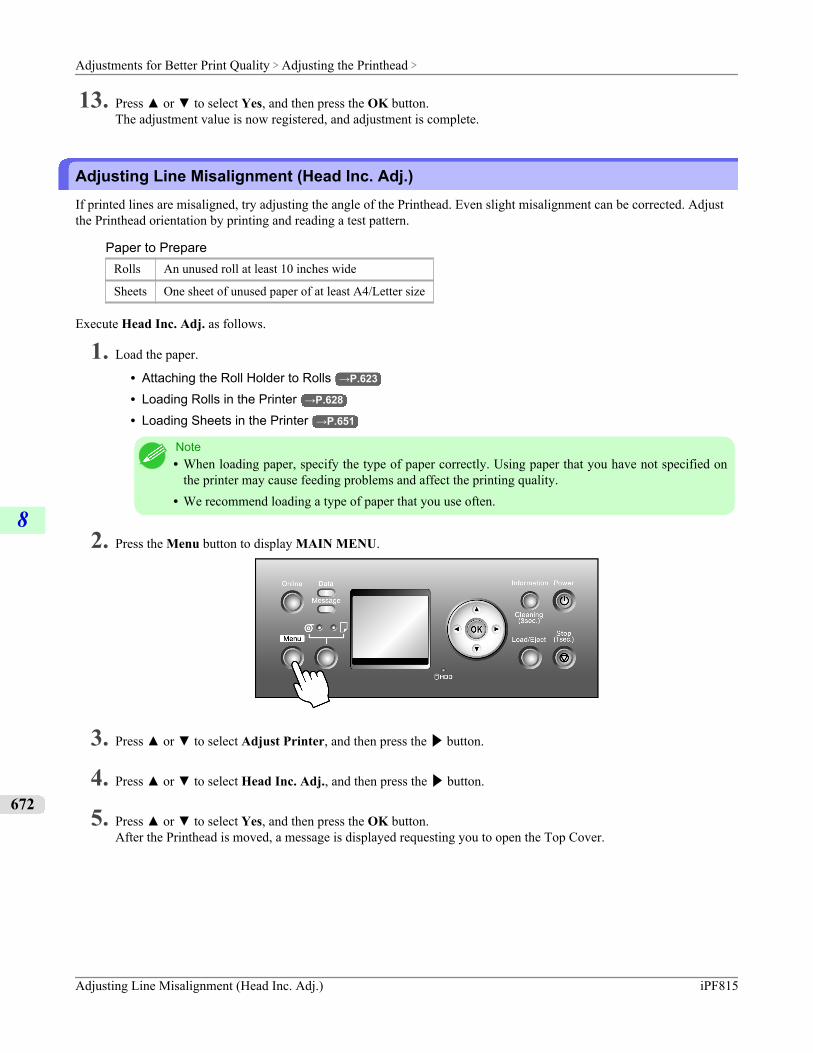
13. Press ▲ or ▼ to select Yes, and then press the OK button.The adjustment value is now registered, and adjustment is complete.
Adjusting Line Misalignment (Head Inc. Adj.)If printed lines are misaligned, try adjusting the angle of the Printhead. Even slight misalignment can be corrected. Adjustthe Printhead orientation by printing and reading a test pattern.
Paper to PrepareRolls An unused roll at least 10 inches wide
Sheets One sheet of unused paper of at least A4/Letter size
Execute Head Inc. Adj. as follows.
1. Load the paper.
• Attaching the Roll Holder to Rolls →P.623
• Loading Rolls in the Printer →P.628
• Loading Sheets in the Printer →P.651
Note• When loading paper, specify the type of paper correctly. Using paper that you have not specified on
the printer may cause feeding problems and affect the printing quality.• We recommend loading a type of paper that you use often.
2. Press the Menu button to display MAIN MENU.
3. Press ▲ or ▼ to select Adjust Printer, and then press the ▶ button.
4. Press ▲ or ▼ to select Head Inc. Adj., and then press the ▶ button.
5. Press ▲ or ▼ to select Yes, and then press the OK button.After the Printhead is moved, a message is displayed requesting you to open the Top Cover.
Adjustments for Better Print Quality > Adjusting the Printhead >
Adjusting Line Misalignment (Head Inc. Adj.) iPF815
8
672
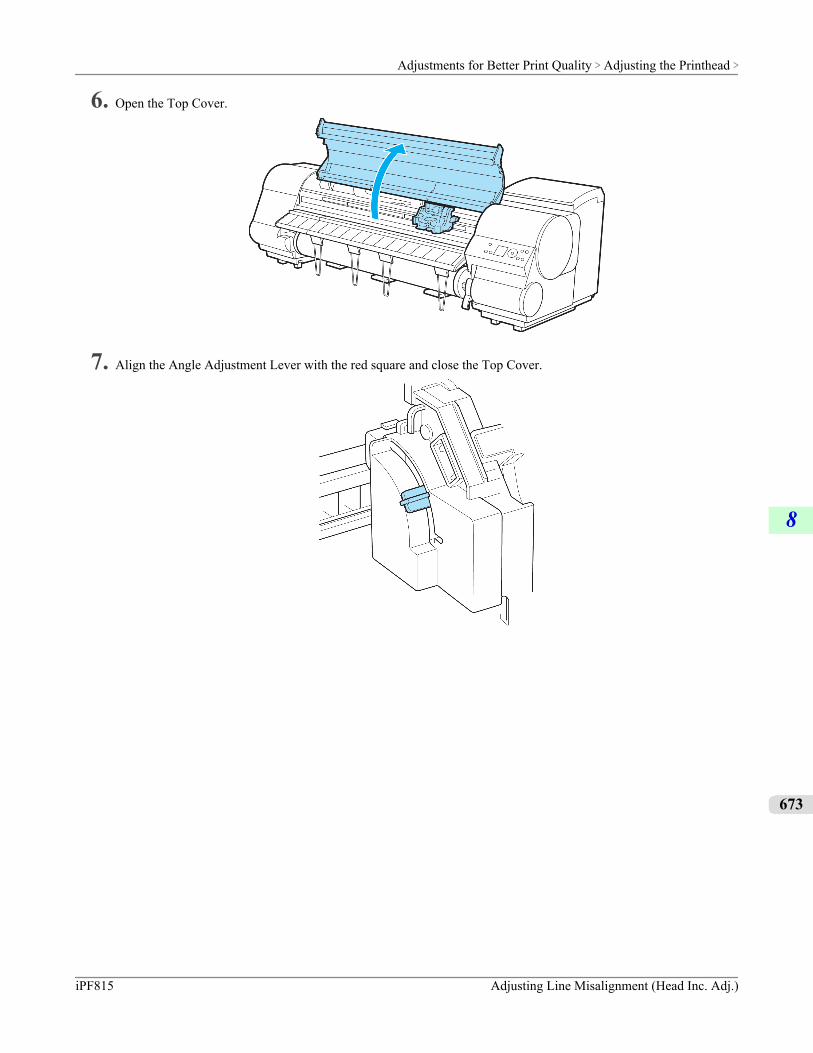
6. Open the Top Cover.
7. Align the Angle Adjustment Lever with the red square and close the Top Cover.
Adjustments for Better Print Quality > Adjusting the Printhead >
iPF815 Adjusting Line Misalignment (Head Inc. Adj.)
8
673
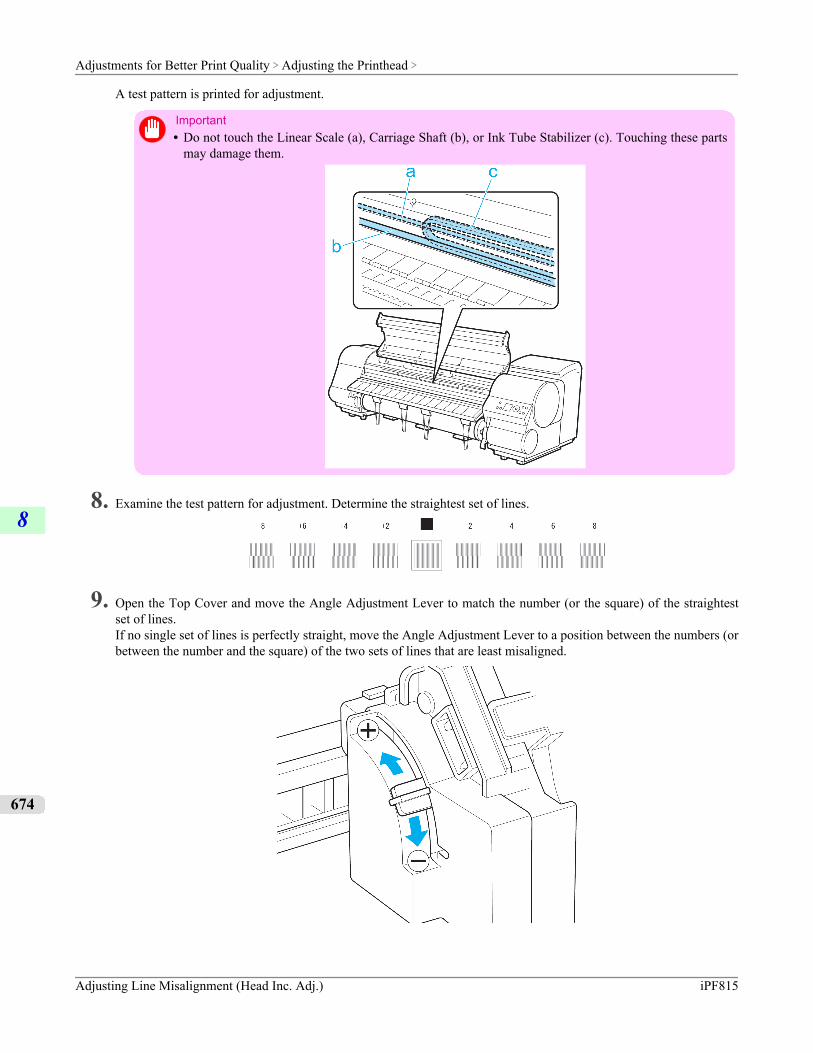
A test pattern is printed for adjustment.
Important• Do not touch the Linear Scale (a), Carriage Shaft (b), or Ink Tube Stabilizer (c). Touching these parts
may damage them.
8. Examine the test pattern for adjustment. Determine the straightest set of lines.
9. Open the Top Cover and move the Angle Adjustment Lever to match the number (or the square) of the straightestset of lines.If no single set of lines is perfectly straight, move the Angle Adjustment Lever to a position between the numbers (orbetween the number and the square) of the two sets of lines that are least misaligned.
Adjustments for Better Print Quality > Adjusting the Printhead >
Adjusting Line Misalignment (Head Inc. Adj.) iPF815
8
674
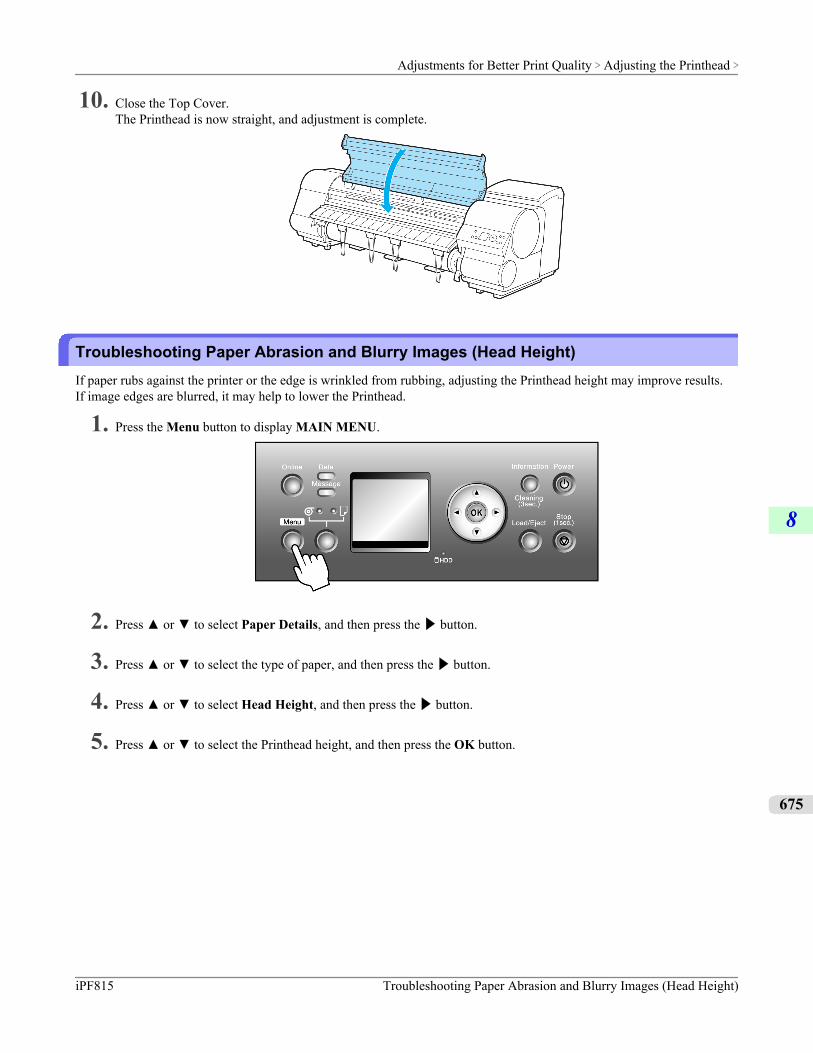
10. Close the Top Cover.The Printhead is now straight, and adjustment is complete.
Troubleshooting Paper Abrasion and Blurry Images (Head Height)If paper rubs against the printer or the edge is wrinkled from rubbing, adjusting the Printhead height may improve results.If image edges are blurred, it may help to lower the Printhead.
1. Press the Menu button to display MAIN MENU.
2. Press ▲ or ▼ to select Paper Details, and then press the ▶ button.
3. Press ▲ or ▼ to select the type of paper, and then press the ▶ button.
4. Press ▲ or ▼ to select Head Height, and then press the ▶ button.
5. Press ▲ or ▼ to select the Printhead height, and then press the OK button.
Adjustments for Better Print Quality > Adjusting the Printhead >
iPF815 Troubleshooting Paper Abrasion and Blurry Images (Head Height)
8
675
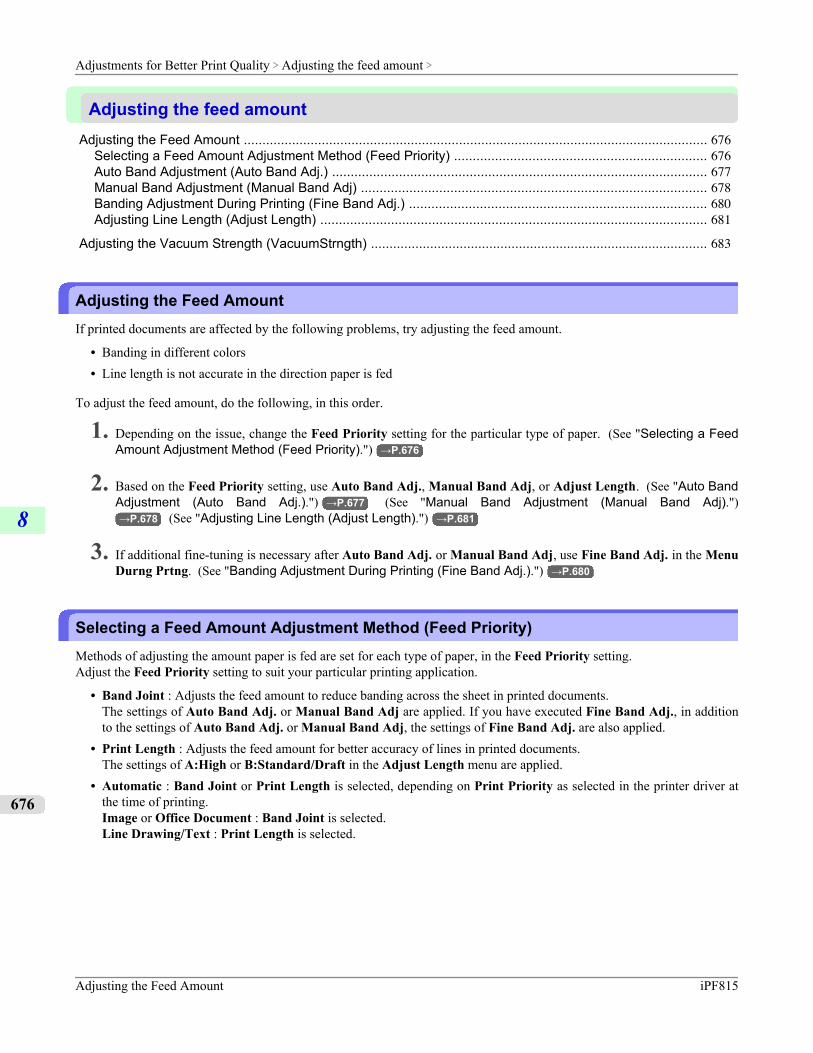
Adjusting the feed amountAdjusting the Feed Amount ............................................................................................................................. 676
Selecting a Feed Amount Adjustment Method (Feed Priority) .................................................................... 676Auto Band Adjustment (Auto Band Adj.) ..................................................................................................... 677Manual Band Adjustment (Manual Band Adj) ............................................................................................. 678Banding Adjustment During Printing (Fine Band Adj.) ................................................................................ 680Adjusting Line Length (Adjust Length) ........................................................................................................ 681
Adjusting the Vacuum Strength (VacuumStrngth) ........................................................................................... 683
Adjusting the Feed AmountIf printed documents are affected by the following problems, try adjusting the feed amount.
• Banding in different colors• Line length is not accurate in the direction paper is fed
To adjust the feed amount, do the following, in this order.
1. Depending on the issue, change the Feed Priority setting for the particular type of paper. (See "Selecting a FeedAmount Adjustment Method (Feed Priority).") →P.676
2. Based on the Feed Priority setting, use Auto Band Adj., Manual Band Adj, or Adjust Length. (See "Auto BandAdjustment (Auto Band Adj.).") →P.677 (See "Manual Band Adjustment (Manual Band Adj).")→P.678 (See "Adjusting Line Length (Adjust Length).") →P.681
3. If additional fine-tuning is necessary after Auto Band Adj. or Manual Band Adj, use Fine Band Adj. in the MenuDurng Prtng. (See "Banding Adjustment During Printing (Fine Band Adj.).") →P.680
Selecting a Feed Amount Adjustment Method (Feed Priority)Methods of adjusting the amount paper is fed are set for each type of paper, in the Feed Priority setting.Adjust the Feed Priority setting to suit your particular printing application.
• Band Joint : Adjusts the feed amount to reduce banding across the sheet in printed documents.The settings of Auto Band Adj. or Manual Band Adj are applied. If you have executed Fine Band Adj., in additionto the settings of Auto Band Adj. or Manual Band Adj, the settings of Fine Band Adj. are also applied.
• Print Length : Adjusts the feed amount for better accuracy of lines in printed documents.The settings of A:High or B:Standard/Draft in the Adjust Length menu are applied.
• Automatic : Band Joint or Print Length is selected, depending on Print Priority as selected in the printer driver atthe time of printing.Image or Office Document : Band Joint is selected.Line Drawing/Text : Print Length is selected.
Adjustments for Better Print Quality > Adjusting the feed amount >
Adjusting the Feed Amount iPF815
8
676
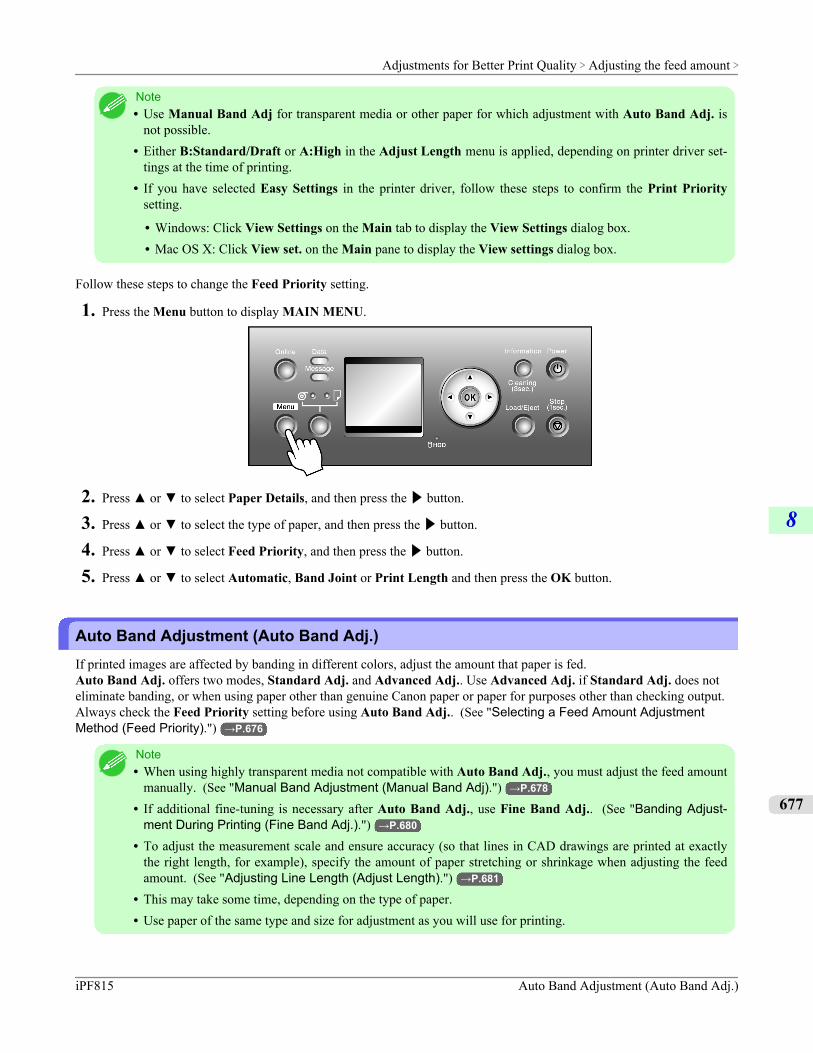
Note• Use Manual Band Adj for transparent media or other paper for which adjustment with Auto Band Adj. is
not possible.• Either B:Standard/Draft or A:High in the Adjust Length menu is applied, depending on printer driver set-
tings at the time of printing.• If you have selected Easy Settings in the printer driver, follow these steps to confirm the Print Priority
setting.
• Windows: Click View Settings on the Main tab to display the View Settings dialog box.• Mac OS X: Click View set. on the Main pane to display the View settings dialog box.
Follow these steps to change the Feed Priority setting.
1. Press the Menu button to display MAIN MENU.
2. Press ▲ or ▼ to select Paper Details, and then press the ▶ button.
3. Press ▲ or ▼ to select the type of paper, and then press the ▶ button.
4. Press ▲ or ▼ to select Feed Priority, and then press the ▶ button.
5. Press ▲ or ▼ to select Automatic, Band Joint or Print Length and then press the OK button.
Auto Band Adjustment (Auto Band Adj.)If printed images are affected by banding in different colors, adjust the amount that paper is fed.Auto Band Adj. offers two modes, Standard Adj. and Advanced Adj.. Use Advanced Adj. if Standard Adj. does noteliminate banding, or when using paper other than genuine Canon paper or paper for purposes other than checking output.Always check the Feed Priority setting before using Auto Band Adj.. (See "Selecting a Feed Amount AdjustmentMethod (Feed Priority).") →P.676
Note• When using highly transparent media not compatible with Auto Band Adj., you must adjust the feed amount
manually. (See "Manual Band Adjustment (Manual Band Adj).") →P.678
• If additional fine-tuning is necessary after Auto Band Adj., use Fine Band Adj.. (See "Banding Adjust-ment During Printing (Fine Band Adj.).") →P.680
• To adjust the measurement scale and ensure accuracy (so that lines in CAD drawings are printed at exactlythe right length, for example), specify the amount of paper stretching or shrinkage when adjusting the feedamount. (See "Adjusting Line Length (Adjust Length).") →P.681
• This may take some time, depending on the type of paper.• Use paper of the same type and size for adjustment as you will use for printing.
Adjustments for Better Print Quality > Adjusting the feed amount >
iPF815 Auto Band Adjustment (Auto Band Adj.)
8
677
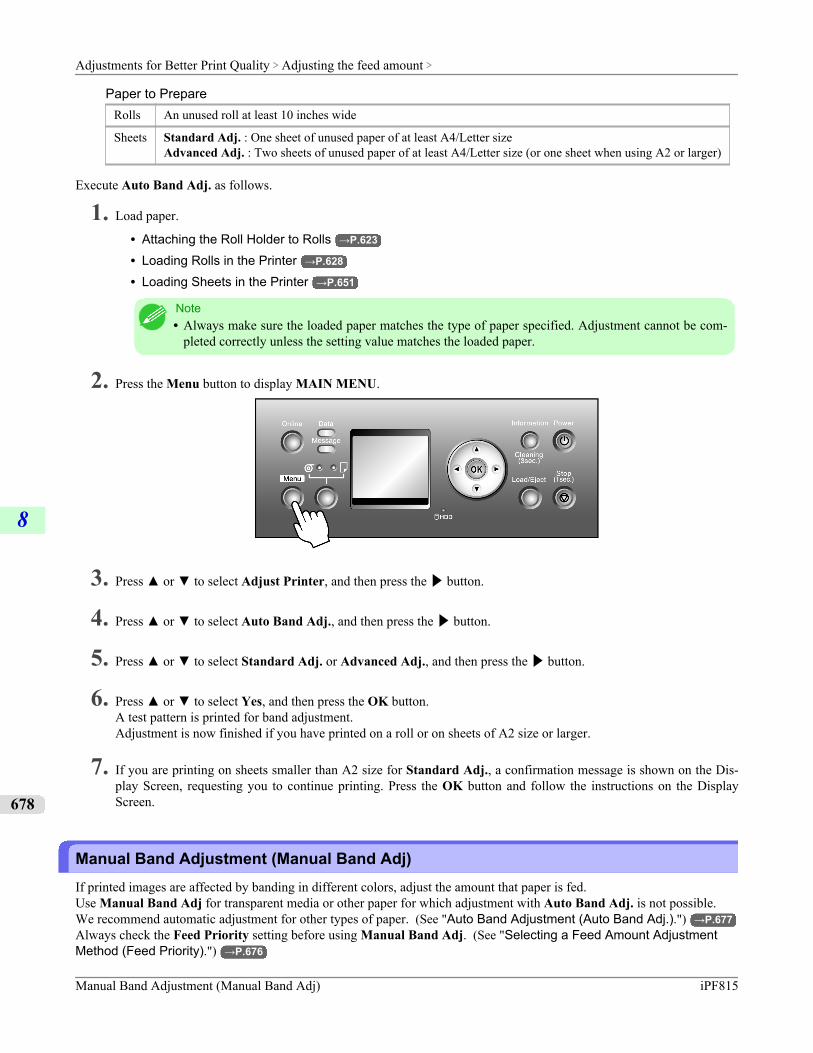
Paper to PrepareRolls An unused roll at least 10 inches wide
Sheets Standard Adj. : One sheet of unused paper of at least A4/Letter sizeAdvanced Adj. : Two sheets of unused paper of at least A4/Letter size (or one sheet when using A2 or larger)
Execute Auto Band Adj. as follows.
1. Load paper.
• Attaching the Roll Holder to Rolls →P.623
• Loading Rolls in the Printer →P.628
• Loading Sheets in the Printer →P.651
Note• Always make sure the loaded paper matches the type of paper specified. Adjustment cannot be com-
pleted correctly unless the setting value matches the loaded paper.
2. Press the Menu button to display MAIN MENU.
3. Press ▲ or ▼ to select Adjust Printer, and then press the ▶ button.
4. Press ▲ or ▼ to select Auto Band Adj., and then press the ▶ button.
5. Press ▲ or ▼ to select Standard Adj. or Advanced Adj., and then press the ▶ button.
6. Press ▲ or ▼ to select Yes, and then press the OK button.A test pattern is printed for band adjustment.Adjustment is now finished if you have printed on a roll or on sheets of A2 size or larger.
7. If you are printing on sheets smaller than A2 size for Standard Adj., a confirmation message is shown on the Dis-play Screen, requesting you to continue printing. Press the OK button and follow the instructions on the DisplayScreen.
Manual Band Adjustment (Manual Band Adj)If printed images are affected by banding in different colors, adjust the amount that paper is fed.Use Manual Band Adj for transparent media or other paper for which adjustment with Auto Band Adj. is not possible.We recommend automatic adjustment for other types of paper. (See "Auto Band Adjustment (Auto Band Adj.).") →P.677Always check the Feed Priority setting before using Manual Band Adj. (See "Selecting a Feed Amount AdjustmentMethod (Feed Priority).") →P.676
Adjustments for Better Print Quality > Adjusting the feed amount >
Manual Band Adjustment (Manual Band Adj) iPF815
8
678
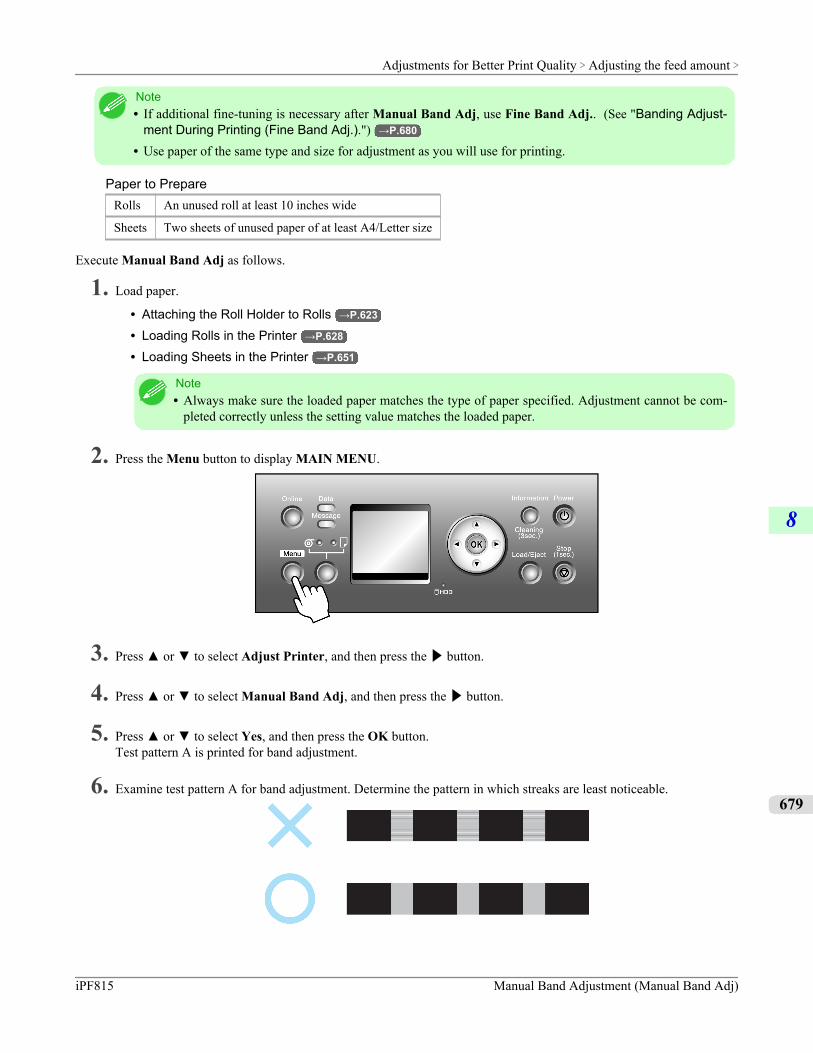
Note• If additional fine-tuning is necessary after Manual Band Adj, use Fine Band Adj.. (See "Banding Adjust-
ment During Printing (Fine Band Adj.).") →P.680
• Use paper of the same type and size for adjustment as you will use for printing.
Paper to PrepareRolls An unused roll at least 10 inches wide
Sheets Two sheets of unused paper of at least A4/Letter size
Execute Manual Band Adj as follows.
1. Load paper.
• Attaching the Roll Holder to Rolls →P.623
• Loading Rolls in the Printer →P.628
• Loading Sheets in the Printer →P.651
Note• Always make sure the loaded paper matches the type of paper specified. Adjustment cannot be com-
pleted correctly unless the setting value matches the loaded paper.
2. Press the Menu button to display MAIN MENU.
3. Press ▲ or ▼ to select Adjust Printer, and then press the ▶ button.
4. Press ▲ or ▼ to select Manual Band Adj, and then press the ▶ button.
5. Press ▲ or ▼ to select Yes, and then press the OK button.Test pattern A is printed for band adjustment.
6. Examine test pattern A for band adjustment. Determine the pattern in which streaks are least noticeable.
Adjustments for Better Print Quality > Adjusting the feed amount >
iPF815 Manual Band Adjustment (Manual Band Adj)
8
679
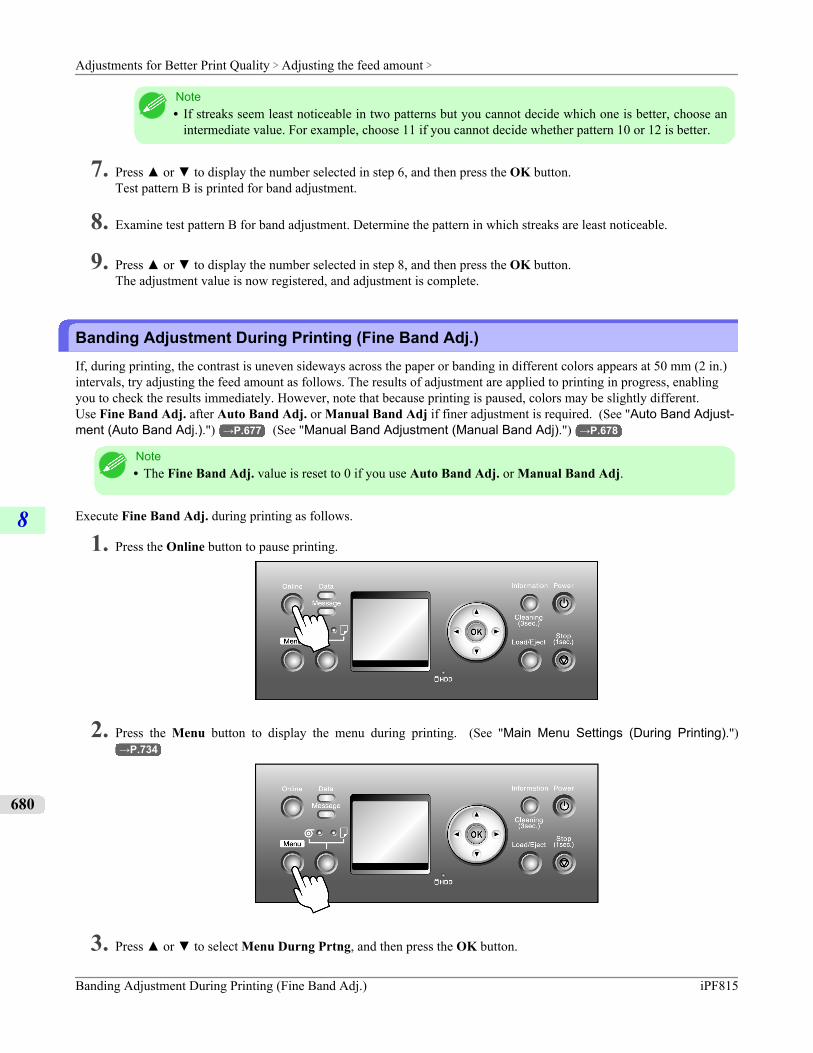
Note• If streaks seem least noticeable in two patterns but you cannot decide which one is better, choose an
intermediate value. For example, choose 11 if you cannot decide whether pattern 10 or 12 is better.
7. Press ▲ or ▼ to display the number selected in step 6, and then press the OK button.Test pattern B is printed for band adjustment.
8. Examine test pattern B for band adjustment. Determine the pattern in which streaks are least noticeable.
9. Press ▲ or ▼ to display the number selected in step 8, and then press the OK button.The adjustment value is now registered, and adjustment is complete.
Banding Adjustment During Printing (Fine Band Adj.)If, during printing, the contrast is uneven sideways across the paper or banding in different colors appears at 50 mm (2 in.)intervals, try adjusting the feed amount as follows. The results of adjustment are applied to printing in progress, enablingyou to check the results immediately. However, note that because printing is paused, colors may be slightly different.Use Fine Band Adj. after Auto Band Adj. or Manual Band Adj if finer adjustment is required. (See "Auto Band Adjust-ment (Auto Band Adj.).") →P.677 (See "Manual Band Adjustment (Manual Band Adj).") →P.678
Note• The Fine Band Adj. value is reset to 0 if you use Auto Band Adj. or Manual Band Adj.
Execute Fine Band Adj. during printing as follows.
1. Press the Online button to pause printing.
2. Press the Menu button to display the menu during printing. (See "Main Menu Settings (During Printing).")→P.734
3. Press ▲ or ▼ to select Menu Durng Prtng, and then press the OK button.
Adjustments for Better Print Quality > Adjusting the feed amount >
Banding Adjustment During Printing (Fine Band Adj.) iPF815
8
680
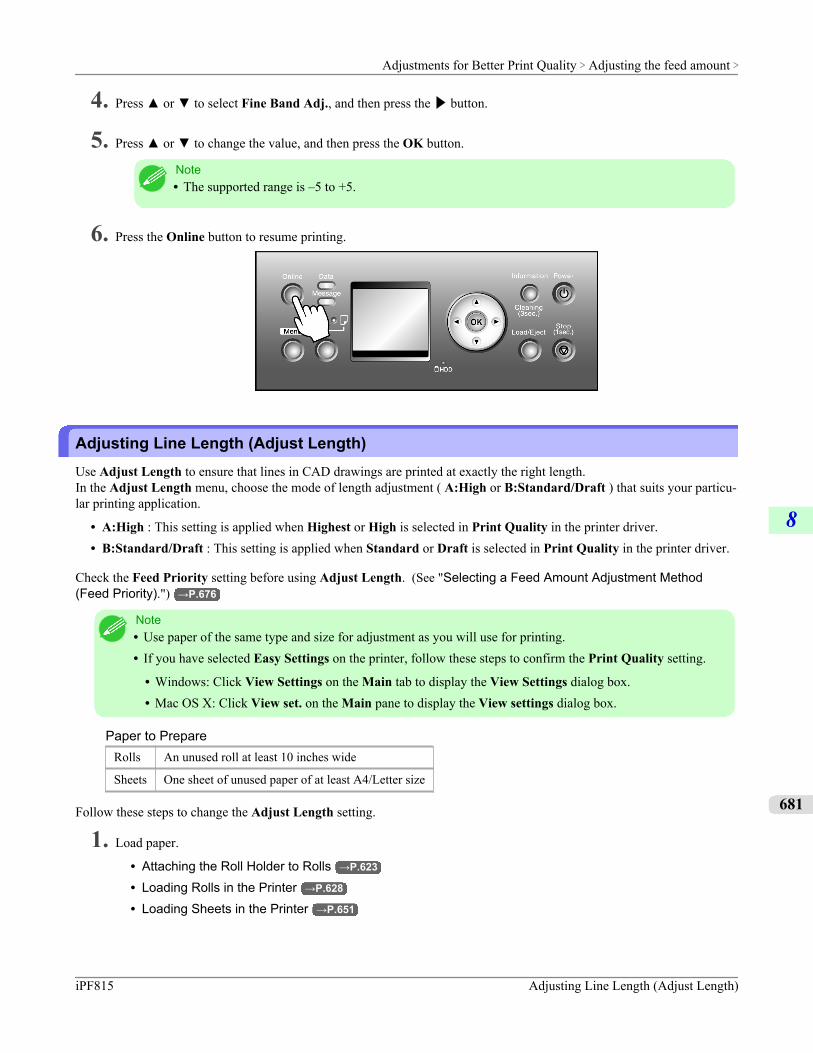
4. Press ▲ or ▼ to select Fine Band Adj., and then press the ▶ button.
5. Press ▲ or ▼ to change the value, and then press the OK button.
Note• The supported range is –5 to +5.
6. Press the Online button to resume printing.
Adjusting Line Length (Adjust Length)Use Adjust Length to ensure that lines in CAD drawings are printed at exactly the right length.In the Adjust Length menu, choose the mode of length adjustment ( A:High or B:Standard/Draft ) that suits your particu-lar printing application.
• A:High : This setting is applied when Highest or High is selected in Print Quality in the printer driver.• B:Standard/Draft : This setting is applied when Standard or Draft is selected in Print Quality in the printer driver.
Check the Feed Priority setting before using Adjust Length. (See "Selecting a Feed Amount Adjustment Method(Feed Priority).") →P.676
Note• Use paper of the same type and size for adjustment as you will use for printing.• If you have selected Easy Settings on the printer, follow these steps to confirm the Print Quality setting.
• Windows: Click View Settings on the Main tab to display the View Settings dialog box.• Mac OS X: Click View set. on the Main pane to display the View settings dialog box.
Paper to PrepareRolls An unused roll at least 10 inches wide
Sheets One sheet of unused paper of at least A4/Letter size
Follow these steps to change the Adjust Length setting.
1. Load paper.
• Attaching the Roll Holder to Rolls →P.623
• Loading Rolls in the Printer →P.628
• Loading Sheets in the Printer →P.651
Adjustments for Better Print Quality > Adjusting the feed amount >
iPF815 Adjusting Line Length (Adjust Length)
8
681
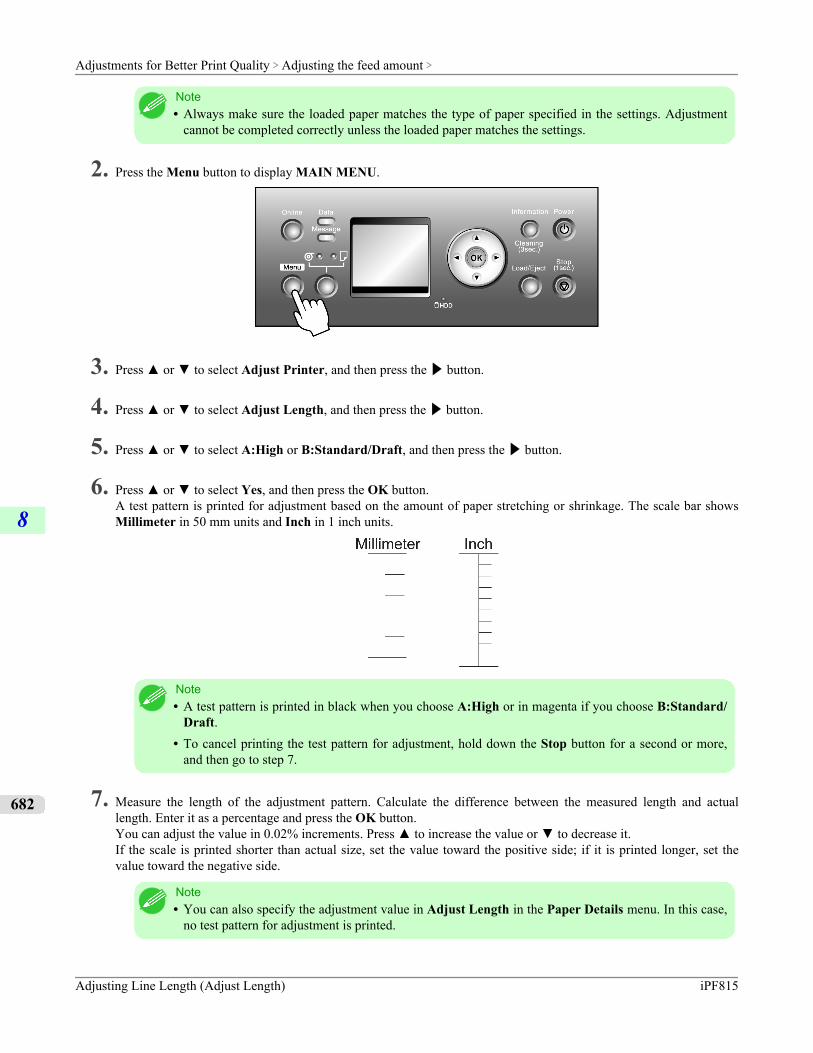
Note• Always make sure the loaded paper matches the type of paper specified in the settings. Adjustment
cannot be completed correctly unless the loaded paper matches the settings.
2. Press the Menu button to display MAIN MENU.
3. Press ▲ or ▼ to select Adjust Printer, and then press the ▶ button.
4. Press ▲ or ▼ to select Adjust Length, and then press the ▶ button.
5. Press ▲ or ▼ to select A:High or B:Standard/Draft, and then press the ▶ button.
6. Press ▲ or ▼ to select Yes, and then press the OK button.A test pattern is printed for adjustment based on the amount of paper stretching or shrinkage. The scale bar showsMillimeter in 50 mm units and Inch in 1 inch units.
Note• A test pattern is printed in black when you choose A:High or in magenta if you choose B:Standard/
Draft.• To cancel printing the test pattern for adjustment, hold down the Stop button for a second or more,
and then go to step 7.
7. Measure the length of the adjustment pattern. Calculate the difference between the measured length and actuallength. Enter it as a percentage and press the OK button.You can adjust the value in 0.02% increments. Press ▲ to increase the value or ▼ to decrease it.If the scale is printed shorter than actual size, set the value toward the positive side; if it is printed longer, set thevalue toward the negative side.
Note• You can also specify the adjustment value in Adjust Length in the Paper Details menu. In this case,
no test pattern for adjustment is printed.
Adjustments for Better Print Quality > Adjusting the feed amount >
Adjusting Line Length (Adjust Length) iPF815
8
682
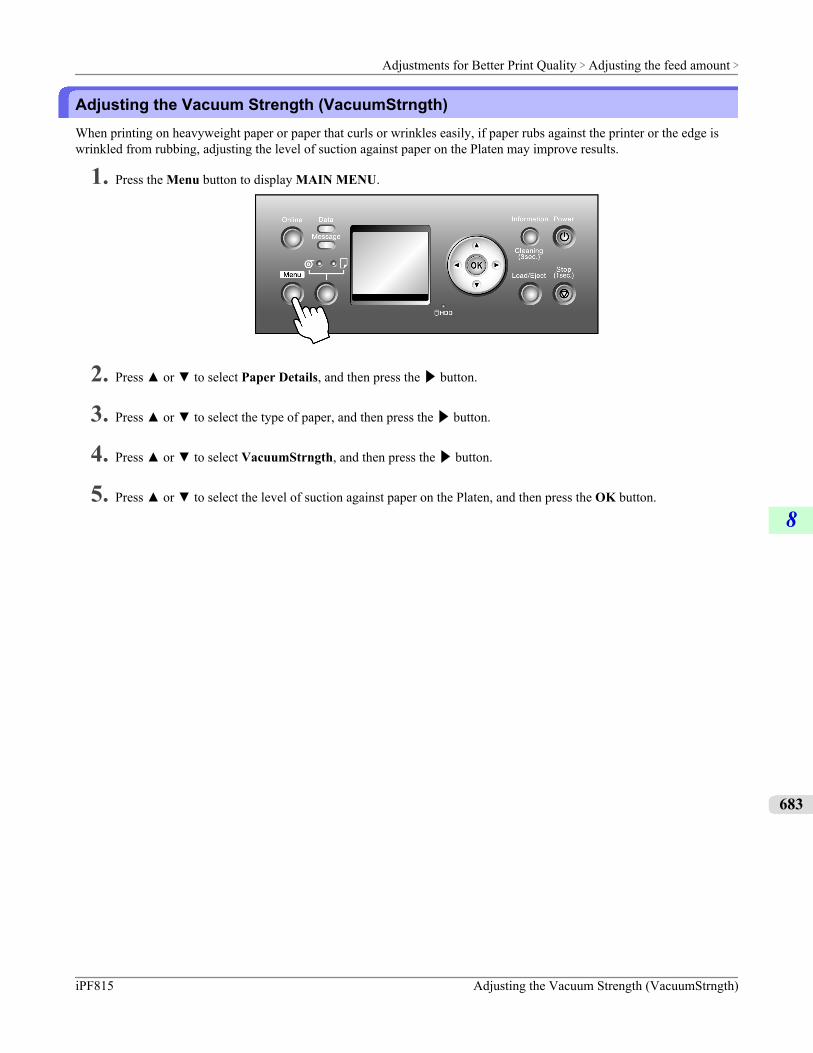
Adjusting the Vacuum Strength (VacuumStrngth)When printing on heavyweight paper or paper that curls or wrinkles easily, if paper rubs against the printer or the edge iswrinkled from rubbing, adjusting the level of suction against paper on the Platen may improve results.
1. Press the Menu button to display MAIN MENU.
2. Press ▲ or ▼ to select Paper Details, and then press the ▶ button.
3. Press ▲ or ▼ to select the type of paper, and then press the ▶ button.
4. Press ▲ or ▼ to select VacuumStrngth, and then press the ▶ button.
5. Press ▲ or ▼ to select the level of suction against paper on the Platen, and then press the OK button.
Adjustments for Better Print Quality > Adjusting the feed amount >
iPF815 Adjusting the Vacuum Strength (VacuumStrngth)
8
683
Printer Parts
Printer parts 685
Control Panel 692
Hard Disk 746
Optional accessories 752
Printer Specifications 765
Printer Parts >
iPF815
9
684
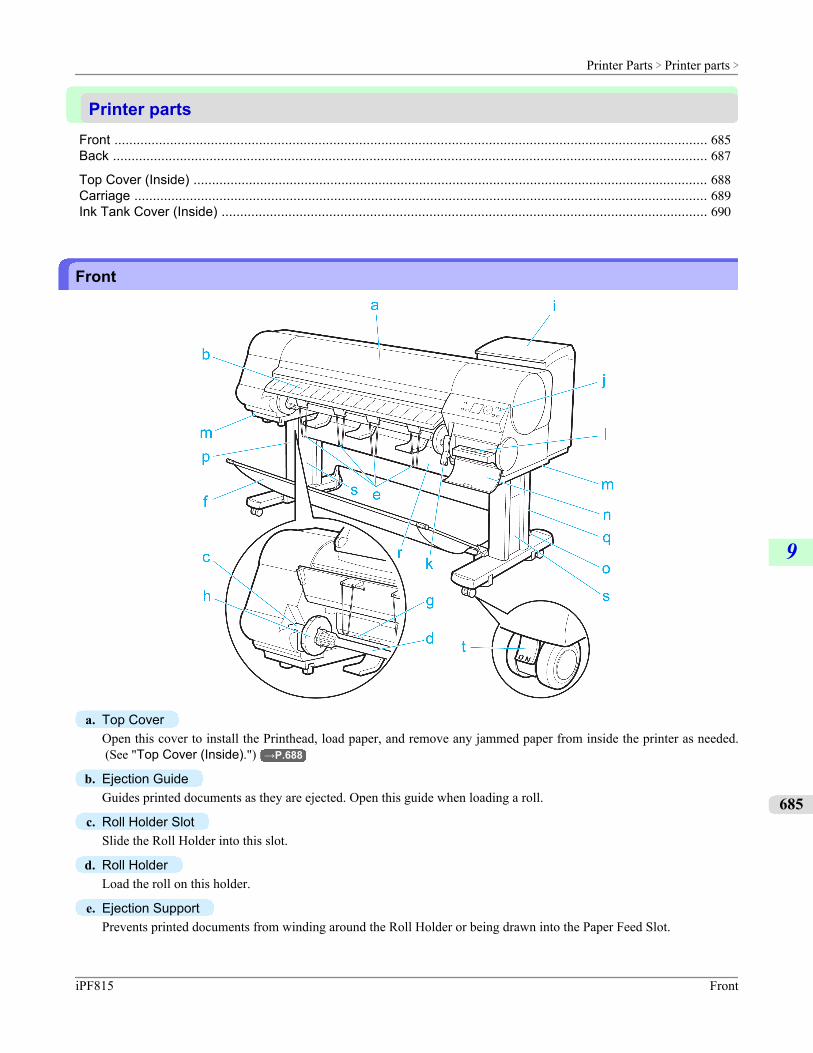
Printer partsFront ................................................................................................................................................................ 685Back ................................................................................................................................................................ 687
Top Cover (Inside) ........................................................................................................................................... 688Carriage ........................................................................................................................................................... 689Ink Tank Cover (Inside) ................................................................................................................................... 690
Front
a. Top CoverOpen this cover to install the Printhead, load paper, and remove any jammed paper from inside the printer as needed. (See "Top Cover (Inside).") →P.688
b. Ejection GuideGuides printed documents as they are ejected. Open this guide when loading a roll.
c. Roll Holder SlotSlide the Roll Holder into this slot.
d. Roll HolderLoad the roll on this holder.
e. Ejection SupportPrevents printed documents from winding around the Roll Holder or being drawn into the Paper Feed Slot.
Printer Parts > Printer parts >
iPF815 Front
9
685
f. Stationary Output StackerA cloth tray that catches ejected documents. (See "Stationary Output Stacker.") →P.658
g. Paper Feed SlotWhen loading a roll, insert the edge of the roll paper here.
h. Holder StopperSecure rolls on the Roll Holder with this part.
i. Ink Tank CoverOpen this cover to replace an Ink Tank. (See "Ink Tank Cover (Inside).") →P.690
j. Control PanelUse this panel to operate the printer and check the printer status. (See "Control Panel.") →P.692
k. Release LeverReleases the Paper Retainer. Lift this lever toward the front of the printer when loading paper.
l. Maintenance CartridgeInk used for maintenance purposes such as head cleaning is absorbed. (Replace the cartridge when it is full.)
m. Carrying HandlesWhen carrying the printer, have six people hold it by these handles under both sides.
n. Maintenance Cartridge CoverOpen this cover to replace the Maintenance Cartridge.
o. StandA stand that holds the printer. Equipped with casters to facilitate moving it.
p. Stand LThe left leg of the Stand.
q. Stand RThe right leg of the Stand.
r. Top Stand StaySupports Stand L and Stand R. Attach the optional Media Take-up Unit to this part.
s. Leg CoversCovers for Stand L and Stand R.
t. StopperLocks the Stand casters.Always release the Stopper before moving the printer. Moving the printer while the Stopper is locked may scratch thecasters or the floor.
Printer Parts > Printer parts >
Front iPF815
9
686
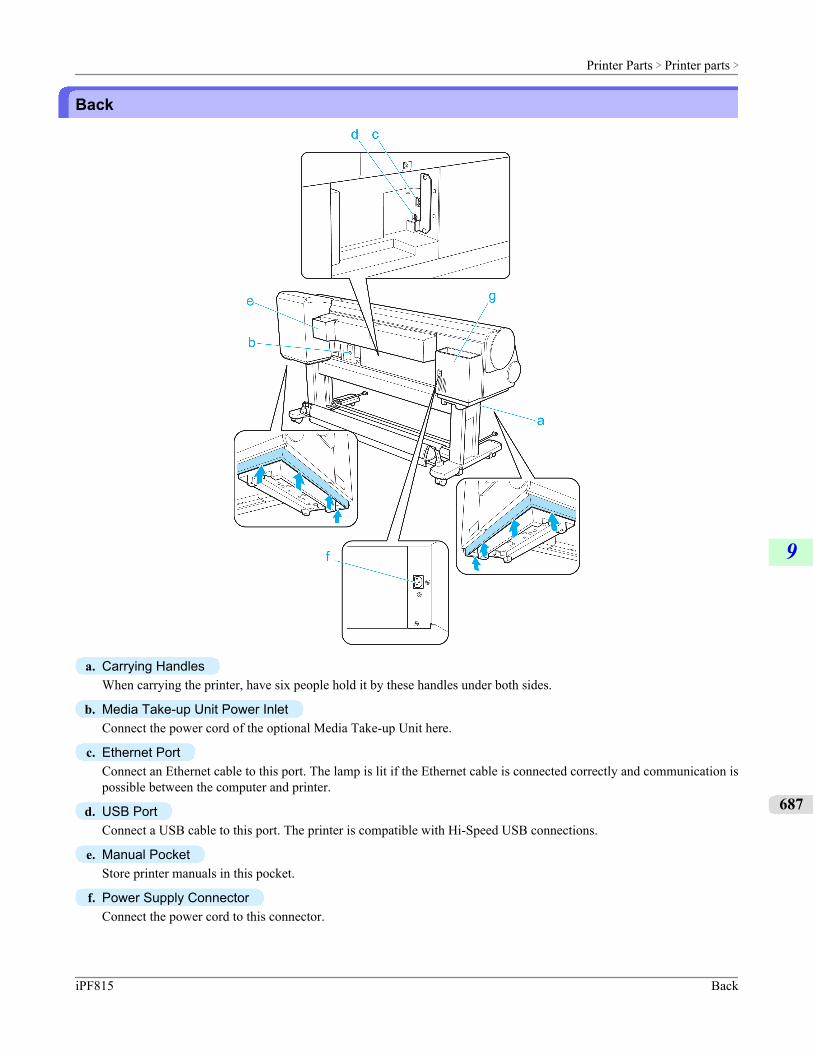
Back
a. Carrying HandlesWhen carrying the printer, have six people hold it by these handles under both sides.
b. Media Take-up Unit Power InletConnect the power cord of the optional Media Take-up Unit here.
c. Ethernet PortConnect an Ethernet cable to this port. The lamp is lit if the Ethernet cable is connected correctly and communication ispossible between the computer and printer.
d. USB PortConnect a USB cable to this port. The printer is compatible with Hi-Speed USB connections.
e. Manual PocketStore printer manuals in this pocket.
f. Power Supply ConnectorConnect the power cord to this connector.
Printer Parts > Printer parts >
iPF815 Back
9
687
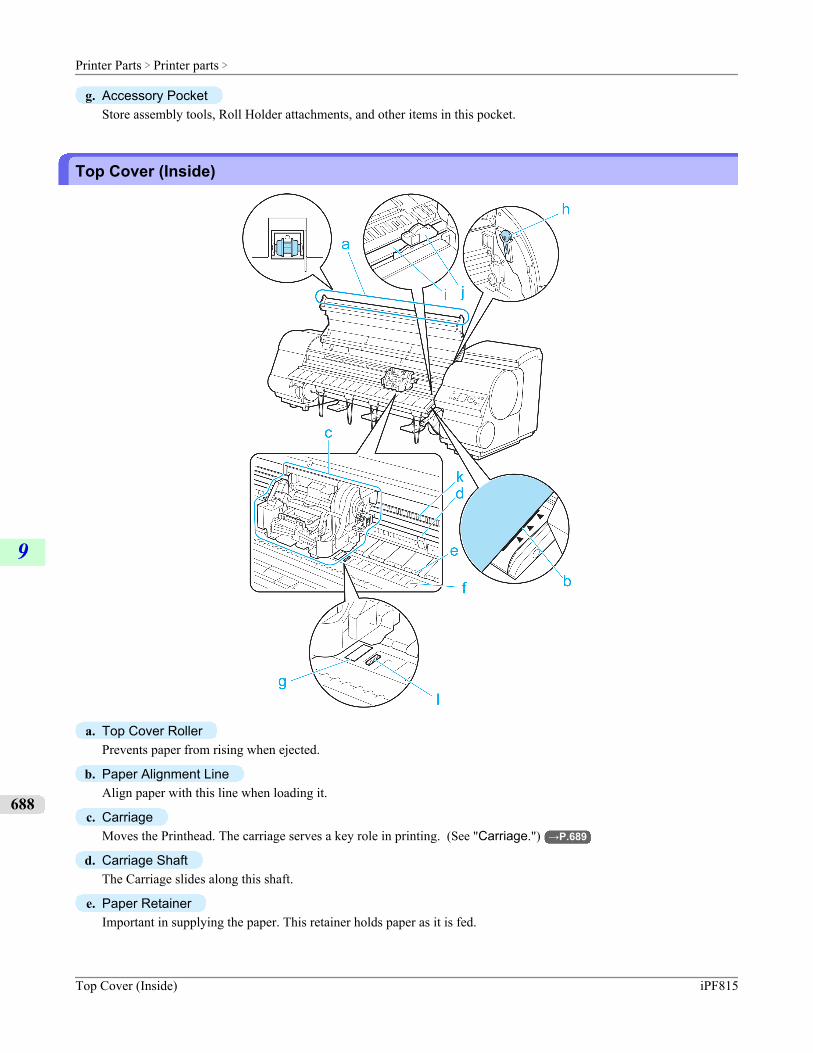
g. Accessory PocketStore assembly tools, Roll Holder attachments, and other items in this pocket.
Top Cover (Inside)
a. Top Cover RollerPrevents paper from rising when ejected.
b. Paper Alignment LineAlign paper with this line when loading it.
c. CarriageMoves the Printhead. The carriage serves a key role in printing. (See "Carriage.") →P.689
d. Carriage ShaftThe Carriage slides along this shaft.
e. Paper RetainerImportant in supplying the paper. This retainer holds paper as it is fed.
Printer Parts > Printer parts >
Top Cover (Inside) iPF815
9
688
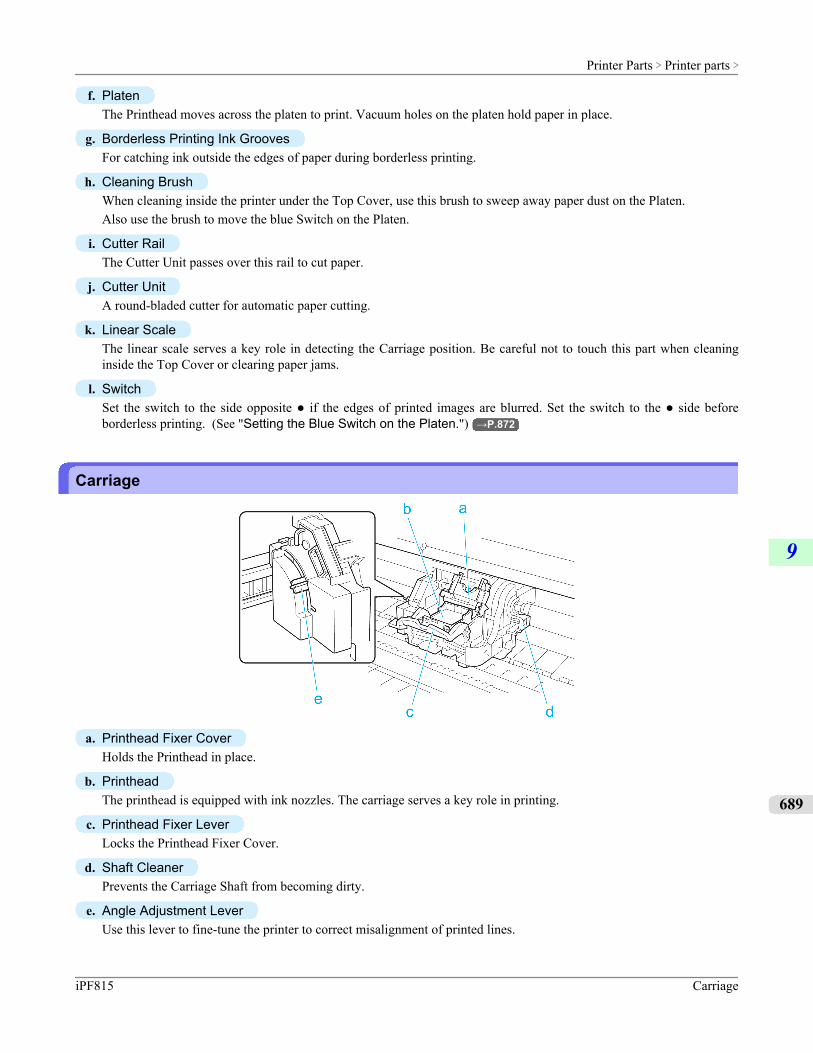
f. PlatenThe Printhead moves across the platen to print. Vacuum holes on the platen hold paper in place.
g. Borderless Printing Ink GroovesFor catching ink outside the edges of paper during borderless printing.
h. Cleaning BrushWhen cleaning inside the printer under the Top Cover, use this brush to sweep away paper dust on the Platen.Also use the brush to move the blue Switch on the Platen.
i. Cutter RailThe Cutter Unit passes over this rail to cut paper.
j. Cutter UnitA round-bladed cutter for automatic paper cutting.
k. Linear ScaleThe linear scale serves a key role in detecting the Carriage position. Be careful not to touch this part when cleaninginside the Top Cover or clearing paper jams.
l. SwitchSet the switch to the side opposite ● if the edges of printed images are blurred. Set the switch to the ● side beforeborderless printing. (See "Setting the Blue Switch on the Platen.") →P.872
Carriage
a. Printhead Fixer CoverHolds the Printhead in place.
b. PrintheadThe printhead is equipped with ink nozzles. The carriage serves a key role in printing.
c. Printhead Fixer LeverLocks the Printhead Fixer Cover.
d. Shaft CleanerPrevents the Carriage Shaft from becoming dirty.
e. Angle Adjustment LeverUse this lever to fine-tune the printer to correct misalignment of printed lines.
Printer Parts > Printer parts >
iPF815 Carriage
9
689
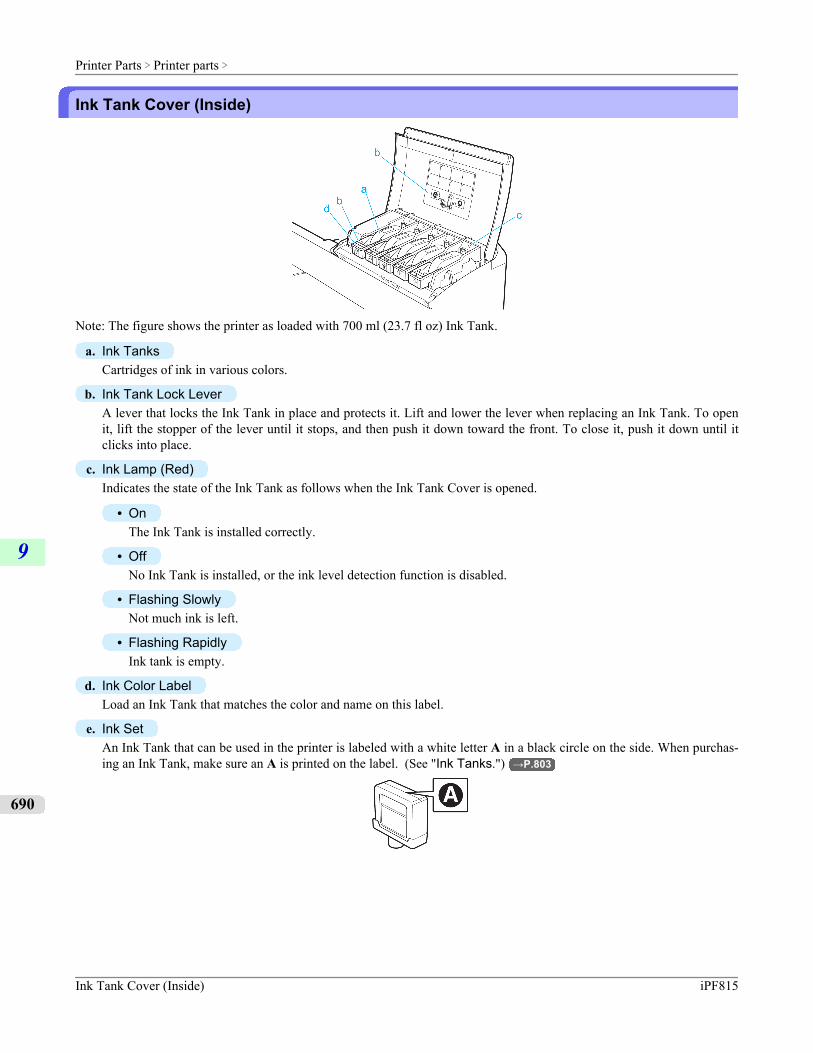
Ink Tank Cover (Inside)
Note: The figure shows the printer as loaded with 700 ml (23.7 fl oz) Ink Tank.
a. Ink TanksCartridges of ink in various colors.
b. Ink Tank Lock LeverA lever that locks the Ink Tank in place and protects it. Lift and lower the lever when replacing an Ink Tank. To openit, lift the stopper of the lever until it stops, and then push it down toward the front. To close it, push it down until itclicks into place.
c. Ink Lamp (Red)Indicates the state of the Ink Tank as follows when the Ink Tank Cover is opened.
• OnThe Ink Tank is installed correctly.
• OffNo Ink Tank is installed, or the ink level detection function is disabled.
• Flashing SlowlyNot much ink is left.
• Flashing RapidlyInk tank is empty.
d. Ink Color LabelLoad an Ink Tank that matches the color and name on this label.
e. Ink SetAn Ink Tank that can be used in the printer is labeled with a white letter A in a black circle on the side. When purchas-ing an Ink Tank, make sure an A is printed on the label. (See "Ink Tanks.") →P.803
Printer Parts > Printer parts >
Ink Tank Cover (Inside) iPF815
9
690
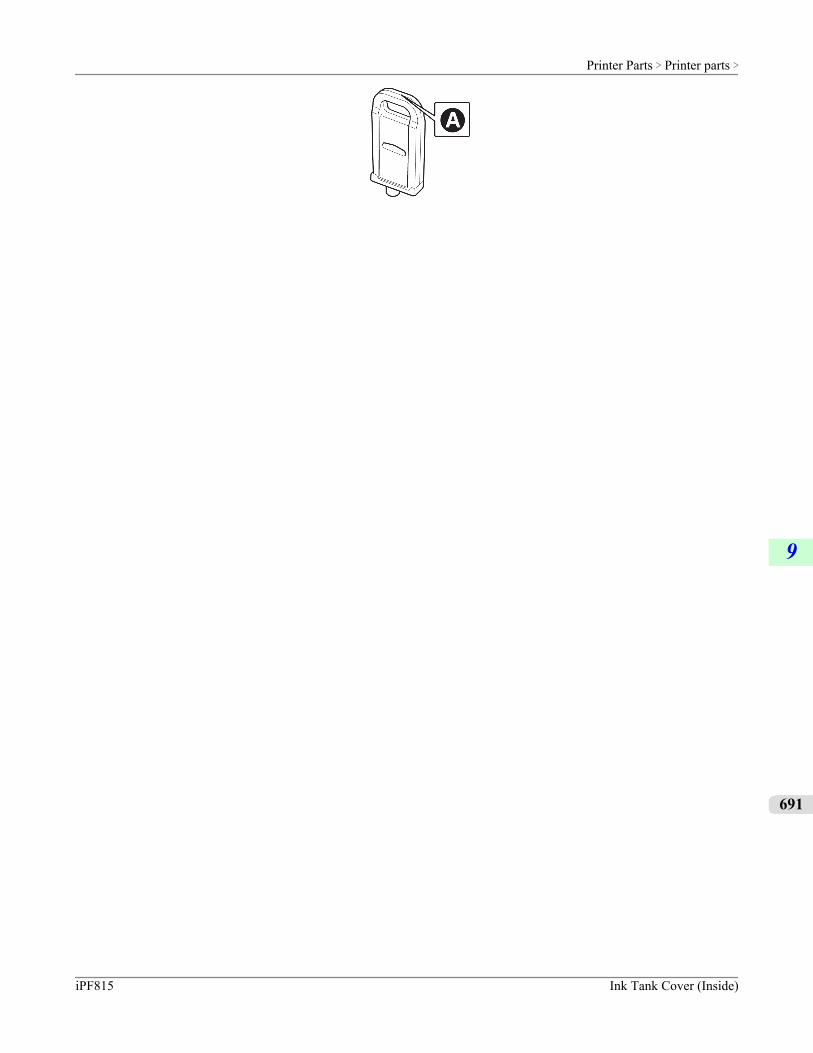
Printer Parts > Printer parts >
iPF815 Ink Tank Cover (Inside)
9
691
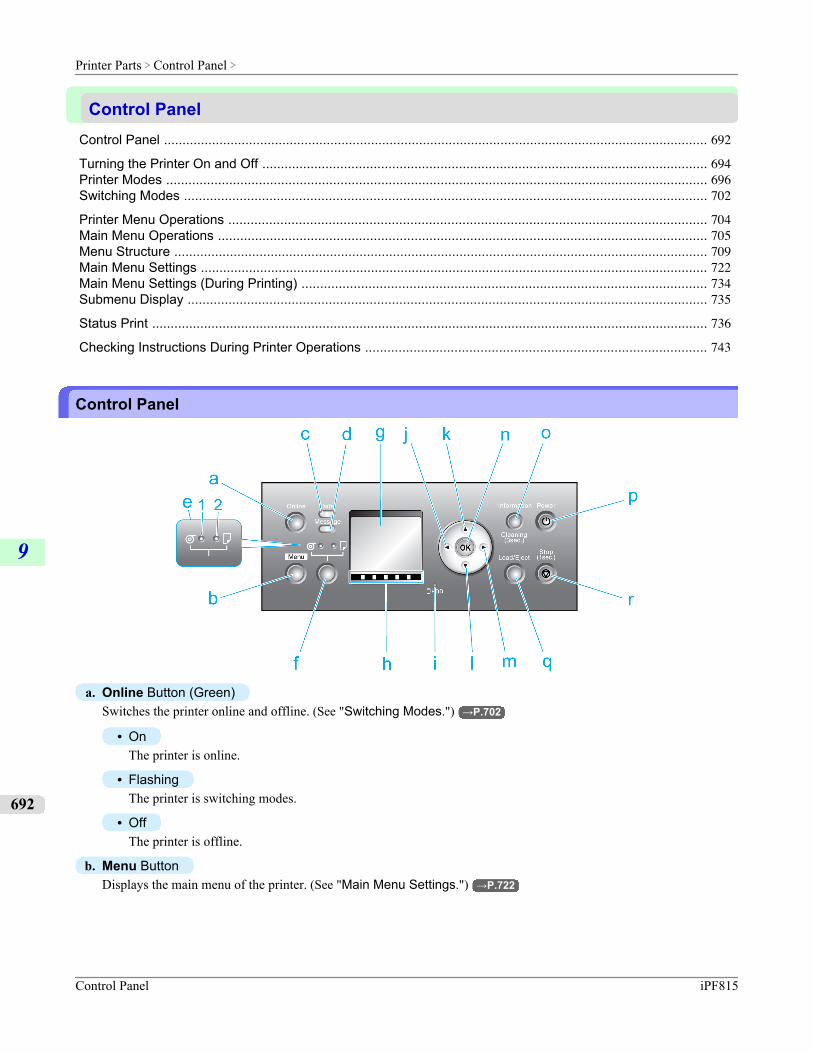
Control PanelControl Panel ................................................................................................................................................... 692
Turning the Printer On and Off ........................................................................................................................ 694Printer Modes .................................................................................................................................................. 696Switching Modes ............................................................................................................................................. 702
Printer Menu Operations ................................................................................................................................. 704Main Menu Operations .................................................................................................................................... 705Menu Structure ................................................................................................................................................ 709Main Menu Settings ......................................................................................................................................... 722Main Menu Settings (During Printing) ............................................................................................................. 734Submenu Display ............................................................................................................................................ 735
Status Print ...................................................................................................................................................... 736
Checking Instructions During Printer Operations ............................................................................................ 743
Control Panel
a. Online Button (Green)Switches the printer online and offline. (See "Switching Modes.") →P.702
• OnThe printer is online.
• FlashingThe printer is switching modes.
• OffThe printer is offline.
b. Menu ButtonDisplays the main menu of the printer. (See "Main Menu Settings.") →P.722
Printer Parts > Control Panel >
Control Panel iPF815
9
692
c. Data lamp (Green)
• FlashingDuring printing, the Data lamp flashes when the printer is receiving or processing print jobs. Otherwise, this lampflashes when the print job is paused or the printer is updating the firmware.
• OffThere are no active print jobs when the Data lamp is off.
d. Message lamp (Orange)
• OnA warning message is displayed.
• FlashingAn error message is displayed.
• OffThe printer is off or is operating normally.
e. Paper Source SectionAfter you press the Feeder Selection button, the lamp for your chosen paper source is lit.
1. Roll Media lamp (Green)
• OnIndicates that a roll is selected as the paper source.
• OffIndicates that a sheet is selected as the paper source.
2. Cut Sheet lamp (Green)
• OnIndicates that a sheet is selected as the paper source.
• OffIndicates that a roll is selected as the paper source.
f. Feeder Selection ButtonSwitches the paper source. Each time you press this button, the paper source switches between the roll and the sheet,and the corresponding lamp on the Paper Source Section is lit.
g. Display ScreenShows the printer menu, as well as the printer status and messages.
h. Color LabelThis label indicates the Ink Tank color. The label corresponds to the ink level on the Display Screen.
i. HDD lamp (Green)
• OnIndicates the printer is accessing the hard disk.
• OffIndicates the printer is not accessing the hard disk.
j. ◀ ButtonMenu mode: Press this button to display the menu one level higher.
Printer Parts > Control Panel >
iPF815 Control Panel
9
693
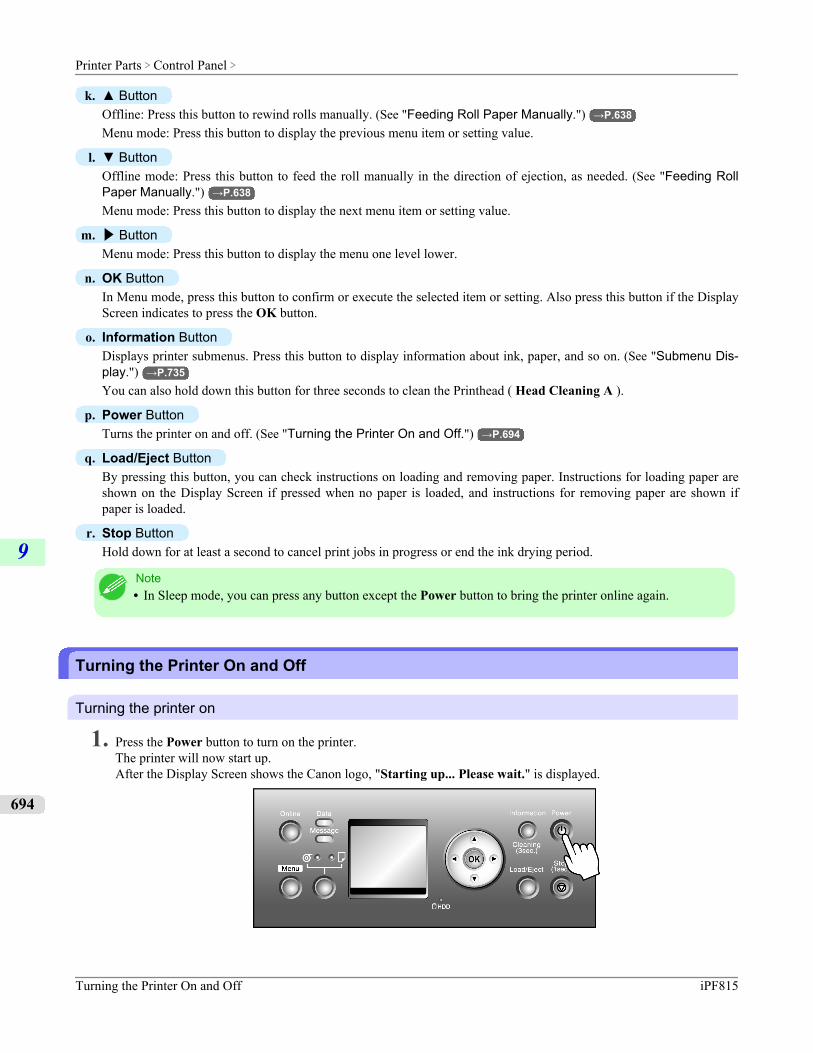
k. ▲ ButtonOffline: Press this button to rewind rolls manually. (See "Feeding Roll Paper Manually.") →P.638
Menu mode: Press this button to display the previous menu item or setting value.
l. ▼ ButtonOffline mode: Press this button to feed the roll manually in the direction of ejection, as needed. (See "Feeding RollPaper Manually.") →P.638
Menu mode: Press this button to display the next menu item or setting value.
m. ▶ ButtonMenu mode: Press this button to display the menu one level lower.
n. OK ButtonIn Menu mode, press this button to confirm or execute the selected item or setting. Also press this button if the DisplayScreen indicates to press the OK button.
o. Information ButtonDisplays printer submenus. Press this button to display information about ink, paper, and so on. (See "Submenu Dis-play.") →P.735
You can also hold down this button for three seconds to clean the Printhead ( Head Cleaning A ).
p. Power ButtonTurns the printer on and off. (See "Turning the Printer On and Off.") →P.694
q. Load/Eject ButtonBy pressing this button, you can check instructions on loading and removing paper. Instructions for loading paper areshown on the Display Screen if pressed when no paper is loaded, and instructions for removing paper are shown ifpaper is loaded.
r. Stop ButtonHold down for at least a second to cancel print jobs in progress or end the ink drying period.
Note• In Sleep mode, you can press any button except the Power button to bring the printer online again.
Turning the Printer On and Off
Turning the printer on
1. Press the Power button to turn on the printer.The printer will now start up.After the Display Screen shows the Canon logo, "Starting up... Please wait." is displayed.
Printer Parts > Control Panel >
Turning the Printer On and Off iPF815
9
694
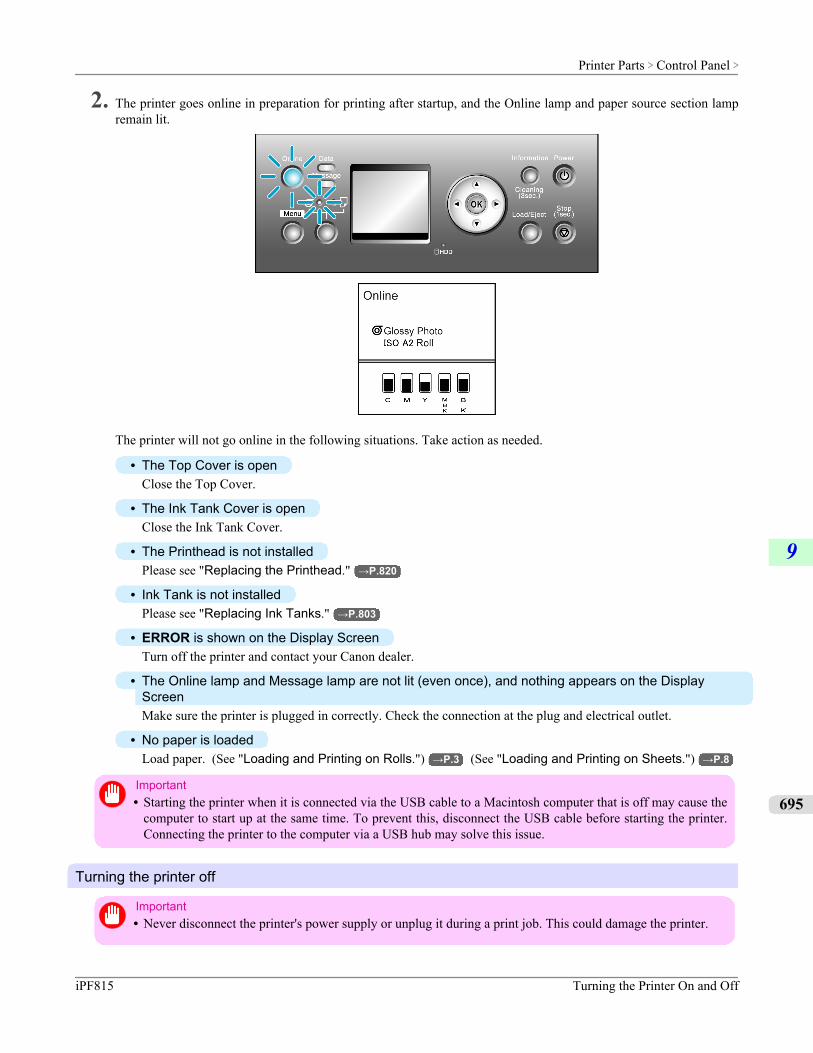
2. The printer goes online in preparation for printing after startup, and the Online lamp and paper source section lampremain lit.
The printer will not go online in the following situations. Take action as needed.
• The Top Cover is openClose the Top Cover.
• The Ink Tank Cover is openClose the Ink Tank Cover.
• The Printhead is not installedPlease see "Replacing the Printhead." →P.820
• Ink Tank is not installedPlease see "Replacing Ink Tanks." →P.803
• ERROR is shown on the Display ScreenTurn off the printer and contact your Canon dealer.
• The Online lamp and Message lamp are not lit (even once), and nothing appears on the DisplayScreenMake sure the printer is plugged in correctly. Check the connection at the plug and electrical outlet.
• No paper is loadedLoad paper. (See "Loading and Printing on Rolls.") →P.3 (See "Loading and Printing on Sheets.") →P.8
Important• Starting the printer when it is connected via the USB cable to a Macintosh computer that is off may cause the
computer to start up at the same time. To prevent this, disconnect the USB cable before starting the printer.Connecting the printer to the computer via a USB hub may solve this issue.
Turning the printer off
Important• Never disconnect the printer's power supply or unplug it during a print job. This could damage the printer.
Printer Parts > Control Panel >
iPF815 Turning the Printer On and Off
9
695
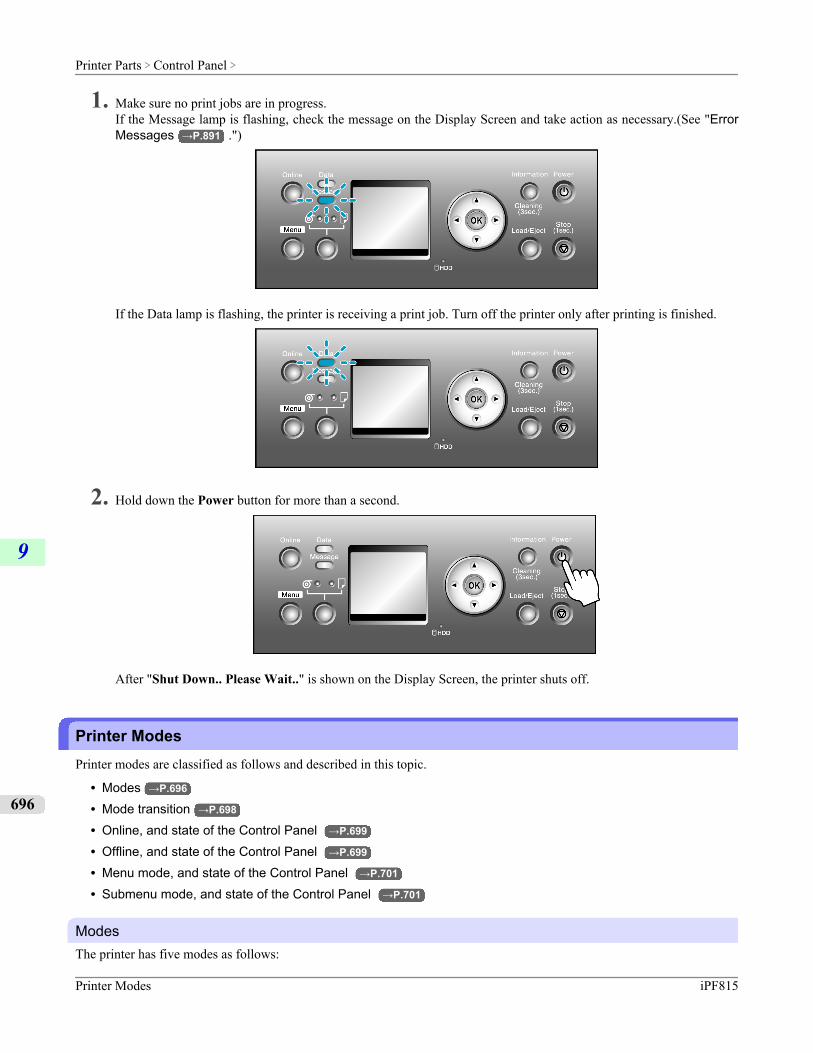
1. Make sure no print jobs are in progress.If the Message lamp is flashing, check the message on the Display Screen and take action as necessary.(See "ErrorMessages →P.891 .")
If the Data lamp is flashing, the printer is receiving a print job. Turn off the printer only after printing is finished.
2. Hold down the Power button for more than a second.
After "Shut Down.. Please Wait.." is shown on the Display Screen, the printer shuts off.
Printer ModesPrinter modes are classified as follows and described in this topic.
• Modes →P.696
• Mode transition →P.698
• Online, and state of the Control Panel →P.699
• Offline, and state of the Control Panel →P.699
• Menu mode, and state of the Control Panel →P.701
• Submenu mode, and state of the Control Panel →P.701
ModesThe printer has five modes as follows:
Printer Parts > Control Panel >
Printer Modes iPF815
9
696
• OnlineThe printer is ready to receive jobs sent from the computer. Jobs sent from the computer are processed immediately. Ifjobs are received in other modes, they are printed the next time the printer goes online.
• OfflineAny jobs sent from the computer are held without being printed.While the printer is offline, you can feed or cut roll paper manually.The printer goes offline automatically if jobs cannot be processed, such as if errors occur.
• Menu modeMenus are displayed on the printer, and you can select, set, or execute menu items. Any jobs sent from the computerare held without being printed.
• Submenu modeSubmenus are displayed regarding ink and paper information. Jobs can be received and printing is possible while sub-menus are displayed and the printer is online. In other modes, any jobs sent from the computer are held without beingprinted while submenus are displayed.
• Sleep modeThe printer is in power-saving mode. The printer automatically enters Sleep mode to conserve power if it is idle for aspecific period (by factory default, five minutes), that is, if no print jobs are received or buttons are pressed while allcovers are closed.You can specify the period before the printer enters Sleep mode in the Sleep Timer menu. (See "Main Menu Set-tings.") →P.722
If any print jobs are received when the printer is in Sleep mode (after it was originally online), the printer goes onlineand prints the jobs.
Printer Parts > Control Panel >
iPF815 Printer Modes
9
697
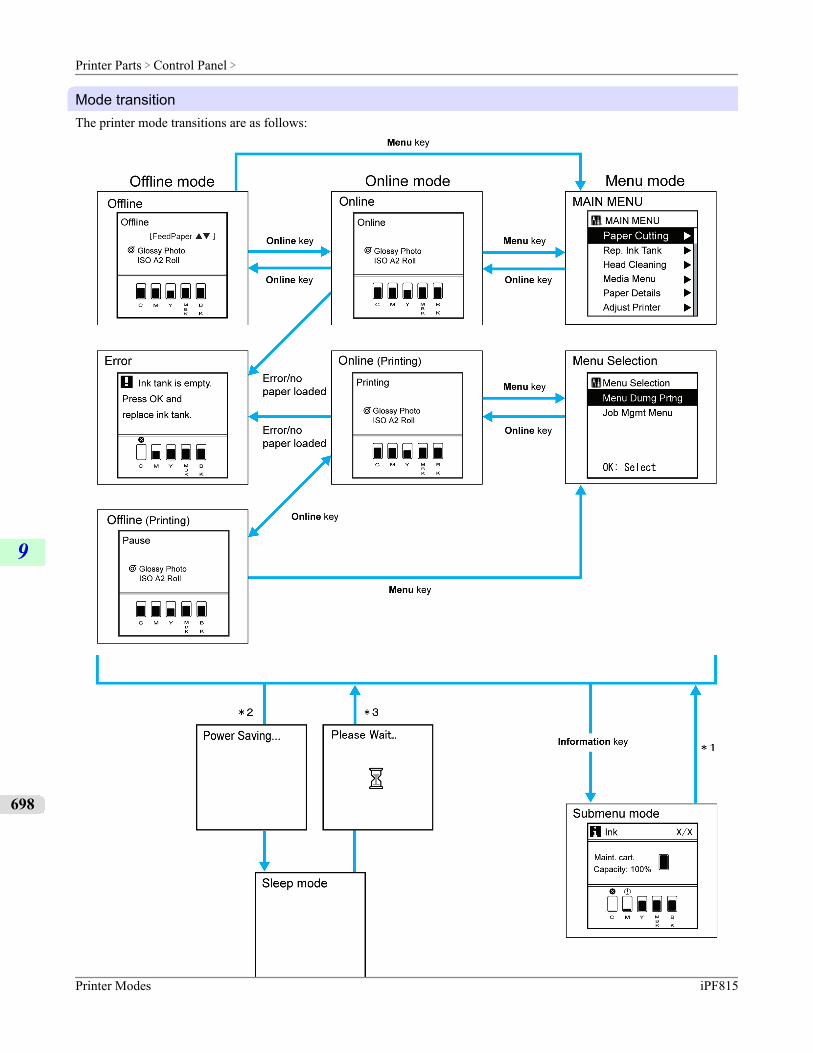
Mode transitionThe printer mode transitions are as follows:
Printer Parts > Control Panel >
Printer Modes iPF815
9
698
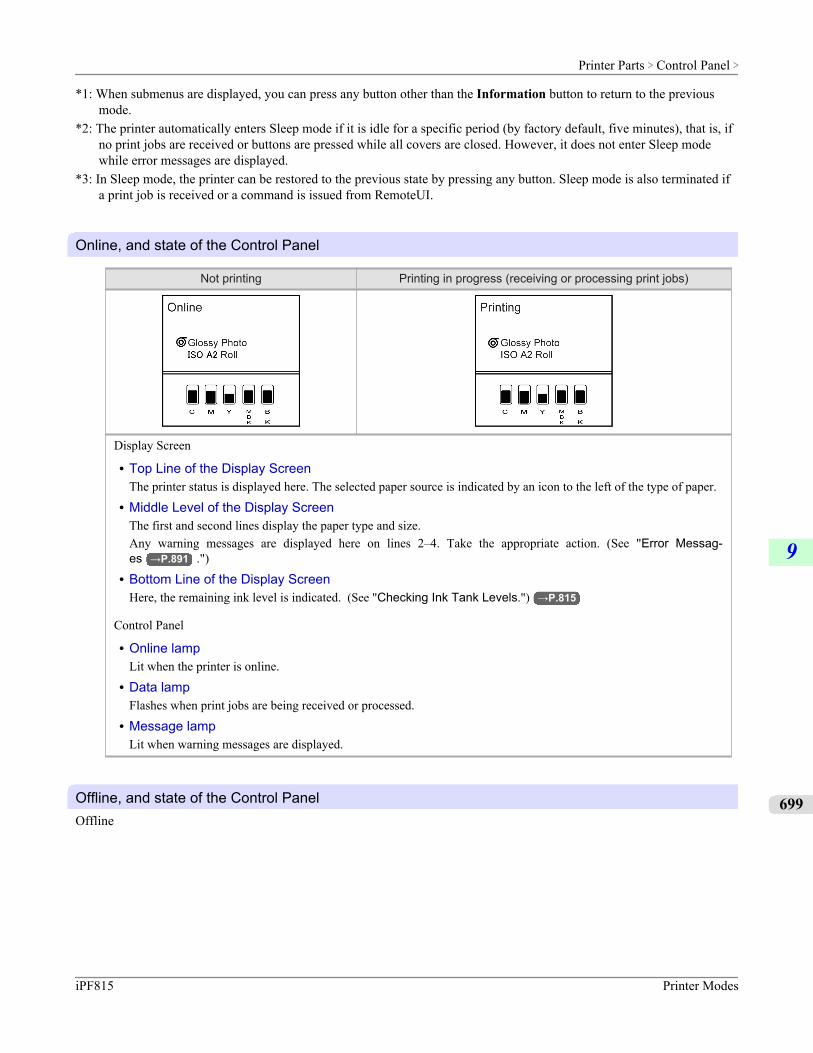
*1: When submenus are displayed, you can press any button other than the Information button to return to the previousmode.
*2: The printer automatically enters Sleep mode if it is idle for a specific period (by factory default, five minutes), that is, ifno print jobs are received or buttons are pressed while all covers are closed. However, it does not enter Sleep modewhile error messages are displayed.
*3: In Sleep mode, the printer can be restored to the previous state by pressing any button. Sleep mode is also terminated ifa print job is received or a command is issued from RemoteUI.
Online, and state of the Control Panel
Not printing Printing in progress (receiving or processing print jobs)
Display Screen
• Top Line of the Display ScreenThe printer status is displayed here. The selected paper source is indicated by an icon to the left of the type of paper.
• Middle Level of the Display ScreenThe first and second lines display the paper type and size.Any warning messages are displayed here on lines 2–4. Take the appropriate action. (See "Error Messag-es →P.891 .")
• Bottom Line of the Display ScreenHere, the remaining ink level is indicated. (See "Checking Ink Tank Levels.") →P.815
Control Panel
• Online lampLit when the printer is online.
• Data lampFlashes when print jobs are being received or processed.
• Message lampLit when warning messages are displayed.
Offline, and state of the Control PanelOffline
Printer Parts > Control Panel >
iPF815 Printer Modes
9
699

Not printing Printing is paused
Display Screen
• Display ScreenThe printer status is displayed here. The selected paper source is indicated by an icon to the left of the type of paper.
• Middle Level of the Display ScreenThe first and second lines display the paper type and size.Any warning messages are displayed here on lines 2–4. Take the appropriate action. (See "Error Messag-es →P.891 .")
• Bottom Line of the Display ScreenHere, the remaining ink level is indicated. (See "Checking Ink Tank Levels.") →P.815
Control Panel
• Message lampLit when warning messages are displayed.
Error Messages
If action can be taken If no action can be taken
• Top Line of theDisplay ScreenError messages are dis-played.
• Bottom Line of theDisplay ScreenHere, the remaining inklevel is indicated. (See"Checking Ink TankLevels.") →P.815
• Top Line of theDisplay ScreenError messages are dis-played.
• Bottom Line of theDisplay ScreenThe corrective actionsare displayed here.
• Top Line of theDisplay ScreenThe error message isdisplayed with the fol-lowing instructions:"Turn off printer,wait, then turn onagain.".
• Display ScreenERROR is displayed,followed by the errorcode and "Call forservice.".
• Data lampFlashes when print jobs are being received.
• Message lampFlashes when error messages are displayed.
• Data lampFlashes when print jobs are being received.
• Message lampFlashes when error messages are displayed.
Printer Parts > Control Panel >
Printer Modes iPF815
9
700
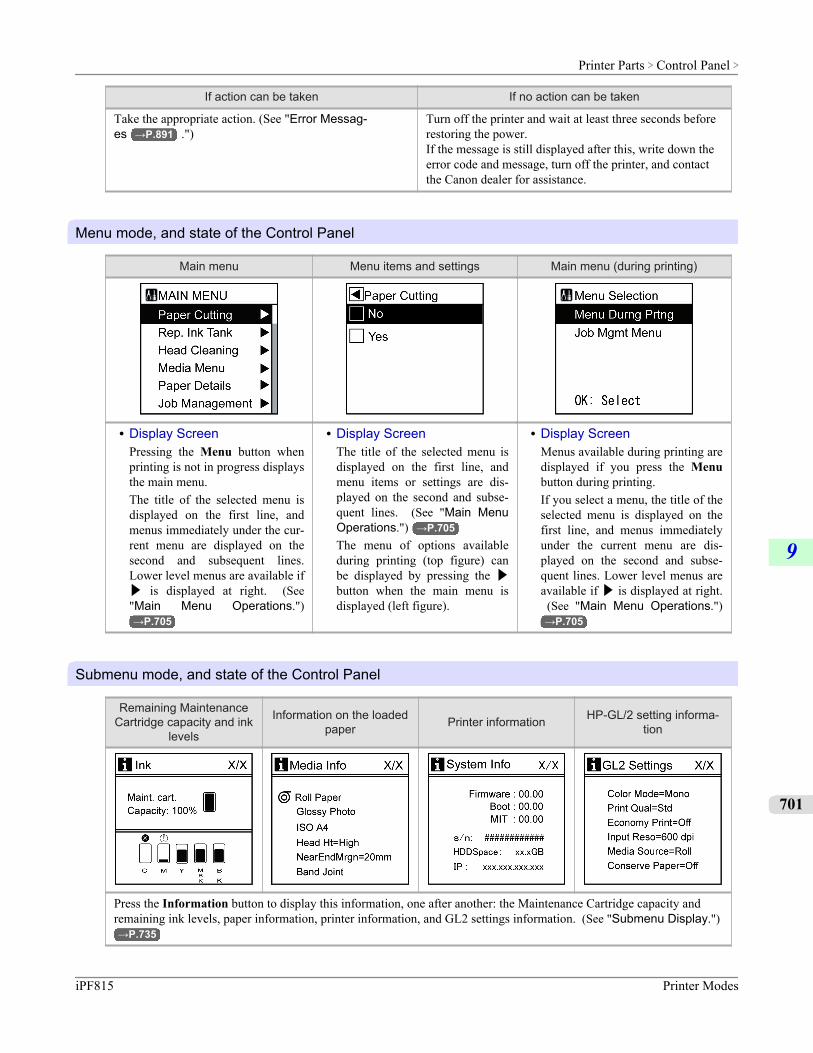
If action can be taken If no action can be taken
Take the appropriate action. (See "Error Messag-es →P.891 .")
Turn off the printer and wait at least three seconds beforerestoring the power.If the message is still displayed after this, write down theerror code and message, turn off the printer, and contactthe Canon dealer for assistance.
Menu mode, and state of the Control Panel
Main menu Menu items and settings Main menu (during printing)
• Display ScreenPressing the Menu button whenprinting is not in progress displaysthe main menu.The title of the selected menu isdisplayed on the first line, andmenus immediately under the cur-rent menu are displayed on thesecond and subsequent lines.Lower level menus are available if▶ is displayed at right. (See"Main Menu Operations.")→P.705
• Display ScreenThe title of the selected menu isdisplayed on the first line, andmenu items or settings are dis-played on the second and subse-quent lines. (See "Main MenuOperations.") →P.705The menu of options availableduring printing (top figure) canbe displayed by pressing the ▶button when the main menu isdisplayed (left figure).
• Display ScreenMenus available during printing aredisplayed if you press the Menubutton during printing.If you select a menu, the title of theselected menu is displayed on thefirst line, and menus immediatelyunder the current menu are dis-played on the second and subse-quent lines. Lower level menus areavailable if ▶ is displayed at right. (See "Main Menu Operations.")→P.705
Submenu mode, and state of the Control Panel
Remaining MaintenanceCartridge capacity and ink
levels
Information on the loadedpaper Printer information HP-GL/2 setting informa-
tion
Press the Information button to display this information, one after another: the Maintenance Cartridge capacity andremaining ink levels, paper information, printer information, and GL2 settings information. (See "Submenu Display.")→P.735
Printer Parts > Control Panel >
iPF815 Printer Modes
9
701
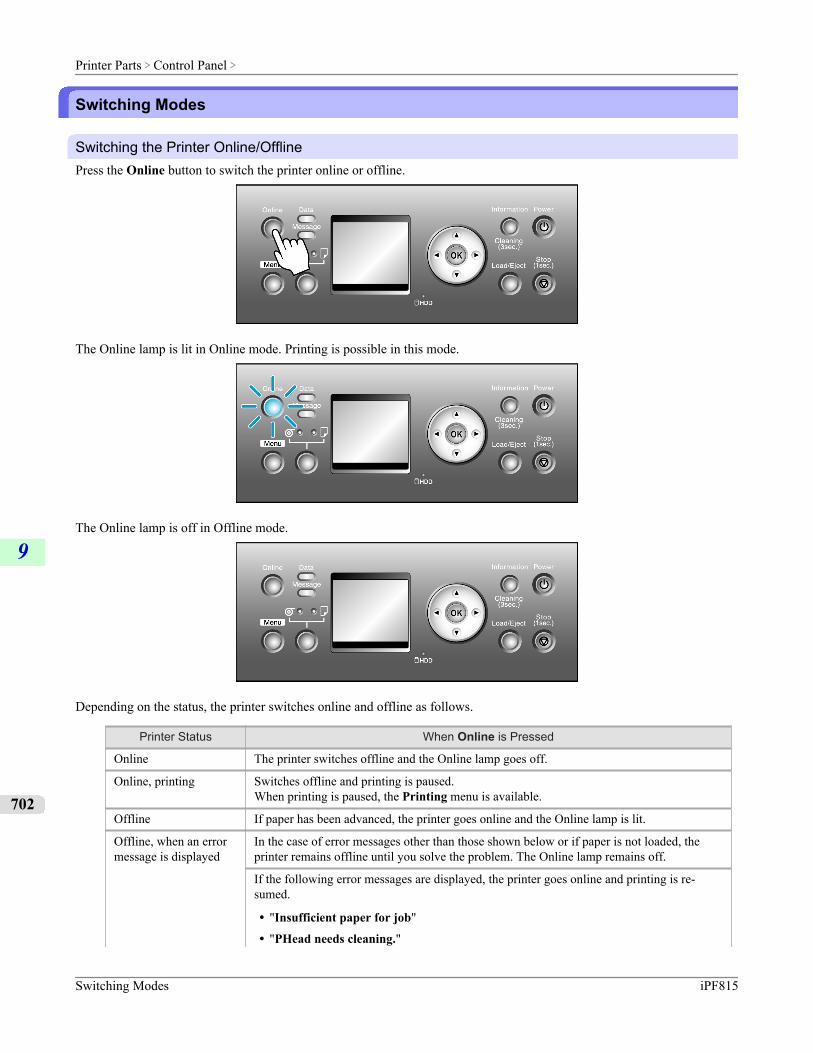
Switching Modes
Switching the Printer Online/OfflinePress the Online button to switch the printer online or offline.
The Online lamp is lit in Online mode. Printing is possible in this mode.
The Online lamp is off in Offline mode.
Depending on the status, the printer switches online and offline as follows.
Printer Status When Online is Pressed
Online The printer switches offline and the Online lamp goes off.
Online, printing Switches offline and printing is paused.When printing is paused, the Printing menu is available.
Offline If paper has been advanced, the printer goes online and the Online lamp is lit.
Offline, when an errormessage is displayed
In the case of error messages other than those shown below or if paper is not loaded, theprinter remains offline until you solve the problem. The Online lamp remains off.
If the following error messages are displayed, the printer goes online and printing is re-sumed.
• "Insufficient paper for job"
• "PHead needs cleaning."
Printer Parts > Control Panel >
Switching Modes iPF815
9
702
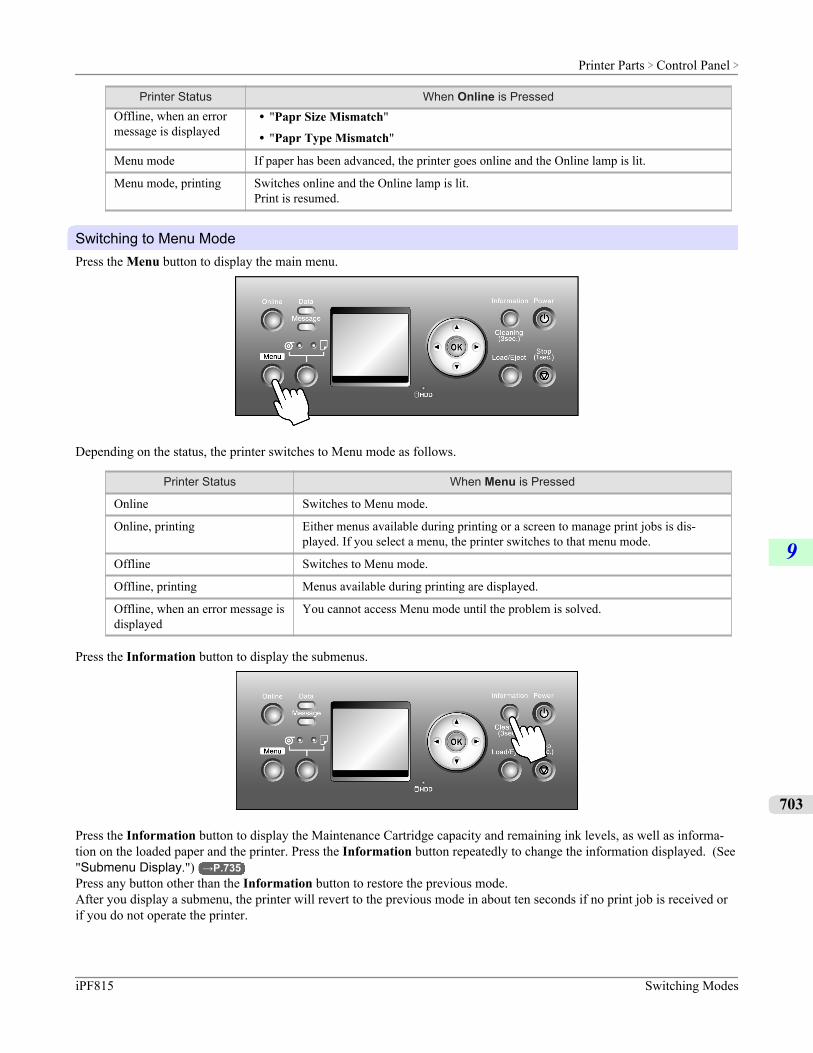
Printer Status When Online is PressedOffline, when an errormessage is displayed
• "Papr Size Mismatch"
• "Papr Type Mismatch"
Menu mode If paper has been advanced, the printer goes online and the Online lamp is lit.
Menu mode, printing Switches online and the Online lamp is lit.Print is resumed.
Switching to Menu ModePress the Menu button to display the main menu.
Depending on the status, the printer switches to Menu mode as follows.
Printer Status When Menu is Pressed
Online Switches to Menu mode.
Online, printing Either menus available during printing or a screen to manage print jobs is dis-played. If you select a menu, the printer switches to that menu mode.
Offline Switches to Menu mode.
Offline, printing Menus available during printing are displayed.
Offline, when an error message isdisplayed
You cannot access Menu mode until the problem is solved.
Press the Information button to display the submenus.
Press the Information button to display the Maintenance Cartridge capacity and remaining ink levels, as well as informa-tion on the loaded paper and the printer. Press the Information button repeatedly to change the information displayed. (See"Submenu Display.") →P.735Press any button other than the Information button to restore the previous mode.After you display a submenu, the printer will revert to the previous mode in about ten seconds if no print job is received orif you do not operate the printer.
Printer Parts > Control Panel >
iPF815 Switching Modes
9
703
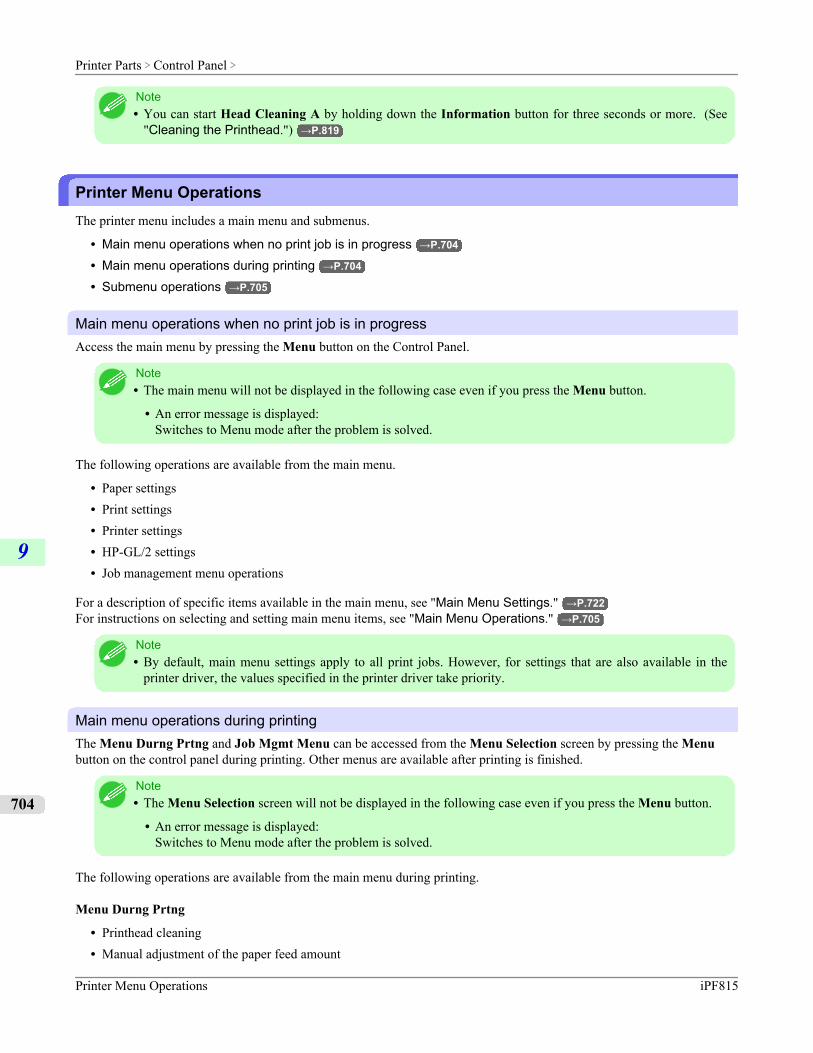
Note• You can start Head Cleaning A by holding down the Information button for three seconds or more. (See
"Cleaning the Printhead.") →P.819
Printer Menu OperationsThe printer menu includes a main menu and submenus.
• Main menu operations when no print job is in progress →P.704
• Main menu operations during printing →P.704
• Submenu operations →P.705
Main menu operations when no print job is in progressAccess the main menu by pressing the Menu button on the Control Panel.
Note• The main menu will not be displayed in the following case even if you press the Menu button.
• An error message is displayed:Switches to Menu mode after the problem is solved.
The following operations are available from the main menu.
• Paper settings• Print settings• Printer settings• HP-GL/2 settings• Job management menu operations
For a description of specific items available in the main menu, see "Main Menu Settings." →P.722For instructions on selecting and setting main menu items, see "Main Menu Operations." →P.705
Note• By default, main menu settings apply to all print jobs. However, for settings that are also available in the
printer driver, the values specified in the printer driver take priority.
Main menu operations during printingThe Menu Durng Prtng and Job Mgmt Menu can be accessed from the Menu Selection screen by pressing the Menubutton on the control panel during printing. Other menus are available after printing is finished.
Note• The Menu Selection screen will not be displayed in the following case even if you press the Menu button.
• An error message is displayed:Switches to Menu mode after the problem is solved.
The following operations are available from the main menu during printing.
Menu Durng Prtng
• Printhead cleaning• Manual adjustment of the paper feed amount
Printer Parts > Control Panel >
Printer Menu Operations iPF815
9
704
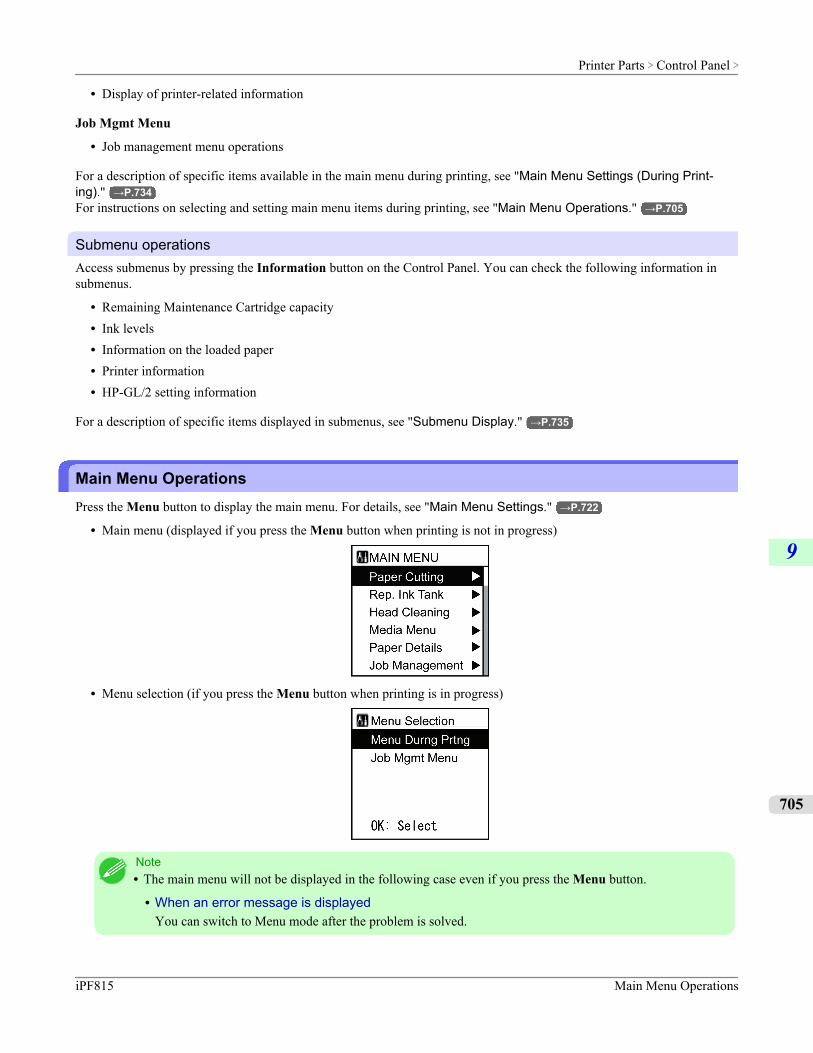
• Display of printer-related information
Job Mgmt Menu
• Job management menu operations
For a description of specific items available in the main menu during printing, see "Main Menu Settings (During Print-ing)." →P.734For instructions on selecting and setting main menu items during printing, see "Main Menu Operations." →P.705
Submenu operationsAccess submenus by pressing the Information button on the Control Panel. You can check the following information insubmenus.
• Remaining Maintenance Cartridge capacity• Ink levels• Information on the loaded paper• Printer information• HP-GL/2 setting information
For a description of specific items displayed in submenus, see "Submenu Display." →P.735
Main Menu OperationsPress the Menu button to display the main menu. For details, see "Main Menu Settings." →P.722
• Main menu (displayed if you press the Menu button when printing is not in progress)
• Menu selection (if you press the Menu button when printing is in progress)
Note• The main menu will not be displayed in the following case even if you press the Menu button.
• When an error message is displayedYou can switch to Menu mode after the problem is solved.
Printer Parts > Control Panel >
iPF815 Main Menu Operations
9
705
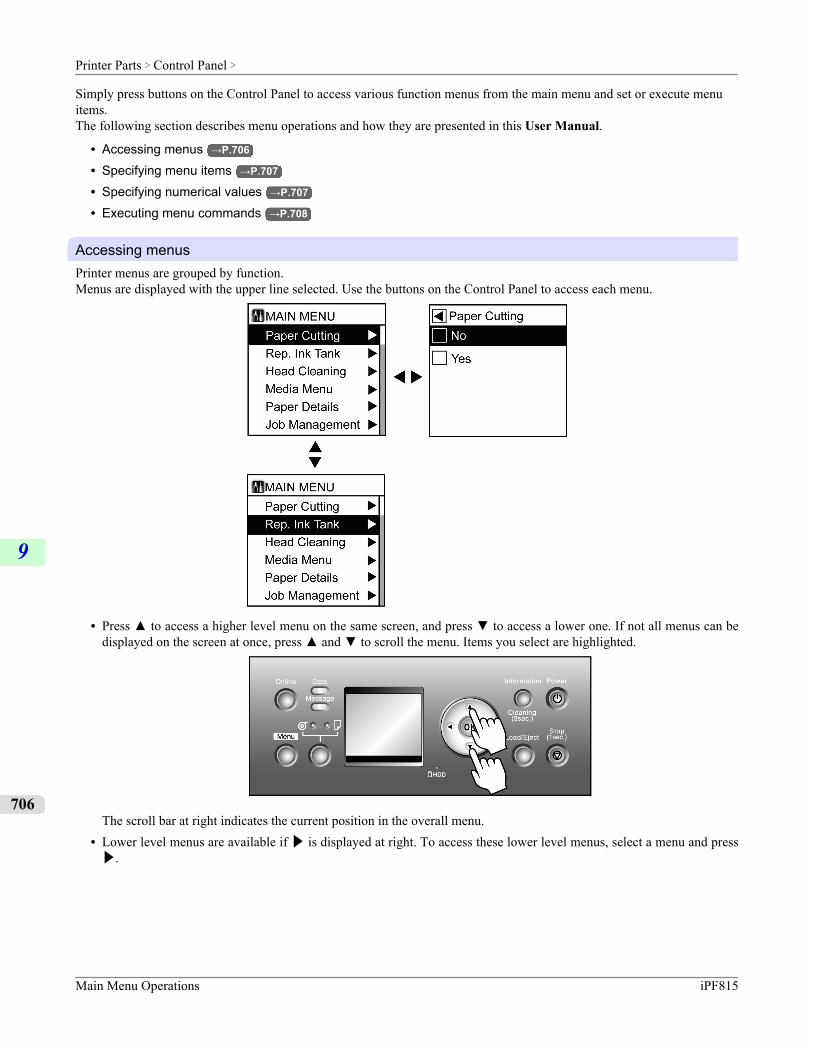
Simply press buttons on the Control Panel to access various function menus from the main menu and set or execute menuitems.The following section describes menu operations and how they are presented in this User Manual.
• Accessing menus →P.706
• Specifying menu items →P.707
• Specifying numerical values →P.707
• Executing menu commands →P.708
Accessing menusPrinter menus are grouped by function.Menus are displayed with the upper line selected. Use the buttons on the Control Panel to access each menu.
• Press ▲ to access a higher level menu on the same screen, and press ▼ to access a lower one. If not all menus can bedisplayed on the screen at once, press ▲ and ▼ to scroll the menu. Items you select are highlighted.
The scroll bar at right indicates the current position in the overall menu.• Lower level menus are available if ▶ is displayed at right. To access these lower level menus, select a menu and press▶.
Printer Parts > Control Panel >
Main Menu Operations iPF815
9
706
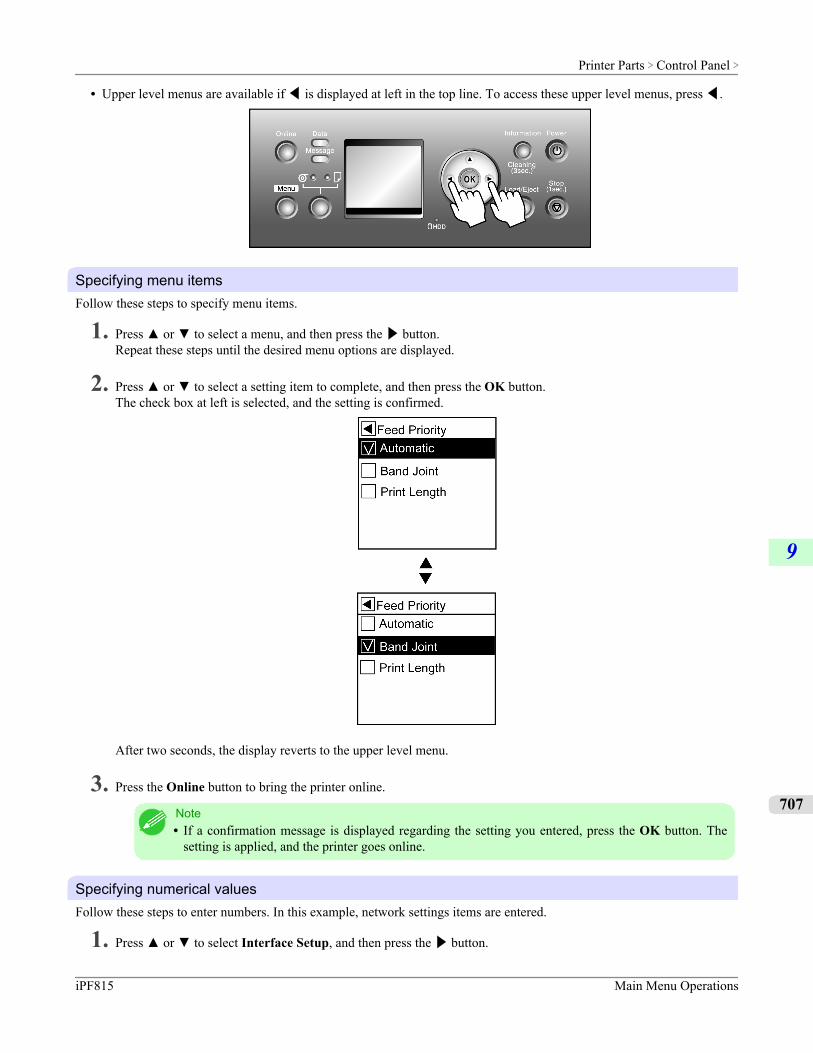
• Upper level menus are available if ◀ is displayed at left in the top line. To access these upper level menus, press ◀.
Specifying menu itemsFollow these steps to specify menu items.
1. Press ▲ or ▼ to select a menu, and then press the ▶ button.Repeat these steps until the desired menu options are displayed.
2. Press ▲ or ▼ to select a setting item to complete, and then press the OK button.The check box at left is selected, and the setting is confirmed.
After two seconds, the display reverts to the upper level menu.
3. Press the Online button to bring the printer online.
Note• If a confirmation message is displayed regarding the setting you entered, press the OK button. The
setting is applied, and the printer goes online.
Specifying numerical valuesFollow these steps to enter numbers. In this example, network settings items are entered.
1. Press ▲ or ▼ to select Interface Setup, and then press the ▶ button.
Printer Parts > Control Panel >
iPF815 Main Menu Operations
9
707
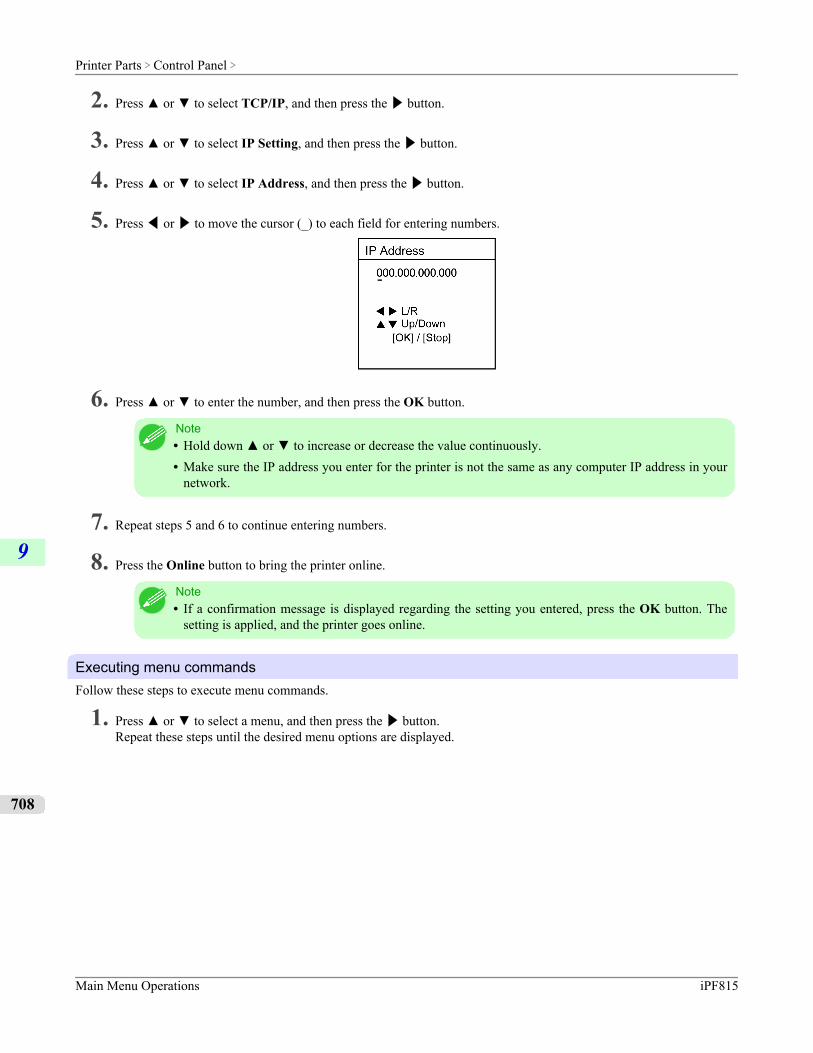
2. Press ▲ or ▼ to select TCP/IP, and then press the ▶ button.
3. Press ▲ or ▼ to select IP Setting, and then press the ▶ button.
4. Press ▲ or ▼ to select IP Address, and then press the ▶ button.
5. Press ◀ or ▶ to move the cursor (_) to each field for entering numbers.
6. Press ▲ or ▼ to enter the number, and then press the OK button.
Note• Hold down ▲ or ▼ to increase or decrease the value continuously.• Make sure the IP address you enter for the printer is not the same as any computer IP address in your
network.
7. Repeat steps 5 and 6 to continue entering numbers.
8. Press the Online button to bring the printer online.
Note• If a confirmation message is displayed regarding the setting you entered, press the OK button. The
setting is applied, and the printer goes online.
Executing menu commandsFollow these steps to execute menu commands.
1. Press ▲ or ▼ to select a menu, and then press the ▶ button.Repeat these steps until the desired menu options are displayed.
Printer Parts > Control Panel >
Main Menu Operations iPF815
9
708
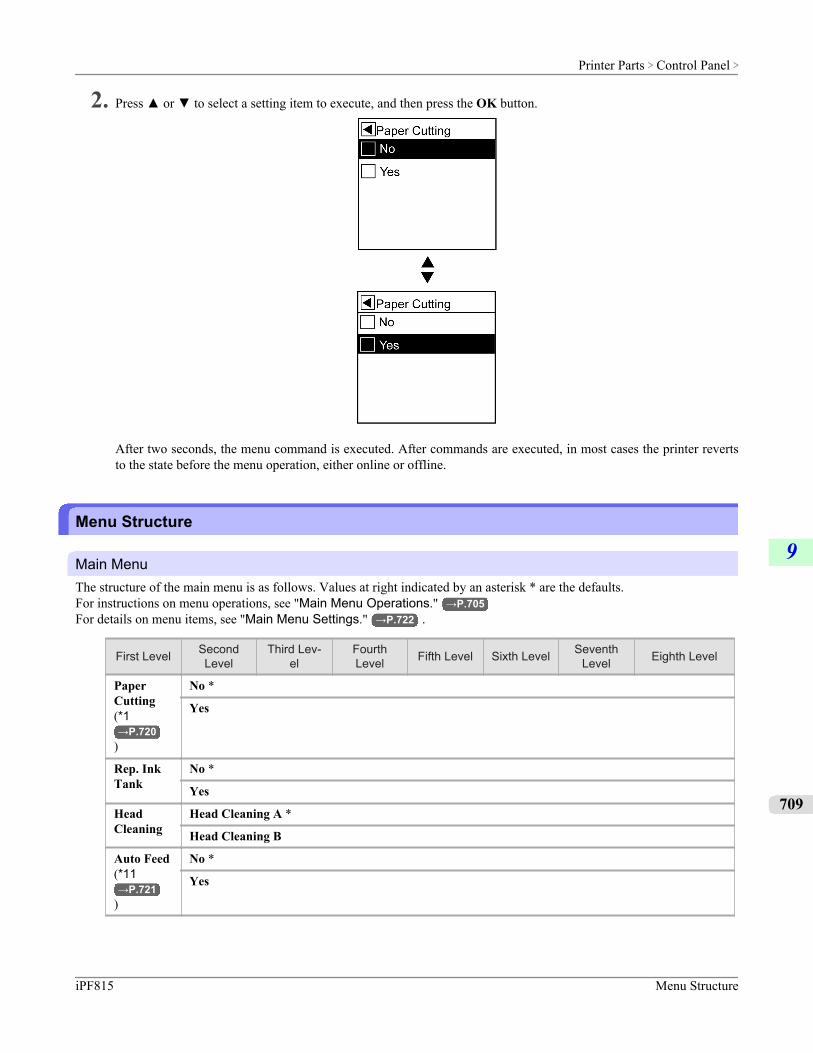
2. Press ▲ or ▼ to select a setting item to execute, and then press the OK button.
After two seconds, the menu command is executed. After commands are executed, in most cases the printer revertsto the state before the menu operation, either online or offline.
Menu Structure
Main MenuThe structure of the main menu is as follows. Values at right indicated by an asterisk * are the defaults.For instructions on menu operations, see "Main Menu Operations." →P.705For details on menu items, see "Main Menu Settings." →P.722 .
First Level SecondLevel
Third Lev-el
FourthLevel Fifth Level Sixth Level Seventh
Level Eighth Level
PaperCutting(*1→P.720
)
No *
Yes
Rep. InkTank
No *
Yes
HeadCleaning
Head Cleaning A *
Head Cleaning B
Auto Feed(*11→P.721
)
No *
Yes
Printer Parts > Control Panel >
iPF815 Menu Structure
9
709
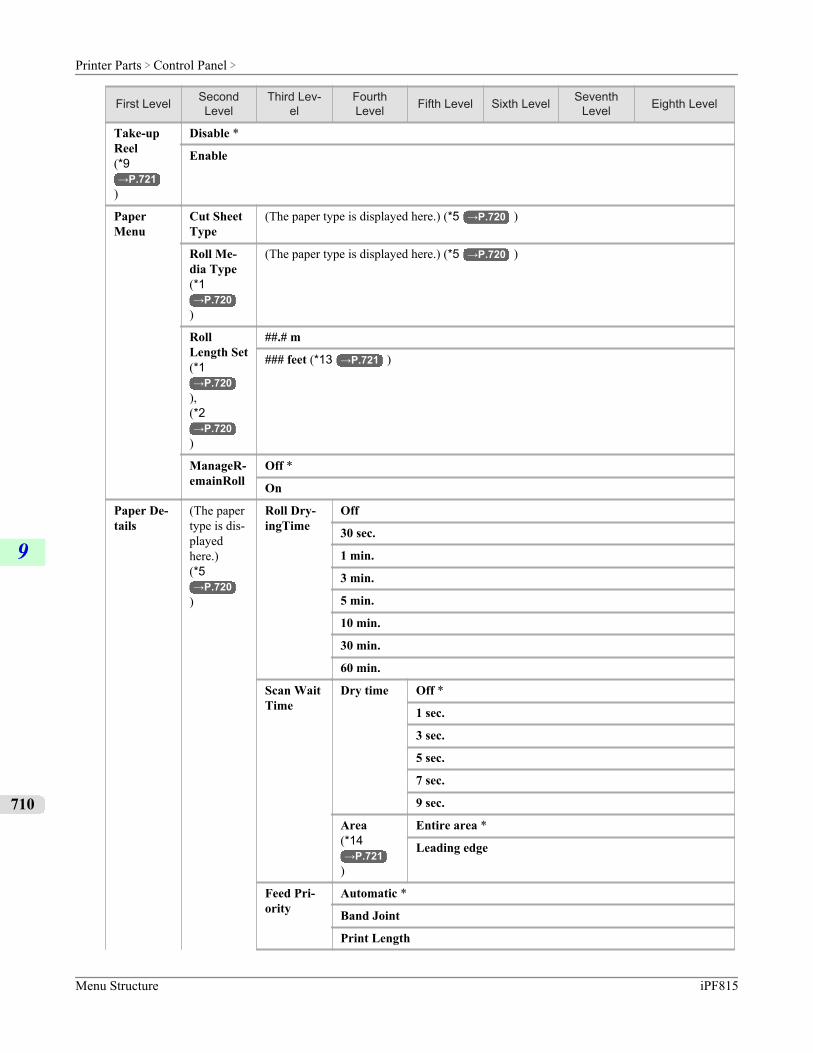
First Level SecondLevel
Third Lev-el
FourthLevel Fifth Level Sixth Level Seventh
Level Eighth Level
Take-upReel(*9→P.721
)
Disable *
Enable
PaperMenu
Cut SheetType
(The paper type is displayed here.) (*5 →P.720 )
Roll Me-dia Type(*1→P.720
)
(The paper type is displayed here.) (*5 →P.720 )
RollLength Set(*1→P.720
),(*2→P.720
)
##.# m
### feet (*13 →P.721 )
ManageR-emainRoll
Off *
On
Paper De-tails
(The papertype is dis-playedhere.)(*5→P.720
)
Roll Dry-ingTime
Off
30 sec.
1 min.
3 min.
5 min.
10 min.
30 min.
60 min.
Scan WaitTime
Dry time Off *
1 sec.
3 sec.
5 sec.
7 sec.
9 sec.
Area(*14→P.721
)
Entire area *
Leading edge
Feed Pri-ority
Automatic *
Band Joint
Print Length
Printer Parts > Control Panel >
Menu Structure iPF815
9
710
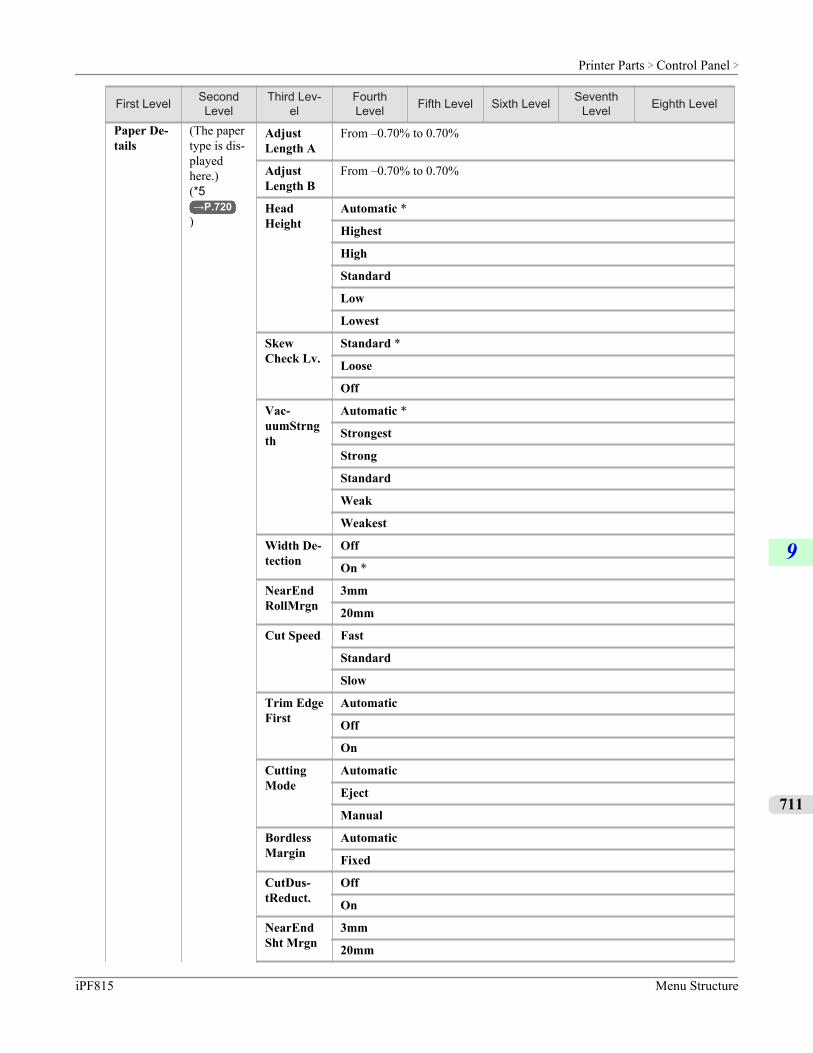
First Level SecondLevel
Third Lev-el
FourthLevel Fifth Level Sixth Level Seventh
Level Eighth Level
Paper De-tails
(The papertype is dis-playedhere.)(*5→P.720
)
AdjustLength A
From –0.70% to 0.70%
AdjustLength B
From –0.70% to 0.70%
HeadHeight
Automatic *
Highest
High
Standard
Low
Lowest
SkewCheck Lv.
Standard *
Loose
Off
Vac-uumStrngth
Automatic *
Strongest
Strong
Standard
Weak
Weakest
Width De-tection
Off
On *
NearEndRollMrgn
3mm
20mm
Cut Speed Fast
Standard
Slow
Trim EdgeFirst
Automatic
Off
On
CuttingMode
Automatic
Eject
Manual
BordlessMargin
Automatic
Fixed
CutDus-tReduct.
Off
On
NearEndSht Mrgn
3mm
20mm
Printer Parts > Control Panel >
iPF815 Menu Structure
9
711
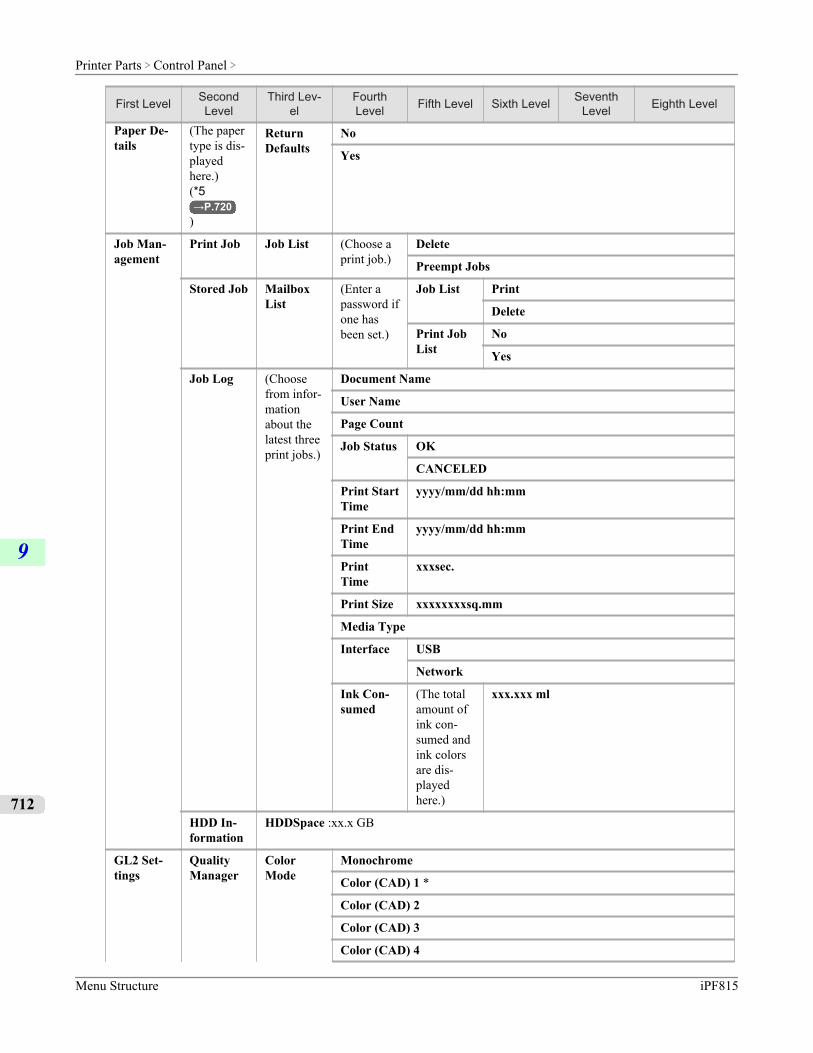
First Level SecondLevel
Third Lev-el
FourthLevel Fifth Level Sixth Level Seventh
Level Eighth Level
Paper De-tails
(The papertype is dis-playedhere.)(*5→P.720
)
ReturnDefaults
No
Yes
Job Man-agement
Print Job Job List (Choose aprint job.)
Delete
Preempt Jobs
Stored Job MailboxList
(Enter apassword ifone hasbeen set.)
Job List Print
Delete
Print JobList
No
Yes
Job Log (Choosefrom infor-mationabout thelatest threeprint jobs.)
Document Name
User Name
Page Count
Job Status OK
CANCELED
Print StartTime
yyyy/mm/dd hh:mm
Print EndTime
yyyy/mm/dd hh:mm
PrintTime
xxxsec.
Print Size xxxxxxxxsq.mm
Media Type
Interface USB
Network
Ink Con-sumed
(The totalamount ofink con-sumed andink colorsare dis-playedhere.)
xxx.xxx ml
HDD In-formation
HDDSpace :xx.x GB
GL2 Set-tings
QualityManager
ColorMode
Monochrome
Color (CAD) 1 *
Color (CAD) 2
Color (CAD) 3
Color (CAD) 4
Printer Parts > Control Panel >
Menu Structure iPF815
9
712
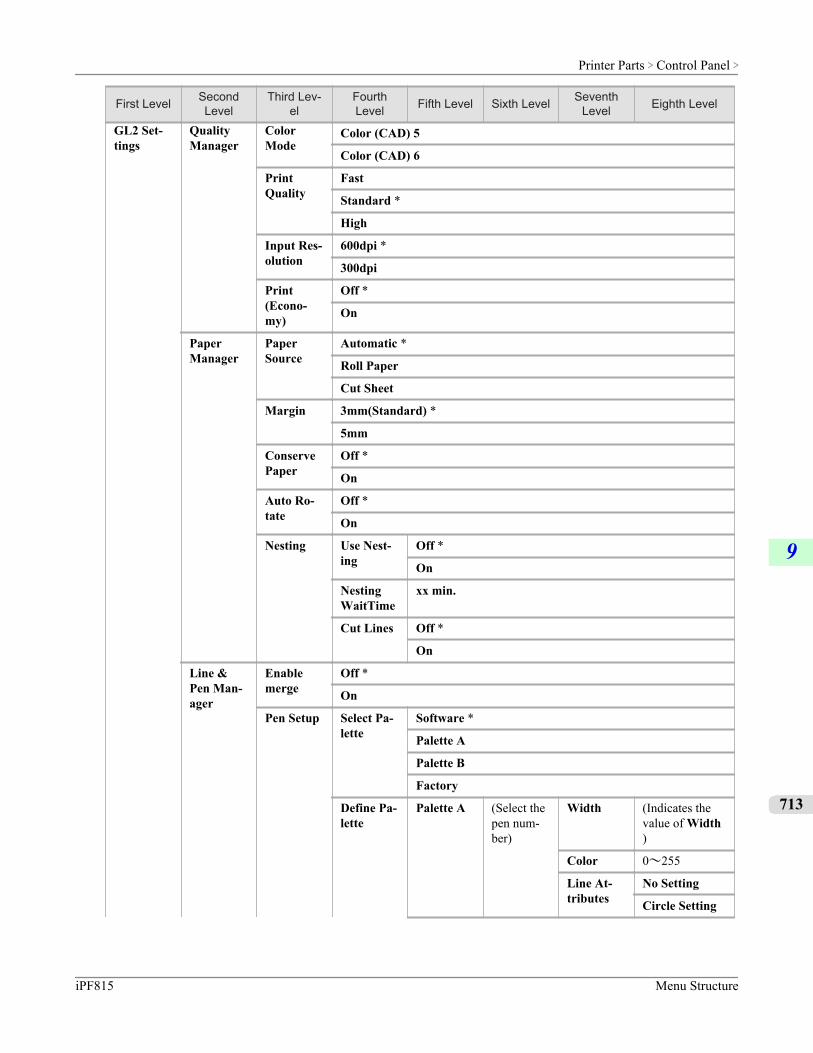
First Level SecondLevel
Third Lev-el
FourthLevel Fifth Level Sixth Level Seventh
Level Eighth Level
GL2 Set-tings
QualityManager
ColorMode
Color (CAD) 5
Color (CAD) 6
PrintQuality
Fast
Standard *
High
Input Res-olution
600dpi *
300dpi
Print(Econo-my)
Off *
On
PaperManager
PaperSource
Automatic *
Roll Paper
Cut Sheet
Margin 3mm(Standard) *
5mm
ConservePaper
Off *
On
Auto Ro-tate
Off *
On
Nesting Use Nest-ing
Off *
On
NestingWaitTime
xx min.
Cut Lines Off *
On
Line &Pen Man-ager
Enablemerge
Off *
On
Pen Setup Select Pa-lette
Software *
Palette A
Palette B
Factory
Define Pa-lette
Palette A (Select thepen num-ber)
Width (Indicates thevalue of Width)
Color 0~255
Line At-tributes
No Setting
Circle Setting
Printer Parts > Control Panel >
iPF815 Menu Structure
9
713
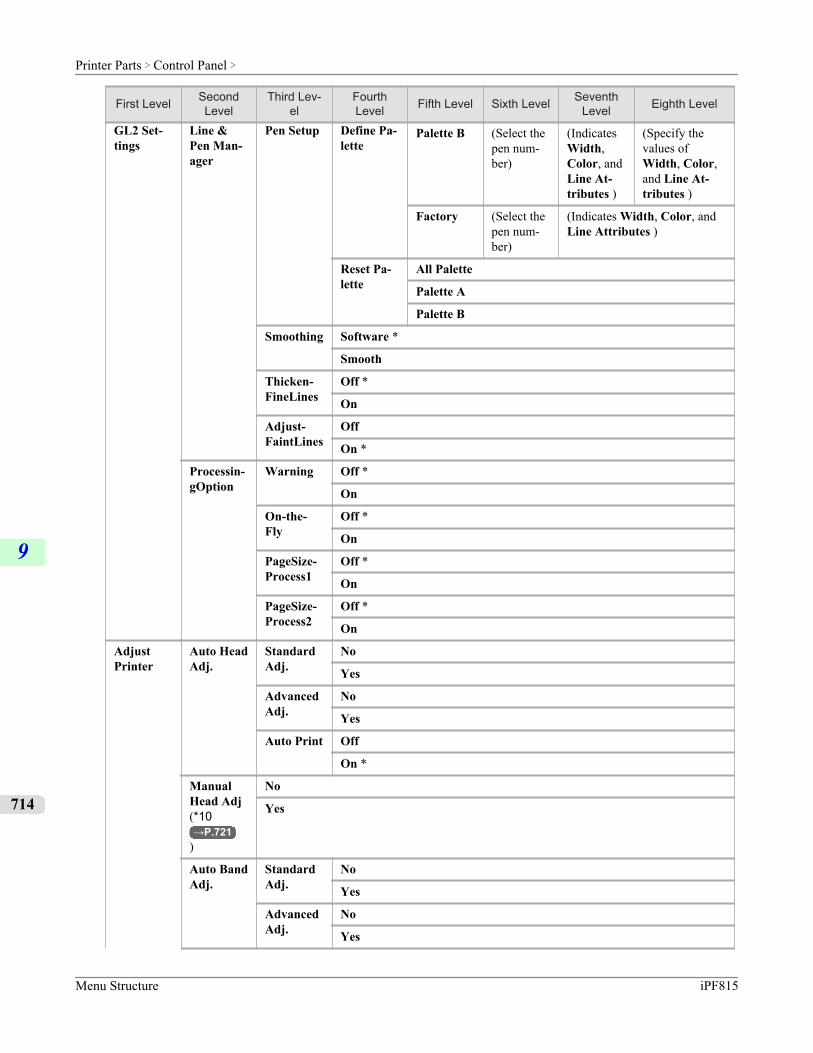
First Level SecondLevel
Third Lev-el
FourthLevel Fifth Level Sixth Level Seventh
Level Eighth Level
GL2 Set-tings
Line &Pen Man-ager
Pen Setup Define Pa-lette
Palette B (Select thepen num-ber)
(IndicatesWidth,Color, andLine At-tributes )
(Specify thevalues ofWidth, Color,and Line At-tributes )
Factory (Select thepen num-ber)
(Indicates Width, Color, andLine Attributes )
Reset Pa-lette
All Palette
Palette A
Palette B
Smoothing Software *
Smooth
Thicken-FineLines
Off *
On
Adjust-FaintLines
Off
On *
Processin-gOption
Warning Off *
On
On-the-Fly
Off *
On
PageSize-Process1
Off *
On
PageSize-Process2
Off *
On
AdjustPrinter
Auto HeadAdj.
StandardAdj.
No
Yes
AdvancedAdj.
No
Yes
Auto Print Off
On *
ManualHead Adj(*10→P.721
)
No
Yes
Auto BandAdj.
StandardAdj.
No
Yes
AdvancedAdj.
No
Yes
Printer Parts > Control Panel >
Menu Structure iPF815
9
714
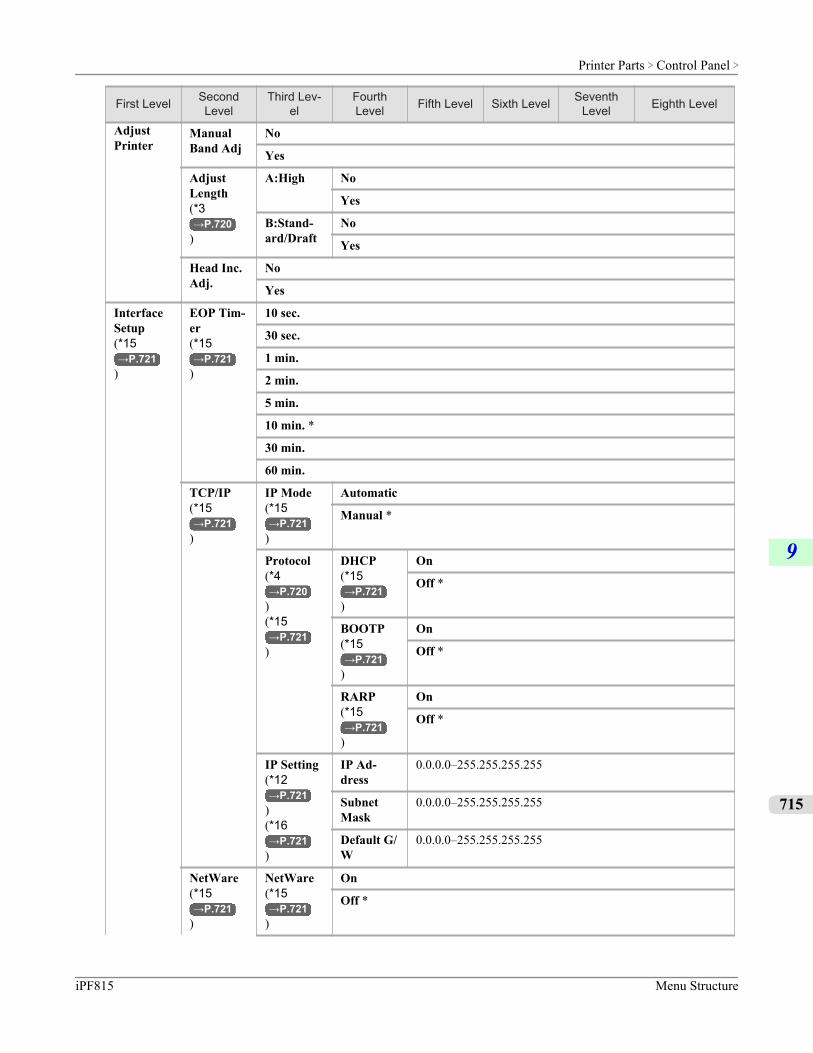
First Level SecondLevel
Third Lev-el
FourthLevel Fifth Level Sixth Level Seventh
Level Eighth Level
AdjustPrinter
ManualBand Adj
No
Yes
AdjustLength(*3→P.720
)
A:High No
Yes
B:Stand-ard/Draft
No
Yes
Head Inc.Adj.
No
Yes
InterfaceSetup(*15→P.721
)
EOP Tim-er(*15→P.721
)
10 sec.
30 sec.
1 min.
2 min.
5 min.
10 min. *
30 min.
60 min.
TCP/IP(*15→P.721
)
IP Mode(*15→P.721
)
Automatic
Manual *
Protocol(*4→P.720
)(*15→P.721
)
DHCP(*15→P.721
)
On
Off *
BOOTP(*15→P.721
)
On
Off *
RARP(*15→P.721
)
On
Off *
IP Setting(*12→P.721
)(*16→P.721
)
IP Ad-dress
0.0.0.0–255.255.255.255
SubnetMask
0.0.0.0–255.255.255.255
Default G/W
0.0.0.0–255.255.255.255
NetWare(*15→P.721
)
NetWare(*15→P.721
)
On
Off *
Printer Parts > Control Panel >
iPF815 Menu Structure
9
715
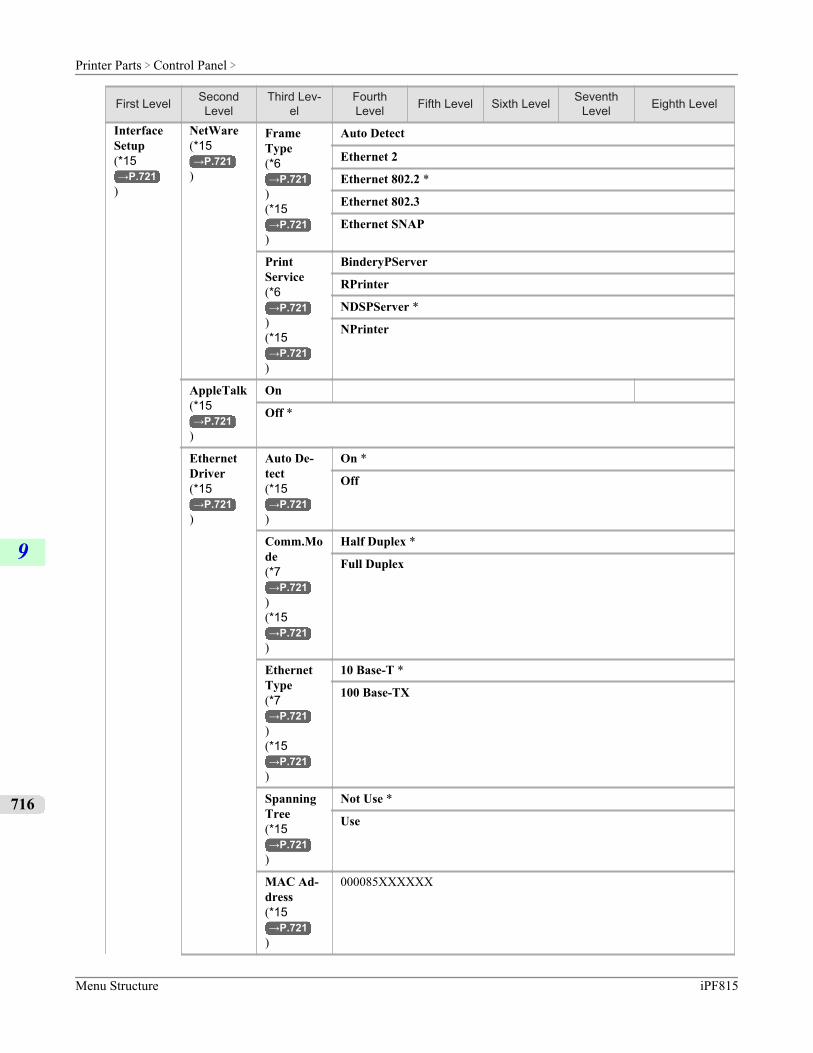
First Level SecondLevel
Third Lev-el
FourthLevel Fifth Level Sixth Level Seventh
Level Eighth Level
InterfaceSetup(*15→P.721
)
NetWare(*15→P.721
)
FrameType(*6→P.721
)(*15→P.721
)
Auto Detect
Ethernet 2
Ethernet 802.2 *
Ethernet 802.3
Ethernet SNAP
PrintService(*6→P.721
)(*15→P.721
)
BinderyPServer
RPrinter
NDSPServer *
NPrinter
AppleTalk(*15→P.721
)
On
Off *
EthernetDriver(*15→P.721
)
Auto De-tect(*15→P.721
)
On *
Off
Comm.Mode(*7→P.721
)(*15→P.721
)
Half Duplex *
Full Duplex
EthernetType(*7→P.721
)(*15→P.721
)
10 Base-T *
100 Base-TX
SpanningTree(*15→P.721
)
Not Use *
Use
MAC Ad-dress(*15→P.721
)
000085XXXXXX
Printer Parts > Control Panel >
Menu Structure iPF815
9
716
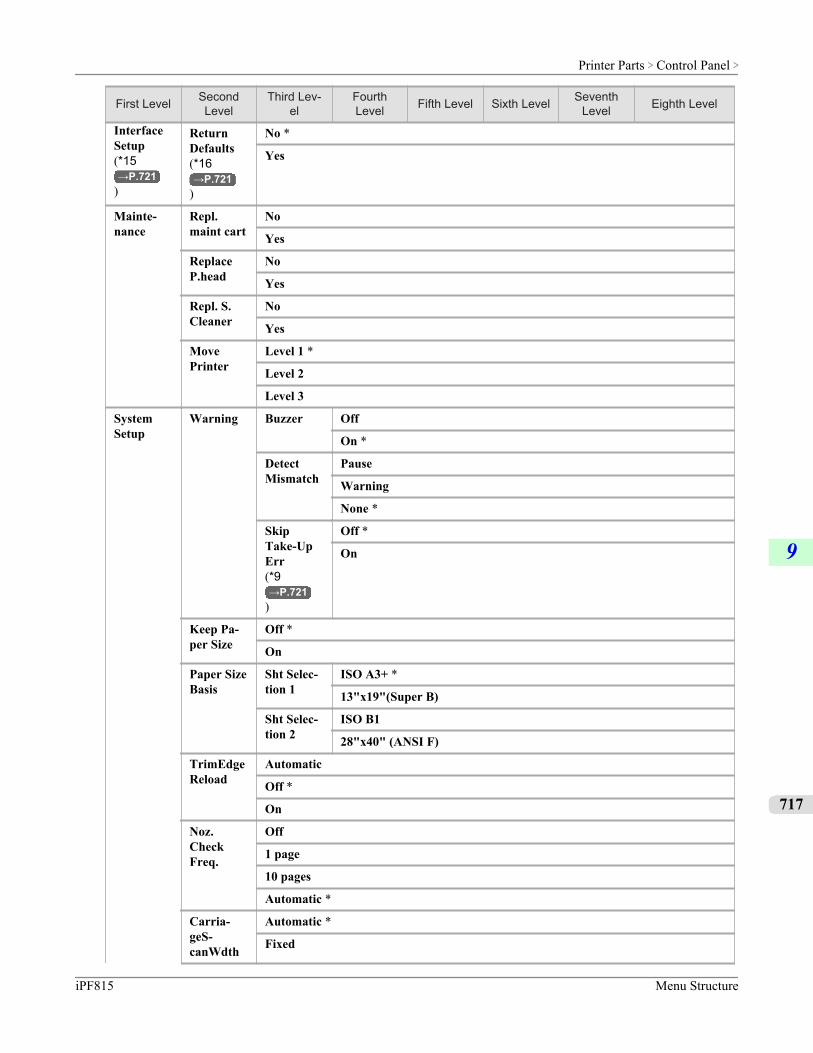
First Level SecondLevel
Third Lev-el
FourthLevel Fifth Level Sixth Level Seventh
Level Eighth Level
InterfaceSetup(*15→P.721
)
ReturnDefaults(*16→P.721
)
No *
Yes
Mainte-nance
Repl.maint cart
No
Yes
ReplaceP.head
No
Yes
Repl. S.Cleaner
No
Yes
MovePrinter
Level 1 *
Level 2
Level 3
SystemSetup
Warning Buzzer Off
On *
DetectMismatch
Pause
Warning
None *
SkipTake-UpErr(*9→P.721
)
Off *
On
Keep Pa-per Size
Off *
On
Paper SizeBasis
Sht Selec-tion 1
ISO A3+ *
13"x19"(Super B)
Sht Selec-tion 2
ISO B1
28"x40" (ANSI F)
TrimEdgeReload
Automatic
Off *
On
Noz.CheckFreq.
Off
1 page
10 pages
Automatic *
Carria-geS-canWdth
Automatic *
Fixed
Printer Parts > Control Panel >
iPF815 Menu Structure
9
717
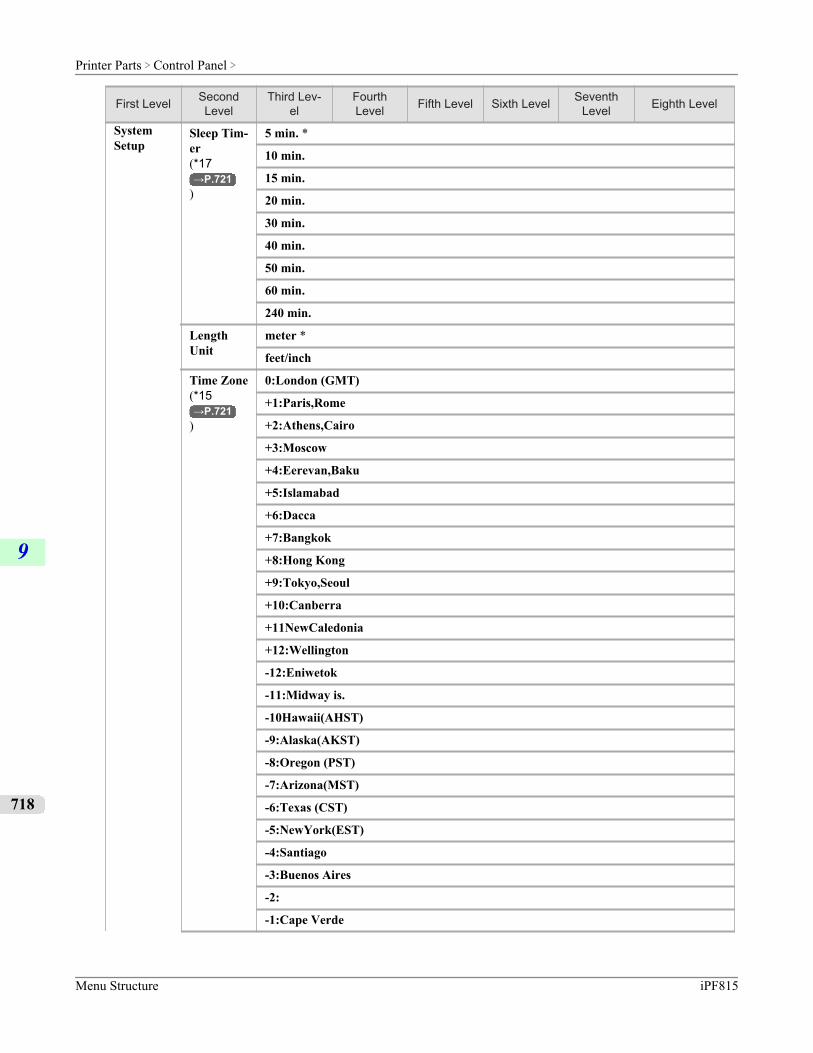
First Level SecondLevel
Third Lev-el
FourthLevel Fifth Level Sixth Level Seventh
Level Eighth Level
SystemSetup
Sleep Tim-er(*17→P.721
)
5 min. *
10 min.
15 min.
20 min.
30 min.
40 min.
50 min.
60 min.
240 min.
LengthUnit
meter *
feet/inch
Time Zone(*15→P.721
)
0:London (GMT)
+1:Paris,Rome
+2:Athens,Cairo
+3:Moscow
+4:Eerevan,Baku
+5:Islamabad
+6:Dacca
+7:Bangkok
+8:Hong Kong
+9:Tokyo,Seoul
+10:Canberra
+11NewCaledonia
+12:Wellington
-12:Eniwetok
-11:Midway is.
-10Hawaii(AHST)
-9:Alaska(AKST)
-8:Oregon (PST)
-7:Arizona(MST)
-6:Texas (CST)
-5:NewYork(EST)
-4:Santiago
-3:Buenos Aires
-2:
-1:Cape Verde
Printer Parts > Control Panel >
Menu Structure iPF815
9
718
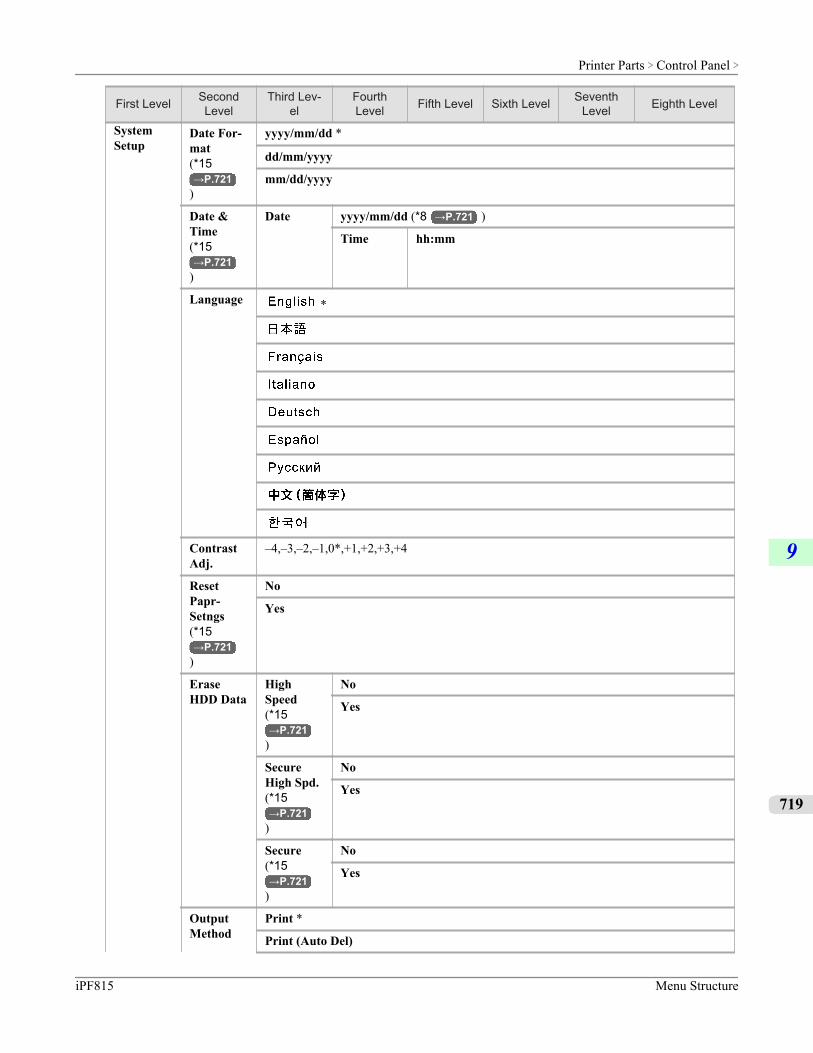
First Level SecondLevel
Third Lev-el
FourthLevel Fifth Level Sixth Level Seventh
Level Eighth Level
SystemSetup
Date For-mat(*15→P.721
)
yyyy/mm/dd *
dd/mm/yyyy
mm/dd/yyyy
Date &Time(*15→P.721
)
Date yyyy/mm/dd (*8 →P.721 )
Time hh:mm
Language *
ContrastAdj.
–4,–3,–2,–1,0*,+1,+2,+3,+4
ResetPapr-Setngs(*15→P.721
)
No
Yes
EraseHDD Data
HighSpeed(*15→P.721
)
No
Yes
SecureHigh Spd.(*15→P.721
)
No
Yes
Secure(*15→P.721
)
No
Yes
OutputMethod
Print *
Print (Auto Del)
Printer Parts > Control Panel >
iPF815 Menu Structure
9
719
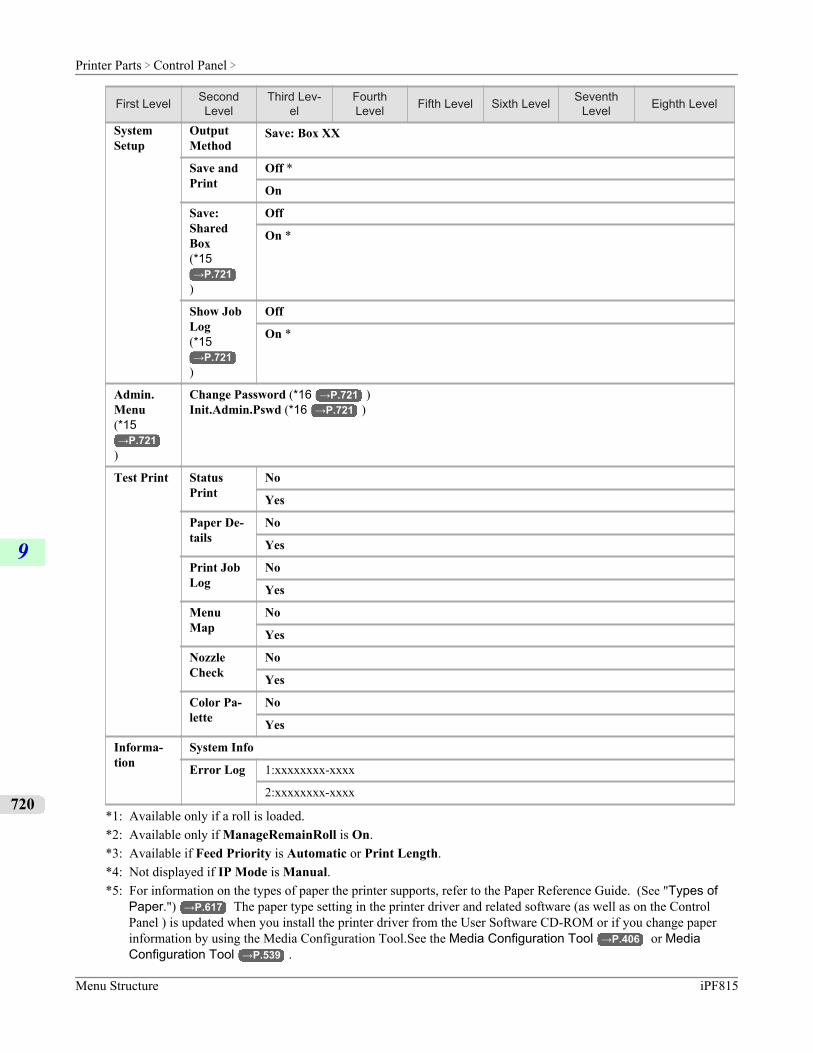
First Level SecondLevel
Third Lev-el
FourthLevel Fifth Level Sixth Level Seventh
Level Eighth Level
SystemSetup
OutputMethod
Save: Box XX
Save andPrint
Off *
On
Save:SharedBox(*15→P.721
)
Off
On *
Show JobLog(*15→P.721
)
Off
On *
Admin.Menu(*15→P.721
)
Change Password (*16 →P.721 )Init.Admin.Pswd (*16 →P.721 )
Test Print StatusPrint
No
Yes
Paper De-tails
No
Yes
Print JobLog
No
Yes
MenuMap
No
Yes
NozzleCheck
No
Yes
Color Pa-lette
No
Yes
Informa-tion
System Info
Error Log 1:xxxxxxxx-xxxx
2:xxxxxxxx-xxxx
*1: Available only if a roll is loaded.*2: Available only if ManageRemainRoll is On.*3: Available if Feed Priority is Automatic or Print Length.*4: Not displayed if IP Mode is Manual.*5: For information on the types of paper the printer supports, refer to the Paper Reference Guide. (See "Types of
Paper.") →P.617 The paper type setting in the printer driver and related software (as well as on the ControlPanel ) is updated when you install the printer driver from the User Software CD-ROM or if you change paperinformation by using the Media Configuration Tool.See the Media Configuration Tool →P.406 or MediaConfiguration Tool →P.539 .
Printer Parts > Control Panel >
Menu Structure iPF815
9
720
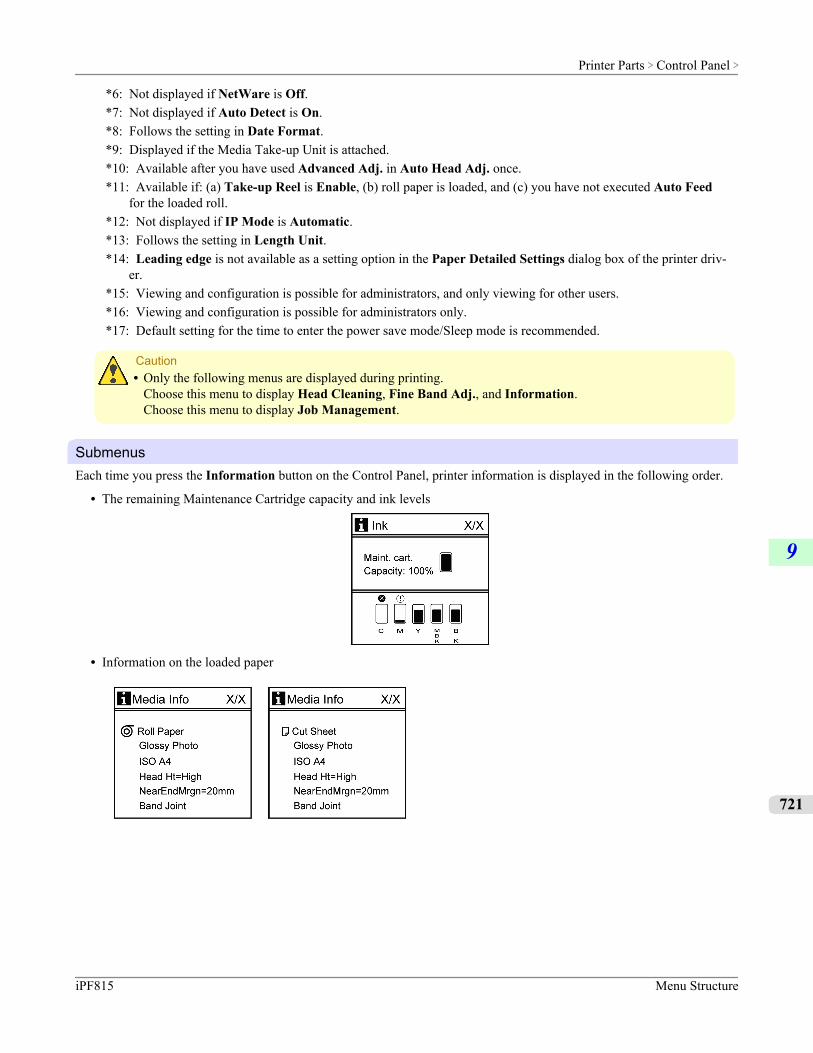
*6: Not displayed if NetWare is Off.*7: Not displayed if Auto Detect is On.*8: Follows the setting in Date Format.*9: Displayed if the Media Take-up Unit is attached.*10: Available after you have used Advanced Adj. in Auto Head Adj. once.*11: Available if: (a) Take-up Reel is Enable, (b) roll paper is loaded, and (c) you have not executed Auto Feed
for the loaded roll.*12: Not displayed if IP Mode is Automatic.*13: Follows the setting in Length Unit.*14: Leading edge is not available as a setting option in the Paper Detailed Settings dialog box of the printer driv-
er.*15: Viewing and configuration is possible for administrators, and only viewing for other users.*16: Viewing and configuration is possible for administrators only.*17: Default setting for the time to enter the power save mode/Sleep mode is recommended.
Caution• Only the following menus are displayed during printing.
Choose this menu to display Head Cleaning, Fine Band Adj., and Information.Choose this menu to display Job Management.
SubmenusEach time you press the Information button on the Control Panel, printer information is displayed in the following order.
• The remaining Maintenance Cartridge capacity and ink levels
• Information on the loaded paper
Printer Parts > Control Panel >
iPF815 Menu Structure
9
721
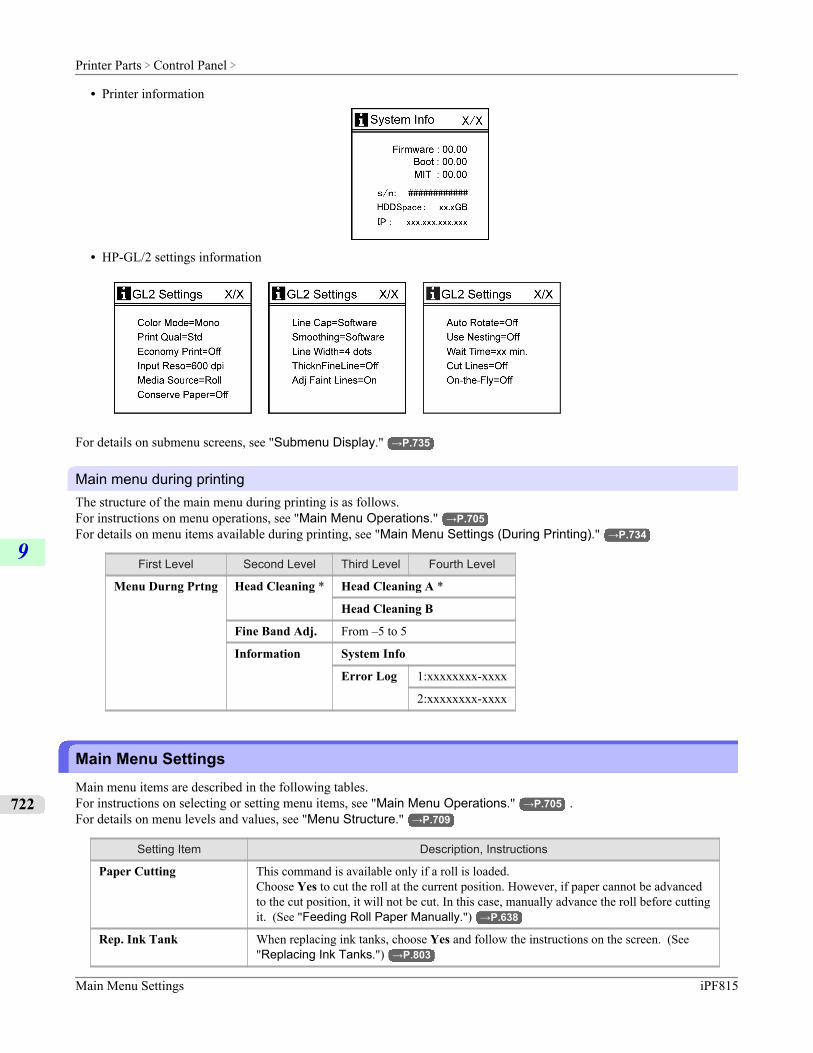
• Printer information
• HP-GL/2 settings information
For details on submenu screens, see "Submenu Display." →P.735
Main menu during printingThe structure of the main menu during printing is as follows.For instructions on menu operations, see "Main Menu Operations." →P.705For details on menu items available during printing, see "Main Menu Settings (During Printing)." →P.734
First Level Second Level Third Level Fourth Level
Menu Durng Prtng Head Cleaning * Head Cleaning A *
Head Cleaning B
Fine Band Adj. From –5 to 5
Information System Info
Error Log 1:xxxxxxxx-xxxx
2:xxxxxxxx-xxxx
Main Menu SettingsMain menu items are described in the following tables.For instructions on selecting or setting menu items, see "Main Menu Operations." →P.705 .For details on menu levels and values, see "Menu Structure." →P.709
Setting Item Description, Instructions
Paper Cutting This command is available only if a roll is loaded.Choose Yes to cut the roll at the current position. However, if paper cannot be advancedto the cut position, it will not be cut. In this case, manually advance the roll before cuttingit. (See "Feeding Roll Paper Manually.") →P.638
Rep. Ink Tank When replacing ink tanks, choose Yes and follow the instructions on the screen. (See"Replacing Ink Tanks.") →P.803
Printer Parts > Control Panel >
Main Menu Settings iPF815
9
722
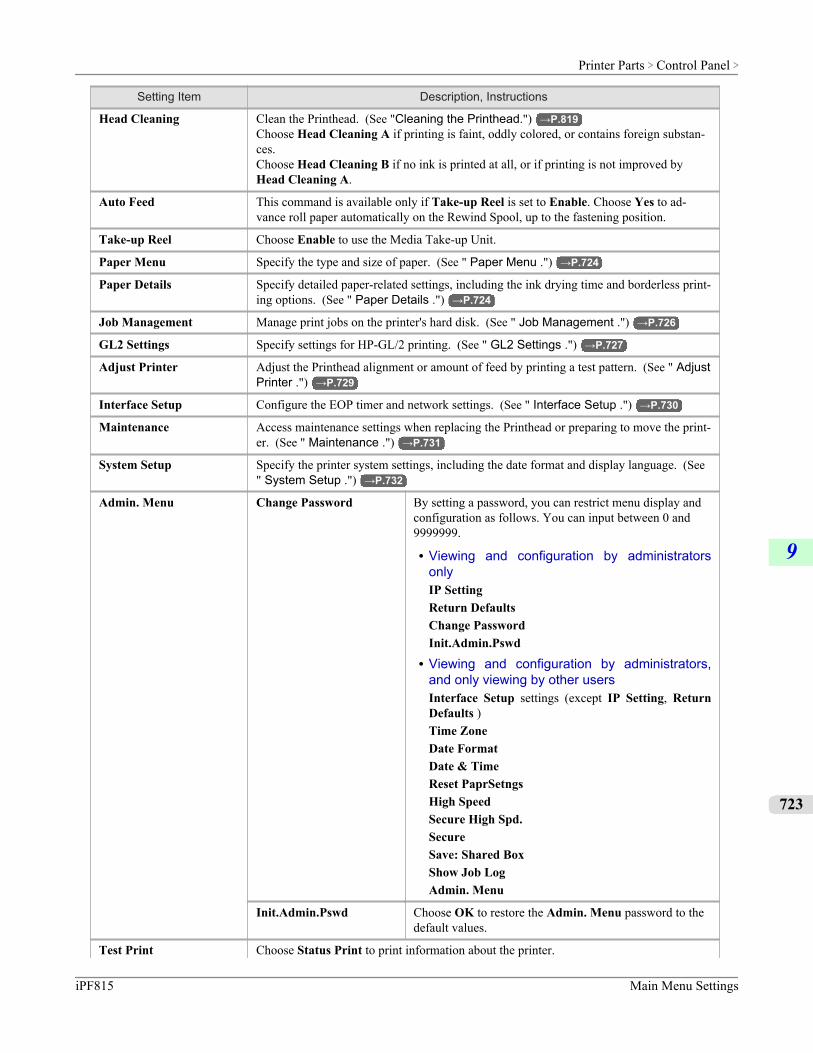
Setting Item Description, Instructions
Head Cleaning Clean the Printhead. (See "Cleaning the Printhead.") →P.819Choose Head Cleaning A if printing is faint, oddly colored, or contains foreign substan-ces.Choose Head Cleaning B if no ink is printed at all, or if printing is not improved byHead Cleaning A.
Auto Feed This command is available only if Take-up Reel is set to Enable. Choose Yes to ad-vance roll paper automatically on the Rewind Spool, up to the fastening position.
Take-up Reel Choose Enable to use the Media Take-up Unit.
Paper Menu Specify the type and size of paper. (See " Paper Menu .") →P.724
Paper Details Specify detailed paper-related settings, including the ink drying time and borderless print-ing options. (See " Paper Details .") →P.724
Job Management Manage print jobs on the printer's hard disk. (See " Job Management .") →P.726
GL2 Settings Specify settings for HP-GL/2 printing. (See " GL2 Settings .") →P.727
Adjust Printer Adjust the Printhead alignment or amount of feed by printing a test pattern. (See " AdjustPrinter .") →P.729
Interface Setup Configure the EOP timer and network settings. (See " Interface Setup .") →P.730
Maintenance Access maintenance settings when replacing the Printhead or preparing to move the print-er. (See " Maintenance .") →P.731
System Setup Specify the printer system settings, including the date format and display language. (See" System Setup .") →P.732
Admin. Menu Change Password By setting a password, you can restrict menu display andconfiguration as follows. You can input between 0 and9999999.
• Viewing and configuration by administratorsonlyIP SettingReturn DefaultsChange PasswordInit.Admin.Pswd
• Viewing and configuration by administrators,and only viewing by other usersInterface Setup settings (except IP Setting, ReturnDefaults )Time ZoneDate FormatDate & TimeReset PaprSetngsHigh SpeedSecure High Spd.SecureSave: Shared BoxShow Job LogAdmin. Menu
Init.Admin.Pswd Choose OK to restore the Admin. Menu password to thedefault values.
Test Print Choose Status Print to print information about the printer.
Printer Parts > Control Panel >
iPF815 Main Menu Settings
9
723
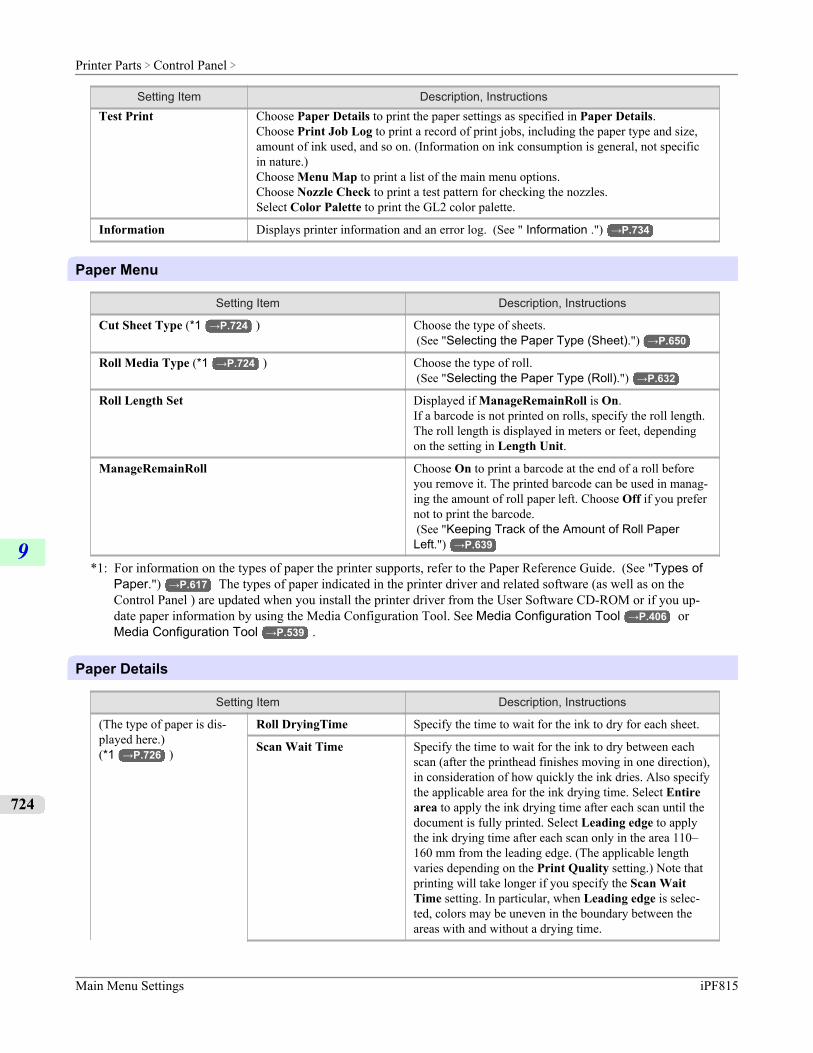
Setting Item Description, InstructionsTest Print Choose Paper Details to print the paper settings as specified in Paper Details.
Choose Print Job Log to print a record of print jobs, including the paper type and size,amount of ink used, and so on. (Information on ink consumption is general, not specificin nature.)Choose Menu Map to print a list of the main menu options.Choose Nozzle Check to print a test pattern for checking the nozzles.Select Color Palette to print the GL2 color palette.
Information Displays printer information and an error log. (See " Information .") →P.734
Paper Menu
Setting Item Description, Instructions
Cut Sheet Type (*1 →P.724 ) Choose the type of sheets. (See "Selecting the Paper Type (Sheet).") →P.650
Roll Media Type (*1 →P.724 ) Choose the type of roll. (See "Selecting the Paper Type (Roll).") →P.632
Roll Length Set Displayed if ManageRemainRoll is On.If a barcode is not printed on rolls, specify the roll length.The roll length is displayed in meters or feet, dependingon the setting in Length Unit.
ManageRemainRoll Choose On to print a barcode at the end of a roll beforeyou remove it. The printed barcode can be used in manag-ing the amount of roll paper left. Choose Off if you prefernot to print the barcode. (See "Keeping Track of the Amount of Roll PaperLeft.") →P.639
*1: For information on the types of paper the printer supports, refer to the Paper Reference Guide. (See "Types ofPaper.") →P.617 The types of paper indicated in the printer driver and related software (as well as on theControl Panel ) are updated when you install the printer driver from the User Software CD-ROM or if you up-date paper information by using the Media Configuration Tool. See Media Configuration Tool →P.406 orMedia Configuration Tool →P.539 .
Paper Details
Setting Item Description, Instructions
(The type of paper is dis-played here.)(*1 →P.726 )
Roll DryingTime Specify the time to wait for the ink to dry for each sheet.
Scan Wait Time Specify the time to wait for the ink to dry between eachscan (after the printhead finishes moving in one direction),in consideration of how quickly the ink dries. Also specifythe applicable area for the ink drying time. Select Entirearea to apply the ink drying time after each scan until thedocument is fully printed. Select Leading edge to applythe ink drying time after each scan only in the area 110–160 mm from the leading edge. (The applicable lengthvaries depending on the Print Quality setting.) Note thatprinting will take longer if you specify the Scan WaitTime setting. In particular, when Leading edge is selec-ted, colors may be uneven in the boundary between theareas with and without a drying time.
Printer Parts > Control Panel >
Main Menu Settings iPF815
9
724

Setting Item Description, Instructions(The type of paper is dis-played here.)(*1 →P.726 )
Feed Priority Specify exact paper feeding, if desired. Normally, selectAutomatic. Choose Print Length if you prefer to feed thepaper an exact amount. However, note that choosing PrintLength may result in slight banding in the direction ofCarriage scanning.
Adjust Length Displayed if Feed Priority is Print Length.Adjustment relative to the amount of stretching or shrink-age of the current paper.Enter either the adjustment results from Print Pattern orthe discrepancy that you measured (as a percentage).For paper that tends to stretch, increase the feed amountby choosing a higher adjustment value. For paper thattends to shrink, decrease the feed amount by choosing alower adjustment value.
Head Height Adjust the Printhead height. (See "Troubleshooting Pa-per Abrasion and Blurry Images (Head Height).")→P.675
Skew Check Lv. If you print on Japanese paper (washi) or other handmadepaper that has an irregular width, choose Loose for a high-er skew detection threshold, or choose Off to disable skewdetection. However, if paper is loaded askew when detec-tion is Off, note that paper jams or Platen soiling may oc-cur.
VacuumStrngth Specify the level of suction that holds paper against thePlaten. (See "Adjusting the Vacuum Strength (Vac-uumStrngth).") →P.683
Width Detection Specify this option to print inside boundaries or in othercases when specifying a particular starting position forprinting. Paper width and skew are not detected if you se-lect Off. If paper is loaded askew, note that paper jams orPlaten soiling may occur.
NearEnd RollMrgn Specify the minimum margin at the leading edge of rollpaper to ensure better printing quality at the leading edge.Note that if you choose 3mm, it may lower the printingquality at the leading edge and affect feeding accuracy.The printed surface may be scratched, and ink may adhereto the leading edge. It may also cause the Platen to be-come soiled.
Cut Speed Choose the cutting speed. If you use adhesive paper,choosing Slow helps prevent adhesive from sticking to thecutter and keeps the cutter sharp.
Trim Edge First If a roll is loaded, the end of the paper will be cut.
Cutting Mode Specify whether or not to cut with the standard round-bla-ded cutter.Choose Automatic to have the roll cut automatically afterprinting. If you choose Manual, the paper will not be cutafter printing. Instead, a line will be printed at the cut po-sition.Choose Eject if you prefer not to have documents droppedimmediately after printing, as when waiting for ink to dry.
Bordless Margin Adjust the margin during borderless printing.
Printer Parts > Control Panel >
iPF815 Main Menu Settings
9
725
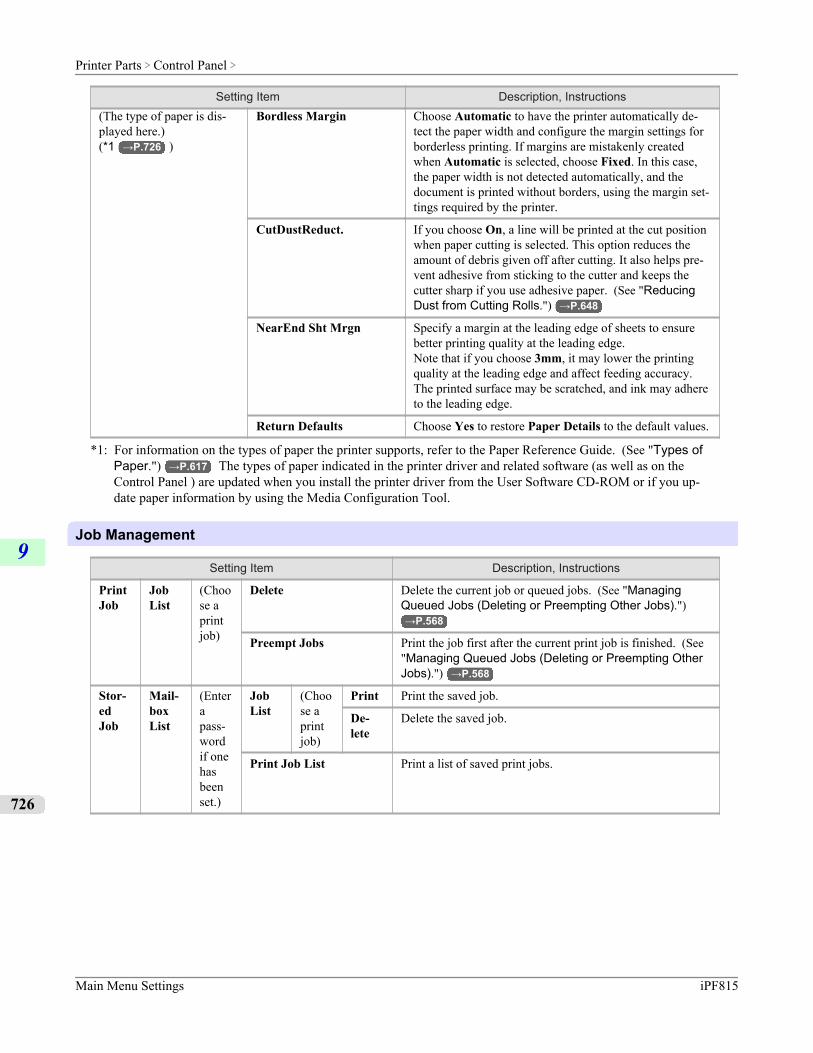
Setting Item Description, Instructions(The type of paper is dis-played here.)(*1 →P.726 )
Bordless Margin Choose Automatic to have the printer automatically de-tect the paper width and configure the margin settings forborderless printing. If margins are mistakenly createdwhen Automatic is selected, choose Fixed. In this case,the paper width is not detected automatically, and thedocument is printed without borders, using the margin set-tings required by the printer.
CutDustReduct. If you choose On, a line will be printed at the cut positionwhen paper cutting is selected. This option reduces theamount of debris given off after cutting. It also helps pre-vent adhesive from sticking to the cutter and keeps thecutter sharp if you use adhesive paper. (See "ReducingDust from Cutting Rolls.") →P.648
NearEnd Sht Mrgn Specify a margin at the leading edge of sheets to ensurebetter printing quality at the leading edge.Note that if you choose 3mm, it may lower the printingquality at the leading edge and affect feeding accuracy.The printed surface may be scratched, and ink may adhereto the leading edge.
Return Defaults Choose Yes to restore Paper Details to the default values.
*1: For information on the types of paper the printer supports, refer to the Paper Reference Guide. (See "Types ofPaper.") →P.617 The types of paper indicated in the printer driver and related software (as well as on theControl Panel ) are updated when you install the printer driver from the User Software CD-ROM or if you up-date paper information by using the Media Configuration Tool.
Job Management
Setting Item Description, Instructions
PrintJob
JobList
(Choose aprintjob)
Delete Delete the current job or queued jobs. (See "ManagingQueued Jobs (Deleting or Preempting Other Jobs).")→P.568
Preempt Jobs Print the job first after the current print job is finished. (See"Managing Queued Jobs (Deleting or Preempting OtherJobs).") →P.568
Stor-edJob
Mail-boxList
(Enterapass-wordif onehasbeenset.)
JobList
(Choose aprintjob)
Print Print the saved job.
De-lete
Delete the saved job.
Print Job List Print a list of saved print jobs.
Printer Parts > Control Panel >
Main Menu Settings iPF815
9
726
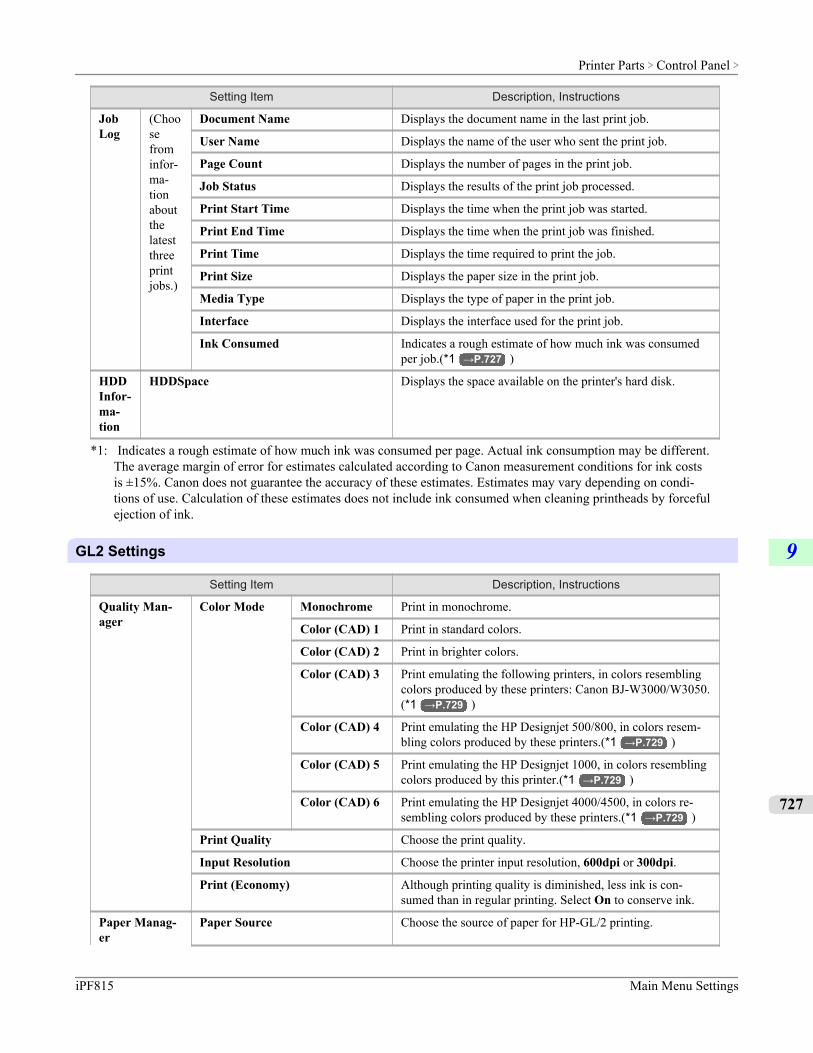
Setting Item Description, Instructions
JobLog
(Choosefrominfor-ma-tionaboutthelatestthreeprintjobs.)
Document Name Displays the document name in the last print job.
User Name Displays the name of the user who sent the print job.
Page Count Displays the number of pages in the print job.
Job Status Displays the results of the print job processed.
Print Start Time Displays the time when the print job was started.
Print End Time Displays the time when the print job was finished.
Print Time Displays the time required to print the job.
Print Size Displays the paper size in the print job.
Media Type Displays the type of paper in the print job.
Interface Displays the interface used for the print job.
Ink Consumed Indicates a rough estimate of how much ink was consumedper job.(*1 →P.727 )
HDDInfor-ma-tion
HDDSpace Displays the space available on the printer's hard disk.
*1: Indicates a rough estimate of how much ink was consumed per page. Actual ink consumption may be different.The average margin of error for estimates calculated according to Canon measurement conditions for ink costsis ±15%. Canon does not guarantee the accuracy of these estimates. Estimates may vary depending on condi-tions of use. Calculation of these estimates does not include ink consumed when cleaning printheads by forcefulejection of ink.
GL2 Settings
Setting Item Description, Instructions
Quality Man-ager
Color Mode Monochrome Print in monochrome.
Color (CAD) 1 Print in standard colors.
Color (CAD) 2 Print in brighter colors.
Color (CAD) 3 Print emulating the following printers, in colors resemblingcolors produced by these printers: Canon BJ-W3000/W3050.(*1 →P.729 )
Color (CAD) 4 Print emulating the HP Designjet 500/800, in colors resem-bling colors produced by these printers.(*1 →P.729 )
Color (CAD) 5 Print emulating the HP Designjet 1000, in colors resemblingcolors produced by this printer.(*1 →P.729 )
Color (CAD) 6 Print emulating the HP Designjet 4000/4500, in colors re-sembling colors produced by these printers.(*1 →P.729 )
Print Quality Choose the print quality.
Input Resolution Choose the printer input resolution, 600dpi or 300dpi.
Print (Economy) Although printing quality is diminished, less ink is con-sumed than in regular printing. Select On to conserve ink.
Paper Manag-er
Paper Source Choose the source of paper for HP-GL/2 printing.
Printer Parts > Control Panel >
iPF815 Main Menu Settings
9
727
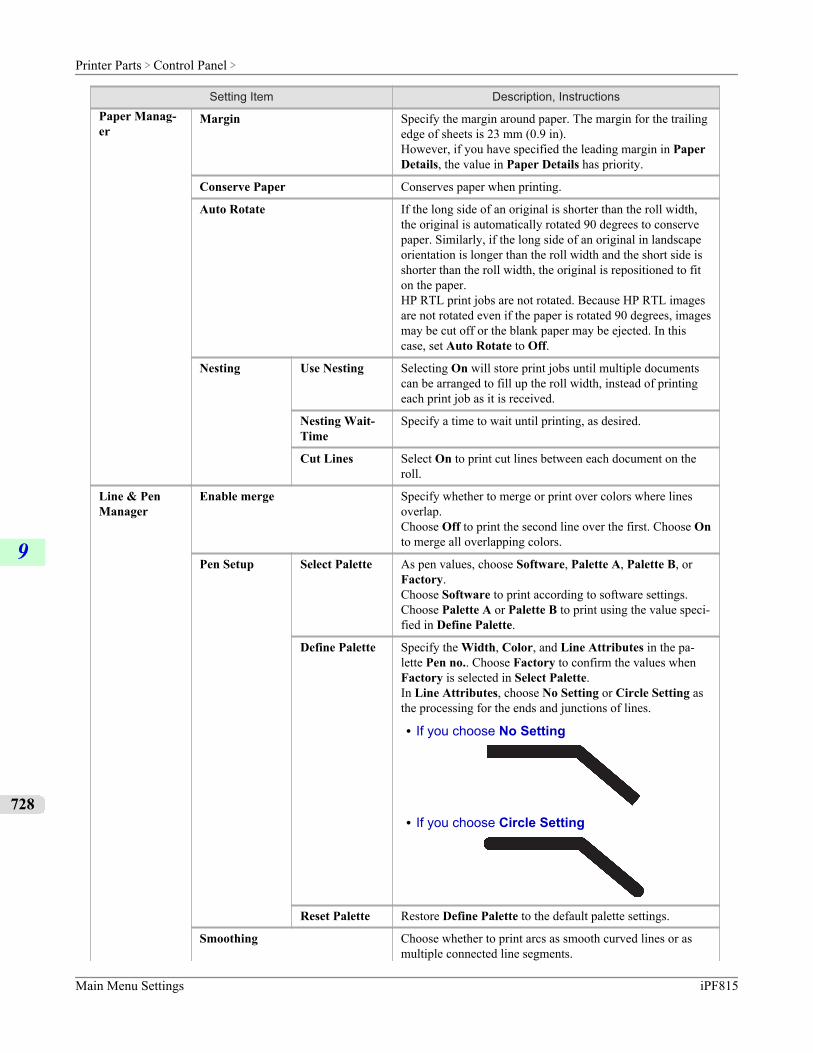
Setting Item Description, InstructionsPaper Manag-er
Margin Specify the margin around paper. The margin for the trailingedge of sheets is 23 mm (0.9 in).However, if you have specified the leading margin in PaperDetails, the value in Paper Details has priority.
Conserve Paper Conserves paper when printing.
Auto Rotate If the long side of an original is shorter than the roll width,the original is automatically rotated 90 degrees to conservepaper. Similarly, if the long side of an original in landscapeorientation is longer than the roll width and the short side isshorter than the roll width, the original is repositioned to fiton the paper.HP RTL print jobs are not rotated. Because HP RTL imagesare not rotated even if the paper is rotated 90 degrees, imagesmay be cut off or the blank paper may be ejected. In thiscase, set Auto Rotate to Off.
Nesting Use Nesting Selecting On will store print jobs until multiple documentscan be arranged to fill up the roll width, instead of printingeach print job as it is received.
Nesting Wait-Time
Specify a time to wait until printing, as desired.
Cut Lines Select On to print cut lines between each document on theroll.
Line & PenManager
Enable merge Specify whether to merge or print over colors where linesoverlap.Choose Off to print the second line over the first. Choose Onto merge all overlapping colors.
Pen Setup Select Palette As pen values, choose Software, Palette A, Palette B, orFactory.Choose Software to print according to software settings.Choose Palette A or Palette B to print using the value speci-fied in Define Palette.
Define Palette Specify the Width, Color, and Line Attributes in the pa-lette Pen no.. Choose Factory to confirm the values whenFactory is selected in Select Palette.In Line Attributes, choose No Setting or Circle Setting asthe processing for the ends and junctions of lines.
• If you choose No Setting
• If you choose Circle Setting
Reset Palette Restore Define Palette to the default palette settings.
Smoothing Choose whether to print arcs as smooth curved lines or asmultiple connected line segments.
Printer Parts > Control Panel >
Main Menu Settings iPF815
9
728
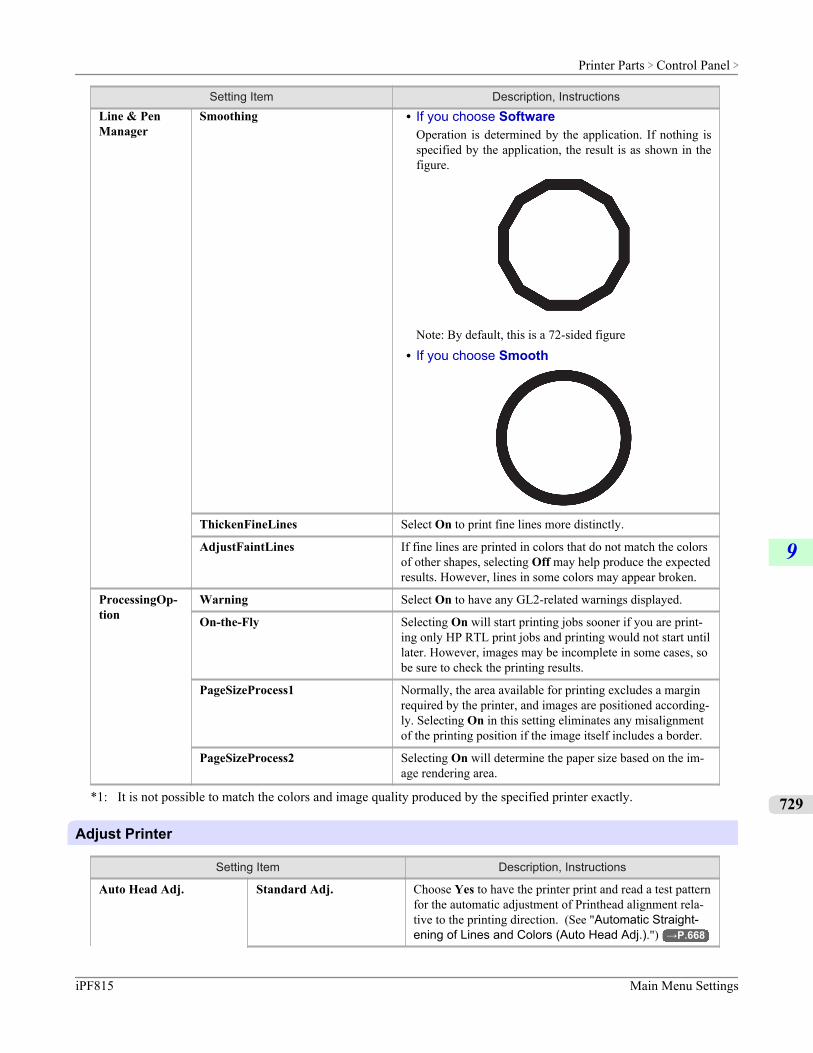
Setting Item Description, InstructionsLine & PenManager
Smoothing • If you choose SoftwareOperation is determined by the application. If nothing isspecified by the application, the result is as shown in thefigure.
Note: By default, this is a 72-sided figure
• If you choose Smooth
ThickenFineLines Select On to print fine lines more distinctly.
AdjustFaintLines If fine lines are printed in colors that do not match the colorsof other shapes, selecting Off may help produce the expectedresults. However, lines in some colors may appear broken.
ProcessingOp-tion
Warning Select On to have any GL2-related warnings displayed.
On-the-Fly Selecting On will start printing jobs sooner if you are print-ing only HP RTL print jobs and printing would not start untillater. However, images may be incomplete in some cases, sobe sure to check the printing results.
PageSizeProcess1 Normally, the area available for printing excludes a marginrequired by the printer, and images are positioned according-ly. Selecting On in this setting eliminates any misalignmentof the printing position if the image itself includes a border.
PageSizeProcess2 Selecting On will determine the paper size based on the im-age rendering area.
*1: It is not possible to match the colors and image quality produced by the specified printer exactly.
Adjust Printer
Setting Item Description, Instructions
Auto Head Adj. Standard Adj. Choose Yes to have the printer print and read a test patternfor the automatic adjustment of Printhead alignment rela-tive to the printing direction. (See "Automatic Straight-ening of Lines and Colors (Auto Head Adj.).") →P.668
Printer Parts > Control Panel >
iPF815 Main Menu Settings
9
729
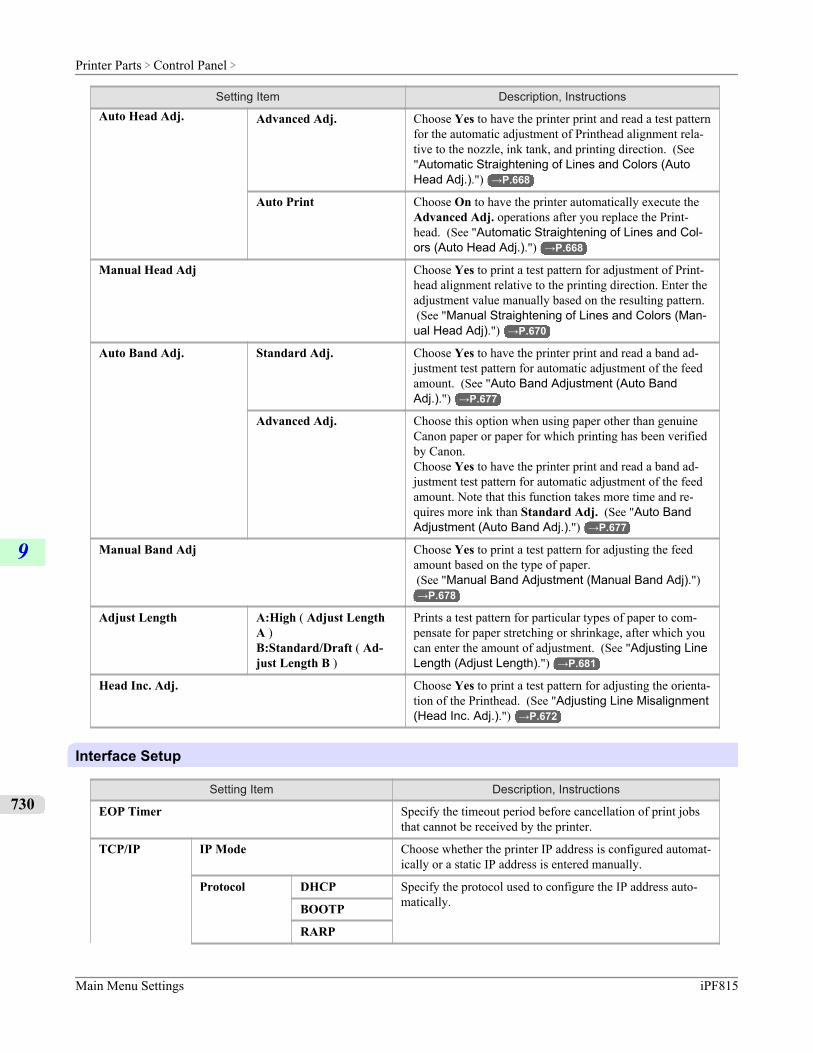
Setting Item Description, InstructionsAuto Head Adj. Advanced Adj. Choose Yes to have the printer print and read a test pattern
for the automatic adjustment of Printhead alignment rela-tive to the nozzle, ink tank, and printing direction. (See"Automatic Straightening of Lines and Colors (AutoHead Adj.).") →P.668
Auto Print Choose On to have the printer automatically execute theAdvanced Adj. operations after you replace the Print-head. (See "Automatic Straightening of Lines and Col-ors (Auto Head Adj.).") →P.668
Manual Head Adj Choose Yes to print a test pattern for adjustment of Print-head alignment relative to the printing direction. Enter theadjustment value manually based on the resulting pattern. (See "Manual Straightening of Lines and Colors (Man-ual Head Adj).") →P.670
Auto Band Adj. Standard Adj. Choose Yes to have the printer print and read a band ad-justment test pattern for automatic adjustment of the feedamount. (See "Auto Band Adjustment (Auto BandAdj.).") →P.677
Advanced Adj. Choose this option when using paper other than genuineCanon paper or paper for which printing has been verifiedby Canon.Choose Yes to have the printer print and read a band ad-justment test pattern for automatic adjustment of the feedamount. Note that this function takes more time and re-quires more ink than Standard Adj. (See "Auto BandAdjustment (Auto Band Adj.).") →P.677
Manual Band Adj Choose Yes to print a test pattern for adjusting the feedamount based on the type of paper. (See "Manual Band Adjustment (Manual Band Adj).")→P.678
Adjust Length A:High ( Adjust LengthA )B:Standard/Draft ( Ad-just Length B )
Prints a test pattern for particular types of paper to com-pensate for paper stretching or shrinkage, after which youcan enter the amount of adjustment. (See "Adjusting LineLength (Adjust Length).") →P.681
Head Inc. Adj. Choose Yes to print a test pattern for adjusting the orienta-tion of the Printhead. (See "Adjusting Line Misalignment(Head Inc. Adj.).") →P.672
Interface Setup
Setting Item Description, Instructions
EOP Timer Specify the timeout period before cancellation of print jobsthat cannot be received by the printer.
TCP/IP IP Mode Choose whether the printer IP address is configured automat-ically or a static IP address is entered manually.
Protocol DHCP Specify the protocol used to configure the IP address auto-matically.BOOTP
RARP
Printer Parts > Control Panel >
Main Menu Settings iPF815
9
730
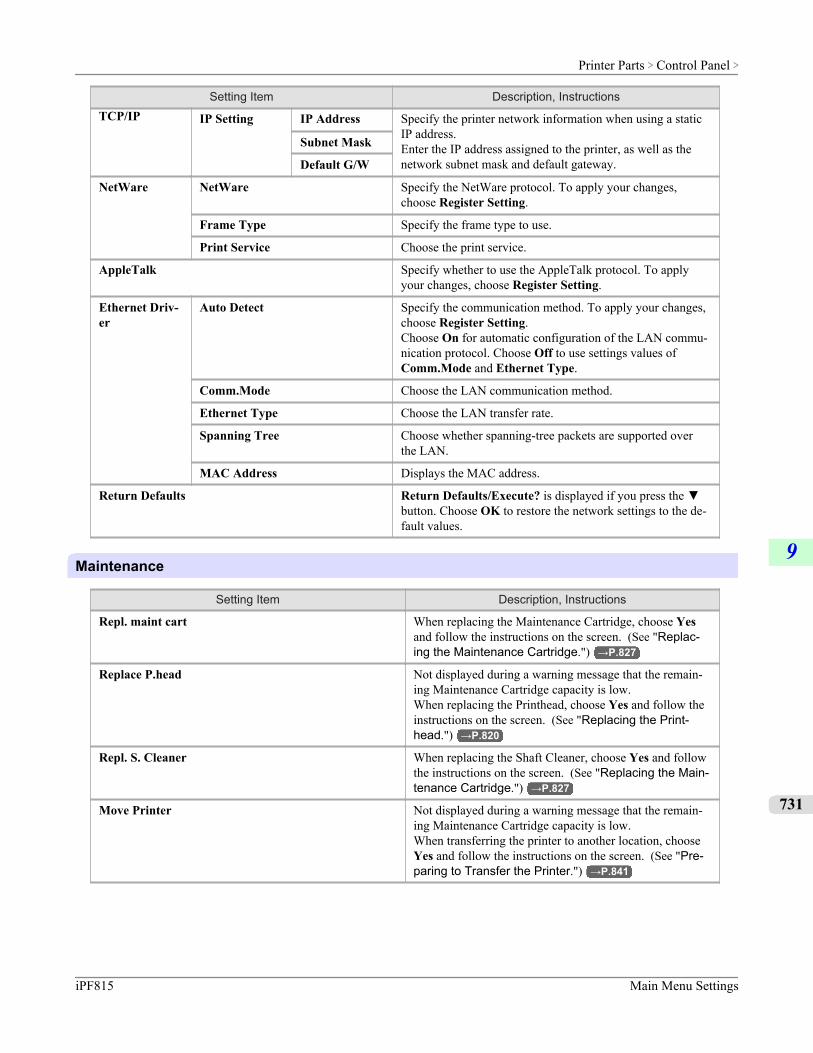
Setting Item Description, InstructionsTCP/IP IP Setting IP Address Specify the printer network information when using a static
IP address.Enter the IP address assigned to the printer, as well as thenetwork subnet mask and default gateway.
Subnet Mask
Default G/W
NetWare NetWare Specify the NetWare protocol. To apply your changes,choose Register Setting.
Frame Type Specify the frame type to use.
Print Service Choose the print service.
AppleTalk Specify whether to use the AppleTalk protocol. To applyyour changes, choose Register Setting.
Ethernet Driv-er
Auto Detect Specify the communication method. To apply your changes,choose Register Setting.Choose On for automatic configuration of the LAN commu-nication protocol. Choose Off to use settings values ofComm.Mode and Ethernet Type.
Comm.Mode Choose the LAN communication method.
Ethernet Type Choose the LAN transfer rate.
Spanning Tree Choose whether spanning-tree packets are supported overthe LAN.
MAC Address Displays the MAC address.
Return Defaults Return Defaults/Execute? is displayed if you press the ▼button. Choose OK to restore the network settings to the de-fault values.
Maintenance
Setting Item Description, Instructions
Repl. maint cart When replacing the Maintenance Cartridge, choose Yesand follow the instructions on the screen. (See "Replac-ing the Maintenance Cartridge.") →P.827
Replace P.head Not displayed during a warning message that the remain-ing Maintenance Cartridge capacity is low.When replacing the Printhead, choose Yes and follow theinstructions on the screen. (See "Replacing the Print-head.") →P.820
Repl. S. Cleaner When replacing the Shaft Cleaner, choose Yes and followthe instructions on the screen. (See "Replacing the Main-tenance Cartridge.") →P.827
Move Printer Not displayed during a warning message that the remain-ing Maintenance Cartridge capacity is low.When transferring the printer to another location, chooseYes and follow the instructions on the screen. (See "Pre-paring to Transfer the Printer.") →P.841
Printer Parts > Control Panel >
iPF815 Main Menu Settings
9
731
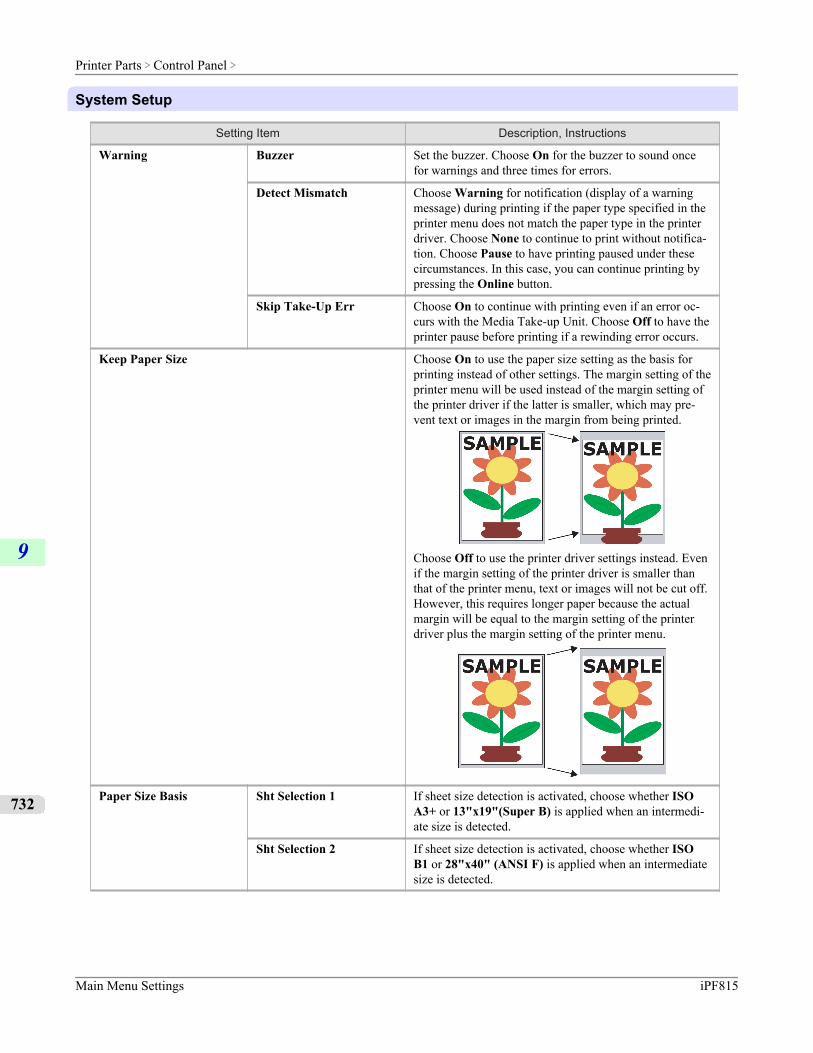
System Setup
Setting Item Description, Instructions
Warning Buzzer Set the buzzer. Choose On for the buzzer to sound oncefor warnings and three times for errors.
Detect Mismatch Choose Warning for notification (display of a warningmessage) during printing if the paper type specified in theprinter menu does not match the paper type in the printerdriver. Choose None to continue to print without notifica-tion. Choose Pause to have printing paused under thesecircumstances. In this case, you can continue printing bypressing the Online button.
Skip Take-Up Err Choose On to continue with printing even if an error oc-curs with the Media Take-up Unit. Choose Off to have theprinter pause before printing if a rewinding error occurs.
Keep Paper Size Choose On to use the paper size setting as the basis forprinting instead of other settings. The margin setting of theprinter menu will be used instead of the margin setting ofthe printer driver if the latter is smaller, which may pre-vent text or images in the margin from being printed.
Choose Off to use the printer driver settings instead. Evenif the margin setting of the printer driver is smaller thanthat of the printer menu, text or images will not be cut off.However, this requires longer paper because the actualmargin will be equal to the margin setting of the printerdriver plus the margin setting of the printer menu.
Paper Size Basis Sht Selection 1 If sheet size detection is activated, choose whether ISOA3+ or 13"x19"(Super B) is applied when an intermedi-ate size is detected.
Sht Selection 2 If sheet size detection is activated, choose whether ISOB1 or 28"x40" (ANSI F) is applied when an intermediatesize is detected.
Printer Parts > Control Panel >
Main Menu Settings iPF815
9
732

Setting Item Description, Instructions
TrimEdge Reload Specify whether to trim the leading edge of the currentlyretracted roll when the roll is advanced. Cut the edge ifyou are concerned about any marks left on the roll whenthe roll is left in the retracted position. Selecting On willalways trim the edge when the roll is advanced from theretracted position. Selecting Automatic will trim the edgewhen the roll has been in the retracted position for twodays or more.
Noz. Check Freq. Specify the timing for automatic checks of nozzle clog-ging. Choose 1 page to check once per printed page.Choose 10 pages to check once per ten printed pages.Choose Automatic to have the printer automatically ad-just the timing for checks based on the frequency of noz-zle use.
CarriageScanWdth For specifying the carriage scan width during printing. Se-lect Automatic for movement equivalent to the width ofpaper loaded. Selecting Fixed will reduce any soiling onthe back of the paper, although printing may take a littlelonger.
Sleep Timer Specify the period before the printer enters sleep mode.
Length Unit Choose the unit of measurement when roll length is dis-played. You can switch the unit displayed for Roll LengthSet and the remaining paper amount displayed in the sub-menu.
Time Zone Specify the time zone. Time zone options indicate a maincity in this time zone and the difference from GreenwichMean Time.
Date Format Specify the date format.
Date & Time Date Set the current date.
Time Set the current time. Available only if the Date setting isspecified.
Language Specify the language used on the Display Screen.
Contrast Adj. Adjust the Display Screen contrast level.
Reset PaprSetngs Restores settings that you have changed with Media Con-figuration Tool to the default values.
Erase HDD Data High Speed Erases file management data for print job data stored onthe printer's hard disk. (See "Erasing Data on the Print-er's Hard Disk.") →P.750
Secure High Spd. Overwrites the entire hard disk with random data. (See"Erasing Data on the Printer's Hard Disk.") →P.750
Secure Overwrites the entire hard disk with 00, FF, and randomdata (one time each). Verification is performed to check ifthe data was correctly written. (See "Erasing Data on thePrinter's Hard Disk.") →P.750
Output Method Print Select the output method.To print as usual, select Print. Selecting Print (Auto Del)will print the job and then delete the data from the printer'shard disk. Selecting Save: Box 01 will only save the printjob in the box, without printing it.
Print (Auto Del)
Printer Parts > Control Panel >
iPF815 Main Menu Settings
9
733

Setting Item Description, InstructionsOutput Method Save: Box 01 Select the output method.
To print as usual, select Print. Selecting Print (Auto Del)will print the job and then delete the data from the printer'shard disk. Selecting Save: Box 01 will only save the printjob in the box, without printing it.
Save and Print Select On to print the job after it has been saved.
Save: Shared Box Select Off to print without saving jobs in the box sharedamong multiple users.
Show Job Log Selecting Off prevents display of the log in Job Menu >Job Log. Additionally, the log is not printed if you chooseJob Menu > Print Job Log. Note that because job logsare not collected, the Status Monitor accounting functionswill not work correctly.
Information
Setting Item Description, Instructions
System Info Firmware Displays the printer firmware version.
Boot Displays the version of the boot ROM.
MIT Displays the version of the MIT database format.
s/n Displays the printer's serial number.
MAC Displays the MAC address of the printer.
IP Displays the printer's IP address.
Error Log ########-#### Displays the most recent error messages (up to two).
Main Menu Settings (During Printing)Main menu items during printing are described in the following tables.For instructions on selecting or setting menu items, see "Main Menu Operations." →P.705 .For details on menu levels and values, see "Menu Structure." →P.709
Setting Item Description, Instructions
Menu Durng Prtng Head Cleaning Printhead cleaning options. (See "Cleaning the Print-head.") →P.819Choose Head Cleaning A if printing is faint, oddly col-ored, or contains foreign substances.Choose Head Cleaning B if no ink is printed at all, or ifprinting is not improved by Head Cleaning A.
Fine Band Adj. Fine-tune the feed amount manually.
Information Displays the information about the printer and history ofprint jobs. (See "Information.") →P.735
Printer Parts > Control Panel >
Main Menu Settings (During Printing) iPF815
9
734

Information
Setting Item Description, Instructions
System Info Firmware Displays the version of the printer and firmware.
Boot Displays the version of the boot ROM.
MIT Displays the version of the MIT database format.
s/n Displays the printer's serial number.
MAC Displays the MAC address.
IP Displays the IP address.
HDDSpace Displays the space available on the printer's hard disk.
Error Log 1: xxxxxxxx-xxxx Displays the two most recent error message numbers,most recent first.2: xxxxxxxx-xxxx
Submenu DisplayPress the Information button to display this information, one after another: the Maintenance Cartridge capacity and remain-ing ink levels, paper information, printer information, and HP-GL/2 settings information.Each time you press the Information button, the following submenus are displayed.
Note• Press any button other than the Information button to restore the previous mode.• After you display a submenu, the printer will revert to the previous mode in about ten seconds if no print job
is received or if you do not operate the printer.
Remaining Maintenance Cartridge capacity and ink levels
The remaining Maintenance Cartridge capacity is shown on the top level of the Display Screen.The remaining level of each ink is shown on the bottom level of the Display Screen. Ink levels shown on the Display Screencorrespond to the inks identified by the color labels on the bottom of the Display Screen.These symbols may be displayed above the ink level: ! if ink is low, × if no ink is left, and ? if ink level detection is not on.Remaining ink is indicated as follows.
Printer Parts > Control Panel >
iPF815 Submenu Display
9
735

Information on the loaded paperHere, the paper size, type, and related printer settings are displayed.
Printer informationDisplays the firmware version, serial number, free hard disk space, IP address, and interface information.
HP-GL/2 setting informationHP-GL/2 settings information is displayed on three screens.
Status PrintYou can print a Status Print report indicating the current status of the printer.With Status Print, information is printed regarding the printer firmware version, various settings, and the utilization levelof consumables.
Printing Status Print Reports
1. Load paper.If using sheets, load paper A4/Letter-sized. You will need at least four sheets.
Printer Parts > Control Panel >
Status Print iPF815
9
736

2. Press the Menu button to display MAIN MENU.
3. Press ▲ or ▼ to select Test Print, and then press the ▶ button.
4. Press ▲ or ▼ to select Status Print, and then press the ▶ button.
5. Press ▲ or ▼ to select Yes, and then press the OK button.
Checking the information in the Status Print reportThe following information is included in the Status Print report.
Canon imagePROGRAF iPFxxxx Status Print Printer model
Firm Firmware version
Boot Boot ROM version
MIT(DBF) MIT database format version
MIT(DB) MIT database version
S/N Printer serial number
MAC Printer MAC address
IP Printer IP address
Ink Info MC Maintenance Cartridge capacity (%)
C, M, Y, MBK, BK Ink levels.The remaining ink is displayed in a five-level scale.
Takeup-Reel Status of the Media Take-up Unit
Media Menu Information on the loaded paper.
Cut Sheet Type
Roll Media Type
ManageRemainRoll
Job Management Job-related information.
HDD Information The free space on the printer's hard disk drive.
HDD Space
Printer Parts > Control Panel >
iPF815 Status Print
9
737

Adjust Printer Current printer settings.
Auto Head Adj. Printhead adjustment value.
Auto Print
Interface Setup Current network settings.
EOP Timer Sets the elapsed time between receiving last data and cancel-ing printing.
TCP/IP Settings related to TCP/IP.
IP Mode
Protocol
DHCP
BOOTP
RARP
IP Setting IP Setting values.
IP Address
SubnetMask
Default G/W
NetWare NetWare settings.
NetWare
FrameType(*1 →P.738 )
Print Serv-ice(*1 →P.738 )
AppleTalk Values that specify whether AppleTalk is active or not.
Ethernet Driver Ethernet Driver settings.
Auto Detect
Comm.Mode(*2→P.738 )
EthernetType(*2 →P.738 )
Spanning Tree
MAC Address
*1: Display when NetWare is set to On.*2: Display when Auto Detect is set to On.
System Setup System settings.
Warning Current warning and error settings.
Buzzer
Detect Mismatch
Printer Parts > Control Panel >
Status Print iPF815
9
738

Skip Take-UpErr
Current warning and error settings.
Keep Media Size Current paper-related settings.
Paper Size Basis
Sheet Selection 1
Sheet Selection 2
TrimEdge Reload
Noz. Check Freq. Nozzle-check settings.
CarriageScanWdth Carriage scan width setting.
Sleep Timer Printer system settings.
Length Unit
Time Zone
Date Format
Language
Contrast Adj.
Output Method Current output method setting.
Save and Print
Save:Shared Box
Information
System Info
Error Log The past five error codes.
GL2 Settings HP-GL/2 setting values.
Quality Manager
Color Mode
Print Quality
Input Resolution
Print (Economy)
Paper Manager Paper Source
Margin
Conserve Paper
Auto Rotate
Nesting
Use Nesting
Nesting Wait-Time
Cut Lines
ProcessingOption Warning
Printer Parts > Control Panel >
iPF815 Status Print
9
739

ProcessingOption On-the-Fly HP-GL/2 setting values.
PageSizePro-cess1
PageSizePro-cess2
GL2 Settings HP-GL/2 setting values.
Line&Pen Manager
Enable merge
Pen Setup
Select Palette
Define Palette (Factory)
Pen 0 -- Width
Pen 1 -- Width
Pen 2 -- Width
Pen 3 -- Width
Pen 4 -- Width
Pen 5 -- Width
Pen 6 -- Width
Pen 7 -- Width
Pen 8 -- Width
Pen 9 -- Width
Pen 10 -- Width
Pen 11 -- Width
Pen 12 -- Width
Pen 13 -- Width
Pen 14 -- Width
Pen 15 -- Width
Define Palette (Palette A)
Pen 0 -- Width
Pen 1 -- Width
Pen 2 -- Width
Pen 3 -- Width
Pen 4 -- Width
Pen 5 -- Width
Pen 6 -- Width
Pen 7 -- Width
Pen 8 -- Width
Pen 9 -- Width
Printer Parts > Control Panel >
Status Print iPF815
9
740

Pen 10 -- Width HP-GL/2 setting values.
Pen 11 -- Width
Pen 12 -- Width
Pen 13 -- Width
Pen 14 -- Width
Pen 15 -- Width
Define Palette (Palette B)
Pen 0 -- Width
Pen 1 -- Width
Pen 2 -- Width
Pen 3 -- Width
Pen 4 -- Width
Pen 5 -- Width
Pen 6 -- Width
Pen 7 -- Width
Pen 8 -- Width
Pen 9 -- Width
Pen 10 -- Width
Pen 11 -- Width
Pen 12 -- Width
Pen 13 -- Width
Pen 14 -- Width
Pen 15 -- Width
Smoothing
ThickenFineLines
AdjustFaintLines
Network (RemoteUI) Current network settings used by RemoteUI.
TCP/IP
Frame Type
Use DHCP
Use BOOTP
Use RARP
Enable DNS DynamicUpdate
Use Zeroconf Function
IP Address
Subnet Mask
Gateway Address
Printer Parts > Control Panel >
iPF815 Status Print
9
741

LPD Printing Current network settings used by RemoteUI.
IPP Printing
IPP Printer URI
RAW Printing
Raw Port Number
Raw Mode Bi-direction
FTP Printing
Primary DNS Server Ad-dress
Secondary DNS ServerAddress
DNS Host Name
DNS Domain Name
Multicast DNS ServiceName
NetWare NetWare settings.
Frame Type
IPX External NetworkNumber
Node Number
Print Service
Tree Name
ContextName
Print Serv-er Name
Print Serv-er Pass-word
Polling In-terval
Current AppleTalk settings.Phase Type
Name
NetworkNumber
Zone
HEAD LOT NUMBER Printhead lot number.
LOT
PARTS STATUS Utilization status of replacement parts that require servic-ing.COUNTER A–Y
Printer Parts > Control Panel >
Status Print iPF815
9
742

COUNTER Utilization status of the cutter, media, and other items (in-dicating how much they have been used).CUTTER
MEDIA
LIFE TTL
LIFE ROLL
LIFE CUT-SHEET
MEDIA1-7
NAME
TTL
ROLL
CUTSHEET
AFTER INSTALLATION
Checking Instructions During Printer OperationsYou can refer to instructions on the printer control panel when loading paper, replacing ink tanks, or performing other oper-ations.
How to view instructionsOnce you complete an action described in the instructions, the printer detects the action and switches to the next instructionscreen.
In the case of actions the printer cannot detect, instruction screens are switched every four seconds, and the sequence ofoperations is shown repeatedly.
Printer Parts > Control Panel >
iPF815 Checking Instructions During Printer Operations
9
743

When all actions in the sequence are finished, the instruction screen for the next step is displayed.
Printer Parts > Control Panel >
Checking Instructions During Printer Operations iPF815
9
744

Note• During a continuous display of instructions, you can press the ◀ button to pause the instructions on the cur-
rent screen.Press the ◀ or ▶ button to display the previous or next screens. If you do not press the ◀ or ▶ buttonwithin 30 seconds, continuous display is resumed.Press the OK button to display the instruction screen for the next step.
Viewing instructions for loading or removing rolls
1. Press the Load/Eject button.
2. Press ▲ or ▼ to select Load Roll or Remove Roll, and then press the OK button.
Instructions are now displayed.
Viewing instructions for loading or removing sheets
1. Press the Load/Eject button.
Instructions are now displayed.
Printer Parts > Control Panel >
iPF815 Checking Instructions During Printer Operations
9
745

Hard DiskPrinter Hard Disk Operations .......................................................................................................................... 746
Checking the Free Hard Disk Space ............................................................................................................... 747Erasing Data on the Printer's Hard Disk .......................................................................................................... 750
Printer Hard Disk OperationsPrinter hard disk operations are available from the following programs and interfaces.
• Printer driver• imagePROGRAF HDI Driver• imagePROGRAF Free Layout• Color imageRUNNER Enlargement Copy• imagePROGRAF Status Monitor• imagePROGRAF Printmonitor• RemoteUI• Control Panel
The hard disk operations available through each interface are as follows.
Windows
Printerdriver
image-PROGRAFFree Layout image-
PROGRAFStatusMonitor
Remo-teUI
ControlPanel
image-PROG-
RAF HDIDriver
Color im-ageRUN-NER En-largement
Copy
Mac OS Printerdriver
Color im-ageRUN-NER En-largement
Copy
image-PROGRAFPrintmoni-
tor
Operation Availability Availability Availability Availabil-ity
Availabili-ty
Saving print jobs Print Yes Yes No No No
Print (auto delete) Yes Yes No No No
Save in mail box Yes No No No No
Save data beforeprinting(*1)
Yes Yes No No No
Do not save print jobsin the common box
No No No No Yes
Save print jobs sentfrom sources otherthan the printer driver
No No No No Yes
Operations withsaved jobs
Print saved jobs No No Yes Yes Yes
Printer Parts > Hard Disk >
Printer Hard Disk Operations iPF815
9
746

Windows
Printerdriver
image-PROGRAFFree Layout image-
PROGRAFStatusMonitor
Remo-teUI
ControlPanel
image-PROG-
RAF HDIDriver
Color im-ageRUN-NER En-largement
Copy
Mac OS Printerdriver
Color im-ageRUN-NER En-largement
Copy
image-PROGRAFPrintmoni-
tor
Operation Availability Availability Availability Availabil-ity
Availabili-ty
Operations withsaved jobs
Delete saved jobs No No Yes Yes Yes
Job queue manage-ment
Display job queue No No Yes Yes Yes
Delete No No Yes Yes Yes
Preempt Jobs No No Yes Yes Yes
Mail box manage-ment
Move saved jobs No No Yes Yes No
Modify saved jobs No No Yes Yes No
Modify mail boxes No No Yes Yes No
Print a list of savedjobs
No No No No Yes
Display a list of savedjobs
No No Yes Yes Yes
Other operations Display free hard diskspace
No No Yes Yes Yes
Initialize hard disk No No No No Yes
Display the time ofprinting
No No Yes No No
Display error messages No No Yes Yes Yes
*1:This option is available in combination with Print, Print (auto delete), and Save in mail box. Print jobs aresaved and then printed.
Checking the Free Hard Disk SpaceYou can check the space available on the printer's hard disk as follows.
• Using the Control Panel• Using RemoteUI• Using imagePROGRAF Status Monitor (Windows)• Using imagePROGRAF Printmonitor (Macintosh)
Printer Parts > Hard Disk >
iPF815 Checking the Free Hard Disk Space
9
747

Using the Control Panel
1. Press the Menu button to display MAIN MENU.
2. Press ▲ or ▼ to select Job Management, and then press the ▶ button.
3. Press ▲ or ▼ to select HDD Information, and then press the ▶ button.
Note• You can also check the available hard disk space in the submenu indicating printer information. Press the
Information button to display the submenus. (See "Submenu Display.") →P.735
Using RemoteUITo view the box list, select Stored Job in Job Management. On the Stored Job page, the free hard disk space is shown inthe upper-right corner when boxes are listed.
For details, refer to the RemoteUI help.
Printer Parts > Hard Disk >
Checking the Free Hard Disk Space iPF815
9
748

Using imagePROGRAF Status MonitorThe Hard Disk sheet shows the free hard disk space.・ Hard Disk Sheet in imagePROGRAF Status Monitor
For details, refer to the imagePROGRAF Status Monitor help file.
Using imagePROGRAF PrintmonitorThe Hard Disk pane shows the free hard disk space.・ Hard Disk Pane in imagePROGRAF Printmonitor
Printer Parts > Hard Disk >
iPF815 Checking the Free Hard Disk Space
9
749

For details, refer to the imagePROGRAF Printmonitor help file.
Erasing Data on the Printer's Hard DiskYou can erase data on the printer's hard disk from the Control Panel.There are three ways to erase the data, as follows.
ErasureMethod Details
HighSpeed
Erases file management data for print job data stored on the printer's hard disk. Choose this method forrelatively fast erasure. Because only the file management data is erased, the print job data itself is noterased. Note that it may be possible to read this data using commercial data recovery software.
SecureHigh Spd.
Overwrites the entire hard disk with random data. No verification is performed to check if the data wascorrectly written. Choose this method to erase highly confidential data. Note that it may be possible toread the overwritten data using specialized data recovery tools.
Secure Overwrites the entire hard disk with 00, FF, and random data (one time each). Verification is performedto check if the data was correctly written. Choose this method to erase especially confidential data. It isvirtually impossible to recover the overwritten data. Conforms to the DoD5220.22-M standard of the U.S.Department of Defense.
Note• For a more secure method of preventing data recovery, we recommend physically or magnetically destroying
the hard disk. In this case, the hard disk can no longer be used.• Erase HDD Data is not available if there is a job queue.
Also note that during execution of Erase HDD Data, print jobs cannot be processed.
1. Press the Menu button to display MAIN MENU.
2. Press ▲ or ▼ to select System Setup, and then press the ▶ button.
3. Press ▲ or ▼ to select Erase HDD Data, and then press the ▶ button.
4. Press ▲ or ▼ to select the method of erasure, and then press the ▶ button.
Note• If a password has been set on the printer, the Admin.Pswd screen is displayed. In this case, enter the
password and press the OK button to go to the next step.
Printer Parts > Hard Disk >
Erasing Data on the Printer's Hard Disk iPF815
9
750

5. Press ▲ or ▼ to select Yes, and then press the OK button to display the confirmation screen.
Note• As for the time required for deletion, confirm it on the Control Panel. However, when High Speed is
selected, this finishes in several seconds.
6. Press ▲ or ▼ to select Yes, and then press the OK button to start erasure.
Printer Parts > Hard Disk >
iPF815 Erasing Data on the Printer's Hard Disk
9
751

Optional accessories
Media Take-up Unit ......................................................................................................................................... 752Using the Media Take-up Unit ..................................................................................................................... 754Removing Printed Documents from the Media Take-up Unit ...................................................................... 761
Media Take-up UnitUse the optional Media Take-up Unit to have documents that are printed on rolls rewound automatically after printing. Thisis convenient for large-format printing, or when printing large-volume jobs continuously.
• Media Take-up Unit TU-06
Note• For instructions on installing the Media Take-up Unit, refer to the Media Take-up Unit Setup Guide.• For information on the types of paper compatible with the Media Take-up Unit, refer to the Paper Reference
Guide. (See "Types of Paper.") →P.617
• For Media Take-up Unit instructions, see "Using the Media Take-up Unit." →P.754
Parts・ Main Unit
Printer Parts > Optional accessories >
Media Take-up Unit iPF815
9
752

a. Left Media Take-up UnitLoad the Rewind Spool here.
b. Right Media Take-up UnitLoad the Rewind Spool here. Includes the Media Take-up UnitPower button, ▲ and ▼ buttons to advance or rewindpaper, and a power cord.
c. Rewind SpoolWinds documents printed on rolls.
d. 3-inch AdapterWhen rewinding rolls with 3-inch paper cores, attach the adapter to the Rewind Spool.
e. Media Take-up SensorA sensor for automatically rewinding rolls.
・ Weight
a. Weight Roll (6)Weights required when rewinding rolls. Use one weight roll or combine two (with a Weight Joint ), depending on theroll width.
b. Weight JointFastens two weight rolls.
c. Weight Flange (2 sets)Attached to the ends of Weight Roll to adjust the weight. Use Weight Flange 1 or Weight Flange 2, depending on thetype of paper. (See "Using the Media Take-up Unit.") →P.754
Printer Parts > Optional accessories >
iPF815 Media Take-up Unit
9
753

Using the Media Take-up UnitThis topic describes how to use the Media Take-up Unit.
Important• The Media Take-up Unit cannot be used with sheets.• Do not put anything near the Media Take-up Sensor that might interfere with it. This may impair operation.• Rolls are not cut automatically when the Media Take-up Unit is used, regardless of the Cutting Mode setting
in the printer menu or the Automatic Cutting setting in the printer driver.• Color tones after printing may change during the ink drying period for some types of paper. Allow ample
drying time before the final check of colors, and do not remove printed documents from the Media Take-upUnit too soon.
• In humid environments, documents printed on relatively insubstantial media such as Fabric Banner, Synthet-ic Paper, or lightweight Coated Paper may not be retracted evenly by the unit. In this case, take steps to con-trol humidity in the operating environment, or adjust the Roll DryingTime or Scan Wait Time settings sothat printed documents are retracted after the ink has fully dried. (See "Main Menu Settings.") →P.722
1. When using the Stationary Output Stacker, stow the Stationary Output Stacker before this procedure. (See "Stowingthe Stationary Output Stacker.") →P.661
Important• Arrange the Basket Cloth and Basket Rod so they do not interfere with the Media Take-up Sensor.
2. Unlock the flange on the left side of the Rewind Spool by lifting the lever (a) from the shaft side. Remove theflange.
Printer Parts > Optional accessories >
Using the Media Take-up Unit iPF815
9
754

3. When rewinding rolls with 3-inch paper cores, insert the 3-inch Adapter on the flanges at both ends.
4. Insert the paper core, which serves as the spindle for rewinding a roll, on the Rewind Spool.
Important• On the Rewind Spool, always use a paper core that is the same size as the roll to be rewound.
Printer Parts > Optional accessories >
iPF815 Using the Media Take-up Unit
9
755
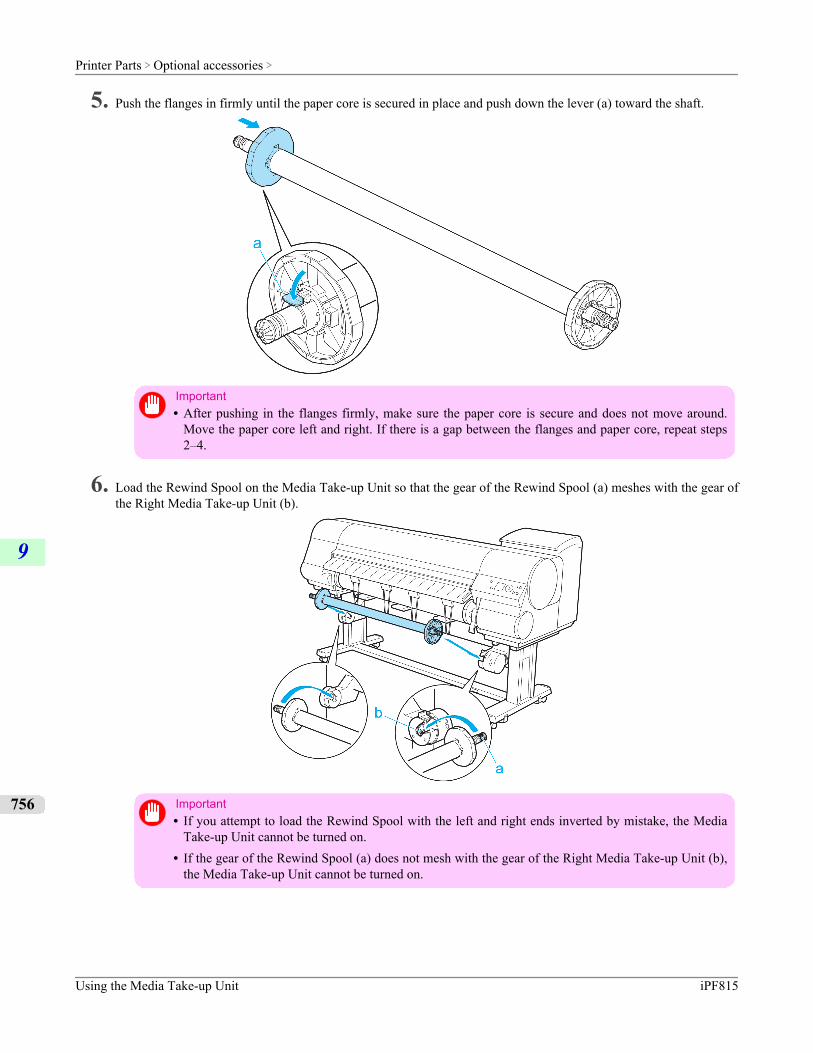
5. Push the flanges in firmly until the paper core is secured in place and push down the lever (a) toward the shaft.
Important• After pushing in the flanges firmly, make sure the paper core is secure and does not move around.
Move the paper core left and right. If there is a gap between the flanges and paper core, repeat steps2–4.
6. Load the Rewind Spool on the Media Take-up Unit so that the gear of the Rewind Spool (a) meshes with the gear ofthe Right Media Take-up Unit (b).
Important• If you attempt to load the Rewind Spool with the left and right ends inverted by mistake, the Media
Take-up Unit cannot be turned on.• If the gear of the Rewind Spool (a) does not mesh with the gear of the Right Media Take-up Unit (b),
the Media Take-up Unit cannot be turned on.
Printer Parts > Optional accessories >
Using the Media Take-up Unit iPF815
9
756
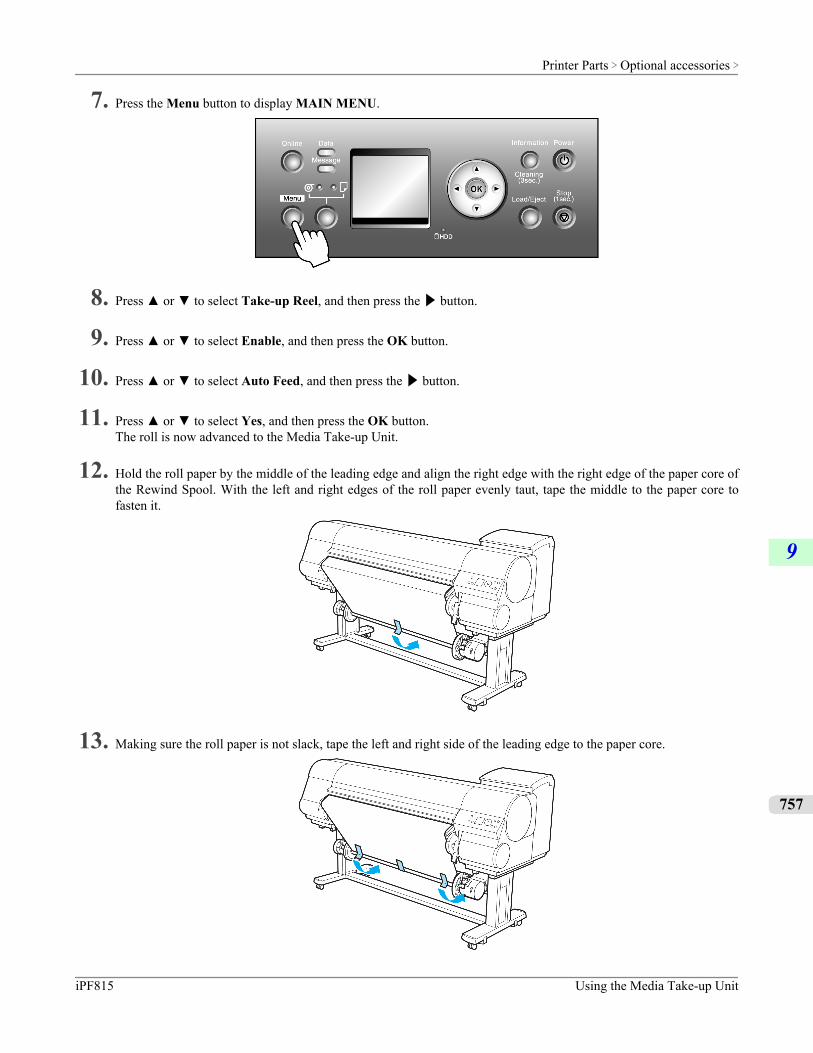
7. Press the Menu button to display MAIN MENU.
8. Press ▲ or ▼ to select Take-up Reel, and then press the ▶ button.
9. Press ▲ or ▼ to select Enable, and then press the OK button.
10. Press ▲ or ▼ to select Auto Feed, and then press the ▶ button.
11. Press ▲ or ▼ to select Yes, and then press the OK button.The roll is now advanced to the Media Take-up Unit.
12. Hold the roll paper by the middle of the leading edge and align the right edge with the right edge of the paper core ofthe Rewind Spool. With the left and right edges of the roll paper evenly taut, tape the middle to the paper core tofasten it.
13. Making sure the roll paper is not slack, tape the left and right side of the leading edge to the paper core.
Printer Parts > Optional accessories >
iPF815 Using the Media Take-up Unit
9
757
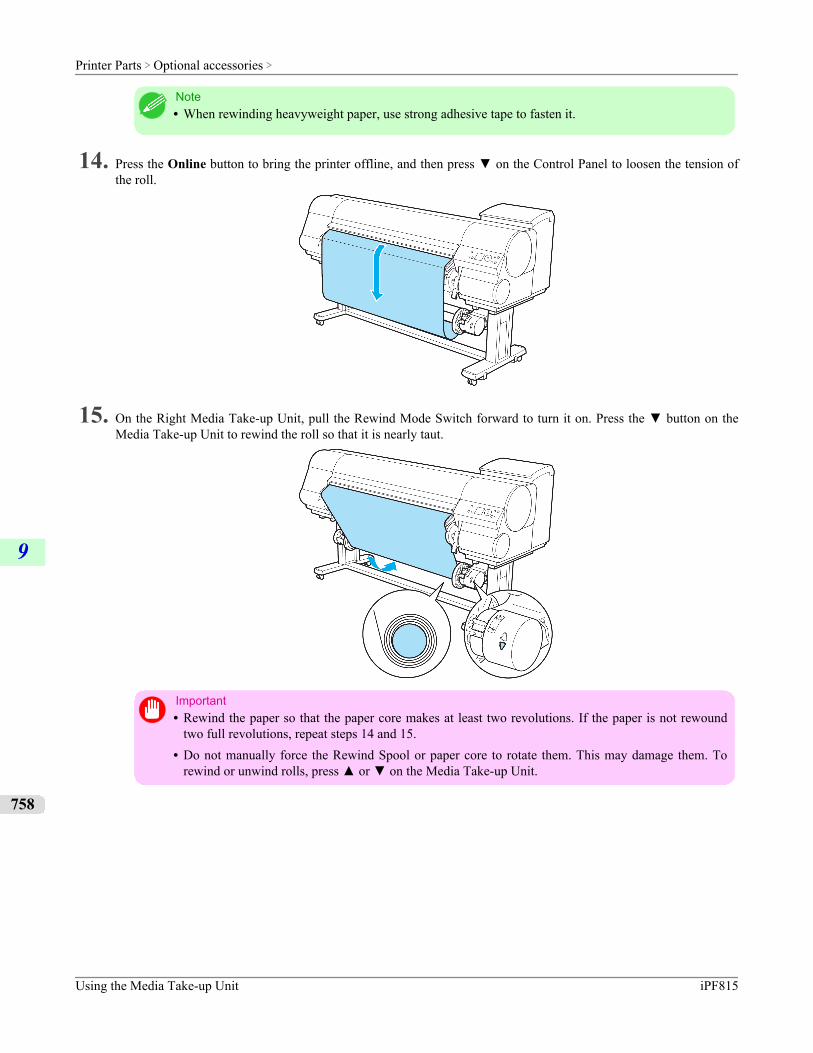
Note• When rewinding heavyweight paper, use strong adhesive tape to fasten it.
14. Press the Online button to bring the printer offline, and then press ▼ on the Control Panel to loosen the tension ofthe roll.
15. On the Right Media Take-up Unit, pull the Rewind Mode Switch forward to turn it on. Press the ▼ button on theMedia Take-up Unit to rewind the roll so that it is nearly taut.
Important• Rewind the paper so that the paper core makes at least two revolutions. If the paper is not rewound
two full revolutions, repeat steps 14 and 15.• Do not manually force the Rewind Spool or paper core to rotate them. This may damage them. To
rewind or unwind rolls, press ▲ or ▼ on the Media Take-up Unit.
Printer Parts > Optional accessories >
Using the Media Take-up Unit iPF815
9
758
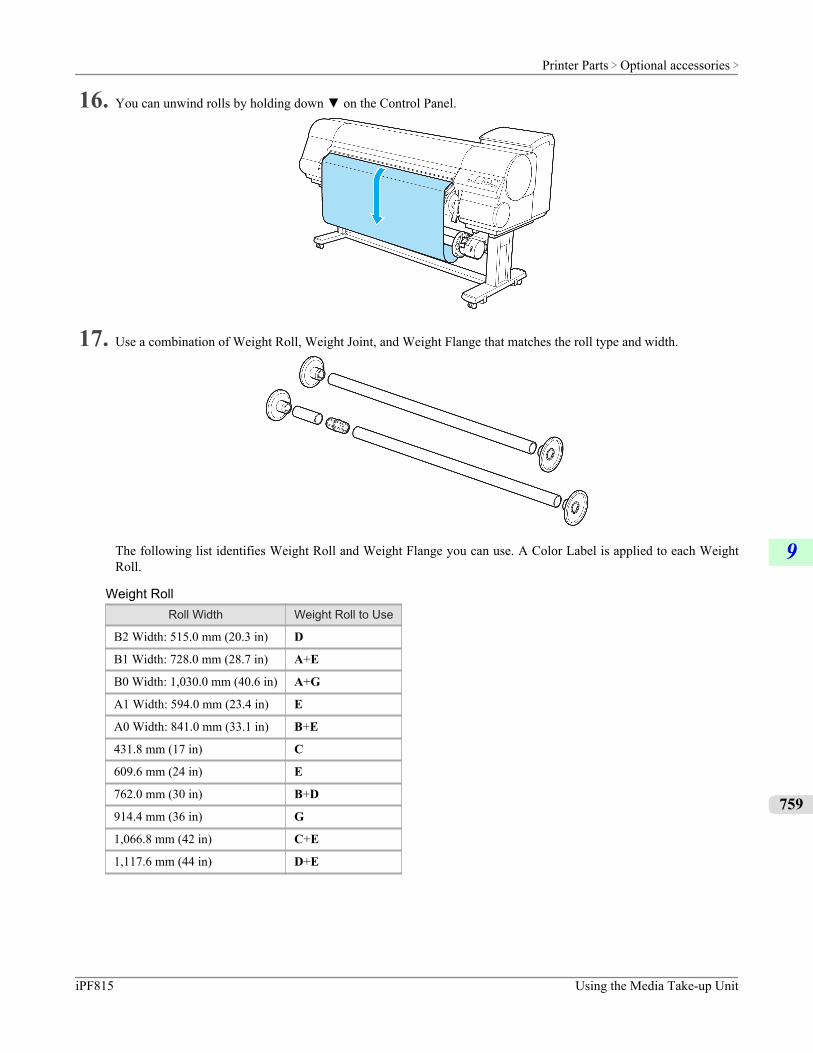
16. You can unwind rolls by holding down ▼ on the Control Panel.
17. Use a combination of Weight Roll, Weight Joint, and Weight Flange that matches the roll type and width.
The following list identifies Weight Roll and Weight Flange you can use. A Color Label is applied to each WeightRoll.
Weight RollRoll Width Weight Roll to Use
B2 Width: 515.0 mm (20.3 in) D
B1 Width: 728.0 mm (28.7 in) A+E
B0 Width: 1,030.0 mm (40.6 in) A+G
A1 Width: 594.0 mm (23.4 in) E
A0 Width: 841.0 mm (33.1 in) B+E
431.8 mm (17 in) C
609.6 mm (24 in) E
762.0 mm (30 in) B+D
914.4 mm (36 in) G
1,066.8 mm (42 in) C+E
1,117.6 mm (44 in) D+E
Printer Parts > Optional accessories >
iPF815 Using the Media Take-up Unit
9
759
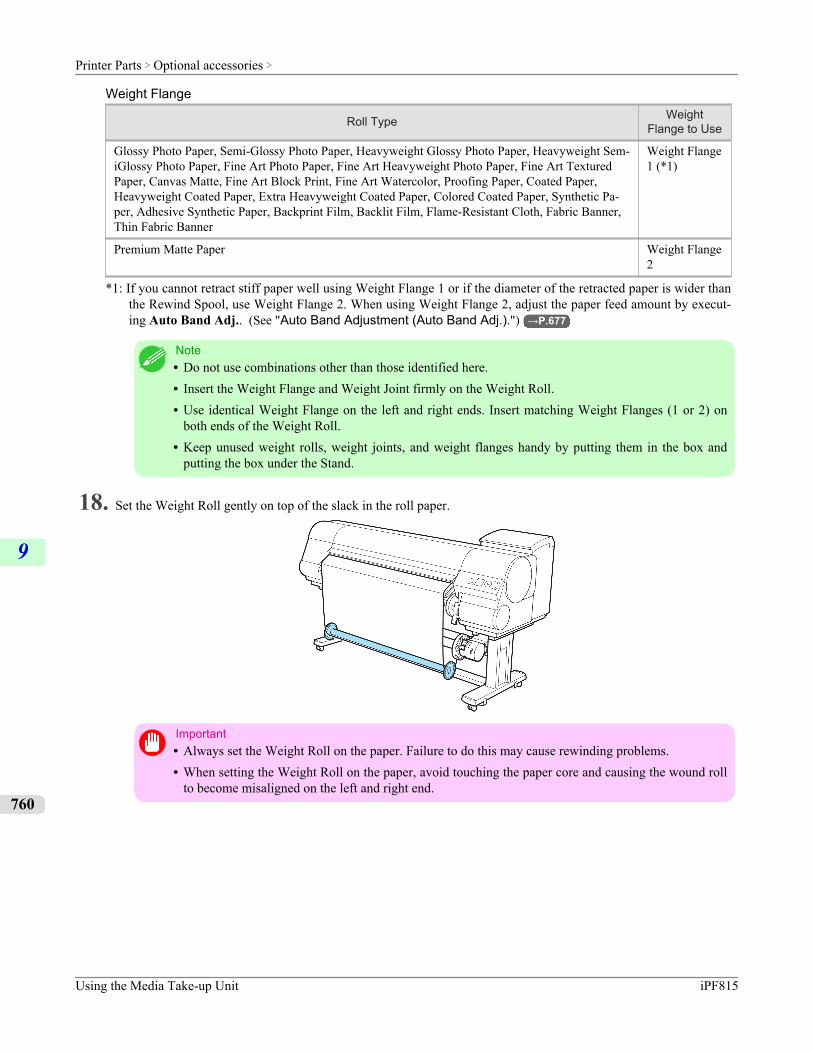
Weight Flange
Roll Type WeightFlange to Use
Glossy Photo Paper, Semi-Glossy Photo Paper, Heavyweight Glossy Photo Paper, Heavyweight Sem-iGlossy Photo Paper, Fine Art Photo Paper, Fine Art Heavyweight Photo Paper, Fine Art TexturedPaper, Canvas Matte, Fine Art Block Print, Fine Art Watercolor, Proofing Paper, Coated Paper,Heavyweight Coated Paper, Extra Heavyweight Coated Paper, Colored Coated Paper, Synthetic Pa-per, Adhesive Synthetic Paper, Backprint Film, Backlit Film, Flame-Resistant Cloth, Fabric Banner,Thin Fabric Banner
Weight Flange1 (*1)
Premium Matte Paper Weight Flange2
*1: If you cannot retract stiff paper well using Weight Flange 1 or if the diameter of the retracted paper is wider thanthe Rewind Spool, use Weight Flange 2. When using Weight Flange 2, adjust the paper feed amount by execut-ing Auto Band Adj.. (See "Auto Band Adjustment (Auto Band Adj.).") →P.677
Note• Do not use combinations other than those identified here.• Insert the Weight Flange and Weight Joint firmly on the Weight Roll.• Use identical Weight Flange on the left and right ends. Insert matching Weight Flanges (1 or 2) on
both ends of the Weight Roll.• Keep unused weight rolls, weight joints, and weight flanges handy by putting them in the box and
putting the box under the Stand.
18. Set the Weight Roll gently on top of the slack in the roll paper.
Important• Always set the Weight Roll on the paper. Failure to do this may cause rewinding problems.• When setting the Weight Roll on the paper, avoid touching the paper core and causing the wound roll
to become misaligned on the left and right end.
Printer Parts > Optional accessories >
Using the Media Take-up Unit iPF815
9
760
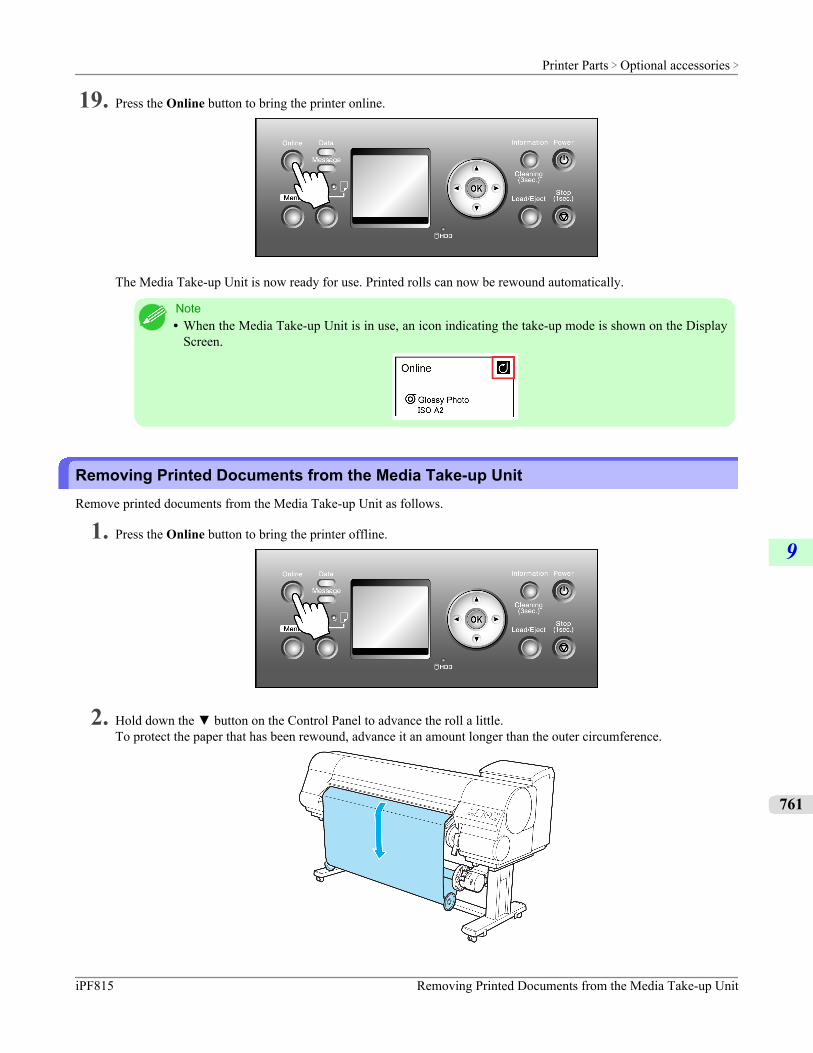
19. Press the Online button to bring the printer online.
The Media Take-up Unit is now ready for use. Printed rolls can now be rewound automatically.
Note• When the Media Take-up Unit is in use, an icon indicating the take-up mode is shown on the Display
Screen.
Removing Printed Documents from the Media Take-up UnitRemove printed documents from the Media Take-up Unit as follows.
1. Press the Online button to bring the printer offline.
2. Hold down the ▼ button on the Control Panel to advance the roll a little.To protect the paper that has been rewound, advance it an amount longer than the outer circumference.
Printer Parts > Optional accessories >
iPF815 Removing Printed Documents from the Media Take-up Unit
9
761

3. Remove the Weight Roll from the roll paper.
4. Press the Menu button to display MAIN MENU.
5. Press ▲ or ▼ to select Paper Cutting, and then press the ▶ button.
6. Press ▲ or ▼ to select Yes. As you hold the trailing edge of the printed document, press the OK button.The roll is now cut.
Important• Always hold the trailing edge of printed documents when cutting rolls. If you do not hold the docu-
ments, they may fall on the floor and the printed surface may become soiled.
7. Hold the trailing edge of the printed document and press the ▼ button on the Media Take-up Unit to rewind theprinted documents.
Printer Parts > Optional accessories >
Removing Printed Documents from the Media Take-up Unit iPF815
9
762
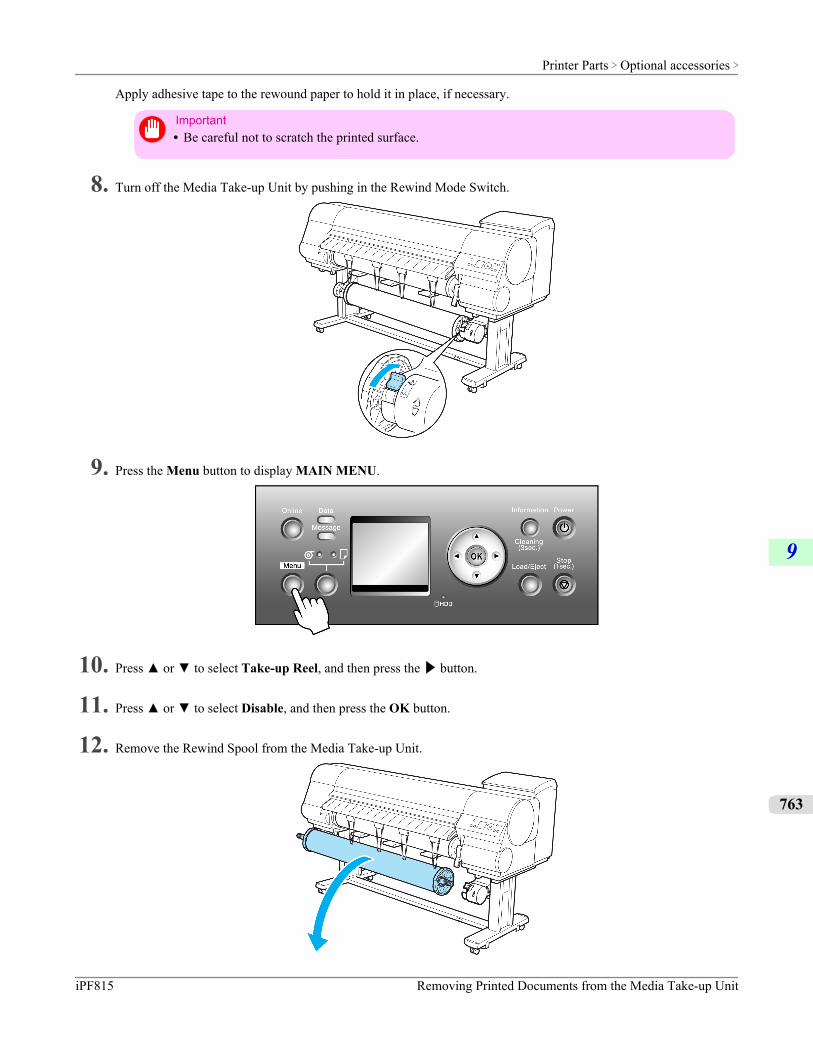
Apply adhesive tape to the rewound paper to hold it in place, if necessary.
Important• Be careful not to scratch the printed surface.
8. Turn off the Media Take-up Unit by pushing in the Rewind Mode Switch.
9. Press the Menu button to display MAIN MENU.
10. Press ▲ or ▼ to select Take-up Reel, and then press the ▶ button.
11. Press ▲ or ▼ to select Disable, and then press the OK button.
12. Remove the Rewind Spool from the Media Take-up Unit.
Printer Parts > Optional accessories >
iPF815 Removing Printed Documents from the Media Take-up Unit
9
763
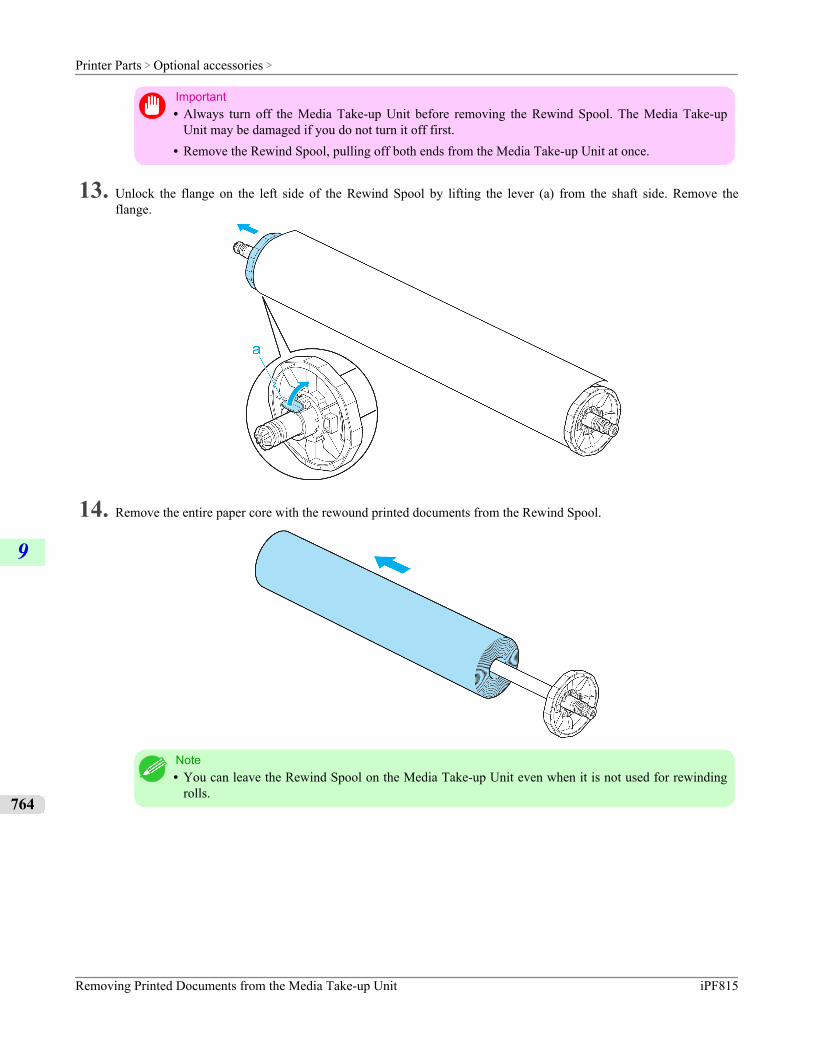
Important• Always turn off the Media Take-up Unit before removing the Rewind Spool. The Media Take-up
Unit may be damaged if you do not turn it off first.• Remove the Rewind Spool, pulling off both ends from the Media Take-up Unit at once.
13. Unlock the flange on the left side of the Rewind Spool by lifting the lever (a) from the shaft side. Remove theflange.
14. Remove the entire paper core with the rewound printed documents from the Rewind Spool.
Note• You can leave the Rewind Spool on the Media Take-up Unit even when it is not used for rewinding
rolls.
Printer Parts > Optional accessories >
Removing Printed Documents from the Media Take-up Unit iPF815
9
764
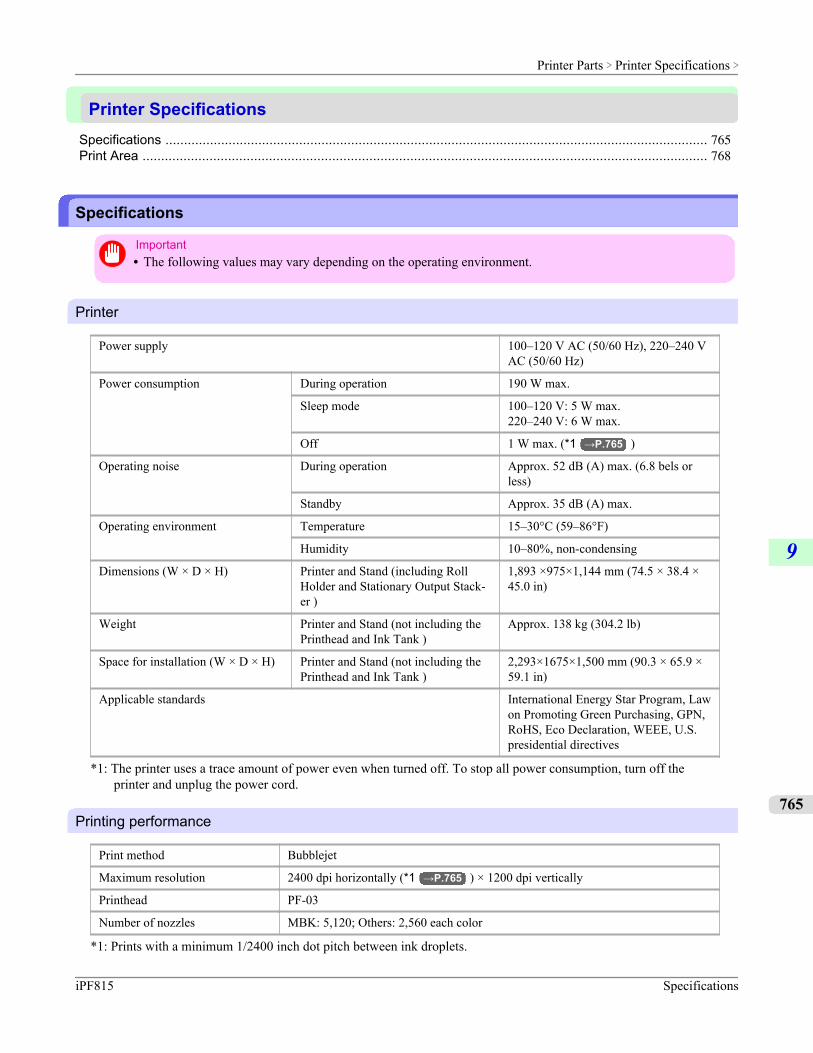
Printer SpecificationsSpecifications .................................................................................................................................................. 765Print Area ........................................................................................................................................................ 768
Specifications
Important• The following values may vary depending on the operating environment.
Printer
Power supply 100–120 V AC (50/60 Hz), 220–240 VAC (50/60 Hz)
Power consumption During operation 190 W max.
Sleep mode 100–120 V: 5 W max.220–240 V: 6 W max.
Off 1 W max. (*1 →P.765 )
Operating noise During operation Approx. 52 dB (A) max. (6.8 bels orless)
Standby Approx. 35 dB (A) max.
Operating environment Temperature 15–30°C (59–86°F)
Humidity 10–80%, non-condensing
Dimensions (W × D × H) Printer and Stand (including RollHolder and Stationary Output Stack-er )
1,893 ×975×1,144 mm (74.5 × 38.4 ×45.0 in)
Weight Printer and Stand (not including thePrinthead and Ink Tank )
Approx. 138 kg (304.2 lb)
Space for installation (W × D × H) Printer and Stand (not including thePrinthead and Ink Tank )
2,293×1675×1,500 mm (90.3 × 65.9 ×59.1 in)
Applicable standards International Energy Star Program, Lawon Promoting Green Purchasing, GPN,RoHS, Eco Declaration, WEEE, U.S.presidential directives
*1: The printer uses a trace amount of power even when turned off. To stop all power consumption, turn off theprinter and unplug the power cord.
Printing performance
Print method Bubblejet
Maximum resolution 2400 dpi horizontally (*1 →P.765 ) × 1200 dpi vertically
Printhead PF-03
Number of nozzles MBK: 5,120; Others: 2,560 each color
*1: Prints with a minimum 1/2400 inch dot pitch between ink droplets.
Printer Parts > Printer Specifications >
iPF815 Specifications
9
765
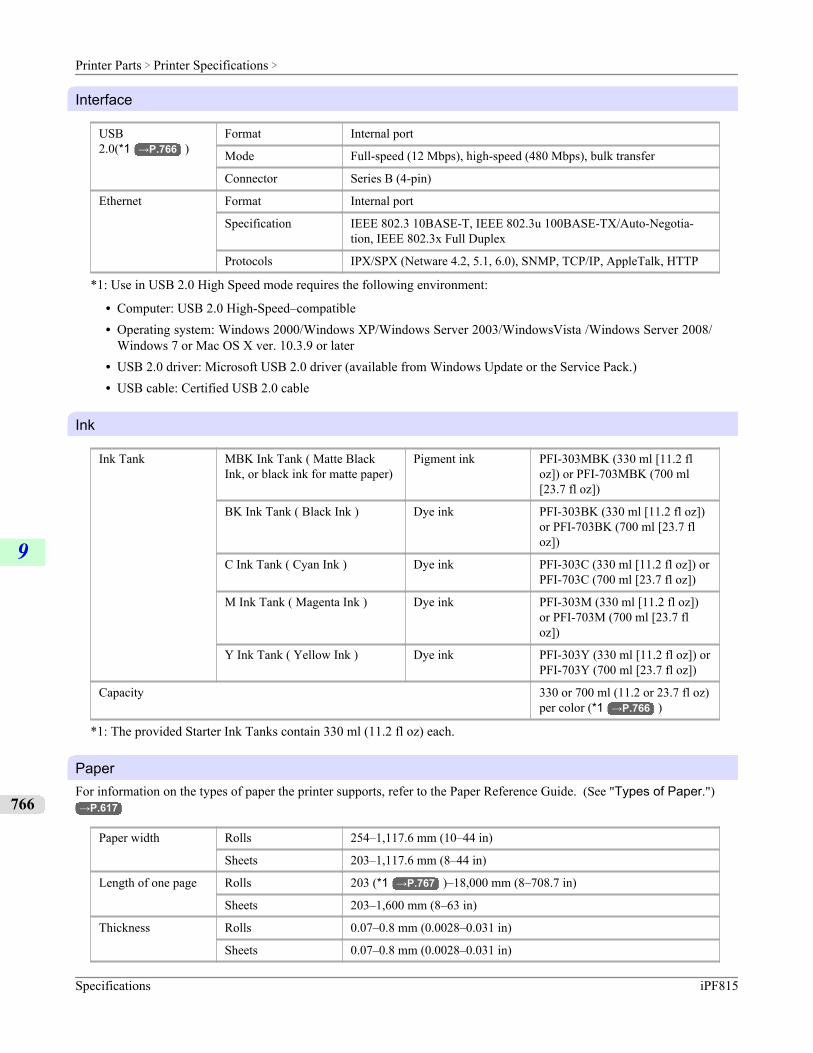
Interface
USB2.0(*1 →P.766 )
Format Internal port
Mode Full-speed (12 Mbps), high-speed (480 Mbps), bulk transfer
Connector Series B (4-pin)
Ethernet Format Internal port
Specification IEEE 802.3 10BASE-T, IEEE 802.3u 100BASE-TX/Auto-Negotia-tion, IEEE 802.3x Full Duplex
Protocols IPX/SPX (Netware 4.2, 5.1, 6.0), SNMP, TCP/IP, AppleTalk, HTTP
*1: Use in USB 2.0 High Speed mode requires the following environment:
• Computer: USB 2.0 High-Speed–compatible• Operating system: Windows 2000/Windows XP/Windows Server 2003/WindowsVista /Windows Server 2008/
Windows 7 or Mac OS X ver. 10.3.9 or later• USB 2.0 driver: Microsoft USB 2.0 driver (available from Windows Update or the Service Pack.)• USB cable: Certified USB 2.0 cable
Ink
Ink Tank MBK Ink Tank ( Matte BlackInk, or black ink for matte paper)
Pigment ink PFI-303MBK (330 ml [11.2 floz]) or PFI-703MBK (700 ml[23.7 fl oz])
BK Ink Tank ( Black Ink ) Dye ink PFI-303BK (330 ml [11.2 fl oz])or PFI-703BK (700 ml [23.7 floz])
C Ink Tank ( Cyan Ink ) Dye ink PFI-303C (330 ml [11.2 fl oz]) orPFI-703C (700 ml [23.7 fl oz])
M Ink Tank ( Magenta Ink ) Dye ink PFI-303M (330 ml [11.2 fl oz])or PFI-703M (700 ml [23.7 floz])
Y Ink Tank ( Yellow Ink ) Dye ink PFI-303Y (330 ml [11.2 fl oz]) orPFI-703Y (700 ml [23.7 fl oz])
Capacity 330 or 700 ml (11.2 or 23.7 fl oz)per color (*1 →P.766 )
*1: The provided Starter Ink Tanks contain 330 ml (11.2 fl oz) each.
PaperFor information on the types of paper the printer supports, refer to the Paper Reference Guide. (See "Types of Paper.")→P.617
Paper width Rolls 254–1,117.6 mm (10–44 in)
Sheets 203–1,117.6 mm (8–44 in)
Length of one page Rolls 203 (*1 →P.767 )–18,000 mm (8–708.7 in)
Sheets 203–1,600 mm (8–63 in)
Thickness Rolls 0.07–0.8 mm (0.0028–0.031 in)
Sheets 0.07–0.8 mm (0.0028–0.031 in)
Printer Parts > Printer Specifications >
Specifications iPF815
9
766
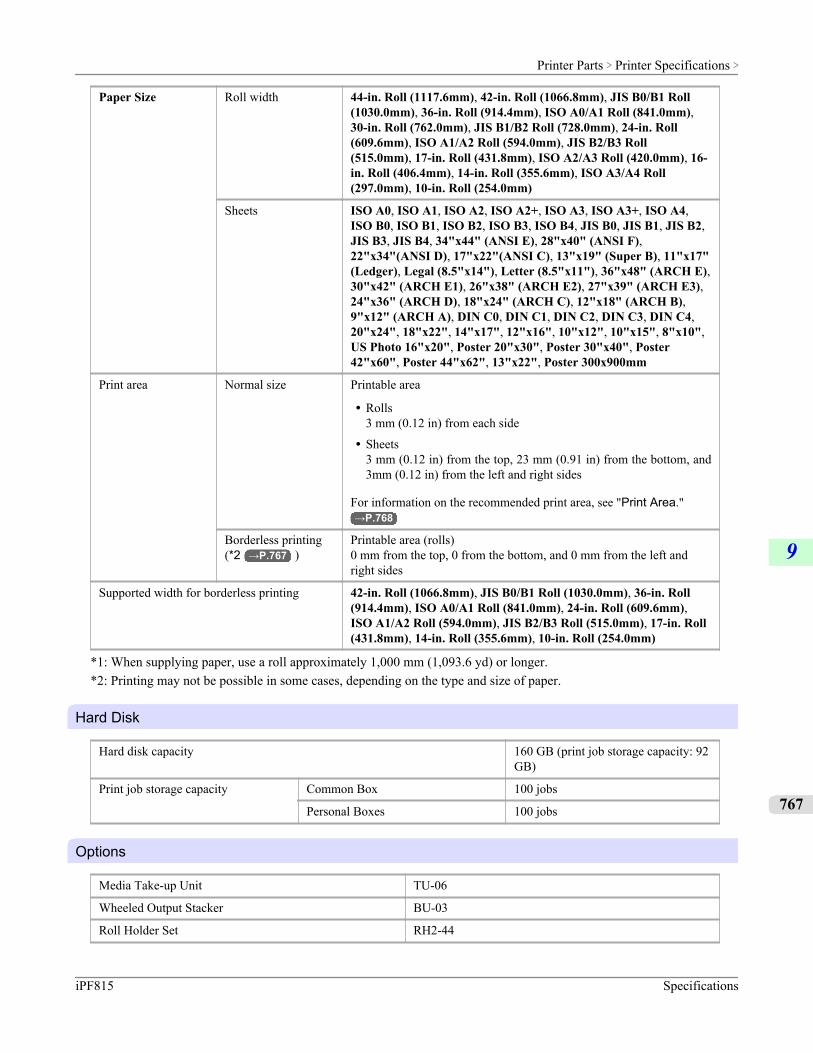
Paper Size Roll width 44-in. Roll (1117.6mm), 42-in. Roll (1066.8mm), JIS B0/B1 Roll(1030.0mm), 36-in. Roll (914.4mm), ISO A0/A1 Roll (841.0mm),30-in. Roll (762.0mm), JIS B1/B2 Roll (728.0mm), 24-in. Roll(609.6mm), ISO A1/A2 Roll (594.0mm), JIS B2/B3 Roll(515.0mm), 17-in. Roll (431.8mm), ISO A2/A3 Roll (420.0mm), 16-in. Roll (406.4mm), 14-in. Roll (355.6mm), ISO A3/A4 Roll(297.0mm), 10-in. Roll (254.0mm)
Sheets ISO A0, ISO A1, ISO A2, ISO A2+, ISO A3, ISO A3+, ISO A4,ISO B0, ISO B1, ISO B2, ISO B3, ISO B4, JIS B0, JIS B1, JIS B2,JIS B3, JIS B4, 34"x44" (ANSI E), 28"x40" (ANSI F),22"x34"(ANSI D), 17"x22"(ANSI C), 13"x19" (Super B), 11"x17"(Ledger), Legal (8.5"x14"), Letter (8.5"x11"), 36"x48" (ARCH E),30"x42" (ARCH E1), 26"x38" (ARCH E2), 27"x39" (ARCH E3),24"x36" (ARCH D), 18"x24" (ARCH C), 12"x18" (ARCH B),9"x12" (ARCH A), DIN C0, DIN C1, DIN C2, DIN C3, DIN C4,20"x24", 18"x22", 14"x17", 12"x16", 10"x12", 10"x15", 8"x10",US Photo 16"x20", Poster 20"x30", Poster 30"x40", Poster42"x60", Poster 44"x62", 13"x22", Poster 300x900mm
Print area Normal size Printable area
• Rolls3 mm (0.12 in) from each side
• Sheets3 mm (0.12 in) from the top, 23 mm (0.91 in) from the bottom, and3mm (0.12 in) from the left and right sides
For information on the recommended print area, see "Print Area."→P.768
Borderless printing(*2 →P.767 )
Printable area (rolls)0 mm from the top, 0 from the bottom, and 0 mm from the left andright sides
Supported width for borderless printing 42-in. Roll (1066.8mm), JIS B0/B1 Roll (1030.0mm), 36-in. Roll(914.4mm), ISO A0/A1 Roll (841.0mm), 24-in. Roll (609.6mm),ISO A1/A2 Roll (594.0mm), JIS B2/B3 Roll (515.0mm), 17-in. Roll(431.8mm), 14-in. Roll (355.6mm), 10-in. Roll (254.0mm)
*1: When supplying paper, use a roll approximately 1,000 mm (1,093.6 yd) or longer.*2: Printing may not be possible in some cases, depending on the type and size of paper.
Hard Disk
Hard disk capacity 160 GB (print job storage capacity: 92GB)
Print job storage capacity Common Box 100 jobs
Personal Boxes 100 jobs
Options
Media Take-up Unit TU-06
Wheeled Output Stacker BU-03
Roll Holder Set RH2-44
Printer Parts > Printer Specifications >
iPF815 Specifications
9
767

Print AreaA margin required by the printer is added with respect to the size of paper loaded in the printer. Except in borderless print-ing, the actual printing area corresponds to the paper size minus the space for this margin.
Note• Printable Area: The area that can be printed.• There is no margin (that is, a margin of 0 mm) during borderless printing on rolls.• Recommended Print Area: We recommend printing within this area.• To print so that your original matches the print area exactly, use an oversized paper size that includes the
required margin. (See "Printing on Oversized Paper.") →P.85
Margins of Printable Area Margins of Recommended Print Area
Top Edge Bottom Edge Sides Top Edge Bottom Edge Sides
Sheets 3 mm (0.12 in) 23 mm (0.91in)
3 mm (0.12 in) 20 mm (0.79in)
23 mm (0.91in)
5 mm (0.20 in)
Rolls 0/3 mm (0/0.12in)
0/3 mm (0/0.12in)
0/3 mm(0/0.12 in)
20 mm (0.79in)
5 mm (0.20 in) 5 mm (0.20 in)
Sheets
• Printable Areaa margin of 3 mm (0.12 in) on top, 23 mm (0.91 in) on bottom, and 3 mm (0.12 in) on left and right sides is required.
• Recommended Print AreaA margin of 20 mm (0.79 in) on top, 23 mm (0.91 in) on bottom, and 5 mm (0.20 in) on left and right sides is required.
Rolls
Printer Parts > Printer Specifications >
Print Area iPF815
9
768
• Printable AreaA margin of 3 mm (0.12 in) on all sides is required. During borderless printing, the margin on all sides is 0 mm. Forinformation on paper compatible with borderless printing, see the Paper Reference Guide. (See "Types of Paper.")→P.617
• Recommended Print AreaA margin of 20 mm (0.79 in) on top, 5 mm (0.20 in) on bottom, and 5 mm (0.20 in) on left and right sides is required.
Printer Parts > Printer Specifications >
iPF815 Print Area
9
769

Network Setting
Network Setting 771
Network Setting (Windows) 783
Network Setting (Mac OS X) 793
Network Setting >
iPF815
10
770
Network SettingNetwork Environment ...................................................................................................................................... 771
Configuring the IP Address on the Printer ....................................................................................................... 773Configuring the IP Address Using the Printer Control Panel ....................................................................... 774Configuring the IP Address Using ARP and PING Commands .................................................................. 775
Using RemoteUI .............................................................................................................................................. 776Configuring the Printer's TCP/IP Network Settings ..................................................................................... 777Specifying Printer-Related Information ....................................................................................................... 778
Configuring the Communication Mode Manually ............................................................................................. 780Email Notification When Printing is Finished or Errors Occur ......................................................................... 781Initializing the Network Settings ...................................................................................................................... 781
Network Environment
System requirementsThe system requirements, which vary depending on your network, are as follows.
• Printing over a TCP/IP network
• Compatible operating systems
• Windows 2000 (Professional or Server)• Windows XP (Home Edition or Professional)• Windows Server 2003 (Standard Edition)• Windows Vista (Home Basic/Business/Ultimate)• Windows Server 2008 (Standard Edition or Enterprise Edition)• Windows 7• Windows XP Professional x64 Edition• Windows Server 2003 x64 Edition• Windows Vista x64• Windows Server 2008 x64• Windows 7 x64• Mac OS X 10.2.8 or later• Unix (Solaris 9)• Unix (Red Hat 9)
• Compatible computer
• A computer that runs one of the above operating systems
Note• The imagePROGRAF printer driver is supported in Mac OS X 10.3.9 or later.• The imagePROGRAF printer driver is not compatible with Unix.
• Printing over an AppleTalk network
• Compatible operating systems
Network Setting > Network Setting >
iPF815 Network Environment
10
771
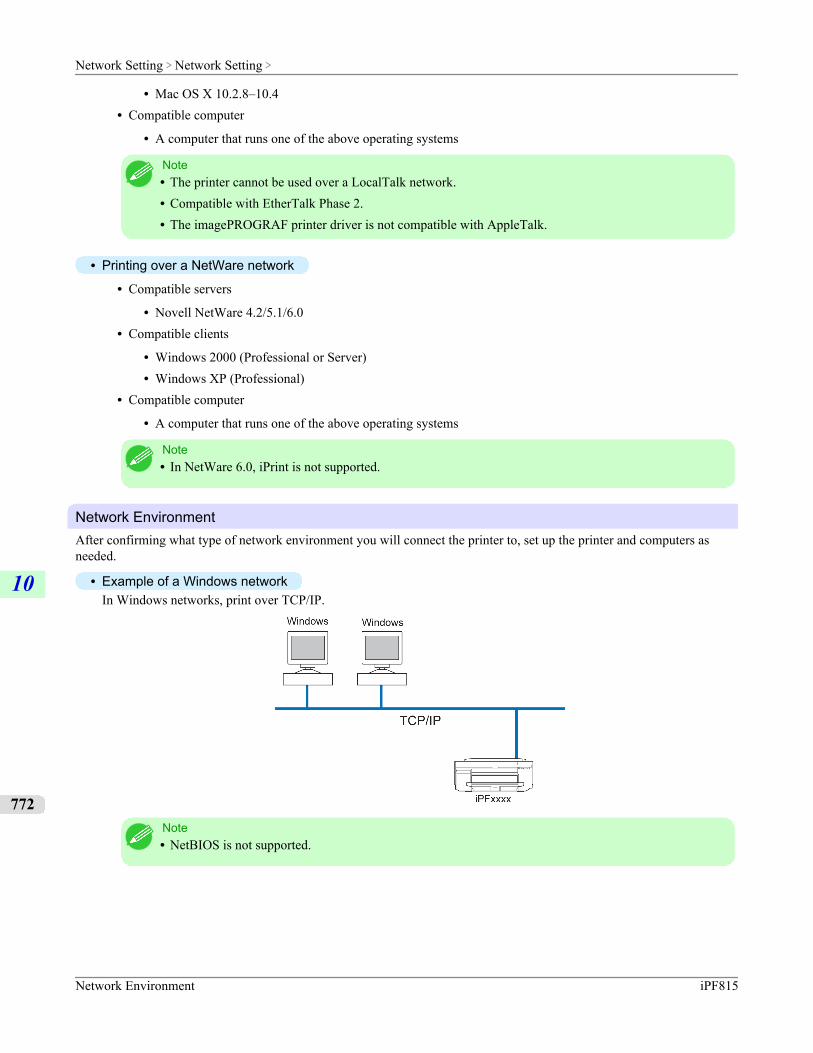
• Mac OS X 10.2.8–10.4• Compatible computer
• A computer that runs one of the above operating systems
Note• The printer cannot be used over a LocalTalk network.• Compatible with EtherTalk Phase 2.• The imagePROGRAF printer driver is not compatible with AppleTalk.
• Printing over a NetWare network
• Compatible servers
• Novell NetWare 4.2/5.1/6.0• Compatible clients
• Windows 2000 (Professional or Server)• Windows XP (Professional)
• Compatible computer
• A computer that runs one of the above operating systems
Note• In NetWare 6.0, iPrint is not supported.
Network EnvironmentAfter confirming what type of network environment you will connect the printer to, set up the printer and computers asneeded.
• Example of a Windows networkIn Windows networks, print over TCP/IP.
Note• NetBIOS is not supported.
Network Setting > Network Setting >
Network Environment iPF815
10
772
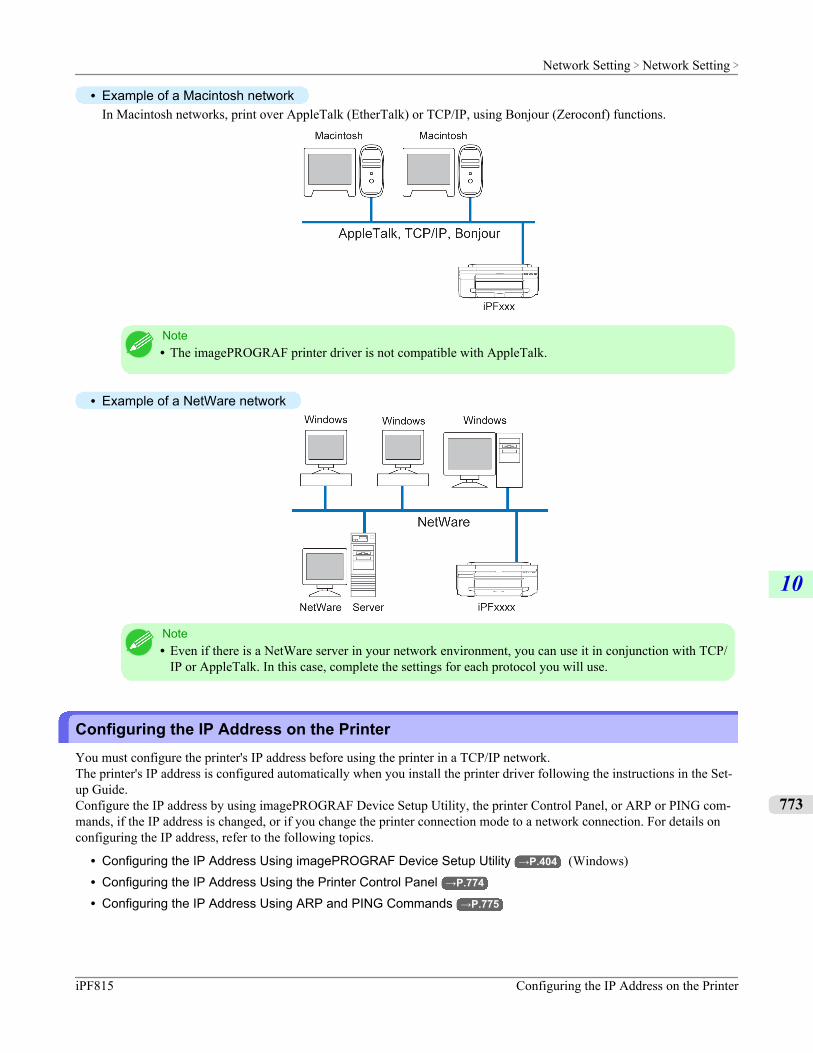
• Example of a Macintosh networkIn Macintosh networks, print over AppleTalk (EtherTalk) or TCP/IP, using Bonjour (Zeroconf) functions.
Note• The imagePROGRAF printer driver is not compatible with AppleTalk.
• Example of a NetWare network
Note• Even if there is a NetWare server in your network environment, you can use it in conjunction with TCP/
IP or AppleTalk. In this case, complete the settings for each protocol you will use.
Configuring the IP Address on the PrinterYou must configure the printer's IP address before using the printer in a TCP/IP network.The printer's IP address is configured automatically when you install the printer driver following the instructions in the Set-up Guide.Configure the IP address by using imagePROGRAF Device Setup Utility, the printer Control Panel, or ARP or PING com-mands, if the IP address is changed, or if you change the printer connection mode to a network connection. For details onconfiguring the IP address, refer to the following topics.
• Configuring the IP Address Using imagePROGRAF Device Setup Utility →P.404 (Windows)• Configuring the IP Address Using the Printer Control Panel →P.774
• Configuring the IP Address Using ARP and PING Commands →P.775
Network Setting > Network Setting >
iPF815 Configuring the IP Address on the Printer
10
773
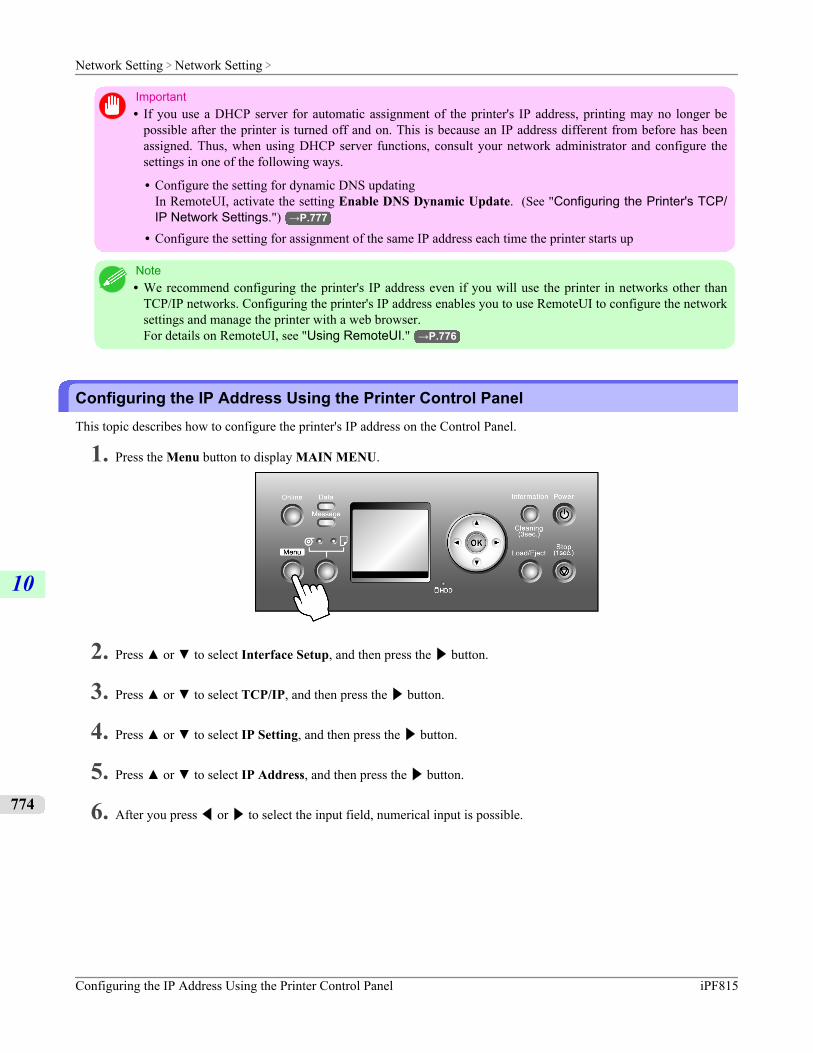
Important• If you use a DHCP server for automatic assignment of the printer's IP address, printing may no longer be
possible after the printer is turned off and on. This is because an IP address different from before has beenassigned. Thus, when using DHCP server functions, consult your network administrator and configure thesettings in one of the following ways.
• Configure the setting for dynamic DNS updatingIn RemoteUI, activate the setting Enable DNS Dynamic Update. (See "Configuring the Printer's TCP/IP Network Settings.") →P.777
• Configure the setting for assignment of the same IP address each time the printer starts up
Note• We recommend configuring the printer's IP address even if you will use the printer in networks other than
TCP/IP networks. Configuring the printer's IP address enables you to use RemoteUI to configure the networksettings and manage the printer with a web browser.For details on RemoteUI, see "Using RemoteUI." →P.776
Configuring the IP Address Using the Printer Control PanelThis topic describes how to configure the printer's IP address on the Control Panel.
1. Press the Menu button to display MAIN MENU.
2. Press ▲ or ▼ to select Interface Setup, and then press the ▶ button.
3. Press ▲ or ▼ to select TCP/IP, and then press the ▶ button.
4. Press ▲ or ▼ to select IP Setting, and then press the ▶ button.
5. Press ▲ or ▼ to select IP Address, and then press the ▶ button.
6. After you press ◀ or ▶ to select the input field, numerical input is possible.
Network Setting > Network Setting >
Configuring the IP Address Using the Printer Control Panel iPF815
10
774
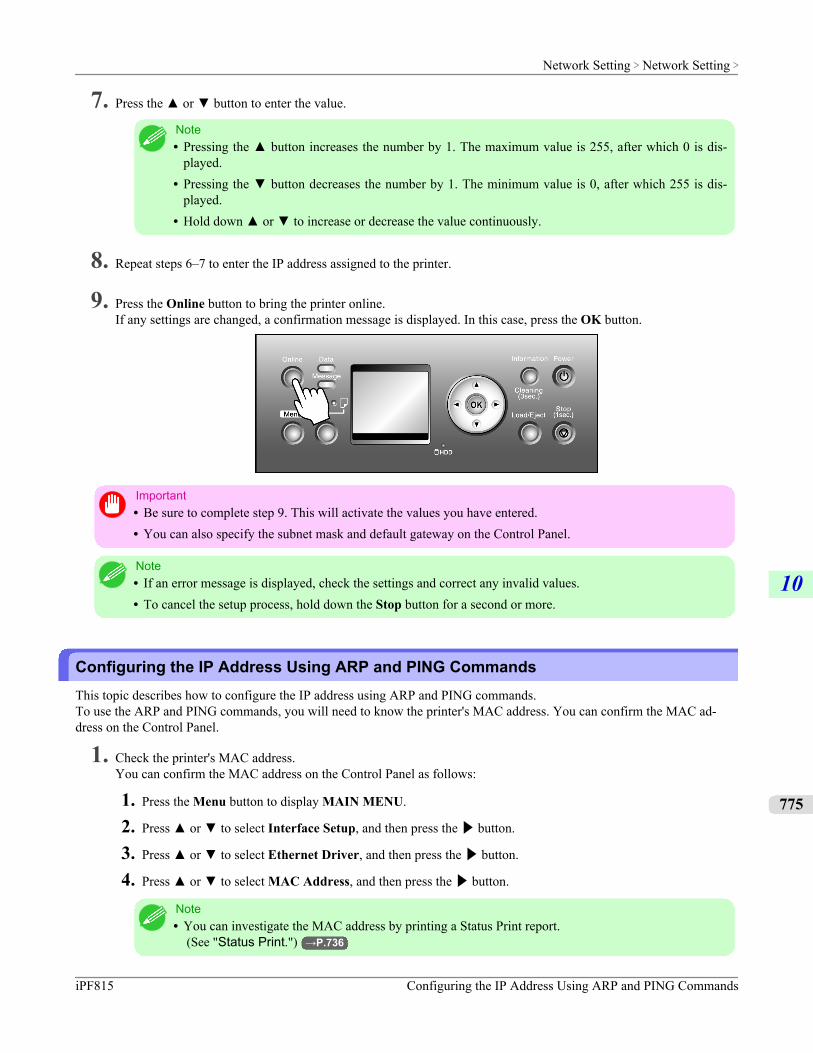
7. Press the ▲ or ▼ button to enter the value.
Note• Pressing the ▲ button increases the number by 1. The maximum value is 255, after which 0 is dis-
played.• Pressing the ▼ button decreases the number by 1. The minimum value is 0, after which 255 is dis-
played.• Hold down ▲ or ▼ to increase or decrease the value continuously.
8. Repeat steps 6–7 to enter the IP address assigned to the printer.
9. Press the Online button to bring the printer online.If any settings are changed, a confirmation message is displayed. In this case, press the OK button.
Important• Be sure to complete step 9. This will activate the values you have entered.• You can also specify the subnet mask and default gateway on the Control Panel.
Note• If an error message is displayed, check the settings and correct any invalid values.• To cancel the setup process, hold down the Stop button for a second or more.
Configuring the IP Address Using ARP and PING CommandsThis topic describes how to configure the IP address using ARP and PING commands.To use the ARP and PING commands, you will need to know the printer's MAC address. You can confirm the MAC ad-dress on the Control Panel.
1. Check the printer's MAC address.You can confirm the MAC address on the Control Panel as follows:
1. Press the Menu button to display MAIN MENU.
2. Press ▲ or ▼ to select Interface Setup, and then press the ▶ button.
3. Press ▲ or ▼ to select Ethernet Driver, and then press the ▶ button.
4. Press ▲ or ▼ to select MAC Address, and then press the ▶ button.
Note• You can investigate the MAC address by printing a Status Print report.
(See "Status Print.") →P.736
Network Setting > Network Setting >
iPF815 Configuring the IP Address Using ARP and PING Commands
10
775
2. In Windows, open a command prompt, or in Mac OS X, start Terminal.
3. Execute the following command to add entries to the ARP table for managing IP addresses and corresponding MACaddresses.arp -s [IP address] [the printer's MAC address you have verified]Example: arp -s xxx.xxx.xxx.xxx 00-00-85-xx-xx-xx
Note• In Mac OS X when using Terminal, enter the arp command in the format arp -s xxx.xxx.xxx.xxx
00:00:85:xx:xx:xx. For details, refer to the help file for the command line.
4. Execute the following command to send the IP address to the printer and configure it.ping [IP address as specified in the ARP command] -l 479Example: ping xxx.xxx.xxx.xxx -l 479
Note• In -l, the l is the letter l.• In Mac OS X when using Terminal, enter the ping command in the format ping -s 479
xxx.xxx.xxx.xxx. For details, refer to the help file for the command line.
Note• The subnet mask and default gateway will be set to 0.0.0.0. Use RemoteUI to change the subnet mask and
default gateway to match your network settings.For details on RemoteUI, see "Using RemoteUI." →P.776
Using RemoteUIEnter the printer's IP address in a web browser to display the RemoteUI page. After you log on to RemoteUI from the page,you can check and change the status of the printer and print jobs, and configure network settings.To access RemoteUI, start the web browser and enter the following URL in the Location (or Address ) box to display theRemoteUI page.http://printer IP address or name/Example: http://xxx.xxx.xxx.xxx/
For details on configuring printer settings for networks, refer to the following topics.
• Configuring the Printer's TCP/IP Network Settings →P.777
• Configuring the Printer's AppleTalk Network Settings →P.793
• Configuring the Printer's NetWare Network Settings →P.784
• Specifying Printer-Related Information →P.778
Note• RemoteUI also offers many other features. You can display the ink levels, check error messages and other
status information, and cancel print jobs.• By factory default, the English screen is displayed. To change the display language, select the desired lan-
guage under Language before logging on in administrator mode.
Network Setting > Network Setting >
Using RemoteUI iPF815
10
776

Important• Use Netscape Navigator 6.0 or later, Internet Explorer 5.01 or later, or Firefox 1.5 or later as a web browser.
In Mac OS X, you can also use Safari 1.32 or later or Safari 2.03 or later.• Access is not possible via a proxy server. In environments where a proxy server is used, add the printer's IP
address to Exceptions (addresses accessed without a proxy server) in the web browser proxy server settings.(Settings may vary depending on the network environment.)
• Enable JavaScript and cookies in the web browser.• If you access RemoteUI with the printer name instead of its IP address, make sure the DNS settings are cor-
rectly configured.
Configuring the Printer's TCP/IP Network SettingsFollow the steps below to configure the TCP/IP network settings.
1. Start the web browser and enter the following URL in the Location (or Address ) box to display the RemoteUIpage.http://printer IP address or name/Example: http://xxx.xxx.xxx.xxx/
2. Select Administrator Mode and click Logon.
3. If a password has been set on the printer, enter the password.
4. Click Network in the Device Manager menu at left to display the Network page.
5. Click Edit in the upper-right corner of the TCP/IP group to display the Edit TCP/IP Protocol Settings page.
6. Refer to the TCP/IP Settings Items table to complete the settings.
TCP/IP Settings ItemsItem Details Default Setting
Use DHCP Activate this setting to use DHCP for configuring the IP address. Off
Use BOOTP Activate this setting to use BOOTP for configuring the IP address. Off
Use RARP Activate this setting to use RARP for configuring the IP address. Off
Enable DNS Dy-namic Update
Activate this setting to perform DNS server registration automati-cally.
Off
Use ZeroconfFunction
Activate this setting to use Bonjour. On
IP Address Specify the printer's IP address. 0.0.0.0
Subnet Mask Specify the printer's subnet mask. 0.0.0.0
Gateway Address Specify the printer's default gateway. 0.0.0.0
LPD Printing Activate this setting to use LDP Printing. On
IPP Printing Activate this setting to use IPP Printing. On
IPP Printer URI Specify the URI of the printer used for IPP printing using up to252 characters.
printer
Network Setting > Network Setting >
iPF815 Configuring the Printer's TCP/IP Network Settings
10
777
Item Details Default SettingIPP Printer URI When using a standard Windows port for IPP printing, enter an
URL less than 255 bytes for all characters for http://"IP ad-dress"/IPP-URI.
printer
RAW Printing Activate this setting to use Raw Printing. On
RAW Mode Bi-di-rection
Activate this setting to use Raw mode bidirectional communica-tion.
Off
FTP Printing Activate this setting to use FTP Printing. On
SMTP Server Ad-dress
Specify the SMTP server's IP address. 0.0.0.0
Primary DNS Serv-er Address
Specify the IP address of the primary DNS server. 0.0.0.0
Secondary DNSServer Address
Specify the IP address of the secondary DNS server. 0.0.0.0
DNS Host Name Specify the printer host name, up to 63 characters (1–63 charac-ters). Use single-byte letters, numbers, and - (hyphens). Do not usenumbers or - for the first character or - for the last character.
NB-17FBxxxxxxxxxxxx
DNS Domain Name Specify the printer domain name, up to 63 characters. Use single-byte letters, numbers, - (hyphens), and . (periods). Do not usenumbers, -, or . for the first character, or - or . for the last charac-ter.
blank
Multicast DNSService Name
Specify the printer's Multicast DNS service name. (1–63 charac-ters)This name will be displayed when Bonjour functions are used.
Canon iPFxxxx (xxxxxx)
7. Click OK to display the Network page.
Note• If you specify to configure the IP address using DHCP, BOOTP, or RARP, there must be a server that sup-
ports such protocol running in the network.• If you specify to configure the IP address using DHCP, BOOTP, or RARP, the IP address obtained by this
method is used first. If you cannot obtain the IP address, the address specified in IP Address is used.• It takes a minute or two to determine whether DHCP, BOOTP, or RARP are available. We recommend clear-
ing check boxes of options you will not use.• If you are using a DNS server, select Enable DNS Dynamic Update and enter the IP Address for DNS serv-
ers, DNS host name, and DNS domain name in Primary DNS Server Address, Secondary DNS ServerAddress, DNS Host Name, and DNS Domain Name, respectively.
Specifying Printer-Related InformationFollow the steps below to specify device information and security settings.
1. Start the web browser and enter the following URL in the Location (or Address ) box to display the RemoteUIpage.http://printer IP address or name/Example: http://xxx.xxx.xxx.xxx/
2. Select Administrator Mode and click Logon.
Network Setting > Network Setting >
Specifying Printer-Related Information iPF815
10
778
3. If a password has been set on the printer, enter the password.
4. Click Information in the Device Manager menu at left to display the Information page.
5. To display the relevant settings page, click Edit in the upper-right corner of Device Information or Security, de-pending on what information you want to specify.
6. Refer to the table of settings for device information and security as you complete these settings.
Device Information SettingsItem Details Default Setting
Device Name Enter a device name.(0–32 characters)
blank
Location Enter the location where the device is installed.(0–32 characters)
blank
Administrator Enter the administrator's name.(0–32 characters)
blank
Phone Enter the administrator's contact information.(0–32 characters)
blank
Comments(E-mail) Enter any comments regarding the administrator.(0–32 characters)
blank
Security SettingsItem Details Default Setting
Old Password Enter the current device password.(0–14 characters)
blank
New Password Enter the new password.(0–14 characters)
blank
Confirm Enter the new password again to confirm it.(0–14 characters)
blank
Besides entering a password, you can specify other security-related information, such as IP address-based SNMP orTCP usage restrictions, MAC address-based access restrictions, or IPP and FTP authentication settings.
7. Click OK to activate the settings.
Network Setting > Network Setting >
iPF815 Specifying Printer-Related Information
10
779
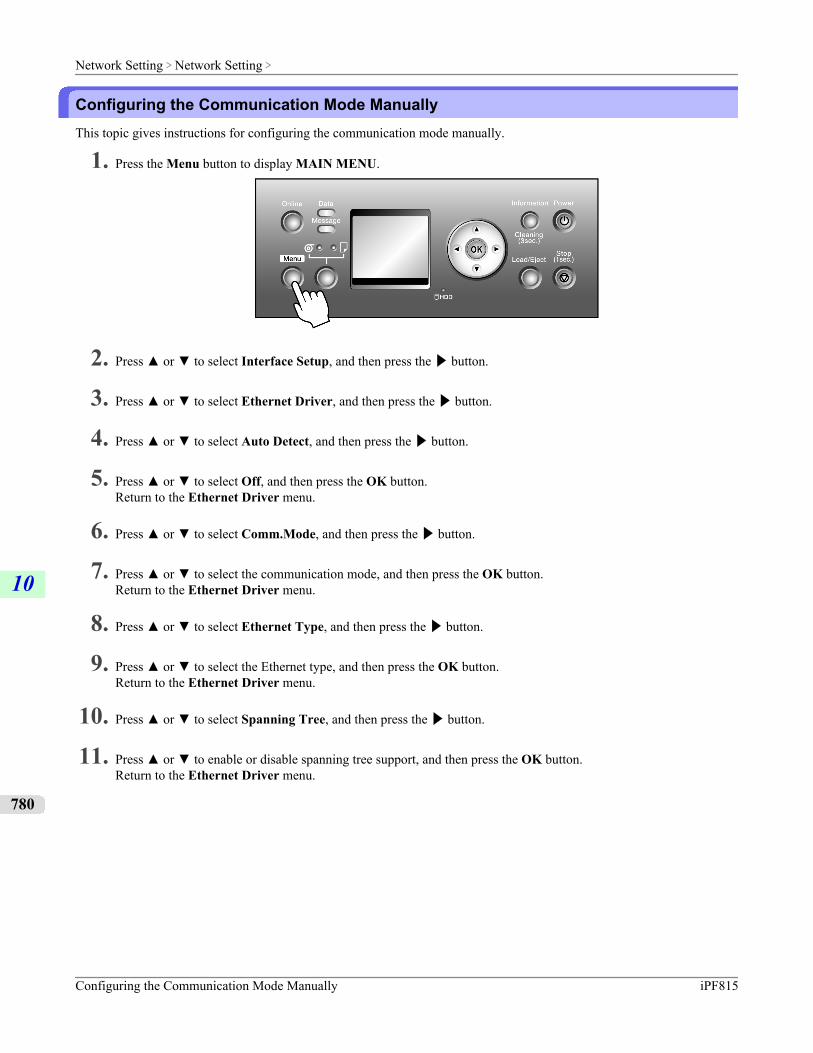
Configuring the Communication Mode ManuallyThis topic gives instructions for configuring the communication mode manually.
1. Press the Menu button to display MAIN MENU.
2. Press ▲ or ▼ to select Interface Setup, and then press the ▶ button.
3. Press ▲ or ▼ to select Ethernet Driver, and then press the ▶ button.
4. Press ▲ or ▼ to select Auto Detect, and then press the ▶ button.
5. Press ▲ or ▼ to select Off, and then press the OK button.Return to the Ethernet Driver menu.
6. Press ▲ or ▼ to select Comm.Mode, and then press the ▶ button.
7. Press ▲ or ▼ to select the communication mode, and then press the OK button.Return to the Ethernet Driver menu.
8. Press ▲ or ▼ to select Ethernet Type, and then press the ▶ button.
9. Press ▲ or ▼ to select the Ethernet type, and then press the OK button.Return to the Ethernet Driver menu.
10. Press ▲ or ▼ to select Spanning Tree, and then press the ▶ button.
11. Press ▲ or ▼ to enable or disable spanning tree support, and then press the OK button.Return to the Ethernet Driver menu.
Network Setting > Network Setting >
Configuring the Communication Mode Manually iPF815
10
780
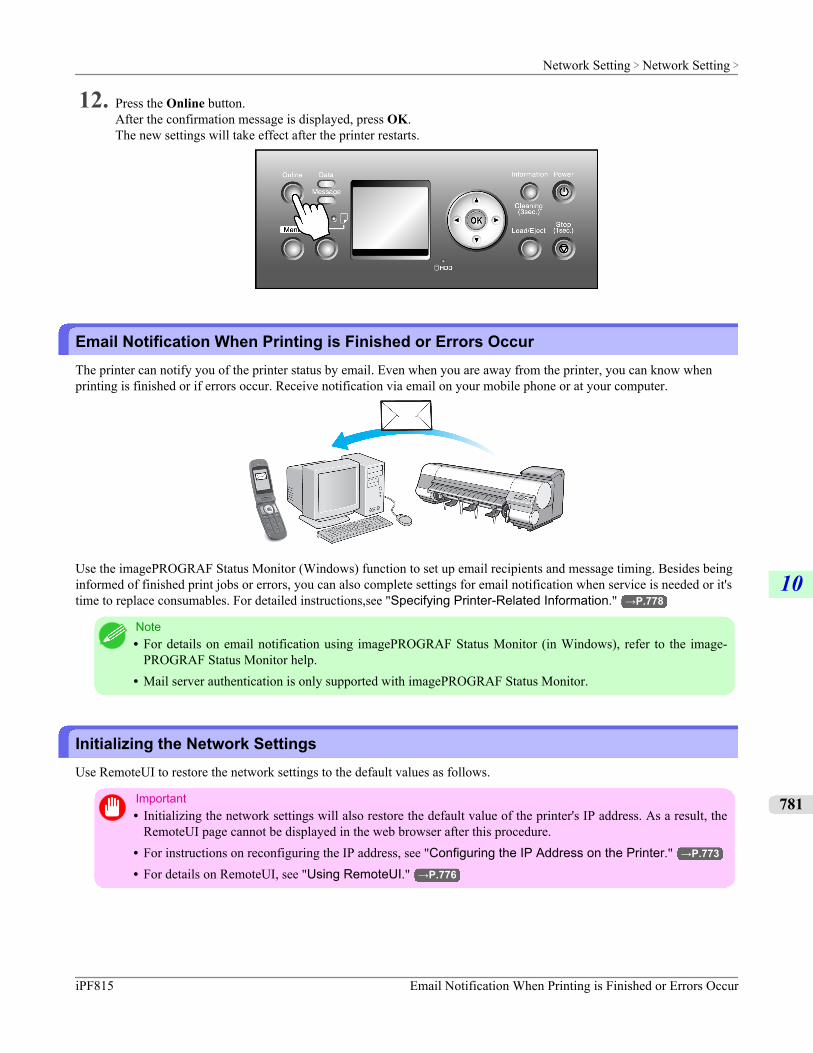
12. Press the Online button.After the confirmation message is displayed, press OK.The new settings will take effect after the printer restarts.
Email Notification When Printing is Finished or Errors OccurThe printer can notify you of the printer status by email. Even when you are away from the printer, you can know whenprinting is finished or if errors occur. Receive notification via email on your mobile phone or at your computer.
Use the imagePROGRAF Status Monitor (Windows) function to set up email recipients and message timing. Besides beinginformed of finished print jobs or errors, you can also complete settings for email notification when service is needed or it'stime to replace consumables. For detailed instructions,see "Specifying Printer-Related Information." →P.778
Note• For details on email notification using imagePROGRAF Status Monitor (in Windows), refer to the image-
PROGRAF Status Monitor help.• Mail server authentication is only supported with imagePROGRAF Status Monitor.
Initializing the Network SettingsUse RemoteUI to restore the network settings to the default values as follows.
Important• Initializing the network settings will also restore the default value of the printer's IP address. As a result, the
RemoteUI page cannot be displayed in the web browser after this procedure.• For instructions on reconfiguring the IP address, see "Configuring the IP Address on the Printer." →P.773
• For details on RemoteUI, see "Using RemoteUI." →P.776
Network Setting > Network Setting >
iPF815 Email Notification When Printing is Finished or Errors Occur
10
781
1. Start the web browser and enter the following URL in the Location (or Address ) box to display the RemoteUIpage.http://printer IP address or name/Example: http://xxx.xxx.xxx.xxx/
2. Select Administrator Mode and click Logon.
3. If a password has been set on the printer, enter the password.
4. Click Network in the Device Manager menu at left to display the Network page.
5. Click Reset to Default settings in the lower-right corner of the Network Interface group.
6. After confirming the message, click OK to restore the network settings to the default values.
Note• You can also use imagePROGRAF Device Setup Utility or the Control Panel to restore the default network
settings.• If you use the Control Panel to initialize the network settings, press the Menu button to display MAIN
MENU, and then press ▲, ▼, and ▶ to select Interface Setup → Ethernet Driver → Init. Settings →Yes (in this order), and finally press the OK button.
Network Setting > Network Setting >
Initializing the Network Settings iPF815
10
782
Network Setting (Windows)Configuring the Printer Driver Destination ...................................................................................................... 783
Configuring the Printer's NetWare Network Settings ...................................................................................... 784Specifying the Printer's Frame Type ............................................................................................................... 785Specifying NetWare Print Services ................................................................................................................. 787Specifying NetWare Protocols ......................................................................................................................... 789Configuring NetWare Network Settings ........................................................................................................... 791
Configuring the Printer Driver DestinationThis topic describes how to specify the printer driver destination if the printer's IP address is changed, or if you will use theprinter over a network connection instead of via USB connection.The procedure described below is the configuration based on the LPR or Raw protocol using the standard TCP/IP port inWindows ( Standard TCP/IP Port ).
Important• If you will use the printer in a TCP/IP network, make sure the printer's IP address is configured correctly.
• Configuring the IP Address on the Printer →P.773
1. Open the Printers and Faxes (or Printers ) window.
2. Right-click the icon of this printer and choose Properties to open the printer properties window.
3. Click the Port tab to display the Port sheet.
4. Click Add Port to display the Printer Ports dialog box.
5. In the Available Port list, select Standard TCP/IP Port.
6. Click New Port.After the wizard starts, a window is displayed for the Welcome to the Add Standard TCP/IP Printer Port Wiz-ard.
7. Click Next.
8. In Printer Name or IP Address, enter the printer's IP address. If the DNS is configured, you can also enter the DNSDomain Name.
9. Follow the instructions on the screen to add a printer port.
10. Click Close to close the Printer Ports dialog box.
11. Make sure the printer port you added is displayed under Ports, and that the port is selected.
12. Click Close to close the printer properties window.
Network Setting > Network Setting (Windows) >
iPF815 Configuring the Printer Driver Destination
10
783
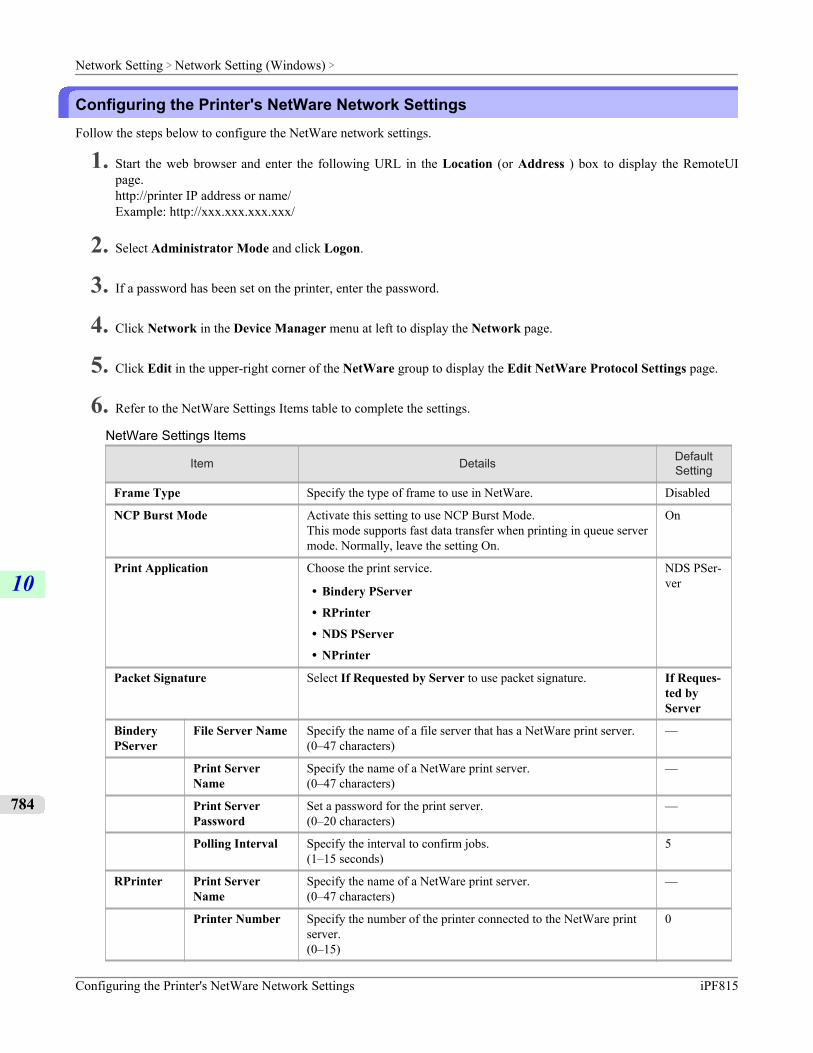
Configuring the Printer's NetWare Network SettingsFollow the steps below to configure the NetWare network settings.
1. Start the web browser and enter the following URL in the Location (or Address ) box to display the RemoteUIpage.http://printer IP address or name/Example: http://xxx.xxx.xxx.xxx/
2. Select Administrator Mode and click Logon.
3. If a password has been set on the printer, enter the password.
4. Click Network in the Device Manager menu at left to display the Network page.
5. Click Edit in the upper-right corner of the NetWare group to display the Edit NetWare Protocol Settings page.
6. Refer to the NetWare Settings Items table to complete the settings.
NetWare Settings Items
Item Details DefaultSetting
Frame Type Specify the type of frame to use in NetWare. Disabled
NCP Burst Mode Activate this setting to use NCP Burst Mode.This mode supports fast data transfer when printing in queue servermode. Normally, leave the setting On.
On
Print Application Choose the print service.
• Bindery PServer
• RPrinter
• NDS PServer
• NPrinter
NDS PSer-ver
Packet Signature Select If Requested by Server to use packet signature. If Reques-ted byServer
BinderyPServer
File Server Name Specify the name of a file server that has a NetWare print server.(0–47 characters)
—
Print ServerName
Specify the name of a NetWare print server.(0–47 characters)
—
Print ServerPassword
Set a password for the print server.(0–20 characters)
—
Polling Interval Specify the interval to confirm jobs.(1–15 seconds)
5
RPrinter Print ServerName
Specify the name of a NetWare print server.(0–47 characters)
—
Printer Number Specify the number of the printer connected to the NetWare printserver.(0–15)
0
Network Setting > Network Setting (Windows) >
Configuring the Printer's NetWare Network Settings iPF815
10
784
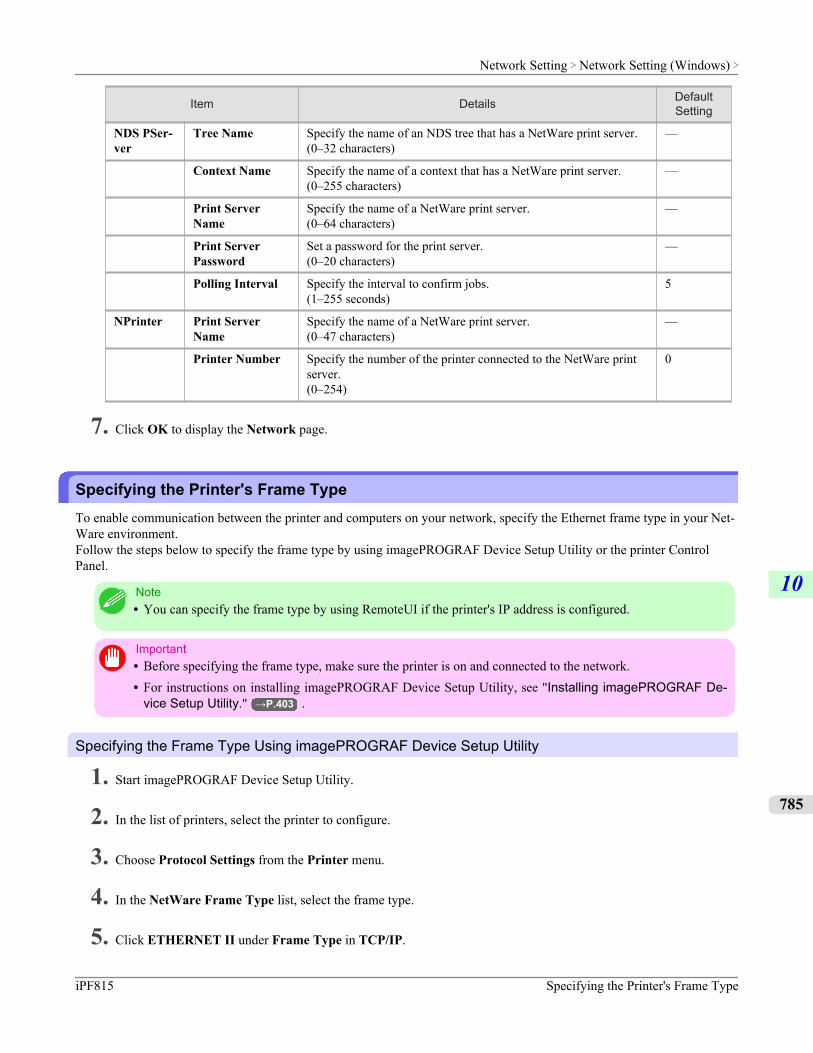
Item Details DefaultSetting
NDS PSer-ver
Tree Name Specify the name of an NDS tree that has a NetWare print server.(0–32 characters)
—
Context Name Specify the name of a context that has a NetWare print server.(0–255 characters)
—
Print ServerName
Specify the name of a NetWare print server.(0–64 characters)
—
Print ServerPassword
Set a password for the print server.(0–20 characters)
—
Polling Interval Specify the interval to confirm jobs.(1–255 seconds)
5
NPrinter Print ServerName
Specify the name of a NetWare print server.(0–47 characters)
—
Printer Number Specify the number of the printer connected to the NetWare printserver.(0–254)
0
7. Click OK to display the Network page.
Specifying the Printer's Frame TypeTo enable communication between the printer and computers on your network, specify the Ethernet frame type in your Net-Ware environment.Follow the steps below to specify the frame type by using imagePROGRAF Device Setup Utility or the printer ControlPanel.
Note• You can specify the frame type by using RemoteUI if the printer's IP address is configured.
Important• Before specifying the frame type, make sure the printer is on and connected to the network.• For instructions on installing imagePROGRAF Device Setup Utility, see "Installing imagePROGRAF De-
vice Setup Utility." →P.403 .
Specifying the Frame Type Using imagePROGRAF Device Setup Utility
1. Start imagePROGRAF Device Setup Utility.
2. In the list of printers, select the printer to configure.
3. Choose Protocol Settings from the Printer menu.
4. In the NetWare Frame Type list, select the frame type.
5. Click ETHERNET II under Frame Type in TCP/IP.
Network Setting > Network Setting (Windows) >
iPF815 Specifying the Printer's Frame Type
10
785
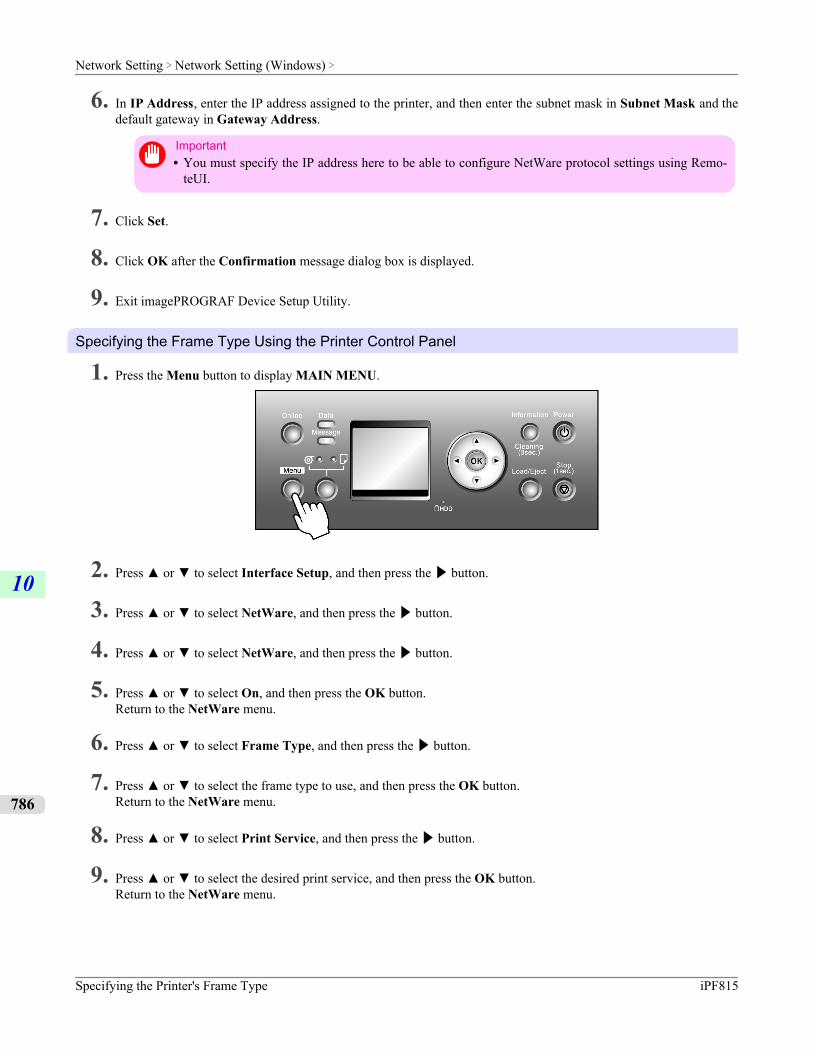
6. In IP Address, enter the IP address assigned to the printer, and then enter the subnet mask in Subnet Mask and thedefault gateway in Gateway Address.
Important• You must specify the IP address here to be able to configure NetWare protocol settings using Remo-
teUI.
7. Click Set.
8. Click OK after the Confirmation message dialog box is displayed.
9. Exit imagePROGRAF Device Setup Utility.
Specifying the Frame Type Using the Printer Control Panel
1. Press the Menu button to display MAIN MENU.
2. Press ▲ or ▼ to select Interface Setup, and then press the ▶ button.
3. Press ▲ or ▼ to select NetWare, and then press the ▶ button.
4. Press ▲ or ▼ to select NetWare, and then press the ▶ button.
5. Press ▲ or ▼ to select On, and then press the OK button.Return to the NetWare menu.
6. Press ▲ or ▼ to select Frame Type, and then press the ▶ button.
7. Press ▲ or ▼ to select the frame type to use, and then press the OK button.Return to the NetWare menu.
8. Press ▲ or ▼ to select Print Service, and then press the ▶ button.
9. Press ▲ or ▼ to select the desired print service, and then press the OK button.Return to the NetWare menu.
Network Setting > Network Setting (Windows) >
Specifying the Printer's Frame Type iPF815
10
786
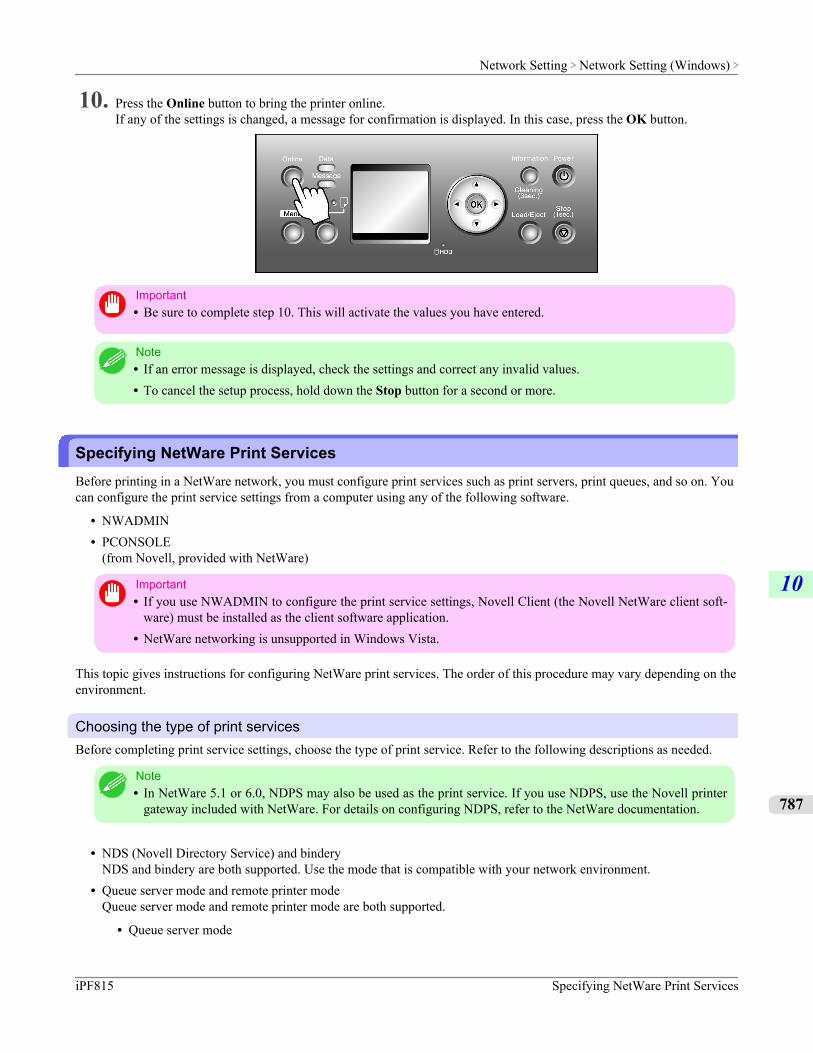
10. Press the Online button to bring the printer online.If any of the settings is changed, a message for confirmation is displayed. In this case, press the OK button.
Important• Be sure to complete step 10. This will activate the values you have entered.
Note• If an error message is displayed, check the settings and correct any invalid values.• To cancel the setup process, hold down the Stop button for a second or more.
Specifying NetWare Print ServicesBefore printing in a NetWare network, you must configure print services such as print servers, print queues, and so on. Youcan configure the print service settings from a computer using any of the following software.
• NWADMIN• PCONSOLE
(from Novell, provided with NetWare)
Important• If you use NWADMIN to configure the print service settings, Novell Client (the Novell NetWare client soft-
ware) must be installed as the client software application.• NetWare networking is unsupported in Windows Vista.
This topic gives instructions for configuring NetWare print services. The order of this procedure may vary depending on theenvironment.
Choosing the type of print servicesBefore completing print service settings, choose the type of print service. Refer to the following descriptions as needed.
Note• In NetWare 5.1 or 6.0, NDPS may also be used as the print service. If you use NDPS, use the Novell printer
gateway included with NetWare. For details on configuring NDPS, refer to the NetWare documentation.
• NDS (Novell Directory Service) and binderyNDS and bindery are both supported. Use the mode that is compatible with your network environment.
• Queue server mode and remote printer modeQueue server mode and remote printer mode are both supported.
• Queue server mode
Network Setting > Network Setting (Windows) >
iPF815 Specifying NetWare Print Services
10
787
When using queue server mode, all print server functions are supported, so there is no need for other print serversoftware or hardware. In NDS queue server mode (NDS PServer), the NDS print server is used for printing. Inbindery queue server mode (Bindery PServer), the bindery print server is used for printing. Note that if you usequeue server mode, a NetWare user license is required for each network interface.
• Remote printer modeIn remote printer mode, the printer is controlled by the NetWare print server. Thus, a NetWare print server is re-quired. In NDS remote printer mode (NPrinter), the NDS print server is used for printing, and in bindery remoteprinter mode (RPrinter), the bindery print server is used for printing.
Using NWADMIN or PCONSOLE to set up the print serverUse NWADMIN to set up the print server if NDS queue server mode or remote printer mode is used.
1. Log into NetWare as Administrator or with equivalent rights, and then start NWADMIN.
2. Run Quick Setup.
1. Choose Print Services Quick Setup in the Tools menu.
2. Enter a desired name in Print Server Name. To use an existing print server, click the button at right andchoose the name from the list.
3. Enter a desired printer name in Name.
4. To use the printer in queue server mode, choose Other/Unknown in Type. To use the printer in remote printermode, choose Parallel in Type, click Communications, and set Ports to LPT1 and Connection Type toManual Load.
5. Enter a desired queue name in Name.
6. In Volume, enter the volume object (that is, the object representing the physical volume on the network) wherethe print queue will be created. Click the button at right to choose from a list.
7. Complete other settings as needed and click OK.
Note• The print server name will be required when configuring the printer's protocol settings. Write down
the print server name for future reference.• When running Quick Setup, the printer is assigned printer number 0. When using the printer in queue
server mode, do not change the printer number from 0.
3. Set a password.
1. Right-click the print server created in step 2 and choose Details.
2. Click Change Password to open the password input dialog box. Enter the password.
3. Click OK to close the password input dialog box.
4. Click OK or Cancel to close the details dialog box.
Network Setting > Network Setting (Windows) >
Specifying NetWare Print Services iPF815
10
788
4. To use the printer in remote printer mode, start the print server.To use the NetWare file server as the print server, enter LOAD PSERVER.NLM at the file server and press theEnter key.
Note• This procedure is not required when using queue server mode.
Use PCONSOLE to set up the print server if bindery queue server mode or remote printer mode is used.
1. Log into NetWare as Supervisor and start PCONSOLE.
2. Switch to bindery mode.
3. If the print server has not been created, create it.
1. In Available Options, select Quick Setup and press the Enter key.
2. Enter the name of the new print server, the new printer, and the queue.
Note• The print server name will be required when configuring the printer's protocol settings. Write down
the print server name for future reference.
4. Specify the printer type.
1. To use the printer in queue server mode, choose Other/Unknown in Type. To use remote printer mode, setPrinter Type to Parallel and Position to Manual Load.
2. Press the Esc key.
3. After the confirmation message is displayed, choose Yes and press the Enter key.
5. Set a password.
1. In Available Options, select Print Servers and press the Enter key.
2. Select the print server created in step 2 and press the Enter key.
3. Select Password, and press the Enter key to display the password input dialog box.
4. Enter the password and press the Enter key.
6. Press the Esc key several times to display the dialog box for confirming that PCONSOLE is finished.
7. Click Yes to exit PCONSOLE.
Specifying NetWare ProtocolsFollow the steps below to configure NetWare protocol settings other than the frame type by using RemoteUI.
Note• For details on RemoteUI, see "Using RemoteUI." →P.776
Network Setting > Network Setting (Windows) >
iPF815 Specifying NetWare Protocols
10
789
1. Start the web browser and enter the following URL in the Location (or Address ) box to display the RemoteUIpage.http://printer IP address or name/Example: http://xxx.xxx.xxx.xxx/
2. Select Administrator Mode and click Logon.
3. If a password has been set on the printer, enter the password.
4. Click Network in the Device Manager menu at left to display the Network page.
5. Click Edit in the upper-right corner of the NetWare group to display the Edit NetWare Protocol Settings page.
6. Make sure the Frame Type indicates the frame type used on the NetWare network.
7. To use burst mode, choose On for NCP Burst Mode.
Note• Burst mode supports fast data transfer when printing in queue server mode. Normally, choose On.
8. In Print Application, click the print service to be used.
Note• Only one print service selected here will be enabled. Multiple print services are not available at the
same time.
9. For packet signature, click If Requested by Server in Packet Signature.
10. Complete the following settings based on the selected service.
• If you have selected Bindery PServer: Queue Server Mode (Using a Bindery Print Server)
1. In File Server Name, enter the file server name.
2. In Print Server Name, enter the name of the print server created in "Specifying NetWare Print Serv-ices →P.787 ."
3. In Print Server Password, enter the password of the print server created in "Specifying NetWare PrintServices →P.787 ."
4. In Polling Interval, specify the interval at which the printer checks the NetWare print queue.
• If you have selected RPrinter: Remote Printer Mode (Using a Bindery Print Server)
1. In Print Server Name, enter the advertising name of the print server created in "Specifying NetWarePrint Services →P.787 ."
2. In Printer Number, enter the same printer number specified in "Specifying NetWare Print Serv-ices →P.787 ."
• If you have selected NDS PServer: Queue Server Mode (Using an NDS Print Server)
1. In Tree Name and Context Name, enter the tree and context name of the print server.
Network Setting > Network Setting (Windows) >
Specifying NetWare Protocols iPF815
10
790
2. In Print Server Name, enter the name of the print server created in "Specifying NetWare Print Serv-ices →P.787 ."
3. In Print Server Password, enter the password of the print server created in "Specifying NetWare PrintServices →P.787 ."
4. In Polling Interval, specify the interval at which the printer checks the NetWare print queue.
• If you have selected NPrinter: Remote Printer Mode (Using a NDS Print Server)
1. In Print Server Name, enter the advertising name of the print server created in "Specifying NetWarePrint Services →P.787 ." Usually, the advertising name is the same as the name of the print server.
2. In Printer Number, enter the same printer number specified in "Specifying NetWare Print Serv-ices →P.787 ."
11. Click OK to display the Network page.
For a list of NetWare protocol settings items, see "Configuring the Printer's NetWare Network Settings." →P.784
Configuring NetWare Network SettingsTo print over a NetWare network, configure the network environment as follows.
Important• To configure network settings, you must be logged in with administrative rights such as Administrator ac-
count. We recommend that your network administrator configure the network settings.
1. Specify the Ethernet frame type for communication between the printer and computers.For instructions, see "Specifying the Printer's Frame Type." →P.785
2. Specify the NetWare print services, including the print server and queue.For instructions, see "Specifying NetWare Print Services." →P.787
3. Specify NetWare protocol details besides the frame type.For instructions, see "Specifying NetWare Protocols." →P.789After you have completed the steps above, configure each computer for printing over the NetWare network.
4. Connect to the NetWare network.Install NetWare client software on each computer to be used for printing over the network, and log in to the Net-Ware server or tree. For instructions on connection, refer to the NetWare and operating system documentation.
5. Install the printer driver.Follow the instructions of your network administrator to install the printer driver on each computer to be used forprinting. When installing the printer driver, choose Network Printer as the printer destination, and then choose theprint queue created from the NetWare print service settings.
6. Follow these steps to configure the printer port. This step is not necessary if you specified the printer destinationduring installation of the printer driver.
1. Open the Printers and Faxes (or Printers ) window.
2. Right-click the printer icon and choose Properties.
3. Click the Port (or Advanced ) tab to display the Port (or Advanced ) sheet.
Network Setting > Network Setting (Windows) >
iPF815 Configuring NetWare Network Settings
10
791
4. As the destination port, specify the print queue created by configuring the NetWare print service settings.
Network Setting > Network Setting (Windows) >
Configuring NetWare Network Settings iPF815
10
792
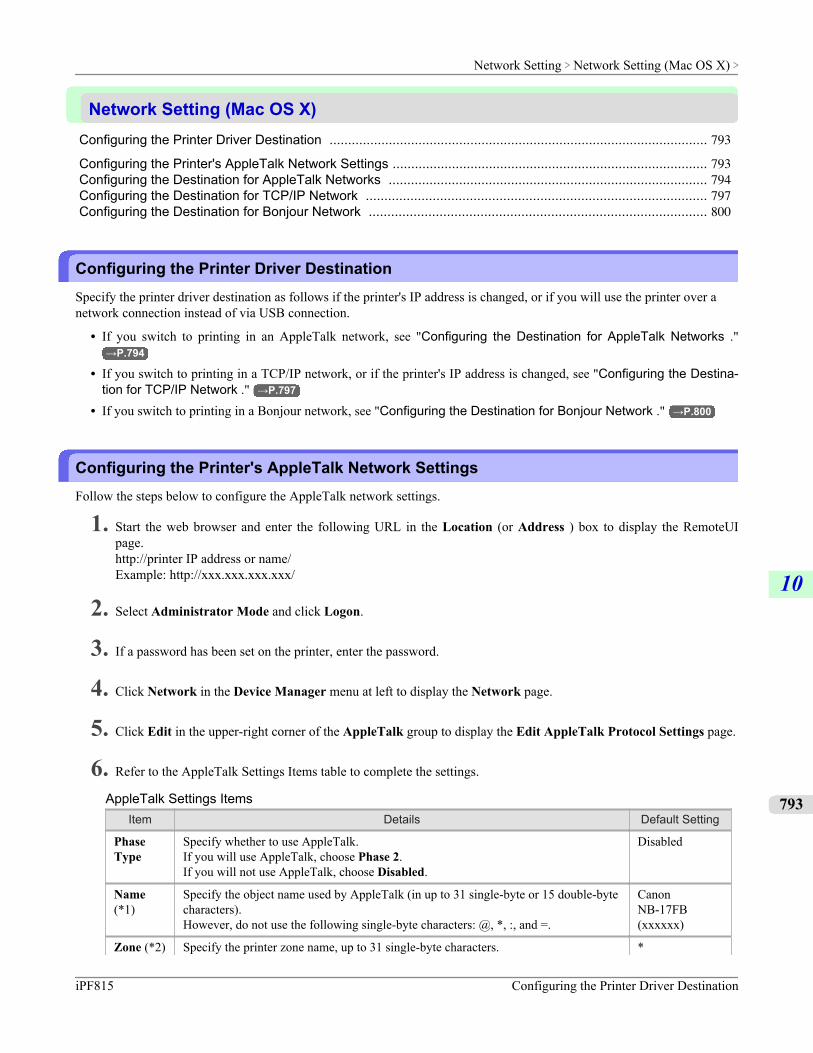
Network Setting (Mac OS X)Configuring the Printer Driver Destination ...................................................................................................... 793
Configuring the Printer's AppleTalk Network Settings ..................................................................................... 793Configuring the Destination for AppleTalk Networks ...................................................................................... 794Configuring the Destination for TCP/IP Network ............................................................................................ 797Configuring the Destination for Bonjour Network ........................................................................................... 800
Configuring the Printer Driver DestinationSpecify the printer driver destination as follows if the printer's IP address is changed, or if you will use the printer over anetwork connection instead of via USB connection.
• If you switch to printing in an AppleTalk network, see "Configuring the Destination for AppleTalk Networks ."→P.794
• If you switch to printing in a TCP/IP network, or if the printer's IP address is changed, see "Configuring the Destina-tion for TCP/IP Network ." →P.797
• If you switch to printing in a Bonjour network, see "Configuring the Destination for Bonjour Network ." →P.800
Configuring the Printer's AppleTalk Network SettingsFollow the steps below to configure the AppleTalk network settings.
1. Start the web browser and enter the following URL in the Location (or Address ) box to display the RemoteUIpage.http://printer IP address or name/Example: http://xxx.xxx.xxx.xxx/
2. Select Administrator Mode and click Logon.
3. If a password has been set on the printer, enter the password.
4. Click Network in the Device Manager menu at left to display the Network page.
5. Click Edit in the upper-right corner of the AppleTalk group to display the Edit AppleTalk Protocol Settings page.
6. Refer to the AppleTalk Settings Items table to complete the settings.
AppleTalk Settings ItemsItem Details Default Setting
PhaseType
Specify whether to use AppleTalk.If you will use AppleTalk, choose Phase 2.If you will not use AppleTalk, choose Disabled.
Disabled
Name(*1)
Specify the object name used by AppleTalk (in up to 31 single-byte or 15 double-bytecharacters).However, do not use the following single-byte characters: @, *, :, and =.
CanonNB-17FB(xxxxxx)
Zone (*2) Specify the printer zone name, up to 31 single-byte characters. *
Network Setting > Network Setting (Mac OS X) >
iPF815 Configuring the Printer Driver Destination
10
793
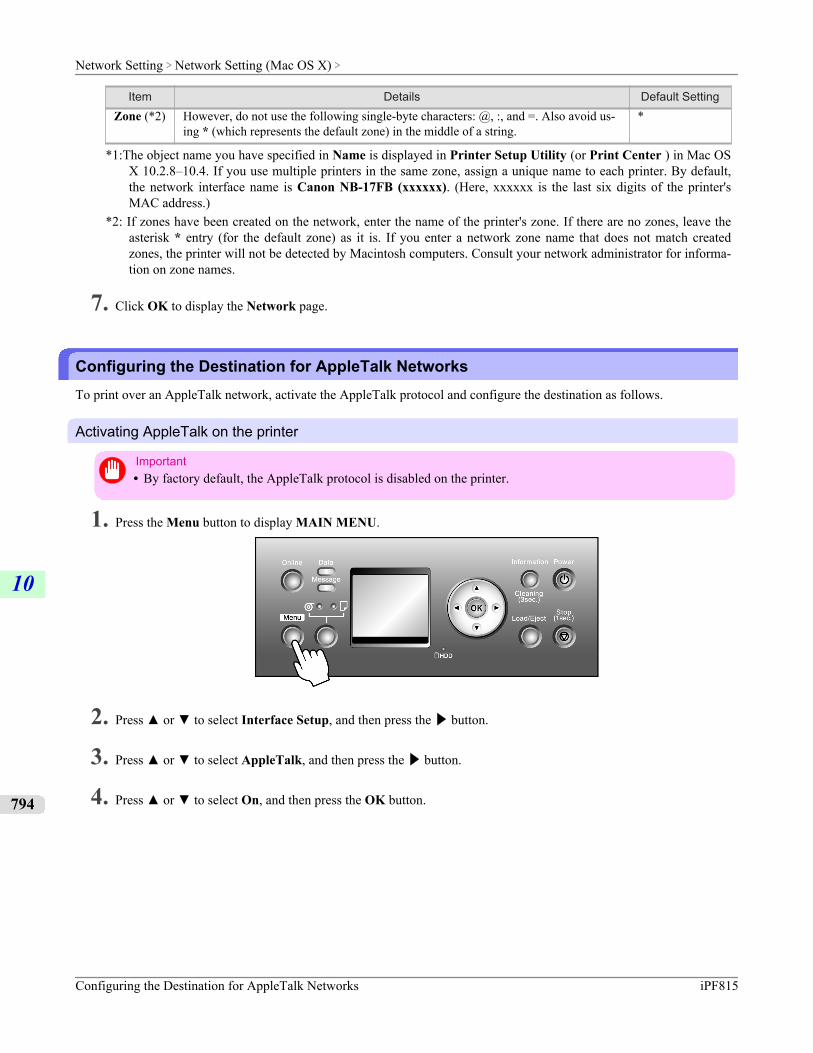
Item Details Default SettingZone (*2) However, do not use the following single-byte characters: @, :, and =. Also avoid us-
ing * (which represents the default zone) in the middle of a string.*
*1:The object name you have specified in Name is displayed in Printer Setup Utility (or Print Center ) in Mac OSX 10.2.8–10.4. If you use multiple printers in the same zone, assign a unique name to each printer. By default,the network interface name is Canon NB-17FB (xxxxxx). (Here, xxxxxx is the last six digits of the printer'sMAC address.)
*2: If zones have been created on the network, enter the name of the printer's zone. If there are no zones, leave theasterisk * entry (for the default zone) as it is. If you enter a network zone name that does not match createdzones, the printer will not be detected by Macintosh computers. Consult your network administrator for informa-tion on zone names.
7. Click OK to display the Network page.
Configuring the Destination for AppleTalk NetworksTo print over an AppleTalk network, activate the AppleTalk protocol and configure the destination as follows.
Activating AppleTalk on the printer
Important• By factory default, the AppleTalk protocol is disabled on the printer.
1. Press the Menu button to display MAIN MENU.
2. Press ▲ or ▼ to select Interface Setup, and then press the ▶ button.
3. Press ▲ or ▼ to select AppleTalk, and then press the ▶ button.
4. Press ▲ or ▼ to select On, and then press the OK button.
Network Setting > Network Setting (Mac OS X) >
Configuring the Destination for AppleTalk Networks iPF815
10
794
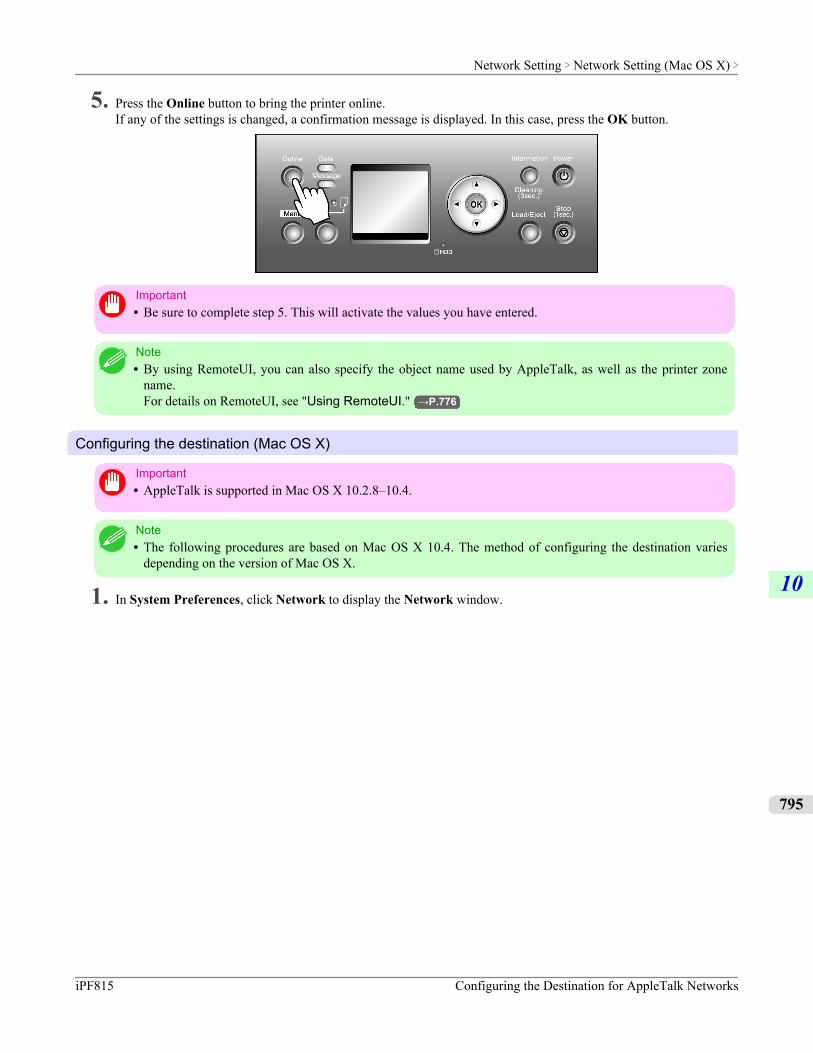
5. Press the Online button to bring the printer online.If any of the settings is changed, a confirmation message is displayed. In this case, press the OK button.
Important• Be sure to complete step 5. This will activate the values you have entered.
Note• By using RemoteUI, you can also specify the object name used by AppleTalk, as well as the printer zone
name.For details on RemoteUI, see "Using RemoteUI." →P.776
Configuring the destination (Mac OS X)
Important• AppleTalk is supported in Mac OS X 10.2.8–10.4.
Note• The following procedures are based on Mac OS X 10.4. The method of configuring the destination varies
depending on the version of Mac OS X.
1. In System Preferences, click Network to display the Network window.
Network Setting > Network Setting (Mac OS X) >
iPF815 Configuring the Destination for AppleTalk Networks
10
795

2. In Show, choose Built-in Ethernet. Next, click AppleTalk, select Make AppleTalk Active, and click Apply now.
3. Close the Network window and save the settings.
4. Choose Utilities (or Applications ) in the Go menu of Finder.
5. Click Printer Setup Utility (or Print Center ) in the Utilities folder.
6. If the printer name is not displayed in Printer List, click Add.
Network Setting > Network Setting (Mac OS X) >
Configuring the Destination for AppleTalk Networks iPF815
10
796
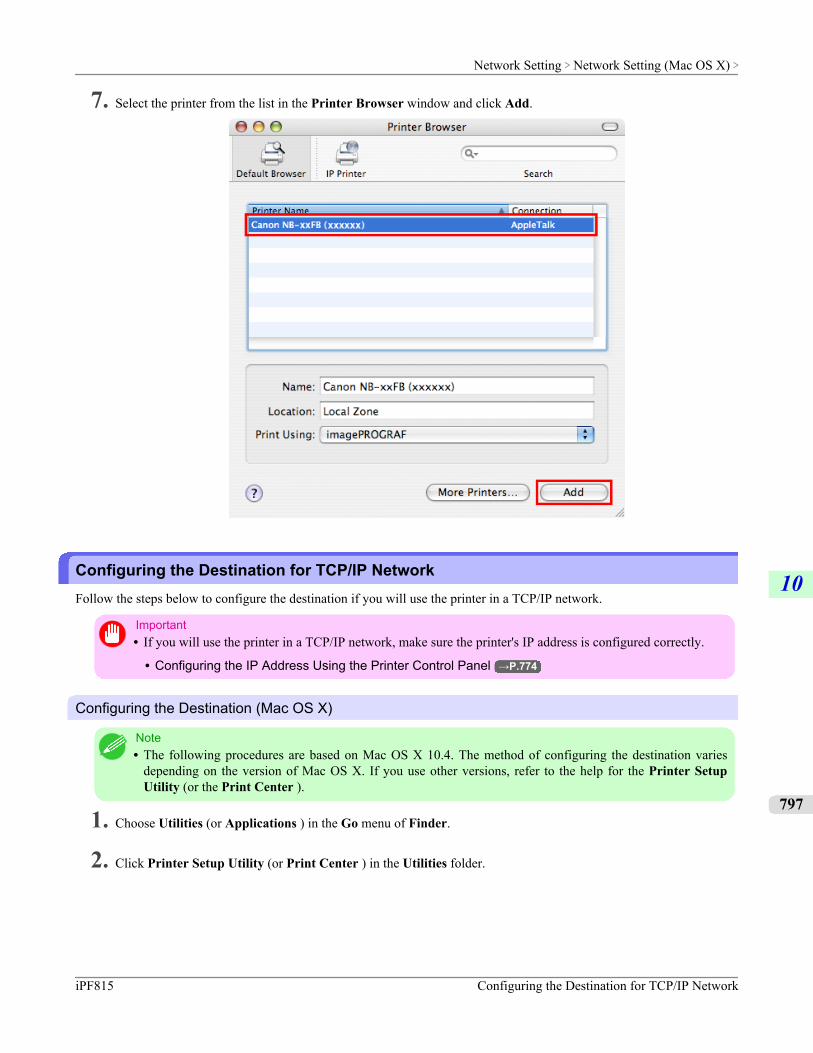
7. Select the printer from the list in the Printer Browser window and click Add.
Configuring the Destination for TCP/IP NetworkFollow the steps below to configure the destination if you will use the printer in a TCP/IP network.
Important• If you will use the printer in a TCP/IP network, make sure the printer's IP address is configured correctly.
• Configuring the IP Address Using the Printer Control Panel →P.774
Configuring the Destination (Mac OS X)
Note• The following procedures are based on Mac OS X 10.4. The method of configuring the destination varies
depending on the version of Mac OS X. If you use other versions, refer to the help for the Printer SetupUtility (or the Print Center ).
1. Choose Utilities (or Applications ) in the Go menu of Finder.
2. Click Printer Setup Utility (or Print Center ) in the Utilities folder.
Network Setting > Network Setting (Mac OS X) >
iPF815 Configuring the Destination for TCP/IP Network
10
797
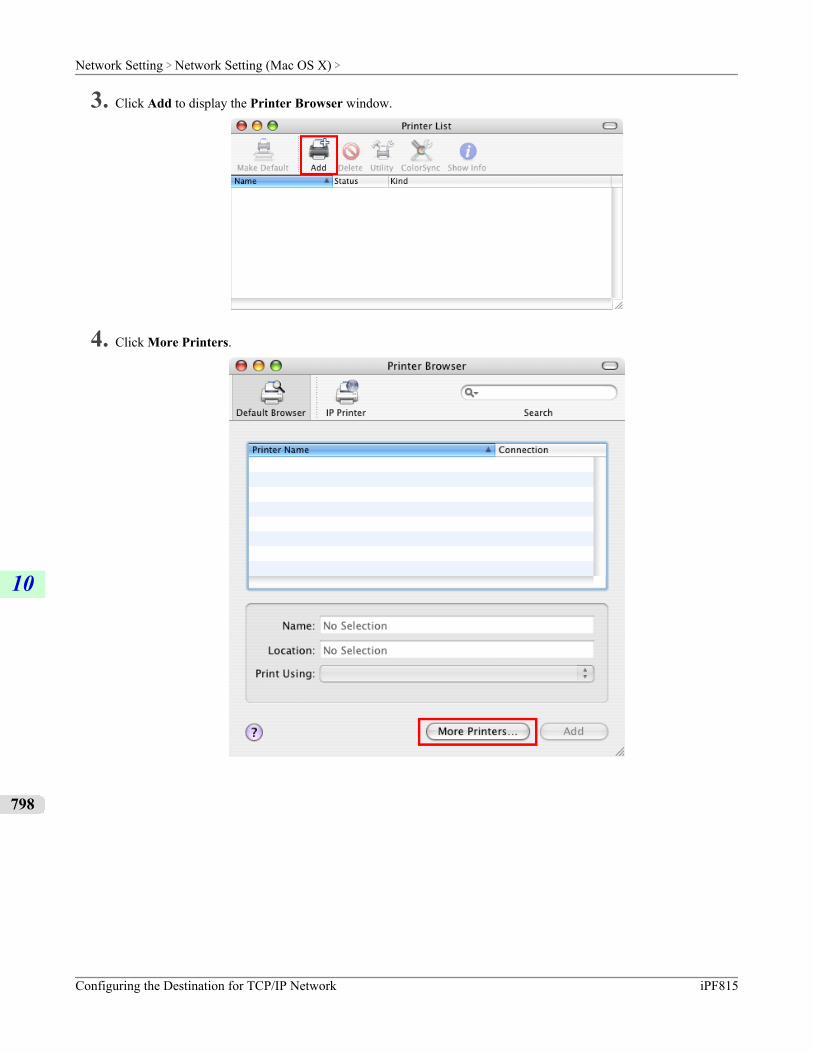
3. Click Add to display the Printer Browser window.
4. Click More Printers.
Network Setting > Network Setting (Mac OS X) >
Configuring the Destination for TCP/IP Network iPF815
10
798
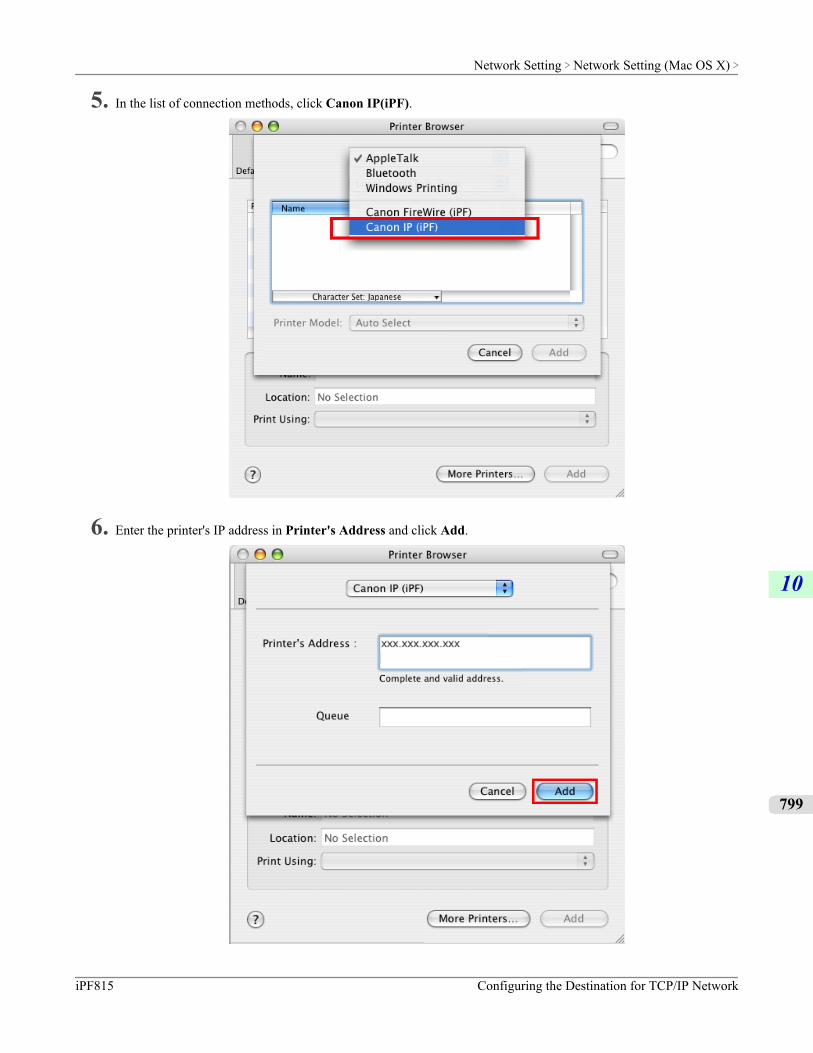
5. In the list of connection methods, click Canon IP(iPF).
6. Enter the printer's IP address in Printer's Address and click Add.
Network Setting > Network Setting (Mac OS X) >
iPF815 Configuring the Destination for TCP/IP Network
10
799
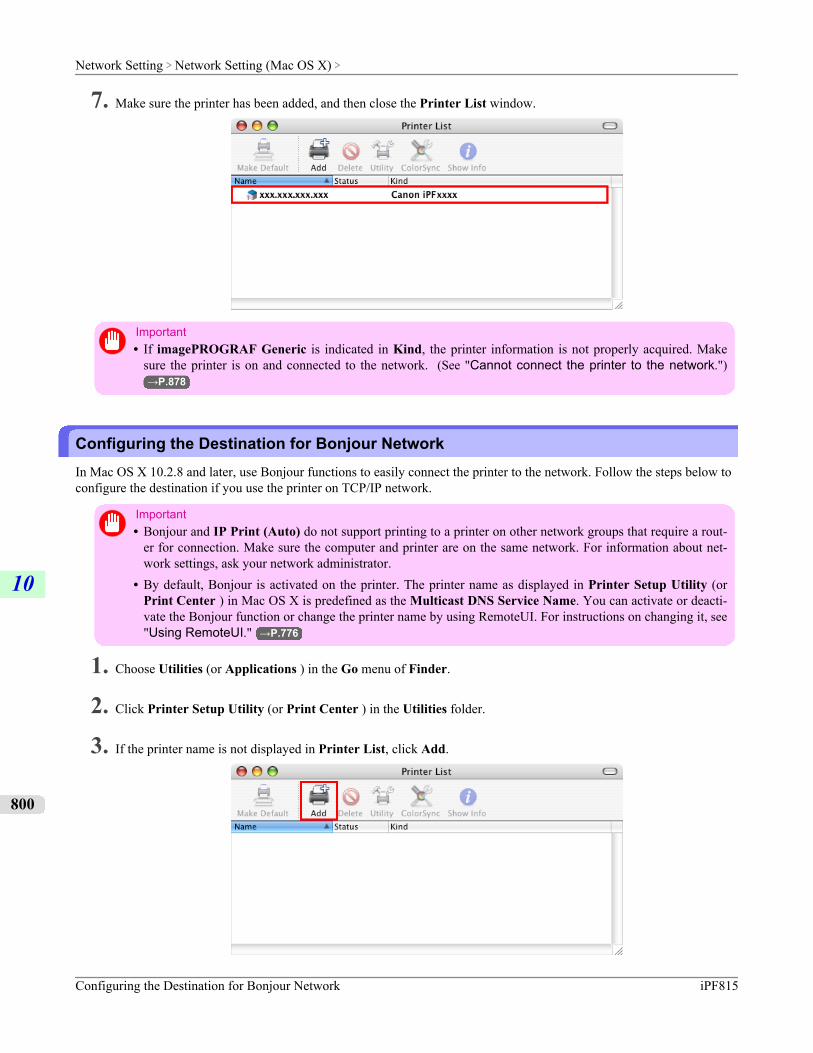
7. Make sure the printer has been added, and then close the Printer List window.
Important• If imagePROGRAF Generic is indicated in Kind, the printer information is not properly acquired. Make
sure the printer is on and connected to the network. (See "Cannot connect the printer to the network.")→P.878
Configuring the Destination for Bonjour NetworkIn Mac OS X 10.2.8 and later, use Bonjour functions to easily connect the printer to the network. Follow the steps below toconfigure the destination if you use the printer on TCP/IP network.
Important• Bonjour and IP Print (Auto) do not support printing to a printer on other network groups that require a rout-
er for connection. Make sure the computer and printer are on the same network. For information about net-work settings, ask your network administrator.
• By default, Bonjour is activated on the printer. The printer name as displayed in Printer Setup Utility (orPrint Center ) in Mac OS X is predefined as the Multicast DNS Service Name. You can activate or deacti-vate the Bonjour function or change the printer name by using RemoteUI. For instructions on changing it, see"Using RemoteUI." →P.776
1. Choose Utilities (or Applications ) in the Go menu of Finder.
2. Click Printer Setup Utility (or Print Center ) in the Utilities folder.
3. If the printer name is not displayed in Printer List, click Add.
Network Setting > Network Setting (Mac OS X) >
Configuring the Destination for Bonjour Network iPF815
10
800
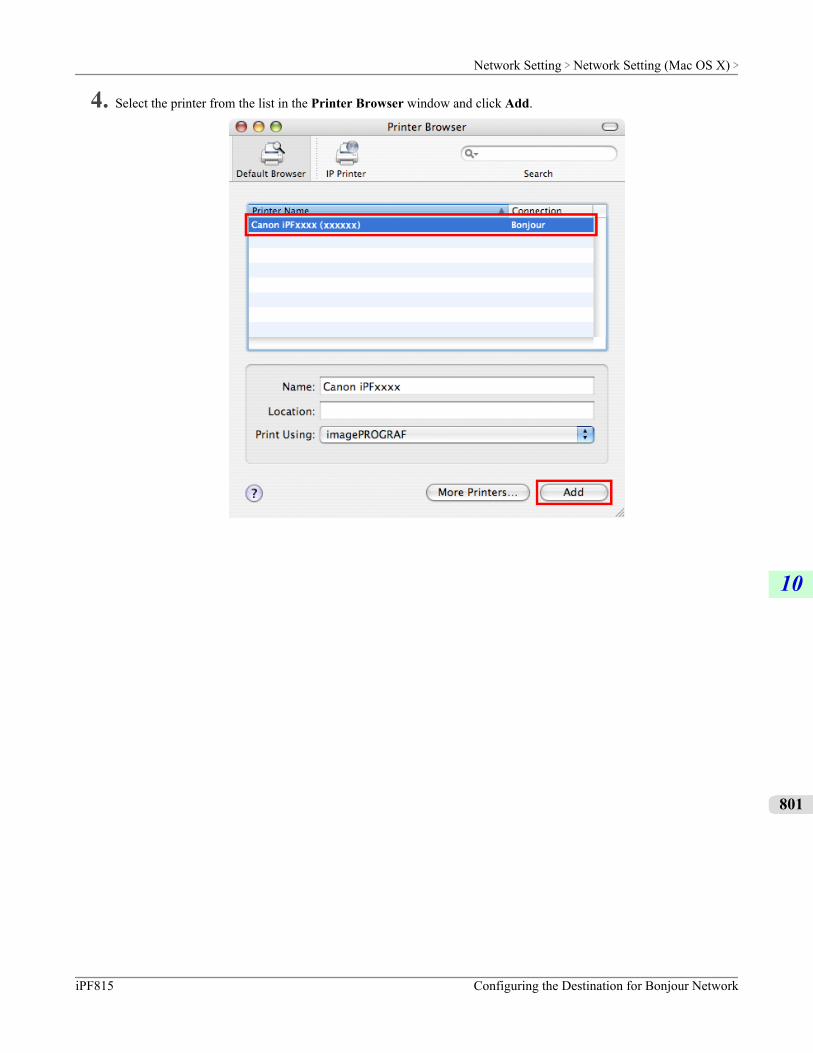
4. Select the printer from the list in the Printer Browser window and click Add.
Network Setting > Network Setting (Mac OS X) >
iPF815 Configuring the Destination for Bonjour Network
10
801
Maintenance
Ink Tanks 803
Printheads 817
Maintenance Cartridge 827
Cleaning the Printer 837
Other Maintenance 841
Maintenance >
iPF815
11
802
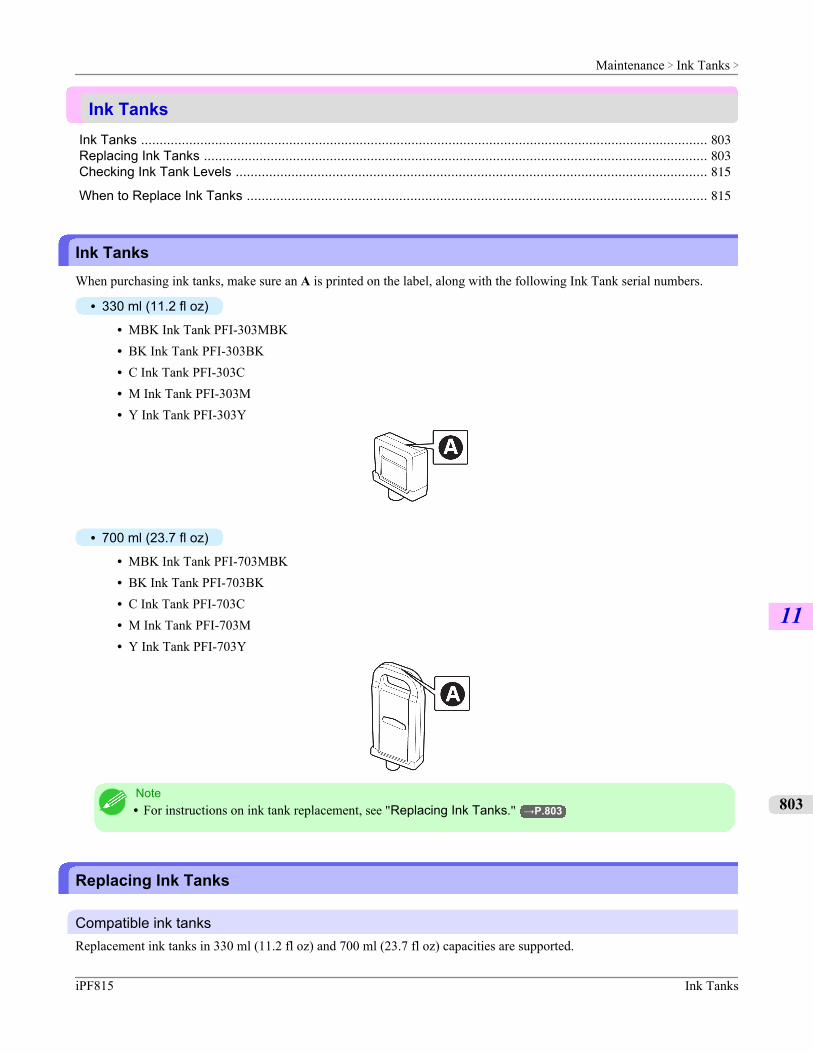
Ink TanksInk Tanks ......................................................................................................................................................... 803Replacing Ink Tanks ........................................................................................................................................ 803Checking Ink Tank Levels ............................................................................................................................... 815
When to Replace Ink Tanks ............................................................................................................................ 815
Ink TanksWhen purchasing ink tanks, make sure an A is printed on the label, along with the following Ink Tank serial numbers.
• 330 ml (11.2 fl oz)
• MBK Ink Tank PFI-303MBK• BK Ink Tank PFI-303BK• C Ink Tank PFI-303C• M Ink Tank PFI-303M• Y Ink Tank PFI-303Y
• 700 ml (23.7 fl oz)
• MBK Ink Tank PFI-703MBK• BK Ink Tank PFI-703BK• C Ink Tank PFI-703C• M Ink Tank PFI-703M• Y Ink Tank PFI-703Y
Note• For instructions on ink tank replacement, see "Replacing Ink Tanks." →P.803
Replacing Ink Tanks
Compatible ink tanksReplacement ink tanks in 330 ml (11.2 fl oz) and 700 ml (23.7 fl oz) capacities are supported.
Maintenance > Ink Tanks >
iPF815 Ink Tanks
11
803
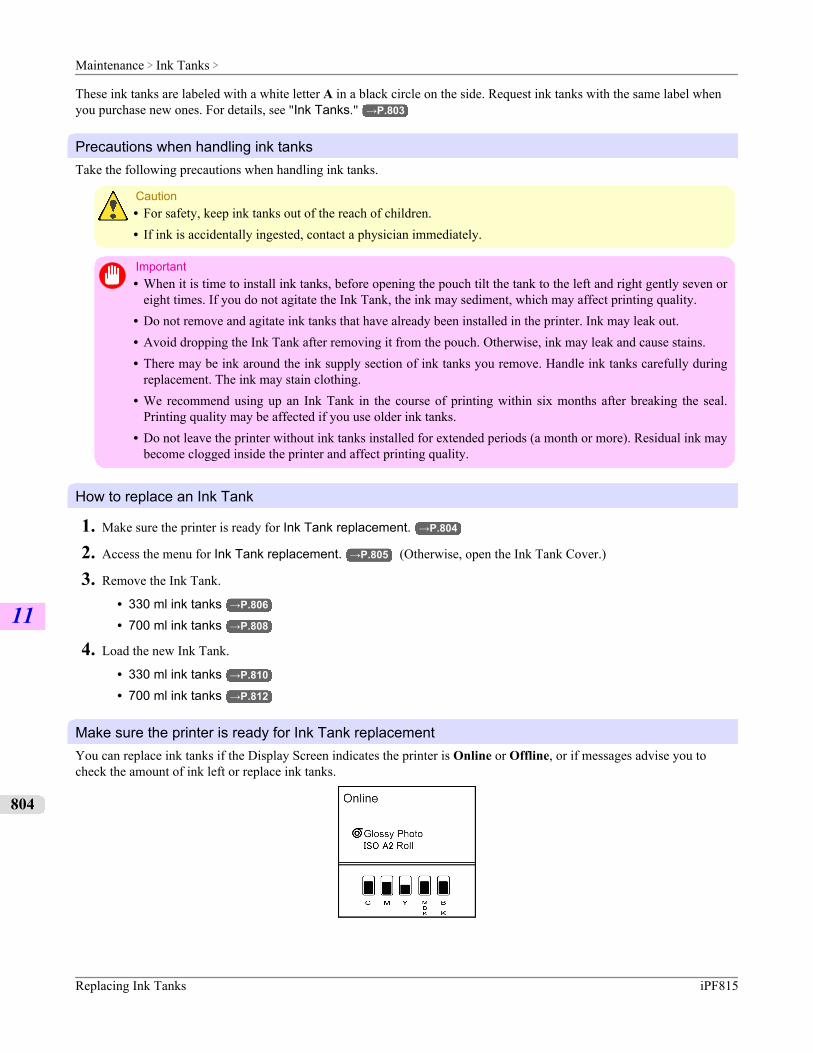
These ink tanks are labeled with a white letter A in a black circle on the side. Request ink tanks with the same label whenyou purchase new ones. For details, see "Ink Tanks." →P.803
Precautions when handling ink tanksTake the following precautions when handling ink tanks.
Caution• For safety, keep ink tanks out of the reach of children.• If ink is accidentally ingested, contact a physician immediately.
Important• When it is time to install ink tanks, before opening the pouch tilt the tank to the left and right gently seven or
eight times. If you do not agitate the Ink Tank, the ink may sediment, which may affect printing quality.• Do not remove and agitate ink tanks that have already been installed in the printer. Ink may leak out.• Avoid dropping the Ink Tank after removing it from the pouch. Otherwise, ink may leak and cause stains.• There may be ink around the ink supply section of ink tanks you remove. Handle ink tanks carefully during
replacement. The ink may stain clothing.• We recommend using up an Ink Tank in the course of printing within six months after breaking the seal.
Printing quality may be affected if you use older ink tanks.• Do not leave the printer without ink tanks installed for extended periods (a month or more). Residual ink may
become clogged inside the printer and affect printing quality.
How to replace an Ink Tank
1. Make sure the printer is ready for Ink Tank replacement. →P.804
2. Access the menu for Ink Tank replacement. →P.805 (Otherwise, open the Ink Tank Cover.)
3. Remove the Ink Tank.
• 330 ml ink tanks →P.806
• 700 ml ink tanks →P.808
4. Load the new Ink Tank.
• 330 ml ink tanks →P.810
• 700 ml ink tanks →P.812
Make sure the printer is ready for Ink Tank replacementYou can replace ink tanks if the Display Screen indicates the printer is Online or Offline, or if messages advise you tocheck the amount of ink left or replace ink tanks.
Maintenance > Ink Tanks >
Replacing Ink Tanks iPF815
11
804
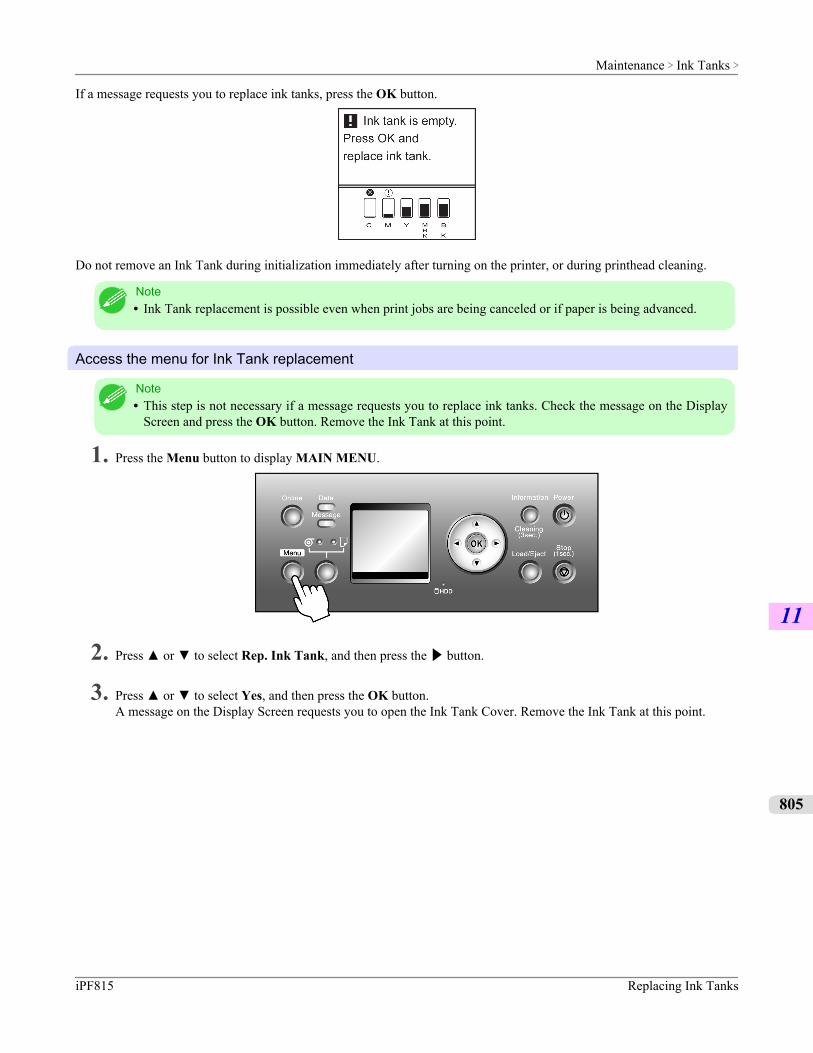
If a message requests you to replace ink tanks, press the OK button.
Do not remove an Ink Tank during initialization immediately after turning on the printer, or during printhead cleaning.
Note• Ink Tank replacement is possible even when print jobs are being canceled or if paper is being advanced.
Access the menu for Ink Tank replacement
Note• This step is not necessary if a message requests you to replace ink tanks. Check the message on the Display
Screen and press the OK button. Remove the Ink Tank at this point.
1. Press the Menu button to display MAIN MENU.
2. Press ▲ or ▼ to select Rep. Ink Tank, and then press the ▶ button.
3. Press ▲ or ▼ to select Yes, and then press the OK button.A message on the Display Screen requests you to open the Ink Tank Cover. Remove the Ink Tank at this point.
Maintenance > Ink Tanks >
iPF815 Replacing Ink Tanks
11
805
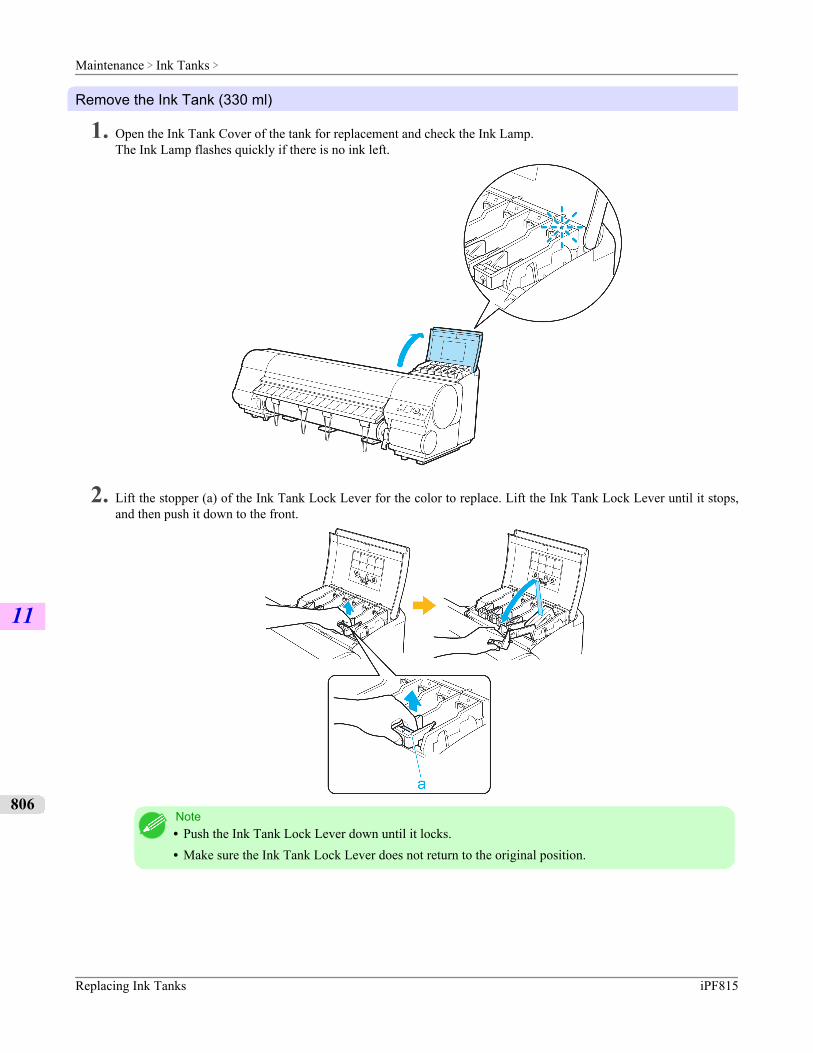
Remove the Ink Tank (330 ml)
1. Open the Ink Tank Cover of the tank for replacement and check the Ink Lamp.The Ink Lamp flashes quickly if there is no ink left.
2. Lift the stopper (a) of the Ink Tank Lock Lever for the color to replace. Lift the Ink Tank Lock Lever until it stops,and then push it down to the front.
Note• Push the Ink Tank Lock Lever down until it locks.• Make sure the Ink Tank Lock Lever does not return to the original position.
Maintenance > Ink Tanks >
Replacing Ink Tanks iPF815
11
806
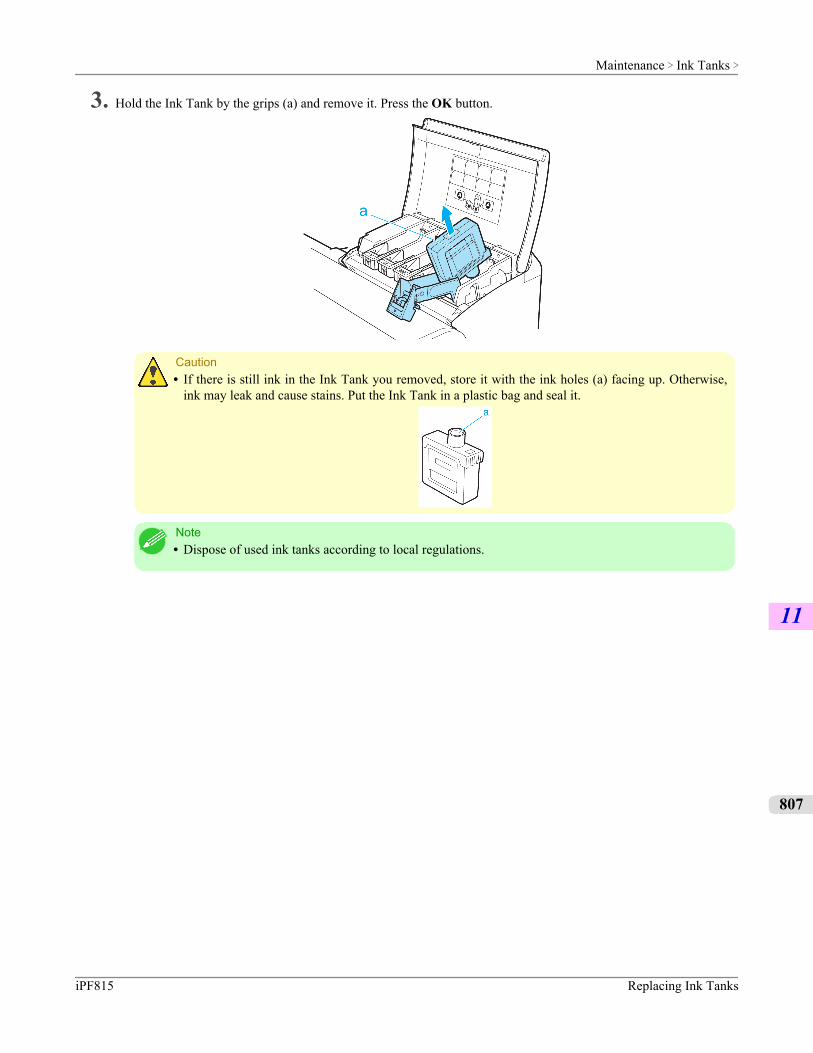
3. Hold the Ink Tank by the grips (a) and remove it. Press the OK button.
Caution• If there is still ink in the Ink Tank you removed, store it with the ink holes (a) facing up. Otherwise,
ink may leak and cause stains. Put the Ink Tank in a plastic bag and seal it.
Note• Dispose of used ink tanks according to local regulations.
Maintenance > Ink Tanks >
iPF815 Replacing Ink Tanks
11
807
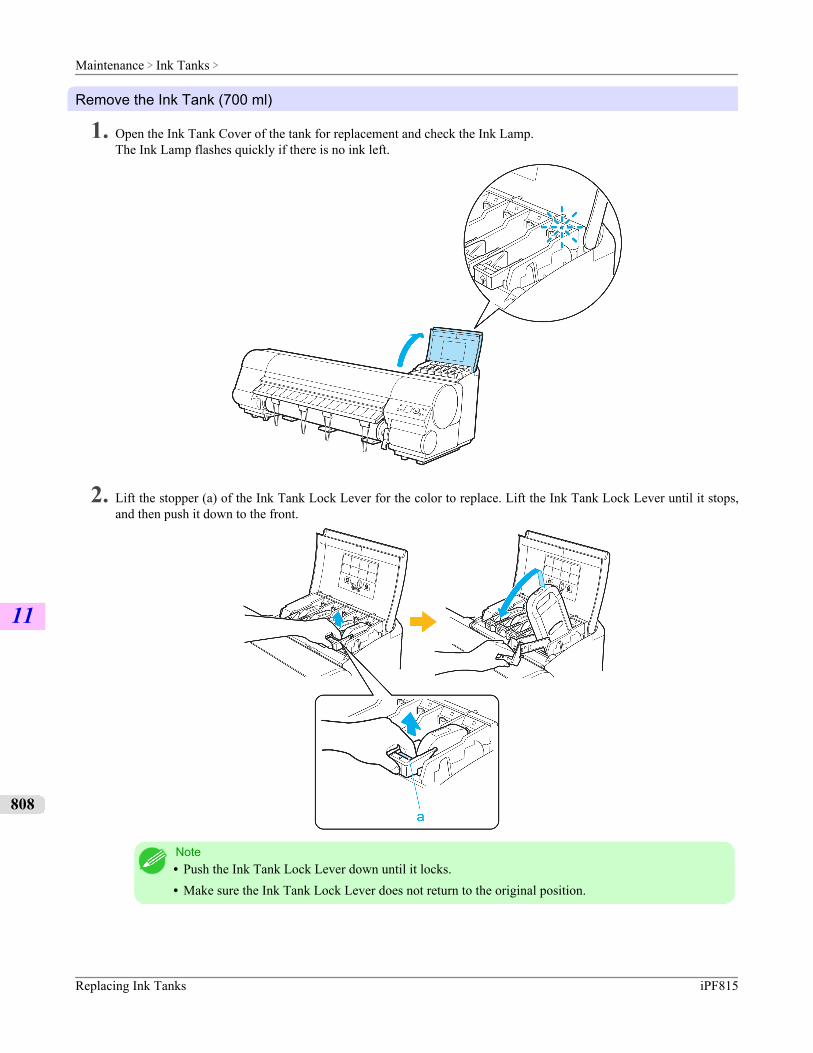
Remove the Ink Tank (700 ml)
1. Open the Ink Tank Cover of the tank for replacement and check the Ink Lamp.The Ink Lamp flashes quickly if there is no ink left.
2. Lift the stopper (a) of the Ink Tank Lock Lever for the color to replace. Lift the Ink Tank Lock Lever until it stops,and then push it down to the front.
Note• Push the Ink Tank Lock Lever down until it locks.• Make sure the Ink Tank Lock Lever does not return to the original position.
Maintenance > Ink Tanks >
Replacing Ink Tanks iPF815
11
808
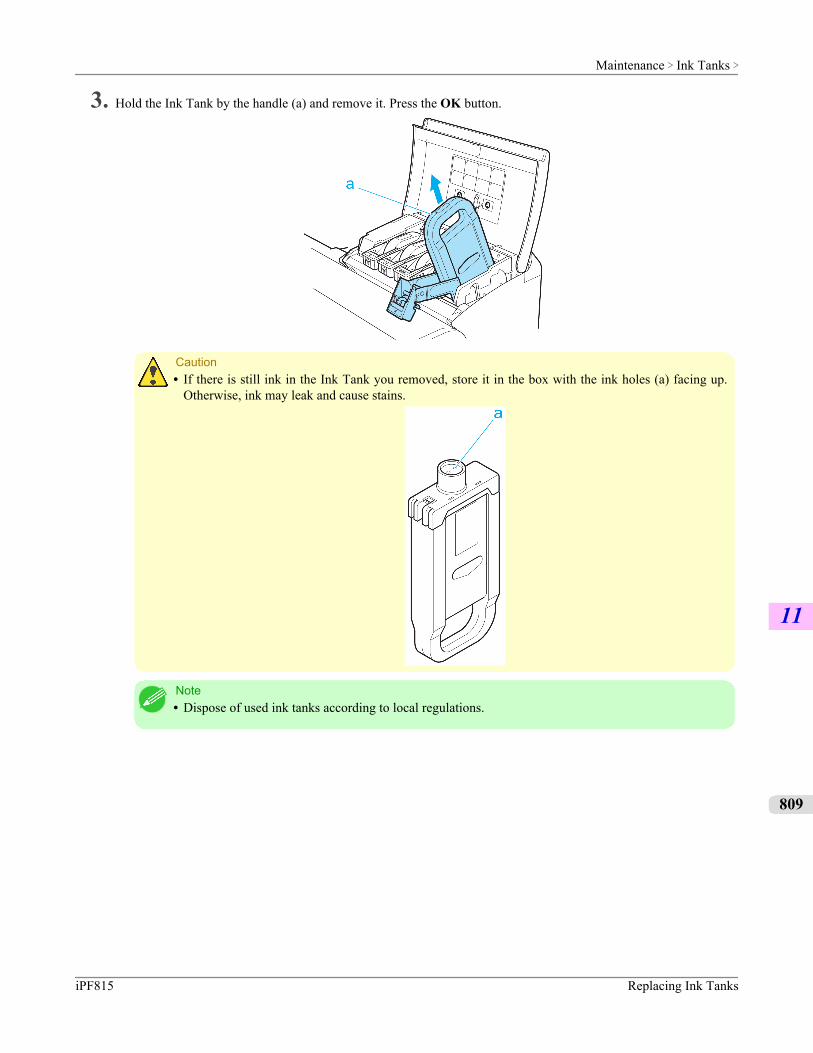
3. Hold the Ink Tank by the handle (a) and remove it. Press the OK button.
Caution• If there is still ink in the Ink Tank you removed, store it in the box with the ink holes (a) facing up.
Otherwise, ink may leak and cause stains.
Note• Dispose of used ink tanks according to local regulations.
Maintenance > Ink Tanks >
iPF815 Replacing Ink Tanks
11
809

Load the ink tank (330 ml)
1. Before opening the pouch, tilt the Ink Tank to the left and right gently seven or eight times.
Important• If you do not agitate the Ink Tank, the ink may sediment, which may affect printing quality.
2. Open the pouch and remove the Ink Tank.
Important• Never touch the ink holes or electrical contacts. This may cause stains, damage the Ink Tank, and
affect printing quality.• Do not remove and agitate ink tanks that have already been installed in the printer. Ink may leak out.
Maintenance > Ink Tanks >
Replacing Ink Tanks iPF815
11
810
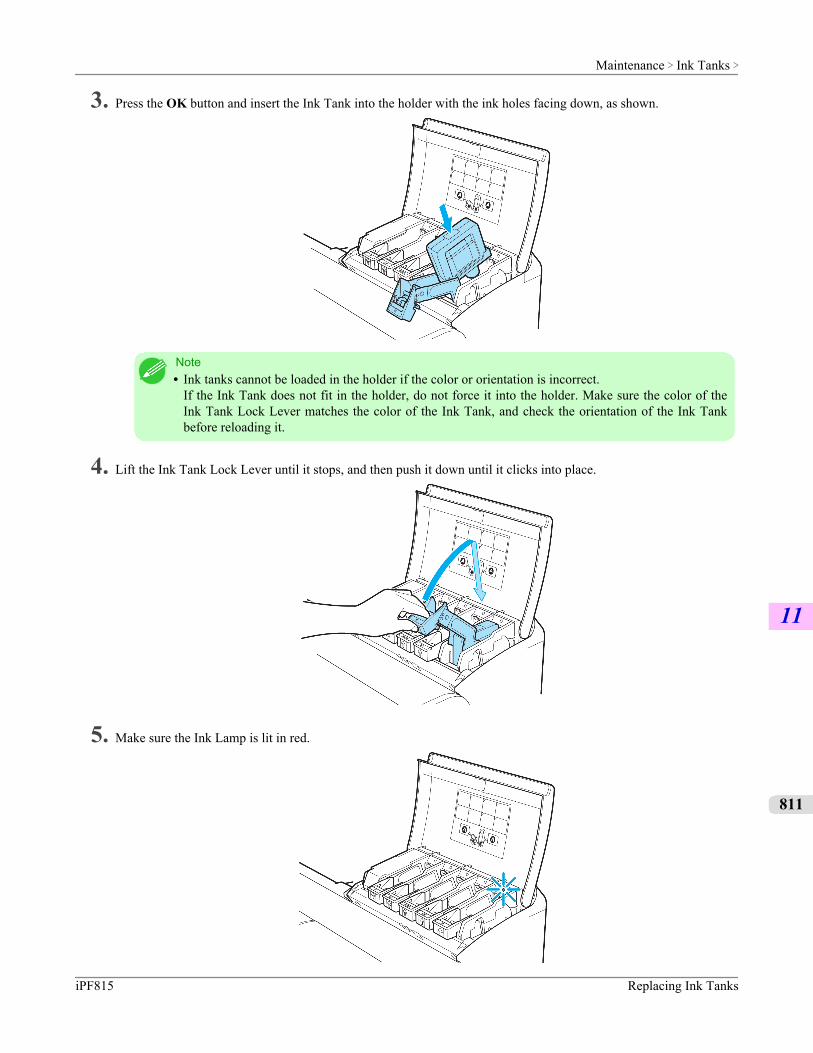
3. Press the OK button and insert the Ink Tank into the holder with the ink holes facing down, as shown.
Note• Ink tanks cannot be loaded in the holder if the color or orientation is incorrect.
If the Ink Tank does not fit in the holder, do not force it into the holder. Make sure the color of theInk Tank Lock Lever matches the color of the Ink Tank, and check the orientation of the Ink Tankbefore reloading it.
4. Lift the Ink Tank Lock Lever until it stops, and then push it down until it clicks into place.
5. Make sure the Ink Lamp is lit in red.
Maintenance > Ink Tanks >
iPF815 Replacing Ink Tanks
11
811
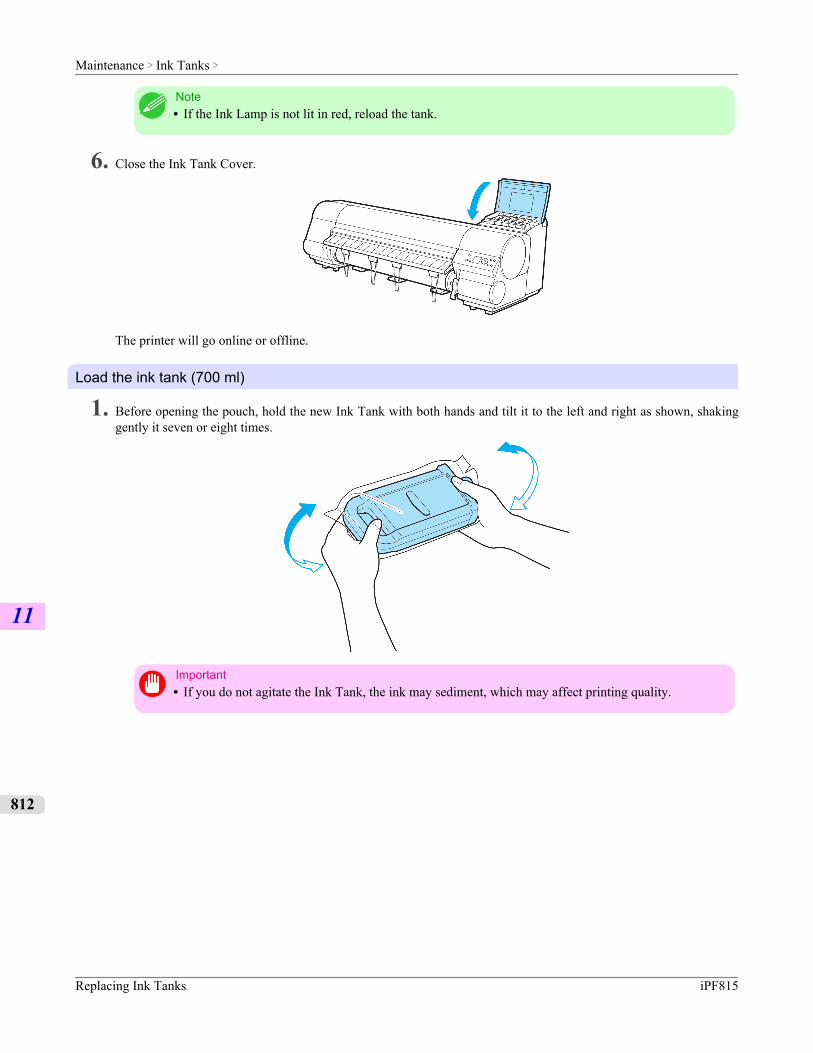
Note• If the Ink Lamp is not lit in red, reload the tank.
6. Close the Ink Tank Cover.
The printer will go online or offline.
Load the ink tank (700 ml)
1. Before opening the pouch, hold the new Ink Tank with both hands and tilt it to the left and right as shown, shakinggently it seven or eight times.
Important• If you do not agitate the Ink Tank, the ink may sediment, which may affect printing quality.
Maintenance > Ink Tanks >
Replacing Ink Tanks iPF815
11
812
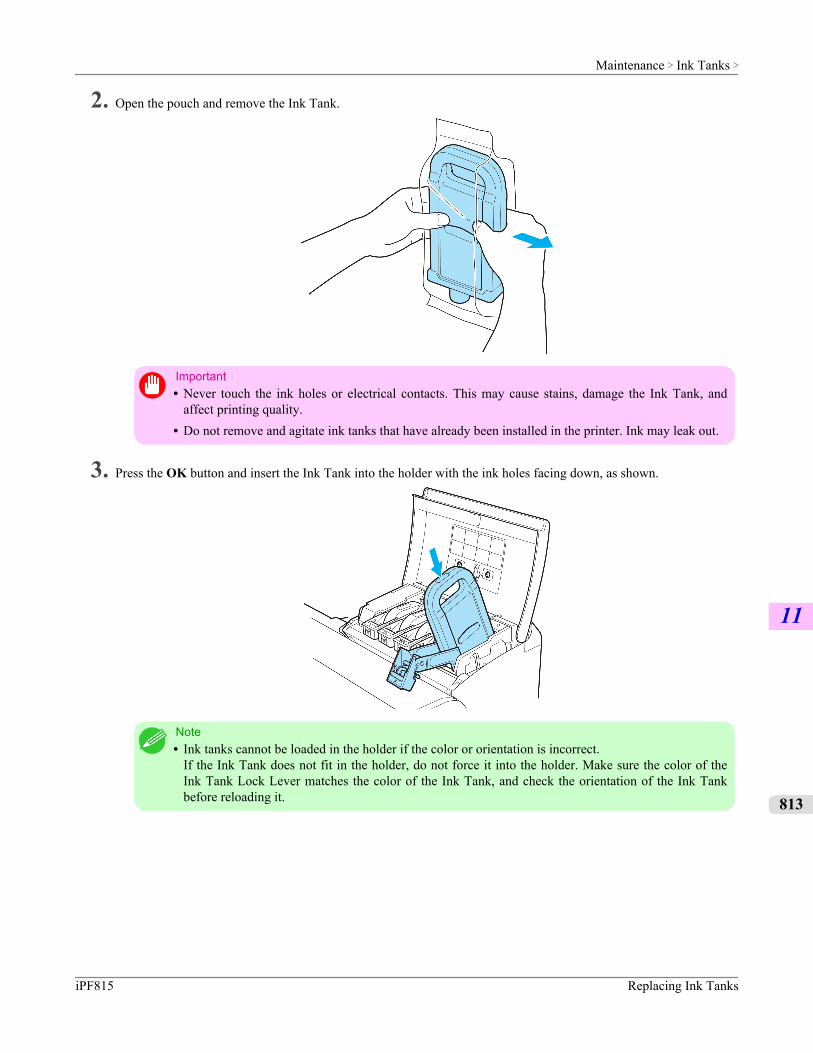
2. Open the pouch and remove the Ink Tank.
Important• Never touch the ink holes or electrical contacts. This may cause stains, damage the Ink Tank, and
affect printing quality.• Do not remove and agitate ink tanks that have already been installed in the printer. Ink may leak out.
3. Press the OK button and insert the Ink Tank into the holder with the ink holes facing down, as shown.
Note• Ink tanks cannot be loaded in the holder if the color or orientation is incorrect.
If the Ink Tank does not fit in the holder, do not force it into the holder. Make sure the color of theInk Tank Lock Lever matches the color of the Ink Tank, and check the orientation of the Ink Tankbefore reloading it.
Maintenance > Ink Tanks >
iPF815 Replacing Ink Tanks
11
813
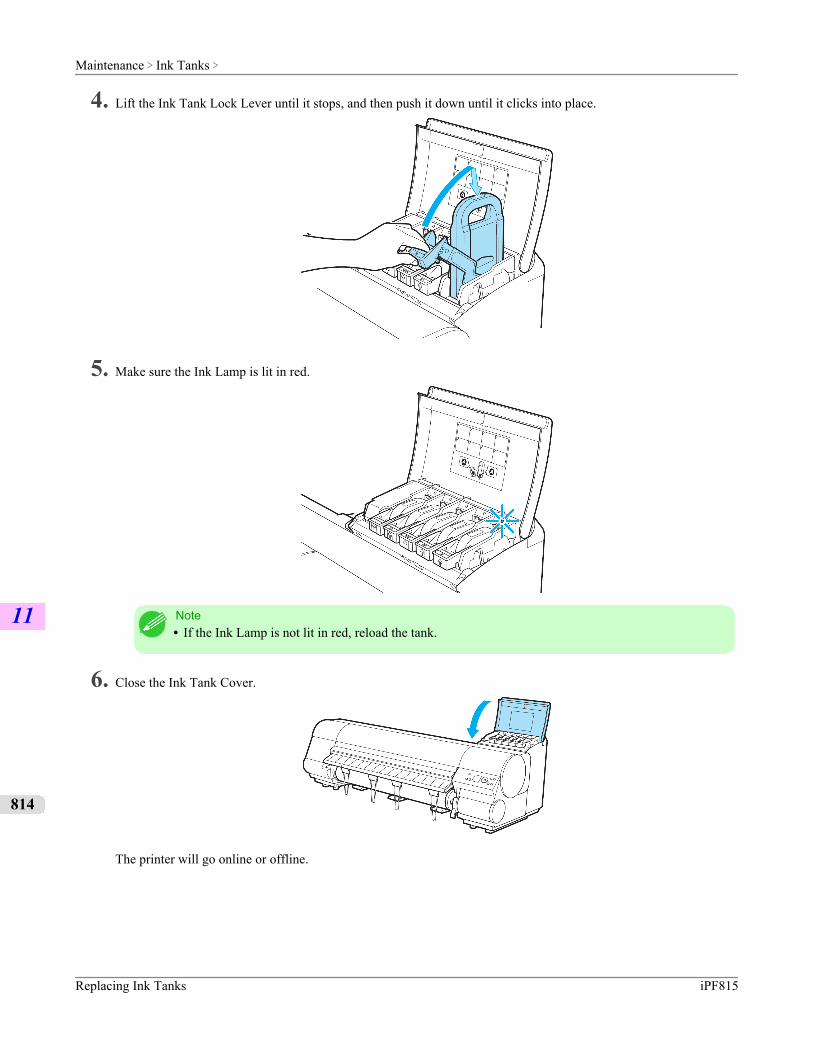
4. Lift the Ink Tank Lock Lever until it stops, and then push it down until it clicks into place.
5. Make sure the Ink Lamp is lit in red.
Note• If the Ink Lamp is not lit in red, reload the tank.
6. Close the Ink Tank Cover.
The printer will go online or offline.
Maintenance > Ink Tanks >
Replacing Ink Tanks iPF815
11
814
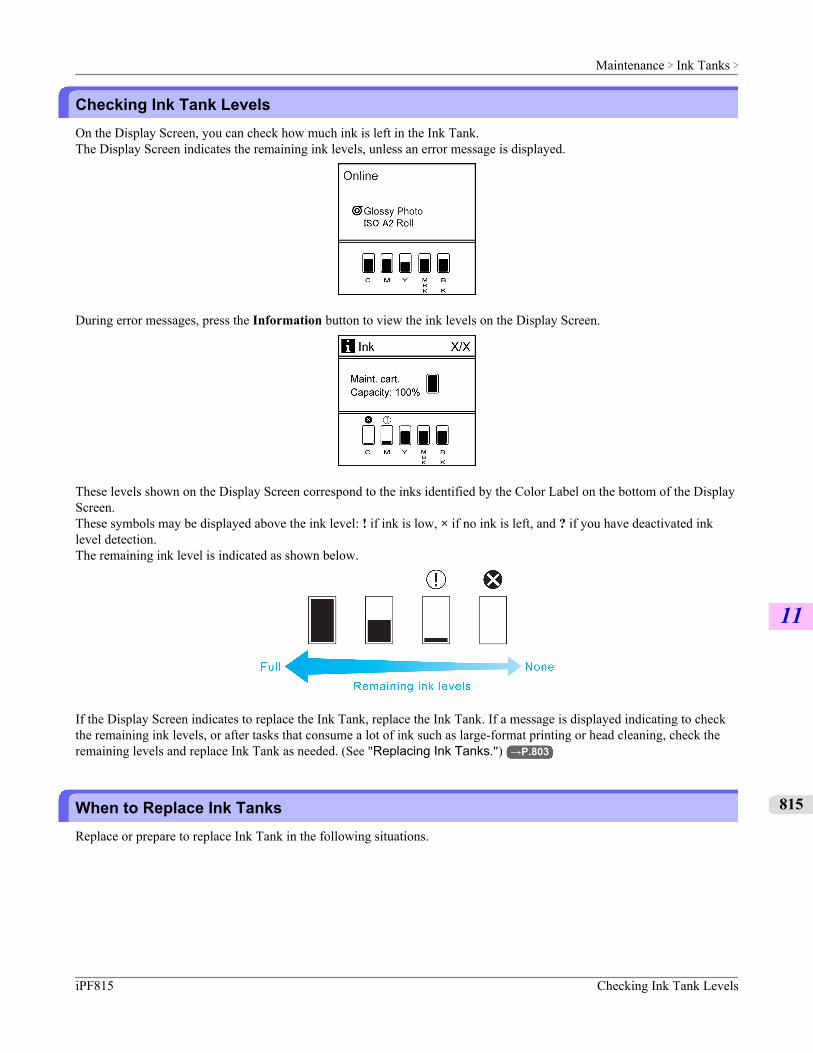
Checking Ink Tank LevelsOn the Display Screen, you can check how much ink is left in the Ink Tank.The Display Screen indicates the remaining ink levels, unless an error message is displayed.
During error messages, press the Information button to view the ink levels on the Display Screen.
These levels shown on the Display Screen correspond to the inks identified by the Color Label on the bottom of the DisplayScreen.These symbols may be displayed above the ink level: ! if ink is low, × if no ink is left, and ? if you have deactivated inklevel detection.The remaining ink level is indicated as shown below.
If the Display Screen indicates to replace the Ink Tank, replace the Ink Tank. If a message is displayed indicating to checkthe remaining ink levels, or after tasks that consume a lot of ink such as large-format printing or head cleaning, check theremaining levels and replace Ink Tank as needed. (See "Replacing Ink Tanks.") →P.803
When to Replace Ink TanksReplace or prepare to replace Ink Tank in the following situations.
Maintenance > Ink Tanks >
iPF815 Checking Ink Tank Levels
11
815
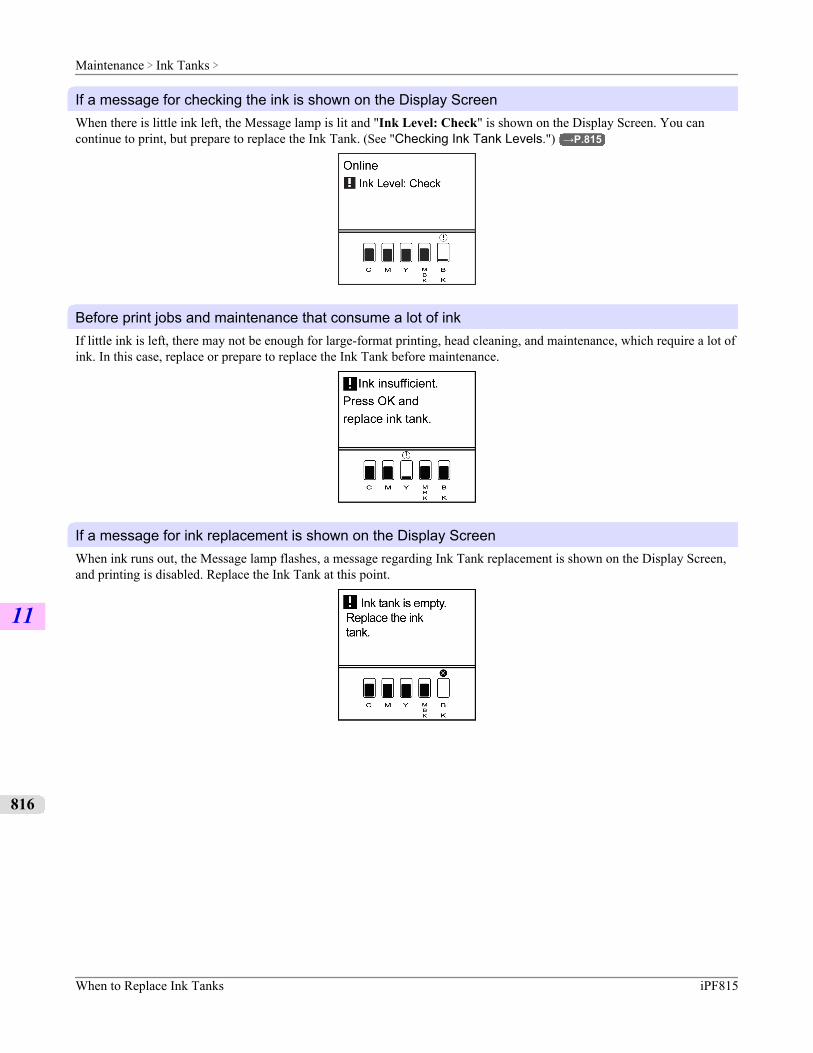
If a message for checking the ink is shown on the Display ScreenWhen there is little ink left, the Message lamp is lit and "Ink Level: Check" is shown on the Display Screen. You cancontinue to print, but prepare to replace the Ink Tank. (See "Checking Ink Tank Levels.") →P.815
Before print jobs and maintenance that consume a lot of inkIf little ink is left, there may not be enough for large-format printing, head cleaning, and maintenance, which require a lot ofink. In this case, replace or prepare to replace the Ink Tank before maintenance.
If a message for ink replacement is shown on the Display ScreenWhen ink runs out, the Message lamp flashes, a message regarding Ink Tank replacement is shown on the Display Screen,and printing is disabled. Replace the Ink Tank at this point.
Maintenance > Ink Tanks >
When to Replace Ink Tanks iPF815
11
816
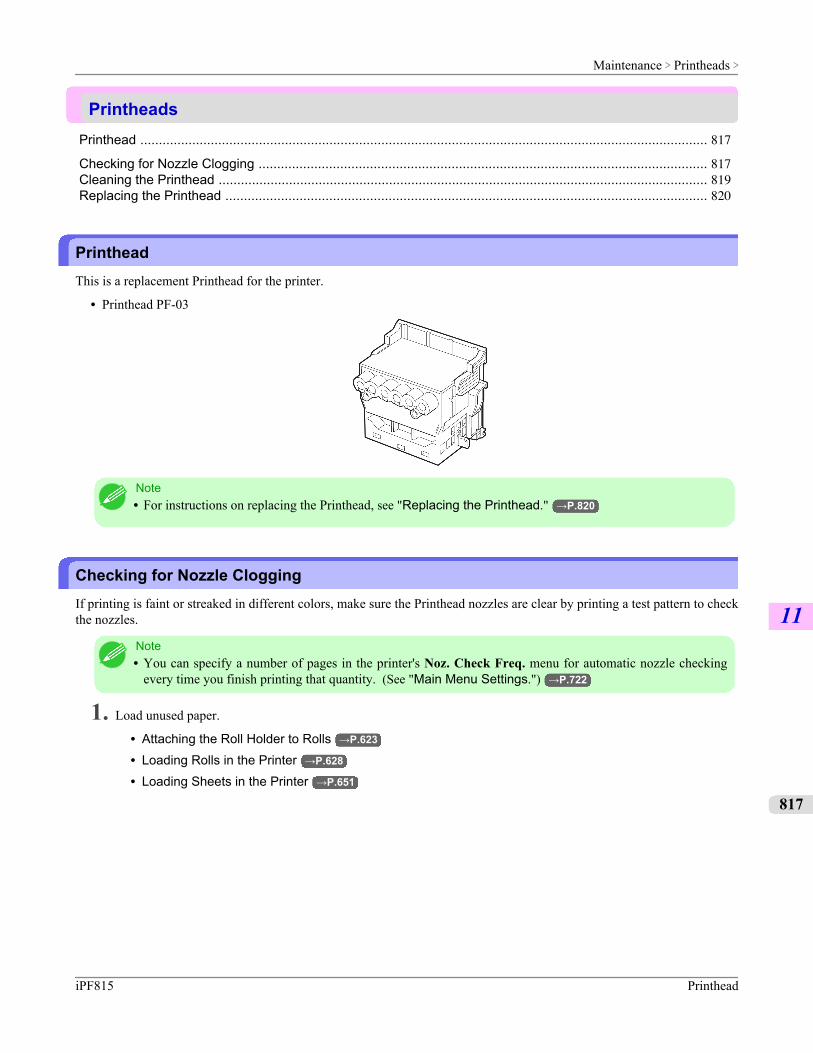
PrintheadsPrinthead ......................................................................................................................................................... 817
Checking for Nozzle Clogging ......................................................................................................................... 817Cleaning the Printhead .................................................................................................................................... 819Replacing the Printhead .................................................................................................................................. 820
PrintheadThis is a replacement Printhead for the printer.
• Printhead PF-03
Note• For instructions on replacing the Printhead, see "Replacing the Printhead." →P.820
Checking for Nozzle CloggingIf printing is faint or streaked in different colors, make sure the Printhead nozzles are clear by printing a test pattern to checkthe nozzles.
Note• You can specify a number of pages in the printer's Noz. Check Freq. menu for automatic nozzle checking
every time you finish printing that quantity. (See "Main Menu Settings.") →P.722
1. Load unused paper.
• Attaching the Roll Holder to Rolls →P.623
• Loading Rolls in the Printer →P.628
• Loading Sheets in the Printer →P.651
Maintenance > Printheads >
iPF815 Printhead
11
817
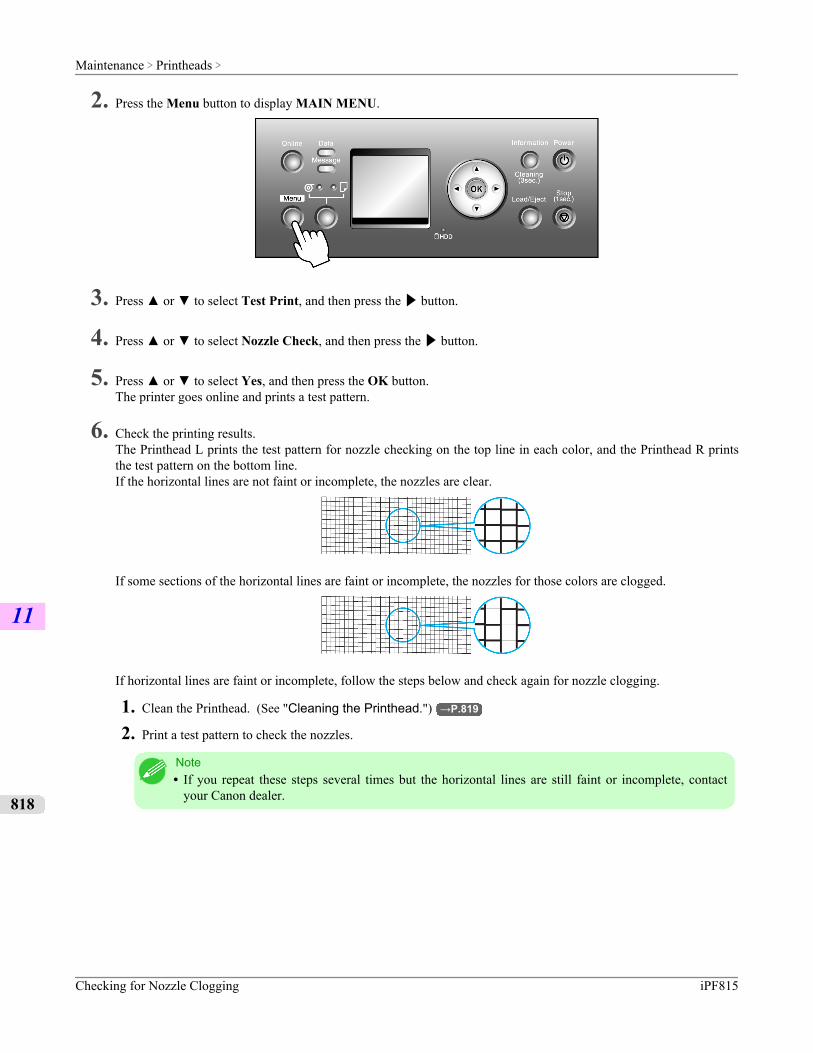
2. Press the Menu button to display MAIN MENU.
3. Press ▲ or ▼ to select Test Print, and then press the ▶ button.
4. Press ▲ or ▼ to select Nozzle Check, and then press the ▶ button.
5. Press ▲ or ▼ to select Yes, and then press the OK button.The printer goes online and prints a test pattern.
6. Check the printing results.The Printhead L prints the test pattern for nozzle checking on the top line in each color, and the Printhead R printsthe test pattern on the bottom line.If the horizontal lines are not faint or incomplete, the nozzles are clear.
If some sections of the horizontal lines are faint or incomplete, the nozzles for those colors are clogged.
If horizontal lines are faint or incomplete, follow the steps below and check again for nozzle clogging.
1. Clean the Printhead. (See "Cleaning the Printhead.") →P.819
2. Print a test pattern to check the nozzles.
Note• If you repeat these steps several times but the horizontal lines are still faint or incomplete, contact
your Canon dealer.
Maintenance > Printheads >
Checking for Nozzle Clogging iPF815
11
818
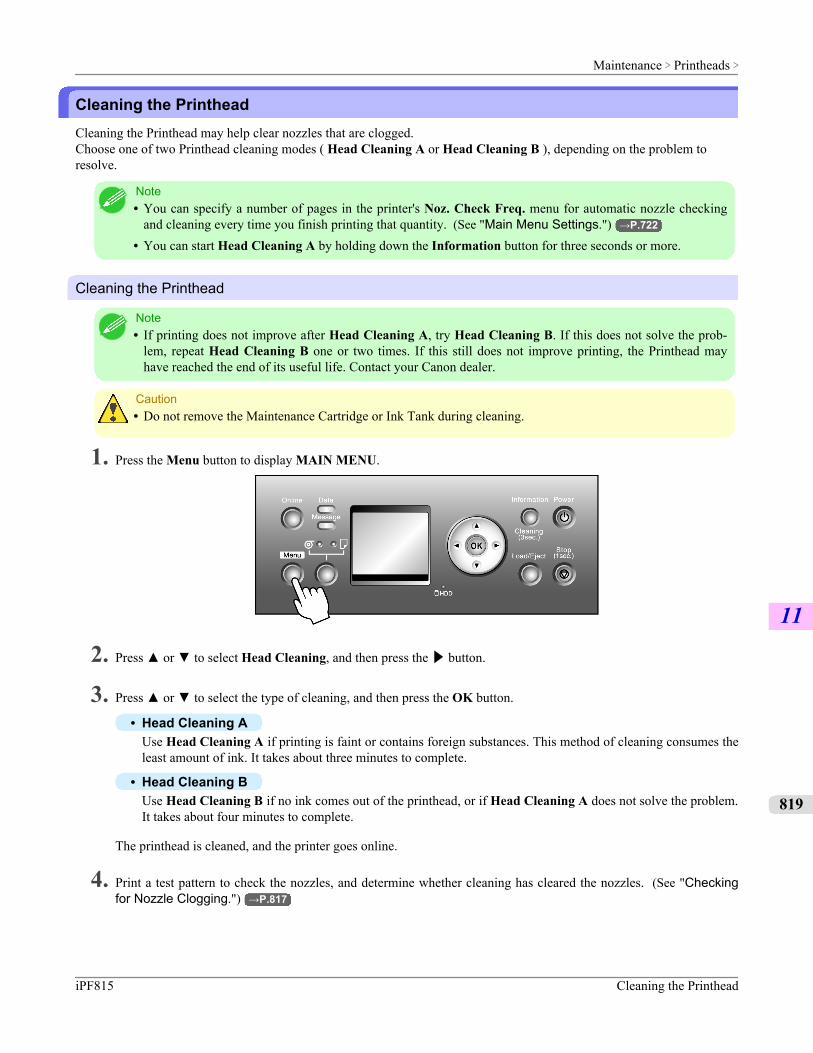
Cleaning the PrintheadCleaning the Printhead may help clear nozzles that are clogged.Choose one of two Printhead cleaning modes ( Head Cleaning A or Head Cleaning B ), depending on the problem toresolve.
Note• You can specify a number of pages in the printer's Noz. Check Freq. menu for automatic nozzle checking
and cleaning every time you finish printing that quantity. (See "Main Menu Settings.") →P.722
• You can start Head Cleaning A by holding down the Information button for three seconds or more.
Cleaning the Printhead
Note• If printing does not improve after Head Cleaning A, try Head Cleaning B. If this does not solve the prob-
lem, repeat Head Cleaning B one or two times. If this still does not improve printing, the Printhead mayhave reached the end of its useful life. Contact your Canon dealer.
Caution• Do not remove the Maintenance Cartridge or Ink Tank during cleaning.
1. Press the Menu button to display MAIN MENU.
2. Press ▲ or ▼ to select Head Cleaning, and then press the ▶ button.
3. Press ▲ or ▼ to select the type of cleaning, and then press the OK button.
• Head Cleaning AUse Head Cleaning A if printing is faint or contains foreign substances. This method of cleaning consumes theleast amount of ink. It takes about three minutes to complete.
• Head Cleaning BUse Head Cleaning B if no ink comes out of the printhead, or if Head Cleaning A does not solve the problem.It takes about four minutes to complete.
The printhead is cleaned, and the printer goes online.
4. Print a test pattern to check the nozzles, and determine whether cleaning has cleared the nozzles. (See "Checkingfor Nozzle Clogging.") →P.817
Maintenance > Printheads >
iPF815 Cleaning the Printhead
11
819
Replacing the Printhead
When to replace the PrintheadReplace the Printhead in the following situations.
• If the printing quality does not improve even after one or two cycles of Head Cleaning B from the printermenu
• If the Display Screen indicates "Open top cover and replace the printhead."
• If your Canon dealer has advised you to replace the Printhead
Compatible printheadsFor information on compatible printheads, see "Printhead." →P.817
Precautions when handling the PrintheadTake the following precautions when handling the Printhead.
Caution• For safety, keep the Printhead out of the reach of children.• If ink is accidentally ingested, contact a physician immediately.• Do not touch the Printhead immediately after printing. The Printhead becomes extremely hot, and there is a
risk of burns.
Important• There may be ink around the nozzles of the Printhead you remove. Handle the Printhead carefully during
replacement. The ink may stain clothing.• Do not open the Printhead pouch until immediately before installation. After removing the Printhead from
the pouch, install it right away. If the Printhead is left after the pouch is opened, the nozzles may dry out,which may affect printing quality.
• If you need to put a Printhead somewhere temporarily before installation, do not keep the nozzles and metalcontacts →P.824 facing down. If the nozzles or metal contacts are damaged, it may affect the printingquality.
Replacing the Printhead
Caution• When replacing the Printhead immediately after printing, wait a few minutes before replacing it. The metal
parts of the Printhead become hot during printing, and there is a risk of burns from touching these parts.
Note• Prepare a new Ink Tank when ink levels are low.• Your hands may become dirty during Printhead replacement. Use the gloves provided with the new Printhead
for replacement.• Choose On in Auto Print to have the printer automatically adjust the Printhead alignment after replacement
of the Printhead. (See "Main Menu Settings.") →P.722
1. If the roll is not ejected because of the cutting method selected, cut it manually and remove it. (See "Cutting RollPaper After Printing.") →P.196
Maintenance > Printheads >
Replacing the Printhead iPF815
11
820
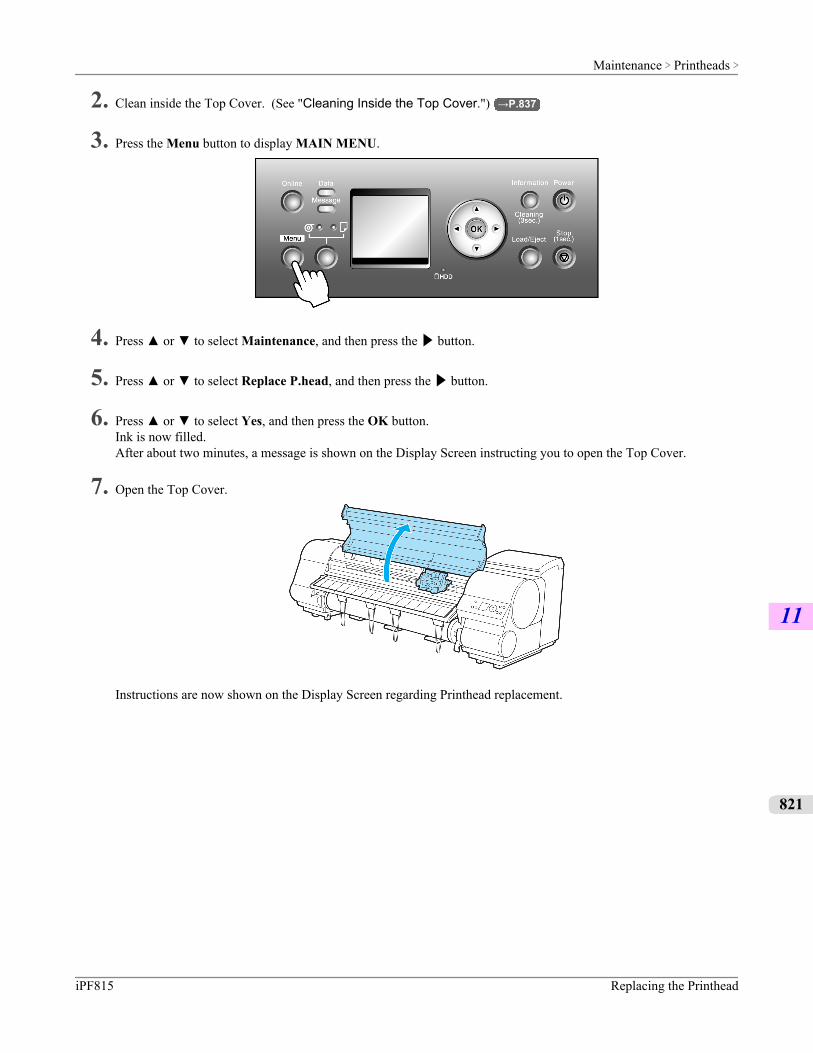
2. Clean inside the Top Cover. (See "Cleaning Inside the Top Cover.") →P.837
3. Press the Menu button to display MAIN MENU.
4. Press ▲ or ▼ to select Maintenance, and then press the ▶ button.
5. Press ▲ or ▼ to select Replace P.head, and then press the ▶ button.
6. Press ▲ or ▼ to select Yes, and then press the OK button.Ink is now filled.After about two minutes, a message is shown on the Display Screen instructing you to open the Top Cover.
7. Open the Top Cover.
Instructions are now shown on the Display Screen regarding Printhead replacement.
Maintenance > Printheads >
iPF815 Replacing the Printhead
11
821
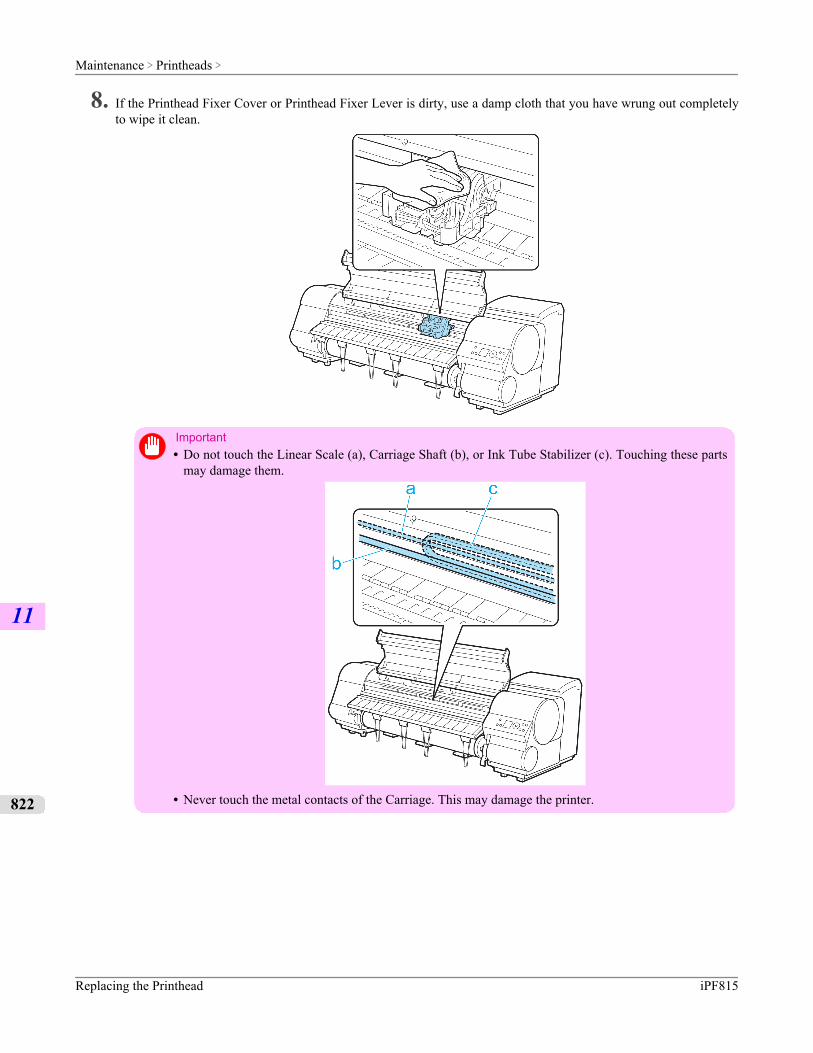
8. If the Printhead Fixer Cover or Printhead Fixer Lever is dirty, use a damp cloth that you have wrung out completelyto wipe it clean.
Important• Do not touch the Linear Scale (a), Carriage Shaft (b), or Ink Tube Stabilizer (c). Touching these parts
may damage them.
• Never touch the metal contacts of the Carriage. This may damage the printer.
Maintenance > Printheads >
Replacing the Printhead iPF815
11
822
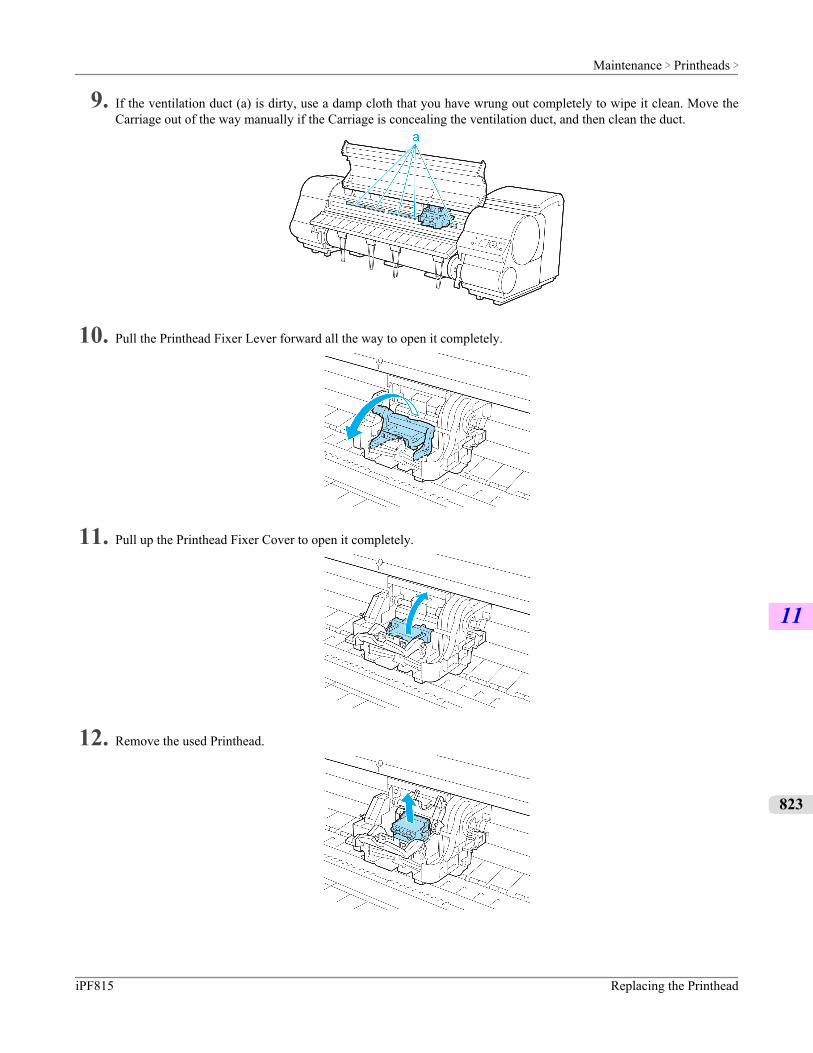
9. If the ventilation duct (a) is dirty, use a damp cloth that you have wrung out completely to wipe it clean. Move theCarriage out of the way manually if the Carriage is concealing the ventilation duct, and then clean the duct.
10. Pull the Printhead Fixer Lever forward all the way to open it completely.
11. Pull up the Printhead Fixer Cover to open it completely.
12. Remove the used Printhead.
Maintenance > Printheads >
iPF815 Replacing the Printhead
11
823
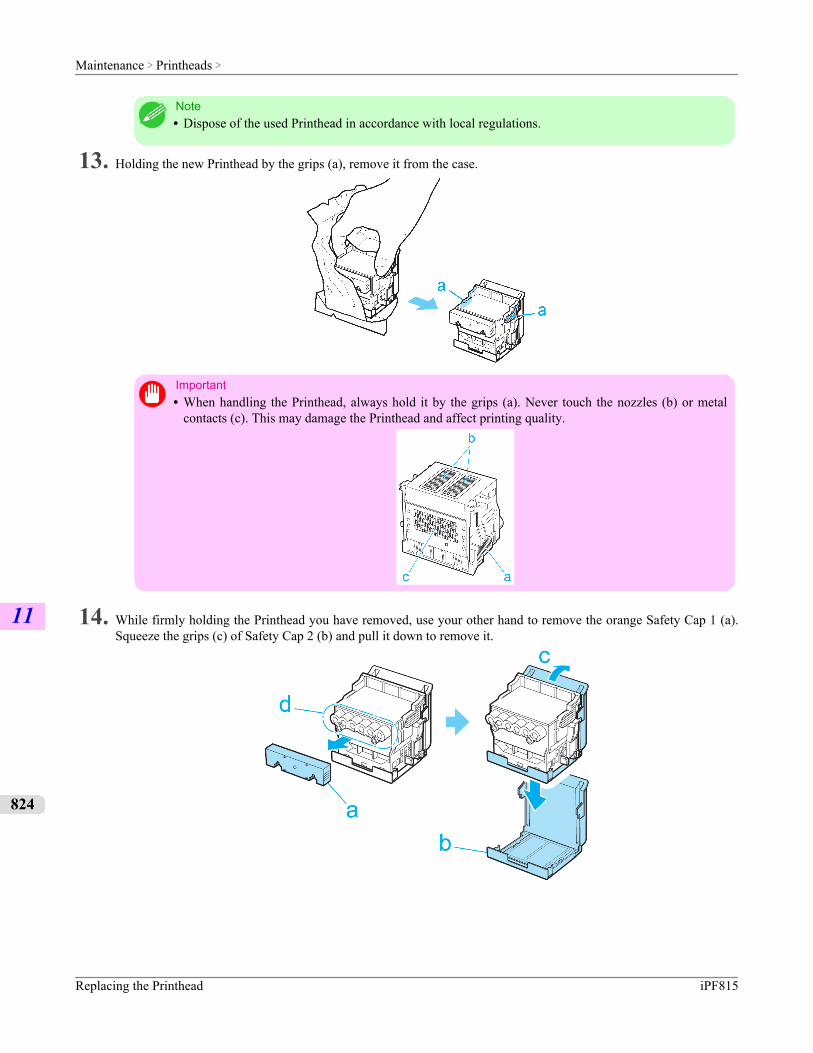
Note• Dispose of the used Printhead in accordance with local regulations.
13. Holding the new Printhead by the grips (a), remove it from the case.
Important• When handling the Printhead, always hold it by the grips (a). Never touch the nozzles (b) or metal
contacts (c). This may damage the Printhead and affect printing quality.
14. While firmly holding the Printhead you have removed, use your other hand to remove the orange Safety Cap 1 (a).Squeeze the grips (c) of Safety Cap 2 (b) and pull it down to remove it.
Maintenance > Printheads >
Replacing the Printhead iPF815
11
824

Important• The inside surfaces of Safety Cap 1 (a) and Safety Cap 2 (b) are coated with ink to protect the noz-
zles. Be careful not to touch these surfaces when removing the caps.• Never touch the ink supply section (d). This may cause printing problems.• The Printhead contains ink to protect the nozzles. We recommend removing Safety Cap 2 (b) as you
hold it over the Printhead package or safely out of the way to avoid spilling ink and staining yourclothes or the surrounding area. If ink accidentally spills, wipe off the ink with a dry cloth.
• Do not reattach the Safety Cap or protective material. Dispose of these materials in accordance withlocal regulations.
15. With the nozzles facing down and the metal contacts toward the back, insert the Printhead into the Carriage. Careful-ly push the printhead firmly into the Carriage, ensuring that the nozzles and metal contacts do not touch the carriage.
16. Pull the Printhead Fixer Cover down toward the front to lock the Printhead in place.
17. Push the Printhead Fixer Lever toward the back of the printer until it clicks.
Maintenance > Printheads >
iPF815 Replacing the Printhead
11
825
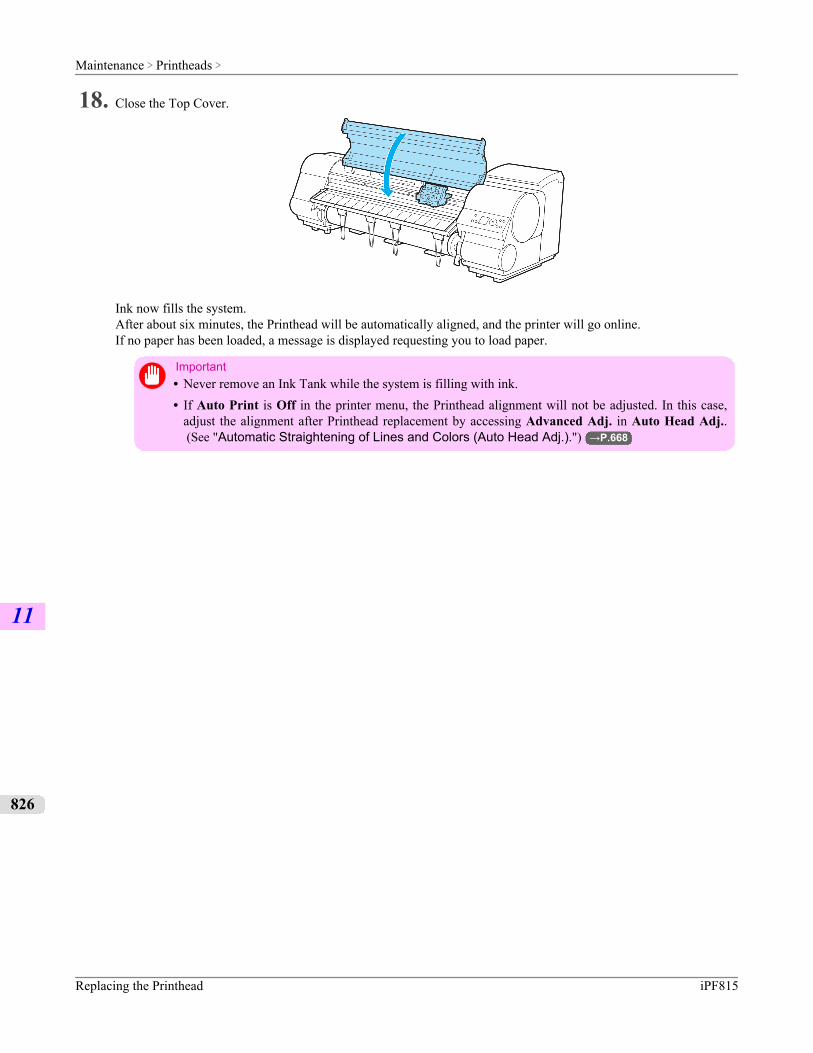
18. Close the Top Cover.
Ink now fills the system.After about six minutes, the Printhead will be automatically aligned, and the printer will go online.If no paper has been loaded, a message is displayed requesting you to load paper.
Important• Never remove an Ink Tank while the system is filling with ink.• If Auto Print is Off in the printer menu, the Printhead alignment will not be adjusted. In this case,
adjust the alignment after Printhead replacement by accessing Advanced Adj. in Auto Head Adj.. (See "Automatic Straightening of Lines and Colors (Auto Head Adj.).") →P.668
Maintenance > Printheads >
Replacing the Printhead iPF815
11
826
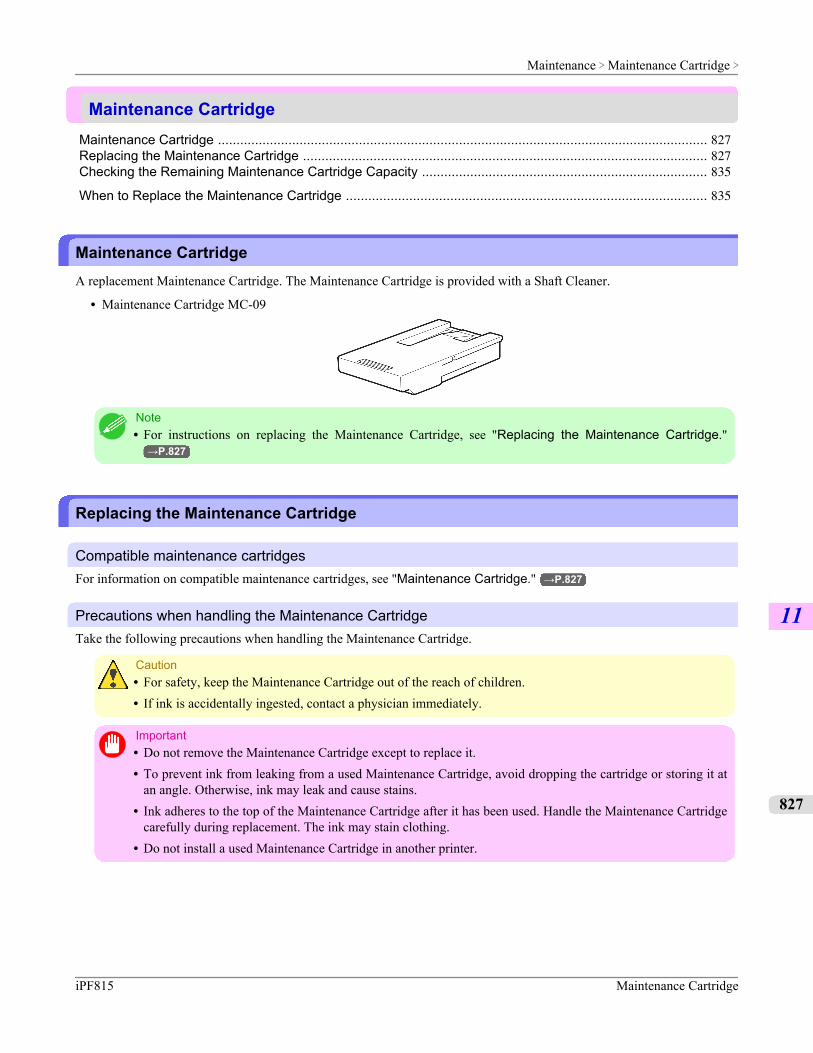
Maintenance CartridgeMaintenance Cartridge .................................................................................................................................... 827Replacing the Maintenance Cartridge ............................................................................................................. 827Checking the Remaining Maintenance Cartridge Capacity ............................................................................. 835
When to Replace the Maintenance Cartridge ................................................................................................. 835
Maintenance CartridgeA replacement Maintenance Cartridge. The Maintenance Cartridge is provided with a Shaft Cleaner.
• Maintenance Cartridge MC-09
Note• For instructions on replacing the Maintenance Cartridge, see "Replacing the Maintenance Cartridge."
→P.827
Replacing the Maintenance Cartridge
Compatible maintenance cartridgesFor information on compatible maintenance cartridges, see "Maintenance Cartridge." →P.827
Precautions when handling the Maintenance CartridgeTake the following precautions when handling the Maintenance Cartridge.
Caution• For safety, keep the Maintenance Cartridge out of the reach of children.• If ink is accidentally ingested, contact a physician immediately.
Important• Do not remove the Maintenance Cartridge except to replace it.• To prevent ink from leaking from a used Maintenance Cartridge, avoid dropping the cartridge or storing it at
an angle. Otherwise, ink may leak and cause stains.• Ink adheres to the top of the Maintenance Cartridge after it has been used. Handle the Maintenance Cartridge
carefully during replacement. The ink may stain clothing.• Do not install a used Maintenance Cartridge in another printer.
Maintenance > Maintenance Cartridge >
iPF815 Maintenance Cartridge
11
827
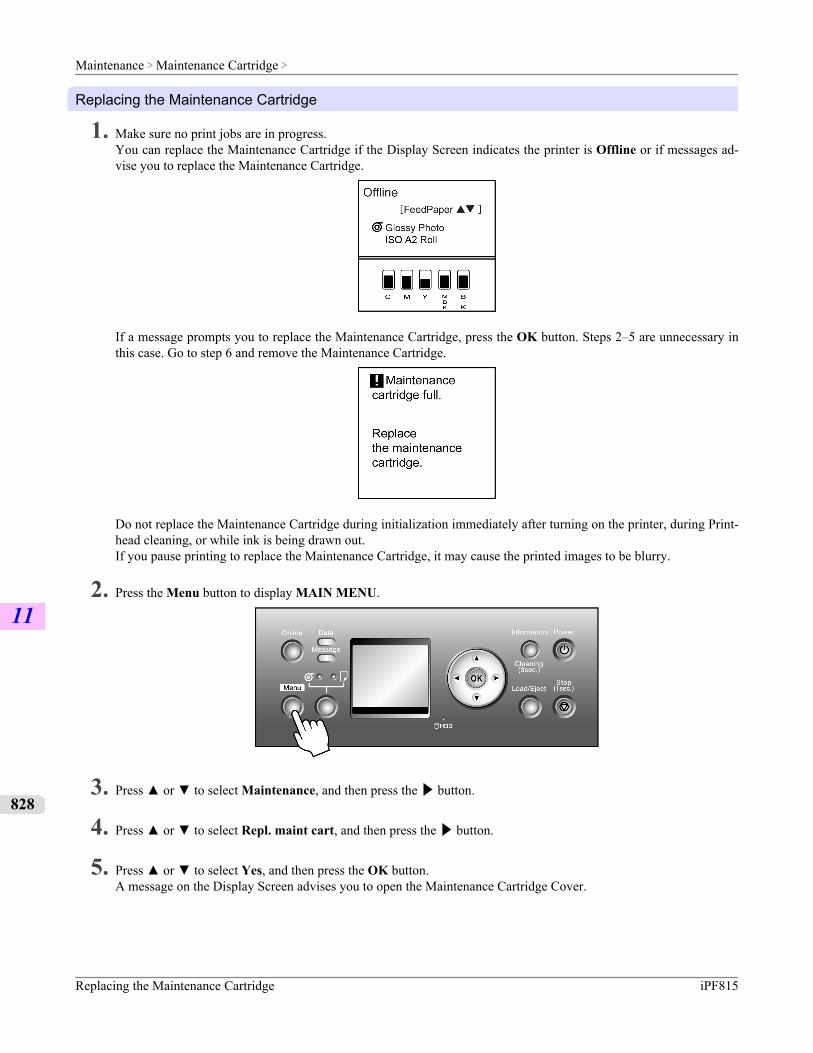
Replacing the Maintenance Cartridge
1. Make sure no print jobs are in progress.You can replace the Maintenance Cartridge if the Display Screen indicates the printer is Offline or if messages ad-vise you to replace the Maintenance Cartridge.
If a message prompts you to replace the Maintenance Cartridge, press the OK button. Steps 2–5 are unnecessary inthis case. Go to step 6 and remove the Maintenance Cartridge.
Do not replace the Maintenance Cartridge during initialization immediately after turning on the printer, during Print-head cleaning, or while ink is being drawn out.If you pause printing to replace the Maintenance Cartridge, it may cause the printed images to be blurry.
2. Press the Menu button to display MAIN MENU.
3. Press ▲ or ▼ to select Maintenance, and then press the ▶ button.
4. Press ▲ or ▼ to select Repl. maint cart, and then press the ▶ button.
5. Press ▲ or ▼ to select Yes, and then press the OK button.A message on the Display Screen advises you to open the Maintenance Cartridge Cover.
Maintenance > Maintenance Cartridge >
Replacing the Maintenance Cartridge iPF815
11
828

6. At this point, open the Maintenance Cartridge Cover.
7. Hold the used Maintenance Cartridge by the grip (a) with one hand and put your other hand under the MaintenanceCartridge to hold it firmly on the bottom, keeping it level as you pull it out.
Important• Used maintenance cartridges are heavy. Always grasp the cartridge firmly and keep the cartridge lev-
el during removal and storage. If you drop a used Maintenance Cartridge or store it at an angle, inkmay leak and cause stains.
• The remaining Maintenance Cartridge capacity is recorded on each printer. Do not install a usedMaintenance Cartridge in another printer.
Maintenance > Maintenance Cartridge >
iPF815 Replacing the Maintenance Cartridge
11
829
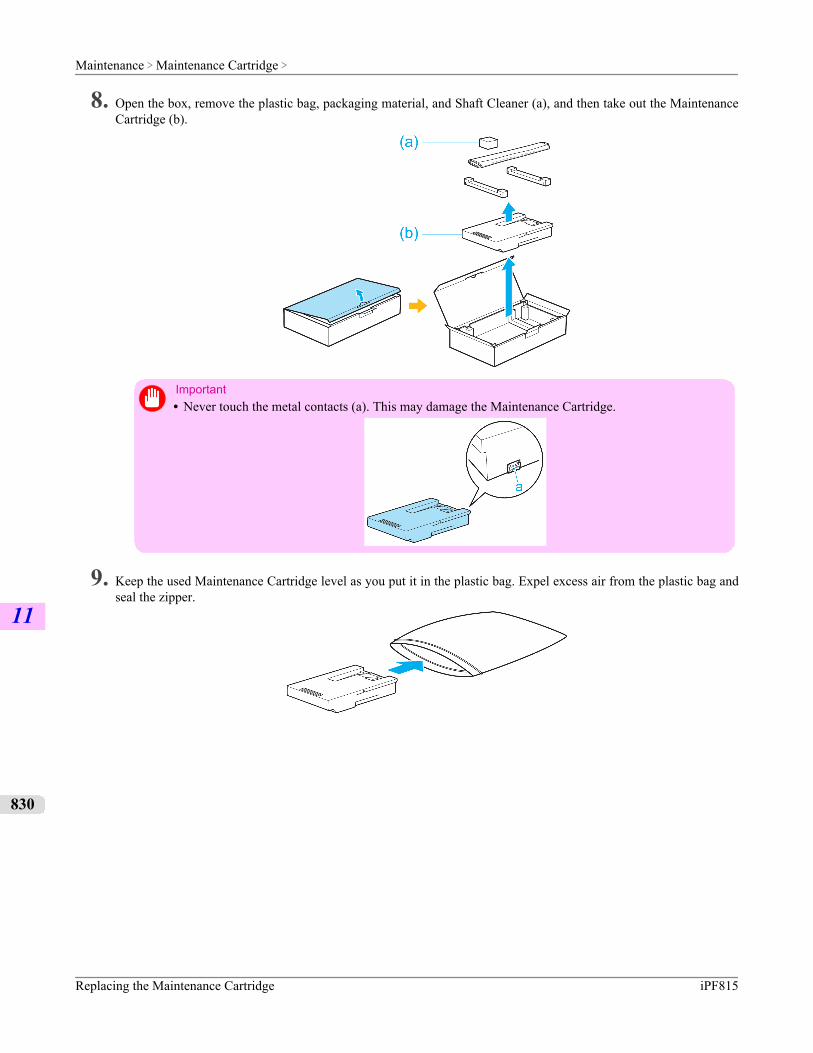
8. Open the box, remove the plastic bag, packaging material, and Shaft Cleaner (a), and then take out the MaintenanceCartridge (b).
Important• Never touch the metal contacts (a). This may damage the Maintenance Cartridge.
9. Keep the used Maintenance Cartridge level as you put it in the plastic bag. Expel excess air from the plastic bag andseal the zipper.
Maintenance > Maintenance Cartridge >
Replacing the Maintenance Cartridge iPF815
11
830
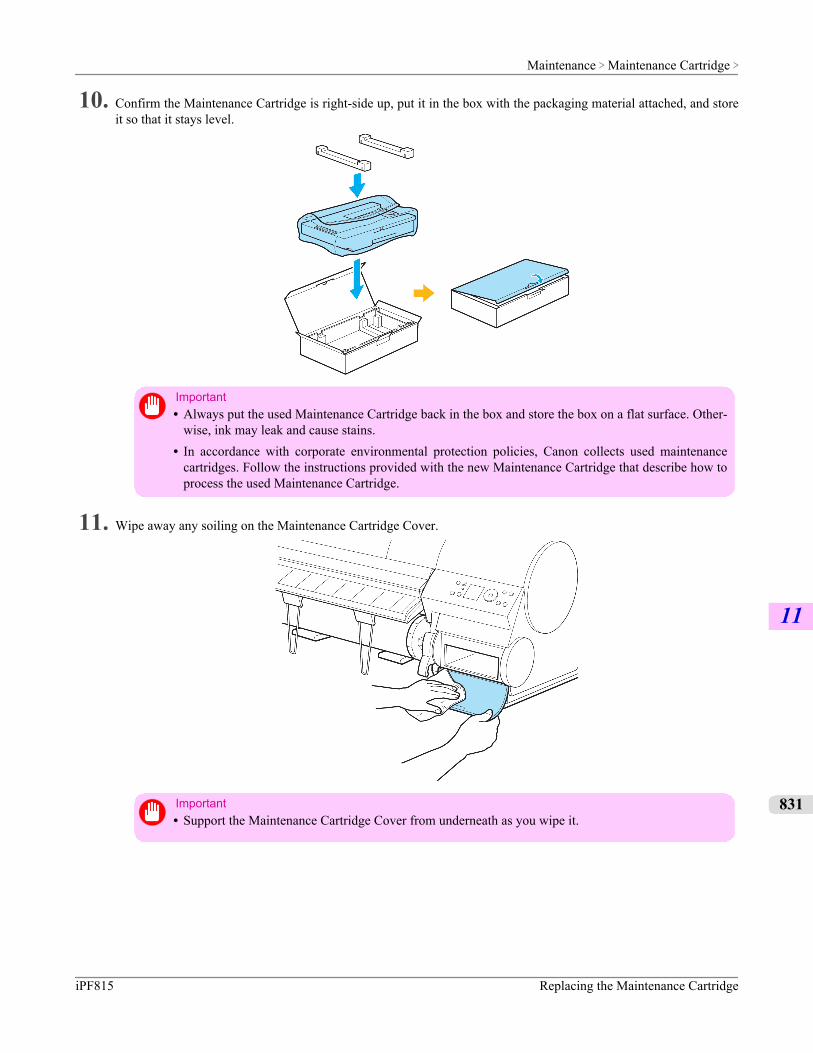
10. Confirm the Maintenance Cartridge is right-side up, put it in the box with the packaging material attached, and storeit so that it stays level.
Important• Always put the used Maintenance Cartridge back in the box and store the box on a flat surface. Other-
wise, ink may leak and cause stains.• In accordance with corporate environmental protection policies, Canon collects used maintenance
cartridges. Follow the instructions provided with the new Maintenance Cartridge that describe how toprocess the used Maintenance Cartridge.
11. Wipe away any soiling on the Maintenance Cartridge Cover.
Important• Support the Maintenance Cartridge Cover from underneath as you wipe it.
Maintenance > Maintenance Cartridge >
iPF815 Replacing the Maintenance Cartridge
11
831
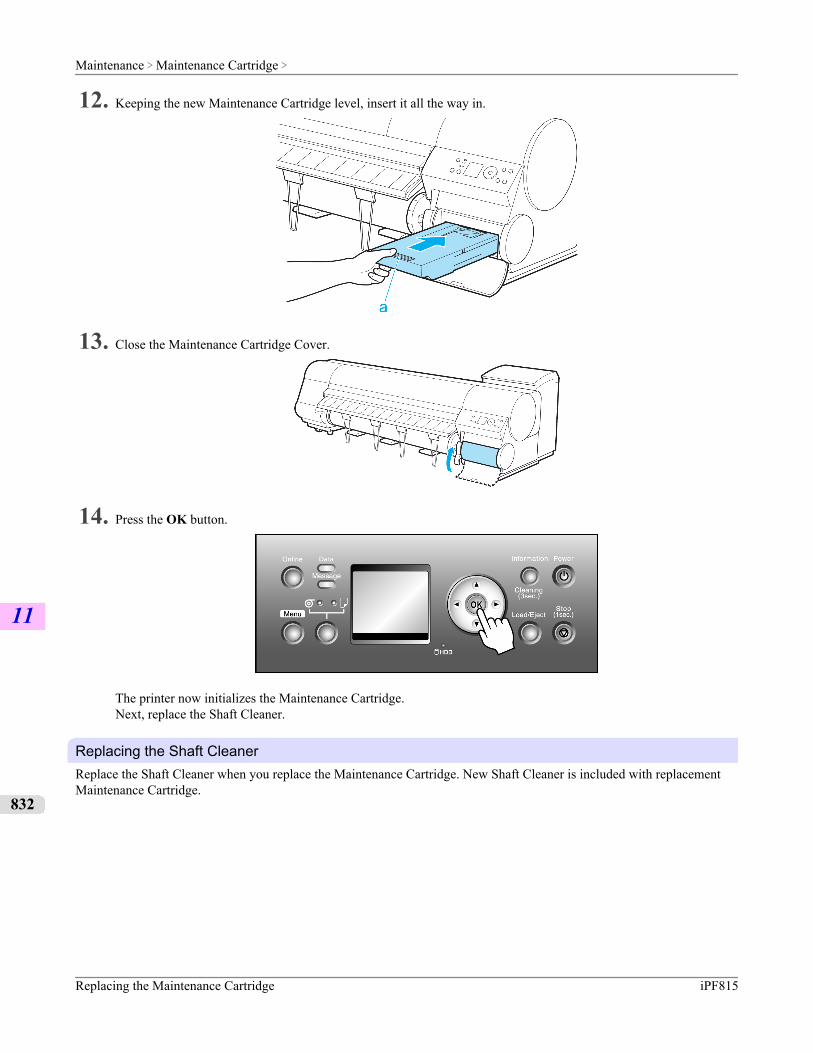
12. Keeping the new Maintenance Cartridge level, insert it all the way in.
13. Close the Maintenance Cartridge Cover.
14. Press the OK button.
The printer now initializes the Maintenance Cartridge.Next, replace the Shaft Cleaner.
Replacing the Shaft CleanerReplace the Shaft Cleaner when you replace the Maintenance Cartridge. New Shaft Cleaner is included with replacementMaintenance Cartridge.
Maintenance > Maintenance Cartridge >
Replacing the Maintenance Cartridge iPF815
11
832
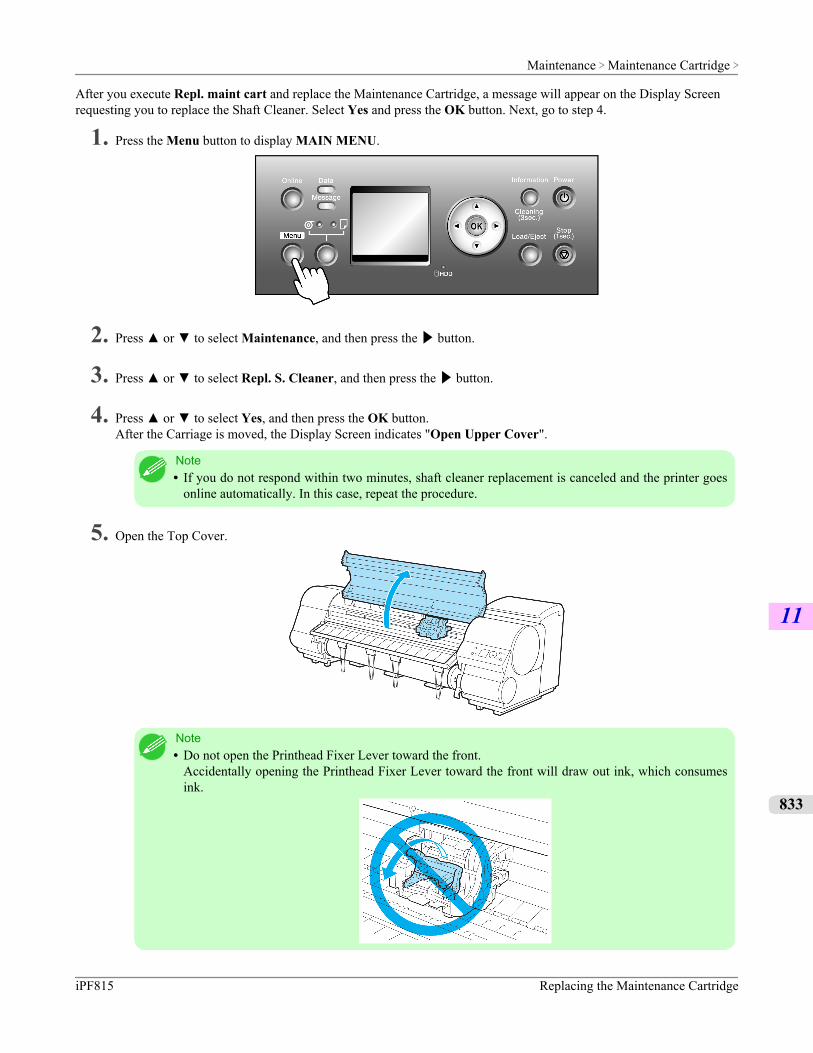
After you execute Repl. maint cart and replace the Maintenance Cartridge, a message will appear on the Display Screenrequesting you to replace the Shaft Cleaner. Select Yes and press the OK button. Next, go to step 4.
1. Press the Menu button to display MAIN MENU.
2. Press ▲ or ▼ to select Maintenance, and then press the ▶ button.
3. Press ▲ or ▼ to select Repl. S. Cleaner, and then press the ▶ button.
4. Press ▲ or ▼ to select Yes, and then press the OK button.After the Carriage is moved, the Display Screen indicates "Open Upper Cover".
Note• If you do not respond within two minutes, shaft cleaner replacement is canceled and the printer goes
online automatically. In this case, repeat the procedure.
5. Open the Top Cover.
Note• Do not open the Printhead Fixer Lever toward the front.
Accidentally opening the Printhead Fixer Lever toward the front will draw out ink, which consumesink.
Maintenance > Maintenance Cartridge >
iPF815 Replacing the Maintenance Cartridge
11
833
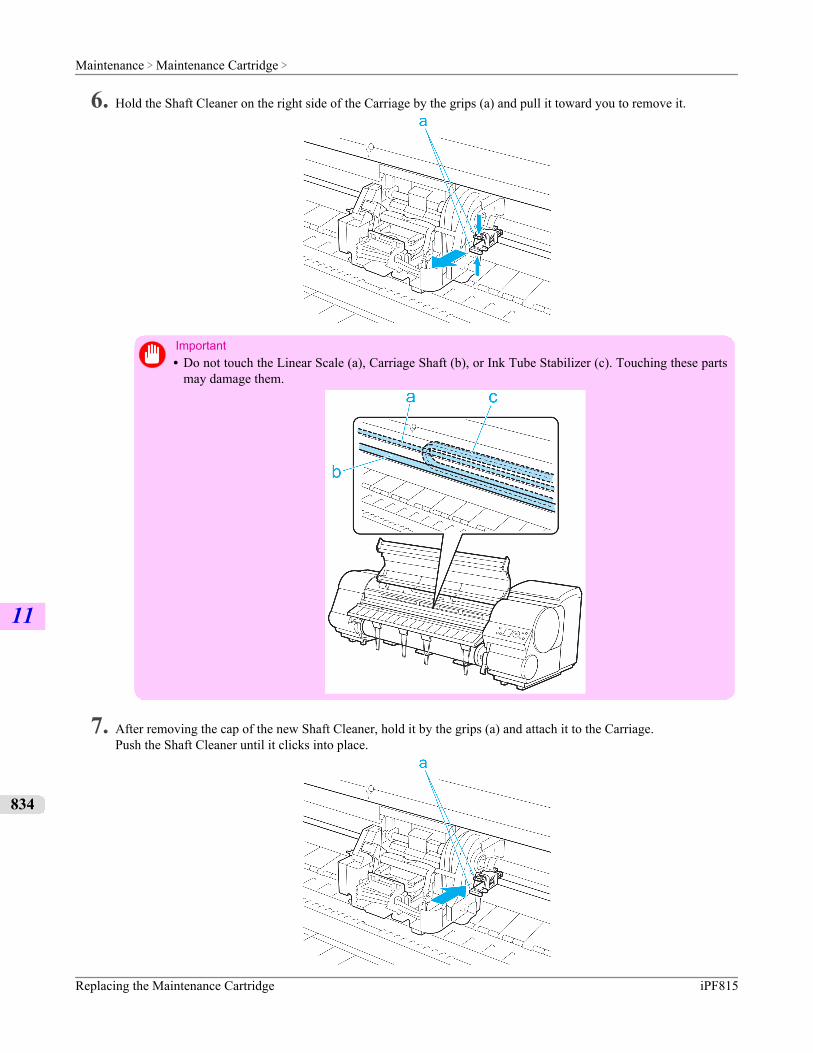
6. Hold the Shaft Cleaner on the right side of the Carriage by the grips (a) and pull it toward you to remove it.
Important• Do not touch the Linear Scale (a), Carriage Shaft (b), or Ink Tube Stabilizer (c). Touching these parts
may damage them.
7. After removing the cap of the new Shaft Cleaner, hold it by the grips (a) and attach it to the Carriage.Push the Shaft Cleaner until it clicks into place.
Maintenance > Maintenance Cartridge >
Replacing the Maintenance Cartridge iPF815
11
834
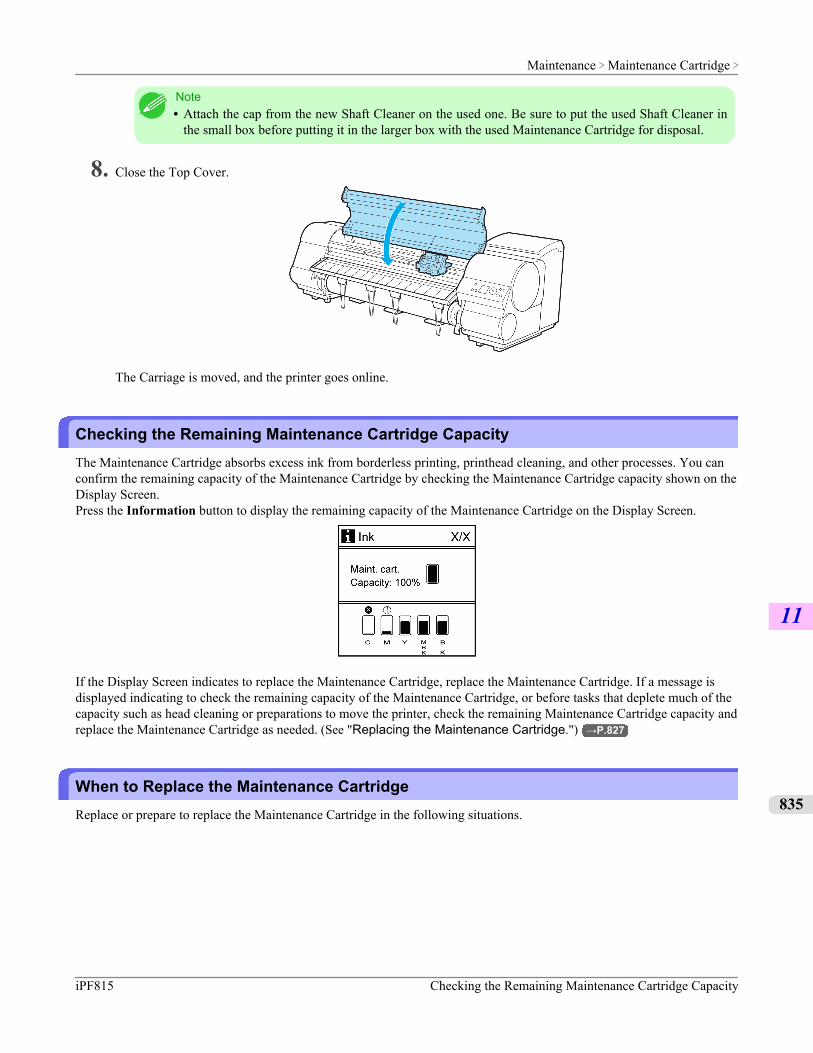
Note• Attach the cap from the new Shaft Cleaner on the used one. Be sure to put the used Shaft Cleaner in
the small box before putting it in the larger box with the used Maintenance Cartridge for disposal.
8. Close the Top Cover.
The Carriage is moved, and the printer goes online.
Checking the Remaining Maintenance Cartridge CapacityThe Maintenance Cartridge absorbs excess ink from borderless printing, printhead cleaning, and other processes. You canconfirm the remaining capacity of the Maintenance Cartridge by checking the Maintenance Cartridge capacity shown on theDisplay Screen.Press the Information button to display the remaining capacity of the Maintenance Cartridge on the Display Screen.
If the Display Screen indicates to replace the Maintenance Cartridge, replace the Maintenance Cartridge. If a message isdisplayed indicating to check the remaining capacity of the Maintenance Cartridge, or before tasks that deplete much of thecapacity such as head cleaning or preparations to move the printer, check the remaining Maintenance Cartridge capacity andreplace the Maintenance Cartridge as needed. (See "Replacing the Maintenance Cartridge.") →P.827
When to Replace the Maintenance CartridgeReplace or prepare to replace the Maintenance Cartridge in the following situations.
Maintenance > Maintenance Cartridge >
iPF815 Checking the Remaining Maintenance Cartridge Capacity
11
835
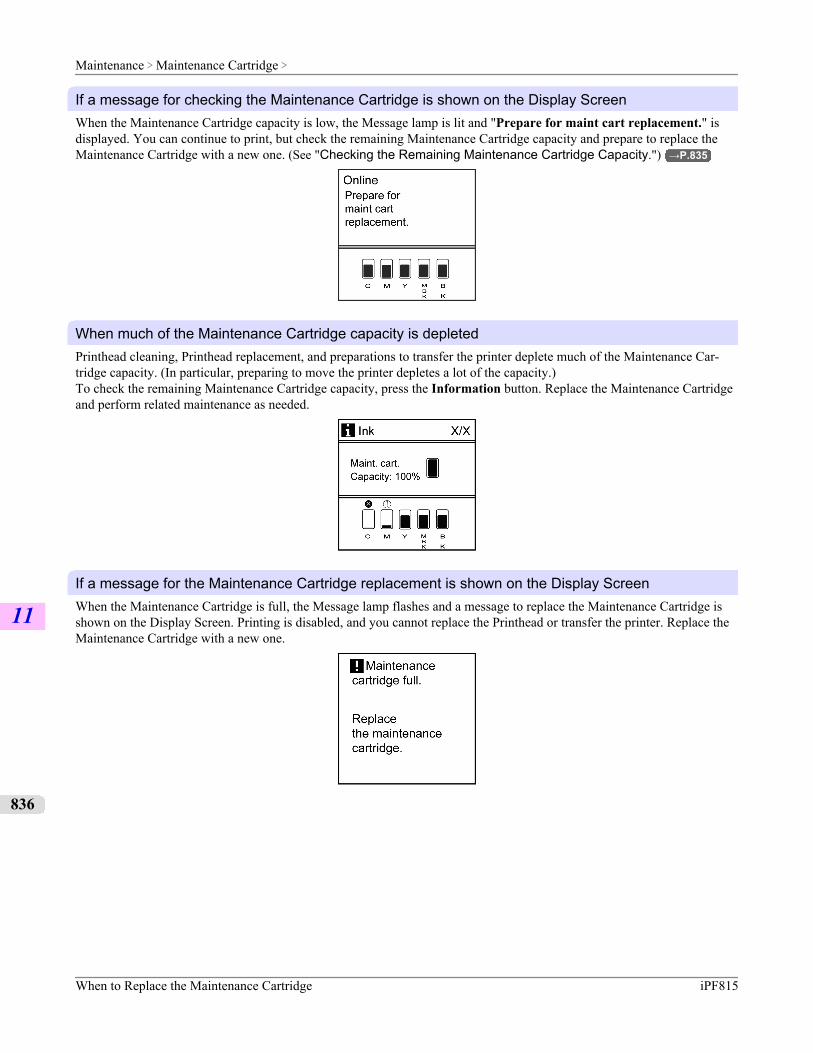
If a message for checking the Maintenance Cartridge is shown on the Display ScreenWhen the Maintenance Cartridge capacity is low, the Message lamp is lit and "Prepare for maint cart replacement." isdisplayed. You can continue to print, but check the remaining Maintenance Cartridge capacity and prepare to replace theMaintenance Cartridge with a new one. (See "Checking the Remaining Maintenance Cartridge Capacity.") →P.835
When much of the Maintenance Cartridge capacity is depletedPrinthead cleaning, Printhead replacement, and preparations to transfer the printer deplete much of the Maintenance Car-tridge capacity. (In particular, preparing to move the printer depletes a lot of the capacity.)To check the remaining Maintenance Cartridge capacity, press the Information button. Replace the Maintenance Cartridgeand perform related maintenance as needed.
If a message for the Maintenance Cartridge replacement is shown on the Display ScreenWhen the Maintenance Cartridge is full, the Message lamp flashes and a message to replace the Maintenance Cartridge isshown on the Display Screen. Printing is disabled, and you cannot replace the Printhead or transfer the printer. Replace theMaintenance Cartridge with a new one.
Maintenance > Maintenance Cartridge >
When to Replace the Maintenance Cartridge iPF815
11
836

Cleaning the PrinterCleaning the Printer Exterior ........................................................................................................................... 837Cleaning Inside the Top Cover ........................................................................................................................ 837
Cleaning the Printer ExteriorClean the printer regularly to maintain better printing quality and help prevent problems.About once a month, clean the printer exterior.
1. Turn the printer off. (See "Turning the Printer On and Off.") →P.694
2. Unplug the power cord from the outlet.
Caution• Always turn off the printer and unplug the power cord before cleaning or maintenance. Accidentally
leaving the printer on poses a risk of injury if you touch moving parts inside the printer.
3. Using a damp cloth that you have wrung out completely, wipe away any dirt or paper dust from the Paper Feed Slot(a), power cord plug, and so on. Dry these parts with a dry cloth.
Caution• Never use flammable solvents such as alcohol, benzene, or thinner. If these substances come into con-
tact with electrical components inside the printer, there is a risk of fire or electrical shock.
Important• If the Ejection Guide is dirty, it may soil the edge of the paper when the paper is cut. We recommend
cleaning the Ejection Guide even if it does not appear dirty, because it may actually be covered withpaper dust. (See "Cleaning Inside the Top Cover.") →P.837
4. Plug the power cord into the outlet.
Cleaning Inside the Top CoverClean inside the Top Cover to maintain better printing quality and help prevent problems.Also clean inside the Top Cover in the following situations to ensure optimal operation.
• If the printed surface or the underside of paper is dirty after printing
• After you have used up a roll
Maintenance > Cleaning the Printer >
iPF815 Cleaning the Printer Exterior
11
837
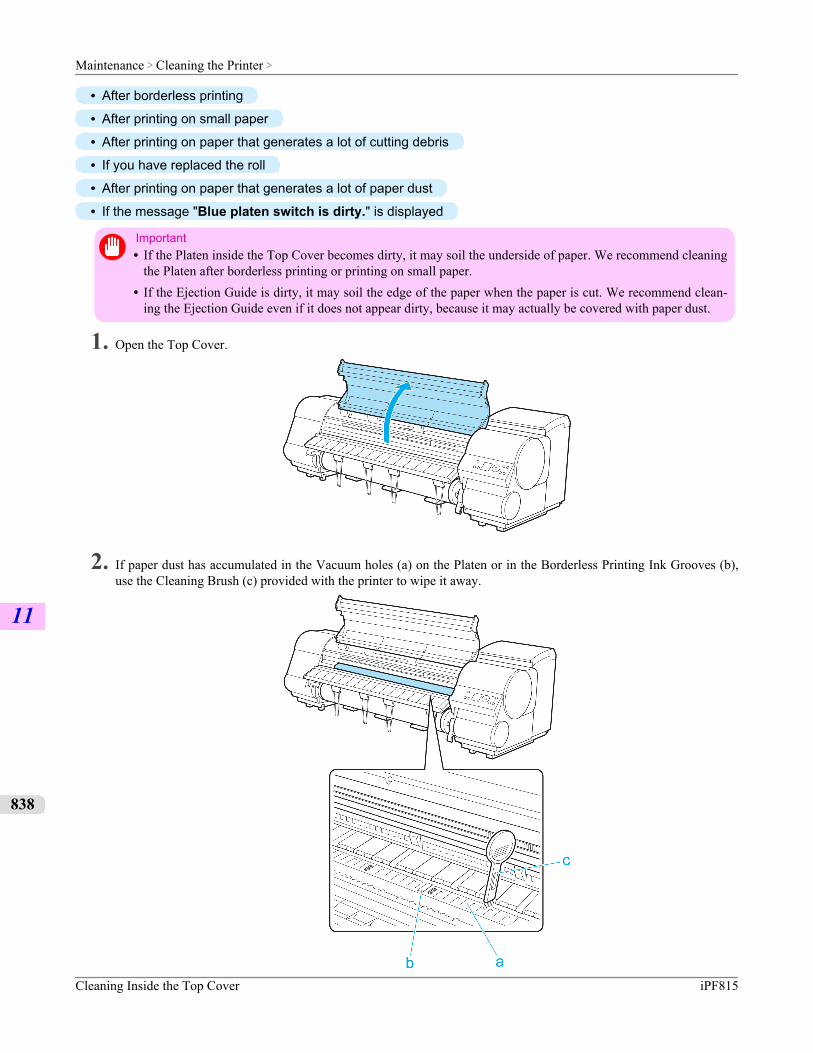
• After borderless printing
• After printing on small paper
• After printing on paper that generates a lot of cutting debris
• If you have replaced the roll
• After printing on paper that generates a lot of paper dust
• If the message "Blue platen switch is dirty." is displayed
Important• If the Platen inside the Top Cover becomes dirty, it may soil the underside of paper. We recommend cleaning
the Platen after borderless printing or printing on small paper.• If the Ejection Guide is dirty, it may soil the edge of the paper when the paper is cut. We recommend clean-
ing the Ejection Guide even if it does not appear dirty, because it may actually be covered with paper dust.
1. Open the Top Cover.
2. If paper dust has accumulated in the Vacuum holes (a) on the Platen or in the Borderless Printing Ink Grooves (b),use the Cleaning Brush (c) provided with the printer to wipe it away.
Maintenance > Cleaning the Printer >
Cleaning Inside the Top Cover iPF815
11
838
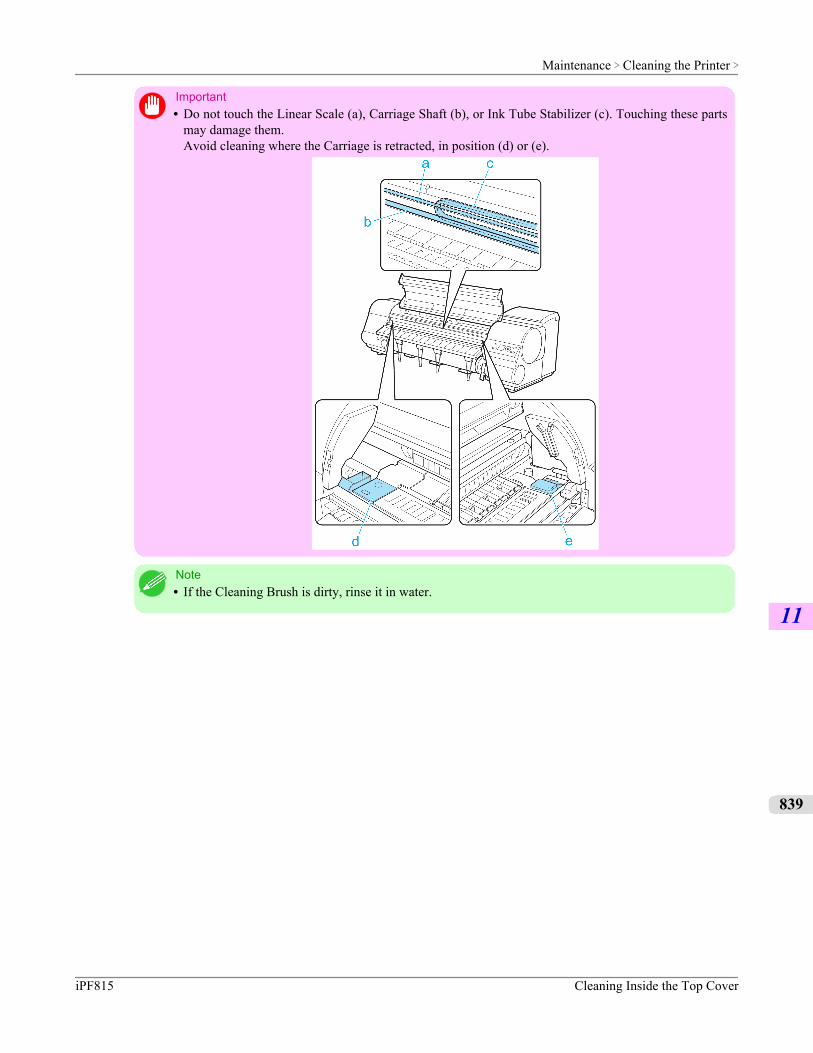
Important• Do not touch the Linear Scale (a), Carriage Shaft (b), or Ink Tube Stabilizer (c). Touching these parts
may damage them.Avoid cleaning where the Carriage is retracted, in position (d) or (e).
Note• If the Cleaning Brush is dirty, rinse it in water.
Maintenance > Cleaning the Printer >
iPF815 Cleaning Inside the Top Cover
11
839
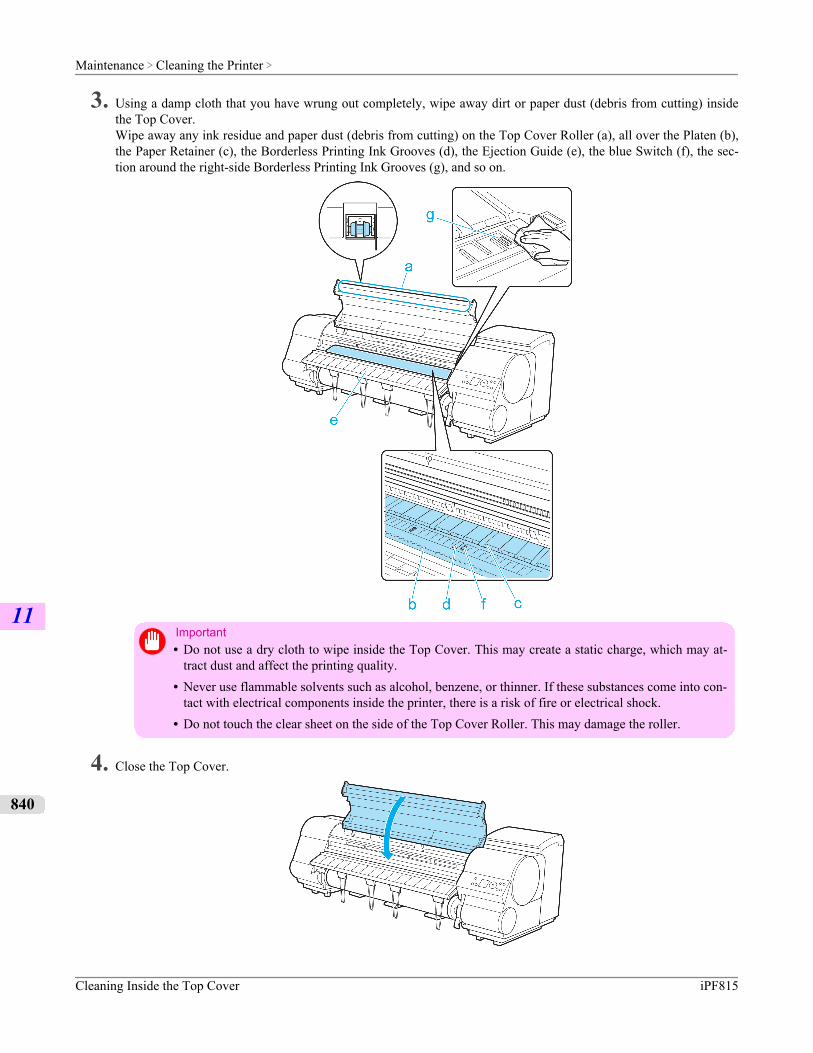
3. Using a damp cloth that you have wrung out completely, wipe away dirt or paper dust (debris from cutting) insidethe Top Cover.Wipe away any ink residue and paper dust (debris from cutting) on the Top Cover Roller (a), all over the Platen (b),the Paper Retainer (c), the Borderless Printing Ink Grooves (d), the Ejection Guide (e), the blue Switch (f), the sec-tion around the right-side Borderless Printing Ink Grooves (g), and so on.
Important• Do not use a dry cloth to wipe inside the Top Cover. This may create a static charge, which may at-
tract dust and affect the printing quality.• Never use flammable solvents such as alcohol, benzene, or thinner. If these substances come into con-
tact with electrical components inside the printer, there is a risk of fire or electrical shock.• Do not touch the clear sheet on the side of the Top Cover Roller. This may damage the roller.
4. Close the Top Cover.
Maintenance > Cleaning the Printer >
Cleaning Inside the Top Cover iPF815
11
840
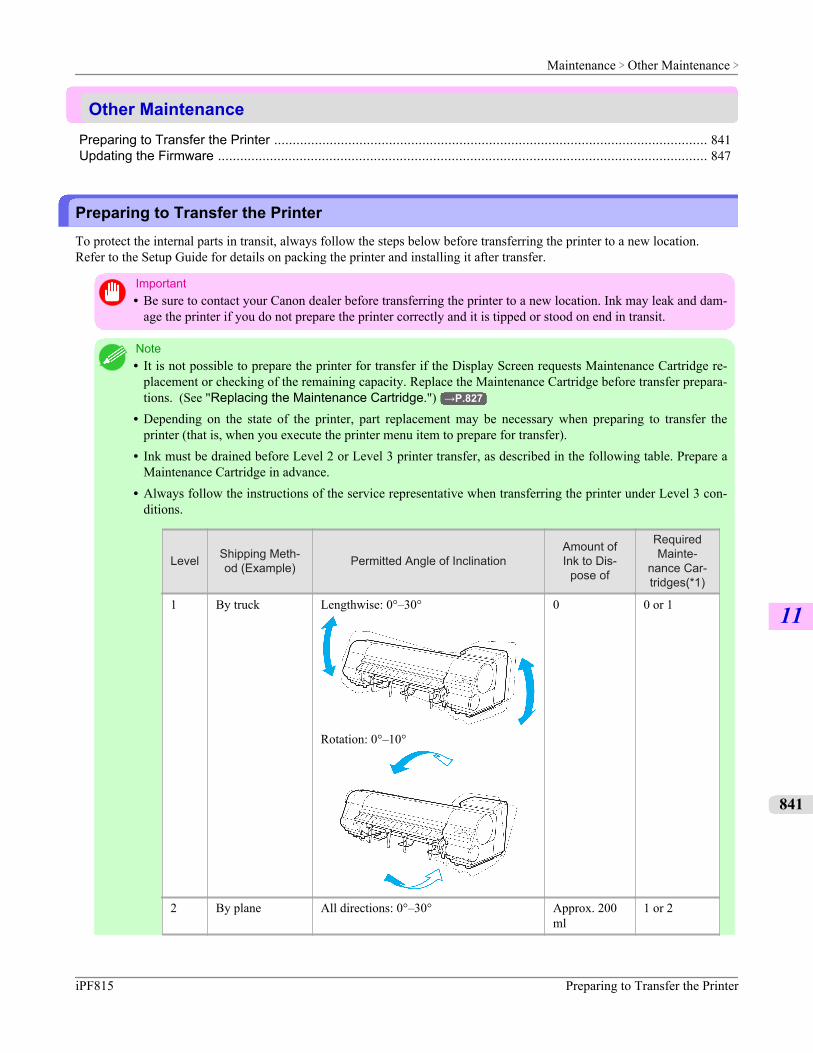
Other MaintenancePreparing to Transfer the Printer ..................................................................................................................... 841Updating the Firmware .................................................................................................................................... 847
Preparing to Transfer the PrinterTo protect the internal parts in transit, always follow the steps below before transferring the printer to a new location.Refer to the Setup Guide for details on packing the printer and installing it after transfer.
Important• Be sure to contact your Canon dealer before transferring the printer to a new location. Ink may leak and dam-
age the printer if you do not prepare the printer correctly and it is tipped or stood on end in transit.
Note• It is not possible to prepare the printer for transfer if the Display Screen requests Maintenance Cartridge re-
placement or checking of the remaining capacity. Replace the Maintenance Cartridge before transfer prepara-tions. (See "Replacing the Maintenance Cartridge.") →P.827
• Depending on the state of the printer, part replacement may be necessary when preparing to transfer theprinter (that is, when you execute the printer menu item to prepare for transfer).
• Ink must be drained before Level 2 or Level 3 printer transfer, as described in the following table. Prepare aMaintenance Cartridge in advance.
• Always follow the instructions of the service representative when transferring the printer under Level 3 con-ditions.
Level Shipping Meth-od (Example) Permitted Angle of Inclination
Amount ofInk to Dis-
pose of
RequiredMainte-
nance Car-tridges(*1)
1 By truck Lengthwise: 0°–30°
Rotation: 0°–10°
0 0 or 1
2 By plane All directions: 0°–30° Approx. 200ml
1 or 2
Maintenance > Other Maintenance >
iPF815 Preparing to Transfer the Printer
11
841
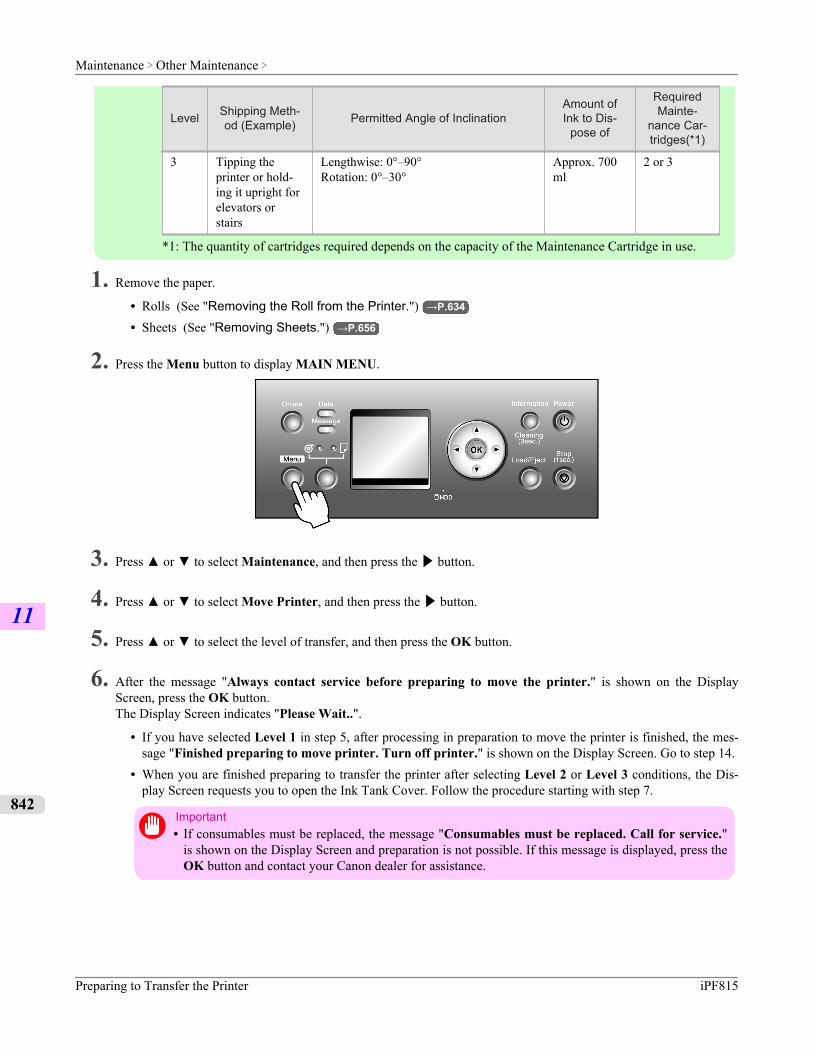
Level Shipping Meth-od (Example) Permitted Angle of Inclination
Amount ofInk to Dis-
pose of
RequiredMainte-
nance Car-tridges(*1)
3 Tipping theprinter or hold-ing it upright forelevators orstairs
Lengthwise: 0°–90°Rotation: 0°–30°
Approx. 700ml
2 or 3
*1: The quantity of cartridges required depends on the capacity of the Maintenance Cartridge in use.
1. Remove the paper.
• Rolls (See "Removing the Roll from the Printer.") →P.634
• Sheets (See "Removing Sheets.") →P.656
2. Press the Menu button to display MAIN MENU.
3. Press ▲ or ▼ to select Maintenance, and then press the ▶ button.
4. Press ▲ or ▼ to select Move Printer, and then press the ▶ button.
5. Press ▲ or ▼ to select the level of transfer, and then press the OK button.
6. After the message "Always contact service before preparing to move the printer." is shown on the DisplayScreen, press the OK button.The Display Screen indicates "Please Wait..".
• If you have selected Level 1 in step 5, after processing in preparation to move the printer is finished, the mes-sage "Finished preparing to move printer. Turn off printer." is shown on the Display Screen. Go to step 14.
• When you are finished preparing to transfer the printer after selecting Level 2 or Level 3 conditions, the Dis-play Screen requests you to open the Ink Tank Cover. Follow the procedure starting with step 7.
Important• If consumables must be replaced, the message "Consumables must be replaced. Call for service."
is shown on the Display Screen and preparation is not possible. If this message is displayed, press theOK button and contact your Canon dealer for assistance.
Maintenance > Other Maintenance >
Preparing to Transfer the Printer iPF815
11
842
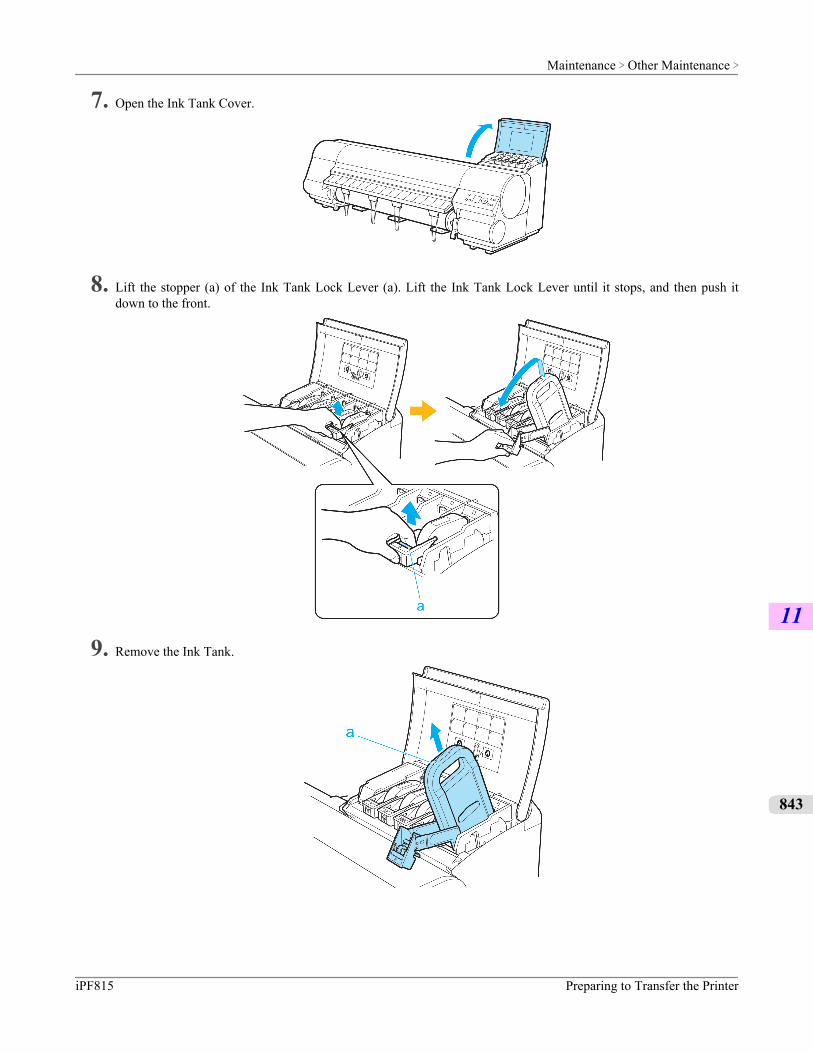
7. Open the Ink Tank Cover.
8. Lift the stopper (a) of the Ink Tank Lock Lever (a). Lift the Ink Tank Lock Lever until it stops, and then push itdown to the front.
9. Remove the Ink Tank.
Maintenance > Other Maintenance >
iPF815 Preparing to Transfer the Printer
11
843
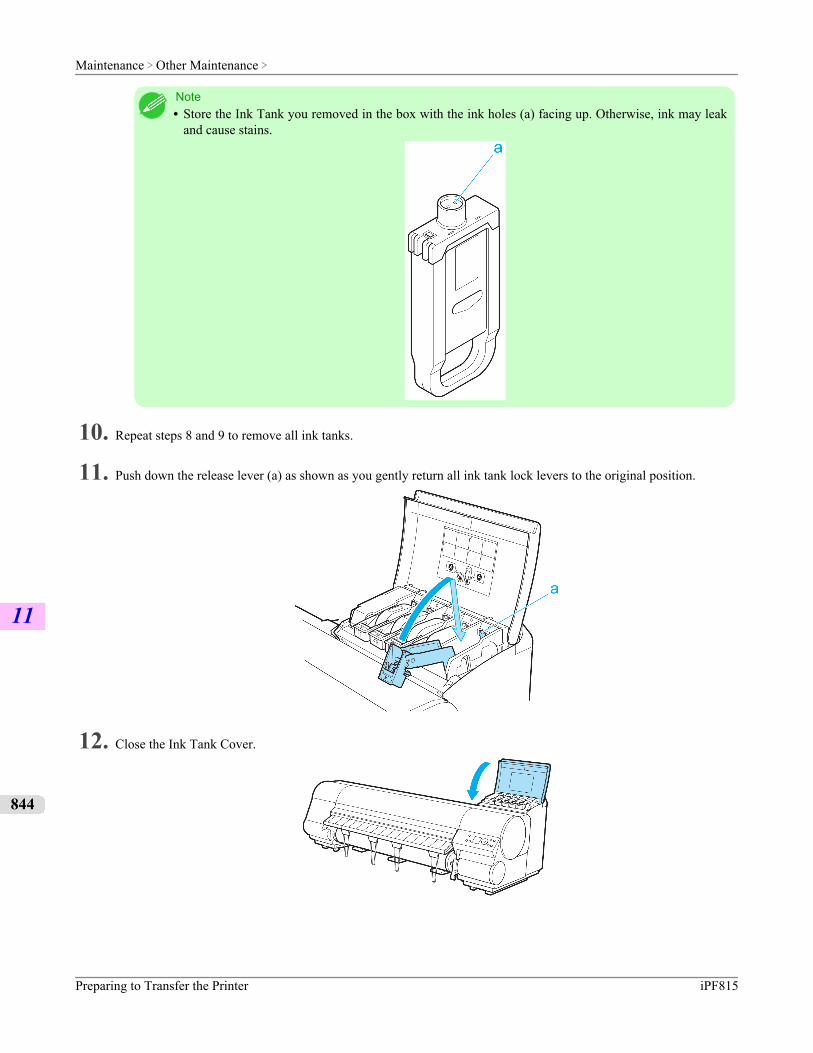
Note• Store the Ink Tank you removed in the box with the ink holes (a) facing up. Otherwise, ink may leak
and cause stains.
10. Repeat steps 8 and 9 to remove all ink tanks.
11. Push down the release lever (a) as shown as you gently return all ink tank lock levers to the original position.
12. Close the Ink Tank Cover.
Maintenance > Other Maintenance >
Preparing to Transfer the Printer iPF815
11
844
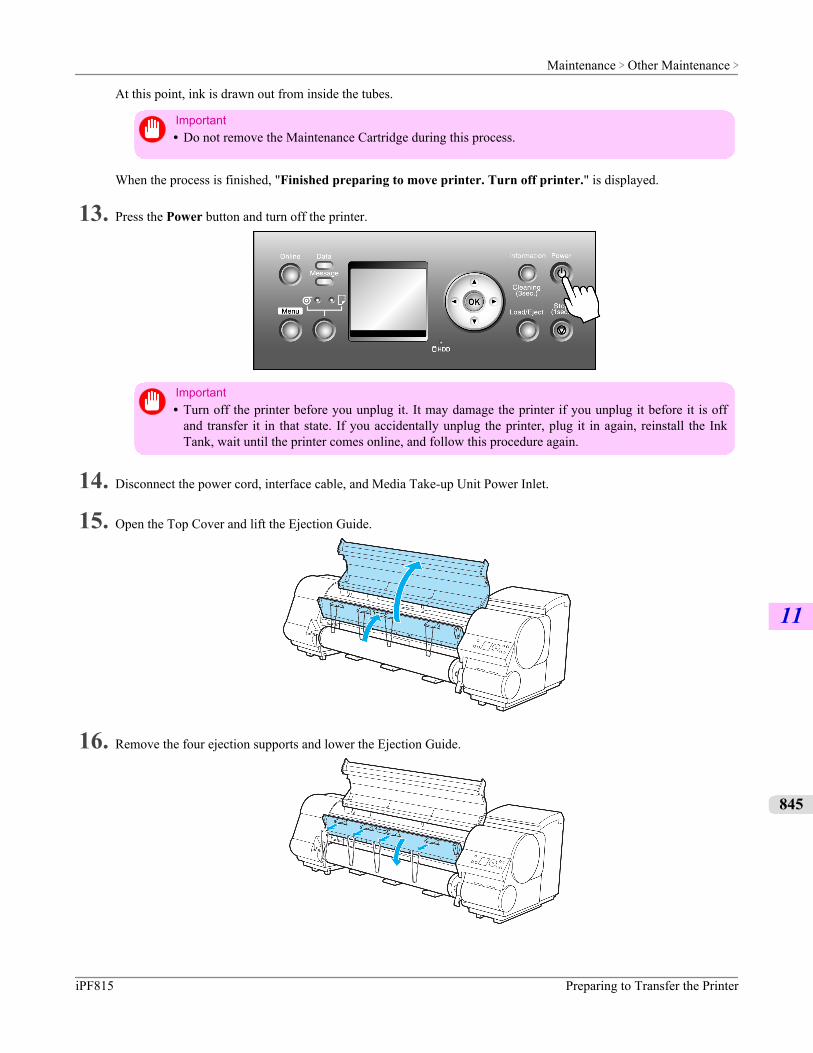
At this point, ink is drawn out from inside the tubes.
Important• Do not remove the Maintenance Cartridge during this process.
When the process is finished, "Finished preparing to move printer. Turn off printer." is displayed.
13. Press the Power button and turn off the printer.
Important• Turn off the printer before you unplug it. It may damage the printer if you unplug it before it is off
and transfer it in that state. If you accidentally unplug the printer, plug it in again, reinstall the InkTank, wait until the printer comes online, and follow this procedure again.
14. Disconnect the power cord, interface cable, and Media Take-up Unit Power Inlet.
15. Open the Top Cover and lift the Ejection Guide.
16. Remove the four ejection supports and lower the Ejection Guide.
Maintenance > Other Maintenance >
iPF815 Preparing to Transfer the Printer
11
845
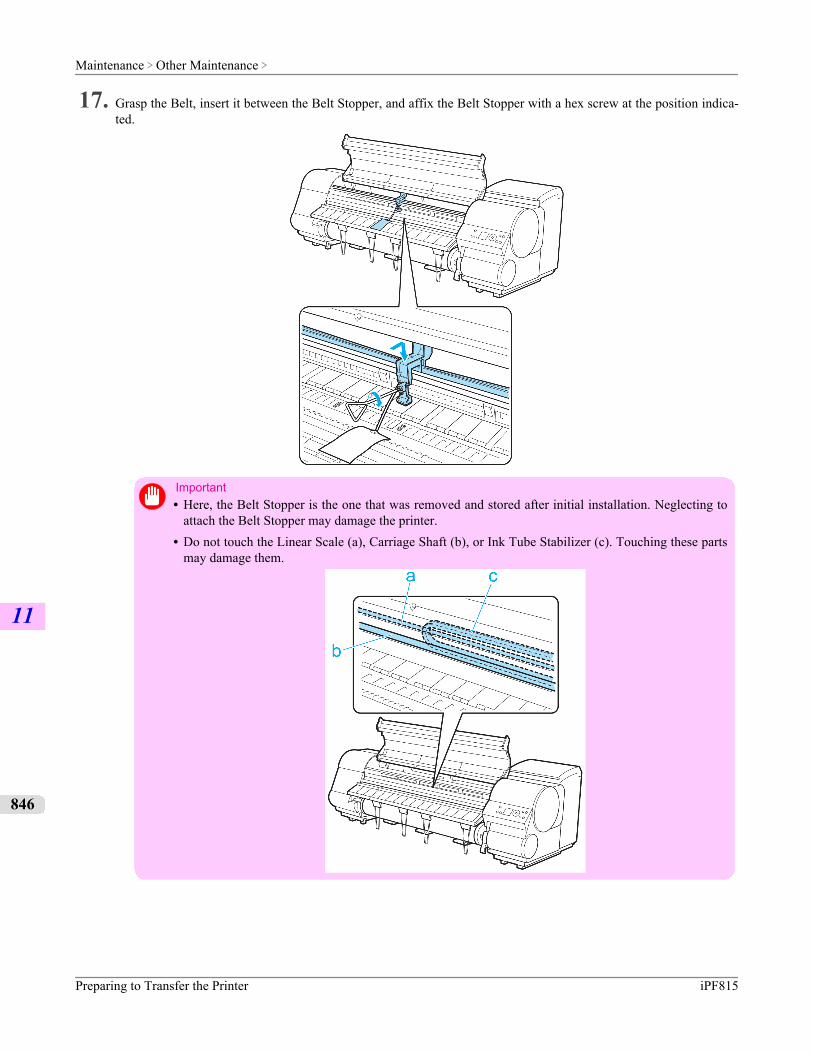
17. Grasp the Belt, insert it between the Belt Stopper, and affix the Belt Stopper with a hex screw at the position indica-ted.
Important• Here, the Belt Stopper is the one that was removed and stored after initial installation. Neglecting to
attach the Belt Stopper may damage the printer.• Do not touch the Linear Scale (a), Carriage Shaft (b), or Ink Tube Stabilizer (c). Touching these parts
may damage them.
Maintenance > Other Maintenance >
Preparing to Transfer the Printer iPF815
11
846
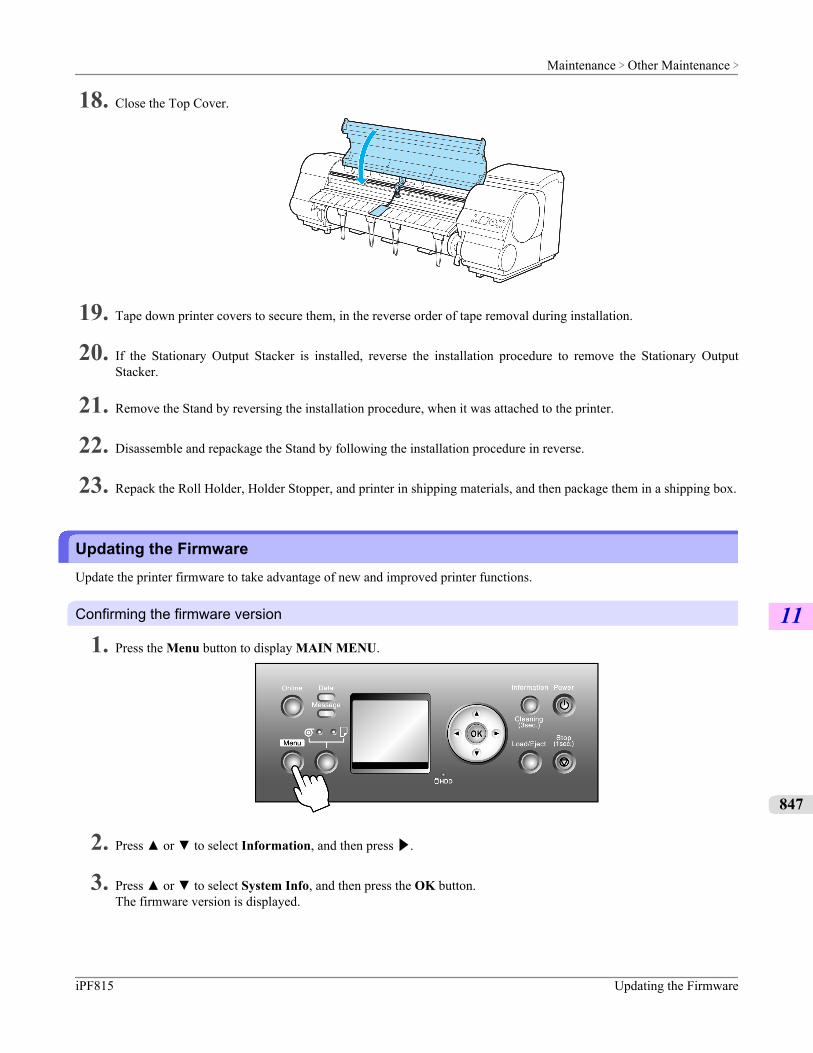
18. Close the Top Cover.
19. Tape down printer covers to secure them, in the reverse order of tape removal during installation.
20. If the Stationary Output Stacker is installed, reverse the installation procedure to remove the Stationary OutputStacker.
21. Remove the Stand by reversing the installation procedure, when it was attached to the printer.
22. Disassemble and repackage the Stand by following the installation procedure in reverse.
23. Repack the Roll Holder, Holder Stopper, and printer in shipping materials, and then package them in a shipping box.
Updating the FirmwareUpdate the printer firmware to take advantage of new and improved printer functions.
Confirming the firmware version
1. Press the Menu button to display MAIN MENU.
2. Press ▲ or ▼ to select Information, and then press ▶.
3. Press ▲ or ▼ to select System Info, and then press the OK button.The firmware version is displayed.
Maintenance > Other Maintenance >
iPF815 Updating the Firmware
11
847
Updating the FirmwareTo obtain the latest firmware, visit the Canon website. If the firmware available online is newer than the installed firmware,update the printer firmware. For details on downloading and updating the firmware, visit the Canon website.
Maintenance > Other Maintenance >
Updating the Firmware iPF815
11
848

Troubleshooting
Frequently Asked Questions 850
Problems Regarding Paper 852
Printing does not start 863
The printer stops during a print job 865
Problems with the printing quality 866
Cannot print over a network 878
Installation problems 880
HP-GL/2 problems 882
Other problems 884
Troubleshooting >
iPF815
12
849
Frequently Asked QuestionsFrequently Asked Questions ........................................................................................................................... 850
Frequently Asked QuestionsThis section presents frequently asked questions and answers. To view more detailed explanations, click the hyperlinks inthe answer column.
Question Answer
How do I print on aroll?
When printing on rolls, after loading the roll, specify the paper type and length, both on theControl Panel and in the printer driver.⇒"Loading and Printing on Rolls →P.3 "
How do I print on asheet?
When printing on sheets, specify the paper type and size in the printer driver before loadingthe paper.⇒"Loading and Printing on Sheets →P.8 "
How do I switch be-tween printing on rollsand sheets?
Press the Feeder Selection button to switch the paper source between the roll and a sheet.⇒"Selecting the Paper Source →P.631 "
How do I change thepaper type or size?
Specify the type and size of paper, both on the Control Panel and in the printer driver.
• Specifying it in the printer driver⇒"Specifying Paper in the Printer Driver →P.64 "
• Specifying it on the Control PanelSelecting the paper type⇒"Selecting the Paper Type (Roll) →P.632 "⇒"Selecting the Paper Type (Sheet) →P.650 "Selecting the paper size⇒"Specifying the Paper Length (Roll) →P.633 "
How do I cut the rollpaper after printing?
You can wait until ink dries before cutting the roll, and you can cut rolls at a desired posi-tion.⇒"Specifying the Cutting Method for Rolls →P.642 "
How do I print withoutborders?
Borderless printing is possible on rolls. You can also specify borderless printing in the print-er driver by adjusting the original size to match the paper size.Before borderless printing, set the blue Switch on the platen to the ● side.Borderless printing is not supported on sheets.⇒"Borderless Printing on Paper of Equivalent Size →P.100 "⇒"Borderless Printing by Resizing Originals to Fit the Roll Width →P.107 "⇒"Borderless Printing at Actual Size →P.91 "⇒"Setting the Blue Switch on the Platen →P.872 "
How do I print an A4original enlarged on A2paper?
In the printer driver, you can adjust the original image to match the paper size or width, oryou can specify enlargement or reduction before printing as desired.⇒"Resizing Originals to Match the Paper Size →P.65 "⇒"Resizing Originals to Fit the Roll Width →P.71 "⇒"Resizing Originals by Entering a Scaling Value →P.77 "
How do I print withoutwasting paper?
To conserve paper, you can specify in the printer driver to rotate originals 90 degrees or toprint without top and bottom margins.⇒"Conserving Roll Paper by Rotating Originals 90 Degrees →P.167 "⇒"Conserving Roll Paper by Printing Originals Without Top and Bottom Mar-gins →P.173 "
Troubleshooting > Frequently Asked Questions >
Frequently Asked Questions iPF815
12
850
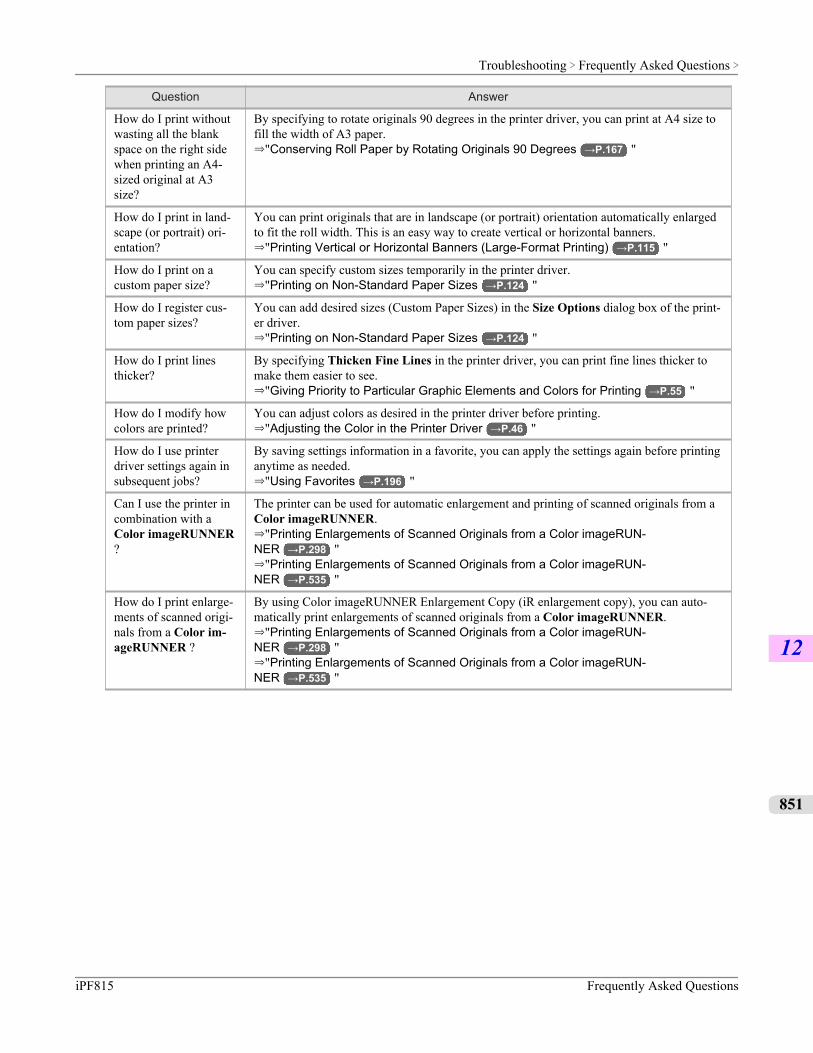
Question Answer
How do I print withoutwasting all the blankspace on the right sidewhen printing an A4-sized original at A3size?
By specifying to rotate originals 90 degrees in the printer driver, you can print at A4 size tofill the width of A3 paper.⇒"Conserving Roll Paper by Rotating Originals 90 Degrees →P.167 "
How do I print in land-scape (or portrait) ori-entation?
You can print originals that are in landscape (or portrait) orientation automatically enlargedto fit the roll width. This is an easy way to create vertical or horizontal banners.⇒"Printing Vertical or Horizontal Banners (Large-Format Printing) →P.115 "
How do I print on acustom paper size?
You can specify custom sizes temporarily in the printer driver.⇒"Printing on Non-Standard Paper Sizes →P.124 "
How do I register cus-tom paper sizes?
You can add desired sizes (Custom Paper Sizes) in the Size Options dialog box of the print-er driver.⇒"Printing on Non-Standard Paper Sizes →P.124 "
How do I print linesthicker?
By specifying Thicken Fine Lines in the printer driver, you can print fine lines thicker tomake them easier to see.⇒"Giving Priority to Particular Graphic Elements and Colors for Printing →P.55 "
How do I modify howcolors are printed?
You can adjust colors as desired in the printer driver before printing.⇒"Adjusting the Color in the Printer Driver →P.46 "
How do I use printerdriver settings again insubsequent jobs?
By saving settings information in a favorite, you can apply the settings again before printinganytime as needed.⇒"Using Favorites →P.196 "
Can I use the printer incombination with aColor imageRUNNER?
The printer can be used for automatic enlargement and printing of scanned originals from aColor imageRUNNER.⇒"Printing Enlargements of Scanned Originals from a Color imageRUN-NER →P.298 "⇒"Printing Enlargements of Scanned Originals from a Color imageRUN-NER →P.535 "
How do I print enlarge-ments of scanned origi-nals from a Color im-ageRUNNER ?
By using Color imageRUNNER Enlargement Copy (iR enlargement copy), you can auto-matically print enlargements of scanned originals from a Color imageRUNNER.⇒"Printing Enlargements of Scanned Originals from a Color imageRUN-NER →P.298 "⇒"Printing Enlargements of Scanned Originals from a Color imageRUN-NER →P.535 "
Troubleshooting > Frequently Asked Questions >
iPF815 Frequently Asked Questions
12
851
Problems Regarding PaperClearing Jammed Roll Paper .......................................................................................................................... 852Clearing a Jammed Sheet ............................................................................................................................... 856
Troubleshooting When Paper Jams are not Found ......................................................................................... 858
Roll paper cannot be inserted into the Paper Feed Slot .................................................................................. 860Cannot Load Sheets ........................................................................................................................................ 861
Paper is not cut straight ................................................................................................................................... 861Paper is not cut ............................................................................................................................................... 861
The Media Take-up Unit Continues Rotating .................................................................................................. 861
The size of clear film cannot be detected ........................................................................................................ 862
Clearing Jammed Roll PaperIf roll paper jams, follow the steps below to remove jams.
Note• If you do not find any scraps or jams, see "Troubleshooting When Paper Jams are not Found." →P.858
1. Turn the printer off. (See "Turning the Printer On and Off.") →P.694
2. Open the Top Cover.
3. If the Carriage is out, move the Carriage out of the way, away from the paper.
Troubleshooting > Problems Regarding Paper >
Clearing Jammed Roll Paper iPF815
12
852
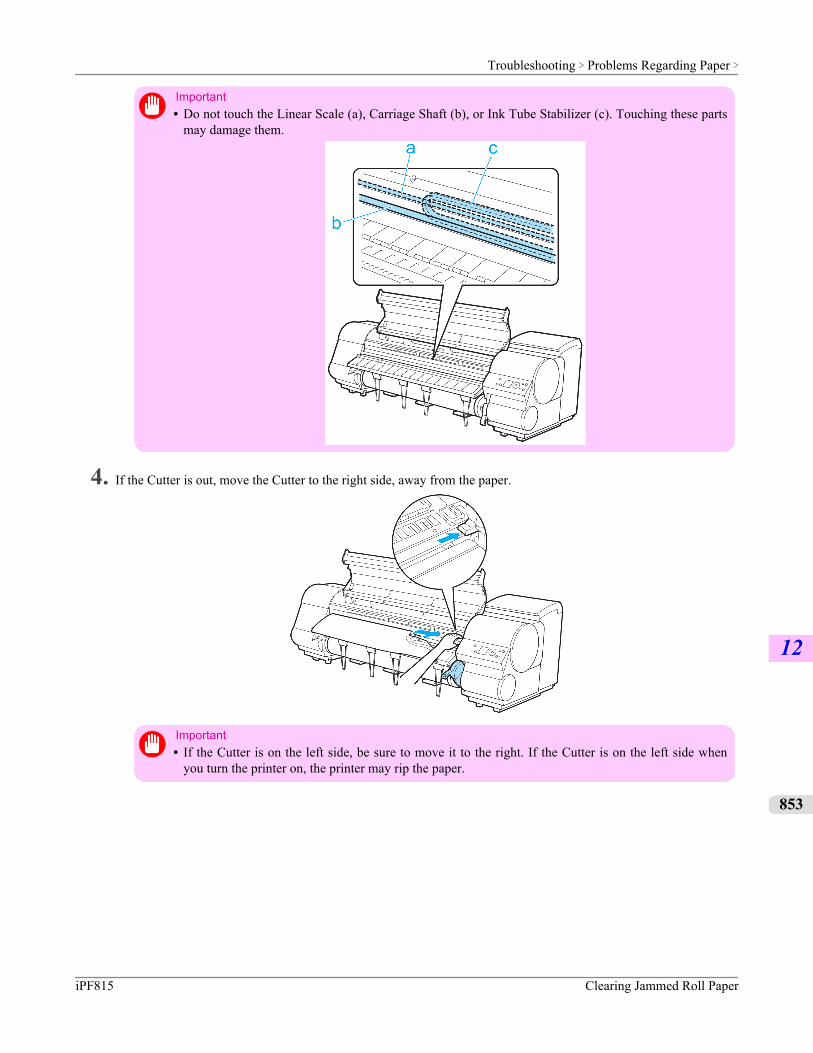
Important• Do not touch the Linear Scale (a), Carriage Shaft (b), or Ink Tube Stabilizer (c). Touching these parts
may damage them.
4. If the Cutter is out, move the Cutter to the right side, away from the paper.
Important• If the Cutter is on the left side, be sure to move it to the right. If the Cutter is on the left side when
you turn the printer on, the printer may rip the paper.
Troubleshooting > Problems Regarding Paper >
iPF815 Clearing Jammed Roll Paper
12
853

5. Lift the Release Lever.
6. Holding the paper on both sides, pull the jammed portion out toward the front. Use a scissors or cutting tool to cutaway the printed or wrinkled portion.
Caution• When cutting paper, be careful to avoid injury and damaging the printer.
Troubleshooting > Problems Regarding Paper >
Clearing Jammed Roll Paper iPF815
12
854
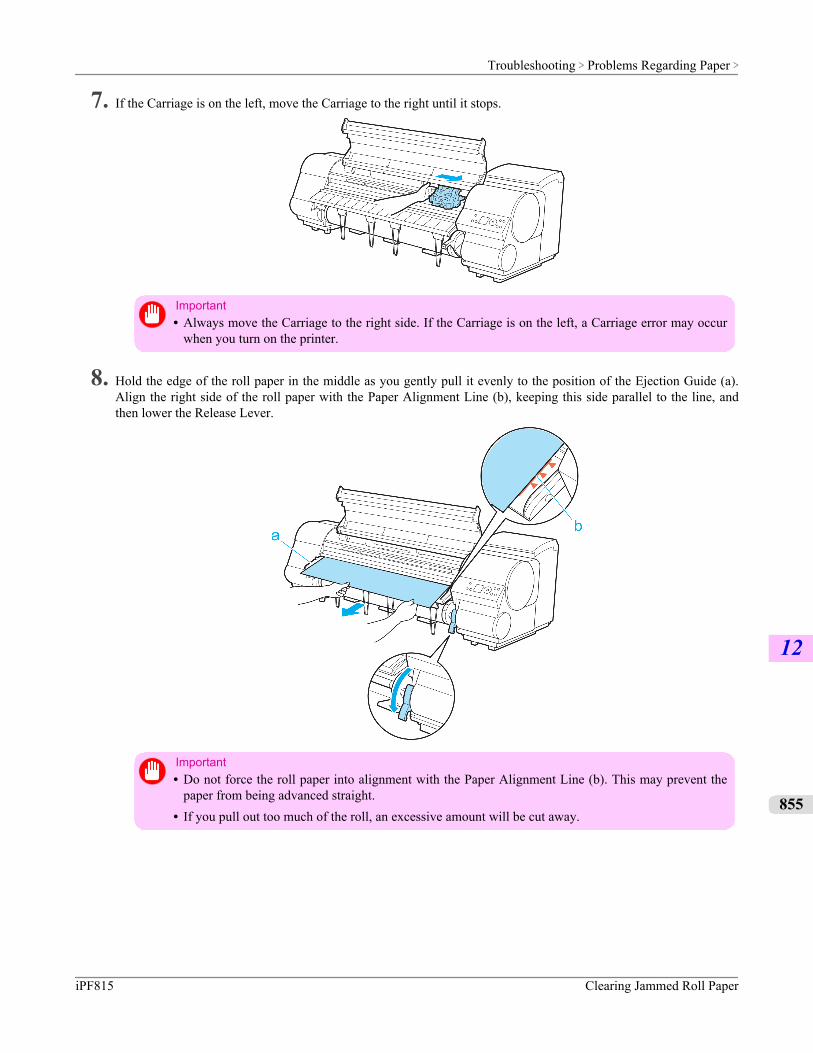
7. If the Carriage is on the left, move the Carriage to the right until it stops.
Important• Always move the Carriage to the right side. If the Carriage is on the left, a Carriage error may occur
when you turn on the printer.
8. Hold the edge of the roll paper in the middle as you gently pull it evenly to the position of the Ejection Guide (a).Align the right side of the roll paper with the Paper Alignment Line (b), keeping this side parallel to the line, andthen lower the Release Lever.
Important• Do not force the roll paper into alignment with the Paper Alignment Line (b). This may prevent the
paper from being advanced straight.• If you pull out too much of the roll, an excessive amount will be cut away.
Troubleshooting > Problems Regarding Paper >
iPF815 Clearing Jammed Roll Paper
12
855
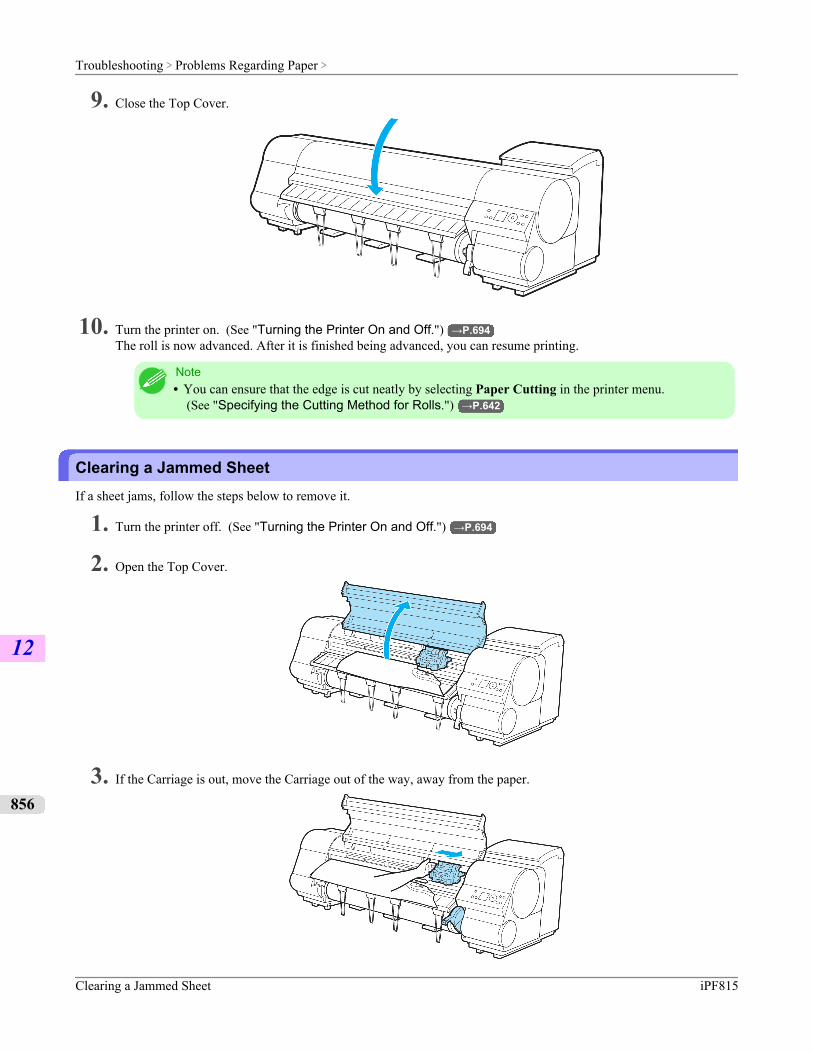
9. Close the Top Cover.
10. Turn the printer on. (See "Turning the Printer On and Off.") →P.694The roll is now advanced. After it is finished being advanced, you can resume printing.
Note• You can ensure that the edge is cut neatly by selecting Paper Cutting in the printer menu.
(See "Specifying the Cutting Method for Rolls.") →P.642
Clearing a Jammed SheetIf a sheet jams, follow the steps below to remove it.
1. Turn the printer off. (See "Turning the Printer On and Off.") →P.694
2. Open the Top Cover.
3. If the Carriage is out, move the Carriage out of the way, away from the paper.
Troubleshooting > Problems Regarding Paper >
Clearing a Jammed Sheet iPF815
12
856
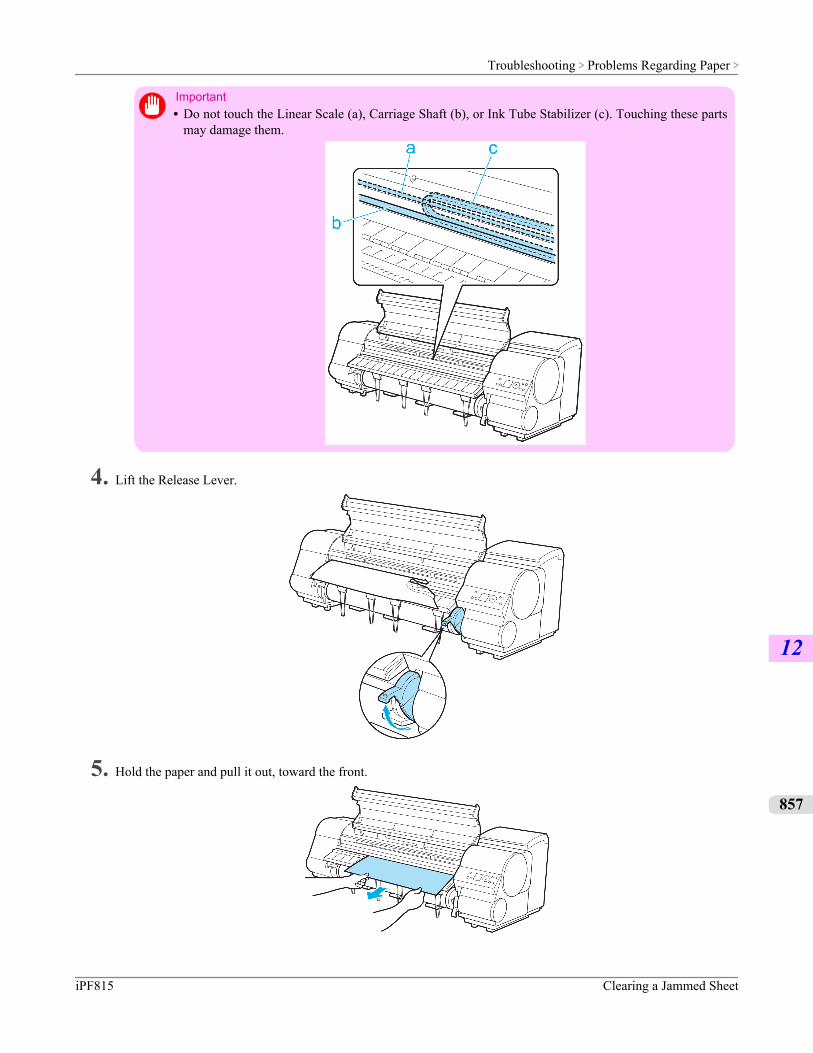
Important• Do not touch the Linear Scale (a), Carriage Shaft (b), or Ink Tube Stabilizer (c). Touching these parts
may damage them.
4. Lift the Release Lever.
5. Hold the paper and pull it out, toward the front.
Troubleshooting > Problems Regarding Paper >
iPF815 Clearing a Jammed Sheet
12
857
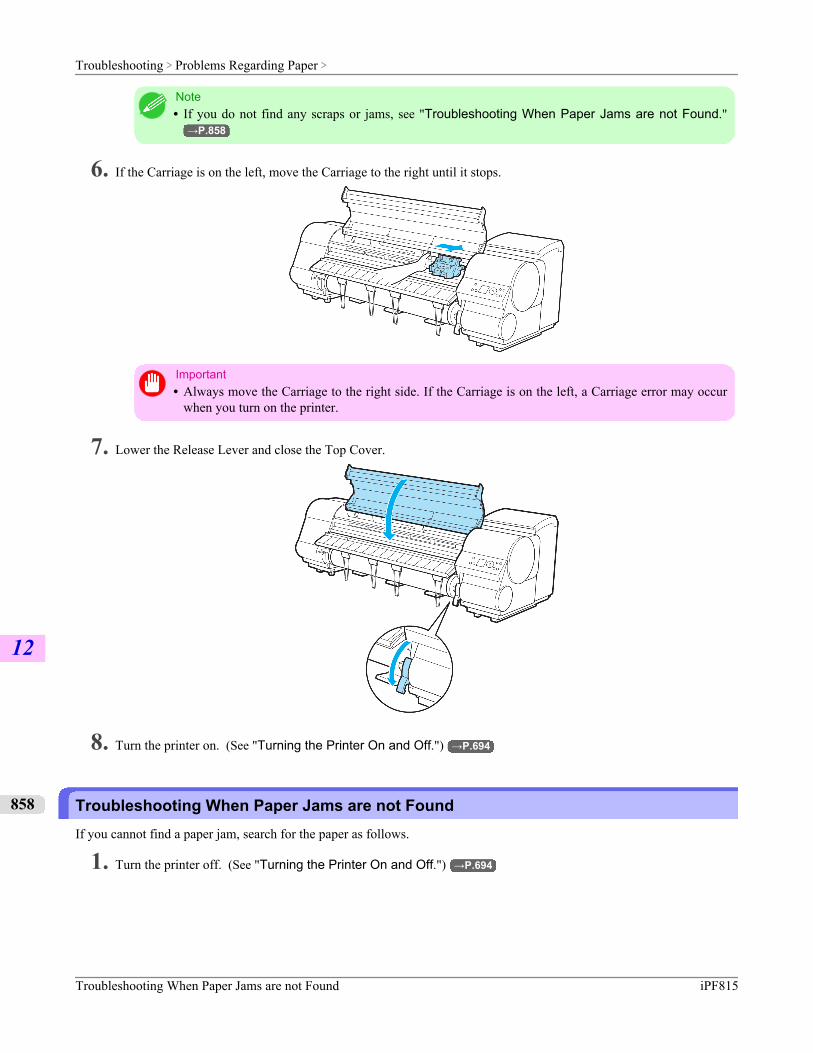
Note• If you do not find any scraps or jams, see "Troubleshooting When Paper Jams are not Found."
→P.858
6. If the Carriage is on the left, move the Carriage to the right until it stops.
Important• Always move the Carriage to the right side. If the Carriage is on the left, a Carriage error may occur
when you turn on the printer.
7. Lower the Release Lever and close the Top Cover.
8. Turn the printer on. (See "Turning the Printer On and Off.") →P.694
Troubleshooting When Paper Jams are not FoundIf you cannot find a paper jam, search for the paper as follows.
1. Turn the printer off. (See "Turning the Printer On and Off.") →P.694
Troubleshooting > Problems Regarding Paper >
Troubleshooting When Paper Jams are not Found iPF815
12
858
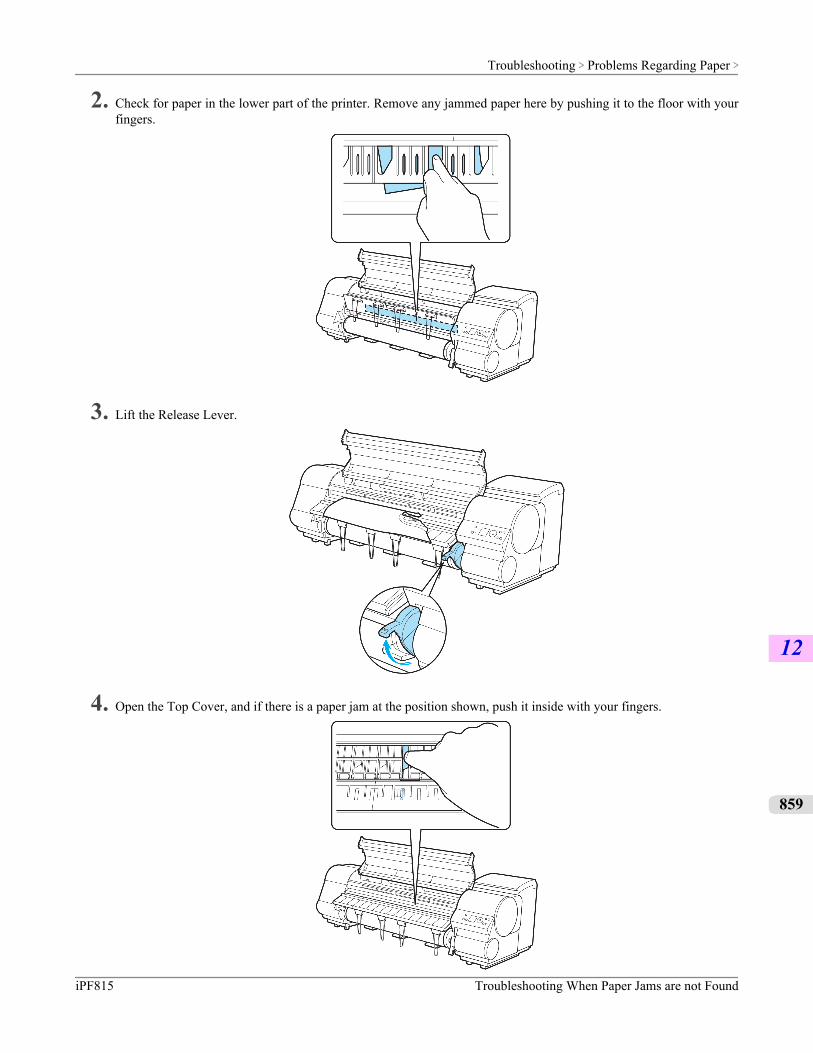
2. Check for paper in the lower part of the printer. Remove any jammed paper here by pushing it to the floor with yourfingers.
3. Lift the Release Lever.
4. Open the Top Cover, and if there is a paper jam at the position shown, push it inside with your fingers.
Troubleshooting > Problems Regarding Paper >
iPF815 Troubleshooting When Paper Jams are not Found
12
859
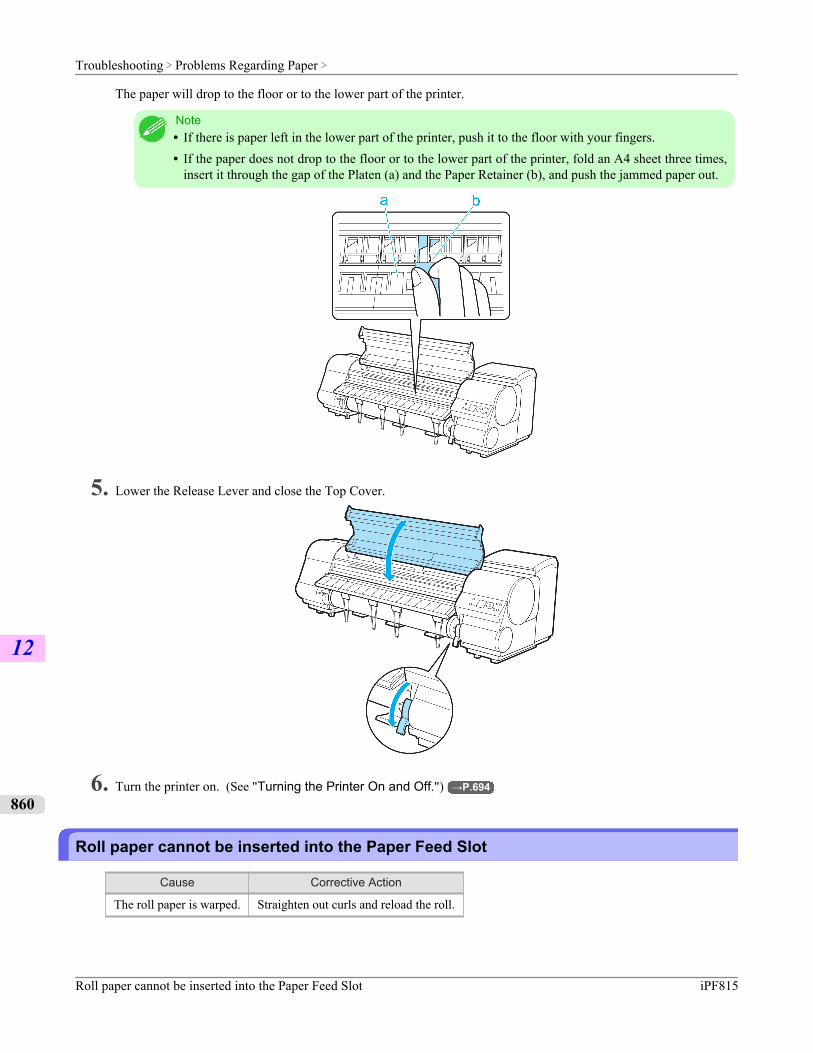
The paper will drop to the floor or to the lower part of the printer.
Note• If there is paper left in the lower part of the printer, push it to the floor with your fingers.• If the paper does not drop to the floor or to the lower part of the printer, fold an A4 sheet three times,
insert it through the gap of the Platen (a) and the Paper Retainer (b), and push the jammed paper out.
5. Lower the Release Lever and close the Top Cover.
6. Turn the printer on. (See "Turning the Printer On and Off.") →P.694
Roll paper cannot be inserted into the Paper Feed Slot
Cause Corrective Action
The roll paper is warped. Straighten out curls and reload the roll.
Troubleshooting > Problems Regarding Paper >
Roll paper cannot be inserted into the Paper Feed Slot iPF815
12
860
Cannot Load Sheets
Cause Corrective Action
The paper source selection is incorrect. Press the Feeder Selection button to activate the Cut Sheet lamp.
Paper is not cut straight
Cause Corrective Action
The paper is bent or curled at the cut position. Straighten out any curling by the edges of the paper.
Paper rises by the ends of the cut position before it is cut. Reload the paper correctly.
Paper is not cut
Cause Corrective Action
In the printer driver, No or Print Cut Guidelineis specified in Auto Cut.
Specify Yes in Auto Cut in the printer driver.
In MAIN MENU, Eject or Manual is specifiedin Cutting Mode.
Specify Automatic in Cutting Mode in MAIN MENU.
Rolls are not cut when you are using the MediaTake-up Unit.
Either execute Paper Cutting in the Control Panel or lift the Re-lease Lever and cut the roll with scissors. (See "Removing Printed Documents from the Media Take-upUnit.") →P.761
The Media Take-up Unit Continues Rotating
Cause Corrective Action
There is a foreign object in the path of the Media Take-up Sensor (indicatedby a dotted line).
Remove the foreign object from theMedia Take-up Sensor path. Arrangethe Basket Cloth and Basket Rod sothey do not interfere with the MediaTake-up Sensor.
Troubleshooting > Problems Regarding Paper >
iPF815 Cannot Load Sheets
12
861
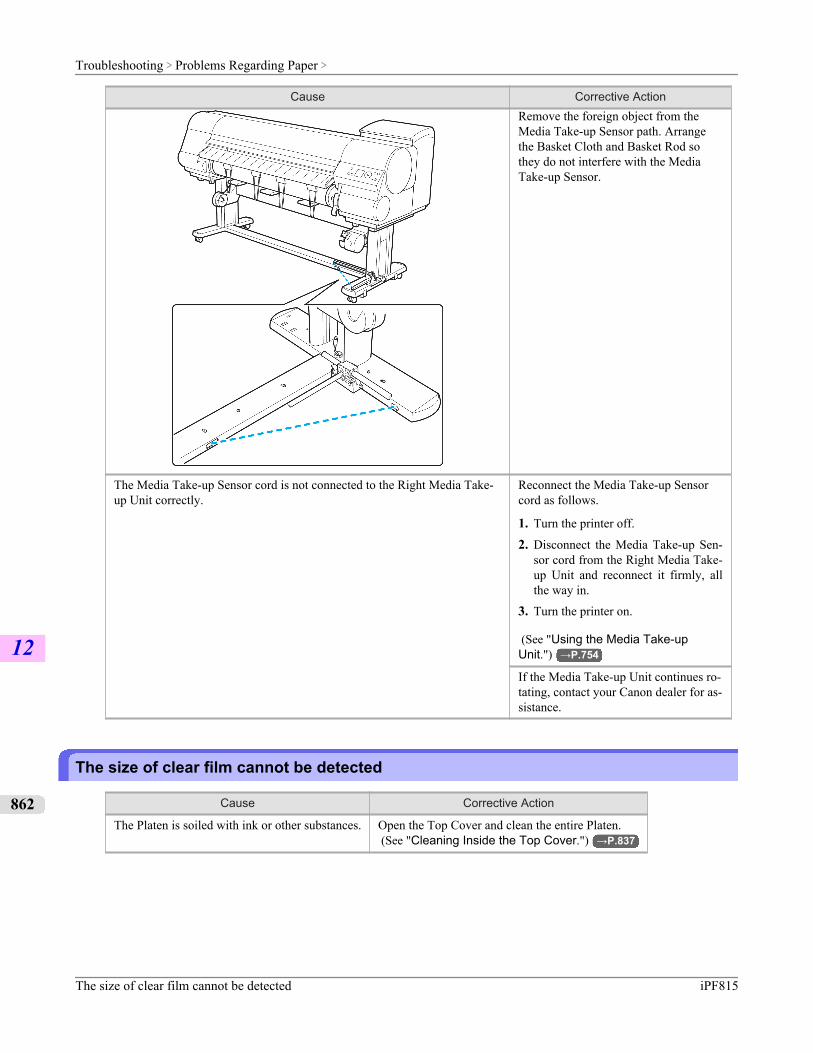
Cause Corrective ActionRemove the foreign object from theMedia Take-up Sensor path. Arrangethe Basket Cloth and Basket Rod sothey do not interfere with the MediaTake-up Sensor.
The Media Take-up Sensor cord is not connected to the Right Media Take-up Unit correctly.
Reconnect the Media Take-up Sensorcord as follows.
1. Turn the printer off.
2. Disconnect the Media Take-up Sen-sor cord from the Right Media Take-up Unit and reconnect it firmly, allthe way in.
3. Turn the printer on.
(See "Using the Media Take-upUnit.") →P.754
If the Media Take-up Unit continues ro-tating, contact your Canon dealer for as-sistance.
The size of clear film cannot be detected
Cause Corrective Action
The Platen is soiled with ink or other substances. Open the Top Cover and clean the entire Platen. (See "Cleaning Inside the Top Cover.") →P.837
Troubleshooting > Problems Regarding Paper >
The size of clear film cannot be detected iPF815
12
862
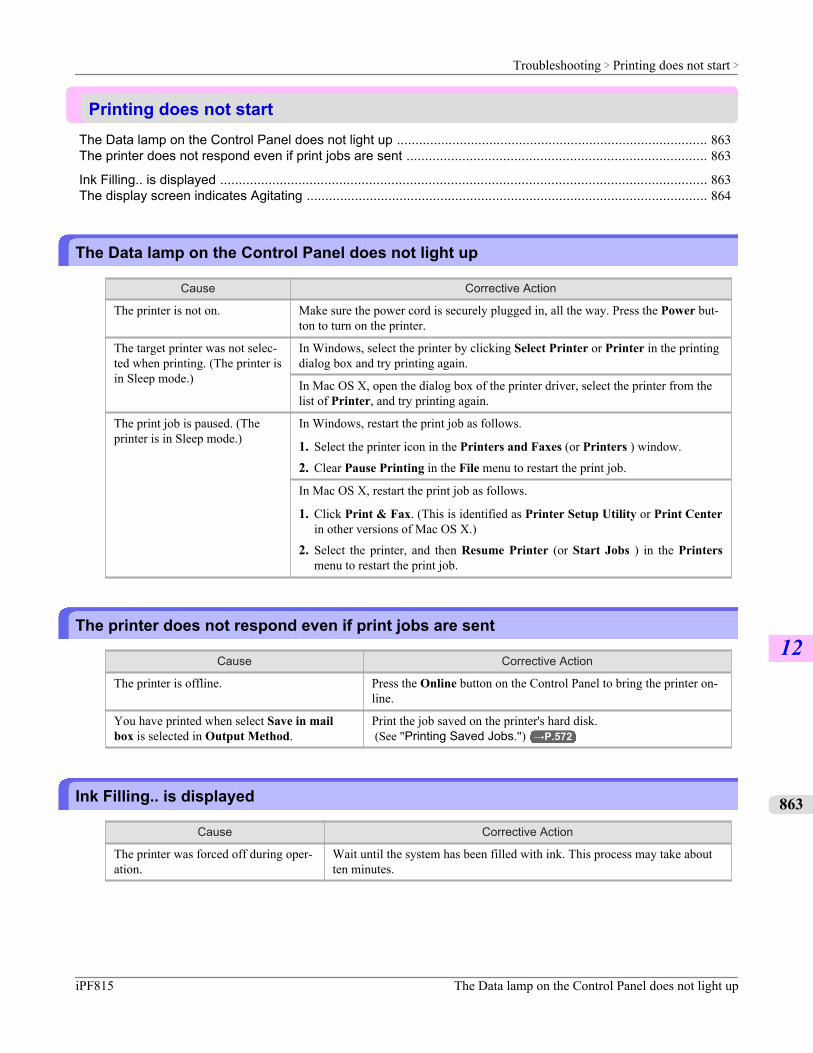
Printing does not startThe Data lamp on the Control Panel does not light up .................................................................................... 863The printer does not respond even if print jobs are sent ................................................................................. 863
Ink Filling.. is displayed ................................................................................................................................... 863The display screen indicates Agitating ............................................................................................................ 864
The Data lamp on the Control Panel does not light up
Cause Corrective Action
The printer is not on. Make sure the power cord is securely plugged in, all the way. Press the Power but-ton to turn on the printer.
The target printer was not selec-ted when printing. (The printer isin Sleep mode.)
In Windows, select the printer by clicking Select Printer or Printer in the printingdialog box and try printing again.
In Mac OS X, open the dialog box of the printer driver, select the printer from thelist of Printer, and try printing again.
The print job is paused. (Theprinter is in Sleep mode.)
In Windows, restart the print job as follows.
1. Select the printer icon in the Printers and Faxes (or Printers ) window.
2. Clear Pause Printing in the File menu to restart the print job.
In Mac OS X, restart the print job as follows.
1. Click Print & Fax. (This is identified as Printer Setup Utility or Print Centerin other versions of Mac OS X.)
2. Select the printer, and then Resume Printer (or Start Jobs ) in the Printersmenu to restart the print job.
The printer does not respond even if print jobs are sent
Cause Corrective Action
The printer is offline. Press the Online button on the Control Panel to bring the printer on-line.
You have printed when select Save in mailbox is selected in Output Method.
Print the job saved on the printer's hard disk. (See "Printing Saved Jobs.") →P.572
Ink Filling.. is displayed
Cause Corrective Action
The printer was forced off during oper-ation.
Wait until the system has been filled with ink. This process may take aboutten minutes.
Troubleshooting > Printing does not start >
iPF815 The Data lamp on the Control Panel does not light up
12
863
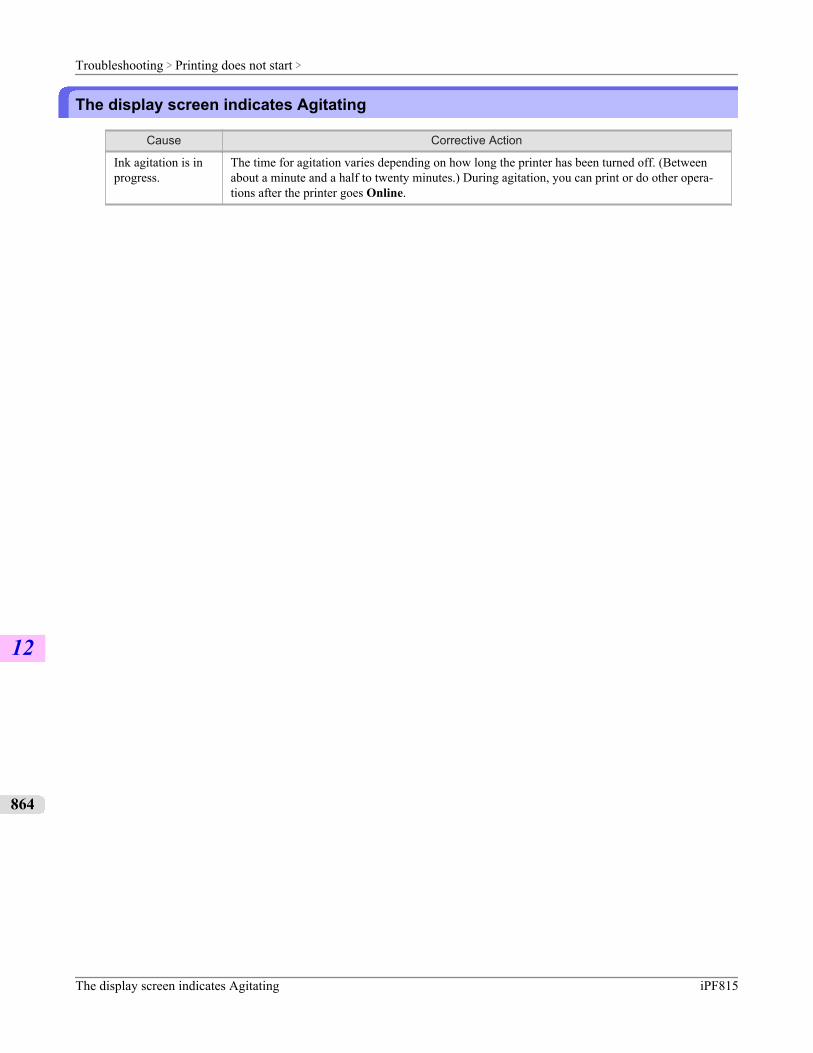
The display screen indicates Agitating
Cause Corrective Action
Ink agitation is inprogress.
The time for agitation varies depending on how long the printer has been turned off. (Betweenabout a minute and a half to twenty minutes.) During agitation, you can print or do other opera-tions after the printer goes Online.
Troubleshooting > Printing does not start >
The display screen indicates Agitating iPF815
12
864
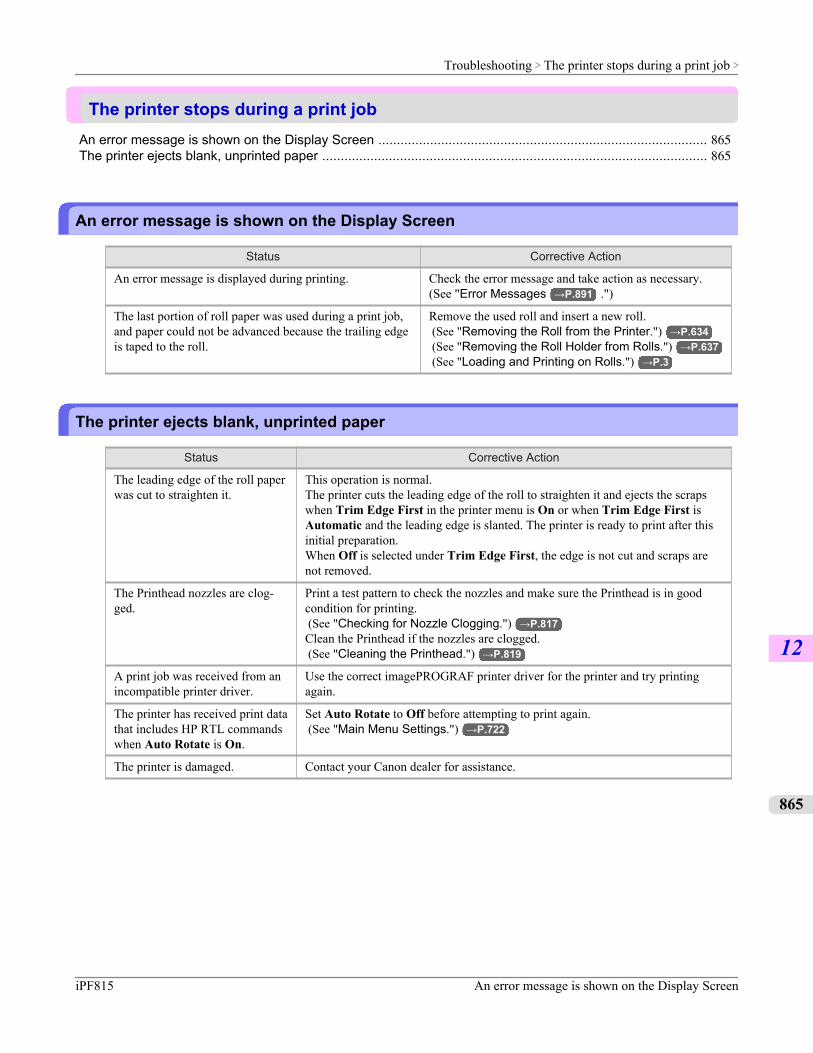
The printer stops during a print jobAn error message is shown on the Display Screen ......................................................................................... 865The printer ejects blank, unprinted paper ........................................................................................................ 865
An error message is shown on the Display Screen
Status Corrective Action
An error message is displayed during printing. Check the error message and take action as necessary.(See "Error Messages →P.891 .")
The last portion of roll paper was used during a print job,and paper could not be advanced because the trailing edgeis taped to the roll.
Remove the used roll and insert a new roll. (See "Removing the Roll from the Printer.") →P.634 (See "Removing the Roll Holder from Rolls.") →P.637 (See "Loading and Printing on Rolls.") →P.3
The printer ejects blank, unprinted paper
Status Corrective Action
The leading edge of the roll paperwas cut to straighten it.
This operation is normal.The printer cuts the leading edge of the roll to straighten it and ejects the scrapswhen Trim Edge First in the printer menu is On or when Trim Edge First isAutomatic and the leading edge is slanted. The printer is ready to print after thisinitial preparation.When Off is selected under Trim Edge First, the edge is not cut and scraps arenot removed.
The Printhead nozzles are clog-ged.
Print a test pattern to check the nozzles and make sure the Printhead is in goodcondition for printing. (See "Checking for Nozzle Clogging.") →P.817Clean the Printhead if the nozzles are clogged. (See "Cleaning the Printhead.") →P.819
A print job was received from anincompatible printer driver.
Use the correct imagePROGRAF printer driver for the printer and try printingagain.
The printer has received print datathat includes HP RTL commandswhen Auto Rotate is On.
Set Auto Rotate to Off before attempting to print again. (See "Main Menu Settings.") →P.722
The printer is damaged. Contact your Canon dealer for assistance.
Troubleshooting > The printer stops during a print job >
iPF815 An error message is shown on the Display Screen
12
865
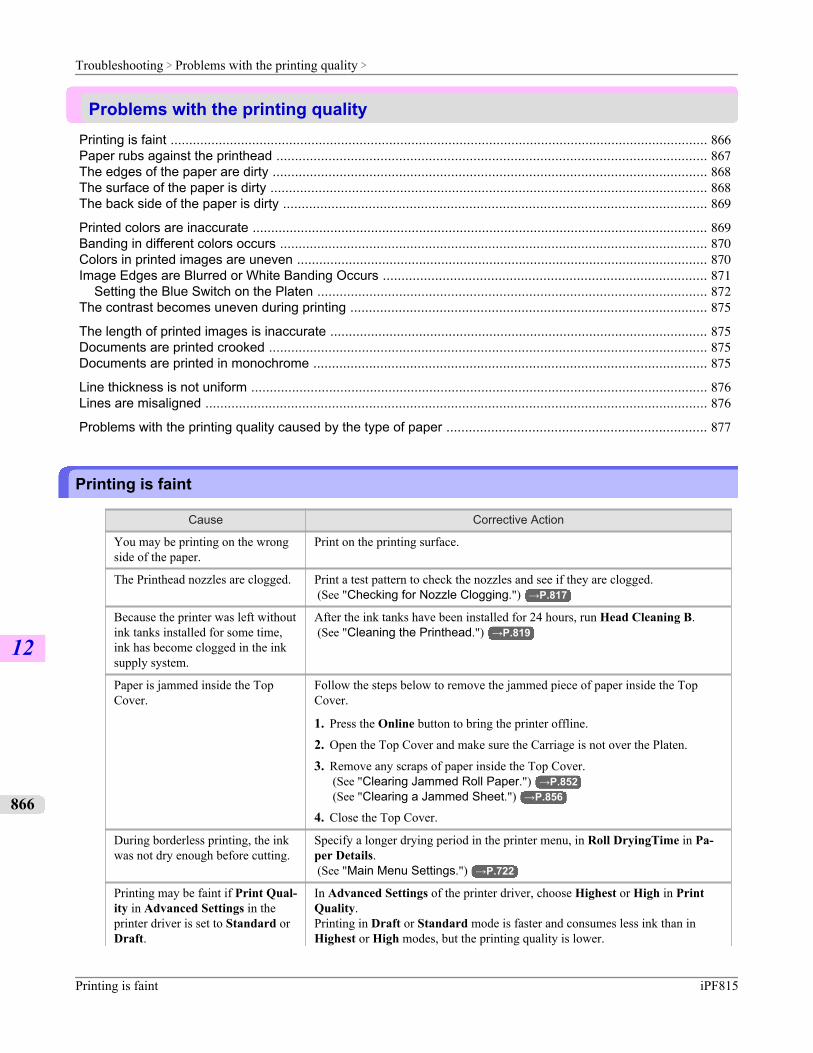
Problems with the printing qualityPrinting is faint ................................................................................................................................................. 866Paper rubs against the printhead .................................................................................................................... 867The edges of the paper are dirty ..................................................................................................................... 868The surface of the paper is dirty ...................................................................................................................... 868The back side of the paper is dirty .................................................................................................................. 869
Printed colors are inaccurate ........................................................................................................................... 869Banding in different colors occurs ................................................................................................................... 870Colors in printed images are uneven ............................................................................................................... 870Image Edges are Blurred or White Banding Occurs ....................................................................................... 871
Setting the Blue Switch on the Platen ......................................................................................................... 872The contrast becomes uneven during printing ................................................................................................ 875
The length of printed images is inaccurate ...................................................................................................... 875Documents are printed crooked ...................................................................................................................... 875Documents are printed in monochrome .......................................................................................................... 875
Line thickness is not uniform ........................................................................................................................... 876Lines are misaligned ....................................................................................................................................... 876
Problems with the printing quality caused by the type of paper ...................................................................... 877
Printing is faint
Cause Corrective Action
You may be printing on the wrongside of the paper.
Print on the printing surface.
The Printhead nozzles are clogged. Print a test pattern to check the nozzles and see if they are clogged. (See "Checking for Nozzle Clogging.") →P.817
Because the printer was left withoutink tanks installed for some time,ink has become clogged in the inksupply system.
After the ink tanks have been installed for 24 hours, run Head Cleaning B. (See "Cleaning the Printhead.") →P.819
Paper is jammed inside the TopCover.
Follow the steps below to remove the jammed piece of paper inside the TopCover.
1. Press the Online button to bring the printer offline.
2. Open the Top Cover and make sure the Carriage is not over the Platen.
3. Remove any scraps of paper inside the Top Cover. (See "Clearing Jammed Roll Paper.") →P.852 (See "Clearing a Jammed Sheet.") →P.856
4. Close the Top Cover.
During borderless printing, the inkwas not dry enough before cutting.
Specify a longer drying period in the printer menu, in Roll DryingTime in Pa-per Details. (See "Main Menu Settings.") →P.722
Printing may be faint if Print Qual-ity in Advanced Settings in theprinter driver is set to Standard orDraft.
In Advanced Settings of the printer driver, choose Highest or High in PrintQuality.Printing in Draft or Standard mode is faster and consumes less ink than inHighest or High modes, but the printing quality is lower.
Troubleshooting > Problems with the printing quality >
Printing is faint iPF815
12
866
Cause Corrective ActionPrinting may be faint if Print Qual-ity in Advanced Settings in theprinter driver is set to Standard orDraft.
(See "Giving Priority to Particular Graphic Elements and Colors for Print-ing.") →P.55
Paper rubs against the printhead
Cause Corrective Action
The type of paper specified in theprinter driver does not match thetype loaded in the printer.
Load paper of the same type as you have specified in the printer driver. (See "Loading Rolls in the Printer.") →P.628 (See "Loading Sheets in the Printer.") →P.651
Make sure the same type of paper is specified in the printer driver as you haveloaded in the printer.
1. Hold down the Stop button for a second or more to cancel printing.
2. Change the type of paper in the printer driver and try printing again.
Paper has been loaded incorrectly,causing it to wrinkle.
Reload the paper. (See "Loading Rolls in the Printer.") →P.628 (See "Loading Sheets in the Printer.") →P.651
The Printhead is set too low. In Head Height, choose Automatic. (See "Troubleshooting Paper Abrasion and Blurry Images (Head Height).")→P.675
You are printing on heavyweightpaper or paper that curls or wrin-kles easily after absorbing ink.
When printing on Heavyweight Coated Paper or other paper-based media, choosea VacuumStrngth setting of Strong or Strongest. If paper still rubs against theprinthead, try raising the Printhead by setting Head Height to Highest. (See "Adjusting the Vacuum Strength (VacuumStrngth).") →P.683 (See "Troubleshooting Paper Abrasion and Blurry Images (Head Height).")→P.675
When printing on CAD Tracing Paper or other film-based media, choose a Vac-uumStrngth setting of Standard, Strong, or Strongest. If paper still rubsagainst the printhead, try raising the Printhead by setting Head Height to High-est. (See "Adjusting the Vacuum Strength (VacuumStrngth).") →P.683 (See "Troubleshooting Paper Abrasion and Blurry Images (Head Height).")→P.675
When printing on paper 0.1 mm (0.004 in) thin or thinner, choose a Vac-uumStrngth setting of Weakest. If paper still rubs against the printhead, try rais-ing the Printhead by setting Head Height to Highest. (See "Adjusting the Vacuum Strength (VacuumStrngth).") →P.683 (See "Troubleshooting Paper Abrasion and Blurry Images (Head Height).")→P.675
When you have loaded paper, thepaper you have loaded does notmatch the type selected on theDisplay Screen.
Be sure to select the correct type of paper in the printer menu when loading paper. (See "Loading Rolls in the Printer.") →P.628 (See "Loading Sheets in the Printer.") →P.651
Troubleshooting > Problems with the printing quality >
iPF815 Paper rubs against the printhead
12
867

The edges of the paper are dirty
Cause Corrective Action
The Platen has become dirty afterborderless printing or printing onsmall paper.
Open the Top Cover and clean the Platen. (See "Cleaning Inside the Top Cover.") →P.837
The paper type as specified on theprinter does not match the typespecified in the printer driver.
Make sure the same paper type is specified on the printer as in the printer driver. (See "Selecting the Paper Type (Roll).") →P.632 (See "Selecting the Paper Type (Sheet).") →P.650
Make sure the same paper type is specified in the printer driver as on the printer.
1. Hold down the Stop button for a second or more to cancel printing.
2. Change the paper type in the printer driver and try printing again.
The paper is wrinkled or warped. Straighten out the wrinkles or curls and reload the paper. Do not use paper thathas been printed on previously. (See "Loading Rolls in the Printer.") →P.628 (See "Loading Sheets in the Printer.") →P.651
A cut line is printed because thefunction to reduce cutting dust hasbeen activated.
If this function is not needed, deactivate CutDustReduct. through the printermenu. (See "Main Menu Settings.") →P.722
The Printhead is set too low. In Head Height, choose Automatic. (See "Troubleshooting Paper Abrasion and Blurry Images (Head Height).")→P.675
You are printing on heavyweightpaper or paper that curls or wrin-kles easily after absorbing ink.
When printing on Heavyweight Coated Paper or other paper-based media, choosea VacuumStrngth setting of Strong or Strongest. If paper still rubs against theprinthead, try raising the Printhead by setting Head Height to Highest. (See "Adjusting the Vacuum Strength (VacuumStrngth).") →P.683 (See "Troubleshooting Paper Abrasion and Blurry Images (Head Height).")→P.675
When printing on CAD Tracing Paper or film-based media, choose a Vac-uumStrngth setting of Standard, Strong, or Strongest. If paper still rubsagainst the printhead, try raising the Printhead by setting Head Height to High-est. (See "Adjusting the Vacuum Strength (VacuumStrngth).") →P.683 (See "Troubleshooting Paper Abrasion and Blurry Images (Head Height).")→P.675
The Ejection Guide is soiled. Clean the Ejection Guide. (See "Cleaning the Printer Exterior.") →P.837
The surface of the paper is dirty
Cause Corrective Action
The Paper Retainer is soiled. Clean the Paper Retainer. (See "Cleaning Inside the Top Cover.") →P.837
You are using a paper thatdoes not dry easily.
In the Control Panel menu, set Roll DryingTime to at least 1 min. (See "Main Menu Settings.") →P.722
When paper that does not dry easily is used for printing, it may curl during printingand touch the Output Tray.
Troubleshooting > Problems with the printing quality >
The edges of the paper are dirty iPF815
12
868
Cause Corrective ActionYou are using a paper thatdoes not dry easily.
In this case, in the Control Panel menu, complete the settings for Dry time and Areain Scan Wait Time.However, note that printing will now take longer. (See "Main Menu Settings.") →P.722
The back side of the paper is dirty
Cause Corrective Action
The Platen has become dirty after borderless print-ing or printing on small paper.
Open the Top Cover and clean the Platen. (See "Cleaning Inside the Top Cover.") →P.837
Set CarriageScanWdth to Fixed.
The Platen has become soiled due to printing on thePlaten because width detection is deactivated.
Activate width detection, and open the Top Cover and clean thePlaten. (See "Cleaning Inside the Top Cover.") →P.837
Open the Top Cover and clean the Platen. After this, manuallyadvance the roll onto the Platen before printing. (See "Cleaning Inside the Top Cover.") →P.837 (See "Feeding Roll Paper Manually.") →P.638
The Paper Retainer is soiled. Clean the Paper Retainer. (See "Cleaning Inside the Top Cover.") →P.837
Printed colors are inaccurate
Cause Corrective Action
Color adjustment has not been activated in the Ad-vanced Settings of the printer driver.
In the Advanced Settings of the printer driver, access Color Set-tings in Color Mode to adjust colors.
Colors have not been adjusted on the computer ormonitor.
Refer to the computer and monitor documentation to adjust thecolors.
Adjust the settings of the color management software, referring tothe software documentation as needed.
The Printhead nozzles are clogged. Print a test pattern to check the nozzles and see if they are clog-ged. (See "Checking for Nozzle Clogging.") →P.817
In the Windows printer driver, Application ColorMatching Priority is not selected.
Click Special Settings on the Layout sheet of the printer driverand select Application Color Matching Priority in the dialogbox.
Printhead characteristics gradually change throughrepeated use, and colors may change.
Adjust the Printhead alignment. (See "Automatic Straightening of Lines and Colors (AutoHead Adj.).") →P.668 (See "Manual Straightening of Lines and Colors (ManualHead Adj).") →P.670
Troubleshooting > Problems with the printing quality >
iPF815 The back side of the paper is dirty
12
869
Cause Corrective Action
Color may change slightly even on the same mod-el of printer if you use a different version of thefirmware or printer driver, or when you print un-der different settings or in a different printing en-vironment.
Follow these steps to prepare the printing environment.
1. Use the same version of firmware or printer driver.
2. Specify the same value for all settings items.
Banding in different colors occurs
Cause Corrective Action
The paper feed amount is out of ad-justment.
Adjust the feed amount. (See "Adjusting the Feed Amount.") →P.676
Printing does not proceed smoothlybecause print jobs are interruptedduring transmission.
Exit other applications and cancel other print jobs.
In the printer menu, Print Length isspecified in Feed Priority.
Selecting Band Joint may improve printing results.Adjust the feed amount in the printer menu by specifying Band Joint in FeedPriority and try printing again. (See "Adjusting the Feed Amount.") →P.676
The Printhead is out of alignment. Adjust the Printhead alignment. (See "Automatic Straightening of Lines and Colors (Auto Head Adj.).")→P.668
The Printhead nozzles are clogged. Print a test pattern to check the nozzles and see if they are clogged. (See "Checking for Nozzle Clogging.") →P.817
Streaks may occur if you set thePrint Quality too low.
Choose a higher level of Print Quality in the Advanced Settings of the printerdriver and try printing again.Printing in Draft or Standard mode is faster and consumes less ink than inHighest or High modes, but the printing quality is lower. (See "Giving Priority to Particular Graphic Elements and Colors for Print-ing.") →P.55
The type of paper specified in theprinter driver does not match thetype loaded in the printer.
Load paper of the same type as you have specified in the printer driver. (See "Loading Rolls in the Printer.") →P.628 (See "Loading Sheets in the Printer.") →P.651
Make sure the same type of paper is specified in the printer driver as you haveloaded in the printer.
1. Hold down the Stop button for a second or more to cancel printing.
2. Change the type of paper in the printer driver and try printing again.
Colors in printed images are uneven
Cause Corrective Action
Line Drawing/Text is selectedwhen printing images in many solidcolors.
Specify Image in the printer driver.
Troubleshooting > Problems with the printing quality >
Banding in different colors occurs iPF815
12
870
Cause Corrective Action
You are printing on paper that curlseasily.
Printed colors may appear uneven on the leading edge of paper that is suscepti-ble to curling. Increase the level of vacuum holding the paper against the Platenor specify a margin of 20 mm (0.79 in.) or more for the leading edge. (See "Adjusting the Vacuum Strength (VacuumStrngth).") →P.683
Printed colors may be uneven if youset the Print Quality too low.
Choose a higher level of Print Quality in the Advanced Settings of the printerdriver.Printing in Draft or Standard mode is faster and consumes less ink than inHighest or High modes, but the printing quality is lower. (See "Giving Priority to Particular Graphic Elements and Colors for Print-ing.") →P.55
Color may be uneven between darkand light image areas.
Select Unidirectional Printing in the Advanced Settings of the printer driver.
When borderless printing is used,the edge of the paper is cut duringprinting. Thus, ink density may beuneven at the edges.
Specify No in Auto Cut in the printer driver before printing. In this case, thepaper can be printed without borders on the left and right sides only. Cut theprinted document ejected from the printer, then use scissors to cut away theedges on the top and bottom.
Choose a higher level of Print Quality in the Advanced Settings of the printerdriver. (See "Giving Priority to Particular Graphic Elements and Colors for Print-ing.") →P.55
The Printhead is out of alignment. Adjust the Printhead alignment. (See "Automatic Straightening of Lines and Colors (Auto Head Adj.).")→P.668
Drying documents stacked on eachother may cause uneven colors.
To avoid uneven colors, we recommend drying each sheet separately.
Color density may be uneven if youuse Glossy Paper, art paper, or Coat-ed Paper.
In Advanced Settings of the printer driver, choose Highest or High in PrintQuality.
The type of paper specified in theprinter driver does not match thetype loaded in the printer.
Load paper of the same type as you have specified in the printer driver. (See "Loading Rolls in the Printer.") →P.628 (See "Loading Sheets in the Printer.") →P.651
Make sure the same type of paper is specified in the printer driver as you haveloaded in the printer.
1. Hold down the Stop button for a second or more to cancel printing.
2. Change the type of paper in the printer driver and try printing again.
Scan Wait Time > Area in theControl Panel menu is set to Lead-ing edge.
When Scan Wait Time > Area is set to Leading edge, colors may be uneven110–160 mm from the leading edge. (The position varies depending on thePrint Quality setting.)In this case, select Scan Wait Time > Area > Entire area.However, note that printing will now take longer. (See "Main Menu Settings.") →P.722
Image Edges are Blurred or White Banding Occurs
Cause Corrective Action
The Platen suction is too strong. Set VacuumStrngth to Weakest. (See "Adjusting the Vacuum Strength (VacuumStrngth).") →P.683
Troubleshooting > Problems with the printing quality >
iPF815 Image Edges are Blurred or White Banding Occurs
12
871
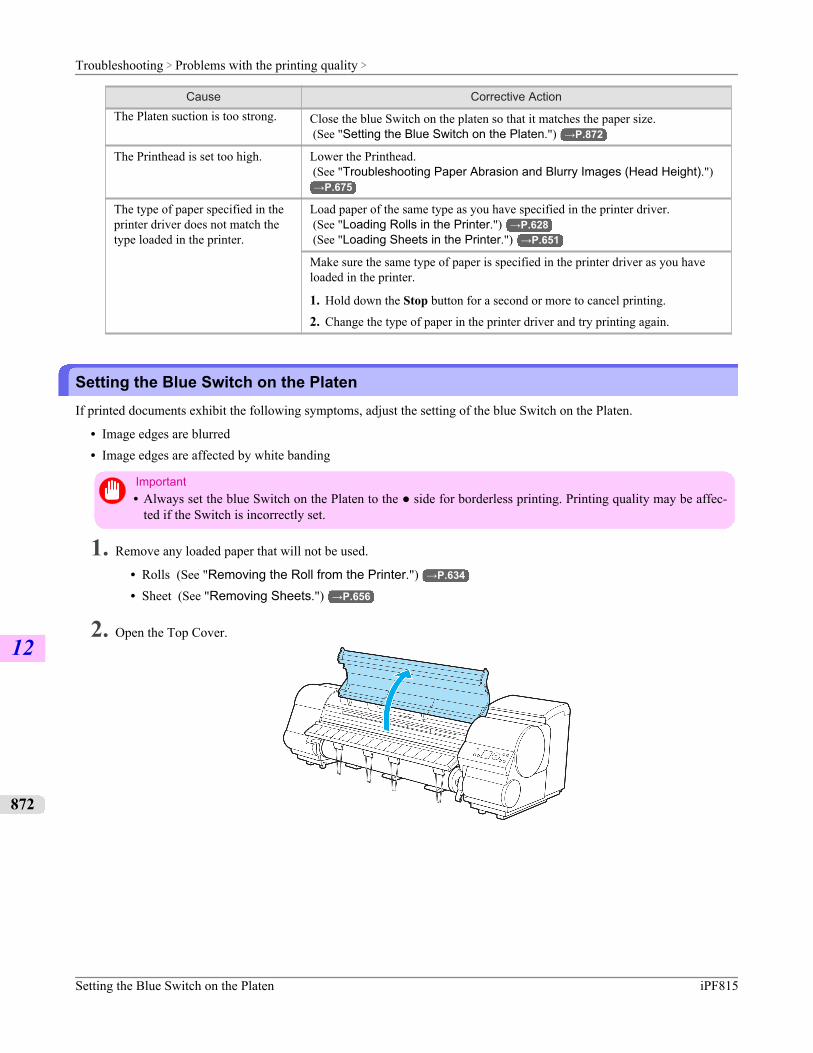
Cause Corrective ActionThe Platen suction is too strong. Close the blue Switch on the platen so that it matches the paper size.
(See "Setting the Blue Switch on the Platen.") →P.872
The Printhead is set too high. Lower the Printhead. (See "Troubleshooting Paper Abrasion and Blurry Images (Head Height).")→P.675
The type of paper specified in theprinter driver does not match thetype loaded in the printer.
Load paper of the same type as you have specified in the printer driver. (See "Loading Rolls in the Printer.") →P.628 (See "Loading Sheets in the Printer.") →P.651
Make sure the same type of paper is specified in the printer driver as you haveloaded in the printer.
1. Hold down the Stop button for a second or more to cancel printing.
2. Change the type of paper in the printer driver and try printing again.
Setting the Blue Switch on the PlatenIf printed documents exhibit the following symptoms, adjust the setting of the blue Switch on the Platen.
• Image edges are blurred• Image edges are affected by white banding
Important• Always set the blue Switch on the Platen to the ● side for borderless printing. Printing quality may be affec-
ted if the Switch is incorrectly set.
1. Remove any loaded paper that will not be used.
• Rolls (See "Removing the Roll from the Printer.") →P.634
• Sheet (See "Removing Sheets.") →P.656
2. Open the Top Cover.
Troubleshooting > Problems with the printing quality >
Setting the Blue Switch on the Platen iPF815
12
872
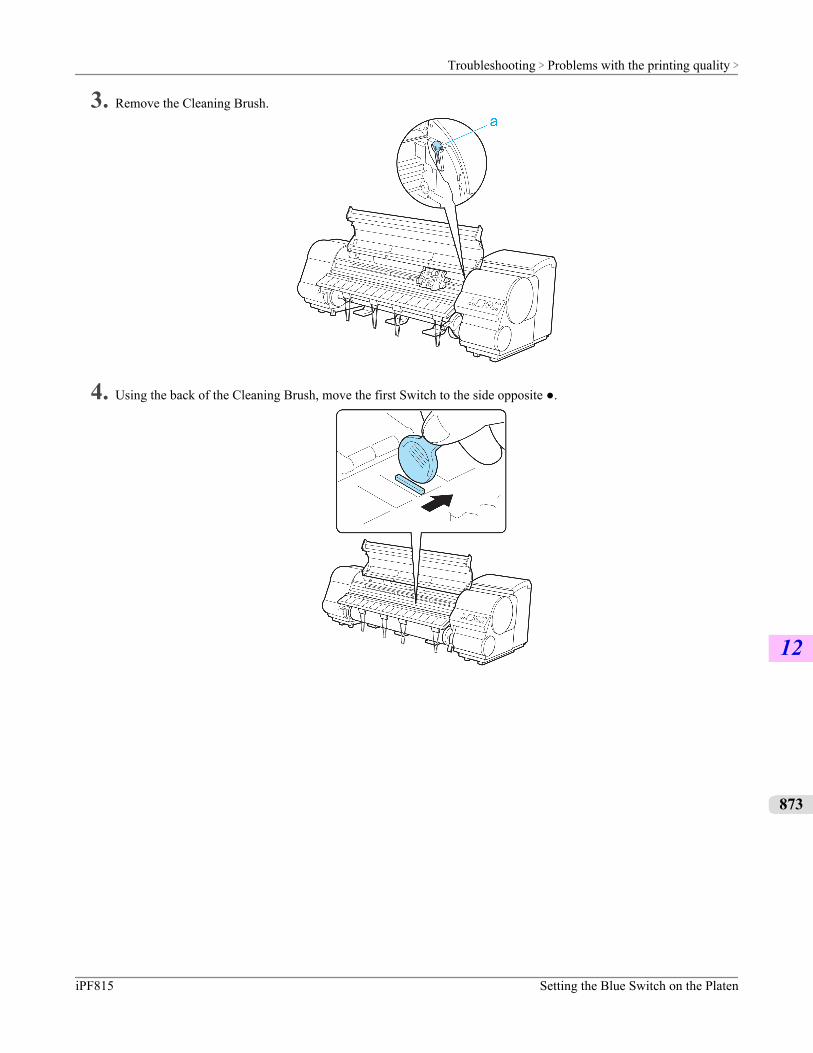
3. Remove the Cleaning Brush.
4. Using the back of the Cleaning Brush, move the first Switch to the side opposite ●.
Troubleshooting > Problems with the printing quality >
iPF815 Setting the Blue Switch on the Platen
12
873
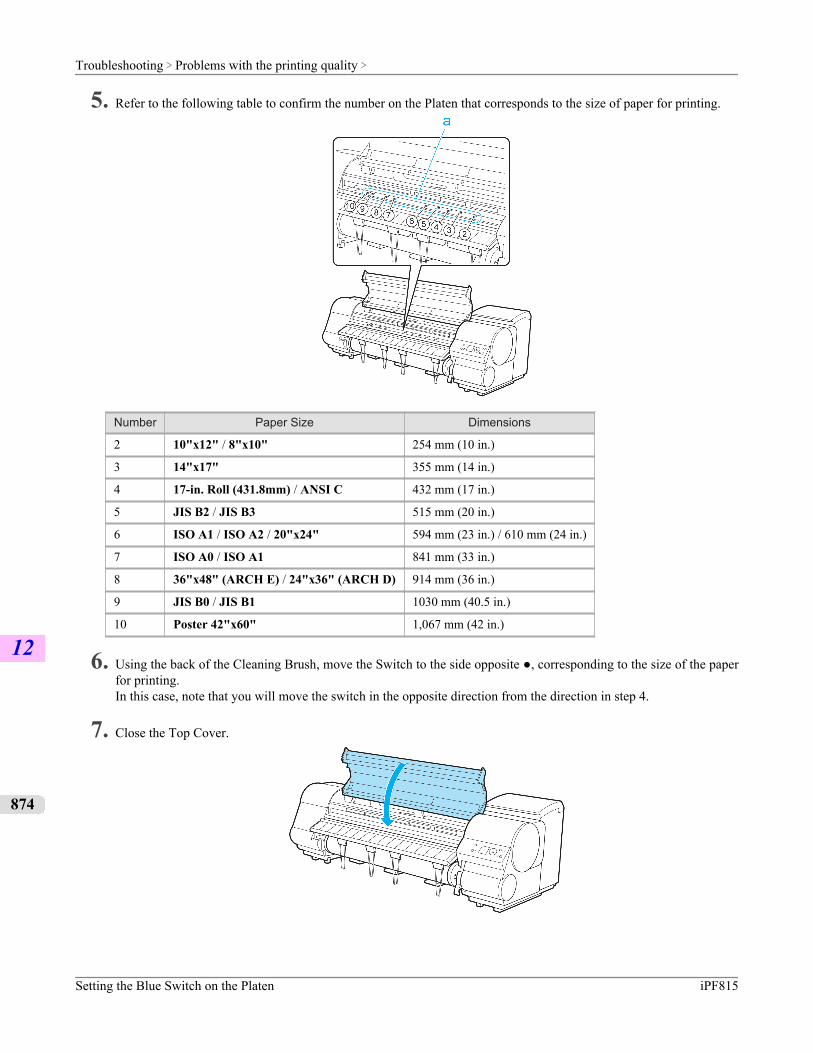
5. Refer to the following table to confirm the number on the Platen that corresponds to the size of paper for printing.
Number Paper Size Dimensions
2 10"x12" / 8"x10" 254 mm (10 in.)
3 14"x17" 355 mm (14 in.)
4 17-in. Roll (431.8mm) / ANSI C 432 mm (17 in.)
5 JIS B2 / JIS B3 515 mm (20 in.)
6 ISO A1 / ISO A2 / 20"x24" 594 mm (23 in.) / 610 mm (24 in.)
7 ISO A0 / ISO A1 841 mm (33 in.)
8 36"x48" (ARCH E) / 24"x36" (ARCH D) 914 mm (36 in.)
9 JIS B0 / JIS B1 1030 mm (40.5 in.)
10 Poster 42"x60" 1,067 mm (42 in.)
6. Using the back of the Cleaning Brush, move the Switch to the side opposite ●, corresponding to the size of the paperfor printing.In this case, note that you will move the switch in the opposite direction from the direction in step 4.
7. Close the Top Cover.
Troubleshooting > Problems with the printing quality >
Setting the Blue Switch on the Platen iPF815
12
874

The contrast becomes uneven during printing
Cause Corrective Action
The paper feed amount is out of adjust-ment.
Adjust the feed amount. (See "Adjusting the Feed Amount.") →P.676
The type of paper specified in the printerdriver does not match the type loaded inthe printer.
Load paper of the same type as you have specified in the printer driver. (See "Loading Rolls in the Printer.") →P.628 (See "Loading Sheets in the Printer.") →P.651
Make sure the same type of paper is specified in the printer driver as youhave loaded in the printer.
1. Hold down the Stop button for a second or more to cancel printing.
2. Change the type of paper in the printer driver and try printing again.
The length of printed images is inaccurate
Cause Corrective Action
In the printer menu, Band Joint isspecified in Feed Priority.
To ensure the feed amount matches the paper size, select Print Length in FeedPriority in the printer menu and enter the amount for adjustment in AdjustLength. (See "Adjusting the Feed Amount.") →P.676You can adjust the feed amount in 0.02% increments. (See "Main Menu Settings.") →P.722
The type of paper specified in theprinter driver does not match thetype loaded in the printer.
Load paper of the same type as you have specified in the printer driver. (See "Loading Rolls in the Printer.") →P.628 (See "Loading Sheets in the Printer.") →P.651
Make sure the same type of paper is specified in the printer driver as you haveloaded in the printer.
1. Hold down the Stop button for a second or more to cancel printing.
2. Change the type of paper in the printer driver and try printing again.
Documents are printed crooked
Cause Corrective Action
Skew Skew Check Lv. has been set to Loose or Off. Choose Standard in Skew Check Lv..
Width Detection has been set to Off. Choose On in Width Detection.
Documents are printed in monochrome
Cause Corrective Action
In the Advanced Settings of the printer driver,Monochrome, Monochrome (BK ink), orMonochrome Bitmap is specified in ColorMode.
In the Advanced Settings of the printer driver, specify Color inColor Mode and try printing again.
Troubleshooting > Problems with the printing quality >
iPF815 The contrast becomes uneven during printing
12
875

Cause Corrective Action
The Printhead nozzles are clogged. Print a test pattern to check the color ink nozzles and see if they areclogged. (See "Checking for Nozzle Clogging.") →P.817
Line thickness is not uniform
Cause Corrective Action
In the Special Settings dialog boxof the Windows printer driver,Fast Graphic Process is selected.
Open the printer driver's Properties dialog box from Print in the application soft-ware's File menu, and try printing following the steps below.
1. Clear the option Open Preview When Print Job Starts on the Main sheet.
2. Clear the option Page Layout on the Layout sheet.
3. Click the Special Settings button on the Layout sheet to display the SpecialSettings dialog box. Clear the option Fast Graphic Process.
The blue Switch on the platen isset incorrectly.
Move the Switch numbered corresponding to the size of paper for printing oppo-site to the ● position. (See "Setting the Blue Switch on the Platen.") →P.872
The type of paper specified in theprinter driver does not match thetype loaded in the printer.
Load paper of the same type as you have specified in the printer driver. (See "Loading Rolls in the Printer.") →P.628 (See "Loading Sheets in the Printer.") →P.651
Make sure the same type of paper is specified in the printer driver as you haveloaded in the printer.
1. Hold down the Stop button for a second or more to cancel printing.
2. Change the type of paper in the printer driver and try printing again.
Lines are misaligned
Cause Corrective Action
The Printhead alignment is not ad-justed.
Adjust the Printhead alignment. (See "Automatic Straightening of Lines and Colors (Auto Head Adj.).")→P.668
(See "Manual Straightening of Lines and Colors (Manual Head Adj).")→P.670
(See "Adjusting Line Misalignment (Head Inc. Adj.).") →P.672
The type of paper specified in theprinter driver does not match thetype loaded in the printer.
Load paper of the same type as you have specified in the printer driver. (See "Loading Rolls in the Printer.") →P.628 (See "Loading Sheets in the Printer.") →P.651
Make sure the same type of paper is specified in the printer driver as you haveloaded in the printer.
1. Hold down the Stop button for a second or more to cancel printing.
2. Change the type of paper in the printer driver and try printing again.
Troubleshooting > Problems with the printing quality >
Line thickness is not uniform iPF815
12
876
Problems with the printing quality caused by the type of paperFor paper-specific troubleshooting tips to improve the printing quality, refer to the Paper Reference Guide. (See "Types ofPaper.") →P.617
Troubleshooting > Problems with the printing quality >
iPF815 Problems with the printing quality caused by the type of paper
12
877
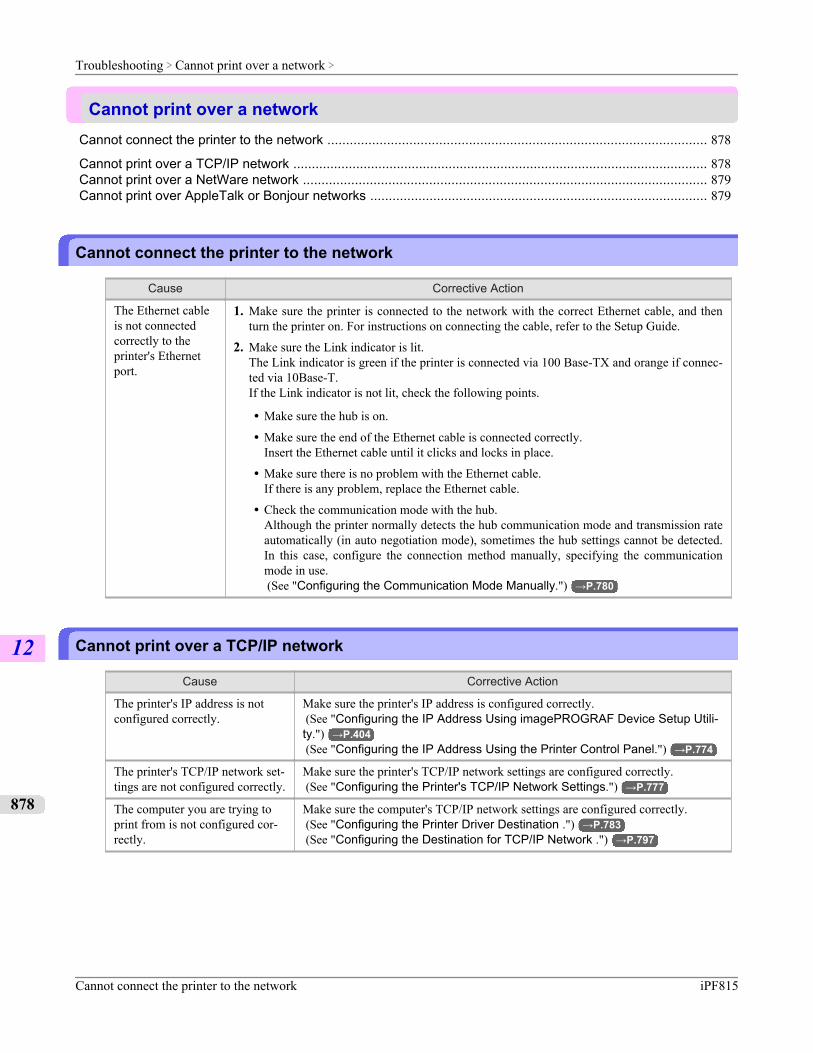
Cannot print over a networkCannot connect the printer to the network ...................................................................................................... 878
Cannot print over a TCP/IP network ................................................................................................................ 878Cannot print over a NetWare network ............................................................................................................. 879Cannot print over AppleTalk or Bonjour networks ........................................................................................... 879
Cannot connect the printer to the network
Cause Corrective Action
The Ethernet cableis not connectedcorrectly to theprinter's Ethernetport.
1. Make sure the printer is connected to the network with the correct Ethernet cable, and thenturn the printer on. For instructions on connecting the cable, refer to the Setup Guide.
2. Make sure the Link indicator is lit.The Link indicator is green if the printer is connected via 100 Base-TX and orange if connec-ted via 10Base-T.If the Link indicator is not lit, check the following points.
• Make sure the hub is on.
• Make sure the end of the Ethernet cable is connected correctly.Insert the Ethernet cable until it clicks and locks in place.
• Make sure there is no problem with the Ethernet cable.If there is any problem, replace the Ethernet cable.
• Check the communication mode with the hub.Although the printer normally detects the hub communication mode and transmission rateautomatically (in auto negotiation mode), sometimes the hub settings cannot be detected.In this case, configure the connection method manually, specifying the communicationmode in use. (See "Configuring the Communication Mode Manually.") →P.780
Cannot print over a TCP/IP network
Cause Corrective Action
The printer's IP address is notconfigured correctly.
Make sure the printer's IP address is configured correctly. (See "Configuring the IP Address Using imagePROGRAF Device Setup Utili-ty.") →P.404 (See "Configuring the IP Address Using the Printer Control Panel.") →P.774
The printer's TCP/IP network set-tings are not configured correctly.
Make sure the printer's TCP/IP network settings are configured correctly. (See "Configuring the Printer's TCP/IP Network Settings.") →P.777
The computer you are trying toprint from is not configured cor-rectly.
Make sure the computer's TCP/IP network settings are configured correctly. (See "Configuring the Printer Driver Destination .") →P.783 (See "Configuring the Destination for TCP/IP Network .") →P.797
Troubleshooting > Cannot print over a network >
Cannot connect the printer to the network iPF815
12
878
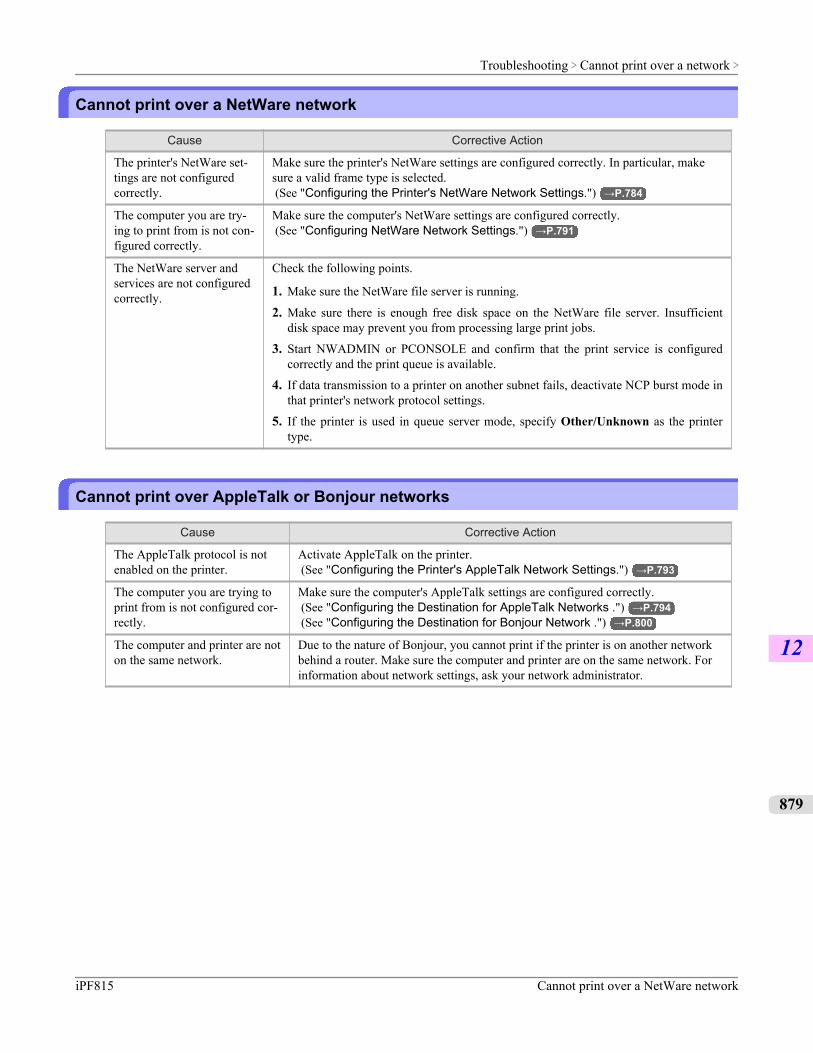
Cannot print over a NetWare network
Cause Corrective Action
The printer's NetWare set-tings are not configuredcorrectly.
Make sure the printer's NetWare settings are configured correctly. In particular, makesure a valid frame type is selected. (See "Configuring the Printer's NetWare Network Settings.") →P.784
The computer you are try-ing to print from is not con-figured correctly.
Make sure the computer's NetWare settings are configured correctly. (See "Configuring NetWare Network Settings.") →P.791
The NetWare server andservices are not configuredcorrectly.
Check the following points.
1. Make sure the NetWare file server is running.
2. Make sure there is enough free disk space on the NetWare file server. Insufficientdisk space may prevent you from processing large print jobs.
3. Start NWADMIN or PCONSOLE and confirm that the print service is configuredcorrectly and the print queue is available.
4. If data transmission to a printer on another subnet fails, deactivate NCP burst mode inthat printer's network protocol settings.
5. If the printer is used in queue server mode, specify Other/Unknown as the printertype.
Cannot print over AppleTalk or Bonjour networks
Cause Corrective Action
The AppleTalk protocol is notenabled on the printer.
Activate AppleTalk on the printer. (See "Configuring the Printer's AppleTalk Network Settings.") →P.793
The computer you are trying toprint from is not configured cor-rectly.
Make sure the computer's AppleTalk settings are configured correctly. (See "Configuring the Destination for AppleTalk Networks .") →P.794 (See "Configuring the Destination for Bonjour Network .") →P.800
The computer and printer are noton the same network.
Due to the nature of Bonjour, you cannot print if the printer is on another networkbehind a router. Make sure the computer and printer are on the same network. Forinformation about network settings, ask your network administrator.
Troubleshooting > Cannot print over a network >
iPF815 Cannot print over a NetWare network
12
879
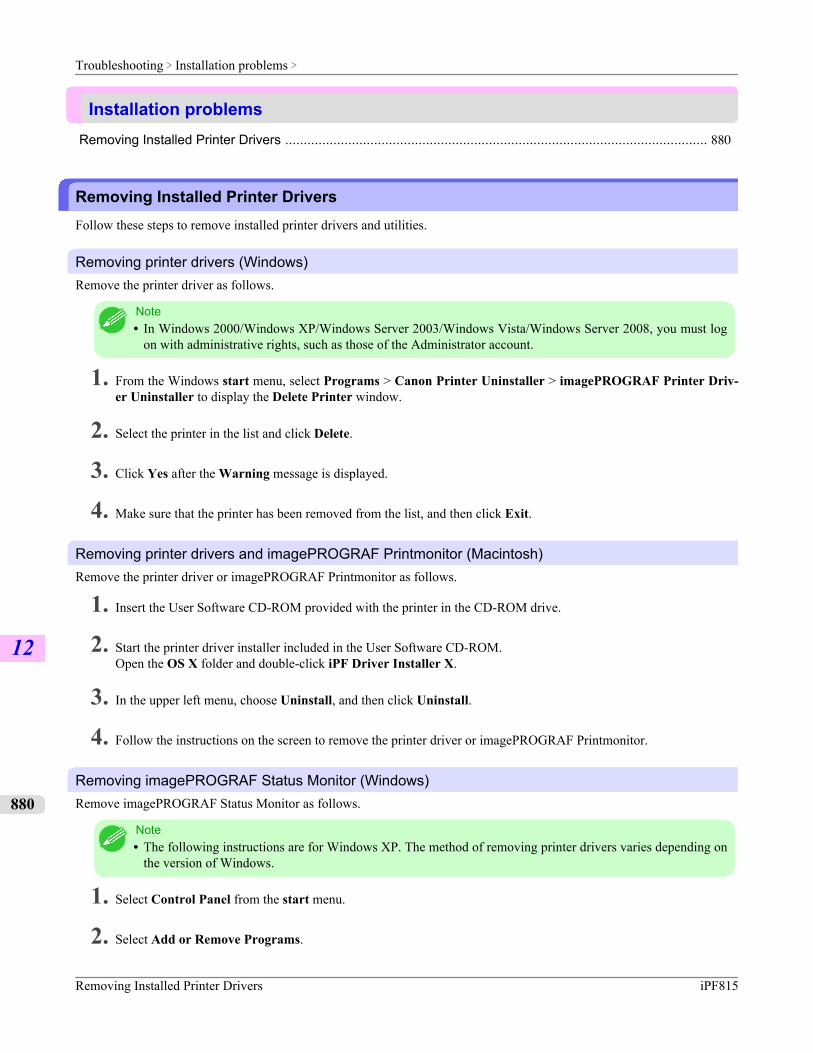
Installation problemsRemoving Installed Printer Drivers .................................................................................................................. 880
Removing Installed Printer DriversFollow these steps to remove installed printer drivers and utilities.
Removing printer drivers (Windows)Remove the printer driver as follows.
Note• In Windows 2000/Windows XP/Windows Server 2003/Windows Vista/Windows Server 2008, you must log
on with administrative rights, such as those of the Administrator account.
1. From the Windows start menu, select Programs > Canon Printer Uninstaller > imagePROGRAF Printer Driv-er Uninstaller to display the Delete Printer window.
2. Select the printer in the list and click Delete.
3. Click Yes after the Warning message is displayed.
4. Make sure that the printer has been removed from the list, and then click Exit.
Removing printer drivers and imagePROGRAF Printmonitor (Macintosh)Remove the printer driver or imagePROGRAF Printmonitor as follows.
1. Insert the User Software CD-ROM provided with the printer in the CD-ROM drive.
2. Start the printer driver installer included in the User Software CD-ROM.Open the OS X folder and double-click iPF Driver Installer X.
3. In the upper left menu, choose Uninstall, and then click Uninstall.
4. Follow the instructions on the screen to remove the printer driver or imagePROGRAF Printmonitor.
Removing imagePROGRAF Status Monitor (Windows)Remove imagePROGRAF Status Monitor as follows.
Note• The following instructions are for Windows XP. The method of removing printer drivers varies depending on
the version of Windows.
1. Select Control Panel from the start menu.
2. Select Add or Remove Programs.
Troubleshooting > Installation problems >
Removing Installed Printer Drivers iPF815
12
880
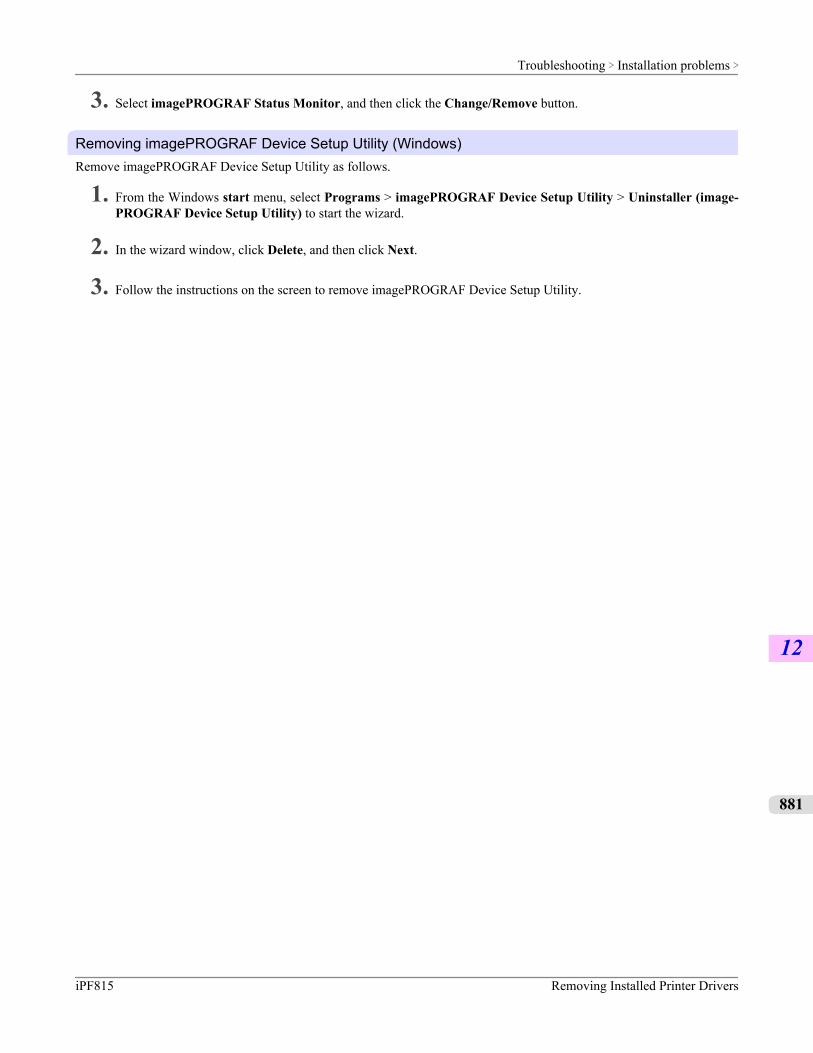
3. Select imagePROGRAF Status Monitor, and then click the Change/Remove button.
Removing imagePROGRAF Device Setup Utility (Windows)Remove imagePROGRAF Device Setup Utility as follows.
1. From the Windows start menu, select Programs > imagePROGRAF Device Setup Utility > Uninstaller (image-PROGRAF Device Setup Utility) to start the wizard.
2. In the wizard window, click Delete, and then click Next.
3. Follow the instructions on the screen to remove imagePROGRAF Device Setup Utility.
Troubleshooting > Installation problems >
iPF815 Removing Installed Printer Drivers
12
881
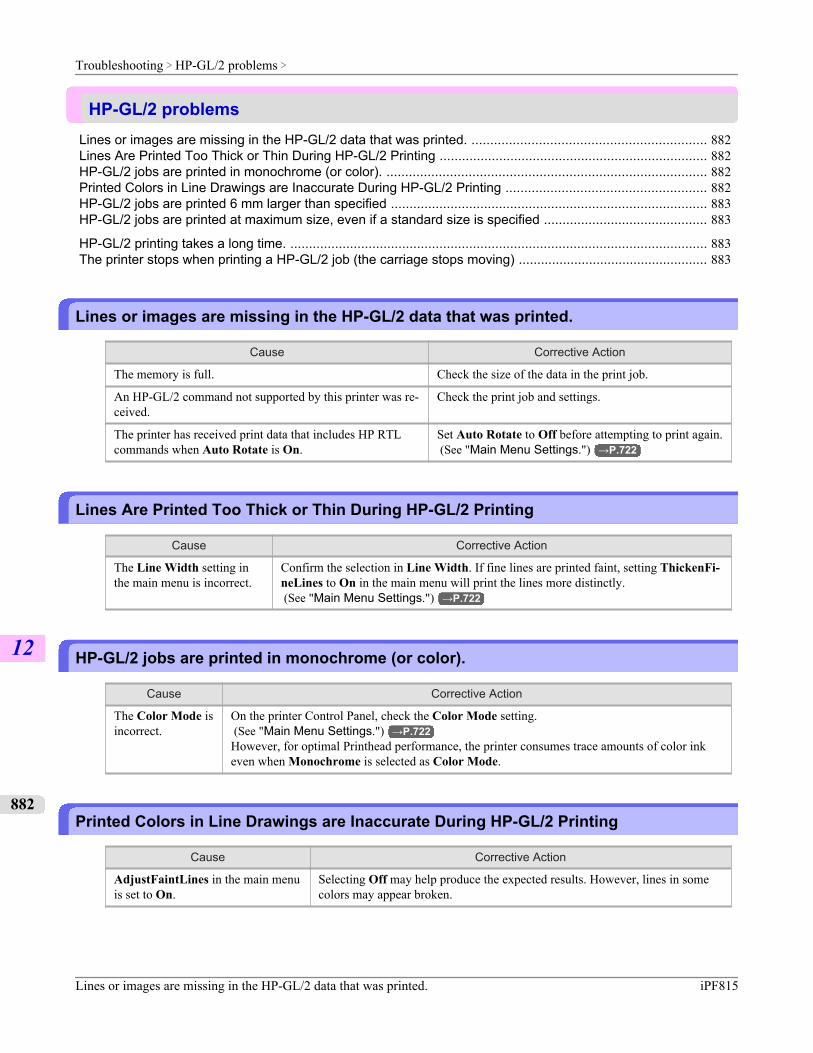
HP-GL/2 problemsLines or images are missing in the HP-GL/2 data that was printed. ............................................................... 882Lines Are Printed Too Thick or Thin During HP-GL/2 Printing ........................................................................ 882HP-GL/2 jobs are printed in monochrome (or color). ...................................................................................... 882Printed Colors in Line Drawings are Inaccurate During HP-GL/2 Printing ...................................................... 882HP-GL/2 jobs are printed 6 mm larger than specified ..................................................................................... 883HP-GL/2 jobs are printed at maximum size, even if a standard size is specified ............................................ 883
HP-GL/2 printing takes a long time. ................................................................................................................ 883The printer stops when printing a HP-GL/2 job (the carriage stops moving) ................................................... 883
Lines or images are missing in the HP-GL/2 data that was printed.
Cause Corrective Action
The memory is full. Check the size of the data in the print job.
An HP-GL/2 command not supported by this printer was re-ceived.
Check the print job and settings.
The printer has received print data that includes HP RTLcommands when Auto Rotate is On.
Set Auto Rotate to Off before attempting to print again. (See "Main Menu Settings.") →P.722
Lines Are Printed Too Thick or Thin During HP-GL/2 Printing
Cause Corrective Action
The Line Width setting inthe main menu is incorrect.
Confirm the selection in Line Width. If fine lines are printed faint, setting ThickenFi-neLines to On in the main menu will print the lines more distinctly. (See "Main Menu Settings.") →P.722
HP-GL/2 jobs are printed in monochrome (or color).
Cause Corrective Action
The Color Mode isincorrect.
On the printer Control Panel, check the Color Mode setting. (See "Main Menu Settings.") →P.722However, for optimal Printhead performance, the printer consumes trace amounts of color inkeven when Monochrome is selected as Color Mode.
Printed Colors in Line Drawings are Inaccurate During HP-GL/2 Printing
Cause Corrective Action
AdjustFaintLines in the main menuis set to On.
Selecting Off may help produce the expected results. However, lines in somecolors may appear broken.
Troubleshooting > HP-GL/2 problems >
Lines or images are missing in the HP-GL/2 data that was printed. iPF815
12
882
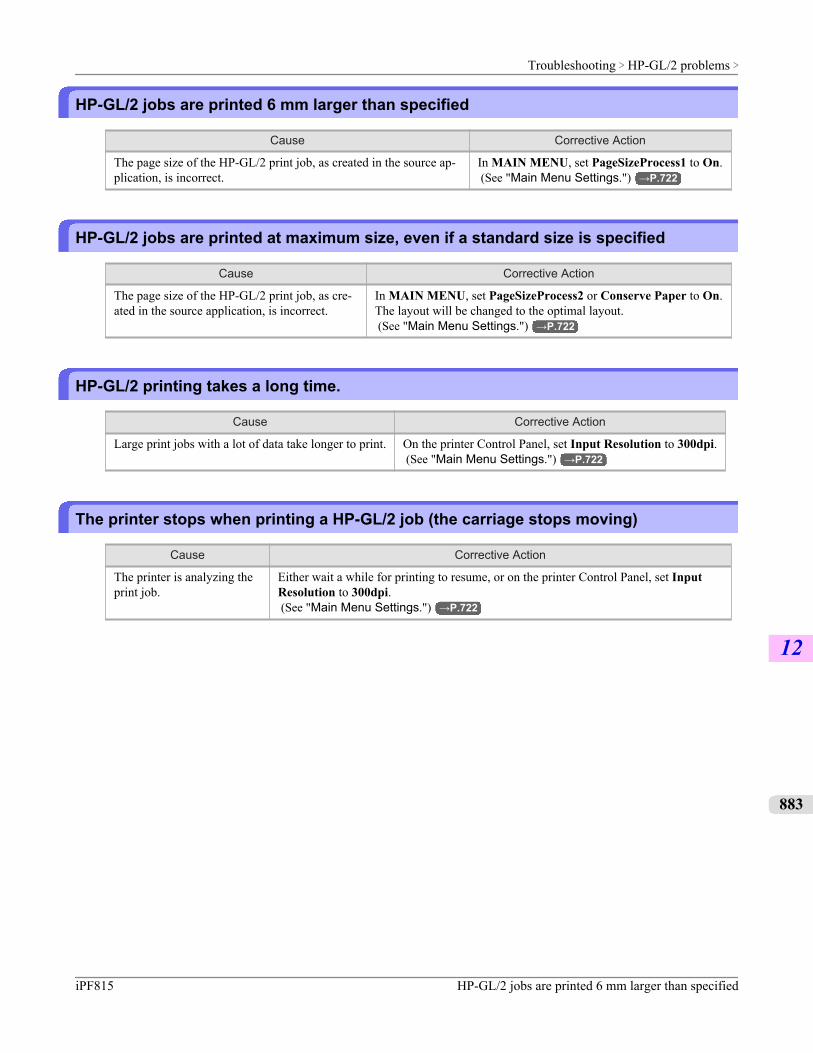
HP-GL/2 jobs are printed 6 mm larger than specified
Cause Corrective Action
The page size of the HP-GL/2 print job, as created in the source ap-plication, is incorrect.
In MAIN MENU, set PageSizeProcess1 to On. (See "Main Menu Settings.") →P.722
HP-GL/2 jobs are printed at maximum size, even if a standard size is specified
Cause Corrective Action
The page size of the HP-GL/2 print job, as cre-ated in the source application, is incorrect.
In MAIN MENU, set PageSizeProcess2 or Conserve Paper to On.The layout will be changed to the optimal layout. (See "Main Menu Settings.") →P.722
HP-GL/2 printing takes a long time.
Cause Corrective Action
Large print jobs with a lot of data take longer to print. On the printer Control Panel, set Input Resolution to 300dpi. (See "Main Menu Settings.") →P.722
The printer stops when printing a HP-GL/2 job (the carriage stops moving)
Cause Corrective Action
The printer is analyzing theprint job.
Either wait a while for printing to resume, or on the printer Control Panel, set InputResolution to 300dpi. (See "Main Menu Settings.") →P.722
Troubleshooting > HP-GL/2 problems >
iPF815 HP-GL/2 jobs are printed 6 mm larger than specified
12
883
Other problemsThe printer does not go on .............................................................................................................................. 884
If the Printer Makes a Strange Sound ............................................................................................................. 885
Messages advising to check the maintenance cartridge are not cleared ........................................................ 885
The printer consumes a lot of ink .................................................................................................................... 886Ink level detection ............................................................................................................................................ 886
The printer does not go on
Cause Corrective Action
The printer is unplugged. Plug the power cord into the outlet, and then turn on the printer.
The specified voltage is not supplied. Check the voltage of the outlet and breaker. (See "Specifications.") →P.765
Troubleshooting > Other problems >
The printer does not go on iPF815
12
884
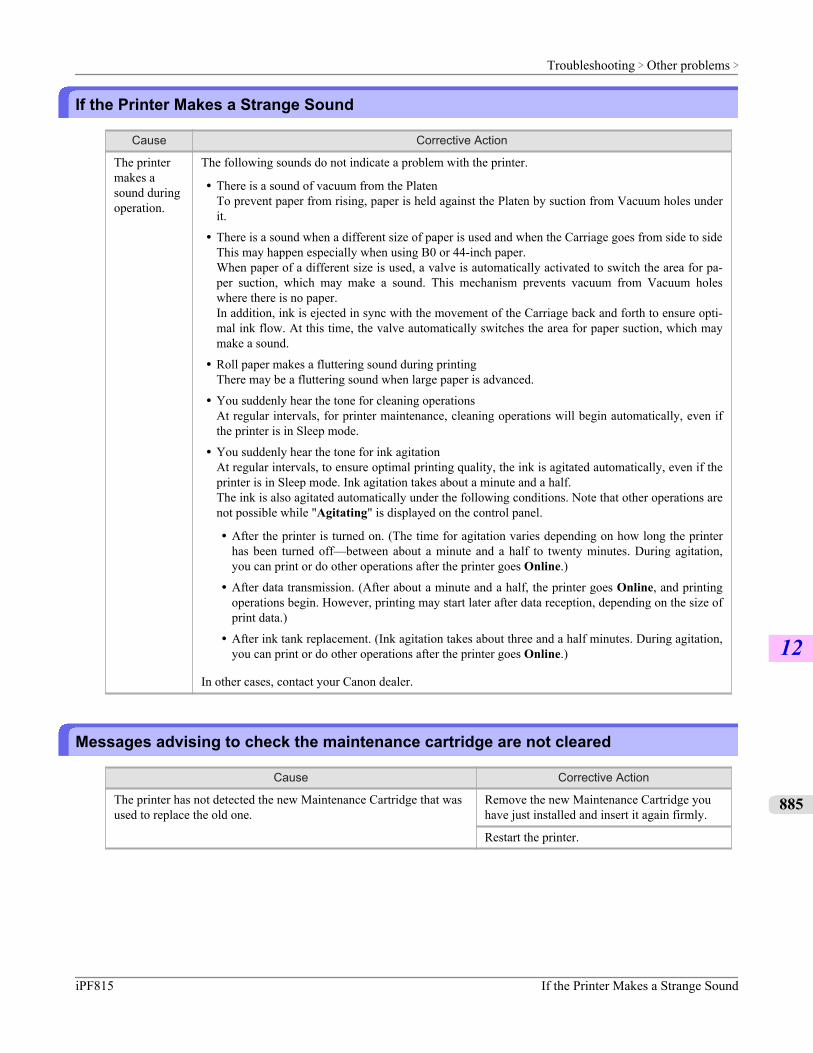
If the Printer Makes a Strange Sound
Cause Corrective Action
The printermakes asound duringoperation.
The following sounds do not indicate a problem with the printer.
• There is a sound of vacuum from the PlatenTo prevent paper from rising, paper is held against the Platen by suction from Vacuum holes underit.
• There is a sound when a different size of paper is used and when the Carriage goes from side to sideThis may happen especially when using B0 or 44-inch paper.When paper of a different size is used, a valve is automatically activated to switch the area for pa-per suction, which may make a sound. This mechanism prevents vacuum from Vacuum holeswhere there is no paper.In addition, ink is ejected in sync with the movement of the Carriage back and forth to ensure opti-mal ink flow. At this time, the valve automatically switches the area for paper suction, which maymake a sound.
• Roll paper makes a fluttering sound during printingThere may be a fluttering sound when large paper is advanced.
• You suddenly hear the tone for cleaning operationsAt regular intervals, for printer maintenance, cleaning operations will begin automatically, even ifthe printer is in Sleep mode.
• You suddenly hear the tone for ink agitationAt regular intervals, to ensure optimal printing quality, the ink is agitated automatically, even if theprinter is in Sleep mode. Ink agitation takes about a minute and a half.The ink is also agitated automatically under the following conditions. Note that other operations arenot possible while "Agitating" is displayed on the control panel.
• After the printer is turned on. (The time for agitation varies depending on how long the printerhas been turned off—between about a minute and a half to twenty minutes. During agitation,you can print or do other operations after the printer goes Online.)
• After data transmission. (After about a minute and a half, the printer goes Online, and printingoperations begin. However, printing may start later after data reception, depending on the size ofprint data.)
• After ink tank replacement. (Ink agitation takes about three and a half minutes. During agitation,you can print or do other operations after the printer goes Online.)
In other cases, contact your Canon dealer.
Messages advising to check the maintenance cartridge are not cleared
Cause Corrective Action
The printer has not detected the new Maintenance Cartridge that wasused to replace the old one.
Remove the new Maintenance Cartridge youhave just installed and insert it again firmly.
Restart the printer.
Troubleshooting > Other problems >
iPF815 If the Printer Makes a Strange Sound
12
885
The printer consumes a lot of ink
Cause Corrective Action
Many full-page color im-ages are printed.
In print jobs such as photos, images are filled with color. This consumes a lot of ink.This does not indicate a problem with the printer.
Head Cleaning B is usedoften.
Head Cleaning B consumes a lot of ink. This does not indicate a problem with theprinter. Unless the printer has been moved or stored for a long period or you are trou-bleshooting Printhead problems, we recommend not performing Head Cleaning B, tothe extent possible.
You have just finished ini-tial installation, when moreink is consumed to fill thesystem.
After initial installation or at the first-time use after transfer, ink flows into the systembetween the Ink Tank and Printhead, which may cause the ink level indicators to drop to80%. This does not indicate a problem with the printer.
The printhead nozzles areclogged.
Check for nozzle clogging. (See "Checking for Nozzle Clogging.") →P.817
Ink level detectionInk level detection will be deactivated if you load ink tanks once emptied.
Ink level detectionInk tanks specified for this printer feature an ink level detection function to prevent the ink from running out during print-ing, which prevents printer damage. (See "Ink Tanks.") →P.803This function will not work correctly if you use refill ink tanks. As a result, printing stops. Thus, before using refill inktanks, you must cancel the ink level detection.Printing with the ink level detection canceled may lead to printer damage and printing problems. Canon Inc. is not liable forany damage that may occur as a result of refilling ink.
Caution• After ink level detection has been disabled, this function cannot be reactivated for the currently loaded Ink
Tank. To use ink level detection again, replace the Ink Tank with a new ink tank specified for use with theprinter.
• Repeatedly removing and inserting an Ink Tank may damage the connection between the Ink Tank and theprinter, which may cause ink leakage from the Ink Tank and damage the printer.
Disabling ink level detection
1. On the Display Screen, a message indicates that the ink level cannot be detected. After checking the message, pressthe ▶ button.
Troubleshooting > Other problems >
The printer consumes a lot of ink iPF815
12
886
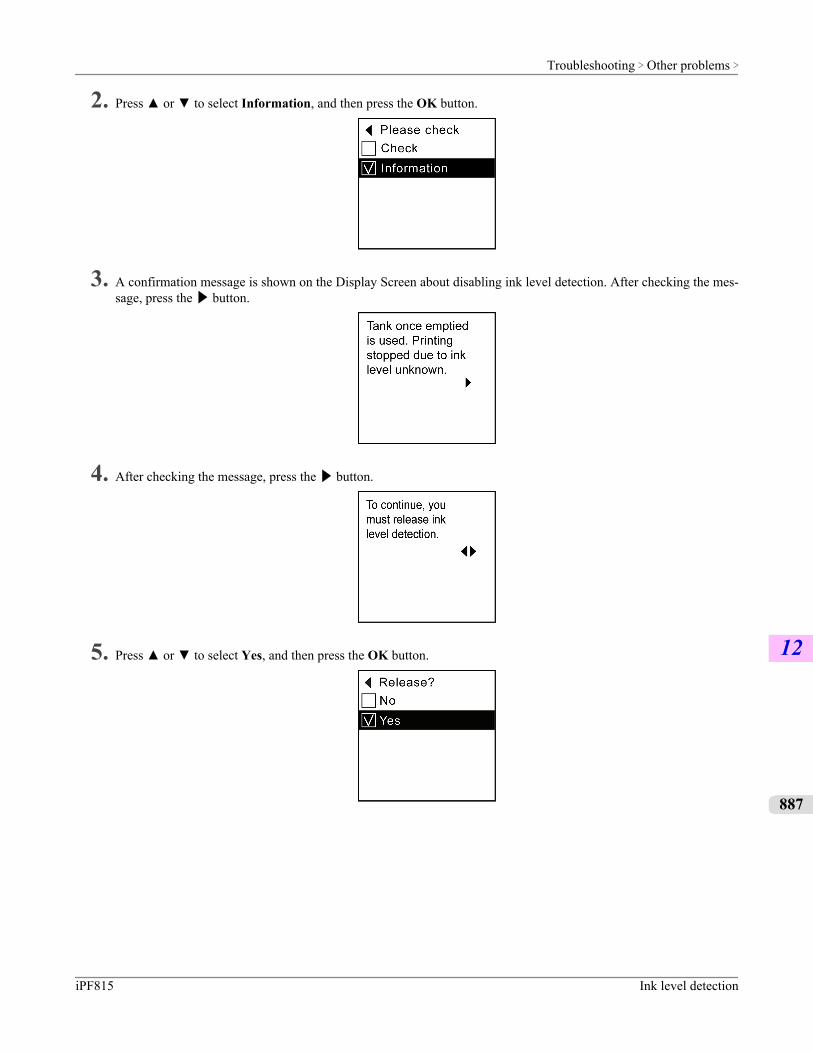
2. Press ▲ or ▼ to select Information, and then press the OK button.
3. A confirmation message is shown on the Display Screen about disabling ink level detection. After checking the mes-sage, press the ▶ button.
4. After checking the message, press the ▶ button.
5. Press ▲ or ▼ to select Yes, and then press the OK button.
Troubleshooting > Other problems >
iPF815 Ink level detection
12
887
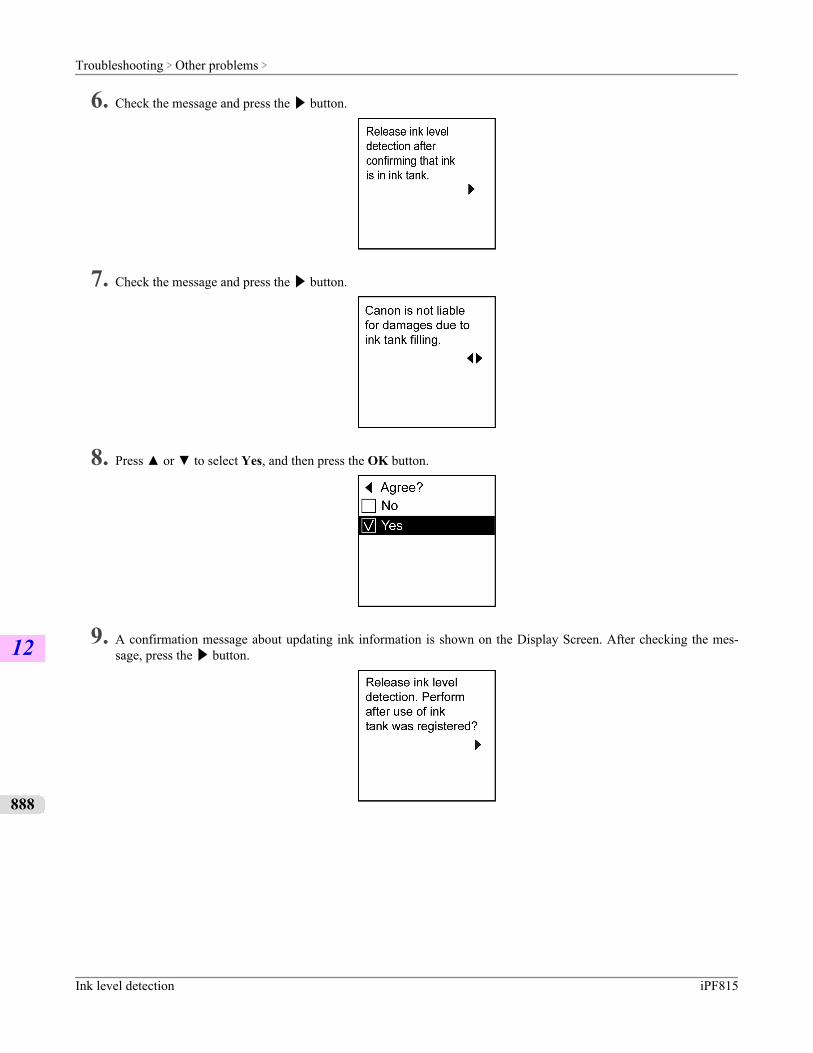
6. Check the message and press the ▶ button.
7. Check the message and press the ▶ button.
8. Press ▲ or ▼ to select Yes, and then press the OK button.
9. A confirmation message about updating ink information is shown on the Display Screen. After checking the mes-sage, press the ▶ button.
Troubleshooting > Other problems >
Ink level detection iPF815
12
888
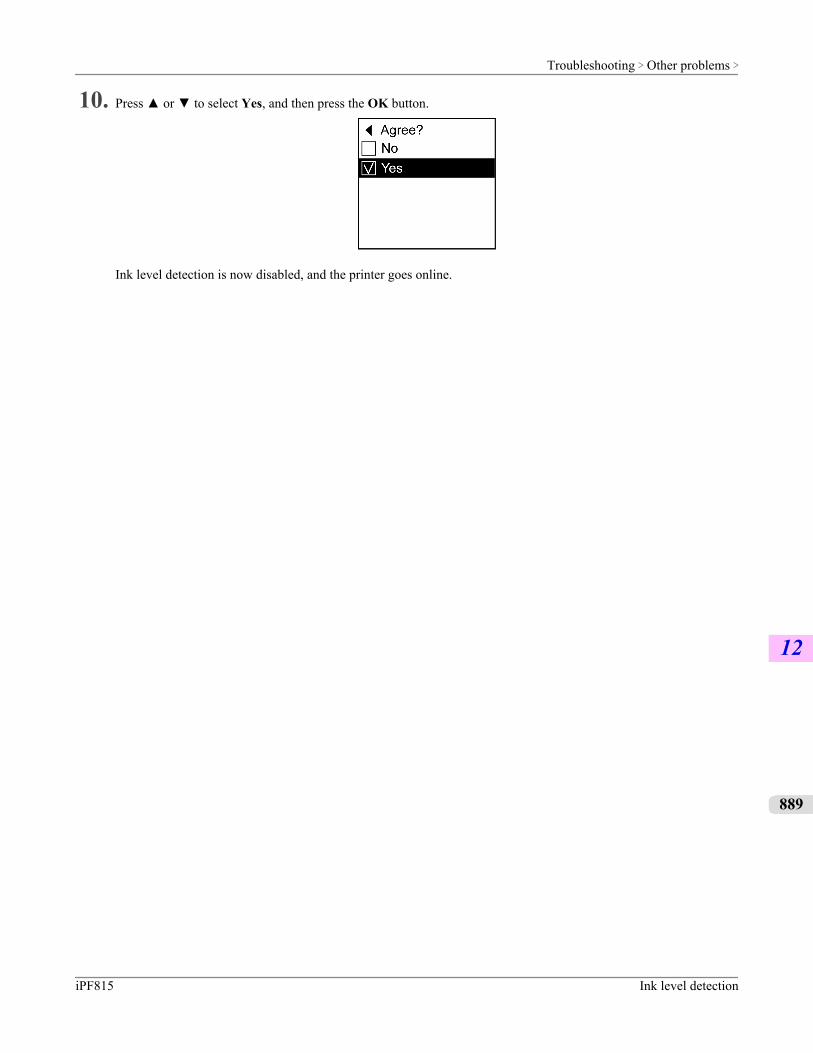
10. Press ▲ or ▼ to select Yes, and then press the OK button.
Ink level detection is now disabled, and the printer goes online.
Troubleshooting > Other problems >
iPF815 Ink level detection
12
889
Error Message
Error Messages 891
Messages regarding paper 893
Messages regarding ink 904
Messages regarding printing or adjustment 907
Messages regarding printheads 909
Messages regarding the maintenance cartridge 912
Messages regarding the hard disk 914
Messages regarding HP-GL/2 916
Other Messages 917
Error Message >
iPF815
13
890
Error MessagesBefore borderless printing, move the blue platen switch. ................................................................................ 908Blue platen switch is dirty. ............................................................................................................................... 908Borderless printng not possible. ...................................................................................................................... 903Borderless printng not possible. Paper stretched or shrank. ........................................................................... 907
Cannot adjust band. ........................................................................................................................................ 909Cannot adjust printhead. ................................................................................................................................. 909Cannot print as specified. ................................................................................................................................ 907Close Ink Tank Cover ...................................................................................................................................... 905
End of paper feed. ........................................................................................................................................... 902ERROR Exxx-xxxx (x represents a letter or number) ...................................................................................... 917Execute printhead cleaning. ............................................................................................................................ 911
File read error. ................................................................................................................................................. 914
GARO Wxxxx (x represents a number) ........................................................................................................... 917GL2: W0502 The parameter is out of range. ................................................................................................... 916GL2: W0504 This command is not supported. ................................................................................................ 916GL2: Wxxxx The memory is full. (xxxx is 0501, 0903, or 0904) ...................................................................... 916
Hard disk error. ................................................................................................................................................ 914Hardware error. xxxxxxxx-xxxx (x represents a letter or number) ................................................................... 917
Ink insufficient. ................................................................................................................................................. 904Ink tank is empty. ............................................................................................................................................ 905Insert the maintenance cartridge. .................................................................................................................... 912Insufficient paper for job .................................................................................................................................. 896
Mail box full. Now printing without saving data. ............................................................................................... 914Mail box nearly full. .......................................................................................................................................... 915Maintenance cartridge full. .............................................................................................................................. 912Maintenance cartridge problem. ...................................................................................................................... 913Maximum jobs stored. ..................................................................................................................................... 915Media take-up unit ready. ................................................................................................................................ 902Multi-sensor error ............................................................................................................................................ 919
No ink left. ....................................................................................................................................................... 904No ink tank loaded. .......................................................................................................................................... 906No Maintenance Cartridge capacity. ............................................................................................................... 912No printhead .................................................................................................................................................... 910Not much ink is left. ......................................................................................................................................... 905
Paper cutting failed. ......................................................................................................................................... 901Paper jam. ....................................................................................................................................................... 900Paper loaded askew. ....................................................................................................................................... 900Paper size not detected. ................................................................................................................................. 895Papr Type Mismatch ....................................................................................................................................... 893PaprTypeMismatch ......................................................................................................................................... 893Parts replacement time has passed. ............................................................................................................... 918PHead needs cleaning. ................................................................................................................................... 910Prepare for maint cart replacement. ................................................................................................................ 912Prepare for parts replacement. ........................................................................................................................ 918Printhead error ................................................................................................................................................ 910Problem with Printhead ................................................................................................................................... 910
Regular printing is selected, but a roll is loaded. ............................................................................................ 899
Error Message > Error Messages >
iPF815
13
891
Rel lever is in wrong position. .......................................................................................................................... 902Remaining level of the ink cannot be correctly detected. ................................................................................ 904Rewinding error. .............................................................................................................................................. 902Roll printing is selected, but sheets are loaded. ............................................................................................. 897Roll printing is selected. .................................................................................................................................. 897RollWdthMismatch .......................................................................................................................................... 894
Sheet printing is selected. ............................................................................................................................... 899Sheet removed. ............................................................................................................................................... 899
The mail box is full. .......................................................................................................................................... 914The paper is too small. .................................................................................................................................... 894The roll is empty. ............................................................................................................................................. 897This paper cannot be used. ............................................................................................................................. 897This type of paper is not compatible with HP-GL/2. ........................................................................................ 916Too many jobs for mail box. ............................................................................................................................ 915Top cover is open. ........................................................................................................................................... 918Turn on the media take-up unit. ...................................................................................................................... 903
Unknown file. ................................................................................................................................................... 918Use another paper. .......................................................................................................................................... 907
Wrong ink tank. ............................................................................................................................................... 906Wrong maintenance cartridge. ........................................................................................................................ 912Wrong printhead. ............................................................................................................................................. 910
Error Message > Error Messages >
iPF815
13
892
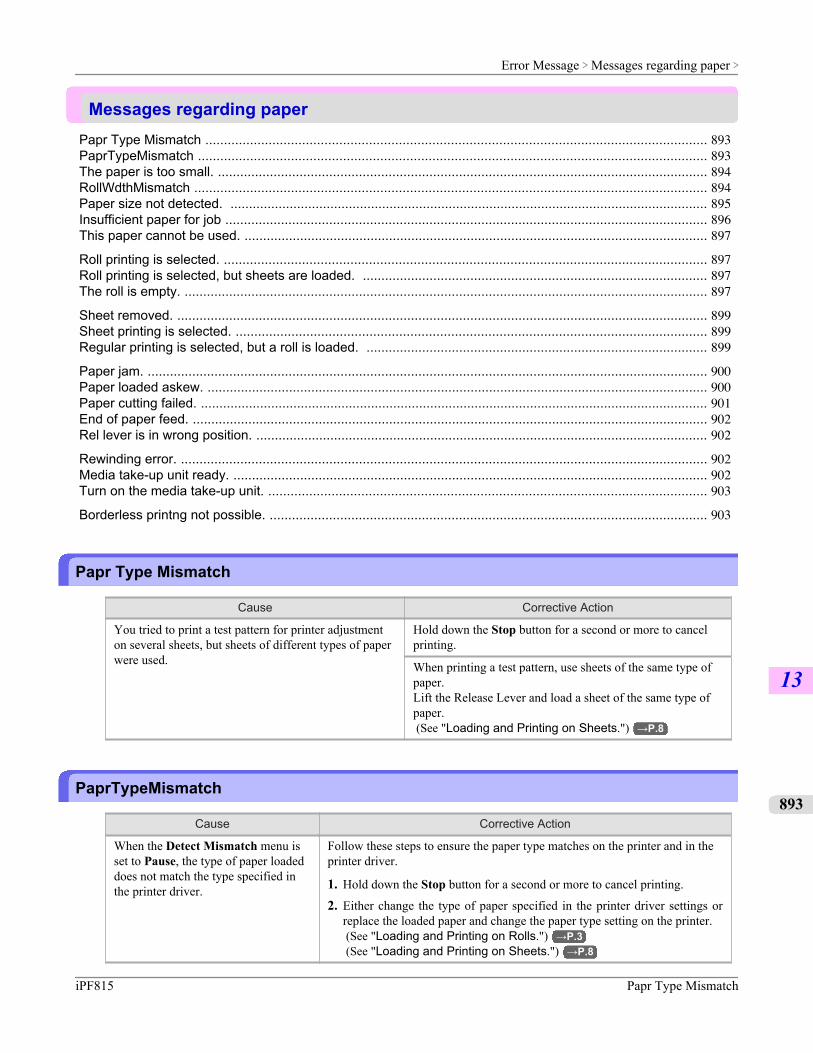
Messages regarding paperPapr Type Mismatch ....................................................................................................................................... 893PaprTypeMismatch ......................................................................................................................................... 893The paper is too small. .................................................................................................................................... 894RollWdthMismatch .......................................................................................................................................... 894Paper size not detected. ................................................................................................................................. 895Insufficient paper for job .................................................................................................................................. 896This paper cannot be used. ............................................................................................................................. 897
Roll printing is selected. .................................................................................................................................. 897Roll printing is selected, but sheets are loaded. ............................................................................................. 897The roll is empty. ............................................................................................................................................. 897
Sheet removed. ............................................................................................................................................... 899Sheet printing is selected. ............................................................................................................................... 899Regular printing is selected, but a roll is loaded. ............................................................................................ 899
Paper jam. ....................................................................................................................................................... 900Paper loaded askew. ....................................................................................................................................... 900Paper cutting failed. ......................................................................................................................................... 901End of paper feed. ........................................................................................................................................... 902Rel lever is in wrong position. .......................................................................................................................... 902
Rewinding error. .............................................................................................................................................. 902Media take-up unit ready. ................................................................................................................................ 902Turn on the media take-up unit. ...................................................................................................................... 903
Borderless printng not possible. ...................................................................................................................... 903
Papr Type Mismatch
Cause Corrective Action
You tried to print a test pattern for printer adjustmenton several sheets, but sheets of different types of paperwere used.
Hold down the Stop button for a second or more to cancelprinting.
When printing a test pattern, use sheets of the same type ofpaper.Lift the Release Lever and load a sheet of the same type ofpaper. (See "Loading and Printing on Sheets.") →P.8
PaprTypeMismatch
Cause Corrective Action
When the Detect Mismatch menu isset to Pause, the type of paper loadeddoes not match the type specified inthe printer driver.
Follow these steps to ensure the paper type matches on the printer and in theprinter driver.
1. Hold down the Stop button for a second or more to cancel printing.
2. Either change the type of paper specified in the printer driver settings orreplace the loaded paper and change the paper type setting on the printer. (See "Loading and Printing on Rolls.") →P.3 (See "Loading and Printing on Sheets.") →P.8
Error Message > Messages regarding paper >
iPF815 Papr Type Mismatch
13
893
Cause Corrective Action
You tried to print a test pattern forprinter adjustment on several sheets,but sheets of different types of paperwere used.
Follow these steps to ensure the paper type matches on the printer and in theprinter driver.
1. Hold down the Stop button for a second or more to cancel printing.
2. Either change the type of paper specified in the printer driver settings orreplace the loaded paper and change the paper type setting on the printer. (See "Loading and Printing on Rolls.") →P.3 (See "Loading and Printing on Sheets.") →P.8
Press the Online button to resume printing.However, note that this error may cause paper jams and affect the printingquality.
When the Detect Mismatch menu isset to Warning, the type of paper loa-ded does not match the type specifiedin the printer driver.
You can continue to print, but note that this error may cause problems in theprinting results.
The paper is too small.
Cause Corrective Action
When the Detect Mismatch menu is set toPause, the paper loaded in the printer is small-er than the size specified in the printer driver.
Press the Online button to resume printing.However, note that this error may cause paper jams and affect theprinting quality.
Adjust the paper size setting in the printer driver to match the sizeloaded in the printer as follows.
1. Hold down the Stop button for a second or more to cancel print-ing.
2. Change the paper size setting in the printer driver to the size loa-ded in the printer and try printing again.
Replace the loaded paper with paper of a size that matches the sizesetting in the printer driver as follows.
1. Hold down the Stop button for a second or more to cancel print-ing.
2. Replace the loaded paper to match the paper size setting in theprinter driver and try printing again.
When the Detect Mismatch menu is set toWarning, the paper loaded in the printer issmaller than the size specified in the printerdriver.
You can continue to print, but note that this error may cause prob-lems in the printing results.
RollWdthMismatch
Cause Corrective Action
The roll width set in Fit Roll Paper Width in theprinter driver does not match the width of the roll loa-ded in the printer.
Press the Online button to resume printing.However, note that this error may cause paper jams and af-fect the printing quality.
Error Message > Messages regarding paper >
The paper is too small. iPF815
13
894
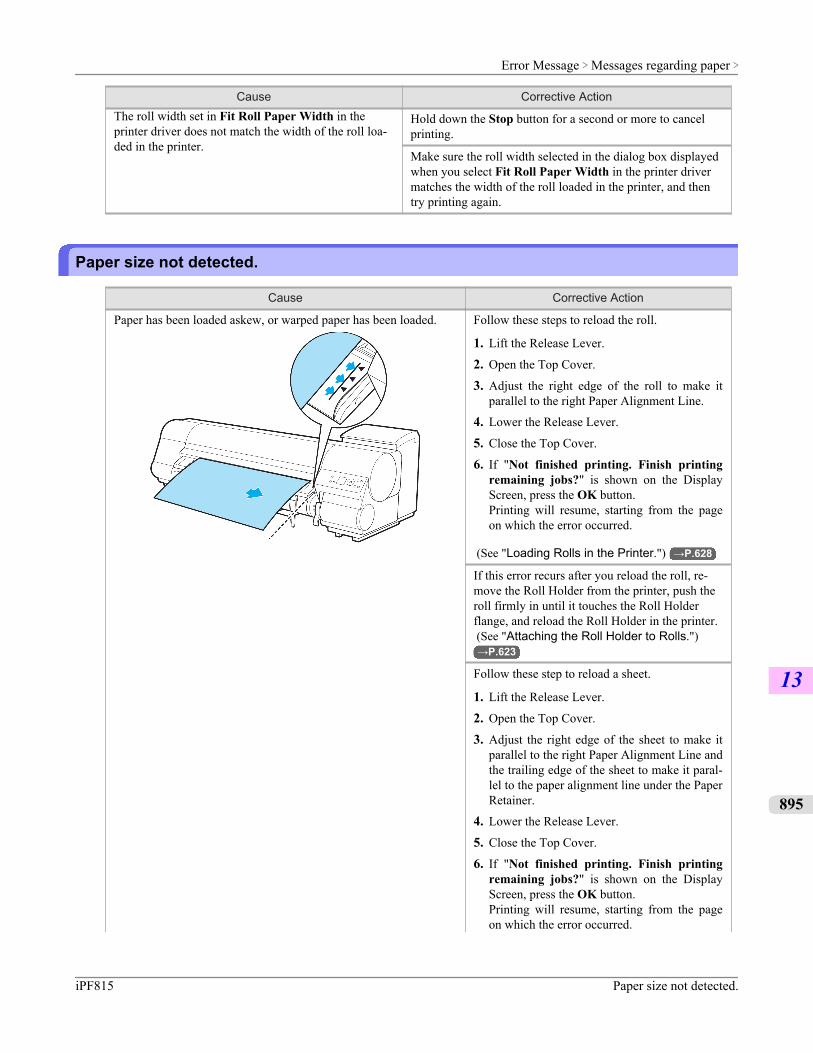
Cause Corrective ActionThe roll width set in Fit Roll Paper Width in theprinter driver does not match the width of the roll loa-ded in the printer.
Hold down the Stop button for a second or more to cancelprinting.
Make sure the roll width selected in the dialog box displayedwhen you select Fit Roll Paper Width in the printer drivermatches the width of the roll loaded in the printer, and thentry printing again.
Paper size not detected.
Cause Corrective Action
Paper has been loaded askew, or warped paper has been loaded. Follow these steps to reload the roll.
1. Lift the Release Lever.
2. Open the Top Cover.
3. Adjust the right edge of the roll to make itparallel to the right Paper Alignment Line.
4. Lower the Release Lever.
5. Close the Top Cover.
6. If "Not finished printing. Finish printingremaining jobs?" is shown on the DisplayScreen, press the OK button.Printing will resume, starting from the pageon which the error occurred.
(See "Loading Rolls in the Printer.") →P.628
If this error recurs after you reload the roll, re-move the Roll Holder from the printer, push theroll firmly in until it touches the Roll Holderflange, and reload the Roll Holder in the printer. (See "Attaching the Roll Holder to Rolls.")→P.623
Follow these step to reload a sheet.
1. Lift the Release Lever.
2. Open the Top Cover.
3. Adjust the right edge of the sheet to make itparallel to the right Paper Alignment Line andthe trailing edge of the sheet to make it paral-lel to the paper alignment line under the PaperRetainer.
4. Lower the Release Lever.
5. Close the Top Cover.
6. If "Not finished printing. Finish printingremaining jobs?" is shown on the DisplayScreen, press the OK button.Printing will resume, starting from the pageon which the error occurred.
Error Message > Messages regarding paper >
iPF815 Paper size not detected.
13
895
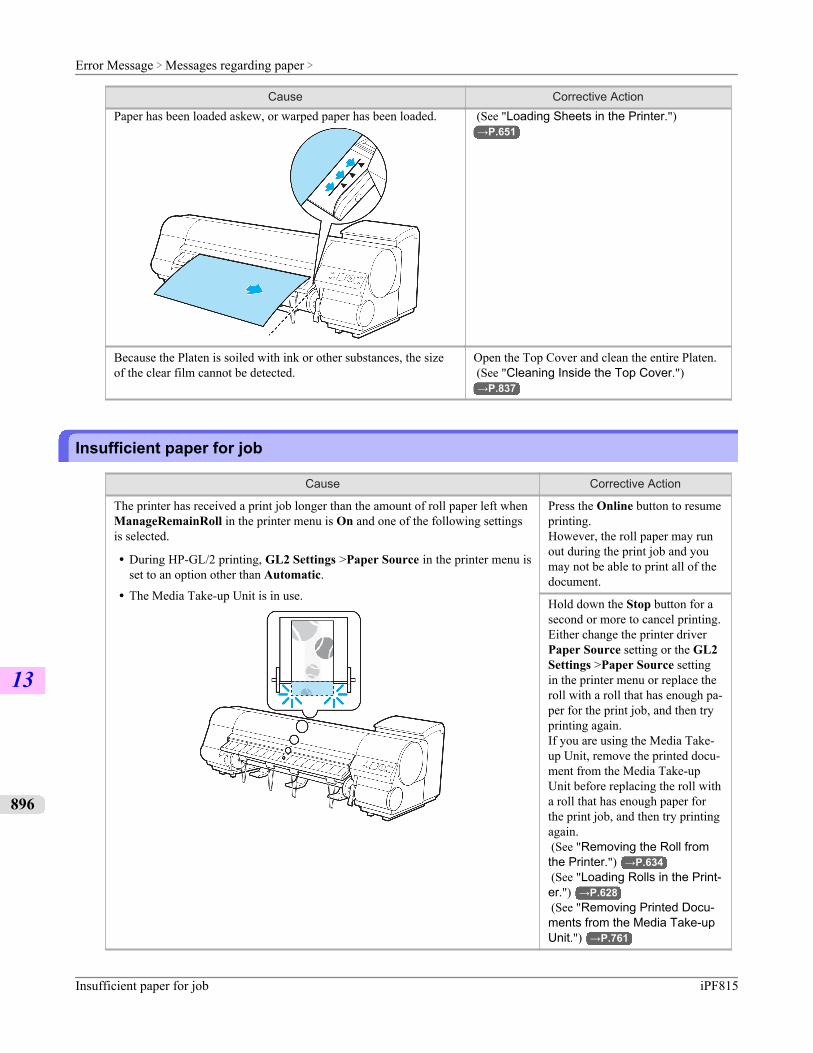
Cause Corrective ActionPaper has been loaded askew, or warped paper has been loaded. (See "Loading Sheets in the Printer.")
→P.651
Because the Platen is soiled with ink or other substances, the sizeof the clear film cannot be detected.
Open the Top Cover and clean the entire Platen. (See "Cleaning Inside the Top Cover.")→P.837
Insufficient paper for job
Cause Corrective Action
The printer has received a print job longer than the amount of roll paper left whenManageRemainRoll in the printer menu is On and one of the following settingsis selected.
• During HP-GL/2 printing, GL2 Settings >Paper Source in the printer menu isset to an option other than Automatic.
• The Media Take-up Unit is in use.
Press the Online button to resumeprinting.However, the roll paper may runout during the print job and youmay not be able to print all of thedocument.
Hold down the Stop button for asecond or more to cancel printing.Either change the printer driverPaper Source setting or the GL2Settings >Paper Source settingin the printer menu or replace theroll with a roll that has enough pa-per for the print job, and then tryprinting again.If you are using the Media Take-up Unit, remove the printed docu-ment from the Media Take-upUnit before replacing the roll witha roll that has enough paper forthe print job, and then try printingagain. (See "Removing the Roll fromthe Printer.") →P.634 (See "Loading Rolls in the Print-er.") →P.628 (See "Removing Printed Docu-ments from the Media Take-upUnit.") →P.761
Error Message > Messages regarding paper >
Insufficient paper for job iPF815
13
896
*When using the Media Take-up Unit, either hold down the Stop button for a second or more to cancel printing orpress the Online button to continue printing. However, if you continue printing, the roll paper may run out dur-ing the print job and you may not be able to print all of the document.
This paper cannot be used.
Cause Corrective Action
Paper that is too large for the printer has beenloaded.
Lift the Release Lever and load paper of the correct size. (See "Paper Sizes.") →P.620
Paper that is too small for the printer has beenloaded.
Lift the Release Lever and load paper of the correct size. (See "Paper Sizes.") →P.620
Paper has been loaded that is too small to printthe test pattern for printhead adjustment or noz-zle checking.
Lift the Release Lever and load unused paper A4 or larger. Morethan one sheet may be required depending on the adjustment.
Roll printing is selected.
Cause Corrective Action
You have attempted to print a job sent from a computer or a testprint sheet or other printer status information on a roll, but no roll isloaded.
Load a roll and try printing again.
To print on a sheet instead, hold down the Stopbutton for more than a second to cancel printing,load a sheet, and then print. (See "Loading and Printing on Sheets.")→P.8
Roll printing is selected, but sheets are loaded.
Cause Corrective Action
A print job for rolls was received when a sheet isloaded.
Follow these steps to load and print on a roll.
1. Press the OK button and remove the sheet. (See "Removing Sheets.") →P.656
2. Load a new roll. (See "Loading Rolls in the Printer.") →P.628The printer now starts printing the print job.
Hold down the Stop button for a second or more to cancel printing.
The roll is empty.
"Lift the release lever and replace the roll."
Cause Corrective Action
The roll is empty. Follow these steps to replace the used roll with a new rollof the same type and size.
Error Message > Messages regarding paper >
iPF815 This paper cannot be used.
13
897
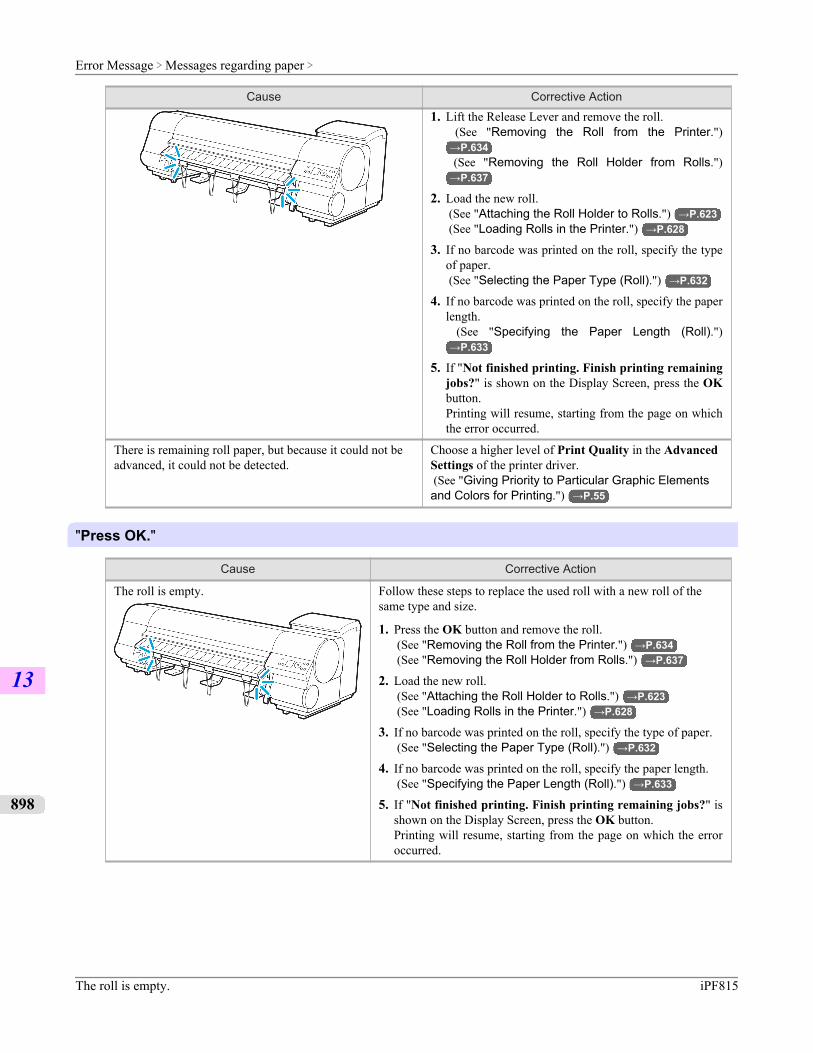
Cause Corrective Action
1. Lift the Release Lever and remove the roll. (See "Removing the Roll from the Printer.")→P.634
(See "Removing the Roll Holder from Rolls.")→P.637
2. Load the new roll. (See "Attaching the Roll Holder to Rolls.") →P.623 (See "Loading Rolls in the Printer.") →P.628
3. If no barcode was printed on the roll, specify the typeof paper. (See "Selecting the Paper Type (Roll).") →P.632
4. If no barcode was printed on the roll, specify the paperlength. (See "Specifying the Paper Length (Roll).")→P.633
5. If "Not finished printing. Finish printing remainingjobs?" is shown on the Display Screen, press the OKbutton.Printing will resume, starting from the page on whichthe error occurred.
There is remaining roll paper, but because it could not beadvanced, it could not be detected.
Choose a higher level of Print Quality in the AdvancedSettings of the printer driver. (See "Giving Priority to Particular Graphic Elementsand Colors for Printing.") →P.55
"Press OK."
Cause Corrective Action
The roll is empty. Follow these steps to replace the used roll with a new roll of thesame type and size.
1. Press the OK button and remove the roll. (See "Removing the Roll from the Printer.") →P.634 (See "Removing the Roll Holder from Rolls.") →P.637
2. Load the new roll. (See "Attaching the Roll Holder to Rolls.") →P.623 (See "Loading Rolls in the Printer.") →P.628
3. If no barcode was printed on the roll, specify the type of paper. (See "Selecting the Paper Type (Roll).") →P.632
4. If no barcode was printed on the roll, specify the paper length. (See "Specifying the Paper Length (Roll).") →P.633
5. If "Not finished printing. Finish printing remaining jobs?" isshown on the Display Screen, press the OK button.Printing will resume, starting from the page on which the erroroccurred.
Error Message > Messages regarding paper >
The roll is empty. iPF815
13
898
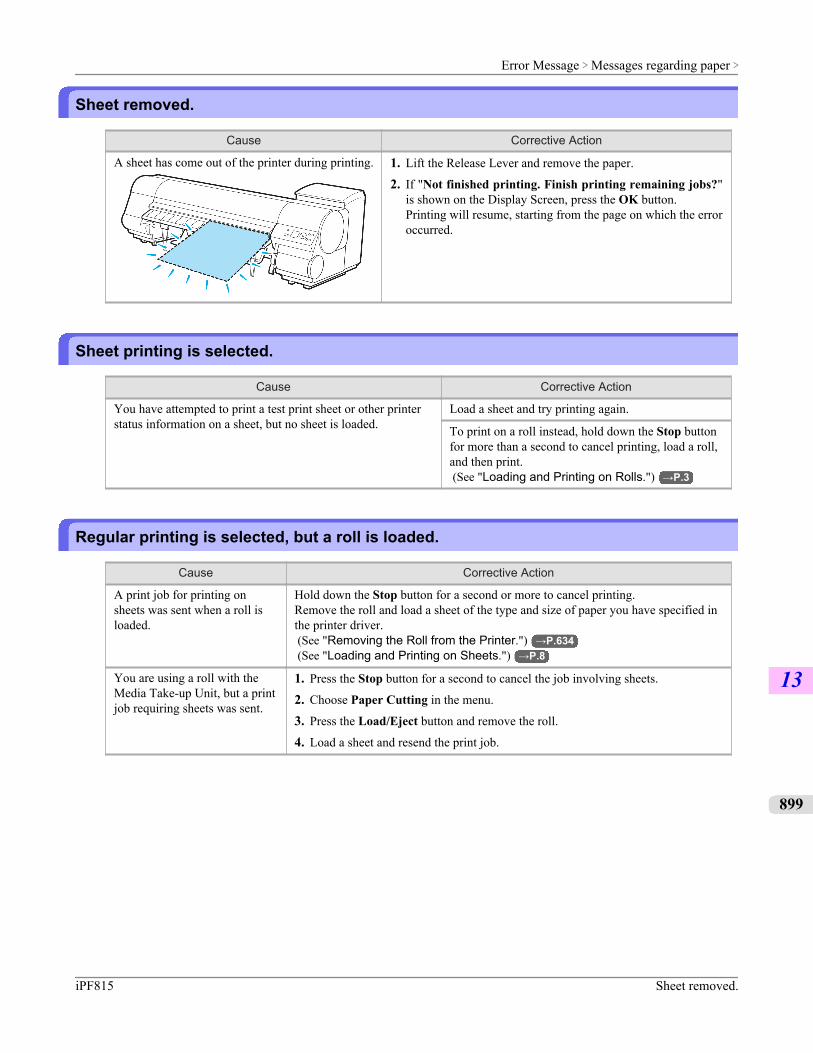
Sheet removed.
Cause Corrective Action
A sheet has come out of the printer during printing. 1. Lift the Release Lever and remove the paper.
2. If "Not finished printing. Finish printing remaining jobs?"is shown on the Display Screen, press the OK button.Printing will resume, starting from the page on which the erroroccurred.
Sheet printing is selected.
Cause Corrective Action
You have attempted to print a test print sheet or other printerstatus information on a sheet, but no sheet is loaded.
Load a sheet and try printing again.
To print on a roll instead, hold down the Stop buttonfor more than a second to cancel printing, load a roll,and then print. (See "Loading and Printing on Rolls.") →P.3
Regular printing is selected, but a roll is loaded.
Cause Corrective Action
A print job for printing onsheets was sent when a roll isloaded.
Hold down the Stop button for a second or more to cancel printing.Remove the roll and load a sheet of the type and size of paper you have specified inthe printer driver. (See "Removing the Roll from the Printer.") →P.634 (See "Loading and Printing on Sheets.") →P.8
You are using a roll with theMedia Take-up Unit, but a printjob requiring sheets was sent.
1. Press the Stop button for a second to cancel the job involving sheets.
2. Choose Paper Cutting in the menu.
3. Press the Load/Eject button and remove the roll.
4. Load a sheet and resend the print job.
Error Message > Messages regarding paper >
iPF815 Sheet removed.
13
899
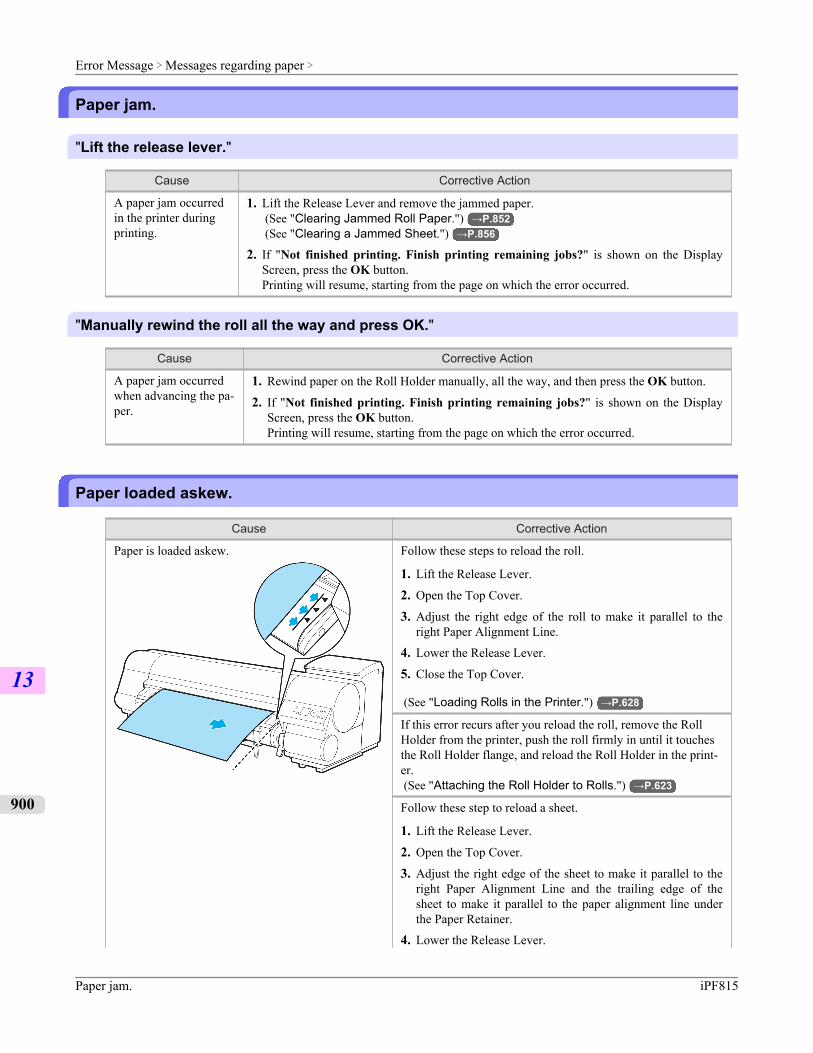
Paper jam.
"Lift the release lever."
Cause Corrective Action
A paper jam occurredin the printer duringprinting.
1. Lift the Release Lever and remove the jammed paper. (See "Clearing Jammed Roll Paper.") →P.852 (See "Clearing a Jammed Sheet.") →P.856
2. If "Not finished printing. Finish printing remaining jobs?" is shown on the DisplayScreen, press the OK button.Printing will resume, starting from the page on which the error occurred.
"Manually rewind the roll all the way and press OK."
Cause Corrective Action
A paper jam occurredwhen advancing the pa-per.
1. Rewind paper on the Roll Holder manually, all the way, and then press the OK button.
2. If "Not finished printing. Finish printing remaining jobs?" is shown on the DisplayScreen, press the OK button.Printing will resume, starting from the page on which the error occurred.
Paper loaded askew.
Cause Corrective Action
Paper is loaded askew. Follow these steps to reload the roll.
1. Lift the Release Lever.
2. Open the Top Cover.
3. Adjust the right edge of the roll to make it parallel to theright Paper Alignment Line.
4. Lower the Release Lever.
5. Close the Top Cover.
(See "Loading Rolls in the Printer.") →P.628
If this error recurs after you reload the roll, remove the RollHolder from the printer, push the roll firmly in until it touchesthe Roll Holder flange, and reload the Roll Holder in the print-er. (See "Attaching the Roll Holder to Rolls.") →P.623
Follow these step to reload a sheet.
1. Lift the Release Lever.
2. Open the Top Cover.
3. Adjust the right edge of the sheet to make it parallel to theright Paper Alignment Line and the trailing edge of thesheet to make it parallel to the paper alignment line underthe Paper Retainer.
4. Lower the Release Lever.
Error Message > Messages regarding paper >
Paper jam. iPF815
13
900
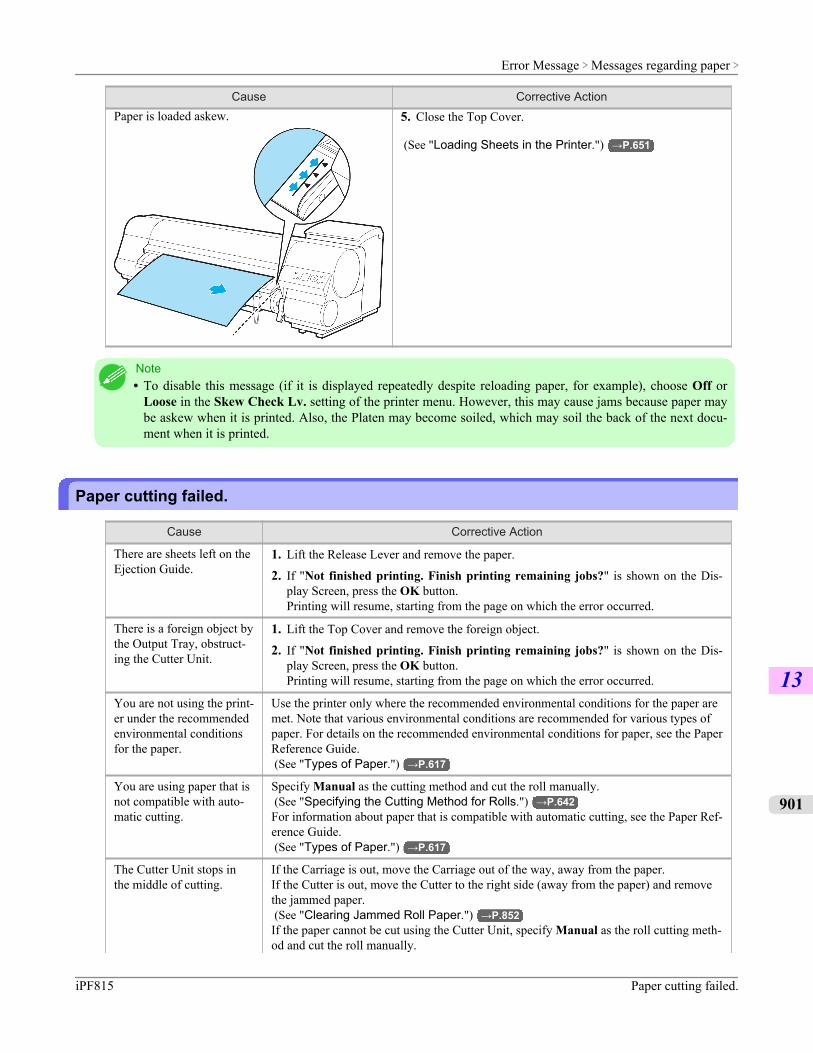
Cause Corrective ActionPaper is loaded askew. 5. Close the Top Cover.
(See "Loading Sheets in the Printer.") →P.651
Note• To disable this message (if it is displayed repeatedly despite reloading paper, for example), choose Off or
Loose in the Skew Check Lv. setting of the printer menu. However, this may cause jams because paper maybe askew when it is printed. Also, the Platen may become soiled, which may soil the back of the next docu-ment when it is printed.
Paper cutting failed.
Cause Corrective Action
There are sheets left on theEjection Guide.
1. Lift the Release Lever and remove the paper.
2. If "Not finished printing. Finish printing remaining jobs?" is shown on the Dis-play Screen, press the OK button.Printing will resume, starting from the page on which the error occurred.
There is a foreign object bythe Output Tray, obstruct-ing the Cutter Unit.
1. Lift the Top Cover and remove the foreign object.
2. If "Not finished printing. Finish printing remaining jobs?" is shown on the Dis-play Screen, press the OK button.Printing will resume, starting from the page on which the error occurred.
You are not using the print-er under the recommendedenvironmental conditionsfor the paper.
Use the printer only where the recommended environmental conditions for the paper aremet. Note that various environmental conditions are recommended for various types ofpaper. For details on the recommended environmental conditions for paper, see the PaperReference Guide. (See "Types of Paper.") →P.617
You are using paper that isnot compatible with auto-matic cutting.
Specify Manual as the cutting method and cut the roll manually. (See "Specifying the Cutting Method for Rolls.") →P.642For information about paper that is compatible with automatic cutting, see the Paper Ref-erence Guide. (See "Types of Paper.") →P.617
The Cutter Unit stops inthe middle of cutting.
If the Carriage is out, move the Carriage out of the way, away from the paper.If the Cutter is out, move the Cutter to the right side (away from the paper) and removethe jammed paper. (See "Clearing Jammed Roll Paper.") →P.852If the paper cannot be cut using the Cutter Unit, specify Manual as the roll cutting meth-od and cut the roll manually.
Error Message > Messages regarding paper >
iPF815 Paper cutting failed.
13
901
Cause Corrective ActionThe Cutter Unit stops inthe middle of cutting.
(See "Specifying the Cutting Method for Rolls.") →P.642
In other cases, the CutterUnit may be damaged.
Contact your Canon dealer for assistance.
End of paper feed.
Cause Corrective Action
You are pressing the ▲ button on the Control Panel and trying to rewind the roll to the edge. Release the ▲ button.
Paper can be retracted only up to 17 mm (0.7 in) when using the Media Take-up Unit. Release the ▲ button.
Rel lever is in wrong position.
Cause Corrective Action
The Release Lever is up. Lower the Release Lever.
If the error occurs again, turn off the printer and wait a while before restoring power.
Rewinding error.
Cause Corrective Action
There is some foreign object near the Media Take-up Unit sensorand the roll cannot be detected.
Remove the foreign object near the sensor.
The Media Take-up Unit sensor is soiled and the roll cannot be de-tected.
Wipe the sensor with a dry cloth to clean it.
The roll is out of range of detection by the Media Take-up Unit sen-sor.
Reload the roll. (See "Loading Rolls in the Printer.") →P.628
The Media Take-up Unit sensor is damaged. Contact your Canon dealer for assistance.
A paper jam has occurred and the roll cannot be rewound. Remove the paper from the Media Take-up Unit.Press the Online button to clear the error.
*Printing will stop momentarily if an error involving the Media Take-up Unit occurs. If you prefer printing not tostop, set Skip Take-Up Err to On.
Media take-up unit ready.
Cause Corrective Action
The Take-up Reel setting in the printer MAIN MENUwas changed from Enable to Disable, but a print job wasreceived before the roll was removed.
Press the Stop button and stop printing.The mode switches from take-up mode to regular mode af-ter you change the Take-up Reel setting in the MAINMENU from Enable to Disable and lift the Release Lever,or after you execute Paper Cutting.
Error Message > Messages regarding paper >
End of paper feed. iPF815
13
902
Cause Corrective ActionThe Take-up Reel setting in the printer MAIN MENUwas changed from Enable to Disable, but a print job wasreceived before the roll was removed.
Press the Online button to resume printing.
Turn on the media take-up unit.
Cause Corrective Action
The Media Take-up Unit was off when you selected Enable for Take-up Reel. Turn the Media Take-up Unit on.
Borderless printng not possible.
"Lift release lever and reload the paper."
Cause Corrective Action
Because paper expands or con-tracts depending on the environ-ment of use, it may become nar-rower or wider than the suppor-ted width for borderless printing.
Hold down the Stop button for a second or more to cancel printing.Use each type of paper only where the recommended environmental conditions aremet. For details on environmental conditions for various paper, see the Paper Ref-erence Guide. (See "Types of Paper.") →P.617
The paper is loaded askew. Lift the Release Lever and straighten the paper so that the edge of the paper is inthe width of the ink groove for borderless printing.Insert the roll firmly until it touches the flange of the Roll Holder. (See "Attaching the Roll Holder to Rolls.") →P.623
If you press the Online button and continue printing, the document will be printedwith a border.
"Check supported paper."
Cause Corrective Action
The print job received specifies a typeor width of paper that is not compatiblewith borderless printing.
Follow these steps to change the settings of the print job to enable border-less printing.
1. Hold down the Stop button for a second or more to cancel printing.
2. Make sure the correct printer driver for the printer is selected and tryprinting again.For information on types of paper compatible with borderless printing,refer to the Paper Reference Guide. (See "Types of Paper.") →P.617
If you press the Online button and continue printing, the document will beprinted with a border.
The loaded paper is not compatible withborderless printing.
Hold down the Stop button for a second or more to cancel printing.
If you press the Online button and continue printing, the document will beprinted with a border.
Error Message > Messages regarding paper >
iPF815 Turn on the media take-up unit.
13
903
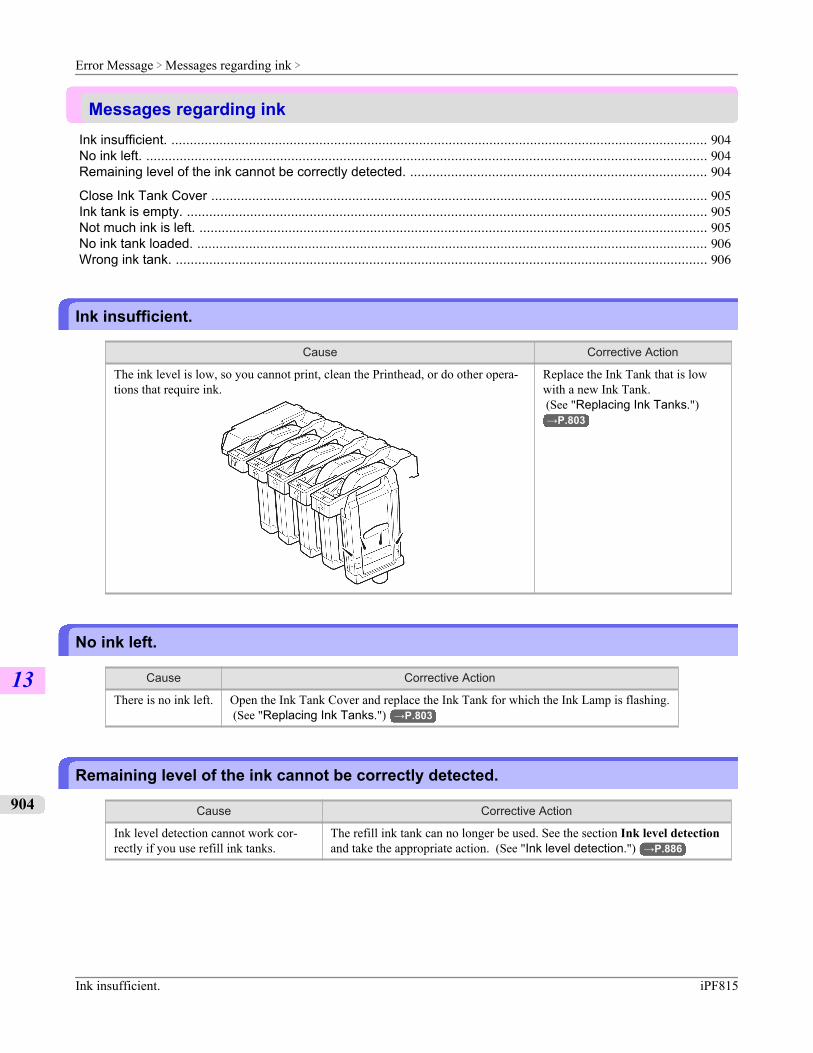
Messages regarding inkInk insufficient. ................................................................................................................................................. 904No ink left. ....................................................................................................................................................... 904Remaining level of the ink cannot be correctly detected. ................................................................................ 904
Close Ink Tank Cover ...................................................................................................................................... 905Ink tank is empty. ............................................................................................................................................ 905Not much ink is left. ......................................................................................................................................... 905No ink tank loaded. .......................................................................................................................................... 906Wrong ink tank. ............................................................................................................................................... 906
Ink insufficient.
Cause Corrective Action
The ink level is low, so you cannot print, clean the Printhead, or do other opera-tions that require ink.
Replace the Ink Tank that is lowwith a new Ink Tank. (See "Replacing Ink Tanks.")→P.803
No ink left.
Cause Corrective Action
There is no ink left. Open the Ink Tank Cover and replace the Ink Tank for which the Ink Lamp is flashing. (See "Replacing Ink Tanks.") →P.803
Remaining level of the ink cannot be correctly detected.
Cause Corrective Action
Ink level detection cannot work cor-rectly if you use refill ink tanks.
The refill ink tank can no longer be used. See the section Ink level detectionand take the appropriate action. (See "Ink level detection.") →P.886
Error Message > Messages regarding ink >
Ink insufficient. iPF815
13
904
Close Ink Tank Cover
Cause Corrective Action
The Ink Tank Cover is open. Close the Ink Tank Cover.
Ink tank is empty.
Cause Corrective Action
There is no ink left in an ink tank. Open the Ink Tank Cover and replace the Ink Tank for which the Ink Lampis flashing. (See "Replacing Ink Tanks.") →P.803
Not much ink is left.
Cause Corrective Action
Not much ink is left. Prepare a new Ink Tank.We recommend replacing the Ink Tank with a new Ink Tank at this point ifyou plan to print large-format or high-quantity jobs.
Error Message > Messages regarding ink >
iPF815 Close Ink Tank Cover
13
905
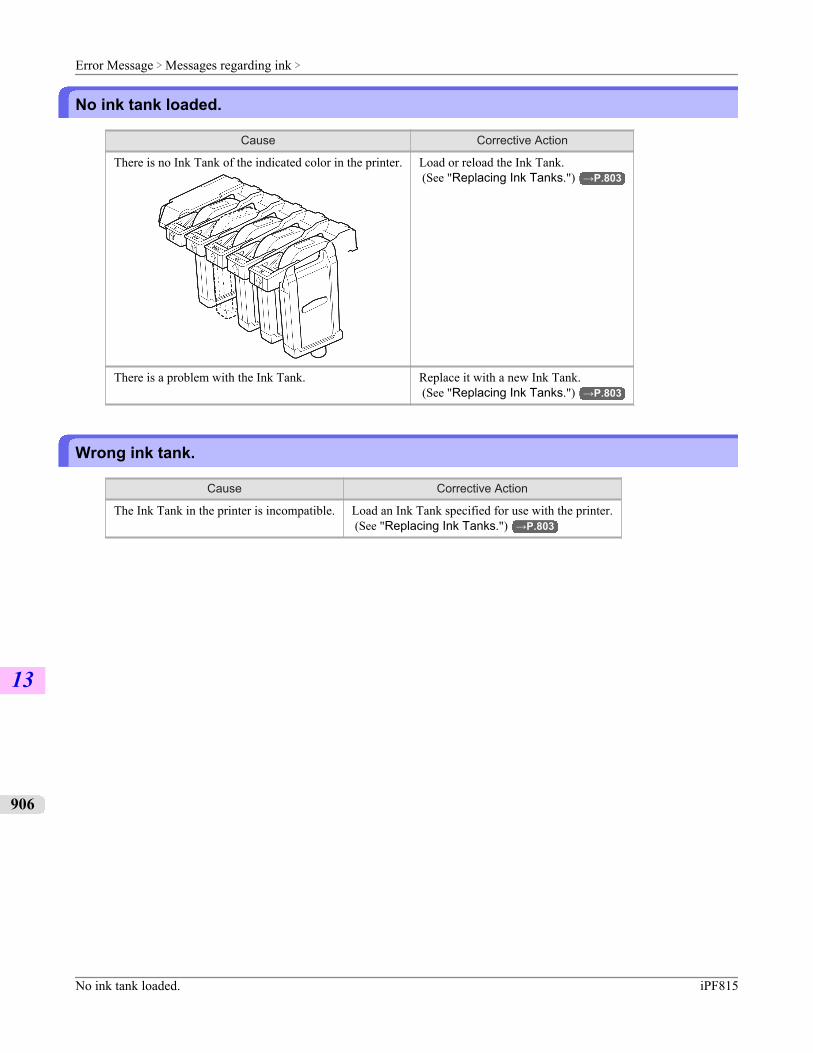
No ink tank loaded.
Cause Corrective Action
There is no Ink Tank of the indicated color in the printer. Load or reload the Ink Tank. (See "Replacing Ink Tanks.") →P.803
There is a problem with the Ink Tank. Replace it with a new Ink Tank. (See "Replacing Ink Tanks.") →P.803
Wrong ink tank.
Cause Corrective Action
The Ink Tank in the printer is incompatible. Load an Ink Tank specified for use with the printer. (See "Replacing Ink Tanks.") →P.803
Error Message > Messages regarding ink >
No ink tank loaded. iPF815
13
906
Messages regarding printing or adjustmentUse another paper. .......................................................................................................................................... 907Cannot print as specified. ................................................................................................................................ 907
Borderless printng not possible. Paper stretched or shrank. ........................................................................... 907Before borderless printing, move the blue platen switch. ................................................................................ 908
Blue platen switch is dirty. ............................................................................................................................... 908
Use another paper.
Cause Corrective Action
The Printhead and feed amount cannotbe adjusted when highly transparentfilm is loaded.
Press the Online button to clear the error.We recommend using a type of paper that you often use, other than film, forPrinthead adjustment. (See "Automatic Straightening of Lines and Colors (Auto Head Adj.).")→P.668
Press the Online button to clear the error, and then adjust the feed amountmanually. (See "Manual Band Adjustment (Manual Band Adj).") →P.678
Cannot print as specified.
"Lift the release lever and replace paper with A4/LTR (vertical) or larger."
Cause Corrective Action
The loaded paper is too small. Switch to paper A4/Letter (vertical) or larger.
"Lift the release lever and replace roll with 10 in. wide or larger roll."
Cause Corrective Action
The loaded paper is too small. Load a roll 10 inches wide or larger.
Borderless printng not possible. Paper stretched or shrank.
Cause Corrective Action
The loaded roll has expanded or contracted due to environ-mental conditions, making it wider or narrower than the sup-ported width for borderless printing.
Hold down the Stop button for a second or more to can-cel printing.
Use each type of paper only where the recommendedenvironmental conditions are met. For details on envi-ronmental conditions for various paper, see the PaperReference Guide. (See "Types of Paper.") →P.617
Error Message > Messages regarding printing or adjustment >
iPF815 Use another paper.
13
907
Before borderless printing, move the blue platen switch.
Cause Corrective Action
The blue Switch on the platen was set to the sideopposite ● when a borderless print job was re-ceived.
Before borderless printing, set the blue Switch on the platen tothe ● side. (See "Setting the Blue Switch on the Platen.") →P.872
Blue platen switch is dirty.
Cause Corrective Action
The blue Switch on the platen is dirty. Open the Top Cover and clean the blue Switch on the platen. (See "Cleaning Inside the Top Cover.") →P.837
Error Message > Messages regarding printing or adjustment >
Before borderless printing, move the blue platen switch. iPF815
13
908
Messages regarding printheadsCannot adjust printhead. ................................................................................................................................. 909Cannot adjust band. ........................................................................................................................................ 909
PHead needs cleaning. ................................................................................................................................... 910Wrong printhead. ............................................................................................................................................. 910Problem with Printhead ................................................................................................................................... 910Printhead error ................................................................................................................................................ 910No printhead .................................................................................................................................................... 910Execute printhead cleaning. ............................................................................................................................ 911
Cannot adjust printhead.
Cause Corrective Action
The Printhead noz-zles are clogged.
Execute Auto Head Adj. again, as follows.
1. Press the Online button to clear the error.
2. Print a test pattern to check the nozzles. (See "Checking for Nozzle Clogging.") →P.817
3. Clean the Printhead if the nozzles are clogged. (See "Cleaning the Printhead.") →P.819
4. Execute Auto Head Adj. again. (See "Automatic Straightening of Lines and Colors (Auto Head Adj.).") →P.668
The Printhead can-not be aligned; high-ly transparent film isloaded.
Press the Online button to clear the error.We recommend using a type of paper that you often use, other than film, for Printhead adjust-ment. (See "Automatic Straightening of Lines and Colors (Auto Head Adj.).") →P.668
The Printhead is in-stalled crooked.
Straighten the Printhead as follows, and then execute Auto Head Adj. again.
1. Press the Online button to clear the error.
2. Use Head Inc. Adj. to adjust the angle of inclination of the Printhead. (See "Adjusting Line Misalignment (Head Inc. Adj.).") →P.672
3. Execute Auto Head Adj. again. (See "Automatic Straightening of Lines and Colors (Auto Head Adj.).") →P.668
Cannot adjust band.
Cause Corrective Action
The Printhead nozzles are clog-ged.
Execute Auto Band Adj. again, as follows.
1. Press the Online button to clear the error.
2. Print a test pattern to check the nozzles. (See "Checking for Nozzle Clogging.") →P.817
3. Clean the Printhead if the nozzles are clogged. (See "Cleaning the Printhead.") →P.819
4. Execute Auto Band Adj. again. (See "Auto Band Adjustment (Auto Band Adj.).") →P.677
Error Message > Messages regarding printheads >
iPF815 Cannot adjust printhead.
13
909
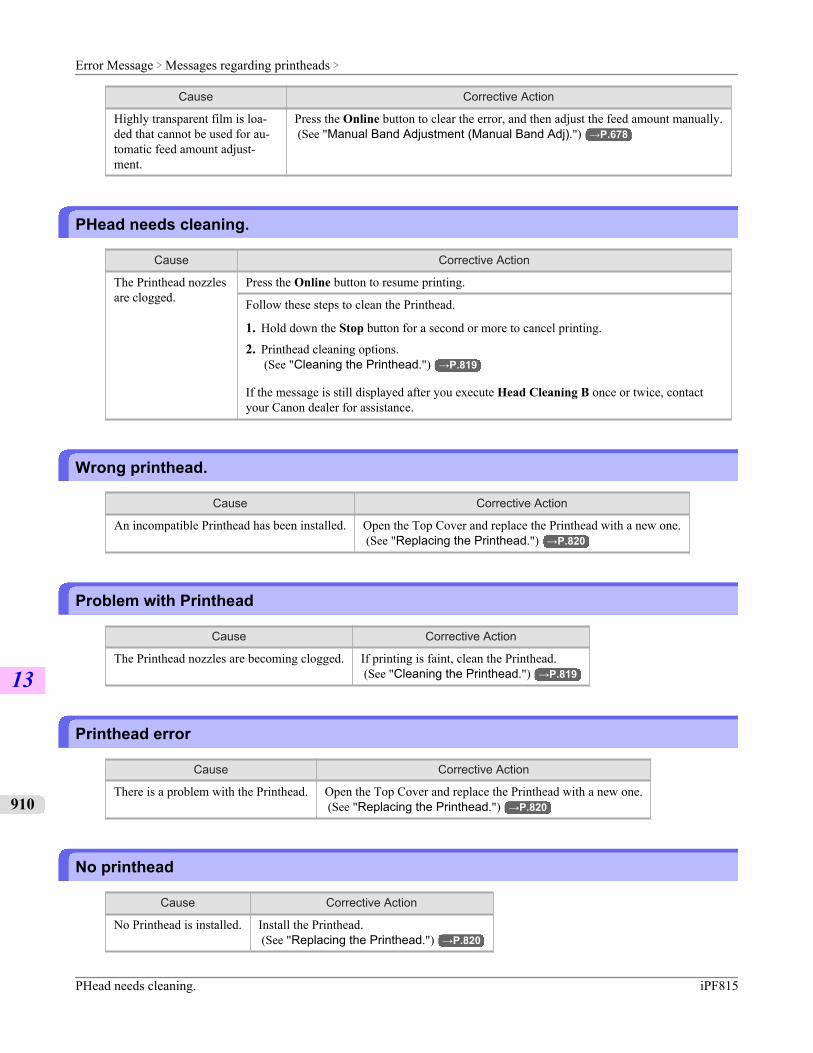
Cause Corrective Action
Highly transparent film is loa-ded that cannot be used for au-tomatic feed amount adjust-ment.
Press the Online button to clear the error, and then adjust the feed amount manually. (See "Manual Band Adjustment (Manual Band Adj).") →P.678
PHead needs cleaning.
Cause Corrective Action
The Printhead nozzlesare clogged.
Press the Online button to resume printing.
Follow these steps to clean the Printhead.
1. Hold down the Stop button for a second or more to cancel printing.
2. Printhead cleaning options. (See "Cleaning the Printhead.") →P.819
If the message is still displayed after you execute Head Cleaning B once or twice, contactyour Canon dealer for assistance.
Wrong printhead.
Cause Corrective Action
An incompatible Printhead has been installed. Open the Top Cover and replace the Printhead with a new one. (See "Replacing the Printhead.") →P.820
Problem with Printhead
Cause Corrective Action
The Printhead nozzles are becoming clogged. If printing is faint, clean the Printhead. (See "Cleaning the Printhead.") →P.819
Printhead error
Cause Corrective Action
There is a problem with the Printhead. Open the Top Cover and replace the Printhead with a new one. (See "Replacing the Printhead.") →P.820
No printhead
Cause Corrective Action
No Printhead is installed. Install the Printhead. (See "Replacing the Printhead.") →P.820
Error Message > Messages regarding printheads >
PHead needs cleaning. iPF815
13
910
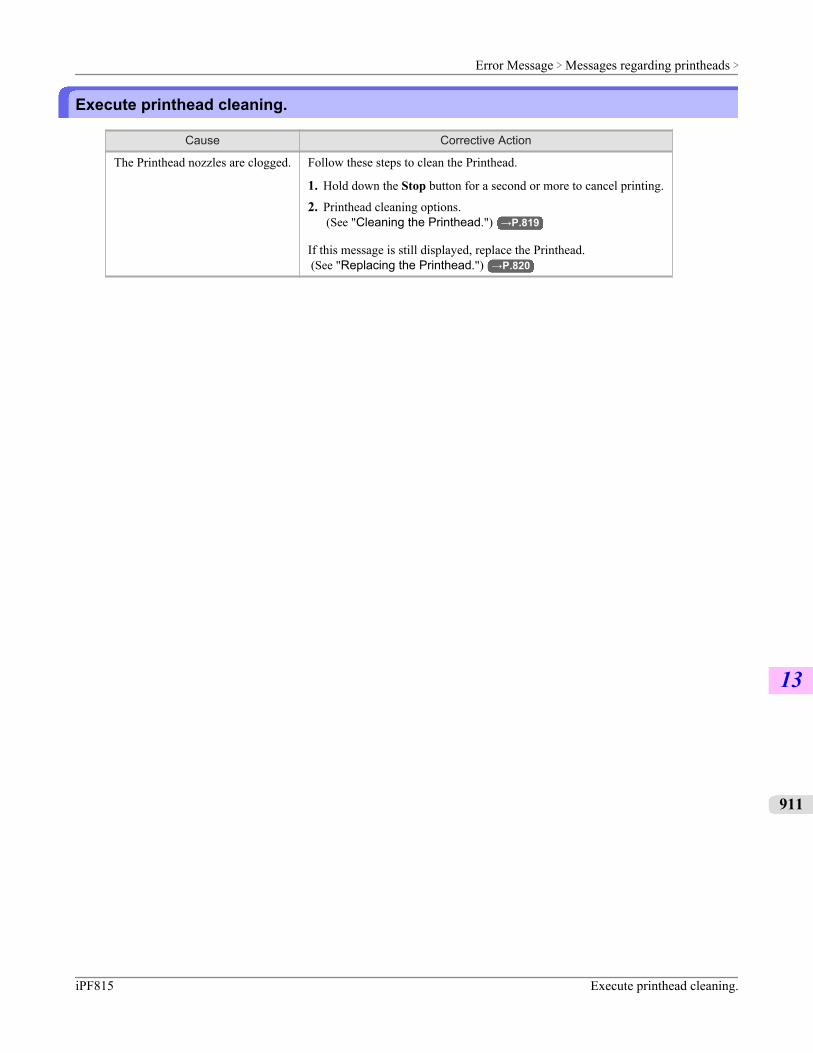
Execute printhead cleaning.
Cause Corrective Action
The Printhead nozzles are clogged. Follow these steps to clean the Printhead.
1. Hold down the Stop button for a second or more to cancel printing.
2. Printhead cleaning options. (See "Cleaning the Printhead.") →P.819
If this message is still displayed, replace the Printhead. (See "Replacing the Printhead.") →P.820
Error Message > Messages regarding printheads >
iPF815 Execute printhead cleaning.
13
911
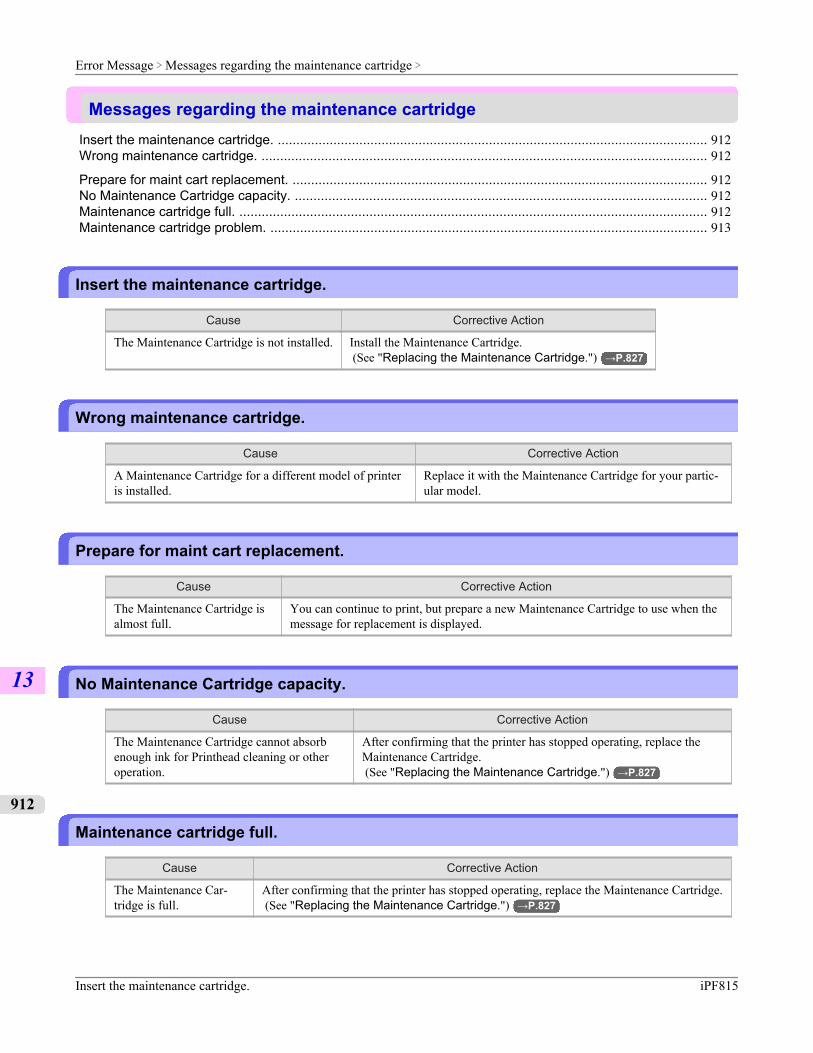
Messages regarding the maintenance cartridgeInsert the maintenance cartridge. .................................................................................................................... 912Wrong maintenance cartridge. ........................................................................................................................ 912
Prepare for maint cart replacement. ................................................................................................................ 912No Maintenance Cartridge capacity. ............................................................................................................... 912Maintenance cartridge full. .............................................................................................................................. 912Maintenance cartridge problem. ...................................................................................................................... 913
Insert the maintenance cartridge.
Cause Corrective Action
The Maintenance Cartridge is not installed. Install the Maintenance Cartridge. (See "Replacing the Maintenance Cartridge.") →P.827
Wrong maintenance cartridge.
Cause Corrective Action
A Maintenance Cartridge for a different model of printeris installed.
Replace it with the Maintenance Cartridge for your partic-ular model.
Prepare for maint cart replacement.
Cause Corrective Action
The Maintenance Cartridge isalmost full.
You can continue to print, but prepare a new Maintenance Cartridge to use when themessage for replacement is displayed.
No Maintenance Cartridge capacity.
Cause Corrective Action
The Maintenance Cartridge cannot absorbenough ink for Printhead cleaning or otheroperation.
After confirming that the printer has stopped operating, replace theMaintenance Cartridge. (See "Replacing the Maintenance Cartridge.") →P.827
Maintenance cartridge full.
Cause Corrective Action
The Maintenance Car-tridge is full.
After confirming that the printer has stopped operating, replace the Maintenance Cartridge. (See "Replacing the Maintenance Cartridge.") →P.827
Error Message > Messages regarding the maintenance cartridge >
Insert the maintenance cartridge. iPF815
13
912
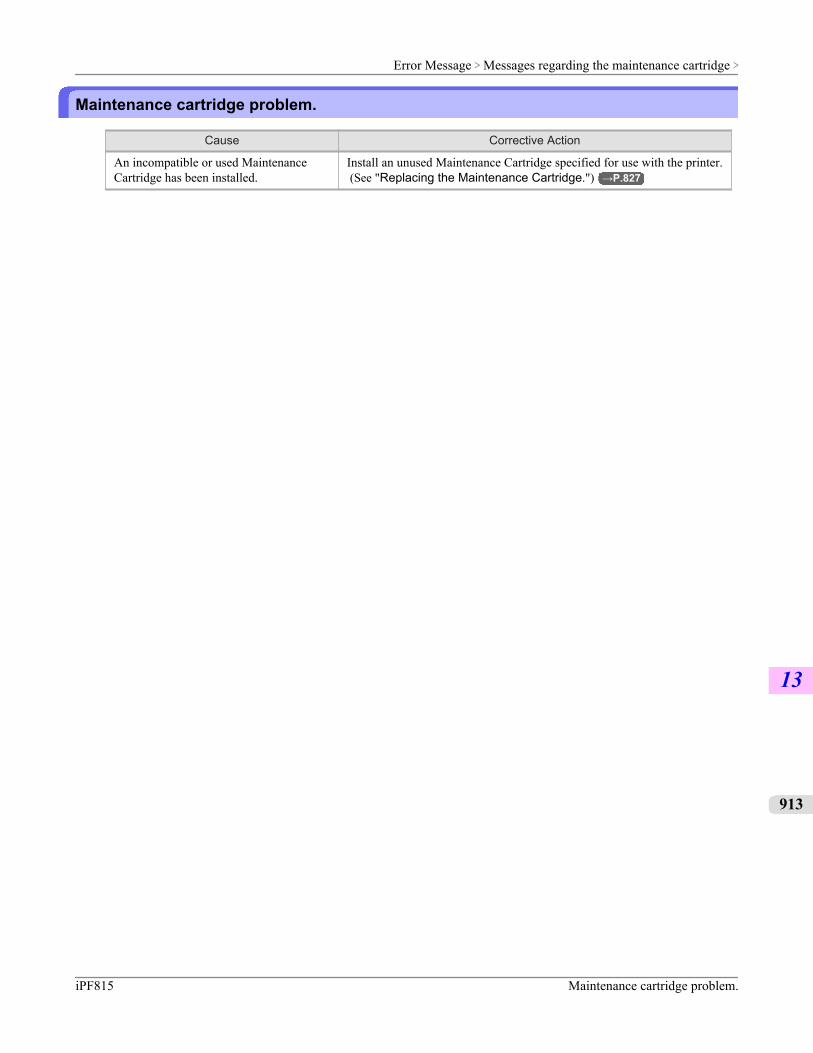
Maintenance cartridge problem.
Cause Corrective Action
An incompatible or used MaintenanceCartridge has been installed.
Install an unused Maintenance Cartridge specified for use with the printer. (See "Replacing the Maintenance Cartridge.") →P.827
Error Message > Messages regarding the maintenance cartridge >
iPF815 Maintenance cartridge problem.
13
913
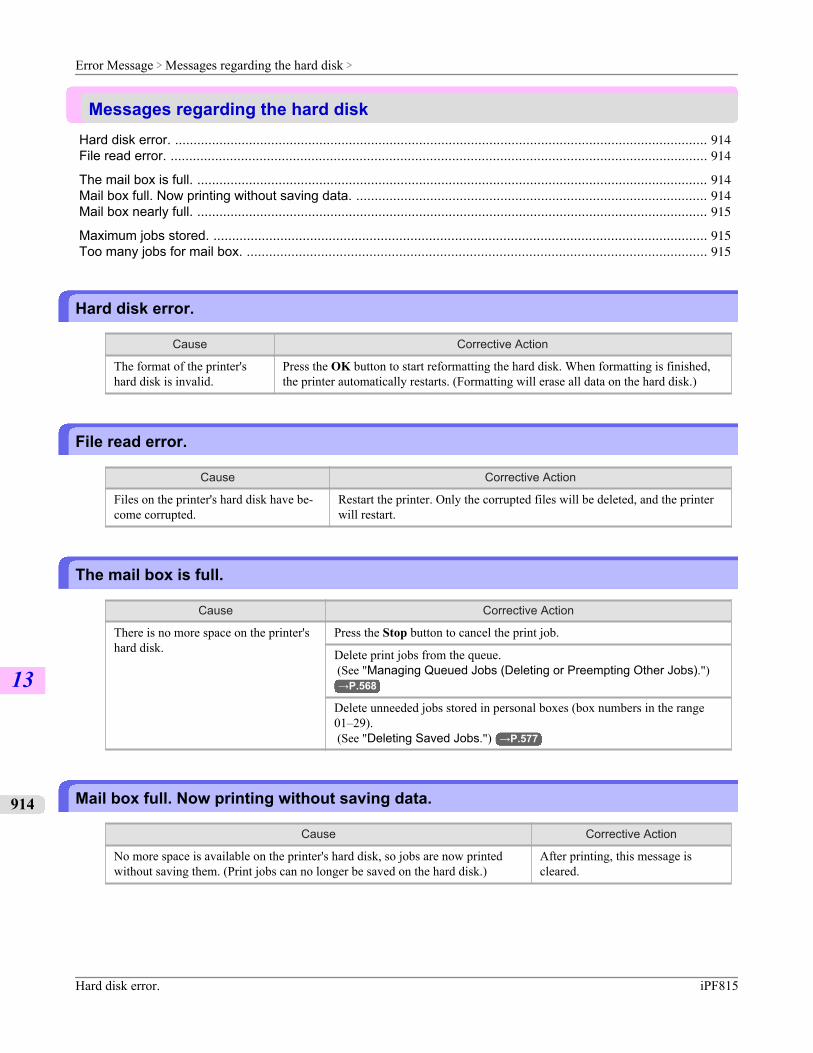
Messages regarding the hard diskHard disk error. ................................................................................................................................................ 914File read error. ................................................................................................................................................. 914
The mail box is full. .......................................................................................................................................... 914Mail box full. Now printing without saving data. ............................................................................................... 914Mail box nearly full. .......................................................................................................................................... 915
Maximum jobs stored. ..................................................................................................................................... 915Too many jobs for mail box. ............................................................................................................................ 915
Hard disk error.
Cause Corrective Action
The format of the printer'shard disk is invalid.
Press the OK button to start reformatting the hard disk. When formatting is finished,the printer automatically restarts. (Formatting will erase all data on the hard disk.)
File read error.
Cause Corrective Action
Files on the printer's hard disk have be-come corrupted.
Restart the printer. Only the corrupted files will be deleted, and the printerwill restart.
The mail box is full.
Cause Corrective Action
There is no more space on the printer'shard disk.
Press the Stop button to cancel the print job.
Delete print jobs from the queue. (See "Managing Queued Jobs (Deleting or Preempting Other Jobs).")→P.568
Delete unneeded jobs stored in personal boxes (box numbers in the range01–29). (See "Deleting Saved Jobs.") →P.577
Mail box full. Now printing without saving data.
Cause Corrective Action
No more space is available on the printer's hard disk, so jobs are now printedwithout saving them. (Print jobs can no longer be saved on the hard disk.)
After printing, this message iscleared.
Error Message > Messages regarding the hard disk >
Hard disk error. iPF815
13
914
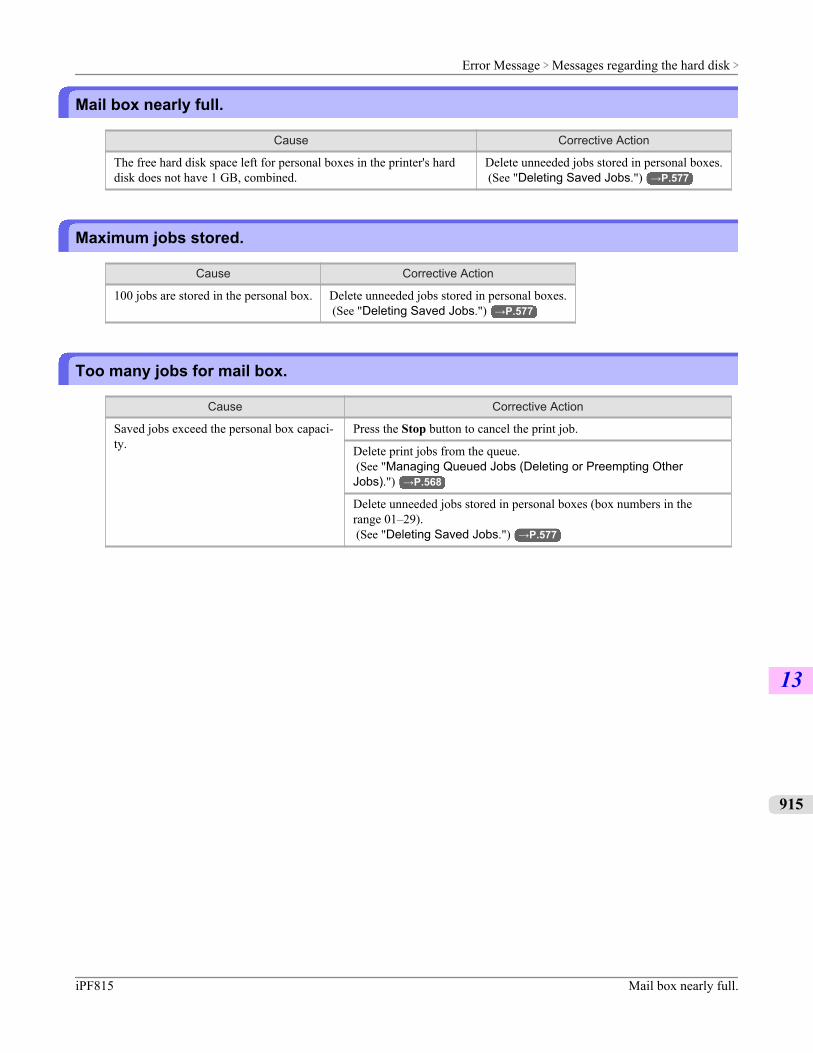
Mail box nearly full.
Cause Corrective Action
The free hard disk space left for personal boxes in the printer's harddisk does not have 1 GB, combined.
Delete unneeded jobs stored in personal boxes. (See "Deleting Saved Jobs.") →P.577
Maximum jobs stored.
Cause Corrective Action
100 jobs are stored in the personal box. Delete unneeded jobs stored in personal boxes. (See "Deleting Saved Jobs.") →P.577
Too many jobs for mail box.
Cause Corrective Action
Saved jobs exceed the personal box capaci-ty.
Press the Stop button to cancel the print job.
Delete print jobs from the queue. (See "Managing Queued Jobs (Deleting or Preempting OtherJobs).") →P.568
Delete unneeded jobs stored in personal boxes (box numbers in therange 01–29). (See "Deleting Saved Jobs.") →P.577
Error Message > Messages regarding the hard disk >
iPF815 Mail box nearly full.
13
915

Messages regarding HP-GL/2This type of paper is not compatible with HP-GL/2. ........................................................................................ 916
GL2: Wxxxx The memory is full. (xxxx is 0501, 0903, or 0904) ...................................................................... 916GL2: W0502 The parameter is out of range. ................................................................................................... 916GL2: W0504 This command is not supported. ................................................................................................ 916
This type of paper is not compatible with HP-GL/2.
Cause Corrective Action
The printer has received a HP-GL/2print job that cannot be printed on thepaper that has been advanced.
Follow these steps to replace the type of paper in the printer.
1. Hold down the Stop button for a second or more to cancel printing.
2. Replace the paper with a type compatible with HP-GL/2. For details onpaper compatible with HP-GL/2, refer to the Paper Reference Guide. (See "Types of Paper.") →P.617
Press the Online button to resume printing. However, note that this errormay cause paper jams and affect the printing quality.
GL2: Wxxxx The memory is full. (xxxx is 0501, 0903, or 0904)
Cause Corrective Action
The printer memory became full while processing the job received. Check the print job and the printing results.
GL2: W0502 The parameter is out of range.
Cause Corrective Action
A parameter specified in a HP-GL/2 command is out of the supported range. Check the print job.
GL2: W0504 This command is not supported.
Cause Corrective Action
The printer has received an unsupported HP-GL/2 command. Check the print job.
Error Message > Messages regarding HP-GL/2 >
This type of paper is not compatible with HP-GL/2. iPF815
13
916
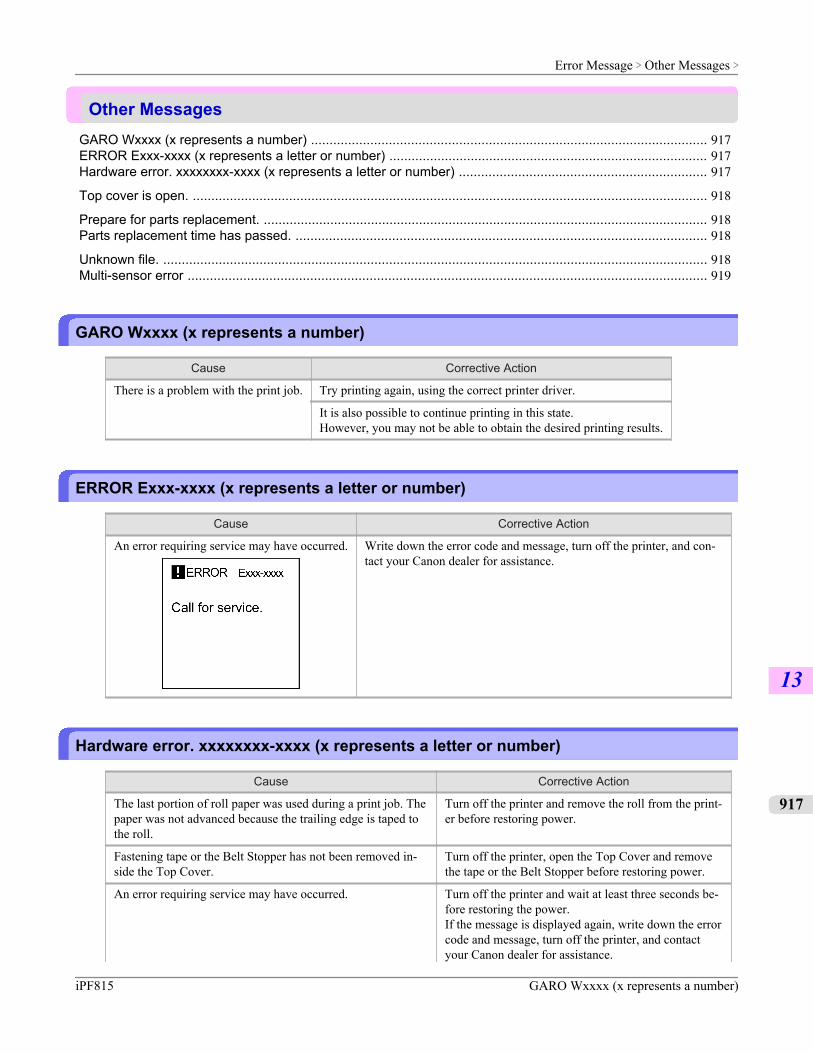
Other MessagesGARO Wxxxx (x represents a number) ........................................................................................................... 917ERROR Exxx-xxxx (x represents a letter or number) ...................................................................................... 917Hardware error. xxxxxxxx-xxxx (x represents a letter or number) ................................................................... 917
Top cover is open. ........................................................................................................................................... 918
Prepare for parts replacement. ........................................................................................................................ 918Parts replacement time has passed. ............................................................................................................... 918
Unknown file. ................................................................................................................................................... 918Multi-sensor error ............................................................................................................................................ 919
GARO Wxxxx (x represents a number)
Cause Corrective Action
There is a problem with the print job. Try printing again, using the correct printer driver.
It is also possible to continue printing in this state.However, you may not be able to obtain the desired printing results.
ERROR Exxx-xxxx (x represents a letter or number)
Cause Corrective Action
An error requiring service may have occurred. Write down the error code and message, turn off the printer, and con-tact your Canon dealer for assistance.
Hardware error. xxxxxxxx-xxxx (x represents a letter or number)
Cause Corrective Action
The last portion of roll paper was used during a print job. Thepaper was not advanced because the trailing edge is taped tothe roll.
Turn off the printer and remove the roll from the print-er before restoring power.
Fastening tape or the Belt Stopper has not been removed in-side the Top Cover.
Turn off the printer, open the Top Cover and removethe tape or the Belt Stopper before restoring power.
An error requiring service may have occurred. Turn off the printer and wait at least three seconds be-fore restoring the power.If the message is displayed again, write down the errorcode and message, turn off the printer, and contactyour Canon dealer for assistance.
Error Message > Other Messages >
iPF815 GARO Wxxxx (x represents a number)
13
917
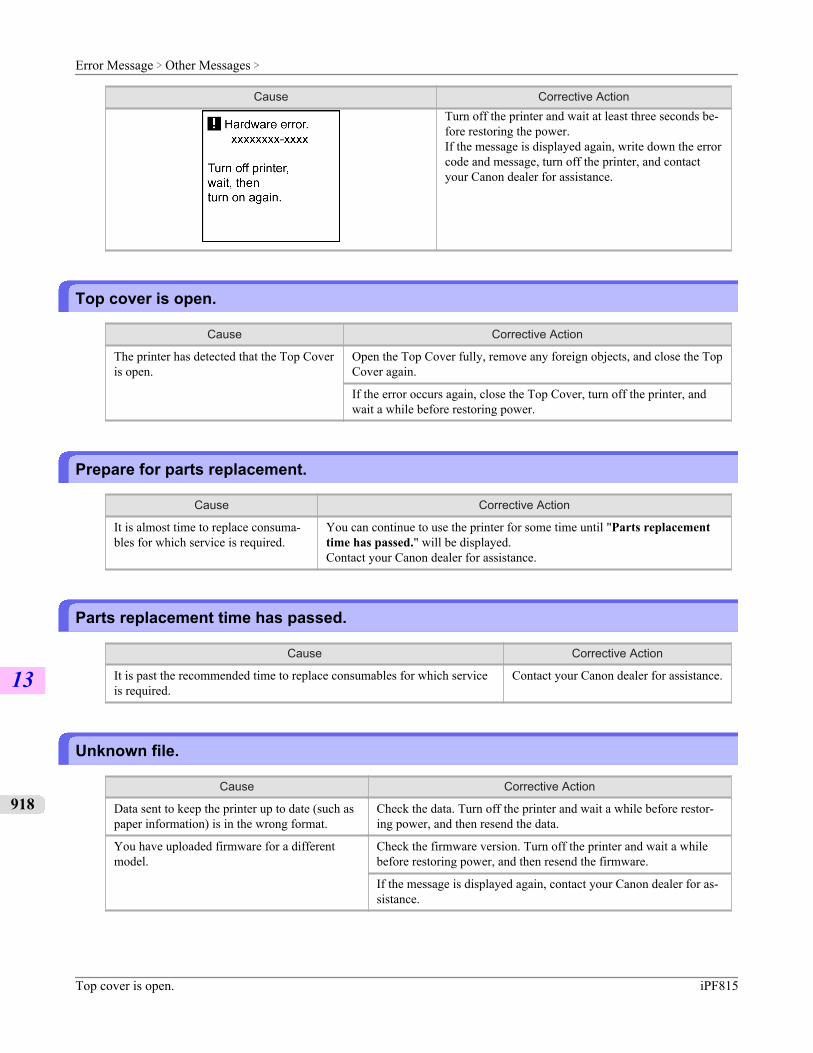
Cause Corrective ActionTurn off the printer and wait at least three seconds be-fore restoring the power.If the message is displayed again, write down the errorcode and message, turn off the printer, and contactyour Canon dealer for assistance.
Top cover is open.
Cause Corrective Action
The printer has detected that the Top Coveris open.
Open the Top Cover fully, remove any foreign objects, and close the TopCover again.
If the error occurs again, close the Top Cover, turn off the printer, andwait a while before restoring power.
Prepare for parts replacement.
Cause Corrective Action
It is almost time to replace consuma-bles for which service is required.
You can continue to use the printer for some time until "Parts replacementtime has passed." will be displayed.Contact your Canon dealer for assistance.
Parts replacement time has passed.
Cause Corrective Action
It is past the recommended time to replace consumables for which serviceis required.
Contact your Canon dealer for assistance.
Unknown file.
Cause Corrective Action
Data sent to keep the printer up to date (such aspaper information) is in the wrong format.
Check the data. Turn off the printer and wait a while before restor-ing power, and then resend the data.
You have uploaded firmware for a differentmodel.
Check the firmware version. Turn off the printer and wait a whilebefore restoring power, and then resend the firmware.
If the message is displayed again, contact your Canon dealer for as-sistance.
Error Message > Other Messages >
Top cover is open. iPF815
13
918
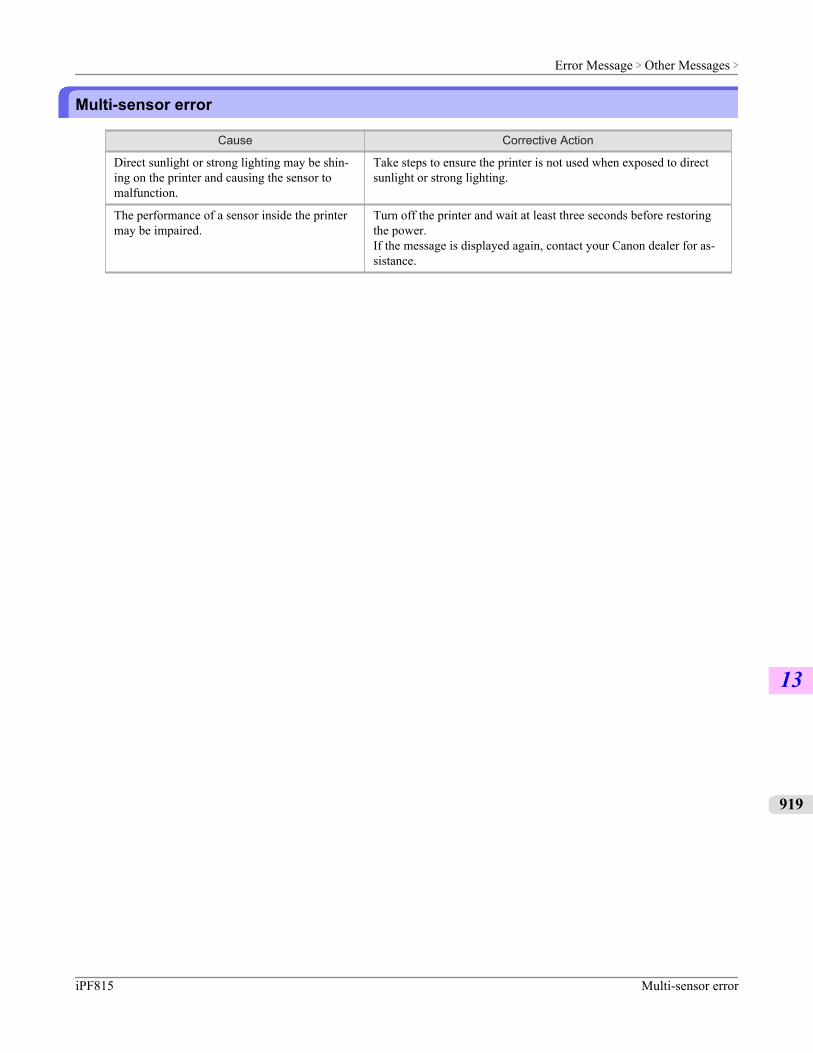
Multi-sensor error
Cause Corrective Action
Direct sunlight or strong lighting may be shin-ing on the printer and causing the sensor tomalfunction.
Take steps to ensure the printer is not used when exposed to directsunlight or strong lighting.
The performance of a sensor inside the printermay be impaired.
Turn off the printer and wait at least three seconds before restoringthe power.If the message is displayed again, contact your Canon dealer for as-sistance.
Error Message > Other Messages >
iPF815 Multi-sensor error
13
919
Appendix
How to use this manual 921
Disposal of the product 931
Appendix >
iPF815
14
920
How to use this manualAbout This User Manual .................................................................................................................................. 921Searching Topics ............................................................................................................................................. 922HTML Version of the Manual for Printing ........................................................................................................ 924
About This User Manual
• SymbolsThe following symbols are used in this User Manual to indicate safety information and explanations on restrictions orprecautions in use.
Impor-tant
Indicates important information that must be followed when using the printer. Be sure to readthis information to prevent printer damage or operating errors.
Caution Indicates caution items for which operating error poses a risk of injury or damage to equipmentor property. To ensure safe use, always follow these precautions.
Note Indicates helpful reference information and supplemental information on particular topics.
• Button names and user interface elementsKey and button names on the control panel and user interface elements in software (such as menus and buttons) areindicated as follows in this User Manual.
Control panel buttons Example: Press the OK button.
Control panel messages Example: Head Cleaning is displayed.
Software interface items(Menus and Buttons)
Example: Click OK.
Keyboard keys Example: Press the Tab key.
• Part namesNames of printer parts are indicated as follows in this User Manual.
Printer part names Example: Open the Top Cover.
• Cross-referenceOther pages or manuals that provide related information are indicated as follows in this User Manual.
Cross-reference in the same User Manual Example: see "Turning the Printer On and Off." →P.694Click the link to jump to the corresponding page.
Cross-reference in related manuals Example: See the Paper Reference Guide .
Other cross-reference Example: See the printer driver help.
• Figures and software screens
• Figures in this User Manual may be different from the actual appearance of the printer in some cases.• Screens depicted in this User Manual for the printer driver or other software may be different from the actual
screens because of subsequent updates.• Windows XP screens are used in explanations of Windows operations in this User Manual.
Appendix > How to use this manual >
iPF815 About This User Manual
14
921
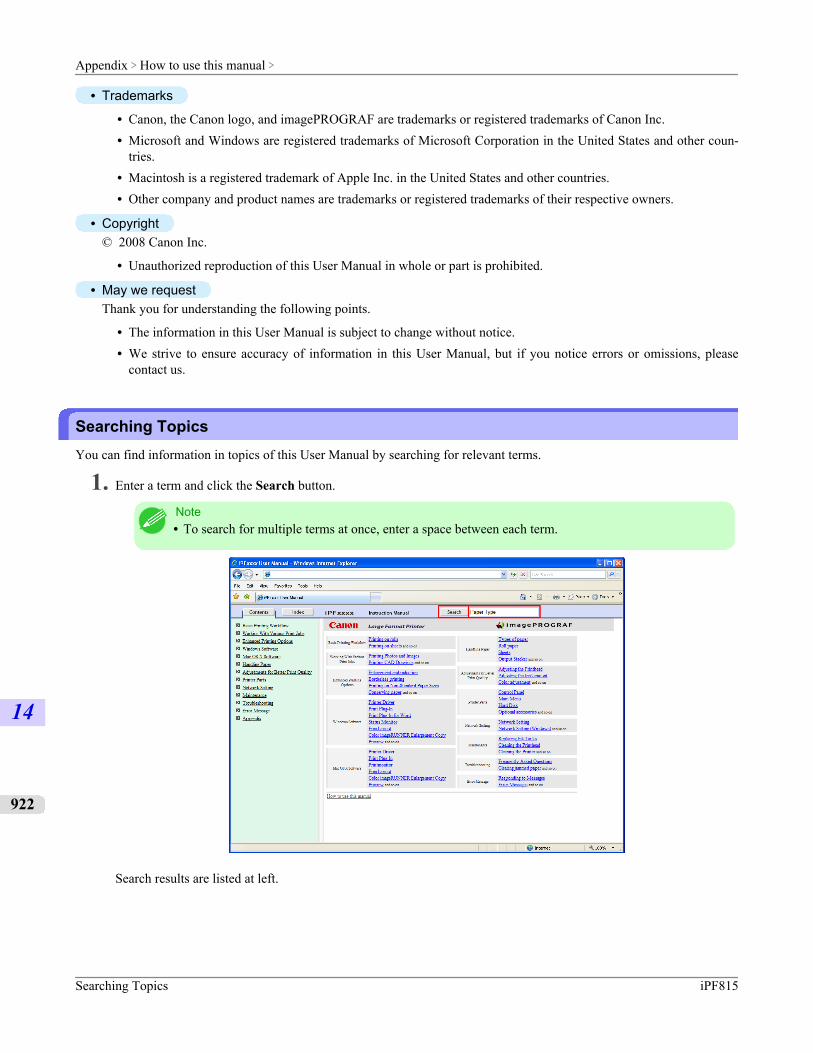
• Trademarks
• Canon, the Canon logo, and imagePROGRAF are trademarks or registered trademarks of Canon Inc.• Microsoft and Windows are registered trademarks of Microsoft Corporation in the United States and other coun-
tries.• Macintosh is a registered trademark of Apple Inc. in the United States and other countries.• Other company and product names are trademarks or registered trademarks of their respective owners.
• Copyright© 2008 Canon Inc.
• Unauthorized reproduction of this User Manual in whole or part is prohibited.
• May we requestThank you for understanding the following points.
• The information in this User Manual is subject to change without notice.• We strive to ensure accuracy of information in this User Manual, but if you notice errors or omissions, please
contact us.
Searching TopicsYou can find information in topics of this User Manual by searching for relevant terms.
1. Enter a term and click the Search button.
Note• To search for multiple terms at once, enter a space between each term.
Search results are listed at left.
Appendix > How to use this manual >
Searching Topics iPF815
14
922
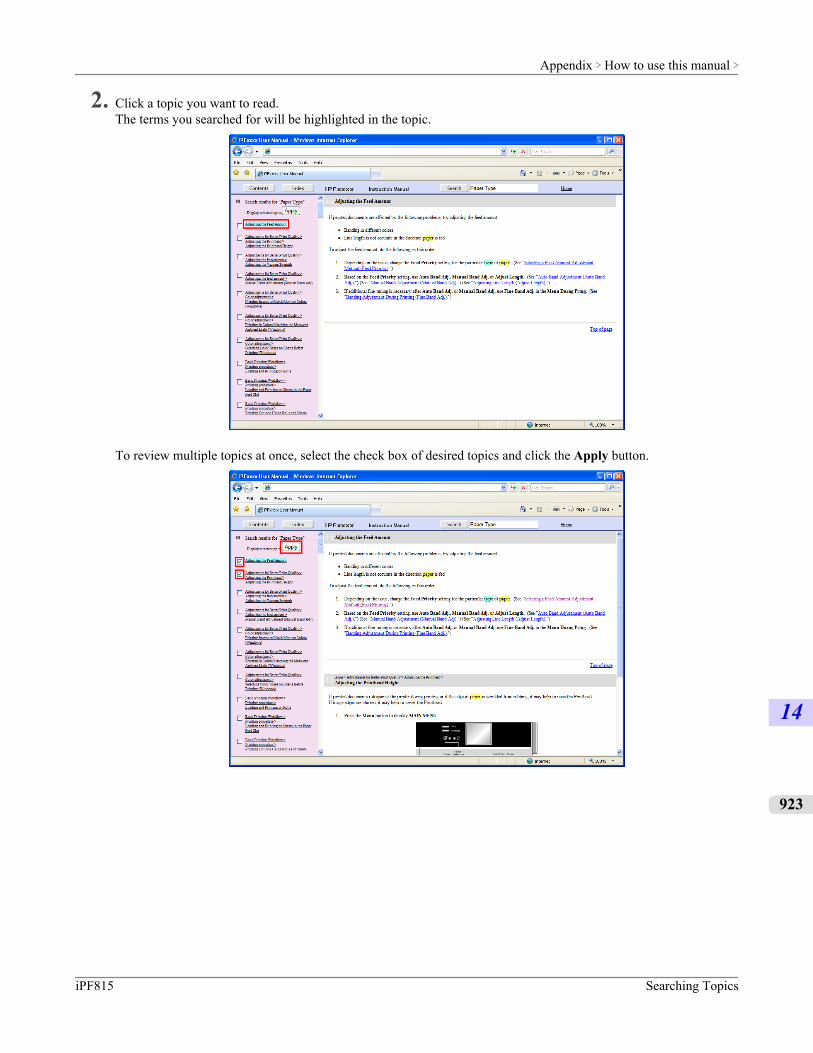
2. Click a topic you want to read.The terms you searched for will be highlighted in the topic.
To review multiple topics at once, select the check box of desired topics and click the Apply button.
Appendix > How to use this manual >
iPF815 Searching Topics
14
923
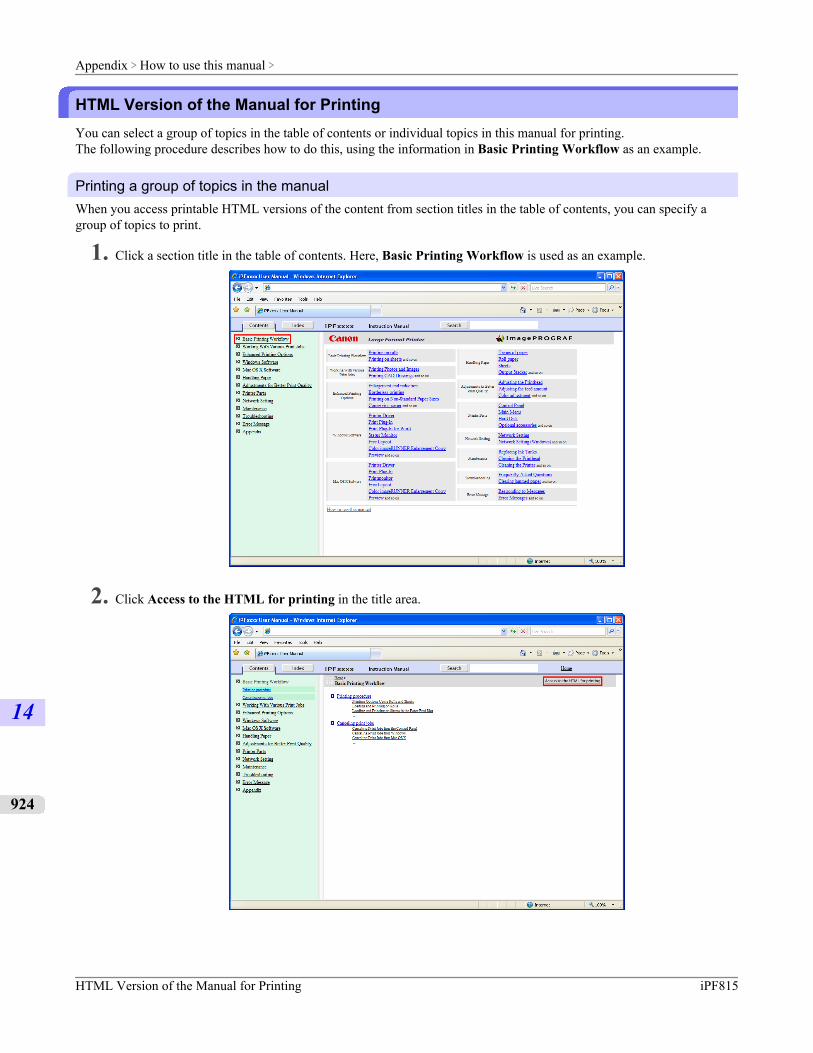
HTML Version of the Manual for PrintingYou can select a group of topics in the table of contents or individual topics in this manual for printing.The following procedure describes how to do this, using the information in Basic Printing Workflow as an example.
Printing a group of topics in the manualWhen you access printable HTML versions of the content from section titles in the table of contents, you can specify agroup of topics to print.
1. Click a section title in the table of contents. Here, Basic Printing Workflow is used as an example.
2. Click Access to the HTML for printing in the title area.
Appendix > How to use this manual >
HTML Version of the Manual for Printing iPF815
14
924
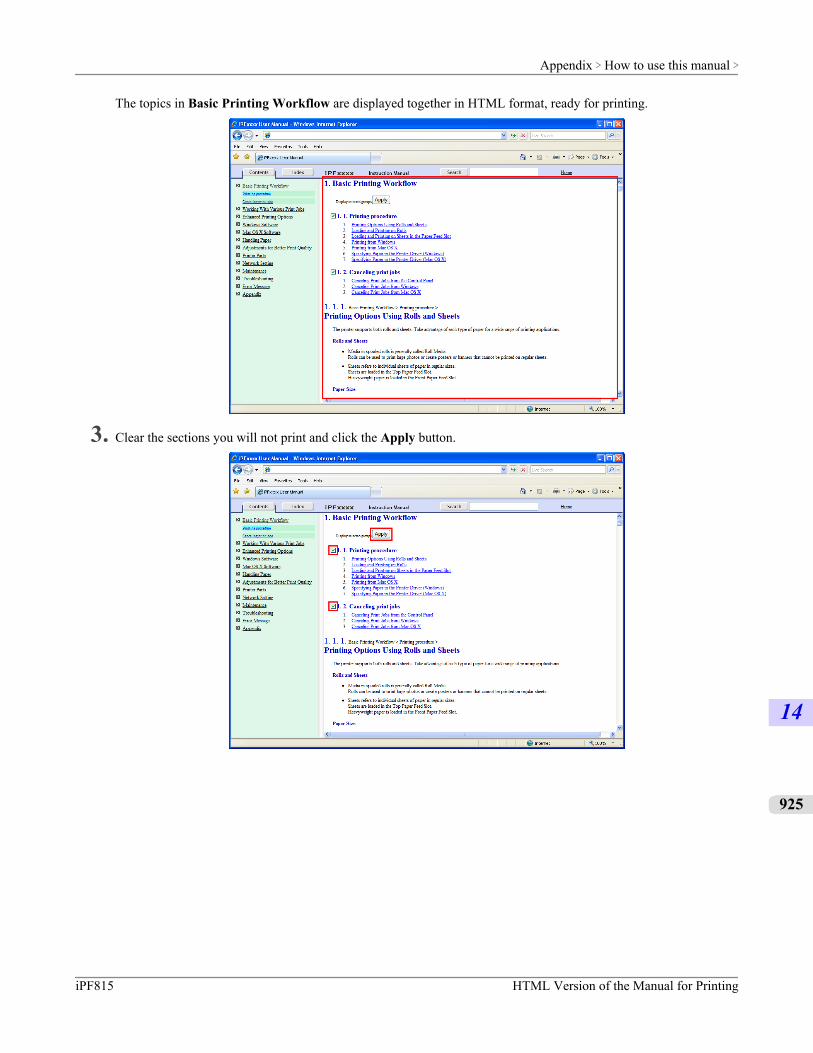
The topics in Basic Printing Workflow are displayed together in HTML format, ready for printing.
3. Clear the sections you will not print and click the Apply button.
Appendix > How to use this manual >
iPF815 HTML Version of the Manual for Printing
14
925
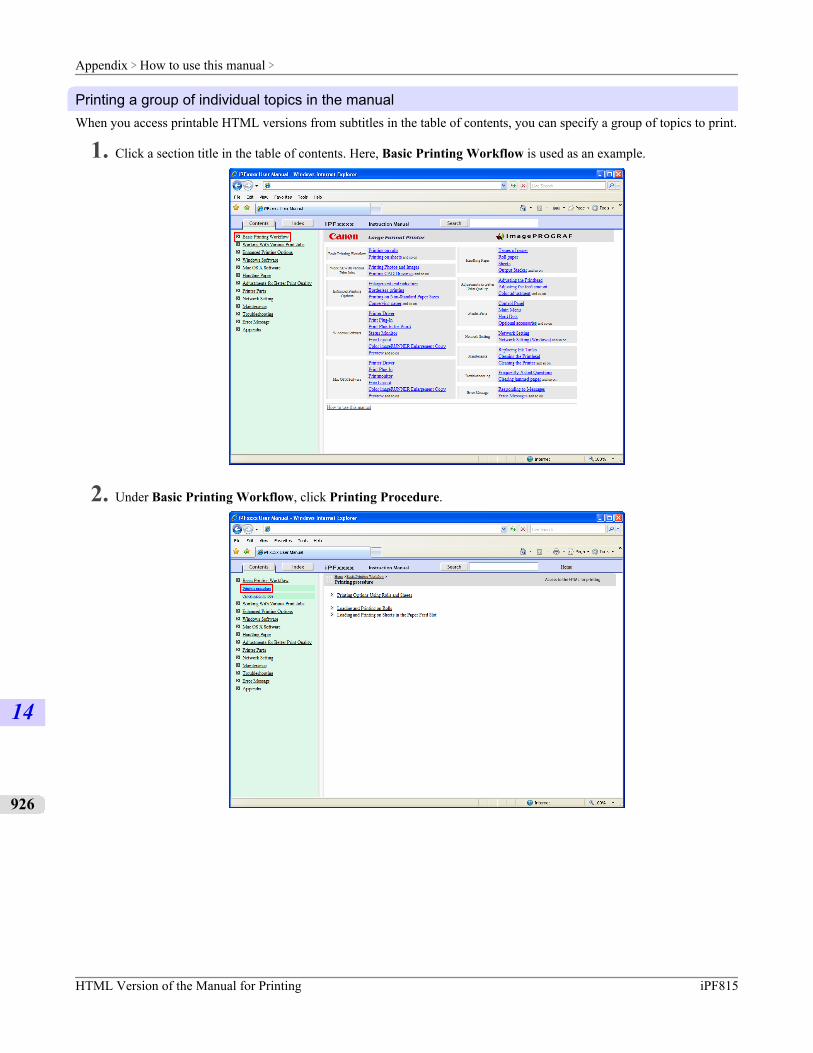
Printing a group of individual topics in the manualWhen you access printable HTML versions from subtitles in the table of contents, you can specify a group of topics to print.
1. Click a section title in the table of contents. Here, Basic Printing Workflow is used as an example.
2. Under Basic Printing Workflow, click Printing Procedure.
Appendix > How to use this manual >
HTML Version of the Manual for Printing iPF815
14
926

3. Click Access to the HTML for printing in the title area.
The topics in Printing Procedure are displayed together in HTML format, ready for printing.
Appendix > How to use this manual >
iPF815 HTML Version of the Manual for Printing
14
927
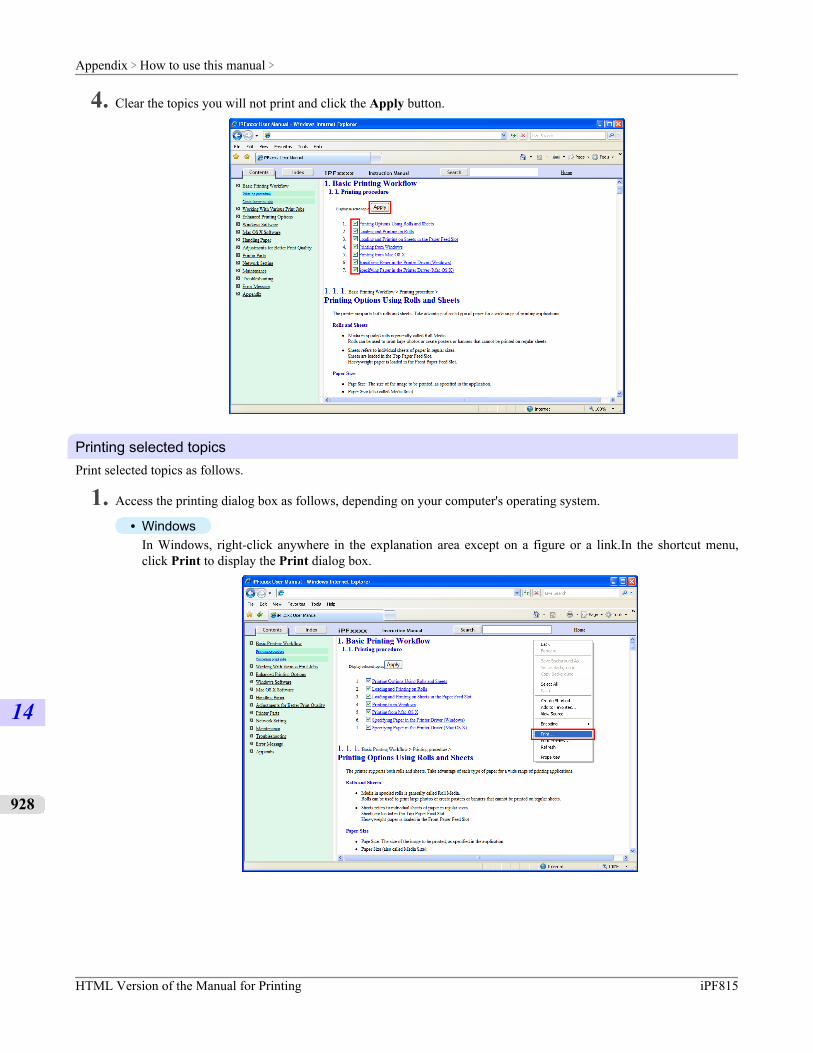
4. Clear the topics you will not print and click the Apply button.
Printing selected topicsPrint selected topics as follows.
1. Access the printing dialog box as follows, depending on your computer's operating system.
• WindowsIn Windows, right-click anywhere in the explanation area except on a figure or a link.In the shortcut menu,click Print to display the Print dialog box.
Appendix > How to use this manual >
HTML Version of the Manual for Printing iPF815
14
928
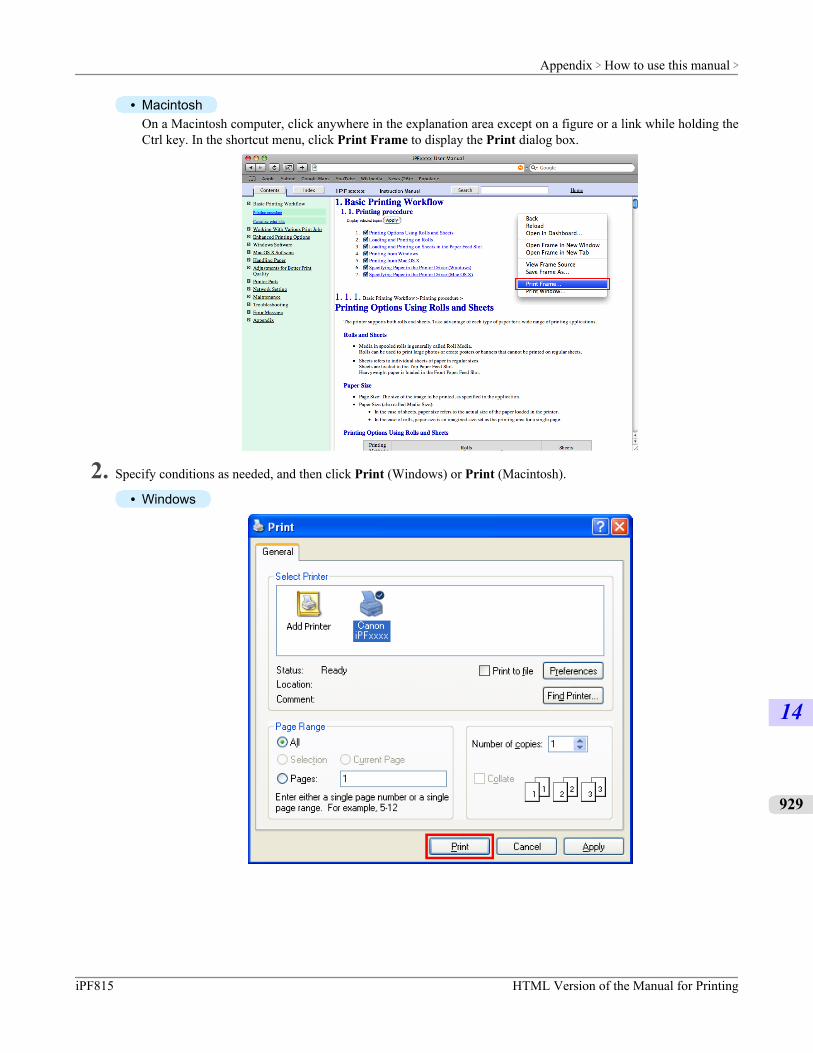
• MacintoshOn a Macintosh computer, click anywhere in the explanation area except on a figure or a link while holding theCtrl key. In the shortcut menu, click Print Frame to display the Print dialog box.
2. Specify conditions as needed, and then click Print (Windows) or Print (Macintosh).
• Windows
Appendix > How to use this manual >
iPF815 HTML Version of the Manual for Printing
14
929
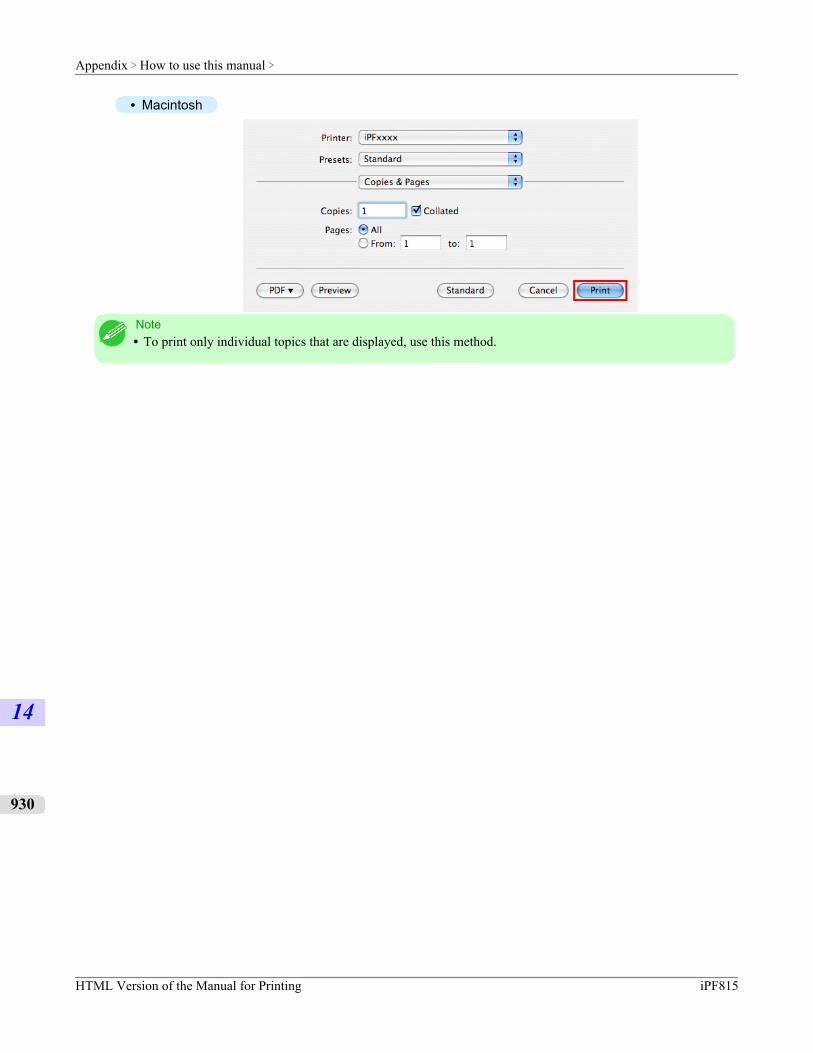
• Macintosh
Note• To print only individual topics that are displayed, use this method.
Appendix > How to use this manual >
HTML Version of the Manual for Printing iPF815
14
930
Disposal of the productWEEE Directive ............................................................................................................................................... 932
Appendix > Disposal of the product >
iPF815
14
931
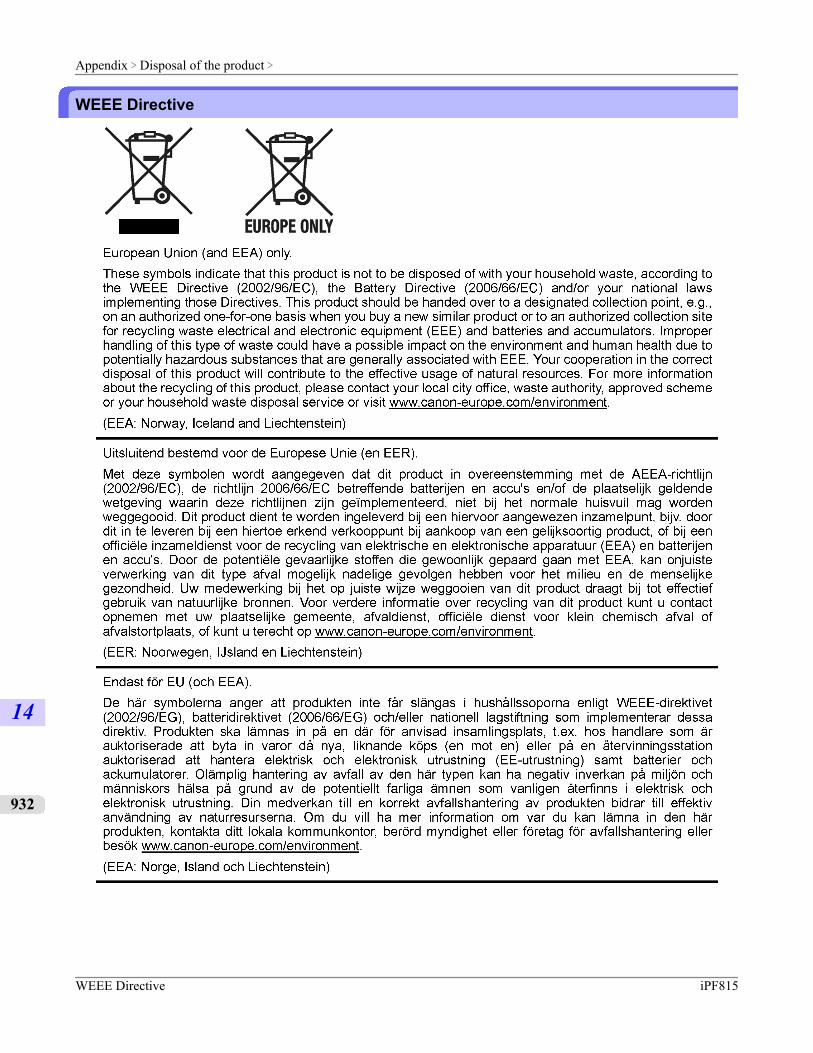
WEEE Directive
Appendix > Disposal of the product >
WEEE Directive iPF815
14
932
Appendix > Disposal of the product >
iPF815 WEEE Directive
14
933
Appendix > Disposal of the product >
WEEE Directive iPF815
14
934
Appendix > Disposal of the product >
iPF815 WEEE Directive
14
935
Appendix > Disposal of the product >
WEEE Directive iPF815
14
936
Appendix > Disposal of the product >
iPF815 WEEE Directive
14
937
Appendix > Disposal of the product >
WEEE Directive iPF815
14
938
Appendix > Disposal of the product >
iPF815 WEEE Directive
14
939
Appendix > Disposal of the product >
WEEE Directive iPF815
14
940

I n d e x
AAccounting ................................ 388,390,391,394,398,399Additional Settings Pane .............................................. 450Adjusting the Vacuum Strength ................................... 683AppleTalk Network ...................................................... 793
BBonjour Network .......................................................... 800
CCAD ..................................................... 19,20,22,26,27,617Cleaning ..................................... 689,694,819,820,837,873Color Adjustment .................................................. 221,226Color imageRUNNER Enlargement Copy .........................286,288,513,515Configuring the IP Address ..................... 404,773,774,775
DDevice Settings Sheet ................................................... 242Drying Time ................................................................. 640
FFavorites Sheet ............................................................. 237Feed amount .......................................................... 239,449Free Layout .................................... 2,234,257,259,481,483
GGlossy Paper .............................................................. 31,33
HHDI driver ............................................................. 354,358Head Cleaning .............................................................. 819
IInk level ........................................................................ 886Ink level detection ........................................................ 886Interface ..................................... 707,774,775,780,786,794
LLarge-Format Printing ............................. 314,325,329,340Layout Sheet ................................................................. 233
MMain Menu Settings ..................................................... 734Main Pane ..................................................................... 433
Main Sheet .................................................................... 215Main menu ............................................... 704,705,722,734Maintenance Cartridge .......................................... 835,912Media Take-up Unit .............................................. 687,861
NNetWare network ......................................................... 784Nozzle ...................................................... 239,449,668,817
OOnline ........................................................................... 695Open Preview ................................... 184,208,216,236,244Orientation ............................................... 190,192,325,340Output Method ...................................................... 231,382
PPage Setup Pane ........................................................... 447Page Setup Sheet .......................................................... 228PosterArtist ................................................................... 181Power ............................................................................ 687Print Job Log ......................................................... 390,399Print area ......................................................................... 85Printer Driver Settings ........................................... 202,425Printer modes ................................................................ 696Printhead ......................................................... 689,836,910Printing Vertical or Horizontal Banners ......... 115,116,120Printing at Actual Size ............................................... 92,95Problems ....................................................................... 877
RRemoving printer drivers .............................................. 880Removing the Roll ................................................. 634,637Roll Holder ..................................................... 623,649,685Rotate Page 90 degrees ................................... 167,169,230reduce cutting dust ........................................................ 648
SSave print jobs ................................................ 563,565,589Saving Print Jobs .......................................................... 589Selecting the Paper Type ....................................... 632,650Size Options ................................................................. 232Special Settings ............................................................ 236Specifying Paper in the Printer Driver .................. 204,427Submenu ......................................................... 697,705,735Support Pane ................................................................. 451Support Sheet ............................................................... 240
T
Transfer ........................................................................ 841
UUtility Sheet .................................................................. 239
VVacuum Strength .......................................................... 683
WWhen to replace ............................................................ 820


©CANON INC. 2010