Embed Size (px)
Citation preview
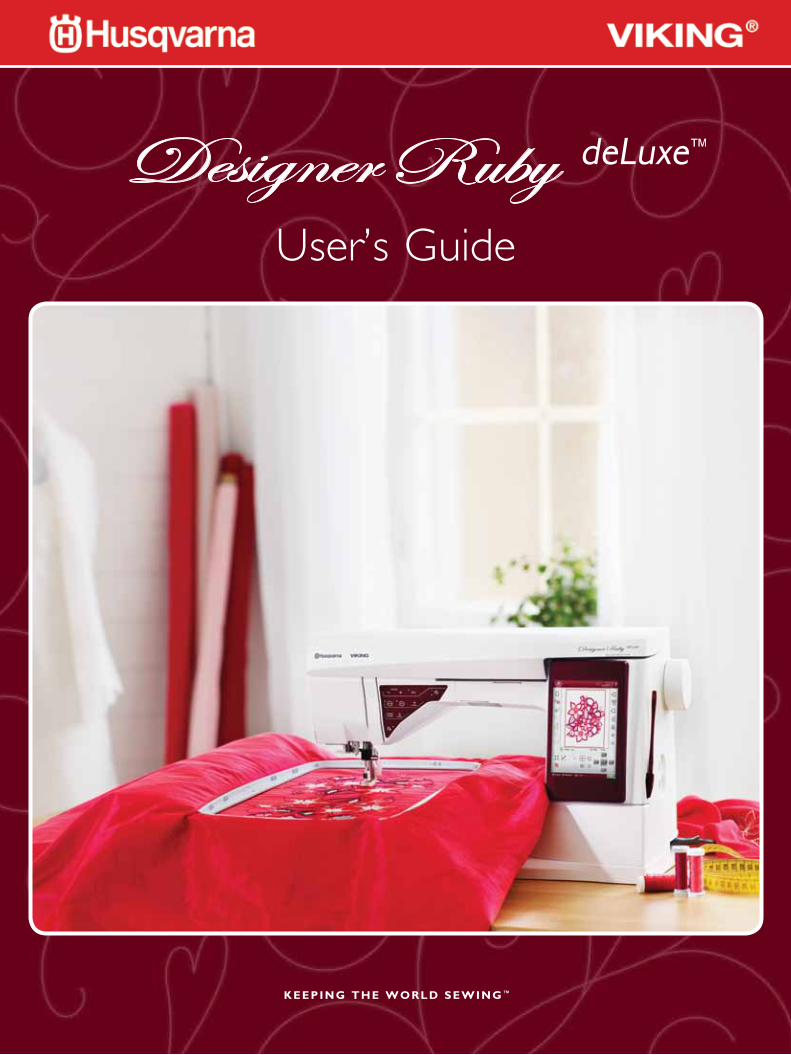
User’s Guide
KEEPING THE WORLD SEWING ™
This household sewing machine is designed to comply with IEC/EN 60335-2-28 and UL1594
IMPORTANT SAFETY INSTRUCTIONSWhen using an electrical appliance, basic safety precautions should always be followed, including the following: Read all instructions before using this household sewing machine.
DANGER – To reduce the risk of electric shock:• Asewingmachineshouldneverbeleftunattendedwhenpluggedin.Alwaysunplugthissewingmachinefromthe
electric outlet immediately after using and before cleaning.
WARNING – To reduce the risk of burns, fire, electric shock, or injury to person:• Thissewingmachineisnotintendedforusebypersons(includingchildren)withreducedphysical,sensoryormentalcapabilities,orlackof experienceandknowledge,unlesstheyhavebeengivensupervisionorinstructionconcerninguseof the sewing machine by a person responsible for their safety.
• Childrenshouldbesupervisedtoensurethattheydonotplaywiththesewingmachine.• Usethissewingmachineonlyforitsintendeduseasdescribedinthismanual.Useonlyattachmentsrecommendedby
the manufacturer as contained in this manual.• Neveroperatethissewingmachineif ithasadamagedcordorplug,if itisnotworkingproperly,if ithasbeendroppedordamaged,ordroppedintowater.Returnthesewingmachinetothenearestauthorizeddealerorservicecenterforexamination, repair, electrical or mechanical adjustment.
• Neveroperatethesewingmachinewithanyairopeningsblocked.Keepventilationopeningsof thesewingmachineandfoot controller free from the accumulation of lint, dust, and loose cloth.
• Keepfingersawayfromallmovingparts.Specialcareisrequiredaroundthesewingmachineneedle.• Alwaysusetheproperneedleplate.Thewrongplatecancausetheneedletobreak.• Donotusebentneedles.• Donotpullorpushfabricwhilestitching.Itmaydeflecttheneedlecausingittobreak.• Wearsafetyglasses.• Switchthesewingmachineoff (“0”)whenmakinganyadjustmentintheneedlearea,suchasthreadingneedle,changing
needle, threading bobbin, or changing presser foot, etc.• Alwaysunplugsewingmachinefromtheelectricaloutletwhenremovingcovers,lubricating,orwhenmakinganyotheruserservicingadjustmentsmentionedintheinstructionmanual.
• Neverdroporinsertanyobjectintoanyopening.• Donotuseoutdoors.• Donotoperatewhereaerosol(spray)productsarebeingusedorwhereoxygenisbeingadministrated.• Todisconnect,turnallcontrolstotheoff (“0”)position,thenremoveplugfromoutlet.• Donotunplugbypullingoncord.Tounplug,grasptheplug,notthecord.• Holdplugwhenrewindingintocordreel.Donotallowplugtowhipwhenrewinding.• Thissewingmachineisprovidedwithdoubleinsulation.Useonlyidenticalreplacementparts.SeeinstructionsforServicingof Double-InsulatedAppliances.
SAVE THESE INSTRUCTIONSSERVICING OF DOUBLE INSULATED PRODUCTSInadouble-insulatedproduct,twosystemsof insulationareprovidedinsteadof grounding.Nogroundmeansisprovidedonadouble-insulatedproduct,norshouldameansforgroundingbeaddedtotheproduct.Servicingof adouble-insulatedproductrequiresextremecareandknowledgeof thesystem,andshouldbedoneonlybyqualifiedservicepersonnel.Replacementpartsforadouble-insulatedproductmustbeidenticaltothosepartsintheproduct.Adouble-insulatedproductismarkedwiththewords‘DOUBLEINSULATION’or‘DOUBLEINSULATED’.
Table of ConTenTsGETTING TO KNOW YOUR MACHINE 1:5MaChine overview 1:6RearSide ...........................................................................1:6NeedleArea ......................................................................1:6AccessoryTray .................................................................1:7Parts of the Embroidery Unit .......................................1:7
aCCessories 1:7IncludedAccessories ......................................................1:7HoopsIncluded ...............................................................1:7AccessoriesIncluded-NotinthePicture ..................1:8Presser Feet ......................................................................1:8
sTiTChes 1:10
SET UP 2:1UnpaCking 2:2
Connect the Power Cord and Foot Control ...............2:2PackAwayafterSewing.................................................2:2
free arM 2:3spool pins 2:3HorizontalPosition .........................................................2:3Vertical Position ...............................................................2:3AuxiliarySpoolPin .........................................................2:3
Threading The Upper Thread 2:4Needle Threader ..............................................................2:4Threading for Twin Needle ...........................................2:5
Thread CUTTer 2:5Thread sensor 2:5bobbin winding 2:6BobbinWindingThroughtheNeedle .........................2:6BobbinWindingwhileEmbroideringorSewing .......2:7
inserTing The bobbin 2:7Changing The presser fooT 2:7aTTaChing The sensor Q-fooT 2:8Changing The needle 2:8needles 2:8Threads 2:9sTabilizers 2:9piCTograM™ pen 2:9Usb porTs 2:10USBembroiderystick ...................................................2:10ConnecttoandRemovefromtheUSBPort ............2:10
ConneCTing The MaChine To yoUr CoMpUTer 2:115D™EmbroiderySoftware ..........................................2:11InstallingyourSoftware ...............................................2:11InstallHardwareDriversand Connect the Embroidery Machine .............................2:11HowtoLaunchthePrograms .....................................2:12Embroidery Machine Communication module...............................................2:12HowtoUpdateyourMachine .....................................2:12
SETTINGS & FUNCTIONS 3:1LARgE inTeraCTive sCreen 3:2CoMMon iCons/fUnCTions 3:2OK .....................................................................................3:2Cancel ................................................................................3:2Touch&Hold ..................................................................3:2
Toolbar 3:2
sTarT MenU 3:2sewing/eMbroidery Mode 3:2QUiCk help 3:3exTended Toolbar 3:3sTiTCh MenU 3:3HowtoSelectaStitch ....................................................3:3
fonT MenU 3:3SelectingaFont ...............................................................3:3
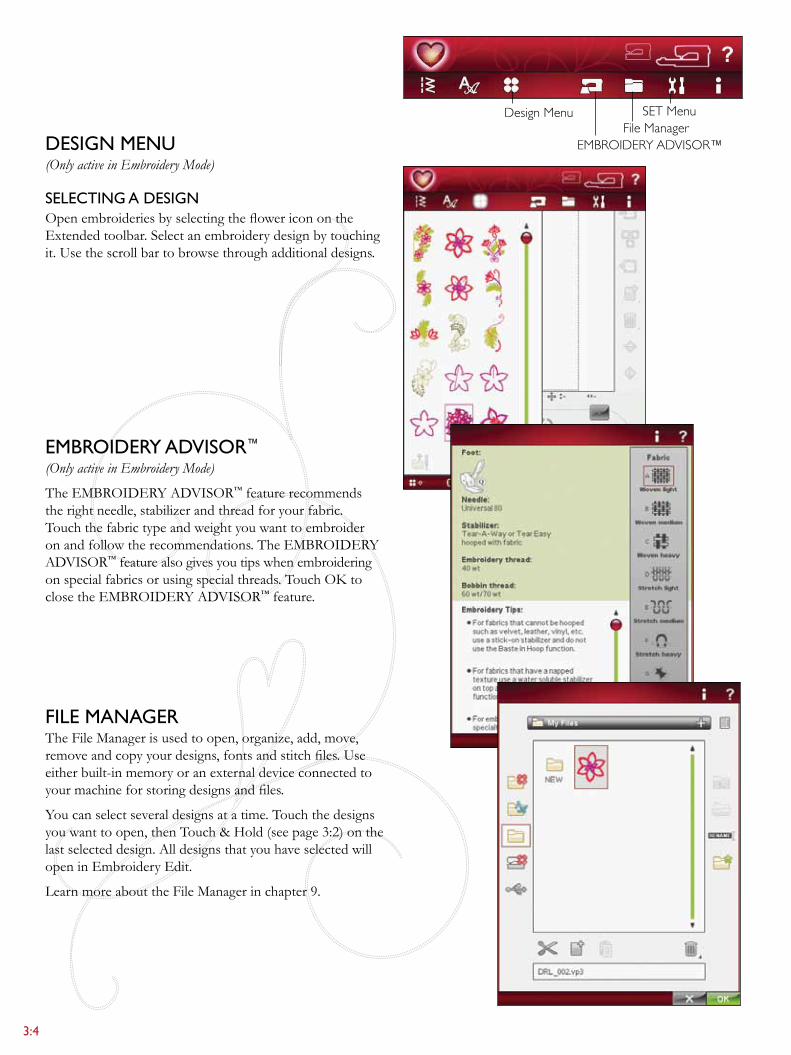
design MenU 3:4SelectingaDesign ...........................................................3:4
eMbroidery advisor™ 3:4file Manager 3:4seT MenU 3:5StitchSettings .................................................................3:5SewingSettings ................................................................3:6MachineSettings..............................................................3:8ScreenSettings ...............................................................3:11
inforMaTion MenU 3:12fUnCTion bUTTons 3:13Speed+and- .................................................................3:13STOP(Monochrome) ..................................................3:13FIX(Baste) .....................................................................3:13Reverse ............................................................................3:13SelectiveThreadCutter ................................................3:14NeedleStopUp/Down(TrimPosition) ...................3:14Start/Stop .......................................................................3:14
exClUsive sensor sysTeM™ 3:14SensorFootUpandExtraLift ...................................3:14SensorFootDownandPivot ......................................3:14
SEWING 4:1sewing Mode - overview of iCons 4:2exClUsive sewing advisor™ 4:3FabricSelection ...............................................................4:3SewingTechniques ..........................................................4:4ExtendedSEWINgADVISOR™ ................................4:4
seleCT a sTiTCh 4:4sTiTCh seTTings 4:5StitchSettingsinSETMenu ..........................................4:6FreeMotionTechnique ..................................................4:7
raise and lower The presser fooT 4:8deLuxe™ sTiTCh sysTeM 4:9sewing TeChniQUes 4:10Seam ................................................................................4:10Overcast ..........................................................................4:11SeamandOvercast ........................................................4:12Seam/OvercastforRibbing ........................................4:12Baste ...............................................................................4:13BlindHem ......................................................................4:13Hem .................................................................................4:14PerfectlyBalancedSensor One-StepButtonhole ...................................................4:15ManualButtonhole .......................................................4:16Embroidered buttonhole .............................................4:16ProgrammableButtonSewOn ...................................4:16Bartacks...........................................................................4:17ManualBartack ..............................................................4:174-wayStitches-MenuS ...............................................4:188-WayStitches–MenuT .............................................4:19SpecialSewingTechniques .........................................4:20
TaperSatinStitch ..........................................................4:20DecorativeTaperingStitches .......................................4:20
sewing pop-Up Messages 4:21
PROGRAM 5:1iMporTanT prograM Mode inforMaTion 5:2prograM - overview of iCons 5:2To prograM in sewing Mode 5:3To prograM in eMbroidery ediT 5:3ediT yoUr sTiTCh or leTTering prograM 5:3Preview..............................................................................5:4AdjusttheEntireProgram ............................................5:4Stitchprogramcommands .............................................5:4
sewing a sTiTCh prograM 5:4To save a sTiTCh prograM 5:5Saveto“MyStitches” .....................................................5:5SaveyourProgramin“MyFiles” .................................5:5
To re-load a sTiTCh prograM 5:6prograM pop-Up Messages 5:6
EMBROIDERY SET UP 6:1eMbroidery UniT overview 6:2eMbroidery hoop overview 6:2ConneCT The eMbroidery UniT 6:3reMove The eMbroidery UniT 6:3To hoop The fabriC 6:4slide on The hoop 6:4bUilT-in designs 6:4DESIgNERRUBYdeLuxe™SamplerBook ............6:4
geTTing sTarTed eMbroidering 6:5
EMBROIDERY EDIT 7:1Main fUnCTions in The exTended eMbroidery ediT Toolbar 7:2LoadaStitch ....................................................................7:2Load a Font ......................................................................7:2LoadaDesign ..................................................................7:2ExclusiveEMBROIDERYADVISOR™ ....................7:2File Manager.....................................................................7:2SETMenu ........................................................................7:2Information Menu ..........................................................7:2
eMbroidery ediT - overview of iCons 7:3My hoops 7:3resize 7:4
Important Resize information .......................................7:5Color ediT 7:6
Thread Color Change .....................................................7:6grid ...................................................................................7:62-dimensional/3-dimensionalviewtoggle ..................7:6
ediT sTiTCh prograM 7:7save ediTed design 7:7park posiTion 7:7Move To hoop 7:7zooM 7:7sTiTCh-oUT order of seleCTed design 7:7ToUCh fUnCTions 7:8Undo 7:9redo 7:9Mirror side-To-side and end-To-end 7:9
deleTe 7:9dUpliCaTe 7:9how To seleCT designs 7:10Advancedselection .......................................................7:10
prograM eMbroidery fonTs 7:11eMbroidery ediT pop-Up Messages 7:12
EMBROIDERY STITCH-OUT 8:1To enTer eMbroidery sTiTCh-oUT 8:2eMbroidery sTiTCh-oUT - overview of iCons 8:2design posiTioning 8:3DesignPositioningExercise ..........................................8:5
basTe in hoop 8:6Move hoop 8:6fUll sCreen 8:7MonoChroMe 8:7sMarT save 8:7Corner CheCk 8:7zooM 8:7reMaining eMbroidery TiMe by Color 8:7sTep sTiTCh-by-sTiTCh ConTrol 8:8gotoStitch ......................................................................8:8
reTUrn To eMbroidery ediT 8:8nUMber of sTiTChes in eMbroidery CoMbinaTion 8:8delUxe™ sTiTCh sysTeM 8:8nUMber of sTiTChes in CUrrenT Color bloCk 8:9Color bloCk lisT 8:9eMbroidery sTiTCh-oUT pop-Up Messages 8:9fUnCTion bUTTons in eMbroidery sTiTCh-oUT 8:10eMbroidery sTiTCh-oUT pop-Up Messages 8:11DesignPositioning ........................................................8:12
FILE MANAGER 9:1file Manager - overview of iCons 9:2available MeMory 9:2file forMaTs 9:2browse file Manager 9:3
List View ...........................................................................9:3MyDesigns .......................................................................9:3My Fonts ..........................................................................9:3My Files .............................................................................9:3Built-indesigns ................................................................9:3ExternalDevice ...............................................................9:4OpenaFolder ..................................................................9:4OpenaFile .......................................................................9:4MoveUpOneFolderLevel ...........................................9:4FolderStructure ...............................................................9:4
organize 9:5Create a New Folder .......................................................9:5Rename a File or Folder .................................................9:5MoveaFileorFolder .....................................................9:5Copy a File or Folder ......................................................9:5DeleteaFileorFolder ...................................................9:5
file Manager pop-Up Messages 9:6
MAINTENANCE 10:1Cleaning The MaChine 10:2TroUbleshooTing 10:3index 10:5inTelleCTUal properTy 10:11
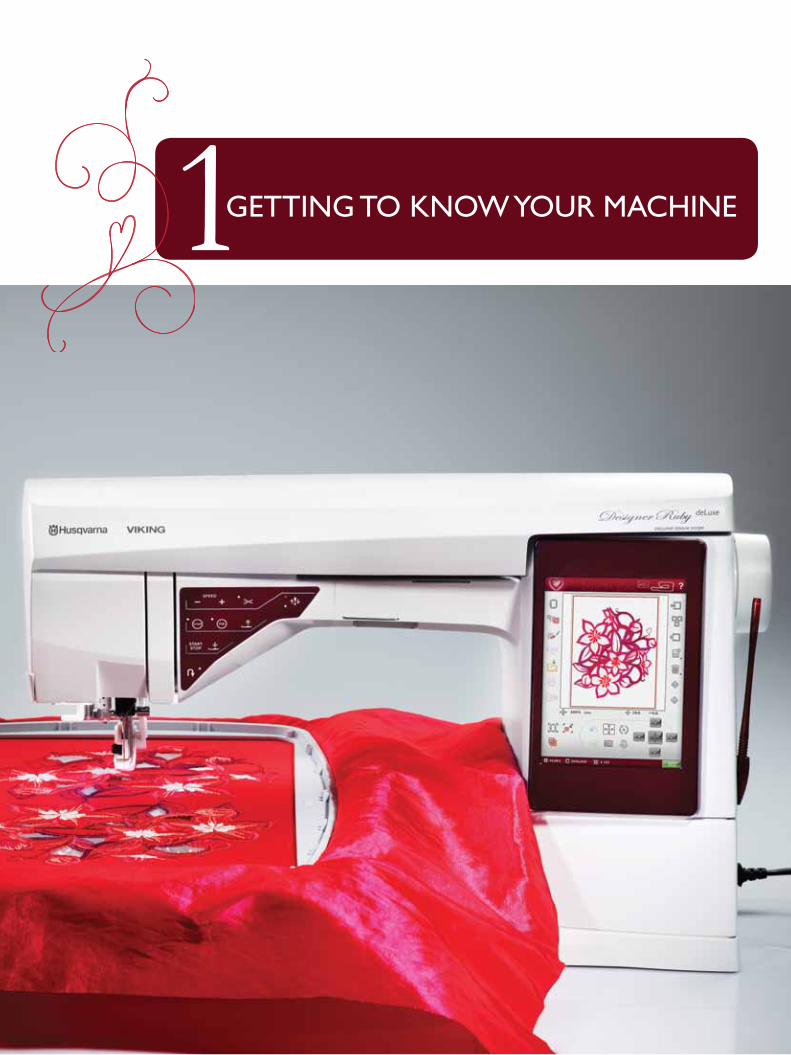
geTTing To know yoUr MaChine1
1:6
16
20
24
22
21
23
1
2
5
12
7
34
8
10 9
13
6
11
8
1718
19
1415
2726
25
34
33
312932
2830
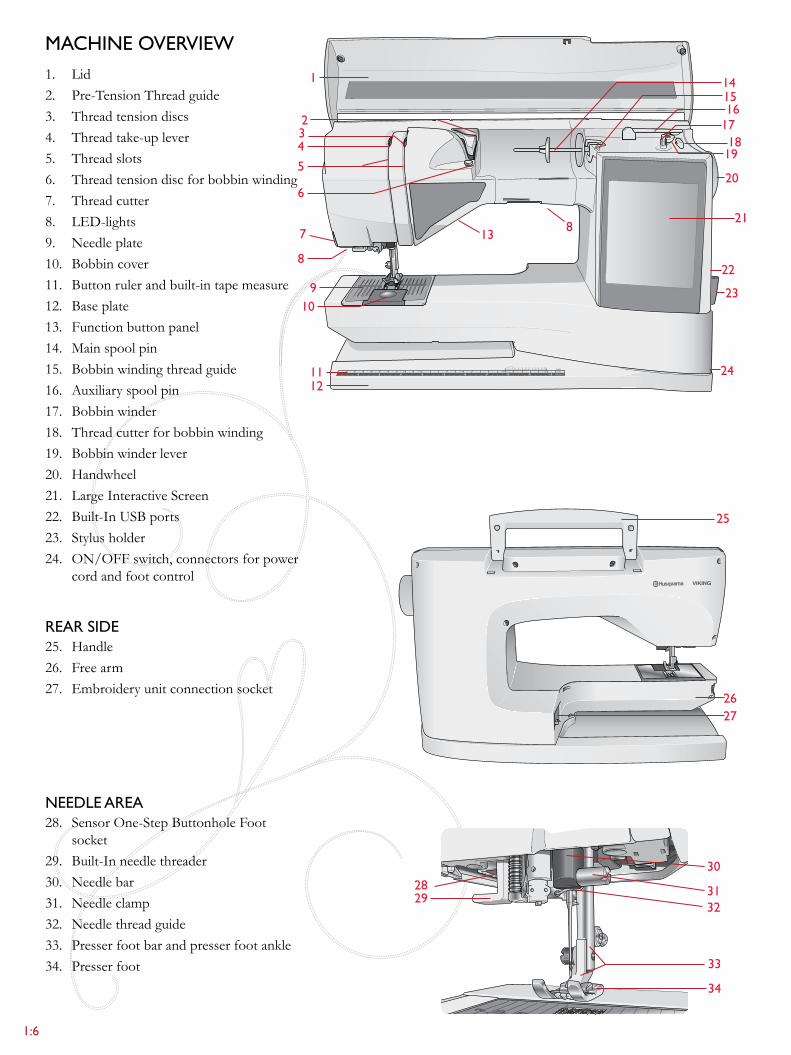
1. Lid2. Pre-Tension Thread guide3. Thread tension discs4. Threadtake-uplever5. Thread slots6. Thread tension disc for bobbin winding7. Thread cutter8. LED-lights9. Needle plate10. Bobbincover11. Buttonrulerandbuilt-intape measure12. Baseplate13. Function button panel14. Main spool pin15. Bobbinwindingthreadguide16. Auxiliaryspoolpin17. Bobbinwinder18. Thread cutter for bobbin winding 19. Bobbinwinderlever20. Handwheel21. Large InteractiveScreen22. Built-InUSBports23. Stylusholder24. ON/OFFswitch,connectors for power
cord and foot control
rear side25. Handle26. Free arm27. Embroidery unit connection socket
needle area28. SensorOne-StepButtonholeFoot
socket29. Built-Inneedle threader30. Needle bar31. Needle clamp32. Needle thread guide33. Presser foot bar and presser foot ankle34. Presser foot
MaChine overview
GettinG to know your machine 1:7
37
38
3940
4140
46 47 48 49
43 44 45
50 51 52
53 54 55 56
42
57 58
36
35
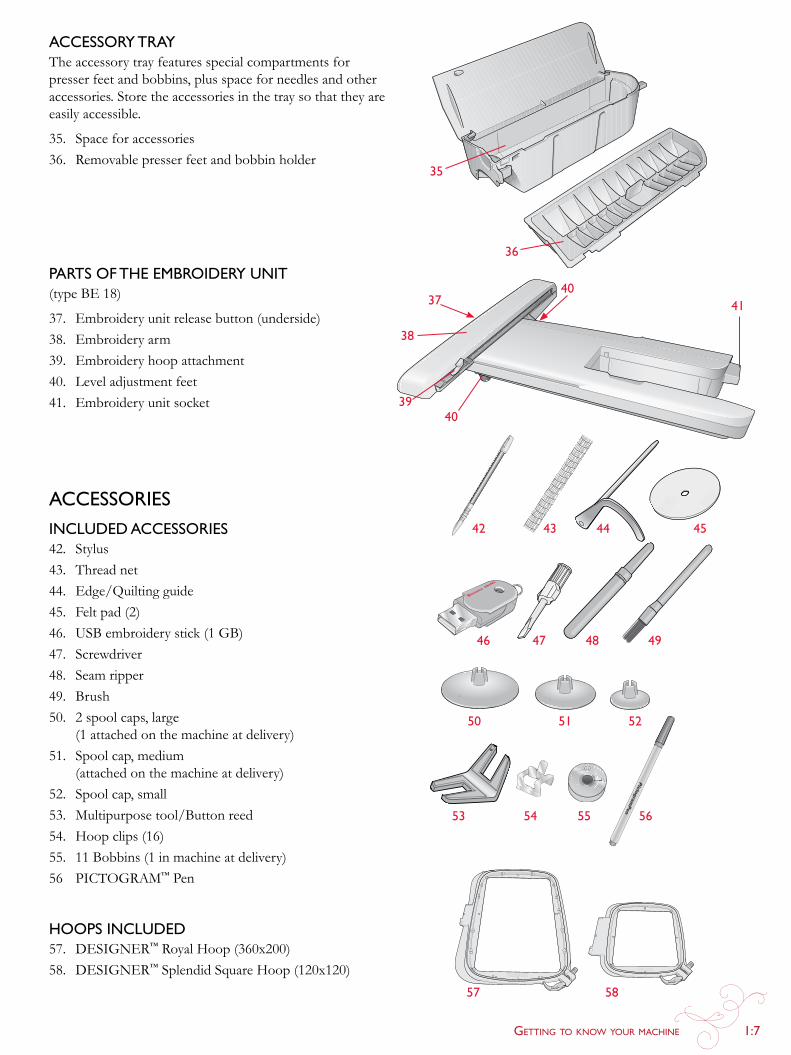
aCCessory TrayThe accessory tray features special compartments for presser feet and bobbins, plus space for needles and other accessories.Storetheaccessoriesinthetraysothattheyareeasily accessible.
35. Spaceforaccessories36. Removablepresser feet and bobbin holder
parTs of The eMbroidery UniT(typeBE18)
37. Embroideryunitreleasebutton(underside)38. Embroidery arm39. Embroidery hoop attachment40. Leveladjustmentfeet41. Embroidery unit socket
aCCessoriesinClUded aCCessories42. Stylus43. Thread net44. Edge/Quilting guide45. Feltpad(2)46. USBembroiderystick(1gB)47. Screwdriver48. Seamripper49. Brush50. 2 spool caps, large
(1attachedonthemachineatdelivery)51. Spoolcap,medium
(attachedonthemachineatdelivery)52. Spoolcap,small53. Multipurpose tool/Buttonreed54. Hoopclips(16)55. 11 Bobbins(1inmachineatdelivery)56 PICTOgRAM™ Pen
hoops inClUded57. DESIgNER™RoyalHoop(360x200)58. DESIgNER™SplendidSquareHoop(120x120)
1:8
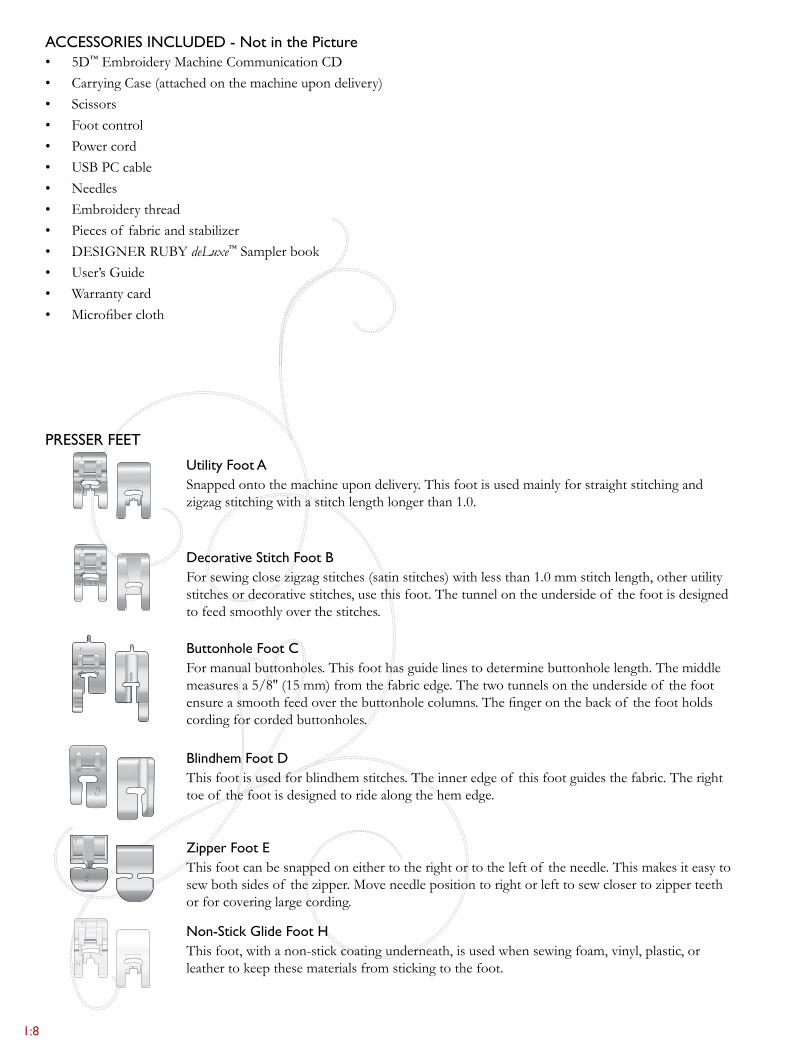
presser feeT7
Utility foot aSnappedontothemachineupondelivery.Thisfootisusedmainlyforstraightstitchingandzigzag stitching with a stitch length longer than 1.0.
7
decorative stitch foot bForsewingclosezigzagstitches(satinstitches)withlessthan1.0mmstitchlength,otherutilitystitchesordecorativestitches,usethisfoot.Thetunnelontheundersideof thefootisdesignedtofeedsmoothlyoverthestitches.
7 buttonhole foot CFor manual buttonholes. This foot has guide lines to determine buttonhole length. The middle measuresa5/8''(15mm)fromthefabricedge.Thetwotunnelsontheundersideof thefootensureasmoothfeedoverthebuttonholecolumns.Thefingeronthebackof thefootholdscording for corded buttonholes.
blindhem foot dThis foot is used for blindhem stitches. The inner edge of this foot guides the fabric. The right toe of the foot is designed to ride along the hem edge.
7 zipper foot eThis foot can be snapped on either to the right or to the left of the needle. This makes it easy to sewbothsidesof thezipper.Moveneedlepositiontorightorlefttosewclosertozipperteethorforcoveringlargecording.
7
non-stick glide foot hThisfoot,withanon-stickcoatingunderneath,isusedwhensewingfoam,vinyl,plastic,orleather to keep these materials from sticking to the foot.
aCCessories inClUded - not in the picture• 5D™EmbroideryMachineCommunicationCD• CarryingCase(attachedonthemachineupondelivery)• Scissors• Foot control• Power cord• USBPCcable• Needles• Embroidery thread• Piecesof fabric and stabilizer• DESIgNERRUBYdeLuxe™ Samplerbook• User’sguide• Warranty card• Microfibercloth
GettinG to know your machine 1:9
edging foot JThisfootisusedforovercastingandseam/overcasting,withstitchesthathaveastitchwidthof 5.0and5.5mm.Stitchesformoverthepinwhichpreventspuckeringattheedgeof thefabric.
Quilter’s 1/4” piecing foot pThisfootisusedwhenpiecingquiltblocks.Thefoothasdistanceguidelinesmarks1/4" (6mm)and1/8"(3mm)fromtheneedle.
embroidery/darning foot rThisfootisusedforfreemotionembroidery/quilting/stitchingandhoopembroidery.
7 side Motion foot sThisfootisusedforside-motion/Omnimotionstitches.
7 decorative stitch foot b TransparentAclearfootfordecorativesewingmakesiteasytomatchstitches.SametunnelontheundersideasPresserFootB.
7
sensor one-step buttonhole footPlugintothemachinethenenterthedesiredbuttonholelengthtosewSensorOne-StepButtonholes.Themiddlemarkmeasuresa5/8"(15mm)fromfabricedge.
self-adhesive glide platesUsedforPresserFootC/SensorOne-StepButtonholeFootwhensewingbuttonholesonplastic-coated fabrics, leather, etc.
sensor Q-foot
TheSensorQ-footisalwaysrecommendedforembroidery.
ThisfootisalsousedforFreeMotionsewing,quiltingandembroideringonespeciallythickorspongyfabric.WhenusingtheSensorQ-footforFreeMotion,selectFreeMotionSpringActionintheFreeMotionTechniquepop-upinSewingMode.
1:10
sTiTChesa – Utility stitchesStitchesforgarmentsewingandmending.
Stitch Stitch description Presser Foot
a1, a2, a3 – straight stitch, left, center and right needle positionForalltypesof sewing.TouchstitchwidthandSide-to-Sidemirrorimagetoselect29differentneedlepositions.
a
a4, a5, a6 – stretch stitch, left, center and right needle positionFor seams in tricot and stretch fabrics.
a
a7, a8, a9 – reinforced straight stitch, left, center and right needle positionTriple and elastic, for reinforced seams. For topstitch, increase the stitch length. 29 different needle positions.
a
a10, a11, a12 – zigzag, left, center and right needle positionForsewingonlace,bandsandappliqués.
a
a13 – Three step zigzagForovercasting,mending,sewingonpatchesandelastic.Suitableforlightandmediumweightfabrics.
a
a14 – serpentine stitchFor mending and elastic applications.
a
a15 – four-step zigzagForovercasting,mending,sewingonpatchesandelasticsonlooselywovenfabrics.
a
a16 – overcast stitchSeamandovercastinonestepalongtheedgeortrimlater.Forlightstretchandnon-stretchfabrics.
J
a17 – stretch seam overcast stitchSeamandovercastinonestepalongtheedgeortrimlater.Formediumandmedium/heavystretchfabrics.
b
a18 – double overlock stitchSeamandovercastinonestepalongtheedgeortrimlater.Forheavystretchandheavywovenfabrics.
b
a19 – overlock stitchSeamandovercastinonestepalongtheedgeortrimlater.Formediumstretchfabrics.
b
a20 – flatlock stitchDecorativehemsandoverlappedseams,beltsandbands.Formedium/heavystretchfabrics.
b
a21 – elastic/Casing stitchForoverlappedseamsintricot.Tosewcasingovernarrowelastic.
b
a22 – reinforced zigzag stitchForjoiningfabricedgetoedgeoroverlappinginleather.Fordecorativesewing.
b
a23 – basting stitchFor joining two pieces of fabric with a long stitch length and reduced tension.
a
a24 – stretch blind hem stitchBlindhemsinstretchmediumandheavyfabrics.
d
GettinG to know your machine 1:11
Stitch Stitch description Presser Foot
a25 – woven blind hem stitchBlindhemsinmediumandheavywovenfabrics.
d
a26 – shell edge stitchForedgings,sewovertheedgeonlightstretchfabrics,sewwovenfabriconbias.
a
a27 – elastic or smocking stitchSewovertworowsof elasticthreadforelasticshirring.
b
a28 – bridging stitchForjoiningtwopiecesof fabricwithfinishededgesandforelasticshirring.
b
a29 – bartack stitchReinforce pockets, shirts openings, belt loops as well as at lower end of a zipper.
b
a30 – darning stitch (forward and backward)Darnandmendsmallholesinworkclothes,jeans,tableclothsandlinentowels.Stitchoverhole,touchreverseforcontinuousdarningandautostop.
a
a31 – darning stitch (side to side)For mending small tears.
a
a32 – reinforced darning stitchDarnandmendworkclothes,jeans,tableclothsandlinentowels.Stitchoverhole,touchreverseforcontinuous darning and auto stop.
a
a33 – bartack, ManualReinforce pockets, shirts openings, belt loops as well as at lower end of a zipper.
b
a34 – gathering stitchFor gathering.
a
a35 – belt loop stitchFor securing belt loops.
a
a36 – Three-step zigzagForovercasting,mending,sewingonpatchesandelastic.Suitableforlightandmediumweightfabrics.
J
a37 – Two-step zigzagForjoiningtwopiecesof fabricwithfinishededgesandforelasticshirring.
a
a38 – straight stitch with fixBeginsandendswithforwardandreversesewing.
a
a39 – straight basting stitchUsetogetherwiththefootcontroltobastepiecesof thefabrictogether.Feedthefabricbymovingtothe next baste position when sensor foot lifts. Feed teeth lowered automatically.
a
a40 – zigzag bastingUsetogetherwiththefootcontroltobastelayersof thefabricbymovingtothenextbastepositionwhen foot lifts.
a

1:12
Stitch Stitch description Presser Foot
b1 – wide bartack buttonholeFormediumandheavy-weightfabricswithextracuttingspace.
sensor buttonh. foot /C
b2 – bartack buttonholeFor most fabric weights.
sensor buttonh. foot /C
b3 – round-end buttonholeForblousesandchildren’sgarments.
sensor buttonh. foot /C
b4 – decorative fashion buttonholeFor most fabric weights.
sensor buttonh. foot /C
b5 – Medium reinforced buttonholeFor medium fabrics.
C
b6 – heirloom buttonholeForhandlookonfineanddelicatefabrics.Tip: For jeans buttonholes, increase length and width of the buttonhole. Use thicker thread.
sensor buttonh. foot /C
b7– rounded heirloom buttonholeForhandlookonfineanddelicatefabrics.
sensor buttonh. foot /C
b8 – keyhole buttonholeSquareendfortailoredjackets,coats,etc.
sensor buttonh. foot /C
b9 – heavy duty buttonholeWith reinforced bartacks.
sensor buttonh. foot /C
b10 – leather buttonhole (straight stitch)For leather and suede.
a
b11 – bound buttonhole (straight stitch)With extra cutting space for bound buttonholes.
a
b12 – automatic button sewingFor sewing on buttons
-
b13 – round eyeletFor belts, laces, etc.
b
b14 – Teardrop eyeletFor laces embellishment.
b
b - buttonhole stitchesDifferentstylesof buttonholes,eyeletsandbuttonsewing.

GettinG to know your machine 1:13
C - pictogram stitchesPictogram satin elements to program original satin stitch designs.
d - heirloom stitchesFor hemstitching, smocking and sewing on lace and trims.
e - Quilt stitchesStitchesforalltypesof quiltingtechniques.

1:14
g - Children stitchesStitchessuitableforsewingonchildren’sclothesandprojects.
h - scallop stitchesCreatescallopdetailsandfinishedgeswith beautiful scallop stitches.
J - vintage stitchesAselectionof quiltstitchesforcrazypatchquiltinganddecorativestitching.
f - appliqué stitchesForsewingappliquéswithdifferenteffects.
GettinG to know your machine 1:15
k - omnimotion stitchesProgram these stitches into an unlimited number of combinations.Stitchesareformedwithsidemotion.Thestitchwidth can be up to 40 mm wide or more.
l - decorative stitchesFordecorativesewing.
M - Crafting stitchesFordecorativestitchestoembellishcrafts.
n - fashion stitchesFashion stitches to decorate clothing and accessories.
1:16
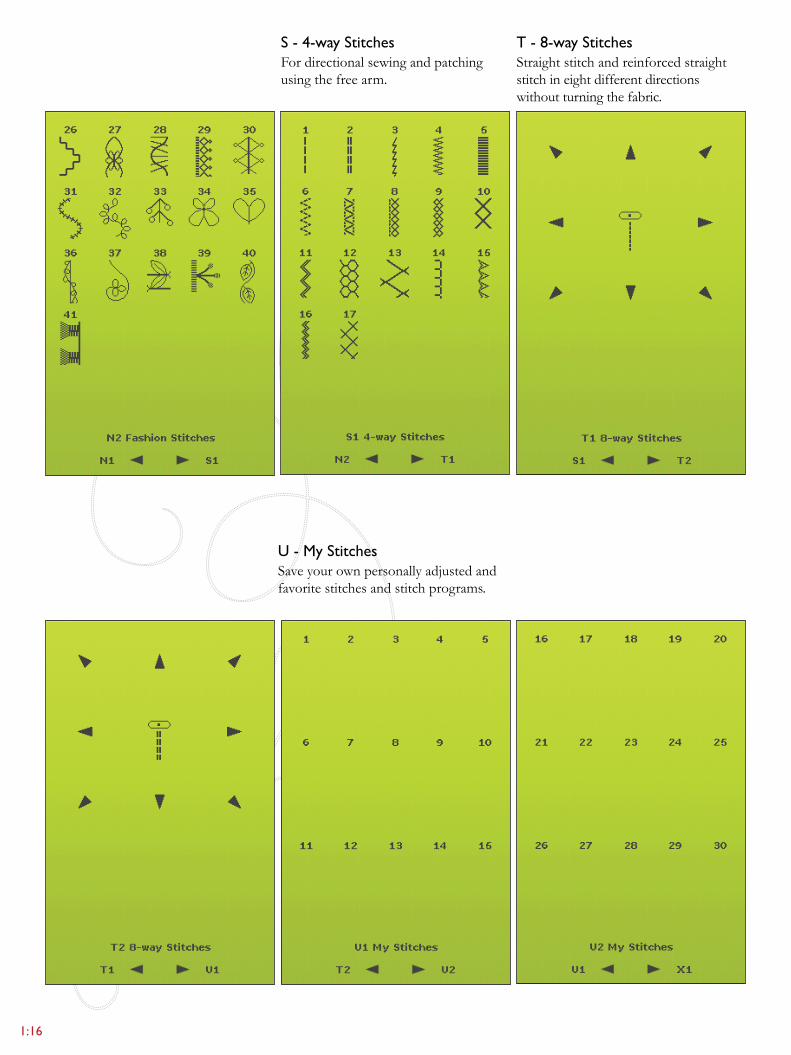
s - 4-way stitchesFor directional sewing and patching using the free arm.
T - 8-way stitchesStraightstitchandreinforcedstraightstitch in eight different directions without turning the fabric.
U - My stitchesSaveyourownpersonallyadjustedandfavoritestitchesandstitchprograms.
GettinG to know your machine 1:17
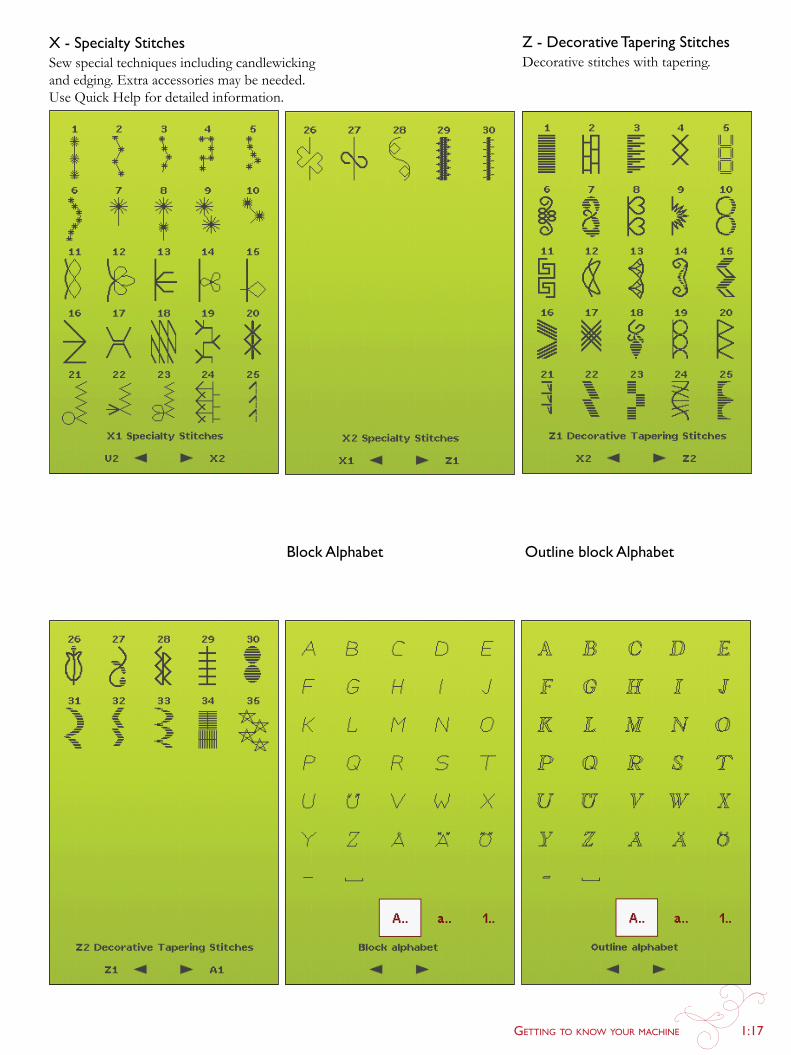
x - specialty stitchesSewspecialtechniquesincludingcandlewicking and edging. Extra accessories may be needed. UseQuickHelpfordetailedinformation.
block alphabet outline block alphabet
z - decorative Tapering stitchesDecorativestitcheswithtapering.
1:18
script alphabet Cyrillic alphabet
hiragana alphabet
brush line alphabet

2 seT Up
2:2
OFF
ON
3 1 2
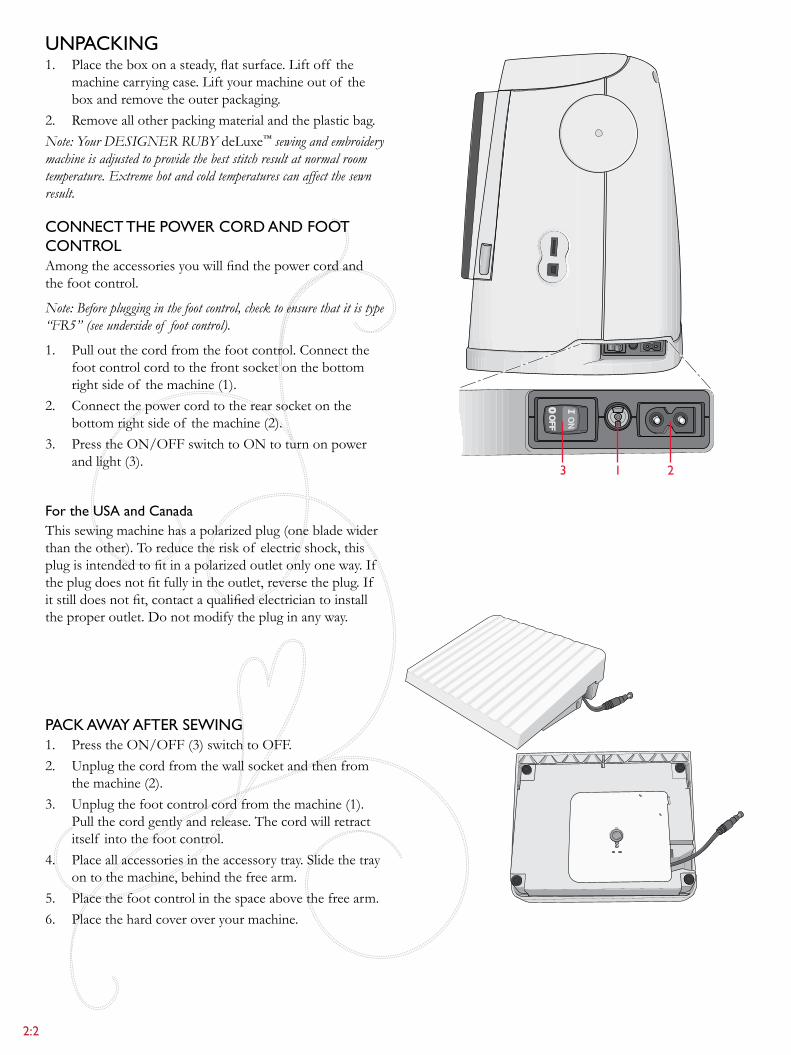
UnpaCking1. Placetheboxonasteady,flatsurface.Liftoff the
machine carrying case. Lift your machine out of the boxandremovetheouterpackaging.
2. Removeallotherpackingmaterialandtheplasticbag.Note: Your DESIGNER RUBY deLuxe™ sewing and embroidery machine is adjusted to provide the best stitch result at normal room temperature. Extreme hot and cold temperatures can affect the sewn result.
ConneCT The power Cord and fooT ConTrolAmongtheaccessoriesyouwillfindthepowercordandthe foot control.
Note: Before plugging in the foot control, check to ensure that it is type “FR5” (see underside of foot control).
1. Pull out the cord from the foot control. Connect the foot control cord to the front socket on the bottom rightsideof themachine(1).
2. Connect the power cord to the rear socket on the bottomrightsideof themachine(2).
3. Press the ON/OFFswitchtoONtoturnonpowerandlight(3).
for the Usa and CanadaThissewingmachinehasapolarizedplug(onebladewiderthantheother).Toreducetheriskof electricshock,thisplugisintendedtofitinapolarizedoutletonlyoneway.If theplugdoesnotfitfullyintheoutlet,reversetheplug.If itstilldoesnotfit,contactaqualifiedelectriciantoinstalltheproperoutlet.Donotmodifythepluginanyway.
paCk away afTer sewing 1. PresstheON/OFF(3)switchtoOFF.2. Unplug the cord from the wall socket and then from
themachine(2).3. Unplugthefootcontrolcordfromthemachine(1).
Pull the cord gently and release. The cord will retract itself into the foot control.
4. Placeallaccessoriesintheaccessorytray.Slidethetrayon to the machine, behind the free arm.
5. Placethefootcontrolinthespaceabovethefreearm.6. Place the hardcoveroveryourmachine.
Set Up 2:3
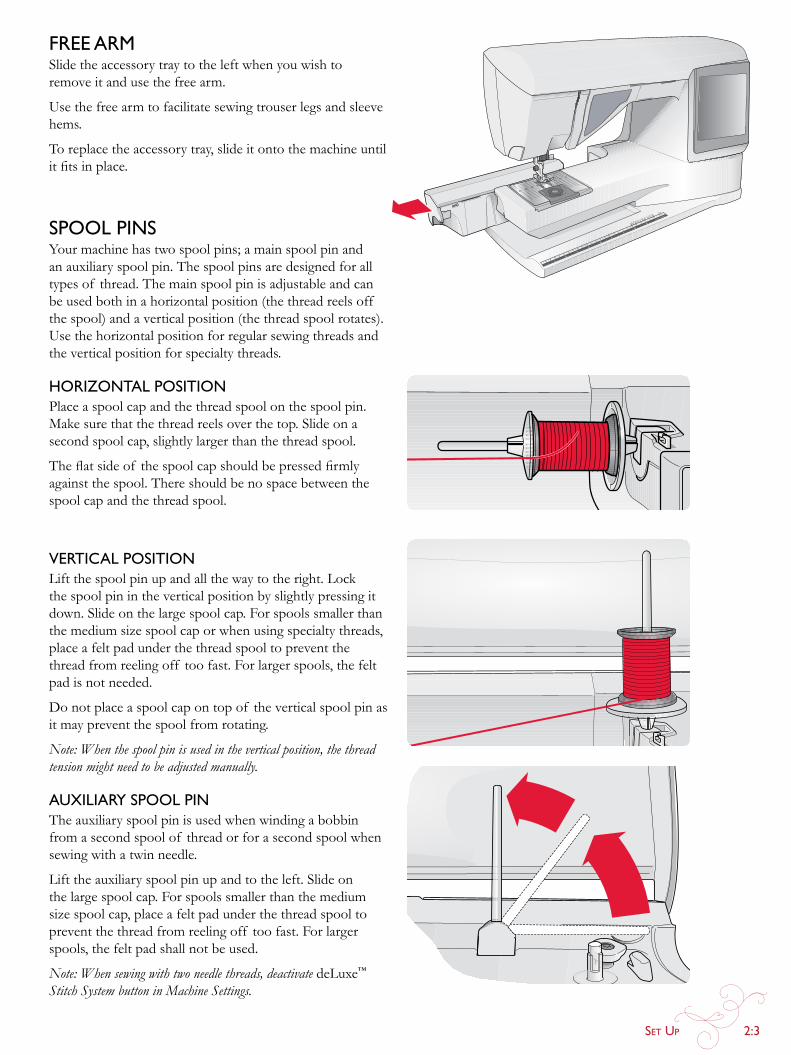
free arMSlidetheaccessory tray to the left when you wish to removeitandusethefreearm.
Usethefreearmtofacilitatesewingtrouserlegsandsleevehems.
To replace the accessory tray, slide it onto the machine until itfitsinplace.
spool pinsYourmachinehastwospoolpins;amain spool pin and an auxiliary spool pin. The spool pins are designed for all types of thread. The main spool pin is adjustable and can beusedbothinahorizontalposition(thethreadreelsoff thespool)andaverticalposition(thethreadspoolrotates).Use the horizontal position for regular sewing threads and theverticalpositionforspecialty threads.
horizonTal posiTionPlace a spool cap and the thread spool on the spool pin. Makesurethatthethreadreelsoverthetop.Slideonasecond spool cap, slightly larger than the thread spool.
Theflatsideof thespoolcapshouldbepressedfirmlyagainst the spool. There should be no space between the spool cap and the thread spool.
verTiCal posiTionLift the spool pin up and all the way to the right. Lock thespoolpinintheverticalpositionbyslightlypressingitdown.Slideonthelargespoolcap.Forspoolssmallerthanthe medium size spool cap or when using specialty threads, place a feltpadunderthethreadspooltopreventthethread from reeling off too fast. For larger spools, the felt pad is not needed.
Donotplaceaspoolcapontopof theverticalspoolpinasitmaypreventthespoolfromrotating.
Note: When the spool pin is used in the vertical position, the thread tension might need to be adjusted manually.
aUxiliary spool pinThe auxiliary spool pin is used when winding a bobbin from a second spool of thread or for a second spool when sewing with a twin needle.
Lifttheauxiliaryspoolpinupandtotheleft.Slideonthe large spool cap. For spools smaller than the medium size spool cap, place a felt pad under the thread spool to preventthethreadfromreelingoff toofast.Forlargerspools, the felt pad shall not be used.
Note: When sewing with two needle threads, deactivate deLuxe™ Stitch System button in Machine Settings.
2:4
a
bCd
e
fg
f
g
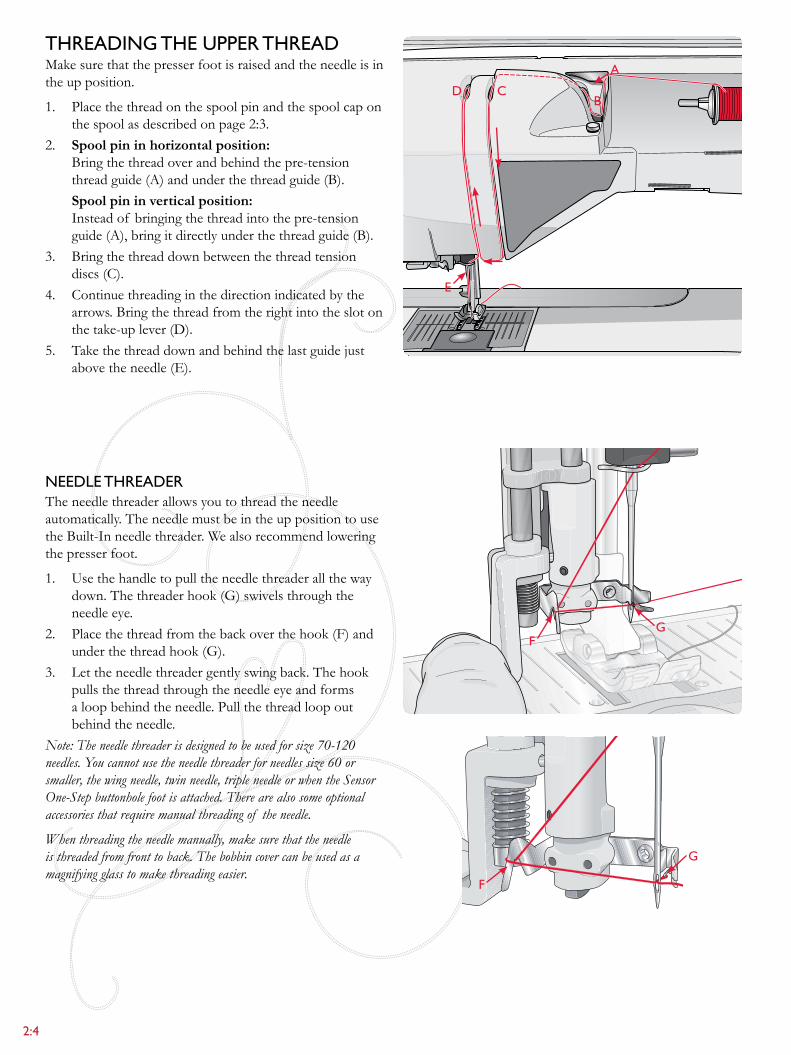
Threading The Upper ThreadMake sure that the presser foot is raised and the needle is in the up position.
1. Place the thread on the spool pin and the spool cap on the spool as described on page 2:3.
2. Spool pin in horizontal position: Bringthethreadoverandbehindthepre-tension threadguide(A)andunderthethreadguide(B).
Spool pin in vertical position: Instead of bringing the thread into the pre-tension guide(A),bringitdirectlyunderthethreadguide(B).
3. Bringthethreaddownbetweenthethread tension discs(C).
4. Continue threading in the direction indicated by the arrows.Bringthethreadfromtherightintotheslotonthe take-uplever(D).
5. Take the thread down and behind the last guide just abovetheneedle(E).
needle ThreaderThe needle threader allows you to thread the needle automatically. The needle must be in the up position to use the Built-Inneedlethreader.Wealsorecommendloweringthe presser foot.
1. Use the handle to pull the needle threader all the way down. The threaderhook(g)swivelsthroughtheneedle eye.
2. Placethethreadfromthebackoverthehook(F)andunderthethreadhook(g).
3. Let the needle threader gently swing back. The hook pulls the thread through the needle eye and forms a loop behind the needle. Pull the thread loop out behind the needle.
Note: The needle threader is designed to be used for size 70-120 needles. You cannot use the needle threader for needles size 60 or smaller, the wing needle, twin needle, triple needle or when the Sensor One-Step buttonhole foot is attached. There are also some optional accessories that require manual threading of the needle.
When threading the needle manually, make sure that the needle is threaded from front to back. The bobbin cover can be used as a magnifying glass to make threading easier.
Set Up 2:5
b
a
C
a
b
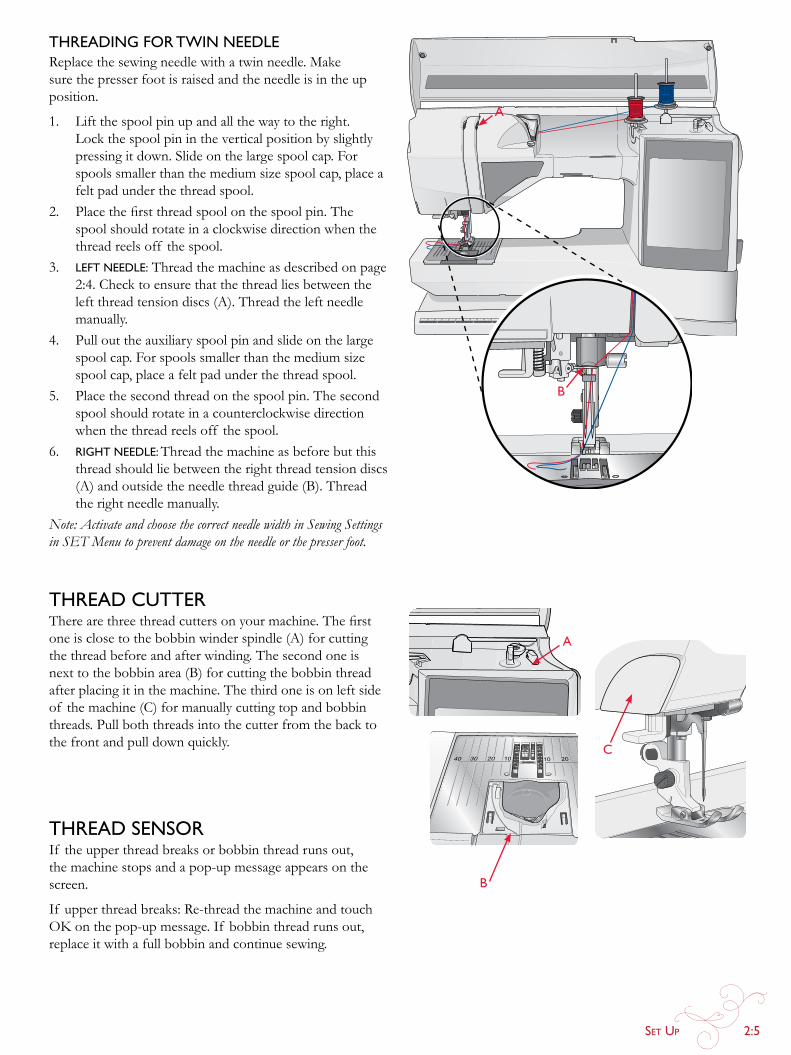
Threading for Twin needleReplace the sewing needle with a twin needle. Make sure the presser foot is raised and the needle is in the up position.
1. Lift the spool pin up and all the way to the right. Lock the spool pin in the verticalpositionbyslightlypressingitdown.Slideonthelargespool cap. For spools smaller than the medium size spool cap, place a felt pad under the thread spool.
2. Placethefirstthreadspoolonthespoolpin.Thespool should rotate in a clockwise direction when the thread reels off the spool.
3. lefT needle: Thread the machine as described on page 2:4. Check to ensure that the thread lies between the left threadtensiondiscs(A).Threadtheleftneedlemanually.
4. Pull out the auxiliary spool pin and slide on the large spool cap. For spools smaller than the medium size spool cap, place a felt pad under the thread spool.
5. Place the second thread on the spool pin. The second spool should rotate in a counterclockwise direction when the thread reels off the spool.
6. righT needle: Thread the machine as before but this thread should lie between the right thread tension discs (A)andoutsidetheneedlethreadguide(B).Threadthe right needle manually.
Note: Activate and choose the correct needle width in Sewing Settings in SET Menu to prevent damage on the needle or the presser foot.
Thread CUTTerTherearethreethreadcuttersonyourmachine.Thefirstoneisclosetothebobbinwinderspindle(A)forcuttingthe thread before and after winding. The second one is nexttothebobbinarea(B)forcuttingthebobbinthreadafter placing it in the machine. The third one is on left side of themachine(C)formanuallycuttingtopandbobbinthreads. Pull both threads into the cutter from the back to thefrontandpulldownquickly.
Thread sensorIf the upper thread breaks or bobbin thread runs out, the machine stops and a pop-up message appears on the screen.
If upper thread breaks: Re-thread the machine and touch OKonthepop-upmessage.If bobbinthreadrunsout,replace it with a full bobbin and continue sewing.
2:6
a
b
C
d
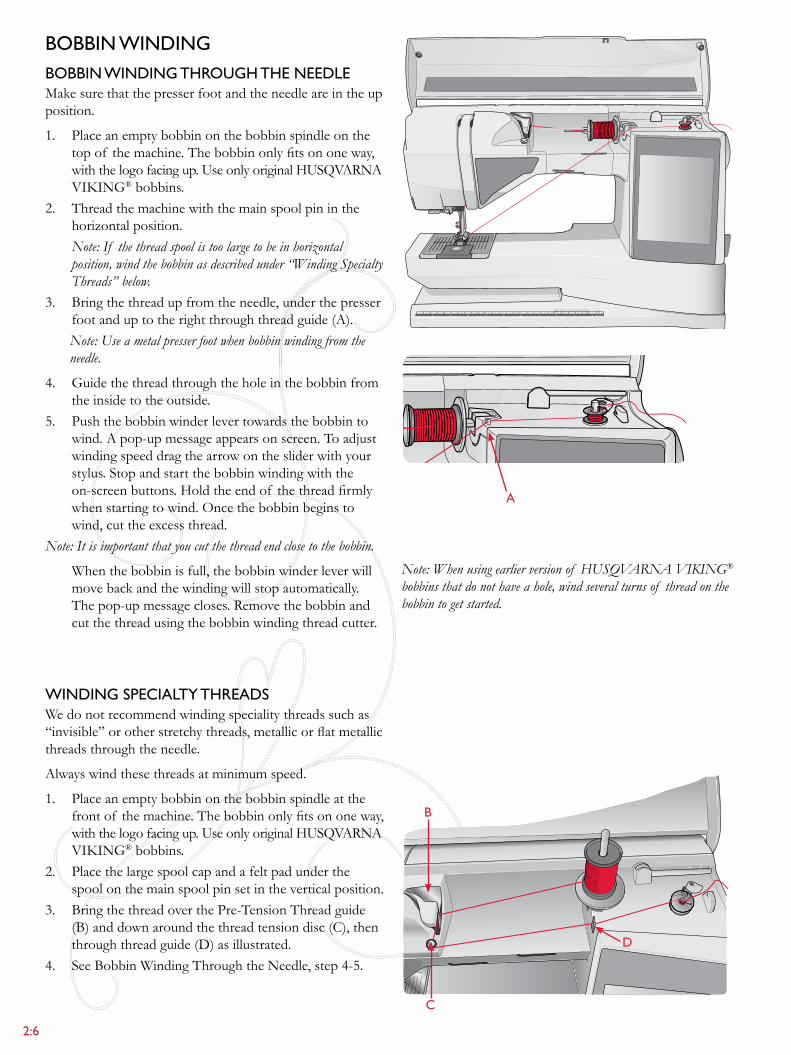
bobbin windingbobbin winding ThroUgh The needleMake sure that the presser foot and the needle are in the up position.
1. Place an empty bobbin on the bobbin spindle on the topof themachine.Thebobbinonlyfitsononeway,withthelogofacingup.UseonlyoriginalHUSQVARNAVIKINg® bobbins.
2. Thread the machine with the main spool pin in the horizontal position.
Note: If the thread spool is too large to be in horizontal position, wind the bobbin as described under “Winding Specialty Threads” below.
3. Bringthethreadupfromtheneedle,underthepresserfoot and up to the right through threadguide(A).Note: Use a metal presser foot when bobbin winding from the needle.
4. guidethethreadthroughtheholeinthebobbinfromthe inside to the outside.
5. Push the bobbinwinderlevertowardsthebobbintowind.Apop-upmessageappearsonscreen.Toadjustwinding speed drag the arrow on the slider with your stylus.Stopandstartthebobbinwindingwiththeon-screenbuttons.Holdtheendof thethreadfirmlywhenstartingtowind.Oncethebobbinbeginstowind, cut the excess thread.
Note: It is important that you cut the thread end close to the bobbin.
Whenthebobbinisfull,thebobbinwinderleverwillmovebackandthewindingwillstopautomatically.The pop-up message closes. Removethebobbinandcut the thread using the bobbin winding thread cutter.
winding speCialTy ThreadsWe do not recommend winding speciality threads such as “invisible”orotherstretchythreads,metallicorflatmetallicthreads through the needle.
Alwayswindthesethreadsatminimumspeed.
1. Place an empty bobbin on the bobbin spindle at the frontof themachine.Thebobbinonlyfitsononeway,withthelogofacingup.UseonlyoriginalHUSQVARNAVIKINg® bobbins.
2. Place the large spool cap and a felt pad under the spoolonthemainspoolpinsetintheverticalposition.
3. BringthethreadoverthePre-Tension Thread guide (B)anddownaroundthethreadtensiondisc(C),thenthroughthreadguide(D)asillustrated.
4. SeeBobbinWindingThroughtheNeedle,step4-5.
Note: When using earlier version of HUSQVARNA VIKING® bobbins that do not have a hole, wind several turns of thread on the bobbin to get started.
Set Up 2:7
1 2
43
f
g
a b
C
d
e
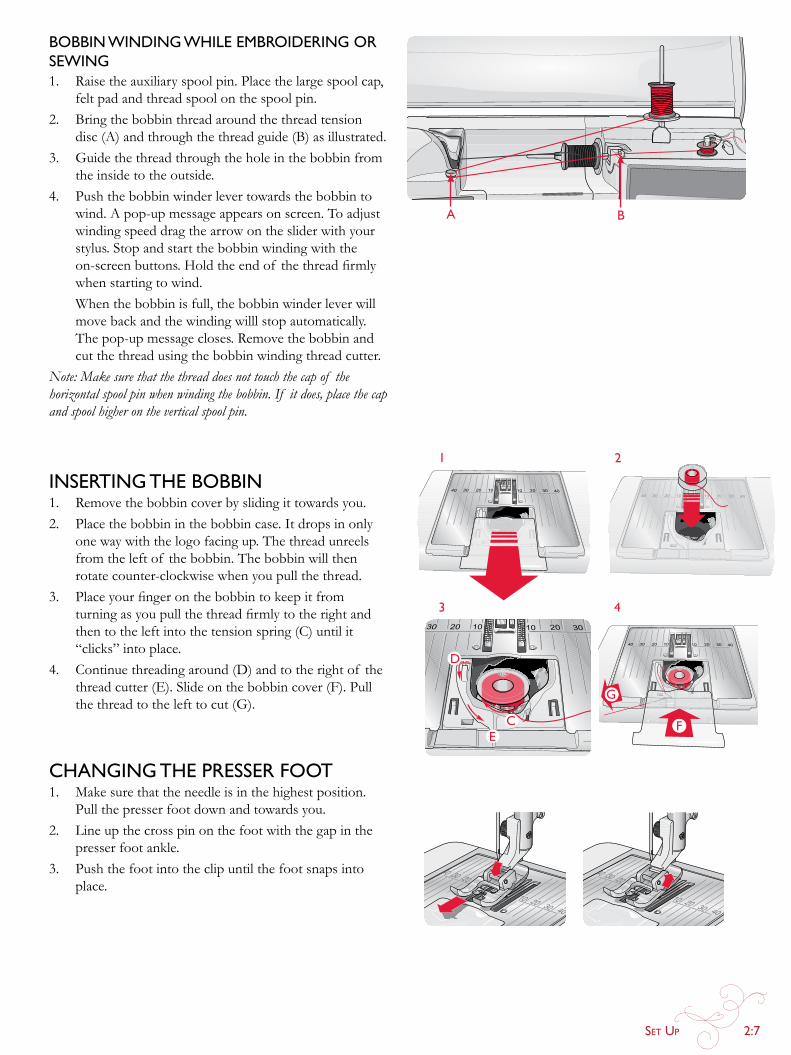
bobbin winding while eMbroidering or sewing1. Raise the auxiliary spool pin. Place the large spool cap,
felt pad and thread spool on the spool pin. 2. Bringthebobbinthreadaroundthethread tension
disc(A)andthroughthethreadguide(B)asillustrated.3. guidethethreadthroughtheholeinthebobbinfrom
the inside to the outside.4. Push the bobbinwinderlevertowardsthebobbinto
wind.Apop-upmessageappearsonscreen.Toadjustwinding speed drag the arrow on the slider with your stylus.Stopandstartthebobbinwindingwiththeon-screenbuttons.Holdtheendof thethreadfirmlywhen starting to wind.
Whenthebobbinisfull,thebobbinwinderleverwillmovebackandthewindingwilllstopautomatically.Thepop-upmessagecloses.Removethebobbinandcut the thread using the bobbin winding thread cutter.
Note: Make sure that the thread does not touch the cap of the horizontal spool pin when winding the bobbin. If it does, place the cap and spool higher on the vertical spool pin.
inserTing The bobbin1. Removethebobbincoverbyslidingittowardsyou.2. Place the bobbin in the bobbin case. It drops in only
one way with the logo facing up. The thread unreels from the left of the bobbin. The bobbin will then rotate counter-clockwise when you pull the thread.
3. Placeyourfingeronthebobbintokeepitfromturningasyoupullthethreadfirmlytotherightandthen to the left into the tensionspring(C)untilit“clicks”intoplace.
4. Continuethreadingaround(D)andtotherightof thethreadcutter(E).Slideonthebobbincover(F).Pullthethreadtothelefttocut(g).
Changing The presser fooT1. Make sure that the needle is in the highest position.
Pull the presser foot down and towards you.2. Line up the cross pin on the foot with the gap in the
presser foot ankle. 3. Push the foot into the clip until the foot snaps into
place.
2:8
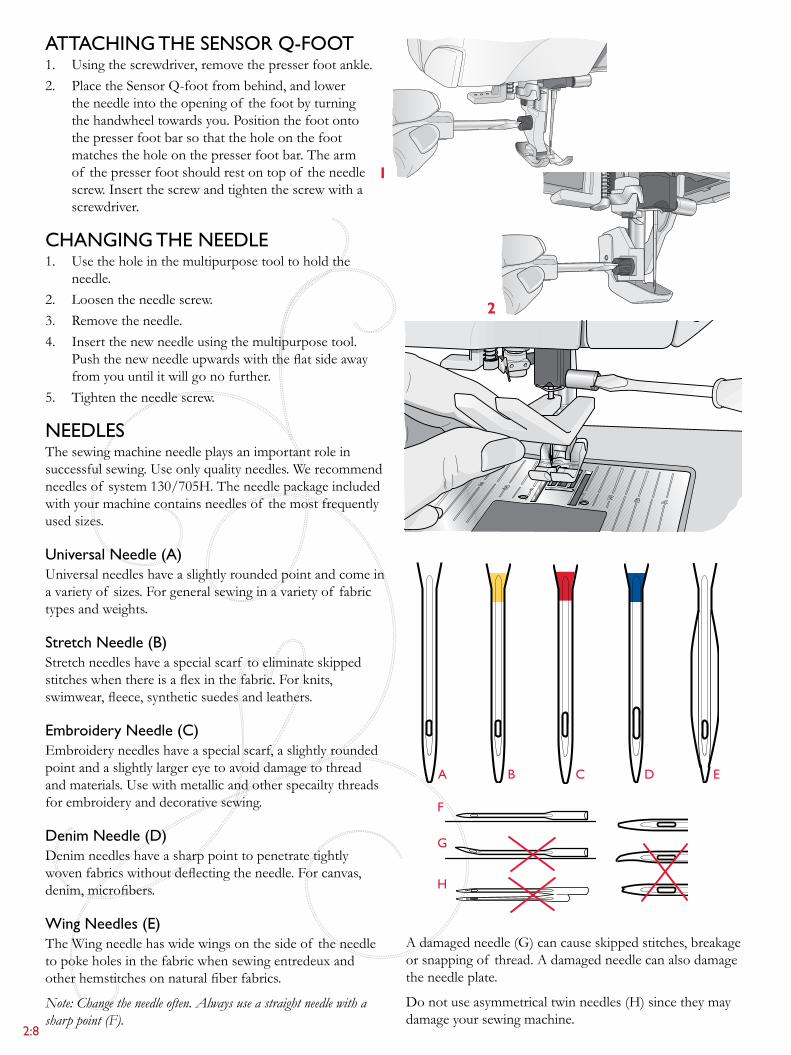
aTTaChing The sensor Q-fooT1. Usingthescrewdriver,removethepresserfootankle.2. PlacetheSensorQ-footfrombehind,andlower
the needle into the opening of the foot by turning the handwheel towards you. Position the foot onto the presser foot bar so that the hole on the foot matches the hole on the presser foot bar. The arm of the presser foot should rest on top of the needle screw. Insert the screw and tighten the screw with a screwdriver.
Changing The needle1. Use the hole in the multipurpose tool to hold the
needle.2. Loosen the needle screw.3. Removetheneedle.4. Insert the new needle using the multipurpose tool.
Pushthenewneedleupwardswiththeflatsideawayfrom you until it will go no further.
5. Tighten the needle screw.
needlesThe sewing machine needle plays an important role in successfulsewing.Useonlyqualityneedles.Werecommendneedlesof system130/705H.Theneedlepackageincludedwithyourmachinecontainsneedlesof themostfrequentlyused sizes.
Universal needle (a)Universalneedleshaveaslightlyroundedpointandcomeinavarietyof sizes.Forgeneralsewinginavarietyof fabrictypes and weights.
stretch needle (b)Stretchneedleshaveaspecialscarf toeliminateskippedstitcheswhenthereisaflexinthefabric.Forknits,swimwear,fleece,syntheticsuedesandleathers.
embroidery needle (C)Embroideryneedleshaveaspecialscarf,aslightlyroundedpointandaslightlylargereyetoavoiddamagetothreadand materials. Use with metallic and other specailty threads forembroideryanddecorativesewing.
denim needle (d)Denimneedleshaveasharppointtopenetratetightlywovenfabricswithoutdeflectingtheneedle.Forcanvas,denim,microfibers.
wing needles (e)The Wing needle has wide wings on the side of the needle to poke holes in the fabric when sewing entredeux and otherhemstitchesonnaturalfiberfabrics.
Note: Change the needle often. Always use a straight needle with a sharp point (F).
f
g
h
a b C ed
1
2
Adamagedneedle(g)cancauseskippedstitches,breakageorsnappingof thread.Adamagedneedlecanalsodamagethe needle plate.
Donotuseasymmetricaltwinneedles(H)sincetheymaydamage your sewing machine.
Set Up 2:9
ThreadsTherearemanythreadsonthemarkettodaydevelopedfordifferent purposes.
all purpose sewing ThreadAllpurposesewingthreadismadeof synthetic,cottonorcottoncoveredpolyester.Thistypeof threadisusedforsewing garments and projects.
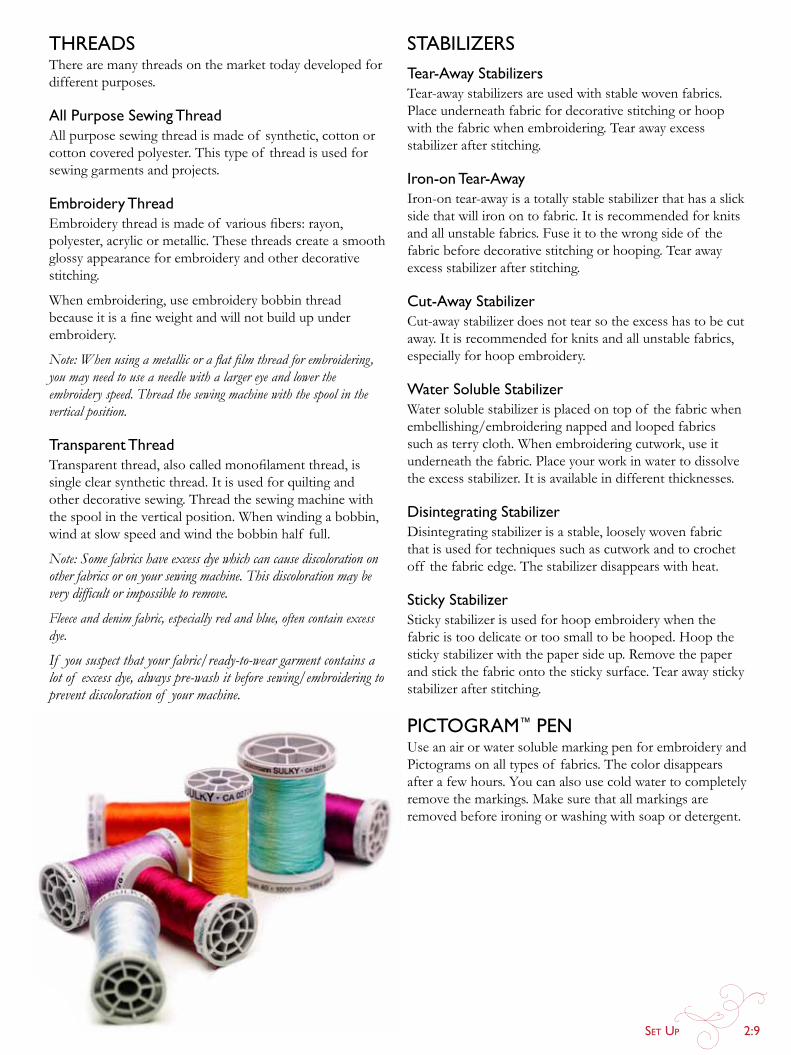
embroidery ThreadEmbroiderythreadismadeof variousfibers:rayon,polyester, acrylic or metallic. These threads create a smooth glossyappearanceforembroideryandotherdecorativestitching.
When embroidering, use embroidery bobbin thread becauseitisafineweightandwillnotbuildupunderembroidery.
Note: When using a metallic or a flat film thread for embroidering, you may need to use a needle with a larger eye and lower the embroidery speed. Thread the sewing machine with the spool in the vertical position.
Transparent ThreadTransparentthread,alsocalledmonofilamentthread,issingleclearsyntheticthread.Itisusedforquiltingandotherdecorativesewing.Threadthesewingmachinewiththespoolintheverticalposition.Whenwindingabobbin,wind at slow speed and wind the bobbin half full.
Note: Some fabrics have excess dye which can cause discoloration on other fabrics or on your sewing machine. This discoloration may be very difficult or impossible to remove.
Fleece and denim fabric, especially red and blue, often contain excess dye.
If you suspect that your fabric/ready-to-wear garment contains a lot of excess dye, always pre-wash it before sewing/embroidering to prevent discoloration of your machine.
sTabilizersTear-away stabilizersTear-awaystabilizersareusedwithstablewovenfabrics.Placeunderneathfabricfordecorativestitchingorhoopwith the fabric when embroidering. Tear away excess stabilizer after stitching.
iron-on Tear-awayIron-on tear-away is a totally stable stabilizer that has a slick side that will iron on to fabric. It is recommended for knits and all unstable fabrics. Fuse it to the wrong side of the fabricbeforedecorativestitchingorhooping.Tearawayexcess stabilizer after stitching.
Cut-away stabilizerCut-away stabilizer does not tear so the excess has to be cut away. It is recommended for knits and all unstable fabrics, especially for hoop embroidery.
water soluble stabilizerWater soluble stabilizer is placed on top of the fabric when embellishing/embroidering napped and looped fabrics such as terry cloth. When embroidering cutwork, use it underneaththefabric.Placeyourworkinwatertodissolvetheexcessstabilizer.Itisavailableindifferentthicknesses.
disintegrating stabilizerDisintegratingstabilizerisastable,looselywovenfabricthatisusedfortechniquessuchascutworkandtocrochetoff the fabric edge. The stabilizer disappears with heat.
sticky stabilizerStickystabilizerisusedforhoopembroiderywhenthefabricistoodelicateortoosmalltobehooped.Hoopthestickystabilizerwiththepapersideup.Removethepaperand stick the fabric onto the sticky surface. Tear away sticky stabilizer after stitching.
piCTograM™ penUse an air or water soluble marking pen for embroidery and Pictograms on all types of fabrics. The color disappears afterafewhours.Youcanalsousecoldwatertocompletelyremovethemarkings.Makesurethatallmarkingsareremovedbeforeironingorwashingwithsoapordetergent.
2:10
OFF
ON
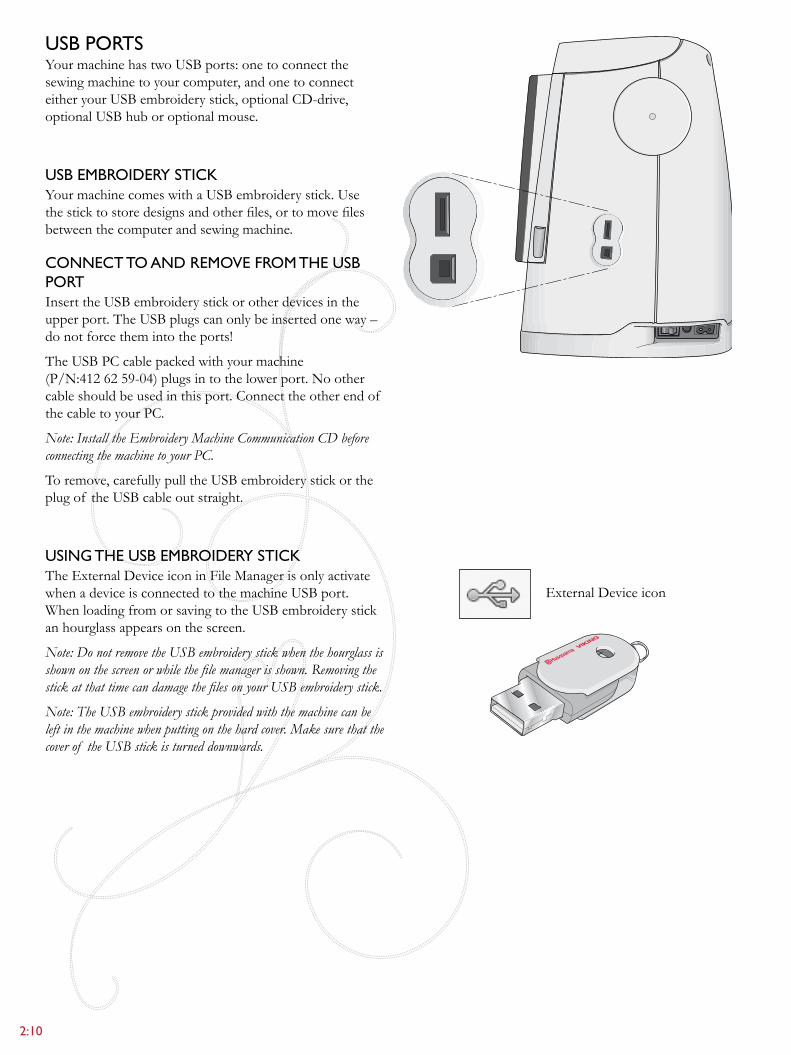
Usb porTsYourmachinehastwoUSBports:onetoconnectthesewing machine to your computer, and one to connect eitheryourUSBembroiderystick,optionalCD-drive,optionalUSBhuboroptionalmouse.
Usb eMbroidery sTiCkYourmachinecomeswithaUSBembroiderystick.Usethesticktostoredesignsandotherfiles,ortomovefilesbetween the computer and sewing machine.
ConneCT To and reMove froM The Usb porTInserttheUSBembroiderystickorotherdevicesintheupperport.TheUSBplugscanonlybeinsertedoneway–do not force them into the ports!
The USBPCcablepackedwithyourmachine(P/N:4126259-04)plugsintothelowerport.Noothercable should be used in this port. Connect the other end of the cable to your PC.
Note: Install the Embroidery Machine Communication CD before connecting the machine to your PC.
Toremove,carefullypulltheUSBembroiderystickortheplugof theUSBcableoutstraight.
Using The Usb eMbroidery sTiCkTheExternalDeviceiconinFileManagerisonlyactivatewhenadeviceisconnectedtothemachineUSBport.WhenloadingfromorsavingtotheUSBembroiderystickan hourglass appears on the screen.
Note: Do not remove the USB embroidery stick when the hourglass is shown on the screen or while the file manager is shown. Removing the stick at that time can damage the files on your USB embroidery stick.
Note: The USB embroidery stick provided with the machine can be left in the machine when putting on the hard cover. Make sure that the cover of the USB stick is turned downwards.
ExternalDeviceicon
Set Up 2:11
ConneCTing The MaChine To yoUr CoMpUTerYourmachinecomeswithanEmbroidery Machine CommunicationCD(attachedinsidethebackcoverof thisUser´sguide).ThisCDshouldbeinstalledbeforethemachineisconnectedtoyourcomputerforthefirsttime.
WhenthesoftwareontheCDisinstalledandthemachineandthecomputerareconnected,viatheUSBcable,youcaneasilymovedesignsorotherfilestoyourmachine.
Note: Your computer must be running Windows® 7/Vista or Windows® XP.
5d™ eMbroidery sofTware
Computer ConnectionThe Embroidery Machine Communication module is automaticallyinstalled.ThisisrequiredtousetheSendTofeaturesinany5D™EmbroiderySystemmodule,andSendMultiplein5D™Organizer.
5d™ QuickfontCreatefontfiles(.vf3)foryourHUSQVARNAVIKINg® DESIgNERRUBYdeLuxe™(orTypeM)sewingandembroidery machine from most TrueType®orOpenType® fonts on your computer.
5d™ organizerFindyourdesignsandpictureseasily.Browsethemindifferent sizes and print selected groups as full worksheets orthumbnailcatalogs.Convertyourdesignsbetweenmajorembroidery formats, to pictures or desktop wallpaper for your computer.
insTalling yoUr sofTwareIf youownotherHUSQVARNAVIKINg®5D™ EmbroiderySystemsoftware,youmayneedtoinstallthe5D™EmbroiderySystem9.2(orhigherversion)Update instead of installing the Embroidery Machine CommunicationSoftware.ThenaddtheHUSQVARNAVIKINg®DESIgNERRUBYdeLuxe™(orTypeM)sewingand embroidery machine from the Machine Manager in 5D™Configure,asdescribedinStep5.ContinuewithStep6toinstallhardwaredrivers.
1. Ensure your embroidery machine is disconnected from your computer.
2. Ensure you are logged onto your computer with a user name that is an administrator on the computer, then installyoursoftwarefromtheCDprovided.
3. InsertyourCD.InWindows®7/Vista,anAutoPlaymessage may appear, asking what you wish to do with theCD.ClicktheoptiontoRunMenu.exe.Selectyourdesiredlanguage,andselectthe“InstallEmbroideryMachineCommunicationSoftware”optionfromthemenu.
4. Follow the instructions in the Installation Wizard. When asked to enter your Installation Code, enter the following number: 9200.
5. Inthe5D™ConfigureWizardunderMyMachinesselectyourmachinetype:HUSQVARNAVIKINg® DESIgNERRUBYdeLuxe™(orTypeM)sewingandembroiderymachine.UnderSendIorSend2selectHUSQVARNAVIKINg®DESIgNERRUBYdeLuxe™(orTypeM)sewingandembroiderymachine.It is recommended to set the Embroidery Machine Communication module to start automatically when starting Windows.
Note: You can find more detailed information about the installation in the 5D™ Embroidery System Getting Started Guide, in the folder ‘UserGuides’ on the CD.
regisTer yoUr 5d™ sofTwareAfterfinishingthesoftwareinstallation,youcanselectto register your software by clicking on Register in the menu.Createanaccountandenteryourdetailstoreceivecustomized5D™ newsletters.
important!Duringtheregistrationprocessyouwillbegivenanoptiontoenterwhichsewingandembroiderymachine(s)youown.ThisisNOTaproductorwarrantyregistration.Themachine information entered here is only used to customize 5D™Softwarenewsletters.Forproductandwarrantyregistration,gototheHUSQVARNAVIKINg® web site atwww.husqvarnaviking.com.
Toregisterlater,selecttheRegisterbuttonin5D™ Configureatanytime.
insTall hardware drivers and ConneCT The eMbroidery MaChinewindows® 7/ vista6. Fromthemainmenuof yourCD,clicktheInstall
Driversoptionforyourversionof Windows® 7/ Vista.If the following User Account Control message appears: ‘A program needs your permission to continue’, click the Continue button.
7. Duringtheinstallationprocessasecuritymessagemayappear,asking‘Wouldyouliketoinstallthisdevicesoftware?’ClickInstalltocontinue.ClickFinishonthelast page.
8. Youmaynowconnectyourembroiderymachinetoyourcomputer.Amessagewillappearandyouwillbeinformed when your embroidery machine is ready to be used.
windows® xp6. Fromthemainmenuof yourCD,clicktheInstall
DriversoptionforWindows® XP.Drivers are only available for 32-bit Windows® XP.
7. Duringtheinstallationprocess,if existingdriversare

2:12
found,youwillbeinformedthatdrivershavebeenremovedandthatthecomputermustberestarted.ClickOKtorestartthecomputer.Installationwillresume after the computer has restarted.
8. Attheendof theinstallation,youwillbepromptedto connect your embroidery machine. Click Finish on thelastpage.Leaveyour5D™EmbroiderySystemsoftwareCDinyourcomputer.
9. TheFoundNewHardwarewizardwillappear.Select‘No,notatthistime’onthefirstpage,thenclickNext.Select‘Installthesoftwareautomatically’,thenclickNext.Awarningwillappearthatthedriversarenot signed. This is normal and should not be a cause forconcern.ClickContinueAnyway,andthedriverinstallation will complete automatically.
how To laUnCh The prograMs
shortcuts on the desktop1. Double-clickontheShortcuttothe5D™ Embroidery
Systemprogramfolder.Alistof theprogramsappears.2. Double-clickon5D™Organizer,5D™ QuickFont or
5D™Configuretolaunchit.AlternativelyusetheStartMenutoopenmodulesunderStart,AllPrograms,5D™EmbroiderySystem.
eMbroidery MaChine CoMMUniCaTion ModUleThe Embroidery Machine Communication module must beactive( or )touseyourembroiderymachinewith your computer. The icons are found in the lower right corner of your computer screen. If the Embroidery MachineCommunicationmoduleisnotactive,itmaybestartedfromtheSendtabof 5D™Configure.
viewing and printing pdf guidesTofindalltheReferenceandSampleguidesforyour5D™ EmbroiderySystemsoftware,gotoStart,AllPrograms,5D™EmbroiderySystemthenchooseReferenceguidesorSampleguides.Choosetherelevantfolder,thenselectthedesiredPDFguide.Double-clickonthedesirednametolaunchtherelevant.pdf fileif youhaveAdobeAcrobatinstalledonyourcomputer.ToinstalltheAcrobatReader,insertthe5D™EmbroiderySystemCDandselectthatoption from the menu that appears.
how To UpdaTe yoUr MaChineBesuretoconsultthewebsiteatwww.husqvarnaviking.com and/oryourlocalauthorizedHUSQVARNAVIKINg® dealer for updates and upgrades for your machine and User’sguide.
YoucanupdateyourmachineusingtheUSBembroiderystick or the USBcablepackedwithyourmachine(P/N:4126259-04).
Updating instructions1. Open5D™Configureandconnectyourmachineto
your computer. 2. Follow the instructions on the screen to update your
machine.
Updating using the hUsQvarna viking® Usb embroidery stick • gototheHUSQVARNAVIKINg® web site at
www.husqvarnaviking.comtofindinformationaboutavailableupdates.
• FollowtheupdatewizardtoprepareyourUSBembroidery stick for the update.
• Tosetyourmachineinupdatemode,pressandholdtheNeedleStopUp/DownbuttonandtheSensorFoot Up button while turning on the machine. Follow the instructions on the sewing machine screen to updatefromyourUSBEmbroiderystick.
• Whentheupdateiscompletedthemachinewillrestartautomatically.
3 seTTings & fUnCTions
3:2
Touch & Hold
Start Menu
Quick Help
Sewing/Embroidery Mode
Sewing Mode Embroidery Mode
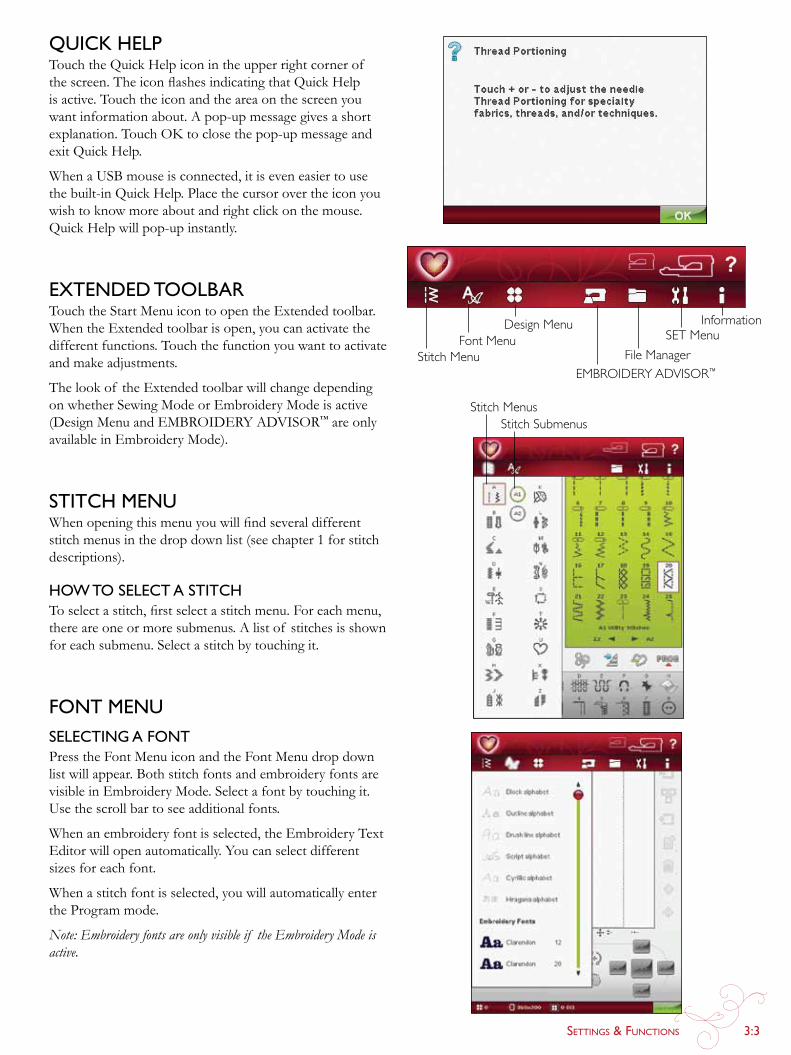
ToolbarOnthistoolbaryouwillfindtheStartMenuicon,Sewing/EmbroideryModeiconandtheQuickHelpicon.
sTarT MenUTouchtheStartMenuicontoopentheExtendedtoolbar.TheExtendedtoolbarisusedforselectingandactivatingdifferent windows. Read more about the Extended Toolbar on next page.
sewing/eMbroidery ModeTogglebetweentheSewingModeandtheEmbroideryModebytouchingtheSewing/EmbroideryModeicon.Theiconfortheactivemodeishighlightedandenlarged.
SewingModeisusedforordinarysewing(seechaper4&5)andEmbroideryModeforembroidering.WhenenteringEmbroidery Mode, EmbroideryEditwillbeactive.Hereyou will be able to change the appearance of your design (seechapter7).Toembroideryourdesign,changefromEmbroidery Edit to EmbroideryStitch-OutbytouchingthegO!iconinthelowerrightcornerof theLargeInteractiveScreen(seechapter8).
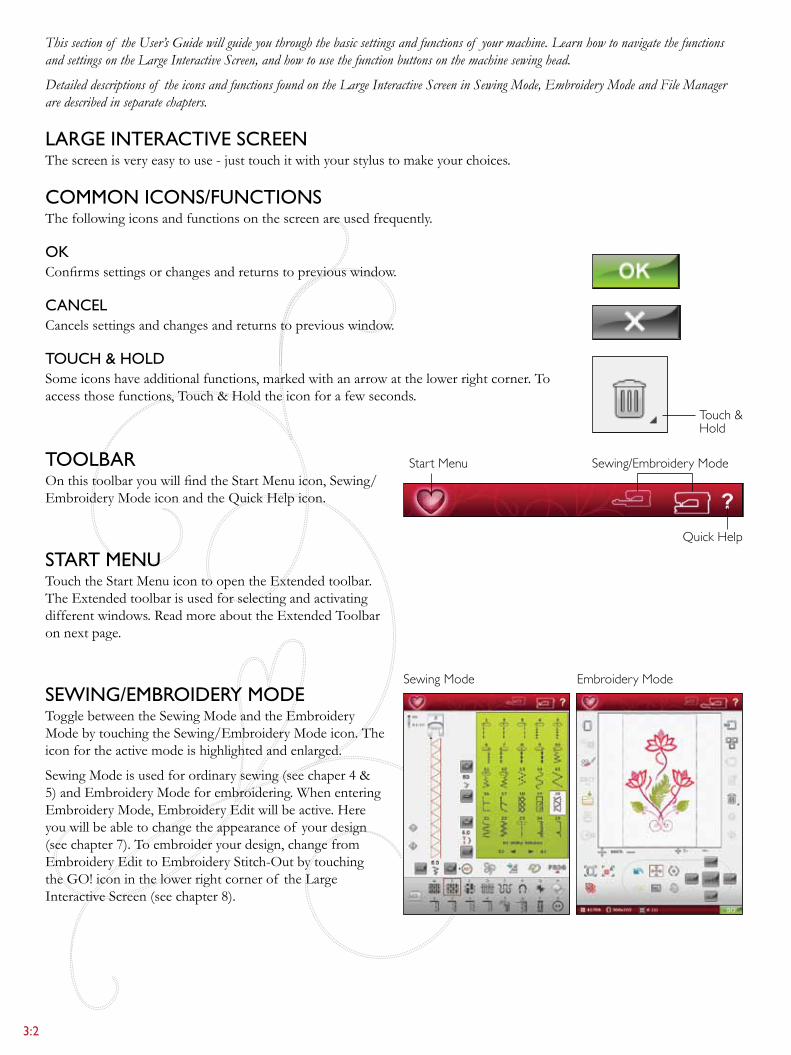
This section of the User’s Guide will guide you through the basic settings and functions of your machine. Learn how to navigate the functions and settings on the Large Interactive Screen, and how to use the function buttons on the machine sewing head.
Detailed descriptions of the icons and functions found on the Large Interactive Screen in Sewing Mode, Embroidery Mode and File Manager are described in separate chapters.
large inTeraCTive sCreenThescreenisveryeasytouse-justtouchitwithyourstylustomakeyourchoices.
CoMMon iCons/fUnCTionsThefollowingiconsandfunctionsonthescreenareusedfrequently.
okConfirmssettingsorchangesandreturnstopreviouswindow.
CanCelCancelssettingsandchangesandreturnstopreviouswindow.
ToUCh & holdSomeiconshaveadditionalfunctions,markedwithanarrowatthelowerrightcorner.Toaccessthosefunctions,Touch&Holdtheiconforafewseconds.
SettingS & FunctionS 3:3
SET MenuInformation
File Manager
Design MenuFont Menu
Stitch MenuEMBROIDERY ADVISOR™
Stitch MenusStitch Submenus
QUiCk helpTouchtheQuickHelpiconintheupperrightcornerof thescreen.TheiconflashesindicatingthatQuickHelpisactive.Touchtheiconandtheareaonthescreenyouwantinformationabout.Apop-upmessagegivesashortexplanation.TouchOKtoclosethepop-upmessageandexitQuickHelp.
WhenaUSBmouseisconnected,itiseveneasiertousethebuilt-inQuickHelp.Placethecursorovertheiconyouwish to know more about and right click on the mouse. QuickHelpwillpop-upinstantly.
exTended Toolbar Touch the StartMenuicontoopentheExtendedtoolbar.WhentheExtendedtoolbarisopen,youcanactivatethedifferentfunctions.Touchthefunctionyouwanttoactivateand make adjustments.
The look of the Extended toolbar will change depending onwhetherSewingModeorEmbroideryModeisactive(DesignMenuandEMBROIDERYADVISOR™ are only availableinEmbroideryMode).
sTiTCh MenUWhenopeningthismenuyouwillfindseveraldifferentstitchmenusinthedropdownlist(seechapter1forstitchdescriptions).
how To seleCT a sTiTChToselectastitch,firstselectastitchmenu.Foreachmenu,there are one or more submenus.Alistof stitchesisshownforeachsubmenu.Selectastitchbytouchingit.
fonT MenUseleCTing a fonTPress the Font Menu icon and the Font Menu drop down listwillappear.Bothstitch fonts and embroidery fonts are visibleinEmbroideryMode.Selectafontbytouchingit.Use the scroll bar to see additional fonts.
When an embroidery font is selected, the Embroidery Text Editorwillopenautomatically.Youcanselectdifferentsizes for each font.
When a stitch font is selected, you will automatically enter the Program mode.
Note: Embroidery fonts are only visible if the Embroidery Mode is active.
3:4
SET MenuFile Manager
Design Menu
EMBROIDERY ADVISOR™design MenU(Only active in Embroidery Mode)
seleCTing a designOpenembroideriesbyselectingtheflowericonontheExtendedtoolbar.Selectanembroiderydesignbytouchingit. Use the scroll bar to browse through additional designs.
eMbroidery advisor™
(Only active in Embroidery Mode)
TheEMBROIDERYADVISOR™ feature recommends the right needle, stabilizer and thread for your fabric. Touch the fabric type and weight you want to embroider onandfollowtherecommendations.TheEMBROIDERYADVISOR™featurealsogivesyoutipswhenembroideringonspecialfabricsorusingspecialthreads.TouchOKtoclosetheEMBROIDERYADVISOR™ feature.
file ManagerTheFileManagerisusedtoopen,organize,add,move,removeandcopyyourdesigns,fontsandstitchfiles.Useeitherbuilt-inmemoryoranexternaldeviceconnectedtoyourmachineforstoringdesignsandfiles.
Youcanselectseveraldesignsatatime.Touchthedesignsyouwanttoopen,thenTouch&Hold(seepage3:2)onthelastselecteddesign.Alldesignsthatyouhaveselectedwillopen in Embroidery Edit.
Learn more about the File Manager in chapter 9.
SettingS & FunctionS 3:5
Stitch Settings
Machine SettingsSound Settings
Screen Settings
Sewing Settings
Pan
Balance Length
Balance WidthSensor Foot
Pressure
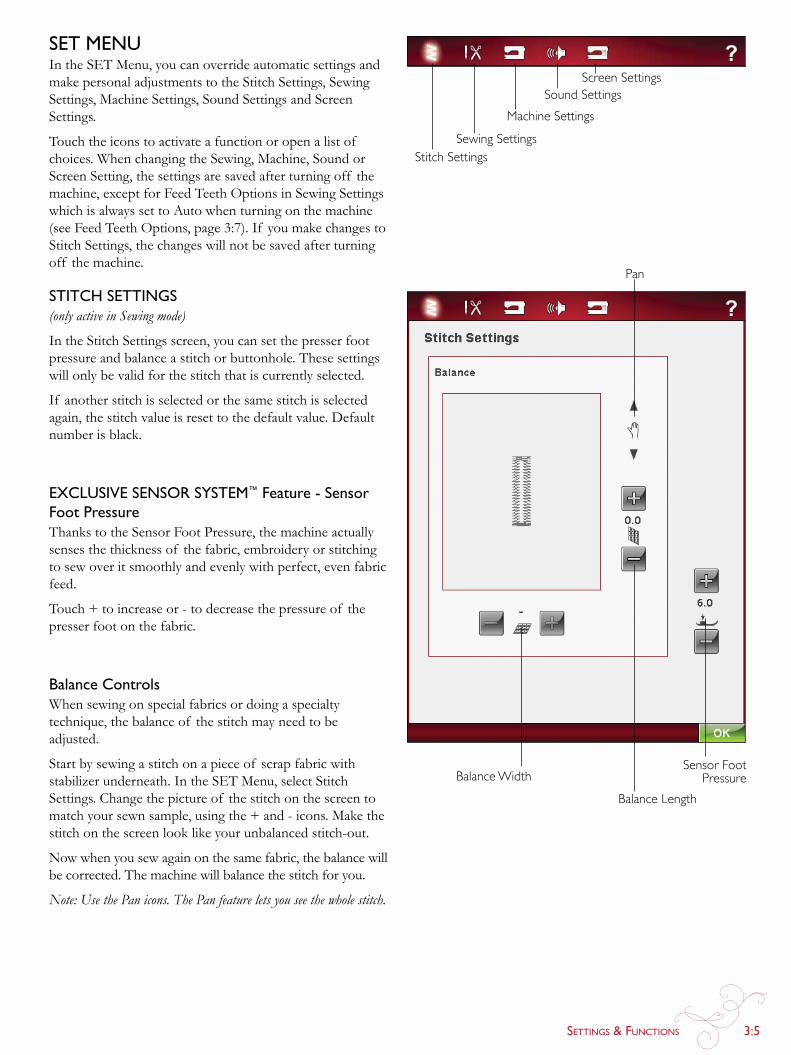
seT MenUIntheSETMenu,youcanoverrideautomaticsettingsandmakepersonaladjustmentstotheStitchSettings,SewingSettings,MachineSettings,SoundSettingsandScreenSettings.
Touchtheiconstoactivateafunctionoropenalistof choices.WhenchangingtheSewing,Machine,SoundorScreenSetting,thesettingsaresavedafterturningoff themachine,exceptforFeedTeethOptionsinSewingSettingswhichisalwayssettoAutowhenturningonthemachine(seeFeedTeethOptions,page3:7).If youmakechangestoStitchSettings,thechangeswillnotbesavedafterturningoff the machine.
sTiTCh seTTings (only active in Sewing mode)
IntheStitchSettingsscreen,youcansetthepresserfootpressure and balance a stitch or buttonhole. These settings willonlybevalidforthestitchthatiscurrentlyselected.
If another stitch is selected or the same stitch is selected again,thestitchvalueisresettothedefaultvalue.Defaultnumber is black.
exClUsive sensor sysTeM™ feature - sensor foot pressureThankstotheSensorFootPressure,themachineactuallysenses the thickness of the fabric, embroidery or stitching tosewoveritsmoothlyandevenlywithperfect,evenfabricfeed.
Touch+toincreaseor-todecreasethepressureof thepresser foot on the fabric.
balance ControlsWhen sewing on special fabrics or doing a specialty technique,thebalanceof thestitchmayneedtobeadjusted.
Startbysewingastitchonapieceof scrapfabricwithstabilizerunderneath.IntheSETMenu,selectStitchSettings.Changethepictureof thestitchonthescreentomatchyoursewnsample,usingthe+and-icons.Makethestitch on the screen look like your unbalanced stitch-out.
Now when you sew again on the same fabric, the balance will be corrected. The machine will balance the stitch for you.
Note: Use the Pan icons. The Pan feature lets you see the whole stitch.
3:6
sewing seTTings
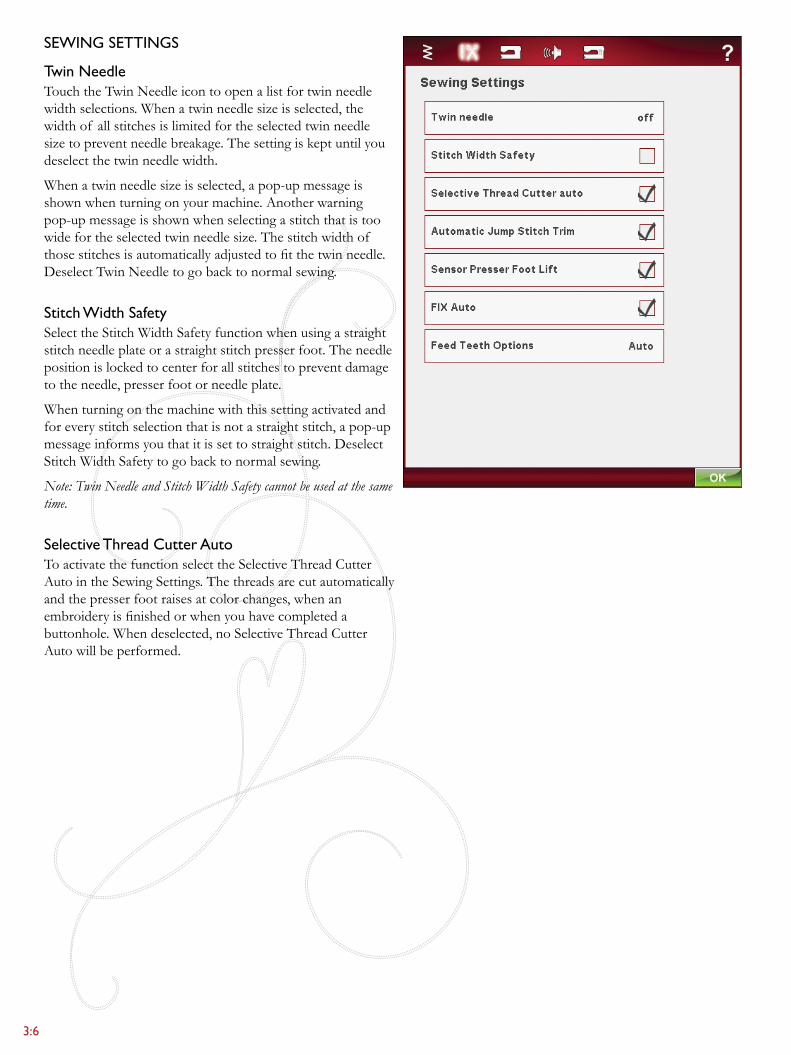
Twin needleTouch the Twin Needle icon to open a list for twin needle width selections. When a twin needle size is selected, the width of all stitches is limited for the selected twin needle sizetopreventneedlebreakage.Thesettingiskeptuntilyoudeselect the twin needle width.
When a twin needle size is selected, a pop-up message is shownwhenturningonyourmachine.Anotherwarningpop-up message is shown when selecting a stitch that is too wide for the selected twin needle size. The stitch width of thosestitchesisautomaticallyadjustedtofitthetwinneedle.DeselectTwinNeedletogobacktonormalsewing.
stitch width safetySelecttheStitchWidthSafetyfunctionwhenusingastraightstitch needle plate or a straight stitch presser foot. The needle positionislockedtocenterforallstitchestopreventdamageto the needle, presser foot or needle plate.
Whenturningonthemachinewiththissettingactivatedandforeverystitchselectionthatisnotastraightstitch,apop-upmessageinformsyouthatitissettostraightstitch.DeselectStitchWidthSafetytogobacktonormalsewing.
Note: Twin Needle and Stitch Width Safety cannot be used at the same time.
selective Thread Cutter autoToactivatethefunctionselecttheSelectiveThreadCutterAutointheSewingSettings.Thethreadsarecutautomaticallyand the presser foot raises at color changes, when an embroideryisfinishedorwhenyouhavecompletedabuttonhole.Whendeselected,noSelectiveThreadCutterAutowillbeperformed.
SettingS & FunctionS 3:7
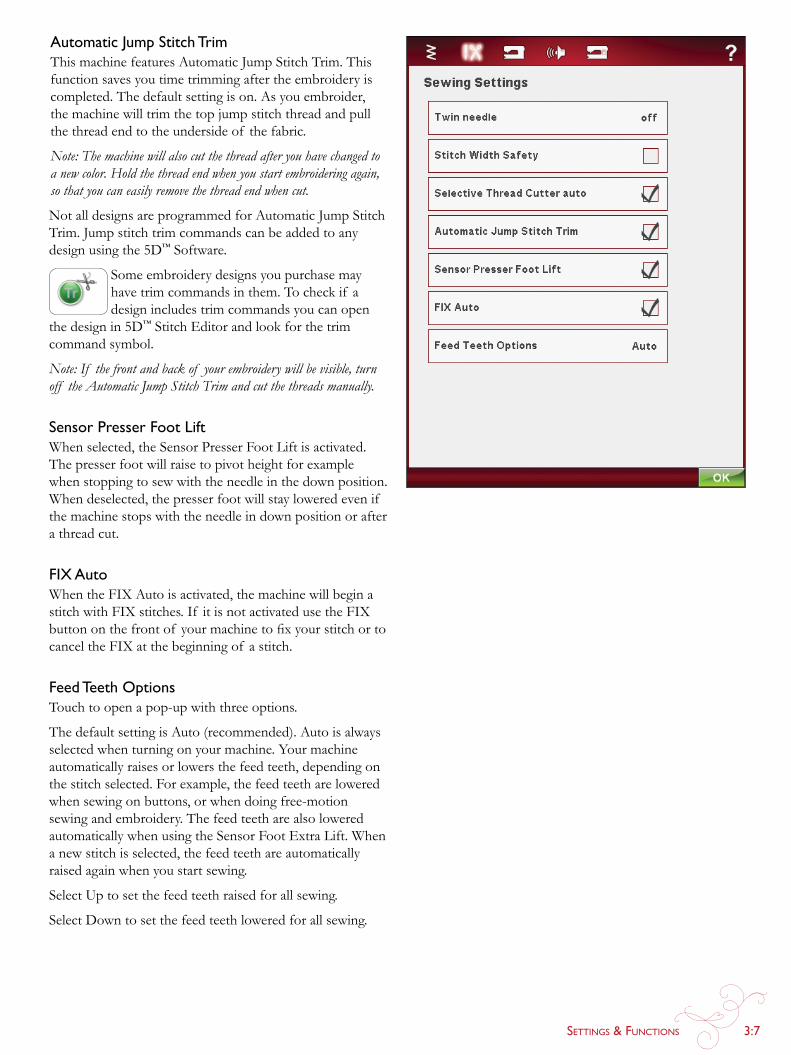
automatic Jump stitch TrimThismachinefeaturesAutomaticJumpStitchTrim.Thisfunctionsavesyoutimetrimmingaftertheembroideryiscompleted.Thedefaultsettingison.Asyouembroider,the machine will trim the top jump stitch thread and pull the thread end to the underside of the fabric.
Note: The machine will also cut the thread after you have changed to a new color. Hold the thread end when you start embroidering again, so that you can easily remove the thread end when cut.
NotalldesignsareprogrammedforAutomaticJumpStitchTrim. Jump stitch trim commands can be added to any designusingthe5D™Software.
Someembroiderydesignsyoupurchasemayhavetrimcommandsinthem.Tocheckif adesign includes trim commands you can open
thedesignin5D™StitchEditorandlookforthetrimcommand symbol.
Note: If the front and back of your embroidery will be visible, turn off the Automatic Jump Stitch Trim and cut the threads manually.
sensor presser foot liftWhenselected,theSensorPresserFootLiftisactivated.Thepresserfootwillraisetopivotheightforexamplewhen stopping to sew with the needle in the down position. Whendeselected,thepresserfootwillstayloweredevenif the machine stops with the needle in down position or after a thread cut.
fix autoWhentheFIXAutoisactivated,themachinewillbeginastitchwithFIXstitches.If itisnotactivatedusetheFIXbuttononthefrontof yourmachinetofixyourstitchortocancel the FIX at the beginning of a stitch.
feed Teeth optionsTouch to open a pop-up with three options.
ThedefaultsettingisAuto(recommended).Autoisalwaysselectedwhenturningonyourmachine.Yourmachineautomatically raises or lowers the feed teeth, depending on the stitch selected. For example, the feed teeth are lowered when sewing on buttons, or when doing free-motion sewing and embroidery. The feed teeth are also lowered automaticallywhenusingtheSensorFootExtraLift.Whena new stitch is selected, the feed teeth are automatically raised again when you start sewing.
SelectUptosetthefeedteethraisedforallsewing.
SelectDowntosetthefeedteethloweredforallsewing.
3:8
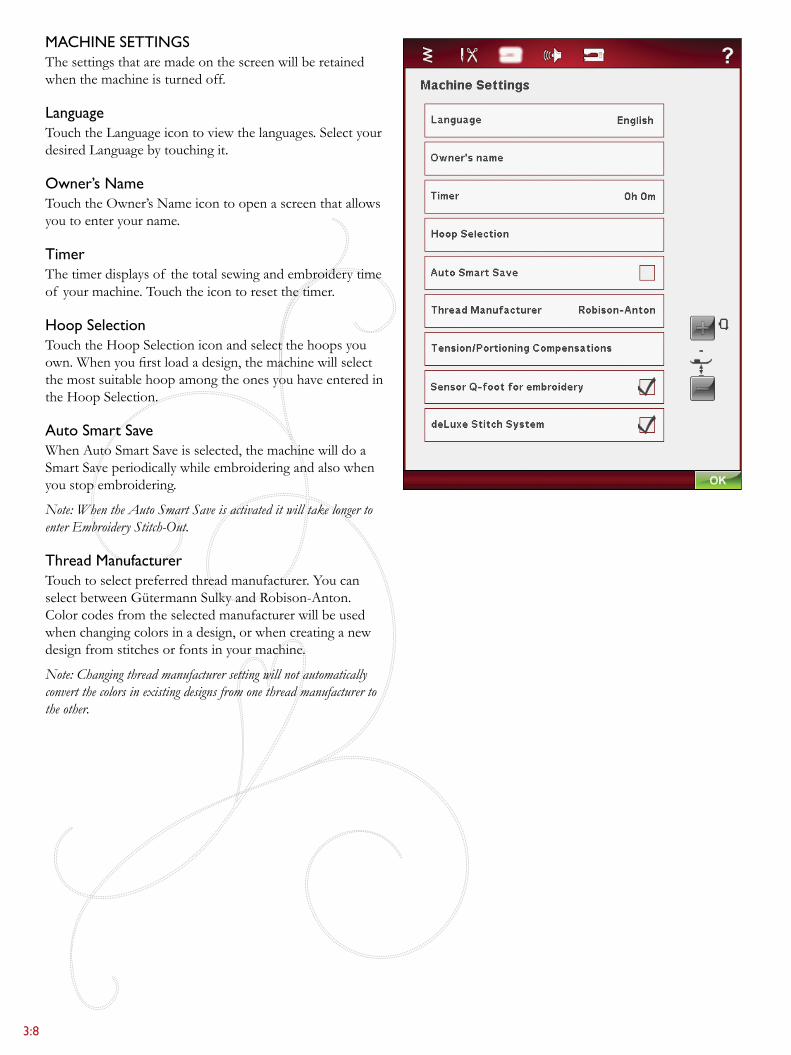
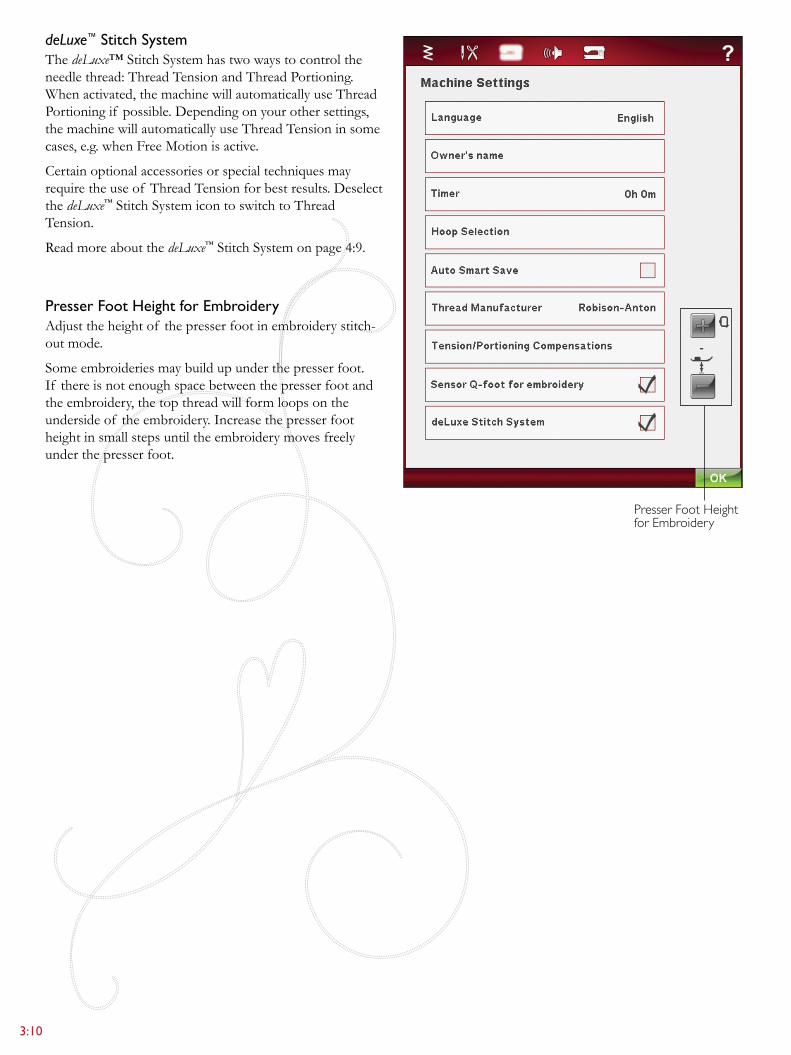
MaChine seTTingsThe settings that are made on the screen will be retained when the machine is turned off.
languageTouchtheLanguageicontoviewthelanguages.Selectyourdesired Language by touching it.
owner’s nameTouchtheOwner’sNameicontoopenascreenthatallowsyou to enter your name.
TimerThe timer displays of the total sewing and embroidery time of your machine. Touch the icon to reset the timer.
hoop selectionTouchtheHoopSelectioniconandselectthehoopsyouown.Whenyoufirstloadadesign,themachinewillselectthemostsuitablehoopamongtheonesyouhaveenteredintheHoopSelection.
auto smart saveWhenAutoSmartSaveisselected,themachinewilldoaSmartSaveperiodicallywhileembroideringandalsowhenyou stop embroidering.
Note: When the Auto Smart Save is activated it will take longer to enter Embroidery Stitch-Out.
Thread ManufacturerTouchtoselectpreferredthreadmanufacturer.YoucanselectbetweengütermannSulkyandRobison-Anton.Color codes from the selected manufacturer will be used when changing colors in a design, or when creating a new design from stitches or fonts in your machine.
Note: Changing thread manufacturer setting will not automatically convert the colors in existing designs from one thread manufacturer to the other.
SettingS & FunctionS 3:9
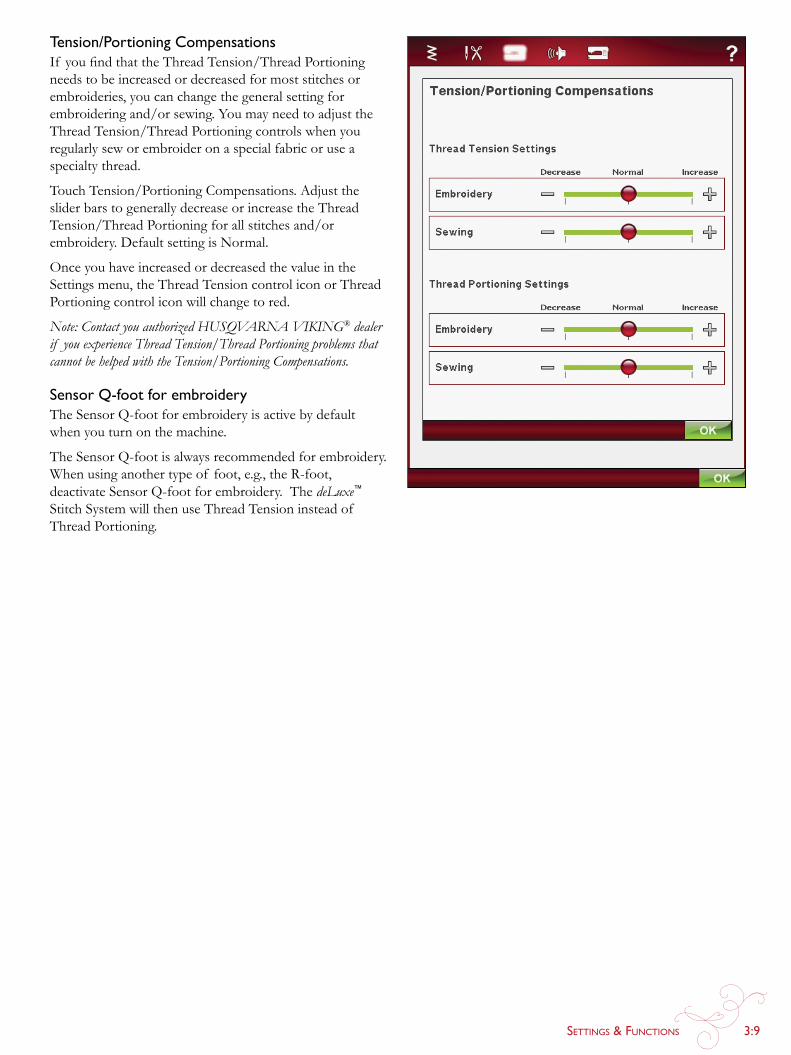
Tension/portioning CompensationsIf youfindthattheThreadTension/ThreadPortioningneeds to be increased or decreased for most stitches or embroideries, you can change the general setting for embroideringand/orsewing.YoumayneedtoadjusttheThread Tension/Thread Portioning controls when you regularly sew or embroider on a special fabric or use a specialty thread.
TouchTension/PortioningCompensations.Adjusttheslider bars to generally decrease or increase the Thread Tension/Thread Portioning for all stitches and/or embroidery.DefaultsettingisNormal.
OnceyouhaveincreasedordecreasedthevalueintheSettingsmenu,theThreadTensioncontroliconorThreadPortioning control icon will change to red.
Note: Contact you authorized HUSQVARNA VIKING® dealer if you experience Thread Tension/Thread Portioning problems that cannot be helped with the Tension/Portioning Compensations.
sensor Q-foot for embroideryTheSensorQ-footforembroideryisactivebydefaultwhen you turn on the machine.
TheSensorQ-footisalwaysrecommendedforembroidery.When using another type of foot, e.g., the R-foot, deactivateSensorQ-footforembroidery.ThedeLuxe™ StitchSystemwillthenuseThreadTensioninsteadof Thread Portioning.
3:10
Presser Foot Height for Embroidery
deLuxe™ stitch systemThe deLuxe™StitchSystemhastwowaystocontroltheneedle thread: Thread Tension and Thread Portioning. Whenactivated,themachinewillautomaticallyuseThreadPortioningif possible.Dependingonyourothersettings,the machine will automatically use Thread Tension in some cases,e.g.whenFreeMotionisactive.
Certainoptionalaccessoriesorspecialtechniquesmayrequiretheuseof ThreadTensionforbestresults.Deselectthe deLuxe™StitchSystemicontoswitchtoThreadTension.
Read more about the deLuxe™StitchSystemonpage4:9.
presser foot height for embroideryAdjusttheheightof thepresserfootinembroiderystitch-out mode.
Someembroideriesmaybuildupunderthepresserfoot.If there is not enough space between the presser foot and the embroidery, the top thread will form loops on the underside of the embroidery. Increase the presser foot heightinsmallstepsuntiltheembroiderymovesfreelyunder the presser foot.
SettingS & FunctionS 3:11
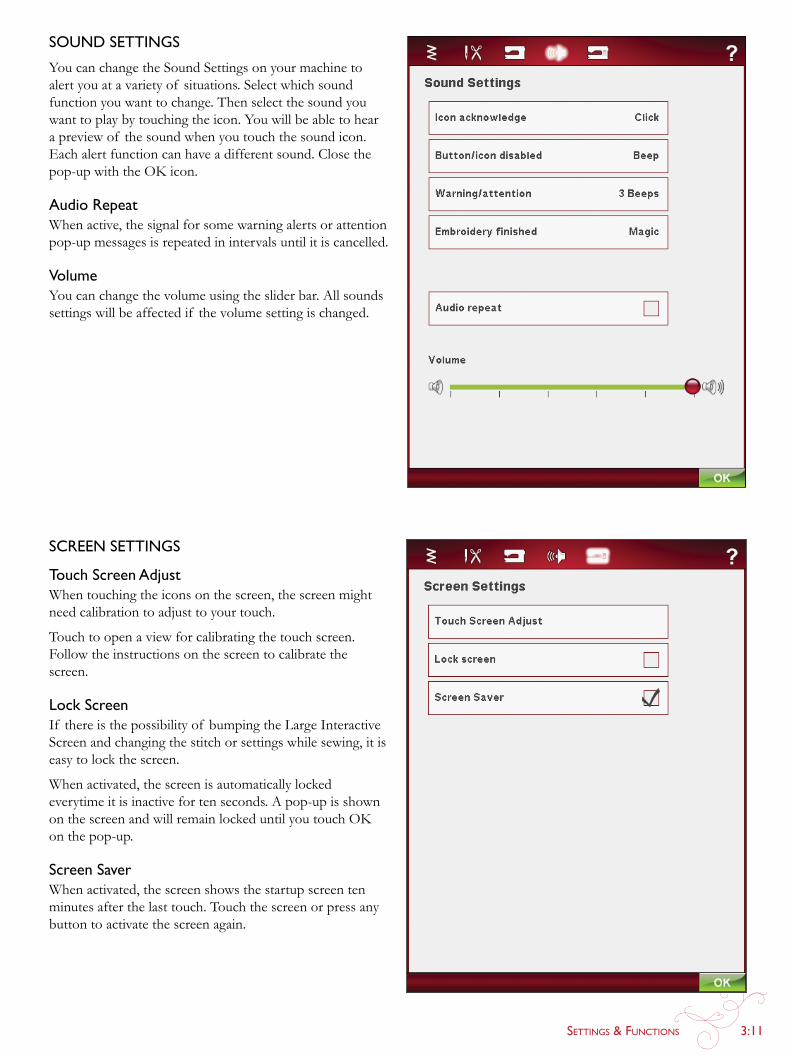
soUnd seTTingsYoucanchangetheSoundSettingsonyourmachinetoalertyouatavarietyof situations.Selectwhichsoundfunction you want to change. Then select the sound you wanttoplaybytouchingtheicon.Youwillbeabletohearapreviewof thesoundwhenyoutouchthesoundicon.Eachalertfunctioncanhaveadifferentsound.Closethepop-upwiththeOKicon.
audio repeatWhenactive,thesignalforsomewarningalertsorattentionpop-upmessagesisrepeatedinintervalsuntilitiscancelled.
volumeYoucanchangethevolumeusingthesliderbar.Allsoundssettingswillbeaffectedif thevolumesettingischanged.
sCreen seTTings
Touch screen adjustWhen touching the icons on the screen, the screen might need calibration to adjust to your touch.
Touchtoopenaviewforcalibratingthetouchscreen. Follow the instructions on the screen to calibrate the screen.
lock screenIf thereisthepossibilityof bumpingtheLargeInteractiveScreenandchangingthestitchorsettingswhilesewing,itiseasy to lock the screen.
Whenactivated,thescreenisautomaticallylockedeverytimeitisinactivefortenseconds.Apop-upisshownonthescreenandwillremainlockeduntilyoutouchOKon the pop-up.
screen saverWhenactivated,thescreenshowsthestartupscreentenminutes after the last touch. Touch the screen or press any buttontoactivatethescreenagain.
3:12
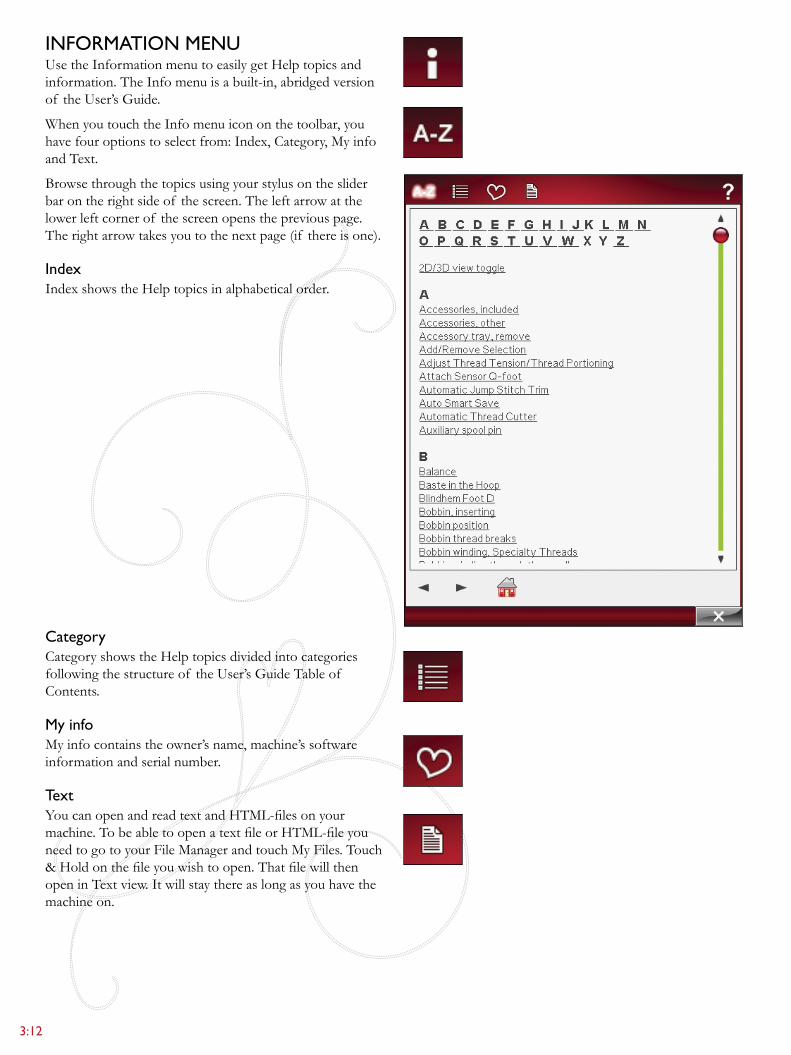
inforMaTion MenUUsetheInformationmenutoeasilygetHelptopicsandinformation.TheInfomenuisabuilt-in,abridgedversionof theUser’sguide.
When you touch the Info menu icon on the toolbar, you havefouroptionstoselectfrom:Index,Category,Myinfoand Text.
Browsethroughthetopicsusingyourstylusonthesliderbar on the right side of the screen. The left arrow at the lowerleftcornerof thescreenopensthepreviouspage.Therightarrowtakesyoutothenextpage(if thereisone).
indexIndexshowstheHelptopicsinalphabeticalorder.
CategoryCategoryshowstheHelptopicsdividedintocategoriesfollowingthestructureof theUser’sguideTableof Contents.
My infoMyinfocontainstheowner’sname,machine’ssoftwareinformation and serial number.
TextYoucanopenandreadtextandHTML-filesonyourmachine.TobeabletoopenatextfileorHTML-fileyouneed to go to your File Manager and touch My Files. Touch &Holdonthefileyouwishtoopen.ThatfilewillthenopeninTextview.Itwillstaythereaslongasyouhavethemachine on.
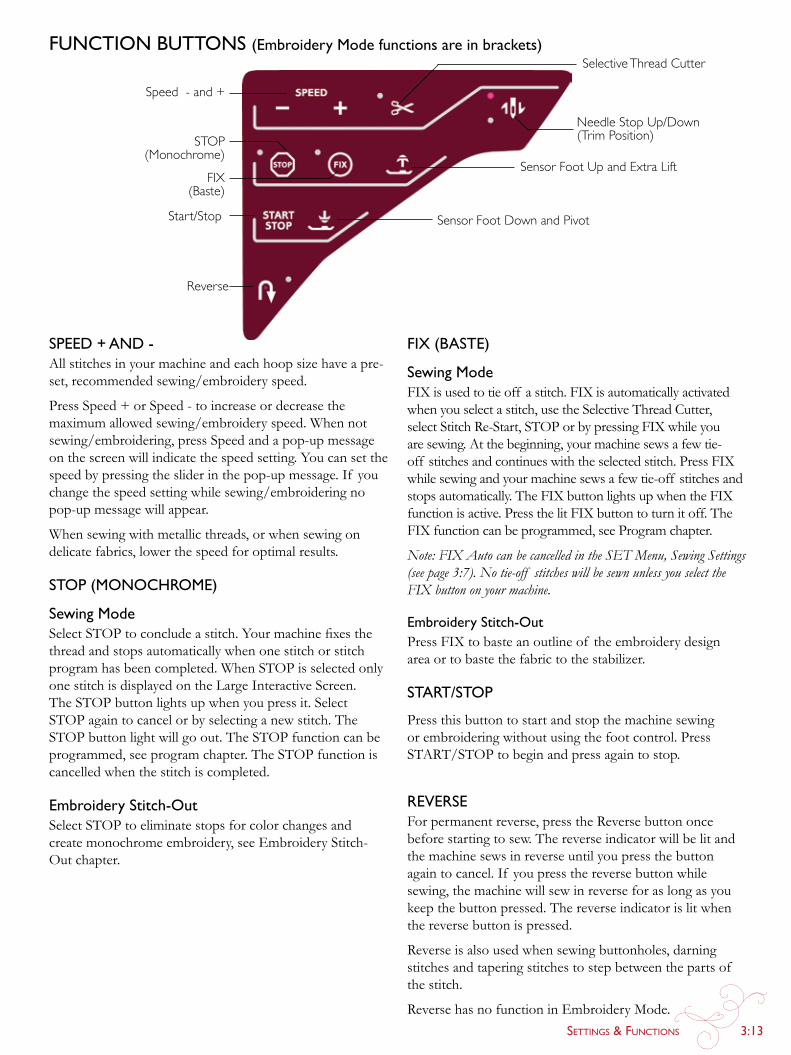
SettingS & FunctionS 3:13
Needle Stop Up/Down (Trim Position)
Speed - and +
STOP (Monochrome)
FIX (Baste)
Reverse
Start/Stop
Selective Thread Cutter
Sensor Foot Down and Pivot
Sensor Foot Up and Extra Lift
speed + and -Allstitchesinyourmachineandeachhoopsizehaveapre-set, recommended sewing/embroidery speed.
PressSpeed+orSpeed-toincreaseordecreasethemaximum allowed sewing/embroidery speed. When not sewing/embroidering,pressSpeedandapop-upmessageonthescreenwillindicatethespeedsetting.Youcansetthespeed by pressing the slider in the pop-up message. If you change the speed setting while sewing/embroidering no pop-up message will appear.
When sewing with metallic threads, or when sewing on delicate fabrics, lower the speed for optimal results.
sTop (MonoChroMe)
sewing ModeSelectSTOPtoconcludeastitch.Yourmachinefixesthethread and stops automatically when one stitch or stitch programhasbeencompleted.WhenSTOPisselectedonlyonestitchisdisplayedontheLargeInteractiveScreen.TheSTOPbuttonlightsupwhenyoupressit.SelectSTOPagaintocancelorbyselectinganewstitch.TheSTOPbuttonlightwillgoout.TheSTOPfunctioncanbeprogrammed,seeprogramchapter.TheSTOPfunctioniscancelled when the stitch is completed.
embroidery stitch-outSelectSTOPtoeliminatestopsforcolorchangesandcreatemonochromeembroidery,seeEmbroideryStitch-Outchapter.
fUnCTion bUTTons (embroidery Mode functions are in brackets)
fix (basTe)
sewing ModeFIXisusedtotieoff astitch.FIXisautomaticallyactivatedwhenyouselectastitch,usetheSelectiveThreadCutter,selectStitchRe-Start,STOPorbypressingFIXwhileyouaresewing.Atthebeginning,yourmachinesewsafewtie-off stitches and continues with the selected stitch. Press FIX while sewing and your machine sews a few tie-off stitches and stops automatically. The FIX button lights up when the FIX functionisactive.PressthelitFIXbuttontoturnitoff.TheFIX function can be programmed, see Program chapter.
Note: FIX Auto can be cancelled in the SET Menu, Sewing Settings (see page 3:7). No tie-off stitches will be sewn unless you select the FIX button on your machine.
embroidery stitch-outPress FIX to baste an outline of the embroidery design area or to baste the fabric to the stabilizer.
sTarT/sTopPress this button to start and stop the machine sewing or embroidering without using the foot control. Press START/STOPtobeginandpressagaintostop.
reverseForpermanentreverse,presstheReversebuttononcebeforestartingtosew.Thereverseindicatorwillbelitandthemachinesewsinreverseuntilyoupressthebuttonagaintocancel.If youpressthereversebuttonwhilesewing,themachinewillsewinreverseforaslongasyoukeepthebuttonpressed.Thereverseindicatorislitwhenthereversebuttonispressed.
Reverseisalsousedwhensewingbuttonholes,darningstitches and tapering stitches to step between the parts of the stitch.
ReversehasnofunctioninEmbroideryMode.
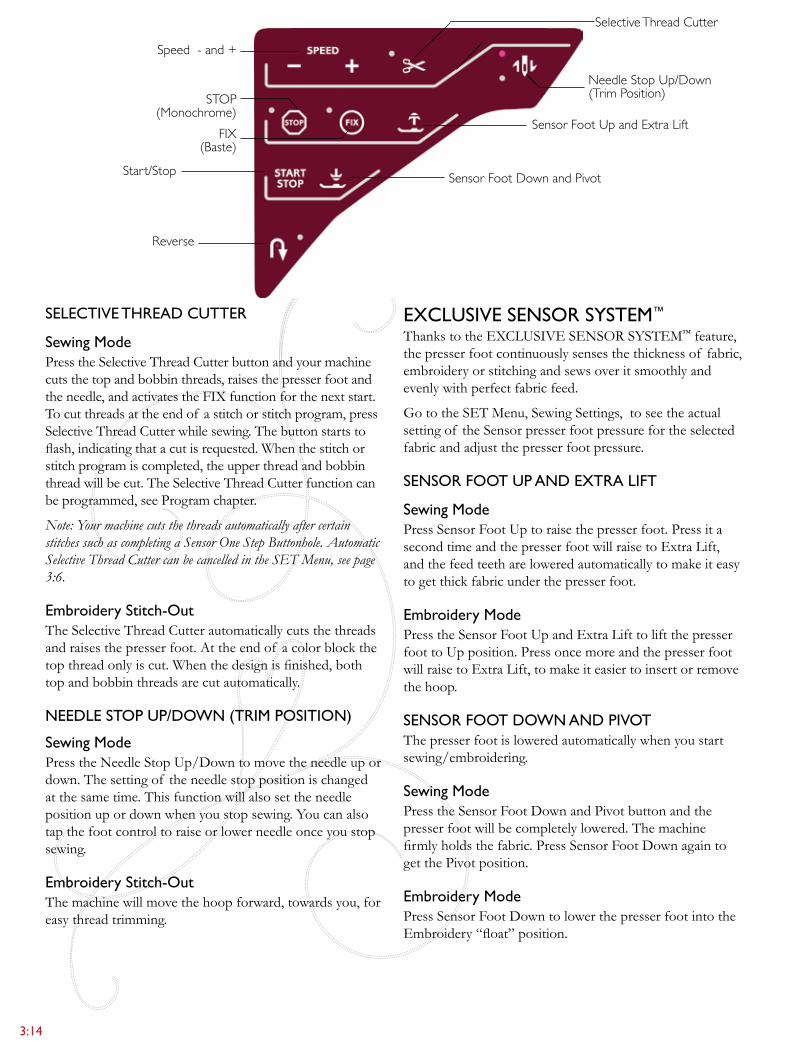
3:14
seleCTive Thread CUTTer
sewing ModePresstheSelectiveThreadCutterbuttonandyourmachinecuts the top and bobbin threads, raises the presser foot and theneedle,andactivatestheFIXfunctionforthenextstart.To cut threads at the end of a stitch or stitch program, press SelectiveThreadCutterwhilesewing.Thebuttonstartstoflash,indicatingthatacutisrequested.Whenthestitchorstitch program is completed, the upper thread and bobbin threadwillbecut.TheSelectiveThreadCutterfunctioncanbe programmed, see Program chapter.
Note: Your machine cuts the threads automatically after certain stitches such as completing a Sensor One Step Buttonhole. Automatic Selective Thread Cutter can be cancelled in the SET Menu, see page 3:6.
embroidery stitch-outTheSelectiveThreadCutterautomaticallycutsthethreadsandraisesthepresserfoot.Attheendof acolorblockthetopthreadonlyiscut.Whenthedesignisfinished,bothtop and bobbin threads are cut automatically.
needle sTop Up/down (TriM posiTion)sewing ModePresstheNeedleStopUp/Downtomovetheneedleupordown. The setting of the needle stop position is changed at the same time. This function will also set the needle positionupordownwhenyoustopsewing.Youcanalsotap the foot control to raise or lower needle once you stop sewing.
embroidery stitch-outThemachinewillmovethehoopforward,towardsyou,foreasy thread trimming.
Needle Stop Up/Down (Trim Position)
Speed - and +
STOP (Monochrome)
FIX (Baste)
Reverse
Start/Stop
Selective Thread Cutter
Sensor Foot Down and Pivot
Sensor Foot Up and Extra Lift
exClUsive sensor sysTeM™
ThankstotheEXCLUSIVESENSORSYSTEM™ feature, the presser foot continuously senses the thickness of fabric, embroideryorstitchingandsewsoveritsmoothlyandevenlywithperfectfabricfeed.
gototheSETMenu,SewingSettings,toseetheactualsettingof theSensorpresserfootpressurefortheselectedfabric and adjust the presser foot pressure.
sensor fooT Up and exTra lifT
sewing ModePressSensorFootUptoraisethepresserfoot.Pressitasecond time and the presser foot will raise to Extra Lift, and the feed teeth are lowered automatically to make it easy to get thick fabric under the presser foot.
embroidery ModePresstheSensorFootUpandExtraLifttoliftthepresserfoot to Up position. Press once more and the presser foot willraisetoExtraLift,tomakeiteasiertoinsertorremovethe hoop.
sensor fooT down and pivoTThe presser foot is lowered automatically when you start sewing/embroidering.
sewing ModePresstheSensorFootDownandPivotbuttonandthepresser foot will be completely lowered. The machine firmlyholdsthefabric.PressSensorFootDownagaintogetthePivotposition.
embroidery ModePressSensorFootDowntolowerthepresserfootintotheEmbroidery“float”position.
4 sewing
4:2
Free Motion Technique
Start Menu Quick Help
Sewing/Embroidery Mode
Sewing Techniques
Save to My Stitches
Program
Fabric
Stitch Menu Name
Stabilizer Recommendation
Needle Recommendation
Presser foot recommendation
Mirror End-to-End
Thread Portioning/Thread Tension
Mirror Side-to-Side
Stitch Width
Stitch Length
Extended SEWING ADVISOR™
Stitch Selection Area
Scroll Through Menus
ALT icon
Stitch Start
Stitch Selected
Exclusive SEWING ADVISOR™
Stitch Re-Start
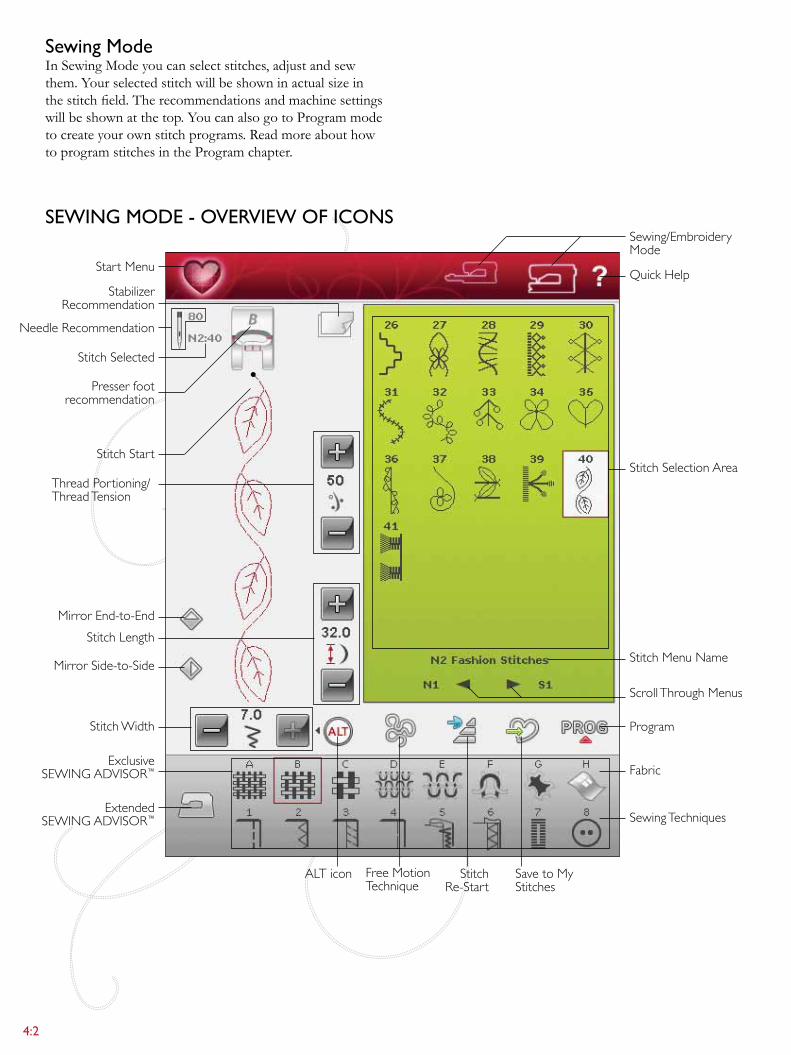
sewing ModeInSewingModeyoucanselectstitches,adjustandsewthem.Yourselectedstitchwillbeshowninactualsizeinthestitchfield.Therecommendationsandmachinesettingswillbeshownatthetop.YoucanalsogotoProgrammodeto create your own stitch programs. Read more about how to program stitches in the Program chapter.
sewing Mode - overview of iCons

Sewing 4:3
exClUsive sewing advisor™
Your new sewing machine has the HUSQVARNA VIKING® Exclusive SEWING ADVISOR™ feature. It is always active and is located at the bottom of the Large Interactive Screen. When beginning a sewing project, touch your fabric type and weight, then touch the technique you desire.
TheExclusiveSEWINgADVISOR™ feature sets the best stitch, stitch length, stitch width, sewing speed, thread tension and sensor foot pressure for your project. The stitch is displayed on screen with presser foot and needle recommendations.
There is also an ExtendedSEWINgADVISOR™ feature with text. Touch the sewing machine icon to open the ExtendedSEWINgADVISOR™ feature.
fabriC seleCTion
woven or knitThedifferencebetweenwovenandknitfabricisthewaythethreadsareputtogether.Wovenfabricsaremadeof two thread systems, warp lengthwise and weft crosswise, thatintersectatrightangles.Aknitfabricismadeof onethreadsystemwithinterlacedstitches.Aknitfabricusuallyhas stretch.
Asageneralrule,enterWovenforstablefabricsthathavenostretchandStretchforfabricsthathavestretch.
suggested fabricsA woven light: chiffon, organza, batiste, silk, wool challis, etc.
B woven medium:calico,quiltingfabrics,woolcrepe,broadcloth, etc.
C woven heAvy: denim,woolsuitingandcoating,canvas,terrycloth, etc.
d stretCh light: charmeuse, nylon, tricot, single knit jerseys, etc.
e stretCh medium:doubleknit,velour,swimwear,etc.
F stretCh heAvy:sweaterknits,fleece,etc.
leather and vinylLeatherisanimalskinwiththecoat(fur)removed.Leathercanbesmoothorsuededandhassomegive.
g leAther: for suede and leather.
Vinylisasyntheticmaterialwhichoftenhasawovenwrongside.Vinylcanbesmoothorpatternedandsomevinylshavestretch.
h vinyl: forvinylandsyntheticleatherandsuede.
Knit fabricWoven fabric
Leather Vinyl
4:4
Stitch Menu
Submenu
File Manager
Save to “My Stitches”
Start Menu
Menu U
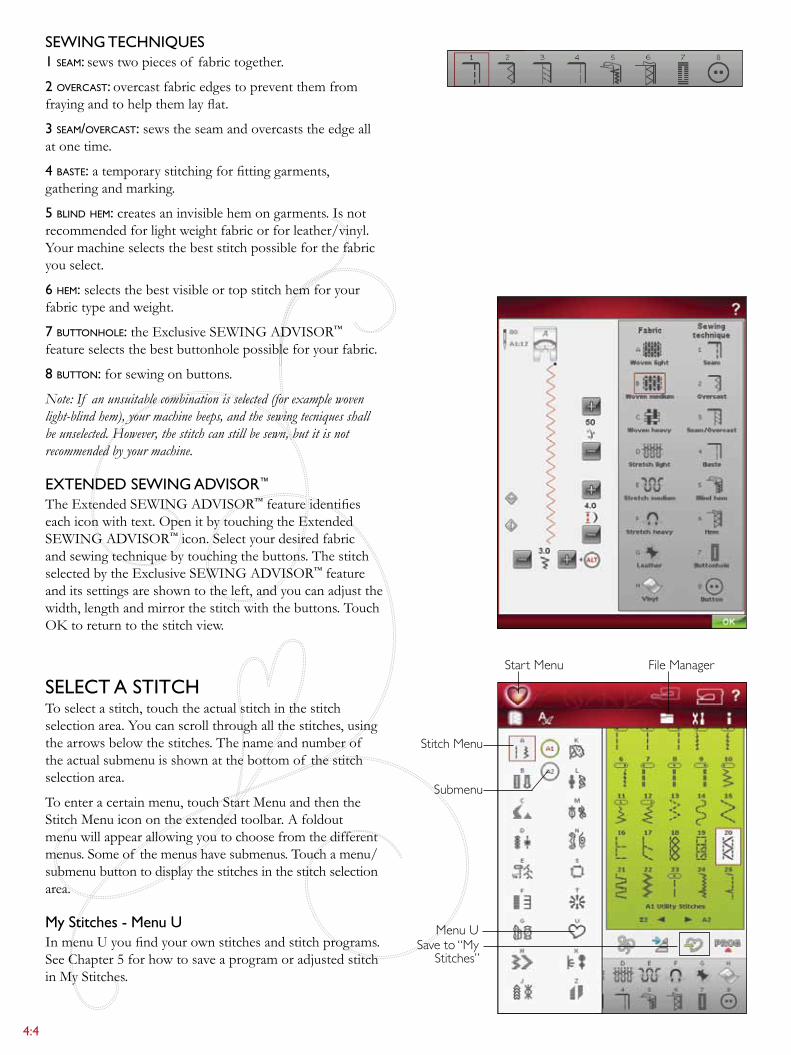
sewing TeChniQUes1 seAm: sews two pieces of fabric together.
2 overCAst: overcastfabricedgestopreventthemfromfrayingandtohelpthemlayflat.
3 seAm/overCAst:sewstheseamandovercaststheedgeallat one time.
4 BAste:atemporarystitchingforfittinggarments,gathering and marking.
5 Blind hem:createsaninvisiblehemongarments.Isnotrecommendedforlightweightfabricorforleather/vinyl.Yourmachineselectsthebeststitchpossibleforthefabricyou select.
6 hem:selectsthebestvisibleortopstitchhemforyourfabric type and weight.
7 Buttonhole:theExclusiveSEWINgADVISOR™ feature selects the best buttonhole possible for your fabric.
8 Button: for sewing on buttons.
Note: If an unsuitable combination is selected (for example woven light-blind hem), your machine beeps, and the sewing tecniques shall be unselected. However, the stitch can still be sewn, but it is not recommended by your machine.
exTended sewing advisor™
TheExtendedSEWINgADVISOR™featureidentifieseachiconwithtext.OpenitbytouchingtheExtendedSEWINgADVISOR™icon.Selectyourdesiredfabricandsewingtechniquebytouchingthebuttons.ThestitchselectedbytheExclusiveSEWINgADVISOR™ feature and its settings are shown to the left, and you can adjust the width, length and mirror the stitch with the buttons. Touch OKtoreturntothestitchview.
seleCT a sTiTChTo select a stitch, touch the actual stitch in the stitch selectionarea.Youcanscrollthroughallthestitches,usingthe arrows below the stitches. The name and number of the actual submenu is shown at the bottom of the stitch selection area.
To enter a certain menu, touch StartMenuandthentheStitchMenuiconontheextendedtoolbar.Afoldoutmenu will appear allowing you to choose from the different menus.Someof themenushavesubmenus.Touchamenu/submenu button to display the stitches in the stitch selection area.
My stitches - Menu UInmenuUyoufindyourownstitchesandstitchprograms.SeeChapter5forhowtosaveaprogramoradjustedstitchinMyStitches.
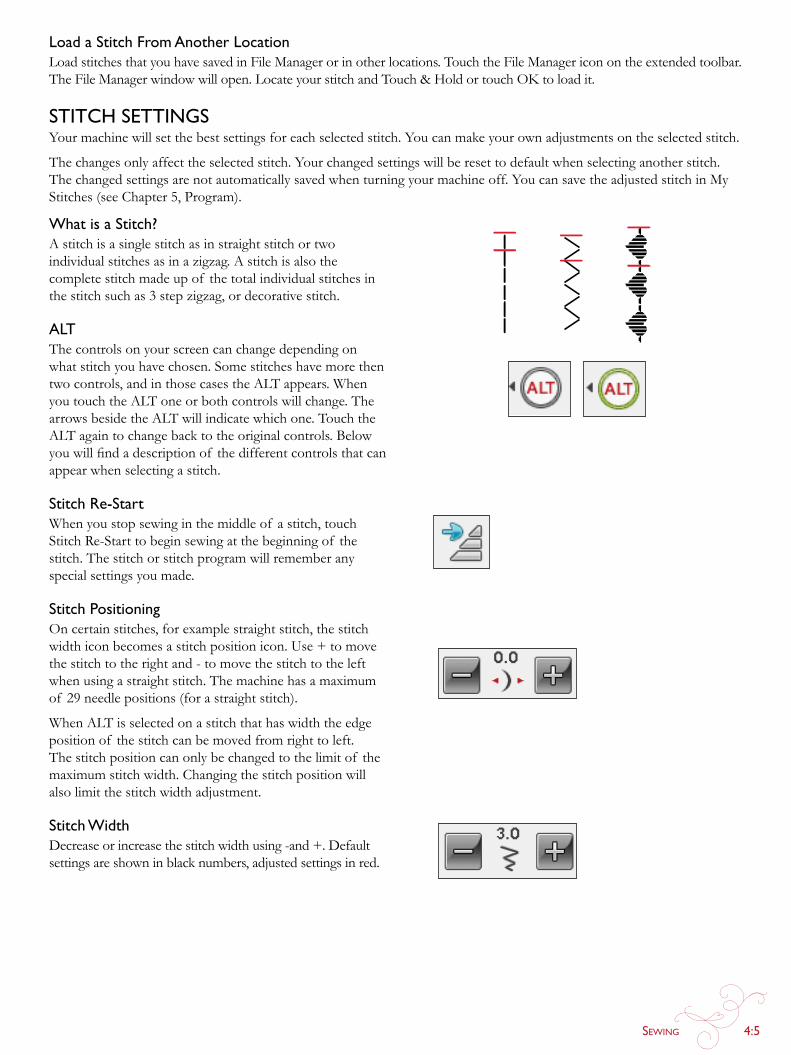
Sewing 4:5
what is a stitch?Astitchisasinglestitchasinstraightstitchortwoindividualstitchesasinazigzag.Astitchisalsothecompletestitchmadeupof thetotalindividualstitchesinthestitchsuchas3stepzigzag,ordecorativestitch.
alTThe controls on your screen can change depending on whatstitchyouhavechosen.Somestitcheshavemorethentwocontrols,andinthosecasestheALTappears.WhenyoutouchtheALToneorbothcontrolswillchange.ThearrowsbesidetheALTwillindicatewhichone.TouchtheALTagaintochangebacktotheoriginalcontrols.Belowyouwillfindadescriptionof thedifferentcontrolsthatcanappear when selecting a stitch.
stitch re-startWhen you stop sewing in the middle of a stitch, touch StitchRe-Starttobeginsewingatthebeginningof thestitch. The stitch or stitch program will remember any special settings you made.
stitch positioningOncertainstitches,forexamplestraightstitch,thestitchwidthiconbecomesastitchpositionicon.Use+tomovethestitchtotherightand-tomovethestitchtotheleftwhen using a straight stitch. The machine has a maximum of 29 needlepositions(forastraightstitch).
When ALTisselectedonastitchthathaswidththeedgepositionof thestitchcanbemovedfromrighttoleft.The stitch position can only be changed to the limit of the maximum stitch width. Changing the stitch position will also limit the stitch width adjustment.
stitch widthDecreaseorincreasethestitchwidthusing-and+.Defaultsettings are shown in black numbers, adjusted settings in red.
load a stitch from another locationLoadstitchesthatyouhavesavedinFile Manager or in other locations. Touch the File Manager icon on the extended toolbar. TheFileManagerwindowwillopen.LocateyourstitchandTouch&HoldortouchOKtoloadit.
sTiTCh seTTingsYourmachinewillsetthebestsettingsforeachselectedstitch.Youcanmakeyourownadjustmentsontheselectedstitch.
Thechangesonlyaffecttheselectedstitch.Yourchangedsettingswillberesettodefaultwhenselectinganotherstitch.Thechangedsettingsarenotautomaticallysavedwhenturningyourmachineoff.YoucansavetheadjustedstitchinMy Stitches(seeChapter5,Program).
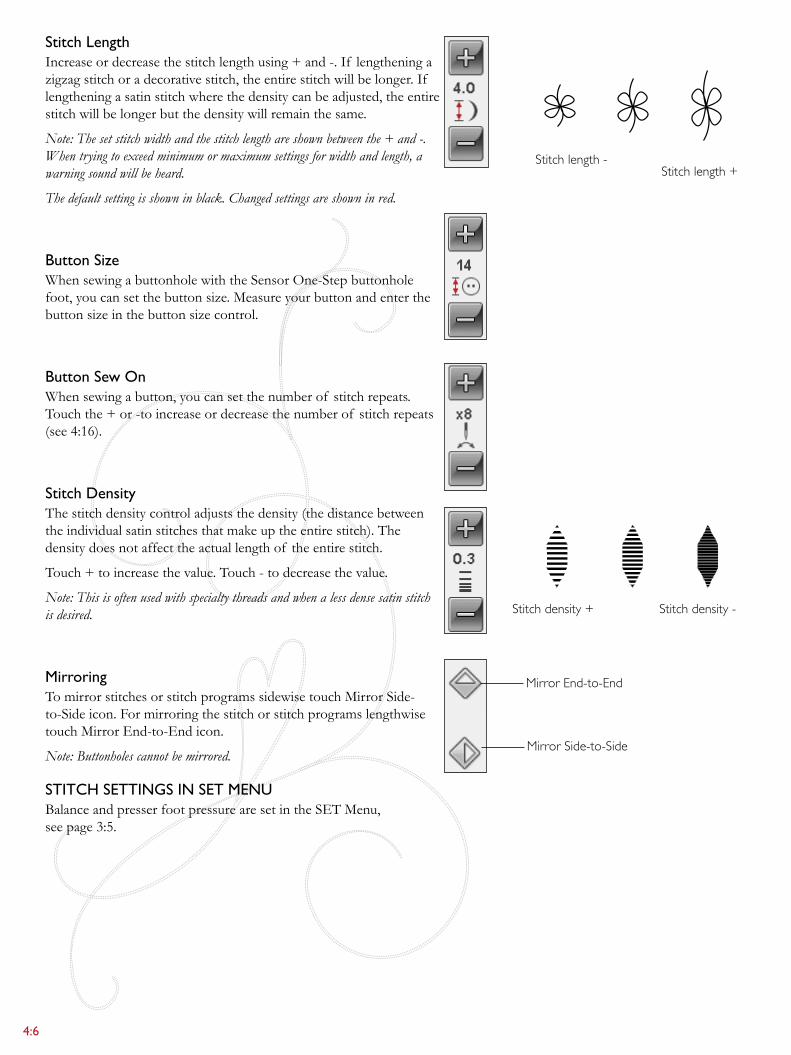
4:6
Stitch length +Stitch length -
Stitch density -Stitch density +
Mirror End-to-End
Mirror Side-to-Side
stitch lengthIncreaseordecreasethestitchlengthusing+and-.If lengtheningazigzagstitchoradecorativestitch,theentirestitchwillbelonger.If lengthening a satin stitch where the density can be adjusted, the entire stitch will be longer but the density will remain the same.
Note: The set stitch width and the stitch length are shown between the + and -. When trying to exceed minimum or maximum settings for width and length, a warning sound will be heard.
The default setting is shown in black. Changed settings are shown in red.
button sizeWhen sewing a buttonhole with the SensorOne-Stepbuttonholefoot, you can set the button size. Measure your button and enter the button size in the button size control.
button sew onWhen sewing a button, you can set the number of stitch repeats. Touchthe+or-toincreaseordecreasethenumberof stitchrepeats(see4:16).
stitch densityThestitchdensitycontroladjuststhedensity(thedistancebetweentheindividualsatinstitchesthatmakeuptheentirestitch).Thedensity does not affect the actual length of the entire stitch.
Touch+toincreasethevalue.Touch-todecreasethevalue.
Note: This is often used with specialty threads and when a less dense satin stitch is desired.
Mirroring TomirrorstitchesorstitchprogramssidewisetouchMirrorSide-to-Sideicon.Formirroringthestitchorstitchprogramslengthwisetouch Mirror End-to-End icon.
Note: Buttonholes cannot be mirrored.
sTiTCh seTTings in seT MenUBalanceandpresserfootpressurearesetintheSETMenu, see page 3:5.
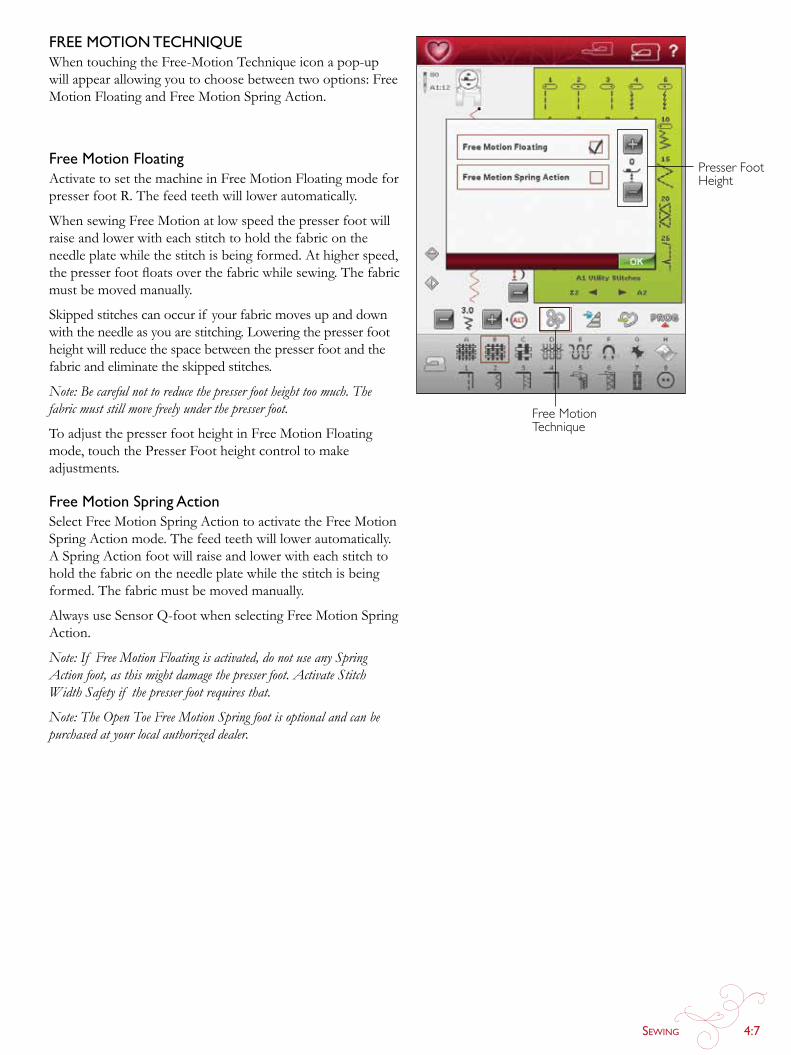
Sewing 4:7
Free Motion Technique
Presser Foot Height
free MoTion TeChniQUeWhentouchingtheFree-MotionTechniqueiconapop-upwill appear allowing you to choose between two options: Free MotionFloatingandFreeMotionSpringAction.
free Motion floatingActivatetosetthemachineinFreeMotionFloatingmodeforpresser foot R. The feed teeth will lower automatically.
When sewing Free Motion at low speed the presser foot will raise and lower with each stitch to hold the fabric on the needleplatewhilethestitchisbeingformed.Athigherspeed,thepresserfootfloatsoverthefabricwhilesewing.Thefabricmustbemovedmanually.
Skippedstitchescanoccurif yourfabricmovesupanddownwith the needle as you are stitching. Lowering the presser foot height will reduce the space between the presser foot and the fabric and eliminate the skipped stitches.
Note: Be careful not to reduce the presser foot height too much. The fabric must still move freely under the presser foot.
To adjust the presser foot height in Free Motion Floating mode, touch the Presser Foot height control to make adjustments.
free Motion spring actionSelectFreeMotionSpringActiontoactivatetheFreeMotionSpringActionmode.Thefeedteethwilllowerautomatically.ASpringActionfootwillraiseandlowerwitheachstitchtohold the fabric on the needle plate while the stitch is being formed.Thefabricmustbemovedmanually.
AlwaysuseSensorQ-footwhenselectingFreeMotionSpringAction.
Note: If Free Motion Floating is activated, do not use any Spring Action foot, as this might damage the presser foot. Activate Stitch Width Safety if the presser foot requires that.
Note: The Open Toe Free Motion Spring foot is optional and can be purchased at your local authorized dealer.
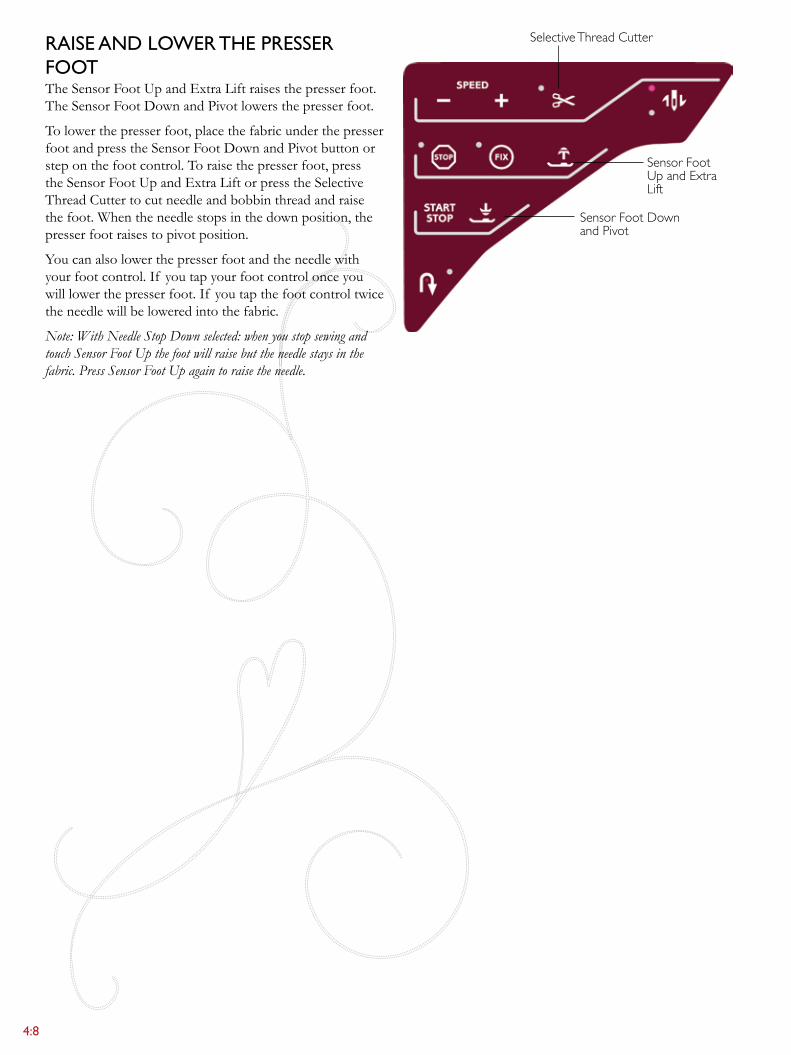
4:8
Sensor Foot Up and Extra Lift
Sensor Foot Down and Pivot
Selective Thread Cutterraise and lower The presser fooTTheSensorFootUpandExtraLiftraisesthepresserfoot.TheSensorFootDownandPivotlowersthepresserfoot.
To lower the presser foot, place the fabric under the presser footandpresstheSensorFootDownandPivotbuttonorstep on the foot control. To raise the presser foot, press theSensorFootUpandExtraLiftorpresstheSelectiveThread Cutter to cut needle and bobbin thread and raise the foot. When the needle stops in the down position, the presserfootraisestopivotposition.
Youcanalsolowerthepresserfootandtheneedlewithyour foot control. If you tap your foot control once you will lower the presser foot. If you tap the foot control twice the needle will be lowered into the fabric.
Note: With Needle Stop Down selected: when you stop sewing and touch Sensor Foot Up the foot will raise but the needle stays in the fabric. Press Sensor Foot Up again to raise the needle.
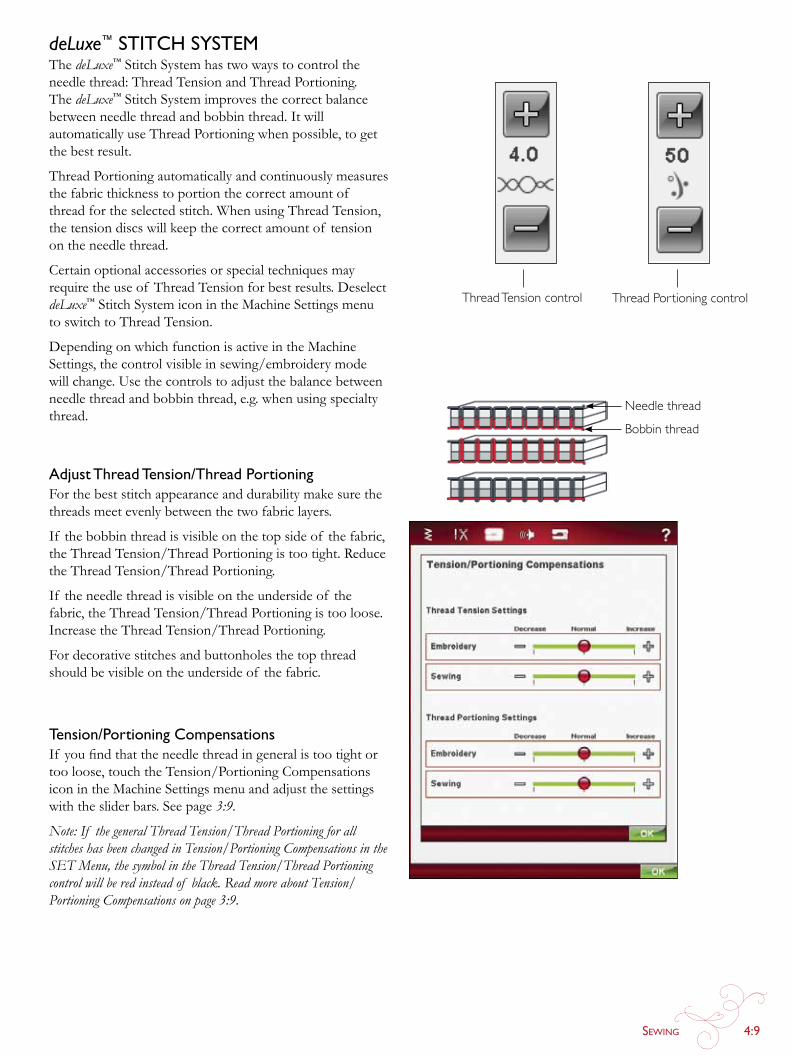
Sewing 4:9
deLuxe™ sTiTCh sysTeMThe deLuxe™StitchSystemhastwowaystocontroltheneedle thread: Thread Tension and Thread Portioning. The deLuxe™StitchSystemimprovesthecorrectbalancebetween needle thread and bobbin thread. It will automatically use Thread Portioning when possible, to get the best result.
Thread Portioning automatically and continuously measures the fabric thickness to portion the correct amount of thread for the selected stitch. When using Thread Tension, the tension discs will keep the correct amount of tension on the needle thread.
Certainoptionalaccessoriesorspecialtechniquesmayrequiretheuseof ThreadTensionforbestresults.DeselectdeLuxe™StitchSystemiconintheMachineSettingsmenuto switch to Thread Tension.
DependingonwhichfunctionisactiveintheMachineSettings,thecontrolvisibleinsewing/embroiderymodewill change. Use the controls to adjust the balance between needle thread and bobbin thread, e.g. when using specialty thread.
adjust Thread Tension/Thread portioningFor the best stitch appearance and durability make sure the threadsmeetevenlybetweenthetwofabriclayers.
If thebobbinthreadisvisibleonthetopsideof thefabric,the Thread Tension/Thread Portioning is too tight. Reduce the Thread Tension/Thread Portioning.
If theneedlethreadisvisibleontheundersideof thefabric, the Thread Tension/Thread Portioning is too loose. Increase the Thread Tension/Thread Portioning.
Fordecorativestitchesandbuttonholesthetopthreadshouldbevisibleontheundersideof thefabric.
Tension/portioning CompensationsIf youfindthattheneedlethreadingeneralistootightortoo loose, touch the Tension/Portioning Compensations iconintheMachineSettingsmenuandadjustthesettingswiththesliderbars.Seepage3:9.
Note: If the general Thread Tension/Thread Portioning for all stitches has been changed in Tension/Portioning Compensations in the SET Menu, the symbol in the Thread Tension/Thread Portioning control will be red instead of black. Read more about Tension/Portioning Compensations on page 3:9.
Needle thread
Bobbin thread
Thread Tension control Thread Portioning control
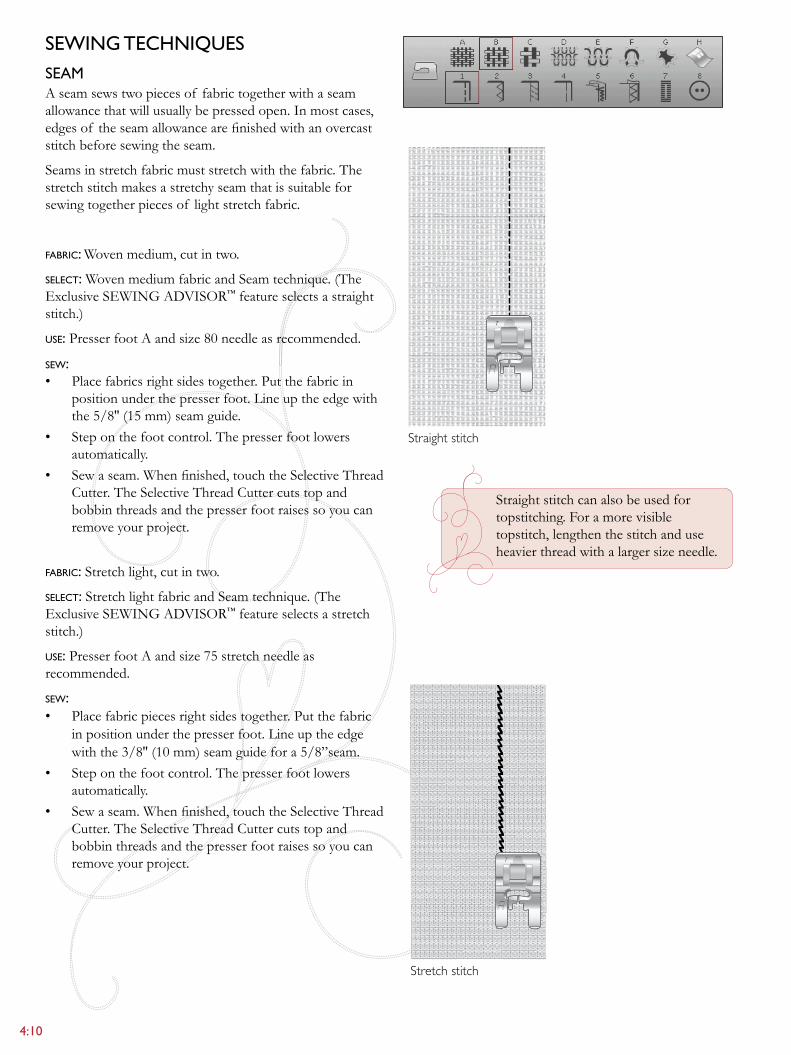
4:10
7
7
sewing TeChniQUesseaMAseamsewstwopiecesof fabrictogetherwithaseamallowance that will usually be pressed open. In most cases, edgesof theseamallowancearefinishedwithanovercaststitch before sewing the seam.
Seamsinstretchfabricmuststretchwiththefabric.Thestretch stitch makes a stretchy seam that is suitable for sewing together pieces of light stretch fabric.
FABriC: Wovenmedium,cutintwo.
seleCt: WovenmediumfabricandSeamtechnique.(TheExclusiveSEWINgADVISOR™ feature selects a straight stitch.)
use: PresserfootAandsize80needleasrecommended.
sew:• Placefabricsrightsidestogether.Putthefabricin
position under the presser foot. Line up the edge with the5/8''(15mm)seamguide.
• Steponthefootcontrol.Thepresserfootlowersautomatically.
• Sewaseam.Whenfinished,touchtheSelectiveThreadCutter.TheSelectiveThreadCuttercutstopandbobbin threads and the presser foot raises so you can removeyourproject.
FABriC: Stretchlight,cutintwo.
seleCt:StretchlightfabricandSeamtechnique.(TheExclusiveSEWINgADVISOR™ feature selects a stretch stitch.)
use:PresserfootAandsize75stretchneedleasrecommended.
sew:• Placefabricpiecesrightsidestogether.Putthefabric
in position under the presser foot. Line up the edge withthe3/8''(10mm)seamguidefora5/8”seam.
• Steponthefootcontrol.Thepresserfootlowersautomatically.
• Sewaseam.Whenfinished,touchtheSelectiveThreadCutter.TheSelectiveThreadCuttercutstopandbobbin threads and the presser foot raises so you can removeyourproject.
Straight stitch
Stretch stitch
Straightstitchcanalsobeusedfortopstitching.Foramorevisibletopstitch, lengthen the stitch and use heavierthreadwithalargersizeneedle.
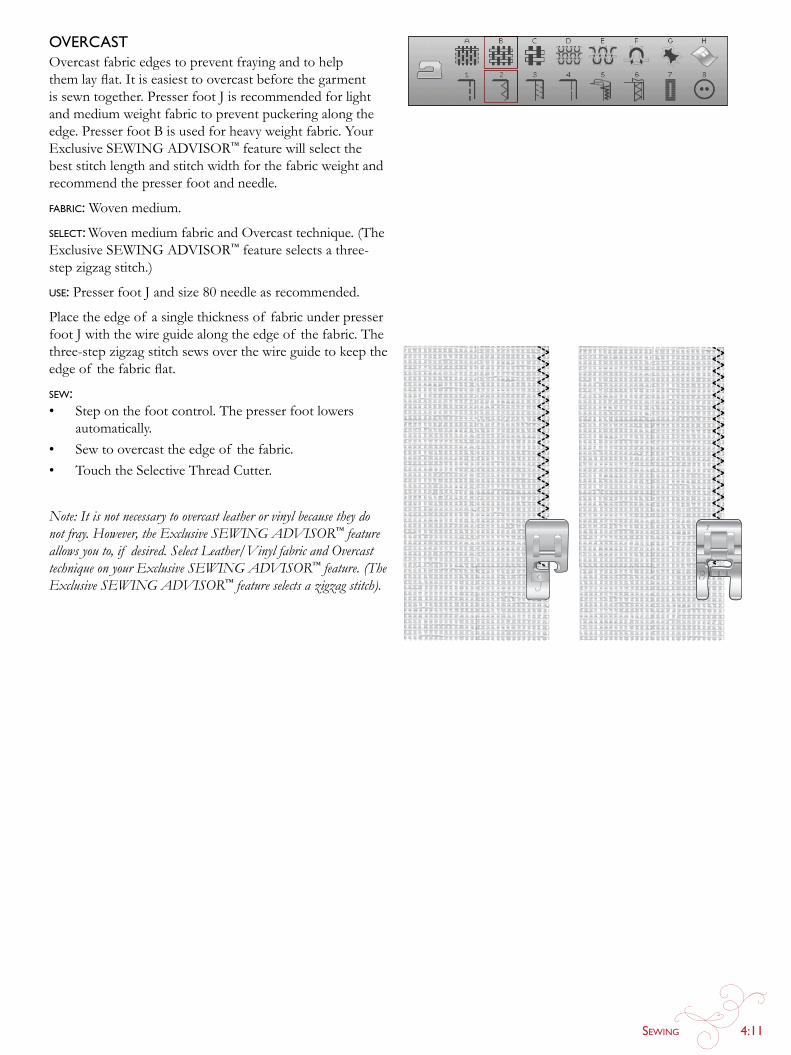
Sewing 4:11
7
overCasTOvercastfabricedgestopreventfrayingandtohelpthemlayflat.Itiseasiesttoovercastbeforethegarmentis sewn together. Presser foot J is recommended for light andmediumweightfabrictopreventpuckeringalongtheedge.PresserfootBisusedforheavyweightfabric.YourExclusiveSEWINgADVISOR™ feature will select the best stitch length and stitch width for the fabric weight and recommend the presser foot and needle.
FABriC:Wovenmedium.
seleCt: WovenmediumfabricandOvercasttechnique.(TheExclusiveSEWINgADVISOR™ feature selects a three-stepzigzagstitch.)
use: Presser foot J and size 80 needle as recommended.
Place the edge of a single thickness of fabric under presser foot J with the wire guide along the edge of the fabric. The three-stepzigzagstitchsewsoverthewireguidetokeeptheedgeof thefabricflat.
sew: • Steponthefootcontrol.Thepresserfootlowers
automatically.• Sewtoovercasttheedgeof thefabric.• TouchtheSelectiveThreadCutter.
Note: It is not necessary to overcast leather or vinyl because they do not fray. However, the Exclusive SEWING ADVISOR™ feature allows you to, if desired. Select Leather/Vinyl fabric and Overcast technique on your Exclusive SEWING ADVISOR™ feature. (The Exclusive SEWING ADVISOR™ feature selects a zigzag stitch).
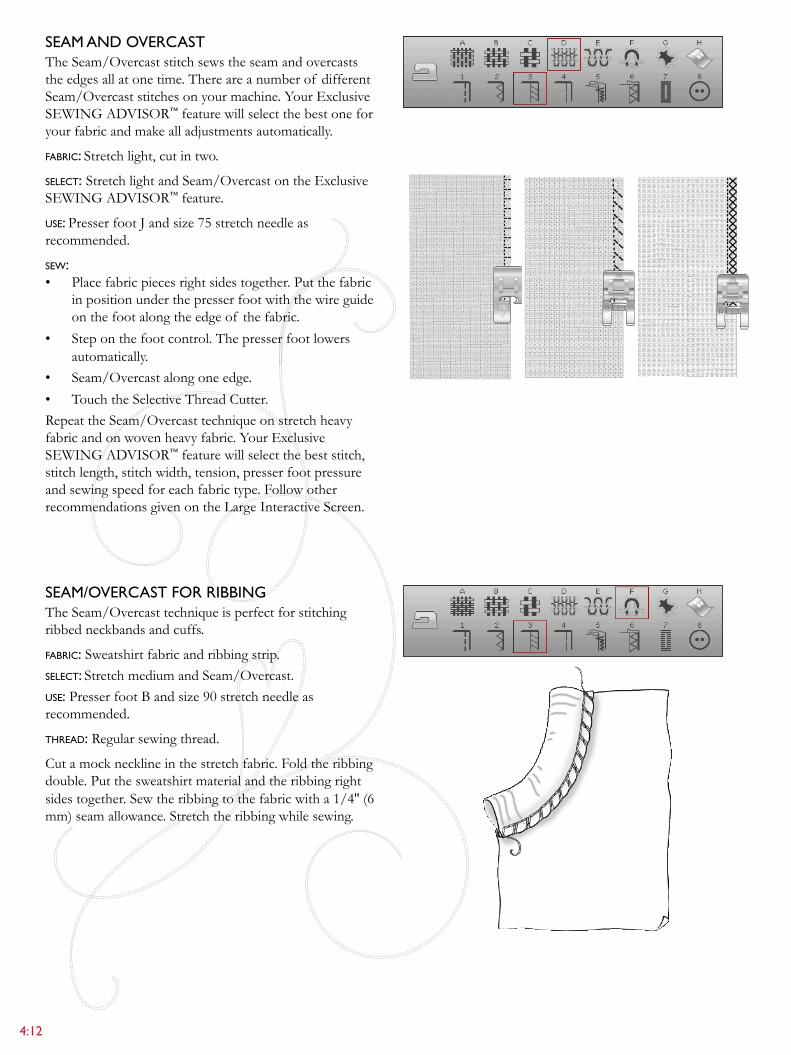
4:12
seaM/overCasT for ribbingTheSeam/Overcasttechniqueisperfectforstitchingribbed neckbands and cuffs.
FABriC:Sweatshirtfabricandribbingstrip.seleCt: StretchmediumandSeam/Overcast.use:PresserfootBandsize90stretchneedleasrecommended.
threAd: Regular sewing thread.
Cut a mock neckline in the stretch fabric. Fold the ribbing double. Put the sweatshirt material and the ribbing right sidestogether.Sewtheribbingtothefabricwitha1/4''(6mm)seamallowance.Stretchtheribbingwhilesewing.
seaM and overCasTTheSeam/Overcaststitchsewstheseamandovercaststhe edges all at one time. There are a number of different Seam/Overcaststitchesonyourmachine.YourExclusiveSEWINgADVISOR™ feature will select the best one for your fabric and make all adjustments automatically.
FABriC: Stretchlight,cutintwo.
seleCt: StretchlightandSeam/OvercastontheExclusiveSEWINgADVISOR™ feature.
use: Presser foot J and size 75 stretch needle as recommended.
sew: • Placefabricpiecesrightsidestogether.Putthefabric
in position under the presser foot with the wire guide on the foot along the edge of the fabric.
• Steponthefootcontrol.Thepresserfootlowersautomatically.
• Seam/Overcastalongoneedge.• TouchtheSelectiveThreadCutter.RepeattheSeam/Overcasttechniqueonstretchheavyfabricandonwovenheavyfabric.YourExclusiveSEWINgADVISOR™ feature will select the best stitch, stitch length, stitch width, tension, presser foot pressure and sewing speed for each fabric type. Follow other recommendationsgivenontheLargeInteractiveScreen.
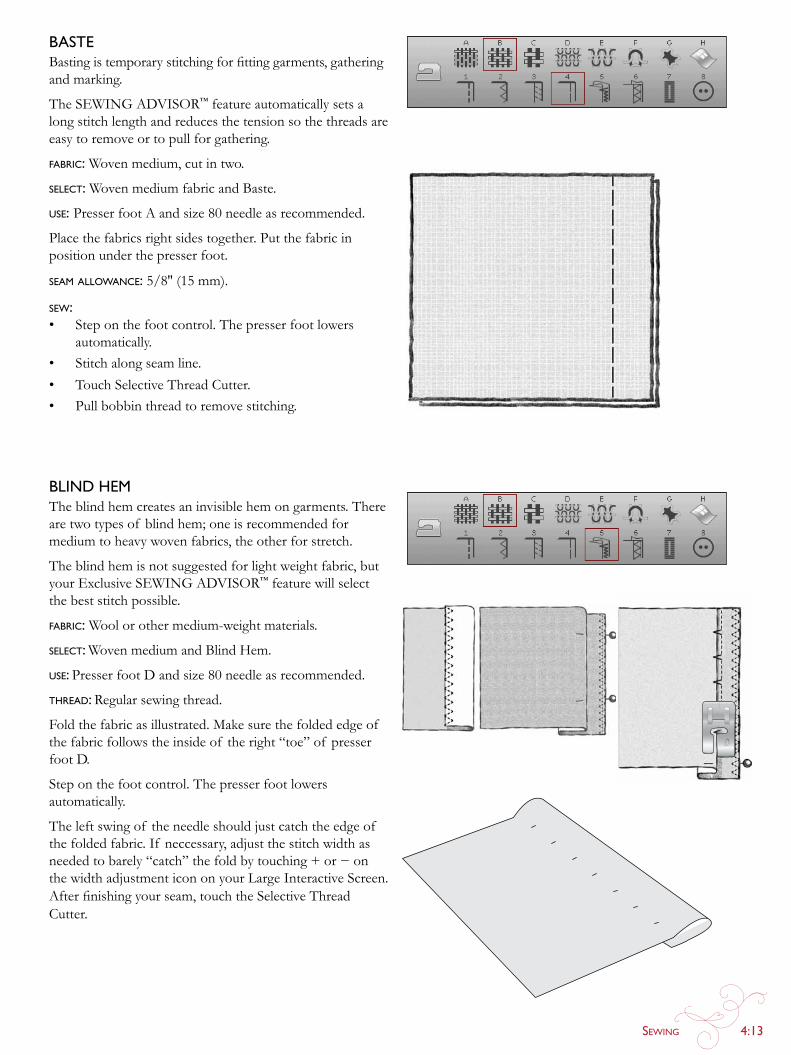
Sewing 4:13
blind heMTheblindhemcreatesaninvisiblehemongarments.Therearetwotypesof blindhem;oneisrecommendedformediumtoheavywovenfabrics,theotherforstretch.
The blind hem is not suggested for light weight fabric, but yourExclusiveSEWINgADVISOR™ feature will select the best stitch possible.
FABriC: Wool or other medium-weight materials.
seleCt: WovenmediumandBlindHem.
use: PresserfootDandsize80needleasrecommended.
threAd: Regular sewing thread.
Fold the fabric as illustrated. Make sure the folded edge of thefabricfollowstheinsideof theright“toe”of presserfootD.
Steponthefootcontrol.Thepresserfootlowersautomatically.
The left swing of the needle should just catch the edge of the folded fabric. If neccessary, adjust the stitch width as neededtobarely“catch”thefoldbytouching+or−onthewidthadjustmenticononyourLargeInteractiveScreen.Afterfinishingyourseam,touchtheSelectiveThreadCutter.
basTe Bastingistemporarystitchingforfittinggarments,gatheringand marking.
TheSEWINgADVISOR™ feature automatically sets a long stitch length and reduces the tension so the threads are easytoremoveortopullforgathering.
FABriC: Wovenmedium,cutintwo.
seleCt: WovenmediumfabricandBaste.
use: PresserfootAandsize80needleasrecommended.
Place the fabrics right sides together. Put the fabric in position under the presser foot.
seAm AllowAnCe: 5/8''(15mm).
sew:• Steponthefootcontrol.Thepresserfootlowers
automatically.• Stitchalongseamline.• TouchSelectiveThreadCutter.• Pullbobbinthreadtoremovestitching.
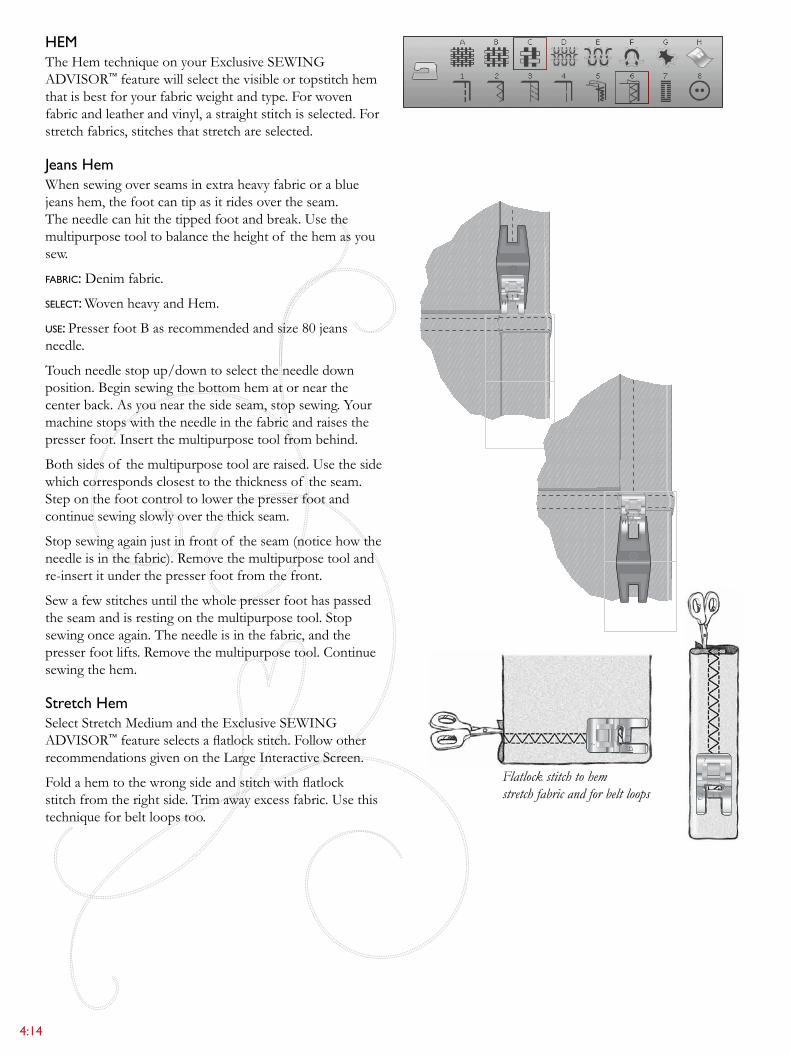
4:14
7
7
Flatlock stitch to hem stretch fabric and for belt loops
heMTheHemtechniqueonyourExclusiveSEWINgADVISOR™featurewillselectthevisibleortopstitchhemthatisbestforyourfabricweightandtype.Forwovenfabricandleatherandvinyl,astraightstitchisselected.Forstretch fabrics, stitches that stretch are selected.
Jeans hemWhensewingoverseamsinextraheavyfabricorabluejeanshem,thefootcantipasitridesovertheseam.The needle can hit the tipped foot and break. Use the multipurpose tool to balance the height of the hem as you sew.
FABriC:Denimfabric.
seleCt: WovenheavyandHem.
use: PresserfootBasrecommendedandsize80jeansneedle.
Touch needle stop up/down to select the needle down position.Beginsewingthebottomhematornearthecenterback.Asyounearthesideseam,stopsewing.Yourmachine stops with the needle in the fabric and raises the presser foot. Insert the multipurpose tool from behind.
Bothsidesof themultipurposetoolareraised.Usethesidewhich corresponds closest to the thickness of the seam. Steponthefootcontroltolowerthepresserfootandcontinuesewingslowlyoverthethickseam.
Stopsewingagainjustinfrontof theseam(noticehowtheneedleisinthefabric).Removethemultipurposetoolandre-insert it under the presser foot from the front.
Sewafewstitchesuntilthewholepresserfoothaspassedtheseamandisrestingonthemultipurposetool.Stopsewing once again. The needle is in the fabric, and the presserfootlifts.Removethemultipurposetool.Continuesewing the hem.
stretch hemSelectStretchMediumandtheExclusiveSEWINgADVISOR™featureselectsaflatlockstitch.FollowotherrecommendationsgivenontheLargeInteractiveScreen.
Foldahemtothewrongsideandstitchwithflatlockstitch from the right side. Trim away excess fabric. Use this techniqueforbeltloopstoo.
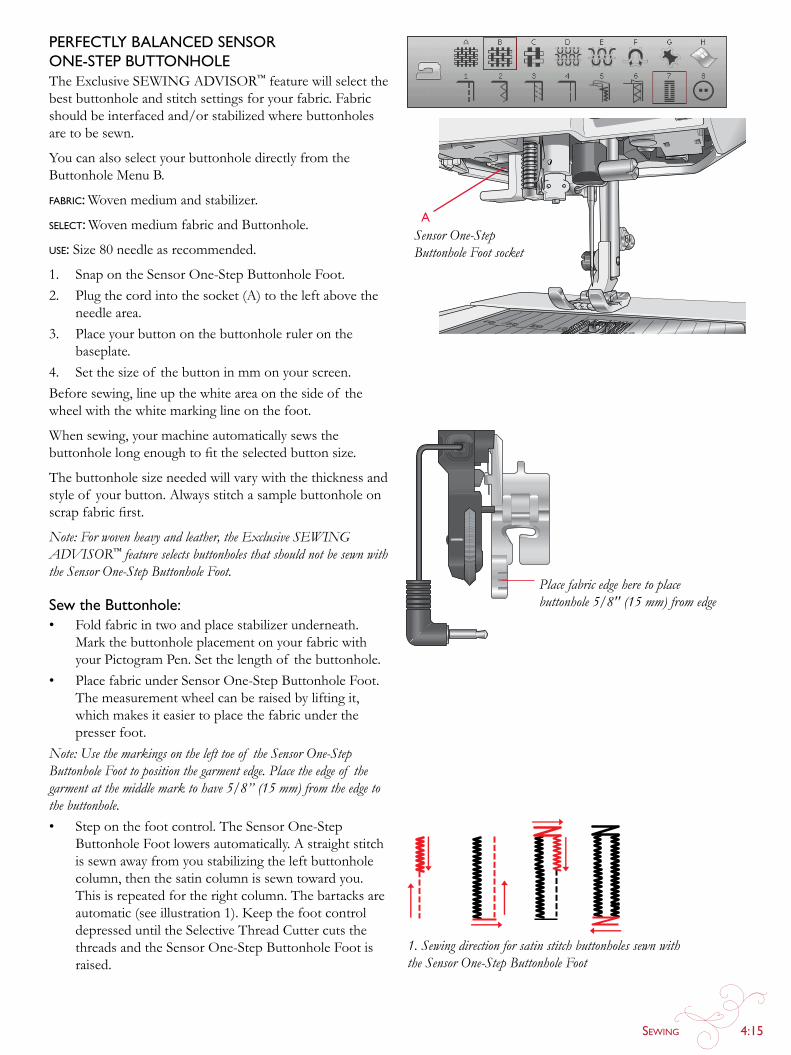
Sewing 4:15
perfeCTly balanCed sensor one-sTep bUTTonholeTheExclusiveSEWINgADVISOR™ feature will select the best buttonhole and stitch settings for your fabric. Fabric should be interfaced and/or stabilized where buttonholes are to be sewn.
YoucanalsoselectyourbuttonholedirectlyfromtheButtonholeMenuB.
FABriC: Wovenmediumandstabilizer.
seleCt: WovenmediumfabricandButtonhole.
use:Size80needleasrecommended.
1. SnapontheSensorOne-StepButtonholeFoot.2. Plugthecordintothesocket(A)totheleftabovethe
needle area. 3. Place your button on the buttonhole ruler on the
baseplate.4. Setthesizeof thebuttoninmmonyourscreen.Beforesewing,lineupthewhiteareaonthesideof thewheel with the white marking line on the foot.
When sewing, your machine automatically sews the buttonholelongenoughtofittheselectedbuttonsize.
Thebuttonholesizeneededwillvarywiththethicknessandstyleof yourbutton.Alwaysstitchasamplebuttonholeonscrapfabricfirst.
Note: For woven heavy and leather, the Exclusive SEWING ADVISOR™ feature selects buttonholes that should not be sewn with the Sensor One-Step Buttonhole Foot.
sew the buttonhole: • Foldfabricintwoandplacestabilizerunderneath.
Mark the buttonhole placement on your fabric with your PictogramPen.Setthelengthof thebuttonhole.
• PlacefabricunderSensorOne-StepButtonholeFoot.The measurement wheel can be raised by lifting it, which makes it easier to place the fabric under the presser foot.
Note: Use the markings on the left toe of the Sensor One-Step Buttonhole Foot to position the garment edge. Place the edge of the garment at the middle mark to have 5/8’’ (15 mm) from the edge to the buttonhole.• Steponthefootcontrol.TheSensorOne-Step
ButtonholeFootlowersautomatically.Astraightstitchis sewn away from you stabilizing the left buttonhole column, then the satin column is sewn toward you. This is repeated for the right column. The bartacks are automatic(seeillustration1).KeepthefootcontroldepresseduntiltheSelectiveThreadCuttercutsthethreadsandtheSensorOne-StepButtonholeFootisraised.
Place fabric edge here to place buttonhole 5/8'' (15 mm) from edge
Sensor One-Step Buttonhole Foot socket
a
1. Sewing direction for satin stitch buttonholes sewn with the Sensor One-Step Buttonhole Foot

4:16
2. Sewing direction for buttonholes without satin stitches or satin stitch buttonholes sewn with presser foot C
When sewing buttonholes without satin stitches or when usingpresserfootC,thesewingstepsaredifferent(thereisnostraightstitchstep).Seeillustration2.
Note: If you are sewing buttonholes in a very narrow area, snap on the standard foot C and sew your buttonhole according to the instructions below.
ManUal bUTTonholeTo sew a manual buttonhole, use buttonhole foot C.
• Sewthefirstcolumnaslongasyouwantthebuttonhole to be.
• Pressthereversebutton.Themachinesewsthebartack and the second column.
• Whenthecolumnsarealigned,pressthereversebutton to sew the second bartack.
eMbroidered bUTTonholeButtonholescanalsobestitchedoutinanembroideryhoop.Seepage7:2.
prograMMable bUTTon sew onSewbuttons,snaps,hooksandeyesquicklywithyourmachine.
FABriC: Wovenmedium.
seleCt: WovenmediumandButtonontheExclusiveSEWINgADVISOR™ feature. The feed teeth are lowered automatically.
use: Size80needleandthemultipurpose tool to create a threadshank,asrecommended.Snapoff presserfoot.
sew: • Placefabric,multipurposetoolandbuttonunderthe
ankle with the holes in the button lined up with the swing of the needle. Check the swing of the needle using the mirror side-to-side button to be sure the needlewillnothitthebutton.Adjuststitchwidthif needed.Bringtheneedledownintotheholeof thebutton.
• Setthenumberof stitchestosewonthebutton(seepage4:6).6-8stitchesisnormal.
• Themachinestitchesthebuttonandautomaticallytiesoff.
Note: Place the thin end of the multipurpose tool under the button when sewing on light fabrics. Use the thick end for heavier fabrics. Hold in place on the fabric with transparent tape.
Note: The recommended width of 3.0 is set for most buttons. If you sew a tiny button or a very large coat button, decrease (−) or increase (+) the stitch width until the swing of the needle sews in the holes of the button or snap.
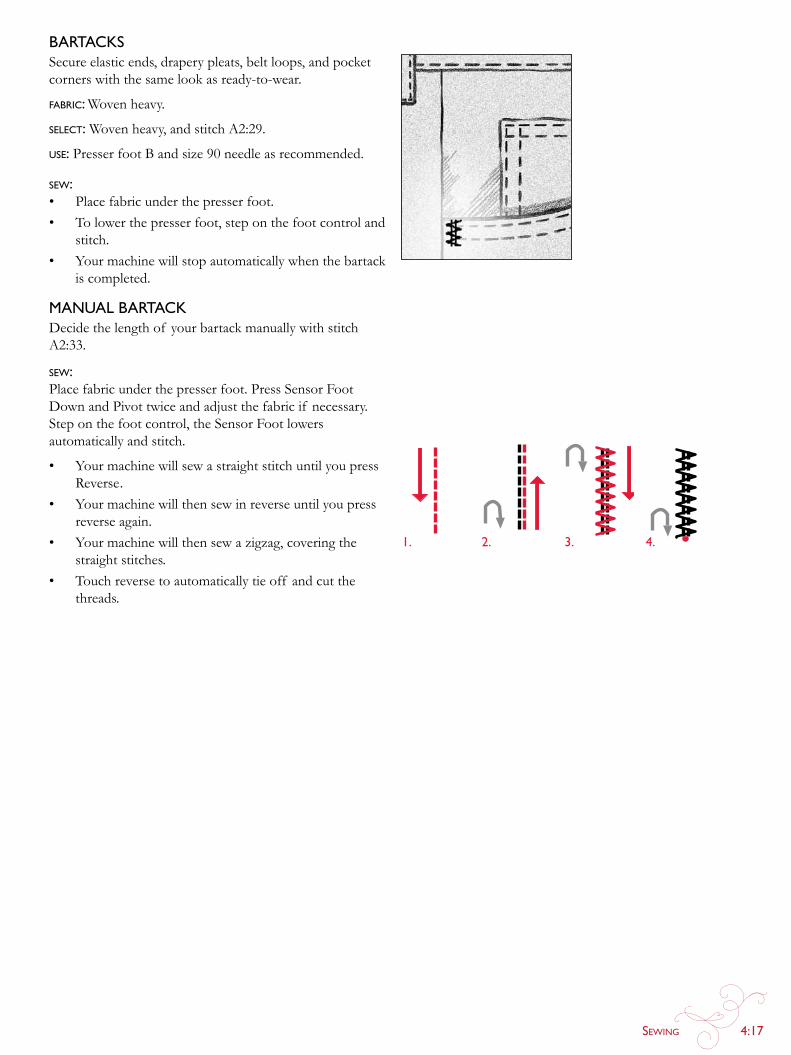
Sewing 4:17
1. 2. 3. 4.
barTaCksSecureelasticends,draperypleats,beltloops,andpocketcorners with the same look as ready-to-wear.
FABriC: Wovenheavy.
seleCt:Wovenheavy,andstitchA2:29.
use:PresserfootBandsize90needleasrecommended.
sew:• Placefabricunderthepresserfoot.• Tolowerthepresserfoot,steponthefootcontroland
stitch.• Yourmachinewillstopautomaticallywhenthebartack
is completed.
ManUal barTaCkDecidethelengthof yourbartackmanuallywithstitchA2:33.
sew:Placefabricunderthepresserfoot.PressSensorFootDownandPivottwiceandadjustthefabricif necessary.Steponthefootcontrol,theSensorFootlowersautomatically and stitch.
• YourmachinewillsewastraightstitchuntilyoupressReverse.
• Yourmachinewillthensewinreverseuntilyoupressreverseagain.
• Yourmachinewillthensewazigzag,coveringthestraight stitches.
• Touchreversetoautomaticallytieoff andcutthethreads.

4:18
7
7
7
7
4-way sTiTChes - MenU sThe4-waymendingstitchallowsyoutostitchseveralsturdystitchesinfourdifferentdirections.Youhaveachoiceof 17different4-waystitches.Youcanselecttheonethatisperfect for the weight and type of fabric you are using. This is especially helpful when patching trouser legs on a free arm.The4-waystitchesareprogrammedatafixedlengthand stitch width.
FABriC: Wovenheavy,twopieces,oneapatch.
seleCt:WovenheavyonyourExclusiveSEWINgADVISOR™feature,menuS-4-waystitches,stitchS1:8.
use:presserfootSandsize80needleasrecommended.
sew: • Placethepatchonthelargerfabricinpositionunder
the presser foot. The sewing machine will start to sew across the top of the patch from the top left corner as shown on the screen.
• Pressreverseorthe4DirectionSewingiconandadjustfabricif necessary.Steponthefootcontrol.Thepresser foot lowers automatically.
• Sewacrossthetopandtouchthe4-waysymbolorthereversebuttontochangesewingdirection.Thedirection of the stitch on the screen will change.
• Sewdownthesideof thepatch.Continuesewingaround the patch, touching the 4-way icon or the reversebuttontochangesewingdirection.
• TouchtheSelectiveThreadCutterbutton.Note: Depending on which stitch you are using, the corners may be irregular if changing sewing direction without completing the stitch first. To sew beautiful corners with 4-way stitches, press the STOP button before changing sewing direction. This will complete the current stitch before changing direction.
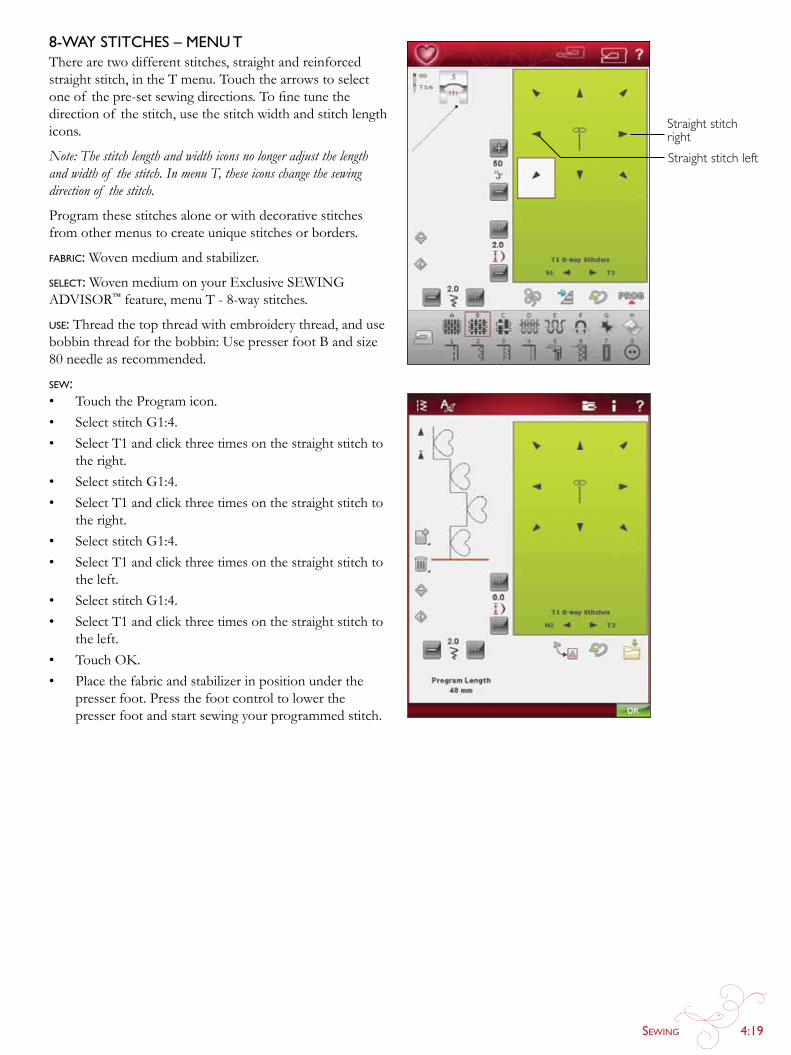
Sewing 4:19
8-way sTiTChes – MenU TThere are two different stitches, straight and reinforced straight stitch, in the T menu. Touch the arrows to select oneof thepre-setsewingdirections.Tofinetunethedirection of the stitch, use the stitch width and stitch length icons.
Note: The stitch length and width icons no longer adjust the length and width of the stitch. In menu T, these icons change the sewing direction of the stitch.
Programthesestitchesaloneorwithdecorativestitchesfromothermenustocreateuniquestitchesorborders.
FABriC:Wovenmediumandstabilizer.
seleCt:WovenmediumonyourExclusiveSEWINgADVISOR™ feature, menu T - 8-way stitches.
use: Thread the top thread with embroidery thread, and use bobbinthreadforthebobbin:UsepresserfootBandsize80 needle as recommended.
sew: • TouchtheProgramicon.• Selectstitchg1:4.• SelectT1andclickthreetimesonthestraightstitchto
the right.• Selectstitchg1:4.• SelectT1andclickthreetimesonthestraightstitchto
the right.• Selectstitchg1:4.• SelectT1andclickthreetimesonthestraightstitchto
the left.• Selectstitchg1:4.• SelectT1andclickthreetimesonthestraightstitchto
the left.• TouchOK.• Placethefabricandstabilizerinpositionunderthe
presser foot. Press the foot control to lower the presser foot and start sewing your programmed stitch.
Straight stitch left
Straight stitch right
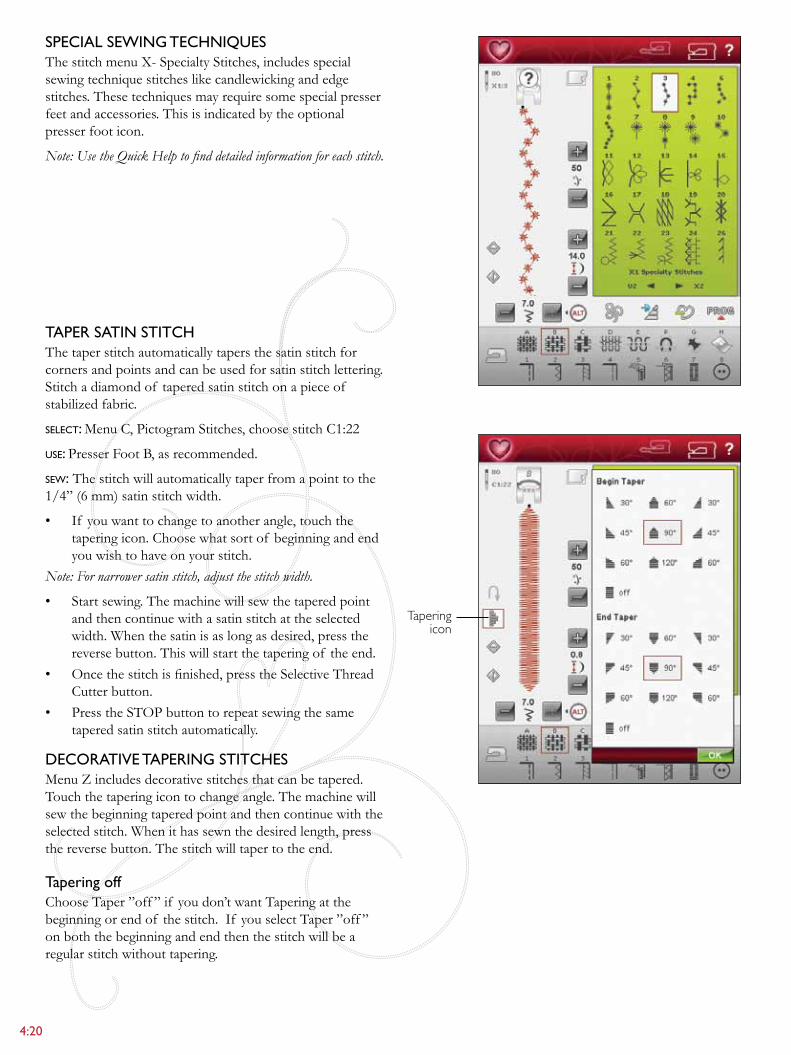
4:20
speCial sewing TeChniQUes ThestitchmenuX-SpecialtyStitches,includesspecialsewingtechniquestitcheslikecandlewickingandedgestitches.Thesetechniquesmayrequiresomespecialpresserfeet and accessories. This is indicated by the optional presser foot icon.
Note: Use the Quick Help to find detailed information for each stitch.
Taper saTin sTiTChThe taper stitch automatically tapers the satin stitch for corners and points and can be used for satin stitch lettering. Stitchadiamondof taperedsatinstitchonapieceof stabilized fabric.
seleCt: MenuC,PictogramStitches,choosestitchC1:22
use: PresserFootB,asrecommended.
sew: The stitch will automatically taper from a point to the 1/4”(6mm)satinstitchwidth.
• If youwanttochangetoanotherangle,touchthetapering icon. Choose what sort of beginning and end youwishtohaveonyourstitch.
Note: For narrower satin stitch, adjust the stitch width.
• Startsewing.Themachinewillsewthetaperedpointand then continue with a satin stitch at the selected width. When the satin is as long as desired, press the reversebutton.Thiswillstartthetaperingof theend.
• Oncethestitchisfinished,presstheSelectiveThreadCutter button.
• PresstheSTOPbuttontorepeatsewingthesametapered satin stitch automatically.
deCoraTive Tapering sTiTChesMenuZincludesdecorativestitchesthatcanbetapered.Touch the tapering icon to change angle. The machine will sew the beginning tapered point and then continue with the selected stitch. When it has sewn the desired length, press thereversebutton.Thestitchwilltapertotheend.
Tapering offChooseTaper”off ”if youdon’twantTaperingatthebeginningorendof thestitch.If youselectTaper”off ”on both the beginning and end then the stitch will be a regular stitch without tapering.
Tapering icon
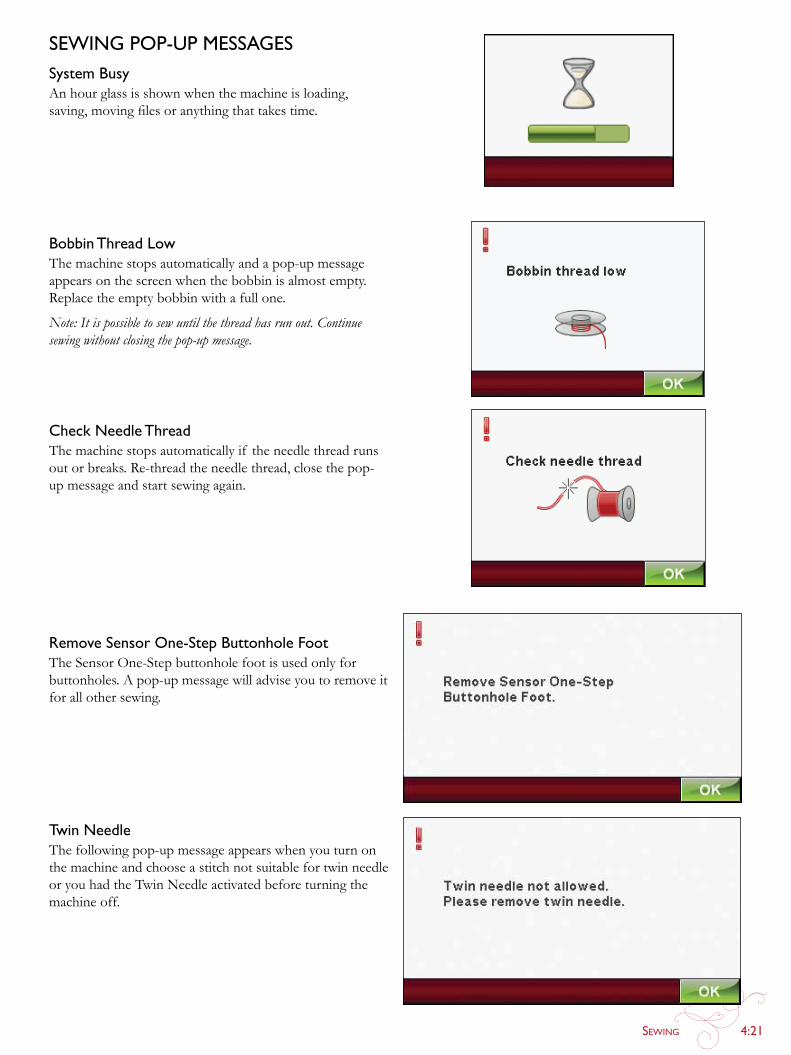
Sewing 4:21
sewing pop-Up Messagessystem busyAnhourglassisshownwhenthemachineisloading,saving,movingfilesoranythingthattakestime.
bobbin Thread lowThe machine stops automatically and a pop-up message appears on the screen when the bobbin is almost empty. Replace the empty bobbin with a full one.
Note: It is possible to sew until the thread has run out. Continue sewing without closing the pop-up message.
Check needle ThreadThe machine stops automatically if the needle thread runs out or breaks. Re-thread the needle thread, close the pop-up message and start sewing again.
remove sensor one-step buttonhole footTheSensorOne-Stepbuttonholefootisusedonlyforbuttonholes.Apop-upmessagewilladviseyoutoremoveitfor all other sewing.
Twin needleThe following pop-up message appears when you turn on the machine and choose a stitch not suitable for twin needle oryouhadtheTwinNeedleactivatedbeforeturningthemachine off.
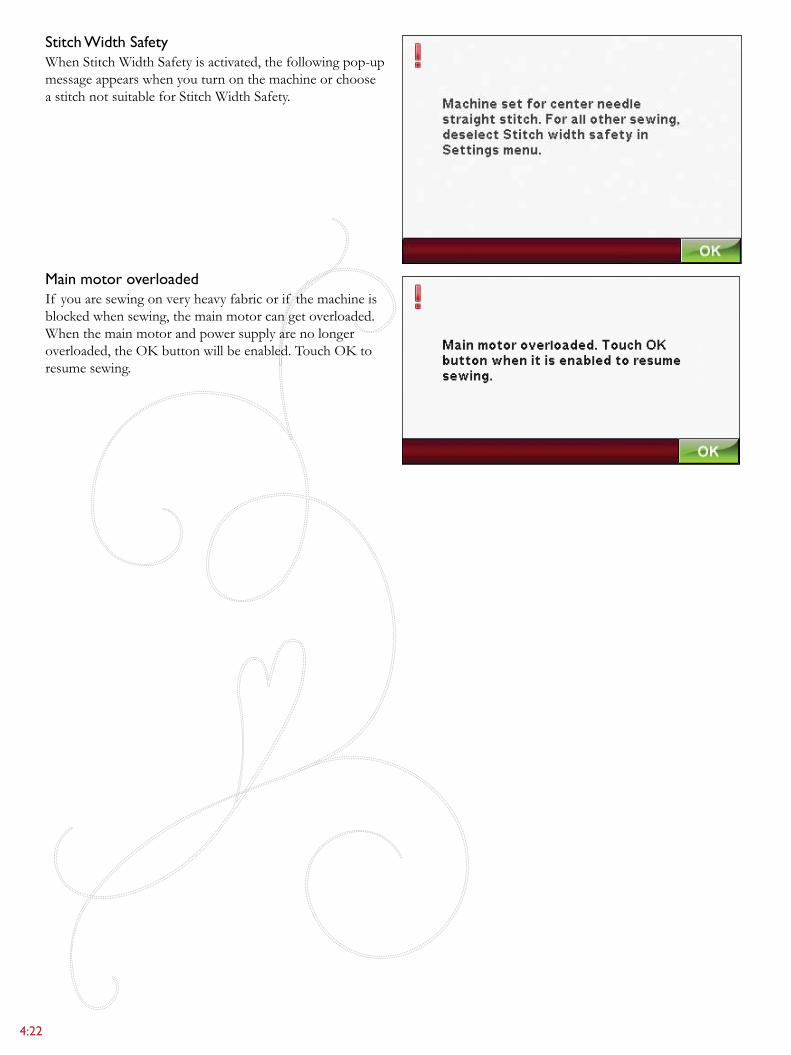
4:22
stitch width safetyWhenStitchWidthSafetyisactivated,thefollowingpop-upmessage appears when you turn on the machine or choose astitchnotsuitableforStitchWidthSafety.
Main motor overloadedIf youaresewingonveryheavyfabricorif themachineisblockedwhensewing,themainmotorcangetoverloaded.When the main motor and power supply are no longer overloaded,theOKbuttonwillbeenabled.TouchOKtoresume sewing.
5 prograM
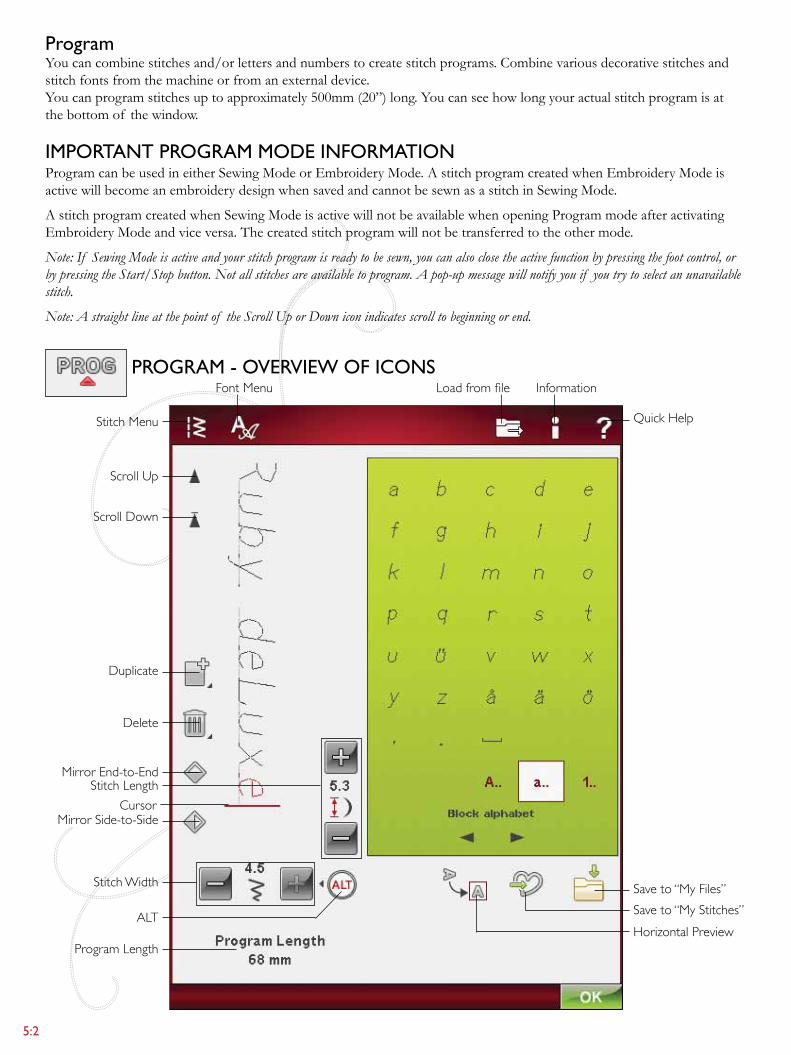
5:2
programYoucancombinestitchesand/orlettersandnumberstocreatestitchprograms.Combinevariousdecorativestitchesandstitchfontsfromthemachineorfromanexternaldevice.Youcanprogramstitchesuptoapproximately500mm(20”)long.Youcanseehowlongyouractualstitchprogramisatthe bottom of the window.
iMporTanT prograM Mode inforMaTionProgramcanbeusedineitherSewingModeorEmbroideryMode.AstitchprogramcreatedwhenEmbroideryModeisactivewillbecomeanembroiderydesignwhensavedandcannotbesewnasastitchinSewingMode.
AstitchprogramcreatedwhenSewingModeisactivewillnotbeavailablewhenopeningProgrammodeafteractivatingEmbroideryModeandviceversa.Thecreatedstitchprogramwillnotbetransferredtotheothermode.
Note: If Sewing Mode is active and your stitch program is ready to be sewn, you can also close the active function by pressing the foot control, or by pressing the Start/Stop button. Not all stitches are available to program. A pop-up message will notify you if you try to select an unavailable stitch.
Note: A straight line at the point of the Scroll Up or Down icon indicates scroll to beginning or end.
prograM - overview of iCons
Stitch Menu
Font Menu Load from file Information
Quick Help
Mirror End-to-End
Mirror Side-to-Side
Stitch Length
Stitch Width
ALTHorizontal PreviewSave to “My Stitches”
Duplicate
Delete
Cursor
Scroll Down
Scroll Up
Program Length
Save to “My Files”
Program 5:3
To prograM in sewing Mode• EntertheProgramwindow,touchthePROgicon.
• TouchtheStitchorFontMenutoopenthestitchorafontyouwishtouse.
• Theactivepositionismarkedbyacursorandtheselectedstitchorletterwillbemarkedinred.Insertedstitcheswillbeplacedatthecursor.Onlytheselectedstitchcanbeadjusted.Movethecursorthroughthestitchprogramusingthescroll.
• ToclosetheProgramwindowandsewyourprogrammedstitch,touchtheOKiconorjustpressthefootcontrol.
To prograM in eMbroidery ediT• ToentertheProgrammodeinEmbroideryEdit,touchtheStartMenuicontofoldouttheExtendedtoolbar.
• TouchtheStitchorFontMenutoopenstitchmenuorafontyouwishtouse.
• Theactivepositionismarkedbyacursorandtheselectedstitchorletterwillbemarkedinred.Insertedstitcheswillbeplacedatthecursor.Onlytheselectedstitchcanbeadjusted.Movethecursorthroughthestitchprogramusingthearrows.
• ToclosetheProgramwindowandembroideryourStitchprogram,touchtheOKicon.
To edit a programmed stitch in embroidery editIf youwanttoeditanalreadyprogrammedstitchselectthestitchandtouchtheEditStitchProgramiconandyouwillenter the Program window again.
Note: If you have selected tapering in the stitch program, it will be converted to a design when loaded to Embroidery Edit, and cannot be opened for editing again.
ediT yoUr sTiTCh or leTTering prograMinsert a stitch or letterMovethecursorwhereyouwanttoaddastitchorletter.Selectthedesiredstitchyouwanttoinsert.Itwillbeplacedatthecursor.
adjust Text and stitchesYoucanmirror,adjustlengthandwidthorchangethedensityof theselectedstitch,inthesamewayaswheninSewingMode.
delete a stitch or letterIf youwanttodeleteastitch,movethecursortothestitchyouwanttodelete(theselectedstitchwillbered)andtouchtheDeleteicon.UsetheTouch&Holdfunctiontodeletetheentireprogram.
duplicate a stitch or letterToduplicateastitch,movethecursortothestitchyouwanttoduplicate(theselectedstitchwillbered).TouchtheDuplicateicontocopytheselectedstitch.
Note: Make your adjustments on the stitch before duplicating and the copied stitch includes the adjustments.
UsetheTouch&Holdfunctiontobringupapop-upmessagewhereyoucanentertheexactnumberof copiesyouwantto insert.
replace a stitch or letterToreplaceastitch,simplyselectit(usingthearrowstoselectthestitchyouwishtoreplace)andtouchDelete.Insertthenew stitch. It will be placed at the cursor.
zoom to allIf thestitchorstitchprogramiswiderthanwhatcanbeshownonthescreen,youmayusetheZoomtoAllicon to see the entire width of the stitch program.
Note: Zoom to All is only visible if the stitch or stitch program is wider than the stitch field.
5:4
previewView your stitch program horizontally by touching the Previewicon.Apop-updisplaysyourprograminactualsize. If the program is too long to be shown in total, use thecursorarrowstoscrollthroughtheprogram.Toviewthewholeprogram,touchtheZoomtoAllicon.TouchOKtoclosethewindow.
adJUsT The enTire prograMToadjusttheentireprogram,returntothestitchviewbytouchingtheOKicon.Adjustmentsmadeherewillaffectthe whole program.
sTiTCh prograM CoMMandsYoucaninsertFIX, STOPandthread cut commands into the stitch program. These commands will be included in the stitch program and will always be performed when sewing it.
Note: If creating a stitch program in Embroidery Mode, tie-offs will be added automatically at the beginning and end, allowing you to create a stitch program in between. The commands can be removed.
InsertaSTOPbypressingtheSTOPbuttononyourmachine, if you want the machine to stop at a certain place in your programmed stitch. This is useful for example at the end of the stitch program if you want to sew it only onceortocreateastitchprograminseveralrows.
Insert the thread cut if you want the machine to tie-off and cut the threads and raise the presser foot.
Movethecursortothepositionwhereyouwanttoaddacommand. Press the button and an icon will be added into theprogrammedstitch.Thisconfirmsthatthecommandis inserted and it also shows where the command will be performed in the stitch program.
Note: The commands will appear on the screen in the order you program them.
sewing a sTiTCh prograMTosewthestitchprogram,returntoSewingModeorEmbroidery Edit. Close Program mode by touching the OKicon.
AdjustmentsmadeinSewingModeorEmbroideryModewillaffecttheentireprogrammedstitch.However,thesechangeswillnotbesavedif youreturntoProgrammode.
If you make changes while in Embroidery Edit, and you savethem,thesechangeswillbesavedasadesignandcanonly be edited again in Embroidery Edit.
However,youcanalwaysopenastitchprogrammadeinSewingMode,inEmbroideryMode.
Preview
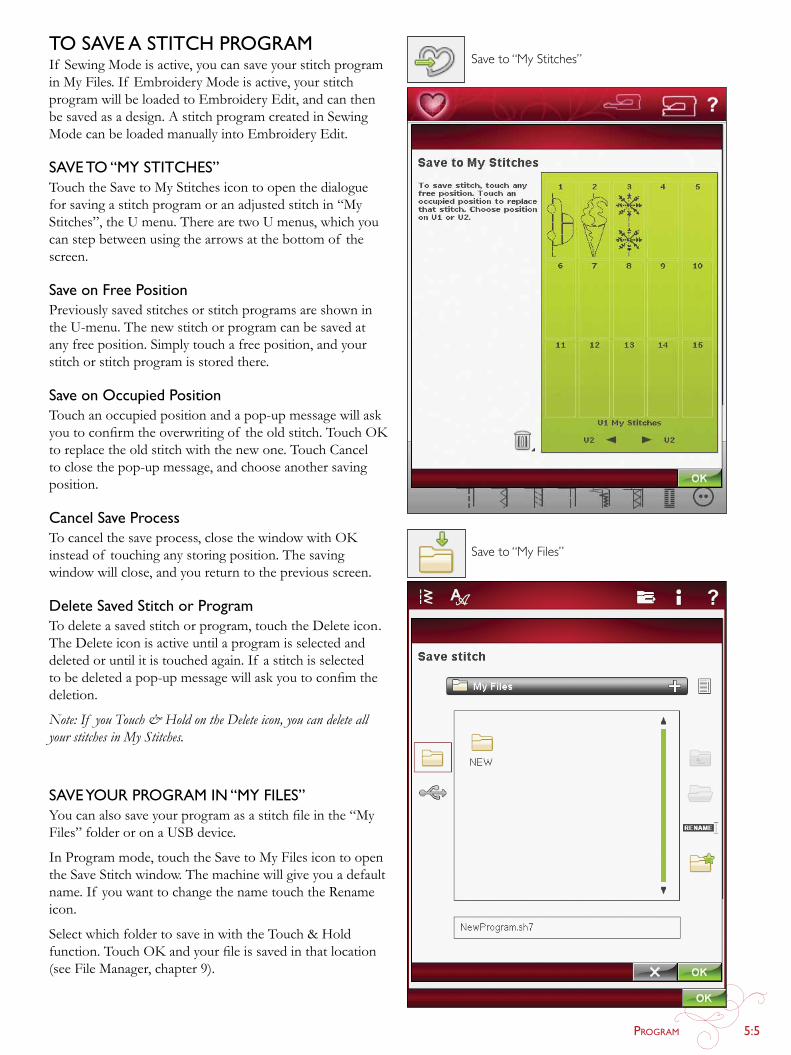
Program 5:5
Save to “My Stitches”
Save to “My Files”
To save a sTiTCh prograMIf SewingModeisactive,youcansaveyourstitchprograminMyFiles.If EmbroideryModeisactive,yourstitchprogram will be loaded to Embroidery Edit, and can then besavedasadesign.AstitchprogramcreatedinSewingMode can be loaded manually into Embroidery Edit.
save To “My sTiTChes”TouchtheSavetoMyStitchesicontoopenthedialogueforsavingastitchprogramoranadjustedstitchin“MyStitches”,theUmenu.TherearetwoUmenus,whichyoucan step between using the arrows at the bottom of the screen.
save on free positionPreviouslysavedstitchesorstitchprogramsareshownintheU-menu.Thenewstitchorprogramcanbesavedatanyfreeposition.Simplytouchafreeposition,andyourstitch or stitch program is stored there.
save on occupied positionTouch an occupied position and a pop-up message will ask youtoconfirmtheoverwritingof theoldstitch.TouchOKto replace the old stitch with the new one. Touch Cancel toclosethepop-upmessage,andchooseanothersavingposition.
Cancel save processTocancelthesaveprocess,closethewindowwithOKinsteadof touchinganystoringposition.Thesavingwindowwillclose,andyoureturntothepreviousscreen.
delete saved stitch or programTodeleteasavedstitchorprogram,touchtheDeleteicon.TheDeleteiconisactiveuntilaprogramisselectedanddeleted or until it is touched again. If a stitch is selected tobedeletedapop-upmessagewillaskyoutoconfimthedeletion.
Note: If you Touch & Hold on the Delete icon, you can delete all your stitches in My Stitches.
save yoUr prograM in “My files”Youcanalsosaveyourprogramasastitchfileinthe“MyFiles”folderoronaUSBdevice.
InProgrammode,touchtheSavetoMyFilesicontoopentheSaveStitchwindow.Themachinewillgiveyouadefaultname. If you want to change the name touch the Rename icon.
SelectwhichfoldertosaveinwiththeTouch&Holdfunction.TouchOKandyourfileissavedinthatlocation(seeFileManager,chapter9).
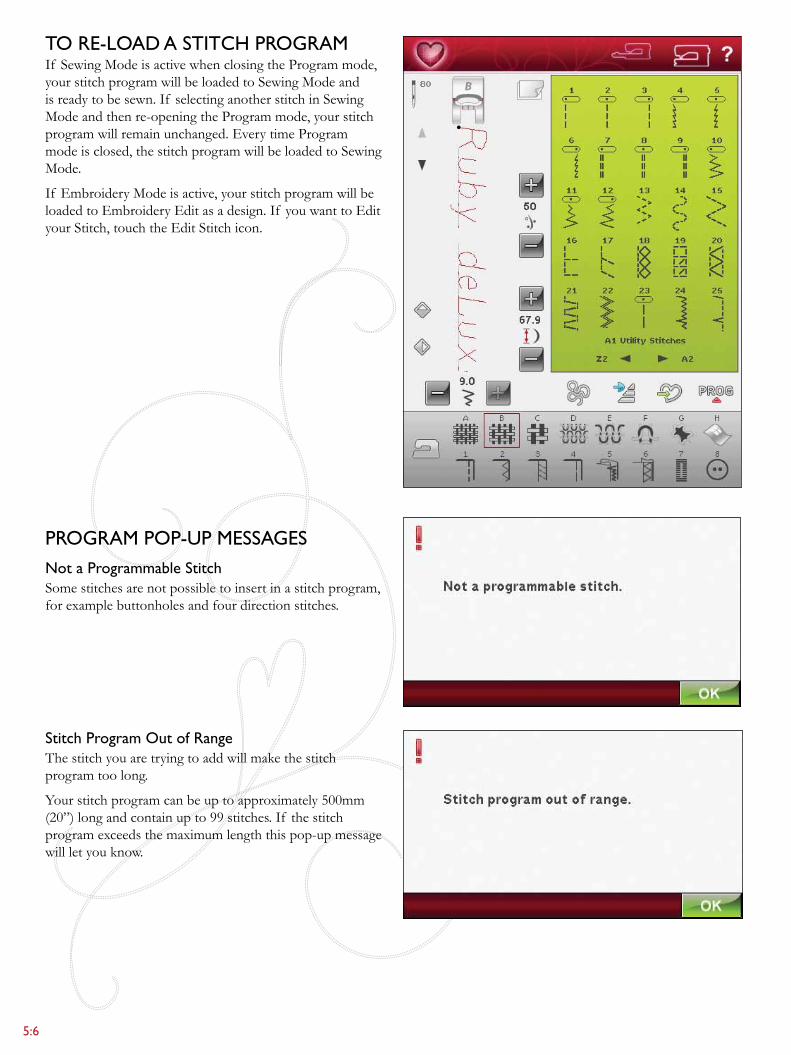
5:6
To re-load a sTiTCh prograMIf SewingModeisactivewhenclosingtheProgrammode,yourstitchprogramwillbeloadedtoSewingModeandisreadytobesewn.If selectinganotherstitchinSewingMode and then re-opening the Program mode, your stitch programwillremainunchanged.EverytimeProgrammodeisclosed,thestitchprogramwillbeloadedtoSewingMode.
If EmbroideryModeisactive,yourstitchprogramwillbeloaded to Embroidery Edit as a design. If you want to Edit yourStitch,touchtheEditStitchicon.
prograM pop-Up Messagesnot a programmable stitchSomestitchesarenotpossibletoinsertinastitchprogram,for example buttonholes and four direction stitches.
stitch program out of rangeThe stitch you are trying to add will make the stitch program too long.
Yourstitchprogramcanbeuptoapproximately500mm(20”)longandcontainupto99stitches.If thestitchprogram exceeds the maximum length this pop-up message will let you know.

6 eMbroidery seT Up
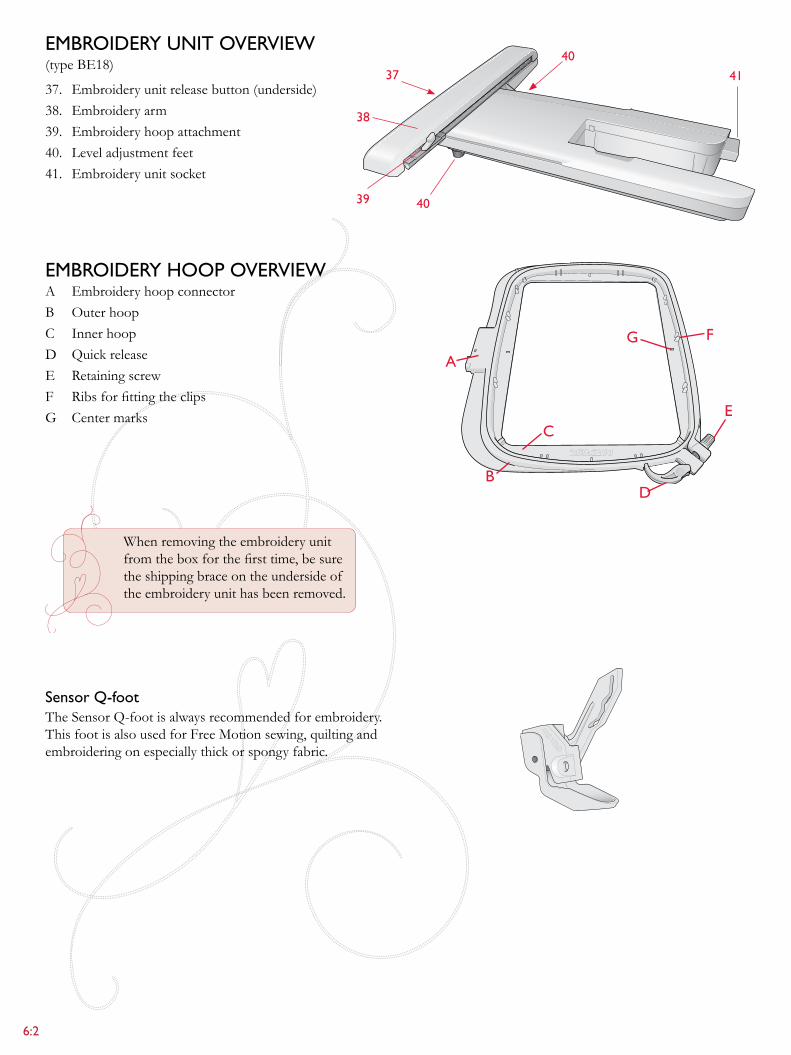
6:2
37
38
39 40
4140
a
b
C
d
f
e
g
eMbroidery UniT overview(typeBE18)
37. Embroideryunitreleasebutton(underside)38. Embroidery arm39. Embroidery hoop attachment40. Leveladjustmentfeet41. Embroidery unit socket
eMbroidery hoop overviewA Embroidery hoop connectorB OuterhoopC Inner hoopD Quick releaseE Retaining screwF Ribsforfittingtheclipsg Centermarks
sensor Q-footTheSensorQ-footisalwaysrecommendedforembroidery.ThisfootisalsousedforFreeMotionsewing,quiltingandembroidering on especially thick or spongy fabric.
Whenremovingtheembroideryunitfromtheboxforthefirsttime,besurethe shipping brace on the underside of theembroideryunithasbeenremoved.

EmbroidEry SEt Up 6:3
a
ConneCT The eMbroidery UniT1. Slidethesewingaccessorytrayoff.2. Thereisacoveredsocketatthebackof themachine.
Turnthecovertotherighttoopenit.Theembroideryunit plugs into the socket.
3. Slidetheembroideryunitontothefreearmof themachineuntilitplugsfirmlyintothesocket.If needed,usetheleveladjustingfeetsothatthemachineandembroideryunitareeven.If themachineisturnedoff,turn it on.
4. Apop-upmessagetellsyoutocleartheembroideryarmandremovethehoopforpositioning.TouchOK.The machine will calibrate and the embroidery arm will movetothereadyposition.
Note: DO NOT calibrate the machine with the embroidery hoop attached as this can damage the needle, presser foot, hoop and/or the embroidery unit. Be sure to clear all materials from around the machine before calibrating so that the embroidery arm does not bump into anything while calibrating.
reMove The eMbroidery UniT1. To store the embroidery unit in the embroidery case,
movetheembroideryarmtoPark Position by selecting Park Position on the screen in either Embroidery Edit orEmbroideryStitch-Out.
2. Press the button at the left, underneath the embroidery unit(A)andslidetheunittothelefttoremoveit.
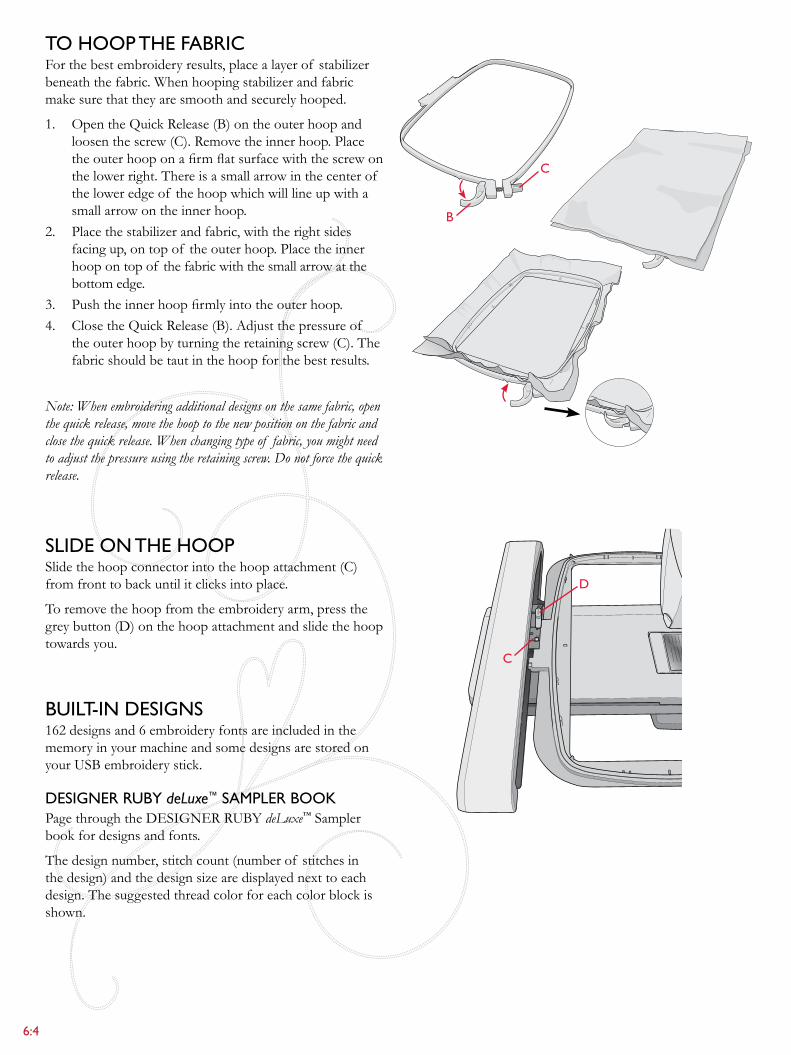
6:4
d
C
b
C
To hoop The fabriCFor the best embroidery results, place a layer of stabilizer beneath the fabric. When hooping stabilizer and fabric make sure that they are smooth and securely hooped.
1. OpentheQuickRelease(B)ontheouterhoopandloosenthescrew(C).Removetheinnerhoop.Placetheouterhooponafirmflatsurfacewiththescrewonthe lower right. There is a small arrow in the center of the lower edge of the hoop which will line up with a small arrow on the inner hoop.
2. Place the stabilizer and fabric, with the right sides facing up, on top of the outer hoop. Place the inner hoop on top of the fabric with the small arrow at the bottom edge.
3. Pushtheinnerhoopfirmlyintotheouterhoop.4. ClosetheQuickRelease(B).Adjustthepressureof
theouterhoopbyturningtheretainingscrew(C).Thefabric should be taut in the hoop for the best results.
Note: When embroidering additional designs on the same fabric, open the quick release, move the hoop to the new position on the fabric and close the quick release. When changing type of fabric, you might need to adjust the pressure using the retaining screw. Do not force the quick release.
slide on The hoopSlidethehoopconnectorintothehoopattachment(C)from front to back until it clicks into place.
Toremovethehoopfromtheembroideryarm,pressthegreybutton(D)onthehoopattachmentandslidethehooptowards you.
bUilT-in designs162 designs and 6 embroidery fonts are included in the memory in your machine and some designs are stored on your USBembroiderystick.
designer rUby deLuxe™ saMpler bookPagethroughtheDESIgNERRUBYdeLuxe™Samplerbook for designs and fonts.
Thedesignnumber,stitchcount(numberof stitchesinthedesign)andthedesignsizearedisplayednexttoeachdesign. The suggested thread color for each color block is shown.
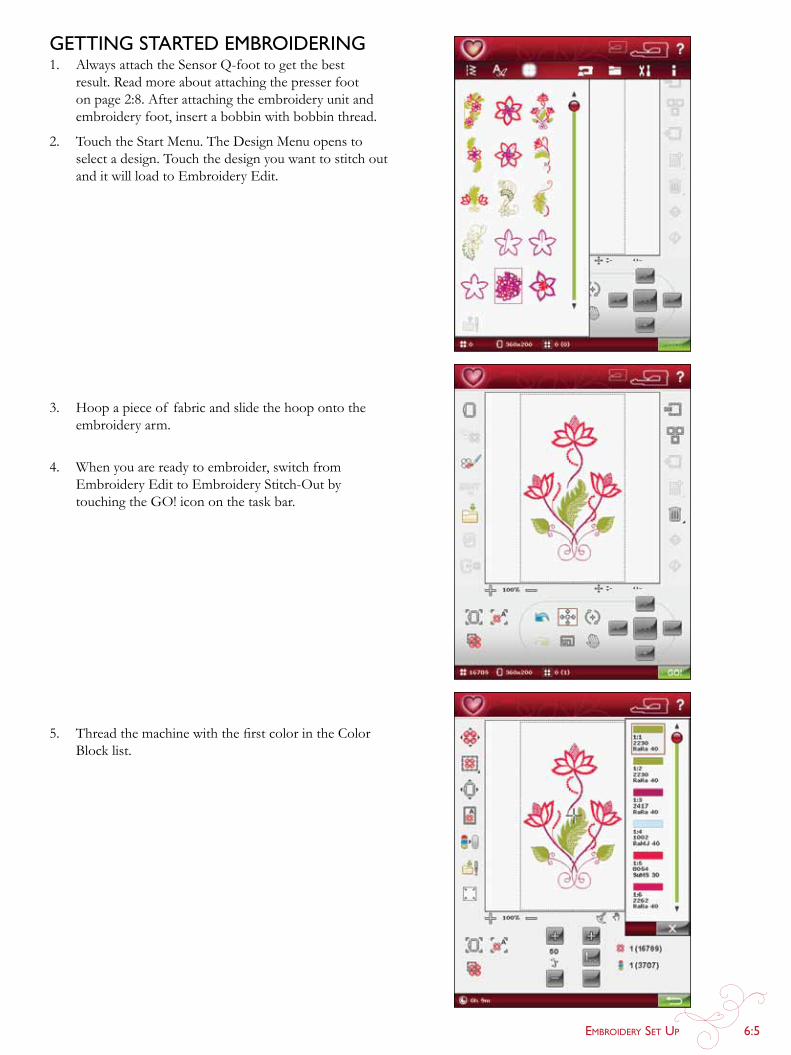
EmbroidEry SEt Up 6:5
geTTing sTarTed eMbroidering1. AlwaysattachtheSensorQ-foottogetthebest
result. Read more about attaching the presser foot onpage2:8.Afterattachingtheembroideryunitandembroidery foot, insert a bobbin with bobbin thread.
2. Touch the StartMenu.TheDesignMenuopenstoselect a design. Touch the design you want to stitch out and it will load to Embroidery Edit.
3. Hoopapieceof fabricandslidethehoopontotheembroidery arm.
4. When you are ready to embroider, switch from Embroidery Edit to EmbroideryStitch-OutbytouchingthegO!icononthetaskbar.
5. ThreadthemachinewiththefirstcolorintheColor Blocklist.
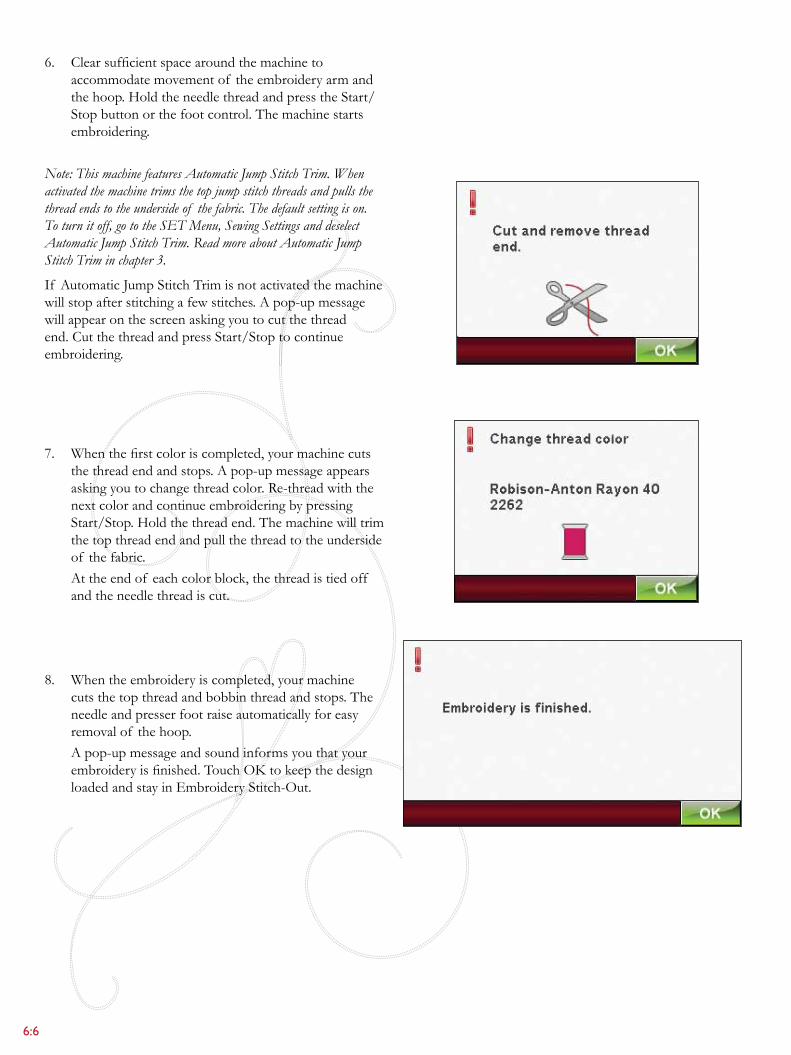
6:6
6. Clearsufficientspacearoundthemachinetoaccommodatemovementof theembroideryarmandthehoop.HoldtheneedlethreadandpresstheStart/Stopbuttonorthefootcontrol.Themachinestartsembroidering.
Note: This machine features Automatic Jump Stitch Trim. When activated the machine trims the top jump stitch threads and pulls the thread ends to the underside of the fabric. The default setting is on. To turn it off, go to the SET Menu, Sewing Settings and deselect Automatic Jump Stitch Trim. Read more about Automatic Jump Stitch Trim in chapter 3.
If AutomaticJumpStitchTrimisnotactivatedthemachinewillstopafterstitchingafewstitches.Apop-upmessagewill appear on the screen asking you to cut the thread end.CutthethreadandpressStart/Stoptocontinueembroidering.
7. Whenthefirstcoloriscompleted,yourmachinecutsthethreadendandstops.Apop-upmessageappearsasking you to change thread color. Re-thread with the next color and continue embroidering by pressing Start/Stop.Holdthethreadend.Themachinewilltrimthe top thread end and pull the thread to the underside of the fabric.
Attheendof eachcolorblock,thethreadistiedoff and the needle thread is cut.
8. When the embroidery is completed, your machine cuts the top thread and bobbin thread and stops. The needle and presser foot raise automatically for easy removalof thehoop.
Apop-upmessageandsoundinformsyouthatyourembroideryisfinished.TouchOKtokeepthedesignloadedandstayinEmbroideryStitch-Out.
7 eMbroidery ediT
7:2
eMbroidery ediTWhenyoutouchtheSewing/EmbroideryModeonthetoolbartoactivateEmbroideryModeorturnthemachineonwiththeembroideryunitattached,EmbroideryEditwillbeopened.InEmbroideryEdityoucanadjust,combine,saveanddeletedesigns.Youdonotneedtohavetheembroideryunitconnectedtoyourmachinetoedityourdesign(s).Theloadeddesign(s)areshownintheEmbroideryfield.Wewillgothroughtheicons,startingontheupperlefthandside.
Main fUnCTions in The exTended eMbroidery ediT ToolbarTouch the StartMenuicontoopentheExtended toolbar.
file ManagerTheFileManagerhelpsyouadd,move,removeandcopydesigns,fontsandstitchfilesinaneasyway.TouchtheFileManagericontoopenFileManagertosavetothemachinememoryorexternaldevicesconnectedtotheUSB-ports,suchasyourcomputerortheHUSQVARNAVIKINg® USBembroiderystick.Selecttheplaceyouwanttosaveyourdesign.TouchafoldertoselectitandTouch&Holditto open it. Read more about File Manager in chapter 9.
seT MenUIntheSETMenu,youcanoverrideautomaticsettingsandmakemanualadjustmentstotheSewingSettings,MachineSettings,SoundSettings,andScreenSettings.
Touchtheiconstoactivateafunctionoropenalistof choices.ReadmoreabouttheSETMenuinchapter3.
inforMaTion MenUUsetheInformationmenutoeasilygetHelptopicsandinformation.TheInfomenuisabuilt-in,abridgedversionof theUser’sguide.ReadmoreabouttheInformationmenu on page 3:12.
load a sTiTChToloadastitch,touchtheStitchMenuiconontheExtendedtoolbar.SelectamenuandtheProgramwindowwill open. Touch your desired stitch/stitch program and touchOKtoloadtoEmbroideryEdit.Readmoreabouthow to make a stitch program in chapter 5.
load a buttonholeButtonholescanbeembroideredinahoop.TouchtheStitchMenuiconontheExtendedtoolbarandselectmenuB.Selectdesiredbuttonholeinthewindowthatopens,andset the buttonhole stitch length, width and density. Touch OKtoloadthebuttonholetotheembroideryarea.
load a fonTText can be created both with embroidery fonts and stitch fonts. Load a font by selecting the Font Menu from the extended toolbar and touch your desired font on the screen.
Embroidery fonts will be loaded into the Embroidery Font Editwindow.StitchfontswillbeloadedtoProgram.Thetext created will then be loaded into Embroidery Edit.
Note: You can also load designs, fonts and stitches from File Manager.
load a designToloadadesign,touchtheStartMenuicontoautomaticallyopenthedropdownlist.Selectdesignsfromthedropdownlist.Yourpersonaldesignswillbeshowninthe menu. To load a design, touch it on the screen and it will be loaded into Embroidery Edit.
exClUsive eMbroidery advisor™
TheExclusiveEMBROIDERYADVISOR™ feature recommends the best needle, stabilizer and thread recommendationforyourfabric.Selectthefabricyouwantto embroider on and follow the recommendations. Touch OKtoclosetheEMBROIDERYADVISOR™ feature.
SET MenuInformation Menu
File ManagerDesign MenuFont Menu
Stitch Menu
Start Menu icon
EMBROIDERY ADVISOR™
EmbroidEry Edit 7:3
UndoRedo
eMbroidery ediT - overview of iCons
My hoopsToselectthecorrecthoopsize,touchtheMyHoopsicon.Apop-upwillappearwiththehoopchoices,includinghoopsthatareavailabletopurchasefromyourauthorizedHUSQVARNAVIKINg® dealer.
Afterselectingyourhoopsize,thepop-upmessagewillclose automatically.
Note: Only your selected hoops will be available in the My Hoops List. You can adjust the My Hoops List by choosing the wanted hoops in Hoop Selection under Machine Settings. Read more about Hoop Selection on page 3:8.
PanTotal number of stitches
in design combinationSelected hoop
Stitch-out order of selected design
Embroidery field
My Hoops
Resize
Color Edit
Edit Stitch Program
Save to My Designs
Zoom In/Zoom Out
Zoom to Hoop
Zoom to Box
Zoom to All
Step Through Designs
Select All
Add/Remove Selection
Duplicate
Delete
Mirror End-to-End
Mirror Side-to-Side
Park Position
Move to Hoop
Control
Control center
PositionScale
Rotate
Embroidery Stitch-Out
7:4
resizeResizecanreduceanembroiderydesignuptofivetimessmaller than the original design or increase it up to eight times larger than the original design. The machine recalculates the number of stitches in the design so the original stitch density remains.
Note: To reduce or increase the design less than 20%, use Scale function. The Scale function does not change the stitch count.
resize adjustmentsSelectthedesignyouwanttoresize.OpentheResizewindow.Adjustthedesignsizebytouchinganddraggingon the screen or by using the Control. The size of the designisshowninmillimetersabovetheControl.Toreturntotheoriginalsize,touchtheControlcentericon.Adjustthe placement of the design in the hoop using Position and Rotate.
retain fill TypeAllfillareasinanembroiderydesignaremadeinaspecifictype to get the best effect. When enlarging or reducing a design,thestitchesinthefillareawillbeaffected.
Therearetwowaystohandlethefilltypeandstyleinthedesign to be resized.
1. Thedefaultsettingwillnotretainfilltype.Thisisthefastestwaytoresizeadesign.However,thefillareasinthe design may look different than the original.
2. When Retain Fill Type is selected, it will take longer to resizebuttheprocesswillretainthefilltypesandstyleswithin the design areas. If greatly enlarging a design, Retain Fill Type is recommended for best results.
To start resizingWhenyouaresatisfiedwiththedesignsizeandposition,touchOKtoclosethewindowandstartresizing.Anhourglass on the screen shows that it is working. When finished,theresizewindowwillclose.
Touch Cancel to return to Embroidery Edit without resizing.
Note: Stitches and stitch programs cannot be resized.
Retain Fill Type
Reduce design
Enlarge design
Control center
PositionRotate Resize
Pan

EmbroidEry Edit 7:5
iMporTanT resize inforMaTionSince designs are digitized for a specific design size, it is important to consider the following information about Resize. Always embroider a test sample of your resized design before embroidering on a project.
• Resizeisalwaysproportional.If youreduceadesign30%, it will be 30% smaller in both length and width. If thedesignisverydetailed,someof itmaybelostordistorted,and/oritcanbeverydense.Somedesignsshouldnotbereducedmorethan25%if theyhavetoomany details.
• Designscanbeincreasedlargerthanthehoop,sobesurethatthedesignfitsinthehoop.If thedesignislarger than hoop size, the machine will not be able to embroider it.
• If youareenlargingadesigntoomuch,youmayseestitch irregularities. Press the Control Center to return to 100% and resize to a smaller percentage for a better result.Dependingonthememoryleftinthemachine,youmayfindsomedesignstoocomplextoresizeinthemachine.Pleaseuse5D™EmbroiderySoftwaretoresizeverylargeandcomplexdesigns.Itisavailabletopurchase from your local authorized dealer.
• Alwaysstartwiththeoriginaldesignwhenresizing.Thisistoensurethebestpossiblestitchquality.If aresizeddesignissaved,andthenresizedagain,itcancause stitch irregularities. For the best resize result, always start with a design in original size.
• Dependingonhowmuchyouresizeadesignandhow many stitches it contains, the resize process time willvary.Resizingaverylargeorcomplexdesignmaytakeafewminutes.OnceyoutouchOK,youcannotcancel.Youwillneedtowaitfortheprocesstobefinished.
• Itdoesnotmatterinwhichorderyouselectfunctionsto adjust the size, rotation, mirroring etc. When you touchOK,yourmachinealwaysresizesfirstandthenadds the rotation, mirroring etc.
• Itisrecommendedthatyouscaleinsteadof resizetochange a design less than 20% and also for designs digitized with single or triple stitches, such as cross stitch embroideries. In this case, you do not want to add stitches to the design, you only want to make the design larger or smaller by making each original stitch larger or smaller.
7:6
Color ediT TouchColorEditicontoentertheColorEditScreen.
Thread Color ChangeIn Thread Color Change you can edit the colors in your design. Each color block is described in the ColorBlockliston the right hand side of the screen.
Example: 1:2, thread number 2230, RaRa 40, 1:2 means the second thread color in the first loaded design is Robison-Anton Rayon 40 weight.
IntheColorBlockList,touchthecolorblockthatyouwant to change. Touch the Thread Color Change icon to open a window with 64 different color choices. Touch your newcolortoselectitandtouchOK.ThewindowwillcloseandyournewcolorwillbeappliedintheColorBlockListand to the design.
select more than one color blockTo change more than one color block at a time, touch the Add/RemoveColorSelectionicon,thentouchthecolorblocks you want to select/deselect.
TouchtheSelectAllicontomakechangestoallcolorblocksatonetime.Add/RemoveColorSelectionisautomaticallyactivated.Todeselectacolorblock,justtouchitinthelist.TouchAdd/RemoveColorSelectiontodeactivatethefunctionanddeselectallcolorblocks.
UseSelectEqualtochangeallthesamecolorblocksatonetime. Touch the color block you want to change, then touch SelectEqualtoselectallidenticalcolorblocksinthecolorblocklist.Add/RemoveColorSelectionisautomaticallyactivated.If twoormoredifferentcolorblocksareselected,SelectEqualwillselectallidenticalcolorblocksof all selected colors.
on-screen display of selected and non-selected color blocksSelectedcolorblocksareshownin2-dimensionalor3-dimensionalview(see“2-dimensional/3-dimensionalviewtoggle”onthispage).Colorblocksthatarenotselected are shown as colored dots on the screen, making it easy to see which color areas in the design will be changed.
gridTouchthegridicontoactivate/deactivateagridontheembroideryfield.Thegridisusedasaguidewhencombining or placing designs. The distance between the gridlinesequalsamaximumof 20mm.Asyouzoominontheembroideryfield,thedistancebetweentheselinesreduces to 10mm and 5mm, indicated with lighter lines.
Thread Color Change
Grid Add/Remove Color Selection
Select All
Select Equal2-dimensional/ 3-dimensional view toggle
2-diMensional/3-diMensional view ToggleIn2-dimensionalview,thedesignsloadfasteronthescreen and it is easier to see the color blocks in the design. 3-dimensionalviewgivesamorerealisticviewof thedesigns, with added shadows and depth.
Touchthe”3D”icontochangeto3-dimensionalview.Theicon becomes selected. Touch again to deselect and return to2-dimensionalview.
EmbroidEry Edit 7:7
ediT sTiTCh prograMIf youtouchtheEditStitchProgramicon,awindowwillopensoyoucaneditastitchprogramthatyouhavecreated.Youcaninsertnewstitchesordeletestitches.If youhaveprogrammedstitchesinEmbroideryMode,youcansavethestitchesasapartof adesign,andtheycanonlybestitchedinembroidery mode.
To save a stitch program in embroidery ModeTouchtheStartMenu,touchtheStitchMenu.ProgramyourstitchandtouchOKinthelowerrightcornerof thescreen.YouwillnowgobacktoEmbroideryEdit.TouchtheSavetoMyDesignsicontosavethestitchprograminMyDesigns.AstitchprogrammadeinEmbroideryModewillnotbe able to open in the sewing mode.
Read more about how to program a stitch in chapter 5.
save ediTed designTouch the SavetoMyDesignsicontosaveyourediteddesignordesigncombination.Inthewindowthatopens,selectwhereyouwanttosavethedesign.SelectMyDesigns,My Files or anexternaldevice.DesignssavedinMyDesignsareavailablethroughtheDesignsmenuontheExtended Toolbar.
park posiTionTouchtheParkPositionicontomovetheembroideryarmtoParkPositionfor storing the embroidery unit.
Move To hoopTouchMovetoHooptomoveanydesignthatisoutsidethehoopareaintothe hoop area. The design will be placed at the outer most edge of the hoop.
zooMzoom in/zoom outZoominoroutof theembroideryfield.UseZoomIn(+)togetaclose-upof anareawithintheembroiderydesign.Use(-)toZoomOut.
zoom to hoopZoomtoHoopwilladjusttheembroideryfieldtofittheselectedhoop.
zoom to allZoomtoAllwillshowallthedesign(s)intheembroiderycombination.
zoom to boxTouchanddragyourstylusintheembroideryfieldonthescreentocreateabox.Thescreenzoomstoshowthatspecificarea.
Note: As you Zoom In your design gets very large. To locate a specific part of your design touch Pan. Touch and drag or use the control arrows to find the part you wish to work with.
sTiTCh-oUT order of seleCTed designDesignsarestitchedoutintheordertheyareloadedtoEmbroideryedit.Whenworkingwithseveraldesignsatatimeitcanbeusefultoknowinwhichordertheywillbestitchedout.Selectadesignbytouchingittoseewhichstitchoutnumberithas.2(5)forexamplemeansthattheselecteddesignisthethirdoutof fivedesignstobestitchedout.
Zoom to Hoop
Zoom to All
Zoom to Box

7:8
ToUCh fUnCTionsAselecteddesignhasaredboxaroundit.Aselectedembroidery font text has a blue box around it. To select a designtouchitonthescreen.Youcanuseyourstylustomakeadjustments directly on screen by touching and dragging in theembroideryfield.YoucanPan,Position,RotateandScale,dependingonwhichtouchfunctionisactive.YoucanalsousethearrowsintheControltofinetune.
positionWhenPositionisactive,youcanmovetheselecteddesign(s)anywhereintheembroideryfield.ThenumbersabovetheControl show, in millimeters, the designs current horizontal andverticalpositionfromthecenterof thehoop.
TouchtheControlCentericonandthedesign(s)willbemovedtothecenterof thehoop.
scaleWhenScaleisactive,youcanincreaseordecreasetheselecteddesignoragroupof designsby20%.Bydefault,the proportions are locked. This is indicated with a closed padlock in the Control Center icon. To unlock, just touch thepadlock.Heightandwidthcannowbechangedindividually.
If youmovethestylusonthescreentowardsthecenterof theselecteddesign(s),thesizewilldecrease.If youmovethestylusfromthecenterof theselecteddesign(s),thesizewillincrease.UsetheControltofinetune.
Note: To increase or decrease a design more than 20%, use the Resize function.
panWhenPanisactive,youcanpantheembroideryfieldinthezoomedview.
TouchtheControlCentericontocentertheviewoverthehoop.
rotateWhenRotateisactive,theselecteddesign(s)willberotatedaroundthecenterpointof theselecteddesign(s).
UsethearrowsintheControltorotatethedesign(s)inonedegree increments. Each touch of the Control Center icon willrotatethedesign(s)90degreesclockwise.
AbovetheControlyoucanseetheangleindegreesthatthedesign(s)hasrotatedfromitsoriginalposition.
Position
Scale
Pan
Rotate
Control Center
Control
EmbroidEry Edit 7:9
Undo
Redo
UndoTouch the arrow pointing left to undo your latest design adjustment. Touch repeatedly to step back through your adjustments.
Note: Not all adjustments can be undone. The arrows will be greyed out if undo is not possible.
redoRedoisactivatedwhenUndoistouched,soyoucanstepforward again through your adjustments.
Mirror side-To-side and end-To-endTomirroradesignhorizontally,touchtheMirrorSide-to-Sideicon.Tomirrorvertically,touchtheMirrorEnd-to-End icon.
deleTeWhenyoutouchtheDeleteicon,theselected design(s)willbedeletedfromtheembroideryfield.If morethanonedesignisselected,apop-upmessagewillaskyoutoconfirmthe deletion.
Touch&HoldtheDeleteicontodeleteallthedesignsintheembroideryfield.Apop-upmessagetoconfirmthedelete all designs will appear.
dUpliCaTeTouchtheDuplicateicontomakeacopyof theselecteddesign(s).
If youwantmorethanonecopy,Touch&Holdtheiconand a pop-up message will open where you can enter the desired number of copies.
See7:10-7:11forinformationaboutselectinganddeselecting designs.
Mirror Side-to-Side
Mirror End-to-End
7:10
how To seleCT designsWhen loading designs into Embroidery Edit, the last design loadedisselectedbydefault.Aselecteddesignhasaredboxaroundit.Aselectedembroideryfonttexthasabluebox around it.
select one designTo select one design you can either touch the design on thescreenortouchtheStepThroughDesignsicon.TheStepThroughDesignsiconallowsyoutoselectoneof thedesigns on your screen if you wish to alter it in some way. EverytimeyoutouchtheStepThroughDesignsicon,youwill select the next design in the order in which they were loaded.
1. InEmbroideryEdit,touchStartonthetoolbartoopentheExtendedtoolbar.TheDesignMenuwillopen.
2. Selectadesignfromthedropdownlistbytouchingit.3. TouchtheDuplicateiconthreetimes.Thelastdesign
willhavearedboxarounditwhichmeansthatitisselected.
4. If youwanttoselectthefirstdesignyouinserted,touchtheStepThroughDesignsicon.Everytimeyoutouchthaticon,youwillmovetothenextdesignintheordertheyhavebeenloaded.
5. Onceyouhaveselectedthedesignyouwant,youcandelete, duplicate, position, scale, mirror, resize, and/orrotateit.Onlythedesignthatisselectedthatwillbeaffected by your changes.
select all6. If you want to select all designs, simply touch the
SelectAllicon.Allthedesignsonyourscreenwillbeselected.Youcannowmove,delete,duplicate,position, scale, mirror, resize and or rotate them.
1. Selected Design(s) have a red box around them.
2. Marked and Selected Design(s) have a red dotted box around them.
3. A black dotted box around a design means it is marked and not active.
Step Through Designs
Select All
Add/Remove Selection
Start Menu
Duplicate
Delete
advanCed seleCTion
selection ModesTherearethreedifferentwaysadesigncanbechosenonthescreen.Thisgivesyouthe opportunity to select a subset of the loaded designs and apply changes only to those designs.
1. Selecteddesign(1)-Thedesignismarkedwithasolidredline.Youcanmakechangestothedesign(s).Youcanscale,rotate,resizeandedittheselecteddesign.
2. MarkedandSelected-Thedesignismarkedwithadottedredline.Youareabletomakechangestothemarkedandselecteddesign.YoucanremovethisdesignfromtheselecteddesignsbypressingtheAdd/RemoveSelectionicon.
3. Marked design - When two or more designs are on your screen, you are able to mark a design. The design is marked by a dotted black line.
It will not be affected by changes such as scale and rotation. When you select theAdd/RemoveSelectionsicon,theblackdottedboxturnsred.Yourdesignis now marked and selected.
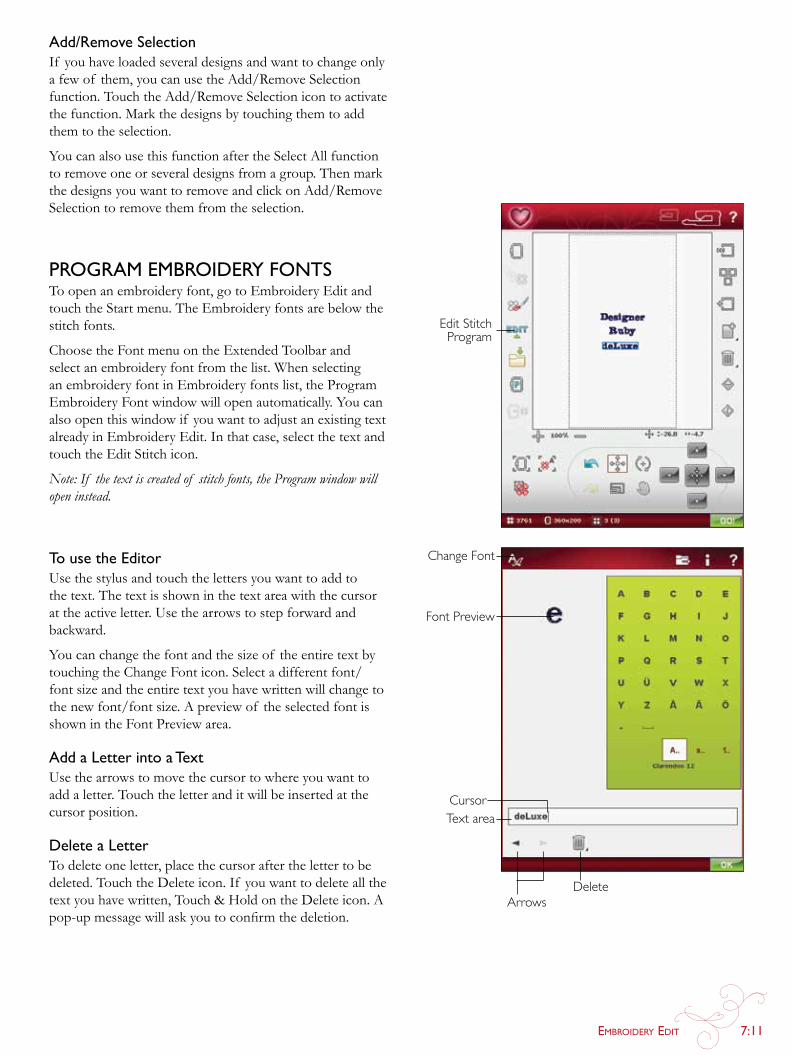
EmbroidEry Edit 7:11
DeleteArrows
add/remove selectionIf youhaveloadedseveraldesignsandwanttochangeonlyafewof them,youcanusetheAdd/RemoveSelectionfunction.TouchtheAdd/RemoveSelectionicontoactivatethe function. Mark the designs by touching them to add them to the selection.
YoucanalsousethisfunctionaftertheSelectAllfunctiontoremoveoneorseveraldesignsfromagroup.ThenmarkthedesignsyouwanttoremoveandclickonAdd/RemoveSelectiontoremovethemfromtheselection.
prograM eMbroidery fonTsTo open an embroidery font, go to Embroidery Edit and touchtheStartmenu.TheEmbroideryfontsarebelowthestitch fonts.
Choose the Font menu on the Extended Toolbar and select an embroidery font from the list. When selecting an embroidery font in Embroidery fonts list, the Program EmbroideryFontwindowwillopenautomatically.Youcanalso open this window if you want to adjust an existing text already in Embroidery Edit. In that case, select the text and touchtheEditStitchicon.
Note: If the text is created of stitch fonts, the Program window will open instead.
To use the editorUse the stylus and touch the letters you want to add to the text. The text is shown in the text area with the cursor attheactiveletter.Usethearrowstostepforwardandbackward.
Youcanchangethefontandthesizeof theentiretextbytouchingtheChangeFonticon.Selectadifferentfont/fontsizeandtheentiretextyouhavewrittenwillchangetothenewfont/fontsize.Apreviewof theselectedfontisshownintheFontPreviewarea.
add a letter into a TextUsethearrowstomovethecursortowhereyouwanttoadd a letter. Touch the letter and it will be inserted at the cursor position.
delete a letterTo delete one letter, place the cursor after the letter to be deleted.TouchtheDeleteicon.If youwanttodeleteallthetextyouhavewritten,Touch&HoldontheDeleteicon.Apop-upmessagewillaskyoutoconfirmthedeletion.
Edit Stitch Program
Change Font
Font Preview
Text areaCursor
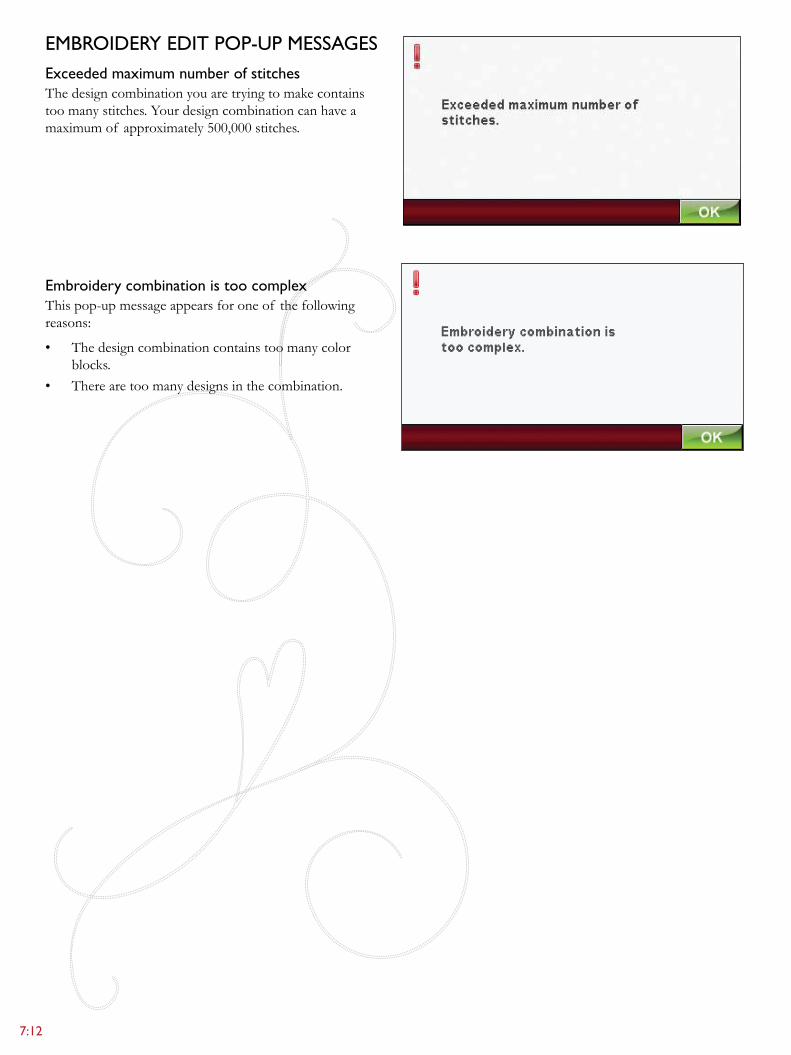
7:12
eMbroidery ediT pop-Up Messagesexceeded maximum number of stitchesThe design combination you are trying to make contains toomanystitches.Yourdesigncombinationcanhaveamaximum of approximately 500,000 stitches.
embroidery combination is too complexThis pop-up message appears for one of the following reasons:
• Thedesigncombinationcontainstoomanycolorblocks.
• Therearetoomanydesignsinthecombination.
8 eMbroidery sTiTCh-oUT
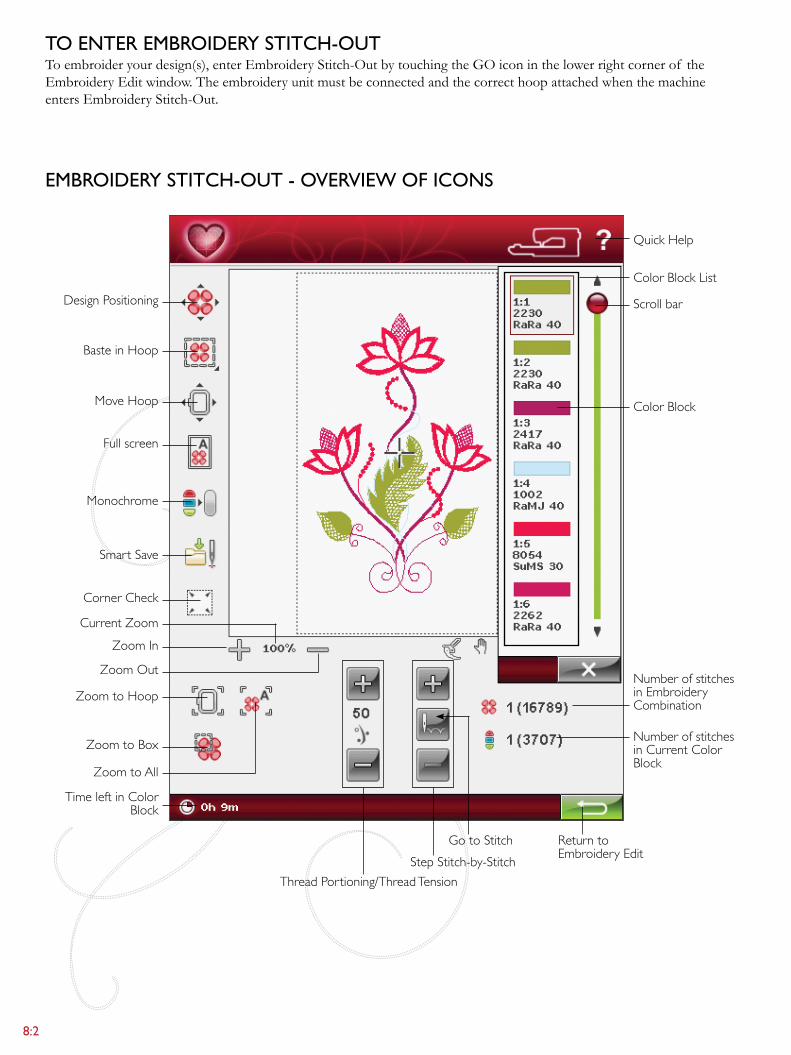
8:2
eMbroidery sTiTCh-oUT - overview of iCons
To enTer eMbroidery sTiTCh-oUTToembroideryourdesign(s),enterEmbroideryStitch-OutbytouchingthegOiconinthelowerrightcornerof theEmbroidery Edit window. The embroidery unit must be connected and the correct hoop attached when the machine entersEmbroideryStitch-Out.
Design Positioning
Monochrome
Move Hoop
Full screen
Corner Check
Baste in Hoop
Quick Help
Scroll bar
Number of stitches in Current Color Block
Number of stitches in Embroidery Combination
Color Block
Zoom Out
Zoom In
Zoom to Hoop
Zoom to All
Zoom to Box
Return to Embroidery Edit
Thread Portioning/Thread TensionStep Stitch-by-Stitch
Time left in Color Block
Color Block List
Current Zoom
Go to Stitch
Smart Save
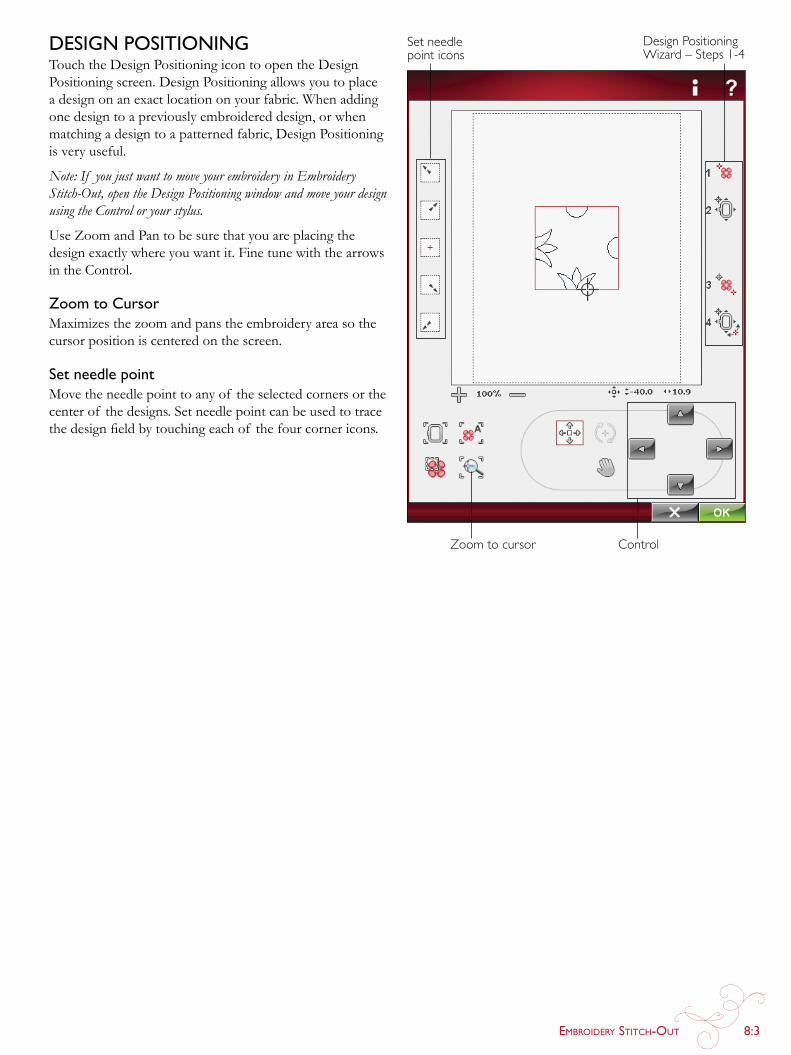
EmbroidEry Stitch-out 8:3
Set needle point icons
ControlZoom to cursor
Design Positioning Wizard – Steps 1-4design posiTioning
TouchtheDesignPositioningicontoopentheDesignPositioningscreen.DesignPositioningallowsyoutoplacea design on an exact location on your fabric. When adding onedesigntoapreviouslyembroidereddesign,orwhenmatchingadesigntoapatternedfabric,DesignPositioningisveryuseful.
Note: If you just want to move your embroidery in Embroidery Stitch-Out, open the Design Positioning window and move your design using the Control or your stylus.
Use Zoom and Pan to be sure that you are placing the design exactly where you want it. Fine tune with the arrows in the Control.
zoom to CursorMaximizes the zoom and pans the embroidery area so the cursor position is centered on the screen.
set needle pointMovetheneedlepointtoanyof theselectedcornersorthecenterof thedesigns.Setneedlepointcanbeusedtotracethedesignfieldbytouchingeachof thefourcornericons.
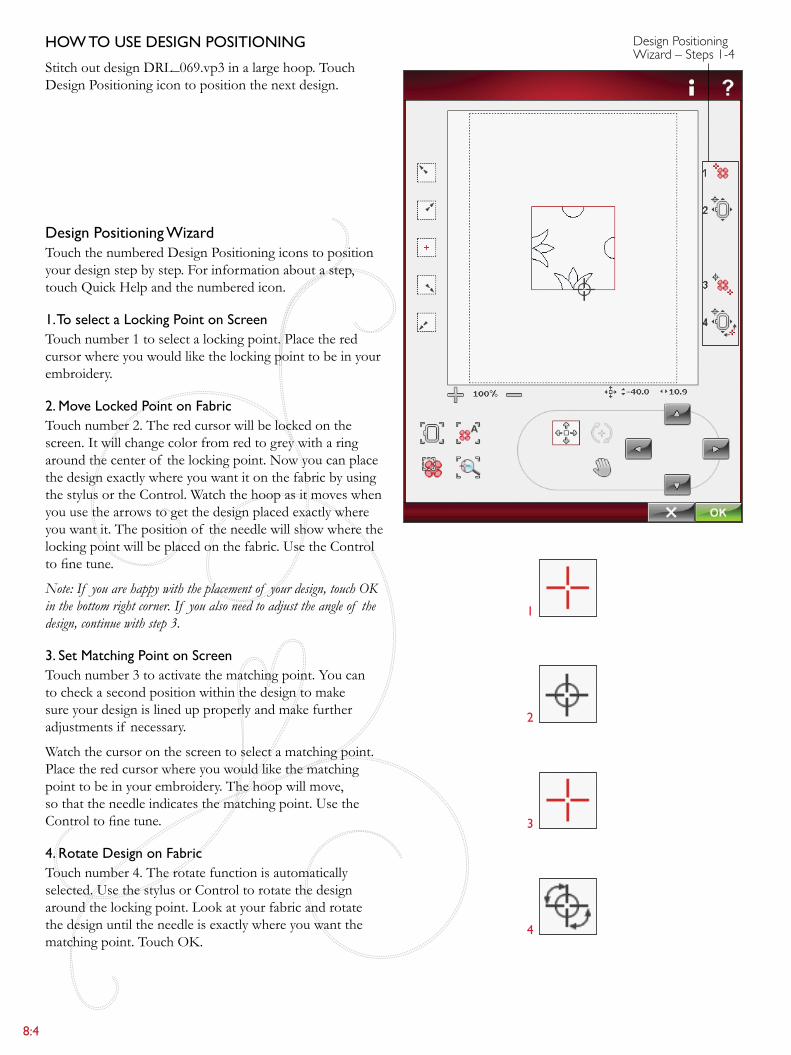
8:4
1
4
3
2
how To Use design posiTioningStitchoutdesignDRL_069.vp3inalargehoop.TouchDesignPositioningicontopositionthenextdesign.
design positioning wizardTouchthenumberedDesignPositioningiconstopositionyour design step by step. For information about a step, touchQuickHelpandthenumberedicon.
1. To select a locking point on screenTouch number 1 to select a locking point. Place the red cursor where you would like the locking point to be in your embroidery.
2. Move locked point on fabricTouch number 2. The red cursor will be locked on the screen. It will change color from red to grey with a ring around the center of the locking point. Now you can place the design exactly where you want it on the fabric by using thestylusortheControl.Watchthehoopasitmoveswhenyou use the arrows to get the design placed exactly where you want it. The position of the needle will show where the locking point will be placed on the fabric. Use the Control tofinetune.
Note: If you are happy with the placement of your design, touch OK in the bottom right corner. If you also need to adjust the angle of the design, continue with step 3.
3. set Matching point on screenTouchnumber3toactivatethematchingpoint.Youcanto check a second position within the design to make sure your design is lined up properly and make further adjustments if necessary.
Watch the cursor on the screen to select a matching point. Place the red cursor where you would like the matching pointtobeinyourembroidery.Thehoopwillmove,so that the needle indicates the matching point. Use the Controltofinetune.
4. rotate design on fabricTouch number 4. The rotate function is automatically selected. Use the stylus or Control to rotate the design around the locking point. Look at your fabric and rotate the design until the needle is exactly where you want the matchingpoint.TouchOK.
Design Positioning Wizard – Steps 1-4

EmbroidEry Stitch-out 8:5
design posiTioning exerCise
1. SelectDesignDRL_069.vp3andembroideroneintheupper left corner of the hoop. Touch number 1. Use thestylusorControlArrowstomovethecursortothe upper left corner of the design. Touch Zoom to Cursor to maximize the zoom so that you will be able toplacethecursoraccuratelyonthedesign.SelectPantomovethedesignonthescreenwithoutmovingthecursor.ReselectPositionwhenyouwanttomovethecursor.
2. Touchnumber2.Thecursorisnowlocked.Movethe locked point to the upper left corner of the embroidered design. Use the Position function and theControltomovethecursor.Watchthehoopmoveuntiltheneedleisexactlyabovethepointwhereyouwanttheembroideriestoconnect.Onceyouaresatisfied,touchOKtoclosetheDesignPositioningwindow and start embroidering.
3. If youwanttolineupthedesignwiththepreviouslyembroidered design, you can select a second matching point.Touchnumber3andmovetheredcursortoapoint where you want the second matching point to be. Watch the screen and zoom in as much as you can so that you will be able to place the cursor accurately.
4. Touch number 4 to rotate the design so that it lines up withthepreviouslyembroidereddesignonyourfabric.Check that the needle is in the exact position on the fabric.
5. TouchOKtocloseDesignPositioningandstartembroidering.
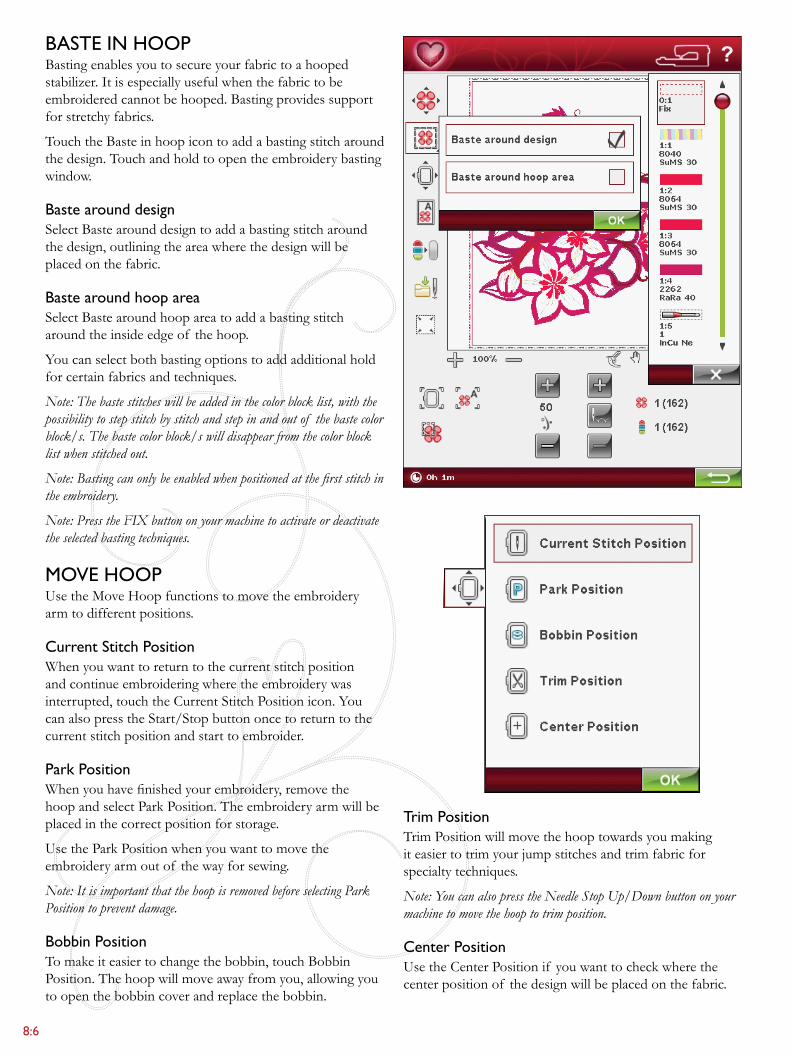
8:6
basTe in hoopBastingenablesyoutosecureyourfabrictoahoopedstabilizer. It is especially useful when the fabric to be embroideredcannotbehooped.Bastingprovidessupportfor stretchy fabrics.
TouchtheBasteinhoopicontoaddabastingstitcharoundthe design. Touch and hold to open the embroidery basting window.
baste around designSelectBastearounddesigntoaddabastingstitcharoundthe design, outlining the area where the design will be placed on the fabric.
baste around hoop areaSelectBastearoundhoopareatoaddabastingstitcharound the inside edge of the hoop.
Youcanselectbothbastingoptionstoaddadditionalholdforcertainfabricsandtechniques.
Note: The baste stitches will be added in the color block list, with the possibility to step stitch by stitch and step in and out of the baste color block/s. The baste color block/s will disappear from the color block list when stitched out.
Note: Basting can only be enabled when positioned at the first stitch in the embroidery.
Note: Press the FIX button on your machine to activate or deactivate the selected basting techniques.
Move hoopUsetheMoveHoopfunctionstomovetheembroideryarm to different positions.
Current stitch positionWhen you want to return to the current stitch position and continue embroidering where the embroidery was interrupted,touchtheCurrentStitchPositionicon.YoucanalsopresstheStart/Stopbuttononcetoreturntothecurrent stitch position and start to embroider.
park positionWhenyouhavefinishedyourembroidery,removethehoop and select Park Position. The embroidery arm will be placed in the correct position for storage.
UsetheParkPositionwhenyouwanttomovetheembroidery arm out of the way for sewing.
Note: It is important that the hoop is removed before selecting Park Position to prevent damage.
bobbin positionTomakeiteasiertochangethebobbin,touchBobbinPosition.Thehoopwillmoveawayfromyou,allowingyoutoopenthebobbincoverandreplacethebobbin.
Trim positionTrimPositionwillmovethehooptowardsyoumakingit easier to trim your jump stitches and trim fabric for specialtytechniques.
Note: You can also press the Needle Stop Up/Down button on your machine to move the hoop to trim position.
Center positionUse the Center Position if you want to check where the center position of the design will be placed on the fabric.
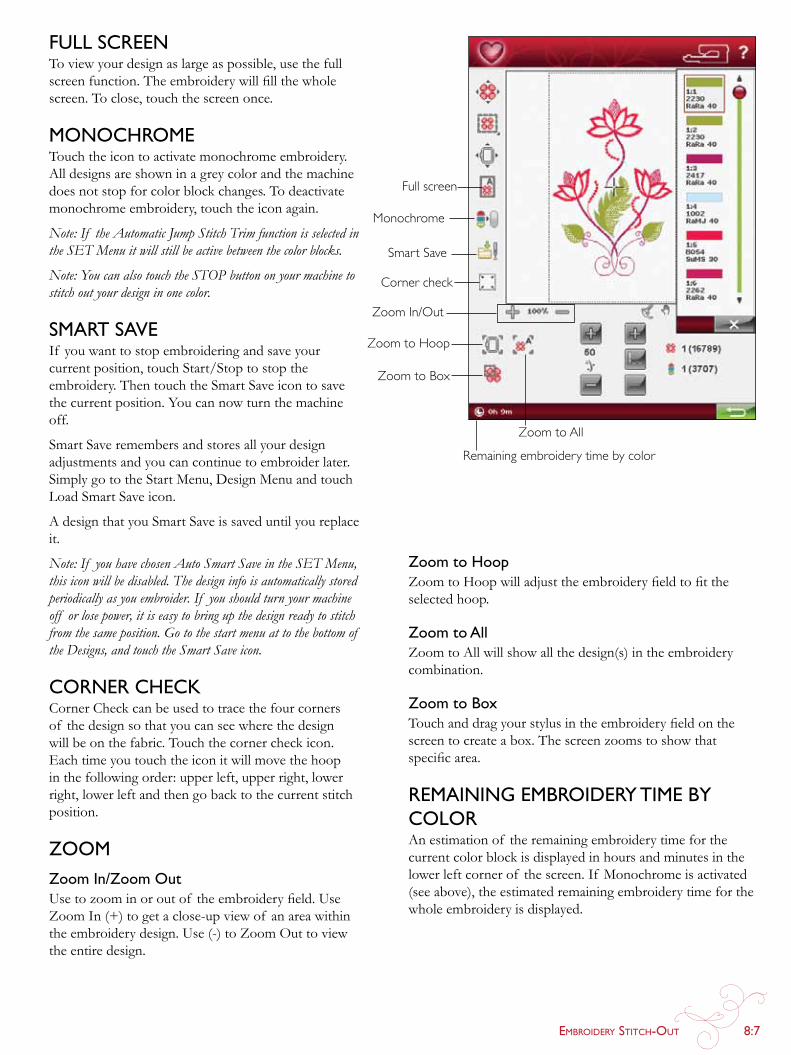
EmbroidEry Stitch-out 8:7
fUll sCreenToviewyourdesignaslargeaspossible,usethefullscreenfunction.Theembroiderywillfillthewholescreen. To close, touch the screen once.
MonoChroMeTouchtheicontoactivatemonochromeembroidery.Alldesignsareshowninagreycolorandthemachinedoesnotstopforcolorblockchanges.Todeactivatemonochrome embroidery, touch the icon again.
Note: If the Automatic Jump Stitch Trim function is selected in the SET Menu it will still be active between the color blocks.
Note: You can also touch the STOP button on your machine to stitch out your design in one color.
sMarT saveIf youwanttostopembroideringandsaveyourcurrentposition,touchStart/Stoptostoptheembroidery.ThentouchtheSmartSaveicontosavethecurrentposition.Youcannowturnthemachineoff.
SmartSaveremembersandstoresallyourdesignadjustments and you can continue to embroider later. SimplygototheStartMenu,DesignMenuandtouchLoadSmartSaveicon.
AdesignthatyouSmartSaveissaveduntilyoureplaceit.
Note: If you have chosen Auto Smart Save in the SET Menu, this icon will be disabled. The design info is automatically stored periodically as you embroider. If you should turn your machine off or lose power, it is easy to bring up the design ready to stitch from the same position. Go to the start menu at to the bottom of the Designs, and touch the Smart Save icon.
Corner CheCkCorner Check can be used to trace the four corners of the design so that you can see where the design will be on the fabric. Touch the corner check icon. Eachtimeyoutouchtheiconitwillmovethehoopin the following order: upper left, upper right, lower right, lower left and then go back to the current stitch position.
zooMzoom in/zoom outUsetozoominoroutof theembroideryfield.UseZoomIn(+)togetaclose-upviewof anareawithintheembroiderydesign.Use(-)toZoomOuttoviewthe entire design.
Full screen
Monochrome
Corner check
Zoom In/Out
Zoom to Hoop
Zoom to Box
Zoom to All
Remaining embroidery time by color
zoom to hoopZoomtoHoopwilladjusttheembroideryfieldtofittheselected hoop.
zoom to allZoomtoAllwillshowallthedesign(s)intheembroiderycombination.
zoom to boxTouchanddragyourstylusintheembroideryfieldonthescreen to create a box. The screen zooms to show that specificarea.
reMaining eMbroidery TiMe by ColorAnestimationof theremainingembroiderytimeforthecurrent color block is displayed in hours and minutes in the lowerleftcornerof thescreen.If Monochromeisactivated(seeabove),theestimatedremainingembroiderytimeforthewhole embroidery is displayed.
Smart Save
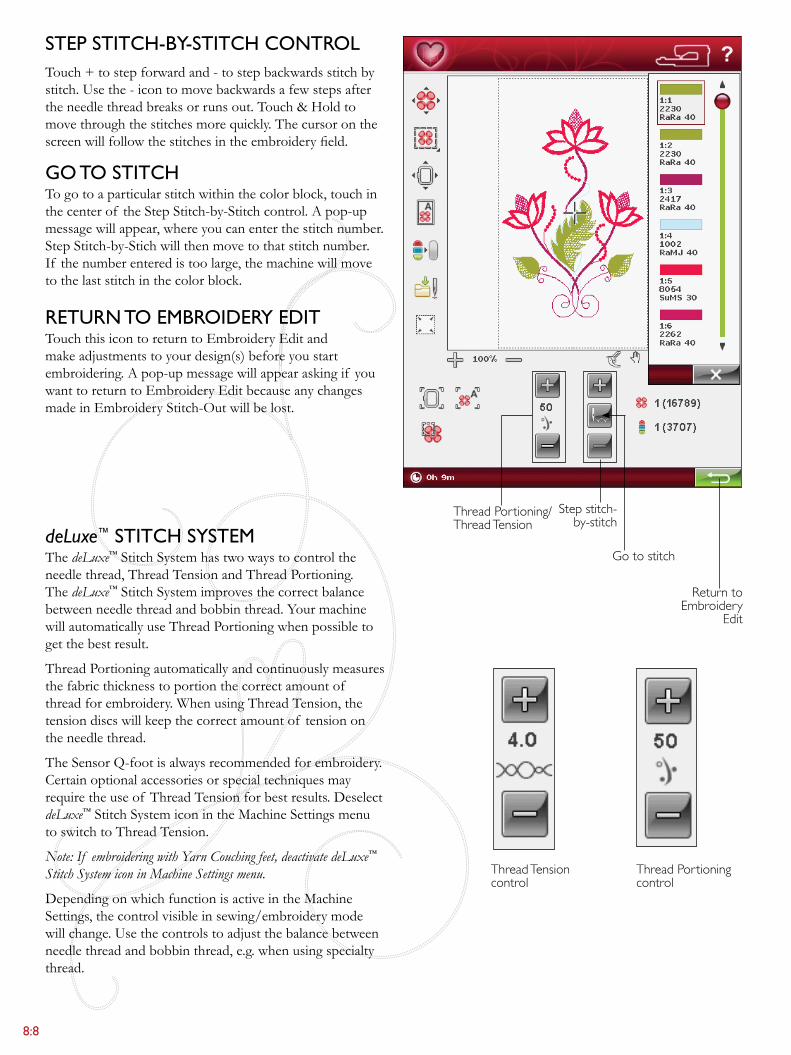
8:8
sTep sTiTCh-by-sTiTCh ConTrolTouch+tostepforwardand-tostepbackwardsstitchbystitch.Usethe-icontomovebackwardsafewstepsaftertheneedlethreadbreaksorrunsout.Touch&Holdtomovethroughthestitchesmorequickly.Thecursor on the screenwillfollowthestitchesintheembroideryfield.
go To sTiTChTo go to a particular stitch within the color block, touch in thecenterof theStepStitch-by-Stitchcontrol.Apop-upmessage will appear, where you can enter the stitch number. StepStitch-by-Stichwillthenmovetothatstitchnumber.If thenumberenteredistoolarge,themachinewillmoveto the last stitch in the color block.
reTUrn To eMbroidery ediTTouch this icon to return to Embroidery Edit and makeadjustmentstoyourdesign(s)beforeyoustartembroidering.Apop-upmessagewillappearaskingif youwant to return to Embroidery Edit because any changes madeinEmbroideryStitch-Outwillbelost.
Thread Portioning/Thread Tension
Return to Embroidery
Edit
Go to stitchdeLuxe™ sTiTCh sysTeMThe deLuxe™StitchSystemhastwowaystocontroltheneedle thread, Thread Tension and Thread Portioning. The deLuxe™StitchSystemimprovesthecorrectbalancebetweenneedlethreadandbobbinthread.Yourmachinewill automatically use Thread Portioning when possible to get the best result.
Thread Portioning automatically and continuously measures the fabric thickness to portion the correct amount of thread for embroidery. When using Thread Tension, the tension discs will keep the correct amount of tension on the needle thread.
TheSensorQ-footisalwaysrecommendedforembroidery.Certainoptionalaccessoriesorspecialtechniquesmayrequiretheuseof ThreadTensionforbestresults.DeselectdeLuxe™StitchSystemiconintheMachineSettingsmenuto switch to Thread Tension.
Note: If embroidering with Yarn Couching feet, deactivate deLuxe™ Stitch System icon in Machine Settings menu.
DependingonwhichfunctionisactiveintheMachineSettings,thecontrolvisibleinsewing/embroiderymodewill change. Use the controls to adjust the balance between needle thread and bobbin thread, e.g. when using specialty thread.
Thread Portioning control
Thread Tension control
Step stitch-by-stitch

EmbroidEry Stitch-out 8:9
Current color block Scroll bar
Number of stitches in current color block
Number of stitches in embroidery combination
Color bloCk lisTAllcolorsintheloadeddesign(s)areshownintheorderthey will be embroidered. Each listed color shows color orderandnumber.Alsoshownarethethreadmanufacturer,thread weight and color number. Use the scroll bar to see all of the colors in the list. To go to another color block, justtouchitintheColorBlockList.
Thread manufacturer and thread number are displayed for designs in .VP3 and .VIP-format. If changing thread color, some thread information may be lost.
Example: 1:2, 2230 RaRa 40, means the second thread color in the first design loaded is thread number 2230 of Robison-Anton Rayon 40 weight. If you have questions about other abbreviations of thread manufacturers, go to your 5D™ Embroidery Software Configure program (installed with your Machine Communication program) and enter the Thread Manager. There you can find information about thread manufacturers and thread type abbreviations.
TomakechangestotheColorBlockList,returntoEmbroidery Edit.
nUMber of sTiTChes in eMbroidery CoMbinaTionThe current stitch position in the design or combination is shownnexttotheflower.Thenumberinbracketsshowsthe total number of stitches in the design or combination.
nUMber of sTiTChes in CUrrenT Color bloCkThe current stitch position in the current color block is shownnexttotheColorBlockpicture.Thenumberinbrackets shows the total number of stitches in the current color block.

8:10
Needle Stop Up/Down (Trim Position)
Speed - and +
STOP (Monochrome)
FIX (Baste)
Reverse
Start/Stop
Selective Thread Cutter
Sensor Foot Down and Pivot
speed + and -Allstitchesinyourmachineandeachhoopsizehaveapre-set, recommended sewing/embroidery speed.
PressSpeed+orSpeed-toincreaseordecreasethemaximum allowed sewing/embroidery speed. When not sewing/embroidering,pressSpeedandapop-upmessageonthescreenwillindicatethespeedsetting.Youcansetthespeed by touching the slider in the pop-up message. If you change the speed setting while sewing/embroidering no pop-up message will appear.
When sewing with metallic threads, or when sewing on delicate fabrics, lower the speed for optimal results.
sTop (MonoChroMe)PressSTOPtoeliminatestopsforcolorchangestocreatemonochrome embroidery.
fix (basTe)Press FIX to baste an outline of the embroidery design area to baste the fabric to the stabilizer.
sTarT/sTopPress this button to start and stop the machine sewing or embroidering without using the foot control. Press START/STOPtobeginandpressagaintostop.
reverseReversehasnofunctioninEmbroideryMode.
seleCTive Thread CUTTerTheSelectiveThreadCutterautomaticallycutsthethreadsandraisesthepresserfoot.Attheendof acolorblockthetopthreadonlyiscut.Whenthedesignisfinished,bothtop and bobbin threads are cut automatically.
needle sTop Up/down (TriM posiTion)Themachinewillmovethehoopforward,towardsyou,foreasy thread trimming.
sensor fooT Up and exTra lifTPresstheSensorFootUpandExtraLifttoliftthepresserfoot to Up position. Press once more and the presser foot willraisetoExtraLift,tomakeiteasiertoinsertorremovethe hoop.
sensor fooT down and pivoTThe presser foot is lowered automatically when you start sewing/embroidering.
PressSensorFootDowntolowerthepresserfootintotheEmbroidery“float”position.
fUnCTion bUTTons in eMbroidery sTiTCh-oUT
Sensor Foot Up and Extra Lift
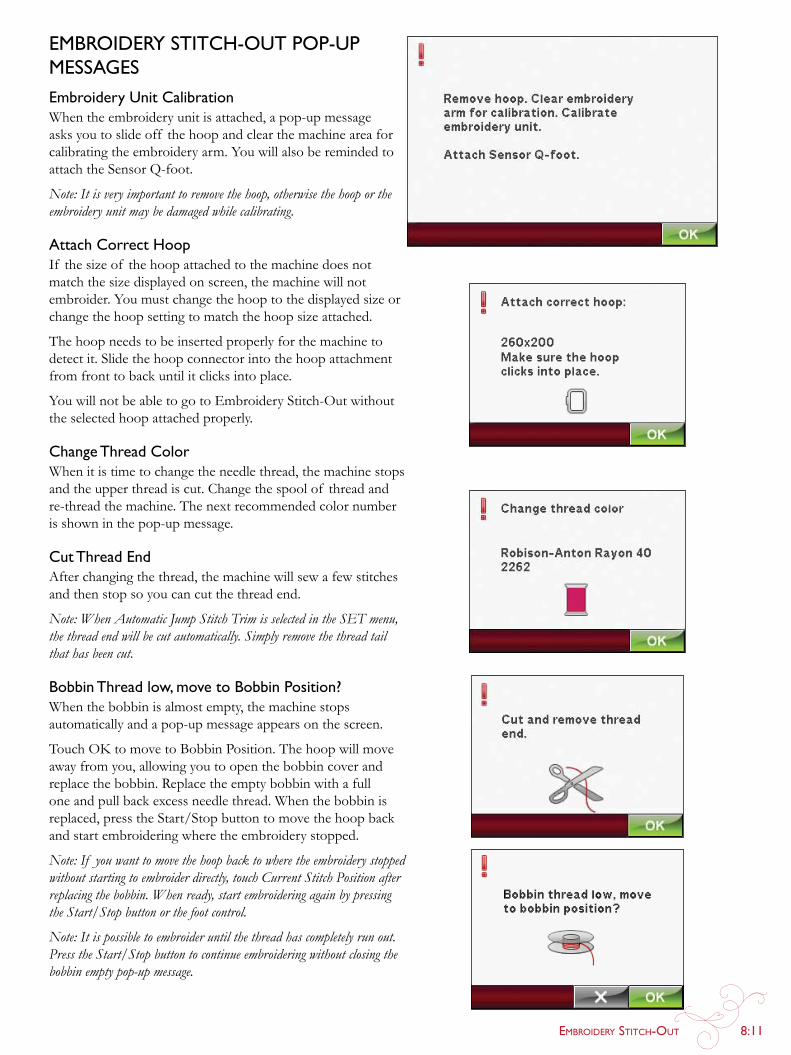
EmbroidEry Stitch-out 8:11
eMbroidery sTiTCh-oUT pop-Up Messagesembroidery Unit CalibrationWhen the embroidery unit is attached, a pop-up message asks you to slide off the hoop and clear the machine area for calibratingtheembroideryarm.YouwillalsoberemindedtoattachtheSensorQ-foot.
Note: It is very important to remove the hoop, otherwise the hoop or the embroidery unit may be damaged while calibrating.
attach Correct hoopIf the size of the hoop attached to the machine does not match the size displayed on screen, the machine will not embroider.Youmustchangethehooptothedisplayedsizeorchange the hoop setting to match the hoop size attached.
The hoop needs to be inserted properly for the machine to detectit.Slidethehoopconnectorintothehoopattachmentfrom front to back until it clicks into place.
YouwillnotbeabletogotoEmbroideryStitch-Outwithoutthe selected hoop attached properly.
Change Thread ColorWhen it is time to change the needle thread, the machine stops and the upper thread is cut. Change the spool of thread and re-thread the machine. The next recommended color number is shown in the pop-up message.
Cut Thread endAfterchangingthethread,themachinewillsewafewstitchesand then stop so you can cut the thread end.
Note: When Automatic Jump Stitch Trim is selected in the SET menu, the thread end will be cut automatically. Simply remove the thread tail that has been cut.
bobbin Thread low, move to bobbin position?When the bobbin is almost empty, the machine stops automatically and a pop-up message appears on the screen.
TouchOKtomovetoBobbinPosition.Thehoopwillmoveawayfromyou,allowingyoutoopenthebobbincoverandreplace the bobbin. Replace the empty bobbin with a full one and pull back excess needle thread. When the bobbin is replaced,presstheStart/Stopbuttontomovethehoopbackand start embroidering where the embroidery stopped.
Note: If you want to move the hoop back to where the embroidery stopped without starting to embroider directly, touch Current Stitch Position after replacing the bobbin. When ready, start embroidering again by pressing the Start/Stop button or the foot control.
Note: It is possible to embroider until the thread has completely run out. Press the Start/Stop button to continue embroidering without closing the bobbin empty pop-up message.
fUnCTion bUTTons in eMbroidery sTiTCh-oUT
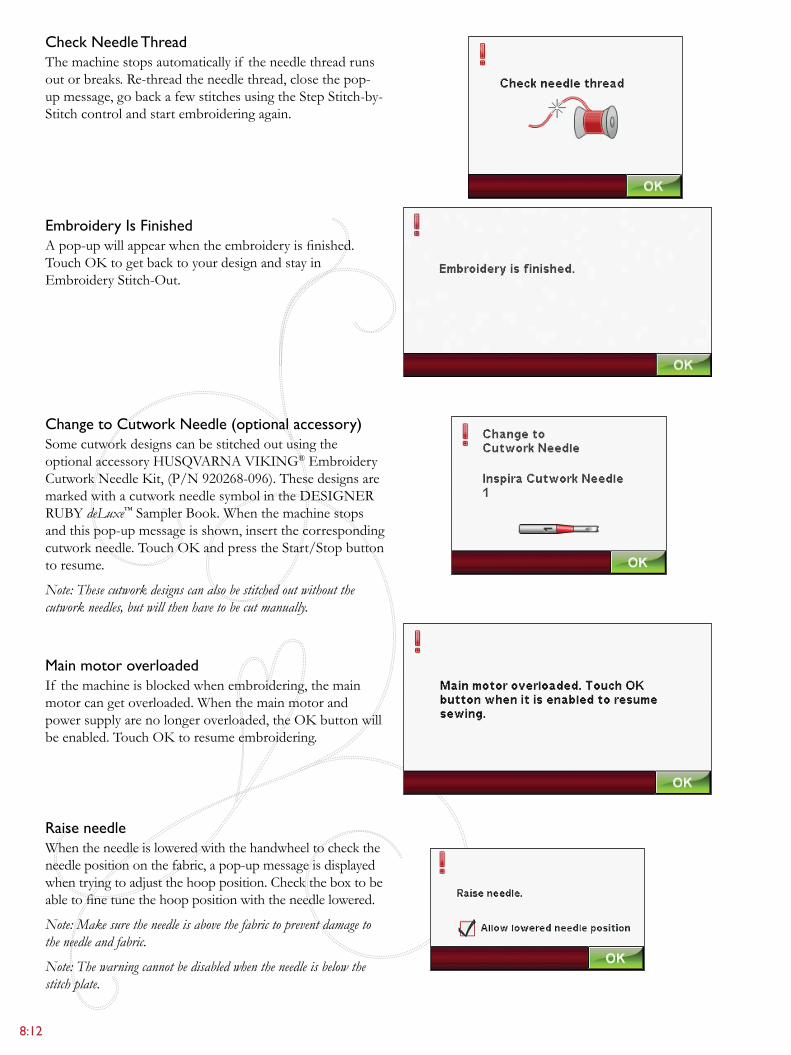
8:12
Check needle ThreadThe machine stops automatically if the needle thread runs out or breaks. Re-thread the needle thread, close the pop-upmessage,gobackafewstitchesusingtheStepStitch-by-Stitchcontrolandstartembroideringagain.
embroidery is finishedApop-upwillappearwhentheembroideryisfinished.TouchOKtogetbacktoyourdesignandstayinEmbroideryStitch-Out.
Change to Cutwork needle (optional accessory)SomecutworkdesignscanbestitchedoutusingtheoptionalaccessoryHUSQVARNAVIKINg® Embroidery CutworkNeedleKit,(P/N920268-096).ThesedesignsaremarkedwithacutworkneedlesymbolintheDESIgNERRUBYdeLuxe™SamplerBook.Whenthemachinestopsand this pop-up message is shown, insert the corresponding cutworkneedle.TouchOKandpresstheStart/Stopbuttonto resume.
Note: These cutwork designs can also be stitched out without the cutwork needles, but will then have to be cut manually.
Main motor overloadedIf the machine is blocked when embroidering, the main motorcangetoverloaded.Whenthemainmotorandpowersupplyarenolongeroverloaded,theOKbuttonwillbeenabled.TouchOKtoresumeembroidering.
raise needleWhen the needle is lowered with the handwheel to check the needle position on the fabric, a pop-up message is displayed when trying to adjust the hoop position. Check the box to be abletofinetunethehooppositionwiththeneedlelowered.
Note: Make sure the needle is above the fabric to prevent damage to the needle and fabric.
Note: The warning cannot be disabled when the needle is below the stitch plate.
9 file Manager
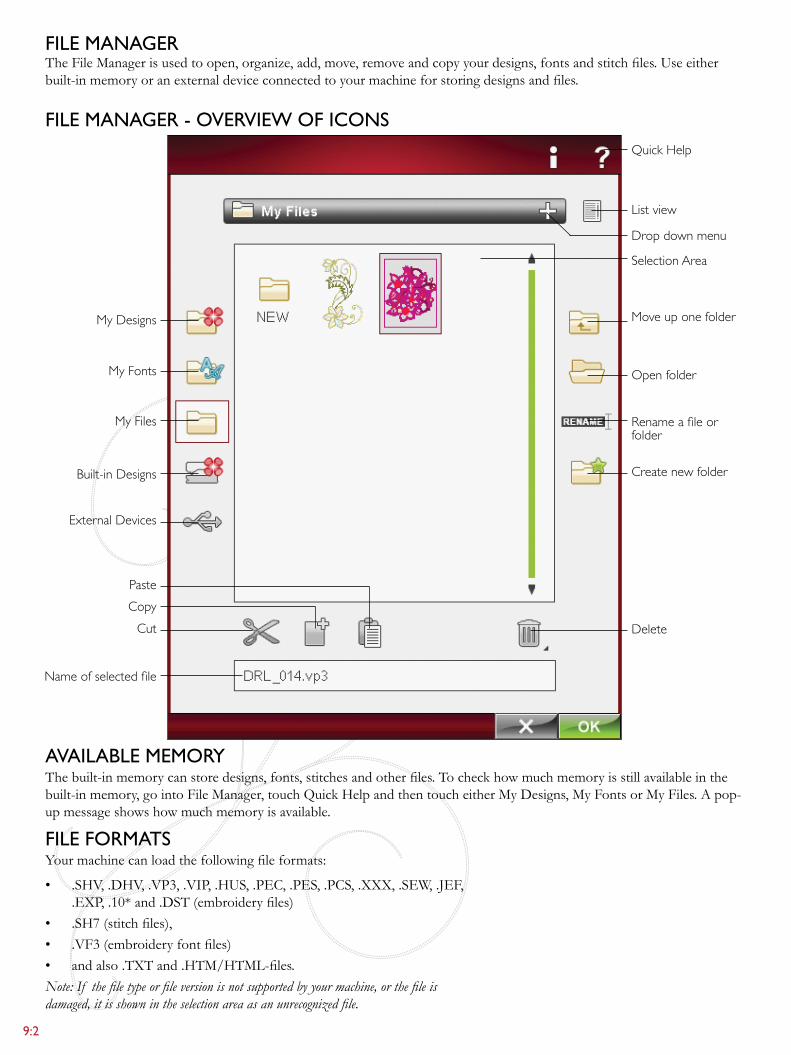
9:2
available MeMoryThebuilt-inmemorycanstoredesigns,fonts,stitchesandotherfiles.Tocheckhowmuchmemoryisstillavailableinthebuilt-inmemory,gointoFileManager,touchQuickHelpandthentoucheitherMyDesigns,MyFontsorMyFiles.Apop-upmessageshowshowmuchmemoryisavailable.
file ManagerTheFileManagerisusedtoopen,organize,add,move,removeandcopyyourdesigns,fontsandstitchfiles.Useeitherbuilt-inmemoryoranexternaldeviceconnectedtoyourmachineforstoringdesignsandfiles.
My Files
My Fonts
My Designs
Built-in Designs
External Devices
Cut
CopyPaste
Delete
Move up one folder
Open folder
Rename a file or folder
Create new folder
Name of selected file
Drop down menu
List view
Quick Help
Selection Area
file Manager - overview of iCons
file forMaTsYourmachinecanloadthefollowingfileformats:
• .SHV,.DHV,.VP3,.VIP,.HUS,.PEC,.PES,.PCS,.XXX,.SEW,.JEF,.EXP,.10*and.DST(embroideryfiles)
• .SH7(stitchfiles),• .VF3(embroideryfontfiles)• andalso.TXTand.HTM/HTML-files.Note: If the file type or file version is not supported by your machine, or the file is damaged, it is shown in the selection area as an unrecognized file.
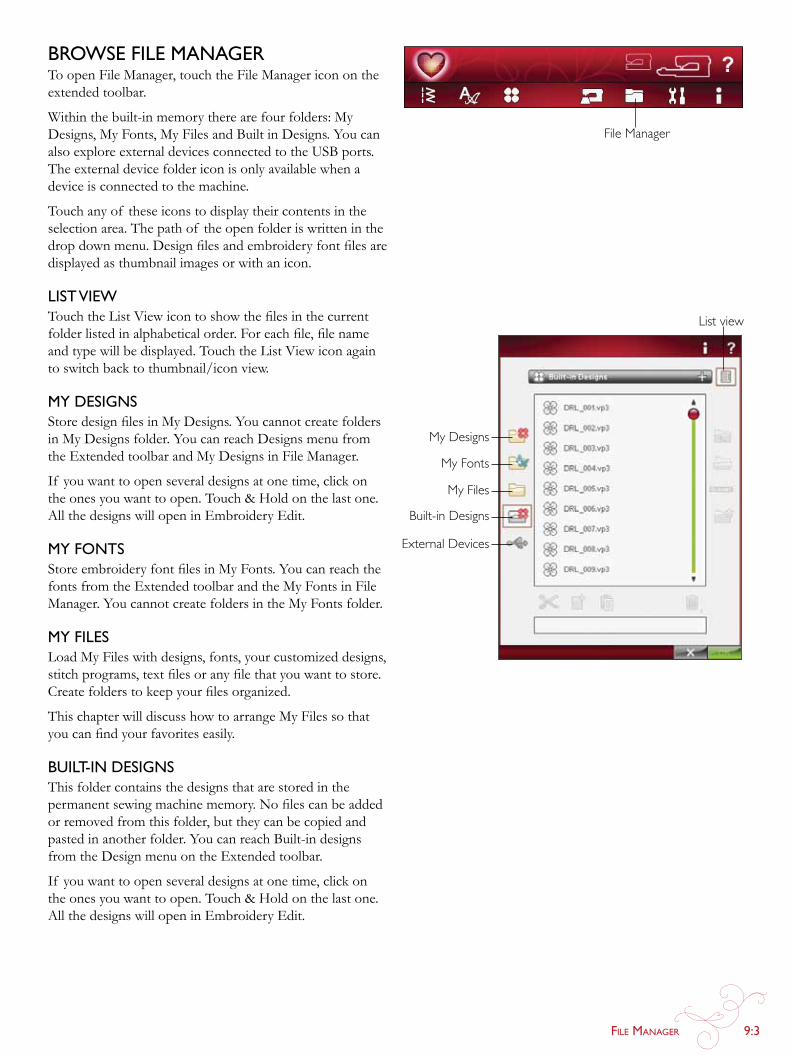
File Manager 9:3
List view
File Manager
My Files
My Fonts
My Designs
Built-in Designs
External Devices
browse file ManagerTo open File Manager, touch the File Manager icon on the extended toolbar.
Within the built-in memory there are four folders: My Designs,MyFonts,MyFilesandBuiltinDesigns.YoucanalsoexploreexternaldevicesconnectedtotheUSBports.Theexternaldevicefoldericonisonlyavailablewhenadeviceisconnectedtothemachine.
Touch any of these icons to display their contents in the selection area. The path of the open folder is written in the dropdownmenu.Designfilesandembroideryfontfilesaredisplayed as thumbnail images or with an icon.
lisT viewTouchtheListViewicontoshowthefilesinthecurrentfolderlistedinalphabeticalorder.Foreachfile,filenameand type will be displayed. Touch the List View icon again toswitchbacktothumbnail/iconview.
My designsStoredesignfilesinMyDesigns.YoucannotcreatefoldersinMyDesignsfolder.YoucanreachDesignsmenufromtheExtendedtoolbarandMyDesignsinFileManager.
If youwanttoopenseveraldesignsatonetime,clickontheonesyouwanttoopen.Touch&Holdonthelastone.AllthedesignswillopeninEmbroideryEdit.
My fonTs StoreembroideryfontfilesinMyFonts.Youcanreachthefonts from the Extended toolbar and the My Fonts in File Manager.YoucannotcreatefoldersintheMyFontsfolder.
My filesLoad My Files with designs, fonts, your customized designs, stitchprograms,textfilesoranyfilethatyouwanttostore.Createfolderstokeepyourfilesorganized.
This chapter will discuss how to arrange My Files so that youcanfindyourfavoriteseasily.
bUilT-in designsThis folder contains the designs that are stored in the permanentsewingmachinememory.Nofilescanbeaddedorremovedfromthisfolder,buttheycanbecopiedandpastedinanotherfolder.YoucanreachBuilt-indesignsfrom the DesignmenuontheExtended toolbar.
If youwanttoopenseveraldesignsatonetime,clickontheonesyouwanttoopen.Touch&Holdonthelastone.AllthedesignswillopeninEmbroidery Edit.
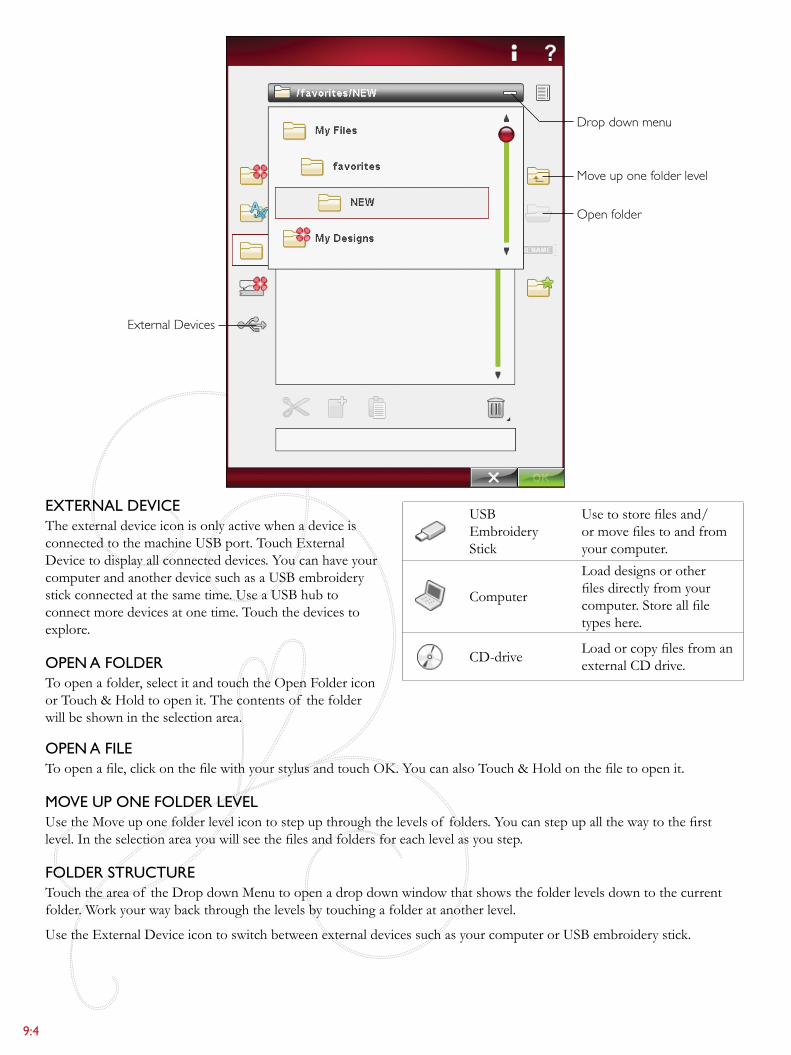
9:4
USBEmbroidery Stick
Usetostorefilesand/ormovefilestoandfromyour computer.
Computer
Load designs or other filesdirectlyfromyourcomputer.Storeallfiletypes here.
CD-drive LoadorcopyfilesfromanexternalCDdrive.
exTernal deviCeTheexternaldeviceiconisonlyactivewhenadeviceisconnectedtothemachineUSBport.TouchExternalDevicetodisplayallconnecteddevices.YoucanhaveyourcomputerandanotherdevicesuchasaUSBembroiderystickconnectedatthesametime.UseaUSBhubtoconnectmoredevicesatonetime.Touchthedevicestoexplore.
open a folderToopenafolder,selectitandtouchtheOpenFoldericonorTouch&Holdtoopenit.Thecontentsof thefolderwill be shown in the selection area.
open a fileToopenafile,clickonthefilewithyourstylusandtouchOK.YoucanalsoTouch&Holdonthefiletoopenit.
Move Up one folder levelUsetheMoveuponefolderlevelicontostepupthroughthelevelsof folders.Youcanstepupallthewaytothefirstlevel.Intheselectionareayouwillseethefilesandfoldersforeachlevelasyoustep.
folder sTrUCTUreTouch the area of the DropdownMenutoopenadropdownwindowthatshowsthefolderlevelsdowntothecurrentfolder.Workyourwaybackthroughthelevelsbytouchingafolderatanotherlevel.
UsetheExternalDeviceicontoswitchbetweenexternaldevicessuchasyourcomputerorUSBembroiderystick.
Move up one folder level
Open folder
Drop down menu
External Devices
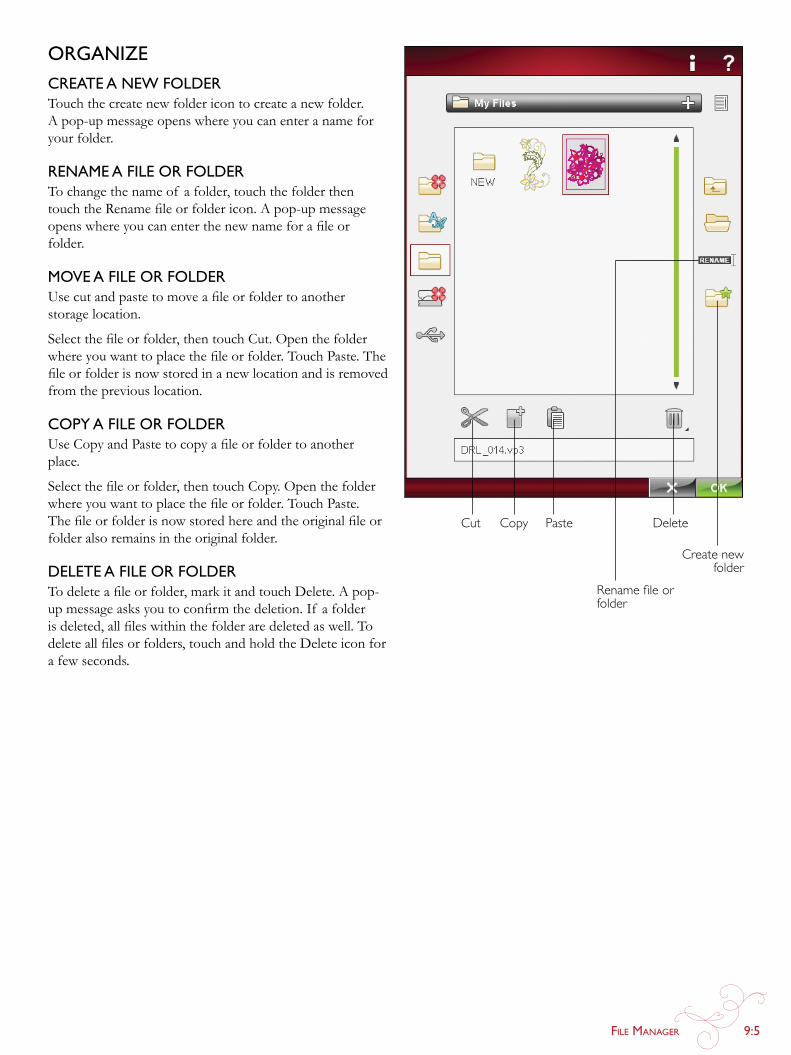
File Manager 9:5
organizeCreaTe a new folderTouch the create new folder icon to create a new folder. Apop-upmessageopenswhereyoucanenteranameforyour folder.
renaMe a file or folderTo change the name of a folder, touch the folder then touchtheRenamefileorfoldericon.Apop-upmessageopenswhereyoucanenterthenewnameforafileorfolder.
Move a file or folderUsecutandpastetomoveafileorfoldertoanotherstorage location.
Selectthefileorfolder,thentouchCut.Openthefolderwhereyouwanttoplacethefileorfolder.TouchPaste.Thefileorfolderisnowstoredinanewlocationandisremovedfromthepreviouslocation.
Copy a file or folderUseCopyandPastetocopyafileorfoldertoanotherplace.
Selectthefileorfolder,thentouchCopy.Openthefolderwhereyouwanttoplacethefileorfolder.TouchPaste.Thefileorfolderisnowstoredhereandtheoriginalfileorfolder also remains in the original folder.
deleTe a file or folder Todeleteafileorfolder,markitandtouchDelete.Apop-upmessageasksyoutoconfirmthedeletion.If afolderisdeleted,allfileswithinthefolderaredeletedaswell.Todeleteallfilesorfolders,touchandholdtheDeleteiconfora few seconds.
Rename file or folder
Create new folder
Cut Copy Paste Delete
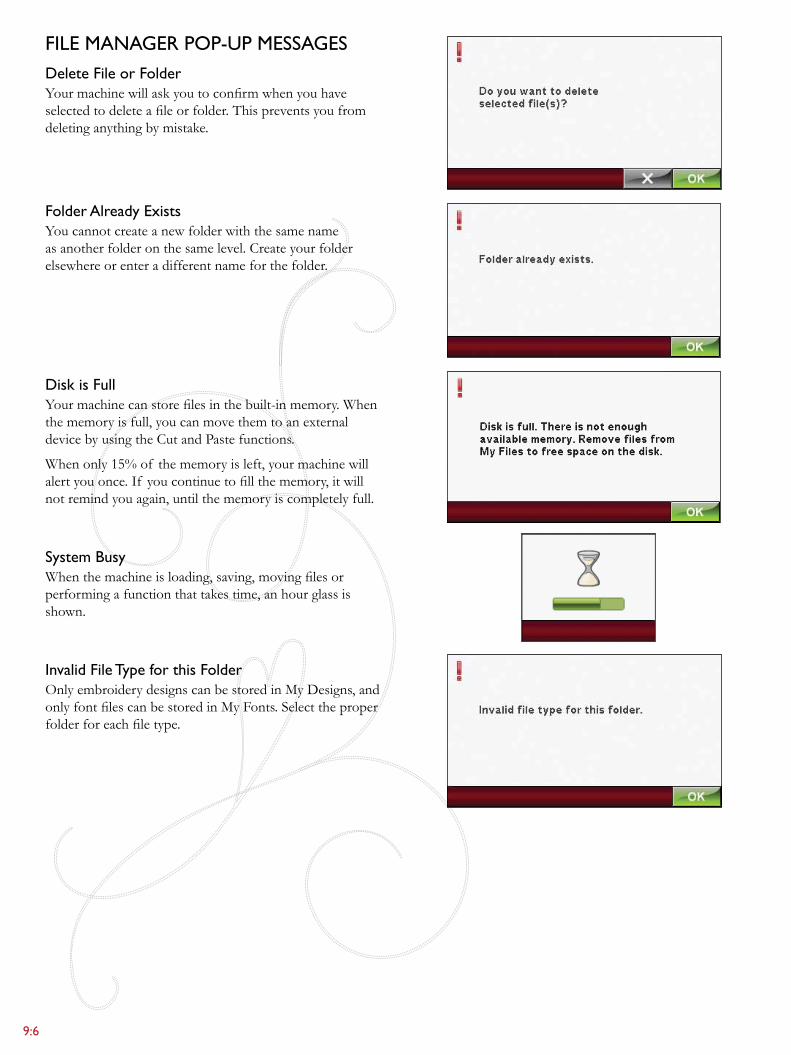
9:6
file Manager pop-Up Messagesdelete file or folderYourmachinewillaskyoutoconfirmwhenyouhaveselectedtodeleteafileorfolder.Thispreventsyoufromdeleting anything by mistake.
folder already existsYoucannotcreateanewfolderwiththesamenameasanotherfolderonthesamelevel.Createyourfolderelsewhere or enter a different name for the folder.
disk is fullYourmachinecanstorefilesinthebuilt-inmemory.Whenthememoryisfull,youcanmovethemtoanexternaldevicebyusingtheCutandPastefunctions.
When only 15% of the memory is left, your machine will alertyouonce.If youcontinuetofillthememory,itwillnot remind you again, until the memory is completely full.
system busyWhenthemachineisloading,saving,movingfilesorperforming a function that takes time, an hour glass is shown.
invalid file Type for this folderOnlyembroiderydesignscanbestoredinMyDesigns,andonlyfontfilescanbestoredinMyFonts.Selecttheproperfolderforeachfiletype.

10 MainTenanCe
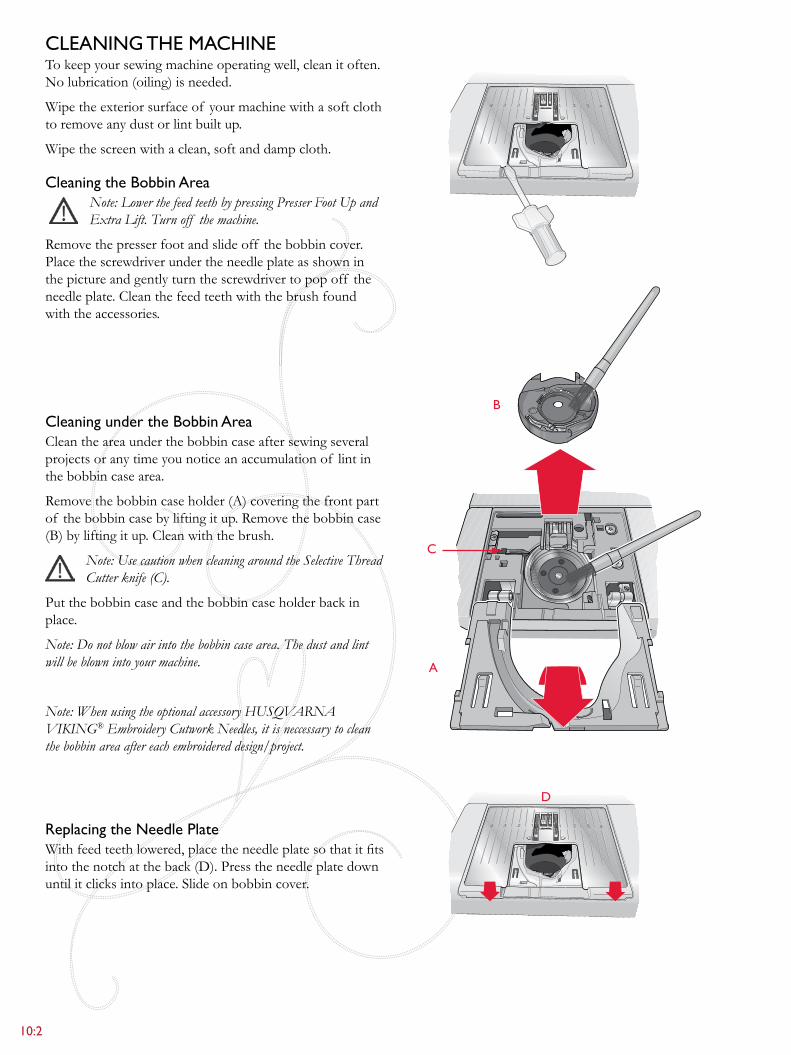
10:2
d
a
b
C
Cleaning The MaChineTo keep your sewing machine operating well, clean it often. Nolubrication(oiling)isneeded.
Wipe the exterior surface of your machine with a soft cloth toremoveanydustorlintbuiltup.
Wipe the screen with a clean, soft and damp cloth.
Cleaning the bobbin area Note: Lower the feed teeth by pressing Presser Foot Up and
Extra Lift. Turn off the machine.
Removethepresserfootandslideoff thebobbincover.Placethescrewdriverundertheneedleplateasshowninthepictureandgentlyturnthescrewdrivertopopoff theneedle plate. Clean the feed teeth with the brush found with the accessories.
Cleaning under the bobbin areaCleantheareaunderthebobbincaseaftersewingseveralprojects or any time you notice an accumulation of lint in the bobbin case area.
Removethebobbincaseholder(A)coveringthefrontpartof thebobbincasebyliftingitup.Removethebobbincase(B)byliftingitup.Cleanwiththebrush.
Note: Use caution when cleaning around the Selective Thread Cutter knife (C).
Put the bobbin case and the bobbin case holder back in place.
Note: Do not blow air into the bobbin case area. The dust and lint will be blown into your machine.
Note: When using the optional accessory HUSQVARNA VIKING® Embroidery Cutwork Needles, it is neccessary to clean the bobbin area after each embroidered design/project.
replacing the needle plateWith feed teeth lowered,placetheneedleplatesothatitfitsintothenotchattheback(D).Presstheneedleplatedownuntilitclicksintoplace.Slideonbobbincover.
Maintenance 10:3
general problemsBobbinalarmdoesnotwork? CleanlintfrombobbinareaanduseonlytheoriginalHUSQVARNA
VIKINg®bobbinsapprovedforthismodel.
Thread cutter does not cut the thread? Remove needle plate and clean lint from bobbin area. Enable automatic thread cutter in the SET Menu.
Fabric does not feed? Make sure that machine is not set in Free Motion mode.
Wrong stitch, irregular or narrow stitch? Deactivate Twin Needle or Stitch Width Safety Sewing Settings in the SET Menu.
The needle breaks? Insert needle correctly as described in chapter 2.
The machine will not sew? Check that all plugs are securely plugged into the machine and into the wall socket.
The screen displays the startup screen? Touchthescreentoactivate. Turnoff ScreenSaverintheSETMenu.
Icons on the screen are not activated when touched? Calibrate the screen. Calibrate is found in the SET Menu.
The sewing and embroidery machine screen and/or function buttons do not respond to touch?
Thesocketsandfunctionbuttonsonthemachinecanbesensitivetostaticelectricity. If the screen does not respond to touch, turn the machine OFFandthenONagain.If theproblempersists,contactyourauthorizedHUSQVARNAVIKINg® dealer.
needle Thread breaksDidyouinserttheneedleproperly? Insert needle correctly as described in chapter 2.
Did you insert a wrong needle? Use needle system 130/705 H.
Is the needle bent or blunt? Insert a new needle.
Is the needle too small for the thread? Change the needle to the proper size for the thread.
Is the needle plate hole damaged? Change the needle plate.
Did you thread the machine properly? Check how the machine is threaded. If needed rethread the machine.
Areyouusingpoorthreadwithslubsorthread which has become dry?
Changetoanewhighqualitythreadpurchasedfromanauthorized HUSQVARNAVIKINg® dealer.
Is a correct spool cap used? Attach a spool cap of the right size for the actual thread spool (see chapter 2).
Is the best spool pin position used? Tryadifferentspoolpinposition(verticalorhorizontal).
bobbin Thread breaksDidyouinsertthebobbinproperly? Check the bobbin thread.
Is the needle plate hole damaged? Change the needle plate.
Is the bobbin area full of lint? Cleanlintfrombobbinareaanduseonlytheoriginalbobbinsapprovedfor this model.
Is the bobbin wound correctly? Wind a new bobbin.
TroUbleshooTingInthistroubleshootingguideyouwillfindsolutionstotheproblemsyoumayhavewithyourmachine.ForfurtherinformationpleasecontactyourlocalauthorizedHUSQVARNAVIKINg® dealer who will be happy to help you.
have your sewing Machine serviced regularly by your local authorized dealer!If youhavefollowedthistroubleshootinginformationandstillhaveproblems,takeyoursewingmachinetoyourdealer.If thereisaspecificproblem,itisagreathelptotestsewwithyourthreadonascrapof yoursewingfabricandbringittoyourdealer.Asewingsamplewilloftengivemuchbetterinformationthanwords.
10:4
The Machine skips stitchesDidyouinserttheneedleproperly? Insert needle correctly as described in chapter 2.
Did you insert a wrong needle? Use needle system 130/705 H.
Is the needle bent or blunt? Insert a new needle.
Did you thread the machine properly? Check how the machine is threaded. If needed rethread the machine.
Is the correct presser foot used? Attachcorrectpresserfoot.
Is the needle too small for the thread? Change the needle.
Isthefabricmovingupanddownwiththe needle when Free Motion sewing or embroidering?
AttachSensorQ-foot.
The seam has uneven stitches Is the thread tension correct? Check needle thread tension and the threading.
Are you using too thick or slubbed thread? Change the thread.
Isthebobbinthreadevenlywound? Check bobbin winding.
Is a correct needle used? Insert a proper needle correctly as described in chapter 2.
The Machine does not feed or feeds irregularlyDidyouthreadthemachineproperly? Check how the machine is threaded. If needed rethread the machine.
Has sewing lint collected between the feed teeth? Remove the needle plate and clean the feed teeth with a brush.
Free Motion setting is on? Turnoff FreeMotionsettinginSewingMode.
Thread loops are forming on the underside of the embroidery designHastheembroiderybuiltuptoomuchtomovefreelyunderthepresserfoot?
AttachSensorQ-foot.
If usingtheR-foot,increasethepresserfootheightinMachineSettingsinSETmenuinsmallstepsuntilproblemissolved.
The embroidery design is distortedIs the fabric hooped properly? The fabric must be tightly hooped.
Is the inner embroidery hoop completely inserted in the outer embroidery hoop?
Hoop the fabric in such a way that the inner hoop exactly matches the outer hoop.
Is the area around the embroidery arm free? Clear area around the embroidery unit.
The embroidery design has puckeredDidyoustabilizeyourfabricsufficiently? Ensureyouusetheproperstabilizerforyourtechniqueorfabrictype.
The Machine will not embroiderIs the embroidery unit attached? Make sure that the embroidery unit is properly attached into the socket.
Is the wrong hoop attached? Slide on the correct hoop.
non-original parts and accessoriesThewarrantydoesnotcoveranydefectordamagecausedbyuseof non-originalaccessoriesorparts.
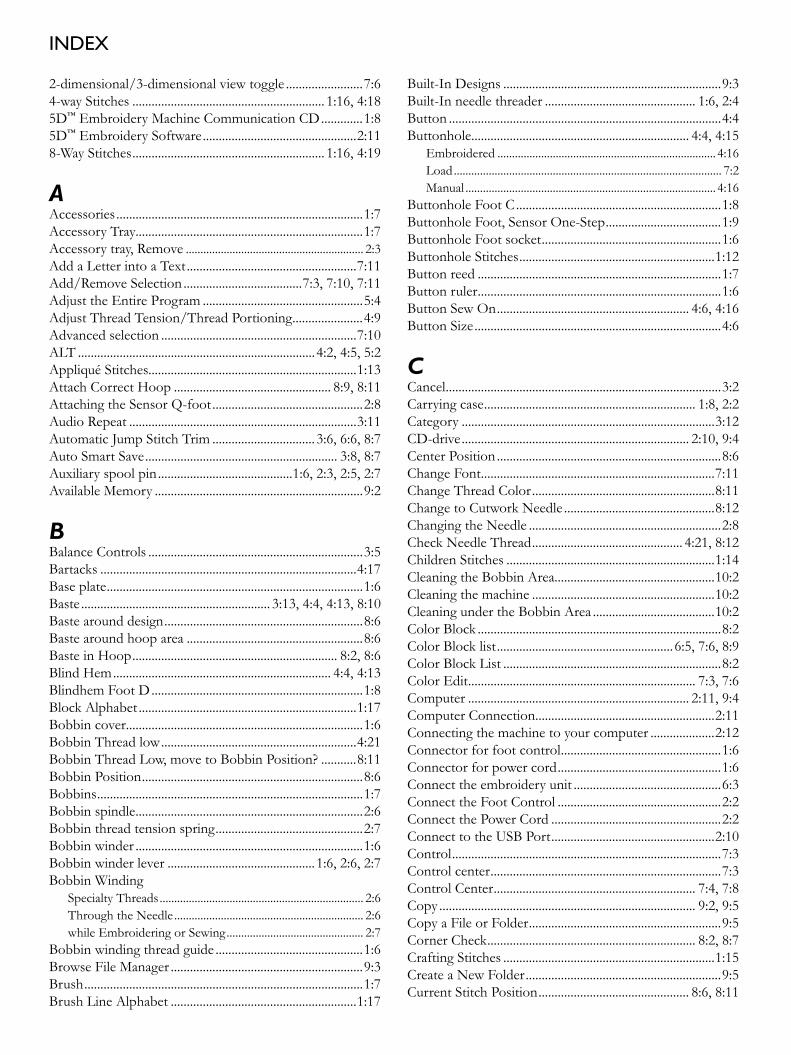
index
2-dimensional/3-dimensionalviewtoggle ........................7:64-wayStitches ............................................................ 1:16, 4:185D™EmbroideryMachineCommunicationCD .............1:85D™EmbroiderySoftware ................................................2:118-WayStitches ............................................................ 1:16, 4:19
AAccessories .............................................................................1:7AccessoryTray .......................................................................1:7Accessorytray,Remove ............................................................. 2:3AddaLetterintoaText .....................................................7:11Add/RemoveSelection .....................................7:3, 7:10, 7:11AdjusttheEntireProgram ..................................................5:4AdjustThreadTension/ThreadPortioning ......................4:9Advancedselection .............................................................7:10ALT ..........................................................................4:2, 4:5, 5:2AppliquéStitches.................................................................1:13AttachCorrectHoop ................................................. 8:9, 8:11AttachingtheSensorQ-foot ...............................................2:8AudioRepeat .......................................................................3:11AutomaticJumpStitchTrim ................................ 3:6, 6:6, 8:7AutoSmartSave ............................................................ 3:8, 8:7Auxiliaryspoolpin ..........................................1:6, 2:3, 2:5, 2:7AvailableMemory .................................................................9:2
BBalanceControls ...................................................................3:5Bartacks ................................................................................4:17Baseplate ................................................................................1:6Baste ........................................................... 3:13, 4:4, 4:13, 8:10Bastearounddesign ..............................................................8:6Bastearoundhooparea .......................................................8:6BasteinHoop ................................................................ 8:2, 8:6BlindHem .................................................................... 4:4, 4:13BlindhemFootD ..................................................................1:8BlockAlphabet ....................................................................1:17Bobbincover ..........................................................................1:6BobbinThreadlow .............................................................4:21BobbinThreadLow,movetoBobbinPosition? ...........8:11BobbinPosition .....................................................................8:6Bobbins ...................................................................................1:7Bobbinspindle .......................................................................2:6Bobbinthreadtensionspring ..............................................2:7Bobbinwinder .......................................................................1:6Bobbinwinderlever ..............................................1:6, 2:6, 2:7BobbinWinding
SpecialtyThreads ...................................................................... 2:6Through the Needle ................................................................. 2:6whileEmbroideringorSewing ............................................... 2:7
Bobbinwindingthreadguide ..............................................1:6BrowseFileManager ............................................................9:3Brush .......................................................................................1:7BrushLineAlphabet ..........................................................1:17
Built-InDesigns ....................................................................9:3Built-Inneedlethreader ............................................... 1:6, 2:4Button .....................................................................................4:4Buttonhole .................................................................... 4:4, 4:15
Embroidered ........................................................................... 4:16Load ............................................................................................ 7:2Manual ...................................................................................... 4:16
ButtonholeFootC ................................................................1:8ButtonholeFoot,SensorOne-Step ....................................1:9ButtonholeFootsocket ........................................................1:6ButtonholeStitches .............................................................1:12Buttonreed ............................................................................1:7Buttonruler ............................................................................1:6ButtonSewOn ............................................................ 4:6, 4:16ButtonSize .............................................................................4:6
CCancel ......................................................................................3:2Carrying case .................................................................. 1:8, 2:2Category ...............................................................................3:12CD-drive ....................................................................... 2:10, 9:4Center Position ......................................................................8:6Change Font .........................................................................7:11Change Thread Color .........................................................8:11Change to Cutwork Needle ...............................................8:12Changing the Needle ............................................................2:8Check Needle Thread ............................................... 4:21, 8:12ChildrenStitches .................................................................1:14CleaningtheBobbinArea..................................................10:2Cleaning the machine .........................................................10:2CleaningundertheBobbinArea ......................................10:2ColorBlock ............................................................................8:2ColorBlocklist .......................................................6:5, 7:6, 8:9ColorBlockList ....................................................................8:2Color Edit ....................................................................... 7:3, 7:6Computer ..................................................................... 2:11, 9:4Computer Connection ........................................................2:11Connecting the machine to your computer ....................2:12Connector for foot control ..................................................1:6Connector for power cord ...................................................1:6Connect the embroidery unit ..............................................6:3Connect the Foot Control ...................................................2:2Connect the Power Cord .....................................................2:2ConnecttotheUSBPort ...................................................2:10Control ....................................................................................7:3Control center ........................................................................7:3Control Center ............................................................... 7:4, 7:8Copy ................................................................................ 9:2, 9:5Copy a File or Folder ............................................................9:5Corner Check ................................................................. 8:2, 8:7CraftingStitches ..................................................................1:15Create a New Folder .............................................................9:5CurrentStitchPosition ............................................... 8:6, 8:11
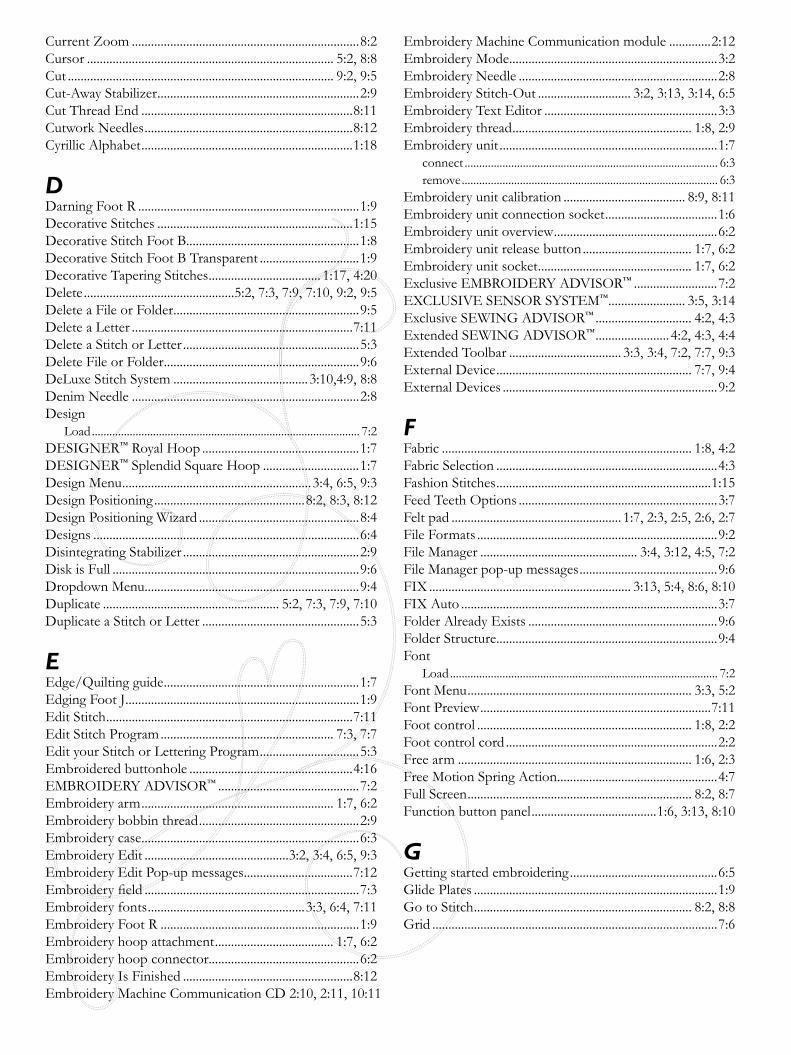
Current Zoom .......................................................................8:2Cursor ............................................................................. 5:2, 8:8Cut ................................................................................... 9:2, 9:5Cut-AwayStabilizer ...............................................................2:9Cut Thread End ..................................................................8:11Cutwork Needles .................................................................8:12CyrillicAlphabet ..................................................................1:18
DDarningFootR .....................................................................1:9DecorativeStitches .............................................................1:15DecorativeStitchFootB......................................................1:8DecorativeStitchFootBTransparent ...............................1:9DecorativeTaperingStitches ................................... 1:17, 4:20Delete ...............................................5:2, 7:3, 7:9, 7:10, 9:2, 9:5DeleteaFileorFolder ..........................................................9:5DeleteaLetter .....................................................................7:11DeleteaStitchorLetter .......................................................5:3DeleteFileorFolder .............................................................9:6DeLuxeStitchSystem .......................................... 3:10,4:9, 8:8DenimNeedle .......................................................................2:8Design
Load ............................................................................................ 7:2DESIgNER™RoyalHoop .................................................1:7DESIgNER™SplendidSquareHoop ..............................1:7DesignMenu ...........................................................3:4, 6:5, 9:3DesignPositioning ...............................................8:2, 8:3, 8:12DesignPositioningWizard ..................................................8:4Designs ...................................................................................6:4DisintegratingStabilizer .......................................................2:9DiskisFull .............................................................................9:6DropdownMenu...................................................................9:4Duplicate ....................................................... 5:2, 7:3, 7:9, 7:10DuplicateaStitchorLetter .................................................5:3
EEdge/Quilting guide .............................................................1:7Edging Foot J .........................................................................1:9EditStitch .............................................................................7:11EditStitchProgram ...................................................... 7:3, 7:7EdityourStitchorLetteringProgram ...............................5:3Embroidered buttonhole ...................................................4:16EMBROIDERYADVISOR™ ............................................7:2Embroidery arm ............................................................ 1:7, 6:2Embroidery bobbin thread ..................................................2:9Embroidery case ....................................................................6:3Embroidery Edit .............................................3:2, 3:4, 6:5, 9:3Embroidery Edit Pop-up messages ..................................7:12Embroideryfield ...................................................................7:3Embroidery fonts .................................................3:3, 6:4, 7:11Embroidery Foot R ..............................................................1:9Embroidery hoop attachment ..................................... 1:7, 6:2Embroidery hoop connector...............................................6:2Embroidery Is Finished .....................................................8:12EmbroideryMachineCommunicationCD 2:10, 2:11, 10:11
Embroidery Machine Communication module .............2:12Embroidery Mode .................................................................3:2Embroidery Needle ..............................................................2:8EmbroideryStitch-Out ............................. 3:2, 3:13, 3:14, 6:5Embroidery Text Editor ......................................................3:3Embroidery thread ........................................................ 1:8, 2:9Embroidery unit ....................................................................1:7
connect ....................................................................................... 6:3remove ........................................................................................ 6:3
Embroidery unit calibration ...................................... 8:9, 8:11Embroidery unit connection socket ...................................1:6Embroideryunitoverview ...................................................6:2Embroidery unit release button .................................. 1:7, 6:2Embroidery unit socket ................................................ 1:7, 6:2ExclusiveEMBROIDERYADVISOR™ ..........................7:2EXCLUSIVESENSORSYSTEM™ ........................ 3:5, 3:14ExclusiveSEWINgADVISOR™ .............................. 4:2, 4:3ExtendedSEWINgADVISOR™ ....................... 4:2, 4:3, 4:4Extended Toolbar ................................... 3:3, 3:4, 7:2, 7:7, 9:3ExternalDevice ............................................................. 7:7, 9:4ExternalDevices ...................................................................9:2
FFabric .............................................................................. 1:8, 4:2FabricSelection .....................................................................4:3FashionStitches ...................................................................1:15FeedTeethOptions ..............................................................3:7Felt pad ..................................................... 1:7, 2:3, 2:5, 2:6, 2:7File Formats ...........................................................................9:2File Manager ................................................. 3:4, 3:12, 4:5, 7:2File Manager pop-up messages ...........................................9:6FIX ............................................................... 3:13, 5:4, 8:6, 8:10FIXAuto ................................................................................3:7FolderAlreadyExists ...........................................................9:6FolderStructure .....................................................................9:4Font
Load ............................................................................................ 7:2Font Menu ...................................................................... 3:3, 5:2FontPreview ........................................................................7:11Foot control ................................................................... 1:8, 2:2Foot control cord ..................................................................2:2Free arm ......................................................................... 1:6, 2:3FreeMotionSpringAction ..................................................4:7FullScreen ...................................................................... 8:2, 8:7Function button panel .......................................1:6, 3:13, 8:10
Ggettingstartedembroidering ..............................................6:5glidePlates ............................................................................1:9gotoStitch .................................................................... 8:2, 8:8grid .........................................................................................7:6
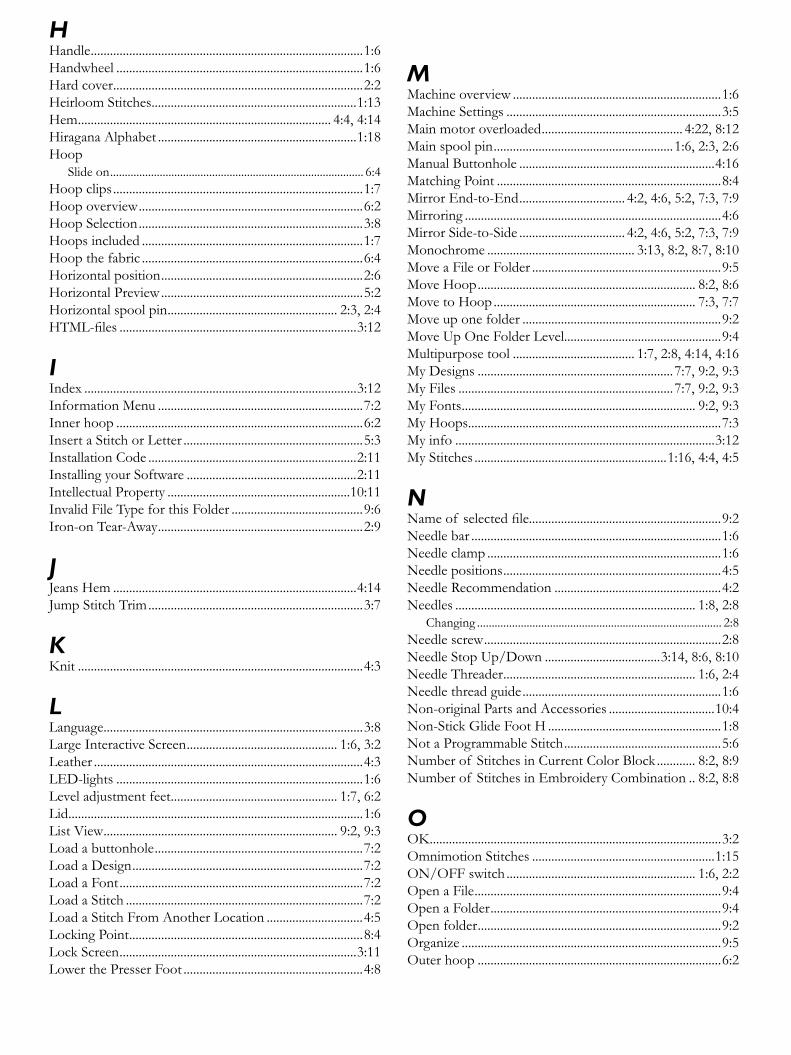
HHandle .....................................................................................1:6Handwheel .............................................................................1:6Hardcover ..............................................................................2:2HeirloomStitches ................................................................1:13Hem ............................................................................... 4:4, 4:14HiraganaAlphabet ..............................................................1:18Hoop
Slideon ....................................................................................... 6:4Hoopclips ..............................................................................1:7Hoopoverview ......................................................................6:2HoopSelection ......................................................................3:8Hoopsincluded .....................................................................1:7Hoopthefabric .....................................................................6:4Horizontalposition ...............................................................2:6HorizontalPreview ...............................................................5:2Horizontalspoolpin ..................................................... 2:3, 2:4HTML-files ..........................................................................3:12
IIndex .....................................................................................3:12Information Menu ................................................................7:2Inner hoop .............................................................................6:2InsertaStitchorLetter ........................................................5:3Installation Code .................................................................2:11InstallingyourSoftware .....................................................2:11Intellectual Property .........................................................10:11InvalidFileTypeforthisFolder .........................................9:6Iron-onTear-Away ................................................................2:9
JJeansHem ............................................................................4:14JumpStitchTrim ...................................................................3:7
KKnit .........................................................................................4:3
LLanguage .................................................................................3:8LargeInteractiveScreen ............................................... 1:6, 3:2 Leather ....................................................................................4:3LED-lights .............................................................................1:6Leveladjustmentfeet .................................................... 1:7, 6:2Lid ............................................................................................1:6List View ......................................................................... 9:2, 9:3Load a buttonhole .................................................................7:2LoadaDesign ........................................................................7:2Load a Font ............................................................................7:2LoadaStitch ..........................................................................7:2LoadaStitchFromAnotherLocation ..............................4:5Locking Point .........................................................................8:4LockScreen ..........................................................................3:11Lower the Presser Foot ........................................................4:8
MMachineoverview .................................................................1:6MachineSettings ...................................................................3:5Mainmotoroverloaded ............................................ 4:22, 8:12Main spool pin ........................................................1:6, 2:3, 2:6ManualButtonhole .............................................................4:16Matching Point ......................................................................8:4Mirror End-to-End ................................. 4:2, 4:6, 5:2, 7:3, 7:9Mirroring ................................................................................4:6MirrorSide-to-Side ................................. 4:2, 4:6, 5:2, 7:3, 7:9Monochrome .............................................. 3:13, 8:2, 8:7, 8:10MoveaFileorFolder ...........................................................9:5MoveHoop .................................................................... 8:2, 8:6MovetoHoop ............................................................... 7:3, 7:7Moveuponefolder ..............................................................9:2MoveUpOneFolderLevel.................................................9:4Multipurpose tool ...................................... 1:7, 2:8, 4:14, 4:16MyDesigns .............................................................7:7, 9:2, 9:3My Files ...................................................................7:7, 9:2, 9:3My Fonts ......................................................................... 9:2, 9:3MyHoops ...............................................................................7:3My info .................................................................................3:12MyStitches ............................................................1:16, 4:4, 4:5
NNameof selectedfile............................................................9:2Needle bar ..............................................................................1:6Needle clamp .........................................................................1:6Needle positions ....................................................................4:5Needle Recommendation ....................................................4:2Needles ........................................................................... 1:8, 2:8
Changing .................................................................................... 2:8Needle screw ..........................................................................2:8NeedleStopUp/Down ....................................3:14, 8:6, 8:10Needle Threader ............................................................ 1:6, 2:4Needle thread guide ..............................................................1:6Non-originalPartsandAccessories .................................10:4Non-StickglideFootH ......................................................1:8NotaProgrammableStitch .................................................5:6Numberof StitchesinCurrentColorBlock ............ 8:2, 8:9Numberof StitchesinEmbroideryCombination .. 8:2, 8:8
OOK ...........................................................................................3:2OmnimotionStitches .........................................................1:15ON/OFFswitch ........................................................... 1:6, 2:2OpenaFile .............................................................................9:4OpenaFolder ........................................................................9:4Openfolder ............................................................................9:2Organize .................................................................................9:5Outerhoop ............................................................................6:2
OutlineBlockAlphabet .....................................................1:17Overcast ........................................................................ 4:4, 4:11Overview
Embroidery Edit ....................................................................... 7:3EmbroideryHoop .................................................................... 6:2EmbroideryStitch-Out ............................................................ 8:2Embroidery Unit ...................................................................... 6:2File Manager .............................................................................. 9:2Machine ...................................................................................... 1:6Program ...................................................................................... 5:2SewingMode ............................................................................. 4:2
Owner’sName .......................................................................3:8
PPackAway...............................................................................2:2Pan ................................................................................... 7:4, 7:8Park Position ....................................................6:3, 7:3, 7:7, 8:6Paste ................................................................................ 9:2, 9:5PerfectlyBalancedSensorOne-StepButtonhole ...........4:15Pictogram Pen ......................................................1:7, 2:9, 4:15PictogramStitches ..............................................................1:13Pop-up messages
Embroidery Edit ..................................................................... 7:12EmbroideryStitch-Out ...................................................8:9, 8:11File Manager .............................................................................. 9:6Program ...................................................................................... 5:6Sewing ...................................................................................... 4:21
Position ....................................................................7:3, 7:4, 7:8Power cord ..................................................................... 1:8, 2:2Presser Feet ............................................................................1:8Presser feet and bobbin holder ................................. 1:7, 10:8Presser foot ............................................................................1:6
Changing .................................................................................... 2:7Presser foot ankle ..................................................................1:6Presser foot bar .....................................................................1:6Presser Foot height control .................................................4:7PresserFootHeightforEmbroidery ...............................3:10Presser foot recommendation .............................................4:2Pre-Tension Thread guide .................................... 1:6, 2:4, 2:6Preview ........................................................................... 5:2, 5:4Program .......................................................................... 4:2, 5:2Program Embroidery fonts ...............................................7:11Program in Embroidery Edit ..............................................5:3PrograminSewingMode ....................................................5:3Program Length ....................................................................5:2Program mode .......................................................................3:3Program pop-up messages ..................................................5:6
QQuickHelp .......................................................3:3, 4:2, 8:2, 9:2Quick release ..........................................................................6:2Quilter’s1/4”PiecingfootP...............................................1:9Quilting guide ........................................................................1:7QuiltStitches ........................................................................1:13
RRaise and Lower the Presser Foot ......................................4:8Raise needle ..........................................................................8:12Redo ........................................................................................7:9Re-LoadaStitchProgram....................................................5:6Remaining Embroidery Time by Color .............................8:7RemovefromtheUSBPort ..............................................2:10RemoveSensorOne-StepButtonholeFoot ...................4:21Removetheembroideryunit ...............................................6:3Rename a File or Folder ............................................... 9:2, 9:5ReplaceaStitchorLetter .....................................................5:3Replacing the Needle Plate ................................................10:2Resize .............................................................................. 7:3, 7:4Retain Fill Type ......................................................................7:4Retaining screw ......................................................................6:2Return to Embroidery Edit ......................................... 8:2, 8:8Reverse ........................................................................ 3:13, 8:10Ribsforfittingtheclips ........................................................6:2Rotate .............................................................................. 7:4, 7:8RotateDesign ........................................................................8:4
SSafetyinstructions .................................................................1:2SamplerBook ................................................................ 1:8, 6:4SaveaStitchProgram ...........................................................5:5SaveaStitchPrograminEmbroideryMode ....................7:7SaveEditeddesign ................................................................7:7SavetoMyDesigns ....................................................... 7:3, 7:7SavetoMyFiles .....................................................................5:2Saveto“MyStitches” .....................................4:2, 4:4, 5:2, 5:5SaveyourProgramin“MyFiles” .......................................5:5Scale ................................................................................. 7:3, 7:8Scalefunction.........................................................................7:4ScallopStitches ....................................................................1:14Scissors....................................................................................1:8ScreenSaver .........................................................................3:11ScreenSettings .......................................................................3:5Screwdriver .............................................................................1:7ScriptAlphabet ....................................................................1:18Scrollbar .................................................................................8:2ScrollDown ...........................................................................5:2ScrollThroughMenus ..........................................................4:2ScrollUp .................................................................................5:2Seam .............................................................................. 4:4, 4:10SeamandOvercast .............................................................4:12Seam/overcast .......................................................................4:4Seam/OvercastforRibbing ..............................................4:12Seamripper ............................................................................1:7SelectAll ....................................................................... 7:3, 7:10SelectaStitch ................................................................. 3:3, 4:4Selectdesigns .......................................................................7:10SelectingaDesign .................................................................3:4SelectingaFont .....................................................................3:3SelectionArea ........................................................................9:2SelectionModes ..................................................................7:10SelectiveThreadCutter .....................................3:14, 4:8, 8:10
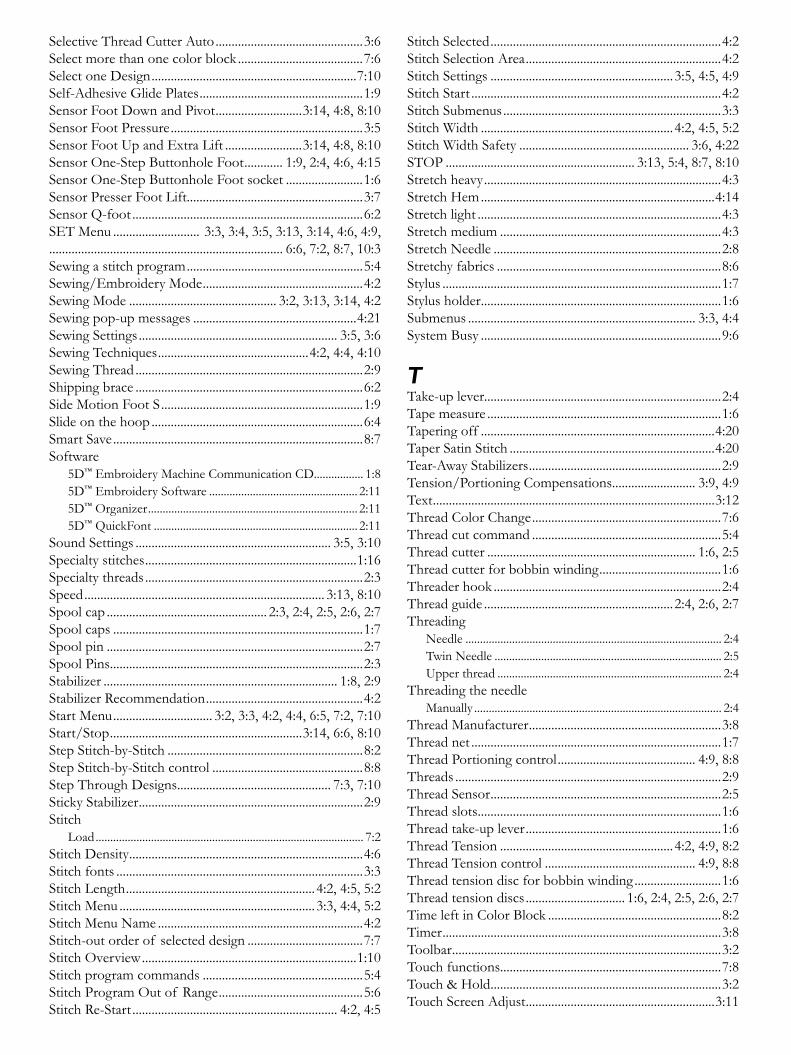
SelectiveThreadCutterAuto ..............................................3:6Selectmorethanonecolorblock .......................................7:6SelectoneDesign ................................................................7:10Self-AdhesiveglidePlates ...................................................1:9SensorFootDownandPivot ...........................3:14, 4:8, 8:10SensorFootPressure ............................................................3:5SensorFootUpandExtraLift ........................3:14, 4:8, 8:10SensorOne-StepButtonholeFoot ............ 1:9, 2:4, 4:6, 4:15SensorOne-StepButtonholeFootsocket ........................1:6SensorPresserFootLift.......................................................3:7SensorQ-foot ........................................................................6:2SETMenu ........................... 3:3, 3:4, 3:5, 3:13, 3:14, 4:6, 4:9, ......................................................................... 6:6, 7:2, 8:7, 10:3Sewingastitchprogram .......................................................5:4Sewing/EmbroideryMode ..................................................4:2SewingMode .............................................. 3:2, 3:13, 3:14, 4:2Sewingpop-upmessages ...................................................4:21SewingSettings .............................................................. 3:5, 3:6SewingTechniques ...............................................4:2, 4:4, 4:10SewingThread .......................................................................2:9Shippingbrace .......................................................................6:2SideMotionFootS ...............................................................1:9Slideonthehoop ..................................................................6:4SmartSave ..............................................................................8:7Software
5D™EmbroideryMachineCommunicationCD................. 1:85D™EmbroiderySoftware ................................................... 2:115D™Organizer ........................................................................ 2:115D™ QuickFont ...................................................................... 2:11
SoundSettings ............................................................. 3:5, 3:10Specialtystitches ..................................................................1:16Specialtythreads ....................................................................2:3Speed ........................................................................... 3:13, 8:10Spoolcap .................................................. 2:3, 2:4, 2:5, 2:6, 2:7Spoolcaps ..............................................................................1:7Spoolpin ................................................................................2:7SpoolPins ...............................................................................2:3Stabilizer ......................................................................... 1:8, 2:9StabilizerRecommendation .................................................4:2StartMenu ............................... 3:2, 3:3, 4:2, 4:4, 6:5, 7:2, 7:10Start/Stop ............................................................3:14, 6:6, 8:10StepStitch-by-Stitch .............................................................8:2StepStitch-by-Stitchcontrol ...............................................8:8StepThroughDesigns ................................................ 7:3, 7:10StickyStabilizer ......................................................................2:9Stitch
Load ............................................................................................ 7:2StitchDensity .........................................................................4:6Stitchfonts .............................................................................3:3StitchLength ...........................................................4:2, 4:5, 5:2StitchMenu .............................................................3:3, 4:4, 5:2StitchMenuName ................................................................4:2Stitch-outorderof selecteddesign ....................................7:7StitchOverview ...................................................................1:10Stitchprogramcommands ..................................................5:4StitchProgramOutof Range .............................................5:6StitchRe-Start ................................................................ 4:2, 4:5
StitchSelected ........................................................................4:2StitchSelectionArea .............................................................4:2StitchSettings .........................................................3:5, 4:5, 4:9StitchStart ..............................................................................4:2StitchSubmenus ....................................................................3:3StitchWidth ............................................................4:2, 4:5, 5:2StitchWidthSafety ..................................................... 3:6, 4:22STOP ........................................................... 3:13, 5:4, 8:7, 8:10Stretchheavy ..........................................................................4:3StretchHem .........................................................................4:14Stretchlight ............................................................................4:3Stretchmedium .....................................................................4:3StretchNeedle .......................................................................2:8Stretchyfabrics ......................................................................8:6Stylus .......................................................................................1:7Stylusholder ...........................................................................1:6Submenus ....................................................................... 3:3, 4:4SystemBusy ...........................................................................9:6
TTake-uplever..........................................................................2:4Tape measure .........................................................................1:6Tapering off .........................................................................4:20TaperSatinStitch ................................................................4:20Tear-AwayStabilizers ............................................................2:9Tension/Portioning Compensations .......................... 3:9, 4:9Text ........................................................................................3:12Thread Color Change ...........................................................7:6Thread cut command ...........................................................5:4Thread cutter ................................................................. 1:6, 2:5Thread cutter for bobbin winding ......................................1:6Threader hook .......................................................................2:4Thread guide ...........................................................2:4, 2:6, 2:7Threading
Needle ........................................................................................ 2:4Twin Needle .............................................................................. 2:5Upper thread ............................................................................. 2:4
Threading the needleManually ..................................................................................... 2:4
Thread Manufacturer ............................................................3:8Thread net ..............................................................................1:7Thread Portioning control ........................................... 4:9, 8:8Threads ...................................................................................2:9ThreadSensor ........................................................................2:5Thread slots ............................................................................1:6Threadtake-uplever .............................................................1:6Thread Tension ......................................................4:2, 4:9, 8:2Thread Tension control ............................................... 4:9, 8:8Thread tension disc for bobbin winding ...........................1:6Thread tension discs ............................... 1:6, 2:4, 2:5, 2:6, 2:7TimeleftinColorBlock ......................................................8:2Timer .......................................................................................3:8Toolbar ....................................................................................3:2Touch functions.....................................................................7:8Touch&Hold ........................................................................3:2TouchScreenAdjust ...........................................................3:11

Transparent Thread ..............................................................2:9Trim Position ......................................................3:14, 8:6, 8:10Triple needle ...........................................................................2:4Troubleshooting ..................................................................10:3Twin Needle .................................................. 2:4, 2:8, 3:6, 4:21Twin Needle Threading........................................................2:5
UUniversalNeedle ...................................................................2:8Unpacking ..............................................................................2:2Unrecognizedfile ..................................................................9:2Update your Machine .........................................................2:12USBembroiderystick .........................1:7, 2:10, 2:12, 6:4, 9:4USBPCcable .....................................................1:8, 2:10, 2:12USBports ..................................................................... 1:6, 2:10UtilityFootA .........................................................................1:8UtilityStitches ......................................................................1:10
VVertical spool pin ...................................................2:3, 2:4, 2:5VintageStitches ...................................................................1:14Vinyl ........................................................................................4:3Volume ..................................................................................3:11
WWarranty card .........................................................................1:8WaterSolubleStabilizer ........................................................2:9WindingBobbin ....................................................................2:6WindingSpecialtyThreads ..................................................2:6Wing Needles ................................................................. 2:4, 2:8Woven .....................................................................................4:3Wovenheavy ..........................................................................4:3Wovenlight ............................................................................4:3Wovenmedium ......................................................................4:3
ZZipper Foot E ........................................................................1:8Zoom .............................................................................. 7:7, 8:7ZoomIn/ZoomOut .....................................7:3, 7:7, 8:2, 8:7ZoomtoAll .....................................................5:3, 7:3, 7:7, 8:2ZoomtoBox ...................................................7:3, 7:7, 8:2, 8:7Zoom to Cursor ....................................................................8:3ZoomtoHoop ................................................7:3, 7:7, 8:2, 8:7
Youhavepurchasedamodern,updatablesewingandembroiderymachine.Asweregularlyreleasesoftwareupdates, it is possible that there may be some differences between the machine software and the software described intheUser’sguide.ConsultyourlocalAuthorizedHUSQVARNAVIKINg®dealer,andbesuretovisitourwebsiteatwww.husqvarnaviking.comforthelatestupdatesof thesoftware,theUser’sguideandtheQuickguide.
Wereservetherighttochangethemachineequipmentand the assortment of accessories without prior notice, or makemodificationstotheperformanceordesign.Suchmodifications,however,willalwaysbetothebenefitof theuser and the product.
CE - Authorised Representative
VSM Group AB, SVP WorldwideDrottninggatan 2, SE-56184, Huskvarna, SWEDEN
CE - Authorised Representative
VSM Group AB, SVP WorldwideDrottninggatan 2, SE-56184, Huskvarna, SWEDEN
Please note that on disposal, this product must be safely recycledinaccordancewithrelevantNationallegislationrelatingto electrical/electronic products. If in doubt please contact your retailer for guidance.
inTelleCTUal properTyPatents protecting this product are listed on a label positioned underneath the SewingMachine.
VIKINg,DESIgNER,DESIgNERRUBYDELUXE,DELUXE,5D,PICTOgRAM,SEWINgADVISOR,EMBROIDERYADVISOR,KEEPINgTHEWORLDSEWINgandEXCLUSIVESENSORSYSTEMaretrademarksof KSINLuxembourgII,S.ar.l.
HUSQVARNAandthe“crownedH-mark”aretrademarksof HusqvarnaAB. AlltrademarksareusedunderlicensebyVSMgroupAB.
5d™ eMbroidery MaChine CoMMUniCaTion Cd(for personal computer. see page 2:11)

www.husqvarnav ik ing .com
413
33 9
6-26
b• E
nglis
h •
InH
ouse
• ©
201
2 KS
IN L
uxem
bour
g II,
S.ar.l.
• A
ll righ
ts re
serv
ed •
Prin
ted
in C
hina
on
envir
onm
enta
lly-fr
iend
ly pa
per