Embed Size (px)
Citation preview

Huskvarna, 2018-03-12
Safety and Operating Instructions
Dear customer,
thank you for choosing a Husqvarna quality product. We hope that you will genuinely enjoy it.
Please note that the enclosed manual contains Atlas Copco references.
The Husqvarna Group is vouching for the quality of this product.
If you have any questions, please do not hesitate to contact our local sales or service point.
Husqvarna AB
561 82 Huskvarna, Sweden
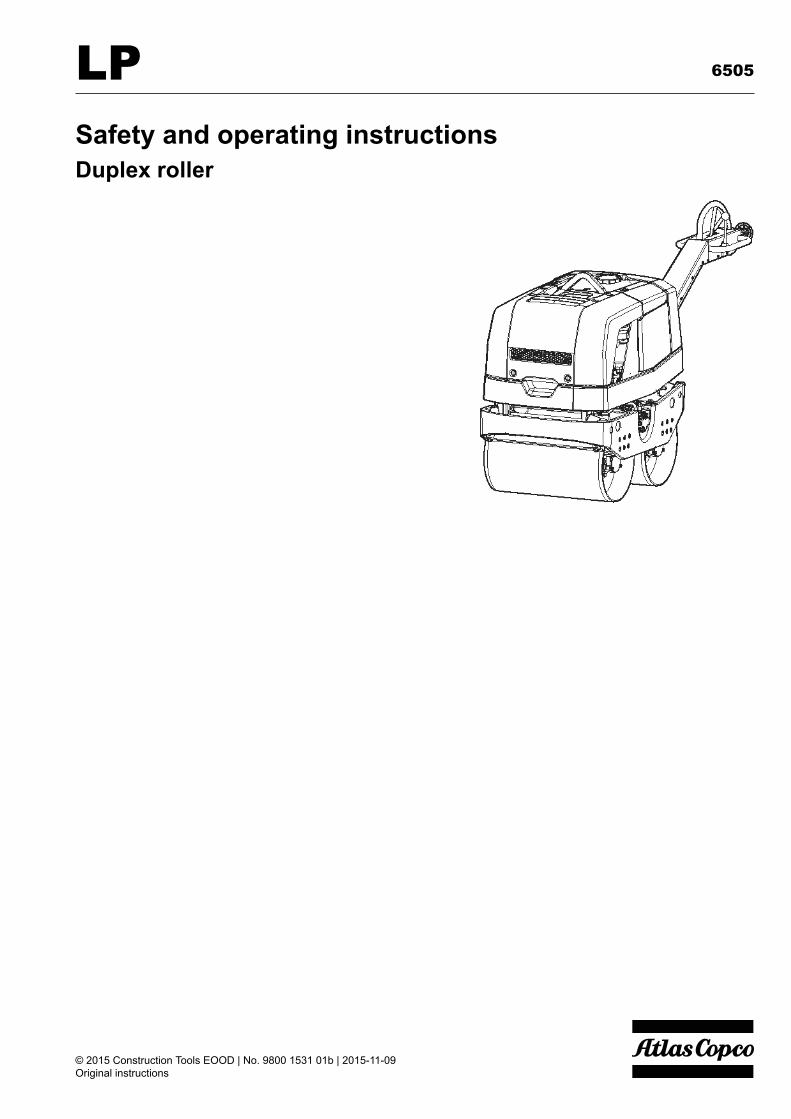
Safety and operating instructionsDuplex roller
© 2015 Construction Tools EOOD | No. 9800 1531 01b | 2015-11-09Original instructions
LP 6505


ContentsIntroduction. . . . . . . . . . . . . . . . . . . . . . . . . . . . . . . . . . . . . . . . . . . . . . . . . . . . . . . . . . . . . . . . . . . . . . . . 5
About the Safety and operating instructions. . . . . . . . . . . . . . . . . . . . . . . . . . . . . . . . . . . . . . . . . . 5
Safety instructions. . . . . . . . . . . . . . . . . . . . . . . . . . . . . . . . . . . . . . . . . . . . . . . . . . . . . . . . . . . . . . . . . 6Safety signal words. . . . . . . . . . . . . . . . . . . . . . . . . . . . . . . . . . . . . . . . . . . . . . . . . . . . . . . . . . . . . . 6Personal precautions and qualifications. . . . . . . . . . . . . . . . . . . . . . . . . . . . . . . . . . . . . . . . . . . 6
Personal protective equipment. . . . . . . . . . . . . . . . . . . . . . . . . . . . . . . . . . . . . . . . . . . . . . . . . . . 6Drugs, alcohol or medication. . . . . . . . . . . . . . . . . . . . . . . . . . . . . . . . . . . . . . . . . . . . . . . . . . . . 6
Operation, precautions. . . . . . . . . . . . . . . . . . . . . . . . . . . . . . . . . . . . . . . . . . . . . . . . . . . . . . . . . . . 6Transport, precautions. . . . . . . . . . . . . . . . . . . . . . . . . . . . . . . . . . . . . . . . . . . . . . . . . . . . . . . . . . 10Maintenance, precautions. . . . . . . . . . . . . . . . . . . . . . . . . . . . . . . . . . . . . . . . . . . . . . . . . . . . . . . 10Storage, precautions. . . . . . . . . . . . . . . . . . . . . . . . . . . . . . . . . . . . . . . . . . . . . . . . . . . . . . . . . . . . 10
Overview. . . . . . . . . . . . . . . . . . . . . . . . . . . . . . . . . . . . . . . . . . . . . . . . . . . . . . . . . . . . . . . . . . . . . . . . . 11Design and function. . . . . . . . . . . . . . . . . . . . . . . . . . . . . . . . . . . . . . . . . . . . . . . . . . . . . . . . . . . . 11Main parts. . . . . . . . . . . . . . . . . . . . . . . . . . . . . . . . . . . . . . . . . . . . . . . . . . . . . . . . . . . . . . . . . . . . . 11Labels. . . . . . . . . . . . . . . . . . . . . . . . . . . . . . . . . . . . . . . . . . . . . . . . . . . . . . . . . . . . . . . . . . . . . . . . . 12
Data plate. . . . . . . . . . . . . . . . . . . . . . . . . . . . . . . . . . . . . . . . . . . . . . . . . . . . . . . . . . . . . . . . . . . . 13Noise level label. . . . . . . . . . . . . . . . . . . . . . . . . . . . . . . . . . . . . . . . . . . . . . . . . . . . . . . . . . . . . . 13Safety label, rotating fan blades. . . . . . . . . . . . . . . . . . . . . . . . . . . . . . . . . . . . . . . . . . . . . . . . . 13Safety label, read the instruction manual. . . . . . . . . . . . . . . . . . . . . . . . . . . . . . . . . . . . . . . . . 13Safety label, handle locking. . . . . . . . . . . . . . . . . . . . . . . . . . . . . . . . . . . . . . . . . . . . . . . . . . . . 13Safety label, hot surfaces. . . . . . . . . . . . . . . . . . . . . . . . . . . . . . . . . . . . . . . . . . . . . . . . . . . . . . 14Safety label, maximum slope angle. . . . . . . . . . . . . . . . . . . . . . . . . . . . . . . . . . . . . . . . . . . . . . 14Safety label, read the instruction manual. . . . . . . . . . . . . . . . . . . . . . . . . . . . . . . . . . . . . . . . . 14Hydraulic oil level label. . . . . . . . . . . . . . . . . . . . . . . . . . . . . . . . . . . . . . . . . . . . . . . . . . . . . . . . 14Hydraulic oil filter label. . . . . . . . . . . . . . . . . . . . . . . . . . . . . . . . . . . . . . . . . . . . . . . . . . . . . . . . . 14Lifting point label. . . . . . . . . . . . . . . . . . . . . . . . . . . . . . . . . . . . . . . . . . . . . . . . . . . . . . . . . . . . . . 14Securing point label. . . . . . . . . . . . . . . . . . . . . . . . . . . . . . . . . . . . . . . . . . . . . . . . . . . . . . . . . . . 14Sprinkler label. . . . . . . . . . . . . . . . . . . . . . . . . . . . . . . . . . . . . . . . . . . . . . . . . . . . . . . . . . . . . . . . 14Water label. . . . . . . . . . . . . . . . . . . . . . . . . . . . . . . . . . . . . . . . . . . . . . . . . . . . . . . . . . . . . . . . . . . 14Operator panel label. . . . . . . . . . . . . . . . . . . . . . . . . . . . . . . . . . . . . . . . . . . . . . . . . . . . . . . . . . . 15Start panel label. . . . . . . . . . . . . . . . . . . . . . . . . . . . . . . . . . . . . . . . . . . . . . . . . . . . . . . . . . . . . . 15
Transport. . . . . . . . . . . . . . . . . . . . . . . . . . . . . . . . . . . . . . . . . . . . . . . . . . . . . . . . . . . . . . . . . . . . . . . . . 15Lifting the machine. . . . . . . . . . . . . . . . . . . . . . . . . . . . . . . . . . . . . . . . . . . . . . . . . . . . . . . . . . . . . 15
Lifting the machine. . . . . . . . . . . . . . . . . . . . . . . . . . . . . . . . . . . . . . . . . . . . . . . . . . . . . . . . . . . . 16Secure transport. . . . . . . . . . . . . . . . . . . . . . . . . . . . . . . . . . . . . . . . . . . . . . . . . . . . . . . . . . . . . . . 16
Secure transport. . . . . . . . . . . . . . . . . . . . . . . . . . . . . . . . . . . . . . . . . . . . . . . . . . . . . . . . . . . . . . 16
Installation. . . . . . . . . . . . . . . . . . . . . . . . . . . . . . . . . . . . . . . . . . . . . . . . . . . . . . . . . . . . . . . . . . . . . . . . 16Fuel. . . . . . . . . . . . . . . . . . . . . . . . . . . . . . . . . . . . . . . . . . . . . . . . . . . . . . . . . . . . . . . . . . . . . . . . . . . 16
Filling. . . . . . . . . . . . . . . . . . . . . . . . . . . . . . . . . . . . . . . . . . . . . . . . . . . . . . . . . . . . . . . . . . . . . . . 16
Operation. . . . . . . . . . . . . . . . . . . . . . . . . . . . . . . . . . . . . . . . . . . . . . . . . . . . . . . . . . . . . . . . . . . . . . . . . 17Operating near edges. . . . . . . . . . . . . . . . . . . . . . . . . . . . . . . . . . . . . . . . . . . . . . . . . . . . . . . . . . . 17Operating on slopes. . . . . . . . . . . . . . . . . . . . . . . . . . . . . . . . . . . . . . . . . . . . . . . . . . . . . . . . . . . . 17
Tilt. . . . . . . . . . . . . . . . . . . . . . . . . . . . . . . . . . . . . . . . . . . . . . . . . . . . . . . . . . . . . . . . . . . . . . . . . . 18Gradeability. . . . . . . . . . . . . . . . . . . . . . . . . . . . . . . . . . . . . . . . . . . . . . . . . . . . . . . . . . . . . . . . . . 18
Start and stop. . . . . . . . . . . . . . . . . . . . . . . . . . . . . . . . . . . . . . . . . . . . . . . . . . . . . . . . . . . . . . . . . . 18Before starting. . . . . . . . . . . . . . . . . . . . . . . . . . . . . . . . . . . . . . . . . . . . . . . . . . . . . . . . . . . . . . . . 18Handle positions. . . . . . . . . . . . . . . . . . . . . . . . . . . . . . . . . . . . . . . . . . . . . . . . . . . . . . . . . . . . . . 20Control box, electrical system. . . . . . . . . . . . . . . . . . . . . . . . . . . . . . . . . . . . . . . . . . . . . . . . . . . 20Starting the engine, manual start. . . . . . . . . . . . . . . . . . . . . . . . . . . . . . . . . . . . . . . . . . . . . . . . 21Starting the engine, electric start. . . . . . . . . . . . . . . . . . . . . . . . . . . . . . . . . . . . . . . . . . . . . . . . 22
3© 2015 Construction Tools EOOD | No. 9800 1531 01b | 2015-11-09Original instructions
ContentsLP 6505
Stopping the engine, manual start. . . . . . . . . . . . . . . . . . . . . . . . . . . . . . . . . . . . . . . . . . . . . . . 23Stopping the engine, electric start . . . . . . . . . . . . . . . . . . . . . . . . . . . . . . . . . . . . . . . . . . . . . . 24
Operating. . . . . . . . . . . . . . . . . . . . . . . . . . . . . . . . . . . . . . . . . . . . . . . . . . . . . . . . . . . . . . . . . . . . . . 25Driving. . . . . . . . . . . . . . . . . . . . . . . . . . . . . . . . . . . . . . . . . . . . . . . . . . . . . . . . . . . . . . . . . . . . . . 25
When taking a break. . . . . . . . . . . . . . . . . . . . . . . . . . . . . . . . . . . . . . . . . . . . . . . . . . . . . . . . . . . . 25Parking. . . . . . . . . . . . . . . . . . . . . . . . . . . . . . . . . . . . . . . . . . . . . . . . . . . . . . . . . . . . . . . . . . . . . . 25
Maintenance. . . . . . . . . . . . . . . . . . . . . . . . . . . . . . . . . . . . . . . . . . . . . . . . . . . . . . . . . . . . . . . . . . . . . . 25Every 10 hours of operating (daily). . . . . . . . . . . . . . . . . . . . . . . . . . . . . . . . . . . . . . . . . . . . . . . 25
Diesel engine, checking oil level and water separator. . . . . . . . . . . . . . . . . . . . . . . . . . . . . . 26Checking the air filter. . . . . . . . . . . . . . . . . . . . . . . . . . . . . . . . . . . . . . . . . . . . . . . . . . . . . . . . . . 26Hydraulic system, checking the oil level. . . . . . . . . . . . . . . . . . . . . . . . . . . . . . . . . . . . . . . . . . 27Scrapers, checking and adjusting. . . . . . . . . . . . . . . . . . . . . . . . . . . . . . . . . . . . . . . . . . . . . . . 27Water tank, filling. . . . . . . . . . . . . . . . . . . . . . . . . . . . . . . . . . . . . . . . . . . . . . . . . . . . . . . . . . . . . 27Check the bolted joints. . . . . . . . . . . . . . . . . . . . . . . . . . . . . . . . . . . . . . . . . . . . . . . . . . . . . . . . 28Checking the safety straps. . . . . . . . . . . . . . . . . . . . . . . . . . . . . . . . . . . . . . . . . . . . . . . . . . . . . 28Cleaning the machine. . . . . . . . . . . . . . . . . . . . . . . . . . . . . . . . . . . . . . . . . . . . . . . . . . . . . . . . . 28
After the first 20 hours of operation. . . . . . . . . . . . . . . . . . . . . . . . . . . . . . . . . . . . . . . . . . . . . . 28Every 250 hours of operation. . . . . . . . . . . . . . . . . . . . . . . . . . . . . . . . . . . . . . . . . . . . . . . . . . . . 28
Diesel engine, changing the oil and filter. . . . . . . . . . . . . . . . . . . . . . . . . . . . . . . . . . . . . . . . . 28Checking battery connectors. . . . . . . . . . . . . . . . . . . . . . . . . . . . . . . . . . . . . . . . . . . . . . . . . . . 29
Every 500 hours of operation (yearly). . . . . . . . . . . . . . . . . . . . . . . . . . . . . . . . . . . . . . . . . . . . 30Diesel engine, replacing the fuel filter. . . . . . . . . . . . . . . . . . . . . . . . . . . . . . . . . . . . . . . . . . . . 30Hydraulic system, changing the oil. . . . . . . . . . . . . . . . . . . . . . . . . . . . . . . . . . . . . . . . . . . . . . 30Hydraulic system, replacing the oil filter. . . . . . . . . . . . . . . . . . . . . . . . . . . . . . . . . . . . . . . . . . 32Eccentric element, changing the oil. . . . . . . . . . . . . . . . . . . . . . . . . . . . . . . . . . . . . . . . . . . . . . 33
Disposal. . . . . . . . . . . . . . . . . . . . . . . . . . . . . . . . . . . . . . . . . . . . . . . . . . . . . . . . . . . . . . . . . . . . . . . . . . 33
Storage. . . . . . . . . . . . . . . . . . . . . . . . . . . . . . . . . . . . . . . . . . . . . . . . . . . . . . . . . . . . . . . . . . . . . . . . . . . 33
Before starting after long-term storage. . . . . . . . . . . . . . . . . . . . . . . . . . . . . . . . . . . . . . . . . . . . . . 33
Technical data. . . . . . . . . . . . . . . . . . . . . . . . . . . . . . . . . . . . . . . . . . . . . . . . . . . . . . . . . . . . . . . . . . . . . 34Machine data. . . . . . . . . . . . . . . . . . . . . . . . . . . . . . . . . . . . . . . . . . . . . . . . . . . . . . . . . . . . . . . . . . . 34Noise and vibration declaration statement. . . . . . . . . . . . . . . . . . . . . . . . . . . . . . . . . . . . . . . . 34Noise and vibration data. . . . . . . . . . . . . . . . . . . . . . . . . . . . . . . . . . . . . . . . . . . . . . . . . . . . . . . . 35Uncertainties, sound value. . . . . . . . . . . . . . . . . . . . . . . . . . . . . . . . . . . . . . . . . . . . . . . . . . . . . . 35Dimensions. . . . . . . . . . . . . . . . . . . . . . . . . . . . . . . . . . . . . . . . . . . . . . . . . . . . . . . . . . . . . . . . . . . . 36
EC Declaration of Conformity. . . . . . . . . . . . . . . . . . . . . . . . . . . . . . . . . . . . . . . . . . . . . . . . . . . . . . 37EC Declaration of Conformity (EC Directive 2006/42/EC). . . . . . . . . . . . . . . . . . . . . . . . . . . 37
© 2015 Construction Tools EOOD | No. 9800 1531 01b | 2015-11-09Original instructions
4
LP 6505Contents
Introduction
Thank you for choosing a product from Atlas Copco. Since 1873, we have beencommitted to finding new and better ways of fulfilling our customers' needs.Through the years, we have developed innovative and ergonomic productdesigns that have helped customers improve and rationalize their daily work.Atlas Copco has a strong global sales and service network, consisting ofcustomer centers and distributors worldwide. Our experts are highly trainedprofessionals with extensive product knowledge and application experience.In all corners of the world, we can offer product support and expertise to ensurethat our customers can work at maximum efficiency at all times.For more information please visit: www.atlascopco.comConstruction Tools EOOD7000 RousseBulgaria
About the Safety and operatinginstructions
The aim of the instructions is to provide you with knowledge of how to use themachine in an efficient, safe way. The instructions also give you advice andtell you how to perform regular maintenance on the machine.Before using the machine for the first time you must read these instructionscarefully and understand all of them.
5© 2015 Construction Tools EOOD | No. 9800 1531 01b | 2015-11-09Original instructions
Safety and operating instructionsLP 6505
Safety instructionsTo reduce the risk of serious injury or death toyourself or others, read and understand the Safetyand operating instruction before installing, operating,repairing, maintaining, or changing accessories onthe machine.Post this Safety and operating instruction at worklocations, provide copies to employees, and makesure that everyone reads the Safety and operatinginstruction before operating or servicing the machine.For professional use only.In addition, the operator or the operator's employermust assess the specific risks that may be presentas a result of each use of the machine.Additional instructions for the engine can be foundin the manufacturer's engine manual.
Safety signal words
The safety signal words Danger, Warning andCaution have the following meanings:
Indicates a hazardous situationwhich, if not avoided, will resultin death or serious injury.
DANGER
Indicates a hazardous situationwhich, if not avoided, couldresult in death or serious injury.
WARNING
Indicates a hazardous situationwhich, if not avoided, couldresult in minor or moderateinjury.
CAUTION
Personal precautions andqualifications
Only qualified and trained persons may operate ormaintain the machine. They must be physically ableto handle the bulk, weight, and power of the machine.Always use your common sense and goodjudgement.
Personal protective equipmentAlways use approved protective equipment.Operators and all other persons in the working areamust wear protective equipment, including at aminimum:● Protective helmet
● Hearing protection
● Impact resistant eye protection with side protection
● Respiratory protection when appropriate
● Protective gloves
● Proper protective boots
● Appropriate work overall or similar clothing (notloose-fitting) that covers your arms and legs.
Drugs, alcohol or medicationWARNING Drugs, alcohol or medication
Drugs, alcohol or medication may impair yourjudgment and powers of concentration. Poorreactions and incorrect assessments can lead tosevere accidents or death.►Never use the machine when you are tired or
under the influence of drugs, alcohol ormedication.
►No person who is under the influence of drugs,alcohol or medication may operate the machine.
Operation, precautions
DANGER Explosion hazardIf a warm machine or exhaust pipe comes intocontact with explosives, an explosion could occur.During operating with certain materials, sparks andignition can occur. Explosions will lead to severeinjuries or death.►Never operate the machine in any explosive
environment.
►Never use the machine near flammable materials,fumes or dust.
►Make sure that there are no undetected sourcesof gas or explosives.
►Avoid contact with the warm exhaust pipe or thebottom of the machine.
DANGER Fire hazardIf a fire starts in the machine, it can cause injury.► If possible use an ABE-class powder extinguisher,
otherwise use a BE-type carbon dioxide fireextinguisher.
DANGER Fuel hazardThe fuel is flammable and fuel fumes can explodewhen ignited, causing serious injury or death.►Protect your skin from contact with the fuel. If fuel
has penetrated the skin, consult a qualified healthprofessional.
►Never remove the filler cap, or fill the fuel tankwhen the machine is hot.
►Fill the fuel tank outdoors or in a clean and wellventilated place, free from sparks and openflames. Fill the fuel tank at least ten meters (30feet) from the place where the machine is to beused.
© 2015 Construction Tools EOOD | No. 9800 1531 01b | 2015-11-09Original instructions
6
LP 6505Safety and operating instructions
►Release the filler cap slowly to let pressureescape.
►Never overfill the fuel tank.
►Make sure the filler cap is screwed on when themachine is used.
►Avoid spilling fuel on the machine, wipe off anyspilled fuel.
►Check regularly for fuel leaks. Never use themachine if it is leaking fuel.
►Never use the machine in the proximity of materialthat can generate sparks. Remove all hot orspark-generating devices before starting themachine.
►Never smoke when filling the fuel tank or whenworking with the machine or servicing it.
►Only store fuel in a container that is speciallyconstructed and approved for the purpose.
►Consumed fuel and oil containers must be takencare of and returned to the retailer.
►Never use your fingers to check for fluid leaks.
WARNING Unexpected movementsThe machine is exposed to heavy strains duringoperation. If the machine breaks or gets stuck, theremay be sudden and unexpected movement that cancause injuries.►Always inspect the machine prior to use. Never
use the machine if you suspect that it is damaged.
►Make sure that the handle is clean and free ofgrease and oil.
►Keep your feet away from the machine.
►Never sit on the machine.
►Never strike or abuse the machine.
►Pay attention and look at what you are doing.
WARNING Dust and fume hazardDusts and/or fumes generated or dispersed whenusing themachinemay cause serious and permanentrespiratory disease, illness, or other bodily injury (forexample, silicosis or other irreversible lung diseasethat can be fatal, cancer, birth defects, and/or skininflammation).Some dusts and fumes created by compaction workcontain substances known to the State of Californiaand other authorities to cause respiratory disease,cancer, birth defects, or other reproductive harm.Some examples of such substances are:● Crystalline silica, cement, and other masonry
products.
● Arsenic and chromium from chemically-treatedrubber.
● Lead from lead-based paints.
Dust and fumes in the air can be invisible to thenaked eye, so do not rely on eye sight to determineif there is dust or fumes are the air.To reduce the risk of exposure to dust and fumes,do all of the following:►Perform site-specific risk assessment. The risk
assessment must include dust and fumes createdby the use of the machine and the potential fordisturbing existing dust.
►Use proper engineering controls to minimize theamount of dust and fumes in the air and tominimize build-up on equipment, surfaces,clothing, and body parts. Examples of controlsinclude: exhaust ventilation and dust collectionsystems, water sprays, and wet drilling. Controldusts and fumes at the source where possible.Make sure that controls are properly installed,maintained and correctly used.
►Wear, maintain and correctly use respiratoryprotection as instructed by your employer and asrequired by occupational health and safetyregulations. The respiratory protection must beeffective for the type of substance at issue (and ifapplicable, approved by relevant governmentalauthority).
►Work in a well ventilated area.
► If the machine has an exhaust, direct the exhaustso as to reduce disturbance of dust in a dust filledenvironment.
►Operate and maintain the machine asrecommended in the operating and safetyinstructions
►Wear washable or disposable protective clothesat the worksite, and shower and change into cleanclothes before leaving the worksite to reduceexposure of dust and fumes to yourself, otherpersons, cars, homes, and other areas.
7© 2015 Construction Tools EOOD | No. 9800 1531 01b | 2015-11-09Original instructions
Safety and operating instructionsLP 6505
►Avoid eating, drinking, and using tobacco productsin areas where there is dust or fumes.
►Wash your hands and face thoroughly as soon aspossible upon leaving the exposure area, andalways before eating, drinking, using tobaccoproducts, or making contact with other persons.
►Comply with all applicable laws and regulations,including occupational health and safetyregulations.
►Participate in air monitoring, medical examinationprograms, and health and safety training programsprovided by your employer or trade organizationsand in accordance with occupational health andsafety regulations and recommendations. Consultwith physicians experienced in relevantoccupational medicine.
►Work with your employer and trade organizationto reduce dust and fume exposure at the worksiteand to reduce the risks. Effective health and safetyprograms, policies and procedures for protectingworkers and others against harmful exposure todust and fumes must be established andimplemented based on advice from health andsafety experts. Consult with experts.
DANGER Exhaust gas hazardThe exhaust gas from the machine’s combustionengine contains carbon monoxide which ispoisonous, and chemicals known to the State ofCalifornia and other authorities to cause cancer, birthdefects, or other reproductive harm. Inhalation ofexhaust fumes can cause serious injury, illness, ordeath.►Never inhale exhaust fumes.
►Ensure good ventilation (extraction of air by fan ifnecessary).
WARNING Battery hazardThe battery contains poisonous and corrosivesulphuric acid and can explode, this can cause injury.►Never expose the battery to naked flames, sparks,
strong heat, or anything else where there is a riskof explosion.
►Avoid getting acid on your skin, clothes or on themachine.
►Wear protective glasses to avoid getting acid inyour eyes, if you get acid in your eyes rinse themwith water for at least 15 minutes and seekimmediate medical treatment.
►Never short-circuit the battery poles when fittingor replacing the battery.
WARNING ProjectilesFailure of the work piece, of accessories, or even ofthe machine itself may generate high velocityprojectiles. During operating, splinters or otherparticles from the compacted material may becomeprojectiles and cause personal injury by striking theoperator or other persons. To reduce these risk:►Use approved personal protective equipment and
safety helmet, including impact resistant eyeprotection with side protection.
►Make sure that no unauthorised persons trespassinto the working zone.
►Keep the workplace free from foreign objects.
WARNING Hydraulic system hazardHydraulic hoses are made of rubber and candeteriorate with age, with the consequent risk ofsplitting. This can cause injuries.►Maintain the hydraulic system regularly.
►Whenever there are uncertainties as to durabilityand wear, replace hoses with new original hoses.
WARNING Slope hazardsDuring operation, secure the machine so it can notfall if it is placed on a sloping ground. A fall can leadto severe accidents and result in personal injury.►Always ensure that all personnel in the working
area are higher up the slope than the machine.
►Always operate the machine straight up and downwhen placed on slopes.
►Never exceed the maximum recommended slopeangle when operating the machine. Follow therecommendations.
WARNING Motion hazardsWhen using the machine to perform work-relatedactivities, you may experience discomfort in thehands, arms, shoulders, neck, or other parts of thebody.►Adopt a comfortable posture while maintaining
secure footing and avoiding awkward off-balancedpostures.
►Changing posture during extended tasks may helpavoid discomfort and fatigue.
► In case of persistent or recurring symptoms,consult a qualified health professional.
© 2015 Construction Tools EOOD | No. 9800 1531 01b | 2015-11-09Original instructions
8
LP 6505Safety and operating instructions
WARNING Vibration hazardsNormal and proper use of the machine exposes theoperator to vibration. Regular and frequent exposureto vibration may cause, contribute to, or aggravateinjury or disorders to the operator’s fingers, hands,wrists, arms, shoulders and/or nerves and bloodsupply or other body parts, including debilitatingand/or permanent injuries or disorders that maydevelop gradually over periods of weeks, months, oryears. Such injuries or disordersmay include damageto the blood circulatory system, damage to thenervous system, damage to joints, and possiblydamage to other body structures.If numbness, persistent recurring discomfort, burningsensation, stiffness, throbbing, tingling, pain,clumsiness, weakened grip, whitening of the skin, orother symptoms occur at any time, when operatingthe machine or when not operating the machine, stopoperating the machine, tell your employer and seekmedical attention. Continued use of themachine afterthe occurrence of any such symptom may increasethe risk of symptoms becoming more severe and/orpermanent.Operate andmaintain the machine as recommendedin these instructions, to prevent an unnecessaryincrease in vibration.The following may help to reduce exposure tovibration for the operator:► If the machine has vibration absorbing handles,
keep them in a central position, avoid pressing thehandles into the end stops.
►When the percussionmechanism is activated, theonly body contact with the machine youmust haveare your hands on the handle or handles. Avoidany other contact, for example supporting any partof the body against the machine or leaning ontothe machine trying to increase the feed force.
►Make sure that the machine is well-maintainedand not worn out.
► Immediately stop working if the machine suddenlystarts to vibrate strongly. Before resuming thework, find and remove the cause of the increasedvibrations.
►Participate in health surveillance or monitoring,medical exams and training programs offered byyour employer and when required by law.
►When working in cold conditions wear warmclothing and keep hands warm and dry.
See the ”Noise and vibration declaration statement”for the machine, including the declared vibrationvalues. This information can be found at the end ofthese Safety and operating instructions.
WARNING Trapping hazardThere is a risk of neck ware, hair, gloves, and clothesgetting dragged into or caught by rotating machineparts. This may cause choking, scalping, lacerations,or death. To reduce the risk:►Never grab or touch a rotating machine part.
►Avoid wearing clothing, neck ware or gloves thatmay get caught.
►Cover long hair with a hair net.
DANGER Electrical hazardThe machine is not electrically insulated. If themachine comes into contact with electricity, seriousinjuries or death may result.►Never operate the machine near any electric wire
or other source of electricity.
►Make sure that there are no concealed wires orother sources of electricity in the working area.
WARNING Concealed object hazardDuring operating, concealed wires and pipesconstitute a danger that can result in serious injury.►Check the composition of the material before
operating.
►Watch out for concealed cables and pipes forexample electricity, telephone, water, gas, andsewage lines.
► If the machine seems to have hit a concealedobject, switch off the machine immediately.
►Make sure that there is no danger beforecontinuing.
WARNING Involuntary startInvoluntary start of the machine may cause injury.►Keep your hands away from the start and stop
device until you are ready to start the machine.
►Learn how the machine is switched off in the eventof an emergency.
WARNING Noise hazardHigh noise levels can cause permanent and disablinghearing loss and other problems such as tinnitus(ringing, buzzing, whistling, or humming in the ears).To reduce risks and prevent an unnecessary increasein noise levels:►Risk assessment of these hazards and
implementation of appropriate controls is essential.
►Operate and maintain the machine asrecommended in these instructions.
► If the machine has a silencer, check that it is inplace and in good working condition.
►Always use hearing protection.
9© 2015 Construction Tools EOOD | No. 9800 1531 01b | 2015-11-09Original instructions
Safety and operating instructionsLP 6505
Transport, precautions
WARNING Loading and unloading hazardWhen the machine is lifted by a crane and similarappliance, this can lead to injury.►Use marked lifting points.
►Make sure that all lifting devices are dimensionedfor the weight of the machine.
►Never remain under or in the immediate vicinityof the machine.
Maintenance, precautions
WARNING Machine modificationAnymachinemodificationmay result in bodily injuriesto yourself or others.►Never modify the machine. Modified machines are
not covered by warranty or product liability.
►Always use original parts and accessoriesapproved by Atlas Copco.
►Change damaged parts immediately.
►Replace worn components in good time.
WARNING Hot oil hazardWhen changing the oil, oil filter or hydraulic oil on ahot machine, there is a risk of burns.►Wait until the machine has cooled down before
changing the oil.
CAUTION High temperatureThe machine's front cover, exhaust pipe, andhydraulic system become hot during operation.Touching them can lead to burns.►Never touch a hot front cover.
►Never touch the hot exhaust pipe.
►Never touch the hydraulic system.
►Wait until the front cover, exhaust pipe, and bottomof the machine has cooled down before carryingout maintenance work.
NOTICE Any use of a quick-charger to charge thebattery can shorten the life time of the battery.
Storage, precautions
♦ Keep themachine in a safe place, out of the reachof children and locked up.
© 2015 Construction Tools EOOD | No. 9800 1531 01b | 2015-11-09Original instructions
10
LP 6505Safety and operating instructions
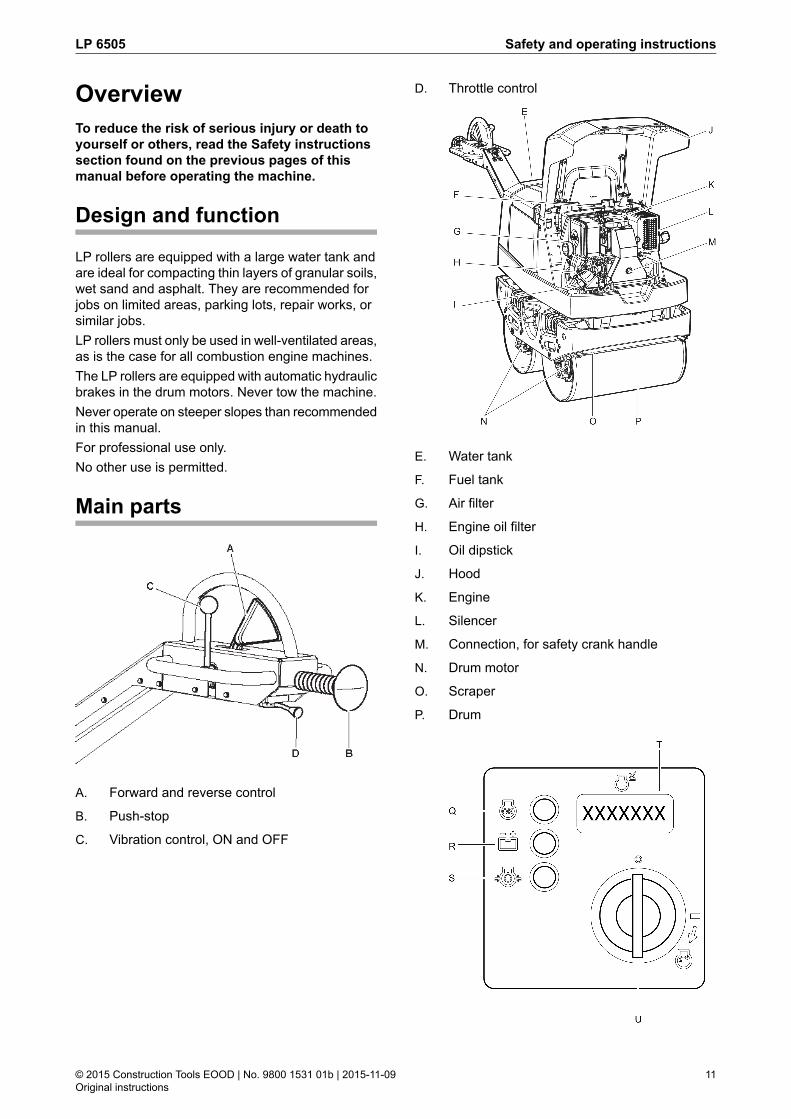
OverviewTo reduce the risk of serious injury or death toyourself or others, read the Safety instructionssection found on the previous pages of thismanual before operating the machine.
Design and function
LP rollers are equipped with a large water tank andare ideal for compacting thin layers of granular soils,wet sand and asphalt. They are recommended forjobs on limited areas, parking lots, repair works, orsimilar jobs.LP rollers must only be used in well-ventilated areas,as is the case for all combustion engine machines.The LP rollers are equipped with automatic hydraulicbrakes in the drum motors. Never tow the machine.Never operate on steeper slopes than recommendedin this manual.For professional use only.No other use is permitted.
Main parts
A. Forward and reverse control
B. Push-stop
C. Vibration control, ON and OFF
D. Throttle control
E. Water tank
F. Fuel tank
G. Air filter
H. Engine oil filter
I. Oil dipstick
J. Hood
K. Engine
L. Silencer
M. Connection, for safety crank handle
N. Drum motor
O. Scraper
P. Drum
11© 2015 Construction Tools EOOD | No. 9800 1531 01b | 2015-11-09Original instructions
Safety and operating instructionsLP 6505

Q. Control lamp, operating
R. Control lamp, charging
S. Control lamp, engine oil pressure
T. Hourmeter
U. Ignition switch
V. Water valve, ON and OFF
EPA (US Environmental Protection Agency)throttle control with three fixed positions.
A. Working mode position
B. Start/Idling speed position
C. Stop position
D. Position lock
Labels
Themachine is fitted with labels containing importantinformation about personal safety and machinemaintenance. The labels must be in such conditionthat they are easy to read. New labels can be orderedfrom the spare parts list.
© 2015 Construction Tools EOOD | No. 9800 1531 01b | 2015-11-09Original instructions
12
LP 6505Safety and operating instructions
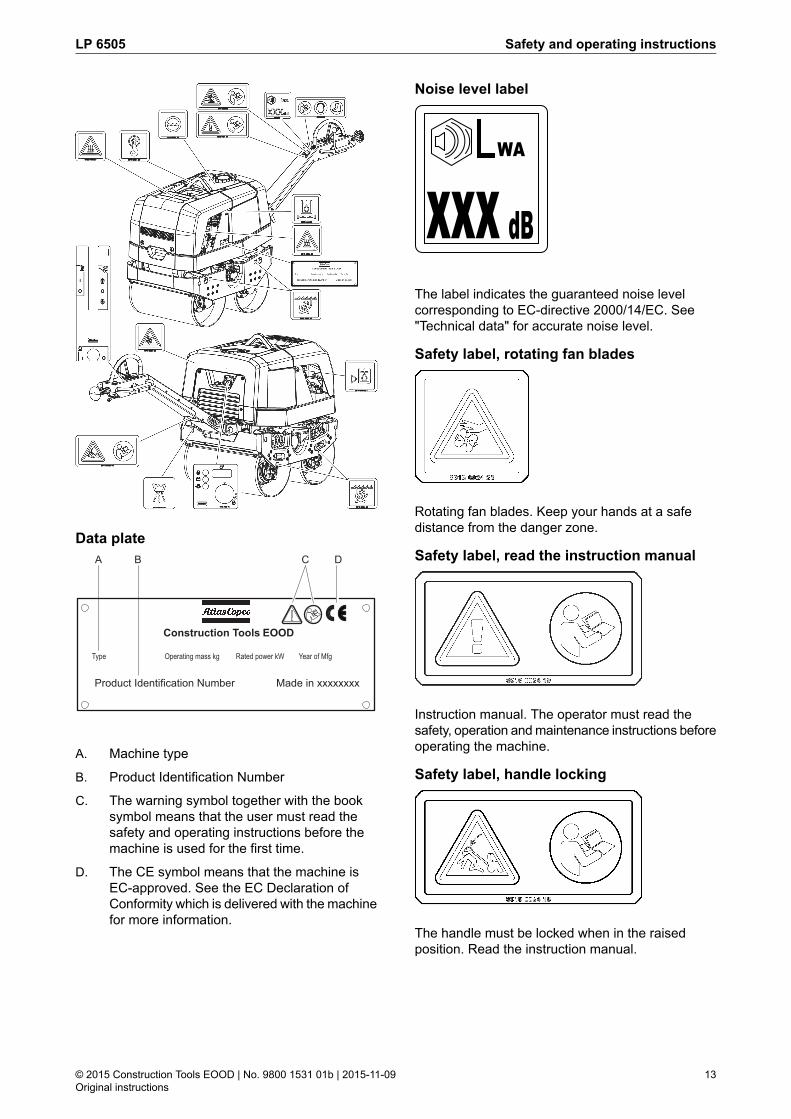
Data plate
Construction Tools EOOD
Type Operating mass kg Rated power kW Year of Mfg
Product Identification Number Made in xxxxxxxx
A B C D
A. Machine type
B. Product Identification Number
C. The warning symbol together with the booksymbol means that the user must read thesafety and operating instructions before themachine is used for the first time.
D. The CE symbol means that the machine isEC-approved. See the EC Declaration ofConformity which is delivered with the machinefor more information.
Noise level label
WA
xxx dB
The label indicates the guaranteed noise levelcorresponding to EC-directive 2000/14/EC. See"Technical data" for accurate noise level.
Safety label, rotating fan blades
Rotating fan blades. Keep your hands at a safedistance from the danger zone.
Safety label, read the instruction manual
Instruction manual. The operator must read thesafety, operation andmaintenance instructions beforeoperating the machine.
Safety label, handle locking
The handle must be locked when in the raisedposition. Read the instruction manual.
13© 2015 Construction Tools EOOD | No. 9800 1531 01b | 2015-11-09Original instructions
Safety and operating instructionsLP 6505
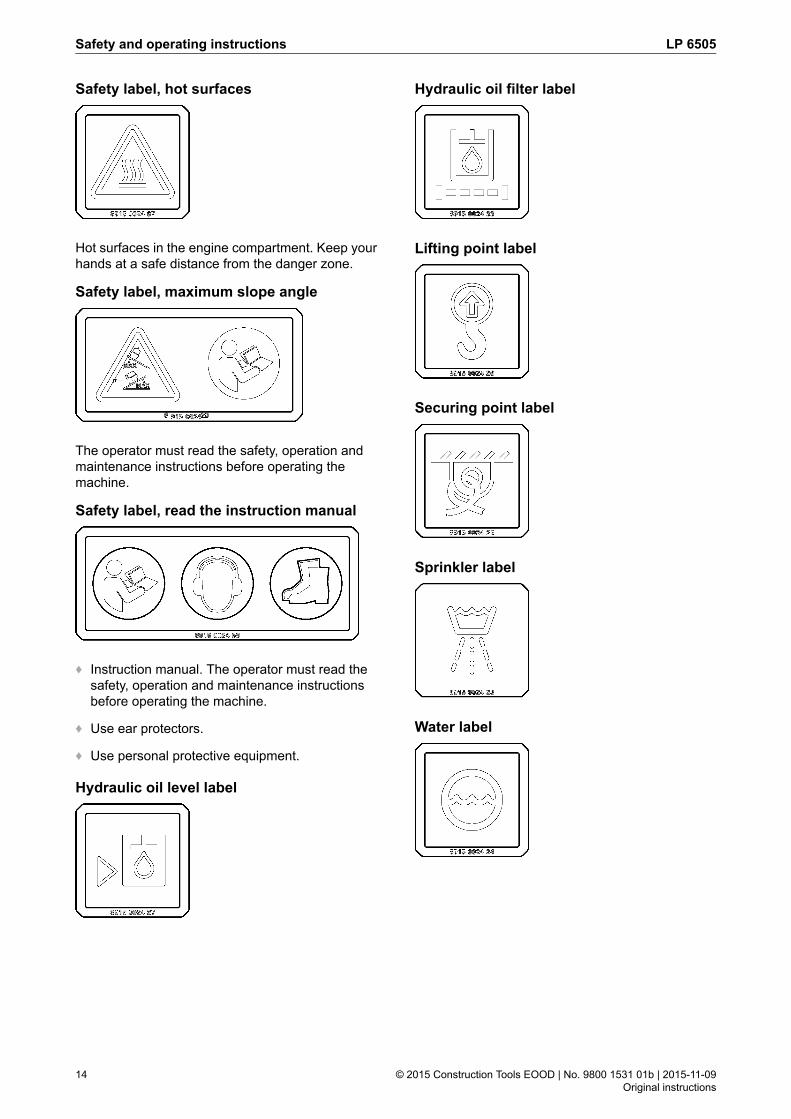
Safety label, hot surfaces
Hot surfaces in the engine compartment. Keep yourhands at a safe distance from the danger zone.
Safety label, maximum slope angle
The operator must read the safety, operation andmaintenance instructions before operating themachine.
Safety label, read the instruction manual
♦ Instruction manual. The operator must read thesafety, operation and maintenance instructionsbefore operating the machine.
♦ Use ear protectors.
♦ Use personal protective equipment.
Hydraulic oil level label
Hydraulic oil filter label
Lifting point label
Securing point label
Sprinkler label
Water label
© 2015 Construction Tools EOOD | No. 9800 1531 01b | 2015-11-09Original instructions
14
LP 6505Safety and operating instructions

Operator panel label
A. Vibration ON/OFF control.
B. Forward and reverse control.
C. Engine speed.
Start panel label
A. Control lamp, operating.
B. Control lamp, charging.
C. Control lamp, engine oil pressure.
D. Hourmeter.
E. Ignition switch.
Transport
Lifting the machine
WARNING Lifting hazardNever lift the machine without checking if it is intact.A damaged machine can fall apart, which can resultin serious injury.►Check the machine's data plate for information of
the weight.
►Check that the shock absorbers, safety straps andprotective frame are correctly attached and notdamaged.
►Check that all equipment is dimensioned inaccordance with applicable regulations.
►Only lift the machine by the hook on the frame.
►Never lift the machine by the lifting eye at theengine.
►Never walk or stand under a lifted machine.
►Never tow the machine.
15© 2015 Construction Tools EOOD | No. 9800 1531 01b | 2015-11-09Original instructions
Safety and operating instructionsLP 6505
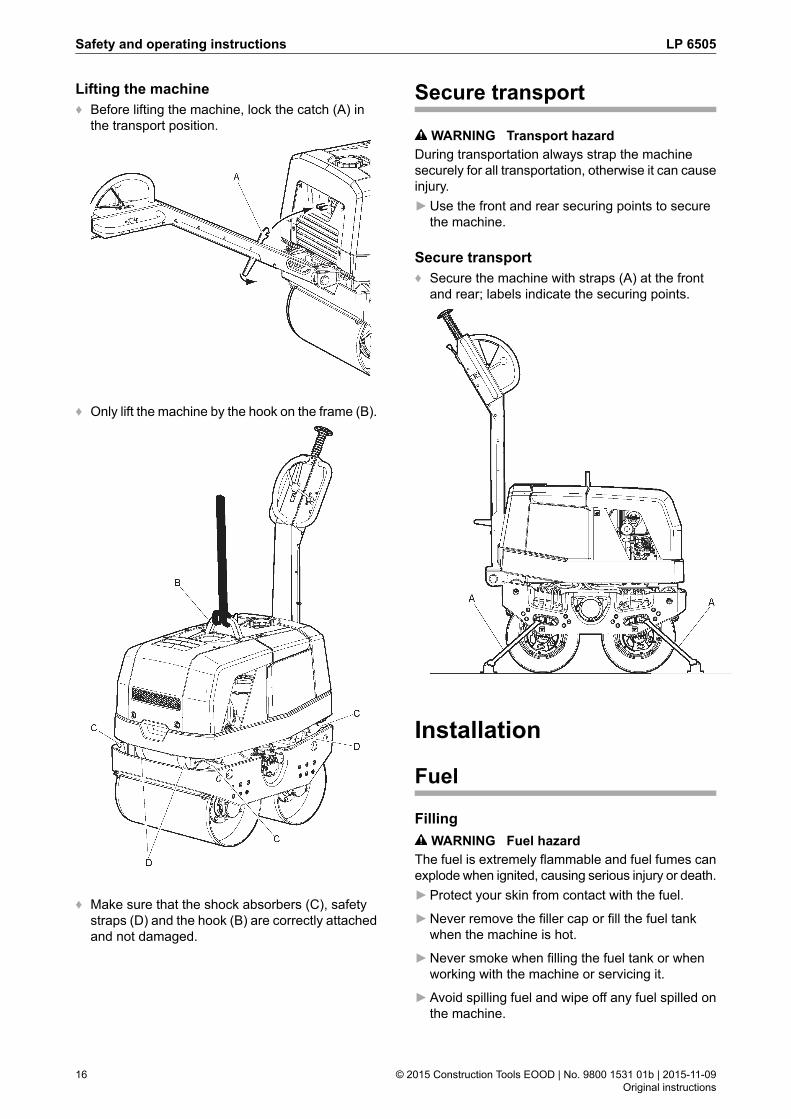
Lifting the machine♦ Before lifting the machine, lock the catch (A) in
the transport position.
♦ Only lift the machine by the hook on the frame (B).
♦ Make sure that the shock absorbers (C), safetystraps (D) and the hook (B) are correctly attachedand not damaged.
Secure transport
WARNING Transport hazardDuring transportation always strap the machinesecurely for all transportation, otherwise it can causeinjury.►Use the front and rear securing points to secure
the machine.
Secure transport♦ Secure the machine with straps (A) at the front
and rear; labels indicate the securing points.
Installation
Fuel
FillingWARNING Fuel hazard
The fuel is extremely flammable and fuel fumes canexplode when ignited, causing serious injury or death.►Protect your skin from contact with the fuel.
►Never remove the filler cap or fill the fuel tankwhen the machine is hot.
►Never smoke when filling the fuel tank or whenworking with the machine or servicing it.
►Avoid spilling fuel and wipe off any fuel spilled onthe machine.
© 2015 Construction Tools EOOD | No. 9800 1531 01b | 2015-11-09Original instructions
16
LP 6505Safety and operating instructions
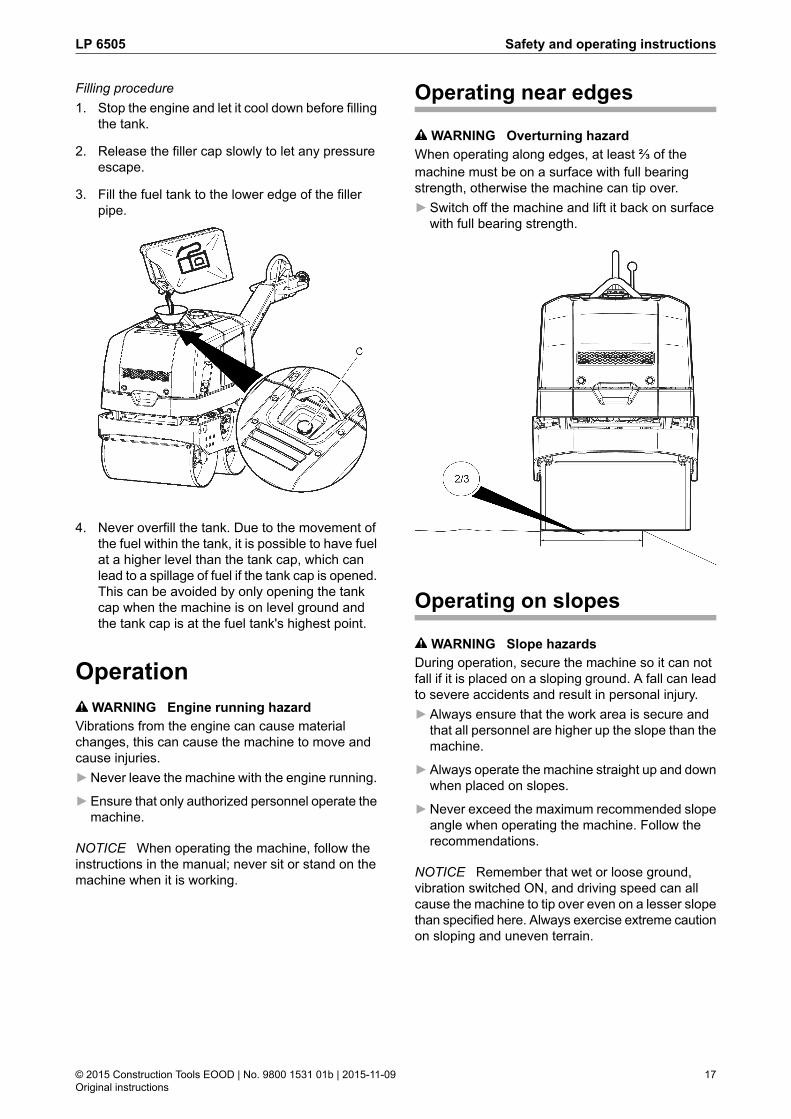
Filling procedure1. Stop the engine and let it cool down before filling
the tank.
2. Release the filler cap slowly to let any pressureescape.
3. Fill the fuel tank to the lower edge of the fillerpipe.
4. Never overfill the tank. Due to the movement ofthe fuel within the tank, it is possible to have fuelat a higher level than the tank cap, which canlead to a spillage of fuel if the tank cap is opened.This can be avoided by only opening the tankcap when the machine is on level ground andthe tank cap is at the fuel tank's highest point.
OperationWARNING Engine running hazard
Vibrations from the engine can cause materialchanges, this can cause the machine to move andcause injuries.►Never leave the machine with the engine running.
►Ensure that only authorized personnel operate themachine.
NOTICE When operating the machine, follow theinstructions in the manual; never sit or stand on themachine when it is working.
Operating near edges
WARNING Overturning hazardWhen operating along edges, at least 2⁄3 of themachine must be on a surface with full bearingstrength, otherwise the machine can tip over.►Switch off the machine and lift it back on surface
with full bearing strength.
Operating on slopes
WARNING Slope hazardsDuring operation, secure the machine so it can notfall if it is placed on a sloping ground. A fall can leadto severe accidents and result in personal injury.►Always ensure that the work area is secure and
that all personnel are higher up the slope than themachine.
►Always operate the machine straight up and downwhen placed on slopes.
►Never exceed the maximum recommended slopeangle when operating the machine. Follow therecommendations.
NOTICE Remember that wet or loose ground,vibration switched ON, and driving speed can allcause the machine to tip over even on a lesser slopethan specified here. Always exercise extreme cautionon sloping and uneven terrain.
17© 2015 Construction Tools EOOD | No. 9800 1531 01b | 2015-11-09Original instructions
Safety and operating instructionsLP 6505
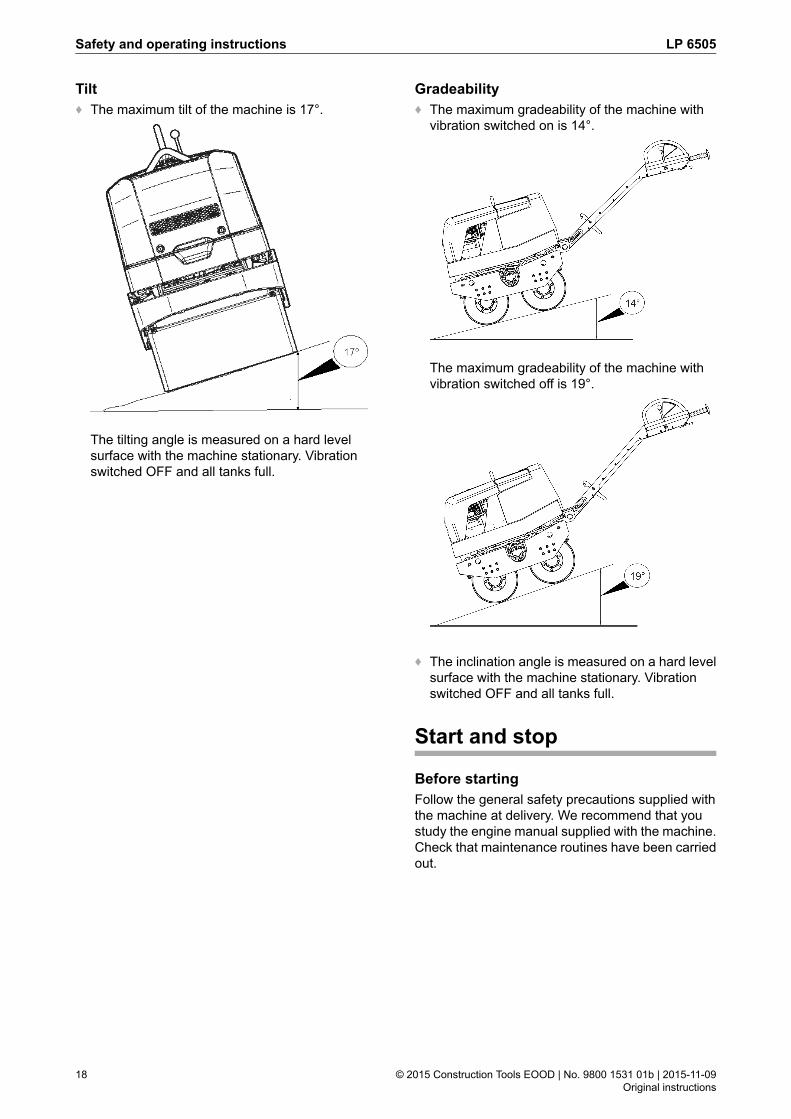
Tilt♦ The maximum tilt of the machine is 17°.
The tilting angle is measured on a hard levelsurface with the machine stationary. Vibrationswitched OFF and all tanks full.
Gradeability♦ The maximum gradeability of the machine with
vibration switched on is 14°.
The maximum gradeability of the machine withvibration switched off is 19°.
♦ The inclination angle is measured on a hard levelsurface with the machine stationary. Vibrationswitched OFF and all tanks full.
Start and stop
Before startingFollow the general safety precautions supplied withthe machine at delivery. We recommend that youstudy the engine manual supplied with the machine.Check that maintenance routines have been carriedout.
© 2015 Construction Tools EOOD | No. 9800 1531 01b | 2015-11-09Original instructions
18
LP 6505Safety and operating instructions
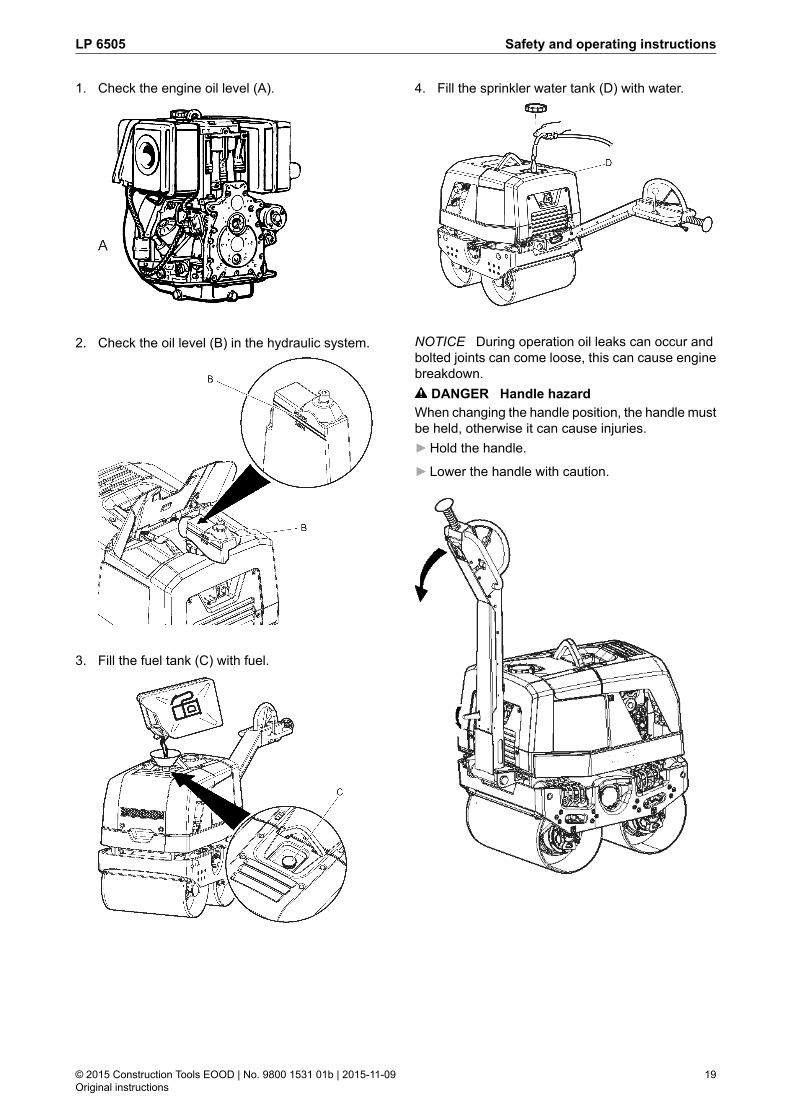
1. Check the engine oil level (A).
2. Check the oil level (B) in the hydraulic system.
3. Fill the fuel tank (C) with fuel.
4. Fill the sprinkler water tank (D) with water.
NOTICE During operation oil leaks can occur andbolted joints can come loose, this can cause enginebreakdown.
DANGER Handle hazardWhen changing the handle position, the handle mustbe held, otherwise it can cause injuries.►Hold the handle.
►Lower the handle with caution.
19© 2015 Construction Tools EOOD | No. 9800 1531 01b | 2015-11-09Original instructions
Safety and operating instructionsLP 6505
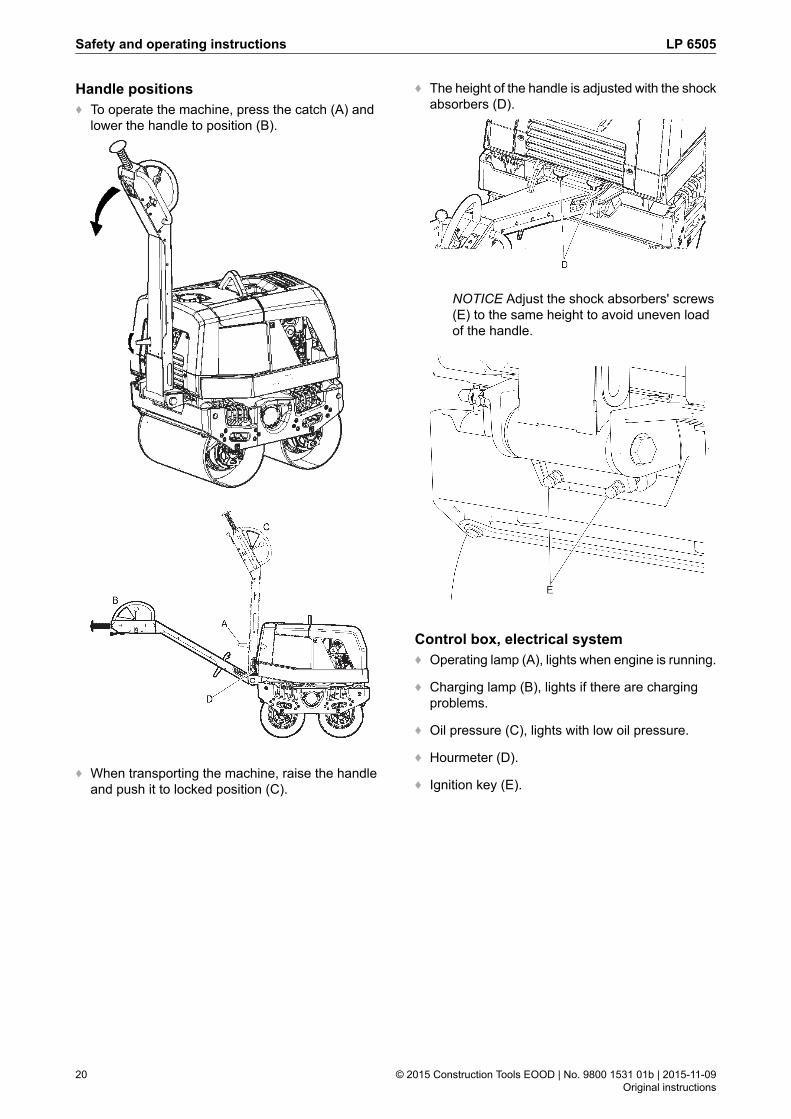
Handle positions♦ To operate the machine, press the catch (A) and
lower the handle to position (B).
♦ When transporting the machine, raise the handleand push it to locked position (C).
♦ The height of the handle is adjusted with the shockabsorbers (D).
NOTICE Adjust the shock absorbers' screws(E) to the same height to avoid uneven loadof the handle.
Control box, electrical system♦ Operating lamp (A), lights when engine is running.
♦ Charging lamp (B), lights if there are chargingproblems.
♦ Oil pressure (C), lights with low oil pressure.
♦ Hourmeter (D).
♦ Ignition key (E).
© 2015 Construction Tools EOOD | No. 9800 1531 01b | 2015-11-09Original instructions
20
LP 6505Safety and operating instructions
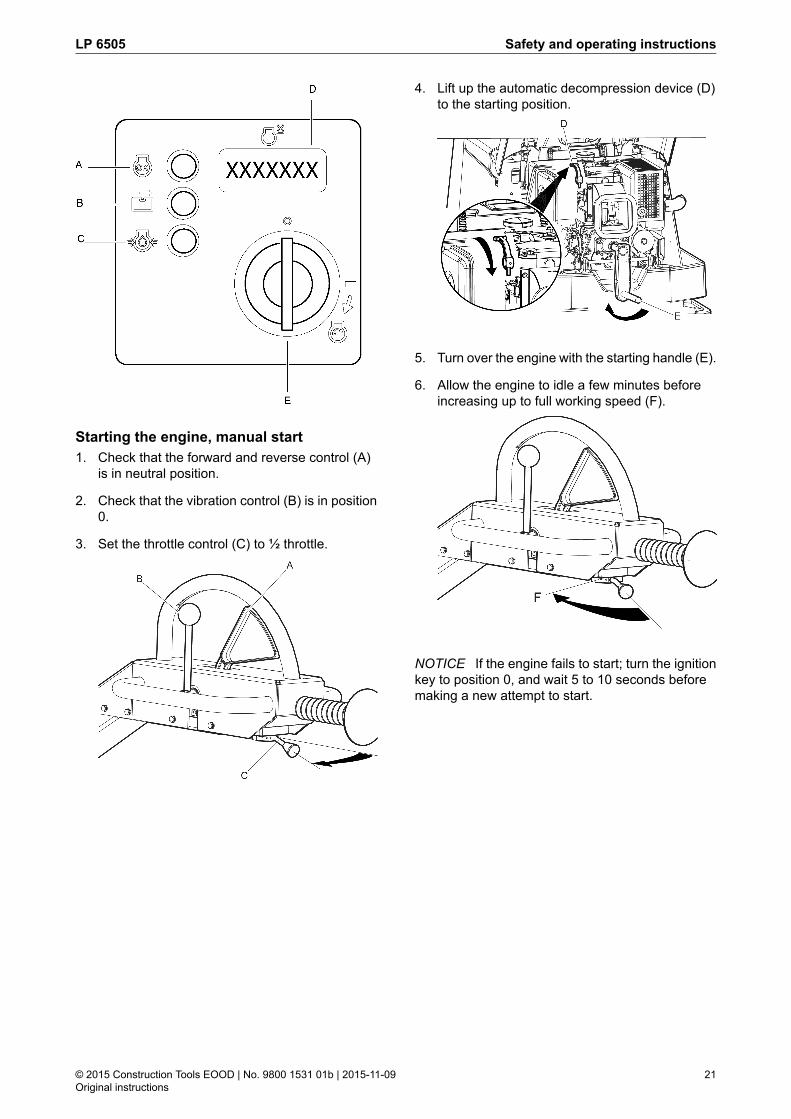
Starting the engine, manual start1. Check that the forward and reverse control (A)
is in neutral position.
2. Check that the vibration control (B) is in position0.
3. Set the throttle control (C) to 1⁄2 throttle.
4. Lift up the automatic decompression device (D)to the starting position.
5. Turn over the engine with the starting handle (E).
6. Allow the engine to idle a few minutes beforeincreasing up to full working speed (F).
NOTICE If the engine fails to start; turn the ignitionkey to position 0, and wait 5 to 10 seconds beforemaking a new attempt to start.
21© 2015 Construction Tools EOOD | No. 9800 1531 01b | 2015-11-09Original instructions
Safety and operating instructionsLP 6505
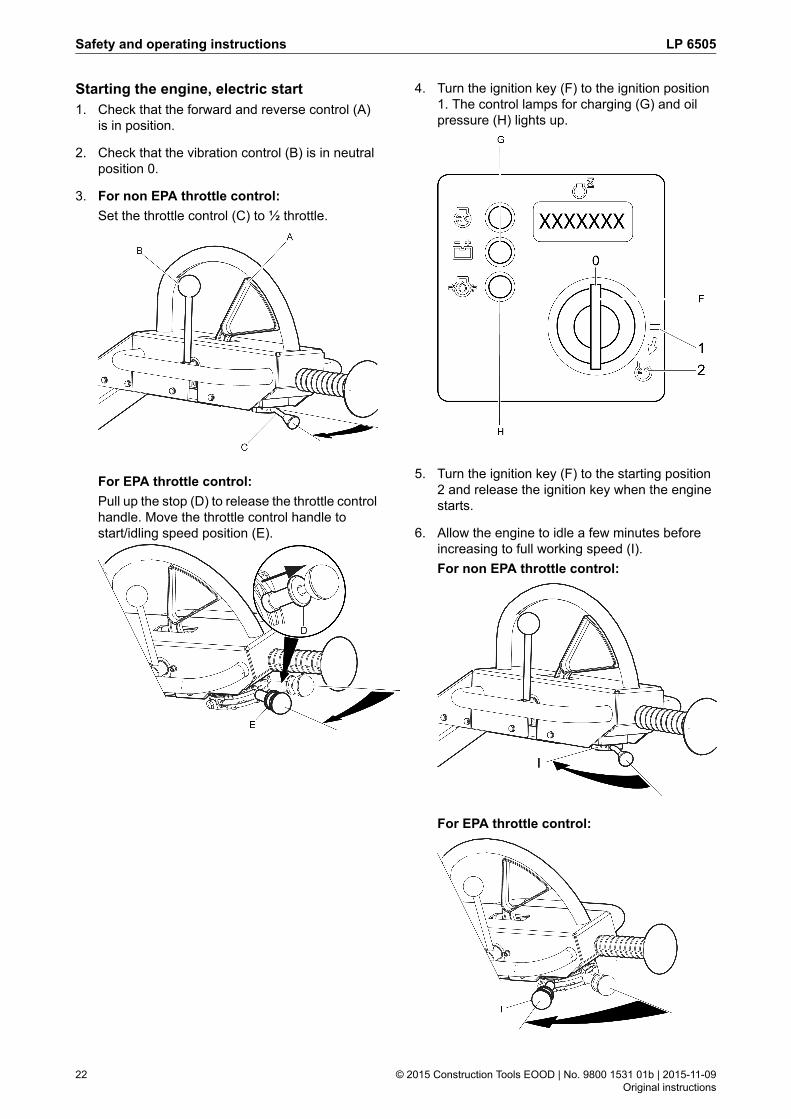
Starting the engine, electric start1. Check that the forward and reverse control (A)
is in position.
2. Check that the vibration control (B) is in neutralposition 0.
3. For non EPA throttle control:Set the throttle control (C) to 1⁄2 throttle.
For EPA throttle control:Pull up the stop (D) to release the throttle controlhandle. Move the throttle control handle tostart/idling speed position (E).
4. Turn the ignition key (F) to the ignition position1. The control lamps for charging (G) and oilpressure (H) lights up.
5. Turn the ignition key (F) to the starting position2 and release the ignition key when the enginestarts.
6. Allow the engine to idle a few minutes beforeincreasing to full working speed (I).For non EPA throttle control:
For EPA throttle control:
© 2015 Construction Tools EOOD | No. 9800 1531 01b | 2015-11-09Original instructions
22
LP 6505Safety and operating instructions
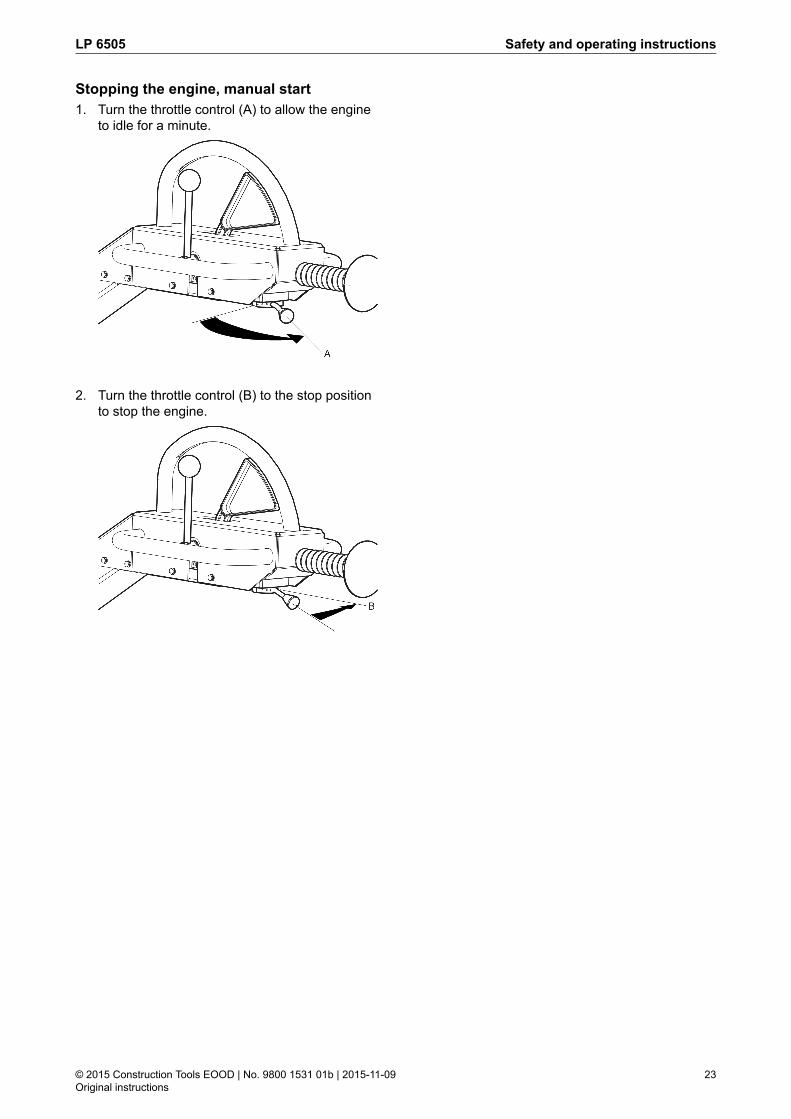
Stopping the engine, manual start1. Turn the throttle control (A) to allow the engine
to idle for a minute.
2. Turn the throttle control (B) to the stop positionto stop the engine.
23© 2015 Construction Tools EOOD | No. 9800 1531 01b | 2015-11-09Original instructions
Safety and operating instructionsLP 6505
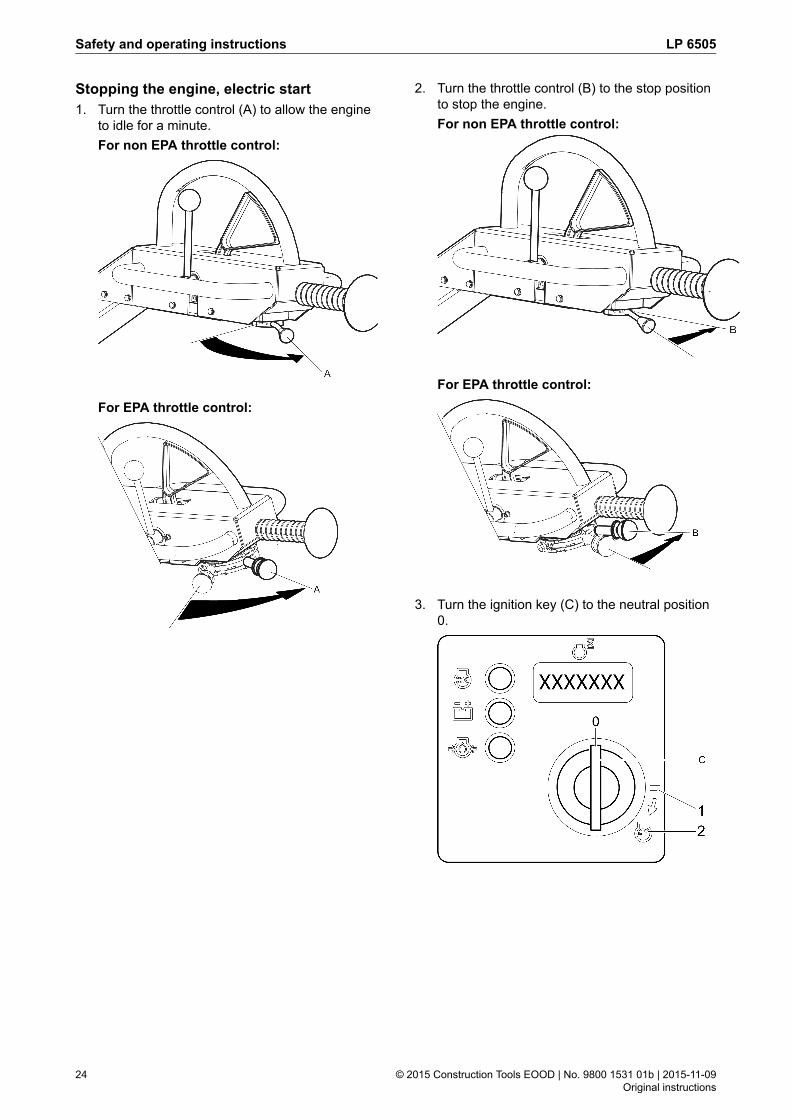
Stopping the engine, electric start1. Turn the throttle control (A) to allow the engine
to idle for a minute.For non EPA throttle control:
For EPA throttle control:
2. Turn the throttle control (B) to the stop positionto stop the engine.For non EPA throttle control:
For EPA throttle control:
3. Turn the ignition key (C) to the neutral position0.
© 2015 Construction Tools EOOD | No. 9800 1531 01b | 2015-11-09Original instructions
24
LP 6505Safety and operating instructions
Operating
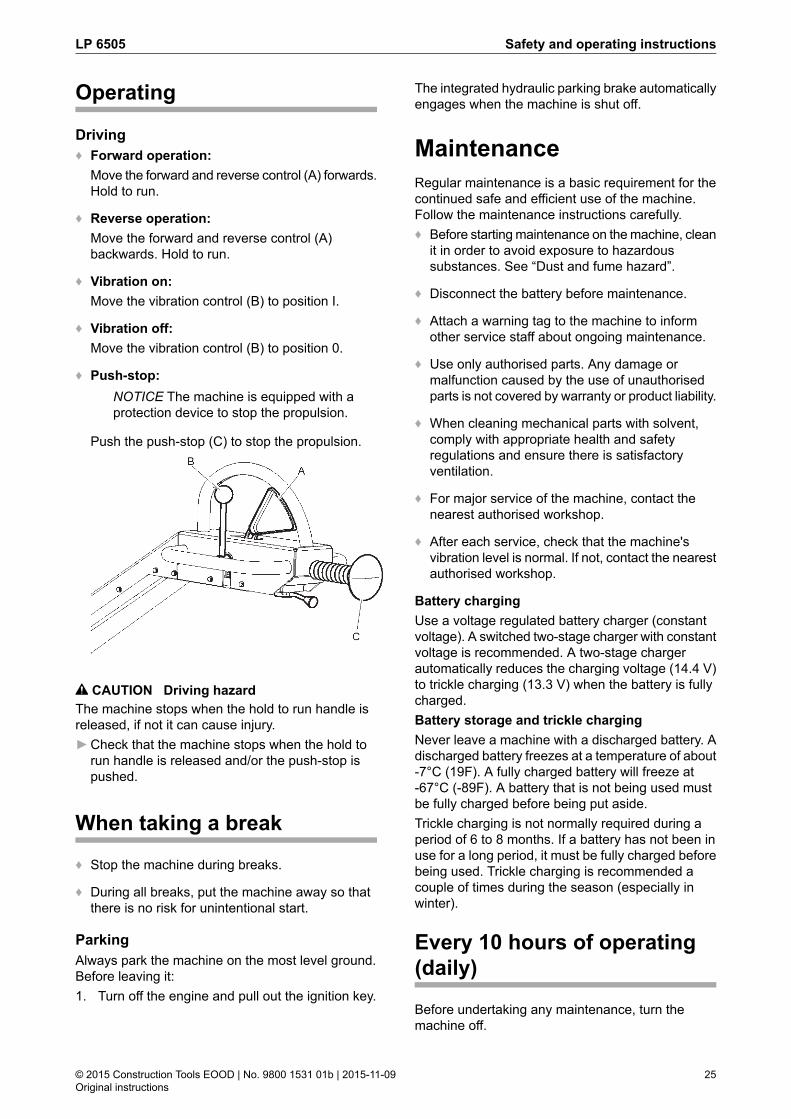
Driving♦ Forward operation:
Move the forward and reverse control (A) forwards.Hold to run.
♦ Reverse operation:Move the forward and reverse control (A)backwards. Hold to run.
♦ Vibration on:Move the vibration control (B) to position I.
♦ Vibration off:Move the vibration control (B) to position 0.
♦ Push-stop:NOTICE The machine is equipped with aprotection device to stop the propulsion.
Push the push-stop (C) to stop the propulsion.
CAUTION Driving hazardThe machine stops when the hold to run handle isreleased, if not it can cause injury.►Check that the machine stops when the hold to
run handle is released and/or the push-stop ispushed.
When taking a break
♦ Stop the machine during breaks.
♦ During all breaks, put the machine away so thatthere is no risk for unintentional start.
ParkingAlways park the machine on the most level ground.Before leaving it:1. Turn off the engine and pull out the ignition key.
The integrated hydraulic parking brake automaticallyengages when the machine is shut off.
MaintenanceRegular maintenance is a basic requirement for thecontinued safe and efficient use of the machine.Follow the maintenance instructions carefully.♦ Before startingmaintenance on themachine, clean
it in order to avoid exposure to hazardoussubstances. See “Dust and fume hazard”.
♦ Disconnect the battery before maintenance.
♦ Attach a warning tag to the machine to informother service staff about ongoing maintenance.
♦ Use only authorised parts. Any damage ormalfunction caused by the use of unauthorisedparts is not covered by warranty or product liability.
♦ When cleaning mechanical parts with solvent,comply with appropriate health and safetyregulations and ensure there is satisfactoryventilation.
♦ For major service of the machine, contact thenearest authorised workshop.
♦ After each service, check that the machine'svibration level is normal. If not, contact the nearestauthorised workshop.
Battery chargingUse a voltage regulated battery charger (constantvoltage). A switched two-stage charger with constantvoltage is recommended. A two-stage chargerautomatically reduces the charging voltage (14.4 V)to trickle charging (13.3 V) when the battery is fullycharged.Battery storage and trickle chargingNever leave a machine with a discharged battery. Adischarged battery freezes at a temperature of about-7°C (19F). A fully charged battery will freeze at-67°C (-89F). A battery that is not being used mustbe fully charged before being put aside.Trickle charging is not normally required during aperiod of 6 to 8 months. If a battery has not been inuse for a long period, it must be fully charged beforebeing used. Trickle charging is recommended acouple of times during the season (especially inwinter).
Every 10 hours of operating(daily)
Before undertaking any maintenance, turn themachine off.
25© 2015 Construction Tools EOOD | No. 9800 1531 01b | 2015-11-09Original instructions
Safety and operating instructionsLP 6505
♦ Inspect the machine before starting. Inspect theentire machine so that leakages or other faults aredetected.
♦ Check the ground under the machine. Leakagesare more easily detected on the ground than onthe machine itself.
♦ Check that the controls are not damaged and doesnot jam. Lubricate the controls if necessary.
In order to ensure that the machine remains withinthe stated vibration level values, the following checksmust be performed:Maintenance routines:♦ Check the oil level in the engine. See the engine
manual for more information.
♦ Fill up with fuel for the engine.
♦ Check/empty the water separator. See the enginemanual for more information.
♦ Check the air filter on the engine.
♦ Check the hydraulic oil level.
♦ Check the adjustment of the scrapers.
♦ Check that the shock absorbers for frame andhandle are not damaged, change if necessary.
♦ Fill the sprinkler system with water.
♦ Check for oil leakage on the machine.
♦ Check that all bolted joints are tightened.
♦ Keep the machine clean.
♦ Check that the safety straps are not damaged,change if necessary.
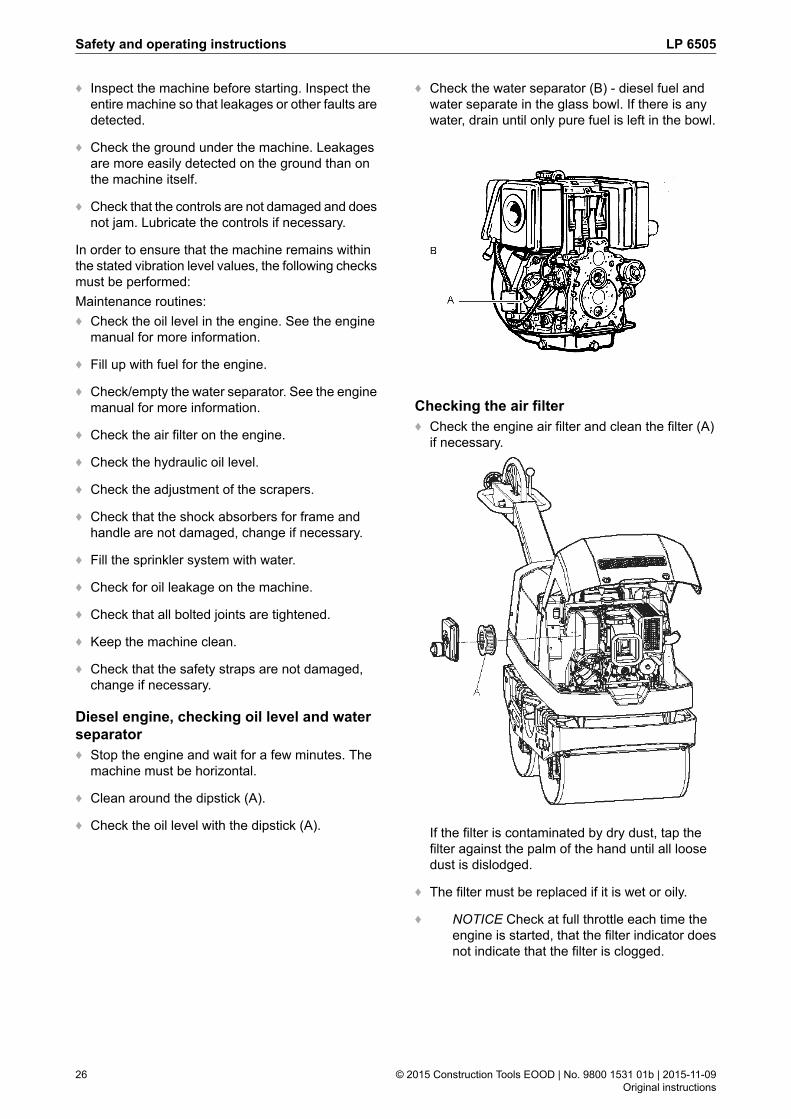
Diesel engine, checking oil level and waterseparator♦ Stop the engine and wait for a few minutes. The
machine must be horizontal.
♦ Clean around the dipstick (A).
♦ Check the oil level with the dipstick (A).
♦ Check the water separator (B) - diesel fuel andwater separate in the glass bowl. If there is anywater, drain until only pure fuel is left in the bowl.
Checking the air filter♦ Check the engine air filter and clean the filter (A)
if necessary.
If the filter is contaminated by dry dust, tap thefilter against the palm of the hand until all loosedust is dislodged.
♦ The filter must be replaced if it is wet or oily.
♦ NOTICE Check at full throttle each time theengine is started, that the filter indicator doesnot indicate that the filter is clogged.
© 2015 Construction Tools EOOD | No. 9800 1531 01b | 2015-11-09Original instructions
26
LP 6505Safety and operating instructions
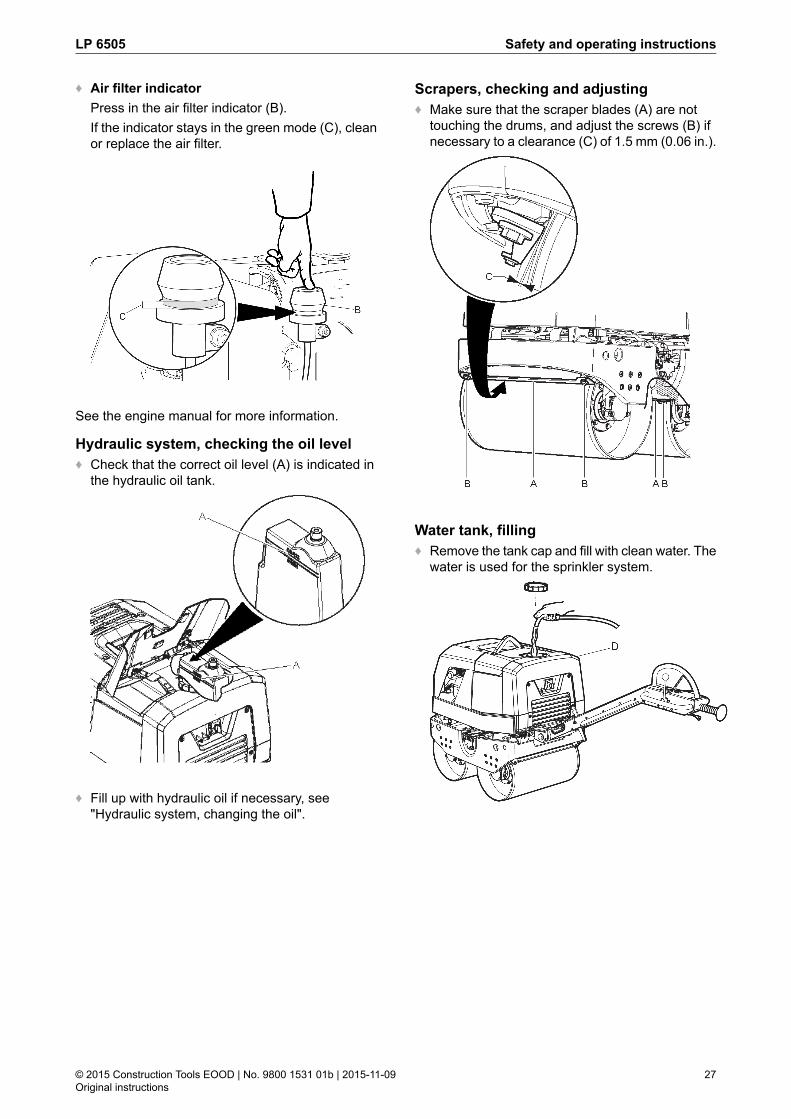
♦ Air filter indicatorPress in the air filter indicator (B).If the indicator stays in the green mode (C), cleanor replace the air filter.
See the engine manual for more information.
Hydraulic system, checking the oil level♦ Check that the correct oil level (A) is indicated in
the hydraulic oil tank.
♦ Fill up with hydraulic oil if necessary, see"Hydraulic system, changing the oil".
Scrapers, checking and adjusting♦ Make sure that the scraper blades (A) are not
touching the drums, and adjust the screws (B) ifnecessary to a clearance (C) of 1.5 mm (0.06 in.).
Water tank, filling♦ Remove the tank cap and fill with clean water. The
water is used for the sprinkler system.
27© 2015 Construction Tools EOOD | No. 9800 1531 01b | 2015-11-09Original instructions
Safety and operating instructionsLP 6505

Check the bolted joints♦ Check that no oil is leaking from the machine.
♦ Check and, where necessary, tighten screws andnuts.
♦ Check the engine cooling system and clean ifnecessary.
Checking the safety straps♦ Check the safety straps on the front and back of
the machine. Replace if they are damaged.
♦ Check the screws on the safety straps, ifnecessary tighten or replace.
Cleaning the machine♦ Do not spray water directly onto electrical
components or the instrument panel.
♦ Place a plastic bag over the fuel filler cap andsecure with a rubber band. (This will prevent waterfrom entering the venting hole in the filler cap.Otherwise this could cause operationaldisturbances, such as clogged filters.)
NOTICE Never aim a water jet directly at the fuelfiller cap. This is particularly important when using ahigh-pressure cleaner.
After the first 20 hours ofoperation
Maintenance routines:♦ Change the oil in the engine. See the engine
manual for more information.
♦ Replace the oil filter. See the engine manual formore information.
♦ Clean and refit the air filter.
♦ Check and adjust the engine valve clearance. Seethe engine manual for more information.
Every 250 hours of operation
Maintenance routines:♦ Check and adjust engine valve clearances. See
the engine manual for more information.
♦ Change the oil in the engine. See the enginemanual for more information.
♦ Replace the oil filter. See the engine manual formore information.
♦ Replace the air filter on the engine.
♦ Check and clean the engine air cooling system.See the engine manual for more information.
♦ Check and clean the hydraulic oil cooler.
♦ Check the battery connections.
Diesel engine, changing the oil and filterOnly drain engine oil while engine is warm.
© 2015 Construction Tools EOOD | No. 9800 1531 01b | 2015-11-09Original instructions
28
LP 6505Safety and operating instructions
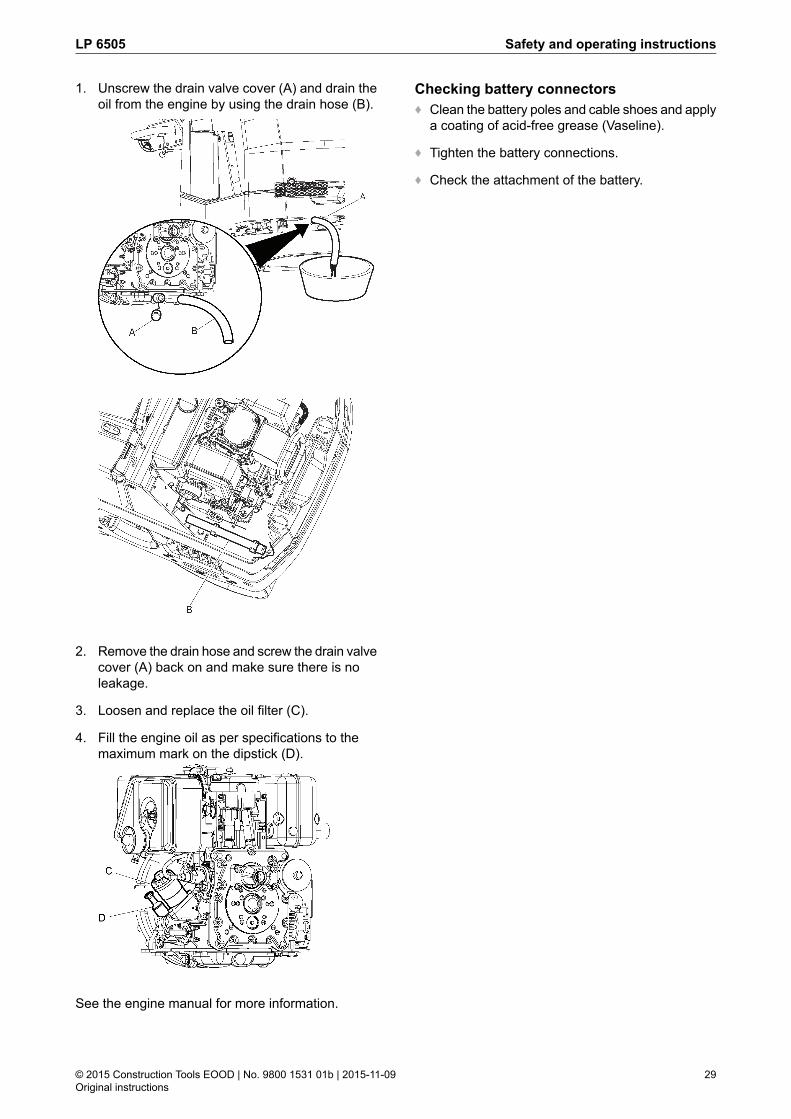
1. Unscrew the drain valve cover (A) and drain theoil from the engine by using the drain hose (B).
2. Remove the drain hose and screw the drain valvecover (A) back on and make sure there is noleakage.
3. Loosen and replace the oil filter (C).
4. Fill the engine oil as per specifications to themaximum mark on the dipstick (D).
See the engine manual for more information.
Checking battery connectors♦ Clean the battery poles and cable shoes and apply
a coating of acid-free grease (Vaseline).
♦ Tighten the battery connections.
♦ Check the attachment of the battery.
29© 2015 Construction Tools EOOD | No. 9800 1531 01b | 2015-11-09Original instructions
Safety and operating instructionsLP 6505

Every 500 hours of operation(yearly)
Maintenance routines:♦ Check and adjust engine valve clearances. See
the engine manual for more information.
♦ Change the oil in the engine. See the enginemanual for more information.
♦ Replace the oil filter. See the engine manual formore information.
♦ Clean fuel tank. See the engine manual for moreinformation.
♦ Replace the fuel filter. See the engine manual formore information.
♦ Replace the air filter on the engine
♦ Check and clean the engine air cooling system.See the engine manual for more information.
♦ Check the fuel injection pump. See the enginemanual for more information.
♦ Check the fuel injection nozzle. See the enginemanual for more information.
♦ Drain the fuel system of water. See the enginemanual for more information.
♦ Change the hydraulic oil.
♦ Change the eccentric element oil
Diesel engine, replacing the fuel filter1. The replacement intervals for fuel filters depend
on how heavily contaminated the fuel is.
2. Release the hoses on both sides of the fuel filter(A) and replace the filter.
3. When fitting the new filter make sure that thearrow on the filter coincides with the direction offlow of the fuel.
See the engine manual for more information.
Hydraulic system, changing the oil1. Remove the oil tank cap, bleeder filter and splash
guard (A).
2. Use an oil suction tool to empty the hydraulic oilfrom the tank.
3. Clean the tank opening and change the bleederfilter.
4. Fill with new hydraulic oil.
© 2015 Construction Tools EOOD | No. 9800 1531 01b | 2015-11-09Original instructions
30
LP 6505Safety and operating instructions
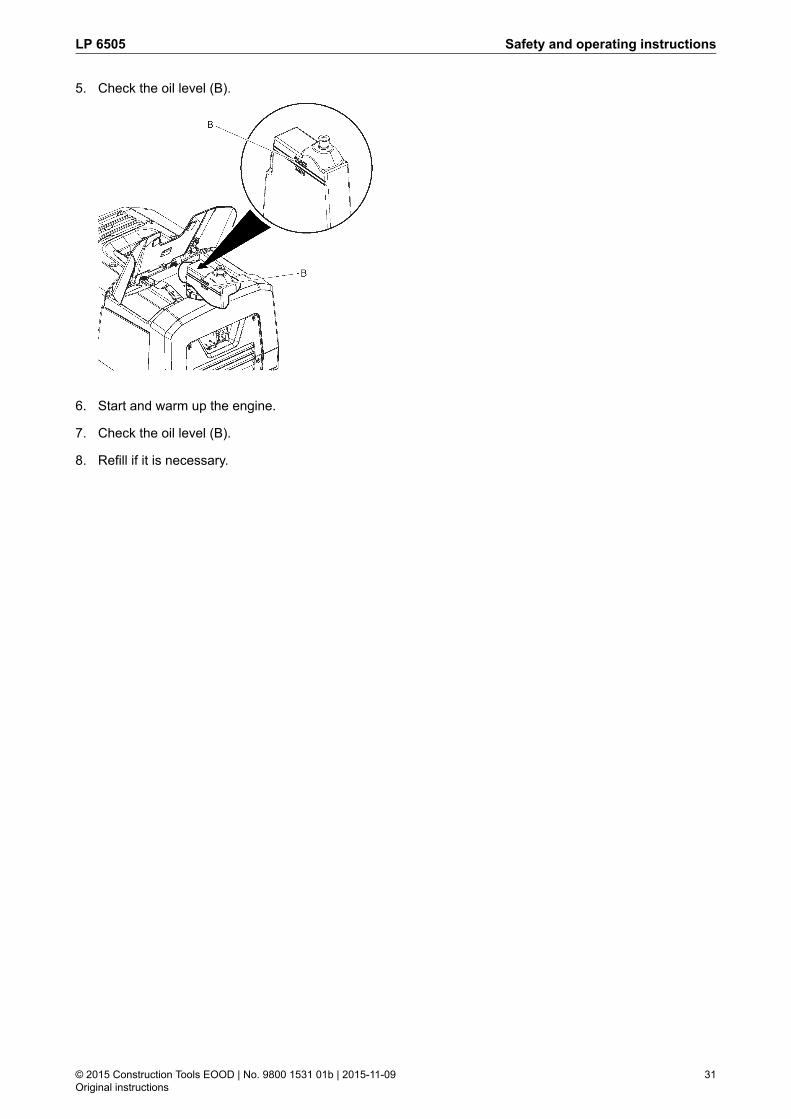
5. Check the oil level (B).
6. Start and warm up the engine.
7. Check the oil level (B).
8. Refill if it is necessary.
31© 2015 Construction Tools EOOD | No. 9800 1531 01b | 2015-11-09Original instructions
Safety and operating instructionsLP 6505
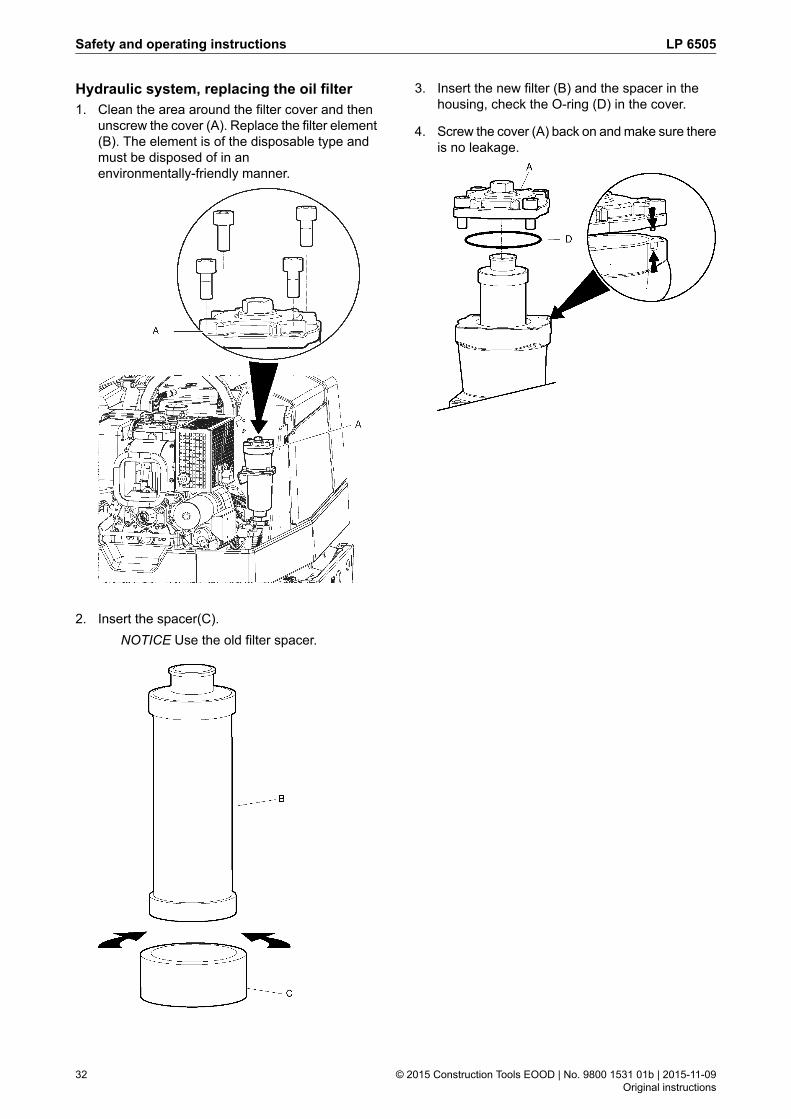
Hydraulic system, replacing the oil filter1. Clean the area around the filter cover and then
unscrew the cover (A). Replace the filter element(B). The element is of the disposable type andmust be disposed of in anenvironmentally-friendly manner.
2. Insert the spacer(C).NOTICE Use the old filter spacer.
3. Insert the new filter (B) and the spacer in thehousing, check the O-ring (D) in the cover.
4. Screw the cover (A) back on andmake sure thereis no leakage.
© 2015 Construction Tools EOOD | No. 9800 1531 01b | 2015-11-09Original instructions
32
LP 6505Safety and operating instructions
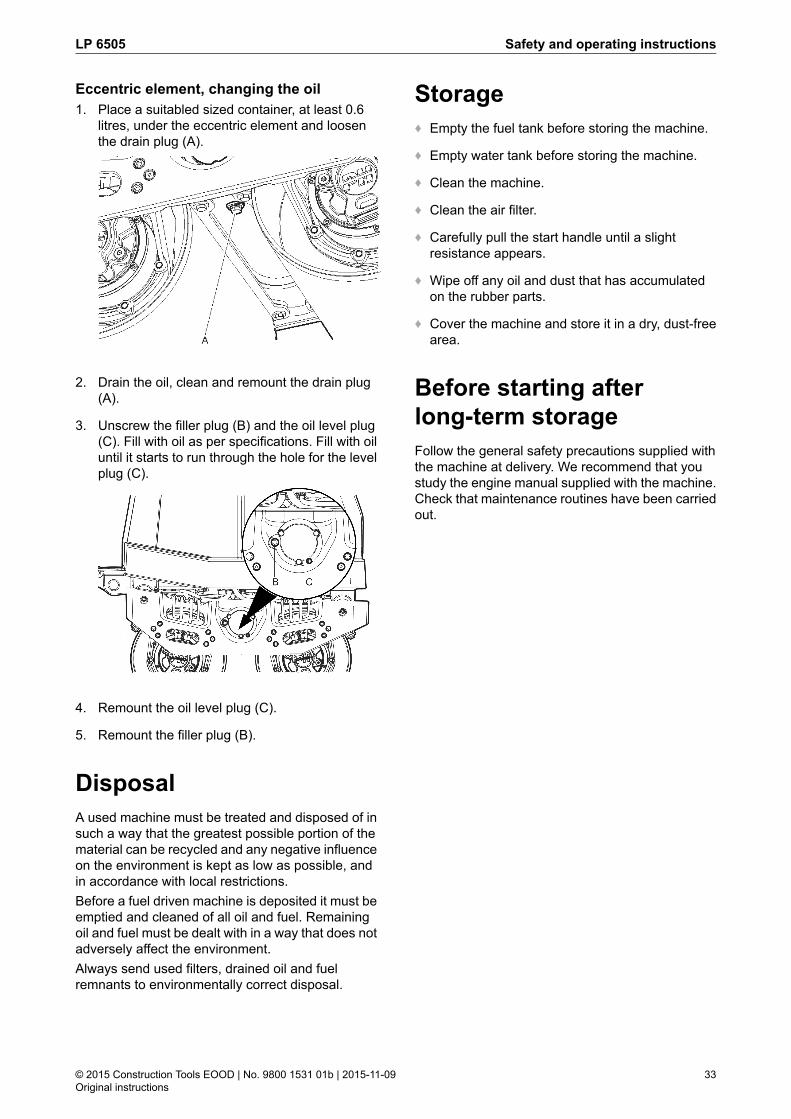
Eccentric element, changing the oil1. Place a suitabled sized container, at least 0.6
litres, under the eccentric element and loosenthe drain plug (A).
2. Drain the oil, clean and remount the drain plug(A).
3. Unscrew the filler plug (B) and the oil level plug(C). Fill with oil as per specifications. Fill with oiluntil it starts to run through the hole for the levelplug (C).
4. Remount the oil level plug (C).
5. Remount the filler plug (B).
DisposalA used machine must be treated and disposed of insuch a way that the greatest possible portion of thematerial can be recycled and any negative influenceon the environment is kept as low as possible, andin accordance with local restrictions.Before a fuel driven machine is deposited it must beemptied and cleaned of all oil and fuel. Remainingoil and fuel must be dealt with in a way that does notadversely affect the environment.Always send used filters, drained oil and fuelremnants to environmentally correct disposal.
Storage♦ Empty the fuel tank before storing the machine.
♦ Empty water tank before storing the machine.
♦ Clean the machine.
♦ Clean the air filter.
♦ Carefully pull the start handle until a slightresistance appears.
♦ Wipe off any oil and dust that has accumulatedon the rubber parts.
♦ Cover the machine and store it in a dry, dust-freearea.
Before starting afterlong-term storageFollow the general safety precautions supplied withthe machine at delivery. We recommend that youstudy the engine manual supplied with the machine.Check that maintenance routines have been carriedout.
33© 2015 Construction Tools EOOD | No. 9800 1531 01b | 2015-11-09Original instructions
Safety and operating instructionsLP 6505

Technical data
Machine data
Hatz, electric startHatz, manual startEngine
Hatz 1 D42S 4-strokeHatz 1 D42S 4-strokeType6,6 (8,6)6,6 (8,6)Power kw (hp)30003000Rated speed (r.p.m.)
Performance0-3.6 (0-2.3)0-3.6 (0-2.3)Operating speed km/h (miles/h)17 (30)17 (30)Maximum tilt, ° (%)14 (25) / 19 (35)14 (25) / 19 (35)Gradeability with / without vibration, ° (%)
Compaction data58 (3480)58 (3480)Vibration frequency, Hz (r.p.m.)21.8 (4.900)21.8 (4.900)Centrifugal force, kN (Ibf)0.52 (0.020)0.52 (0.020)Amplitude, mm (in.)5.88 (33)5.73 (32.1)Static linear load, kg/cm (pli)
Fluid volumes5.0 (5.25)5.0 (5.25)Fuel tank, litres (qts)1.2 (1.27)1.2 (1.27)Crank case, litres (qts)12.5 (13.2)12.5 (13.2)Hydraulic oil, litres (qts)0.57 (0.6)0.57 (0.6)Eccentric element, litres (qts)58 (12.75)58 (12.75)Water tank, litres (gallon)
LubricantsShell Rimula R4 L 15W-40Shell Rimula R4 L 15W-40Engine oilShell Rimula R4 L 15W-40Shell Rimula R4 L 15W-40Eccentric element oilShell Tellus S2 V68Shell Tellus S2 V68Hydraulic oilHatz: Use diesel oil that complies with EN590 or DIN 51601.
Hatz: Use diesel oil that complies with EN590 or DIN 51601.
Fuel
1.35 (1.43)1.35 (1.43)Fuel consumption, litres/hour (qts/h)Weights
736 (1623)716 (1579)Weight, kg (lb)765 (1687)745 (1642)Operating weight EN500, kg (lb)
Noise and vibration declaration statement
Guaranteed sound power level Lw according to EN ISO 3744 in accordance with directive 2000/14/EC.Sound pressure level Lp according to EN ISO 11201, EN 500-4.Vibration value determined according to EN 500-4 See table ”Noise and vibration data” for the values etc.These declared values were obtained by laboratory type testing in accordance with the stated directive orstandards and are suitable for comparison with the declared values of other machines tested in accordancewith the same directive or standards. These declared values are not suitable for use in risk assessments andvalues measured in individual work places may be higher. The actual exposure values and risk of harmexperienced by an individual user are unique and depend upon the way the user works, in what material themachine is used, as well as upon the exposure time and the physical condition of the user, and the conditionof the machine.We, Construction Tools EOOD, cannot be held liable for the consequences of using the declared values, insteadof values reflecting the actual exposure, in an individual risk assessment in a work place situation over whichwe have no control.This machine may cause hand-arm vibration syndrome if its use is not adequately managed. An EU guide tomanaging hand-arm vibration can be found at http://www.humanvibration.com/humanvibration/EU/VIBGUIDE.html
© 2015 Construction Tools EOOD | No. 9800 1531 01b | 2015-11-09Original instructions
34
LP 6505Safety and operating instructions

We recommend a programme of health surveillance to detect early symptoms which may relate to vibrationexposure, so that management procedures can be modified to help prevent future impairment.
Noise and vibration data
VibrationNoiseDeclared valuesDeclared values
Three axes valuesSound powerSoundpressure
EN 500-42000/14/ECEN ISO 11201
permittedworkinghours/daym/s 2 value
Lwmeasured dB(A)
rel 1pW
Lwguaranteed
dB(A) rel 1pW
Lpat operator's
earType84.010510788LP 6505 manual84.010510788LP 6505 electric
Permitted working hours per day are calculated on limit value of 5 m/s2 as per 2002/44/EC.
Uncertainties, sound value
Uncertainties, sound valueKpA dB(A)KwA dB(A)Type
2.5-3.01.5-2.5LP 6505
Uncertainty factor for gravel bed.
35© 2015 Construction Tools EOOD | No. 9800 1531 01b | 2015-11-09Original instructions
Safety and operating instructionsLP 6505
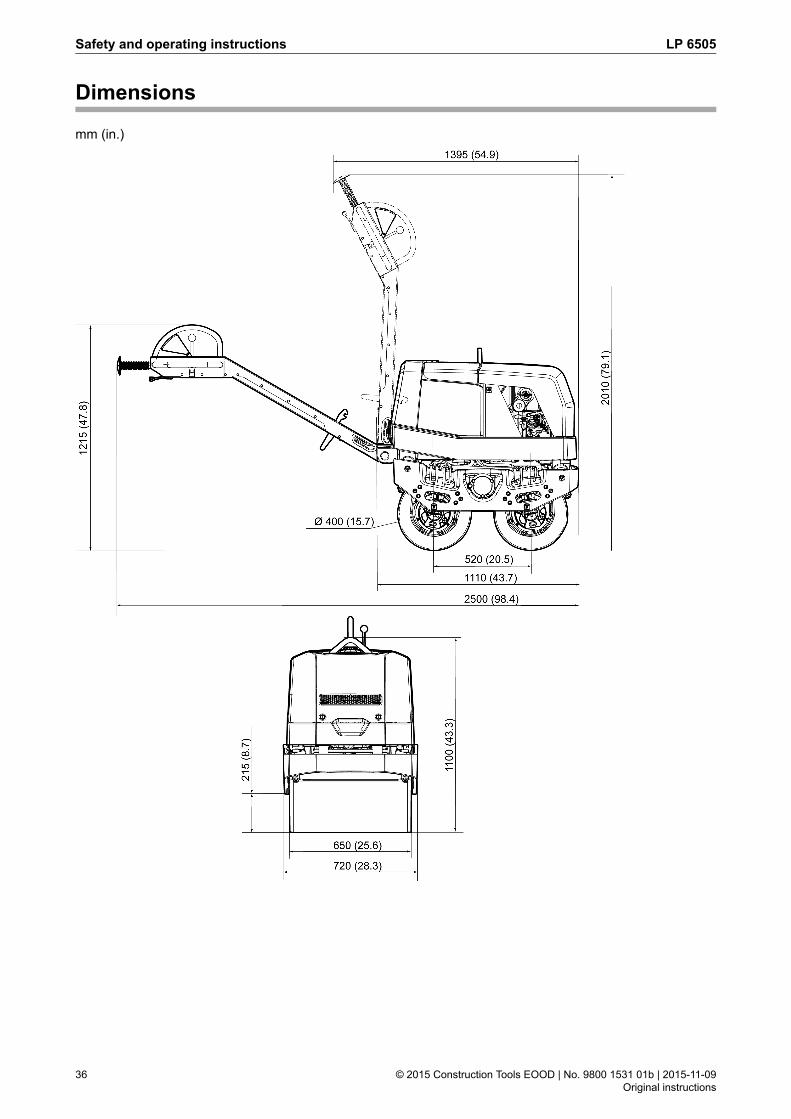
Dimensions
mm (in.)
© 2015 Construction Tools EOOD | No. 9800 1531 01b | 2015-11-09Original instructions
36
LP 6505Safety and operating instructions
EC Declaration of Conformity
EC Declaration of Conformity (EC Directive 2006/42/EC)
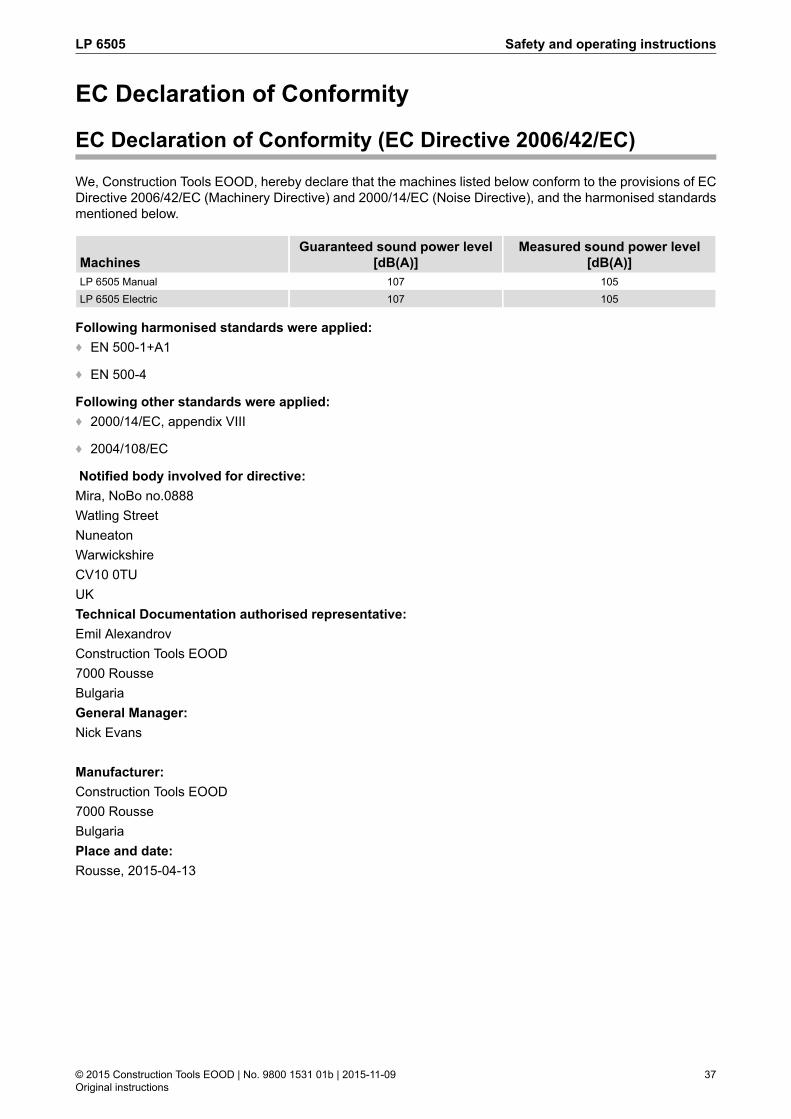
We, Construction Tools EOOD, hereby declare that the machines listed below conform to the provisions of ECDirective 2006/42/EC (Machinery Directive) and 2000/14/EC (Noise Directive), and the harmonised standardsmentioned below.
Measured sound power level[dB(A)]
Guaranteed sound power level[dB(A)]Machines
105107LP 6505 Manual105107LP 6505 Electric
Following harmonised standards were applied:♦ EN 500-1+A1
♦ EN 500-4
Following other standards were applied:♦ 2000/14/EC, appendix VIII
♦ 2004/108/EC
Notified body involved for directive:Mira, NoBo no.0888Watling StreetNuneatonWarwickshireCV10 0TUUKTechnical Documentation authorised representative:Emil AlexandrovConstruction Tools EOOD7000 RousseBulgariaGeneral Manager:Nick Evans
Manufacturer:Construction Tools EOOD7000 RousseBulgariaPlace and date:Rousse, 2015-04-13
37© 2015 Construction Tools EOOD | No. 9800 1531 01b | 2015-11-09Original instructions
Safety and operating instructionsLP 6505


Any unauthorized use or copying of the contents or any part thereof is prohibited.This applies in particular to trademarks, model denominations, part numbers, anddrawings.
www.atlascopco.com
©20
15Con
structionTo
olsEOOD|N
o.98
0015
3101
b|2
015-11-09


