Embed Size (px)
Citation preview

Predict Application Control
PAC User's Guide
Version 2.6.1
November 2016

This document applies to Predict Application Control Version 2.6.1.
Specifications contained herein are subject to change and these changes will be reported in subsequent release notes or new editions.
Copyright © 1990-2016 Software AG, Darmstadt, Germany and/or Software AG USA, Inc., Reston, VA, USA, and/or its subsidiariesand/or its affiliates and/or their licensors.
The name Software AG and all Software AG product names are either trademarks or registered trademarks of Software AG and/orSoftware AGUSA, Inc. and/or its subsidiaries and/or its affiliates and/or their licensors. Other company and product namesmentionedherein may be trademarks of their respective owners.
Detailed information on trademarks and patents owned by Software AG and/or its subsidiaries is located athttp://softwareag.com/licenses.
Use of this software is subject to adherence to Software AG's licensing conditions and terms. These terms are part of the productdocumentation, located at http://softwareag.com/licenses/ and/or in the root installation directory of the licensed product(s).
This software may include portions of third-party products. For third-party copyright notices, license terms, additional rights or re-strictions, please refer to "License Texts, Copyright Notices and Disclaimers of Third-Party Products". For certain specific third-partylicense restrictions, please refer to section E of the Legal Notices available under "License Terms andConditions for Use of Software AGProducts / Copyright and Trademark Notices of Software AG Products". These documents are part of the product documentation,located at http://softwareag.com/licenses and/or in the root installation directory of the licensed product(s).
Use, reproduction, transfer, publication or disclosure is prohibited except as specifically provided for in your License Agreement withSoftware AG.
Document ID: PAC-USERGUIDE-261-20161120
Table of Contents
PAC User's Guide ............................................................................................................. ix1 Concepts and Terms Used in This Documentation ......................................................... 12 Planning and Configuring PAC ...................................................................................... 33 Navigating in PAC .......................................................................................................... 5
PAC User Profile ........................................................................................................ 6Logging On to PAC .................................................................................................... 6PAC Maintenance and Reporting Facilities ............................................................... 8About PAC Menus and Screens ............................................................................... 13Listing Locked Data ................................................................................................. 22
4 Planning a PAC Environment ....................................................................................... 25Application Phases ................................................................................................... 26Integrating PAC ........................................................................................................ 27PAC Controlled Environment .................................................................................. 28When to Implement PAC ......................................................................................... 29What PAC Functions to Implement ......................................................................... 30Life-Cycle of a PAC Object ....................................................................................... 33Foundations of PAC Control .................................................................................... 34PAC Entities and Their Relationships ...................................................................... 35PAC Administration Facilities ................................................................................. 36PAC Utilities ............................................................................................................. 37Facilities for Customizing PAC ................................................................................ 38
5 Configuring a PAC Environment .................................................................................. 41Defining PAC Statuses ............................................................................................. 43Linking Statuses and Applications .......................................................................... 58File Translation Tables .............................................................................................. 60Defining Migration Paths ......................................................................................... 68Jobs ........................................................................................................................... 74
6 Statuses .......................................................................................................................... 81Adding (Defining) a Status ...................................................................................... 83Displaying/Modifying a Status ................................................................................ 85Selecting a Status ...................................................................................................... 85Linking Applications to a Status .............................................................................. 86Purging a Status ....................................................................................................... 88
7 Applications .................................................................................................................. 89Adding (Defining) an Application of Type NAT ..................................................... 92Adding (Defining) an Application of Type PRD ................................................... 100Displaying/Modifying an Application ................................................................... 102Selecting an Application from a List ...................................................................... 102Copying an Application ......................................................................................... 103Linking Statuses to an Application ........................................................................ 107Purging an Application .......................................................................................... 109View Security Maintenance .................................................................................... 109
8 Application Defaults .................................................................................................... 115
iii

9 Linking Applications and Statuses .............................................................................. 119Screens Used to Define Application Status Links .................................................. 121Adding an Individual Application Status Link ..................................................... 122Linking Multiple Statuses or Applications ............................................................ 129Selecting an Application Status Link ..................................................................... 131Modifying Application Status Links ...................................................................... 133Purging an Application Status Link ....................................................................... 135Displaying an Application Status Link .................................................................. 135Displaying Objects for an Application Status ........................................................ 136Displaying an Object Version Audit History ......................................................... 140Displaying Predict Cross-Reference Data .............................................................. 142
10 File Translation Tables ............................................................................................... 145Displaying the FTT Main Menu ............................................................................. 146Adding (Defining) a File Translation Table ............................................................ 149Selecting a File Translation Table ........................................................................... 158Displaying a File Translation Table ........................................................................ 159Modifying a File Translation Table ......................................................................... 162Copying a File Translation Table ............................................................................ 163Linking an FTT to an Application Status Link ....................................................... 164Changing an FTT Assignment ............................................................................... 164Purging a File Translation Table ............................................................................. 164
11 Part II - PAC Migration Concepts .............................................................................. 16712 Migration ................................................................................................................... 169
General Procedure .................................................................................................. 170Defining Migration Events ..................................................................................... 171Creating the Object List .......................................................................................... 172Validating the Object List ....................................................................................... 178Authorizing a Migration Event .............................................................................. 179Submitting a Migration Event ................................................................................ 181Monitoring a Migration Event ............................................................................... 181Audit Report ........................................................................................................... 183
13 Migration Paths .......................................................................................................... 185Adding (Defining) a Migration Path and Authorization ....................................... 188Modifying/Displaying a Migration Path ................................................................ 192Selecting a Migration Path ...................................................................................... 193Displaying Migration Path Information ................................................................. 196Purging a Migration Path ....................................................................................... 198
14 Migration Events ........................................................................................................ 199Migration Path Prerequisite ................................................................................... 200Accessing Migration Event Sub-Functions ............................................................ 200Direct Commands for Migration Events ................................................................ 203Adding (Defining) a Migration Event .................................................................... 204Selecting a Migration Event ................................................................................... 219Displaying a Migration Event ................................................................................ 220Modifying a Migration Event ................................................................................. 223
PAC User's Guideiv
PAC User's Guide
Copying a Migration Event .................................................................................... 223Purging a Migration Event ..................................................................................... 225Trying a Migration Event ....................................................................................... 225
15 Migration Path Defaults ............................................................................................. 22716 Archive Event Maintenance ....................................................................................... 233
Select an Archive Event .......................................................................................... 234Display Archive Event ............................................................................................ 236Modify Archive Event ............................................................................................ 237Finalize Archive Event ........................................................................................... 238Purge Archive Event .............................................................................................. 239
17 Authorizing and Submitting a Migration Event ....................................................... 241Authorizing a Migration Event .............................................................................. 242Submitting a Migration Event ................................................................................ 249Backing Out an Incomplete Migration Event ......................................................... 256Migration Event Audit Report ............................................................................... 256Migration Processing and Monitoring ................................................................... 260
18 Migrations Into, Within, and Out of PAC .................................................................. 26319 Incorporating Existing Applications ......................................................................... 265
Incorporation Options ............................................................................................ 267Incorporation Paths ................................................................................................ 267Incorporation Object List ........................................................................................ 268Authorizing and Submitting an Incorporation Event ............................................ 268
20 Migrations from Development or Maintenance ........................................................ 269Compiling Natural Objects in PAC ........................................................................ 271Using the Rolling Facility ....................................................................................... 272
21 Migrations to Development or Maintenance ............................................................. 27522 Migrations from Neighbour ...................................................................................... 27723 Migrations from External .......................................................................................... 27924 Migrations from Control to Control - Alignment ...................................................... 281
Creating the Object List .......................................................................................... 28225 Migrations Between Control, Test, and Production .................................................. 285
Migrations to Test or Production ........................................................................... 286Migrations to Production ....................................................................................... 286Migrations to Test ................................................................................................... 286
26 Migrations to and from the Archive .......................................................................... 287Archiving Process ................................................................................................... 288Phase 1 .................................................................................................................... 289Restoring Objects Before Phase 2 ........................................................................... 294Phase 2 : Removing the Object Versions from the PAC Environment ................... 295Restoring Archived Objects to the PAC Environment ........................................... 296
27 Migrations to Retire Status ........................................................................................ 299Reserved Status Retire: Objects are purged from the Control or Archivestatuses. .................................................................................................................. 300User Status Retire: Objects are purged from test, production or maintenancestatus types. ............................................................................................................ 300
vPAC User's Guide
PAC User's Guide
Retire Facility Overview ......................................................................................... 300User Status Retire ................................................................................................... 301Reserved Status Retire ............................................................................................ 303Retire Event Processing .......................................................................................... 304
28 Open Systems Support and Migrations ..................................................................... 305Application Definition ............................................................................................ 306Status Definition ..................................................................................................... 306Application Status Links ........................................................................................ 306Migration Process In ............................................................................................... 307Migration Process Out ............................................................................................ 308Object Handling ..................................................................................................... 309
29 Migrating Predict Objects .......................................................................................... 311Migrating Predict Data Into and Out of PAC ......................................................... 312Migrating Predict Data Within PAC ...................................................................... 320Reports About Versioned Predict Objects .............................................................. 323
30 Assigning and Maintaining Object Versions ............................................................. 325Object Version ......................................................................................................... 327Versioned Objects ................................................................................................... 329
31 Object Version Maintenance ...................................................................................... 361Change Control Logs .............................................................................................. 363Select Closed Change Log from List ...................................................................... 364Deactivate Object Versions ..................................................................................... 367Deactivate Objects from Selection List ................................................................... 368Object Version Audit History ................................................................................. 370Purge Object Version Audit History ...................................................................... 373Versioned Object Logs ............................................................................................ 373Select Object Version Log from List ....................................................................... 375Display Object Version Log .................................................................................... 376Purge Object Version Log ....................................................................................... 376Purge Object Version .............................................................................................. 378
32 Part III - Maintenance Facilities ................................................................................. 38333 Creating and Validating a Migration List .................................................................. 38534 Using the Migration List Editor ................................................................................. 387
Step 1. Accessing the Migration List Editor ........................................................... 388Step 2. Specifying Objects for the List .................................................................... 389Step 3. Saving the Migration List ........................................................................... 390
35 Object Types for the List ............................................................................................ 393Predict Objects ........................................................................................................ 394Foreign Objects ....................................................................................................... 395Natural Objects ....................................................................................................... 396Natural Dynamic Source Objects ........................................................................... 401User Error Message Objects ................................................................................... 402
36 Using the SEL (Select) Command .............................................................................. 403Expand Options ...................................................................................................... 404Creating the Migration List .................................................................................... 405
PAC User's Guidevi
PAC User's Guide

Migrations into PAC ............................................................................................... 405Other Migrations .................................................................................................... 415
37 Using the EXP (Expand) Command .......................................................................... 419Using EXP With Predict ......................................................................................... 420EXP Procedure ........................................................................................................ 421Using EXP For Large Migrations ........................................................................... 422
38 Using the IMP (Import) Command ........................................................................... 425IMP Procedure ........................................................................................................ 426
39 Validating a Migration List ........................................................................................ 427Correcting Errors in the Migration List .................................................................. 428
40 Displaying a Migration List ....................................................................................... 43141 Maintenance Requests ............................................................................................... 433
Generating Maintenance Requests ......................................................................... 434Accessing the Maintenance Request Sub-Functions .............................................. 435Adding a Maintenance Request ............................................................................. 436Selecting a Maintenance Request ........................................................................... 439Modifying/Displaying a Maintenance Request ..................................................... 441Copying a Maintenance Request ............................................................................ 443Purging a Maintenance Request ............................................................................. 443
42 Maintaining Natural Objects in PAC ......................................................................... 445Maintenance Requests ............................................................................................ 447Change Control Logs .............................................................................................. 452
43 Using PAC with Predict Case or Natural for DB2 ..................................................... 457Predict Case ............................................................................................................ 458Natural for DB2 ...................................................................................................... 461
44 Creating and Managing PAC Jobs ............................................................................. 467Accessing the Job Sub-Functions ............................................................................ 468Adding (Defining) a Job ......................................................................................... 470Displaying or Modifying a Job ............................................................................... 471Selecting a Job ......................................................................................................... 471Copying a Job ......................................................................................................... 473Renaming a Job ....................................................................................................... 473Submitting a Job ..................................................................................................... 474Editing Job Control ................................................................................................. 474Job Control Substitution Parameters ...................................................................... 476Purging a Job .......................................................................................................... 478
45 Change Control Logs ................................................................................................. 479Checking Objects Out for Maintenance ................................................................. 480Checking Objects Back In to PAC ........................................................................... 480Accessing the Change Control Log Sub-Functions ................................................ 481Selecting a Log from a List ..................................................................................... 482Displaying a Change Control Log .......................................................................... 484
A Appendices ................................................................................................................. 487Setting Up the Application Environment .............................................................. 489Setting Up the Environment for Processing Applications ..................................... 490
viiPAC User's Guide
PAC User's Guide
Using the Change Control Facilities ....................................................................... 491The PAC Administrator Functions ......................................................................... 492Checklist for Setting Up Applications in PAC ....................................................... 495Overview of PAC Activities ................................................................................... 495
B Appendix ..................................................................................................................... 497Keyword and New Keyword Fields ...................................................................... 499Keyword Menu Sub-Functions .............................................................................. 499
PAC User's Guideviii
PAC User's Guide
PAC User's Guide
Predict Application Control (PAC) is a flexible tool for controlling both Natural and "foreign"(non-Natural and non-Predict) applications throughout the software life-cycle and for ensuringthe integrity of applications in the production environment. PAC facilitates and controls themovement of applications through the life-cycle. When an application is implemented intoproduction, it is protected and audited by Predict Application Audit (PAA).
This documentation addresses developers who use PAC to control the life cycle of their programs.It describes how to use PAC and PAA to perform the following functions:
■ Develop and enforce site- or application-specific software life-cycles.■ Establish who can promote applications through the life-cycle.■ Control and audit the migration of applications from one location to another.■ Analyze the impact of proposed code changes.■ Track and control maintenance activities.■ Protect the source code for each version of an application component and link it to the executablecode.
■ Maintain accurate relationships among versions of application components.
This documentation tells you how tomanage and control applications using PAC.With this overallgoal in mind, it has been divided into parts containing documents, and some appendixes:
This part contains documents describing how to not only prepare the PACenvironment, but also how to define objects and entities (the applications,statuses, migrations and other events for both Natural and Predict objects).
Part I: Planning andconfiguring PAC
In this part the topic of migration is generally discussed as well as how todefine andmanipulatemigration events, and paths and how to authorize and
Part II: Migration Concepts
submit an event to PAC. The last part of this section discusses how objectsare migrated into, within and out of the PAC environment.
These final documents discuss the maintenance of PAC entities and objectsthemselves once the environment has been defined. These are the ongoing
Part III: PACMaintenanceFacilities
tasks such as object list creation, object maintenance, job creation and controland control log maintenance.
PAC activities checklist for planning, performing and tracking the tasks youmust perform to set up the PAC environment.
Appendix A
Defining optional PAC keywords.Appendix B
ix

x
1 Concepts and Terms Used in This Documentation
Objects and Types of CodeA PAC object is one of the following:■ A unit of programming code (for example, a program or subroutine);■ A data dictionary definition (for example, a view of a database file);■ A user-written error message.
Natural views (which can be generated from Predict views) are called data definitionmodules(DDMs). To accommodate the terminologies used at different sites, they are called views/DDMsin this documentation.
An object version is an object that has been compiled in PAC and assigned a version number.An object version is sometimes called a PAC object or versioned object.
Source code means a unit of code written in a high-level language, such as Natural. Sourcecode is equivalent to Natural "saved" code.
Executable code or executable object means a unit of code that has been compiled and can betranslated by Natural. Executable code is equivalent to Natural "cataloged" code.
A PAC entity is any of the structures that PAC uses to control or facilitate the movement ofobjects through the life-cycle.
Applications, Libraries, and LocksAn application is a set of objects that work together to perform a task. Thus, an applicationobject is a component of the application.
A Natural library is a set of Natural objects that are stored together; you can add objects to alibrary or delete objects from it. A lock prohibits access to a library, application, or object.
System FilesSystemfiles are PAC, PAAandAdabas files that contain the following (the name of each systemfile is in parentheses):
1

■ Software resources (FNAT)■ Application libraries (FUSER)■ Predict information (FDIC)■ Security information (FSEC)
In this documentation, the FUSER file, which contains application objects, is called the usersystem file. The FDIC file is called the Predict file. In addition to Predict data definitions andcross-reference information, Natural rules and views/DDMs generated from Predict entriesare stored in the Predict file. User system files and Predict files are identified in PAC by thedatabase number (DBnr) and file number (Fnr).
In addition, there are three system files reserved to PAC and PAA:■ The PACACFfile stores the saved and cataloged code for every version of every object underPAC control. The ACF also stores extended information about object versions and PAC en-tities.
■ The PAC PCF file stores cross-reference data, keywords, and the latest version of Naturaland Predict objects in the PAC-controlled environment. Natural objects are cataloged andPredict objects are generated in the PCF.
■ The PAA file stores audit data for production objects.
Environments and DirectoriesThe user environment is the mix of hardware, operating systems, teleprocessing (TP) systems,and database managers (DBMSs) at a site.
An application environment or operating environment includes the physical locations whereapplication objects are stored and the operating system, TP system, and DBMS with whichthey are developed, tested or used.
The PAC-controlled environment refers to the PACACF andPCF systemfiles and the operatingenvironments that are governed by site-specific procedures defined in PAC.
The PAA-controlled environment refers to production environments that are protected andaudited by PAA.
A Natural directory provides information about the environment in which an object was de-veloped, saved,or cataloged.
PAC User's Guide2
Concepts and Terms Used in This Documentation

2 Planning and Configuring PAC
This part tells you how to configure your PACenvironment by defining statuses (phases), definingapplications to PAC and linking the applications with the statuses, defining migration paths forthe applications between/among the statuses, and finally setting up the jobs to perform the events,creating the translation table, and defining and authorizing users of the various migrations.
■ Navigating in PACdescribes how to logon to and navigate within PAC. Here, the overall PAC screen structure isexplained, the general field structure and information is described as well as the ways that PFkeys can be used to move among the various PAC functions.
■ Planning a PAC EnvironmentDefine and locate the statuses and associated Predict files from/to which the application can bemigrated.
■ Configuring a PAC EnvironmentDefine the application to be moved through the PAC controlled environment.
■ StatusesDefine the application status links.
■ ApplicationsDefine the origin and destination statuses (migration path) for the application. The migrationpath must be set up before you can set up a migration event.
■ Application DefaultsDefine the defaults for the application to be processed.
■ Linking Applications and StatusesSet up and select the jobs that run the migration events. A job may be set up at any time beforea migration event is authorized or submitted.
■ File Translation TablesDefine a file translation table as required.Specify the user(s) who may authorize a migration.
3

4
3 Navigating in PAC
■ PAC User Profile ............................................................................................................................... 6■ Logging On to PAC ............................................................................................................................ 6■ PAC Maintenance and Reporting Facilities ............................................................................................. 8■ About PAC Menus and Screens ......................................................................................................... 13■ Listing Locked Data ......................................................................................................................... 22
5
This section discusses the facilities provided for navigating in PAC, including the PACuser profiles,logging on to the PAC system, menus and screens, and the maintenance and reporting facilitiesfor PAC entities.
This chapter covers the following topics:
PAC User Profile
Contact the PAC administrator at your site for information about the PAC functions and entitiesyou are allowed to use; these permissions are specified in your PAC user profile. The functionsand entities you are allowed to use determine the PAC maintenance and/or reporting menus andscreens you can access.
You may or may not be authorized to
■ use the PAC administration functions;■ authorize migration event processing;■ submit migration events for processing;■ use the PAC utilities (migration, scan, compare).
Logging On to PAC
To use the full range of PAC options and functions, log on to the PAC system:
1 Log on to Natural.
2 From the Natural system screen, enter LOGON SYSPAC or simply SYSPAC.
3 Enter MENU on the Logon Accepted screen (if your PAC administrator has configured yoursystem accordingly, the Logon Accepted screen may not appear).
The PAC Main Menu appears listing those PAC entities for which the PAC administrator has as-signed maintenance and/or reporting permissions in your user profile. That list will include all orsome part of the list shown in the screen below.
PAC User's Guide6
Navigating in PAC

16:41:24 ** PREDICT APPLICATION CONTROL *** 2007-05-11 User POR - Main Menu - Code Entity Code Entity ---- -------------------------- ---- ----------------------------------- A Applications B Display Control Information E Migration Events D Display System Defaults F File Translation Tables G Display PREDICT Generation Defaults J Jobs H Display Applymods K Keywords N Display Foreign Table L Application Status Links P Display PAC Profile M Maintenance Requests R Display Locked Data Q Change Control Logs U Display User Profile Defaults S Statuses W Display NSC PAC Defaults T Migration Paths X Display Userexits V Versioned Objects C Compare Function ? Help . Exit ---- ------------------------- Code .. _ No editor profile found. Doing without. Command ===> Enter-PF1---PF2---PF3---PF4---PF5---PF6---PF7---PF8---PF9---PF10--PF11--PF12--- Help Menu Exit Canc ↩
Note: If the PAC banner has been activated by your site, the banner will be displayed first.
The PAC entities that may be listed on the Main Menu include the following:
DescriptionEntityCode
Maintain applications, which identify and group Natural, foreign,and/or Predict objects and define the default options to be usedduring their processing.
ApplicationsA
Compare versioned objectsCompareC
Maintain migration events, which define the tasks/ procedures formigrating application objects from one status to another.
Migration EventsE
Maintain file translation tables, which ensure that the correctDBID/FNR set is used in each PAC environment to locate user data
File Translation TablesF
referenced by views/DDMs needed by Natural objects at executiontime.
Maintain the JCL used for the batch processing of various PACfunctions including migrations.
JobsJ
Define keywords that may be assigned to PAC entities.KeywordsK
Maintain the subset of status conditions valid for an applicationlife-cycle.
Application Status LinksL
7PAC User's Guide
Navigating in PAC
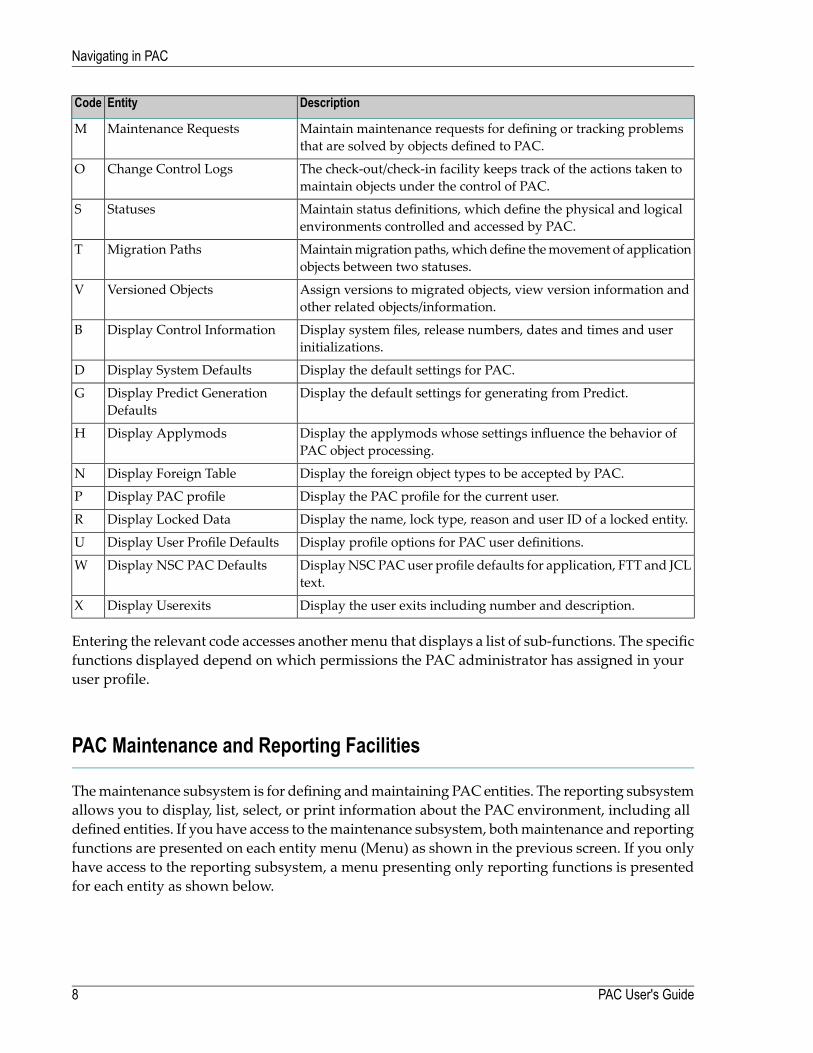
DescriptionEntityCode
Maintain maintenance requests for defining or tracking problemsthat are solved by objects defined to PAC.
Maintenance RequestsM
The check-out/check-in facility keeps track of the actions taken tomaintain objects under the control of PAC.
Change Control LogsO
Maintain status definitions, which define the physical and logicalenvironments controlled and accessed by PAC.
StatusesS
Maintainmigration paths,which define themovement of applicationobjects between two statuses.
Migration PathsT
Assign versions to migrated objects, view version information andother related objects/information.
Versioned ObjectsV
Display system files, release numbers, dates and times and userinitializations.
Display Control InformationB
Display the default settings for PAC.Display System DefaultsD
Display the default settings for generating from Predict.Display Predict GenerationDefaults
G
Display the applymods whose settings influence the behavior ofPAC object processing.
Display ApplymodsH
Display the foreign object types to be accepted by PAC.Display Foreign TableN
Display the PAC profile for the current user.Display PAC profileP
Display the name, lock type, reason and user ID of a locked entity.Display Locked DataR
Display profile options for PAC user definitions.Display User Profile DefaultsU
DisplayNSC PACuser profile defaults for application, FTT and JCLtext.
Display NSC PAC DefaultsW
Display the user exits including number and description.Display UserexitsX
Entering the relevant code accesses anothermenu that displays a list of sub-functions. The specificfunctions displayed depend on which permissions the PAC administrator has assigned in youruser profile.
PAC Maintenance and Reporting Facilities
Themaintenance subsystem is for defining andmaintaining PAC entities. The reporting subsystemallows you to display, list, select, or print information about the PAC environment, including alldefined entities. If you have access to themaintenance subsystem, bothmaintenance and reportingfunctions are presented on each entity menu (Menu) as shown in the previous screen. If you onlyhave access to the reporting subsystem, a menu presenting only reporting functions is presentedfor each entity as shown below.
PAC User's Guide8
Navigating in PAC
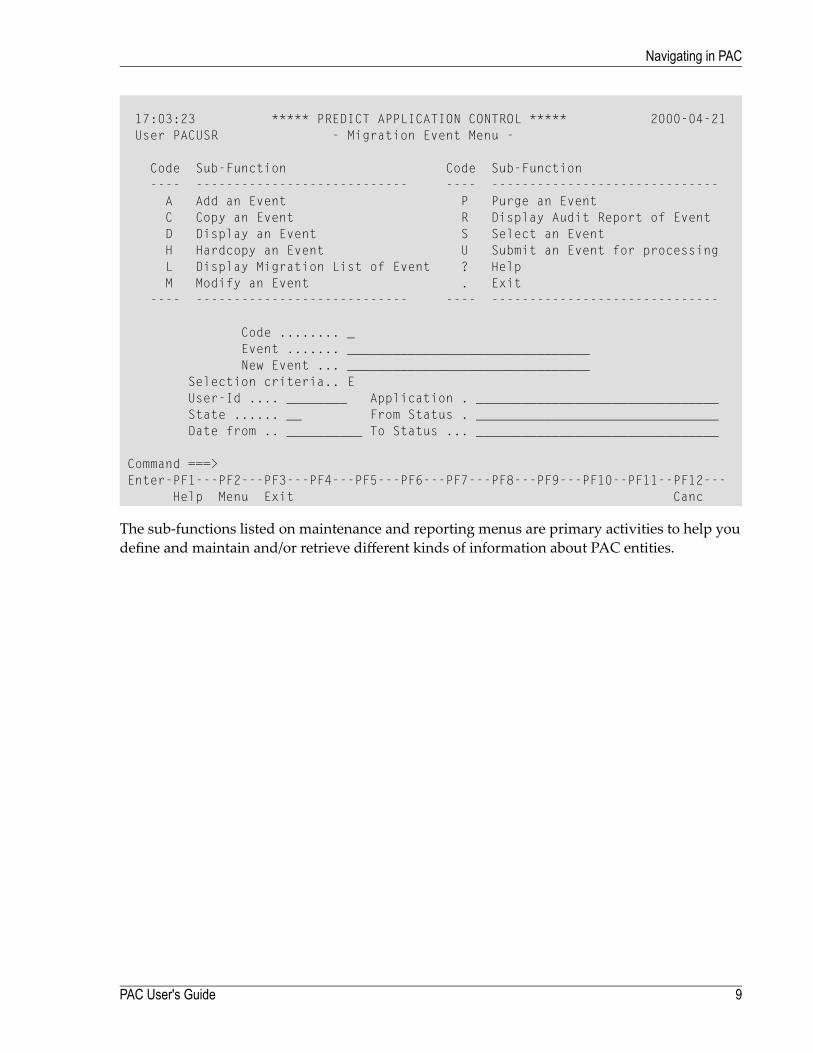
17:03:23 ***** PREDICT APPLICATION CONTROL ***** 2000-04-21User PACUSR - Migration Event Menu -
Code Sub-Function Code Sub-Function---- ---------------------------- ---- ------------------------------A Add an Event P Purge an EventC Copy an Event R Display Audit Report of EventD Display an Event S Select an EventH Hardcopy an Event U Submit an Event for processingL Display Migration List of Event ? HelpM Modify an Event . Exit
---- ---------------------------- ---- ------------------------------
Code ........ _Event ....... ________________________________New Event ... ________________________________
Selection criteria.. EUser-Id .... ________ Application . ________________________________State ...... __ From Status . ________________________________Date from .. __________ To Status ... ________________________________
Command ===>Enter-PF1---PF2---PF3---PF4---PF5---PF6---PF7---PF8---PF9---PF10--PF11--PF12---
Help Menu Exit Canc
The sub-functions listed on maintenance and reporting menus are primary activities to help youdefine and maintain and/or retrieve different kinds of information about PAC entities.
9PAC User's Guide
Navigating in PAC
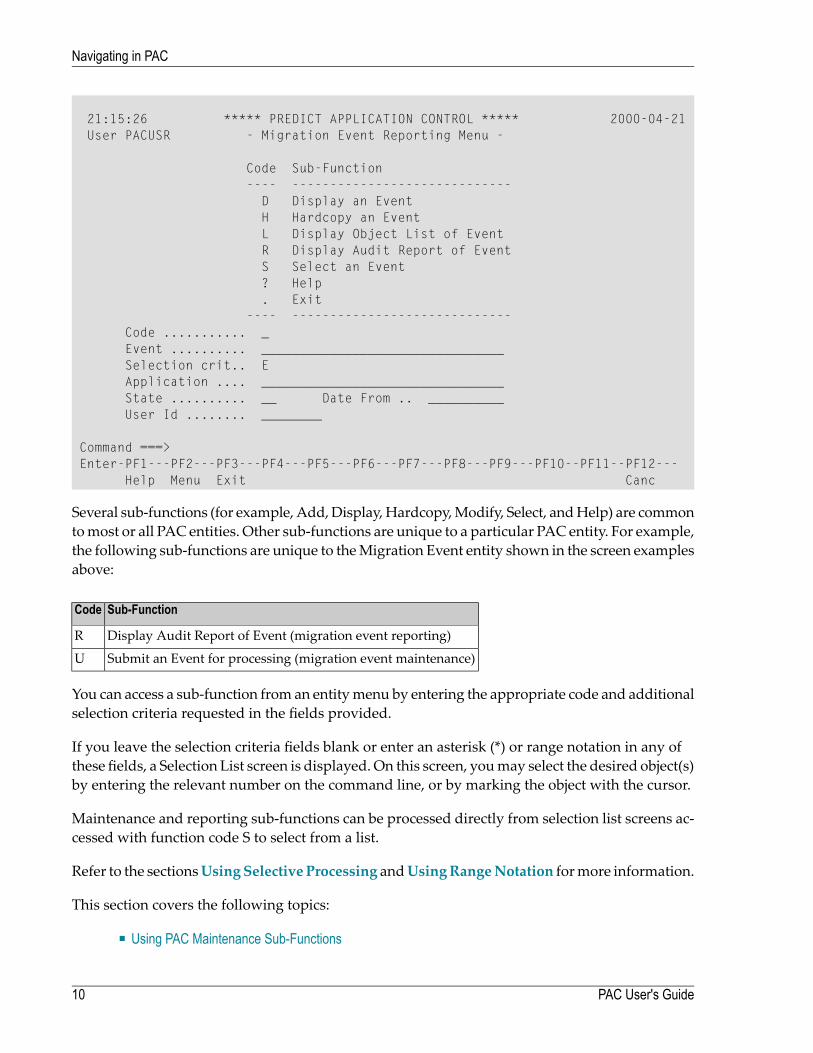
21:15:26 ***** PREDICT APPLICATION CONTROL ***** 2000-04-21User PACUSR - Migration Event Reporting Menu -
Code Sub-Function---- -----------------------------D Display an EventH Hardcopy an EventL Display Object List of EventR Display Audit Report of EventS Select an Event? Help. Exit
---- -----------------------------Code ........... _Event .......... ________________________________Selection crit.. EApplication .... ________________________________State .......... __ Date From .. __________User Id ........ ________
Command ===>Enter-PF1---PF2---PF3---PF4---PF5---PF6---PF7---PF8---PF9---PF10--PF11--PF12---
Help Menu Exit Canc
Several sub-functions (for example, Add,Display,Hardcopy,Modify, Select, andHelp) are commontomost or all PAC entities. Other sub-functions are unique to a particular PAC entity. For example,the following sub-functions are unique to theMigration Event entity shown in the screen examplesabove:
Sub-FunctionCode
Display Audit Report of Event (migration event reporting)R
Submit an Event for processing (migration event maintenance)U
You can access a sub-function from an entitymenu by entering the appropriate code and additionalselection criteria requested in the fields provided.
If you leave the selection criteria fields blank or enter an asterisk (*) or range notation in any ofthese fields, a Selection List screen is displayed. On this screen, youmay select the desired object(s)by entering the relevant number on the command line, or by marking the object with the cursor.
Maintenance and reporting sub-functions can be processed directly from selection list screens ac-cessed with function code S to select from a list.
Refer to the sectionsUsingSelective Processing andUsingRangeNotation formore information.
This section covers the following topics:
■ Using PAC Maintenance Sub-Functions
PAC User's Guide10
Navigating in PAC

■ Using PAC Reporting Sub-Functions
Using PAC Maintenance Sub-Functions
Youmay use the maintenance sub-functions for PAC entities as defined by the PAC administratorin your user profile.
Some fields on the maintenance screens permit data to be entered only at the time the PAC entityis initially defined, and these field values cannot be changed later.
Additional Options allow you to perform additional maintenance functions without having tonavigate through a series of menus and screens. Refer to the section Accessing PAC AdditionalOptions for more information.
Note: Some of the sub-function namesmay be used as direct commands that can be enteredon the command line. Refer to the PAC Reference documentation.
The following maintenance sub-functions are available to PAC entities:
DescriptionSub-FunctionCode
Add (define) PAC entities on the Add screen. The namemust be unique andmust beginwith an alphabetic character; itmay be up to 32 characters in length (maintenance requests
AddA
may be up to 20 characters). Embedded blanks are automatically changed to theunderscore ( ) character.
Copy PAC entities such as applications, jobs, migration events, and file translation tables(FTTs).
CopyC
Edit PAC entities such as JCL for jobs, keyword descriptions.EditE
Link application to status (Application Menu). Link status to an application (StatusMenu).
LinkL
Modify information about PAC entities by entering a unique entity name or alias, orusing range notation to select from a list.
ModifyM
Purge (delete) PAC entities. You are told how many subordinate entities will also bepurged and you are requested to confirm the Purge request.
PurgeP
Rename jobs.RenameR
Display a list of PAC entities on the Selection List screen by entering the entity name orusing range notation to display the selection list.
SelectS
Submit a job or migration event for processing.SubmitU
Display help information for a field. Refer to the section Accessing Field Help for moreinformation.
Help?
Exit from a PAC function.Exit
11PAC User's Guide
Navigating in PAC
Using PAC Reporting Sub-Functions
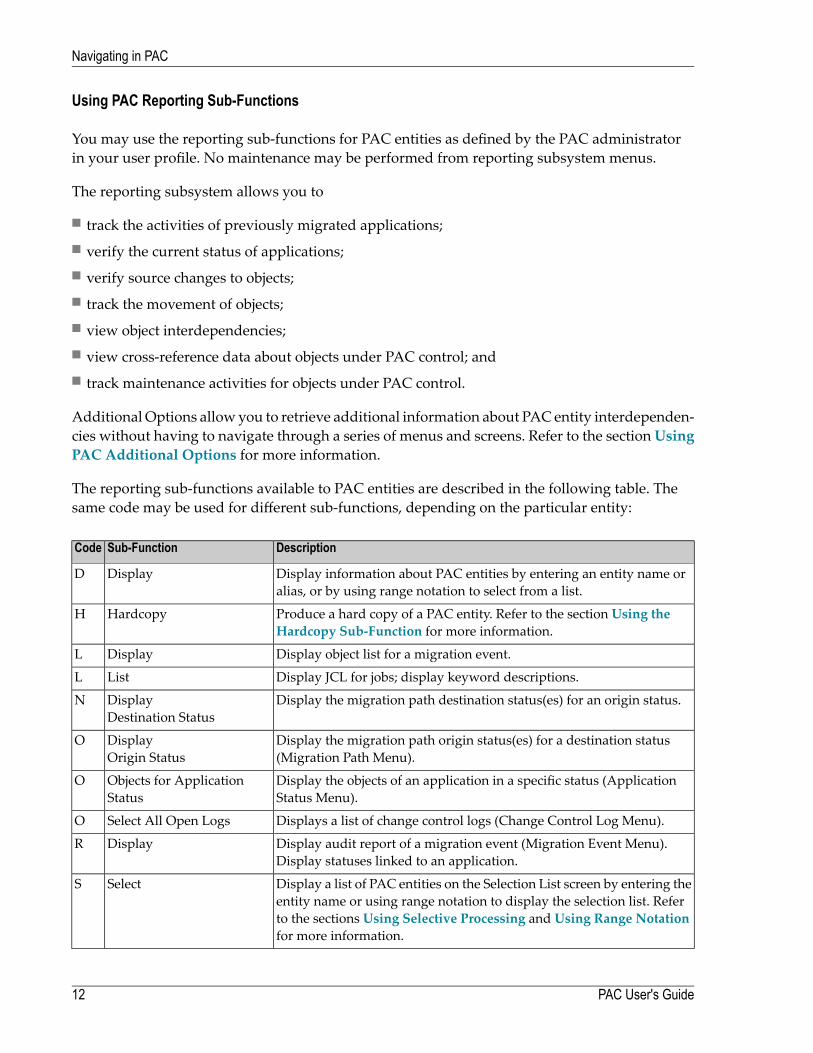
You may use the reporting sub-functions for PAC entities as defined by the PAC administratorin your user profile. No maintenance may be performed from reporting subsystem menus.
The reporting subsystem allows you to
■ track the activities of previously migrated applications;■ verify the current status of applications;■ verify source changes to objects;■ track the movement of objects;■ view object interdependencies;■ view cross-reference data about objects under PAC control; and■ track maintenance activities for objects under PAC control.
Additional Options allow you to retrieve additional information about PAC entity interdependen-cies without having to navigate through a series of menus and screens. Refer to the sectionUsingPAC Additional Options for more information.
The reporting sub-functions available to PAC entities are described in the following table. Thesame code may be used for different sub-functions, depending on the particular entity:
DescriptionSub-FunctionCode
Display information about PAC entities by entering an entity name oralias, or by using range notation to select from a list.
DisplayD
Produce a hard copy of a PAC entity. Refer to the section Using theHardcopy Sub-Function for more information.
HardcopyH
Display object list for a migration event.DisplayL
Display JCL for jobs; display keyword descriptions.ListL
Display the migration path destination status(es) for an origin status.DisplayDestination Status
N
Display the migration path origin status(es) for a destination status(Migration Path Menu).
DisplayOrigin Status
O
Display the objects of an application in a specific status (ApplicationStatus Menu).
Objects for ApplicationStatus
O
Displays a list of change control logs (Change Control Log Menu).Select All Open LogsO
Display audit report of a migration event (Migration Event Menu).Display statuses linked to an application.
DisplayR
Display a list of PAC entities on the Selection List screen by entering theentity name or using range notation to display the selection list. Refer
SelectS
to the sections Using Selective Processing and Using Range Notationfor more information.
PAC User's Guide12
Navigating in PAC
DescriptionSub-FunctionCode
Display a list of PACapplications linked to a specific status (StatusMenu)or statuses linked to a specific application (Application Menu).
DisplayT
Display status(es) with no application links; display application(s) withno status links.
Display StatusU
Display the object versions of objects for an application in a specificstatus.
Object Version AuditHistory
V
Display the Predict cross-reference data for a specific application.PredictCross-reference Data
X
Display help information for a field. Refer to the sectionAccessing FieldHelp for more information.
Help?
Exit from a PAC function.Exit
Note: Some of the sub-function namesmay be used as direct commands from the commandline. Refer to the PAC Reference documentation.
About PAC Menus and Screens
PAC is driven bymenus that lead you into the systemandhelp you to navigate through subsystems,functions, and sub-functions.
This section covers the following topics:
■ Menu/Screen Attributes■ Using Direct Commands■ Using PF Keys■ Accessing Field Help■ Accessing Error Message Text■ PAC Entity Sub-Function Screens■ Using Selective Processing■ Using Range Notation■ Using the Natural Editor■ Using the Hardcopy Sub-Function
13PAC User's Guide
Navigating in PAC
■ Using PAC Additional Options
Menu/Screen Attributes
The attributes described in the following table are common to all PAC menu screens:
DescriptionAttribute
The current time appears in the upper left corner of the screen.Time
The product name (PAC) and themenu title appear in the top center of the screen. The titleis modifiable.
Title
The current date appears in the upper right corner of the screen.Date
The user ID of the person currently using PAC is displayed directly under the current time.User
The Code and Function or Sub-Function columns list the functions or subsystems availablefrom the menu along with their function codes.
Code/Function
The input field for any of the codes listed in the Code column.Code
A PAC direct command can be entered on this line.Command
PF key assignments for use with this menu are given across the bottom of the screen. PFkey numbers without assignments are not functional for the particular screen.
PF Keys
Using Direct Commands
PAC allows you to issue direct commands frommost screens in the PAC system. Refer to the PACReference documentation for more information about PAC commands.
Using PF Keys
The PF keys that are unique to individual screens are explained in context. General PF key assign-ments are described below:
DescriptionFunctionKey
Displays the PAC Help facility for this screen.HelpPF1
Returns you to the PAC Main Menu.MenuPF2
Goes back one screen in the screen structure.ExitPF3
Accesses the Additional Options.OptsPF4
Confirms an action.ConfirmPF5
Goes back to the first screen of a selection list.--PF6
Goes forward to the last screen of a selection list.++
Goes forward one screen of a selection list.+PF8
Goes back one screen of a selection list.-
Shifts the screen to the left.<PF10
PAC User's Guide14
Navigating in PAC
DescriptionFunctionKey
Shifts the screen to the right.>PF11
Cancels the current function and backs out any changes not yet committed.CancPF12
Accessing Field Help
Online help is provided for all fields in the PAC system. You can access the Help facility is twoways:
■ Press PF1 (Help) to invoke a help screen relevant to the functions of the field where the cursoris positioned; or
■ Enter a questionmark (?) in the first position of a data entry field (excluding the direct commandline) to access a help screen specific to that data entry field.
If there is no help text available for a particular field, a message may be displayed to that effect.In this case, you should verify with your PAC administrator that the help maps and text in thelibrary SYSPACUS are accessible in the SYSPAC library.
Accessing Error Message Text
Where it is available, PAC provides access to extended text for error messages displayed on yourscreen. You can access error message text in two ways:
■ Enter D or DISPLAY on the command line while the error message is displayed;■ Enter a h followed by the message number on the command line; for example, h 7126.
You can exit from the extended error message and return to the previous screen by pressing PF3(Exit) or entering a period (.).
PAC Entity Sub-Function Screens
Certain entity sub-function screens are similar to each other and across all PAC entities. Thesesimilarities are discussed in the following paragraphs.
Entity sub-function screens are accessible using menu Codes or direct commands. Refer to thePAC Reference documentation for more information about PAC commands.
15PAC User's Guide
Navigating in PAC
Display/Modify Screens
The PACDisplay screens allowyou to view information about PAC entity definitions.Maintenancemay not be performed on display screens. The PAC Modify screens are used to edit PAC entitydefinitions. Display and modify screens are similar to the Add screen and are available for mostPAC entities. The following screen is a typical example:
21:21:24 ***** PREDICT APPLICATION CONTROL ***** 2000-04-21User UKMJ - Display Application -
Application . UKMJ_APPLIACTION Modified: 2000-04-21 by UKMJKeys ........ ,,,,,,,,,,,,,,,,,,,Appl. Type .. NATSYSDIC Appl. UKMJ_PREDICT____________________Prefix ...... MJ_ Level .. 1.1.2_____ Gen No .. 40000Title ....... demo application____________________________________________
PREDICT CASE Usage ......... N DB2 Support ........ N
Default NATURAL LibraryDevelopment .. ________Incorporate .. ________Maintenance .. ________Test ......... ________
Additional Options ......... N
Command ===>Enter-PF1---PF2---PF3---PF4---PF5---PF6---PF7---PF8---PF9---PF10--PF11--PF12---
Help Exit Opts Links NNAT Canc
Display/modify screens show entity-specific information thatwas entered on an add/modify screenwhen the entity was defined to PAC or modified. Most display/modify screens provide
■ the name of the entity;■ information about when and by whom the entity was added/modified; and■ access to Additional Options.
PAC User's Guide16
Navigating in PAC
Purge Windows
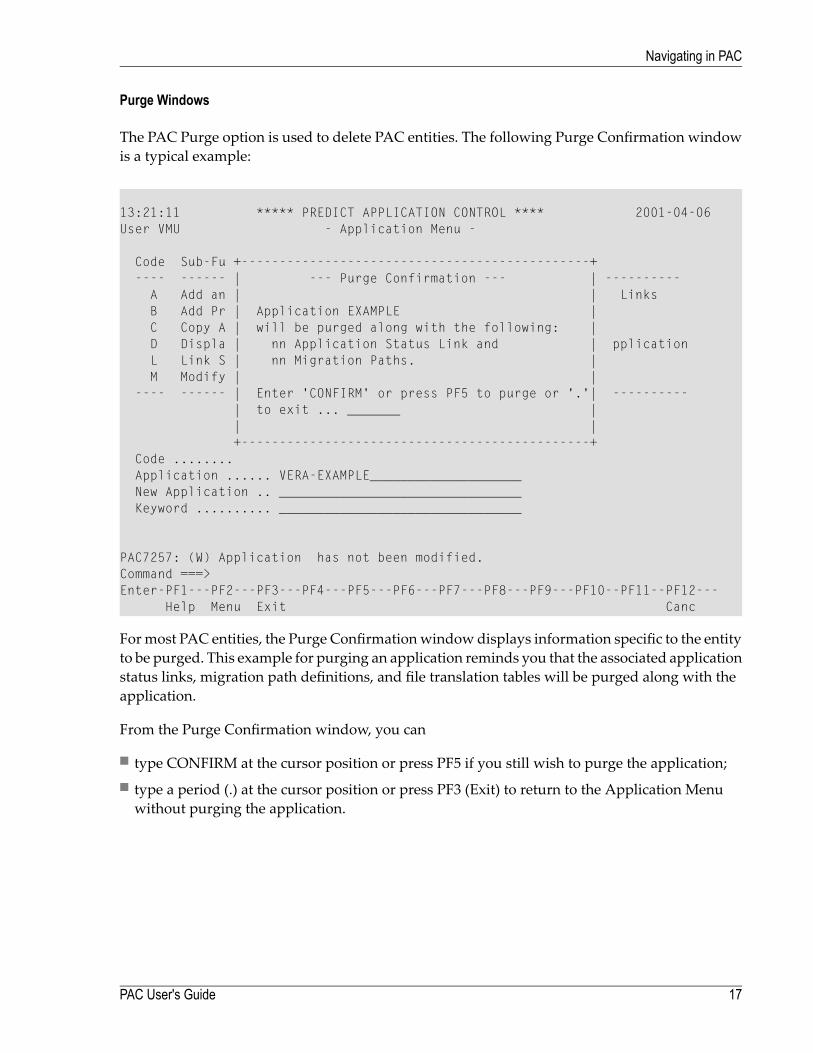
The PAC Purge option is used to delete PAC entities. The following Purge Confirmation windowis a typical example:
13:21:11 ***** PREDICT APPLICATION CONTROL **** 2001-04-06User VMU - Application Menu -
Code Sub-Fu +----------------------------------------------+---- ------ | --- Purge Confirmation --- | ----------
A Add an | | LinksB Add Pr | Application EXAMPLE |C Copy A | will be purged along with the following: |D Displa | nn Application Status Link and | pplicationL Link S | nn Migration Paths. |M Modify | |
---- ------ | Enter 'CONFIRM' or press PF5 to purge or '.'| ----------| to exit ... _______ || |+----------------------------------------------+
Code ........Application ...... VERA-EXAMPLE____________________New Application .. ________________________________Keyword .......... ________________________________
PAC7257: (W) Application has not been modified.Command ===>Enter-PF1---PF2---PF3---PF4---PF5---PF6---PF7---PF8---PF9---PF10--PF11--PF12---
Help Menu Exit Canc
Formost PAC entities, the Purge Confirmationwindow displays information specific to the entityto be purged. This example for purging an application reminds you that the associated applicationstatus links, migration path definitions, and file translation tables will be purged along with theapplication.
From the Purge Confirmation window, you can
■ type CONFIRM at the cursor position or press PF5 if you still wish to purge the application;■ type a period (.) at the cursor position or press PF3 (Exit) to return to the Application Menuwithout purging the application.
17PAC User's Guide
Navigating in PAC
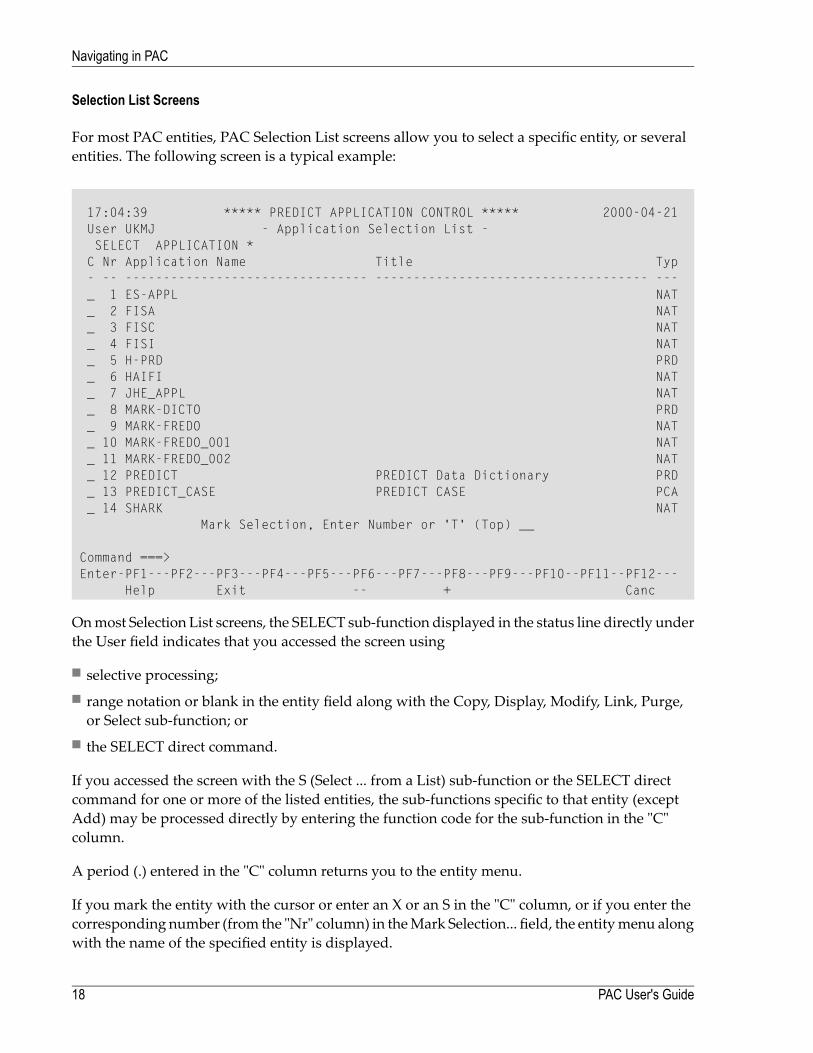
Selection List Screens
For most PAC entities, PAC Selection List screens allow you to select a specific entity, or severalentities. The following screen is a typical example:
17:04:39 ***** PREDICT APPLICATION CONTROL ***** 2000-04-21User UKMJ - Application Selection List -SELECT APPLICATION *C Nr Application Name Title Typ- -- -------------------------------- ------------------------------------ ---_ 1 ES-APPL NAT_ 2 FISA NAT_ 3 FISC NAT_ 4 FISI NAT_ 5 H-PRD PRD_ 6 HAIFI NAT_ 7 JHE_APPL NAT_ 8 MARK-DICTO PRD_ 9 MARK-FREDO NAT_ 10 MARK-FREDO_001 NAT_ 11 MARK-FREDO_002 NAT_ 12 PREDICT PREDICT Data Dictionary PRD_ 13 PREDICT_CASE PREDICT CASE PCA_ 14 SHARK NAT
Mark Selection, Enter Number or 'T' (Top) __
Command ===>Enter-PF1---PF2---PF3---PF4---PF5---PF6---PF7---PF8---PF9---PF10--PF11--PF12---
Help Exit -- + Canc
Onmost Selection List screens, the SELECT sub-function displayed in the status line directly underthe User field indicates that you accessed the screen using
■ selective processing;■ range notation or blank in the entity field along with the Copy, Display, Modify, Link, Purge,or Select sub-function; or
■ the SELECT direct command.
If you accessed the screen with the S (Select ... from a List) sub-function or the SELECT directcommand for one or more of the listed entities, the sub-functions specific to that entity (exceptAdd) may be processed directly by entering the function code for the sub-function in the "C"column.
A period (.) entered in the "C" column returns you to the entity menu.
If you mark the entity with the cursor or enter an X or an S in the "C" column, or if you enter thecorresponding number (from the "Nr" column) in theMark Selection... field, the entitymenu alongwith the name of the specified entity is displayed.
PAC User's Guide18
Navigating in PAC
Using Selective Processing
Selective processing is an online facility that allows you to display a Selection List screen containinga list of all entities meeting specified selection criteria. You can access a PAC Selection List froma PAC sub-function menu by
■ entering the desired code in the Code field and■ an asterisk (*) in the fields displayed below the Code field; or■ nothing (blank) in the fields displayed below the Code field.
■ entering code S (Select) and■ nothing (blank) in the fields displayed below the Code field; or■ a range as described in the section Using Range Notation, below.
Using Range Notation
Many PAC sub-functions allow attributes to be specified as a range using the following notation:
Displays a list of . . .Notation
all objects/entities beginning with the first item.blank or *
objects/entities beginning with the specified value.value*
objects/entities greater than or equal to the specified value.value>
objects/entities less than or equal to the specified value.value<
Using the Natural Editor
Many PAC sub-functions are performed using the Natural editor screen or window. Refer to thePAC Reference documentation for more information about the Natural editor commands used byPAC.
Using the Hardcopy Sub-Function
The hardcopy sub-function is available only on selected PAC menus and only if you are runningPAC under the Software AG product Com-Plete. From menus that support the hardcopy sub-function, you can print information about PAC entities by entering
■ code H (Hardcopy) in the Code field; and■ the name of the entity you wish to print in the relevant field.
The hardcopy is produced at the destination printer defined to Com-Plete.
19PAC User's Guide
Navigating in PAC

Using PAC Additional Options
Additional Options fields allow you to trace the interdependencies of PAC entities and performsub-functions on PAC entities without selecting a sub-function from a menu. The Additional Op-tions are specific to the particular PAC entity; however, those listed in the following table arecommon to most PAC entities:
DescriptionOption
Alternative name for a PAC entity such as an application. A window is displayed foradding/editing aliases.
Aliases
The dates and times a PAC entity was added/modified and the user ID and terminal ID of theperson who added/modified the entity.
Date
Description of an entity (for example, application, status).Description
List of available keywords for a PAC entity such as an application or a job. A window isdisplayed for adding/editing. Before a keyword may be used in PAC, it must be defined tothe PAC system.
Keys
For some PAC entities, Additional Options are processed only after all other changes are made tothe rest of the screen. After the options are processed, the user is returned to the original screen.
At this time, all fields, except Additional Options and the command line, are protected so that nofurther processing may be performed on them. Thus, in the maintenance subsystem, once youenter the Additional Options submenu, all updates on the maintenance screen are locked fromfurther data entry.
Accessing Additional Options from a Window
1. You can access theAdditionalOptionswindowby pressing PF4 (Opts) or typing over the defaultwith Y (Yes) in the Additional Options field.
PAC User's Guide20
Navigating in PAC
13:57:26 ***** PREDICT APPLICATION CONTROL **** 2001-04-06User VMU - Display Event -
Event ....... ABC-01-01 Modified: 2001-03-13 by XSETIMApplication . ABC___________________________From Status . CONTROL_____________________+---------------------------------+To Status ... TEST________________________| -- Additional Options -- |Exec Mode ... COPY Objects in Batch Using | |Scheduled ... __________ at _____ | * Migration List ............ N |
| Audit Report .............. N |Notes ....... | Authorization Info......... N |
__________________________| Job Information ........... N |__________________________| Description ............... N |
| * Dates ..................... N |Maintenance Request .. CAPA______________| |Processing State ..... Validated +---------------------------------+
Additional Options ... Y
Command ===>Enter-PF1---PF2---PF3---PF4---PF5---PF6---PF7---PF8---PF9---PF10--PF11--PF12---
Help Menu Exit Opts ObLst Auth Canc
An asterisk (*) at anAdditional Options field indicates that the field contains unique informationand suggests that you access the option. For example, "*Authorization Info" indicates that thereare added parameters and information.
2. In the Additional Options window, type over the defaults with Y (Yes) to access the desiredoption screen. The default in Additional Options fields is generally N (No).
Youmay access several options, one after another, by entering Y inmultiple fields, thenmovingfrom one option to the next by repeatedly pressing ENTER.OnNatural editor screens, however,youmust enter a period (.) on the editor command line before you press ENTER to move to thenext option.
Accessing an Additional Option Directly
On several entity screens, a PF key option is available to access a particular additional option directlywithout having to access an Additional Options window. For example, PF7 (ObLst) on certainmigration event screens allows you to directly access the Object List Editor window. The screenabove shows an example of the PF7 (ObLst) key.
21PAC User's Guide
Navigating in PAC
Assigning Aliases to a PAC Entity
PAC allows you to assign alternative names to PAC entities so that you can access those entitiesmore easily. All data entry fields that request the name of a PAC entity also allow you to enter thename of a previously assigned alias.
You may not assign the same alias to more than one entity of the same type. Aliases must be atleast two (2) characters in length and must begin with an alphabetic character.
TheAliasNameswindow is accessed using the "Aliases" option on theAdditionalOptionswindow.You can specify up to sixteen (16) alternate names for the current entity.
Listing Locked Data
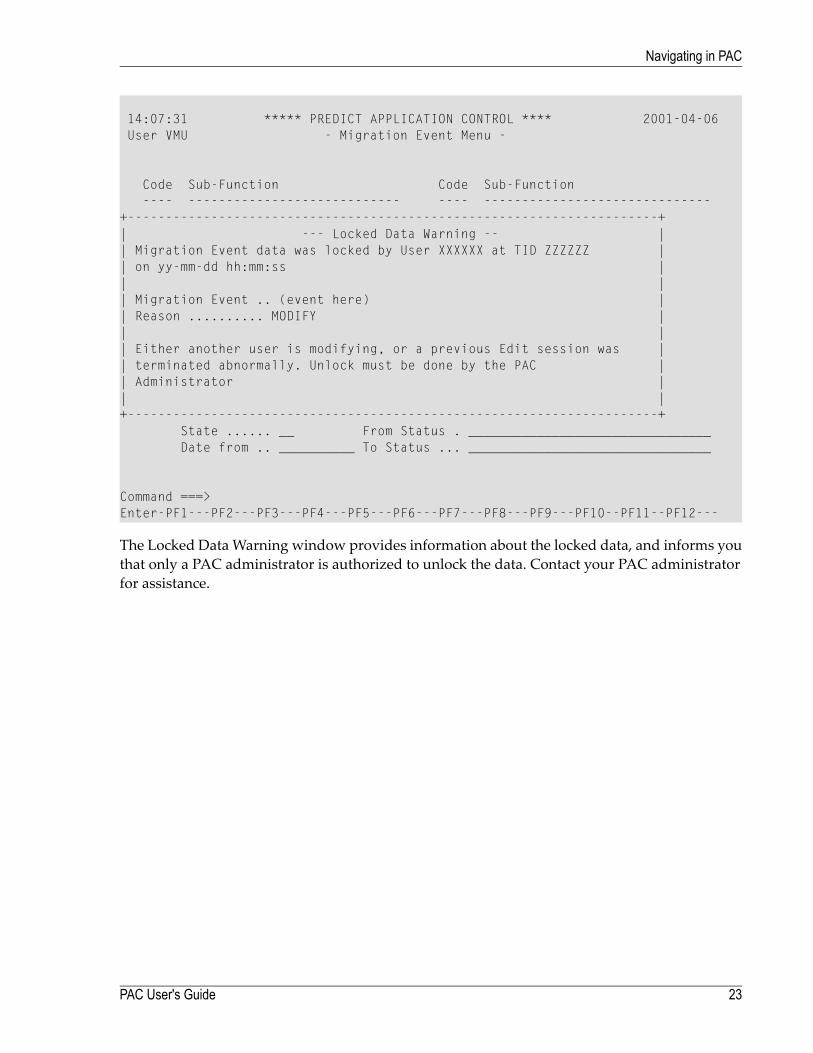
To gain exclusive control, PAC locks data by applying a series of unique identifiers to data involvedin processing requests or migrations.
If your PAC administrator has specified Y (Yes) for the List Locked Data option in your PAC userprofile, the LockedData screen appears automaticallywhen you log on to PAC. This screen displaysa list of all the data entities locked by you or your batch user ID. It identifies the data or entity,data/entity types, the reason for locking (for example, for editing), and the dates and times theywere locked.
Youmay viewor release (unlock) only data that has been locked by you.Only a PACadministratormay unlock data that was locked by other users. If you attempt to access data locked by anotheruser while you are using the PACmaintenance sub-functions, the Locked Data Warning windowappears as shown in the following example:
PAC User's Guide22
Navigating in PAC
14:07:31 ***** PREDICT APPLICATION CONTROL **** 2001-04-06User VMU - Migration Event Menu -
Code Sub-Function Code Sub-Function---- ---------------------------- ---- ------------------------------
+----------------------------------------------------------------------+| --- Locked Data Warning -- || Migration Event data was locked by User XXXXXX at TID ZZZZZZ || on yy-mm-dd hh:mm:ss || || Migration Event .. (event here) || Reason .......... MODIFY || || Either another user is modifying, or a previous Edit session was || terminated abnormally. Unlock must be done by the PAC || Administrator || |+----------------------------------------------------------------------+
State ...... __ From Status . ________________________________Date from .. __________ To Status ... ________________________________
Command ===>Enter-PF1---PF2---PF3---PF4---PF5---PF6---PF7---PF8---PF9---PF10--PF11--PF12---
The Locked Data Warning window provides information about the locked data, and informs youthat only a PAC administrator is authorized to unlock the data. Contact your PAC administratorfor assistance.
23PAC User's Guide
Navigating in PAC

24

4 Planning a PAC Environment
■ Application Phases .......................................................................................................................... 26■ Integrating PAC ............................................................................................................................... 27■ PAC Controlled Environment ............................................................................................................. 28■ When to Implement PAC ................................................................................................................... 29■ What PAC Functions to Implement ...................................................................................................... 30■ Life-Cycle of a PAC Object ................................................................................................................ 33■ Foundations of PAC Control .............................................................................................................. 34■ PAC Entities and Their Relationships ................................................................................................... 35■ PAC Administration Facilities ............................................................................................................. 36■ PAC Utilities ................................................................................................................................... 37■ Facilities for Customizing PAC ........................................................................................................... 38
25
Predict Application Control (PAC) is a system for controlling and tracking changes made to Nat-ural or "foreign" (non-Natural and non-Predict) applications throughout the application life-cycle.In the production environment, PAC uses the Predict Application Audit (PAA) subsystem toprotect and audit the application.
This chapter covers the following topics:
Application Phases
Applications typically move through more or less formal phases or statuses, of development,testing, and production. Amaintenance status with unique functions distinct from those in devel-opment may also exist. These statuses are summarized in the following table:
DescriptionStatus
The application source code is developed and/or modified and major enhancements areadded to fulfill a specific purpose for the organization.
Development
Modifications and enhancements are tested before the application is put into production.Types of tests might include- Functional- System- Integration
Testing
Modifications includingminor enhancements to the source codemay need to bemade apartfrom development, especially if the development effort is at a different level from that of
Maintenance
the code being maintained. If no distinct maintenance phase is recognized, maintenancewould be considered part of the development phase.
The application fulfills its purpose within the organization.Production
Note: When using an external version control software together with PAC the applicationis linked to a status of type External. It is possible to link such an externally versioned ap-plication to a status of type Development or Maintenance in parallel. However, the sourcesstored in the external version control software will not be updated.
Programs are copied to and from locations. These are usually Natural libraries, Predict systemfiles or partitioned datasets (PDSs) for foreign objects. A single application may comprise variousobjects in a set of locations having a single name. These named location sets are called deployments,and are discussed in PAC Controlled Environment.
Application statuses are linked by the logical paths typically taken by application objects as theymove through the application life-cycle. An Application Environment:
PAC User's Guide26
Planning a PAC Environment
Integrating PAC
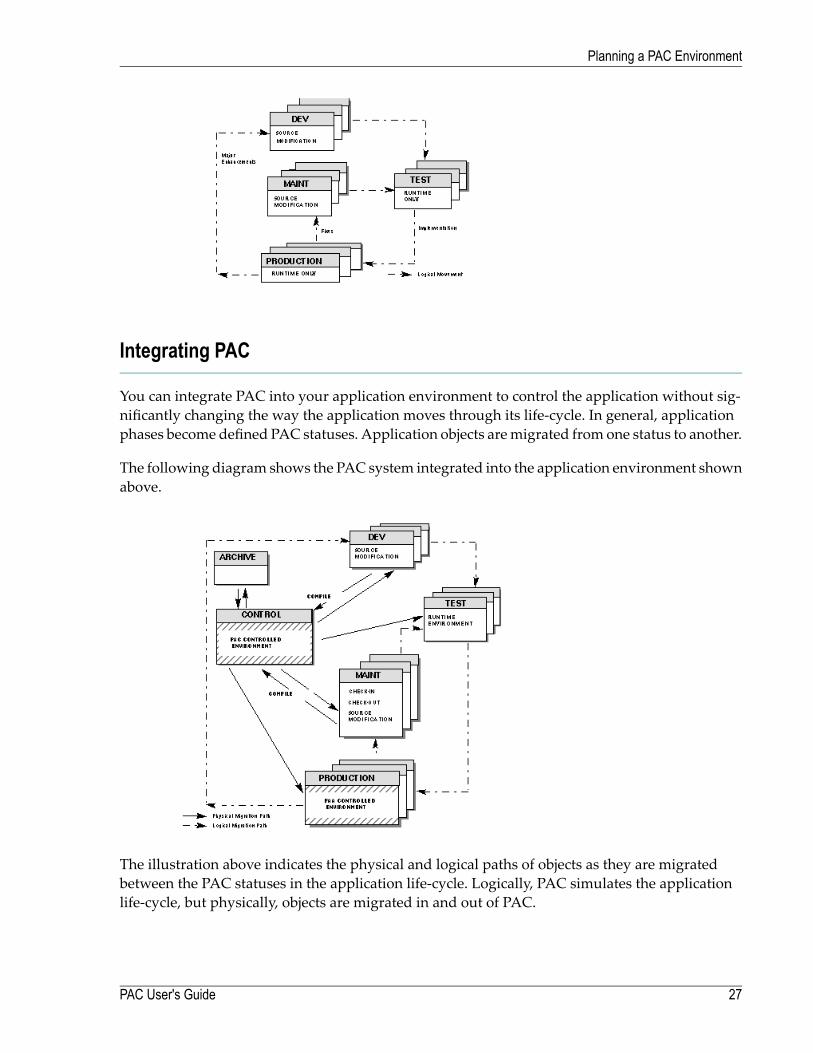
You can integrate PAC into your application environment to control the application without sig-nificantly changing the way the application moves through its life-cycle. In general, applicationphases become defined PAC statuses. Application objects aremigrated from one status to another.
The following diagram shows the PAC system integrated into the application environment shownabove.
The illustration above indicates the physical and logical paths of objects as they are migratedbetween the PAC statuses in the application life-cycle. Logically, PAC simulates the applicationlife-cycle, but physically, objects are migrated in and out of PAC.
27PAC User's Guide
Planning a PAC Environment
PAC Controlled Environment
Two files are used to physically implement PAC in your environment: the PCF and ACF systemfiles. All applications defined to PAC are linked automatically to the Control status which is rep-resented physically by these two files.
When Predict Application Audit (PAA) is implemented, the PAA system file is also used.
This section covers the following topics:
■ Application Control System File - ACF■ Predict Control System File - PCF■ Tracking the Application's Path
Application Control System File - ACF
The PAC ACF file is a protected file that stores:
■ Source and executable code for every object version in the PAC-controlled environment;■ Object-version information;■ PAC entity definitions;■ JCL used for batch PAC jobs;■ System and user profile information; and■ Control data about the PAC installation itself.
Predict Control System File - PCF
The PCF file contains the current versions of all objects for all applications under the control ofPAC. PAC keyword definitions and generation defaults are also stored on this file.
To guarantee consistency in the PAC controlled environment, Natural objects are saved andcompiled here using the current object versions of subordinates as defaults in the compile process.Additionally, Natural rules and views/DDMs are generated here from Predict verifications anduserviews.
The file has the same file definition table (FDT) as a Predict file. It is not accessible to a user, butis used as a work area during migrations that involve the development, maintenance, and incor-poration statuses.
PAC User's Guide28
Planning a PAC Environment

Tracking the Application's Path
The ACF system file records the state of an application. In most PAC cases, "updating an applica-tion" means in fact updating the application's ACF record. Among other things, the ACF tracksthe location(s) of the components comprising the application. These combined locations are groupedinto a named set called a deployment.
There are five types of deployments:
■ Incorporation■ Development■ Test■ Maintenance■ Production
Adeployment becomes one of the above typeswhen it is defined in the link between the applicationand a status. A given location (say, the application's job control in a partitioned dataset) couldoccur in more than one application-status link; however, it is better to avoid such cases, sincemarking an application-status linkwith one of the five deployment types applies to all application-status links for that particular status.
PCF/ACF System File Location
You can decide where to locate the PCF and ACF system files based on the production, develop-ment, or test environments. Before you decide, however, you need to consider the security, network,and distributed environments operational procedures (such as backup and recovery) of the locationenvironment.
For example, monthly or even weekly backups may not be adequate because PAC files generallycontain "production" data in the development database; that is, objects of applications implementedfor production use. On the other hand, placing PAC files in a production database may affectperformance due to programmer and quality assurance activities.
When to Implement PAC
Certain physical constraints in your environment may affect the way applications are handled inthe PAC (and PAA) systems:
■ the responsibilities of users, including those authorized to perform PAC functions;■ the sequence of testing through which the application passes;■ the location of application development, maintenance, testing, and the implementation of theapplication in production;
29PAC User's Guide
Planning a PAC Environment
■ the access to various functions and the movement of objects to various locations according tothe environment definition.
Based on the requirements of your environment, you must decide when in its life-cycle you willplace your application under PAC control. Two possibilities for implementing PAC are illustratedin the following examples.
Example 1: After the Code is Written
PAC is traditionally implemented into the application environment after the code is written andas the first phase of testing begins.
Advantages: The state or progress of application objects can be tracked during all phases of theapplication's life-cycle, especially during testing.
Disadvantage: Because the activity of the physical PAC system files is intensified, increasedmaintenance to these files is required.
Example 2: After the Testing is Completed
Objects may be placed under PAC at a later stage after all testing is completed; the final phase oftest and acceptance can then be completed under PAC control.
Advantage: The number of object versions in PAC is reduced. During testing, superseded versionsof objects are simply discarded. Only object versions that reach the final testing phase are placedunder PAC control and tracked.
Disadvantage: You have less information about the progress of the application; minimal versionsof the code are retained.
What PAC Functions to Implement
The PAC architecture allows you to implement its comprehensive set of change managementfunctions and facilities in phases. You can start with basic PAC functions and build expandedPAC capabilities into your environment as and when the need arises.
The first phase includes PAC's basic migration facilities for implementing application(s) from de-velopment into production. These migration facilities allow you to
■ control the migration process;■ automatically version and track all objects loaded into PAC;■ save time with automated procedures; and■ track all of your activities as you move your application from development into production.
PAC User's Guide30
Planning a PAC Environment

Once you are familiar with the basic PAC migration procedures, you can implement additionalPAC capabilities according to your own requirements.
This section covers the following topics:
■ Sample Application Life-Cycles
Sample Application Life-Cycles
This section contains some basic application examples. They can serve as a guide as you start usingPAC and begin to think about how PAC can best serve your individual application needs.
Sample 1: Basic Setup
The basic setup example provides control over themigration of your application fromdevelopmentto testing, and from testing to production. The basic application life-cycle:
If you test during development, you might eliminate the test status. The application life-cyclewould then be:
Development ->Production ->Development
Sample 2: Add a Second Test Status and a Maintenance Status
The second example includes an additional test status and a maintenance status.
Additional test statuses can be used if your application testing comprises various phases such asunit, system, and acceptance testing.
The maintenance status accommodates bug fixes and minor enhancements to your productionapplications. It is separated from development to avoid any conflict with other ongoing develop-ment. Maintenance may reflect changes to production while development may contain a laterphase of the application that is no longer consistent with the code in production.
The Control status indicates that the application is under the control of PAC. The Control statuscan be used as an intermediate stepwhenmigrating objects; however, if it is not required,migratingdirectly to the Control status can be deleted from the test plan. When objects are migrated from adevelopment or maintenance environment into PAC, they are always implicitly migrated to theControl status.
31PAC User's Guide
Planning a PAC Environment
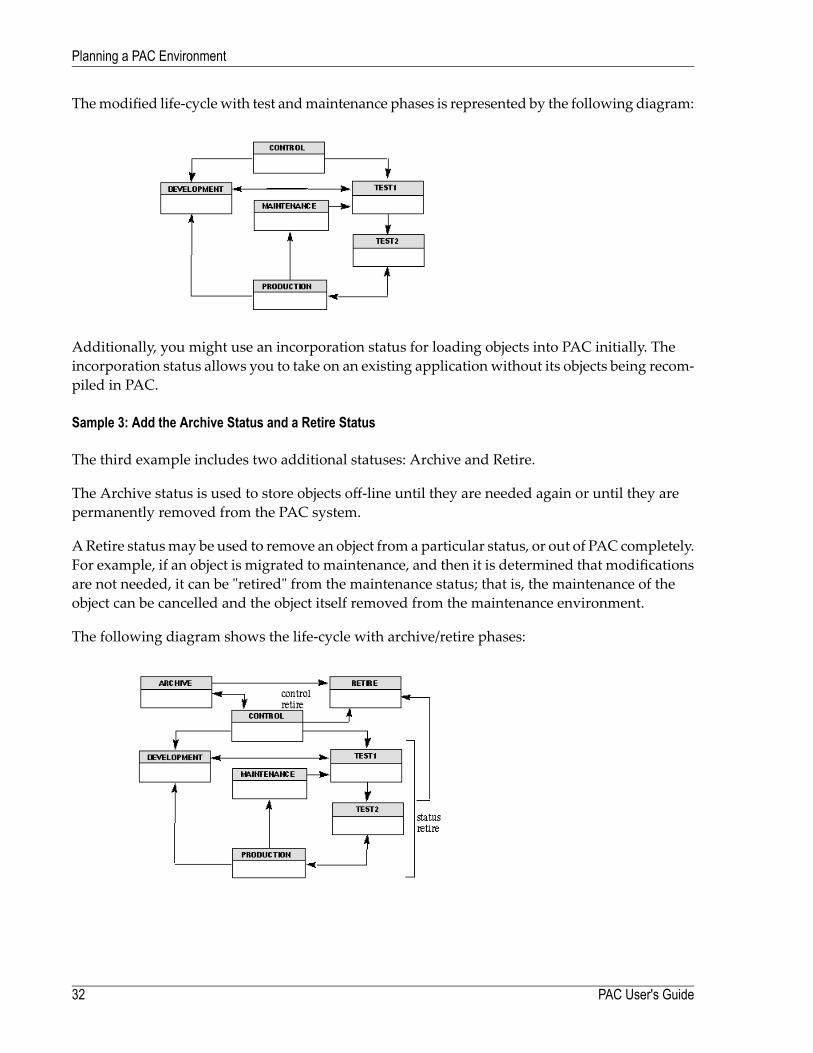
Themodified life-cyclewith test andmaintenance phases is represented by the following diagram:
Additionally, you might use an incorporation status for loading objects into PAC initially. Theincorporation status allows you to take on an existing application without its objects being recom-piled in PAC.
Sample 3: Add the Archive Status and a Retire Status
The third example includes two additional statuses: Archive and Retire.
The Archive status is used to store objects off-line until they are needed again or until they arepermanently removed from the PAC system.
ARetire statusmay be used to remove an object from a particular status, or out of PAC completely.For example, if an object is migrated to maintenance, and then it is determined that modificationsare not needed, it can be "retired" from the maintenance status; that is, the maintenance of theobject can be cancelled and the object itself removed from the maintenance environment.
The following diagram shows the life-cycle with archive/retire phases:
PAC User's Guide32
Planning a PAC Environment

Life-Cycle of a PAC Object
Following is an example of a typical life-cycle of an object within PAC illustrating some of thePAC facilities:
The steps illustrated in this diagram are summarized as follows:
ActionStep
The object is migrated into PAC.1
The object is compiled and then versioned.2
Test the object.3
Implement the tested object into production.4
Check the object out for maintenance.5
Check themodified object back in. The object is then retested and implemented again into productionand supersedes the current production version.
6
The superseded object ages.7
The superseded object is archived and unloaded.8
The archived object ages.9
The archived object is retired.10
If logging of retired (purged) objects has been implemented, the final step is to purge the logs of thepurged object and totally remove all audit information for the object from PAC.
11
33PAC User's Guide
Planning a PAC Environment
Foundations of PAC Control
Three basic principles of change control systems are observed by PAC:
■ Objects are compiled only once;■ Only tested code is placed in production; and■ The source code is located in only one place to prevent possible inconsistencies.
Except for foreign objects, objects are compiled by PAC only once for the following reasons:■ To avoid recompiling and all of the effort and resources used to set up an environment with allof the objects to be compiled, including the subordinates (data areas, views, rules, maps, copy-code) needed when the object is migrated to a new environment (test or production);
■ To prevent anomalies from occurring if objects are recompiled with changed code or with dif-ferent instances of their subordinates.
For example, if a piece of copycode is modified, it is not necessary for all objects that use it to berecompiled. If the copycode is changed and the object is recompiled, the new version of the objectthat uses this copycode will be untested and may no longer execute in the same way that the pre-vious version did.
By not recompiling, the PAC methodology of implementing only the tested code is maintained.
The PAC methodology requires that all versions of the code be maintained in a single location sothat the latest source code can be located at all times and remains distinct from previous versionsof code that have been tested. Programs that use dynamic source variables are the exception tothis.
The basic purpose of PAC is to support the integrity of the production environment; therefore,Software AG recommends that source code not be available in the production environment forthe following reasons:
■ Tomaintain integrity, PACmust ensure that all objects running in production are synchronizedwith PACandhave proceeded through the appropriate control and trackingmechanisms inherentin the PAC product and defined by the user (primarily, the migration paths).
■ When source code resides in the production environment, changes can be made to it and thecode can be recompiled. Such changes are incompatiblewith the basic tenets of changemanage-ment.
For foreign objects, PAC assigns versions to both the source and object (loadable) code. PAC doesnot force a recompilation of these object types; instead, PAC assumes that the source and objectcode match. Once migrated into PAC, these foreign objects follow the same application life-cycleas Natural-based code.
PAC User's Guide34
Planning a PAC Environment

PAC Entities and Their Relationships
An object and any other life-cycle component and path defined to PAC is a PAC entity. The fol-lowing basic entity types used in the PAC and PAA systems are initially defined to PAC in thefollowing sequence (these and other entity types are described in the glossary):
EntityOrder
Status1
Application2
Application status link3
File translation table (FTT)4
Migration path5
Job6
Maintenance request7
Migration entities (migration event, object list, audit report)8
Versioned object9
Change control log10
Keyword11
Once the PAC entities are initially defined, you can add or modify the definitions with minimalconcern for the sequence. For instance, entities such as maintenance requests that are not immedi-ately needed can be defined as the need arises.
The relationships among PAC entities are illustrated in the following diagram:
35PAC User's Guide
Planning a PAC Environment
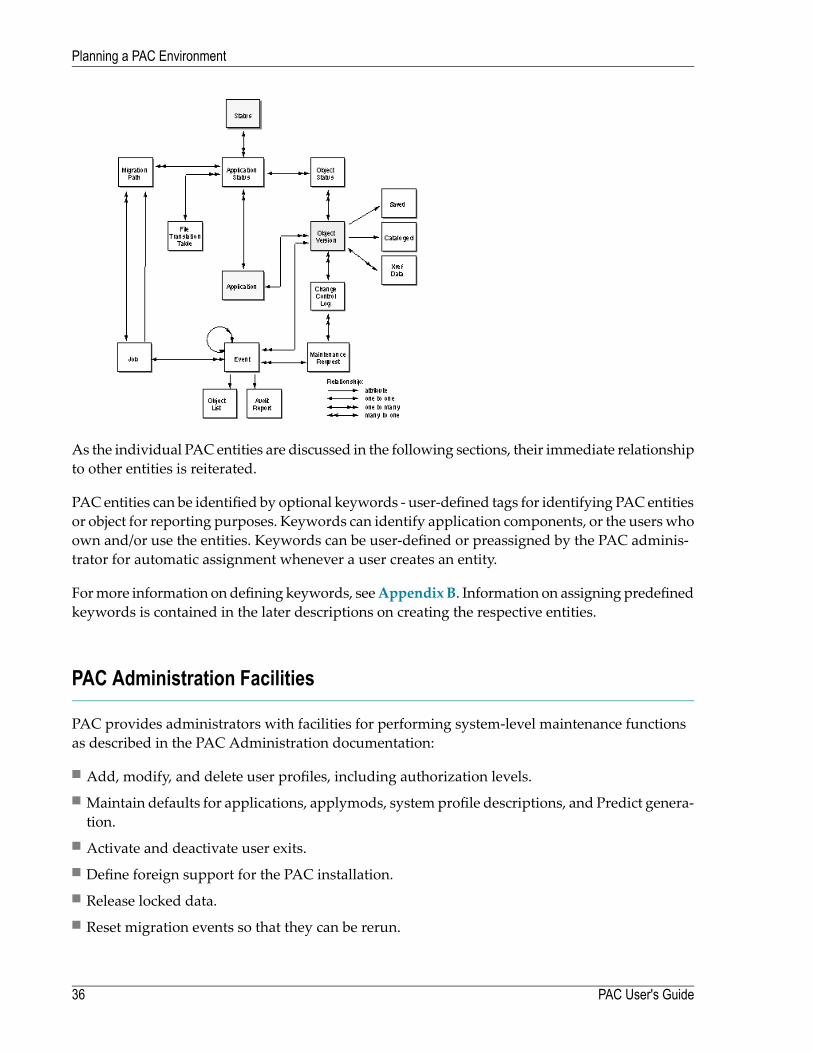
As the individual PAC entities are discussed in the following sections, their immediate relationshipto other entities is reiterated.
PAC entities can be identified by optional keywords - user-defined tags for identifying PAC entitiesor object for reporting purposes. Keywords can identify application components, or the userswhoown and/or use the entities. Keywords can be user-defined or preassigned by the PAC adminis-trator for automatic assignment whenever a user creates an entity.
Formore information on defining keywords, seeAppendix B. Information on assigning predefinedkeywords is contained in the later descriptions on creating the respective entities.
PAC Administration Facilities
PAC provides administrators with facilities for performing system-level maintenance functionsas described in the PAC Administration documentation:
■ Add, modify, and delete user profiles, including authorization levels.■ Maintain defaults for applications, applymods, system profile descriptions, and Predict genera-tion.
■ Activate and deactivate user exits.■ Define foreign support for the PAC installation.■ Release locked data.■ Reset migration events so that they can be rerun.
PAC User's Guide36
Planning a PAC Environment
■ Maintain table definitions for maintenance requests.■ Maintain security definitions for views.■ Finalize the process of archiving objects.■ Purge change control logs, audit histories, and obsolete object versions. Object versions can bepurged with or without first archiving them.
PAC Utilities
PAC provides three types of utilities: migration, scan, and compare. PAC utilities are describedin the PAC Reference documentation.
This section covers the following topics:
■ Migration Load - MIGLOAD Utility■ Scan Utilities■ Compare Utility
Migration Load - MIGLOAD Utility
The PAC migration load MIGLOAD utility performs the same functions as the Natural utilitiesNATLOAD, but also creates and uses PAC control information. If you want to use only one utilityin a mixed environment, you can use MIGLOAD for non-PAC objects as well.
The MIGLOAD utility loads Natural and foreign saved objects and cataloged objects, views anduser error messages. A MIGLOAD report lists the name, type, and version of each object loaded;its destination library, database, and file; whether or not it replaced an existing object with thesame name in the destination library; and other information.
You can execute MIGLOAD in either batch or online mode, using menu selections or direct com-mands.
Scan Utilities
Scan utilities allow you to scan Natural object versions and migration paths. These utilities can beexecuted in batch or online.
■ SCANOBJ is used to scan for any string of characters in the source code of versioned objectsthat belong to an application defined to PAC. You can specify a range of objects or object types,a version number, a range of version numbers, or all versions in a particular status. The utilitysupports absolute scans.
■ With SCANPATH, you can scan all migration paths for a specified job name. This utility includesoptions to replace the job name selectively or globally and to modify migration-path defaults.
37PAC User's Guide
Planning a PAC Environment
Compare Utility
The PCA compare utility allows you to compare both Natural and foreign object types. Outsideof PAC/PAA only Natural objects can be compared; inside of PAC/PAA, both Natural and foreignobjects. You can compare:
■ Individual objects as well as lists of objects;■ directory information of objects
It is also possible to compare an object outside of PAC/PAAwith one that is controlled by PAC/PAA.For a detailed description of the Compare Utility see the PAC Reference documentation.
Facilities for Customizing PAC
PAC provides Application Program Interfaces (APIs), more than 30 user exits, and more than 30applymods to help you customize the PACenvironment tomeet your specific requirements. Thesefacilities are described in detail in the PAC Reference documentation.
This section covers the following topics:
■ Application Program Interface - API Facility■ User Exits■ Applymods
Application Program Interface - API Facility
PACprovides anApplication Program Interface (API) facility to simplify the process of customizingPAC to meet your site requirements. The APIs provide flexibility in accessing PAC informationand interfacing with your existing systems.
PAC APIs are Natural subprograms that can be used to call PAC directly from within a user-written programwithout invokingPACwithMENU,ADMIN, or SYSPACcommands. For example,you can create a maintenance request or migration event without entering the PAC system.Whenyou enter information on a front-end screen, the information is communicated to PAC.
The maintenance-request API lets you interface an external problem-tracking system with PAC.You can validate maintenance requests against the external system or extract data from it.
Another API lets you retrieve statistics for an object, display source code for an object version, andedit the source code from the work area.
PAC User's Guide38
Planning a PAC Environment

User Exits
At various points in the system, PACprovides user exits that pass control to a user-writtenNaturalprogram. When activated by the administrator, these exits allow you to
■ add site-dependent code into PAC processing for auditing, security verification, or additionalrules;
■ add functionality to certain PAC processing; or■ override default change-management procedures.
For example, if the user exit PACEX010 is active, it is invoked during the validation of an objectlist for amigration. The PACadministrator can view each entry in the list anddisallow themigrationof specific objects.
Applymods
System applymods change certain PAC or PAA processing defaults. For example:
■ The user who authorizes a PACmigration event can normally override some event parametersduring authorization. Applymod 1 disallows the override.
■ By default, PAC creates a new version of an object even if the object fails to compile successfullyduring a migration from a development or maintenance status. Applymod 14 rejects an objectwith compilation errors so that no new version is created.
A user who authorizes an event can activate or deactivate applymods by selecting from a list. ThePAC administrator establishes the default applymod settings and can prevent specified settingsfrom being overridden by the event authorizer.
39PAC User's Guide
Planning a PAC Environment

40
5 Configuring a PAC Environment
■ Defining PAC Statuses ..................................................................................................................... 43■ Linking Statuses and Applications ....................................................................................................... 58■ File Translation Tables ...................................................................................................................... 60■ Defining Migration Paths ................................................................................................................... 68■ Jobs ............................................................................................................................................. 74
41

Once you have decided on the life-cycle stages for your application, you need to define the statusesyou will use, you need to define your application to PAC, and you need to link the applicationand the statuses. You need to decidewhere the user datawill reside for each status and forNaturalobjects, you may need to use file translation tables.
When you have defined the statuses and the application to PAC, and have defined the applicationstatus links between them, you need to define the migration paths between statuses that the ap-plication will use.
This chapter covers the following topics:
PAC User's Guide42
Configuring a PAC Environment

Defining PAC Statuses
Each status represents a distinct phase, stage, or milestone in the life-cycle of an application.Within PAC, each status is an operational environment for an application or object. The type ofstatus determines how PAC handles objects in that status.
■ A status defines the location of objects migrated to that status.■ An object may exist in several statuses at any one time.
Status definitions are used to set up statuses in PAC. They establish the defaults to be usedwhenthe status is linked to an application. These definitions identify:
■ the status type;■ the Natural system file where the Natural objects are located;■ where applicable, the associated Predict file where Predict objects such as cross-reference data,files and verifications are kept;
■ options for maintaining cross-reference data for the status.
This section covers the following topics:
■ Status Types■ Status Locations■ Foreign Object Support■ Logical Definition■ Defining Applications to PAC■ Application Name■ Copying an Application■ Original Application Library■ Using Other Applications as Steplibs
Status Types
A PAC status type (deployment) determines the rules of migration to/from the status. Althoughthe PAC controlled environment consists of the same basic environments that are typically foundin an application environment (development, maintenance, test, production), the PAC status typesthat correspond to these environments have differing behaviors; therefore, you should select theenvironment accordingly.
43PAC User's Guide
Configuring a PAC Environment

Using PAC, you are free to assign a status type maintenance to an application development envir-onment or a status type test to a production environment. The status type defines the rules; youare free to use the rules as appropriate in your particular PAC system.
A status type cannot be modified; however, a status may be purged if it is not populated withobjects. For instance, once an application has passed through a certain status, it may never needto pass through that status again. In those cases, the definition for that status could be removedfrom the application life-cycle.
All or any combination of status types may be used when establishing a user environment oridentifying it to PAC. When you define a status to PAC, you must assign one of the predefinedstatus types to it with the following exceptions:
■ You may not assign the reserved PAC status types of Archive, Control and Retire; only PACdesignates Archive, Control and Retire statuses.
■ A corresponding history status type is defined whenever a production status type is defined toPAC. A history status is optional, however, and may be omitted.
Reserved PAC Status Types
TheArchive, Control andRetire status types are reserved to PAC. There is one and only one instanceof each type; that instance is predefined in the PAC system and cannot be deleted.
Archive
The Archive status type is a single status named "archive".
It is the status for any versioned object that has been removed either temporarily or permanentlyfrom the PAC environment. Objects that exist in test, production, and maintenance statuses arenormally not eligible for archiving (but see Applymod 23). Active production objects cannot bearchived.
When an object is migrated to the Archive status, it is removed from all other statuses. The objectcan be unloaded to disk or tape and purged from the PAC system.
Control
Control is a single status named "control".
The PAC controlled environment is synonymous with the PAC reserved status "Control".
All objects are automatically placed into Control status when they first enter the PAC controlledenvironment, even if they are not explicitly migrated to Control. This means that the source andexecutable code for all versions of all objects for every PAC-controlled application are always ac-cessible in the Control status and are centrally controlled. When reviewing objects in Controlstatus, you can see all other statuses in which the object exists as well.
PAC User's Guide44
Configuring a PAC Environment

The Control status is implicitly used whenever application objects are migrated into and out ofPAC; the objects need not be migrated directly to the Control status. If the destination status is astatus other than Control, PAC then copies the executable object from Control to the destinationlibrary. Thus, an object in a production status could be copied to a maintenance status for changeswhile the original remains available to users.
If explicitly identified, the Control status may be used as a staging area and a way to distributeauthority. Parts of an application may be completed and migrated into the PAC Control status,one part at a time. Once the whole application is ready for testing, it can be migrated as a unitfrom the Control status to statuses for which migration paths have been specifically defined.
For example, several programmers may be responsible for different parts of an application. Theprogrammers could be allowed to independentlymigrate their parts of the application to Control.When all the parts have been compiled and stored in the ACF, the project leader could authorizean event migrating the entire application from Control to a designated test status.
Although all versions of objects are accessible fromControl, PAC assumes themost recent versionis intended when an object is referenced by the status Control.
Retire
A retire status defines a logical location for objects to be purged
■ from PAC Control or Archive.
Objects that exist only in Control status, or objects that have been removed from all other statusesand have been archived, may be physically and permanently removed from PAC, including allaudit information stored about the objects.
■ from another PAC status.
Retire from a status other than Control or Archive results in the permanent removal of the ob-ject(s) from the specified origin status, and the removal of the object status definition in PAC,but no deletion of the object(s) in PAC itself. Inactive or obsolete objects are good candidatesfor migration to a retire status. Applymod 23must be active to retire objects from statuses otherthan Control or Archive.
User-Definable Status Types
Other status types can have multiple instances defined and named by the user. This is especiallyuseful in distributed or decentralized environments. For instance, if your application is to bemovedinto production in more than one environment, a production status is recommended for each en-vironment. Each user-defined status must be assigned a status type.
45PAC User's Guide
Configuring a PAC Environment
Development
The development environment is usually the locationwhere all new andmajor ongoing applicationdevelopment occurs. Objects in the development environment are not part of the PAC controlledenvironment and source code can be modified freely.
Because the development environment has minimal controls or restrictions applied to it, neededcontrols or security restrictions must be implemented through Natural Security, Adabas security,or other facilities external to PAC.
Adevelopment status type defines the location of objects being developed, before they aremigratedto the PAC controlled environment.
Only saved objects are migrated into the PAC controlled environment from a development status;they are cataloged in PAC as part of the migration process unless they are identified as dynamicsource. Natural command processors are special cases in that they may be migrated into PAC incatalog form without being recompiled during the migration. Foreign datasets may be migratedinto PAC either as source or compiled code and are not compiled by default during migration.
External
The link of a PAC application to an External status defines a foreign source from where Naturalsources can be transferred into a PAC controlled environment and holds the information aboutthe path into the external version control software. Additionally, a user ID and a password maybe defined to such an application-status link. This information is used for every future access tothe sources in the external version control software.
The status type External is a mixture of the behaviour of the statuses Development and Incorpor-ation in the following sense: objects to be transferred will be compiled newly and a new PACversion of the object code is created, but it is not possible to transfer objects into such a status.
Maintenance
Amaintenance status defines the location of maintenance libraries where saved objects that havebeen checked out of the PAC controlled environment can be modified to correct problems or addfunctionality.
Objects in a maintenance status differ from objects in a development status in that maintenanceobjects are always implicitly tracked by PAC. PAC automatically creates a change control log andperforms check-out/ check-in controls for all objects migrated to a maintenance status and trackstheir progress. This control allows PAC to keep track of and differentiate modifications madeconcurrently in two places development and maintenance.
When these objects are associated with maintenance requests, PAC allows you to view all objectsupdated/modified for a particular maintenance request.
The maintenance environment can optionally support a test environment where changes can betested before being returned to the PAC controlled environment.
PAC User's Guide46
Configuring a PAC Environment
When modified objects are returned to PAC control, the saved object is migrated into the Controlstatus and cataloged; that is, "checked in" (unless it is dynamic source). A new version number isassigned to the object, and the old version number is kept as a reference note on the new version.
Both Development and Maintenance
Both a development and a maintenance status type are available in PAC to accommodate the re-quirements of applications undergoing routine maintenance and development at the same time -an essential consideration when an application continues to be developed after it is implementedin production.
Separating these two environments precludes the possibility of objects being recompiled with theincorrect subordinates userviews, rules, global data areas, maps, and copycode.
If both a maintenance status and a development status are established:
■ the development status is generally used for developing the next major implementation of anapplication as a whole; whereas
■ themaintenance status is used for requiredmaintenance to the implementation of the applicationcurrently running in production.
If both development andmaintenance statuses are defined, they need to be associatedwith differentlibraries (and Predict system files, where necessary).
Incorporate
The incorporate status defines the location of an existing application to be "taken on" when PACis first implemented at a site. Entire applications or certain objects of an application can be incor-porated into PAC. Objects incorporated into PAC will not be compiled.
This status type allows you to place under PAC control applications or objects that exist only incatalog form.
Objects can be incorporated to a Control, test, or production status type. The incorporated applic-ation establishes a base level for subsequent development, testing, implementation, andmaintenancein the PAC environment.
In some cases, you may wish to incorporate your applications into PAC and never compile themin PAC, perhaps because the application originates from a remote location and should not be re-compiled unless absolutely necessary.
An object may be incorporated only if a previous version of the object was not compiled in PAC.PAC does not allow an object previously migrated into PAC from a development or maintenancestatus type to be incorporated, because incorporation could affect the integrity of not only theobject itself, but related objects and even the entire application. PAC has no way of synchronizingand controlling subordinate and other objects that may be used by the incorporated object sinceobjects are not compiled when they are incorporated into PAC.
47PAC User's Guide
Configuring a PAC Environment
Test
A test status defines the location of objects in a test environment. Test statuses are used to facilitatethe testing of applications before they are implemented in production. You may define severaluser-defined test statuses such as integration test, system test, quality assurance, and user test toaccommodate the application test plan.
All objects migrated from PAC to a test status type are implicitly tracked. In principal, test statustypes have only execution (runtime) requirements and generally need to have objects in compiled(cataloged) form only. Objects that use dynamic source variables are an exception.
During testing, an applicationmay bemodified using SYSMAINor the PACmigrate/load utilities.However, if PAC is not also updated with any changes made, the changes are ignored when PACmigrates objects from the test status. This restriction ensures the consistency of the application.
If you need to maintain a protected environment during application testing, you should considerestablishing the test environment as a production type environment. Certain protections can alsobe implemented using Natural Security.
Separate libraries (and Predict system files, where necessary) are recommended for different teststatuses. It is not necessary to use a separate Natural system file.
Production
The primary objective of PAC is to preserve the integrity of the production environment.
Production is normally the ultimate environment in which an application is installed for use byan organization for its business needs. Except for objects that use dynamic source variables, PACmigrates only executable code to a production status.
A production status defines the location of the PAA systemfiles. Youmay define asmany differentproduction statuses as you need to accommodate a distributed production environment.
A production status type is controlled and audited by the Predict Application Audit (PAA) sub-system, an extension of PAC that enforces integrity, consistency, and control. All objects are pro-tected by PAA and cannot be modified.
Although PAA reporting facilities are independent of the PAC reporting facilities, all objects mi-grated into the production environment are under PAA control and remain consistent with theversioned objects under PAC control. The status of the application and its objects in the productionenvironment is known for any time, present or past.
PAA tracks application activities in the production environment and provides information about
■ the sequence of migration events, information that may be important for resolving certainproblems;
■ the PAC objects that were actually migrated into the production environment;
PAC User's Guide48
Configuring a PAC Environment

■ the objects that were backed out; and■ the objects that have been activated.
PAA also provides administrative facilities in the production environment.
Software AG recommends that the production environment be kept separate from all other PACenvironments; that is, the production environment should have a separateNatural systemfile anda different Predict system file.
Neighbour
A neighbour status (Nbor) is used to facilitate the migration of objects between two separate PACapplications. This status belongs to the user-defined group even though it has an internal functionwithin PAC. The status, when defined can carry any name the user chooses and has to be linkedto the receiving application by means of the standard Application-Status link definition. PACtreats this status as a shared central repository for the linked applications.
The functioning of this status can best be described in the form of an example:
A user has two applications defined to PAC with a normal status life-cycle defined for these ap-plications, 'Application-one' and 'Application-two'. After some time the user has a business needto transfer some objects from Application-one into Application-two. The user now defines a newstatus of type neighbour (Nbor) and calls this status 'appl1-appl2-shar'. During the definition ofthis new status there is a newfield on the status definition screen *termed* 'NeighbourApplication'this has to be the name of the applicationwhere the objectswill be coming from and in our examplethis is 'Application-one'.
49PAC User's Guide
Configuring a PAC Environment
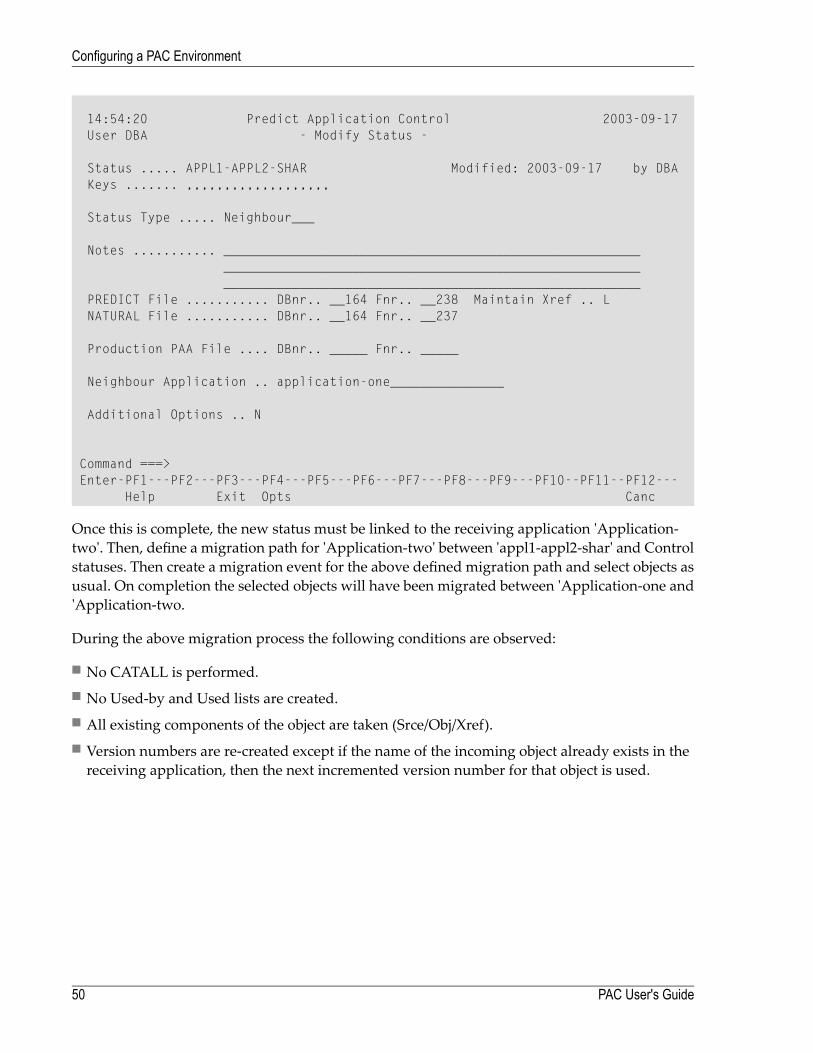
14:54:20 Predict Application Control 2003-09-17User DBA - Modify Status -
Status ..... APPL1-APPL2-SHAR Modified: 2003-09-17 by DBAKeys ....... ,,,,,,,,,,,,,,,,,,,
Status Type ..... Neighbour___
Notes ........... _____________________________________________________________________________________________________________________________________________________________________
PREDICT File ........... DBnr.. __164 Fnr.. __238 Maintain Xref .. LNATURAL File ........... DBnr.. __164 Fnr.. __237
Production PAA File .... DBnr.. _____ Fnr.. _____
Neighbour Application .. application-one_______________
Additional Options .. N
Command ===>Enter-PF1---PF2---PF3---PF4---PF5---PF6---PF7---PF8---PF9---PF10--PF11--PF12---
Help Exit Opts Canc
Once this is complete, the new status must be linked to the receiving application 'Application-two'. Then, define a migration path for 'Application-two' between 'appl1-appl2-shar' and Controlstatuses. Then create a migration event for the above defined migration path and select objects asusual. On completion the selected objects will have been migrated between 'Application-one and'Application-two.
During the above migration process the following conditions are observed:
■ No CATALL is performed.■ No Used-by and Used lists are created.■ All existing components of the object are taken (Srce/Obj/Xref).■ Version numbers are re-created except if the name of the incoming object already exists in thereceiving application, then the next incremented version number for that object is used.
PAC User's Guide50
Configuring a PAC Environment
Status Locations
By default, a user-definable status points to the Predict file (DBnr/Fnr) and the Natural systemfiles (DBnr/Fnr) that were in effect at the time PAC was initialized. You can modify these file loc-ations to suit your site requirements.
The Predict file and Natural system file locations specified in the status definition are defaults forthe status; this information can be modified for any particular link between an application and astatus.
When an application is linked to a status, the physical locations of the programming objects thatmake up the application are specified. The Predict andNatural databases and fileswhere all objectsfor the application are stored are identified.
Migration of an application or object fromone status to anothermay ormay not result in the actualphysical movement of that application or object, depending on the particular application statuslink definition.
In distributed environments, a distributed status definition allows you tomaintainmultiple statesof an application in parallel with one another. Such a statusmay be a single definition representingmultiple physical environments, each of which may be located on a different database and/ormachine, or it may be a number of Natural libraries on a single Natural system file.
Foreign Object Support
Non-Natural and non-Predict objects are foreign objects in PAC. Foreign object types are definedto PAC using the Foreign Maintenance Administration PAC function, allowing foreign objects tobe included in the application when it is added or changed. The latter is done using the ForeignSupport additional options. Once defined for an application, only those foreign objects can be as-signed to related foreign locations in the application's links.
Logical Definition
A status definition is a logical definition with an associated physical location (that is, a library,database and file number).
If two different statuses for the same application have the same physical location, and amigrationpath is set up between them, then the migration path is considered to be a logical path becauseno objects are actually moved during the migration.
For example, if an application is successfully tested in the USER_TEST status and the applicationis passed to the ACCEPTANCE_TEST status, it has reached a newmilestone in its life-cycle. If theUSER_TEST and ACCEPTANCE_TEST statuses have the same physical location (that is, the sameNatural library name, the same database ID, and the same file number), then any migrationsbetween the two statuses result in no physical movement of objects; the action is a promotion ofthe objects to the next logical status.
51PAC User's Guide
Configuring a PAC Environment

Natural and Predict Files
A status may be associatedwith only one Predict file and one Natural system file. The Predict andNatural file locations defined in the status definition are used as the default locations.
When an application is linked to a status, you may specify a different Predict and Natural libraryname and physical location (database ID and file number) for that application at that status. Thisoption is especially useful if the default status Predict file orNatural systemfile is not large enoughto hold the information for all of the applications linked to the status.
It is recommended that the samephysical Predict file be used for cross-reference data anduserviewsto ensure the consistency, accuracy, and integrity of the Predict information for all applications.
Special Status Location Considerations
Amaintenance library can be on the same Natural system file and Predict file as the developmentenvironment, but if so, separate libraries are required to prevent ambiguities.
A test library can be on the same Natural system file and Predict file as the development environ-ment, but if so, separate libraries should be used.
The PAA subsystem allows PAC to track applications in production. It is recommended that theproduction environment be separate from all other PAC environments, that is, have a separateNatural system file and Predict file.
PAC User's Guide52
Configuring a PAC Environment

Defining Applications to PAC
An application is a collection of entities configured to accomplish specific data processing tasks.
Most PAC activities are performed at the application level. PAC handles applications as a whole,parts of applications, and individual objects belonging to an application.
An application is defined to PAC by its name and level. It provides default information to be usedwhen objects belonging to the application are processed. The objects that compose the applicationmay change as the application is developed and tested.
Application Name
When objects are migrated into PAC, the migration must be assigned an application name. Thatapplication name then becomes the high-level qualifier to identify the object(s) migrated. Becausethe application name must always be given to identify an object, it is implied that the object isowned by the application. In this way, objects with the same name, type, and version that belongto different applications can be identified as different objects.
An application definition requires a unique name within PAC. You must then set up the defaultNatural library, foreign datasets, and Predict file for each of the statuses that will be part of theapplication test plan in your environment.
The application names Predict and Predict Case are reserved for PAC and may not be deleted.These are special-use applications.
Predict Applications
PAC uses a special application type (PRD) to accommodate data dictionary objects. A default ap-plication 'Predict' is delivered as standard and this application may not be deleted. The (PRD)type application is handled like any other application under PAC control in that it can be linkedto statuses, and the Predict data can bemigrated from one status to another usingmigration events.
The (PRD) type application is used to populate PAC with the data dictionary information fromPredict. This information is used by Natural applications defined to PAC. (PRD) type applicationobjects must be migrated into PAC before the application that uses them is populated with its re-spective objects.
Objects migrated for application type (PRD) can either be a shared resource or an individual one.Many Natural applications can share a single (PRD) application or even use their own individual(PRD) application.
53PAC User's Guide
Configuring a PAC Environment
Because Predict objects have properties that differ from those of Natural objects, PAC handlesPredict objects differently. See the sectionMigrating Predict Objects.
Predict Case Application
The Predict Case application is used to populate the Predict Case objects used for composing objectsfor other applications under the control of PAC.
Predict Case application objects are automatically migrated into PAC when the Natural objectsthat use them are migrated into PAC.
Unlike other applications, the Predict Case application may not be linked to statuses other thanControl status.
Copying an Application
Copying an application to create a new application saves time. You can create an applicationmodel appropriate for your site and use it as a template for creating additional applications.
When you copy an application, you can copy application defaults, application status links, andmigration paths at the same time. Once the application is copied, appropriate default libraries canbe specified in the fields provided. These library specifications will be automatically substitutedin the application status link definitions for the new application.
Original Application Library
For Natural Objects
When loaded into PAC, the Natural objects of an application are grouped together as a singlelibrary. PAC currently limits an application to one library definition per status.
Outside of PAC, a library and an applicationmay be defined as one and the same, or an applicationmay be implemented across libraries.
Suppose an application outside of PAC is implemented across two libraries and there is a MENUprogram in each library. In order to define the application to PAC, it would be necessary to eithergroup the objects from the two libraries into a single library and rename one of theMENUprogramsto avoid ambiguity within the application, or define each library as a separate application underPAC.
The original Natural library from which objects are loaded into PAC may be arbitrarily assigned.The execution Natural libraries where PAC delivers objects for actual execution (production ortest) may be different, and the Natural library for test may be different from the Natural libraryfor production.
PAC User's Guide54
Configuring a PAC Environment
Although an application may have a one-to-one or a one-to-many relationship with a Naturallibrary, PAC currently supports only the one-to-one relationship; PAA, however, supports theone-to-many relationship.
For Foreign Objects
When loaded into PAC, the foreign objects of an application may be located in more than onedataset. Each dataset contains objects of a specific class and type (for example, COBOL, COBOLLoad, Assembler Copycode). The classes and types of foreign objects supported are defined forthe application.
Foreign objects (datasets) are defined for an application when the application is defined to PACor modified. This definition limits the support for these objects later in the application status linksand also migration events.
Using Other Applications as Steplibs
Another applicationmay own or have defined to it additional and/or common subordinate objects(copycode, maps, data areas) that are required for the successful compilation of objects belongingto your application. In PAC, you can define the "library" of that other application as a step libraryfor use at compile time.
PAC also supports steplibs for use at execution time. In certain circumstances, the Natural objectsof an application in a particular librarymay need to invoke or use at execution time certain objects(global data areas, subroutines, programs, maps, help routines, subprograms) contained in otherlibraries that were populated by the same application or by other applications. Natural Securitymust be used to establish execution time steplibs for these libraries as the role of PAC is only todistribute the objects in a controlled and coordinated manner.
Steplibs have the following advantages:
■ Duplicate or redundant objects are removed across applications.■ "Common code" is consistent. For example, when compiled, all objects for all applications usethe same version of the same copycode.
■ When the common code is changed, you have the option of using the Generate and Expand fa-cilities to identify all objects across applications that were compiled against the version of thecode. For example, if a piece of copycode used with the steplib facility is changed, all objects(for example, programs, subprograms, subroutines) that use that copycodemay be listed for allapplications.
■ The rules for using an application as a steplib are the same as those for using a library underNatural.
A compile time steplib is used only when objects are compiled during migrations into PAC fromdevelopment or maintenance statuses or during alignment (a Control-to-Control) migration.
55PAC User's Guide
Configuring a PAC Environment
Defining an Application as a Steplib
Any application defined to PACmay be established as a compile steplib for any other application.The compile steplib is specified in the application status link definition. If a default steplib isdefined to the application, PAC uses it in the definition for a new application status link.
You can specify a steplib in the application status link only for development or maintenancestatuses or for the Control status:
■ For a migration from a development or maintenance status, the steplib must be specified in theapplication status link for the origin (From) status of the migration event.
■ For an alignment, the steplib must be specified in the application status link for the Controlstatus.
Example
Application BILLING uses copycode in the ACCOUNTS application; therefore, the development-to-Control application status link for BILLING must specify ACCOUNTS as the compile steplib.
Steplib Objects
The object types of a steplib that can be used during compilation are:
■ copycode■ local, global, and parameter data areas■ maps
Using Steplib Objects to Compile
During the migration of objects from development or maintenance status types:
■ PAC ensures that the objects in the steplib are available during compile time for any applicationthat uses them. These subordinate steplib objects cannot be specified in the object list for theapplication that uses them because they do not belong to that application.
■ Objects that were originally part of one application may be switched to another application. If,however, the object is a subordinate (for example, copycode), it must be removed from the PCFsystem file by the PAC administrator or purged from the original application. If subordinatesare not found in the current application, the steplib is checked. If the object cannot be found ineither location, a compile error will result.
PAC User's Guide56
Configuring a PAC Environment
Resulting Steplib Object Information
When the compile is performed, PACbuilds versioned cross-reference information about all objectscompiled. Cross-reference information includes the following additional information for objectsfrom a referenced steplib:
■ The use of objects in the steplib application.■ The name of the application that owns the objects.
In addition, the objects of a steplib application acquire "used by" references for all objects of allapplications that used them at compile time. The "used by" reference is always the highest versionof the object (rolling is not possible).
New Steplib Object Versions
An object in the steplib application is changed in the samemanner as an object for any other (non-steplib) application; however, when the new version of the object is created, youmay invoke UserExit 22 (if it is active in your environment) to obtain a list of all objects that used the previousversion. This listmay be used to verify consistency since themigration of objectsmay be performedfor only one application at a time.
User Exit 22 may be used to print messages, or it may be used to write information to a work file.If the information is written to a work file, that work file may then be used as input to the batchADDEVENT (GENTYPE andGENLIST) option, using the "I" (read the object list from input) optionto generate the object list. A new event may then be run to align the objects of another applicationto use the new version of the steplib object.
57PAC User's Guide
Configuring a PAC Environment
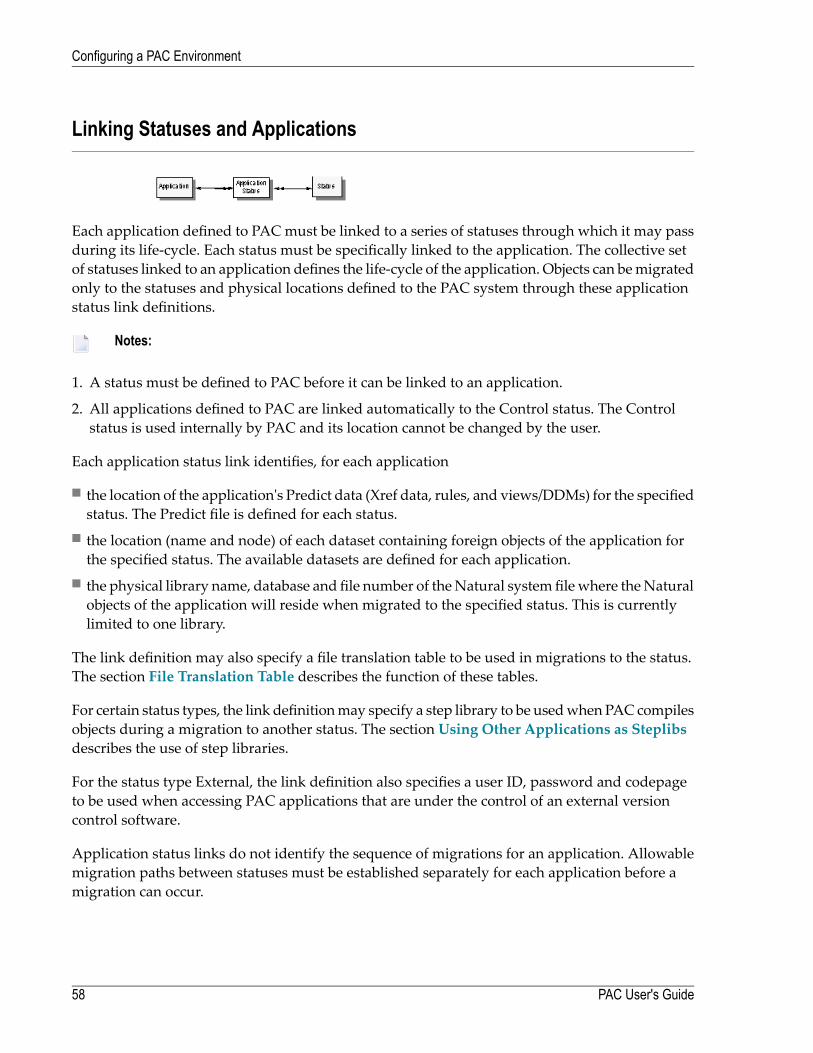
Linking Statuses and Applications
Each application defined to PACmust be linked to a series of statuses through which it may passduring its life-cycle. Each status must be specifically linked to the application. The collective setof statuses linked to an application defines the life-cycle of the application. Objects can bemigratedonly to the statuses and physical locations defined to the PAC system through these applicationstatus link definitions.
Notes:
1. A status must be defined to PAC before it can be linked to an application.
2. All applications defined to PAC are linked automatically to the Control status. The Controlstatus is used internally by PAC and its location cannot be changed by the user.
Each application status link identifies, for each application
■ the location of the application's Predict data (Xref data, rules, and views/DDMs) for the specifiedstatus. The Predict file is defined for each status.
■ the location (name and node) of each dataset containing foreign objects of the application forthe specified status. The available datasets are defined for each application.
■ the physical library name, database and file number of theNatural systemfilewhere theNaturalobjects of the application will reside when migrated to the specified status. This is currentlylimited to one library.
The link definition may also specify a file translation table to be used in migrations to the status.The section File Translation Table describes the function of these tables.
For certain status types, the link definitionmay specify a step library to be usedwhen PAC compilesobjects during a migration to another status. The section Using Other Applications as Steplibsdescribes the use of step libraries.
For the status type External, the link definition also specifies a user ID, password and codepageto be used when accessing PAC applications that are under the control of an external versioncontrol software.
Application status links do not identify the sequence of migrations for an application. Allowablemigration paths between statuses must be established separately for each application before amigration can occur.
PAC User's Guide58
Configuring a PAC Environment
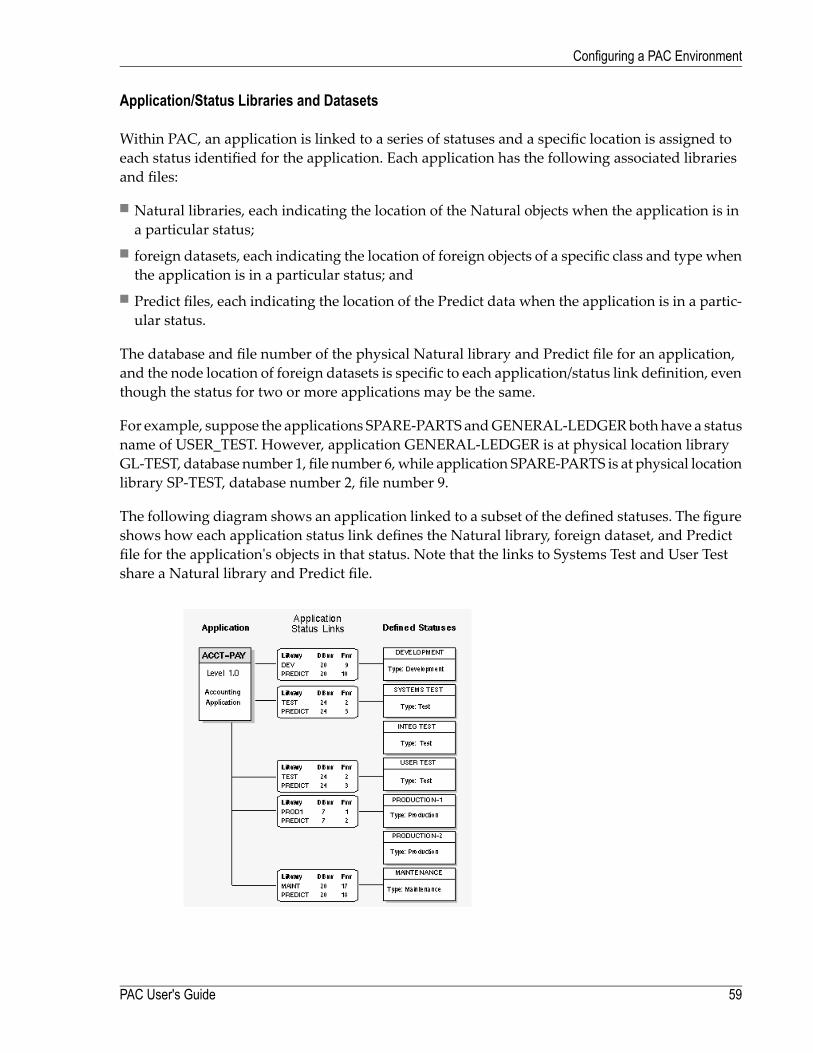
Application/Status Libraries and Datasets
Within PAC, an application is linked to a series of statuses and a specific location is assigned toeach status identified for the application. Each application has the following associated librariesand files:
■ Natural libraries, each indicating the location of the Natural objects when the application is ina particular status;
■ foreign datasets, each indicating the location of foreign objects of a specific class and type whenthe application is in a particular status; and
■ Predict files, each indicating the location of the Predict data when the application is in a partic-ular status.
The database and file number of the physical Natural library and Predict file for an application,and the node location of foreign datasets is specific to each application/status link definition, eventhough the status for two or more applications may be the same.
For example, suppose the applications SPARE-PARTS andGENERAL-LEDGERboth have a statusname of USER_TEST. However, application GENERAL-LEDGER is at physical location libraryGL-TEST, database number 1, file number 6,while application SPARE-PARTS is at physical locationlibrary SP-TEST, database number 2, file number 9.
The following diagram shows an application linked to a subset of the defined statuses. The figureshows how each application status link defines the Natural library, foreign dataset, and Predictfile for the application's objects in that status. Note that the links to Systems Test and User Testshare a Natural library and Predict file.
59PAC User's Guide
Configuring a PAC Environment
File Translation Tables
The file translation table (FTT) facility is unique to PAC and its use contributes to the effectiveimplementation of the PAC methodology. It resolves the problem of executing the database callto the correct database number and file for each application phase or environment.
When Natural objects are compiled, the views/DDMs referenced identify a set of database/filenumbers of user data that the codewill access/update at execution time. If an object is thenmigratedwithin PAC to an environment where the user data is located on another set of database/filenumbers, PAC uses a file translation table (FTT) to translate between these database/file numbersets.
When you migrate an object to a status, PAC copies the executable object from the ACF withoutremoving it; thus neither the source code nor the executable code in the ACF is affected.
In PAC, an FTT is assigned to an application status link. During the migration process to an ap-plication status with an attached FTT, PAC dynamically recompiles the migrated copies of theobjects to resolve the database/file number inconsistency without affecting any of the actual pro-gramming logic.
FTTs may be used in all Natural migrations to test and production status types; they can also beused in migrations from Control status to any one of the preceding status types.
This section covers the following topics:
■ FTT Versions■ Comparison with the NTTF Macro Facility■ Why a File Translation Table?■ Implementing FTTs in PAC■ Verifying FTTs for a Migration Event
PAC User's Guide60
Configuring a PAC Environment
■ FTT Examples
FTT Versions
FTTs are versioned to ensure the integrity of the application in a migration.
The current version of an FTT can be modified if it has never been used during the processing ofa migration event. The current version is used during the processing of any migration eventswhich require that FTT.
Once the FTT version has been used in a processed migration event, it can no longer be modified.Any attempt to modify it causes PAC to create a new version and assign a new version numberto it. This version supersedes any previous versions as the current version and can be modifieduntil it has been used to process a migration event.
Previous versions remain for documentation purposes, but these versions cannot be modified.
For example, if the current version (Version 3) of an FTT has been used in a migration event andyou attempt to modify it, PAC assigns Version 4 to the FTT and a "4" is displayed in the Versionfield on the FTT Allocation screen.
Version 4 may be modified as often as necessary until it is used in a migration event. Version 3remains as an audit trail for any migration event that used it. The DBnr and Fnr data from theprevious version are provided as the base information for the new version.
Comparison with the NTTF Macro Facility
The dynamic recompile function provided with PAC for use with FTTs offers the same function-ality as the NTTF macro facility function (that is, the parameter for the translation facility of Nat-ural in the Natural parameter module) and in no way changes the logic of the executable code ofthe object. The correct database and/or file access is not dependent on the specification of specialNatural parameter modules or dynamic Natural parameter modules.
TheNTTFmacro performs a function similar to that of the FTT, but with the following differences:
■ The FTTmakes permanent changes to theNatural objects; these changes remain in effect regard-less of where the object is migrated.
■ The NTTF macro assignment is dynamic, that is, a temporary solution which remains in effectonly as long as it is defined in the Natural parameter module of the current Natural session.The correct NTTF must always be specified to ensure that the correct database and/or filenumbers are being accessed at execution time for each execution environment.
61PAC User's Guide
Configuring a PAC Environment

Why a File Translation Table?
Natural saved objects reference userviews that identify the DBnrs and Fnrs of the physical filesto be accessed at execution time. When an object is cataloged, the syntax-checking facility verifiesthe userview and retrieves the physical file references stored in the cataloged object.
To ensure the integrity of the object and user data accessibility, the object can be executed onlyagainst the DBnrs/Fnrs identified when the object was compiled; however, when the object is mi-grated to an environmentwhere the user data is located on a different set of DBnrs/Fnrs, the objectmust be recompiled.
Assuming that the DBID=0 option is not used, the following actions would normally be necessaryto prepare and implement objects into test or production:
1. Migrate Predict userviews and files;
2. Renumber DBnrs and Fnrs;
3. Regenerate the Natural views (DDMs);
4. Recompile the Natural objects.
Alternatively:
1. Copy Natural views (DDMs);
2. Renumber the DBnrs and Fnrs using SYSDDM;
3. Recompile the necessary Natural objects.
These procedures have the following disadvantages:
■ They are time-consuming.■ Inconsistencies may be introduced to the application (if, for example, something has been for-gotten) requiring that the previously tested objects be retested.
■ Subordinate objects (copycode, maps, data areas) used during the compile may be differentfrom those of the environment where the code was tested, possibly introducing errors and/orinconsistencies.
■ They increase the "outage" time for the actual implementation of the objects into the physicalenvironment.
The PAC FTT facility solves the problem by dynamically recompiling ("zapping") the alreadycompiled code with the required changes for DBnrs and Fnrs as it is migrated to the destinationenvironment (status).
PAC User's Guide62
Configuring a PAC Environment
Implementing FTTs in PAC
You may use one or a series of file translation tables (FTTs) for each application. You may set upone or more base tables and then create or copy subsets for special requirements. For each table,the origin DBnr and Fnr always represent the DBnr and Fnr of the views/DDMs with which theobjects were first placed under PAC's control and compiled.
If the same table is required by two different applications, you can copy it from one applicationto the other or you can share the table across the applications by specifying all of the other DB-nrs/Fnrs that are valid for each application in the destination status.
Defining and Assigning FTTs
An FTT is defined using the File Translation Table maintenance facility. The table is assigned aspart of the Application Status Link definition. If a table is `assigned' before it has been `defined',a dormant FTT is created which will not become active until the database/file translation valueshave been entered using the FTT maintenance facilities.
An FTTmay be defined as valid for all applications and all statuses (shared). Or it may be restrictedto one specific application (not shared) and/or one specific status (a separate not shared specifica-tion) to provide security or effective usage. The use of an FTT is maximally restricted when it isdefined as not shared for both an application and a status; that is, the FTT can only be used whenmigrating a specific application to a specific status.
Even if an FTT is defined to a specific application and status, the FTT must still be defined to theapplication status link because there may be more than one FTT assigned to the same applicationand status.
Note: The status definition is independent of the application status link definition and theFTT is an attribute of (assigned to) the application status link definition, not the status itself.
When an FTT is defined as not shared for an application only, PAC scans the application for allknown databases and file numbers that its objects access. PAC then verifies that the most recentversions of views are used, and that all databases and file numbers used have been placed on theDBnr and Fnr origin list.When amigration event is created for the application, the FTT is assignedautomatically, but the assignment may be overridden by the event authorizer.
If an FTT is shared (that is, it is neither application- nor status-specific), it may be either formallyassigned on the application status link or dynamically assigned by the event authorizer.
63PAC User's Guide
Configuring a PAC Environment
Changing Definitions and Assignments
You can change an FTT assignment for a particular application link only if the FTT is defined asshared.
If the FTT is defined as not shared, its application status link assignment cannot be updated toshared. A not shared FTT can be changed to a shared FTT only by redefining the FTT using theFTT maintenance facilities, in which case, a new version of the FTT is created.
AND/OR/IF Operand
You can set up an FTT to translate one DBnr to another DBnr; and/or one Fnr to another Fnr (theOR operand). In this case, PAC looks at and translates the DBnr and Fnr independently. Thus, anFTT set up with the OR operand could result in the following translation for each of the objectsbeing migrated:
■ Only the DBnr or only the Fnr;■ Both the DBnr and the Fnr;■ Neither the DBnr nor the Fnr.
You can also set up an FTT to translate oneDBnr/Fnr combination to anotherDBnr/Fnr combination(the AND operand). In this case, PAC processes the database number and file number as a pair.An FTT set up with the AND operand translates any exact database number/file number pair tothe corresponding exact database number/file number pair for each object being migrated. If theexact pairs are not matched, the FTT does no translation.
You can also set up an FTT to translate DBnr/Fnr combinations with conditional entries (the IFoperand). In this case PAC processes the databse number and file number depending on whatconditional option is selected and then further to this is able to evaluate the presence of an inputedvalue mask. This also enables the user to use conditions such as grater than, less than or betweenspecified values.
Verifying FTTs for a Migration Event
If the FTT is dormant, PAC assumes an error and rejects the FTT table when the migration eventis processed, but continues processing normally. If no other application status links use this table,PAC purges the dormant FTT entry.
When the migration event is submitted, PAC updates the event with the current version of theFTT used during the migration. The audit facility allows the user to historically verify the specificFTT that was used in the migration.
PAC User's Guide64
Configuring a PAC Environment
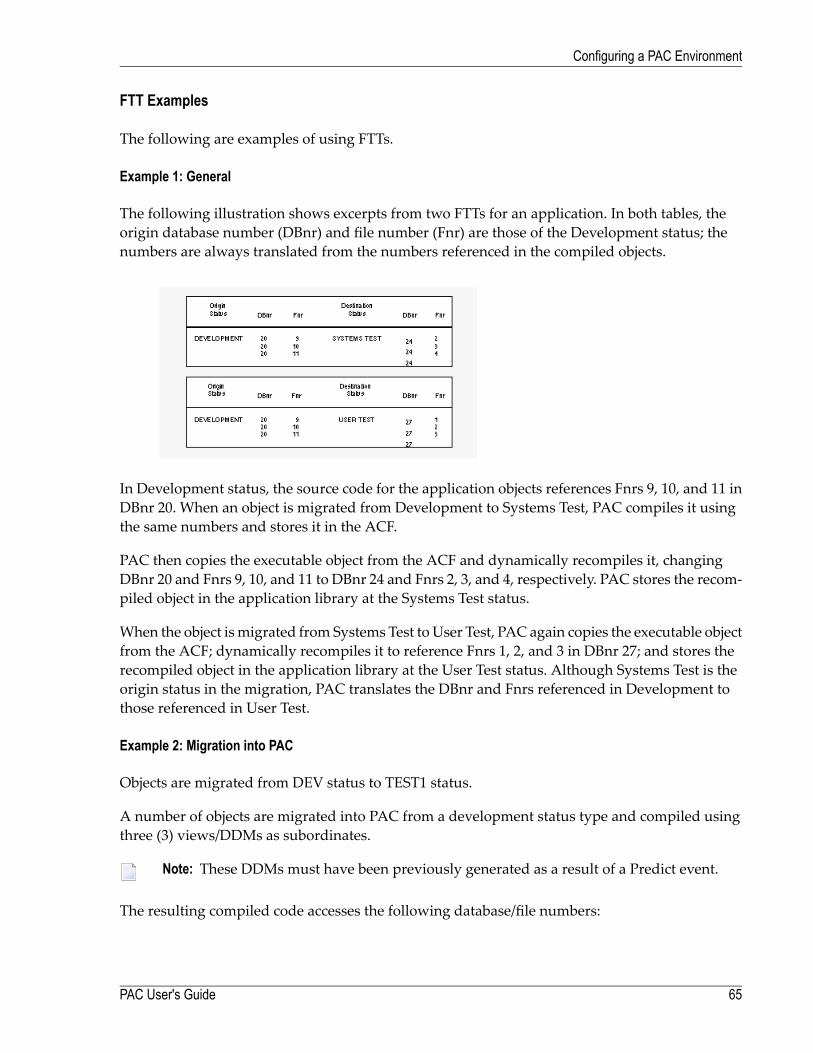
FTT Examples
The following are examples of using FTTs.
Example 1: General
The following illustration shows excerpts from two FTTs for an application. In both tables, theorigin database number (DBnr) and file number (Fnr) are those of the Development status; thenumbers are always translated from the numbers referenced in the compiled objects.
In Development status, the source code for the application objects references Fnrs 9, 10, and 11 inDBnr 20. When an object is migrated from Development to Systems Test, PAC compiles it usingthe same numbers and stores it in the ACF.
PAC then copies the executable object from the ACF and dynamically recompiles it, changingDBnr 20 and Fnrs 9, 10, and 11 to DBnr 24 and Fnrs 2, 3, and 4, respectively. PAC stores the recom-piled object in the application library at the Systems Test status.
When the object ismigrated from Systems Test to User Test, PAC again copies the executable objectfrom the ACF; dynamically recompiles it to reference Fnrs 1, 2, and 3 in DBnr 27; and stores therecompiled object in the application library at the User Test status. Although Systems Test is theorigin status in the migration, PAC translates the DBnr and Fnrs referenced in Development tothose referenced in User Test.
Example 2: Migration into PAC
Objects are migrated from DEV status to TEST1 status.
A number of objects are migrated into PAC from a development status type and compiled usingthree (3) views/DDMs as subordinates.
Note: These DDMs must have been previously generated as a result of a Predict event.
The resulting compiled code accesses the following database/file numbers:
65PAC User's Guide
Configuring a PAC Environment
Employee DBnr 1, Fnr 3Finance DBnr 1, Fnr 4Auto DBnr 1, Fnr 5
A file translation table (FTT) is set up with the OR operand to translate databases or file numbersbetween the origin DBnr/Fnr of the development (DEV) status and the destination DBnr/Fnr ofthe TEST1 status as shown below:
When the objects are loaded into the TEST1 environment, they are dynamically recompiled andtranslated as follows:
■ DBnr 1 is translated to DBnr 2;■ Fnr 3 is translated to Fnr 13;■ Fnr 4 is translated to Fnr 14; and■ Fnr 5 is translated to Fnr 15.
The resulting database and file numbers that the objects will access/update will be the physicallocations of the Employee, Finance, and Auto files in the TEST1 status; that is, the Employee, Fin-ance, and Auto files are located on Database 2 and File Numbers 13, 14, and 15, respectively.
Example 3: Migration Between Test Statuses
The same objects (from Example 2) are then migrated from TEST1 status to TEST2 status.
Because objects are compiled in the Control environment using the views of the DEV status, andbecause compiled objects are always migrated from Control, the objects have the same origindatabase and file number (that is, DEV) as they did in Example 2.
The destinationDBnr and Fnr is the user data of the files at the TEST2 status; that is, the Employee,Finance, and Auto files are located on Database 3 and File Numbers 23, 24, and 25, respectively.
A file translation table (FTT) is set up to translate databases or file numbers between the originDBnr/Fnr of the development (DEV) status and the destination DBnr/Fnr of the TEST2 status asshown below:
PAC User's Guide66
Configuring a PAC Environment
When the objects are migrated from TEST1 into the TEST2 environment, they are dynamicallyrecompiled and translated as follows:
■ DBnr 1 is translated to DBnr 3;■ Fnr 3 is translated to Fnr 23;■ Fnr 4 is translated to Fnr 24; and■ Fnr 5 is translated to Fnr 25.
The resulting database and file numbers that the objects will access/update will be the physicallocations of the Employee, Finance, and Auto files in the TEST2 status.
67PAC User's Guide
Configuring a PAC Environment
Defining Migration Paths
The migration path is the route between two statuses that an application is permitted to followduring its planned life-cycle. Migration paths secure the restrictions on movement of objectsbetween statuses. Every status and application status link specified in a migration path definitionmust already be defined to PAC. Events that initiate the migration process may be defined onlyfor two application statuses that have been paired in a migration path.
The information specified in themigration path definition is used bymigration events. Themigra-tion path definition specifies the origin status (the environment inwhich the objects currently existand from which they are to be migrated) and destination status (the environment into which youwish to migrate the objects).
In addition, a migration path definition specifies defaults for the way a migration event that usesthe path is to be processed, including
■ the authorization controls required: the person(s) or group(s) who may authorize the events;■ the processing mode: whether the events will run online or in batch;■ for batch events, the names of the PAC jobs (JCL/JCS) to be submitted by the event;■ theWorkfileUsage option: whether PACwillmigrate objects directly from one status to anotheror use a work file in an intermediate step;
■ the migration mode: whether the objects are to be moved or copied into the destination statuswhen the event is processed; or, in the case of development, maintenance, and incorporationstatus types, whether the objects are to be included from a previously created work file.
■ the Auto Expansion option: whether PAC automatically includes related objects in (expands)the list of objects to bemigrated and howPAC identifieswhich versions of the objects to include.
It may be possible to override these defaults when the migration event is authorized. Refer to thesection Customizing the Authorization Process.
This section covers the following topics:
■ Origin and Destination Statuses■ Event Authorizers■ Migration Mode: Copy / Move / Include■ Processing Mode: Batch or Online■ Auto Expansion Option
PAC User's Guide68
Configuring a PAC Environment
■ User Exits and APIs for Migration Paths
Origin and Destination Statuses
The application test plan consists of the application status links andmigration paths. The test plandepends on your site requirements. An application test plan may be as rigid or as flexible asneeded.
Suppose that an application ACCT-PAY has been linked to each of the statuses shown in the fol-lowing diagram. The arrows between the statuses indicate the paths that application objects areallowed to follow during migrations. This is the test plan for the application.
Note: When the origin status is outside of PAC, objects are always implicitly migrated toControl status before being migrated to the specified destination status.
The allowed migration paths in the example test plan are indicated in the following table:
MaintenanceProductionUser TestSystems TestDevelopment
xDevelopment
xxSystems Test
xxUser Test
xxxProduction
xxxMaintenance
69PAC User's Guide
Configuring a PAC Environment
Restrictions on Migration Path Statuses
■ The migration path to load Predict objects into PAC must always have a destination status ofControl.
■ A migration path may not be defined between two development statuses, two maintenancestatuses, two incorporation statuses, or any combination of these three status types.
■ Incorporation is an origin status only.■ The Control-to-Control migration path is used only for the special migration type Alignment.
Event Authorizers
To ensure the integrity of the application, the decision to migrate any or all of the objects of anapplication to a particular status must be made at the right time by qualified people. The list of(up to eight) person(s) or group(s) who may authorize the migration events associated with a mi-gration path is specified in themigration path definition. For this reason, the definition ofmigrationpaths is a restricted function controlled by an option on the user's profile.
If you are a person authorized (in the user profile) to define amigration path, you have the followingoptions for specifying a migration event authorizer:
■ Individual User
By specifying specific user IDs, youmay individually add aperson or persons as event authorizersto any migration path for any application. The user ID, however, must be defined in the userprofile as being allowed to authorize migration events.
■ Group
If you want the flexibility of adding new authorizers or deleting existing authorizers, you mayspecify the name of a group that has been defined inNatural Security. This allows you to updatethe authorizers for several migration paths in one place; that is, in Natural Security.
■ Unrestricted or Range
The @ option implies no authorization, although the user needs to go through the step to "freeze"the event.
If authorization of the migration event is not restricted, you can use an asterisk (*) to allow anyindividual users who have the necessary setting in their user profiles to authorize their own oranother's event. For example, @* allows any qualified user ID (not a group) to authorize theevent.
You may use range notation to specify authorizers all user IDs starting with a specific prefix,for instance. This allows new persons to be added to the list automatically. For example, @US1*allows any user whose user ID starts with US1 to authorize the event.
■ Other Than Creator
PAC User's Guide70
Configuring a PAC Environment

If you want to ensure that someone other than the user or groupmember who created the eventis to authorize it, you may add this restriction by using the Separate Authority Required optionin the migration path definition.
Customizing the Authorization Process
Themigration event authorization process can be customized using PAC system applymods, userexits, and APIs.
For instance, a migration event authorizer may be allowed to override default values specified inthemigration path: whether the event is processed in batch or online, job name, orwhether objectsare to be copied or moved, or included from a work file.
Applymods
Applymods are activated by the PAC administrator and are used to protect the application duringmigration by enforcing values for the authorization process. For example, applymod 1 ensuresthat PAC always uses the default values supplied in the migration path by disallowing anymodification of those values during event processing.
User Exits
The PAC administrator can set up user exits to increase flexibility during the migration authoriz-ation process. For example, the authorization exit, User Exit 30 (PACEX030), can be used duringthe authorization process
■ to automatically override the default parameters specified on the actual migration path;■ to provide additional audit and security checking of the authorization process;■ to suppress display of the authorization screen.
Application Program Interface (APIs)
The PAC Express APIs provide a useful base for creating a custom system to process migrationevents quickly and easily. It allows you to change the way events are authorized. For example,the screen displayed can be simplified, or a PF key can be assigned to confirm an authorization.
The Event Authorization API allows you to add or purge information about the authorization fora particular migration event. This API also allows you to display authorization information.
71PAC User's Guide
Configuring a PAC Environment
Migration Mode: Copy / Move / Include
The migration mode is set by specifying whether the objects are to be copied, moved, or includedfrom a work file into PAC or between statuses.
Copy Option
Copy maintains the object version in the origin status and stores a copy in the destination status;you can specify the Copy option for Natural objects, foreign objects, and Predict objects.
Move Option
Move removes the object version from the origin status and stores it in the destination status.
If the location of the origin status is
■ local, the object version is loaded to the destination and the objects are purged automatically aspart of the migration process at the origin location.
■ remote (that is, PAC cannot issue a database call to access/update the objects), objects must bepurged at the origin status using other methods such as the PACEXDEL user exit.
PACEXDEL allows you to issue delete commands through the SYSMAIN utility or the PAC mi-gration utilityMIGUNLD.Multiple delete requests may be issued each time the utility is invoked.
Note: Predict objects may not be moved.
Include Option
The include option allows you to include in a migration objects located in a previously createdwork file as opposed to migrating objects directly from the Natural system file.
Include copies objects from an external work file rather than directly from a Natural system fileand stores them in the destination status. The include option can only be specified for Naturalobjects and is valid only for batch migrations into the PAC-controlled environment from develop-ment, maintenance, or incorporation statuses.
PAC User's Guide72
Configuring a PAC Environment

Processing Mode: Batch or Online
A migration event may be processed either online or in batch.
■ An event processed online is processed in real time in your current Natural session and theresults may be viewed interactively as the processing takes place.
■ An event processed in batch is processed as a background task. This is useful for large eventsor when processing should be asynchronous to the user's current activities.
Auto Expansion Option
Themigration path definition specifies the type of object expansion that is to occur duringmigrationevent processing. A statusmay be specified as the Expand status so that subordinate objects addedto the list during the expand process are
■ migrated to a destination status from the specified Expand status.■ rolled in from the Expand status in the case of migration from a development or maintenancestatus.
As an option in the migration path definition, the Expand option ensures that the subcomponentsto be included in the object list are determined based on the overall PAC environment at the timethe migration event is processed.
User Exit 23 may be invoked during expand processing.
User Exits and APIs for Migration Paths
PAC user exits can be used to implement audits and security for the migration path.
APINPATH, the PACApplication Program Interface (API) formigration paths, allows you to add,modify, or display information about a particular migration path.
Contact your PAC administrator for information about user exits or APIs that may be operatingin your environment.
73PAC User's Guide
Configuring a PAC Environment
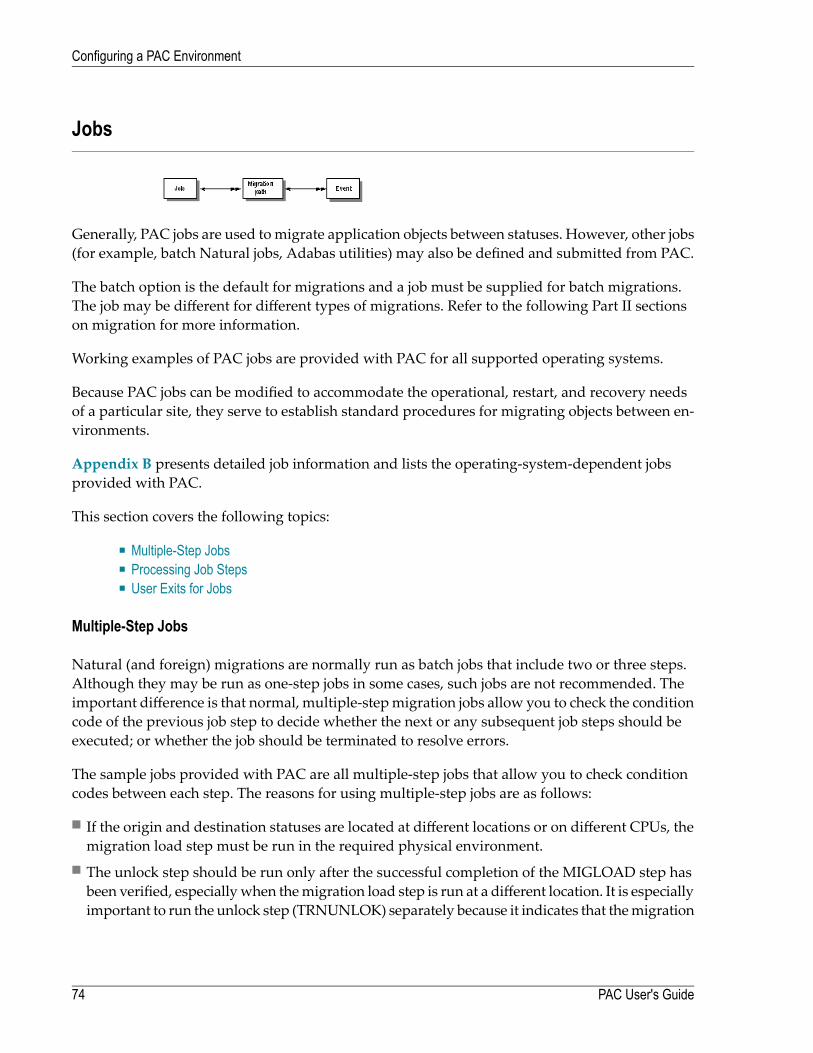
Jobs
Generally, PAC jobs are used tomigrate application objects between statuses. However, other jobs(for example, batch Natural jobs, Adabas utilities) may also be defined and submitted from PAC.
The batch option is the default for migrations and a job must be supplied for batch migrations.The job may be different for different types of migrations. Refer to the following Part II sectionson migration for more information.
Working examples of PAC jobs are provided with PAC for all supported operating systems.
Because PAC jobs can be modified to accommodate the operational, restart, and recovery needsof a particular site, they serve to establish standard procedures for migrating objects between en-vironments.
Appendix B presents detailed job information and lists the operating-system-dependent jobsprovided with PAC.
This section covers the following topics:
■ Multiple-Step Jobs■ Processing Job Steps■ User Exits for Jobs
Multiple-Step Jobs
Natural (and foreign) migrations are normally run as batch jobs that include two or three steps.Although they may be run as one-step jobs in some cases, such jobs are not recommended. Theimportant difference is that normal, multiple-stepmigration jobs allow you to check the conditioncode of the previous job step to decide whether the next or any subsequent job steps should beexecuted; or whether the job should be terminated to resolve errors.
The sample jobs provided with PAC are all multiple-step jobs that allow you to check conditioncodes between each step. The reasons for using multiple-step jobs are as follows:
■ If the origin and destination statuses are located at different locations or on different CPUs, themigration load step must be run in the required physical environment.
■ The unlock step should be run only after the successful completion of the MIGLOAD step hasbeen verified, especiallywhen themigration load step is run at a different location. It is especiallyimportant to run the unlock step (TRNUNLOK) separately because it indicates that themigration
PAC User's Guide74
Configuring a PAC Environment

is complete and, if the Move option has been specified, results in the migrated objects beingpurged from the origin status.
■ For a migration from an incorporation or development status that specifies the Include option,an externally created work file is used as input. In this case, a multiple-step job must be usedto ensure that the original input dataset is not overwritten during subsequent migration pro-cessing. Multiple-step jobs are strongly recommended whenever work files are used.
Online, Natural (and foreign) migration processing simulates the multiple-step job. If an error isdetected in the online display of the audit report, you can decide to terminate themigration processto resolve the error by entering a Natural command at the MORE prompt. After each simulatedstep, the NEXT prompt appears, again allowing you to interrupt the migration process.
Processing Job Steps
Job steps are processed as described in the following paragraphs unless otherwise stated in thissection (for example, Archiving).
The job steps required depend on whether the job is being processed
■ online or in batch without the work file option, with or without the Include option;■ in batch with the work file option, with or without the Include option.
If the work file option is not selected, objects are copied directly from Control to a destinationstatus. If thework file option is selected, objects already loaded into PACControl, whether compiledor not, are unloaded to a work file for subsequent load to a destination status.
In order to process migrations online or without the (output) work file option, PAC must havedirect access to the destination status specified on the application links in the migration pathdefinition. This is the case if all environments defined to PAC are located in
■ the same physical database;■ multiple databases running with the same SVC or ID Table Manager; or■ multiple databases connected through a network.
If none of these conditions ismet, then awork file or some other intermediatemediumof transportmust be used for migration processing.
If the Include option is specified, the first job step (TRNEVENT) reads from a work file which isdefined to PAC as Work File 1 (CMWK01).
75PAC User's Guide
Configuring a PAC Environment
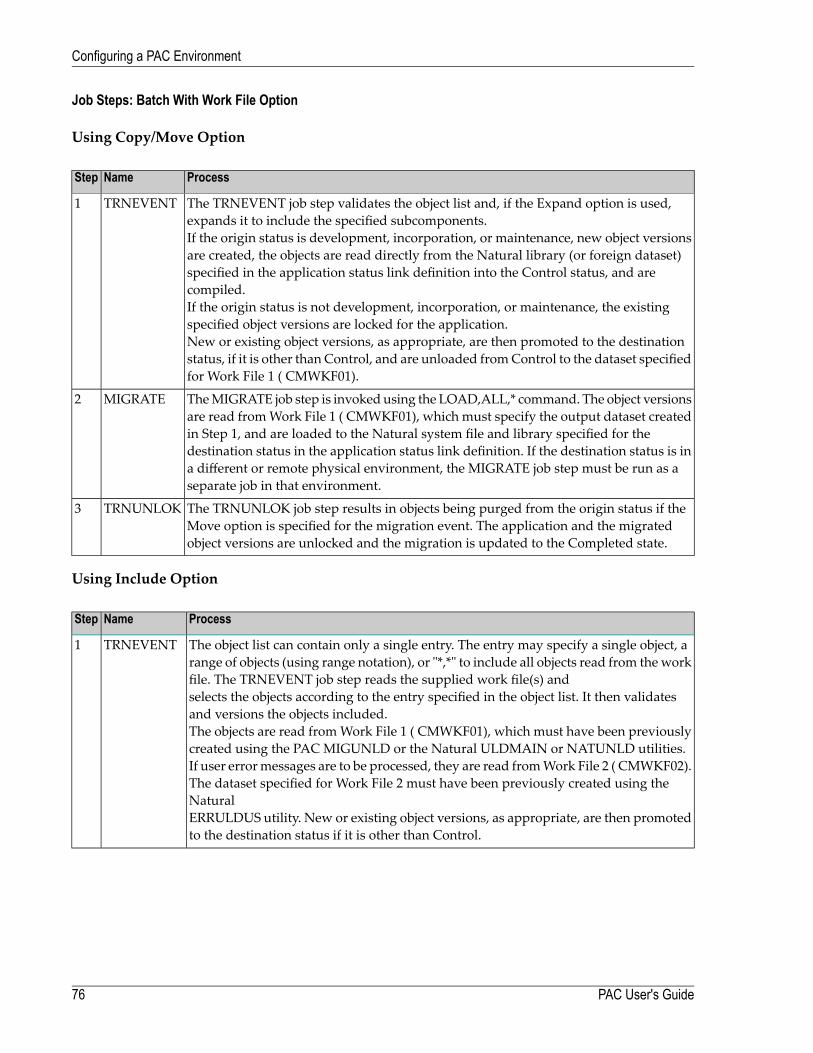
Job Steps: Batch With Work File Option
Using Copy/Move Option
ProcessNameStep
The TRNEVENT job step validates the object list and, if the Expand option is used,expands it to include the specified subcomponents.If the origin status is development, incorporation, or maintenance, new object versionsare created, the objects are read directly from the Natural library (or foreign dataset)
TRNEVENT1
specified in the application status link definition into the Control status, and arecompiled.If the origin status is not development, incorporation, or maintenance, the existingspecified object versions are locked for the application.New or existing object versions, as appropriate, are then promoted to the destinationstatus, if it is other than Control, and are unloaded fromControl to the dataset specifiedfor Work File 1 ( CMWKF01).
TheMIGRATE job step is invoked using the LOAD,ALL,* command. The object versionsare read fromWork File 1 ( CMWKF01), which must specify the output dataset created
MIGRATE2
in Step 1, and are loaded to the Natural system file and library specified for thedestination status in the application status link definition. If the destination status is ina different or remote physical environment, the MIGRATE job step must be run as aseparate job in that environment.
The TRNUNLOK job step results in objects being purged from the origin status if theMove option is specified for the migration event. The application and the migratedobject versions are unlocked and the migration is updated to the Completed state.
TRNUNLOK3
Using Include Option
ProcessNameStep
The object list can contain only a single entry. The entry may specify a single object, arange of objects (using range notation), or "*,*" to include all objects read from theworkfile. The TRNEVENT job step reads the supplied work file(s) andselects the objects according to the entry specified in the object list. It then validatesand versions the objects included.The objects are read fromWork File 1 ( CMWKF01), which must have been previouslycreated using the PAC MIGUNLD or the Natural ULDMAIN or NATUNLD utilities.If user errormessages are to be processed, they are read fromWork File 2 ( CMWKF02).The dataset specified for Work File 2 must have been previously created using theNaturalERRULDUS utility. New or existing object versions, as appropriate, are then promotedto the destination status if it is other than Control.
TRNEVENT1
PAC User's Guide76
Configuring a PAC Environment
ProcessNameStep
When using the Include option, TRNUNLD is run as an additional job step separatefrom TRNEVENT to preclude overwriting the original input work file used in Step 1.Objects to be migrated are unloaded to Work File 1. The name specified for Work File 1 must be different from the originalinput dataset supplied for TRNEVENT; otherwise, that dataset will be overwritten.The dataset created in this step (TRNUNLD) must be used as input for the next step(MIGRATE).
TRNUNLD2
The MIGRATE job step is invoked using the LOAD,ALL,*command. The object versions are read fromWork File 1, whichmust specify the outputdataset created in Step 2, and are loaded to theNatural system file and library specified
MIGRATE3
for the destination status in the application status link definition. If the destinationstatus is in a different or remote physical environment, the MIGRATE job step must berun as a separate job in that environment.
The TRNUNLOK job step unlocks the application and themigrated object versions andupdates the migration to the Completed state.
TRNUNLOK4
Example Batch Job: Work File Option
If amigration event using awork file is processed in batch and theCopy orMove option is specified,the sample job supplied with PAC is MIGRATE_WORKFILE (or MIGRATE_WORKFILE for z/OSand BS2000).
If a migration event is processed with the work file option and the Include option specified, itmust be run in batch to supply the objects to be migrated. INCORPORATE is the sample job sup-plied with PAC.
■ Depending on the origin anddestination status combination, youmaybe able to select theReplace(Y/N) option. If the Replace option is not selectable, the required value is automatically insertedand the field is protected.
■ Youmay specify a validAuto Expansion option. If you do, youmay optionally specify the statusfrom which the objects should be included.
■ If applymods have been set up in your environment by your PAC administrator, you may ac-tivate or deactivate them.
A batch migration that uses a work file and the Copy/Move options may be run as a single jobstep. The job syntax requires Work File 1 ( CMWKF01) to be specified in the job and the followingCMSYNIN cards:
LOGON SYSPACTRNEVENT @EVENTMIGRATELOAD,ALL,*TRNUNLOK @EVENT
77PAC User's Guide
Configuring a PAC Environment
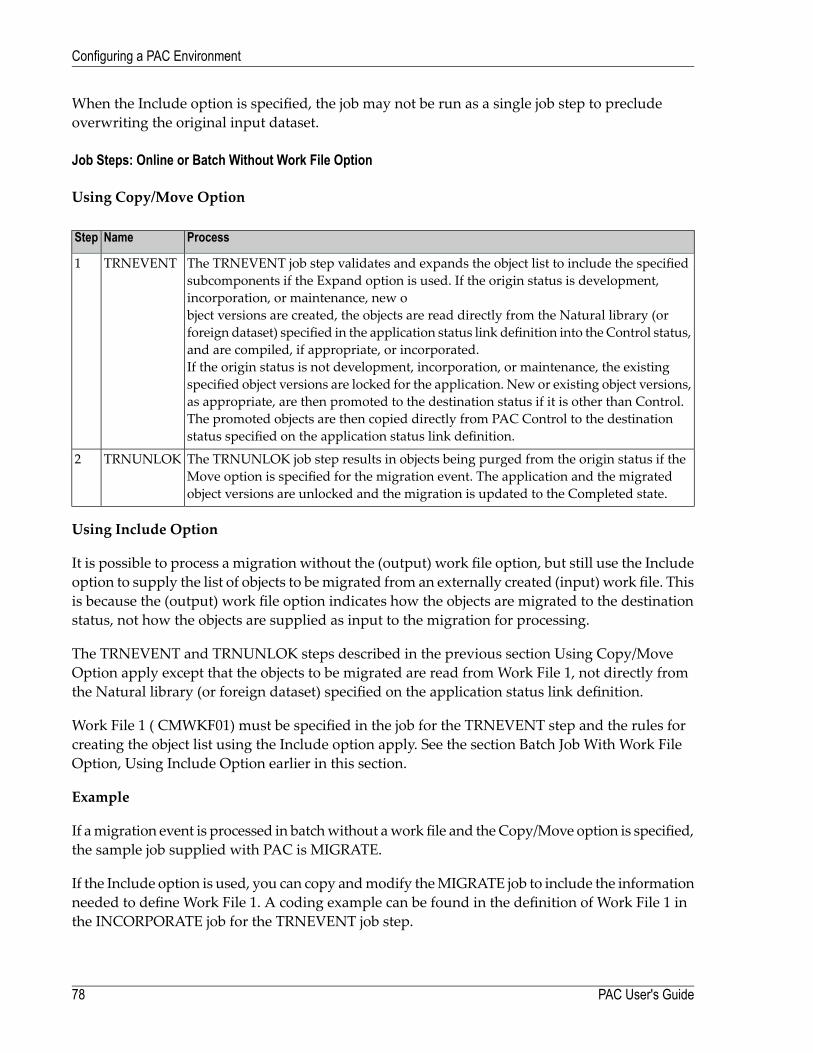
When the Include option is specified, the job may not be run as a single job step to precludeoverwriting the original input dataset.
Job Steps: Online or Batch Without Work File Option
Using Copy/Move Option
ProcessNameStep
The TRNEVENT job step validates and expands the object list to include the specifiedsubcomponents if the Expand option is used. If the origin status is development,incorporation, or maintenance, new object versions are created, the objects are read directly from the Natural library (orforeign dataset) specified in the application status link definition into the Control status,and are compiled, if appropriate, or incorporated.If the origin status is not development, incorporation, or maintenance, the existingspecified object versions are locked for the application. New or existing object versions,
TRNEVENT1
as appropriate, are then promoted to the destination status if it is other than Control.The promoted objects are then copied directly from PAC Control to the destinationstatus specified on the application status link definition.
The TRNUNLOK job step results in objects being purged from the origin status if theMove option is specified for the migration event. The application and the migratedobject versions are unlocked and the migration is updated to the Completed state.
TRNUNLOK2
Using Include Option
It is possible to process a migration without the (output) work file option, but still use the Includeoption to supply the list of objects to bemigrated from an externally created (input) work file. Thisis because the (output) work file option indicates how the objects are migrated to the destinationstatus, not how the objects are supplied as input to the migration for processing.
The TRNEVENT and TRNUNLOK steps described in the previous section Using Copy/MoveOption apply except that the objects to be migrated are read fromWork File 1, not directly fromthe Natural library (or foreign dataset) specified on the application status link definition.
Work File 1 ( CMWKF01) must be specified in the job for the TRNEVENT step and the rules forcreating the object list using the Include option apply. See the section Batch Job With Work FileOption, Using Include Option earlier in this section.
Example
If amigration event is processed in batchwithout awork file and theCopy/Move option is specified,the sample job supplied with PAC is MIGRATE.
If the Include option is used, you can copy andmodify theMIGRATE job to include the informationneeded to define Work File 1. A coding example can be found in the definition of Work File 1 inthe INCORPORATE job for the TRNEVENT job step.
PAC User's Guide78
Configuring a PAC Environment
■ You may specify a valid Auto Expansion option. If you do so, you may optionally specify thestatus from which the objects are to be included.
■ If set up in your environment by your PAC administrator, youmay activate or deactivate apply-mods.
A batch migration without a work file using the Copy/Move options may be run as a single jobstep. The job syntax requires the following CMSYNIN cards:
LOGON SYSPACTRNEVENT @EVENTTRNUNLOK @EVENT
User Exits for Jobs
PAC user exits can be used to
■ implement tracking and customized security for jobs;■ make substitutions to the JCL/JCS before a job is submitted;■ specify default parameters that you can modify for batch job submission.
Contact your PAC administrator for information about user exits that may be operating in yourenvironment.
79PAC User's Guide
Configuring a PAC Environment

80
6 Statuses
■ Adding (Defining) a Status ................................................................................................................ 83■ Displaying/Modifying a Status ............................................................................................................ 85■ Selecting a Status ........................................................................................................................... 85■ Linking Applications to a Status .......................................................................................................... 86■ Purging a Status ............................................................................................................................. 88
81
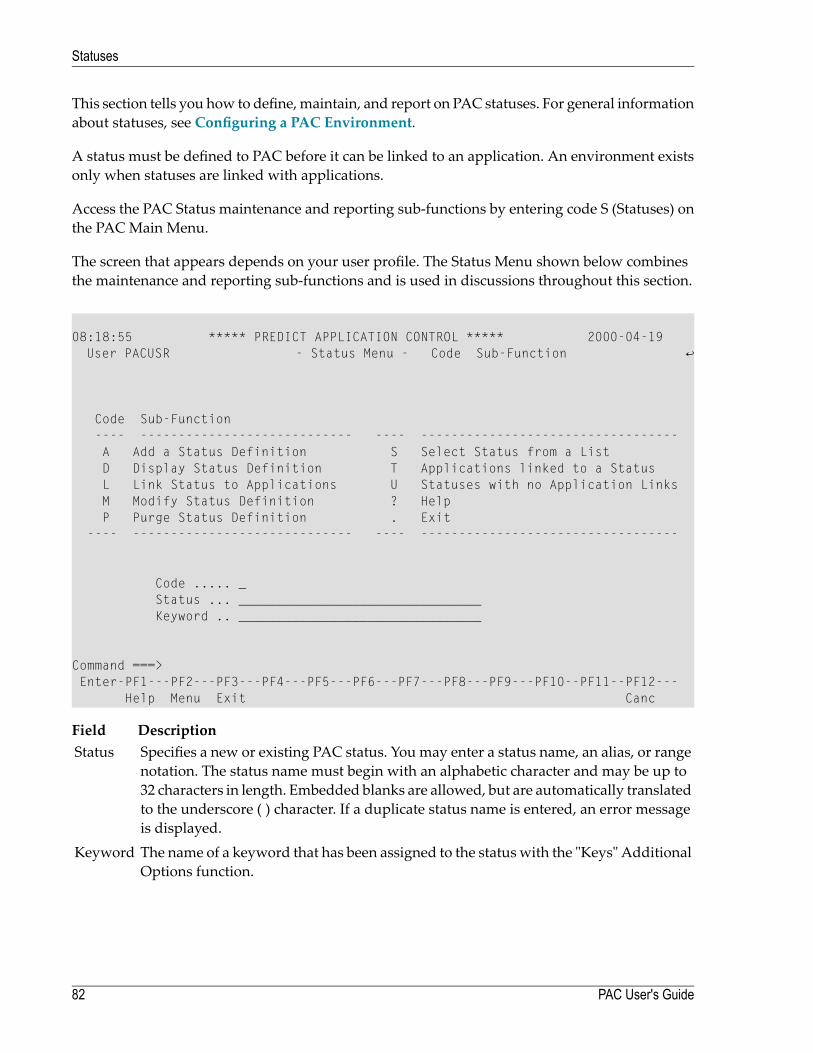
This section tells you how to define,maintain, and report on PAC statuses. For general informationabout statuses, see Configuring a PAC Environment.
A status must be defined to PAC before it can be linked to an application. An environment existsonly when statuses are linked with applications.
Access the PAC Status maintenance and reporting sub-functions by entering code S (Statuses) onthe PAC Main Menu.
The screen that appears depends on your user profile. The Status Menu shown below combinesthe maintenance and reporting sub-functions and is used in discussions throughout this section.
08:18:55 ***** PREDICT APPLICATION CONTROL ***** 2000-04-19 User PACUSR - Status Menu - Code Sub-Function ↩
Code Sub-Function ---- ---------------------------- ---- ---------------------------------- A Add a Status Definition S Select Status from a List D Display Status Definition T Applications linked to a Status L Link Status to Applications U Statuses with no Application Links M Modify Status Definition ? Help P Purge Status Definition . Exit ---- ----------------------------- ---- ----------------------------------
Code ..... _ Status ... ________________________________ Keyword .. ________________________________
Command ===> Enter-PF1---PF2---PF3---PF4---PF5---PF6---PF7---PF8---PF9---PF10--PF11--PF12--- Help Menu Exit Canc
DescriptionFieldSpecifies a new or existing PAC status. You may enter a status name, an alias, or rangenotation. The status name must begin with an alphabetic character and may be up to
Status
32 characters in length. Embedded blanks are allowed, but are automatically translatedto the underscore ( ) character. If a duplicate status name is entered, an error messageis displayed.The name of a keyword that has been assigned to the status with the "Keys" AdditionalOptions function.
Keyword
PAC User's Guide82
Statuses
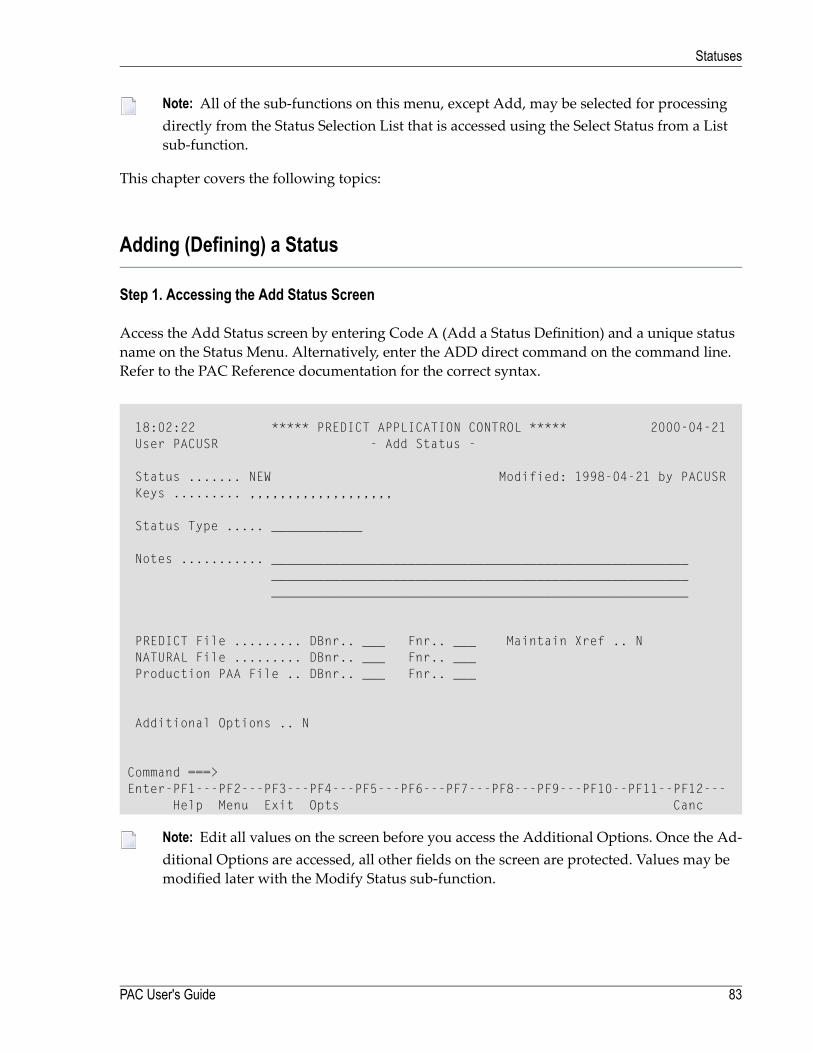
Note: All of the sub-functions on this menu, except Add, may be selected for processingdirectly from the Status Selection List that is accessed using the Select Status from a Listsub-function.
This chapter covers the following topics:
Adding (Defining) a Status
Step 1. Accessing the Add Status Screen
Access the Add Status screen by entering Code A (Add a Status Definition) and a unique statusname on the Status Menu. Alternatively, enter the ADD direct command on the command line.Refer to the PAC Reference documentation for the correct syntax.
18:02:22 ***** PREDICT APPLICATION CONTROL ***** 2000-04-21User PACUSR - Add Status -
Status ....... NEW Modified: 1998-04-21 by PACUSRKeys ......... ,,,,,,,,,,,,,,,,,,,
Status Type ..... ____________
Notes ........... _____________________________________________________________________________________________________________________________________________________________________
PREDICT File ......... DBnr.. ___ Fnr.. ___ Maintain Xref .. NNATURAL File ......... DBnr.. ___ Fnr.. ___Production PAA File .. DBnr.. ___ Fnr.. ___
Additional Options .. N
Command ===>Enter-PF1---PF2---PF3---PF4---PF5---PF6---PF7---PF8---PF9---PF10--PF11--PF12---
Help Menu Exit Opts Canc
Note: Edit all values on the screen before you access the Additional Options. Once the Ad-ditional Options are accessed, all other fields on the screen are protected. Values may bemodified later with the Modify Status sub-function.
83PAC User's Guide
Statuses
Step 2. Editing the Add Status Screen
1. In the Status Type field, enter a valid status type by typing a valid one-character code or theentire name over the first character of "Unknown".
For details on the possible status types please refer to the descriptions given in the section StatusTypes.
Note: Archive, Control and Retire statuses may not be assigned. Only PAC designatesArchive, Control and Retire status types.
2. (Optional) In the Notes field, enter comments.
3. In the Predict Data and Natural File fields, enter the database number (DBnr) and file number(Fnr) of the Predict data and Natural files that will be associated with the new status.
4. For the Production PAA File field, specify the DBID and file number of the PAA file that willbe active for the application objects transferred to this production status.
5. In the Maintain Xref field, identify the way you want cross-reference data to be maintained byentering one of the following options. The option depends on the status.
DescriptionLocationCode
Cross-reference data is stored within PAC.LocalL
Cross-reference data is copied to the Predict file specified by the application status link.RemoteR
Cross-reference data is stored within PAC (Local) and is also copied to the Predict filespecified by the application status link (Remote).
BothB
No cross-reference data is maintained.NoneN
Step 3. Selecting Additional Options
1. Access Additional Options by pressing PF4 (Opts), or by typing Y (Yes) over the default.
2. From the resultingwindow, select and edit any of the following options that youwish to specify:DescriptionOptionAdd alias names for the status.AliasesAdd keywords for the status. Keywords must have been previouslydefined to PAC.
Keys
Add the names of applications you want to link to the status. Refer tothe section , LinkingApplications and Statuses, on page formore inform-ation.
Linked Applications
TheDate option displays information about the dates and times the statuswas added/modifiedand by whom.
3. Press ENTER to return to the Add Status screen when you have finished editing the options.
PAC User's Guide84
Statuses
Step 4. Adding the New Status to PAC
Add the new status to PAC by pressing ENTER on the Add Status screen.
When you have added the new status, you are returned to the Status Menu where the message"Status has been added successfully." is displayed.
Displaying/Modifying a Status
You may display or modify information about a status on the Display Status and Modify Statusscreens, respectively.Maintenancemay not be performed on theDisplay Status screen. The sectionAdd (Define) a Status provides a similar screen for reference.
To access theDisplay Status orModify Status screens from the StatusMenu, enter CodeD (DisplayStatus) or M (Modify Status) and the name of the desired status. Alternatively, enter the DISPLAYor MODIFY direct commands on the command line of the relevant menus. Refer to the PAC Ref-erence documentation for the correct syntax.
Selecting a Status
To select a status, access the Status Selection List by entering Code S (Select Status from a List) onthe Status Menu. Alternatively, enter the SELECT STATUS direct command on the command lineof theApplicationMenu. Refer to the PACReference documentation for the correct direct commandsyntax.
If you accessed the Status Selection List screen with the S (Select Status from a List) sub-functionor with the SELECT STATUS direct command for one or more of the listed statuses, you mayperform the following sub-functions directly by entering the function code in the "C" column:
Sub-FunctionCodeDisplay a status definitionDLink applications to a statusLModify a status definitionMPurge a status definitionPSelect a status definitionSApplications linked to a statusTStatuses without application linksU(Quit/return to the main menu).
85PAC User's Guide
Statuses

If you mark the status with the cursor or enter an S or a T in the "C" column or if you enter thestatus number (from the "Nr" column) in theMark Selection... field, the StatusMenu appears withthe specified status already displayed in the Status field.
Linking Applications to a Status
You may link several applications to a specified status with the Link Applications to a Status sub-function.
1. From the Status Menu, access the Link Applications to a Status screen by entering Code L(Link Applications to a Status) and by either entering the desired status name or by selectingit from the resulting status list.
08:38:57 ***** PREDICT APPLICATION CONTROL ***** 2000-04-19User PACUSR - Link Applications to a Status -
Status ... DEVELOPMENT (Development)Library Predict
C Linked Application Name DBnr Fnr DBnr Fnr Xr Message--- -------------------------------- ---------------- ----------- ----------__ NATURAL_SECURITY________________ SYSSEC__ 235 _18 235 _10 N__ ORDERS _________________________ ORD-EXAM 235 __9 235 _10 N__ PREDICT_________________________ PREDICT_ 235 _18 235 _44 N
________________________________ ________ ___ ___ ___ ___ _________________________________ ________ ___ ___ ___ ___ _________________________________ ________ ___ ___ ___ ___ _________________________________ ________ ___ ___ ___ ___ _________________________________ ________ ___ ___ ___ ___ _________________________________ ________ ___ ___ ___ ___ _________________________________ ________ ___ ___ ___ ___ _________________________________ ________ ___ ___ ___ ___ _________________________________ ________ ___ ___ ___ ___ _
Enter options (above), or '?' (help), or '.' (exit): _Enter-PF1---PF2---PF3---PF4---PF5---PF6---PF7---PF8---PF9---PF10--PF11--PF12---
Help Menu Exit Canc
This screen displays existing application status links as well as library and Predict informationfor the applications.
2. Enter the following information on the blank lines:■ In the Linked Application column, the application(s) to be linked to the specified status;■ In the Library columns, the library, database number, and file number where the applicationstatus is located.
PAC User's Guide86
Statuses
Note: The library locations used for the Control status, as well as for the Archive (A),Retire (R), Production (P) and Neighbour (N) statuses, are reserved for use by PAC.
■ In the Predict columns, enter the Predict database ID number and file number where thecross-reference data is stored.
Note: If you do not enter a Predict database and file number, the Predict Data database(DBnr) and file number (Fnr) display the values set when the application was defined.You may override these values.
■ In the Predict "Xr" column, enter the following cross-reference information: L (Local), R (Re-mote), B (Both), orN (None). Refer to the explanation in Step 2 "Editing theAdd Status Screen"for more information. Available options depend on the status type.
■ The Message column displays messages relevant to sub-functions performed on the listedapplication status.
Refer to the section Linking Applications and Statuses for detailed information about linkingapplications to a status.
This section covers the following topics:
■ Selecting Additional Sub-Functions for Linked Applications■ Displaying Applications Linked to a Status■ Displaying Statuses with No Application Links
Selecting Additional Sub-Functions for Linked Applications
You may select additional sub-functions for linked applications without returning to a menu.
1. In the "C" column on the Link Applications to a Status screen, mark the desired applicationwith the appropriate two-character code to display the desired option screen.
The following sub-functions are available:Sub-FunctionCodeDisplay Link DefinitionDIDisplay Application DefinitionAPDisplay Status DefinitionSTModify Link DefinitionMOPurge Link DefinitionPU
2. To access a list of available options for a PAC object, mark the desired object with a ? or an as-terisk (*) in the "C" column at the left of the screen.
The resulting Options window lists the available sub-functions and their corresponding codes.
87PAC User's Guide
Statuses
3. In the Options window, select the sub-function by entering the relevant code on the commandline.
Displaying Applications Linked to a Status
You can display the existing application status links for a specific status on theApplications Linkedto a Status screen by entering Code T (Statuses Linked to Application) and the status name.Maintenance may not be performed from this screen.
This screen is similar to the Link Applications to a Status screen described.
Displaying Statuses with No Application Links
You can display a list of statuses not linked to applications by entering Code U (Statuses with NoApplication Links) on the Status Menu.
Purging a Status
Note: A status may be purged under certain circumstances, but a status type cannot bemodified.
To purge a status, enter Code P and the status name on the Status Menu. Alternatively, enter thePURGE direct command on the command line. Refer to the PAC Reference documentation for thecorrect syntax.
If versioned objects exist in the status under PAC control, the purge request is ignored and thefollowing message is displayed:
"Objects exist for this status. Purge cannot be performed until the objects have been deleted usingthe PAC Administrator Functions."
Otherwise, the PurgeConfirmationwindowappears reminding you that the associated applicationstatus links, migration paths, and fixed file translation tables will also be purged.
■ To purge the status, type CONFIRM or press PF5.■ To return to the Status Menu without purging the status, type a period (.) or press PF3.
PAC User's Guide88
Statuses
7 Applications
■ Adding (Defining) an Application of Type NAT ....................................................................................... 92■ Adding (Defining) an Application of Type PRD ..................................................................................... 100■ Displaying/Modifying an Application ................................................................................................... 102■ Selecting an Application from a List ................................................................................................... 102■ Copying an Application ................................................................................................................... 103■ Linking Statuses to an Application ..................................................................................................... 107■ Purging an Application .................................................................................................................... 109■ View Security Maintenance .............................................................................................................. 109
89

This section tells you how to define,maintain, and report on PAC applications. For general inform-ation about applications, see Configuring a PAC Environment.
The application is the high level identifier for a set of related objects. An object can be placed underPAC control only as part of an application. An application definition is required for every applic-ation placed under PAC control.
When an application definition is added to PAC, it is automatically linked to the Control status;this link is required and cannot be deleted.
Applications must be linked to predefined statuses. An environment exists only when statusesand applications are linked. The process of linking an application to a status is described inLinking Applications and Statuses.
The application names Predict and Predict Case are reserved for PAC and may not be deleted.These are special-use applications. The Predict Case application is used to populate the PredictCase objects used for composing objects for other applications under the control of PAC.
You can access the PAC application maintenance and reporting sub-functions by entering CodeA (Applications) on the PAC Main Menu.
Depending on your user profile, either the ApplicationMenu or the Application Reporting Menuappears. Discussions of the PAC maintenance and reporting sub-functions in this section refer tothe Application Menu.
PAC User's Guide90
Applications
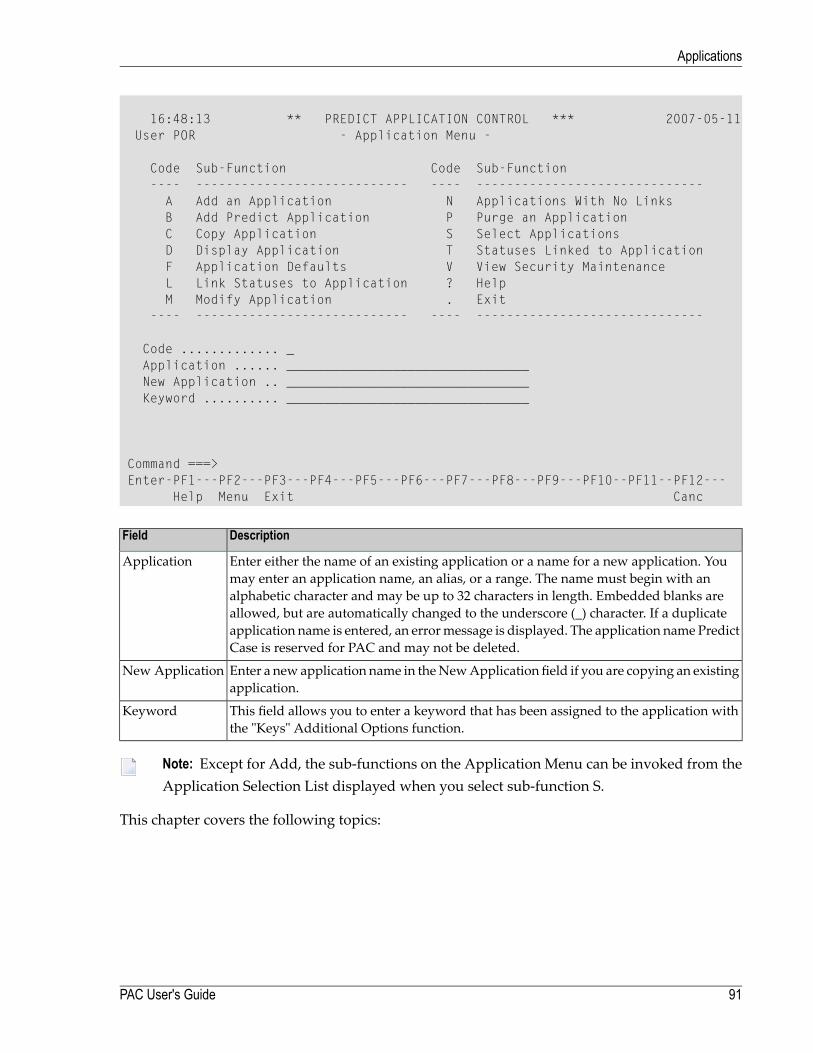
16:48:13 ** PREDICT APPLICATION CONTROL *** 2007-05-11User POR - Application Menu -
Code Sub-Function Code Sub-Function---- ---------------------------- ---- ------------------------------A Add an Application N Applications With No LinksB Add Predict Application P Purge an ApplicationC Copy Application S Select ApplicationsD Display Application T Statuses Linked to ApplicationF Application Defaults V View Security MaintenanceL Link Statuses to Application ? HelpM Modify Application . Exit
---- ---------------------------- ---- ------------------------------
Code ............. _Application ...... ________________________________New Application .. ________________________________Keyword .......... ________________________________
Command ===>Enter-PF1---PF2---PF3---PF4---PF5---PF6---PF7---PF8---PF9---PF10--PF11--PF12---
Help Menu Exit Canc
DescriptionField
Enter either the name of an existing application or a name for a new application. Youmay enter an application name, an alias, or a range. The name must begin with an
Application
alphabetic character and may be up to 32 characters in length. Embedded blanks areallowed, but are automatically changed to the underscore (_) character. If a duplicateapplication name is entered, an errormessage is displayed. The application name PredictCase is reserved for PAC and may not be deleted.
Enter a new application name in theNewApplication field if you are copying an existingapplication.
New Application
This field allows you to enter a keyword that has been assigned to the application withthe "Keys" Additional Options function.
Keyword
Note: Except for Add, the sub-functions on the Application Menu can be invoked from theApplication Selection List displayed when you select sub-function S.
This chapter covers the following topics:
91PAC User's Guide
Applications
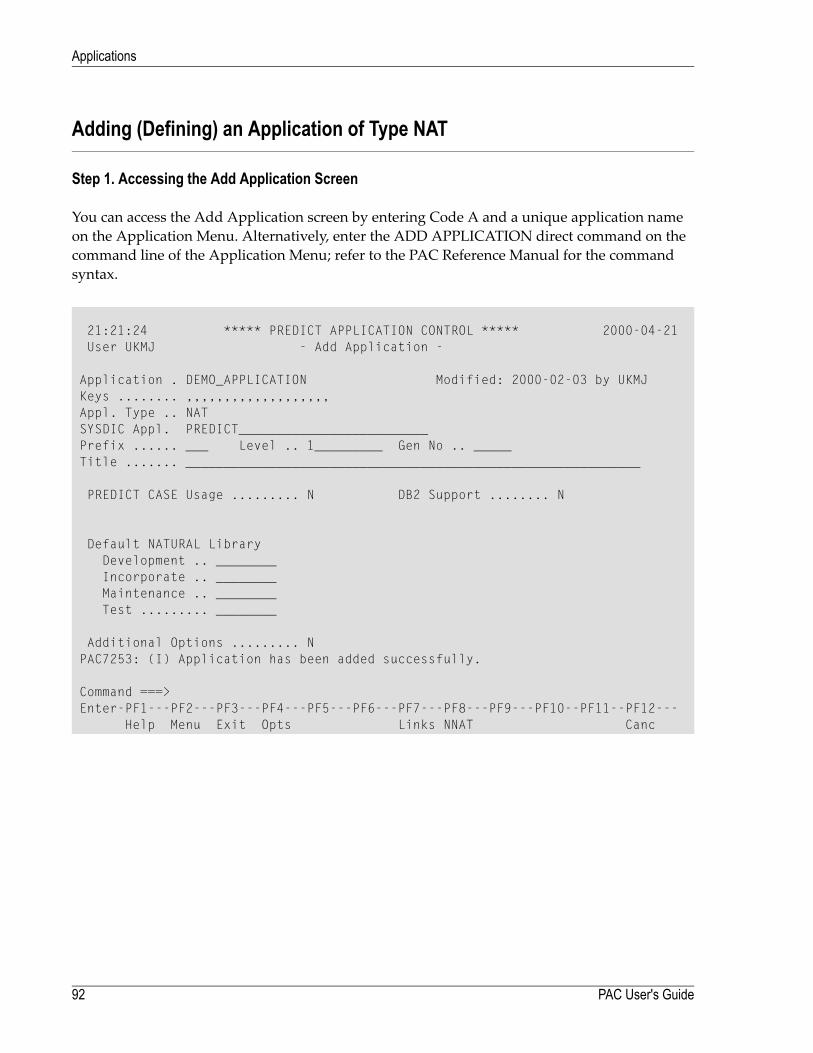
Adding (Defining) an Application of Type NAT
Step 1. Accessing the Add Application Screen
You can access the Add Application screen by entering Code A and a unique application nameon the Application Menu. Alternatively, enter the ADD APPLICATION direct command on thecommand line of the Application Menu; refer to the PAC Reference Manual for the commandsyntax.
21:21:24 ***** PREDICT APPLICATION CONTROL ***** 2000-04-21User UKMJ - Add Application -
Application . DEMO_APPLICATION Modified: 2000-02-03 by UKMJKeys ........ ,,,,,,,,,,,,,,,,,,,Appl. Type .. NATSYSDIC Appl. PREDICT_________________________Prefix ...... ___ Level .. 1_________ Gen No .. _____Title ....... ____________________________________________________________
PREDICT CASE Usage ......... N DB2 Support ........ N
Default NATURAL LibraryDevelopment .. ________Incorporate .. ________Maintenance .. ________Test ......... ________
Additional Options ......... NPAC7253: (I) Application has been added successfully.
Command ===>Enter-PF1---PF2---PF3---PF4---PF5---PF6---PF7---PF8---PF9---PF10--PF11--PF12---
Help Menu Exit Opts Links NNAT Canc
PAC User's Guide92
Applications
Step 2. Editing the Add Application Screen
Prefix, Level, and Gen No Fields
These fields require values only if the names of migration events for this application are to beautomatically generated.
The Prefix is a 1-3 character designation that functions as the higher level qualifier for the applic-ation in the generated migration event name. If you intend to generate migration event namesthat beginwith this prefix, then the first charactermust be non-numeric because amigration eventname cannot begin with a numeric value. The Prefix is most useful if it is a meaningful identifierfor the application. The Prefix designation can be subsequently modified.
The Level field can contain a version level designation for the application as a whole. Currently,this designation is not used within the PAC system; it is for documentation purposes only. Theformat for an entry in this field is not restricted. The version level designation can be subsequentlymodified.
TheGenNo (generation number) is a 5-digit numeric value ranging from 00000-99999. The startingvalue is set by entering a value in this field. If the number you enter contains fewer than 5 digits,the PAC system adds initial zeros. The value you enter is incremented by one for each migrationevent defined for the application to ensure a unique value for each event.
The incremented value serves as the "suffix" value following the value specified in the Prefix field.The two values together create a value for the @GEN variable when it is used in the migrationevent name. If a Prefix has not been defined for the application, the @GEN variable replacementcomprises just the suffix value.
The Gen No starting value can be reset at any time by modifying the application definition.However, if a non-unique (duplicate) number is created as a result of resetting the Gen No, anerror message is returned along with a request that the user enter a unique name for the event.Non-unique numbers can be avoided by using standard naming conventions; that is, meaningfulstring prefixes and suffixes.
Note: User Exits 13 and 25 allow you to use additional variableswhen generatingmigrationevent names.
93PAC User's Guide
Applications
Title Field
You may optionally add a title in the Title field. A title is an expanded name or description of theapplication. Selection List screens display the titles assigned to PAC entities. The title is free format;up to 60 characters in length.
Predict Case Usage Field
By default, this field has the value N (no) which indicates that Predict Case is not used; that is,Natural objects for this application are not to be composed by Predict Case.
If this application will be using Natural objects composed by Predict Case, you need to overtypethe default in this fieldwith Y (yes). In this case, all Predict Case objects used by theNatural objectsare versioned in the PAC application.
Note: If you change the default to Y, a Predict Case librarymust be specified in the develop-ment or maintenance status link of the application to link the Predict Case definition to theNatural definition and activate the facility.
Later sections of this manual provide information about using Predict Case with PAC.
DB2 Support Field
By default, this field has the value N (no) which indicates that Natural for DB2 support is not re-quired for the application.
If you are defining a Natural for DB2 application to PAC, overtype the default with Y (yes). PACsupports migrations for both qualified and non-qualified DB2 tables/views, but the migrationsmust be performed separately. The Truncate Creator option is supported for non-qualifiedtables/views. Ensure that the Predict generation defaults for views are set correctly before runningthe migration.
section Using PAC with Predict Case or Natural for DB2 provides general information aboutusing Natural for DB2 with PAC.
Default Natural Library Fields
You may optionally specify default Natural libraries to be used when linking the application toone of the status types listed.
PAC User's Guide94
Applications
Step 3. Selecting Additional Options
1. Access the Additional Options window by typing over the default with Y (yes) or by pressingPF4 (Opts).
The Additional Options window displays the following available options:PurposeOptionSpecifies the Compile Options: MCG, steplibs, Version 2.1 syntax, objectversion retention, log all object purge options and view security default.
General Defaults
Adds statuses you want to link to the application. Refer to the section ,Linking Applications and Statuses, on page for more information.
Linked Statuses
Defines foreign datasets for the application.Foreign SupportProvides a detailed description of the application.DescriptionAdds alias names for the application.AliasesAdds keywords for the application. Keywords must have been previouslydefined to PAC.
Keywords
Records the date/time that the application was added/modified, the user IDof the person adding/modifying the application, and the terminal ID fromwhich the addition/modification was made.
Dates
2. On the Additional Options window, enter Y (yes) to select the options you wish to edit as de-scribed in the following steps.
Step 4. Editing the General Defaults
The General Defaults are presented on the Application General Defaults screen:
95PAC User's Guide
Applications
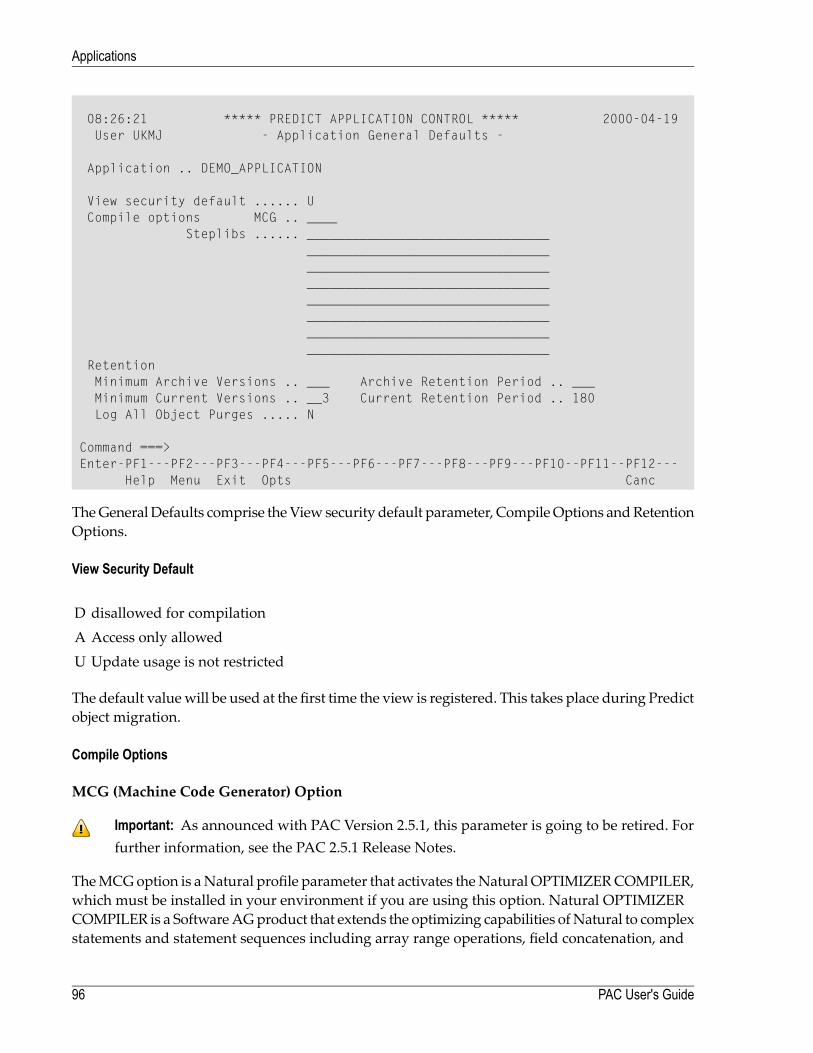
08:26:21 ***** PREDICT APPLICATION CONTROL ***** 2000-04-19User UKMJ - Application General Defaults -
Application .. DEMO_APPLICATION
View security default ...... UCompile options MCG .. ____
Steplibs ...... ________________________________________________________________________________________________________________________________________________________________________________________________________________________________________________________________
RetentionMinimum Archive Versions .. ___ Archive Retention Period .. ___Minimum Current Versions .. __3 Current Retention Period .. 180Log All Object Purges ..... N
Command ===>Enter-PF1---PF2---PF3---PF4---PF5---PF6---PF7---PF8---PF9---PF10--PF11--PF12---
Help Menu Exit Opts Canc
TheGeneralDefaults comprise theView security default parameter, CompileOptions andRetentionOptions.
View Security Default
disallowed for compilationDAccess only allowedAUpdate usage is not restrictedU
The default valuewill be used at the first time the view is registered. This takes place during Predictobject migration.
Compile Options
MCG (Machine Code Generator) Option
Important: As announced with PAC Version 2.5.1, this parameter is going to be retired. Forfurther information, see the PAC 2.5.1 Release Notes.
TheMCGoption is aNatural profile parameter that activates theNatural OPTIMIZERCOMPILER,which must be installed in your environment if you are using this option. Natural OPTIMIZERCOMPILER is a SoftwareAGproduct that extends the optimizing capabilities ofNatural to complexstatements and statement sequences including array range operations, field concatenation, and
PAC User's Guide96
Applications
optimal base register assignment. If MCG is active, all programs are compiled to machine code.Refer to the Natural OPTIMIZER COMPILER documentation for more information.
This field allows you to specify default values for the MCG option. Valid values are as follows:PurposeValue(blank) Ignores the MCG option; normally used when Natural Optimizer Compiler is notinstalled in your environment.
( )
Turns off the MCG option (other options are not turned on/restored)NTurns on the MCG option. Programs are partly compiled to machine code. Additionalfeatures (overflow checking, index checking,mixedmode, optimization of I/O statements)
Y
are switched off by default. To activate one or more of these features, add the relevantcode(s) listed below:Activates checking in all programs for arithmetic overflows and zero division.OActivates checking in all programs for array indexes that are out of bounds (MIX).IActivatemixed-mode checking to ensure that the generated object code is compatiblewithIBM, SNI and Wang mainframes.
M
activate I/O statement compilation tomachine code for the following statements: DISPLAY,WRITE,WRITETITLE,WRITETRAILER,READWORKFILEwith SELECToption,WRITEWORK FILE.
W
Specifying O, I, M, and/orW presuppose Y. Multiple options can simply be specified one after theother.
Compile Steplib Option
A steplib is another existing PAC application that has copycode, maps, and/or data areas that areused as subordinates by application objects at compile time. Such steplibs are used in migrationsfrom development or maintenance or during alignment migrations. You may specify up to eightcompile steplibs.
The provisionmade at application level is for default and documentation purposes only and valuesused here are not used during migrations. The list in the application record is used as a default atthe creation of application status links records. Formore information, see section LinkingApplic-ations and Statuses.
97PAC User's Guide
Applications
Retention Options
These options are used to specify the number of object versions to be retained and the period ofretention before the Purge Object Version sub-function is invoked.
the number of archived object versions retained by PAC before theoldest version is eligible for automatic purging.
Minimum Archive Versions
the number of days before an archived object version is eligible forautomatic purging.
Archive Retention Period
the number of object versions retained by PAC before the oldestversion is eligible for automatic purging.
Minimum Current Versions
the number of days before an object version is eligible for automaticpurging.
Current Retention Period
Log All Object Purges Option
This option indicates whether all purges through the Purge Object Version function are to belogged in the object version audit trail. The default is N (no).
Overtype the default with Y (yes) if you want to create a log in the object version audit trail of theobjects purged with the Purge Object Version function.
Step 5. Specifying Foreign Datasets for the Application
The PAC administrator defines the classes and types of foreign datasets that PAC supports for aparticular site. You may be responsible for selecting a subset of those dataset types to be used fora particular application.
1. You can view a list of the foreign datasets supported at your site on the Foreign SupportMaintenance screen by accessing the Additional Options window from the Add Applicationscreen.
PAC User's Guide98
Applications
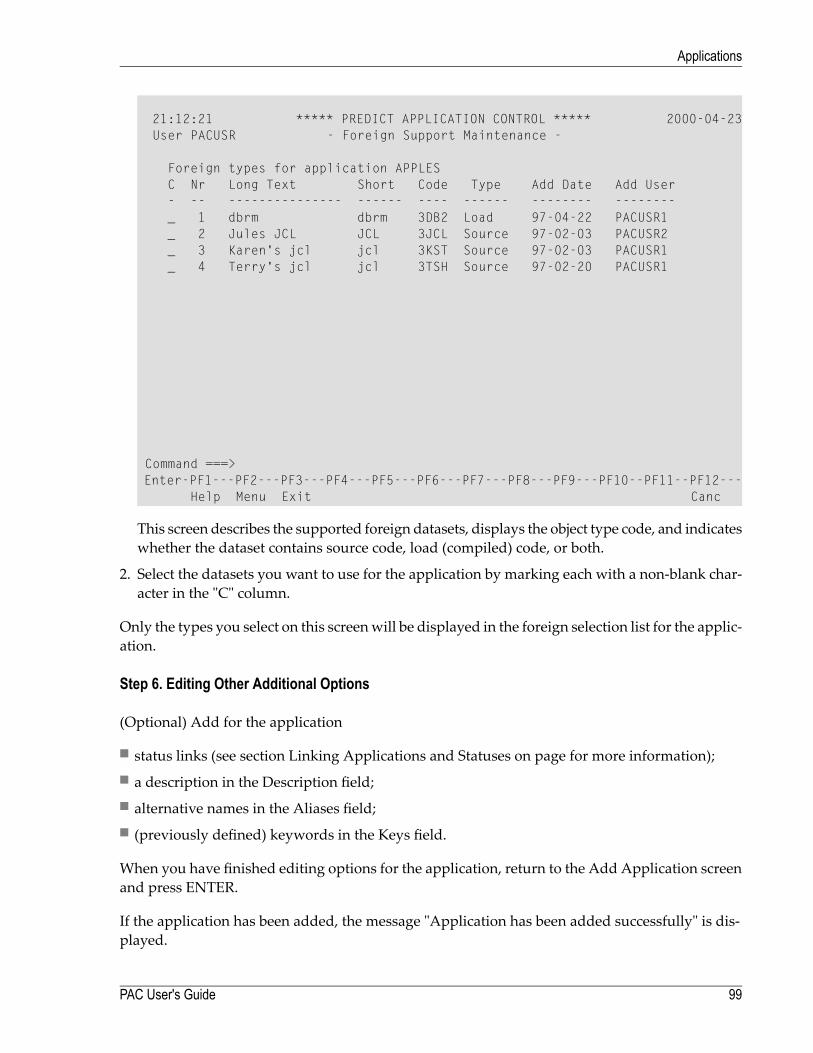
21:12:21 ***** PREDICT APPLICATION CONTROL ***** 2000-04-23User PACUSR - Foreign Support Maintenance -
Foreign types for application APPLESC Nr Long Text Short Code Type Add Date Add User- -- --------------- ------ ---- ------ -------- --------_ 1 dbrm dbrm 3DB2 Load 97-04-22 PACUSR1_ 2 Jules JCL JCL 3JCL Source 97-02-03 PACUSR2_ 3 Karen's jcl jcl 3KST Source 97-02-03 PACUSR1_ 4 Terry's jcl jcl 3TSH Source 97-02-20 PACUSR1
Command ===>Enter-PF1---PF2---PF3---PF4---PF5---PF6---PF7---PF8---PF9---PF10--PF11--PF12---
Help Menu Exit Canc
This screen describes the supported foreign datasets, displays the object type code, and indicateswhether the dataset contains source code, load (compiled) code, or both.
2. Select the datasets you want to use for the application by marking each with a non-blank char-acter in the "C" column.
Only the types you select on this screenwill be displayed in the foreign selection list for the applic-ation.
Step 6. Editing Other Additional Options
(Optional) Add for the application
■ status links (see section Linking Applications and Statuses on page for more information);■ a description in the Description field;■ alternative names in the Aliases field;■ (previously defined) keywords in the Keys field.
When you have finished editing options for the application, return to the Add Application screenand press ENTER.
If the application has been added, the message "Application has been added successfully" is dis-played.
99PAC User's Guide
Applications
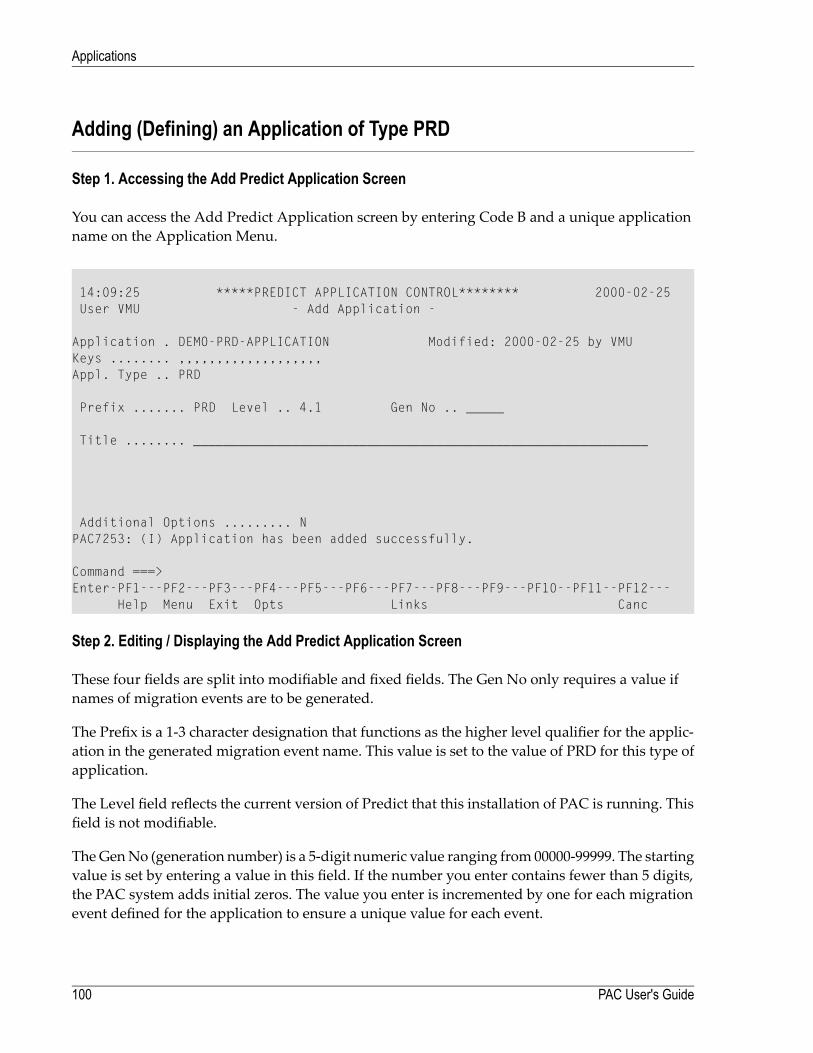
Adding (Defining) an Application of Type PRD
Step 1. Accessing the Add Predict Application Screen
You can access the Add Predict Application screen by entering Code B and a unique applicationname on the Application Menu.
14:09:25 *****PREDICT APPLICATION CONTROL******** 2000-02-25User VMU - Add Application -
Application . DEMO-PRD-APPLICATION Modified: 2000-02-25 by VMUKeys ........ ,,,,,,,,,,,,,,,,,,,Appl. Type .. PRD
Prefix ....... PRD Level .. 4.1 Gen No .. _____
Title ........ ____________________________________________________________
Additional Options ......... NPAC7253: (I) Application has been added successfully.
Command ===>Enter-PF1---PF2---PF3---PF4---PF5---PF6---PF7---PF8---PF9---PF10--PF11--PF12---
Help Menu Exit Opts Links Canc
Step 2. Editing / Displaying the Add Predict Application Screen
These four fields are split into modifiable and fixed fields. The Gen No only requires a value ifnames of migration events are to be generated.
The Prefix is a 1-3 character designation that functions as the higher level qualifier for the applic-ation in the generated migration event name. This value is set to the value of PRD for this type ofapplication.
The Level field reflects the current version of Predict that this installation of PAC is running. Thisfield is not modifiable.
TheGenNo (generation number) is a 5-digit numeric value ranging from 00000-99999. The startingvalue is set by entering a value in this field. If the number you enter contains fewer than 5 digits,the PAC system adds initial zeros. The value you enter is incremented by one for each migrationevent defined for the application to ensure a unique value for each event.
PAC User's Guide100
Applications

The Title field is optional. You can extend the name of the application by using this field. Selectionlist screens display the titles assigned to PAC entities. the title is free format; up to 60 charactersin length.
Step 3. Selecting Additional Options
Access the Additional Options window by typing over the default with Y (yes) or by pressing PF4(Opts). See the section Selecting Additional Options for more information on these options.
Step 4. Editing the General Defaults
In the Additional Options window enter Y (yes) to select the options youwish to edit as describedin the following step. The General Defaults are presented on the Application General Defaultsscreen:
14:51:29 *****PREDICT APPLICATION CONTROL******** 2000-02-25User VMU - Application General Defaults -
Application .. DEMO-PRD-APPLICATION
RetentionMinimum Current Versions .. __3Current Retention Period .. 180
Log All Object Purges ..... N
Command ===>Enter-PF1---PF2---PF3---PF4---PF5---PF6---PF7---PF8---PF9---PF10--PF11--PF12---
Help Menu Exit Opts Canc
101PAC User's Guide
Applications
Retention Options
These options are used to specify the number of object versions to be retained and the period ofretention before the Purge Object Version sub-function is invoked.
the number of object versions retained by PAC before the oldest version iseligible for automatic purging.
Minimum Current Versions
the number of days before an object version is eligible for automatic purging.Current Retention Period
Log All Object Purges Option
This option indicates whether all purges through the Purge Object Version function are to belogged in the object version audit trail. The default is N (no).
Overtype the default with Y (yes) if you want to create a log in the object version audit trail of theobjects purged with the Purge Object Version function.
Displaying/Modifying an Application
TheDisplay (non-modifiable) andModify screens are similar to theAddApplication screen. Referto the section Add (Define) an Application for more information.
Access the Display or Modify screens from the Application Menu by entering Code D (DisplayApplication) orM (ModifyApplication) and the application name.Alternatively, enter theDISPLAYor MODIFY direct commands on the command line of the relevant menus. PAC commands aredescribed in the PAC Reference Manual.
Selecting an Application from a List
You can display a list of existing applications by entering Code S (Select an Application from aList) on the Application Menu. Alternatively, enter the SELECT APPLICATION direct commandon the command line of theApplicationMenu. PAC commands are described in the PACReferenceManual.
The resulting Application Selection List screen lists the application name and title.
If you accessed the screen with the S sub-function or with the SELECT direct command for one ormore of the listed applications, youmay process the following sub-functions directly from the listby entering the Code for the sub-function in the "C" column:
Sub-FunctionCodeCopy an applicationCDisplay an applicationD
PAC User's Guide102
Applications
Sub-FunctionCodeLink an application to a statusLModify an applicationMPurge an applicationPSelect an applicationSStatuses linked to an applicationTReturn to the Application Maintenance Menu..
If you mark the status with the cursor or enter an X or an S in the "C" column, or if you enter theapplication number (from the "Nr" column) in the Mark Selection... field, the Application Menuappears with the specified status already displayed in the Application field.
Copying an Application
You can copy the application definition of one application to another and, optionally, copy theassociated application status links and migration paths. Application aliases are not copied.
1. To copy an application, enter Code C (Copy an Application), the name of the application to becopied, and a new name for the copy on the Application Menu. If you do not enter the nameof an application to be copied, PAC first presents a list of existing applications and you mustselect one to be copied by entering "C" next to the application.
You may also copy an application from the Selection Application List screen.
In both cases, the Copy Application screen appears:
103PAC User's Guide
Applications
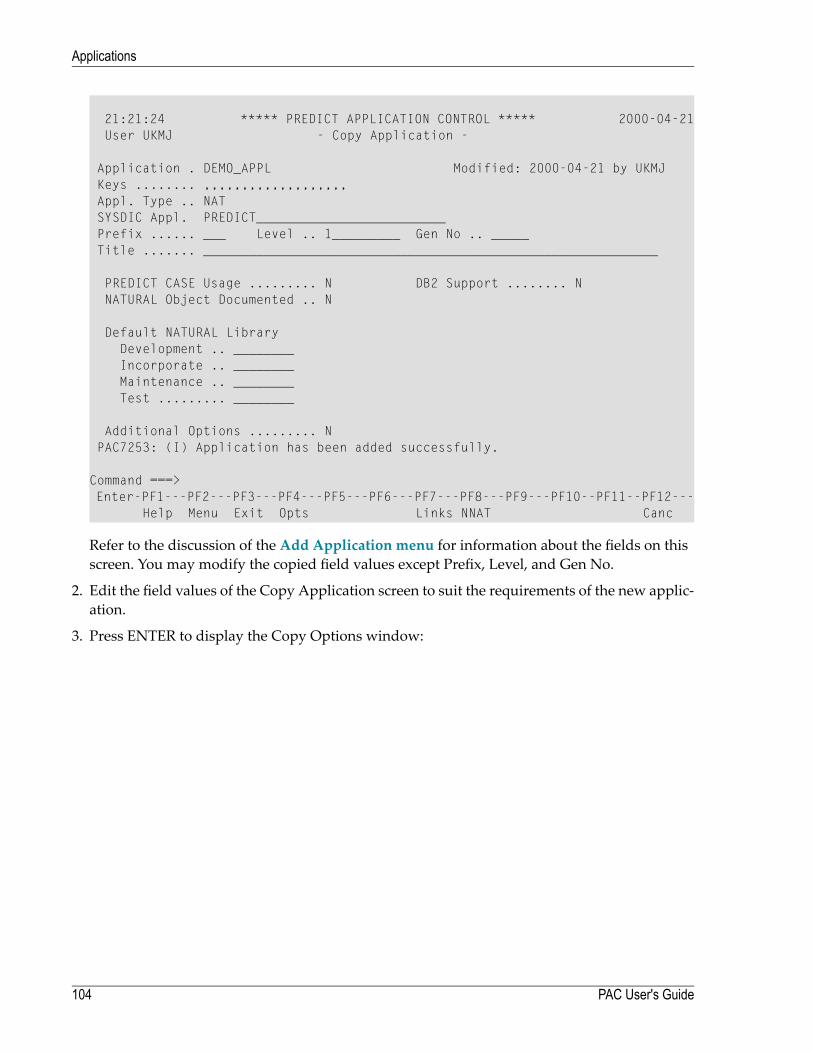
21:21:24 ***** PREDICT APPLICATION CONTROL ***** 2000-04-21User UKMJ - Copy Application -
Application . DEMO_APPL Modified: 2000-04-21 by UKMJKeys ........ ,,,,,,,,,,,,,,,,,,,Appl. Type .. NATSYSDIC Appl. PREDICT_________________________Prefix ...... ___ Level .. 1_________ Gen No .. _____Title ....... ____________________________________________________________
PREDICT CASE Usage ......... N DB2 Support ........ NNATURAL Object Documented .. N
Default NATURAL LibraryDevelopment .. ________Incorporate .. ________Maintenance .. ________Test ......... ________
Additional Options ......... NPAC7253: (I) Application has been added successfully.
Command ===>Enter-PF1---PF2---PF3---PF4---PF5---PF6---PF7---PF8---PF9---PF10--PF11--PF12---
Help Menu Exit Opts Links NNAT Canc
Refer to the discussion of the Add Application menu for information about the fields on thisscreen. You may modify the copied field values except Prefix, Level, and Gen No.
2. Edit the field values of the Copy Application screen to suit the requirements of the new applic-ation.
3. Press ENTER to display the Copy Options window:
PAC User's Guide104
Applications

14:21:57 ***** PREDICT APPLICATION CONTROL **** 2001-04-06User VMU - Copy Application - Application . DEMO_APPL Modified: 2001-04-06 by ↩VMU Keys ........ ,,,,,,,,,,,,,,,,,,, Appl. Type .. NAT SYSDIC Appl. PREDICT_________________________ Prefix ...... ___ Level .. 1_________ Gen No .. _____ Title ....... ____________________________________________________________ PREDICT CASE Usage .........+-----------------------------------------------+ NATURAL Object Documented ..| --- Copy Options --- | | | Default NATURAL Library | Application .. DEMO_APPL | Development .. ________ | | Incorporate .. ________ | Copy Application Status Link .. Y | Maintenance .. ________ | Copy Migration Path ........... Y | Test ......... ________ | | +-----------------------------------------------+ Additional Options ......... N PAC7253: (I) Application has been added successfully. Command ===> Enter-PF1---PF2---PF3---PF4---PF5---PF6---PF7---PF8---PF9---PF10--PF11--PF12--- Help Menu Exit Opts Links NNAT Canc ↩
The Copy Options are copied by default.
If you do not wish to copy the application status links or migration paths, type N (No) over theY defaults.
Note: Migration paths may only be copied if the application status links are also copied.
4. To copy the application status links and migration paths, press ENTER.
The following screens are those displayed if you elected to copy the application status linksand migration paths:
105PAC User's Guide
Applications
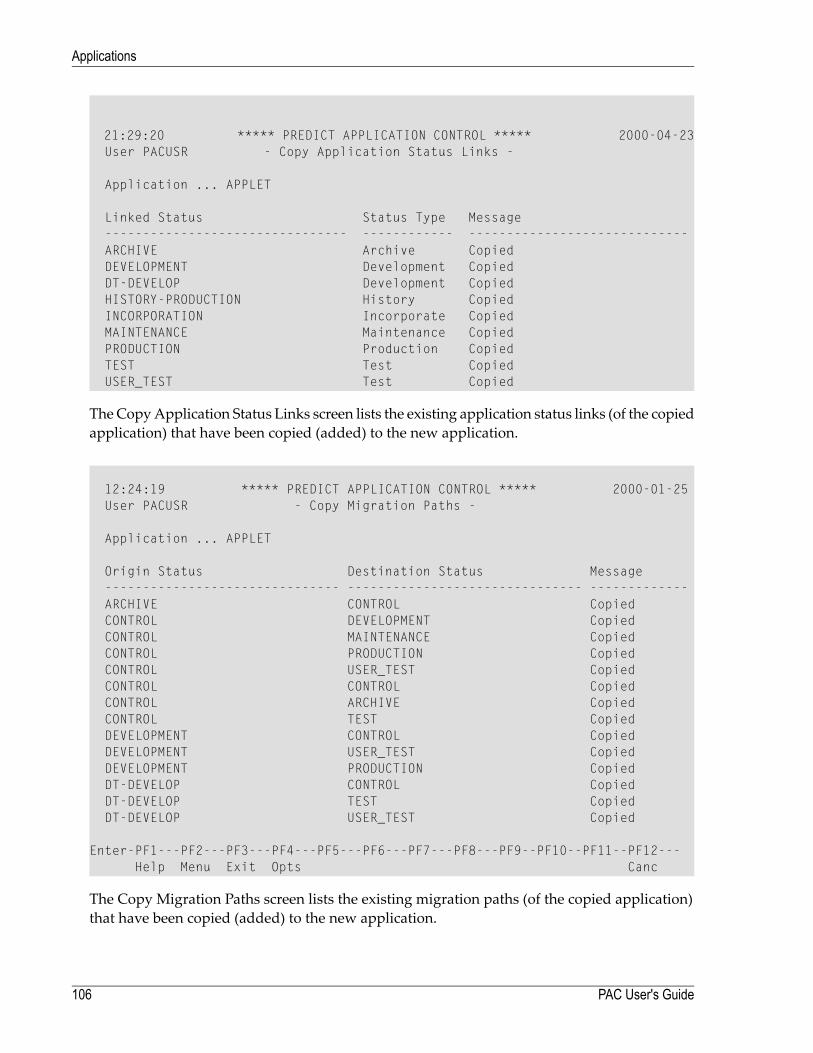
21:29:20 ***** PREDICT APPLICATION CONTROL ***** 2000-04-23User PACUSR - Copy Application Status Links -
Application ... APPLET
Linked Status Status Type Message-------------------------------- ------------ -----------------------------ARCHIVE Archive CopiedDEVELOPMENT Development CopiedDT-DEVELOP Development CopiedHISTORY-PRODUCTION History CopiedINCORPORATION Incorporate CopiedMAINTENANCE Maintenance CopiedPRODUCTION Production CopiedTEST Test CopiedUSER_TEST Test Copied
TheCopyApplication Status Links screen lists the existing application status links (of the copiedapplication) that have been copied (added) to the new application.
12:24:19 ***** PREDICT APPLICATION CONTROL ***** 2000-01-25User PACUSR - Copy Migration Paths -
Application ... APPLET
Origin Status Destination Status Message------------------------------- ------------------------------- -------------ARCHIVE CONTROL CopiedCONTROL DEVELOPMENT CopiedCONTROL MAINTENANCE CopiedCONTROL PRODUCTION CopiedCONTROL USER_TEST CopiedCONTROL CONTROL CopiedCONTROL ARCHIVE CopiedCONTROL TEST CopiedDEVELOPMENT CONTROL CopiedDEVELOPMENT USER_TEST CopiedDEVELOPMENT PRODUCTION CopiedDT-DEVELOP CONTROL CopiedDT-DEVELOP TEST CopiedDT-DEVELOP USER_TEST Copied
Enter-PF1---PF2---PF3---PF4---PF5---PF6---PF7---PF8---PF9--PF10--PF11--PF12---Help Menu Exit Opts Canc
The Copy Migration Paths screen lists the existing migration paths (of the copied application)that have been copied (added) to the new application.
PAC User's Guide106
Applications
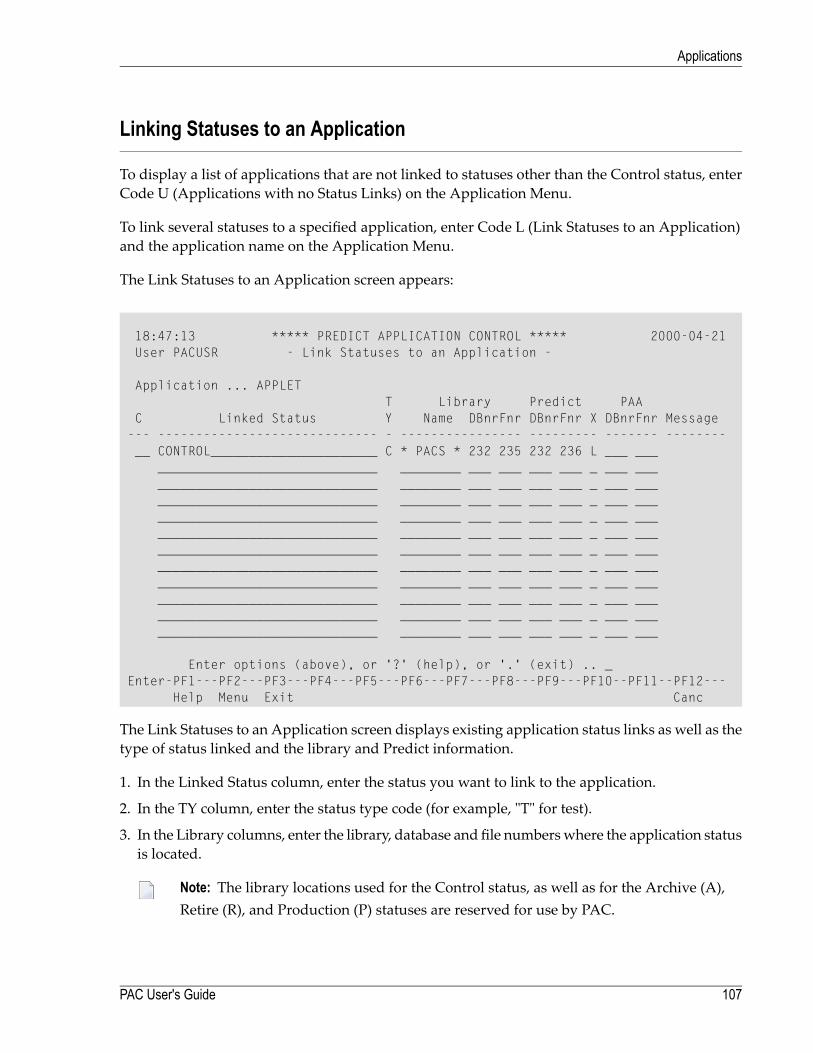
Linking Statuses to an Application
To display a list of applications that are not linked to statuses other than the Control status, enterCode U (Applications with no Status Links) on the Application Menu.
To link several statuses to a specified application, enter Code L (Link Statuses to an Application)and the application name on the Application Menu.
The Link Statuses to an Application screen appears:
18:47:13 ***** PREDICT APPLICATION CONTROL ***** 2000-04-21User PACUSR - Link Statuses to an Application -
Application ... APPLETT Library Predict PAA
C Linked Status Y Name DBnrFnr DBnrFnr X DBnrFnr Message--- ----------------------------- - ---------------- --------- ------- --------__ CONTROL______________________ C * PACS * 232 235 232 236 L ___ ___
_____________________________ ________ ___ ___ ___ ___ _ ___ ________________________________ ________ ___ ___ ___ ___ _ ___ ________________________________ ________ ___ ___ ___ ___ _ ___ ________________________________ ________ ___ ___ ___ ___ _ ___ ________________________________ ________ ___ ___ ___ ___ _ ___ ________________________________ ________ ___ ___ ___ ___ _ ___ ________________________________ ________ ___ ___ ___ ___ _ ___ ________________________________ ________ ___ ___ ___ ___ _ ___ ________________________________ ________ ___ ___ ___ ___ _ ___ ________________________________ ________ ___ ___ ___ ___ _ ___ ________________________________ ________ ___ ___ ___ ___ _ ___ ___
Enter options (above), or '?' (help), or '.' (exit) .. _Enter-PF1---PF2---PF3---PF4---PF5---PF6---PF7---PF8---PF9---PF10--PF11--PF12---
Help Menu Exit Canc
The Link Statuses to an Application screen displays existing application status links as well as thetype of status linked and the library and Predict information.
1. In the Linked Status column, enter the status you want to link to the application.
2. In the TY column, enter the status type code (for example, "T" for test).
3. In the Library columns, enter the library, database and file numberswhere the application statusis located.
Note: The library locations used for the Control status, as well as for the Archive (A),Retire (R), and Production (P) statuses are reserved for use by PAC.
107PAC User's Guide
Applications

4. In the Predict columns, enter the Predict database and file numbers where the cross-referencedata is stored.
Note: If no Predict database or file number are entered, the Predict Data database (DBnr)and file number (Fnr) display the values set when the application was defined. Youmayoverride these values.
5. In the Predict "Xr" column, enter the following cross-reference information: L (Local), R (Remote),B (Both), or N (None). Available options depend on the status type.
6. The PAA DBnr/Fnr field identifies the database number of the PAA file for application objectstransferred to this production status. This field is modifiable only for production type statuses;for all other statuses the field is write-protected.
The Message column displays messages relevant to sub-functions performed on the listedstatuses.
Refer to section Linking Applications and Statuses for information about linking statuses to anapplication.
Selecting Sub-Functions for Linked Statuses
1. To display the existing application status links for an application, enter Code T (Statuses Linkedto Application) on the Application Menu along with the application name.
The Statuses Linked to Application screen appears. It is similar to the Link Statuses to an Ap-plication screen. From this screen, youmay directly select additional sub-functions for statuseslinked to applications. The following table lists the sub-functions available:
Sub-FunctionCodeDisplay Application DefinitionAPDisplay Link DefinitionDIDisplay ForeignDNModify Link DefinitionMOPurge Link DefinitionPUDisplay Status DefinitionST
You may access an Options window listing available sub-functions and corresponding codesonline by marking the list entry with a ? or an asterisk (*) in the "C" column or by accessingHelp ( PF1 ).
2. To select a sub-function and display the corresponding sub-function screen, mark the desiredstatus in the "C" column with the appropriate two-character code, or enter the code on thecommand line of the Options window.
PAC User's Guide108
Applications
Purging an Application
To purge an application, enter Code P (Purge an Application) and the application name on theApplication Menu.
If versioned objects exist for the application under PAC control, the purge request is denied andthe following message is displayed:
"Objects exist for this application. Purge cannot be performed until the objects have been deletedusing the PAC Administrator Functions."
Otherwise, the Purge Confirmation window appears and reminds you that the associated applic-ation status links, migration path definitions, and file translation tables will also be purged.
From the Purge Confirmation window, you can
■ type Confirm or press PF5 to purge the application; or■ type a period (.) or press PF3 to return to theApplicationMenuwithout purging the application.
View Security Maintenance
A DDM is transferred to PAC
■ either via migration to the Predict application.■ or via generation atmigration time fromdevelopment ormaintenance to the Predict applicationof an Adabas or user file.
If a Natural object, which is being migrated from a development or maintenance to a non-Predictapplication, needs a DDM at compilation, a version of the DDMmust be available in the Predictapplication; if not, the compilation will fail. If a DDM is used at such a compilation, it is "linked"or "registered" to the application to which the compiled Natural object is migrated.
DDMs can be migrated from CONTROL to those applications to which they are registered, butnot from the Predict application.
The view security maintenance facilities allows you to
■ register aDDM to an application "by hand"without, or before, using theDDMat the compilationof a Natural object;
■ prohibit the use of all DDMs of a particular name during migrations to the location of a partic-ular application;
109PAC User's Guide
Applications
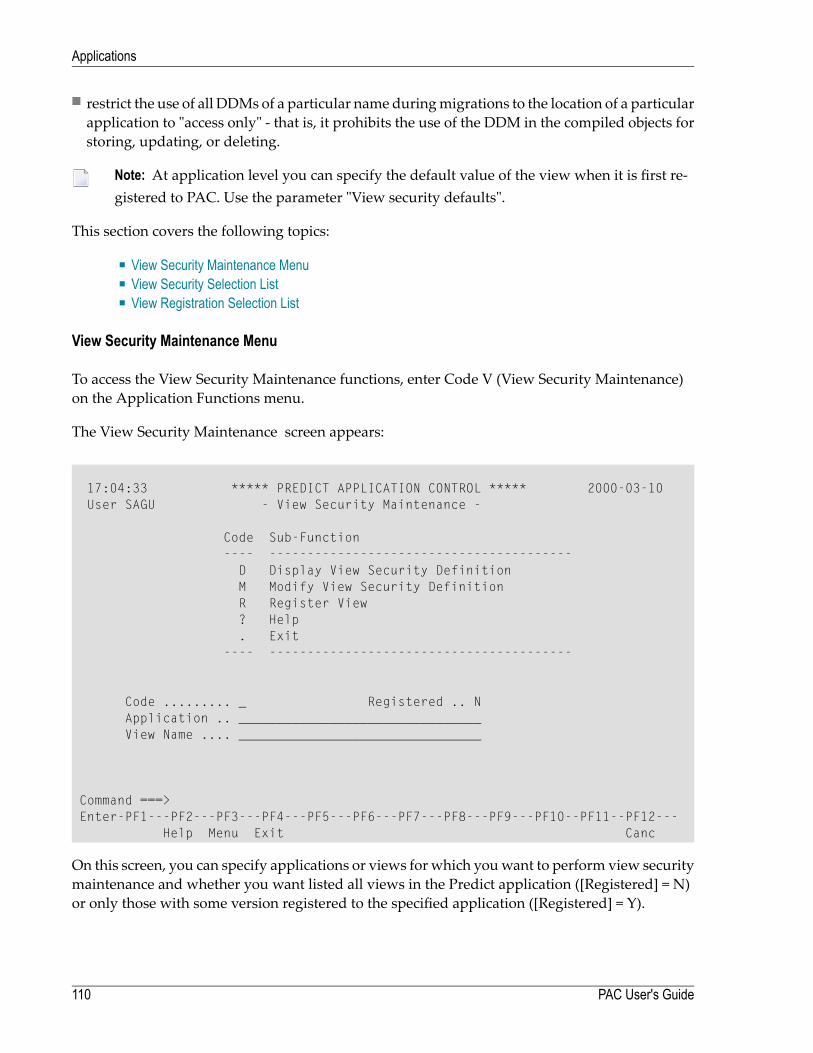
■ restrict the use of all DDMs of a particular name duringmigrations to the location of a particularapplication to "access only" - that is, it prohibits the use of the DDM in the compiled objects forstoring, updating, or deleting.
Note: At application level you can specify the default value of the view when it is first re-gistered to PAC. Use the parameter "View security defaults".
This section covers the following topics:
■ View Security Maintenance Menu■ View Security Selection List■ View Registration Selection List
View Security Maintenance Menu
To access the View Security Maintenance functions, enter Code V (View Security Maintenance)on the Application Functions menu.
The View Security Maintenance screen appears:
17:04:33 ***** PREDICT APPLICATION CONTROL ***** 2000-03-10User SAGU - View Security Maintenance -
Code Sub-Function---- ----------------------------------------D Display View Security DefinitionM Modify View Security DefinitionR Register View? Help. Exit
---- ----------------------------------------
Code ......... _ Registered .. NApplication .. ________________________________View Name .... ________________________________
Command ===>Enter-PF1---PF2---PF3---PF4---PF5---PF6---PF7---PF8---PF9---PF10--PF11--PF12---
Help Menu Exit Canc
On this screen, you can specify applications or views for which youwant to perform view securitymaintenance and whether you want listed all views in the Predict application ([Registered] = N)or only those with some version registered to the specified application ([Registered] = Y).
PAC User's Guide110
Applications

To display or modify a view security definition or register a view to an application, enter Code D(DisplayViewSecurityDefinition) orCodeM (ModifyViewSecurityDefinition) orCodeR (RegisterView). Use range notation in the fields Application or View Name to restrict the choice of applic-ations or views respectively.
If the Application field is left blank or "*", "<", or ">" is used in it and and if there is an applicationsatisfying the application selection criterion, an Applications window appears in which you canselect a single application.
The Registered field can take valuesN (the default) and Y. N stands for "list all views in the Predictapplication which satisfy the view selection criterion". Y stands for "list the views in the Predictapplication which satisfy the view selection criterion and are registered to the application".
View Security Selection List
To display or modify a view security definition, enter Code D orM on the View SecurityMainten-ance screen.
In either case, a View Security Selection List appears:
20:22:38 ***** PREDICT APPLICATION CONTROL ***** 2000-03-12User SAGU - View Security Selection List -Application .. HEATHERC Nr View Name DBid Fnr Usage State- -- --------------------------------- ----- ----- ---------- --------------_ 1 ES_FU_11 127 Access Registered_ 2 ES_FU_12 127 Update Registered_ 3 FUSER-127-ES 127 Disallowed_ 4 FUSER-127-ES-0 127 Disallowed Registered
Mark Selection, 'T' for (Top) or '.' to exit: _
Command ===>Enter-PF1---PF2---PF3---PF4---PF5---PF6---PF7---PF8---PF9---PF10--PF11--PF12---
Help Menu Exit -- + Canc
Its C fields are protected if it has come in response to Code D; these fields are unprotected if theyare in response to Code M.
The list contains DDM names, not versioned DDMs. The name of the application is displayed inthe third line of the screen.
111PAC User's Guide
Applications
For each view, the database and file numbers of its master file are listed. The number zero isblanked out. Each view ismarkedwith "Update", "Access", or "Disallowed" in the "Usage" column."Update" means that any version of the DDM can be used without restriction at the compilationsconcerning migrations to the application's compartment. "Access" means that such a compilationwill fail (NAT0975) if an object being compiled contains a STORE, UPDATE, or DELETE statementwhich uses the DDM. "Disallowed" means that such a compilation will fail (NAT0974) if an objectbeing compiled refers to the DDM.
"Registered" in the "State" column indicates that some version of the DDM has been registered tothe application.
A View Security Selection List screen with unprotected "C" fields allows you to modify the usagepermissions for the listed views. To assign a usage permission to a view, mark its entry with Ufor "Update', A' for "Access", or D for "Disallowed".
Note: Marking a view's entry with U or A also causes the view to be immediately registeredto the application.
Press ENTER to confirm the modifications. Enter a period (.) in the "Mark Selection" field or pressPF3 (Exit) to abandon the latest (following the last pressing of ENTER) modifications and returnto the View Security Maintenance screen.
View Registration Selection List
To register versioned DDMs to an application, enter Code on the View Security Maintenancescreen.
A View Registration Selection List screen appears:
PAC User's Guide112
Applications
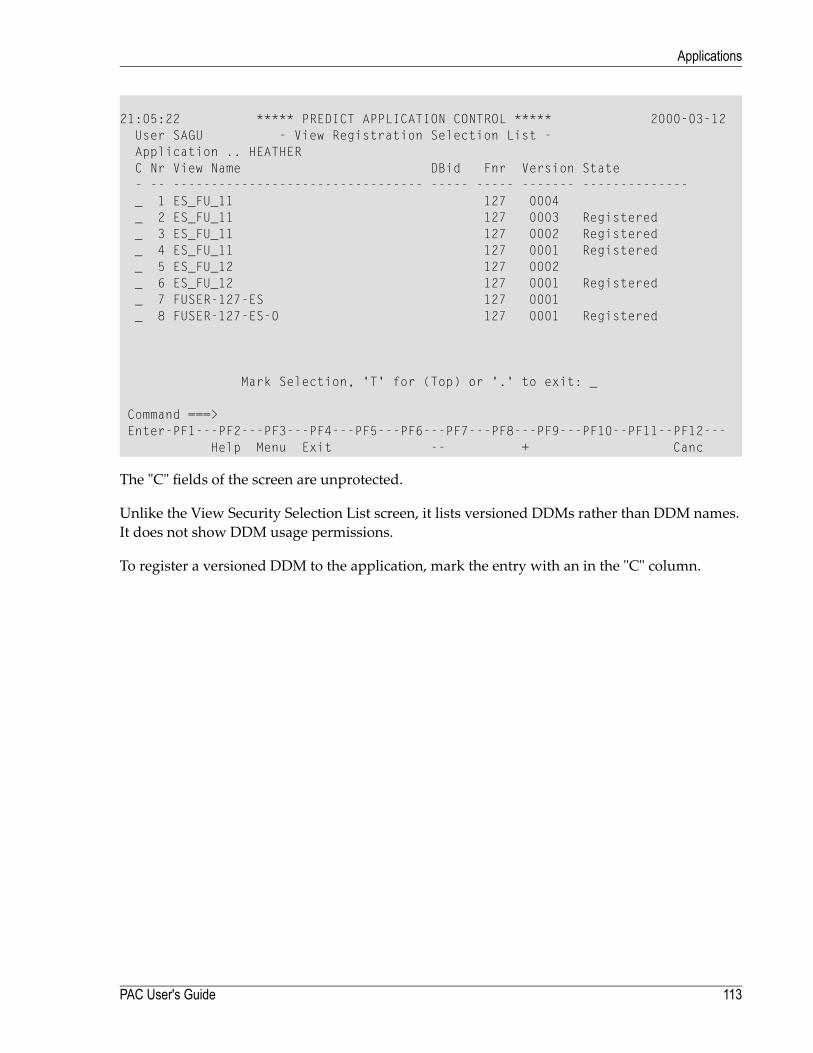
21:05:22 ***** PREDICT APPLICATION CONTROL ***** 2000-03-12User SAGU - View Registration Selection List -Application .. HEATHERC Nr View Name DBid Fnr Version State- -- --------------------------------- ----- ----- ------- --------------_ 1 ES_FU_11 127 0004_ 2 ES_FU_11 127 0003 Registered_ 3 ES_FU_11 127 0002 Registered_ 4 ES_FU_11 127 0001 Registered_ 5 ES_FU_12 127 0002_ 6 ES_FU_12 127 0001 Registered_ 7 FUSER-127-ES 127 0001_ 8 FUSER-127-ES-0 127 0001 Registered
Mark Selection, 'T' for (Top) or '.' to exit: _
Command ===>Enter-PF1---PF2---PF3---PF4---PF5---PF6---PF7---PF8---PF9---PF10--PF11--PF12---
Help Menu Exit -- + Canc
The "C" fields of the screen are unprotected.
Unlike the View Security Selection List screen, it lists versioned DDMs rather than DDM names.It does not show DDM usage permissions.
To register a versioned DDM to the application, mark the entry with an in the "C" column.
113PAC User's Guide
Applications

114
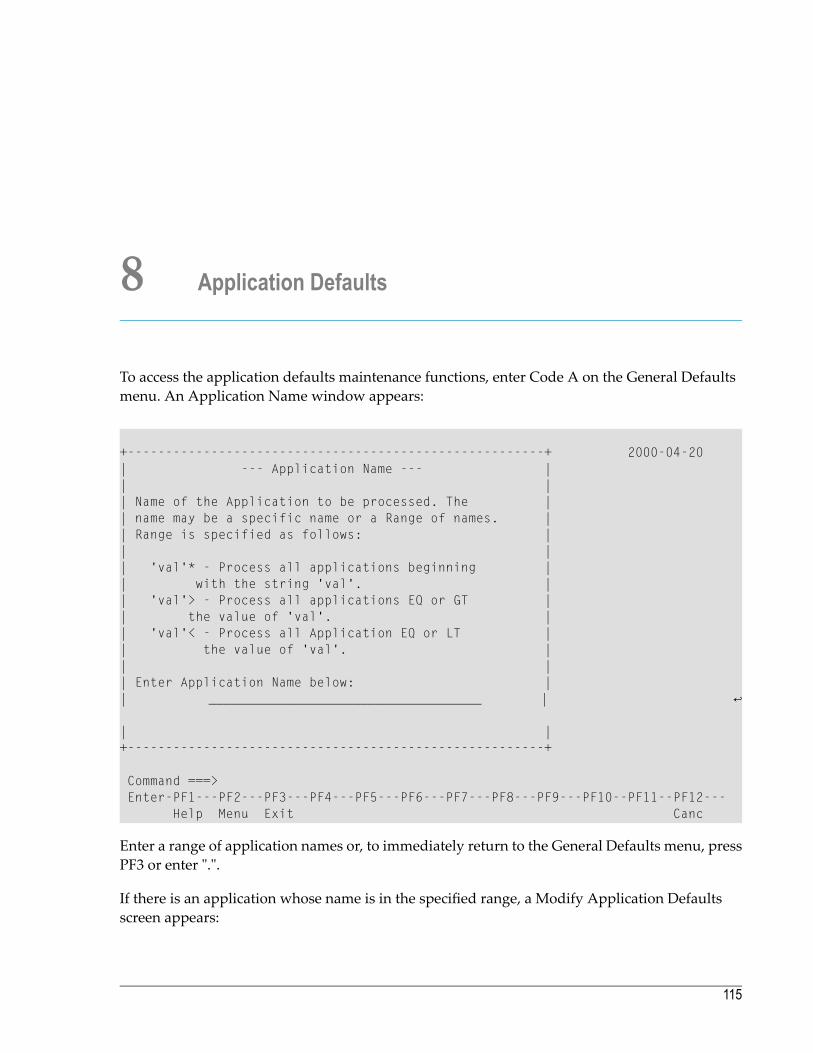
8 Application Defaults
To access the application defaults maintenance functions, enter Code A on the General Defaultsmenu. An Application Name window appears:
+-------------------------------------------------------+ 2000-04-20| --- Application Name --- | | | | Name of the Application to be processed. The | | name may be a specific name or a Range of names. | | Range is specified as follows: | | | | 'val'* - Process all applications beginning | | with the string 'val'. | | 'val'> - Process all applications EQ or GT | | the value of 'val'. | | 'val'< - Process all Application EQ or LT | | the value of 'val'. | | | | Enter Application Name below: | | ____________________________________ | ↩ | | +-------------------------------------------------------+
Command ===> Enter-PF1---PF2---PF3---PF4---PF5---PF6---PF7---PF8---PF9---PF10--PF11--PF12--- Help Menu Exit Canc
Enter a range of application names or, to immediately return to the General Defaults menu, pressPF3 or enter ".".
If there is an application whose name is in the specified range, a Modify Application Defaultsscreen appears:
115

17:42:39 ***** PREDICT APPLICATION CONTROL ***** 2000-04-20User SAGU - Modify Application Defaults -
Application Name Level Level Name Prefix Gen No MCG-------------------------------- ----- ---------- ------ ------ ----CLOVER 00001 1_________ CLO ___14 ____FURZE 00001 1_________ ___ _____ ____HEATHER 00001 1_________ ___ ____1 ____MOSS 00001 1_________ ___ _____ ____PREDICT 00001 3.4_______ PRD ____1 ____PREDICT_CASE 00001 2.3.1_____ PCA _____ ____
Press ENTER to continue or '.' to exit: __
Command ===>Enter-PF1---PF2---PF3---PF4---PF5---PF6---PF7---PF8---PF9---PF10--PF11--PF12---
Help Menu Exit -- + Canc
If there is no application whose name is in the specified range, the General Defaults menu is re-displayed with a message.
The values of fields Level Name, Prefix, Gen No, and MCG of each listed application can bemodified. They can also bemodified at applicationmodification in the Reporting andMaintenancesubsystem of PAC.
The LevelNamefieldswill take any character string values, whereby lower-case letters are replacedwith their upper-case counterparts. The value of an application's Level Name field appears on thescreens and displays the attributes of the application; it has no other significance.
The values of Prefix (a string of 1 to 3 characters) and Gen No (an unsigned integer automaticallyconverted to a five digit sequence) are concatenated to replace "@GEN" atmigration event addition.The value of Gen No is automatically incremented by one at the addition for the application of anevent with sub-segment "@GEN" in its name. The values of Prefix and Gen No can be freelychanged. Duplicate event names and event names beginning with digits are rejected at event ad-dition - regardless ofwhether they have been entered in full by the user or have undergone "@GEN"replacement.
The value of an application'sMGCfieldmay affect the compilation of Natural objects at migrationto the application's compartment.
The MCG option is a Natural profile parameter which activates the Natural Optimizer Compiler,which must be installed in your environment if you are using this option. Natural Optimizer
PAC User's Guide116
Application Defaults
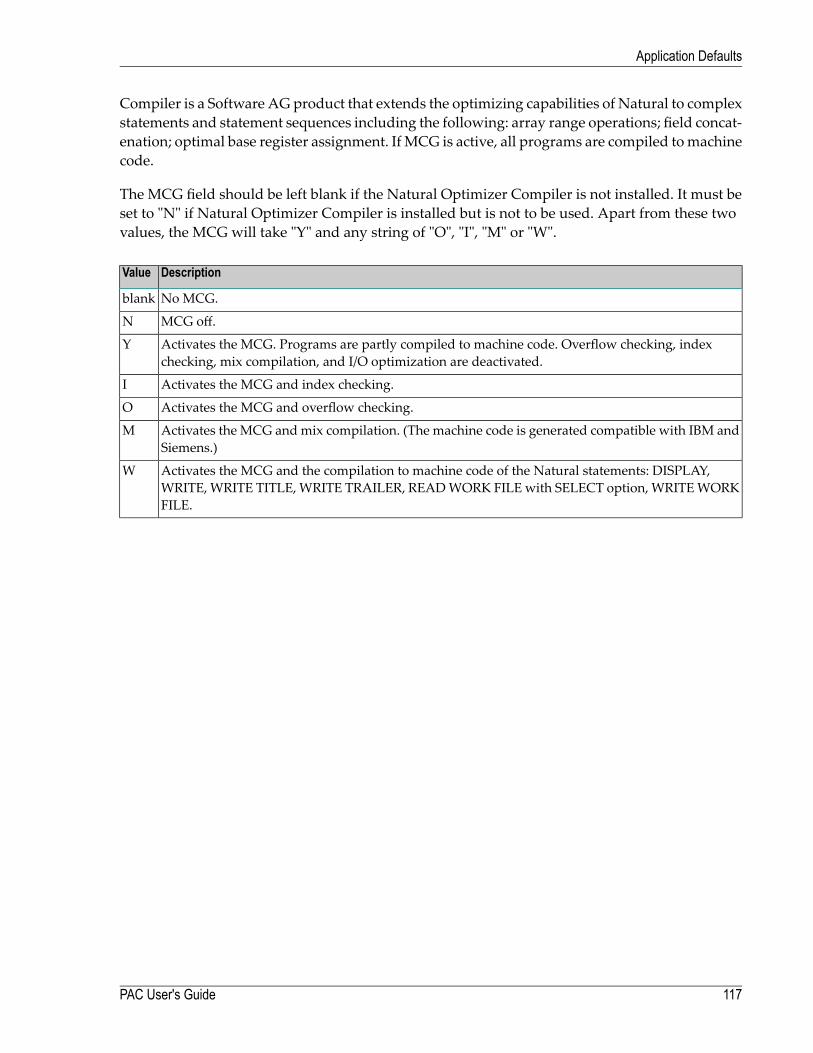
Compiler is a Software AG product that extends the optimizing capabilities of Natural to complexstatements and statement sequences including the following: array range operations; field concat-enation; optimal base register assignment. If MCG is active, all programs are compiled tomachinecode.
The MCG field should be left blank if the Natural Optimizer Compiler is not installed. It must beset to "N" if Natural Optimizer Compiler is installed but is not to be used. Apart from these twovalues, the MCG will take "Y" and any string of "O", "I", "M" or "W".
DescriptionValue
No MCG.blank
MCG off.N
Activates the MCG. Programs are partly compiled to machine code. Overflow checking, indexchecking, mix compilation, and I/O optimization are deactivated.
Y
Activates the MCG and index checking.I
Activates the MCG and overflow checking.O
Activates the MCG and mix compilation. (The machine code is generated compatible with IBM andSiemens.)
M
Activates the MCG and the compilation to machine code of the Natural statements: DISPLAY,WRITE, WRITE TITLE, WRITE TRAILER, READWORK FILE with SELECT option, WRITEWORKFILE.
W
117PAC User's Guide
Application Defaults

118
9 Linking Applications and Statuses
■ Screens Used to Define Application Status Links ................................................................................. 121■ Adding an Individual Application Status Link ........................................................................................ 122■ Linking Multiple Statuses or Applications ............................................................................................ 129■ Selecting an Application Status Link .................................................................................................. 131■ Modifying Application Status Links .................................................................................................... 133■ Purging an Application Status Link .................................................................................................... 135■ Displaying an Application Status Link ................................................................................................. 135■ Displaying Objects for an Application Status ........................................................................................ 136■ Displaying an Object Version Audit History .......................................................................................... 140■ Displaying Predict Cross-Reference Data ........................................................................................... 142
119
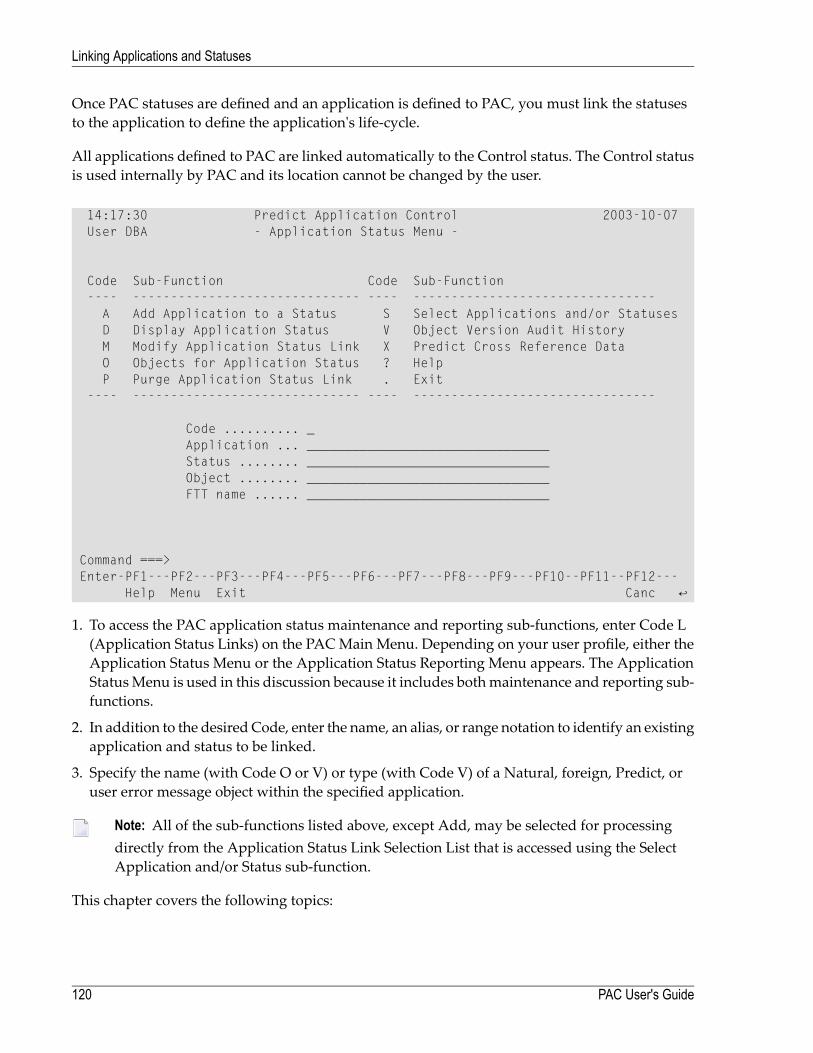
Once PAC statuses are defined and an application is defined to PAC, you must link the statusesto the application to define the application's life-cycle.
All applications defined to PAC are linked automatically to the Control status. The Control statusis used internally by PAC and its location cannot be changed by the user.
14:17:30 Predict Application Control 2003-10-07 User DBA - Application Status Menu - Code Sub-Function Code Sub-Function ---- ------------------------------ ---- -------------------------------- A Add Application to a Status S Select Applications and/or Statuses D Display Application Status V Object Version Audit History M Modify Application Status Link X Predict Cross Reference Data O Objects for Application Status ? Help P Purge Application Status Link . Exit ---- ------------------------------ ---- -------------------------------- Code .......... _ Application ... ________________________________ Status ........ ________________________________ Object ........ ________________________________ FTT name ...... ________________________________ Command ===> Enter-PF1---PF2---PF3---PF4---PF5---PF6---PF7---PF8---PF9---PF10--PF11--PF12--- Help Menu Exit Canc ↩
1. To access the PAC application status maintenance and reporting sub-functions, enter Code L(Application Status Links) on the PACMain Menu. Depending on your user profile, either theApplication Status Menu or the Application Status Reporting Menu appears. The ApplicationStatusMenu is used in this discussion because it includes bothmaintenance and reporting sub-functions.
2. In addition to the desiredCode, enter the name, an alias, or range notation to identify an existingapplication and status to be linked.
3. Specify the name (with Code O or V) or type (with Code V) of a Natural, foreign, Predict, oruser error message object within the specified application.
Note: All of the sub-functions listed above, except Add, may be selected for processingdirectly from the Application Status Link Selection List that is accessed using the SelectApplication and/or Status sub-function.
This chapter covers the following topics:
PAC User's Guide120
Linking Applications and Statuses
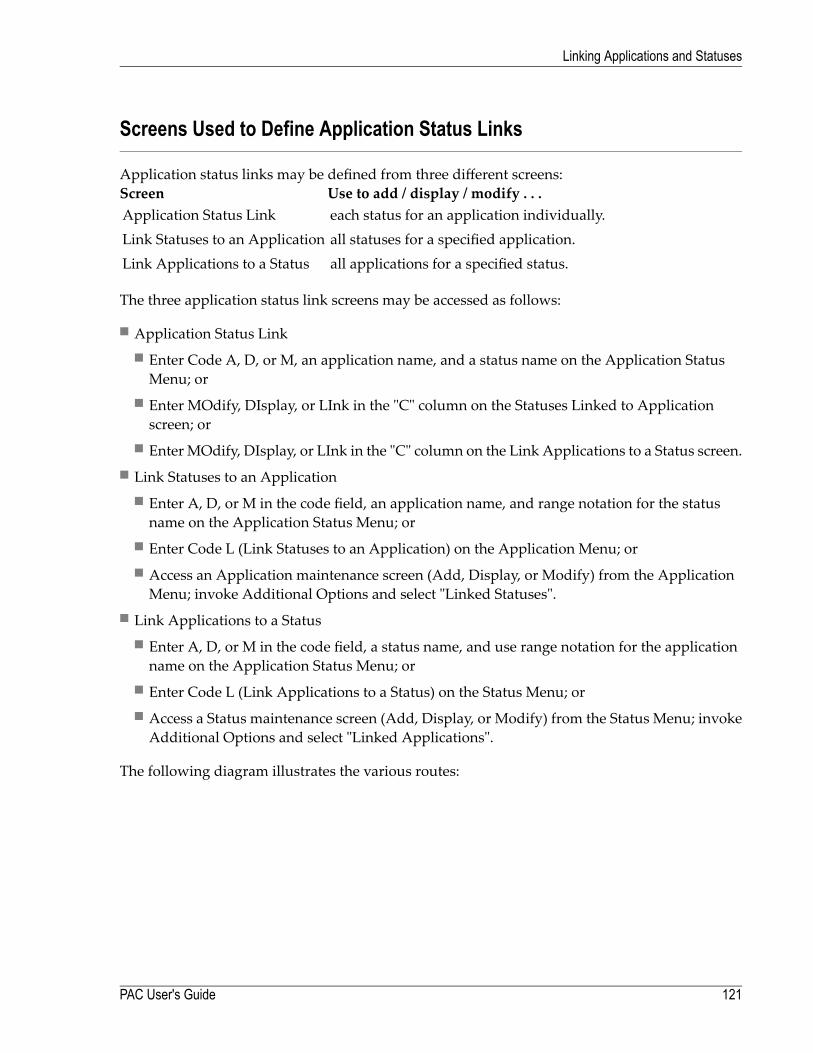
Screens Used to Define Application Status Links
Application status links may be defined from three different screens:Use to add / display / modify . . .Screeneach status for an application individually.Application Status Linkall statuses for a specified application.Link Statuses to an Applicationall applications for a specified status.Link Applications to a Status
The three application status link screens may be accessed as follows:
■ Application Status Link■ Enter Code A, D, or M, an application name, and a status name on the Application StatusMenu; or
■ Enter MOdify, DIsplay, or LInk in the "C" column on the Statuses Linked to Applicationscreen; or
■ Enter MOdify, DIsplay, or LInk in the "C" column on the Link Applications to a Status screen.■ Link Statuses to an Application
■ Enter A, D, or M in the code field, an application name, and range notation for the statusname on the Application Status Menu; or
■ Enter Code L (Link Statuses to an Application) on the Application Menu; or■ Access an Application maintenance screen (Add, Display, or Modify) from the ApplicationMenu; invoke Additional Options and select "Linked Statuses".
■ Link Applications to a Status■ Enter A, D, or M in the code field, a status name, and use range notation for the applicationname on the Application Status Menu; or
■ Enter Code L (Link Applications to a Status) on the Status Menu; or■ Access a Status maintenance screen (Add, Display, or Modify) from the Status Menu; invokeAdditional Options and select "Linked Applications".
The following diagram illustrates the various routes:
121PAC User's Guide
Linking Applications and Statuses
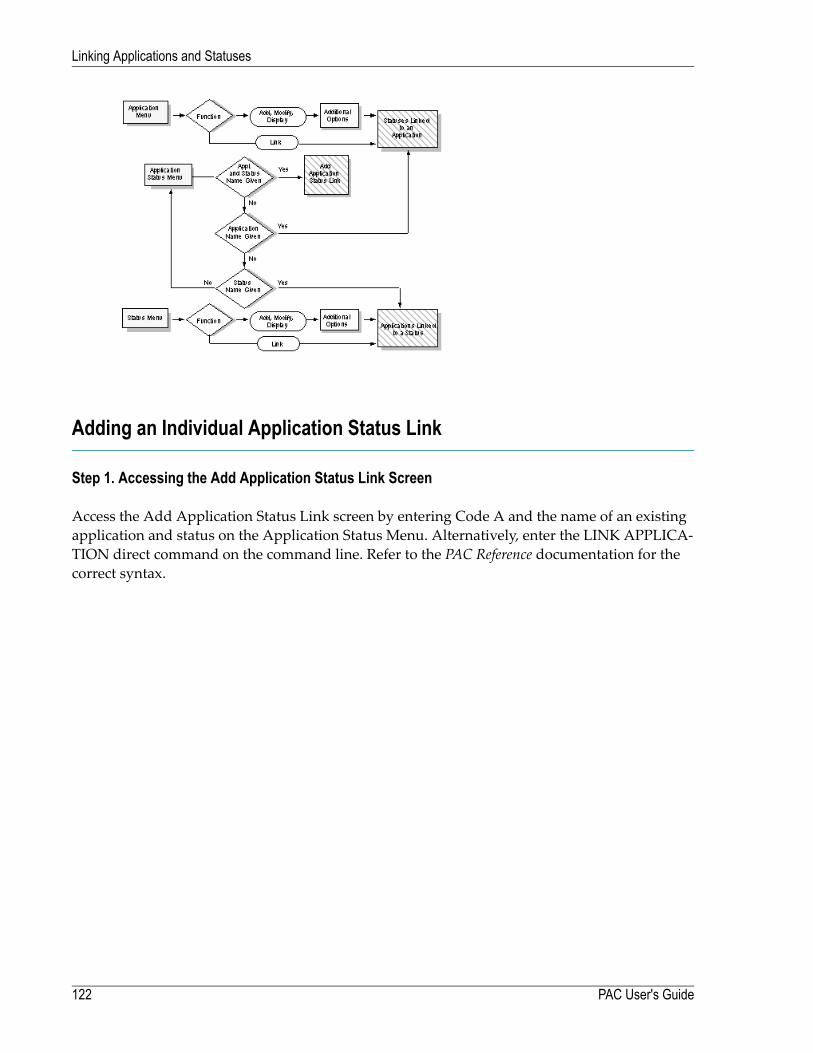
Adding an Individual Application Status Link
Step 1. Accessing the Add Application Status Link Screen
Access the Add Application Status Link screen by entering Code A and the name of an existingapplication and status on the Application Status Menu. Alternatively, enter the LINK APPLICA-TION direct command on the command line. Refer to the PAC Reference documentation for thecorrect syntax.
PAC User's Guide122
Linking Applications and Statuses
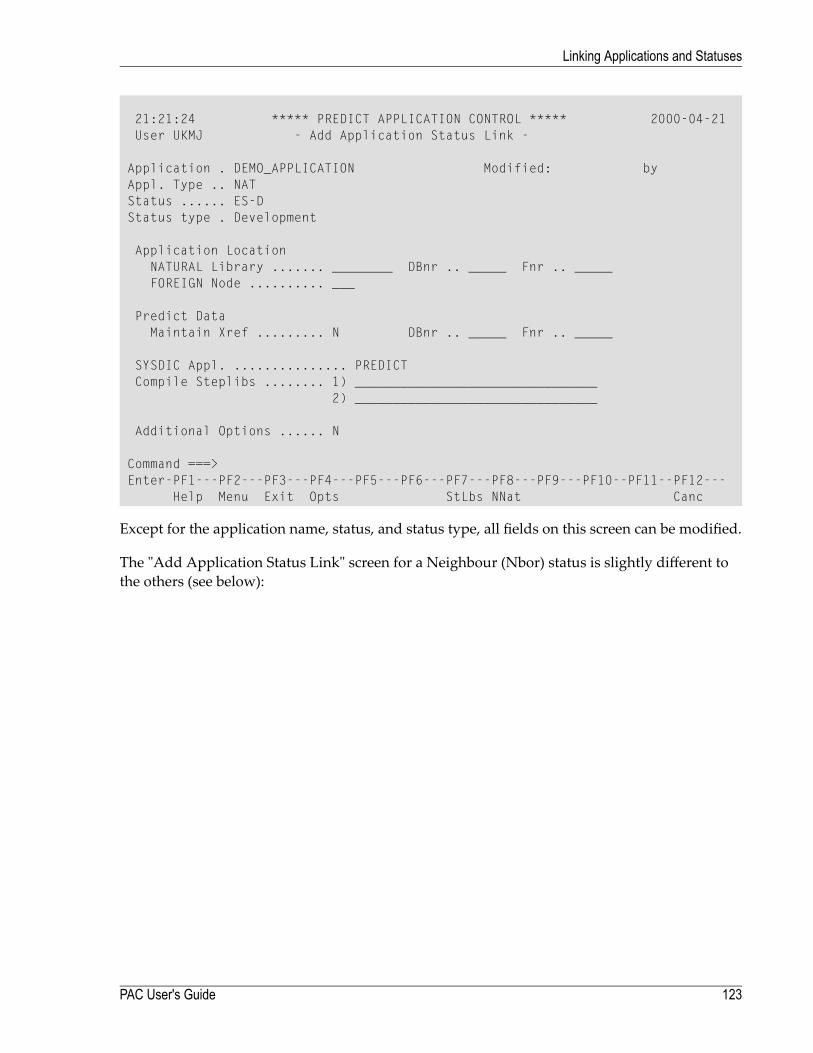
21:21:24 ***** PREDICT APPLICATION CONTROL ***** 2000-04-21User UKMJ - Add Application Status Link -
Application . DEMO_APPLICATION Modified: byAppl. Type .. NATStatus ...... ES-DStatus type . Development
Application LocationNATURAL Library ....... ________ DBnr .. _____ Fnr .. _____FOREIGN Node .......... ___
Predict DataMaintain Xref ......... N DBnr .. _____ Fnr .. _____
SYSDIC Appl. ............... PREDICTCompile Steplibs ........ 1) ________________________________
2) ________________________________
Additional Options ...... N
Command ===>Enter-PF1---PF2---PF3---PF4---PF5---PF6---PF7---PF8---PF9---PF10--PF11--PF12---
Help Menu Exit Opts StLbs NNat Canc
Except for the application name, status, and status type, all fields on this screen can be modified.
The "Add Application Status Link" screen for a Neighbour (Nbor) status is slightly different tothe others (see below):
123PAC User's Guide
Linking Applications and Statuses
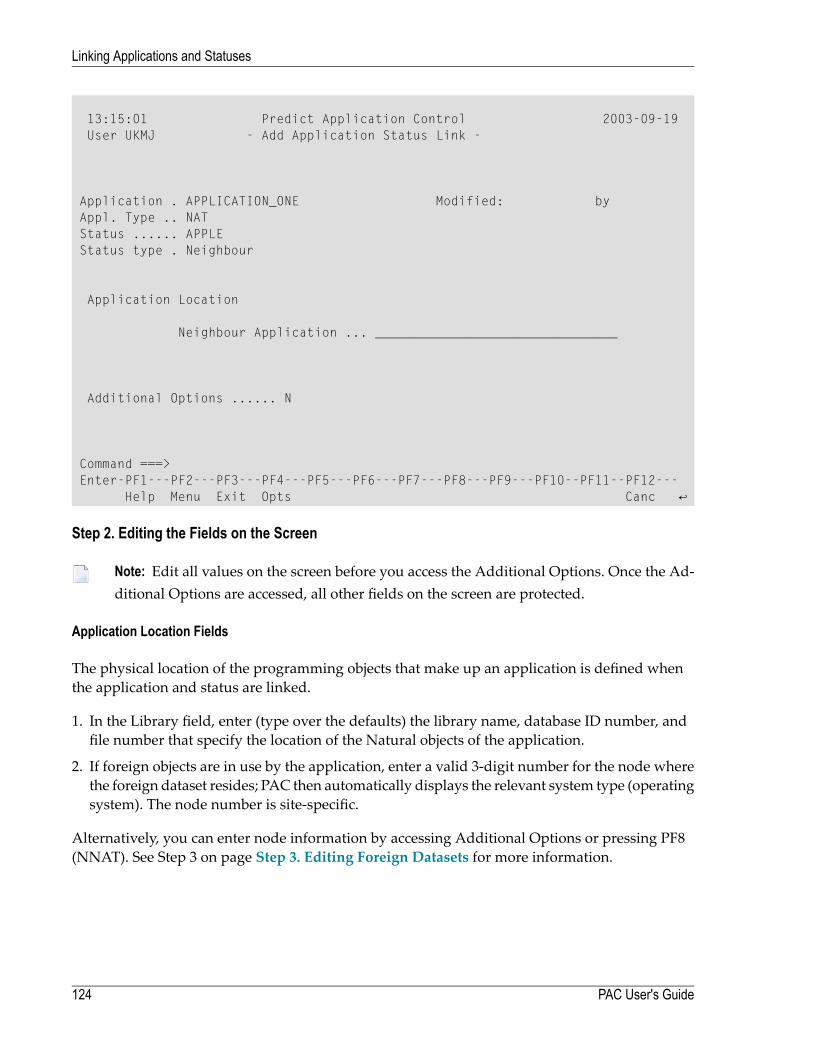
13:15:01 Predict Application Control 2003-09-19 User UKMJ - Add Application Status Link - Application . APPLICATION_ONE Modified: by Appl. Type .. NAT Status ...... APPLE Status type . Neighbour Application Location Neighbour Application ... ________________________________ Additional Options ...... N Command ===> Enter-PF1---PF2---PF3---PF4---PF5---PF6---PF7---PF8---PF9---PF10--PF11--PF12--- Help Menu Exit Opts Canc ↩
Step 2. Editing the Fields on the Screen
Note: Edit all values on the screen before you access the Additional Options. Once the Ad-ditional Options are accessed, all other fields on the screen are protected.
Application Location Fields
The physical location of the programming objects that make up an application is defined whenthe application and status are linked.
1. In the Library field, enter (type over the defaults) the library name, database ID number, andfile number that specify the location of the Natural objects of the application.
2. If foreign objects are in use by the application, enter a valid 3-digit number for the node wherethe foreign dataset resides; PAC then automatically displays the relevant system type (operatingsystem). The node number is site-specific.
Alternatively, you can enter node information by accessing Additional Options or pressing PF8(NNAT). See Step 3 on page Step 3. Editing Foreign Datasets for more information.
PAC User's Guide124
Linking Applications and Statuses
Predict Data Fields
1. In the Maintain Xref field, enter one of the following options:
DescriptionLocationCode
Cross-reference data is stored within PAC.LocalL
Cross-reference data is copied to the Predict file specified by the application status link.RemoteR
Cross-reference data is stored within PAC (Local) and is also copied to the Predict filespecified by the application status link (Remote).
BothB
No cross-reference data is maintained.NoneN
Available options depend on the status type.
2. Enter the Predict database ID number (DBnr) and file number (Fnr) that specify the storagelocation of cross-reference information for the application.
Translation Table Fields
1. In the Translation Table field, enter the name of a new or existing file translation table (FTT)that will be invoked when objects are migrated into the status specified on this screen.■ If an existing FTT is specified, PAC automatically assigns the Shared option if it was specifiedwhen the FTT was originally defined. In this case, the Shared option field is protected; thevalue cannot be modified.
For an existing FTT, the Shared option may be specified on this screen only if the status wasnot specified when the FTT was originally defined.
■ If a new name is specified, a "dormant" FTT is created. The name you specify is entered onthe FTT list without a version number assigned to it. You must define this dormant FTT laterusing the Modify File Translation Table sub-function.
If you specify a new FTT, you must specify the Shared option. If you fail to do so, the followingmessage appears:
"New transfer table - enter table type."
2. In the Shared field, enter Y (Yes) to allow this FTT to be used by other application status links;enter N (No) to specify that the FTT is not to be shared.■ Verifies that the FTT is not already in use by another application status link. If the specifiedFTT is already in use by another application status link and identified as not shared ("N" inthe Shared Table field), the use of this FTT by this application status link is rejected.
■ Processes the Shared Option as instructed for this application status link if the FTT is notused by another application status link.
125PAC User's Guide
Linking Applications and Statuses

Compile Steplibs Fields
This option is available only for migrations from development or maintenance statuses, or foralignment (Control to Control). A maximum of eight compile steplibs may be specified.
On this screen, you can enter the names of two applications within the PAC system that containsubordinate objects (copycode, maps, data areas) required during compilation. You can specifyup to six additional application steplibs by accessingAdditionalOptions or by pressing PF7 (StLbs).
Test Connection to External Version Control Software
This option is available onlywhen adding ormodifying an application status link of type External.
09:52:23 *** PREDICT APPLICATION CONTROL *** 2008-11-05 User HNO - Add Application Status Link - Application . AAA Added: 2008-10-14 by HNO Appl. Type .. NAT Status ...... HEB_EXT Status type . External Access User ID ... ________________________________________________________________ Password .. Server Encoding .. ________________________________________________________________ SYSDIC Appl. ............... PREDICT Compile Steplibs ........ 1) ________________________________ 2) ________________________________ Additional Options ...... N Command ===> Enter-PF1---PF2---PF3---PF4---PF5---PF6---PF7---PF8---PF9---PF10--PF11--PF12--- Help Menu Exit Opts StLbs Test Canc ↩
On this screen, you can enter theURL that is used to connect to the external version control softwarewith a given user ID and password. Press PF10 to test the connection.
PAC User's Guide126
Linking Applications and Statuses
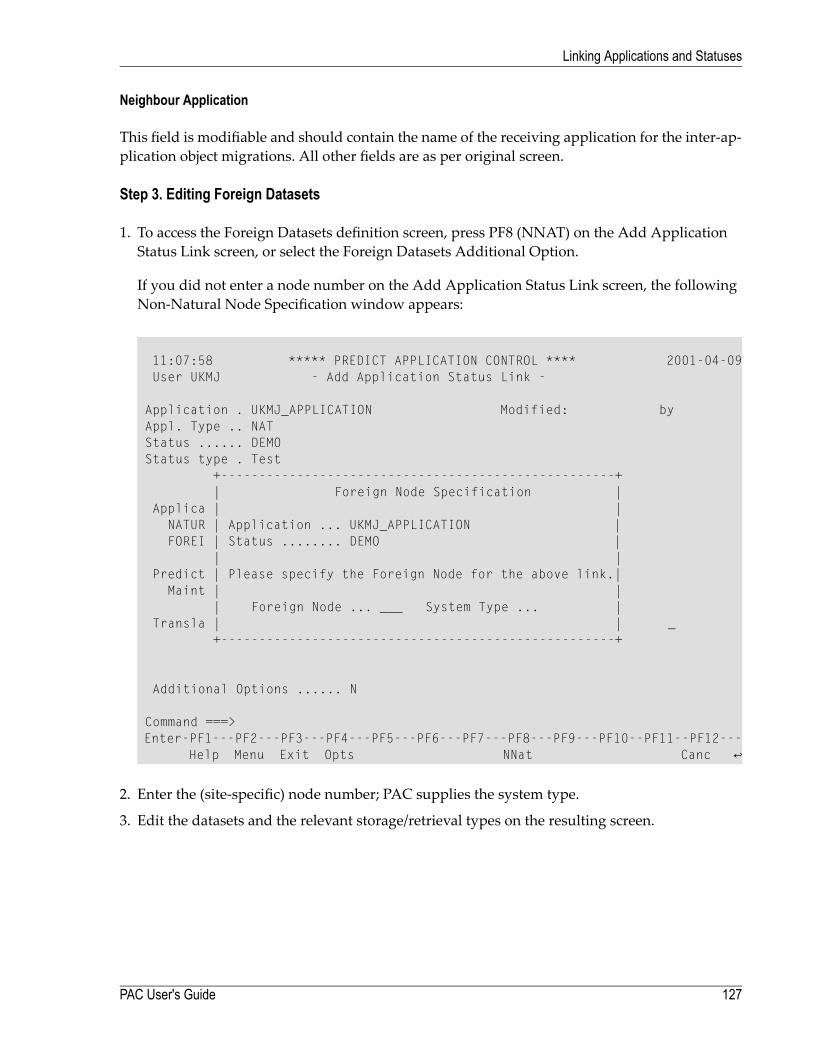
Neighbour Application
This field is modifiable and should contain the name of the receiving application for the inter-ap-plication object migrations. All other fields are as per original screen.
Step 3. Editing Foreign Datasets
1. To access the Foreign Datasets definition screen, press PF8 (NNAT) on the Add ApplicationStatus Link screen, or select the Foreign Datasets Additional Option.
If you did not enter a node number on the Add Application Status Link screen, the followingNon-Natural Node Specification window appears:
11:07:58 ***** PREDICT APPLICATION CONTROL **** 2001-04-09 User UKMJ - Add Application Status Link - Application . UKMJ_APPLICATION Modified: by Appl. Type .. NAT Status ...... DEMO Status type . Test +----------------------------------------------------+ | Foreign Node Specification | Applica | | NATUR | Application ... UKMJ_APPLICATION | FOREI | Status ........ DEMO | | | Predict | Please specify the Foreign Node for the above link.| Maint | | | Foreign Node ... ___ System Type ... | Transla | | _ +----------------------------------------------------+ Additional Options ...... N Command ===> Enter-PF1---PF2---PF3---PF4---PF5---PF6---PF7---PF8---PF9---PF10--PF11--PF12--- Help Menu Exit Opts NNat Canc ↩
2. Enter the (site-specific) node number; PAC supplies the system type.
3. Edit the datasets and the relevant storage/retrieval types on the resulting screen.
127PAC User's Guide
Linking Applications and Statuses
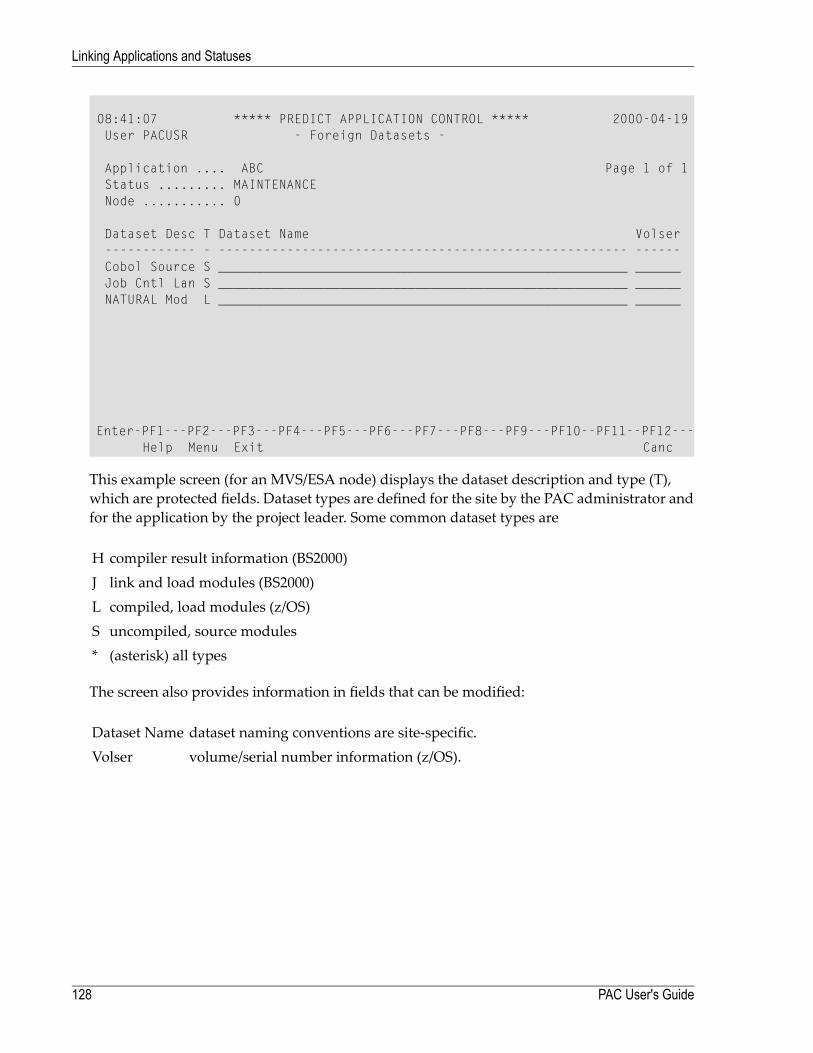
08:41:07 ***** PREDICT APPLICATION CONTROL ***** 2000-04-19User PACUSR - Foreign Datasets -
Application .... ABC Page 1 of 1Status ......... MAINTENANCENode ........... 0
Dataset Desc T Dataset Name Volser------------ - ------------------------------------------------------ ------Cobol Source S ______________________________________________________ ______Job Cntl Lan S ______________________________________________________ ______NATURAL Mod L ______________________________________________________ ______
Enter-PF1---PF2---PF3---PF4---PF5---PF6---PF7---PF8---PF9---PF10--PF11--PF12---Help Menu Exit Canc
This example screen (for an MVS/ESA node) displays the dataset description and type (T),which are protected fields. Dataset types are defined for the site by the PAC administrator andfor the application by the project leader. Some common dataset types are
compiler result information (BS2000)Hlink and load modules (BS2000)Jcompiled, load modules (z/OS)Luncompiled, source modulesS(asterisk) all types*
The screen also provides information in fields that can be modified:
dataset naming conventions are site-specific.Dataset Namevolume/serial number information (z/OS).Volser
PAC User's Guide128
Linking Applications and Statuses
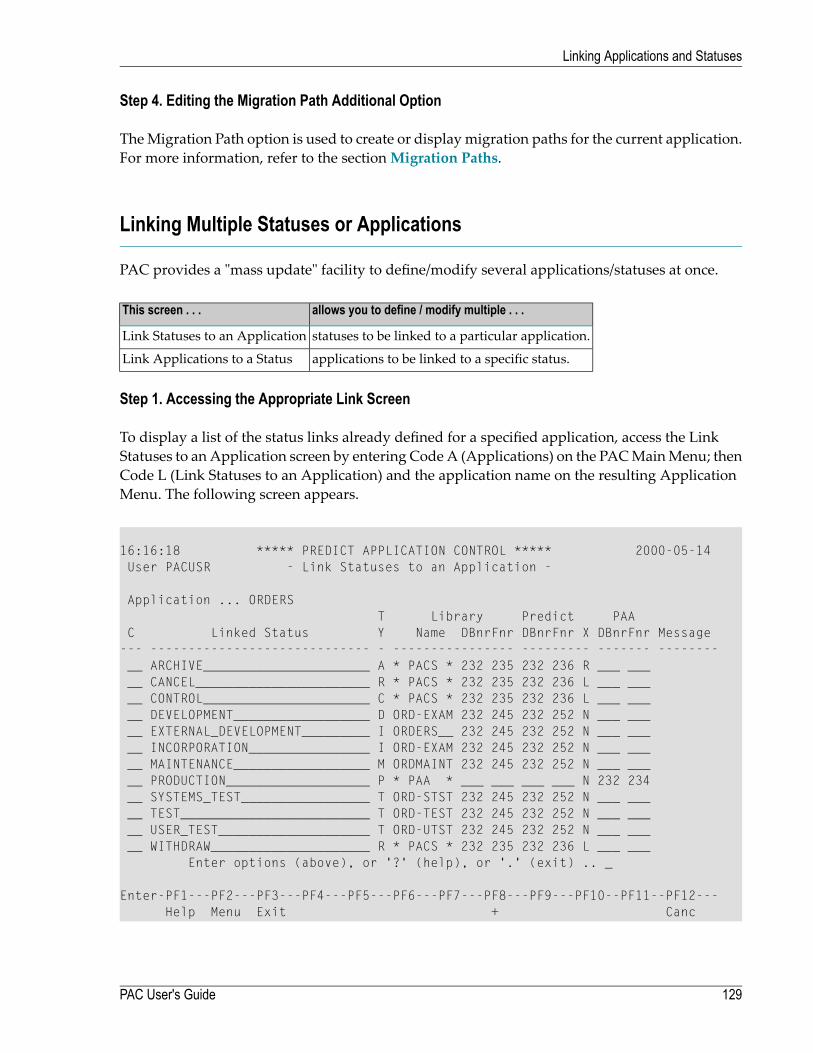
Step 4. Editing the Migration Path Additional Option
TheMigration Path option is used to create or displaymigration paths for the current application.For more information, refer to the sectionMigration Paths.
Linking Multiple Statuses or Applications
PAC provides a "mass update" facility to define/modify several applications/statuses at once.
allows you to define / modify multiple . . .This screen . . .
statuses to be linked to a particular application.Link Statuses to an Application
applications to be linked to a specific status.Link Applications to a Status
Step 1. Accessing the Appropriate Link Screen
To display a list of the status links already defined for a specified application, access the LinkStatuses to an Application screen by entering Code A (Applications) on the PACMainMenu; thenCode L (Link Statuses to an Application) and the application name on the resulting ApplicationMenu. The following screen appears.
16:16:18 ***** PREDICT APPLICATION CONTROL ***** 2000-05-14User PACUSR - Link Statuses to an Application -
Application ... ORDERST Library Predict PAA
C Linked Status Y Name DBnrFnr DBnrFnr X DBnrFnr Message--- ----------------------------- - ---------------- --------- ------- --------__ ARCHIVE______________________ A * PACS * 232 235 232 236 R ___ _____ CANCEL_______________________ R * PACS * 232 235 232 236 L ___ _____ CONTROL______________________ C * PACS * 232 235 232 236 L ___ _____ DEVELOPMENT__________________ D ORD-EXAM 232 245 232 252 N ___ _____ EXTERNAL_DEVELOPMENT_________ I ORDERS__ 232 245 232 252 N ___ _____ INCORPORATION________________ I ORD-EXAM 232 245 232 252 N ___ _____ MAINTENANCE__________________ M ORDMAINT 232 245 232 252 N ___ _____ PRODUCTION___________________ P * PAA * ___ ___ ___ ___ N 232 234__ SYSTEMS_TEST_________________ T ORD-STST 232 245 232 252 N ___ _____ TEST_________________________ T ORD-TEST 232 245 232 252 N ___ _____ USER_TEST____________________ T ORD-UTST 232 245 232 252 N ___ _____ WITHDRAW_____________________ R * PACS * 232 235 232 236 L ___ ___
Enter options (above), or '?' (help), or '.' (exit) .. _
Enter-PF1---PF2---PF3---PF4---PF5---PF6---PF7---PF8---PF9---PF10--PF11--PF12---Help Menu Exit + Canc
129PAC User's Guide
Linking Applications and Statuses
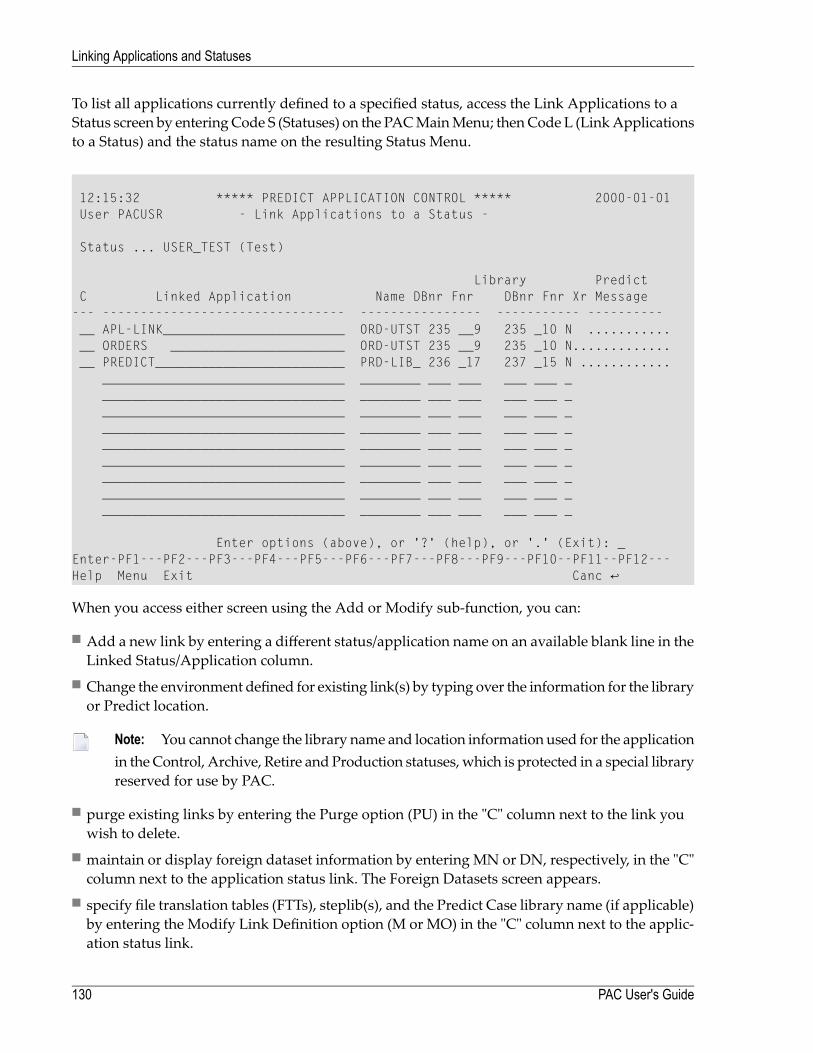
To list all applications currently defined to a specified status, access the Link Applications to aStatus screen by enteringCode S (Statuses) on the PACMainMenu; thenCode L (LinkApplicationsto a Status) and the status name on the resulting Status Menu.
12:15:32 ***** PREDICT APPLICATION CONTROL ***** 2000-01-01 User PACUSR - Link Applications to a Status - Status ... USER_TEST (Test) Library Predict C Linked Application Name DBnr Fnr DBnr Fnr Xr Message --- -------------------------------- ---------------- ----------- ---------- __ APL-LINK________________________ ORD-UTST 235 __9 235 _10 N ........... __ ORDERS _______________________ ORD-UTST 235 __9 235 _10 N............. __ PREDICT_________________________ PRD-LIB_ 236 _17 237 _15 N ............ ________________________________ ________ ___ ___ ___ ___ _ ________________________________ ________ ___ ___ ___ ___ _ ________________________________ ________ ___ ___ ___ ___ _ ________________________________ ________ ___ ___ ___ ___ _ ________________________________ ________ ___ ___ ___ ___ _ ________________________________ ________ ___ ___ ___ ___ _ ________________________________ ________ ___ ___ ___ ___ _ ________________________________ ________ ___ ___ ___ ___ _ ________________________________ ________ ___ ___ ___ ___ _
Enter options (above), or '?' (help), or '.' (Exit): _ Enter-PF1---PF2---PF3---PF4---PF5---PF6---PF7---PF8---PF9---PF10--PF11--PF12--- Help Menu Exit Canc ↩
When you access either screen using the Add or Modify sub-function, you can:
■ Add a new link by entering a different status/application name on an available blank line in theLinked Status/Application column.
■ Change the environment defined for existing link(s) by typing over the information for the libraryor Predict location.
Note: You cannot change the library name and location information used for the applicationin theControl, Archive, Retire and Production statuses,which is protected in a special libraryreserved for use by PAC.
■ purge existing links by entering the Purge option (PU) in the "C" column next to the link youwish to delete.
■ maintain or display foreign dataset information by entering MN or DN, respectively, in the "C"column next to the application status link. The Foreign Datasets screen appears.
■ specify file translation tables (FTTs), steplib(s), and the Predict Case library name (if applicable)by entering the Modify Link Definition option (M or MO) in the "C" column next to the applic-ation status link.
PAC User's Guide130
Linking Applications and Statuses
Step 2. Linking the Status(es)
Add each status/application as follows:
1. Enter the name of the status/application in the "Linked Status/Application" column.
2. In the Library "Name", "DBnr", and "Fnr" columns, respectively, enter theNatural library name,database ID number, and file number where the application is located. For production statuses,these fields do not exist.
Note: If no library, database, or file number are entered, the Library field displays thevalues set in the application library defaults. The database and file number fields displaythe values set when the status/application was defined. For production statuses, enterthe database ID (DBID) and file number (Fnr) of the PAA system file.
3. Enter the Predict database ID number and file number where the cross-reference data is stored,in the Predict "DBnr" and "Fnr" columns, respectively.
Note: If no Predict database or file number are entered, the Predict Data database (DBnr)and file number (Fnr) display the values set when the status/application was defined.You may override these values.
4. Enter cross-reference information in the "Xr" column (L for Local; R for Remote; B for both; Nfor none. The available options depend on the status type.
5. Press ENTER to link the status to the application.
When the application link is successfully added, the "Message" column displays the message"Added".
Selecting an Application Status Link
You can access a list of links defined for a specified application,status or FTT by entering Code S(Select Application and/or Status or FTT) on theApplication StatusMenu alongwith the applicationor status or FTT name (or a range for either).Alternatively, you can enter the SELECT direct com-mand on the command line. Refer to the PAC Reference documentation for the correct syntax.
The Application Status Link Selection List appears:
131PAC User's Guide
Linking Applications and Statuses

08:42:34 ***** PREDICT APPLICATION CONTROL ***** 2000-04-19User PACUSR - Application Status Link Selection List -DISPLAY Link Application * Status *C Nr Application Name Status- -- -------------------------------- --------------------------------_ 1 ABC DEVELOPMENT_ 2 ABC-2 ARCHIVE_ 3 ABC-2 CONTROL_ 4 ABC-2 DEV_BS2000_ 5 ABC-2 DEV_MVS_ 6 ABC-2 DEVELOPMENT_ 7 ABC-2 HISTORY-PRODUCTION_ 8 ABC-2 MAINTENANCE_ 9 ABC-2 PRODUCTION_ 10 ABC-2 TEST_ 11 ABC-2 TST_BS2000_ 12 APL_EXAMPLE_1 CONTROL_ 13 APL_EXAMPLE_1 DEVELOPMENT
Mark Selection, Enter Number or 'T' (Top) __
Command ===>Enter-PF1---PF2---PF3---PF4---PF5---PF6---PF7---PF8---PF9---PF10--PF11--PF12---
Help Menu Exit -- + Canc
If you accessed this screen using the S (Select Application Status Link) sub-function or the SELECTdirect command, the following sub-functions can be processed directly for one ormore of the listedapplication status links by entering the code for the sub-function in the "C" column: D (Display),M (Modify), O (Object versions), P (Purge), S (Select) and V (Object version audit history).
If you mark the application status with the cursor or enter an X or an S in the "C" column, or enterthe application status link number (from the "Nr" column) in the Mark Selection... field, you arereturned to the Application Status Menu; the specified application and status are displayed in theApplication field and Status field, respectively.
If selection is by FTT then the following screen is displayed:
PAC User's Guide132
Linking Applications and Statuses
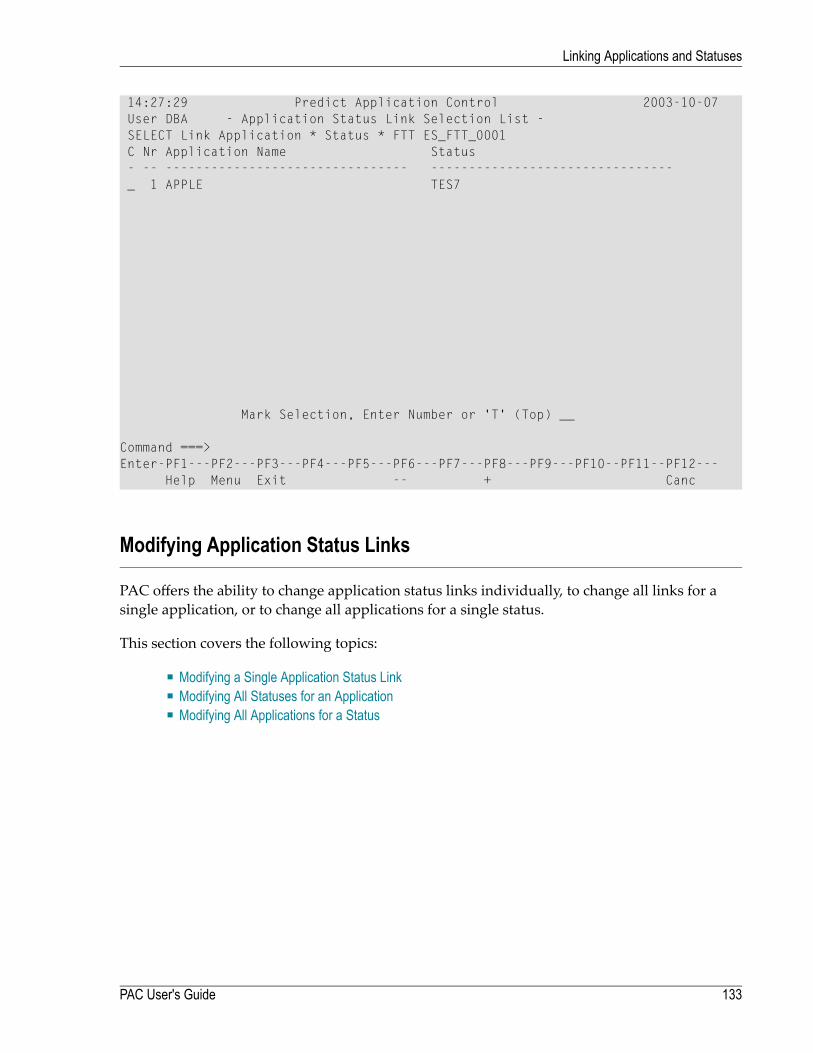
14:27:29 Predict Application Control 2003-10-07User DBA - Application Status Link Selection List -SELECT Link Application * Status * FTT ES_FTT_0001C Nr Application Name Status- -- -------------------------------- --------------------------------_ 1 APPLE TES7
Mark Selection, Enter Number or 'T' (Top) __
Command ===>Enter-PF1---PF2---PF3---PF4---PF5---PF6---PF7---PF8---PF9---PF10--PF11--PF12---
Help Menu Exit -- + Canc
Modifying Application Status Links
PAC offers the ability to change application status links individually, to change all links for asingle application, or to change all applications for a single status.
This section covers the following topics:
■ Modifying a Single Application Status Link■ Modifying All Statuses for an Application■ Modifying All Applications for a Status
133PAC User's Guide
Linking Applications and Statuses

Modifying a Single Application Status Link
10:32:08 ***** PREDICT APPLICATION CONTROL ***** 2000-07-01User PACUSR - Modify Application Status Link -
Application .. ORDERS Modified: 1998-03-21 by EXUSR ↩ Status ....... INSERVICE Status type .. production
Application Location Production PAA ........ DBnr .. ___ Fnr .. ___ Maintain Xref .. _
Translation Table ... ________________________________ Shared ..
Additional Options .. N
Command ===>Enter-PF1---PF2---PF3---PF4---PF5---PF6---PF7---PF8---PF9---PF10--PF11--PF12--- Help Menu Exit Opts StLbs NNAT Canc ↩
To modify an individual application status link, enter Code M (Modify Application Status Link)on the Application Status Menu.
The resultingModify Application Status Link screen is similar to the AddApplication Status Linkscreen, but instead contains parameters for the production status of the application.
Modifying All Statuses for an Application
To modify all statuses for an application at one time, enter Code A (Applications) on the PACMainMenu; thenCodeL (Link Statuses to anApplication) and the application name on the resultingApplication Menu.
Modifying All Applications for a Status
To modify all applications for a specific status at one time, enter Code S (Statuses) on the PACMain Menu; then Code L (Link Applications to a Status) and the status name on the resultingStatus Menu.
The screen that appears is similar to the Link Applications to a Status screen.
PAC User's Guide134
Linking Applications and Statuses

Purging an Application Status Link
To purge a status link, enter Code P, the application name, and the status name on the ApplicationStatus Menu.
If objects exist in the application status link, the purge request is ignored and the followingmessageis displayed:
"Objects exist in this Status. Purge cannot be performed until the objects have been deleted via thePAC Administrator Functions."
Otherwise, the Purge Confirmationwindow appears reminding you that the associatedmigrationpaths and fixed file translation tables will also be purged.
From the Purge Confirmation window, you have the following options:
■ Type Confirm or press PF5 to purge the application status link.■ Type a period (.) or press PF3 to return to theApplicationMenuwithout purging the applicationstatus link.
Displaying an Application Status Link
To display application status link information, enter CodeD (DisplayApplication Status) togetherwith the application name and status name on the Application Status Menu.
The Display Application Status Link screen appears; it is similar to the Add Application StatusLink screen. You may not modify the Display information.
This section covers the following topics:
■ Displaying Additional Options
Displaying Additional Options
When you access Additional Options from the Display Application Status Link screen, you candisplay a list of object versions, a list of the migration path destinations associated with the statuslink, and information about when and by whom the application status link was added/modified.
Displays a list of . . .Optionup to eight applications defined as steplibs on the Compile Steplibswindow. These are displayed only for maintenance or developmentstatuses.
Compile Steplibs
135PAC User's Guide
Linking Applications and Statuses
Displays a list of . . .Optionthe application objects currently at this status. You can also display thislist directly from theApplication StatusMenuby enteringCodeO (Objectsfor Application Status).
Object Versions
Foreign support application status the foreign datasets currently definedto the application status link. You can also display this list directly byentering PF8 (NNAT) on the Display Application Status Link screen.
Foreign Datasets
destination status names. You can also display this list directly from theMigration Path Menu.
Migration Path
statuses that use the same FTT used by this application status link. If notranslation table is in use by any statuses, a message to that effect is dis-
Translation TableUsage
played. These are displayed only for non-maintenance or non-develop-ment statuses.
Displaying Objects for an Application Status
You can obtain information about an application's versioned objects by using the Objects for Ap-plication Status sub-function on the Application Status Menu.
This section covers the following topics:
■ Displaying a Specific Object■ Displaying Objects from a List
Displaying a Specific Object
To display information about a specific object in a specific status, enter Code O (Objects for Ap-plication Status) on the Application Status Menu along with the application name, status name,and object name. The Display Object Version screen appears:
PAC User's Guide136
Linking Applications and Statuses
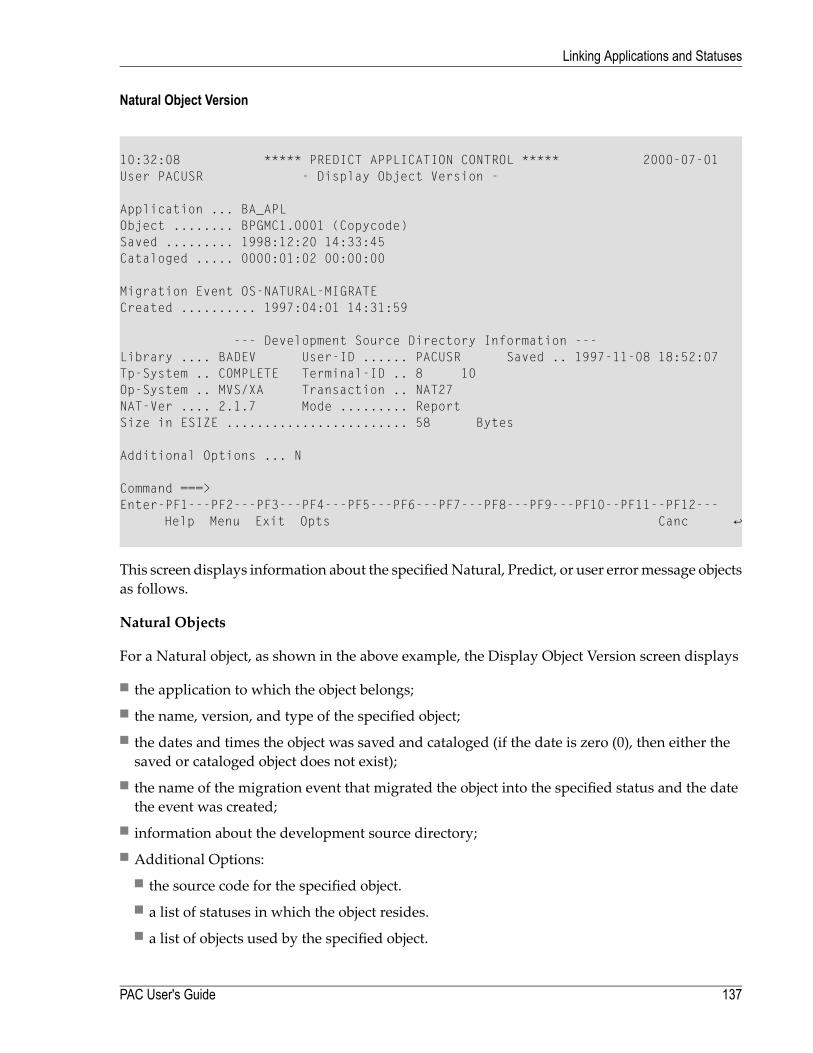
Natural Object Version
10:32:08 ***** PREDICT APPLICATION CONTROL ***** 2000-07-01User PACUSR - Display Object Version - Application ... BA_APLObject ........ BPGMC1.0001 (Copycode)Saved ......... 1998:12:20 14:33:45Cataloged ..... 0000:01:02 00:00:00 Migration Event OS-NATURAL-MIGRATECreated .......... 1997:04:01 14:31:59
--- Development Source Directory Information ---Library .... BADEV User-ID ...... PACUSR Saved .. 1997-11-08 18:52:07Tp-System .. COMPLETE Terminal-ID .. 8 10Op-System .. MVS/XA Transaction .. NAT27NAT-Ver .... 2.1.7 Mode ......... ReportSize in ESIZE ........................ 58 Bytes Additional Options ... N
Command ===>Enter-PF1---PF2---PF3---PF4---PF5---PF6---PF7---PF8---PF9---PF10--PF11--PF12--- Help Menu Exit Opts Canc ↩
This screen displays information about the specifiedNatural, Predict, or user errormessage objectsas follows.
Natural Objects
For a Natural object, as shown in the above example, the Display Object Version screen displays
■ the application to which the object belongs;■ the name, version, and type of the specified object;■ the dates and times the object was saved and cataloged (if the date is zero (0), then either thesaved or cataloged object does not exist);
■ the name of the migration event that migrated the object into the specified status and the datethe event was created;
■ information about the development source directory;■ Additional Options:
■ the source code for the specified object.■ a list of statuses in which the object resides.■ a list of objects used by the specified object.
137PAC User's Guide
Linking Applications and Statuses
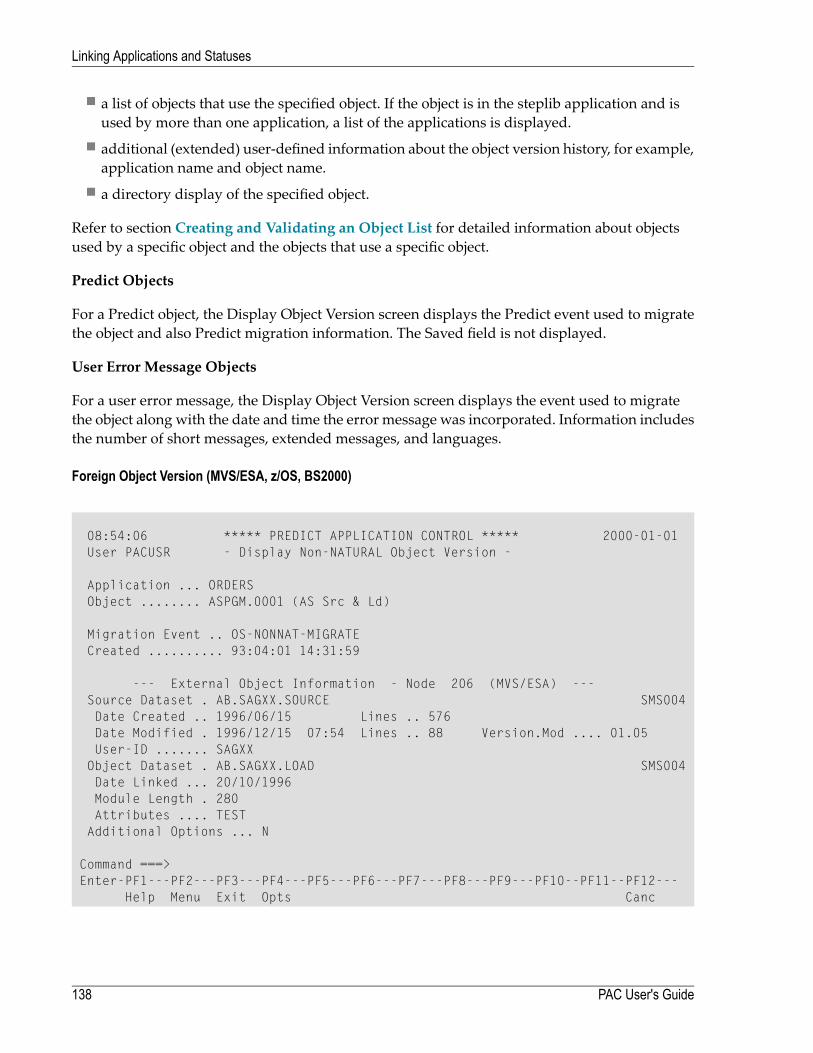
■ a list of objects that use the specified object. If the object is in the steplib application and isused by more than one application, a list of the applications is displayed.
■ additional (extended) user-defined information about the object version history, for example,application name and object name.
■ a directory display of the specified object.
Refer to section Creating and Validating an Object List for detailed information about objectsused by a specific object and the objects that use a specific object.
Predict Objects
For a Predict object, the Display Object Version screen displays the Predict event used to migratethe object and also Predict migration information. The Saved field is not displayed.
User Error Message Objects
For a user error message, the Display Object Version screen displays the event used to migratethe object along with the date and time the error message was incorporated. Information includesthe number of short messages, extended messages, and languages.
Foreign Object Version (MVS/ESA, z/OS, BS2000)
08:54:06 ***** PREDICT APPLICATION CONTROL ***** 2000-01-01User PACUSR - Display Non-NATURAL Object Version -
Application ... ORDERSObject ........ ASPGM.0001 (AS Src & Ld)
Migration Event .. OS-NONNAT-MIGRATECreated .......... 93:04:01 14:31:59
--- External Object Information - Node 206 (MVS/ESA) ---Source Dataset . AB.SAGXX.SOURCE SMS004Date Created .. 1996/06/15 Lines .. 576Date Modified . 1996/12/15 07:54 Lines .. 88 Version.Mod .... 01.05User-ID ....... SAGXXObject Dataset . AB.SAGXX.LOAD SMS004Date Linked ... 20/10/1996Module Length . 280Attributes .... TESTAdditional Options ... N
Command ===>Enter-PF1---PF2---PF3---PF4---PF5---PF6---PF7---PF8---PF9---PF10--PF11--PF12---
Help Menu Exit Opts Canc
PAC User's Guide138
Linking Applications and Statuses
This screen displays information about the specified foreign object version. External object inform-ation includes the
■ node and system type where the dataset is located;■ name of the source/object datasets to which the object belongs and the Volser (SMS004 in thisexample);
■ date the object was created;■ number of lines of code comprising the object when it was created;■ date and time the objectwas lastmodified, the number of lines after themost recentmodification;■ version of the object that was modified and the number of lines that were modified;■ ID of the user who last modified the object;■ operating system attributes of the object (in the above example, a test environment).
Displaying Objects from a List
You can display a list of the objects of an application in a specific status from the ApplicationStatus Menu as follows:
1. To display a list of application objects in a specific status, enter Code O (Objects for ApplicationStatus) on the Application Status Menu along with the application name and status name.
The Object Version Selection List appears:
139PAC User's Guide
Linking Applications and Statuses
17:43:13 ***** PREDICT APPLICATION CONTROL ***** 2000-05-14User PACUSR - Object Version Selection List -
C Nr Object Name Object Type Ver Migration Date- -- -------------------------------- --------------- ---- ------------------_ 1 ABEND Program 0001 1998-05-05 21:46:04_ 2 ADADBS5 Karen's jcl 0001 1998-02-03 23:45:38_ 3 ADAINV Karen's jcl 0001 1998-02-03 23:45:39_ 4 CALLPROG Program 0001 1998-05-05 21:46:04_ 5 CALLSUB Subprogram 0001 1998-05-05 21:46:05_ 6 DEMO Processor 0001 1998-05-05 21:46:05_ 7 EDTKST Program 0002 1998-05-05 21:46:05_ 8 EDTKST Program 0001 1997-10-08 18:06:53_ 9 EDTPAC Program 0001 1997-10-08 18:06:55_ 10 EEWORK Program 0001 1998-05-05 21:46:05_ 11 EMARRAY Program 0001 1998-05-05 21:46:05_ 12 EMPGM Program 0001 1998-05-05 21:46:05_ 13 EMPLLCL2 Local 0001 1998-05-05 21:46:05_ 14 EMPLMAP Map 0001 1998-05-05 21:46:05
Mark Selection, Enter Number or 'T' (Top) __
Command ===>Enter-PF1---PF2---PF3---PF4---PF5---PF6---PF7---PF8---PF9---PF10--PF11--PF12---
Help Menu Exit -- + Canc
This screen lists the type and version of each object; and the date and time that each objectversion was migrated into that status.
Note: Where no cataloged version exists, the object name is highlighted.
2. To display information about individual objects on the Display Object Version screen, markthe desired object with the cursor, or enter the number of the object (from the "Nr" column) inthe Mark Selection... field.
Displaying an Object Version Audit History
1. To list the versions of application objects from the Application Status Menu, enter Code V(Object Version Audit History) and the application name and status name.
You may limit the list of objects by specifying range notation in the Object Name field.
The Audit History Selection List appears for statuses other than Control. The screen displayedfor the Control status shows the date the objectsweremigrated. For statuses other thanControl,the effective date and superseded date are displayed.
PAC User's Guide140
Linking Applications and Statuses
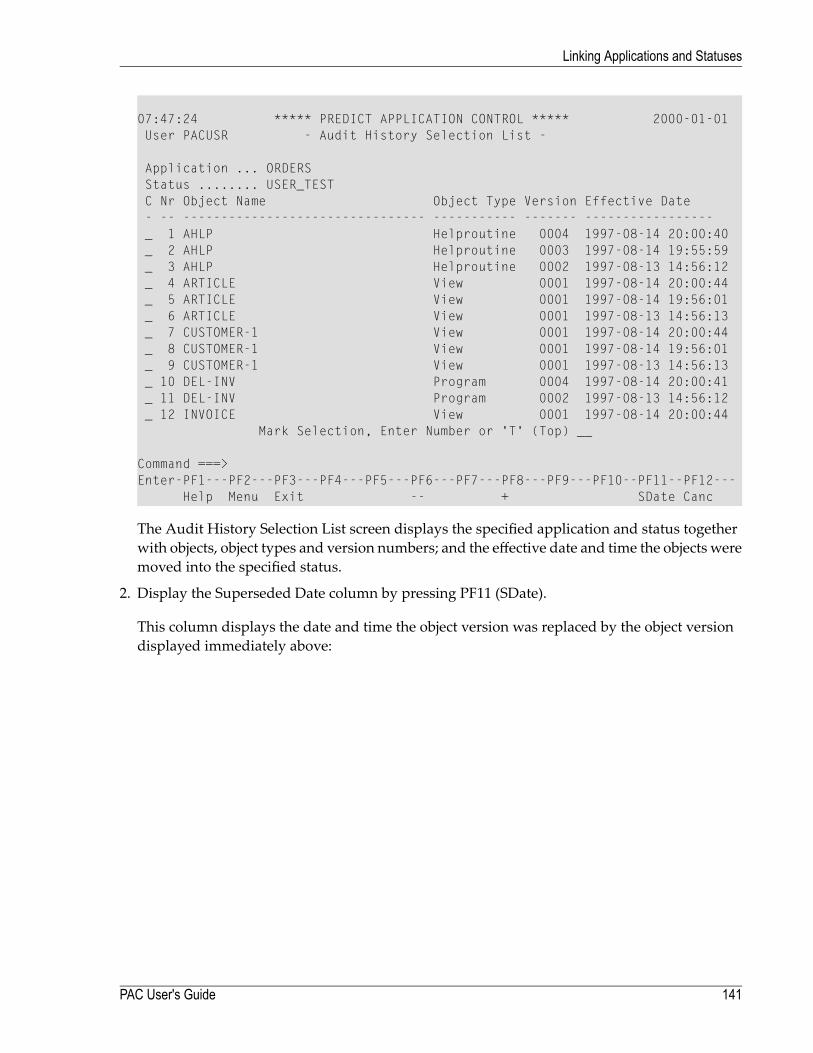
07:47:24 ***** PREDICT APPLICATION CONTROL ***** 2000-01-01User PACUSR - Audit History Selection List -
Application ... ORDERSStatus ........ USER_TESTC Nr Object Name Object Type Version Effective Date- -- -------------------------------- ----------- ------- -----------------_ 1 AHLP Helproutine 0004 1997-08-14 20:00:40_ 2 AHLP Helproutine 0003 1997-08-14 19:55:59_ 3 AHLP Helproutine 0002 1997-08-13 14:56:12_ 4 ARTICLE View 0001 1997-08-14 20:00:44_ 5 ARTICLE View 0001 1997-08-14 19:56:01_ 6 ARTICLE View 0001 1997-08-13 14:56:13_ 7 CUSTOMER-1 View 0001 1997-08-14 20:00:44_ 8 CUSTOMER-1 View 0001 1997-08-14 19:56:01_ 9 CUSTOMER-1 View 0001 1997-08-13 14:56:13_ 10 DEL-INV Program 0004 1997-08-14 20:00:41_ 11 DEL-INV Program 0002 1997-08-13 14:56:12_ 12 INVOICE View 0001 1997-08-14 20:00:44
Mark Selection, Enter Number or 'T' (Top) __
Command ===>Enter-PF1---PF2---PF3---PF4---PF5---PF6---PF7---PF8---PF9---PF10--PF11--PF12---
Help Menu Exit -- + SDate Canc
The Audit History Selection List screen displays the specified application and status togetherwith objects, object types and version numbers; and the effective date and time the objects weremoved into the specified status.
2. Display the Superseded Date column by pressing PF11 (SDate).
This column displays the date and time the object version was replaced by the object versiondisplayed immediately above:
141PAC User's Guide
Linking Applications and Statuses
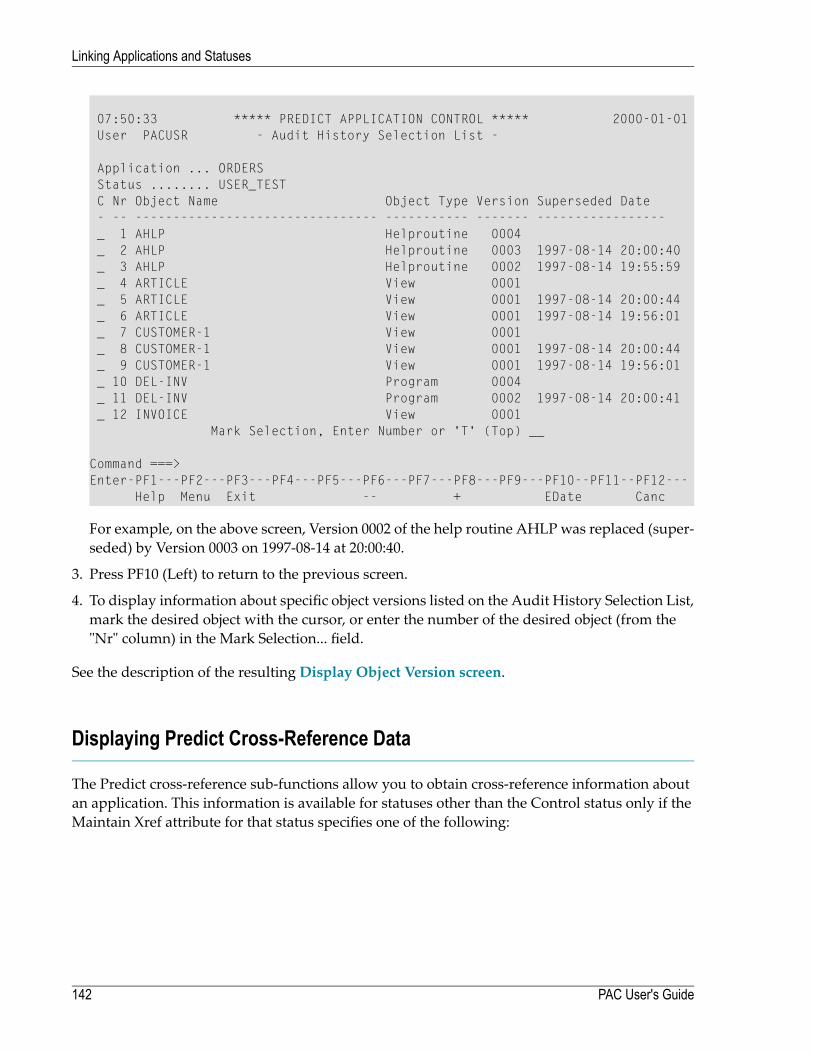
07:50:33 ***** PREDICT APPLICATION CONTROL ***** 2000-01-01User PACUSR - Audit History Selection List -
Application ... ORDERSStatus ........ USER_TESTC Nr Object Name Object Type Version Superseded Date- -- -------------------------------- ----------- ------- -----------------_ 1 AHLP Helproutine 0004_ 2 AHLP Helproutine 0003 1997-08-14 20:00:40_ 3 AHLP Helproutine 0002 1997-08-14 19:55:59_ 4 ARTICLE View 0001_ 5 ARTICLE View 0001 1997-08-14 20:00:44_ 6 ARTICLE View 0001 1997-08-14 19:56:01_ 7 CUSTOMER-1 View 0001_ 8 CUSTOMER-1 View 0001 1997-08-14 20:00:44_ 9 CUSTOMER-1 View 0001 1997-08-14 19:56:01_ 10 DEL-INV Program 0004_ 11 DEL-INV Program 0002 1997-08-14 20:00:41_ 12 INVOICE View 0001
Mark Selection, Enter Number or 'T' (Top) __
Command ===>Enter-PF1---PF2---PF3---PF4---PF5---PF6---PF7---PF8---PF9---PF10--PF11--PF12---
Help Menu Exit -- + EDate Canc
For example, on the above screen, Version 0002 of the help routine AHLP was replaced (super-seded) by Version 0003 on 1997-08-14 at 20:00:40.
3. Press PF10 (Left) to return to the previous screen.
4. To display information about specific object versions listed on the Audit History Selection List,mark the desired object with the cursor, or enter the number of the desired object (from the"Nr" column) in the Mark Selection... field.
See the description of the resultingDisplay Object Version screen.
Displaying Predict Cross-Reference Data
The Predict cross-reference sub-functions allow you to obtain cross-reference information aboutan application. This information is available for statuses other than the Control status only if theMaintain Xref attribute for that status specifies one of the following:
PAC User's Guide142
Linking Applications and Statuses
DescriptionLocationAttr.
Cross-reference data is stored within PAC. (Control status.)LocalL
Cross-reference data is copied to the Predict file specified by the application status link.(Development, incorporation, maintenance, test, and production statuses.)
RemoteR
Cross-reference data is stored both locally and remotely. (Test or production statuses.)BothB
1. To display theXrefMenu, enter CodeX (Predict Cross-ReferenceData) alongwith the applicationname and the status name on the Application Status Menu.■ If you specify Control status, all versions are traced by Control. PAC allows you to displaycross-reference information only for themost recent versions of the objects that are in Controlstatus.
■ You may specify a status other than Control if either B (both local and remote) or R (remote)was specified for that status. In this case, the cross-reference data is displayed as it exists inthe external Natural library.
The Predict Xref Menu appears:
18:56:29 ***** P R E D I C T 4.1.1 ***** 2000-02-03Library: * PACS * - Xref Menu - DBnr: 164 Fnr: 245Applic.: JHE_APPL CONTROL
Code Object Code Object---- ------------------------------ ---- -------------------------------
I Invoked programs S Retained setsD Data areas and variables R Processing rulesV Views and fields X Report programs with xref dataC Copycode A Verify applicationE Error numbers N Create new sets via selectionP Printers O Operate on setsW Work files
---- ------------------------------ ---- -------------------------------
Code .........: (!? Help . Terminate)Structure ...*:System .......:
Command ===>Enter-PF1---PF2---PF3---PF4---PF5---PF6---PF7---PF8---PF9---PF10--PF11--PF12---
Invp GDAV Quit Sets Rule Copy Xref View OSet SPfk Main Exit
The Predict Xref Menu screen allows you to obtain information about Predict cross-referenceobjects that belong to a specific application including programs, data areas, userviews, copycode,and retained sets.
2. To access an object, enter the relevant Code on the Predict Xref Menu. Alternatively, you mayenter a direct command.
143PAC User's Guide
Linking Applications and Statuses
Formore information about the Predict cross-reference facility, refer to the Predict documentation.Also, refer to sectionMigrating Predict Objects.
PAC User's Guide144
Linking Applications and Statuses
10 File Translation Tables
■ Displaying the FTT Main Menu ......................................................................................................... 146■ Adding (Defining) a File Translation Table ........................................................................................... 149■ Selecting a File Translation Table ...................................................................................................... 158■ Displaying a File Translation Table .................................................................................................... 159■ Modifying a File Translation Table ..................................................................................................... 162■ Copying a File Translation Table ....................................................................................................... 163■ Linking an FTT to an Application Status Link ....................................................................................... 164■ Changing an FTT Assignment .......................................................................................................... 164■ Purging a File Translation Table ........................................................................................................ 164
145
PAC file translation tables (FTTs) allow you to compile Natural objects with the set of user data-base/file numbers defined by the views/DDMs with which the objects are compiled, and executethem against another set of user database/file numbers.
Because the objects are compiled just once, the code that is tested is the same code that is executedin production. The FTT facility maintains application integrity and reduces the amount of workrequired to prepare an application for implementation.
Refer to Configuring a PAC Environment for additional information and examples of FTT use.
You may use an FTT with all applications if the target status is either Production or Test, or youmay restrict its use to a specific application and/or status to provide security or effective use.
You may set up one or more base tables and then create or copy subsets for special requirements.For each table, the origin DBnr and Fnr always represent the DBnr and Fnr of the views/DDMswith which the objects were compiled.
This chapter covers the following topics:
Displaying the FTT Main Menu
To access the PAC file translation table (FTT) maintenance and reporting sub-functions, enterCode F (File Translation Tables) on the PAC Main Menu.
Depending on your user profile, the File Translation Table Menu or the File Translation TableReporting Menu appears. The File Translation Table Menu that combines the maintenance andreporting sub-functions is used throughout this section.
Note: The Modify Application Status screen can also be used to define file translationtables. In this case, a "dormant" file translation table is created for the application status.This table is activated once it is updated with a set of DBnr and/or Fnr entries.
PAC User's Guide146
File Translation Tables
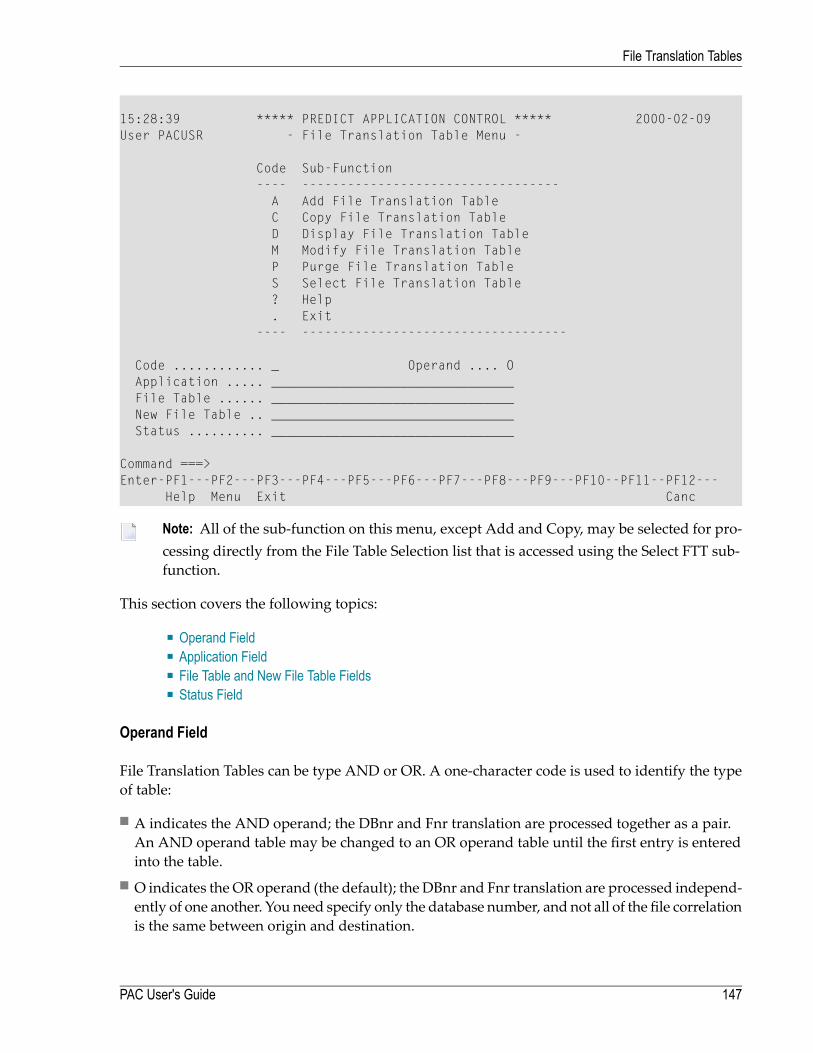
15:28:39 ***** PREDICT APPLICATION CONTROL ***** 2000-02-09User PACUSR - File Translation Table Menu -
Code Sub-Function---- ----------------------------------A Add File Translation TableC Copy File Translation TableD Display File Translation TableM Modify File Translation TableP Purge File Translation TableS Select File Translation Table? Help. Exit
---- -----------------------------------
Code ............ _ Operand .... OApplication ..... ________________________________File Table ...... ________________________________New File Table .. ________________________________Status .......... ________________________________
Command ===>Enter-PF1---PF2---PF3---PF4---PF5---PF6---PF7---PF8---PF9---PF10--PF11--PF12---
Help Menu Exit Canc
Note: All of the sub-function on this menu, except Add and Copy, may be selected for pro-cessing directly from the File Table Selection list that is accessed using the Select FTT sub-function.
This section covers the following topics:
■ Operand Field■ Application Field■ File Table and New File Table Fields■ Status Field
Operand Field
File Translation Tables can be type AND or OR. A one-character code is used to identify the typeof table:
■ A indicates the AND operand; the DBnr and Fnr translation are processed together as a pair.An AND operand table may be changed to an OR operand table until the first entry is enteredinto the table.
■ O indicates the OR operand (the default); the DBnr and Fnr translation are processed independ-ently of one another. You need specify only the database number, and not all of the file correlationis the same between origin and destination.
147PAC User's Guide
File Translation Tables

■ I indicates the IF operand; TheDBnr and Fnr translations are processed according to any specifiedconditional entries, including between values, greater than values, less than values or maskedvalues.
Application Field
The name of the application to which the FTT is defined. Each FTTmay belong to only one applic-ation or to no specific application; that is, the application namemay be left blank. If an applicationis not specified, PAC considers the FTT to be valid for all applications. PACuses the **All** notation.
You may enter an application name, an alias, range notation, or leave the field blank.
File Table and New File Table Fields
The File Table field is used for the name of the FTT. Youmay enter an FTT name or range notation.
Each FTT name must begin with an alphabetic character and may be from 1 to 32 characters inlength. Embedded blanks are allowed, but are automatically changed to the underscore (_) char-acter. If a duplicate FTT name is entered, an error message is displayed.
An existing FTT may be copied under a new name and optionally to another application andstatus. The New Table field is used to add a unique name for the new FTT.
Status Field
The status to which the application is linked. The FTT is applied when objects are migrated intothis status (destination or "To" status). It may be a T status type; or it may be a blank, range notation,or an alias name.
The FTT may be defined as being either shared (the FTT may be used with any status) or notshared (the FTT may only be used with one specific status). If you enter the status name, the FTTwill be defined as not shared. If you wish the FTT to be shared, leave this field blank (do not entera status name). If both shared and not shared FTTs are to be selected, use asterisk "*" notation.
Note: The status definition is independent of the application definition.
PAC User's Guide148
File Translation Tables
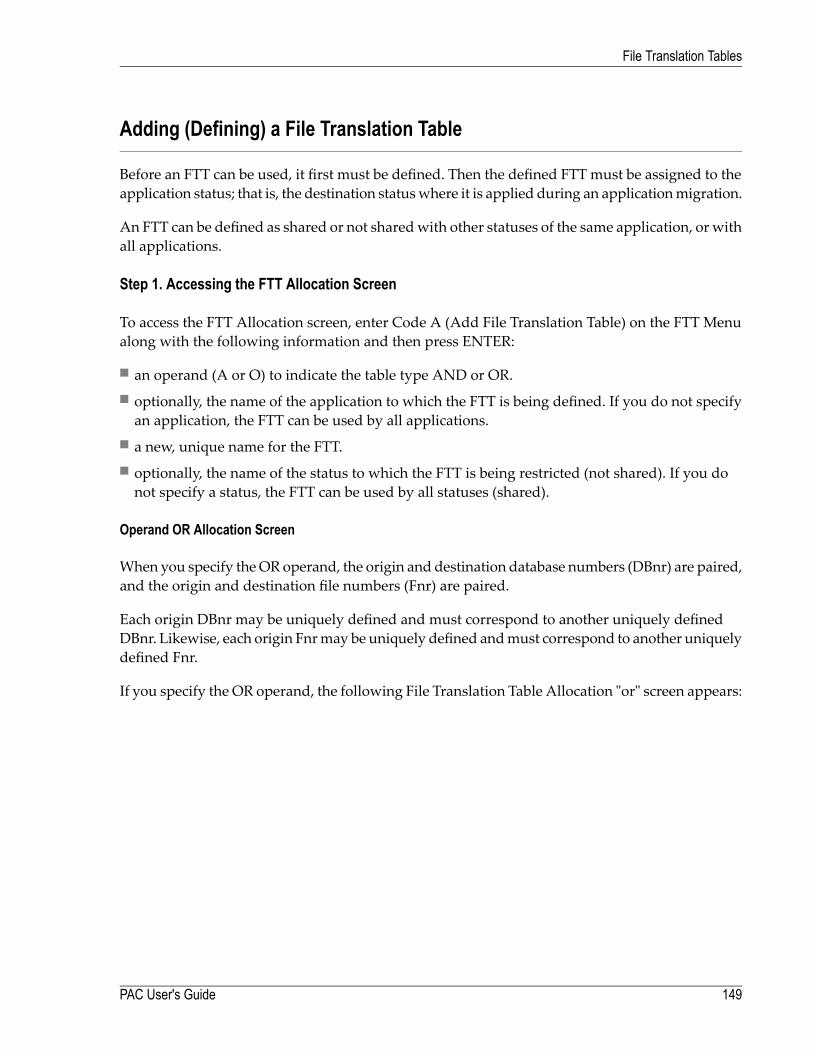
Adding (Defining) a File Translation Table
Before an FTT can be used, it first must be defined. Then the defined FTT must be assigned to theapplication status; that is, the destination statuswhere it is applied during an applicationmigration.
An FTT can be defined as shared or not sharedwith other statuses of the same application, or withall applications.
Step 1. Accessing the FTT Allocation Screen
To access the FTT Allocation screen, enter Code A (Add File Translation Table) on the FTT Menualong with the following information and then press ENTER:
■ an operand (A or O) to indicate the table type AND or OR.■ optionally, the name of the application to which the FTT is being defined. If you do not specifyan application, the FTT can be used by all applications.
■ a new, unique name for the FTT.■ optionally, the name of the status to which the FTT is being restricted (not shared). If you donot specify a status, the FTT can be used by all statuses (shared).
Operand OR Allocation Screen
When you specify theOR operand, the origin and destination database numbers (DBnr) are paired,and the origin and destination file numbers (Fnr) are paired.
Each origin DBnr may be uniquely defined and must correspond to another uniquely definedDBnr. Likewise, each origin Fnrmay be uniquely defined andmust correspond to another uniquelydefined Fnr.
If you specify the OR operand, the following File Translation Table Allocation "or" screen appears:
149PAC User's Guide
File Translation Tables
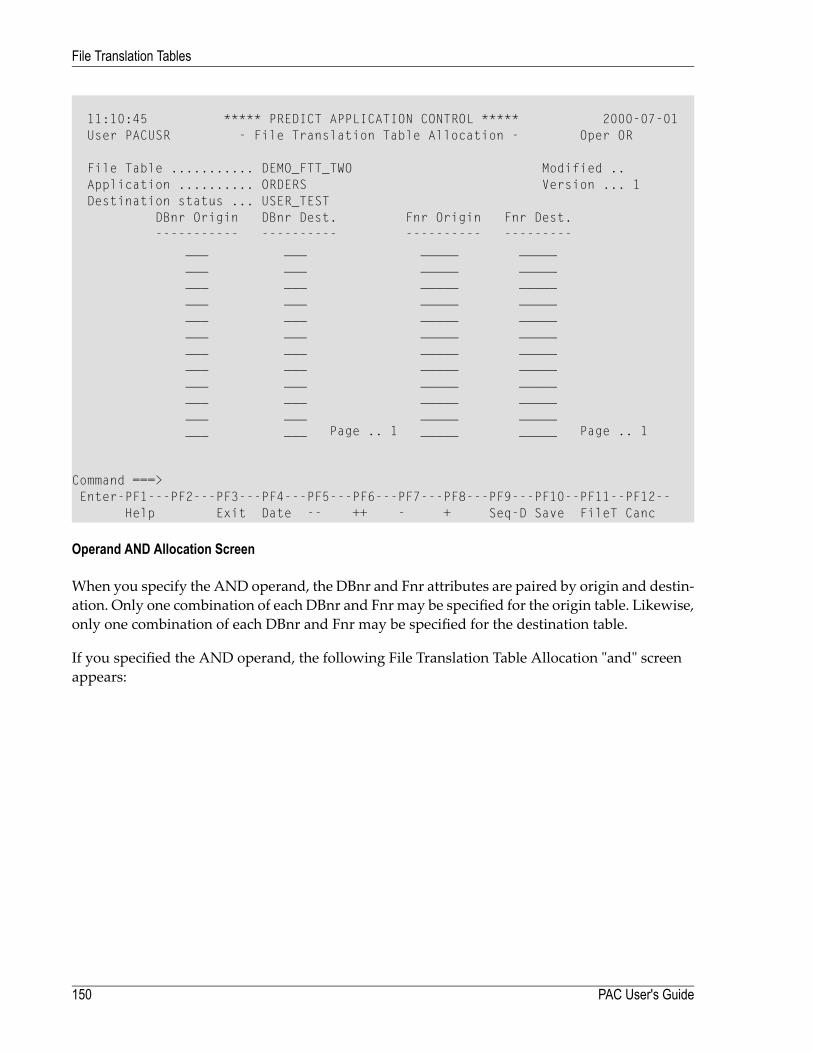
11:10:45 ***** PREDICT APPLICATION CONTROL ***** 2000-07-01User PACUSR - File Translation Table Allocation - Oper OR
File Table ........... DEMO_FTT_TWO Modified ..Application .......... ORDERS Version ... 1Destination status ... USER_TEST
DBnr Origin DBnr Dest. Fnr Origin Fnr Dest.----------- ---------- ---------- ---------
___ ___ _____ ________ ___ _____ ________ ___ _____ ________ ___ _____ ________ ___ _____ ________ ___ _____ ________ ___ _____ ________ ___ _____ ________ ___ _____ ________ ___ _____ ________ ___ _____ ________ ___ Page .. 1 _____ _____ Page .. 1
Command ===>Enter-PF1---PF2---PF3---PF4---PF5---PF6---PF7---PF8---PF9---PF10--PF11--PF12--
Help Exit Date -- ++ - + Seq-D Save FileT Canc
Operand AND Allocation Screen
When you specify the AND operand, the DBnr and Fnr attributes are paired by origin and destin-ation. Only one combination of each DBnr and Fnr may be specified for the origin table. Likewise,only one combination of each DBnr and Fnr may be specified for the destination table.
If you specified the AND operand, the following File Translation Table Allocation "and" screenappears:
PAC User's Guide150
File Translation Tables
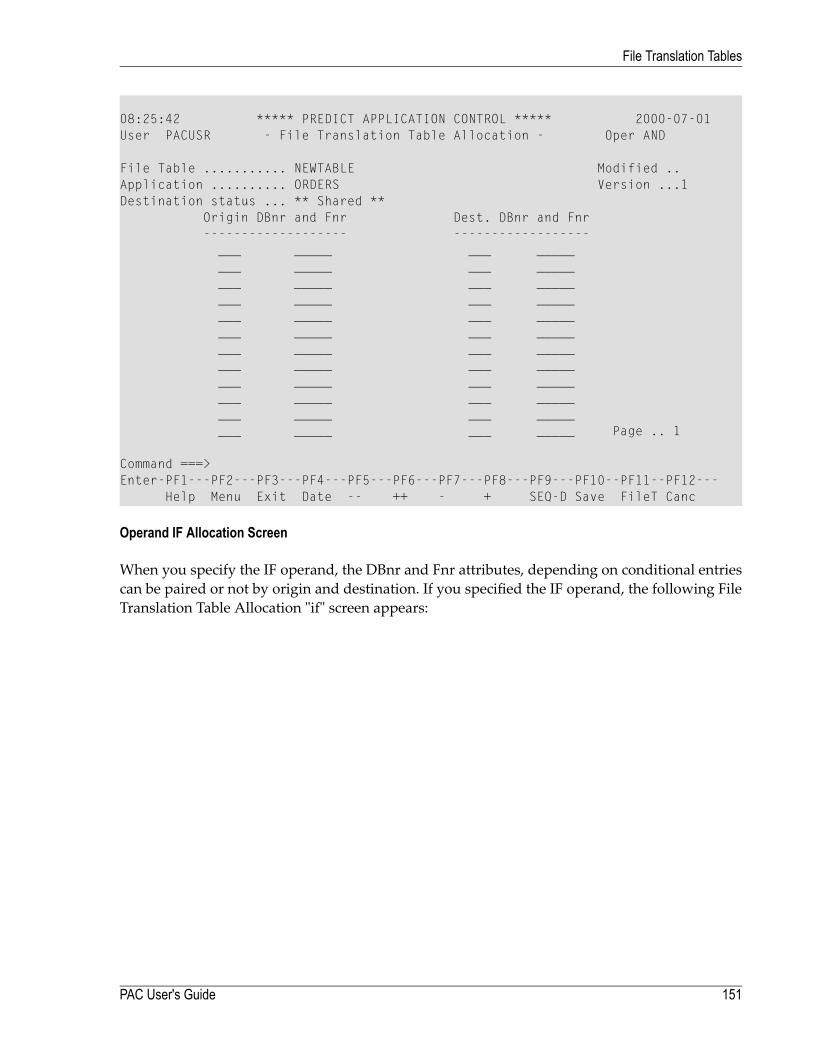
08:25:42 ***** PREDICT APPLICATION CONTROL ***** 2000-07-01User PACUSR - File Translation Table Allocation - Oper AND
File Table ........... NEWTABLE Modified ..Application .......... ORDERS Version ...1Destination status ... ** Shared **
Origin DBnr and Fnr Dest. DBnr and Fnr------------------- ------------------
___ _____ ___ ________ _____ ___ ________ _____ ___ ________ _____ ___ ________ _____ ___ ________ _____ ___ ________ _____ ___ ________ _____ ___ ________ _____ ___ ________ _____ ___ ________ _____ ___ ________ _____ ___ _____ Page .. 1
Command ===>Enter-PF1---PF2---PF3---PF4---PF5---PF6---PF7---PF8---PF9---PF10--PF11--PF12---
Help Menu Exit Date -- ++ - + SEQ-D Save FileT Canc
Operand IF Allocation Screen
When you specify the IF operand, the DBnr and Fnr attributes, depending on conditional entriescan be paired or not by origin and destination. If you specified the IF operand, the following FileTranslation Table Allocation "if" screen appears:
151PAC User's Guide
File Translation Tables
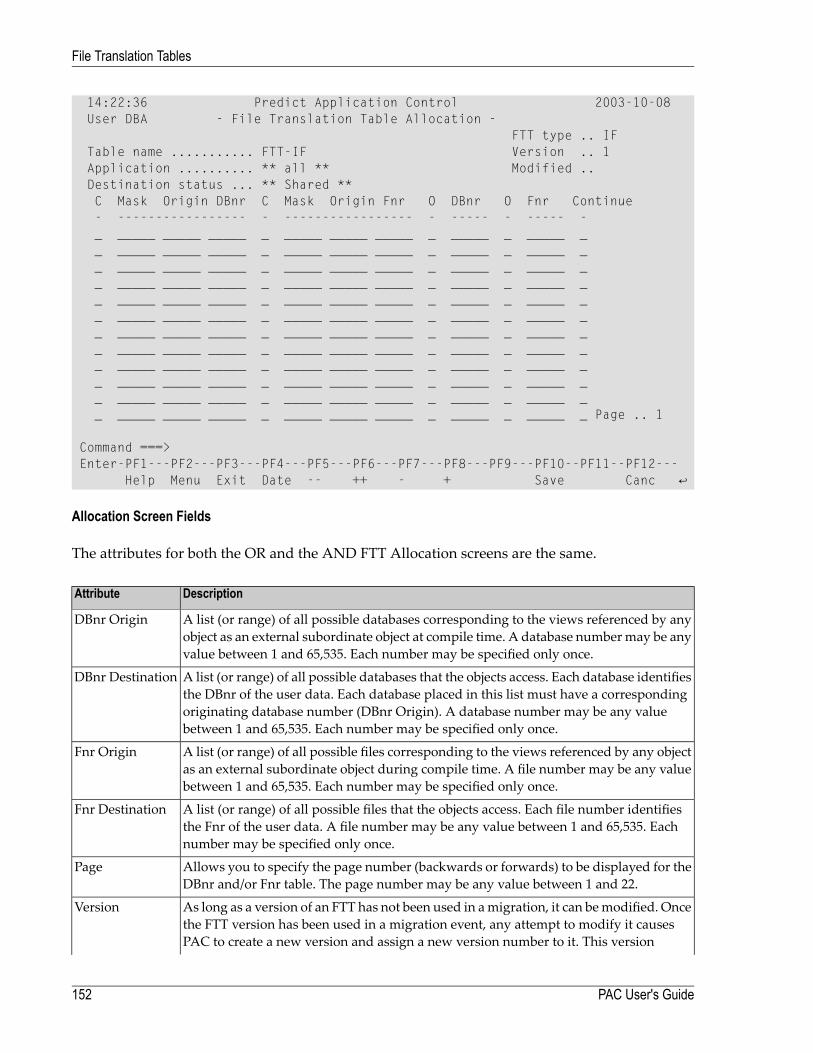
14:22:36 Predict Application Control 2003-10-08 User DBA - File Translation Table Allocation - FTT type .. IF Table name ........... FTT-IF Version .. 1 Application .......... ** all ** Modified .. Destination status ... ** Shared ** C Mask Origin DBnr C Mask Origin Fnr O DBnr O Fnr Continue - ----------------- - ----------------- - ----- - ----- - _ _____ _____ _____ _ _____ _____ _____ _ _____ _ _____ _ _ _____ _____ _____ _ _____ _____ _____ _ _____ _ _____ _ _ _____ _____ _____ _ _____ _____ _____ _ _____ _ _____ _ _ _____ _____ _____ _ _____ _____ _____ _ _____ _ _____ _ _ _____ _____ _____ _ _____ _____ _____ _ _____ _ _____ _ _ _____ _____ _____ _ _____ _____ _____ _ _____ _ _____ _ _ _____ _____ _____ _ _____ _____ _____ _ _____ _ _____ _ _ _____ _____ _____ _ _____ _____ _____ _ _____ _ _____ _ _ _____ _____ _____ _ _____ _____ _____ _ _____ _ _____ _ _ _____ _____ _____ _ _____ _____ _____ _ _____ _ _____ _ _ _____ _____ _____ _ _____ _____ _____ _ _____ _ _____ _ _ _____ _____ _____ _ _____ _____ _____ _ _____ _ _____ _ Page .. 1 Command ===> Enter-PF1---PF2---PF3---PF4---PF5---PF6---PF7---PF8---PF9---PF10--PF11--PF12--- Help Menu Exit Date -- ++ - + Save Canc ↩
Allocation Screen Fields
The attributes for both the OR and the AND FTT Allocation screens are the same.
DescriptionAttribute
A list (or range) of all possible databases corresponding to the views referenced by anyobject as an external subordinate object at compile time. A database numbermay be anyvalue between 1 and 65,535. Each number may be specified only once.
DBnr Origin
A list (or range) of all possible databases that the objects access. Each database identifiesthe DBnr of the user data. Each database placed in this list must have a corresponding
DBnr Destination
originating database number (DBnr Origin). A database number may be any valuebetween 1 and 65,535. Each number may be specified only once.
A list (or range) of all possible files corresponding to the views referenced by any objectas an external subordinate object during compile time. A file number may be any valuebetween 1 and 65,535. Each number may be specified only once.
Fnr Origin
A list (or range) of all possible files that the objects access. Each file number identifiesthe Fnr of the user data. A file number may be any value between 1 and 65,535. Eachnumber may be specified only once.
Fnr Destination
Allows you to specify the page number (backwards or forwards) to be displayed for theDBnr and/or Fnr table. The page number may be any value between 1 and 22.
Page
As long as a version of an FTT has not been used in amigration, it can bemodified. Oncethe FTT version has been used in a migration event, any attempt to modify it causes
Version
PAC to create a new version and assign a new version number to it. This version
PAC User's Guide152
File Translation Tables
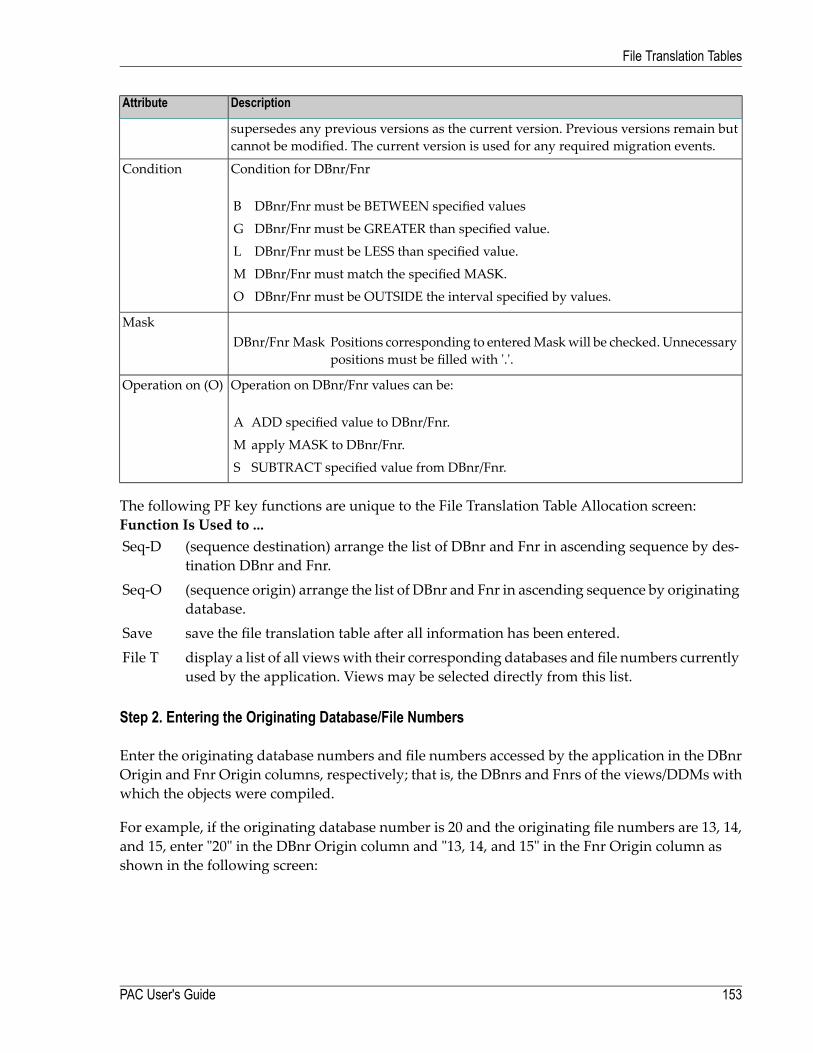
DescriptionAttribute
supersedes any previous versions as the current version. Previous versions remain butcannot be modified. The current version is used for any required migration events.
Condition for DBnr/FnrCondition
DBnr/Fnr must be BETWEEN specified valuesB
DBnr/Fnr must be GREATER than specified value.G
DBnr/Fnr must be LESS than specified value.L
DBnr/Fnr must match the specified MASK.M
DBnr/Fnr must be OUTSIDE the interval specified by values.O
MaskPositions corresponding to enteredMaskwill be checked. Unnecessarypositions must be filled with '.'.
DBnr/Fnr Mask
Operation on DBnr/Fnr values can be:Operation on (O)
ADD specified value to DBnr/Fnr.A
apply MASK to DBnr/Fnr.M
SUBTRACT specified value from DBnr/Fnr.S
The following PF key functions are unique to the File Translation Table Allocation screen:Is Used to ...Function(sequence destination) arrange the list of DBnr and Fnr in ascending sequence by des-tination DBnr and Fnr.
Seq-D
(sequence origin) arrange the list of DBnr and Fnr in ascending sequence by originatingdatabase.
Seq-O
save the file translation table after all information has been entered.Savedisplay a list of all viewswith their corresponding databases and file numbers currentlyused by the application. Views may be selected directly from this list.
File T
Step 2. Entering the Originating Database/File Numbers
Enter the originating database numbers and file numbers accessed by the application in the DBnrOrigin and Fnr Origin columns, respectively; that is, the DBnrs and Fnrs of the views/DDMswithwhich the objects were compiled.
For example, if the originating database number is 20 and the originating file numbers are 13, 14,and 15, enter "20" in the DBnr Origin column and "13, 14, and 15" in the Fnr Origin column asshown in the following screen:
153PAC User's Guide
File Translation Tables
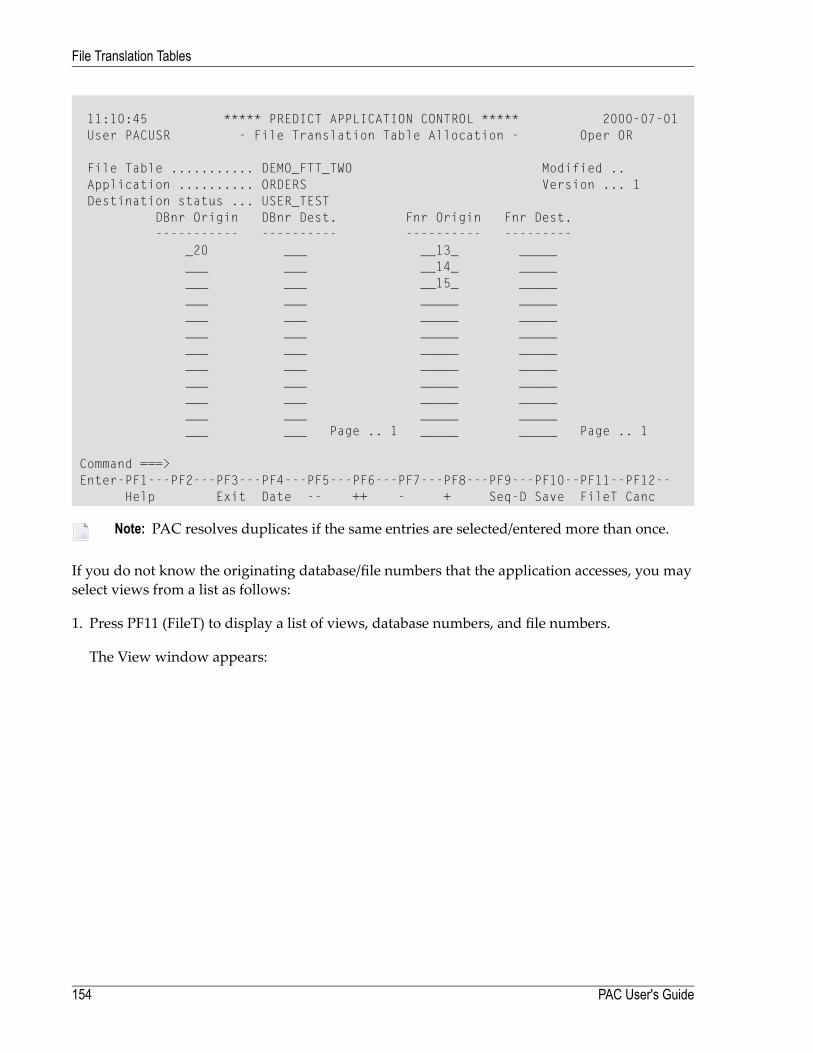
11:10:45 ***** PREDICT APPLICATION CONTROL ***** 2000-07-01User PACUSR - File Translation Table Allocation - Oper OR
File Table ........... DEMO_FTT_TWO Modified ..Application .......... ORDERS Version ... 1Destination status ... USER_TEST
DBnr Origin DBnr Dest. Fnr Origin Fnr Dest.----------- ---------- ---------- ---------
_20 ___ __13_ ________ ___ __14_ ________ ___ __15_ ________ ___ _____ ________ ___ _____ ________ ___ _____ ________ ___ _____ ________ ___ _____ ________ ___ _____ ________ ___ _____ ________ ___ _____ ________ ___ Page .. 1 _____ _____ Page .. 1
Command ===>Enter-PF1---PF2---PF3---PF4---PF5---PF6---PF7---PF8---PF9---PF10--PF11--PF12--
Help Exit Date -- ++ - + Seq-D Save FileT Canc
Note: PAC resolves duplicates if the same entries are selected/entered more than once.
If you do not know the originating database/file numbers that the application accesses, you mayselect views from a list as follows:
1. Press PF11 (FileT) to display a list of views, database numbers, and file numbers.
The View window appears:
PAC User's Guide154
File Translation Tables

11:10:45 ***** PREDICT APPLICATION CONTROL ***** 2000-07-01User PACUSR - File Translation Table Allocation - Oper OR
File Table ........... DEMO_FTT_TWO Modified ..Application .......... ORDERS Version ...1Destination status ... +--------------------------------------------------+
DBnr Origin | - View - |----------- | |
___ | C View Name DBnr Fnr |___ | - -------------------------------- ---- ----- |___ | _ ARTICLE 20 13 |___ | _ CUSTOMER 20 14 |___ | _ INVOICE 20 15 |___ | _ INVOICE-LINE 20 15 |___ | |___ | |___ | |___ | |___ | |___ | |
| |Command ===> +--------------------------------------------------+Enter-PF1---PF2---PF3---PF4---PF5---PF6---PF7---PF8---PF9---PF10--PF11--PF12--
Help Menu Exit Date -- ++ - + Seq-D Save FileT Canc
2. Select the desired views from this list by marking the view(s) with an X in the "C" column andpressing ENTER.
The database numbers and file numbers of the selected views are then placed in theDBnrOriginand Fnr Origin columns of the File Translation Table Allocation screen.
Step 3. Entering the Destination Database/File Numbers
In theDBnrDest. and FnrDest. columns, enter the destination database numbers and file numbersthat the application accesses, respectively.
For example, if the originating database number is 20 and is to be translated to 21, enter "21" inthe DBnr Dest. column directly across from the "20" designation in the DBnr Origin column. If thefile number is 13 and is to be translated to destination file number 24, enter "24" in the Fnr Dest.columndirectly across from the "13" designation in the FnrOrigin column as shown in the followingscreen:
155PAC User's Guide
File Translation Tables
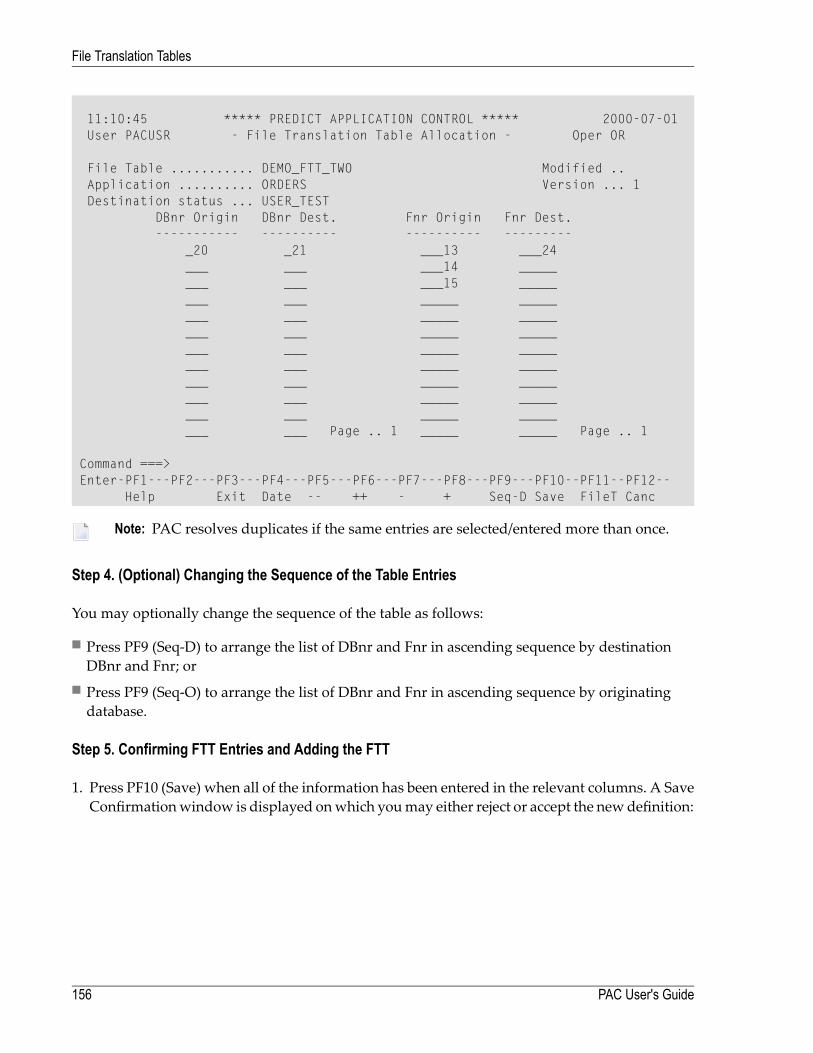
11:10:45 ***** PREDICT APPLICATION CONTROL ***** 2000-07-01User PACUSR - File Translation Table Allocation - Oper OR
File Table ........... DEMO_FTT_TWO Modified ..Application .......... ORDERS Version ... 1Destination status ... USER_TEST
DBnr Origin DBnr Dest. Fnr Origin Fnr Dest.----------- ---------- ---------- ---------
_20 _21 ___13 ___24___ ___ ___14 ________ ___ ___15 ________ ___ _____ ________ ___ _____ ________ ___ _____ ________ ___ _____ ________ ___ _____ ________ ___ _____ ________ ___ _____ ________ ___ _____ ________ ___ Page .. 1 _____ _____ Page .. 1
Command ===>Enter-PF1---PF2---PF3---PF4---PF5---PF6---PF7---PF8---PF9---PF10--PF11--PF12--
Help Exit Date -- ++ - + Seq-D Save FileT Canc
Note: PAC resolves duplicates if the same entries are selected/entered more than once.
Step 4. (Optional) Changing the Sequence of the Table Entries
You may optionally change the sequence of the table as follows:
■ Press PF9 (Seq-D) to arrange the list of DBnr and Fnr in ascending sequence by destinationDBnr and Fnr; or
■ Press PF9 (Seq-O) to arrange the list of DBnr and Fnr in ascending sequence by originatingdatabase.
Step 5. Confirming FTT Entries and Adding the FTT
1. Press PF10 (Save) when all of the information has been entered in the relevant columns. A SaveConfirmationwindow is displayed onwhich youmay either reject or accept the newdefinition:
PAC User's Guide156
File Translation Tables
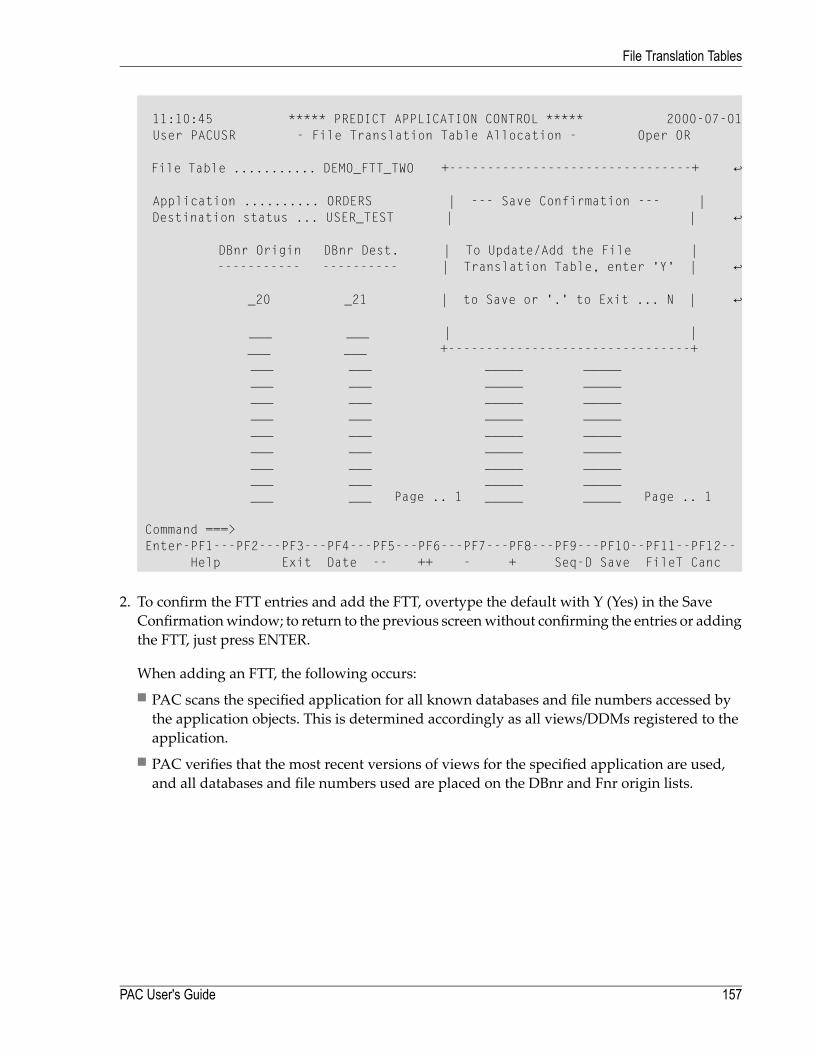
11:10:45 ***** PREDICT APPLICATION CONTROL ***** 2000-07-01 User PACUSR - File Translation Table Allocation - Oper OR File Table ........... DEMO_FTT_TWO +--------------------------------+ ↩ Application .......... ORDERS | --- Save Confirmation --- | Destination status ... USER_TEST | | ↩ DBnr Origin DBnr Dest. | To Update/Add the File | ----------- ---------- | Translation Table, enter 'Y' | ↩ _20 _21 | to Save or '.' to Exit ... N | ↩ ___ ___ | | ___ ___ +--------------------------------+ ___ ___ _____ _____ ___ ___ _____ _____ ___ ___ _____ _____ ___ ___ _____ _____ ___ ___ _____ _____ ___ ___ _____ _____ ___ ___ _____ _____ ___ ___ _____ _____ ___ ___ Page .. 1 _____ _____ Page .. 1 Command ===> Enter-PF1---PF2---PF3---PF4---PF5---PF6---PF7---PF8---PF9---PF10--PF11--PF12-- Help Exit Date -- ++ - + Seq-D Save FileT Canc
2. To confirm the FTT entries and add the FTT, overtype the default with Y (Yes) in the SaveConfirmationwindow; to return to the previous screenwithout confirming the entries or addingthe FTT, just press ENTER.
When adding an FTT, the following occurs:■ PAC scans the specified application for all known databases and file numbers accessed bythe application objects. This is determined accordingly as all views/DDMs registered to theapplication.
■ PAC verifies that the most recent versions of views for the specified application are used,and all databases and file numbers used are placed on the DBnr and Fnr origin lists.
157PAC User's Guide
File Translation Tables
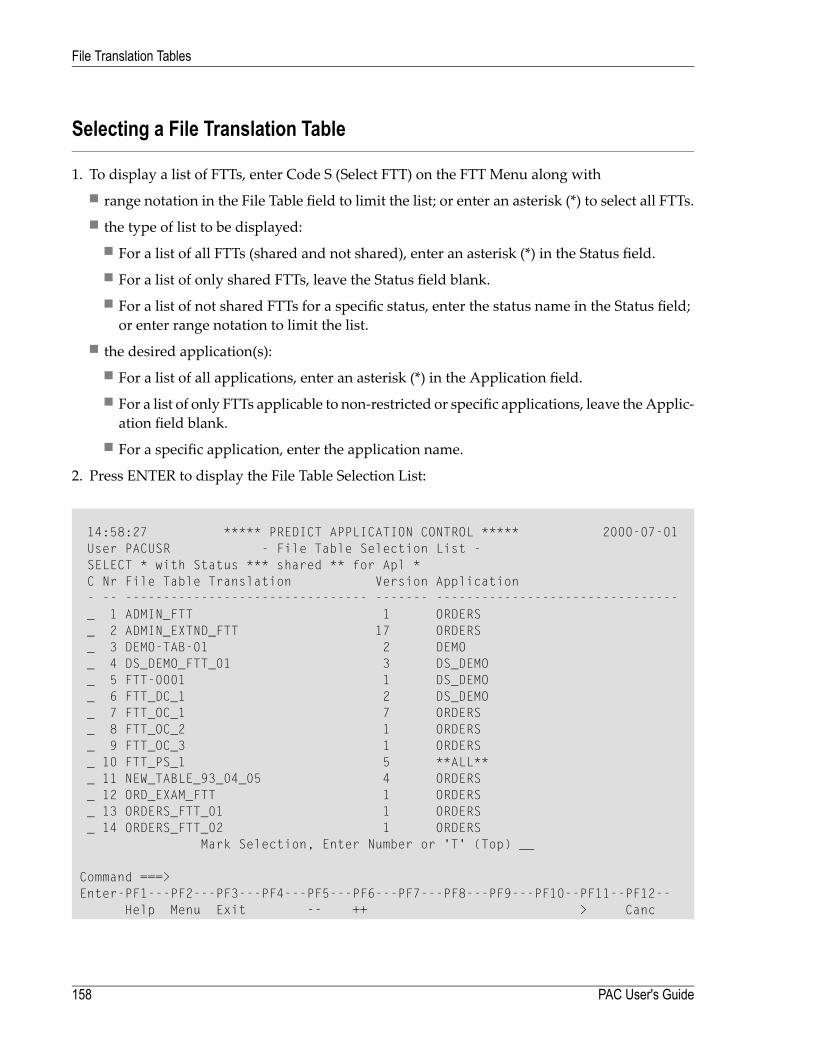
Selecting a File Translation Table
1. To display a list of FTTs, enter Code S (Select FTT) on the FTT Menu along with■ range notation in the File Table field to limit the list; or enter an asterisk (*) to select all FTTs.■ the type of list to be displayed:
■ For a list of all FTTs (shared and not shared), enter an asterisk (*) in the Status field.■ For a list of only shared FTTs, leave the Status field blank.■ For a list of not shared FTTs for a specific status, enter the status name in the Status field;or enter range notation to limit the list.
■ the desired application(s):■ For a list of all applications, enter an asterisk (*) in the Application field.■ For a list of only FTTs applicable to non-restricted or specific applications, leave the Applic-ation field blank.
■ For a specific application, enter the application name.
2. Press ENTER to display the File Table Selection List:
14:58:27 ***** PREDICT APPLICATION CONTROL ***** 2000-07-01User PACUSR - File Table Selection List -SELECT * with Status *** shared ** for Apl *C Nr File Table Translation Version Application- -- -------------------------------- ------- --------------------------------_ 1 ADMIN_FTT 1 ORDERS_ 2 ADMIN_EXTND_FTT 17 ORDERS_ 3 DEMO-TAB-01 2 DEMO_ 4 DS_DEMO_FTT_01 3 DS_DEMO_ 5 FTT-0001 1 DS_DEMO_ 6 FTT_DC_1 2 DS_DEMO_ 7 FTT_OC_1 7 ORDERS_ 8 FTT_OC_2 1 ORDERS_ 9 FTT_OC_3 1 ORDERS_ 10 FTT_PS_1 5 **ALL**_ 11 NEW_TABLE_93_04_05 4 ORDERS_ 12 ORD_EXAM_FTT 1 ORDERS_ 13 ORDERS_FTT_01 1 ORDERS_ 14 ORDERS_FTT_02 1 ORDERS
Mark Selection, Enter Number or 'T' (Top) __
Command ===>Enter-PF1---PF2---PF3---PF4---PF5---PF6---PF7---PF8---PF9---PF10--PF11--PF12--
Help Menu Exit -- ++ > Canc
PAC User's Guide158
File Translation Tables

The above File Table Selection List example screen displays an alphabetical list of shared FTTsalong with the maximum number of versions that exist for a particular FTT and the applicationto which each FTT belongs.
The sub-function ("SELECT" in the above example) displayed on the line directly under the Userfield indicates that you used one of the following methods to access this screen:
■ Range notation or blank in the Status field along with the Display, Modify, Purge, or Select sub-function;
■ The SELECT direct command (see the PAC Reference documentation).
If you accessed the screenwith the S (Select FTT) sub-function orwith the SELECTdirect commandfor one or more of the listed FTTs, you can process the following sub-function by entering thecorresponding Code in the "C" column: D (Display), M (Modify), P (Purge), S (Select). Enter aperiod (`.') to return to the FTT Menu.
If you mark the FTT with the cursor or if you enter an X or an S in the "C" column; or if you enterthe FTT number (From the "Nr" column) in the Mark Selection... field, and press ENTER, you arereturned to the FTT Menu where the specified FTT is displayed in the File Table field.
Displaying FTT Creation Dates and Status
■ Press PF11 (>) to display the creation dates of the FTTs listed on the File Table Selection Listscreen.
■ Press PF11 (>) again to display the status (shared, not shared) of the FTT.■ Press PF10 (<) to return to the previous screen.
Displaying a File Translation Table
1. To display an FTT, enter Code D on the FTT Menu, the name of the FTT, and optionally thename of the application to which the FTT is assigned.■ If only one version of the FTT exists, the File Translation Table Allocation screen is displayed.■ If more than one version of the FTT exists, a list of the versions is displayed on the File TableSelection List:
159PAC User's Guide
File Translation Tables
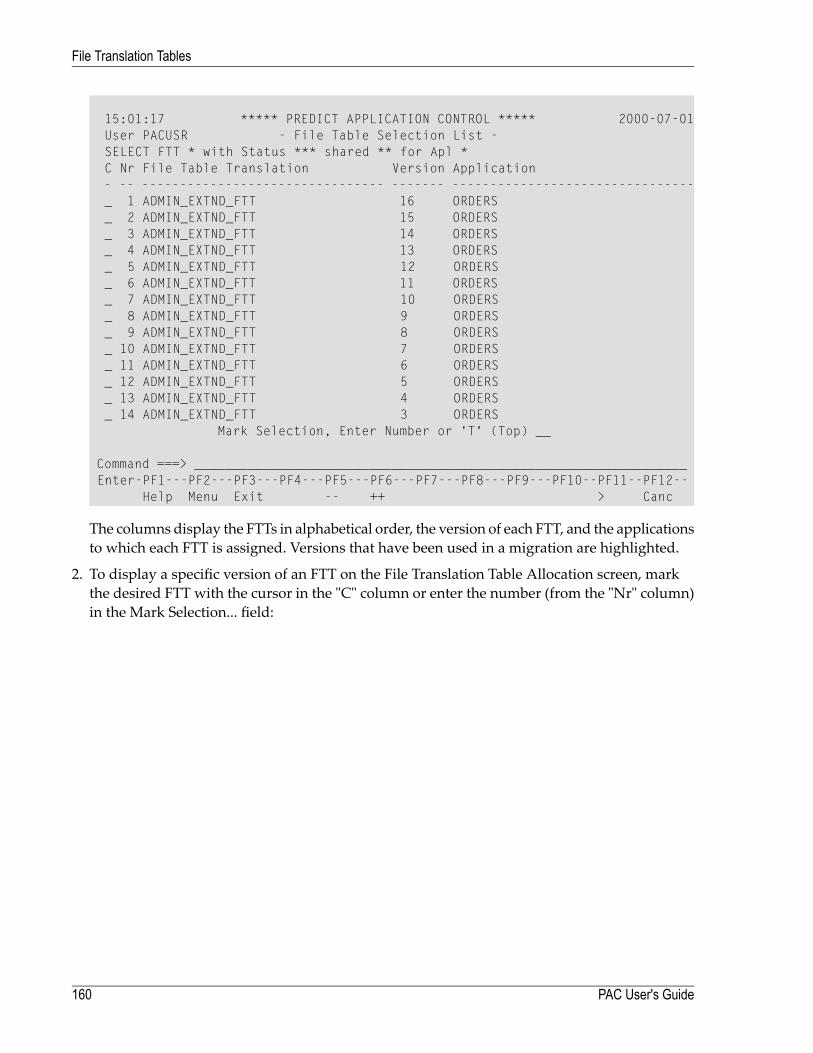
15:01:17 ***** PREDICT APPLICATION CONTROL ***** 2000-07-01User PACUSR - File Table Selection List -SELECT FTT * with Status *** shared ** for Apl *C Nr File Table Translation Version Application- -- -------------------------------- ------- --------------------------------_ 1 ADMIN_EXTND_FTT 16 ORDERS_ 2 ADMIN_EXTND_FTT 15 ORDERS_ 3 ADMIN_EXTND_FTT 14 ORDERS_ 4 ADMIN_EXTND_FTT 13 ORDERS_ 5 ADMIN_EXTND_FTT 12 ORDERS_ 6 ADMIN_EXTND_FTT 11 ORDERS_ 7 ADMIN_EXTND_FTT 10 ORDERS_ 8 ADMIN_EXTND_FTT 9 ORDERS_ 9 ADMIN_EXTND_FTT 8 ORDERS_ 10 ADMIN_EXTND_FTT 7 ORDERS_ 11 ADMIN_EXTND_FTT 6 ORDERS_ 12 ADMIN_EXTND_FTT 5 ORDERS_ 13 ADMIN_EXTND_FTT 4 ORDERS_ 14 ADMIN_EXTND_FTT 3 ORDERS
Mark Selection, Enter Number or 'T' (Top) __
Command ===> _________________________________________________________________Enter-PF1---PF2---PF3---PF4---PF5---PF6---PF7---PF8---PF9---PF10--PF11--PF12--
Help Menu Exit -- ++ > Canc
The columns display the FTTs in alphabetical order, the version of each FTT, and the applicationsto which each FTT is assigned. Versions that have been used in a migration are highlighted.
2. To display a specific version of an FTT on the File Translation Table Allocation screen, markthe desired FTT with the cursor in the "C" column or enter the number (from the "Nr" column)in the Mark Selection... field:
PAC User's Guide160
File Translation Tables

08:56:09 ***** PREDICT APPLICATION CONTROL ***** 2000-07-01User PACUSR - File Translation Table Allocation -
File Table ........... ADMIN_EXTND_FTT Modified ..00-01-02Application .......... ORDERS Version ...12Destination status ... ** Shared **
DBnr Origin DBnr Dest. Fnr Origin Fnr Dest.----------- ---------- ---------- ---------
1 2 11 12 3 12 23 4 13 34 5 14 45 6 15 56 7 16 67 8 17 78 9 18 89 10 19 910 11 20 1011 1212 13 Page .. 1 Page .. 1
Command ===>Enter-PF1---PF2---PF3---PF4---PF5---PF6---PF7---PF8---PF9---PF10--PF11--PF12---
Help Menu Exit Date -- ++ - + Seq-D Usage Canc
This screen is similar to the screen used to define the FTT. You may page forward or backwardusing the appropriate PF keys, or by entering the number of the page in the Page: field for theDBnr and/or Fnr.
3. To display a list of statuses that use the FTT, press PF10 (Usage).■ If the FTT is not shared, only one Status Name entry is displayed.■ If the FTT is shared with several statuses, the Translation Table Usage window displays alist of the names and types of all other statuses that use the FTT:
161PAC User's Guide
File Translation Tables

12:20:58 ***** PREDICT APPLICATION CONTROL ***** 2000-07-01User PACUSR - File Translation Table Allocation -
File Table ........... DS-DEMO-FTT +-----------------------------------------+Application .......... DS_DEMO | --- Translation Table Usage --- |Destination status ... ** Shared * | |
DBnr Origin DBnr Dest. | Status Name Type |----------- ---------- | -------------------------------- ---- |
10 235 | DEVELOPMENT D || || || || || || || || || || |
Pa | Enter '.' to Exit ... _ |+-----------------------------------------+
Command ===>Enter-PF1---PF2---PF3---PF4---PF5---PF6---PF7---PF8---PF9---PF10--PF11--PF12---
Help Menu Exit Date -- ++ - + Seq-D Usage Canc
If no statuses use the FTT version, a window appears displaying the following message:
"Translation Table is not used by any Statuses."
Modifying a File Translation Table
If the FTT has not been used in amigration, the existing information for the FTTmay bemodified.
If the FTT has been used in a migration, PAC assigns a new version number to the FTT when youattempt to modify it. This version supersedes any previous versions as the current version. Theprevious versions remain, and are not modifiable.
For example, if the current version (Version 3, for example) has been used in a migration eventand you attempt to modify it, PAC creates a new version (Version 4) of the FTT and a "4" is dis-played in the Version field on the FTT Allocation screen. Version 4 may be modified as often asnecessary until it is used in amigration event. Version 3 remains as an audit trail for anymigrationevent that used it. The DBnr and Fnr data from the previous version are provided as the base in-formation for the new version.
Once the FTT is created, migration events that use it will use the current version until it is super-seded when the FTT is modified.
PAC User's Guide162
File Translation Tables
To modify a file translation table
1. On the FTTMenu, enter CodeM (Modify FTT), the name of the FTT to bemodified, and option-ally, the name of the application to which the FTT is assigned and/or the name of the status towhich the FTT is assigned.
The FTT Allocation screen appears .
2. Modify the FTT.
You may use the PF keys or specify a page number in the Page: field to page forward or back-wards in the list tomodifyDBnr and/or Fnr assignments. Refer to the sectionAllocation ScreenFields for more information.
3. Press PF10 (Save) or press ENTER to confirm your modifications and return to the FTT Menu.
Copying a File Translation Table
When copying an FTT, you may change the application and/or status on the FTT Menu so thatthe new FTT acquires that new application and/or status assignment.
To copy a file translation table
1. On the FTT Menu, enter Code C, the name of the FTT to be copied, and a name for the newFTT. If the new FTT is to be restricted (not shared), enter the status and/or application name aswell.
The Copy File Translation Table screen appears. The information assigned to the new FTT isidentical to that of the old FTT unless you entered a status and/or application name on the FTTMenu.
2. Modify the information (adding and removing entries as required) and press PF10 (Save) toupdate.
3. To retrieve the list of views used by the specified application, press PF11 .
4. Press PF3 to exit.
163PAC User's Guide
File Translation Tables
Linking an FTT to an Application Status Link
Once an FTT has been created (defined), it must be assigned as an attribute of the To status (des-tination status) of an application status link before it can be used in a migration event. This is ac-complished by modifying the specific application status link.
Even if an FTT is assigned a specific application and status, the FTT must still be defined to theapplication status link because there may be more than one FTT with the same application andstatus assignments.
When the migration event is created for the application, the FTT is then assigned automaticallyand may not be overridden.
Refer to the section Adding an Individual Application Status Link for detailed information.
Changing an FTT Assignment
To change the FTT assigned to a particular application status link, type over the FTTnamedisplayedin the Translation Table field on the Modify Application Status Link screen.
If the FTT is specified as shared ("Y") in the Shared Table field, the entry is updated.
If the FTT is specified as not shared ("N") in the Shared Table field, it cannot be updated to beshared. You can only update an FTT to shared as a separate taskwhen the FTT is defined. Updatingresults in the creation of a new version of the FTT.
If the FTT is dormant, PAC assumes that an error previously occurred and, if no other applicationstatus links use this table, the FTT entry is purged.
Purging a File Translation Table
1. To purge an FTT, enter Code P and the name of the FTT on the FTT Menu.
If there is more than one version of the FTT, a list of all versions is displayed on the File TableSelection List:
PAC User's Guide164
File Translation Tables
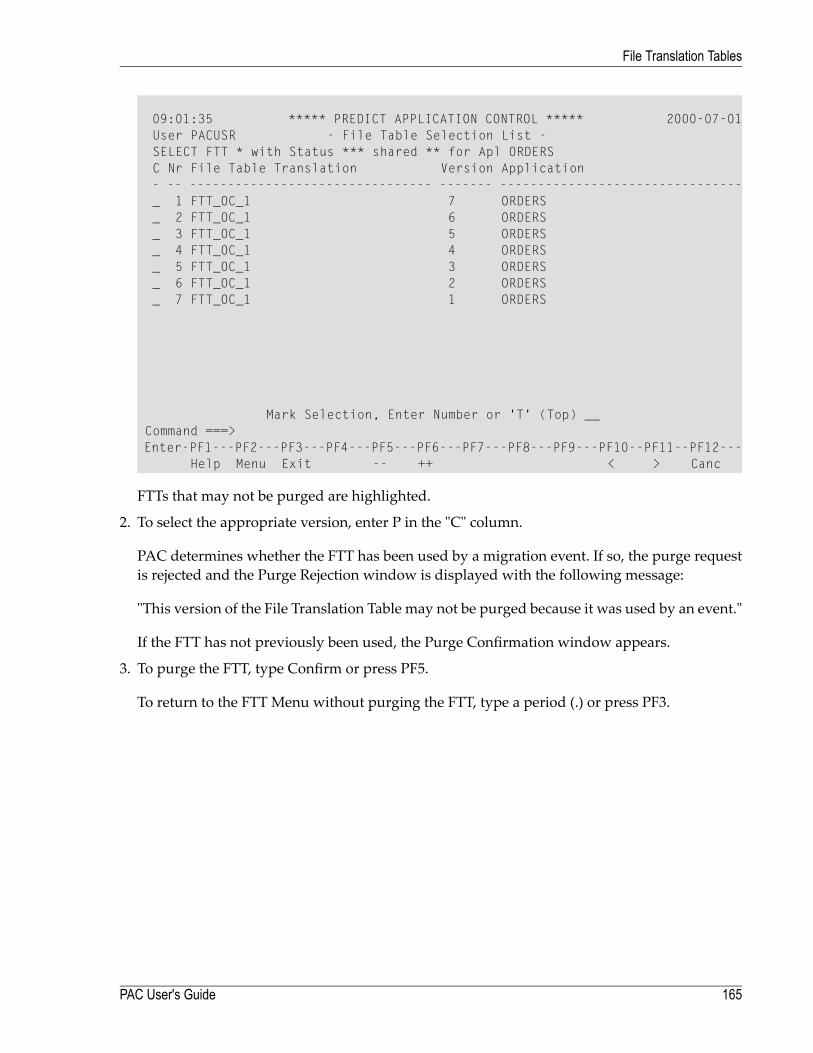
09:01:35 ***** PREDICT APPLICATION CONTROL ***** 2000-07-01User PACUSR - File Table Selection List -SELECT FTT * with Status *** shared ** for Apl ORDERSC Nr File Table Translation Version Application- -- -------------------------------- ------- --------------------------------_ 1 FTT_OC_1 7 ORDERS_ 2 FTT_OC_1 6 ORDERS_ 3 FTT_OC_1 5 ORDERS_ 4 FTT_OC_1 4 ORDERS_ 5 FTT_OC_1 3 ORDERS_ 6 FTT_OC_1 2 ORDERS_ 7 FTT_OC_1 1 ORDERS
Mark Selection, Enter Number or 'T' (Top) __Command ===>Enter-PF1---PF2---PF3---PF4---PF5---PF6---PF7---PF8---PF9---PF10--PF11--PF12---
Help Menu Exit -- ++ < > Canc
FTTs that may not be purged are highlighted.
2. To select the appropriate version, enter P in the "C" column.
PAC determines whether the FTT has been used by a migration event. If so, the purge requestis rejected and the Purge Rejection window is displayed with the following message:
"This version of the File Translation Table may not be purged because it was used by an event."
If the FTT has not previously been used, the Purge Confirmation window appears.
3. To purge the FTT, type Confirm or press PF5.
To return to the FTT Menu without purging the FTT, type a period (.) or press PF3.
165PAC User's Guide
File Translation Tables

166
11 Part II - PAC Migration Concepts
This part tells you how to set up, run, and monitor migration events and assign and maintainversions of migrated objects.
■ Migration■ Migration Paths■ Migration Events■ Migration Path Defaults■ Archive Event Maintenance■ Authorizing and Submitting a Migration Event■ Migrations Into, Within, and Out of PAC■ Migrating Predict Objects■ Assigning and Maintaining Object Versions■ Object Version Maintenance
The overall migration steps are:
1. Define themigration event tomigrate the application from one status to another along a definedmigration path. Identify the activities that must take place during the migration of the objectsof an application.
Note: The event that migrates Predict objects must be run before the event thatmoves/copies the Natural and non-Natural application objects that use them.
2. Build the object list. The object list identifies the objects of an application to be migrated.
The expand status option may be used to specify the status fromwhich subordinate objects areto be compiled.
167
3. Validate the object list. PAC checks the list of objects to be migrated.
4. Authorize the event. Permission is given to execute the migration.
5. Submit the event; this activates the job that runs the migration event.
6. Monitor the processing of themigration event. TheAudit Report and the Job Information screensshow the progress of the migration.
After the migration steps are completed, a version can be assigned to an object to identify andcontrol it in the PAC environment.
PAC User's Guide168
Part II - PAC Migration Concepts
12 Migration
■ General Procedure ......................................................................................................................... 170■ Defining Migration Events ................................................................................................................ 171■ Creating the Object List .................................................................................................................. 172■ Validating the Object List ................................................................................................................. 178■ Authorizing a Migration Event ........................................................................................................... 179■ Submitting a Migration Event ........................................................................................................... 181■ Monitoring a Migration Event ............................................................................................................ 181■ Audit Report ................................................................................................................................. 183
169

Migration is the process of transferring applications or parts of applications (objects), either onlineor in batch, from one location (status) to another. Three PAC entities are used for the migrationprocess:
■ Migration event■ Object list■ Audit report
As an application moves through its test plan or life-cycle, PAC uses defined procedures andcontrols to migrate its objects from one linked status to another. These procedures and controlsare defined in the migration path and migration event.
This chapter covers the following topics:
General Procedure
The procedure for migrations must be followed in sequence:
1. Define themigration event tomigrate the application along an authorizedmigration path fromone status to another.
2. Create the list of objects to be migrated.
3. Validate the object list. PAC checks the list of objects to be migrated.
4. Authorize the event; that is, grant permission to execute the migration.
5. Submit the event; this activates the job that performs the migration.
6. Monitor the processing of themigration event. TheAudit Report and the Job Information screensshow the progress of the migration.
PAC User's Guide170
Migration
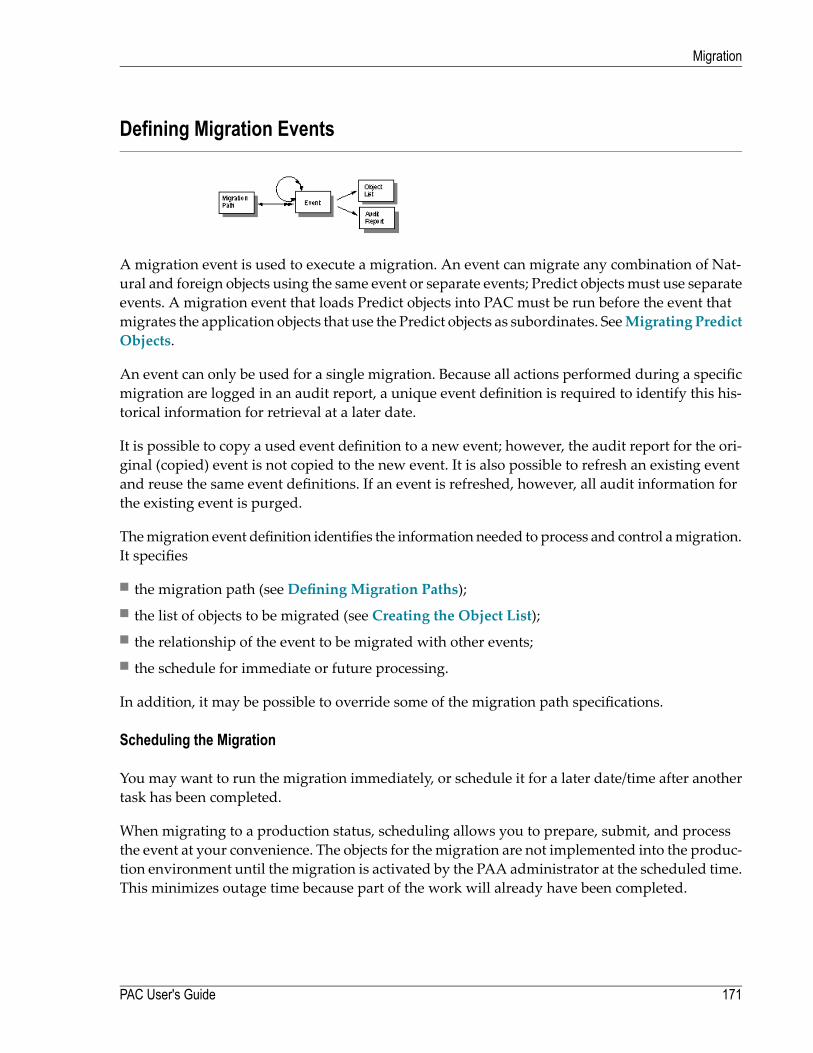
Defining Migration Events
A migration event is used to execute a migration. An event can migrate any combination of Nat-ural and foreign objects using the same event or separate events; Predict objects must use separateevents. A migration event that loads Predict objects into PAC must be run before the event thatmigrates the application objects that use the Predict objects as subordinates. SeeMigrating PredictObjects.
An event can only be used for a single migration. Because all actions performed during a specificmigration are logged in an audit report, a unique event definition is required to identify this his-torical information for retrieval at a later date.
It is possible to copy a used event definition to a new event; however, the audit report for the ori-ginal (copied) event is not copied to the new event. It is also possible to refresh an existing eventand reuse the same event definitions. If an event is refreshed, however, all audit information forthe existing event is purged.
Themigration event definition identifies the information needed to process and control amigration.It specifies
■ the migration path (seeDefining Migration Paths);■ the list of objects to be migrated (see Creating the Object List);■ the relationship of the event to be migrated with other events;■ the schedule for immediate or future processing.
In addition, it may be possible to override some of the migration path specifications.
Scheduling the Migration
You may want to run the migration immediately, or schedule it for a later date/time after anothertask has been completed.
When migrating to a production status, scheduling allows you to prepare, submit, and processthe event at your convenience. The objects for themigration are not implemented into the produc-tion environment until the migration is activated by the PAA administrator at the scheduled time.This minimizes outage time because part of the work will already have been completed.
171PAC User's Guide
Migration
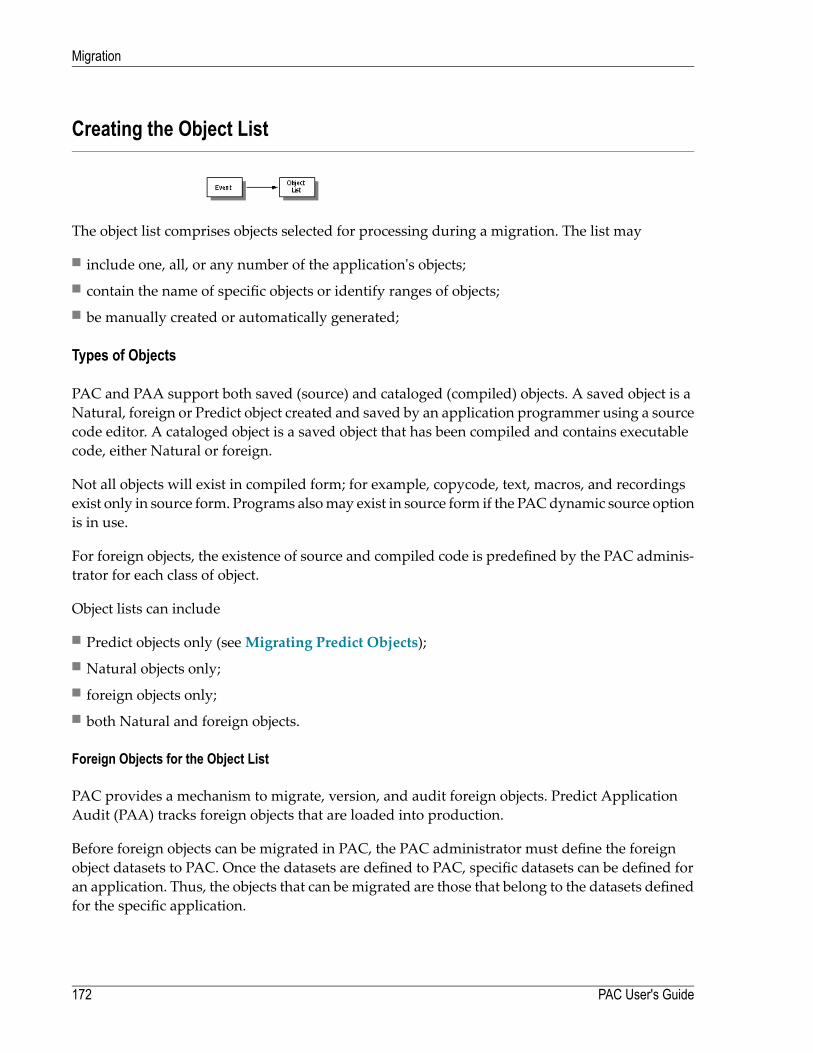
Creating the Object List
The object list comprises objects selected for processing during a migration. The list may
■ include one, all, or any number of the application's objects;■ contain the name of specific objects or identify ranges of objects;■ be manually created or automatically generated;
Types of Objects
PAC and PAA support both saved (source) and cataloged (compiled) objects. A saved object is aNatural, foreign or Predict object created and saved by an application programmer using a sourcecode editor. A cataloged object is a saved object that has been compiled and contains executablecode, either Natural or foreign.
Not all objects will exist in compiled form; for example, copycode, text, macros, and recordingsexist only in source form. Programs alsomay exist in source form if the PACdynamic source optionis in use.
For foreign objects, the existence of source and compiled code is predefined by the PAC adminis-trator for each class of object.
Object lists can include
■ Predict objects only (seeMigrating Predict Objects);■ Natural objects only;■ foreign objects only;■ both Natural and foreign objects.
Foreign Objects for the Object List
PAC provides a mechanism to migrate, version, and audit foreign objects. Predict ApplicationAudit (PAA) tracks foreign objects that are loaded into production.
Before foreign objects can be migrated in PAC, the PAC administrator must define the foreignobject datasets to PAC. Once the datasets are defined to PAC, specific datasets can be defined foran application. Thus, the objects that can be migrated are those that belong to the datasets definedfor the specific application.
PAC User's Guide172
Migration
The supported datasets are two formats: source and load (compiled). The default dataset type issource if a dataset type is not specified. foreign objects are not compiled or recompiled when theyenter the PAC environment.
The foreign objects that are supported by PAC are user-defined and can include, for example:
Assembler copy codeAssembler macroCCOBOL copy codeCOBOL programJCL
Foreign objects are identified on the object list by the prefix 3 on the object type (for example,3COB is a Cobol object type); this prefix is automatically assigned by PAC.
Although the Expand function is not valid for foreign objects, a Natural program can be expandedto include foreign objects that are used by that Natural program.
Refer to later sections of this documentation for detailed information aboutmigrating foreign objects.
Objects Containing Dynamic Source Variables
Natural programs that contain dynamic source variables (that is, fields prefixed with a plus sign(+) or an ampersand (&)) are referred to as dynamic source. In most cases, programs that containfields with an& variablemust be run, not executed; that is, the programmust exist in source form.
PAC requires that you add an extension S to the object type for objects that are to be designatedas dynamic sourcewhen you create the object list formigrations fromdevelopment ormaintenance.This extension indicates to PAC that the specified object version is to be flagged and migrated asdynamic source for subsequent migrations to test or production statuses; the extension need notbe specified for these migrations. Each time the object is migrated from development or mainten-ance, however, itmust be newly flagged to ensure that the newversion of the objectwill bemigratedas dynamic source.
Since these objects may require subordinates when they are run, the subordinates (data areas,maps, copycode) must be included in the object list as well.
Note the following compile considerations for subordinates and the states that are required whenobjects that use these are migrated as dynamic source:
■ Programs are not compiled; only the source is migrated;■ Maps are compiled and both source and cataloged forms are migrated;■ Copycode source is migrated;■ Data areas are compiled; only the cataloged form is migrated (Applymod 8 is required).
173PAC User's Guide
Migration
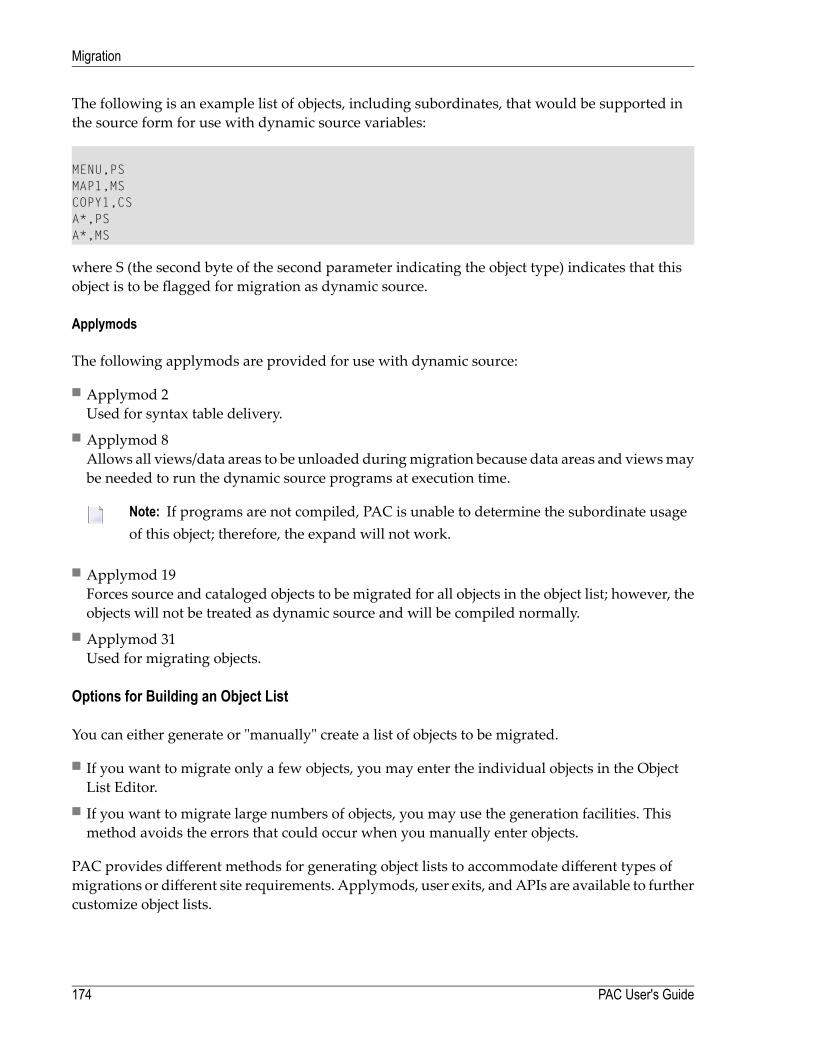
The following is an example list of objects, including subordinates, that would be supported inthe source form for use with dynamic source variables:
MENU,PSMAP1,MSCOPY1,CSA*,PSA*,MS
where S (the second byte of the second parameter indicating the object type) indicates that thisobject is to be flagged for migration as dynamic source.
Applymods
The following applymods are provided for use with dynamic source:
■ Applymod 2Used for syntax table delivery.
■ Applymod 8Allows all views/data areas to be unloaded duringmigration because data areas and viewsmaybe needed to run the dynamic source programs at execution time.
Note: If programs are not compiled, PAC is unable to determine the subordinate usageof this object; therefore, the expand will not work.
■ Applymod 19Forces source and cataloged objects to be migrated for all objects in the object list; however, theobjects will not be treated as dynamic source and will be compiled normally.
■ Applymod 31Used for migrating objects.
Options for Building an Object List
You can either generate or "manually" create a list of objects to be migrated.
■ If you want to migrate only a few objects, you may enter the individual objects in the ObjectList Editor.
■ If you want to migrate large numbers of objects, you may use the generation facilities. Thismethod avoids the errors that could occur when you manually enter objects.
PAC provides different methods for generating object lists to accommodate different types ofmigrations or different site requirements. Applymods, user exits, andAPIs are available to furthercustomize object lists.
PAC User's Guide174
Migration

See Creating and Validating a Migration List for detailed information about building the objectlist for specific types of object migrations.
Manually Creating the Object List
When you create an object list "manually" in theObject List Editor, youmay enter objects in differentforms to accommodate the type of migration. For example, you may enter
■ the specific object name (or range notation);■ the object type (or range notation);
Note: Currently, range notation is not available for selecting foreign objects.
■ an optional reference such as a status name or version number. The status name is effective be-cause it uses the version of the object present in the particular execution environment representedby the status name.
Generating the Object List
Note: You can generate a list of foreign objects only where the origin (From) status is theControl status.
Automation of object grouping guarantees that the list of objects migrated from status to status isalways a consistent, related set of objects.
You may automatically generate an object list either online or in batch:
■ Whenyou are adding amigration event online, youmay generate the object list online by enteringa valid value in the Generate List field of the Add Event screen.
■ When you are adding amigration event in batch, youmay specify a valid value for theGENTYPEoption of the ADD EVENT command.
Either online or in batch, youmay create the object list for an existing event by issuing theGENLISTcommandwhen you are modifying the event. GENLISTmay also be used to replace or regeneratean object list for an existing migration event.
175PAC User's Guide
Migration
Selecting and Expanding Objects for the Object List
You may use the select options (SEL command) to add objects to the object list, either alone or inconjunction with the expand options (EXP command) to include subordinate objects that use orare used by the selected objects.
For foreign objects, only the "used by" expand option is valid. OnlyNatural objects can be expandedto include subordinate foreign objects that are used by that Natural object.
The SEL Command
The SEL command can be used to select
■ Natural objects;■ foreign objects;■ Natural user error messages;■ rules and views to be used during the migration compile phase (of Natural objects).
If selection criteria is provided, the objects that meet the criteria are presented in a list. You maythen select those objects to be included in the object list.
The EXP Command
The Expand Status option may be used to include additional objects that may be required duringthe compile phase.
The object list can be expanded using the Expand option, which can be invoked either manuallyor automatically.
The Expand option can be used to
■ include subordinate objects used by the selected object at compile time;■ include referenced objects used by the selected objects at run time;■ include both subordinate and referenced objects that are used by the selected object;■ include objects that use the selected object:
Objects Used By. When the expand option (EXP command) is requested, PAC takes each entry inthe object list in turn and retrieves its subcomponents (for example, views, copycode, data areas,and rules) and adds them to the object list. External referenced foreign objects that are called froma Natural program are also added to the object list.
Objects That Use. (Not valid for foreign objects) For example, if a particular copy code has beenchanged, youmay need to recompile all objects that use the copy code to incorporate and synchron-ize these changes.
PAC User's Guide176
Migration

Youmay optionally reissue the EXP command so that these subcomponents are expanded in turn,the list sorted, and all duplicate objects eliminated. This recursive EXPANDcan be used at executiontime if Applymod 13 is active in your environment.
Note: The Expand option may also be used as an option in the migration path definition.This ensures that the subcomponents to be included in the object list are determined basedon the overall PAC environment at the time the migration event is processed.
When migrating objects from development or maintenance status types, the Expand function isvalid only if the cross-reference data exists for the object on the Predict file specified for the applic-ation status link. The EXP (Expand) command and special options of the SEL (Select) commanduse cross-reference (Xref) data from Predict for migrations from development, maintenance, andincorporation status types; for all other migrations, cross-reference data from PAC is used.
Customizing the Object List
When you have created the object list, you can use system applymods, user exits, and APIs tofurther customize the objects that are to be migrated.
Applymods
The PAC administrator can choose from a number of applymods to override object list defaults:
■ You can suppress the auto expansion of the global data area (GDA) during migration to reducethe number of objects involved in the migration.
■ You can instruct PAC to compare the versions of objects added during processing of the Expandoption and update the object list with the highest version found. In cases when an object is ref-erenced more than once, this clearly identifies the version to be migrated.
■ You can expand the object list recursively. See the section The EXP Command earlier in thissection.
User Exits
The PAC administrator can set up user exits to add options for building object lists:
■ User Exit 10 can be used to limit the list of objects verified when PAC validates the objects tobe processed for a migration event. It can also be used to perform some additional processingon the objects.
■ User Exit 23 allows you to selectively suppress expansion or modify Expand option parametersfor particular objects.
■ User Exit 26 allows you to modify the application general default criteria for selecting objectsto be archived.
177PAC User's Guide
Migration
Application Program Interface (APIs)
The PAC administrator can set up the Object List API in your environment so that you can directlyadd, purge, or display objects from the object list for a particular migration event.
Validating the Object List
Once created, an object list must be validated before a migration event can be authorized andprocessed.
Youmay choose to validate the list immediately, or later, before the event itself becomes authorized.PAC always validates the object list again at execution time to accommodate changes that mayhave occurred since the list was previously validated.
Depending on the type of migration, PAC performs different types of validation. The followingtypes of questions require answers in any case:
■ Does the object exist at the origin location?■ If a range of objects is specified, does at least one object in the range exist at the origin location?■ If an object type (for example, program) is specified to limit the objects in a range, does at leastone object of that type in that range exist at the origin location?
If status is used as a reference, PAC verifies this at execution time, and the corresponding versionnumber is substituted before processing continues. The status reference validation ensures thatthe correct version is used for event processing since the version number may have changed bythat time.
How PAC Validates an Object List
PAC uses the following process to validate an object list:
■ For objects being copied in fromdevelopment ormaintenance, PAC checks the specifiedNaturallibrary (or dataset for foreign objects) to ensure that each named object exists and is the correcttype.
■ For objects being copied from Control, PAC checks against other objects in Control.■ For objects being copied to development or maintenance without replacement, PAC checks thedestination library to ensure that the object does not already exist there.
■ If a type code has not been provided for a Natural object, PAC updates the object list with theobject type found on the system file (origin status).
■ If the type code is not consistent with the object type, it is flagged and a warning message isreturned.
PAC User's Guide178
Migration

Revalidation During Processing
Once the object list is validated, the eventmay be authorized and submitted for processing. Duringthe initial step of the migration process, PAC again validates the object list to determine if allentries are valid.
Note: Between authorizing the event and processing the event, some timemay elapse duringwhich the status of an application and/or any of its objects may change.
Thereafter, if PAC finds an error during the processing of the event, it prints an audit message tothe audit report, ignores the object, and then proceeds with processing.
Authorizing a Migration Event
An event must be authorized before it is submitted.
Event authorization is a restricted function that must be performed before an event is submitted.The list of authorizers is specified uniquely for each migration path defined to PAC and is main-tained through the Modify Migration Path function.
Once authorized, amigration event is placed in a "frozen" state and cannot bemodified. This helpsto ensure that only the correct actions and activities take place during the migration.
Amigration event, however, can be unauthorized,modified, and then authorized again.Amigrationevent that is copied is automatically unauthorized.
Initiating the Authorization Process
If you have been designated as a migration event authorizer, you can authorize the event online,in batch, or by using the event authorization API provided by PAC if it has been set up in yourenvironment.
■ To authorize an event online, enter the AUTHORIZE command on the command line of theMigration Event Authorization screen or use the PF5 key.
■ To authorize an event in batch, issue the AUTHORIZE EVENT batch command.
Only an event that is in the Pending or Validated state can be authorized. The authorization requestwill take a Pending event through the Validated state automatically.
If the event authorization API has been set up in your environment, ask your PAC administratorfor information about invoking it.
179PAC User's Guide
Migration
Customizing the Migration Event Process
When authorizing a migration event, you can set system applymods, which override PAC defaultprocessing procedures.
You may override certain PAC defaults during the migration by invoking specific PAC systemapplymods, user exits, and APIs. See the PAC Reference documentation for detailed information.
Applymods
Applymods can be used to override certain PAC defaults during migrations. For example:
■ To conserve space, youmay suppress the creation of the audit report duringmigration (applymod4). For example, you may only need the report listing from the batch job for verification. Thedisadvantage is that the suppressed report is not available for an audit review in the PAC systemat a later time.
■ When copying an event or performing a refresh, you can retain the job name specified in thesource event rather than use the job name specified in the migration path. The information isrippled forward and the copied event is run using the same job (applymod 20).
User Exits
User exits can be used to
■ generate and verify migration event names;■ add controls at the initialization of the event before migration processing;■ implement audits and security;■ prevent the termination of the migration event after the compile processing step, even if one ormore objects do not compile successfully;
■ permit the migration unload/load jobs to end normally in spite of certain error conditions beingdetected.
Application Program Interface (APIs)
The PAC Express APIs provide a useful base for creating a custom system to process migrationevents quickly and easily. The following APIs are available for migration events:
■ TheMigration Event API allows you to add,modify, submit, purge or display information abouta particular migration event.
■ The Object List API allows you to add, purge, or display (retrieve) object list objects for a partic-ular migration event.
■ The Text Objects API allows you to display the audit report for a particular migration event.
PAC User's Guide180
Migration
Submitting a Migration Event
Once amigration event has been defined, details of the event such as the object listmust be validated(or optionally overridden). Before amigration event can be submitted, itmust have been authorizedby an authorizer designated on the migration path.
Based on the options specified at authorization time, the event is submitted for processing eitherin batch using the remote job entry (RJE) facility, or online in your current Natural session. If anevent is submitted online and a job (JCL) has been specified for the migration path, the job is ig-nored.
You can submitmigration events online by entering the SUBMITdirect command on the commandline of theMigration Event Submission screen or by using the PF key assigned to confirm submis-sion (PF10).
If the event submission API has been set up in your environment, ask your PAC administratorfor information about invoking it. Formore information, refer to the sectionCustomizingMigrationProcessing later in this section.
Monitoring a Migration Event
Once a migration event has been started, the application is locked and no other event for this ap-plication can be processed until the first migration event has been completed and unlocked. Thisrestriction ensures that multiple events do not run concurrently, which could cause inconsistentresults.
If migration event processing ends abnormally, you have the option to either rerun the event im-mediately, or to back it out, modify it, and then restart it.
If you decide to back out the incomplete event, any changes made are reversed and the migrationevent itself is updated unless the event has reached a point of no return (Step 6).
Once processing of a migration event has been completed or backed out, the event may not beprocessed again or modified unless the REFRESH command is used.
The REFRESH commandmakes the event reusable by removing all audit information and resettingtotals set during its processing.
181PAC User's Guide
Migration

Locking
The PAC locking mechanism has been enhanced for better data consistency within the migrationevent process. duringmigration events into PAC, either from a development ormaintenance statusit is possible only to execute one migration event at a time, regardless of whether the applicationsinvolved are using unique (PRD) applications.
During migrations within or out of PAC it is possible to execute migration events in parallel re-gardless of whether they use a common (PRD) application or a unique (PRD) application.
This has been changed due to the new way that Predict objects are handled. All Predict objectsare now handled within the PCF file and as there is only one PCF file per system this mechanismof locking is essential.
Customized Migration Processing
Migration event processing can be customized using PAC system applymods, user exits, andAPIs.
PAC User's Guide182
Migration
Audit Report
An audit report is a log of the actions performed during a specific migration. It includes the audit,warning, and caution messages needed to verify the results of a migration. The audit report istypically used for problem determination if a migration should fail.
For both online and batch migration events, PAC tracks all migration activities and stores themin an audit report, which is available for review during or after the migration process. In addition,totals of objects processed may be viewed in the job totals.
During processing, PAC may issue a number of warnings and cautions. You therefore need toverify in the audit report that the correct actions have been performed.
183PAC User's Guide
Migration

184

13 Migration Paths
■ Adding (Defining) a Migration Path and Authorization ............................................................................ 188■ Modifying/Displaying a Migration Path ................................................................................................ 192■ Selecting a Migration Path ............................................................................................................... 193■ Displaying Migration Path Information ................................................................................................ 196■ Purging a Migration Path ................................................................................................................. 198
185
This section explains the steps required to define migration paths.
The migration path is the route between two statuses that an application is permitted to followduring its planned life-cycle. Each status specified in a migration path must have been previouslydefined to PAC and linked to the application. Migration events may be defined only for twostatuses that have been paired in a migration path.
Migration paths specify the conditions of application object movement between statuses:
■ the origin and destination application statuses;■ the person(s) or group(s) who may authorize the events that use the migration path;■ whether the event using the migration path is run online or in batch, and whether a work fileis to be used during migration;
■ the names of the jobs to be submitted by a batch event;■ whether the listed objects are to be moved or copied to the destination status when the event isprocessed; or, in the case of development, maintenance, and incorporation status types,whether the objects are to be included from a previously created work file;
■ whether and how the listed objects are to be expanded before the migration (the Expand optionto be used).
To access the PACmigration pathmaintenance and reporting sub-functions, enter Code T (Migra-tion Paths) on the PAC Main Menu.
Depending on your user profile, either the Migration Path Maintenance Menu or the MigrationPath Reporting Menu appears. The Migration Path Maintenance Menu, which combines themaintenance and reporting sub-functions, is used in discussions throughout this section.
PAC User's Guide186
Migration Paths
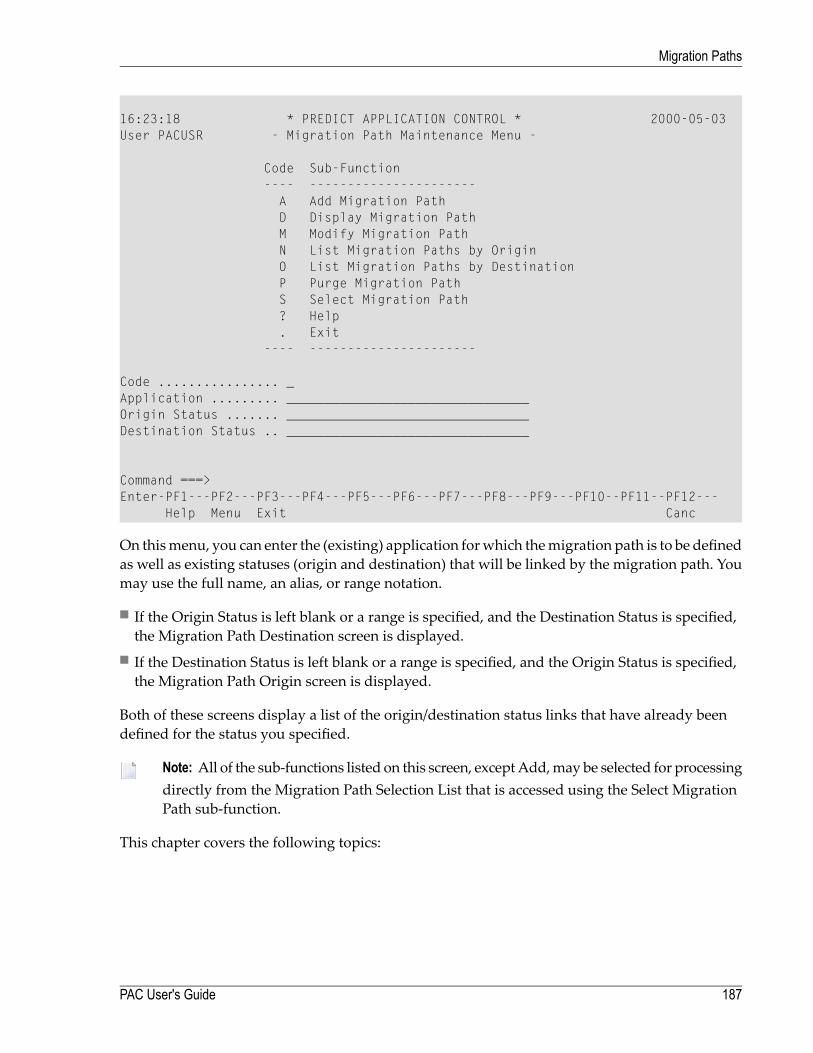
16:23:18 * PREDICT APPLICATION CONTROL * 2000-05-03User PACUSR - Migration Path Maintenance Menu -
Code Sub-Function---- ----------------------A Add Migration PathD Display Migration PathM Modify Migration PathN List Migration Paths by OriginO List Migration Paths by DestinationP Purge Migration PathS Select Migration Path? Help. Exit
---- ----------------------
Code ................ _Application ......... ________________________________Origin Status ....... ________________________________Destination Status .. ________________________________
Command ===>Enter-PF1---PF2---PF3---PF4---PF5---PF6---PF7---PF8---PF9---PF10--PF11--PF12---
Help Menu Exit Canc
On thismenu, you can enter the (existing) application forwhich themigration path is to be definedas well as existing statuses (origin and destination) that will be linked by the migration path. Youmay use the full name, an alias, or range notation.
■ If the Origin Status is left blank or a range is specified, and the Destination Status is specified,the Migration Path Destination screen is displayed.
■ If the Destination Status is left blank or a range is specified, and the Origin Status is specified,the Migration Path Origin screen is displayed.
Both of these screens display a list of the origin/destination status links that have already beendefined for the status you specified.
Note: All of the sub-functions listed on this screen, exceptAdd,may be selected for processingdirectly from the Migration Path Selection List that is accessed using the Select MigrationPath sub-function.
This chapter covers the following topics:
187PAC User's Guide
Migration Paths
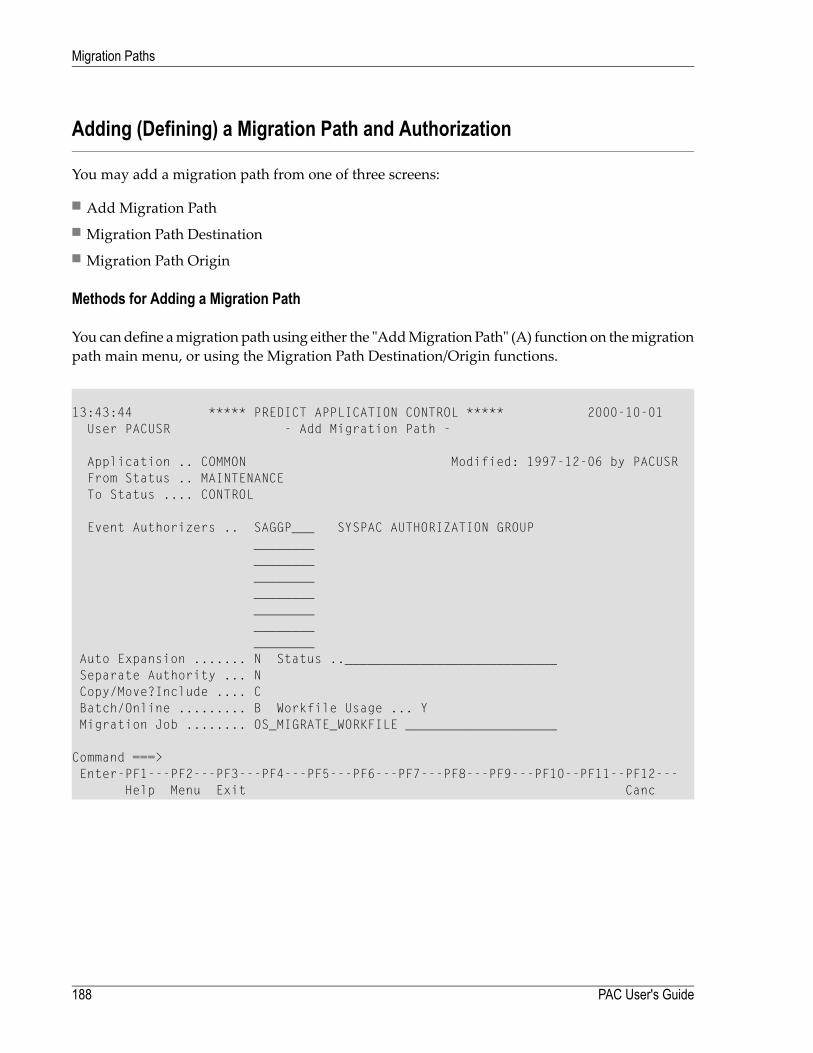
Adding (Defining) a Migration Path and Authorization
You may add a migration path from one of three screens:
■ Add Migration Path■ Migration Path Destination■ Migration Path Origin
Methods for Adding a Migration Path
You candefine amigration path using either the "AddMigration Path" (A) function on themigrationpath main menu, or using the Migration Path Destination/Origin functions.
13:43:44 ***** PREDICT APPLICATION CONTROL ***** 2000-10-01User PACUSR - Add Migration Path -
Application .. COMMON Modified: 1997-12-06 by PACUSRFrom Status .. MAINTENANCETo Status .... CONTROL
Event Authorizers .. SAGGP___ SYSPAC AUTHORIZATION GROUP________________________________________________________
Auto Expansion ....... N Status ..____________________________Separate Authority ... NCopy/Move?Include .... CBatch/Online ......... B Workfile Usage ... YMigration Job ........ OS_MIGRATE_WORKFILE ____________________
Command ===>Enter-PF1---PF2---PF3---PF4---PF5---PF6---PF7---PF8---PF9---PF10--PF11--PF12---
Help Menu Exit Canc
PAC User's Guide188
Migration Paths
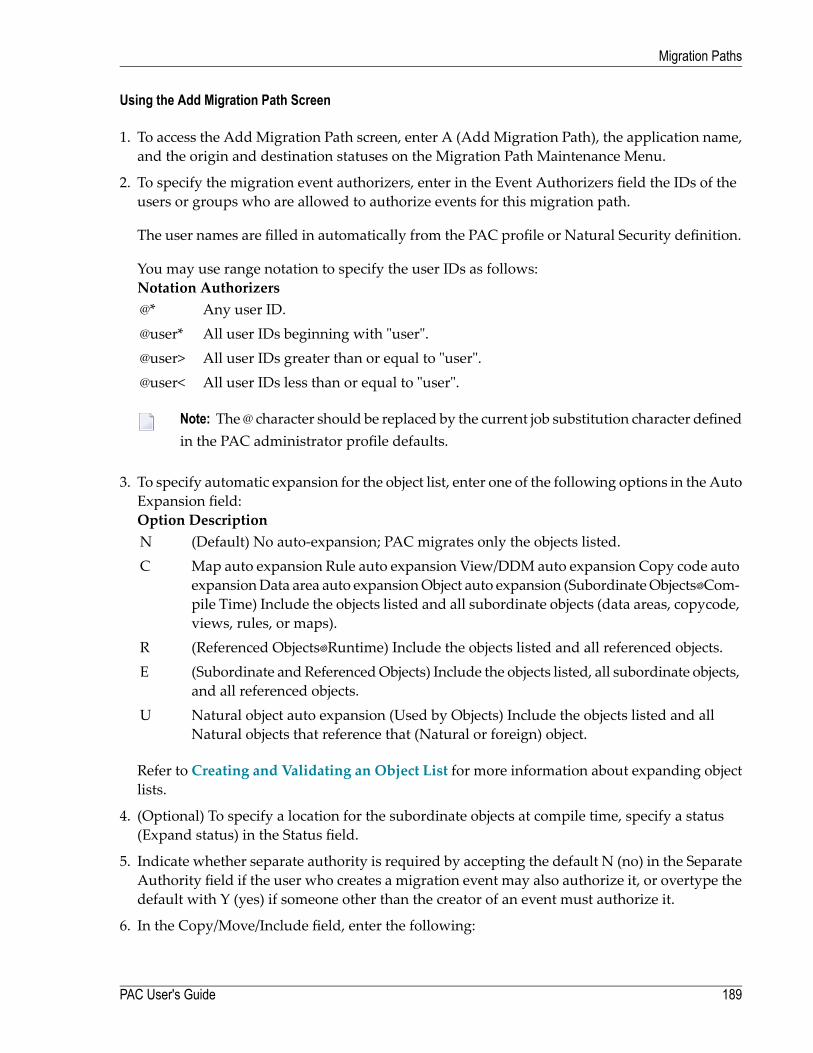
Using the Add Migration Path Screen
1. To access the AddMigration Path screen, enter A (AddMigration Path), the application name,and the origin and destination statuses on the Migration Path Maintenance Menu.
2. To specify the migration event authorizers, enter in the Event Authorizers field the IDs of theusers or groups who are allowed to authorize events for this migration path.
The user names are filled in automatically from the PAC profile or Natural Security definition.
You may use range notation to specify the user IDs as follows:AuthorizersNotationAny user ID.@*All user IDs beginning with "user".@user*All user IDs greater than or equal to "user".@user>All user IDs less than or equal to "user".@user<
Note: The@ character should be replaced by the current job substitution character definedin the PAC administrator profile defaults.
3. To specify automatic expansion for the object list, enter one of the following options in the AutoExpansion field:
DescriptionOption(Default) No auto-expansion; PAC migrates only the objects listed.NMap auto expansion Rule auto expansion View/DDM auto expansion Copy code autoexpansionData area auto expansionObject auto expansion (SubordinateObjects Com-
C
pile Time) Include the objects listed and all subordinate objects (data areas, copycode,views, rules, or maps).(Referenced Objects Runtime) Include the objects listed and all referenced objects.R(Subordinate andReferencedObjects) Include the objects listed, all subordinate objects,and all referenced objects.
E
Natural object auto expansion (Used by Objects) Include the objects listed and allNatural objects that reference that (Natural or foreign) object.
U
Refer to Creating and Validating an Object List for more information about expanding objectlists.
4. (Optional) To specify a location for the subordinate objects at compile time, specify a status(Expand status) in the Status field.
5. Indicate whether separate authority is required by accepting the default N (no) in the SeparateAuthority field if the user who creates a migration event may also authorize it, or overtype thedefault with Y (yes) if someone other than the creator of an event must authorize it.
6. In the Copy/Move/Include field, enter the following:
189PAC User's Guide
Migration Paths
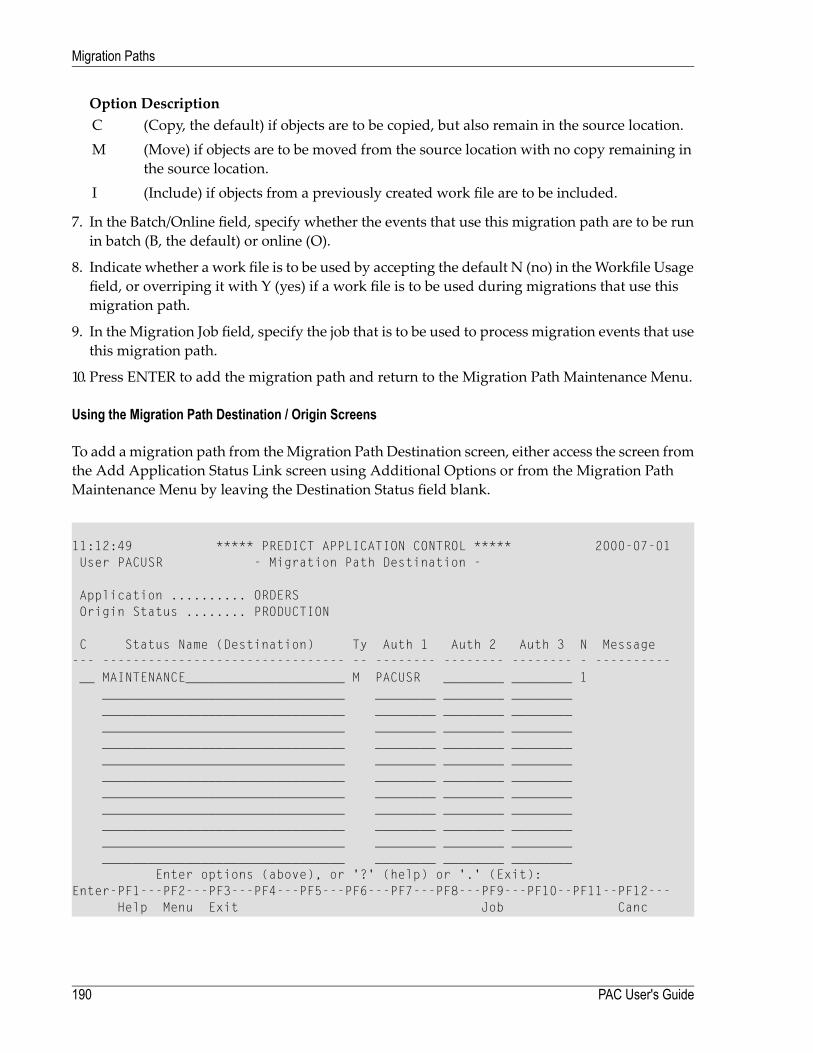
DescriptionOption(Copy, the default) if objects are to be copied, but also remain in the source location.C(Move) if objects are to be moved from the source location with no copy remaining inthe source location.
M
(Include) if objects from a previously created work file are to be included.I
7. In the Batch/Online field, specify whether the events that use this migration path are to be runin batch (B, the default) or online (O).
8. Indicate whether a work file is to be used by accepting the default N (no) in theWorkfile Usagefield, or overriping it with Y (yes) if a work file is to be used during migrations that use thismigration path.
9. In the Migration Job field, specify the job that is to be used to process migration events that usethis migration path.
10. Press ENTER to add the migration path and return to the Migration Path Maintenance Menu.
Using the Migration Path Destination / Origin Screens
To add amigration path from theMigration Path Destination screen, either access the screen fromthe Add Application Status Link screen using Additional Options or from the Migration PathMaintenance Menu by leaving the Destination Status field blank.
11:12:49 ***** PREDICT APPLICATION CONTROL ***** 2000-07-01User PACUSR - Migration Path Destination -
Application .......... ORDERSOrigin Status ........ PRODUCTION
C Status Name (Destination) Ty Auth 1 Auth 2 Auth 3 N Message--- -------------------------------- -- -------- -------- -------- - ----------__ MAINTENANCE_____________________ M PACUSR ________ ________ 1
________________________________ ________ ________ ________________________________________ ________ ________ ________________________________________ ________ ________ ________________________________________ ________ ________ ________________________________________ ________ ________ ________________________________________ ________ ________ ________________________________________ ________ ________ ________________________________________ ________ ________ ________________________________________ ________ ________ ________________________________________ ________ ________ ________________________________________ ________ ________ ________
Enter options (above), or '?' (help) or '.' (Exit):Enter-PF1---PF2---PF3---PF4---PF5---PF6---PF7---PF8---PF9---PF10--PF11--PF12---
Help Menu Exit Job Canc
PAC User's Guide190
Migration Paths
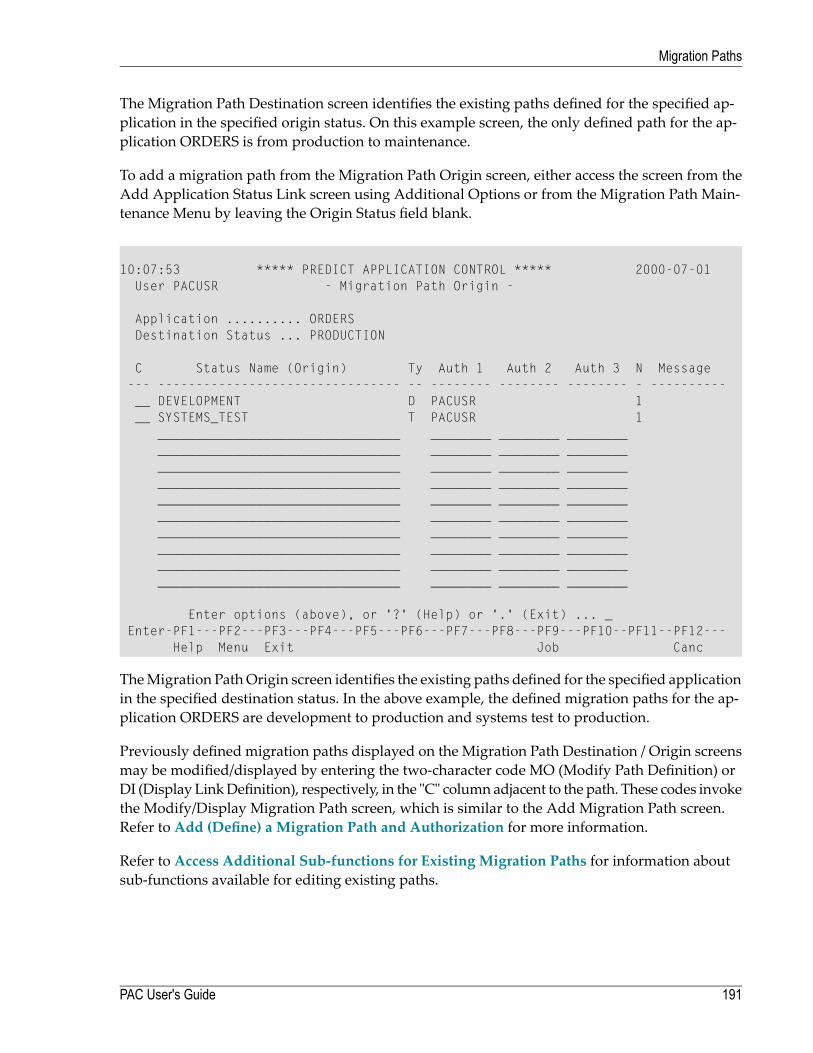
The Migration Path Destination screen identifies the existing paths defined for the specified ap-plication in the specified origin status. On this example screen, the only defined path for the ap-plication ORDERS is from production to maintenance.
To add a migration path from the Migration Path Origin screen, either access the screen from theAdd Application Status Link screen using Additional Options or from the Migration Path Main-tenance Menu by leaving the Origin Status field blank.
10:07:53 ***** PREDICT APPLICATION CONTROL ***** 2000-07-01User PACUSR - Migration Path Origin -
Application .......... ORDERSDestination Status ... PRODUCTION
C Status Name (Origin) Ty Auth 1 Auth 2 Auth 3 N Message--- -------------------------------- -- -------- -------- -------- - ----------__ DEVELOPMENT D PACUSR 1__ SYSTEMS_TEST T PACUSR 1
________________________________ ________ ________ ________________________________________ ________ ________ ________________________________________ ________ ________ ________________________________________ ________ ________ ________________________________________ ________ ________ ________________________________________ ________ ________ ________________________________________ ________ ________ ________________________________________ ________ ________ ________________________________________ ________ ________ ________________________________________ ________ ________ ________
Enter options (above), or '?' (Help) or '.' (Exit) ... _Enter-PF1---PF2---PF3---PF4---PF5---PF6---PF7---PF8---PF9---PF10--PF11--PF12---
Help Menu Exit Job Canc
TheMigration PathOrigin screen identifies the existing paths defined for the specified applicationin the specified destination status. In the above example, the defined migration paths for the ap-plication ORDERS are development to production and systems test to production.
Previously defined migration paths displayed on the Migration Path Destination / Origin screensmay be modified/displayed by entering the two-character code MO (Modify Path Definition) orDI (Display LinkDefinition), respectively, in the "C" column adjacent to the path. These codes invokethe Modify/Display Migration Path screen, which is similar to the Add Migration Path screen.Refer to Add (Define) a Migration Path and Authorization for more information.
Refer to Access Additional Sub-functions for Existing Migration Paths for information aboutsub-functions available for editing existing paths.
191PAC User's Guide
Migration Paths
Step 1. Specify the Destination / Origin Status and Migration Event Authorizers
On the Migration Path Destination / Origin screen, enter the following information:Enter the . . .Field Namedestination status on a blank line.Status Name (Destination)origin status on a blank line.Status Name (Origin)user ID or group ID of those users who may authorize the migrationevent.
Auth 1 / Auth 2 / Auth 3
You may add additional authorizers on the Modify Migration Path screen. Refer to Access Addi-tional Sub-functions for Existing Migration Paths for more information.
Step 2. Specify the Migration Job
1. Press PF9 (Job) to display the Job column.
2. Enter the name of the job that is to be submitted to process the event.
3. Press PF9 (Auth) to return to the previous screen.
Step 3. Add the Migration Path
Press ENTER to add the migration path and return to the previous screen.
The following attributes must be specified on the Modify Migration Path screen when you aredefining a migration path on a screen other than the Add Migration Path screen:
■ Auto Expansion■ Separate Authority■ Copy/Move/Include objects■ Batch/Online■ Workfile Usage
Modifying/Displaying a Migration Path
PAC allows you to update or display existing (defined) migration paths by modifying/displaying
■ an individualmigration path using theModify sub-function on theMigration PathMaintenanceMenu;
■ several migration paths at a time using the SCANPATH utility.
PAC User's Guide192
Migration Paths

Modifying/Displaying an Individual Migration Path
Youmaymodify or display an individual migration path definition on theModifyMigration Pathor Display Migration Path screens, which are accessed in the following ways:
■ On theMigration PathMaintenanceMenu, enter CodeM (ModifyMigration Path) orD (DisplayMigration Path), the application, and the origin and destination statuses of an existing path inthe relevant fields.
■ On theMigration Path Destination or Origin screen, select the path you wish to modify/displayby entering the two-character codeMO (Modify PathDefinition) orDI (Display LinkDefinition)in the "C" column.
In both cases, the Modify/DisplayMigration Path screen appears. The screen is similar to the AddMigration Path screen. Refer to Add (Define) a Migration Path and Authorization for more in-formation.
Updating Multiple Migration Paths
The SCANPATH utility allows you to modify (update) the defaults of several migration paths ata time. For migration paths that satisfy your selection criteria, you can
■ modify the default values such as execution mode (batch/online), work file use, andcopy/move/include objects;
■ scan for paths that use a particular job to processmigration events and (optionally) update/replacethat job for all paths that use it.
Refer to the PAC Reference documentation for more information.
Selecting a Migration Path
To access a selection list of existing migration paths, enter Code S (Select Migration Path) on theMigration Path Maintenance Menu.
193PAC User's Guide
Migration Paths
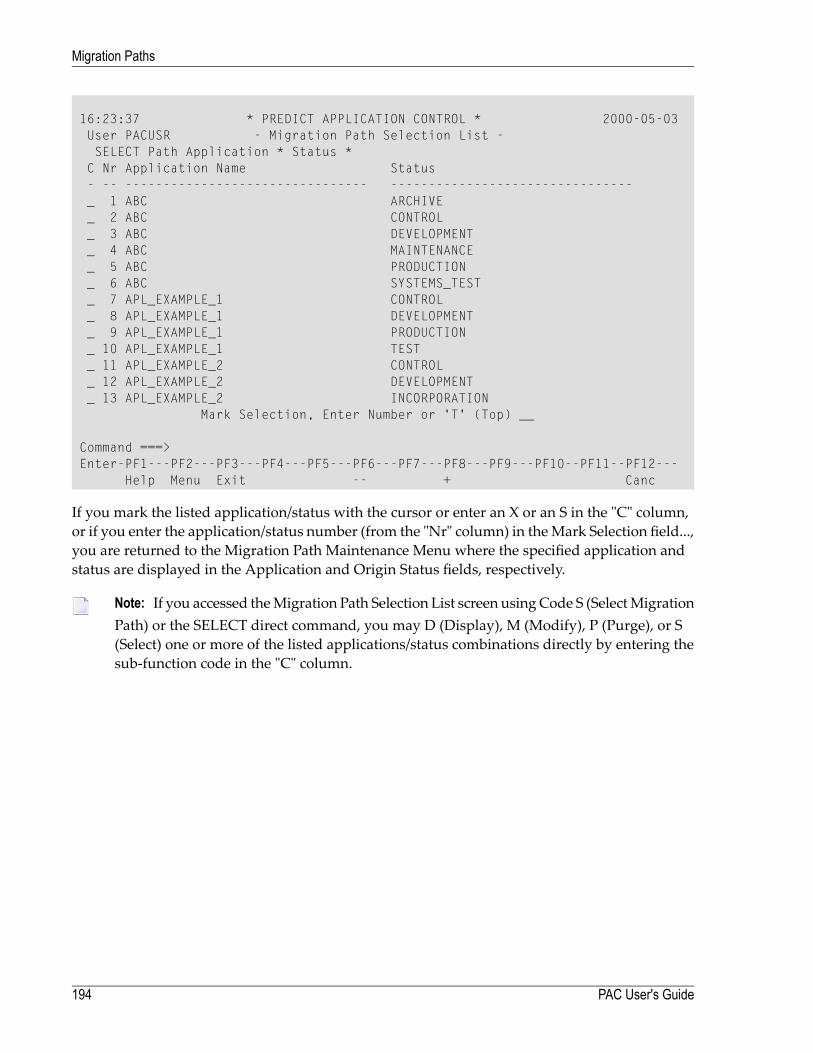
16:23:37 * PREDICT APPLICATION CONTROL * 2000-05-03User PACUSR - Migration Path Selection List -SELECT Path Application * Status *C Nr Application Name Status- -- -------------------------------- --------------------------------_ 1 ABC ARCHIVE_ 2 ABC CONTROL_ 3 ABC DEVELOPMENT_ 4 ABC MAINTENANCE_ 5 ABC PRODUCTION_ 6 ABC SYSTEMS_TEST_ 7 APL_EXAMPLE_1 CONTROL_ 8 APL_EXAMPLE_1 DEVELOPMENT_ 9 APL_EXAMPLE_1 PRODUCTION_ 10 APL_EXAMPLE_1 TEST_ 11 APL_EXAMPLE_2 CONTROL_ 12 APL_EXAMPLE_2 DEVELOPMENT_ 13 APL_EXAMPLE_2 INCORPORATION
Mark Selection, Enter Number or 'T' (Top) __
Command ===>Enter-PF1---PF2---PF3---PF4---PF5---PF6---PF7---PF8---PF9---PF10--PF11--PF12---
Help Menu Exit -- + Canc
If you mark the listed application/status with the cursor or enter an X or an S in the "C" column,or if you enter the application/status number (from the "Nr" column) in theMark Selection field...,you are returned to the Migration Path Maintenance Menu where the specified application andstatus are displayed in the Application and Origin Status fields, respectively.
Note: If you accessed theMigration Path Selection List screen usingCode S (SelectMigrationPath) or the SELECT direct command, you may D (Display), M (Modify), P (Purge), or S(Select) one or more of the listed applications/status combinations directly by entering thesub-function code in the "C" column.
PAC User's Guide194
Migration Paths

16:23:52 * PREDICT APPLICATION CONTROL * 2000-05-03User PACUSR - Migration Path Maintenance Menu -
Code Sub-Function---- ----------------------A Add Migration PathD Display Migration PathM Modify Migration PathP Purge Migration PathS Select Migration Path? Help. Exit
---- ----------------------
Code ................ SApplication.......... ABC_____________________________Origin Status ....... PRODUCTION______________________Destination Status .. *_______________________________
PAC2007: (I) No Migration Path selected.Command ===>Enter-PF1---PF2---PF3---PF4---PF5---PF6---PF7---PF8---PF9---PF10--PF11--PF12---
Help Menu Exit Canc
If you then press ENTER, theMigration PathDestination screen appears allowing you to completeyour selection of an existing migration path by choosing the destination status.
Accessing Additional Sub-Functions for Existing Migration Paths
To display and edit an existingmigration path displayed on theMigration PathDestination screenor the Migration Path Origin screen, mark the desired status in the "C" column with a valid two-character code.
A list of valid codes is available by accessingHelp or bymarking the desired statuswith an asterisk(*).
If you access the Migration Path Destination / Origin screens using the Display (D) sub-function,maintenance is not allowed and you may only display information about existing paths.
If you use the Modify (M) sub-function to access the Migration Path Destination / Origin screens,the following sub-functions are available:
Sub-FunctionCodeModify Link DefinitionMOPurge Link DefinitionPUDisplay Application DefinitionAPDisplay Status DefinitionSTDisplay Link DefinitionLI
195PAC User's Guide
Migration Paths

Sub-FunctionCodeDisplay Migration Path OriginPODisplay Migration Path DestinationPD
Displaying Migration Path Information
Youmaydisplay information about themigration paths defined for an application on theMigrationPath Destination / Origin screen by entering Code N (Migration Path Destination) or Code O(Migration Path Origin) and the application name on the Migration Path Maintenance Menu.
Using the Destination Screen
The Migration Path Destination screen appears if you entered Code N:
10:01:34 ***** PREDICT APPLICATION CONTROL ***** 2000-07-01User PACUSR - Migration Path Destination -
Application .. ORDERSLibrary Predict
Status - Path Destination Name DBnr Fnr DBnr Fnr Auth-1----------------------------------- ---------------- -------- --------CONTROL * PACS * 235 054 235 055>> DEVELOPMENT ORD-EXAM 235 017 235 016 SAGXX>> MAINTENANCE ORD-MAIN 235 017 235 016 SAGXX>> USER_TEST ORD-UTST 235 017 235 016 SAGXXDEVELOPMENT ORD-EXAM 235 017 235 016>> CONTROL * PACS * 235 054 235 055 SAGXX>> PRODUCTION ORD-PROD 235 017 235 016 SAGXX>> USER_TEST ORD-UTST 235 017 235 016 SAGXXMAINTENANCE ORD-MAIN 235 017 235 016>> CONTROL * PACS * 235 054 235 055 SAGXXPRODUCTION ORD-PROD 235 017 235 016>> MAINTENANCE ORD-MAIN 235 017 235 016 SAGXX
Press ENTER to continue or '.' to exit: _Enter-PF1---PF2---PF3---PF4---PF5---PF6---PF7---PF8---PF9---PF10--PF11--PF12---
HELP Menu Exit Canc
This screen provides a global view of the existing migration paths of the application. In essence,this screen answers the question "For each status defined, where may the objects be migrated?"
PAC User's Guide196
Migration Paths
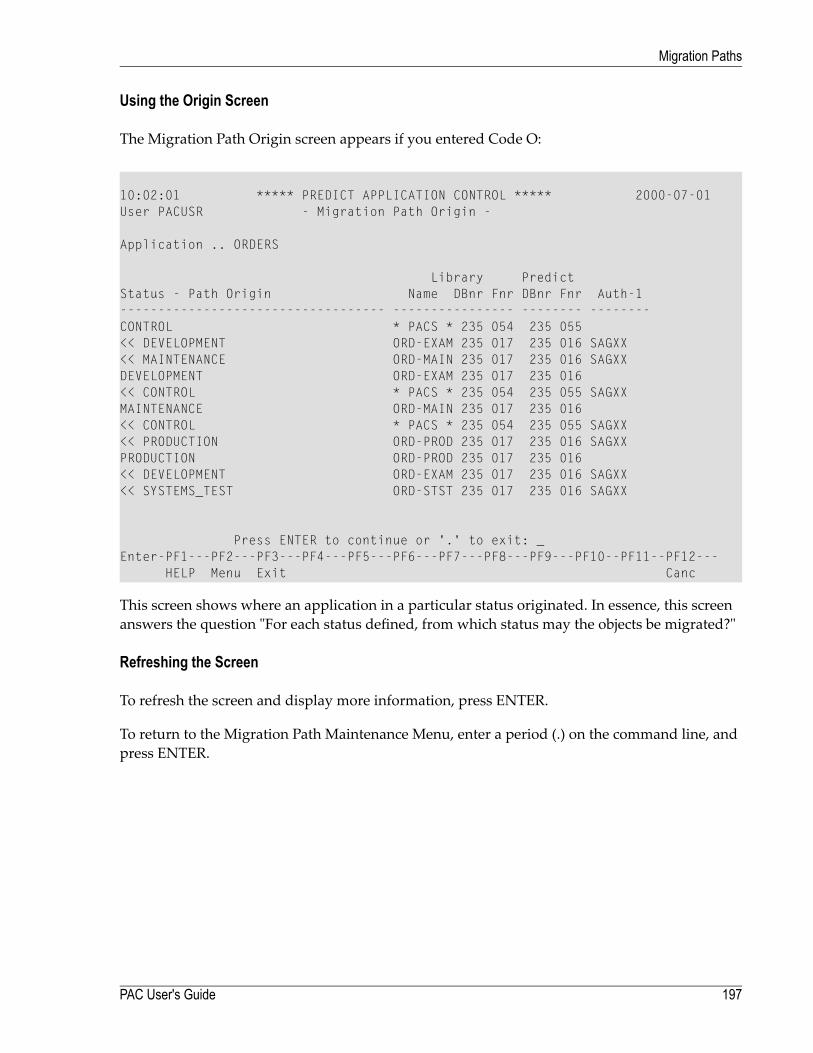
Using the Origin Screen
The Migration Path Origin screen appears if you entered Code O:
10:02:01 ***** PREDICT APPLICATION CONTROL ***** 2000-07-01User PACUSR - Migration Path Origin -
Application .. ORDERS
Library PredictStatus - Path Origin Name DBnr Fnr DBnr Fnr Auth-1----------------------------------- ---------------- -------- --------CONTROL * PACS * 235 054 235 055<< DEVELOPMENT ORD-EXAM 235 017 235 016 SAGXX<< MAINTENANCE ORD-MAIN 235 017 235 016 SAGXXDEVELOPMENT ORD-EXAM 235 017 235 016<< CONTROL * PACS * 235 054 235 055 SAGXXMAINTENANCE ORD-MAIN 235 017 235 016<< CONTROL * PACS * 235 054 235 055 SAGXX<< PRODUCTION ORD-PROD 235 017 235 016 SAGXXPRODUCTION ORD-PROD 235 017 235 016<< DEVELOPMENT ORD-EXAM 235 017 235 016 SAGXX<< SYSTEMS_TEST ORD-STST 235 017 235 016 SAGXX
Press ENTER to continue or '.' to exit: _Enter-PF1---PF2---PF3---PF4---PF5---PF6---PF7---PF8---PF9---PF10--PF11--PF12---
HELP Menu Exit Canc
This screen shows where an application in a particular status originated. In essence, this screenanswers the question "For each status defined, from which status may the objects be migrated?"
Refreshing the Screen
To refresh the screen and display more information, press ENTER.
To return to the Migration Path Maintenance Menu, enter a period (.) on the command line, andpress ENTER.
197PAC User's Guide
Migration Paths
Interpreting the Displayed Information
The following table describes attributes of the Migration Path Origin and Destination screens:DescriptionAttributeThe application specified.ApplicationThe current statuses in which the application is held (for example,DEVELOPMENT), and the statuses to which the application may bemigrated (for example, >>PRODUCTION).
Status - Path Destination
The current statuses in which the application is held (for example,MAINTENANCE), and the statuses from which the application maybe migrated (<<PRODUCTION, for example).
Status - Path Origin
The library name, the database ID, and the file number where eachapplication status is stored.
Library Name / DBnr /Fnr
The Predict database ID and file number where the Predict cross-refer-ence data for each application status is stored.
Predict DBnr / Fnr
The ID of the first user on a list of users who may authorize the migra-tion of the application from one status to another. The complete list of
Auth-1
authorizersmay be viewed on theMigration Path definition screen thatis accessed using the Display Migration Path sub-function.
Purging a Migration Path
To purge a migration path, enter Code P (Purge Migration Path), the application, and the originand destination statuses that identify themigration path on theMigration PathMaintenanceMenu.
The Purge Confirmation window appears displaying the migration path (From status / To status)that will be deleted for the specified application.
PAC User's Guide198
Migration Paths

14 Migration Events
■ Migration Path Prerequisite .............................................................................................................. 200■ Accessing Migration Event Sub-Functions .......................................................................................... 200■ Direct Commands for Migration Events .............................................................................................. 203■ Adding (Defining) a Migration Event .................................................................................................. 204■ Selecting a Migration Event ............................................................................................................. 219■ Displaying a Migration Event ............................................................................................................ 220■ Modifying a Migration Event ............................................................................................................. 223■ Copying a Migration Event ............................................................................................................... 223■ Purging a Migration Event ............................................................................................................... 225■ Trying a Migration Event ................................................................................................................. 225
199
A migration event is first defined and then authorized and submitted. The migration eventdefinition identifies the set of application objects (the migration list) that will be migrated fromone status to another.
Amigration event can be defined either online or in batch. It may also be defined using an Applic-ation Program Interface (API) call. Refer to the PAC Reference documentation for informationabout batch commands and APIs.
Migration Path Prerequisite
A migration event is valid for a specific migration path.
Before a migration event can be defined, the migration path for the application must be defined.The origin status and the destination status specified in themigration event definition are checkedagainst the defined paths to verify that the migration is valid.
Software AG recommends that:
■ The migration path definition should also specify the list of users permitted to authorize theevent. Refer toMigration Paths for more information.
■ The job control (JCL/JCS) used to process a batch migration event also be defined. Refer to Ap-pendix B for more information on jobs included with PAC.
Accessing Migration Event Sub-Functions
If you are authorized to maintain migration events, you can access the Migration Event Menudirectly (Code E, Migration Events) from the PAC Main Menu.
PAC User's Guide200
Migration Events
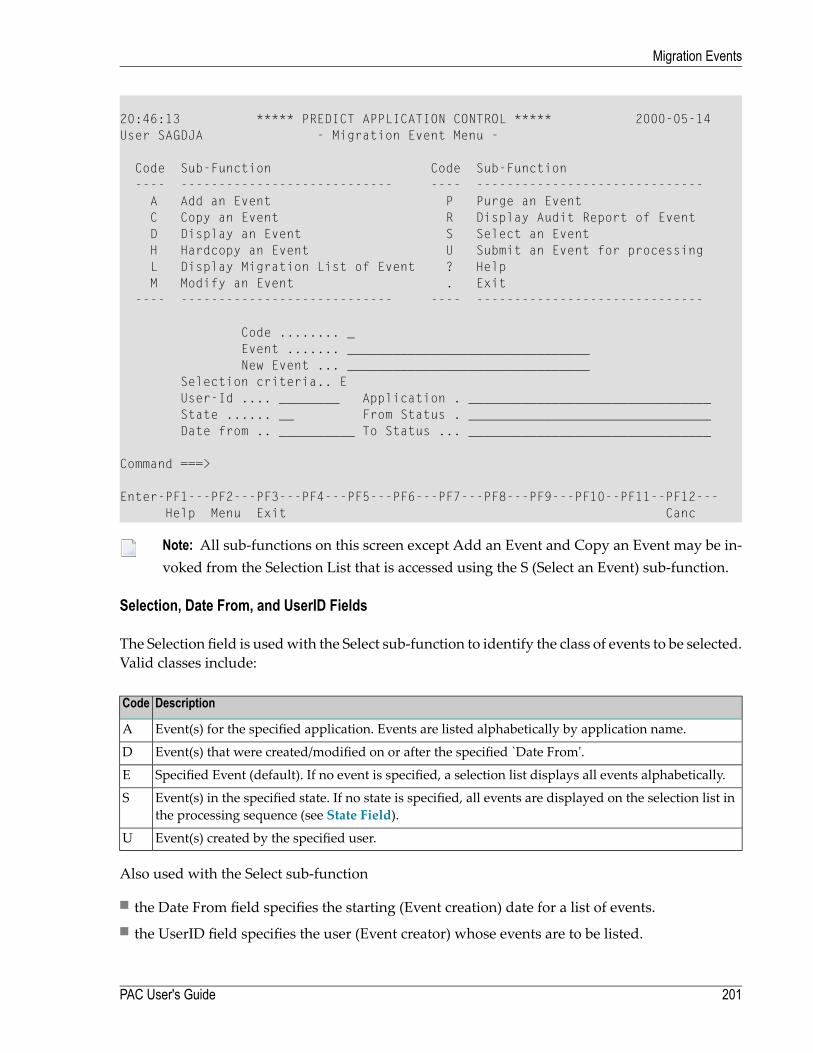
20:46:13 ***** PREDICT APPLICATION CONTROL ***** 2000-05-14User SAGDJA - Migration Event Menu -
Code Sub-Function Code Sub-Function---- ---------------------------- ---- ------------------------------
A Add an Event P Purge an EventC Copy an Event R Display Audit Report of EventD Display an Event S Select an EventH Hardcopy an Event U Submit an Event for processingL Display Migration List of Event ? HelpM Modify an Event . Exit
---- ---------------------------- ---- ------------------------------
Code ........ _Event ....... ________________________________New Event ... ________________________________
Selection criteria.. EUser-Id .... ________ Application . ________________________________State ...... __ From Status . ________________________________Date from .. __________ To Status ... ________________________________
Command ===>
Enter-PF1---PF2---PF3---PF4---PF5---PF6---PF7---PF8---PF9---PF10--PF11--PF12---Help Menu Exit Canc
Note: All sub-functions on this screen except Add an Event and Copy an Event may be in-voked from the Selection List that is accessed using the S (Select an Event) sub-function.
Selection, Date From, and UserID Fields
The Selection field is usedwith the Select sub-function to identify the class of events to be selected.Valid classes include:
DescriptionCode
Event(s) for the specified application. Events are listed alphabetically by application name.A
Event(s) that were created/modified on or after the specified `Date From'.D
Specified Event (default). If no event is specified, a selection list displays all events alphabetically.E
Event(s) in the specified state. If no state is specified, all events are displayed on the selection list inthe processing sequence (see State Field).
S
Event(s) created by the specified user.U
Also used with the Select sub-function
■ the Date From field specifies the starting (Event creation) date for a list of events.■ the UserID field specifies the user (Event creator) whose events are to be listed.
201PAC User's Guide
Migration Events
Event and New Event Fields
The Event field names an existing migration event or an event being added. You may enter anevent name or range notation. TheNewEvent field names an existingmigration event that is beingcopied to create a new event.
Refer to Step 1 Specifying the Migration Event Name for specific information about entering avalue in these fields.
Application, From Status, and To Status Fields
You can optionally enter the name of an existing application to which the migration event appliesand the names of origin and destination statuses to identify the previously definedmigration pathof the migration event. Refer to Step 2 Specifying the Application to be migrated and Step 3Specifying the Origin and Destination Status for specific information about entering values inthese fields.
State Field
The current processing state of a migration event. Valid states (listed in processing sequence) in-clude:
DescriptionStateA new migration event is being created.NewMigration list not created and / or validated.PendingMigration list successfully created and verified. The event is ready to be authorizedand submitted.
Validated
Event can no longer be updated and can be submitted for processing unless disal-lowed by the schedule date.
Authorized
Event submitted but processing has not yet started.SubmittedEvent submitted and processing started but not completed. The application is locked.StartedEvent submitted and processed. The application is unlocked.Completed(Control to Archive only). Objects unloaded from PAC to archive file.UnloadedEvent submitted andprocessing started but not completed. The application is released(unlocked); all processing is reversed.
Backed Out
PAC User's Guide202
Migration Events
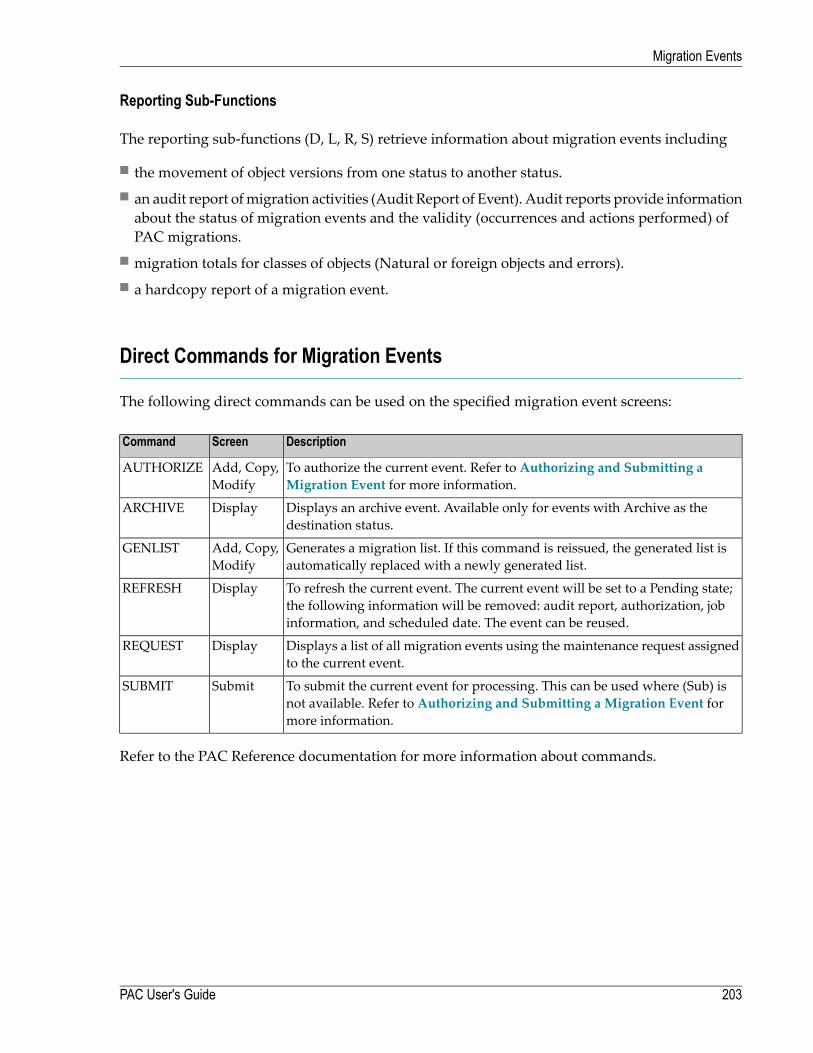
Reporting Sub-Functions
The reporting sub-functions (D, L, R, S) retrieve information about migration events including
■ the movement of object versions from one status to another status.■ an audit report ofmigration activities (Audit Report of Event). Audit reports provide informationabout the status of migration events and the validity (occurrences and actions performed) ofPAC migrations.
■ migration totals for classes of objects (Natural or foreign objects and errors).■ a hardcopy report of a migration event.
Direct Commands for Migration Events
The following direct commands can be used on the specified migration event screens:
DescriptionScreenCommand
To authorize the current event. Refer to Authorizing and Submitting aMigration Event for more information.
Add, Copy,Modify
AUTHORIZE
Displays an archive event. Available only for events with Archive as thedestination status.
DisplayARCHIVE
Generates a migration list. If this command is reissued, the generated list isautomatically replaced with a newly generated list.
Add, Copy,Modify
GENLIST
To refresh the current event. The current event will be set to a Pending state;the following information will be removed: audit report, authorization, jobinformation, and scheduled date. The event can be reused.
DisplayREFRESH
Displays a list of all migration events using the maintenance request assignedto the current event.
DisplayREQUEST
To submit the current event for processing. This can be used where (Sub) isnot available. Refer to Authorizing and Submitting a Migration Event formore information.
SubmitSUBMIT
Refer to the PAC Reference documentation for more information about commands.
203PAC User's Guide
Migration Events
Adding (Defining) a Migration Event
Information required for processing a migration event includes the
■ environment in which the objects currently exist, and the new environment into which they areto be migrated;
■ list of objects to be migrated;■ externally created work file from which objects are to be included;■ date and time when the migration is to take place; whether or not there is a schedule if thedestination status is a production status type;
■ (optional) maintenance request assigned for the processing of the migration event.
Once amigration event has been processed, it may not be processed again, or modified. However,the current migration event may be refreshed (REFRESH command), in which case it is set to thePending state and can be used again.
You may add (define) a migration event online by performing the steps outlined in the followingoverview and diagram; or youmay add amigration event in batch. For detailed information aboutadding an event in batch, refer to the PAC Reference documentation.
Overview of Steps for Adding a Migration Event
1. Specify the migration event name.
2. Specify the application to be migrated.
3. Specify the origin and destination status.
4. Specify the schedule (To status of production); and date/time for the migration (optional).
5. Optionally include notes concerning the migration event.
6. Specify an archive event, if applicable.
7. Specify a maintenance request, if applicable.
8. Indicate how the migration list is to be created.
9. Edit the Add Event screen, if applicable.
10. Indicate when to validate the migration list.
11. Access the migration list editor.
12. Add the migration event.
13. Authorize the successfully created migration event (optional at this time).
The following diagram shows the process for adding a migration event:
PAC User's Guide204
Migration Events
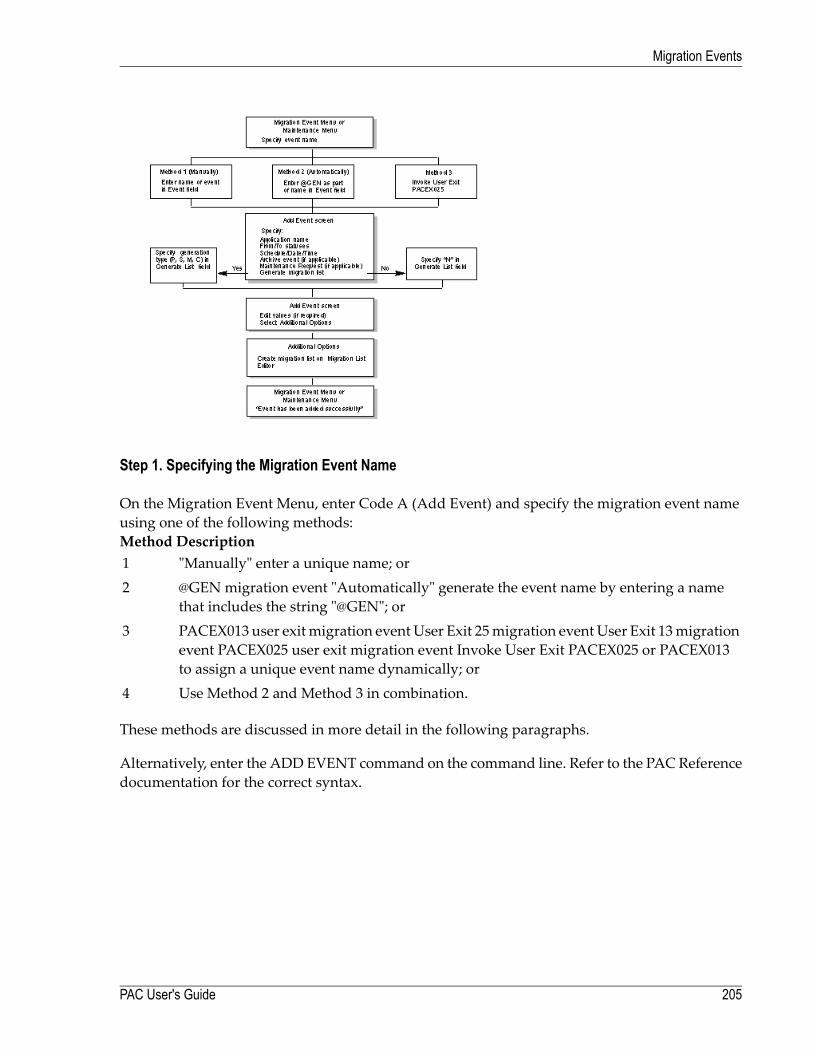
Step 1. Specifying the Migration Event Name
On the Migration Event Menu, enter Code A (Add Event) and specify the migration event nameusing one of the following methods:
DescriptionMethod"Manually" enter a unique name; or1@GEN migration event "Automatically" generate the event name by entering a namethat includes the string "@GEN"; or
2
PACEX013 user exit migration event User Exit 25migration event User Exit 13migrationevent PACEX025 user exit migration event Invoke User Exit PACEX025 or PACEX013to assign a unique event name dynamically; or
3
Use Method 2 and Method 3 in combination.4
These methods are discussed in more detail in the following paragraphs.
Alternatively, enter the ADD EVENT command on the command line. Refer to the PAC Referencedocumentation for the correct syntax.
205PAC User's Guide
Migration Events
Method 1 : Entering a Name Manually
Enter a unique migration event name on the Migration Event Menu.
The name must begin with an alphabetic character and may be up to 32 characters in length. Em-bedded blanks are allowed, but will be translated automatically to the underscore ( ) character. Ifa duplicate event name is entered, an error message is displayed.
Method 2 : Generating a Name Automatically
Enter a name that includes the "@GEN" string on the Migration Event Menu.
The name must begin with an alphabetic character and may be up to 32 characters in length in-cluding the resolution of the @GEN string; or up to 24 characters if a prefix (1-3 characters) is in-cluded. Embedded blanks are allowed, but will be translated automatically to the underscore ( )character.
PAC scans for the @GEN string and replaces the string with a prefix and a suffix as follows:
■ If a prefix was defined when the application was added/modified, this is the prefix of the gen-erated number. Otherwise, the generated string will not have a prefix.
■ PAC uses the incremented application Gen No (defined when the application was added/mod-ified) as the suffix for the generated number. The generated number is a 5-digit numeric valueranging from 00000-99999.
The Gen Nomay be reset or changed at any time. If, however, a duplicate number is encountered,PAC issues an error and asks the user to enter a unique value for the event name.
The uniqueness of the event name can be ensured by using standard naming conventions; that is,meaningful string prefixes and suffixes for the @GEN value.
Example 1:
USERID-YYMMDD-@GEN
where PAC replaces the @GEN suffix with the prefix for the application (if one has been defined)and the 5-digit number; for example, -APL01234.
Example 2:
@GEN-YYMMDD-DEV-TO-TEST
where PAC replaces the @GEN prefix as follows:
■ Where there is a prefix defined for the application, @GEN is replaced by the application prefixfollowed by the 5-digit numeric value, for example, APL01234-.
PAC User's Guide206
Migration Events
■ If no prefix is defined for the application, this example is invalid because an event name cannotbegin with a numeric value.
Method 3 : Setting Up a User Exit to Generate a Name
Invoke User Exit 25 before the migration list is validated, or User Exit 13 after the migration listis validated; and enter the desired variables for the event name.
Refer to the PAC Reference documentation section User Exits for detailed information.
Method 4 : Using Methods 2 and 3 Together
This method combines Methods 2 and 3 described above.
Invoke User Exit 25 or User Exit 13 and enter the desired variables for the event name using the@GEN string.
Example:
APL-@DATE-@GEN
where:
■ PAC replaces @GEN with the prefix for the application and the 5-digit number.■ the user exit replaces @DATE.
Note: Since User Exit 25 is called before the migration list is validated, the Event field mayoptionally be left blank allowing the exit to generate an event name.
Accessing the Add Event Screen
When you press ENTER after specifying themigration event name, theAdd Event screen appears:
207PAC User's Guide
Migration Events
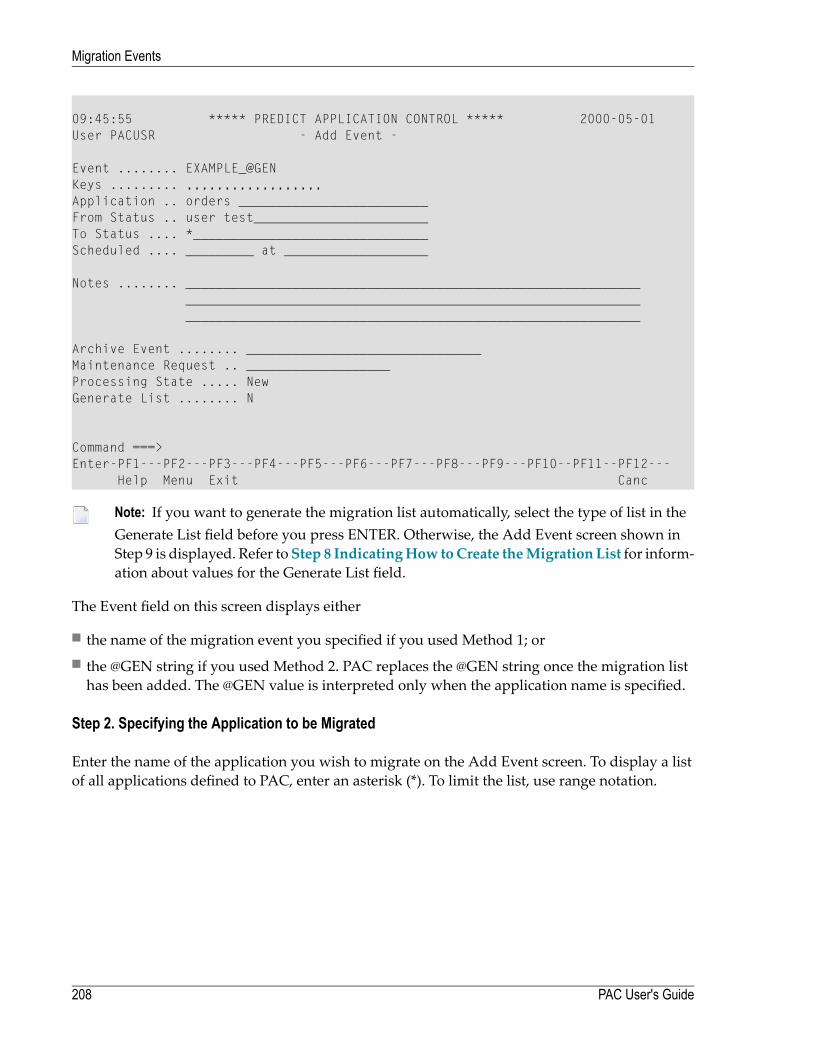
09:45:55 ***** PREDICT APPLICATION CONTROL ***** 2000-05-01User PACUSR - Add Event -
Event ........ EXAMPLE_@GENKeys ......... ,,,,,,,,,,,,,,,,,,Application .. orders _________________________From Status .. user test_______________________To Status .... *_______________________________Scheduled .... _________ at ___________________
Notes ........ ____________________________________________________________________________________________________________________________________________________________________________________
Archive Event ........ _______________________________Maintenance Request .. ___________________Processing State ..... NewGenerate List ........ N
Command ===>Enter-PF1---PF2---PF3---PF4---PF5---PF6---PF7---PF8---PF9---PF10--PF11--PF12---
Help Menu Exit Canc
Note: If you want to generate the migration list automatically, select the type of list in theGenerate List field before you press ENTER. Otherwise, the Add Event screen shown inStep 9 is displayed. Refer toStep 8 IndicatingHow toCreate theMigration List for inform-ation about values for the Generate List field.
The Event field on this screen displays either
■ the name of the migration event you specified if you used Method 1; or■ the @GEN string if you used Method 2. PAC replaces the @GEN string once the migration listhas been added. The @GEN value is interpreted only when the application name is specified.
Step 2. Specifying the Application to be Migrated
Enter the name of the application you wish to migrate on the Add Event screen. To display a listof all applications defined to PAC, enter an asterisk (*). To limit the list, use range notation.
PAC User's Guide208
Migration Events
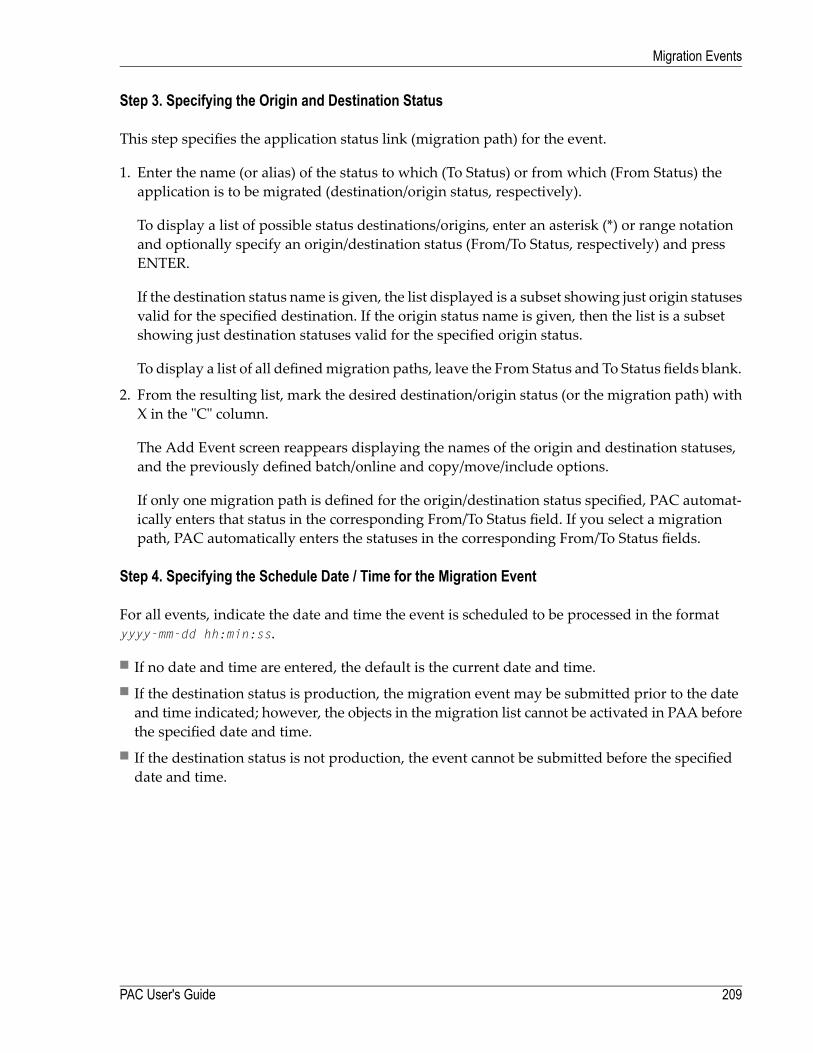
Step 3. Specifying the Origin and Destination Status
This step specifies the application status link (migration path) for the event.
1. Enter the name (or alias) of the status to which (To Status) or from which (From Status) theapplication is to be migrated (destination/origin status, respectively).
To display a list of possible status destinations/origins, enter an asterisk (*) or range notationand optionally specify an origin/destination status (From/To Status, respectively) and pressENTER.
If the destination status name is given, the list displayed is a subset showing just origin statusesvalid for the specified destination. If the origin status name is given, then the list is a subsetshowing just destination statuses valid for the specified origin status.
To display a list of all definedmigration paths, leave the From Status and To Status fields blank.
2. From the resulting list, mark the desired destination/origin status (or the migration path) withX in the "C" column.
The Add Event screen reappears displaying the names of the origin and destination statuses,and the previously defined batch/online and copy/move/include options.
If only one migration path is defined for the origin/destination status specified, PAC automat-ically enters that status in the corresponding From/To Status field. If you select a migrationpath, PAC automatically enters the statuses in the corresponding From/To Status fields.
Step 4. Specifying the Schedule Date / Time for the Migration Event
For all events, indicate the date and time the event is scheduled to be processed in the formatyyyy-mm-dd hh:min:ss.
■ If no date and time are entered, the default is the current date and time.■ If the destination status is production, the migration event may be submitted prior to the dateand time indicated; however, the objects in the migration list cannot be activated in PAA beforethe specified date and time.
■ If the destination status is not production, the event cannot be submitted before the specifieddate and time.
209PAC User's Guide
Migration Events

Step 5. Optionally Include Notes
You can enter comments relevant to the migration event in the Notes field.
Step 6. Specifying the Archive Event
The Archive Event field is used if the migration event will restore to PAC objects that were previ-ously archived. Such an event migrates objects from the origin status of Archive to the destinationstatus of Control.
Enter the name of the event initially used to archive the objects.
Step 7. Specifying a Maintenance Request
TheMaintenanceRequest field is used if themigration eventwill be linked to amaintenance request.Themaintenance requestmust have been previously defined. Using this field enables PAC to keeptrack of objects processed to or from maintenance status types.
In the Maintenance Request field, enter an existing maintenance request ID.
Refer toMaintenance Requests for more information.
Step 8. Indicating How to Create the Migration List
You can create a migration list for the migration event "automatically" by generating it, or"manually" by entering objects on the Migration List Editor.
Refer to Step 11 Accessing the Migration List Editor and Creating and Validating a MigrationList for information about creating migration lists manually. Refer to the PAC Reference docu-mentation for information about generating migration lists in batch mode. This section tells youhow to generate lists online.
Note: A list of foreign objects can be generated only when the destination status is Control.
To specify that a migration list should be automatically generated and what objects should be in-cluded in that generation, enter one of the following values in the Generate List field by overtypingthe default N (do not generate a list) or by typing the direct command GENLIST on the commandline and selecting an option from the resulting window:
PAC User's Guide210
Migration Events
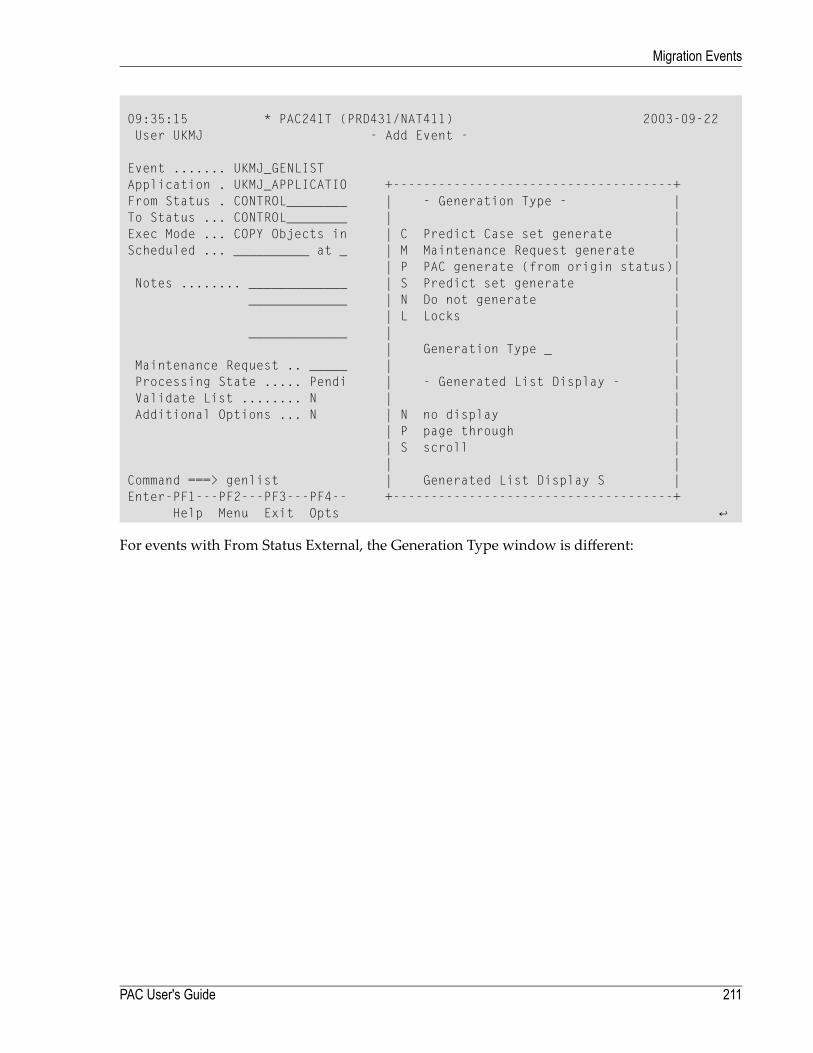
09:35:15 * PAC241T (PRD431/NAT411) 2003-09-22 User UKMJ - Add Event - Event ....... UKMJ_GENLIST Application . UKMJ_APPLICATIO +-------------------------------------+ From Status . CONTROL________ | - Generation Type - | To Status ... CONTROL________ | | Exec Mode ... COPY Objects in | C Predict Case set generate | Scheduled ... __________ at _ | M Maintenance Request generate | | P PAC generate (from origin status)| Notes ........ _____________ | S Predict set generate | _____________ | N Do not generate | | L Locks | _____________ | | | Generation Type _ | Maintenance Request .. _____ | | Processing State ..... Pendi | - Generated List Display - | Validate List ........ N | | Additional Options ... N | N no display | | P page through | | S scroll | | | Command ===> genlist | Generated List Display S | Enter-PF1---PF2---PF3---PF4-- +-------------------------------------+ Help Menu Exit Opts ↩
For events with From Status External, the Generation Type window is different:
211PAC User's Guide
Migration Events
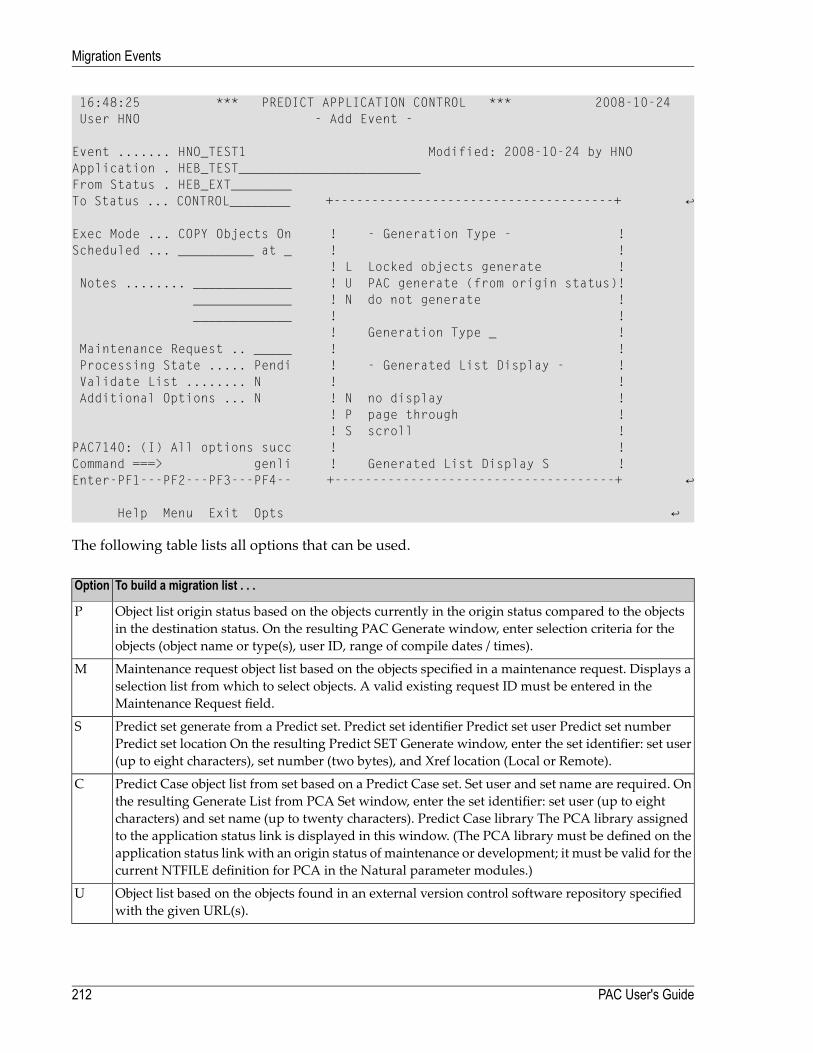
16:48:25 *** PREDICT APPLICATION CONTROL *** 2008-10-24 User HNO - Add Event - Event ....... HNO_TEST1 Modified: 2008-10-24 by HNO Application . HEB_TEST________________________ From Status . HEB_EXT________ To Status ... CONTROL________ +-------------------------------------+ ↩ Exec Mode ... COPY Objects On ! - Generation Type - ! Scheduled ... __________ at _ ! ! ! L Locked objects generate ! Notes ........ _____________ ! U PAC generate (from origin status)! _____________ ! N do not generate ! _____________ ! ! ! Generation Type _ ! Maintenance Request .. _____ ! ! Processing State ..... Pendi ! - Generated List Display - ! Validate List ........ N ! ! Additional Options ... N ! N no display ! ! P page through ! ! S scroll ! PAC7140: (I) All options succ ! ! Command ===> genli ! Generated List Display S ! Enter-PF1---PF2---PF3---PF4-- +-------------------------------------+ ↩ Help Menu Exit Opts ↩
The following table lists all options that can be used.
To build a migration list . . .Option
Object list origin status based on the objects currently in the origin status compared to the objectsin the destination status. On the resulting PAC Generate window, enter selection criteria for theobjects (object name or type(s), user ID, range of compile dates / times).
P
Maintenance request object list based on the objects specified in a maintenance request. Displays aselection list from which to select objects. A valid existing request ID must be entered in theMaintenance Request field.
M
Predict set generate from a Predict set. Predict set identifier Predict set user Predict set numberPredict set location On the resulting Predict SET Generate window, enter the set identifier: set user(up to eight characters), set number (two bytes), and Xref location (Local or Remote).
S
Predict Case object list from set based on a Predict Case set. Set user and set name are required. Onthe resulting Generate List from PCA Set window, enter the set identifier: set user (up to eight
C
characters) and set name (up to twenty characters). Predict Case library The PCA library assignedto the application status link is displayed in this window. (The PCA library must be defined on theapplication status link with an origin status of maintenance or development; it must be valid for thecurrent NTFILE definition for PCA in the Natural parameter modules.)
Object list based on the objects found in an external version control software repository specifiedwith the given URL(s).
U
PAC User's Guide212
Migration Events
To build a migration list . . .Option
This migration list generation option would normally be used to help setting up one or severalevents following an unexpected outcome of a previous event. For this to work, the previous event
L
must remain locked. For example, if an emigration from CONTROL to a test deployment is abortedbecause it is discovered (with PACEX029) that the FTT being applied is wrong, then, as long as theaborted emigration event remains locked, GENLISTL can help obtain various lists of objects involvedin the aborted migration.
The following lock types are available:
O - object recordsAt immigration an object record is created and locked for each object which is being immigrated.If rolling results from the migration list of the event, then the record of an object rolled out islocked as well. The record of the object rolled in is locked if and only if the rolled-in object is ofthe same application as the migration event. The object records are unlocked in the followingunlocking step.
At emigration the records of the objects referred to in the migration list are locked. These arethe objects actually emigrated as well as those which are considered for emigration but notemigrated for some reason, for example, because they are copycodes and applymod 19 is off.The object records are unlocked in the following unlocking step.
A transmigration locks an object record if and only if it would be locked by the immigration orthe emigration part of this transmigration. The object records are unlocked in the followingunlocking step.
A migration from a neighbour compartment locks object records like an immigration does; therecords of the objects in the origin compartment are not locked. The object records are unlockedin the following unlocking step.
A retirement from amaintenance, test, or production deployment locks the records of the objectsreferred to in the migration list of the retirement event. The object records are unlocked in thefollowing unlocking step.
An archiving event locks the records of the objects referred to in the migration list. The objectrecords are unlocked in the following unlocking step. The finalisation of an archiving eventlocks the records of the archived objects. There is no separate unlocking step, and the objectrecords normally turn into tokens and are unlocked later in the finalisation.
A retirement from CONTROL locks the records of the objects referred to in the migration list.The records of the objects which are retired are deleted in the same step. The records of theobjects referred to in the migration list but not retired are unlocked in the following unlockingstep.
A retirement fromARCHIVE locks the tokens of objects referred to in the migration list. Tokensare deleted in the same step. The tokens referred to in the migration list but not deleted areunlocked in the following unlocking step.
A restoration (from ARCHIVE) event locks the tokens of the objects being restored and turnsthem back into object records. The object records are unlocked in the following unlocking step.
213PAC User's Guide
Migration Events
To build a migration list . . .Option
N - new object - status linksA COPY immigration from a maintenance deployment creates new object - origin status links.They are created locked; they are unlocked in the following unlocking step.
An emigration to amaintenance, test, or production deployment creates new object - destinationstatus links. They are created locked; they are unlocked in the following unlocking step.
A finalisation of an archiving event creates object - ARCHIVE links. They are created locked;they are unlocked later in the same step after the unlocking of the tokens.
H - historical object - status links corresponding to objects just supersededAn emigration to a maintenance, test, or production deployment may render some object -destination status links historical. Links thus made historical are locked. They are unlocked inthe following unlocking step; they remain historical, if the event is RELEASEd; they revert to acurrent state, if the event is UNDOne.
A finalisation of an archiving event run with applymod 23 on renders the non-ARCHIVE linksof the archived objects historical. Links thus made historical are locked; they are unlocked laterin the same step after the unlocking of the tokens.
R - historical object - status links corresponding to objects just retired from non-ACF locationsAn immigration from a maintenance deployment may render some object - origin status linkshistorical. Links thus made historical are locked. They are unlocked in the following unlockingstep.
A false MOVE migration from a test status renders the object - origin status links historical.Links thus made historical are locked. They are unlocked in the following unlocking step.
A retirement from a maintenance, test, or production deployment renders the object - originstatus links historical. Links thusmade historical are locked. They are unlocked in the followingunlocking step.
S - all object - status linksThis designates all locks of types N, H, or R.
The genlist display option enables the user to control the generated migration list displayed.
No list. Pac will not display the generated list.NPage. This allows the user to page through the generated list using the <Enter> key.PScroll (default). This scrolls the generated list.S
The migration path determines the way the migration list is generated. To manually add dynamicsource variables or foreign objects to the generated list, see Step 9 Editing the Add Event screen.
When an application is migrated from development into the PAC controlled environment, PACreads the development library. The name of each saved object is compared with the most recentobjects already under PAC control for that application. If an object found in the development library
■ is not currently under PAC control, it is added to the migration list.
PAC User's Guide214
Migration Events
■ is also found under PAC control, then the saved dates are compared. (PAC retains the date thatthe object was last saved in the development library when it is migrated into PAC control.)
■ has a saved date different from the saved date of the duplicate object retained by PAC, it is addedto the migration list; otherwise it is ignored.
When generating an event that migrates an application from Control to Control (Alignment), themost recent version of every object in Control status is included in the migration list unless over-ridden by another specific entry.
Otherwise, when migrating objects to or from Control or a test or production status, all objectversions found in the origin status are eligible for migration to the destination status.
■ PAC does not check whether the objects already exist in the destination status.■ If the same object version is in both the origin status and destination status, it is ignored.
An Example of Displayed List Generation
If the default display option (S) is selected then the following screen is displayed.
09:45:55 ***** PREDICT APPLICATION CONTROL ***** 2000-05-01+--------------------------------------------------------------------------+| - Generate Object List - || || Object Name Type Ver Message || -------------------------------- ------ ---- ----------------------------|| XNATRDC1 3SRC 0004 Ignored - already in dest || XNATRJE 3SRC 0004 Ignored - already in dest || XNAT3GA1 3SRC 0004 Ignored - already in dest || XNCFBACK 3SRC 0004 Ignored - already in dest || XNCFRDC1 3SRC 0004 Ignored - already in dest || XXXXX 3SRC 0001 Ignored - already in dest || ZZZZZ 3SRC 0001 Ignored - already in dest || E0001 ErrMsg 0001 Added || E0003 ErrMsg 0001 Added || E0005 ErrMsg 0001 Added || E0007 ErrMsg 0001 Added || ***** End of List ***** |+--------------------------------------------------------------------------+
| | | |+------------------| |--------+
Command ===> +-----------------------------------------+Enter-PF1---PF2---PF3---PF4---PF5---PF6---PF7---PF8---PF9---PF10--PF11--PF12---
Help Menu Exit Canc
The window above shows objects being added to the PAC controlled environment. In either case,when the list is complete, the "End of List" message appears.
215PAC User's Guide
Migration Events
When generating amigration list for an archive event (option P), the Generate Object List windowappears, displaying the objects as they are selected for the event. The Application Defaults forminimum current versions and the current retention period determine which objects are addedor ignored.
11:54:57 ***** PREDICT APPLICATION CONTROL ***** 2000-04-23+--------------------------------------------------------------------------+| - Generate Object List - || || Object Name Type Ver Message || ----------------------------- ------ ---- ----------------------------- || ORD-LIN1 Subrtn 0002 Added || ORD-MAIN Progrm 0002 Added |
Step 9. Editing the Add Event Screen
When you press ENTER after identifying the application, the migration path, the schedule, andthe Generate List option, the Add Event screen displays the field values you have specified asshown in the following example:
11:13:47 ***** PREDICT APPLICATION CONTROL ***** 2000-05-01User PACUSR - Add Event -
Event ........ EXAMPLE_001 Modified: 1998-05-01 by SAGXXKeys ......... ,,,,,,,,,,,,,,,,,,Application .. ORDERS _________________________From Status .. USER_TEST_______________________To Status .... PRODUCTION______________________Exec Mode .... COPY Objects Batch Using WorkfileScheduled .... _ Date ___________ at __________
Notes ........ Example of an event to migrate objects from user test_______to system test__________________________________________________________________________________________________________
Maintenance Request .. ____________________Processing State ..... PendingValidate list ........ YAdditional Options ... N
Command ===>Enter-PF1---PF2---PF3---PF4---PF5---PF6---PF7---PF8---PF9---PF10--PF11--PF12---
Help Menu Exit Opts Auth ObLst Canc
If you entered the @GEN string to generate themigration event name, the generated name appearson this screen as well if the migration list has already been created.
PAC User's Guide216
Migration Events
Highlighted fields on this screen may be edited. Additionally, new fields may appear on thisscreen, some dependent on the particular migration path specified.
To manually add dynamic source variables or foreign objects to a generated list, you can accessthe Migration List Editor through Additional Options or directly by pressing PF7 (ObLst). SeeCreating and Validating a Migration List for more information.
Exec Mode Field
This field shows information retrieved from the migration path specified. It indicates whether theobjects associatedwith the event are to be copied ormoved andwhether the event is to be processedonline or in batch; and if in batch, whether or not the objects are to be included from a work file.
You may be allowed to edit the following three values.
Scheduled Field
If the specifiedmigration path has a destination status of production, the Scheduled field appearson this screen.
Indicate in the Scheduled fieldwhether the event will be scheduled (enter Y) or not (leave the fieldblank - the default).
You may also be able to edit the schedule date and time for the event.
Replace Field
In PAC, objects are automatically replaced in the destination status except when that status is de-velopment or maintenance. In those cases, the Replace field appears on the Add Event screen.
Indicate in the Replace field whether to replace (overwrite) an object already existing in the des-tination status with the version that is being migrated (enter Y); or not (enter N).
If you enterN, an object already existing in the destination statuswill be flagged as an error duringvalidation and must be manually "commented out" or deleted from the migration list.
Archive Event Field
If the specified migration path has an origin status of Archive and a destination status of Control(that is, the event will restore archived objects to PAC) and you have not yet specified the nameof the event that initially archived the objects, the Archive Event field reappears on this screen.
Specify the name of the event that initially archived the objects you now wish to restore to PAC.
217PAC User's Guide
Migration Events
Step 10. Indicating When to Validate the Migration List
Once the migration list has been created, youmay validate the list immediately or wait to validateit at a later time; however, the migration list must be validated before the migration event can beauthorized or at the time it is authorized..
Note: When themigration list is created and/ormodified, the validation flag is automaticallyset to Y. If the validation flag is left as Y, validation ("revalidation" if the migration list wasmodified) will be performed when the event is saved.
If the Validate List field contains the valueN (no), themigration list you create (or have generated)is saved, but not validated. This choice allows you to include other objects in the list. This is apossibility if the event is scheduled to run at some time in the future.
The value Y (yes) in the Validate List field directs PAC to validate yourmigration list immediately.The objects in your list are compared with those held in the origin status for consistency of objectname, type, and version number.
Enter the appropriate value in the Validate List field.
Refer to Validating a Migration List for information about how PAC validates the migration listand suggestions for troubleshooting validation problems.
Step 11. Accessing the Migration List Editor
This step is only necessary if you are creating your migration list manually.
To create the migration list using the Migration List Editor
1. From the currentAddEvent screen, access theMigration List Editor throughAdditionalOptions(migration list) or directly by pressing PF7 (ObLst).
2. Use themigration list Editor to create the list according to the instructions in the sectionCreatingand Validating a Migration List.
3. Enter SAVE on the editor command line to save the migration list; then a period (.) to exit fromthe editor.
PAC User's Guide218
Migration Events

Step 12. Adding the Migration Event
1. When you have completed all of the preceding steps, press PF3 to return to the Add Eventscreen.
2. Press ENTER to add the event and return to the Migration Event Menu screen.
The message "Event has been added successfully" is displayed.
Step 13. Authorizing the Migration Event
When all of the steps for creating the migration event have been successfully completed, youmayauthorize the event on the Add Event screen using PF5 (Auth). Refer toAuthorizing and Submit-ting a Migration Event for detailed information.
Selecting a Migration Event
To select a migration event from a list, enter Code S (Select a Migration Event) on the MigrationEvent Menu. Use range notation to limit the list.
The Migration Event Selection List appears:
10:19:05 ***** PREDICT APPLICATION CONTROL ***** 2000-03-01User PACUSR - Migration Event Selection List -SELECT Event * Date From 94-02-01 State Authorized> User ID * Appl *C Nr Event Name State Application Name- -- -------------------------------- ---------- -----------------------------_ 1 APPLIC-02-1 Completed ORDERS_ 2 APPLIC-02_2 Submitted ORDERS_ 3 DEMO Backed out DEMO_ 4 DEMO2-CNTL-UTST-01 Completed DEMO2_ 5 DEMO2-DEV-CNTL-01 Completed DEMO2_ 6 DEMO2-DEV-CNTL-02 Authorized DEMO2_ 7 DEMO2-DEV-CNTL-3 Completed DEMO2_ 8 DEMO2-PREDICT Completed PREDICT_ 9 DEMO3-PREDICT Authorized PREDICT_ 10 DEMO4-PREDICT Authorized PREDICT_ 11 DEMO6-PREDICT Completed PREDICT_ 12 DEMO7-PREDICT Backed out PREDICT_ 13 DEMO8-PREDICT Completed PREDICT
Enter No. or 'T' (Top) __ Reposition to Event ______________________________
Command ===>Enter-PF1---PF2---PF3---PF4---PF5---PF6---PF7---PF8---PF9---PF10--PF11--PF12---
Help Menu Exit -- + < > Canc
219PAC User's Guide
Migration Events

On this screen, the status line directly under the User field indicates the selection criteria you usedto access the screen. In the example shown above, events created on or after 94-02-01 in the pro-cessing state "Authorized" or after (Submitted, Started, Completed, Backed Out) were selected.
The sub-function ("SELECT..." in the above example) displayed on the status line directly underthe User field indicates that you used one of the following methods to access this screen:
■ Range notation or blank in the Event field along with the Display, Modify, Purge, Submit, orSelect sub-function;
■ The SELECT direct command.
If you accessed the screen with the S (Select a Migration Event) sub-function or with the SELECTdirect command for one or more of the listed migration events, the following sub-functions maybe invoked on this screen by entering the corresponding function code in the "C" column: D (Dis-play), H (Hardcopy), L (Display object list), M (Modify), P (Purge), R (Display event audit report),S or X (Select), or U (Submit).
If you mark the event with the cursor or enter an X or an S in the "C" column, or the migrationevent number (from the "Nr" column) in the EnterNo. or `T' (Top) field, theMigration EventMenuappears with the specified event displayed in the Event field.
For an explanation of values in the "State" column, see State Field.
The following navigation aids are available to position the table both vertically and horizontally:ActionAidRepositions the table back (vertically) to the top.T or PF6 (--)Scrolls the table forward (vertically) one screen.PF8 (+)Scrolls the table to the left (horizontally) to display the To Status, From Status,and Notes of the migration event.
PF10 (<)
Scrolls the table to the right (horizontally) to display the From Status of the mi-gration event.
PF11 (>)
Allows you to specify a starting value for the selection list for the type of selection(application name, modification date, event name, event state, and user ID).
Reposition to ...
Displaying a Migration Event
To display a migration event, enter Code D (Display Event) and the event name or a range on theMigration Event Menu.
The Display Event screen appears:
PAC User's Guide220
Migration Events
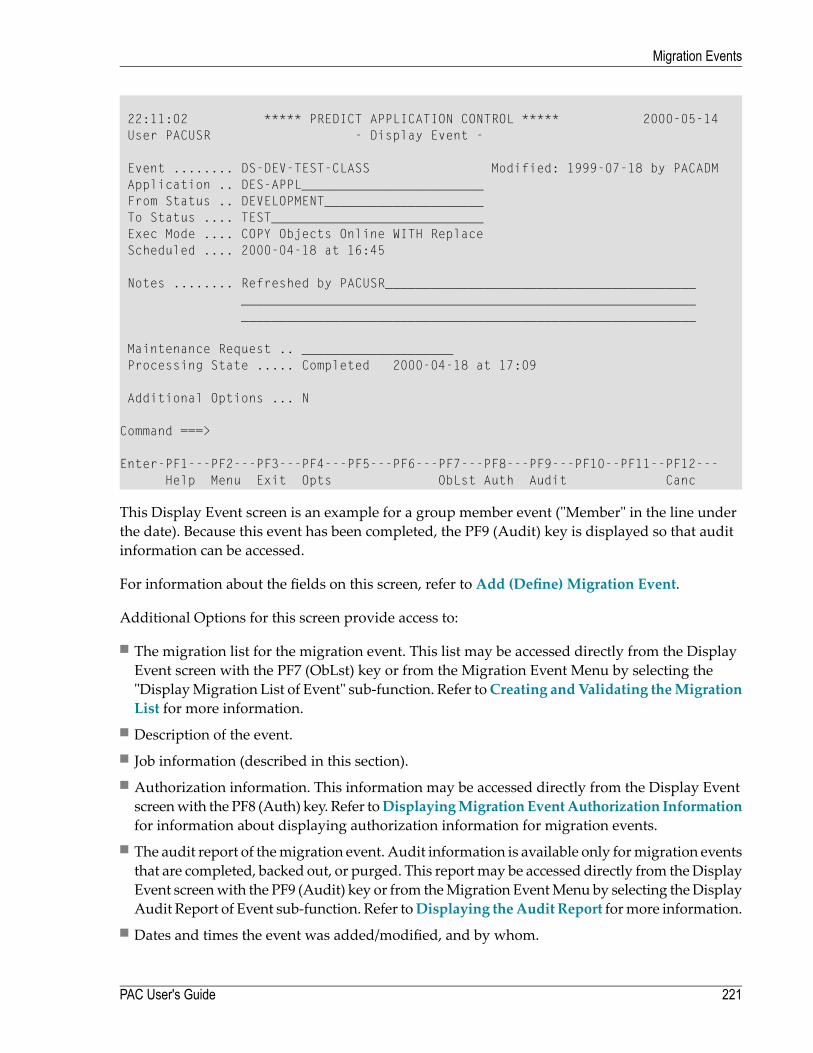
22:11:02 ***** PREDICT APPLICATION CONTROL ***** 2000-05-14User PACUSR - Display Event -
Event ........ DS-DEV-TEST-CLASS Modified: 1999-07-18 by PACADMApplication .. DES-APPL________________________From Status .. DEVELOPMENT_____________________To Status .... TEST____________________________Exec Mode .... COPY Objects Online WITH ReplaceScheduled .... 2000-04-18 at 16:45
Notes ........ Refreshed by PACUSR_________________________________________________________________________________________________________________________________________________________________
Maintenance Request .. ____________________Processing State ..... Completed 2000-04-18 at 17:09
Additional Options ... N
Command ===>
Enter-PF1---PF2---PF3---PF4---PF5---PF6---PF7---PF8---PF9---PF10--PF11--PF12---Help Menu Exit Opts ObLst Auth Audit Canc
This Display Event screen is an example for a group member event ("Member" in the line underthe date). Because this event has been completed, the PF9 (Audit) key is displayed so that auditinformation can be accessed.
For information about the fields on this screen, refer to Add (Define) Migration Event.
Additional Options for this screen provide access to:
■ The migration list for the migration event. This list may be accessed directly from the DisplayEvent screen with the PF7 (ObLst) key or from the Migration Event Menu by selecting the"DisplayMigration List of Event" sub-function. Refer toCreating andValidating theMigrationList for more information.
■ Description of the event.■ Job information (described in this section).■ Authorization information. This information may be accessed directly from the Display Eventscreenwith the PF8 (Auth) key. Refer toDisplayingMigration EventAuthorization Informationfor information about displaying authorization information for migration events.
■ The audit report of themigration event. Audit information is available only formigration eventsthat are completed, backed out, or purged. This reportmay be accessed directly from theDisplayEvent screenwith the PF9 (Audit) key or from theMigration EventMenu by selecting theDisplayAudit Report of Event sub-function. Refer toDisplaying theAudit Report formore information.
■ Dates and times the event was added/modified, and by whom.
221PAC User's Guide
Migration Events
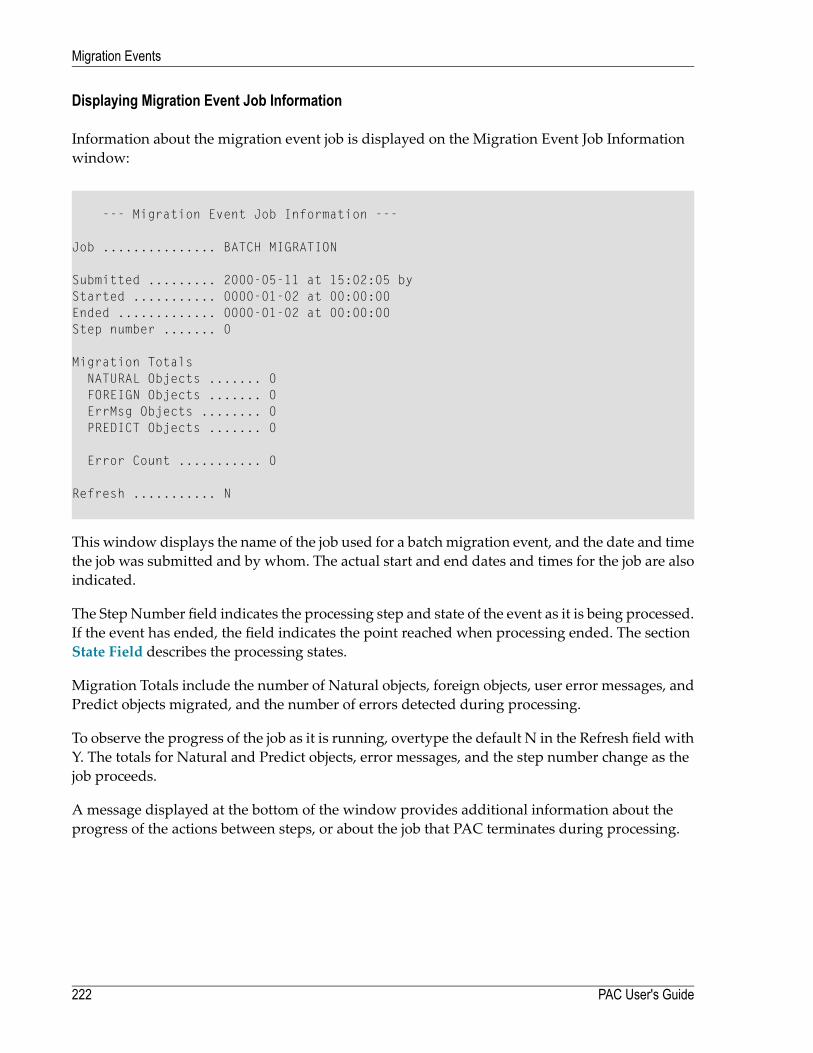
Displaying Migration Event Job Information
Information about the migration event job is displayed on the Migration Event Job Informationwindow:
--- Migration Event Job Information ---
Job ............... BATCH MIGRATION
Submitted ......... 2000-05-11 at 15:02:05 byStarted ........... 0000-01-02 at 00:00:00Ended ............. 0000-01-02 at 00:00:00Step number ....... 0
Migration TotalsNATURAL Objects ....... 0FOREIGN Objects ....... 0ErrMsg Objects ........ 0PREDICT Objects ....... 0
Error Count ........... 0
Refresh ........... N
This window displays the name of the job used for a batch migration event, and the date and timethe job was submitted and by whom. The actual start and end dates and times for the job are alsoindicated.
The Step Number field indicates the processing step and state of the event as it is being processed.If the event has ended, the field indicates the point reached when processing ended. The sectionState Field describes the processing states.
Migration Totals include the number of Natural objects, foreign objects, user error messages, andPredict objects migrated, and the number of errors detected during processing.
To observe the progress of the job as it is running, overtype the default N in the Refresh field withY. The totals for Natural and Predict objects, error messages, and the step number change as thejob proceeds.
A message displayed at the bottom of the window provides additional information about theprogress of the actions between steps, or about the job that PAC terminates during processing.
PAC User's Guide222
Migration Events
Modifying a Migration Event
You can modify events that have the processing state Pending, Validated, or Authorized. ForAuthorized events, a Warning window displays the message "This event has been authorized. Ifmodified, the Event must be reauthorized." You have the option to continue and modify.
If you attempt to modify a
■ Completed or Backed Out event, a Warning window tells you that an event can be copied butnot modified once it is processed.
■ Started event, the Locked Data Warning window tells you that the event is locked and cannotbe modified.
1. To modify a migration event, enter Code M (Modify an Event) and the name of the event or arange on the Migration Event Menu.
The Modify Event screen appears. This screen is similar to the Add Event screen.
The Archive Event field appears only for migrations from Archive to Control; it allows you toidentify the event that initially archived the objects. The Replace field appears only formigrationsto development or maintenance statuses.
2. You may modify the migration event by overtyping the existing values.
3. Press ENTER to confirm your modifications.
The Migration Event Menu displays the message "Event . . . has been modified".
Copying a Migration Event
You may copy an existing migration event and then modify the attributes of the copied event.
1. To copy an event, enter Code C (Copy Event), the name of an existing migration event, and aunique name for the new event using one of the four methods described in the section Add(Define) a Migration Event.
If you generate the new name automatically using the "@GEN" string in the new name, thegenerated migration event name (resolution of the @GEN string) is based on the applicationfrom which the event was copied.
Alternatively, enter the COPY EVENT command on the command line. Refer to the PAC Refer-ence documentation for the correct syntax.
The Copy Event screen appears:
223PAC User's Guide
Migration Events
11:13:47 ***** PREDICT APPLICATION CONTROL ***** 2000-05-01User PACUSR - Copy Event -
Event ........ EXAMPLE_002 Modified: 2000-05-01 by SAGXXKeys ......... ,,,,,,,,,,,,,,,,,,Application .. ORDERS _________________________From Status .. USER_TEST_______________________To Status .... SYSTEM_TEST ____________________Exec Mode .... COPY Objects Batch Using WorkfileScheduled .... 2000-05-01 at 11:47
Notes ........ Copied from EXAMPLE_001_____________________________________________________________________________________________________________________________________________________________
Maintenance Request .. ____________________Processing State ..... PendingValidate list ........ YAdditional Options ... N
Command ===>Enter-PF1---PF2---PF3---PF4---PF5---PF6---PF7---PF8---PF9---PF10--PF11--PF12---
Help Menu Exit Opts Auth ObLst Canc
This screen is similar to the Add Event screen.
All field values are copied except the event authorizer and the audit report. These values areretained in the original event, however. The audit report is "refreshed" for the new event.
A comment is automatically entered in the Notes field of the new event telling you the nameof the event that was copied.
The Archive Event field appears only for migrations from Archive to Control; it allows you toidentify the event that initially archived the objects. The Replace field appears only formigrationsto development or maintenance statuses.
2. You may edit the Copy Event screen by typing over the existing values.
3. Press ENTER to copy the event.
The Migrate Event Menu displays the message "Event . . . has been copied".
PAC User's Guide224
Migration Events

Purging a Migration Event
A migration event that has been started cannot be purged.
To purge a migration event, enter Code P (Purge an Event) and the name of the event on the Mi-gration Event Menu. Alternatively, mark the migration event with P in the "C" column of the Mi-gration Event Selection List.
The Purge Confirmation window appears.
■ Type Confirm or press PF5 to purge the migration event.■ Type a period (.) or press PF3 to return to the Migration Event Menu without purging the mi-gration event.
Trying a Migration Event
The TRY EVENT direct command lists the objects whose retirement or the finalisation of whosearchiving would be refused if the retirement were to be submitted or the archiving finalised at thetime when the command is issued.
There can be five reasons for such refusals: four application defaults' settings and the setting (OFF)of applymod 23.
The objects get messages, but the retirement or finalisation of archiving goes on. This provides away of knowing before the submission of the retirement or archiving event whether he was likelyto run into any such refusal.
225PAC User's Guide
Migration Events

226
15 Migration Path Defaults
Using themaintenance functions in theAdministration subsystemof PACavailable in theMigrationPathDefaultsMenu allow you to see andmodify the values of the job, batch/online, workfile usage,and copy (C)/move (M)/include (I) fields of themigration paths. Perform themodification in eitherof the following ways:
■ manually on screens listing migration paths (one per line);■ automatically for all paths satisfying the selection criteria.
The facilities described in this section are also available via the SCANPATH utility. For details,see the PAC Reference documentation.
To access the defaults maintenance functions for migration paths, enter Code P on the GeneralDefaults menu.
The Migration Path Defaults Menu appears:
227
18:18:13 ***** PREDICT APPLICATION CONTROL ***** 2000-04-20User SAGU - Migration Path Defaults Menu -
Code Sub-Function---- -------------------------------
M Modify Migration Paths DefaultsS Scan/Replace Migration Paths? Help. Exit
---- -------------------------------
Code ................ _Application ......... *_______________________________Origin Status ....... *_______________________________ Type .. *Destination Status .. *_______________________________ Type .. *Scan for Job ........ ________________________________
Command ===>Enter-PF1---PF2---PF3---PF4---PF5---PF6---PF7---PF8---PF9---PF10--PF11--PF12---
Help Menu Exit Canc
Enter Code M to get a list of migration paths and for modifying manually the values of their job,batch/online, workfile usage, and copy/move/include fields.
Enter Code S for PAC to automatically modify the values of the job, batch/online, workfile usage,or copy/move/include fields of all paths which satisfy the selection criteria.
In either case, specify the migration path selection criteria. Six fields are provided:DescriptionInput FieldFor the specification of a range of application names to restrict the choiceof paths to those whose application names are in the range.
Application
For the specification of a range of status names to restrict the choice ofpaths to those whose origin status names are within the range.
Origin Status
For the optional specification of a status type to restrict the choice ofpaths to those whose origin statuses are of the specified type.
(origin status) Type
For the specification of a range of status names to restrict the choice ofpaths to those whose destination status names are within the range.
Destination Status
For the optional specification of a status type to restrict the choice ofpaths to those whose destination statuses are of the specified type.
(destination status) Type
For the optional full (i.e., no range notation) specification of a JCL textname to restrict the choice of paths to those whoseMigration Job fieldscontain the specified name.
Scan for Job
PAC User's Guide228
Migration Path Defaults
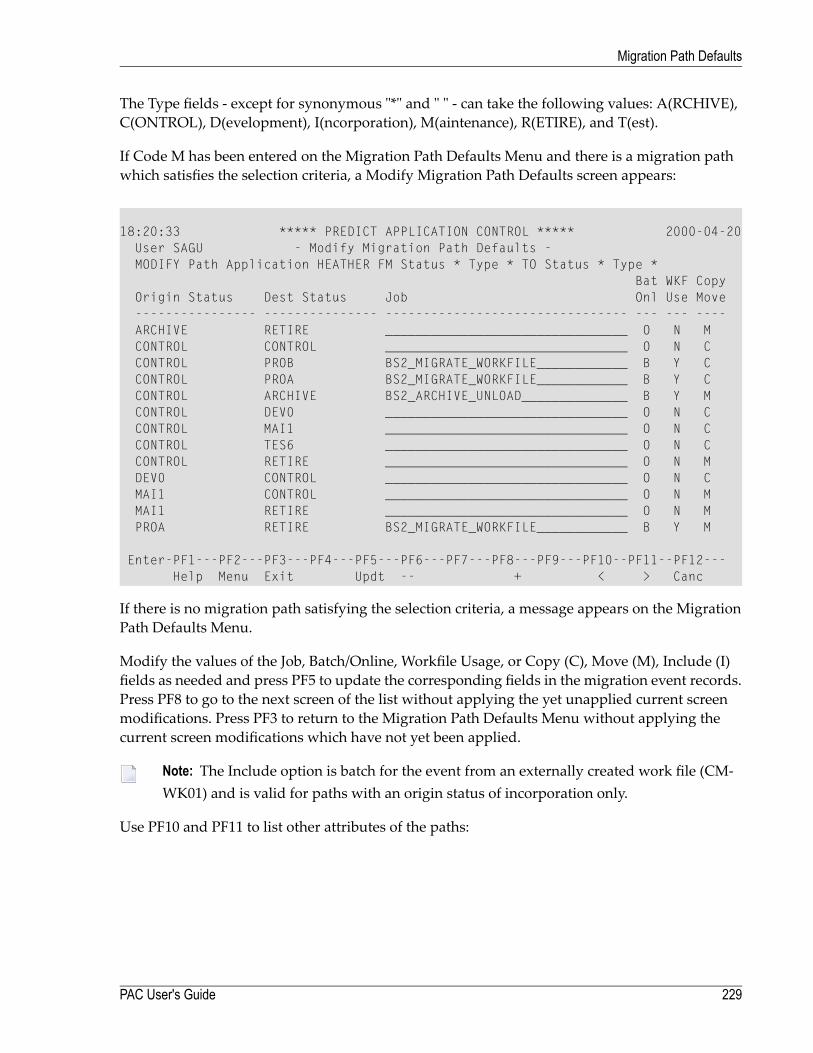
The Type fields - except for synonymous "*" and " " - can take the following values: A(RCHIVE),C(ONTROL), D(evelopment), I(ncorporation), M(aintenance), R(ETIRE), and T(est).
If Code M has been entered on the Migration Path Defaults Menu and there is a migration pathwhich satisfies the selection criteria, a Modify Migration Path Defaults screen appears:
18:20:33 ***** PREDICT APPLICATION CONTROL ***** 2000-04-20User SAGU - Modify Migration Path Defaults -MODIFY Path Application HEATHER FM Status * Type * TO Status * Type *
Bat WKF CopyOrigin Status Dest Status Job Onl Use Move---------------- --------------- -------------------------------- --- --- ----ARCHIVE RETIRE ________________________________ O N MCONTROL CONTROL ________________________________ O N CCONTROL PROB BS2_MIGRATE_WORKFILE____________ B Y CCONTROL PROA BS2_MIGRATE_WORKFILE____________ B Y CCONTROL ARCHIVE BS2_ARCHIVE_UNLOAD______________ B Y MCONTROL DEV0 ________________________________ O N CCONTROL MAI1 ________________________________ O N CCONTROL TES6 ________________________________ O N CCONTROL RETIRE ________________________________ O N MDEV0 CONTROL ________________________________ O N CMAI1 CONTROL ________________________________ O N MMAI1 RETIRE ________________________________ O N MPROA RETIRE BS2_MIGRATE_WORKFILE____________ B Y M
Enter-PF1---PF2---PF3---PF4---PF5---PF6---PF7---PF8---PF9---PF10--PF11--PF12---Help Menu Exit Updt -- + < > Canc
If there is no migration path satisfying the selection criteria, a message appears on the MigrationPath Defaults Menu.
Modify the values of the Job, Batch/Online, Workfile Usage, or Copy (C), Move (M), Include (I)fields as needed and press PF5 to update the corresponding fields in the migration event records.Press PF8 to go to the next screen of the list without applying the yet unapplied current screenmodifications. Press PF3 to return to the Migration Path Defaults Menu without applying thecurrent screen modifications which have not yet been applied.
Note: The Include option is batch for the event from an externally created work file (CM-WK01) and is valid for paths with an origin status of incorporation only.
Use PF10 and PF11 to list other attributes of the paths:
229PAC User's Guide
Migration Path Defaults
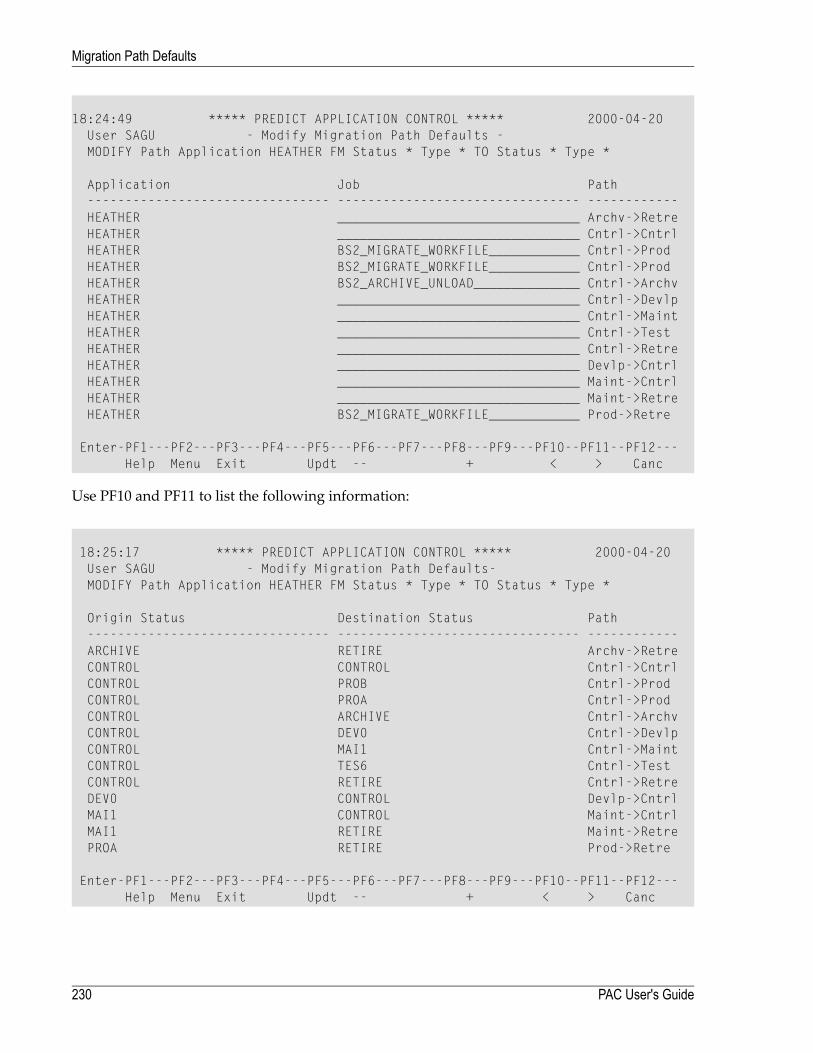
18:24:49 ***** PREDICT APPLICATION CONTROL ***** 2000-04-20User SAGU - Modify Migration Path Defaults -MODIFY Path Application HEATHER FM Status * Type * TO Status * Type *
Application Job Path-------------------------------- -------------------------------- ------------HEATHER ________________________________ Archv->RetreHEATHER ________________________________ Cntrl->CntrlHEATHER BS2_MIGRATE_WORKFILE____________ Cntrl->ProdHEATHER BS2_MIGRATE_WORKFILE____________ Cntrl->ProdHEATHER BS2_ARCHIVE_UNLOAD______________ Cntrl->ArchvHEATHER ________________________________ Cntrl->DevlpHEATHER ________________________________ Cntrl->MaintHEATHER ________________________________ Cntrl->TestHEATHER ________________________________ Cntrl->RetreHEATHER ________________________________ Devlp->CntrlHEATHER ________________________________ Maint->CntrlHEATHER ________________________________ Maint->RetreHEATHER BS2_MIGRATE_WORKFILE____________ Prod->Retre
Enter-PF1---PF2---PF3---PF4---PF5---PF6---PF7---PF8---PF9---PF10--PF11--PF12---Help Menu Exit Updt -- + < > Canc
Use PF10 and PF11 to list the following information:
18:25:17 ***** PREDICT APPLICATION CONTROL ***** 2000-04-20User SAGU - Modify Migration Path Defaults-MODIFY Path Application HEATHER FM Status * Type * TO Status * Type *
Origin Status Destination Status Path-------------------------------- -------------------------------- ------------ARCHIVE RETIRE Archv->RetreCONTROL CONTROL Cntrl->CntrlCONTROL PROB Cntrl->ProdCONTROL PROA Cntrl->ProdCONTROL ARCHIVE Cntrl->ArchvCONTROL DEV0 Cntrl->DevlpCONTROL MAI1 Cntrl->MaintCONTROL TES6 Cntrl->TestCONTROL RETIRE Cntrl->RetreDEV0 CONTROL Devlp->CntrlMAI1 CONTROL Maint->CntrlMAI1 RETIRE Maint->RetrePROA RETIRE Prod->Retre
Enter-PF1---PF2---PF3---PF4---PF5---PF6---PF7---PF8---PF9---PF10--PF11--PF12---Help Menu Exit Updt -- + < > Canc
PAC User's Guide230
Migration Path Defaults
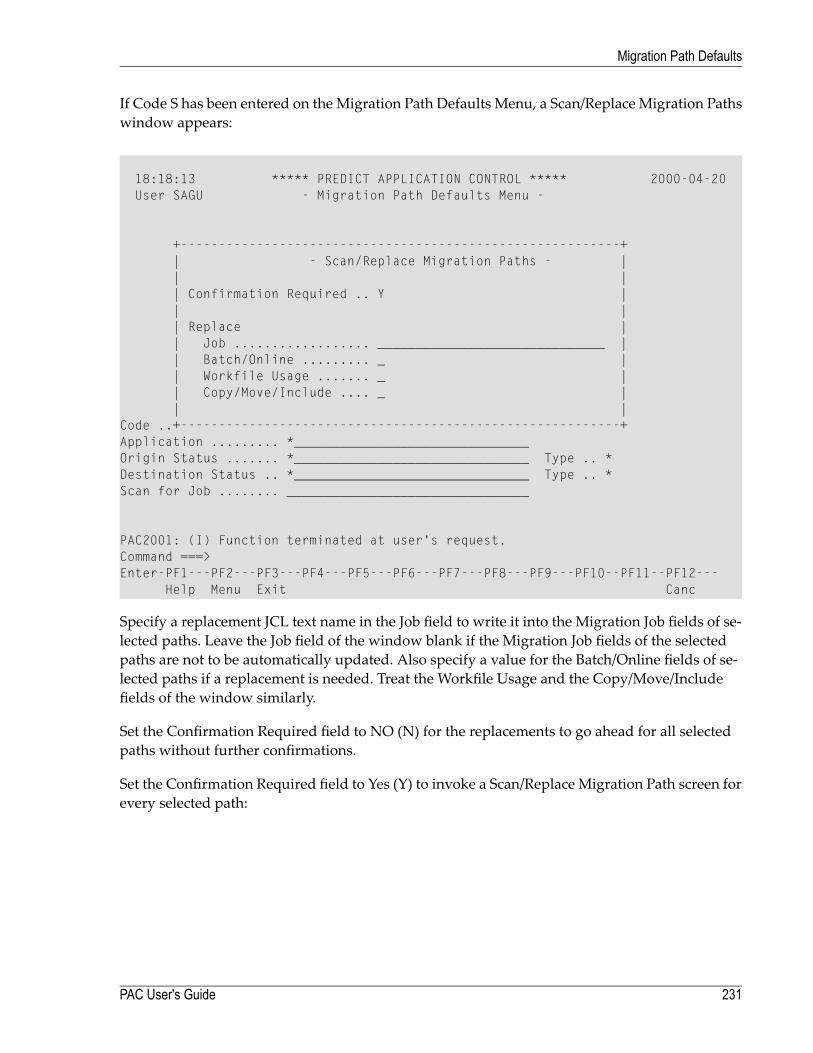
If Code S has been entered on the Migration Path Defaults Menu, a Scan/Replace Migration Pathswindow appears:
18:18:13 ***** PREDICT APPLICATION CONTROL ***** 2000-04-20User SAGU - Migration Path Defaults Menu -
+----------------------------------------------------------+| - Scan/Replace Migration Paths - || || Confirmation Required .. Y || || Replace || Job .................. ______________________________ || Batch/Online ......... _ || Workfile Usage ....... _ || Copy/Move/Include .... _ || |
Code ..+----------------------------------------------------------+Application ......... *_______________________________Origin Status ....... *_______________________________ Type .. *Destination Status .. *_______________________________ Type .. *Scan for Job ........ ________________________________
PAC2001: (I) Function terminated at user's request.Command ===>Enter-PF1---PF2---PF3---PF4---PF5---PF6---PF7---PF8---PF9---PF10--PF11--PF12---
Help Menu Exit Canc
Specify a replacement JCL text name in the Job field to write it into the Migration Job fields of se-lected paths. Leave the Job field of the window blank if the Migration Job fields of the selectedpaths are not to be automatically updated. Also specify a value for the Batch/Online fields of se-lected paths if a replacement is needed. Treat the Workfile Usage and the Copy/Move/Includefields of the window similarly.
Set the Confirmation Required field to NO (N) for the replacements to go ahead for all selectedpaths without further confirmations.
Set the Confirmation Required field to Yes (Y) to invoke a Scan/Replace Migration Path screen forevery selected path:
231PAC User's Guide
Migration Path Defaults

18:27:09 ***** PREDICT APPLICATION CONTROL ***** 2000-04-20User SAGU - Scan/Replace Migration Path -
Application .......... HEATHEROrigin Status ........ ARCHIVE Type .. ArchiveDestination Status ... CONTROL Type .. Control
Update Path .......... U (U-Update, I-Ignore)
Current ValuesJob ................Batch/Online ....... B Workfile Usage ... NCopy/Move/Include .. I
New ValuesJob ................ ________________________________Batch/Online ....... B Workfile Usage ... NCopy/Move/Include .. I
PAC7000: (I) Enter 'U' to update Path, 'I' to Ignore.
Enter-PF1---PF2---PF3---PF4---PF5---PF6---PF7---PF8---PF9---PF10--PF11--PF12---Help Menu Exit Updat Canc
Five fields are unprotected on this screen: the Update Path and the four New Values fields.
You can
■ keep or enter Update (U) in the Update Path field and press ENTER or press PF5 to apply thespecified replacements to the particular path;
■ modify the New Values for the particular path and then update the four fields of the particularpath record by entering U in the Update Path field or pressing PF5;
■ keep or enter Ignore (I) in the Update Path field and press ENTER or just press PF3 to avoidupdating the particular path and to pass on to the next selected path (or the Migration PathDefaults Menu after dealing with the last selected path);
■ press PF12 to immediately return to the Migration Path Defaults Menu.
PAC User's Guide232
Migration Path Defaults
16 Archive Event Maintenance
■ Select an Archive Event .................................................................................................................. 234■ Display Archive Event ..................................................................................................................... 236■ Modify Archive Event ...................................................................................................................... 237■ Finalize Archive Event .................................................................................................................... 238■ Purge Archive Event ....................................................................................................................... 239
233
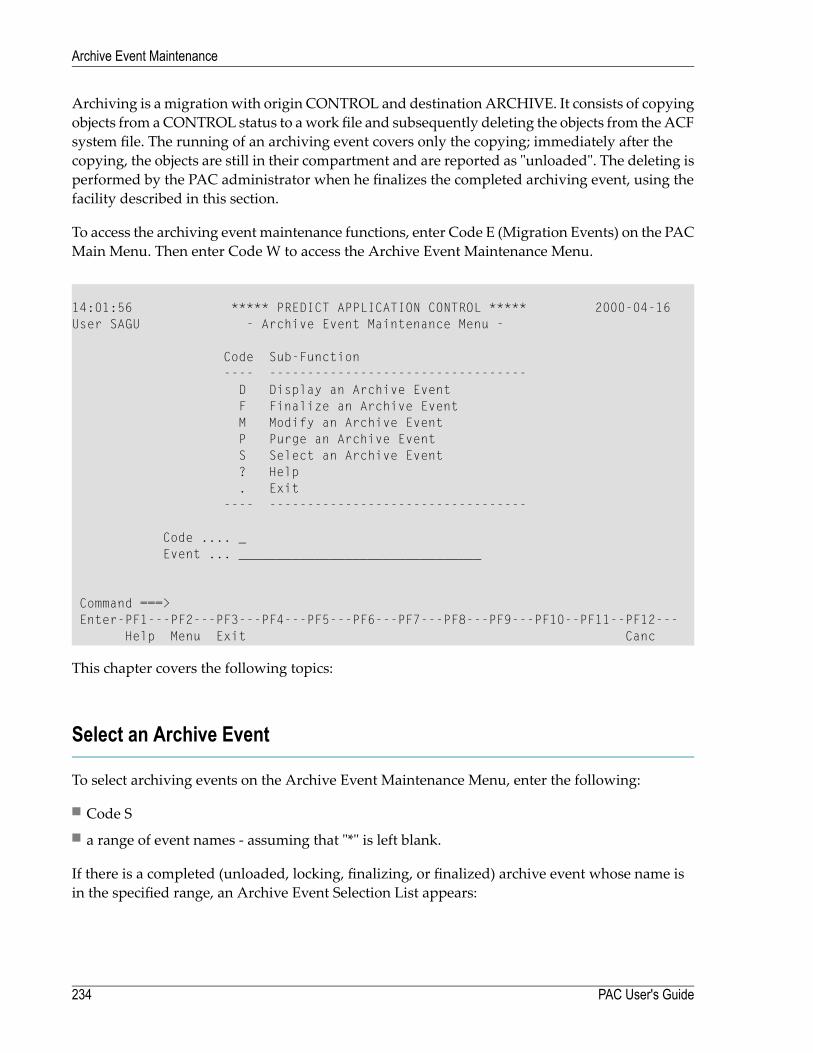
Archiving is a migration with origin CONTROL and destination ARCHIVE. It consists of copyingobjects from aCONTROL status to awork file and subsequently deleting the objects from theACFsystem file. The running of an archiving event covers only the copying; immediately after thecopying, the objects are still in their compartment and are reported as "unloaded". The deleting isperformed by the PAC administrator when he finalizes the completed archiving event, using thefacility described in this section.
To access the archiving event maintenance functions, enter Code E (Migration Events) on the PACMain Menu. Then enter Code W to access the Archive Event Maintenance Menu.
14:01:56 ***** PREDICT APPLICATION CONTROL ***** 2000-04-16User SAGU - Archive Event Maintenance Menu -
Code Sub-Function---- ----------------------------------D Display an Archive EventF Finalize an Archive EventM Modify an Archive EventP Purge an Archive EventS Select an Archive Event? Help. Exit
---- ----------------------------------
Code .... _Event ... ________________________________
Command ===>Enter-PF1---PF2---PF3---PF4---PF5---PF6---PF7---PF8---PF9---PF10--PF11--PF12---
Help Menu Exit Canc
This chapter covers the following topics:
Select an Archive Event
To select archiving events on the Archive Event Maintenance Menu, enter the following:
■ Code S■ a range of event names - assuming that "*" is left blank.
If there is a completed (unloaded, locking, finalizing, or finalized) archive event whose name isin the specified range, an Archive Event Selection List appears:
PAC User's Guide234
Archive Event Maintenance
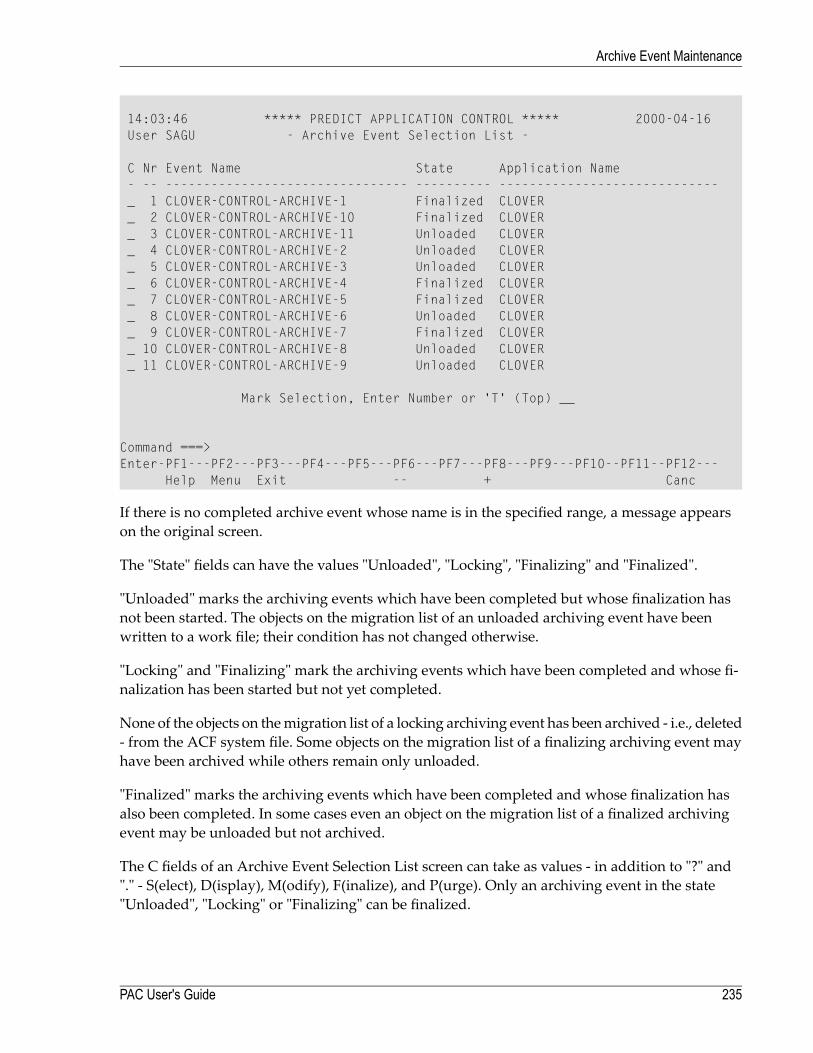
14:03:46 ***** PREDICT APPLICATION CONTROL ***** 2000-04-16User SAGU - Archive Event Selection List -
C Nr Event Name State Application Name- -- -------------------------------- ---------- -----------------------------_ 1 CLOVER-CONTROL-ARCHIVE-1 Finalized CLOVER_ 2 CLOVER-CONTROL-ARCHIVE-10 Finalized CLOVER_ 3 CLOVER-CONTROL-ARCHIVE-11 Unloaded CLOVER_ 4 CLOVER-CONTROL-ARCHIVE-2 Unloaded CLOVER_ 5 CLOVER-CONTROL-ARCHIVE-3 Unloaded CLOVER_ 6 CLOVER-CONTROL-ARCHIVE-4 Finalized CLOVER_ 7 CLOVER-CONTROL-ARCHIVE-5 Finalized CLOVER_ 8 CLOVER-CONTROL-ARCHIVE-6 Unloaded CLOVER_ 9 CLOVER-CONTROL-ARCHIVE-7 Finalized CLOVER_ 10 CLOVER-CONTROL-ARCHIVE-8 Unloaded CLOVER_ 11 CLOVER-CONTROL-ARCHIVE-9 Unloaded CLOVER
Mark Selection, Enter Number or 'T' (Top) __
Command ===>Enter-PF1---PF2---PF3---PF4---PF5---PF6---PF7---PF8---PF9---PF10--PF11--PF12---
Help Menu Exit -- + Canc
If there is no completed archive event whose name is in the specified range, a message appearson the original screen.
The "State" fields can have the values "Unloaded", "Locking", "Finalizing" and "Finalized".
"Unloaded" marks the archiving events which have been completed but whose finalization hasnot been started. The objects on the migration list of an unloaded archiving event have beenwritten to a work file; their condition has not changed otherwise.
"Locking" and "Finalizing" mark the archiving events which have been completed and whose fi-nalization has been started but not yet completed.
None of the objects on themigration list of a locking archiving event has been archived - i.e., deleted- from the ACF system file. Some objects on the migration list of a finalizing archiving event mayhave been archived while others remain only unloaded.
"Finalized" marks the archiving events which have been completed and whose finalization hasalso been completed. In some cases even an object on the migration list of a finalized archivingevent may be unloaded but not archived.
The C fields of an Archive Event Selection List screen can take as values - in addition to "?" and"." - S(elect), D(isplay), M(odify), F(inalize), and P(urge). Only an archiving event in the state"Unloaded", "Locking" or "Finalizing" can be finalized.
235PAC User's Guide
Archive Event Maintenance
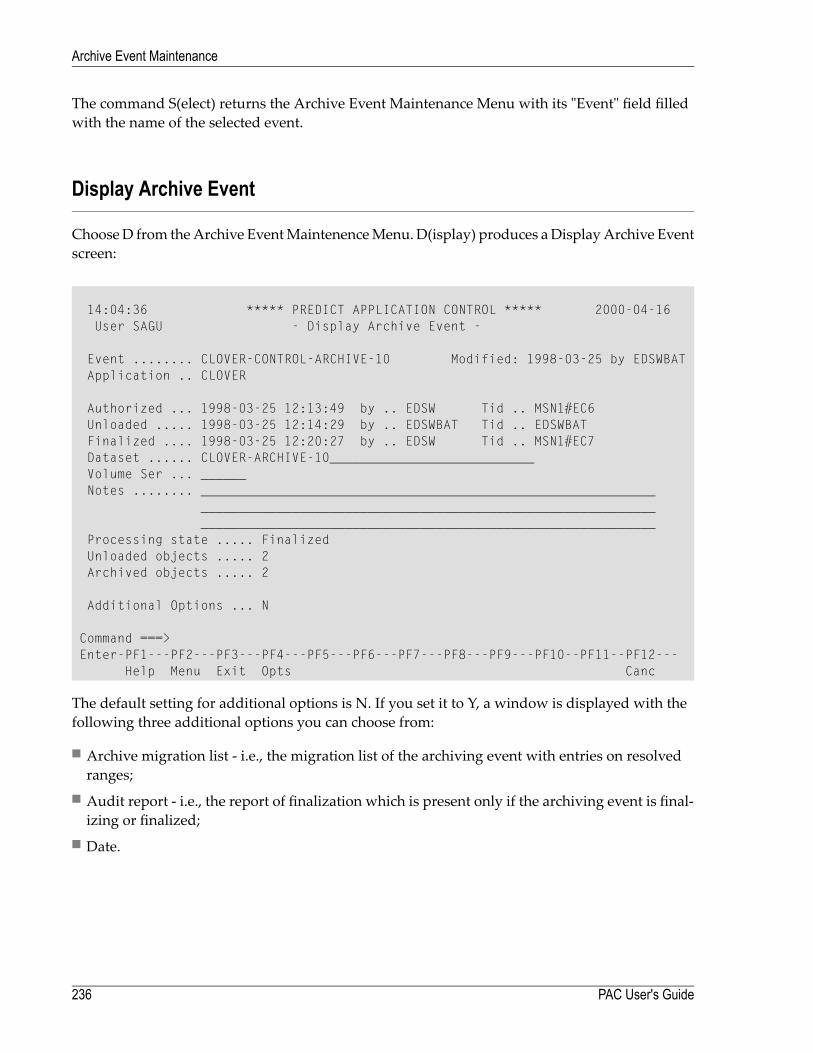
The command S(elect) returns the Archive Event Maintenance Menu with its "Event" field filledwith the name of the selected event.
Display Archive Event
ChooseD from theArchive EventMaintenenceMenu. D(isplay) produces aDisplayArchive Eventscreen:
14:04:36 ***** PREDICT APPLICATION CONTROL ***** 2000-04-16User SAGU - Display Archive Event -
Event ........ CLOVER-CONTROL-ARCHIVE-10 Modified: 1998-03-25 by EDSWBATApplication .. CLOVER
Authorized ... 1998-03-25 12:13:49 by .. EDSW Tid .. MSN1#EC6Unloaded ..... 1998-03-25 12:14:29 by .. EDSWBAT Tid .. EDSWBATFinalized .... 1998-03-25 12:20:27 by .. EDSW Tid .. MSN1#EC7Dataset ...... CLOVER-ARCHIVE-10___________________________Volume Ser ... ______Notes ........ ____________________________________________________________
________________________________________________________________________________________________________________________
Processing state ..... FinalizedUnloaded objects ..... 2Archived objects ..... 2
Additional Options ... N
Command ===>Enter-PF1---PF2---PF3---PF4---PF5---PF6---PF7---PF8---PF9---PF10--PF11--PF12---
Help Menu Exit Opts Canc
The default setting for additional options is N. If you set it to Y, a window is displayed with thefollowing three additional options you can choose from:
■ Archive migration list - i.e., the migration list of the archiving event with entries on resolvedranges;
■ Audit report - i.e., the report of finalization which is present only if the archiving event is final-izing or finalized;
■ Date.
PAC User's Guide236
Archive Event Maintenance
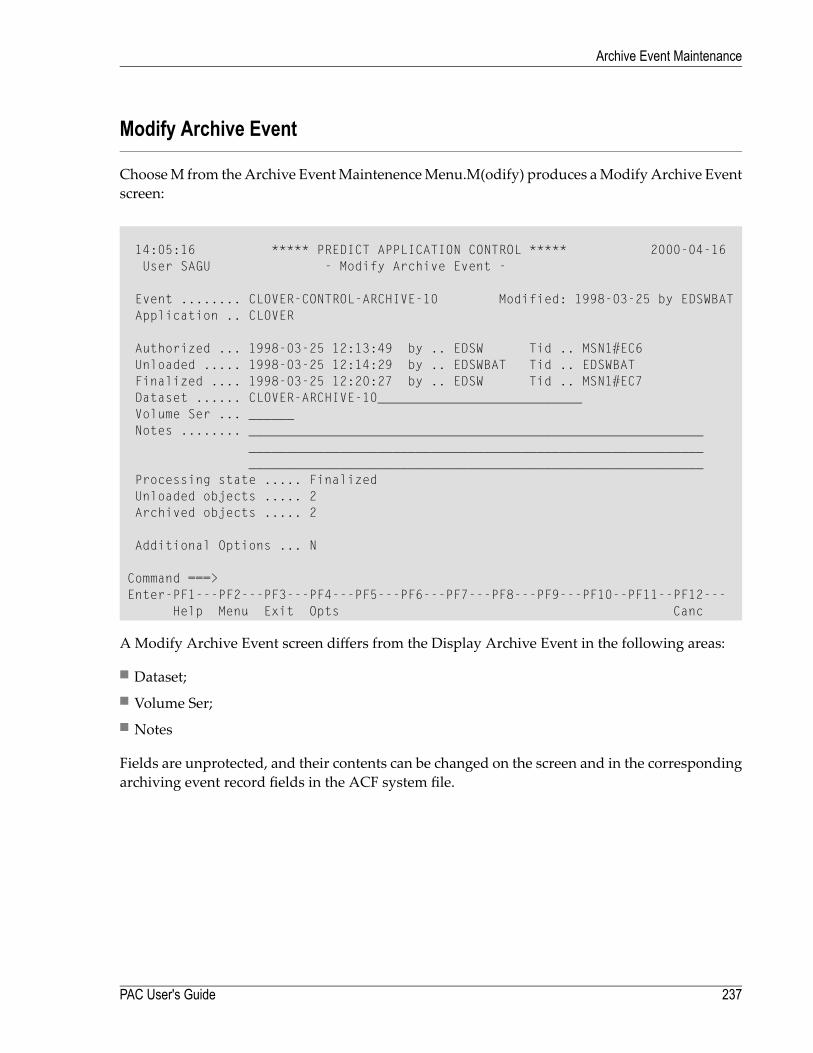
Modify Archive Event
ChooseM from theArchive EventMaintenenceMenu.M(odify) produces aModify Archive Eventscreen:
14:05:16 ***** PREDICT APPLICATION CONTROL ***** 2000-04-16User SAGU - Modify Archive Event -
Event ........ CLOVER-CONTROL-ARCHIVE-10 Modified: 1998-03-25 by EDSWBATApplication .. CLOVER
Authorized ... 1998-03-25 12:13:49 by .. EDSW Tid .. MSN1#EC6Unloaded ..... 1998-03-25 12:14:29 by .. EDSWBAT Tid .. EDSWBATFinalized .... 1998-03-25 12:20:27 by .. EDSW Tid .. MSN1#EC7Dataset ...... CLOVER-ARCHIVE-10___________________________Volume Ser ... ______Notes ........ ____________________________________________________________
________________________________________________________________________________________________________________________
Processing state ..... FinalizedUnloaded objects ..... 2Archived objects ..... 2
Additional Options ... N
Command ===>Enter-PF1---PF2---PF3---PF4---PF5---PF6---PF7---PF8---PF9---PF10--PF11--PF12---
Help Menu Exit Opts Canc
AModify Archive Event screen differs from the Display Archive Event in the following areas:
■ Dataset;■ Volume Ser;■ Notes
Fields are unprotected, and their contents can be changed on the screen and in the correspondingarchiving event record fields in the ACF system file.
237PAC User's Guide
Archive Event Maintenance
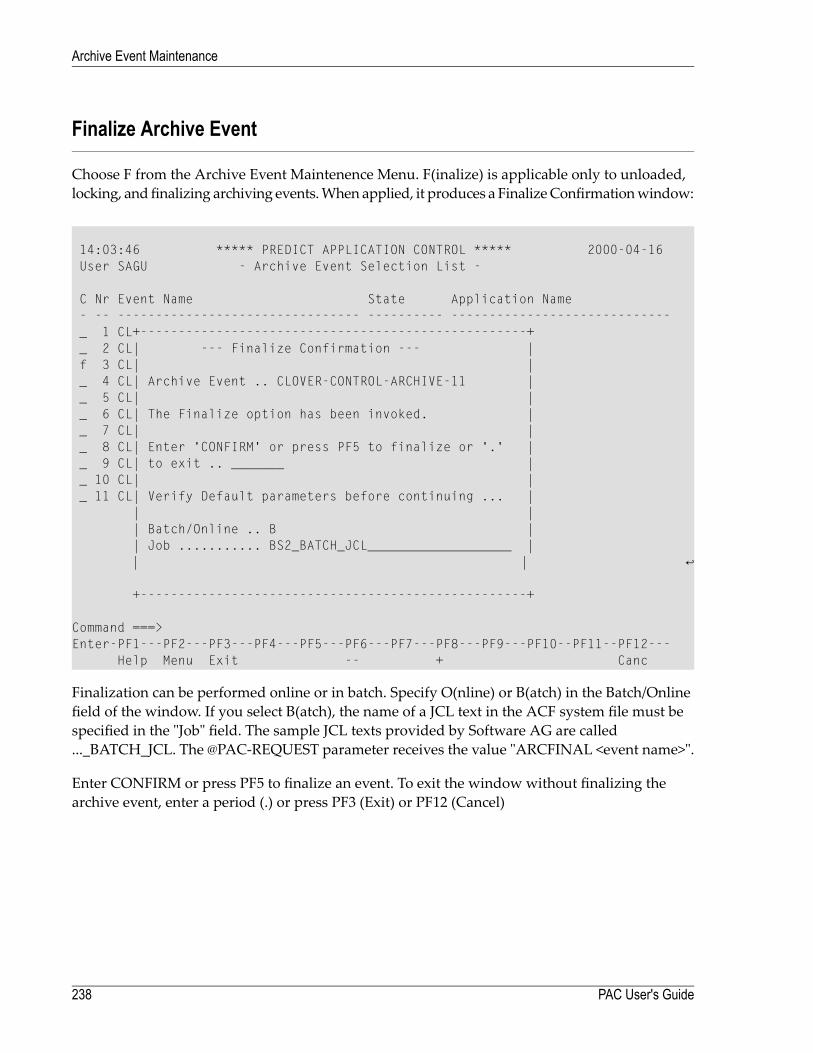
Finalize Archive Event
Choose F from the Archive Event Maintenence Menu. F(inalize) is applicable only to unloaded,locking, andfinalizing archiving events.When applied, it produces a FinalizeConfirmationwindow:
14:03:46 ***** PREDICT APPLICATION CONTROL ***** 2000-04-16 User SAGU - Archive Event Selection List - C Nr Event Name State Application Name - -- -------------------------------- ---------- ----------------------------- _ 1 CL+---------------------------------------------------+ _ 2 CL| --- Finalize Confirmation --- | f 3 CL| | _ 4 CL| Archive Event .. CLOVER-CONTROL-ARCHIVE-11 | _ 5 CL| | _ 6 CL| The Finalize option has been invoked. | _ 7 CL| | _ 8 CL| Enter 'CONFIRM' or press PF5 to finalize or '.' | _ 9 CL| to exit .. _______ | _ 10 CL| | _ 11 CL| Verify Default parameters before continuing ... | | | | Batch/Online .. B | | Job ........... BS2_BATCH_JCL___________________ | | | ↩ +---------------------------------------------------+
Command ===> Enter-PF1---PF2---PF3---PF4---PF5---PF6---PF7---PF8---PF9---PF10--PF11--PF12--- Help Menu Exit -- + Canc
Finalization can be performed online or in batch. Specify O(nline) or B(atch) in the Batch/Onlinefield of the window. If you select B(atch), the name of a JCL text in the ACF system file must bespecified in the "Job" field. The sample JCL texts provided by Software AG are called..._BATCH_JCL. The @PAC-REQUEST parameter receives the value "ARCFINAL <event name>".
Enter CONFIRM or press PF5 to finalize an event. To exit the window without finalizing thearchive event, enter a period (.) or press PF3 (Exit) or PF12 (Cancel)
PAC User's Guide238
Archive Event Maintenance
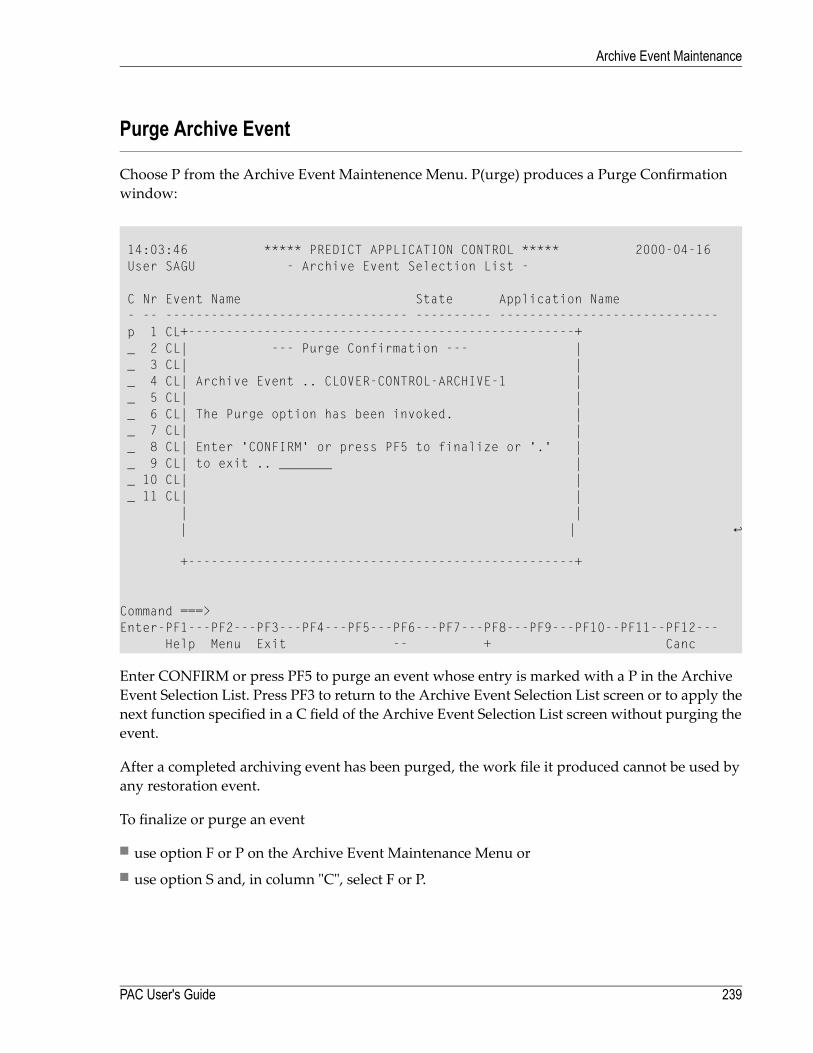
Purge Archive Event
Choose P from the Archive Event Maintenence Menu. P(urge) produces a Purge Confirmationwindow:
14:03:46 ***** PREDICT APPLICATION CONTROL ***** 2000-04-16 User SAGU - Archive Event Selection List - C Nr Event Name State Application Name - -- -------------------------------- ---------- ----------------------------- p 1 CL+---------------------------------------------------+ _ 2 CL| --- Purge Confirmation --- | _ 3 CL| | _ 4 CL| Archive Event .. CLOVER-CONTROL-ARCHIVE-1 | _ 5 CL| | _ 6 CL| The Purge option has been invoked. | _ 7 CL| | _ 8 CL| Enter 'CONFIRM' or press PF5 to finalize or '.' | _ 9 CL| to exit .. _______ | _ 10 CL| | _ 11 CL| | | | | | ↩ +---------------------------------------------------+
Command ===> Enter-PF1---PF2---PF3---PF4---PF5---PF6---PF7---PF8---PF9---PF10--PF11--PF12--- Help Menu Exit -- + Canc
Enter CONFIRM or press PF5 to purge an event whose entry is marked with a P in the ArchiveEvent Selection List. Press PF3 to return to the Archive Event Selection List screen or to apply thenext function specified in a C field of the Archive Event Selection List screen without purging theevent.
After a completed archiving event has been purged, the work file it produced cannot be used byany restoration event.
To finalize or purge an event
■ use option F or P on the Archive Event Maintenance Menu or■ use option S and, in column "C", select F or P.
239PAC User's Guide
Archive Event Maintenance

240
17 Authorizing and Submitting a Migration Event
■ Authorizing a Migration Event ........................................................................................................... 242■ Submitting a Migration Event ........................................................................................................... 249■ Backing Out an Incomplete Migration Event ........................................................................................ 256■ Migration Event Audit Report ........................................................................................................... 256■ Migration Processing and Monitoring ................................................................................................. 260
241
After a migration event is defined, it may be authorized and then submitted as described in thefollowing sections.
This chapter covers the following topics:
Authorizing a Migration Event
Before a migration event can be submitted, it must be authorized by the authorizer(s) assigned onthe migration path. Refer to Migration Paths for information about designating authorizers.
Only a migration event with a processing state of Pending or Validated can be authorized. Theauthorization request takes a Pending event through the Validated state automatically.
Migration events may be authorized
■ online from the Modify Event screen;■ in batch mode using commands; or■ by using Application Program Interface (API) calls.
Refer to the PAC Reference documentation for more information about APIs.
Removing an Authorization
If an attempt is made to update a migration event that has been authorized, a warning messageis issued and the update is interrupted until the authorization(s) has been removed.
To remove an authorization, type Y (Yes) in the window that contains the error message.
Authorizing a Migration Event
Step 1. Accessing the Modify Event Screen
On the Migration Event Menu, enter Code M (Modify an Event) and the name of the migrationevent you wish to modify.
The Modify Event screen appears:
PAC User's Guide242
Authorizing and Submitting a Migration Event
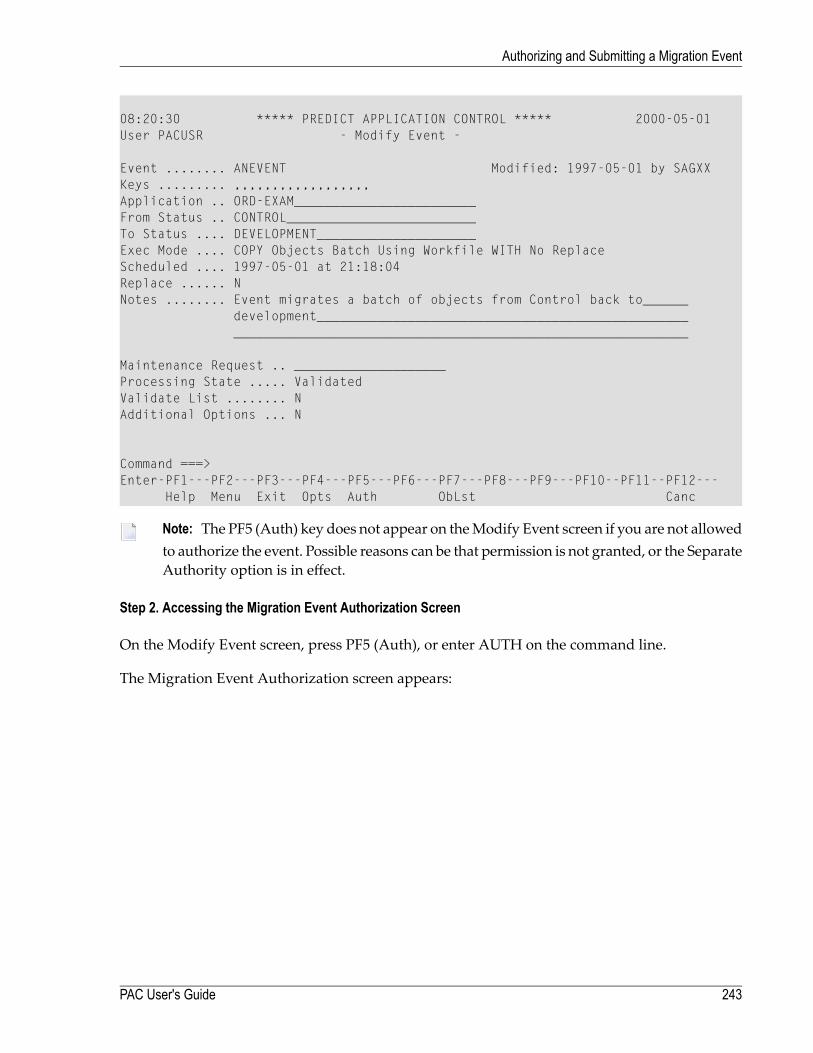
08:20:30 ***** PREDICT APPLICATION CONTROL ***** 2000-05-01User PACUSR - Modify Event -
Event ........ ANEVENT Modified: 1997-05-01 by SAGXXKeys ......... ,,,,,,,,,,,,,,,,,,Application .. ORD-EXAM________________________From Status .. CONTROL_________________________To Status .... DEVELOPMENT_____________________Exec Mode .... COPY Objects Batch Using Workfile WITH No ReplaceScheduled .... 1997-05-01 at 21:18:04Replace ...... NNotes ........ Event migrates a batch of objects from Control back to______
development_____________________________________________________________________________________________________________
Maintenance Request .. ____________________Processing State ..... ValidatedValidate List ........ NAdditional Options ... N
Command ===>Enter-PF1---PF2---PF3---PF4---PF5---PF6---PF7---PF8---PF9---PF10--PF11--PF12---
Help Menu Exit Opts Auth ObLst Canc
Note: The PF5 (Auth) key does not appear on theModify Event screen if you are not allowedto authorize the event. Possible reasons can be that permission is not granted, or the SeparateAuthority option is in effect.
Step 2. Accessing the Migration Event Authorization Screen
On the Modify Event screen, press PF5 (Auth), or enter AUTH on the command line.
The Migration Event Authorization screen appears:
243PAC User's Guide
Authorizing and Submitting a Migration Event

15:10:24 ***** PREDICT APPLICATION CONTROL ***** 2000-05-01User PACUSR - Migration Event Authorization -
Event .......... ANEVENT
From Status .... CONTROLFrom Location .. * PACS * (235,010) PREDICT .. (235,015)To Status ...... DEVELOPMENTTo Location .... ORD-DEV (100,010) PREDICT .. (100,010)
Batch/Online ....... B Workfile Usage .......... YCopy/Move/Include .. C Replace ................. NJob ................ NATURAL_MIGRATE_WORKFILEAuto Expansion ..... NExpand Status ......
Applymods .......... N
Enter CONFIRM or press `PF5' to Authorize
Command ===>Enter-PF1---PF2---PF3---PF4---PF5---PF6---PF7---PF8---PF9---PF10--PF11--PF12---
Help Menu Exit Confm Canc
The values for the attributes on the Migration Event Authorization screen were set when the mi-gration path was defined.
The following attributes cannot be modified on this screen:
■ name of the migration event to be authorized;■ origin and destination statuses and their locations;■ origin and destination locations of the Predict objects.■ physical location of foreign datasets.
The attributes described in the following table are modifiable depending on the migration path(From/To statuses):
DescriptionAttribute
Applymods in effect for the current migration event.Applymods
The type of object expansion to be performed.Auto Expansion
Whether the job is to be run in batch or online. The executionmode (batch/online) optionswere specified when the migration path was defined.
Batch/Online
Copy/move/include options.Copy/Move/Include
PAC User's Guide244
Authorizing and Submitting a Migration Event
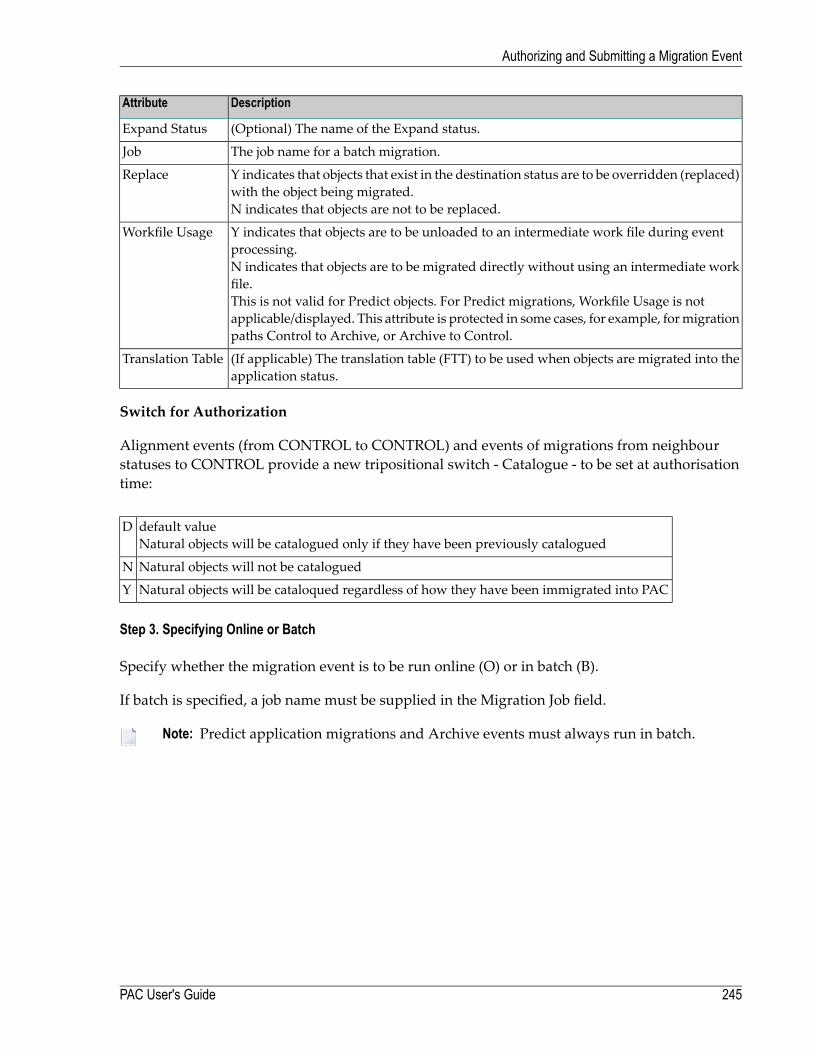
DescriptionAttribute
(Optional) The name of the Expand status.Expand Status
The job name for a batch migration.Job
Y indicates that objects that exist in the destination status are to be overridden (replaced)with the object being migrated.N indicates that objects are not to be replaced.
Replace
Y indicates that objects are to be unloaded to an intermediate work file during eventprocessing.N indicates that objects are to be migrated directly without using an intermediate workfile.This is not valid for Predict objects. For Predict migrations, Workfile Usage is notapplicable/displayed. This attribute is protected in some cases, for example, formigrationpaths Control to Archive, or Archive to Control.
Workfile Usage
(If applicable) The translation table (FTT) to be used when objects are migrated into theapplication status.
Translation Table
Switch for Authorization
Alignment events (from CONTROL to CONTROL) and events of migrations from neighbourstatuses to CONTROL provide a new tripositional switch - Catalogue - to be set at authorisationtime:
default valueNatural objects will be catalogued only if they have been previously catalogued
D
Natural objects will not be cataloguedN
Natural objects will be cataloqued regardless of how they have been immigrated into PACY
Step 3. Specifying Online or Batch
Specify whether the migration event is to be run online (O) or in batch (B).
If batch is specified, a job name must be supplied in the Migration Job field.
Note: Predict application migrations and Archive events must always run in batch.
245PAC User's Guide
Authorizing and Submitting a Migration Event
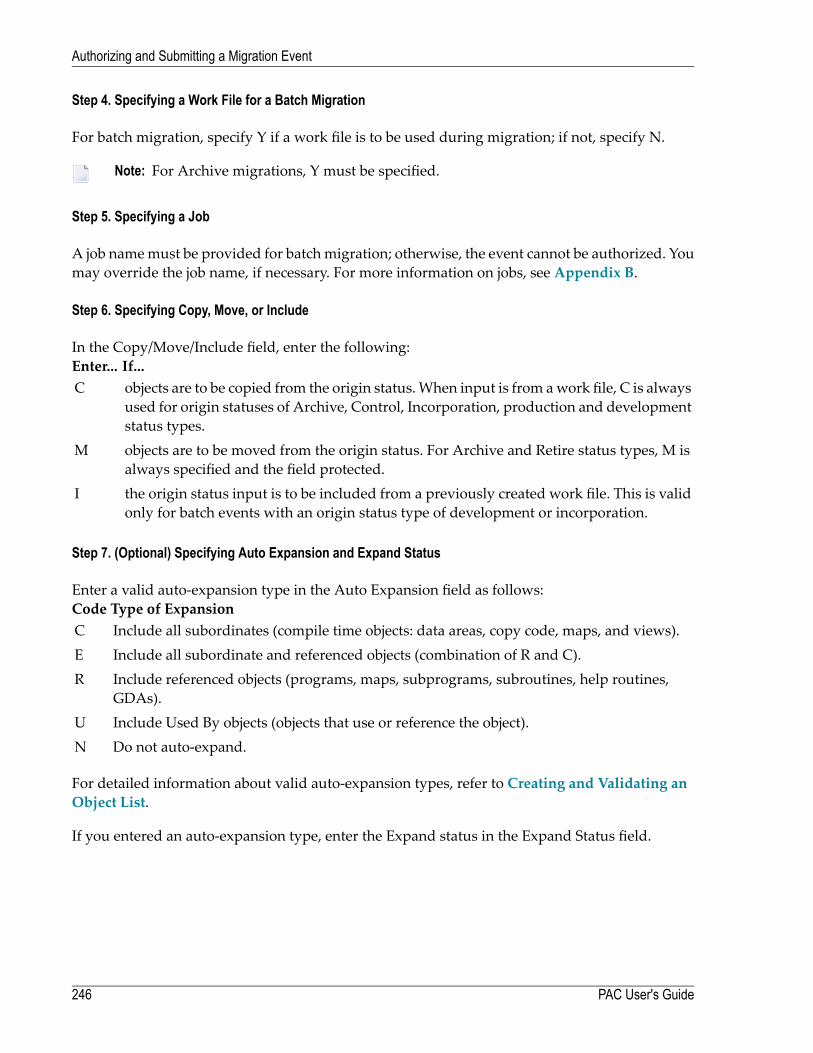
Step 4. Specifying a Work File for a Batch Migration
For batch migration, specify Y if a work file is to be used during migration; if not, specify N.
Note: For Archive migrations, Y must be specified.
Step 5. Specifying a Job
A job namemust be provided for batchmigration; otherwise, the event cannot be authorized. Youmay override the job name, if necessary. For more information on jobs, see Appendix B.
Step 6. Specifying Copy, Move, or Include
In the Copy/Move/Include field, enter the following:If...Enter...objects are to be copied from the origin status.When input is from awork file, C is alwaysused for origin statuses of Archive, Control, Incorporation, production and developmentstatus types.
C
objects are to be moved from the origin status. For Archive and Retire status types, M isalways specified and the field protected.
M
the origin status input is to be included from a previously created work file. This is validonly for batch events with an origin status type of development or incorporation.
I
Step 7. (Optional) Specifying Auto Expansion and Expand Status
Enter a valid auto-expansion type in the Auto Expansion field as follows:Type of ExpansionCodeInclude all subordinates (compile time objects: data areas, copy code, maps, and views).CInclude all subordinate and referenced objects (combination of R and C).EInclude referenced objects (programs, maps, subprograms, subroutines, help routines,GDAs).
R
Include Used By objects (objects that use or reference the object).UDo not auto-expand.N
For detailed information about valid auto-expansion types, refer to Creating and Validating anObject List.
If you entered an auto-expansion type, enter the Expand status in the Expand Status field.
PAC User's Guide246
Authorizing and Submitting a Migration Event
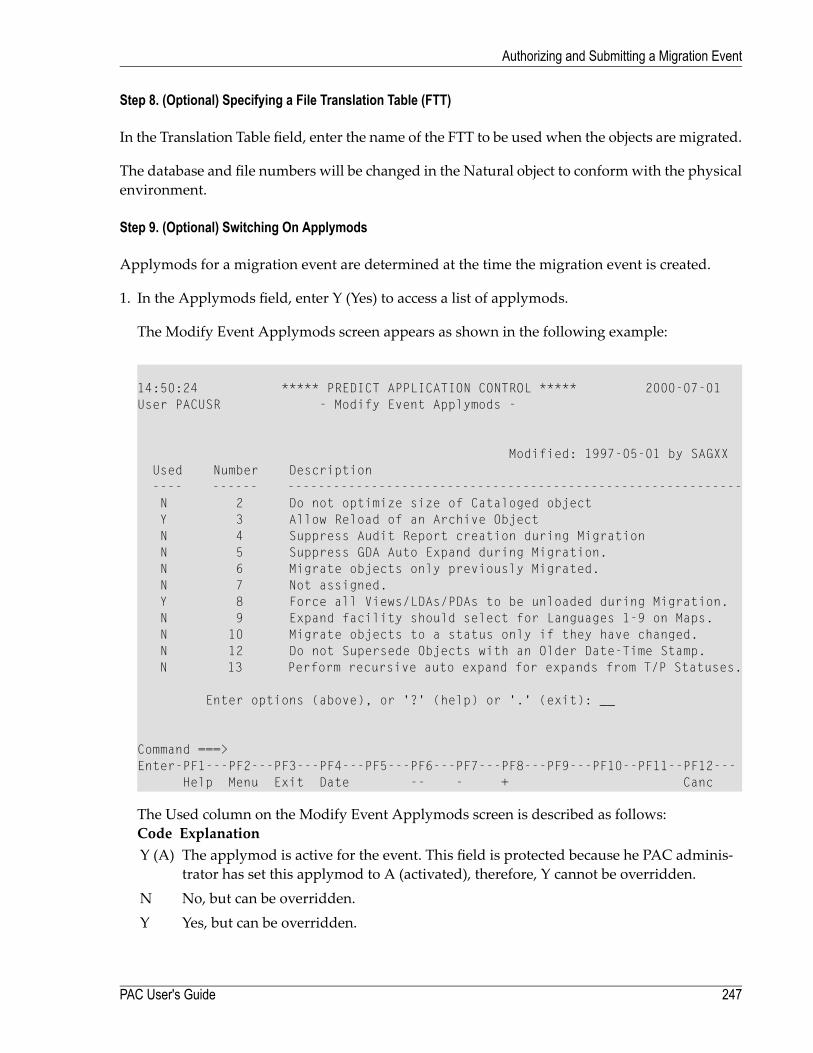
Step 8. (Optional) Specifying a File Translation Table (FTT)
In the Translation Table field, enter the name of the FTT to be used when the objects are migrated.
The database and file numbers will be changed in the Natural object to conformwith the physicalenvironment.
Step 9. (Optional) Switching On Applymods
Applymods for a migration event are determined at the time the migration event is created.
1. In the Applymods field, enter Y (Yes) to access a list of applymods.
The Modify Event Applymods screen appears as shown in the following example:
14:50:24 ***** PREDICT APPLICATION CONTROL ***** 2000-07-01User PACUSR - Modify Event Applymods -
Modified: 1997-05-01 by SAGXXUsed Number Description---- ------ ------------------------------------------------------------N 2 Do not optimize size of Cataloged objectY 3 Allow Reload of an Archive ObjectN 4 Suppress Audit Report creation during MigrationN 5 Suppress GDA Auto Expand during Migration.N 6 Migrate objects only previously Migrated.N 7 Not assigned.Y 8 Force all Views/LDAs/PDAs to be unloaded during Migration.N 9 Expand facility should select for Languages 1-9 on Maps.N 10 Migrate objects to a status only if they have changed.N 12 Do not Supersede Objects with an Older Date-Time Stamp.N 13 Perform recursive auto expand for expands from T/P Statuses.
Enter options (above), or '?' (help) or '.' (exit): __
Command ===>Enter-PF1---PF2---PF3---PF4---PF5---PF6---PF7---PF8---PF9---PF10--PF11--PF12---
Help Menu Exit Date -- - + Canc
The Used column on the Modify Event Applymods screen is described as follows:ExplanationCodeThe applymod is active for the event. This field is protected because he PAC adminis-trator has set this applymod to A (activated), therefore, Y cannot be overridden.
Y (A)
No, but can be overridden.NYes, but can be overridden.Y
247PAC User's Guide
Authorizing and Submitting a Migration Event
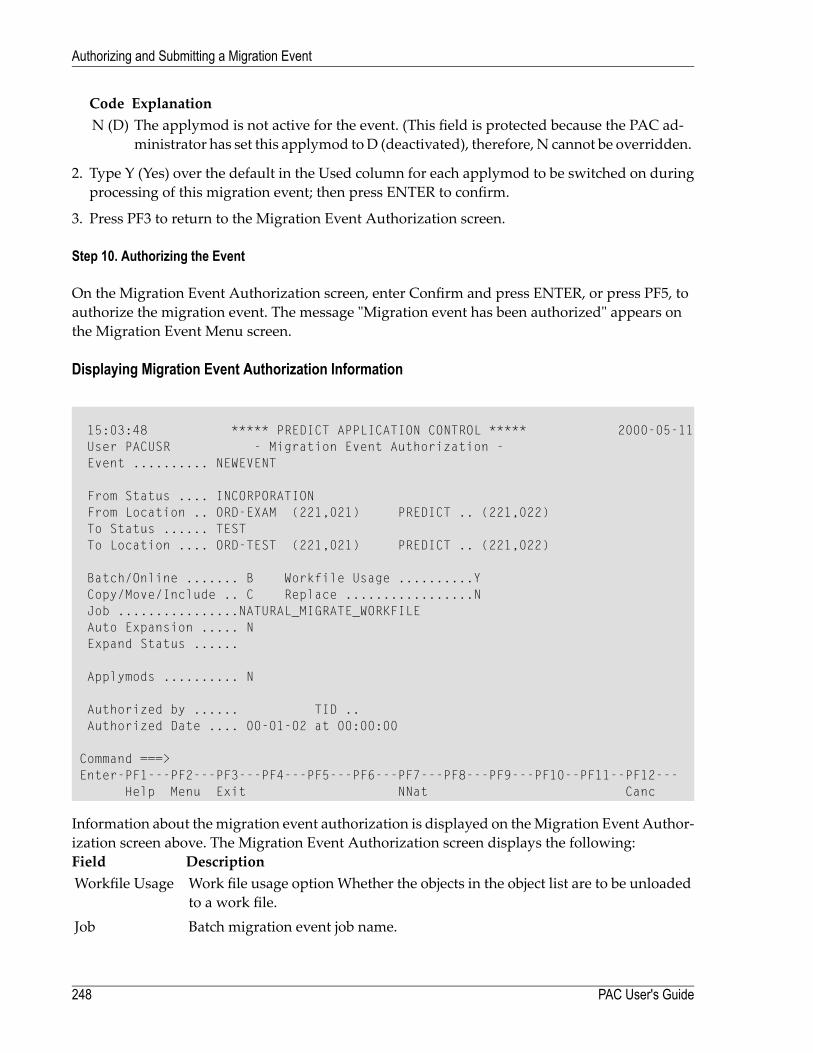
ExplanationCodeThe applymod is not active for the event. (This field is protected because the PAC ad-ministrator has set this applymod toD (deactivated), therefore, N cannot be overridden.
N (D)
2. Type Y (Yes) over the default in the Used column for each applymod to be switched on duringprocessing of this migration event; then press ENTER to confirm.
3. Press PF3 to return to the Migration Event Authorization screen.
Step 10. Authorizing the Event
On the Migration Event Authorization screen, enter Confirm and press ENTER, or press PF5, toauthorize the migration event. The message "Migration event has been authorized" appears onthe Migration Event Menu screen.
Displaying Migration Event Authorization Information
15:03:48 ***** PREDICT APPLICATION CONTROL ***** 2000-05-11User PACUSR - Migration Event Authorization -Event .......... NEWEVENT
From Status .... INCORPORATIONFrom Location .. ORD-EXAM (221,021) PREDICT .. (221,022)To Status ...... TESTTo Location .... ORD-TEST (221,021) PREDICT .. (221,022)
Batch/Online ....... B Workfile Usage ..........YCopy/Move/Include .. C Replace .................NJob ................NATURAL_MIGRATE_WORKFILEAuto Expansion ..... NExpand Status ......
Applymods .......... N
Authorized by ...... TID ..Authorized Date .... 00-01-02 at 00:00:00
Command ===>Enter-PF1---PF2---PF3---PF4---PF5---PF6---PF7---PF8---PF9---PF10--PF11--PF12---
Help Menu Exit NNat Canc
Information about themigration event authorization is displayed on theMigration Event Author-ization screen above. The Migration Event Authorization screen displays the following:
DescriptionFieldWork file usage optionWhether the objects in the object list are to be unloadedto a work file.
Workfile Usage
Batch migration event job name.Job
PAC User's Guide248
Authorizing and Submitting a Migration Event

DescriptionFieldWhether the auto expansion facility was selected for the object list.Auto ExpansionThe name of the Expand status (if specified).Expand StatusApplymods migration event authorization Applymods used. Type Y over theN default to display the applymods for this migration event.
Applymods
User ID and terminal ID number of the user who authorized the job.Authorized ByDate and time the event was authorized.Authorized Date
Submitting a Migration Event
Migration eventsmay be submitted in batch or online from theMigration Event Submission screen;or in batch using direct commands (in an MVS environment only). PAC supplies an applymodfor submitting migration events. You may also use an API to submit an event.
Using the Migration Event Submission Screen
Step 1. Accessing the Migration Event Submission Screen
Enter Code U (Submit a Migration Event for Processing) and the appropriate migration eventname on the Migration Event Menu.
The Migration Event Submission screen appears:
249PAC User's Guide
Authorizing and Submitting a Migration Event
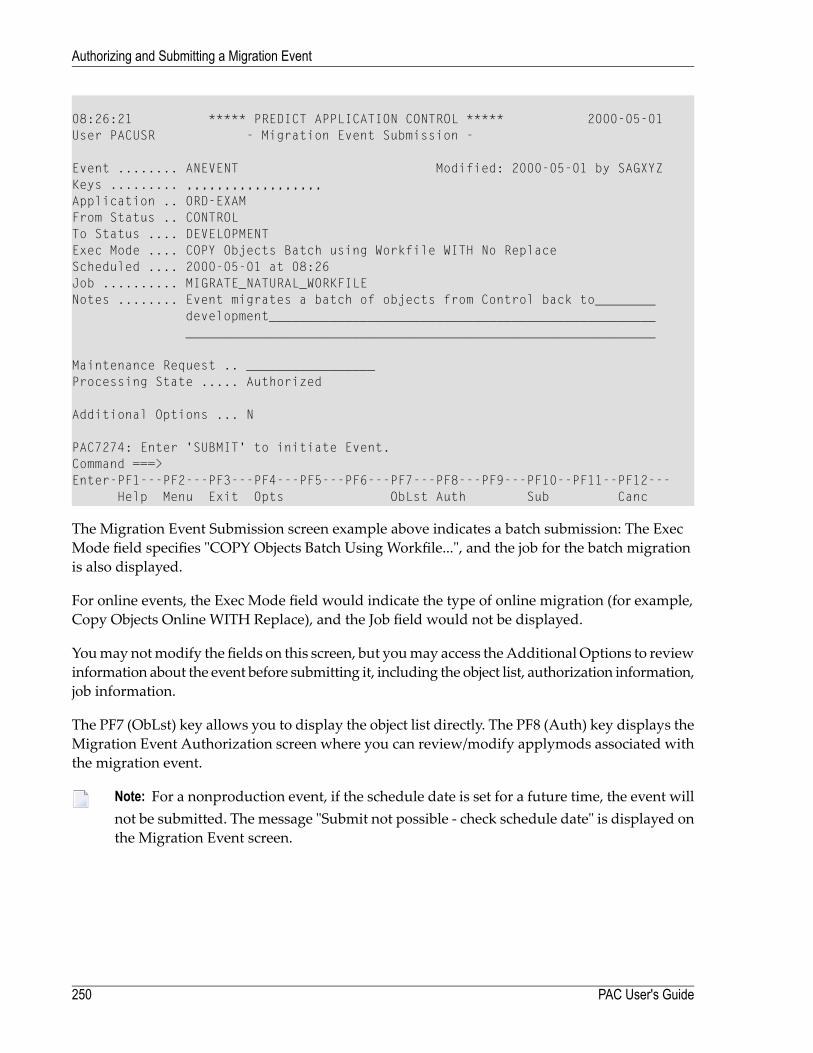
08:26:21 ***** PREDICT APPLICATION CONTROL ***** 2000-05-01User PACUSR - Migration Event Submission -
Event ........ ANEVENT Modified: 2000-05-01 by SAGXYZKeys ......... ,,,,,,,,,,,,,,,,,,Application .. ORD-EXAMFrom Status .. CONTROLTo Status .... DEVELOPMENTExec Mode .... COPY Objects Batch using Workfile WITH No ReplaceScheduled .... 2000-05-01 at 08:26Job .......... MIGRATE_NATURAL_WORKFILENotes ........ Event migrates a batch of objects from Control back to________
development_________________________________________________________________________________________________________________
Maintenance Request .. _________________Processing State ..... Authorized
Additional Options ... N
PAC7274: Enter 'SUBMIT' to initiate Event.Command ===>Enter-PF1---PF2---PF3---PF4---PF5---PF6---PF7---PF8---PF9---PF10--PF11--PF12---
Help Menu Exit Opts ObLst Auth Sub Canc
The Migration Event Submission screen example above indicates a batch submission: The ExecMode field specifies "COPY Objects Batch Using Workfile...", and the job for the batch migrationis also displayed.
For online events, the Exec Mode field would indicate the type of online migration (for example,Copy Objects Online WITH Replace), and the Job field would not be displayed.
Youmay notmodify the fields on this screen, but youmay access theAdditional Options to reviewinformation about the event before submitting it, including the object list, authorization information,job information.
The PF7 (ObLst) key allows you to display the object list directly. The PF8 (Auth) key displays theMigration Event Authorization screen where you can review/modify applymods associated withthe migration event.
Note: For a nonproduction event, if the schedule date is set for a future time, the event willnot be submitted. The message "Submit not possible - check schedule date" is displayed onthe Migration Event screen.
PAC User's Guide250
Authorizing and Submitting a Migration Event
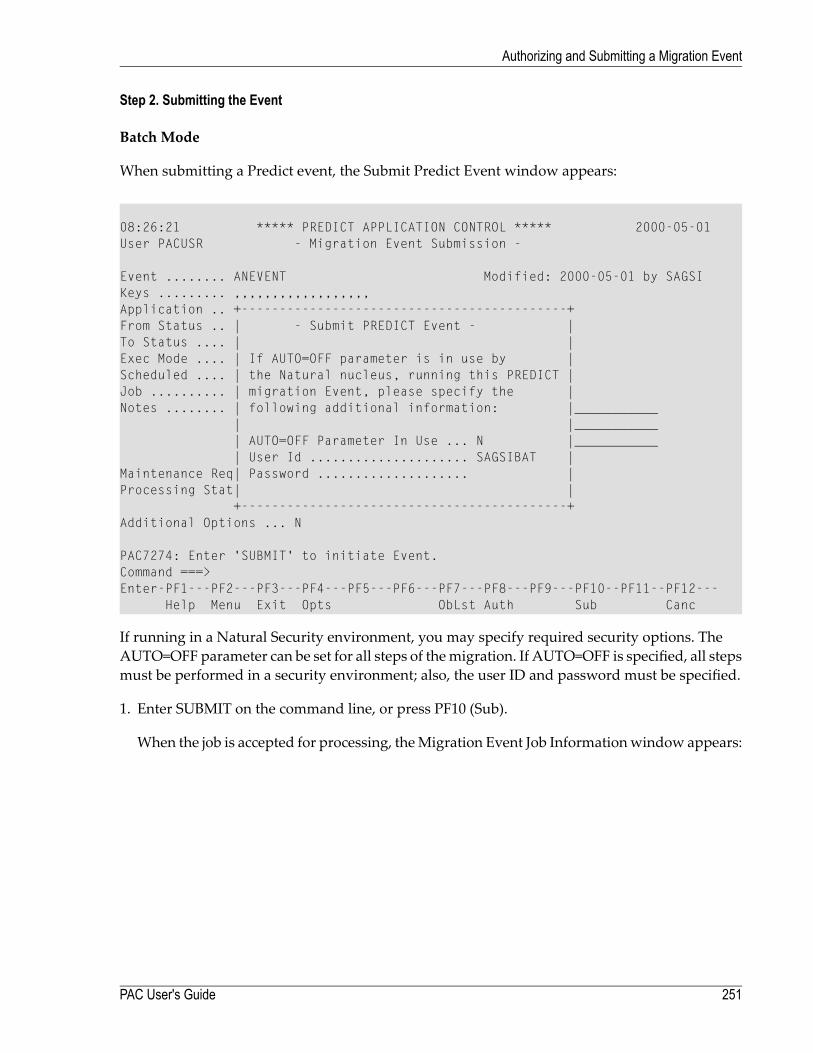
Step 2. Submitting the Event
Batch Mode
When submitting a Predict event, the Submit Predict Event window appears:
08:26:21 ***** PREDICT APPLICATION CONTROL ***** 2000-05-01User PACUSR - Migration Event Submission -
Event ........ ANEVENT Modified: 2000-05-01 by SAGSIKeys ......... ,,,,,,,,,,,,,,,,,,Application .. +-------------------------------------------+From Status .. | - Submit PREDICT Event - |To Status .... | |Exec Mode .... | If AUTO=OFF parameter is in use by |Scheduled .... | the Natural nucleus, running this PREDICT |Job .......... | migration Event, please specify the |Notes ........ | following additional information: |___________
| |___________| AUTO=OFF Parameter In Use ... N |___________| User Id ..................... SAGSIBAT |
Maintenance Req| Password .................... |Processing Stat| |
+-------------------------------------------+Additional Options ... N
PAC7274: Enter 'SUBMIT' to initiate Event.Command ===>Enter-PF1---PF2---PF3---PF4---PF5---PF6---PF7---PF8---PF9---PF10--PF11--PF12---
Help Menu Exit Opts ObLst Auth Sub Canc
If running in a Natural Security environment, you may specify required security options. TheAUTO=OFF parameter can be set for all steps of themigration. If AUTO=OFF is specified, all stepsmust be performed in a security environment; also, the user ID and password must be specified.
1. Enter SUBMIT on the command line, or press PF10 (Sub).
When the job is accepted for processing, theMigration Event Job Informationwindow appears:
251PAC User's Guide
Authorizing and Submitting a Migration Event
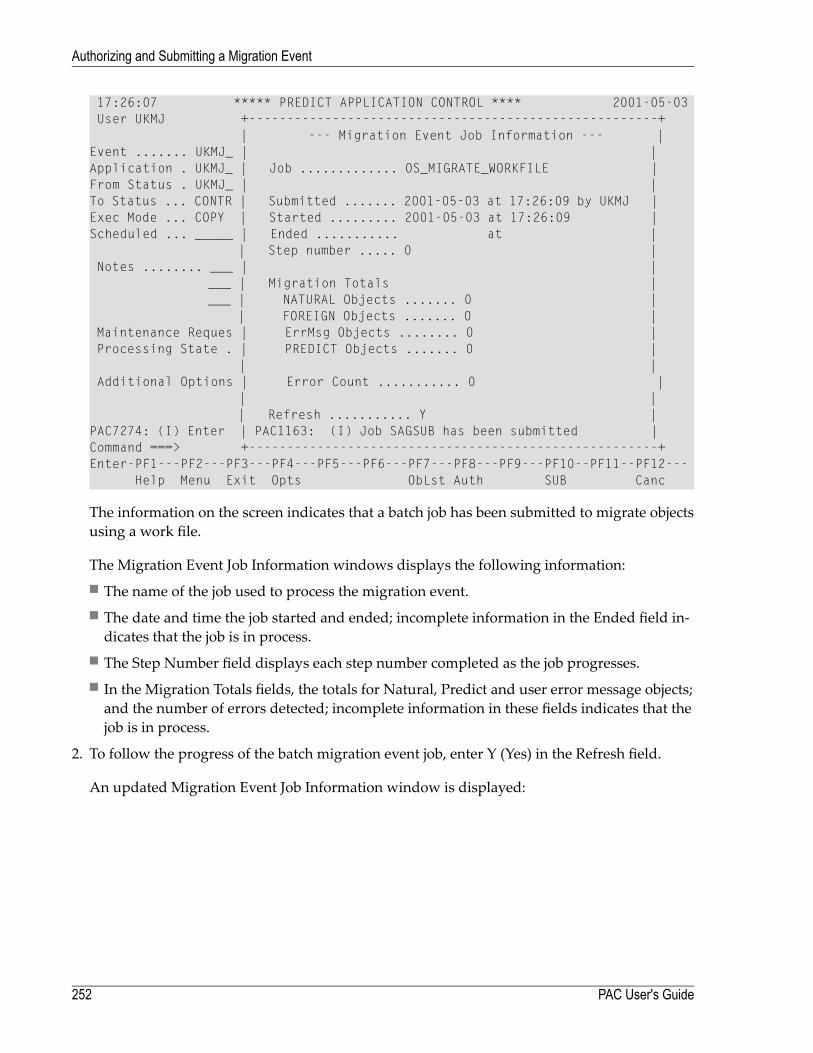
17:26:07 ***** PREDICT APPLICATION CONTROL **** 2001-05-03User UKMJ +------------------------------------------------------+
| --- Migration Event Job Information --- |Event ....... UKMJ_ | |Application . UKMJ_ | Job ............. OS_MIGRATE_WORKFILE |From Status . UKMJ_ | |To Status ... CONTR | Submitted ....... 2001-05-03 at 17:26:09 by UKMJ |Exec Mode ... COPY | Started ......... 2001-05-03 at 17:26:09 |Scheduled ... _____ | Ended ........... at |
| Step number ..... 0 |Notes ........ ___ | |
___ | Migration Totals |___ | NATURAL Objects ....... 0 |
| FOREIGN Objects ....... 0 |Maintenance Reques | ErrMsg Objects ........ 0 |Processing State . | PREDICT Objects ....... 0 |
| |Additional Options | Error Count ........... 0 |
| || Refresh ........... Y |
PAC7274: (I) Enter | PAC1163: (I) Job SAGSUB has been submitted |Command ===> +------------------------------------------------------+Enter-PF1---PF2---PF3---PF4---PF5---PF6---PF7---PF8---PF9---PF10--PF11--PF12---
Help Menu Exit Opts ObLst Auth SUB Canc
The information on the screen indicates that a batch job has been submitted to migrate objectsusing a work file.
The Migration Event Job Information windows displays the following information:■ The name of the job used to process the migration event.■ The date and time the job started and ended; incomplete information in the Ended field in-dicates that the job is in process.
■ The Step Number field displays each step number completed as the job progresses.■ In the Migration Totals fields, the totals for Natural, Predict and user error message objects;and the number of errors detected; incomplete information in these fields indicates that thejob is in process.
2. To follow the progress of the batch migration event job, enter Y (Yes) in the Refresh field.
An updated Migration Event Job Information window is displayed:
PAC User's Guide252
Authorizing and Submitting a Migration Event
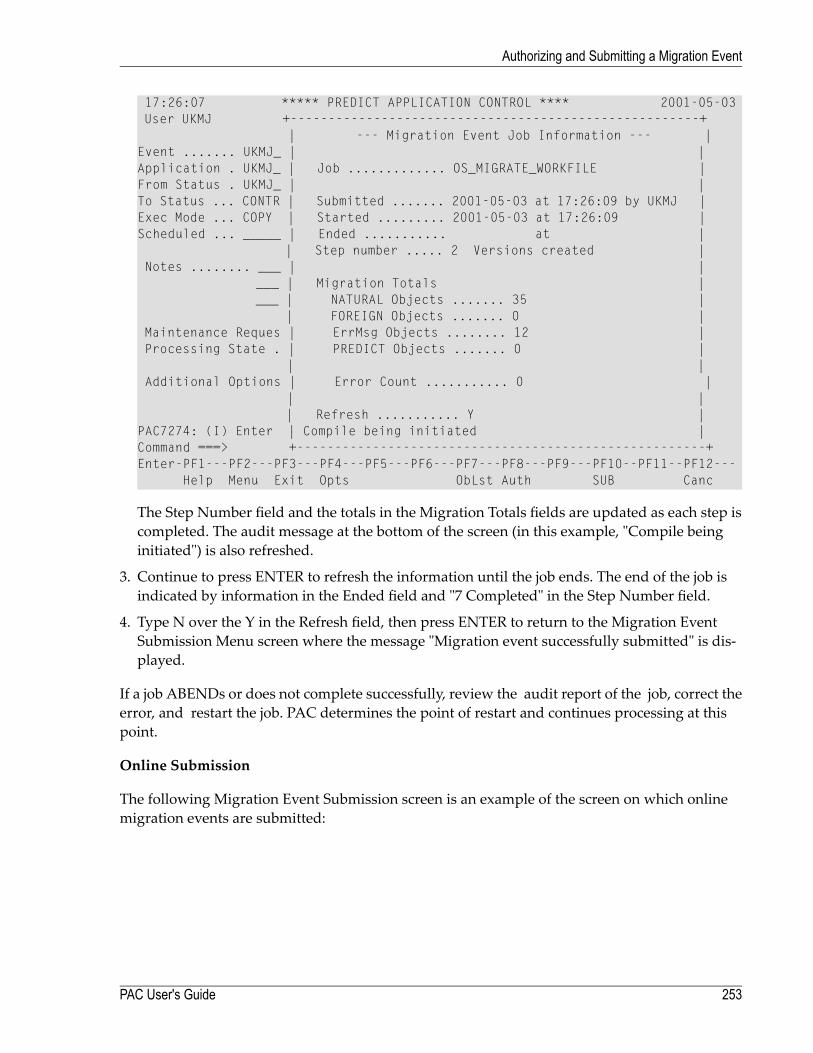
17:26:07 ***** PREDICT APPLICATION CONTROL **** 2001-05-03User UKMJ +------------------------------------------------------+
| --- Migration Event Job Information --- |Event ....... UKMJ_ | |Application . UKMJ_ | Job ............. OS_MIGRATE_WORKFILE |From Status . UKMJ_ | |To Status ... CONTR | Submitted ....... 2001-05-03 at 17:26:09 by UKMJ |Exec Mode ... COPY | Started ......... 2001-05-03 at 17:26:09 |Scheduled ... _____ | Ended ........... at |
| Step number ..... 2 Versions created |Notes ........ ___ | |
___ | Migration Totals |___ | NATURAL Objects ....... 35 |
| FOREIGN Objects ....... 0 |Maintenance Reques | ErrMsg Objects ........ 12 |Processing State . | PREDICT Objects ....... 0 |
| |Additional Options | Error Count ........... 0 |
| || Refresh ........... Y |
PAC7274: (I) Enter | Compile being initiated |Command ===> +------------------------------------------------------+Enter-PF1---PF2---PF3---PF4---PF5---PF6---PF7---PF8---PF9---PF10--PF11--PF12---
Help Menu Exit Opts ObLst Auth SUB Canc
The Step Number field and the totals in the Migration Totals fields are updated as each step iscompleted. The audit message at the bottom of the screen (in this example, "Compile beinginitiated") is also refreshed.
3. Continue to press ENTER to refresh the information until the job ends. The end of the job isindicated by information in the Ended field and "7 Completed" in the Step Number field.
4. Type N over the Y in the Refresh field, then press ENTER to return to the Migration EventSubmission Menu screen where the message "Migration event successfully submitted" is dis-played.
If a job ABENDs or does not complete successfully, review the audit report of the job, correct theerror, and restart the job. PAC determines the point of restart and continues processing at thispoint.
Online Submission
The following Migration Event Submission screen is an example of the screen on which onlinemigration events are submitted:
253PAC User's Guide
Authorizing and Submitting a Migration Event
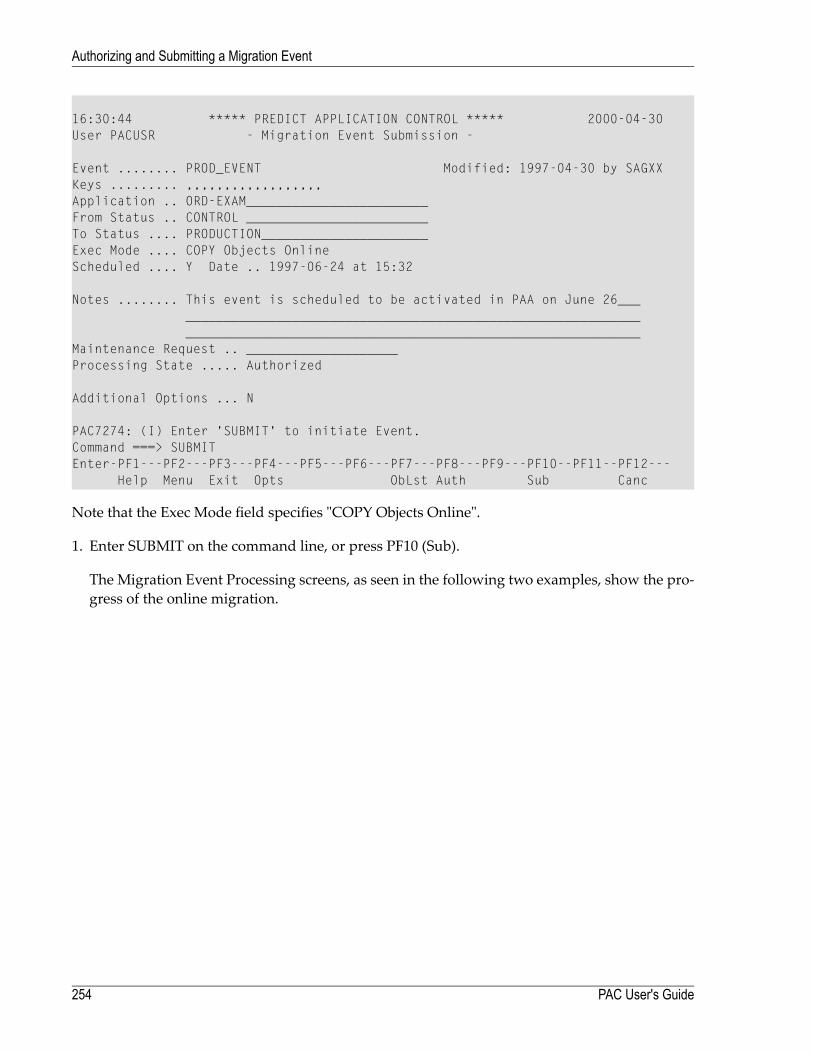
16:30:44 ***** PREDICT APPLICATION CONTROL ***** 2000-04-30User PACUSR - Migration Event Submission -
Event ........ PROD_EVENT Modified: 1997-04-30 by SAGXXKeys ......... ,,,,,,,,,,,,,,,,,,Application .. ORD-EXAM________________________From Status .. CONTROL ________________________To Status .... PRODUCTION______________________Exec Mode .... COPY Objects OnlineScheduled .... Y Date .. 1997-06-24 at 15:32
Notes ........ This event is scheduled to be activated in PAA on June 26___________________________________________________________________________________________________________________________
Maintenance Request .. ____________________Processing State ..... Authorized
Additional Options ... N
PAC7274: (I) Enter 'SUBMIT' to initiate Event.Command ===> SUBMITEnter-PF1---PF2---PF3---PF4---PF5---PF6---PF7---PF8---PF9---PF10--PF11--PF12---
Help Menu Exit Opts ObLst Auth Sub Canc
Note that the Exec Mode field specifies "COPY Objects Online".
1. Enter SUBMIT on the command line, or press PF10 (Sub).
The Migration Event Processing screens, as seen in the following two examples, show the pro-gress of the online migration.
PAC User's Guide254
Authorizing and Submitting a Migration Event
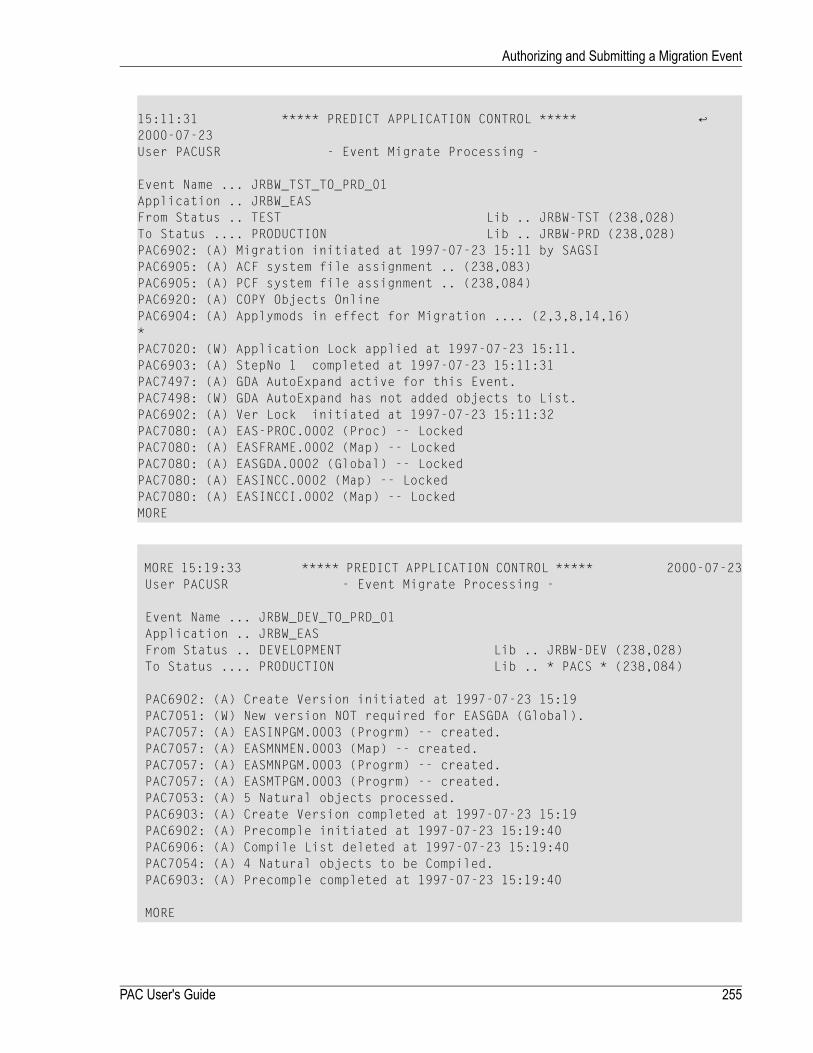
15:11:31 ***** PREDICT APPLICATION CONTROL ***** ↩2000-07-23User PACUSR - Event Migrate Processing -
Event Name ... JRBW_TST_TO_PRD_01Application .. JRBW_EASFrom Status .. TEST Lib .. JRBW-TST (238,028)To Status .... PRODUCTION Lib .. JRBW-PRD (238,028)PAC6902: (A) Migration initiated at 1997-07-23 15:11 by SAGSIPAC6905: (A) ACF system file assignment .. (238,083)PAC6905: (A) PCF system file assignment .. (238,084)PAC6920: (A) COPY Objects OnlinePAC6904: (A) Applymods in effect for Migration .... (2,3,8,14,16)*PAC7020: (W) Application Lock applied at 1997-07-23 15:11.PAC6903: (A) StepNo 1 completed at 1997-07-23 15:11:31PAC7497: (A) GDA AutoExpand active for this Event.PAC7498: (W) GDA AutoExpand has not added objects to List.PAC6902: (A) Ver Lock initiated at 1997-07-23 15:11:32PAC7080: (A) EAS-PROC.0002 (Proc) -- LockedPAC7080: (A) EASFRAME.0002 (Map) -- LockedPAC7080: (A) EASGDA.0002 (Global) -- LockedPAC7080: (A) EASINCC.0002 (Map) -- LockedPAC7080: (A) EASINCCI.0002 (Map) -- LockedMORE
MORE 15:19:33 ***** PREDICT APPLICATION CONTROL ***** 2000-07-23User PACUSR - Event Migrate Processing -
Event Name ... JRBW_DEV_TO_PRD_01Application .. JRBW_EASFrom Status .. DEVELOPMENT Lib .. JRBW-DEV (238,028)To Status .... PRODUCTION Lib .. * PACS * (238,084)
PAC6902: (A) Create Version initiated at 1997-07-23 15:19PAC7051: (W) New version NOT required for EASGDA (Global).PAC7057: (A) EASINPGM.0003 (Progrm) -- created.PAC7057: (A) EASMNMEN.0003 (Map) -- created.PAC7057: (A) EASMNPGM.0003 (Progrm) -- created.PAC7057: (A) EASMTPGM.0003 (Progrm) -- created.PAC7053: (A) 5 Natural objects processed.PAC6903: (A) Create Version completed at 1997-07-23 15:19PAC6902: (A) Precomple initiated at 1997-07-23 15:19:40PAC6906: (A) Compile List deleted at 1997-07-23 15:19:40PAC7054: (A) 4 Natural objects to be Compiled.PAC6903: (A) Precomple completed at 1997-07-23 15:19:40
MORE
255PAC User's Guide
Authorizing and Submitting a Migration Event
2. When the migration event has completed processing, press ENTER to return to the DisplayEvent screen.
If a job ABENDs or does not complete successfully, review the audit report of the job, correctthe error, and restart the job. It is possible to restart a job (PAC determines the point of restartand continues processing at this point); or rerun the job from the beginning after the job hasbeen backed out and then refreshed.
Backing Out an Incomplete Migration Event
Once a migration event has been started, the application is locked and no other event for this ap-plication can proceed until the first migration event has been completed and unlocked.
If a migration event cannot be completed (for example, the database from which it is reading be-comes inactive), then it may be backed out (aborted). This action will reverse any changes made,and will update the migration event itself with a step of "8" (migration event backed out).
The following methods can be used to access locked data:
■ The UNLOCK command accesses a list of migration events that a user is authorized (in the userprofile) to unlock;
■ The PAC administrator may invoke the "Release Locked Data" function.
Note that at Step 6, no backout/release is possible.
Migration Event Audit Report
An audit report is created when a migration event is being processed. The report gives a detailedlisting of all actions that take place and any errors that occur in the form of PAC messages.
The audit report allows you to view information about amigration event from the time processingstarts to the time it is completed/backed out/purged. Audit reports provide information about thestatus ofmigration events and the validity (occurrences and actions performed) of PACmigrations.
When the event is submitted, the resulting audit reportmay also be viewed as part of a batch report.The information in the audit report for the batch job may contain additional statistics or otheraudit information.
For example, during the compile process, the batch report provides a complete listing of all objectsincluded in the compile; the audit report, on the other hand, retains information only about thoseobjects that did not compile successfully.
PAC User's Guide256
Authorizing and Submitting a Migration Event
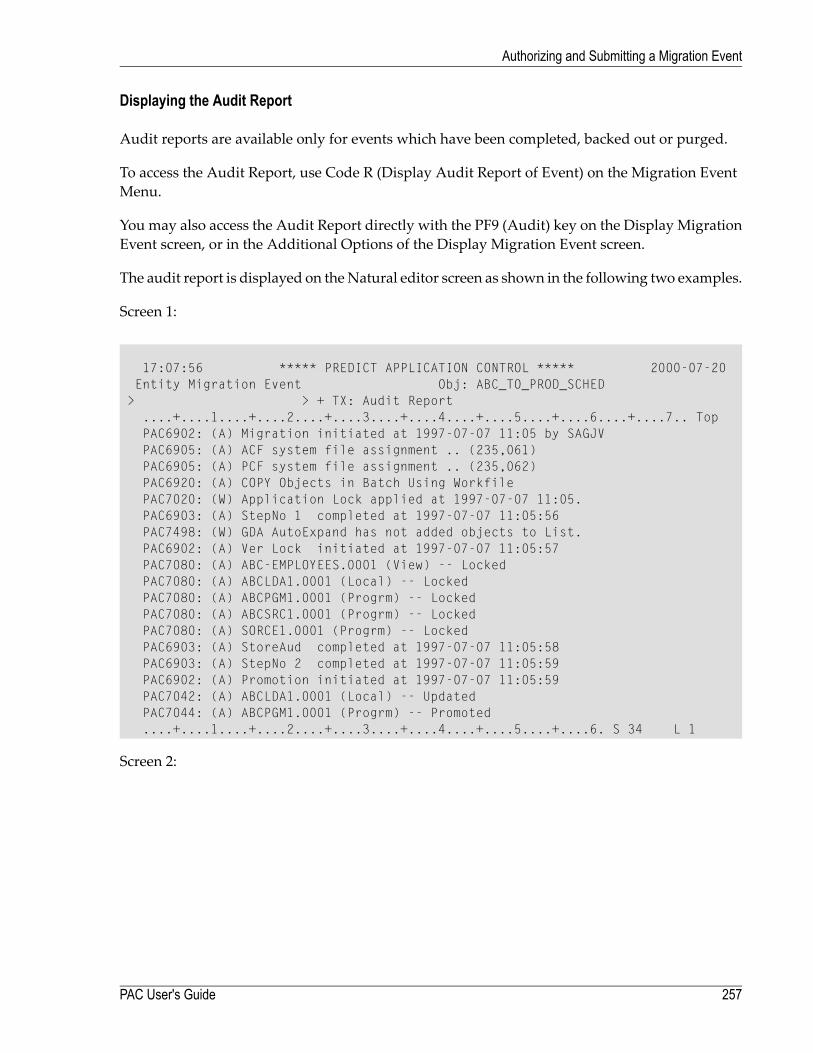
Displaying the Audit Report
Audit reports are available only for events which have been completed, backed out or purged.
To access the Audit Report, use Code R (Display Audit Report of Event) on the Migration EventMenu.
You may also access the Audit Report directly with the PF9 (Audit) key on the Display MigrationEvent screen, or in the Additional Options of the Display Migration Event screen.
The audit report is displayed on theNatural editor screen as shown in the following two examples.
Screen 1:
17:07:56 ***** PREDICT APPLICATION CONTROL ***** 2000-07-20Entity Migration Event Obj: ABC_TO_PROD_SCHED
> > + TX: Audit Report....+....1....+....2....+....3....+....4....+....5....+....6....+....7.. TopPAC6902: (A) Migration initiated at 1997-07-07 11:05 by SAGJVPAC6905: (A) ACF system file assignment .. (235,061)PAC6905: (A) PCF system file assignment .. (235,062)PAC6920: (A) COPY Objects in Batch Using WorkfilePAC7020: (W) Application Lock applied at 1997-07-07 11:05.PAC6903: (A) StepNo 1 completed at 1997-07-07 11:05:56PAC7498: (W) GDA AutoExpand has not added objects to List.PAC6902: (A) Ver Lock initiated at 1997-07-07 11:05:57PAC7080: (A) ABC-EMPLOYEES.0001 (View) -- LockedPAC7080: (A) ABCLDA1.0001 (Local) -- LockedPAC7080: (A) ABCPGM1.0001 (Progrm) -- LockedPAC7080: (A) ABCSRC1.0001 (Progrm) -- LockedPAC7080: (A) SORCE1.0001 (Progrm) -- LockedPAC6903: (A) StoreAud completed at 1997-07-07 11:05:58PAC6903: (A) StepNo 2 completed at 1997-07-07 11:05:59PAC6902: (A) Promotion initiated at 1997-07-07 11:05:59PAC7042: (A) ABCLDA1.0001 (Local) -- UpdatedPAC7044: (A) ABCPGM1.0001 (Progrm) -- Promoted....+....1....+....2....+....3....+....4....+....5....+....6. S 34 L 1
Screen 2:
257PAC User's Guide
Authorizing and Submitting a Migration Event
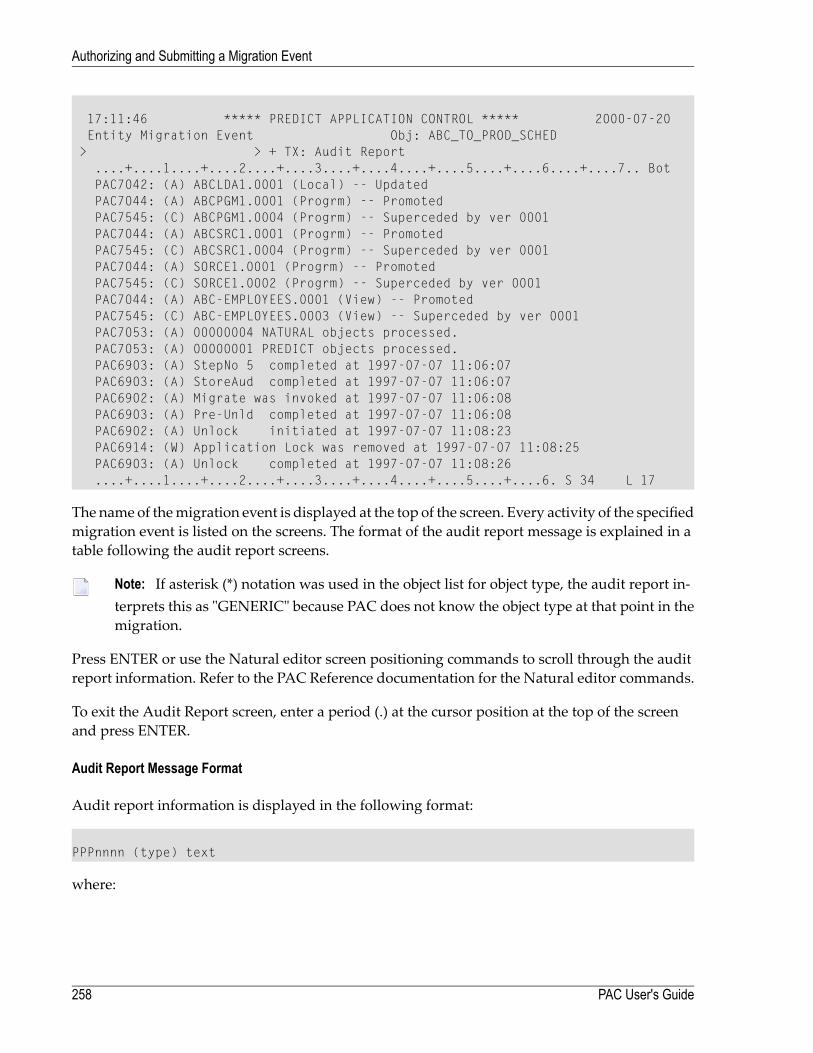
17:11:46 ***** PREDICT APPLICATION CONTROL ***** 2000-07-20Entity Migration Event Obj: ABC_TO_PROD_SCHED
> > + TX: Audit Report....+....1....+....2....+....3....+....4....+....5....+....6....+....7.. BotPAC7042: (A) ABCLDA1.0001 (Local) -- UpdatedPAC7044: (A) ABCPGM1.0001 (Progrm) -- PromotedPAC7545: (C) ABCPGM1.0004 (Progrm) -- Superceded by ver 0001PAC7044: (A) ABCSRC1.0001 (Progrm) -- PromotedPAC7545: (C) ABCSRC1.0004 (Progrm) -- Superceded by ver 0001PAC7044: (A) SORCE1.0001 (Progrm) -- PromotedPAC7545: (C) SORCE1.0002 (Progrm) -- Superceded by ver 0001PAC7044: (A) ABC-EMPLOYEES.0001 (View) -- PromotedPAC7545: (C) ABC-EMPLOYEES.0003 (View) -- Superceded by ver 0001PAC7053: (A) 00000004 NATURAL objects processed.PAC7053: (A) 00000001 PREDICT objects processed.PAC6903: (A) StepNo 5 completed at 1997-07-07 11:06:07PAC6903: (A) StoreAud completed at 1997-07-07 11:06:07PAC6902: (A) Migrate was invoked at 1997-07-07 11:06:08PAC6903: (A) Pre-Unld completed at 1997-07-07 11:06:08PAC6902: (A) Unlock initiated at 1997-07-07 11:08:23PAC6914: (W) Application Lock was removed at 1997-07-07 11:08:25PAC6903: (A) Unlock completed at 1997-07-07 11:08:26....+....1....+....2....+....3....+....4....+....5....+....6. S 34 L 17
The name of themigration event is displayed at the top of the screen. Every activity of the specifiedmigration event is listed on the screens. The format of the audit report message is explained in atable following the audit report screens.
Note: If asterisk (*) notation was used in the object list for object type, the audit report in-terprets this as "GENERIC" because PAC does not know the object type at that point in themigration.
Press ENTER or use the Natural editor screen positioning commands to scroll through the auditreport information. Refer to the PAC Reference documentation for the Natural editor commands.
To exit the Audit Report screen, enter a period (.) at the cursor position at the top of the screenand press ENTER.
Audit Report Message Format
Audit report information is displayed in the following format:
PPPnnnn (type) text
where:
PAC User's Guide258
Authorizing and Submitting a Migration Event
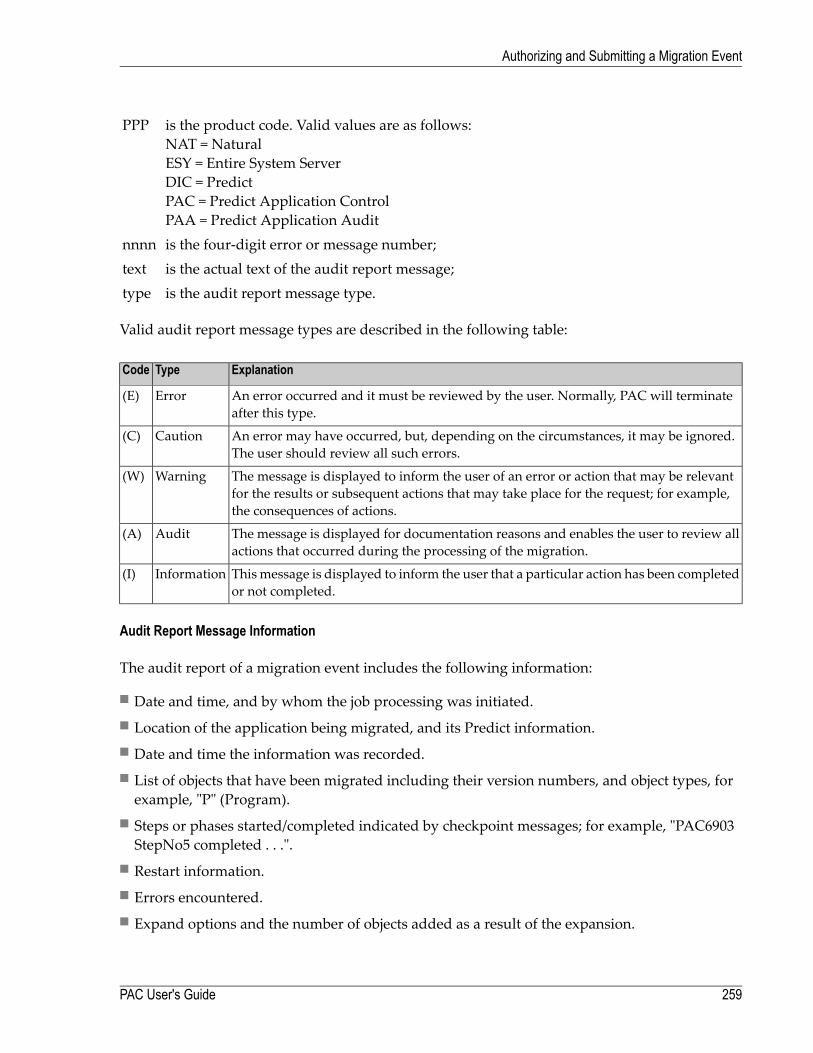
is the product code. Valid values are as follows:NAT = NaturalESY = Entire System ServerDIC = PredictPAC = Predict Application ControlPAA = Predict Application Audit
PPP
is the four-digit error or message number;nnnnis the actual text of the audit report message;textis the audit report message type.type
Valid audit report message types are described in the following table:
ExplanationTypeCode
An error occurred and it must be reviewed by the user. Normally, PAC will terminateafter this type.
Error(E)
An error may have occurred, but, depending on the circumstances, it may be ignored.The user should review all such errors.
Caution(C)
The message is displayed to inform the user of an error or action that may be relevantfor the results or subsequent actions that may take place for the request; for example,the consequences of actions.
Warning(W)
The message is displayed for documentation reasons and enables the user to review allactions that occurred during the processing of the migration.
Audit(A)
This message is displayed to inform the user that a particular action has been completedor not completed.
Information(I)
Audit Report Message Information
The audit report of a migration event includes the following information:
■ Date and time, and by whom the job processing was initiated.■ Location of the application being migrated, and its Predict information.■ Date and time the information was recorded.■ List of objects that have been migrated including their version numbers, and object types, forexample, "P" (Program).
■ Steps or phases started/completed indicated by checkpoint messages; for example, "PAC6903StepNo5 completed . . .".
■ Restart information.■ Errors encountered.■ Expand options and the number of objects added as a result of the expansion.
259PAC User's Guide
Authorizing and Submitting a Migration Event
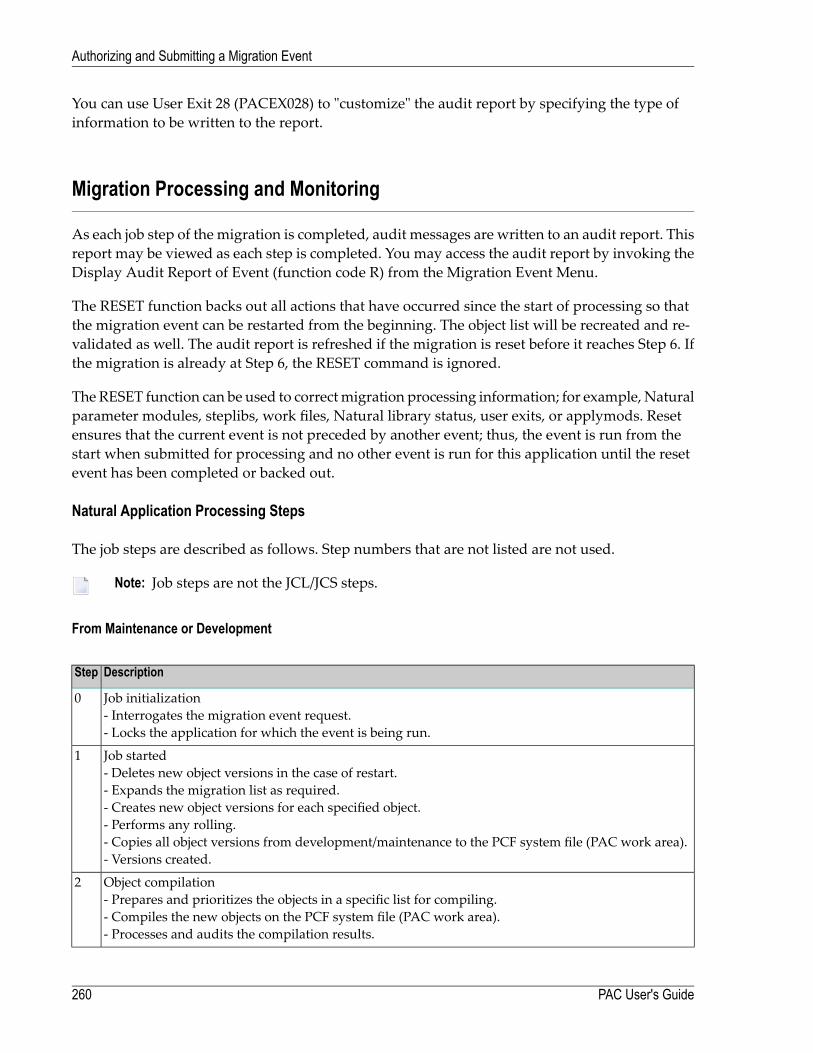
You can use User Exit 28 (PACEX028) to "customize" the audit report by specifying the type ofinformation to be written to the report.
Migration Processing and Monitoring
As each job step of the migration is completed, audit messages are written to an audit report. Thisreport may be viewed as each step is completed. You may access the audit report by invoking theDisplay Audit Report of Event (function code R) from the Migration Event Menu.
The RESET function backs out all actions that have occurred since the start of processing so thatthe migration event can be restarted from the beginning. The object list will be recreated and re-validated as well. The audit report is refreshed if the migration is reset before it reaches Step 6. Ifthe migration is already at Step 6, the RESET command is ignored.
The RESET function can be used to correctmigration processing information; for example, Naturalparameter modules, steplibs, work files, Natural library status, user exits, or applymods. Resetensures that the current event is not preceded by another event; thus, the event is run from thestart when submitted for processing and no other event is run for this application until the resetevent has been completed or backed out.
Natural Application Processing Steps
The job steps are described as follows. Step numbers that are not listed are not used.
Note: Job steps are not the JCL/JCS steps.
From Maintenance or Development
DescriptionStep
Job initialization- Interrogates the migration event request.- Locks the application for which the event is being run.
0
Job started- Deletes new object versions in the case of restart.- Expands the migration list as required.- Creates new object versions for each specified object.- Performs any rolling.- Copies all object versions from development/maintenance to the PCF system file (PAC work area).- Versions created.
1
Object compilation- Prepares and prioritizes the objects in a specific list for compiling.- Compiles the new objects on the PCF system file (PAC work area).- Processes and audits the compilation results.
2
PAC User's Guide260
Authorizing and Submitting a Migration Event

DescriptionStep
Compile check point- Captures Natural CATALL report and audit results.- Promotes the object to the new status, unless the new status is Control or Retire.
4
Versions copied Versions all objects as cross-reference data by copying them to the ACF system file.5
Object unload/load- Unloads the objects to be migrated.- Loads the objects into the destination location (To Status).
6
Application unlocked- Unlocks the application and any of the "held" objects.- Job completed. Prints an audit report.
7
If the Move option is in effect, the saved objects are removed/deleted from the origin status.
Note: If the job is backed out before Step 6, the object versions are deleted. The objectsthemselves are left intact regardless of the Move or Copy options.
To Maintenance or Development
DescriptionStep
Job initialization- Interrogates the migration event request.- Locks the application for which the event is being run.
0
Expands the object list as required. If maintenance or development, verifies the Replace option foreach object.
1
Copies each specific object version to the target location.2
Creates a notification checkpoint if the destination status (To Status) is maintenance.3
Promotes the objects to the new status.5
Unlocks the application and any of the "held" objects. Job completed. Prints an audit report.7
From Control, To or From Test or Production
DescriptionStep
Job initialization- Interrogates the migration event request.- Locks the application for which the event is being run.
0
Expands the object list as required.1
Determines the correct object versions to be processed.2
Promotes the object to the new status, unless the new status is Control or development.4
Unloads the object to be migrated. Loads the objects into the destination status (To Status).6
Unlocks the application and any of the "held" objects. Job completed. Prints an audit report.7
261PAC User's Guide
Authorizing and Submitting a Migration Event
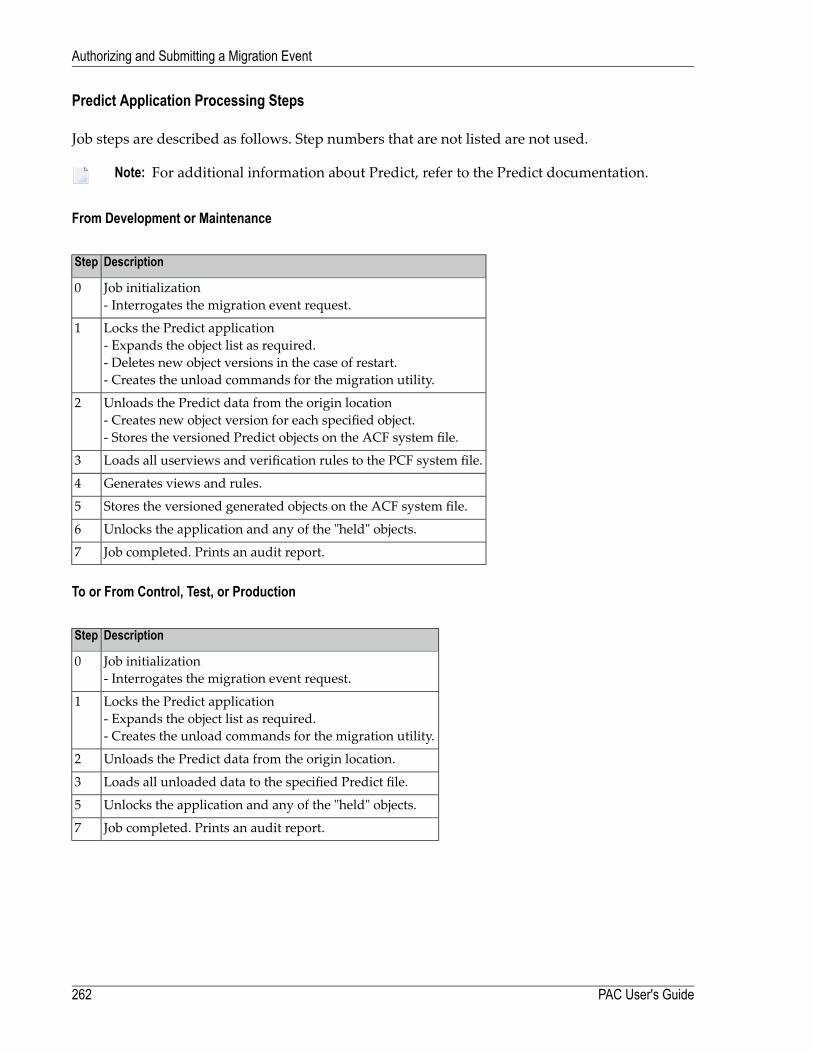
Predict Application Processing Steps
Job steps are described as follows. Step numbers that are not listed are not used.
Note: For additional information about Predict, refer to the Predict documentation.
From Development or Maintenance
DescriptionStep
Job initialization- Interrogates the migration event request.
0
Locks the Predict application- Expands the object list as required.- Deletes new object versions in the case of restart.- Creates the unload commands for the migration utility.
1
Unloads the Predict data from the origin location- Creates new object version for each specified object.- Stores the versioned Predict objects on the ACF system file.
2
Loads all userviews and verification rules to the PCF system file.3
Generates views and rules.4
Stores the versioned generated objects on the ACF system file.5
Unlocks the application and any of the "held" objects.6
Job completed. Prints an audit report.7
To or From Control, Test, or Production
DescriptionStep
Job initialization- Interrogates the migration event request.
0
Locks the Predict application- Expands the object list as required.- Creates the unload commands for the migration utility.
1
Unloads the Predict data from the origin location.2
Loads all unloaded data to the specified Predict file.3
Unlocks the application and any of the "held" objects.5
Job completed. Prints an audit report.7
PAC User's Guide262
Authorizing and Submitting a Migration Event
18 Migrations Into, Within, and Out of PAC
Once the required Predict objects have been migrated into PAC, you can load the Natural applic-ation and its subordinates including foreign subordinates, if any.
■ Incorporating Existing Applications■ Migrations from Development or Maintenance■ Migrations to Development or Maintenance■ Migrations from External■ Migrations from Neighbour■ Migrations from Control to Control : Alignment■ Migrations Between Control, Test, and Production■ Migrations to and from the Archive■ Migrations to Retire Status■ Open Systems Support and Migrations
263

264
19 Incorporating Existing Applications
■ Incorporation Options ..................................................................................................................... 267■ Incorporation Paths ........................................................................................................................ 267■ Incorporation Object List ................................................................................................................. 268■ Authorizing and Submitting an Incorporation Event ............................................................................... 268
265
Applications and objects may be incorporated into PAC without being compiled or recompiled.Incorporation allows you to place under PAC control applications or objects that exist in catalogform only.
The PAC incorporation facility is used for migrations from environments where development ormaintenance is performed to Control, or to a test or production status type.
Once an application has been linked to an incorporate status type, the entire application or justselected objects can be incorporated into PAC. PAA treats objects incorporated into a productionstatus type like any other objects.
Saved, cataloged, and cross-reference (Xref) objects can be incorporated in the following combin-ations:
SavedCatalogedSaved/catalogedCataloged + XrefSaved/cataloged + Xref
Xref data is optional, but must be accompanied by the corresponding cataloged object; otherwise,it will be rejected.
An object may be incorporated only if a previous version of the object was not compiled in PAC.PAC does not allow an object previously migrated into PAC from a development or maintenancestatus type to be incorporated, because incorporation could affect the integrity of not only theobject itself, but related objects and even the entire application. Since objects are not compiledwhen they are incorporated into PAC, PAC has no way of synchronizing and controlling subor-dinate and other objects that may be used by the incorporated object.
There is no restriction on the number of times an object can be incorporated into PAC; however,PAC always considers the cataloged object as "alien" because it was compiled outside the controlof PAC and its used and used-by objects and/or Xref data may be inconsistent.
With incorporated objects, certain interrelationshipsmay be lost; for example, object usage inform-ation established from the Xref data derived from the compile.
This chapter covers the following topics:
■ Incorporation Options■ Incorporation Paths■ Incorporation Object List■ Authorizing and Submitting an Incorporation Event
PAC User's Guide266
Incorporating Existing Applications
Incorporation Options
Objectsmay be incorporated online or in batch; theymay be incorporated froman externally createdwork file or not:
■ If the Include option is specified, objects are by definition incorporated in batch froman externallycreated work file. The work file must have been created using the Natural NATUNLD utility.
Note: Do not use a work file created by the Natural Transfer Utility, except when incor-porating Natural Open System objects.
■ Without a work file as input, object are incorporated directly. The process is the same as a mi-gration fromdevelopment, including setting up the object list; however, objects are not compiled.
If the Include option is specified, the INCORPORATE batch sample job is used. Step 1 of this jobshould assign Work File 1 (CMWKF01) to the external work file. The Include flag must be set inthe migration path definition or at the time the event is authorized.
If the incorporated objects are then to be migrated to another status and this migration uses anoutput work file (the work file option is set), an extra step, the TRNUNLD command, is neededto unload the necessary objects. Refer to Job Steps: BatchWithWork FileOption formore inform-ation.
If only an input and not an output work file is required (the Include option is specified but thework file option is not set), the JCL should be modified appropriately to exclude the TRNUNLDand the migration load step. Refer to Job Steps: Online or Batch Without Work File Option,Using Include Option for more information.
Incorporation Paths
Objects and applicationsmay be incorporated into PAC using previously definedmigration pathsfrom an incorporate status type to Control, a test status type, or a production status type.
If the origin and destination statuses have the same library, database and file number in their ap-plication status links, PAC treats the migration as a logical one and does not unload the objects.To ensure that the objects to be incorporated are unloaded, use a different Natural library nameor a different database or file number for the destination status.
If objects are incorporated from an external work file (the Include option is specified), the libraryselection is determined by the library name on the application status link. For example, if thedestination library is LIB01, then the library on the incorporation application status link shouldalso be LIB01.
267PAC User's Guide
Incorporating Existing Applications
Incorporation Object List
Natural views/DDMs that exist in catalog form external to PAC can be incorporated into PACwithout being regenerated, but only for the initial setup of Predict information in PAC. Becauseviews/DDMs are considered Natural objects, this is a Natural migration. For information aboutincorporating views/DDMs, refer toMigrating Predict Objects.
If objects are to be incorporated directly (that is, the Copy/Move option is specified indicating thata work file is not to be used as an input), then the object list for incorporation may be set up as formigrations from development, except that no views/DDMs or rules may be specified.
The EXP (Expand) command and special options of the SEL (Select) command use cross-reference(Xref) data from Predict for incorporations.
If objects are to be incorporated from an external work file (that is, the Include option is specified),then the object list must consist of a single entry only which indicates which objects of which typeare to be loaded. For example:
loads all program type objects.*,Ploads all maps with a name greater than "S".S>,M
Authorizing and Submitting an Incorporation Event
When the incorporation event is authorized and submitted:
1. PAC selects all objects identified by the object list entry from the library on the applicationstatus link.
2. Objects satisfying the selection criteria are assigned a unique version number and added to thePCF system file. The object may exist in saved and/or cataloged form.
3. Once loaded, PACbypasses the compile stage and processes the object like any other newobjectfrom a development status type.
4. The versioned object is stored on the ACF system file.
PAC User's Guide268
Incorporating Existing Applications
20 Migrations from Development or Maintenance
■ Compiling Natural Objects in PAC ..................................................................................................... 271■ Using the Rolling Facility ................................................................................................................. 272
269
Applications or objects can be migrated into PAC from a development or maintenance status toControl, or to a test or production status. Migrations from development or maintenance may beprocessed in batch or online.
SavedNatural objects are compiledunless the dynamic source option is specified.Natural commandprocessors are migrated "as is"; that is, they are not compiled during migration processing. Thesame applies to foreign datasets.
Not all objects will exist in catalog form; for example, copycode, text, macros, and recordings existonly in source form. Programs also may exist in source form if the PAC dynamic source option isin use.
For foreign objects, the existence of source and object code is predefined by the PAC administratorfor each class of object.
Views/DDMs and rules which are required during the compile of Natural objects must alreadyhave been defined to PAC in a previous Predict migration event. Only then are they used for thecompilation. They are treated as Natural objects and are identified with Natural object lists.
When migrating objects from development or maintenance status types, the Expand function isvalid only if the cross-reference data exists for the object on the Predict file specified for the applic-ation status link. The EXP (Expand) command and special options of the SEL (Select) commanduse cross-reference (Xref) data from Predict for migrations from development or maintenance.
If the Copy option is specified for the migration, a copy of the objects remains in development ormaintenance. If the Move option is specified, the objects are purged from the development ormaintenance status.
Batch migrations from development (but not maintenance) can include input from an externallycreated work file by setting the Include option (instead of Copy or Move) in the migration pathdefinition, or when the event is authorized. The work file can also be specified for CMWKF01 inthe TRNEVENT step of the migration job. Only saved objects are processed and all objects arecompiled as usual.
This chapter covers the following topics:
■ Compiling Natural Objects in PAC■ Using the Rolling Facility
PAC User's Guide270
Migrations from Development or Maintenance
Compiling Natural Objects in PAC
PAC invokes the standard Natural CATALL utility to compile objects; thus, the compile processis the samewhen using PAC as when using the CATALL utility alone. The CATALL utility residesin library SYSLIB on the Natural system file FNAT.
All or None Compile
PAC considers a migration event to be a "unit of work" requiring that all or none of the objects inthat unit bemigrated. By default, then, PAC terminates amigration event if even one of the objectsin the object list does not compile successfully. You can then correct the error and restart the mi-gration. A restart causes all objects to be recompiled. Parameters, views/DDMs, and rules mayalso be reestablished.
User Exit 6 and Applymod 14 are available to customize the compile process.
User Exit 6
User Exit 6 can be used to override the "unit of work" default. It is invoked when a compile erroroccurs but before themigration event is terminated. It provides information about the total numberof objects to be compiled and the total number of objects that did and did not compile. You canthen decide whether to
■ terminate the migration; then correct the error and restart the migration (the default); or■ migrate objects that compile now and then migrate other objects later after they have been cor-rected.
If you choose to migrate compiled objects now and uncompiled objects later, the source of theobject(s) that did not compile is stored in PAC (Control status) under a new object version. If theMove option is specified, the object is purged from the origin status.
You can then migrate the uncompiled source to development or maintenance, correct the error,and migrate it back into PAC as another new version.
271PAC User's Guide
Migrations from Development or Maintenance
Applymod 14
If you useUser Exit 6, you can then useApplymod 14 to ensure that an object that does not compileis not stored in PAC and a new version of the object is not created. Applymod 14 also ensures thatthe object will not be purged from the origin status, even if the Move option has been specified.
Natural Optimizer Compiler Error
If the MCG option is in effect, and the Natural Optimizer Compiler has not been linked to theNatural nucleus under which the migration is being processed, the object will still be compiled,but without the Natural Optimizer Compiler.
This error does not invoke User Exit 6 because the object does compile; however, the compiledcode is not optimized.
Even though the object is processed normally, aNAT0893 error is returned and awarningmessageappears in the audit report of the event.
The MCG option can be overridden within the program itself; otherwise, the defaults specifiedon the PAC application definition are used.
View Security Restrictions Error
Compilation errorsmay occur due to violations of view security restrictions (for example, an attemptto update an "access only" file; or an attempt to read and/or update a "disallowed" file).
Using the Rolling Facility
Subordinate objects are those objects "used" when compiling another object. Subordinate objectsinclude maps, copycode, data areas, rules, and views. By default, PAC uses the current versionsof subordinate objects to compile new objects. However, because PAC represents applications indifferent phases of their life-cycles, it may be necessary to compile objects with specific earlierversions of subordinate objects.
The PAC rolling facility allows new versions of objects to be compiledwith specific earlier versionsof subordinate objects. Rolling can occur only when objects are migrated into PAC from a devel-opment or maintenance status since only these migrations result in the compilation of migratedobjects.
The following subordinate objects may be rolled:
■ The source form of copycode and maps.■ The cataloged form of data areas (local, parameter, and global).■ Views and rules.
PAC User's Guide272
Migrations from Development or Maintenance
If other types of objects are specified for rolling, PAC ignores them.
Specifying Objects to be Rolled
You can specify a subordinate object for rolling by attaching a reference to the object list entry.This reference instructs PAC to temporarily roll out the current version of the subordinate objectand then roll in the older version of that same subordinate object.
When the migration is completed, the current version of the subordinate object is restored so thatit may be used again as the default subordinate for any new compiles.
The reference you attach to an object list entry must indicate either a specific version number ora specific status:
■ A specific version reference ensures that the correct object is rolled in, even if the object has beensuperseded. For example:
MAINGDA,G,0001
where the reference is a specific version number (0001).■ A status reference allows rolling to proceed without an exact version number. For example:
MAINCOPY,C,PRODUCTION
where the reference is to whatever version exists in a particular status (PRODUCTION).
While the version number method is a fixed definition and guarantees that the same version isalways used, the status reference is dynamic; that is, PAC determines at processing time whichversion is at the specified status and then rolls in that version.
Since migration events are serialized for this purpose, the references are always guaranteed; thisis important when versions of objects currently in a specific status are superseded. The referencemethod allows the same object list to be reused with subsequent migrations without the potentialfor loss of integrity.
Rolling Example
A typical example of the rolling procedure is presented below to demonstrate the need for and tofurther clarify the use of rolling.
1. The programmer develops Phase 1 of an application and migrates the objects into the PACcontrolled environment. One of the objects is a global data area (GDA).
2. The application (includingVersion 0001 of theGDA) is implemented into production as requiredfor use by the end user.
273PAC User's Guide
Migrations from Development or Maintenance

3. The programmer at a later point develops Phase 2 of an application and migrates the objectsinto the System-Test status in the PAC controlled environment where the project leader teststhe new phase. At this point, the GDA has been changed and recompiled; that is, Version 0002of the GDA is in the System-Test status, while Version 0001 of the GDA is in production.
4. The end user then encounters a bug in Phase 1 of the application in production and the program-mer subsequently discovers that a program that uses the GDA must be changed.
5. The programmer changes the program and when he creates the object list, he ensures that theGDA is also included, except that theGDAentry in the object list specifies a reference (Productionor 1 for Version 0001 of the GDA).
If the GDA reference is not specified in the object list, PAC recompiles the program with thecurrent version of the GDA (Version 0002 in this case) and a NAT0933 error is received whenthe program is migrated into production.
6. PAC processes the object list as follows:■ PAC recognizes the referenced GDA in the object list and rolls in that version of the GDA tothe PCF system file (the work area for compiling).
■ The compile is performed; PAC recognizes that the production version (in this case, Version0001) is to be used.
■ After the compile, the program ismigrated into production once again and theNAT0933 erroris not incurred because the program was compiled with the correct version of the GDA.
■ During the unlock step of the migration, the latest version of the GDA is then rolled back tothe PCF system file, ready for the next compile that may use the latest version of the GDAby default.
PAC User's Guide274
Migrations from Development or Maintenance
21 Migrations to Development or Maintenance
Saved and/or cataloged objects can be migrated out of PAC to development or maintenance fromControl, or a test or production status for the purpose of maintenance, ongoing development, orto access source code for the object outside the confines of PAC. Migrations to development ormaintenance may be processed in batch or online.
Only the Copy option is possible for migrations to development or maintenance from productionor Control; a copy of the objects must remain in Control and production. Both the Copy andMoveoptions are possible for migrations from a test status.
For migrations out of PAC, views/DDMs can be included on a list that comprises only Natural orboth Natural and foreign objects. If views are placed in the object list, these will be migrated tothe Predict file identified by the development or maintenance application status link definition.
An object status entry is created to audit the fact that the object is beingmigrated to amaintenancestatus; a change control log is created and updatedwith the check-out information, and optionallyverified by User Exit 7. SeeMaintaining Natural Objects in PAC for more information. No suchentry is created for a migration to a development status: PAC does not maintain change controlinformation for objects migrated to a development status.
Note: Currently, check-out to maintenance is not available for foreign objects.
If a maintenance request is defined for the migration event, then the objects are also added to themaintenance request Related Object Versions list.
275

276

22 Migrations from Neighbour
This type of migration facilitates the copying of objects between two PAC-defined Applications.
Migrations from this status type can only be to CONTROL and no other status type. During mi-grations in this category all connected objects are migarted, Source, Object and Xref if present. Ifonly source code or object code are present, then only they will be migrated. No compilation(CATALL) takes place during this type of migration. The objects are merely copied from one Ap-plications compartment to another one. As no compile takes place, PAC cannot build 'used' or'used-by' lists for these migrated objects.
Versioning does take place during these types of migrations, however, if during a migration PACencounters a like named object then the in-coming object will receive the next highest availableversion number for that object. For exapmle, if we were to migrate an object called 'PDA001' fromapplication_1 to application_2 and application_2 already had an object called 'PDA001' versionnumber (7), then the in-coming object would obtain a version number (8).
277

278
23 Migrations from External
Applications or objects can be migrated into PAC from an External status (i. e. the sources residein a repository under the control of an external version control software) to Control, or to a testor production status. Migrations from External may be processed in batch or online.
When new or changed Natural sources are transferred into a PAC controlled environment, atransfer event from External to Control status (or any other target status) must be created. Thiscan be done by specifying the fully qualified URL. When the transfer event is executed, thehandling is the same as with other migrations from a development status into a PAC controlledenvironment. PAC gets the source by means of a REQUEST DOCUMENT statement and writes it intothe PCF, compiles the sources in the PCF and creates a new version of the cataloged object in theACF. DDMs are written into the PCF. But instead of the source text the used URL is stored in theACF.
Before storing the source into the PCF, the line numbers and line number references will be recre-ated.
The Natural member name, the programming mode, the save date, the user and the code pageinformation will be extracted from the source text. This information is either inserted into thesource text by the Local Versioning plug-in or by Natural for Eclipse. If that information does notexist, default values will be used. The member type of the source file can only be derived from itsextension. Those URLs that do not allow to determine the member type will be rejected.
279

280

24 Migrations from Control to Control - Alignment
■ Creating the Object List .................................................................................................................. 282
281
Alignment is a special migration that forces Natural objects already under the control of PAC tobe recompiled in the Control status with the current version or a specific version of all referencedsubordinate objects. Alignment is used to ensure that all objects use the same version of a subor-dinate object at compile time. Alignment occurs when the Control status is specified as both theorigin status and the destination status; that is, Control to Control.
Subordinate objects are those objects "used" during the compile of another object. Subordinateobjects include maps, copycode, data areas, rules, and views.
By default, PAC uses the current versions of subordinate objects to compile new objects. However,because PAC represents applications in different phases of their life-cycles, it may be necessaryto recompile objects already under PAC control with current versions of subordinate objects.
For example, if a global data area (GDA) is changed and migrated into PAC, all objects that usethe GDA will need to be recompiled. If you use the alignment facility, there is no need to checkthe objects out to maintenance first.
At compile time, PAC recatalogs each object in the object list with the most recent version ofControl's subordinate object, or with the version specified by the version number or status refer-enced in the object list (see the information about "rolling"). The newly compiled object versionsbecome the current versions.
If a steplib is needed for the compile, this should be specified on the Control application statuslink.
Alignment migrations can be run online or in batch; a work file is not required.
The MIGRATE job is used to perform the alignment of object versions.
This chapter covers the following topic:
■ Creating the Object List
Creating the Object List
When creating the object list for an alignment migration event, subordinates that are not to be re-compiledmust have a "reference" (version or status) attached to their object list entries. If a subor-dinate has a reference, then rolling occurs:
■ the object is not recompiled with the current version of the subordinate objects; and■ a new version is not created for it.
If the subordinate has no reference, then it is recompiled.
PAC User's Guide282
Migrations from Control to Control - Alignment
The Expand option can be used to help ensure that all necessary objects are included in the objectlist.
Note: If status or version references are not specified, the current versions for all objects inthe list are used, including any objects added as a result of expand processing.
283PAC User's Guide
Migrations from Control to Control - Alignment

284
25 Migrations Between Control, Test, and Production
■ Migrations to Test or Production ........................................................................................................ 286■ Migrations to Production ................................................................................................................. 286■ Migrations to Test .......................................................................................................................... 286
285
This chapter covers the following topics:
Migrations to Test or Production
Cataloged objects can be migrated to a test or production status from Control status, a test status,or a production status. If support for dynamic source variables is required in the execution envir-onment, saved copy code, programs and maps are migrated as well. Foreign objects, whethersaved or cataloged, can also be migrated as part of the object list.
Rules, views/DDMs (except VSAM views which are required at execution time), local data areas,and parameter data areas are ignored unless Applymod 8 is active in your environment to forcethe migration of views and data areas during migration processing.
Migrations to test or production result in an object status entry being created for each object mi-grated. The migration may be processed in batch or online.
Migrations to Production
The production status is controlled by PAA; thus, there ismore processing required for verificationand consistency checking of themigration because PAAaudit information and superseded backupswill also be created.
Migrations to Test
Only the Copy option is possible for migrations to test from production or Control; a copy of theobjects must remain in Control and production. Both the Copy andMove options are possible formigrations to a test status from another test status.
PAC User's Guide286
Migrations Between Control, Test, and Production
26 Migrations to and from the Archive
■ Archiving Process .......................................................................................................................... 288■ Phase 1 ....................................................................................................................................... 289■ Restoring Objects Before Phase 2 .................................................................................................... 294■ Phase 2 : Removing the Object Versions from the PAC Environment ........................................................ 295■ Restoring Archived Objects to the PAC Environment ............................................................................. 296
287
Natural objects (source and cataloged form as well as Xref data), as well as foreign objects can bemigrated from theControl status to theArchive status, where they are stored off-line as a sequentialfile on a medium such as tape, cassette, or DASD.
Archiving allows you to manage your available storage space more effectively by removing re-dundant or historical objects from the PAC environment in a timely manner leaving only thecurrent and active object versions online in PAC.
Note: Objects in a production status type are current and cannot be archived because theymust be synchronized with PAA.
Archived objects are still under PAC control and can subsequently be restored to a Control, test,or production status using the archive reload facility.
Themaintenance of archive events is a PACadministrator function. Refer to the PACAdministrationdocumentation for more information.
Archived objects are not retired objects. A retired object has been physically removed either froma status or from PAC itself. An archived object can subsequently be retired. Refer to the sectionMigrations to Retire Status for more information.
Note: It is not yet possible to archive Predict objects.
This chapter covers the following topics:
Archiving Process
To preserve the integrity of the objects, the archiving process unloads objects into an archive filein two phases:
ActionPhaseThe archive file (dataset) is created. The archive event for Phase 2 is created and placed inan unloaded state. Since the objects are still physically in PAC until Phase 2 is performed,the objects' status is not updated; their status is still what it was before Phase 1.
1
Finalizes the archive event: The objects on the archive (output) file are verified and thenremoved from the PAC environment (ACF system file).
2
Note: Phase 2 can only be done by the PAC administrator.
PAC User's Guide288
Migrations to and from the Archive
Phase 1
This section covers the following topics:
■ Creating the Archive File■ Setting Up the Job■ Defining the Archive File■ Defining the Unload Migration Event■ Creating the Object List■ Archiving Objects in a Status Other Than Control■ Unload Migration Event Processing■ Unlocking the Migration Event■ Archive Event
Creating the Archive File
Phase 1 unloads the object version to the archive file as represented in the diagram below. Thesteps indicated in the diagram are described below:
ActionStepDefine the migration event from Control to Archive.1PACEX026 user exit archiving User Exit 26 archiving Select objects for the migration eventobject list. The list can be generated automatically or created manually. User Exit 26 can be
2
set up in your environment to provide the criteria for automatically selecting the objects tobe archived.Verify the object version selection. Specified statuses are checked and objects found arechecked first against the minimum current version, then against the minimum retentionperiod defined in the application defaults, and finally, against the status.
3
Authorize and submit the event. The archiving process unloads the objects to the archivefile and creates the archive event for Phase 2.
4
Unlock the migration event to complete Phase 1.5
Setting Up the Job
The archive migration event can be run only in batch with a work file. The JCL (ARCHIVE_UN-LOAD) is similar to the JCL for a Natural migration with a work file; however, the processingcontrol statements are different.
289PAC User's Guide
Migrations to and from the Archive
Defining the Archive File
You need to define the archive file where the application objects are to be stored.
When the job for themigration is set up,Work File 1 (CMWKF01) should be assigned to the archivefile or to an @ variable.
PAC provides the @ARC-DSN and @ARC-VOLSER substitution parameters for this purpose. Ifyou use these substitution parameters, you are prompted for the archive file name and any othervariables (for example, DISP) when the migration event is submitted. This information is storedin the archive event (Phase 2).
You may use use other substitution parameters; however, the migration event is automaticallyupdated only if you use the @ARC-DSN and @ARC-VOLSER parameters.
Do not use the MVS JCL or the CMS filedef option DISP=MOD for the disposition of the archivedataset; PAChas no facility for tracking datasets that have been concatenated using this parameter;thus, each archive file should be unique and independent of the others.
Note: For VM/CMS, the substitution parameters are @ARC-VMUSERID, @ARC-VADDR1,@ARC-FN, and @ARC-FT.
Defining the Unload Migration Event
Once the status Archive has been linked to the application whose objects are to be archived andamigration path between Control andArchive has been defined for the application, themigrationevent can be defined. The origin status of a migration event is Control; the destination status isArchive.
PAC User's Guide290
Migrations to and from the Archive
Creating the Object List
Saved, cataloged, and Xref objects that exist only in Control (that is, have been removed from allother statuses), can normally be migrated to the Archive status. These objects may be selected forunloading in the following combinations:
SavedCatalogedSaved/catalogedCataloged + XrefSaved/cataloged + Xref
PAC provides several options for creating the object list: you can generate the object list or createit by "manually" entering the objects in the Object List Editor.
You can use the PACObject List API (APINOBLS) to create or update an object listwithout loggingon to PAC.
291PAC User's Guide
Migrations to and from the Archive

Creating the List Manually
If you manually specify objects to be archived
■ a version number reference must be used to specify multiple versions of the same object.■ by default, the object version selected will be the oldest version for the object or the lowestavailable object version number.
■ range notation can be used. To select the oldest version of all the objects, enter *,*. (Note that *,*will not select all of the objects).
The SEL (Select) and EXP (Expand) command options can be used in the normal way to selectobjects for archiving.
Note: Because objects are validated after expansion, those objects added as a result of theexpansion may be rejected based on the application defaults for minimum current versionand minimum retention period, and status roles.
Creating the List Automatically
You can generate an object list automatically for a new migration event by
■ specifying a value P for the Generate List option when defining a migration event online; or■ issuing the ADD EVENT command either online or in batch, and specifying the value P in theGENTYPE field.
For an existing migration event, you can generate an object list automatically by issuing theGENLIST command with the value P for the GENTYPE keyword to generate a new or replace anexisting object list.
Retention Defaults
When generating a list of objects for archiving, the objects selected can be restricted by using theretention defaults defined in the application:
■ The minimum current versions specifies the minimum number of object versions to be retainedin PAC.
■ The minimum retention period specifies the number of days the object must have existed inPAC before it is eligible to be archived.
Theminimum retention period is verified only after PAC establishes theminimumcurrent versionsfor each object to be archived.
Once the objects have been validated against theminimum current versions and the current reten-tion period, PAC selects the object for archiving. The values are checked again during Phase 2 ofthe archiving process (finalization).
PAC User's Guide292
Migrations to and from the Archive
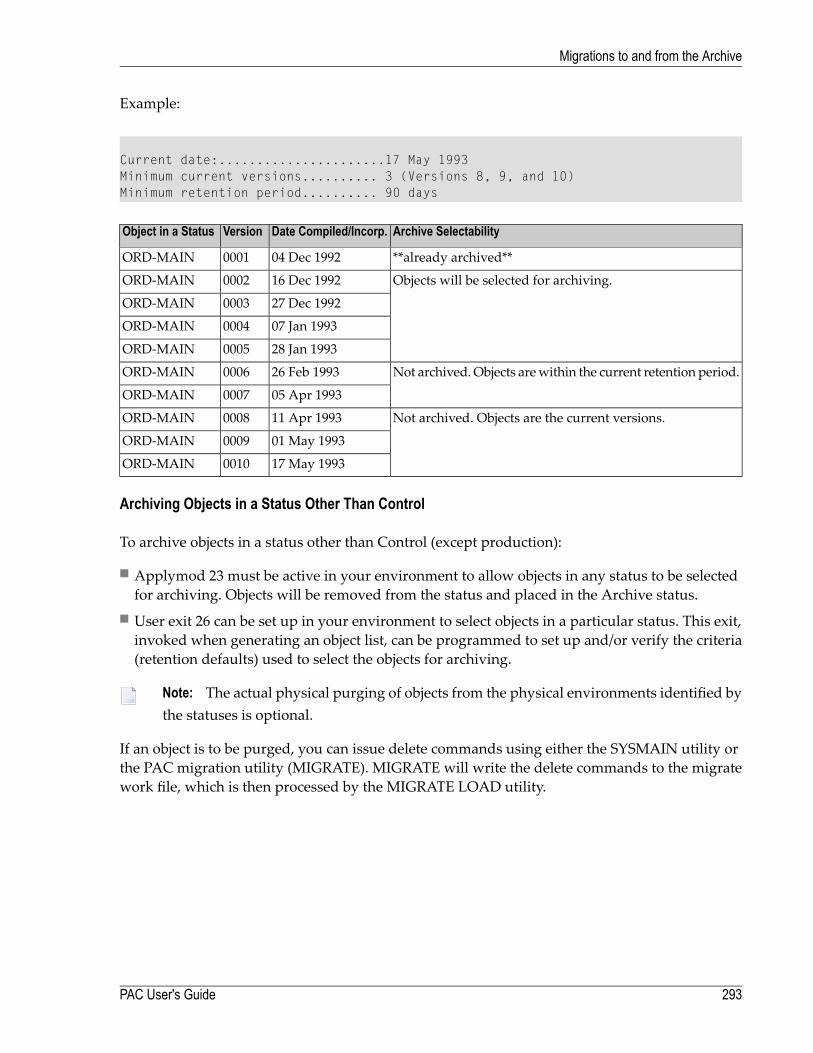
Example:
Current date:......................17 May 1993Minimum current versions.......... 3 (Versions 8, 9, and 10)Minimum retention period.......... 90 days
Archive SelectabilityDate Compiled/Incorp.VersionObject in a Status
**already archived**04 Dec 19920001ORD-MAIN
Objects will be selected for archiving.16 Dec 19920002ORD-MAIN
27 Dec 19920003ORD-MAIN
07 Jan 19930004ORD-MAIN
28 Jan 19930005ORD-MAIN
Not archived.Objects arewithin the current retention period.26 Feb 19930006ORD-MAIN
05 Apr 19930007ORD-MAIN
Not archived. Objects are the current versions.11 Apr 19930008ORD-MAIN
01 May 19930009ORD-MAIN
17 May 19930010ORD-MAIN
Archiving Objects in a Status Other Than Control
To archive objects in a status other than Control (except production):
■ Applymod 23 must be active in your environment to allow objects in any status to be selectedfor archiving. Objects will be removed from the status and placed in the Archive status.
■ User exit 26 can be set up in your environment to select objects in a particular status. This exit,invoked when generating an object list, can be programmed to set up and/or verify the criteria(retention defaults) used to select the objects for archiving.
Note: The actual physical purging of objects from the physical environments identified bythe statuses is optional.
If an object is to be purged, you can issue delete commands using either the SYSMAIN utility orthe PAC migration utility (MIGRATE). MIGRATE will write the delete commands to the migratework file, which is then processed by the MIGRATE LOAD utility.
293PAC User's Guide
Migrations to and from the Archive
Unload Migration Event Processing
When the migration event has been defined and the object list has been selected and validated,the event can be authorized and submitted.
If for any reason there is an abnormal termination during the unload, or a new or another copyof the archive file is required, you must run the unload step again. The unload step can be run asmany times as necessary before the event is finalized.
Unlocking the Migration Event
Phase 1 of the archiving process is complete when the migration event is unlocked. At this point,all objects have been migrated to the Archive status and unloaded to the archive dataset.
The resulting unloaded archive file can only be used as input to the PAC MIGLOAD utility. Themigrationmust be fromArchive to Control, a test, or a production status. The dataset is in a specialformat that can only be handled by PAC during an archive reload migration.
You can verify the successful completion of the archiving process by:
■ Reviewing the audit report for inconsistencies, cautions, or possible errors;■ Verifying the archive event and object list and updating it if necessary.
Archive Event
The archive event for use in Phase 2 is created using the information from the migration event(for example, object list and name of the archive file). The name of the archive event is taken fromthe migration event that created it.
The information contained in the archive event is used to audit the results of the archive. This in-formation is also used as input during the optional reloading of any or all of the archived objects.
The archive list (that is, an itemized list of every object, including type and version) correspondsto the objects unloaded to the archive file.
Restoring Objects Before Phase 2
It is possible to restore objects to the PAC environment once Phase 1 is completed and before Phase2 of the archiving process is started; that is, before the cataloged/saved object versions and cross-reference information of the object version(s) are removed from the PAC environment (ACF systemfile). You may restore the entire archive file or you may restore selected objects from the file.
PAC User's Guide294
Migrations to and from the Archive
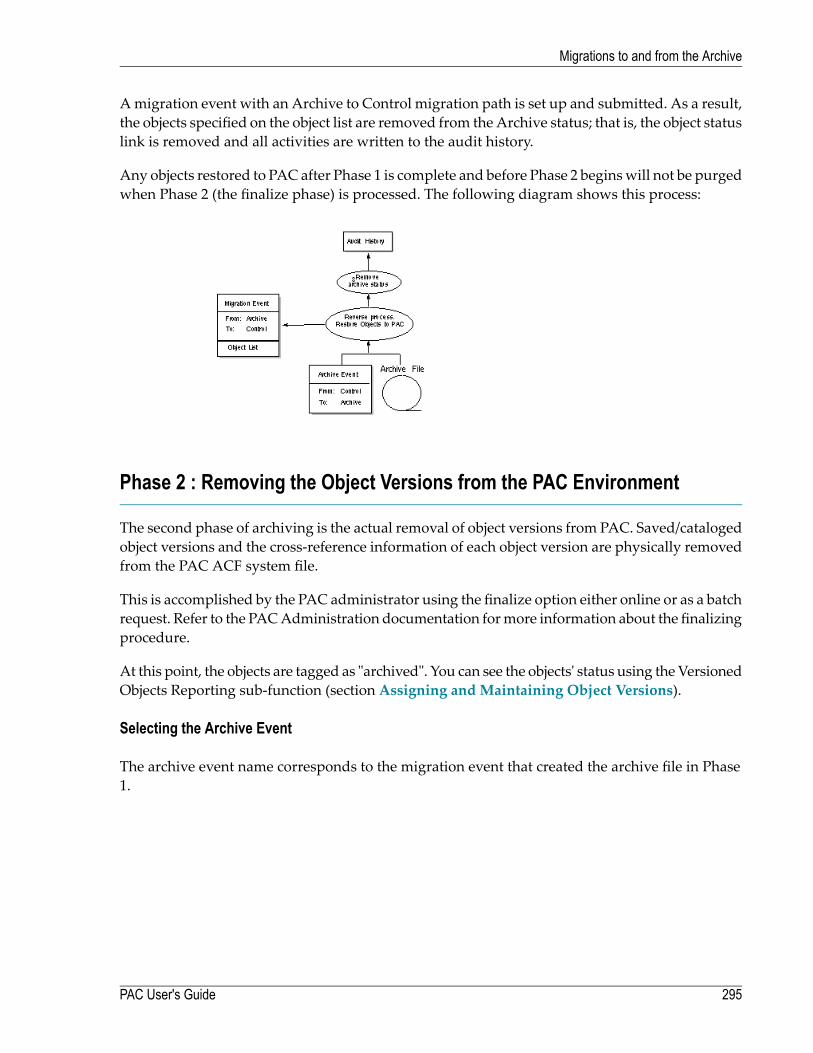
Amigration event with an Archive to Control migration path is set up and submitted. As a result,the objects specified on the object list are removed from the Archive status; that is, the object statuslink is removed and all activities are written to the audit history.
Any objects restored to PAC after Phase 1 is complete and before Phase 2 beginswill not be purgedwhen Phase 2 (the finalize phase) is processed. The following diagram shows this process:
Phase 2 : Removing the Object Versions from the PAC Environment
The second phase of archiving is the actual removal of object versions from PAC. Saved/catalogedobject versions and the cross-reference information of each object version are physically removedfrom the PAC ACF system file.
This is accomplished by the PAC administrator using the finalize option either online or as a batchrequest. Refer to the PACAdministration documentation formore information about the finalizingprocedure.
At this point, the objects are tagged as "archived". You can see the objects' status using the VersionedObjects Reporting sub-function (section Assigning and Maintaining Object Versions).
Selecting the Archive Event
The archive event name corresponds to the migration event that created the archive file in Phase1.
295PAC User's Guide
Migrations to and from the Archive
Finalizing the Archive Event
The finalize step can be run either in batch or online. PAC systematically deletes the saved, cata-loged, and cross-reference data for each object version in the archive object list.
The PAC references to the archived objects remain. The reference information retains the objectversion, date-time saved and cataloged (as applicable), original development directory, and any"Uses" information.
Once the actual deletion has started, deleted objects can be retrieved only by reloading the objectfrom the archive file; however, the archive eventmay be terminated to prevent any further deletionsof the objects.
If the archive event terminates abnormally, it can be restarted. The deletion process will restart atthe point where the event terminated.
The archive event is unlocked to complete the archiving of the specified objects.
Restoring Archived Objects to the PAC Environment
Archived objects can be restored (reloaded) to the PAC environment. Once an object has been re-stored to PAC, it can be used as if it had never been archived.
Reloading is accomplished by running amigration eventwhere the origin (From) status is Archiveand the destination (To) status is the Control status.
When objects are reloaded into PAC, the saved and/or cataloged object and cross-reference (Xref)information are restored in the Control status. These objects may then be immediately or sub-sequently migrated to test or production status types.
Reloading the Migration Event Definition
Only objects from a single archive file may be restored. The archive file created during the actualarchiving of the objectsmust be referenced by themigration event for reloading the archived objectsto PAC.
The archive event created when the objects were unloaded to the Archive status supplies the in-formation necessary to identify the archive file. If the archive event for an archived object has beenpurged from the system, it is not possible to restore any of the objects on the archive file.
The archive file information should be verified. If, for some reason, the file information has changed(for example, the dataset name has been changed or moved to a different volume), the archive filename, the volume serial number of the dataset, and notes may be updated.
PAC User's Guide296
Migrations to and from the Archive
The object list will be consistent with the objects unloaded. If the @ARC-DSN and @ARC-VOLSERsubstitution parameters were used in the job for the migration event that unloaded the objects,the file name and volume serial number will be updated automatically by PAC for the reload mi-gration event.
Note: For VM/CMS, the substitution parameters are @ARC-VMUSERID, @ARC-VADDR1,@ARC-FN, and @ARC-FT.
Archived objects which have been retired from the Archive status cannot be reloaded.
The object list for the reload migration event should specify only those objects to be restored:
■ The *,* notation can be used if all objects on the archive file are to be restored.■ The Generate List option can be used to create a list from the archive event; the list can bemodified. Objects can be deleted from the list but not added to it unless they were originallyarchived by the referenced event.
Reloading Migration Event Processing
The reload migration must be run in batch and must use a work file. The JCL is ARCHIVE_RE-LOAD.
When the job is submitted, the referenced archive event is determined or verified:
■ If the archive event was known (specified): PAC verifies that the archive event name specifiedon the event is the correct one for reload (that is, that it corresponds with the file specified inthe JCL).
Since it is possible to archive and reload an archived object many times, PAC does not requirethat the user always use the last archive file (with a specific object version) to restore the object.
■ If the archive eventwas not known (not specified), but the archive file is known: PACdeterminesthe correct archive event used to create the archive file during the initiation of the reload.
All objects on the object list for the reload migration event are loaded from the archive file intoPAC.
■ Any object on the object list that was not archived by themigration event that created the archivefile is ignored.
■ Any object that is no longer in a status of Archive is ignored, unless Applymod 3 is active.■ If the archive file was created using another PAC system, then all objects are rejected.
As a result of the reload migration, the saved, cataloged and cross-reference data are storedback on to the ACF system file.
■ The object status of "ARCHIVE" is removed; and■ The ARCHIVED flag on the object version is removed.
297PAC User's Guide
Migrations to and from the Archive

298
27 Migrations to Retire Status
■ Reserved Status Retire: Objects are purged from the Control or Archive statuses. ...................................... 300■ User Status Retire: Objects are purged from test, production or maintenance status types. ........................... 300■ Retire Facility Overview .................................................................................................................. 300■ User Status Retire ......................................................................................................................... 301■ Reserved Status Retire ................................................................................................................... 303■ Retire Event Processing .................................................................................................................. 304
299
The Retire facility is used to remove objects from an origin status identified by a migration path:either a PAC reserved status (Control or Archive) or a user-defined status.
This chapter covers the following topics:
Reserved Status Retire: Objects are purged from the Control or Archivestatuses.
When objects have been removed from all other statuses and exist only in Control or Archivestatus, they can be retired (purged) from PAC.
Retiring objects from the Control or Archive statuses results in the permanent physical removalof objects from PAC, including all information stored about the objects such as audit history.
■ Retiring objects from Archive purges the object and removes the object status definition.■ Retiring objects from Control purges both the objects and the object links to any other status.
User Status Retire: Objects are purged from test, production or maintenancestatus types.
Performing a "retire" from one of these user-defined statuses removes the saved and/or catalogedobject(s) from the physical location of the user. The object status reference of the specific objectversion in PAC is also removed, but the object(s) are not removed from PAC itself. The objectsstill exist in Control and in any other status to which they have been migrated.
Retiring objects from amaintenance status results in the cancellation of the corresponding changecontrol logs in addition to the removal of the object from the maintenance status. The changecontrol log is updated to indicate that maintenance has been "cancelled".
The Retire status type is a logical status.
Retire Facility Overview
The following diagram represents an overview of the Retire facility:
PAC User's Guide300
Migrations to Retire Status
User Status Retire
Objects are purged from test, production or maintenance status types as shown in the followingtwo diagrams:
This section covers the following topics:
■ From Test or Production
301PAC User's Guide
Migrations to Retire Status
■ From Maintenance
From Test or Production
When objects are retired from test or production statuses, the following occurs:
■ The object status is removed.■ The audit history is created.■ The objects in the physical location are purged.■ The objects remain in Control status at least; if only in Control, they are eligible to be archivedor permanently retired from the PAC environment.
■ Objects are not restricted by the defaults (minimumcurrent versions,minimum retention period)defined in the application defaults.
From Maintenance
When objects are retired from maintenance, the following occurs:
■ The object status is removed.■ The audit history is created.■ The objects in the physical location are purged.■ The objects remain in Control status at least; if only in Control, they are eligible to be archivedor permanently retired from the PAC environment.
■ Objects are not restricted by the defaults (minimumcurrent Archive versions,minimumarchiveretention period) defined in the application defaults.
■ The change control logs are cancelled; that is, the corresponding change control log is updatedwith the check-in information of "cancel" indicating that the object has been removed frommaintenance.
PAC User's Guide302
Migrations to Retire Status
Reserved Status Retire
Object versions in Control and object versions (saved, cataloged, and cross-reference data) in theArchive status that were purged by the PAC administrator in Phase 2 of archiving can be retired.
Retiring objects that exist only in the Control status or in the Archive status results in the total re-moval of all components of the objects from PAC.
■ For objects retired from Archive, this means that the object status is removed.■ For objects retired from Control, saved, cataloged, and cross-reference data, as well as all audithistory information, is purged as part of the retire process.
Objects are purged from Control or Archive statuses as shown in the following diagram:
This section covers the following topics:
■ Object Selection■ Retention Defaults Example
Object Selection
Objects to be retired are selected based on the retention defaults defined in the specified application.
FromControl, the retention defaults defined in the application restrict object selection by specifyingminimum current versions (the number of objects to be retained in PACbefore the object is eligiblefor "automatic" purging) and a minimum retention period (the number of days the object musthave existed in PAC before it is eligible to be purged). The minimum retention period is verifiedonly after PAC establishes the minimum current versions for each object to be retired.
The PAC administrator can override the retention defaults by establishing and activating user exit26.
From Archive, the retention defaults defined in the application restrict the object selection byspecifying minimum archive versions (the number of versions of archived objects to be retainedin PAC before the versions are eligible for "automatic" purging) and by specifying the archive re-tention period (the number of days the archived object version must have existed in PAC before
303PAC User's Guide
Migrations to Retire Status
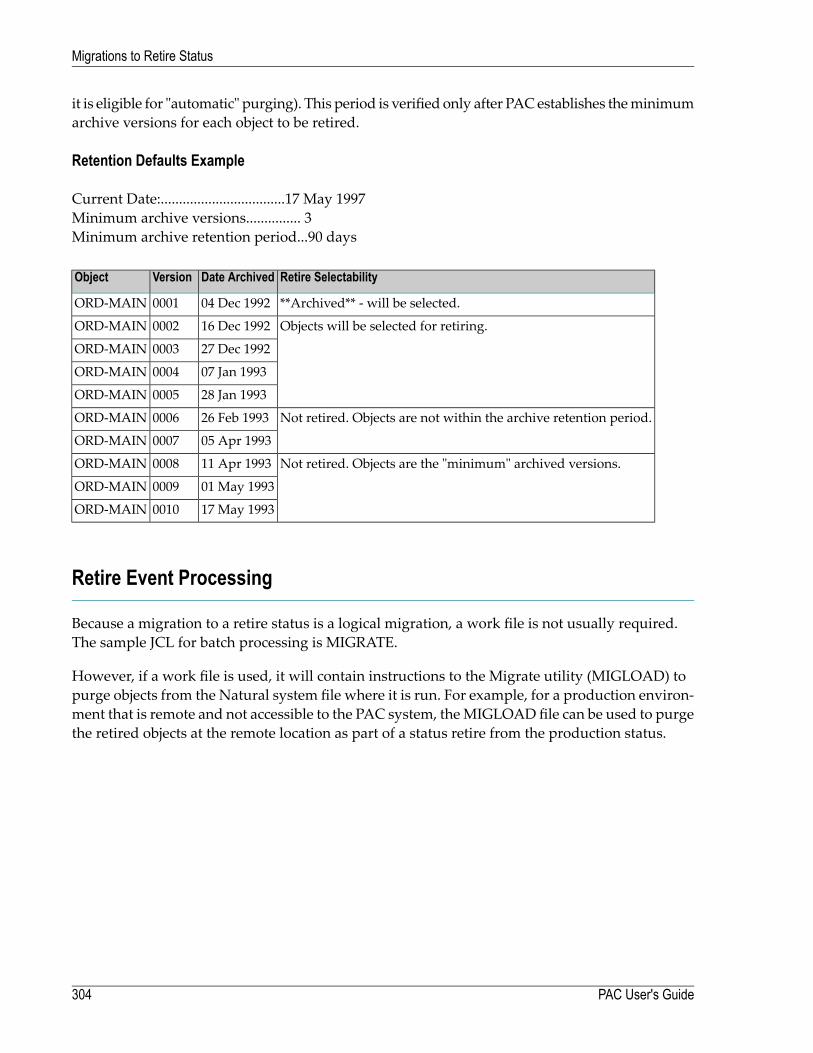
it is eligible for "automatic" purging). This period is verified only after PACestablishes theminimumarchive versions for each object to be retired.
Retention Defaults Example
Current Date:..................................17 May 1997Minimum archive versions............... 3Minimum archive retention period...90 days
Retire SelectabilityDate ArchivedVersionObject
**Archived** - will be selected.04 Dec 19920001ORD-MAIN
Objects will be selected for retiring.16 Dec 19920002ORD-MAIN
27 Dec 19920003ORD-MAIN
07 Jan 19930004ORD-MAIN
28 Jan 19930005ORD-MAIN
Not retired. Objects are not within the archive retention period.26 Feb 19930006ORD-MAIN
05 Apr 19930007ORD-MAIN
Not retired. Objects are the "minimum" archived versions.11 Apr 19930008ORD-MAIN
01 May 19930009ORD-MAIN
17 May 19930010ORD-MAIN
Retire Event Processing
Because a migration to a retire status is a logical migration, a work file is not usually required.The sample JCL for batch processing is MIGRATE.
However, if a work file is used, it will contain instructions to the Migrate utility (MIGLOAD) topurge objects from the Natural system file where it is run. For example, for a production environ-ment that is remote and not accessible to the PAC system, theMIGLOADfile can be used to purgethe retired objects at the remote location as part of a status retire from the production status.
PAC User's Guide304
Migrations to Retire Status
28 Open Systems Support and Migrations
■ Application Definition ...................................................................................................................... 306■ Status Definition ............................................................................................................................ 306■ Application Status Links .................................................................................................................. 306■ Migration Process In ....................................................................................................................... 307■ Migration Process Out .................................................................................................................... 308■ Object Handling ............................................................................................................................. 309
305
PAC is able to support the migration and versioning of objects that are developed under Naturalon the Open System platform. PAC uses the Natural Utility SYSTRANS to partially facilitate thisprocess.
This process is only able to accommodate source code coming from the Open System platform,Natural sourcesmay containOperating Systems specific code, thatwould be impossible to compile,thus the PAC compile process is ignored for these objectswithin the PACmainframe environment.Themajority of the migration process for these objects is similar to the Incorporation process usedfor other PAC recognized objects. The process is delivered as semi-automatic, with the need fora SYSTRANS created formatted workfile to be loaded onto the mainframe platform, in order forthe PAC migration event process to be executed.
This chapter covers the following topics:
Application Definition
An application to be used for this process would be defined as any other normal application oftype (NAT). This is fully documented in section 5 of this documentation.
Status Definition
Statuses to be used for this process need to be defined in a similar way as statuses for other applic-ations, with only a few exceptions. The status of type I (incorporation) has to be defined for thebase status, that of the initial entry status of the incoming objects. This status has to have a definedNatural library. All other statuses for usewith this application can be as normal of types of T (test),M (maintenance) and P (production).
Application Status Links
Defined statuses for the application should be linked in the normal way. This is fully documentedin section 6 of this documentation.
PAC User's Guide306
Open Systems Support and Migrations

Migration Process In
This process details the process of migrating Natural Open System objects into PAC.
Step 1: Create workfile
Create a SYSTRANS formatworkfile from theOpen Systemplatformwhere the application sourcesreside.
Step 2: Transfer workfile to mainframe
Use a recognized transportmechanism (FTP) to transfer theworkfile from theOpen Systemplatformto the mainframe.
Step 3: Create / Authorize the PAC migration event
Add a PAC migration event for the Open Systems application with the Incorporation status asthe From-Status. The migration list must contain the wildcard selection of (*,*) , in order for theevent tomigrate-in thewhole contents of theworkfile (please seeNatural Systrans documentationfor more details). Authorize the PAC event in the normal way.
Ensure that the event has run-mode set to B (Batch) and that it uses the supplied PAC Job <pre-fix>_SYSTRANS_MIGRATE_IN.
Step 4: Submit the PAC migration event
The defined PAC migration event through the PAC Job uses a number of variable parameters.These will be called for when the PAC migration event is submitted.
The parameters are:
FUSER value for incorporation library@FUSER-FROMIncorporation library@LIBRARY-FROMName of SYSTRANS workfile@SYSTRANS_DSNVolume Serial of workfile@VOLSERDisposition of workfile@DISP
307PAC User's Guide
Open Systems Support and Migrations
Step 5: Execution of the PAC migration event
The PACmigration eventwill nowperform the various steps containedwithin the PAC Job. Pleasesee Job details for more information on this.
The migration event will produce an audit trail as normal for migration events. Upon successfulcompletion of the migration event the Natural Open Systems objects will now be fully versionedwithin PAC and stored in the PAC ACF file.
Migration Process Out
This process details the process of migrating Natural Open System objects out of PAC.
Step 1: Create / Authorize the PAC migration event
Add a PAC migration event for the Open Systems application with the Incorporation status asthe To-Status. The migration list objects can now be selected and saved. Authorize the PAC eventin the normal way.
Ensure that the event has run-mode set to B (Batch) and that it uses the supplied PAC Job <pre-fix>_SYSTRANS_MIGRATE_OUT. Applymods 8, 19 and 31 should be used when migratingthese objects out of PAC.
Step 2: Submit the PAC migration event
The defined PAC migration event through the PAC Job uses a number of variable parameters.These will be called for when the PAC migration event is submitted.
The parameters are:
FUSER value for incorporation library@FUSER-FROMIncorporation library@LIBRARY-FROMName of SYSTRANS workfile@SYSTRANS_DSNDisposition of workfile@DISPVolume Serial of workfile@VOLSER
PAC User's Guide308
Open Systems Support and Migrations

Step 3: Execution of the PAC migration event
The PACmigration eventwill nowperform the various steps containedwithin the PAC Job. Pleasesee Job details for more information on this.
The migration event will produce an audit trail as normal for migration events. Upon successfulcompletion of the migration event the objects will now be contained in the defined workfile.
Step 4: Transfer workfile to Open System Platform
Use a recognized transport mechanism (FTP) to transfer the workfile from the Mainframe to theOpen Systems Platform.
Step 5: Load objects from Workfile
Perform a SYSTRANS load from the workfile into your Natural system on the Open Systemsplatform.
Object Handling
Once the Natural Open Systems objects are migrated into PAC, they can then be handled as perany other PAC controlled object. They can be Archived, Retired, Purged and viewed in the Ver-sioned Objects function.
309PAC User's Guide
Open Systems Support and Migrations

310
29 Migrating Predict Objects
■ Migrating Predict Data Into and Out of PAC ......................................................................................... 312■ Migrating Predict Data Within PAC .................................................................................................... 320■ Reports About Versioned Predict Objects ........................................................................................... 323
311
Software AG's active data dictionary system Predict is used to supply information needed by ap-plications defined to PAC:
■ Natural views/DDMs and rules are generated from Predict files, userviews, and verificationsto supply the subordinates needed to compile Natural objects.
■ Predict cross-reference (Xref) data is created for Natural objects when they are compiled and isused for building and documenting interrelationships among objects.
When migrating objects from development or maintenance status types, the Expand function isvalid only if the cross-reference data exists for the object on the Predict file specified for the applic-ation status link. The EXP (Expand) command and special options of the SEL (Select) commanduse cross-reference (Xref) data from Predict for migrations from development, maintenance, andincorporation status types; for all other migrations, cross-reference data from PAC is used.
This chapter covers the following topics:
Migrating Predict Data Into and Out of PAC
Predict objects are migrated or copied into the PAC controlled environment. Predict objects cansubsequently be unloaded fromPAC into an external Predict file. A PAC administrator can removePredict objects from PAC when they are no longer needed.
The migration event that loads Predict objects into PAC must be run separately and before theevent that migrates the Natural application objects that use the Predict objects.
Notes:
1. To bypass this step, views/DDMs that exist in catalog form external to PAC can be incorporatedinto PACwithout being regenerated. Because views/DDMs are consideredNatural objects, thisis a Natural migration.
2. You can also bypass this step for views/DDMs that exist in an external versioning tool. Thesecan be incorporated into PAC without being regenerated. This requires an event for a Predictapplication from External to Control status. The value for SYSDDM utility in the Protectionoption of the System Defaults must be set to A (Allowed) for this alternative to work. See Pro-tection in the General Defaults section of the Predict Defaults part of the Predict Administrationdocumentation for further details.
The following example PAC jobs migrate only Predict objects:
■ Predict_MIGRATE_IN JCL/JCS migrates Predict objects from an external Predict system file(FDIC) into PAC;
■ Predict_MIGRATE_OUT JCL/JCS migrates Predict objects from PAC to an external FDIC file.
PAC User's Guide312
Migrating Predict Objects

For Predict migrations into PAC, any objects that require it are generated or regenerated automat-ically in PAC as part of the migration.
For Predict migrations from PAC to an external FDIC file, such objects are migrated but notautomatically generated or regenerated. The objects must be manually generated or regeneratedin the external FDIC file after the successful completion of the migration event.
Origin of Predict Objects
For the reserved Predict application (see Predict Application), PAC acquires the Predict datadictionary information for each status defined to PAC from the Predict system file (FDIC). TheFDIC file is identified by a database number (DBnr) and file number (Fnr).
PAC can be populated with any data dictionary information except user-defined entity objects(UDEs).
Certain data dictionary informationmust bemigrated into the PAC controlled environment usingthe Predictmigration utility SYSDICBE (userviews, files, verifications, keywords, help text), whileother information is copied into the PAC environment as needed (generation default sets andlinked databases).
Sets of generation defaults are used when generating PAC views/DDMs and rules from Predictfiles, userviews, and verifications. You must log on to Predict to create or maintain the sets ofgeneration defaults, which are then copied into the PAC controlled environment where the actualgeneration occurs.
You must also log on to Predict to maintain the Predict keyword subsystem. Refer to the Predictdocumentation formore information. Keywords created in Predict can bemigrated to PACbecausethe PAC keyword system is sufficiently similar. However, keywords defined within PAC for useas selection criteria within the PAC reporting subsystem are maintained separate from the Predictkeywords.
Predict help is documented in Predict and stored on the FDIC file; certain applicationsmay requireaccess to this information at execution time.
Interaction With the PAC System Files
The PAC PCF system file is a work area with the same file structure as a Predict FDIC file. AnyPredict files, userviews, and verifications used to generate PACviews/DDMsand rules aremigratedto the PCF file from the Predict FDIC file using the Predict migration utility SYSDICBE.
Sets of generation defaults and any linked database information that may be specified for the setsis copied from the Predict FDIC file to the PCF system file by the PAC administrator.
A specific set of generation defaults may be specified for use during the generation phase of aPredict migration, based on the Predict objects being migrated. If no specific set is specified, thegeneration defaults set named DEFAULTS is used.
313PAC User's Guide
Migrating Predict Objects
PAC views/DDMs and rules are actually generated in the PCF system file. The new versions ofthe Predict objects that are required during the compilation of Natural objects are stored in thePCF system file.
After the executable code has been generated for the PAC views/DDMs and rules, the versionedsource used to generate them is copied to the ACF system file for documentation and reportingpurposes.
Using the Predict Migration Utility SYSDICBE
Predict files, userviews, and verifications are loaded into the PAC controlled environment usingthe the Predict migration utility SYSDICBE, rather than the PAC migration utilities (MIGUNLD,MIGLOAD).
Caution: Do not use SYSMAIN, INPL, NATLOAD, or MIGLOAD directly to load viewsinto the PAC environment (PCF file); this will cause a loss of data integrity in PAC.
■ When initially invoked from PAC, the Predict SYSDICBE utility unloads Predict objects to awork file from the FDIC file specified on the application status link definition.
■ When restarted, it loads■ those Predict objects used for generation (files, userviews, verifications, databases) from thework file to the PCF system file.
■ all other Predict objects from the work file to the ACF system file where they are labeled asversioned Predict objects.
A defined interface allows PAC to communicatewith the Predictmigration utilities and vice versa.Using this mechanism, the different requirements for migrating the Predict objects are handledas effectively and consistently as with any Predict migration without PAC.
When using the Predict migration utility to migrate Predict data from the PAC controlled envir-onment, the migration unload from PAC is processed in the same way as the migration load, en-suring consistency with the Predict data whenever the data are migrated from status to status.
During the unloading and loading of Predict objects, control can be given to PAC at specific pointsto verify the state of the migration and to issue checkpoints. These checkpoints are useful for re-starting Predict events because PACwill ensure that each event process restarts from the step thatwas active during the previous termination.
If Predict incurs any errors while processing the Predict migration load step, it calls PAC to recordthe information about the error in the event audit report. This information is written at the bottomof the report at the time of termination and can normally be used to help identify problems withPredict migrations.
Note: For the os_PREDICT_MIGRATE_OUT job (where osmust be replaced by the corres-ponding operating system notation, for example MVS_PREDICT_MIGRATE_OUT for the
PAC User's Guide314
Migrating Predict Objects
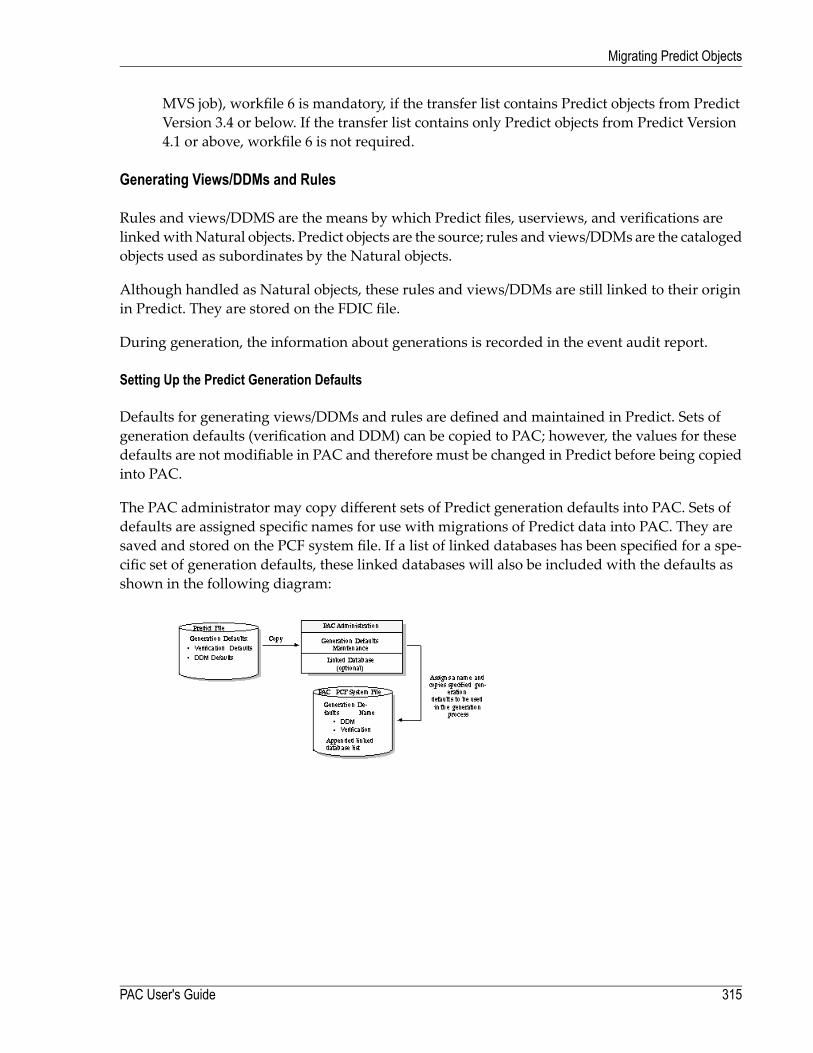
MVS job), workfile 6 is mandatory, if the transfer list contains Predict objects from PredictVersion 3.4 or below. If the transfer list contains only Predict objects from Predict Version4.1 or above, workfile 6 is not required.
Generating Views/DDMs and Rules
Rules and views/DDMS are the means by which Predict files, userviews, and verifications arelinkedwithNatural objects. Predict objects are the source; rules and views/DDMs are the catalogedobjects used as subordinates by the Natural objects.
Although handled as Natural objects, these rules and views/DDMs are still linked to their originin Predict. They are stored on the FDIC file.
During generation, the information about generations is recorded in the event audit report.
Setting Up the Predict Generation Defaults
Defaults for generating views/DDMs and rules are defined and maintained in Predict. Sets ofgeneration defaults (verification and DDM) can be copied to PAC; however, the values for thesedefaults are not modifiable in PAC and therefore must be changed in Predict before being copiedinto PAC.
The PAC administrator may copy different sets of Predict generation defaults into PAC. Sets ofdefaults are assigned specific names for use with migrations of Predict data into PAC. They aresaved and stored on the PCF system file. If a list of linked databases has been specified for a spe-cific set of generation defaults, these linked databases will also be included with the defaults asshown in the following diagram:
315PAC User's Guide
Migrating Predict Objects
Sets of Generation Defaults
When PAC is initialized, a set of Predict generation defaults called DEFAULTS is automaticallydefined for usewithmigrations of Predict data into PAC. The generation defaults copied are thosedefined in Predict at the time PAC is initialized.
The defaults to be used with a Predict migration event to generate views/DDMs and rules can bespecified during authorization by entering the name of a set of defaults previously copied andstored on the PCF system file. If a specific set is not specified for a migration of Predict data intoPAC, the default set DEFAULTS is used.
If the specified set or the DEFAULTS set itself cannot be found (that is, has been removed or doesnot exist) at the time the migration is processed, an error will occur indicating the name of the setthat was specified and that it does not exist.
Linked Databases
Predict generation defaults for Adabas files may have up to ten (10) databases to which files maybe linked. TheAdabas Subsystem SpecificationDB-ID parameter in the stored generation defaultsdetermines whether a linked database is required; if so, a database number (DBnr) is assigned tothe generated view/DDM .
Predict determines if a specific database is required for the generation of views/DDMs based onthe value of the SpecificationDB-IDparameter and on the names of databases linked to the specifiedgeneration defaults set. Adabas files can be linked to one database, to several databases, or to nodatabase.
The action taken by PAC depends on whether the value of the Specification DB-ID parameter inthe stored generation defaults is N or Y:
PAC generates a DDMwith DBnr=0, even if the file is linked to several databases.N(o)Before the files can be generated, Adabas files must be linked to one or several databasesthat were previouslymigrated into PAC (although the required databasesmay bemigrated
Y(es)
at the same time as the files as part of the same migration event). PAC generates theviews/DDM based on the number of the appropriate linked databases by scanning thelinked database list. If the databases required for specific file generations have not beenmigrated into PAC, Predict terminates the migration.
If the user exit PACEX037 is active, PAC invokes the exit before the generation command is builtto determine the linked database to be used for the view/DDM generation. If no linked databaseis found or the Specification DB-ID=N, a blank is passed to the exit. Depending on the value ofSpecificationDB-ID, the user exitmay then verify, override, or reset the appropriate linked databasename by scanning the linked database list.
PAC User's Guide316
Migrating Predict Objects
Predict Object List
The Predict migration event migrates only Predict objects; that is, the object list may contain onlyPredict objects. Natural objects may not be included in a Predict object list.
Views/DDMs and rules are required during the compile of Natural objects; they are treated asNatural objects and occur on Natural object lists. They may be identified in the Predict object listin terms of files, userviews, and verifications; that is, in terms of the Predict objects used to generatethem.
PAC provides specific applymods and user exits for additional customization of the list.
Building Object Lists
There are several options for building a list of Predict object types. If you want to migrate only afew objects, it may be more useful to enter the individual objects "manually" in the Object ListEditor; however, if you want to migrate large numbers of objects, the generation facilities can beused to avoid the errors that could occur when manually entering objects.
Because of the nature of the Predict migration utility, a single entry in the Predict object list mayresult in numerous Predict objects being processed. For example, if the Predict type FILE (F or C)is specified for an object in the object list, Predict automatically unloads the file together with allof the verifications and userviews linked to the file, and generates new automatic rules andDDMsfor each object.
Note: The conditions required for successful generation of Predict objects and the objecttypes that do or do not require generation are determined by Predict. Refer to the appropriatePredict documentation for more information.
If only userviews and/or verifications are required for the object list, they should be individuallyplaced in the list and the file itself should be omitted. The parent file (F or C) must have beenpreviously migrated into PAC; otherwise, Predict will terminate the generation with an error.
Manually Creating the Object List
An object list may be created "manually' by entering each object on the Object List Editor.
To prevent ambiguities, the object name and type must be explicitly specified. The name of anobject or a range of objects may be specified. An asterisk (*) or range notation may be used tospecify a prefix or range of objects.
Selecting and Expanding Objects for the Object List
The Select option (SEL command) and the Expand option (EXP command) can be used on theObject List Editor to build the object list for Predict objects to be migrated into PAC.
317PAC User's Guide
Migrating Predict Objects
You may use the SEL command to add Predict objects to the object list, either alone or when youare specifying objects manually on the Object List Editor. The objects presented for selection willbe read directly from the Predict FDIC file specified in the development or maintenance statuslink definition. Selection is based on the specified object name, type, and range date or the datemodified. Range notation or an asterisk (*) may be used to limit the list of objects returned.
The EXP command can be used to include in the object list all files linked to a database. A databasecan be expanded to include its files using the EXP command. However, files will be expanded toinclude the userviews and automatic verifications during migration. EXP is valid for databaseswhen they are entering PAC from development or maintenance status types.
Generating the Object List
The list of Predict objects may be generated "automatically" using the PAC object list generationfacilities either online or in batch. Automatic generation is only possiblewhen the origin is Control,a test, or a production status.
When you are adding amigration event, youmay specify a generation option online by providinga GENTYPE value of P in the Generate List field of the Add Event screen.
When you want to generate the object list for an existing migration event or regenerate the objectlist, use the GENLIST command while modifying the event and specify the desired generationoption.
The PACEX037 user exit can be invoked to control the views/DDMs and rules that are to be gen-erated. For example, you may not wish to have an actual view/DDM generated for a file becauseonly the views/DDMs of userviews are to be used by programming objects.
Overview of Generating and Versioning Predict Objects
The process of generating and versioning Predict objects in PAC is outlined in the following dia-gram:
PAC User's Guide318
Migrating Predict Objects

Explanation of Steps in the DiagramActionStepGeneration defaults Predict Predict generation defaults Generation defaults are copied fromthe Predict FDIC file to the PCF system file; if applicable, the PAC administrator specifieslinked databases for some or all sets of generation defaults copied.
1
SYSDICBE utility The migration event is created; PAC validates the object list and createsunload commands to be processed by the Predictmigration utility SYSDICBE. The generationdefaults to be used are identified in the migration event; the event is submitted.
2
The SYSDICBE utility is invoked with the unload commands to create the migrate dataset(work file).With the SYSDICBE utility, one unload command normally results in the unload
3
of several Predict objects (the parent object will be unloaded as well as all of its linked chil-dren).The SYSDICBEutility is restarted to load from thework file to the PCF systemfile any objectsrequired for the generation of views/DDMs and rules (that is, Predict userviews, files,databases, and verifications).
4
PAC loads all objects from the work file to the ACF system file as new versions.5For all objects that will require generation, the appropriate Predict SYSDIC generate com-mands are created and entries are made in the generate list.
6
Using the specified generation defaults, the generate commands are processed and theviews/DDMsand rules are generated in the PCF systemfile; linkeddatabases are determined.
7
PACEX037 user exit Predict generation exit Predict generation user exit The PACEX037 userexit can be invoked to control the views/DDMs and rules that are to be generated. For ex-ample, if programming objects only use the views/DDMs of userviews, the generation ofviews/DDMs of files can be suppressed.
319PAC User's Guide
Migrating Predict Objects
ActionStepThe generated objects (views/DDms and rules) are copied from the PCF system file to theACF system file where they are versioned. In versioning the Predict application objects,
8
PAC inherently tracks the state of these objects; that is, whether they have been migratedto other statuses.
Migrating Predict Data Within PAC
Once Predict data has entered the PAC controlled environment as versioned Predict objects or asNatural objects (views/DDMs and rules), it can be migrated throughout the PAC environment aspart of a Natural migration.
Statuses/Application Status Links
PAC is able to retain an interrelationship between Predict files, userviews, and verifications andthe applications that use them.
The origin status of each application status link defined in PAC identifies the physical location ofthe Predict FDIC file where the Predict objects, cross-reference data, and generated Naturalviews/DDMs and rules are stored. You can override the location (DBnr/Fnr) specified in the statusdefinition when you define the application status link.
Locating Predict in Your Environment
You may use a single Predict FDIC system file for all environments or you may have differentFDIC files in different environments.
You may locate FDIC files in the development, maintenance, test, and production environments.If you use different FDIC files in different environments and youmake changes to the Predict datain any one of these environments, those changes will not be reflected in the other environments.
For example, suppose you have FDIC files in development, maintenance, and test. If you migratePredict data through PAC, you could override more recent changes made in test or productionwith earlier data migrated from development or maintenance.
Tomaintain consistency across environments, it is strongly recommended that youmake changesto the Predict data in a centralized location; that is, changes should be made in development ormaintenance as required and then distributed to other locations throughout PAC.
Because this may not be possible for some sites, PAC does support a distributed Predict environ-ment; however, PAC itself centralizes all Predict data.
PAC User's Guide320
Migrating Predict Objects
Locating Predict in Development and Maintenance
The most likely locations for Predict are development (where the data is initially defined) andmaintenance (where the data is maintained).
For instance, maintenance changes to PAC objects may require changes to the Predict userviews,files, and/or verifications needed to generate the views/DDMs and/or rules that must be used torecompile the PAC objects when they are returned from maintenance.
Locating Predict in Other Environments
Reasons for locating Predict in other environments are as follows:
■ You may need Predict help at execution time for certain applications; this information needs tobe readily available to the programs that use it.
■ You may need to migrate VSAM DDMs for use at execution time.■ You may want to use Predict directly to generate files, for instance. Once files are defined inPredict, the actual files (FDT) can be generated for loading to the database.
■ Youmaywant to use Predict to maintain files using certain Adabas Basic Services functionality.■ Youmaywant to locate Predict in an environment so that it reflects the state of all objects currentfor that environment; for example, you may locate it in production so that you can determinewhat the production versions of databases and files look like.
■ You may need to have the cross-reference data of all objects in a particular status for derivingvarious statistical information.
Note: It is no longer possible to migrate Predict objects to a status of type (P). You can nowattain the same functionality if you define a status of type (T) to a Predict application spe-cifying the production FDIC as its location.Creating a migration event for this migration path will ensure that objects of type Predictwill be migrated to your production FDIC.
Migration Path/Event
Predict application objects from development, incorporation, or maintenance must have a destin-ation status of Control. Once the Predict data is in the Control status, it can be migrated directlyto other allowed statuses.
321PAC User's Guide
Migrating Predict Objects
Cross-Reference Data
Cross-reference (Xref) data is available only with Predict Version 3.1 or above when the PredictActive References feature is installed.
The PAC Predict cross-reference sub-function allows you to obtain cross-reference informationabout application-linked Predict cross-reference objects such as the following:
■ Programs■ Data areas■ Userviews■ Copy code■ Retained sets
Predict cross-referencing of Natural objects occurs only in the PAC Control status as part of aNaturalmigration. Xref information forNatural objects is created at compile time; itmay optionallybe migrated with Natural objects and stored at the destination as defined in the application statuslink.
Maintaining Cross-Reference Data
A migration event definition specifies whether
■ cross-reference data is to be stored within PAC (Local);■ cross-reference data is to be copied to the Predict file specified by the application status link(Remote);
■ cross-reference data is to be stored both locally and remotely;■ no cross-reference data is maintained.
The Predict Xref Menu is accessible from the Application Status Reporting Menu. Refer to thePredict User's Guide for more information.
Enhanced Predict Object Handling
It is necessary with the handling of Predict objects to correctly separate Predict files and DDMs.This change has resulted in some minor display and storage enhancements now being seen inPAC.
During a migration event of Predict objects, the audit report will show 'double' objects as follows:
PAC User's Guide322
Migrating Predict Objects
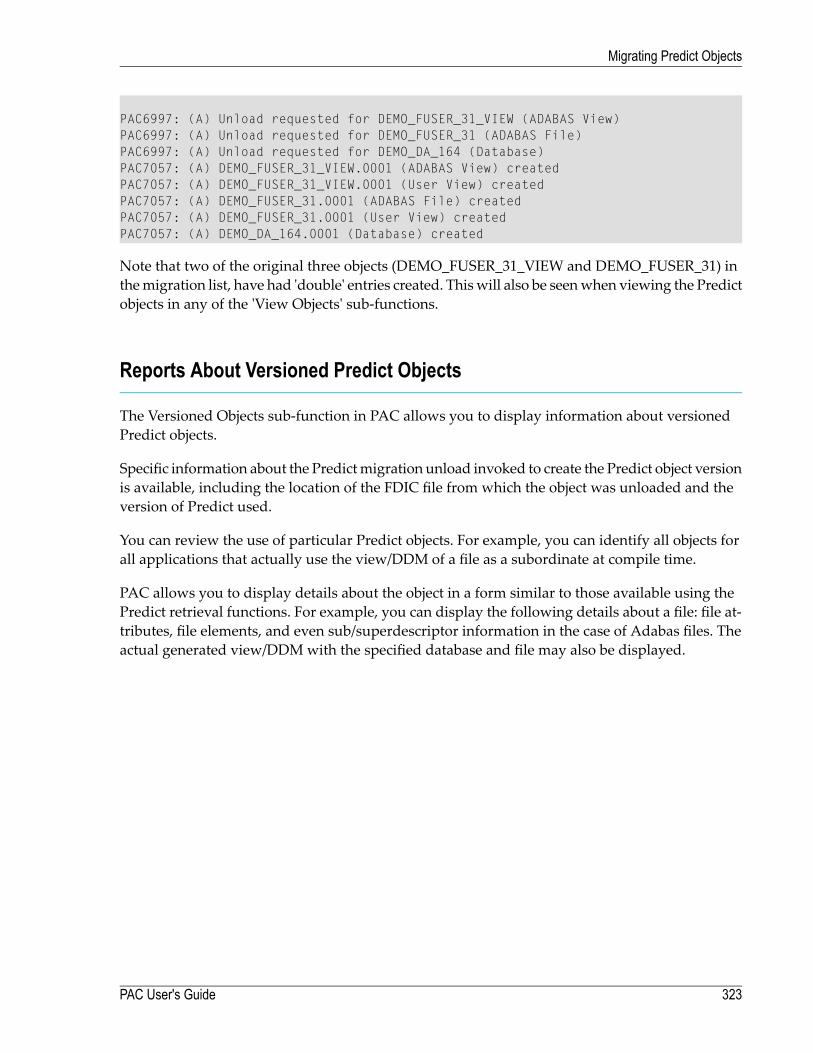
PAC6997: (A) Unload requested for DEMO_FUSER_31_VIEW (ADABAS View)PAC6997: (A) Unload requested for DEMO_FUSER_31 (ADABAS File)PAC6997: (A) Unload requested for DEMO_DA_164 (Database)PAC7057: (A) DEMO_FUSER_31_VIEW.0001 (ADABAS View) createdPAC7057: (A) DEMO_FUSER_31_VIEW.0001 (User View) createdPAC7057: (A) DEMO_FUSER_31.0001 (ADABAS File) createdPAC7057: (A) DEMO_FUSER_31.0001 (User View) createdPAC7057: (A) DEMO_DA_164.0001 (Database) created
Note that two of the original three objects (DEMO_FUSER_31_VIEW and DEMO_FUSER_31) inthemigration list, have had 'double' entries created. Thiswill also be seenwhen viewing the Predictobjects in any of the 'View Objects' sub-functions.
Reports About Versioned Predict Objects
The Versioned Objects sub-function in PAC allows you to display information about versionedPredict objects.
Specific information about the Predictmigration unload invoked to create the Predict object versionis available, including the location of the FDIC file from which the object was unloaded and theversion of Predict used.
You can review the use of particular Predict objects. For example, you can identify all objects forall applications that actually use the view/DDM of a file as a subordinate at compile time.
PAC allows you to display details about the object in a form similar to those available using thePredict retrieval functions. For example, you can display the following details about a file: file at-tributes, file elements, and even sub/superdescriptor information in the case of Adabas files. Theactual generated view/DDMwith the specified database and file may also be displayed.
323PAC User's Guide
Migrating Predict Objects

324
30 Assigning and Maintaining Object Versions
■ Object Version .............................................................................................................................. 327■ Versioned Objects .......................................................................................................................... 329
325

Each time a newor changed object ismigrated or incorporated into the PAC controlled environmentfrom a development, maintenance, or incorporation status, it is assigned a version number. Theobject name, object type, and version number assigned by PAC are used together to uniquelyidentify each instance of an object belonging to a specific application.
The PAC and PAA systems each assign an independent version number to an object:
■ PAC assigns the control version when the object enters the PAC controlled environment; and■ PAA assigns the production version when the object enters the PAA-controlled production en-vironment.
The two different versions are maintained for purposes of consistency and ease of understanding.The Natural List Directory function lists the PAC control version. The PAA system tracks thecorrelation between version numbers in different environments. Refer to the PAA documentationfor information about identifying the object version that is executing in production.
Objects that have been incorporated or migrated into the PAC controlled environment and havebeen assigned a version number are called versioned objects. A versioned object is not necessarilya compiled object. Each instance of a versioned object is called an object version. Migration eventspopulate PAC with object versions.
For a specific version of an object in a specific status, you can view the date and time it was savedand cataloged, the event that migrated it to the status, other statuses in which the version exists,and related objects.
The object audit history shows every version of the object, the statuses to which each version hasbeen migrated, and the dates and times of the migrations. You can view the source code for anobject version.
You can use a PAC utility to compare the source code for two versions of an object or compare aPAC version with an object on a Natural system file outside the PAC-controlled environment.PAC indicates when objects are identical or displays the differences between them.
The following diagram shows howNatural objects being loaded into PAC are processed to createversioned objects:
Amigration event from a development or incorporate status to Control status is created and objectsare selected for the object list from the physical location. The objects aremigrated to the PCF system
PAC User's Guide326
Assigning and Maintaining Object Versions
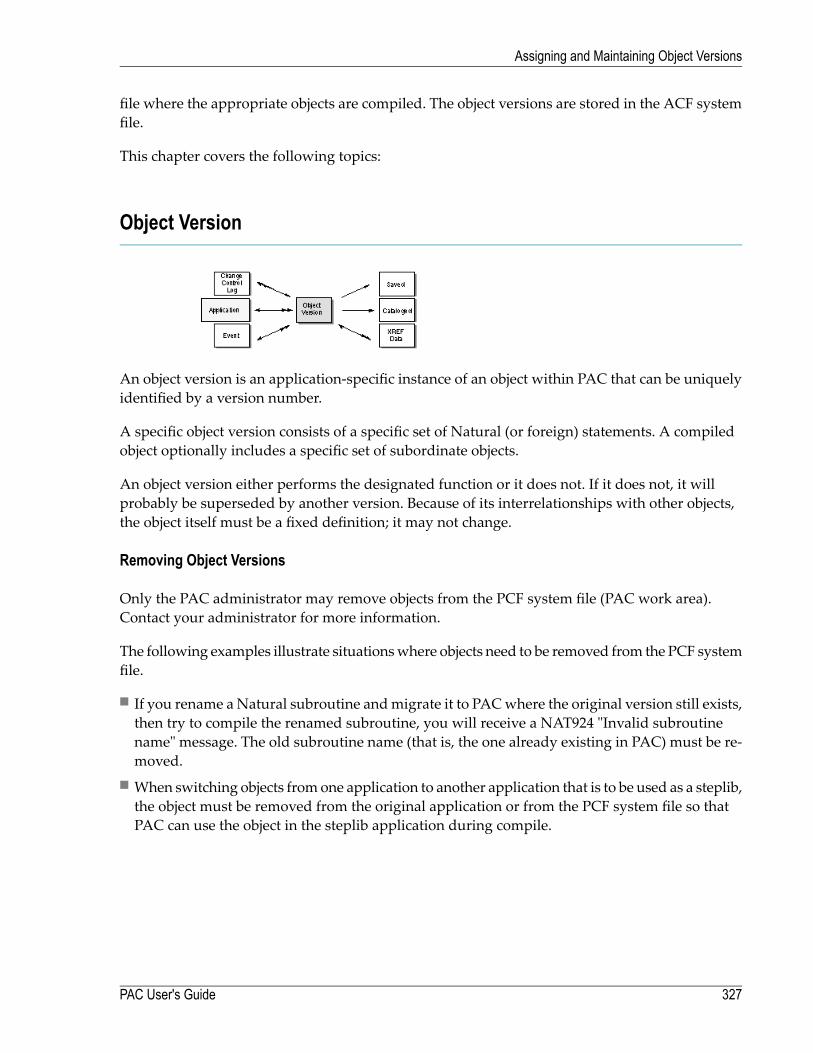
file where the appropriate objects are compiled. The object versions are stored in the ACF systemfile.
This chapter covers the following topics:
Object Version
An object version is an application-specific instance of an object within PAC that can be uniquelyidentified by a version number.
A specific object version consists of a specific set of Natural (or foreign) statements. A compiledobject optionally includes a specific set of subordinate objects.
An object version either performs the designated function or it does not. If it does not, it willprobably be superseded by another version. Because of its interrelationships with other objects,the object itself must be a fixed definition; it may not change.
Removing Object Versions
Only the PAC administrator may remove objects from the PCF system file (PAC work area).Contact your administrator for more information.
The following examples illustrate situationswhere objects need to be removed from the PCF systemfile.
■ If you rename aNatural subroutine andmigrate it to PACwhere the original version still exists,then try to compile the renamed subroutine, you will receive a NAT924 "Invalid subroutinename" message. The old subroutine name (that is, the one already existing in PAC) must be re-moved.
■ When switching objects fromone application to another application that is to be used as a steplib,the object must be removed from the original application or from the PCF system file so thatPAC can use the object in the steplib application during compile.
327PAC User's Guide
Assigning and Maintaining Object Versions
Retrieving Information About Versioned Objects
Youmay check the integrity of application object versionswith theVersionedObjects sub-functionof PAC or by using the supplied PAC Application Program Interface (APIs).
Versioned Objects Sub-Function
The Versioned Objects sub-function of PAC allows you to retrieve information about all versionsof an object in the PAC environment, including the current version. You may retrieve informationabout Natural, foreign, Predict, and Predict Case objects.
Along with the application name, object name, type, and version, you may display the followinginformation about versioned objects:
■ Development source directory information to identify the particulars about the person whochanged the object before it was loaded into PAC:■ the save library name;■ the date it was saved in the development library;■ the user ID;■ the TP monitor and operating system;■ the Natural version and system maintenance level;■ the programming mode.
■ The type of user error message (short or extended) and languages used; this information canbe used for verification and also audit information.
■ Subordinate objects that the versioned object uses; and the objects that use the versioned object;this information is useful for impact analysis and the expand facilities.
■ Information about the statuses in which the object version exists for object list verification andpossible problem resolution and state of the application.
■ The "history" of an object version, for example the dates an object wasmigrated into a particularstatus; this information is used primarily for problem tracking; that is, to determine the state ofan application at a specific previous date.
■ Object versions that do not exist in any status; that is,■ objects that have been superseded and no longer exist in any status other than Control;■ objects that have been archived;■ objects that have never been migrated to any status other than Control; that is, have neverbeen used.
This informationmay be used to identify objects that should be purged from the PAC environment.
PAC User's Guide328
Assigning and Maintaining Object Versions
■ Extended information from user-modifiable reporting front-ends supplied with PAC provideextended user facilities similar to user exit processing. These reporting front-ends are invokedby selecting the Extended User Info option from Additional Options.
■ The date the object was saved and cataloged when it was brought into PAC.■ The maintenance version used: the version number of the object when it was checked out formaintenance; this information can be used for back-tracking the origin of the object that waschanged a compare of these two versions will identify the exact changes.
■ Themigration event that brought this object version into PAC and the date the eventwas createdto determine the actions associated with the loading of this object, for example, other objectsalso migrated.
Application Program Interface (APIs)
PAC object version reporting has fixed definitions for the actual reports. You can tailor the reportsto your specific needs using the APIs or even the supplied PAC Express.
The following PAC APIs can be used to retrieve information about versioned objects. A list ofcurrent APIs is provided in the PAC Reference documentation.
■ The Display Object VersionNatural Source API (APINNSRC) allows you to display the Naturalsource code for a particular object version in the Natural source area.
■ The LoadObject VersionNatural SourceAPI (APINLSRC) allows you to load theNatural sourcecode for a particular object version into the Natural source area and edit it. Any changes madeto the object version will not be reflected in PAC.
■ TheObject VersionAPI (APINOBJV) allows you to display information about a particular objectversion; this information is the basic information about the object.
Versioned Objects
When an object is moved into the PAC controlled environment, it is assigned a version numberand is called a versioned object. You can use the VersionedObjects function to retrieve informationabout all versions of an object in the PAC environment and the Compare function to compareobject versions.
You can display version information aboutNatural programming objects anduser errormessages;foreign, Predict, and Predict Case objects. Available information about versioned objects includes
■ migration information;■ development source directory information (Natural objects);■ type of user error message (short or extended) and languages used;■ subordinate objects that the versioned object uses;
329PAC User's Guide
Assigning and Maintaining Object Versions
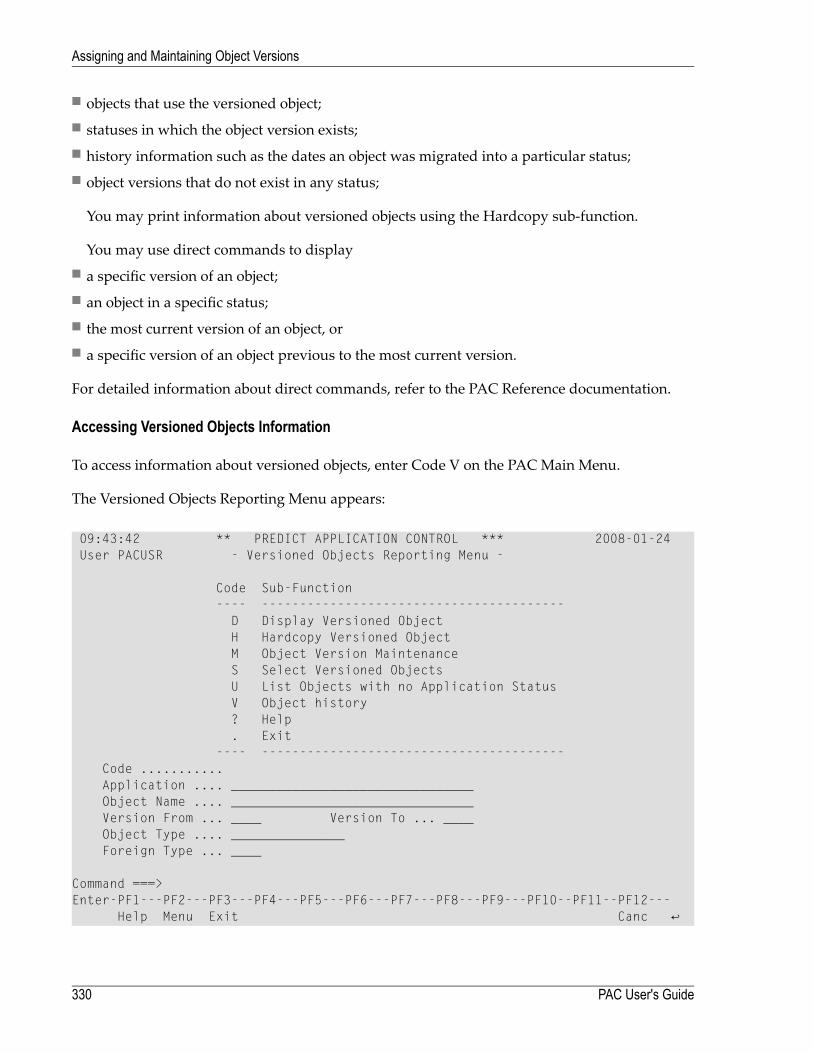
■ objects that use the versioned object;■ statuses in which the object version exists;■ history information such as the dates an object was migrated into a particular status;■ object versions that do not exist in any status;
You may print information about versioned objects using the Hardcopy sub-function.
You may use direct commands to display■ a specific version of an object;■ an object in a specific status;■ the most current version of an object, or■ a specific version of an object previous to the most current version.
For detailed information about direct commands, refer to the PAC Reference documentation.
Accessing Versioned Objects Information
To access information about versioned objects, enter Code V on the PAC Main Menu.
The Versioned Objects Reporting Menu appears:
09:43:42 ** PREDICT APPLICATION CONTROL *** 2008-01-24 User PACUSR - Versioned Objects Reporting Menu - Code Sub-Function ---- ---------------------------------------- D Display Versioned Object H Hardcopy Versioned Object M Object Version Maintenance S Select Versioned Objects U List Objects with no Application Status V Object history ? Help . Exit ---- ---------------------------------------- Code ........... Application .... ________________________________ Object Name .... ________________________________ Version From ... ____ Version To ... ____ Object Type .... _______________ Foreign Type ... ____ Command ===> Enter-PF1---PF2---PF3---PF4---PF5---PF6---PF7---PF8---PF9---PF10--PF11--PF12--- Help Menu Exit Canc ↩
PAC User's Guide330
Assigning and Maintaining Object Versions
This menu provides the following fields for entering selection criteria:DescriptionFieldName of the application to which the versioned objects belong. If you leave thisfield blank or enter range notation, a selection list of available applications is dis-played.
Application
Name of the object to be processed. A range may be specified.Object NameVersion number of the object to be processed. If a range is specified, this field isused along with the Version To field. Version numbers are always equal to or less
Version From
than the version number specified in the Version To field. Valid values are 1-9999.If a range is specified only for the Version From field, this value is used as thestarting value of the versions selected.Used along with the Version From field to specify a range. Version numbers arealways greater than or equal to the version number specified in the Version From
Version To
field. If specified, this value will be used for the ending value of the requestedrange. Valid values are 1-9999.Versioned object user error message Versioned object Natural Versioned objectPredict Versioned object Predict Case The type of object to be processed (Natural,
Object Type
foreign, Predict, Predict Case, user errormessage). A questionmark (?) in this fieldproduces a list of Natural object types with the option to also list Predict objecttypes.Foreign object to be processed, specified as 3nnn. A question mark (?) in this fieldproduces a list of foreign datasets supported by the specified application.
Foreign Type
You may also select the D, H, and S sub-functions directly from the Versioned Objects SelectionList that is accessed using Code S (Select Versioned Object).
Selecting a Versioned Object from a List
1. To display a list of versioned objects for a specified application, enter Code S (Select VersionedObject) and the application name on the Versioned Objects Reporting Menu.
If the application name is not specified, a selectionwindowof available applications is displayedon which you may make your selection.
You may limit the list of object versions retrieved by specifying the version numbers in theVersion From.../Version To... fields; and/or object types to be displayed in the Object Type field.
The Object Version Selection List appears displaying the selected list of object versions:
331PAC User's Guide
Assigning and Maintaining Object Versions
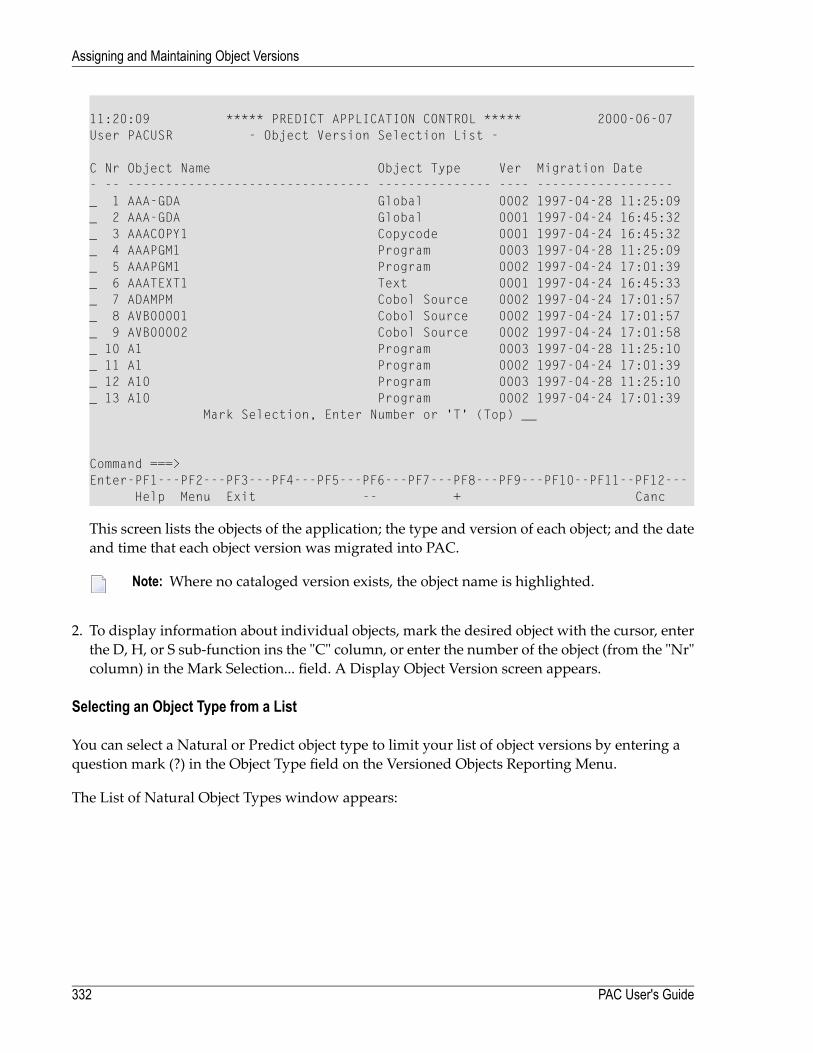
11:20:09 ***** PREDICT APPLICATION CONTROL ***** 2000-06-07User PACUSR - Object Version Selection List -
C Nr Object Name Object Type Ver Migration Date- -- -------------------------------- --------------- ---- ------------------_ 1 AAA-GDA Global 0002 1997-04-28 11:25:09_ 2 AAA-GDA Global 0001 1997-04-24 16:45:32_ 3 AAACOPY1 Copycode 0001 1997-04-24 16:45:32_ 4 AAAPGM1 Program 0003 1997-04-28 11:25:09_ 5 AAAPGM1 Program 0002 1997-04-24 17:01:39_ 6 AAATEXT1 Text 0001 1997-04-24 16:45:33_ 7 ADAMPM Cobol Source 0002 1997-04-24 17:01:57_ 8 AVB00001 Cobol Source 0002 1997-04-24 17:01:57_ 9 AVB00002 Cobol Source 0002 1997-04-24 17:01:58_ 10 A1 Program 0003 1997-04-28 11:25:10_ 11 A1 Program 0002 1997-04-24 17:01:39_ 12 A10 Program 0003 1997-04-28 11:25:10_ 13 A10 Program 0002 1997-04-24 17:01:39
Mark Selection, Enter Number or 'T' (Top) __
Command ===>Enter-PF1---PF2---PF3---PF4---PF5---PF6---PF7---PF8---PF9---PF10--PF11--PF12---
Help Menu Exit -- + Canc
This screen lists the objects of the application; the type and version of each object; and the dateand time that each object version was migrated into PAC.
Note: Where no cataloged version exists, the object name is highlighted.
2. To display information about individual objects, mark the desired object with the cursor, enterthe D, H, or S sub-function ins the "C" column, or enter the number of the object (from the "Nr"column) in the Mark Selection... field. A Display Object Version screen appears.
Selecting an Object Type from a List
You can select a Natural or Predict object type to limit your list of object versions by entering aquestion mark (?) in the Object Type field on the Versioned Objects Reporting Menu.
The List of Natural Object Types window appears:
PAC User's Guide332
Assigning and Maintaining Object Versions

08:38:53 ***** PREDICT APPLICATION CONTROL ***** 2000-04-19User PACUSR - Versioned Objects Reporting Menu -+-----------------------------------------+| -- List of NATURAL Object Types -- || || P Program A Parameter Data || N Subprogram G Global Data || S Subroutine L Local Data || M Map C Copycode || H Helproutine T Text || Y ExpertModel Z Recording || || V View R Rule || 3 Dialog 4 Class || 5 Processor E Error Message || * All Objects 7 Function || || Object Type ... ______________ || Predict Types ... N || |+-----------------------------------------+
Command ===>Enter-PF1---PF2---PF3---PF4---PF5---PF6---PF7---PF8---PF9---PF10--PF11--PF12---
Help Menu Exit Canc
To select one or more Natural object types, enter the corresponding one-character code(s) in theObject Type field in this window; for example, "PMC" to select programs, maps, and copycode.To request all objects of the application, enter an asterisk (*). Press ENTER.
To select one or more Predict object types, change the default N in the Predict Types field to Y(es)to display a List of Predict Object Types:
333PAC User's Guide
Assigning and Maintaining Object Versions
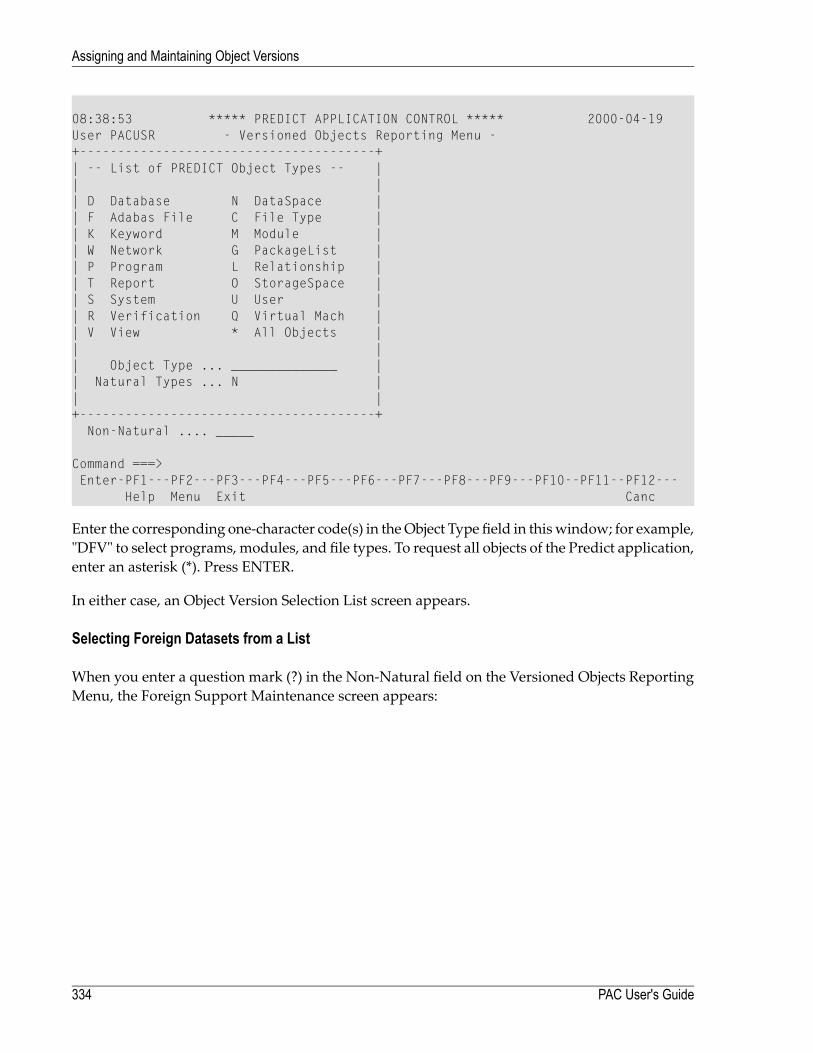
08:38:53 ***** PREDICT APPLICATION CONTROL ***** 2000-04-19User PACUSR - Versioned Objects Reporting Menu -+---------------------------------------+| -- List of PREDICT Object Types -- || || D Database N DataSpace || F Adabas File C File Type || K Keyword M Module || W Network G PackageList || P Program L Relationship || T Report O StorageSpace || S System U User || R Verification Q Virtual Mach || V View * All Objects || || Object Type ... ______________ || Natural Types ... N || |+---------------------------------------+
Non-Natural .... _____
Command ===>Enter-PF1---PF2---PF3---PF4---PF5---PF6---PF7---PF8---PF9---PF10--PF11--PF12---
Help Menu Exit Canc
Enter the corresponding one-character code(s) in theObject Type field in thiswindow; for example,"DFV" to select programs, modules, and file types. To request all objects of the Predict application,enter an asterisk (*). Press ENTER.
In either case, an Object Version Selection List screen appears.
Selecting Foreign Datasets from a List
When you enter a question mark (?) in the Non-Natural field on the Versioned Objects ReportingMenu, the Foreign Support Maintenance screen appears:
PAC User's Guide334
Assigning and Maintaining Object Versions
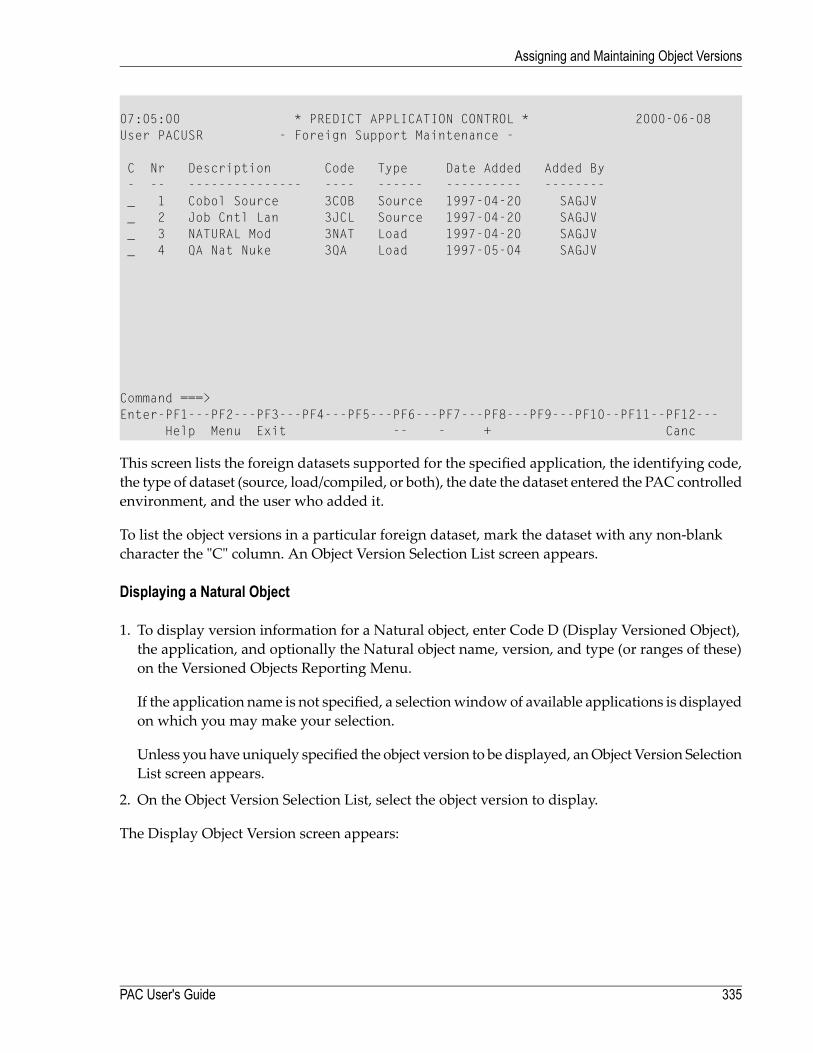
07:05:00 * PREDICT APPLICATION CONTROL * 2000-06-08User PACUSR - Foreign Support Maintenance -
C Nr Description Code Type Date Added Added By- -- --------------- ---- ------ ---------- --------_ 1 Cobol Source 3COB Source 1997-04-20 SAGJV_ 2 Job Cntl Lan 3JCL Source 1997-04-20 SAGJV_ 3 NATURAL Mod 3NAT Load 1997-04-20 SAGJV_ 4 QA Nat Nuke 3QA Load 1997-05-04 SAGJV
Command ===>Enter-PF1---PF2---PF3---PF4---PF5---PF6---PF7---PF8---PF9---PF10--PF11--PF12---
Help Menu Exit -- - + Canc
This screen lists the foreign datasets supported for the specified application, the identifying code,the type of dataset (source, load/compiled, or both), the date the dataset entered the PAC controlledenvironment, and the user who added it.
To list the object versions in a particular foreign dataset, mark the dataset with any non-blankcharacter the "C" column. An Object Version Selection List screen appears.
Displaying a Natural Object
1. To display version information for a Natural object, enter Code D (Display Versioned Object),the application, and optionally the Natural object name, version, and type (or ranges of these)on the Versioned Objects Reporting Menu.
If the application name is not specified, a selectionwindowof available applications is displayedon which you may make your selection.
Unless you have uniquely specified the object version to be displayed, anObject Version SelectionList screen appears.
2. On the Object Version Selection List, select the object version to display.
The Display Object Version screen appears:
335PAC User's Guide
Assigning and Maintaining Object Versions

15:43:57 ***** PREDICT APPLICATION CONTROL ***** 2000-01-01User PACUSR - Display Object Version -
Application ... ORDERSObject ........ ORD-COPY.0004 (Copycode)Saved ......... 1993-06-21 18:14:07Cataloged ..... 0000-01-02 00:00:00
Maintenance version used .......... 0003
Migration Event ... ORD_DC_01Created .......... 1990-06-21 17:53:13
--- Development Source Directory Information ---Library .... ORD-EXAM User-ID ...... SADXXSaved .. 1993-06-07 15:42:26Tp-System .. COMPLETE Terminal-ID .. 7 11Op-System .. MVS/XA Transaction .. NAT22NAT-Ver .... 2.2.3 Mode ......... ReportSize in ESIZE ........................ 88 Bytes
Additional Options ... N
Command ===>Enter-PF1---PF2---PF3---PF4---PF5---PF6---PF7---PF8---PF9---PF10--PF11--PF12---
Help Menu Exit Opts Canc
This screen identifies the name, version, and type of the object alongwith the application towhichit belongs.
It displays the date and time the object was saved and cataloged when it was brought into PAC(note the default values for Cataloged date and time in the example because the object typecopycode is not cataloged in PAC).
If the object has been maintained, it displays the maintenance version used; that is, the versionnumber of the object when it was checked out for maintenance.
It identifies the migration event that brought this object version into PAC and the date the eventwas created. If the object version was incorporated, the Incorporated field appears displaying thedate and time of incorporation.
PAC User's Guide336
Assigning and Maintaining Object Versions
Development Source Directory Information
Development source directory information reproduces the Natural directory of the object as itwas when the object was migrated into PAC. It includes
■ the name of the development library;■ the date and time the object was saved in the development library and the user who saved it;■ the TP monitor and operating system under which Natural was running in the developmentenvironment, along with the version of Natural used;
■ the terminal ID and the name of the transaction under which the object was saved.■ the programming mode of Natural used: Report or Structure; and■ the size of the object in bytes.
Additional Options
Type over the default N in the Additional Options fieldwith Y or press PF4 to access the followingadditional information about the versioned object:
ActionOptionDate and time and by whom the object version was migrated.DateScreens Object Version Source Object source code The Object Version Sourcescreen appears displaying theNatural editorwith a source listing for the object
Source
version. The source is not modifiable. However, certain editor commands areavailable for viewing the object.Screens Object Version Status Values Screens Display Object Status Versionedobject status The Object Version Status Values window displays the statuses
Status Values
in which the object version exists. You can access information about the objectversion in the status by enteringD in the "C" column. TheDisplayObject Statusscreen appears displaying the date and time the object version was migratedinto the status and the migration event that was used. The additional optionon the Display Object Status screen displays the user who created/modifiedthe event that migrated the object version to the status and the date and timeof the creation/modification.ScreensUsed ByObjects Subordinate object used by versioned object TheUsedby Objects window appears displaying the Natural program editor with in-
Used by Objects
formation about objects that use (that is, invoke using the Natural statementsFETCH, CALLNAT, or PERFORM) the specified object version during execu-tion.ScreensObjects Used Subordinate object object used TheObjects Usedwindowappears displaying the Natural program editor with information about the
Objects Used
subordinate objects (and their versions) that the specified object version uses.Subordinate objects are objects needed to compile another object, or invokedduring the execution of that object.
337PAC User's Guide
Assigning and Maintaining Object Versions
ActionOptionPredict Case objects used (If applicable) Lists Predict Case objects that thespecified object version uses.
PCAObjectsUsed
HISTORY command Invokes a user-modifiable routine to display user-definedinformation.
ExtendedUser In-formation
Screens Directory Display The Directory Display screen appears displayingsaved or catalog directory information for the object version in PAC. SeeDe-
List Directory
velopment Source Directory Information for a listing of the types of systeminformation displayed.
Displaying Database Calls for a Natural Object
You may review the use of database calls for Natural programs, subprograms, subroutines, andhelp routines.
To display database calls, enter the SHOW CALL direct command on the Display Object Versionscreen command line as shown below:
10:26:21 ***** PREDICT APPLICATION CONTROL **** 2001-04-10 User UKMJ - Display Object Version - Application ... HAIFI Object ........ APA.0001 (Program) Saved ......... 2001-03-28 11:04:08 Cataloged ..... 2001-03-28 11:04:08 Migration Event .. HINCCON Incorporated ..... 2001-03-28 15:02:58 --- Development Source Directory Information --- Library .... FIS User-ID ...... XSETGP Saved .. 2001-03-28 11:04:08 Tp-System .. COMPLETE Terminal-ID .. DAEFTCJ8 Op-System .. MVS/ESA Transaction .. NAT31 NAT-Ver .... 3.1.4 Mode ......... Structured Size in ESIZE ........................ 291 Bytes Additional Options ... N Command ===> SHOW CALL Enter-PF1---PF2---PF3---PF4---PF5---PF6---PF7---PF8---PF9---PF10--PF11--PF12--- Help Menu Exit Opts Canc ↩
For the particular object, its field information shows:
■ object and application name■ Natural version of that object
PAC User's Guide338
Assigning and Maintaining Object Versions
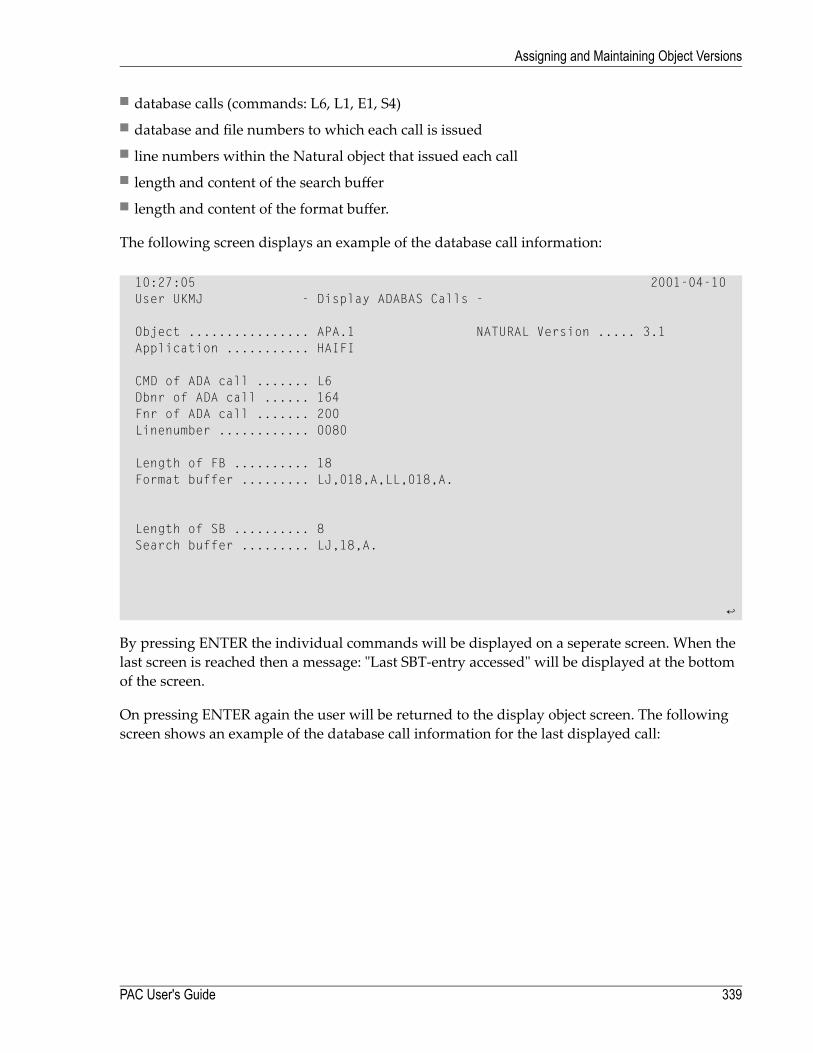
■ database calls (commands: L6, L1, E1, S4)■ database and file numbers to which each call is issued■ line numbers within the Natural object that issued each call■ length and content of the search buffer■ length and content of the format buffer.
The following screen displays an example of the database call information:
10:27:05 2001-04-10 User UKMJ - Display ADABAS Calls - Object ................ APA.1 NATURAL Version ..... 3.1 Application ........... HAIFI CMD of ADA call ....... L6 Dbnr of ADA call ...... 164 Fnr of ADA call ....... 200 Linenumber ............ 0080 Length of FB .......... 18 Format buffer ......... LJ,018,A,LL,018,A. Length of SB .......... 8 Search buffer ......... LJ,18,A. ↩
By pressing ENTER the individual commands will be displayed on a seperate screen. When thelast screen is reached then a message: "Last SBT-entry accessed" will be displayed at the bottomof the screen.
On pressing ENTER again the user will be returned to the display object screen. The followingscreen shows an example of the database call information for the last displayed call:
339PAC User's Guide
Assigning and Maintaining Object Versions
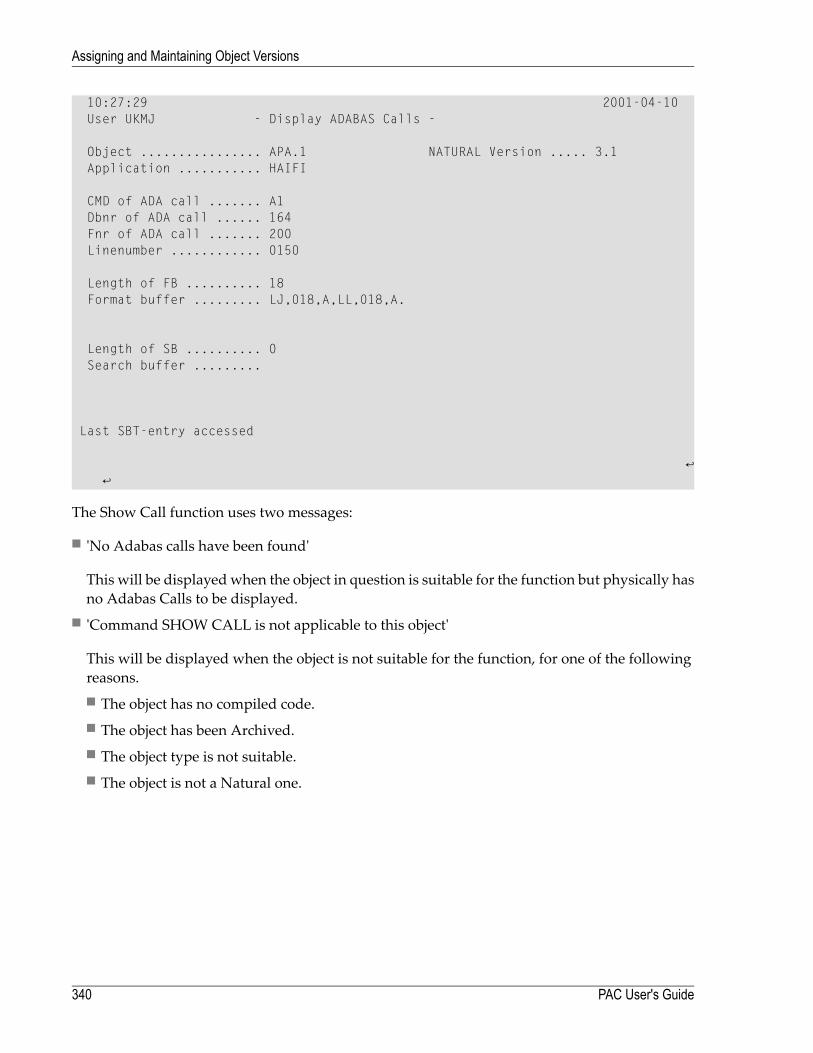
10:27:29 2001-04-10 User UKMJ - Display ADABAS Calls - Object ................ APA.1 NATURAL Version ..... 3.1 Application ........... HAIFI CMD of ADA call ....... A1 Dbnr of ADA call ...... 164 Fnr of ADA call ....... 200 Linenumber ............ 0150 Length of FB .......... 18 Format buffer ......... LJ,018,A,LL,018,A. Length of SB .......... 0 Search buffer ......... Last SBT-entry accessed ↩ ↩
The Show Call function uses two messages:
■ 'No Adabas calls have been found'
This will be displayed when the object in question is suitable for the function but physically hasno Adabas Calls to be displayed.
■ 'Command SHOW CALL is not applicable to this object'
This will be displayed when the object is not suitable for the function, for one of the followingreasons.■ The object has no compiled code.■ The object has been Archived.■ The object type is not suitable.■ The object is not a Natural one.
PAC User's Guide340
Assigning and Maintaining Object Versions
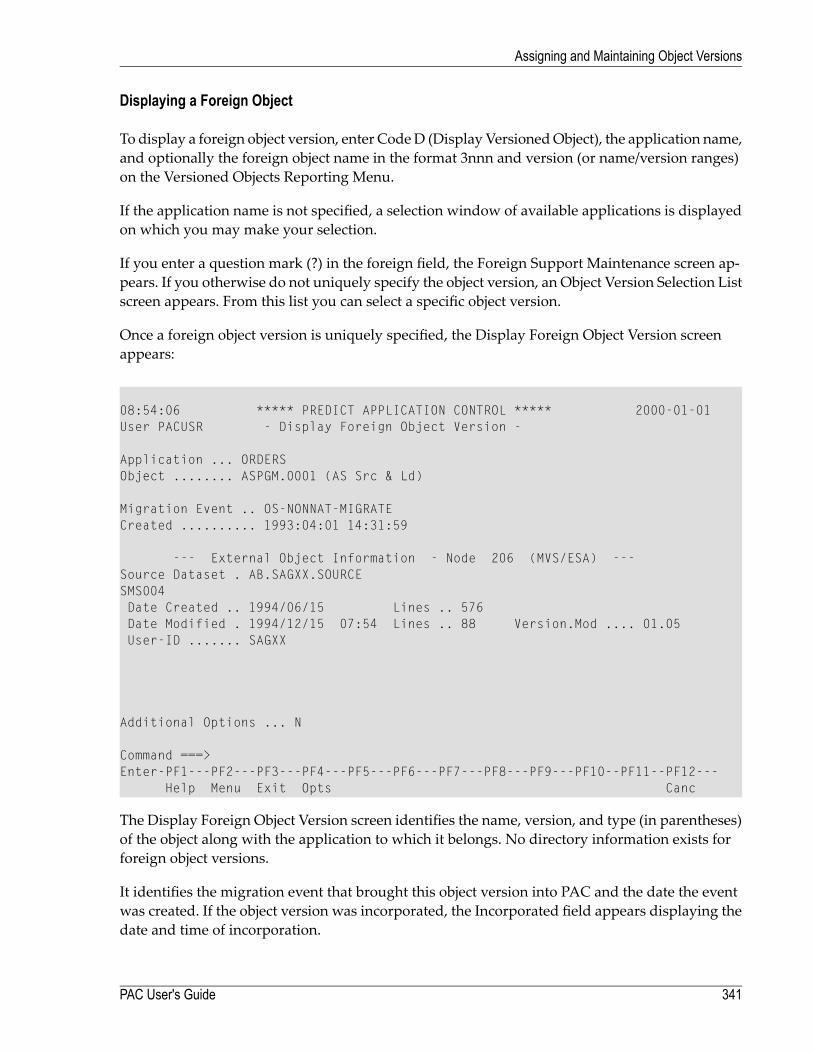
Displaying a Foreign Object
To display a foreign object version, enter CodeD (Display VersionedObject), the application name,and optionally the foreign object name in the format 3nnn and version (or name/version ranges)on the Versioned Objects Reporting Menu.
If the application name is not specified, a selection window of available applications is displayedon which you may make your selection.
If you enter a question mark (?) in the foreign field, the Foreign Support Maintenance screen ap-pears. If you otherwise do not uniquely specify the object version, an Object Version Selection Listscreen appears. From this list you can select a specific object version.
Once a foreign object version is uniquely specified, the Display Foreign Object Version screenappears:
08:54:06 ***** PREDICT APPLICATION CONTROL ***** 2000-01-01User PACUSR - Display Foreign Object Version -
Application ... ORDERSObject ........ ASPGM.0001 (AS Src & Ld)
Migration Event .. OS-NONNAT-MIGRATECreated .......... 1993:04:01 14:31:59
--- External Object Information - Node 206 (MVS/ESA) ---Source Dataset . AB.SAGXX.SOURCESMS004Date Created .. 1994/06/15 Lines .. 576Date Modified . 1994/12/15 07:54 Lines .. 88 Version.Mod .... 01.05User-ID ....... SAGXX
Additional Options ... N
Command ===>Enter-PF1---PF2---PF3---PF4---PF5---PF6---PF7---PF8---PF9---PF10--PF11--PF12---
Help Menu Exit Opts Canc
The Display Foreign Object Version screen identifies the name, version, and type (in parentheses)of the object along with the application to which it belongs. No directory information exists forforeign object versions.
It identifies the migration event that brought this object version into PAC and the date the eventwas created. If the object version was incorporated, the Incorporated field appears displaying thedate and time of incorporation.
341PAC User's Guide
Assigning and Maintaining Object Versions
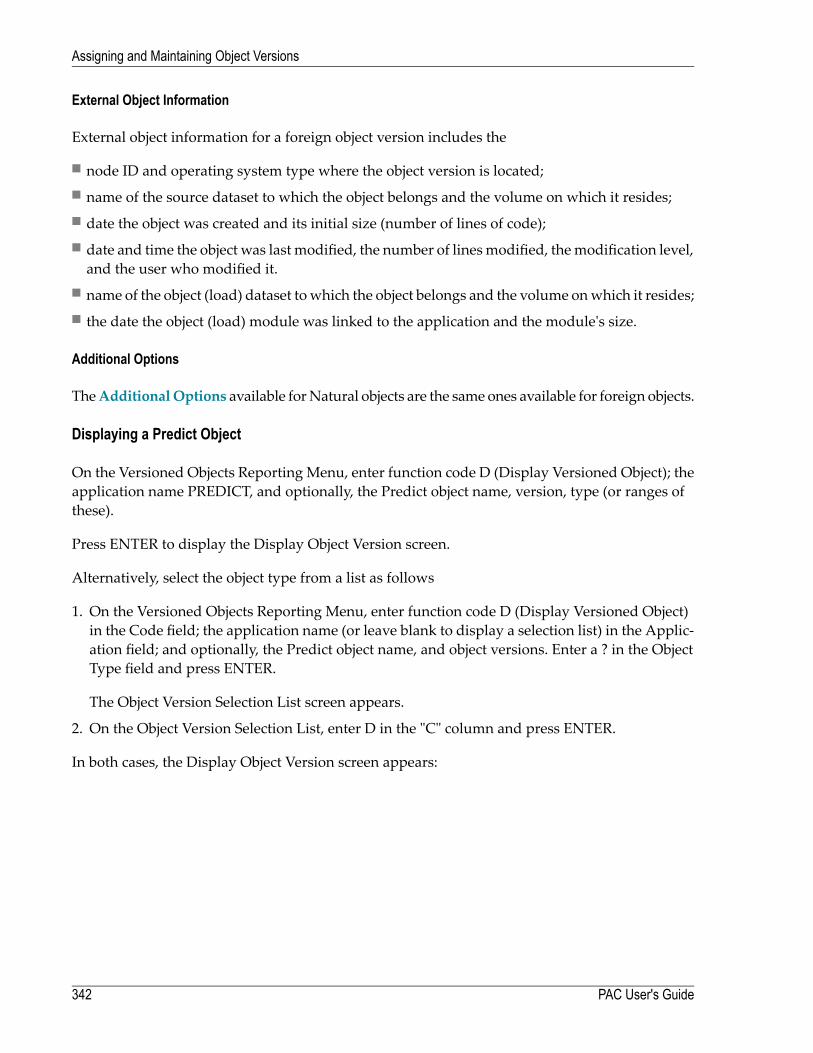
External Object Information
External object information for a foreign object version includes the
■ node ID and operating system type where the object version is located;■ name of the source dataset to which the object belongs and the volume on which it resides;■ date the object was created and its initial size (number of lines of code);■ date and time the object was last modified, the number of linesmodified, themodification level,and the user who modified it.
■ name of the object (load) dataset towhich the object belongs and the volume onwhich it resides;■ the date the object (load) module was linked to the application and the module's size.
Additional Options
TheAdditionalOptions available forNatural objects are the same ones available for foreign objects.
Displaying a Predict Object
On the Versioned Objects Reporting Menu, enter function code D (Display Versioned Object); theapplication name PREDICT, and optionally, the Predict object name, version, type (or ranges ofthese).
Press ENTER to display the Display Object Version screen.
Alternatively, select the object type from a list as follows
1. On the Versioned Objects Reporting Menu, enter function code D (Display Versioned Object)in the Code field; the application name (or leave blank to display a selection list) in the Applic-ation field; and optionally, the Predict object name, and object versions. Enter a ? in the ObjectType field and press ENTER.
The Object Version Selection List screen appears.
2. On the Object Version Selection List, enter D in the "C" column and press ENTER.
In both cases, the Display Object Version screen appears:
PAC User's Guide342
Assigning and Maintaining Object Versions
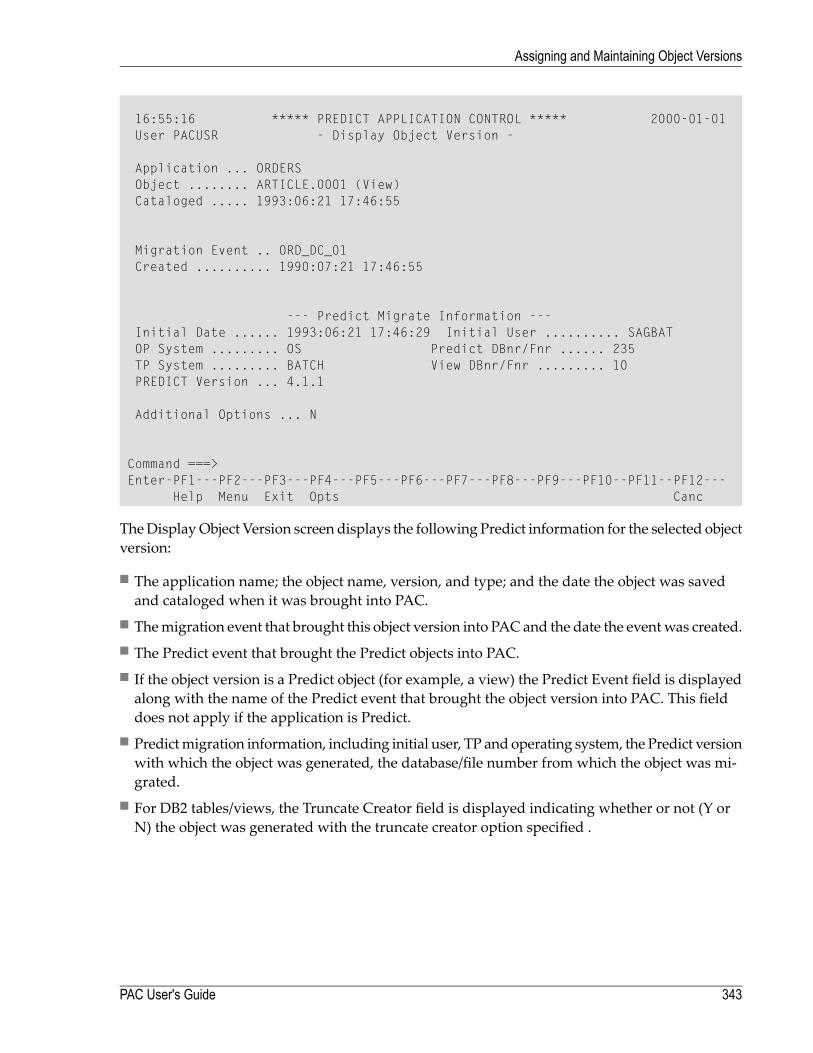
16:55:16 ***** PREDICT APPLICATION CONTROL ***** 2000-01-01User PACUSR - Display Object Version -
Application ... ORDERSObject ........ ARTICLE.0001 (View)Cataloged ..... 1993:06:21 17:46:55
Migration Event .. ORD_DC_01Created .......... 1990:07:21 17:46:55
--- Predict Migrate Information ---Initial Date ...... 1993:06:21 17:46:29 Initial User .......... SAGBATOP System ......... OS Predict DBnr/Fnr ...... 235TP System ......... BATCH View DBnr/Fnr ......... 10PREDICT Version ... 4.1.1
Additional Options ... N
Command ===>Enter-PF1---PF2---PF3---PF4---PF5---PF6---PF7---PF8---PF9---PF10--PF11--PF12---
Help Menu Exit Opts Canc
TheDisplayObject Version screen displays the following Predict information for the selected objectversion:
■ The application name; the object name, version, and type; and the date the object was savedand cataloged when it was brought into PAC.
■ Themigration event that brought this object version into PAC and the date the eventwas created.■ The Predict event that brought the Predict objects into PAC.■ If the object version is a Predict object (for example, a view) the Predict Event field is displayedalong with the name of the Predict event that brought the object version into PAC. This fielddoes not apply if the application is Predict.
■ Predictmigration information, including initial user, TP and operating system, the Predict versionwith which the object was generated, the database/file number from which the object was mi-grated.
■ For DB2 tables/views, the Truncate Creator field is displayed indicating whether or not (Y orN) the object was generated with the truncate creator option specified .
343PAC User's Guide
Assigning and Maintaining Object Versions
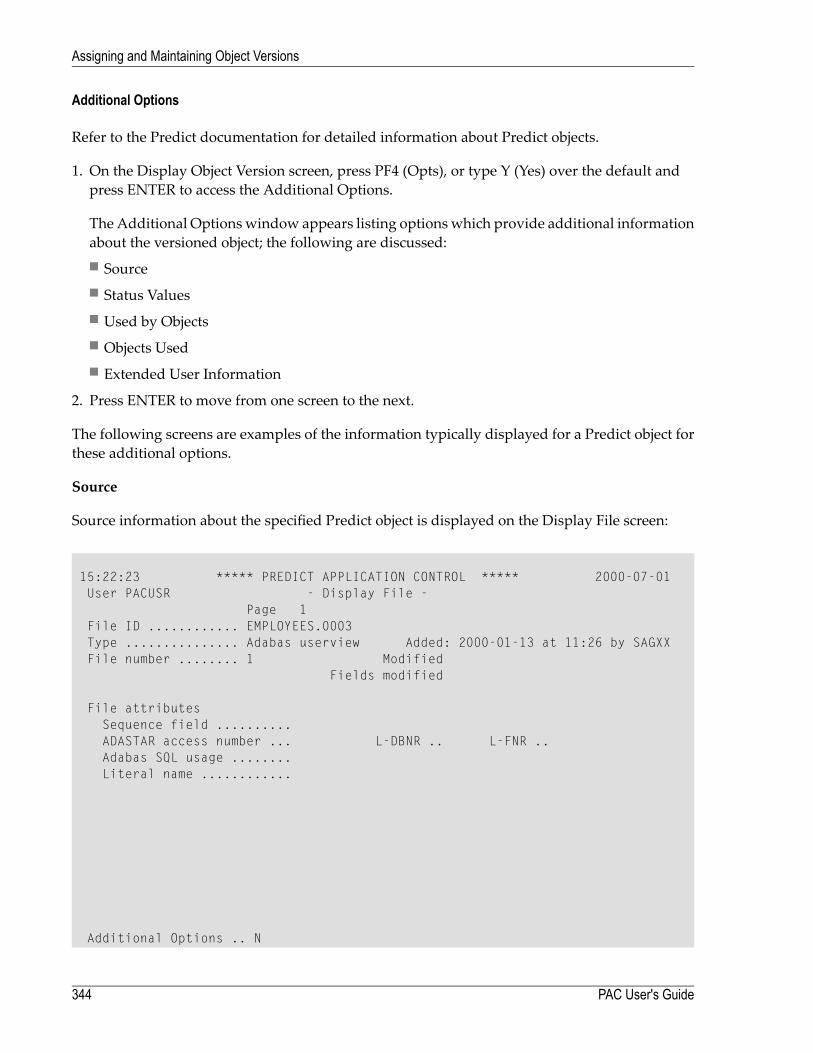
Additional Options
Refer to the Predict documentation for detailed information about Predict objects.
1. On the Display Object Version screen, press PF4 (Opts), or type Y (Yes) over the default andpress ENTER to access the Additional Options.
The Additional Options window appears listing options which provide additional informationabout the versioned object; the following are discussed:■ Source■ Status Values■ Used by Objects■ Objects Used■ Extended User Information
2. Press ENTER to move from one screen to the next.
The following screens are examples of the information typically displayed for a Predict object forthese additional options.
Source
Source information about the specified Predict object is displayed on the Display File screen:
15:22:23 ***** PREDICT APPLICATION CONTROL ***** 2000-07-01User PACUSR - Display File -
Page 1File ID ............ EMPLOYEES.0003Type ............... Adabas userview Added: 2000-01-13 at 11:26 by SAGXXFile number ........ 1 Modified
Fields modified
File attributesSequence field ..........ADASTAR access number ... L-DBNR .. L-FNR ..Adabas SQL usage ........Literal name ............
Additional Options .. N
PAC User's Guide344
Assigning and Maintaining Object Versions
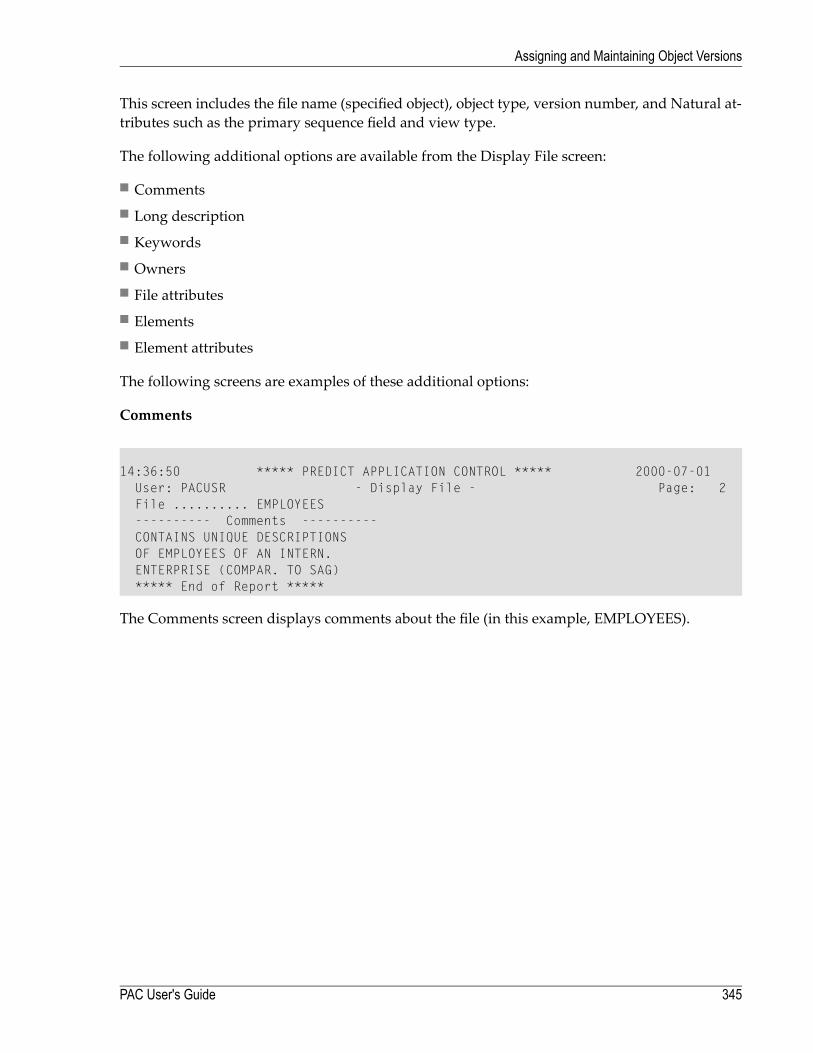
This screen includes the file name (specified object), object type, version number, and Natural at-tributes such as the primary sequence field and view type.
The following additional options are available from the Display File screen:
■ Comments■ Long description■ Keywords■ Owners■ File attributes■ Elements■ Element attributes
The following screens are examples of these additional options:
Comments
14:36:50 ***** PREDICT APPLICATION CONTROL ***** 2000-07-01User: PACUSR - Display File - Page: 2File .......... EMPLOYEES---------- Comments ----------CONTAINS UNIQUE DESCRIPTIONSOF EMPLOYEES OF AN INTERN.ENTERPRISE (COMPAR. TO SAG)***** End of Report *****
The Comments screen displays comments about the file (in this example, EMPLOYEES).
345PAC User's Guide
Assigning and Maintaining Object Versions
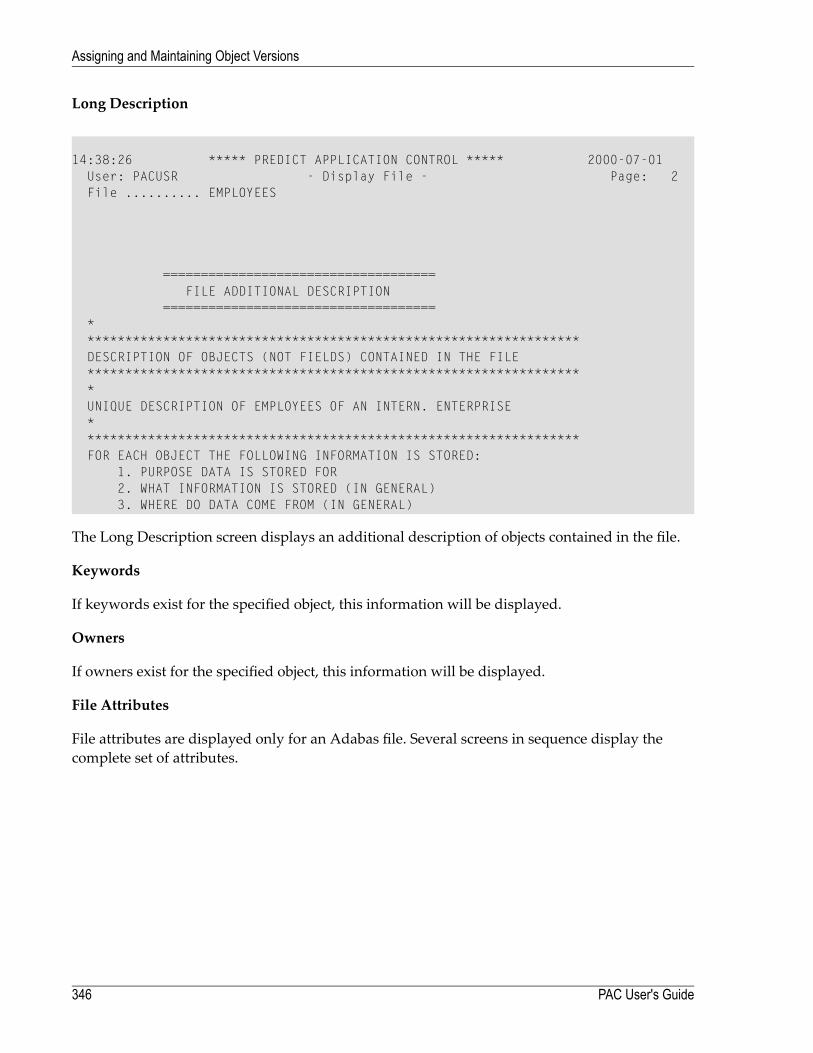
Long Description
14:38:26 ***** PREDICT APPLICATION CONTROL ***** 2000-07-01User: PACUSR - Display File - Page: 2File .......... EMPLOYEES
====================================FILE ADDITIONAL DESCRIPTION
====================================******************************************************************DESCRIPTION OF OBJECTS (NOT FIELDS) CONTAINED IN THE FILE******************************************************************UNIQUE DESCRIPTION OF EMPLOYEES OF AN INTERN. ENTERPRISE******************************************************************FOR EACH OBJECT THE FOLLOWING INFORMATION IS STORED:
1. PURPOSE DATA IS STORED FOR2. WHAT INFORMATION IS STORED (IN GENERAL)3. WHERE DO DATA COME FROM (IN GENERAL)
The Long Description screen displays an additional description of objects contained in the file.
Keywords
If keywords exist for the specified object, this information will be displayed.
Owners
If owners exist for the specified object, this information will be displayed.
File Attributes
File attributes are displayed only for an Adabas file. Several screens in sequence display thecomplete set of attributes.
PAC User's Guide346
Assigning and Maintaining Object Versions
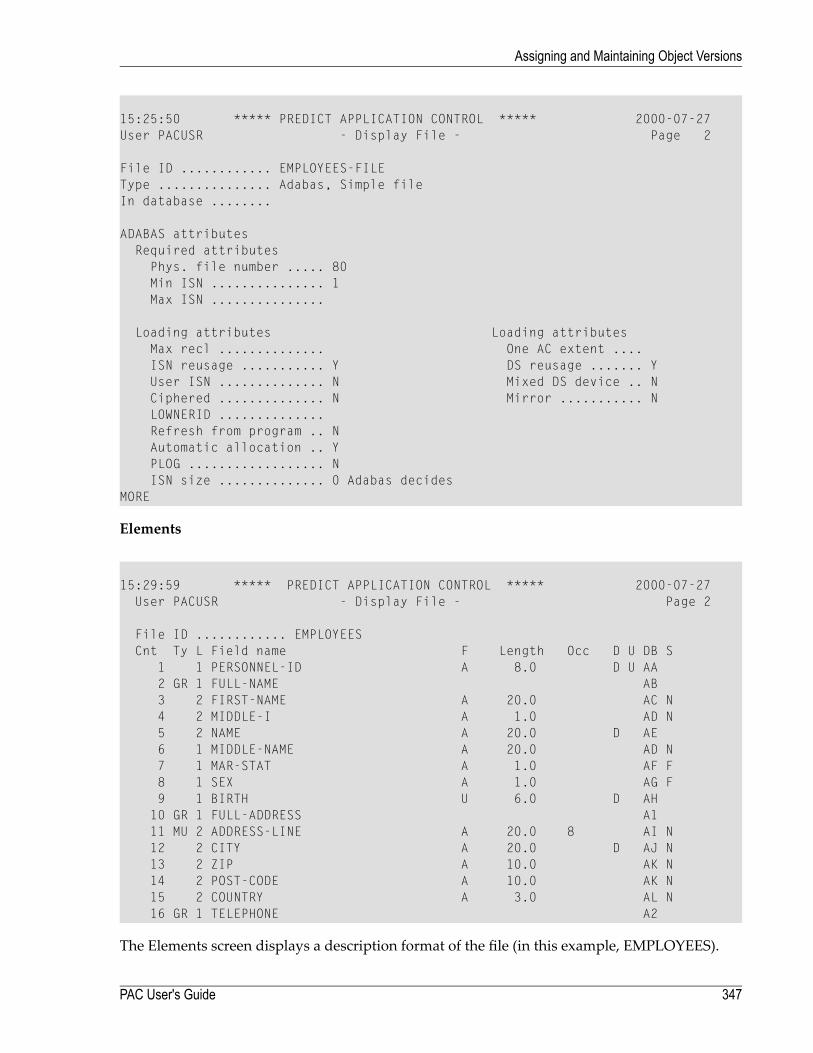
15:25:50 ***** PREDICT APPLICATION CONTROL ***** 2000-07-27User PACUSR - Display File - Page 2
File ID ............ EMPLOYEES-FILEType ............... Adabas, Simple fileIn database ........
ADABAS attributesRequired attributes
Phys. file number ..... 80Min ISN ............... 1Max ISN ...............
Loading attributes Loading attributesMax recl .............. One AC extent ....ISN reusage ........... Y DS reusage ....... YUser ISN .............. N Mixed DS device .. NCiphered .............. N Mirror ........... NLOWNERID ..............Refresh from program .. NAutomatic allocation .. YPLOG .................. NISN size .............. 0 Adabas decides
MORE
Elements
15:29:59 ***** PREDICT APPLICATION CONTROL ***** 2000-07-27User PACUSR - Display File - Page 2
File ID ............ EMPLOYEESCnt Ty L Field name F Length Occ D U DB S
1 1 PERSONNEL-ID A 8.0 D U AA2 GR 1 FULL-NAME AB3 2 FIRST-NAME A 20.0 AC N4 2 MIDDLE-I A 1.0 AD N5 2 NAME A 20.0 D AE6 1 MIDDLE-NAME A 20.0 AD N7 1 MAR-STAT A 1.0 AF F8 1 SEX A 1.0 AG F9 1 BIRTH U 6.0 D AH10 GR 1 FULL-ADDRESS A111 MU 2 ADDRESS-LINE A 20.0 8 AI N12 2 CITY A 20.0 D AJ N13 2 ZIP A 10.0 AK N14 2 POST-CODE A 10.0 AK N15 2 COUNTRY A 3.0 AL N16 GR 1 TELEPHONE A2
The Elements screen displays a description format of the file (in this example, EMPLOYEES).
347PAC User's Guide
Assigning and Maintaining Object Versions
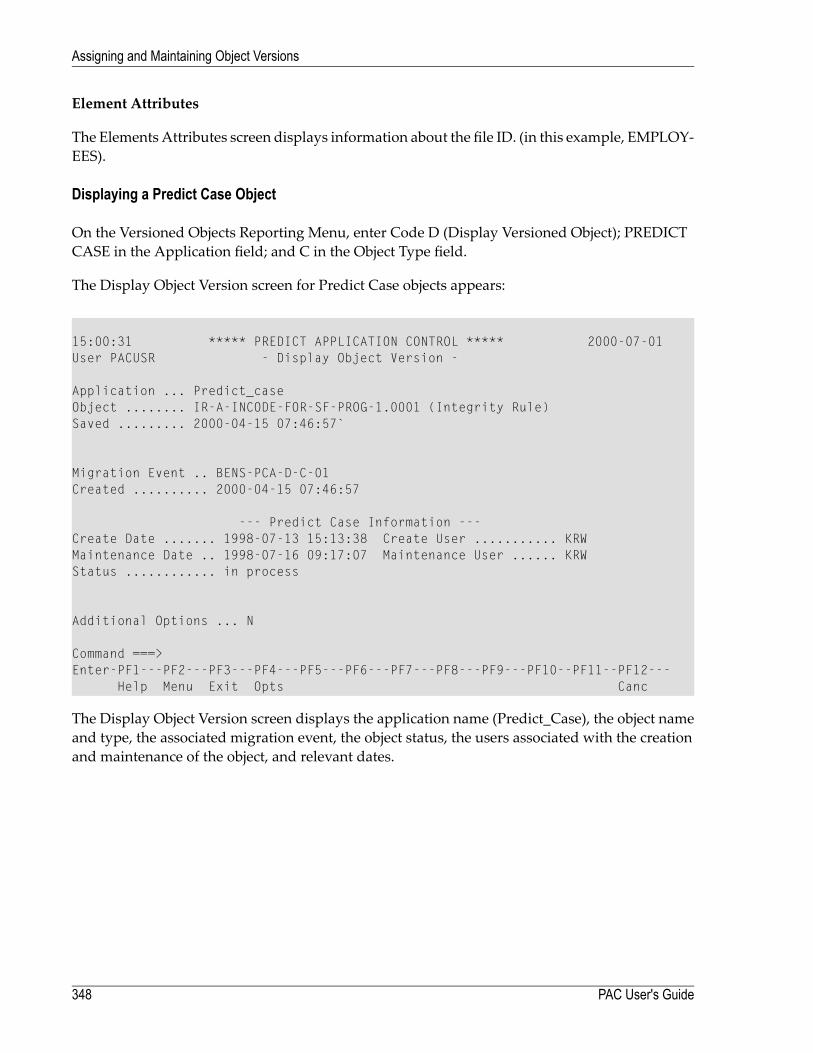
Element Attributes
The Elements Attributes screen displays information about the file ID. (in this example, EMPLOY-EES).
Displaying a Predict Case Object
On the Versioned Objects Reporting Menu, enter Code D (Display Versioned Object); PREDICTCASE in the Application field; and C in the Object Type field.
The Display Object Version screen for Predict Case objects appears:
15:00:31 ***** PREDICT APPLICATION CONTROL ***** 2000-07-01User PACUSR - Display Object Version -
Application ... Predict_caseObject ........ IR-A-INCODE-FOR-SF-PROG-1.0001 (Integrity Rule)Saved ......... 2000-04-15 07:46:57`
Migration Event .. BENS-PCA-D-C-01Created .......... 2000-04-15 07:46:57
--- Predict Case Information ---Create Date ....... 1998-07-13 15:13:38 Create User ........... KRWMaintenance Date .. 1998-07-16 09:17:07 Maintenance User ...... KRWStatus ............ in process
Additional Options ... N
Command ===>Enter-PF1---PF2---PF3---PF4---PF5---PF6---PF7---PF8---PF9---PF10--PF11--PF12---
Help Menu Exit Opts Canc
The Display Object Version screen displays the application name (Predict_Case), the object nameand type, the associated migration event, the object status, the users associated with the creationand maintenance of the object, and relevant dates.
PAC User's Guide348
Assigning and Maintaining Object Versions
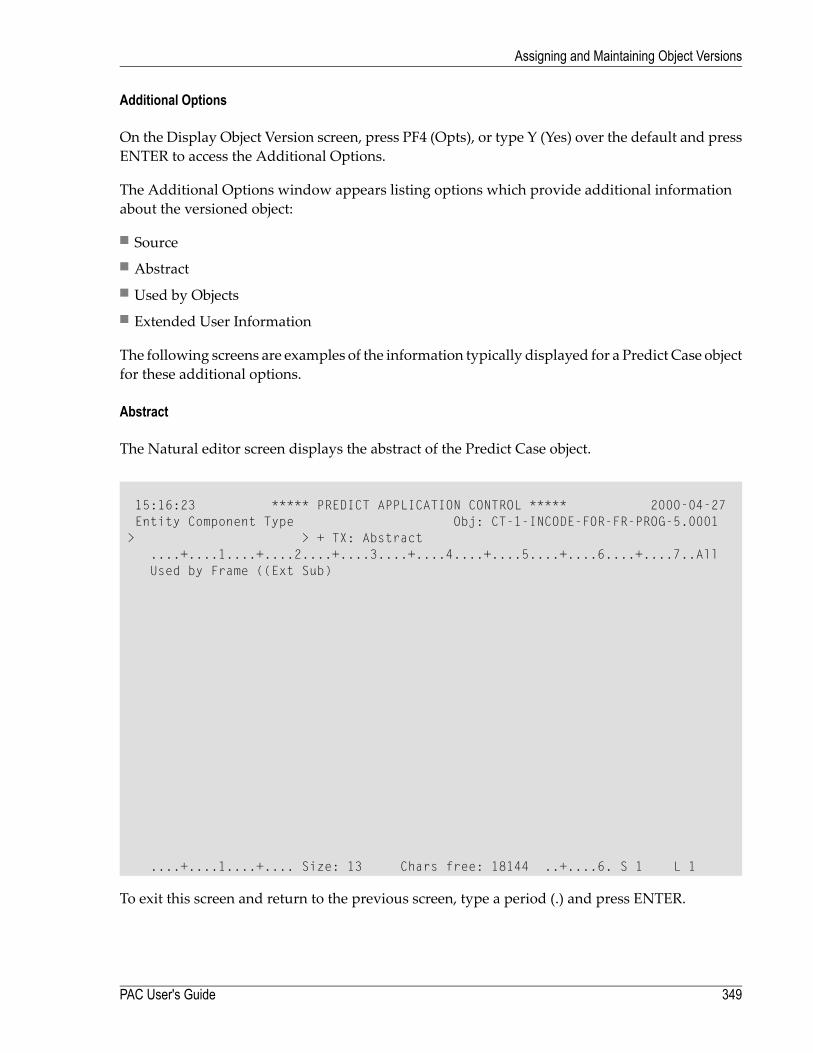
Additional Options
On the Display Object Version screen, press PF4 (Opts), or type Y (Yes) over the default and pressENTER to access the Additional Options.
The Additional Options window appears listing options which provide additional informationabout the versioned object:
■ Source■ Abstract■ Used by Objects■ Extended User Information
The following screens are examples of the information typically displayed for a Predict Case objectfor these additional options.
Abstract
The Natural editor screen displays the abstract of the Predict Case object.
15:16:23 ***** PREDICT APPLICATION CONTROL ***** 2000-04-27Entity Component Type Obj: CT-1-INCODE-FOR-FR-PROG-5.0001
> > + TX: Abstract....+....1....+....2....+....3....+....4....+....5....+....6....+....7..AllUsed by Frame ((Ext Sub)
....+....1....+.... Size: 13 Chars free: 18144 ..+....6. S 1 L 1
To exit this screen and return to the previous screen, type a period (.) and press ENTER.
349PAC User's Guide
Assigning and Maintaining Object Versions
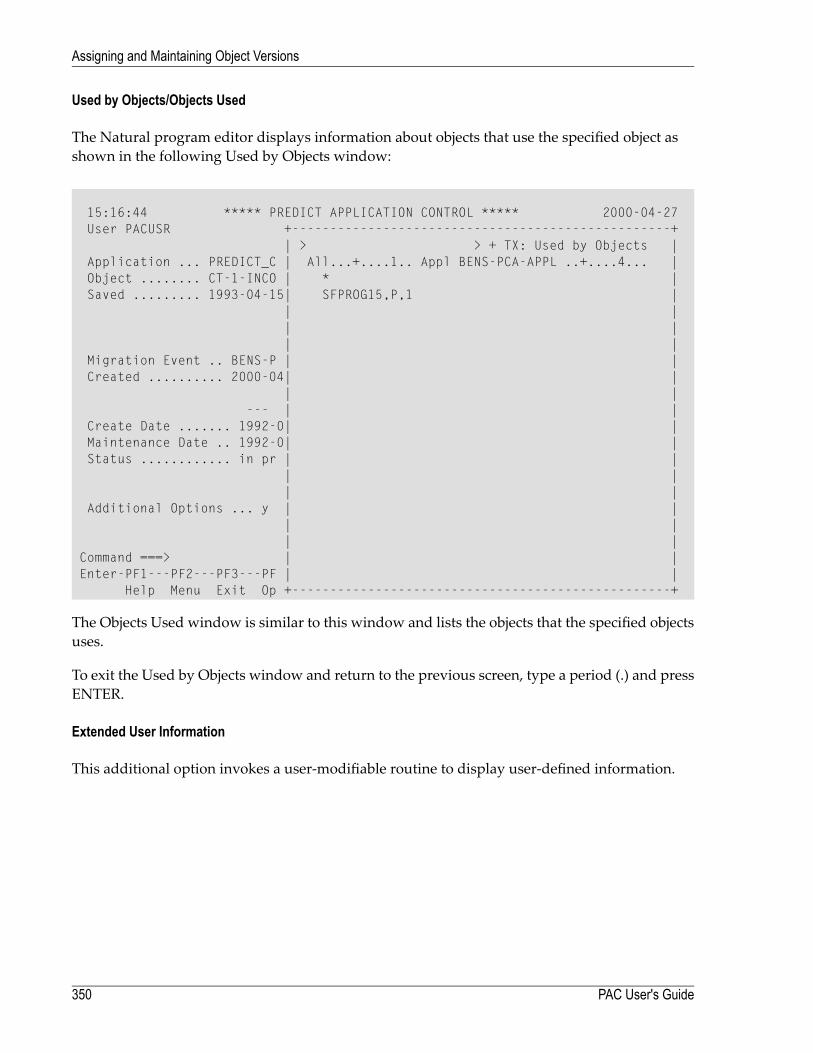
Used by Objects/Objects Used
The Natural program editor displays information about objects that use the specified object asshown in the following Used by Objects window:
15:16:44 ***** PREDICT APPLICATION CONTROL ***** 2000-04-27User PACUSR +--------------------------------------------------+
| > > + TX: Used by Objects |Application ... PREDICT_C | All...+....1.. Appl BENS-PCA-APPL ..+....4... |Object ........ CT-1-INCO | * |Saved ......... 1993-04-15| SFPROG15,P,1 |
| || || |
Migration Event .. BENS-P | |Created .......... 2000-04| |
| |--- | |
Create Date ....... 1992-0| |Maintenance Date .. 1992-0| |Status ............ in pr | |
| || |
Additional Options ... y | || || |
Command ===> | |Enter-PF1---PF2---PF3---PF | |
Help Menu Exit Op +--------------------------------------------------+
The Objects Used window is similar to this window and lists the objects that the specified objectsuses.
To exit the Used by Objects window and return to the previous screen, type a period (.) and pressENTER.
Extended User Information
This additional option invokes a user-modifiable routine to display user-defined information.
PAC User's Guide350
Assigning and Maintaining Object Versions
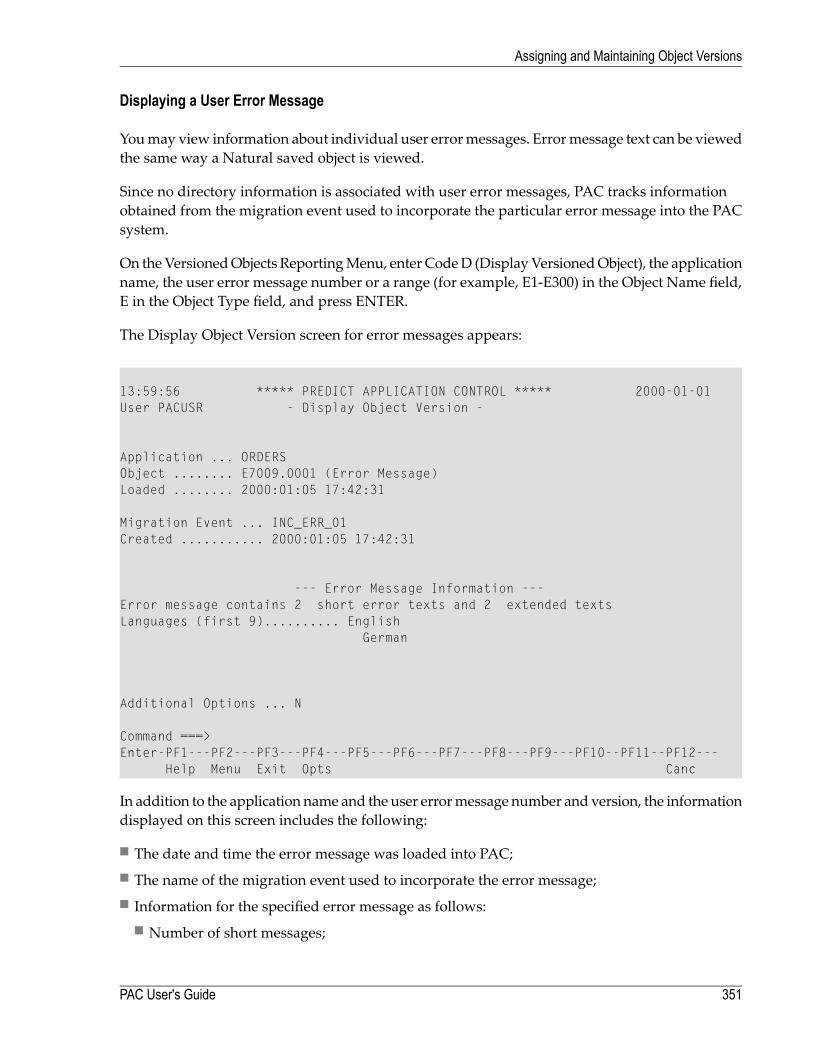
Displaying a User Error Message
Youmay view information about individual user errormessages. Errormessage text can be viewedthe same way a Natural saved object is viewed.
Since no directory information is associated with user error messages, PAC tracks informationobtained from the migration event used to incorporate the particular error message into the PACsystem.
On theVersionedObjects ReportingMenu, enter CodeD (DisplayVersionedObject), the applicationname, the user error message number or a range (for example, E1-E300) in the Object Name field,E in the Object Type field, and press ENTER.
The Display Object Version screen for error messages appears:
13:59:56 ***** PREDICT APPLICATION CONTROL ***** 2000-01-01User PACUSR - Display Object Version -
Application ... ORDERSObject ........ E7009.0001 (Error Message)Loaded ........ 2000:01:05 17:42:31
Migration Event ... INC_ERR_01Created ........... 2000:01:05 17:42:31
--- Error Message Information ---Error message contains 2 short error texts and 2 extended textsLanguages (first 9).......... English
German
Additional Options ... N
Command ===>Enter-PF1---PF2---PF3---PF4---PF5---PF6---PF7---PF8---PF9---PF10--PF11--PF12---
Help Menu Exit Opts Canc
In addition to the application name and the user errormessage number and version, the informationdisplayed on this screen includes the following:
■ The date and time the error message was loaded into PAC;■ The name of the migration event used to incorporate the error message;■ Information for the specified error message as follows:
■ Number of short messages;
351PAC User's Guide
Assigning and Maintaining Object Versions
■ Number of extended messages;■ Languages in which the message has been defined (up to nine in this screen example).
Displaying Additional Options for a User Error Message
On the Display Object Version screen, press PF4 (Opts), or type Y (Yes) over the default and pressENTER to access the Additional Options.
The Additional Options window appears listing options which provide additional informationabout the error message.
■ Source■ Status Values■ Objects Used■ Used by Objects■ Extended User Information■ List Directory(If applicable) Displays the saved/cataloged directory information for the object. (Not availablefor user error message objects.)
Source
The Display Error Version screen shown in the following example displays source informationabout the specified user error message, including the name of the application, the name (number)of the error message object, and the languages in which the error message exists:
PAC User's Guide352
Assigning and Maintaining Object Versions
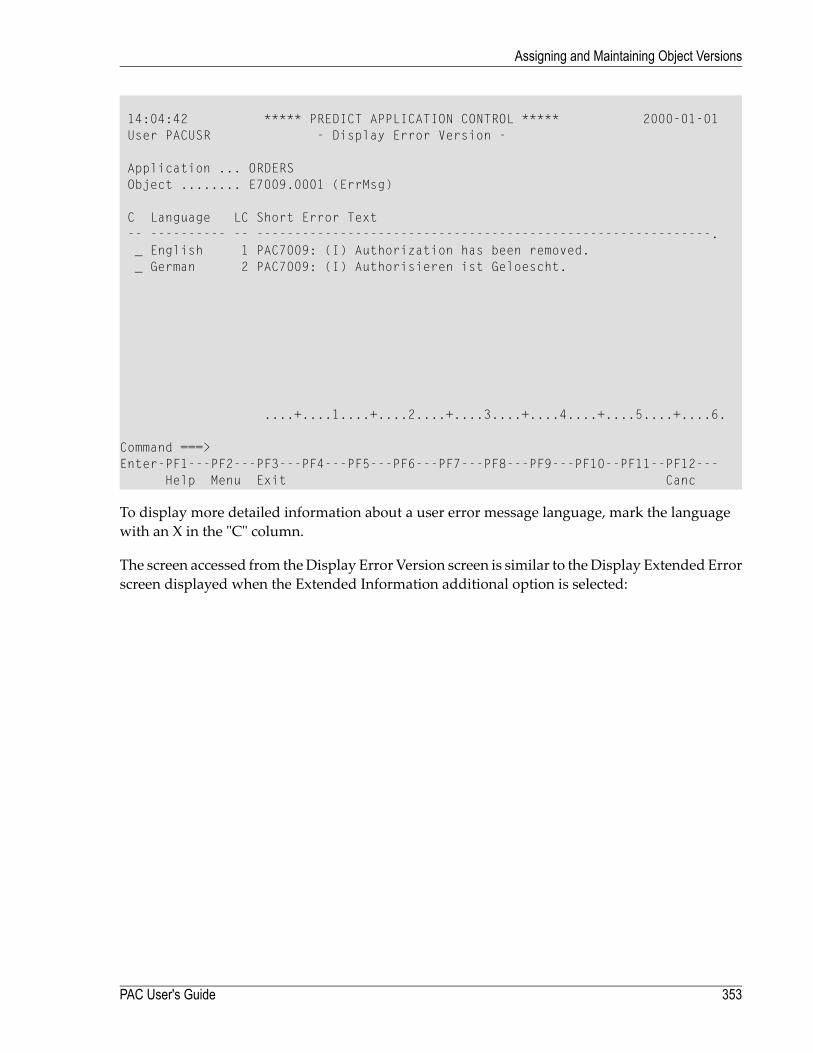
14:04:42 ***** PREDICT APPLICATION CONTROL ***** 2000-01-01User PACUSR - Display Error Version -
Application ... ORDERSObject ........ E7009.0001 (ErrMsg)
C Language LC Short Error Text-- ---------- -- ------------------------------------------------------------._ English 1 PAC7009: (I) Authorization has been removed._ German 2 PAC7009: (I) Authorisieren ist Geloescht.
....+....1....+....2....+....3....+....4....+....5....+....6.
Command ===>Enter-PF1---PF2---PF3---PF4---PF5---PF6---PF7---PF8---PF9---PF10--PF11--PF12---
Help Menu Exit Canc
To display more detailed information about a user error message language, mark the languagewith an X in the "C" column.
The screen accessed from theDisplay Error Version screen is similar to theDisplay Extended Errorscreen displayed when the Extended Information additional option is selected:
353PAC User's Guide
Assigning and Maintaining Object Versions

14:06:00 ***** PREDICT APPLICATION CONTROL ***** 2000-07-01User PACUSR - Display Extended Error Nr. E7009 English
Short Text
PAC7009: (I) Authorization has been removed.
Explanation
The Authorization for the specified Event has been removed, theEvent may be modified.
Recommended Action
Re-authorize the event before submitting.
Command ===>Enter-PF1---PF2---PF3---PF4---PF5---PF6---PF7---PF8---PF9---PF10--PF11--PF12---
Help Menu Exit Canc
TheDisplay Extended Error screen displays the short text, explanation of themessage, and recom-mended action, of the specified user error message.
Status Values
The Object Version Status Values window is accessed from the Display Object Version screenwhen the Status Values additional option is selected:
PAC User's Guide354
Assigning and Maintaining Object Versions
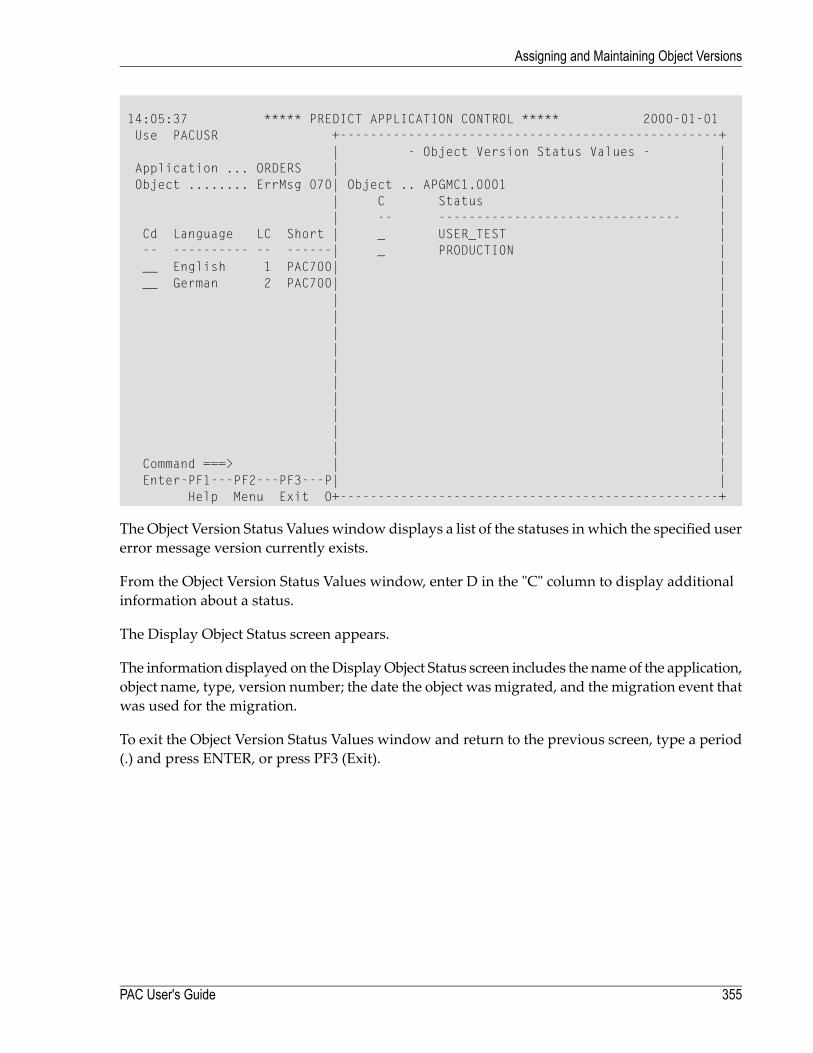
14:05:37 ***** PREDICT APPLICATION CONTROL ***** 2000-01-01Use PACUSR +--------------------------------------------------+
| - Object Version Status Values - |Application ... ORDERS | |Object ........ ErrMsg 070| Object .. APGMC1.0001 |
| C Status || -- -------------------------------- |
Cd Language LC Short | _ USER_TEST |-- ---------- -- ------| _ PRODUCTION |__ English 1 PAC700| |__ German 2 PAC700| |
| || || || || || || || || || |
Command ===> | |Enter-PF1---PF2---PF3---P| |
Help Menu Exit O+--------------------------------------------------+
The Object Version Status Values window displays a list of the statuses in which the specified usererror message version currently exists.
From the Object Version Status Values window, enter D in the "C" column to display additionalinformation about a status.
The Display Object Status screen appears.
The information displayed on theDisplayObject Status screen includes the name of the application,object name, type, version number; the date the object was migrated, and the migration event thatwas used for the migration.
To exit the Object Version Status Values window and return to the previous screen, type a period(.) and press ENTER, or press PF3 (Exit).
355PAC User's Guide
Assigning and Maintaining Object Versions
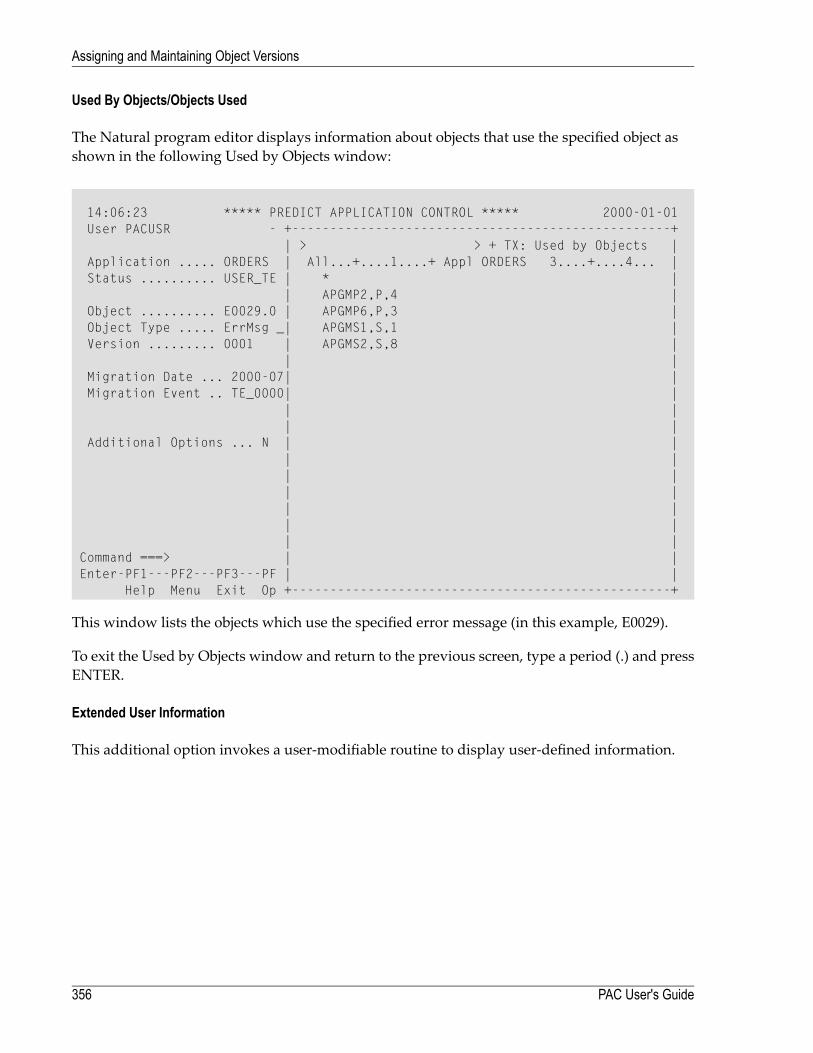
Used By Objects/Objects Used
The Natural program editor displays information about objects that use the specified object asshown in the following Used by Objects window:
14:06:23 ***** PREDICT APPLICATION CONTROL ***** 2000-01-01User PACUSR - +--------------------------------------------------+
| > > + TX: Used by Objects |Application ..... ORDERS | All...+....1....+ Appl ORDERS 3....+....4... |Status .......... USER_TE | * |
| APGMP2,P,4 |Object .......... E0029.0 | APGMP6,P,3 |Object Type ..... ErrMsg _| APGMS1,S,1 |Version ......... 0001 | APGMS2,S,8 |
| |Migration Date ... 2000-07| |Migration Event .. TE_0000| |
| || |
Additional Options ... N | || || || || || || |
Command ===> | |Enter-PF1---PF2---PF3---PF | |
Help Menu Exit Op +--------------------------------------------------+
This window lists the objects which use the specified error message (in this example, E0029).
To exit the Used by Objects window and return to the previous screen, type a period (.) and pressENTER.
Extended User Information
This additional option invokes a user-modifiable routine to display user-defined information.
PAC User's Guide356
Assigning and Maintaining Object Versions
Listing Objects with No Application Status
You may list the object versions of an application that have never been migrated to any status.
This information is useful when, for example, you are creating a list of objects to be archived orretired.
On theVersionedObjects ReportingMenu, enter function codeU (List ObjectswithNoApplicationStatus), leave the object field blank, and press ENTER.
The Object Versions with No Status screen appears displaying the following information:
■ The object name and version;■ The date and time the object version was created;■ The object type (for example, program, subroutine).
Object History
You may display information about an object's history in PAC.
On the Versioned Objects Reporting Menu, enter function code V (Object History) in the Codefield; the desired application name; optionally, the object name, type, and version, or range notation;then press ENTER.
The Object Version Selection List screen appears as shown in the following example:
357PAC User's Guide
Assigning and Maintaining Object Versions
08:36:16 ***** PREDICT APPLICATION CONTROL ***** 2000-07-01User PACUSR - Object Version Selection List -
C Nr Object Name Object Type Ver Migration Date-Time- -- -------------------------------- --------------- ---- --------------------_ 1 ORD-MAIN Program 0004 1997-06-15 07:58:05
USER_TEST 1997-06-15 07:58:43_ 2 ORD-MAIN Program 0003 1997-06-14 20:00:07
PRODUCTION 1997-06-15 07:56:13_ 3 ORD-MAIN Program 0002 1997-06-13 14:24:08
SYSTEMS_TEST 1997-06-13 16:05:01HISTORY-PRODUCTION 1997-06-13 16:07:26
_ 4 ORD-MAIN Program 0001 1990-06-21 17:53:14_ 5 ORD-MAI1 Program 0004 1997-06-15 07:58:06
USER_TEST 1997-06-15 07:58:43_ 6 ORD-MAI1 Program 0003 1997-06-14 20:00:07
PRODUCTION 1997-06-15 07:56:13_ 7 ORD-MAI1 Program 0002 1997-06-13 14:24:08
SYSTEMS_TEST 1997-06-13 16:05:01Mark Selection, Enter Number or 'T' (Top) __
PAC2041: Mark one or more lines for display.Command ===>Enter-PF1---PF2---PF3---PF4---PF5---PF6---PF7---PF8---PF9---PF10--PF11--PF12---
Help Menu Exit -- + Canc
The Object Version Selection List screen displays the following information:
■ List of objects in the Object Name column.■ The statuses in which each object version exists (listed below each object name).■ The type of each object in the Object Type column.■ The object version in the "Ver" column.■ The date and time that each object version was created and moved to a specific status in theMigration Date-Time column.
■ An object is highlighted to indicate that it did not compile; that is, it exists in saved form only.
For example, this screen shows that Version 0002 of the program ORD-MAIN was moved intoControl status on 1997/06/13 at 14:24:08, into Systems Test status on 1997/06/13 at 16:05:01; andinto History and Production status on 1997/06/13 at 16:07:26.
To access the following sub-functions directly from the Object Version Selection List, enter thecode for the desired sub-function in the "C" column:
FunctionCodeDisplay a versioned object.DHard copy a versioned object.HSelect a versioned object and return to the Versioned Objects Reporting Menu.S
PAC User's Guide358
Assigning and Maintaining Object Versions
If you enter S in the "C" column or you enter the object number (from the "Nr" column) in theMark Selection... field, the VersionedObjects ReportingMenu is displayed onwhich youmay selecta sub-function.
359PAC User's Guide
Assigning and Maintaining Object Versions

360
31 Object Version Maintenance
■ Change Control Logs ..................................................................................................................... 363■ Select Closed Change Log from List .................................................................................................. 364■ Deactivate Object Versions .............................................................................................................. 367■ Deactivate Objects from Selection List ............................................................................................... 368■ Object Version Audit History ............................................................................................................ 370■ Purge Object Version Audit History .................................................................................................... 373■ Versioned Object Logs .................................................................................................................... 373■ Select Object Version Log from List ................................................................................................... 375■ Display Object Version Log .............................................................................................................. 376■ Purge Object Version Log ................................................................................................................ 376■ Purge Object Version ..................................................................................................................... 378
361
The object maintenance facilities allow PAC administrators to
■ view and purge change control logs - i.e., the records of migrations of individual objects to andfrom A (M) status;
■ view which parts of Natural objects are in the PCF system file and deactivate the objects - i.e.delete their copies from the PCF;
■ view and purge object audit history - i.e., the records of the individual objects in migrations;■ view and purge logged object versions - i.e., the records of individual object removals (retirementor purging from CONTROL or retirement or purging from ARCHIVE);
■ view and purge objects in CONTROL or ARCHIVE.
To access the objectmaintenance functions, enter CodeV on themainmenu to access the VersionedObjects menu. Enter Code M on the Versioned Objects menu.
The Object Version Maintenance menu appears:
18:47:45 ***** PREDICT APPLICATION CONTROL ***** 2000-04-03User SAGU - Object Version Maintenance -
Code Function---- -----------------------------------C Change Control LogsD Deactivate Object VersionsH Object Version Audit HistoryL Logged Object VersionsP Purge Object Versions? Help. Exit
---- -----------------------------------
Code ... _
Command ===>Enter-PF1---PF2---PF3---PF4---PF5---PF6---PF7---PF8---PF9---PF10--PF11--PF12---
Help Menu Exit Canc
This chapter covers the following topics:
PAC User's Guide362
Object Version Maintenance
Change Control Logs
Change control logs are records of individual objects to be migrated to and from a (M) status. Achange control log refers either to a versioned object migrated to a (M) status or to a versionedobject from a (M) status or to several like named objects, the first of which was migrated to, andthe second migrated from a (M) status.
A change control log contains
■ the name of an application;■ the name of a maintenance status;■ the name of a Natural object or the number of an error message;■ a designation of the object's type.
It may contain
■ the identifier of a maintenance request.
The check-out / check-in information contains
■ either an object's check-out data■ or an object's check-in data.
An object's check-out data includes
■ the number of the version (migrated to maintenance);■ the library name and the database and file numbers of the Natural location of the migration;■ the time of the migration;■ the user ID of the initiator of the migration;■ the terminal ID of the terminal from which the migration was initiated.
An object's check-in data includes
■ the number of the version (migrated from maintenance or retired to maintenance;■ the library name and the database and file numbers of the Natural location of the migration,whereby the string ">Cancel<" takes the place of the library name, if the object was retired fromthe maintenance migration;
■ the time of the migration or retirement;■ the user ID of the initiator of the migration or retirement;■ the terminal ID of the terminal from which the migration or retirement was initiated.
363PAC User's Guide
Object Version Maintenance
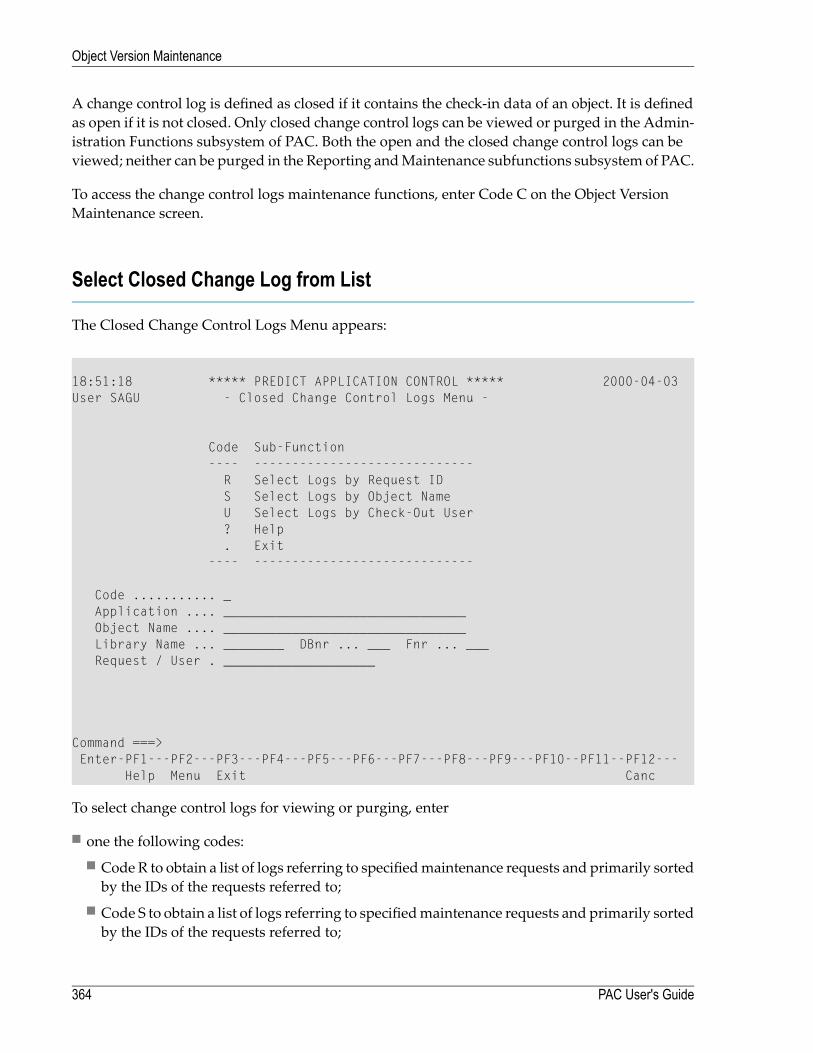
A change control log is defined as closed if it contains the check-in data of an object. It is definedas open if it is not closed. Only closed change control logs can be viewed or purged in the Admin-istration Functions subsystem of PAC. Both the open and the closed change control logs can beviewed; neither can be purged in the Reporting andMaintenance subfunctions subsystem of PAC.
To access the change control logs maintenance functions, enter Code C on the Object VersionMaintenance screen.
Select Closed Change Log from List
The Closed Change Control Logs Menu appears:
18:51:18 ***** PREDICT APPLICATION CONTROL ***** 2000-04-03User SAGU - Closed Change Control Logs Menu -
Code Sub-Function---- -----------------------------R Select Logs by Request IDS Select Logs by Object NameU Select Logs by Check-Out User? Help. Exit
---- -----------------------------
Code ........... _Application .... ________________________________Object Name .... ________________________________Library Name ... ________ DBnr ... ___ Fnr ... ___Request / User . ____________________
Command ===>Enter-PF1---PF2---PF3---PF4---PF5---PF6---PF7---PF8---PF9---PF10--PF11--PF12---
Help Menu Exit Canc
To select change control logs for viewing or purging, enter
■ one the following codes:■ Code R to obtain a list of logs referring to specifiedmaintenance requests and primarily sortedby the IDs of the requests referred to;
■ Code S to obtain a list of logs referring to specifiedmaintenance requests and primarily sortedby the IDs of the requests referred to;
PAC User's Guide364
Object Version Maintenance
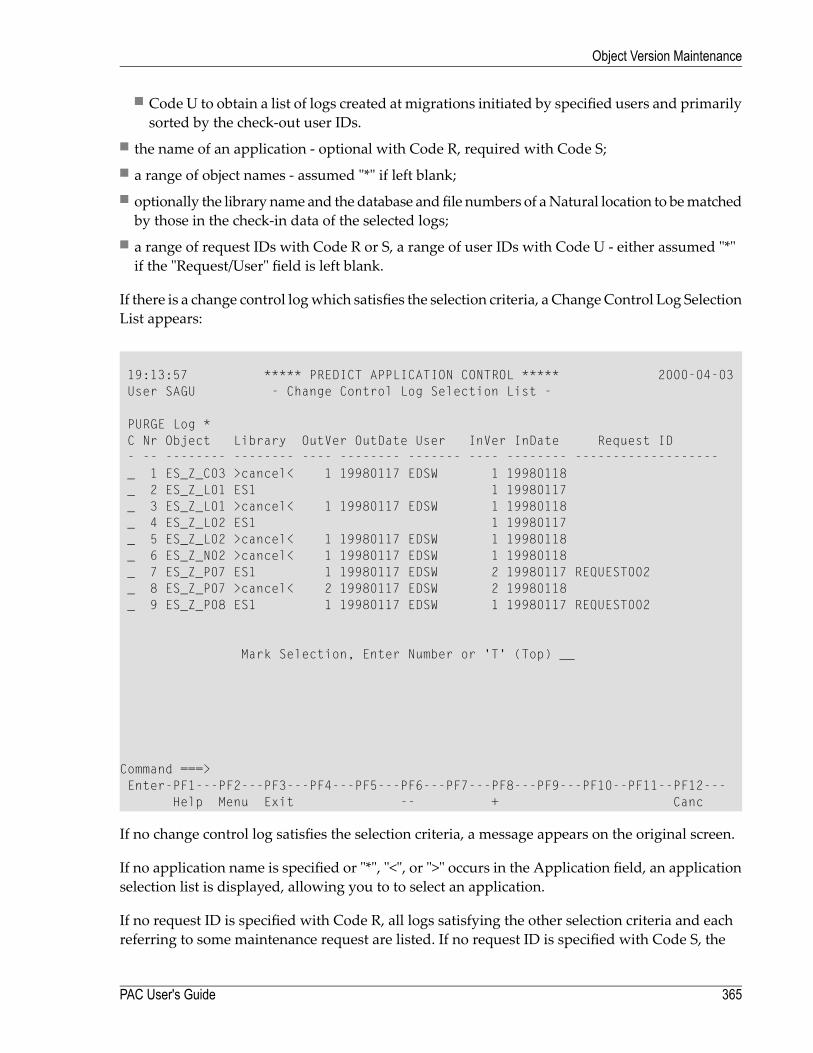
■ Code U to obtain a list of logs created at migrations initiated by specified users and primarilysorted by the check-out user IDs.
■ the name of an application - optional with Code R, required with Code S;■ a range of object names - assumed "*" if left blank;■ optionally the library name and the database andfile numbers of aNatural location to bematchedby those in the check-in data of the selected logs;
■ a range of request IDs with Code R or S, a range of user IDs with Code U - either assumed "*"if the "Request/User" field is left blank.
If there is a change control logwhich satisfies the selection criteria, a ChangeControl Log SelectionList appears:
19:13:57 ***** PREDICT APPLICATION CONTROL ***** 2000-04-03User SAGU - Change Control Log Selection List -
PURGE Log *C Nr Object Library OutVer OutDate User InVer InDate Request ID- -- -------- -------- ---- -------- ------- ---- -------- -------------------_ 1 ES_Z_C03 >cancel< 1 19980117 EDSW 1 19980118_ 2 ES_Z_L01 ES1 1 19980117_ 3 ES_Z_L01 >cancel< 1 19980117 EDSW 1 19980118_ 4 ES_Z_L02 ES1 1 19980117_ 5 ES_Z_L02 >cancel< 1 19980117 EDSW 1 19980118_ 6 ES_Z_N02 >cancel< 1 19980117 EDSW 1 19980118_ 7 ES_Z_P07 ES1 1 19980117 EDSW 2 19980117 REQUEST002_ 8 ES_Z_P07 >cancel< 2 19980117 EDSW 2 19980118_ 9 ES_Z_P08 ES1 1 19980117 EDSW 1 19980117 REQUEST002
Mark Selection, Enter Number or 'T' (Top) __
Command ===>Enter-PF1---PF2---PF3---PF4---PF5---PF6---PF7---PF8---PF9---PF10--PF11--PF12---
Help Menu Exit -- + Canc
If no change control log satisfies the selection criteria, a message appears on the original screen.
If no application name is specified or "*", "<", or ">" occurs in the Application field, an applicationselection list is displayed, allowing you to to select an application.
If no request ID is specified with Code R, all logs satisfying the other selection criteria and eachreferring to some maintenance request are listed. If no request ID is specified with Code S, the
365PAC User's Guide
Object Version Maintenance
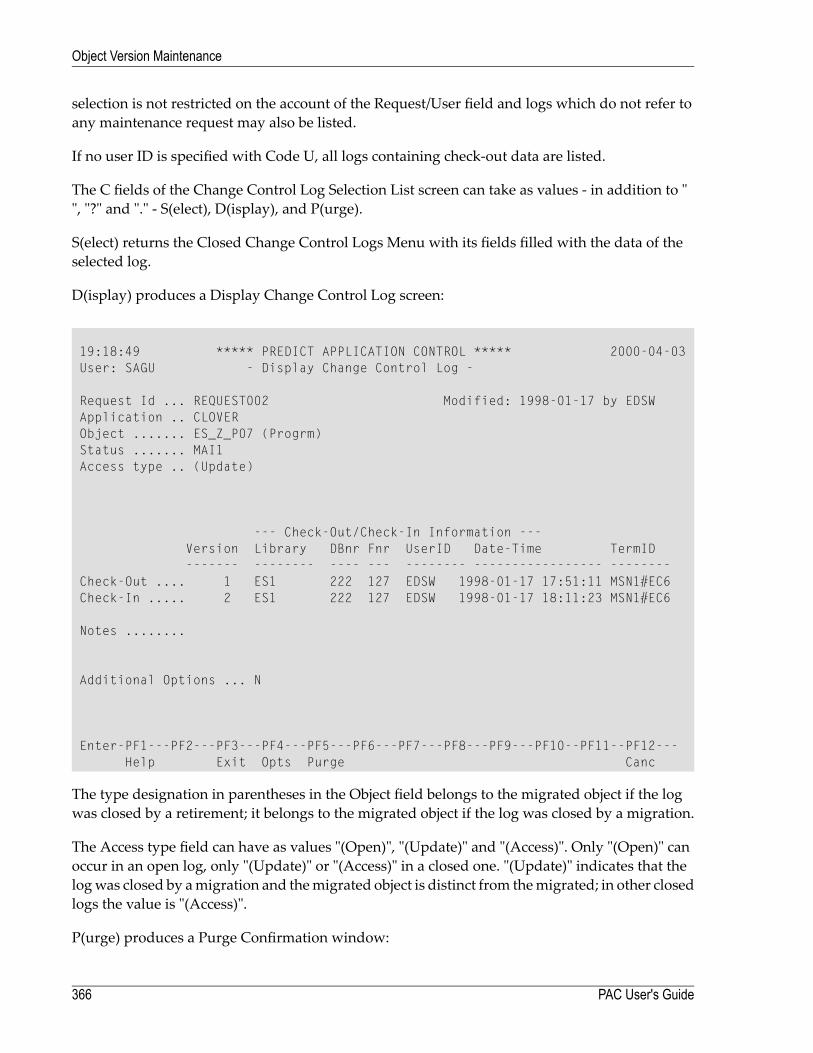
selection is not restricted on the account of the Request/User field and logs which do not refer toany maintenance request may also be listed.
If no user ID is specified with Code U, all logs containing check-out data are listed.
The C fields of the Change Control Log Selection List screen can take as values - in addition to "", "?" and "." - S(elect), D(isplay), and P(urge).
S(elect) returns the Closed Change Control Logs Menu with its fields filled with the data of theselected log.
D(isplay) produces a Display Change Control Log screen:
19:18:49 ***** PREDICT APPLICATION CONTROL ***** 2000-04-03User: SAGU - Display Change Control Log -
Request Id ... REQUEST002 Modified: 1998-01-17 by EDSWApplication .. CLOVERObject ....... ES_Z_P07 (Progrm)Status ....... MAI1Access type .. (Update)
--- Check-Out/Check-In Information ---Version Library DBnr Fnr UserID Date-Time TermID------- -------- ---- --- -------- ----------------- --------
Check-Out .... 1 ES1 222 127 EDSW 1998-01-17 17:51:11 MSN1#EC6Check-In ..... 2 ES1 222 127 EDSW 1998-01-17 18:11:23 MSN1#EC6
Notes ........
Additional Options ... N
Enter-PF1---PF2---PF3---PF4---PF5---PF6---PF7---PF8---PF9---PF10--PF11--PF12---Help Exit Opts Purge Canc
The type designation in parentheses in the Object field belongs to the migrated object if the logwas closed by a retirement; it belongs to the migrated object if the log was closed by a migration.
The Access type field can have as values "(Open)", "(Update)" and "(Access)". Only "(Open)" canoccur in an open log, only "(Update)" or "(Access)" in a closed one. "(Update)" indicates that thelogwas closed by amigration and themigrated object is distinct from themigrated; in other closedlogs the value is "(Access)".
P(urge) produces a Purge Confirmation window:
PAC User's Guide366
Object Version Maintenance
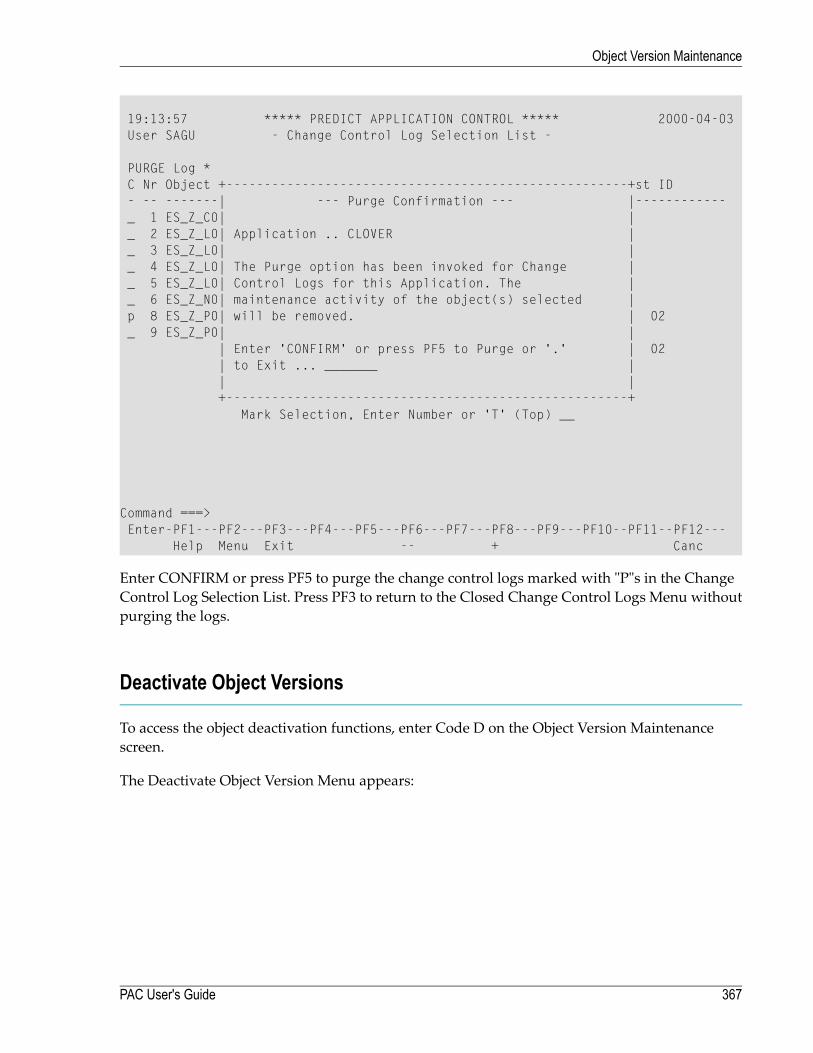
19:13:57 ***** PREDICT APPLICATION CONTROL ***** 2000-04-03User SAGU - Change Control Log Selection List -
PURGE Log *C Nr Object +-----------------------------------------------------+st ID- -- -------| --- Purge Confirmation --- |------------_ 1 ES_Z_C0| |_ 2 ES_Z_L0| Application .. CLOVER |_ 3 ES_Z_L0| |_ 4 ES_Z_L0| The Purge option has been invoked for Change |_ 5 ES_Z_L0| Control Logs for this Application. The |_ 6 ES_Z_N0| maintenance activity of the object(s) selected |p 8 ES_Z_P0| will be removed. | 02_ 9 ES_Z_P0| |
| Enter 'CONFIRM' or press PF5 to Purge or '.' | 02| to Exit ... _______ || |+-----------------------------------------------------+
Mark Selection, Enter Number or 'T' (Top) __
Command ===>Enter-PF1---PF2---PF3---PF4---PF5---PF6---PF7---PF8---PF9---PF10--PF11--PF12---
Help Menu Exit -- + Canc
Enter CONFIRM or press PF5 to purge the change control logs marked with "P"s in the ChangeControl Log Selection List. Press PF3 to return to the Closed Change Control Logs Menu withoutpurging the logs.
Deactivate Object Versions
To access the object deactivation functions, enter Code D on the Object Version Maintenancescreen.
The Deactivate Object Version Menu appears:
367PAC User's Guide
Object Version Maintenance
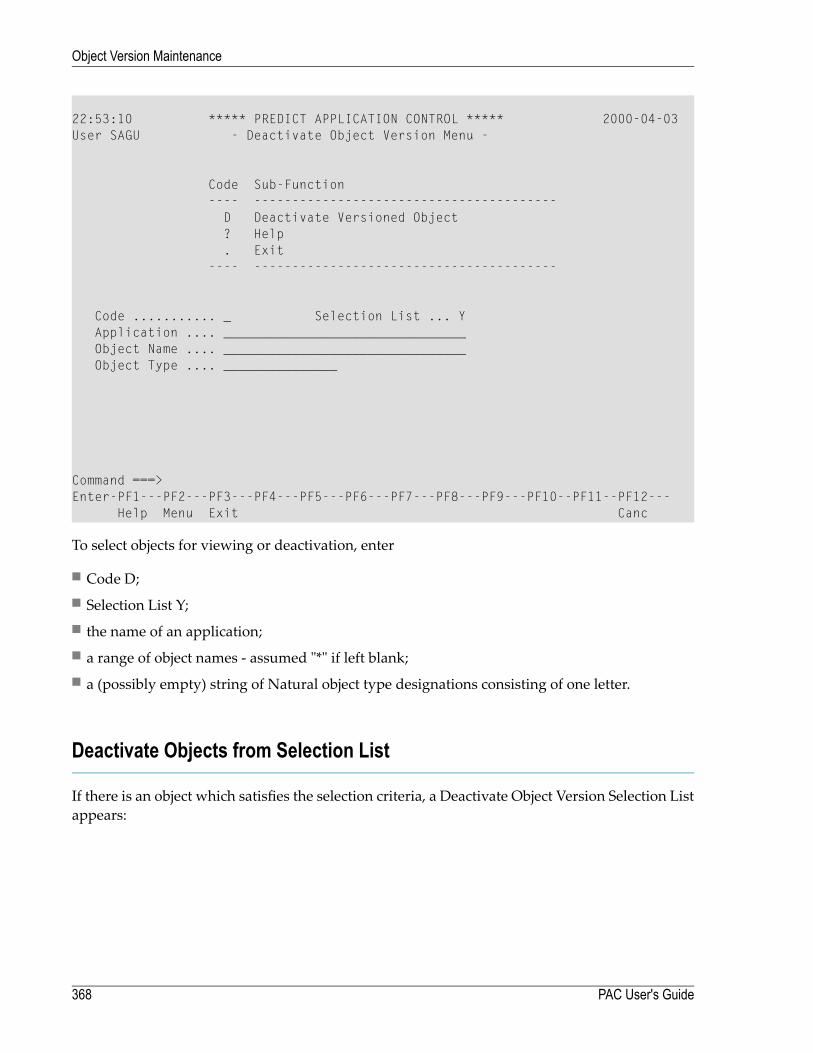
22:53:10 ***** PREDICT APPLICATION CONTROL ***** 2000-04-03User SAGU - Deactivate Object Version Menu -
Code Sub-Function---- ----------------------------------------D Deactivate Versioned Object? Help. Exit
---- ----------------------------------------
Code ........... _ Selection List ... YApplication .... ________________________________Object Name .... ________________________________Object Type .... _______________
Command ===>Enter-PF1---PF2---PF3---PF4---PF5---PF6---PF7---PF8---PF9---PF10--PF11--PF12---
Help Menu Exit Canc
To select objects for viewing or deactivation, enter
■ Code D;■ Selection List Y;■ the name of an application;■ a range of object names - assumed "*" if left blank;■ a (possibly empty) string of Natural object type designations consisting of one letter.
Deactivate Objects from Selection List
If there is an object which satisfies the selection criteria, a Deactivate Object Version Selection Listappears:
PAC User's Guide368
Object Version Maintenance
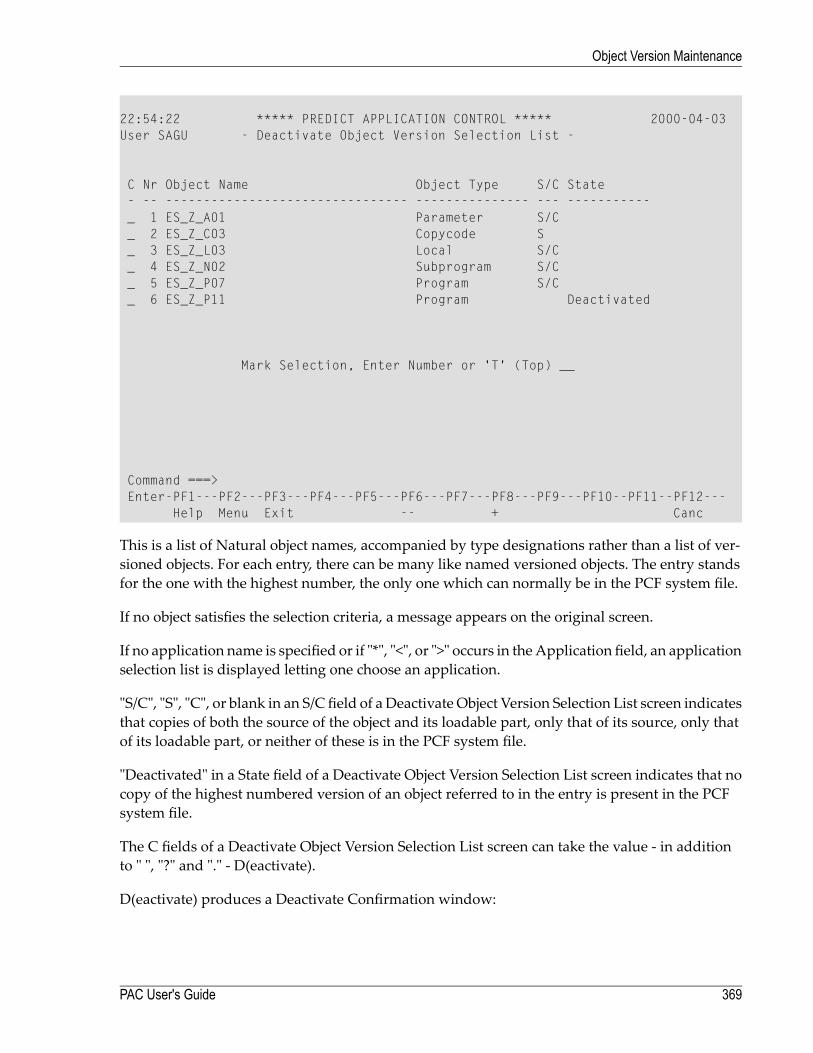
22:54:22 ***** PREDICT APPLICATION CONTROL ***** 2000-04-03User SAGU - Deactivate Object Version Selection List -
C Nr Object Name Object Type S/C State- -- -------------------------------- --------------- --- -----------_ 1 ES_Z_A01 Parameter S/C_ 2 ES_Z_C03 Copycode S_ 3 ES_Z_L03 Local S/C_ 4 ES_Z_N02 Subprogram S/C_ 5 ES_Z_P07 Program S/C_ 6 ES_Z_P11 Program Deactivated
Mark Selection, Enter Number or 'T' (Top) __
Command ===>Enter-PF1---PF2---PF3---PF4---PF5---PF6---PF7---PF8---PF9---PF10--PF11--PF12---
Help Menu Exit -- + Canc
This is a list of Natural object names, accompanied by type designations rather than a list of ver-sioned objects. For each entry, there can be many like named versioned objects. The entry standsfor the one with the highest number, the only one which can normally be in the PCF system file.
If no object satisfies the selection criteria, a message appears on the original screen.
If no application name is specified or if "*", "<", or ">" occurs in theApplication field, an applicationselection list is displayed letting one choose an application.
"S/C", "S", "C", or blank in an S/C field of a Deactivate Object Version Selection List screen indicatesthat copies of both the source of the object and its loadable part, only that of its source, only thatof its loadable part, or neither of these is in the PCF system file.
"Deactivated" in a State field of a Deactivate Object Version Selection List screen indicates that nocopy of the highest numbered version of an object referred to in the entry is present in the PCFsystem file.
The C fields of a Deactivate Object Version Selection List screen can take the value - in additionto " ", "?" and "." - D(eactivate).
D(eactivate) produces a Deactivate Confirmation window:
369PAC User's Guide
Object Version Maintenance
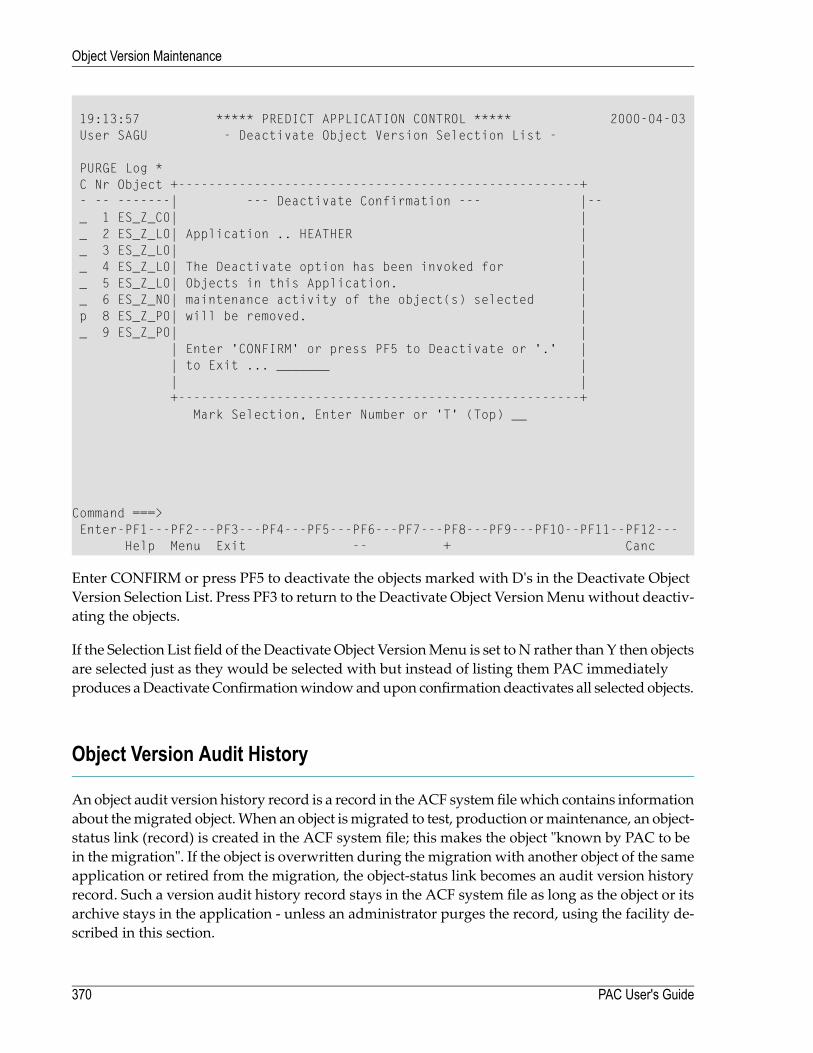
19:13:57 ***** PREDICT APPLICATION CONTROL ***** 2000-04-03User SAGU - Deactivate Object Version Selection List -
PURGE Log *C Nr Object +-----------------------------------------------------+- -- -------| --- Deactivate Confirmation --- |--_ 1 ES_Z_C0| |_ 2 ES_Z_L0| Application .. HEATHER |_ 3 ES_Z_L0| |_ 4 ES_Z_L0| The Deactivate option has been invoked for |_ 5 ES_Z_L0| Objects in this Application. |_ 6 ES_Z_N0| maintenance activity of the object(s) selected |p 8 ES_Z_P0| will be removed. |_ 9 ES_Z_P0| |
| Enter 'CONFIRM' or press PF5 to Deactivate or '.' || to Exit ... _______ || |+-----------------------------------------------------+
Mark Selection, Enter Number or 'T' (Top) __
Command ===>Enter-PF1---PF2---PF3---PF4---PF5---PF6---PF7---PF8---PF9---PF10--PF11--PF12---
Help Menu Exit -- + Canc
Enter CONFIRM or press PF5 to deactivate the objects marked with D's in the Deactivate ObjectVersion Selection List. Press PF3 to return to the Deactivate Object VersionMenuwithout deactiv-ating the objects.
If the Selection List field of theDeactivate Object VersionMenu is set toN rather than Y then objectsare selected just as they would be selected with but instead of listing them PAC immediatelyproduces aDeactivateConfirmationwindowandupon confirmationdeactivates all selected objects.
Object Version Audit History
Anobject audit version history record is a record in theACF systemfilewhich contains informationabout themigrated object.When an object ismigrated to test, production ormaintenance, an object-status link (record) is created in the ACF system file; this makes the object "known by PAC to bein the migration". If the object is overwritten during the migration with another object of the sameapplication or retired from the migration, the object-status link becomes an audit version historyrecord. Such a version audit history record stays in the ACF system file as long as the object or itsarchive stays in the application - unless an administrator purges the record, using the facility de-scribed in this section.
PAC User's Guide370
Object Version Maintenance
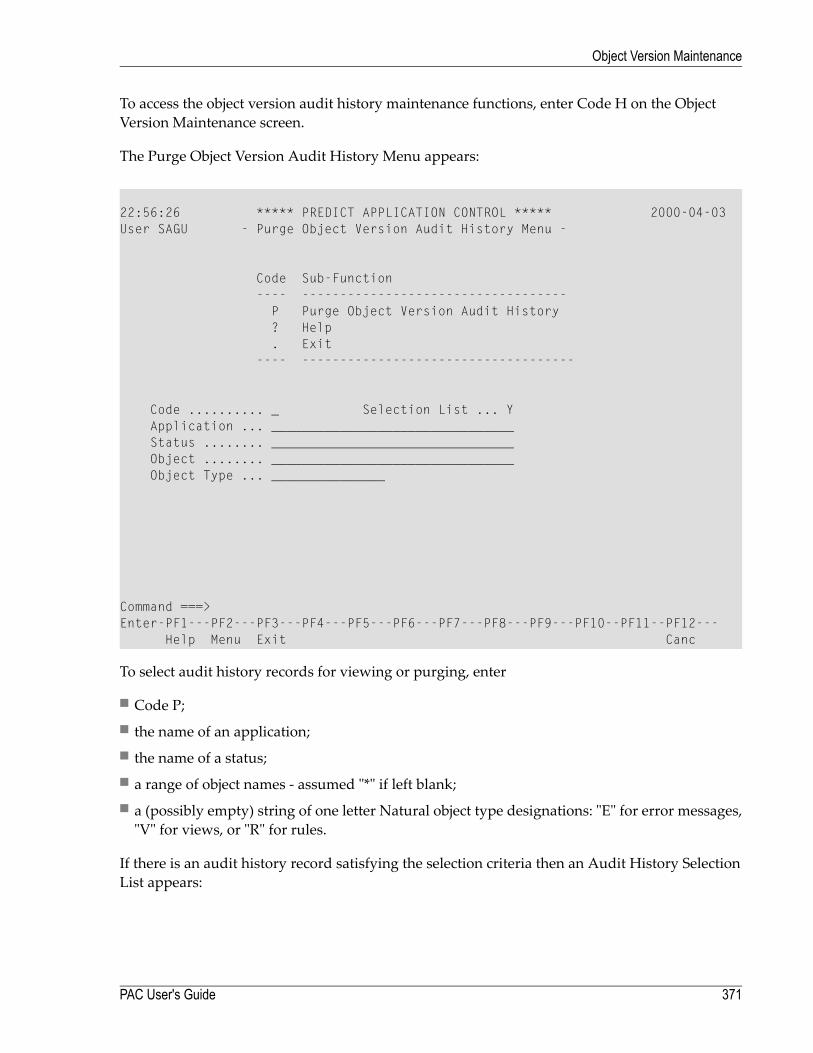
To access the object version audit history maintenance functions, enter Code H on the ObjectVersion Maintenance screen.
The Purge Object Version Audit History Menu appears:
22:56:26 ***** PREDICT APPLICATION CONTROL ***** 2000-04-03User SAGU - Purge Object Version Audit History Menu -
Code Sub-Function---- -----------------------------------P Purge Object Version Audit History? Help. Exit
---- ------------------------------------
Code .......... _ Selection List ... YApplication ... ________________________________Status ........ ________________________________Object ........ ________________________________Object Type ... _______________
Command ===>Enter-PF1---PF2---PF3---PF4---PF5---PF6---PF7---PF8---PF9---PF10--PF11--PF12---
Help Menu Exit Canc
To select audit history records for viewing or purging, enter
■ Code P;■ the name of an application;■ the name of a status;■ a range of object names - assumed "*" if left blank;■ a (possibly empty) string of one letter Natural object type designations: "E" for error messages,"V" for views, or "R" for rules.
If there is an audit history record satisfying the selection criteria then an Audit History SelectionList appears:
371PAC User's Guide
Object Version Maintenance
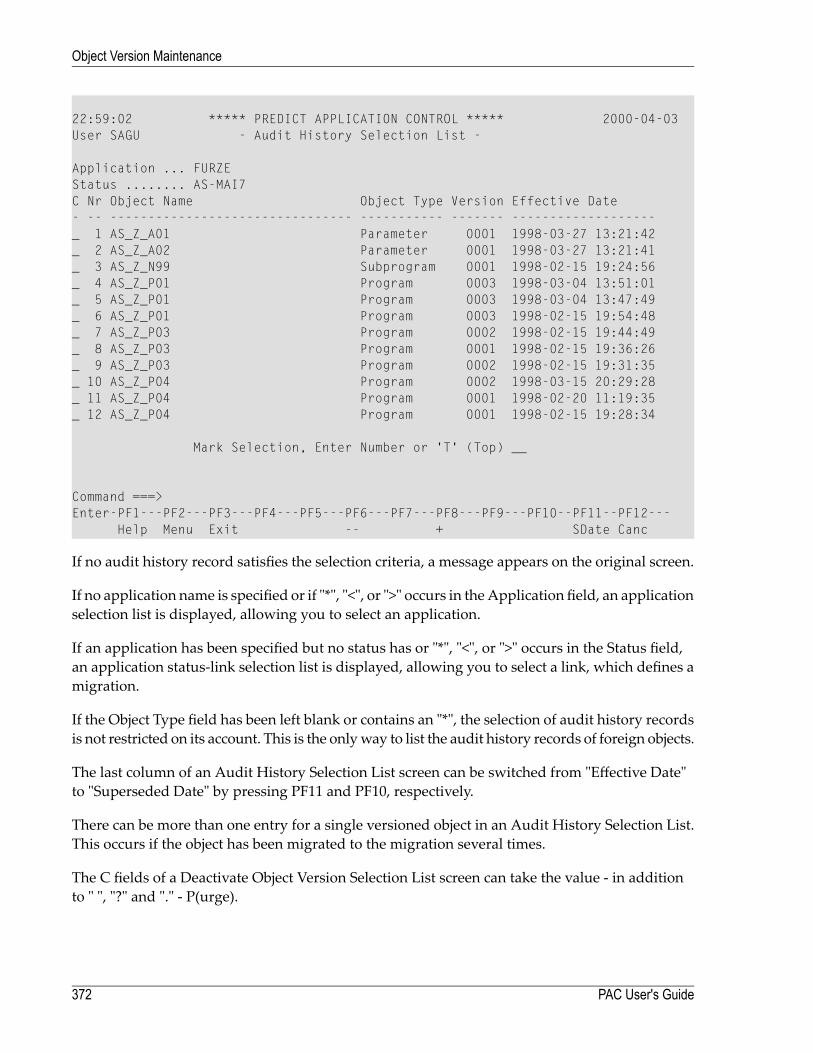
22:59:02 ***** PREDICT APPLICATION CONTROL ***** 2000-04-03User SAGU - Audit History Selection List -
Application ... FURZEStatus ........ AS-MAI7C Nr Object Name Object Type Version Effective Date- -- -------------------------------- ----------- ------- -------------------_ 1 AS_Z_A01 Parameter 0001 1998-03-27 13:21:42_ 2 AS_Z_A02 Parameter 0001 1998-03-27 13:21:41_ 3 AS_Z_N99 Subprogram 0001 1998-02-15 19:24:56_ 4 AS_Z_P01 Program 0003 1998-03-04 13:51:01_ 5 AS_Z_P01 Program 0003 1998-03-04 13:47:49_ 6 AS_Z_P01 Program 0003 1998-02-15 19:54:48_ 7 AS_Z_P03 Program 0002 1998-02-15 19:44:49_ 8 AS_Z_P03 Program 0001 1998-02-15 19:36:26_ 9 AS_Z_P03 Program 0002 1998-02-15 19:31:35_ 10 AS_Z_P04 Program 0002 1998-03-15 20:29:28_ 11 AS_Z_P04 Program 0001 1998-02-20 11:19:35_ 12 AS_Z_P04 Program 0001 1998-02-15 19:28:34
Mark Selection, Enter Number or 'T' (Top) __
Command ===>Enter-PF1---PF2---PF3---PF4---PF5---PF6---PF7---PF8---PF9---PF10--PF11--PF12---
Help Menu Exit -- + SDate Canc
If no audit history record satisfies the selection criteria, a message appears on the original screen.
If no application name is specified or if "*", "<", or ">" occurs in theApplication field, an applicationselection list is displayed, allowing you to select an application.
If an application has been specified but no status has or "*", "<", or ">" occurs in the Status field,an application status-link selection list is displayed, allowing you to select a link, which defines amigration.
If the Object Type field has been left blank or contains an "*", the selection of audit history recordsis not restricted on its account. This is the onlyway to list the audit history records of foreign objects.
The last column of an Audit History Selection List screen can be switched from "Effective Date"to "Superseded Date" by pressing PF11 and PF10, respectively.
There can be more than one entry for a single versioned object in an Audit History Selection List.This occurs if the object has been migrated to the migration several times.
The C fields of a Deactivate Object Version Selection List screen can take the value - in additionto " ", "?" and "." - P(urge).
PAC User's Guide372
Object Version Maintenance
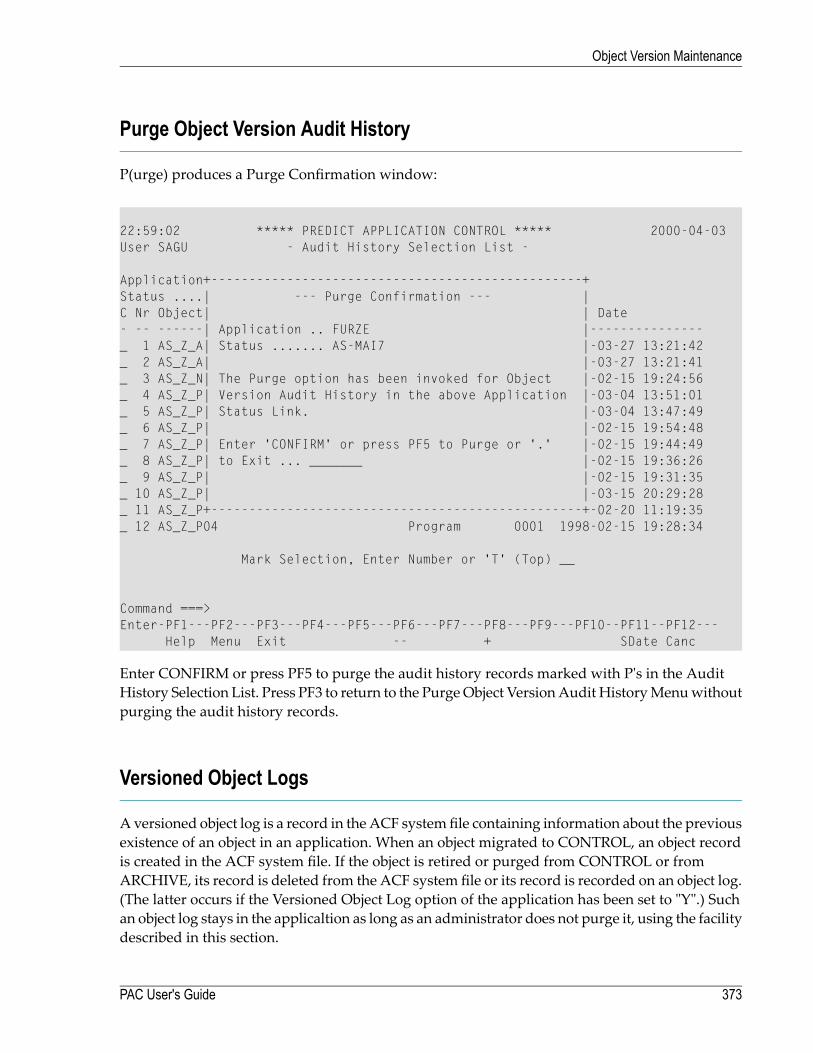
Purge Object Version Audit History
P(urge) produces a Purge Confirmation window:
22:59:02 ***** PREDICT APPLICATION CONTROL ***** 2000-04-03User SAGU - Audit History Selection List -
Application+-------------------------------------------------+Status ....| --- Purge Confirmation --- |C Nr Object| | Date- -- ------| Application .. FURZE |---------------_ 1 AS_Z_A| Status ....... AS-MAI7 |-03-27 13:21:42_ 2 AS_Z_A| |-03-27 13:21:41_ 3 AS_Z_N| The Purge option has been invoked for Object |-02-15 19:24:56_ 4 AS_Z_P| Version Audit History in the above Application |-03-04 13:51:01_ 5 AS_Z_P| Status Link. |-03-04 13:47:49_ 6 AS_Z_P| |-02-15 19:54:48_ 7 AS_Z_P| Enter 'CONFIRM' or press PF5 to Purge or '.' |-02-15 19:44:49_ 8 AS_Z_P| to Exit ... _______ |-02-15 19:36:26_ 9 AS_Z_P| |-02-15 19:31:35_ 10 AS_Z_P| |-03-15 20:29:28_ 11 AS_Z_P+-------------------------------------------------+-02-20 11:19:35_ 12 AS_Z_P04 Program 0001 1998-02-15 19:28:34
Mark Selection, Enter Number or 'T' (Top) __
Command ===>Enter-PF1---PF2---PF3---PF4---PF5---PF6---PF7---PF8---PF9---PF10--PF11--PF12---
Help Menu Exit -- + SDate Canc
Enter CONFIRM or press PF5 to purge the audit history records marked with P's in the AuditHistory Selection List. Press PF3 to return to the PurgeObject VersionAudit HistoryMenuwithoutpurging the audit history records.
Versioned Object Logs
Aversioned object log is a record in theACF systemfile containing information about the previousexistence of an object in an application. When an object migrated to CONTROL, an object recordis created in the ACF system file. If the object is retired or purged from CONTROL or fromARCHIVE, its record is deleted from the ACF system file or its record is recorded on an object log.(The latter occurs if the Versioned Object Log option of the application has been set to "Y".) Suchan object log stays in the applicaltion as long as an administrator does not purge it, using the facilitydescribed in this section.
373PAC User's Guide
Object Version Maintenance
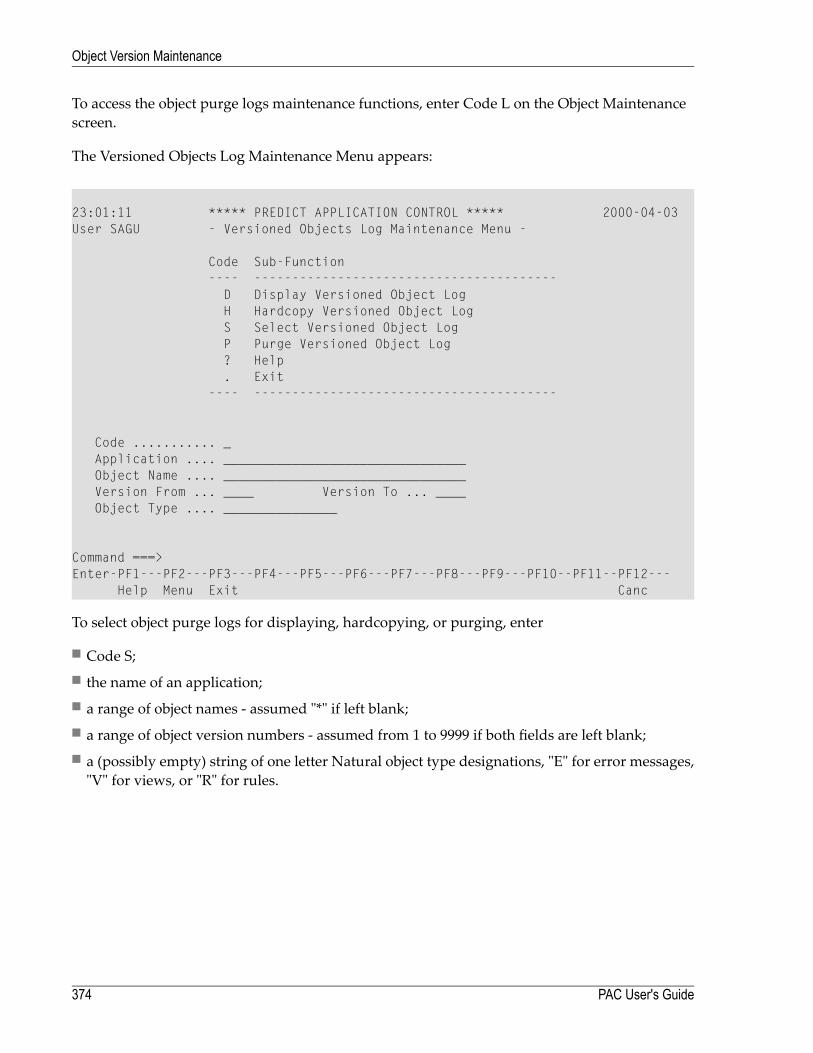
To access the object purge logs maintenance functions, enter Code L on the Object Maintenancescreen.
The Versioned Objects Log Maintenance Menu appears:
23:01:11 ***** PREDICT APPLICATION CONTROL ***** 2000-04-03User SAGU - Versioned Objects Log Maintenance Menu -
Code Sub-Function---- ----------------------------------------D Display Versioned Object LogH Hardcopy Versioned Object LogS Select Versioned Object LogP Purge Versioned Object Log? Help. Exit
---- ----------------------------------------
Code ........... _Application .... ________________________________Object Name .... ________________________________Version From ... ____ Version To ... ____Object Type .... _______________
Command ===>Enter-PF1---PF2---PF3---PF4---PF5---PF6---PF7---PF8---PF9---PF10--PF11--PF12---
Help Menu Exit Canc
To select object purge logs for displaying, hardcopying, or purging, enter
■ Code S;■ the name of an application;■ a range of object names - assumed "*" if left blank;■ a range of object version numbers - assumed from 1 to 9999 if both fields are left blank;■ a (possibly empty) string of one letter Natural object type designations, "E" for error messages,"V" for views, or "R" for rules.
PAC User's Guide374
Object Version Maintenance
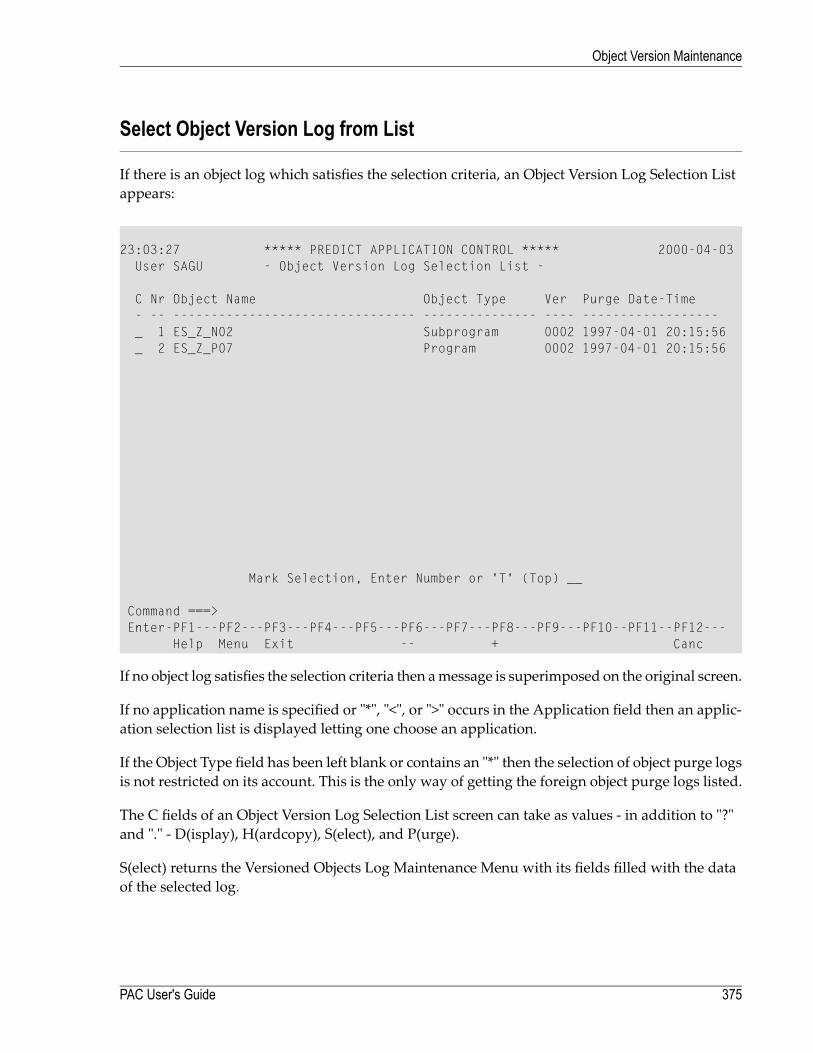
Select Object Version Log from List
If there is an object log which satisfies the selection criteria, an Object Version Log Selection Listappears:
23:03:27 ***** PREDICT APPLICATION CONTROL ***** 2000-04-03User SAGU - Object Version Log Selection List -
C Nr Object Name Object Type Ver Purge Date-Time- -- -------------------------------- --------------- ---- ------------------_ 1 ES_Z_N02 Subprogram 0002 1997-04-01 20:15:56_ 2 ES_Z_P07 Program 0002 1997-04-01 20:15:56
Mark Selection, Enter Number or 'T' (Top) __
Command ===>Enter-PF1---PF2---PF3---PF4---PF5---PF6---PF7---PF8---PF9---PF10--PF11--PF12---
Help Menu Exit -- + Canc
If no object log satisfies the selection criteria then amessage is superimposed on the original screen.
If no application name is specified or "*", "<", or ">" occurs in the Application field then an applic-ation selection list is displayed letting one choose an application.
If the Object Type field has been left blank or contains an "*" then the selection of object purge logsis not restricted on its account. This is the only way of getting the foreign object purge logs listed.
The C fields of an Object Version Log Selection List screen can take as values - in addition to "?"and "." - D(isplay), H(ardcopy), S(elect), and P(urge).
S(elect) returns the Versioned Objects Log Maintenance Menu with its fields filled with the dataof the selected log.
375PAC User's Guide
Object Version Maintenance
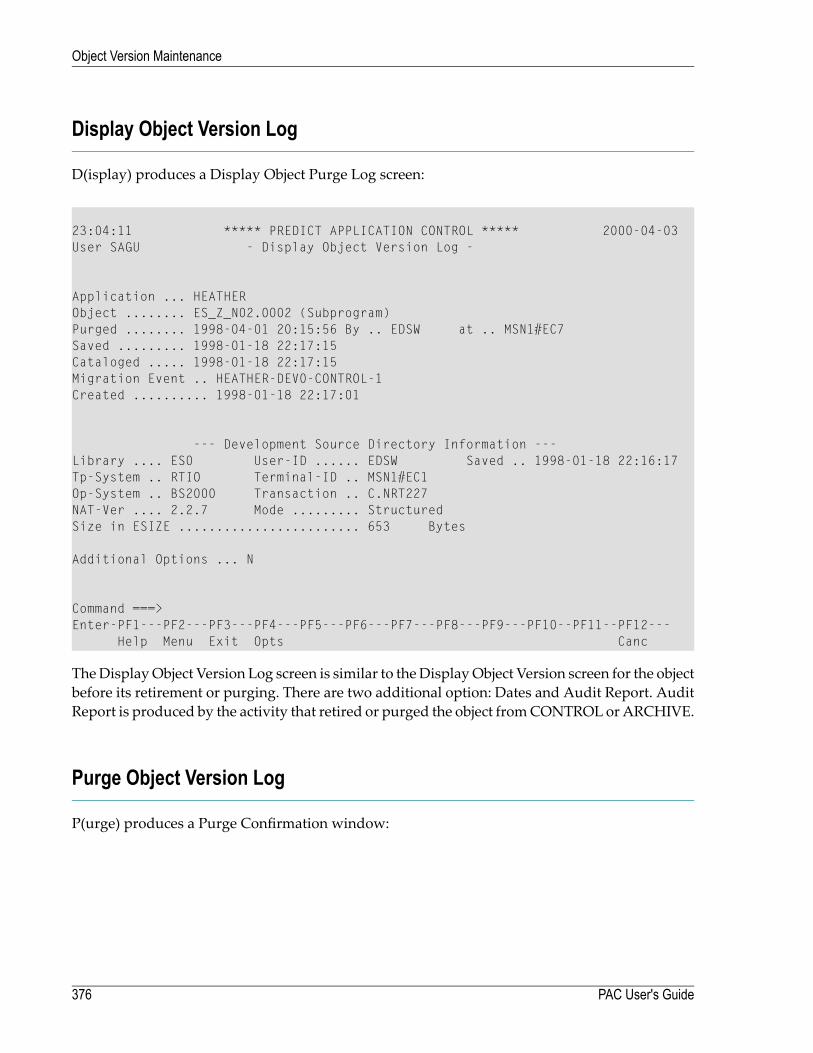
Display Object Version Log
D(isplay) produces a Display Object Purge Log screen:
23:04:11 ***** PREDICT APPLICATION CONTROL ***** 2000-04-03User SAGU - Display Object Version Log -
Application ... HEATHERObject ........ ES_Z_N02.0002 (Subprogram)Purged ........ 1998-04-01 20:15:56 By .. EDSW at .. MSN1#EC7Saved ......... 1998-01-18 22:17:15Cataloged ..... 1998-01-18 22:17:15Migration Event .. HEATHER-DEV0-CONTROL-1Created .......... 1998-01-18 22:17:01
--- Development Source Directory Information ---Library .... ES0 User-ID ...... EDSW Saved .. 1998-01-18 22:16:17Tp-System .. RTIO Terminal-ID .. MSN1#EC1Op-System .. BS2000 Transaction .. C.NRT227NAT-Ver .... 2.2.7 Mode ......... StructuredSize in ESIZE ........................ 653 Bytes
Additional Options ... N
Command ===>Enter-PF1---PF2---PF3---PF4---PF5---PF6---PF7---PF8---PF9---PF10--PF11--PF12---
Help Menu Exit Opts Canc
TheDisplayObject Version Log screen is similar to the DisplayObject Version screen for the objectbefore its retirement or purging. There are two additional option: Dates and Audit Report. AuditReport is produced by the activity that retired or purged the object fromCONTROL orARCHIVE.
Purge Object Version Log
P(urge) produces a Purge Confirmation window:
PAC User's Guide376
Object Version Maintenance
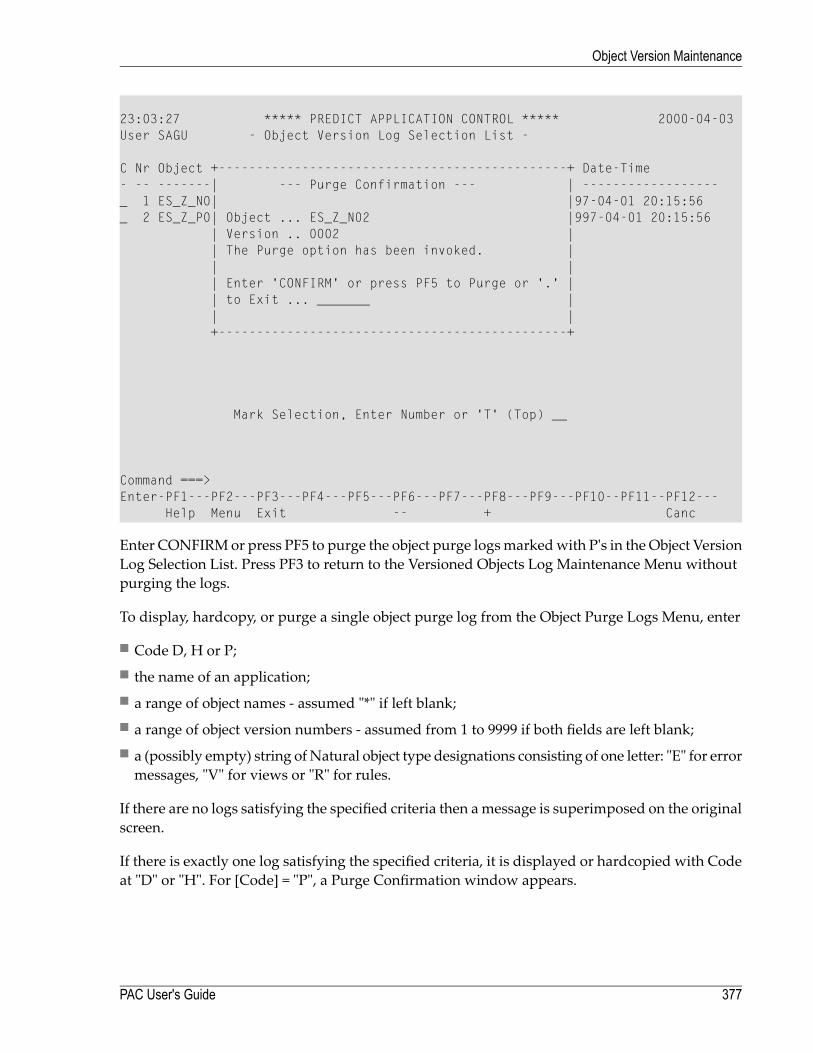
23:03:27 ***** PREDICT APPLICATION CONTROL ***** 2000-04-03User SAGU - Object Version Log Selection List -
C Nr Object +----------------------------------------------+ Date-Time- -- -------| --- Purge Confirmation --- | ------------------_ 1 ES_Z_N0| |97-04-01 20:15:56_ 2 ES_Z_P0| Object ... ES_Z_N02 |997-04-01 20:15:56
| Version .. 0002 || The Purge option has been invoked. || || Enter 'CONFIRM' or press PF5 to Purge or '.' || to Exit ... _______ || |+----------------------------------------------+
Mark Selection, Enter Number or 'T' (Top) __
Command ===>Enter-PF1---PF2---PF3---PF4---PF5---PF6---PF7---PF8---PF9---PF10--PF11--PF12---
Help Menu Exit -- + Canc
Enter CONFIRMor press PF5 to purge the object purge logsmarkedwith P's in the Object VersionLog Selection List. Press PF3 to return to the Versioned Objects Log Maintenance Menu withoutpurging the logs.
To display, hardcopy, or purge a single object purge log from the Object Purge Logs Menu, enter
■ Code D, H or P;■ the name of an application;■ a range of object names - assumed "*" if left blank;■ a range of object version numbers - assumed from 1 to 9999 if both fields are left blank;■ a (possibly empty) string ofNatural object type designations consisting of one letter: "E" for errormessages, "V" for views or "R" for rules.
If there are no logs satisfying the specified criteria then amessage is superimposed on the originalscreen.
If there is exactly one log satisfying the specified criteria, it is displayed or hardcopied with Codeat "D" or "H". For [Code] = "P", a Purge Confirmation window appears.
377PAC User's Guide
Object Version Maintenance
If there is more than one log satisfying the specified criteria, a modified S(elect) is applied instead.The modification consists in the restriction of the set of functions applicable to the selected logsto {D}, {H}, or {P}.
Purge Object Version
Objects can be removed from CONTROL
■ by retirement from CONTROL;■ by archiving - i.e., by finalizing a completed CONTROL to ARCHIVE migration event;■ by purging from CONTROL, which is described in this section.
The removability of an object from a CONTROL status is affected by the values of the MinimumCurrent Versions and Current Retention Period fields of the application.
Note: If applymod 23 is not active, an object cannot be removed from aCONTROL compart-ment if it is known to have been migrated to test, production, or maintenance and is notknown to have been subsequently overwritten there or retired to it. An objectwhose removalfrom CONTROL is not allowed for any of these reasons.
■ will be passed over by any submitted retirement from CONTROL event;■ will be passed over at the finalization of any archiving event;■ will be neither presented on any Purge Object Version Selection List nor purged without beingso presented.
When an object is archived, it is removed from CONTROL, and its record in the ACF system fileis logged. While thelogged object remains in the application (and the work file to which the objecthas been copied remains available), the object itself can be restored. If the token is deleted, theobject is no longer restorable. The deletion of a logged object from an application causes its "removalfrom ARCHIVE". It can be achieved
■ by retirement from ARCHIVE;■ by purging from ARCHIVE, which is described in this section.
The removability of an object from ARCHIVE in the above sense is affected by the values of theMinimumArchive Versions andArchive Retention Period fields of the application. A logged objectwhose deletion is not allowed by either of the two values
■ will be passed over by any submitted retirement from ARCHIVE event;■ will neither appear on any Purge (archived)Object Version Selection List nor be deletedwithoutbeing so presented.
To access the object purging functions, enter Code P on the Object Version Maintenance screen.
PAC User's Guide378
Object Version Maintenance
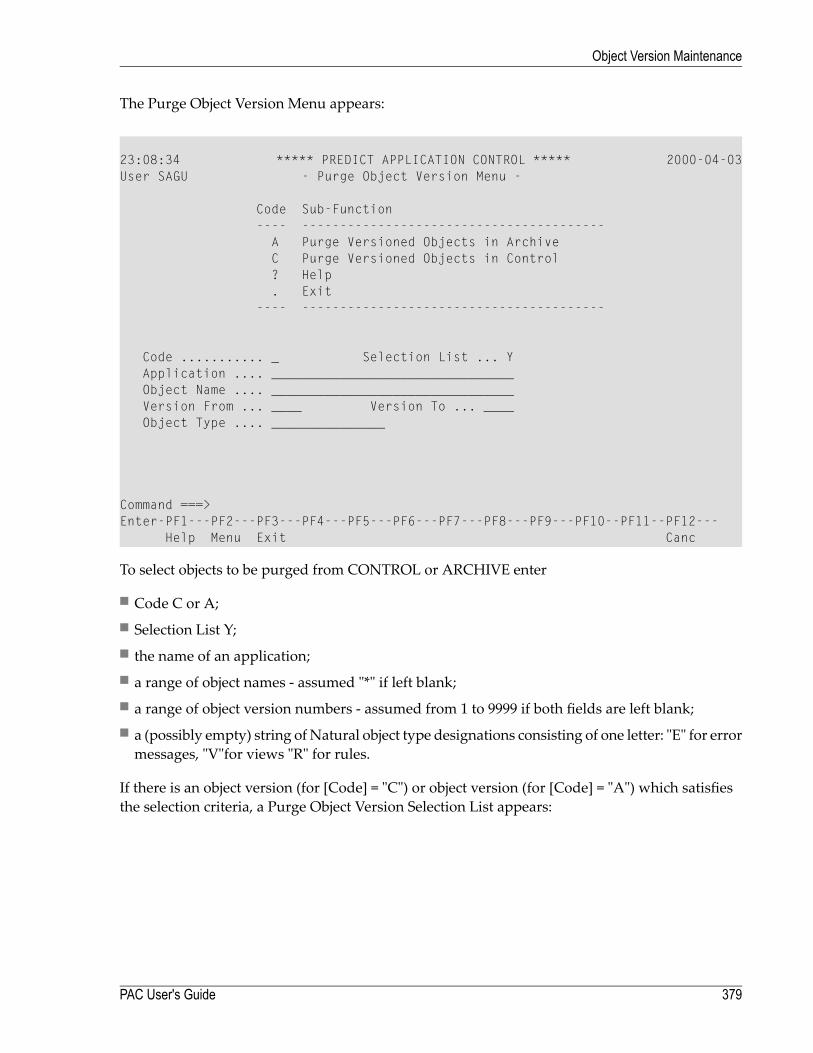
The Purge Object Version Menu appears:
23:08:34 ***** PREDICT APPLICATION CONTROL ***** 2000-04-03User SAGU - Purge Object Version Menu -
Code Sub-Function---- ----------------------------------------A Purge Versioned Objects in ArchiveC Purge Versioned Objects in Control? Help. Exit
---- ----------------------------------------
Code ........... _ Selection List ... YApplication .... ________________________________Object Name .... ________________________________Version From ... ____ Version To ... ____Object Type .... _______________
Command ===>Enter-PF1---PF2---PF3---PF4---PF5---PF6---PF7---PF8---PF9---PF10--PF11--PF12---
Help Menu Exit Canc
To select objects to be purged from CONTROL or ARCHIVE enter
■ Code C or A;■ Selection List Y;■ the name of an application;■ a range of object names - assumed "*" if left blank;■ a range of object version numbers - assumed from 1 to 9999 if both fields are left blank;■ a (possibly empty) string ofNatural object type designations consisting of one letter: "E" for errormessages, "V"for views "R" for rules.
If there is an object version (for [Code] = "C") or object version (for [Code] = "A") which satisfiesthe selection criteria, a Purge Object Version Selection List appears:
379PAC User's Guide
Object Version Maintenance
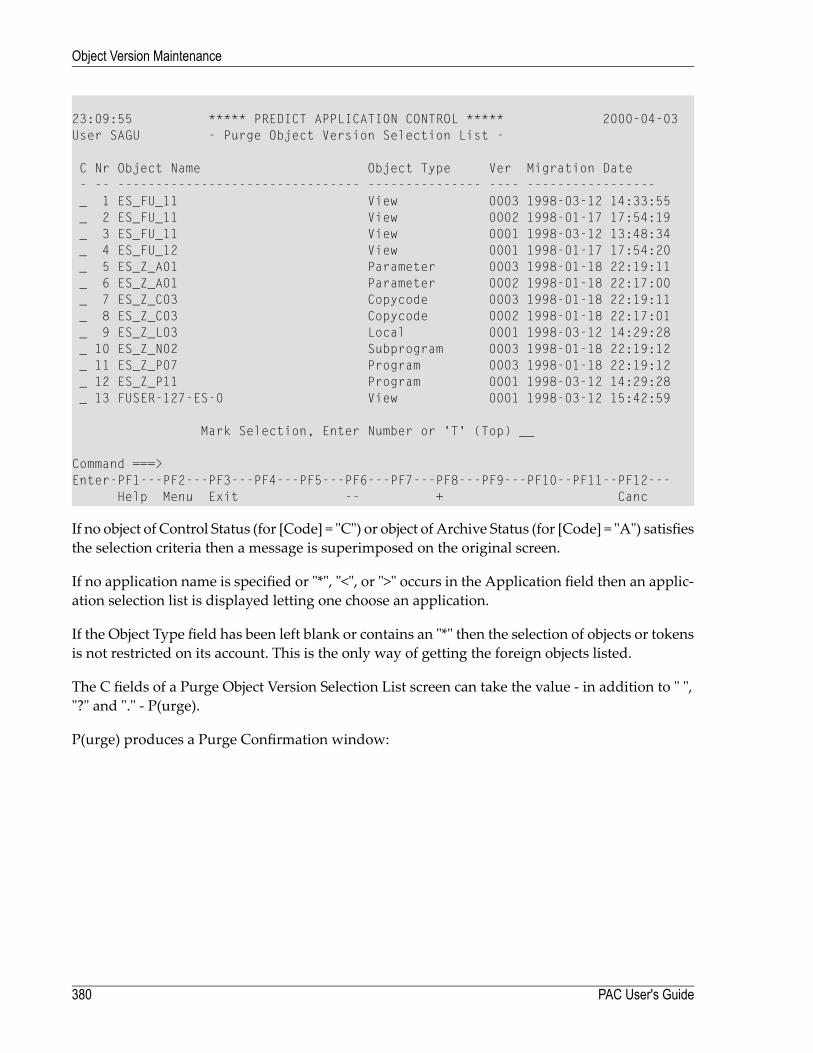
23:09:55 ***** PREDICT APPLICATION CONTROL ***** 2000-04-03User SAGU - Purge Object Version Selection List -
C Nr Object Name Object Type Ver Migration Date- -- -------------------------------- --------------- ---- -----------------_ 1 ES_FU_11 View 0003 1998-03-12 14:33:55_ 2 ES_FU_11 View 0002 1998-01-17 17:54:19_ 3 ES_FU_11 View 0001 1998-03-12 13:48:34_ 4 ES_FU_12 View 0001 1998-01-17 17:54:20_ 5 ES_Z_A01 Parameter 0003 1998-01-18 22:19:11_ 6 ES_Z_A01 Parameter 0002 1998-01-18 22:17:00_ 7 ES_Z_C03 Copycode 0003 1998-01-18 22:19:11_ 8 ES_Z_C03 Copycode 0002 1998-01-18 22:17:01_ 9 ES_Z_L03 Local 0001 1998-03-12 14:29:28_ 10 ES_Z_N02 Subprogram 0003 1998-01-18 22:19:12_ 11 ES_Z_P07 Program 0003 1998-01-18 22:19:12_ 12 ES_Z_P11 Program 0001 1998-03-12 14:29:28_ 13 FUSER-127-ES-0 View 0001 1998-03-12 15:42:59
Mark Selection, Enter Number or 'T' (Top) __
Command ===>Enter-PF1---PF2---PF3---PF4---PF5---PF6---PF7---PF8---PF9---PF10--PF11--PF12---
Help Menu Exit -- + Canc
If no object of Control Status (for [Code] = "C") or object of Archive Status (for [Code] = "A") satisfiesthe selection criteria then a message is superimposed on the original screen.
If no application name is specified or "*", "<", or ">" occurs in the Application field then an applic-ation selection list is displayed letting one choose an application.
If the Object Type field has been left blank or contains an "*" then the selection of objects or tokensis not restricted on its account. This is the only way of getting the foreign objects listed.
The C fields of a Purge Object Version Selection List screen can take the value - in addition to " ","?" and "." - P(urge).
P(urge) produces a Purge Confirmation window:
PAC User's Guide380
Object Version Maintenance
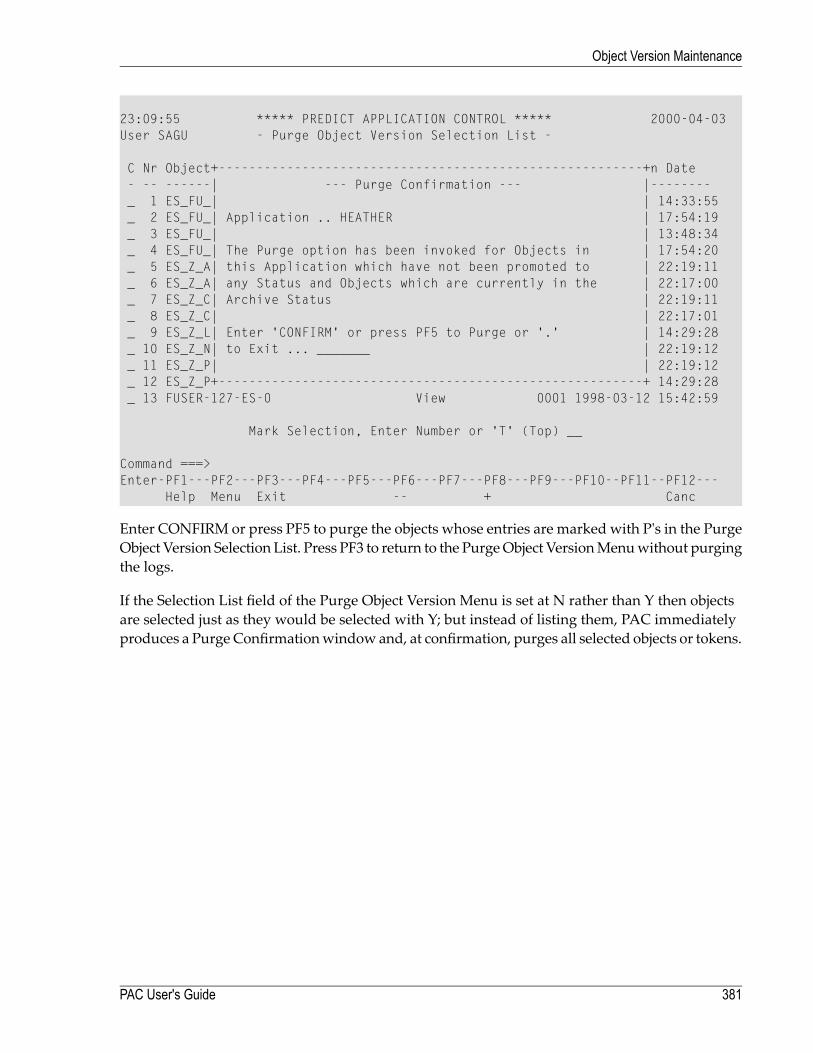
23:09:55 ***** PREDICT APPLICATION CONTROL ***** 2000-04-03User SAGU - Purge Object Version Selection List -
C Nr Object+--------------------------------------------------------+n Date- -- ------| --- Purge Confirmation --- |--------_ 1 ES_FU_| | 14:33:55_ 2 ES_FU_| Application .. HEATHER | 17:54:19_ 3 ES_FU_| | 13:48:34_ 4 ES_FU_| The Purge option has been invoked for Objects in | 17:54:20_ 5 ES_Z_A| this Application which have not been promoted to | 22:19:11_ 6 ES_Z_A| any Status and Objects which are currently in the | 22:17:00_ 7 ES_Z_C| Archive Status | 22:19:11_ 8 ES_Z_C| | 22:17:01_ 9 ES_Z_L| Enter 'CONFIRM' or press PF5 to Purge or '.' | 14:29:28_ 10 ES_Z_N| to Exit ... _______ | 22:19:12_ 11 ES_Z_P| | 22:19:12_ 12 ES_Z_P+--------------------------------------------------------+ 14:29:28_ 13 FUSER-127-ES-0 View 0001 1998-03-12 15:42:59
Mark Selection, Enter Number or 'T' (Top) __
Command ===>Enter-PF1---PF2---PF3---PF4---PF5---PF6---PF7---PF8---PF9---PF10--PF11--PF12---
Help Menu Exit -- + Canc
Enter CONFIRM or press PF5 to purge the objects whose entries are marked with P's in the PurgeObject Version Selection List. Press PF3 to return to the PurgeObject VersionMenuwithout purgingthe logs.
If the Selection List field of the Purge Object Version Menu is set at N rather than Y then objectsare selected just as they would be selected with Y; but instead of listing them, PAC immediatelyproduces a Purge Confirmationwindow and, at confirmation, purges all selected objects or tokens.
381PAC User's Guide
Object Version Maintenance

382
32 Part III - Maintenance Facilities
This part tells you how to use the change control facilities to track andmaintain application objects.
1. Defining maintenance requests. PAC can be integrated with problem-tracking systems so thatmaintenance of objects can be monitored by PAC.
2. Tracking the maintenance activities of application objects with change control logs that can bereviewed for check-out/check-in information.
3. Comparing versioned objects both inside and outside the PAC environment.
4. Retrieving information about objects that have been moved into the PAC environment and as-signed a version number.
These facilities are described under the following headings:
■ Creating and Validating a Migration List■ Maintenance Requests■ Maintaining Natural Objects in PAC■ Using PAC with Predict Case or Natural for DB2■ Creating and Managing PAC Jobs■ Change Control Logs
383

384
33 Creating and Validating a Migration List
A migration list identifies a set of objects to be migrated with a specific event for a specific PACapplication.
Except for the Predict applications, migration lists may contain Natural objects, foreign objects,and user errormessage objects.Migrations fromPACmay containNatural objects, foreign objects,and views.
For the Predict application, only those Predict objects supported by PAC may be specified in themigration list. When Predict userviews, files, and verifications are migrated into PAC, they aregenerated into views/DDMs and rules that are used by Natural objects.
A migration list may be created "automatically" by using the PAC Generate List facilities or"manually" by entering objects on the Migration List Editor. This section discusses the manualcreation of migration lists using the Migration List Editor. For information about generating amigration list in batch mode using commands, see the PAC Reference documentation.
■ Using the Migration List Editor■ Object Types for the List■ Using the SEL (Select) Command■ Using the EXP (Expand) Command■ Using the IMP (Import) Command■ Validating a Migration List■ Displaying a Migration List
385

386
34 Using the Migration List Editor
■ Step 1. Accessing the Migration List Editor ......................................................................................... 388■ Step 2. Specifying Objects for the List ................................................................................................ 389■ Step 3. Saving the Migration List ....................................................................................................... 390
387
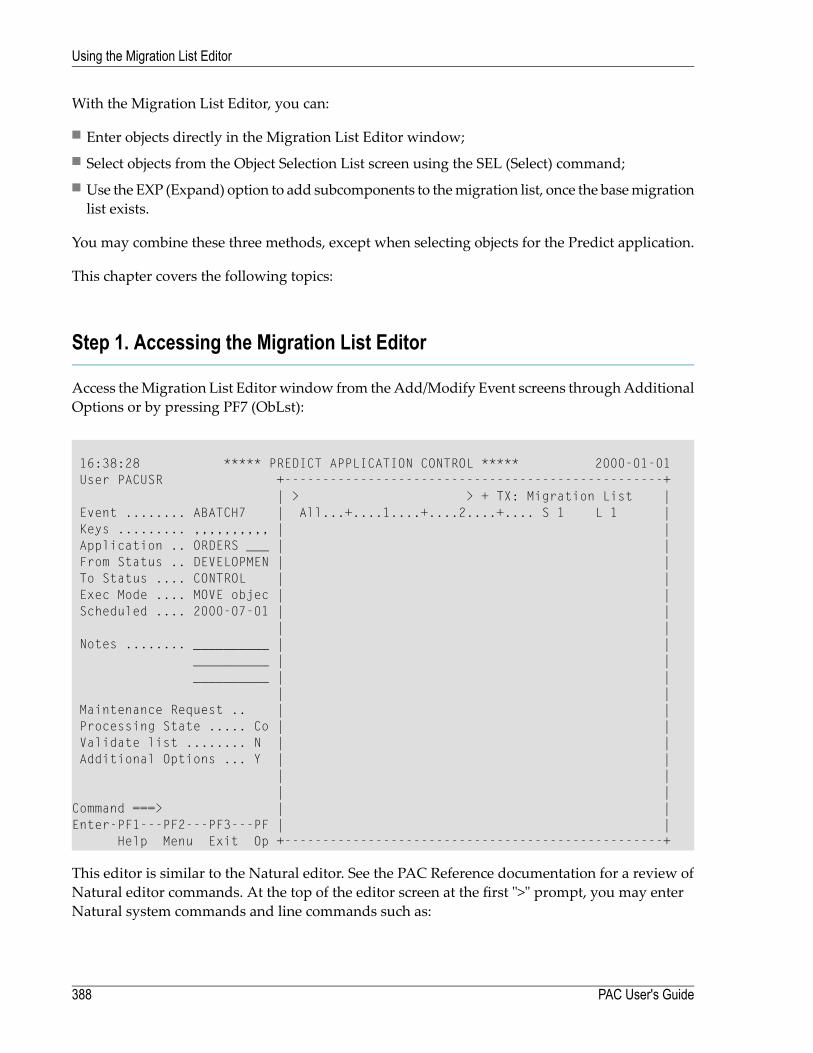
With the Migration List Editor, you can:
■ Enter objects directly in the Migration List Editor window;■ Select objects from the Object Selection List screen using the SEL (Select) command;■ Use the EXP (Expand) option to add subcomponents to themigration list, once the basemigrationlist exists.
You may combine these three methods, except when selecting objects for the Predict application.
This chapter covers the following topics:
Step 1. Accessing the Migration List Editor
Access theMigration List Editorwindow from theAdd/Modify Event screens throughAdditionalOptions or by pressing PF7 (ObLst):
16:38:28 ***** PREDICT APPLICATION CONTROL ***** 2000-01-01User PACUSR +--------------------------------------------------+
| > > + TX: Migration List |Event ........ ABATCH7 | All...+....1....+....2....+.... S 1 L 1 |Keys ......... ,,,,,,,,,, | |Application .. ORDERS ___ | |From Status .. DEVELOPMEN | |To Status .... CONTROL | |Exec Mode .... MOVE objec | |Scheduled .... 2000-07-01 | |
| |Notes ........ __________ | |
__________ | |__________ | |
| |Maintenance Request .. | |Processing State ..... Co | |Validate list ........ N | |Additional Options ... Y | |
| || |
Command ===> | |Enter-PF1---PF2---PF3---PF | |
Help Menu Exit Op +--------------------------------------------------+
This editor is similar to the Natural editor. See the PAC Reference documentation for a review ofNatural editor commands. At the top of the editor screen at the first ">" prompt, you may enterNatural system commands and line commands such as:
PAC User's Guide388
Using the Migration List Editor
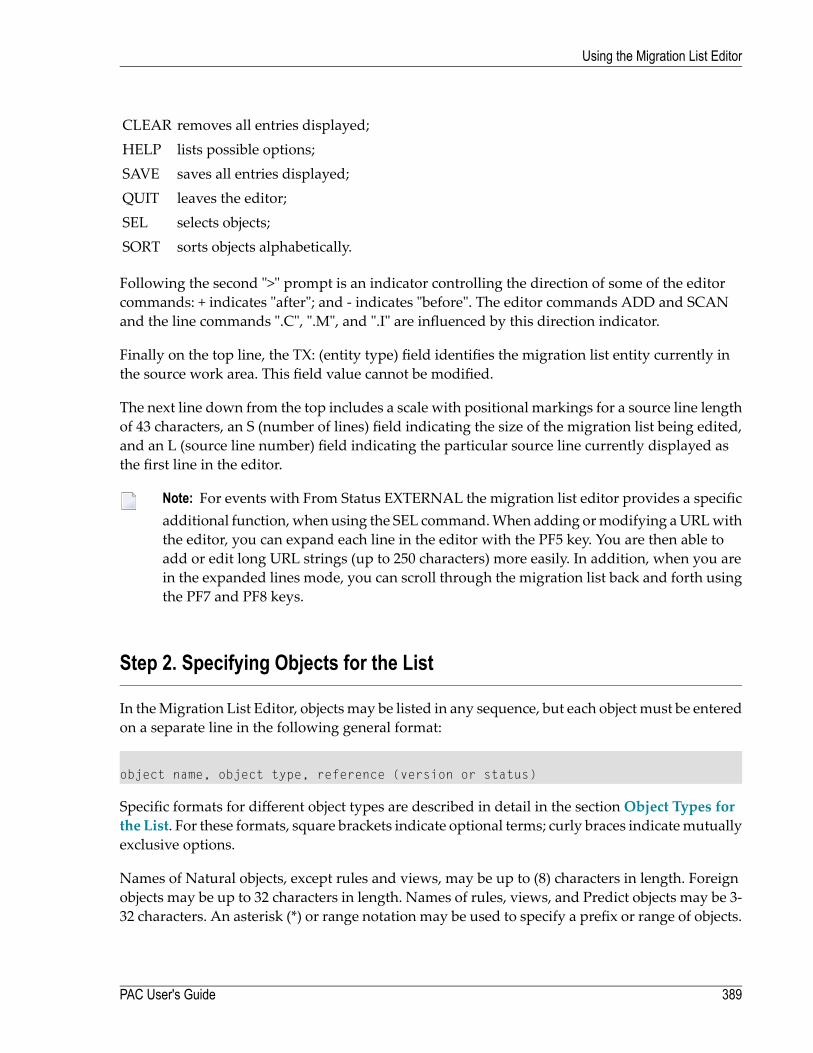
removes all entries displayed;CLEARlists possible options;HELPsaves all entries displayed;SAVEleaves the editor;QUITselects objects;SELsorts objects alphabetically.SORT
Following the second ">" prompt is an indicator controlling the direction of some of the editorcommands: + indicates "after"; and - indicates "before". The editor commands ADD and SCANand the line commands ".C", ".M", and ".I" are influenced by this direction indicator.
Finally on the top line, the TX: (entity type) field identifies the migration list entity currently inthe source work area. This field value cannot be modified.
The next line down from the top includes a scale with positional markings for a source line lengthof 43 characters, an S (number of lines) field indicating the size of the migration list being edited,and an L (source line number) field indicating the particular source line currently displayed asthe first line in the editor.
Note: For events with From Status EXTERNAL the migration list editor provides a specificadditional function, when using the SEL command.When adding ormodifying aURLwiththe editor, you can expand each line in the editor with the PF5 key. You are then able toadd or edit long URL strings (up to 250 characters) more easily. In addition, when you arein the expanded lines mode, you can scroll through the migration list back and forth usingthe PF7 and PF8 keys.
Step 2. Specifying Objects for the List
In theMigration List Editor, objectsmay be listed in any sequence, but each object must be enteredon a separate line in the following general format:
object name, object type, reference (version or status)
Specific formats for different object types are described in detail in the sectionObject Types forthe List. For these formats, square brackets indicate optional terms; curly braces indicatemutuallyexclusive options.
Names of Natural objects, except rules and views, may be up to (8) characters in length. Foreignobjects may be up to 32 characters in length. Names of rules, views, and Predict objects may be 3-32 characters. An asterisk (*) or range notation may be used to specify a prefix or range of objects.
389PAC User's Guide
Using the Migration List Editor

Note: Range notation is not currently available for foreign objects. To display a list of validforeign object types, enter FTYPES on the command line of the Migration List Editor.
PAC interprets the migration list information according to the type of object being processed. Theobject type is a 1-4 character code. If an asterisk (*) is used, PAC determines the exact type(s) forobjects based on the object name specification.
Note: The audit report interprets the asterisk as "GNERIC".
The reference includes the version of the object to be processed (a 1-4 character number) or thestatus of the object (a 1-32 character name or alias that uniquely identifies the status) if the versionnumber is not known.
Step 3. Saving the Migration List
Once you have specified the objects (or selected them from lists; see Using the SEL (Select)Command), the Migration List Editor window displays the list in alphabetical order:
11:41:07 ***** PREDICT APPLICATION CONTROL ***** 2000-01-01User PACUSR +--------------------------------------------------+
Library .. ORDERS (235,9 | > > + TX: object List |C Nr Object Object Type | All...+....1....+....2....+.... S 1 L 12 |- -- -------- ----------- | ASMPGM,3ASL |_ 1 MENU Program | COBPGM,3COB |_ 2 NHL Helproutine | ORD-AHLP,H |_ 3 ORD-AHLP Helproutine | ORD-CUST,S |_ 4 ORD-COPY Copycode | ORD-END,S |_ 5 ORD-CUST Subroutine | ORD-GLOB,G |_ 6 ORD-END Subroutine | ORD-LINE,S |_ 7 ORD-GLOB Global | ORD-MAIN,P |_ 8 ORD-INV Subroutine | ORD-MAP,M |_ 9 ORD-LINE Subroutine | ORD-MAP,M |_ 10 ORD-LIN1 Subroutine | ORD-NHLP,H |_ 11 ORD-MAIN Program | ORD-RLIN,S |_ 12 ORD-MAI1 Program | |_ 13 ORD-MAP Map | |_ 14 ORD-NHLP Helproutine | |
Mark Selec | |PAC7037: (E) Mark line(s) w| |Command ===> | |Enter-PF1---PF2---PF3---PF | |
Help Menu Exit +--------------------------------------------------+
Natural objects, foreign objects, data areas, copy code, rules, views, and maps selected using theavailable options are listed.
On the Editor command line, enter SAVE to save themigration list or a period (.) to exit the Editor.
PAC User's Guide390
Using the Migration List Editor
If you attempt to exit the Migration List Editor before you save your modifications, a warningwindow appears requesting you to enter:
■ E to continue editing;■ C to save your modifications; or■ . (period) to abandon changes and exit the Migration List Editor.
391PAC User's Guide
Using the Migration List Editor

392
35 Object Types for the List
■ Predict Objects .............................................................................................................................. 394■ Foreign Objects ............................................................................................................................. 395■ Natural Objects ............................................................................................................................. 396■ Natural Dynamic Source Objects ...................................................................................................... 401■ User Error Message Objects ............................................................................................................ 402
393

Objects fall into basic groups: Predict, foreign, Natural and user error message. DDMs and rulesare recognized as Natural objects. Files and verifications are recognized as Predict objects.
This chapter covers the following topics:
Predict Objects
A Predict object is an entity in the Predict environment. For Predict objects, the reference in theformat is optional:
object-name,object-type[,reference]
You may specify single or multiple-character codes for Predict object types as indicated in thefollowing table; single-character codes are translated to the longer codes during migration listvalidation.
Object TypeTranslates to . . .Code
File type (e.g., DB2, views, conceptual files, standard files)FICC
DatabaseDAD
Adabas fileFILEF
Package listPAG
KeywordKYK
RelationshipRLL
Data spaceDSN
Storage spaceSTO
ProgramPRP
Virtual machineVMQ
VerificationVER
SystemSYS
UserUSU
ViewVIEWV
NetworkNWW
All objects*
Note: User-defined entities (UDEs) may not be specified.
PAC User's Guide394
Object Types for the List
Controlling the Predict Objects Included in a Migration
PAC uses the Predict SYSDICBE migration utility to load and unload Predict objects. Because ofthe nature of this migration utility, it is important to explicitly define the Predict object type. Asingle entry in the migration list may result in numerous Predict objects being processed. For ex-ample, if Predict type F or C is specified for an object, Predict automatically unloads the file togetherwith all of the verifications and userviews linked to the file, and generates new automatic rulesand DDMs for each object.
If you only need userviews and/or verifications for the migration list, place them individually inthe list and omit the file itself.
However, the parent file (F or C) must have been previously migrated into PAC using the Predictmigration utility SYSDICBE or an errorwill occur. Refer toMigrating PredictObjects, for detailedinformation. Refer to the Predict documentation formore information about the Predictmigrationutility.
Foreign Objects
A foreign object is an entity that exists outside theNatural systemfile. It may reside in a partitioneddataset (PDS) under z/OS or in an LMS library under BS2000. Foreign objects can be source codeor object code or both. They are loaded into PAC without being compiled or recompiled.
For foreign objects, the reference in the format is optional:
object-name,object-type[,reference]
Foreign objects in a migration list are identified by the prefix 3 (for example, 3COB is recognizedas a COBOL object).
The PAC administrator determines the classes and types of foreign objects that are supported atyour site and a project leader has the ability to further limit that set of classes and types for a par-ticular application.
Examples of foreign object classes and types that might be supported at your site include:
■ JCL■ APL Load■ Assembler Copycode■ Assembler Load■ Assembler Program■ Assembler Macro
395PAC User's Guide
Object Types for the List
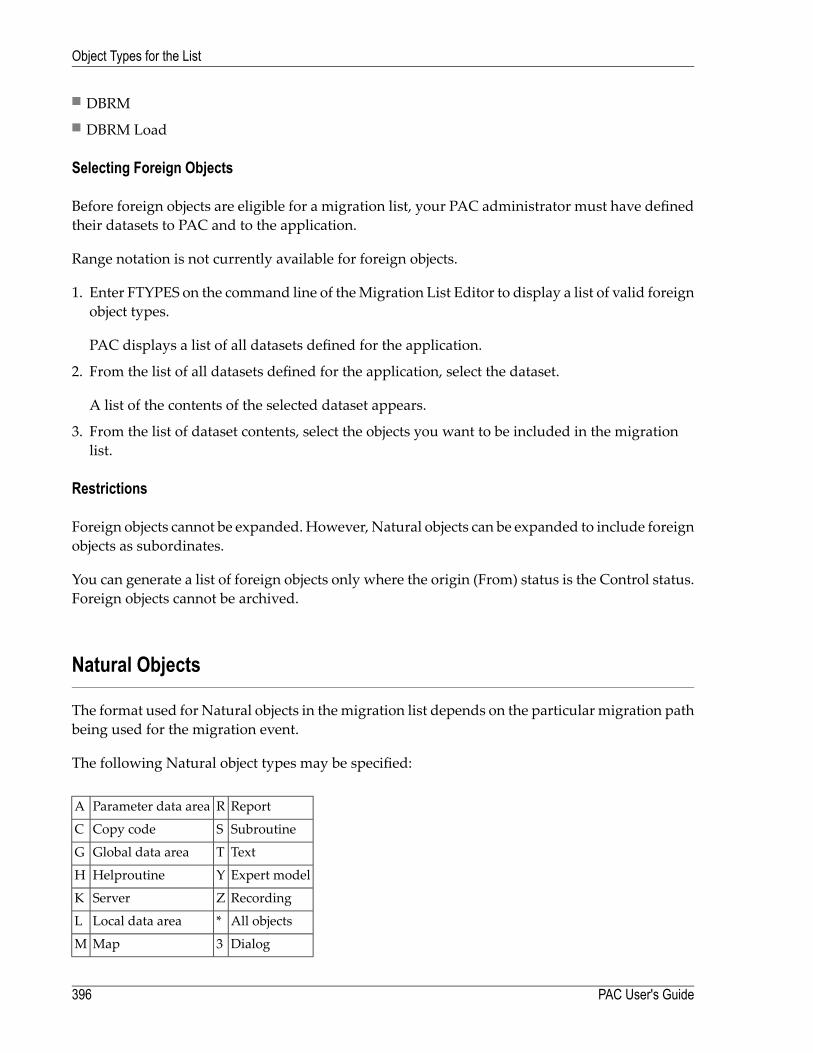
■ DBRM■ DBRM Load
Selecting Foreign Objects
Before foreign objects are eligible for a migration list, your PAC administrator must have definedtheir datasets to PAC and to the application.
Range notation is not currently available for foreign objects.
1. Enter FTYPES on the command line of theMigration List Editor to display a list of valid foreignobject types.
PAC displays a list of all datasets defined for the application.
2. From the list of all datasets defined for the application, select the dataset.
A list of the contents of the selected dataset appears.
3. From the list of dataset contents, select the objects you want to be included in the migrationlist.
Restrictions
Foreign objects cannot be expanded. However, Natural objects can be expanded to include foreignobjects as subordinates.
You can generate a list of foreign objects only where the origin (From) status is the Control status.Foreign objects cannot be archived.
Natural Objects
The format used for Natural objects in themigration list depends on the particular migration pathbeing used for the migration event.
The following Natural object types may be specified:
ReportRParameter data areaA
SubroutineSCopy codeC
TextTGlobal data areaG
Expert modelYHelproutineH
RecordingZServerK
All objects*Local data areaL
Dialog3MapM
PAC User's Guide396
Object Types for the List

Class4SubprogramN
Processor5ProgramP
This section covers the following topics:
■ Rules and Views■ Migration into PAC■ Migration from Control (Including Alignment)■ Migration from Test or Production
Rules and Views
You may specify rules and views if they were generated when the object was identified to PACby a Predict migration that generated the rule and/or view during the migration load. Objectentries may also reference views/DDMs that were incorporated into PAC. Because these objectsare already under the control of PAC, a status or version number has been assigned.
Note: Other than the views incorporated into PACduring the initial setup of Predict inform-ation in PAC, views and rules may not be specified for incorporations.
If the same view or rule is specifiedmultiple times in the migration list, only the last entry is used.
Migration into PAC
Natural objects being migrated online from development, maintenance, or incorporation statustypes, with or without a work file as input, are specified in the migration list using the followingformat:
Youmay use range notation for the object name andwhen specifying rules and views, even if youalso specify the version number or status name.
From Development or Maintenance
When migrating objects from a development or a maintenance status, note the following:
■ If the object name is specified, the typemay optionally be specified, but if the type is inconsistentwith the object name, a warning message may be issued indicating that the object type selectedfor the object is incorrect and that PAC has changed the type to be consistent with the object.
■ You may limit the range of objects by entering a specific object type (currently limited to onetype per entry) so that only objects of the specified type are selected during processing; or enteran asterisk (*) or blank for all types.
397PAC User's Guide
Object Types for the List
■ You may specify a status or status alias for a maintenance status type; you may not specify adevelopment status type because PACdoes not track objectswhich are implicitly in development.
■ You may specify a version number if the object is a subordinate and under the control of PAC.
If a version number is specified for certain object types (that is, copy code; map; global, local,and parameter data areas), PAC invokes rolling for that object type. Refer toUsing the RollingFacility for information about the rolling facility.
■ If neither version nor status is specified, PAC compiles the objects with the latest version of thesubordinate object. If a view and/or rule is not available, PAC uses the latest version for theapplication.
In the case of rules and views, the default version number may not necessarily be the highestexisting version, but rather the highest version assigned (linked) to that application determinedin a migration event where the From status is a development or maintenance type.
■ When migrating objects from a development status, PAC processes the migration list andcompares the date-time stamp of the object specified in the migration list with the date-timestamp of the latest version stored in PAC.■ If the date-time stamps are identical and the object type is copy code or text, then the objectis ignored; however, this may be overridden by User Exit 9.
■ For all other Natural objects (for example, program, subprogram, subroutine, data areas),PAC continues to process the object, even though the programhas not beenmodified, becausea copy code, or a view used by the program may have been changed.
From Incorporate
■ When objects are incorporated from the Natural library directly (without using a work file), themigration list may be created as if it were a migration from development or maintenance (notethe restriction on views and rules in the section Rules and Views).
■ When objects are to be incorporated with input from a work file, the migration list consists ofa single entry only as shown in the following examples:
Loads all . . .Entryobjects except user error messages.*,*objects starting with "A" except user error messages.A*,*program-type objects.*,Pmaps with a name greater than "S".S>,Muser error messages.*,E
Note: User error message objects cannot be included in a migration list with other objecttypes.
PAC User's Guide398
Object Types for the List
Migration from Control (Including Alignment)
When migrating Natural objects from the PAC Control status, version numbers or statuses mayoptionally be provided to identify the specific object(s) to be included during processing.
Status is Specified
If a status (or status alias) is specified, the following format is used for the object in the list:
object-name[,object-type],status
■ The object name must be specified; however, range notation may be used.■ PAC accepts the object only if it has been migrated to the specified status. PAC determines theversion number when the migration event is processed.
■ The object type may optionally be specified.■ Rules and views may be specified if they have been registered to the application.■ For archiving, multiple objects with different versions may be added to the migration list.
Version is Specified
If a version number is specified, the following format is used for the object in the list:
object-name[,object-type],version
■ The object name with the specified version number is processed regardless of the status(s) inwhich it exists (except the Archive status); it is then ignored and the user is notified.
■ Object type is optional, but if the type is inconsistent with the object name, an error or warningmessage is issued.
■ Range notation may be specified for rule and view objects only (except with alignment).■ Version number for rule and view objects must be valid for the application and not for the ver-sions created during themigration of Predict data; that is, the rules and viewsmust be registeredto the application.
399PAC User's Guide
Object Types for the List
Neither Version nor Status is Specified
If neither version nor status is specified, the following format is used for the object in the list:
object-name[,object-type]
■ The object name must be specified. Range notation may be used.■ The object type may optionally be specified.■ PAC defaults to the highest existing version number for the specified object, unless that versionis archived.
■ In the case of rules and views, the default version number may not necessarily be the highestexisting version, but rather the highest version registered to that application.
Migration from Test or Production
When migrating Natural objects from test or production status types (that is, from a status otherthan Control, maintenance or development), the version number or status may optionally beprovided to identify the specific object(s) to be processed. However, the reference will default tothe name of the origin status.
Status is Specified
If status is specified, the following format is used for the object in the migration list:
object-name[,object-type],status
■ The object name must be specified. Range notation may be used.■ The object type may optionally be specified.■ PAC accepts the object only if it has been migrated to the specified status. PAC determines theversion number when the migration event is processed.■ If the Control status is specified, the version number will always be the most recent one.■ Status may not be used as a reference for the Archive and Retire statuses.
■ In the case of rules and views, the object must be registered to the (foreign) application.
PAC User's Guide400
Object Types for the List

Version is Specified
If a version number is specified, the following format is used for the object in the list:
object-name[,object-type],version
■ The object name with the specified version number is processed regardless of any status(s) inwhich it exists.
■ If the destination status is Archive:■ multiple versions of the same object may be specified.■ asterisk (*) notationmay be used for version to select the oldest as opposed to the most recentversion.
■ The object type may optionally be specified. If the object type is inconsistent with the object, anerror or warning message is returned to the user.
■ For rules and views, range notation may be specified.■ Version number for rules and views must be valid for the application and not for the versionscreated during the migration of Predict data; that is, they must be registered to the application.
Neither Version nor Status is Specified
If neither version nor status is specified, the following format is used for the object in the list:
object-name[,object-type]
■ PAC defaults to the version of the object that is currently in the status from which the objectsare beingmigrated. If the destination status isArchive, the default is the oldest version as opposedto the most recent version.
■ PAC assumes that every object listed with no override version or status must exist in the origin(From) status of the migration event; if not, the object is ignored.
■ For rules and views, range notation may be specified.
Natural Dynamic Source Objects
To migrate the source as well as the cataloged objects of copy code, maps, or programs from de-velopment, maintenance, or incorporation status types, manually enter the following codes in themigration list:
CS for source of copy codeMS for source of a mapPS for source of a program
401PAC User's Guide
Object Types for the List
Objects migrated into PAC with these designations are internally flagged to indicate that whenthey aremigrated, the sourcewill bemigrated and objectswill not be compiled. Refer toMigrationsBetween Control, Test, and Production for more information about dynamic source variables.
User Error Message Objects
The migration list also supports user error messages objects. User error messages are specified onthe migration list in the following format:
error-number[,reference]
where error-number is the number assigned to the user errormessage preceded by E (for example,E1234); and reference is the version number or status of the user error message. The reference isoptional; you may leave it blank.
Since the number of error messages used by any one application may vary from 1 to 9999, rangenotation may be used as follows:
from error number - to error number
For example: E100-E200,E
Since they cannot be compiled, user error messages do not need to reside in the Control status.
User error messages are migrated into and out of PAC. In a migration list, user error messagesare treated similarly to Natural objects.
PAC validates user errormessages in themigration list in the sameway it validatesNatural objects.User error messages must exist in the origin status.
User error messages consist of short and long error texts. For each error message, up to sixty lan-guages for the same error message can exist. (The correlation of language codes to language textis defined in the ULANGTAB Natural macro.)
PAC User's Guide402
Object Types for the List
36 Using the SEL (Select) Command
■ Expand Options ............................................................................................................................. 404■ Creating the Migration List ............................................................................................................... 405■ Migrations into PAC ........................................................................................................................ 405■ Other Migrations ............................................................................................................................ 415
403

You may use the SEL (Select) command from the Migration List Editor to create a migration list,either alone or in conjunction with its expand options.
Use of the SEL command and its options depends on whether the event migrates objects
■ into the PAC controlled environment from development, maintenance or incorporation; or■ from or within the PAC controlled environment (other migrations).
The following SEL command options apply for migration events into PAC; for other migrations,only SEL, the default, is valid:
Used to select...Cmd
(default) Natural and/or foreign objects.SEL
user error message objects from development.SEL E
rules to be used during the compile phase of the migration event. Rules must have been previouslymigrated into the Predict application.
SEL R
SEL U one or several URLs to be used to access a repository in an external version control software.Alternatively, used to enter a root URL. You can either select all objects below a root URL or select(and expand) a specific node from the root URL.In addition, you can further narrow down the list of objects to be selected by specifying a pattern(file name and/or extension). For example using .NS* as input in the Extension field would onlyselect Natural sources for the migration list.
Note: Only available for events with source status External.
views to be used during the compile phase of themigration event. Viewsmust have been previouslymigrated into the Predict application.
SEL V
This chapter covers the following topics:
Expand Options
The following expand options are available with the SEL command:Include in the migration list:OptionMarked object and subordinate objects; for compile time. Valid for the default SEL com-mand only.
C
Marked object and both subordinate and referenced objects; for both compile time andruntime (expand options C+R). Valid for the default SEL command only.
E
Marked object and referenced objects; for runtime. Valid for the default SEL commandonly.
R
Marked object only.S or XMarked object and objects used by the marked object.U
PAC User's Guide404
Using the SEL (Select) Command
The expand options C, E, R, and U use cross-reference (Xref) data from:
■ Predict for migrations into PAC.■ PAC for all other migrations.
When migrating objects into PAC (that is, from development or maintenance status), the expandoptions are valid only if cross-reference data exists for the object as specified by the Predict locationfor the application status.
C includes data areas, copy code, views, rules, or maps used as subordinate objects by themarkedobject. These objects are required in order to properly compile the marked object.
E includes both subordinate and referenced objects in the list with the marked object.
R includes all objects referenced by the marked object. For instance, if the marked object is a pro-gram, it may reference other programs, subprograms, or subroutines. These objects are requiredin order to properly execute the marked object at runtime.
S or X include just the marked object. You can also select individual objects by entering the objectnumber (from the "Nr" column) in the Mark Selection... field.
U includes themarked object and all Natural objects that use that object. For example, if themarkedobject is a program, other programs that use the marked program would also be included in thelist.
Creating the Migration List
To create the migration list for migrations using the SEL command, do the following:
1. Display the Migration List Editor window.
2. Select the objects to be migrated.
3. Save the resulting migration list in the Migration List Editor.
Migrations into PAC
The SEL command is used differently to migrate Natural, foreign, user error message, rule andview objects into the PAC controlled environment.
This section covers the following topics:
■ Natural or Foreign Objects■ User Error Message Objects
405PAC User's Guide
Using the SEL (Select) Command
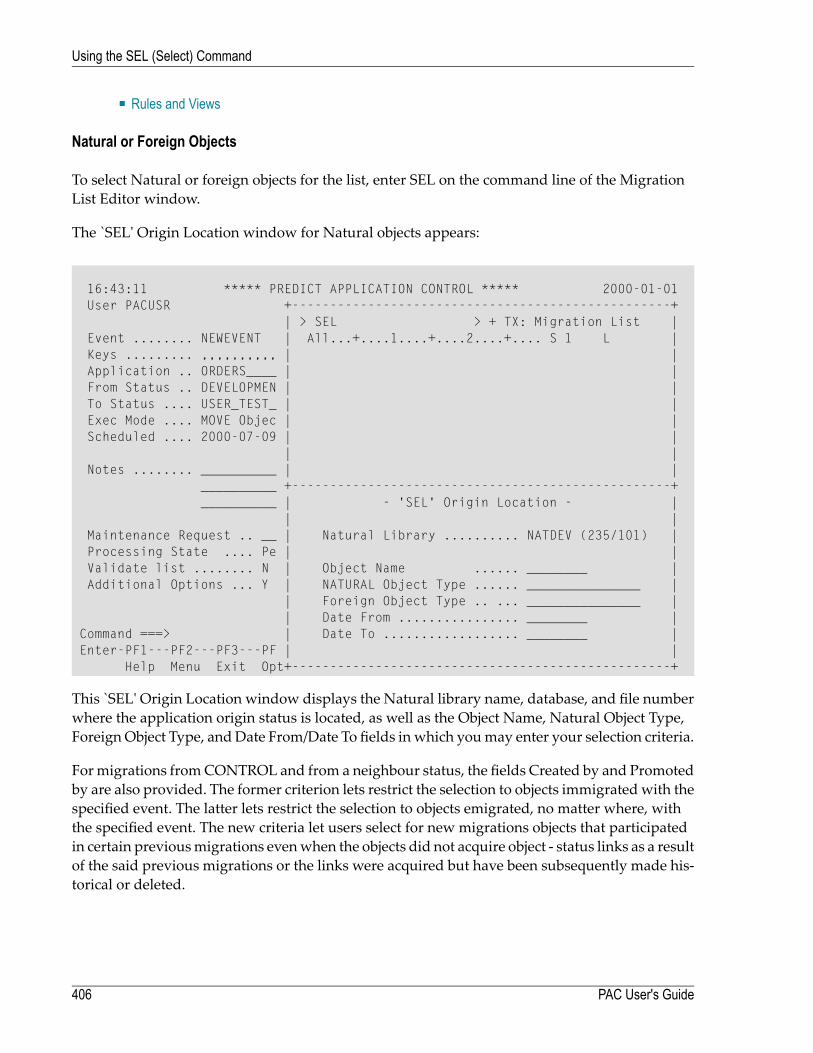
■ Rules and Views
Natural or Foreign Objects
To select Natural or foreign objects for the list, enter SEL on the command line of the MigrationList Editor window.
The `SEL' Origin Location window for Natural objects appears:
16:43:11 ***** PREDICT APPLICATION CONTROL ***** 2000-01-01User PACUSR +--------------------------------------------------+
| > SEL > + TX: Migration List |Event ........ NEWEVENT | All...+....1....+....2....+.... S 1 L |Keys ......... ,,,,,,,,,, | |Application .. ORDERS____ | |From Status .. DEVELOPMEN | |To Status .... USER_TEST_ | |Exec Mode .... MOVE Objec | |Scheduled .... 2000-07-09 | |
| |Notes ........ __________ | |
__________ +--------------------------------------------------+__________ | - 'SEL' Origin Location - |
| |Maintenance Request .. __ | Natural Library .......... NATDEV (235/101) |Processing State .... Pe | |Validate list ........ N | Object Name ...... ________ |Additional Options ... Y | NATURAL Object Type ...... _______________ |
| Foreign Object Type .. ... _______________ || Date From ................ ________ |
Command ===> | Date To .................. ________ |Enter-PF1---PF2---PF3---PF | |
Help Menu Exit Opt+--------------------------------------------------+
This `SEL' Origin Location window displays the Natural library name, database, and file numberwhere the application origin status is located, as well as the Object Name, Natural Object Type,Foreign Object Type, and Date From/Date To fields in which youmay enter your selection criteria.
For migrations fromCONTROL and from a neighbour status, the fields Created by and Promotedby are also provided. The former criterion lets restrict the selection to objects immigrated with thespecified event. The latter lets restrict the selection to objects emigrated, no matter where, withthe specified event. The new criteria let users select for new migrations objects that participatedin certain previousmigrations evenwhen the objects did not acquire object - status links as a resultof the said previous migrations or the links were acquired but have been subsequently made his-torical or deleted.
PAC User's Guide406
Using the SEL (Select) Command

For Natural Objects
Enter the desired object name and object type, and if desired, a compile date range in the DateFrom/Date To fields in yymmdd format. Alternatively, leave these fields blank, or specify a rangeof objects and/or object types to limit the selection list.
The Object Selection List screen appears displaying a list of all objects that satisfy the selectioncriteria:
08:22:45 ***** PREDICT APPLICATION CONTROL ***** 2000-07-01User PACUSR - Object Selection List -Library .. ORD-EXAM (235,9)C Nr Object Object Type Ver-Lev User Cat Date-Time Saved Date-Time- -- -------- ----------- ------- -------- ----------------- -----------------_ 1 NHL Helproutine 2.3 002 XX 20000214 09:54:50 20000214 09:54:50_ 2 ORD-AHLP Helproutine 2.3 002 PACUSR 20000203 13:26:16 20000319 11:20:37_ 3 ORD-COPY Copycode 2.3 002 SADXX 20000607 15:42:26_ 4 ORD-CUST Subroutine 2.3 002 PACUSR 20000319 11:19:35 20000319 11:20:51_ 5 ORD-END Subroutine 2.3 002 PACUSR 20000319 11:19:37 20000319 11:20:55_ 6 ORD-GLOB Global 2.3 002 SADXX 20000203 13:25:19 20000203 13:25:19_ 7 ORD-INV Subroutine 2.3 002 PACUSR 20000319 11:19:40 20000319 11:19:40_ 8 ORD-LINE Subroutine 2.3 002 PACUSR 20000319 11:19:46 20000319 11:19:46_ 9 ORD-LIN1 Subroutine 2.3 002 PACUSR 20000319 11:19:54 20000319 11:19:54_ 10 ORD-MAIN Program 2.3 002 PACUSR 20000319 11:20:08 20000319 11:20:08_ 11 ORD-MAI1 Program 2.3 002 PACUSR 20000319 11:20:13 20000319 11:20:13_ 12 ORD-MAP Map 2.3 002 XX 20000214 09:55:33 20000214 09:55:33_ 13 ORD-NHLP Helproutine 2.3 002 XX 20000214 09:55:43 20000214 09:55:43_ 14 ORD-RLIN Subroutine 2.3 002 PACUSR 20000319 11:20:15 20000319 11:20:15
Mark Selection, Enter Number or 'T' (Top) __
Command ===>Enter-PF1---PF2---PF3---PF4---PF5---PF6---PF7---PF8---PF9---PF10--PF11--PF12---
Help Menu Exit Canc
DescriptionColumnInput field for entering selection (SEL) expand options.CName, database, and file number of librarywhere objects are physically locatedin development or maintenance
Library
Number assigned to the object on the immediate screen.NrNames of application objects that meet the specified selection criteria.ObjectType of the named object. You must update the entry using the Object ListEditor to include dynamic source.
Object Type
The Natural version and system maintenance level under which the objectresides in development or maintenance.
Ver-Lev
ID of the user who saved the object.UserDate and time the object was compiled (that is, cataloged).Cat Date-Time
407PAC User's Guide
Using the SEL (Select) Command
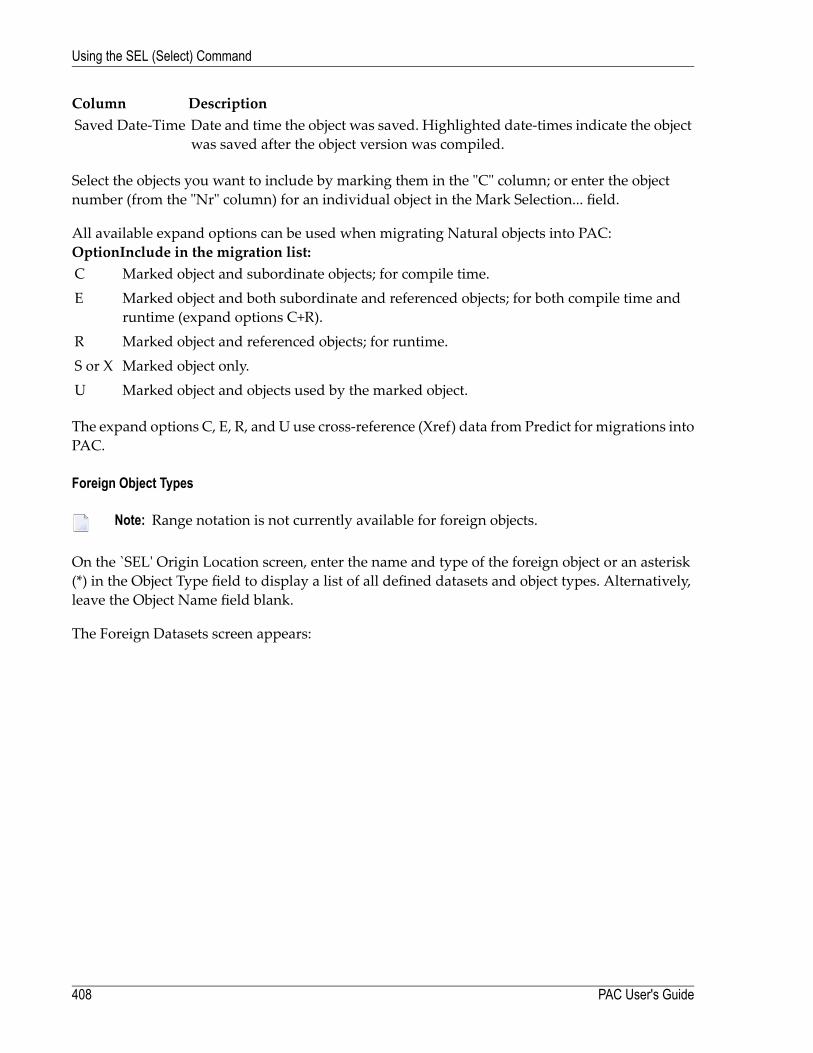
DescriptionColumnDate and time the object was saved. Highlighted date-times indicate the objectwas saved after the object version was compiled.
Saved Date-Time
Select the objects you want to include by marking them in the "C" column; or enter the objectnumber (from the "Nr" column) for an individual object in the Mark Selection... field.
All available expand options can be used when migrating Natural objects into PAC:Include in the migration list:OptionMarked object and subordinate objects; for compile time.CMarked object and both subordinate and referenced objects; for both compile time andruntime (expand options C+R).
E
Marked object and referenced objects; for runtime.RMarked object only.S or XMarked object and objects used by the marked object.U
The expand options C, E, R, and U use cross-reference (Xref) data from Predict for migrations intoPAC.
Foreign Object Types
Note: Range notation is not currently available for foreign objects.
On the `SEL' Origin Location screen, enter the name and type of the foreign object or an asterisk(*) in the Object Type field to display a list of all defined datasets and object types. Alternatively,leave the Object Name field blank.
The Foreign Datasets screen appears:
PAC User's Guide408
Using the SEL (Select) Command
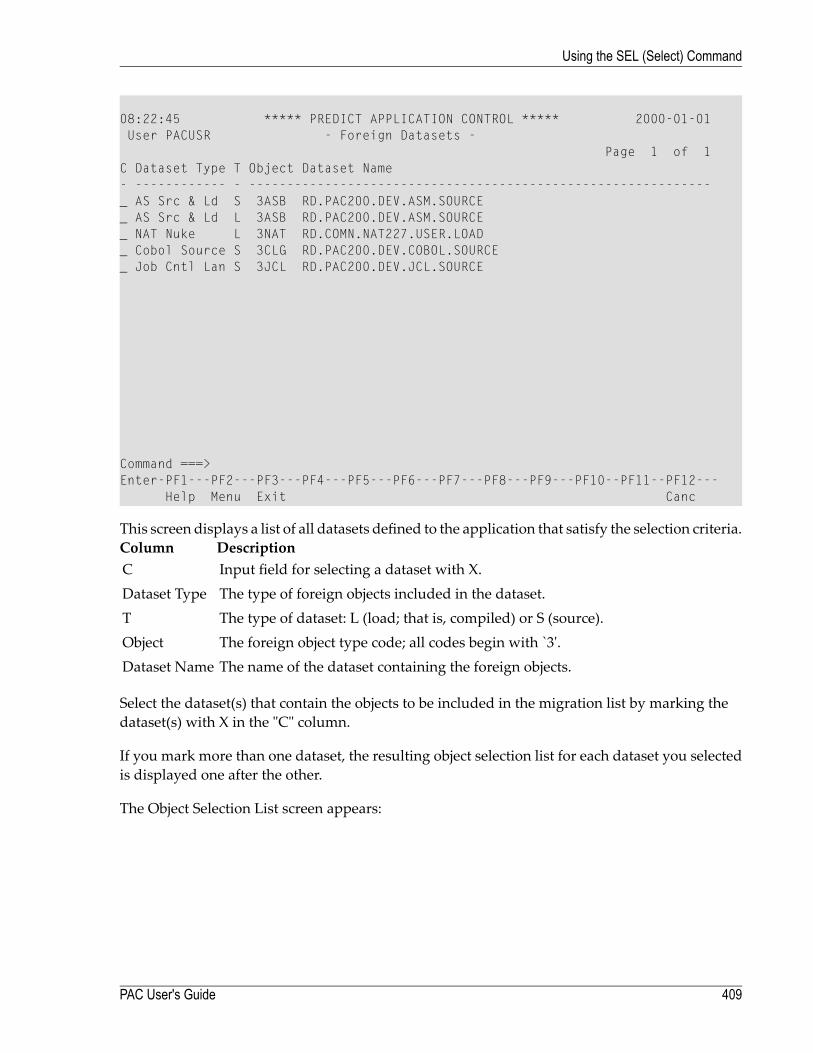
08:22:45 ***** PREDICT APPLICATION CONTROL ***** 2000-01-01User PACUSR - Foreign Datasets -
Page 1 of 1C Dataset Type T Object Dataset Name- ------------ - -------------------------------------------------------------_ AS Src & Ld S 3ASB RD.PAC200.DEV.ASM.SOURCE_ AS Src & Ld L 3ASB RD.PAC200.DEV.ASM.SOURCE_ NAT Nuke L 3NAT RD.COMN.NAT227.USER.LOAD_ Cobol Source S 3CLG RD.PAC200.DEV.COBOL.SOURCE_ Job Cntl Lan S 3JCL RD.PAC200.DEV.JCL.SOURCE
Command ===>Enter-PF1---PF2---PF3---PF4---PF5---PF6---PF7---PF8---PF9---PF10--PF11--PF12---
Help Menu Exit Canc
This screen displays a list of all datasets defined to the application that satisfy the selection criteria.DescriptionColumnInput field for selecting a dataset with X.CThe type of foreign objects included in the dataset.Dataset TypeThe type of dataset: L (load; that is, compiled) or S (source).TThe foreign object type code; all codes begin with `3'.ObjectThe name of the dataset containing the foreign objects.Dataset Name
Select the dataset(s) that contain the objects to be included in the migration list by marking thedataset(s) with X in the "C" column.
If you mark more than one dataset, the resulting object selection list for each dataset you selectedis displayed one after the other.
The Object Selection List screen appears:
409PAC User's Guide
Using the SEL (Select) Command
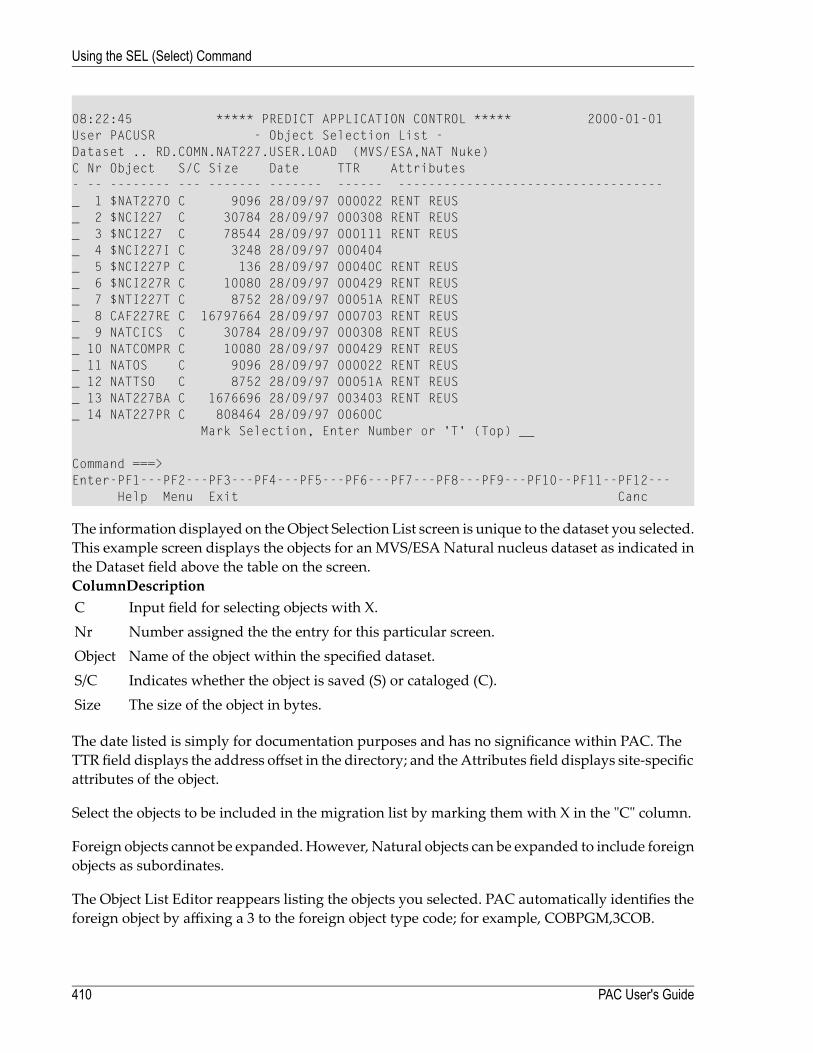
08:22:45 ***** PREDICT APPLICATION CONTROL ***** 2000-01-01User PACUSR - Object Selection List -Dataset .. RD.COMN.NAT227.USER.LOAD (MVS/ESA,NAT Nuke)C Nr Object S/C Size Date TTR Attributes- -- -------- --- ------- ------- ------ -----------------------------------_ 1 $NAT227O C 9096 28/09/97 000022 RENT REUS_ 2 $NCI227 C 30784 28/09/97 000308 RENT REUS_ 3 $NCI227 C 78544 28/09/97 000111 RENT REUS_ 4 $NCI227I C 3248 28/09/97 000404_ 5 $NCI227P C 136 28/09/97 00040C RENT REUS_ 6 $NCI227R C 10080 28/09/97 000429 RENT REUS_ 7 $NTI227T C 8752 28/09/97 00051A RENT REUS_ 8 CAF227RE C 16797664 28/09/97 000703 RENT REUS_ 9 NATCICS C 30784 28/09/97 000308 RENT REUS_ 10 NATCOMPR C 10080 28/09/97 000429 RENT REUS_ 11 NATOS C 9096 28/09/97 000022 RENT REUS_ 12 NATTSO C 8752 28/09/97 00051A RENT REUS_ 13 NAT227BA C 1676696 28/09/97 003403 RENT REUS_ 14 NAT227PR C 808464 28/09/97 00600C
Mark Selection, Enter Number or 'T' (Top) __
Command ===>Enter-PF1---PF2---PF3---PF4---PF5---PF6---PF7---PF8---PF9---PF10--PF11--PF12---
Help Menu Exit Canc
The information displayed on theObject Selection List screen is unique to the dataset you selected.This example screen displays the objects for an MVS/ESA Natural nucleus dataset as indicated inthe Dataset field above the table on the screen.
DescriptionColumnInput field for selecting objects with X.CNumber assigned the the entry for this particular screen.NrName of the object within the specified dataset.ObjectIndicates whether the object is saved (S) or cataloged (C).S/CThe size of the object in bytes.Size
The date listed is simply for documentation purposes and has no significance within PAC. TheTTR field displays the address offset in the directory; and the Attributes field displays site-specificattributes of the object.
Select the objects to be included in the migration list by marking them with X in the "C" column.
Foreign objects cannot be expanded. However, Natural objects can be expanded to include foreignobjects as subordinates.
The Object List Editor reappears listing the objects you selected. PAC automatically identifies theforeign object by affixing a 3 to the foreign object type code; for example, COBPGM,3COB.
PAC User's Guide410
Using the SEL (Select) Command

User Error Message Objects
Note: User error message objects cannot be included in a migration list with other objecttypes.
To select user error message objects for a list, enter SEL E on the command line of the MigrationList Editor window.
The `SEL' Origin Location window for user error messages appears:
11:22:01 ***** PREDICT APPLICATION CONTROL ***** 2000-01-01User PACUSR +--------------------------------------------------+
| > SEL E > + TX: Migration List |Event ........ ANEVENT__ | All...+....1....+....2....+.... S 1 L 1 |Keys ......... ,,,,,,,,,, | |Application .. ORDERS_____| |From Status .. DEVELOPMEN | |To Status .... CONTROL___ | |Exec Mode .... COPY Objec | |Scheduled .... 2000-05-05 | +-----------------------------------+ |
| | - 'SEL' Origin Location - | |Notes ........ __________ | | | |
__________ | | From Library . ORD-EXAM | |__________ | | DBnr/Fnr ..... 235 / 17 | |
| | Error From ... 1___ | |Maintenance Request .. __ | | Error To ..... 9999 | |Processing State ..... Va | | | |Validate List ........ N | +-----------------------------------+ |Additional Options ... N | |
| || |
Command ===> | |Enter-PF1---PF2---PF3---PF | |
Help Menu Exit Op +--------------------------------------------------+
The `SEL' Origin Location window for user error messages displays the library name, database,and file number where the application origin status is located, as well as the Error From/Error Tofields allowing you to specify an error message number or a range of numbers to be selected.
Enter the user error message number (for example, 0078) in the Error From field, or a range in theError From/Error To fields. Or you can leave these fields blank.
The Error Selection List screen appears:
411PAC User's Guide
Using the SEL (Select) Command
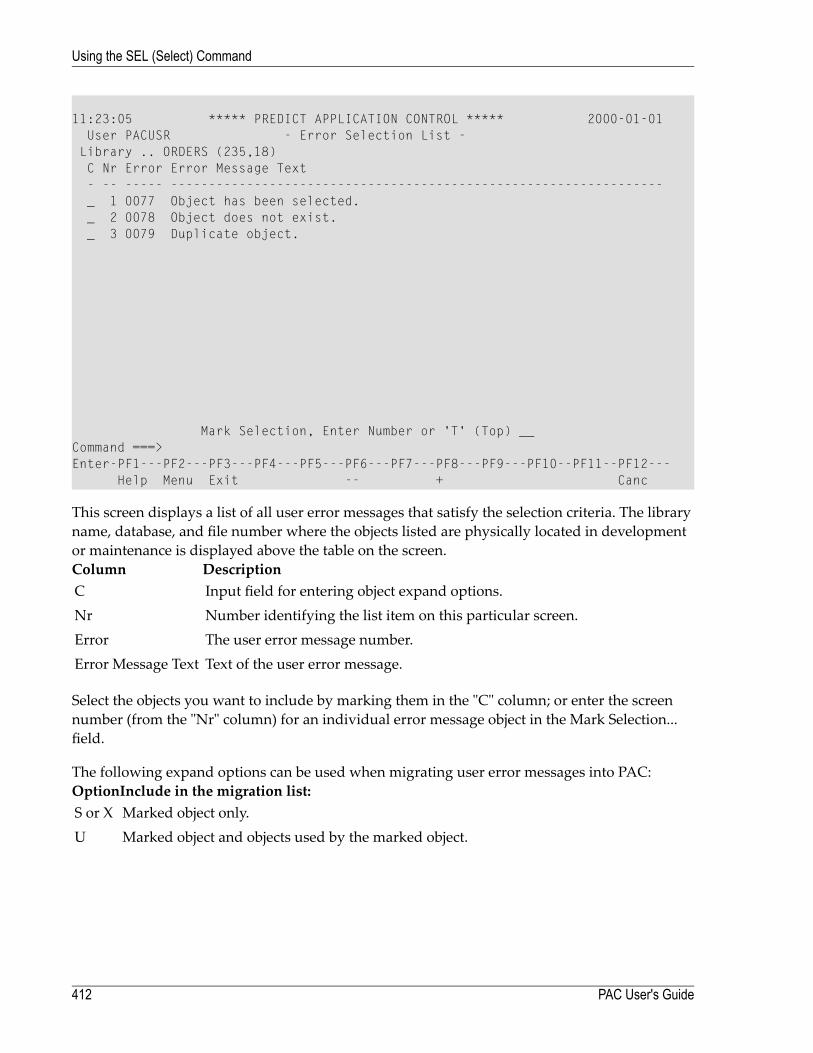
11:23:05 ***** PREDICT APPLICATION CONTROL ***** 2000-01-01User PACUSR - Error Selection List -
Library .. ORDERS (235,18)C Nr Error Error Message Text- -- ----- -----------------------------------------------------------------_ 1 0077 Object has been selected._ 2 0078 Object does not exist._ 3 0079 Duplicate object.
Mark Selection, Enter Number or 'T' (Top) __Command ===>Enter-PF1---PF2---PF3---PF4---PF5---PF6---PF7---PF8---PF9---PF10--PF11--PF12---
Help Menu Exit -- + Canc
This screen displays a list of all user error messages that satisfy the selection criteria. The libraryname, database, and file number where the objects listed are physically located in developmentor maintenance is displayed above the table on the screen.
DescriptionColumnInput field for entering object expand options.CNumber identifying the list item on this particular screen.NrThe user error message number.ErrorText of the user error message.Error Message Text
Select the objects you want to include by marking them in the "C" column; or enter the screennumber (from the "Nr" column) for an individual error message object in the Mark Selection...field.
The following expand options can be used when migrating user error messages into PAC:Include in the migration list:OptionMarked object only.S or XMarked object and objects used by the marked object.U
PAC User's Guide412
Using the SEL (Select) Command
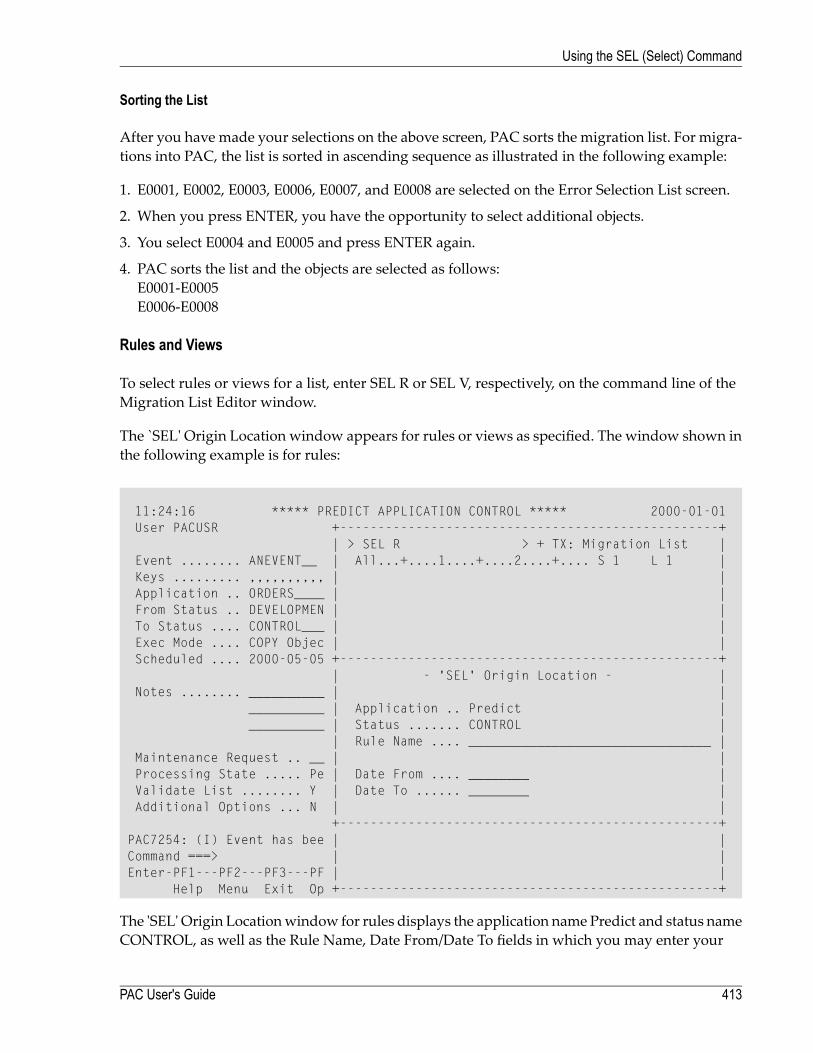
Sorting the List
After you have made your selections on the above screen, PAC sorts the migration list. For migra-tions into PAC, the list is sorted in ascending sequence as illustrated in the following example:
1. E0001, E0002, E0003, E0006, E0007, and E0008 are selected on the Error Selection List screen.
2. When you press ENTER, you have the opportunity to select additional objects.
3. You select E0004 and E0005 and press ENTER again.
4. PAC sorts the list and the objects are selected as follows:E0001-E0005E0006-E0008
Rules and Views
To select rules or views for a list, enter SEL R or SEL V, respectively, on the command line of theMigration List Editor window.
The `SEL' Origin Location window appears for rules or views as specified. The window shown inthe following example is for rules:
11:24:16 ***** PREDICT APPLICATION CONTROL ***** 2000-01-01User PACUSR +--------------------------------------------------+
| > SEL R > + TX: Migration List |Event ........ ANEVENT__ | All...+....1....+....2....+.... S 1 L 1 |Keys ......... ,,,,,,,,,, | |Application .. ORDERS____ | |From Status .. DEVELOPMEN | |To Status .... CONTROL___ | |Exec Mode .... COPY Objec | |Scheduled .... 2000-05-05 +--------------------------------------------------+
| - 'SEL' Origin Location - |Notes ........ __________ | |
__________ | Application .. Predict |__________ | Status ....... CONTROL |
| Rule Name .... ________________________________ |Maintenance Request .. __ | |Processing State ..... Pe | Date From .... ________ |Validate List ........ Y | Date To ...... ________ |Additional Options ... N | |
+--------------------------------------------------+PAC7254: (I) Event has bee | |Command ===> | |Enter-PF1---PF2---PF3---PF | |
Help Menu Exit Op +--------------------------------------------------+
The 'SEL' Origin Locationwindow for rules displays the application name Predict and status nameCONTROL, as well as the Rule Name, Date From/Date To fields in which you may enter your
413PAC User's Guide
Using the SEL (Select) Command
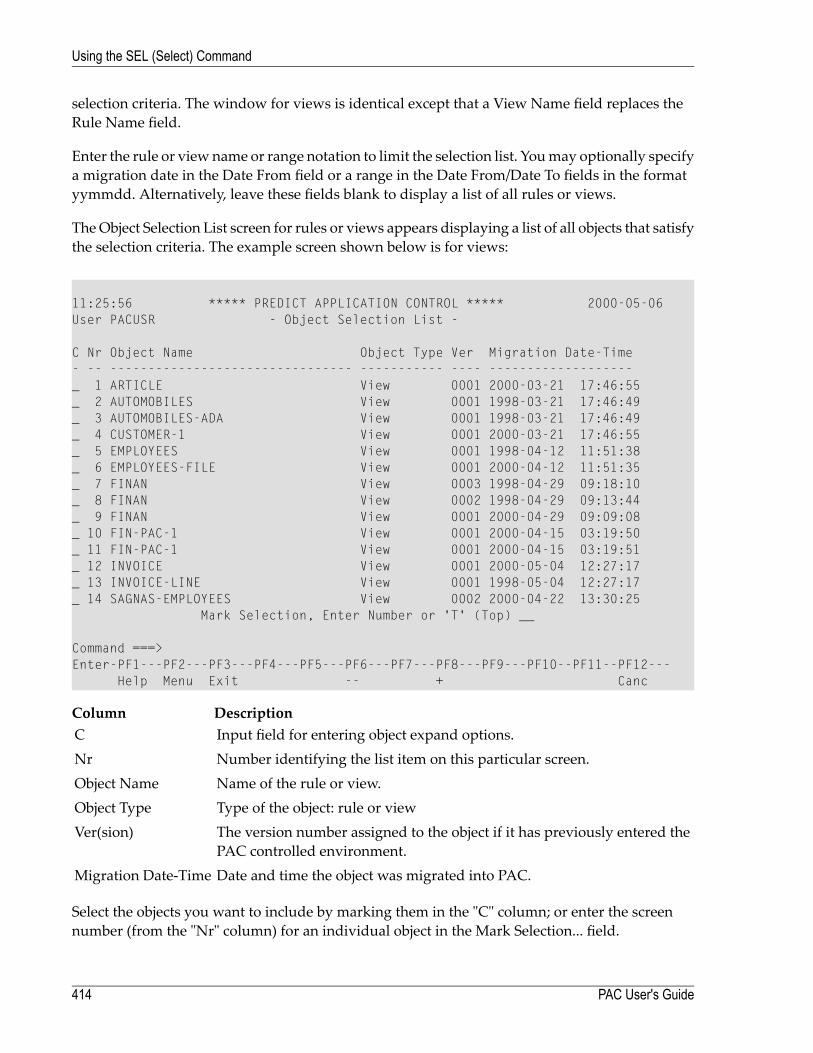
selection criteria. The window for views is identical except that a View Name field replaces theRule Name field.
Enter the rule or view name or range notation to limit the selection list. Youmay optionally specifya migration date in the Date From field or a range in the Date From/Date To fields in the formatyymmdd. Alternatively, leave these fields blank to display a list of all rules or views.
TheObject Selection List screen for rules or views appears displaying a list of all objects that satisfythe selection criteria. The example screen shown below is for views:
11:25:56 ***** PREDICT APPLICATION CONTROL ***** 2000-05-06User PACUSR - Object Selection List -
C Nr Object Name Object Type Ver Migration Date-Time- -- -------------------------------- ----------- ---- -------------------_ 1 ARTICLE View 0001 2000-03-21 17:46:55_ 2 AUTOMOBILES View 0001 1998-03-21 17:46:49_ 3 AUTOMOBILES-ADA View 0001 1998-03-21 17:46:49_ 4 CUSTOMER-1 View 0001 2000-03-21 17:46:55_ 5 EMPLOYEES View 0001 1998-04-12 11:51:38_ 6 EMPLOYEES-FILE View 0001 2000-04-12 11:51:35_ 7 FINAN View 0003 1998-04-29 09:18:10_ 8 FINAN View 0002 1998-04-29 09:13:44_ 9 FINAN View 0001 2000-04-29 09:09:08_ 10 FIN-PAC-1 View 0001 2000-04-15 03:19:50_ 11 FIN-PAC-1 View 0001 2000-04-15 03:19:51_ 12 INVOICE View 0001 2000-05-04 12:27:17_ 13 INVOICE-LINE View 0001 1998-05-04 12:27:17_ 14 SAGNAS-EMPLOYEES View 0002 2000-04-22 13:30:25
Mark Selection, Enter Number or 'T' (Top) __
Command ===>Enter-PF1---PF2---PF3---PF4---PF5---PF6---PF7---PF8---PF9---PF10--PF11--PF12---
Help Menu Exit -- + Canc
DescriptionColumnInput field for entering object expand options.CNumber identifying the list item on this particular screen.NrName of the rule or view.Object NameType of the object: rule or viewObject TypeThe version number assigned to the object if it has previously entered thePAC controlled environment.
Ver(sion)
Date and time the object was migrated into PAC.Migration Date-Time
Select the objects you want to include by marking them in the "C" column; or enter the screennumber (from the "Nr" column) for an individual object in the Mark Selection... field.
PAC User's Guide414
Using the SEL (Select) Command
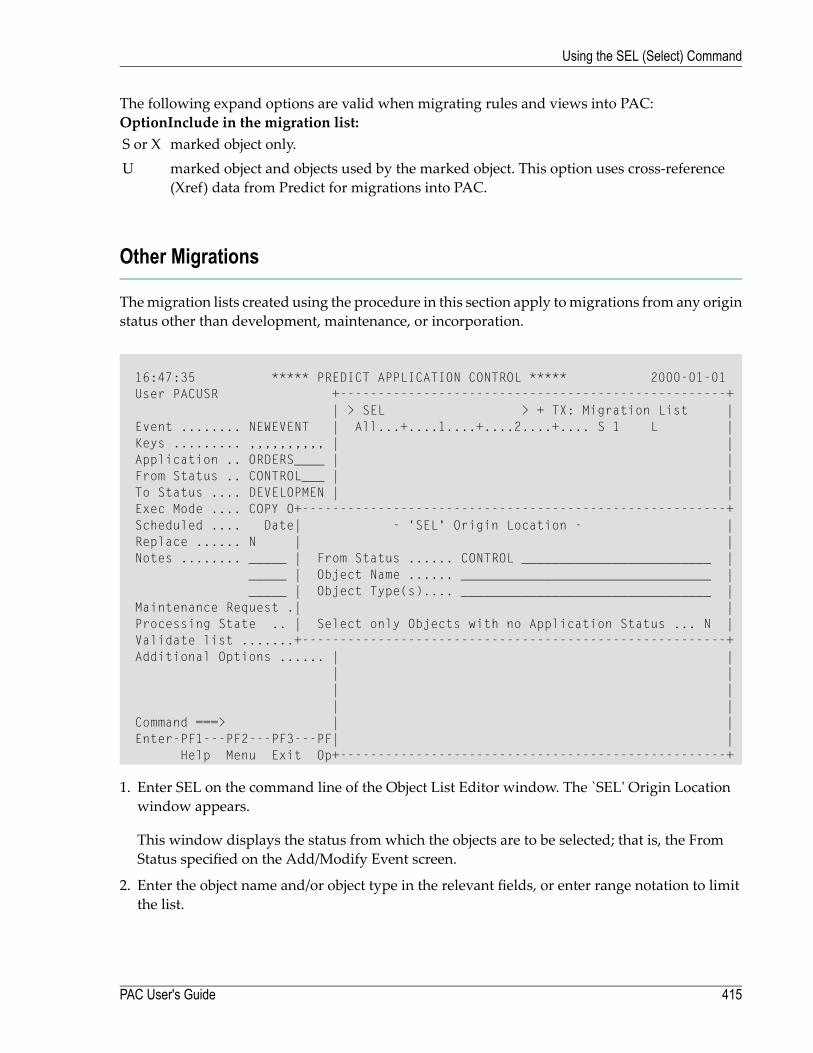
The following expand options are valid when migrating rules and views into PAC:Include in the migration list:Optionmarked object only.S or Xmarked object and objects used by the marked object. This option uses cross-reference(Xref) data from Predict for migrations into PAC.
U
Other Migrations
Themigration lists created using the procedure in this section apply tomigrations from any originstatus other than development, maintenance, or incorporation.
16:47:35 ***** PREDICT APPLICATION CONTROL ***** 2000-01-01User PACUSR +---------------------------------------------------+
| > SEL > + TX: Migration List |Event ........ NEWEVENT | All...+....1....+....2....+.... S 1 L |Keys ......... ,,,,,,,,,, | |Application .. ORDERS____ | |From Status .. CONTROL___ | |To Status .... DEVELOPMEN | |Exec Mode .... COPY O+--------------------------------------------------------+Scheduled .... Date| - 'SEL' Origin Location - |Replace ...... N | |Notes ........ _____ | From Status ...... CONTROL _________________________ |
_____ | Object Name ...... _________________________________ |_____ | Object Type(s).... _________________________________ |
Maintenance Request .| |Processing State .. | Select only Objects with no Application Status ... N |Validate list .......+--------------------------------------------------------+Additional Options ...... | |
| || || |
Command ===> | |Enter-PF1---PF2---PF3---PF| |
Help Menu Exit Op+---------------------------------------------------+
1. Enter SEL on the command line of the Object List Editor window. The `SEL' Origin Locationwindow appears.
This window displays the status from which the objects are to be selected; that is, the FromStatus specified on the Add/Modify Event screen.
2. Enter the object name and/or object type in the relevant fields, or enter range notation to limitthe list.
415PAC User's Guide
Using the SEL (Select) Command
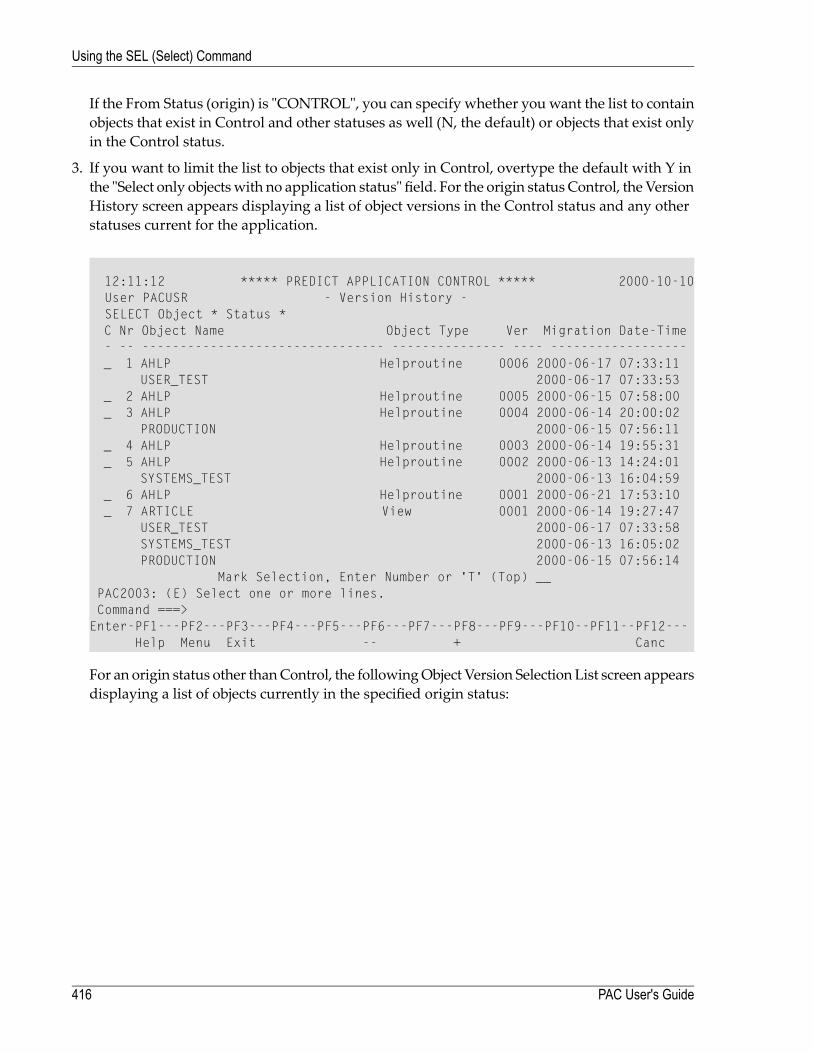
If the From Status (origin) is "CONTROL", you can specify whether you want the list to containobjects that exist in Control and other statuses as well (N, the default) or objects that exist onlyin the Control status.
3. If you want to limit the list to objects that exist only in Control, overtype the default with Y inthe "Select only objectswith no application status" field. For the origin status Control, the VersionHistory screen appears displaying a list of object versions in the Control status and any otherstatuses current for the application.
12:11:12 ***** PREDICT APPLICATION CONTROL ***** 2000-10-10User PACUSR - Version History -SELECT Object * Status *C Nr Object Name Object Type Ver Migration Date-Time- -- -------------------------------- --------------- ---- ------------------_ 1 AHLP Helproutine 0006 2000-06-17 07:33:11
USER_TEST 2000-06-17 07:33:53_ 2 AHLP Helproutine 0005 2000-06-15 07:58:00_ 3 AHLP Helproutine 0004 2000-06-14 20:00:02
PRODUCTION 2000-06-15 07:56:11_ 4 AHLP Helproutine 0003 2000-06-14 19:55:31_ 5 AHLP Helproutine 0002 2000-06-13 14:24:01
SYSTEMS_TEST 2000-06-13 16:04:59_ 6 AHLP Helproutine 0001 2000-06-21 17:53:10_ 7 ARTICLE View 0001 2000-06-14 19:27:47
USER_TEST 2000-06-17 07:33:58SYSTEMS_TEST 2000-06-13 16:05:02PRODUCTION 2000-06-15 07:56:14
Mark Selection, Enter Number or 'T' (Top) __PAC2003: (E) Select one or more lines.Command ===>
Enter-PF1---PF2---PF3---PF4---PF5---PF6---PF7---PF8---PF9---PF10--PF11--PF12---Help Menu Exit -- + Canc
For an origin status other thanControl, the followingObject Version Selection List screen appearsdisplaying a list of objects currently in the specified origin status:
PAC User's Guide416
Using the SEL (Select) Command

14:12:08 ***** PREDICT APPLICATION CONTROL ***** 2000-10-26User PACUSR - Object Version Selection List -SELECT Object * Status MAINTENANCEC Nr Object Name Object Type Ver Migration Date-Time- -- -------------------------------- --------------- ---- ------------------_ 1 AHLP Helproutine 0004 2000-08-14 20:00:02_ 2 CUSTOMER-1 View 0001 2000-08-14 19:27:48_ 3 DEL-INV Program 0004 2000-08-14 20:00:03_ 4 L-ARTICL Local 0003 2000-08-14 20:00:04_ 5 L-CUSTOM Local 0003 2000-08-14 20:00:04_ 6 L-INV-LN Local 0003 2000-08-14 20:00:04_ 7 L-INVOIC Local 0003 2000-08-14 20:00:04_ 8 LI-CUST Program 0003 2000-08-14 20:00:04_ 9 MENU Program 0004 2000-08-14 20:00:05_ 10 NHL Helproutine 0004 2000-08-14 20:00:05_ 11 ORD-AHLP Helproutine 0004 2000-08-14 20:00:05_ 12 ORD-COPY Copycode 0004 2000-08-14 20:00:06_ 13 ORD-CUST Subroutine 0004 2000-08-14 20:00:06_ 14 ORD-END Subroutine 0003 2000-08-14 20:00:06
Mark Selection, Enter Number or 'T' (Top) __PAC2003: (E) Select one or more lines.Command ===>Enter-PF1---PF2---PF3---PF4---PF5---PF6---PF7---PF8---PF9---PF10--PF11--PF12---
Help Menu Exit -- + Canc
DescriptionColumnInput field for entering object expand options.CNumber identifying the list item on this particular screen.NrName of the object and other statuses in which the object version alsoexists.
Object Name
Type of the object.Object TypeThe version number assigned to the object when it entered the PACcontrolled environment.
Ver(sion)
Date and time the object was migrated into PAC.Migration Date-Time
The specified origin status is displayed on the line below the User field.
4. Select the objects you want to include by marking them in the "C" column; or enter the objectnumber (from the "Nr" column) for an individual object in the Mark Selection... field.
All available expand options can be used for "other" migrations:Include in the migration list the marked object . . .Optionand subordinate objects; for compile time.Cand both subordinate and referenced objects; for both compile time and runtime (expandoptions C+R).
E
and referenced objects; for runtime.R
417PAC User's Guide
Using the SEL (Select) Command
Include in the migration list the marked object . . .Optiononly.S or Xand objects used by the marked object.U
For "other" migrations, the expand options C, E, R, and U use cross-reference (Xref) data fromPAC.
The Migration List Editor window now displays the objects you selected.
5. Enter SAVE on the editor command line to save the migration list.
6. Enter a period (.) on the editor command line to exit the Migration List Editor window.
If you attempt to exit the Migration List Editor before you save your modifications, a warningwindow appears requesting that you save or abandon changes, or return to the editor.
PAC User's Guide418
Using the SEL (Select) Command
37 Using the EXP (Expand) Command
■ Using EXP With Predict .................................................................................................................. 420■ EXP Procedure ............................................................................................................................. 421■ Using EXP For Large Migrations ....................................................................................................... 422
419

Note: A migration list is expanded automatically during migration if the Auto Expansionoption is specified in the migration path definition.
You can expand an existing migration list using the EXP command. PAC processes each entry inthemigration list in turn and, depending on the expand option selected, retrieves its subcomponentsand adds them to the source area.
If the EXP command is then reissued, these subcomponents are expanded in turn, the list is sorted,and all duplicate objects are eliminated.
By default, the expand process expands only one level of subordinate and referenced objects. Toexpandmore than one level (that is, to implement a recursive expand), useApplymod 13. To expandmaps formultiple languages, useApplymod 9. Applymods are documented in the PACReferencedocumentation.
Foreign objects cannot be expanded. OnlyNatural objects can be expanded to include subordinateforeign objects that are used by that Natural object.
When migrating objects into PAC, the expand function is valid only if cross-reference data existsfor the object as specified by the Predict location for the application status.
This chapter covers the following topics:
■ Using EXP With Predict■ EXP Procedure■ Using EXP For Large Migrations
Using EXP With Predict
With Predict, the EXP command can be used to include in the migration list all files linked to adatabase. A databasewill be expanded to include its files, and the fileswill be expanded to includethe userviews.
The EXP field is valid for databases and files when they are entering PAC from development ormaintenance.
PAC User's Guide420
Using the EXP (Expand) Command
EXP Procedure
1. To expand a migration list once it has been created, enter the EXP (Expand) command on theMigration List Editor command line.
The Expand command has the format
EXP [option]
where option is C, E, R, or U as explained in the following table:Include in the migration list . . .Optionsubordinate objects; for compile time.EXP Csubordinate and referenced objects (options C+R); for compile time and runtime.EXP Ereferenced objects; for runtime.EXP Robjects used by other objects.EXP Uobjects range.EXP O
The expand options C, E, R, and U use cross-reference (Xref) data■ from Predict for migrations into PAC; and■ from PAC for all other migrations.
If you do not specify an expand option, the Expand Objects List Options window appears:
421PAC User's Guide
Using the EXP (Expand) Command
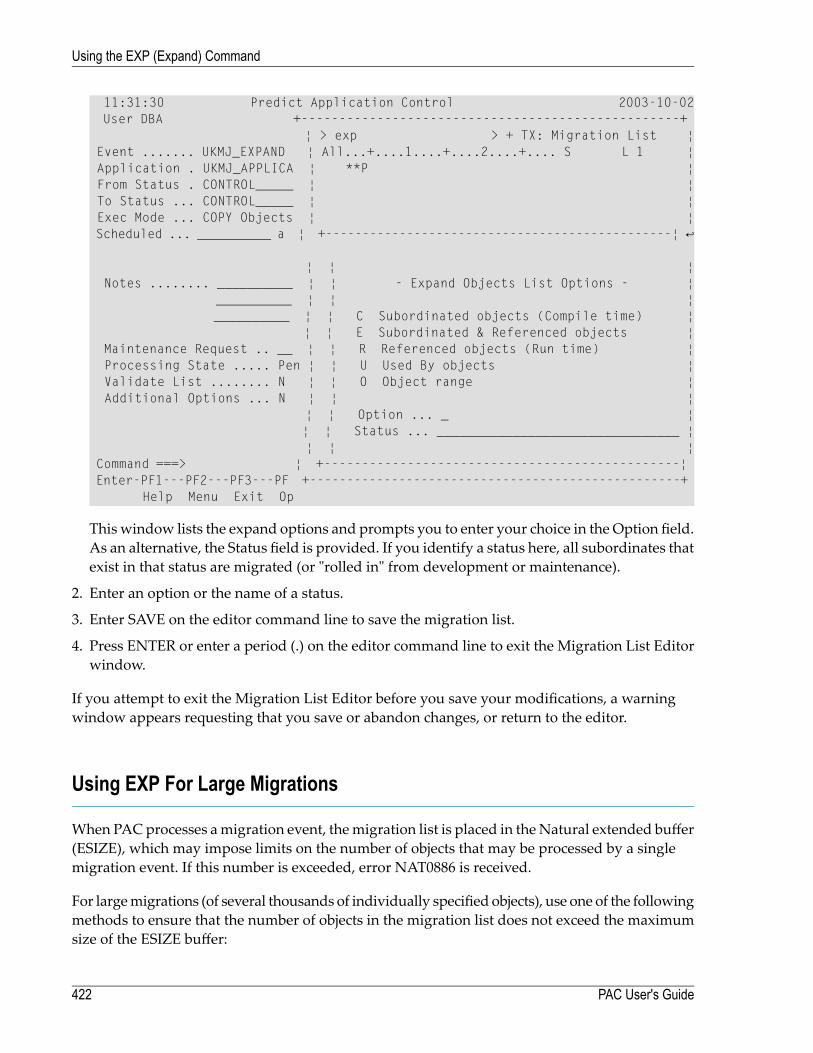
11:31:30 Predict Application Control 2003-10-02 User DBA +--------------------------------------------------+ ¦ > exp > + TX: Migration List ¦ Event ....... UKMJ_EXPAND ¦ All...+....1....+....2....+.... S L 1 ¦ Application . UKMJ_APPLICA ¦ **P ¦ From Status . CONTROL_____ ¦ ¦ To Status ... CONTROL_____ ¦ ¦ Exec Mode ... COPY Objects ¦ ¦ Scheduled ... __________ a ¦ +-----------------------------------------------¦ ↩ ¦ ¦ ¦ Notes ........ __________ ¦ ¦ - Expand Objects List Options - ¦ __________ ¦ ¦ ¦ __________ ¦ ¦ C Subordinated objects (Compile time) ¦ ¦ ¦ E Subordinated & Referenced objects ¦ Maintenance Request .. __ ¦ ¦ R Referenced objects (Run time) ¦ Processing State ..... Pen ¦ ¦ U Used By objects ¦ Validate List ........ N ¦ ¦ O Object range ¦ Additional Options ... N ¦ ¦ ¦ ¦ ¦ Option ... _ ¦ ¦ ¦ Status ... ________________________________ ¦ ¦ ¦ ¦ Command ===> ¦ +-----------------------------------------------¦ Enter-PF1---PF2---PF3---PF +--------------------------------------------------+ Help Menu Exit Op
This window lists the expand options and prompts you to enter your choice in the Option field.As an alternative, the Status field is provided. If you identify a status here, all subordinates thatexist in that status are migrated (or "rolled in" from development or maintenance).
2. Enter an option or the name of a status.
3. Enter SAVE on the editor command line to save the migration list.
4. Press ENTER or enter a period (.) on the editor command line to exit the Migration List Editorwindow.
If you attempt to exit the Migration List Editor before you save your modifications, a warningwindow appears requesting that you save or abandon changes, or return to the editor.
Using EXP For Large Migrations
When PACprocesses amigration event, themigration list is placed in theNatural extended buffer(ESIZE), which may impose limits on the number of objects that may be processed by a singlemigration event. If this number is exceeded, error NAT0886 is received.
For largemigrations (of several thousands of individually specified objects), use one of the followingmethods to ensure that the number of objects in the migration list does not exceed the maximumsize of the ESIZE buffer:
PAC User's Guide422
Using the EXP (Expand) Command
1. Set your ESIZE to 128 KB, or greater if necessary;
2. Use asterisk (*) and/or range notation to limit the number of individual entries in the migrationlist, but still include all necessary objects.
Large numbers of objects may be processed using range notation because the specified ranges ofobjects are not expanded (with ESIZE) unless the expand options are used.
423PAC User's Guide
Using the EXP (Expand) Command

424
38 Using the IMP (Import) Command
■ IMP Procedure .............................................................................................................................. 426
425
For eventswith status External you can import a list of objects (this can also be references to objectssuch as URLs or path names) from aworkfile into the migration list using the IMP commandwithEntire Connection. PACprocesses each entry in themigration list in turn and retrieves its subcom-ponents and adds them to the source area.
IMP Procedure
1. To import a migration list, enter the IMP (Import) command on the Migration List Editorcommand line.
A new window appears where you can select the appropriate file from your environment.
2. Select the desired file and choose OK.
3. The window is closed automatically.
4. Press ENTER or enter a period (.) on the editor command line to exit the Migration List Editorwindow.
If you attempt to exit the Migration List Editor before you save your modifications, a warningwindow appears requesting that you save or abandon changes, or return to the editor.
PAC User's Guide426
Using the IMP (Import) Command

39 Validating a Migration List
■ Correcting Errors in the Migration List ................................................................................................ 428
427
The migration list must be validated before the migration event may be authorized. Validationoccurs after the migration event has been defined and the list of objects has been selected.
Once the migration list has been created, it is validated immediately unless you specified N in theValidate List field on the Add Event screen. In that case, access the Modify Event screen for theevent when you are ready to validate the migration list and overtype the N in the Validate Listfield with Y.
In either case, the validation is performed for the current status of the objects in the list; that is,the precise definition of the object specified in themigration listmust exist at the time the validationcheck is performed.
Note: Validation of migration lists of events with source status External takes place duringevent processing. Automatic validation during authorization will be suppressed (for per-formance reasons). By default, the Validate List option is set to N for such events and cannot be set to Y.
This chapter covers the following topic:
■ Correcting Errors in the Migration List
Correcting Errors in the Migration List
If an entry in the migration list fails the validation check, a window is displayed so that you canmodify the entry.
Review the entry and determine the exact cause of the error. Use the following table as a guide toproblem resolution:
QuestionsErrorIs the name spelled correctly?Object nameIs the type valid? Is the type consistent with the object name?Object typeIs the range notation for the object name valid for the migrationpath? For archiving or retiring, is the range notation valid for themigration type?
Range notation
Is the number within the acceptable PAC range? For a rule or view,was the version registered to the application in a previous migra-tion?
Version number
Is the name valid? Does the object currently exist in the specifiedstatus?
Status name
If set to N (no) in a migration to development, does the objectalready exist in development?
Replace option object list Ob-ject list replace option Replaceoption
PAC User's Guide428
Validating a Migration List

QuestionsErrorFor verification rules or userviews,was the Predictmigration done?For rules or views, was the object registered to the application ina previous migration?
Rules and views
Is there more than the one allowed entry in the migration list forincorporation or migration from development that includes inputfrom a work file?
Number of entries
If you are unable to resolve the error, either press PF3 to exit the validation check, or commentout the entry by placing "*" or "**" in the first two positions of that entry.
PAC then treats this entry as a comment.
429PAC User's Guide
Validating a Migration List

430
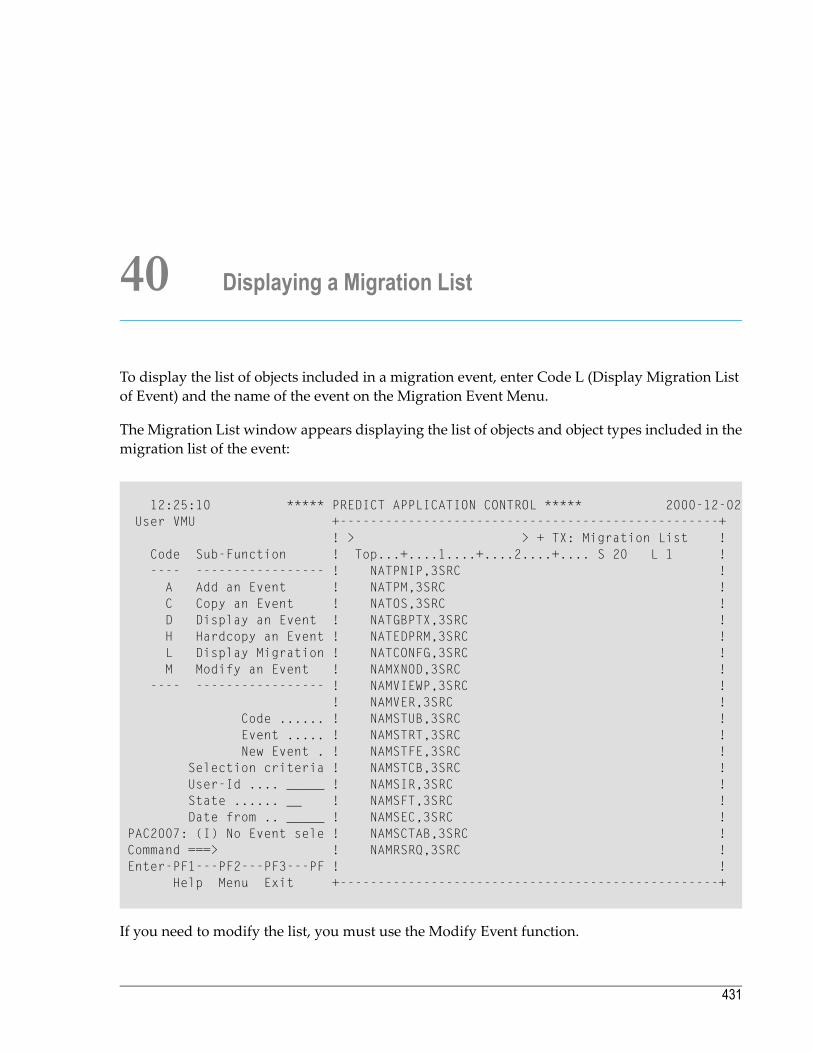
40 Displaying a Migration List
To display the list of objects included in a migration event, enter Code L (Display Migration Listof Event) and the name of the event on the Migration Event Menu.
The Migration List window appears displaying the list of objects and object types included in themigration list of the event:
12:25:10 ***** PREDICT APPLICATION CONTROL ***** 2000-12-02User VMU +--------------------------------------------------+
! > > + TX: Migration List !Code Sub-Function ! Top...+....1....+....2....+.... S 20 L 1 !---- ----------------- ! NATPNIP,3SRC !A Add an Event ! NATPM,3SRC !C Copy an Event ! NATOS,3SRC !D Display an Event ! NATGBPTX,3SRC !H Hardcopy an Event ! NATEDPRM,3SRC !L Display Migration ! NATCONFG,3SRC !M Modify an Event ! NAMXNOD,3SRC !
---- ----------------- ! NAMVIEWP,3SRC !! NAMVER,3SRC !
Code ...... ! NAMSTUB,3SRC !Event ..... ! NAMSTRT,3SRC !New Event . ! NAMSTFE,3SRC !
Selection criteria ! NAMSTCB,3SRC !User-Id .... _____ ! NAMSIR,3SRC !State ...... __ ! NAMSFT,3SRC !Date from .. _____ ! NAMSEC,3SRC !
PAC2007: (I) No Event sele ! NAMSCTAB,3SRC !Command ===> ! NAMRSRQ,3SRC !Enter-PF1---PF2---PF3---PF ! !
Help Menu Exit +--------------------------------------------------+
If you need to modify the list, you must use the Modify Event function.
431
To exit the Migration List window, enter a period (.) at the cursor position.
PAC User's Guide432
Displaying a Migration List
41 Maintenance Requests
■ Generating Maintenance Requests ................................................................................................... 434■ Accessing the Maintenance Request Sub-Functions ............................................................................. 435■ Adding a Maintenance Request ........................................................................................................ 436■ Selecting a Maintenance Request ..................................................................................................... 439■ Modifying/Displaying a Maintenance Request ...................................................................................... 441■ Copying a Maintenance Request ...................................................................................................... 443■ Purging a Maintenance Request ....................................................................................................... 443
433
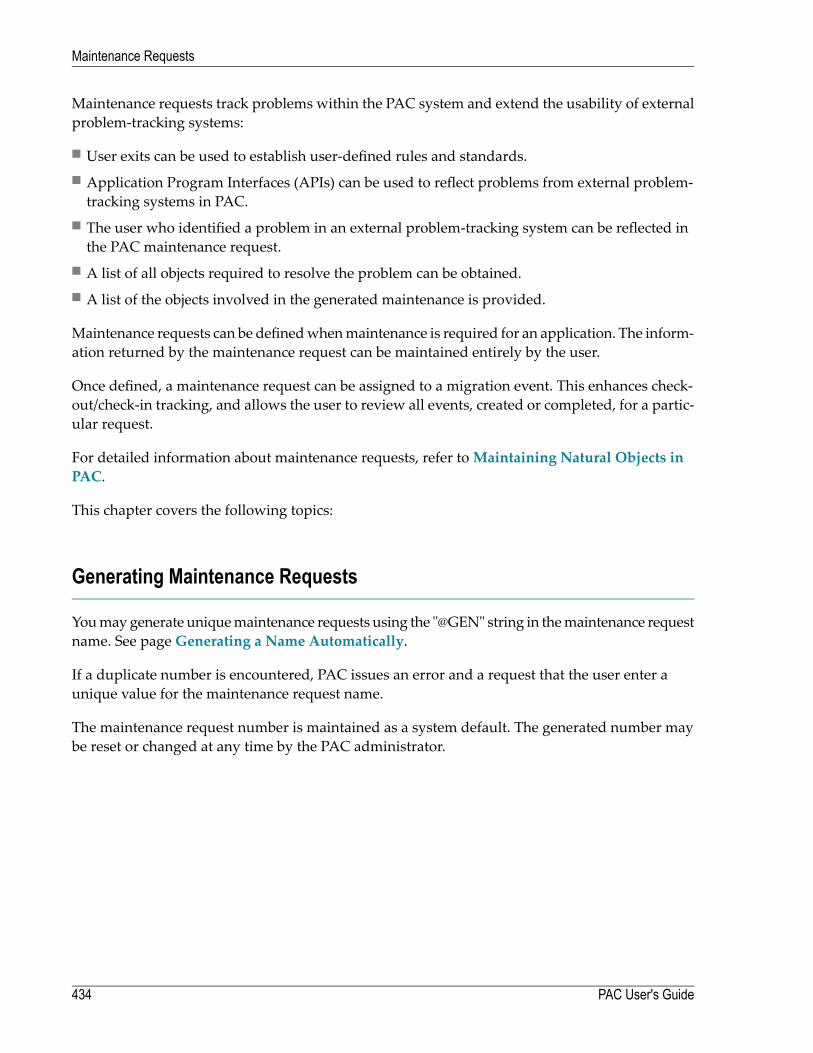
Maintenance requests track problems within the PAC system and extend the usability of externalproblem-tracking systems:
■ User exits can be used to establish user-defined rules and standards.■ Application Program Interfaces (APIs) can be used to reflect problems from external problem-tracking systems in PAC.
■ The user who identified a problem in an external problem-tracking system can be reflected inthe PAC maintenance request.
■ A list of all objects required to resolve the problem can be obtained.■ A list of the objects involved in the generated maintenance is provided.
Maintenance requests can be definedwhenmaintenance is required for an application. The inform-ation returned by the maintenance request can be maintained entirely by the user.
Once defined, a maintenance request can be assigned to a migration event. This enhances check-out/check-in tracking, and allows the user to review all events, created or completed, for a partic-ular request.
For detailed information about maintenance requests, refer toMaintaining Natural Objects inPAC.
This chapter covers the following topics:
Generating Maintenance Requests
Youmaygenerate uniquemaintenance requests using the "@GEN" string in themaintenance requestname. See pageGenerating a Name Automatically.
If a duplicate number is encountered, PAC issues an error and a request that the user enter aunique value for the maintenance request name.
The maintenance request number is maintained as a system default. The generated number maybe reset or changed at any time by the PAC administrator.
PAC User's Guide434
Maintenance Requests

Accessing the Maintenance Request Sub-Functions
From the PAC Main Menu, enter Code M (Maintenance Requests).
The menu that appears depends on your user profile. The Maintenance Request Menu, whichcombines both reporting and maintenance functions, is used for discussions in this section:
15:30:03 ***** PREDICT APPLICATION CONTROL ***** 2000-02-09User PACUSR - Maintenance Request Menu -
Code Sub-Function---- ---------------------A Add Request IDC Copy Request IDD Display Request IDM Modify Request IDP Purge Request IDS Select Request ID? Help. Exit
---- ---------------------
Code ............ _ Select Type .. _Request ID ...... ____________________New Request ID .. ____________________Assigned To ..... ________
Command ===>Enter-PF1---PF2---PF3---PF4---PF5---PF6---PF7---PF8---PF9---PF10--PF11--PF12---
Help Menu Exit Canc
Note: All of the sub-functions on this screen except Add may be processed directly fromthe Maintenance Request Selection List that is accessed using the Select Request ID sub-function.
435PAC User's Guide
Maintenance Requests

Select Type Field
When you are selectingmaintenance requests from a list, this field allows you to identify how youwant the maintenance requests to be listed:
by maintenance request ID: to access a list of maintenance requests displayed alphabeticallyby maintenance request name. (ID).
L
by status, priority, andmaintenance request ID: to access a list ofmaintenance requests displayedby status, priority, andmaintenance request ID. The values and priority sequences are determ-ined in the table definitions by the PAC administrator.
S
by assigned user ID: to access a list of maintenance requests displayed alphabetically by theID of the user to whom they are assigned.
U
Request ID and New Request ID Fields
These fields are used to identify new and existing request IDs. The New Request ID field is usedfor the name of the event created when an existing event is copied.
Assigned To Field
The value in this field specifies the ID of the user to whom the maintenance request is assigned.
Adding a Maintenance Request
Note: Edit all other values on the Add Request screen before you access the AdditionalOptions. Once you access Additional Options, all other fields on the screen are protected.
Step 1. Accessing the Add Request Screen
From the Maintenance Request Menu, enter Code A and a unique maintenance request name inone of the following ways:
■ Enter a unique name.The namemay be numeric and/or alphabetic and up to 20 characters in length. Embedded blanksare allowed, but are automatically changed to the underscore ( ) character. If a duplicate main-tenance request ID is entered, an error message is displayed.
■ Use the @GEN string in the name.The name must begin with an alphabetic character and may be up to 19 characters in lengthincluding the resolution of the @GEN string. Do not use all 20 characters of the Request ID fieldbecause the @GEN string will be expanded from 4 to 5 characters, which could jeopardize theuniqueness of themaintenance request ID. Embedded blanks are allowed, butwill be translatedautomatically to the underscore (_) character.
PAC User's Guide436
Maintenance Requests
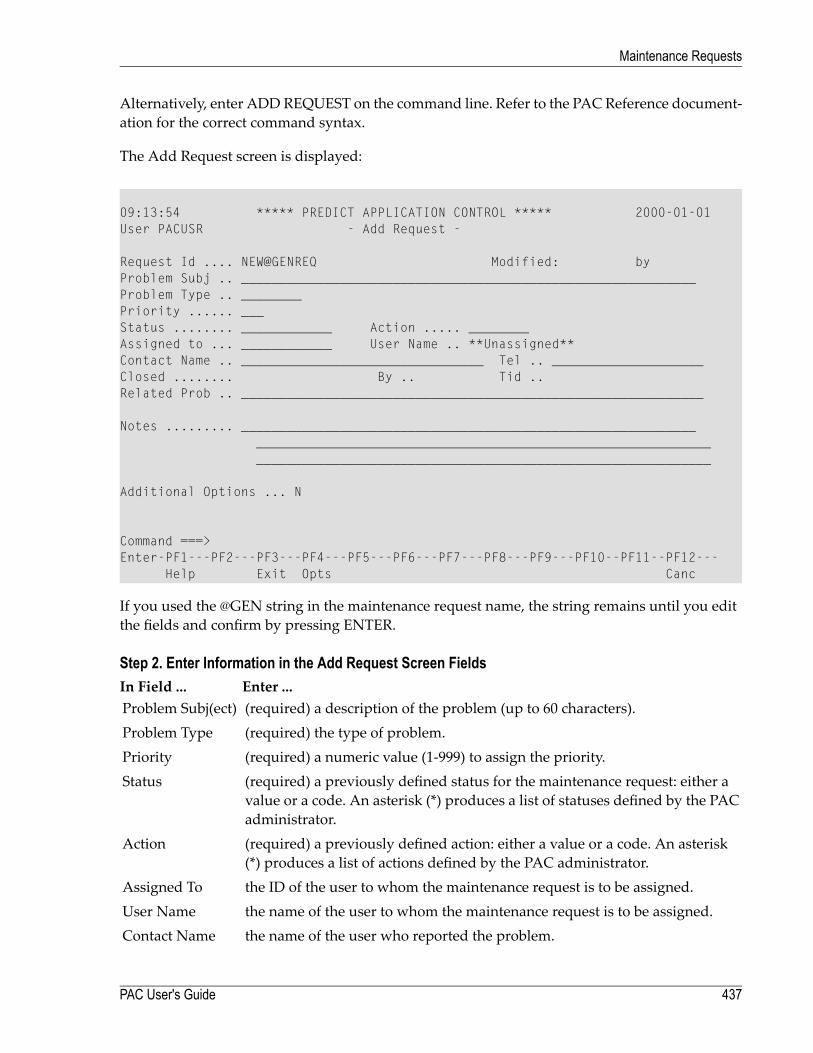
Alternatively, enter ADD REQUEST on the command line. Refer to the PAC Reference document-ation for the correct command syntax.
The Add Request screen is displayed:
09:13:54 ***** PREDICT APPLICATION CONTROL ***** 2000-01-01User PACUSR - Add Request -
Request Id .... NEW@GENREQ Modified: byProblem Subj .. ____________________________________________________________Problem Type .. ________Priority ...... ___Status ........ ____________ Action ..... ________Assigned to ... ____________ User Name .. **Unassigned**Contact Name .. ________________________________ Tel .. ____________________Closed ........ By .. Tid ..Related Prob .. _____________________________________________________________
Notes ......... ____________________________________________________________________________________________________________________________________________________________________________________
Additional Options ... N
Command ===>Enter-PF1---PF2---PF3---PF4---PF5---PF6---PF7---PF8---PF9---PF10--PF11--PF12---
Help Exit Opts Canc
If you used the @GEN string in the maintenance request name, the string remains until you editthe fields and confirm by pressing ENTER.
Step 2. Enter Information in the Add Request Screen FieldsEnter ...In Field ...(required) a description of the problem (up to 60 characters).Problem Subj(ect)(required) the type of problem.Problem Type(required) a numeric value (1-999) to assign the priority.Priority(required) a previously defined status for the maintenance request: either avalue or a code. An asterisk (*) produces a list of statuses defined by the PACadministrator.
Status
(required) a previously defined action: either a value or a code. An asterisk(*) produces a list of actions defined by the PAC administrator.
Action
the ID of the user to whom the maintenance request is to be assigned.Assigned Tothe name of the user to whom the maintenance request is to be assigned.User Namethe name of the user who reported the problem.Contact Name
437PAC User's Guide
Maintenance Requests
Enter ...In Field ...the telephone number of the user who reported the problem.Tel(ephone)information about a problemalready reported that is related to themaintenanceyou are currently requesting.
Related Prob(lem)
information related to the request you are currently adding.Notes
Step 3. (Optional) Accessing the Additional Options
Notes:
1. Edit all other values on the Add Request screen before you access the Additional Options. Onceyou access Additional Options, all other fields on the screen are protected.
2. When you leave the Add Request screen, PAC substitutes a 5-digit number for the @GEN stringin the maintenance request name.
Access Additional Options by pressing PF4 (Opts), or typing over the default in the AdditionalOptions field with Y (yes).
The following additional options may be edited:ActionOptionThe Extended Description editor appears. Enter a description of the re-quest you are adding and type a period (.) to exit.
Description
Invokes a modifiable routine for displaying user-defined information.ExtendedUser Info(rma-tion)
Displays the object versions related to the maintenance request you areadding. See the sectionDisplay RelatedObject Versions on page formoreinformation about the screen displayed.
Related Object Versions
Maintenance request related request Screens Related RequestsMainten-ance request related request The Related Requests window appears.
Related Requests
Enter the name of an existing maintenance request(s) to be linked withthe maintenance request you are adding. Press ENTER to confirm youredits; press PF3 to exit.Maintenance request migration event Migration event The MigrationEventswindowappears. Enter the name of an existingmigration event(s)
Migration Events Usage
to be processed in conjunction with the maintenance request you areadding. Press ENTER to confirm your edits; press PF3 to exit.
When you have completed editing the options, press ENTER to confirm the edits and return tothe Add Request screen.
PAC User's Guide438
Maintenance Requests
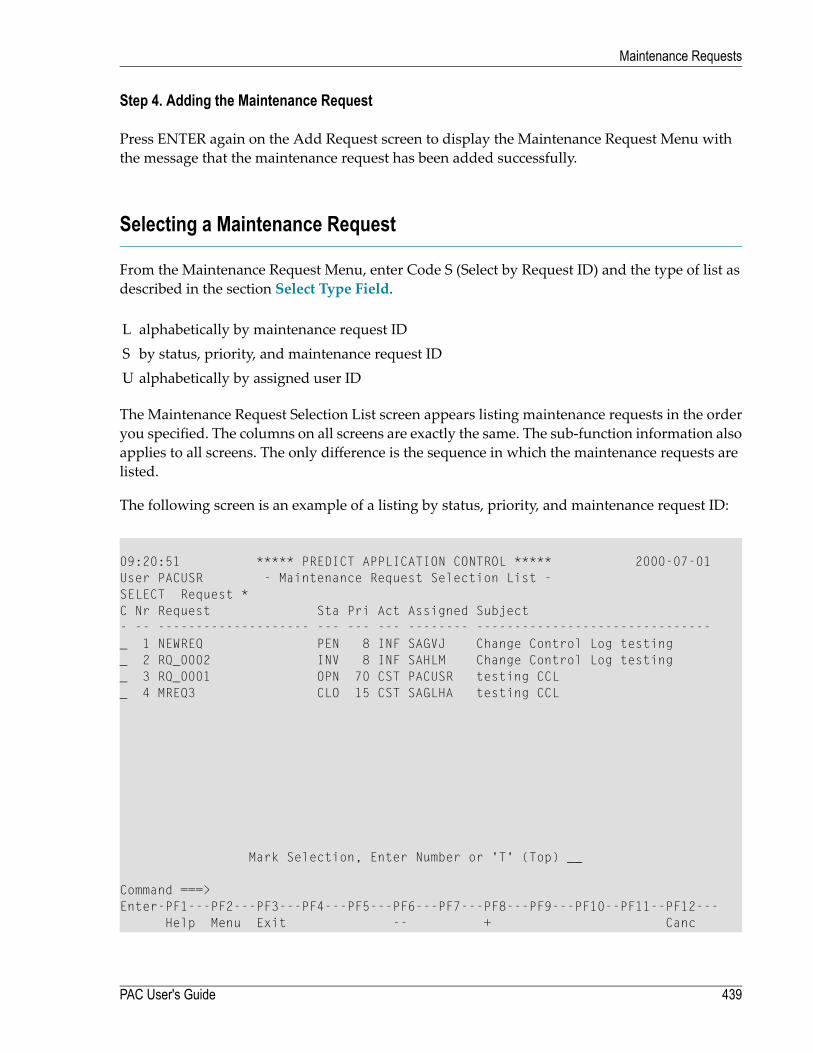
Step 4. Adding the Maintenance Request
Press ENTER again on the Add Request screen to display the Maintenance Request Menu withthe message that the maintenance request has been added successfully.
Selecting a Maintenance Request
From the Maintenance Request Menu, enter Code S (Select by Request ID) and the type of list asdescribed in the section Select Type Field.
alphabetically by maintenance request IDLby status, priority, and maintenance request IDSalphabetically by assigned user IDU
The Maintenance Request Selection List screen appears listing maintenance requests in the orderyou specified. The columns on all screens are exactly the same. The sub-function information alsoapplies to all screens. The only difference is the sequence in which the maintenance requests arelisted.
The following screen is an example of a listing by status, priority, and maintenance request ID:
09:20:51 ***** PREDICT APPLICATION CONTROL ***** 2000-07-01User PACUSR - Maintenance Request Selection List -SELECT Request *C Nr Request Sta Pri Act Assigned Subject- -- -------------------- --- --- --- -------- -------------------------------_ 1 NEWREQ PEN 8 INF SAGVJ Change Control Log testing_ 2 RQ_0002 INV 8 INF SAHLM Change Control Log testing_ 3 RQ_0001 OPN 70 CST PACUSR testing CCL_ 4 MREQ3 CLO 15 CST SAGLHA testing CCL
Mark Selection, Enter Number or 'T' (Top) __
Command ===>Enter-PF1---PF2---PF3---PF4---PF5---PF6---PF7---PF8---PF9---PF10--PF11--PF12---
Help Menu Exit -- + Canc
439PAC User's Guide
Maintenance Requests
DescriptionColumn
Maintenance request name (ID).Request
Three-character abbreviation for the status of themaintenance request. Valid optionsmay include:OPN-OpenCLO - ClosedINV - InvestigatePEN - PendingC/E-Change/EnhancementThe options available at your site are defined by your PAC administrator.
Sta(tus)
A number from 1-999 indicating the priority sequence of the maintenance request.Pri(ority)
A three-character code for the action of the maintenance request. The action codes are definedby your PAC administrator.
Act(ion)
ID of the user to whom the maintenance request is assigned.Assigned
Description of the maintenance request topic - truncated, if necessary.Subject
The sub-function displayed on the status line directly under the User field indicates whether youaccessed this screen using
■ the Select sub-function (Code S);■ range notation in the Request ID field along with the Display, Modify, Copy, Purge, or Selectsub-function;
■ the SELECT direct command. Refer to the PAC Reference documentation for more informationabout PAC commands.
If you accessed the screen with the Select (S) sub-function, you may invoke the following sub-functions for one ormore of the listed requests by entering the appropriate code in the "C" column:D (Display); M (Modify); P (Purge); S (Select).
If you mark the maintenance request with the cursor, or enter an X or an S in the "C" column, orif you enter the request number (from the "Nr" column) in the Mark Selection... field, you are re-turned to the Maintenance Request Menu where the specified request is displayed in the RequestID field.
PAC User's Guide440
Maintenance Requests
Modifying/Displaying a Maintenance Request
You may modify or display a maintenance request on the Modify Request or Display Requestscreens. These screens are similar to the Add Request screen. Maintenance may not be performedon the Display Request ID screen.
All of the attributes are modifiable, except the Closed/By/TID, and Related Problem fields. Referto Adding a Maintenance Request for more information.
To modify or display a maintenance request, enter Code M (Modify...) or D (Display...) and thename of the maintenance request in the Request ID field of the Maintenance Request Menu.
This section covers the following topics:
■ Modifying/Displaying Additional Options■ Displaying Related Object Versions
Modifying/Displaying Additional Options
To modify or display the additional options for a maintenance request, press PF4 (Opts), or typeover the default in theAdditional Options fieldwith Y (Yes) on theModify or DisplayMaintenanceRequest screens.
■ You may modify/display migration events used in conjunction with the maintenance request.■ You may display related object versions.
Refer to Additional Options for maintenance requests for more information.
441PAC User's Guide
Maintenance Requests
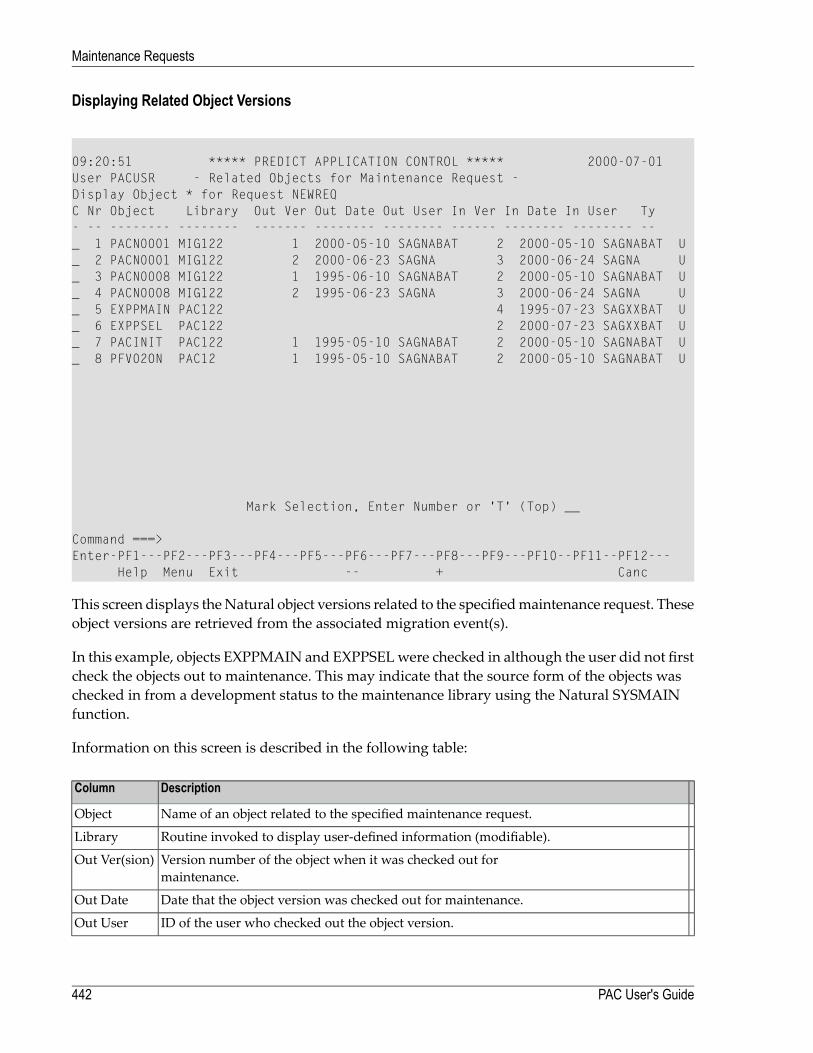
Displaying Related Object Versions
09:20:51 ***** PREDICT APPLICATION CONTROL ***** 2000-07-01User PACUSR - Related Objects for Maintenance Request -Display Object * for Request NEWREQC Nr Object Library Out Ver Out Date Out User In Ver In Date In User Ty- -- -------- -------- ------- -------- -------- ------ -------- -------- --_ 1 PACN0001 MIG122 1 2000-05-10 SAGNABAT 2 2000-05-10 SAGNABAT U_ 2 PACN0001 MIG122 2 2000-06-23 SAGNA 3 2000-06-24 SAGNA U_ 3 PACN0008 MIG122 1 1995-06-10 SAGNABAT 2 2000-05-10 SAGNABAT U_ 4 PACN0008 MIG122 2 1995-06-23 SAGNA 3 2000-06-24 SAGNA U_ 5 EXPPMAIN PAC122 4 1995-07-23 SAGXXBAT U_ 6 EXPPSEL PAC122 2 2000-07-23 SAGXXBAT U_ 7 PACINIT PAC122 1 1995-05-10 SAGNABAT 2 2000-05-10 SAGNABAT U_ 8 PFV02ON PAC12 1 1995-05-10 SAGNABAT 2 2000-05-10 SAGNABAT U
Mark Selection, Enter Number or 'T' (Top) __
Command ===>Enter-PF1---PF2---PF3---PF4---PF5---PF6---PF7---PF8---PF9---PF10--PF11--PF12---
Help Menu Exit -- + Canc
This screen displays theNatural object versions related to the specifiedmaintenance request. Theseobject versions are retrieved from the associated migration event(s).
In this example, objects EXPPMAIN and EXPPSELwere checked in although the user did not firstcheck the objects out to maintenance. This may indicate that the source form of the objects waschecked in from a development status to the maintenance library using the Natural SYSMAINfunction.
Information on this screen is described in the following table:
DescriptionColumn
Name of an object related to the specified maintenance request.Object
Routine invoked to display user-defined information (modifiable).Library
Version number of the object when it was checked out formaintenance.
Out Ver(sion)
Date that the object version was checked out for maintenance.Out Date
ID of the user who checked out the object version.Out User
PAC User's Guide442
Maintenance Requests
DescriptionColumn
Version number assigned to the object when it was checked back into PAC.In Ver(sion)
Date the object version was checked back into PAC.In Date
ID of the user who checked out the object version.In User
Purpose for or result of the check-out:Uchecked out with the intention to update the object. If the object has been checked in, andType is still U, the object was updated.Achecked out for access to the object only; when the object was checked in, it was determinedthat no maintenance (updates or modifications) had been performed.
Ty(pe)
Press PF3 to close the window.
Copying a Maintenance Request
1. To copy a maintenance request, enter Code C (Copy Request ID) on the Maintenance RequestMenu along with the name of the maintenance request to be copied and a new name for themaintenance request copy.
The resulting Copy Request screen is similar to the Add Request ID screen and displays thenew name of the maintenance request and the attributes of the original (copied) maintenancerequest.
2. Modify the attributes on the Copy Request screen, if required.
3. Press ENTER to confirm your modifications and return to the Maintenance Request Menu.
Purging a Maintenance Request
From the Maintenance Request Menu, enter Code P (Purge Request ID) and the request ID name.Alternatively, enter PURGE REQUEST on the command line.
Ifmigration events exist for themaintenance request youwish to purge, awarningmessage appearstelling you that the events existing for themaintenance requestmust be deleted or themaintenancerequest removed from the events before the maintenance request can be purged.
Otherwise, the Purge Confirmationwindow appears reminding you that themaintenance requestwill be purged.
■ Press PF5 or type Confirm to purge the request.■ Press PF3 or type a period (.) to return to the Maintenance Request Menu without purging therequest.
443PAC User's Guide
Maintenance Requests

444
42 Maintaining Natural Objects in PAC
■ Maintenance Requests ................................................................................................................... 447■ Change Control Logs ..................................................................................................................... 452
445
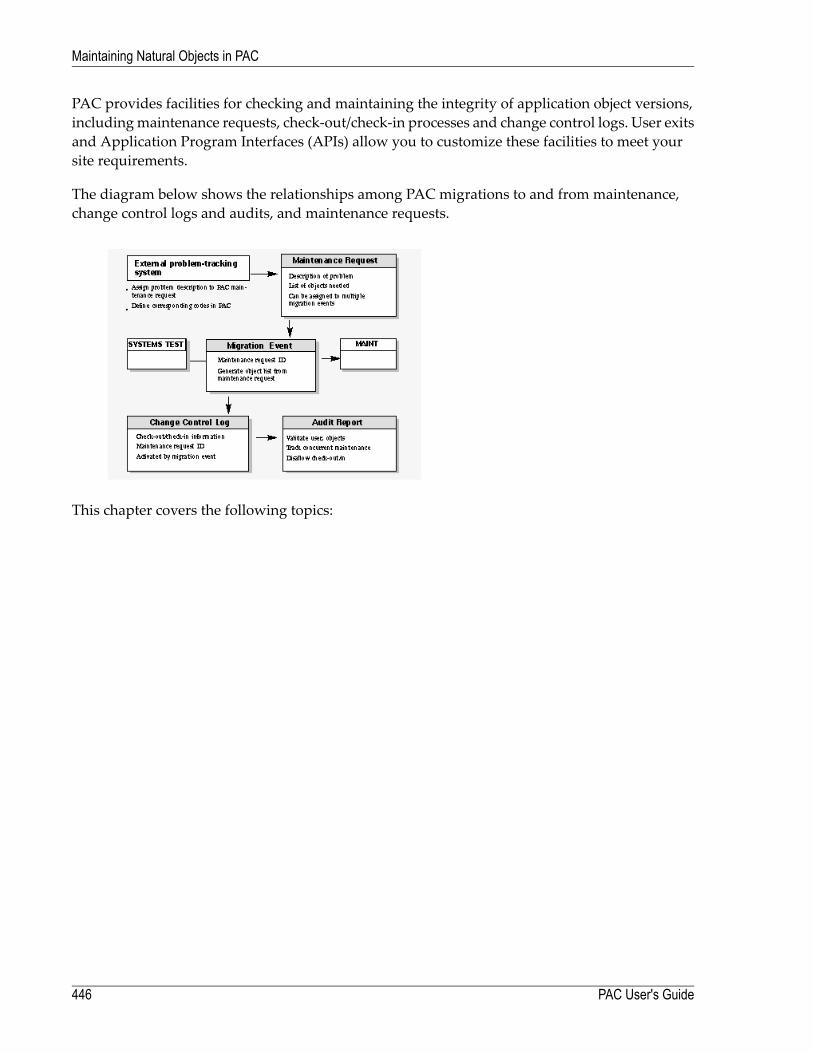
PAC provides facilities for checking and maintaining the integrity of application object versions,includingmaintenance requests, check-out/check-in processes and change control logs. User exitsand Application Program Interfaces (APIs) allow you to customize these facilities to meet yoursite requirements.
The diagram below shows the relationships among PAC migrations to and from maintenance,change control logs and audits, and maintenance requests.
This chapter covers the following topics:
PAC User's Guide446
Maintaining Natural Objects in PAC
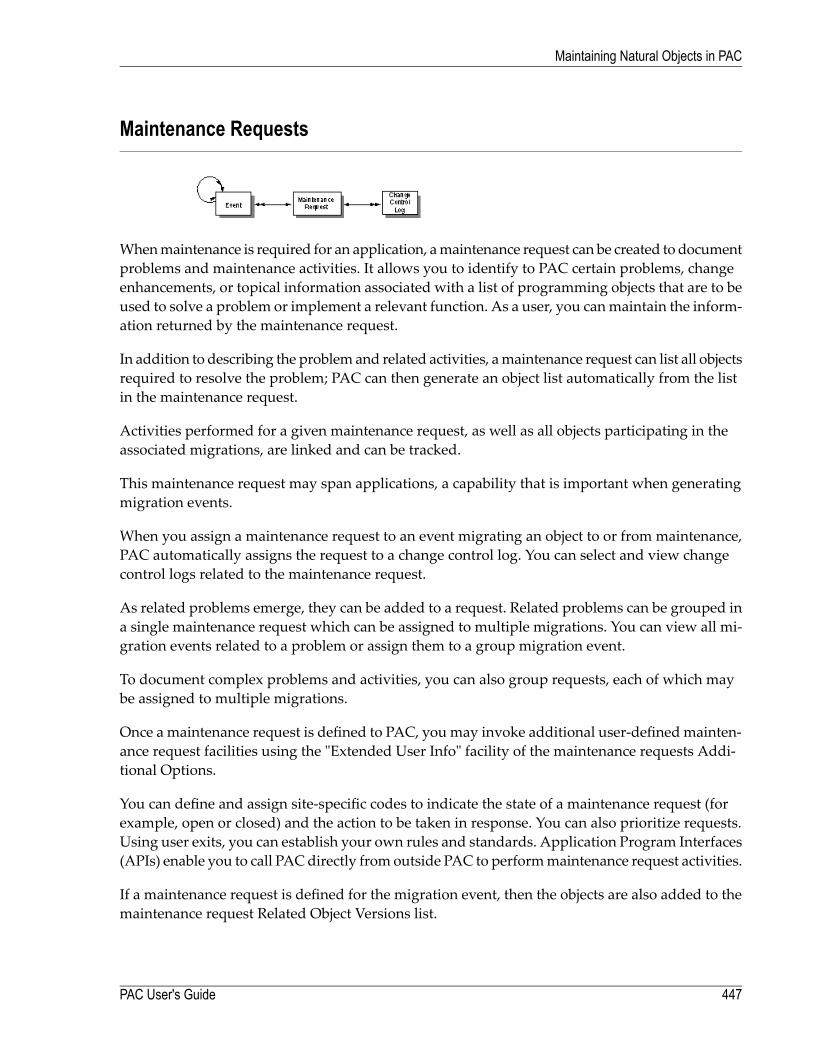
Maintenance Requests
Whenmaintenance is required for an application, amaintenance request can be created to documentproblems and maintenance activities. It allows you to identify to PAC certain problems, changeenhancements, or topical information associated with a list of programming objects that are to beused to solve a problem or implement a relevant function. As a user, you canmaintain the inform-ation returned by the maintenance request.
In addition to describing the problem and related activities, amaintenance request can list all objectsrequired to resolve the problem; PAC can then generate an object list automatically from the listin the maintenance request.
Activities performed for a given maintenance request, as well as all objects participating in theassociated migrations, are linked and can be tracked.
This maintenance request may span applications, a capability that is important when generatingmigration events.
When you assign a maintenance request to an event migrating an object to or from maintenance,PAC automatically assigns the request to a change control log. You can select and view changecontrol logs related to the maintenance request.
As related problems emerge, they can be added to a request. Related problems can be grouped ina single maintenance request which can be assigned to multiple migrations. You can view all mi-gration events related to a problem or assign them to a group migration event.
To document complex problems and activities, you can also group requests, each of which maybe assigned to multiple migrations.
Once a maintenance request is defined to PAC, you may invoke additional user-definedmainten-ance request facilities using the "Extended User Info" facility of the maintenance requests Addi-tional Options.
You can define and assign site-specific codes to indicate the state of a maintenance request (forexample, open or closed) and the action to be taken in response. You can also prioritize requests.Using user exits, you can establish your own rules and standards. Application Program Interfaces(APIs) enable you to call PACdirectly from outside PAC to performmaintenance request activities.
If a maintenance request is defined for the migration event, then the objects are also added to themaintenance request Related Object Versions list.
447PAC User's Guide
Maintaining Natural Objects in PAC

Interfacing with External Problem-Tracking Systems
Although not a problem-tracking system itself, PAC does provide some basic problem-trackingfacilities and may be used to extend the facilities of existing external problem-tracking systems.
You can integrate PACwith an external problem-tracking system through theMaintenanceRequestssub-function.
1. Define the PAC maintenance request ID to match the problem ID in the external problem-tracking system.
2. Define the maintenance request so that the identifier of the problem in the external problem-tracking system is synonymous with the maintenance request in PAC.
3. Assign the problem description in the external system as an attribute to the PAC maintenancerequest.
4. Define the codes for PAC problem states, priorities, and actions to correspond with codes inthe external system.
5. Record the description of a problem in a problem-tracking system and useApplication ProgramInterfaces (APIs) to reflect or copy these external problem descriptions into PAC.
6. Use provided user exits to derive the maintenance request data from, or keep the maintenancerequest data in synchronization with, the data in the external problem-tracking system.
Assigning Maintenance Requests to Migration Events
Once a maintenance request is defined, you may assign it to a migration event to enhance check-out/check-in tracking and allow you to review all events, created or completed, for a particularrequest.
The following example illustrates how amaintenance request is used to enhance tracking of objectmaintenance activities:
ActionSeqUser A discovers a problem in production.1.User A identifies the object causing the problem.2.User A opens a maintenance request (RQ 00001) for the problem.3.Programmer B creates a migration event (production to maintenance) ORD-PM-0001 with amaintenance request of RQ 00001.
4.
Programmer B starts making modifications to resolve the problem. Subsequently, User Adiscovers the need to maintain other objects and creates another migration event (Controlto maintenance) ORD-CM-0007 with the same maintenance request of RQ 00001.
5.
When the updates are completed, Programmer B generates an event (maintenance to Control)ORD-MC-0011 to migrate the new objects into PAC.
6.
Maintenance request RQ 00001 is again specified.7.
PAC User's Guide448
Maintaining Natural Objects in PAC
ActionSeqProgrammer B now creates an event (Control to integration-test) ORD-CTI-0036 with main-tenance request RQ 00001 to test the new changes.
8.
At this point, the project leader may access maintenance request RQ_00001 to review itsstatus; and then may review all events completed as part of the change. The list of eventswill be as follows: ORD-CM-0007 ORD-CTI-0036 ORD-MC-0011 ORD-PM-0001
9.
Table Maintenance
When maintenance requests are defined to PAC, Status tables and Action tables are used to de-termine the sequence in which maintenance requests are retrieved for selective processing.
These tablesmust be defined before you can entermaintenance requests. Status andAction inform-ation codes are required inputwhen you addmaintenance requests to PAC, and the values providedare validated against the Status and Action tables defined at your site.
Tables are defined by the PAC administrator who uses the table maintenance facility to set uptable entries and perform maintenance functions for maintenance requests. Tables should bedefined so that they extend the integration of PACmaintenance requestswith the external problem-tracking system currently used at your site.
Depending on the table type (Status or Action), the PAC administrator specifies the possible codesalong with descriptive text for each as table entries.
Status Table ExamplesStatus TextCodeOpenOPEInitial, new problemINIClosedCLOInform userINFWaiting for additional error informationWERIncomplete information givenINCQuestionQUE
Note: The only Status code that cannot be deleted is CLO (Closed). A maintenance requestwith the Status of Closed can no longer be modified.
449PAC User's Guide
Maintaining Natural Objects in PAC
Action Table ExamplesAction TextCodeSource changeSRCNext versionVERDocumentation changeDOCMiscellaneousMSCHardware problemHDWSoftware problemSFT
Maintenance Request Reporting Facilities
The PAC administrator also establishes a mechanism to prioritize the sequence in which the listof maintenance requests is retrieved. Table entries must have an associated sequence number.This number along with the maintenance request priority determines the sequence in whichmaintenance requests are displayed with the Selection option.
To facilitate reporting, PAC uses a grouping facility. The grouping hierarchy is as follows:
Status of the maintenance request;StatusPriority assigned to the problem;PriorityThe action or reason code to further define the status;ActionThe name of the maintenance request. This may be a numeric and/or alphabetic value.Request
Also, the list of maintenance requests may be retrieved in alphabetical order.
User Exits
Youmay use PACuser exits for interfacingwith external problem-tracking systems, rules, security,extended processing, and customization.
DescriptionExitUser Exit 19maintenance request DataManipulation invokedduring the processing (adding,modifying, displaying) of the maintenance request data. PAC uses this user exit to pass thedata and/or allow the user to update the PAC information.
19
User Exit 4 maintenance request User Exit 20 maintenance request Invoking MaintenanceRequests invoked whenever any function (except Purge, which may be handled with User
20
Exit 4) formaintenance requests is invoked. User Exit 20 can be used tomeet security require-ments and validate and/or override the maintenance request ID. (The maintenance requestID may be updated using this exit).User Exit 21 maintenance request Linking to Events allows you to validate the use of main-tenance requests specifiedwithmigration events. For example, the exitmay be set up to ensure
21
that a maintenance request is always specified for a migration event where the origin ordestination status is a maintenance status type. This is important for tracking the actual state
PAC User's Guide450
Maintaining Natural Objects in PAC
DescriptionExitof the maintenance request and the progression of objects through the defined applicationlife-cycle.
Refer to the PAC Reference documentation for detailed information about PAC user exits.
Application Program Interface (APIs)
TheMaintenanceRequestAPI (APINMREQ) allowsusers to add,modify, purge or display (retrieve)information about a particular maintenance request.
A list of current APIs is provided in the PAC Reference documentation.
451PAC User's Guide
Maintaining Natural Objects in PAC
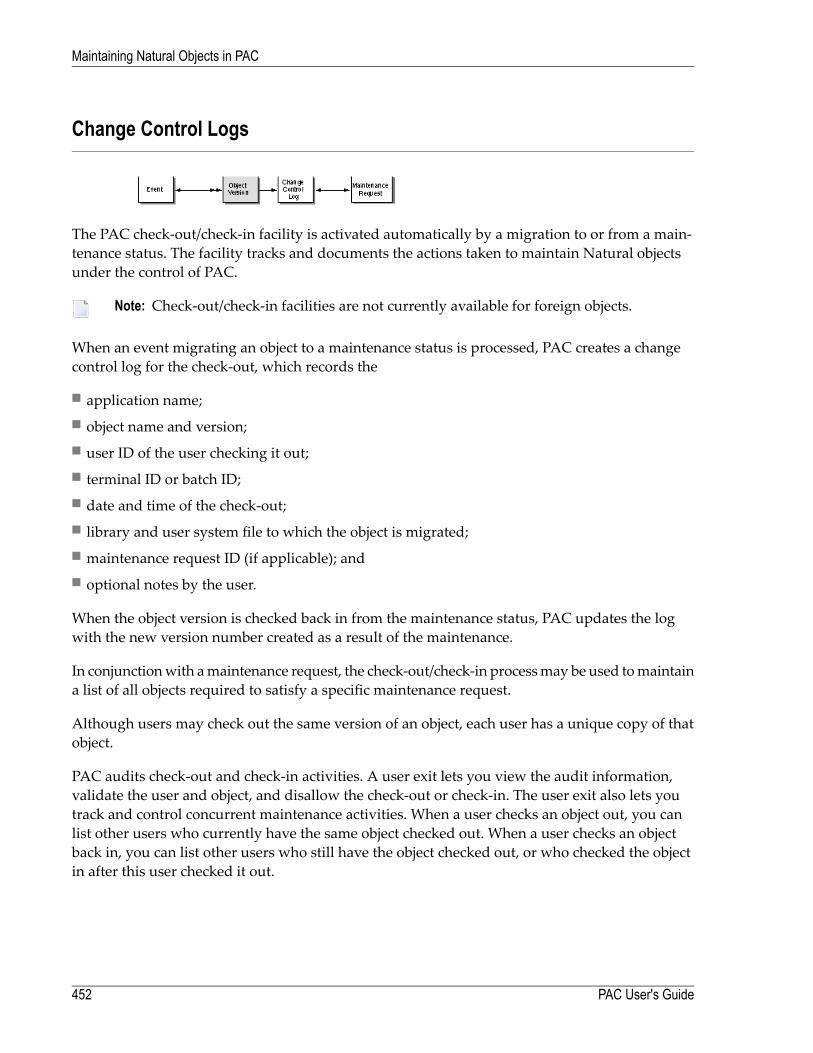
Change Control Logs
The PAC check-out/check-in facility is activated automatically by a migration to or from a main-tenance status. The facility tracks and documents the actions taken to maintain Natural objectsunder the control of PAC.
Note: Check-out/check-in facilities are not currently available for foreign objects.
When an event migrating an object to a maintenance status is processed, PAC creates a changecontrol log for the check-out, which records the
■ application name;■ object name and version;■ user ID of the user checking it out;■ terminal ID or batch ID;■ date and time of the check-out;■ library and user system file to which the object is migrated;■ maintenance request ID (if applicable); and■ optional notes by the user.
When the object version is checked back in from the maintenance status, PAC updates the logwith the new version number created as a result of the maintenance.
In conjunctionwith amaintenance request, the check-out/check-in processmay be used tomaintaina list of all objects required to satisfy a specific maintenance request.
Although users may check out the same version of an object, each user has a unique copy of thatobject.
PAC audits check-out and check-in activities. A user exit lets you view the audit information,validate the user and object, and disallow the check-out or check-in. The user exit also lets youtrack and control concurrent maintenance activities. When a user checks an object out, you canlist other users who currently have the same object checked out. When a user checks an objectback in, you can list other users who still have the object checked out, or who checked the objectin after this user checked it out.
PAC User's Guide452
Maintaining Natural Objects in PAC
Check-Out Processing
When you set up the initial migration event to check an object out for maintenance, you may op-tionally specify an associated maintenance request ID.
The processing of the migration event results in the following:
■ The specified version of each object is migrated to the location of the maintenance status.■ A change control log is created for each object.■ An object status entry is created for each object indicating that it has been migrated to a main-tenance status.
If PAC detects that any object being checked out is already checked out to a maintenance statusor that its most recent migration was to a development status, PAC writes a warning about theconcurrent maintenance to the audit report. If User Exit 7 has been implemented, it may be usedto permit or disallow the concurrent check-out of the object in question. The exit may also be usedto write additional user information to the audit report.
Check-in Processing
Aftermaintenance has been performed on an object, the objectmust reenter PAC before the changecan be recorded. A migration event must be set up to return the object to the PAC controlled en-vironment; the migration event should specify
■ the maintenance origin status where the object is being maintained;■ the destination status, which must be Control, or a test or production status type; and■ the maintenance request ID (recommended but optional).
As a result of the migration, the object is moved or copied from the maintenance status into thedestination status and implicitly to Control status if the destination status is other than Control.The link of the object version checked out to the maintenance status is purged.
During the check-in process, PAC locates the corresponding change control log (check-out record),updates it with the check-in information, and closes it. If there is no corresponding open changecontrol log for an object (for example, a new object was created as the result of the maintenanceprocess), a change control log is created and will contain only the check-in information.
453PAC User's Guide
Maintaining Natural Objects in PAC
Move Option
The Move option results in the object being compiled and assigned a new version number. Thenew version of the object is migrated to the destination status.
By default, the Move option is in effect for all migration paths where the origin status is a main-tenance status type. This means that when objects are migrated from maintenance back into PAC(that is, checked in), both the saved and cataloged objects are physically purged from themainten-ance library.
If Applymod 24 is active, only the saved (source) object is purged from the maintenance library.The cataloged object is not purged. This helps to protect the integrity of the environment for anysubsequent testing of other maintenance changes.
Copy Option
If the Copy option is used, the object is recompiled in PAC and assigned a new version number.The new version of the object must then be copied to the maintenance library.
A new change control log recording the check-out of the new version of the object is created, andthe new version of the object is placed in the maintenance status fromwhich the previous versionof the object wasmigrated. The new change control log is created tomaintain consistency betweenwhat is in PAC and what is in the maintenance environment.
The following example illustrates the steps used when the Copy option is selected for migratingobjects from maintenance:
1. APGMP1.0003 is checked out to the status MAINTENANCE (status type M).■ An object-status link is created for APGMP1.0003-MAINTENANCE.■ A change control log is created for APGMP1.0003 and the check-out information is recordedin the log.
2. APGMP1.0003 is modified and saved; the saved date-time stamp information is also updated.
3. APGMP1.0003 is checked in from the status MAINTENANCE and assigned a new version of0007 and recompiled in PAC.■ The object-status link for APGMP1.0003-MAINTENANCE is purged.■ The change control log that corresponds to APGMP1.0003 is located and updated with thecheck-in information for APGMP1.0007.
Thus, the change control log documents that APGMP1 was checked out to maintenance asVersion 3, modified, then checked back into PAC as Version 7. Version 3 is the maintenanceversion of Version 7.
4. To maintain consistency between what is in PAC and what is in the maintenance environment:■ An object-status link for APGMP1.0007-MAINTENANCE is created.
PAC User's Guide454
Maintaining Natural Objects in PAC
■ Anew change control logwith associated check-out information is created for APGMP1.0007.■ APGMP1.0007 is copied to the maintenance status specified in the migration path.
Canceling Maintenance
If an object version has been checked out to maintenance, and it is later decided that the objectrequires nomodification, amigration eventmay be set up to cancel themaintenance for the object.The migration event specifies
■ the maintenance origin status where the object is being maintained;■ the destination status, which must be a retire status type; and■ the maintenance request ID (recommended but optional).
As a result of the migration, PAC locates the corresponding change control log with the check-outinformation; updates it to indicate that themaintenancewas cancelled; and purges the object fromthe maintenance status location.
Selecting Objects With User Exit 7
User Exit 7 is invoked during the check-out/in of objects to/from a maintenance status type. Aseach object is processed, you can allow or disallow themigration of that object. A nonzero responsecode returned from the exit instructs PAC to reject a specific object for processing.
Note: Since PAC currently does not supportmessage switching facilities, it is recommendedthat users integrate their ownmessage switching facilities. For example, use Con-nect fromUser Exit 7 in the check-out/check-in process of PAC so that all users are correctly informedabout check-out/check-in activities.
Refer to the PAC Reference documentation for more information about User Exit 7.
When PAC User Exit 7) is active during check-out of an object, you may
■ validate the user and the object being checked out;■ display information about the object being checked out;■ obtain a list of other userswho alsomay have previously checked out the same object (concurrentmaintenance); and
■ disallow the check-out of the object.
When a same or different version of an object is checked out by another user, User Exit 7 may beused to notify that user that another version of the object may be undergoing modification in an-other library. It is the user's responsibility to check the validity of the notification.
If PAC User Exit 7 is active during check-in of an object, you may
455PAC User's Guide
Maintaining Natural Objects in PAC
■ validate the user and the object being checked in;■ display information (for example, terminal, library, maintenance request) about the object beingchecked in;
■ obtain a list of all users who■ have the same object still checked out;■ checked in the same object subsequent to the check-out date of the object.
■ disallow the check-in of the object.
PAC User's Guide456
Maintaining Natural Objects in PAC
43 Using PAC with Predict Case or Natural for DB2
■ Predict Case ................................................................................................................................. 458■ Natural for DB2 ............................................................................................................................. 461
457
This chapter covers the following topics:
Predict Case
PAC provides the following integration with Predict Case:
■ Natural object lists can be generated from a Predict Case object set.■ PAC verifies that Natural object versions are synchronizedwith the corresponding Predict Caseobject.
■ PAC identifies the Predict Case object versions that were used to compose the actual source ofthe Natural object and maintains a usage list of them.
This section covers the following topics:
■ Establishing PAC in a Predict Case Environment■ Generating a Natural Object List■ Natural Object List Validation■ Information Stored by PAC■ Reporting Facilities■ Predict Case Object Classes
Establishing PAC in a Predict Case Environment
When PAC is started, it uses the Entire DB files defined for Predict Case by the NTFILE macro inthe Natural parameter module to establish direct communication with Predict Case.
Predict Case must be installed with NTFILE values 249 and 250 established as a valid PredictCase/Entire DB environment.
Generating a Natural Object List
For Predict Case applications, you must specify a Predict Case library in application status linkdefinitions that have an origin status of either "development" or "maintenance". PAC communicateswith Predict Case to verify the relationship between the objects residing in the Natural library andthe objects defined to the Predict Case library used to compose them.
Although the Predict Case library name can be specified at any time, it is validated only when anevent with a development or maintenance origin status is validated and authorized, and againduring the actual migration of the objects from development or maintenance.
The Predict Case library contains the Predict Case object set, which is identified by set name anduser ID in the PAC Generate List option.
You can create a Natural object list for the Predict Case application by
PAC User's Guide458
Using PAC with Predict Case or Natural for DB2

■ manually entering the objects;■ generating the list from a Predict Case object set (GENTYPE C);■ comparing the date-time stamps of objects in the origin and destination statuses and includingthe objects that are different (GENTYPE P).
In all cases, the Natural objects are compared with the Predict Case library during validation toverify that the Natural objects are consistent with the Predict Case objects used to compose them.
Any inconsistencies detected during validation produce an error message. You can then eitherremove the object from the list or correct the inconsistency before migrating the object.
Aswith all PACmigrations, the object list is validated again at execution time. If any inconsistenciesare detected at this time, the object is automatically rejected for the migration.
Natural Object List Validation
During the validation of the object list, when it is detected that a particular application status linkhas an associated Predict Case library, PAC verifies that all objects being processed (except thosebeing rolled) were composed by Predict Case.
Note: Rules and views are processed normally since Predict Case does not treat these objectsin any special manner.
Objects for which an error condition is returned are not migrated.
PAC checks the following for each object in the object list and issues an error if all conditions arenot verified:
■ The Natural object has corresponding Predict Case source objects fromwhich it was composed.The corresponding Predict Case objects that composed the Natural object must still exist.
■ The Natural objects have the save/stow date recorded on the Predict Case object.■ None of the Predict Case objects used to compose the Natural source object has been changedsince the Natural object was last composed.
Information Stored by PAC
For auditing purposes, PAC stores the following information about the Predict Case objects usedto compose the Natural objects migrated:
■ A list of the Predict Case objects used to compose each Natural object as part of that Naturalobject's usage list;
■ The Predict Case source library name recorded in the directory information for theNatural object;■ The date-time stamp of the Predict Case object as it is stored in Predict Case;■ A list of all Natural objects that used a particular Predict Case object to compose.
459PAC User's Guide
Using PAC with Predict Case or Natural for DB2
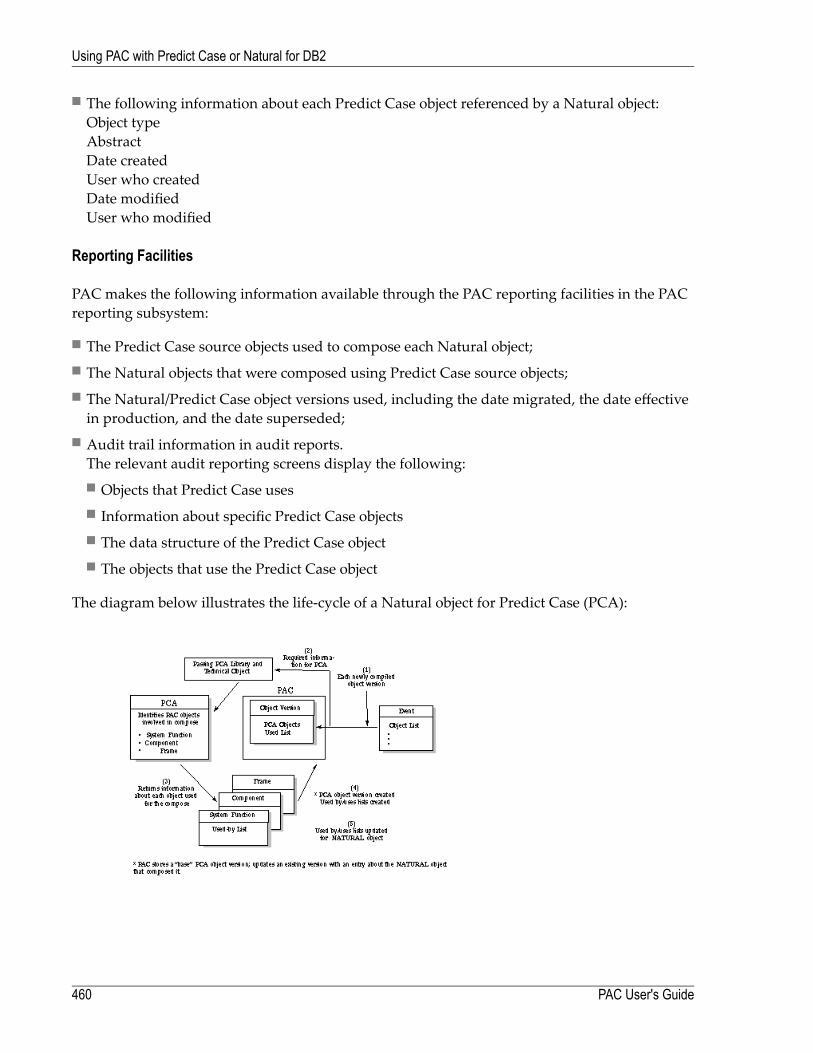
■ The following information about each Predict Case object referenced by a Natural object:Object typeAbstractDate createdUser who createdDate modifiedUser who modified
Reporting Facilities
PAC makes the following information available through the PAC reporting facilities in the PACreporting subsystem:
■ The Predict Case source objects used to compose each Natural object;■ The Natural objects that were composed using Predict Case source objects;■ The Natural/Predict Case object versions used, including the date migrated, the date effectivein production, and the date superseded;
■ Audit trail information in audit reports.The relevant audit reporting screens display the following:■ Objects that Predict Case uses■ Information about specific Predict Case objects■ The data structure of the Predict Case object■ The objects that use the Predict Case object
The diagram below illustrates the life-cycle of a Natural object for Predict Case (PCA):
PAC User's Guide460
Using PAC with Predict Case or Natural for DB2
Explanation of the Steps in the DiagramActionStepNatural objects are composed fromPredict Case objects specified for themigration of objectsinto the PAC controlled environment; each composedNatural object is verified before beingnewly compiled and versioned.
1
Predict Case library and technical object information about the Natural objects composedin PAC from Predict Case objects is communicated to Predict Case. Predict Case identifiesthe Predict Case objects involved in the composition of Natural objects in PAC.
2
Predict Case returns to PAC system function, component, and frame information about eachPredict Case object used for the composition of Natural objects in PAC. The Predict Caseobjects are assigned a version number.
3
An object version is created for the Natural composed objects; used-by and uses lists arecreated. PAC updates the object version with an entry concerning the Predict Case objectsused to compose it and including their version numbers.
4
Used-by and uses lists are updated for the Natural object versions.5
Predict Case Object Classes
A Predict Case object is an entity used to compose Natural objects in a Predict Case environment.Examples of Predict Case object classes supported by PAC include
■ System Function■ Frame Component
Natural for DB2
If you are running Natural for DB2 applications, PAC supports migrations for both qualified andnon-qualified DB2 tables/views. The Truncate Creator option is supported for non-qualifiedtables/views.
This section covers the following topics:
■ Predict Event Prerequisite■ Migrating Qualified DB2 Tables/Views■ Migrating Non-Qualified DB2 Tables/Views■ Truncate Creator Support for Non-Qualified DB2 Tables/Views
461PAC User's Guide
Using PAC with Predict Case or Natural for DB2
■ Qualified and Non-Qualified Tables/Views
Predict Event Prerequisite
Migrations for qualified and non-qualifiedDB2 tables/viewsmust be performed separately. Ensurethat the Predict generation defaults for views are set correctly before running the migration.
Migrating Qualified DB2 Tables/Views
If you are migrating qualified DB2 tables/views, then before running the Predict migration intoPAC, check that the Truncate Creator option in the Predict generation defaults for views is set toN.
Migrating Non-Qualified DB2 Tables/Views
If you are migrating non-qualified DB2 tables/views, then before running the Predict migrationinto PAC, check that the Truncate Creator option in the Predict generation defaults for views isset to Y.
For information about copying Predict generation defaults, refer to the section General DefaultsMaintenance in the PAC Administration Manual. For information about the Truncate Creatoroption in Predict generation defaults, refer to the Predict Administration Manual.
Truncate Creator Support for Non-Qualified DB2 Tables/Views
You may write Natural FOR DB2 applications with non-qualified tables/views by using theTruncator Creator option in the Generation Defaults for Natural views.
PAC supports the Truncate Creator option for DB2 tables/views with the following restrictions:
■ The truncated view name of the DB2 table/view must not correspond to a view name whichalready exists for another■ file; or■ DB2 table/view.
PAC User's Guide462
Using PAC with Predict Case or Natural for DB2
Qualified and Non-Qualified Tables/Views
The diagrams in the following sections show examples of qualified and non-qualified DB2tables/views:
In the example above for qualified DB2 tables/views, objects that access owner1.customers shouldnot be migrated to any other environment unless that environment supports the high level quali-fier owner1.
If all environments support qualifier owner1, then the objects are valid for all environments.
If the objects are valid only for some environments, then the objects must be recompiled with dif-ferent DB2 tables/views so that the objects may be executed against these DB2 tables.
Note: Even if the SET CURRENT SQLID DB2 command is issued in dynamic mode, orthe owner parameter is specified on the BIND for the application PLAN in static mode, thequalifier of customers will still be owner1.
463PAC User's Guide
Using PAC with Predict Case or Natural for DB2

In the example above for non-qualified DB2 tables/views in dynamic mode, the user refers to thetruncated name of the DB2 view and will run the application in dynamic mode.
All objectsmay refer to customers and the qualifierwill be determined during execution; therefore,the objects may be migrated to any environment where they can access the DB2 table based onthe qualifier assigned by the SET CURRENT SQLID DB2 command.
For dynamic PLANs, the creator must be set up before executing the code that accesses the tablein each environment. The setup may be performed in several ways; the following program is oneexample. This program may be found in library SYSDB2:
* SET CURRENT SQLID*DEFINE DATALOCAL USING DEMSQLCALOCAL* Parameter for DB2SERV1 STMT (A250)1 STMTL (I2) CONST <250>1 RETCODE (I2)1 OLDSQLID (A8)1 NEWSQLID (A8)*END-DEFINE*SELECT DISTINCT CURRENT SQLID
INTO OLDSQLIDFROM SYSIBM.SYSTABLES
ESCAPE BOTTOMEND-SELECT*MOVE 'SET CURRENT SQLID="PROD"'
TO STMT
PAC User's Guide464
Using PAC with Predict Case or Natural for DB2
CALL 'DB2SERV' 'D' STMT STMTL SQLCA RETCODE*IF RETCODE > 0
FETCH'SQLERR' 0290 ELSE
SELECT DISTINCT CURRENT SQLIDINTO NEWSQLIDFROM SYSIBM.SYSTABLES
ESCAPE BOTTOMEND-SELECT
*WRITE ' Old SQLID was :' OLDSQLIDWRITE ' New SQLID is :' NEWSQLID
END-IF*END
In the example above for non-qualifiedDB2 tables/views in staticmode, the user's objects referencethe truncated name of the DB2 table/view, and the qualifier will be determined by the BINDstatement of the application PLAN.
Using this method, the user compiles the code only once and then can migrate the Natural forDB2 objects to any environment where the DB2 tables/views are accessible.
465PAC User's Guide
Using PAC with Predict Case or Natural for DB2

466
44 Creating and Managing PAC Jobs
■ Accessing the Job Sub-Functions ..................................................................................................... 468■ Adding (Defining) a Job .................................................................................................................. 470■ Displaying or Modifying a Job ........................................................................................................... 471■ Selecting a Job ............................................................................................................................. 471■ Copying a Job ............................................................................................................................... 473■ Renaming a Job ............................................................................................................................ 473■ Submitting a Job ............................................................................................................................ 474■ Editing Job Control ......................................................................................................................... 474■ Job Control Substitution Parameters .................................................................................................. 476■ Purging a Job ............................................................................................................................... 478
467

PAC provides jobs for processing migration events, for submitting jobs, and for importing to andexporting from partitioned datasets (PDS). Refer to Sample Jobs for a list of the jobs provided byPAC.
PAC jobs are grouped by operating system. Within each of these groups, the jobs are classified bythe type of migration to be processed. The job for each migration type follows its own set of stepsto completion, allowing the event to be processed in increments.
PAC maintenance facilities can be used to customize batch jobs to meet the requirements at yoursite for job names, account codes, dataset names, and other standards.
User-defined/specific jobs can also be loaded into PAC and submitted for execution using theRemote Job Entry (RJE) facility.
Note: As part of the installation / upgrade process includes the re-loading of PAC jobs, it isrecommended that you copy the delivered jobs to customized names, before any site-spe-cific information is changed. Otherwise these changes will be lost when upgrading to ahigher version.
This chapter covers the following topics:
Accessing the Job Sub-Functions
To access the PAC job maintenance and reporting sub-functions, enter Code J (Jobs) on the PACMain Menu.
Depending on your user profile, either the Job Menu or the Job Reporting Menu appears. The JobMenu, which combines the maintenance and reporting menus, is used in discussions throughoutthis section.
PAC User's Guide468
Creating and Managing PAC Jobs
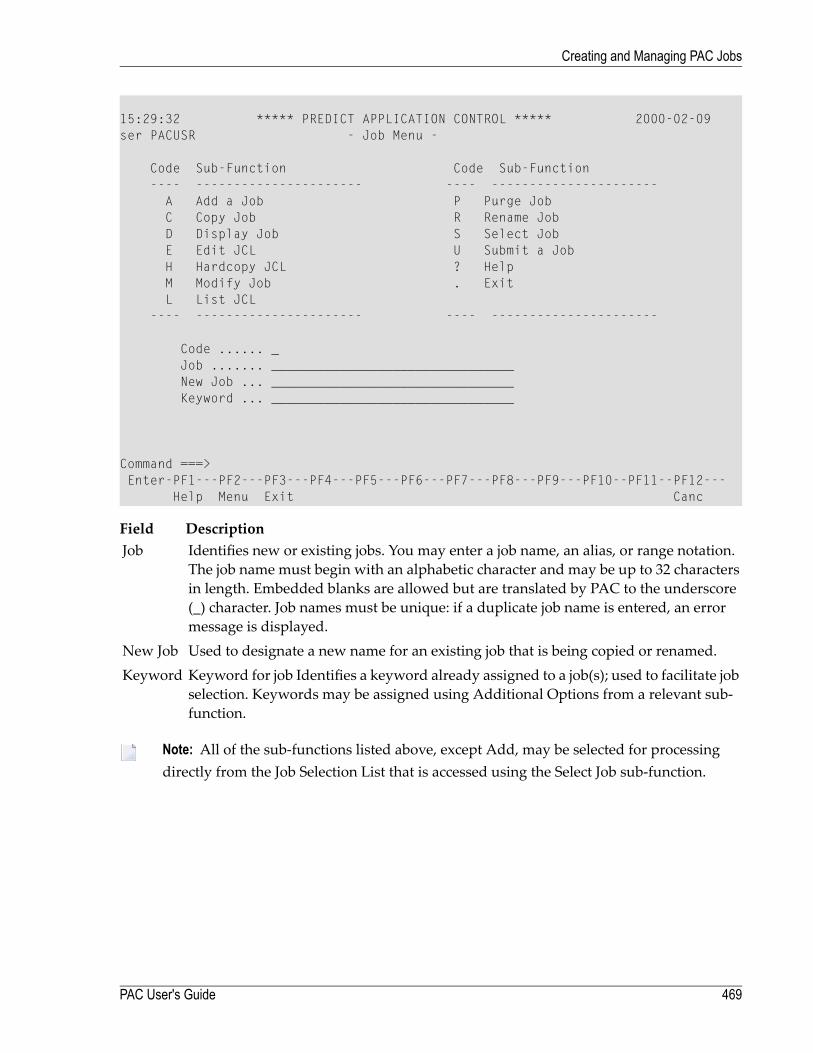
15:29:32 ***** PREDICT APPLICATION CONTROL ***** 2000-02-09ser PACUSR - Job Menu -
Code Sub-Function Code Sub-Function---- ---------------------- ---- ----------------------A Add a Job P Purge JobC Copy Job R Rename JobD Display Job S Select JobE Edit JCL U Submit a JobH Hardcopy JCL ? HelpM Modify Job . ExitL List JCL
---- ---------------------- ---- ----------------------
Code ...... _Job ....... ________________________________New Job ... ________________________________Keyword ... ________________________________
Command ===>Enter-PF1---PF2---PF3---PF4---PF5---PF6---PF7---PF8---PF9---PF10--PF11--PF12---
Help Menu Exit Canc
DescriptionFieldIdentifies new or existing jobs. You may enter a job name, an alias, or range notation.The job name must begin with an alphabetic character and may be up to 32 characters
Job
in length. Embedded blanks are allowed but are translated by PAC to the underscore(_) character. Job names must be unique: if a duplicate job name is entered, an errormessage is displayed.Used to designate a new name for an existing job that is being copied or renamed.New JobKeyword for job Identifies a keyword already assigned to a job(s); used to facilitate jobselection. Keywords may be assigned using Additional Options from a relevant sub-function.
Keyword
Note: All of the sub-functions listed above, except Add, may be selected for processingdirectly from the Job Selection List that is accessed using the Select Job sub-function.
469PAC User's Guide
Creating and Managing PAC Jobs
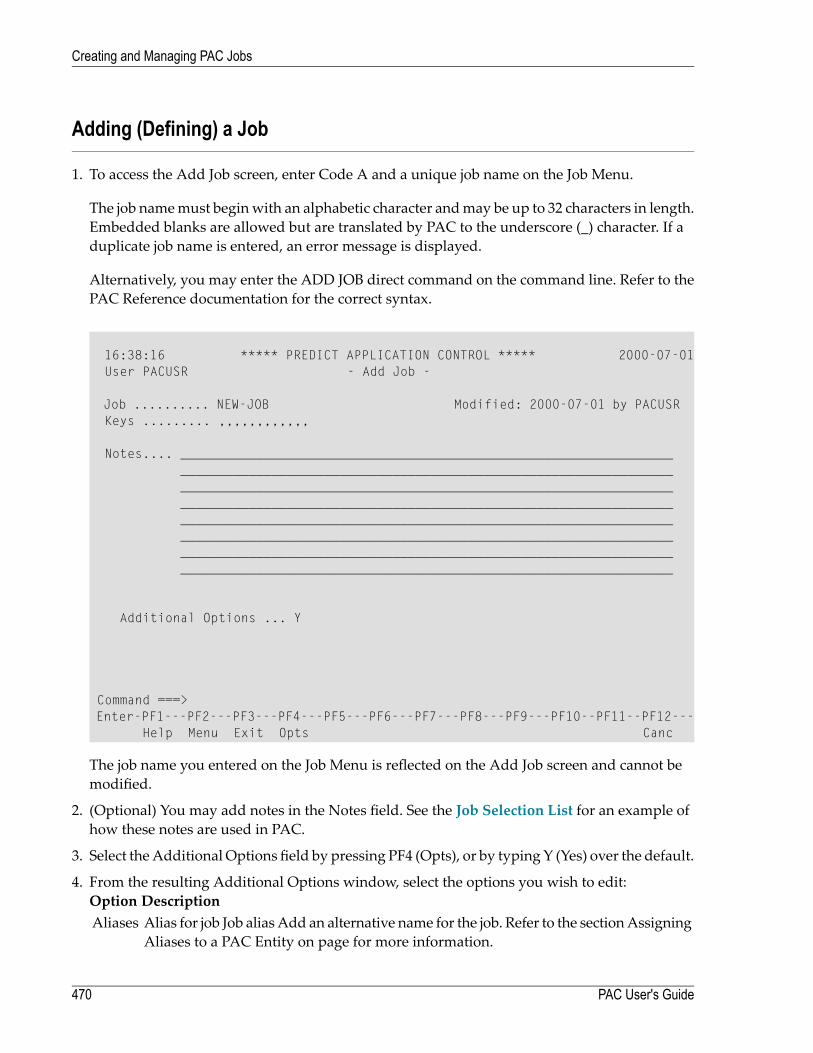
Adding (Defining) a Job
1. To access the Add Job screen, enter Code A and a unique job name on the Job Menu.
The job namemust beginwith an alphabetic character andmay be up to 32 characters in length.Embedded blanks are allowed but are translated by PAC to the underscore (_) character. If aduplicate job name is entered, an error message is displayed.
Alternatively, you may enter the ADD JOB direct command on the command line. Refer to thePAC Reference documentation for the correct syntax.
16:38:16 ***** PREDICT APPLICATION CONTROL ***** 2000-07-01User PACUSR - Add Job -
Job .......... NEW-JOB Modified: 2000-07-01 by PACUSRKeys ......... ,,,,,,,,,,,,
Notes.... ________________________________________________________________________________________________________________________________________________________________________________________________________________________________________________________________________________________________________________________________________________________________________________________________________________________________________________________________________________________________________________________________________
Additional Options ... Y
Command ===>Enter-PF1---PF2---PF3---PF4---PF5---PF6---PF7---PF8---PF9---PF10--PF11--PF12---
Help Menu Exit Opts Canc
The job name you entered on the Job Menu is reflected on the Add Job screen and cannot bemodified.
2. (Optional) You may add notes in the Notes field. See the Job Selection List for an example ofhow these notes are used in PAC.
3. Select theAdditional Options field by pressing PF4 (Opts), or by typing Y (Yes) over the default.
4. From the resulting Additional Options window, select the options you wish to edit:DescriptionOptionAlias for job Job alias Add an alternative name for the job. Refer to the sectionAssigningAliases to a PAC Entity on page for more information.
Aliases
PAC User's Guide470
Creating and Managing PAC Jobs
DescriptionOptionJob keyword Keyword for job Assign keywords for the job. Keywords must alreadyhave been defined to PAC. Refer to Appendix , Defining Keywords to PAC, on pagefor more information.
Keys
Edit the JCL/JCS for the job on the Natural Editor screen. Refer to the PAC Referencedocumentation for information about using the editor.
JCL
The Date option displays information about the dates and times the job was added/modified,and also identifies the user who performed the addition/modification.
5. Press ENTER to add the job.
Displaying or Modifying a Job
The Display Job and Modify Job screens are similar to the Add Job screen: they display notes andkeywords for the specified job. The Display screen may not be modified. Refer to Add (Define)an Application for more information.
To access the Display or Modify screens, enter Code D (Display Job) or M (Modify Job) and thename of the job on the Job Menu. Alternatively, enter the DISPLAY or MODIFY direct commandon the command line. Refer to the PAC Reference documentation for the correct syntax.
Selecting a Job
To display a list of jobs, enter Code S (Select Job) on the JobMenu. Alternatively, enter the SELECTJOB direct command on the command line to access the Job Selection List screen. Refer to the PACReference documentation for the correct syntax.
471PAC User's Guide
Creating and Managing PAC Jobs
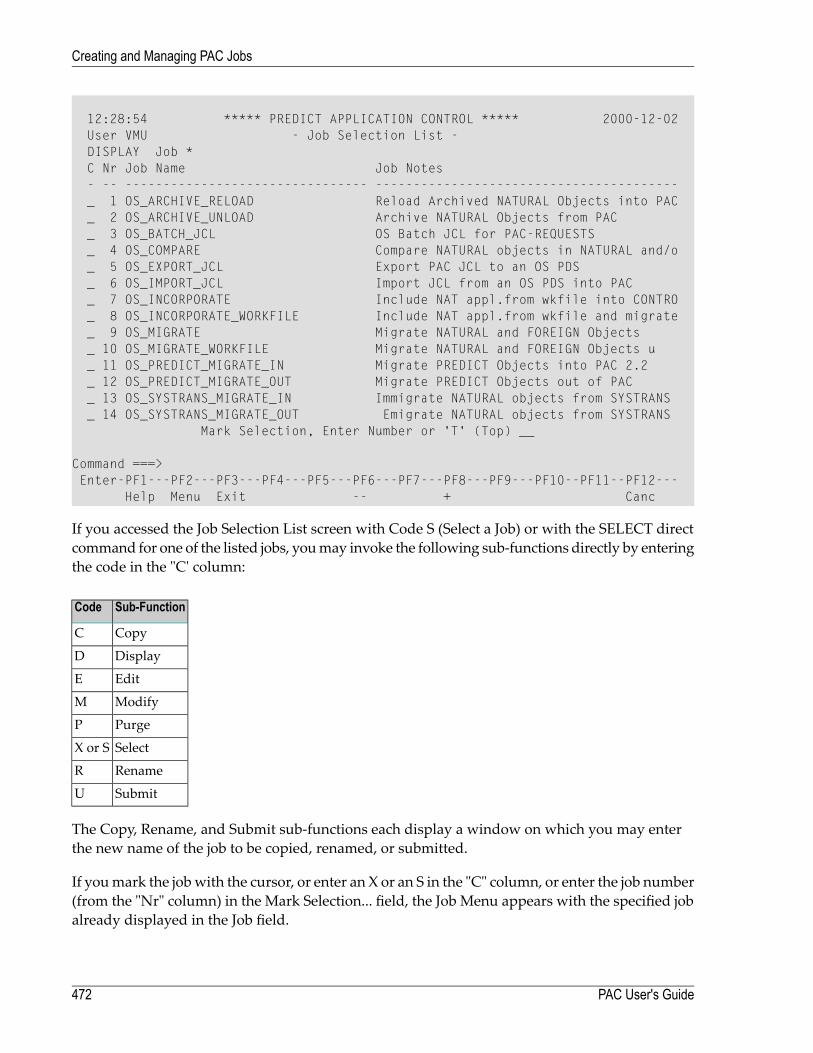
12:28:54 ***** PREDICT APPLICATION CONTROL ***** 2000-12-02User VMU - Job Selection List -DISPLAY Job *C Nr Job Name Job Notes- -- -------------------------------- ----------------------------------------_ 1 OS_ARCHIVE_RELOAD Reload Archived NATURAL Objects into PAC_ 2 OS_ARCHIVE_UNLOAD Archive NATURAL Objects from PAC_ 3 OS_BATCH_JCL OS Batch JCL for PAC-REQUESTS_ 4 OS_COMPARE Compare NATURAL objects in NATURAL and/o_ 5 OS_EXPORT_JCL Export PAC JCL to an OS PDS_ 6 OS_IMPORT_JCL Import JCL from an OS PDS into PAC_ 7 OS_INCORPORATE Include NAT appl.from wkfile into CONTRO_ 8 OS_INCORPORATE_WORKFILE Include NAT appl.from wkfile and migrate_ 9 OS_MIGRATE Migrate NATURAL and FOREIGN Objects_ 10 OS_MIGRATE_WORKFILE Migrate NATURAL and FOREIGN Objects u_ 11 OS_PREDICT_MIGRATE_IN Migrate PREDICT Objects into PAC 2.2_ 12 OS_PREDICT_MIGRATE_OUT Migrate PREDICT Objects out of PAC_ 13 OS_SYSTRANS_MIGRATE_IN Immigrate NATURAL objects from SYSTRANS_ 14 OS_SYSTRANS_MIGRATE_OUT Emigrate NATURAL objects from SYSTRANS
Mark Selection, Enter Number or 'T' (Top) __
Command ===>Enter-PF1---PF2---PF3---PF4---PF5---PF6---PF7---PF8---PF9---PF10--PF11--PF12---
Help Menu Exit -- + Canc
If you accessed the Job Selection List screen with Code S (Select a Job) or with the SELECT directcommand for one of the listed jobs, youmay invoke the following sub-functions directly by enteringthe code in the "C' column:
Sub-FunctionCode
CopyC
DisplayD
EditE
ModifyM
PurgeP
SelectX or S
RenameR
SubmitU
The Copy, Rename, and Submit sub-functions each display a window on which you may enterthe new name of the job to be copied, renamed, or submitted.
If youmark the jobwith the cursor, or enter an X or an S in the "C" column, or enter the job number(from the "Nr" column) in the Mark Selection... field, the Job Menu appears with the specified jobalready displayed in the Job field.
PAC User's Guide472
Creating and Managing PAC Jobs
Copying a Job
Youmay copy a job from the JobMenu, from the Job Selection List, or by issuing a direct command.
1. To copy an existing job from the Job Menu, enter Code C (Copy Job), the name of the job youwish to copy (Job field) and a new name for the job (New Job field).
In the Job Selection List mark the job you wish to copy with C in the "C" column. On the res-ulting Copy Job window, enter a new name for the copied job.
Alternatively, enter the COPY JOB command on the command line. Refer to the PAC Referencedocumentation for the correct syntax.
The Copy PAC Job screen appears; this screen is similar to the Add Job screen. You maymodify the Notes field and the Additional Options, including Aliases, Keywords, and the JCL.
2. Press ENTER to confirm your modifications.
The message that the job (that is, the old job name) has been copied appears at the bottom of thescreen.
Renaming a Job
You may rename a job from the Job Menu, from the Job Selection List, or by issuing a direct com-mand.
Note: If you rename a job, you must also rename it in the migration paths that use this job.Refer toMigration Path for information about migration path defaults.
1. To rename an existing job from the Job Menu, enter Code R (Rename Job), the name of the jobyou wish to rename (Job field), and a new name for the job (New Job field).
From the Job Selection Listmark the job you wish to rename with R in the "C" column. On theresulting Rename Job window, enter a new name for the job.
Alternatively, enter the RENAME JOB command on the command line. Refer to the PAC Refer-ence documentation for the correct syntax.
2. Press ENTER to confirm your modifications.
The message that the job (that is, the old job name) has been renamed appears at the bottom ofthe screen.
473PAC User's Guide
Creating and Managing PAC Jobs
Submitting a Job
You may submit a job for execution from the Job Menu, from the Job Selection List, or by issuinga direct command.
Note: Jobs for migration events must be submitted from the Submit Migration Event screenbecause of the automatic substitution of various PAC substitution characters. Refer to Au-thorizing and Submitting a Migration Event for more information. For more informationabout PAC substitution characters, see Job Control Substitution Parameters.
1. To submit a job from the Job Menu, enter Code U (Submit a Job) and the name of the job.
From the Job Selection Listmark the job you wish to submit with U in the "C" column.
Alternatively, enter the SUBMIT JOB command on the command line or the SUB command onthe command line of the JCL screen (i.e., the Natural editor). Refer to the PAC Reference docu-mentation for the correct syntax.
2. On the resulting Submit Confirmation window, confirm the request by entering Confirm orpressing PF5 (Sub).
When a job is submitted successfully, a message to that effect appears at the bottom of the screen.
Editing Job Control
You may edit job control statements (JCL/JCS) on the Natural editor screen using Natural editorcommands and variable substitution parameters identified by an "@" prefix. Setting andmodifyingthe @ prefix character is a PAC administrator function.
Refer to the PACReference documentation formore information aboutNatural editor commands.
Variable substitution parameters are discussed in the section JobControl Substitution Parameters.
1. Access the Natural editor from one of the following screens as indicated:ActionScreenAccess Additional Options and enter Y (yes) in the JCL field.Add JobEnter Code E (Edit JCL) and the job name.Job MenuEnter Code M (Modify Job) and the job name; from the resulting Modify Jobscreen, access Additional Options and enter Y (yes) in the JCL field.
Job Menu
Enter EDIT JOB on the command line. Refer to the PAC Reference document-ation for the correct syntax.
Any Job screen
The Natural editor screen appears. The following example shows JCL source in the editor:
PAC User's Guide474
Creating and Managing PAC Jobs
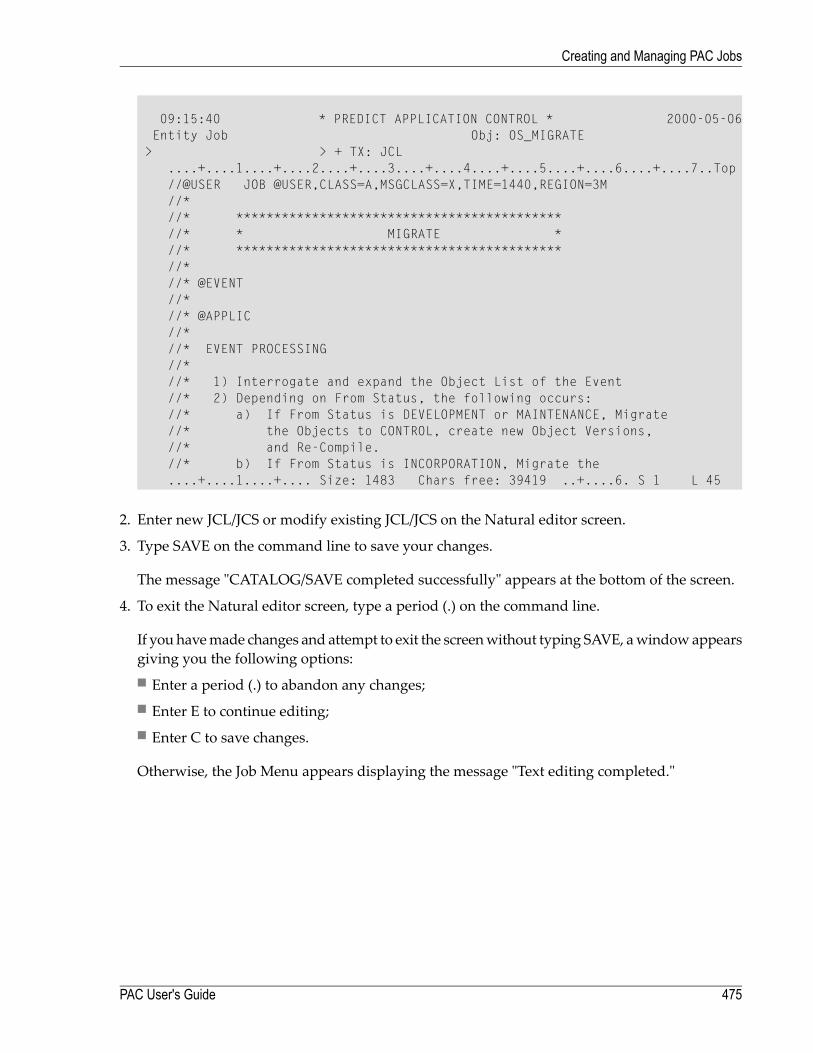
09:15:40 * PREDICT APPLICATION CONTROL * 2000-05-06Entity Job Obj: OS_MIGRATE> > + TX: JCL
....+....1....+....2....+....3....+....4....+....5....+....6....+....7..Top//@USER JOB @USER,CLASS=A,MSGCLASS=X,TIME=1440,REGION=3M//*//* *******************************************//* * MIGRATE *//* *******************************************//*//* @EVENT//*//* @APPLIC//*//* EVENT PROCESSING//*//* 1) Interrogate and expand the Object List of the Event//* 2) Depending on From Status, the following occurs://* a) If From Status is DEVELOPMENT or MAINTENANCE, Migrate//* the Objects to CONTROL, create new Object Versions,//* and Re-Compile.//* b) If From Status is INCORPORATION, Migrate the....+....1....+.... Size: 1483 Chars free: 39419 ..+....6. S 1 L 45
2. Enter new JCL/JCS or modify existing JCL/JCS on the Natural editor screen.
3. Type SAVE on the command line to save your changes.
The message "CATALOG/SAVE completed successfully" appears at the bottom of the screen.
4. To exit the Natural editor screen, type a period (.) on the command line.
If you havemade changes and attempt to exit the screenwithout typing SAVE, awindowappearsgiving you the following options:■ Enter a period (.) to abandon any changes;■ Enter E to continue editing;■ Enter C to save changes.
Otherwise, the Job Menu appears displaying the message "Text editing completed."
475PAC User's Guide
Creating and Managing PAC Jobs
Job Control Substitution Parameters
Variable substitution parameters add flexibility to the standard Natural editor commands andfacilities. These parameters are uniquely identified by an "@" prefix (for example, "@PASSWORD")and fall into the following categories:
■ Automatic Substitution Parameters are predefined to PAC. Each time a job is submitted, PACautomatically substitutes values for these parameters. These parameters may exist in JCL/JCSfor either job submission or migration events.
■ User-prompted substitution parameters require additional, manual input before they can beexecuted. Each time the job is submitted, a window is displayed requesting values for thesesubstitution variables. The JCL/JCS text is scanned for such substitution parameters. Theseparameters are used in job submission JCL/JCS only.
Rules for Using Substitution Parameters
The following rules apply when using all JCL/JCS substitution parameters:
■ A maximum of 10 variables is allowed for any given job.■ There is no limit to the number of occurrences of any given parameter within a job.■ A default character other than "@" may be specified by the PAC administrator for identifyingsubstitution parameters.
■ The name of the job itself may be substituted in the JCL/JCS by using the text string @JOB-ID.■ When a particular line of JCL/JCS is parsed, the substitution string is terminated if any of thefollowing characters is encountered:
quote (apostrophe)'comma,left parenthesis(right parenthesis)semicolon;colon:dollar sign$
In addition to these characters, another instance of the substitution character "@" will terminatethe substitution string.
PAC User's Guide476
Creating and Managing PAC Jobs

Automatic Substitution Parameters
Automatic JCL substitution parameters are identified and explained in the following table:
Replaced by . . .Automatic Parameter
the name of the application being migrated.@APPLIC
the DBnr/Fnr of the ACF system file.@APL-CONTROL
the current date in the format dd.mm.yy.@DATD
the current date in the format dd/mm/yy.@DATE
the current date in the format ddmonthnameyyyy.@DATG
the current date in the format yy-mm-dd.@DATI
the current Julian date in the format yyddd.@DATJ
the current date in the format yyyymmdd.@DATN
the current date in the format mm-dd-yy.@DATU
database ID of transfer library for OpenSystem objects@DBID_LIBRARY
the name of the migration event being processed.@EVENT
the FDIC (the Predict dictionary file) from which the files are being migrated (in theformat "(DBnr/Fnr)").
@FDIC-FROM
the FDIC to which the files are being migrated (in the format "(DBnr/Fnr)").@FDIC-TO
file number of transfer library for OpenSystem objects@FNR_LIBRARY
the name of the Natural FUSER from which the files are being migrated (in the format"(DBnr/Fnr)").
@FUSER-FROM
the name of the Natural FUSER to which the files are being migrated (in the format"(DBnr/Fnr)").
@FUSER-TO
temporary transfer library for OpenSystem objects@LIBRARY_TEMP
an 8-character user password that is obtained from the user at submission time. (Inputwill be "hidden").
@PASSWORD
the DBnr/Fnr of the PCF system file (in the format "(DBnr/Fnr)").@PRD-CONTROL
the current time in the format `hhmmss'.@TIME
the user ID of the user submitting the job. If a batch ID has been specified in the userprofile, the batch ID will be substituted.
@USER
477PAC User's Guide
Creating and Managing PAC Jobs
User-Prompted Substitution Parameters
Caution: Whenusing the "@" prefixwith user-prompted substitution parameters, the lengthof the expanded job card must not exceed 72 characters.
User-prompted JCL substitution parameters are displayed on the Job Submission screen each timethe job is submitted.; the user must supply the appropriate value for each unique substitutionparameter. If there are no user-prompted substitution parameters in the JCL, this screen does notappear and the job is submitted without intervention.
The variables you enter on the Job Submission screen are then substituted into the job stream sothat you may specify each variable for each job without using the Natural editor.
As an example of this feature, the JCL for your job might consist of the following statements:
//USER JOB @USER,CLASS=A,MSGCLASS=X,REGION=2048K//*//CMWKF01 DD DSN=@LIBRARY(@MEMBER),DISP=SHR
The first line of the listed JCL statements contains the automatic JCL substitution parameter"@USER"; this value will automatically be replaced in the job stream with the user ID of the usersubmitting the job.
In addition to this automatic JCL substitution parameter, the JCL statements contain the user-prompted JCL substitution parameters @LIBRARY and @MEMBER. You will need to specify avalue for each of these variable on the Job Submission screen. You will only be prompted once foreach unique user-prompted substitution parameter.
Purging a Job
To purge a job, enter Code P (Purge a Job) and the job name on the Job Menu. Alternatively, enterPURGE JOB on the command line of the Job Menu. Refer to the PAC Reference documentationfor the complete syntax.
From the resulting Purge Confirmation window
■ Type Confirm or press PF5 to purge the job.■ Type a period (.) or PF3 to return to the Job Menu without purging the job.
PAC User's Guide478
Creating and Managing PAC Jobs
45 Change Control Logs
■ Checking Objects Out for Maintenance .............................................................................................. 480■ Checking Objects Back In to PAC ..................................................................................................... 480■ Accessing the Change Control Log Sub-Functions ............................................................................... 481■ Selecting a Log from a List .............................................................................................................. 482■ Displaying a Change Control Log ...................................................................................................... 484
479
When objects are migrated to or from amaintenance status, the check-out/check-in facility of PACis automatically activated: objects are checked out of PAC to a maintenance status type, then arechecked back into PAC. The maintenance activities are tracked through the audit history of thechange control logs that record these events.
Detailed information about the maintenance of Natural objects can be retrieved using the changecontrol log sub-function of the PAC check-out/check-in facility
For general information about change control logs, refer toMaintaining Natural Objects in PAC.
This chapter covers the following topics:
Checking Objects Out for Maintenance
Note: Different users may check out the same object since each user has a unique copy ofthe object.
When you set up the migration event to check an object out to a maintenance status, you mayidentify amaintenance request ID, but that is not required.When themigration event is processed
■ the specified versions of the objects are migrated to the maintenance status location;■ an object status is created; and■ a change control log is created for each object.
Information recorded when the change control log is created can be displayed on the DisplayChange Control Logscreen.
Checking Objects Back In to PAC
Before a maintenance change to an object can be recorded, the object must be returned to PAC.The migration event to return the object to the PAC controlled environment should specify
■ the maintenance status in which the object is being maintained;■ the destination status, which must be Control, test, or production; and■ optionally, the maintenance request ID.
When the migration event is processed
■ the object is moved or copied from the maintenance status into Control;■ the link of the object version checked out to the maintenance status is purged; and■ the change control log for that object is located, updated, and closed.
PAC User's Guide480
Change Control Logs

■ If the Copy option is used, a new change control log of the new version of the object is created,and the new version of the object is placed in the origin maintenance status.
■ If theMove option is used, the object is checked in andphysically deleted from themaintenancelibrary.
If applymod 24 is switched on, only the source of the object is deleted from themaintenance library.
If PAC User Exit 7 is active, the user may verify the check-in.
PAC audits the check-in of the object. This information can be viewed in the audit report.
The updated change control log can be displayed on the Display Change Control Log screen.
Accessing the Change Control Log Sub-Functions
To access the PAC Change Control Log sub-functions, enter Code Q on the PAC Main Menu.
The Change Control Log Menu appears:
08:13:00 ***** PREDICT APPLICATION CONTROL ***** 2000-05-01User PACUSR - Change Control Log Menu -
Code Sub-Function---- ----------------------------D Display Change Control LogO Select All Open LogsR Select Logs by Request IDS Select Logs by Object NameU Select Logs by Check-Out User? Help. Exit
---- ------------------
Code .......... _Application ... ________________________________Object Name ... ________________________________Library Name .. ________ DBnr ... ___ Fnr ... ___Request ID .... ____________________
Command ===>Enter-PF1---PF2---PF3---PF4---PF5---PF6---PF7---PF8---PF9---PF10--PF11--PF12---
Help Menu Exit Canc
481PAC User's Guide
Change Control Logs
From this menu, you can retrieve change control log information for a specific log, or you can re-trieve lists of all logs, logs for objects checked out but not yet checked back in, logs displayed al-phabetically by maintenance request ID, object name, or user who checked the object out.
The input fields on the screen are used to enter search criteria for retrieving logs. Depending onthe sub-function, entries may be required or optional. See Selecting a Log from a List for moreinformation. You may specify a value or a range for Object Name, Library Name, and Request ID.In the DBnr and Fnr fields, you may indicate a search of all numbers by leaving the field blank orentering a 0; or you may enter a specific value (1-254 for DBnr; 1-255 for Fnr).
Selecting a Log from a List
To access a list of logs from the Change Control LogMenu, enter one of the Select ... sub-functions(O, R, S, U) and the required search criteria.
The requirements for each available option are indicated in the following table:Description and RequirementsCodeAll open logs for an application. Enter any relevant selection criteria; the application nameis required.
O
All logs for a specified maintenance request. Enter the name of the maintenance request ora range in the Request ID field; the application name is optional.
R
All logs for a specified object. Enter the object name or a range in the Object Name field;the application name is optional.
S
All logs for an application for the current check-out user. Enter any relevant selection cri-teria; the application name is required. To select all logs that are checked out but not yet
U
checked in, enter Code U and in the Request ID field, enter the user ID followed by ".O";for example, SAGNA.O.
Note: Since the selection criteria may result in many reads before a selection is made, themonitor option may be used to view all activities. You may set the monitor on by typing"MON" on the command line and turn it off by typing "NOMON". By default, the monitoris set to off.
The Change Control Log Selection List screen appears displaying the requested list of logs:
PAC User's Guide482
Change Control Logs

14:34:00 ***** PREDICT APPLICATION CONTROL ***** 2000-07-01User PACUSR - Change Control Log Selection List -DISPLAY Request *C Nr Object Ver. Library Out User Out Date In Date Request ID Ty- -- -------- ---- -------- -------- -------- -------- -------------------- --_ 1 AA 10 MRMNT SAGMRBAT 2000-06-22 U_ 2 BB 6 MRMNT SAGMRBAT 2000-06-22 U_ 3 DUT2 1 MR SAGYZBAT 2000-06-23 MR3 U_ 4 DUT3 1 MR SAGYZBAT 2000-06-23 MR3 U_ 5 DUT4 1 MR SAGYZBAT 2000-06-23 MR3 U_ 6 D82PMAIN 24 MRMNT SAGMRBAT 2000-06-22 U_ 7 PROGA 1 MRMNT SAGMRBAT 2000-06-23 2000-06-23 MR3 U_ 8 PROGA 1 MRMNT SAGNA 2000-06-23 U
Mark Selection, Enter Number or 'T' (Top) __Command ===>Enter-PF1---PF2---PF3---PF4---PF5---PF6---PF7---PF8---PF9---PF10--PF11--PF12---
Help Menu Exit -- + Canc
Note: Objects with no check-out/check-in information are ignored.
The status line directly under the User field displays the sub-function you used to access thisscreen.
This particular screen is the result of selecting a list in alphabetical order by maintenance requestID. The same columns are displayed for all Select options.
The columns of the Change Control Log Selection List are described as follows:DescriptionColumnInput field for sub-function codes to display a specific log.CScreen number assigned to a particular list item.NrName of the object checked out of or back into PAC.ObjectVersion number of the migrated object.Ver(sion)Name of the maintenance library. If set to ">Cancel<", a check-out was cancelled bya migration from maintenance to Retire.
Library
Identity of the user who checked the object out to maintenance.Out UserDate the object was checked out of or back into PAC.DateName or number of the maintenance request for the object, if there is one.Request IDMaintenance request type of check-out The intention or result of the check-out: Uindicates an intention to update the object. If a checked-in object displays type U, the
Ty(pe)
483PAC User's Guide
Change Control Logs

DescriptionColumnobject has been updated. A indicates an intention to access the object only. PAC de-termines whether changes were in fact made when the object is checked-in.
To display the log entries for a specific object, type the number of the object (from the "Nr" column)in the Mark Selection... field, or mark the object with D in the "C" column.
TheDisplay Change Control Log screen appears.
Displaying a Change Control Log
To select a specific change control log, enter CodeD on the ChangeControl LogMenu and selectioncriteria sufficient to uniquely identify the log, or select a log from a list.
14:34:53 ***** PREDICT APPLICATION CONTROL ***** 2000-07-01User PACUSR - Display Change Control Log -
Request Id ... RQ3 (Update) Modified: 2000-07-01 by SAGXXApplication .. ORD-EXAMObject ....... APGMH1Status ....... MAINTENANCE
--- Check-Out/Check-In Information ---Version Library DBnr Fnr Userid Date-Time Termid------- -------- ---- --- -------- ----------------- --------
Check-Out .... 1 RQMNT 235 17 SAGNABAT 2000-06-23 10:58:11 NATDEMOCheck-In ..... 2 RQMNT 235 17 SAGNA 2000-06-23 11:40:52 10
Notes ........
Additional Options ... N
Command ===>Enter-PF1---PF2---PF3---PF4---PF5---PF6---PF7---PF8---PF9---PF10--PF11--PF12---
Help Menu Exit Opts Canc
If you specified a maintenance request ID on the migration event, that ID along with the type(Update or Access only) in parentheses is recorded along with the name of the object migrated,its application, and the name of the maintenance status.
The table of Check-Out/Check-In Information provides for each event:
PAC User's Guide484
Change Control Logs
the version of the specified object migrated out of/into PAC.Versionthe name of the maintenance library.Librarythe location of the object before it was migrated.DBnr/Fnrthe value of the *USER variable at the time the event was processed.Useridthe date and time of the event, andDate-Timethe value of the *INIT-ID variable at the time the event was processed - a terminal IDor batch.
Termid
The Notes field displays additional information created during the processing of the event, orcomments you may want to attach to the change control log.
The Additional Options (change the default N to Y or press PF4) available from this screen allowyou to
■ display the date and time the object was added / modified, and by whom.■ display the Events for Maintenance Request screen which lists the other migration events towhich the current maintenance request ID is assigned.
485PAC User's Guide
Change Control Logs

486
A Appendices
■ Setting Up the Application Environment .............................................................................................. 489■ Setting Up the Environment for Processing Applications ........................................................................ 490■ Using the Change Control Facilities ................................................................................................... 491■ The PAC Administrator Functions ...................................................................................................... 492■ Checklist for Setting Up Applications in PAC ....................................................................................... 495■ Overview of PAC Activities ............................................................................................................... 495
487
This appendix lists a series of actions for using PAC as follows:
■ Setting up the PAC system in your environment;■ Setting up the PAC environment for an application; and■ Moving an application through its life-cycle, and ultimately into production.
Change control activities, reporting activities, and PAC administrator functions are also included.
These actions are not necessarily listed in the sequence in which they are to be accomplished;however, any prerequisites to a particular action or step are indicated. Note the following:
■ Applications and statuses must be defined before application status links can be defined.■ Some steps are optional and/or can be performed at any time. For example, keywords can bedefined to PAC at any time; however, they must be defined to PAC before they can be assignedto PAC entities.
■ Authorization suggests the userswhomay be authorized to perform these functions, for example:■ PAC configurator (PC);■ Administrator (ADM);■ Project leader (PL);■ Authorized user (AUTH);■ Database administrator (DBA);■ Natural Security administrator (NSA);■ User (USER). Usersmay be developers, quality assurance personnel, or coordinators; however,authorization requirements are specific to individual environments.
■ Reference indicates the location in this documentation or in another PAC documentationwhere you can find detailed instructions for the particular step.
The following sections summarize the actions used to set up PAC in your environment.
This document covers the following topics:
■ Setting Up the Application Environment■ Setting Up the Environment for Processing Applications■ Using the Change Control Facilities■ The PAC Administrator Functions■ Checklist for Setting Up Applications in PAC■ Overview of PAC Activities
PAC User's Guide488
Appendices

Setting Up the Application Environment
Define the Application to PAC
PCAuthorization:Configuring a PAC EnvironmentReference:
Define and Locate the Statuses and Associated Predict Files
Define and locate the statuses and associated Predict files from/to which the application can bemigrated. The following status types have the specified location considerations:
PC/PLAuthorization:Configuring a PAC EnvironmentReference:
Define the Application Status Links
Note: The application and statuses must be defined to PAC first.
PC/PLAuthorization:Configuring a PAC EnvironmentReference:
Define a File Translation Table as Required
PCAuthorization:Configuring a PAC EnvironmentReference:
Define a Migration Path (Select Migration (Jobs)
Define the origin and destination statuses for the application. The migration path must be set upbefore you can set up a migration event.
PCAuthorization:Configuring a PAC EnvironmentReference:
489PAC User's Guide
Appendices

Set Up a Migration Authorization
Specify the user(s) who may authorize a migration; that is, someone who may be identifies as"AUTH".
PCAuthorization:Configuring a PAC EnvironmentReference:
Incorporate an Application
Bring an application already implemented in a production status type into PAC.
USERAuthorization:Migrations, andMigrations Into, Within, and Out of PACReference:
Setting Up the Environment for Processing Applications
The following actions are performed in sequence:
1. Create themigration event tomove the application from one status to another (migration path).Identify the activities that must take place during the migration of the objects of an application.
Note: The event that moves Predict objects must be run before the event thatmoves/copies the Natural application objects.
USERAuthorization:Migration EventsReference:
2. Build the object list. The object list identifies the objects of an application to be migrated.
The expand status option may be used to specify the status fromwhich subordinate objects areto be compiled.
USERAuthorization:Creating and Validating an Object ListReference:
3. Validate the object list. PAC checks the list of objects to be migrated.
USERAuthorization:Creating and Validating an Object ListReference:
4. Authorize the event. Permission is given to execute the migration.
PAC User's Guide490
Appendices

AUTHAuthorization:Authorizing and Submitting Migration EventsReference:
5. Submit the event; this activates the job that runs the migration event.
USERAuthorizer:Authorizing and Submitting Migration EventsReference:
6. Monitor the processing of themigration event. TheAudit Report and the Job Information screensshow the progress of the migration.
USERAuthorizer:Authorizing and Submitting Migration EventsReference:
Using the Change Control Facilities
The following change control facilities are used to track and maintain application objects.
Maintain Table Entries
Maintenance request table entries are maintained by the PAC administrator.
ADMAuthorizer:Assigning andMaintainingObject Versions; Administration documentation sectionObject Version Maintenance
Reference:
Define Maintenance Requests
Integrates PAC with problem-tracking systems so that maintenance of objects can be monitoredby PAC.
USERAuthorizer:Assigning and Maintaining Object Versions and Maintenance RequestsReference:
491PAC User's Guide
Appendices
Track the Maintenance Activities of Application Objects
Change control logs can be reviewed for check-out/check-in information.
USERAuthorizer:Assigning and Maintaining Object Versions and Changing Control LogsReference:
Compare Versioned Objects
Use this PAC-related utility for comparing objects both inside and outside the PAC environment.
USERAuthorizer:Reference documentation section Compare UtilityReference:
Retrieve Information About Versioned Objects
Retrieve information about objects that have beenmoved into the PAC environment and assigneda version number.
USERAuthorizer:Assigning and Maintaining Object VersionsReference:
The PAC Administrator Functions
The following functions are available to the PAC administrator.
Maintain Archive Events
■ Remove objects from the PAC environment;■ Restore archived objects to the PAC environment.
ADM/DBAAuthorization:Chapter ,Migration Into,Within, andOut of PAC;Administration documentationchapter Archive Event Maintenance
Reference:
PAC User's Guide492
Appendices
Maintain General Defaults
Modify the following:
■ Application defaults to generate migration event names automatically;■ Applymods to override selected PAC defaults;■ Profile defaults, such as screen header, number of transactions performed before an ET is issued,number of transactions before a Natural rollout;
■ Extended Descriptions ( textual attributes) of applications, job JCL/JCS, and migration events;■ JCL for jobs;■ Predict generation defaults may be copied to the Predict Control File (PCF).
ADM/DBAAuthorization:Administration documentation chapter General Defaults MaintenanceReference:
Maintain View Security
Identify and assign protection levels for view usage by objects.
ADM/DBAAuthorization:Administration documentation chapter View Security MaintenanceReference:
Verify Locked Data
Display or release data currently being processed or locked due to incomplete processing.
ADM/DBAAuthorization:Administration documentation chapter Locked Data MaintenanceReference:
Maintain User Profiles
Add or modify profiles of users of the PAC system.
ADM/DBAAuthorization:Administration documentation chapter User Profile MaintenanceReference:
493PAC User's Guide
Appendices
Maintain Versioned Objects
Maintain versioned objects; purging object versions, archived objects, change control logs.
ADMAuthorization:Administration documentation chapter Object Version MaintenanceReference:
Define and Maintain Maintenance Requests: Customize Tables Defined to PAC
Maintain the status and action tables used when maintenance requests are defined to PAC.
ADMAuthorization:Chapter , Assigning andMaintainingObject Versions; Administration document-ation chapter Table Maintenance
Reference:
Maintain User Exits
User exits provide facilities that allow control to be passed to a user-writtenNatural program (userexit routine).
ADM/NSA/PCAuthorization:Reference documentation chapter User ExitsReference:
Maintain Application Program Interface (API) Facilities
Maintain the Natural facilities that allow the user to call PAC directly from within a user-writtenprogram outside the control of PAC.
ADM/NSA/PCAuthorization:Reference documentation chapter Application Programming InterfaceReference:
Maintain System Applymods (System Defaults)
Switch on/off the applymods currently used by PAC.
ADMAuthorization:Reference documentation chapter System ApplymodsReference:
PAC User's Guide494
Appendices
Checklist for Setting Up Applications in PAC
Application setup activities for PAC are summarized below. The overall environment can bemodified at any time; applications can be defined to PAC at any time.
Define the Overall Environment
■ Identify your application life-cycle environments: development,maintenance, test, andproduction■ Identify the type(s) of status(es) applicable for each environment;■ Identify the typical flow of an application through the identified environments;■ Identify the Predict usage for each environment.
Define the Application
■ Identify the application and application subsystems, if applicable.■ Identify the application library usage.■ Map the application, subsystems, and library to a PAC application.■ Define the application to PAC.
Review the Application Statuses
■ Identify the development, test, maintenance, and production locations of each application.■ Verify the type of status in terms of the behavior of the application attributes as defined by PAC.■ Identify the Predict location of each environment.■ Modify the supplied PAC statuses as required.■ If any new status is identified at this time, add it to the PAC configuration.
Overview of PAC Activities
PAC controls themovement of your application through its life-cycle by prescribing the proceduresdescribed in the following paragraphs.
495PAC User's Guide
Appendices
Define and Maintain the Application Environment
■ Identify and predefine the development, test, production, and maintenance environments foran application.
■ Identify the physical library, database and file numbers of the Natural and Predict system files;identify the foreign nodes and datasets.
Migrate Application Objects
■ Define test plans (migration paths) for the secured movement of objects.■ Use automated online/batch migration facilities to migrate objects.■ Document the movement of objects from one status to another.
Maintain Application Objects
■ Version each new instance of an object migrated into PAC.■ Track the movement of objects to different maintenance, test, and production libraries; check-out and check-in objects for maintenance.
Audit and Report
■ Audit activities performed on an application including compilation andmigration of its objects.■ Audit the activities of an application in the production environment.■ Retrieve information about application and object history and status.
Archive and Retire Application Objects
■ Remove objects fromPAC either temporarily or permanently using the off-line archiving facility.■ Purge objects permanently from PAC or from an application status.
PAC User's Guide496
Appendices
B Appendix
■ Keyword and New Keyword Fields .................................................................................................... 499■ Keyword Menu Sub-Functions .......................................................................................................... 499
497

Keywords are tags defined by the user to identify and select PAC entities or objects for reportingpurposes. Keywords are a PAC option, and may be defined at any time.
Keywords are first defined to the PAC system and subsequently assigned to PAC entities or objects.The Additional Options, available on many PAC screens, provide the "Keys" option for assigningpredefined keywords to PAC entities. Direct commands currently are not available for processingkeywords.
To access the PAC keyword sub-functions, enter Code K (Keywords) on the PAC Main Menu.Depending on your user profile, youwill see theKeywordMenu or theKeywordReportingMenu.The Keyword Menu which combines the maintenance and reporting menus, is referred tothroughout this section.
08:35:50 ***** PREDICT APPLICATION CONTROL ***** 1999-04-19User PACUSR - Keyword Menu -
Code Sub-Function Code Sub-Function---- ---------------------------- ---- ----------------------------
A Add a Keyword P Purge KeywordC Copy Keyword R Rename KeywordD Display Keyword S Select KeywordE Edit Description of Keyword ? HelpL List Keywords . ExitM Modify Keyword
---- ---------------------------- ---- ----------------------------
Code ......... _Keyword ...... ________________________________New Keyword .. ________________________________
Command ===>Enter-PF1---PF2---PF3---PF4---PF5---PF6---PF7---PF8---PF9---PF10--PF11--PF12---
Help Exit Canc
This document covers the following topics:
■ Keyword and New Keyword Fields■ Keyword Menu Sub-Functions
PAC User's Guide498
Appendix
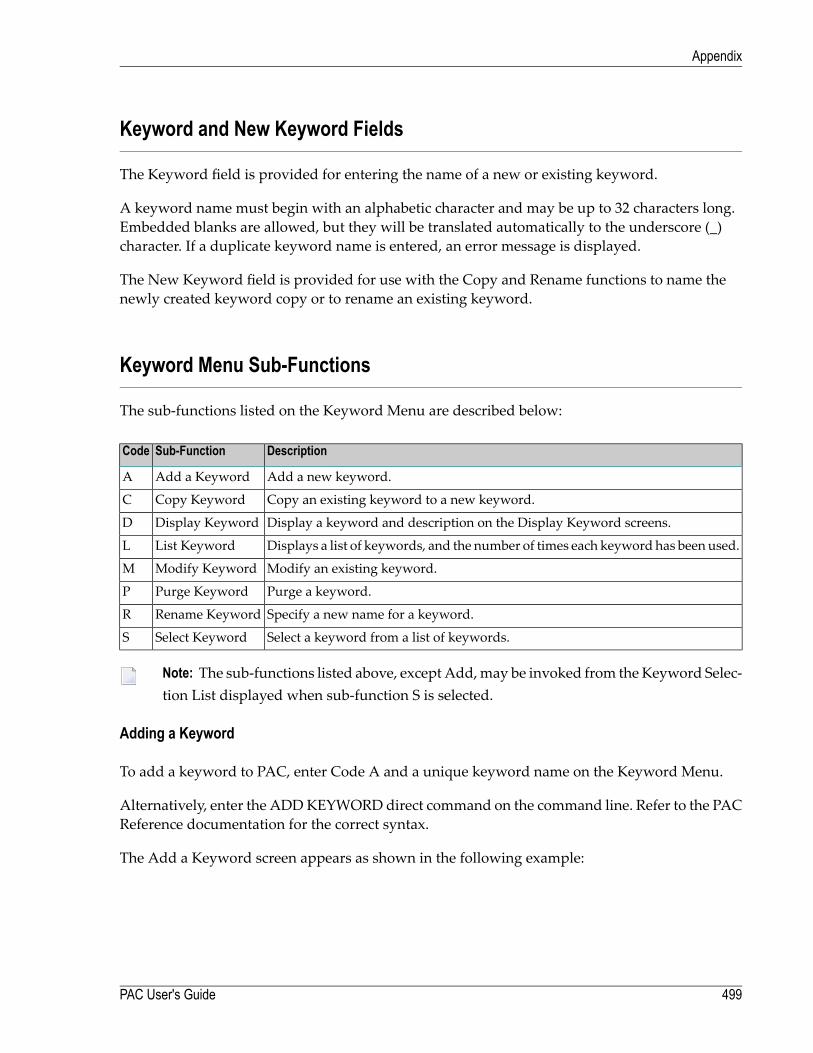
Keyword and New Keyword Fields
The Keyword field is provided for entering the name of a new or existing keyword.
A keyword name must begin with an alphabetic character and may be up to 32 characters long.Embedded blanks are allowed, but they will be translated automatically to the underscore (_)character. If a duplicate keyword name is entered, an error message is displayed.
The New Keyword field is provided for use with the Copy and Rename functions to name thenewly created keyword copy or to rename an existing keyword.
Keyword Menu Sub-Functions
The sub-functions listed on the Keyword Menu are described below:
DescriptionSub-FunctionCode
Add a new keyword.Add a KeywordA
Copy an existing keyword to a new keyword.Copy KeywordC
Display a keyword and description on the Display Keyword screens.Display KeywordD
Displays a list of keywords, and the number of times each keyword has been used.List KeywordL
Modify an existing keyword.Modify KeywordM
Purge a keyword.Purge KeywordP
Specify a new name for a keyword.Rename KeywordR
Select a keyword from a list of keywords.Select KeywordS
Note: The sub-functions listed above, except Add,may be invoked from the Keyword Selec-tion List displayed when sub-function S is selected.
Adding a Keyword
To add a keyword to PAC, enter Code A and a unique keyword name on the Keyword Menu.
Alternatively, enter the ADDKEYWORDdirect command on the command line. Refer to the PACReference documentation for the correct syntax.
The Add a Keyword screen appears as shown in the following example:
499PAC User's Guide
Appendix
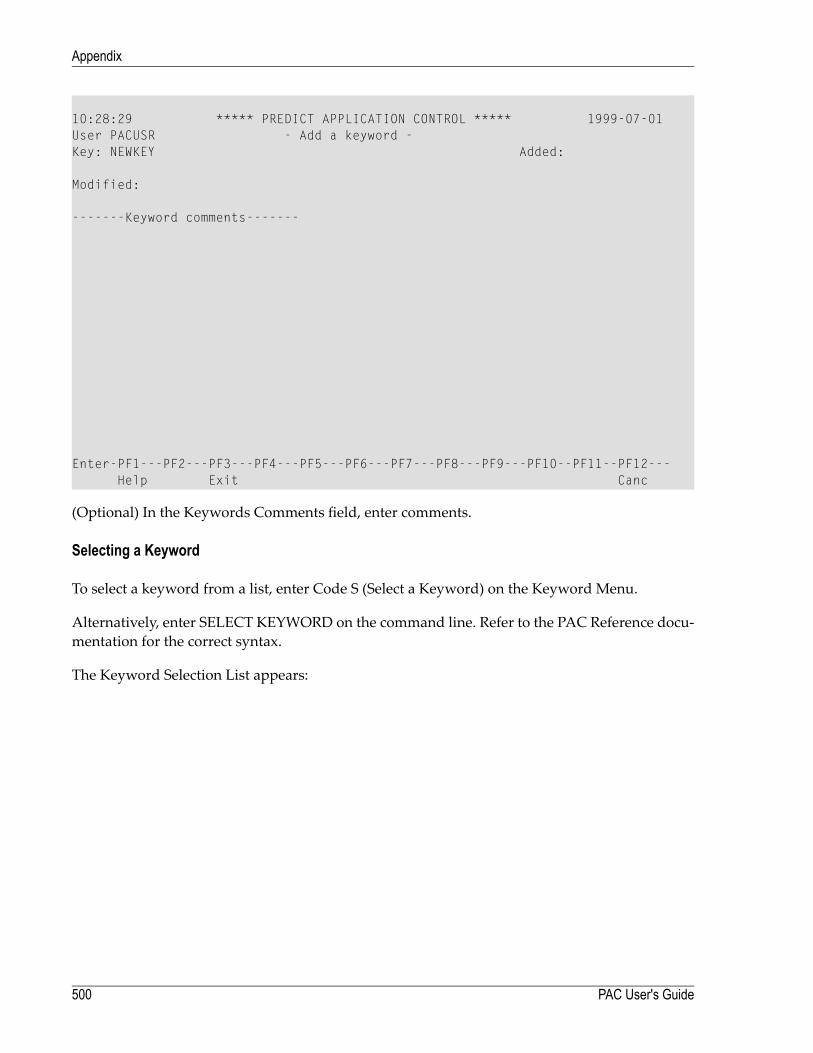
10:28:29 ***** PREDICT APPLICATION CONTROL ***** 1999-07-01User PACUSR - Add a keyword -Key: NEWKEY Added:
Modified:
-------Keyword comments-------
Enter-PF1---PF2---PF3---PF4---PF5---PF6---PF7---PF8---PF9---PF10--PF11--PF12---Help Exit Canc
(Optional) In the Keywords Comments field, enter comments.
Selecting a Keyword
To select a keyword from a list, enter Code S (Select a Keyword) on the Keyword Menu.
Alternatively, enter SELECT KEYWORD on the command line. Refer to the PAC Reference docu-mentation for the correct syntax.
The Keyword Selection List appears:
PAC User's Guide500
Appendix
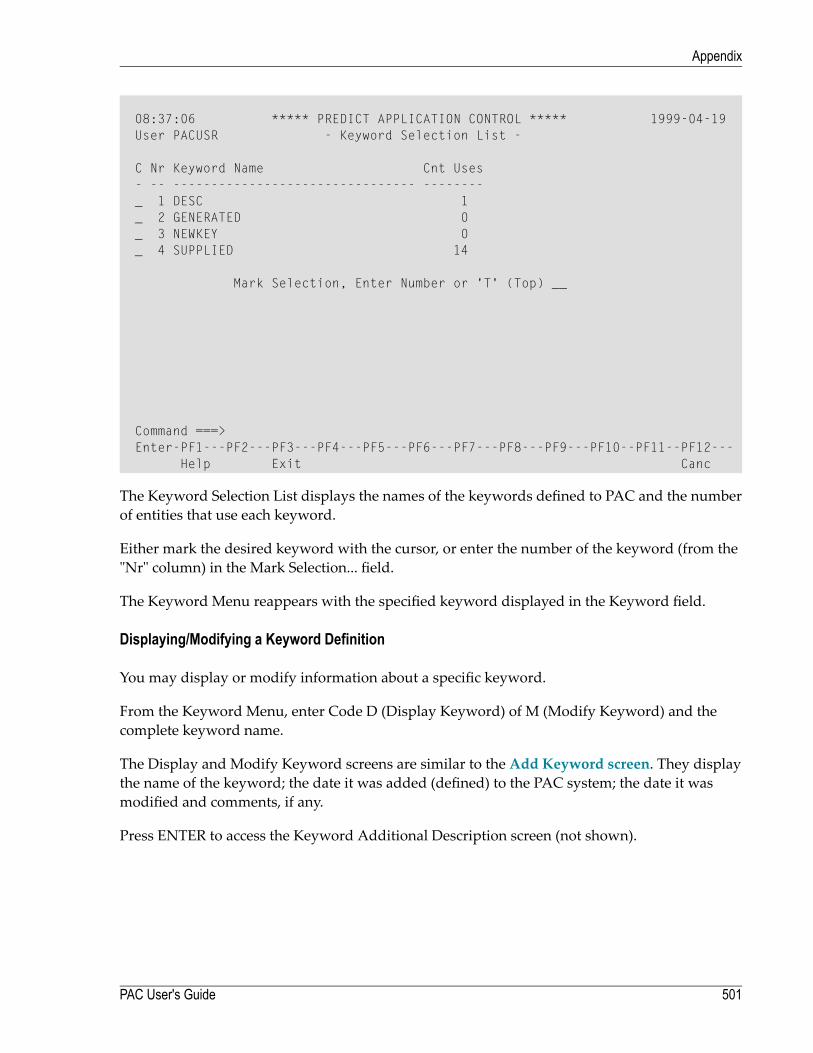
08:37:06 ***** PREDICT APPLICATION CONTROL ***** 1999-04-19User PACUSR - Keyword Selection List -
C Nr Keyword Name Cnt Uses- -- -------------------------------- --------_ 1 DESC 1_ 2 GENERATED 0_ 3 NEWKEY 0_ 4 SUPPLIED 14
Mark Selection, Enter Number or 'T' (Top) __
Command ===>Enter-PF1---PF2---PF3---PF4---PF5---PF6---PF7---PF8---PF9---PF10--PF11--PF12---
Help Exit Canc
The Keyword Selection List displays the names of the keywords defined to PAC and the numberof entities that use each keyword.
Either mark the desired keyword with the cursor, or enter the number of the keyword (from the"Nr" column) in the Mark Selection... field.
The Keyword Menu reappears with the specified keyword displayed in the Keyword field.
Displaying/Modifying a Keyword Definition
You may display or modify information about a specific keyword.
From the Keyword Menu, enter Code D (Display Keyword) of M (Modify Keyword) and thecomplete keyword name.
The Display and Modify Keyword screens are similar to the Add Keyword screen. They displaythe name of the keyword; the date it was added (defined) to the PAC system; the date it wasmodified and comments, if any.
Press ENTER to access the Keyword Additional Description screen (not shown).
501PAC User's Guide
Appendix
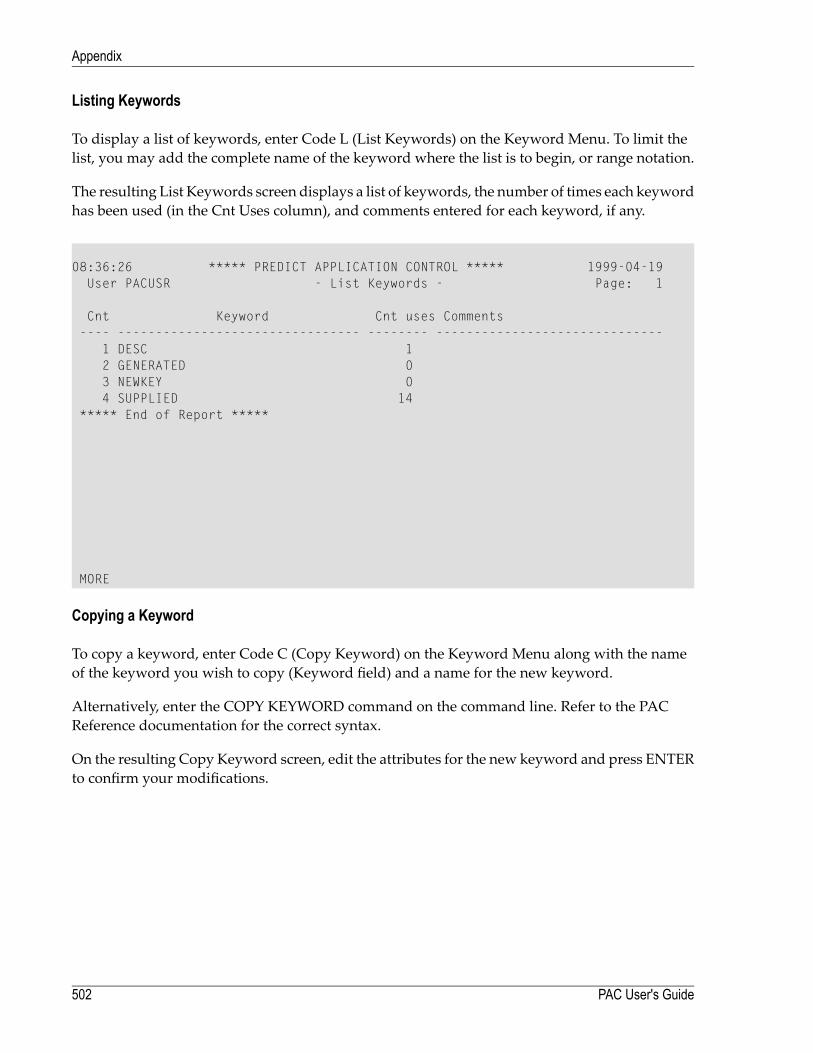
Listing Keywords
To display a list of keywords, enter Code L (List Keywords) on the Keyword Menu. To limit thelist, you may add the complete name of the keyword where the list is to begin, or range notation.
The resulting List Keywords screen displays a list of keywords, the number of times each keywordhas been used (in the Cnt Uses column), and comments entered for each keyword, if any.
08:36:26 ***** PREDICT APPLICATION CONTROL ***** 1999-04-19User PACUSR - List Keywords - Page: 1
Cnt Keyword Cnt uses Comments---- -------------------------------- -------- ------------------------------
1 DESC 12 GENERATED 03 NEWKEY 04 SUPPLIED 14
***** End of Report *****
MORE
Copying a Keyword
To copy a keyword, enter Code C (Copy Keyword) on the Keyword Menu along with the nameof the keyword you wish to copy (Keyword field) and a name for the new keyword.
Alternatively, enter the COPY KEYWORD command on the command line. Refer to the PACReference documentation for the correct syntax.
On the resulting Copy Keyword screen, edit the attributes for the new keyword and press ENTERto confirm your modifications.
PAC User's Guide502
Appendix
Renaming a Keyword
To change the name of an existing keyword, do the following from the Keyword Menu:
1. Enter R (Rename Keyword) in the Code field.
2. Enter the name of the keyword you wish to rename in the Keyword field.
3. Enter the new name for the keyword in the New Keyword field.
4. Press ENTER.
Alternatively, enter the RENAME KEYWORD direct command on the command line and pressENTER. Refer to the PAC Reference documentation for the correct syntax.
When the keyword has been renamed, the message "Keyword renamed successfully" appears atthe bottom of the screen.
Purging a Keyword
To purge a keyword, enter function code P (Purge a Keyword) in the Code field, the name of thekeyword you wish to purge in the Keyword field, and press ENTER.
Alternatively, enter the PURGE KEYWORD direct command on the command line. Refer to thePAC Reference documentation for the correct syntax.
From the Purge Confirmation window, you have the following options:
■ Type Confirm at the cursor position and press ENTER, or press PF5, if you still wish to purgethe keyword.
■ Type a period (.) at the cursor position andpress ENTER if you do notwant to purge the keyword.■ Press PF3 to return to the Keyword Menu without purging the application.
503PAC User's Guide
Appendix

504


