Embed Size (px)
Citation preview
Super Natural
User's Guide
Version 8.2.8
October 2020

This document applies to Super Natural Version 8.2.8 and all subsequent releases.
Specifications contained herein are subject to change and these changes will be reported in subsequent release notes or new editions.
Copyright © 1985-2020 Software AG, Darmstadt, Germany and/or Software AG USA, Inc., Reston, VA, USA, and/or its subsidiariesand/or its affiliates and/or their licensors.
The name Software AG and all Software AG product names are either trademarks or registered trademarks of Software AG and/orSoftware AGUSA, Inc. and/or its subsidiaries and/or its affiliates and/or their licensors. Other company and product namesmentionedherein may be trademarks of their respective owners.
Detailed information on trademarks and patents owned by Software AG and/or its subsidiaries is located athttp://softwareag.com/licenses.
Use of this software is subject to adherence to Software AG's licensing conditions and terms. These terms are part of the productdocumentation, located at http://softwareag.com/licenses/ and/or in the root installation directory of the licensed product(s).
This software may include portions of third-party products. For third-party copyright notices, license terms, additional rights or re-strictions, please refer to "License Texts, Copyright Notices and Disclaimers of Third-Party Products". For certain specific third-partylicense restrictions, please refer to section E of the Legal Notices available under "License Terms andConditions for Use of Software AGProducts / Copyright and Trademark Notices of Software AG Products". These documents are part of the product documentation,located at http://softwareag.com/licenses and/or in the root installation directory of the licensed product(s).
Use, reproduction, transfer, publication or disclosure is prohibited except as specifically provided for in your License Agreement withSoftware AG.
Document ID: NSN-USERGUIDE-828-20210412
Table of Contents
Preface ............................................................................................................................... ix1 About this Documentation .............................................................................................. 1
Document Conventions ............................................................................................. 2Online Information and Support ............................................................................... 2Data Protection ........................................................................................................... 3
2 Introducing Super Natural .............................................................................................. 5What is Super Natural? .............................................................................................. 6Reporting Transactions .............................................................................................. 6Prototypes and Exits ................................................................................................ 10User Defaults ............................................................................................................ 11Application Connections .......................................................................................... 12Maintaining Data ..................................................................................................... 13
3 Using Super Natural ...................................................................................................... 15Screen and Window Structure ................................................................................. 16Selecting from Screens and Windows ...................................................................... 22Paging ....................................................................................................................... 23Commands ............................................................................................................... 24ENTER Key .............................................................................................................. 25PF Keys ..................................................................................................................... 25Asterisk List Function .............................................................................................. 28Checklist Function .................................................................................................... 29Navigation ................................................................................................................ 32Online Help .............................................................................................................. 34Libraries .................................................................................................................... 35Notepad Function .................................................................................................... 39Technical Information Function ............................................................................... 42
4 Starting Up .................................................................................................................... 43Starting a Super Natural Session .............................................................................. 44How is Super Natural Organized? ........................................................................... 44Choosing an Object Type or Function ...................................................................... 45Choosing an Object .................................................................................................. 47Working with an Object ........................................................................................... 50
5 Using Reporting Transactions ....................................................................................... 51What are Reporting Transactions? ........................................................................... 52Listing Transactions ................................................................................................. 53Adding Transactions ................................................................................................ 53Keeping Transactions ............................................................................................... 58Saving Transactions .................................................................................................. 58Running Transactions ............................................................................................... 59Reports Which are Too Wide ................................................................................... 59Modifying Transactions ........................................................................................... 61Executing Transactions ............................................................................................. 62Copying Transactions ............................................................................................... 62
iii
Deleting Transactions ............................................................................................... 64Information (Info) Function ..................................................................................... 65Commands Available From Within a Transaction ................................................... 67
6 Working with the Worksheet ......................................................................................... 71What is the Worksheet? ............................................................................................ 72Field Reference Column ........................................................................................... 74Database Reference Column .................................................................................... 74Field Name Column ................................................................................................. 76Text Variable Column ............................................................................................... 81Sequence Column ..................................................................................................... 81Sort/Control Column ................................................................................................ 88Option Column ........................................................................................................ 91Function Column ..................................................................................................... 91Field Definition Column .......................................................................................... 98Information (Info) Column ..................................................................................... 101Delete Column ........................................................................................................ 102Commands Available from the Worksheet ............................................................ 103
7 Using a Database Structure ......................................................................................... 105What is a Database? ................................................................................................ 106Accessing Data UsingSuper Natural ...................................................................... 107
8 Defining Files ............................................................................................................... 109What are Files? ....................................................................................................... 110Using More Than One File - The INCLUDE Command ........................................ 111What is File Linking? .............................................................................................. 119What is File Lookup? .............................................................................................. 121Superfiles ................................................................................................................ 125Extended File Descriptions and File Comments .................................................... 126
9 Defining Fields ............................................................................................................. 127What are Fields? ..................................................................................................... 128Field Types .............................................................................................................. 129Field Formats .......................................................................................................... 132Constants ................................................................................................................ 135Descriptors ............................................................................................................. 137Extended Field Descriptions .................................................................................. 138
10 Using Editors ............................................................................................................. 139What are the Super Natural Editors? ..................................................................... 140Editor Commands .................................................................................................. 141Editor Help System ................................................................................................ 145Operators Available in the Full-Screen Editors ...................................................... 146Selection Editor ....................................................................................................... 147Calculation Editor .................................................................................................. 159Logical Conditions Editor ...................................................................................... 171SQL SELECT Editor ................................................................................................ 175PC File Description Editor ...................................................................................... 181Work File Description Editor .................................................................................. 183
User's Guideiv
User's Guide
User File Description Editor ................................................................................... 185Arrays ..................................................................................................................... 185
11 Working with Natural Report Manager .................................................................... 189What is Natural Report Manager? ......................................................................... 190When is a Default Layout Generated? ................................................................... 191Invoking Natural Report Manager ......................................................................... 192Issuing Commands ................................................................................................. 192Navigating Within Natural Report Manager ......................................................... 193Natural Report Manager PF Keys .......................................................................... 195Layout Overview Screen ........................................................................................ 196Layout Editor Screens ............................................................................................. 198Layout Editor Editor Area ...................................................................................... 205Display Layout Element Screen ............................................................................. 215Layout Field List Screen ......................................................................................... 216Extended Field Editing Window ............................................................................ 217Array Editing Window ........................................................................................... 220Layout Settings ....................................................................................................... 221Testing Layouts ....................................................................................................... 223Elements ................................................................................................................. 223
12 Working with Prototype Programs ........................................................................... 227What Are Prototype Programs? ............................................................................. 228Listing Prototype Programs ................................................................................... 229Generating Prototype Programs ............................................................................ 229Saving Prototype Programs ................................................................................... 229Running Prototype Programs ................................................................................ 230Leaving the Natural Program Editor ..................................................................... 230Modifying Prototype Programs ............................................................................. 230Copying Prototype Programs ................................................................................ 231Deleting Prototype Programs ................................................................................. 232Example Prototype Program .................................................................................. 232
13 Using the Super Natural RPC Service ....................................................................... 235Introduction ............................................................................................................ 236Hints and Limitations ............................................................................................. 237Dynamic Input Fields ............................................................................................. 238Generate an RPC Service ........................................................................................ 238
14 Using User Exit Programs ......................................................................................... 243What are User Exit Programs? ............................................................................... 244Activating User Exit Programs ............................................................................... 245Deactivating User Exit Programs ........................................................................... 247Locking User Exit Locations ................................................................................... 247
15 Adjusting a User Profile ............................................................................................ 249What is a User Profile? ........................................................................................... 250Modifying Your User Profile .................................................................................. 252Screen Colors .......................................................................................................... 254Screen Defaults ....................................................................................................... 254
vUser's Guide
User's Guide
Time and Date Formats .......................................................................................... 255PF Key Settings ....................................................................................................... 256Language Code and Checklist ................................................................................ 257Transaction Options ............................................................................................... 257Environment Options ............................................................................................. 257Output Options ...................................................................................................... 259Processing Options ................................................................................................. 260Transaction Modes ................................................................................................. 262
16 Defining Transaction Modes for Reporting ............................................................... 263What are Reporting Modes? ................................................................................... 264Modifying Your Reporting Modes ......................................................................... 266Data Selection ......................................................................................................... 268Data Change ........................................................................................................... 273Report Type ............................................................................................................ 275Report Level ........................................................................................................... 281Destination ............................................................................................................. 282Run Mode ............................................................................................................... 285
17 Defining Transaction Modes for Data Maintenance .................................................. 287What are Maintenance Modes? .............................................................................. 288Modifying Your Maintenance Mode Defaults ....................................................... 289Transaction Type .................................................................................................... 291Logging ................................................................................................................... 291Logging Destination ............................................................................................... 292
18 Working with Application Programs ........................................................................ 293What are Application Programs? ........................................................................... 294Listing Application Programs ................................................................................ 294Adding Application Programs ............................................................................... 295Executing Application Programs ........................................................................... 299Deleting Application Programs ............................................................................. 299
19 Using Super Natural with Con-nect .......................................................................... 301What is the Super Natural Con-nect Interface? ..................................................... 302Report Type CON-NECT ....................................................................................... 302Report Destination CON-NECT ............................................................................. 305
20 Working with User Files ............................................................................................ 307What are User Files? ............................................................................................... 308Listing User Files .................................................................................................... 308Adding User Files ................................................................................................... 310Information Function ............................................................................................. 314Deleting User Files ................................................................................................. 315Retrieving User Files .............................................................................................. 317Creating User Files Using Destination USER FILE ................................................ 317
21 Working with Data Maintenance Transactions ......................................................... 323What are Data Maintenance Transactions? ............................................................ 324Listing Transactions ................................................................................................ 324Adding Data Maintenance Transactions ................................................................ 325
User's Guidevi
User's Guide
Adding Data ........................................................................................................... 328Updating Data ........................................................................................................ 332Deleting Data .......................................................................................................... 335
22 Command List ........................................................................................................... 337A ............................................................................................................................. 338B .............................................................................................................................. 340C .............................................................................................................................. 342D ............................................................................................................................. 343E .............................................................................................................................. 344F .............................................................................................................................. 345G ............................................................................................................................. 346H ............................................................................................................................. 347I ............................................................................................................................... 347J ............................................................................................................................... 348K .............................................................................................................................. 348L .............................................................................................................................. 348M ............................................................................................................................. 349N ............................................................................................................................. 350O ............................................................................................................................. 350P .............................................................................................................................. 351Q ............................................................................................................................. 352R .............................................................................................................................. 352S .............................................................................................................................. 353T .............................................................................................................................. 356U ............................................................................................................................. 357V .............................................................................................................................. 357W ............................................................................................................................. 357X .............................................................................................................................. 358Y .............................................................................................................................. 358Z .............................................................................................................................. 358Special Characters .................................................................................................. 358
23 System Variables ........................................................................................................ 361*APPLIC-ID ............................................................................................................ 362*APPLIC-NAME ..................................................................................................... 363*DAT Variables ....................................................................................................... 363*DEVICE ................................................................................................................. 364*GROUP .................................................................................................................. 364*HARDCOPY ......................................................................................................... 364*INIT-ID .................................................................................................................. 365*INIT-USER ............................................................................................................ 365*LANGUAGE ......................................................................................................... 365*LIBRARY-ID .......................................................................................................... 367*OPSYS ................................................................................................................... 367*PAGE-NUMBER ................................................................................................... 367*PROGRAM ............................................................................................................ 367
viiUser's Guide
User's Guide
*TIM Variables ........................................................................................................ 367*TPSYS .................................................................................................................... 368*USER ..................................................................................................................... 368*USER-NAME ........................................................................................................ 368
24 Edit Masks ................................................................................................................. 369What are Edit Masks? ............................................................................................. 370
User's Guideviii
User's Guide
Preface
This documentation introduces you to the usage of SuperNatural. The documentation is organizedin the following parts:
Introducing Super Natural
Using Super Natural
Starting Up
Using Reporting Transactions
Working with the Worksheet
Using a Database Structure
Defining Files
Defining Fields
Using Editors
Working with Natural Report Manager
Working with Prototype Programs
Using the Super Natural RPC Service
Using User Exit Programs
Adjusting a User Profile
Defining Transaction Modes for Reporting
Defining Transaction Modes for Data Maintenance
Working with Application Programs
Using Super Natural with Con-nect
Working with User Files
Working with Data Maintenance Transactions
Command List
System Variables
Edit Masks
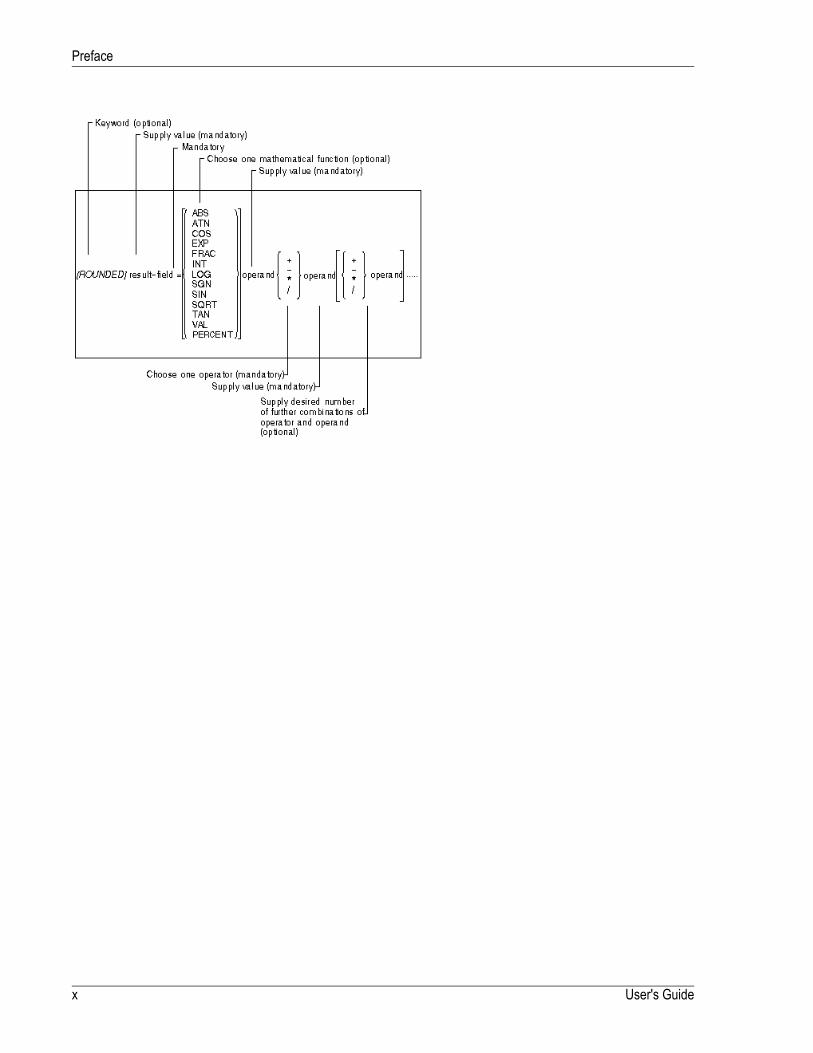
The following diagram explains a syntax diagram used later in his documentation which usesnearly all the syntax conventions.
ix
User's Guidex
Preface
1 About this Documentation
■ Document Conventions ...................................................................................................................... 2■ Online Information and Support ........................................................................................................... 2■ Data Protection ................................................................................................................................. 3
1
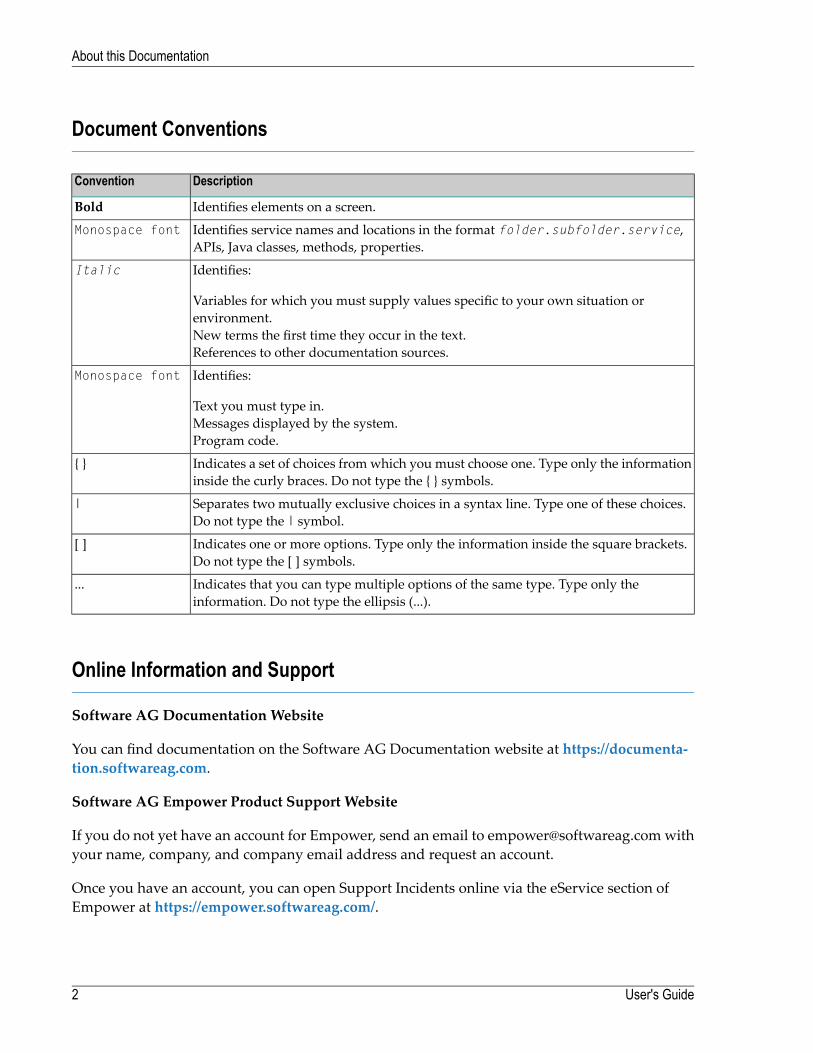
Document Conventions
DescriptionConvention
Identifies elements on a screen.Bold
Identifies service names and locations in the format folder.subfolder.service,APIs, Java classes, methods, properties.
Monospace font
Identifies:Italic
Variables for which you must supply values specific to your own situation orenvironment.New terms the first time they occur in the text.References to other documentation sources.
Identifies:Monospace font
Text you must type in.Messages displayed by the system.Program code.
Indicates a set of choices from which you must choose one. Type only the informationinside the curly braces. Do not type the { } symbols.
{ }
Separates two mutually exclusive choices in a syntax line. Type one of these choices.Do not type the | symbol.
|
Indicates one or more options. Type only the information inside the square brackets.Do not type the [ ] symbols.
[ ]
Indicates that you can type multiple options of the same type. Type only theinformation. Do not type the ellipsis (...).
...
Online Information and Support
Software AG Documentation Website
You can find documentation on the Software AG Documentation website at https://documenta-tion.softwareag.com.
Software AG Empower Product Support Website
If you do not yet have an account for Empower, send an email to [email protected] name, company, and company email address and request an account.
Once you have an account, you can open Support Incidents online via the eService section ofEmpower at https://empower.softwareag.com/.
User's Guide2
About this Documentation
You can find product information on the Software AG Empower Product Support website at ht-tps://empower.softwareag.com.
To submit feature/enhancement requests, get information about product availability, and downloadproducts, go to Products.
To get information about fixes and to read early warnings, technical papers, and knowledge basearticles, go to the Knowledge Center.
If you have any questions, you can find a local or toll-free number for your country in our GlobalSupport Contact Directory at https://empower.softwareag.com/public_directory.aspx and giveus a call.
Software AG TECHcommunity
You can finddocumentation and other technical information on the SoftwareAGTECHcommunitywebsite at http://techcommunity.softwareag.com. You can:
■ Access product documentation, if you have TECHcommunity credentials. If you do not, youwill need to register and specify "Documentation" as an area of interest.
■ Access articles, code samples, demos, and tutorials.■ Use the online discussion forums, moderated by Software AG professionals, to ask questions,discuss best practices, and learn how other customers are using Software AG technology.
■ Link to external websites that discuss open standards and web technology.
Data Protection
SoftwareAGproducts provide functionalitywith respect to processing of personal data accordingto the EU General Data Protection Regulation (GDPR). Where applicable, appropriate steps aredocumented in the respective administration documentation.
3User's Guide
About this Documentation

4
2 Introducing Super Natural
■ What is Super Natural? ...................................................................................................................... 6■ Reporting Transactions ...................................................................................................................... 6■ Prototypes and Exits ........................................................................................................................ 10■ User Defaults ................................................................................................................................. 11■ Application Connections ................................................................................................................... 12■ Maintaining Data ............................................................................................................................. 13
5
This chapter gives an overview of Super Natural's capabilities.
This section covers the following topics:
■ What is Super Natural?■ Reporting Transactions■ Prototypes and Exits■ User Defaults■ Application Connections■ Maintaining Data
What is Super Natural?
Super Natural is a product for extracting and processing data from mainframe or PC files. UsingSuperNatural, it is easy to perform both simple and complex tasks. Themain task of SuperNaturalis to extract data from a database according to the selection criteria you define and to present it inthe form of reports. To do this you need no detailed knowledge of programming so Super Naturalis also suitable for occasional users. You can process the report data you obtain eitherwithin SuperNatural or externally. For example, you can send the report data to a PC, or to an office informationsystem.
Reporting Transactions
Reporting transactions are the most important part of Super Natural. Super Natural's main taskis to obtain data from a file and present it in the form of a report. Super Natural can access dataheld in one or more database files, in PC files and work files. Reporting transactions provide youwith the framework necessary to tell Super Natural which data you want.
Worksheet
The Worksheet provides the basis for creating reports. You use the Worksheet as follows:
■ To select the fields you want to use from the file or files you have chosen■ To determine how the data is displayed in the report.
Different versions of the Worksheet appear according to your user default settings and the trans-action mode you are using. The following version of the Worksheet appears for a reportingtransaction with the default settings supplied with Super Natural:
User's Guide6
Introducing Super Natural
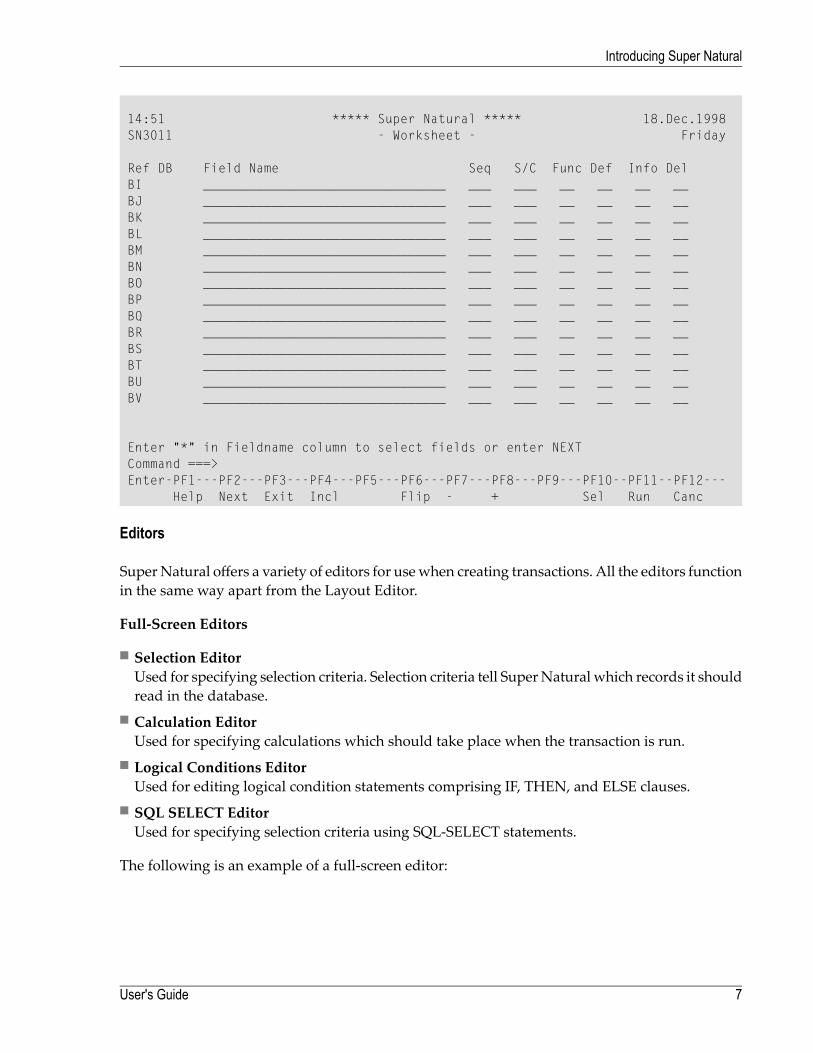
14:51 ***** Super Natural ***** 18.Dec.1998SN3011 - Worksheet - Friday
Ref DB Field Name Seq S/C Func Def Info DelBI ________________________________ ___ ___ __ __ __ __BJ ________________________________ ___ ___ __ __ __ __BK ________________________________ ___ ___ __ __ __ __BL ________________________________ ___ ___ __ __ __ __BM ________________________________ ___ ___ __ __ __ __BN ________________________________ ___ ___ __ __ __ __BO ________________________________ ___ ___ __ __ __ __BP ________________________________ ___ ___ __ __ __ __BQ ________________________________ ___ ___ __ __ __ __BR ________________________________ ___ ___ __ __ __ __BS ________________________________ ___ ___ __ __ __ __BT ________________________________ ___ ___ __ __ __ __BU ________________________________ ___ ___ __ __ __ __BV ________________________________ ___ ___ __ __ __ __
Enter "*" in Fieldname column to select fields or enter NEXTCommand ===>Enter-PF1---PF2---PF3---PF4---PF5---PF6---PF7---PF8---PF9---PF10--PF11--PF12---
Help Next Exit Incl Flip - + Sel Run Canc
Editors
SuperNatural offers a variety of editors for usewhen creating transactions. All the editors functionin the same way apart from the Layout Editor.
Full-Screen Editors
■ Selection EditorUsed for specifying selection criteria. Selection criteria tell SuperNatural which records it shouldread in the database.
■ Calculation EditorUsed for specifying calculations which should take place when the transaction is run.
■ Logical Conditions EditorUsed for editing logical condition statements comprising IF, THEN, and ELSE clauses.
■ SQL SELECT EditorUsed for specifying selection criteria using SQL-SELECT statements.
The following is an example of a full-screen editor:
7User's Guide
Introducing Super Natural
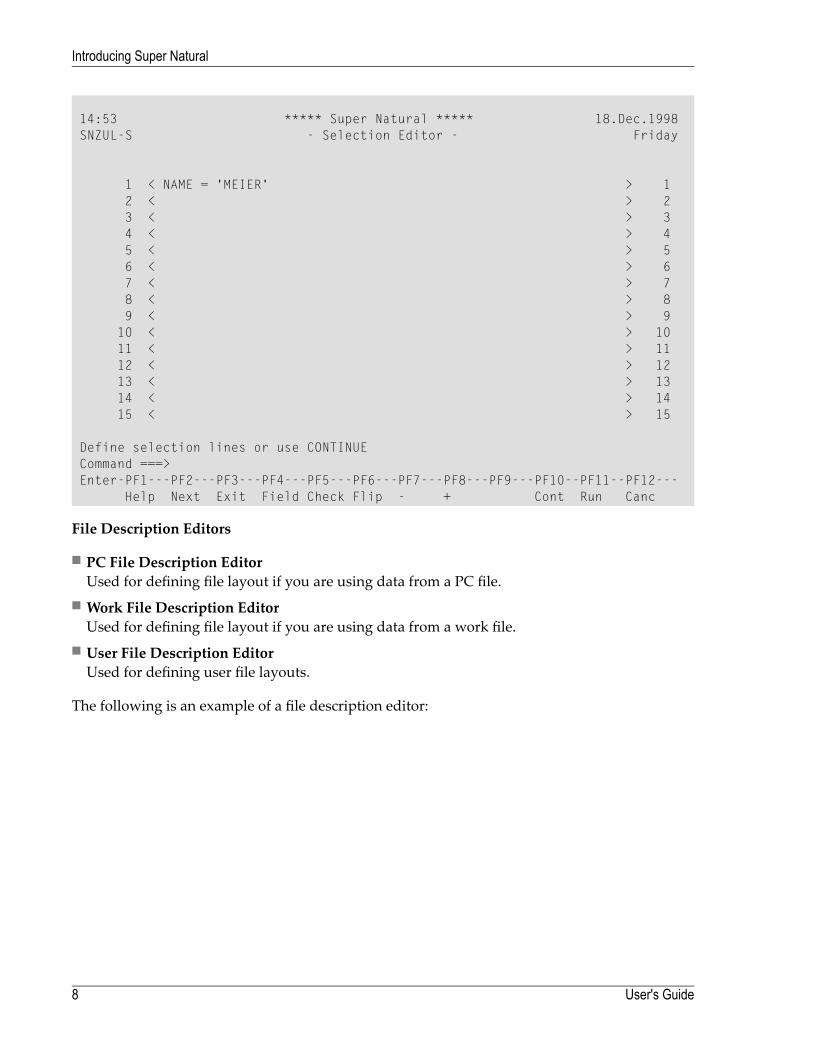
14:53 ***** Super Natural ***** 18.Dec.1998SNZUL-S - Selection Editor - Friday
1 < NAME = 'MEIER' > 12 < > 23 < > 34 < > 45 < > 56 < > 67 < > 78 < > 89 < > 9
10 < > 1011 < > 1112 < > 1213 < > 1314 < > 1415 < > 15
Define selection lines or use CONTINUECommand ===>Enter-PF1---PF2---PF3---PF4---PF5---PF6---PF7---PF8---PF9---PF10--PF11--PF12---
Help Next Exit Field Check Flip - + Cont Run Canc
File Description Editors
■ PC File Description EditorUsed for defining file layout if you are using data from a PC file.
■ Work File Description EditorUsed for defining file layout if you are using data from a work file.
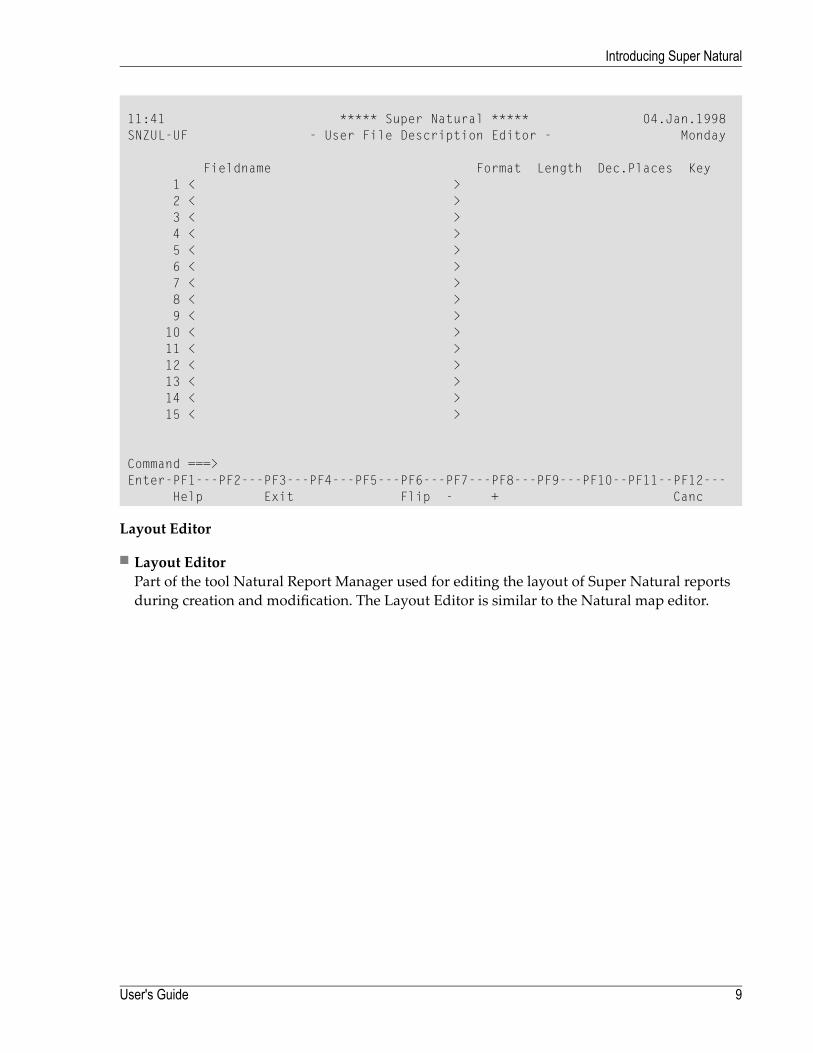
■ User File Description EditorUsed for defining user file layouts.
The following is an example of a file description editor:
User's Guide8
Introducing Super Natural
11:41 ***** Super Natural ***** 04.Jan.1998SNZUL-UF - User File Description Editor - Monday
Fieldname Format Length Dec.Places Key1 < >2 < >3 < >4 < >5 < >6 < >7 < >8 < >9 < >10 < >11 < >12 < >13 < >14 < >15 < >
Command ===>Enter-PF1---PF2---PF3---PF4---PF5---PF6---PF7---PF8---PF9---PF10--PF11--PF12---
Help Exit Flip - + Canc
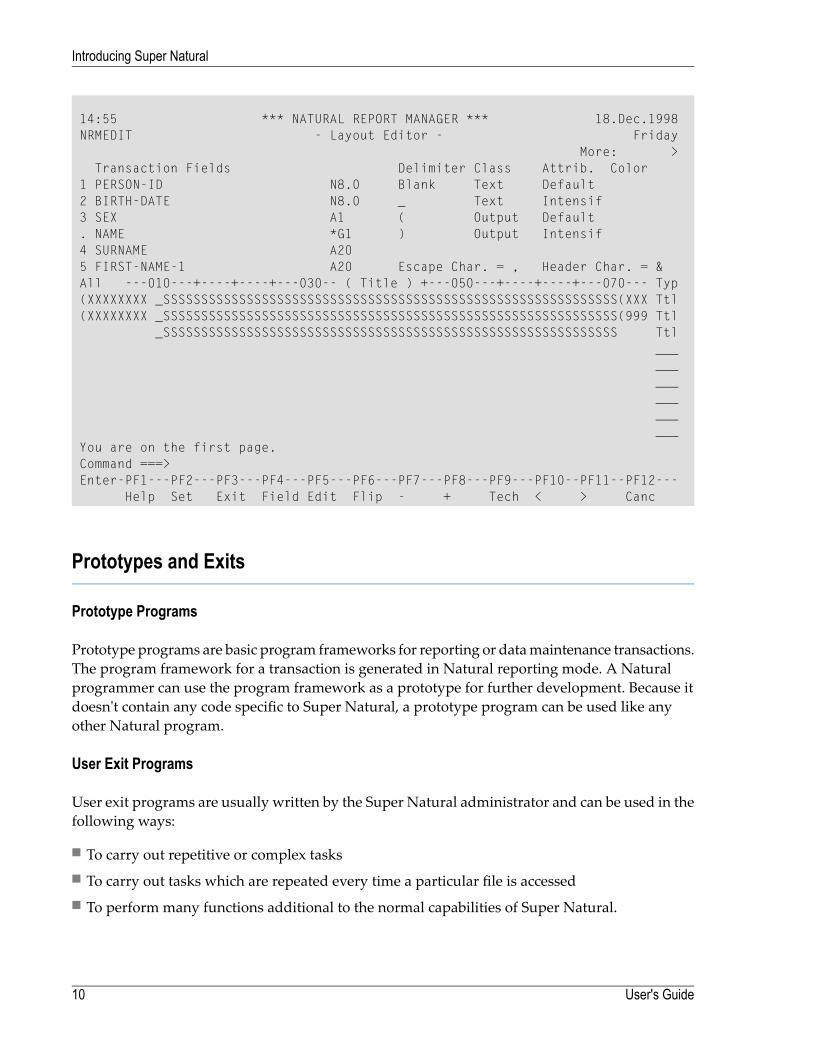
Layout Editor
■ Layout EditorPart of the tool Natural Report Manager used for editing the layout of Super Natural reportsduring creation and modification. The Layout Editor is similar to the Natural map editor.
9User's Guide
Introducing Super Natural
14:55 *** NATURAL REPORT MANAGER *** 18.Dec.1998NRMEDIT - Layout Editor - Friday
More: >Transaction Fields Delimiter Class Attrib. Color
1 PERSON-ID N8.0 Blank Text Default2 BIRTH-DATE N8.0 _ Text Intensif3 SEX A1 ( Output Default. NAME *G1 ) Output Intensif4 SURNAME A205 FIRST-NAME-1 A20 Escape Char. = , Header Char. = &All ---010---+----+----+---030-- ( Title ) +---050---+----+----+---070--- Typ(XXXXXXXX _SSSSSSSSSSSSSSSSSSSSSSSSSSSSSSSSSSSSSSSSSSSSSSSSSSSSSSSSSSSS(XXX Ttl(XXXXXXXX _SSSSSSSSSSSSSSSSSSSSSSSSSSSSSSSSSSSSSSSSSSSSSSSSSSSSSSSSSSSS(999 Ttl
_SSSSSSSSSSSSSSSSSSSSSSSSSSSSSSSSSSSSSSSSSSSSSSSSSSSSSSSSSSSS Ttl__________________
You are on the first page.Command ===>Enter-PF1---PF2---PF3---PF4---PF5---PF6---PF7---PF8---PF9---PF10--PF11--PF12---
Help Set Exit Field Edit Flip - + Tech < > Canc
Prototypes and Exits
Prototype Programs
Prototype programs are basic program frameworks for reporting or datamaintenance transactions.The program framework for a transaction is generated in Natural reporting mode. A Naturalprogrammer can use the program framework as a prototype for further development. Because itdoesn't contain any code specific to Super Natural, a prototype program can be used like anyother Natural program.
User Exit Programs
User exit programs are usually written by the Super Natural administrator and can be used in thefollowing ways:
■ To carry out repetitive or complex tasks■ To carry out tasks which are repeated every time a particular file is accessed■ To perform many functions additional to the normal capabilities of Super Natural.
User's Guide10
Introducing Super Natural
User exit programs are stored outside Super Natural but can be invoked and executed when aSuper Natural transaction is run. A user exit program can be a Natural object (program, sub-pro-gram, sub-routine or map) or a Natural-callable program stored outside Natural. Super Naturalenables the end user to invoke user exit programs from selected locations within a transaction.
User Defaults
User defaults are set by the Super Natural administrator. You can change your user environmentto suit your individual needs by modifying your user profile and/or your transaction modes.
User Profile
Your user profile influences the appearance of screens, PF key settings, screen colors, how the dateand time are displayed and many technical details concerning the environment, output and pro-cessing of transactions.
Transaction Modes
Transaction modes control the basic conditions for reporting and data maintenance transactions.
Reporting Modes
There are six groups of modes for reporting transactions (reporting modes) which influence thefollowing areas:
■ Data Selection - how you select data. You can select data as follows:■ Using the Selection Editor■ Using the SQL SELECT Editor.■ Using the Work File Description Editor (for data from a work file)■ Using the PC File Description Editor (for data from a PC file)■ Data Change - allows you to edit each record separately when a report runs before sending itto a user file or a printer
■ Report Type - how the report is to be displayed, for example as a list, graph or table.■ Report Level - allows you to obtain the data produced by standard functions at control breaksonly
■ Destination - where the data is directed (see diagram on following page)■ Run Mode - allows you to execute transactions online or in batch mode.
The following diagram shows which report destinations are available.
11User's Guide
Introducing Super Natural
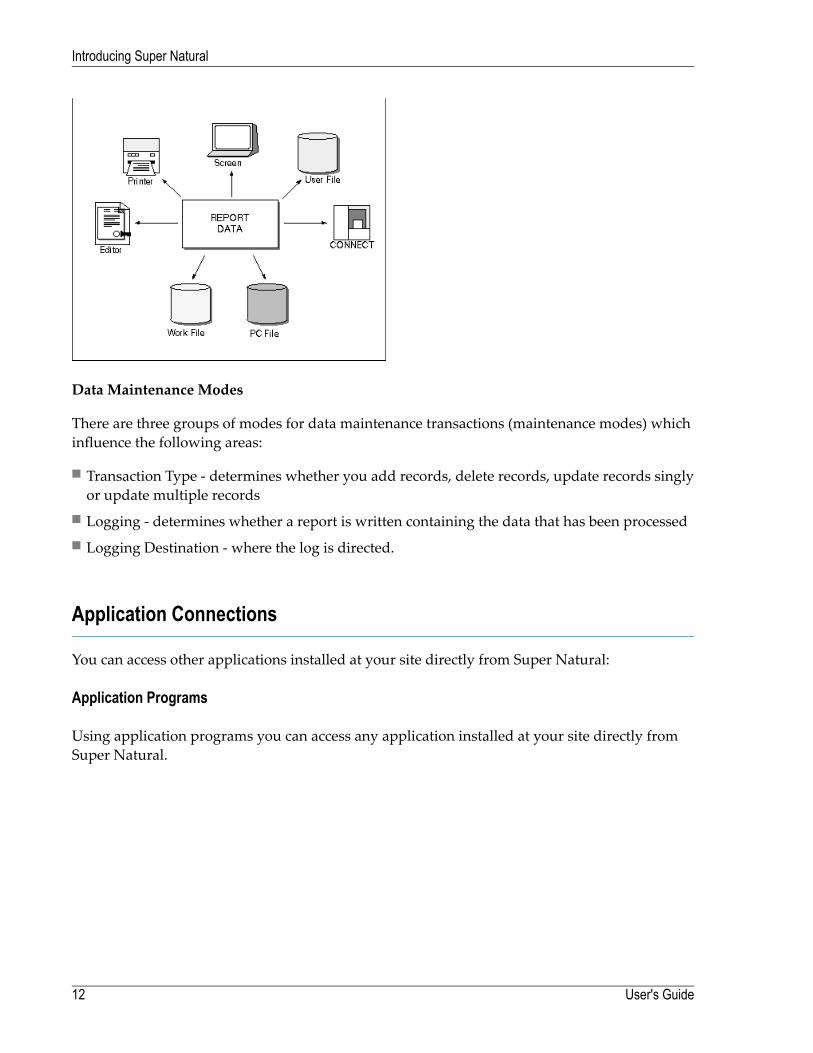
Data Maintenance Modes
There are three groups of modes for data maintenance transactions (maintenance modes) whichinfluence the following areas:
■ Transaction Type - determines whether you add records, delete records, update records singlyor update multiple records
■ Logging - determines whether a report is written containing the data that has been processed■ Logging Destination - where the log is directed.
Application Connections
You can access other applications installed at your site directly from Super Natural:
Application Programs
Using application programs you can access any application installed at your site directly fromSuper Natural.
User's Guide12
Introducing Super Natural
Con-nect
You can access Software AG's automated office systemCon-nect directly from Super Natural. Youcan also send reports to Con-nect and create form letters with reports of the report type CON-NECT.
Maintaining Data
Data maintenance is the term used for creating user files and modifying, deleting, adding andcopying data.
User Files
You can use Super Natural to create your own files which are known as user files. There are twoways to create a user file:
■ Copy an existing file■ Create an empty file
Data Maintenance Transactions
You can use data maintenance transactions to add, update and delete records in user files.
The Super Natural administrator can restrict your access to files created by other users.
13User's Guide
Introducing Super Natural

14
3 Using Super Natural
■ Screen and Window Structure ............................................................................................................ 16■ Selecting from Screens and Windows .................................................................................................. 22■ Paging .......................................................................................................................................... 23■ Commands .................................................................................................................................... 24■ ENTER Key ................................................................................................................................... 25■ PF Keys ........................................................................................................................................ 25■ Asterisk List Function ....................................................................................................................... 28■ Checklist Function ........................................................................................................................... 29■ Navigation ..................................................................................................................................... 32■ Online Help .................................................................................................................................... 34■ Libraries ........................................................................................................................................ 35■ Notepad Function ............................................................................................................................ 39■ Technical Information Function ........................................................................................................... 42
15
This section describes how to start using Super Natural.
This section covers the following topics:
■ Screen and Window Structure■ Selecting from Screens and Windows■ Paging■ Commands■ ENTER () Key■ Keys■ Asterisk (*) List Function■ Checklist Function■ Navigation■ Online Help■ Libraries■ Notepad Function■ Technical Information Function
Screen and Window Structure
A system of screens and windows guides you through Super Natural. From these screens andwindows you can select object types and functions.
This documentation describes and shows Super Natural screens and windows as they are distrib-uted by Software AG.
Some of the screens and windows shown in this documentation may look different from thoseyou see on your terminal screen. If this is the case, your Super Natural administrator has changedyour user profile. For further information on user profiles, see User Profile or ask your adminis-trator.
The following are a few examples of differences due to user profile modifications:
■ The Menu is not the first screen to appear when you log on to Super Natural■ Screen layout is different■ Functions or options shown in the documentation are missing.
User's Guide16
Using Super Natural
Screens
The word screen is used in this documentation for a page which a program displays on your ter-minal screen. Screens display information and also allow you to make entries which are thenprocessed by Super Natural. Screens provide the basis for complex functions.
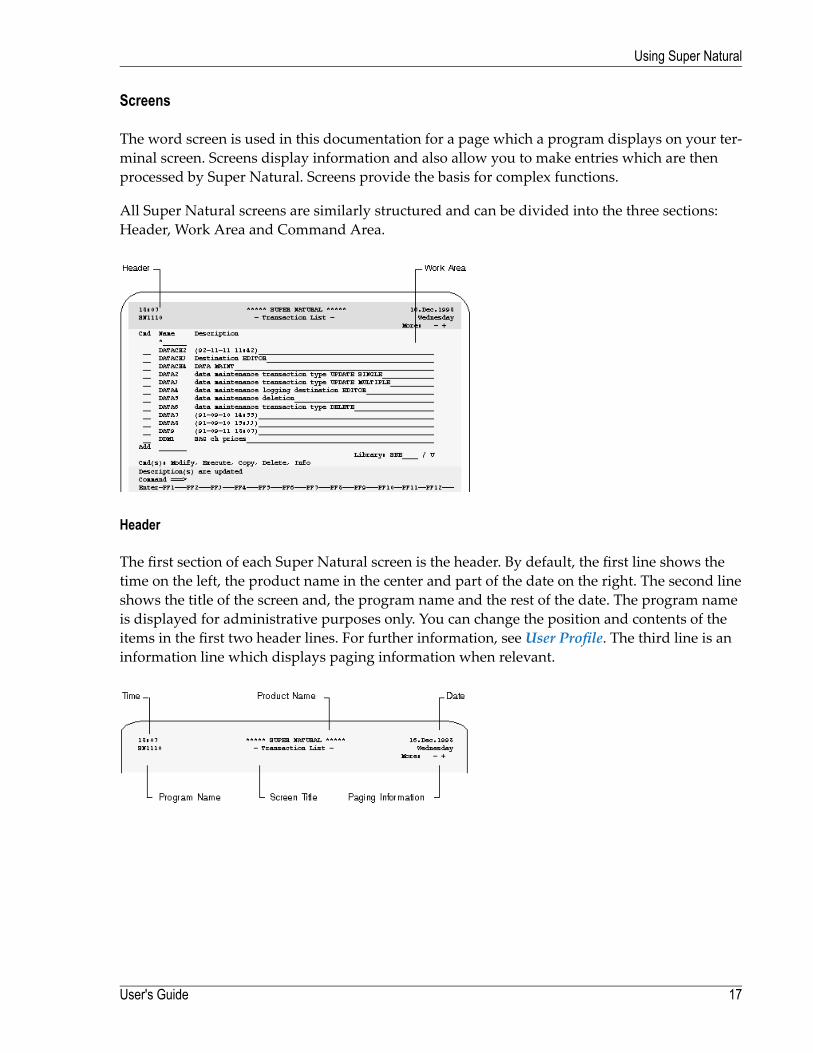
All Super Natural screens are similarly structured and can be divided into the three sections:Header, Work Area and Command Area.
Header
The first section of each Super Natural screen is the header. By default, the first line shows thetime on the left, the product name in the center and part of the date on the right. The second lineshows the title of the screen and, the program name and the rest of the date. The program nameis displayed for administrative purposes only. You can change the position and contents of theitems in the first two header lines. For further information, see User Profile. The third line is aninformation line which displays paging information when relevant.
17User's Guide
Using Super Natural
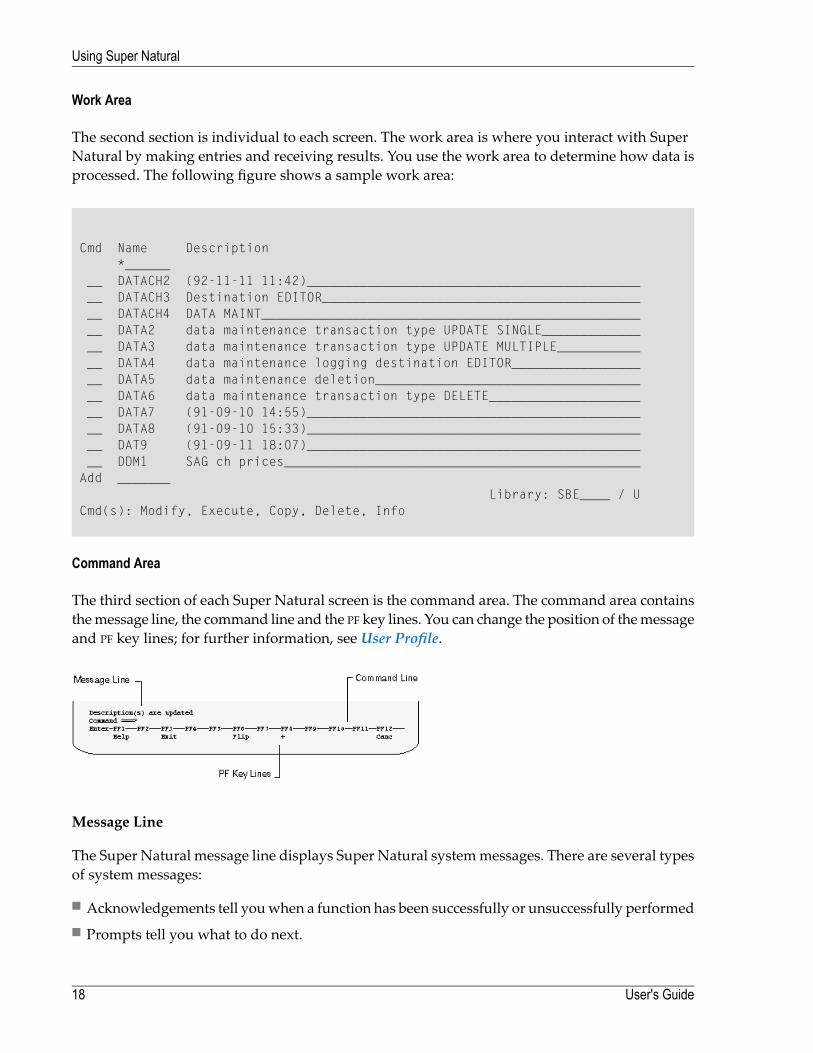
Work Area
The second section is individual to each screen. The work area is where you interact with SuperNatural by making entries and receiving results. You use the work area to determine how data isprocessed. The following figure shows a sample work area:
Cmd Name Description*______
__ DATACH2 (92-11-11 11:42)______________________________________________ DATACH3 Destination EDITOR____________________________________________ DATACH4 DATA MAINT____________________________________________________ DATA2 data maintenance transaction type UPDATE SINGLE_______________ DATA3 data maintenance transaction type UPDATE MULTIPLE_____________ DATA4 data maintenance logging destination EDITOR___________________ DATA5 data maintenance deletion_____________________________________ DATA6 data maintenance transaction type DELETE______________________ DATA7 (91-09-10 14:55)______________________________________________ DATA8 (91-09-10 15:33)______________________________________________ DAT9 (91-09-11 18:07)______________________________________________ DDM1 SAG ch prices_______________________________________________
Add _______Library: SBE____ / U
Cmd(s): Modify, Execute, Copy, Delete, Info
Command Area
The third section of each Super Natural screen is the command area. The command area containsthemessage line, the command line and the PF key lines. You can change the position of themessageand PF key lines; for further information, see User Profile.
Message Line
The Super Natural message line displays Super Natural systemmessages. There are several typesof system messages:
■ Acknowledgements tell youwhen a function has been successfully or unsuccessfully performed■ Prompts tell you what to do next.
User's Guide18
Using Super Natural
■ Error messages tell you if you have made a mistake. Error messages are identified by a four-figure number before the text.
Command Line
You can enter commands and command abbreviations in the Super Natural command line.
For further information on commands, see Commands.
PF Key Lines
The PF key lines show which PF keys (program function keys) are allocated to which functions.The PF key lines only show the functions available from the screen currently displayed. PF keysare described later in this section.
You can display the PF key lines in ISA format, SAA format or as a cursor-sensitive bar by changingyour user profile. For further information, see PF Key Settings in User Profile.
The ENTER key is also listed in the PF key lines and is described later in this section.
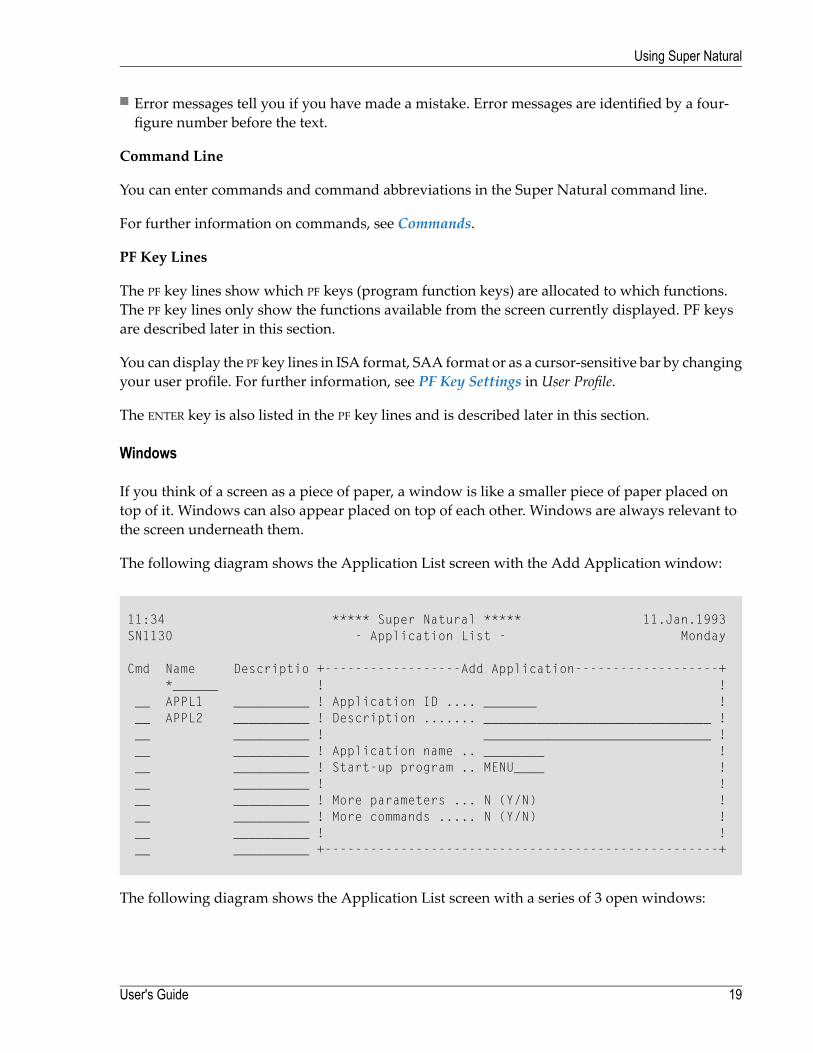
Windows
If you think of a screen as a piece of paper, a window is like a smaller piece of paper placed ontop of it. Windows can also appear placed on top of each other. Windows are always relevant tothe screen underneath them.
The following diagram shows the Application List screen with the Add Application window:
11:34 ***** Super Natural ***** 11.Jan.1993SN1130 - Application List - Monday
Cmd Name Descriptio +------------------Add Application-------------------+*______ ! !
__ APPL1 __________ ! Application ID .... _______ !__ APPL2 __________ ! Description ....... ______________________________ !__ __________ ! ______________________________ !__ __________ ! Application name .. ________ !__ __________ ! Start-up program .. MENU____ !__ __________ ! !__ __________ ! More parameters ... N (Y/N) !__ __________ ! More commands ..... N (Y/N) !__ __________ ! !__ __________ +----------------------------------------------------+
The following diagram shows the Application List screen with a series of 3 open windows:
19User's Guide
Using Super Natural
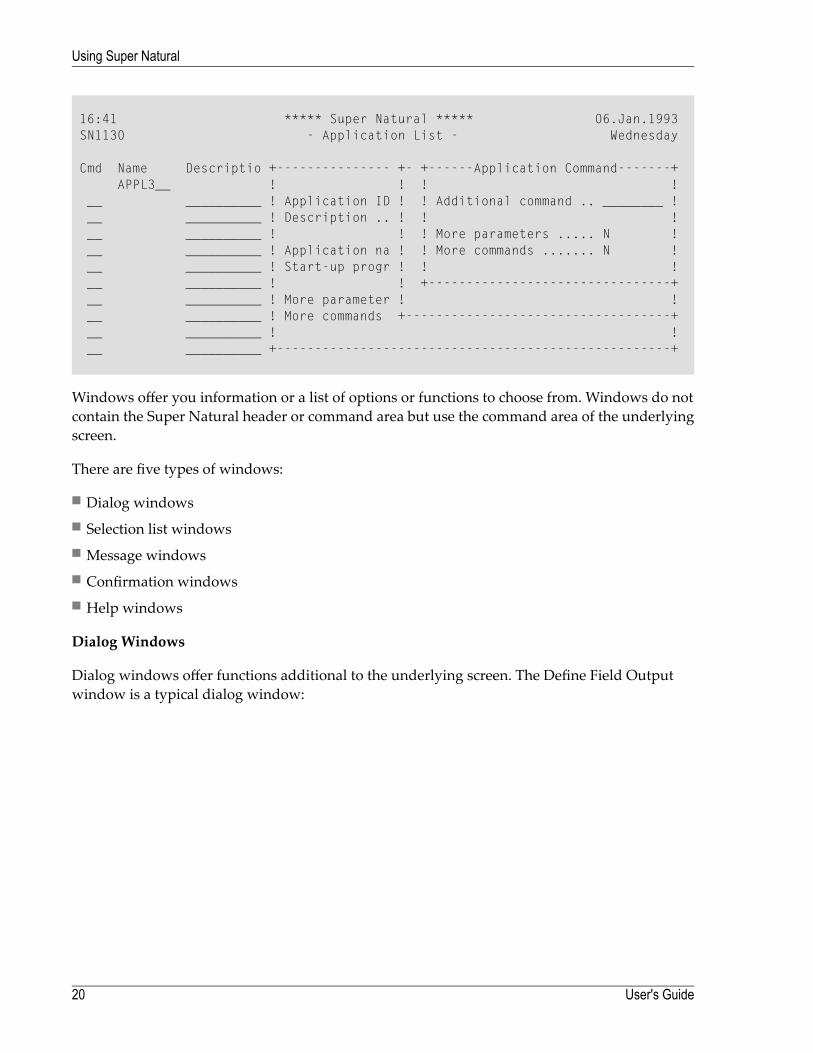
16:41 ***** Super Natural ***** 06.Jan.1993SN1130 - Application List - Wednesday
Cmd Name Descriptio +--------------- +- +------Application Command-------+APPL3__ ! ! ! !
__ __________ ! Application ID ! ! Additional command .. ________ !__ __________ ! Description .. ! ! !__ __________ ! ! ! More parameters ..... N !__ __________ ! Application na ! ! More commands ....... N !__ __________ ! Start-up progr ! ! !__ __________ ! ! +--------------------------------+__ __________ ! More parameter ! !__ __________ ! More commands +-----------------------------------+__ __________ ! !__ __________ +----------------------------------------------------+
Windows offer you information or a list of options or functions to choose from. Windows do notcontain the Super Natural header or command area but use the command area of the underlyingscreen.
There are five types of windows:
■ Dialog windows■ Selection list windows■ Message windows■ Confirmation windows■ Help windows
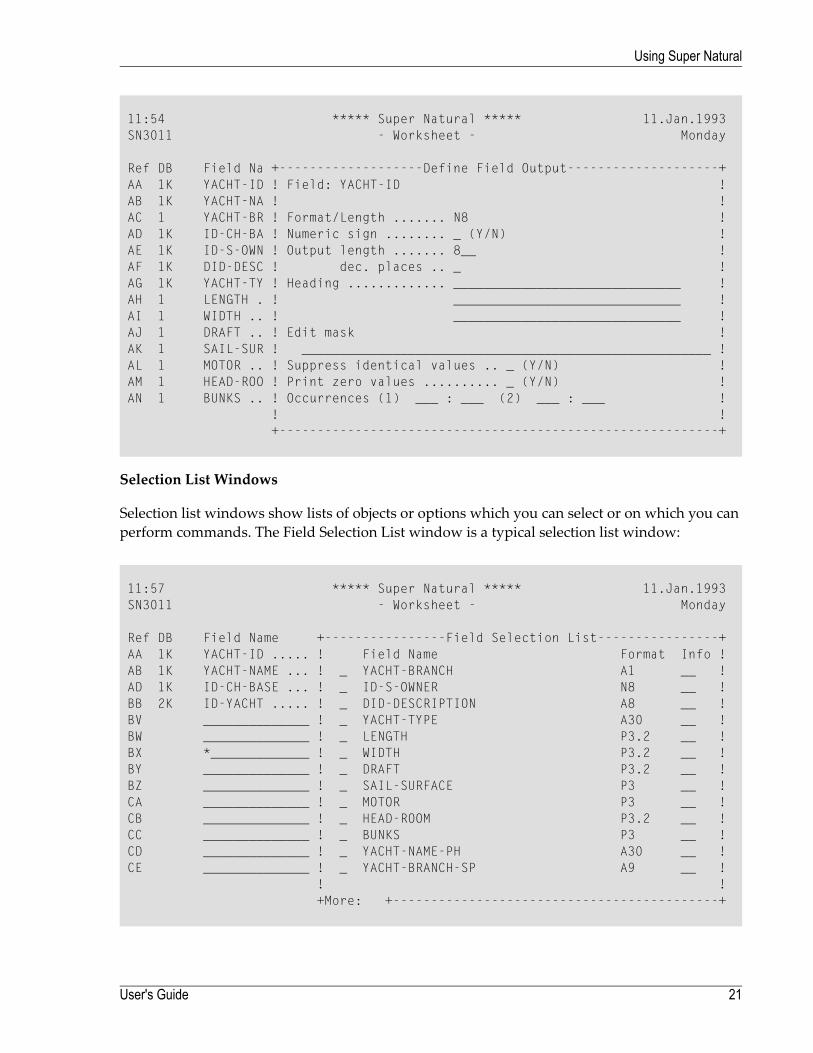
Dialog Windows
Dialog windows offer functions additional to the underlying screen. The Define Field Outputwindow is a typical dialog window:
User's Guide20
Using Super Natural
11:54 ***** Super Natural ***** 11.Jan.1993SN3011 - Worksheet - Monday
Ref DB Field Na +-------------------Define Field Output--------------------+AA 1K YACHT-ID ! Field: YACHT-ID !AB 1K YACHT-NA ! !AC 1 YACHT-BR ! Format/Length ....... N8 !AD 1K ID-CH-BA ! Numeric sign ........ _ (Y/N) !AE 1K ID-S-OWN ! Output length ....... 8__ !AF 1K DID-DESC ! dec. places .. _ !AG 1K YACHT-TY ! Heading ............. ______________________________ !AH 1 LENGTH . ! ______________________________ !AI 1 WIDTH .. ! ______________________________ !AJ 1 DRAFT .. ! Edit mask !AK 1 SAIL-SUR ! ______________________________________________________ !AL 1 MOTOR .. ! Suppress identical values .. _ (Y/N) !AM 1 HEAD-ROO ! Print zero values .......... _ (Y/N) !AN 1 BUNKS .. ! Occurrences (1) ___ : ___ (2) ___ : ___ !
! !+----------------------------------------------------------+
Selection List Windows
Selection list windows show lists of objects or options which you can select or on which you canperform commands. The Field Selection List window is a typical selection list window:
11:57 ***** Super Natural ***** 11.Jan.1993SN3011 - Worksheet - Monday
Ref DB Field Name +----------------Field Selection List----------------+AA 1K YACHT-ID ..... ! Field Name Format Info !AB 1K YACHT-NAME ... ! _ YACHT-BRANCH A1 __ !AD 1K ID-CH-BASE ... ! _ ID-S-OWNER N8 __ !BB 2K ID-YACHT ..... ! _ DID-DESCRIPTION A8 __ !BV ______________ ! _ YACHT-TYPE A30 __ !BW ______________ ! _ LENGTH P3.2 __ !BX *_____________ ! _ WIDTH P3.2 __ !BY ______________ ! _ DRAFT P3.2 __ !BZ ______________ ! _ SAIL-SURFACE P3 __ !CA ______________ ! _ MOTOR P3 __ !CB ______________ ! _ HEAD-ROOM P3.2 __ !CC ______________ ! _ BUNKS P3 __ !CD ______________ ! _ YACHT-NAME-PH A30 __ !CE ______________ ! _ YACHT-BRANCH-SP A9 __ !
! !+More: +-------------------------------------------+
21User's Guide
Using Super Natural
Message Windows
Message windows display Super Natural system messages. There are several types of systemmessages:
■ Acknowledgements tell youwhen a function has been successfully or unsuccessfully performed■ Prompts tell you what to do next■ Error messages tell you if an error has occurred■ Warnings
Confirmation Windows
Confirmationwindows give you a chance to cancel functionswhich have important consequencessuch as deleting an object. Confirmation windows can also offer you alternatives to the currentfunction.
Help Windows
For information on help windows, seeOnline Help in Using Super Natural.
Selecting from Screens and Windows
There are two ways to select items from a screen or window:
To select an item from a screen or window
■ Type any non-blank character in the selection column next to the item and press Enter.
Or:
Position the cursor in the selection column next to the item and press Enter.
Once you have marked an item or items with a non-blank character in the selection column,the cursor position is ignored.
User's Guide22
Using Super Natural
Paging
When you are looking at object list screens, reports, list windows or at a series of windows, youneed to know where you are in the list or series and to look at the pages before or after.
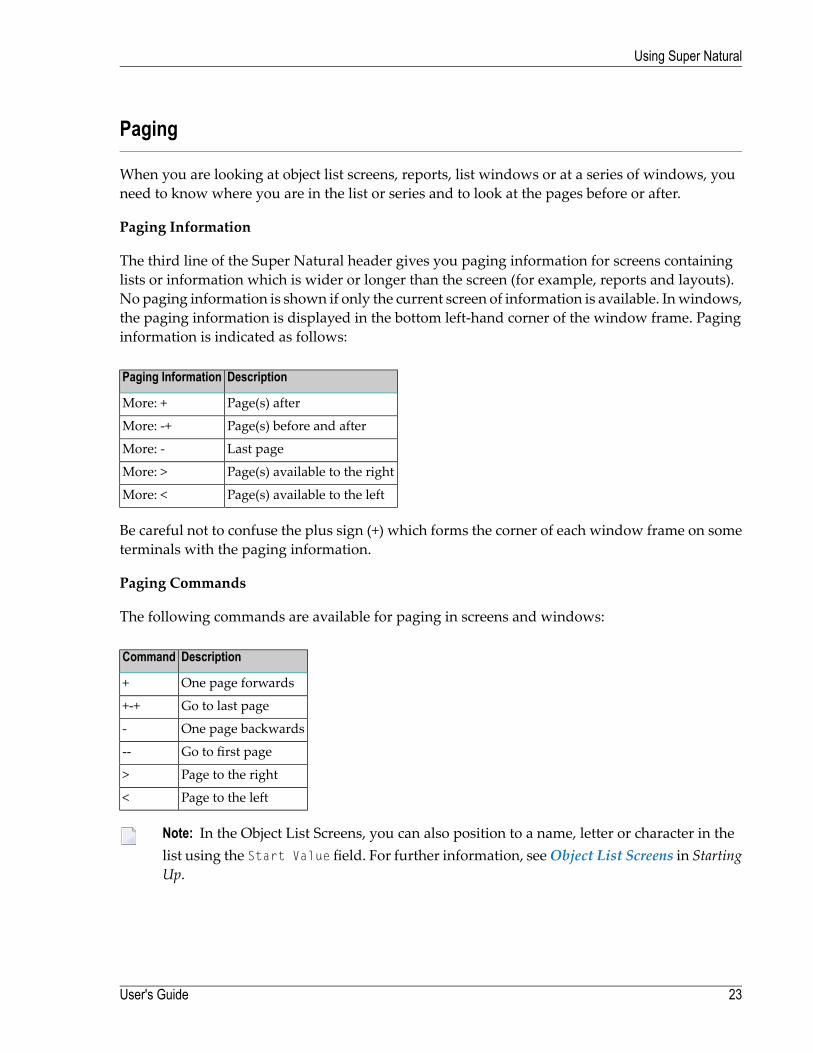
Paging Information
The third line of the Super Natural header gives you paging information for screens containinglists or information which is wider or longer than the screen (for example, reports and layouts).No paging information is shown if only the current screen of information is available. Inwindows,the paging information is displayed in the bottom left-hand corner of the window frame. Paginginformation is indicated as follows:
DescriptionPaging Information
Page(s) afterMore: +
Page(s) before and afterMore: -+
Last pageMore: -
Page(s) available to the rightMore: >
Page(s) available to the leftMore: <
Be careful not to confuse the plus sign (+) which forms the corner of each window frame on someterminals with the paging information.
Paging Commands
The following commands are available for paging in screens and windows:
DescriptionCommand
One page forwards+
Go to last page+-+
One page backwards-
Go to first page--
Page to the right>
Page to the left<
Note: In the Object List Screens, you can also position to a name, letter or character in thelist using the Start Value field. For further information, seeObject List Screens in StartingUp.
23User's Guide
Using Super Natural
Commands
Commands are instructions which tell Super Natural what to do with an object, invoke a screenor start a function.
If you enter an incorrect command or a command which is not available at the current location,the Command List window appears.
For a complete list of the commands available in Super Natural, see Command List.
Command Sequence
Super Natural commands are structured as follows:
command-keyword object-type object-name
Abbreviating Commands
You can abbreviate commands as long as the commands remain unique. For example the commandDELETE TRANSACTION TEST can be abbreviated as follows in the Transaction List screen:
D TR TEST
On a screen where the commands LOCK and LOGICS are both available, you cannot use the abbre-viation L. The shortest abbreviations possible are as follows:
LOC
LOG
Issuing Commands
There are three ways to issue commands:
To issue a command
■ Enter the command in the command line.
Or:
Enter the command abbreviation in the command column next to the object it is to act on.
When a list of objects is displayed, the commands you can use with the object type are listedin the line above the message line (legend).
Or:
User's Guide24
Using Super Natural
Press the PF key allocated to the command.
You can often choose which way you want to issue a command.
Note: When a window is displayed, you can only issue the commands relevant to the win-dow. When an object name is the same as a command keyword, in direct commands theobject name must be preceded by the data-delimiter character. The default data-delimitercharacter is #.Example: DELETE #JCL
Listing Commands
To list the commands available from the current screen
■ Enter an asterisk (*) in the command line.
Only the commandswhich you can currently use are displayed. For example, when you enteran asterisk (*) in the command line of Natural Report Manager, the command list you get isdifferent from the list you getwhen you enter an asterisk (*) in the command line of theMenu.
ENTER Key
The ENTER key is listed in the PF key line. Whenever you type information in a command line orinput field, you must submit it for processing by pressing the ENTER key.
If you have specified or selected functions, pressing Enter executes the functions you have selectedand displays the next screen or window.
PF Keys
Commands can be allocated to PF keys (program function keys) so that pressing a PF key executesa particular function. The PF key allocations which are available for a particular screen are listedin the PF key lines.
For further information on the PF key lines, see Screens in UsingSuper Natural.
To issue a command using a PF key
■ Press the PF key.
You do not need to press Enter.
25User's Guide
Using Super Natural
You can change the format and position of the PF key line by modifying your user profile. Forfurther information on modifying your user profile, see User Profile.
Default PF Key Allocation
Super Natural provides the following default PF key allocations in accordance with the SoftwareAG ISA (Integrated open SoftwareArchitecture) standards. The PF keys execute the same functionson every screen where they are available.
Help Function
You can invoke a help window for every screen in Super Natural by pressing PF1. For further in-formation on the Super Natural help system, seeOnline Help in Using Super Natural.
Exit Function
The Exit function ends the function you are performing and saves your modifications.
If you leave a transaction using the EXIT commandwhich hasn't yet been saved, the Exit Handlingwindow gives you a choice of the following:
■ Save and exit■ Keep and exit■ Exit without keeping or saving■ Resume the current function
Flip Function
There are twenty-four PF keys, but you can only see twelve PF keys in the PF key line.
If you use the Flip function, the other twelve PF keys are displayed.
For example, if the keys PF1 to PF12 are displayed, the Flip function displays the keys PF12 to PF24.
Whichever twelve keys are displayed, you can still use any of the other twelve keys which havea function allocated to them.
The Flip function is not relevant for SAA PF key display format.
User's Guide26
Using Super Natural
Page Backwards Function
If you use the Page Backwards (-) function, the previous screen or window of information isdisplayed.
Page Forwards Function
If you use the Page Forwards (+) function, the next screen orwindowof information is displayed.
Shift Left Function
If you have more columns in a report than you can see at one time, the Shift Left (<) functionallows you to look at data to the left of your present screen contents.
Shift Right Function
If you have more columns in a report than you can see at one time, the Shift Right (>) functionallows you to look at data to the right of your present screen contents.
Cancel Function
The CANCEL function interrupts the current function without saving. If a window is displayed, theCANCEL command closes it and if a screen is displayed, the CANCEL command invokes the previousscreen.
Note: The Confirmation window does not appear and entries made since you last saved orpressed Enter are cancelled!
Menu Function
The Menu function interrupts the current function without saving and takes you back to the Menufrom any point inSuper Natural.
Note: The Confirmation window does not appear and entries made since you last saved orpressed Enter are cancelled!
27User's Guide
Using Super Natural
Top Function
The Top function (--) takes you to the top or beginning of the information or list you are lookingat.
Bottom Function
The Bottom function (++) takes you to the bottom or end of the information or list you arelooking at.
Asterisk List Function
The Asterisk (*) List function helps you if you don't know which libraries, files, fields, com-mands or objects for a particular command are available.
To obtain a list of the libraries available
■ Enter an asterisk (*) in the Library field on a List Object Screen.
To obtain a list of the files available
■ Enter an asterisk (*) in the Enter File Name field in the Add Transaction window.
To obtain a list of the fields available
■ Enter an asterisk (*) in the Fieldname column in the Worksheet.
To obtain a list of the commands available
■ Enter an asterisk (*) in the command line.
To obtain a list of objects available for a particular command
■ Enter the command followed by a blank and an asterisk (*) in the command line.
In each case a window appears displaying a selection list of the items available.
The list of commands displayed depends on your positionwithin SuperNatural. For example,when you enter an asterisk (*) in the command line of Natural ReportManager, the commandlist you get is different from the list you get when you enter an asterisk (*) in the commandline of the Menu.
User's Guide28
Using Super Natural
Checklist Function
The Checklist function provides a framework which guides you through adding and modifyingtransactions. The Checklist window tells you which steps are available, which are mandatory andwhich are optional. You choose the steps you want to take and the Checklist function takes youfrom step to step automatically. Using the Checklist function, you only need the NEXT commandsto navigate within Super Natural.
The Checklist function is intended for users less familiarwith SuperNatural. Userswho aremorefamiliar with Super Natural can invoke the Checklist window as a type of online help.
Switching the Checklist Function On
To switch the Checklist function on
1 Issue the PROFILE command from the Menu or an Object List screen.
2 Choose Language Code and Checklist
3 Mark the Automatic Checklist field.
4 Type in 1, 2 or 3 in the On Level field.
5 Press Enter.
The levels for the Checklist function determine how much guidance you are given when usingthe Worksheet.
DescriptionLevelTheWorksheet as a whole is offered as one option.When you invoke theWorksheet,all the columns available for the transaction modes you are working with are open.
1 (Global)
The Worksheet as a whole is is offered as one option and each input column of theWorksheet is shown additionally as a separate option (see description for Level 3).
2 (Mixed)
Each column of the Worksheet is offered as a separate option. When you invoke theWorksheet, you can only work on the columns which you have chosen in the
3 (Detailed)
Checklist window. These columns are presented one at a time as separate steps. Inaddition, the Fieldname column and the Information column are always open.
To switch the Checklist function off
■ Remove the mark in the Automatic Checklist field in your user profile.
For further information, see above.
29User's Guide
Using Super Natural
Using the Checklist Function
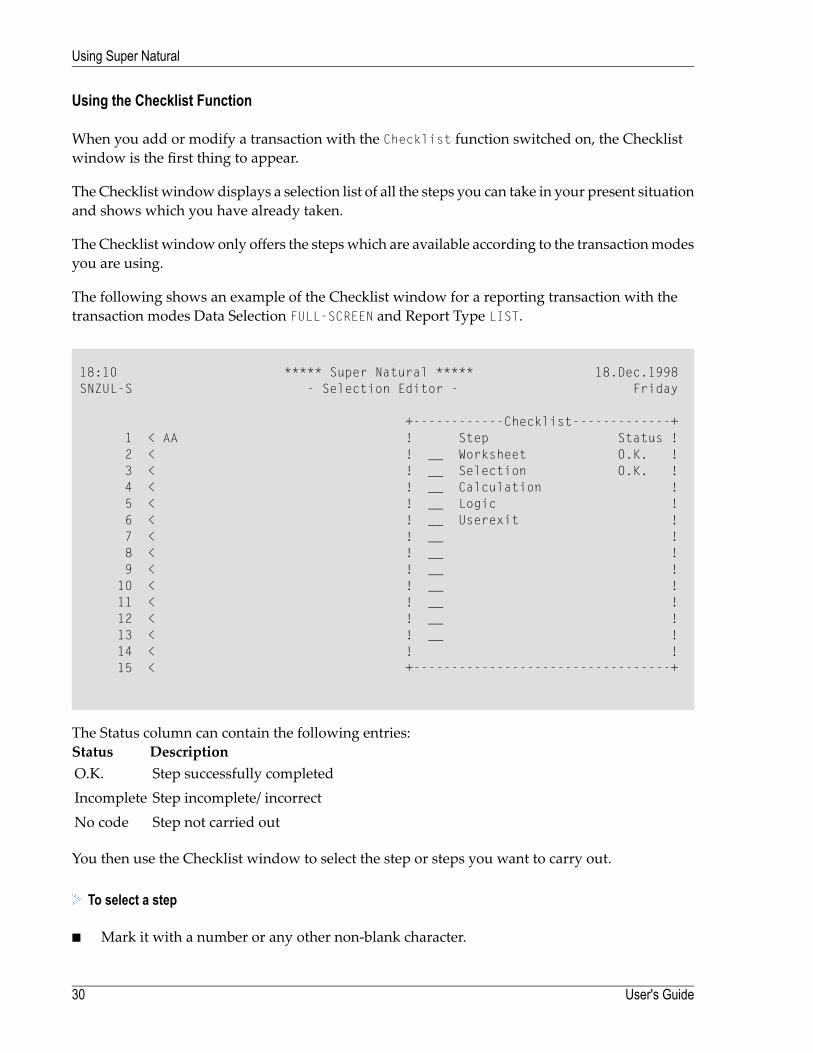
When you add or modify a transaction with the Checklist function switched on, the Checklistwindow is the first thing to appear.
The Checklist windowdisplays a selection list of all the steps you can take in your present situationand shows which you have already taken.
The Checklist windowonly offers the stepswhich are available according to the transactionmodesyou are using.
The following shows an example of the Checklist window for a reporting transaction with thetransaction modes Data Selection FULL-SCREEN and Report Type LIST.
18:10 ***** Super Natural ***** 18.Dec.1998SNZUL-S - Selection Editor - Friday
+------------Checklist-------------+1 < AA ! Step Status !2 < ! __ Worksheet O.K. !3 < ! __ Selection O.K. !4 < ! __ Calculation !5 < ! __ Logic !6 < ! __ Userexit !7 < ! __ !8 < ! __ !9 < ! __ !
10 < ! __ !11 < ! __ !12 < ! __ !13 < ! __ !14 < ! !15 < +----------------------------------+
The Status column can contain the following entries:DescriptionStatusStep successfully completedO.K.Step incomplete/ incorrectIncompleteStep not carried outNo code
You then use the Checklist window to select the step or steps you want to carry out.
To select a step
■ Mark it with a number or any other non-blank character.
User's Guide30
Using Super Natural
If you number steps, the step with the lowest number is carried out first and the step withthe highest number is carried out last. The steps youmarkwith any other non-blank characterare carried out in the order they appear in the list. If you mark the steps with a mixture ofnumbers and non-blank characters, the numbered steps are carried out first.
To take a step
■ Issue the NEXT command.
When you have successfully completed a step, issue the NEXT command to take you directlyto the next step on your list. You can also issue direct commands to continue working withthe transaction independently of the Checklist function.
If you have completed all the steps you selected in the Checklist window, issuing the NEXTcommand invokes the Checklist window again.
You can invoke the Checklist window at any point when you are adding or modifying atransaction by issuing the CHECKLIST command.
Using the Checklist Window Without the Automatic Checklist Function
If you are not working with the Checklist function, you can still invoke the Checklist window tohelp you when you are adding or modifying transactions.
To invoke the Checklist window
■ Issue the CHECKLIST command.
The Checklist window functions as described above.
Using the Next Function Without the Checklist Function
When you are adding or modifying a transaction, you can use the Next function without invokingthe Checklist function. The Next function takes you through a default sequence of the steps ne-cessary to complete the transaction and then invokes the Checklist window for further optionalprocessing.
31User's Guide
Using Super Natural

Navigation
As mentioned earlier in this section, Super Natural presents functions and information in screensand windows. There are several ways of moving or navigating between screens and windows inSuper Natural.
Navigating Forwards
There are several methods for moving forwards through Super Natural (from the beginning of afunction or a series of functions to the end):
To navigate forwards in Super Natural
■ Select a menu option.
For example, selecting the Profile option from the Menu invokes the Modify Profile screen.
Or:
Enter a command in the command line which invokes another screen or window.
Or:
Press a PF key which invokes another screen or window.
For example, issuing the command PROTOTYPE from the Transaction List screen invokesthePrototype List screen.
You can invoke a list of the commands available at any point in Super Natural by enteringan asterisk (*) in the command line.
Or:
Enter a command abbreviation in the work area of a screen or window.
For example, issuing the command abbreviation MO next to a transaction name on the Trans-action List screen invokes the Worksheet.
Or:
Use the Checklist and Next functions.
The Checklist and Next functions take care of navigation for you, as described earlier in thissection.
Or:
User's Guide32
Using Super Natural
Issue a paging command.
You use paging commands to navigate within Object List screens, reports, List windows ora series of windows as described earlier in this section.
Navigating Backwards
You can use commands to interrupt or end a function and return to a previous stage in processing(navigate backwards).
To navigate backwards in Super Natural
■ Issue one of the following commands, as available:
■ EXIT
■ CANCEL
■ MENU
These functions are described in the section PF Keys earlier in this section.
Leaving Screens
To leave a screen
■ Use the methods for navigating forwards and backwards described in the previous sections.
Making another entry on a screen and pressing Enter results in processing and display of theresults on the same screen.
Leaving Windows
To leave a window
1 Type in any data required.
2 Press Enter.
Either the nextwindow in the series appears or the screen fromwhich thewindowwas invokedreappears.
33User's Guide
Using Super Natural
Online Help
The SuperNatural help text systemprovides youwith online help from any point in SuperNatural.You can either invoke help for the particular situation you are in (field help) or invoke help ongeneral topics independent of the situation you in (general help glossary). You can also invokehelp on a particular command (command help glossary).
Note: When you are looking at online help, no further help is available.
Field Help
You can obtain information on the function of and possible input for a particular field.
To invoke help for a certain field
■ Enter a question mark (?) in it.
Many helpwindows and screens provide interactive help. You can select from a list of optionsgiven in the help screen and your selection is carried over onto the original screen.
General Help Glossary
You can obtain information on general topics from any point in Super Natural. The general helpglossary also tells you where each topic is described in the User's Guide.
To invoke the general help glossary
1 Position the cursor in the command line and press PF1.
Or:
Issue the HELP command.
A selection window containing a list of help topics appears.
2 Select the topic you want information on.
A help window containing the help glossary entry appears. The window also tells youwherethe topic is described in the User's Guide.
User's Guide34
Using Super Natural
Command Help Glossary
You can obtain information on a particular Super Natural command by invoking the commandhelp glossary.
The command help glossary gives the following information on the commands known to SuperNatural:
■ A description of each command.■ Where to issue each command.
You can find the command help glossary (command list) in this documentation. The shortestpossible abbreviation of each command is underlined.
To invoke the command information in this appendix online
1 Enter an asterisk (*) in the command line.
The Command List window appears.
2 Position the cursor next to or on the command about which you want information.
3 Press PF1.
A help window containing the help glossary entry appears.
Libraries
Super Natural stores objects in libraries. There are three types of libraries in Super Natural:
■ Private libraries (single-user access)■ Common libraries (multiple-user access).■ Public libraries (multiple-user access read only)
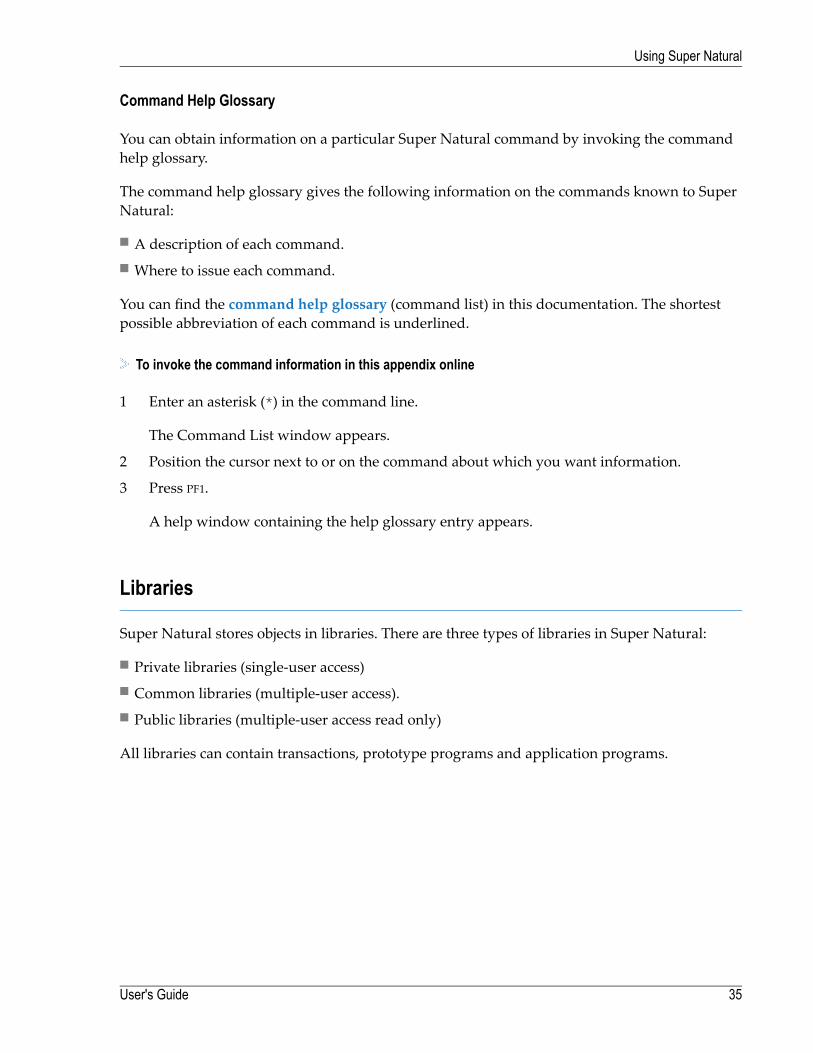
All libraries can contain transactions, prototype programs and application programs.
35User's Guide
Using Super Natural
Private Libraries
Each Super Natural user has a private library (except in special cases). When you start a SuperNatural session, you enter your private library when you invoke an Object List screen or theModify Profile screen.
Note: If you don't have a private library, the Select Library window appears when you logon. The window contains a selection list of the libraries you are authorized to use.
No other user can access your private library. Your private library ID is the same as your user ID.
Common Libraries
Common libraries are created by the Super Natural administrator for use by multiple users.
The difference between private and common libraries is that all users can access common libraries.
Note: You cannot copy a transaction which creates a user file into a common library.
Users can perform the following commands on objects in common libraries:
■ EXECUTE
■ MODIFY
■ DELETE
■ COPY
■ INFO
■ ADD
User's Guide36
Using Super Natural
Con-nect Considerations
If you copy a transaction of Report TypeCON-NECT into a common library, theCon-nect documentit is linked tomust be stored in a sharedConnect cabinetwith the same name as the common library.
Restricting Access to Transactions
When you copy a transaction into a common library, you can choose to restrict other users to ex-ecuting it only.
To restrict transaction access to EXECUTE only
■ Enter the character which corresponds to H4F on your keyboard in the first position in theDescription column. For example, this character might be an exclamation mark (!).
For further information, contact your administrator.
Public Libraries
Public libraries are created by the Super Natural administrator for use by multiple users. The ad-ministrator creates the objects contained in public libraries and decides which users may accesseach public library.
Users have read-only access to the objects in public libraries.
Users can perform the following commands on objects in public libraries:
■ EXECUTE
■ COPY
■ INFO
Note: If you want to modify an item stored in a public library, you must first copy it intoyour private library.
Only the administrator can copy objects into a public library.
37User's Guide
Using Super Natural
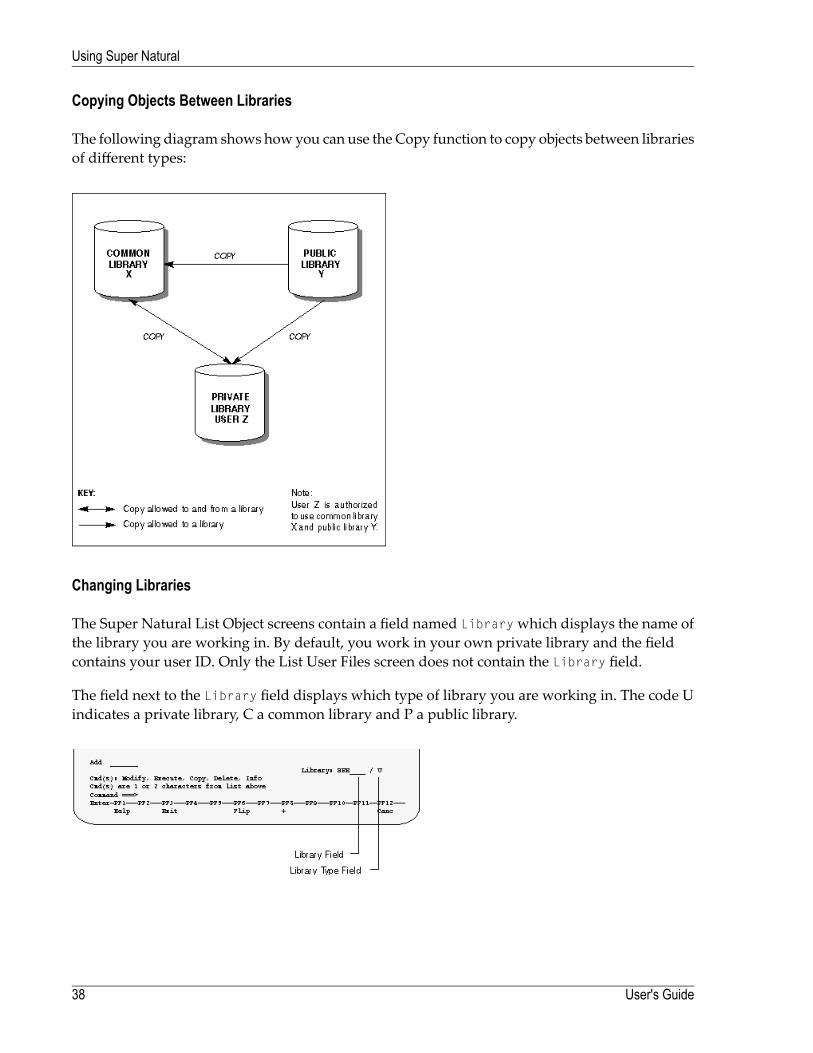
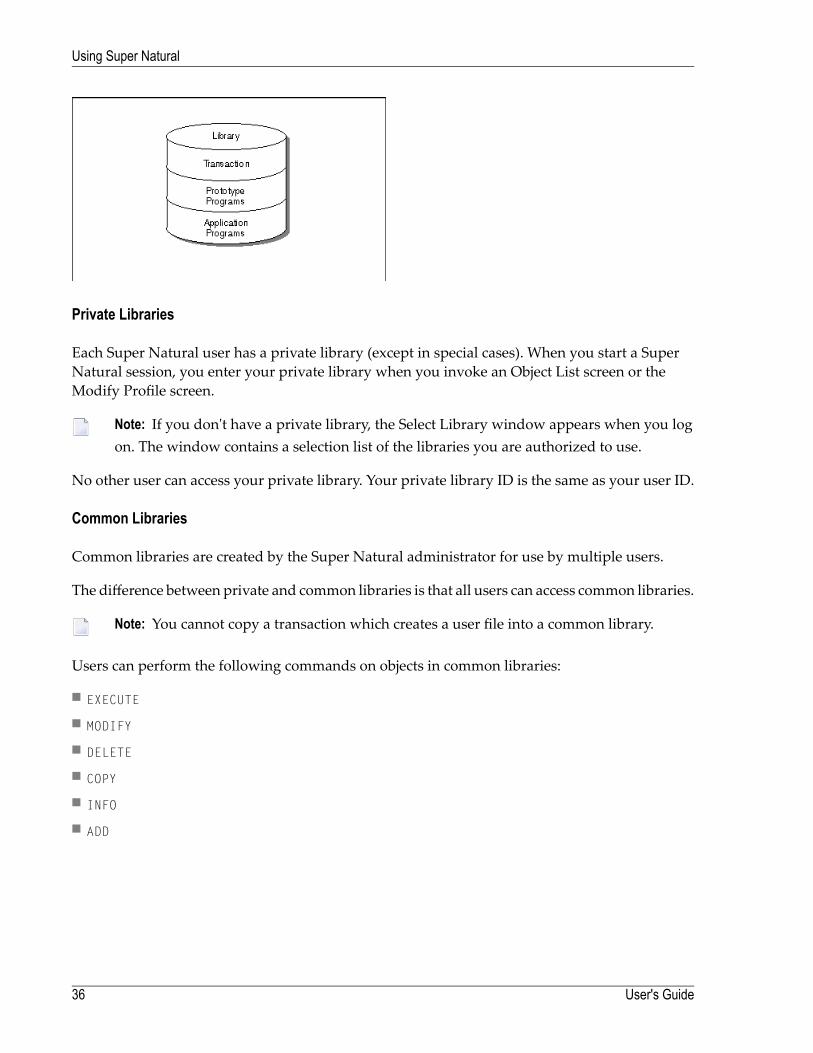
Copying Objects Between Libraries
The following diagram shows howyou can use the Copy function to copy objects between librariesof different types:
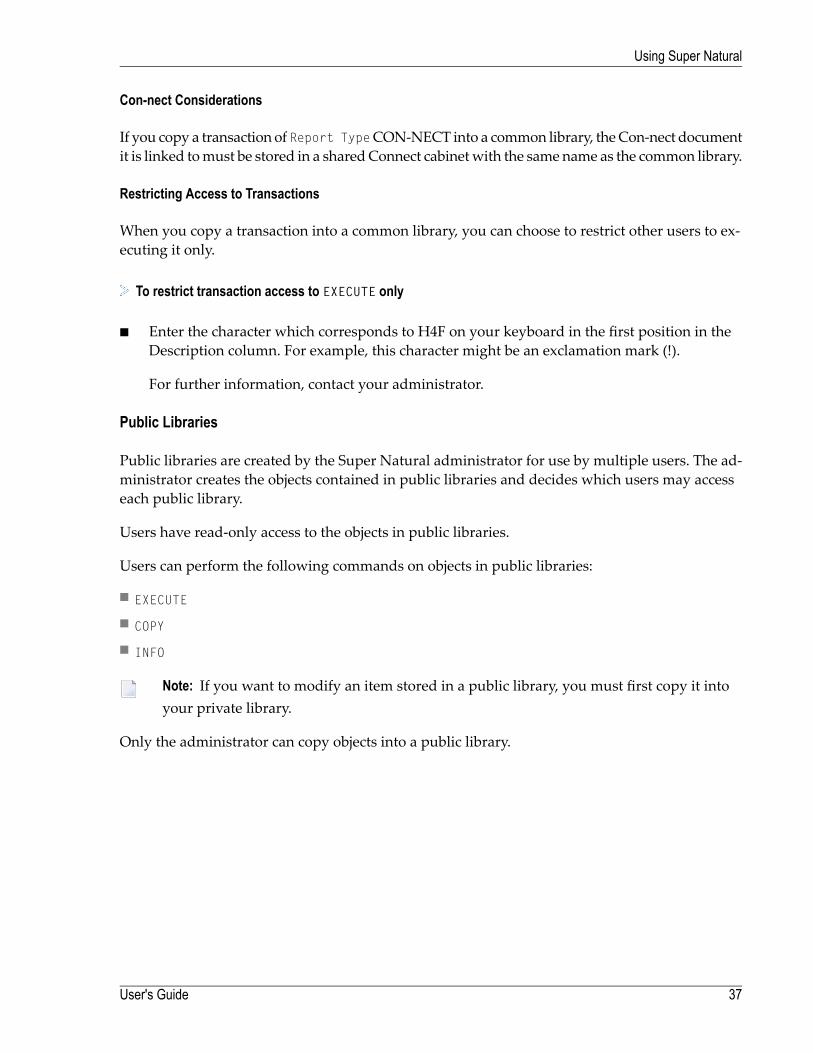
Changing Libraries
The Super Natural List Object screens contain a field named Librarywhich displays the name ofthe library you are working in. By default, you work in your own private library and the fieldcontains your user ID. Only the List User Files screen does not contain the Library field.
The field next to the Library field displays which type of library you are working in. The code Uindicates a private library, C a common library and P a public library.
User's Guide38
Using Super Natural
To change libraries
1 Access any Super Natural List Object screen.
2 Type the ID of the library you want to access in the Library field.
3 Type the library type code of the library you want to access in the Library Type field.
4 Press Enter.
If you enter a library name or typewhich does not exist, a selection list of the libraries or librarytypes available appears.
Listing Libraries
To obtain a selection list of all the library types available
■ Enter an asterisk (*) in the Library Type field.
To obtain a selection list of all the libraries available for the library type displayed
■ Enter an asterisk (*) in the Library field.
Notepad Function
If you want to make notes whilst using Super Natural, you can use the notepad provided just asyou would a piece of paper - the advantage is that it won't get lost!
Writing Notes
To write a note
1 Issue the NOTEPAD command from any point in Super Natural.
The following window appears:
39User's Guide
Using Super Natural
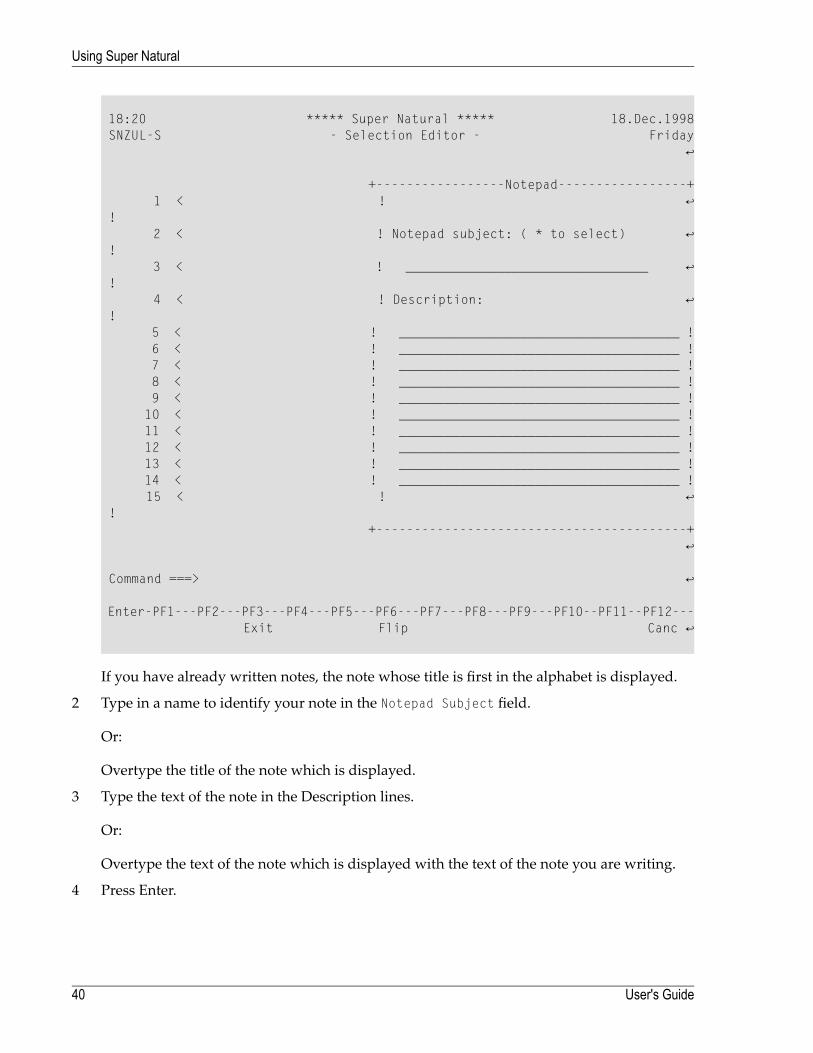
18:20 ***** Super Natural ***** 18.Dec.1998 SNZUL-S - Selection Editor - Friday ↩ +-----------------Notepad-----------------+ 1 < ! ↩ ! 2 < ! Notepad subject: ( * to select) ↩ ! 3 < ! ________________________________ ↩ ! 4 < ! Description: ↩ ! 5 < ! _____________________________________ ! 6 < ! _____________________________________ ! 7 < ! _____________________________________ ! 8 < ! _____________________________________ ! 9 < ! _____________________________________ ! 10 < ! _____________________________________ ! 11 < ! _____________________________________ ! 12 < ! _____________________________________ ! 13 < ! _____________________________________ ! 14 < ! _____________________________________ ! 15 < ! ↩ ! +-----------------------------------------+ ↩ Command ===> ↩ Enter-PF1---PF2---PF3---PF4---PF5---PF6---PF7---PF8---PF9---PF10--PF11--PF12--- Exit Flip Canc ↩
If you have already written notes, the note whose title is first in the alphabet is displayed.
2 Type in a name to identify your note in the Notepad Subject field.
Or:
Overtype the title of the note which is displayed.
3 Type the text of the note in the Description lines.
Or:
Overtype the text of the note which is displayed with the text of the note you are writing.
4 Press Enter.
User's Guide40
Using Super Natural
Listing Notes
To get a list of all existing notes
■ Enter an asterisk (*) in the title line.
A window appears displaying a selection list of the notes available.
To display the note you want to see
1 Mark it.
2 Press Enter.
Deleting Notes
To delete the note displayed
■ Enter X in the input field below (X to erase).
Modifying Notes
To modify the text of a note
1 Type over the existing text.
2 Press Enter.
Closing the Notepad
To close the notepad
■ Press PF8.
The last note is automatically saved.
41User's Guide
Using Super Natural

Technical Information Function
The Technical Information function provides you with technical information concerning yourenvironment as in the following example:
18:01 ***** Super Natural ***** 18.Dec.1998SN1110 - Transaction List - Friday
More: +Cmd Na +------------------------Technical Information------------------------+
*_ ! NSN Version ......... 3.0.0 Operating System .. MVS/XA !__ AD ! PersonalDB-File ..... (0,90) TP Monitor ........ COMPLETE !__ AS ! Device Type ....... PC !__ AU ! NATURAL Version ..... 2.2.4 !__ CH ! PREDICT Version ..... 3.2.0 AOS Version ....... 2.2.2 !__ CO ! CON-NECT Version .... 0.0.0 NSC Version ....... 0.0.0 !__ CO ! !__ CO ! Buffer Sizes: Esize .. 35 k DATsize ... 45 k Usize .. 31 k !__ CO ! Fsize .. 20 k SORTsize .. 10 k Csize .. 1 k !__ CO ! !__ CO ! Last Error Number ... 1101 !__ DA ! Last Error Program .. Last Error Line ... 34 !__ DA ! !
Add __ ! Program: ________ was cataloged at !! !
Cmd(s): +---------------------------------------------------------------------+
Command ===>Enter-PF1---PF2---PF3---PF4---PF5---PF6---PF7---PF8---PF9---PF10--PF11--PF12---
Help Exit Flip Canc
The Technical Information function is always available.
To invoke the Technical Information screen
■ Issue the TECH command.
User's Guide42
Using Super Natural
4 Starting Up
■ Starting a Super Natural Session ........................................................................................................ 44■ How is Super Natural Organized? ....................................................................................................... 44■ Choosing an Object Type or Function .................................................................................................. 45■ Choosing an Object ......................................................................................................................... 47■ Working with an Object ..................................................................................................................... 50
43

This section tells you how to start a session in Super Natural.
This section covers the following topics:
■ Starting a Super Natural Session■ How is Super Natural Organized?■ Choosing an Object Type or Function■ Choosing an Object■ Working with an Object
Starting a Super Natural Session
Within SuperNatural you are identified by a user ID. If your user ID has not already been specifiedby the teleprocessing monitor or by Natural Security, you must specify it yourself when you logon to Super Natural for the first time.
Your SuperNatural administrator can tell you how to log on to SuperNatural in your environment.
How is Super Natural Organized?
Everything you can do with Super Natural can be put into one of three categories:
■ Choosing an object type or function■ Choosing an object■ Working with an object
The following diagram shows how Super Natural is organized.
User's Guide44
Starting Up
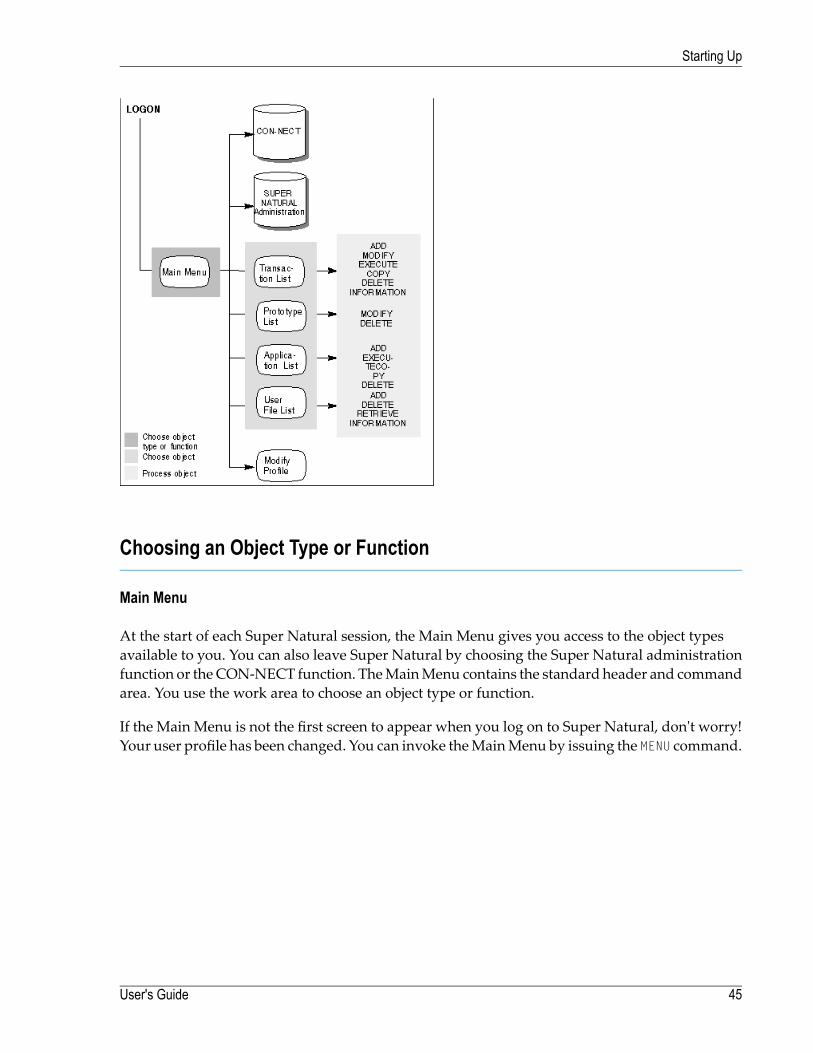
Choosing an Object Type or Function
Main Menu
At the start of each Super Natural session, the Main Menu gives you access to the object typesavailable to you. You can also leave Super Natural by choosing the Super Natural administrationfunction or the CON-NECT function. TheMainMenu contains the standard header and commandarea. You use the work area to choose an object type or function.
If the Main Menu is not the first screen to appear when you log on to Super Natural, don't worry!Your user profile has been changed. You can invoke theMainMenu by issuing the MENU command.
45User's Guide
Starting Up
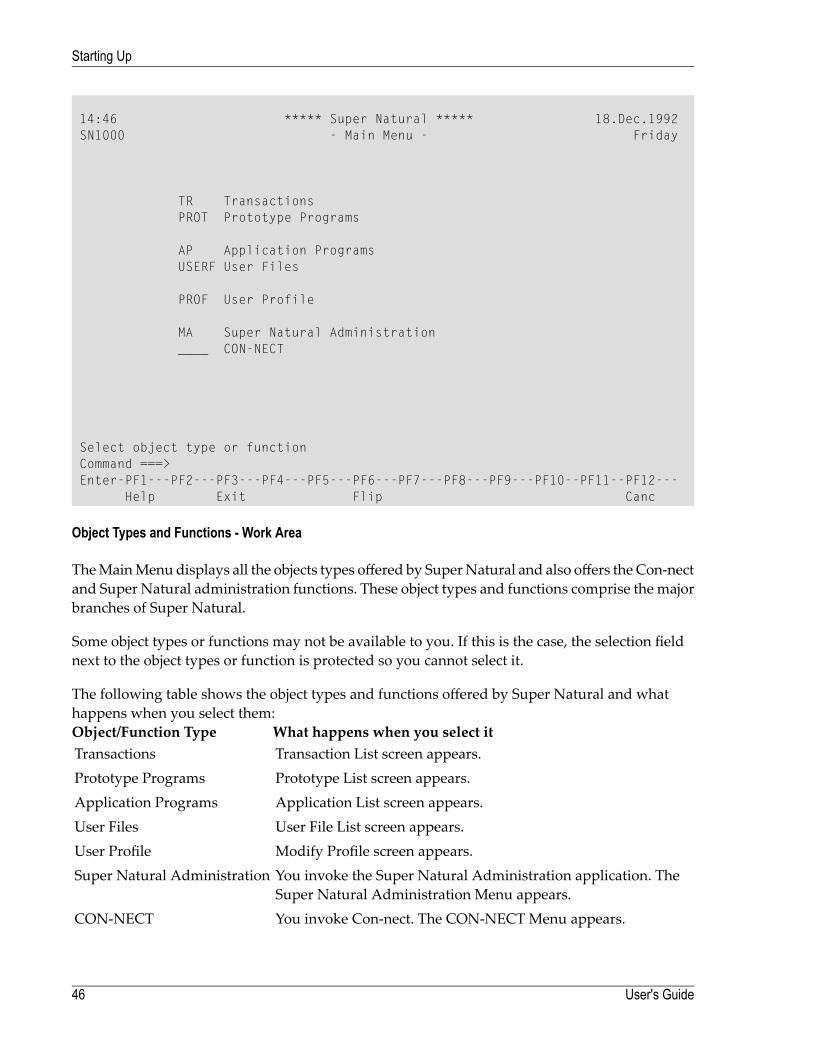
14:46 ***** Super Natural ***** 18.Dec.1992SN1000 - Main Menu - Friday
TR TransactionsPROT Prototype Programs
AP Application ProgramsUSERF User Files
PROF User Profile
MA Super Natural Administration____ CON-NECT
Select object type or functionCommand ===>Enter-PF1---PF2---PF3---PF4---PF5---PF6---PF7---PF8---PF9---PF10--PF11--PF12---
Help Exit Flip Canc
Object Types and Functions - Work Area
TheMainMenu displays all the objects types offered by SuperNatural and also offers the Con-nectand Super Natural administration functions. These object types and functions comprise the majorbranches of Super Natural.
Some object types or functions may not be available to you. If this is the case, the selection fieldnext to the object types or function is protected so you cannot select it.
The following table shows the object types and functions offered by Super Natural and whathappens when you select them:
What happens when you select itObject/Function TypeTransaction List screen appears.TransactionsPrototype List screen appears.Prototype ProgramsApplication List screen appears.Application ProgramsUser File List screen appears.User FilesModify Profile screen appears.User ProfileYou invoke the Super Natural Administration application. TheSuper Natural Administration Menu appears.
Super Natural Administration
You invoke Con-nect. The CON-NECT Menu appears.CON-NECT
User's Guide46
Starting Up
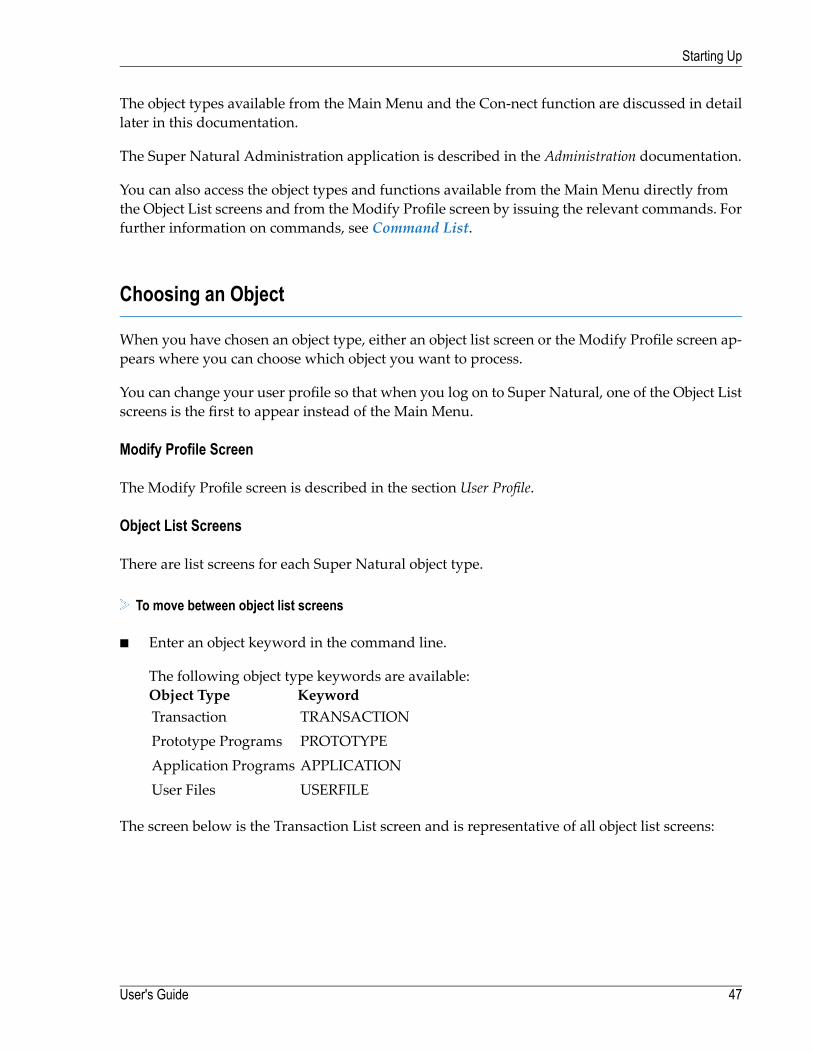
The object types available from the Main Menu and the Con-nect function are discussed in detaillater in this documentation.
The Super Natural Administration application is described in the Administration documentation.
You can also access the object types and functions available from the Main Menu directly fromthe Object List screens and from the Modify Profile screen by issuing the relevant commands. Forfurther information on commands, see Command List.
Choosing an Object
When you have chosen an object type, either an object list screen or the Modify Profile screen ap-pears where you can choose which object you want to process.
You can change your user profile so that when you log on to Super Natural, one of the Object Listscreens is the first to appear instead of the Main Menu.
Modify Profile Screen
The Modify Profile screen is described in the section User Profile.
Object List Screens
There are list screens for each Super Natural object type.
To move between object list screens
■ Enter an object keyword in the command line.
The following object type keywords are available:KeywordObject TypeTRANSACTIONTransactionPROTOTYPEPrototype ProgramsAPPLICATIONApplication ProgramsUSERFILEUser Files
The screen below is the Transaction List screen and is representative of all object list screens:
47User's Guide
Starting Up
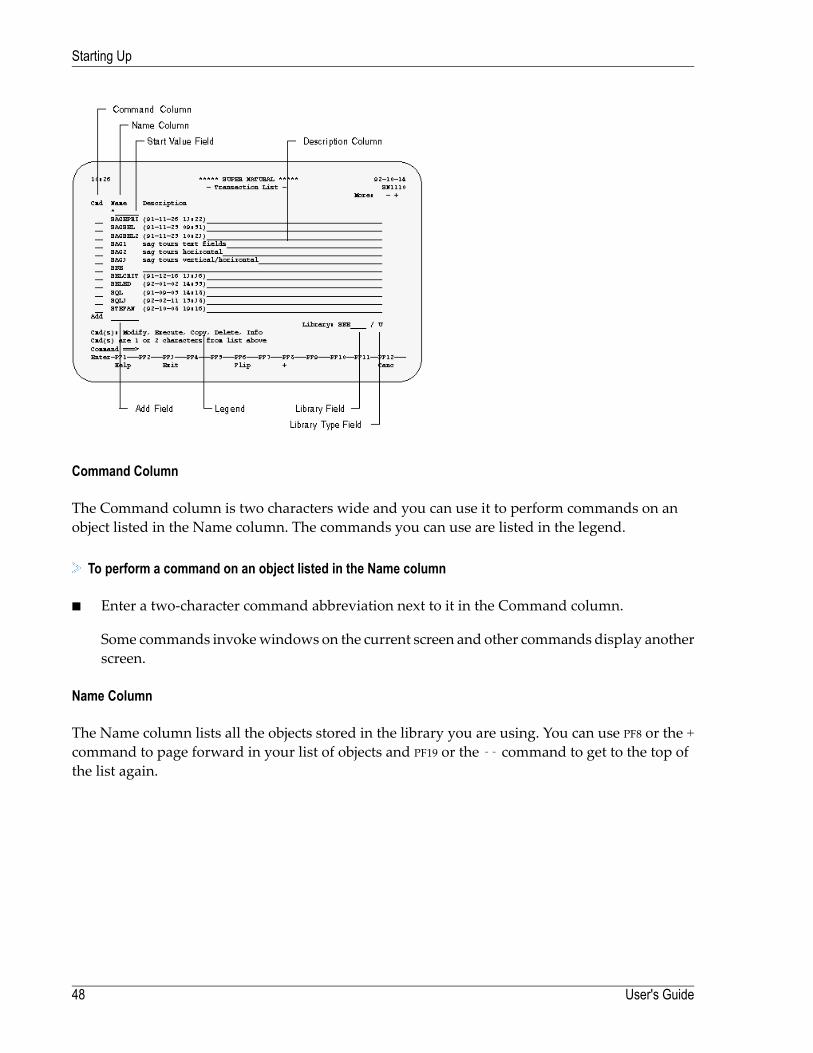
Command Column
The Command column is two characters wide and you can use it to perform commands on anobject listed in the Name column. The commands you can use are listed in the legend.
To perform a command on an object listed in the Name column
■ Enter a two-character command abbreviation next to it in the Command column.
Some commands invokewindows on the current screen and other commands display anotherscreen.
Name Column
The Name column lists all the objects stored in the library you are using. You can use PF8 or the +command to page forward in your list of objects and PF19 or the -- command to get to the top ofthe list again.
User's Guide48
Starting Up
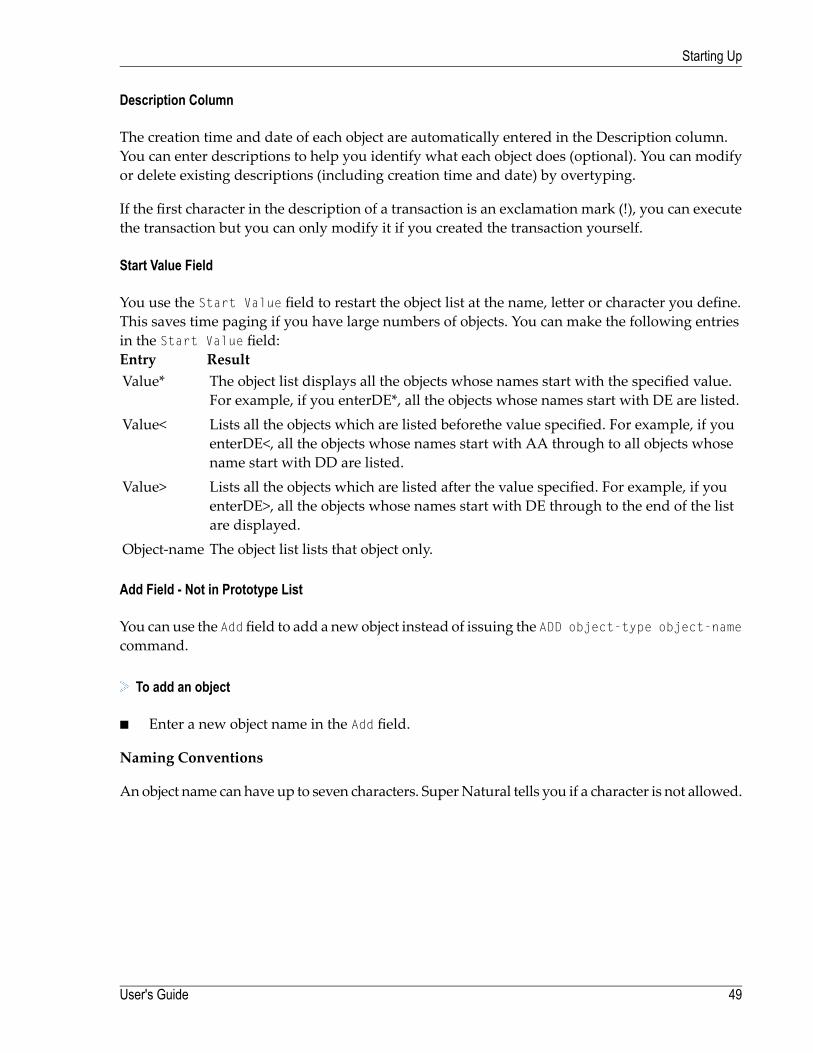
Description Column
The creation time and date of each object are automatically entered in the Description column.You can enter descriptions to help you identify what each object does (optional). You can modifyor delete existing descriptions (including creation time and date) by overtyping.
If the first character in the description of a transaction is an exclamation mark (!), you can executethe transaction but you can only modify it if you created the transaction yourself.
Start Value Field
You use the Start Value field to restart the object list at the name, letter or character you define.This saves time paging if you have large numbers of objects. You can make the following entriesin the Start Value field:
ResultEntryThe object list displays all the objects whose names start with the specified value.For example, if you enterDE*, all the objects whose names start with DE are listed.
Value*
Lists all the objects which are listed beforethe value specified. For example, if youenterDE<, all the objects whose names start with AA through to all objects whosename start with DD are listed.
Value<
Lists all the objects which are listed after the value specified. For example, if youenterDE>, all the objects whose names start with DE through to the end of the listare displayed.
Value>
The object list lists that object only.Object-name
Add Field - Not in Prototype List
You can use the Add field to add a new object instead of issuing the ADD object-type object-namecommand.
To add an object
■ Enter a new object name in the Add field.
Naming Conventions
Anobject name can have up to seven characters. SuperNatural tells you if a character is not allowed.
49User's Guide
Starting Up

Legend
The legend lists the commands you can use in the command column. Use the first two letters (orjust the first letter if the command remains unique) of the commands listed.
Library Field
The Library field indicates which library you are using. For further information on libraries, seeLibraries in Using Super Natural.
The Library Type Field
The Library Type field indicates type of library you are using. For further information on libraries,see Libraries in Using Super Natural.
Working with an Object
You can issue commands to be performed on particular objects from the Object List screens or theModify Profile screen.
Once you have chosen an object and perform a command on it, a variety of things can happenaccording to object type, transaction type and transaction modes. For example, a window, an ed-itor or the Worksheet may appear.
Each object type is described in its own section later in this documentation.
In the case of transactions, the processing which takes place once you have left the TransactionList screen is referred to as being within a transaction.
User's Guide50
Starting Up

5 Using Reporting Transactions
■ What are Reporting Transactions? ...................................................................................................... 52■ Listing Transactions ......................................................................................................................... 53■ Adding Transactions ........................................................................................................................ 53■ Keeping Transactions ....................................................................................................................... 58■ Saving Transactions ........................................................................................................................ 58■ Running Transactions ...................................................................................................................... 59■ Reports Which are Too Wide ............................................................................................................. 59■ Modifying Transactions ..................................................................................................................... 61■ Executing Transactions .................................................................................................................... 62■ Copying Transactions ....................................................................................................................... 62■ Deleting Transactions ....................................................................................................................... 64■ Information (Info) Function ................................................................................................................ 65■ Commands Available From Within a Transaction ................................................................................... 67
51
This section describes reporting transactions and the commands which you can use with them.
Note: Data maintenance transactions are described in the section Data Maintenance Trans-actions later in this documentation.
This section covers the following topics:
■ What are Reporting Transactions?■ Listing Transactions■ Adding Transactions■ Keeping Transactions■ Saving Transactions■ Running Transactions■ Reports Which are Too Wide■ Modifying Transactions■ Executing Transactions■ Copying Transactions■ Deleting Transactions■ The Information (Info) Function■ Commands Available FromWithin a Transaction
What are Reporting Transactions?
Reporting transactions are the most important part of Super Natural.
Super Natural's main task is to obtain data from a database file, work file or PC file. Reportingtransactions provide you with the framework necessary to tell Super Natural which data youwant.
Modes for reporting govern the basic conditions under which the transaction runs, for examplereport type and report destination.
For further information on modes, seeModes for Reporting in Defining Transaction Modes for Re-porting.
When you have finished adding a reporting transaction and run it, Super Natural provides youwith the data you have requested in the form of a report.
Note: You can use the CHECKLIST function and the NEXT function to help you add andmodify reporting transactions. For further information, see Using Super Natural.
User's Guide52
Using Reporting Transactions
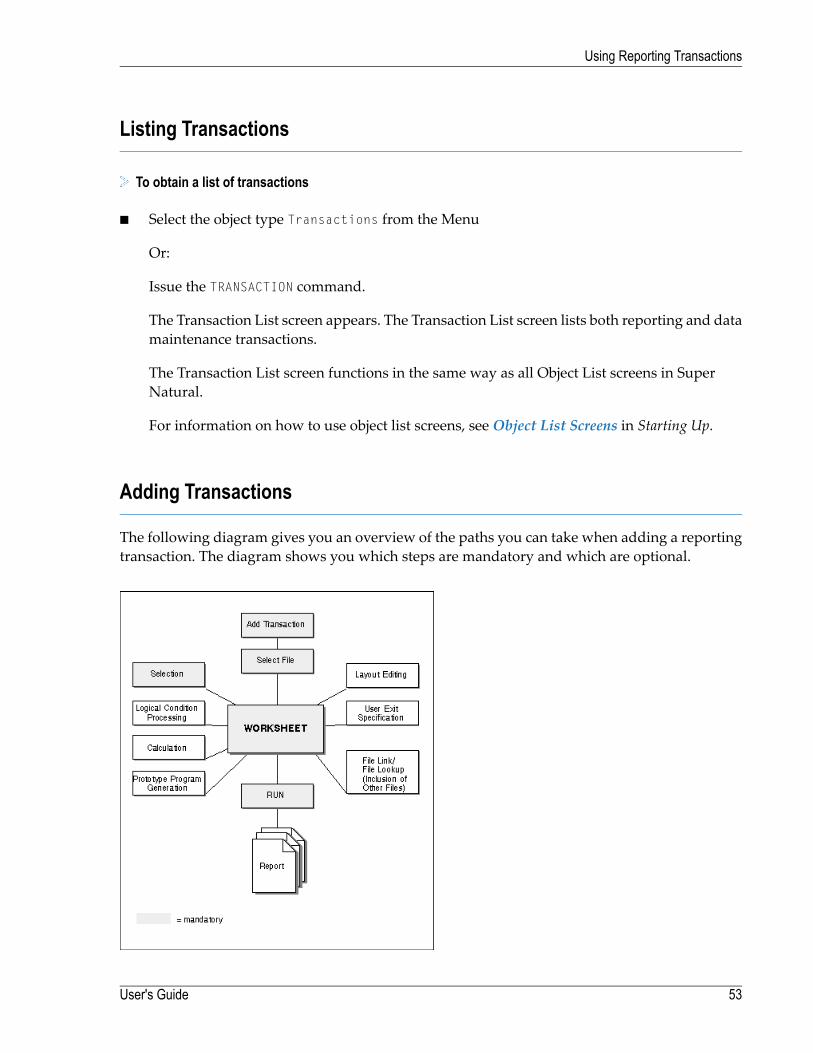
Listing Transactions
To obtain a list of transactions
■ Select the object type Transactions from the Menu
Or:
Issue the TRANSACTION command.
The Transaction List screen appears. The Transaction List screen lists both reporting and datamaintenance transactions.
The Transaction List screen functions in the same way as all Object List screens in SuperNatural.
For information on how to use object list screens, seeObject List Screens in Starting Up.
Adding Transactions
The following diagram gives you an overview of the paths you can take when adding a reportingtransaction. The diagram shows you which steps are mandatory and which are optional.
53User's Guide
Using Reporting Transactions
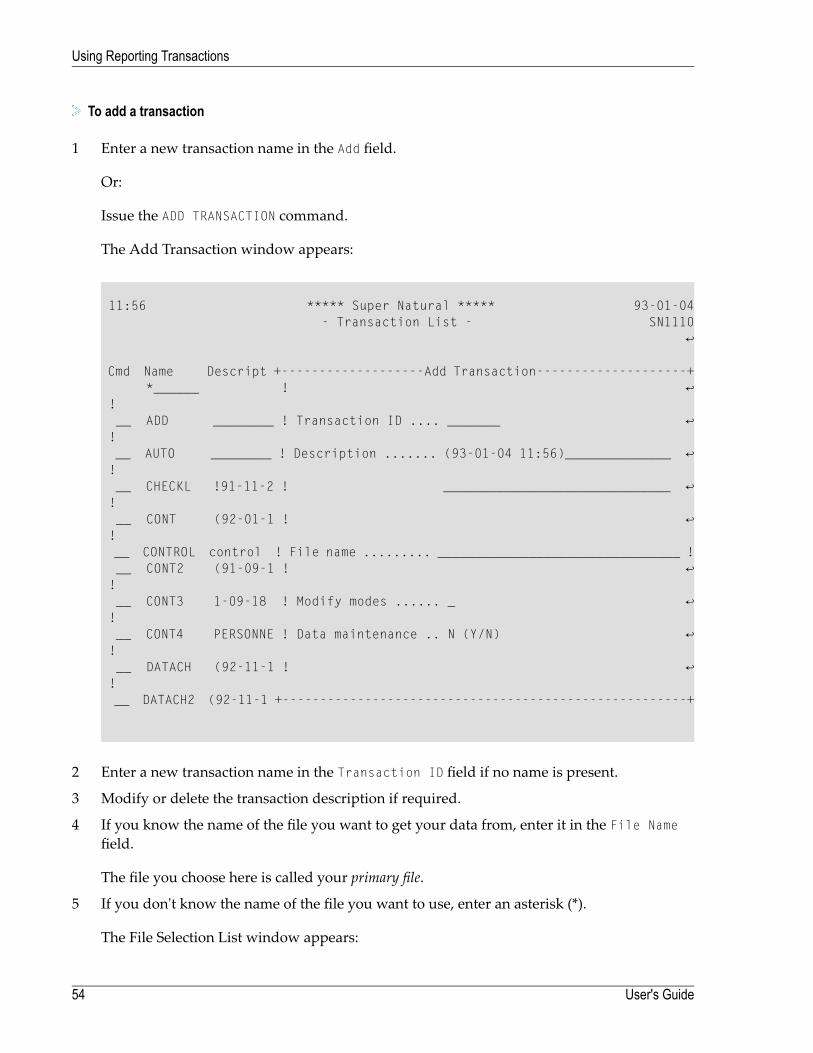
To add a transaction
1 Enter a new transaction name in the Add field.
Or:
Issue the ADD TRANSACTION command.
The Add Transaction window appears:
11:56 ***** Super Natural ***** 93-01-04 - Transaction List - SN1110 ↩ Cmd Name Descript +-------------------Add Transaction--------------------+ *______ ! ↩ ! __ ADD ________ ! Transaction ID .... _______ ↩ ! __ AUTO ________ ! Description ....... (93-01-04 11:56)______________ ↩ ! __ CHECKL !91-11-2 ! ______________________________ ↩ ! __ CONT (92-01-1 ! ↩ ! __ CONTROL control ! File name ......... ________________________________ ! __ CONT2 (91-09-1 ! ↩ ! __ CONT3 1-09-18 ! Modify modes ...... _ ↩ ! __ CONT4 PERSONNE ! Data maintenance .. N (Y/N) ↩ ! __ DATACH (92-11-1 ! ↩ ! __ DATACH2 (92-11-1 +------------------------------------------------------+
2 Enter a new transaction name in the Transaction ID field if no name is present.
3 Modify or delete the transaction description if required.
4 If you know the name of the file you want to get your data from, enter it in the File Namefield.
The file you choose here is called your primary file.
5 If you don't know the name of the file you want to use, enter an asterisk (*).
The File Selection List window appears:
User's Guide54
Using Reporting Transactions
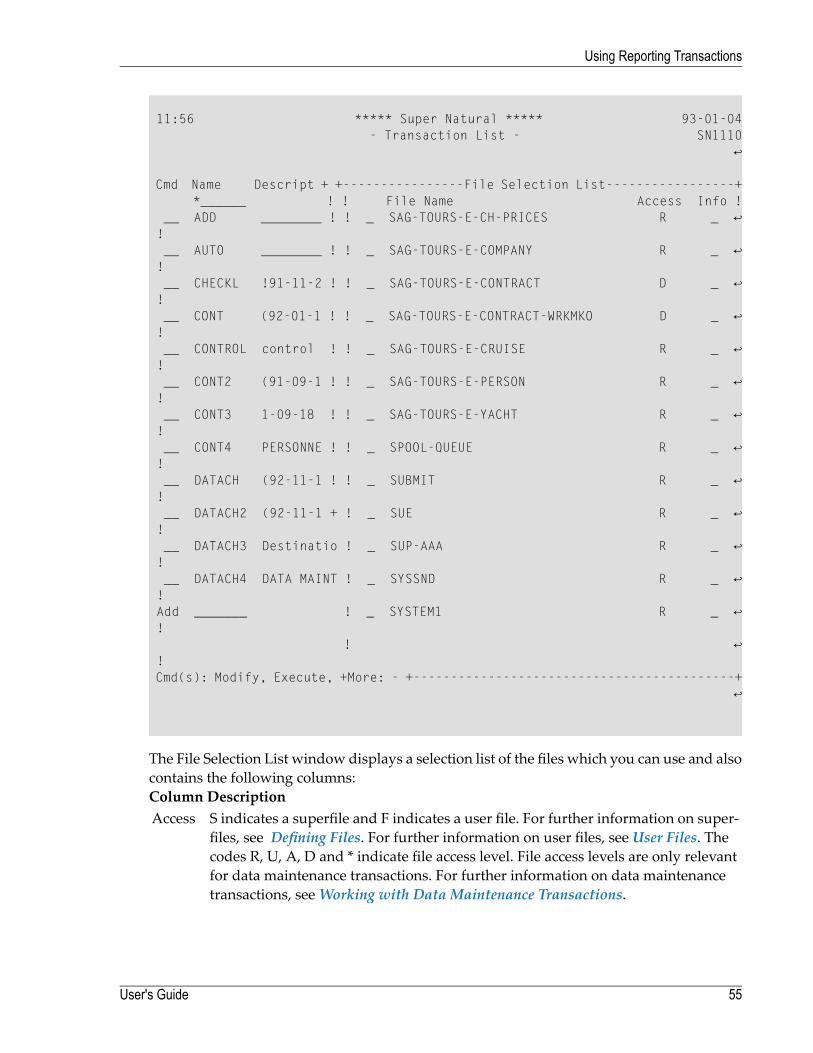
11:56 ***** Super Natural ***** 93-01-04 - Transaction List - SN1110 ↩ Cmd Name Descript + +----------------File Selection List-----------------+ *______ ! ! File Name Access Info ! __ ADD ________ ! ! _ SAG-TOURS-E-CH-PRICES R _ ↩ ! __ AUTO ________ ! ! _ SAG-TOURS-E-COMPANY R _ ↩ ! __ CHECKL !91-11-2 ! ! _ SAG-TOURS-E-CONTRACT D _ ↩ ! __ CONT (92-01-1 ! ! _ SAG-TOURS-E-CONTRACT-WRKMKO D _ ↩ ! __ CONTROL control ! ! _ SAG-TOURS-E-CRUISE R _ ↩ ! __ CONT2 (91-09-1 ! ! _ SAG-TOURS-E-PERSON R _ ↩ ! __ CONT3 1-09-18 ! ! _ SAG-TOURS-E-YACHT R _ ↩ ! __ CONT4 PERSONNE ! ! _ SPOOL-QUEUE R _ ↩ ! __ DATACH (92-11-1 ! ! _ SUBMIT R _ ↩ ! __ DATACH2 (92-11-1 + ! _ SUE R _ ↩ ! __ DATACH3 Destinatio ! _ SUP-AAA R _ ↩ ! __ DATACH4 DATA MAINT ! _ SYSSND R _ ↩ ! Add _______ ! _ SYSTEM1 R _ ↩ ! ! ↩ ! Cmd(s): Modify, Execute, +More: - +-------------------------------------------+ ↩
The File Selection List window displays a selection list of the files which you can use and alsocontains the following columns:
DescriptionColumnS indicates a superfile and F indicates a user file. For further information on super-files, see Defining Files. For further information on user files, see User Files. The
Access
codes R, U, A, D and * indicate file access level. File access levels are only relevantfor data maintenance transactions. For further information on data maintenancetransactions, seeWorking with Data Maintenance Transactions.
55User's Guide
Using Reporting Transactions
DescriptionColumnMark this column to obtain first comments if available and then an extended filedescription from the data dictionary Predict. This feature is only available at siteswhere Predict is installed. No dictionary information is available for user files.
Info
Inserting fields into aDDMor deleting them affects SuperNatural's internal field referencing.This means that you may either not be able to run existing transactions or that running themwill result in unpredictable data.
To insert a field
1 Select your primary file.
2 Press Enter.
You are returned to the Add Transaction window. The name of the file you have selected isentered in the File Name field.
3 Mark the Modify Modes field to modify your default transaction modes for the current trans-action only.
If you don't mark this field, you continue to add the transaction using your default modes.For further information on transactionmodes, seeDefining TransactionModes for Reportingand Defining Transaction Modes for Data Maintenance.
4 Enter Y in the Data Maintenance field if you want to add a data maintenance transaction.
For further information ondatamaintenance transactions, seeWorkingwithDataMaintenanceTransactions.
If you leave the default setting N (No), you continue to add a reporting transaction.
5 Press Enter.
The Worksheet appears:
User's Guide56
Using Reporting Transactions
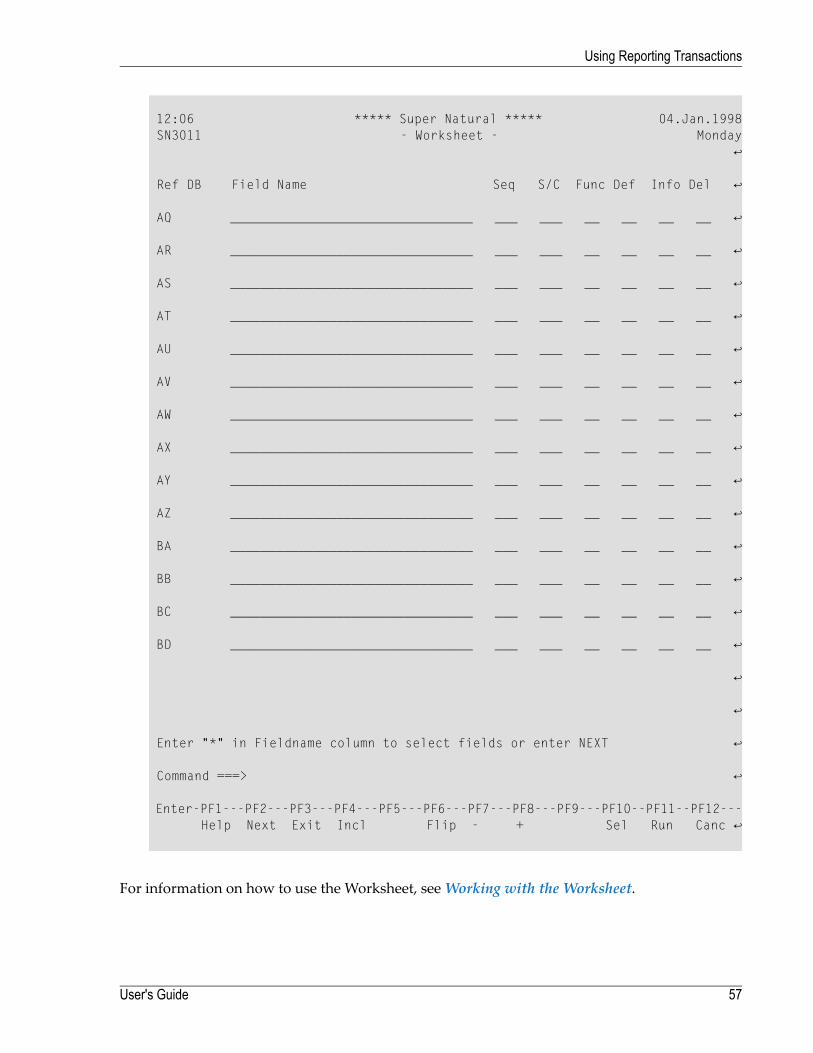
12:06 ***** Super Natural ***** 04.Jan.1998 SN3011 - Worksheet - Monday ↩ Ref DB Field Name Seq S/C Func Def Info Del ↩ AQ ________________________________ ___ ___ __ __ __ __ ↩ AR ________________________________ ___ ___ __ __ __ __ ↩ AS ________________________________ ___ ___ __ __ __ __ ↩ AT ________________________________ ___ ___ __ __ __ __ ↩ AU ________________________________ ___ ___ __ __ __ __ ↩ AV ________________________________ ___ ___ __ __ __ __ ↩ AW ________________________________ ___ ___ __ __ __ __ ↩ AX ________________________________ ___ ___ __ __ __ __ ↩ AY ________________________________ ___ ___ __ __ __ __ ↩ AZ ________________________________ ___ ___ __ __ __ __ ↩ BA ________________________________ ___ ___ __ __ __ __ ↩ BB ________________________________ ___ ___ __ __ __ __ ↩ BC ________________________________ ___ ___ __ __ __ __ ↩ BD ________________________________ ___ ___ __ __ __ __ ↩ ↩ ↩ Enter "*" in Fieldname column to select fields or enter NEXT ↩ Command ===> ↩ Enter-PF1---PF2---PF3---PF4---PF5---PF6---PF7---PF8---PF9---PF10--PF11--PF12--- Help Next Exit Incl Flip - + Sel Run Canc ↩
For information on how to use the Worksheet, seeWorking with the Worksheet.
57User's Guide
Using Reporting Transactions

As shown in the diagram at the beginning of this section, you can leave theWorksheet to performone of severalmajor functions in any order youwish. The following table shows themajor functionsavailable from the Worksheet and where they are documented:
section Where it is DocumentedFunctionEditorsSelection criteria specification (mandatory)EditorsCalculation criteria specificationEditorsLogical condition criteria specificationUser ExitsUser exit specificationNatural Report ManagerLayout editingFilesFile linking and/or lookup (Including other files in the transac-
tion)Prototype ProgramsPrototype program generation
Keeping Transactions
If you want to, you can keep a transaction which is either not finished or still has errors in it andfinish it later.
To save a transaction which is incomplete or has errors in it
■ Issue the KEEP command from within the transaction.
Note: You cannot execute the transaction (for example from the Transaction List) if it haserrors or is incomplete.
Saving Transactions
If you have completed a transaction but do not want to see the results immediately, you can saveit.
To save a transaction
■ Issue the SAVE command from within the transaction.
Note: You cannot save a transaction which has errors in it.
If the report is too wide, the Report Line Length window appears. For further information,see Reports Which are Too Wide.
User's Guide58
Using Reporting Transactions
Running Transactions
If you want to see the results of a transaction, you must run it.
To run a transaction
■ Issue the RUN command from within the transaction.
Super Natural then provides you with the data you require in the form you have chosen. Thetransaction is saved.
Note: You cannot run a transaction which has errors in it.
If you want to run an existing transaction without modifying it, it is most efficient to issue theEXECUTE command from the Transaction List screen.
Note: For further information on the SAVE, KEEP, RUN and EXECUTE commands, seeCommandList.
If the report is too wide, the Report Line Length window appears. For further information, seeReports Which are Too Wide.
Reports Which are Too Wide
When using the transactionmodes Destination SCREEN, PRINTER, CON-NECT or EDITOR, youmay select so many fields for display that they exceed the width (line length) of the screen orprinter to which you are sending the report. If your report is too wide, the Report Line Lengthwindow appears when you save or run the transaction:
59User's Guide
Using Reporting Transactions
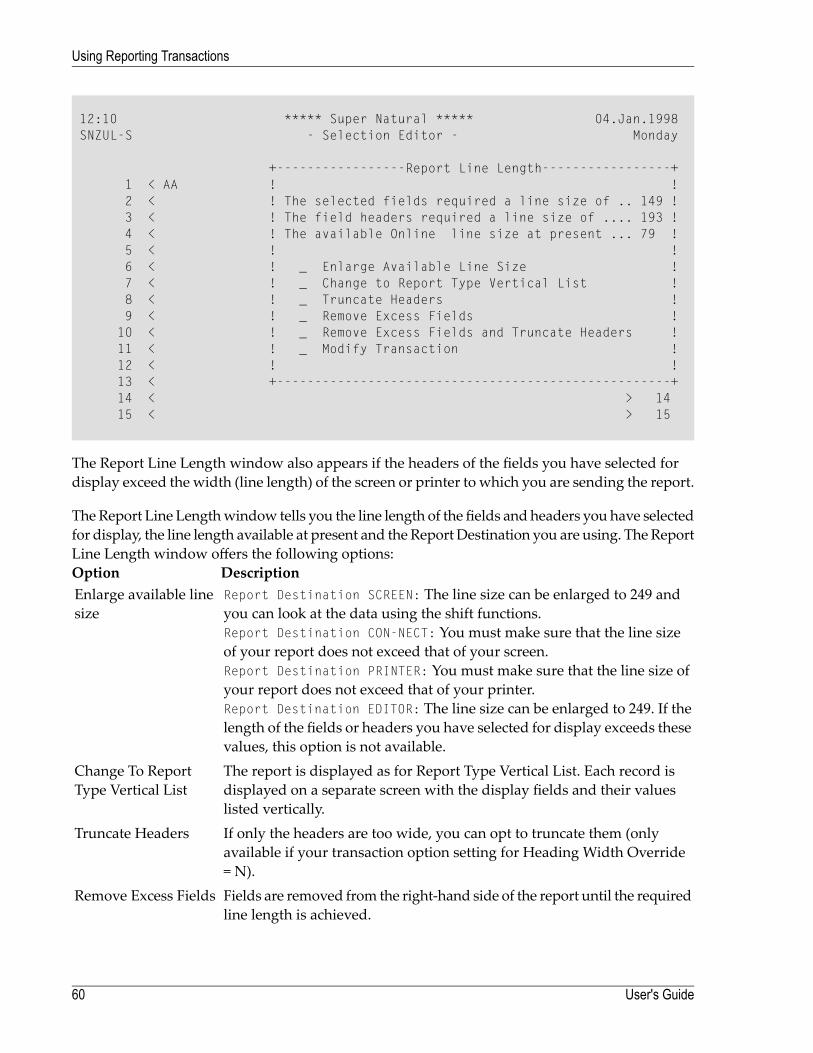
12:10 ***** Super Natural ***** 04.Jan.1998SNZUL-S - Selection Editor - Monday
+-----------------Report Line Length-----------------+1 < AA ! !2 < ! The selected fields required a line size of .. 149 !3 < ! The field headers required a line size of .... 193 !4 < ! The available Online line size at present ... 79 !5 < ! !6 < ! _ Enlarge Available Line Size !7 < ! _ Change to Report Type Vertical List !8 < ! _ Truncate Headers !9 < ! _ Remove Excess Fields !
10 < ! _ Remove Excess Fields and Truncate Headers !11 < ! _ Modify Transaction !12 < ! !13 < +----------------------------------------------------+14 < > 1415 < > 15
The Report Line Length window also appears if the headers of the fields you have selected fordisplay exceed the width (line length) of the screen or printer to which you are sending the report.
The Report Line Lengthwindow tells you the line length of the fields and headers you have selectedfor display, the line length available at present and the Report Destination you are using. The ReportLine Length window offers the following options:
DescriptionOptionReport Destination SCREEN: The line size can be enlarged to 249 andyou can look at the data using the shift functions.Report Destination CON-NECT: You must make sure that the line sizeof your report does not exceed that of your screen.Report Destination PRINTER: You must make sure that the line size ofyour report does not exceed that of your printer.Report Destination EDITOR: The line size can be enlarged to 249. If thelength of the fields or headers you have selected for display exceeds thesevalues, this option is not available.
Enlarge available linesize
The report is displayed as for Report Type Vertical List. Each record isdisplayed on a separate screen with the display fields and their valueslisted vertically.
Change To ReportType Vertical List
If only the headers are too wide, you can opt to truncate them (onlyavailable if your transaction option setting for Heading Width Override= N).
Truncate Headers
Fields are removed from the right-hand side of the report until the requiredline length is achieved.
Remove Excess Fields
User's Guide60
Using Reporting Transactions
DescriptionOptionFields are removed from the right-hand side of the and Truncate Head-ers/tab/report and headers are truncated until the required line length isachieved.
Remove Excess Fields
You are returned to the Worksheet where you can modify your report.For example, you canmodify your transaction options to make the online
Modify transaction
screen size larger (for further information, see Working with User Files)or you canmodify thewidth of the columns and their headers by changingtheir output definition (for further information, see The Field DefinitionColumn inWorking with the Worksheet).
Modifying Transactions
You may want to go back and modify (change) a transaction once you have run it or modify anexisting transaction.
To modify a transaction
■ Enter the command abbreviation MO in the command column of the Transaction List screennext to the transaction name.
Or:
Issue the MODIFY TRANSACTION name command.
The Worksheet appears.
You may not change the following when modifying a transaction:
■ File specification■ Certain reporting modes. For example, if you created a transaction using the data selectionmode SQL-SELECT, you may not change it.
Transactions with Restricted Access
If you are in a common library, some transactions may have restricted access. Transactions withrestricted access are marked with an exclamation mark (!) in the first position in the Descriptioncolumn and you can only execute them.
61User's Guide
Using Reporting Transactions
Executing Transactions
If you want to run an existing transaction without modifying it, it is most efficient to issue theEXECUTE command from the Transaction List screen. This is because when you issue the EXECUTEcommand, SuperNatural uses the transaction as it waswhen the transactionwas last run or saved.When you run a transaction using the RUN command, Super Natural completely recreates thetransaction even if you have not modified it since it was last run or saved.
To execute a transaction
■ Enter the command abbreviation EX in the command column of the Transaction List screennext to the transaction name.
Or:
Issue the EXECUTE TRANSACTION name command.
For further information on the SAVE, KEEP, RUN and EXECUTE commands, see Command List.
Note: You cannot execute a transaction which you left using the KEEP command.
Copying Transactions
You may not copy a transaction into a public library.
You may not copy transactions with destination USERFILE.
To copy a transaction
1 Enter the command abbreviation CO in the command column of the Transaction List screennext to the transaction name.
Or:
Issue the COPY TRANSACTION name command.
The Copy window appears:
User's Guide62
Using Reporting Transactions
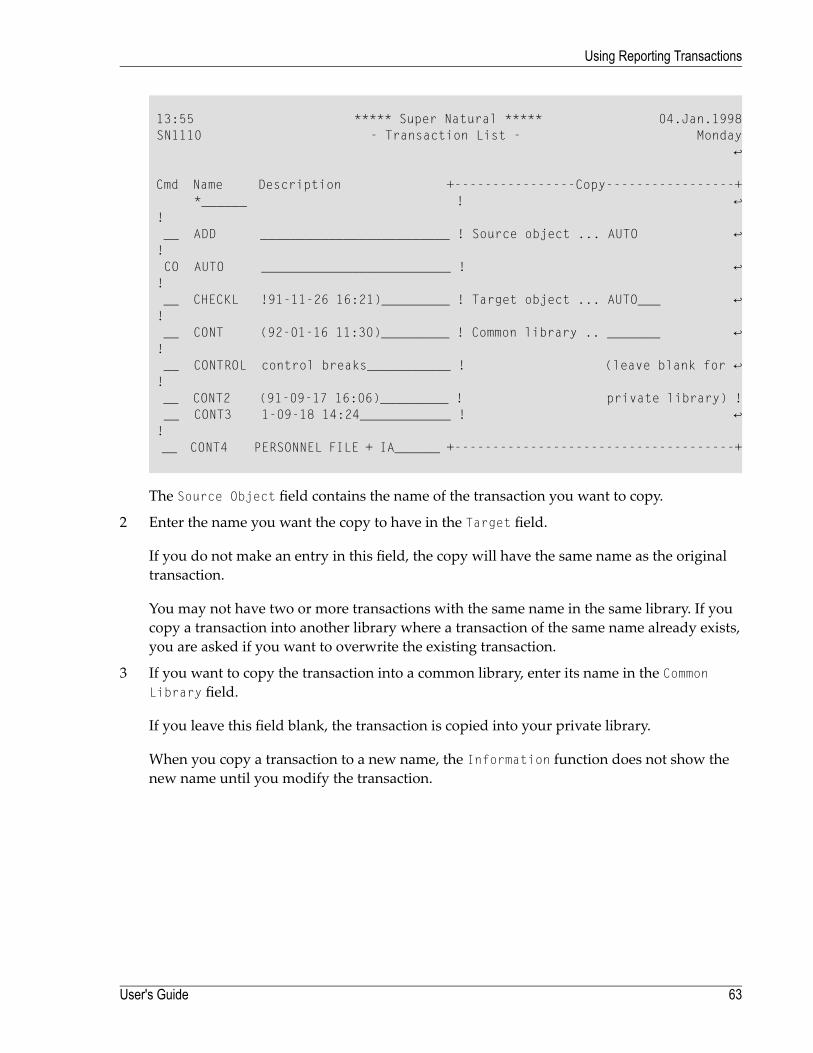
13:55 ***** Super Natural ***** 04.Jan.1998 SN1110 - Transaction List - Monday ↩ Cmd Name Description +----------------Copy-----------------+ *______ ! ↩ ! __ ADD _________________________ ! Source object ... AUTO ↩ ! CO AUTO _________________________ ! ↩ ! __ CHECKL !91-11-26 16:21)_________ ! Target object ... AUTO___ ↩ ! __ CONT (92-01-16 11:30)_________ ! Common library .. _______ ↩ ! __ CONTROL control breaks___________ ! (leave blank for ↩ ! __ CONT2 (91-09-17 16:06)_________ ! private library) ! __ CONT3 1-09-18 14:24____________ ! ↩ ! __ CONT4 PERSONNEL FILE + IA______ +-------------------------------------+
The Source Object field contains the name of the transaction you want to copy.
2 Enter the name you want the copy to have in the Target field.
If you do not make an entry in this field, the copy will have the same name as the originaltransaction.
You may not have two or more transactions with the same name in the same library. If youcopy a transaction into another library where a transaction of the same name already exists,you are asked if you want to overwrite the existing transaction.
3 If you want to copy the transaction into a common library, enter its name in the CommonLibrary field.
If you leave this field blank, the transaction is copied into your private library.
When you copy a transaction to a new name, the Information function does not show thenew name until you modify the transaction.
63User's Guide
Using Reporting Transactions
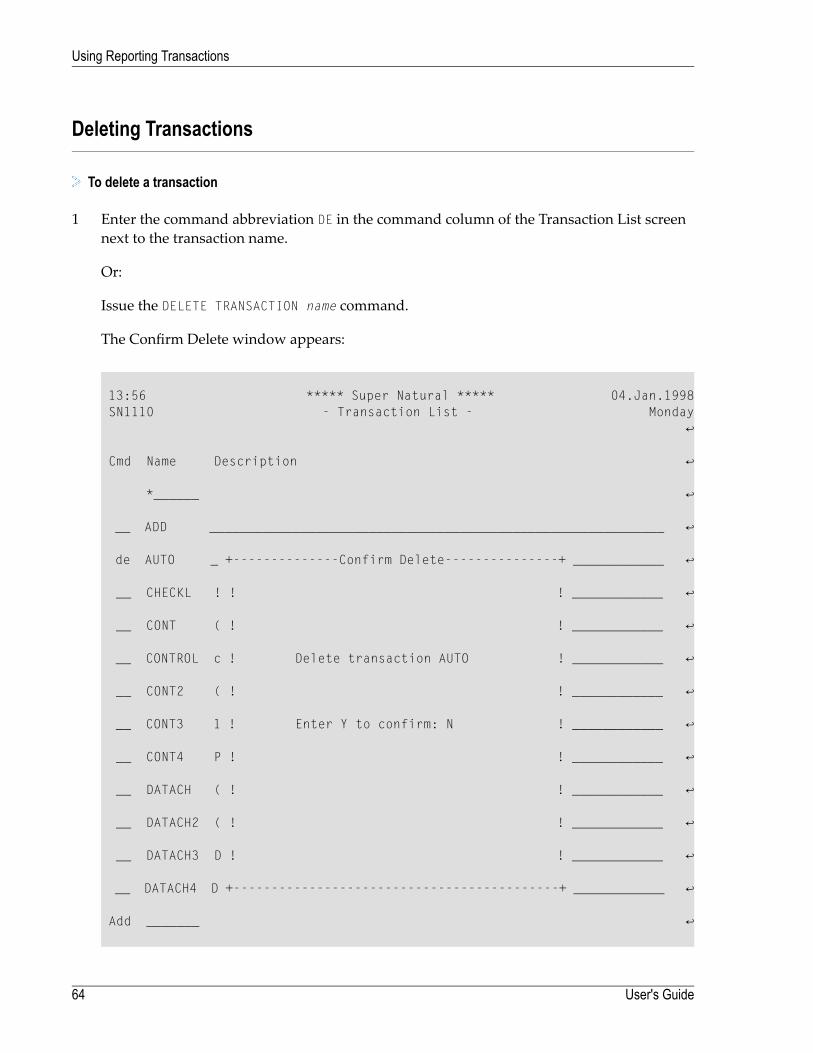
Deleting Transactions
To delete a transaction
1 Enter the command abbreviation DE in the command column of the Transaction List screennext to the transaction name.
Or:
Issue the DELETE TRANSACTION name command.
The Confirm Delete window appears:
13:56 ***** Super Natural ***** 04.Jan.1998 SN1110 - Transaction List - Monday ↩ Cmd Name Description ↩ *______ ↩ __ ADD ____________________________________________________________ ↩ de AUTO _ +--------------Confirm Delete---------------+ ____________ ↩ __ CHECKL ! ! ! ____________ ↩ __ CONT ( ! ! ____________ ↩ __ CONTROL c ! Delete transaction AUTO ! ____________ ↩ __ CONT2 ( ! ! ____________ ↩ __ CONT3 1 ! Enter Y to confirm: N ! ____________ ↩ __ CONT4 P ! ! ____________ ↩ __ DATACH ( ! ! ____________ ↩ __ DATACH2 ( ! ! ____________ ↩ __ DATACH3 D ! ! ____________ ↩ __ DATACH4 D +-------------------------------------------+ ____________ ↩ Add _______ ↩
User's Guide64
Using Reporting Transactions
2 Enter Y to confirm the deletion.
You can also delete several transactions at the same time. In this case, the Confirm MultipleDelete window appears. You can choose if you want to confirm each deletion, delete withoutconfirmation or cancel the deletion.
Information (Info) Function
To obtain information about a transaction
■ Enter the command abbreviation IN in the command column of the Transaction List screennext to the transaction name.
Or:
Issue the INFO TRANSACTION name command.
The Transaction Information window appears:
65User's Guide
Using Reporting Transactions
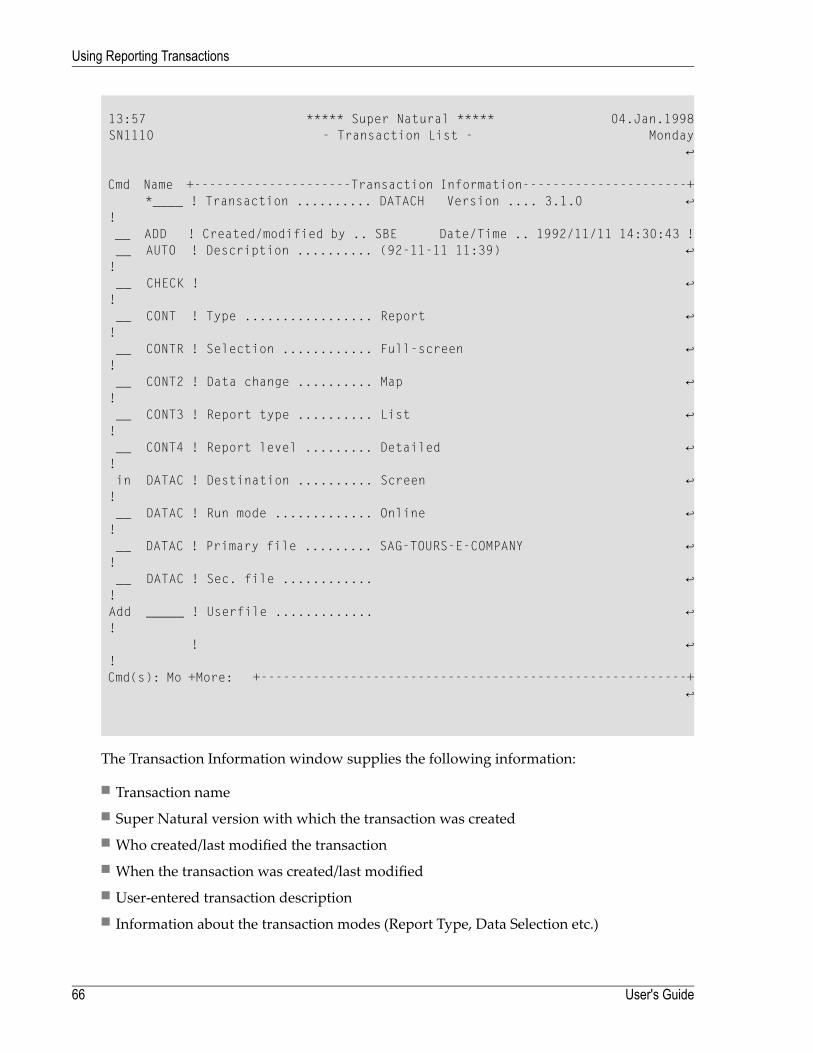
13:57 ***** Super Natural ***** 04.Jan.1998 SN1110 - Transaction List - Monday ↩ Cmd Name +---------------------Transaction Information----------------------+ *____ ! Transaction .......... DATACH Version .... 3.1.0 ↩ ! __ ADD ! Created/modified by .. SBE Date/Time .. 1992/11/11 14:30:43 ! __ AUTO ! Description .......... (92-11-11 11:39) ↩ ! __ CHECK ! ↩ ! __ CONT ! Type ................. Report ↩ ! __ CONTR ! Selection ............ Full-screen ↩ ! __ CONT2 ! Data change .......... Map ↩ ! __ CONT3 ! Report type .......... List ↩ ! __ CONT4 ! Report level ......... Detailed ↩ ! in DATAC ! Destination .......... Screen ↩ ! __ DATAC ! Run mode ............. Online ↩ ! __ DATAC ! Primary file ......... SAG-TOURS-E-COMPANY ↩ ! __ DATAC ! Sec. file ............ ↩ ! Add _____ ! Userfile ............. ↩ ! ! ↩ ! Cmd(s): Mo +More: +---------------------------------------------------------+ ↩
The Transaction Information window supplies the following information:
■ Transaction name■ Super Natural version with which the transaction was created■ Who created/last modified the transaction■ When the transaction was created/last modified■ User-entered transaction description■ Information about the transaction modes (Report Type, Data Selection etc.)
User's Guide66
Using Reporting Transactions
■ Primary file■ Secondary file (if defined)■ Name of user file (for Destination USER FILE)
You can page forward to obtain information on the following if relevant to the transaction:
■ Link and lookup fields used.■ Selection criteria■ Calculation■ Logical conditions■ Fields used
When you print the information, you are also providedwith information on the entries madein the Worksheet.
Note: When you copy a transaction to a new name, the Information function does notshow the new name until you modify the transaction.
Commands Available From Within a Transaction
The following commands are available fromwithin a transaction (the default PF key functions andcommands specific to the Worksheet are not included):
Note: For a list of the default PF key functions, see Using Super Natural.
Note: For a list of commands specific to the Worksheet, seeWorking with the Worksheet.
DescriptionCommand (Abbreviation)
Invokes the Calculation Editor.CALCULATION (CAL)
Invokes the Checklist window (not in Natural Report Manager).CHECKLIST (CHECKL)
Counts the number of records found by the present transaction but does notdisplay the resulting data.
COUNT (COU)
Generates a prototype program from the transaction you are working on. Youcannot generate a prototype program from a transaction which is not finished.
GENERATE (GE)
Invokes the Include Fileswindowwhere you can do the following (not inNaturalReport Manager):
INCLUDE (INC)
67User's Guide
Using Reporting Transactions
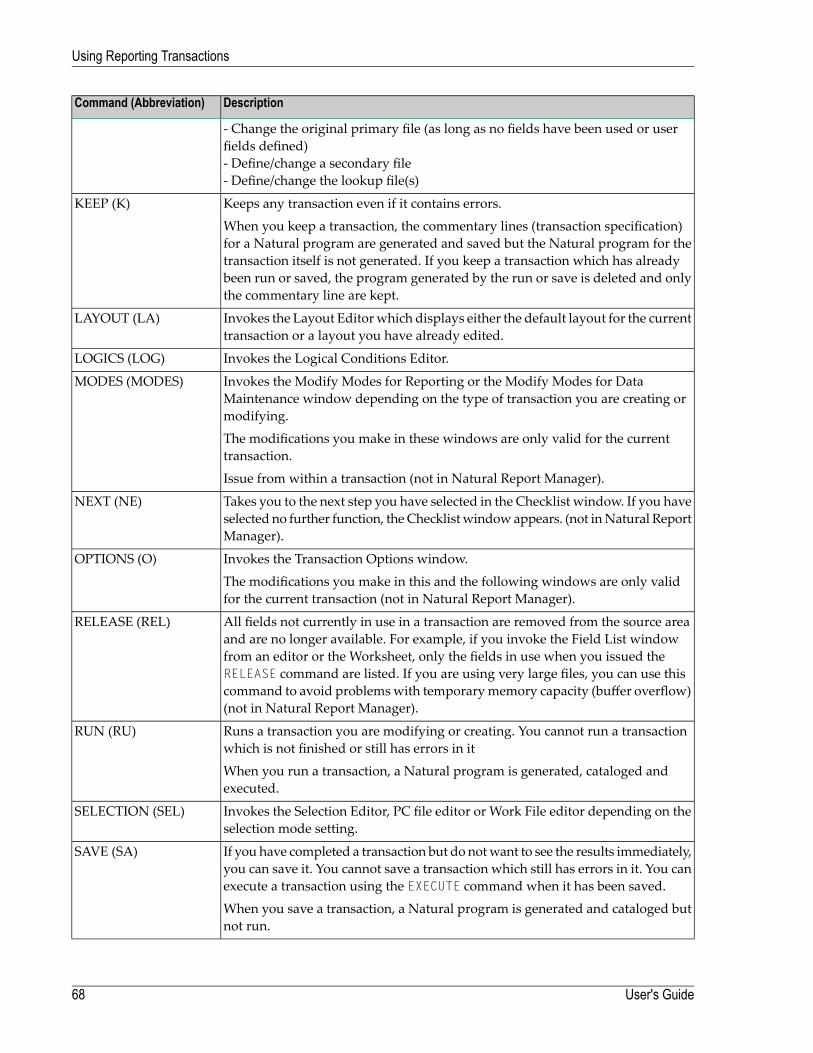
DescriptionCommand (Abbreviation)
- Change the original primary file (as long as no fields have been used or userfields defined)- Define/change a secondary file- Define/change the lookup file(s)
Keeps any transaction even if it contains errors.KEEP (K)
When you keep a transaction, the commentary lines (transaction specification)for a Natural program are generated and saved but the Natural program for thetransaction itself is not generated. If you keep a transaction which has alreadybeen run or saved, the program generated by the run or save is deleted and onlythe commentary line are kept.
Invokes the Layout Editorwhich displays either the default layout for the currenttransaction or a layout you have already edited.
LAYOUT (LA)
Invokes the Logical Conditions Editor.LOGICS (LOG)
Invokes the Modify Modes for Reporting or the Modify Modes for DataMaintenance window depending on the type of transaction you are creating ormodifying.
MODES (MODES)
The modifications you make in these windows are only valid for the currenttransaction.
Issue from within a transaction (not in Natural Report Manager).
Takes you to the next step you have selected in the Checklist window. If you haveselected no further function, the Checklistwindowappears. (not inNatural ReportManager).
NEXT (NE)
Invokes the Transaction Options window.OPTIONS (O)
The modifications you make in this and the following windows are only validfor the current transaction (not in Natural Report Manager).
All fields not currently in use in a transaction are removed from the source areaand are no longer available. For example, if you invoke the Field List window
RELEASE (REL)
from an editor or the Worksheet, only the fields in use when you issued theRELEASE command are listed. If you are using very large files, you can use thiscommand to avoid problemswith temporarymemory capacity (buffer overflow)(not in Natural Report Manager).
Runs a transaction you are modifying or creating. You cannot run a transactionwhich is not finished or still has errors in it
RUN (RU)
When you run a transaction, a Natural program is generated, cataloged andexecuted.
Invokes the Selection Editor, PC file editor or Work File editor depending on theselection mode setting.
SELECTION (SEL)
If you have completed a transaction but do notwant to see the results immediately,you can save it. You cannot save a transaction which still has errors in it. You canexecute a transaction using the EXECUTE command when it has been saved.
SAVE (SA)
When you save a transaction, a Natural program is generated and cataloged butnot run.
User's Guide68
Using Reporting Transactions

DescriptionCommand (Abbreviation)
Invokes the Tabular Report Specification screen when you are adding a report ofreport type TABLE. Issue fromwithin a transaction of report type TABLE (not inNatural Report Manager).
TABULAR (TABU)
Invokes the Exit Specification screen.USEREXIT (USERE)
Invokes the Worksheet (not in Natural Report Manager).WORKSHEET (W)
69User's Guide
Using Reporting Transactions

70
6 Working with the Worksheet
■ What is the Worksheet? .................................................................................................................... 72■ Field Reference Column ................................................................................................................... 74■ Database Reference Column ............................................................................................................. 74■ Field Name Column ......................................................................................................................... 76■ Text Variable Column ....................................................................................................................... 81■ Sequence Column ........................................................................................................................... 81■ Sort/Control Column ........................................................................................................................ 88■ Option Column ................................................................................................................................ 91■ Function Column ............................................................................................................................. 91■ Field Definition Column ..................................................................................................................... 98■ Information (Info) Column ................................................................................................................ 101■ Delete Column .............................................................................................................................. 102■ Commands Available from the Worksheet ........................................................................................... 103
71
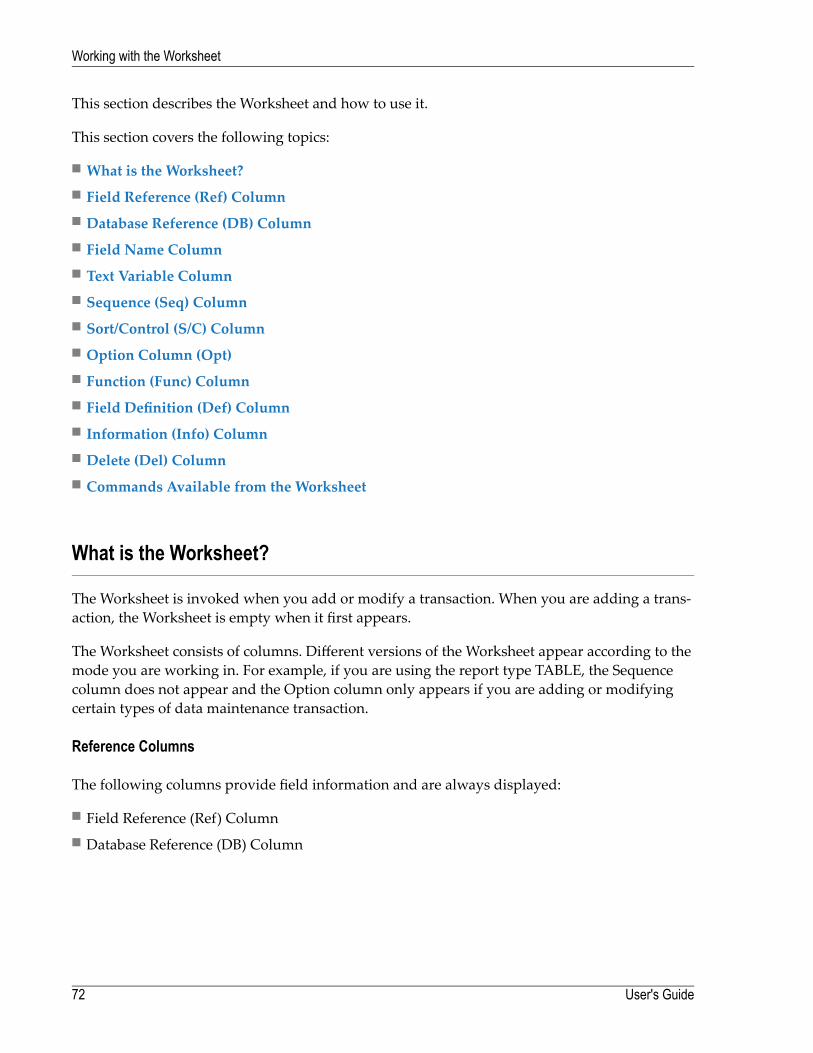
This section describes the Worksheet and how to use it.
This section covers the following topics:
■ What is the Worksheet?■ Field Reference (Ref) Column■ Database Reference (DB) Column■ Field Name Column■ Text Variable Column■ Sequence (Seq) Column■ Sort/Control (S/C) Column■ Option Column (Opt)■ Function (Func) Column■ Field Definition (Def) Column■ Information (Info) Column■ Delete (Del) Column■ Commands Available from the Worksheet
What is the Worksheet?
The Worksheet is invoked when you add or modify a transaction. When you are adding a trans-action, the Worksheet is empty when it first appears.
The Worksheet consists of columns. Different versions of the Worksheet appear according to themode you are working in. For example, if you are using the report type TABLE, the Sequencecolumn does not appear and the Option column only appears if you are adding or modifyingcertain types of data maintenance transaction.
Reference Columns
The following columns provide field information and are always displayed:
■ Field Reference (Ref) Column■ Database Reference (DB) Column
User's Guide72
Working with the Worksheet

Input Columns
The following are input columns and may not always be displayed:
■ Field Name column■ Text Variable column■ Sequence (Seq) column■ Sort/Control (S/C) column■ Option (Opt) column■ Function (Func) column■ Field Definition (Def) column■ Information (Info) column■ Delete (Del) column■ Key column
The number and type of columns which are displayed depend on the type of transaction you areadding or modifying.
Function Codes
You can enter two-letter function codes in all of the input columns except for the Field Namecolumn and the Text Variable column.
If you are not sure what to enter in the columns, you can use the online help system to obtain in-formation.
To obtain information on what to enter in a column
■ Enter a question mark (?) opposite the relevant field.
Column Protection - Columns "Closed"
When you have selected a field, the columns you can use in conjunction with it are opened. Theinput fields in the Worksheet columns open and close according to the entries you make on theWorksheet and elsewhere in SuperNatural. SuperNatural only allows you tomake an entrywherean entry is meaningful. For example, you cannot define a sort or control break for a group fieldand you cannot display a phonetic descriptor.
73User's Guide
Working with the Worksheet
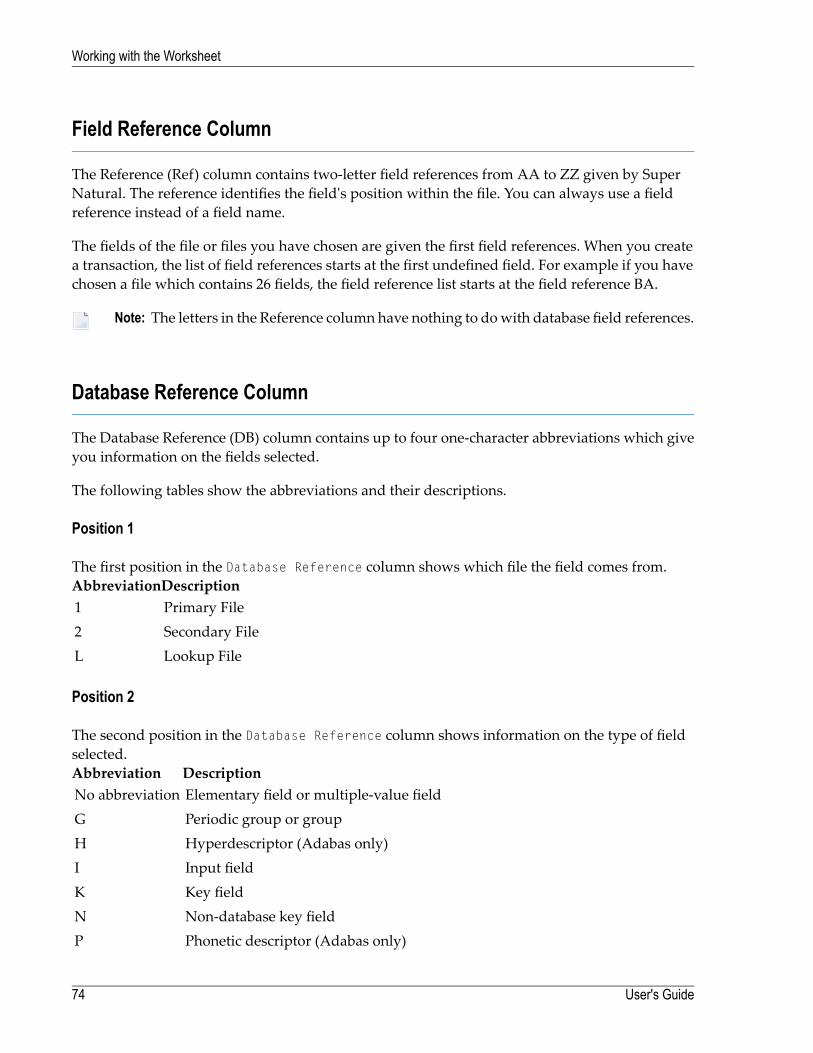
Field Reference Column
The Reference (Ref) column contains two-letter field references from AA to ZZ given by SuperNatural. The reference identifies the field's position within the file. You can always use a fieldreference instead of a field name.
The fields of the file or files you have chosen are given the first field references. When you createa transaction, the list of field references starts at the first undefined field. For example if you havechosen a file which contains 26 fields, the field reference list starts at the field reference BA.
Note: The letters in the Reference column have nothing to dowith database field references.
Database Reference Column
The Database Reference (DB) column contains up to four one-character abbreviations which giveyou information on the fields selected.
The following tables show the abbreviations and their descriptions.
Position 1
The first position in the Database Reference column shows which file the field comes from.DescriptionAbbreviationPrimary File1Secondary File2Lookup FileL
Position 2
The second position in the Database Reference column shows information on the type of fieldselected.
DescriptionAbbreviationElementary field or multiple-value fieldNo abbreviationPeriodic group or groupGHyperdescriptor (Adabas only)HInput fieldIKey fieldKNon-database key fieldNPhonetic descriptor (Adabas only)P
User's Guide74
Working with the Worksheet
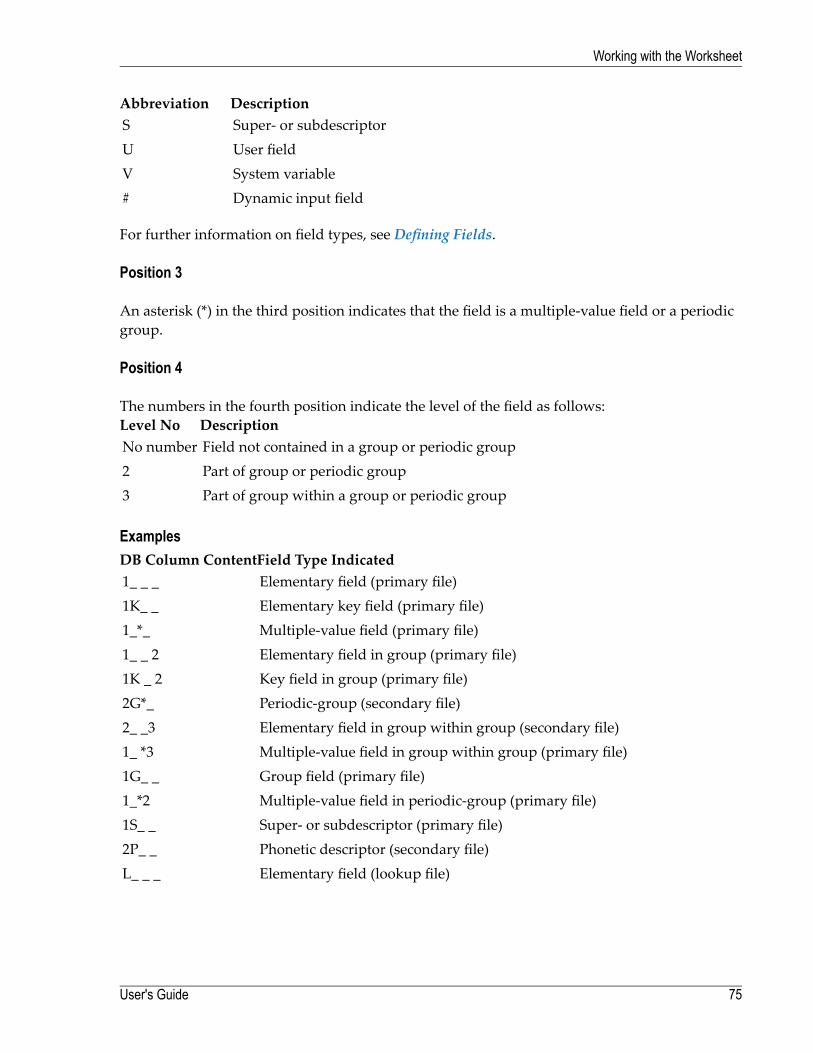
DescriptionAbbreviationSuper- or subdescriptorSUser fieldUSystem variableVDynamic input field#
For further information on field types, see Defining Fields.
Position 3
An asterisk (*) in the third position indicates that the field is a multiple-value field or a periodicgroup.
Position 4
The numbers in the fourth position indicate the level of the field as follows:DescriptionLevel NoField not contained in a group or periodic groupNo numberPart of group or periodic group2Part of group within a group or periodic group3
ExamplesField Type IndicatedDB Column ContentElementary field (primary file)1_ _ _Elementary key field (primary file)1K_ _Multiple-value field (primary file)1_*_Elementary field in group (primary file)1_ _ 2Key field in group (primary file)1K _ 2Periodic-group (secondary file)2G*_Elementary field in group within group (secondary file)2_ _3Multiple-value field in group within group (primary file)1_ *3Group field (primary file)1G_ _Multiple-value field in periodic-group (primary file)1_*2Super- or subdescriptor (primary file)1S_ _Phonetic descriptor (secondary file)2P_ _Elementary field (lookup file)L_ _ _
75User's Guide
Working with the Worksheet
Field Name Column
Use the Field Name column to select the fields you want to use. As well as database fields youcan use user fields, and system variables. If you are adding a transactionwith the transactionmodeData Selection WORK FILE or PC FILE, you use input fields. The different types of fields are de-scribed in detail in the section Fields. System variables are described in detail in System Variables.
Field Order
The fields which appear in the Field Name column are automatically sorted in order of their fieldreferences. Database fields are listed first, then user fields and then system variables.
Selecting Fields Directly
If you already know which database fields, input variables or system variables you want to use,you can select them directly.
To select fields directly
■ Enter their names directly in the Field Name column.
Selecting Database Fields Using the Field Selection List Window
If you do not knowwhich fields the file contains, or if you want to save on typing, you can invokethe Field Selection List window.
For further descriptions on the DB column, see Database Reference Column
User's Guide76
Working with the Worksheet
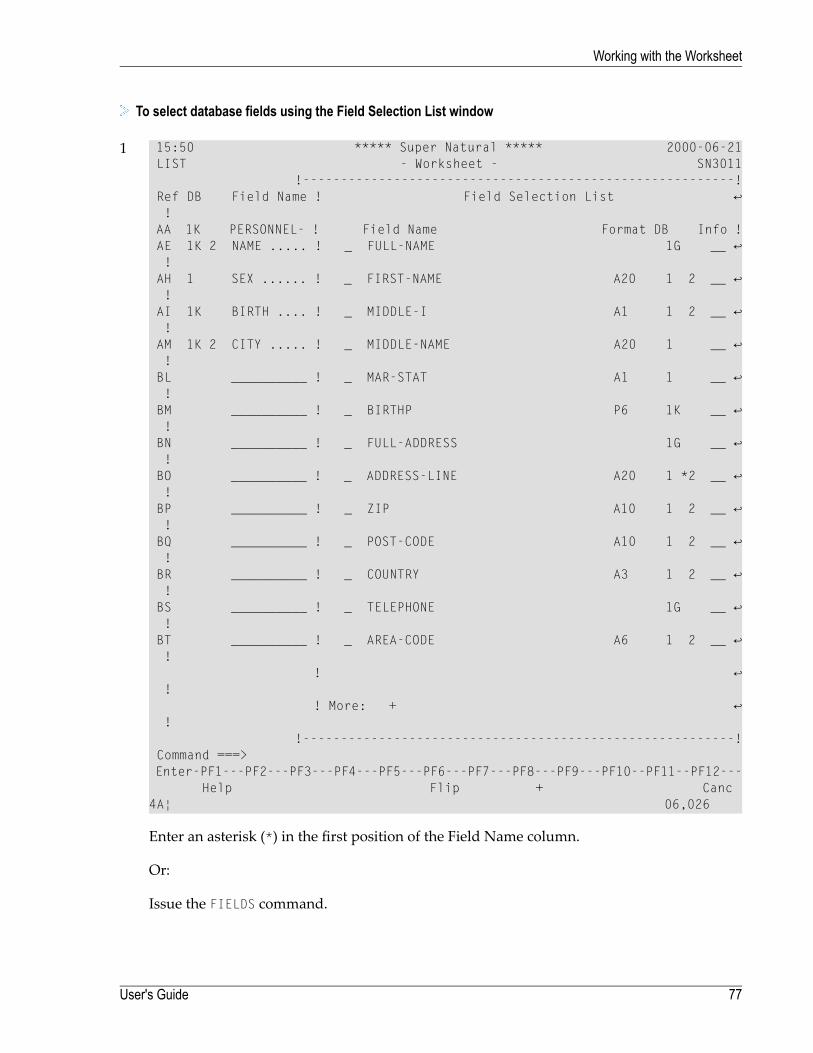
To select database fields using the Field Selection List window
1 15:50 ***** Super Natural ***** 2000-06-21 LIST - Worksheet - SN3011 !---------------------------------------------------------! Ref DB Field Name ! Field Selection List ↩ ! AA 1K PERSONNEL- ! Field Name Format DB Info ! AE 1K 2 NAME ..... ! _ FULL-NAME 1G __ ↩ ! AH 1 SEX ...... ! _ FIRST-NAME A20 1 2 __ ↩ ! AI 1K BIRTH .... ! _ MIDDLE-I A1 1 2 __ ↩ ! AM 1K 2 CITY ..... ! _ MIDDLE-NAME A20 1 __ ↩ ! BL __________ ! _ MAR-STAT A1 1 __ ↩ ! BM __________ ! _ BIRTHP P6 1K __ ↩ ! BN __________ ! _ FULL-ADDRESS 1G __ ↩ ! BO __________ ! _ ADDRESS-LINE A20 1 *2 __ ↩ ! BP __________ ! _ ZIP A10 1 2 __ ↩ ! BQ __________ ! _ POST-CODE A10 1 2 __ ↩ ! BR __________ ! _ COUNTRY A3 1 2 __ ↩ ! BS __________ ! _ TELEPHONE 1G __ ↩ ! BT __________ ! _ AREA-CODE A6 1 2 __ ↩ ! ! ↩ ! ! More: + ↩ ! !---------------------------------------------------------! Command ===> Enter-PF1---PF2---PF3---PF4---PF5---PF6---PF7---PF8---PF9---PF10--PF11--PF12--- Help Flip + Canc4A¦ 06,026
Enter an asterisk (*) in the first position of the Field Name column.
Or:
Issue the FIELDS command.
77User's Guide
Working with the Worksheet
The Field Selection List window displays a list of all the fields contained in the file or filesyou are using apart from those already displayed in the Field Name column.
2 Mark the fields you require.
3 Press Enter.
The fields are transferred to the Field Name column.
Selecting All Fields
To select all the fields in the file(s) you are using
■ Issue the ALL command.
The fields are entered in the Field Name column.
Selecting System Variables Using the Field Selection List Window
If you don't know which system variables Super Natural offers, or if you want to save on typing,you can invoke the Field Selection List window for system variables.
To select system variables using the Field Selection List window
1 Enter two asterisks (**) in the Field Name column.
The Field Selection List window for system variables appears.
The Field Selection List window for system variables displays a list of all the system variablesavailable to you apart from those already displayed in the Field Name column.
2 Mark the system variables you require.
3 Press Enter.
The system variables are transferred to the Field Name column:
Note: System variables are described in detail in System Variables.
User's Guide78
Working with the Worksheet
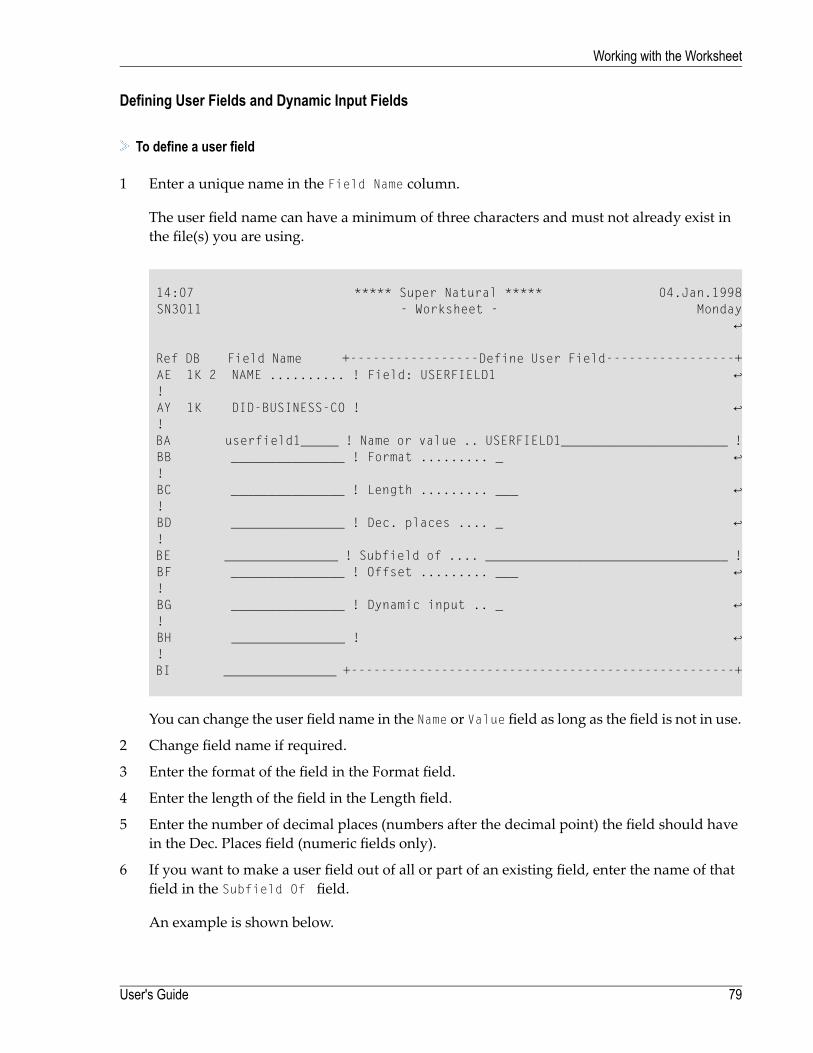
Defining User Fields and Dynamic Input Fields
To define a user field
1 Enter a unique name in the Field Name column.
The user field name can have a minimum of three characters and must not already exist inthe file(s) you are using.
14:07 ***** Super Natural ***** 04.Jan.1998 SN3011 - Worksheet - Monday ↩ Ref DB Field Name +-----------------Define User Field-----------------+ AE 1K 2 NAME .......... ! Field: USERFIELD1 ↩ ! AY 1K DID-BUSINESS-CO ! ↩ ! BA userfield1_____ ! Name or value .. USERFIELD1______________________ ! BB _______________ ! Format ......... _ ↩ ! BC _______________ ! Length ......... ___ ↩ ! BD _______________ ! Dec. places .... _ ↩ ! BE _______________ ! Subfield of .... ________________________________ ! BF _______________ ! Offset ......... ___ ↩ ! BG _______________ ! Dynamic input .. _ ↩ ! BH _______________ ! ↩ ! BI _______________ +---------------------------------------------------+
You can change the user field name in the Name or Value field as long as the field is not in use.
2 Change field name if required.
3 Enter the format of the field in the Format field.
4 Enter the length of the field in the Length field.
5 Enter the number of decimal places (numbers after the decimal point) the field should havein the Dec. Places field (numeric fields only).
6 If you want to make a user field out of all or part of an existing field, enter the name of thatfield in the Subfield Of field.
An example is shown below.
79User's Guide
Working with the Worksheet
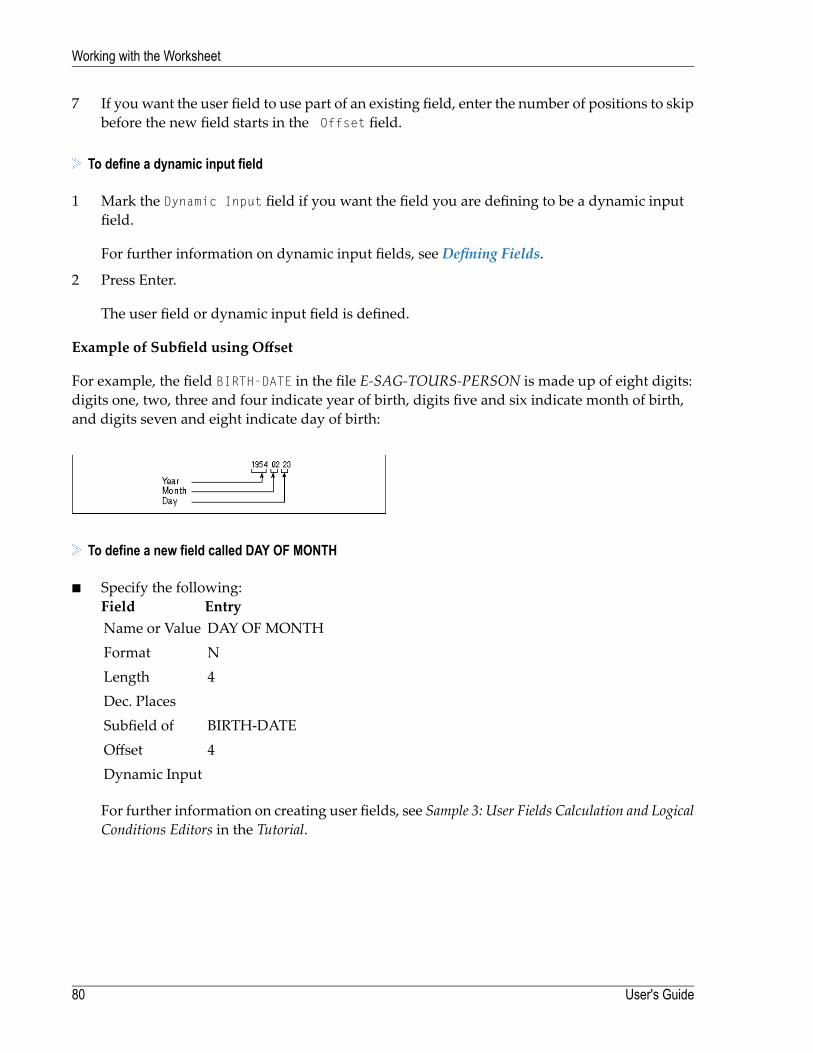
7 If you want the user field to use part of an existing field, enter the number of positions to skipbefore the new field starts in the Offset field.
To define a dynamic input field
1 Mark the Dynamic Input field if you want the field you are defining to be a dynamic inputfield.
For further information on dynamic input fields, see Defining Fields.
2 Press Enter.
The user field or dynamic input field is defined.
Example of Subfield using Offset
For example, the field BIRTH-DATE in the file E-SAG-TOURS-PERSON is made up of eight digits:digits one, two, three and four indicate year of birth, digits five and six indicate month of birth,and digits seven and eight indicate day of birth:
To define a new field called DAY OF MONTH
■ Specify the following:EntryFieldDAY OF MONTHName or ValueNFormat4Length
Dec. PlacesBIRTH-DATESubfield of4Offset
Dynamic Input
For further information on creating user fields, see Sample 3: User Fields Calculation and LogicalConditions Editors in the Tutorial.
User's Guide80
Working with the Worksheet
Field Name Column and the Report Manager
When a layout is generated for a report, the systemvariables contained in the standard title appearin the Field Name column. The standard title supplied with Super Natural contains the systemvariables *TIMX, *DATX, *PROGRAM and *PAGE-NUMBER but your administrator may change this. Ifyou delete the layout element title, the system variables still appear in the Field Name column butmay be deleted.
Text Variable Column
This column only appears for reporting transactions of the Report Type CON-NECT and is describedin the section Super Natural and Con-nect.
Sequence Column
Use the Sequence (Seq) column to determine the following:
■ Which fields are to be displayed when the transaction is run■ The order in which the fields are shown in a report (output sequence)■ Whether fields are to be displayed horizontally, vertically or as text
If you mark the Sequence column next to a group, all the fields belonging to the group alreadylisted in the Field Name column are automatically numbered.
You must mark at least one field in the Sequence column in order to run or save the transaction.
You can number up to 99 fields in the Sequence column. If youwant to displaymore than 99 fields,you can mark themwith a column number and a sequence letter as described later in this section.
Note: If your report has Destination WORK FILE, PC FILE or USER FILE, the first 99 fieldswhich are marked in the Sequencecolumn (whether marked with just a column number orwith both a column number and a sequence letter) are written to file.
Note: For earlier versions: If you did not mark any fields in the Sequence column in SuperNatural Version 2.4 or below, a record count was performed and the number of recordswhich met the selection criteria was returned. You must now use the COUNT command toachieve this.
81User's Guide
Working with the Worksheet
Horizontal Output - Column number
To display a field horizontally
■ Mark it with a column number between 1 and 99.
The field marked with the lowest number is displayed first, the field with the second lowestnumber second, etc. You can display up to 99 fields horizontally. The following is an exampleof horizontal output:
User's Guide82
Working with the Worksheet
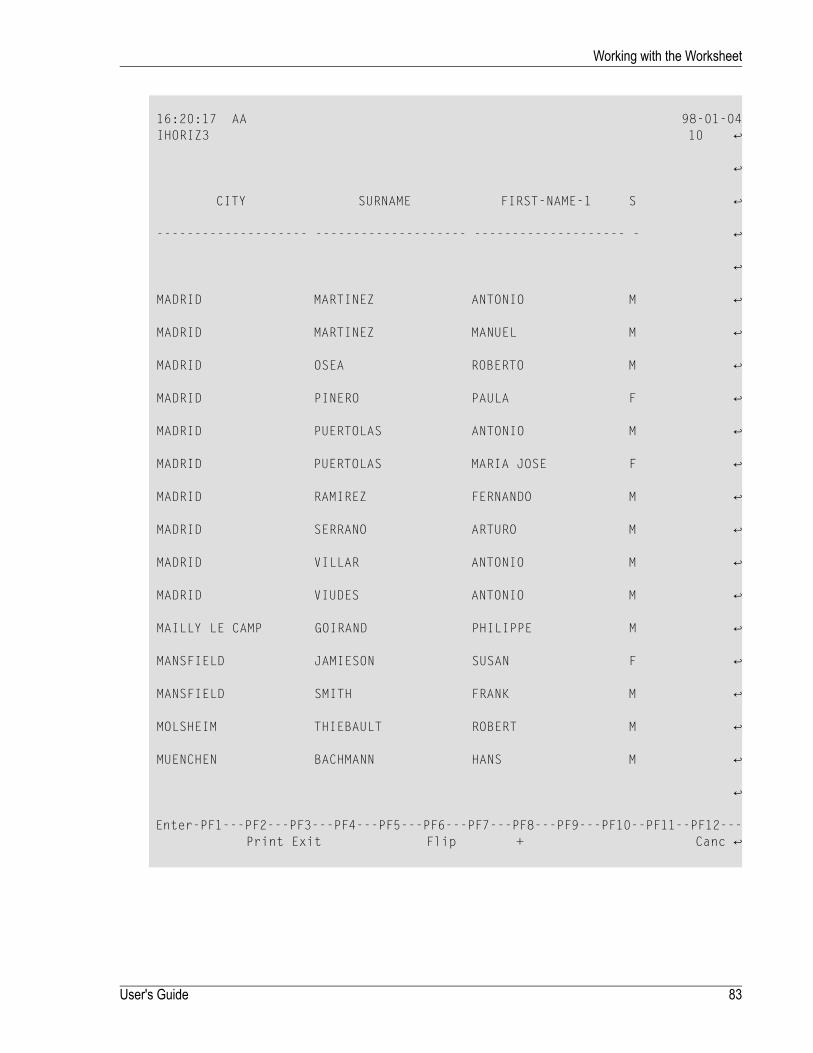
16:20:17 AA 98-01-04 IHORIZ3 10 ↩ ↩ CITY SURNAME FIRST-NAME-1 S ↩ -------------------- -------------------- -------------------- - ↩ ↩ MADRID MARTINEZ ANTONIO M ↩ MADRID MARTINEZ MANUEL M ↩ MADRID OSEA ROBERTO M ↩ MADRID PINERO PAULA F ↩ MADRID PUERTOLAS ANTONIO M ↩ MADRID PUERTOLAS MARIA JOSE F ↩ MADRID RAMIREZ FERNANDO M ↩ MADRID SERRANO ARTURO M ↩ MADRID VILLAR ANTONIO M ↩ MADRID VIUDES ANTONIO M ↩ MAILLY LE CAMP GOIRAND PHILIPPE M ↩ MANSFIELD JAMIESON SUSAN F ↩ MANSFIELD SMITH FRANK M ↩ MOLSHEIM THIEBAULT ROBERT M ↩ MUENCHEN BACHMANN HANS M ↩ ↩ Enter-PF1---PF2---PF3---PF4---PF5---PF6---PF7---PF8---PF9---PF10--PF11--PF12--- Print Exit Flip + Canc ↩
83User's Guide
Working with the Worksheet
Numbering All Fields in the Sequence Column
To number all the fields in the Sequence column
■ Issue the SEQUENCE command.
The first 99 fields are numbered in ascending order from the top of the Worksheet to thebottom of the last page.
Removing All Numbers from the Sequence Column
To remove all the numbers from the Sequence column
■ Issue the NOSEQUENCE command.
Vertical Output - Column number and sequence letter
You can choose to display fields beneath each other in a column instead of next to each other in arow.
To display a field vertically
■ Mark it with a column number (from 1 to 99) and a letter (fromA to Z) to indicate the sequencewithin the column.
If your report has Destination WORK FILE, PC FILE or USER FILE, the first 99 fields whichare marked in the Sequence column (whether marked with just a column number or withboth a column number and a sequence letter) are written to file.
For example, to display both FIRST-NAME-1 and SURNAME (fromSAG-TOURS-E-PERSON)in column two, enter 2A next to FIRST-NAME-1 and 2B next to SURNAME. To display CITYin column one, enter 1 or 1A next to the field CITY. The result is shown in the next figure.
User's Guide84
Working with the Worksheet
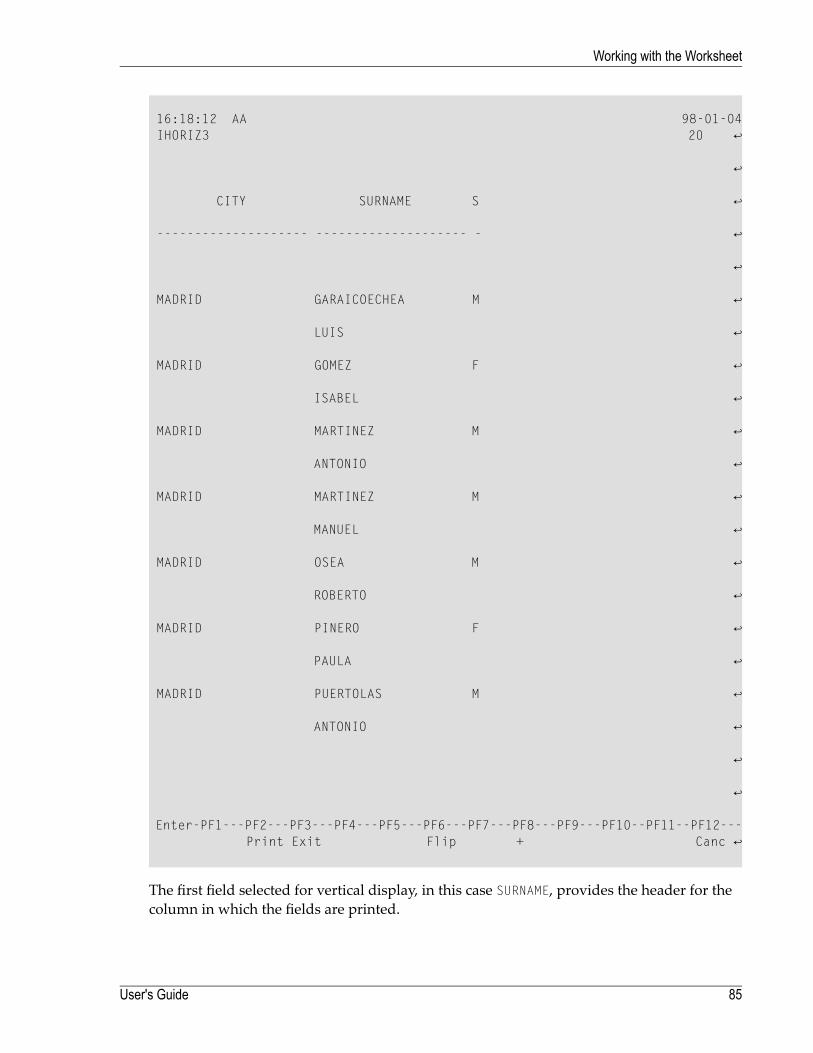
16:18:12 AA 98-01-04 IHORIZ3 20 ↩ ↩ CITY SURNAME S ↩ -------------------- -------------------- - ↩ ↩ MADRID GARAICOECHEA M ↩ LUIS ↩ MADRID GOMEZ F ↩ ISABEL ↩ MADRID MARTINEZ M ↩ ANTONIO ↩ MADRID MARTINEZ M ↩ MANUEL ↩ MADRID OSEA M ↩ ROBERTO ↩ MADRID PINERO F ↩ PAULA ↩ MADRID PUERTOLAS M ↩ ANTONIO ↩ ↩ ↩ Enter-PF1---PF2---PF3---PF4---PF5---PF6---PF7---PF8---PF9---PF10--PF11--PF12--- Print Exit Flip + Canc ↩
The first field selected for vertical display, in this case SURNAME, provides the header for thecolumn in which the fields are printed.
85User's Guide
Working with the Worksheet
If you want all the fields in each record to be displayed as a vertical list, use the report typeVERTICAL LIST. For further information, see Defining Transaction Modes for Reporting.
Text Output - T and sequence number
To display a field as text
■ Mark it with T and a sequence number.
The field is displayed in a line of its own below the other fields in the record and without aheader. You can have up to 99 text fields in a report. In the following, the field SEX is a textfield:
User's Guide86
Working with the Worksheet

16:21:56 AA 98-01-04 IHORIZ3 1 ↩ ↩ CITY SURNAME FIRST-NAME-1 ↩ -------------------- -------------------- -------------------- ↩ ↩ AIX EN OTHE. GODEFROY ANNIE ↩ F ↩ ALBERTSLUND PLOUG MICHAEL ↩ M ↩ ALICANTE FERNANDEZ ZACARIAS ↩ M ↩ ALICANTE LLAGUNO AMANDA ↩ F ↩ ALICANTE MARTINEZ JESUS ↩ M ↩ ARGENTEUIL LEROUGE MARC ↩ M ↩ AUGSBURG MOHN JAN ↩ M ↩ ↩ ↩ Enter-PF1---PF2---PF3---PF4---PF5---PF6---PF7---PF8---PF9---PF10--PF11--PF12--- Print Exit Flip + Canc ↩
87User's Guide
Working with the Worksheet

Sequence Column and Natural Report Manager
When a layout exists for a report, the Sequence column is protected. If an L appears in the Sequencecolumn next to a field it means that the field has been used in the Layout Editor. You can makeno further entries in the Sequence columnuntil both the layout elements list and header are deleted.When you have deleted the layout elements list and header, the entries you made in the Sequencecolumn before invoking Natural Report Manager reappear.
Definitions made in the Layout Editor override those made in the Sequence column. For furtherinformation on the Layout Editor, seeWorking with Natural Report Manager.
Sort/Control Column
You use the Sort/Control (S/C) column to define sort fields and control fields. The sort level de-termines in which order the records found are sorted.
Sort Field
When you define a field as a sort field, the records found are sorted according to the field's alpha-betical or numeric order (whether the field is displayed or not).
To define a sort field
■ Enter an S next to it in the Sort/Control column.
Performance Note for Adabas Users
If the sort criteria consist of only key fields and no more than three key fields are specified, SuperNatural invokes the Adabas sort feature instead of an operating system sort. Unless the numberof values for a given key field is extremely large, anAdabas sort ismore efficient than an operatingsystem sort.
Control Field
When you define a field as a control field, the records found are sorted as for a sort field. In addition,you can define system functions which are calculated when the value or part of the value of thecontrol field changes. For further information, see Function Column.
To define a control field
■ Enter a C next to it in the Sort/Control column.
User's Guide88
Working with the Worksheet
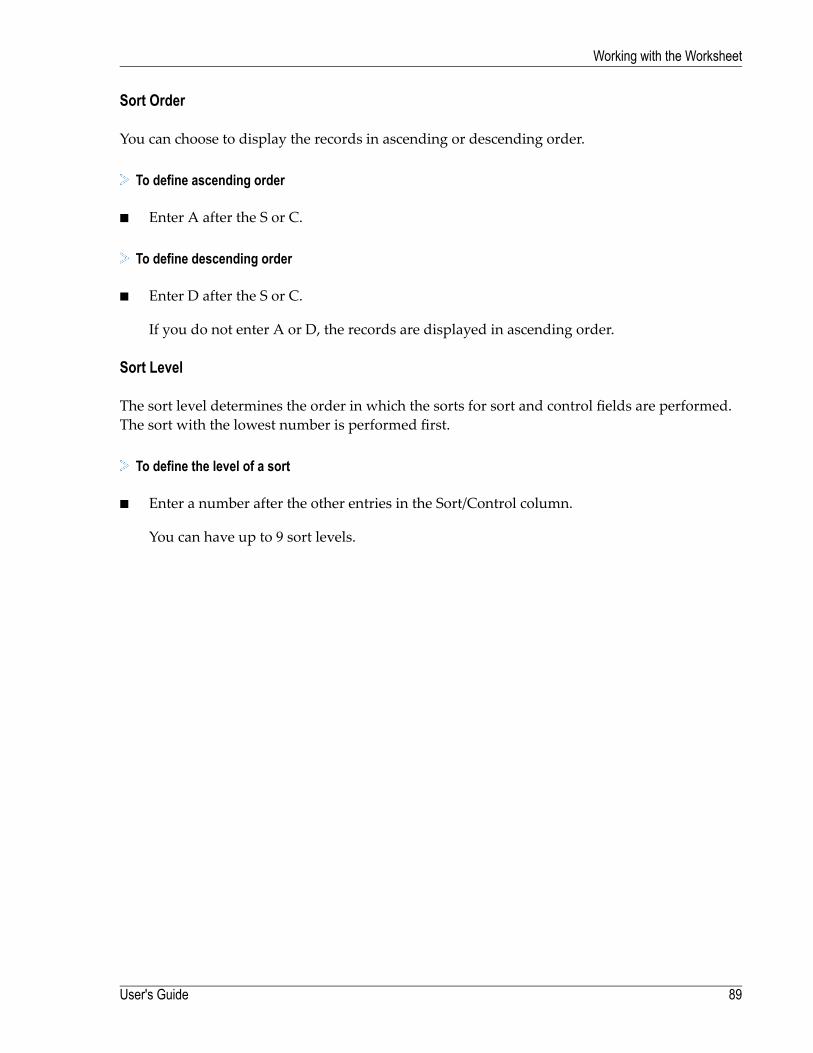
Sort Order
You can choose to display the records in ascending or descending order.
To define ascending order
■ Enter A after the S or C.
To define descending order
■ Enter D after the S or C.
If you do not enter A or D, the records are displayed in ascending order.
Sort Level
The sort level determines the order in which the sorts for sort and control fields are performed.The sort with the lowest number is performed first.
To define the level of a sort
■ Enter a number after the other entries in the Sort/Control column.
You can have up to 9 sort levels.
89User's Guide
Working with the Worksheet
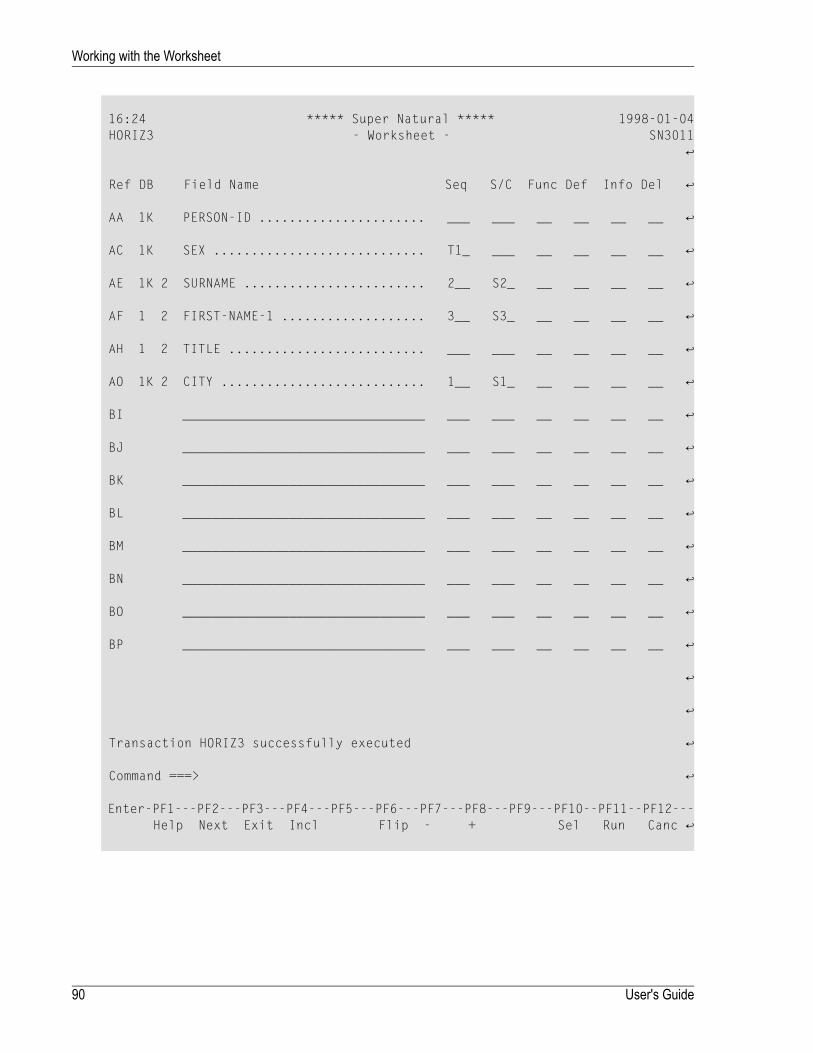
16:24 ***** Super Natural ***** 1998-01-04 HORIZ3 - Worksheet - SN3011 ↩ Ref DB Field Name Seq S/C Func Def Info Del ↩ AA 1K PERSON-ID ...................... ___ ___ __ __ __ __ ↩ AC 1K SEX ............................ T1_ ___ __ __ __ __ ↩ AE 1K 2 SURNAME ........................ 2__ S2_ __ __ __ __ ↩ AF 1 2 FIRST-NAME-1 ................... 3__ S3_ __ __ __ __ ↩ AH 1 2 TITLE .......................... ___ ___ __ __ __ __ ↩ AO 1K 2 CITY ........................... 1__ S1_ __ __ __ __ ↩ BI ________________________________ ___ ___ __ __ __ __ ↩ BJ ________________________________ ___ ___ __ __ __ __ ↩ BK ________________________________ ___ ___ __ __ __ __ ↩ BL ________________________________ ___ ___ __ __ __ __ ↩ BM ________________________________ ___ ___ __ __ __ __ ↩ BN ________________________________ ___ ___ __ __ __ __ ↩ BO ________________________________ ___ ___ __ __ __ __ ↩ BP ________________________________ ___ ___ __ __ __ __ ↩ ↩ ↩ Transaction HORIZ3 successfully executed ↩ Command ===> ↩ Enter-PF1---PF2---PF3---PF4---PF5---PF6---PF7---PF8---PF9---PF10--PF11--PF12--- Help Next Exit Incl Flip - + Sel Run Canc ↩
User's Guide90
Working with the Worksheet
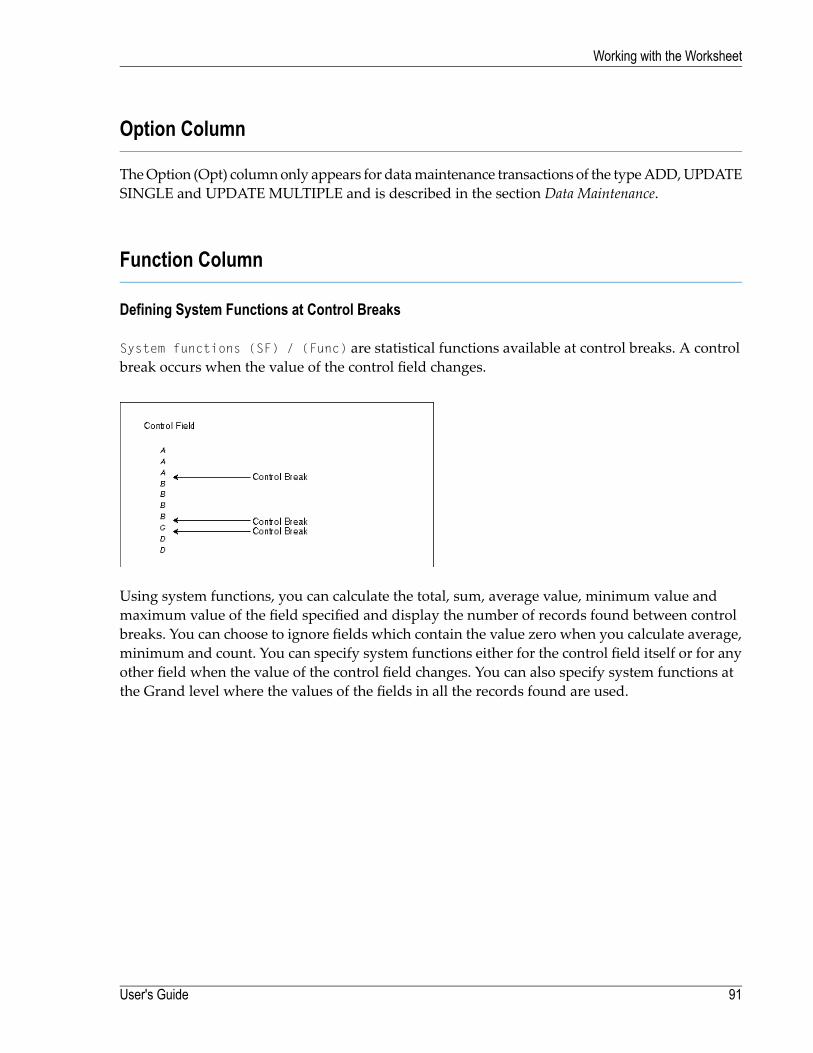
Option Column
TheOption (Opt) columnonly appears for datamaintenance transactions of the typeADD,UPDATESINGLE and UPDATE MULTIPLE and is described in the section Data Maintenance.
Function Column
Defining System Functions at Control Breaks
System functions (SF) / (Func) are statistical functions available at control breaks. A controlbreak occurs when the value of the control field changes.
Using system functions, you can calculate the total, sum, average value, minimum value andmaximum value of the field specified and display the number of records found between controlbreaks. You can choose to ignore fields which contain the value zero when you calculate average,minimum and count. You can specify system functions either for the control field itself or for anyother field when the value of the control field changes. You can also specify system functions atthe Grand level where the values of the fields in all the records found are used.
91User's Guide
Working with the Worksheet
To define system functions
1 Enter SF in the Function column next to the field for which you want to calculate statistics ata control break.
The Specify System Functions window appears as in the following example:
User's Guide92
Working with the Worksheet
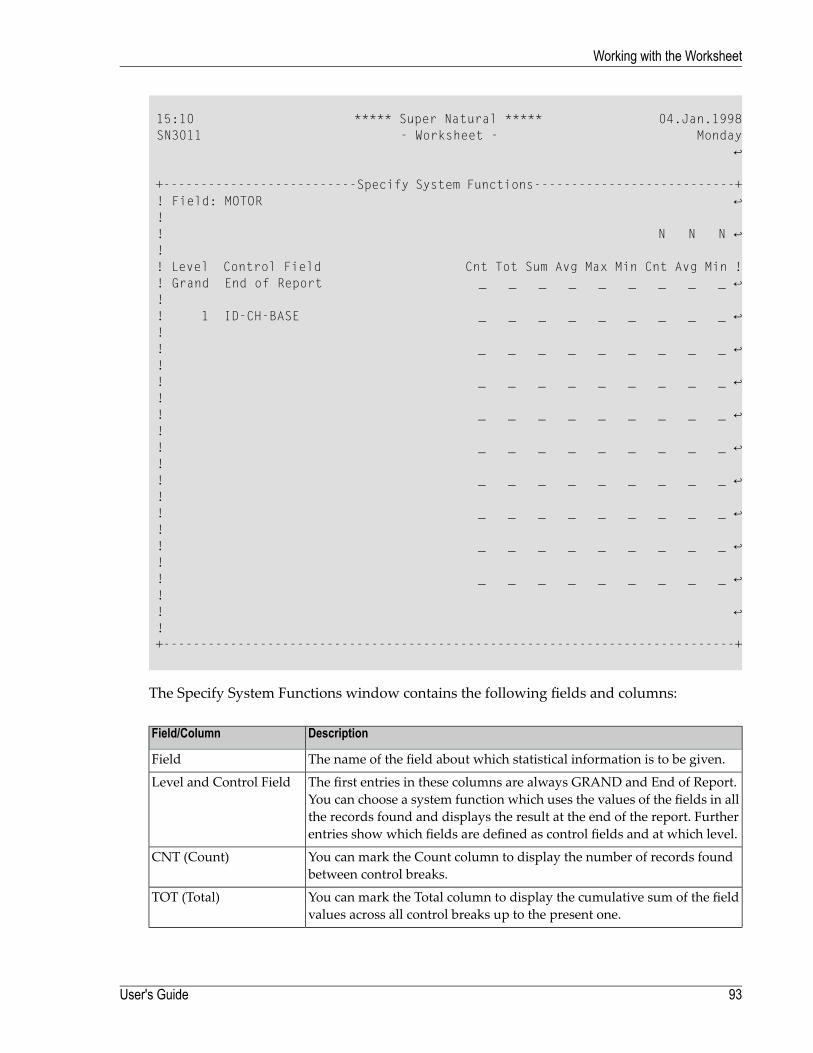
15:10 ***** Super Natural ***** 04.Jan.1998 SN3011 - Worksheet - Monday ↩ +--------------------------Specify System Functions---------------------------+ ! Field: MOTOR ↩ ! ! N N N ↩ ! ! Level Control Field Cnt Tot Sum Avg Max Min Cnt Avg Min ! ! Grand End of Report _ _ _ _ _ _ _ _ _ ↩ ! ! 1 ID-CH-BASE _ _ _ _ _ _ _ _ _ ↩ ! ! _ _ _ _ _ _ _ _ _ ↩ ! ! _ _ _ _ _ _ _ _ _ ↩ ! ! _ _ _ _ _ _ _ _ _ ↩ ! ! _ _ _ _ _ _ _ _ _ ↩ ! ! _ _ _ _ _ _ _ _ _ ↩ ! ! _ _ _ _ _ _ _ _ _ ↩ ! ! _ _ _ _ _ _ _ _ _ ↩ ! ! _ _ _ _ _ _ _ _ _ ↩ ! ! ↩ ! +-----------------------------------------------------------------------------+
The Specify System Functions window contains the following fields and columns:
DescriptionField/Column
The name of the field about which statistical information is to be given.Field
The first entries in these columns are always GRAND and End of Report.You can choose a system function which uses the values of the fields in allthe records found and displays the result at the end of the report. Furtherentries show which fields are defined as control fields and at which level.
Level and Control Field
You can mark the Count column to display the number of records foundbetween control breaks.
CNT (Count)
You can mark the Total column to display the cumulative sum of the fieldvalues across all control breaks up to the present one.
TOT (Total)
93User's Guide
Working with the Worksheet
DescriptionField/Column
You can mark the Sum column if you want to know the sum of the valuesof a field between control breaks.
SUM
You can mark the Minimum column to display the minimum field valuebetween control breaks.
MIN (Minimum)
You can mark the Maximum column to display the maximum field valuebetween control breaks.
MAX (Maximum)
You can mark the Average column to display the average field valuebetween control breaks.
AVE (Average)
You can mark the Count column to display the number of records foundbetween control breaks. Null values are ignored.
N CNT (Null Count)
You can mark the Average column to display the average field valuebetween control breaks. Null values are ignored.
N AVE (Null Average)
You can mark the Minimum column to display the minimum field valuebetween control breaks. Null values are ignored.
N MIN (Null Minimum)
Only available in Natural Report Manager via the Extended Field Editingwindow.This system function displays the value of the field prior to a control break.
OLD
Note: Null values are zero for numeric fields and blank for alphanumeric fields.
Columns which are not relevant to the field type you have chosen are protected.
2 Make your entries in the Specify System Functions window.
Note: If you only want report data to be output after each control break, use thetransaction mode Report Level SUMMARY. For further information, see DefiningTransaction Modes for Reporting.
The following screen is part of the report generated by the sample transaction SAMPLE2 whichis described in the Tutorial:
User's Guide94
Working with the Worksheet
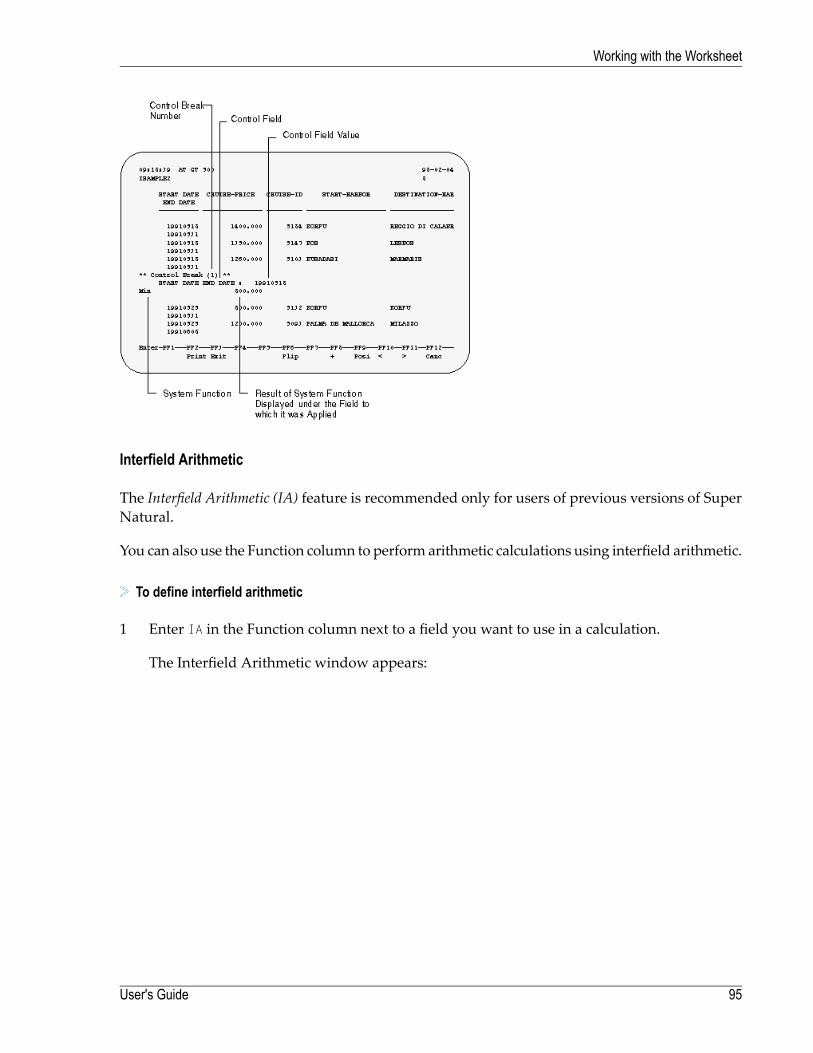
Interfield Arithmetic
The Interfield Arithmetic (IA) feature is recommended only for users of previous versions of SuperNatural.
You can also use the Function column to perform arithmetic calculations using interfield arithmetic.
To define interfield arithmetic
1 Enter IA in the Function column next to a field you want to use in a calculation.
The Interfield Arithmetic window appears:
95User's Guide
Working with the Worksheet
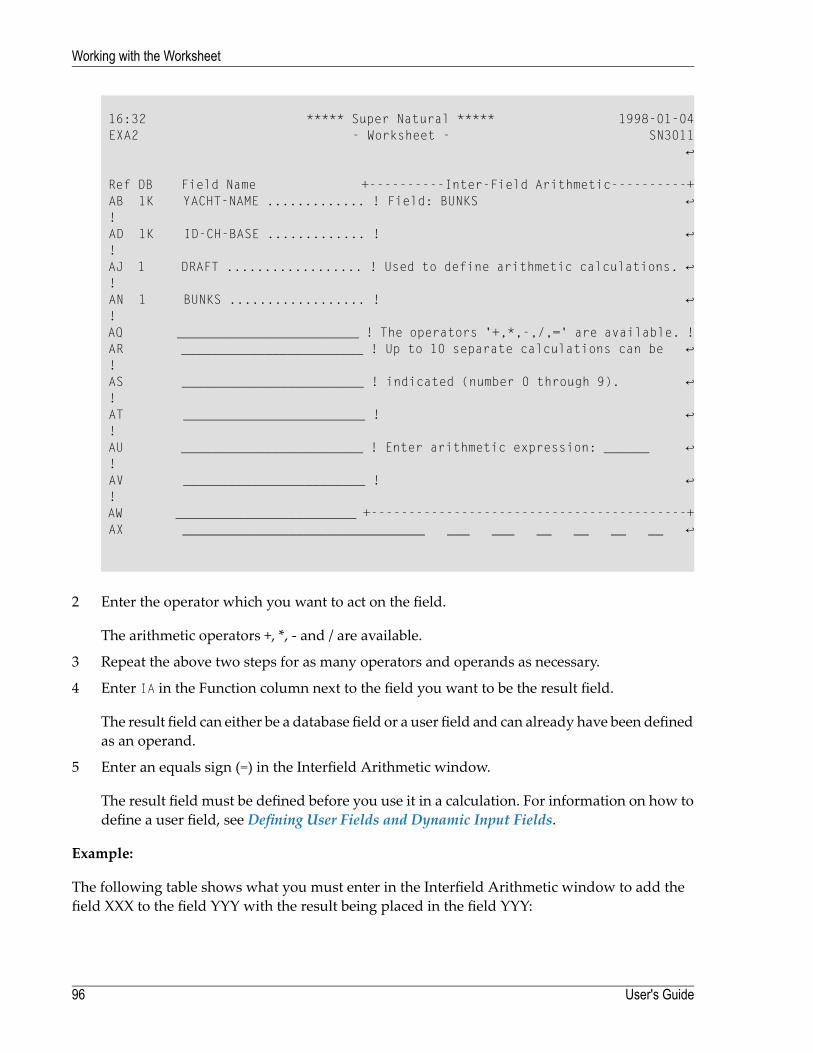
16:32 ***** Super Natural ***** 1998-01-04 EXA2 - Worksheet - SN3011 ↩ Ref DB Field Name +----------Inter-Field Arithmetic----------+ AB 1K YACHT-NAME ............. ! Field: BUNKS ↩ ! AD 1K ID-CH-BASE ............. ! ↩ ! AJ 1 DRAFT .................. ! Used to define arithmetic calculations. ↩ ! AN 1 BUNKS .................. ! ↩ ! AQ ________________________ ! The operators '+,*,-,/,=' are available. ! AR ________________________ ! Up to 10 separate calculations can be ↩ ! AS ________________________ ! indicated (number 0 through 9). ↩ ! AT ________________________ ! ↩ ! AU ________________________ ! Enter arithmetic expression: ______ ↩ ! AV ________________________ ! ↩ ! AW ________________________ +------------------------------------------+ AX ________________________________ ___ ___ __ __ __ __ ↩
2 Enter the operator which you want to act on the field.
The arithmetic operators +, *, - and / are available.
3 Repeat the above two steps for as many operators and operands as necessary.
4 Enter IA in the Function column next to the field you want to be the result field.
The result field can either be a database field or a user field and can already have been definedas an operand.
5 Enter an equals sign (=) in the Interfield Arithmetic window.
The result field must be defined before you use it in a calculation. For information on how todefine a user field, see Defining User Fields and Dynamic Input Fields.
Example:
The following table shows what you must enter in the Interfield Arithmetic window to add thefield XXX to the field YYY with the result being placed in the field YYY:
User's Guide96
Working with the Worksheet

Entry in Interfield Arithmetic windowField+XXX+=YYY
Multiple Calculations
You can indicate up to ten separate calculations. If you enter more than one calculation, you mustidentify each one with a number (from 0 through 9) following the operator.
Example:
The following table shows what you must enter in the Interfield Arithmetic window to performthe following calculations:
XXX + YYY = YYY (calculation 1)AAA - (BBB * XXX) = CCC (calculation 2)
Entry in Interfield Arithmetic windowField+1*2XXX+1=1YYY+2AAA-2BBB=2CCC
Special Break Conditions
Using special break conditions (CB), you canmake control breaks occurwhen the first n charactersin the control field change. For example, youmay want a control break to occur each time the firsttwo characters of the field YACHT-NAME change.
To define special break conditions
1 Enter CB in the Function column next to a control break field.
The Special Break Conditions window appears as in the following example:
97User's Guide
Working with the Worksheet
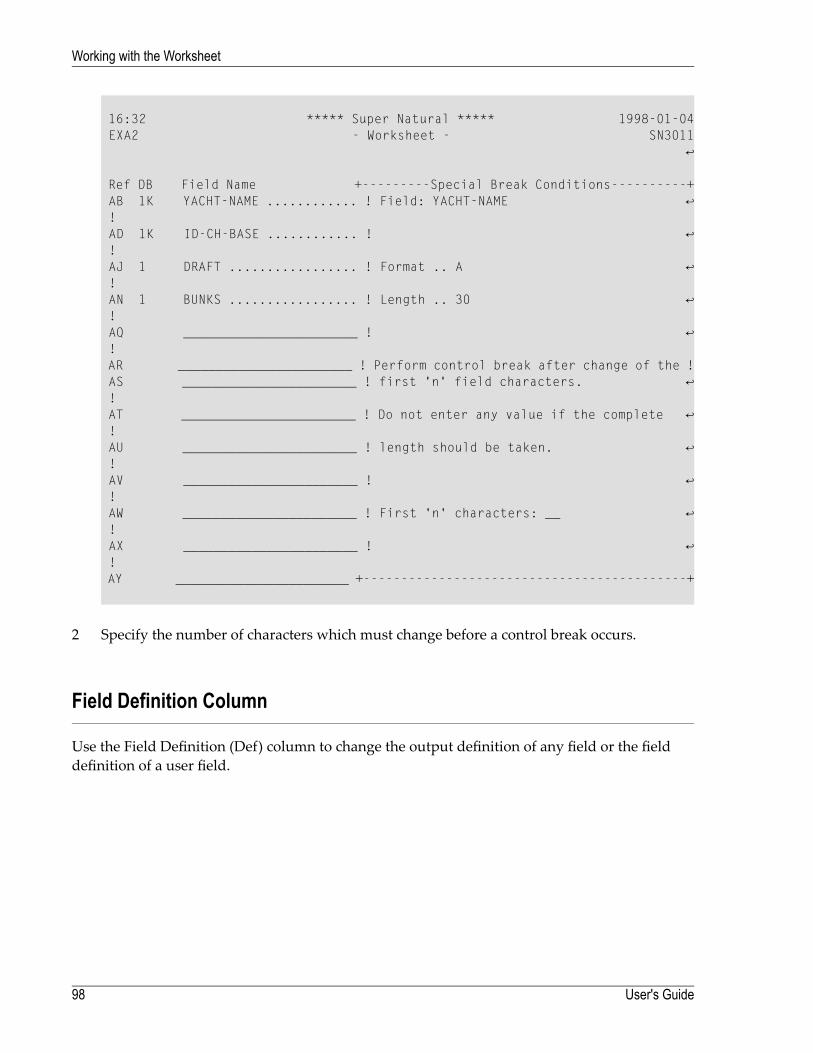
16:32 ***** Super Natural ***** 1998-01-04 EXA2 - Worksheet - SN3011 ↩ Ref DB Field Name +---------Special Break Conditions----------+ AB 1K YACHT-NAME ............ ! Field: YACHT-NAME ↩ ! AD 1K ID-CH-BASE ............ ! ↩ ! AJ 1 DRAFT ................. ! Format .. A ↩ ! AN 1 BUNKS ................. ! Length .. 30 ↩ ! AQ _______________________ ! ↩ ! AR _______________________ ! Perform control break after change of the ! AS _______________________ ! first 'n' field characters. ↩ ! AT _______________________ ! Do not enter any value if the complete ↩ ! AU _______________________ ! length should be taken. ↩ ! AV _______________________ ! ↩ ! AW _______________________ ! First 'n' characters: __ ↩ ! AX _______________________ ! ↩ ! AY _______________________ +-------------------------------------------+
2 Specify the number of characters which must change before a control break occurs.
Field Definition Column
Use the Field Definition (Def) column to change the output definition of any field or the fielddefinition of a user field.
User's Guide98
Working with the Worksheet
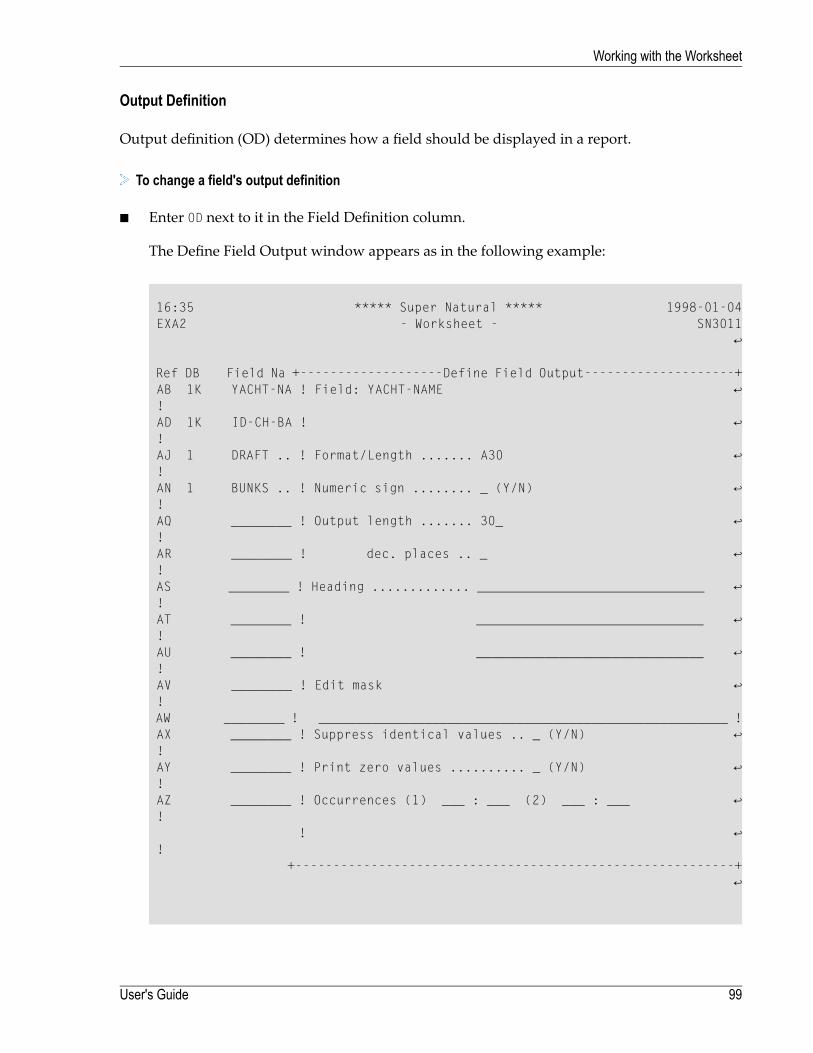
Output Definition
Output definition (OD) determines how a field should be displayed in a report.
To change a field's output definition
■ Enter OD next to it in the Field Definition column.
The Define Field Output window appears as in the following example:
16:35 ***** Super Natural ***** 1998-01-04 EXA2 - Worksheet - SN3011 ↩ Ref DB Field Na +-------------------Define Field Output--------------------+ AB 1K YACHT-NA ! Field: YACHT-NAME ↩ ! AD 1K ID-CH-BA ! ↩ ! AJ 1 DRAFT .. ! Format/Length ....... A30 ↩ ! AN 1 BUNKS .. ! Numeric sign ........ _ (Y/N) ↩ ! AQ ________ ! Output length ....... 30_ ↩ ! AR ________ ! dec. places .. _ ↩ ! AS ________ ! Heading ............. ______________________________ ↩ ! AT ________ ! ______________________________ ↩ ! AU ________ ! ______________________________ ↩ ! AV ________ ! Edit mask ↩ ! AW ________ ! ______________________________________________________ ! AX ________ ! Suppress identical values .. _ (Y/N) ↩ ! AY ________ ! Print zero values .......... _ (Y/N) ↩ ! AZ ________ ! Occurrences (1) ___ : ___ (2) ___ : ___ ↩ ! ! ↩ ! +----------------------------------------------------------+ ↩
99User's Guide
Working with the Worksheet
Note: Modifications made in this windows apply to the field output only, and not tothe actual field definition or contents.
The Define Field Output window contains the following fields:DescriptionFieldYoumay not modify the name of a database field. Once a user field hasbeen used, you cannot change its name and format.
Fieldname
You may not modify the length/format of a database field.Format/LengthIf you enter Y, a sign position is reserved for the field and the character- is printed before each negative value of the field. An entry made forthis field may be modified in the layout editor.
Numeric Sign (numericformats only)
Use this field to determine the number of positions to appear in the re-port. For numeric fields, this is the number of positions left of thedecimal point.
Output Length
Use this field to determine the number of positions to the right of thedecimal point to appear in the report.
Dec. Places (numericformats only)
Use this field to define which heading is to appear above the field inthe report you are creating. If you leave this field blank, the field nameis used.
Heading
You can enter any valid Natural edit mask here. Edit masks definedhere have priority over other entries in this window. If this field already
Edit Mask
contains an edit mask, you can overwrite it. You can use this field todefine leading, floating and trailing characters. For further informationon edit masks, see Edit Masks. The online help for this field gives youexamples of edit masks and possible resulting output.If you specify Y, identical values for the field are suppressed.Suppress Identical Val-
uesIf you enter N, the field value is printed as blanks if the value is zero.PrintZeroValues (numer-
ic formats only)Use this field to define themaximumnumber of occurrences (i.e., values)to be displayed for multiple-value fields and fields that are contained
Occurrences
in a periodic group. For multiple-value fields which are contained in aperiodic group, the entry for (1) applies to the periodic group and theentry for (2) applies to the multiple-value field. If it is only a multiple-value field, the entry for (1) applies.
User's Guide100
Working with the Worksheet
Field Definition
The Field Definition (FD) option is only available for user fields which have not yet been used.The Define User Field window appears as described in Defining User Fields and Dynamic InputFields.
Information (Info) Column
Use the Information column to obtain information about field attributes, values for key fields,field usage and dictionary information.
Field Attributes
Field Attributes (AT) information tells you how the field is defined in the database.
Dictionary Information
Dictionary information (PI) gives you first comments if available and then an extended field de-scription from the data dictionary Predict. This feature is only available at sites where Predict isinstalled.
Values for Key Fields
You can use the Values for Key Fields (VA) function to obtain a list showing howmany recordscontain values within a certain range for a certain field.
You can only use the Value for Key Fields function with key fields.
When you select the Values for Key Fields function, the Values window appears in which youcan define the range of values you want to see. When you press Enter, you are shown the valuespresent, the number of records which contain each value and the total number of values found.
To print Values for Key Fields information
■ Issue the PRINT command when the Values window is displayed.
101User's Guide
Working with the Worksheet
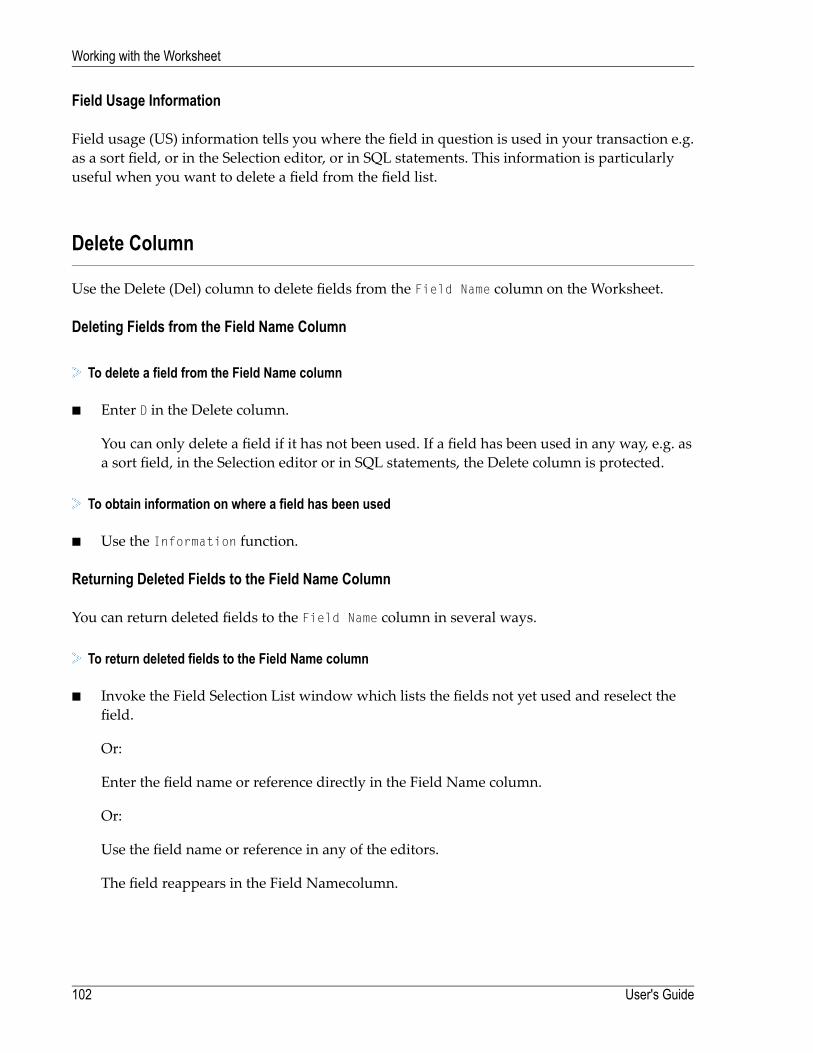
Field Usage Information
Field usage (US) information tells you where the field in question is used in your transaction e.g.as a sort field, or in the Selection editor, or in SQL statements. This information is particularlyuseful when you want to delete a field from the field list.
Delete Column
Use the Delete (Del) column to delete fields from the Field Name column on the Worksheet.
Deleting Fields from the Field Name Column
To delete a field from the Field Name column
■ Enter D in the Delete column.
You can only delete a field if it has not been used. If a field has been used in any way, e.g. asa sort field, in the Selection editor or in SQL statements, the Delete column is protected.
To obtain information on where a field has been used
■ Use the Information function.
Returning Deleted Fields to the Field Name Column
You can return deleted fields to the Field Name column in several ways.
To return deleted fields to the Field Name column
■ Invoke the Field Selection List window which lists the fields not yet used and reselect thefield.
Or:
Enter the field name or reference directly in the Field Name column.
Or:
Use the field name or reference in any of the editors.
The field reappears in the Field Namecolumn.
User's Guide102
Working with the Worksheet
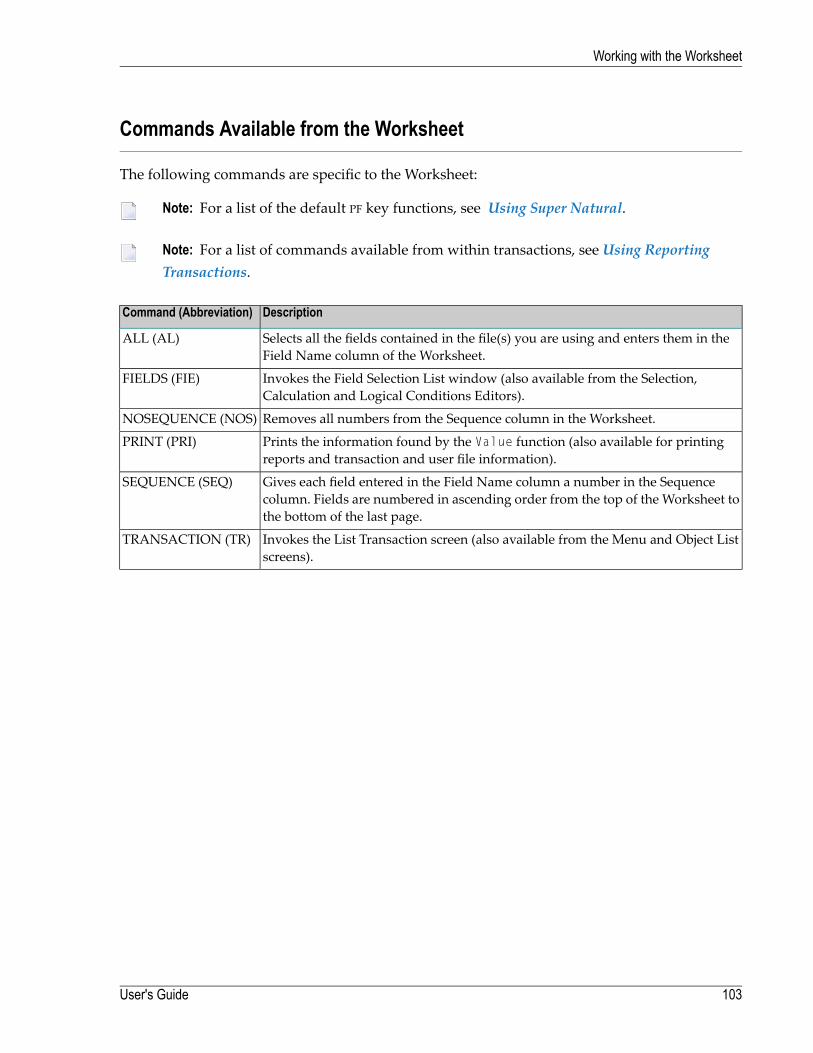
Commands Available from the Worksheet
The following commands are specific to the Worksheet:
Note: For a list of the default PF key functions, see Using Super Natural.
Note: For a list of commands available from within transactions, see Using ReportingTransactions.
DescriptionCommand (Abbreviation)
Selects all the fields contained in the file(s) you are using and enters them in theField Name column of the Worksheet.
ALL (AL)
Invokes the Field Selection List window (also available from the Selection,Calculation and Logical Conditions Editors).
FIELDS (FIE)
Removes all numbers from the Sequence column in the Worksheet.NOSEQUENCE (NOS)
Prints the information found by the Value function (also available for printingreports and transaction and user file information).
PRINT (PRI)
Gives each field entered in the Field Name column a number in the Sequencecolumn. Fields are numbered in ascending order from the top of the Worksheet tothe bottom of the last page.
SEQUENCE (SEQ)
Invokes the List Transaction screen (also available from the Menu and Object Listscreens).
TRANSACTION (TR)
103User's Guide
Working with the Worksheet

104
7 Using a Database Structure
■ What is a Database? ...................................................................................................................... 106■ Accessing Data UsingSuper Natural .................................................................................................. 107
105
This section gives a basic overview of database structure and accessing data using Super Natural.
This section covers the following topics:
■ What is a Database?■ Accessing Data Using Super Natural
What is a Database?
A database is a collection of data. The data within a database is stored in files.
Files are groups of related data stored together and treated as one unit, for example, all the inform-ation about pricing is held in the demonstration file SAG-TOURS-E-PRICES. The data within afile is stored in records.
Records are smaller sets of related data treated as a unit for example, all the information about aparticular company in the demonstration file SAG-TOURS-E-COMPANY. The datawithin a recordis organized into fields.
Fields contain the values which you are interested in.
The diagram below gives an overview of database structure:
User's Guide106
Using a Database Structure
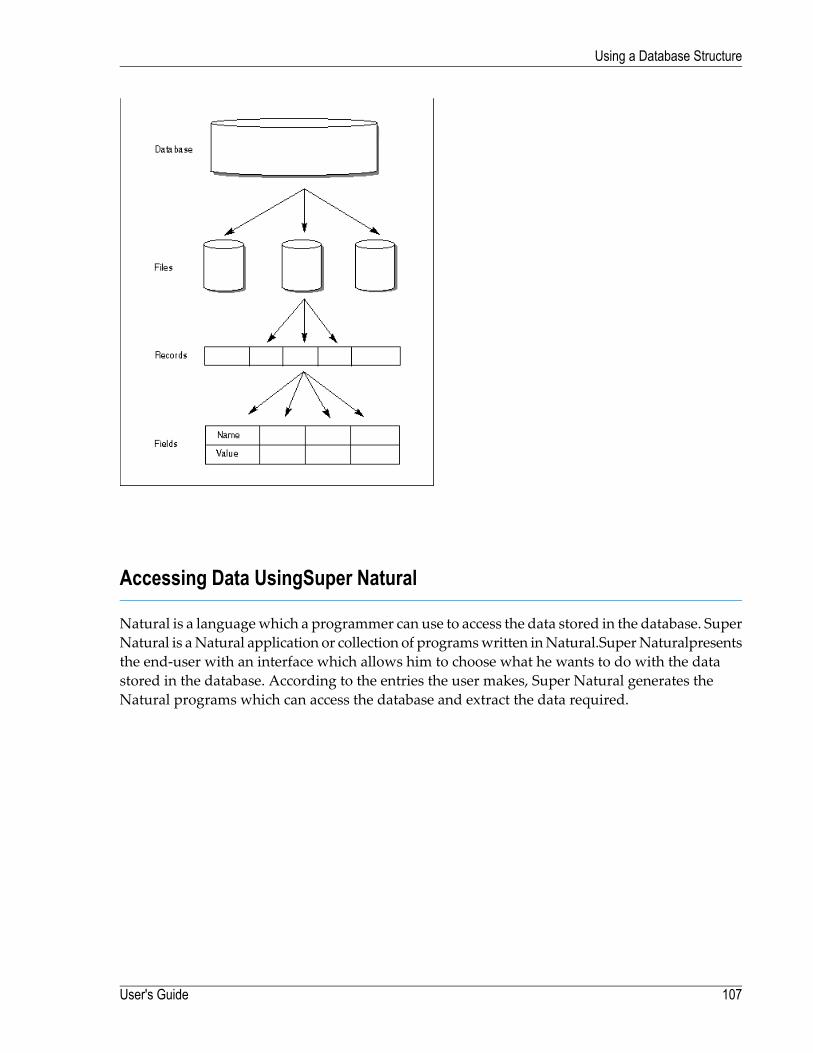
Accessing Data UsingSuper Natural
Natural is a languagewhich a programmer can use to access the data stored in the database. SuperNatural is aNatural application or collection of programswritten inNatural.SuperNaturalpresentsthe end-user with an interface which allows him to choose what he wants to do with the datastored in the database. According to the entries the user makes, Super Natural generates theNatural programs which can access the database and extract the data required.
107User's Guide
Using a Database Structure

108
8 Defining Files
■ What are Files? ............................................................................................................................. 110■ Using More Than One File - The INCLUDE Command .......................................................................... 111■ What is File Linking? ...................................................................................................................... 119■ What is File Lookup? ...................................................................................................................... 121■ Superfiles ..................................................................................................................................... 125■ Extended File Descriptions and File Comments ................................................................................... 126
109
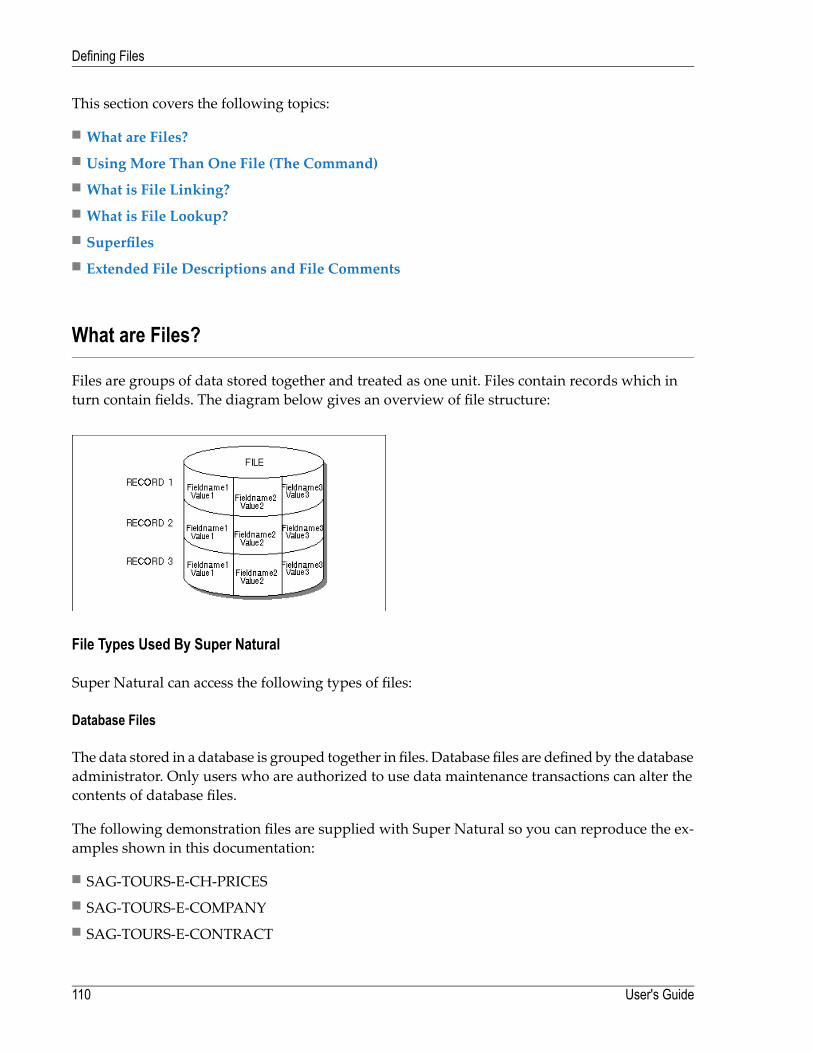
This section covers the following topics:
■ What are Files?■ Using More Than One File (The Command)■ What is File Linking?■ What is File Lookup?■ Superfiles■ Extended File Descriptions and File Comments
What are Files?
Files are groups of data stored together and treated as one unit. Files contain records which inturn contain fields. The diagram below gives an overview of file structure:
File Types Used By Super Natural
Super Natural can access the following types of files:
Database Files
The data stored in a database is grouped together in files. Database files are defined by the databaseadministrator. Only users who are authorized to use data maintenance transactions can alter thecontents of database files.
The following demonstration files are supplied with Super Natural so you can reproduce the ex-amples shown in this documentation:
■ SAG-TOURS-E-CH-PRICES■ SAG-TOURS-E-COMPANY■ SAG-TOURS-E-CONTRACT
User's Guide110
Defining Files
■ SAG-TOURS-E-CRUISE■ SAG-TOURS-E-PERSON■ SAG-TOURS-E-YACHT
User Files
User files are defined by users. Only the creator and the administrator can perform maintenanceon a user file. For more information on user files, seeWorking with User Files.
PC Files
PC files are sequential files stored in a PC. You can read data from andwrite data to a PC file usingthe transaction modes Data Selection PC FILE and Destination PC FILE respectively.
Work Files
Work files are sequential files stored in the mainframe database. You can read data from and writedata to awork file using the transactionmodesData SelectionWORKFILE andDestinationWORKFILE respectively.
Superfiles
Superfiles are a special type of file and are described later in this section.
Using More Than One File - The INCLUDE Command
If you want to use fields from more than one files you can use the INCLUDE command from anypoint within a transaction to define a link to a secondary file, file lookups, and the order in whichfile lookups are to be processed.
Sections later in this section give detailed technical information on what actually happens whenyou link files andperformfile lookups. The sample transactions SAMPLE6 and SAMPLE7describedin the Tutorial give examples of file linking and file lookup.
To include other files in a transaction
■ Issue the INCLUDE command.
The Include Files window appears:
111User's Guide
Defining Files
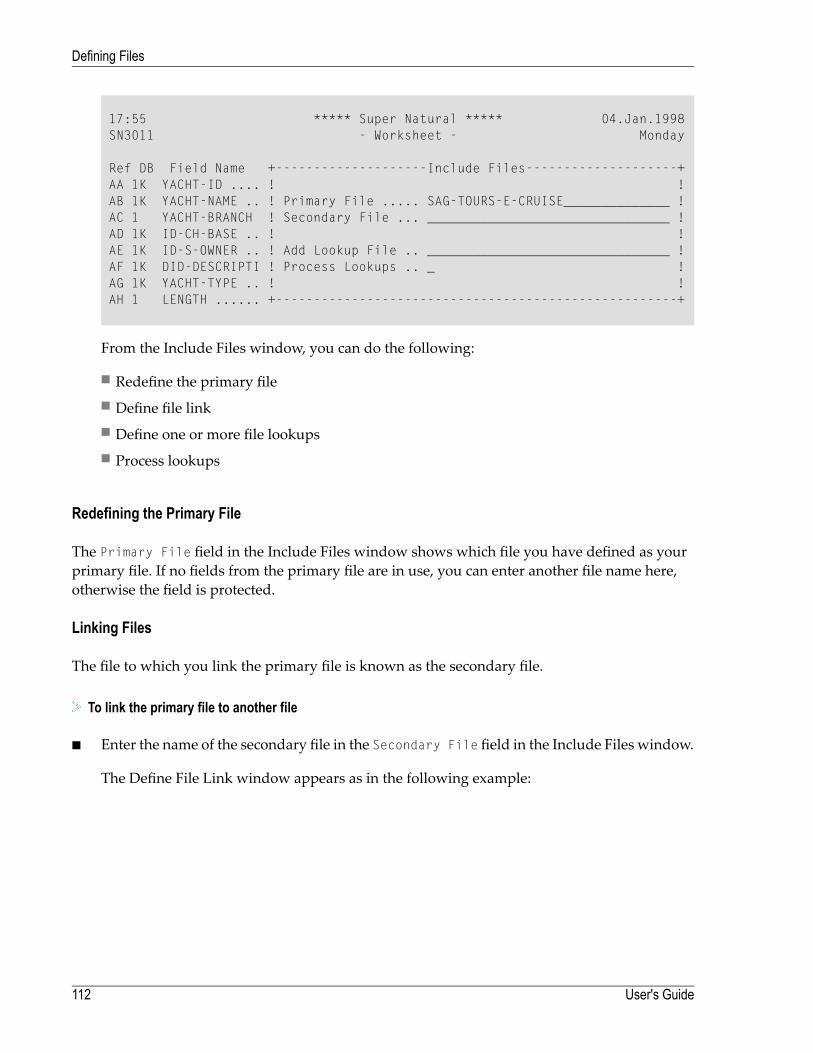
17:55 ***** Super Natural ***** 04.Jan.1998SN3011 - Worksheet - Monday
Ref DB Field Name +--------------------Include Files--------------------+AA 1K YACHT-ID .... ! !AB 1K YACHT-NAME .. ! Primary File ..... SAG-TOURS-E-CRUISE______________ !AC 1 YACHT-BRANCH ! Secondary File ... ________________________________ !AD 1K ID-CH-BASE .. ! !AE 1K ID-S-OWNER .. ! Add Lookup File .. ________________________________ !AF 1K DID-DESCRIPTI ! Process Lookups .. _ !AG 1K YACHT-TYPE .. ! !AH 1 LENGTH ...... +-----------------------------------------------------+
From the Include Files window, you can do the following:
■ Redefine the primary file■ Define file link■ Define one or more file lookups■ Process lookups
Redefining the Primary File
The Primary File field in the Include Files window shows which file you have defined as yourprimary file. If no fields from the primary file are in use, you can enter another file name here,otherwise the field is protected.
Linking Files
The file to which you link the primary file is known as the secondary file.
To link the primary file to another file
■ Enter the name of the secondary file in the Secondary File field in the Include Files window.
The Define File Link window appears as in the following example:
User's Guide112
Defining Files
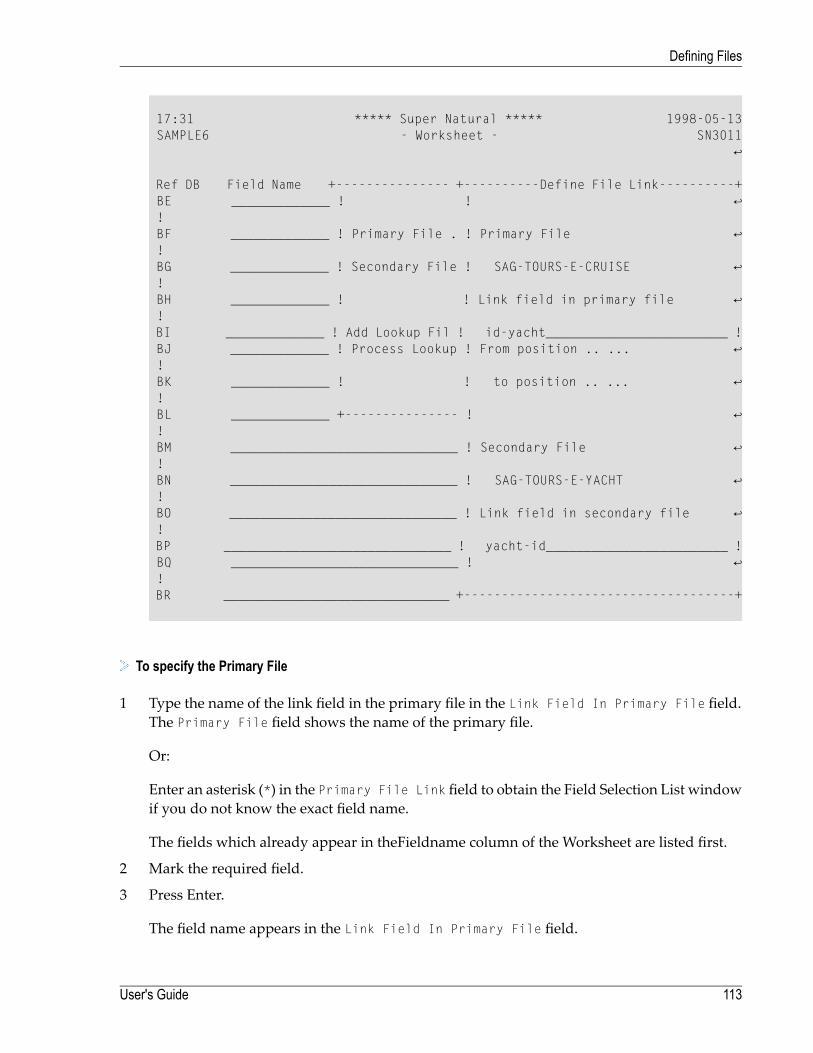
17:31 ***** Super Natural ***** 1998-05-13 SAMPLE6 - Worksheet - SN3011 ↩ Ref DB Field Name +--------------- +----------Define File Link----------+ BE _____________ ! ! ↩ ! BF _____________ ! Primary File . ! Primary File ↩ ! BG _____________ ! Secondary File ! SAG-TOURS-E-CRUISE ↩ ! BH _____________ ! ! Link field in primary file ↩ ! BI _____________ ! Add Lookup Fil ! id-yacht________________________ ! BJ _____________ ! Process Lookup ! From position .. ... ↩ ! BK _____________ ! ! to position .. ... ↩ ! BL _____________ +--------------- ! ↩ ! BM ______________________________ ! Secondary File ↩ ! BN ______________________________ ! SAG-TOURS-E-YACHT ↩ ! BO ______________________________ ! Link field in secondary file ↩ ! BP ______________________________ ! yacht-id________________________ ! BQ ______________________________ ! ↩ ! BR ______________________________ +------------------------------------+
To specify the Primary File
1 Type the name of the link field in the primary file in the Link Field In Primary File field.The Primary File field shows the name of the primary file.
Or:
Enter an asterisk (*) in the Primary File Link field to obtain the Field Selection List windowif you do not know the exact field name.
The fields which already appear in theFieldname column of the Worksheet are listed first.
2 Mark the required field.
3 Press Enter.
The field name appears in the Link Field In Primary File field.
113User's Guide
Defining Files
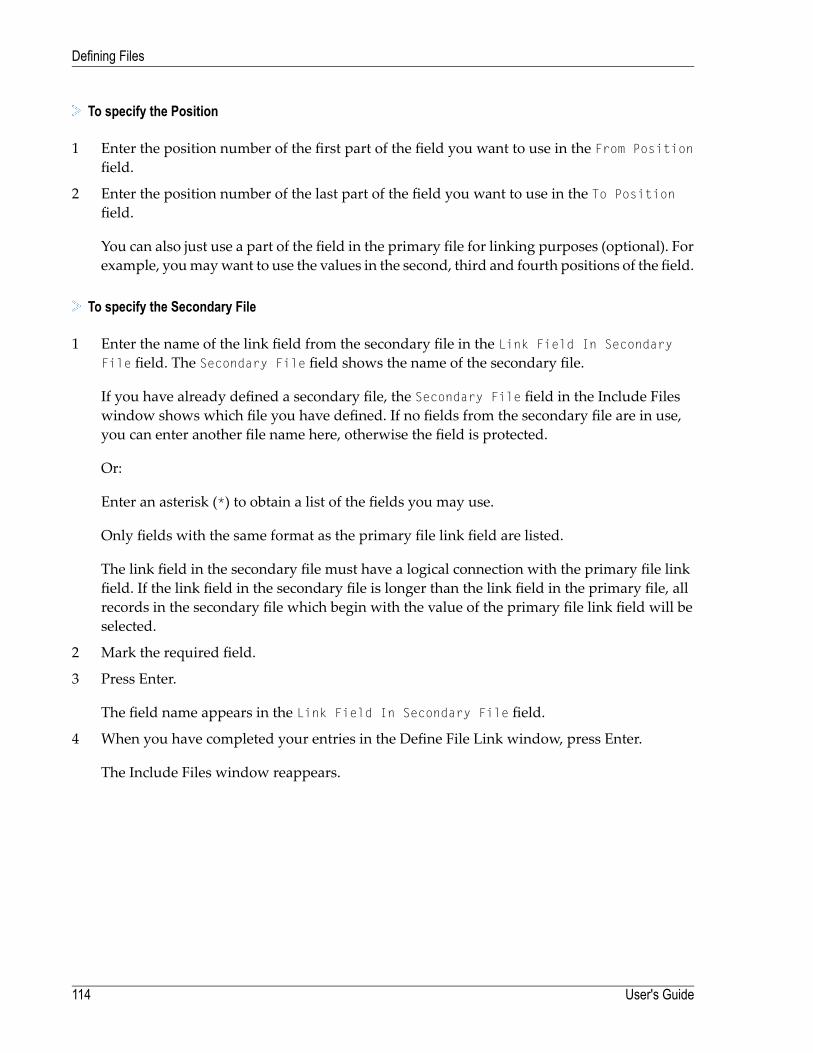
To specify the Position
1 Enter the position number of the first part of the field you want to use in the From Positionfield.
2 Enter the position number of the last part of the field you want to use in the To Positionfield.
You can also just use a part of the field in the primary file for linking purposes (optional). Forexample, youmaywant to use the values in the second, third and fourth positions of the field.
To specify the Secondary File
1 Enter the name of the link field from the secondary file in the Link Field In SecondaryFile field. The Secondary File field shows the name of the secondary file.
If you have already defined a secondary file, the Secondary File field in the Include Fileswindow shows which file you have defined. If no fields from the secondary file are in use,you can enter another file name here, otherwise the field is protected.
Or:
Enter an asterisk (*) to obtain a list of the fields you may use.
Only fields with the same format as the primary file link field are listed.
The link field in the secondary file must have a logical connection with the primary file linkfield. If the link field in the secondary file is longer than the link field in the primary file, allrecords in the secondary file which begin with the value of the primary file link field will beselected.
2 Mark the required field.
3 Press Enter.
The field name appears in the Link Field In Secondary File field.
4 When you have completed your entries in the Define File Link window, press Enter.
The Include Files window reappears.
User's Guide114
Defining Files
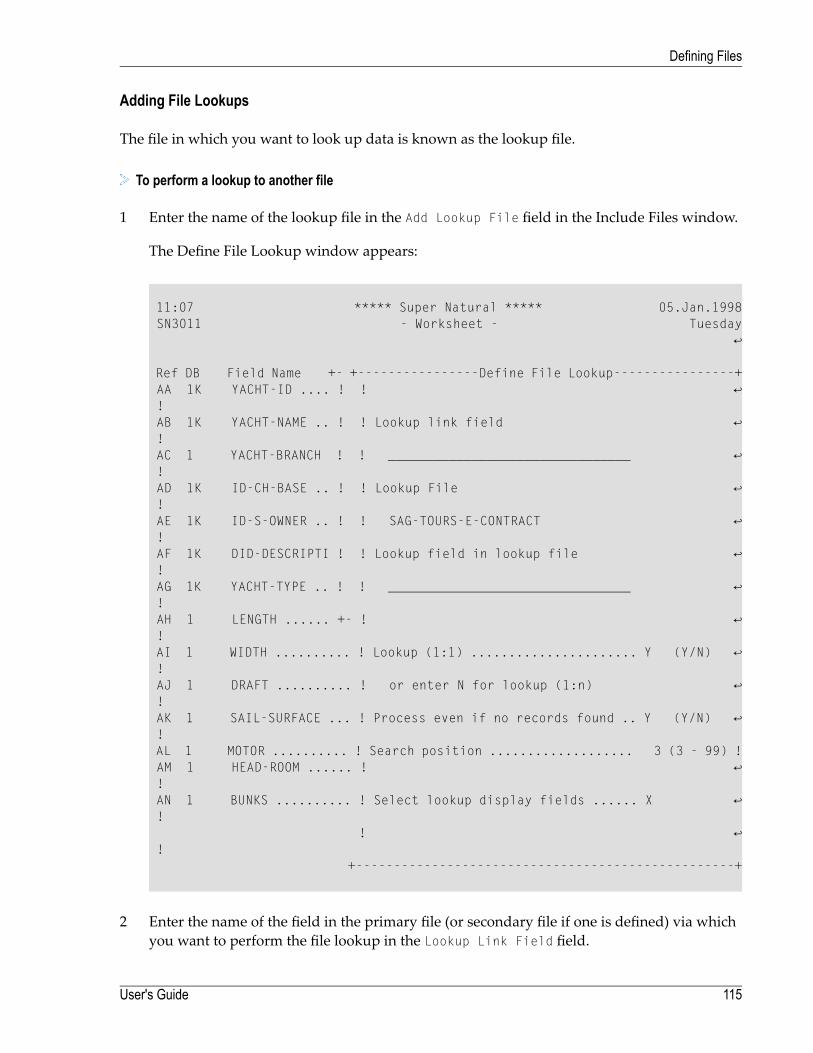
Adding File Lookups
The file in which you want to look up data is known as the lookup file.
To perform a lookup to another file
1 Enter the name of the lookup file in the Add Lookup File field in the Include Files window.
The Define File Lookup window appears:
11:07 ***** Super Natural ***** 05.Jan.1998 SN3011 - Worksheet - Tuesday ↩ Ref DB Field Name +- +----------------Define File Lookup----------------+ AA 1K YACHT-ID .... ! ! ↩ ! AB 1K YACHT-NAME .. ! ! Lookup link field ↩ ! AC 1 YACHT-BRANCH ! ! ________________________________ ↩ ! AD 1K ID-CH-BASE .. ! ! Lookup File ↩ ! AE 1K ID-S-OWNER .. ! ! SAG-TOURS-E-CONTRACT ↩ ! AF 1K DID-DESCRIPTI ! ! Lookup field in lookup file ↩ ! AG 1K YACHT-TYPE .. ! ! ________________________________ ↩ ! AH 1 LENGTH ...... +- ! ↩ ! AI 1 WIDTH .......... ! Lookup (1:1) ...................... Y (Y/N) ↩ ! AJ 1 DRAFT .......... ! or enter N for lookup (1:n) ↩ ! AK 1 SAIL-SURFACE ... ! Process even if no records found .. Y (Y/N) ↩ ! AL 1 MOTOR .......... ! Search position ................... 3 (3 - 99) ! AM 1 HEAD-ROOM ...... ! ↩ ! AN 1 BUNKS .......... ! Select lookup display fields ...... X ↩ ! ! ↩ ! +--------------------------------------------------+
2 Enter the name of the field in the primary file (or secondary file if one is defined) via whichyou want to perform the file lookup in the Lookup Link Field field.
115User's Guide
Defining Files
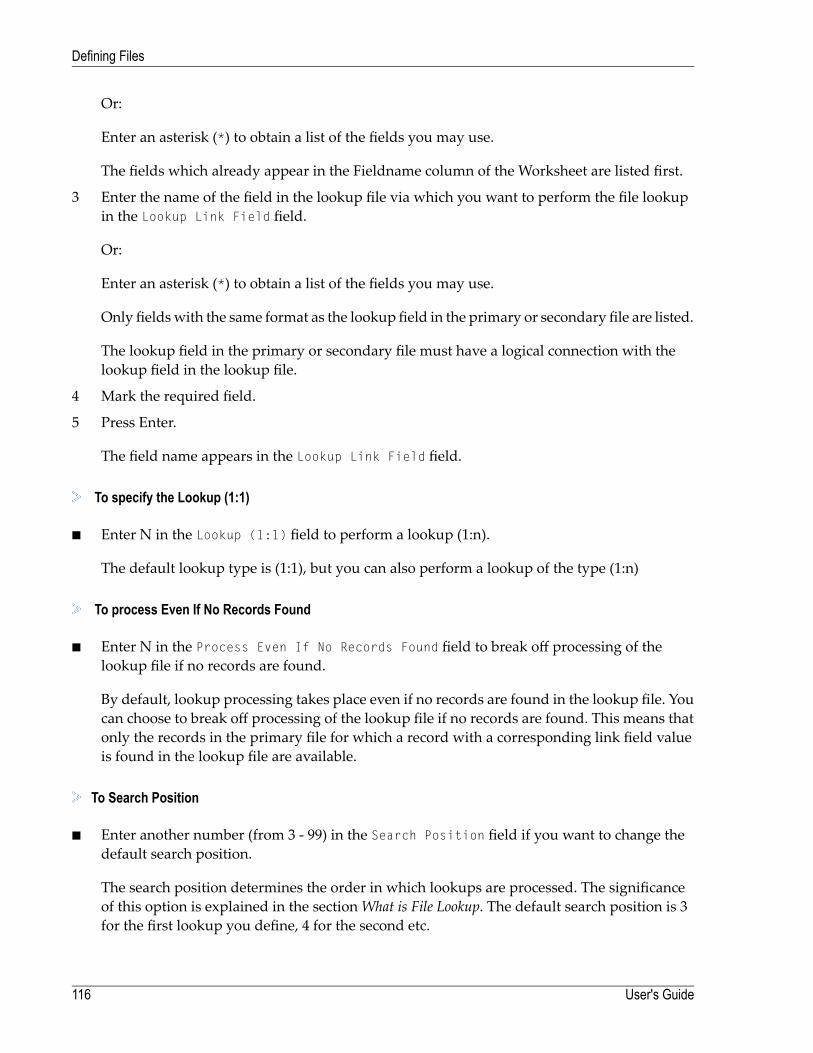
Or:
Enter an asterisk (*) to obtain a list of the fields you may use.
The fields which already appear in the Fieldname column of the Worksheet are listed first.
3 Enter the name of the field in the lookup file via which you want to perform the file lookupin the Lookup Link Field field.
Or:
Enter an asterisk (*) to obtain a list of the fields you may use.
Only fieldswith the same format as the lookup field in the primary or secondary file are listed.
The lookup field in the primary or secondary file must have a logical connection with thelookup field in the lookup file.
4 Mark the required field.
5 Press Enter.
The field name appears in the Lookup Link Field field.
To specify the Lookup (1:1)
■ Enter N in the Lookup (1:1) field to perform a lookup (1:n).
The default lookup type is (1:1), but you can also perform a lookup of the type (1:n)
To process Even If No Records Found
■ Enter N in the Process Even If No Records Found field to break off processing of thelookup file if no records are found.
By default, lookup processing takes place even if no records are found in the lookup file. Youcan choose to break off processing of the lookup file if no records are found. This means thatonly the records in the primary file for which a record with a corresponding link field valueis found in the lookup file are available.
To Search Position
■ Enter another number (from 3 - 99) in the Search Position field if you want to change thedefault search position.
The search position determines the order in which lookups are processed. The significanceof this option is explained in the sectionWhat is File Lookup. The default search position is 3for the first lookup you define, 4 for the second etc.
User's Guide116
Defining Files
To Select Lookup Display Fields
1 Enter any non-blank character in the Select Lookup Display Fields.
You can define which fields from the lookup file youwant to display in the report. Awindowcontaining a selection list of the fields in the lookup file which you may display appears.
2 Mark the fields you want to display.
3 Press Enter.
You are returned to the Define File Lookup/Link window.
4 When you have finished making your entries in the Define File Lookup/Link window, pressEnter.
You are returned to the Include Files window. The number of lookup files currently definedis shown next to the Process Lookups field.
Processing File Lookups
The number after the Process Lookups field in the Include Files window indicates howmany filelookups have been defined for the current transaction. If no lookups have been defined, the ProcessLookups field is protected.
To obtain a list of the lookup files currently in use
■ Mark the Process Lookups field with any non-blank character.
The Defined Lookup Files window appears as in the following example:
117User's Guide
Defining Files
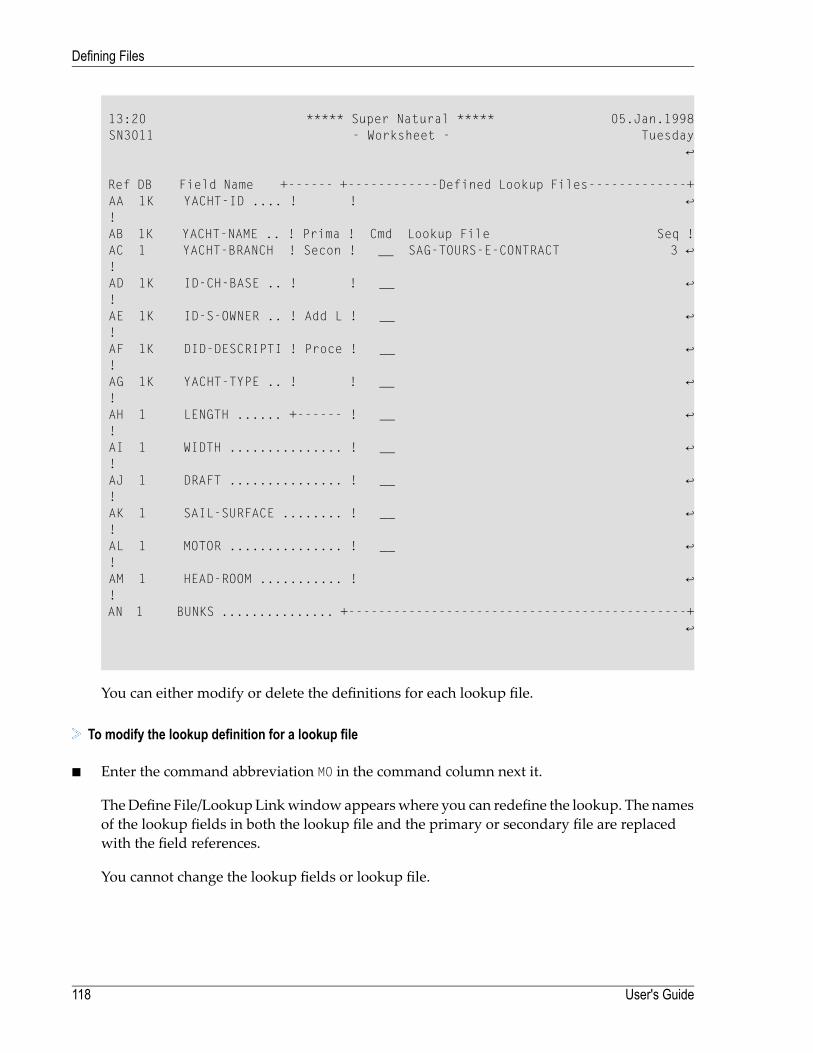
13:20 ***** Super Natural ***** 05.Jan.1998 SN3011 - Worksheet - Tuesday ↩ Ref DB Field Name +------ +------------Defined Lookup Files-------------+ AA 1K YACHT-ID .... ! ! ↩ ! AB 1K YACHT-NAME .. ! Prima ! Cmd Lookup File Seq ! AC 1 YACHT-BRANCH ! Secon ! __ SAG-TOURS-E-CONTRACT 3 ↩ ! AD 1K ID-CH-BASE .. ! ! __ ↩ ! AE 1K ID-S-OWNER .. ! Add L ! __ ↩ ! AF 1K DID-DESCRIPTI ! Proce ! __ ↩ ! AG 1K YACHT-TYPE .. ! ! __ ↩ ! AH 1 LENGTH ...... +------ ! __ ↩ ! AI 1 WIDTH ............... ! __ ↩ ! AJ 1 DRAFT ............... ! __ ↩ ! AK 1 SAIL-SURFACE ........ ! __ ↩ ! AL 1 MOTOR ............... ! __ ↩ ! AM 1 HEAD-ROOM ........... ! ↩ ! AN 1 BUNKS ............... +---------------------------------------------+ ↩
You can either modify or delete the definitions for each lookup file.
To modify the lookup definition for a lookup file
■ Enter the command abbreviation MO in the command column next it.
TheDefine File/LookupLinkwindowappearswhere you can redefine the lookup. The namesof the lookup fields in both the lookup file and the primary or secondary file are replacedwith the field references.
You cannot change the lookup fields or lookup file.
User's Guide118
Defining Files
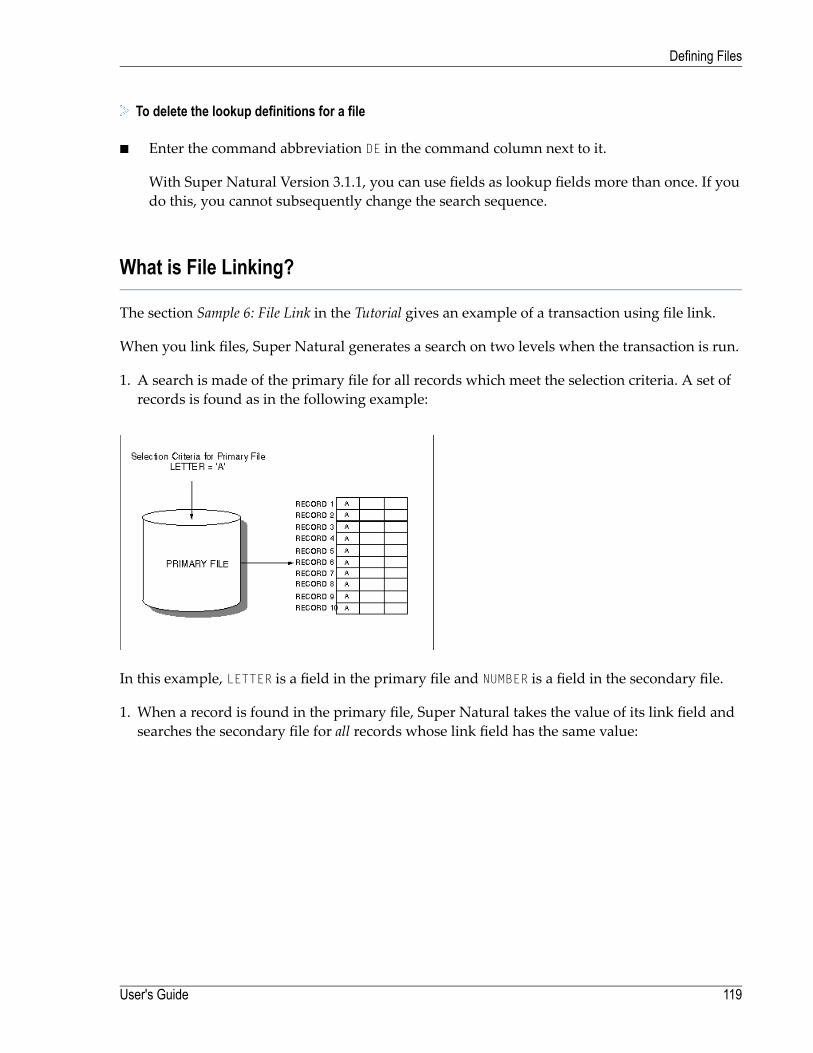
To delete the lookup definitions for a file
■ Enter the command abbreviation DE in the command column next to it.
With Super Natural Version 3.1.1, you can use fields as lookup fields more than once. If youdo this, you cannot subsequently change the search sequence.
What is File Linking?
The section Sample 6: File Link in the Tutorial gives an example of a transaction using file link.
When you link files, Super Natural generates a search on two levels when the transaction is run.
1. A search is made of the primary file for all records which meet the selection criteria. A set ofrecords is found as in the following example:
In this example, LETTER is a field in the primary file and NUMBER is a field in the secondary file.
1. When a record is found in the primary file, Super Natural takes the value of its link field andsearches the secondary file for all records whose link field has the same value:
119User's Guide
Defining Files
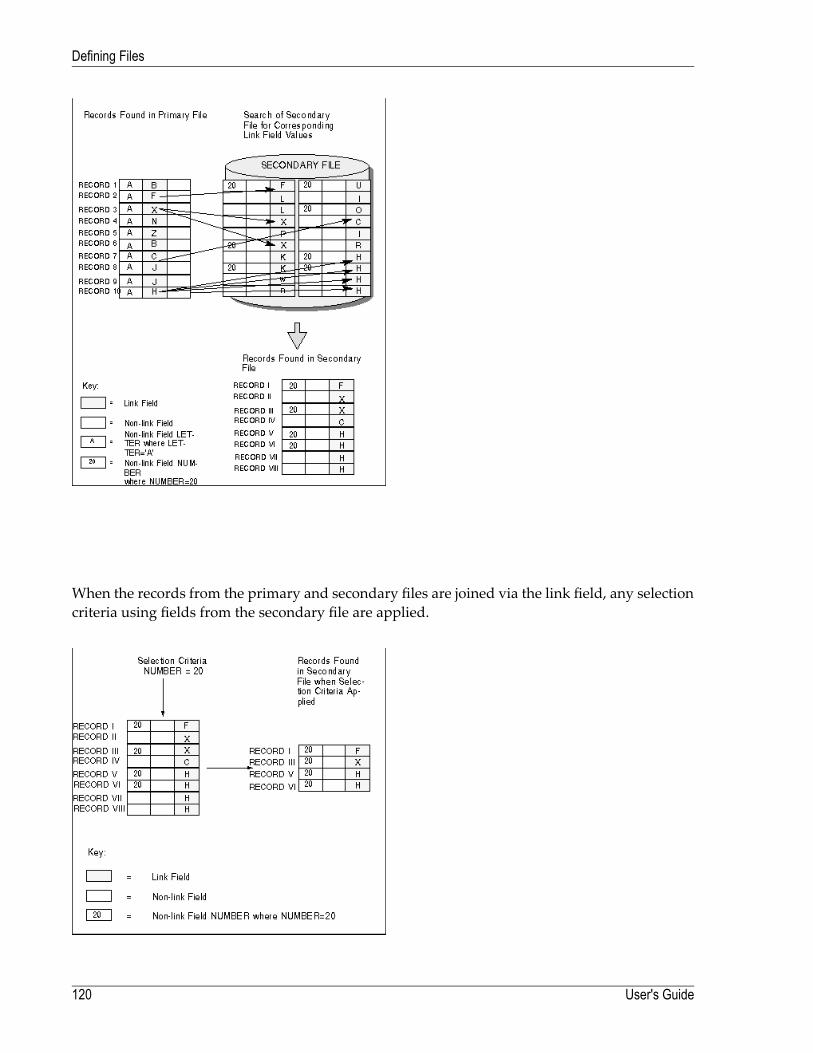
When the records from the primary and secondary files are joined via the link field, any selectioncriteria using fields from the secondary file are applied.
User's Guide120
Defining Files
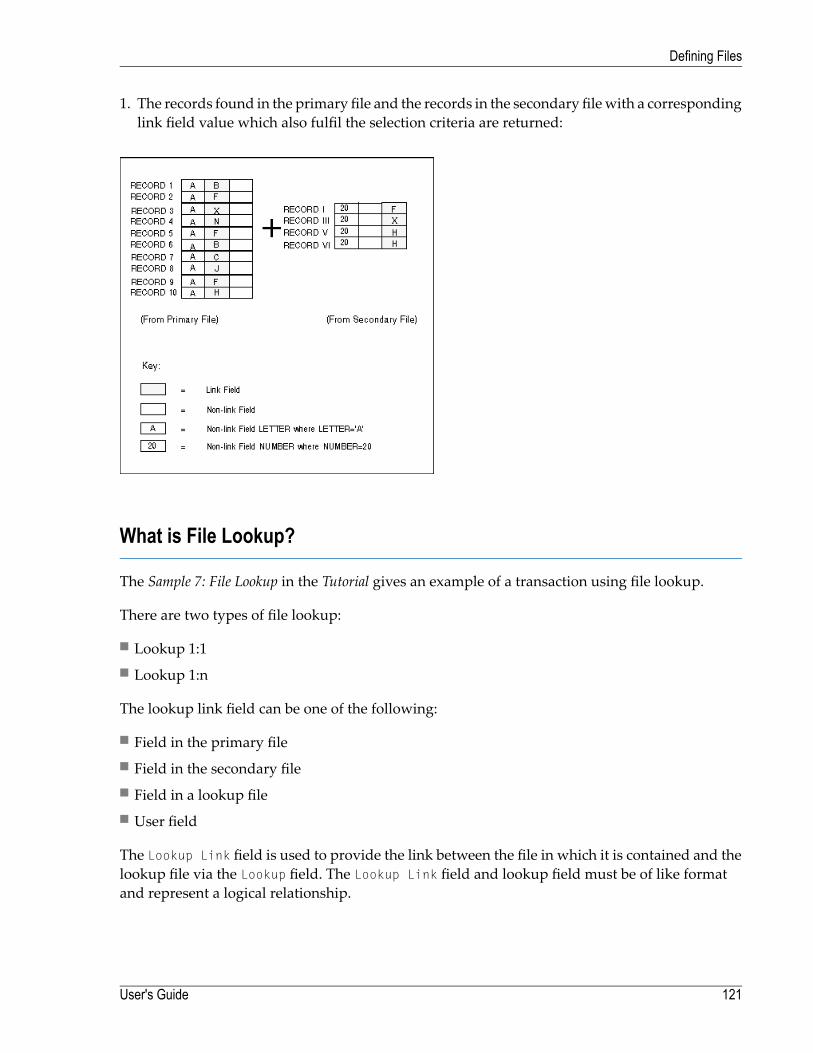
1. The records found in the primary file and the records in the secondary filewith a correspondinglink field value which also fulfil the selection criteria are returned:
What is File Lookup?
The Sample 7: File Lookup in the Tutorial gives an example of a transaction using file lookup.
There are two types of file lookup:
■ Lookup 1:1■ Lookup 1:n
The lookup link field can be one of the following:
■ Field in the primary file■ Field in the secondary file■ Field in a lookup file■ User field
The Lookup Link field is used to provide the link between the file in which it is contained and thelookup file via the Lookup field. The Lookup Link field and lookup field must be of like formatand represent a logical relationship.
121User's Guide
Defining Files
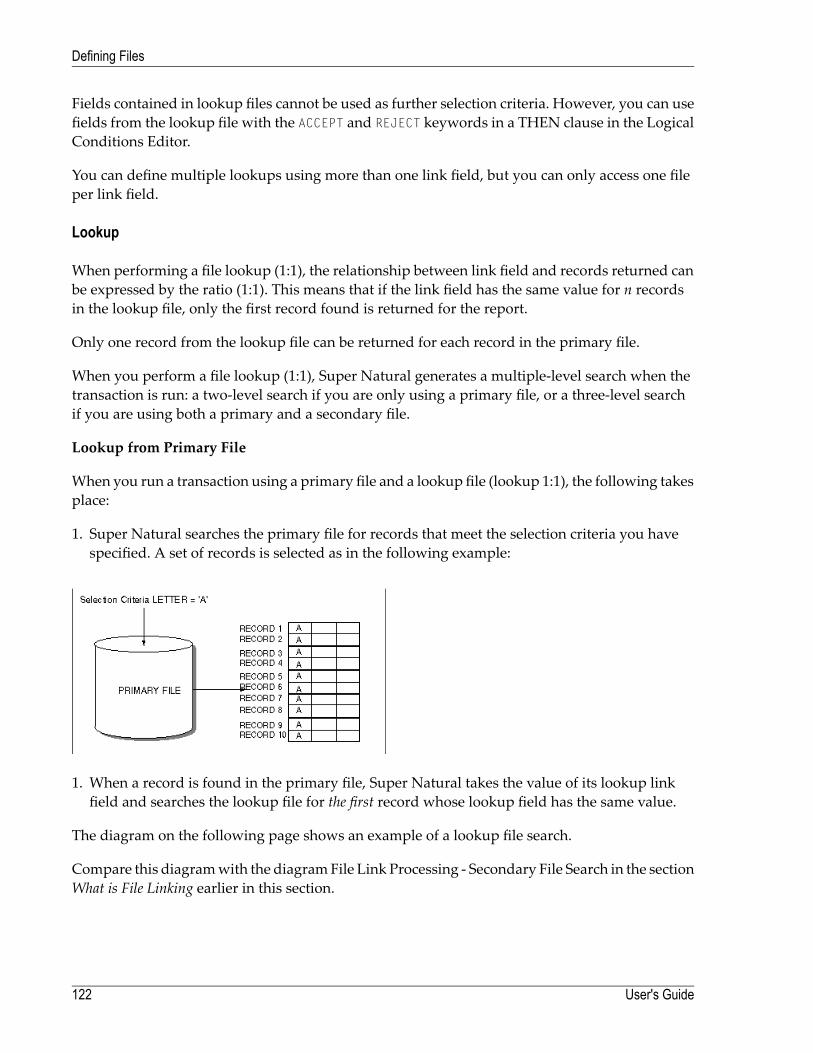
Fields contained in lookup files cannot be used as further selection criteria. However, you can usefields from the lookup file with the ACCEPT and REJECT keywords in a THEN clause in the LogicalConditions Editor.
You can define multiple lookups using more than one link field, but you can only access one fileper link field.
Lookup
When performing a file lookup (1:1), the relationship between link field and records returned canbe expressed by the ratio (1:1). This means that if the link field has the same value for n recordsin the lookup file, only the first record found is returned for the report.
Only one record from the lookup file can be returned for each record in the primary file.
When you perform a file lookup (1:1), Super Natural generates a multiple-level search when thetransaction is run: a two-level search if you are only using a primary file, or a three-level searchif you are using both a primary and a secondary file.
Lookup from Primary File
When you run a transaction using a primary file and a lookup file (lookup 1:1), the following takesplace:
1. Super Natural searches the primary file for records that meet the selection criteria you havespecified. A set of records is selected as in the following example:
1. When a record is found in the primary file, Super Natural takes the value of its lookup linkfield and searches the lookup file for the first record whose lookup field has the same value.
The diagram on the following page shows an example of a lookup file search.
Compare this diagramwith the diagramFile Link Processing - Secondary File Search in the sectionWhat is File Linking earlier in this section.
User's Guide122
Defining Files
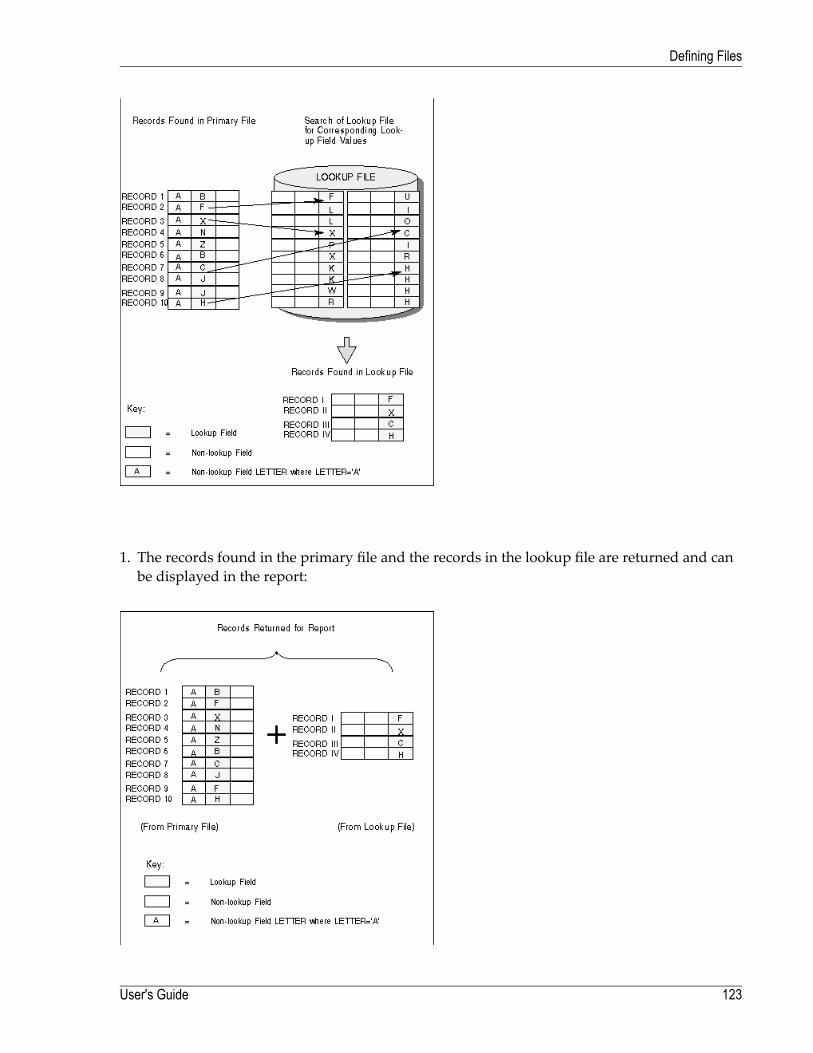
1. The records found in the primary file and the records in the lookup file are returned and canbe displayed in the report:
123User's Guide
Defining Files
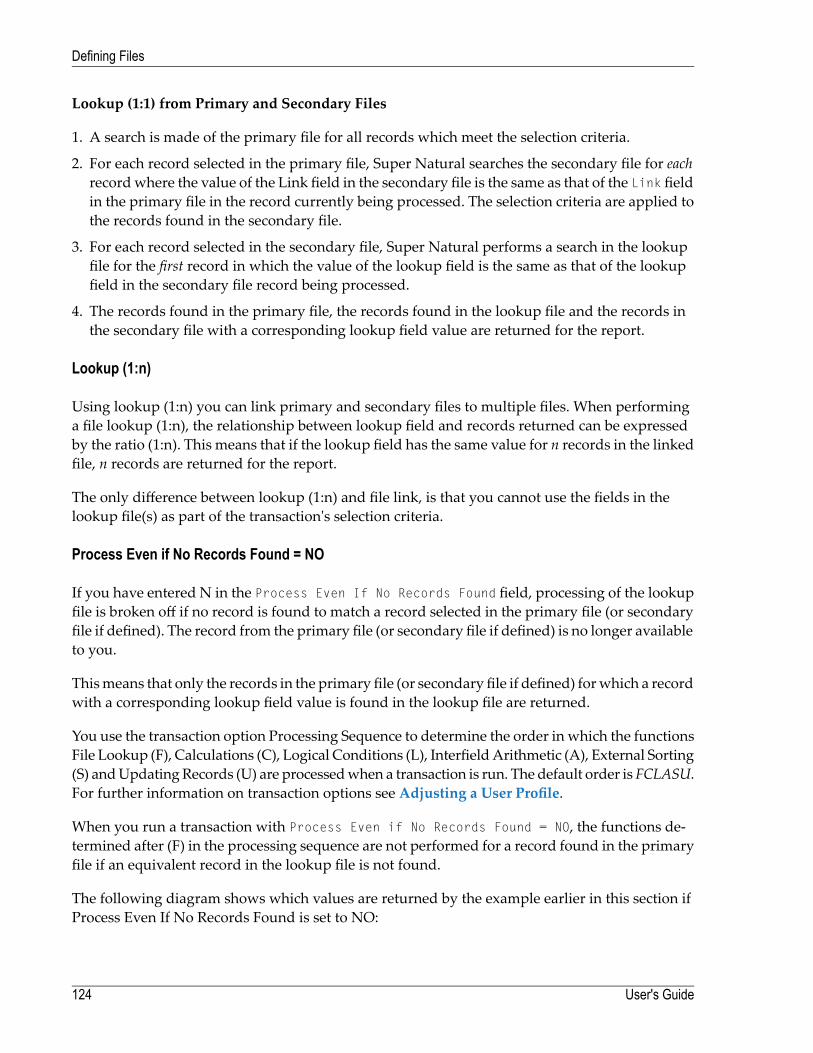
Lookup (1:1) from Primary and Secondary Files
1. A search is made of the primary file for all records which meet the selection criteria.
2. For each record selected in the primary file, Super Natural searches the secondary file for eachrecordwhere the value of the Link field in the secondary file is the same as that of the Link fieldin the primary file in the record currently being processed. The selection criteria are applied tothe records found in the secondary file.
3. For each record selected in the secondary file, Super Natural performs a search in the lookupfile for the first record in which the value of the lookup field is the same as that of the lookupfield in the secondary file record being processed.
4. The records found in the primary file, the records found in the lookup file and the records inthe secondary file with a corresponding lookup field value are returned for the report.
Lookup (1:n)
Using lookup (1:n) you can link primary and secondary files to multiple files. When performinga file lookup (1:n), the relationship between lookup field and records returned can be expressedby the ratio (1:n). This means that if the lookup field has the same value for n records in the linkedfile, n records are returned for the report.
The only difference between lookup (1:n) and file link, is that you cannot use the fields in thelookup file(s) as part of the transaction's selection criteria.
Process Even if No Records Found = NO
If you have entered N in the Process Even If No Records Found field, processing of the lookupfile is broken off if no record is found to match a record selected in the primary file (or secondaryfile if defined). The record from the primary file (or secondary file if defined) is no longer availableto you.
Thismeans that only the records in the primary file (or secondary file if defined) forwhich a recordwith a corresponding lookup field value is found in the lookup file are returned.
You use the transaction option Processing Sequence to determine the order in which the functionsFile Lookup (F), Calculations (C), Logical Conditions (L), InterfieldArithmetic (A), External Sorting(S) andUpdatingRecords (U) are processedwhen a transaction is run. The default order is FCLASU.For further information on transaction options see Adjusting a User Profile.
When you run a transaction with Process Even if No Records Found = NO, the functions de-termined after (F) in the processing sequence are not performed for a record found in the primaryfile if an equivalent record in the lookup file is not found.
The following diagram shows which values are returned by the example earlier in this section ifProcess Even If No Records Found is set to NO:
User's Guide124
Defining Files
Compare this diagram with the diagram File Lookup Processing - Records Returned for Reportearlier in this section.
Superfiles
Superfiles are transactions created by the administrator which you can use instead of a file. Super-files are ready-made transactions or transaction templates which you can use as a basis for yourown transactions. Superfiles are often transactions inwhich files are already linked and complicatedor lengthy selection criteria, logical condition processing statements or calculations are alreadyentered. You can take the superfile and then adapt it to your own needs. The aim of superfiles isto save you time.
Using Superfiles
To use a superfile
■ Enter its name in the File Name field in the Add Transaction window
Or:
Select it from the File Selection List.
The Worksheet appears with entries already made in it. You can now modify the transactionas described below.
125User's Guide
Defining Files
What You Can Modify in a Transaction Using a Superfile
You can modify the following when using a superfile:
■ Sort and control fields■ Display fields■ System functions■ Selection criteria■ Logical conditions■ SQL-SELECT■ Calculations
Modifications which you make to a superfile are only valid for the transaction you make them in.You cannot modify the superfile itself.
What You Cannot Modify in a Transaction Using a Superfile
You cannot modify the following when using a superfile:
■ Files used■ Fields used■ File specifications
Extended File Descriptions and File Comments
SuperNatural provides access to extendedfile descriptions andfile comments stored in the SoftwareAG data dictionary Predict. (This feature is only available at sites where Predict is installed.)
You can access extended file information bymarking the Information column of any File SelectionList window, for example, when adding a user file or a transaction.
User's Guide126
Defining Files
9 Defining Fields
■ What are Fields? ........................................................................................................................... 128■ Field Types ................................................................................................................................... 129■ Field Formats ................................................................................................................................ 132■ Constants .................................................................................................................................... 135■ Descriptors ................................................................................................................................... 137■ Extended Field Descriptions ............................................................................................................ 138
127
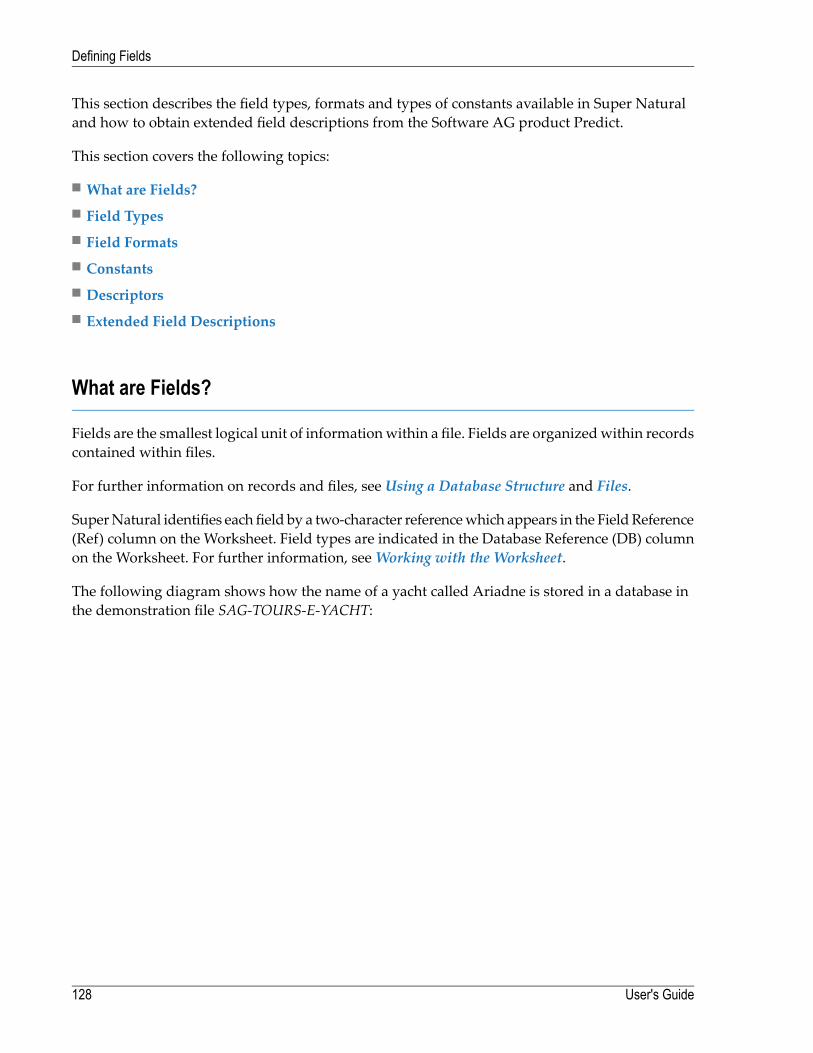
This section describes the field types, formats and types of constants available in Super Naturaland how to obtain extended field descriptions from the Software AG product Predict.
This section covers the following topics:
■ What are Fields?■ Field Types■ Field Formats■ Constants■ Descriptors■ Extended Field Descriptions
What are Fields?
Fields are the smallest logical unit of informationwithin a file. Fields are organizedwithin recordscontained within files.
For further information on records and files, see Using a Database Structure and Files.
SuperNatural identifies each field by a two-character referencewhich appears in the FieldReference(Ref) column on the Worksheet. Field types are indicated in the Database Reference (DB) columnon the Worksheet. For further information, seeWorking with the Worksheet.
The following diagram shows how the name of a yacht called Ariadne is stored in a database inthe demonstration file SAG-TOURS-E-YACHT:
User's Guide128
Defining Fields
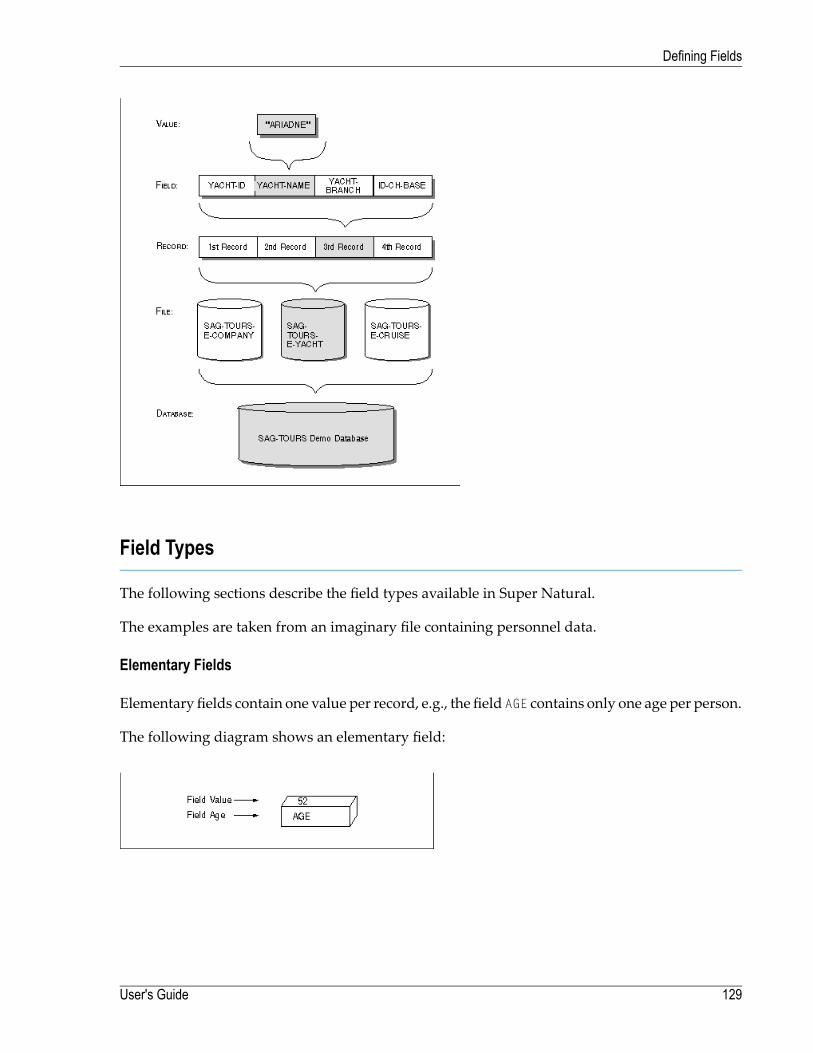
Field Types
The following sections describe the field types available in Super Natural.
The examples are taken from an imaginary file containing personnel data.
Elementary Fields
Elementary fields contain one value per record, e.g., the field AGE contains only one age per person.
The following diagram shows an elementary field:
129User's Guide
Defining Fields
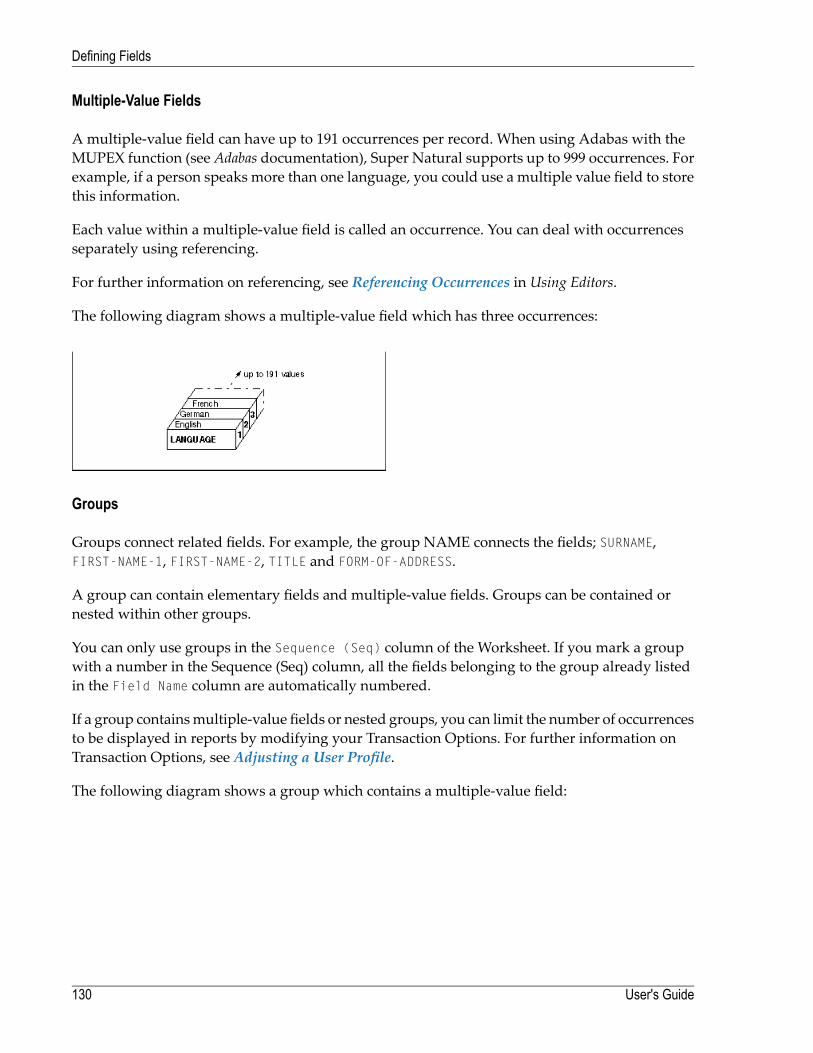
Multiple-Value Fields
A multiple-value field can have up to 191 occurrences per record. When using Adabas with theMUPEX function (see Adabas documentation), Super Natural supports up to 999 occurrences. Forexample, if a person speaks more than one language, you could use a multiple value field to storethis information.
Each value within a multiple-value field is called an occurrence. You can deal with occurrencesseparately using referencing.
For further information on referencing, see Referencing Occurrences in Using Editors.
The following diagram shows a multiple-value field which has three occurrences:
Groups
Groups connect related fields. For example, the group NAME connects the fields; SURNAME,FIRST-NAME-1, FIRST-NAME-2, TITLE and FORM-OF-ADDRESS.
A group can contain elementary fields and multiple-value fields. Groups can be contained ornested within other groups.
You can only use groups in the Sequence (Seq) column of the Worksheet. If you mark a groupwith a number in the Sequence (Seq) column, all the fields belonging to the group already listedin the Field Name column are automatically numbered.
If a group containsmultiple-value fields or nested groups, you can limit the number of occurrencesto be displayed in reports by modifying your Transaction Options. For further information onTransaction Options, see Adjusting a User Profile.
The following diagram shows a group which contains a multiple-value field:
User's Guide130
Defining Fields
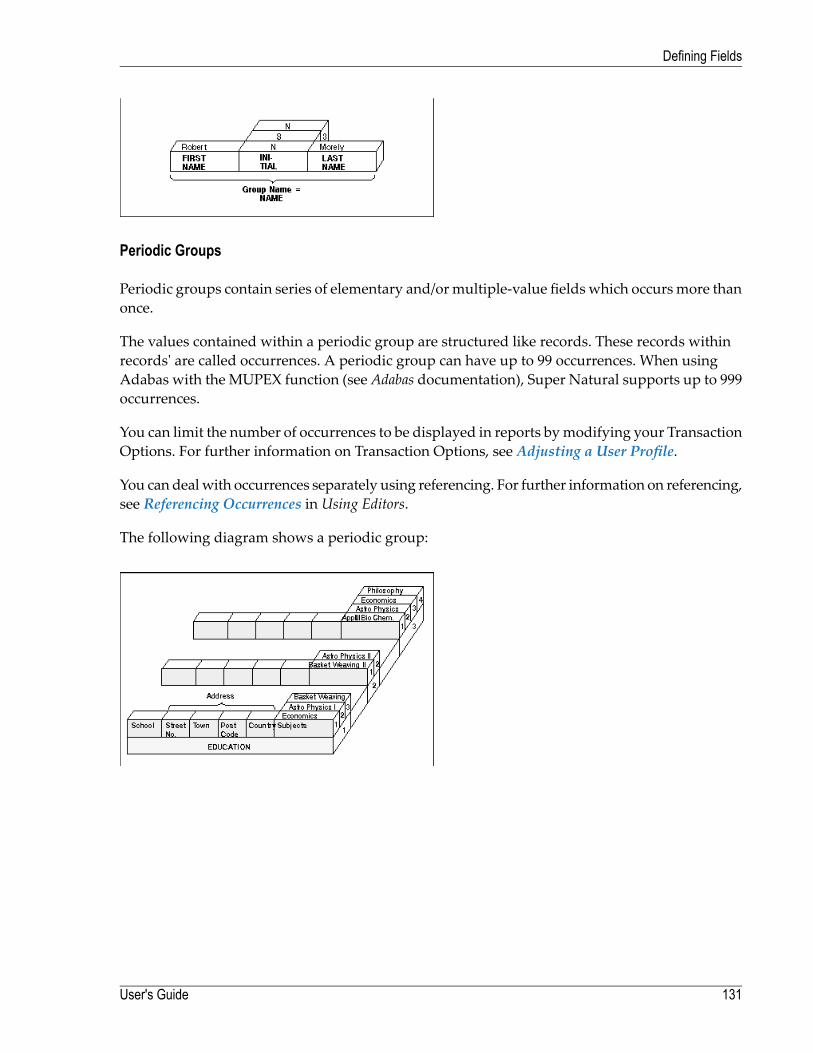
Periodic Groups
Periodic groups contain series of elementary and/or multiple-value fields which occurs more thanonce.
The values contained within a periodic group are structured like records. These records withinrecords' are called occurrences. A periodic group can have up to 99 occurrences. When usingAdabas with the MUPEX function (see Adabas documentation), Super Natural supports up to 999occurrences.
You can limit the number of occurrences to be displayed in reports bymodifying your TransactionOptions. For further information on Transaction Options, see Adjusting a User Profile.
You can dealwith occurrences separately using referencing. For further information on referencing,see Referencing Occurrences in Using Editors.
The following diagram shows a periodic group:
131User's Guide
Defining Fields
User Fields
User fields are not contained in a database file. User fields are defined by the user for a particulartransaction. User fields are most commonly used in calculations, logical condition processing andSQL.
For information on how to define user fields, see Field Name Column in Working with theWorksheet.
Dynamic Input Fields
Dynamic input fields are a kind of user field which you can use to execute a transaction severaltimes using different values. You can use dynamic input fields in the same way as any other userfield. Each time you run a transaction using dynamic input fields, Super Natural asks you tosupply a value for each one. This means that you do not have to modify the transaction to seewhat happens when a new value is used.
You can use dynamic input fields in the Selection, Calculation and Logical Conditions editors.
Note: You cannot run transactions using dynamic input fields in batch mode.
System Variables
System variables show information which comes directly from the system.
You can obtain a selection list of system variables by entering two asterisks (**) in the Field Namecolumn in the Worksheet.
System variables are described in detail in section System Variables.
Input Fields
Input fields are fields from PC or Work files which you use with the Data Selection modes PCFILE and WORK FILE.
Field Formats
The field format determines which values can be assigned to a field and how long it can be. Eachformat is identified by a code.
User's Guide132
Defining Fields
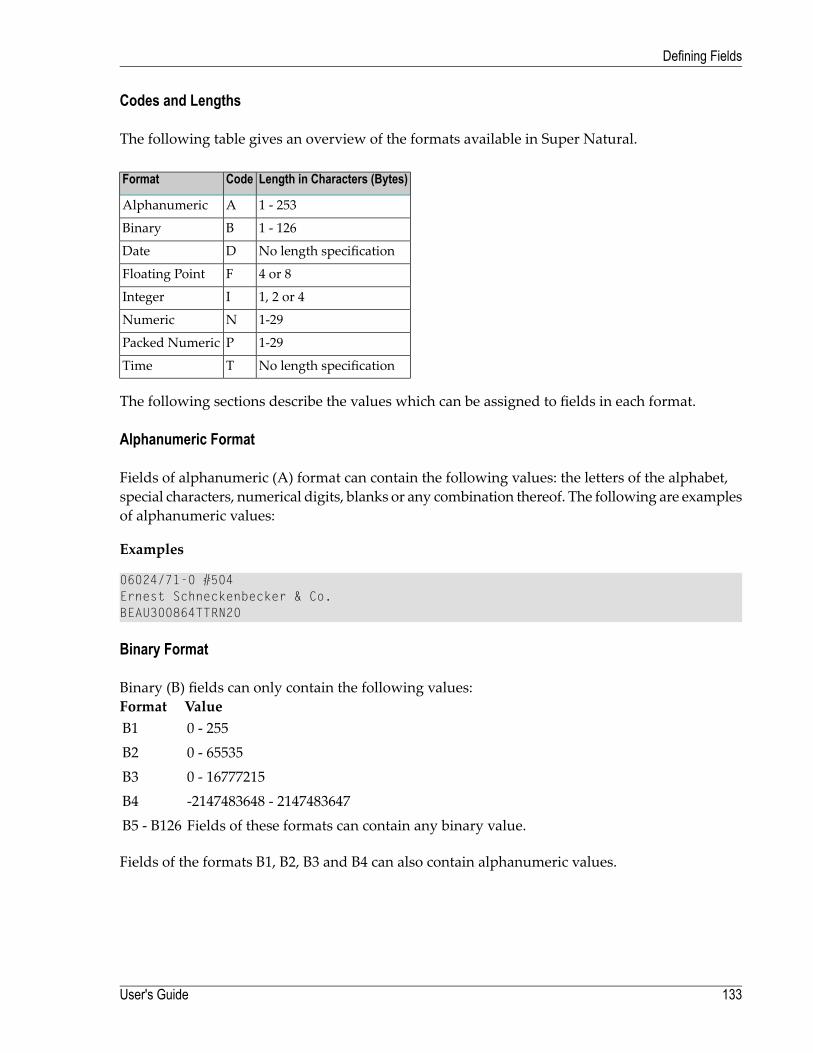
Codes and Lengths
The following table gives an overview of the formats available in Super Natural.
Length in Characters (Bytes)CodeFormat
1 - 253AAlphanumeric
1 - 126BBinary
No length specificationDDate
4 or 8FFloating Point
1, 2 or 4IInteger
1-29NNumeric
1-29PPacked Numeric
No length specificationTTime
The following sections describe the values which can be assigned to fields in each format.
Alphanumeric Format
Fields of alphanumeric (A) format can contain the following values: the letters of the alphabet,special characters, numerical digits, blanks or any combination thereof. The following are examplesof alphanumeric values:
Examples
06024/71-0 #504Ernest Schneckenbecker & Co.BEAU300864TTRN20
Binary Format
Binary (B) fields can only contain the following values:ValueFormat0 - 255B10 - 65535B20 - 16777215B3-2147483648 - 2147483647B4Fields of these formats can contain any binary value.B5 - B126
Fields of the formats B1, B2, B3 and B4 can also contain alphanumeric values.
133User's Guide
Defining Fields
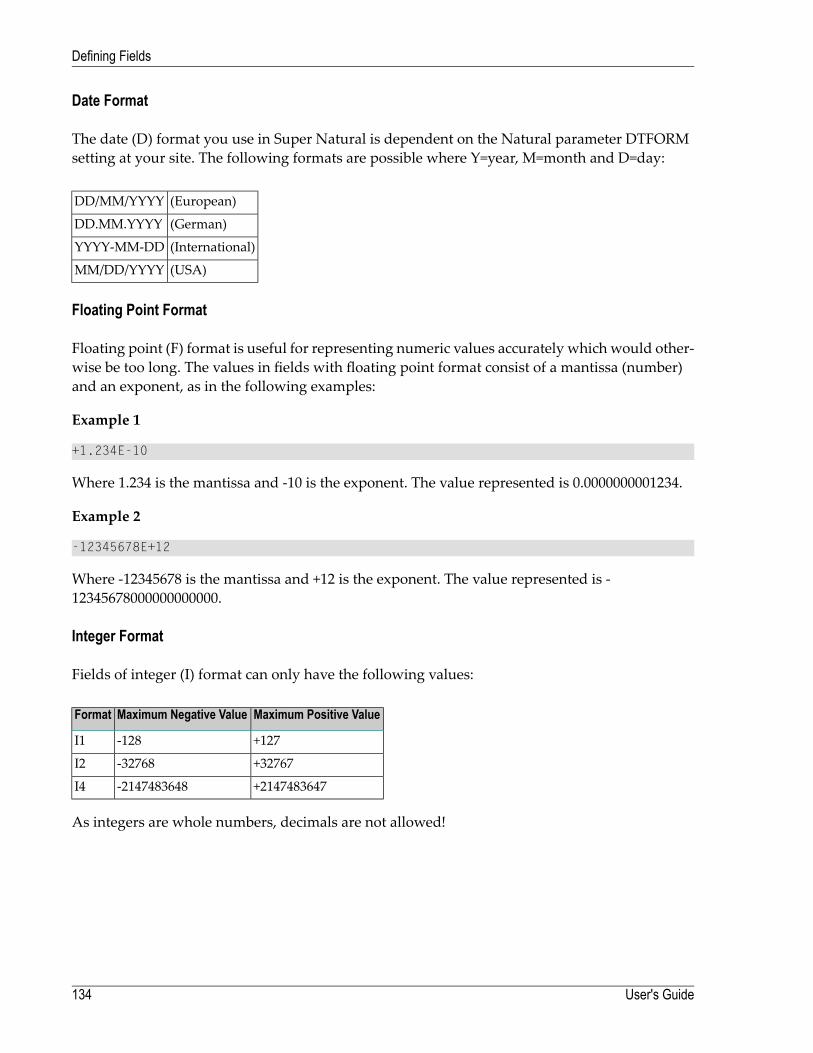
Date Format
The date (D) format you use in Super Natural is dependent on the Natural parameter DTFORMsetting at your site. The following formats are possible where Y=year, M=month and D=day:
(European)DD/MM/YYYY
(German)DD.MM.YYYY
(International)YYYY-MM-DD
(USA)MM/DD/YYYY
Floating Point Format
Floating point (F) format is useful for representing numeric values accurately which would other-wise be too long. The values in fields with floating point format consist of a mantissa (number)and an exponent, as in the following examples:
Example 1
+1.234E-10
Where 1.234 is the mantissa and -10 is the exponent. The value represented is 0.0000000001234.
Example 2
-12345678E+12
Where -12345678 is the mantissa and +12 is the exponent. The value represented is -12345678000000000000.
Integer Format
Fields of integer (I) format can only have the following values:
Maximum Positive ValueMaximum Negative ValueFormat
+127-128I1
+32767-32768I2
+2147483647-2147483648I4
As integers are whole numbers, decimals are not allowed!
User's Guide134
Defining Fields
Numeric Format
Fields of numeric (N) format can contain the following values: numerals, the special characters"+", "-", and the decimal character. The character which is used as the decimal character dependson theNatural settings (DCparameter) at your site. The following are examples of numeric values:
Examples
1000-15+0.0258
Numeric values can have a total of 29 numerals (the decimal character and + and - signs are notincluded in the field length). You can have a maximum of seven numerals after the decimal char-acter.
Note: The term numeric field can refer to fields of the following formats: B, F, I, N and P.
Packed Numeric Format
Packed Numeric (P) values do not take up as much space internally as numeric values. Values inpacked numeric format are represented in numeric format on your screen and in reports.
Values in packed numeric format can have a total of 29 numerals (the decimal character and + and- signs are not included in the field length). You can have a maximum of seven numerals after thedecimal character.
Time Format
Values in time (T) format are presented as follows where H=hour, M=minute and S=second:
HH:MM:SS
Constants
Constants are values which cannot change - the opposite of variables. The following are examplesof the use of constants:
■ SelectionNAME = 'SHAW'
■ CalculationSALARY = SALARY * 1.2
135User's Guide
Defining Fields
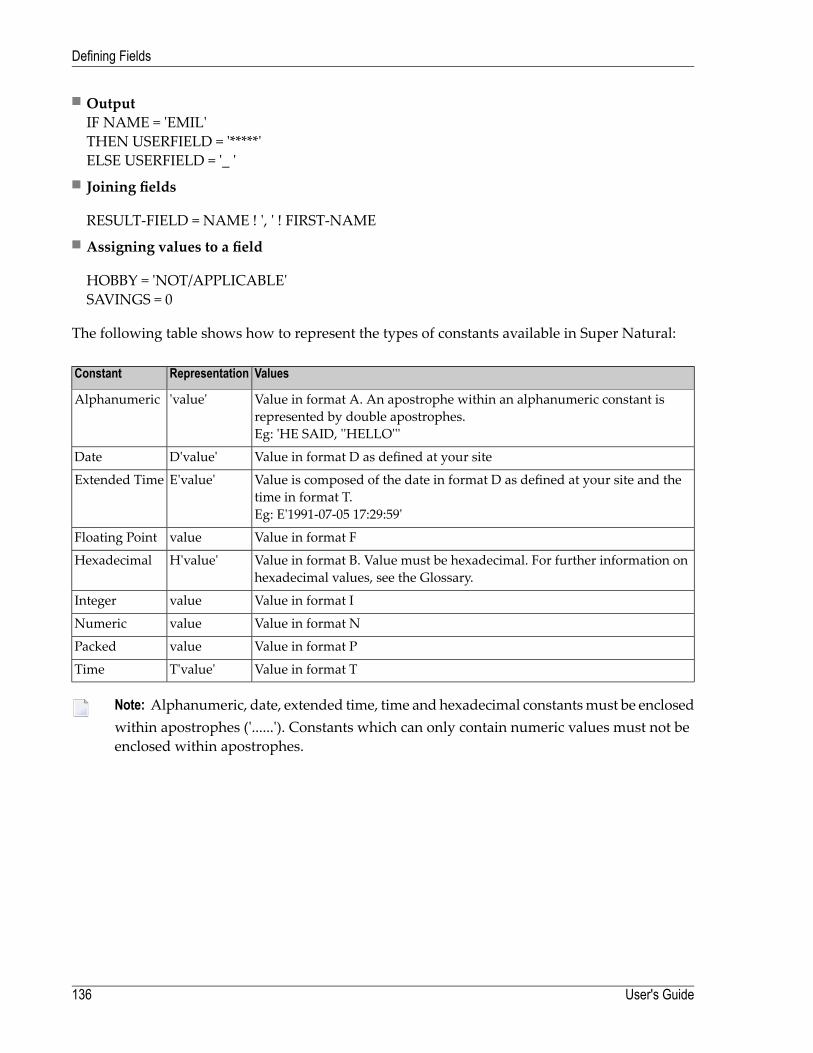
■ OutputIF NAME = 'EMIL'THEN USERFIELD = '*****'ELSE USERFIELD = '_ '
■ Joining fields
RESULT-FIELD = NAME ! ', ' ! FIRST-NAME■ Assigning values to a field
HOBBY = 'NOT/APPLICABLE'SAVINGS = 0
The following table shows how to represent the types of constants available in Super Natural:
ValuesRepresentationConstant
Value in format A. An apostrophe within an alphanumeric constant isrepresented by double apostrophes.Eg: 'HE SAID, ''HELLO'''
'value'Alphanumeric
Value in format D as defined at your siteD'value'Date
Value is composed of the date in format D as defined at your site and thetime in format T.Eg: E'1991-07-05 17:29:59'
E'value'Extended Time
Value in format FvalueFloating Point
Value in format B. Value must be hexadecimal. For further information onhexadecimal values, see the Glossary.
H'value'Hexadecimal
Value in format IvalueInteger
Value in format NvalueNumeric
Value in format PvaluePacked
Value in format TT'value'Time
Note: Alphanumeric, date, extended time, time and hexadecimal constantsmust be enclosedwithin apostrophes ('......'). Constants which can only contain numeric values must not beenclosed within apostrophes.
User's Guide136
Defining Fields
Descriptors
Descriptors enable Super Natural to search for data in the database without having to read everyrecord. The database administrator can use both elementary and multiple-value fields to definedescriptors.
The following sections describe the types of descriptors available in Super Natural.
Hyperdescriptors - Adabas only
Hyperdescriptors are user exits in Adabas and function like subdescriptors and superdescriptorsin Super Natural. Ask your administrator how to use hyperdescriptors at your site.
Key Field Descriptors
There are two types of descriptors known as key fields in Super Natural.
Elementary Key Fields
Elementary key fields are elementary fields which have been defined as descriptors.
Multiple-Value Key Fields
Multiple-value key fields are multiple-value fields which have been defined as descriptors.
Non-Database Descriptors - Adabas only
A non-database descriptor is an elementary or multiple-value field which can be used in selectioncriteria in the same way as a descriptor, but is not defined as such in the database.
Note: When you use a non-database descriptor in the selection criteria, Adabas reads everyrecord in the database.
Phonetic Descriptors - Adabas only
You can use phonetic descriptors to perform phonetic searches on fields. Phonetic searches resultin the return of all values which sound similar to the phonetic descriptor you are using as a searchvalue. Phonetic searches are useful if you are not sure how to spell what you are looking for! Youcan only use phonetic descriptors in the selection editor.
For further information on how to use phonetic descriptors, see Using Editors.
137User's Guide
Defining Fields

Subdescriptors - Adabas only
Subdescriptors are created from a portion of a field.
Superdescriptors - Adabas only
Superdescriptors are created from up to five fields (or parts thereof) which may or may not bedescriptors. Superdescriptors can be of alphanumeric format or, if all the fields included are nu-meric, of binary format.
Extended Field Descriptions
Super Natural provides access to extended field descriptions stored in the Software AG data dic-tionary Predict. (This feature is only available at sites where Predict is installed.)
You can access extended field information by entering PI in the Information column either of theWorksheet or of any Field Selection List window.
User's Guide138
Defining Fields
10 Using Editors
■ What are the Super Natural Editors? ................................................................................................. 140■ Editor Commands .......................................................................................................................... 141■ Editor Help System ........................................................................................................................ 145■ Operators Available in the Full-Screen Editors ..................................................................................... 146■ Selection Editor ............................................................................................................................. 147■ Calculation Editor .......................................................................................................................... 159■ Logical Conditions Editor ................................................................................................................. 171■ SQL SELECT Editor ....................................................................................................................... 175■ PC File Description Editor ................................................................................................................ 181■ Work File Description Editor ............................................................................................................. 183■ User File Description Editor ............................................................................................................. 185■ Arrays ......................................................................................................................................... 185
139
This section describes the Super Natural editors.
This section covers the following topics:
■ What are the Super Natural Editors?■ Editor Commands■ Editor Help System■ Operators Available in the Full-Screen Editors■ Selection Editor■ Calculation Editor■ Logical Conditions Editor■ SQL SELECT Editor■ PC File Description Editor■ Work File Description Editor■ User File Description Editor■ Arrays
What are the Super Natural Editors?
An editor is a tool for creating, modifying and deleting components necessary for creating trans-actions. Super Natural offers full-screen editors and file description editors. The editors whichyou can use for a transaction depend on your transaction modes.
You can also use the Natural Report Manager Layout Editor to edit the layout of reports duringcreation andmodification. The Layout Editor is not related to the other Super Natural editors andis described in the sectionWorking with Natural Report Manager.
The Super Natural full-screen editors and file description editors function in the same way.
Full-Screen Editors
You use full-screen editors to tell SuperNatural which data youwant from the database, to specifycalculations which take place when the transaction is run and for logical condition processing.The following full-screen editors are available:
■ Selection Editor■ SQL SELECT Editor■ Calculation Editor■ Logical Conditions Editor
User's Guide140
Using Editors
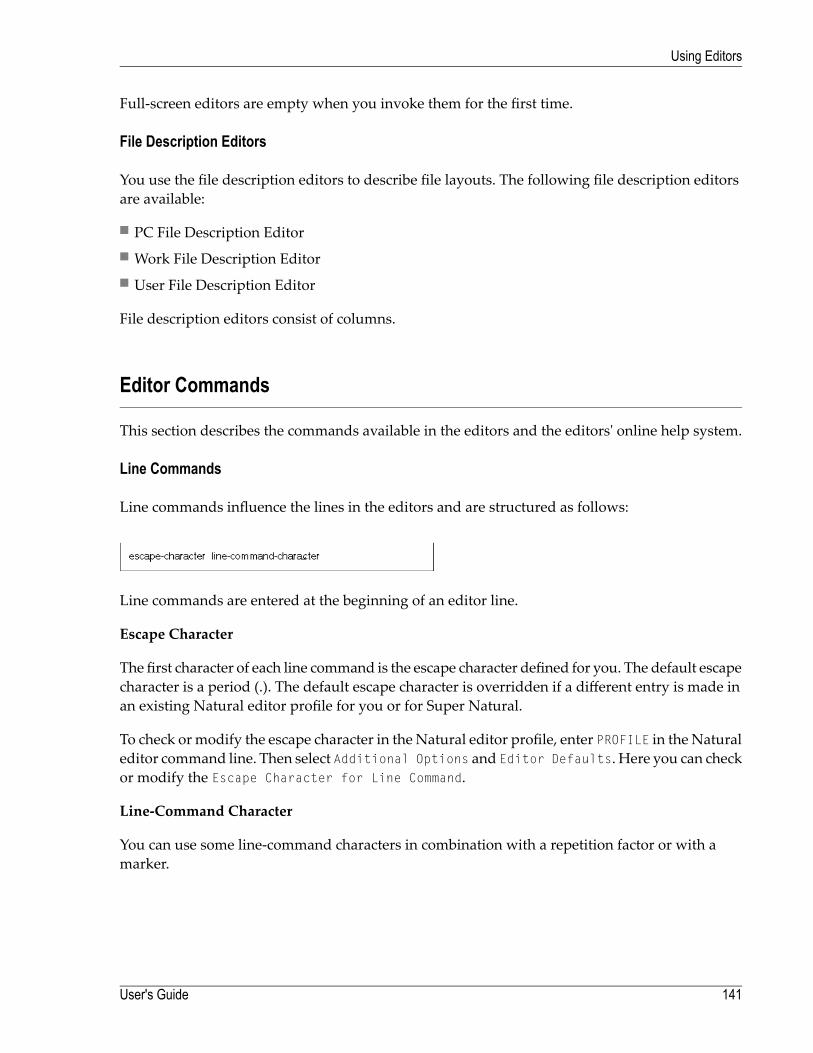
Full-screen editors are empty when you invoke them for the first time.
File Description Editors
You use the file description editors to describe file layouts. The following file description editorsare available:
■ PC File Description Editor■ Work File Description Editor■ User File Description Editor
File description editors consist of columns.
Editor Commands
This section describes the commands available in the editors and the editors' online help system.
Line Commands
Line commands influence the lines in the editors and are structured as follows:
Line commands are entered at the beginning of an editor line.
Escape Character
The first character of each line command is the escape character defined for you. The default escapecharacter is a period (.). The default escape character is overridden if a different entry is made inan existing Natural editor profile for you or for Super Natural.
To check or modify the escape character in the Natural editor profile, enter PROFILE in the Naturaleditor command line. Then select Additional Options and Editor Defaults. Here you can checkor modify the Escape Character for Line Command.
Line-Command Character
You can use some line-command characters in combination with a repetition factor or with amarker.
141User's Guide
Using Editors

(Blank)
Entering a blank at the end of each line command prevents the editor from trying to interpret anyof the information in the editor line as part of the line command.
Issuing Line Commands
To issue a line command
1 Type the escape character at the first position of an editor line.
2 Type the line command character immediately after the escape character.
3 Type a blank.
4 Press Enter.
Do not leave a blank between the escape character and the line command character.
List of Line Commands
The line commands available in the Super Naturaleditors are listed below:
Note: The notation n indicates a repetition factor. The default repetition factor is 1. Youmust enclose the repetition factor in parentheses.
Note: The line in which you enter the command is referred to as the current line.
FunctionCommandCopies the current line and inserts it directly below the current line..CCopies the current line n times and inserts the new lines directly below the currentline.
.C(n)
Copies the line previouslymarkedwith X and inserts it directly below the current line.For further information on marking lines, see the description of the .X command.
.CX
Copies the line previously marked with X n times and inserts the new lines directlybelow the current line. For further information on marking lines, see the descriptionof the .X command.
.CX(n)
Copies the line previouslymarkedwith Y and inserts it directly below the current line.For further information on marking lines, see the description of the .Ycommand.
.CY
Copies the line previously marked with Y n times and inserts the new lines directlybelow the current line. For further information on marking lines, see the descriptionof the .Y command.
.CY(n)
Copies the block of lines previously delimited by the X and Y markers and inserts itdirectly below the current line. For further information on marking lines, see the de-scriptions of the .X and the .Y commands.
.CX-Y
User's Guide142
Using Editors
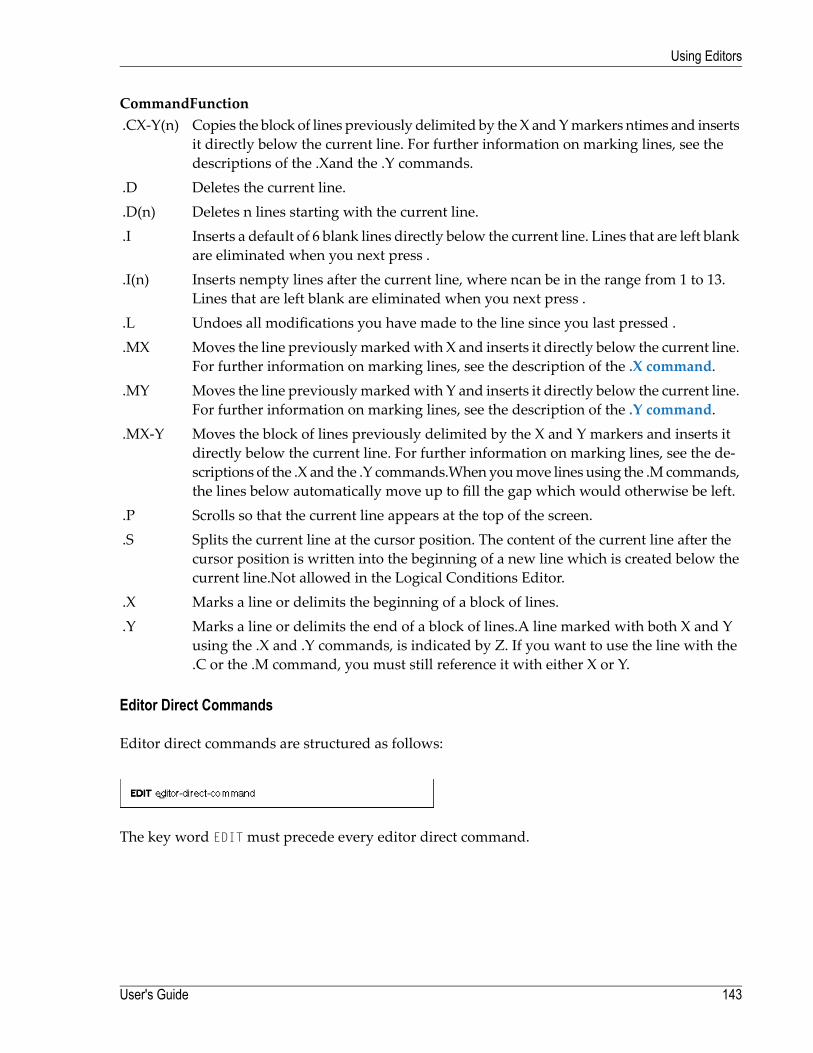
FunctionCommandCopies the block of lines previously delimited by theX andYmarkers ntimes and insertsit directly below the current line. For further information on marking lines, see thedescriptions of the .Xand the .Y commands.
.CX-Y(n)
Deletes the current line..DDeletes n lines starting with the current line..D(n)Inserts a default of 6 blank lines directly below the current line. Lines that are left blankare eliminated when you next press .
.I
Inserts nempty lines after the current line, where ncan be in the range from 1 to 13.Lines that are left blank are eliminated when you next press .
.I(n)
Undoes all modifications you have made to the line since you last pressed ..LMoves the line previouslymarkedwith X and inserts it directly below the current line.For further information on marking lines, see the description of the .X command.
.MX
Moves the line previouslymarkedwith Y and inserts it directly below the current line.For further information on marking lines, see the description of the .Y command.
.MY
Moves the block of lines previously delimited by the X and Y markers and inserts itdirectly below the current line. For further information on marking lines, see the de-
.MX-Y
scriptions of the .X and the .Y commands.Whenyoumove lines using the .M commands,the lines below automatically move up to fill the gap which would otherwise be left.Scrolls so that the current line appears at the top of the screen..PSplits the current line at the cursor position. The content of the current line after thecursor position is written into the beginning of a new line which is created below thecurrent line.Not allowed in the Logical Conditions Editor.
.S
Marks a line or delimits the beginning of a block of lines..XMarks a line or delimits the end of a block of lines.A line marked with both X and Yusing the .X and .Y commands, is indicated by Z. If you want to use the line with the.C or the .M command, you must still reference it with either X or Y.
.Y
Editor Direct Commands
Editor direct commands are structured as follows:
The key word EDITmust precede every editor direct command.
143User's Guide
Using Editors
Issue an Editor Direct Command
To issue an editor direct command
■ Enter the command in the command line of any Super Natural editor except for the LayoutEditor.
List of Editor Direct CommandsDescriptionCommandAdds 6 empty lines at the end of the lines.ADDAdds n empty lines at the end of the lines. The value n must be in therange from 1 to 6.
ADD (n)
Positions to the end of the lines.BOTTOMScans for the string entered as value 1 and replaces it with the stringentered as value 2. Values which have been replaced are marked withR. Not allowed in the Logical Conditions Editor.
CHANGE'value1'value2'
Deletes all the editor lines.CLEARDeletes the line marked with X.DXDeletes the line marked with Y.DYDeletes the block of lines delimited by X and Y.DX-YDeletes all the lines above the line marked with X.EXDeletes all the lines below the line marked with Y.EYDeletes all the lines except for the block of lines delimited by X and Y.EX-YUndoes all modifications made since you last pressed .LETDeletes all line markers except for S and R.RESETScrolls to the string entered as value'. The single quotation marks areoptional. Lines containing strings found by the SCAN value' commandare marked with S.
SCAN value'
Scrolls to the next occurrence of the string entered as value'.SCAN =Positions to the top of the lines in the editor.TOPScrolls to the line marked with X.XScrolls to the line marked with Y.YPages half a page forwards.+HPages half a page backwards.-HPositions n lines forwards.+nPositions n lines backwards.-nPages one page forward.+PPages one page backwards.-P
User's Guide144
Using Editors
Note: You can also use the SuperNatural Paging functions for positioningwithin the editors.
The S Marker and the R Marker
The S marker and the R marker overwrite any other markers previously set. Lines are markedwith S or R until the SCAN command or CHANGE 'value1'value2' command respectively is deac-tivated by issuing another command. The original markers become visible again.
General Editor Commands
The commands listed below are only available in the Super Natural editors.DescriptionCommandChecks your entries in all the SuperNatural editors apart from theUser File Descrip-tion Editor and pin-points errors. You can correct the error, ignore it and continue
CHECK
working using CANCEL, invoke syntax help by pressing or leave the editor and savethe error using EXIT.Invokes a syntax help window which tells you what you can do next. Available inall the full-screen editors apart from the SQL SELECT Editor. If you issue the
CONTINUE
CONTINUE commandwhen there is an error in the editor lines, the error is pin-pointedand you can either correct it or invoke syntax help as for the CHECK command.Thedescription of Sample Transaction 1 in the Transaction in the Tutorial demonstrateshow to use the Continue function. For further information on using the CONTINUEcommand in the Logical Conditions Editor, see Logical Conditions Editor in UsingEditors.Deletes all the editor lines. This achieves the same as the EDIT CLEAR command.DELETEInvokes the Field Selection List window. The fields which are already in use arelisted first and marked with a chevron (>). You can page forward to list the otherfields in the file(s) you are using.
FIELDS
Deletes the lines in the current editor and recalls the lines which were present (ifany) when the transaction was last saved.
REFRESH
Invokes the List DB2 Tables window. Issue from the SQL SELECT editor.TABLES
Editor Help System
Two types of help are available in the Super Natural editors:
Help for Editor Commands
To invoke the help for editor commands
1 Position the cursor in the editor area.
145User's Guide
Using Editors
2 Press PF1.
A help screen appears where you can choose between displaying information on editor linecommands and editor direct commands.
Syntax Help
Syntax help is available in all the full-screen editors apart from the SQL SELECT Editor. Syntaxhelp does not just display information, but allows you to make entries which are then transferredto the underlying screen.
You can invoke syntax help if you don't know what to do next.
To invoke syntax help if you don't know what to do next
■ Issue the CONTINUE command.
You can also invoke syntax help if the CHECK command has pin-pointed an error which youdo not know how to correct.
To invoke syntax help if you have just issued the CHECK command
■ Press Enter.
In both cases, a window appears telling you which alternatives are available. Syntax helpwindows display selection lists of objects or options. Selecting an object or option may leadto a further syntax help window, may invoke another Super Natural window e.g. the DefineUser Field window or may result in an entry being inserted in the editor lines.
Many syntax help windows display the option Mark to Replace. If you mark this option, theentry you have selected will replace the error in the editor lines instead of being inserted.
Note: The help system offered in the SQL SELECT Editor is different to the help offered inthe other Super Natural editors and is described later in this section.
Operators Available in the Full-Screen Editors
The following operators are available in the full-screen editors:
User's Guide146
Using Editors
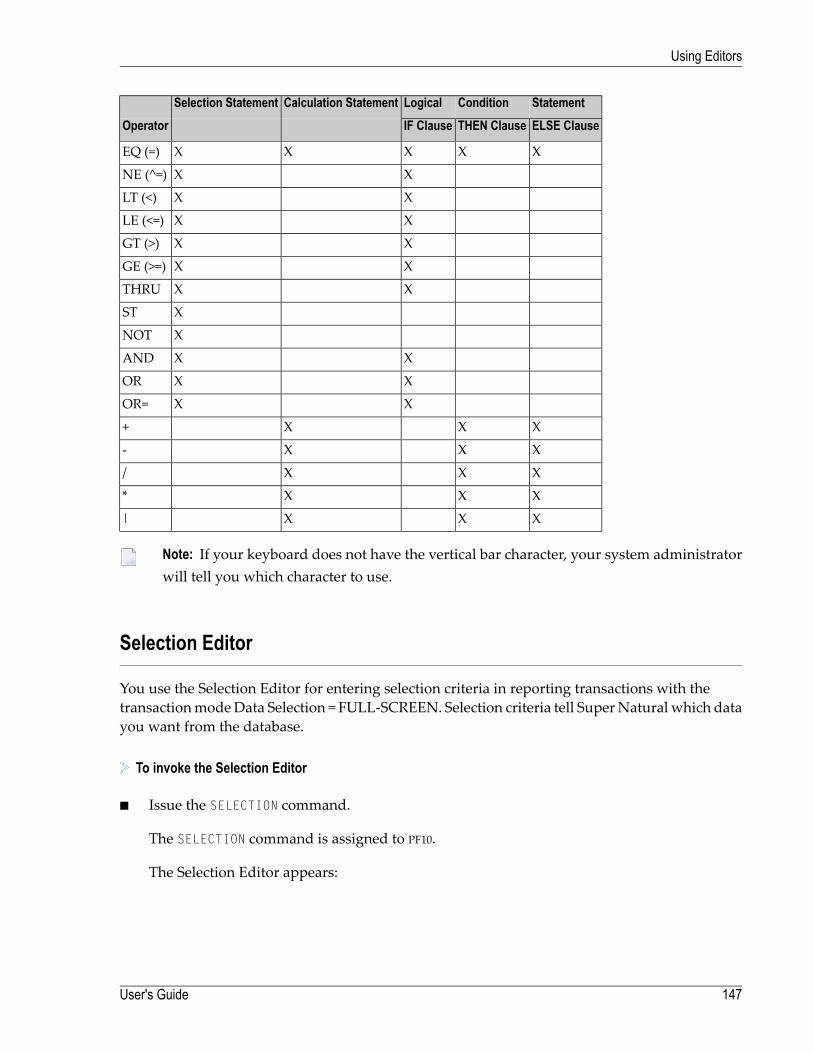
StatementConditionLogicalCalculation StatementSelection StatementELSE ClauseTHEN ClauseIF ClauseOperator
XXXXXEQ (=)
XXNE (^=)
XXLT (<)
XXLE (<=)
XXGT (>)
XXGE (>=)
XXTHRU
XST
XNOT
XXAND
XXOR
XXOR=
XXX+
XXX-
XXX/
XXX*
XXX|
Note: If your keyboard does not have the vertical bar character, your system administratorwill tell you which character to use.
Selection Editor
You use the Selection Editor for entering selection criteria in reporting transactions with thetransactionmodeData Selection = FULL-SCREEN. Selection criteria tell SuperNatural which datayou want from the database.
To invoke the Selection Editor
■ Issue the SELECTION command.
The SELECTION command is assigned to PF10.
The Selection Editor appears:
147User's Guide
Using Editors
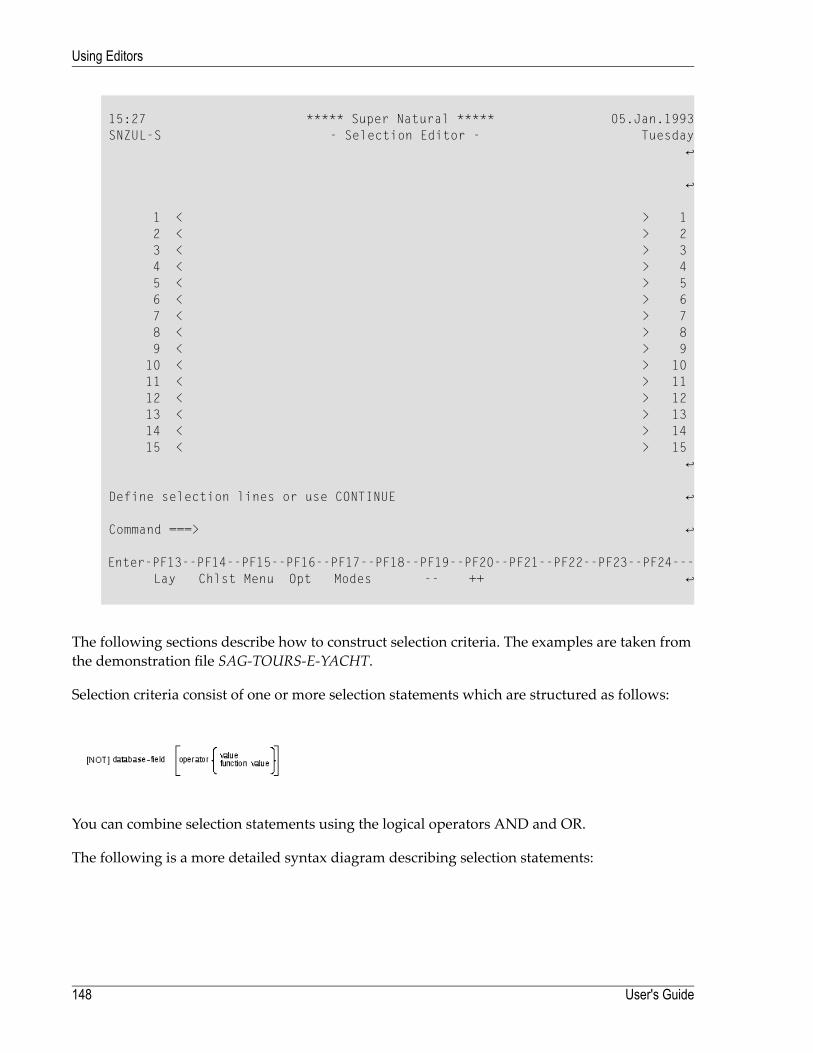
15:27 ***** Super Natural ***** 05.Jan.1993 SNZUL-S - Selection Editor - Tuesday ↩ ↩ 1 < > 1 2 < > 2 3 < > 3 4 < > 4 5 < > 5 6 < > 6 7 < > 7 8 < > 8 9 < > 9 10 < > 10 11 < > 11 12 < > 12 13 < > 13 14 < > 14 15 < > 15 ↩ Define selection lines or use CONTINUE ↩ Command ===> ↩ Enter-PF13--PF14--PF15--PF16--PF17--PF18--PF19--PF20--PF21--PF22--PF23--PF24--- Lay Chlst Menu Opt Modes -- ++ ↩
The following sections describe how to construct selection criteria. The examples are taken fromthe demonstration file SAG-TOURS-E-YACHT.
Selection criteria consist of one or more selection statements which are structured as follows:
You can combine selection statements using the logical operators AND and OR.
The following is a more detailed syntax diagram describing selection statements:
User's Guide148
Using Editors
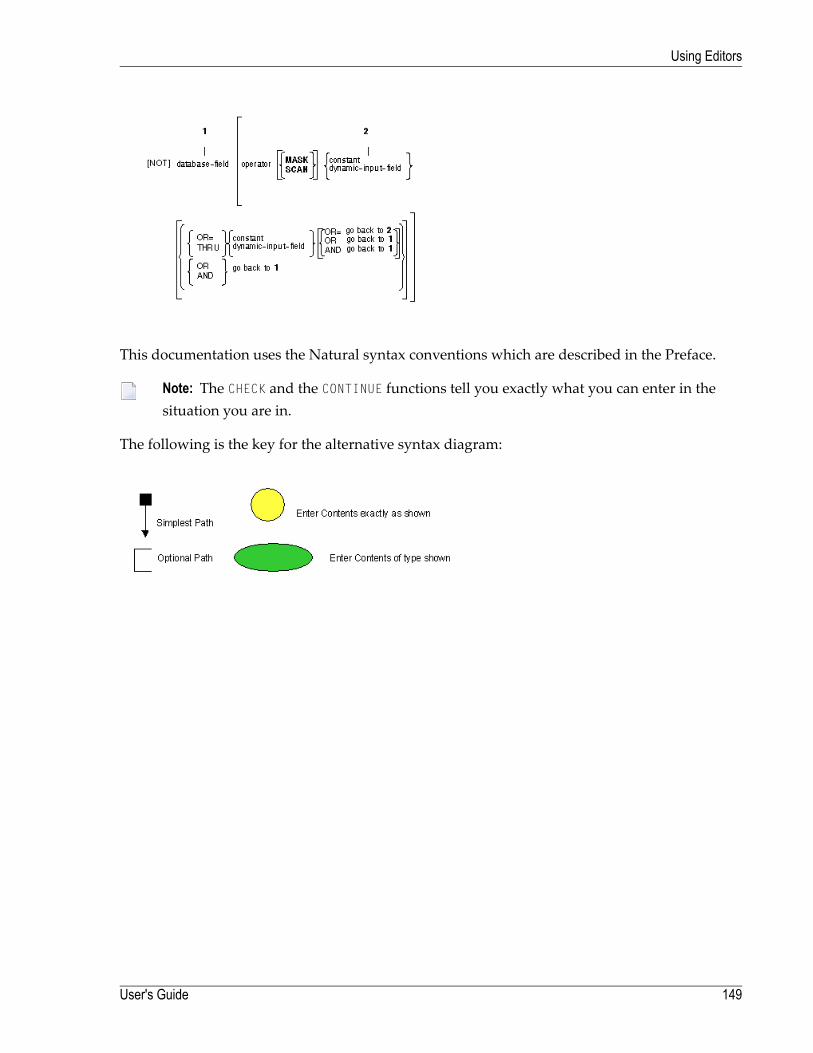
This documentation uses the Natural syntax conventions which are described in the Preface.
Note: The CHECK and the CONTINUE functions tell you exactly what you can enter in thesituation you are in.
The following is the key for the alternative syntax diagram:
149User's Guide
Using Editors
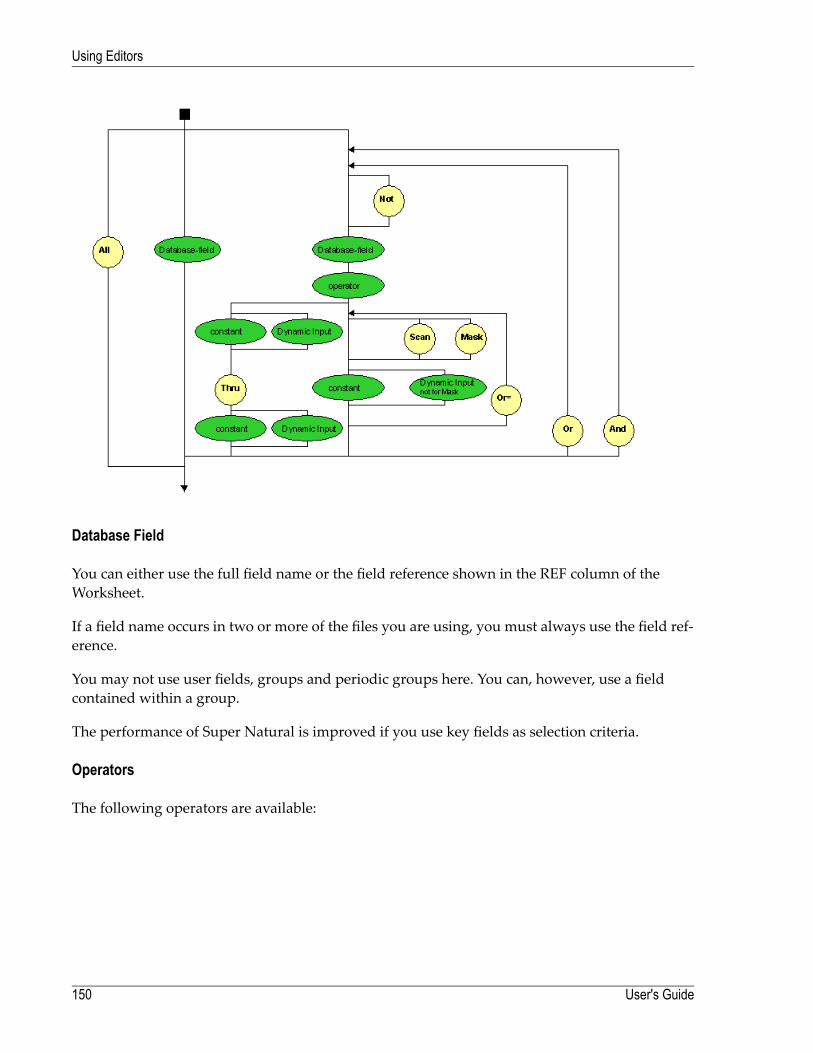
Database Field
You can either use the full field name or the field reference shown in the REF column of theWorksheet.
If a field name occurs in two or more of the files you are using, you must always use the field ref-erence.
You may not use user fields, groups and periodic groups here. You can, however, use a fieldcontained within a group.
The performance of Super Natural is improved if you use key fields as selection criteria.
Operators
The following operators are available:
User's Guide150
Using Editors
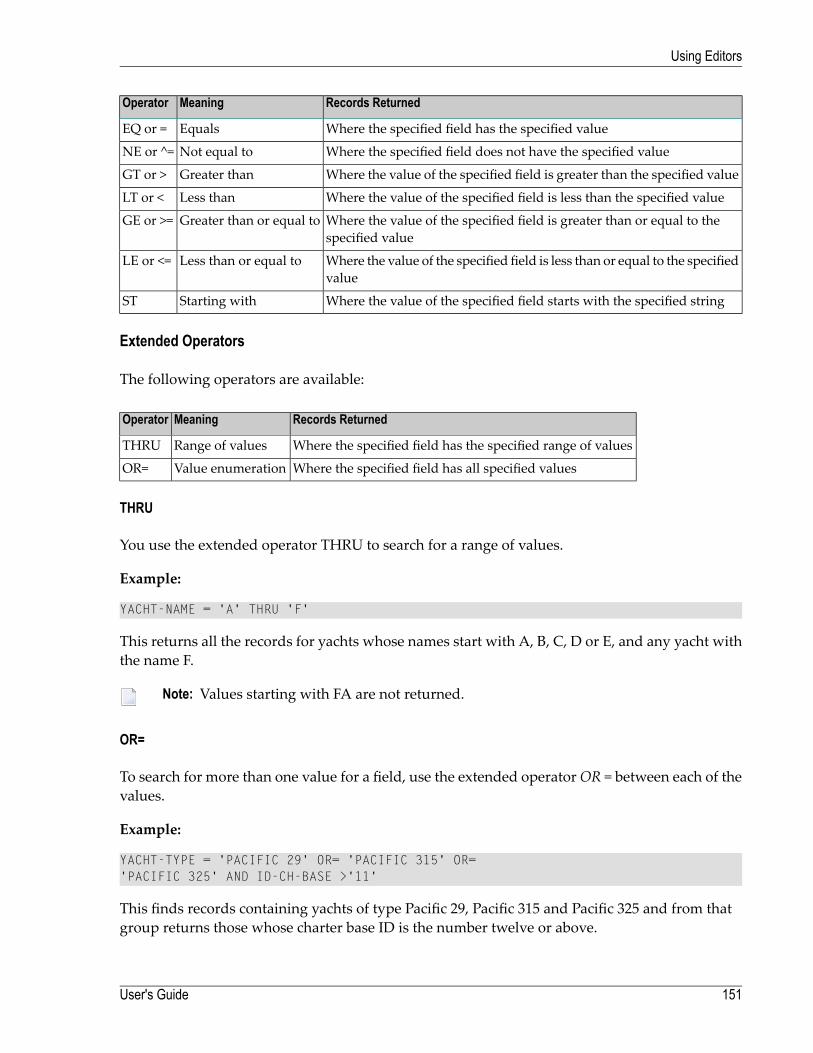
Records ReturnedMeaningOperator
Where the specified field has the specified valueEqualsEQ or =
Where the specified field does not have the specified valueNot equal toNE or ^=
Where the value of the specified field is greater than the specified valueGreater thanGT or >
Where the value of the specified field is less than the specified valueLess thanLT or <
Where the value of the specified field is greater than or equal to thespecified value
Greater than or equal toGE or >=
Where the value of the specified field is less than or equal to the specifiedvalue
Less than or equal toLE or <=
Where the value of the specified field starts with the specified stringStarting withST
Extended Operators
The following operators are available:
Records ReturnedMeaningOperator
Where the specified field has the specified range of valuesRange of valuesTHRU
Where the specified field has all specified valuesValue enumerationOR=
THRU
You use the extended operator THRU to search for a range of values.
Example:
YACHT-NAME = 'A' THRU 'F'
This returns all the records for yachts whose names start with A, B, C, D or E, and any yacht withthe name F.
Note: Values starting with FA are not returned.
OR=
To search for more than one value for a field, use the extended operatorOR = between each of thevalues.
Example:
YACHT-TYPE = 'PACIFIC 29' OR= 'PACIFIC 315' OR='PACIFIC 325' AND ID-CH-BASE >'11'
This finds records containing yachts of type Pacific 29, Pacific 315 and Pacific 325 and from thatgroup returns those whose charter base ID is the number twelve or above.
151User's Guide
Using Editors
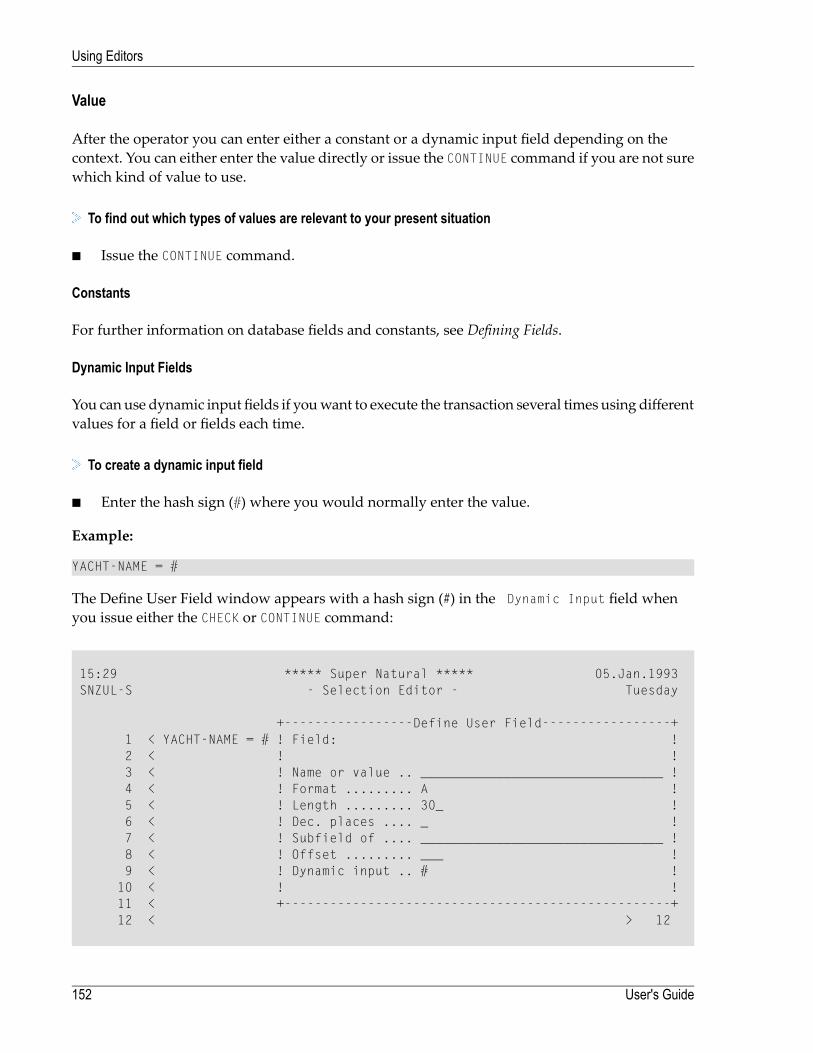
Value
After the operator you can enter either a constant or a dynamic input field depending on thecontext. You can either enter the value directly or issue the CONTINUE command if you are not surewhich kind of value to use.
To find out which types of values are relevant to your present situation
■ Issue the CONTINUE command.
Constants
For further information on database fields and constants, see Defining Fields.
Dynamic Input Fields
You can use dynamic input fields if youwant to execute the transaction several times using differentvalues for a field or fields each time.
To create a dynamic input field
■ Enter the hash sign (#) where you would normally enter the value.
Example:
YACHT-NAME = #
The Define User Field window appears with a hash sign (#) in the Dynamic Input field whenyou issue either the CHECK or CONTINUE command:
15:29 ***** Super Natural ***** 05.Jan.1993SNZUL-S - Selection Editor - Tuesday
+-----------------Define User Field-----------------+1 < YACHT-NAME = # ! Field: !2 < ! !3 < ! Name or value .. ________________________________ !4 < ! Format ......... A !5 < ! Length ......... 30_ !6 < ! Dec. places .... _ !7 < ! Subfield of .... ________________________________ !8 < ! Offset ......... ___ !9 < ! Dynamic input .. # !
10 < ! !11 < +---------------------------------------------------+12 < > 12
User's Guide152
Using Editors

Make your entries in the Define User Fieldwindow as described in the section Fields.
You have now defined a dynamic input field.
Note: When you return to the Selection Editor, the hash (#) sign is replaced by the user fieldname you have just defined.
When you run the transaction, the Dynamic Input Value window appears as in the following ex-ample:
15:30 ***** Super Natural ***** 05.Jan.1993SN3011 - Worksheet - Tuesday
Ref DB Field Name +----------- Dynamic Input Value -----------+AA 1K YACHT-ID .............. ! Transaction: IDDM6 !AB 1K YACHT-NAME ............ ! !AC 1 YACHT-BRANCH .......... ! DYNAMIC .. ______________________________ !AD 1K ID-CH-BASE ............ +-------------------------------------------+AE 1K ID-S-OWNER ..................... ___ ___ __ __ __ __
Enter the value you want your dynamic input field to have when the transaction is run this time.
The transaction is run using the value specified.
You can also use multiple dynamic input fields as shown in the examples below:
Examples:
WIDTH = # THRU #
LENGTH = 10 THRU #
YACHT-TYPE = # AND LENGTH GT #
YACHT-NAME = SCAN #
Each time you execute or run the transaction, Super Natural asks you to supply a value for eachdynamic input field.
You may have problems if you run a transaction containing dynamic input fields in batch mode.
Note: You can also use dynamic input fields in the Calculation and Logical Conditions Ed-itors.
153User's Guide
Using Editors
Functions
You can use the Scan function or the Mask function in the Selection Editor after the EQUALS oper-ator.
Scan Function
You can use the Scan function to search for a specific string of characters located anywhere withinan alphanumeric field. Use the Scan function as follows:
DATABASE FIELD = SCAN 'VALUE'
Example:
YACHT-NAME = SCAN 'Q'
This returns all the records where the value for the field YACHT-NAME contains the letter Q.
Mask Function
You can use the Mask function to search for a specific string of characters within specific positionsof an alphanumeric field. Use the mask function as follows:
DATABASE FIELD = MASK 'definition'
The mask definition defines the position of the character string or strings you want to look for.Mark the positions whose content you want to be ignored with a period (.) and enter the valuesyou are looking for in the positions in which you are looking for them. You do not need to enterperiods after the last value.
Example:
YACHT-NAME = MASK '.HA...A'
This returns all the records where the value for the field YACHT-NAME contains the letter H in thesecond position and A in the third and seventh positions.
Logical Operators
The following logical operators are available and are executed in the following order:
NOT
AND
OR
Selection criteria enclosed within parentheses are evaluated first.
User's Guide154
Using Editors
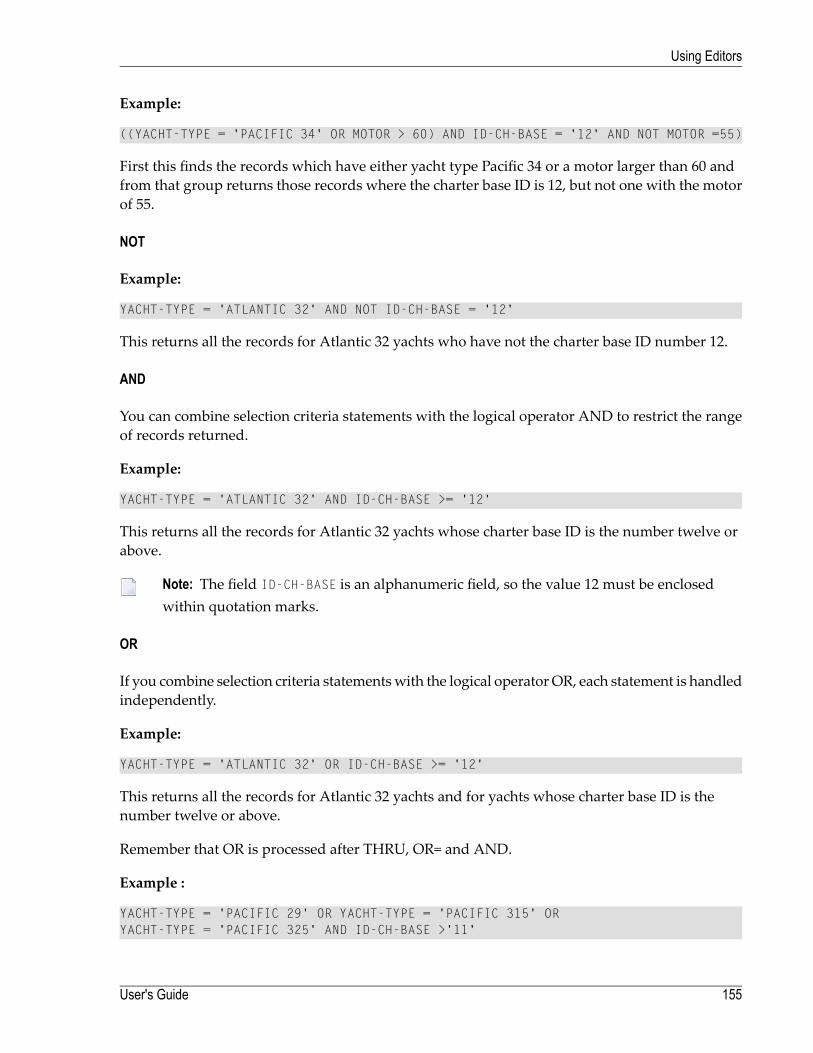
Example:
((YACHT-TYPE = 'PACIFIC 34' OR MOTOR > 60) AND ID-CH-BASE = '12' AND NOT MOTOR =55)
First this finds the records which have either yacht type Pacific 34 or a motor larger than 60 andfrom that group returns those records where the charter base ID is 12, but not one with the motorof 55.
NOT
Example:
YACHT-TYPE = 'ATLANTIC 32' AND NOT ID-CH-BASE = '12'
This returns all the records for Atlantic 32 yachts who have not the charter base ID number 12.
AND
You can combine selection criteria statements with the logical operator AND to restrict the rangeof records returned.
Example:
YACHT-TYPE = 'ATLANTIC 32' AND ID-CH-BASE >= '12'
This returns all the records for Atlantic 32 yachts whose charter base ID is the number twelve orabove.
Note: The field ID-CH-BASE is an alphanumeric field, so the value 12 must be enclosedwithin quotation marks.
OR
If you combine selection criteria statementswith the logical operatorOR, each statement is handledindependently.
Example:
YACHT-TYPE = 'ATLANTIC 32' OR ID-CH-BASE >= '12'
This returns all the records for Atlantic 32 yachts and for yachts whose charter base ID is thenumber twelve or above.
Remember that OR is processed after THRU, OR= and AND.
Example :
YACHT-TYPE = 'PACIFIC 29' OR YACHT-TYPE = 'PACIFIC 315' ORYACHT-TYPE = 'PACIFIC 325' AND ID-CH-BASE >'11'
155User's Guide
Using Editors
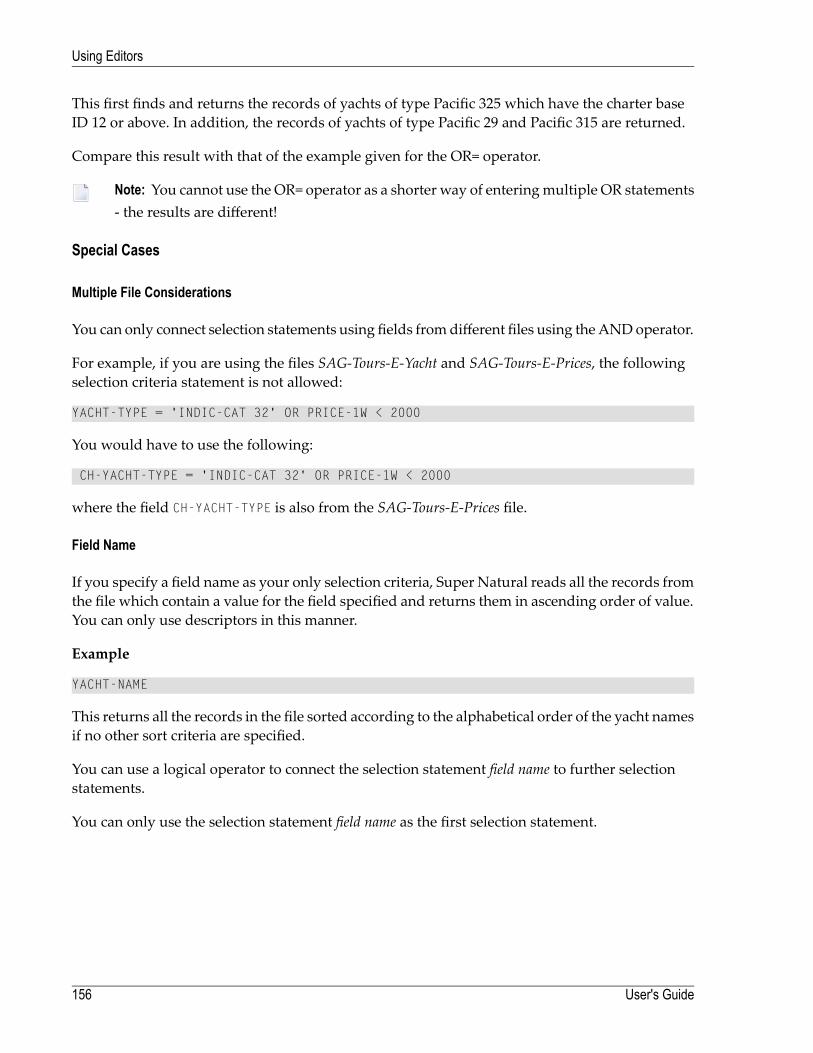
This first finds and returns the records of yachts of type Pacific 325 which have the charter baseID 12 or above. In addition, the records of yachts of type Pacific 29 and Pacific 315 are returned.
Compare this result with that of the example given for the OR= operator.
Note: You cannot use the OR= operator as a shorter way of enteringmultiple OR statements- the results are different!
Special Cases
Multiple File Considerations
You can only connect selection statements using fields fromdifferent files using theANDoperator.
For example, if you are using the files SAG-Tours-E-Yacht and SAG-Tours-E-Prices, the followingselection criteria statement is not allowed:
YACHT-TYPE = 'INDIC-CAT 32' OR PRICE-1W < 2000
You would have to use the following:
CH-YACHT-TYPE = 'INDIC-CAT 32' OR PRICE-1W < 2000
where the field CH-YACHT-TYPE is also from the SAG-Tours-E-Prices file.
Field Name
If you specify a field name as your only selection criteria, Super Natural reads all the records fromthe file which contain a value for the field specified and returns them in ascending order of value.You can only use descriptors in this manner.
Example
YACHT-NAME
This returns all the records in the file sorted according to the alphabetical order of the yacht namesif no other sort criteria are specified.
You can use a logical operator to connect the selection statement field name to further selectionstatements.
You can only use the selection statement field name as the first selection statement.
User's Guide156
Using Editors
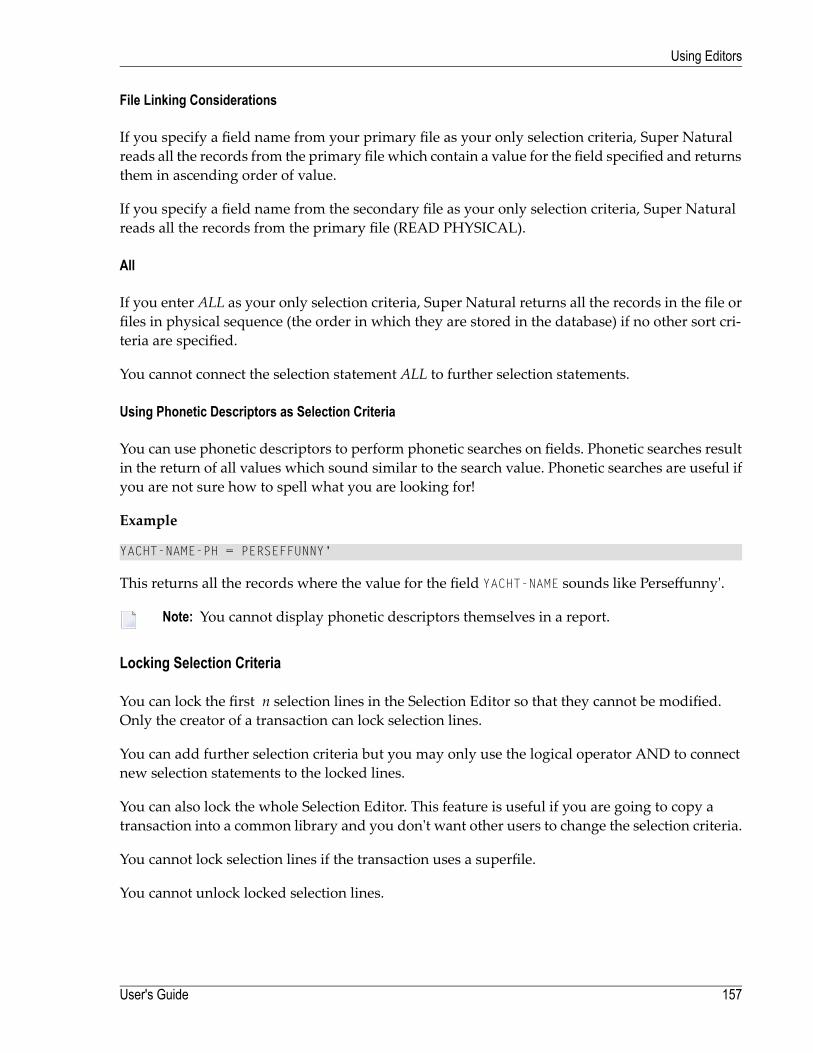
File Linking Considerations
If you specify a field name from your primary file as your only selection criteria, Super Naturalreads all the records from the primary file which contain a value for the field specified and returnsthem in ascending order of value.
If you specify a field name from the secondary file as your only selection criteria, Super Naturalreads all the records from the primary file (READ PHYSICAL).
All
If you enter ALL as your only selection criteria, Super Natural returns all the records in the file orfiles in physical sequence (the order in which they are stored in the database) if no other sort cri-teria are specified.
You cannot connect the selection statement ALL to further selection statements.
Using Phonetic Descriptors as Selection Criteria
You can use phonetic descriptors to perform phonetic searches on fields. Phonetic searches resultin the return of all values which sound similar to the search value. Phonetic searches are useful ifyou are not sure how to spell what you are looking for!
Example
YACHT-NAME-PH = PERSEFFUNNY'
This returns all the records where the value for the field YACHT-NAME sounds like Perseffunny'.
Note: You cannot display phonetic descriptors themselves in a report.
Locking Selection Criteria
You can lock the first n selection lines in the Selection Editor so that they cannot be modified.Only the creator of a transaction can lock selection lines.
You can add further selection criteria but you may only use the logical operator AND to connectnew selection statements to the locked lines.
You can also lock the whole Selection Editor. This feature is useful if you are going to copy atransaction into a common library and you don't want other users to change the selection criteria.
You cannot lock selection lines if the transaction uses a superfile.
You cannot unlock locked selection lines.
157User's Guide
Using Editors
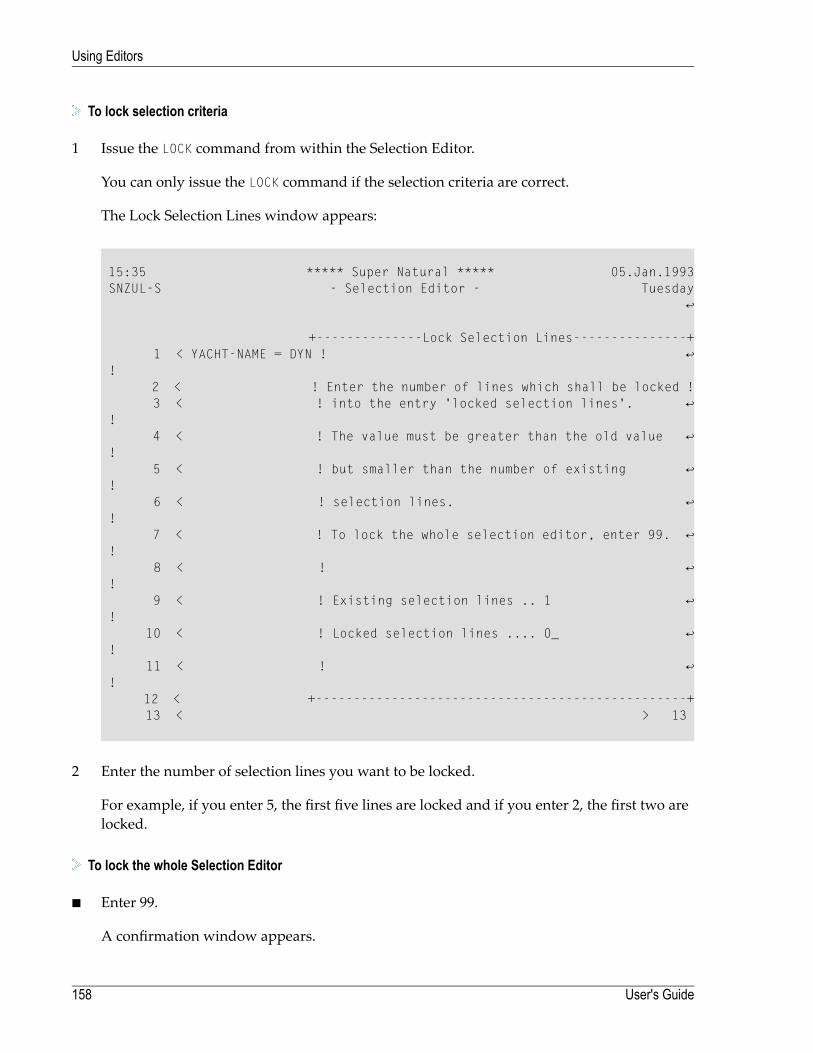
To lock selection criteria
1 Issue the LOCK command from within the Selection Editor.
You can only issue the LOCK command if the selection criteria are correct.
The Lock Selection Lines window appears:
15:35 ***** Super Natural ***** 05.Jan.1993 SNZUL-S - Selection Editor - Tuesday ↩ +--------------Lock Selection Lines---------------+ 1 < YACHT-NAME = DYN ! ↩ ! 2 < ! Enter the number of lines which shall be locked ! 3 < ! into the entry 'locked selection lines'. ↩ ! 4 < ! The value must be greater than the old value ↩ ! 5 < ! but smaller than the number of existing ↩ ! 6 < ! selection lines. ↩ ! 7 < ! To lock the whole selection editor, enter 99. ↩ ! 8 < ! ↩ ! 9 < ! Existing selection lines .. 1 ↩ ! 10 < ! Locked selection lines .... 0_ ↩ ! 11 < ! ↩ ! 12 < +-------------------------------------------------+ 13 < > 13
2 Enter the number of selection lines you want to be locked.
For example, if you enter 5, the first five lines are locked and if you enter 2, the first two arelocked.
To lock the whole Selection Editor
■ Enter 99.
A confirmation window appears.
User's Guide158
Using Editors
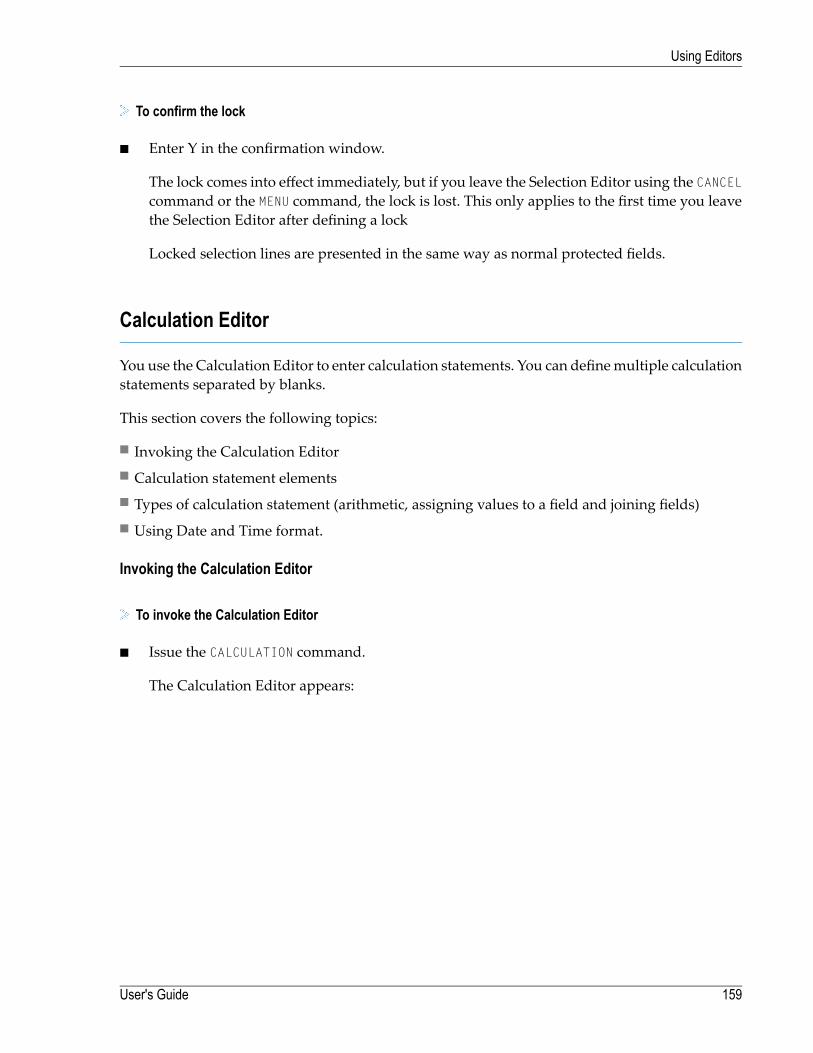
To confirm the lock
■ Enter Y in the confirmation window.
The lock comes into effect immediately, but if you leave the Selection Editor using the CANCELcommand or the MENU command, the lock is lost. This only applies to the first time you leavethe Selection Editor after defining a lock
Locked selection lines are presented in the same way as normal protected fields.
Calculation Editor
You use the Calculation Editor to enter calculation statements. You can definemultiple calculationstatements separated by blanks.
This section covers the following topics:
■ Invoking the Calculation Editor■ Calculation statement elements■ Types of calculation statement (arithmetic, assigning values to a field and joining fields)■ Using Date and Time format.
Invoking the Calculation Editor
To invoke the Calculation Editor
■ Issue the CALCULATION command.
The Calculation Editor appears:
159User's Guide
Using Editors
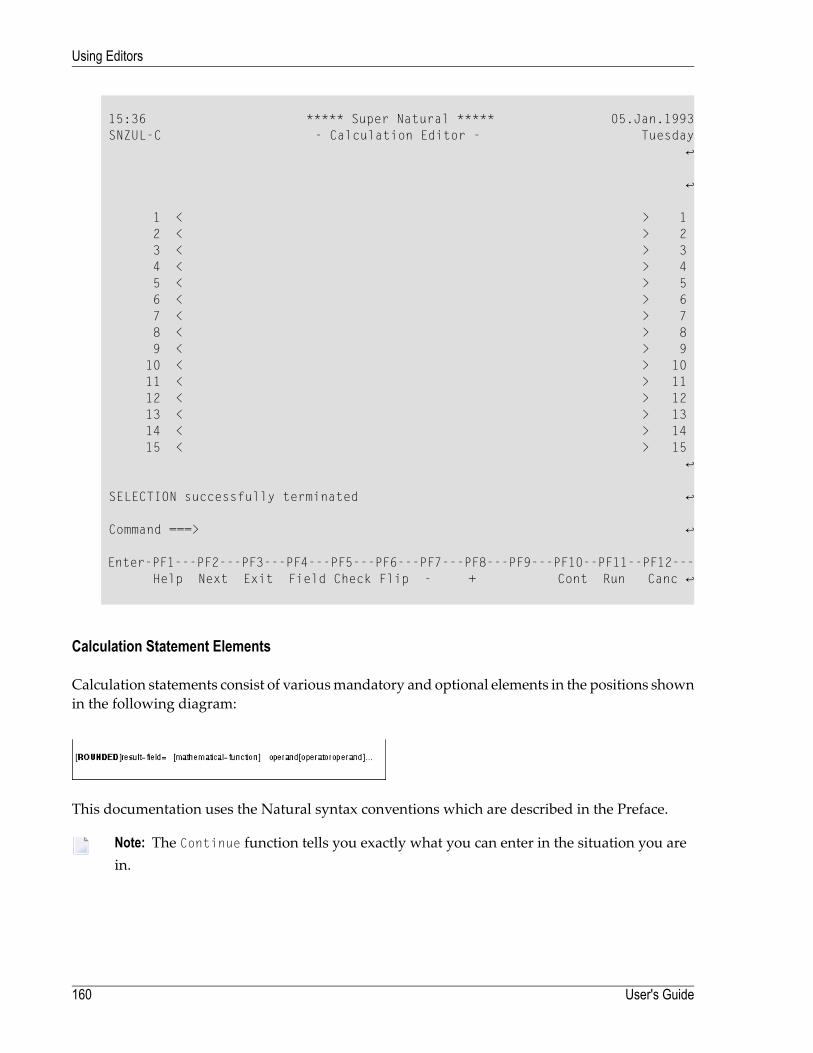
15:36 ***** Super Natural ***** 05.Jan.1993 SNZUL-C - Calculation Editor - Tuesday ↩ ↩ 1 < > 1 2 < > 2 3 < > 3 4 < > 4 5 < > 5 6 < > 6 7 < > 7 8 < > 8 9 < > 9 10 < > 10 11 < > 11 12 < > 12 13 < > 13 14 < > 14 15 < > 15 ↩ SELECTION successfully terminated ↩ Command ===> ↩ Enter-PF1---PF2---PF3---PF4---PF5---PF6---PF7---PF8---PF9---PF10--PF11--PF12--- Help Next Exit Field Check Flip - + Cont Run Canc ↩
Calculation Statement Elements
Calculation statements consist of variousmandatory and optional elements in the positions shownin the following diagram:
This documentation uses the Natural syntax conventions which are described in the Preface.
Note: The Continue function tells you exactly what you can enter in the situation you arein.
User's Guide160
Using Editors
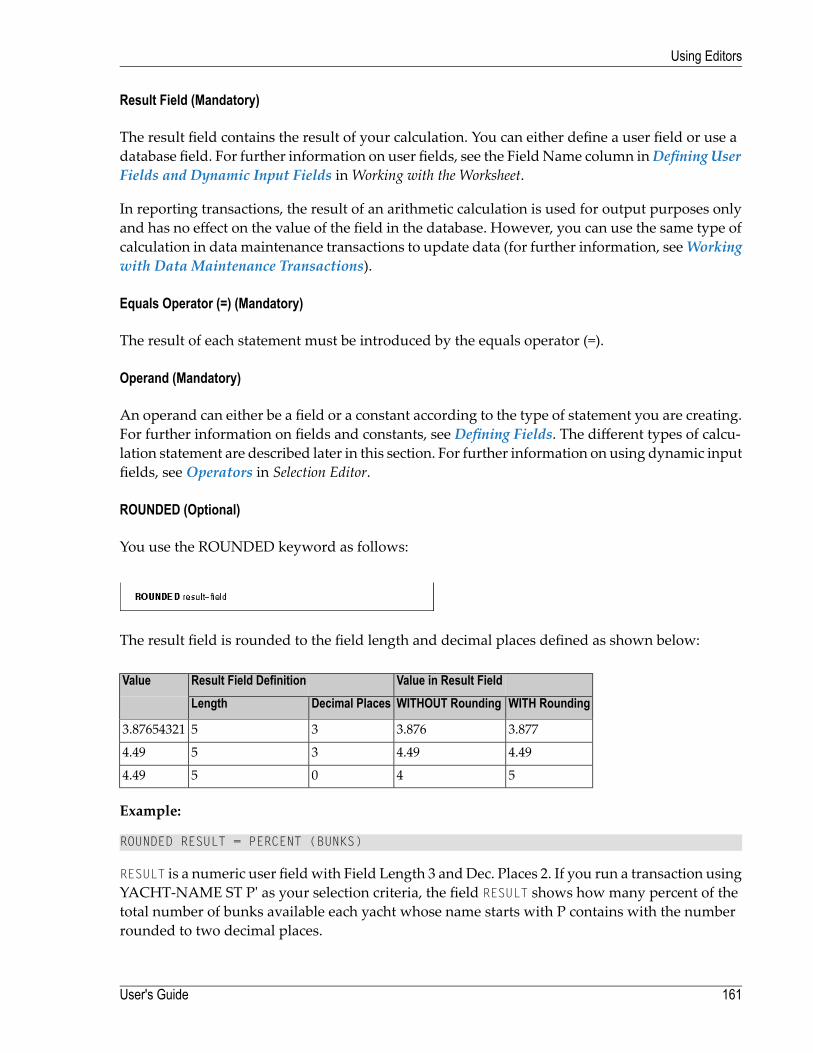
Result Field (Mandatory)
The result field contains the result of your calculation. You can either define a user field or use adatabase field. For further information on user fields, see the Field Name column inDefining UserFields and Dynamic Input Fields inWorking with the Worksheet.
In reporting transactions, the result of an arithmetic calculation is used for output purposes onlyand has no effect on the value of the field in the database. However, you can use the same type ofcalculation in data maintenance transactions to update data (for further information, seeWorkingwith Data Maintenance Transactions).
Equals Operator (=) (Mandatory)
The result of each statement must be introduced by the equals operator (=).
Operand (Mandatory)
An operand can either be a field or a constant according to the type of statement you are creating.For further information on fields and constants, see Defining Fields. The different types of calcu-lation statement are described later in this section. For further information on using dynamic inputfields, seeOperators in Selection Editor.
ROUNDED (Optional)
You use the ROUNDED keyword as follows:
The result field is rounded to the field length and decimal places defined as shown below:
Value in Result FieldResult Field DefinitionValueWITH RoundingWITHOUT RoundingDecimal PlacesLength
3.8773.876353.87654321
4.494.49354.49
54054.49
Example:
ROUNDED RESULT = PERCENT (BUNKS)
RESULT is a numeric user fieldwith Field Length 3 andDec. Places 2. If you run a transaction usingYACHT-NAME ST P' as your selection criteria, the field RESULT shows how many percent of thetotal number of bunks available each yacht whose name starts with P contains with the numberrounded to two decimal places.
161User's Guide
Using Editors
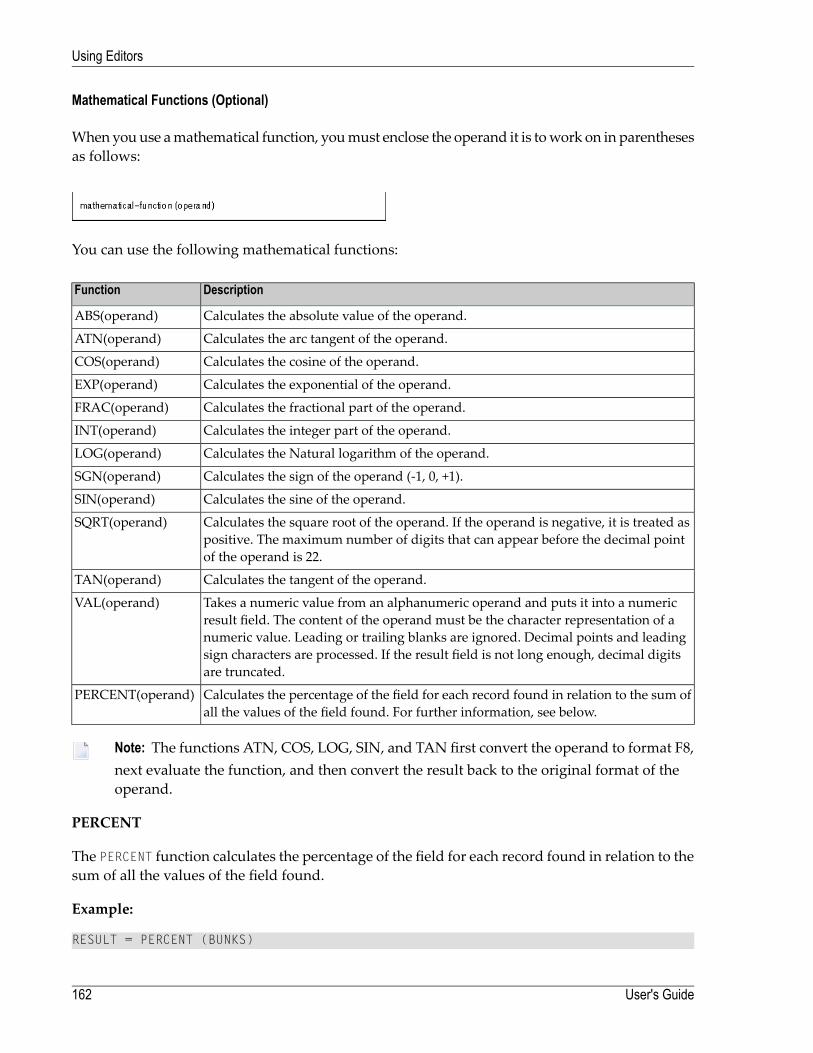
Mathematical Functions (Optional)
Whenyouuse amathematical function, youmust enclose the operand it is towork on in parenthesesas follows:
You can use the following mathematical functions:
DescriptionFunction
Calculates the absolute value of the operand.ABS(operand)
Calculates the arc tangent of the operand.ATN(operand)
Calculates the cosine of the operand.COS(operand)
Calculates the exponential of the operand.EXP(operand)
Calculates the fractional part of the operand.FRAC(operand)
Calculates the integer part of the operand.INT(operand)
Calculates the Natural logarithm of the operand.LOG(operand)
Calculates the sign of the operand (-1, 0, +1).SGN(operand)
Calculates the sine of the operand.SIN(operand)
Calculates the square root of the operand. If the operand is negative, it is treated aspositive. The maximum number of digits that can appear before the decimal pointof the operand is 22.
SQRT(operand)
Calculates the tangent of the operand.TAN(operand)
Takes a numeric value from an alphanumeric operand and puts it into a numericresult field. The content of the operand must be the character representation of a
VAL(operand)
numeric value. Leading or trailing blanks are ignored. Decimal points and leadingsign characters are processed. If the result field is not long enough, decimal digitsare truncated.
Calculates the percentage of the field for each record found in relation to the sum ofall the values of the field found. For further information, see below.
PERCENT(operand)
Note: The functions ATN, COS, LOG, SIN, and TAN first convert the operand to format F8,next evaluate the function, and then convert the result back to the original format of theoperand.
PERCENT
The PERCENT function calculates the percentage of the field for each record found in relation to thesum of all the values of the field found.
Example:
RESULT = PERCENT (BUNKS)
User's Guide162
Using Editors
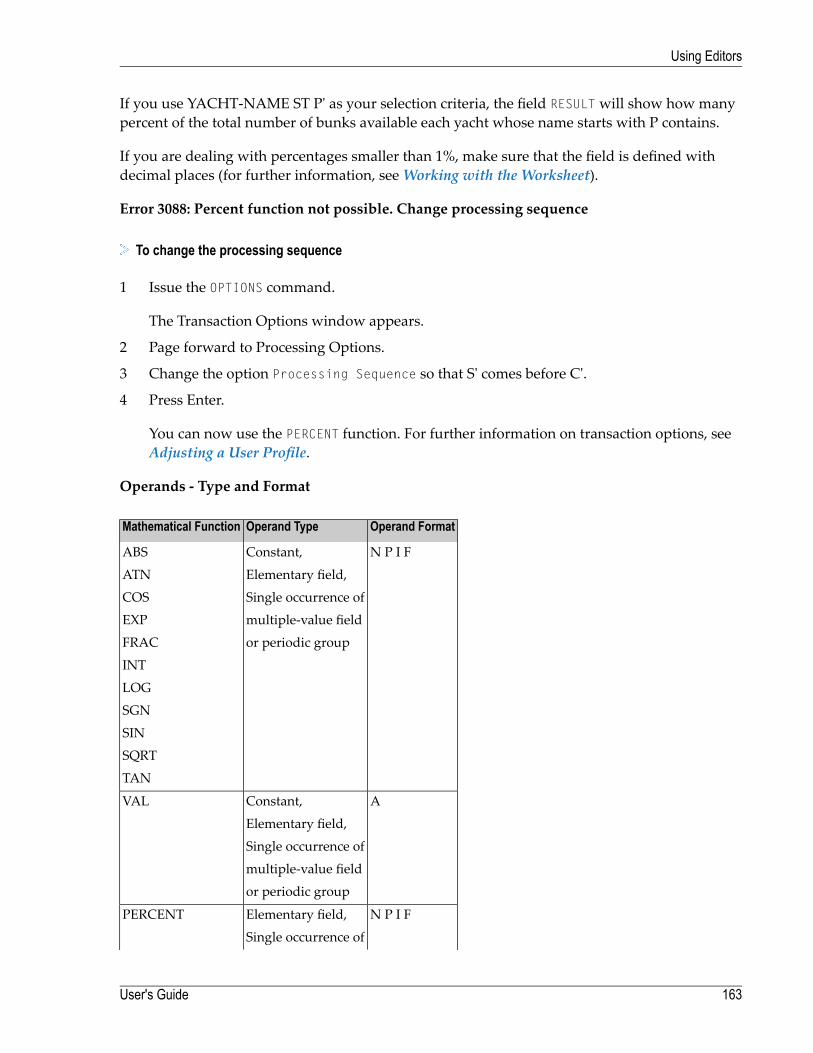
If you use YACHT-NAME ST P' as your selection criteria, the field RESULTwill show how manypercent of the total number of bunks available each yacht whose name starts with P contains.
If you are dealing with percentages smaller than 1%, make sure that the field is defined withdecimal places (for further information, seeWorking with the Worksheet).
Error 3088: Percent function not possible. Change processing sequence
To change the processing sequence
1 Issue the OPTIONS command.
The Transaction Options window appears.
2 Page forward to Processing Options.
3 Change the option Processing Sequence so that S' comes before C'.
4 Press Enter.
You can now use the PERCENT function. For further information on transaction options, seeAdjusting a User Profile.
Operands - Type and Format
Operand FormatOperand TypeMathematical Function
N P I FConstant,ABS
Elementary field,ATN
Single occurrence ofCOS
multiple-value fieldEXP
or periodic groupFRAC
INT
LOG
SGN
SIN
SQRT
TAN
AConstant,VAL
Elementary field,
Single occurrence of
multiple-value field
or periodic group
N P I FElementary field,PERCENT
Single occurrence of
163User's Guide
Using Editors
Operand FormatOperand TypeMathematical Function
multiple-value field
or periodic group
Operators
Arithmetic Operators
The following operators are available:FunctionOperandAddition+Subtraction-Multiplication*Division/Concatenation (joining fields)|
Note: If your keyboard does not have the vertical bar character (| ), your system adminis-trator will tell you which character to use.
Priority of Arithmetic Operators
You use parentheses to specify the order of operations. Operations enclosed within parentheses( ) will are performed first. The priority of operation processing is as follows:
Operations enclosed within parentheses ( )
Multiplication and Division
Addition and Subtraction
If both multiplication and division, or both addition and subtraction, occur within an arithmeticcalculation, the operation which occurs first has priority.
Examples of Arithmetic Operations:
SALARY = SALARY * 1.1
NEW-SALARY = SALARY * 1.1
PAST-EARNINGS = SALARY * YEARS-WITH-COMPANY
NEXT-5YR-EARNINGS = (SALARY * 1.25) * 5
NEXT-5YR-EARNINGS-PER-MONTH = (SALARY * 1.25) * 5 / 60
SEASON-LENGTH = SEASON-END - SEASON-START
User's Guide164
Using Editors
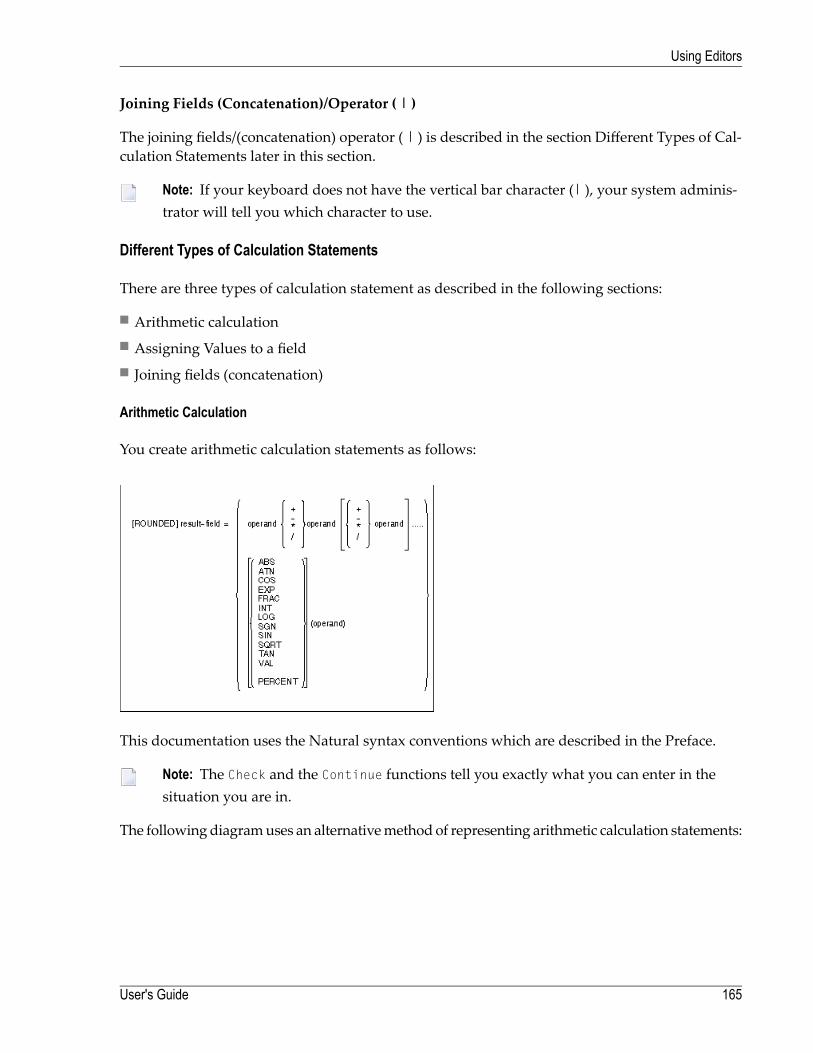
Joining Fields (Concatenation)/Operator ( | )
The joining fields/(concatenation) operator ( | ) is described in the section Different Types of Cal-culation Statements later in this section.
Note: If your keyboard does not have the vertical bar character (| ), your system adminis-trator will tell you which character to use.
Different Types of Calculation Statements
There are three types of calculation statement as described in the following sections:
■ Arithmetic calculation■ Assigning Values to a field■ Joining fields (concatenation)
Arithmetic Calculation
You create arithmetic calculation statements as follows:
This documentation uses the Natural syntax conventions which are described in the Preface.
Note: The Check and the Continue functions tell you exactly what you can enter in thesituation you are in.
The followingdiagramuses an alternativemethod of representing arithmetic calculation statements:
165User's Guide
Using Editors
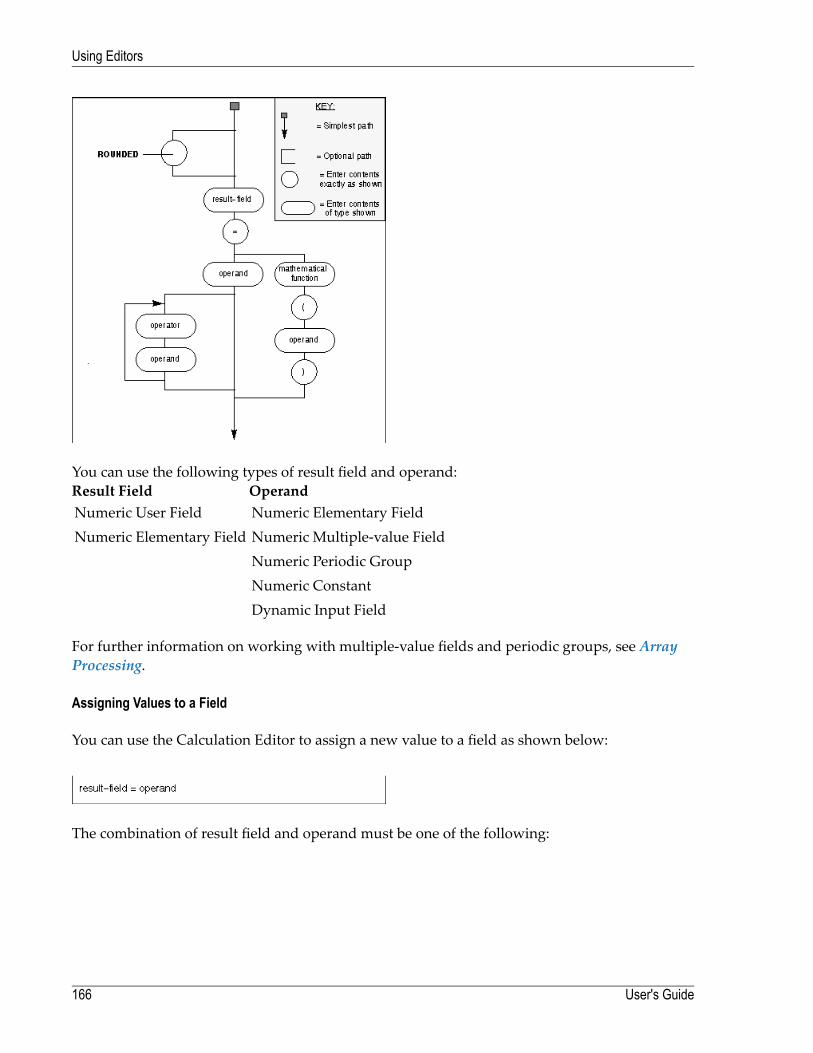
You can use the following types of result field and operand:OperandResult FieldNumeric Elementary FieldNumeric User FieldNumeric Multiple-value FieldNumeric Elementary FieldNumeric Periodic GroupNumeric ConstantDynamic Input Field
For further information on working with multiple-value fields and periodic groups, see ArrayProcessing.
Assigning Values to a Field
You can use the Calculation Editor to assign a new value to a field as shown below:
The combination of result field and operand must be one of the following:
User's Guide166
Using Editors
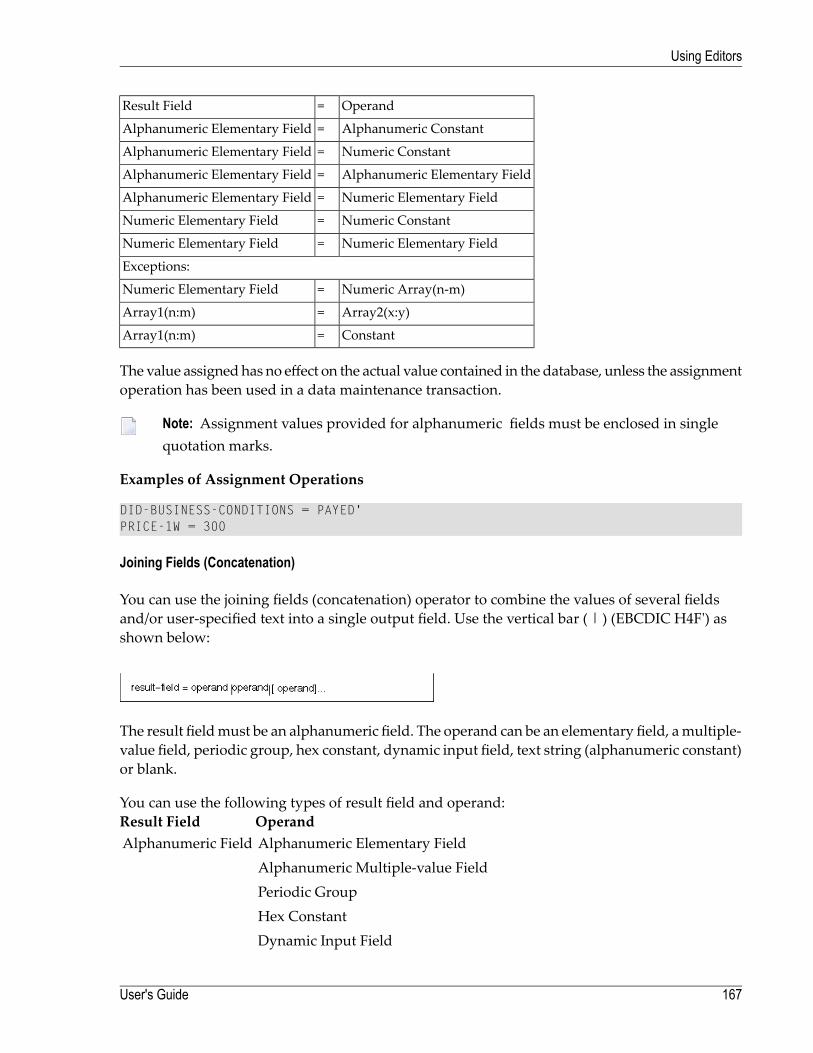
Operand=Result Field
Alphanumeric Constant=Alphanumeric Elementary Field
Numeric Constant=Alphanumeric Elementary Field
Alphanumeric Elementary Field=Alphanumeric Elementary Field
Numeric Elementary Field=Alphanumeric Elementary Field
Numeric Constant=Numeric Elementary Field
Numeric Elementary Field=Numeric Elementary Field
Exceptions:
Numeric Array(n-m)=Numeric Elementary Field
Array2(x:y)=Array1(n:m)
Constant=Array1(n:m)
The value assignedhas no effect on the actual value contained in the database, unless the assignmentoperation has been used in a data maintenance transaction.
Note: Assignment values provided for alphanumeric fields must be enclosed in singlequotation marks.
Examples of Assignment Operations
DID-BUSINESS-CONDITIONS = PAYED'PRICE-1W = 300
Joining Fields (Concatenation)
You can use the joining fields (concatenation) operator to combine the values of several fieldsand/or user-specified text into a single output field. Use the vertical bar ( | ) (EBCDIC H4F') asshown below:
The result fieldmust be an alphanumeric field. The operand can be an elementary field, amultiple-value field, periodic group, hex constant, dynamic input field, text string (alphanumeric constant)or blank.
You can use the following types of result field and operand:OperandResult FieldAlphanumeric Elementary FieldAlphanumeric FieldAlphanumeric Multiple-value FieldPeriodic GroupHex ConstantDynamic Input Field
167User's Guide
Using Editors
OperandResult FieldText String (Alphanumeric Constant)Blank
Any text or blanks that are to be inserted between the field valuesmust be enclosed between singlequotationmarks. Any hexadecimal values to be insertedmust be enclosed between single quotationmarks and preceded by H.
Note: If your keyboard does not have the vertical bar character, your system administratorwill tell you which character to use.
Example:
RESULT-FIELD = START-HARBOR | START-DATE
results in the field RESULT-FIELD having the following contents:
MARMARIS19910729
where MARMARIS is the current value of the field START-HARBOR and 19910729 is the currentvalue of the fieldSTART-DATE.
Example:
RESULT-FIELD = SURNAME | ', ' | FIRST-NAME-1
results in the field RESULT-FIELD having the following contents:
BAKER,PAULINE
where BAKER is the current value of the field SURNAME and PAULINE is the current value of thefield FIRST-NAME-1.
Arithmetic Operations with Date and Time
With formats D (date) and T (time), only addition and subtraction are allowed; multiplication anddivision are not allowed.
Date/time values can be added to/subtracted fromone another; or integer values (no decimal digits)can be added to/subtracted from date/time values. Such integer values can be contained in fieldsof formats N, P, I, D, or T.
An integer value added to/subtracted from a date value is assumed to be in days. An integer valueadded to/subtracted from a time value is assumed to be in tenths of seconds.
For arithmetic operations with date and time, certain restrictions apply, which are due to theNatural's internal handling of arithmetic operations with date and time, as explained below.
Internally, Natural handles an arithmetic operation with date/time variables as follows:
User's Guide168
Using Editors
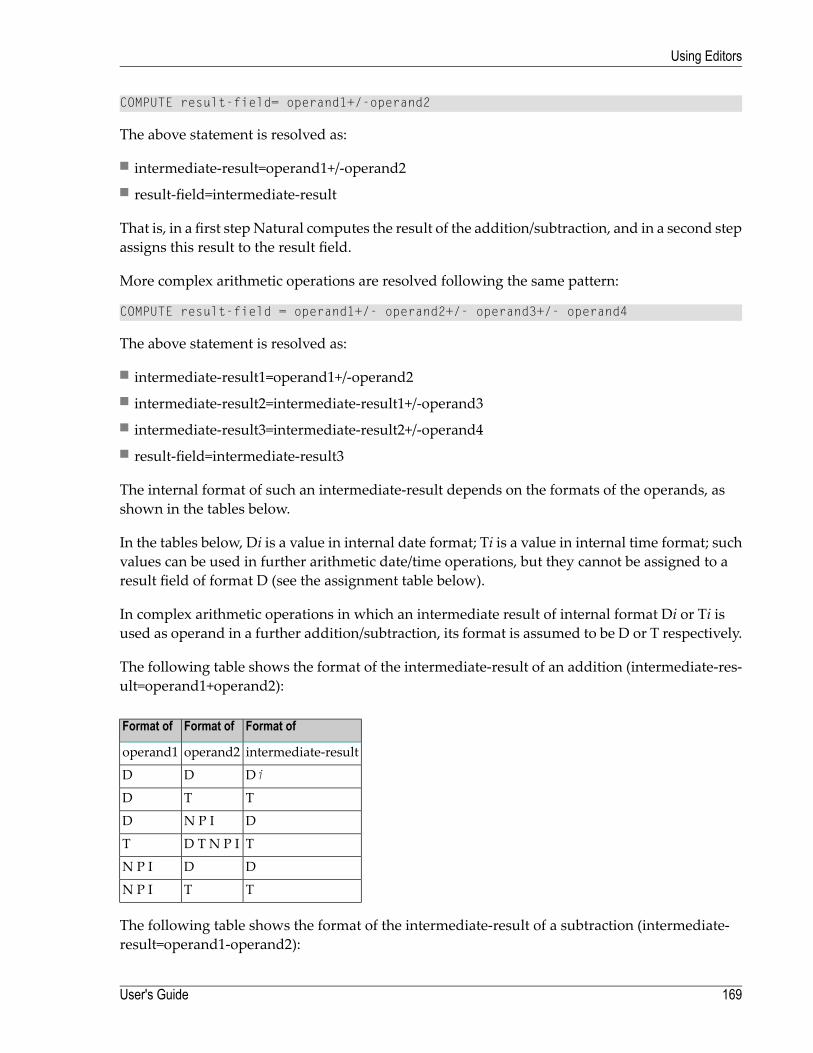
COMPUTE result-field= operand1+/-operand2
The above statement is resolved as:
■ intermediate-result=operand1+/-operand2■ result-field=intermediate-result
That is, in a first stepNatural computes the result of the addition/subtraction, and in a second stepassigns this result to the result field.
More complex arithmetic operations are resolved following the same pattern:
COMPUTE result-field = operand1+/- operand2+/- operand3+/- operand4
The above statement is resolved as:
■ intermediate-result1=operand1+/-operand2■ intermediate-result2=intermediate-result1+/-operand3■ intermediate-result3=intermediate-result2+/-operand4■ result-field=intermediate-result3
The internal format of such an intermediate-result depends on the formats of the operands, asshown in the tables below.
In the tables below, Di is a value in internal date format; Ti is a value in internal time format; suchvalues can be used in further arithmetic date/time operations, but they cannot be assigned to aresult field of format D (see the assignment table below).
In complex arithmetic operations in which an intermediate result of internal format Di or Ti isused as operand in a further addition/subtraction, its format is assumed to be D or T respectively.
The following table shows the format of the intermediate-result of an addition (intermediate-res-ult=operand1+operand2):
Format ofFormat ofFormat of
intermediate-resultoperand2operand1
DiDD
TTD
DN P ID
TD T N P IT
DDN P I
TTN P I
The following table shows the format of the intermediate-result of a subtraction (intermediate-result=operand1-operand2):
169User's Guide
Using Editors

Format ofFormat ofFormat of
intermediate-resultoperand2operand1
DiDD
TiTD
DN P ID
TiD TT
DiDN P I
TiTN P I
The following table shows which intermediate results can internally be assigned to which resultfields (result-field=intermediate-result).
Format ofFormat ofFormat of
possibleintermediate-resultresult-field
yesD TD
noDi Ti N P ID
yesD T Di Ti N P IT
yesD T Di Ti N P IN P I
A result field of format D or T must not contain a negative value.
Examples 1 and 2 (invalid):
COMPUTE DATE1 (D) = DATE2 (D) + DATE3 (D)
COMPUTE DATE1 (D) = DATE2 (D) - DATE3 (D)
These operations are not possible, because the intermediate result of the addition/subtractionwould be format Di, and a value of format Di cannot be assigned to a result field of format D.
Examples 3 and 4 (invalid):
COMPUTE DATE1 (D) = TIME2 (T) - TIME3 (T)
COMPUTE DATE1 (D) = DATE2 (D) - TIME3 (T)
These operations are not possible, because the intermediate result of the addition/ subtractionwould be format Ti, and a value of format Ti cannot be assigned to a result field of format D.
User's Guide170
Using Editors

Example 5 (valid):
COMPUTE DATE1 (D) = DATE2 (D) - DATE3 (D) + TIME3 (T)
This operation is possible. First, DATE3 is subtracted from DATE2, giving an intermediate resultof format Di; then, this intermediate result is added to TIME3, giving an intermediate result offormat T; finally, this second intermediate result is assigned to the result field DATE1.
If a format T value is assigned to a format D field, you must ensure that the time value contains avalid date component.
Logical Conditions Editor
You use the Logical Conditions Editor to define logical condition statements using IF, THEN andELSE clauses. You can define multiple logical condition statements.
To use the Logical Conditions Editor
■ Issue the LOGIC command.
The Logical Conditions Editor appears:
There are three types of lines in the Logical Conditions Editor. Entries made in the I lines areinterpreted as IF clauses, entries made in the T lines are interpreted as THEN clauses andentries made in the E lines are interpreted as ELSE clauses. Every logical condition statementmust start with an IF clause.
171User's Guide
Using Editors
You can only edit the active statement. The active statement is highlighted and the rest of theeditor area is protected. If you want to edit another statement, you must activate it first.
To activate a statement
1 Position the cursor in the statement you want to activate.
2 Press Enter.
The statement is now highlighted and you can edit it.
When you invoke the Logical Conditions Editor, one line of each type is available. If a clause islonger than one line, you must create a new line of the same type for the remainder.
To create a new line of same type
■ Use the .I or .C editor command as described earlier in this section.
To change the line type
1 Position the cursor in the Clause Type column next to the linewhose type youwant to change.
2 Overtype the present entry with the letter of the required clause type.
3 Press Enter.
To start a new statement
1 Activate the last statement.
2 Enter an I in the Clause Type column below the last entry.
Every logical condition statement must start with an IF clause.
A line for the IF clause of a new statement is created and numbered accordingly.
A new statement is only started if the previous statement contains a THEN or an ELSE line.
Continue Function
As in the Selection and Calculation Editors, you use the Continue function to obtain informationon what you can enter next.
The Continue function in the Logical Conditions editor differs from the Continue function in theother full-screen editors in the following cases:
■ When writing the first statement
User's Guide172
Using Editors
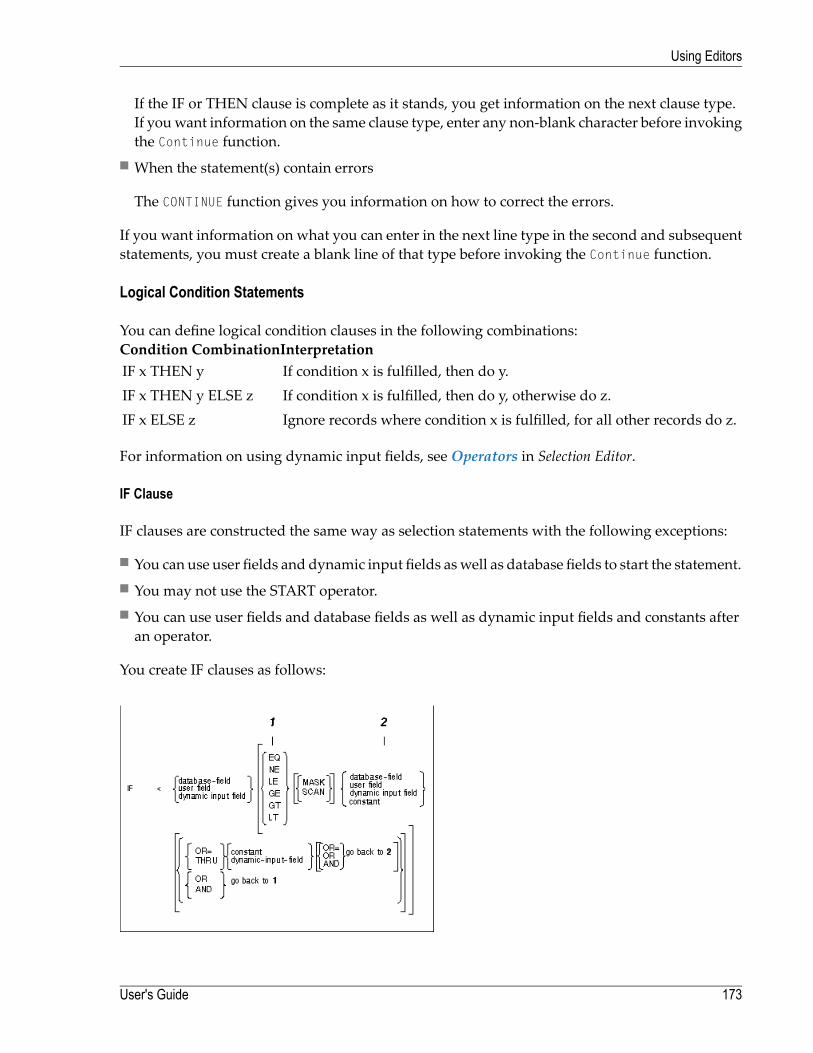
If the IF or THEN clause is complete as it stands, you get information on the next clause type.If youwant information on the same clause type, enter any non-blank character before invokingthe Continue function.
■ When the statement(s) contain errors
The CONTINUE function gives you information on how to correct the errors.
If you want information on what you can enter in the next line type in the second and subsequentstatements, you must create a blank line of that type before invoking the Continue function.
Logical Condition Statements
You can define logical condition clauses in the following combinations:InterpretationCondition CombinationIf condition x is fulfilled, then do y.IF x THEN yIf condition x is fulfilled, then do y, otherwise do z.IF x THEN y ELSE zIgnore records where condition x is fulfilled, for all other records do z.IF x ELSE z
For information on using dynamic input fields, seeOperators in Selection Editor.
IF Clause
IF clauses are constructed the same way as selection statements with the following exceptions:
■ You can use user fields and dynamic input fields aswell as database fields to start the statement.■ You may not use the START operator.■ You can use user fields and database fields as well as dynamic input fields and constants afteran operator.
You create IF clauses as follows:
173User's Guide
Using Editors
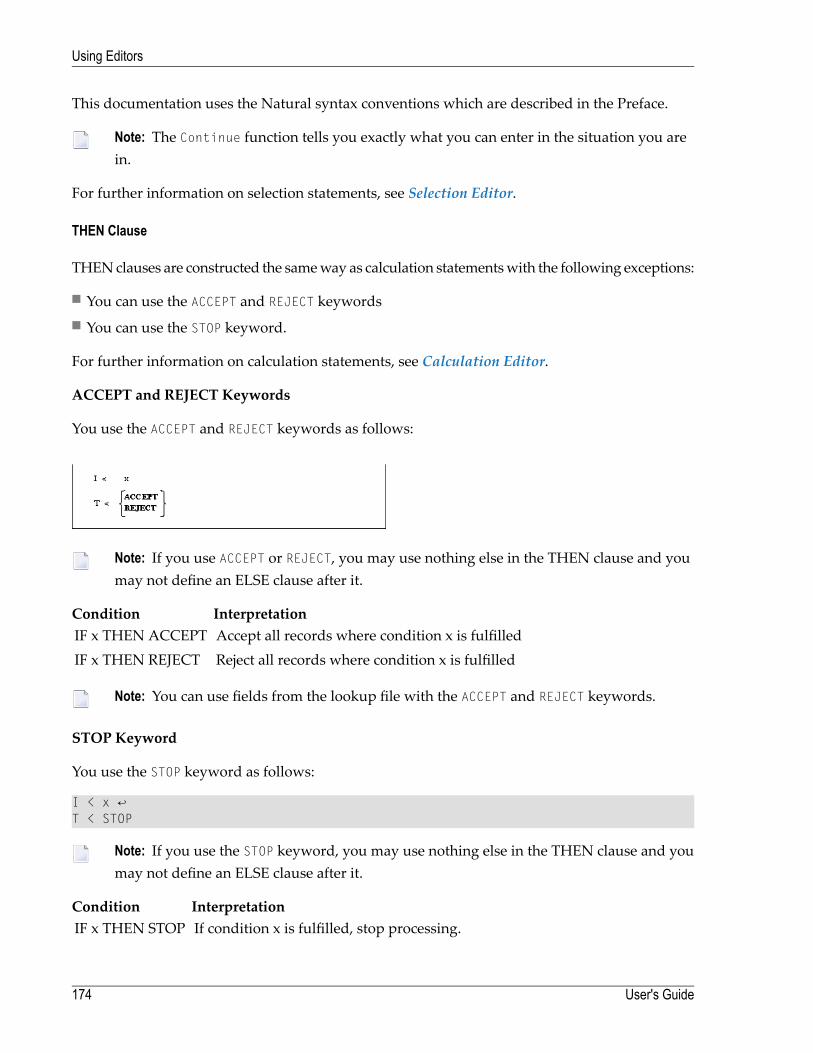
This documentation uses the Natural syntax conventions which are described in the Preface.
Note: The Continue function tells you exactly what you can enter in the situation you arein.
For further information on selection statements, see Selection Editor.
THEN Clause
THENclauses are constructed the sameway as calculation statementswith the following exceptions:
■ You can use the ACCEPT and REJECT keywords■ You can use the STOP keyword.
For further information on calculation statements, see Calculation Editor.
ACCEPT and REJECT Keywords
You use the ACCEPT and REJECT keywords as follows:
Note: If you use ACCEPT or REJECT, you may use nothing else in the THEN clause and youmay not define an ELSE clause after it.
InterpretationConditionAccept all records where condition x is fulfilledIF x THEN ACCEPTReject all records where condition x is fulfilledIF x THEN REJECT
Note: You can use fields from the lookup file with the ACCEPT and REJECT keywords.
STOP Keyword
You use the STOP keyword as follows:
I < x ↩T < STOP
Note: If you use the STOP keyword, you may use nothing else in the THEN clause and youmay not define an ELSE clause after it.
InterpretationConditionIf condition x is fulfilled, stop processing.IF x THEN STOP
User's Guide174
Using Editors
ELSE Clause
The ELSE statement is the same as the calculation statement.
For further information on calculation statements, see Calculation Editor.
Note: The Continue function tells you exactly what you can enter in the situation you arein.
SQL SELECT Editor
Youuse the SQLSELECTEditor for entering SQL (StructuredQuery Language) SELECT statementsfor reporting transactions with the reporting mode Data Selection SQL-SELECT. (For further in-formation on reporting modes, see Defining Transaction Modes for Reporting). You must enterselection criteria using SQL (Structured Query Language) SELECT statements. Selection criteriatell Super Natural which data you want from the database.
Users of the SQL SELECT Editor must already be familiar with SQL.
Note: The CONTINUE command is not available in the SQL SELECT Editor.
To use the SQL SELECT Editor
1 Issue the SELECTION command.
The SQL Editor appears:
175User's Guide
Using Editors
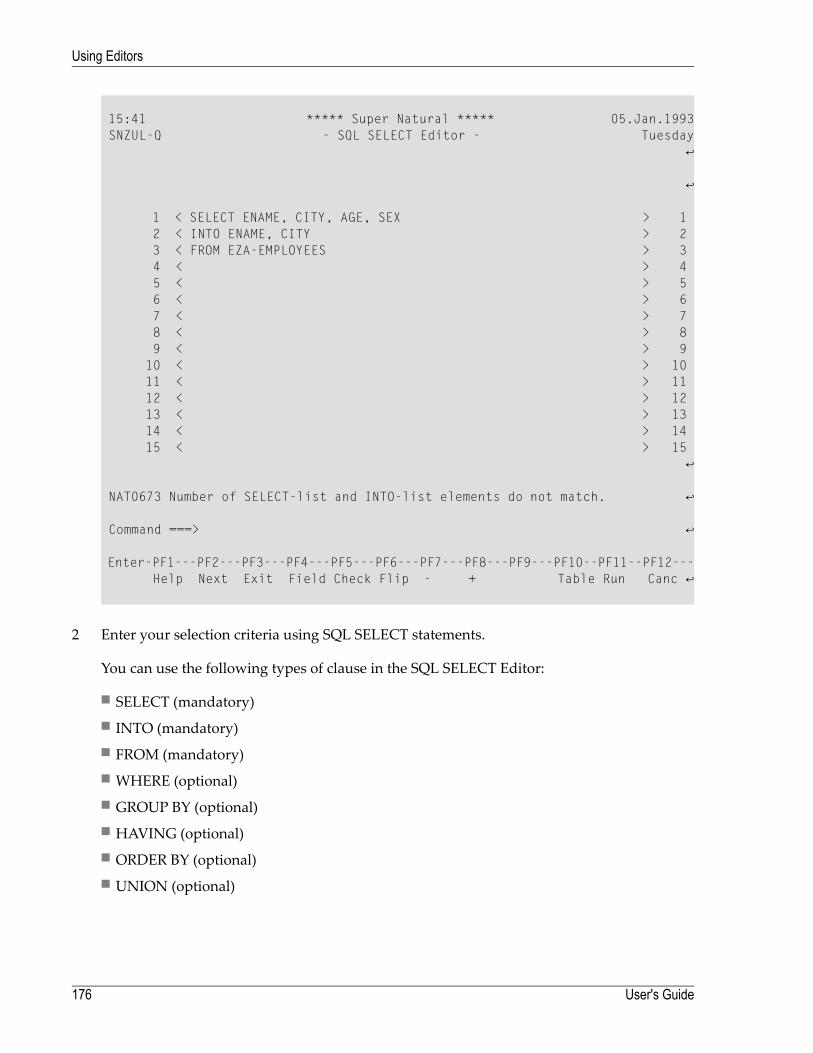
15:41 ***** Super Natural ***** 05.Jan.1993 SNZUL-Q - SQL SELECT Editor - Tuesday ↩ ↩ 1 < SELECT ENAME, CITY, AGE, SEX > 1 2 < INTO ENAME, CITY > 2 3 < FROM EZA-EMPLOYEES > 3 4 < > 4 5 < > 5 6 < > 6 7 < > 7 8 < > 8 9 < > 9 10 < > 10 11 < > 11 12 < > 12 13 < > 13 14 < > 14 15 < > 15 ↩ NAT0673 Number of SELECT-list and INTO-list elements do not match. ↩ Command ===> ↩ Enter-PF1---PF2---PF3---PF4---PF5---PF6---PF7---PF8---PF9---PF10--PF11--PF12--- Help Next Exit Field Check Flip - + Table Run Canc ↩
2 Enter your selection criteria using SQL SELECT statements.
You can use the following types of clause in the SQL SELECT Editor:
■ SELECT (mandatory)■ INTO (mandatory)■ FROM (mandatory)■ WHERE (optional)■ GROUP BY (optional)■ HAVING (optional)■ ORDER BY (optional)■ UNION (optional)
User's Guide176
Using Editors
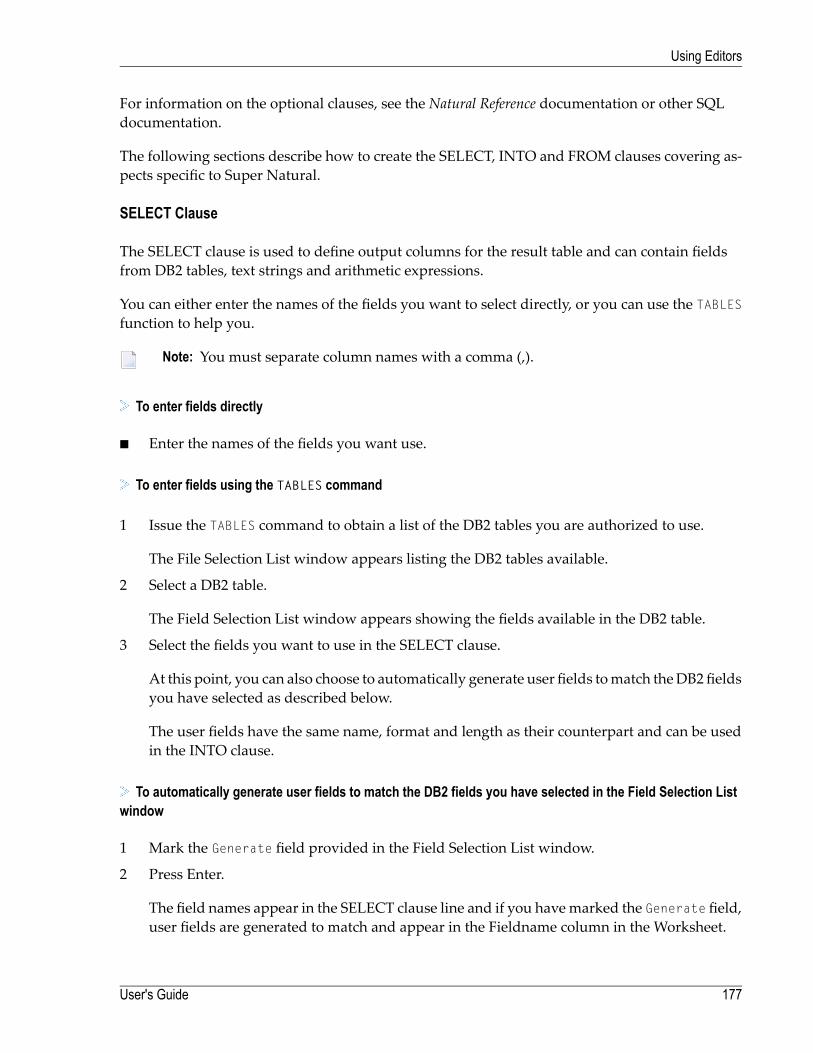
For information on the optional clauses, see the Natural Reference documentation or other SQLdocumentation.
The following sections describe how to create the SELECT, INTO and FROM clauses covering as-pects specific to Super Natural.
SELECT Clause
The SELECT clause is used to define output columns for the result table and can contain fieldsfrom DB2 tables, text strings and arithmetic expressions.
You can either enter the names of the fields you want to select directly, or you can use the TABLESfunction to help you.
Note: You must separate column names with a comma (,).
To enter fields directly
■ Enter the names of the fields you want use.
To enter fields using the TABLES command
1 Issue the TABLES command to obtain a list of the DB2 tables you are authorized to use.
The File Selection List window appears listing the DB2 tables available.
2 Select a DB2 table.
The Field Selection List window appears showing the fields available in the DB2 table.
3 Select the fields you want to use in the SELECT clause.
At this point, you can also choose to automatically generate user fields tomatch theDB2 fieldsyou have selected as described below.
The user fields have the same name, format and length as their counterpart and can be usedin the INTO clause.
To automatically generate user fields to match the DB2 fields you have selected in the Field Selection Listwindow
1 Mark the Generate field provided in the Field Selection List window.
2 Press Enter.
The field names appear in the SELECT clause line and if you havemarked the Generate field,user fields are generated to match and appear in the Fieldname column in the Worksheet.
177User's Guide
Using Editors
INTO Clause
Every output column defined in the SELECT clause must have a user field of like format andlength in the INTO clause. Only the first SELECT clause needs a corresponding INTO clause.
Note: You must separate user field names with a comma (,).
You can either generate the user fields automatically as described above or enter the names directly.If you enter the name of a non-defined field, you must define it later in the Define User Fieldwindow which appears when you issue the CHECK command or leave the SQL Editor with EXIT.You can also define user fields from the Worksheet.
To obtain a list of the user fields you can use
■ Issue the FIELDS command.
A selection list of the user fields which are already in theFieldname column of theWorksheetappears. The field list is empty if no user fields are defined.
For information on the interpretation of null values, see the section INDICATOR/LINDICATORin the description of SQL SELECT statements in the Natural Reference documentation.
FROM Clause
The name of every DB2 table which you want to use in the SELECT statement must appear in theFROM clause. You can use the TABLES function to remind you of the DB2 tables available butyou cannot use it to enter the table names in the editor for you.
Issuing the TABLES and FIELDS Commands
Before you issue the TABLES or FIELDS command, you must press Enter and position the cursorto where fields can be inserted using the arrow keys (not the space bar). You can issue the TABLESand FIELDS commands either by entering them in the command line or by pressing the relevantPFkey.
Note: The FIELDS command is allocated to PF4. The TABLES command is allocated to PF10.
User's Guide178
Using Editors

SQL Help Routine
Aswell as the general editor help available in all editors, the SQL SELECT Editor has its own SQL-specific help routine which gives information on each of the types of clause available.
To access the SQL Help Routine
1 Position the cursor inside the editor area.
2 Press PF1.
The menu for the SQL Help Routine window appears:
179User's Guide
Using Editors
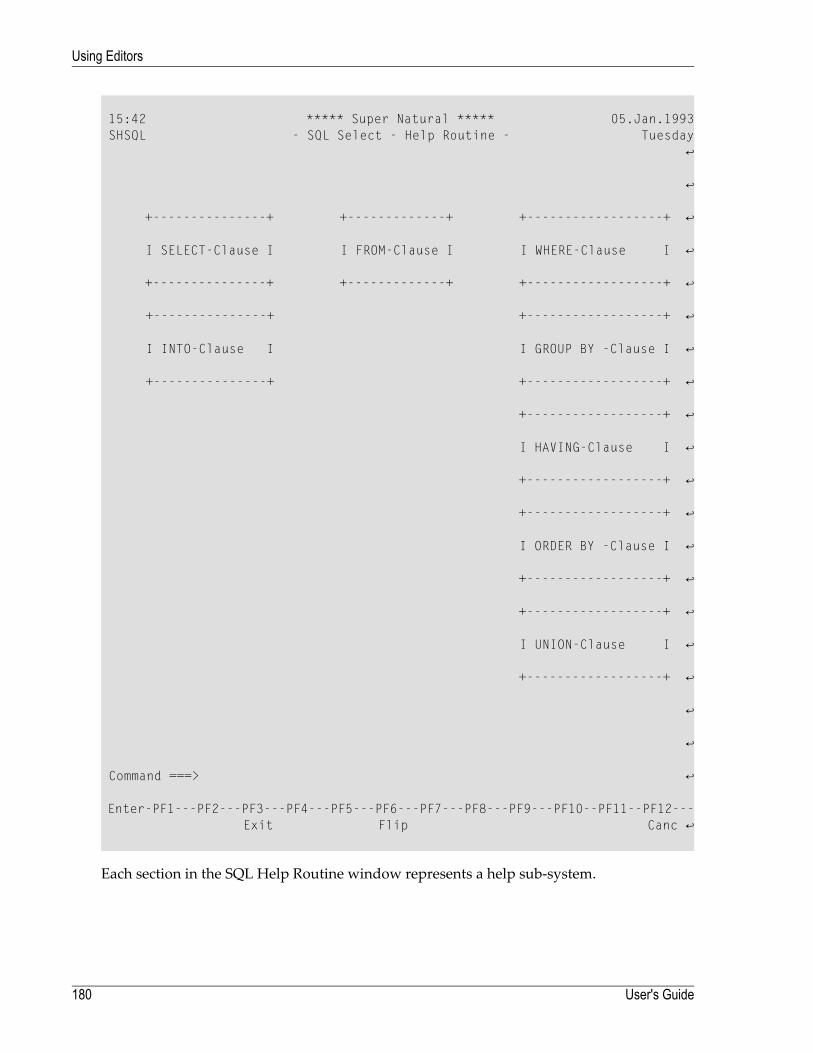
15:42 ***** Super Natural ***** 05.Jan.1993 SHSQL - SQL Select - Help Routine - Tuesday ↩ ↩ +---------------+ +-------------+ +------------------+ ↩ I SELECT-Clause I I FROM-Clause I I WHERE-Clause I ↩ +---------------+ +-------------+ +------------------+ ↩ +---------------+ +------------------+ ↩ I INTO-Clause I I GROUP BY -Clause I ↩ +---------------+ +------------------+ ↩ +------------------+ ↩ I HAVING-Clause I ↩ +------------------+ ↩ +------------------+ ↩ I ORDER BY -Clause I ↩ +------------------+ ↩ +------------------+ ↩ I UNION-Clause I ↩ +------------------+ ↩ ↩ ↩ Command ===> ↩ Enter-PF1---PF2---PF3---PF4---PF5---PF6---PF7---PF8---PF9---PF10--PF11--PF12--- Exit Flip Canc ↩
Each section in the SQL Help Routine window represents a help sub-system.
User's Guide180
Using Editors
To access a help sub-system
1 Position the cursor at the sub-system you require.
Use the carriage return key or tabs to do this, not the arrow keys.
2 Press Enter.
Marking options takes you to further help windows, the CANCEL command takes you to thelast window and the EXIT command you takes you back to the SQL- SELECT Editor from anypoint within the SQL help routine.
PC File Description Editor
When you are adding a reporting transaction with the transaction mode Data Selection set toDATA FROM PC FILE, you must use the PC File Description Editor to describe the file layout ofthe file you are using.
To invoke the PC File Description Editor
1 Issue the SELECTION command.
181User's Guide
Using Editors
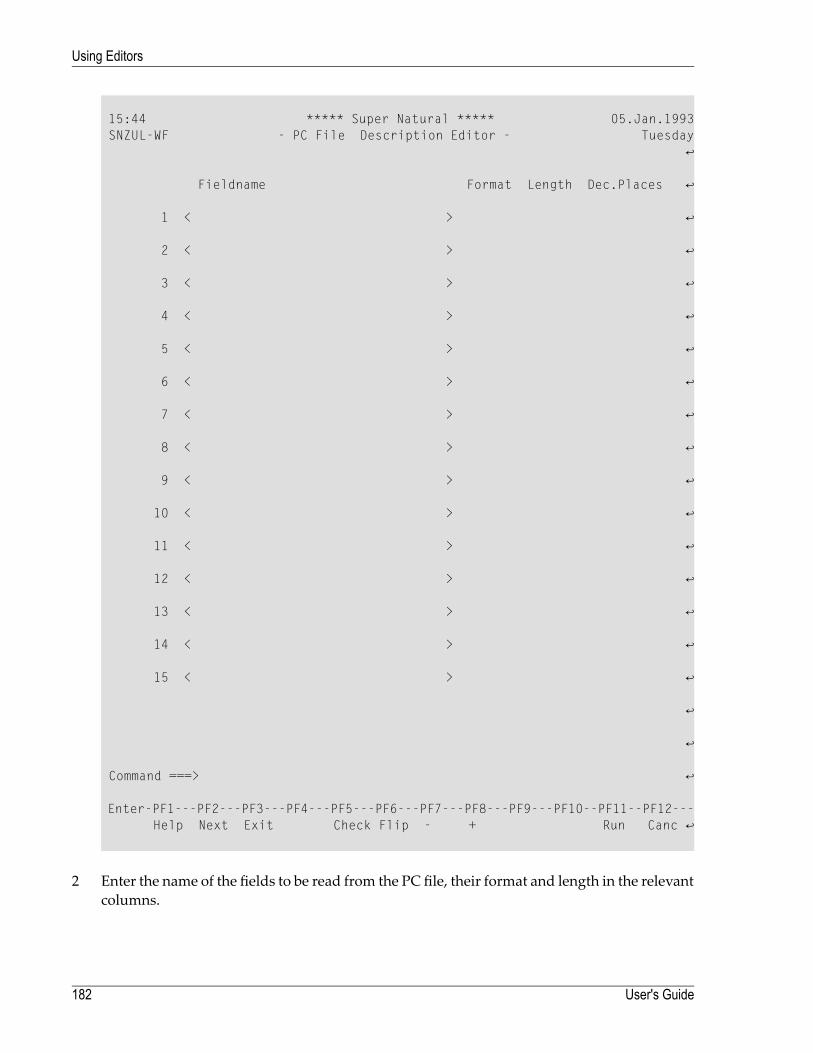
15:44 ***** Super Natural ***** 05.Jan.1993 SNZUL-WF - PC File Description Editor - Tuesday ↩ Fieldname Format Length Dec.Places ↩ 1 < > ↩ 2 < > ↩ 3 < > ↩ 4 < > ↩ 5 < > ↩ 6 < > ↩ 7 < > ↩ 8 < > ↩ 9 < > ↩ 10 < > ↩ 11 < > ↩ 12 < > ↩ 13 < > ↩ 14 < > ↩ 15 < > ↩ ↩ ↩ Command ===> ↩ Enter-PF1---PF2---PF3---PF4---PF5---PF6---PF7---PF8---PF9---PF10--PF11--PF12--- Help Next Exit Check Flip - + Run Canc ↩
2 Enter the name of the fields to be read from the PC file, their format and length in the relevantcolumns.
User's Guide182
Using Editors
To prevent errors when the transaction is run, the following restrictions are applied to theeditor area as soon as one or more fields are used elsewhere in the transaction:
■ You cannot enter new fields■ You cannot delete fields■ You cannot change the field order■ The fields used elsewhere in the transaction are locked■ Fields only used in the editor can only be edited
The availability of line commands and editor direct commands are restricted accordingly.
Note: To lift the restrictions, remove all fields from use in the transaction, for example fromtheWorksheet, any other editor or in a prototype program. The Info column in theWorksheetprovides you with information on field usage.
Work File Description Editor
When you are adding a reporting transaction with the transaction mode Data Selection set toDATA FROMWORK FILE, you must use the Work File Description Editor to describe the filelayout of the file you are using.
To invoke the Work File Description Editor
■ Issue the SELECTION command.
183User's Guide
Using Editors
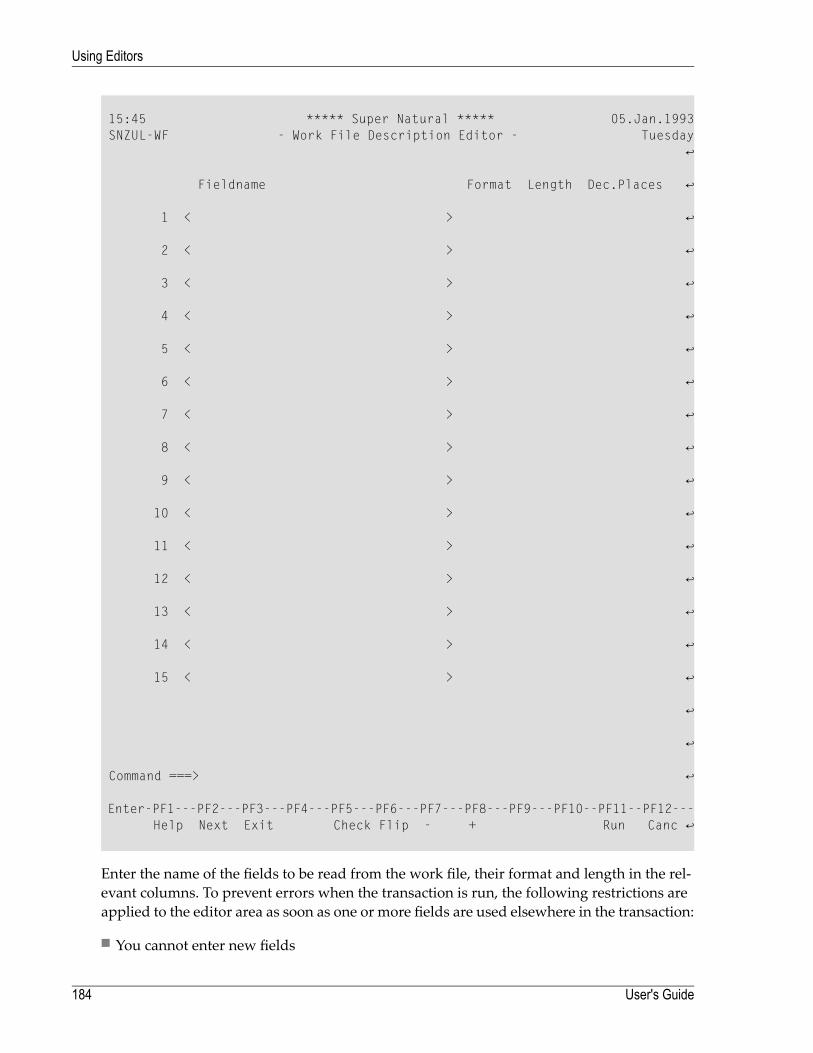
15:45 ***** Super Natural ***** 05.Jan.1993 SNZUL-WF - Work File Description Editor - Tuesday ↩ Fieldname Format Length Dec.Places ↩ 1 < > ↩ 2 < > ↩ 3 < > ↩ 4 < > ↩ 5 < > ↩ 6 < > ↩ 7 < > ↩ 8 < > ↩ 9 < > ↩ 10 < > ↩ 11 < > ↩ 12 < > ↩ 13 < > ↩ 14 < > ↩ 15 < > ↩ ↩ ↩ Command ===> ↩ Enter-PF1---PF2---PF3---PF4---PF5---PF6---PF7---PF8---PF9---PF10--PF11--PF12--- Help Next Exit Check Flip - + Run Canc ↩
Enter the name of the fields to be read from the work file, their format and length in the rel-evant columns. To prevent errors when the transaction is run, the following restrictions areapplied to the editor area as soon as one or more fields are used elsewhere in the transaction:
■ You cannot enter new fields
User's Guide184
Using Editors
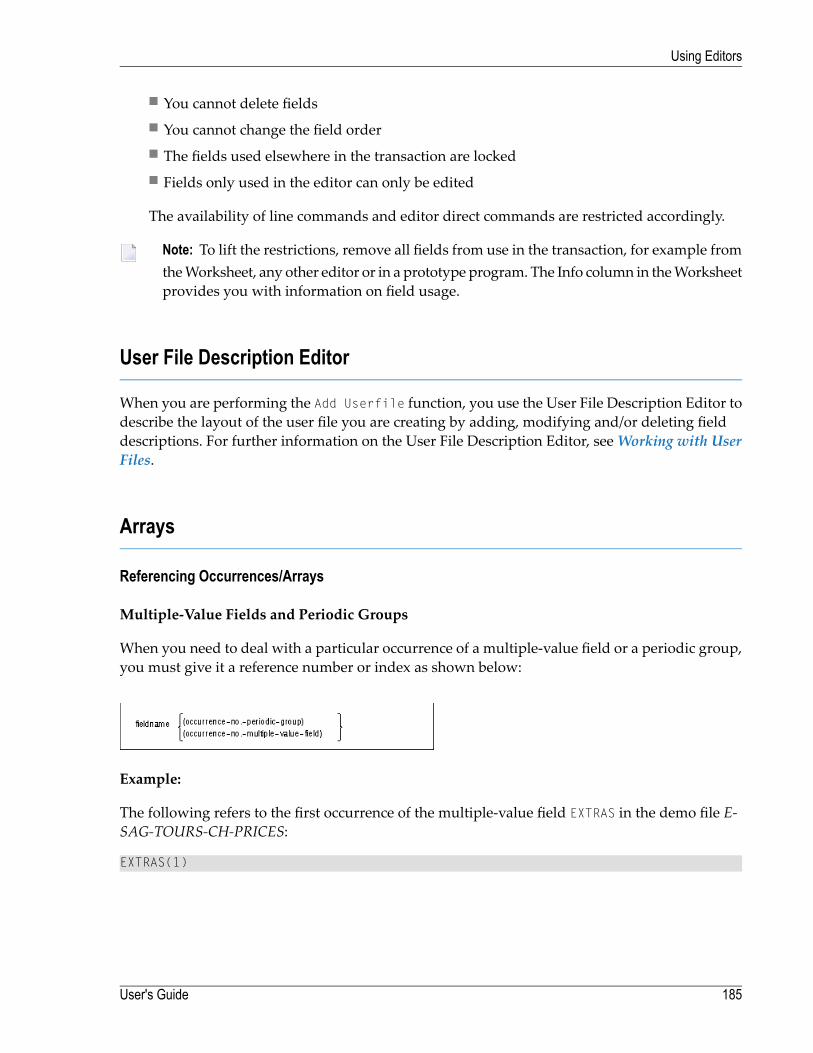
■ You cannot delete fields■ You cannot change the field order■ The fields used elsewhere in the transaction are locked■ Fields only used in the editor can only be edited
The availability of line commands and editor direct commands are restricted accordingly.
Note: To lift the restrictions, remove all fields from use in the transaction, for example fromtheWorksheet, any other editor or in a prototype program. The Info column in theWorksheetprovides you with information on field usage.
User File Description Editor
When you are performing the Add Userfile function, you use the User File Description Editor todescribe the layout of the user file you are creating by adding, modifying and/or deleting fielddescriptions. For further information on the User File Description Editor, seeWorking with UserFiles.
Arrays
Referencing Occurrences/Arrays
Multiple-Value Fields and Periodic Groups
When you need to deal with a particular occurrence of a multiple-value field or a periodic group,you must give it a reference number or index as shown below:
Example:
The following refers to the first occurrence of the multiple-value field EXTRAS in the demo file E-SAG-TOURS-CH-PRICES:
EXTRAS(1)
185User's Guide
Using Editors
Multiple-Value Field or Periodic Group Within a Periodic-Group
Two reference numbers are required to reference an occurrence of a multiple-value field within aperiodic group as shown below:
where PG is periodic group and MU is multiple-value field.
The first number indicates which occurrence of the periodic group it is in and the second numberindicates which occurrence of the multiple-value field it is. Separate the reference numbers witha comma (,) and enclose them within parentheses(()).
Example:
The following refers to the third occurrence of the multiple-value field LANGUAGES, contained inthe second occurrence of the periodic group SAILOR in the demo file E-SAG-TOURS-CRUISE:
LANGUAGES(2,3)
For further information on multiple-value fields and periodic groups, see Field Types in DefiningFields.
Array Processing
All scalar operations can be applied to array elements which consist of a single occurrence.
Assignment Operations with Arrays
If an array range is assigned to another array range, the assignment is performed element by ele-ment.
If a single occurrence is assigned to an array range, each element of the range is filled with thevalue of the single occurrence. (For a mathematical function, each element of the range is filledwith the result of the function.)
Before an assignment operation is executed, the individual dimensions of the arrays involved arecomparedwith one another to check if theymeet one of the conditions listed below. The dimensionsare compared independently of one another; that is, the 1st dimension of the one array is comparedwith the 1st dimension of the other array and the 2nd dimension of the one array is comparedwith the 2nd dimension of the other array.
The assignment of values from one array to another is only allowed under one of the followingconditions:
■ The number of occurrences is the same for both dimensions compared.
User's Guide186
Using Editors
■ The dimension that is assigned to another dimension consists of a single occurrence.
Sample Array Assignments:
FIELD1(1:3) = FIELD2(6:8)FIELD3(1,1:3) = FIELD4(6:8)FIELD5(1:3,3:5) = FIELD6(1:3,1:3)
Comparison Operations with Arrays
Generally, the following applies: if arrays with multiple dimensions are compared, the individualdimensions are handled independently of one another. The 1st dimension of the one array iscompared with the 1st dimension of the other array and the 2nd dimension of the one array iscompared with the 2nd dimension of the other array.
The comparison of two array dimensions is only allowed under one of the following conditions:
■ The array dimensions compared with one another have the same number of occurrences.■ The array dimensions compared with one another have an indefinite number of occurrences.
Note: Only in the IF clause of the Logical Conditions editor.
■ All array dimensions of one of the arrays involved are single occurrences.
The following sample shows which array comparison operations are possible:
Sample Array Comparisons:
IF A2(1,1) = A1(1) THEN ACCEPTIF A2(1,*) = A1(1) THEN STOPIF A2(1,*) = A1(*) THEN ACCEPTIF A2(1,1) = A2(1,1) THEN REJECT
Comparing Two Array Ranges:
Example:
IF #ARRAY1(1:2) NE #ARRAY2(1:2)
The above condition is fulfilled if the first occurrence of #ARRAY1does not equal the first occurrenceof #ARRAY2 and the second occurrence of #ARRAY1 does not equal the second occurrence of#ARRAY2.
This is equivalent to the following expression:
IF (#ARRAY1(1) NE #ARRAY2(1)) AND (#ARRAY1(2) NE #ARRAY2(2))
187User's Guide
Using Editors
Arithmetic Operations with Arrays
Array ranges can be specified in the following ways:
■ ADD rangeTO rangeGIVING rangeRange dimensions must be equal. ADD is performed element by element.
■ MULTIPLYrange BY rangeGIVING rangeRange dimensions must be equal. MULTIPLY is performed element by element.
■ ADD scalarTO rangeGIVING rangeRange dimensions must be equal. Scalar is added to each element of range.
■ MULTIPLYrange BY scalarGIVING rangeRange dimensions must be equal. Each element of range is multiplied by scalar.
■ ADD rangeTO scalarGIVING scalarEach element of the array is added to scalar and the result is stored in scalar.
■ MULTIPLYscalar BY rangeGIVING scalar2Scalar is multiplied by each element of the array and the result is assigned to scalar2.
User's Guide188
Using Editors
11 Working with Natural Report Manager
■ What is Natural Report Manager? ..................................................................................................... 190■ When is a Default Layout Generated? ................................................................................................ 191■ Invoking Natural Report Manager ...................................................................................................... 192■ Issuing Commands ........................................................................................................................ 192■ Navigating Within Natural Report Manager ......................................................................................... 193■ Natural Report Manager PF Keys ..................................................................................................... 195■ Layout Overview Screen ................................................................................................................. 196■ Layout Editor Screens .................................................................................................................... 198■ Layout Editor Editor Area ................................................................................................................ 205■ Display Layout Element Screen ........................................................................................................ 215■ Layout Field List Screen .................................................................................................................. 216■ Extended Field Editing Window ........................................................................................................ 217■ Array Editing Window ..................................................................................................................... 220■ Layout Settings ............................................................................................................................. 221■ Testing Layouts ............................................................................................................................. 223■ Elements ..................................................................................................................................... 223
189
This section describes Natural Report Manager. Each screen available in Natural Report Manageris described. The sections Navigating Within Natural Report Manager and Navigating Between theLayout Editor Screens tell you how to navigate between the main screens.
This section covers the following topics:
■ What is Natural Report Manager?■ When is a Default Layout Generated?■ Invoking Natural Report Manager■ Issuing Commands■ Navigating Within Natural Report Manager■ Natural Report Manager PF Keys■ Layout Overview Screen■ Layout Editor Screens■ Layout Editor Editor Area■ Display Layout Element Screen■ Layout Field List Screen■ Extended Field Editing Window■ Array EditingWindow■ Layout Settings■ Testing Layouts■ Elements
What is Natural Report Manager?
Natural Report Manager is a tool which is available within Super Natural for editing the layoutof reports.
You can create and edit the following layout elements:
■ Preface■ Title■ Header■ List■ Groups■ Appendix
User's Guide190
Working with Natural Report Manager
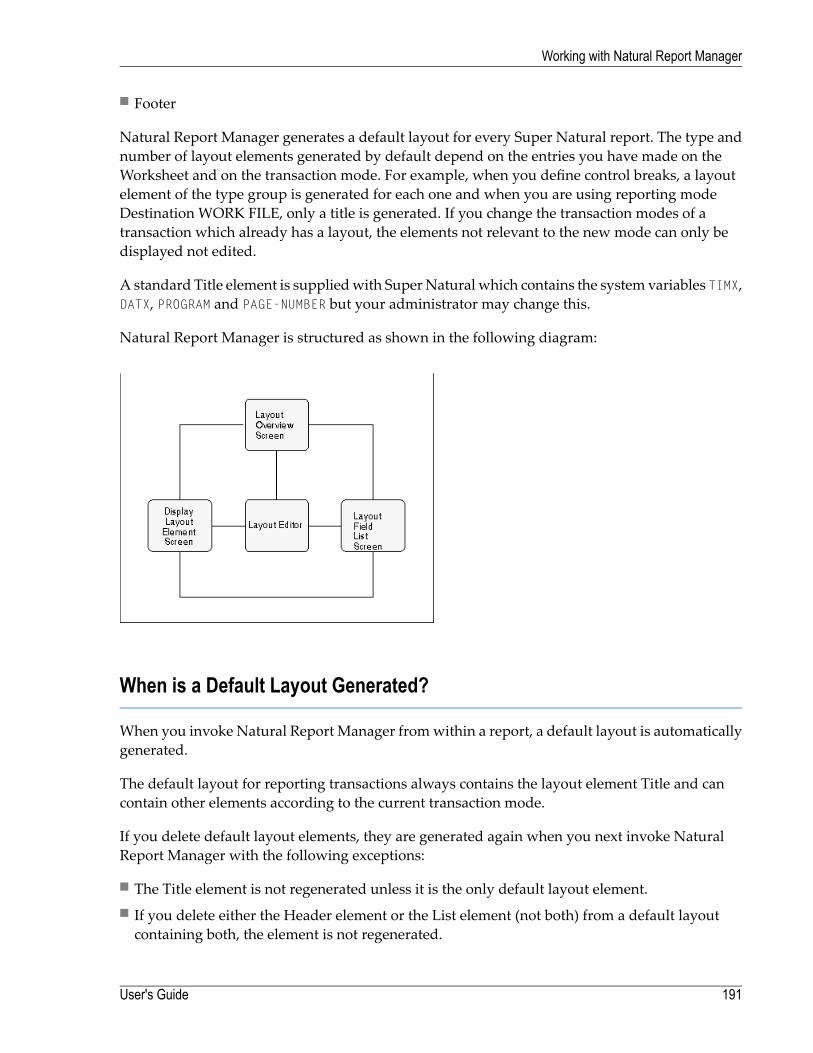
■ Footer
Natural Report Manager generates a default layout for every Super Natural report. The type andnumber of layout elements generated by default depend on the entries you have made on theWorksheet and on the transaction mode. For example, when you define control breaks, a layoutelement of the type group is generated for each one and when you are using reporting modeDestination WORK FILE, only a title is generated. If you change the transaction modes of atransaction which already has a layout, the elements not relevant to the new mode can only bedisplayed not edited.
A standard Title element is suppliedwith SuperNatural which contains the system variables TIMX,DATX, PROGRAM and PAGE-NUMBER but your administrator may change this.
Natural Report Manager is structured as shown in the following diagram:
When is a Default Layout Generated?
When you invoke Natural Report Manager fromwithin a report, a default layout is automaticallygenerated.
The default layout for reporting transactions always contains the layout element Title and cancontain other elements according to the current transaction mode.
If you delete default layout elements, they are generated again when you next invoke NaturalReport Manager with the following exceptions:
■ The Title element is not regenerated unless it is the only default layout element.■ If you delete either the Header element or the List element (not both) from a default layoutcontaining both, the element is not regenerated.
191User's Guide
Working with Natural Report Manager
Note: Deleted default layout elements are also regenerated when you save or run thetransaction.
Entries made in the Layout Editor override those made in the Sequence column in theWorksheet.When you return to the Worksheet, you cannot use the Sequence column until you delete theelements list and header. Fields which have been used in the Layout Editor are marked with anL.
If you add a transactionwithout invokingNatural ReportManager, a default layout is still generatedbut not until you save or run the transaction. The Sequence columnof theWorksheet is not effectedif you do not invoke Natural Report Manager.
Invoking Natural Report Manager
You can invoke Natural Report Manager from any point within a transaction you are creating ormodifying.
To invoke Natural Report Manager
■ Issue the LAYOUT command.
The Layout Overview screen appears.
Note: Your administrator may change your user profile so that the Layout Editor takes theplace of the Layout Overview screen in the diagram. The Layout Editor is then the firstscreen to appear when you invoke Natural Report Manager.
Issuing Commands
There are three ways of issuing commands in Natural Report Manager.
Using the Command Line
You can enter commands directly in the command line.
To issue a command directly
1 Type the command in the command line.
2 Press Enter.
User's Guide192
Working with Natural Report Manager

Using the Command Line and the Cursor Position
In the Layout Overview screen, the Layout Editor split-screen with information sections and theLayout Editor editor area you can issue commands using the command line and cursor position.
To issue a command using the command line and cursor position
1 Type the command in the command line.
2 Position the cursor in the layout element box or section you want the command to act on.
3 Press Enter.
Using the Cursor Position and a PF Key
In the Layout Overview screen, the Layout Editor split-screen with information sections and theLayout Editor editor area you can issue commands using the cursor position and a PF key.
To issue a command using the cursor position and a PF key
1 Position the cursor in the layout element box or section you want the command to act on.
2 Press the relevant PF key.
Navigating Within Natural Report Manager
The followingdiagramshows the commandsneeded for navigationwithinNatural ReportManager:
193User's Guide
Working with Natural Report Manager

OVERVIEW Command
The OVERVIEW command invokes the Layout Overview screen from the Display Layout Elementscreen, Layout Editor and Layout Field List screens.
EXIT and CANCEL Commands
The EXIT and CANCEL commands function as described in the section PF keys in the section UsingSuper Natural.
However, you should note the following:
If you issue the CANCEL command from the Layout Overview screen, you leave Natural ReportManager and return to Super Natural. The layout is returned to the version which existed beforeyou invoked Natural Report Manager and you lose any changes made since.
If you issue the EXIT command from the Layout Overview screen, you leave Natural ReportManager and return to Super Natural. When you keep, save or run the transaction, the currentversion of the layout is kept or saved.
DISPLAY, EDIT and FIELDS Commands
The DISPLAY, EDIT and FIELDS commands invoke the Display Layout Element screen, LayoutEditor and Layout Field List screens respectively for the layout element you specify or for thelayout element you are working with.
With an Element Name
If youwant toworkwith a layout element, you can issue the DISPLAY, EDIT and FIELDS commandswith an element name.
To process a layout element
■ Issue one of the following commands from the Display Layout Element screen, Layout Editoror Layout Field List screen:
■ DISPLAY element-name■ EDIT element-name■ FIELDS element-name
With No Element Name
Once you are working with a layout element, the commands DISPLAY, EDIT and FIELDS act uponit until otherwise specified.
User's Guide194
Working with Natural Report Manager
The ALL Keyword
The ALL keyword allows you to process all the elements of a layout together.
To process all the elements of a layout together
■ Issue one of the following commands:
■ DISPLAY ALL
■ EDIT ALL
■ FIELDS ALL
Note: You cannot issue the FIELDS ALL and EDIT ALL commands if one or more layoutelements are protected.
When you have all elements in the editor area, all elements are affected by the line and fieldcommands you then issue.
The Asterisk (*) List Function
The Asterisk List function provides youwith a list of elements availablewith a certain command.
To invoke a selection list of elements, which you can display, edit or see the field list for
■ Issue one of the following commands:
■ DISPLAY *
■ EDIT *
■ FIELDS *
Natural Report Manager PF Keys
The following table shows the default PF key allocation in Natural Report Manager. These PF keyallocations are additional to the standard allocations described in the section Using Super Naturalearlier in this documentation.
195User's Guide
Working with Natural Report Manager

Section DocumentedAllocationPF Key
Layout SettingsSETTINGSPF2
Navigating Within Natural Report ManagerFIELDSPF4
Navigating Within Natural Report ManagerEDITPF5
Testing LayoutsTESTPF13
Navigating Within Natural Report ManagerDISPLAYPF14
The Layout Editor ScreensSECTIONPF16
The Layout Editor ScreensSHOWPF17
The Layout Editor ScreensFULLPF18
Layout Overview Screen
The Layout Overview screen shows which elements are already present in the layout.
If an element is outlined with a dotted line, you may not edit it.
In the example below, the element types for a simple report are present.
12:34 *** NATURAL REPORT MANAGER *** 07.Dec.1992NRMPAGE - Layout Overview - Monday
+------------------------------------+I Title I+------------------------------------++------------------------------------+I Header II I+------------------------------------++------------------------------------+I List II II II II II II II I+------------------------------------+
Command ===>Enter-PF1---PF2---PF3---PF4---PF5---PF6---PF7---PF8---PF9---PF10--PF11--PF12---
Help Set Exit Field Edit Flip Tech Canc
User's Guide196
Working with Natural Report Manager
Invoking the Field List for, Displaying and Editing Elements
To display, edit or invoke the field list for an element
■ Issue a direct commandas described in the sectionNavigatingwithinNaturalReportManager.
Deleting Elements
To delete a layout element
■ Issue the DELETE element-name command.
ALL Parameter
The ALL parameter allows you to delete all the elements of a layout at once.
To delete all the elements of a layout at once
■ Issue the DELETE ALL command.
The ConfirmMultiple Deletewindow appearswhere you can select between confirming eachdeletion, deleting without confirmation or cancelling the deletion.
Note: The DELETE ALL command is not available if an element in the layout is protected.
The Asterisk (*) List Function
The Asterisk List function provides you with a list of the elements available with a certaincommand.
To invoke a selection list of elements which you can delete
■ Issue the DELETE * command.
Creating Elements
To create a new layout element
■ Issue the EDIT element-name command.
197User's Guide
Working with Natural Report Manager
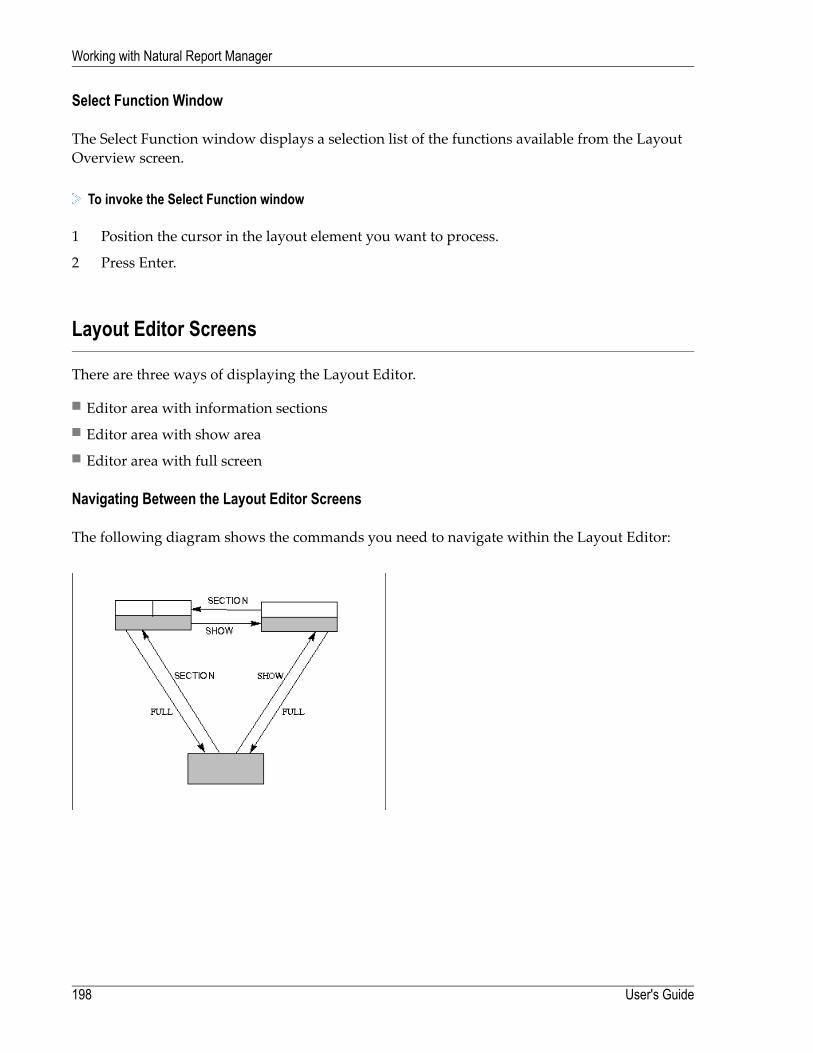
Select Function Window
The Select Function window displays a selection list of the functions available from the LayoutOverview screen.
To invoke the Select Function window
1 Position the cursor in the layout element you want to process.
2 Press Enter.
Layout Editor Screens
There are three ways of displaying the Layout Editor.
■ Editor area with information sections■ Editor area with show area■ Editor area with full screen
Navigating Between the Layout Editor Screens
The following diagram shows the commands you need to navigate within the Layout Editor:
User's Guide198
Working with Natural Report Manager
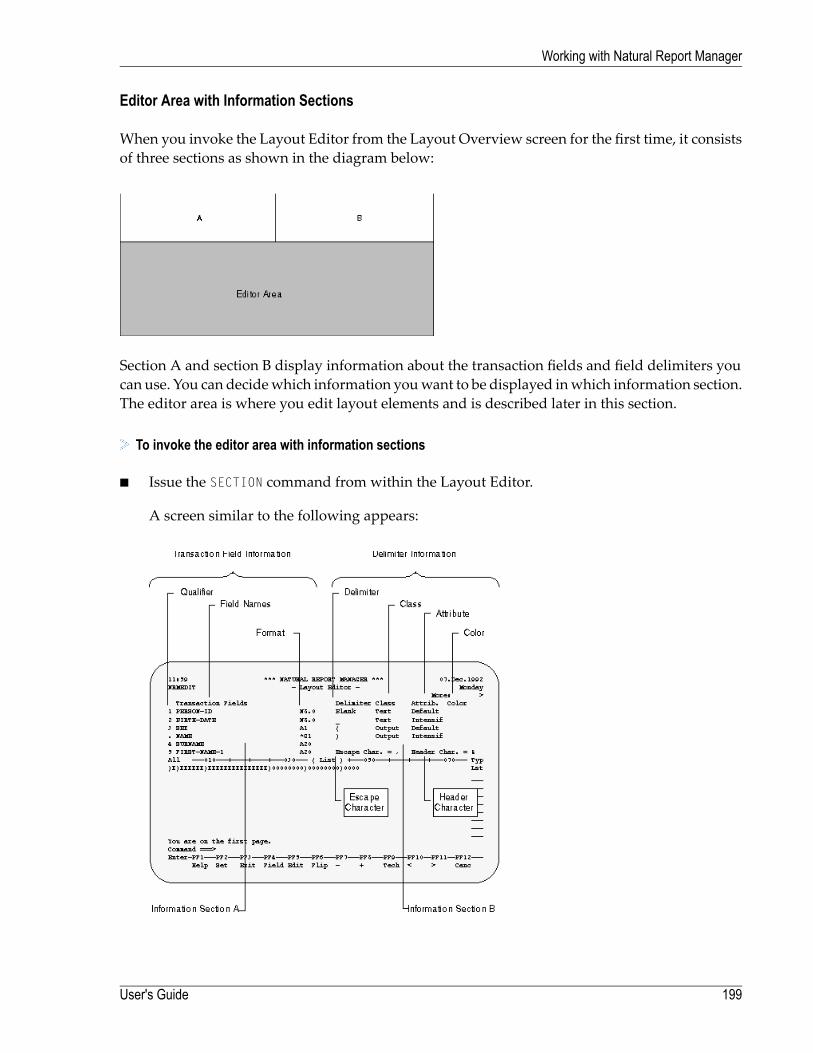
Editor Area with Information Sections
When you invoke the Layout Editor from the Layout Overview screen for the first time, it consistsof three sections as shown in the diagram below:
Section A and section B display information about the transaction fields and field delimiters youcan use. You can decidewhich information youwant to be displayed inwhich information section.The editor area is where you edit layout elements and is described later in this section.
To invoke the editor area with information sections
■ Issue the SECTION command from within the Layout Editor.
A screen similar to the following appears:
199User's Guide
Working with Natural Report Manager
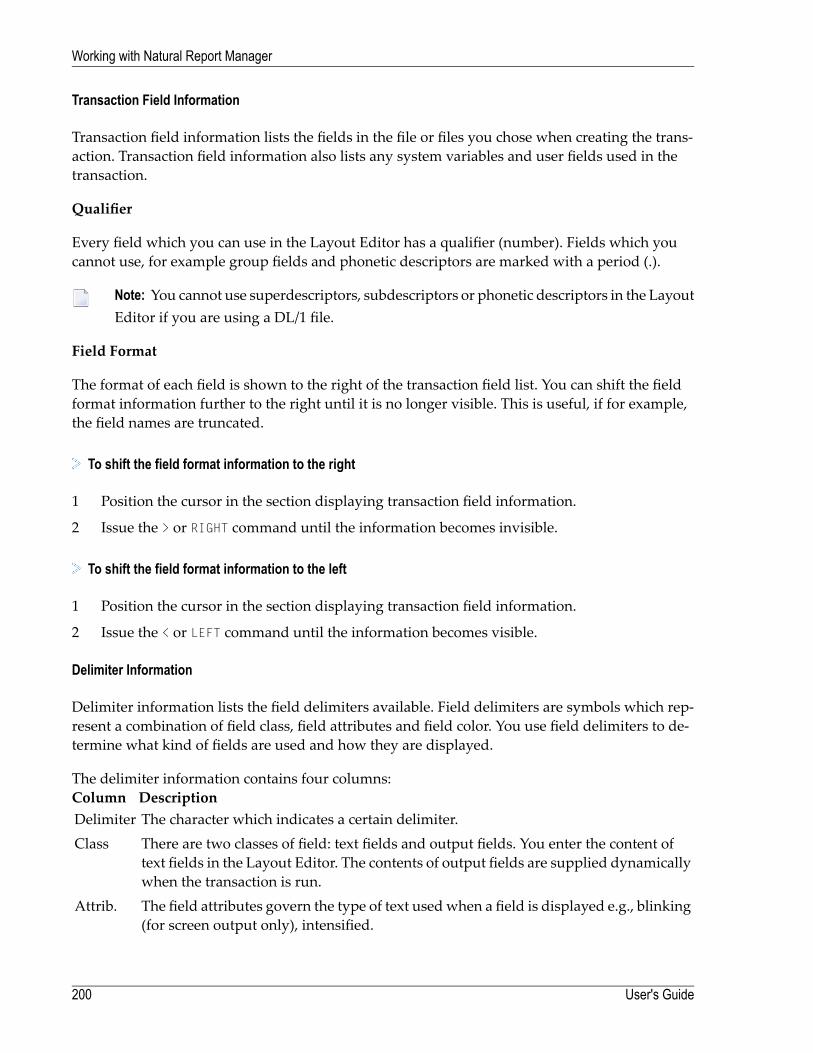
Transaction Field Information
Transaction field information lists the fields in the file or files you chose when creating the trans-action. Transaction field information also lists any system variables and user fields used in thetransaction.
Qualifier
Every field which you can use in the Layout Editor has a qualifier (number). Fields which youcannot use, for example group fields and phonetic descriptors are marked with a period (.).
Note: You cannot use superdescriptors, subdescriptors or phonetic descriptors in the LayoutEditor if you are using a DL/1 file.
Field Format
The format of each field is shown to the right of the transaction field list. You can shift the fieldformat information further to the right until it is no longer visible. This is useful, if for example,the field names are truncated.
To shift the field format information to the right
1 Position the cursor in the section displaying transaction field information.
2 Issue the > or RIGHT command until the information becomes invisible.
To shift the field format information to the left
1 Position the cursor in the section displaying transaction field information.
2 Issue the < or LEFT command until the information becomes visible.
Delimiter Information
Delimiter information lists the field delimiters available. Field delimiters are symbols which rep-resent a combination of field class, field attributes and field color. You use field delimiters to de-termine what kind of fields are used and how they are displayed.
The delimiter information contains four columns:DescriptionColumnThe character which indicates a certain delimiter.DelimiterThere are two classes of field: text fields and output fields. You enter the content oftext fields in the Layout Editor. The contents of output fields are supplied dynamicallywhen the transaction is run.
Class
The field attributes govern the type of text usedwhen a field is displayed e.g., blinking(for screen output only), intensified.
Attrib.
User's Guide200
Working with Natural Report Manager
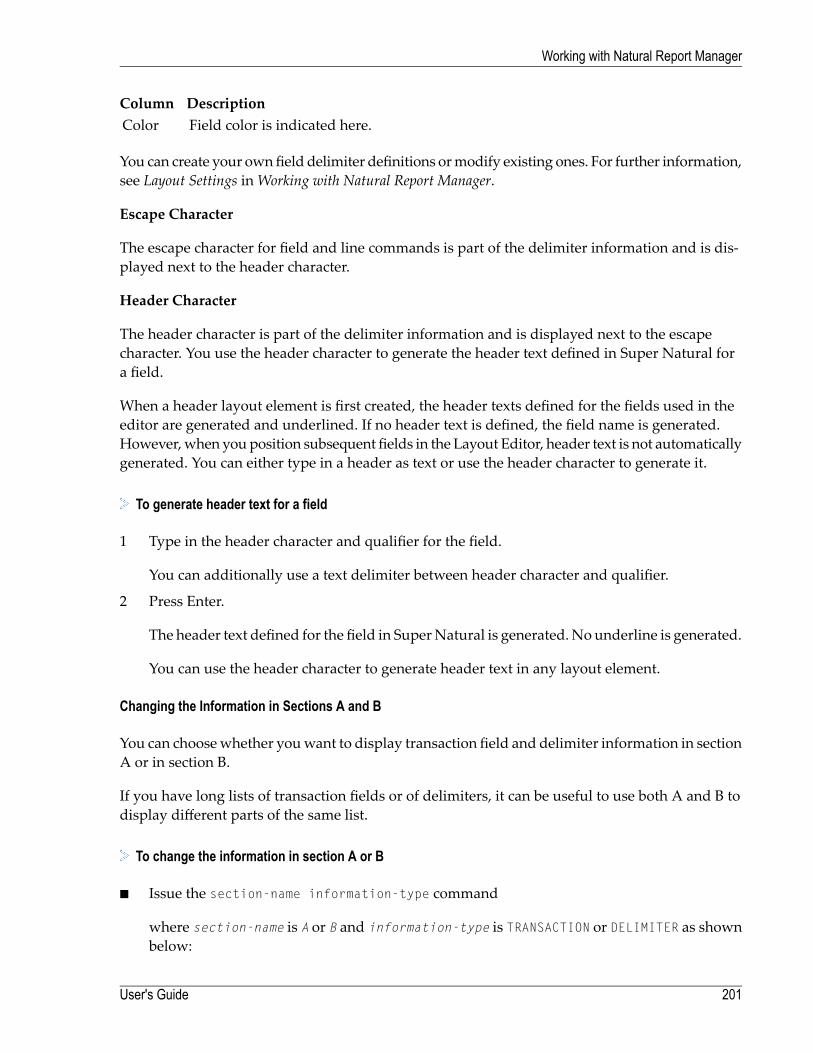
DescriptionColumnField color is indicated here.Color
You can create your ownfield delimiter definitions ormodify existing ones. For further information,see Layout Settings inWorking with Natural Report Manager.
Escape Character
The escape character for field and line commands is part of the delimiter information and is dis-played next to the header character.
Header Character
The header character is part of the delimiter information and is displayed next to the escapecharacter. You use the header character to generate the header text defined in Super Natural fora field.
When a header layout element is first created, the header texts defined for the fields used in theeditor are generated and underlined. If no header text is defined, the field name is generated.However,when youposition subsequent fields in the Layout Editor, header text is not automaticallygenerated. You can either type in a header as text or use the header character to generate it.
To generate header text for a field
1 Type in the header character and qualifier for the field.
You can additionally use a text delimiter between header character and qualifier.
2 Press Enter.
The header text defined for the field in SuperNatural is generated. No underline is generated.
You can use the header character to generate header text in any layout element.
Changing the Information in Sections A and B
You can choosewhether youwant to display transaction field and delimiter information in sectionA or in section B.
If you have long lists of transaction fields or of delimiters, it can be useful to use both A and B todisplay different parts of the same list.
To change the information in section A or B
■ Issue the section-name information-type command
where section-name is A or B and information-type is TRANSACTION or DELIMITER as shownbelow:
201User's Guide
Working with Natural Report Manager
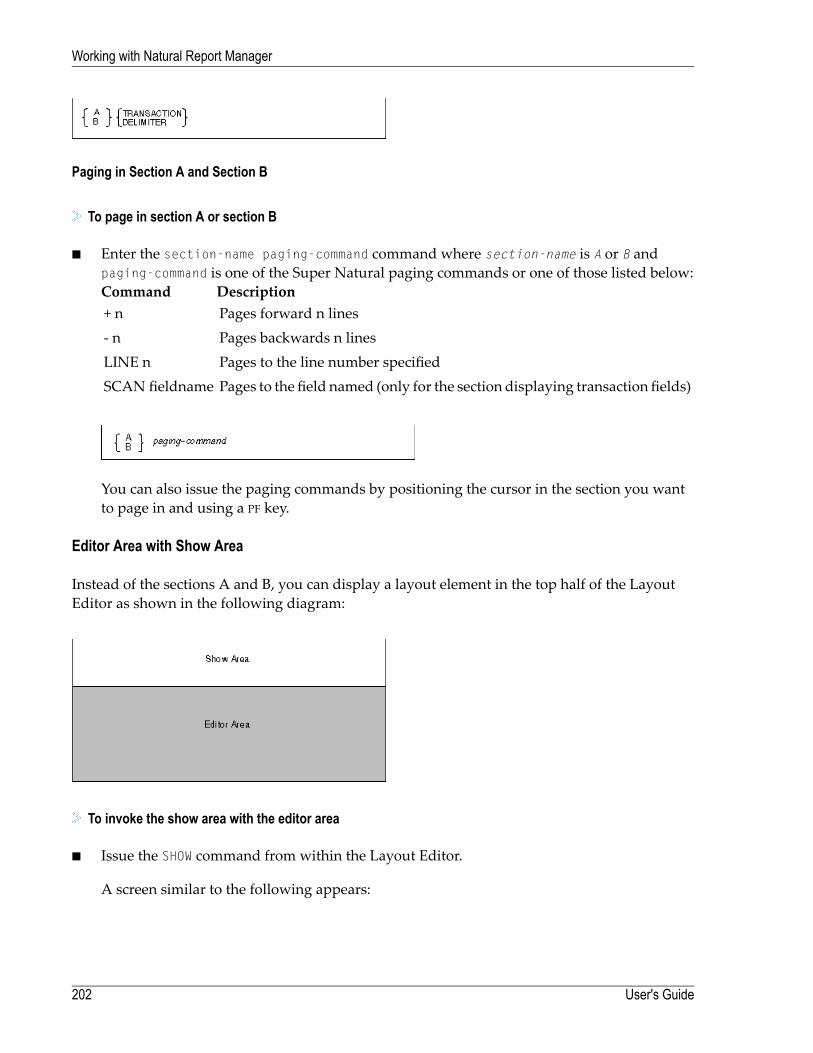
Paging in Section A and Section B
To page in section A or section B
■ Enter the section-name paging-command command where section-name is A or B andpaging-command is one of the Super Natural paging commands or one of those listed below:
DescriptionCommandPages forward n lines+ nPages backwards n lines- nPages to the line number specifiedLINE nPages to the field named (only for the section displaying transaction fields)SCAN fieldname
You can also issue the paging commands by positioning the cursor in the section you wantto page in and using a PF key.
Editor Area with Show Area
Instead of the sections A and B, you can display a layout element in the top half of the LayoutEditor as shown in the following diagram:
To invoke the show area with the editor area
■ Issue the SHOW command from within the Layout Editor.
A screen similar to the following appears:
User's Guide202
Working with Natural Report Manager
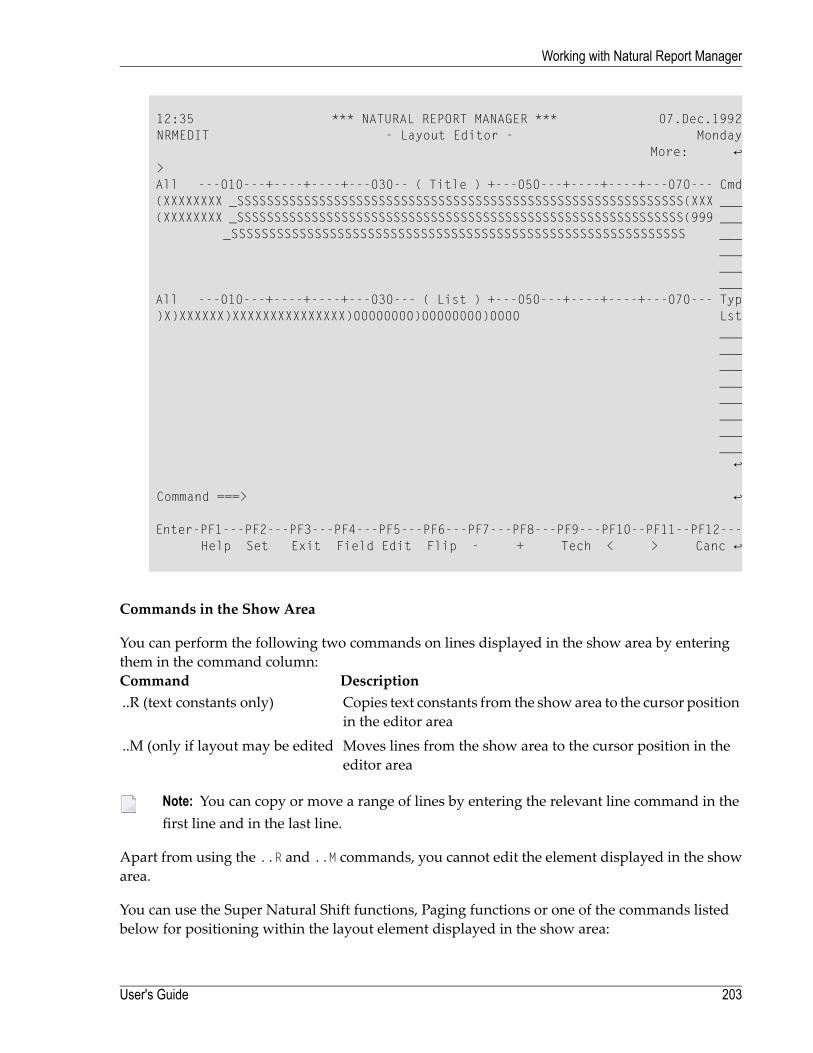
12:35 *** NATURAL REPORT MANAGER *** 07.Dec.1992 NRMEDIT - Layout Editor - Monday More: ↩ > All ---010---+----+----+---030-- ( Title ) +---050---+----+----+---070--- Cmd (XXXXXXXX _SSSSSSSSSSSSSSSSSSSSSSSSSSSSSSSSSSSSSSSSSSSSSSSSSSSSSSSSSSSS(XXX ___ (XXXXXXXX _SSSSSSSSSSSSSSSSSSSSSSSSSSSSSSSSSSSSSSSSSSSSSSSSSSSSSSSSSSSS(999 ___ _SSSSSSSSSSSSSSSSSSSSSSSSSSSSSSSSSSSSSSSSSSSSSSSSSSSSSSSSSSSS ___ ___ ___ ___ All ---010---+----+----+---030--- ( List ) +---050---+----+----+---070--- Typ )X)XXXXXX)XXXXXXXXXXXXXXX)00000000)00000000)0000 Lst ___ ___ ___ ___ ___ ___ ___ ___ ↩ Command ===> ↩ Enter-PF1---PF2---PF3---PF4---PF5---PF6---PF7---PF8---PF9---PF10--PF11--PF12--- Help Set Exit Field Edit Flip - + Tech < > Canc ↩
Commands in the Show Area
You can perform the following two commands on lines displayed in the show area by enteringthem in the command column:
DescriptionCommandCopies text constants from the showarea to the cursor positionin the editor area
..R (text constants only)
Moves lines from the show area to the cursor position in theeditor area
..M (only if layout may be edited
Note: You can copy or move a range of lines by entering the relevant line command in thefirst line and in the last line.
Apart from using the ..R and ..M commands, you cannot edit the element displayed in the showarea.
You can use the Super Natural Shift functions, Paging functions or one of the commands listedbelow for positioning within the layout element displayed in the show area:
203User's Guide
Working with Natural Report Manager
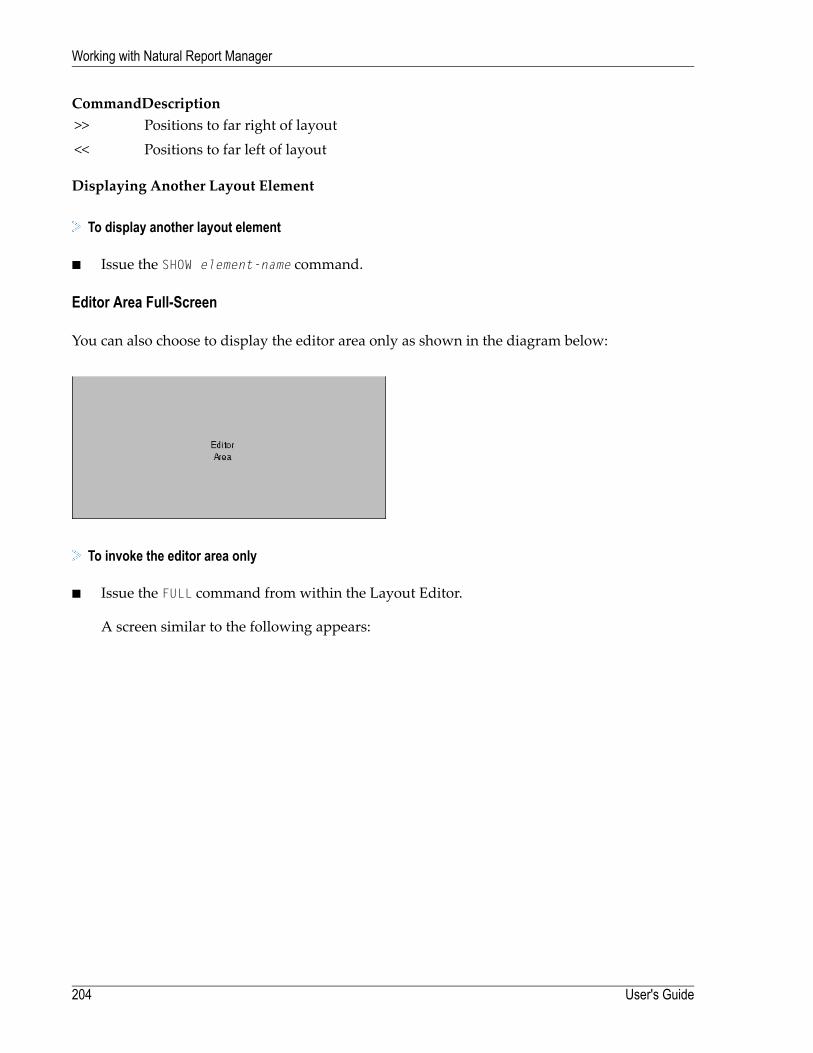
DescriptionCommandPositions to far right of layout>>Positions to far left of layout<<
Displaying Another Layout Element
To display another layout element
■ Issue the SHOW element-name command.
Editor Area Full-Screen
You can also choose to display the editor area only as shown in the diagram below:
To invoke the editor area only
■ Issue the FULL command from within the Layout Editor.
A screen similar to the following appears:
User's Guide204
Working with Natural Report Manager

)X)XXXXXX)XXXXXXXXXXXXXXX)00000000)00000000)0000 Lst ___ ___ ___ ___ ___ ___ ___ ___ ___ ___ ___ ___ ___ ___ ___ ___ ___ ___ ___ All ---010---+----+----+---030--- ( List ) +---050---+----+----+---070--- Typ Command ===> ↩ Enter-PF1---PF2---PF3---PF4---PF5---PF6---PF7---PF8---PF9---PF10--PF11--PF12--- Help Set Exit Field Edit Flip - + Tech < > Canc ↩
Layout Editor Editor Area
You can use the Layout Editor editor area to position and edit transaction fields and text constantswithin layout elements either directly or using line commands, field commands and direct com-mands.
Reports can be up to 250 columns wide and 250 lines long. The editor area is 75 columns wide, 20lines long in the full-screen Layout Editor screen and 9 lines long in the split-screen Layout Editorscreen.
If your report is wider than the editor area, you can use one of the Super Natural Shift functionsor one of the commands listed below to position to the right or left in the layout element(s) dis-played:
DescriptionCommandPositions to far right of layout>>Positions to far left of layout<<
205User's Guide
Working with Natural Report Manager
If your report is longer than the editor area, you can use the Super Natural paging commands topage within the layout element(s) displayed.
Scale
The scale is a line either at the top or the bottom of the editor area which displays informationabout the element(s) you are editing.
In the two split-screen Layout Editor screens, the information line separates the editor area fromthe rest of the screen. In the full-screen Layout Editor screen, the information line is in themessageline and is overwritten if a message is displayed.
The scale displays the following information:
Line Position Information
Line position information shows the number of the first line you can see in the editor area. TheinformationALL (when you can see thewhole element), TOP andBOTTOMappear as appropriate.
Element Name
The scale displays the name of the element you are editing or the text All Elements'.
Column Numbers
The scale also shows which columns are displayed. The columns are identified by a three-figurenumber at intervals of 20 columns. The column itself is underneath the second figure of the number.
User's Guide206
Working with Natural Report Manager
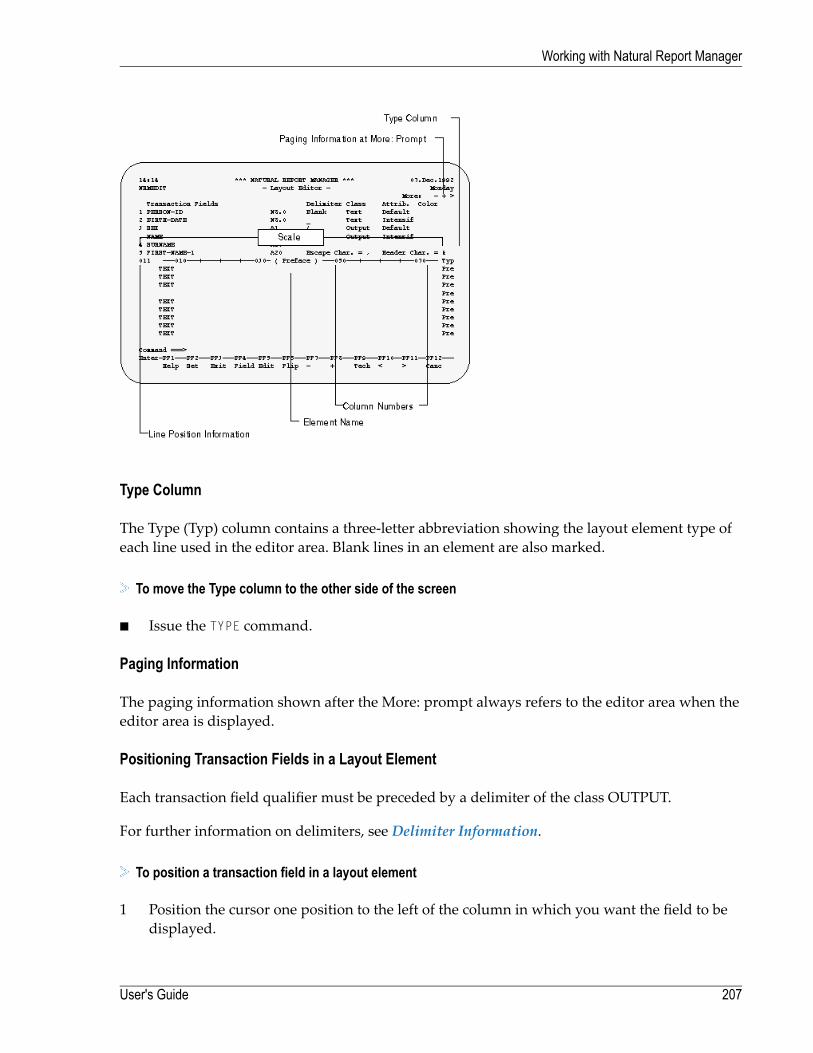
Type Column
The Type (Typ) column contains a three-letter abbreviation showing the layout element type ofeach line used in the editor area. Blank lines in an element are also marked.
To move the Type column to the other side of the screen
■ Issue the TYPE command.
Paging Information
The paging information shown after the More: prompt always refers to the editor area when theeditor area is displayed.
Positioning Transaction Fields in a Layout Element
Each transaction field qualifier must be preceded by a delimiter of the class OUTPUT.
For further information on delimiters, see Delimiter Information.
To position a transaction field in a layout element
1 Position the cursor one position to the left of the column in which you want the field to bedisplayed.
207User's Guide
Working with Natural Report Manager
2 Type in a field delimiter of class OUTPUT.
3 Type the field qualifier (number allocated to the field in the information section) after thefield delimiter.
4 Press Enter.
For right-justified fields of numeric (N), integer (I) or packed numeric (P) format, the figurenine (9) appears to represent the full length of the field. For example, if you choose a field ofthe format N12, twelve 9's appear.
For left-justified fields of numeric (N), integer (I) or packed numeric (P) format, the figurezero (0) appears to represent the full length of the field. For example, if you choose a field ofthe format N12, twelve 0's appear.
For fields of alphanumeric (A), floating (F), Date (D), time (T) or binary (B) format, the letterX appears to represent the full length of the field. For example, if you choose a field of theformat A12, twelve X's appear.
Fields of any type with an edit mask are represented by the letter M.
To alter the position of transaction fields already present in a layout element
■ Use the field commands and line commands described later in this section.
Positioning Text Constants in a Layout Element
A text constant is piece of text which always appears in a layout element. You can enter text con-stants directly into the editor area.
Each text constant must be preceded by a delimiter of the class TEXT.
Note: The default delimiter for text constants is blank ( ).
To alter the position of text constants already present in a layout element
■ Use the field commands and line commands described later in this section.
The first column of the editor area is only for delimiters or commands. You may not positiontext constants in it.
User's Guide208
Working with Natural Report Manager
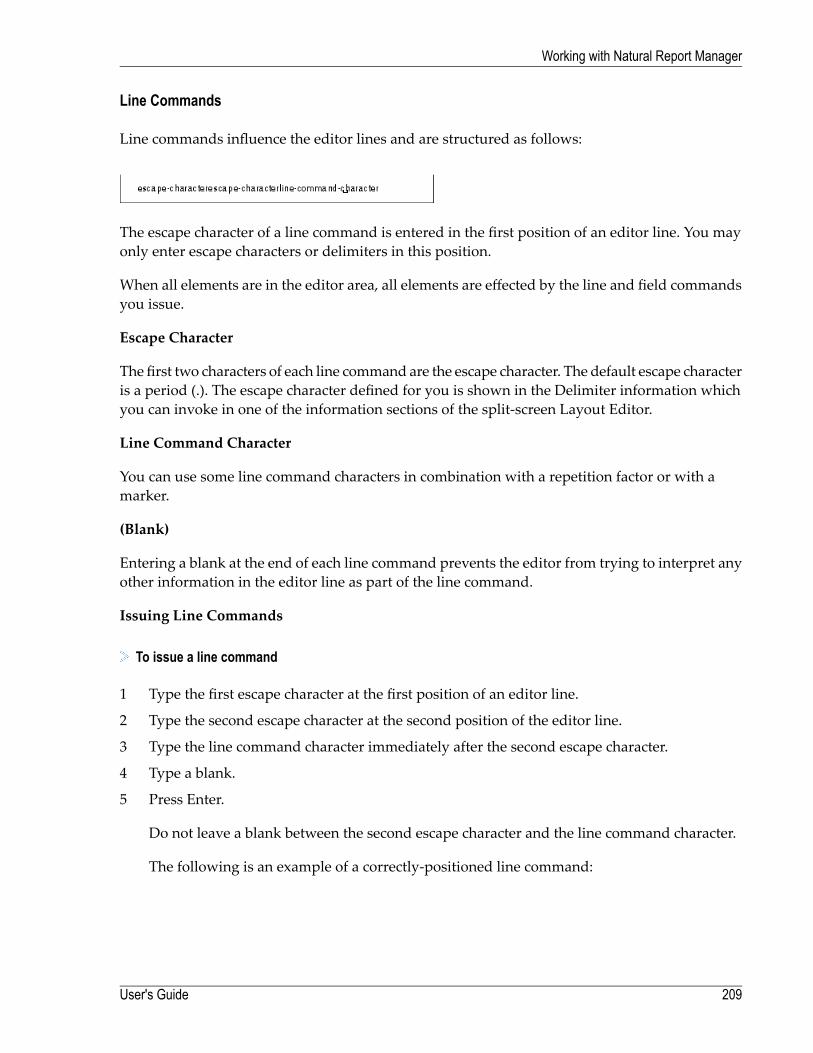
Line Commands
Line commands influence the editor lines and are structured as follows:
The escape character of a line command is entered in the first position of an editor line. You mayonly enter escape characters or delimiters in this position.
When all elements are in the editor area, all elements are effected by the line and field commandsyou issue.
Escape Character
The first two characters of each line command are the escape character. The default escape characteris a period (.). The escape character defined for you is shown in the Delimiter information whichyou can invoke in one of the information sections of the split-screen Layout Editor.
Line Command Character
You can use some line command characters in combination with a repetition factor or with amarker.
(Blank)
Entering a blank at the end of each line command prevents the editor from trying to interpret anyother information in the editor line as part of the line command.
Issuing Line Commands
To issue a line command
1 Type the first escape character at the first position of an editor line.
2 Type the second escape character at the second position of the editor line.
3 Type the line command character immediately after the second escape character.
4 Type a blank.
5 Press Enter.
Do not leave a blank between the second escape character and the line command character.
The following is an example of a correctly-positioned line command:
209User's Guide
Working with Natural Report Manager
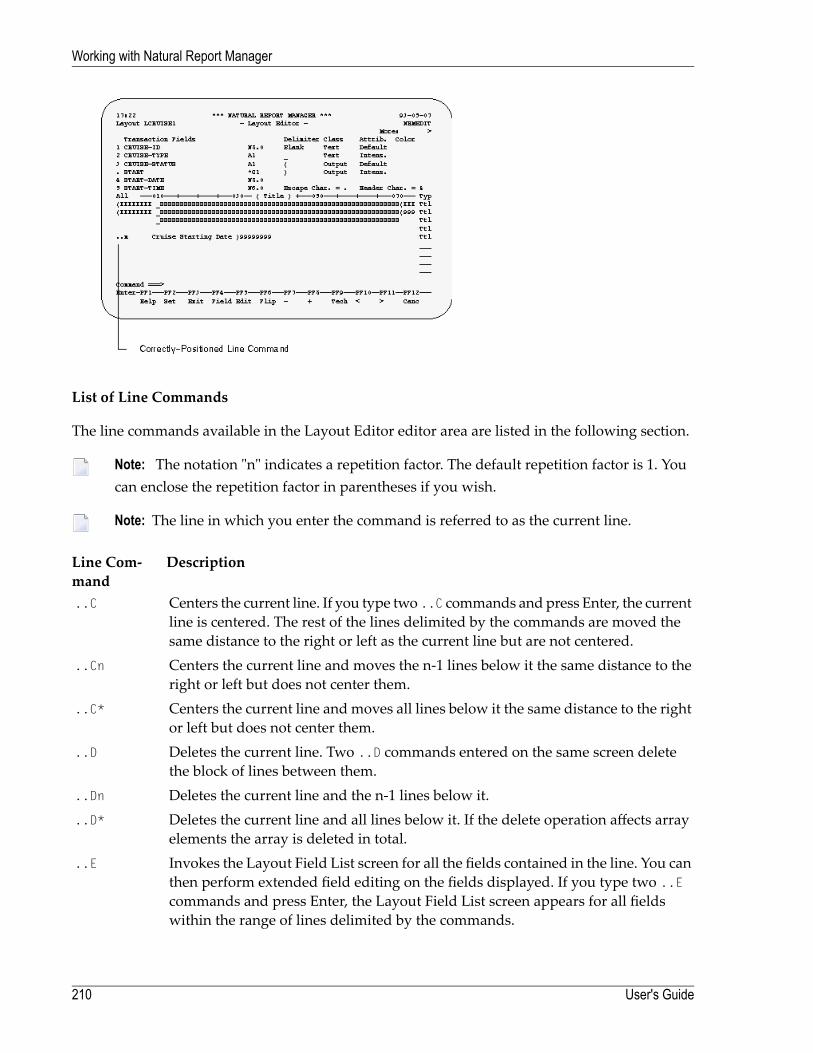
List of Line Commands
The line commands available in the Layout Editor editor area are listed in the following section.
Note: The notation "n" indicates a repetition factor. The default repetition factor is 1. Youcan enclose the repetition factor in parentheses if you wish.
Note: The line in which you enter the command is referred to as the current line.
DescriptionLine Com-mand
Centers the current line. If you type two ..C commands and press Enter, the currentline is centered. The rest of the lines delimited by the commands are moved thesame distance to the right or left as the current line but are not centered.
..C
Centers the current line and moves the n-1 lines below it the same distance to theright or left but does not center them.
..Cn
Centers the current line and moves all lines below it the same distance to the rightor left but does not center them.
..C*
Deletes the current line. Two ..D commands entered on the same screen deletethe block of lines between them.
..D
Deletes the current line and the n-1 lines below it...Dn
Deletes the current line and all lines below it. If the delete operation affects arrayelements the array is deleted in total.
..D*
Invokes the Layout Field List screen for all the fields contained in the line. You canthen perform extended field editing on the fields displayed. If you type two ..E
..E
commands and press Enter, the Layout Field List screen appears for all fieldswithin the range of lines delimited by the commands.
User's Guide210
Working with Natural Report Manager
DescriptionLine Com-mand
Invokes the Layout Field List screen for the current line and the n-1 lines below it.You can then perform extended field editing on the fields displayed.
..En
Invokes the Layout Field List screen for the current line and all lines below it. Youcan then perform extended field editing on the fields displayed. For further inform-ation on extended field editing, see Extended Field Editing Window.
..E*
Fills the blank spaces of the current line with the character c...Fc
Inserts a single line below the current line...I
Inserts n lines below the current line...In
Joins the current line with the line below it. If you type two ..J commands andpress Enter, the range of lines delimited by the commands are joined.
..J
Joins the current line with the n-1 lines below it...Jn
Joins the current linewith all lines below it. If a join operation results in a line beingtoo long, the characterswhich don't fit arewritten to the beginning of the next line.
..J*
Moves the current line to the line below the line in which the cursor is positionedwhen you press Enter. If two ..M commands are entered on the same screen, the
..M
block of lines delimited by the commands is moved below the line marked withthe cursor.Moves the line and the n-1 lines below it to the line below the line in which thecursor is positioned when you press Enter.
..Mn
Moves the current line and all lines below it to the line below the line in which thecursor is positioned when you press Enter. This command is only practical if theline marked with the cursor is above the current line.
..M*
Repeats (copies) all the text constants in the current line and writes them to theline indicated by the cursor position. Transaction fields are not copied. If you copy
..R
a line which only contains transaction fields, the line is copied but it is blank. Two..R commands entered on the same screen repeat the text constants within theblock of lines delimited by the commands.Repeats (copies) all text constants on the current and the n-1 following lines to thecursor position. If the cursor is located in the current line, the same text is repeatedntimes.
..Rn
Repeats (copies) all the text constants in the current line and the lines below to thecursor position. This command is only practical if the line marked with the cursoris above the current line.
..R*
Splits the current line at the cursor position. The content of the current line afterthe cursor position is written into a new line which is created below the current
..S
line. If you type in two ..S commands and press Enter, the block of lines delimitedby the commands is split at the cursor position. The part of the block after thecursor position is written into a new line which is created below the current line.
211User's Guide
Working with Natural Report Manager
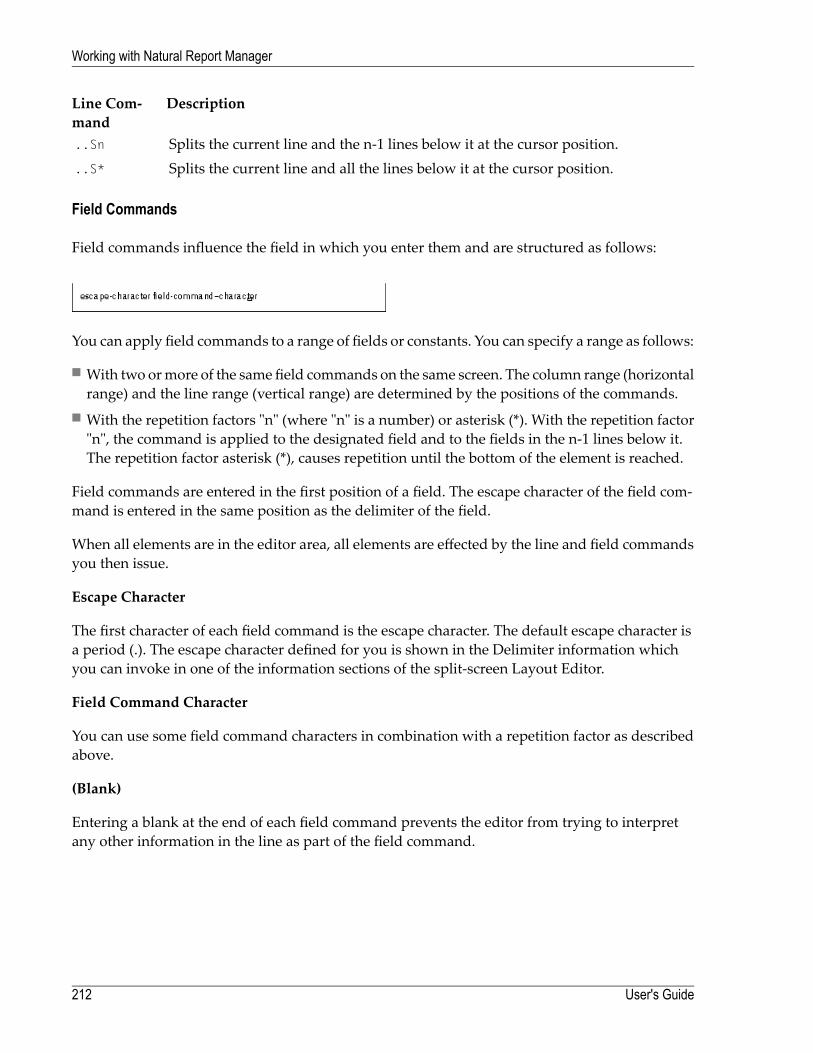
DescriptionLine Com-mand
Splits the current line and the n-1 lines below it at the cursor position...Sn
Splits the current line and all the lines below it at the cursor position...S*
Field Commands
Field commands influence the field in which you enter them and are structured as follows:
You can apply field commands to a range of fields or constants. You can specify a range as follows:
■ With two ormore of the same field commands on the same screen. The column range (horizontalrange) and the line range (vertical range) are determined by the positions of the commands.
■ With the repetition factors "n" (where "n" is a number) or asterisk (*). With the repetition factor"n", the command is applied to the designated field and to the fields in the n-1 lines below it.The repetition factor asterisk (*), causes repetition until the bottom of the element is reached.
Field commands are entered in the first position of a field. The escape character of the field com-mand is entered in the same position as the delimiter of the field.
When all elements are in the editor area, all elements are effected by the line and field commandsyou then issue.
Escape Character
The first character of each field command is the escape character. The default escape character isa period (.). The escape character defined for you is shown in the Delimiter information whichyou can invoke in one of the information sections of the split-screen Layout Editor.
Field Command Character
You can use some field command characters in combination with a repetition factor as describedabove.
(Blank)
Entering a blank at the end of each field command prevents the editor from trying to interpretany other information in the line as part of the field command.
User's Guide212
Working with Natural Report Manager
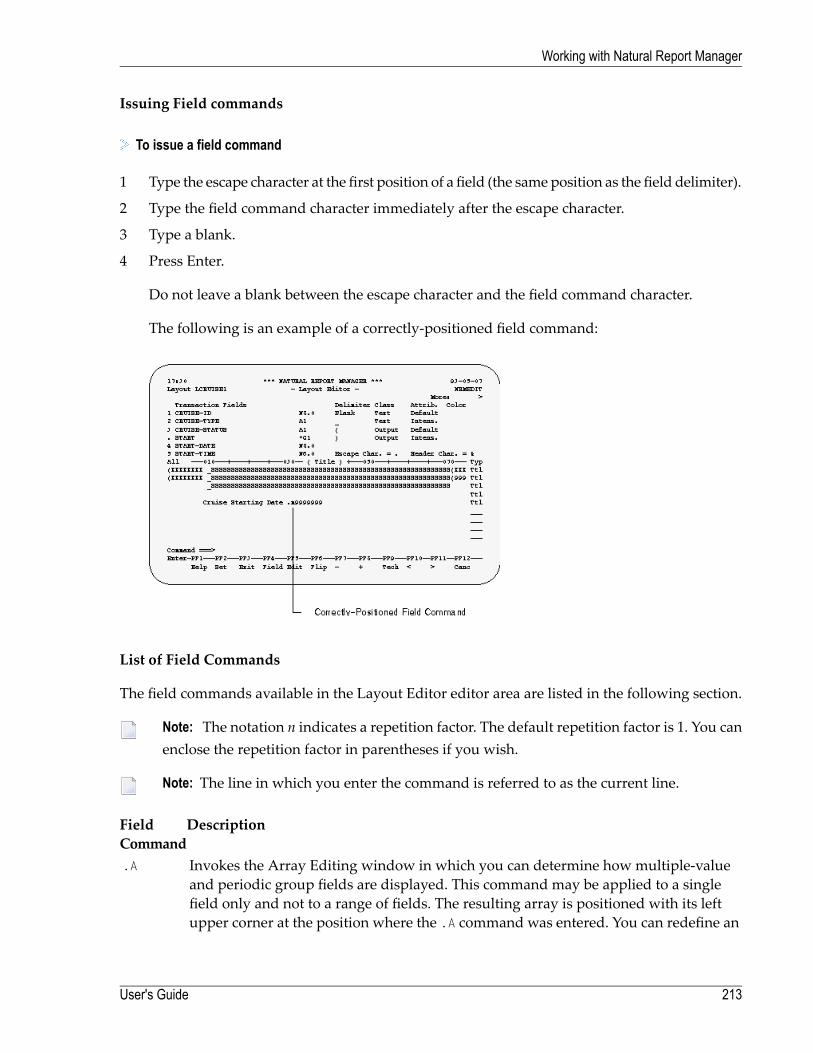
Issuing Field commands
To issue a field command
1 Type the escape character at the first position of a field (the same position as the field delimiter).
2 Type the field command character immediately after the escape character.
3 Type a blank.
4 Press Enter.
Do not leave a blank between the escape character and the field command character.
The following is an example of a correctly-positioned field command:
List of Field Commands
The field commands available in the Layout Editor editor area are listed in the following section.
Note: The notation n indicates a repetition factor. The default repetition factor is 1. You canenclose the repetition factor in parentheses if you wish.
Note: The line in which you enter the command is referred to as the current line.
DescriptionFieldCommand
Invokes the Array Editing window in which you can determine how multiple-valueand periodic group fields are displayed. This command may be applied to a single
.A
field only and not to a range of fields. The resulting array is positioned with its leftupper corner at the position where the .A command was entered. You can redefine an
213User's Guide
Working with Natural Report Manager
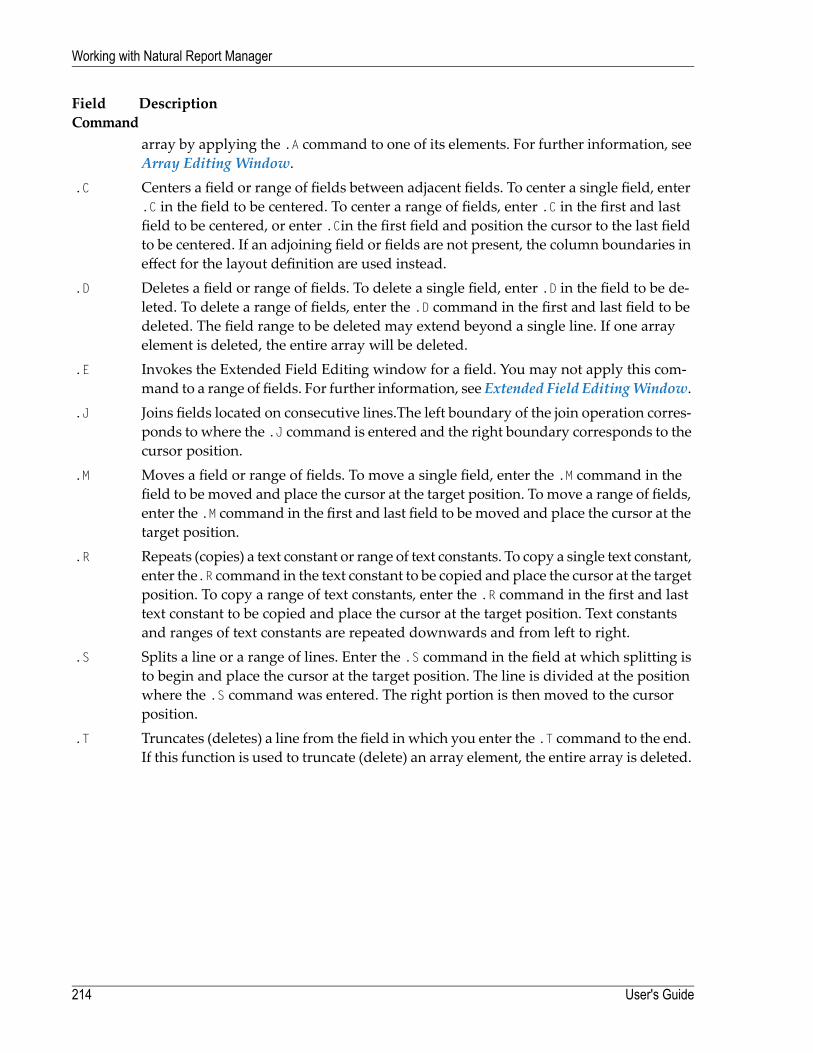
DescriptionFieldCommand
array by applying the .A command to one of its elements. For further information, seeArray Editing Window.Centers a field or range of fields between adjacent fields. To center a single field, enter.C in the field to be centered. To center a range of fields, enter .C in the first and last
.C
field to be centered, or enter .Cin the first field and position the cursor to the last fieldto be centered. If an adjoining field or fields are not present, the column boundaries ineffect for the layout definition are used instead.Deletes a field or range of fields. To delete a single field, enter .D in the field to be de-leted. To delete a range of fields, enter the .D command in the first and last field to be
.D
deleted. The field range to be deleted may extend beyond a single line. If one arrayelement is deleted, the entire array will be deleted.Invokes the Extended Field Editing window for a field. You may not apply this com-mand to a range of fields. For further information, see Extended Field EditingWindow.
.E
Joins fields located on consecutive lines.The left boundary of the join operation corres-ponds to where the .J command is entered and the right boundary corresponds to thecursor position.
.J
Moves a field or range of fields. To move a single field, enter the .M command in thefield to be moved and place the cursor at the target position. To move a range of fields,
.M
enter the .M command in the first and last field to be moved and place the cursor at thetarget position.Repeats (copies) a text constant or range of text constants. To copy a single text constant,enter the.R command in the text constant to be copied and place the cursor at the target
.R
position. To copy a range of text constants, enter the .R command in the first and lasttext constant to be copied and place the cursor at the target position. Text constantsand ranges of text constants are repeated downwards and from left to right.Splits a line or a range of lines. Enter the .S command in the field at which splitting isto begin and place the cursor at the target position. The line is divided at the position
.S
where the .S command was entered. The right portion is then moved to the cursorposition.Truncates (deletes) a line from the field in which you enter the .T command to the end.If this function is used to truncate (delete) an array element, the entire array is deleted.
.T
User's Guide214
Working with Natural Report Manager
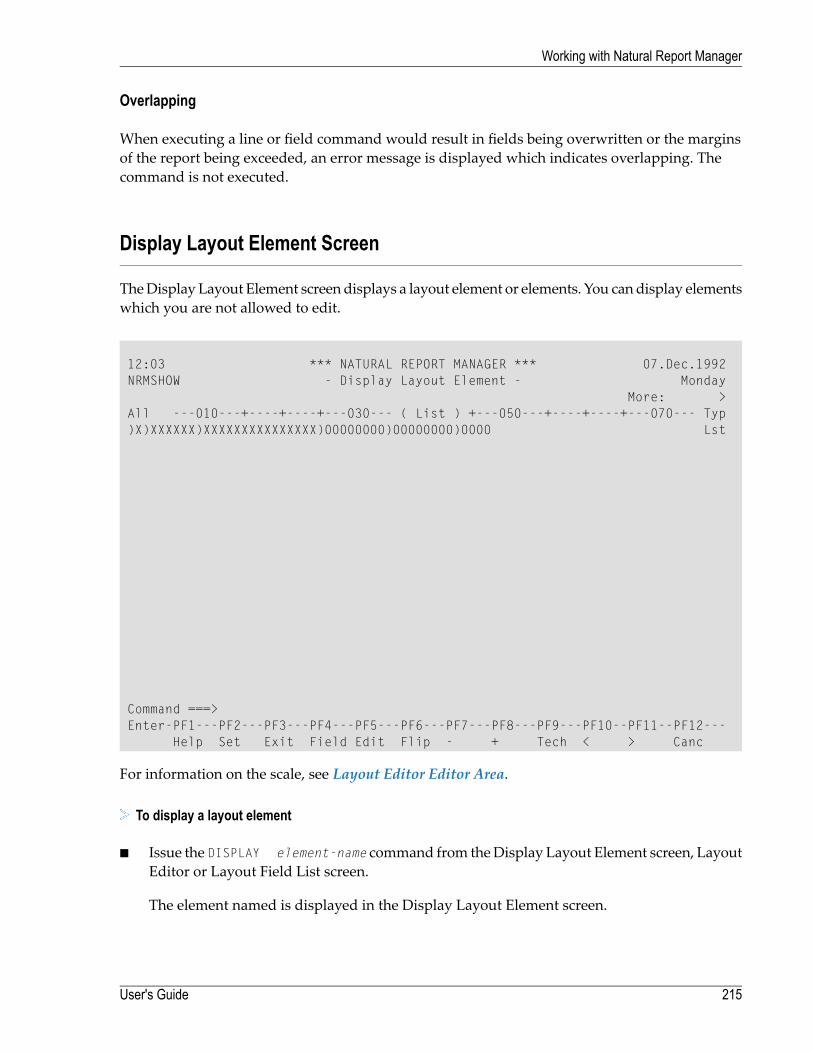
Overlapping
When executing a line or field command would result in fields being overwritten or the marginsof the report being exceeded, an error message is displayed which indicates overlapping. Thecommand is not executed.
Display Layout Element Screen
TheDisplay Layout Element screen displays a layout element or elements. You can display elementswhich you are not allowed to edit.
12:03 *** NATURAL REPORT MANAGER *** 07.Dec.1992NRMSHOW - Display Layout Element - Monday
More: >All ---010---+----+----+---030--- ( List ) +---050---+----+----+---070--- Typ)X)XXXXXX)XXXXXXXXXXXXXXX)00000000)00000000)0000 Lst
Command ===>Enter-PF1---PF2---PF3---PF4---PF5---PF6---PF7---PF8---PF9---PF10--PF11--PF12---
Help Set Exit Field Edit Flip - + Tech < > Canc
For information on the scale, see Layout Editor Editor Area.
To display a layout element
■ Issue the DISPLAY element-name command from theDisplay Layout Element screen, LayoutEditor or Layout Field List screen.
The element named is displayed in the Display Layout Element screen.
215User's Guide
Working with Natural Report Manager
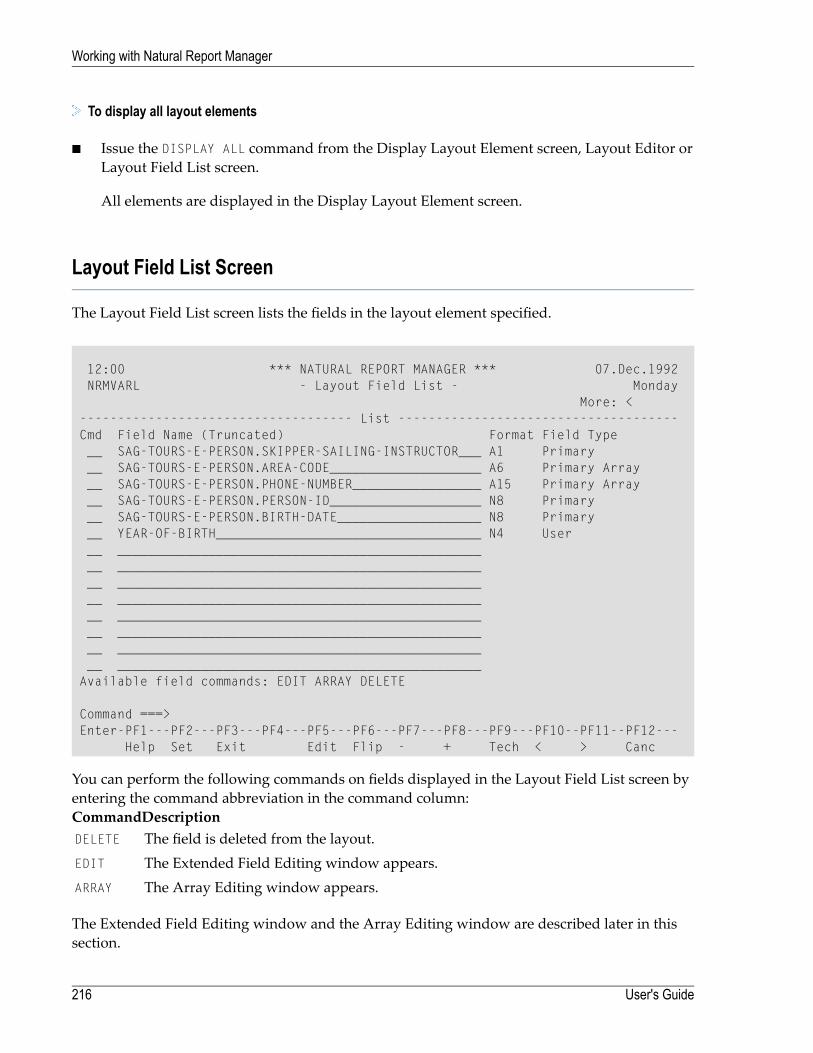
To display all layout elements
■ Issue the DISPLAY ALL command from the Display Layout Element screen, Layout Editor orLayout Field List screen.
All elements are displayed in the Display Layout Element screen.
Layout Field List Screen
The Layout Field List screen lists the fields in the layout element specified.
12:00 *** NATURAL REPORT MANAGER *** 07.Dec.1992NRMVARL - Layout Field List - Monday
More: <------------------------------------ List -------------------------------------Cmd Field Name (Truncated) Format Field Type__ SAG-TOURS-E-PERSON.SKIPPER-SAILING-INSTRUCTOR___ A1 Primary__ SAG-TOURS-E-PERSON.AREA-CODE____________________ A6 Primary Array__ SAG-TOURS-E-PERSON.PHONE-NUMBER_________________ A15 Primary Array__ SAG-TOURS-E-PERSON.PERSON-ID____________________ N8 Primary__ SAG-TOURS-E-PERSON.BIRTH-DATE___________________ N8 Primary__ YEAR-OF-BIRTH___________________________________ N4 User__ __________________________________________________ __________________________________________________ __________________________________________________ __________________________________________________ __________________________________________________ __________________________________________________ __________________________________________________ ________________________________________________
Available field commands: EDIT ARRAY DELETE
Command ===>Enter-PF1---PF2---PF3---PF4---PF5---PF6---PF7---PF8---PF9---PF10--PF11--PF12---
Help Set Exit Edit Flip - + Tech < > Canc
You can perform the following commands on fields displayed in the Layout Field List screen byentering the command abbreviation in the command column:
DescriptionCommandThe field is deleted from the layout.DELETE
The Extended Field Editing window appears.EDIT
The Array Editing window appears.ARRAY
The Extended Field Editing window and the Array Editing window are described later in thissection.
User's Guide216
Working with Natural Report Manager
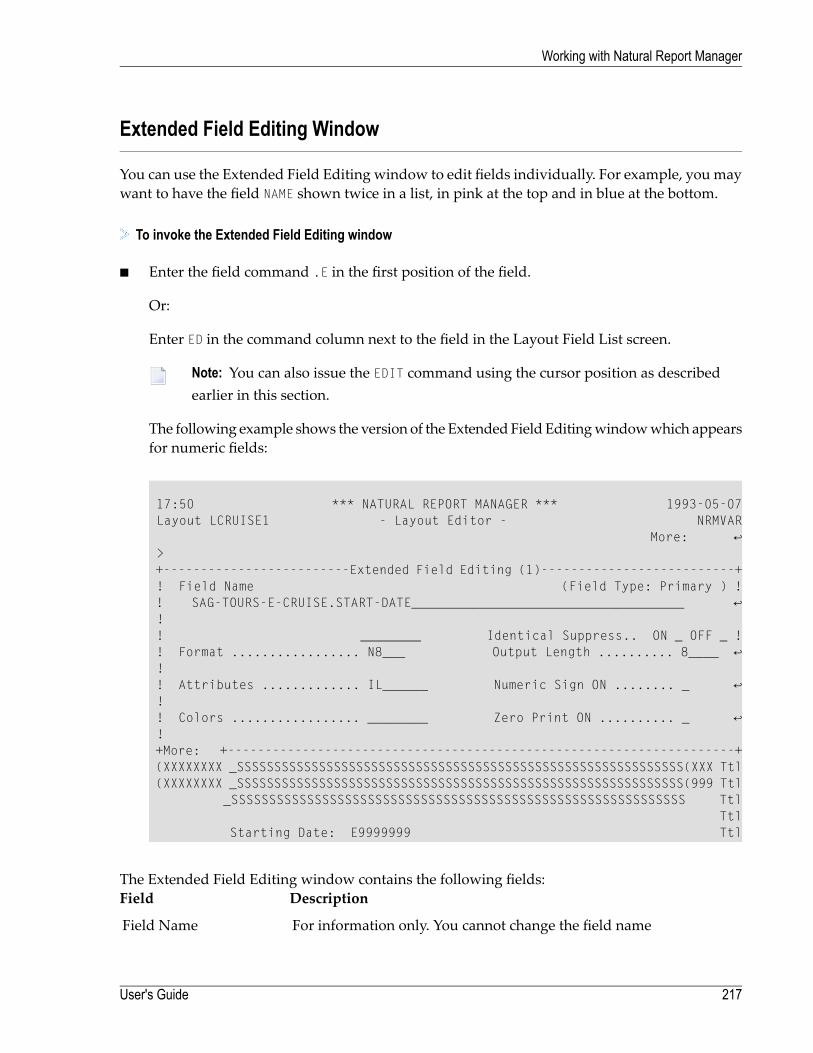
Extended Field Editing Window
You can use the Extended Field Editing window to edit fields individually. For example, you maywant to have the field NAME shown twice in a list, in pink at the top and in blue at the bottom.
To invoke the Extended Field Editing window
■ Enter the field command .E in the first position of the field.
Or:
Enter ED in the command column next to the field in the Layout Field List screen.
Note: You can also issue the EDIT command using the cursor position as describedearlier in this section.
The following example shows the version of the ExtendedField Editingwindowwhich appearsfor numeric fields:
17:50 *** NATURAL REPORT MANAGER *** 1993-05-07 Layout LCRUISE1 - Layout Editor - NRMVAR More: ↩ > +-------------------------Extended Field Editing (1)--------------------------+ ! Field Name (Field Type: Primary ) ! ! SAG-TOURS-E-CRUISE.START-DATE____________________________________ ↩ ! ! ________ Identical Suppress.. ON _ OFF _ ! ! Format ................. N8___ Output Length .......... 8____ ↩ ! ! Attributes ............. IL______ Numeric Sign ON ........ _ ↩ ! ! Colors ................. ________ Zero Print ON .......... _ ↩ ! +More: +--------------------------------------------------------------------+ (XXXXXXXX _SSSSSSSSSSSSSSSSSSSSSSSSSSSSSSSSSSSSSSSSSSSSSSSSSSSSSSSSSSSS(XXX Ttl (XXXXXXXX _SSSSSSSSSSSSSSSSSSSSSSSSSSSSSSSSSSSSSSSSSSSSSSSSSSSSSSSSSSSS(999 Ttl _SSSSSSSSSSSSSSSSSSSSSSSSSSSSSSSSSSSSSSSSSSSSSSSSSSSSSSSSSSSS Ttl Ttl Starting Date: E9999999 Ttl
The Extended Field Editing window contains the following fields:DescriptionField
For information only. You cannot change the field nameField Name
217User's Guide
Working with Natural Report Manager
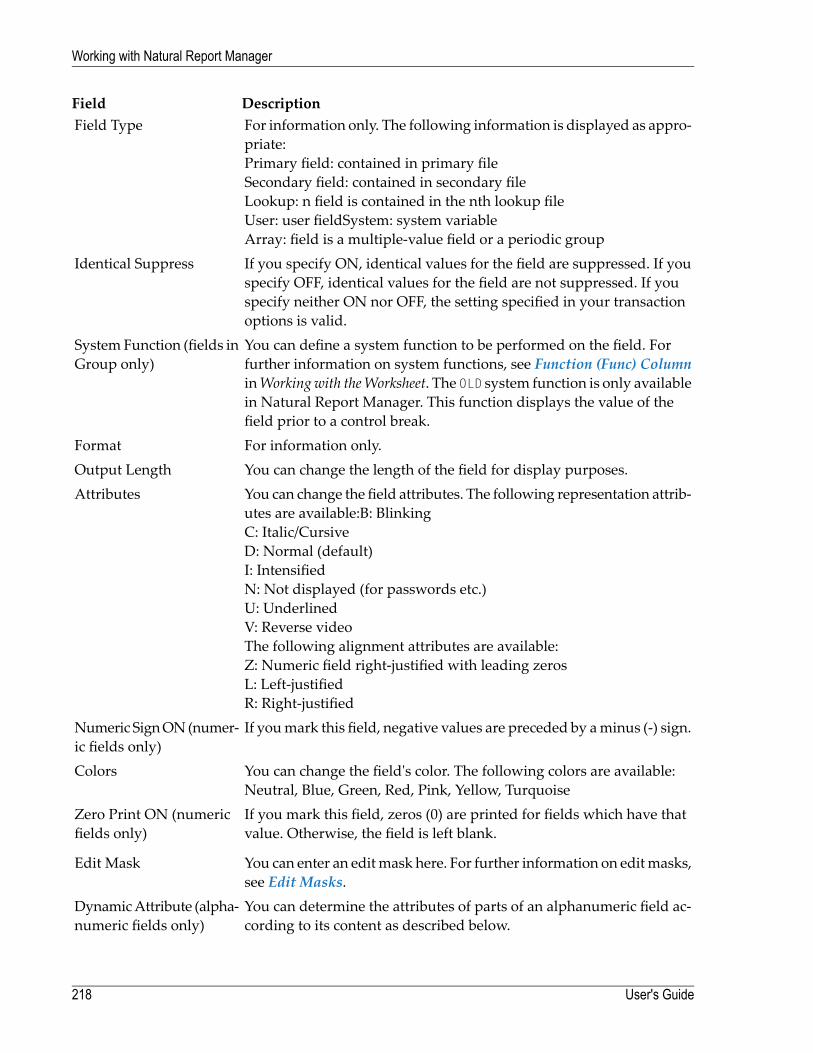
DescriptionFieldFor information only. The following information is displayed as appro-priate:Primary field: contained in primary fileSecondary field: contained in secondary fileLookup: n field is contained in the nth lookup fileUser: user fieldSystem: system variableArray: field is a multiple-value field or a periodic group
Field Type
If you specify ON, identical values for the field are suppressed. If youspecify OFF, identical values for the field are not suppressed. If you
Identical Suppress
specify neither ON nor OFF, the setting specified in your transactionoptions is valid.You can define a system function to be performed on the field. Forfurther information on system functions, see Function (Func) Column
SystemFunction (fields inGroup only)
inWorkingwith theWorksheet. The OLD system function is only availablein Natural Report Manager. This function displays the value of thefield prior to a control break.For information only.FormatYou can change the length of the field for display purposes.Output LengthYou can change the field attributes. The following representation attrib-utes are available:B: BlinkingC: Italic/CursiveD: Normal (default)I: IntensifiedN: Not displayed (for passwords etc.)U: UnderlinedV: Reverse videoThe following alignment attributes are available:Z: Numeric field right-justified with leading zerosL: Left-justifiedR: Right-justified
Attributes
If youmark this field, negative values are preceded by aminus (-) sign.Numeric SignON(numer-ic fields only)
You can change the field's color. The following colors are available:Neutral, Blue, Green, Red, Pink, Yellow, Turquoise
Colors
If you mark this field, zeros (0) are printed for fields which have thatvalue. Otherwise, the field is left blank.
Zero Print ON (numericfields only)
You can enter an editmask here. For further information on editmasks,see Edit Masks.
Edit Mask
You can determine the attributes of parts of an alphanumeric field ac-cording to its content as described below.
DynamicAttribute (alpha-numeric fields only)
User's Guide218
Working with Natural Report Manager
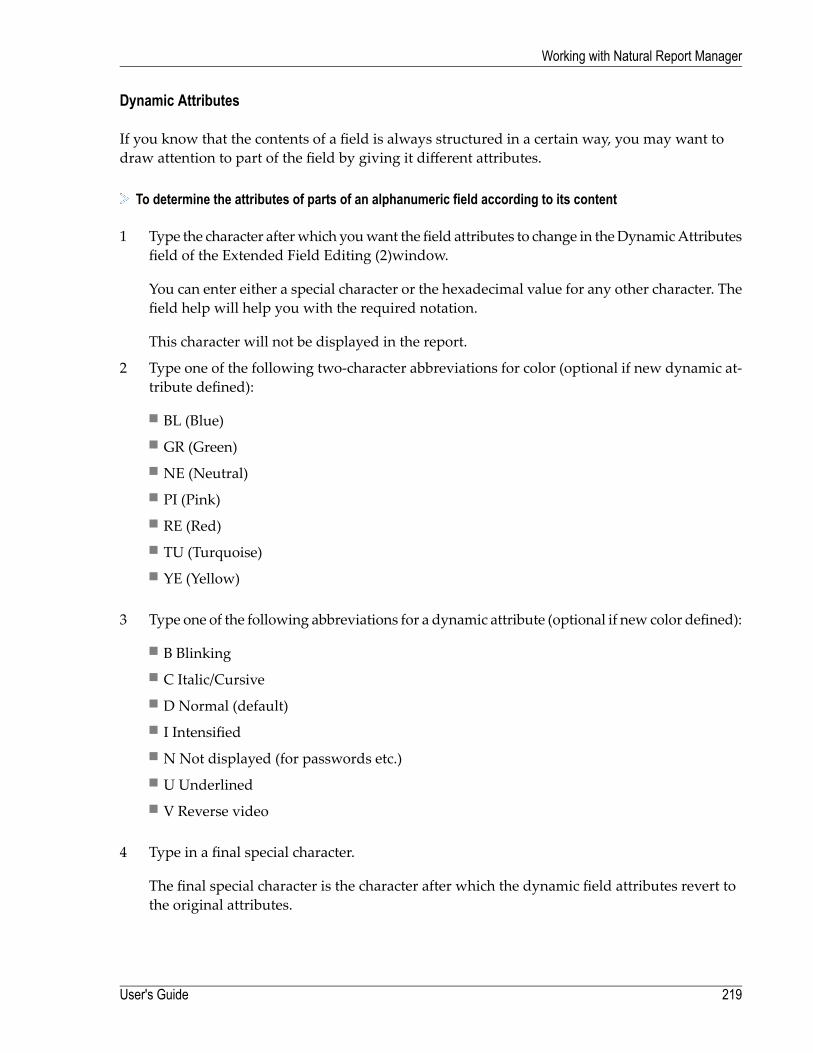
Dynamic Attributes
If you know that the contents of a field is always structured in a certain way, you may want todraw attention to part of the field by giving it different attributes.
To determine the attributes of parts of an alphanumeric field according to its content
1 Type the character afterwhich youwant the field attributes to change in theDynamicAttributesfield of the Extended Field Editing (2)window.
You can enter either a special character or the hexadecimal value for any other character. Thefield help will help you with the required notation.
This character will not be displayed in the report.
2 Type one of the following two-character abbreviations for color (optional if new dynamic at-tribute defined):
■ BL (Blue)■ GR (Green)■ NE (Neutral)■ PI (Pink)■ RE (Red)■ TU (Turquoise)■ YE (Yellow)
3 Type one of the following abbreviations for a dynamic attribute (optional if new color defined):
■ B Blinking■ C Italic/Cursive■ D Normal (default)■ I Intensified■ N Not displayed (for passwords etc.)■ U Underlined■ V Reverse video
4 Type in a final special character.
The final special character is the character after which the dynamic field attributes revert tothe original attributes.
219User's Guide
Working with Natural Report Manager
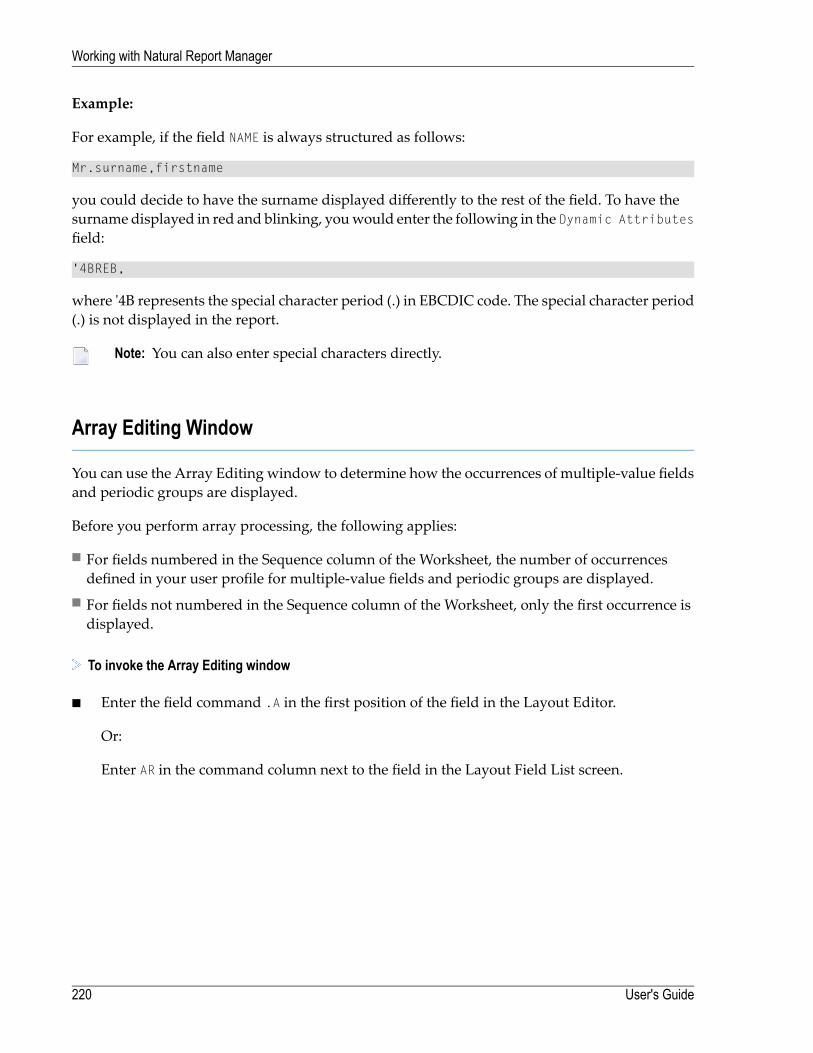
Example:
For example, if the field NAME is always structured as follows:
Mr.surname,firstname
you could decide to have the surname displayed differently to the rest of the field. To have thesurnamedisplayed in red and blinking, youwould enter the following in the Dynamic Attributesfield:
'4BREB,
where '4B represents the special character period (.) in EBCDIC code. The special character period(.) is not displayed in the report.
Note: You can also enter special characters directly.
Array Editing Window
You can use the Array Editing window to determine how the occurrences of multiple-value fieldsand periodic groups are displayed.
Before you perform array processing, the following applies:
■ For fields numbered in the Sequence column of the Worksheet, the number of occurrencesdefined in your user profile for multiple-value fields and periodic groups are displayed.
■ For fields not numbered in the Sequence column of the Worksheet, only the first occurrence isdisplayed.
To invoke the Array Editing window
■ Enter the field command .A in the first position of the field in the Layout Editor.
Or:
Enter AR in the command column next to the field in the Layout Field List screen.
User's Guide220
Working with Natural Report Manager
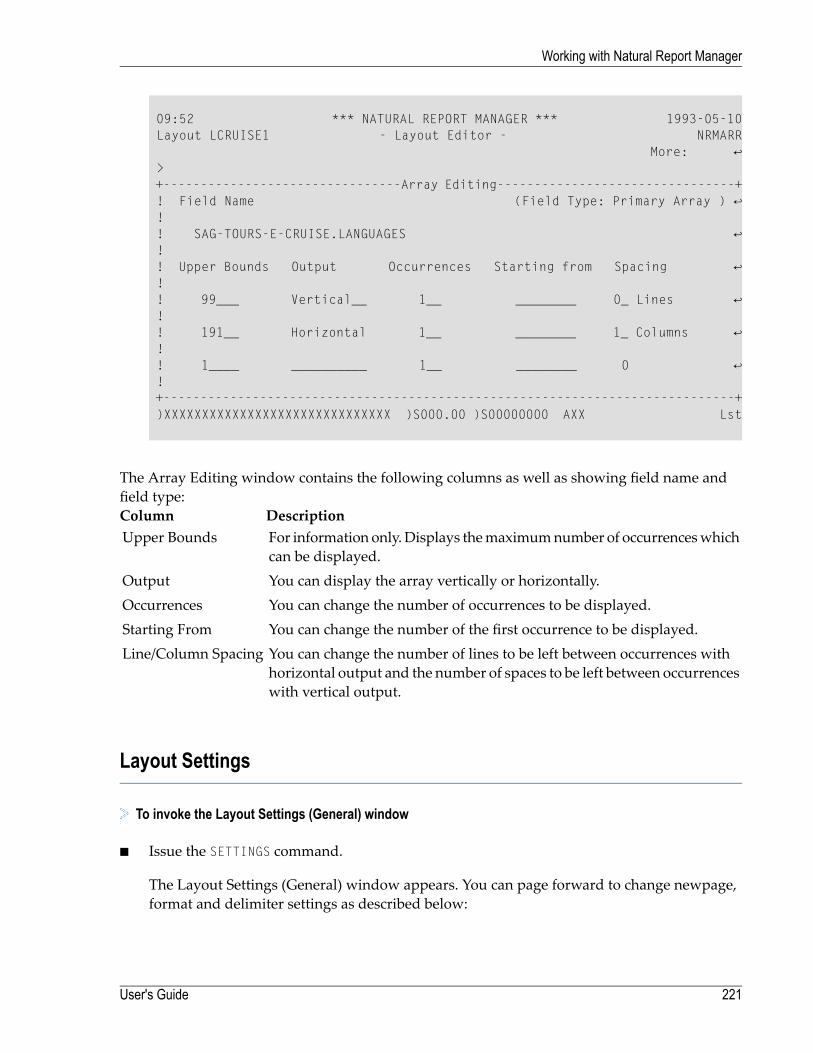
09:52 *** NATURAL REPORT MANAGER *** 1993-05-10 Layout LCRUISE1 - Layout Editor - NRMARR More: ↩ > +--------------------------------Array Editing--------------------------------+ ! Field Name (Field Type: Primary Array ) ↩ ! ! SAG-TOURS-E-CRUISE.LANGUAGES ↩ ! ! Upper Bounds Output Occurrences Starting from Spacing ↩ ! ! 99___ Vertical__ 1__ ________ 0_ Lines ↩ ! ! 191__ Horizontal 1__ ________ 1_ Columns ↩ ! ! 1____ __________ 1__ ________ 0 ↩ ! +-----------------------------------------------------------------------------+ )XXXXXXXXXXXXXXXXXXXXXXXXXXXXXX )S000.00 )S00000000 AXX Lst
The Array Editing window contains the following columns as well as showing field name andfield type:
DescriptionColumnFor information only. Displays themaximumnumber of occurrenceswhichcan be displayed.
Upper Bounds
You can display the array vertically or horizontally.OutputYou can change the number of occurrences to be displayed.OccurrencesYou can change the number of the first occurrence to be displayed.Starting FromYou can change the number of lines to be left between occurrences withhorizontal output and the number of spaces to be left between occurrenceswith vertical output.
Line/Column Spacing
Layout Settings
To invoke the Layout Settings (General) window
■ Issue the SETTINGS command.
The Layout Settings (General) window appears. You can page forward to change newpage,format and delimiter settings as described below:
221User's Guide
Working with Natural Report Manager
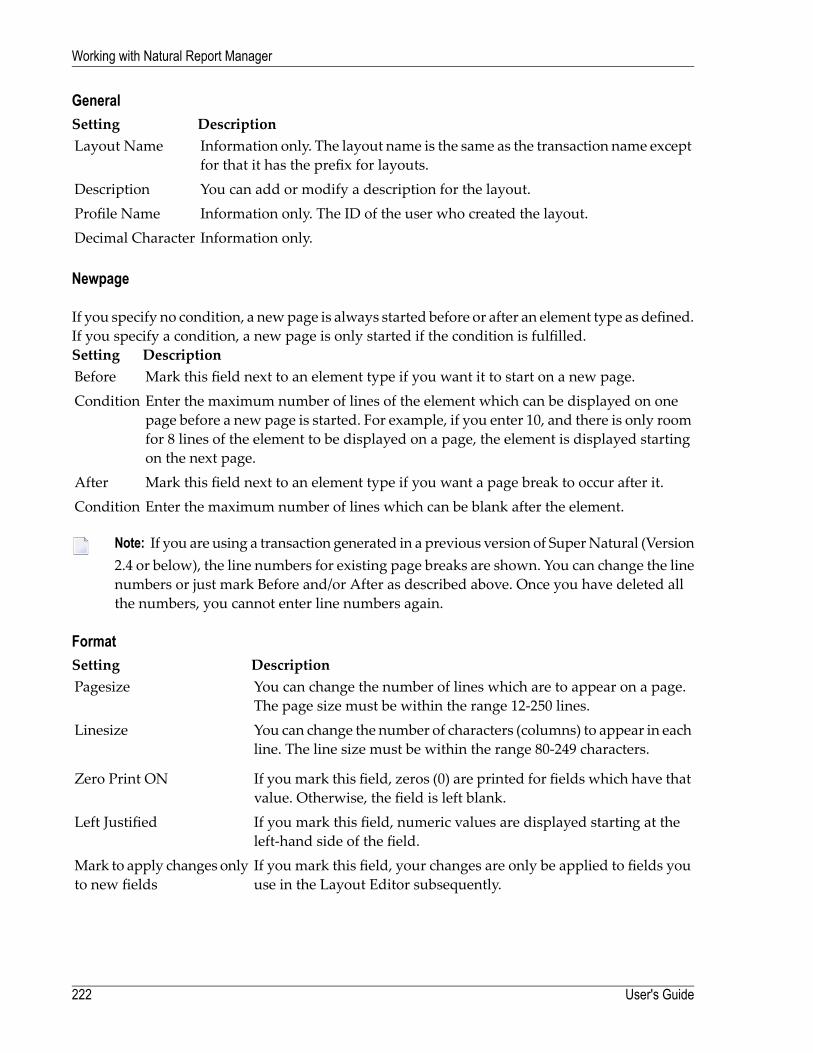
GeneralDescriptionSettingInformation only. The layout name is the same as the transaction name exceptfor that it has the prefix for layouts.
Layout Name
You can add or modify a description for the layout.DescriptionInformation only. The ID of the user who created the layout.Profile NameInformation only.Decimal Character
Newpage
If you specify no condition, a newpage is always started before or after an element type as defined.If you specify a condition, a new page is only started if the condition is fulfilled.
DescriptionSettingMark this field next to an element type if you want it to start on a new page.BeforeEnter the maximum number of lines of the element which can be displayed on onepage before a new page is started. For example, if you enter 10, and there is only room
Condition
for 8 lines of the element to be displayed on a page, the element is displayed startingon the next page.Mark this field next to an element type if you want a page break to occur after it.AfterEnter the maximum number of lines which can be blank after the element.Condition
Note: If you are using a transaction generated in a previous version of SuperNatural (Version2.4 or below), the line numbers for existing page breaks are shown. You can change the linenumbers or just mark Before and/or After as described above. Once you have deleted allthe numbers, you cannot enter line numbers again.
FormatDescriptionSettingYou can change the number of lines which are to appear on a page.The page size must be within the range 12-250 lines.
Pagesize
You can change the number of characters (columns) to appear in eachline. The line size must be within the range 80-249 characters.
Linesize
If you mark this field, zeros (0) are printed for fields which have thatvalue. Otherwise, the field is left blank.
Zero Print ON
If you mark this field, numeric values are displayed starting at theleft-hand side of the field.
Left Justified
If you mark this field, your changes are only be applied to fields youuse in the Layout Editor subsequently.
Mark to apply changes onlyto new fields
User's Guide222
Working with Natural Report Manager
DelimiterDescriptionSettingThe following classes are offered: Text, Output Only.ClassThe following attributes are offered: Italic/Cursive, Normal (default),Intensified, Not displayed (for passwords etc.), Underlined, Reversevideo, Dynamic (not available).
Attribute
The following colors are offered: NE (Neutral), BL (Blue), GR (Green),RE (Red), PI (Pink), YE (Yellow), TU (Turquoise).
Color
Use special characters as delimiters to represent the combinations ofclass, attribute and color you have specified.
Delimiter
If you mark this field, your changes are only applied only to fields youuse in the Layout Editor subsequently.
Mark to apply changesnew fields
Testing Layouts
When you test a layout, you are shown how the report data would be presented if you ran thetransaction you are working on using Report Destination SCREEN, PRINTER, CON-NECT orEDITOR. The test report is filled with dummy data.
To test a layout
■ Issue the TEST command from within the Layout Editor.
The TEST command is allocated to PF12.
Elements
Element Length
The Layout Editor does not allow you to create a title as long as or longer than the page. If youare also using a header and footer, the Layout Editor makes sure that there is room for the reportdata.
223User's Guide
Working with Natural Report Manager
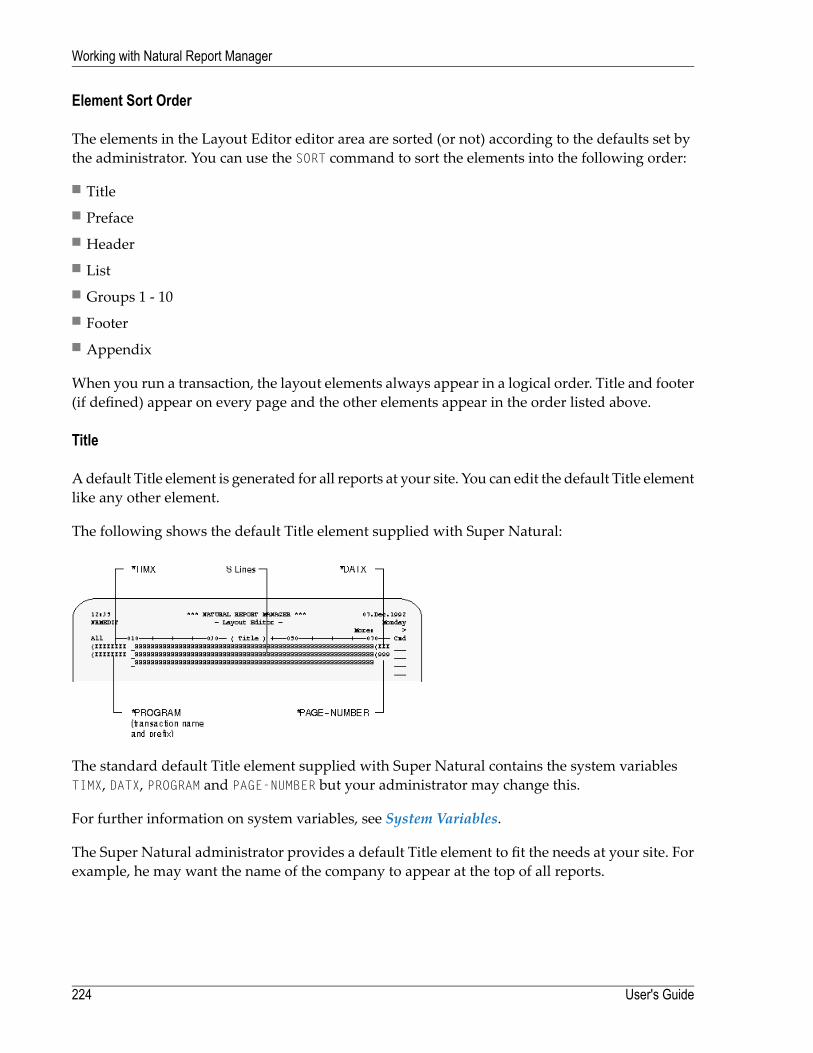
Element Sort Order
The elements in the Layout Editor editor area are sorted (or not) according to the defaults set bythe administrator. You can use the SORT command to sort the elements into the following order:
■ Title■ Preface■ Header■ List■ Groups 1 - 10■ Footer■ Appendix
When you run a transaction, the layout elements always appear in a logical order. Title and footer(if defined) appear on every page and the other elements appear in the order listed above.
Title
Adefault Title element is generated for all reports at your site. You can edit the default Title elementlike any other element.
The following shows the default Title element supplied with Super Natural:
The standard default Title element supplied with Super Natural contains the system variablesTIMX, DATX, PROGRAM and PAGE-NUMBER but your administrator may change this.
For further information on system variables, see System Variables.
The Super Natural administrator provides a default Title element to fit the needs at your site. Forexample, he may want the name of the company to appear at the top of all reports.
User's Guide224
Working with Natural Report Manager
S Lines
The S lines are a placeholder for up to 5 lines of selection criteria. Each S line contains 60 Ss. If youeither add or erase Ss from the S lines, the Ss are interpreted as text. You can edit the S lines if youwish. For example, you can move the S lines two lines down and enter text above them.
Dynamic Values in Title Element
If you use dynamic input fields in the first 5 lines of your selection criteria, the current value ofthe field does not appear in the standard title when the transaction is run.
To display the current value of a dynamic input field in the title when the transaction is run
1 Edit the Title element.
2 Position the dynamic input field in the editor area as described in the section PositioningTransaction Fields in a Layout Element earlier in this section.
The current value of the dynamic input field is supplied in the title when the transaction isrun.
225User's Guide
Working with Natural Report Manager

226
12 Working with Prototype Programs
■ What Are Prototype Programs? ........................................................................................................ 228■ Listing Prototype Programs .............................................................................................................. 229■ Generating Prototype Programs ....................................................................................................... 229■ Saving Prototype Programs ............................................................................................................. 229■ Running Prototype Programs ........................................................................................................... 230■ Leaving the Natural Program Editor ................................................................................................... 230■ Modifying Prototype Programs ......................................................................................................... 230■ Copying Prototype Programs ........................................................................................................... 231■ Deleting Prototype Programs ........................................................................................................... 232■ Example Prototype Program ............................................................................................................ 232
227

This sectiondescribes PrototypePrograms andhow tohandle them.An example prototypeprogramis also given.
This section covers the following topics:
■ What Are Prototype Programs?■ Listing Prototype Programs■ Generating Prototype Programs■ Saving Prototype Programs■ Running Prototype Programs■ Leaving the Natural Program Editor■ Modifying Prototype Programs■ Copying Prototype Programs■ Deleting Prototype Programs■ Example Prototype Program
What Are Prototype Programs?
Prototype programs are basic program frameworks for reporting or datamaintenance transactions.The program framework for a transaction is generated in Natural reporting mode. A Naturalprogrammer can use the program framework as a prototype for further development. Because itdoesn't contain any code specific to Super Natural, a prototype program can be used like anyother Natural program.
Note: When you use prototype programs, Super Natural no longer checks your activities,since you are workingwithNatural. That means that you are fully responsible for what youdo.
Note: Prototype programs created with Super Natural under Natural Version 2.2 cannotbe cataloged under Natural Version 2.3 without revision. This is because the keyword LESSof the NEWPAGE statement is no longer optional, but required.
User's Guide228
Working with Prototype Programs
Listing Prototype Programs
To list the prototype programs generated in your present library
■ Issue the PROTOTYPE command.
The Prototype List screen appears.
The Prototype List screen functions in the same way as all object list screens. For further in-formation on how to use object list screens, seeObject List Screens in Starting Up.
Generating Prototype Programs
To generate a prototype program
■ Issue the GENERATE PROTOTYPE command fromwithin a transaction you have finished creatingor modifying.
You can only generate prototype programs from transactions which can be run.
Prototype programs generated with Super Natural are read into the Natural program editorwhere they can be modified, saved and/or executed.
Enter Natural program editor commands at the top left corner of the screen after the greaterthan sign (>).
For further information concerning the Natural program editor, refer to the Natural Referencedocumentation.
Saving Prototype Programs
To save a prototype program
■ Issue the SAVE command while in the Natural program editor.
Note: If you do not save your prototype program before leaving theNatural program editorfor the first time, you will lose the prototype and have to generate it again!
When you leave the Natural program editor, the Prototype List screen appears.
229User's Guide
Working with Prototype Programs
When you save a prototype program you have generated from an existing transaction, the trans-action name appears on both the Transaction Listscreen and the Prototype List screen.
When you save a prototype program generated from a transaction you are creating which youhave not saved or run, the transaction name (program name) appears on the Prototype List screenbut not on the Transaction List screen and the transaction is lost.
When you save a prototype program generated from a transaction you are modifying which youhaven't saved or run, the transaction name (program name) appears on the Prototype List screenbut modifications you have made since you last saved the transaction are lost.
Running Prototype Programs
Do not run a prototype program if you have accessed from Super Natural as this is not a develop-ment environment. You will have problems if the program has errors in it. If you want to run aprototype program, access it directly from Natural.
Note: Prototype programs created with Super Natural under Natural Version 2.2 cannotbe cataloged under Natural Version 2.3 without revision. This is because the keyword LESSof the NEWPAGE statement is no longer optional, but required.
Leaving the Natural Program Editor
To leave the Natural program editor and return to Super Natural
■ Enter a period (.) in the top line of the editor and press Enter.
Note: The prototype program is not saved.
Modifying Prototype Programs
To modify a prototype program
■ Enter the command abbreviation MO in the command column of the Prototype List screen nextto the prototype program name.
Or:
Issue the MODIFY PROTOTYPE name command.
User's Guide230
Working with Prototype Programs
The Natural program editor appears where you can modify the program.
Inprototypeprograms created fromdatamaintenance transactions, the datamaintenance statementsSTORE, UPDATE, DELETE etc. are commented out with asterisks (*) to prevent accidental executionof data maintenance functions. If you access these programs directly from Natural and want torun them, youmust remove the asterisks and provide END TRANSACTION and BACKOUT TRANSACTIONstatements yourself.
Copying Prototype Programs
Program Stored in Your Private Library
If you want to copy a prototype program stored in your private library, you simply save it undera different name in the Natural program editor.
To save a program stored in your private library
1 Enter the command abbreviation MO in the command column of the Prototype List screen nextto the prototype program name.
The Natural program editor appears displaying the prototype program.
2 Issue the SAVE command togetherwith the name to be assigned (see the note below for namingconventions).
To identify the new program as a prototype to Super Natural, the first character of the newname must be the prefix for prototype programs at your installation. Otherwise the programwill not be listed on the Prototype List screen.
Now the same program exists twice, but with two different names.
Program Stored in a Public Library
To copy a prototype program stored in a public library to your private library
■ Enter the command abbreviation CO in the command column next to the prototype programname of the Prototype List screen in the public library.
Or:
Issue the COPY PROTOTYPE name command.
The prototype program is copied to your private library.
231User's Guide
Working with Prototype Programs
Deleting Prototype Programs
To delete a prototype program
1 Enter the command abbreviation DE in the command column of the Prototype List screen nextto the prototype program name.
Or:
Issue the DELETE PROTOTYPE name command.
The Confirm Delete window appears. This window asks you to confirm that you want todelete the prototype program named.
2 Enter Y to delete the prototype program.
The prototype program is deleted.
Example Prototype Program
The following prototype program was generated with the transaction SAMPLE3 demonstratedin the Tutorial:
User's Guide232
Working with Prototype Programs
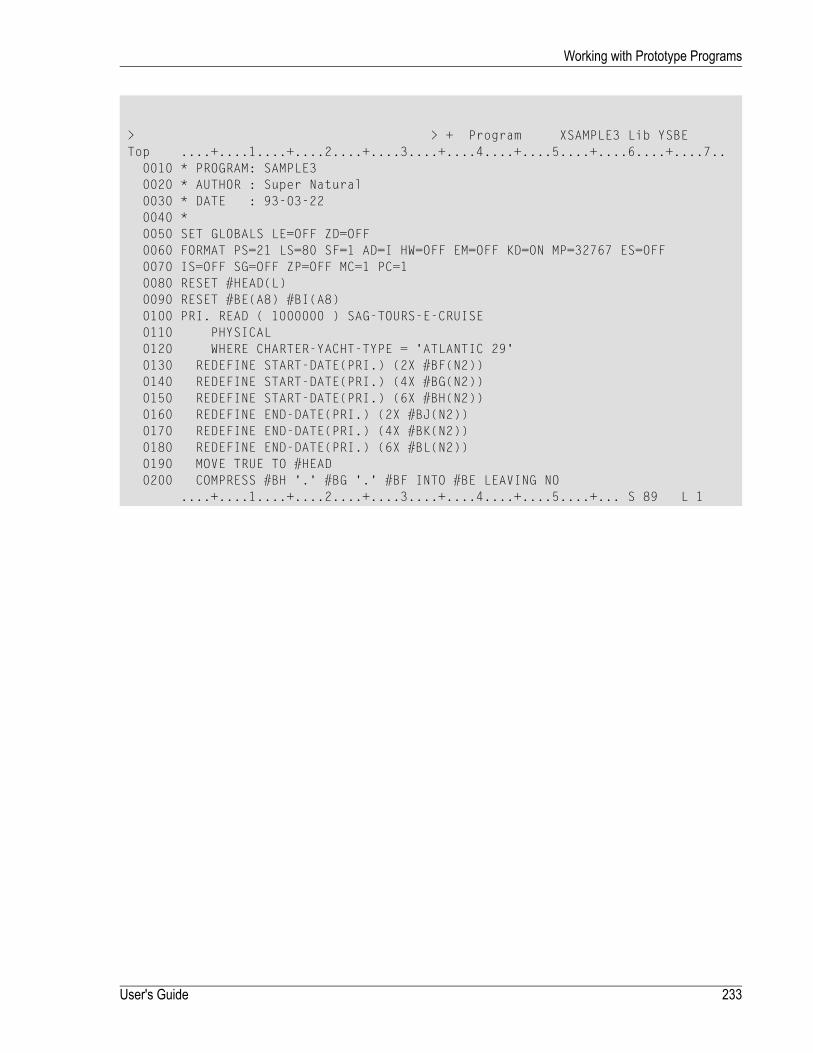
> > + Program XSAMPLE3 Lib YSBETop ....+....1....+....2....+....3....+....4....+....5....+....6....+....7..
0010 * PROGRAM: SAMPLE30020 * AUTHOR : Super Natural0030 * DATE : 93-03-220040 *0050 SET GLOBALS LE=OFF ZD=OFF0060 FORMAT PS=21 LS=80 SF=1 AD=I HW=OFF EM=OFF KD=ON MP=32767 ES=OFF0070 IS=OFF SG=OFF ZP=OFF MC=1 PC=10080 RESET #HEAD(L)0090 RESET #BE(A8) #BI(A8)0100 PRI. READ ( 1000000 ) SAG-TOURS-E-CRUISE0110 PHYSICAL0120 WHERE CHARTER-YACHT-TYPE = 'ATLANTIC 29'0130 REDEFINE START-DATE(PRI.) (2X #BF(N2))0140 REDEFINE START-DATE(PRI.) (4X #BG(N2))0150 REDEFINE START-DATE(PRI.) (6X #BH(N2))0160 REDEFINE END-DATE(PRI.) (2X #BJ(N2))0170 REDEFINE END-DATE(PRI.) (4X #BK(N2))0180 REDEFINE END-DATE(PRI.) (6X #BL(N2))0190 MOVE TRUE TO #HEAD0200 COMPRESS #BH '.' #BG '.' #BF INTO #BE LEAVING NO
....+....1....+....2....+....3....+....4....+....5....+... S 89 L 1
233User's Guide
Working with Prototype Programs

234
13 Using the Super Natural RPC Service
■ Introduction .................................................................................................................................. 236■ Hints and Limitations ...................................................................................................................... 237■ Dynamic Input Fields ...................................................................................................................... 238■ Generate an RPC Service ............................................................................................................... 238
235
This section describes how to use the RPC Service.
This section covers the following topics:
■ Introduction■ Hints and Limitations■ Dynamic Input Fields within the RPC Service■ Generate an RPC Service (Server Side)
Introduction
Remote procedure call (RPC) techniques establish a framework for communication betweenserver and client systems that can be collocated on the same computer or based on a network ofidentical or heterogeneous machines and operating systems. The Natural RPC facility enables aclient Natural program to issue a CALLNAT statement to invoke a subprogram in a server Natural.The Natural client and server sessions may run on the same or on a different computer.
Natural RPC exploits the advantages of client server computing. In a typical scenario, Natural ona Windows client computer accesses server data (using a middleware layer) from a Natural on amainframe computer. The following advantages arise from that:
■ The end user on the client can use a Natural application with a graphical user interface.■ A large database can be accessed on a mainframe server.■ Network traffic can be minimized when only relevant data are sent from client to server andback.
The RPC service is designed to produce Super Natural services for distributed working. SuperNatural RPC generates aNatural RPC subprogram from a SuperNatural Transaction. ThisNaturalRPC subprogram represents a Naturalobject that is executable in any Natural RPC environment.A Natural RPC service (subprogram) that was generated from Super Natural is executable via aNatural RPC server. The RPC client can be in a network or on a local system and is completelyindependent.
User's Guide236
Using the Super Natural RPC Service
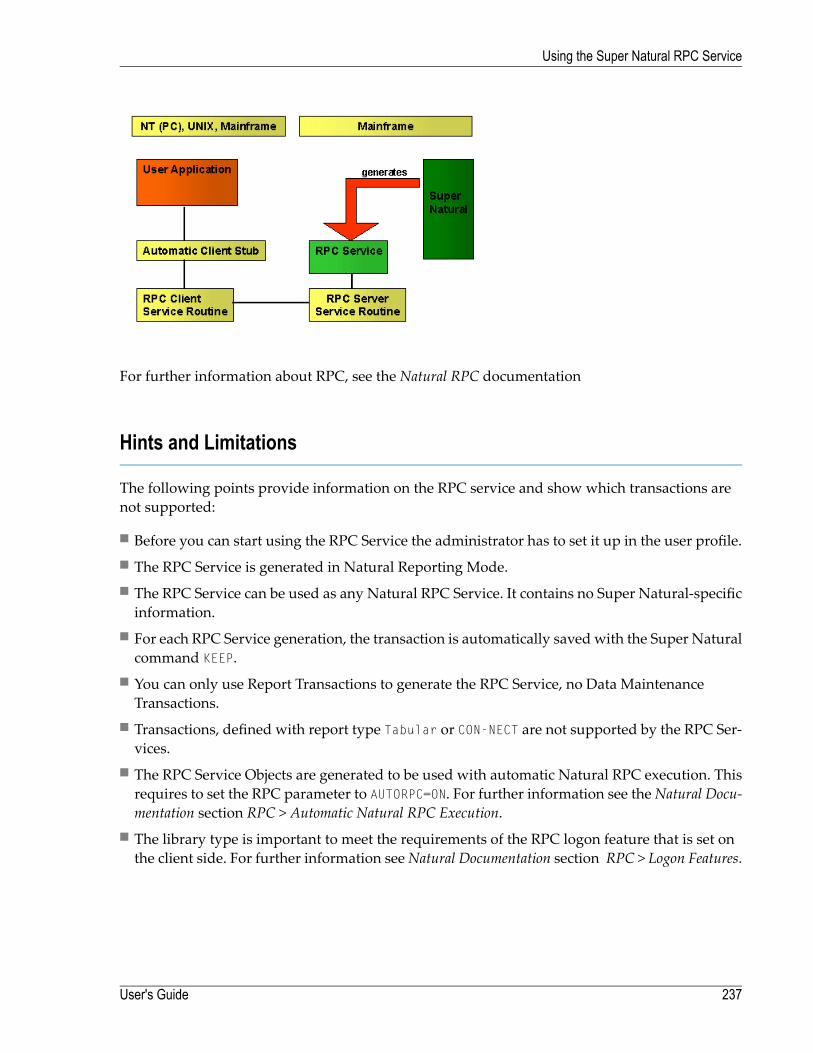
For further information about RPC, see the Natural RPC documentation
Hints and Limitations
The following points provide information on the RPC service and show which transactions arenot supported:
■ Before you can start using the RPC Service the administrator has to set it up in the user profile.■ The RPC Service is generated in Natural Reporting Mode.■ The RPC Service can be used as any Natural RPC Service. It contains no Super Natural-specificinformation.
■ For each RPC Service generation, the transaction is automatically saved with the Super Naturalcommand KEEP.
■ You can only use Report Transactions to generate the RPC Service, no Data MaintenanceTransactions.
■ Transactions, defined with report type Tabular or CON-NECT are not supported by the RPC Ser-vices.
■ The RPC Service Objects are generated to be used with automatic Natural RPC execution. Thisrequires to set the RPC parameter to AUTORPC=ON. For further information see theNatural Docu-mentation section RPC > Automatic Natural RPC Execution.
■ The library type is important to meet the requirements of the RPC logon feature that is set onthe client side. For further information seeNatural Documentation section RPC > Logon Features.
237User's Guide
Using the Super Natural RPC Service
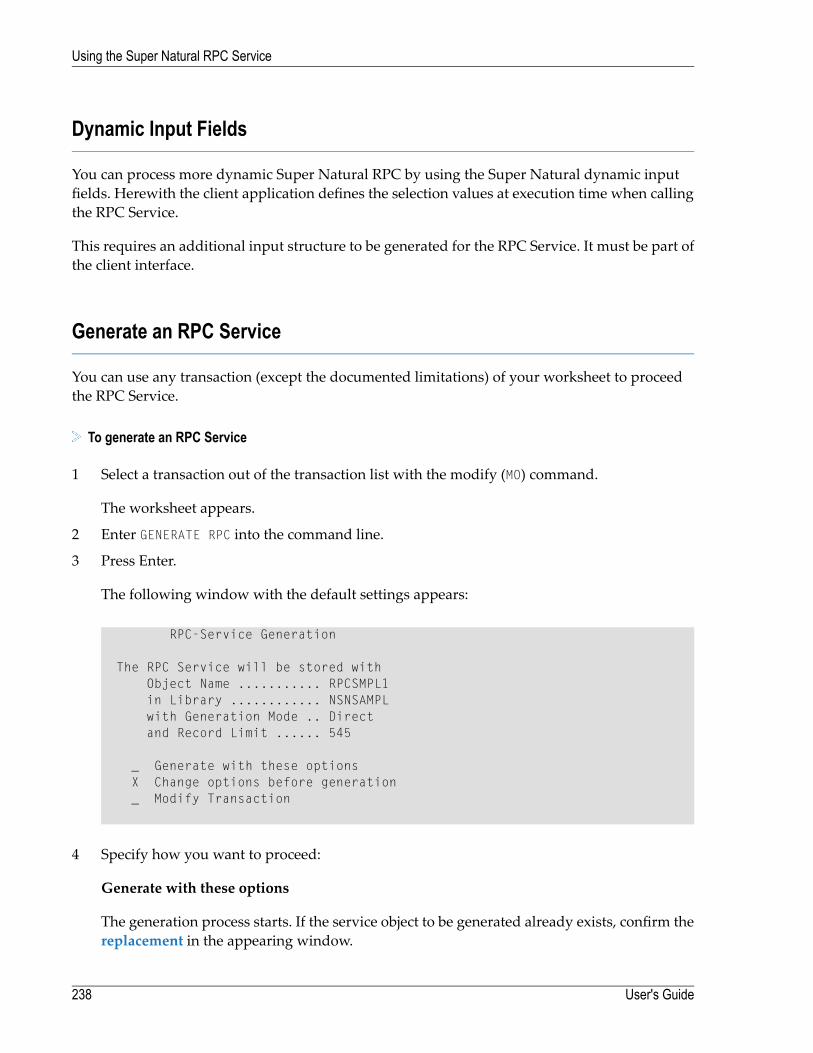
Dynamic Input Fields
You can process more dynamic Super Natural RPC by using the Super Natural dynamic inputfields. Herewith the client application defines the selection values at execution time when callingthe RPC Service.
This requires an additional input structure to be generated for the RPC Service. It must be part ofthe client interface.
Generate an RPC Service
You can use any transaction (except the documented limitations) of your worksheet to proceedthe RPC Service.
To generate an RPC Service
1 Select a transaction out of the transaction list with the modify (MO) command.
The worksheet appears.
2 Enter GENERATE RPC into the command line.
3 Press Enter.
The following window with the default settings appears:
RPC-Service Generation
The RPC Service will be stored withObject Name ........... RPCSMPL1in Library ............ NSNSAMPLwith Generation Mode .. Directand Record Limit ...... 545
_ Generate with these optionsX Change options before generation_ Modify Transaction
4 Specify how you want to proceed:
Generate with these options
The generation process starts. If the service object to be generated already exists, confirm thereplacement in the appearing window.
User's Guide238
Using the Super Natural RPC Service
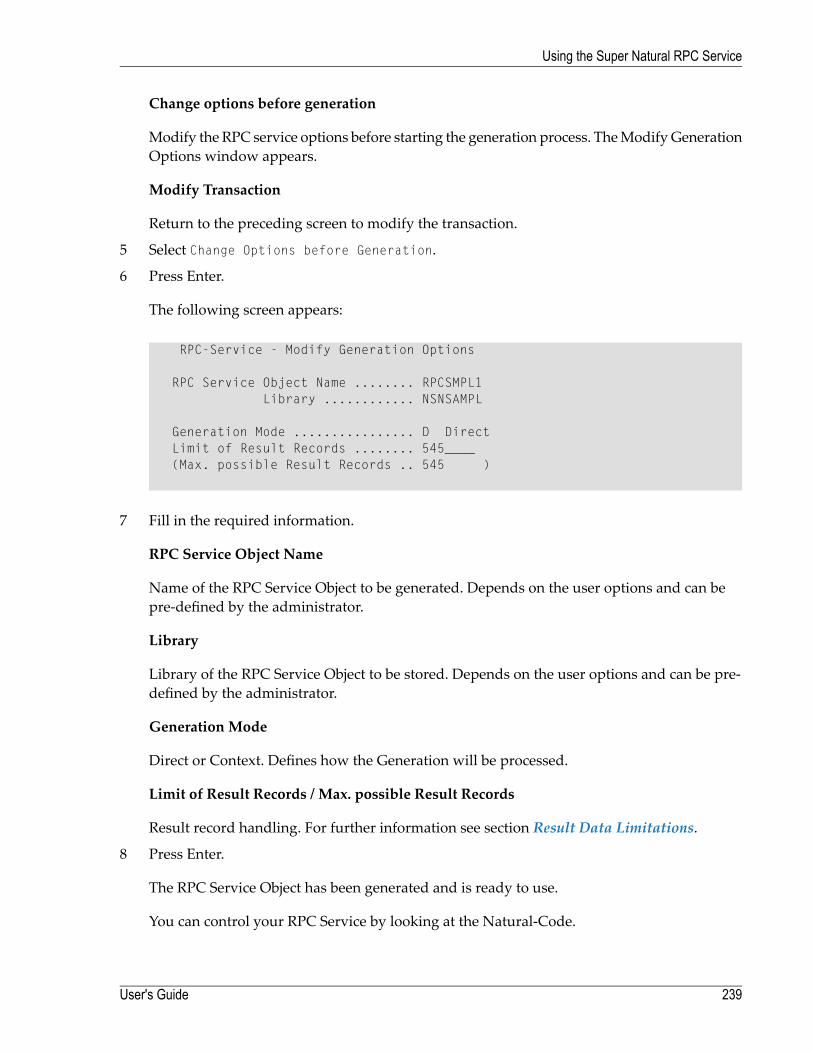
Change options before generation
Modify the RPC service options before starting the generation process. TheModifyGenerationOptions window appears.
Modify Transaction
Return to the preceding screen to modify the transaction.
5 Select Change Options before Generation.
6 Press Enter.
The following screen appears:
RPC-Service - Modify Generation Options
RPC Service Object Name ........ RPCSMPL1Library ............ NSNSAMPL
Generation Mode ................ D DirectLimit of Result Records ........ 545____(Max. possible Result Records .. 545 )
7 Fill in the required information.
RPC Service Object Name
Name of the RPC Service Object to be generated. Depends on the user options and can bepre-defined by the administrator.
Library
Library of the RPC Service Object to be stored. Depends on the user options and can be pre-defined by the administrator.
Generation Mode
Direct or Context. Defines how the Generation will be processed.
Limit of Result Records / Max. possible Result Records
Result record handling. For further information see section Result Data Limitations.
8 Press Enter.
The RPC Service Object has been generated and is ready to use.
You can control your RPC Service by looking at the Natural-Code.
239User's Guide
Using the Super Natural RPC Service

To confirm the replacement of an RPC Service
If you want to generate the same RPC Service object twice you have to confirm the replacementof the first.
1 Specify the RPC Service Object name in the RPC Options window and press Enter.
The following window apprears:
!------------------------------------------! ! Confirm Replace RPC Service ! ! ! ! The RPC Service RPCSMPL1 ! ! in Library NSNSAMPL ! ! does already exist. ! ! The object will be replaced now. ! ! ! ! Enter Y to confirm: Y ! !------------------------------------------! ↩
2 Confirm the replacement by entering Y and press Enter.
Result Data Limitations
Direct Mode
The number and the length of fields are relevant for the number of records!
Example selected result data:
N 8#FIELD - A
A 1#FIELD - B
A 20#FIELD - C
A 20#FIELD - D
■ results in a record length of 49 Byte■ maximal parameter buffer is 30 KByte■ results in a maximal number of 612 records
Context Mode
The largest field length is relevant for the number of records in the context area (intermediatestorage). The number of records retrievedwith one client call has the same limitation as explainedin direct mode but multiple calls can be performed in the context mode.
User's Guide240
Using the Super Natural RPC Service
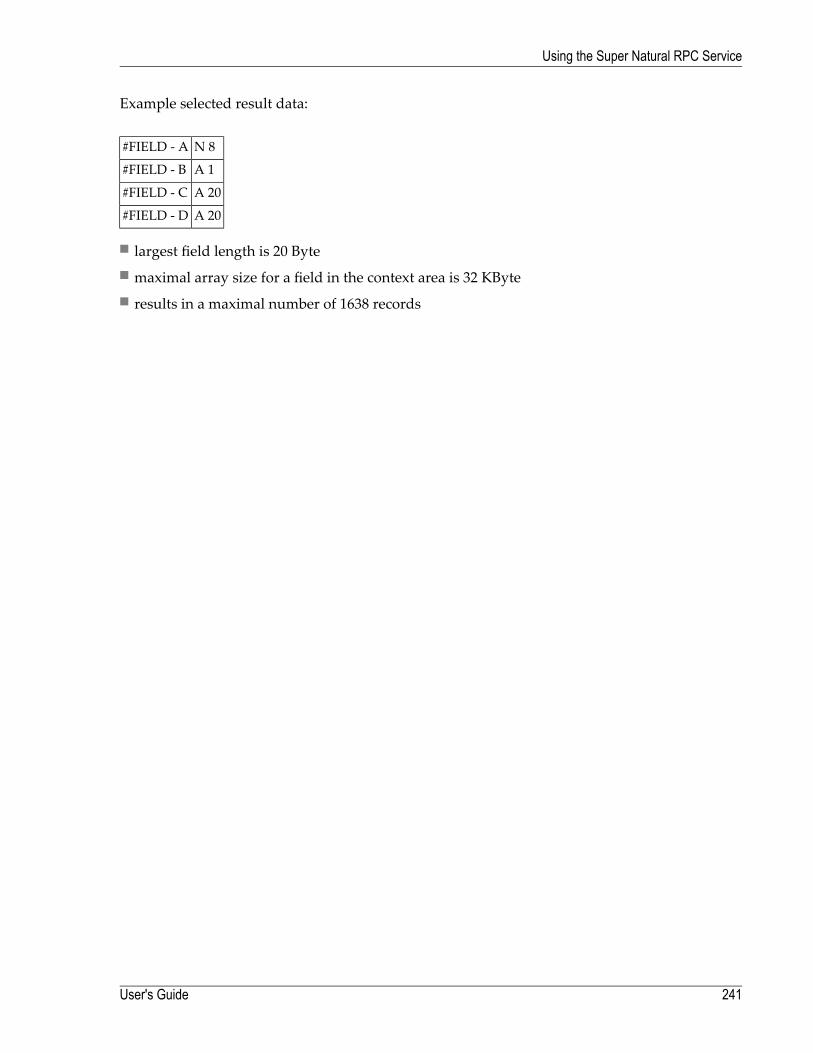
Example selected result data:
N 8#FIELD - A
A 1#FIELD - B
A 20#FIELD - C
A 20#FIELD - D
■ largest field length is 20 Byte■ maximal array size for a field in the context area is 32 KByte■ results in a maximal number of 1638 records
241User's Guide
Using the Super Natural RPC Service

242
14 Using User Exit Programs
■ What are User Exit Programs? ......................................................................................................... 244■ Activating User Exit Programs .......................................................................................................... 245■ Deactivating User Exit Programs ...................................................................................................... 247■ Locking User Exit Locations ............................................................................................................. 247
243
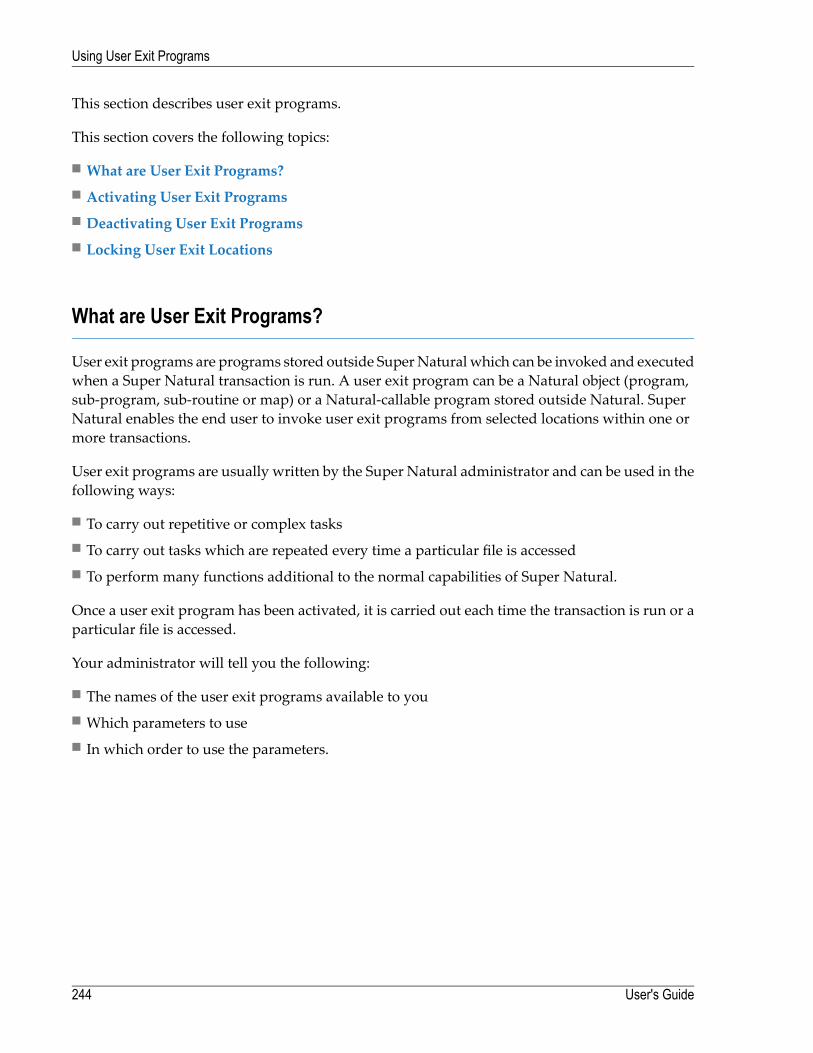
This section describes user exit programs.
This section covers the following topics:
■ What are User Exit Programs?■ Activating User Exit Programs■ Deactivating User Exit Programs■ Locking User Exit Locations
What are User Exit Programs?
User exit programs are programs stored outside SuperNatural which can be invoked and executedwhen a Super Natural transaction is run. A user exit program can be a Natural object (program,sub-program, sub-routine or map) or a Natural-callable program stored outside Natural. SuperNatural enables the end user to invoke user exit programs from selected locations within one ormore transactions.
User exit programs are usually written by the Super Natural administrator and can be used in thefollowing ways:
■ To carry out repetitive or complex tasks■ To carry out tasks which are repeated every time a particular file is accessed■ To perform many functions additional to the normal capabilities of Super Natural.
Once a user exit program has been activated, it is carried out each time the transaction is run or aparticular file is accessed.
Your administrator will tell you the following:
■ The names of the user exit programs available to you■ Which parameters to use■ In which order to use the parameters.
User's Guide244
Using User Exit Programs
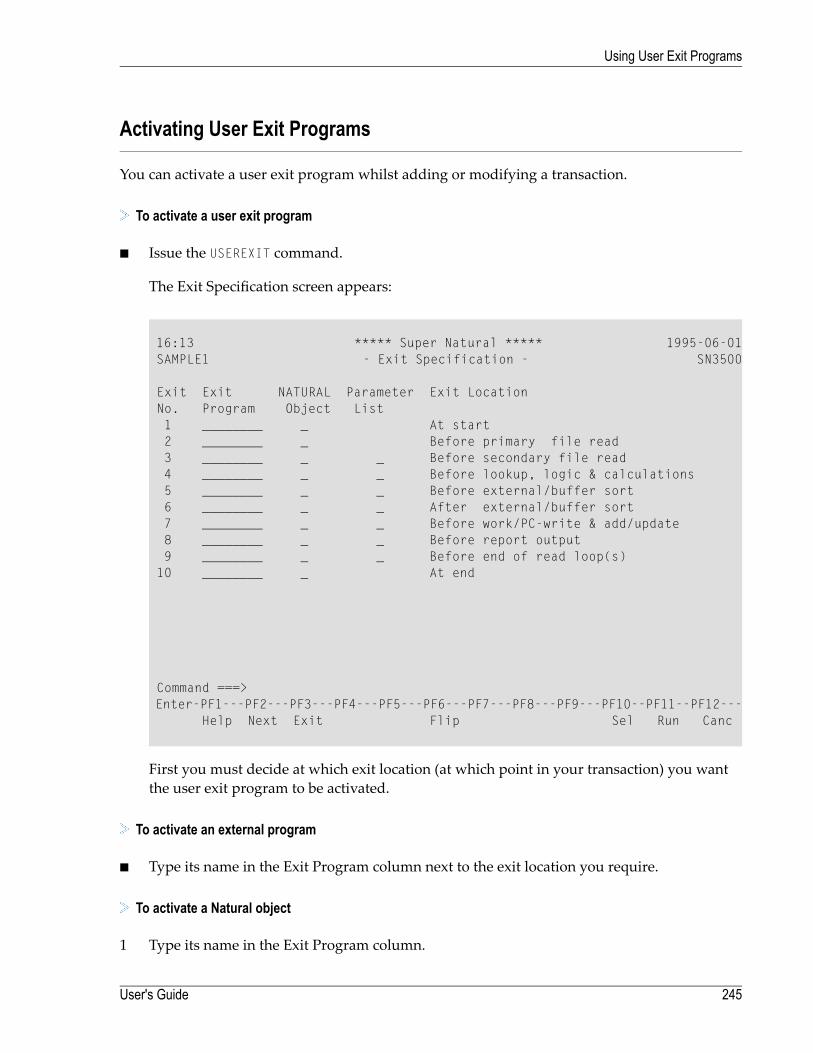
Activating User Exit Programs
You can activate a user exit program whilst adding or modifying a transaction.
To activate a user exit program
■ Issue the USEREXIT command.
The Exit Specification screen appears:
16:13 ***** Super Natural ***** 1995-06-01SAMPLE1 - Exit Specification - SN3500
Exit Exit NATURAL Parameter Exit LocationNo. Program Object List1 ________ _ At start2 ________ _ Before primary file read3 ________ _ _ Before secondary file read4 ________ _ _ Before lookup, logic & calculations5 ________ _ _ Before external/buffer sort6 ________ _ _ After external/buffer sort7 ________ _ _ Before work/PC-write & add/update8 ________ _ _ Before report output9 ________ _ _ Before end of read loop(s)
10 ________ _ At end
Command ===>Enter-PF1---PF2---PF3---PF4---PF5---PF6---PF7---PF8---PF9---PF10--PF11--PF12---
Help Next Exit Flip Sel Run Canc
First you must decide at which exit location (at which point in your transaction) you wantthe user exit program to be activated.
To activate an external program
■ Type its name in the Exit Program column next to the exit location you require.
To activate a Natural object
1 Type its name in the Exit Program column.
245User's Guide
Using User Exit Programs
2 Mark the Natural Object column next to the exit location you require.
If you enter the name of a Natural object which doesn't exist, a window appears which asksif you to confirm the entry. If you enter N, the name is removed from the Exit Programcolumn.
If you enter Y, you can continue and either write or obtain access to the program later.
Note: You must write or obtain access to the program before you can run the transaction.
Optional:
To pass values from your transaction to the external program
1 Mark the Parameter column at the relevant exit location.
2 Press Enter.
The Exit Parameter window appears with a selection list of the fields, which you can use asparameters in the external program.
At exit location 1, no fields are available.
At exit locations 2 and 10, only user fields and dynamic input fields are available. If thetransaction contains no user fields or dynamic input fields, the Parameter list is protectednext to these exit locations.
At exit locations 3 through 9, all the fieldswhich have been read by that point in the transactionare available.
Multiple-value fields and periodic groups are not available.
3 Mark the values you want to be passed to the external program using numbers from 1 to 40to specify the sequence.
4 Press Enter.
You can now continue creating or modifying your transaction.
You can specify more than one user exit program for a transaction.
User's Guide246
Using User Exit Programs
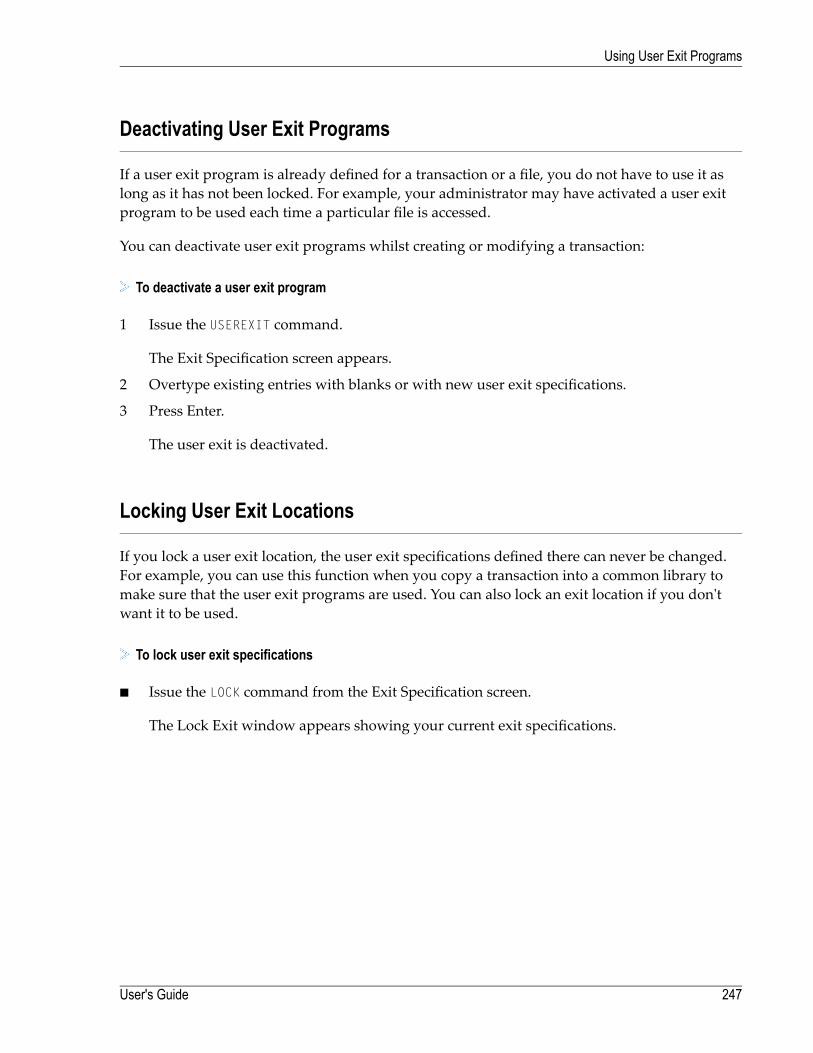
Deactivating User Exit Programs
If a user exit program is already defined for a transaction or a file, you do not have to use it aslong as it has not been locked. For example, your administrator may have activated a user exitprogram to be used each time a particular file is accessed.
You can deactivate user exit programs whilst creating or modifying a transaction:
To deactivate a user exit program
1 Issue the USEREXIT command.
The Exit Specification screen appears.
2 Overtype existing entries with blanks or with new user exit specifications.
3 Press Enter.
The user exit is deactivated.
Locking User Exit Locations
If you lock a user exit location, the user exit specifications defined there can never be changed.For example, you can use this function when you copy a transaction into a common library tomake sure that the user exit programs are used. You can also lock an exit location if you don'twant it to be used.
To lock user exit specifications
■ Issue the LOCK command from the Exit Specification screen.
The Lock Exit window appears showing your current exit specifications.
247User's Guide
Using User Exit Programs
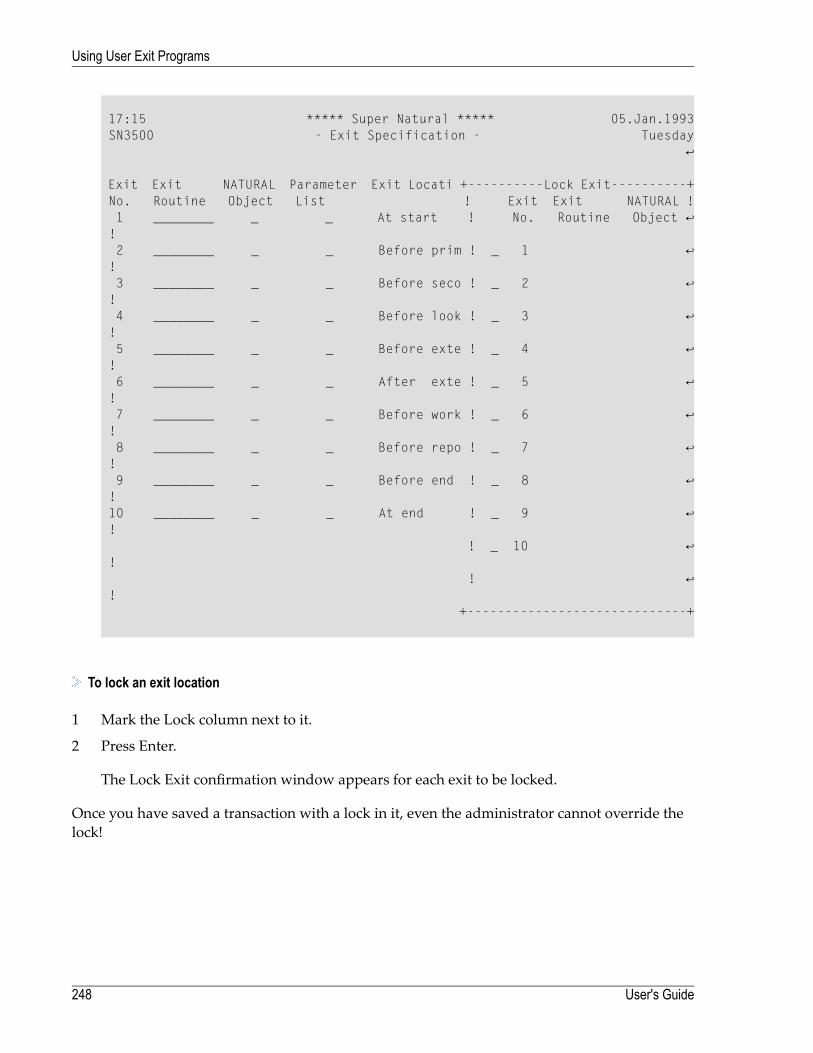
17:15 ***** Super Natural ***** 05.Jan.1993 SN3500 - Exit Specification - Tuesday ↩ Exit Exit NATURAL Parameter Exit Locati +----------Lock Exit----------+ No. Routine Object List ! Exit Exit NATURAL ! 1 ________ _ _ At start ! No. Routine Object ↩ ! 2 ________ _ _ Before prim ! _ 1 ↩ ! 3 ________ _ _ Before seco ! _ 2 ↩ ! 4 ________ _ _ Before look ! _ 3 ↩ ! 5 ________ _ _ Before exte ! _ 4 ↩ ! 6 ________ _ _ After exte ! _ 5 ↩ ! 7 ________ _ _ Before work ! _ 6 ↩ ! 8 ________ _ _ Before repo ! _ 7 ↩ ! 9 ________ _ _ Before end ! _ 8 ↩ ! 10 ________ _ _ At end ! _ 9 ↩ ! ! _ 10 ↩ ! ! ↩ ! +-----------------------------+
To lock an exit location
1 Mark the Lock column next to it.
2 Press Enter.
The Lock Exit confirmation window appears for each exit to be locked.
Once you have saved a transaction with a lock in it, even the administrator cannot override thelock!
User's Guide248
Using User Exit Programs
15 Adjusting a User Profile
■ What is a User Profile? ................................................................................................................... 250■ Modifying Your User Profile .............................................................................................................. 252■ Screen Colors ............................................................................................................................... 254■ Screen Defaults ............................................................................................................................. 254■ Time and Date Formats .................................................................................................................. 255■ PF Key Settings ............................................................................................................................ 256■ Language Code and Checklist .......................................................................................................... 257■ Transaction Options ....................................................................................................................... 257■ Environment Options ...................................................................................................................... 257■ Output Options .............................................................................................................................. 259■ Processing Options ........................................................................................................................ 260■ Transaction Modes ........................................................................................................................ 262
249
This section describes the Super Natural user profile and how to modify it.
This section covers the following topics:
■ What is a User Profile?■ Modifying Your User Profile■ Screen Colors■ Screen Defaults■ Time and Date Formats■ PF Key Settings■ Language Code and Checklist■ Transaction Options■ Environment Options■ Output Options■ Processing Options■ Transaction Modes
What is a User Profile?
A user profile is defined by the Super Natural administrator for each user of Super Natural to suithis or her individual requirements. For example, the administrator decideswhich files and librariesyou can use, and gives you authorization to use various features of Super Natural.
The Super Natural administrator defines certain default settings which you can modify yourself.You can influence the appearance of screens, PF key display, screen colors, how the date and timeare displayed and many technical details concerning the environment, output and processing oftransactions.
Your modifications are valid for all new transactions but not for existing ones.
The user profile default settings which you can modify are organized into seven groups as shownin the following diagram:
User's Guide250
Adjusting a User Profile
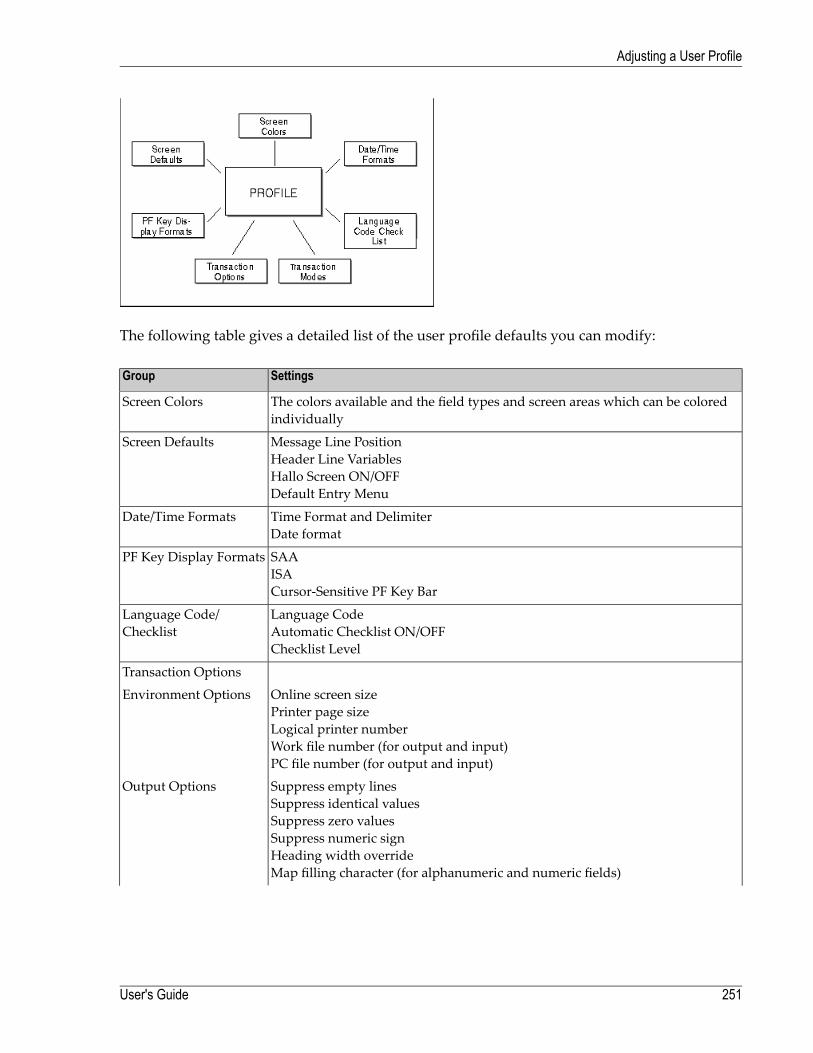
The following table gives a detailed list of the user profile defaults you can modify:
SettingsGroup
The colors available and the field types and screen areas which can be coloredindividually
Screen Colors
Message Line PositionHeader Line VariablesHallo Screen ON/OFFDefault Entry Menu
Screen Defaults
Time Format and DelimiterDate format
Date/Time Formats
SAAISACursor-Sensitive PF Key Bar
PF Key Display Formats
Language CodeAutomatic Checklist ON/OFFChecklist Level
Language Code/Checklist
Transaction Options
Online screen sizePrinter page sizeLogical printer numberWork file number (for output and input)PC file number (for output and input)
Environment Options
Suppress empty linesSuppress identical valuesSuppress zero valuesSuppress numeric signHeading width overrideMap filling character (for alphanumeric and numeric fields)
Output Options
251User's Guide
Adjusting a User Profile
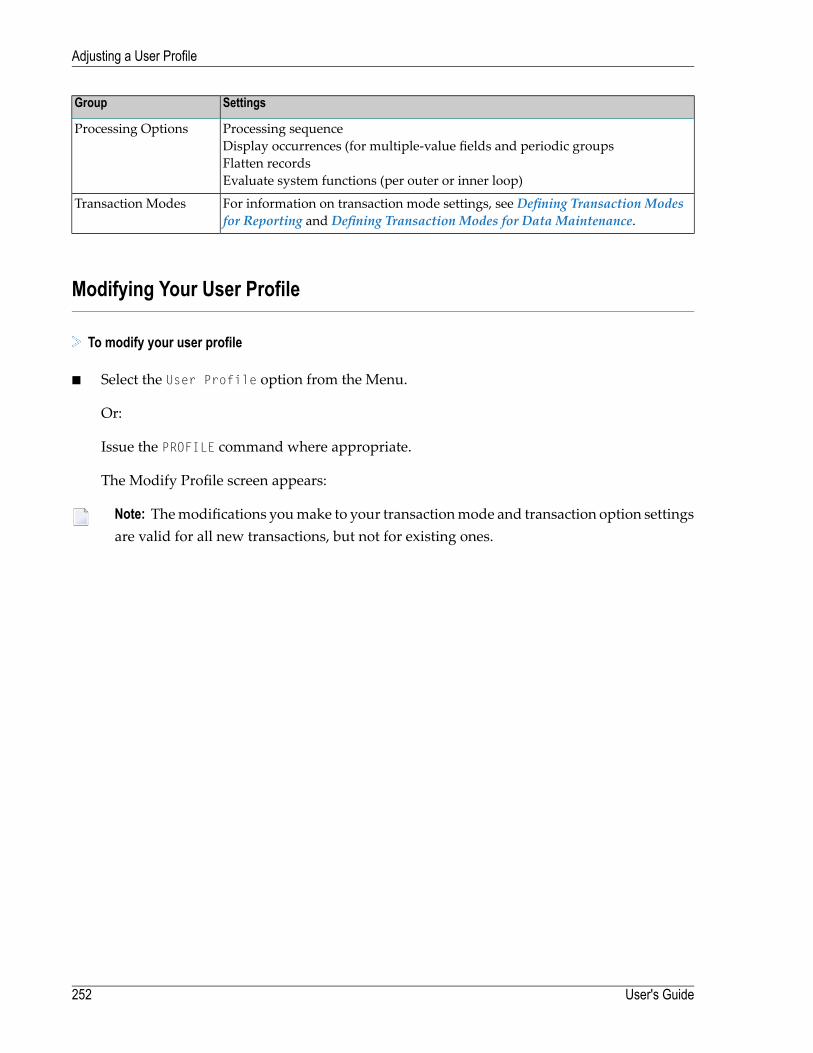
SettingsGroup
Processing sequenceDisplay occurrences (for multiple-value fields and periodic groupsFlatten recordsEvaluate system functions (per outer or inner loop)
Processing Options
For information on transaction mode settings, see Defining Transaction Modesfor Reporting and Defining Transaction Modes for Data Maintenance.
Transaction Modes
Modifying Your User Profile
To modify your user profile
■ Select the User Profile option from the Menu.
Or:
Issue the PROFILE command where appropriate.
The Modify Profile screen appears:
Note: Themodifications youmake to your transactionmode and transaction option settingsare valid for all new transactions, but not for existing ones.
User's Guide252
Adjusting a User Profile
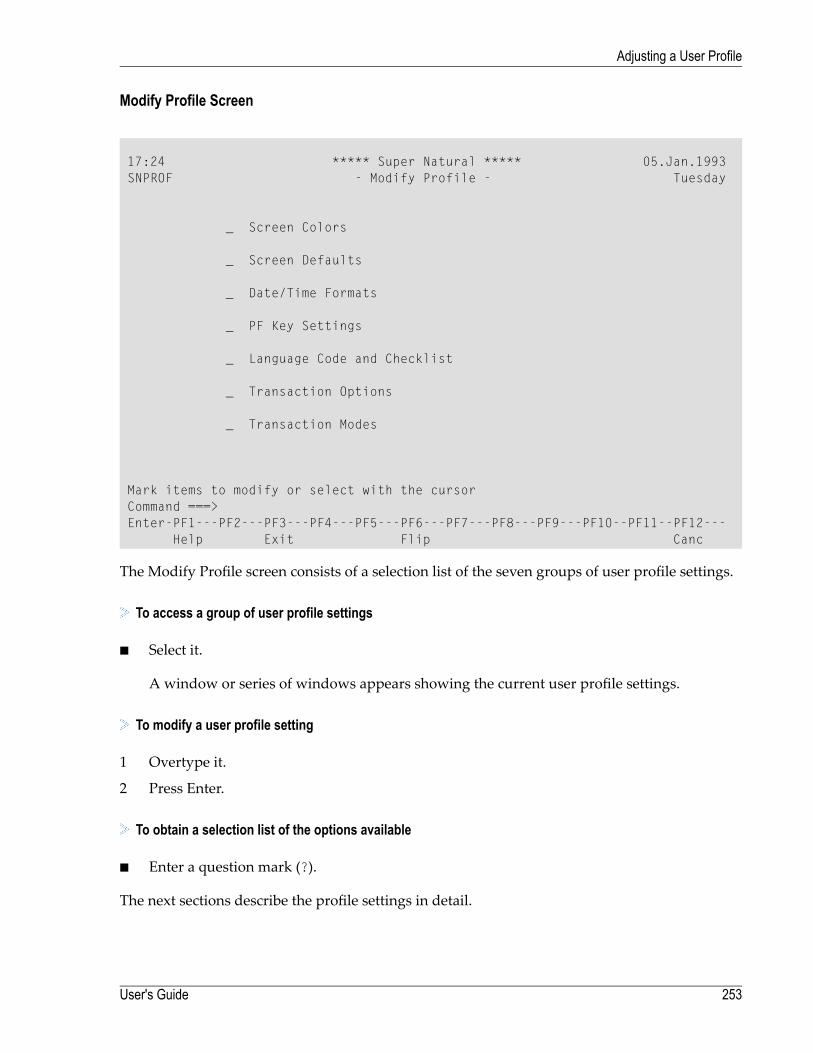
Modify Profile Screen
17:24 ***** Super Natural ***** 05.Jan.1993SNPROF - Modify Profile - Tuesday
_ Screen Colors
_ Screen Defaults
_ Date/Time Formats
_ PF Key Settings
_ Language Code and Checklist
_ Transaction Options
_ Transaction Modes
Mark items to modify or select with the cursorCommand ===>Enter-PF1---PF2---PF3---PF4---PF5---PF6---PF7---PF8---PF9---PF10--PF11--PF12---
Help Exit Flip Canc
The Modify Profile screen consists of a selection list of the seven groups of user profile settings.
To access a group of user profile settings
■ Select it.
A window or series of windows appears showing the current user profile settings.
To modify a user profile setting
1 Overtype it.
2 Press Enter.
To obtain a selection list of the options available
■ Enter a question mark (?).
The next sections describe the profile settings in detail.
253User's Guide
Adjusting a User Profile
Screen Colors
On the left-hand side of the Screen Colors window there is a list of the field types and screen areaswhich can be colored individually. The current color settings are shown in highlighted text. Thefollowing colors are available:
■ Blue■ Green■ Neutral■ Pink■ Red■ Turquoise■ Yellow
If youmark theMark for Default field and press Enter, you return to the default settings suppliedby Software AG.
Screen Defaults
Message Line Position
You can choose between three message line positions:
■ Above the command line■ Top of the screen■ Bottom of the screen.
Header Line Variables
You can change the position of the date, time, program name, object and day within the SuperNatural header.
User's Guide254
Adjusting a User Profile

Hello Screen
The Hello screen is the screen which welcomes you to Super Natural. You can choose to switchthis screen off.
Default Entry Menu
You can choose which of the following screens you see after the Hello screen when you enterSuper Natural:
■ Main Menu■ Transaction List■ Prototype Program List■ Application List■ User File List
Time and Date Formats
Time Format
You can choose to display the time either in 24 hour format e.g. 17.30 or in am/pm format e.g. 5.30pm.
Time Delimiter
The time delimiter is the character which comes between the hours and the minutes when a timeis written. You can choose which character you want to use as the time delimiter.
Date Format
You can choose to display the date in any format you wish.
The following are some examples of dates in different formats and with different delimiters:
MM/DD/YYAmerican
DD/MM/YYEuropean
DD.MM.YYGerman
YY-MM-DDInternational
YYYYMMDDOther
255User's Guide
Adjusting a User Profile
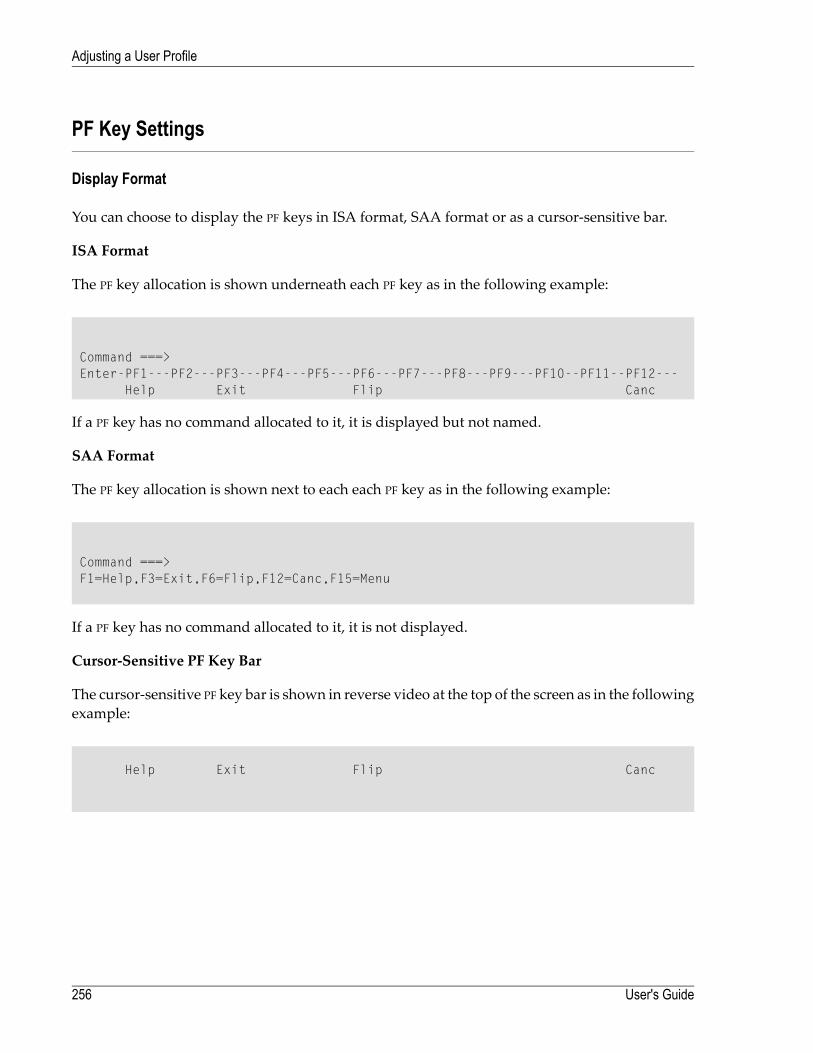
PF Key Settings
Display Format
You can choose to display the PF keys in ISA format, SAA format or as a cursor-sensitive bar.
ISA Format
The PF key allocation is shown underneath each PF key as in the following example:
Command ===>Enter-PF1---PF2---PF3---PF4---PF5---PF6---PF7---PF8---PF9---PF10--PF11--PF12---
Help Exit Flip Canc
If a PF key has no command allocated to it, it is displayed but not named.
SAA Format
The PF key allocation is shown next to each each PF key as in the following example:
Command ===>F1=Help,F3=Exit,F6=Flip,F12=Canc,F15=Menu
If a PF key has no command allocated to it, it is not displayed.
Cursor-Sensitive PF Key Bar
The cursor-sensitive PF key bar is shown in reverse video at the top of the screen as in the followingexample:
Help Exit Flip Canc
User's Guide256
Adjusting a User Profile

Language Code and Checklist
Language Code
You can change the language on the Super Natural screens.
Checklist
You can decide whether you want to use the Checklist and at which level. For further informationon the Checklist, see The Checklist in Using Super Natural.
Transaction Options
There are three groups of transaction options; environment options, output options and processingoptions.
When you modify your transaction options in your user profile, the new settings are valid for allnew transactions but not for existing ones. You can modify your transaction options for thetransaction you are working on only (modifying or adding) by issuing the OPTIONS commandfrom within the transaction - your modifications are only valid for the transaction in which youissue the command.
Environment Options
Online Screen Size
You can choose how many rows (lines) and columns (characters per line) to use when producingreports in online run mode.
The minimum number of columns is 80, the maximum 250. The number of columns must exceedthe display field length by at least 1. Thismeans that amaximumof 249 characters can be displayed.If you specify an online screen size which is larger than the physical screen size, you can use thePF keys to page to the left and right to see the whole display.
The value specified for the number of rows must not exceed your terminal's physical screen sizeor a Natural error message is issued.
257User's Guide
Adjusting a User Profile
Printer Page Size
You can choose how many rows (lines) and columns (characters per line) to use when producingreports in batch run mode or with destination PRINTER.
The minimum number of columns is 80, the maximum 250. The number of columns must exceedthe display field length by at least 1.This means that a maximum page width of 249 characters canbe printed.
The value specified for the number of rows must not exceed the physical page size of the printeror a Natural error message is issued.
Logical Printer Number
Enter the number of the printer to be used for transactionswith report or log destination PRINTER.For further information contact your Super Natural administrator.
Work File Number
OUTPUT
Enter the work file number to which data is to be sent for transactions with report destinationWORK FILE.
INPUT
Enter the work file number from which data is to be received for transactions in data selectionmode DATA FROMWORK FILE.
For further information contact your Super Natural administrator.
PC File Number
OUTPUT
Enter the PC file number to which data is to be sent for transactions with report destination PCFILE
INPUT
Enter the PC file number fromwhich data is to be received for transactions in data selection modeDATA FROM PC FILE.
For further information contact your Super Natural administrator.
User's Guide258
Adjusting a User Profile
Output Options
If a line, value, or sign is suppressed, it means that it is not displayed as part of the transactionoutput.
Suppress Empty Lines
The setting Y indicates that empty lines in a report are to be suppressed. N indicates that emptylines are not to be suppressed.
Suppress Identical Values
The setting Y indicates that identical values in a report are to be suppressed. N indicates thatidentical values are not to be suppressed.
Suppress Zero Values
The setting Y indicates that fields with the value zero in a report, are to be suppressed. N indicatesthat zero values are not to be suppressed.
Suppress Numeric Sign
The setting Y indicates that the signs of numeric fields in a report are to be suppressed. N indicatesthat the signs of numeric fields are not to be suppressed.
Heading Width Override
The setting Y indicates that headers in a report will be truncated (cut off) if they are too long.
If you specify the setting N, theReport Line Length window appears if the headers alone exceedthe specified online screen size.
The Report Line Lengthwindow is described in the sectionReportsWhich are TooWide in the sectionReporting Transactions.
259User's Guide
Adjusting a User Profile
Map Filling Character
You can choose map filling characters to differentiate between alphanumeric and numeric fieldsin data maintenance transactions and transactions using the data change mode MAP. The recom-mended characters are the underscore (_) for alphanumeric and the period (.) for numeric fields.
Processing Options
Number of Records to Read
This option controls the maximum number of records to be read when a transaction is run.
If you are modifying your profile (using thePROFILE command), this field is not offered and themaximum number of records read is controlled by the administrator.
If you are modifying your transaction options for the current transaction (using the OPTIONScommand), you can reduce themaximumnumber of records to be read. This is intended for testingtransactions. You can reset the number of records to be read before you run the transaction.
Note: You cannot read more records than the maximum determined by the administrator.
Processing Sequence
Use this option setting to determine the order in which the functions File Lookup (F), Calculations(C), Logical Conditions (L), Inter-field Arithmetic (A), External Sorting (S) and Updating Records(U) are processed when a transaction is run.
Display Occurrence
Multiple Value Field (MU)
Use this option setting to determine the number of occurrences to be displayed for a field definedas amultiple value field. For further information onmultiple- value fields, see Field Types inDefiningFields.
Periodic Group (PE)
Use this option setting to determine the default number of occurrences which are to be displayedfor a field contained with a periodic group. For further information on periodic groups, see FieldTypes in Defining Fields.
User's Guide260
Adjusting a User Profile
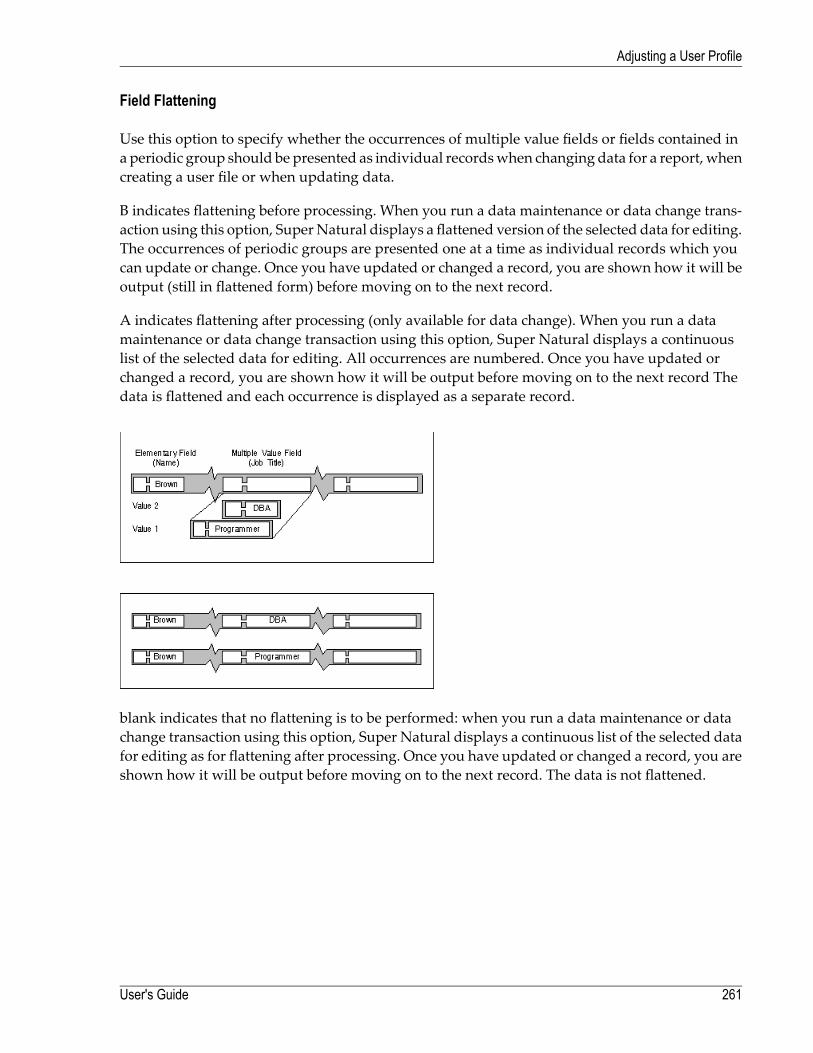
Field Flattening
Use this option to specify whether the occurrences of multiple value fields or fields contained ina periodic group should be presented as individual recordswhen changing data for a report, whencreating a user file or when updating data.
B indicates flattening before processing. When you run a data maintenance or data change trans-action using this option, SuperNatural displays a flattened version of the selected data for editing.The occurrences of periodic groups are presented one at a time as individual records which youcan update or change. Once you have updated or changed a record, you are shown how it will beoutput (still in flattened form) before moving on to the next record.
A indicates flattening after processing (only available for data change). When you run a datamaintenance or data change transaction using this option, Super Natural displays a continuouslist of the selected data for editing. All occurrences are numbered. Once you have updated orchanged a record, you are shown how it will be output before moving on to the next record Thedata is flattened and each occurrence is displayed as a separate record.
blank indicates that no flattening is to be performed: when you run a data maintenance or datachange transaction using this option, Super Natural displays a continuous list of the selected datafor editing as for flattening after processing. Once you have updated or changed a record, you areshown how it will be output before moving on to the next record. The data is not flattened.
261User's Guide
Adjusting a User Profile
Evaluate System Functions Per Outer Loop
Use this option setting to define the evaluation of system functions used for control break processingwhen two files have been linked for the transaction.
Y indicates that system functions are to be evaluated for all records found in the primary file(outer loop).
N indicates that system functions are to be evaluated for all records found in the secondary file(inner loop). This setting is only relevant if two files are linked via the File Selection screen. If morethan two files are linked via the Lookup function (1:n), system functions are processed per outerloop.
Transaction Modes
There are transaction modes for both reporting and data maintenance transactions.
Transaction modes are described in detail in the sectionsTransaction Modes for Reporting andTransaction Modes for Data Maintenance later in this documentation.
When you modify your transaction modes in your user profile, the new settings are valid for allnew transactions but not for existing ones. You can modify your transaction modes for the trans-action you are working on (adding ormodifying) from the Add Transactionwindow or by issuingtheMODEScommand fromwithin the transaction - yourmodifications are only valid for the transac-tion in which you issue the command.
User's Guide262
Adjusting a User Profile
16 Defining Transaction Modes for Reporting
■ What are Reporting Modes? ............................................................................................................ 264■ Modifying Your Reporting Modes ...................................................................................................... 266■ Data Selection .............................................................................................................................. 268■ Data Change ................................................................................................................................ 273■ Report Type .................................................................................................................................. 275■ Report Level ................................................................................................................................. 281■ Destination ................................................................................................................................... 282■ Run Mode .................................................................................................................................... 285
263

This section describes the transaction modes available for reporting transactions and how tomodify them for new and existing transactions. For information on transaction modes for datamaintenance transactions, see Defining Transaction Modes for Data Maintenance. For convenience,transaction modes for reporting are referred to as reporting modes in this documentation.
This section covers the following topics:
■ What are Reporting Modes?■ Modifying Your Reporting Modes■ Data Selection■ Data Change■ Report Type■ Report Level■ Destination■ Run Mode
What are Reporting Modes?
Reporting modes control the basic conditions for reporting transactions, for example where datais to be obtained and how it is to be displayed.
Reporting modes are organized into six groups as shown in the following diagram:
The following table gives a detailed list of the reporting mode settings available and the optioncode for each mode:
User's Guide264
Defining Transaction Modes for Reporting
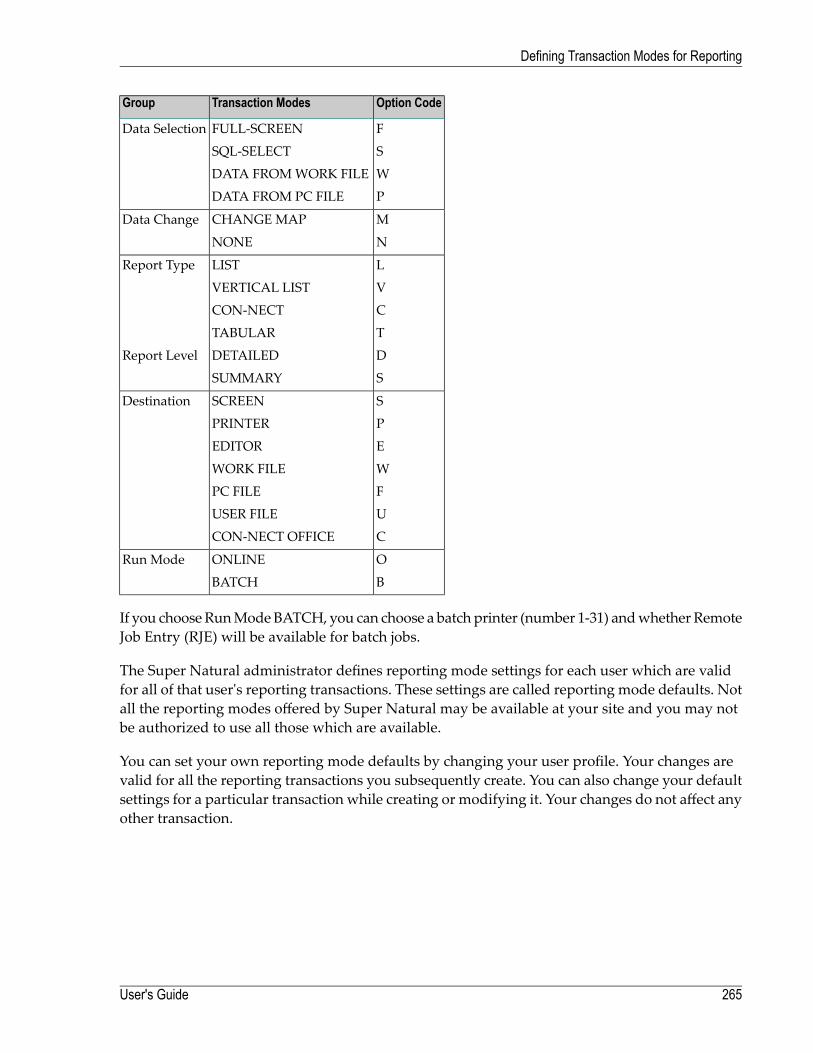
Option CodeTransaction ModesGroup
FFULL-SCREENData Selection
SSQL-SELECT
WDATA FROMWORK FILE
PDATA FROM PC FILE
MCHANGE MAPData Change
NNONE
LLISTReport Type
VVERTICAL LIST
CCON-NECT
TTABULAR
DDETAILEDReport Level
SSUMMARY
SSCREENDestination
PPRINTER
EEDITOR
WWORK FILE
FPC FILE
UUSER FILE
CCON-NECT OFFICE
OONLINERun Mode
BBATCH
If you chooseRunModeBATCH, you can choose a batch printer (number 1-31) andwhether RemoteJob Entry (RJE) will be available for batch jobs.
The Super Natural administrator defines reporting mode settings for each user which are validfor all of that user's reporting transactions. These settings are called reporting mode defaults. Notall the reporting modes offered by Super Natural may be available at your site and you may notbe authorized to use all those which are available.
You can set your own reporting mode defaults by changing your user profile. Your changes arevalid for all the reporting transactions you subsequently create. You can also change your defaultsettings for a particular transaction while creating or modifying it. Your changes do not affect anyother transaction.
265User's Guide
Defining Transaction Modes for Reporting
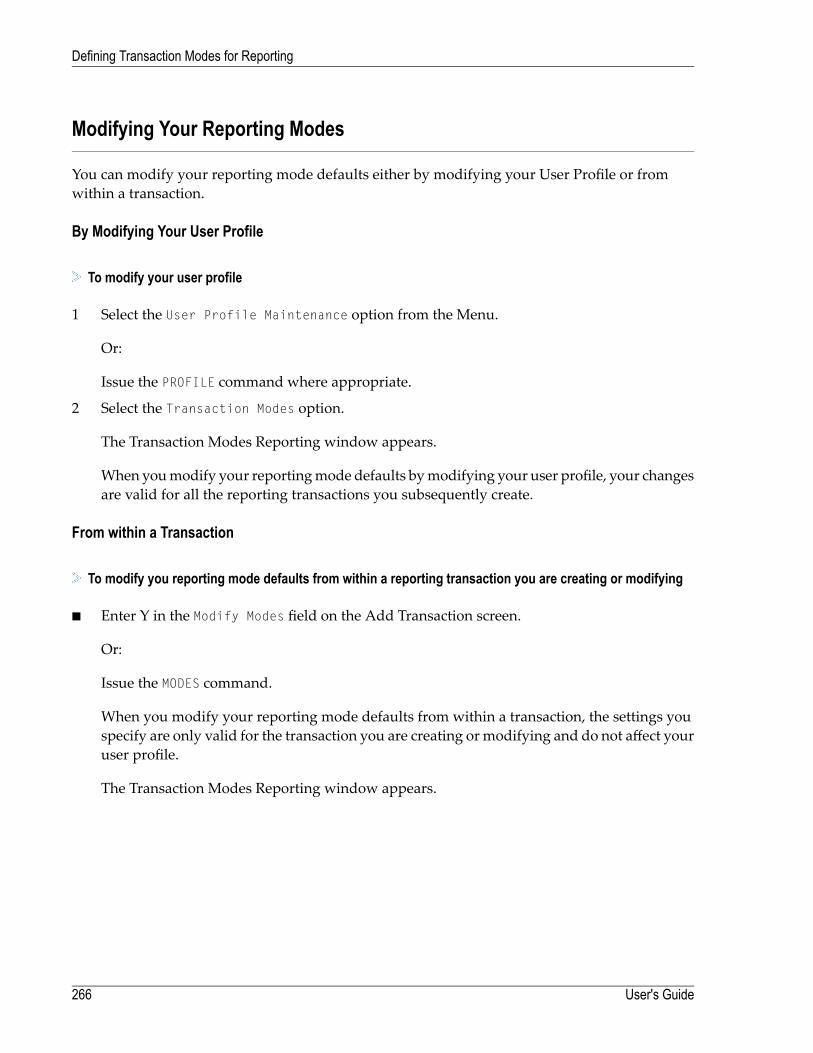
Modifying Your Reporting Modes
You can modify your reporting mode defaults either by modifying your User Profile or fromwithin a transaction.
By Modifying Your User Profile
To modify your user profile
1 Select the User Profile Maintenance option from the Menu.
Or:
Issue the PROFILE command where appropriate.
2 Select the Transaction Modes option.
The Transaction Modes Reporting window appears.
When youmodify your reportingmode defaults bymodifying your user profile, your changesare valid for all the reporting transactions you subsequently create.
From within a Transaction
To modify you reporting mode defaults from within a reporting transaction you are creating or modifying
■ Enter Y in the Modify Modes field on the Add Transaction screen.
Or:
Issue the MODES command.
When you modify your reporting mode defaults from within a transaction, the settings youspecify are only valid for the transaction you are creating or modifying and do not affect youruser profile.
The Transaction Modes Reporting window appears.
User's Guide266
Defining Transaction Modes for Reporting
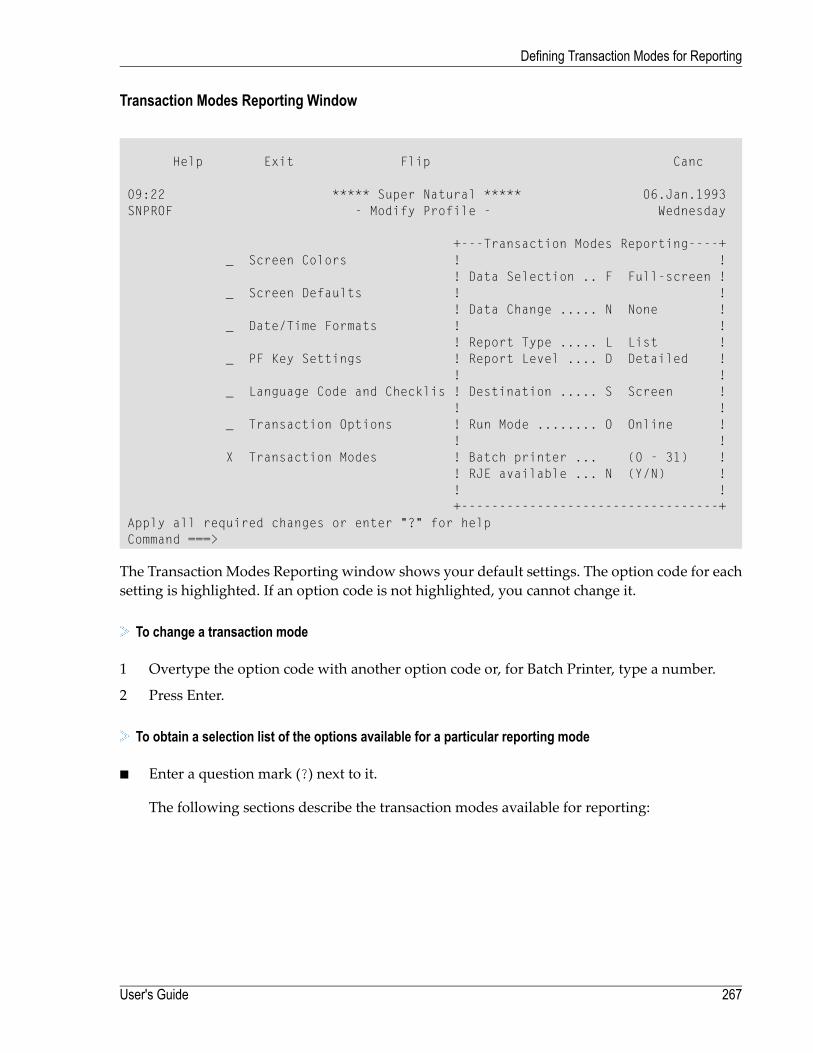
Transaction Modes Reporting Window
Help Exit Flip Canc
09:22 ***** Super Natural ***** 06.Jan.1993SNPROF - Modify Profile - Wednesday
+---Transaction Modes Reporting----+_ Screen Colors ! !
! Data Selection .. F Full-screen !_ Screen Defaults ! !
! Data Change ..... N None !_ Date/Time Formats ! !
! Report Type ..... L List !_ PF Key Settings ! Report Level .... D Detailed !
! !_ Language Code and Checklis ! Destination ..... S Screen !
! !_ Transaction Options ! Run Mode ........ O Online !
! !X Transaction Modes ! Batch printer ... (0 - 31) !
! RJE available ... N (Y/N) !! !+----------------------------------+
Apply all required changes or enter "?" for helpCommand ===>
The Transaction Modes Reporting window shows your default settings. The option code for eachsetting is highlighted. If an option code is not highlighted, you cannot change it.
To change a transaction mode
1 Overtype the option code with another option code or, for Batch Printer, type a number.
2 Press Enter.
To obtain a selection list of the options available for a particular reporting mode
■ Enter a question mark (?) next to it.
The following sections describe the transaction modes available for reporting:
267User's Guide
Defining Transaction Modes for Reporting
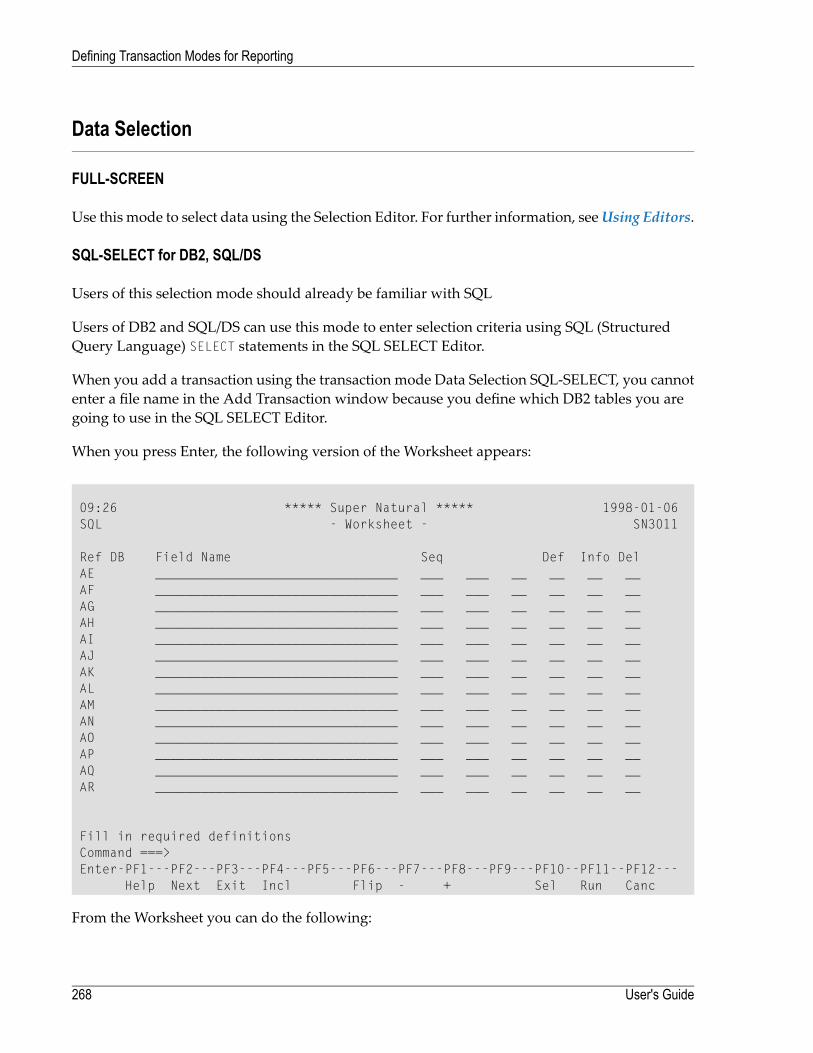
Data Selection
FULL-SCREEN
Use this mode to select data using the Selection Editor. For further information, seeUsing Editors.
SQL-SELECT for DB2, SQL/DS
Users of this selection mode should already be familiar with SQL
Users of DB2 and SQL/DS can use this mode to enter selection criteria using SQL (StructuredQuery Language) SELECT statements in the SQL SELECT Editor.
When you add a transaction using the transaction mode Data Selection SQL-SELECT, you cannotenter a file name in the Add Transaction window because you define which DB2 tables you aregoing to use in the SQL SELECT Editor.
When you press Enter, the following version of the Worksheet appears:
09:26 ***** Super Natural ***** 1998-01-06SQL - Worksheet - SN3011
Ref DB Field Name Seq Def Info DelAE ________________________________ ___ ___ __ __ __ __AF ________________________________ ___ ___ __ __ __ __AG ________________________________ ___ ___ __ __ __ __AH ________________________________ ___ ___ __ __ __ __AI ________________________________ ___ ___ __ __ __ __AJ ________________________________ ___ ___ __ __ __ __AK ________________________________ ___ ___ __ __ __ __AL ________________________________ ___ ___ __ __ __ __AM ________________________________ ___ ___ __ __ __ __AN ________________________________ ___ ___ __ __ __ __AO ________________________________ ___ ___ __ __ __ __AP ________________________________ ___ ___ __ __ __ __AQ ________________________________ ___ ___ __ __ __ __AR ________________________________ ___ ___ __ __ __ __
Fill in required definitionsCommand ===>Enter-PF1---PF2---PF3---PF4---PF5---PF6---PF7---PF8---PF9---PF10--PF11--PF12---
Help Next Exit Incl Flip - + Sel Run Canc
From the Worksheet you can do the following:
User's Guide268
Defining Transaction Modes for Reporting
■ Define user fields■ Include lookup files■ Modify field output definitions■ Define the field output sequence■ Invoke the Logical Conditions Editor■ Invoke the Calculation Editor■ Invoke the SQL SELECT Editor.
When the Worksheet appears, the field list is empty. You can either define user fields in theWorksheet or go directly into the SQL SELECT Editor.
You can use the fields from a lookup file everywhere in the transaction except for in the SQL SE-LECT Editor.
Note: Using the SQL mode, sort and control breaks (in the S/C column) and the systemfunctions ( Average, Count, Max etc.) (in the FUNC column) are not available.
You cannot use SQL for data maintenance within Super Natural.
DATA FROM WORK FILE
Use this mode if you want to read the data for a Super Natural transaction from a sequential workfile.
Note: You may not specify selection criteria.
To read data from a sequential work file
1 Add a transaction using Data Selection WORK. Do not enter a file name in the File Namefield in the Add Transaction window.
The Worksheet appears.
2 Issue the SELECTION command.
The Work File Description Editor appears:
269User's Guide
Defining Transaction Modes for Reporting

09:27 ***** Super Natural ***** 1998-01-06 WORK1 - Work File Description Editor - SNZUL-WF ↩ Fieldname Format Length Dec.Places ↩ 1 < > ↩ 2 < > ↩ 3 < > ↩ 4 < > ↩ 5 < > ↩ 6 < > ↩ 7 < > ↩ 8 < > ↩ 9 < > ↩ 10 < > ↩ 11 < > ↩ 12 < > ↩ 13 < > ↩ 14 < > ↩ 15 < > ↩ ↩ ↩ Command ===> ↩ Enter-PF1---PF2---PF3---PF4---PF5---PF6---PF7---PF8---PF9---PF10--PF11--PF12--- Help Next Exit Check Flip - + Run Canc ↩
3 Enter the name, format and length of the field(s) to be read from the work file.
To prevent errors when the transaction is run, the following restrictions are applied to theeditor area as soon as one or more fields are used elsewhere in the transaction:
User's Guide270
Defining Transaction Modes for Reporting
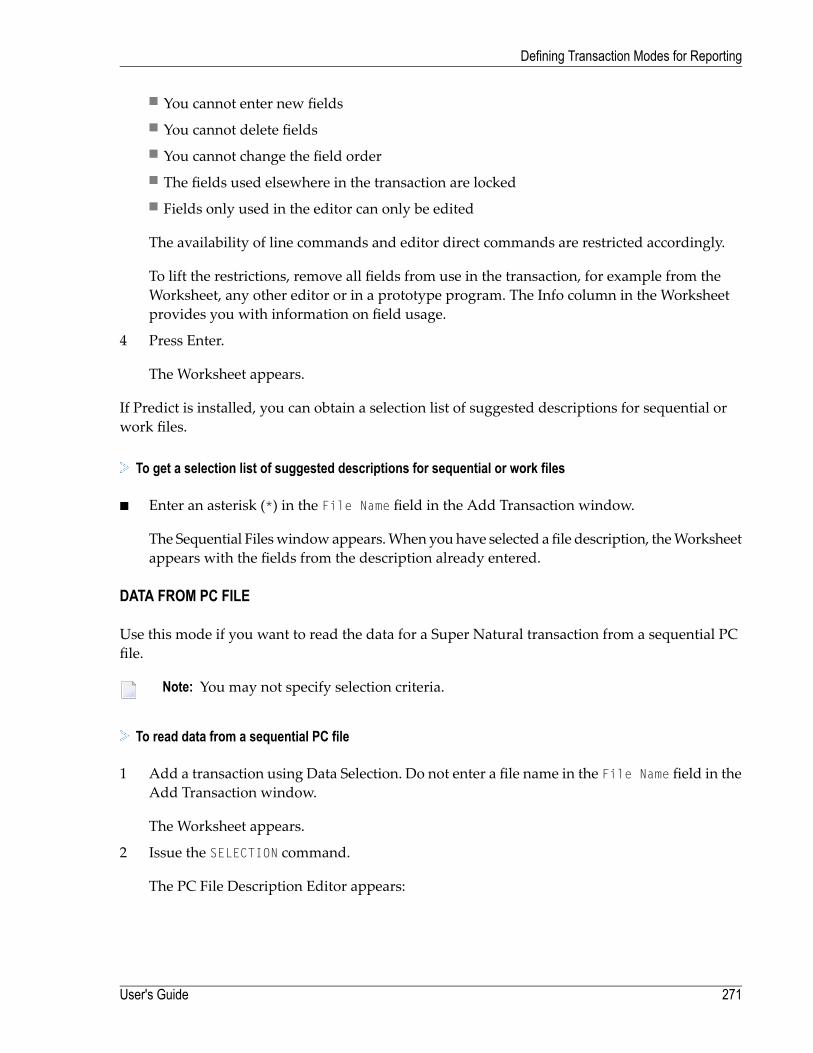
■ You cannot enter new fields■ You cannot delete fields■ You cannot change the field order■ The fields used elsewhere in the transaction are locked■ Fields only used in the editor can only be edited
The availability of line commands and editor direct commands are restricted accordingly.
To lift the restrictions, remove all fields from use in the transaction, for example from theWorksheet, any other editor or in a prototype program. The Info column in the Worksheetprovides you with information on field usage.
4 Press Enter.
The Worksheet appears.
If Predict is installed, you can obtain a selection list of suggested descriptions for sequential orwork files.
To get a selection list of suggested descriptions for sequential or work files
■ Enter an asterisk (*) in the File Name field in the Add Transaction window.
The Sequential Fileswindowappears.When youhave selected a file description, theWorksheetappears with the fields from the description already entered.
DATA FROM PC FILE
Use this mode if you want to read the data for a Super Natural transaction from a sequential PCfile.
Note: You may not specify selection criteria.
To read data from a sequential PC file
1 Add a transaction using Data Selection. Do not enter a file name in the File Name field in theAdd Transaction window.
The Worksheet appears.
2 Issue the SELECTION command.
The PC File Description Editor appears:
271User's Guide
Defining Transaction Modes for Reporting
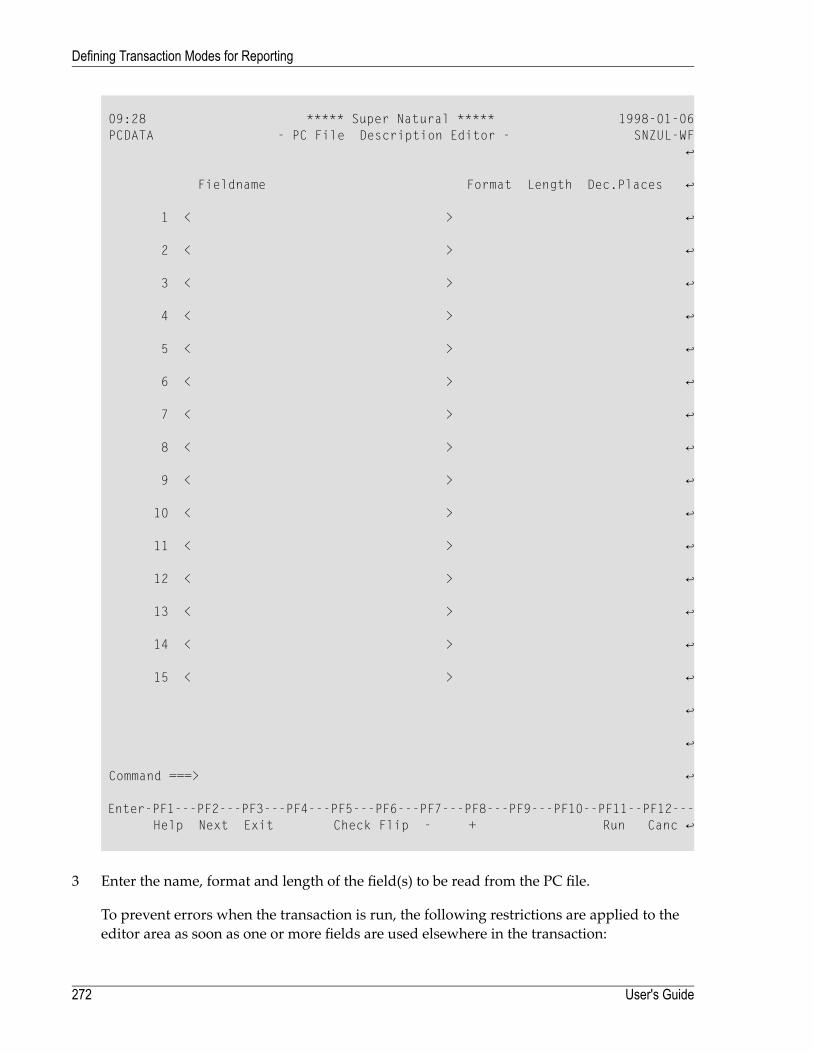
09:28 ***** Super Natural ***** 1998-01-06 PCDATA - PC File Description Editor - SNZUL-WF ↩ Fieldname Format Length Dec.Places ↩ 1 < > ↩ 2 < > ↩ 3 < > ↩ 4 < > ↩ 5 < > ↩ 6 < > ↩ 7 < > ↩ 8 < > ↩ 9 < > ↩ 10 < > ↩ 11 < > ↩ 12 < > ↩ 13 < > ↩ 14 < > ↩ 15 < > ↩ ↩ ↩ Command ===> ↩ Enter-PF1---PF2---PF3---PF4---PF5---PF6---PF7---PF8---PF9---PF10--PF11--PF12--- Help Next Exit Check Flip - + Run Canc ↩
3 Enter the name, format and length of the field(s) to be read from the PC file.
To prevent errors when the transaction is run, the following restrictions are applied to theeditor area as soon as one or more fields are used elsewhere in the transaction:
User's Guide272
Defining Transaction Modes for Reporting
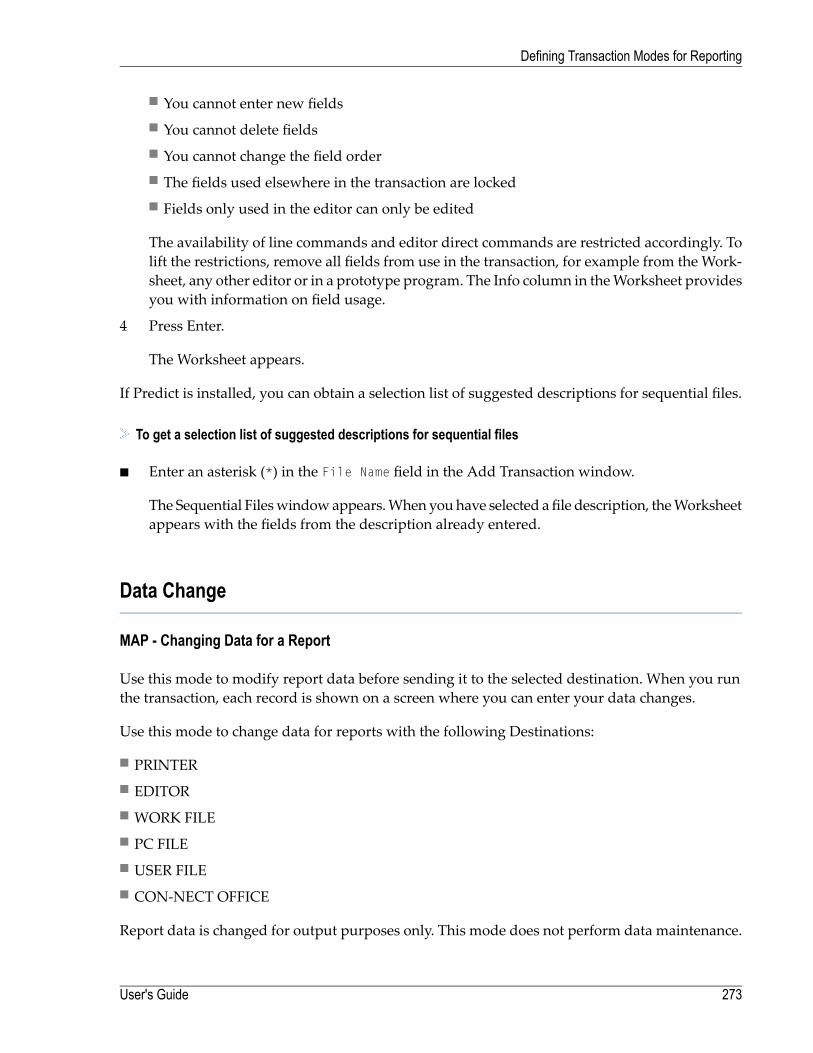
■ You cannot enter new fields■ You cannot delete fields■ You cannot change the field order■ The fields used elsewhere in the transaction are locked■ Fields only used in the editor can only be edited
The availability of line commands and editor direct commands are restricted accordingly. Tolift the restrictions, remove all fields from use in the transaction, for example from the Work-sheet, any other editor or in a prototype program. The Info column in theWorksheet providesyou with information on field usage.
4 Press Enter.
The Worksheet appears.
If Predict is installed, you can obtain a selection list of suggested descriptions for sequential files.
To get a selection list of suggested descriptions for sequential files
■ Enter an asterisk (*) in the File Name field in the Add Transaction window.
The Sequential Fileswindowappears.When youhave selected a file description, theWorksheetappears with the fields from the description already entered.
Data Change
MAP - Changing Data for a Report
Use this mode to modify report data before sending it to the selected destination. When you runthe transaction, each record is shown on a screen where you can enter your data changes.
Use this mode to change data for reports with the following Destinations:
■ PRINTER■ EDITOR■ WORK FILE■ PC FILE■ USER FILE■ CON-NECT OFFICE
Report data is changed for output purposes only. This mode does not perform data maintenance.
273User's Guide
Defining Transaction Modes for Reporting
To change date for a report
1 Run a report with Data Change = MAP.
A screen appears showing the first record found.
2 Make your modifications.
3 Press Enter.
The next record found is displayed.
4 Continue as above until you have made all the changes you require.
When you reach the end of the report data, the report is sent to the Destination specified.
If you have modified the records desired, you can press PF2 (EXIT) before reaching the end ofthe report to send the data to the Destination specified.
Your changes are not saved. The next time you execute or run the transaction, you must make thechanges again.
Flattening
In order to change data for a report, the occurrences of multiple-value fields and periodic groupsmust be presented in separate records. This is called flattening records.
The user option FIELD FLATTENING determines whether the occurrences of multiple-value fieldsor fields contained in a periodic group are presented as individual records when data is changedfor a report.
For further information on flattening, see Transaction Options in Adjusting a User Profile.
NONE
Use this option if you want the original report data to be sent to the destination selected.
User's Guide274
Defining Transaction Modes for Reporting
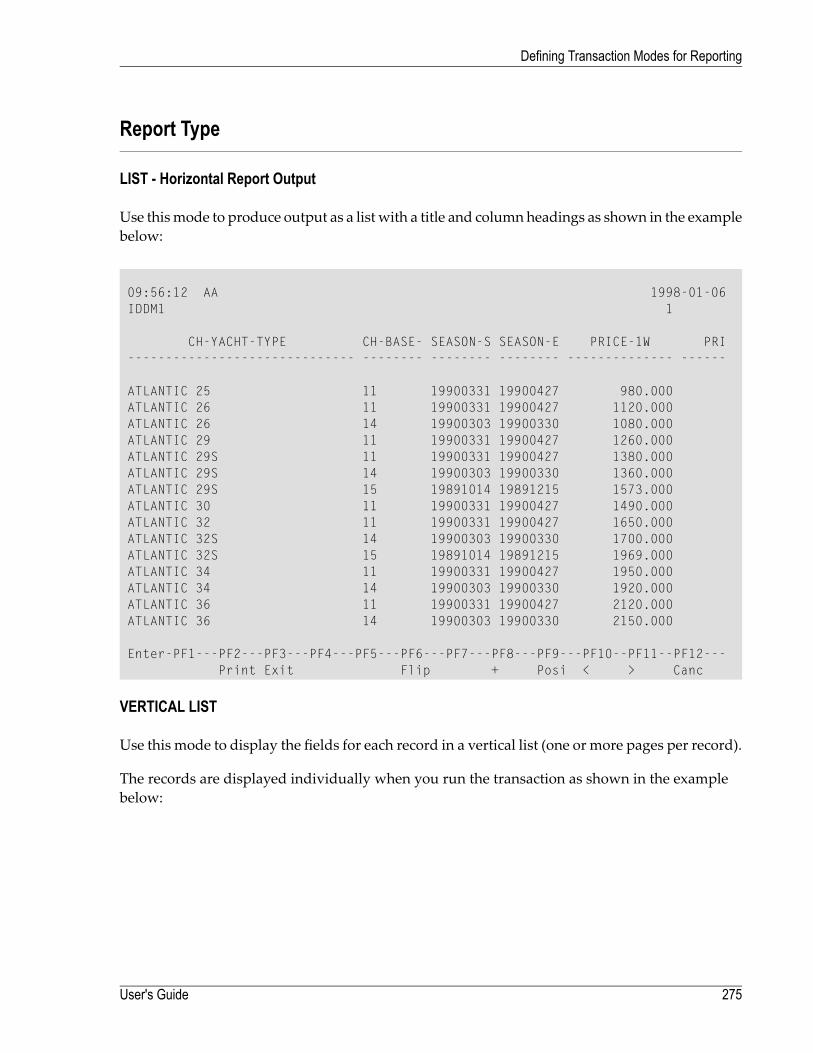
Report Type
LIST - Horizontal Report Output
Use thismode to produce output as a list with a title and columnheadings as shown in the examplebelow:
09:56:12 AA 1998-01-06IDDM1 1
CH-YACHT-TYPE CH-BASE- SEASON-S SEASON-E PRICE-1W PRI------------------------------ -------- -------- -------- -------------- ------
ATLANTIC 25 11 19900331 19900427 980.000ATLANTIC 26 11 19900331 19900427 1120.000ATLANTIC 26 14 19900303 19900330 1080.000ATLANTIC 29 11 19900331 19900427 1260.000ATLANTIC 29S 11 19900331 19900427 1380.000ATLANTIC 29S 14 19900303 19900330 1360.000ATLANTIC 29S 15 19891014 19891215 1573.000ATLANTIC 30 11 19900331 19900427 1490.000ATLANTIC 32 11 19900331 19900427 1650.000ATLANTIC 32S 14 19900303 19900330 1700.000ATLANTIC 32S 15 19891014 19891215 1969.000ATLANTIC 34 11 19900331 19900427 1950.000ATLANTIC 34 14 19900303 19900330 1920.000ATLANTIC 36 11 19900331 19900427 2120.000ATLANTIC 36 14 19900303 19900330 2150.000
Enter-PF1---PF2---PF3---PF4---PF5---PF6---PF7---PF8---PF9---PF10--PF11--PF12---Print Exit Flip + Posi < > Canc
VERTICAL LIST
Use this mode to display the fields for each record in a vertical list (one or more pages per record).
The records are displayed individually when you run the transaction as shown in the examplebelow:
275User's Guide
Defining Transaction Modes for Reporting
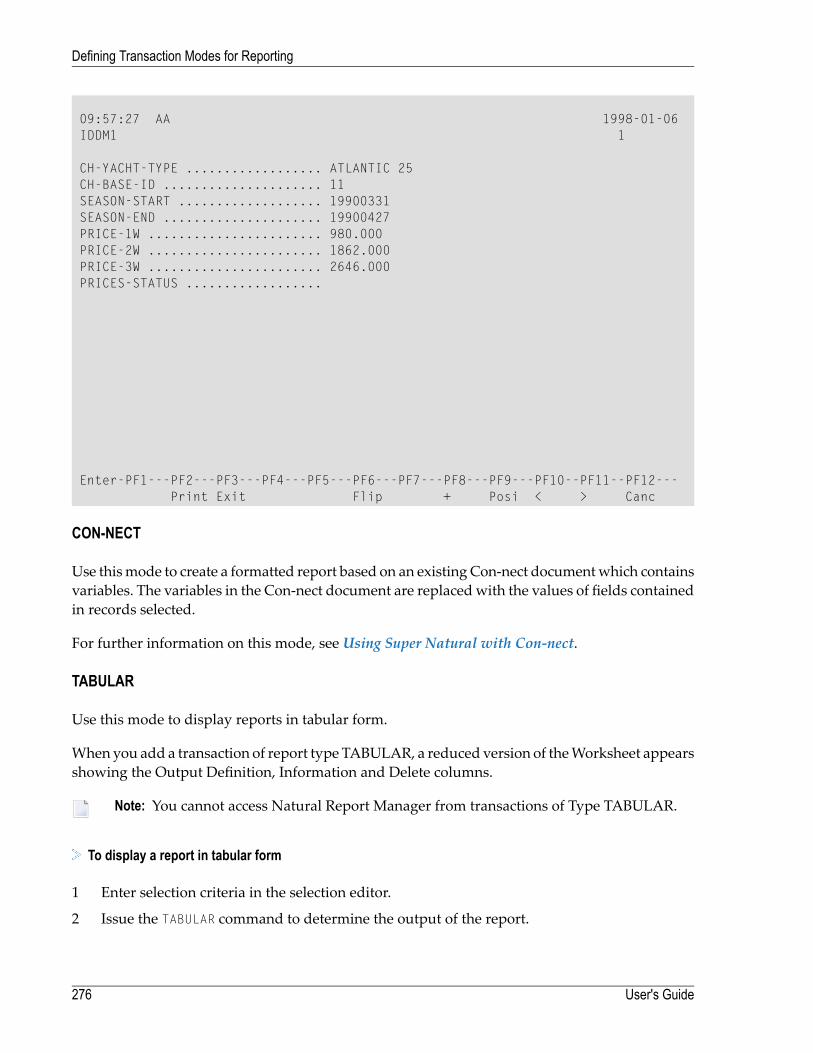
09:57:27 AA 1998-01-06IDDM1 1
CH-YACHT-TYPE .................. ATLANTIC 25CH-BASE-ID ..................... 11SEASON-START ................... 19900331SEASON-END ..................... 19900427PRICE-1W ....................... 980.000PRICE-2W ....................... 1862.000PRICE-3W ....................... 2646.000PRICES-STATUS ..................
Enter-PF1---PF2---PF3---PF4---PF5---PF6---PF7---PF8---PF9---PF10--PF11--PF12---Print Exit Flip + Posi < > Canc
CON-NECT
Use thismode to create a formatted report based on an existing Con-nect documentwhich containsvariables. The variables in the Con-nect document are replacedwith the values of fields containedin records selected.
For further information on this mode, see Using Super Natural with Con-nect.
TABULAR
Use this mode to display reports in tabular form.
When you add a transaction of report type TABULAR, a reduced version of theWorksheet appearsshowing the Output Definition, Information and Delete columns.
Note: You cannot access Natural Report Manager from transactions of Type TABULAR.
To display a report in tabular form
1 Enter selection criteria in the selection editor.
2 Issue the TABULAR command to determine the output of the report.
User's Guide276
Defining Transaction Modes for Reporting
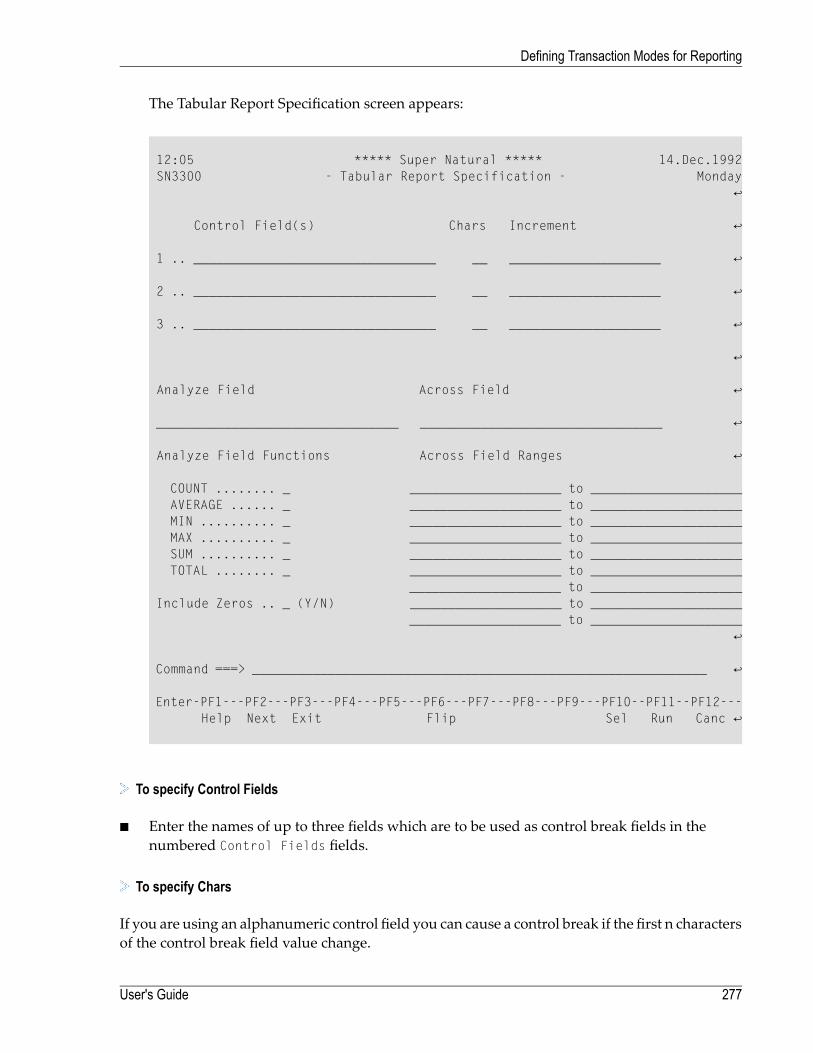
The Tabular Report Specification screen appears:
12:05 ***** Super Natural ***** 14.Dec.1992 SN3300 - Tabular Report Specification - Monday ↩ Control Field(s) Chars Increment ↩ 1 .. ________________________________ __ ____________________ ↩ 2 .. ________________________________ __ ____________________ ↩ 3 .. ________________________________ __ ____________________ ↩ ↩ Analyze Field Across Field ↩ ________________________________ ________________________________ ↩ Analyze Field Functions Across Field Ranges ↩ COUNT ........ _ ____________________ to ____________________ AVERAGE ...... _ ____________________ to ____________________ MIN .......... _ ____________________ to ____________________ MAX .......... _ ____________________ to ____________________ SUM .......... _ ____________________ to ____________________ TOTAL ........ _ ____________________ to ____________________ ____________________ to ____________________ Include Zeros .. _ (Y/N) ____________________ to ____________________ ____________________ to ____________________ ↩ Command ===> ____________________________________________________________ ↩ Enter-PF1---PF2---PF3---PF4---PF5---PF6---PF7---PF8---PF9---PF10--PF11--PF12--- Help Next Exit Flip Sel Run Canc ↩
To specify Control Fields
■ Enter the names of up to three fields which are to be used as control break fields in thenumbered Control Fields fields.
To specify Chars
If you are using an alphanumeric control field you can cause a control break if the first n charactersof the control break field value change.
277User's Guide
Defining Transaction Modes for Reporting

■ Enter the value n next to the relevant control field in the Chars column.
For example, if you enter 3 under Chars a control break only occurs if the value in the first 3characters of the control field has changed.
To specify Increment
If you are using a numeric control field, you can define a control break if the control break fieldvalue changes by a certain increment:
■ Enter the size of the increment next to the relevant control field in the Increment column.
For example, if you enter 10 under Increment for the field AGE, the data is displayed in incre-ments of 10 beginning with the lowest value present.
Note: You cannot specify both characters and increment.
Analyze Field
The Analyze field is the field for which you define system functions to be performed at controlbreaks. The Analyze field must be an elementary numeric field.
When you run the transaction, the values of the Analyze field found for the records selected arenot displayed. The results of the system functions performed on the Analyzefield at control breaksare displayed.
To specify the Analyze Field
■ Enter the name of the elementary numeric field forwhich the tabular output is to be produced.
Analyze Field System Functions
The Analyze Field functions are system functions which must be defined for the Analyze fieldand are performed at control breaks.
DescriptionFunctionThe number of values processed for the field being analyzed. The count is reset to zeroeach time the value of a control break field changes.
COUNT
The average of the values processed for the field being analyzed. The average is calculatedeach time the value of a control break field changes.
AVERAGE
Theminimum value processed for the field being analyzed. The minimum is calculatedeach time the value of a control break field changes.
MIN
Themaximumvalue processed for the field being analyzed. Themaximum is calculatedeach time the value of a control break field changes.
MAX
User's Guide278
Defining Transaction Modes for Reporting

DescriptionFunctionThe sum of all values processed for the field being analyzed. The sum is reset to zeroeach time the value of a control break field changes.
SUM
Include Zeros
By default, zero values are not included in the calculation of the system functions mentionedabove.
To specify Include Zeros
■ Enter a Y in the Include Zeros field to include zero values.
Across Field
The results of the standard functions performed on the Analyze field can be displayed for rangesdefined for an Across field. The Across field is displayed along the top of the report.
To specify an Across Field
■ Enter the name of the field to be the Across field in your table.
If you leave the Across Field field blank, the field you defined as the Analyze field is taken.
Across Field Ranges
You can specify up to nine different ranges. An asterisk (*) in the first position indicates lowestvalue and an asterisk (*) in the to column indicates the highest value.
The lowest and highest numeric values possible are dependent on the format of the Across fieldas shown in the samples below:
Highest ValueLowest ValueSample Format of Across Field
+99999-99999N5
+999-999P3
+999.99-999.99N3.2
To specify an Across Field Range
1 Enter the ranges of values for the Across field for which you want to see statistics providedby the system functions.
2 When you have completed your entries on the Tabular Report Specification screen, run thetransaction.
279User's Guide
Defining Transaction Modes for Reporting
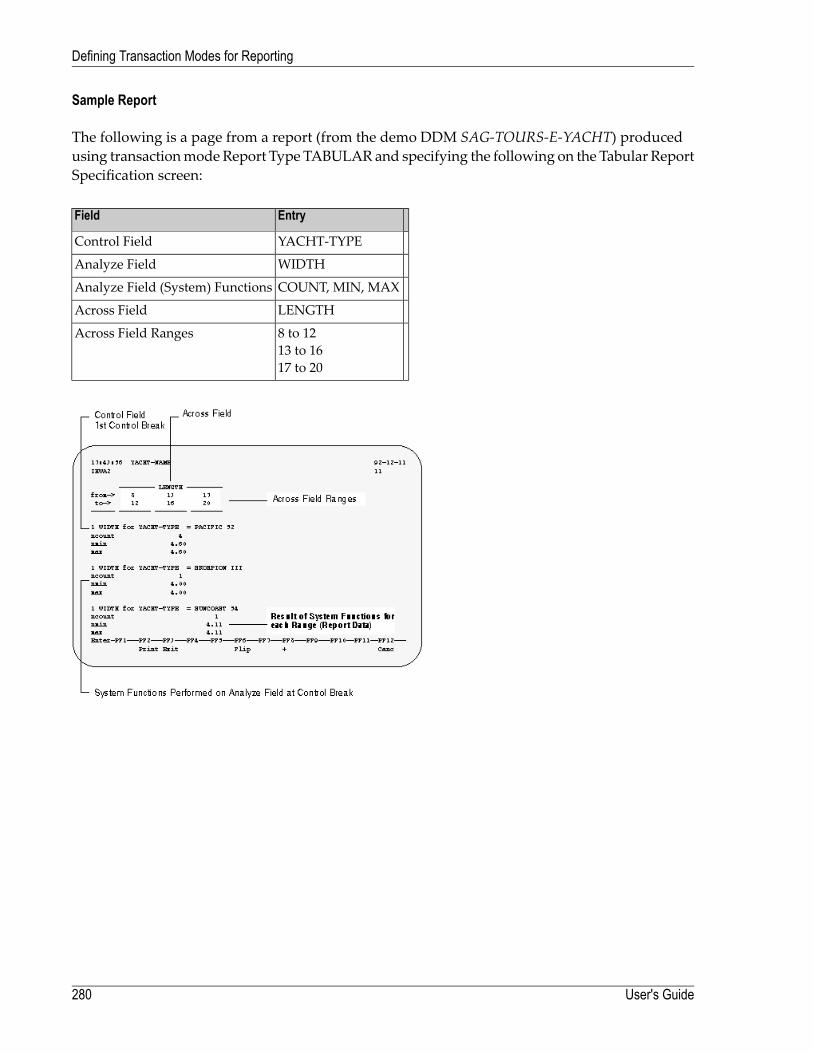
Sample Report
The following is a page from a report (from the demo DDM SAG-TOURS-E-YACHT) producedusing transactionmodeReport Type TABULARand specifying the following on the Tabular ReportSpecification screen:
EntryField
YACHT-TYPEControl Field
WIDTHAnalyze Field
COUNT, MIN, MAXAnalyze Field (System) Functions
LENGTHAcross Field
8 to 1213 to 1617 to 20
Across Field Ranges
User's Guide280
Defining Transaction Modes for Reporting
Report Level
DETAIL
Use this mode to display all records found in a report (detailed report data).
SUMMARY - Output at Control Breaks Only
Use this mode to display report data only when a control break has occurred.
If you specify the Report Level SUMMARY, you cannot define a control break without defininga system function.
For further information on control break processing, see Function (Func) Column inWorking withthe Worksheet.
Old Lines
When you run a transaction which has fields marked in the Sequence column and report levelSUMMARY, the values in the last record found before each control break are displayed in linesmarked Old. You can avoid this by issuing the NOSEQUENCE command from the Worksheet. Whenno fields are marked in the Sequence column, the Old lines do not appear.
SUMMARY with Destination PC FILE and WORK FILE
Use this mode to write the results of system functions at one control break or grand totals only tofile. You may not mix Summary with Detail format.
You may only define one field as a control break field. If no field is defined as a break field, onlygrand totals are downloaded.
The system functions are written to a PC or work file in the following order, regardless of the se-quence in which they were specified:
Total, Sum, Average, Maximum, Minimum, Count, Ncount, Naver, Nmin
If you specify no system functions for a selected field, the old value (the last value before thecontrol break) is written to file. Otherwise, when a field is selected and system functions are spe-cified, only the system functions are written to file.
If you specify more than one control break, the summary data for the lowest level break field(control break with the highest number) only is written to file.
281User's Guide
Defining Transaction Modes for Reporting
SUMMARY with Destination USER FILE
For handling the Destination USER FILE, see section Using the Worksheet with Report DestinationUSER FILE.
Destination
In the following sections, the expression report is used for a report with title lines, column headingsand data. Transaction data denotes the data only, without title lines, headings and columns.
SCREEN
Use this mode to display the report on your terminal screen.
PRINTER
Use this mode to route reports to a printer. You can also use this mode to send reports to a PC tobe printed as normal PC files.
To send a report to a printer attached to your PC
1 Enter the number assigned to your PC as Logical Printer Number in your transaction options(your Super Natural administrator can tell you which number you should enter).
For additional information on changing your transaction options, seeAdjusting aUser Profile.
2 Enter the PC file name at the prompt which appears when you run the transaction.
The report is sent to your PC as a PCfile. You can nowprint the report following the procedurethat you always use to print files from your PC.
Only use this method of sending a report to your PC if you want to store a report for printing. Ifyou want to download data to your PC in order to process it and then uploading it back to SuperNatural, use report destination PC FILE as described later in this section.
User's Guide282
Defining Transaction Modes for Reporting
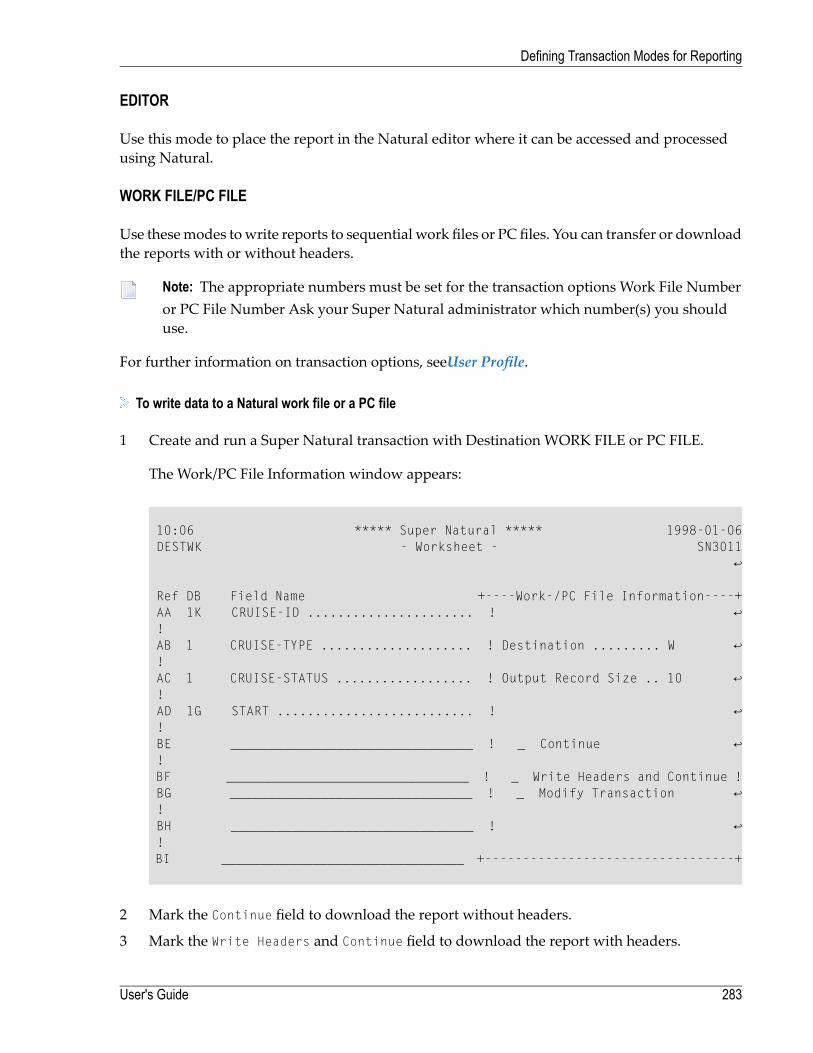
EDITOR
Use this mode to place the report in the Natural editor where it can be accessed and processedusing Natural.
WORK FILE/PC FILE
Use thesemodes towrite reports to sequential work files or PC files. You can transfer or downloadthe reports with or without headers.
Note: The appropriate numbers must be set for the transaction options Work File Numberor PC File Number Ask your Super Natural administrator which number(s) you shoulduse.
For further information on transaction options, seeUser Profile.
To write data to a Natural work file or a PC file
1 Create and run a Super Natural transaction with Destination WORK FILE or PC FILE.
The Work/PC File Information window appears:
10:06 ***** Super Natural ***** 1998-01-06 DESTWK - Worksheet - SN3011 ↩ Ref DB Field Name +----Work-/PC File Information----+ AA 1K CRUISE-ID ...................... ! ↩ ! AB 1 CRUISE-TYPE .................... ! Destination ......... W ↩ ! AC 1 CRUISE-STATUS .................. ! Output Record Size .. 10 ↩ ! AD 1G START .......................... ! ↩ ! BE ________________________________ ! _ Continue ↩ ! BF ________________________________ ! _ Write Headers and Continue ! BG ________________________________ ! _ Modify Transaction ↩ ! BH ________________________________ ! ↩ ! BI ________________________________ +---------------------------------+
2 Mark the Continue field to download the report without headers.
3 Mark the Write Headers and Continue field to download the report with headers.
283User's Guide
Defining Transaction Modes for Reporting
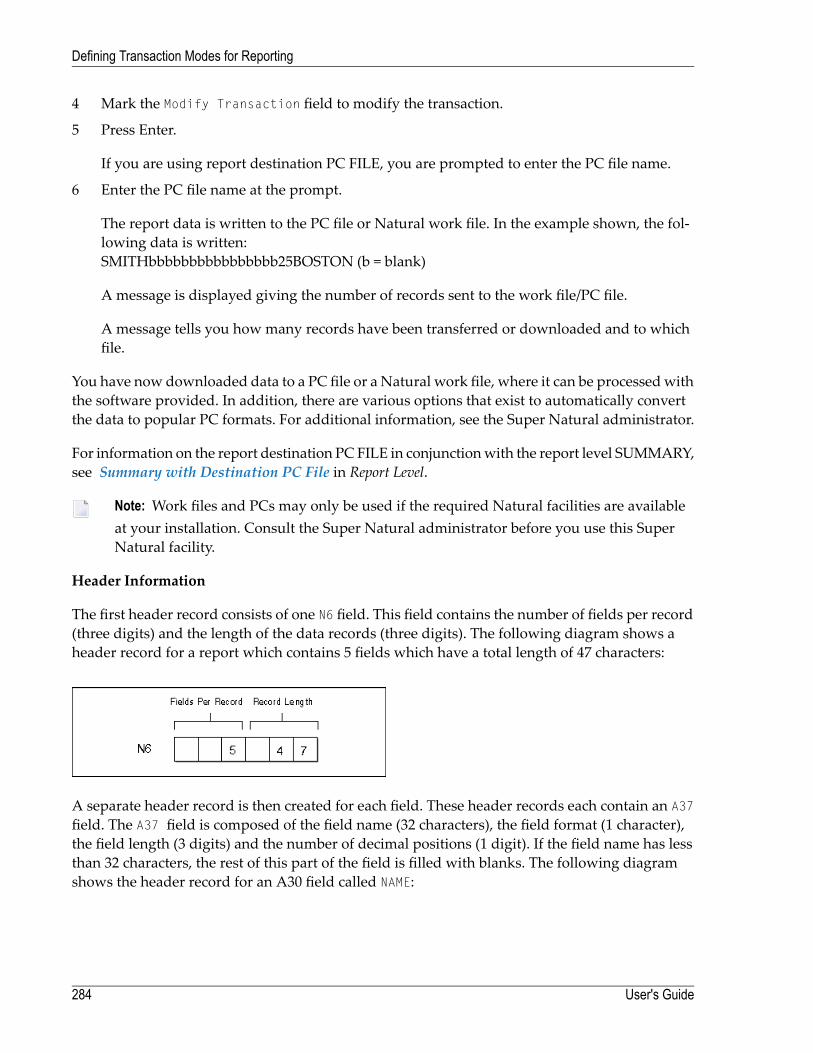
4 Mark the Modify Transaction field to modify the transaction.
5 Press Enter.
If you are using report destination PC FILE, you are prompted to enter the PC file name.
6 Enter the PC file name at the prompt.
The report data is written to the PC file or Natural work file. In the example shown, the fol-lowing data is written:SMITHbbbbbbbbbbbbbbbb25BOSTON (b = blank)
A message is displayed giving the number of records sent to the work file/PC file.
A message tells you how many records have been transferred or downloaded and to whichfile.
You have now downloaded data to a PC file or a Natural work file, where it can be processedwiththe software provided. In addition, there are various options that exist to automatically convertthe data to popular PC formats. For additional information, see the Super Natural administrator.
For information on the report destination PC FILE in conjunctionwith the report level SUMMARY,see Summary with Destination PC File in Report Level.
Note: Work files and PCs may only be used if the required Natural facilities are availableat your installation. Consult the Super Natural administrator before you use this SuperNatural facility.
Header Information
The first header record consists of one N6 field. This field contains the number of fields per record(three digits) and the length of the data records (three digits). The following diagram shows aheader record for a report which contains 5 fields which have a total length of 47 characters:
A separate header record is then created for each field. These header records each contain an A37field. The A37 field is composed of the field name (32 characters), the field format (1 character),the field length (3 digits) and the number of decimal positions (1 digit). If the field name has lessthan 32 characters, the rest of this part of the field is filled with blanks. The following diagramshows the header record for an A30 field called NAME:
User's Guide284
Defining Transaction Modes for Reporting
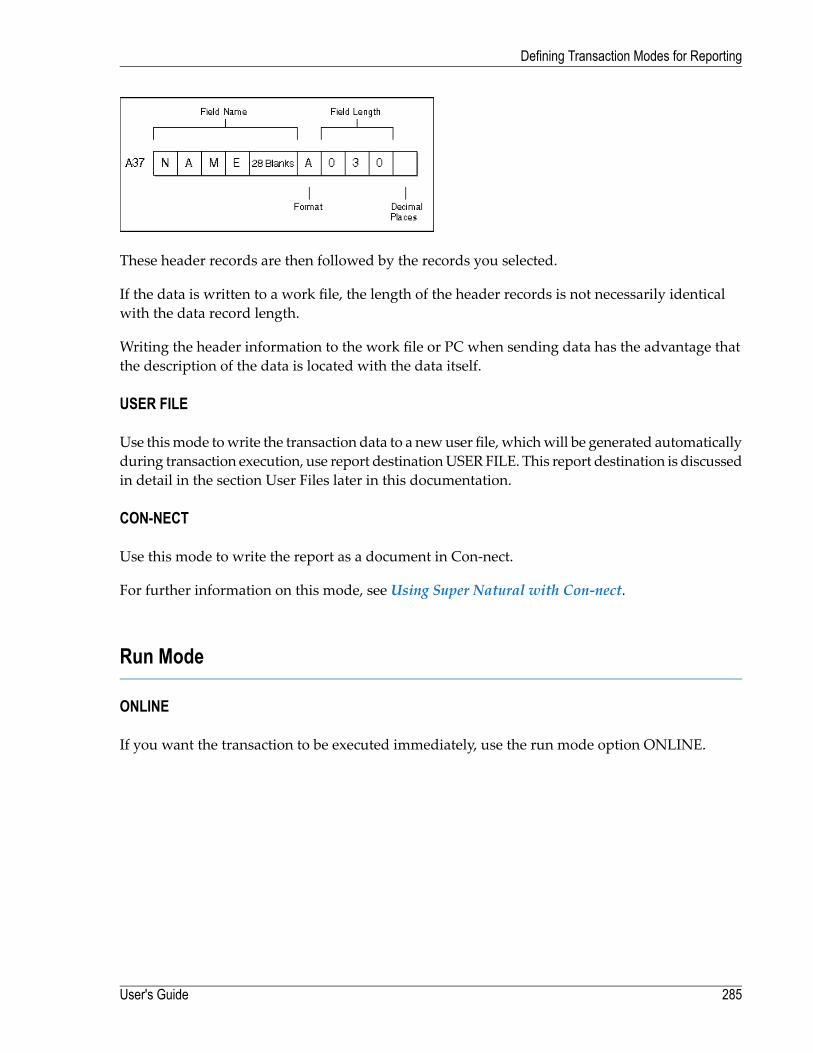
These header records are then followed by the records you selected.
If the data is written to a work file, the length of the header records is not necessarily identicalwith the data record length.
Writing the header information to the work file or PC when sending data has the advantage thatthe description of the data is located with the data itself.
USER FILE
Use thismode towrite the transaction data to a newuser file, whichwill be generated automaticallyduring transaction execution, use report destinationUSERFILE. This report destination is discussedin detail in the section User Files later in this documentation.
CON-NECT
Use this mode to write the report as a document in Con-nect.
For further information on this mode, see Using Super Natural with Con-nect.
Run Mode
ONLINE
If you want the transaction to be executed immediately, use the run mode option ONLINE.
285User's Guide
Defining Transaction Modes for Reporting

BATCH
If you want the transaction to be run in batch mode, where a number of transactions are groupedtogether and processed together as a batch job, use run mode option BATCH on the Modes forReporting screen.
Batch printer no. indicates the number of the batch printer, and batch RJE available indicateswhether remote job entry is available for batch jobs. If this option is set to N, transactions for batchexecution can be created but not submitted.
Your administrator will give you further information.
User's Guide286
Defining Transaction Modes for Reporting
17 Defining Transaction Modes for Data Maintenance
■ What are Maintenance Modes? ........................................................................................................ 288■ Modifying Your Maintenance Mode Defaults ........................................................................................ 289■ Transaction Type ........................................................................................................................... 291■ Logging ....................................................................................................................................... 291■ Logging Destination ....................................................................................................................... 292
287
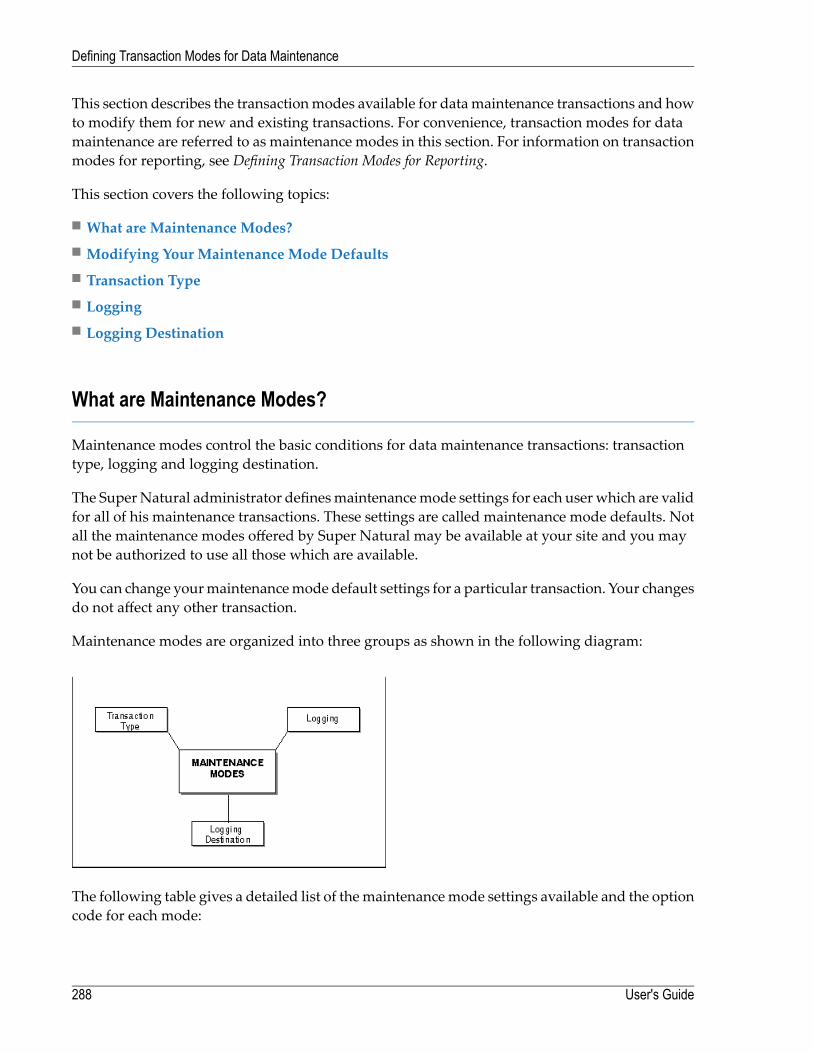
This section describes the transactionmodes available for data maintenance transactions and howto modify them for new and existing transactions. For convenience, transaction modes for datamaintenance are referred to as maintenance modes in this section. For information on transactionmodes for reporting, see Defining Transaction Modes for Reporting.
This section covers the following topics:
■ What are Maintenance Modes?■ Modifying Your Maintenance Mode Defaults■ Transaction Type■ Logging■ Logging Destination
What are Maintenance Modes?
Maintenance modes control the basic conditions for data maintenance transactions: transactiontype, logging and logging destination.
The SuperNatural administrator definesmaintenancemode settings for each userwhich are validfor all of his maintenance transactions. These settings are called maintenance mode defaults. Notall the maintenance modes offered by Super Natural may be available at your site and you maynot be authorized to use all those which are available.
You can change yourmaintenancemode default settings for a particular transaction. Your changesdo not affect any other transaction.
Maintenance modes are organized into three groups as shown in the following diagram:
The following table gives a detailed list of themaintenancemode settings available and the optioncode for each mode:
User's Guide288
Defining Transaction Modes for Data Maintenance
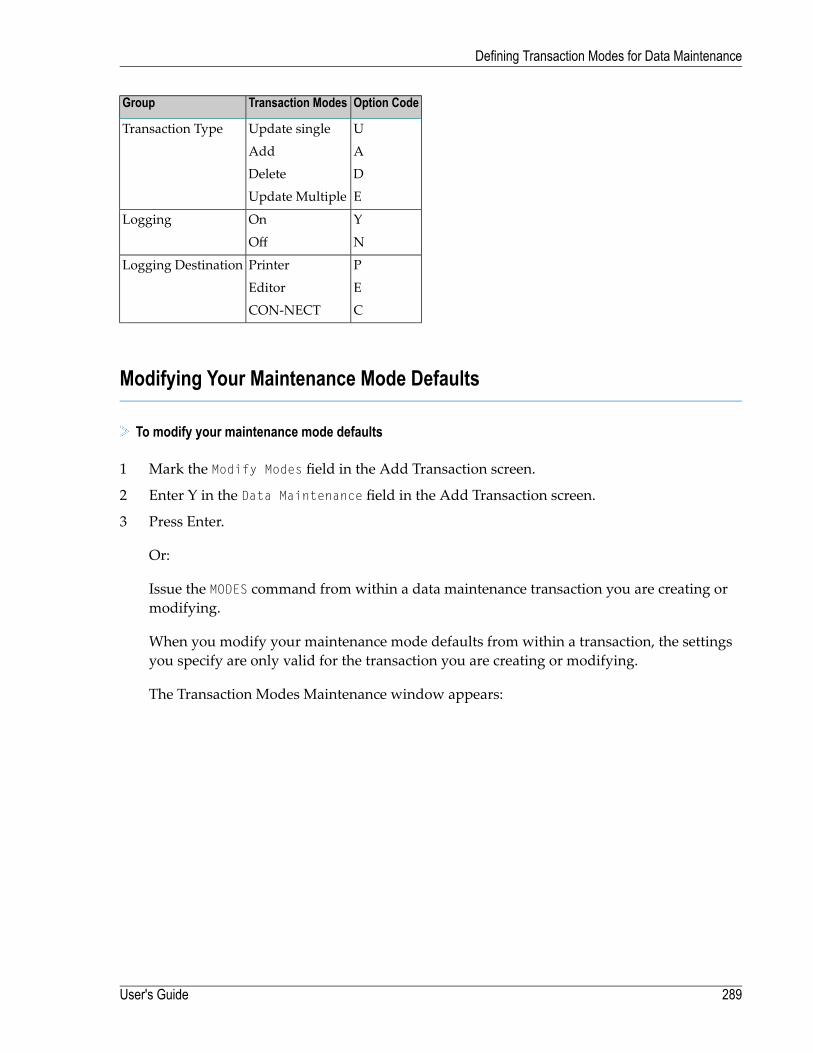
Option CodeTransaction ModesGroup
UUpdate singleTransaction Type
AAdd
DDelete
EUpdate Multiple
YOnLogging
NOff
PPrinterLogging Destination
EEditor
CCON-NECT
Modifying Your Maintenance Mode Defaults
To modify your maintenance mode defaults
1 Mark the Modify Modes field in the Add Transaction screen.
2 Enter Y in the Data Maintenance field in the Add Transaction screen.
3 Press Enter.
Or:
Issue the MODES command from within a data maintenance transaction you are creating ormodifying.
When you modify your maintenance mode defaults from within a transaction, the settingsyou specify are only valid for the transaction you are creating or modifying.
The Transaction Modes Maintenance window appears:
289User's Guide
Defining Transaction Modes for Data Maintenance
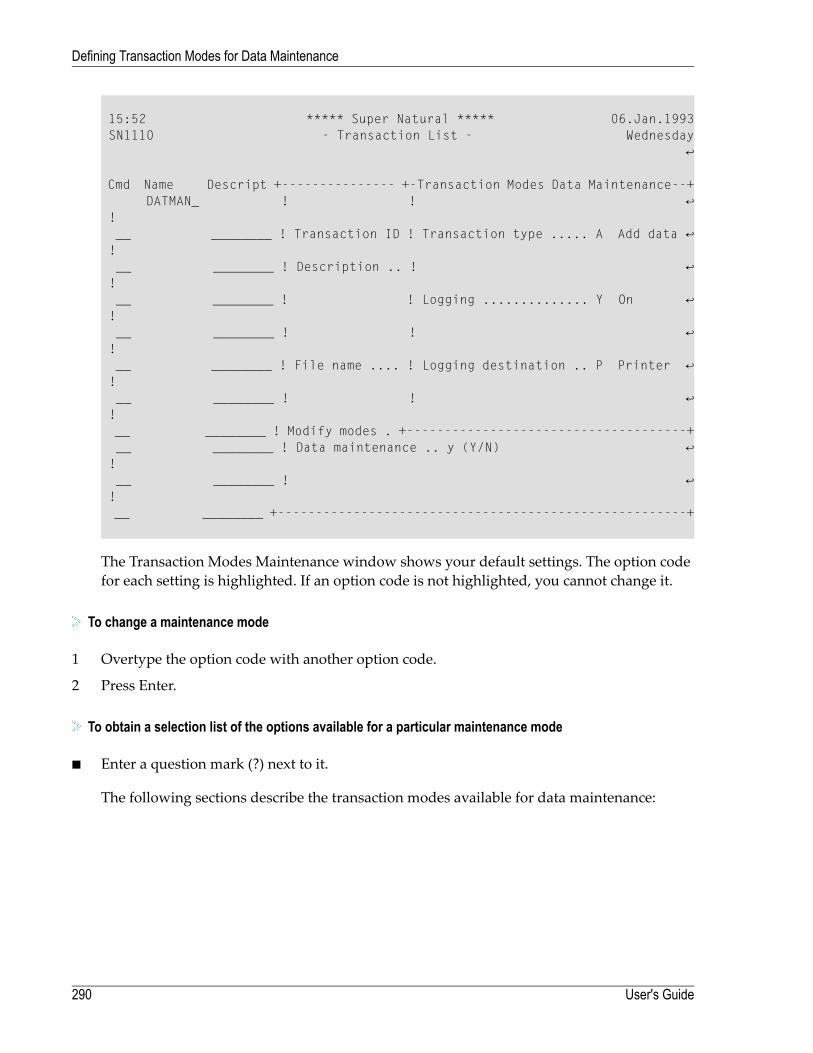
15:52 ***** Super Natural ***** 06.Jan.1993 SN1110 - Transaction List - Wednesday ↩ Cmd Name Descript +--------------- +-Transaction Modes Data Maintenance--+ DATMAN_ ! ! ↩ ! __ ________ ! Transaction ID ! Transaction type ..... A Add data ↩ ! __ ________ ! Description .. ! ↩ ! __ ________ ! ! Logging .............. Y On ↩ ! __ ________ ! ! ↩ ! __ ________ ! File name .... ! Logging destination .. P Printer ↩ ! __ ________ ! ! ↩ ! __ ________ ! Modify modes . +-------------------------------------+ __ ________ ! Data maintenance .. y (Y/N) ↩ ! __ ________ ! ↩ ! __ ________ +------------------------------------------------------+
The Transaction Modes Maintenance window shows your default settings. The option codefor each setting is highlighted. If an option code is not highlighted, you cannot change it.
To change a maintenance mode
1 Overtype the option code with another option code.
2 Press Enter.
To obtain a selection list of the options available for a particular maintenance mode
■ Enter a question mark (?) next to it.
The following sections describe the transaction modes available for data maintenance:
User's Guide290
Defining Transaction Modes for Data Maintenance
Transaction Type
Add
Use this mode to add records to Super Natural files.
Update Single
Use this mode to update data. Records are displayed one at a time for update. Each record mayinclude one or more pages.
Delete
Use this mode to delete records from Super Natural files, one record at a time.
Update Multiple
Use this mode to update data. Multiple records are displayed horizontally for update.
Note: This transaction type is only available for Adabas files.
The transaction types for data maintenance are described in detail in the sectionData MaintenanceTransactions.
Logging
You can write a report for data maintenance transactions containing the data that has been pro-cessed. This report is called a log. It is designed for control purposes only and may not be used torestore data.
No
Use this mode if you don't want logging to take place for data maintenance transactions.
291User's Guide
Defining Transaction Modes for Data Maintenance

Yes
Use this mode if you want logging to take place for data maintenance transactions.
Logging Destination
The setting for logging destination determines where the log is to be sent.
Printer
Use thismode to send the log output to a hardcopy device or a PC terminal. For printer assignmentrefer to the section Transaction Options (Environment Options) in the section User Profile.
Editor
Use this mode to send the log output to the Natural editor where it can be accessed and manipu-lated.
CON-NECT
Use this mode to send the log output to Con-nect.
For further information on this transaction mode, see Using Super Natural with Con-nect.
User's Guide292
Defining Transaction Modes for Data Maintenance
18 Working with Application Programs
■ What are Application Programs? ....................................................................................................... 294■ Listing Application Programs ............................................................................................................ 294■ Adding Application Programs ........................................................................................................... 295■ Executing Application Programs ....................................................................................................... 299■ Deleting Application Programs ......................................................................................................... 299
293
This section describes application programs and how to list, add, execute and delete them.
This section covers the following topics:
■ What are Application Programs?■ Listing Application Programs■ Adding Application Programs■ Executing Application Programs■ Deleting Application Programs
What are Application Programs?
Application programs allow you to invoke any Natural application available at your site fromwithin Super Natural. For example, if Natural Elite is installed, you can invoke it from SuperNatural, do a tutorial and return to Super Natural when you have finished. Further examples ofapplications whichmay be available to you are electronic mailing systems or in-house accountingsystems. Your Super Natural administrator will tell you which applications are available at yoursite.
Listing Application Programs
To obtain a list of application programs available
■ Issue the APPLICATION command.
Or:
Select the Application Programs option on the Menu.
The Application List screen appears.
The Application List screen functions in the same way as all object list screens. For generalinformation on object list screens, seeObject List Screens in Starting Up.
User's Guide294
Working with Application Programs
Adding Application Programs
You can only add application programs in your private library.
To add an application program
1 Enter a new application program name in the Name column of the Application List screen inthe input field next to the Add field.
Or:
Issue the ADD APPLICATION name command.
The Add Application window appears:
295User's Guide
Working with Application Programs
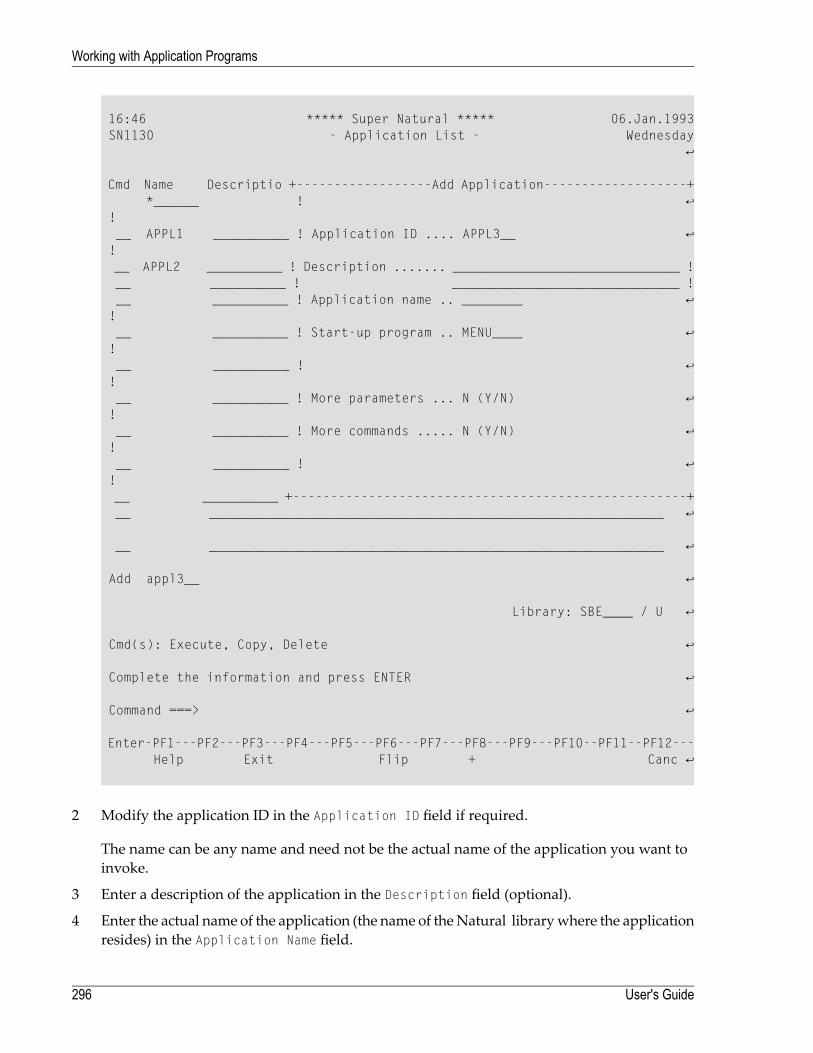
16:46 ***** Super Natural ***** 06.Jan.1993 SN1130 - Application List - Wednesday ↩ Cmd Name Descriptio +------------------Add Application-------------------+ *______ ! ↩ ! __ APPL1 __________ ! Application ID .... APPL3__ ↩ ! __ APPL2 __________ ! Description ....... ______________________________ ! __ __________ ! ______________________________ ! __ __________ ! Application name .. ________ ↩ ! __ __________ ! Start-up program .. MENU____ ↩ ! __ __________ ! ↩ ! __ __________ ! More parameters ... N (Y/N) ↩ ! __ __________ ! More commands ..... N (Y/N) ↩ ! __ __________ ! ↩ ! __ __________ +----------------------------------------------------+ __ ____________________________________________________________ ↩ __ ____________________________________________________________ ↩ Add appl3__ ↩ Library: SBE____ / U ↩ Cmd(s): Execute, Copy, Delete ↩ Complete the information and press ENTER ↩ Command ===> ↩ Enter-PF1---PF2---PF3---PF4---PF5---PF6---PF7---PF8---PF9---PF10--PF11--PF12--- Help Exit Flip + Canc ↩
2 Modify the application ID in the Application ID field if required.
The name can be any name and need not be the actual name of the application you want toinvoke.
3 Enter a description of the application in the Description field (optional).
4 Enter the actual name of the application (the name of theNatural librarywhere the applicationresides) in the Application Name field.
User's Guide296
Working with Application Programs

Your Super Natural administrator will tell you which applications are available at your site.
5 Enter the name of the program which starts the application in the Start-up Program field .
6 Mark the More Parameters field with Y if you want to specify parameters to be passed to theapplication when it is invoked.
7 Mark the More Commands field with Y if you want to specify more commands to be passed tothe application when it is invoked.
8 Press Enter.
The Application Parameter window appears if you marked the More Parameters field withY:
16:41 ***** Super Natural ***** 06.Jan.1993 SN1130 - Application List - Wednesday ↩ Cmd Name Descriptio +--------------- +-------Application Parameter-------+ APPL3__ ! ! ↩ ! __ __________ ! Application ID ! 1 ______________________________ ! __ __________ ! Description .. ! 2 ______________________________ ! __ __________ ! ! 3 ______________________________ ! __ __________ ! Application na ! 4 ______________________________ ! __ __________ ! Start-up progr ! 5 ______________________________ ! __ __________ ! ! 6 ______________________________ ! __ __________ ! More parameter ! ↩ ! __ __________ ! More commands +-----------------------------------+ __ __________ ! ↩ ! __ __________ +----------------------------------------------------+
9 Type in the parameters to be passed to the application when it is invoked.
10 Press Enter.
The Application Command window appears if you marked the More Commands field with Y:
297User's Guide
Working with Application Programs
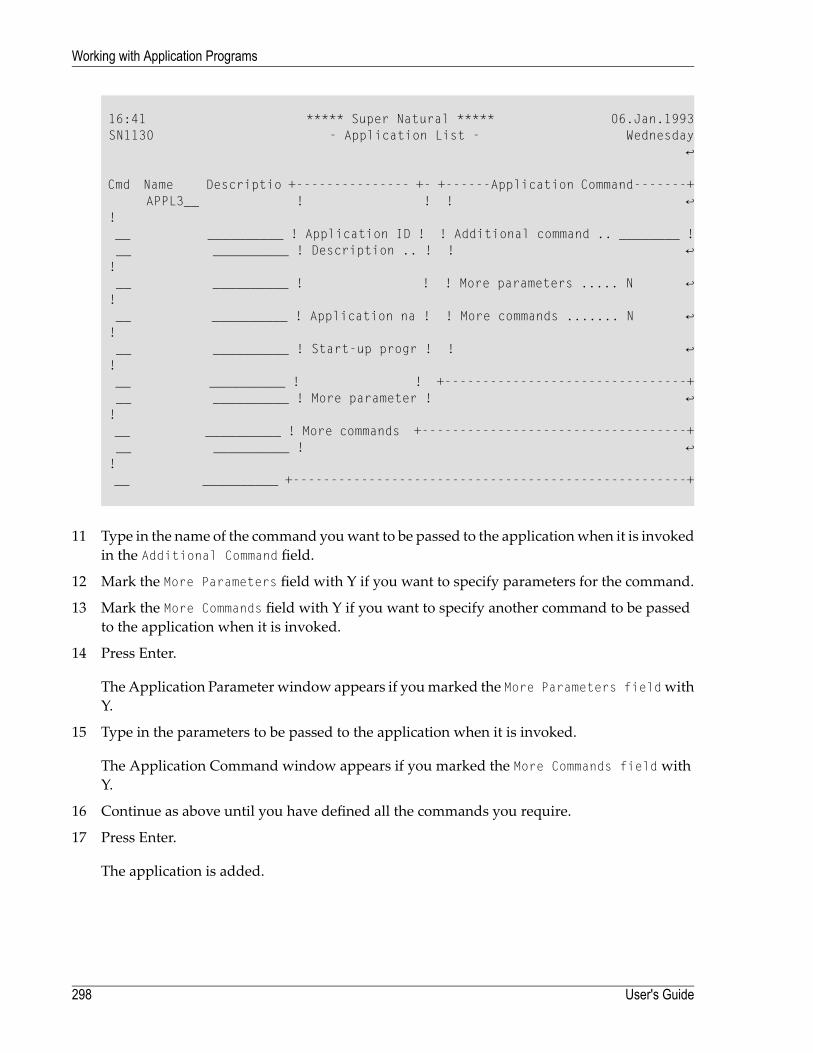
16:41 ***** Super Natural ***** 06.Jan.1993 SN1130 - Application List - Wednesday ↩ Cmd Name Descriptio +--------------- +- +------Application Command-------+ APPL3__ ! ! ! ↩ ! __ __________ ! Application ID ! ! Additional command .. ________ ! __ __________ ! Description .. ! ! ↩ ! __ __________ ! ! ! More parameters ..... N ↩ ! __ __________ ! Application na ! ! More commands ....... N ↩ ! __ __________ ! Start-up progr ! ! ↩ ! __ __________ ! ! +--------------------------------+ __ __________ ! More parameter ! ↩ ! __ __________ ! More commands +-----------------------------------+ __ __________ ! ↩ ! __ __________ +----------------------------------------------------+
11 Type in the name of the command youwant to be passed to the applicationwhen it is invokedin the Additional Command field.
12 Mark the More Parameters field with Y if you want to specify parameters for the command.
13 Mark the More Commands field with Y if you want to specify another command to be passedto the application when it is invoked.
14 Press Enter.
The Application Parameter window appears if youmarked the More Parameters fieldwithY.
15 Type in the parameters to be passed to the application when it is invoked.
The Application Command window appears if you marked the More Commands fieldwithY.
16 Continue as above until you have defined all the commands you require.
17 Press Enter.
The application is added.
User's Guide298
Working with Application Programs
Executing Application Programs
To execute an application program
■ Enter the command abbreviation EX in the Command column of the Application List screennext to the application program name.
Or:
Issue the EXECUTE APPLICATION name command.
You leave Super Natural and enter the application you have selected.
Deleting Application Programs
To delete an application program
■ Enter the command abbreviation DE in the command column of the Application List screennext to the application program name.
Or:
Issue the DELETE APPLICATION name command.
The Confirm Delete window appears.
This window asks you to confirm that you want to delete the application program named. Ifyou do not enter Y to confirm, the application program is not deleted.
You can also delete several applications at the same time. In this case, the Confirm MultipleDelete window appears. You can choose if you want to confirm each deletion, delete withoutconfirmation or cancel the deletion.
299User's Guide
Working with Application Programs

300
19 Using Super Natural with Con-nect
■ What is the Super Natural Con-nect Interface? .................................................................................... 302■ Report Type CON-NECT ................................................................................................................. 302■ Report Destination CON-NECT ........................................................................................................ 305
301
This section describes the interface between Super Natural and Con-nect.
This section covers the following topics:
■ What is the Super Natural Con-nect Interface?■ Report Type CON-NECT■ Report Destination CON-NECT
What is the Super Natural Con-nect Interface?
You canwrite report data to Con-nect documents using the transactionmodes for reporting ReportType CON-NECT and Destination CON-NECT.
To use the Super Natural Con-nect interface, you must have a cabinet in Con-nect with the samename as your user ID in Super Natural
Report Type CON-NECT
Report TypeCON-NECT is intended for the creation of form letters.When you create a transactionwith Report Type CON-NECT, text variables in a selected Con-nect document are replaced withvalues from the resulting report. A separate Con-nect document is written for each record foundby Super Natural.
You can use Report Type CON-NECT with all Report Destinations except WORK FILE, PC FILEand USER FILE.
To create a form letter
1 Add a reporting transaction with Report Type CON-NECT.
When you leave the Add Transaction window, the CON-NECT Documents window appearswhich lists all the Con-nect documents available which contain text variables.
2 Select a Con-nect document. You cannot use a document which contains Con-form systemvariables.
The following version of the Worksheet appears:
User's Guide302
Using Super Natural with Con-nect
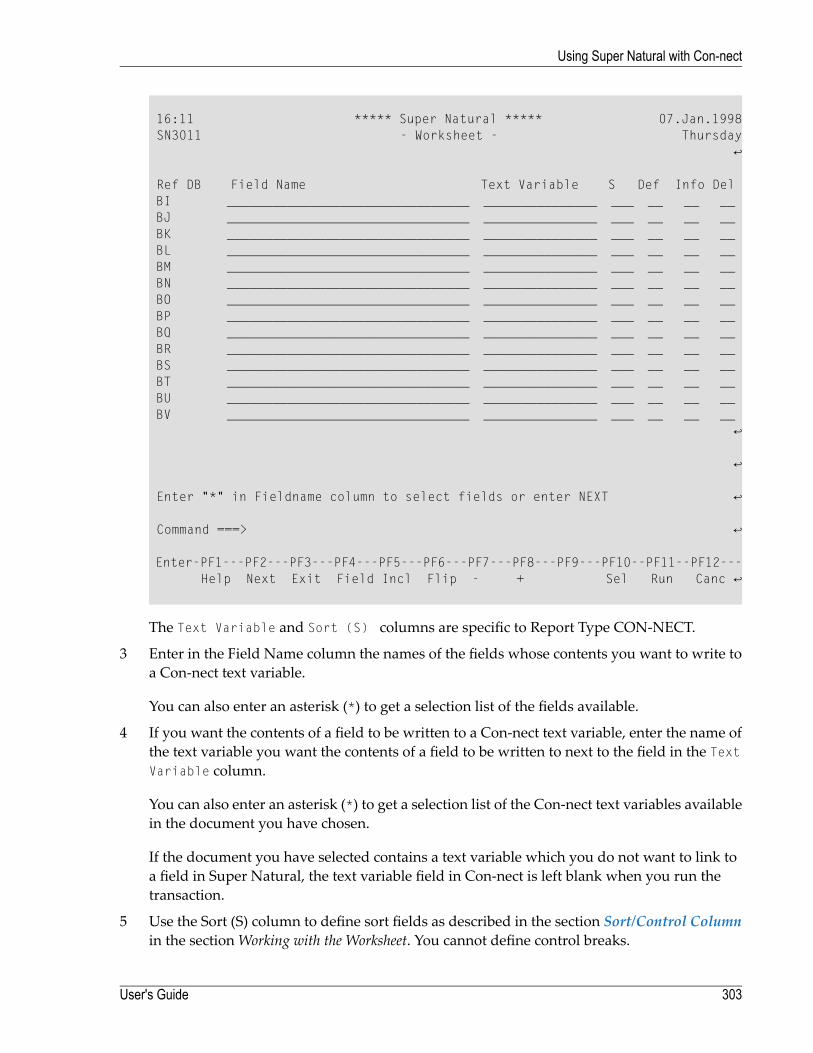
16:11 ***** Super Natural ***** 07.Jan.1998 SN3011 - Worksheet - Thursday ↩ Ref DB Field Name Text Variable S Def Info Del BI ________________________________ _______________ ___ __ __ __ BJ ________________________________ _______________ ___ __ __ __ BK ________________________________ _______________ ___ __ __ __ BL ________________________________ _______________ ___ __ __ __ BM ________________________________ _______________ ___ __ __ __ BN ________________________________ _______________ ___ __ __ __ BO ________________________________ _______________ ___ __ __ __ BP ________________________________ _______________ ___ __ __ __ BQ ________________________________ _______________ ___ __ __ __ BR ________________________________ _______________ ___ __ __ __ BS ________________________________ _______________ ___ __ __ __ BT ________________________________ _______________ ___ __ __ __ BU ________________________________ _______________ ___ __ __ __ BV ________________________________ _______________ ___ __ __ __ ↩ ↩ Enter "*" in Fieldname column to select fields or enter NEXT ↩ Command ===> ↩ Enter-PF1---PF2---PF3---PF4---PF5---PF6---PF7---PF8---PF9---PF10--PF11--PF12--- Help Next Exit Field Incl Flip - + Sel Run Canc ↩
The Text Variable and Sort (S) columns are specific to Report Type CON-NECT.
3 Enter in the Field Name column the names of the fields whose contents you want to write toa Con-nect text variable.
You can also enter an asterisk (*) to get a selection list of the fields available.
4 If you want the contents of a field to be written to a Con-nect text variable, enter the name ofthe text variable you want the contents of a field to be written to next to the field in the TextVariable column.
You can also enter an asterisk (*) to get a selection list of the Con-nect text variables availablein the document you have chosen.
If the document you have selected contains a text variable which you do not want to link toa field in Super Natural, the text variable field in Con-nect is left blank when you run thetransaction.
5 Use the Sort (S) column to define sort fields as described in the section Sort/Control Columnin the sectionWorking with the Worksheet. You cannot define control breaks.
303User's Guide
Using Super Natural with Con-nect
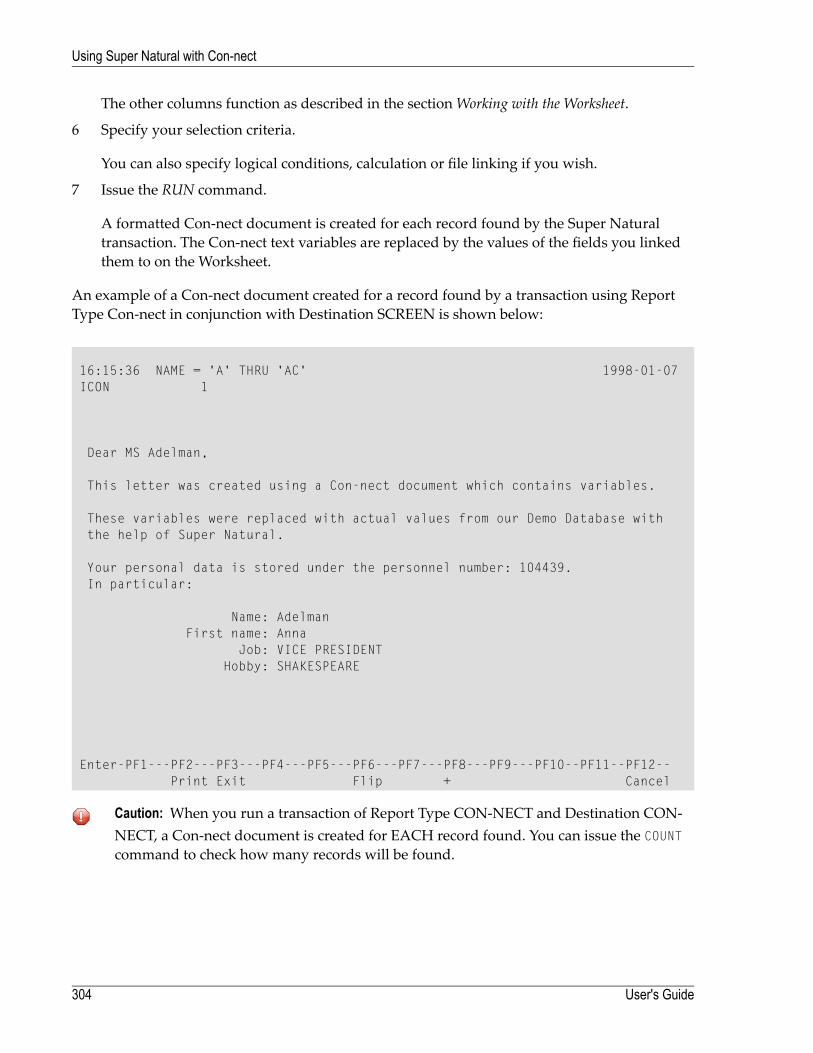
The other columns function as described in the sectionWorking with the Worksheet.
6 Specify your selection criteria.
You can also specify logical conditions, calculation or file linking if you wish.
7 Issue the RUN command.
A formatted Con-nect document is created for each record found by the Super Naturaltransaction. The Con-nect text variables are replaced by the values of the fields you linkedthem to on the Worksheet.
An example of a Con-nect document created for a record found by a transaction using ReportType Con-nect in conjunction with Destination SCREEN is shown below:
16:15:36 NAME = 'A' THRU 'AC' 1998-01-07ICON 1
Dear MS Adelman,
This letter was created using a Con-nect document which contains variables.
These variables were replaced with actual values from our Demo Database withthe help of Super Natural.
Your personal data is stored under the personnel number: 104439.In particular:
Name: AdelmanFirst name: Anna
Job: VICE PRESIDENTHobby: SHAKESPEARE
Enter-PF1---PF2---PF3---PF4---PF5---PF6---PF7---PF8---PF9---PF10--PF11--PF12--Print Exit Flip + Cancel
Caution: When you run a transaction of Report Type CON-NECT and Destination CON-NECT, a Con-nect document is created for EACH record found. You can issue the COUNTcommand to check how many records will be found.
User's Guide304
Using Super Natural with Con-nect
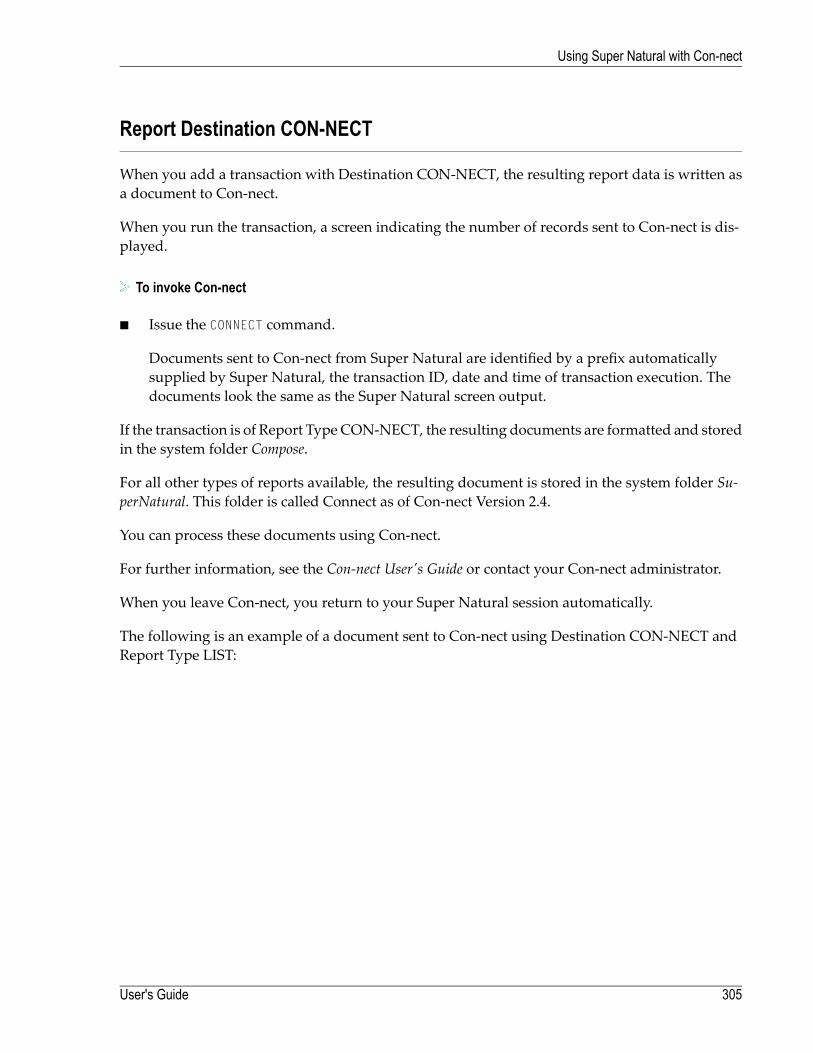
Report Destination CON-NECT
When you add a transaction with Destination CON-NECT, the resulting report data is written asa document to Con-nect.
When you run the transaction, a screen indicating the number of records sent to Con-nect is dis-played.
To invoke Con-nect
■ Issue the CONNECT command.
Documents sent to Con-nect from Super Natural are identified by a prefix automaticallysupplied by Super Natural, the transaction ID, date and time of transaction execution. Thedocuments look the same as the Super Natural screen output.
If the transaction is of Report Type CON-NECT, the resulting documents are formatted and storedin the system folder Compose.
For all other types of reports available, the resulting document is stored in the system folder Su-perNatural. This folder is called Connect as of Con-nect Version 2.4.
You can process these documents using Con-nect.
For further information, see the Con-nect User's Guide or contact your Con-nect administrator.
When you leave Con-nect, you return to your Super Natural session automatically.
The following is an example of a document sent to Con-nect using Destination CON-NECT andReport Type LIST:
305User's Guide
Using Super Natural with Con-nect
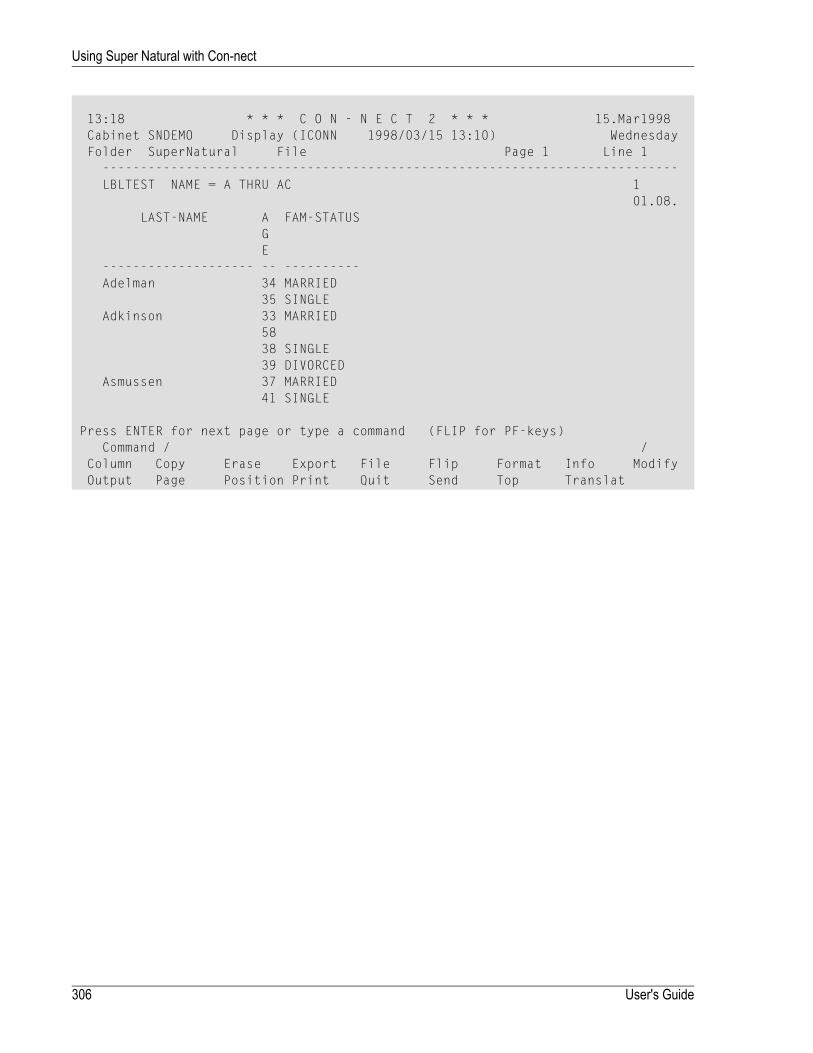
13:18 * * * C O N - N E C T 2 * * * 15.Mar1998Cabinet SNDEMO Display (ICONN 1998/03/15 13:10) WednesdayFolder SuperNatural File Page 1 Line 1
----------------------------------------------------------------------------LBLTEST NAME = A THRU AC 1
01.08.LAST-NAME A FAM-STATUS
GE
-------------------- -- ----------Adelman 34 MARRIED
35 SINGLEAdkinson 33 MARRIED
5838 SINGLE39 DIVORCED
Asmussen 37 MARRIED41 SINGLE
Press ENTER for next page or type a command (FLIP for PF-keys)Command / /
Column Copy Erase Export File Flip Format Info ModifyOutput Page Position Print Quit Send Top Translat
User's Guide306
Using Super Natural with Con-nect
20 Working with User Files
■ What are User Files? ...................................................................................................................... 308■ Listing User Files ........................................................................................................................... 308■ Adding User Files .......................................................................................................................... 310■ Information Function ...................................................................................................................... 314■ Deleting User Files ......................................................................................................................... 315■ Retrieving User Files ...................................................................................................................... 317■ Creating User Files Using Destination USER FILE ............................................................................... 317
307
User files are only available to users of Super Natural under Adabas.
This section covers the following topics:
■ What are User Files?■ Listing User Files■ Adding User Files■ The Information Function■ Deleting User Files■ Retrieving User Files■ Creating User Files Using Destination USER FILE
What are User Files?
User files are files created by users. You can store both data copied from a database file and yourown data in user files.
Other users can modify data contained in your user files and create reports using them only if theSuper Natural administrator has given them authorization. Other users cannot delete your userfiles.
There are two ways of creating user files which are described in the sections Adding User Files andCreating User Files Using Report Destination USER FILE.
Note: You can access user files created with Super Natural directly from a Natural session.
Listing User Files
To obtain a list of user files available
■ Issue the USERFILE command.
Or:
Select the object User Files on the Menu.
The User File List screen appears.
User's Guide308
Working with User Files
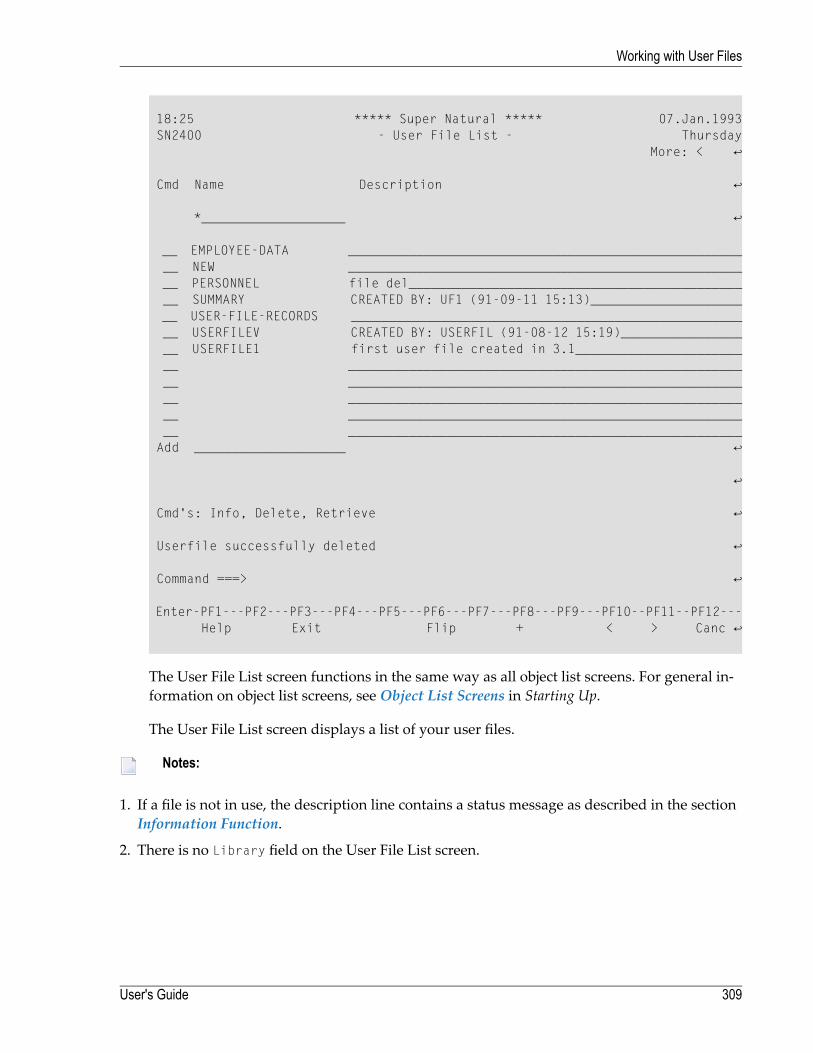
18:25 ***** Super Natural ***** 07.Jan.1993 SN2400 - User File List - Thursday More: < ↩ Cmd Name Description ↩ *___________________ ↩ __ EMPLOYEE-DATA ____________________________________________________ __ NEW ____________________________________________________ __ PERSONNEL file del____________________________________________ __ SUMMARY CREATED BY: UF1 (91-09-11 15:13)____________________ __ USER-FILE-RECORDS ____________________________________________________ __ USERFILEV CREATED BY: USERFIL (91-08-12 15:19)________________ __ USERFILE1 first user file created in 3.1______________________ __ ____________________________________________________ __ ____________________________________________________ __ ____________________________________________________ __ ____________________________________________________ __ ____________________________________________________ Add ____________________ ↩ ↩ Cmd's: Info, Delete, Retrieve ↩ Userfile successfully deleted ↩ Command ===> ↩ Enter-PF1---PF2---PF3---PF4---PF5---PF6---PF7---PF8---PF9---PF10--PF11--PF12--- Help Exit Flip + < > Canc ↩
The User File List screen functions in the same way as all object list screens. For general in-formation on object list screens, seeObject List Screens in Starting Up.
The User File List screen displays a list of your user files.
Notes:
1. If a file is not in use, the description line contains a status message as described in the sectionInformation Function.
2. There is no Library field on the User File List screen.
309User's Guide
Working with User Files
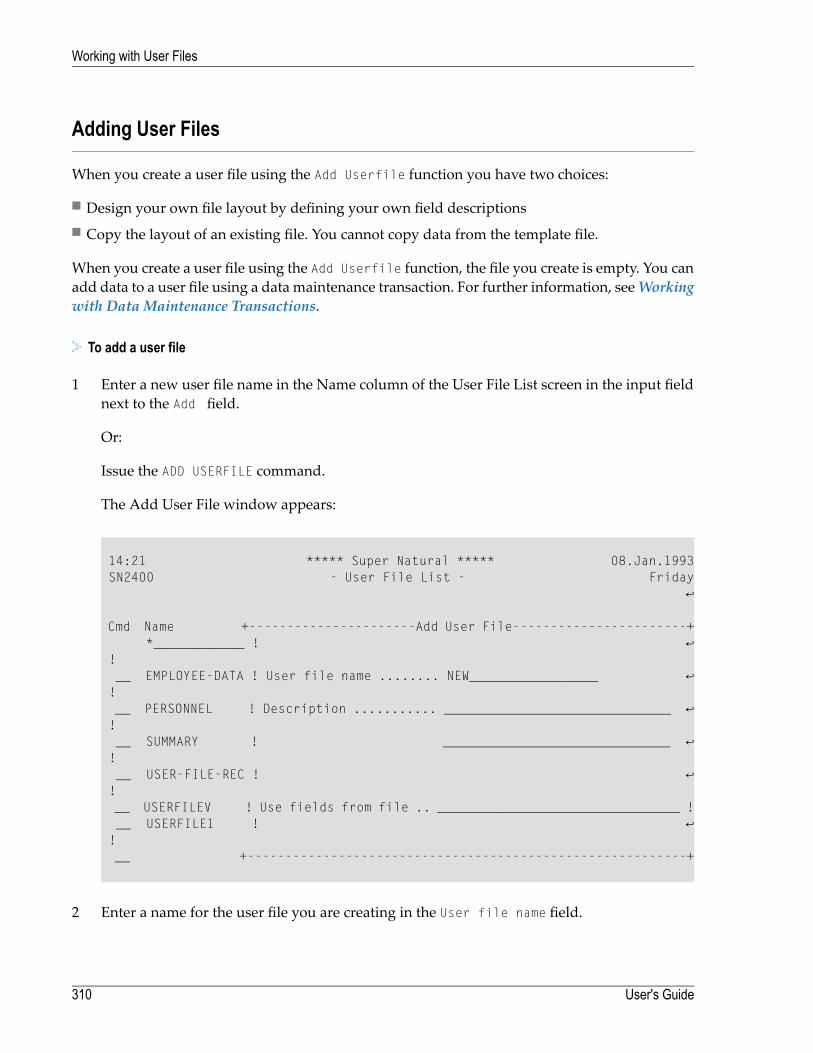
Adding User Files
When you create a user file using the Add Userfile function you have two choices:
■ Design your own file layout by defining your own field descriptions■ Copy the layout of an existing file. You cannot copy data from the template file.
When you create a user file using the Add Userfile function, the file you create is empty. You canadd data to a user file using a data maintenance transaction. For further information, seeWorkingwith Data Maintenance Transactions.
To add a user file
1 Enter a new user file name in the Name column of the User File List screen in the input fieldnext to the Add field.
Or:
Issue the ADD USERFILE command.
The Add User File window appears:
14:21 ***** Super Natural ***** 08.Jan.1993 SN2400 - User File List - Friday ↩ Cmd Name +----------------------Add User File-----------------------+ *____________ ! ↩ ! __ EMPLOYEE-DATA ! User file name ........ NEW_________________ ↩ ! __ PERSONNEL ! Description ........... ______________________________ ↩ ! __ SUMMARY ! ______________________________ ↩ ! __ USER-FILE-REC ! ↩ ! __ USERFILEV ! Use fields from file .. ________________________________ ! __ USERFILE1 ! ↩ ! __ +----------------------------------------------------------+
2 Enter a name for the user file you are creating in the User file name field.
User's Guide310
Working with User Files
File names must begin with a letter or a special non-blank character and are limited to 20characters.
3 Enter a description of the user file in the Description field if required.
4 If you want to copy the layout of an existing file, type it's name in the Use Fields From Filefield.
5 If you don't know the name of the file you want to use, enter an asterisk (*) and the File Selec-tion List window appears.
6 If you don't want to copy the layout of an existing file, leave this field blank.
7 Press Enter.
The User File Description Editor appears. If you are not copying the layout of an existing file,the editor columns are blank:
311User's Guide
Working with User Files
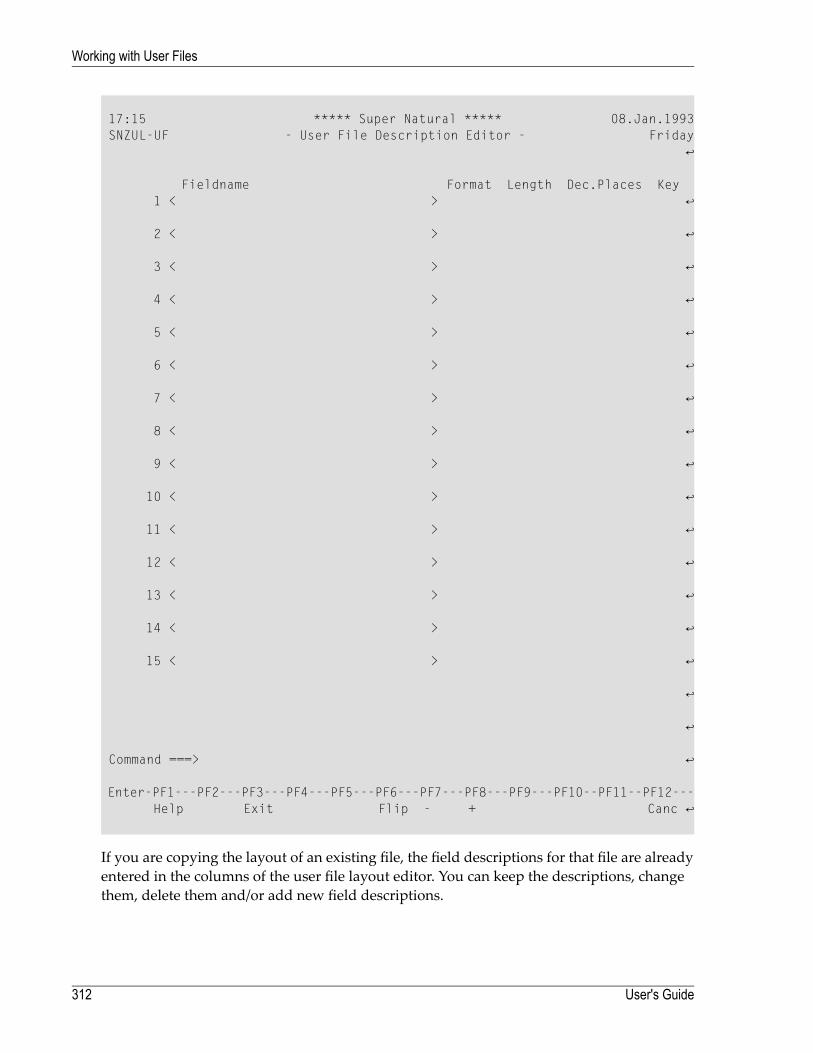
17:15 ***** Super Natural ***** 08.Jan.1993 SNZUL-UF - User File Description Editor - Friday ↩ Fieldname Format Length Dec.Places Key 1 < > ↩ 2 < > ↩ 3 < > ↩ 4 < > ↩ 5 < > ↩ 6 < > ↩ 7 < > ↩ 8 < > ↩ 9 < > ↩ 10 < > ↩ 11 < > ↩ 12 < > ↩ 13 < > ↩ 14 < > ↩ 15 < > ↩ ↩ ↩ Command ===> ↩ Enter-PF1---PF2---PF3---PF4---PF5---PF6---PF7---PF8---PF9---PF10--PF11--PF12--- Help Exit Flip - + Canc ↩
If you are copying the layout of an existing file, the field descriptions for that file are alreadyentered in the columns of the user file layout editor. You can keep the descriptions, changethem, delete them and/or add new field descriptions.
User's Guide312
Working with User Files

The following diagram shows the User File Description Editor with the layout of thedemonstration file SAG-TOURS-E-PERSON:
14:26 ***** Super Natural ***** 08.Jan.1993 SNZUL-UF - User File Description Editor - Friday More: + Fieldname Format Length Dec.Places Key 1 < PERSON-ID > N 8 D ↩ 2 < BIRTH-DATE > N 8 ↩ 3 < SEX > A 1 D ↩ 4 < SURNAME > A 20 D ↩ 5 < FIRST-NAME-1 > A 20 ↩ 6 < FIRST-NAME-2 > A 20 ↩ 7 < TITLE > A 20 ↩ 8 < FORM-OF-ADDRESS > A 8 ↩ 9 < ADDRESS-ADDITION > A 20 ↩ 10 < STREET-NUMBER > A 20 ↩ 11 < COUNTRY > A 3 D ↩ 12 < ZIP-CODE > A 10 D ↩ 13 < CITY > A 20 D ↩ 14 < AREA-CODE > A 6 ↩ 15 < PHONE-NUMBER > A 15 ↩ ↩ ↩ Command ===> ↩ Enter-PF1---PF2---PF3---PF4---PF5---PF6---PF7---PF8---PF9---PF10--PF11--PF12--- Help Exit Flip - + Canc ↩
If you are copying the layout of an existing file, some of the fields of that file may not bepresented in the User File Description Editor. The omitted fields are Adabas phonetic
313User's Guide
Working with User Files
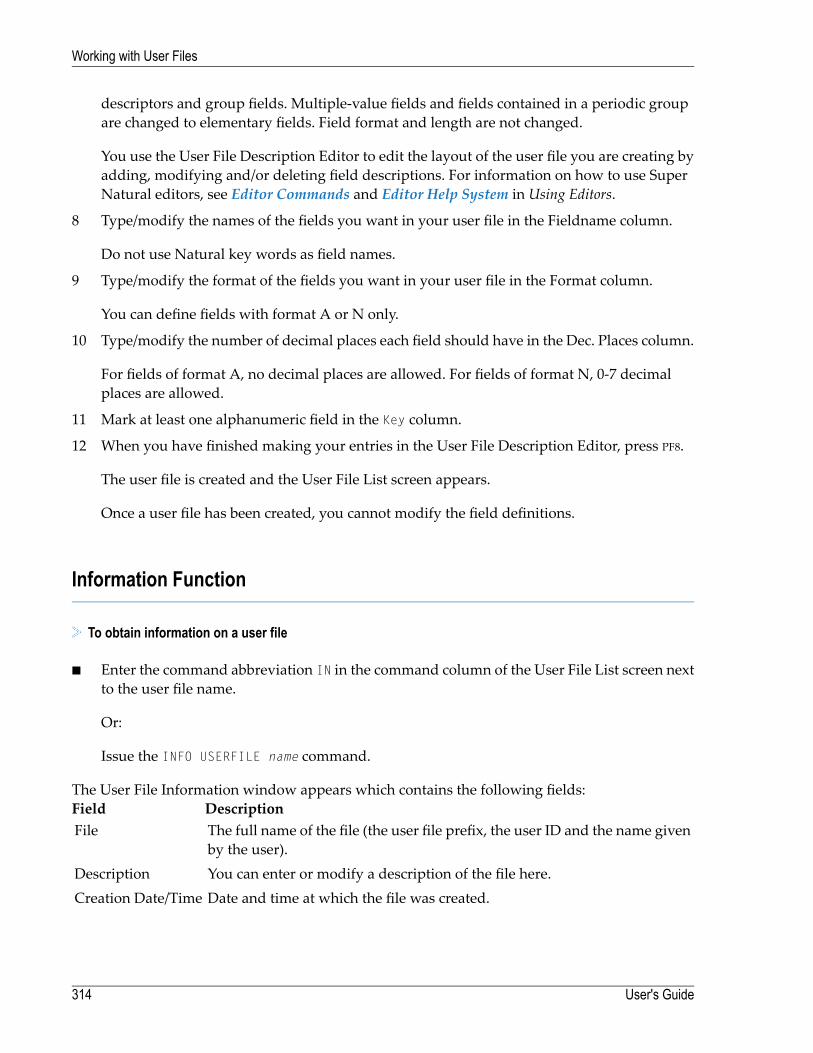
descriptors and group fields. Multiple-value fields and fields contained in a periodic groupare changed to elementary fields. Field format and length are not changed.
You use the User File Description Editor to edit the layout of the user file you are creating byadding, modifying and/or deleting field descriptions. For information on how to use SuperNatural editors, see Editor Commands and Editor Help System in Using Editors.
8 Type/modify the names of the fields you want in your user file in the Fieldname column.
Do not use Natural key words as field names.
9 Type/modify the format of the fields you want in your user file in the Format column.
You can define fields with format A or N only.
10 Type/modify the number of decimal places each field should have in the Dec. Places column.
For fields of format A, no decimal places are allowed. For fields of format N, 0-7 decimalplaces are allowed.
11 Mark at least one alphanumeric field in the Key column.
12 When you have finished making your entries in the User File Description Editor, press PF8.
The user file is created and the User File List screen appears.
Once a user file has been created, you cannot modify the field definitions.
Information Function
To obtain information on a user file
■ Enter the command abbreviation IN in the command column of the User File List screen nextto the user file name.
Or:
Issue the INFO USERFILE name command.
The User File Information window appears which contains the following fields:DescriptionFieldThe full name of the file (the user file prefix, the user ID and the name givenby the user).
File
You can enter or modify a description of the file here.DescriptionDate and time at which the file was created.Creation Date/Time
User's Guide314
Working with User Files
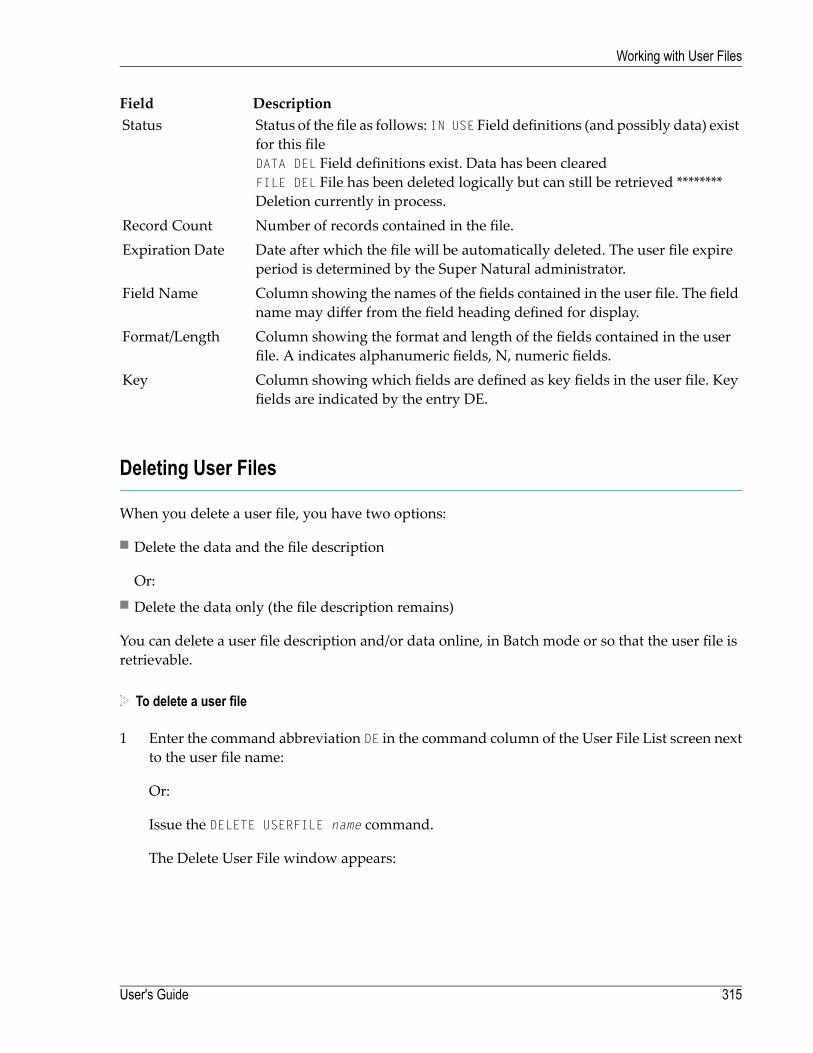
DescriptionFieldStatus of the file as follows: IN USE Field definitions (and possibly data) existfor this fileDATA DEL Field definitions exist. Data has been clearedFILE DEL File has been deleted logically but can still be retrieved ********Deletion currently in process.
Status
Number of records contained in the file.Record CountDate after which the file will be automatically deleted. The user file expireperiod is determined by the Super Natural administrator.
Expiration Date
Column showing the names of the fields contained in the user file. The fieldname may differ from the field heading defined for display.
Field Name
Column showing the format and length of the fields contained in the userfile. A indicates alphanumeric fields, N, numeric fields.
Format/Length
Column showing which fields are defined as key fields in the user file. Keyfields are indicated by the entry DE.
Key
Deleting User Files
When you delete a user file, you have two options:
■ Delete the data and the file description
Or:■ Delete the data only (the file description remains)
You can delete a user file description and/or data online, in Batch mode or so that the user file isretrievable.
To delete a user file
1 Enter the command abbreviation DE in the command column of the User File List screen nextto the user file name:
Or:
Issue the DELETE USERFILE name command.
The Delete User File window appears:
315User's Guide
Working with User Files
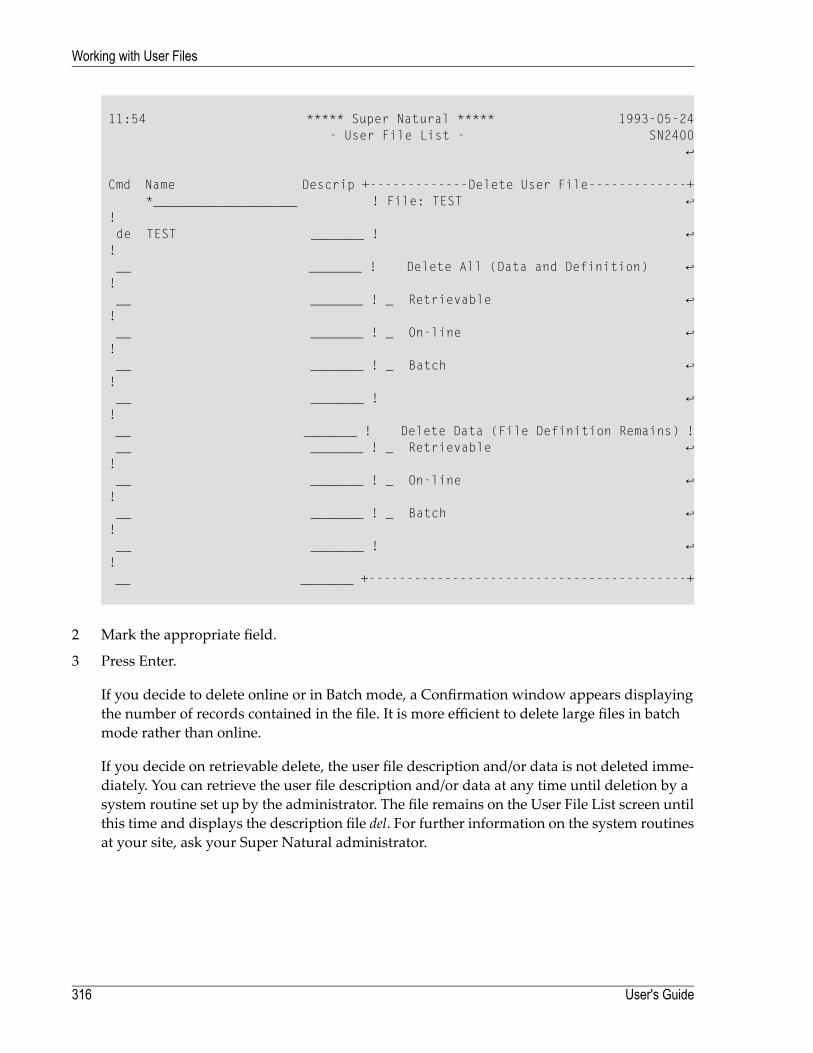
11:54 ***** Super Natural ***** 1993-05-24 - User File List - SN2400 ↩ Cmd Name Descrip +-------------Delete User File-------------+ *___________________ ! File: TEST ↩ ! de TEST _______ ! ↩ ! __ _______ ! Delete All (Data and Definition) ↩ ! __ _______ ! _ Retrievable ↩ ! __ _______ ! _ On-line ↩ ! __ _______ ! _ Batch ↩ ! __ _______ ! ↩ ! __ _______ ! Delete Data (File Definition Remains) ! __ _______ ! _ Retrievable ↩ ! __ _______ ! _ On-line ↩ ! __ _______ ! _ Batch ↩ ! __ _______ ! ↩ ! __ _______ +------------------------------------------+
2 Mark the appropriate field.
3 Press Enter.
If you decide to delete online or in Batch mode, a Confirmation window appears displayingthe number of records contained in the file. It is more efficient to delete large files in batchmode rather than online.
If you decide on retrievable delete, the user file description and/or data is not deleted imme-diately. You can retrieve the user file description and/or data at any time until deletion by asystem routine set up by the administrator. The file remains on the User File List screen untilthis time and displays the description file del. For further information on the system routinesat your site, ask your Super Natural administrator.
User's Guide316
Working with User Files
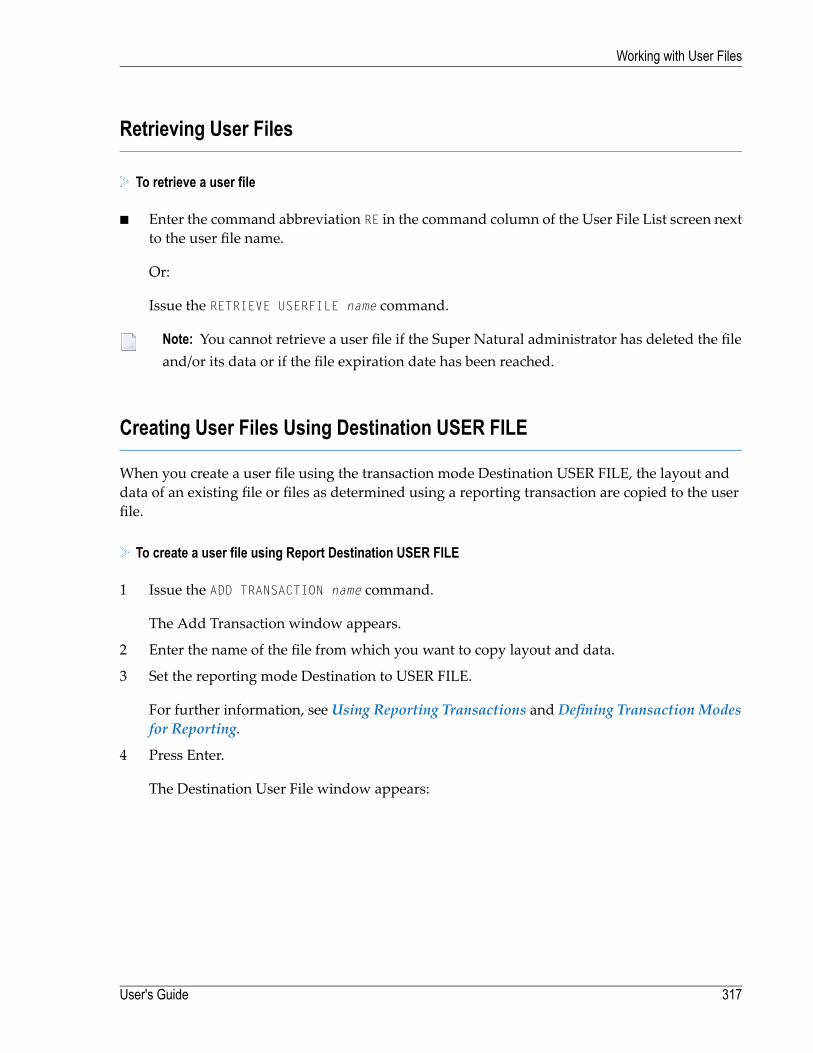
Retrieving User Files
To retrieve a user file
■ Enter the command abbreviation RE in the command column of the User File List screen nextto the user file name.
Or:
Issue the RETRIEVE USERFILE name command.
Note: You cannot retrieve a user file if the Super Natural administrator has deleted the fileand/or its data or if the file expiration date has been reached.
Creating User Files Using Destination USER FILE
When you create a user file using the transaction mode Destination USER FILE, the layout anddata of an existing file or files as determined using a reporting transaction are copied to the userfile.
To create a user file using Report Destination USER FILE
1 Issue the ADD TRANSACTION name command.
The Add Transaction window appears.
2 Enter the name of the file from which you want to copy layout and data.
3 Set the reporting mode Destination to USER FILE.
For further information, see Using Reporting Transactions and Defining Transaction Modesfor Reporting.
4 Press Enter.
The Destination User File window appears:
317User's Guide
Working with User Files
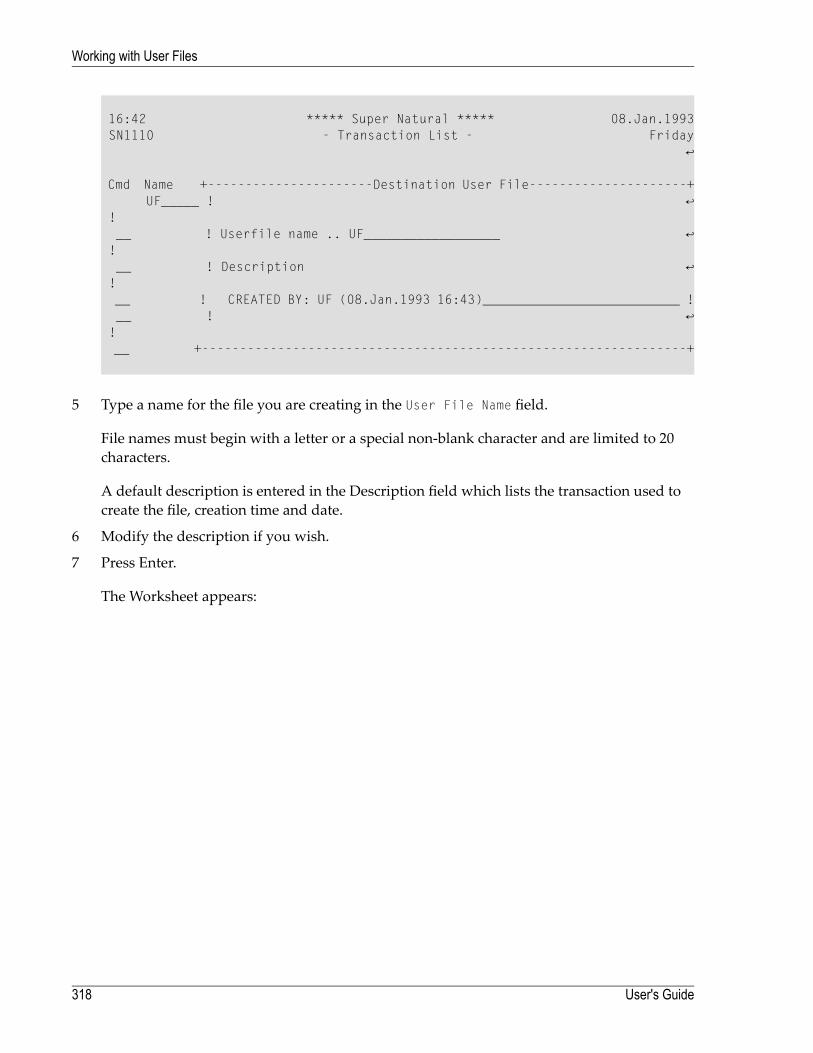
16:42 ***** Super Natural ***** 08.Jan.1993 SN1110 - Transaction List - Friday ↩ Cmd Name +----------------------Destination User File---------------------+ UF_____ ! ↩ ! __ ! Userfile name .. UF__________________ ↩ ! __ ! Description ↩ ! __ ! CREATED BY: UF (08.Jan.1993 16:43)__________________________ ! __ ! ↩ ! __ +----------------------------------------------------------------+
5 Type a name for the file you are creating in the User File Name field.
File names must begin with a letter or a special non-blank character and are limited to 20characters.
A default description is entered in the Description field which lists the transaction used tocreate the file, creation time and date.
6 Modify the description if you wish.
7 Press Enter.
The Worksheet appears:
User's Guide318
Working with User Files
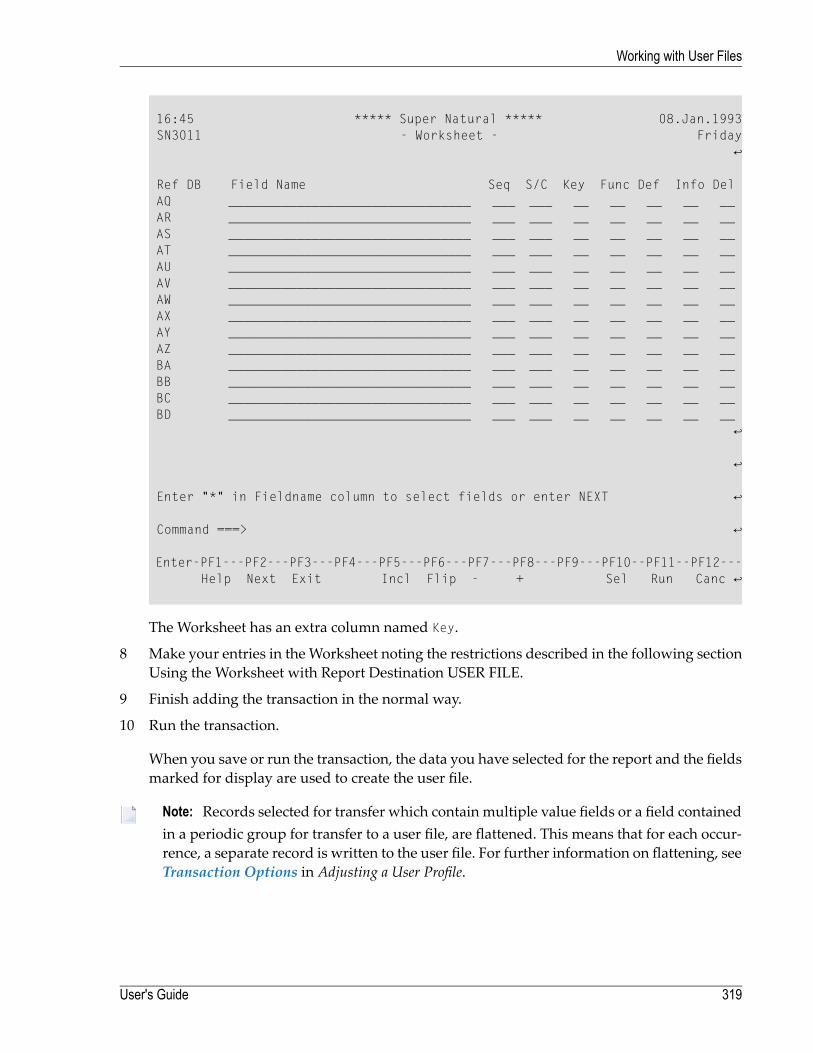
16:45 ***** Super Natural ***** 08.Jan.1993 SN3011 - Worksheet - Friday ↩ Ref DB Field Name Seq S/C Key Func Def Info Del AQ ________________________________ ___ ___ __ __ __ __ __ AR ________________________________ ___ ___ __ __ __ __ __ AS ________________________________ ___ ___ __ __ __ __ __ AT ________________________________ ___ ___ __ __ __ __ __ AU ________________________________ ___ ___ __ __ __ __ __ AV ________________________________ ___ ___ __ __ __ __ __ AW ________________________________ ___ ___ __ __ __ __ __ AX ________________________________ ___ ___ __ __ __ __ __ AY ________________________________ ___ ___ __ __ __ __ __ AZ ________________________________ ___ ___ __ __ __ __ __ BA ________________________________ ___ ___ __ __ __ __ __ BB ________________________________ ___ ___ __ __ __ __ __ BC ________________________________ ___ ___ __ __ __ __ __ BD ________________________________ ___ ___ __ __ __ __ __ ↩ ↩ Enter "*" in Fieldname column to select fields or enter NEXT ↩ Command ===> ↩ Enter-PF1---PF2---PF3---PF4---PF5---PF6---PF7---PF8---PF9---PF10--PF11--PF12--- Help Next Exit Incl Flip - + Sel Run Canc ↩
The Worksheet has an extra column named Key.
8 Make your entries in the Worksheet noting the restrictions described in the following sectionUsing the Worksheet with Report Destination USER FILE.
9 Finish adding the transaction in the normal way.
10 Run the transaction.
When you save or run the transaction, the data you have selected for the report and the fieldsmarked for display are used to create the user file.
Note: Records selected for transfer which contain multiple value fields or a field containedin a periodic group for transfer to a user file, are flattened. This means that for each occur-rence, a separate record is written to the user file. For further information on flattening, seeTransaction Options in Adjusting a User Profile.
319User's Guide
Working with User Files

Using the Worksheet with Report Destination USER FILE
When you are using report Destination USER FILE, the Worksheet has an extra column namedKey and certain restrictions must be observed.
The Key Column
You must mark at least one alphanumeric field as a key field in the Key column. Key fields mustalso be marked with a number in the Sequence column.
Control Breaks
Report Level DETAIL
If you are using the transaction mode Report Level DETAIL, only a sort occurs at control breaksand you cannot use the system functions.
Report Level SUMMARY
If you are using the transaction mode Report Level SUMMARY, you can define one control breakonly.
If you define no control breaks, only the Grand Total is written to the user file - one record!
If you define more than one control break, the break with the highest number is taken and theothers are used as sort levels.
You can only define one system function for each field. If you definemore than one system function,the first found in the following list is performed:
■ Count (Cnt)■ Total (Tot)■ Sum (Sum)■ Average (Avg)■ Maximum (Max)■ Minimum (Min)■ Null Count (NCnt) null values ignored■ Null Average (NAvg) null values ignored■ Null Minimum (NMin) null values ignored
Note: Null values are zero for numeric fields and blank for alphanumeric fields.
If you define no system function for a field but the field is marked in the Sequence column, theold value is taken.
User's Guide320
Working with User Files
Fields
You can only use fields of alphanumeric and numeric format. You cannot use system variables.
Field Length
The field length defined in the Define Field Output window is transferred to the user file. You canchange the field length if you wish.
There are no other restrictions on how you create the transaction.
Transactions with Report Destination USER FILE
When you create a user file by sending a report to destination USER FILE, the transaction is storedin your private library. You can execute the transaction again or copy it directly from the TransactionList screen or modify the transaction and run it again. It is important to know what happens tothe existing user file and any transactions which perform datamaintenance functions on it in eachcase.
Executing Transactions with Report Destination USER FILE
If you execute a transactionwith destinationUSER FILE, the existing user file and data are retainedand additional data is written to the file. Any modifications made to the data in the existing userfile using data maintenance transactions are retained. The corresponding ADD, UPDATE and DELETEtransactions can still be executed. If you used dynamic input fields for data selection, you can alsowrite new data to your file. You are asked to enter the selection criteria value during transactionexecution. You can still use the transactions you have created which use the user file.
Modifying and Running Transactions with Report Destination USER FILE
If you use the Modify Transaction function and run the transaction again, the existing user fileis deleted and a new file is created. Any modifications made to the data in the existing user fileusing data maintenance transactions are lost. The ADD, UPDATE and DELETE transactions remain.The transactions which use the user file remain.
If you have not modified the layout of the user file (selected different fields) and you try to runthe corresponding ADD, UPDATE and DELETE transactions again, a warning message is issued, sincethe file for which they were created no longer exists. However, you can still run the transactions.You can still use the transactions you have created which use the user file.
If you have modified the layout of the file (selected different fields), an error message is issued ifyou try to run the corresponding ADD, UPDATE and DELETE transactions again. An error message isissued if you try to use the transactions you have created which use the user file.
321User's Guide
Working with User Files
Copying Transactions with Report Destination USER FILE
If you use the Copy Transaction function, the destination of the new transaction is changed tothe value set in your User Profile. This is because there cannot bemore than one transactionwhichadds the same user file.
Note: You cannot copy a transaction with the transaction mode Report Destination USERFILE into a common library.
User's Guide322
Working with User Files
21 Working with Data Maintenance Transactions
■ What are Data Maintenance Transactions? ......................................................................................... 324■ Listing Transactions ....................................................................................................................... 324■ Adding Data Maintenance Transactions ............................................................................................. 325■ Adding Data ................................................................................................................................. 328■ Updating Data ............................................................................................................................... 332■ Deleting Data ................................................................................................................................ 335
323
This section describes how to perform the data maintenance functions available in Super Natural.
This section covers the following topics:
■ What are Data Maintenance Transactions?■ Listing Transactions■ Adding Data Maintenance Transactions■ Adding Data■ Updating Data■ Deleting Data
What are Data Maintenance Transactions?
Datamaintenance transactions are transactionswhich you can use to perform the datamaintenancefunctions Add, Update and Delete. The type of data maintenance function you perform dependson the setting of your data maintenance mode Report Type.
You cannot use data maintenance transactions to modify field definitions or add new fields.
Data maintenance transactions are intended for use with your user files only. Do not perform datamaintenance functions on database files without asking your Super Natural administrator.
The Super Natural administrator decides whether you may perform data maintenance, on whichfiles and at which level.
Note: Data maintenance transactions can use primary and secondary files, but not lookupfiles.
If you set the transaction mode Logging to Y, you can write a report containing the data that hasbeen processed in a data maintenance transaction to a printer, the Natural program editor or toCon-nect. For further information, see Defining Transaction Modes for Data Maintenance.
Listing Transactions
To obtain a list of transactions
■ Select the object Transactions from the Menu.
Or:
Issue the TRANSACTION command.
User's Guide324
Working with Data Maintenance Transactions
The List Transactions screen appears.
The Transaction List screen functions in the sameway as all object list screens in SuperNatural.For general information on how to use object list screens, seeObject List Screens in StartingUp.
The List Transactions screen lists both reporting and data maintenance transactions.
Adding Data Maintenance Transactions
To add a data maintenance transaction
1 Enter a new transaction name in the Name column of the List Transactions screen in the inputfield next to the Add field.
Or:
Issue the ADD TRANSACTION name command.
The Add Transaction window appears.
Note: You can use the CHECKLIST function and the NEXT function to help you add andmodify datamaintenance transactions. For further information, seeUsing SuperNatural.
325User's Guide
Working with Data Maintenance Transactions
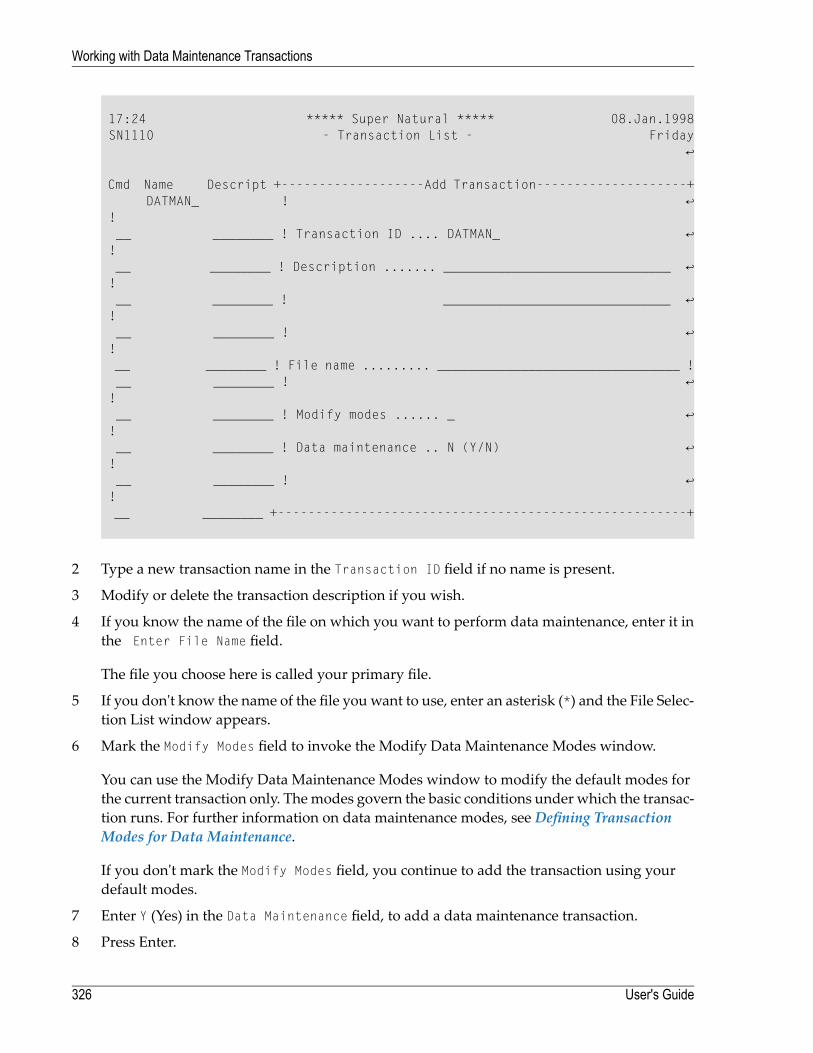
17:24 ***** Super Natural ***** 08.Jan.1998 SN1110 - Transaction List - Friday ↩ Cmd Name Descript +-------------------Add Transaction--------------------+ DATMAN_ ! ↩ ! __ ________ ! Transaction ID .... DATMAN_ ↩ ! __ ________ ! Description ....... ______________________________ ↩ ! __ ________ ! ______________________________ ↩ ! __ ________ ! ↩ ! __ ________ ! File name ......... ________________________________ ! __ ________ ! ↩ ! __ ________ ! Modify modes ...... _ ↩ ! __ ________ ! Data maintenance .. N (Y/N) ↩ ! __ ________ ! ↩ ! __ ________ +------------------------------------------------------+
2 Type a new transaction name in the Transaction ID field if no name is present.
3 Modify or delete the transaction description if you wish.
4 If you know the name of the file on which you want to perform data maintenance, enter it inthe Enter File Name field.
The file you choose here is called your primary file.
5 If you don't know the name of the file you want to use, enter an asterisk (*) and the File Selec-tion List window appears.
6 Mark the Modify Modes field to invoke the Modify Data Maintenance Modes window.
You can use the Modify Data Maintenance Modes window to modify the default modes forthe current transaction only. Themodes govern the basic conditions under which the transac-tion runs. For further information on data maintenance modes, see Defining TransactionModes for Data Maintenance.
If you don't mark the Modify Modes field, you continue to add the transaction using yourdefault modes.
7 Enter Y (Yes) in the Data Maintenance field, to add a data maintenance transaction.
8 Press Enter.
User's Guide326
Working with Data Maintenance Transactions
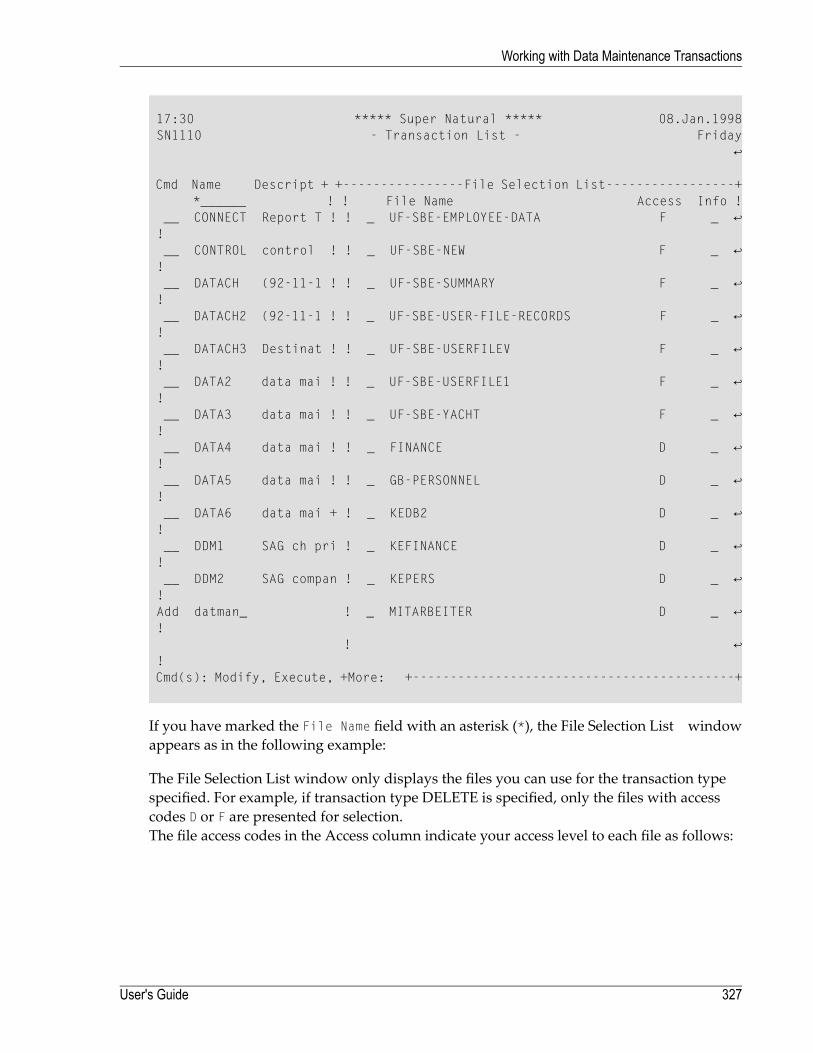
17:30 ***** Super Natural ***** 08.Jan.1998 SN1110 - Transaction List - Friday ↩ Cmd Name Descript + +----------------File Selection List-----------------+ *______ ! ! File Name Access Info ! __ CONNECT Report T ! ! _ UF-SBE-EMPLOYEE-DATA F _ ↩ ! __ CONTROL control ! ! _ UF-SBE-NEW F _ ↩ ! __ DATACH (92-11-1 ! ! _ UF-SBE-SUMMARY F _ ↩ ! __ DATACH2 (92-11-1 ! ! _ UF-SBE-USER-FILE-RECORDS F _ ↩ ! __ DATACH3 Destinat ! ! _ UF-SBE-USERFILEV F _ ↩ ! __ DATA2 data mai ! ! _ UF-SBE-USERFILE1 F _ ↩ ! __ DATA3 data mai ! ! _ UF-SBE-YACHT F _ ↩ ! __ DATA4 data mai ! ! _ FINANCE D _ ↩ ! __ DATA5 data mai ! ! _ GB-PERSONNEL D _ ↩ ! __ DATA6 data mai + ! _ KEDB2 D _ ↩ ! __ DDM1 SAG ch pri ! _ KEFINANCE D _ ↩ ! __ DDM2 SAG compan ! _ KEPERS D _ ↩ ! Add datman_ ! _ MITARBEITER D _ ↩ ! ! ↩ ! Cmd(s): Modify, Execute, +More: +-------------------------------------------+
If you have marked the File Name field with an asterisk (*), the File Selection List windowappears as in the following example:
The File Selection List window only displays the files you can use for the transaction typespecified. For example, if transaction type DELETE is specified, only the files with accesscodes D or F are presented for selection.The file access codes in the Access column indicate your access level to each file as follows:
327User's Guide
Working with Data Maintenance Transactions
DescriptionFile Access Code
Update (includes read). You can update existing records to this file.U
Add (includes update). You can add new records to this file.A
Delete (includes add). You can delete records in this file.D
This file is being deleted. Access is not possible.*
Superfile. For further information on superfiles, see Defining Files.S
User file. All datamaintenance functions are available (read, add, update and delete).For further information on user files, seeWorking with User Files.
F
9 Choose your primary file.
10 Mark the Information column to obtain an extended file description from the data dictionaryPredict. This feature is only available at sites where Predict is installed.
No dictionary information is available for user files.
11 Press Enter.
What happens now is dependent on the Transaction Type specified. The four differentTransaction Types for data maintenance are described in the following sections.
Adding Data
To add data
1 Add a data maintenance transaction of Transaction Type ADD.
The following version of the Worksheet appears:
User's Guide328
Working with Data Maintenance Transactions
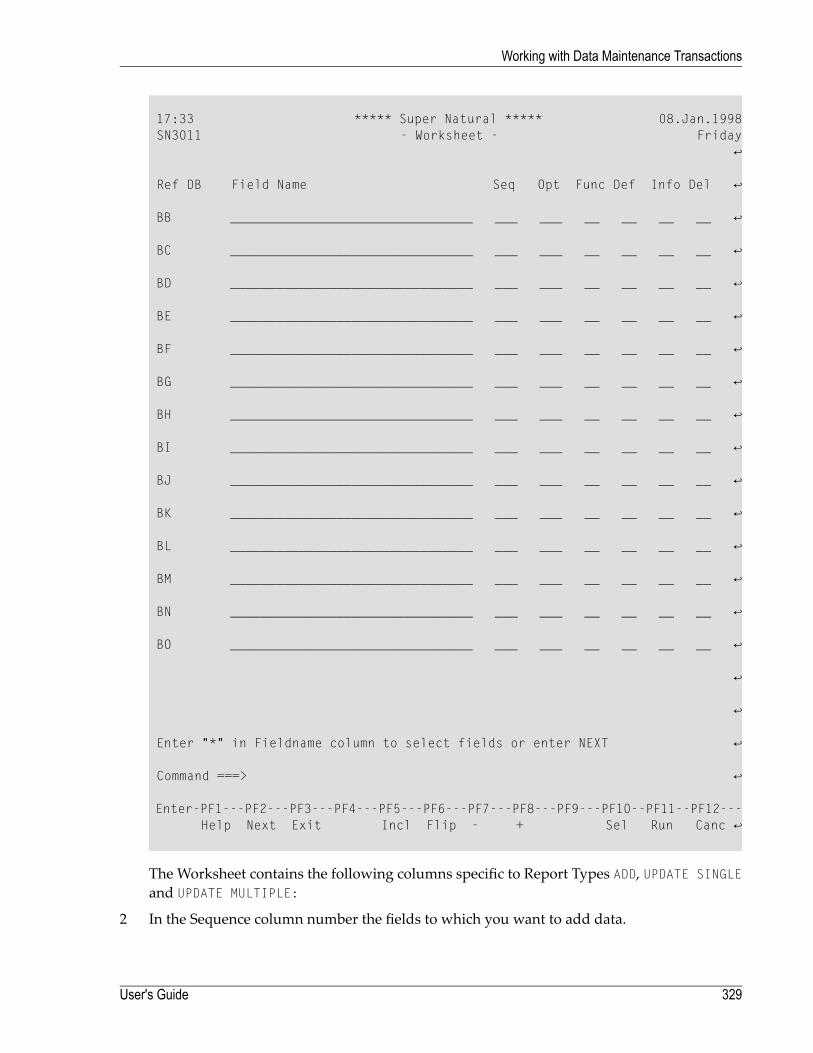
17:33 ***** Super Natural ***** 08.Jan.1998 SN3011 - Worksheet - Friday ↩ Ref DB Field Name Seq Opt Func Def Info Del ↩ BB ________________________________ ___ ___ __ __ __ __ ↩ BC ________________________________ ___ ___ __ __ __ __ ↩ BD ________________________________ ___ ___ __ __ __ __ ↩ BE ________________________________ ___ ___ __ __ __ __ ↩ BF ________________________________ ___ ___ __ __ __ __ ↩ BG ________________________________ ___ ___ __ __ __ __ ↩ BH ________________________________ ___ ___ __ __ __ __ ↩ BI ________________________________ ___ ___ __ __ __ __ ↩ BJ ________________________________ ___ ___ __ __ __ __ ↩ BK ________________________________ ___ ___ __ __ __ __ ↩ BL ________________________________ ___ ___ __ __ __ __ ↩ BM ________________________________ ___ ___ __ __ __ __ ↩ BN ________________________________ ___ ___ __ __ __ __ ↩ BO ________________________________ ___ ___ __ __ __ __ ↩ ↩ ↩ Enter "*" in Fieldname column to select fields or enter NEXT ↩ Command ===> ↩ Enter-PF1---PF2---PF3---PF4---PF5---PF6---PF7---PF8---PF9---PF10--PF11--PF12--- Help Next Exit Incl Flip - + Sel Run Canc ↩
The Worksheet contains the following columns specific to Report Types ADD, UPDATE SINGLEand UPDATE MULTIPLE:
2 In the Sequence column number the fields to which you want to add data.
329User's Guide
Working with Data Maintenance Transactions
3 In the Option column enter one of the following codes for each fieldmarked in the Selectioncolumn:
DescriptionCode
Indicates a required field. You must supply a value for a required field.R
Indicates that the contents you add to this field will be copied to the next record. (TransactionType ADD only)
C
Indicates that the field will be displayed for information only, you may not update it.If you leave this column blank, you can choose whether you want to update the field when it isdisplayed. (Transaction Types UPDATE SINGLE and UPDATE MULTIPLE) or whether you wantto add a value to it (Transaction Type ADD).
D
The other columns function as described in the section The Worksheet earlier in this docu-mentation.
When you have finishedmaking entries on theWorksheet, you can specify logical conditions,calculation or file linking if you wish. You cannot specify selection criteria.
4 Issue the RUN command.
The fields you have chosen in the Sequence column of the Worksheet are displayed. Youcan now supply your own values.
Before you supply your own value, the fields are filled with map filling characters . Mapfilling characters allow you to distinguish between alphanumeric and numeric fields. Theyalso indicate field length. You can define which characters you want to use as map fillingcharacters by changing your transaction optionMap FillingCharacter. For further information,see Adjusting a User Profile. The recommended characters are the underscore (_) for alpha-numeric and the full stop ( . ) for numeric fields.
When you add data, the occurrences of multiple-value fields and periodic groups arepresented in separate records. This is called flattening records. For further information onflattening, see Transaction Options in Adjusting a User Profile.
5 To add data, type in a value (overtype the map filling characters).
6 Press Enter or PF3.
If you have assigned a value to a field in the Calculation Editor, the value you assigned doesnot appear but overrides any entries you make for the field here.
The following is an example of the output for an ADD transaction:
User's Guide330
Working with Data Maintenance Transactions

17:39:21 1998-01-08 IDATMAN 0 ↩ ↩ ↩ TITLE .......................... ____________________ ↩ SURNAME ........................ ____________________ ↩ FIRST-NAME-1 ................... ____________________ ↩ ↩ ↩ ↩ ↩ ↩ ↩ ↩ ↩ ↩ ↩ ↩ ↩ ↩ ↩ ↩ Enter-PF1---PF2---PF3---PF4---PF5---PF6---PF7---PF8---PF9---PF10--PF11--PF12--- Exit Add Flip Canc ↩
331User's Guide
Working with Data Maintenance Transactions
Updating Data
You can use two transaction types to update data: UPDATE SINGLE and UPDATE MULTIPLE.
When you update data, the occurrences ofmultiple-value fields and periodic groups are presentedin separate records. This is called flattening records. For further information on flattening, seeTransaction Options in Adjusting a User Profile.
Note: You cannot update subfields (redefined database fields defined in the Define UserField window).
Displaying Single Records
To update data displaying records singly
1 Add a data maintenance transaction of Transaction Type UPDATE SINGLE.
The version of the Worksheet specific to Report Types ADD, UPDATE SINGLE and UPDATEMULTIPLE appears. This version of the Worksheet is described in the section Adding Data.
2 Make your entries on the Worksheet.
3 Specify selection criteria.
4 Specify logical conditions or calculation, file linking and lookup if you wish.
5 Issue the RUN command.
The records found are displayed consecutively. The fields for each record are displayed ver-tically and may cover more than one screen.
6 To update a record, overtype the current entries.
7 To display the next record, press Enter.
The following is an example of the output for an UPDATE SINGLE transaction:
User's Guide332
Working with Data Maintenance Transactions
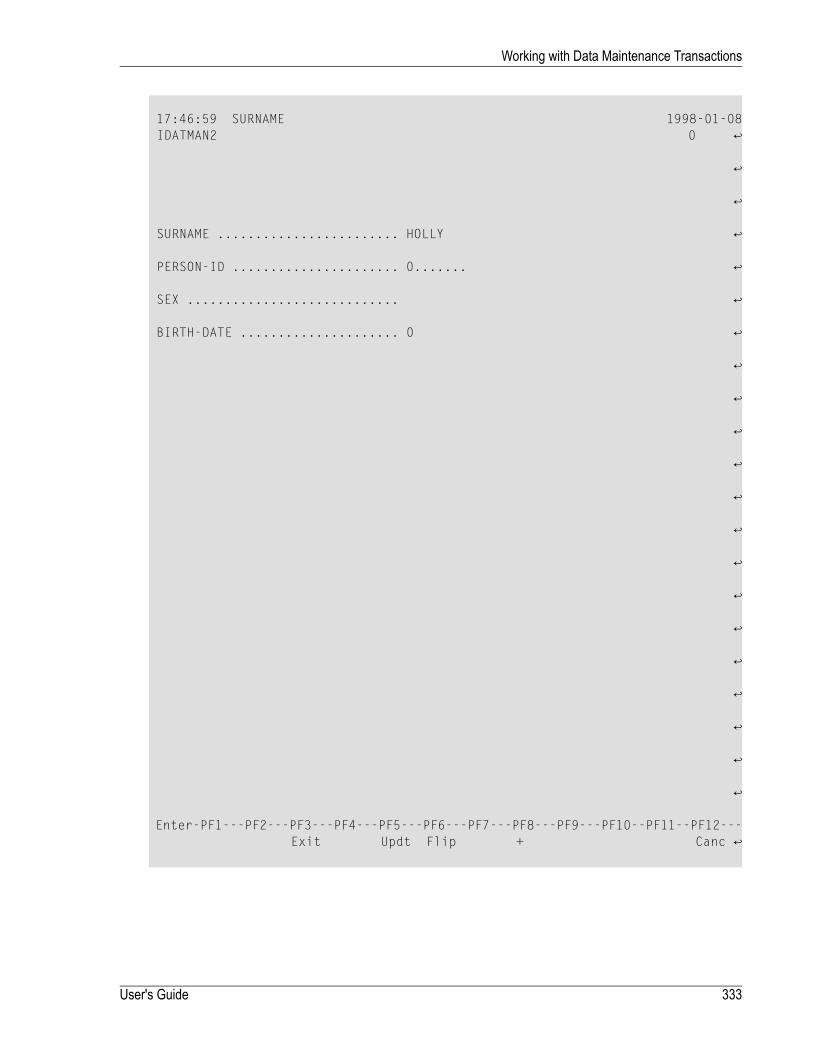
17:46:59 SURNAME 1998-01-08 IDATMAN2 0 ↩ ↩ ↩ SURNAME ........................ HOLLY ↩ PERSON-ID ...................... 0....... ↩ SEX ............................ ↩ BIRTH-DATE ..................... 0 ↩ ↩ ↩ ↩ ↩ ↩ ↩ ↩ ↩ ↩ ↩ ↩ ↩ ↩ ↩ Enter-PF1---PF2---PF3---PF4---PF5---PF6---PF7---PF8---PF9---PF10--PF11--PF12--- Exit Updt Flip + Canc ↩
333User's Guide
Working with Data Maintenance Transactions
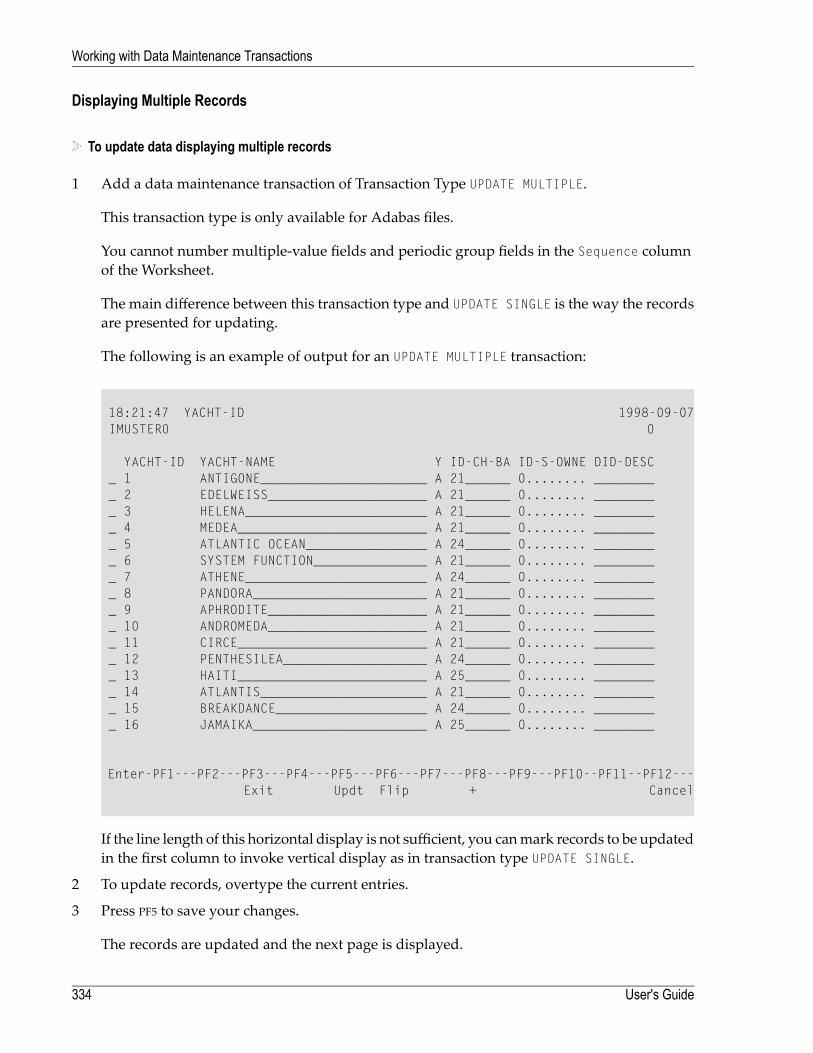
Displaying Multiple Records
To update data displaying multiple records
1 Add a data maintenance transaction of Transaction Type UPDATE MULTIPLE.
This transaction type is only available for Adabas files.
You cannot number multiple-value fields and periodic group fields in the Sequence columnof the Worksheet.
The main difference between this transaction type and UPDATE SINGLE is the way the recordsare presented for updating.
The following is an example of output for an UPDATE MULTIPLE transaction:
18:21:47 YACHT-ID 1998-09-07IMUSTER0 0
YACHT-ID YACHT-NAME Y ID-CH-BA ID-S-OWNE DID-DESC_ 1 ANTIGONE______________________ A 21______ 0........ _________ 2 EDELWEISS_____________________ A 21______ 0........ _________ 3 HELENA________________________ A 21______ 0........ _________ 4 MEDEA_________________________ A 21______ 0........ _________ 5 ATLANTIC OCEAN________________ A 24______ 0........ _________ 6 SYSTEM FUNCTION_______________ A 21______ 0........ _________ 7 ATHENE________________________ A 24______ 0........ _________ 8 PANDORA_______________________ A 21______ 0........ _________ 9 APHRODITE_____________________ A 21______ 0........ _________ 10 ANDROMEDA_____________________ A 21______ 0........ _________ 11 CIRCE_________________________ A 21______ 0........ _________ 12 PENTHESILEA___________________ A 24______ 0........ _________ 13 HAITI_________________________ A 25______ 0........ _________ 14 ATLANTIS______________________ A 21______ 0........ _________ 15 BREAKDANCE____________________ A 24______ 0........ _________ 16 JAMAIKA_______________________ A 25______ 0........ ________
Enter-PF1---PF2---PF3---PF4---PF5---PF6---PF7---PF8---PF9---PF10--PF11--PF12---Exit Updt Flip + Cancel
If the line length of this horizontal display is not sufficient, you canmark records to be updatedin the first column to invoke vertical display as in transaction type UPDATE SINGLE.
2 To update records, overtype the current entries.
3 Press PF5 to save your changes.
The records are updated and the next page is displayed.
User's Guide334
Working with Data Maintenance Transactions
Deleting Data
Deleting Records Singly
To delete data
1 Add a data maintenance transaction of Transaction Type DELETE.
The Worksheet appears as described in the sectionWorksheet.
2 Continue to add a transaction which selects all the records you want to delete.
The fields you select to be displayed allow you to review each record before deletion.
3 Specify logical conditions, calculation or file linking if you wish.
4 Issue the RUN command.
Each record is presented separately for review.
5 To continue to the next record without deleting, press Enter or PF8 (page one page forwards).
6 To delete a record, press PF3 (delete).
The entire record is deleted, not just the fields selected for display. Only the records displayedare deleted.
Deleting the Contents of a User File
You can delete all the records in a user file using the Delete User File Data Only function de-scribed in the section User Files.
335User's Guide
Working with Data Maintenance Transactions

336
22 Command List
■ A ................................................................................................................................................ 338■ B ................................................................................................................................................ 340■ C ................................................................................................................................................ 342■ D ................................................................................................................................................ 343■ E ................................................................................................................................................ 344■ F ................................................................................................................................................ 345■ G ................................................................................................................................................ 346■ H ................................................................................................................................................ 347■ I ................................................................................................................................................. 347■ J ................................................................................................................................................ 348■ K ................................................................................................................................................ 348■ L ................................................................................................................................................ 348■ M ............................................................................................................................................... 349■ N ................................................................................................................................................ 350■ O ................................................................................................................................................ 350■ P ................................................................................................................................................ 351■ Q ................................................................................................................................................ 352■ R ................................................................................................................................................ 352■ S ................................................................................................................................................ 353■ T ................................................................................................................................................ 356■ U ................................................................................................................................................ 357■ V ................................................................................................................................................ 357■ W ............................................................................................................................................... 357■ X ................................................................................................................................................ 358■ Y ................................................................................................................................................ 358■ Z ................................................................................................................................................ 358■ Special Characters ......................................................................................................................... 358
337
This section lists the following:
■ The commands known to Super Natural■ The shortest possible abbreviation of each command (underlined)■ A description of each command.■ Where to issue each command.
Super Natural commands are language-dependent!
This appendix is available online when youmark a command in the Command List windowwiththe cursor position and press PF1.
This section covers the following topics:
[ A | B | C | D | E | F | G | H | I | J | K | L |M | N | O | P | Q | R | S | T | U | V |W | X | Y| Z | Special Characters ]
A
A BACKWARD
Pages one page backwards in section A of the Layout Editor.
■ Issue from the Layout Editor.
A BOTTOM
Pages to last page in section A of the Layout Editor.
■ Issue from the Layout Editor.
A DELIMITER
Invokes delimiter information in section A of the Layout Editor.
■ Issue from the Layout Editor.
A FORWARD
Pages one page forwards.
■ Issue from the Layout Editor.
User's Guide338
Command List
A LEFT
Displays data to the left of your present screen contents if you havemore columns in a report thanyou can see at one time.
■ Issue from the Layout Editor.
A LINE line-number
Pages to the line number specified in section A of the Layout Editor.
■ Issue from the Layout Editor.
A RIGHT
Displays data to the right of your present screen contents if you have more columns in a reportthan you can see at one time.
■ Issue from the Layout Editor.
A SCAN field-name
Pages to the field named (only if section A is displaying transaction fields)
■ Issue from the Layout Editor.
A TOP
Pages to first page.
■ Issue from the Layout Editor.
A TRANSACTION
Invokes transaction field information in section A of the Layout Editor.
■ Issue from the Layout Editor.
ADD object-type object-name
Invokes the appropriate add object window with the new object name already entered.
Use with the following object types:
■ Transaction■ Application program■ User file■ Issue from the Menu and list object screens.
339User's Guide
Command List
Note: If the list object screen for the type of object you want to add is displayed, you neednot specify object type.
ALL
Selects all the fields contained in the file(s) you are using and enters them in the Fieldname columnof the Worksheet.
■ Issue from the Worksheet.
APPLICATION
Invokes the List Application screen.
■ Issue from the Menu and list object screens.
ARRAY
Invokes the Array Editing window from the command column in the Layout Field List screen.
■ Issue from Display Layout Element screen.
B
B BACKWARD
Pages one page backwards in section B of the Layout Editor.
■ Issue from the Layout Editor.
B BOTTOM
Pages to last page.
■ Issue from the Layout Editor in section B of the Layout Editor.
B DELIMITER
Invokes delimiter information in section B of the Layout Editor.
■ Issue from the Layout Editor.
B FORWARD
Pages one page forwards in section B of the Layout Editor.
■ Issue from the Layout Editor.
User's Guide340
Command List
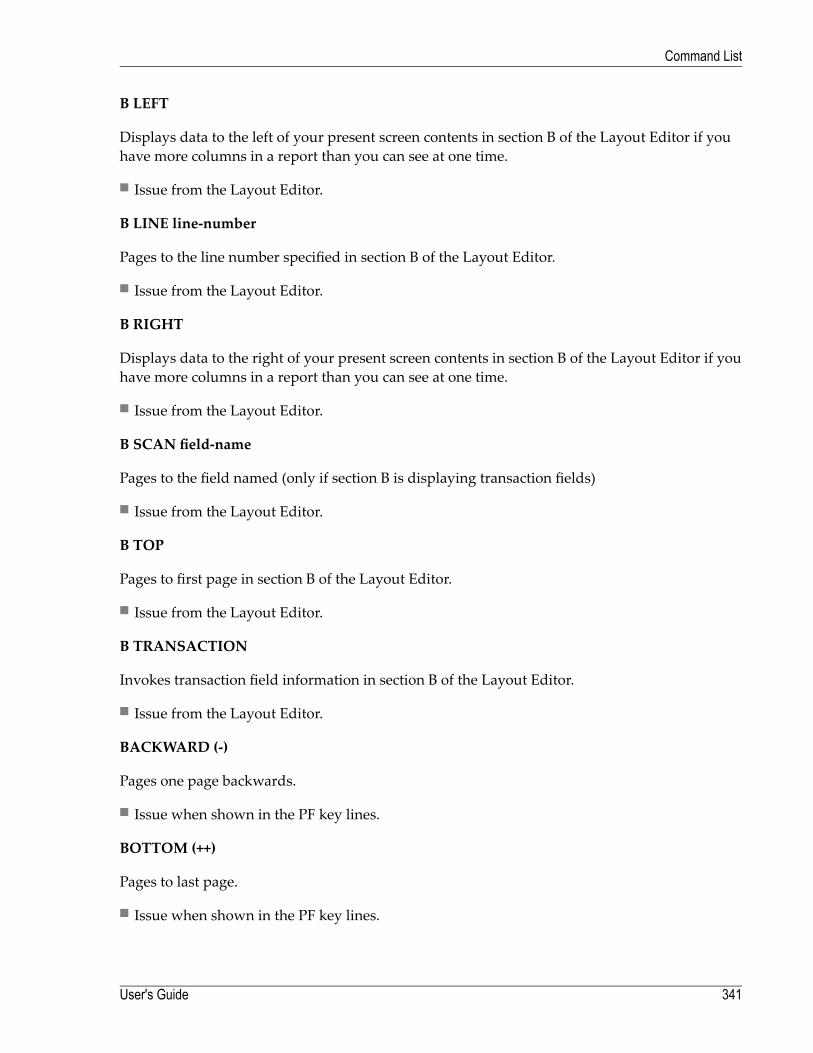
B LEFT
Displays data to the left of your present screen contents in section B of the Layout Editor if youhave more columns in a report than you can see at one time.
■ Issue from the Layout Editor.
B LINE line-number
Pages to the line number specified in section B of the Layout Editor.
■ Issue from the Layout Editor.
B RIGHT
Displays data to the right of your present screen contents in section B of the Layout Editor if youhave more columns in a report than you can see at one time.
■ Issue from the Layout Editor.
B SCAN field-name
Pages to the field named (only if section B is displaying transaction fields)
■ Issue from the Layout Editor.
B TOP
Pages to first page in section B of the Layout Editor.
■ Issue from the Layout Editor.
B TRANSACTION
Invokes transaction field information in section B of the Layout Editor.
■ Issue from the Layout Editor.
BACKWARD (-)
Pages one page backwards.
■ Issue when shown in the PF key lines.
BOTTOM (++)
Pages to last page.
■ Issue when shown in the PF key lines.
341User's Guide
Command List
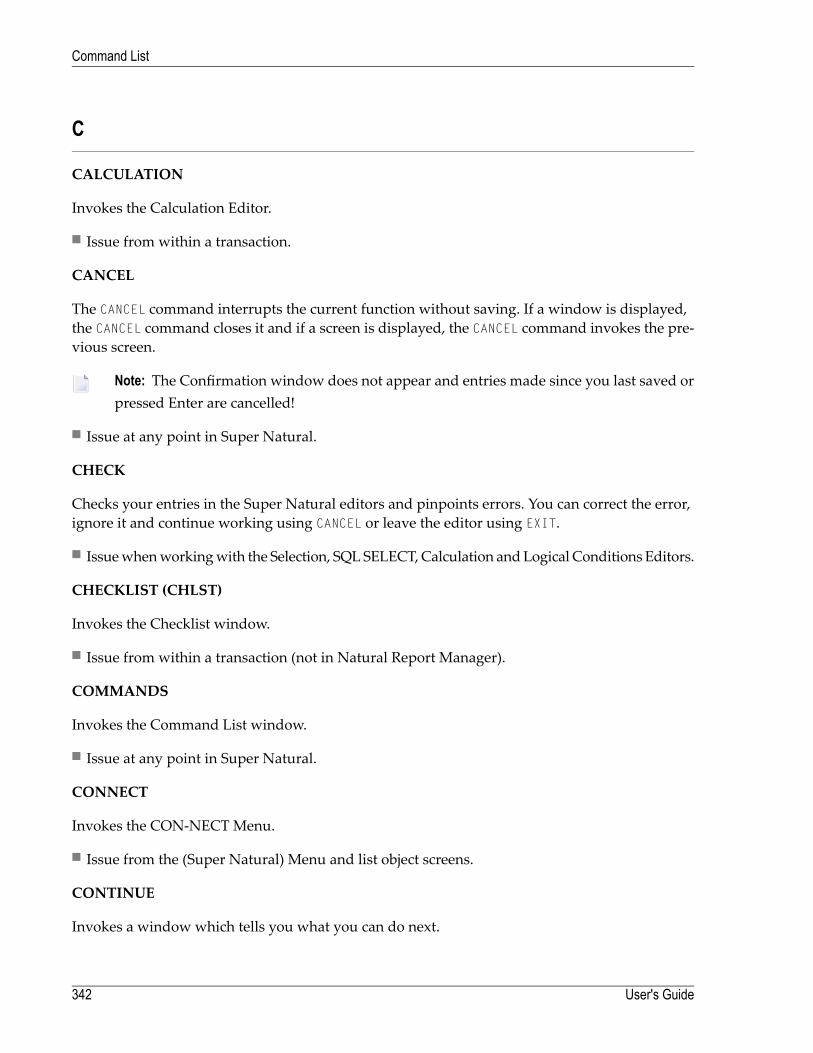
C
CALCULATION
Invokes the Calculation Editor.
■ Issue from within a transaction.
CANCEL
The CANCEL command interrupts the current function without saving. If a window is displayed,the CANCEL command closes it and if a screen is displayed, the CANCEL command invokes the pre-vious screen.
Note: The Confirmation window does not appear and entries made since you last saved orpressed Enter are cancelled!
■ Issue at any point in Super Natural.
CHECK
Checks your entries in the Super Natural editors and pinpoints errors. You can correct the error,ignore it and continue working using CANCEL or leave the editor using EXIT.
■ Issuewhenworkingwith the Selection, SQLSELECT,Calculation andLogical Conditions Editors.
CHECKLIST (CHLST)
Invokes the Checklist window.
■ Issue from within a transaction (not in Natural Report Manager).
COMMANDS
Invokes the Command List window.
■ Issue at any point in Super Natural.
CONNECT
Invokes the CON-NECT Menu.
■ Issue from the (Super Natural) Menu and list object screens.
CONTINUE
Invokes a window which tells you what you can do next.
User's Guide342
Command List

■ Issue from the Selection, Calculation and Logical Conditions Editors.
COPY object-type object-name [target-name] [target-library]
Copies the named object within a library or to another library. Usewith the following object types:
■ Transaction■ Prototype program■ Application program■ Issue from the Menu, Worksheet and list object screens.
Note: If the list object screen for the type of object you want to copy is displayed, you neednot specify object type.
COUNT
Counts the number of records found by the present transaction but does not display the resultingdata.
■ Issue from within a transaction.
Note: The COUNT command disregards lookup files.
D
DELETE
Deletes edit lines in all editors (not the Layout Editor).
■ Issue from any Super Natural editor except the Layout Editor.
DELETE object-type object-name
Deletes the named object. Use with the following object types:
■ Transaction■ Prototype program■ Application program■ User file■ Issue from the Menu, Worksheet and list object screens.
Note: If the list object screen for the type of object you want to delete is displayed, you neednot specify object type.
343User's Guide
Command List
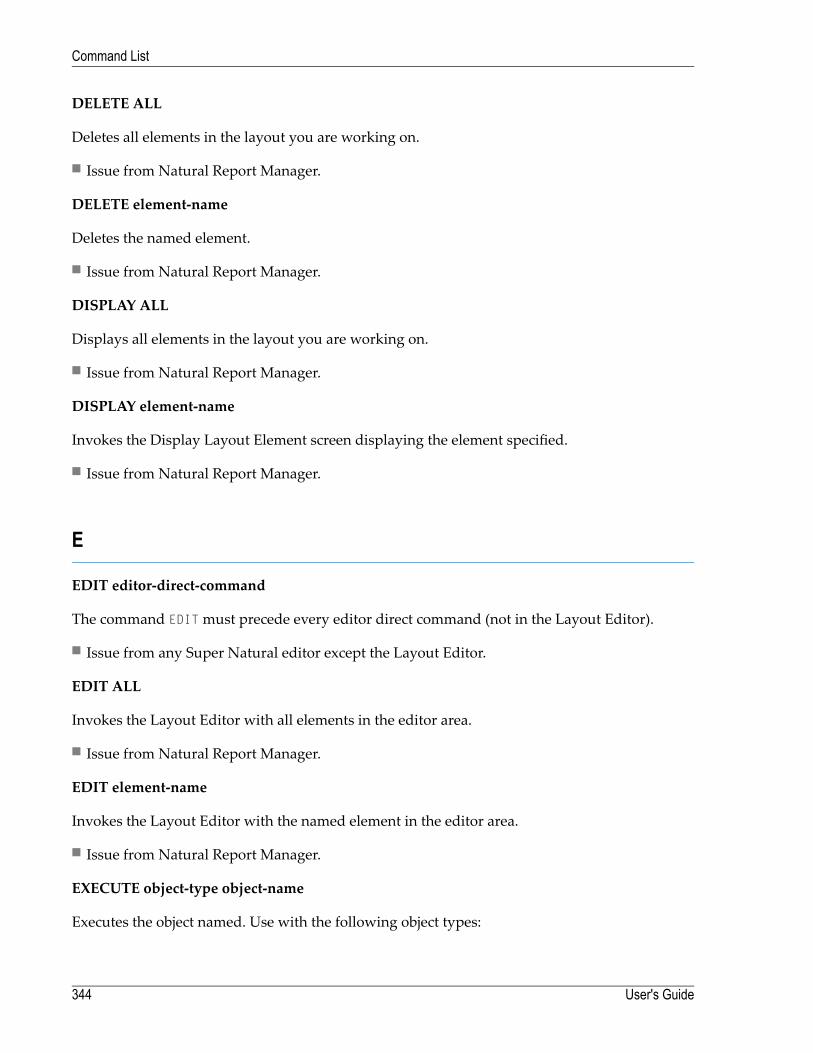
DELETE ALL
Deletes all elements in the layout you are working on.
■ Issue from Natural Report Manager.
DELETE element-name
Deletes the named element.
■ Issue from Natural Report Manager.
DISPLAY ALL
Displays all elements in the layout you are working on.
■ Issue from Natural Report Manager.
DISPLAY element-name
Invokes the Display Layout Element screen displaying the element specified.
■ Issue from Natural Report Manager.
E
EDIT editor-direct-command
The command EDITmust precede every editor direct command (not in the Layout Editor).
■ Issue from any Super Natural editor except the Layout Editor.
EDIT ALL
Invokes the Layout Editor with all elements in the editor area.
■ Issue from Natural Report Manager.
EDIT element-name
Invokes the Layout Editor with the named element in the editor area.
■ Issue from Natural Report Manager.
EXECUTE object-type object-name
Executes the object named. Use with the following object types:
User's Guide344
Command List
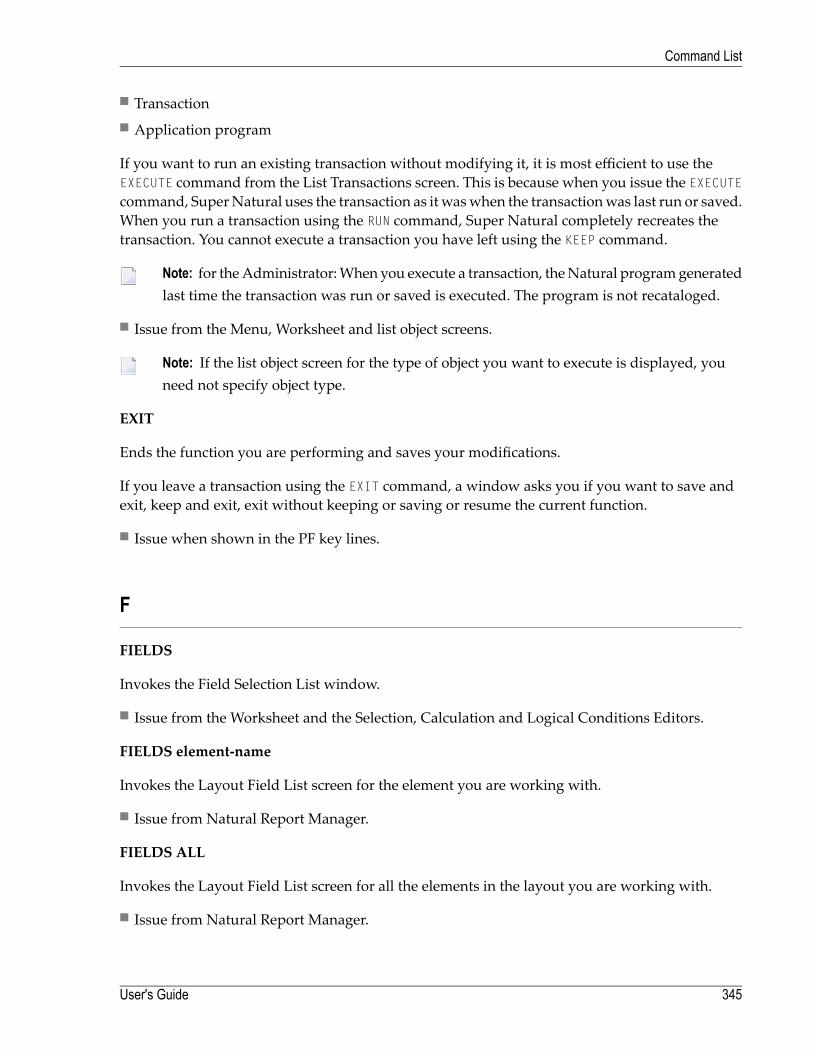
■ Transaction■ Application program
If you want to run an existing transaction without modifying it, it is most efficient to use theEXECUTE command from the List Transactions screen. This is because when you issue the EXECUTEcommand, SuperNatural uses the transaction as it waswhen the transactionwas last run or saved.When you run a transaction using the RUN command, Super Natural completely recreates thetransaction. You cannot execute a transaction you have left using the KEEP command.
Note: for theAdministrator:When you execute a transaction, theNatural programgeneratedlast time the transaction was run or saved is executed. The program is not recataloged.
■ Issue from the Menu, Worksheet and list object screens.
Note: If the list object screen for the type of object you want to execute is displayed, youneed not specify object type.
EXIT
Ends the function you are performing and saves your modifications.
If you leave a transaction using the EXIT command, a window asks you if you want to save andexit, keep and exit, exit without keeping or saving or resume the current function.
■ Issue when shown in the PF key lines.
F
FIELDS
Invokes the Field Selection List window.
■ Issue from the Worksheet and the Selection, Calculation and Logical Conditions Editors.
FIELDS element-name
Invokes the Layout Field List screen for the element you are working with.
■ Issue from Natural Report Manager.
FIELDS ALL
Invokes the Layout Field List screen for all the elements in the layout you are working with.
■ Issue from Natural Report Manager.
345User's Guide
Command List
FLIP
Displays the twelve PF keys not currently on view.
For example, if the keys PF1 to PF12 are displayed, the FLIP command displays the keys PF12 toPF24.
Whichever twelve keys are displayed, you can still use any of the other twelve keys which has afunction allocated to it.
■ Issue at any point in Super Natural.
Note: This command does not apply if you are using the SAA PF key format.
FORWARD (+)
Pages one page forwards.
■ Issue when shown in the PF key lines.
FULL
Invokes the Layout Editor with full screen editor area.
■ Issue from the Layout Editor.
G
GENERATE PROTOTYPE
Generates a prototype program from the transaction you are working on. You cannot generate aprototype program from a transaction which is not finished.
■ Issue from within a transaction.
GENERATE RPC
Generates an RPC Service from the transaction you are working on. You cannot generate an RPCService from a transaction which is not finished.
■ Issue from within a transaction.
User's Guide346
Command List
H
HELP
Invokes the Super Natural help system.
■ Issue at any point in Super Natural except when already using the help system.
I
INCLUDE
Invokes the Include Files window where you can do the following:
■ Change the original primary file (as long as no fields have been used or user fields defined)■ Define/change a secondary file■ Define/change a lookup file(s)■ Issue from the Worksheet.
INFO object object-name
Supplies information on named object. Use with the following object types:
■ Transaction■ User file■ Issue from the Menu, Worksheet, object list screens and editors (not Layout Editor).
Note: If the list object screen for the type of object you want information on is displayed,you need not specify object type.
347User's Guide
Command List
J
K
KEEP
Keeps any transaction even if it contains errors.
■ Issue from within a transaction.
Note: for theAdministrator:When you keep a transaction, the commentary lines (transactionspecification) for a Natural program are generated and saved but the Natural program forthe transaction itself is not generated. If you keep a transaction which has already been runor saved, the program generated by the run or save is deleted and only the commentarylines are kept.
L
LAYOUT
Invokes the Layout Editor which displays either the default layout for the current transaction ora layout you have already edited.
■ Issue from within a transaction.
LEFT (<)
Displays data to the left of your present screen contents if you havemore columns in a report thanyou can see at one time.
■ Issue when shown in the PF key lines.
LINE line-number
Scrolls to the line number specified in the Layout Editor and Display Element screen.
■ Issue from the Layout Editor or Display Element screen.
LOCK
Lock user exits and selection lines in the Selection Editor so that they may not be modified. Youcan add further selection criteria but you may not use the logical operator OR.
User's Guide348
Command List
■ Issue from the Selection Editor or from the Exit Specification screen.
LOGIC
Invokes the Logical Conditions Editor.
■ Issue from within a transaction.
M
MAINTAIN
Invokes the Super Natural Maintenance Menu.
■ Issue from the (Super Natural Processor) Menu.
MENU
Invokes the Menu from any point in Super Natural. Processing is interrupted and your changesare not saved.
■ Issue at any point in Super Natural.
MODES
Invokes the Modify Modes for Reporting or the Modify Modes for Data Maintenance windowdepending on the type of transaction you are creating or modifying.
Note: Themodifications youmake in thesewindows are only valid for the current transaction.See PROFILE.
■ Issue from within a transaction (not in Natural Report Manager).
MODIFY object-type object-name
Invokes the Modify object function. Use with the following object types:
■ Transaction■ Prototype program■ Issue from the Menu and list object screens.
Note: If the list object screen for the type of object you want to modify is displayed, youneed not specify object type.
349User's Guide
Command List
N
NEXT
Takes you to the next step you have selected in the Checklist window. If you have selected nofurther function, the Checklist window appears.
■ Issue from within a transaction (not in Natural Report Manager).
NOSEQUENCE
Removes all numbers from the Sequence column in the Worksheet.
■ Issue from the Worksheet.
NOTEPAD
Invokes the Super Natural notepad.
■ Issue at any point in Super Natural.
O
OPTIONS
Invokes the Transaction Options window. See PROFILE.
Note: The modifications you make in this and the following windows are only valid for thecurrent transaction.
■ Issue from within a transaction (not in Natural Report Manager).
OVERVIEW
Invokes the Layout Overview screen from the Display Layout Element screen, Layout Editor andLayout Field List screens.
■ Issue from Natural Report Manager.
User's Guide350
Command List
P
POSITION
Displays the reportwith the column at the cursor position on the left-hand side of the report display.
■ Issue using PF9 when looking at a report which is wider than one screen.
■ Prints the information found by the Value function■ Prints the transaction and user file information found by the Information function.■ Prints a report starting at the current page. If you are using Com-plete, the Com-plete PrintoutSpecification screen appears.
Note: If you want to print a whole report, you can also use Report Destination PRINTER.
■ Issue when the relevant information is displayed.
PROFILE
Invokes the Modify Profile screen.
Note: The modifications you make in this screen are valid for all new transactions.
■ Issue from the Menu and list object screens.
PROTOTYPE
Invokes the List Prototype screen.
■ Issue from the Menu and list object screens.
351User's Guide
Command List
Q
R
REFRESH
Deletes the lines in the current editor and recalls the lines which were present (if any) when thetransaction was last saved.
■ Issue from any Super Natural editor except the Layout Editor.
RELEASE
All fields not currently in use in a transaction are removed from the source area and are no longeravailable. For example, if you invoke the Field List window from an editor or theWorksheet, onlythe fields in use when you issued the RELEASE command are listed. If you are using very largefiles, you can use this command to avoid problems with temporary memory capacity (bufferoverflow).
■ Issue from within a transaction (not in Natural Report Manager).
RETRIEVE USERFILE userfile-name
Retrieves the named user file which has been deleted logically but not physically. The user filecan be retrieved until the administrator or a system routine deletes it.
■ Issue from the Menu and list object screens.
Note: If you are in the Userfile List screen, you need not specify object type.
RIGHT (>)
Displays data to the right of your present screen contents if you have more columns in a reportthan you can see at one time.
■ Issue when shown in the PF key lines.
RUN
Runs a transaction you aremodifying or creating. You cannot run a transactionwhich is not finishedor still has errors in it.
■ Issue from within the transaction you want to run.
User's Guide352
Command List
Note: For the Administrator:When you run a transaction, a Natural program is generated, cataloged and executed.
S
SAVE
If you have completed a transaction but do not want to see the results immediately, you can saveit. You cannot save a transaction which still has errors in it. You can execute a transaction usingthe EXECUTE command when it has been saved.
■ Issue from within the transaction you want to save.
Note: For the Administrator:When you save a transaction, aNatural program is generated and cataloged but not executed.
SCAN field-name
Pages to the field named in the section of the Layout Editor displaying transaction fields.
■ Issue from the Layout Editor.
SCAN text-string
Pages to the specified text string in the show area, display area and editor area.
■ Issue from the Layout Editor.
SECTION
Invokes the Layout Editor with information sections.
■ Issue from the Layout Editor.
SELECTION
Invokes the Selection Editor, PC file editor or work file editor depending on the selection modesetting.
■ Issue from within a transaction.
SEQUENCE
Gives each field entered in the Fieldname column a number from 1 to 99 in the Sequence column.The first 99 fields are numbered in ascending order from the top of the Worksheet to the bottomof the last page.
353User's Guide
Command List
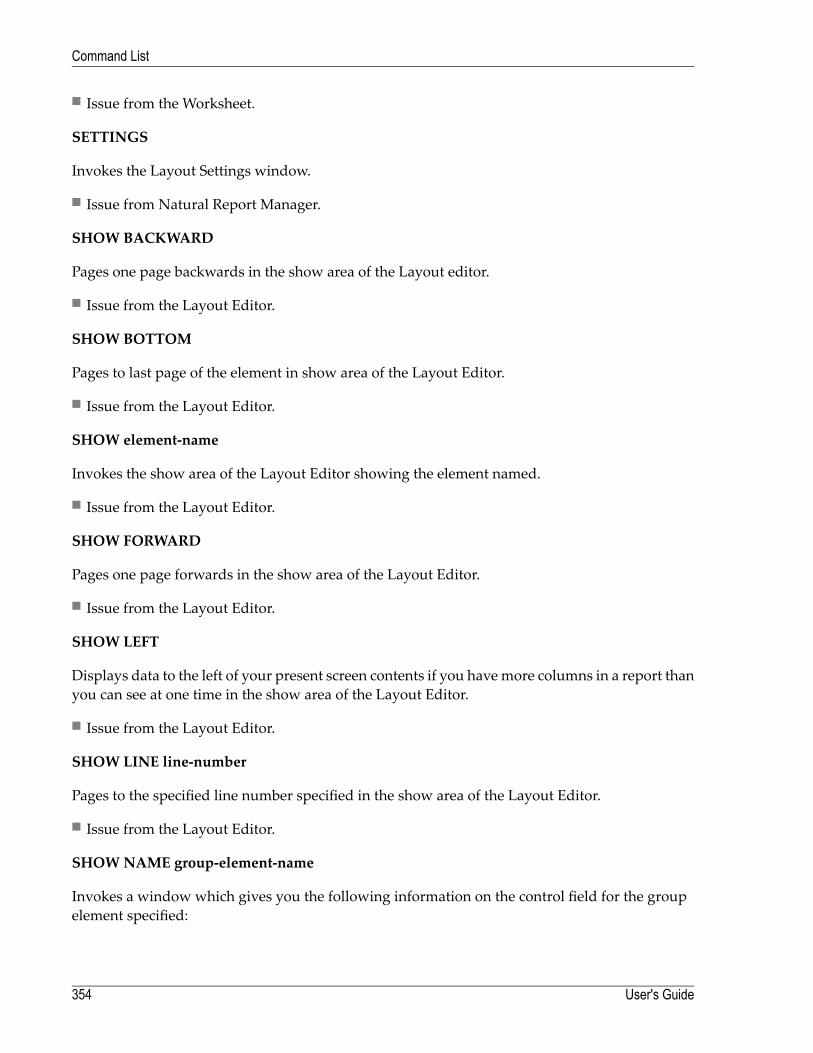
■ Issue from the Worksheet.
SETTINGS
Invokes the Layout Settings window.
■ Issue from Natural Report Manager.
SHOW BACKWARD
Pages one page backwards in the show area of the Layout editor.
■ Issue from the Layout Editor.
SHOW BOTTOM
Pages to last page of the element in show area of the Layout Editor.
■ Issue from the Layout Editor.
SHOW element-name
Invokes the show area of the Layout Editor showing the element named.
■ Issue from the Layout Editor.
SHOW FORWARD
Pages one page forwards in the show area of the Layout Editor.
■ Issue from the Layout Editor.
SHOW LEFT
Displays data to the left of your present screen contents if you havemore columns in a report thanyou can see at one time in the show area of the Layout Editor.
■ Issue from the Layout Editor.
SHOW LINE line-number
Pages to the specified line number specified in the show area of the Layout Editor.
■ Issue from the Layout Editor.
SHOWNAME group-element-name
Invokes a window which gives you the following information on the control field for the groupelement specified:
User's Guide354
Command List
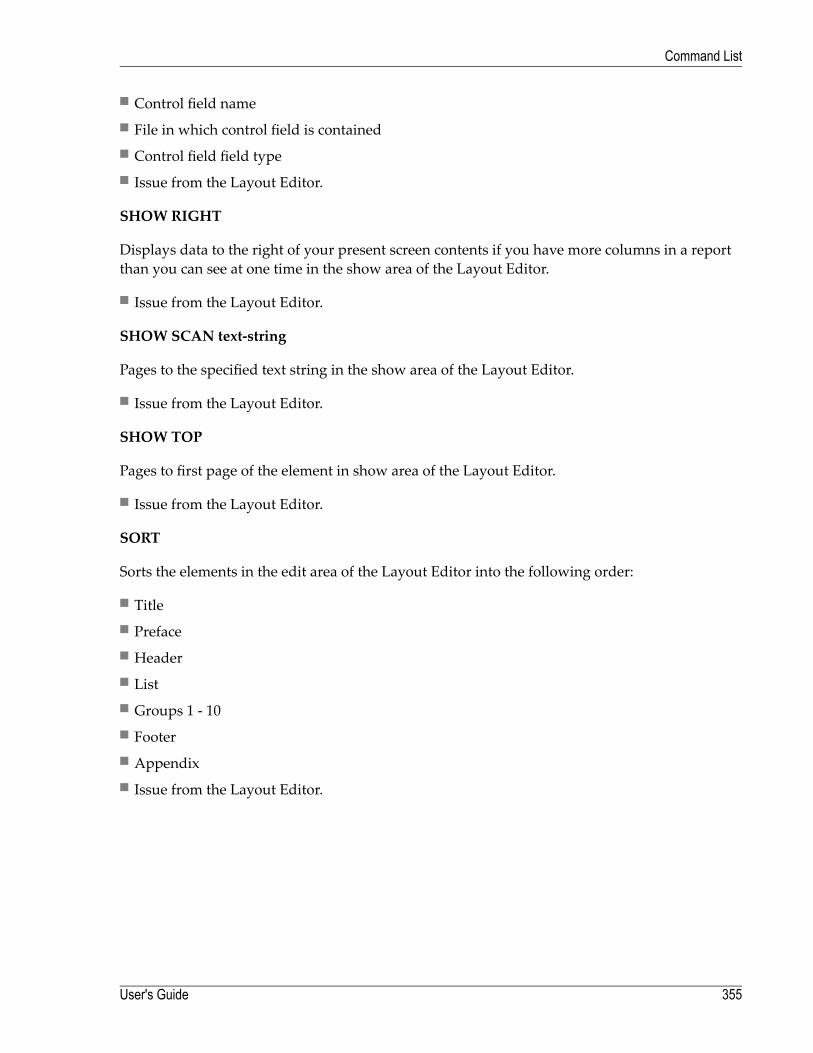
■ Control field name■ File in which control field is contained■ Control field field type■ Issue from the Layout Editor.
SHOW RIGHT
Displays data to the right of your present screen contents if you have more columns in a reportthan you can see at one time in the show area of the Layout Editor.
■ Issue from the Layout Editor.
SHOW SCAN text-string
Pages to the specified text string in the show area of the Layout Editor.
■ Issue from the Layout Editor.
SHOW TOP
Pages to first page of the element in show area of the Layout Editor.
■ Issue from the Layout Editor.
SORT
Sorts the elements in the edit area of the Layout Editor into the following order:
■ Title■ Preface■ Header■ List■ Groups 1 - 10■ Footer■ Appendix■ Issue from the Layout Editor.
355User's Guide
Command List
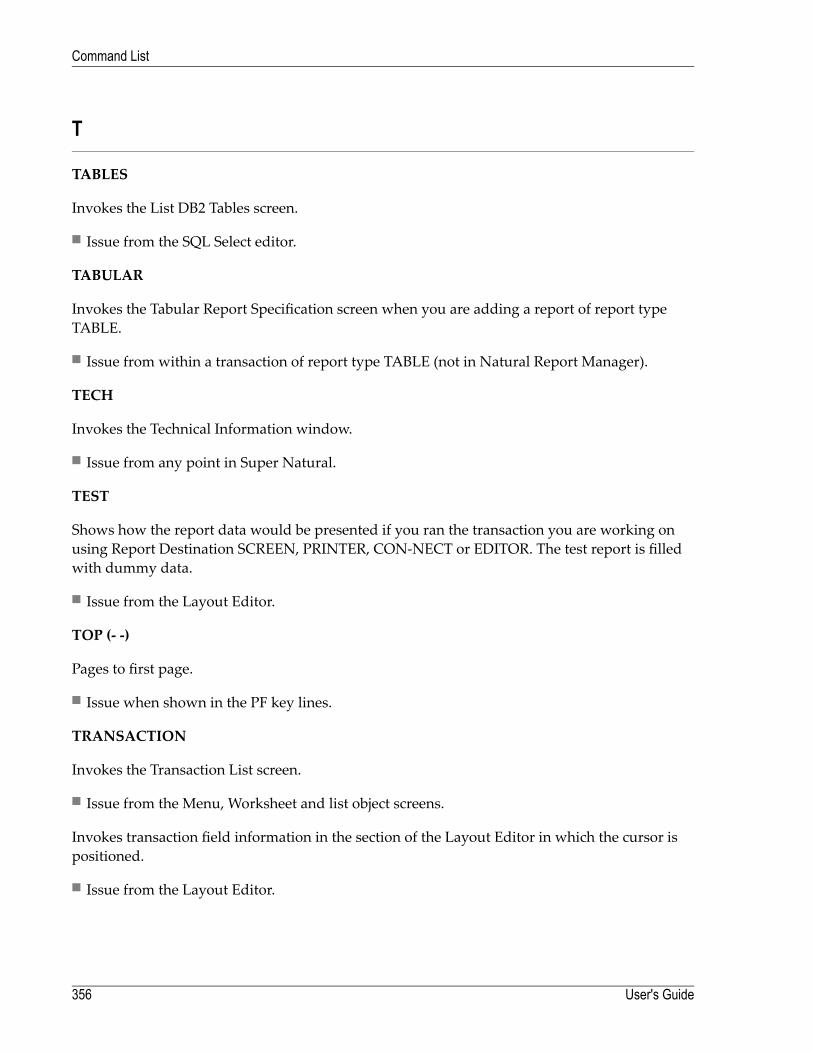
T
TABLES
Invokes the List DB2 Tables screen.
■ Issue from the SQL Select editor.
TABULAR
Invokes the Tabular Report Specification screen when you are adding a report of report typeTABLE.
■ Issue from within a transaction of report type TABLE (not in Natural Report Manager).
TECH
Invokes the Technical Information window.
■ Issue from any point in Super Natural.
TEST
Shows how the report data would be presented if you ran the transaction you are working onusing Report Destination SCREEN, PRINTER, CON-NECT or EDITOR. The test report is filledwith dummy data.
■ Issue from the Layout Editor.
TOP (- -)
Pages to first page.
■ Issue when shown in the PF key lines.
TRANSACTION
Invokes the Transaction List screen.
■ Issue from the Menu, Worksheet and list object screens.
Invokes transaction field information in the section of the Layout Editor in which the cursor ispositioned.
■ Issue from the Layout Editor.
User's Guide356
Command List
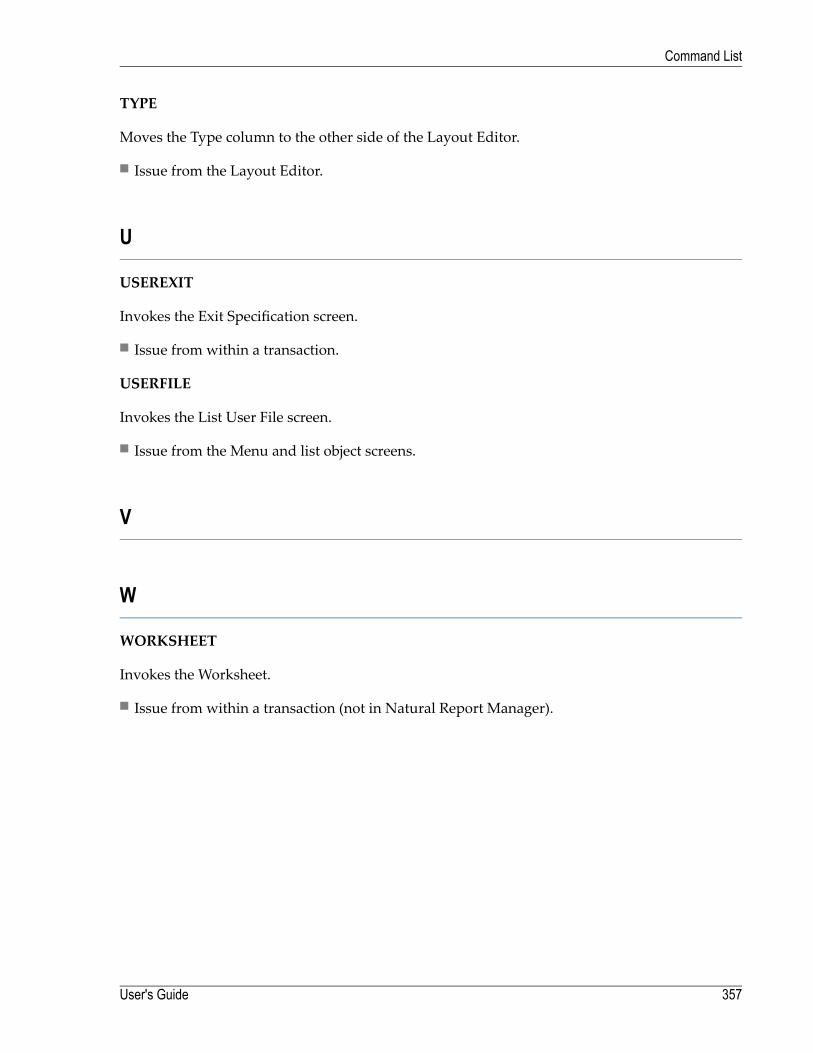
TYPE
Moves the Type column to the other side of the Layout Editor.
■ Issue from the Layout Editor.
U
USEREXIT
Invokes the Exit Specification screen.
■ Issue from within a transaction.
USERFILE
Invokes the List User File screen.
■ Issue from the Menu and list object screens.
V
W
WORKSHEET
Invokes the Worksheet.
■ Issue from within a transaction (not in Natural Report Manager).
357User's Guide
Command List
X
Y
Z
Special Characters
*
Invokes the Command List window.
■ Issue from any point in Super Natural or Natural Report Manager.
-
Pages one page backwards.
■ Issue when shown in the PF key lines.
- -
Pages to first page.
■ Issue when shown in the PF key lines.
+
Pages one page forwards.
■ Issue when shown in the PF key lines.
++
Pages to last page.
■ Issue when shown in the PF key lines.
User's Guide358
Command List
<
Displays data to the left of your present screen contents if you havemore columns in a report thanyou can see at one time.
■ Issue when shown in the PF key lines.
<<
Shifts to the far left position of your present screen contents if you have more columns in a reportthan you can see at one time.
■ Issue from the Layout Editor.
>
Displays data to the right of your present screen contents if you have more columns in a reportthan you can see at one time.
■ Issue when shown in the PF key lines.
>>
Shifts to the far right position of your present screen contents if you havemore columns in a reportthan you can see at one time.
■ Issue from the Layout Editor.
359User's Guide
Command List

360
23 System Variables
■ *APPLIC-ID .................................................................................................................................. 362■ *APPLIC-NAME ............................................................................................................................ 363■ *DAT Variables .............................................................................................................................. 363■ *DEVICE ...................................................................................................................................... 364■ *GROUP ...................................................................................................................................... 364■ *HARDCOPY ................................................................................................................................ 364■ *INIT-ID ....................................................................................................................................... 365■ *INIT-USER .................................................................................................................................. 365■ *LANGUAGE ................................................................................................................................ 365■ *LIBRARY-ID ................................................................................................................................ 367■ *OPSYS ...................................................................................................................................... 367■ *PAGE-NUMBER ........................................................................................................................... 367■ *PROGRAM ................................................................................................................................. 367■ *TIM Variables .............................................................................................................................. 367■ *TPSYS ....................................................................................................................................... 368■ *USER ........................................................................................................................................ 368■ *USER-NAME ............................................................................................................................... 368
361
This section describes the system variables available in Super Natural.
This section covers the following topics:
■ *APPLIC-ID■ *APPLIC-NAME■ *DAT Variables■ *DEVICE■ *GROUP■ *HARDCOPY■ *INIT-ID■ *INIT-USER■ *LANGUAGE■ *LIBRARY-ID■ *OPSYS■ *PAGE-NUMBER■ *PROGRAM■ *TIM Variables■ *TPSYS■ *USER■ *USER-NAME
*APPLIC-ID
Format/length: A8.
This system variable contains the ID of the library which the user is using.
User's Guide362
System Variables
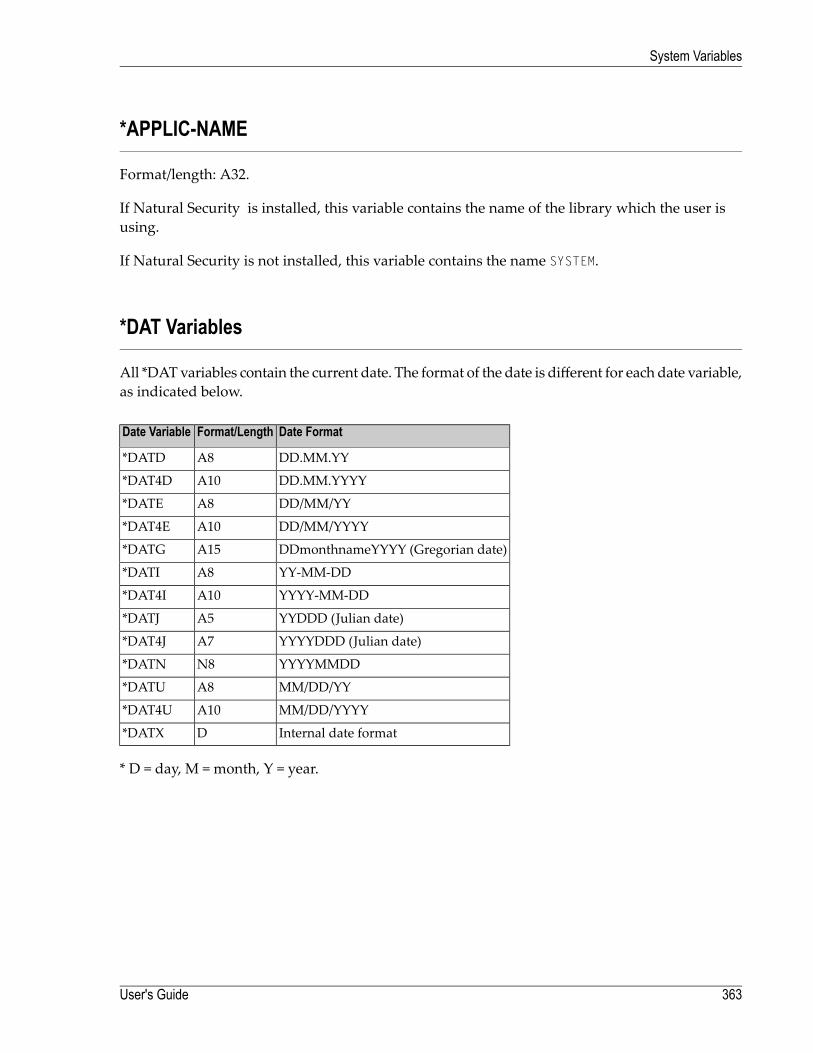
*APPLIC-NAME
Format/length: A32.
If Natural Security is installed, this variable contains the name of the library which the user isusing.
If Natural Security is not installed, this variable contains the name SYSTEM.
*DAT Variables
All *DATvariables contain the current date. The format of the date is different for each date variable,as indicated below.
Date FormatFormat/LengthDate Variable
DD.MM.YYA8*DATD
DD.MM.YYYYA10*DAT4D
DD/MM/YYA8*DATE
DD/MM/YYYYA10*DAT4E
DDmonthnameYYYY (Gregorian date)A15*DATG
YY-MM-DDA8*DATI
YYYY-MM-DDA10*DAT4I
YYDDD (Julian date)A5*DATJ
YYYYDDD (Julian date)A7*DAT4J
YYYYMMDDN8*DATN
MM/DD/YYA8*DATU
MM/DD/YYYYA10*DAT4U
Internal date formatD*DATX
* D = day, M = month, Y = year.
363User's Guide
System Variables
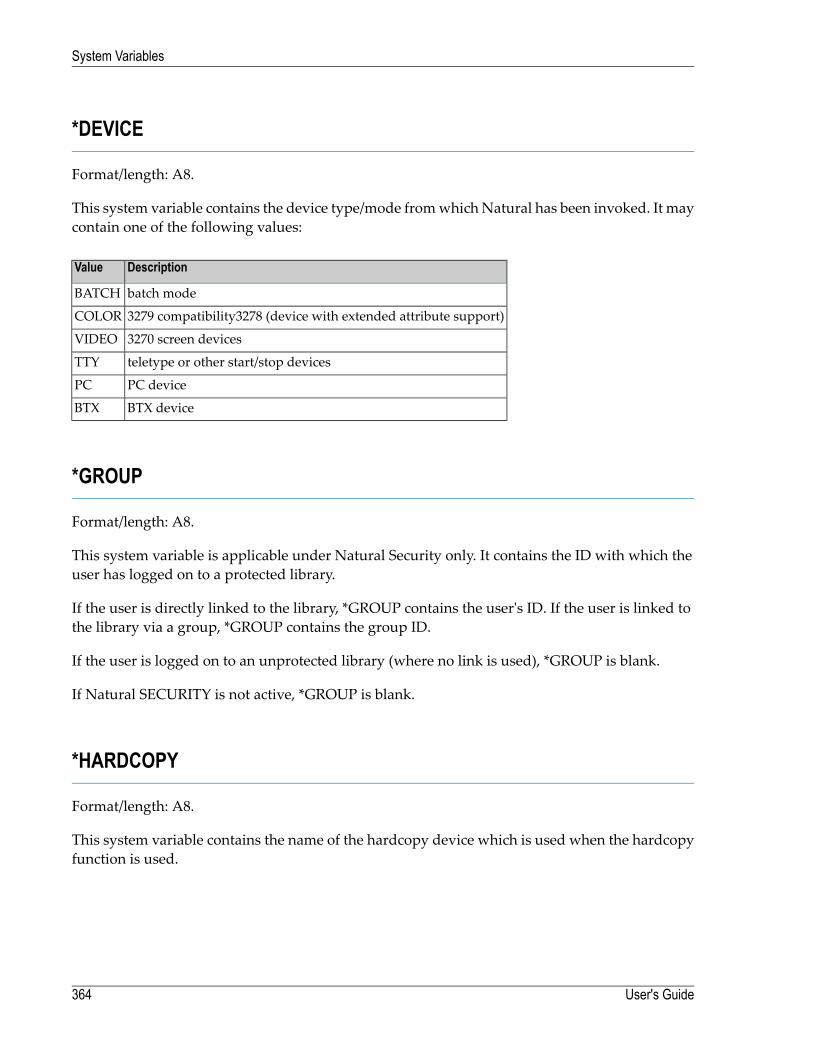
*DEVICE
Format/length: A8.
This system variable contains the device type/mode fromwhich Natural has been invoked. It maycontain one of the following values:
DescriptionValue
batch modeBATCH
3279 compatibility3278 (device with extended attribute support)COLOR
3270 screen devicesVIDEO
teletype or other start/stop devicesTTY
PC devicePC
BTX deviceBTX
*GROUP
Format/length: A8.
This system variable is applicable under Natural Security only. It contains the ID with which theuser has logged on to a protected library.
If the user is directly linked to the library, *GROUP contains the user's ID. If the user is linked tothe library via a group, *GROUP contains the group ID.
If the user is logged on to an unprotected library (where no link is used), *GROUP is blank.
If Natural SECURITY is not active, *GROUP is blank.
*HARDCOPY
Format/length: A8.
This system variable contains the name of the hardcopy device which is used when the hardcopyfunction is used.
User's Guide364
System Variables
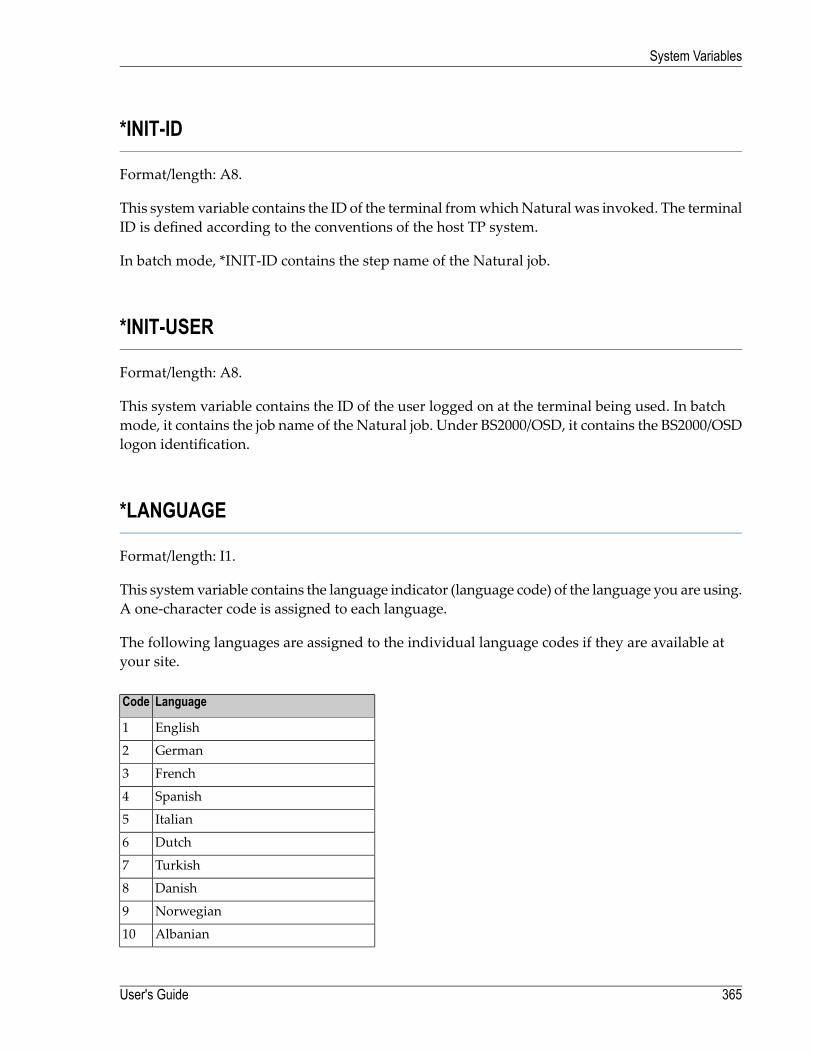
*INIT-ID
Format/length: A8.
This systemvariable contains the ID of the terminal fromwhichNatural was invoked. The terminalID is defined according to the conventions of the host TP system.
In batch mode, *INIT-ID contains the step name of the Natural job.
*INIT-USER
Format/length: A8.
This system variable contains the ID of the user logged on at the terminal being used. In batchmode, it contains the job name of the Natural job. Under BS2000/OSD, it contains the BS2000/OSDlogon identification.
*LANGUAGE
Format/length: I1.
This systemvariable contains the language indicator (language code) of the language you are using.A one-character code is assigned to each language.
The following languages are assigned to the individual language codes if they are available atyour site.
LanguageCode
English1
German2
French3
Spanish4
Italian5
Dutch6
Turkish7
Danish8
Norwegian9
Albanian10
365User's Guide
System Variables
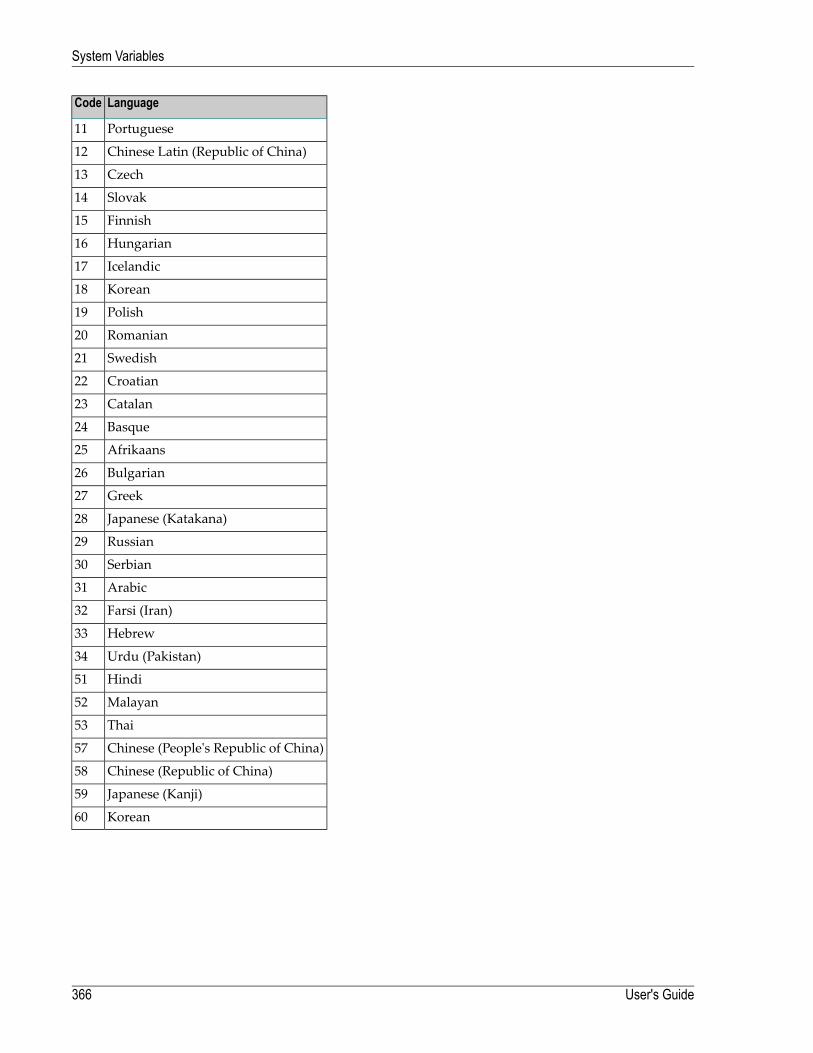
LanguageCode
Portuguese11
Chinese Latin (Republic of China)12
Czech13
Slovak14
Finnish15
Hungarian16
Icelandic17
Korean18
Polish19
Romanian20
Swedish21
Croatian22
Catalan23
Basque24
Afrikaans25
Bulgarian26
Greek27
Japanese (Katakana)28
Russian29
Serbian30
Arabic31
Farsi (Iran)32
Hebrew33
Urdu (Pakistan)34
Hindi51
Malayan52
Thai53
Chinese (People's Republic of China)57
Chinese (Republic of China)58
Japanese (Kanji)59
Korean60
User's Guide366
System Variables
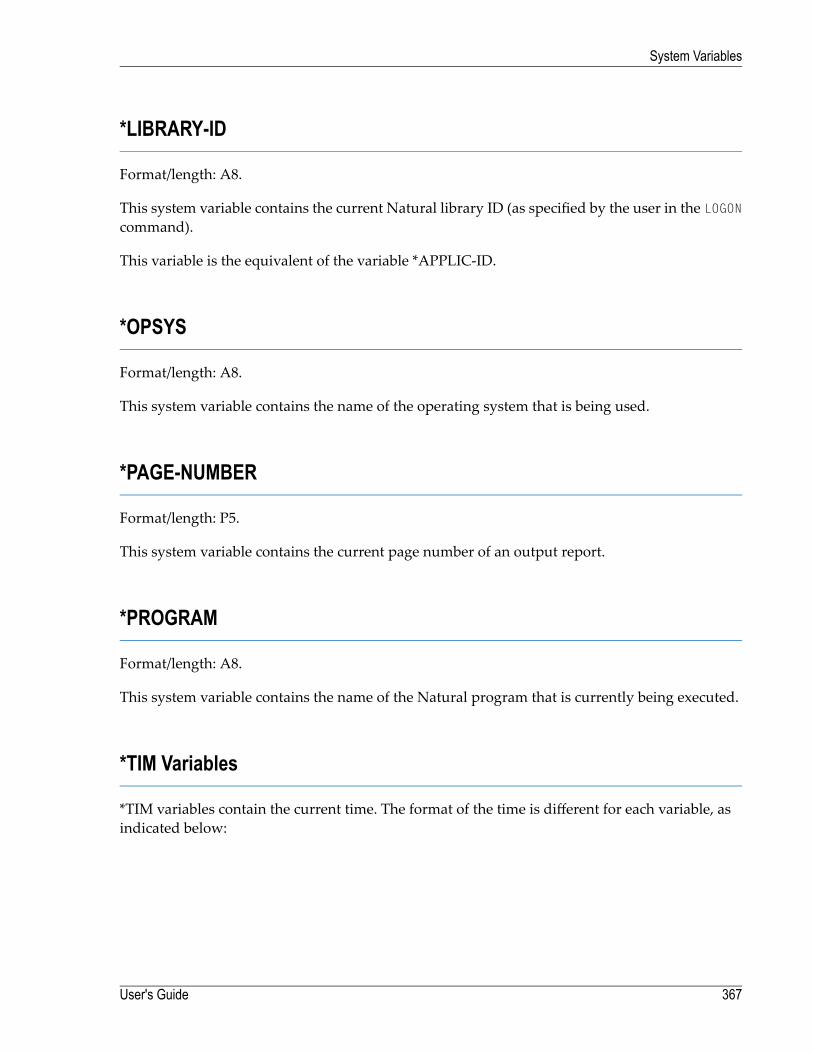
*LIBRARY-ID
Format/length: A8.
This system variable contains the current Natural library ID (as specified by the user in the LOGONcommand).
This variable is the equivalent of the variable *APPLIC-ID.
*OPSYS
Format/length: A8.
This system variable contains the name of the operating system that is being used.
*PAGE-NUMBER
Format/length: P5.
This system variable contains the current page number of an output report.
*PROGRAM
Format/length: A8.
This system variable contains the name of the Natural program that is currently being executed.
*TIM Variables
*TIM variables contain the current time. The format of the time is different for each variable, asindicated below:
367User's Guide
System Variables
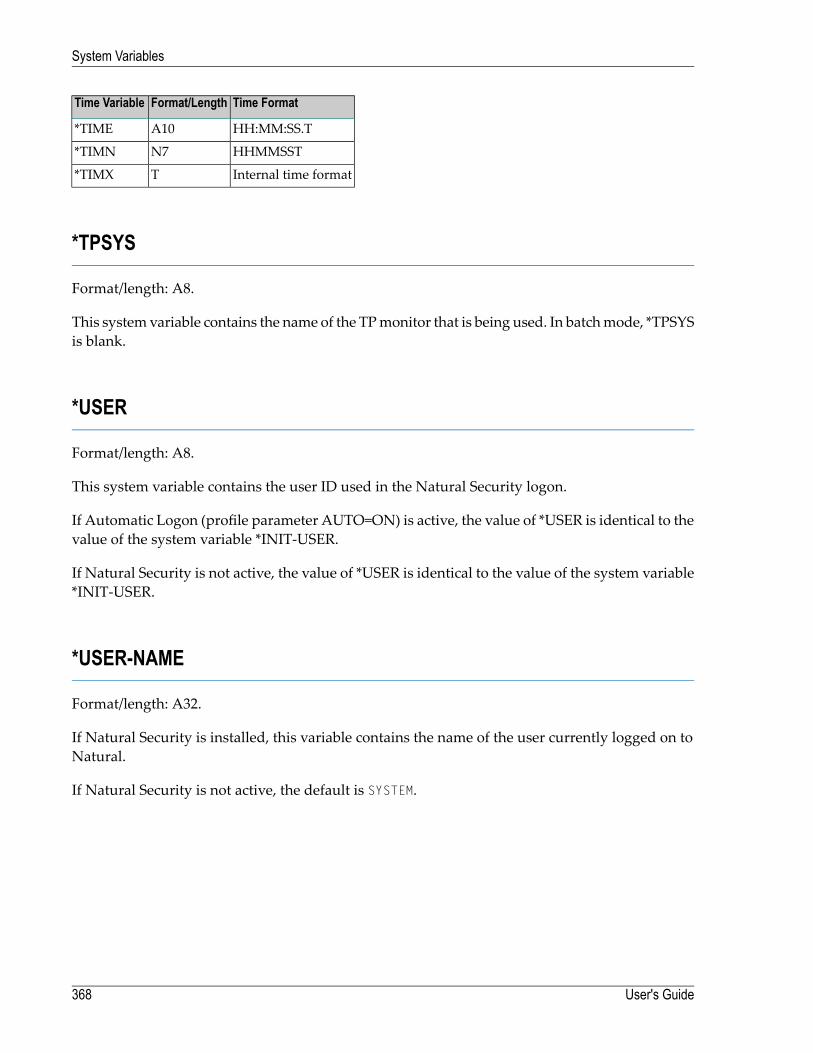
Time FormatFormat/LengthTime Variable
HH:MM:SS.TA10*TIME
HHMMSSTN7*TIMN
Internal time formatT*TIMX
*TPSYS
Format/length: A8.
This systemvariable contains the name of the TPmonitor that is being used. In batchmode, *TPSYSis blank.
*USER
Format/length: A8.
This system variable contains the user ID used in the Natural Security logon.
If Automatic Logon (profile parameter AUTO=ON) is active, the value of *USER is identical to thevalue of the system variable *INIT-USER.
If Natural Security is not active, the value of *USER is identical to the value of the system variable*INIT-USER.
*USER-NAME
Format/length: A32.
If Natural Security is installed, this variable contains the name of the user currently logged on toNatural.
If Natural Security is not active, the default is SYSTEM.
User's Guide368
System Variables

24 Edit Masks
■ What are Edit Masks? .................................................................................................................... 370
369
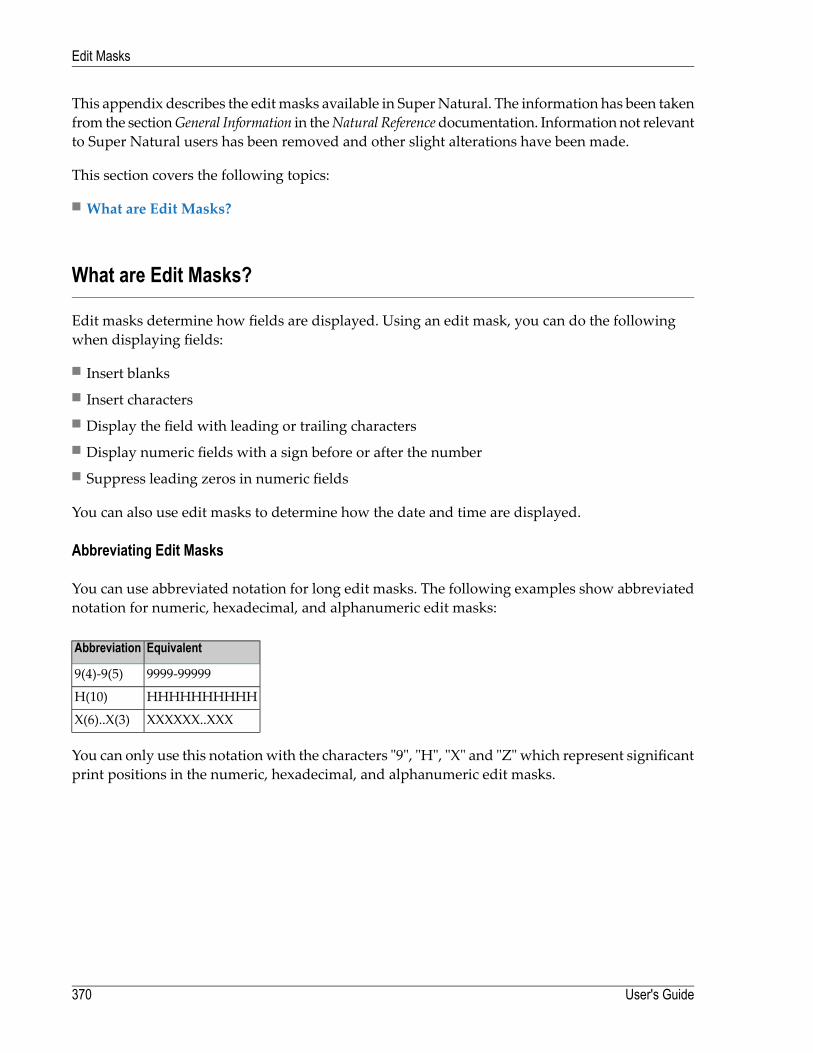
This appendix describes the editmasks available in SuperNatural. The information has been takenfrom the sectionGeneral Information in theNatural Referencedocumentation. Information not relevantto Super Natural users has been removed and other slight alterations have been made.
This section covers the following topics:
■ What are Edit Masks?
What are Edit Masks?
Edit masks determine how fields are displayed. Using an edit mask, you can do the followingwhen displaying fields:
■ Insert blanks■ Insert characters■ Display the field with leading or trailing characters■ Display numeric fields with a sign before or after the number■ Suppress leading zeros in numeric fields
You can also use edit masks to determine how the date and time are displayed.
Abbreviating Edit Masks
You can use abbreviated notation for long edit masks. The following examples show abbreviatednotation for numeric, hexadecimal, and alphanumeric edit masks:
EquivalentAbbreviation
9999-999999(4)-9(5)
HHHHHHHHHHH(10)
XXXXXX..XXXX(6)..X(3)
You can only use this notationwith the characters "9", "H", "X" and "Z" which represent significantprint positions in the numeric, hexadecimal, and alphanumeric edit masks.
User's Guide370
Edit Masks
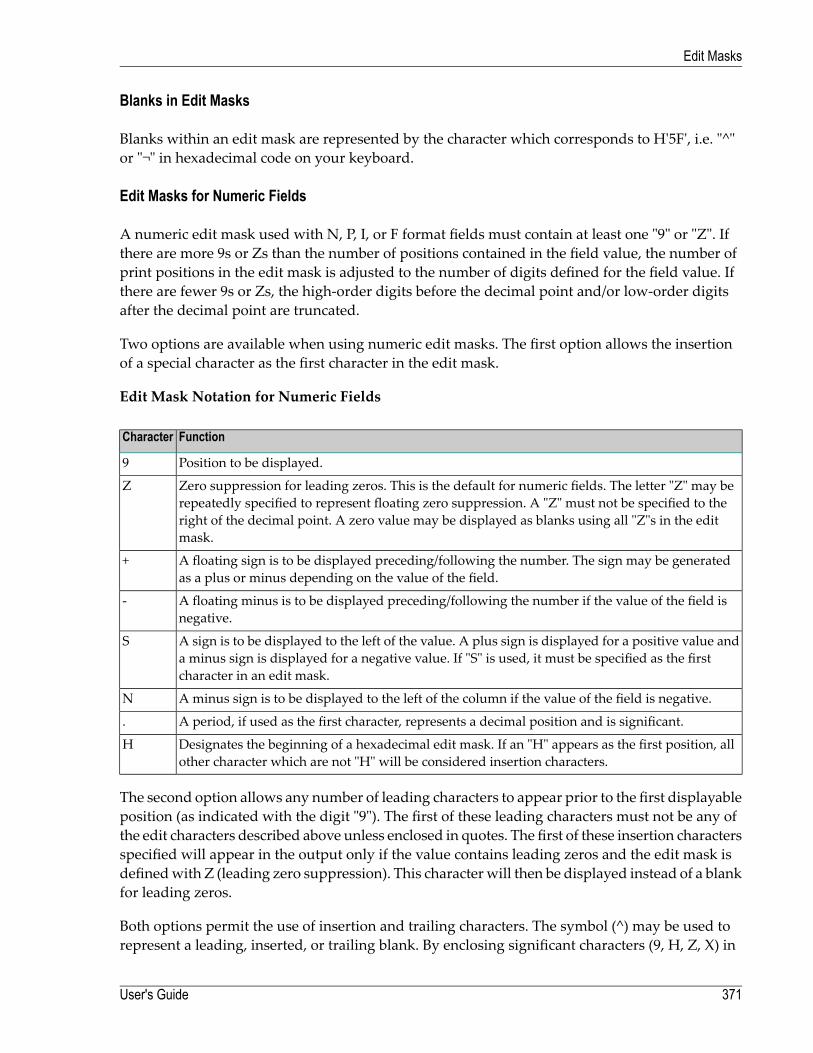
Blanks in Edit Masks
Blanks within an edit mask are represented by the character which corresponds to H'5F', i.e. "^"or "¬" in hexadecimal code on your keyboard.
Edit Masks for Numeric Fields
A numeric edit mask used with N, P, I, or F format fields must contain at least one "9" or "Z". Ifthere are more 9s or Zs than the number of positions contained in the field value, the number ofprint positions in the edit mask is adjusted to the number of digits defined for the field value. Ifthere are fewer 9s or Zs, the high-order digits before the decimal point and/or low-order digitsafter the decimal point are truncated.
Two options are available when using numeric edit masks. The first option allows the insertionof a special character as the first character in the edit mask.
Edit Mask Notation for Numeric Fields
FunctionCharacter
Position to be displayed.9
Zero suppression for leading zeros. This is the default for numeric fields. The letter "Z" may berepeatedly specified to represent floating zero suppression. A "Z" must not be specified to the
Z
right of the decimal point. A zero value may be displayed as blanks using all "Z"s in the editmask.
A floating sign is to be displayed preceding/following the number. The sign may be generatedas a plus or minus depending on the value of the field.
+
A floating minus is to be displayed preceding/following the number if the value of the field isnegative.
-
A sign is to be displayed to the left of the value. A plus sign is displayed for a positive value anda minus sign is displayed for a negative value. If "S" is used, it must be specified as the firstcharacter in an edit mask.
S
A minus sign is to be displayed to the left of the column if the value of the field is negative.N
A period, if used as the first character, represents a decimal position and is significant..
Designates the beginning of a hexadecimal edit mask. If an "H" appears as the first position, allother character which are not "H" will be considered insertion characters.
H
The second option allows any number of leading characters to appear prior to the first displayableposition (as indicated with the digit "9"). The first of these leading characters must not be any ofthe edit characters described above unless enclosed in quotes. The first of these insertion charactersspecified will appear in the output only if the value contains leading zeros and the edit mask isdefinedwith Z (leading zero suppression). This character will then be displayed instead of a blankfor leading zeros.
Both options permit the use of insertion and trailing characters. The symbol (^) may be used torepresent a leading, inserted, or trailing blank. By enclosing significant characters (9, H, Z, X) in
371User's Guide
Edit Masks
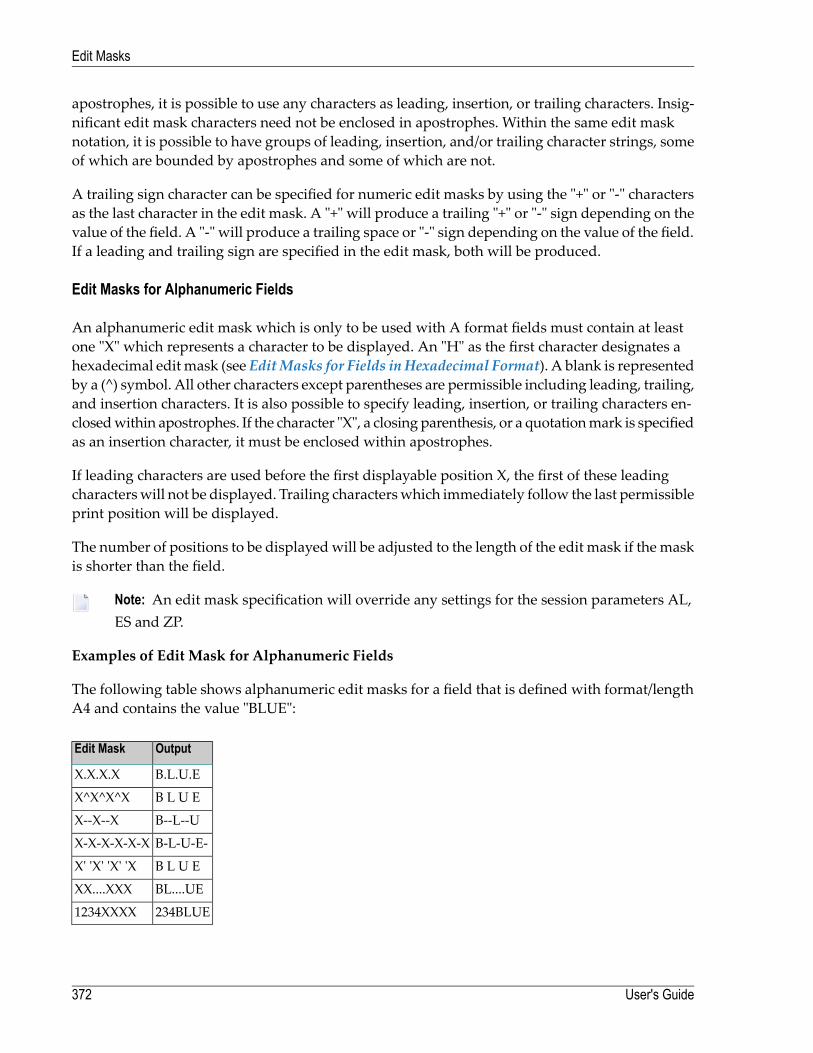
apostrophes, it is possible to use any characters as leading, insertion, or trailing characters. Insig-nificant edit mask characters need not be enclosed in apostrophes. Within the same edit masknotation, it is possible to have groups of leading, insertion, and/or trailing character strings, someof which are bounded by apostrophes and some of which are not.
A trailing sign character can be specified for numeric edit masks by using the "+" or "-" charactersas the last character in the edit mask. A "+" will produce a trailing "+" or "-" sign depending on thevalue of the field. A "-" will produce a trailing space or "-" sign depending on the value of the field.If a leading and trailing sign are specified in the edit mask, both will be produced.
Edit Masks for Alphanumeric Fields
An alphanumeric edit mask which is only to be used with A format fields must contain at leastone "X" which represents a character to be displayed. An "H" as the first character designates ahexadecimal edit mask (see EditMasks for Fields in Hexadecimal Format). A blank is representedby a (^) symbol. All other characters except parentheses are permissible including leading, trailing,and insertion characters. It is also possible to specify leading, insertion, or trailing characters en-closedwithin apostrophes. If the character "X", a closing parenthesis, or a quotationmark is specifiedas an insertion character, it must be enclosed within apostrophes.
If leading characters are used before the first displayable position X, the first of these leadingcharacterswill not be displayed. Trailing characterswhich immediately follow the last permissibleprint position will be displayed.
The number of positions to be displayedwill be adjusted to the length of the edit mask if the maskis shorter than the field.
Note: An edit mask specification will override any settings for the session parameters AL,ES and ZP.
Examples of Edit Mask for Alphanumeric Fields
The following table shows alphanumeric edit masks for a field that is defined with format/lengthA4 and contains the value "BLUE":
OutputEdit Mask
B.L.U.EX.X.X.X
B L U EX^X^X^X
B--L--UX--X--X
B-L-U-E-X-X-X-X-X-X
B L U EX' 'X' 'X' 'X
BL....UEXX....XXX
234BLUE1234XXXX
User's Guide372
Edit Masks
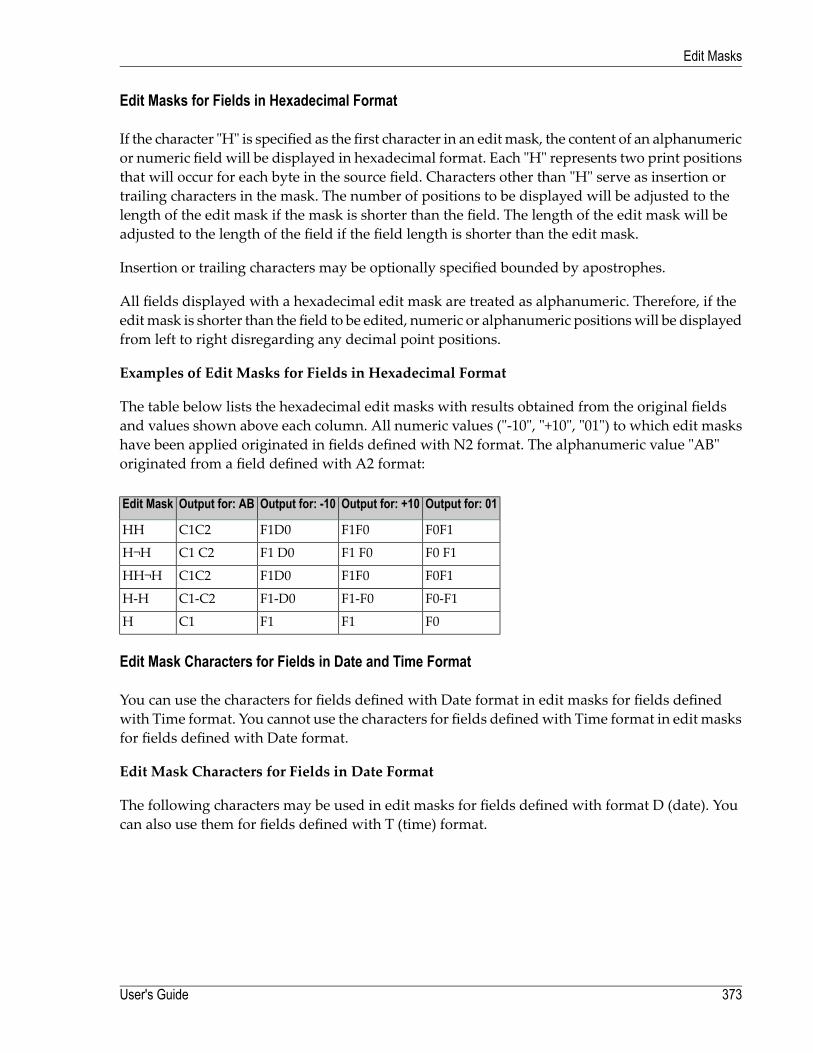
Edit Masks for Fields in Hexadecimal Format
If the character "H" is specified as the first character in an editmask, the content of an alphanumericor numeric field will be displayed in hexadecimal format. Each "H" represents two print positionsthat will occur for each byte in the source field. Characters other than "H" serve as insertion ortrailing characters in the mask. The number of positions to be displayed will be adjusted to thelength of the edit mask if the mask is shorter than the field. The length of the edit mask will beadjusted to the length of the field if the field length is shorter than the edit mask.
Insertion or trailing characters may be optionally specified bounded by apostrophes.
All fields displayed with a hexadecimal edit mask are treated as alphanumeric. Therefore, if theeditmask is shorter than the field to be edited, numeric or alphanumeric positionswill be displayedfrom left to right disregarding any decimal point positions.
Examples of Edit Masks for Fields in Hexadecimal Format
The table below lists the hexadecimal edit masks with results obtained from the original fieldsand values shown above each column. All numeric values ("-10", "+10", "01") to which edit maskshave been applied originated in fields defined with N2 format. The alphanumeric value "AB"originated from a field defined with A2 format:
Output for: 01Output for: +10Output for: -10Output for: ABEdit Mask
F0F1F1F0F1D0C1C2HH
F0 F1F1 F0F1 D0C1 C2H¬H
F0F1F1F0F1D0C1C2HH¬H
F0-F1F1-F0F1-D0C1-C2H-H
F0F1F1C1H
Edit Mask Characters for Fields in Date and Time Format
You can use the characters for fields defined with Date format in edit masks for fields definedwith Time format. You cannot use the characters for fields definedwith Time format in edit masksfor fields defined with Date format.
Edit Mask Characters for Fields in Date Format
The following characters may be used in edit masks for fields defined with format D (date). Youcan also use them for fields defined with T (time) format.
373User's Guide
Edit Masks
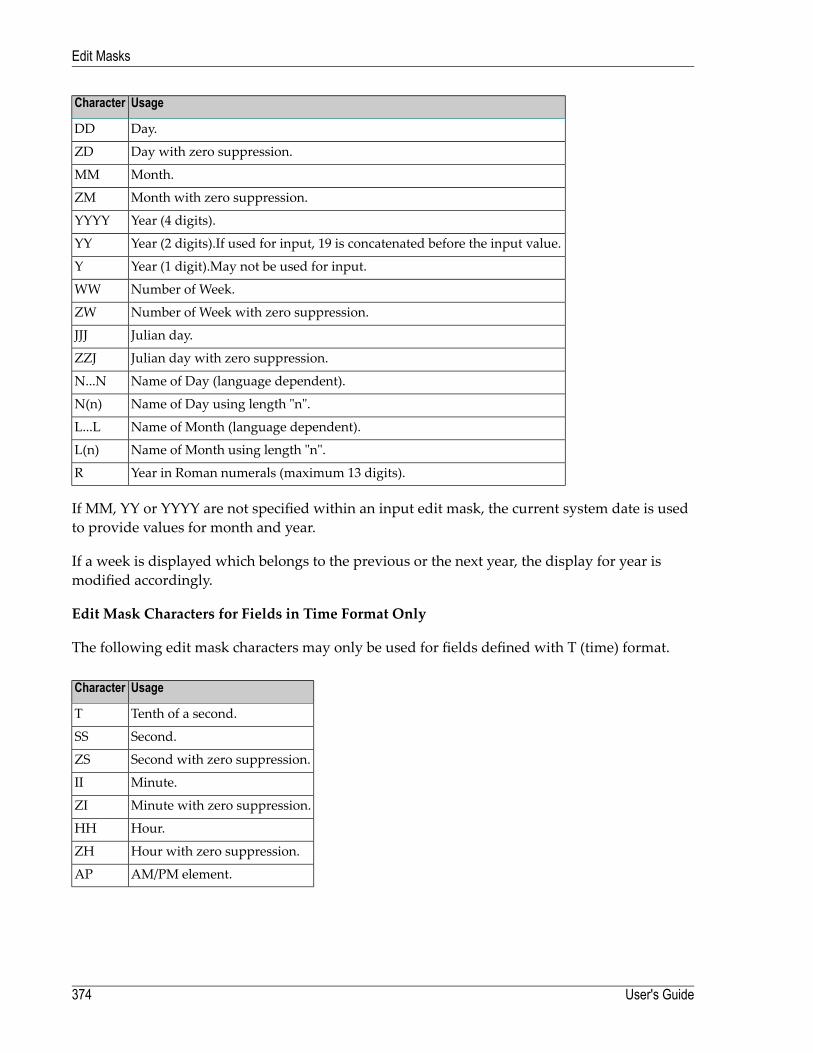
UsageCharacter
Day.DD
Day with zero suppression.ZD
Month.MM
Month with zero suppression.ZM
Year (4 digits).YYYY
Year (2 digits).If used for input, 19 is concatenated before the input value.YY
Year (1 digit).May not be used for input.Y
Number of Week.WW
Number of Week with zero suppression.ZW
Julian day.JJJ
Julian day with zero suppression.ZZJ
Name of Day (language dependent).N...N
Name of Day using length "n".N(n)
Name of Month (language dependent).L...L
Name of Month using length "n".L(n)
Year in Roman numerals (maximum 13 digits).R
If MM, YY or YYYY are not specified within an input edit mask, the current system date is usedto provide values for month and year.
If a week is displayed which belongs to the previous or the next year, the display for year ismodified accordingly.
Edit Mask Characters for Fields in Time Format Only
The following edit mask characters may only be used for fields defined with T (time) format.
UsageCharacter
Tenth of a second.T
Second.SS
Second with zero suppression.ZS
Minute.II
Minute with zero suppression.ZI
Hour.HH
Hour with zero suppression.ZH
AM/PM element.AP
User's Guide374
Edit Masks
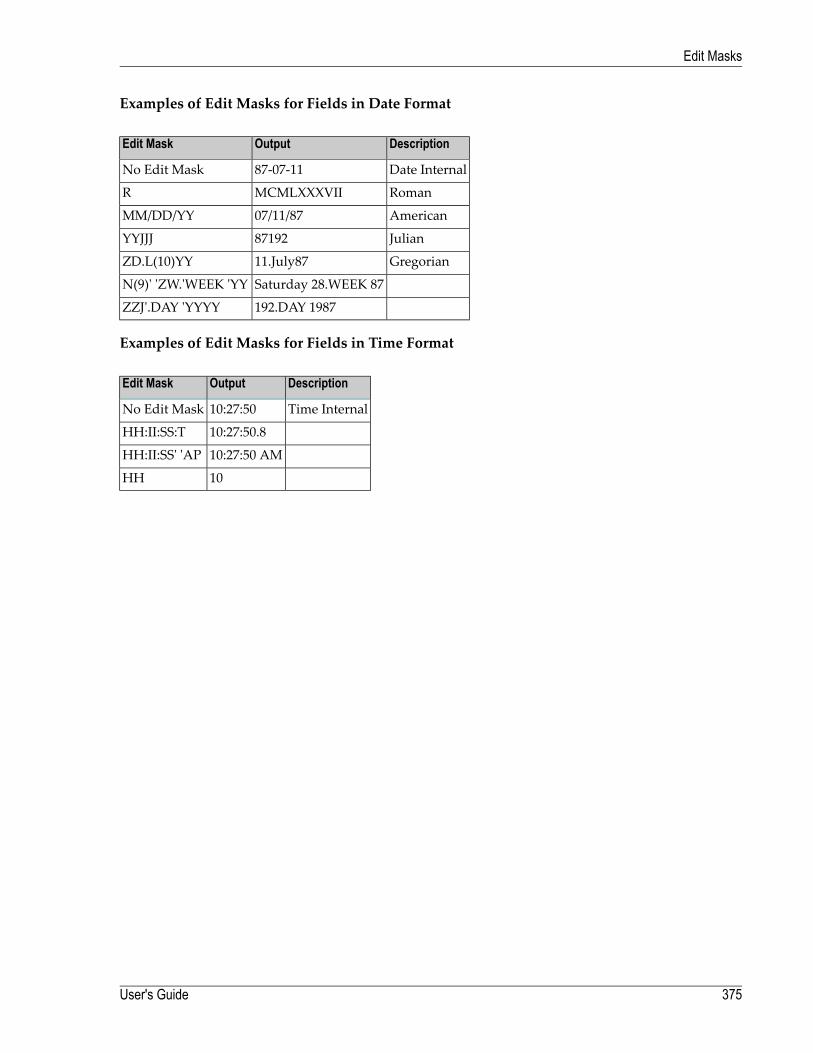
Examples of Edit Masks for Fields in Date Format
DescriptionOutputEdit Mask
Date Internal87-07-11No Edit Mask
RomanMCMLXXXVIIR
American07/11/87MM/DD/YY
Julian87192YYJJJ
Gregorian11.July87ZD.L(10)YY
Saturday 28.WEEK 87N(9)' 'ZW.'WEEK 'YY
192.DAY 1987ZZJ'.DAY 'YYYY
Examples of Edit Masks for Fields in Time Format
DescriptionOutputEdit Mask
Time Internal10:27:50No Edit Mask
10:27:50.8HH:II:SS:T
10:27:50 AMHH:II:SS' 'AP
10HH
375User's Guide
Edit Masks

376


