Giga 3000 Micro, IM1-engl, A31008-G3000-B022-1-6Z19 3000cou.fm 31.03.00
�
8�
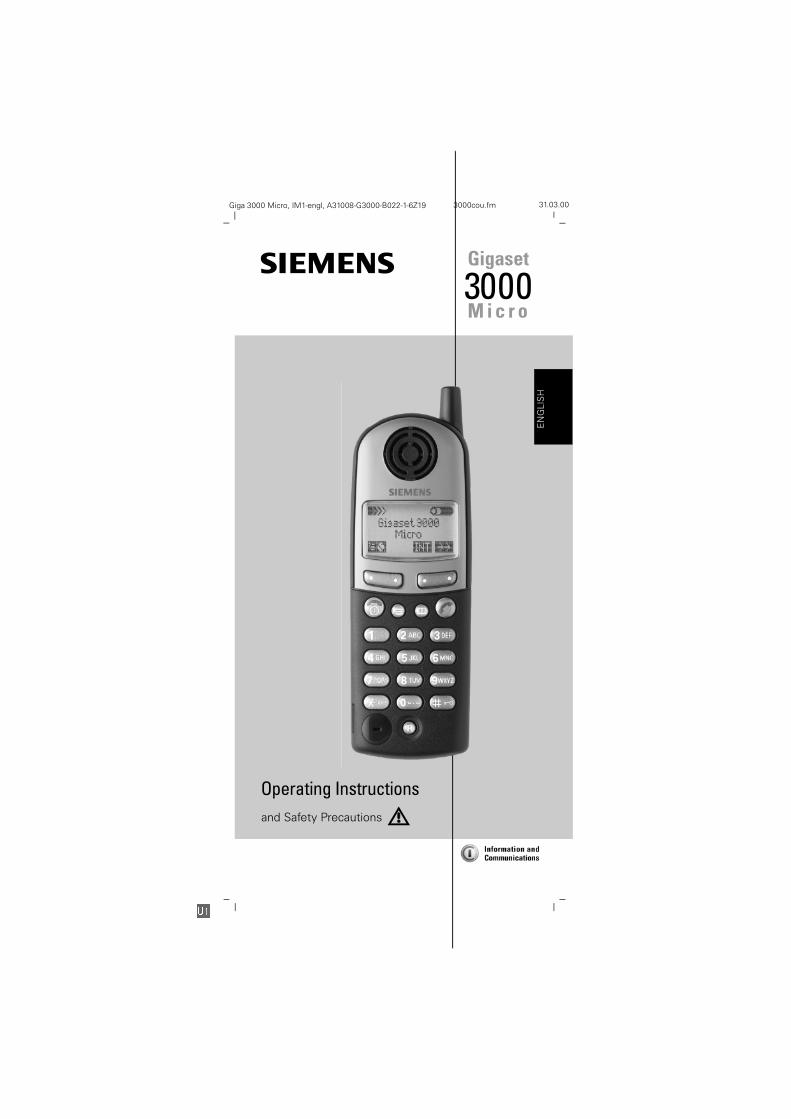
Operating Instructions
EN
GLI
SH
and Safety Precautions
*LJDVHW
30000LF U R
2
Giga 3000 Micro, IM1-engl, A31008-G3000-B022-1-6Z19 3000cou.fm 31.03.00
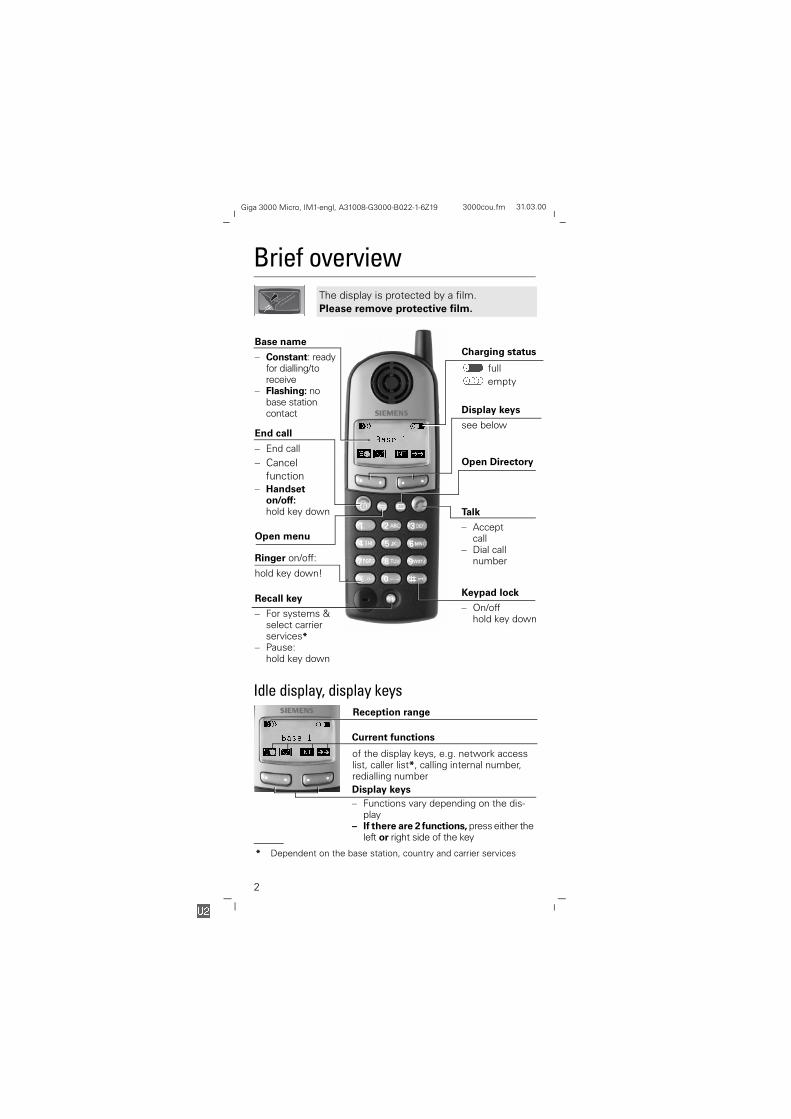
Brief overview
Idle display, display keys
The display is protected by a film. Please remove protective film.
� 8
2QcU !
M, +[
Base name
– Constant: readyfor dialling/toreceive
– Flashing: no base station contact
Recall key
– For systems &select carrier services*
– Pause:hold key down
End call
– End call
– Cancel function
– Handset on/off:hold key down
Open menu
Charging status
7 full� empty
Display keys
see below
Keypad lock
– On/offhold key down
Talk
– Accept call
– Dial call number
Open Directory
Ringer on/off:
hold key down!
� 8
2QcU !
M, +[
Display keys– Functions vary depending on the dis-
play– If there are 2 functions, press either the
left or right side of the key
Reception range
Current functions
of the display keys, e.g. network access list, caller list*, calling internal number, redialling number
* Dependent on the base station, country and carrier services
8�
3
Giga 3000 Micro, IM1-engl, A31008-G3000-B022-1-6Z19 3000cou.fm 31.03.00
Important menus�
Main menu
6HWWLQJVÖÖÖÖÖÖÖÖ
Ö2.Ö %DVH VHWWLQJV
%DVH 8VHU 2SWLRQ
+VHW 8VHU 2SWLRQ
5RRP 0RQLWRU 6HW
6HUYLFH 6HW 8S
Settings
6RXQG�6HWWLQJVÖÖ
Ö2.Ö 6HFXULW\
$XWR 7DON
/DQJXDJH
'HIDXOW 5HVHW
Audio
5LQJHU�9ROXPHÖÖÖ
5LQJHU 0HORG\
%HHS
+DQGVHW 9ROXPH
.H\ %HHSV
%DWW� /RZ %HHS
&RQILUP� %HHSV
� Activate the main menu
;< Scroll through menus, directory
Ö2.Ö Confirm function/input
9 Activate supple-mentary menu
\ /B Cancel/end func-tions
-
Directory
$QQH
%DUEDUDÖÖÖÖÖÖÖÖÖ
9 &ROLQ�
Supplementary menu
'LVSOD\�1XPEHUÖÖ
'LDO 1XPEHU
1HZ (QWU\
(GLW (QWU\
'HOHWH (QWU\
'LVSOD\ (QWU\
&RS\ (QWU\
'HOHWH /LVW
&RS\ /LVW
$YDLODEOH 0HPRU\
[
Redialling number
�����
�������ÖÖÖÖÖÖÖÖÖ
9 �������
Supplementary menu
'LVSOD\�1XPEHUÖÖ
'LDO 1XPEHU
&RS\ WR 'LU�
(GLW (QWU\
'HOHWH (QWU\
'LVSOD\ (QWU\
8�

4
Giga 3000 Micro, IM1-engl, A31008-G3000-B022-1-6Z19 3000cou.fm 31.03.00
Safety precautions• Never use ordinary (non-rechargeable) batteries. Only use
the V30145-K1310-X143 battery supplied (rechargea-ble), otherwise the battery casings may be destroyed (dangerous).
• The following symbol is displayed in the battery compart-ment:
h Use battery type in accordance with these operating instructions.
• Only use the plug-in power supply unit supplied as in-dicated on the underside of the charging unit.
• Do not use third-party charging units as these can dam-age the battery.
• The battery warms up during charging; this is normal and not dangerous.
• The operation of medical equipment can be affected by the handset.
• The handset can cause an unpleasant humming noise in hearing aids.
• Do not operate the handset in environments where there is risk of explosion, such as paint shops.
• Please remember to include the operating instructions when passing your handset on to a third party.
• Please dispose of the battery in an environmentally friend-ly manner in accordance with the relevant legislation.
Display symbolsThe following symbols appear in display, depending on the operating situation:
M Network access list
;< On/off
� Left/right
, Mailbox function:e.g. new entryin the caller list
: Delete character
,17 Internal dialling
[ Redialling number
Ö2.� Confirmation
*2�%$&. End function
\ Cancel/higher menu level
9 Supplementary menu
8�
5
Giga 3000 Micro, IM1-engl, A31008-G3000-B022-1-6Z19 3000CoIVZ.fm 31.03.00
ContentsBrief overview ................................................................... 2
Idle display, display keys.........................................................2Important menus .............................................................. 3Safety precautions............................................................ 4Display symbols ................................................................ 4Preparing the handset ...................................................... 6
Inserting the battery................................................................6Connecting the charging unit ..................................................7Wall-mounting the charging unit .............................................7Charging the battery ...............................................................8Fitting the attachment clip ......................................................8Activating/deactivating the handset ........................................9Activating/deactivating the keypad lock ..................................9
Registering the handset................................................. 10Making calls .................................................................... 11
Making external calls ............................................................11Direct internal dialling............................................................11Answering a call ....................................................................11Transferring an external call, making an enquiry call.............12
Redial ............................................................................... 13Directories ....................................................................... 14
Storing a call number ............................................................14Dialling from the directory.....................................................14Entering names.....................................................................15
Network access support ................................................ 17Caller list .......................................................................... 18Audio settings ................................................................. 18
Handset volume....................................................................18Ringer volume/melody ..........................................................19Setting short beeps (advisory beep) .....................................19Activating/deactivating the ringer..........................................19Activating/deactivating warning and signal beeps ................19
Security............................................................................ 20Changing the telephone PIN .................................................20Hot key selection (direct station selection) ..........................21Telephone lock......................................................................21Dialling the emergency number............................................22
Further settings............................................................... 22Auto talk................................................................................22Setting the display language .................................................22Resetting the handset to the default configuration ..............23
Base settings ................................................................... 24Registering the handset........................................................24
User options (short cuts) ............................................... 25Room monitor ................................................................. 27Appendix ......................................................................... 28
6
Giga 3000 Micro, IM1-engl, A31008-G3000-B022-1-6Z19 3000co.fm 31.03.00
Preparing the handsetContents of the packageEnhanced Gigaset 3000 Micro handset, battery, belt clip, charging unit, plug-in power supply unit, operating instruc-tions.
Inserting the battery
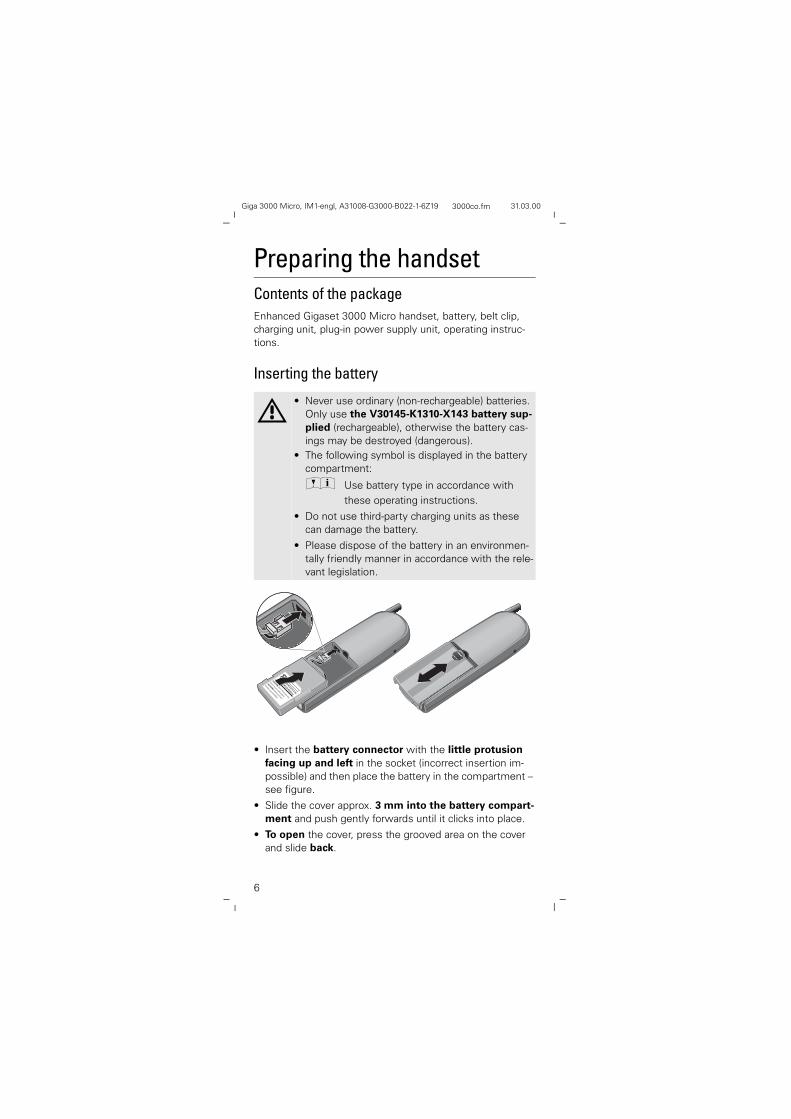
• Insert the battery connector with the little protusion facing up and left in the socket (incorrect insertion im-possible) and then place the battery in the compartment – see figure.
• Slide the cover approx. 3 mm into the battery compart-ment and push gently forwards until it clicks into place.
• To open the cover, press the grooved area on the cover and slide back.
• Never use ordinary (non-rechargeable) batteries. Only use the V30145-K1310-X143 battery sup-plied (rechargeable), otherwise the battery cas-ings may be destroyed (dangerous).
• The following symbol is displayed in the battery compartment:
h Use battery type in accordance with these operating instructions.
• Do not use third-party charging units as these can damage the battery.
• Please dispose of the battery in an environmen-tally friendly manner in accordance with the rele-vant legislation.
NO.:LOT:V30145-K1310-X143
Ni-MH 3.6V 600mAh typ
CAUTION:
ACHTUNG:
Don't throw into fire,
short circuit, disassemble.
Nicht ins Feuer
werfen, kurzschließen,
7
Giga 3000 Micro, IM1-engl, A31008-G3000-B022-1-6Z19 3000co.fm 31.03.00
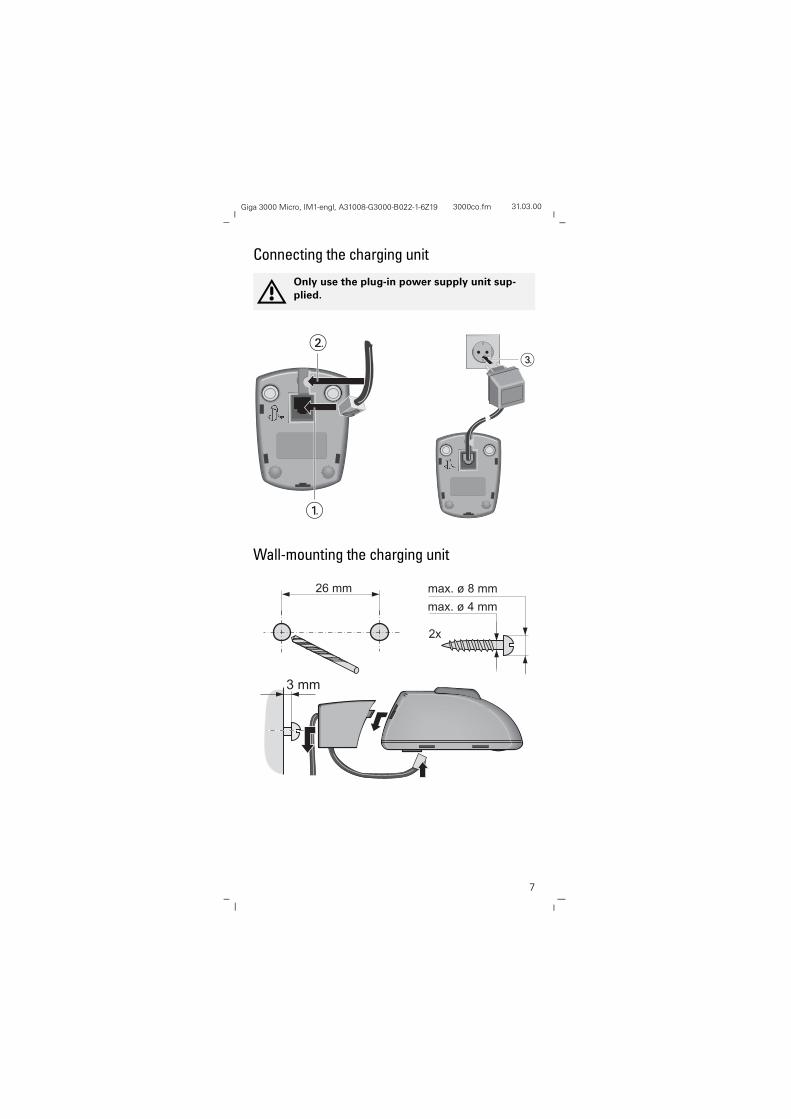
Connecting the charging unit
Wall-mounting the charging unit
Only use the plug-in power supply unit sup-plied.
2
1
3
max. ø 8 mm
max. ø 4 mm
2x
26 mm
3 mm
8
Giga 3000 Micro, IM1-engl, A31008-G3000-B022-1-6Z19 3000co.fm 31.03.00
Charging the batteryThe battery is supplied uncharged.To charge the battery, insert the handset either into the base station or the Gigaset 3000L Micro charging unit – you will hear the confirmation beep. The charging operation is indi-cated by a flashing LED on the handset:
Approved battery:
Toshiba Power Pack (NiMH), order no. V30145-K1310-X143.
Battery operating times/charging times:
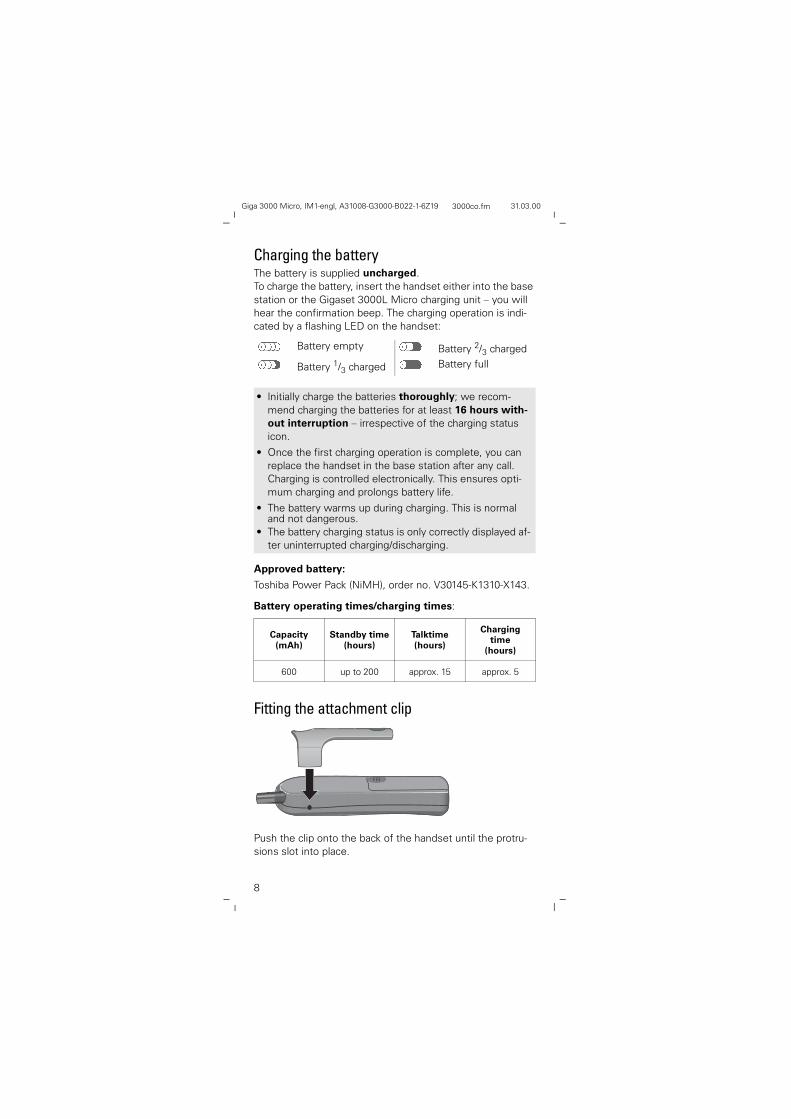
Fitting the attachment clip
Push the clip onto the back of the handset until the protru-sions slot into place.
� Battery empty 8 Battery 2/3 charged
F Battery 1/3 charged 7 Battery full
• Initially charge the batteries thoroughly; we recom-mend charging the batteries for at least 16 hours with-out interruption – irrespective of the charging status icon.
• Once the first charging operation is complete, you can replace the handset in the base station after any call. Charging is controlled electronically. This ensures opti-mum charging and prolongs battery life.
• The battery warms up during charging. This is normal and not dangerous.
• The battery charging status is only correctly displayed af-ter uninterrupted charging/discharging.
Capacity(mAh)
Standby time(hours)
Talktime(hours)
Charging time
(hours)
600 up to 200 approx. 15 approx. 5

9
Giga 3000 Micro, IM1-engl, A31008-G3000-B022-1-6Z19 3000co.fm 31.03.00
Activating/deactivating the handsetB Press the end call key for 1 second.
Activating/deactivating the keypad lockKey activation is ineffective when the keypad lock is ena-bled.To answer an incoming call, press the talk key D – the key-pad lock is automatically disabled for the call.
z To activate/deactivate, press and hold down for longer than 1 second.
The handset automatically activates when the battery is inserted and when the handset is placed in the base sta-tion/charging unit.
10
Giga 3000 Micro, IM1-engl, A31008-G3000-B022-1-6Z19 3000co.fm 31.03.00
Registering the handsetYou can change the display language* (see page 22). After doing this, switch your handset off and then on again.
You must register a new handset at the base station before you can make any telephone calls. When you switch on your handset, the message 5HJLVWHU" appears.
Step 1:
• You must first prepare the Siemens base station:
Step 2:
• Now enter the following in the handset within one minute:
�<(6�� Press the display key.
Enter base PIN
Ö2.ÖEnter the base station’s system PIN (fac-tory setting: 0000) and confirm – unas-signed internal numbers are displayed.
e.g. q Enter the required call number – the base name, e.g. %DVH �, is displayed (no longer flashing).Your handset is now ready for use!
* English is the default factory setting
Gigaset Preparing the base station
3010 Micro3010/3015
Press the coloured key on the base station for approx. 10 seconds until you hear the signal tones.
3020, 30253030, 3035
In the base station menu select registration option and confirm.
ISDNmodels
Press the LED – flashes during registration.
1000/2000 models
See above for appropriate successor models in the 3000 range, e.g. 3010 for 2010.
– To register at multiple base stations or to change base names, see page 24.
– To modify the internal call number: re-register your hand-set at the same base, see page 24.

11
Giga 3000 Micro, IM1-engl, A31008-G3000-B022-1-6Z19 3000co.fm 31.03.00
Making callsMaking external callsP Enter the call number.
If necessary, correct with :.
D Press the talk key to start dialling.
Ending a call: Press the end call key B.
Direct internal dialling,17 Press the display key – your own internal
number is displayed.
e.g. q Enter the internal call number.
To call all handsets:&$//�$// or �
Ending a call:Press the end call key B.
Answering a callD Press the talk key
or
�L Remove the handset if it is sitting in the base station - the connection is set up without key activation ("Auto. Talk" - default setting).
.
– You can cancel the dial operation with the end call key B.
– You can enter a pause with the recall key 4(hold down key).
– You can opt to not save entries, e.g. when controlling ex-ternal telephone services: press the menu key �, select 6ZLWFK WR 7RQH and confirm with= – none of the num-bers entered afterwards will be saved.
To immediately deactivate the ringer: hold � down.The call can be accepted while it appears on the display by pressing the talk key D.

12
Giga 3000 Micro, IM1-engl, A31008-G3000-B022-1-6Z19 3000co.fm 31.03.00
Transferring an external call, making an enquiry callSiemens base stations allow you to transfer an external call to another handset or to hold a call while making an internal enquiry call.
,17 Press the display key.
e.g. q Dial the internal number.
When the user answers:
• transfer the call: press the end call key B.
• end the enquiry call: press 4 to revert to the caller placed on hold.

13
Giga 3000 Micro, IM1-engl, A31008-G3000-B022-1-6Z19 3000co.fm 31.03.00
RedialYou can access the last call numbers dialled.
[< Display and select the call number.
D Start the dial operation.
Additional functionsAll functions in the supplementary menu start as fol-lows:
[< Display and select call numbers.
9 Open the supplementary menu.
< Ö2.Ö Select the required function and con-firm:
'LVSOD\ 1XPEHU (further numbers can be added before dialling);
'LDO 1XPEHU (the selected call number is dialled);
&RS\ WR 'LU� (the call number can be saved in the tele-phone directory);
(GLW (QWU\ (change the call number);
'HOHWH (QWU\ (delete the call number);
'LVSOD\ (QWU\ (the whole call number is displayed).
14
Giga 3000 Micro, IM1-engl, A31008-G3000-B022-1-6Z19 3000co.fm 31.03.00
DirectoriesWith the directory - , you can store up to 100 call num-bers and then dial them at the push of a button.
You can store prefixes for telephone companies and fre-quently used call numbers in the network access list M (see also Network access support, page 17).
Apart from the entry operation, using the directory and the network access list is identical.
Storing a call number- / M Display the directory/network access list.
9 Open the supplementary menu.
< Ö2.Ö Select 1HZ (QWU\.
Name Enter the name, see page 15.
< Scroll to the next line.
P Enter the call number, see also note below.
9 Open the supplementary menu.
< Ö2.Ö Confirm 6DYH (QWU\.
Dialling from the directory- / M Display the directory/network access list.
e.g. ¬ ¬ Enter the first letters of the name, e.g. press the key ¬ twice for "(� or scroll with <.
D Press the talk key to start dialling.
– When entering the number, you can insert a pause with the recall key 4 or a number from the network access list via the supplementary menu 9 .
– You can, for example, store the number of a company’s switchboard so that you only have to dial the extension when making a call.
– You can also save incoming or outgoing call numbers dur-ing a call.

15
Giga 3000 Micro, IM1-engl, A31008-G3000-B022-1-6Z19 3000co.fm 31.03.00
Entering namesTo enter names, you can choose letters, digits and symbols with the appropriate key:
Press the appropriate key repeatedly or hold it down:
The entries are sorted as follows: ✱, #, space, digit (0-9), letter (in alphabetical order), –, other characters.
Upper/lowercase:
The first letter of the name is written automatically in upper case, the letters immediately afterwards are written in lower case.
� Manual shift to upper/lower case for one character.
Controlling the cursor:
� Move the cursor to the left or right or to the end of the word/line in the next line (press briefly or hold down).
;< Scroll up or down one line.
Deleting a character:
: The character to the left of the cursor is deleted (press briefly or hold down).
Inserting characters:
Characters are always inserted to the left of the cursor.
1x 2x 3x 4x 5x 6x 7x 8x 9x® 1q a b c 2 ä à â ã ç¬ d e f 3 ë é è ês g h i 4 ï î� j k l 5u m n o 6 ö ñ ó ô õv p q r s 7 ßw t u v 8 ü ú ù û| w x y z 9 ý æ ø å" T*
* Blank
. – 0 , + : ? !� a→A ✱ / ( ) = & @z # £ $
16
Giga 3000 Micro, IM1-engl, A31008-G3000-B022-1-6Z19 3000co.fm 31.03.00
Additional functions- /M Display the directory/network access list.
e.g. w Enter the first letter of the name, e.g. press w for "7�.
9 Open the supplementary menu.
< Ö2.Ö Select the required function and con-firm:
'LVSOD\ 1XPEHU (further numbers can be added);
'LDO 1XPEHU (the call number is dialled);
1HZ (QWU\ (see page 14);
(GLW (QWU\ (change the call number/name);
'HOHWH (QWU\ (delete the call number);
'LVSOD\ (QWU\ (the whole call number is displayed);
&RS\ (QWU\
Prerequisite: both handset and base station support this function.
You can copy the entry to another Comfort handset.
If &RS\ HQWU\ WR ,17 +VHW� is displayed:
e.g. ¬ Ö2.Ö Enter the number of the handset called and confirm.
The handset called rings:
e.g. D Accept the call.
Tel. PIN Ö2.Ö Enter the telephone PIN of the handset called and confirm – the entry is trans-ferred.
'HOHWH /LVWAll entries are deleted.
&RS\ /LVW
Procedure as for "Copy Entry".
$YDLODEOH 0HPRU\
Indicates the memory available. This is shared by the direc-tory, the network access list and the short cuts.

17
Giga 3000 Micro, IM1-engl, A31008-G3000-B022-1-6Z19 3000co.fm 31.03.00
Network access support• Linking call numbers
This function allows you to merge two parts of a number.
M< Open the network access list and select an entry.
9 Open the supplementary menu.
= Confirm 'LVSOD\ 1XPEHU – the number is displayed.
e.g. P Either enter the user’s call number or open the directory and select a number.
D Start the dial operation – the two parts of the call numbers are dialled one after the other.
• Speed dialling from the network access list
– You can save 10 numbers (0-9) in the call-by-call list for speed dialling. These speed dialling numbers (0-9) must be entered before the name, e.g. "1 Name".
– Hold down the relevant digit key (0-9) to display the number saved.
Prerequisite: speed dialling number is saved!
e.g. ® Hold down the relevant digit key – e.g. 1, and the number saved under the name "1 Name" is displayed.
e.g. P Enter the user’s call number or open the directory and select the number.
D Start the dial operation – the two parts of the call numbers are dialled, one after the other.
18
Giga 3000 Micro, IM1-engl, A31008-G3000-B022-1-6Z19 3000co.fm 31.03.00
Caller listUnanswered calls are also, for example, stored in the caller list*.
New entries in the caller list are indicated by the display symbol , .
, Press the display key – the caller list, for example, is displayed.
;< Scroll to the required entry.
e.g. dial the call number:
D Press the talk key.
Audio settingsHandset volumeYou can set the handset volume to any of three levels – even during a call!
� Press the menu key.
Ö2.Ö Select 6HWWLQJV.
Ö2.Ö Select 6RXQG 6HWWLQJV.
< Ö2.Ö Select +DQGVHW 9ROXPH.
� Ö2.Ö Change the volume and save.
* Dependent on the base station, country and carrier services
In the case of base stations with answering machines, this symbol , also indicates that new messages have been recorded. Please refer to the appropriate operating instructions.

19
Giga 3000 Micro, IM1-engl, A31008-G3000-B022-1-6Z19 3000co.fm 31.03.00
Ringer volume/melody– You can choose between 5 ringer volumes, the
crescendo ring (increasing volume =C) and ringer off (=0).
– You can choose between 10 ringer melodies.
� Press the menu key.
Ö2.Ö Select 6HWWLQJV.
Ö2.Ö Select 6RXQG 6HWWLQJV.
< Ö2.Ö Select 5LQJHU 9ROXPH or 5LQJHU 0HORG\.
� Ö2.Ö Change the setting and save.
Setting short beeps (advisory beep)A call is signalled by a single short advisory beep when you set the %HHS function.
� Press the menu key.
Ö2.Ö Select 6HWWLQJV.
Ö2.Ö Select 6RXQG 6HWWLQJV.
< Ö2.Ö Select %HHS.9 = activated.
Activating/deactivating the ringer You can deactivate the ringer if it disturbs you, for example, during a meeting – all calls appear only on the display, but can, however, be accepted while displayed by pressing the talk key D.
� To activate/deactivate this feature, hold down the key until the cancelled bell icon appears or disappears.
Activating/deactivating warning and signal beeps• Key Beeps: every keystroke is confirmed.
• Batt. Low Beep: the battery needs to be charged.
• Confirm. Beeps: confirmation beep (1 beep) at the end of the input/settings and when replacing the handset in the charging unit; error beep (4 short tones) following an in-correct entry.

20
Giga 3000 Micro, IM1-engl, A31008-G3000-B022-1-6Z19 3000co.fm 31.03.00
� Press the menu key.
Ö2.Ö Select 6HWWLQJV.
Ö2.Ö Select 6RXQG 6HWWLQJV.
< Select the required function.
Ö2.Ö Activate or deactivate the function.9 = beep activated.
SecurityYou can change the telephone PIN, set up direct station selection or lock your telephone (handset).
The security functions begin as follows:
� Press the menu key.
Ö2.Ö Select 6HWWLQJV.
< Ö2.Ö Select 6HFXULW\.
Tel. PIN Ö2.Ö Enter the telephone PIN (factory setting: 0000).
< Select the required function:
Changing the telephone PINImportant functions/settings are protected by the PIN (Per-sonal Identification Number) on your handset.
First steps are as described at the start of the Safety pre-cautions section, then:
Ö2.Ö Select &KDQJH 3,1.
Tel. PIN Ö2.Ö Enter the new telephone PIN (4 digits) twice and confirm – the new tel-ephone PIN is saved.
Do not forget your telephone PIN! It can only be reset by calling the Siemens hotline, see page 28.
Tel. PIN Ö2.Ö
21
Giga 3000 Micro, IM1-engl, A31008-G3000-B022-1-6Z19 3000co.fm 31.03.00
Hot key selection (direct station selection)
When hot key selection is activated, every keystroke ini-tiates a call to the previously stored hot key number. Sick people and the elderly, for example, can thus summon help in emergencies. The handset, however, can still receive calls. Simply press the talk key D to take incoming calls.
Saving/changing/deleting a hot key number:
First steps are as described at the start of the Safety pre-cautions section, page 20, then:
Ö2.Ö Select +RW .H\ 6HW 8S.See also note below!
P Enter the hot key number, change it or delete it with :.
9 Select the supplementary menu.
Ö2.Ö Select 6DYH (QWU\.
Activating the hot key:
First steps as described at the start of the Safety precau-tions section, page 20, then:
Ö2.Ö B Select +RW .H\ and activate.9 = activated.
Deactivate: 2)) enter the telephone PIN =B.
Telephone lockIf the telephone lock is activated, with the exception of the emergency call, all functions are disabled. The handset, however, can still receive calls. Simply press the talk key D to take incoming calls.
First steps are as described at the start of the Safety pre-cautions section, page 20, then:
Ö2.Ö B Select +DQGVHW /RFN and activate.9 = activated.
Deactivate: 2)) enter the telephone PIN =B.
This function is not available in all countries!
When entering a number, if necessary open the supplemen-tary menu 9 and enter , for an internal hot key number (e.g. ,�), a pause or a number from the network access list.

22
Giga 3000 Micro, IM1-engl, A31008-G3000-B022-1-6Z19 3000co.fm 31.03.00
Dialling the emergency numberWhen the hot key/telephone lock is activated, you can dial the emergency numbers saved on the base station – see base station operating instructions!
Further settingsAuto talkIf this function is activated, simply remove the handset from the base station/charging unit to answer a call.
� Press the menu key.
Ö2.Ö Select 6HWWLQJV.
< Ö2.Ö Select $XWR 7DON and activate or deactivate the function.9 = activated.
Setting the display language� Press the menu key.
Ö2.Ö Select 6HWWLQJV.
< Ö2.Ö Select /DQJXDJH. 9 = language set.
< Ö2.Ö Select the language and confirm.
Language setting displays:
Einstellungen Sprache Deutsch
Settings Language English
Réglages Langue Français
Impostazioni Lingua Italiano
Ajustes Idioma Español
Programações Língua Português
Instellingen Taal Nederlands

23
Giga 3000 Micro, IM1-engl, A31008-G3000-B022-1-6Z19 3000co.fm 31.03.00
Resetting the handset to the default configuration
Handset factory settings:
� Press the menu key.
Ö2.Ö Select 6HWWLQJV.
< Ö2.Ö Select 'HIDXOW 5HVHW.
Tel. PIN Ö2.Ö Enter the telephone PIN and confirm(factory setting: 0000).
The telephone PIN is not reset, the directory, network access list and the caller list are not deleted.
Language setting English
Hot key, redial deleted
Auto talk, key beep, battery low beep, con-firmation beeps
on
Handset volume, ringer tone 1
Ringer volume 5
Short beep off
Room monitor level 2
24
Giga 3000 Micro, IM1-engl, A31008-G3000-B022-1-6Z19 3000co.fm 31.03.00
Base settingsRegistering the handsetYou can operate your handset at up to 4 base stations.For information on registering at non-Siemens GAP base stations, see the relevant base station operating instruc-tions.
• To prepare the base station, see page 10.
• Enter the following in the handset within one minute:
� Press the menu key.
< Ö2.Ö Select %DVH VHWWLQJV.
9 Open the supplementary menu.
< Ö2.Ö Select 5HJLVWHU.
System PIN Ö2.Ö Enter the base station’s system PIN (factory setting: 0000) and confirm.
Additional base settingsAll other base settings begin as follows:
� Press the menu key.
< Ö2.Ö Select %DVH VHWWLQJV.
<9 Select the base and open the supplemen-tary menu.
< Select the required function:
&KDQJH %DVH 1DPHYou can change the base name, e.g. %DVH to ,QWHUQDO �; in this case, "3" is the handset’s internal number.
Ö2.Ö Select &KQJH %DVH 1DPH (Change Base Name).
Name Enter the required name.For information on entering the name, see page 15.
9 Ö2.Ö Select 6DYH (QWU\.

25
Giga 3000 Micro, IM1-engl, A31008-G3000-B022-1-6Z19 3000co.fm 31.03.00
6HOHFW %DVHYou can set the handset permanently to a specific base station or to %HVW %DVH – automatic switch to the base station with the strongest reception.
Ö2.Ö Select 6HOHFW %DVH.
,6'1 &RQILJ�
Only possible in conjunction with some Siemens ISDN base stations. Refer to the appropriate operating instructions.
User options (short cuts)Base station user optionsOnly available with Gigaset 3000 base stations!Refer to the appropriate operating instructions.
Handset user options (handset short cuts)You can save multiple operating steps (inputs) as a handset "short cut" and assign an appropriate name to it. You can edit and copy short cuts via the supplementary menu 9 in the same way as directory entries.
Saving handset user options:
� Press the menu key.
< Ö2.Ö Select +VHW 8VHU 2SWLRQ.
9 Open the supplementary menu.
< Ö2.Ö Select 1HZ (QWU\.
Name Enter the name of the short cut.
< Scroll to the next line.
Contents Enter the contents for the short cut.
9 Ö2.Ö Open the supplementary menu and con-firm 6DYH (QWU\.
26
Giga 3000 Micro, IM1-engl, A31008-G3000-B022-1-6Z19 3000co.fm 31.03.00
Additional supplementary menu functions when enter-ing the short cut contents:
,QVHUW )XQFWLRQ
The following letters are displayed for the functions:
< Ö2.Ö Select a function and confirm.
6KRZ )XQFWLRQ
The meaning of the character at the current cursor position is displayed.
1HWZRUN $FFHVV
To insert a number from the network access list.
Starting a handset short cut:
� Press the menu key.
< Ö2.Ö Select +VHW 8VHU 2SWLRQ.
< D Select the required short cut and start it with the talk key.
& 5HTXHVW 3,1 , ,17
1 5HTXHVW 1R� ( (QG &DOO
4 5HT� $FNQRZO� 0 7HPS� 7RQH
3 ,QVHUW 3DXVH

27
Giga 3000 Micro, IM1-engl, A31008-G3000-B022-1-6Z19 3000co.fm 31.03.00
Room monitorWhen the room monitor feature is activated, an internal call to another handset is triggered as soon as the noise level in the monitored room reaches the level set. You can hear the noises in the room when you answer the call. The room monitor remains active even after you replace the handset. Calls are only shown on the monitoring handset’s display. The distance between the handset placed there and the area to be monitored should be between 1 and 2 meters.
Saving the call number� Press the menu key.
< Ö2.Ö Select 5RRP 0RQLWRU 6HW.
< Ö2.Ö Select 5RRP 0RQLW� 1R�
P Ö2.Ö Enter the number of the handset to be called by the monitoring handset and con-firm.
Setting the noise level� Press the menu key.
< Ö2.Ö Select 5RRP 0RQLWRU 6HW.
< Ö2.Ö Select 6HW /HYHO.
� Ö2.Ö Change the level and save.Level 1 = sensitive!
Activating the room monitorPrerequisite: call number saved.
� Press the menu key.
< Ö2.Ö Select 5RRP 0RQLWRU 6HW.
Ö2.Ö B Activate 5RRP 0RQLWRULQJ and terminate the function.9 = activated.
Deactivating the room monitor2)) The function is deactivated.
If you entered a 2-digit number by accident: enter a "zero" before the number.

28
Giga 3000 Micro, IM1-engl, A31008-G3000-B022-1-6Z19 3000co.fm 31.03.00
AppendixSettings at the baseThe setting options in the 6HUYLFH 6HW 8S menu item are dependent on the base station.Refer to the appropriate base station operating instructions.
RangeThe range is up to 300 m outdoors and approx. 50 m indoors. The reception strength symbol indicates the strength of radio contact between the base station and the handset:
Headset (accessory)The Gigaset 3000 Micro headset leaves both hands free to conduct calls. Moreover, additional parties can listen in to the calls on the handset.
Guarantee/serviceOver a guarantee period of six months from the date of pur-chase from the stockist, Siemens AG will rectify all material or manufacturing defects by repairing or replacing the defec-tive terminal.
The guarantee does not cover damage caused by incorrect use, wear and tear, or third-party access. The guarantee does not cover consumables or defects which only have a minor effect on the value or operability of the terminal.
Service telephone number see back cover.
ApprovalThe Gigaset 3000 Micro handset has been approved throughout the EU.
´ High reception strength� Low reception strength
Recommended