Embed Size (px)
Citation preview

B-Web V5.5 Quick User Guide (v1.0)

B-Web V5.5
Quick User Guide
Version 1.0 © Clear2Pay - Strictly Confidential Page 2 of 77
Table of contents
1 INTRODUCTION TO B-WEB V5 EBANKING ............................................................................... 5
1.1 This document .............................................................................................................................. 5
2 ACCESSING THE APPLICATION .................................................................................................. 6
2.1 Browser Behavior .......................................................................................................................... 6
2.2 Login .............................................................................................................................................. 6
2.2.1 Log in with user name and password (virtual keyboard) ...................................................... 8
2.2.2 Log in with Digipass GO3, DP550 or DP2xx/3xx .................................................................... 9
2.3 Customer dashboard ................................................................................................................... 10
2.4 Exiting the application ................................................................................................................ 11
3 INTERFACE OVERVIEW ............................................................................................................... 12
3.1 B-Web V5 eBanking Screen Layout ............................................................................................. 12
3.2 Navigation Menu ......................................................................................................................... 12
3.3 Screen Messages ......................................................................................................................... 13
3.4 On-Screen Buttons ...................................................................................................................... 14
3.5 Fields ........................................................................................................................................... 14
3.5.1 Mandatory Fields ................................................................................................................ 14
3.5.2 Drop Down Lists .................................................................................................................. 14
3.5.3 Date Fields ........................................................................................................................... 15
3.6 Lists ............................................................................................................................................. 15
3.7 Searches ...................................................................................................................................... 16
4 ACCOUNT REPORTING ................................................................................................................ 18
4.1 Consult your account balances ................................................................................................... 18
4.2 View the balance history of an account ...................................................................................... 18
4.3 View the account details and movements .................................................................................. 20
4.4 Search movements ..................................................................................................................... 21
4.5 Download movements ................................................................................................................ 22
5 FUND TRANSFER ........................................................................................................................... 24
5.1 Create a book transfer ................................................................................................................ 24

B-Web V5.5
Quick User Guide
Version 1.0 © Clear2Pay - Strictly Confidential Page 3 of 77
5.2 Create a domestic payment ........................................................................................................ 26
5.3 Use a registered beneficiary to create a domestic credit transfer ............................................. 29
5.4 Create an international payment ................................................................................................ 32
5.5 Use a registered beneficiary to create an international credit transfer ..................................... 37
5.6 Sign payments ............................................................................................................................. 39
5.7 Manage your beneficiaries ......................................................................................................... 40
5.7.1 Create a beneficiary ............................................................................................................ 41
5.7.2 Edit a beneficiary................................................................................................................. 44
5.7.3 Delete a beneficiary ............................................................................................................ 45
5.8 View Payment history ................................................................................................................. 45
5.9 Import (upload) a payment file ................................................................................................... 46
5.10 Manage Imported Files ............................................................................................................... 47
5.11 Managing Templates for Manual Payments ............................................................................... 49
5.11.1 Creating Templates ............................................................................................................. 49
5.11.2 Modifying Templates .......................................................................................................... 52
5.11.3 Deleting Templates ............................................................................................................. 52
6 EXCHANGE RATES ........................................................................................................................ 54
6.1 Viewing the Exchange Rates Summary Table ............................................................................. 54
6.2 Viewing the Detailed List of Exchange Rates .............................................................................. 56
6.3 Converting Amounts Using the Converter .................................................................................. 58
7 PERSONAL SETTINGS .................................................................................................................. 60
7.1 Manage your accounts ................................................................................................................ 60
7.2 Manage your contact details ...................................................................................................... 60
7.3 Change your password ................................................................................................................ 61
7.4 Manage your security details ...................................................................................................... 62
7.5 Access your Inbox ....................................................................................................................... 63
7.6 Send a message to your bank (Outbox) ...................................................................................... 63
7.7 Manage your alerts ..................................................................................................................... 65
7.7.1 Create an alert on account balance at a specified date and time ...................................... 66
7.7.2 Create an alert on account balance exceeding a specified amount ................................... 68

B-Web V5.5
Quick User Guide
Version 1.0 © Clear2Pay - Strictly Confidential Page 4 of 77
7.7.3 Create an alert on account balance below a specified amount......................................... 70
7.7.4 Create an alert on a debit operation .................................................................................. 72
7.7.5 Create an alert on a credit operation ................................................................................. 74
7.8 Downloading files ........................................................................................................................ 75

B-Web V5.5
Quick User Guide
Version 1.0 © Clear2Pay - Strictly Confidential Page 5 of 77
1 INTRODUCTION TO B-WEB V5 EBANKING © Clear2Pay 2014. All rights reserved. All product names, company names or trademarks mentioned in this document remain the property of their respective owners. No part of this document may be reproduced in any form without permission from Clear2Pay.
1.1 This document
This document is a simplified, non-contractual description of the B-Web eBanking application to provide you, a bank customer user with a global financial view and tools to manage your accounts, do payments and perform a number of self-service functions.
Important
This document describes all the functionalities available in the B-Web eBanking application. Depending on the functionalities available at your bank, some of these functions and menus described in this guide may not be available.
All trademarks used in this document remain the property of their rightful owners.

B-Web V5.5
Quick User Guide
Version 1.0 © Clear2Pay - Strictly Confidential Page 6 of 77
2 ACCESSING THE APPLICATION
2.1 Browser Behavior
Supported Browsers We recommend that you use the Mozilla Firefox version 3 or higher, or Internet Explorer 8 or higher for accessing the application. Some other browsers may result in minor loss of display quality. Use of Tabs It is advised not to open any links within the application in another tab or window. This would intervene with the user sessions and will imply a disconnection from the system. Button Use When filling data into one of the forms, it is advisable to always use buttons on screen. This practice assures that there are no interferences in the behavior of the browser.
2.2 Login
In order to access the application, you need to use the credentials provided by your bank. On the login page, the application allows you to select an authentication method. Select the appropriate authentication method to move to the next screen. You can change the language in which you want to view the application by clicking on one of the flags below the text boxes. When you have selected a language, your browser will retain these settings and next time you log on to the application, this language will automatically be selected for you. Depending on the configuration at the bank level, customer users logging to the Web Client user interface can be blocked after a number of failed login attempts. Whenever a customer user fails to log in, a counter is increased. If the customer user logs in with the right credentials before the maximum number of failed login attempts has been reached, the counter is reset to 0. However, when the maximum number of failed login attempts has been reached, the associated token is blocked and a message appears in the login page. The blocking can be temporary if a period has been defined at the bank level. When this period expires, the blocking is disabled. Otherwise, the blocking is permanent and necessitates the intervention of a bank administrator to be disabled.

B-Web V5.5
Quick User Guide
Version 1.0 © Clear2Pay - Strictly Confidential Page 7 of 77
Figure 1: Login Screen

B-Web V5.5
Quick User Guide
Version 1.0 © Clear2Pay - Strictly Confidential Page 8 of 77
2.2.1 Log in with user name and password (virtual keyboard)
To log in with this authentication method, enter your login name in the text box and key in your
password using the virtual keyboard.
Figure 2: Log in with user name and password
In case you provide incorrect credentials, the application will inform you via an error message. If you are unable to log in to the eBanking application, you should contact your Bank. During the initial log in, you will need to configure your security settings. These are secret questions that will be asked by the application when you click on the “Forgot password” link, and that will allow you to type in a new password.

B-Web V5.5
Quick User Guide
Version 1.0 © Clear2Pay - Strictly Confidential Page 9 of 77
2.2.2 Log in with Digipass GO3, DP550 or DP2xx/3xx
To generate a one-time password using a Digipass device, follow the instructions on the screen.
Figure 3: Log in with GO3 one time password
Figure 4: Log in with DP550 challenge/response

B-Web V5.5
Quick User Guide
Version 1.0 © Clear2Pay - Strictly Confidential Page 10 of 77
Figure 5: Log in with DP2xx/3xx challenge/response
Once logged in, customer dashboard will be displayed.
2.3 Customer dashboard
Your dashboard, or Home page, displays the following information:
The date and time of the last time you logged in
Optionally, a number of information messages (for example: when your password is
about to expire or in case a new message is available for you or in case there is still a
payment pending, you can find this information in the dashboard)
Some of the messages are mandatory to read. You will not be able to use the
application until you confirm that you have read them by clicking on a “Next” button.
You can return to the dashboard at any time.
Figure 6: Customer Dashboard

B-Web V5.5
Quick User Guide
Version 1.0 © Clear2Pay - Strictly Confidential Page 11 of 77
2.4 Exiting the application
To log out of the eBanking application, click on the Log Out button on top of the page. This will automatically terminate your session.
Figure 7: Logging out of the application

B-Web V5.5
Quick User Guide
Version 1.0 © Clear2Pay - Strictly Confidential Page 12 of 77
3 INTERFACE OVERVIEW
3.1 B-Web V5 eBanking Screen Layout
The main screen elements are: Header Navigation Menu Main panel Footer
Figure 8: B-Web V5 eBanking Screen Layout
3.2 Navigation Menu
The Navigation Menu is used to select the different eBanking functions. It is divided into three functional groups:
Account Reporting Fund Transfer Personal Settings
Within each of these functional groups, one or more features are available. These features are accessible via the left hand navigation menu and/or via the top menu.
Figure 9: Top Navigation Menu

B-Web V5.5
Quick User Guide
Version 1.0 © Clear2Pay - Strictly Confidential Page 13 of 77
Figure 10: Left hand Navigation Menu
Depending on your contract with your bank, you may not see all of the options shown in the illustration. The content of the user’s Navigation Menu is dependent on your user profile and your access entitlements. This means that the contents of the Navigation Menu can vary for different users.
3.3 Screen Messages
The application will provide you with feedback on your actions via different screen messages. These screen messages are shown on top of the page, right beneath the top menu. Different types of screen messages exist:
Confirmation messages
Figure 11: Confirmation Message Example
Error messages: in addition to the error message, the field that is in error will be highlighted. You can click on the error message in the screen message pane to go to the field in error.
Figure 12: Error Message Example

B-Web V5.5
Quick User Guide
Version 1.0 © Clear2Pay - Strictly Confidential Page 14 of 77
3.4 On-Screen Buttons
There are a number of on-screen buttons available that are used to perform actions in eBanking application. Some of these buttons are specific for a page, but a number of buttons can be found on several screens. The following buttons appear on several screens throughout the application:
Icon Function
Executes the search criteria you have specified.
Clears the text boxes on the page.
Saves any changes that you made to a new or edited item.
3.5 Fields
The eBanking application employs a variety of standard Windows fields to enter and edit data. Some have a character limit on field lengths. The application will automatically validate the format of the entered data and inform you in case a field is incorrectly formatted.
3.5.1 Mandatory Fields
In any create or edit screen there may be fields that are mandatory. Independent of the field type, whenever a field is mandatory, it is identified by an orange asterisk on the top left side of the field's label.
Figure 13: Mandatory Field Indicator
3.5.2 Drop Down Lists
Some fields can be populated only with the contents of a drop-down list. Such lists have an arrowed box on the right side of the field and contain the legend Make a Selection or All. You can only populate this type of field by making a selection from the list.

B-Web V5.5
Quick User Guide
Version 1.0 © Clear2Pay - Strictly Confidential Page 15 of 77
Figure 14: Drop down List example
3.5.3 Date Fields
Dates can be entered either by typing the dates directly into the field or by selecting the required date in the displayed calendar.
Figure 15: Example of a Calendar Control
Note: Using the calendar to select the date reduces the possibility of date format errors.
3.6 Lists
Data is displayed in the eBanking application in the form of lists. A number of items are displayed on a screen; longer lists display their data over multiple screens. You can navigate through most multi page lists using the List Pagination controls.

B-Web V5.5
Quick User Guide
Version 1.0 © Clear2Pay - Strictly Confidential Page 16 of 77
Figure 16: Example of a List Screen
For some lists, you can change the order in which data is displayed by reversing the sort order of an individual column. This function is not available for all columns or lists. Columns that can be sorted in this way are identified by an underlined title in the header row. Click the title of the column to reverse the sort order. The sort order is indicated by an upward or a downward arrow.
Figure 17: Example of sorting
3.7 Searches
It is usually quicker to find the information that you need on multi pages lists by using the Search Panel rather than by using the pagination controls or changing the sort order. For some of the lists, the application offers you a Search Panel to make it easier to find specific information.
Figure 18: Search example
B-Web V5.5
Quick User Guide
Version 1.0 © Clear2Pay - Strictly Confidential Page 17 of 77
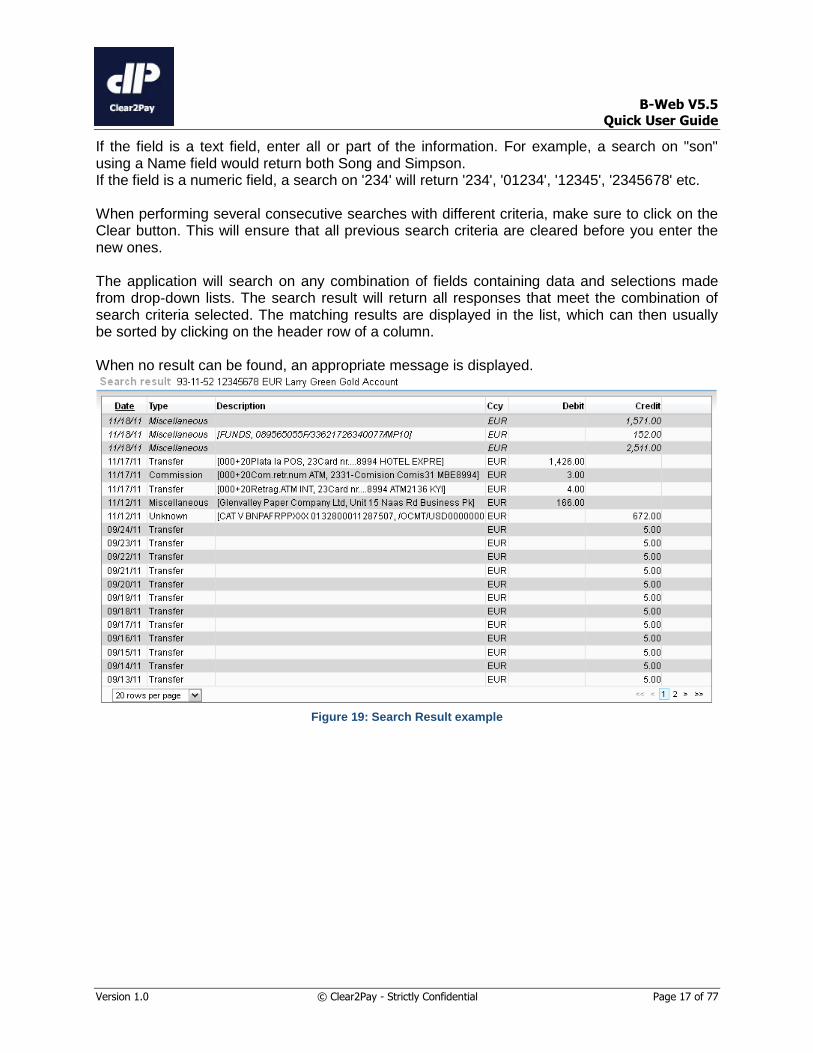
If the field is a text field, enter all or part of the information. For example, a search on "son" using a Name field would return both Song and Simpson. If the field is a numeric field, a search on '234' will return '234', '01234', '12345', '2345678' etc. When performing several consecutive searches with different criteria, make sure to click on the Clear button. This will ensure that all previous search criteria are cleared before you enter the new ones. The application will search on any combination of fields containing data and selections made from drop-down lists. The search result will return all responses that meet the combination of search criteria selected. The matching results are displayed in the list, which can then usually be sorted by clicking on the header row of a column. When no result can be found, an appropriate message is displayed.
Figure 19: Search Result example

B-Web V5.5
Quick User Guide
Version 1.0 © Clear2Pay - Strictly Confidential Page 18 of 77
4 ACCOUNT REPORTING
You can consult your account balances and movements using the account reporting module.
This module allows you to:
Consult an overview of your accounts and their balance
View the account details and movements for each of your accounts
Search movements based on a number of criteria
Download your movements
4.1 Consult your account balances
Select the Account Balances entry from the Account reporting top or left hand menu to consult
your accounts and their balances.
You will see an overview of all accounts you have access to, grouped according to their
categories.
Figure 20: Account Balances overview
4.2 View the balance history of an account
You can view the balance history of an account by clicking on its Balance field on the Account
Balances screen.
This screen will show you the evolution of your account balance and displays the balance dates
and the associated values.

B-Web V5.5
Quick User Guide
Version 1.0 © Clear2Pay - Strictly Confidential Page 19 of 77
The account balances displayed in italic are based on intraday (e.g for the current day)
statements and this information is used to calculate the future balance (for information only).
With a corporate profile, you can select one or more statements from this page (via the check
boxes) and export them using the Export button. Note that intraday records are displayed in
italic. The Balance displayed is the balance received in that last end of day statement. The
Future Balance is calculated based on the Balance and the information provided in the intraday
statements.
Figure 21: Balance History

B-Web V5.5
Quick User Guide
Version 1.0 © Clear2Pay - Strictly Confidential Page 20 of 77
4.3 View the account details and movements
The Details & Movements page provides you a view on the detailed account information and
the different debit and credit operations on the selected account. If no account was yet selected
(i.e. you accessed the page via the top or left menu), you will have to select the appropriate
account from a drop down list:
Figure 22: Details & movements account selection
The Account Details & Movements page has two sections:
Account Details: contains the details of the selected account like the Account Number,
the Account Balance and the associated Account Balance Date.
Account Movements: gives you a view on all the debit and credit operations on the
account.
Note Depending on whether the functionality is enabled for the bank, the amount may appear in two separate columns for debit and credit operations.

B-Web V5.5
Quick User Guide
Version 1.0 © Clear2Pay - Strictly Confidential Page 21 of 77
Figure 23: Details & Movements account
If the movements do not fit on one screen, they will be displayed on multiple pages.
4.4 Search movements
Using the Search & Download menu, you can search movements based on a number of
search criteria, including:
The account number: select the applicable account number from the drop down list. You
can also search on all your accounts by selecting the “All” value.
The minimum and maximum amount of the movement.
The start and end date.
The transaction currency
The transaction description
The Classification of the transaction (intraday or end of day)

B-Web V5.5
Quick User Guide
Version 1.0 © Clear2Pay - Strictly Confidential Page 22 of 77
Figure 24: Search Movements
The application will return all movements that match the search parameters. The search result
is displayed below the Search panel.
If the search results do not fit on one screen, they will be displayed on multiple screens. You can use the list pagination controls browse through the different pages.
4.5 Download movements
You can download the result of your search by clicking on one of the Export buttons on the
bottom of the Search Results list. You can either open the file or save it by selecting the
appropriate option in the pop up window. The application will export the content of the Search
Results list.

B-Web V5.5
Quick User Guide
Version 1.0 © Clear2Pay - Strictly Confidential Page 23 of 77
Figure 25: Download Movements
The “CSV” export format is designed to open a Microsoft Excel application (or an equivalent
spreadsheet program). In some cases that depend on your computer’s configuration, it may be
necessary to save the result as a file, and then open that file from the spreadsheet application.

B-Web V5.5
Quick User Guide
Version 1.0 © Clear2Pay - Strictly Confidential Page 24 of 77
5 FUND TRANSFER The Fund Transfer module allows you to initiate payments (create and sign), manage your
beneficiaries and view your payments history. A file upload module is also available.
5.1 Create a book transfer
You can transfer funds between your own accounts by initiating a book transfer payment. You
must have at least two accounts to use this feature.
To create a new book transfer, select the Book Transfer entry from the Fund Transfer top or
left hand menu and perform the following steps:
Step Action
Transaction Details
1 Fill out the transaction amount. The amount needs to be numeric and is mandatory.
2 Optionally, select a payment date. If you leave this field empty, today’s date will automatically be set. If you want to create a future dated payment, enter the appropriate date or use the calendar control to select one. If the payment date falls on a bank holiday then the application will refuse the date and
propose the first working day after the holiday.
B-Web V5.5
Quick User Guide
Version 1.0 © Clear2Pay - Strictly Confidential Page 25 of 77
Step Action
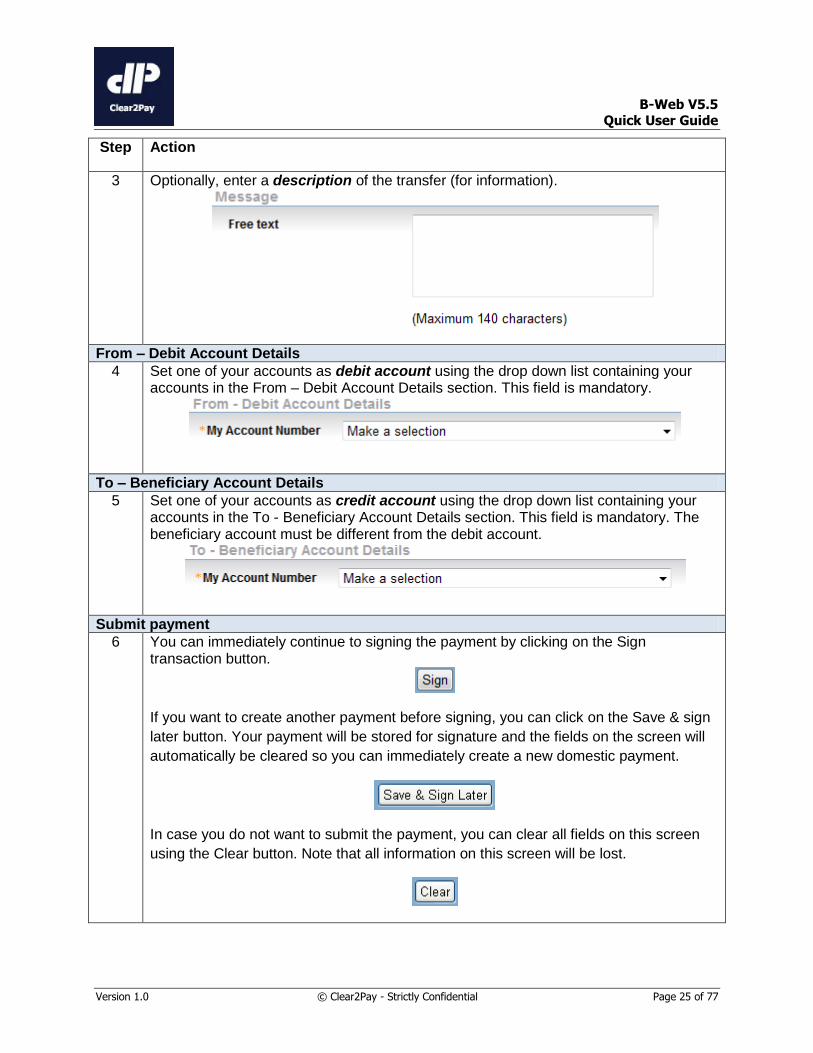
3 Optionally, enter a description of the transfer (for information).
From – Debit Account Details
4 Set one of your accounts as debit account using the drop down list containing your accounts in the From – Debit Account Details section. This field is mandatory.
To – Beneficiary Account Details
5 Set one of your accounts as credit account using the drop down list containing your accounts in the To - Beneficiary Account Details section. This field is mandatory. The beneficiary account must be different from the debit account.
Submit payment
6 You can immediately continue to signing the payment by clicking on the Sign transaction button.
If you want to create another payment before signing, you can click on the Save & sign
later button. Your payment will be stored for signature and the fields on the screen will
automatically be cleared so you can immediately create a new domestic payment.
In case you do not want to submit the payment, you can clear all fields on this screen
using the Clear button. Note that all information on this screen will be lost.

B-Web V5.5
Quick User Guide
Version 1.0 © Clear2Pay - Strictly Confidential Page 26 of 77
For example:
Figure 26: Create Book Transfer
5.2 Create a domestic payment
A domestic payment is a payment between two local accounts (in you bank’s country) in the
local currency (or one of the bank’s local currencies in some cases).
To create a new domestic payment, select the Domestic Payment entry from the Fund
Transfer top or left hand menu and perform the following steps:
Step Action
Transaction Details
1 Fill out the transaction amount. The amount needs to be numeric and is mandatory.

B-Web V5.5
Quick User Guide
Version 1.0 © Clear2Pay - Strictly Confidential Page 27 of 77
Step Action
2 Optionally, select a payment date. If you leave this field empty, today’s date will automatically be set. If you want to create a future dated payment, enter the appropriate date or use the calendar control to select one. If the payment date falls on a bank holiday then the application will refuse the date and
propose the first working day after the holiday.
From – Debit Account Details
3 Set one of your accounts as debit account using the drop down list containing your accounts in the From – Debit Account Details section. This field is mandatory.
To – Beneficiary Account Details
4 Fill out the beneficiary account number in the To – Beneficiary Account Details section. The application will verify if the account number is correctly formatted. This field is mandatory.
5 Optionally, enter the beneficiary name and address.
6 If you want to save the details for this beneficiary for later use, select the check box “Save beneficiary”.

B-Web V5.5
Quick User Guide
Version 1.0 © Clear2Pay - Strictly Confidential Page 28 of 77
Step Action
Messages
7 Optionally, enter a Free text description or a Structured Message.
Submit payment
9 You can immediately continue to signing the payment by clicking on the Sign transaction button.
If you want to create another payment before signing, you can click on the Save & sign
later button. Your payment will be stored for signature and the fields on the screen will
automatically be cleared so you can immediately create a new domestic payment.
In case you do not want to submit the payment, you can clear all fields on this screen
using the Clear button. Note that all information on this screen will be lost.

B-Web V5.5
Quick User Guide
Version 1.0 © Clear2Pay - Strictly Confidential Page 29 of 77
Figure 27: Create Domestic Payment
5.3 Use a registered beneficiary to create a domestic credit transfer
Instead of manually entering the beneficiary data (like account number, name and address), you
can also use beneficiaries that you have registered previously:

B-Web V5.5
Quick User Guide
Version 1.0 © Clear2Pay - Strictly Confidential Page 30 of 77
Step Action
From – Debit Account Details
1 Set one of your accounts as debit account using the drop down list containing your accounts in the From – Debit Account Details section. This field is mandatory.
To – Beneficiary Account Details 2 Click on the “Search for Beneficiary” link to access your registered beneficiaries.
3 Select one of the beneficiaries from the list by clicking on the Beneficiary nickname.
The application will return to the Create Domestic Payments screen and the beneficiary
related fields will automatically populated with the data stored for the selected
beneficiary.
B-Web V5.5
Quick User Guide
Version 1.0 © Clear2Pay - Strictly Confidential Page 31 of 77
Step Action
Transaction Details
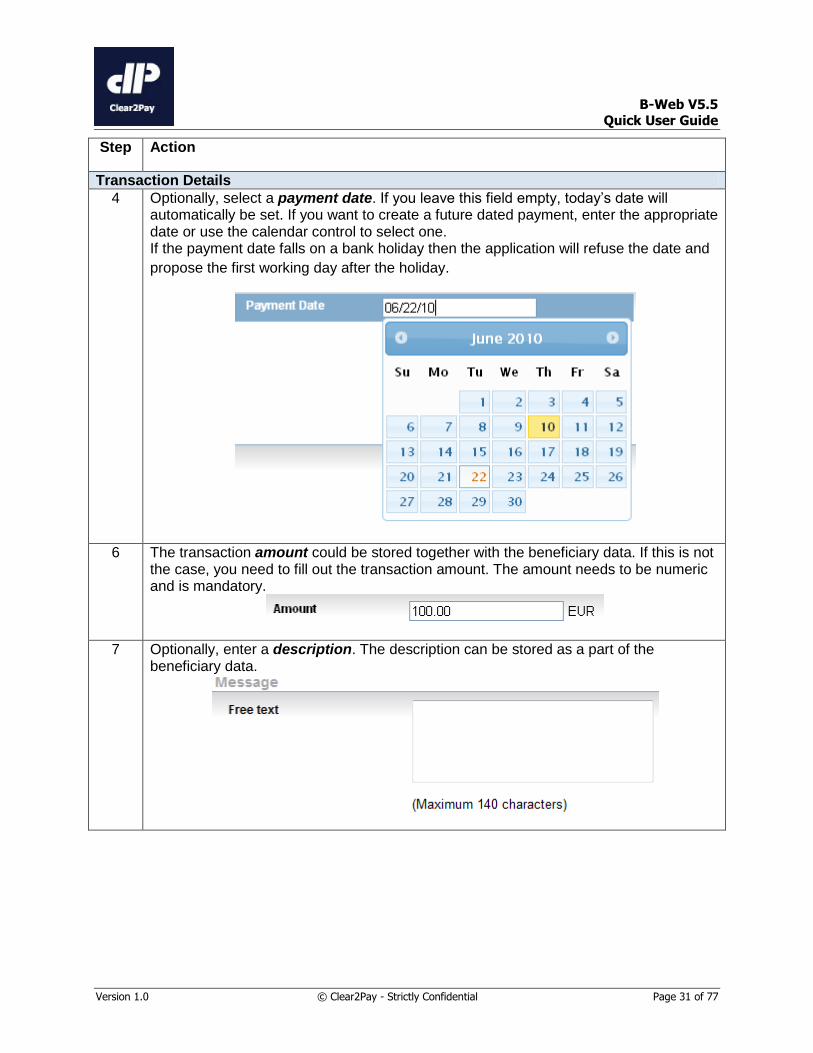
4 Optionally, select a payment date. If you leave this field empty, today’s date will automatically be set. If you want to create a future dated payment, enter the appropriate date or use the calendar control to select one. If the payment date falls on a bank holiday then the application will refuse the date and
propose the first working day after the holiday.
6 The transaction amount could be stored together with the beneficiary data. If this is not the case, you need to fill out the transaction amount. The amount needs to be numeric and is mandatory.
7 Optionally, enter a description. The description can be stored as a part of the beneficiary data.

B-Web V5.5
Quick User Guide
Version 1.0 © Clear2Pay - Strictly Confidential Page 32 of 77
Step Action
Submit payment 8 You can immediately continue to signing the payment by clicking on the Sign
transaction button.
If you want to create another payment before signing, you can click on the Save & sign
later button. Your payment will be stored for signature and the fields on the screen will
automatically be cleared so you can immediately create a new domestic payment.
In case you do not want to submit the payment, you can clear all fields on this screen
using the Clear button. Note that all information on this screen will be lost.
5.4 Create an international payment
An international payment is a payment to a foreign account or a payment between local
accounts in foreign currency.
To create a new international payment, select the International Payment entry from the Fund
Transfer top or left hand menu and perform the following steps:
Step Action
Transaction Details
1 Fill out the transaction amount. The amount needs to be numeric and is mandatory.

B-Web V5.5
Quick User Guide
Version 1.0 © Clear2Pay - Strictly Confidential Page 33 of 77
Step Action
2 Select the transaction currency from the drop down list next to the transaction amount. This field is mandatory.
3 Optionally, select a payment date. If you leave this field empty, today’s date will automatically be set. If you want to create a future dated payment, enter the appropriate date or use the calendar control to select one. If the payment date falls on a bank holiday then the application will refuse the date and
propose the first working day after the holiday.
4 Optionally, enter a description.

B-Web V5.5
Quick User Guide
Version 1.0 © Clear2Pay - Strictly Confidential Page 34 of 77
Step Action
From – Debit Account Details
5 Set one of your accounts as debit account using the drop down list in the From – Debit Account Details section. This field is mandatory.
To – Beneficiary Account Details
6 Select the Destination Country from the drop down list.
You can still modify the destination country by clicking on the Modify Destination
Country link:
Beneficiary
7 Select the format in which you want to enter the account number from the drop down list next to the Account Number field. Note that for some countries, only one option is supported.
8 Fill out the beneficiary account number in the To – Beneficiary Account Details section. This field is mandatory.
B-Web V5.5
Quick User Guide
Version 1.0 © Clear2Pay - Strictly Confidential Page 35 of 77
Step Action
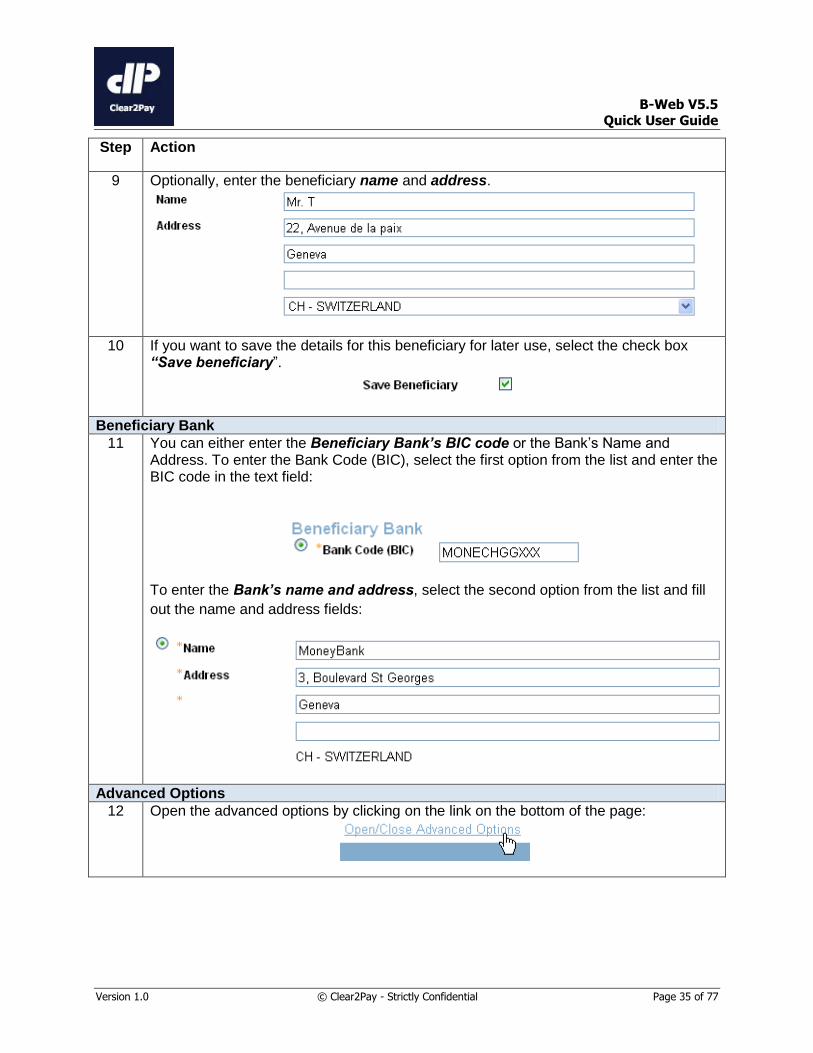
9 Optionally, enter the beneficiary name and address.
10 If you want to save the details for this beneficiary for later use, select the check box “Save beneficiary”.
Beneficiary Bank
11 You can either enter the Beneficiary Bank’s BIC code or the Bank’s Name and Address. To enter the Bank Code (BIC), select the first option from the list and enter the BIC code in the text field:
To enter the Bank’s name and address, select the second option from the list and fill
out the name and address fields:
Advanced Options
12 Open the advanced options by clicking on the link on the bottom of the page:

B-Web V5.5
Quick User Guide
Version 1.0 © Clear2Pay - Strictly Confidential Page 36 of 77
Step Action
Instructions
13 You can optionally enter instructions for the bank in the text field Instruction to Bank:
Charges
14 In the charges section, you define who will pay the charges for the payment and the Account Number from which you want to pay your share of the charges.
Submit payment
15 You can immediately continue to signing the payment by clicking on the Sign transaction button.
If you want to create another payment before signing, you can click on the Save & sign
later button. Your payment will be stored for signature and the fields on the screen will
automatically be cleared so you can immediately create a new domestic payment.
In case you do not want to submit the payment, you can clear all fields on this screen
using the Clear button. Note that all information on this screen will be lost.

B-Web V5.5
Quick User Guide
Version 1.0 © Clear2Pay - Strictly Confidential Page 37 of 77
5.5 Use a registered beneficiary to create an international credit transfer
Instead of manually entering the beneficiary data (like account number, name and address), you
can also use beneficiaries that you have registered previously:
Step Action
From – Debit Account Details
1 Set one of your accounts as debit account using the drop down list containing your accounts in the From – Debit Account Details section. This field is mandatory.
To – Beneficiary Account Details 2 Click on the “Search for Beneficiary” link to access your registered beneficiaries.
3 Select one of the beneficiaries from the list by clicking on the Beneficiary nickname.
The application will return to the Create International Payments screen and the
beneficiary related fields will automatically populated with the data stored for the
selected beneficiary.

B-Web V5.5
Quick User Guide
Version 1.0 © Clear2Pay - Strictly Confidential Page 38 of 77
Step Action
Transaction Details
4 Optionally, select a payment date. If you leave this field empty, today’s date will automatically be set. If you want to create a future dated payment, enter the appropriate date or use the calendar control to select one. If the payment date falls on a bank holiday then the application will refuse the date and
propose the first working day after the holiday.
5 The transaction amount could be stored together with the beneficiary data. If this is not the case, you need to fill out the transaction amount. The amount needs to be numeric and is mandatory.
6 Optionally, enter a description. The description can be stored as a part of the beneficiary data.

B-Web V5.5
Quick User Guide
Version 1.0 © Clear2Pay - Strictly Confidential Page 39 of 77
Step Action
Submit payment 7 You can immediately continue to signing the payment by clicking on the Sign
transaction button.
If you want to create another payment before signing, you can click on the Save & sign
later button. Your payment will be stored for signature and the fields on the screen will
automatically be cleared so you can immediately create a new domestic payment.
In case you do not want to submit the payment, you can clear all fields on this screen
using the Clear button. Note that all information on this screen will be lost.
5.6 Sign payments
Once you have created one or more payments, you need to sign them before they are
submitted (and for Corporate customers, more than one user may be required to sign certain
payments).
To sign your payments, click on the Sign button on the payment initiation screen or select the
Sign Payments entry from the Fund Transfer top or left hand menu. You can also click the
Sign button from the payment template.
If you have more than one authentication method for signing payments (ex: virtual keyboard and
Digipass) you will first have to select the method you wish to use.
The Sign Payments screen provides you an overview of all payments that have been created
but that are still awaiting signature. Select the payments you want to sign and submit and enter
your credentials. Clicking on the confirm button will submit the transactions for further
processing.
Some payments will be displayed without a selection checkbox, if you do not have the authority
to sign them (this normally only occurs for corporate customers).
The following actions are available on this screen:

B-Web V5.5
Quick User Guide
Version 1.0 © Clear2Pay - Strictly Confidential Page 40 of 77
Action Button Description
View payment View the selected payment. You will be redirected to the appropriate screen. Note that you will not be able to edit the payment.
Edit payment Edit the selected payment. You will be redirected to the appropriate pre-filled create payment screen.
Delete payment Delete the selected payment.
Figure 28: Sign Payments
5.7 Manage your beneficiaries
To view, edit, delete or create new beneficiaries, select the Manage Beneficiaries entry from
the Fund Transfer top or left hand menu:
The application will display a list of all beneficiaries that have been registered:

B-Web V5.5
Quick User Guide
Version 1.0 © Clear2Pay - Strictly Confidential Page 41 of 77
Figure 29: Manage Beneficiaries
To refine the list of beneficiaries listed, you can specify a number of search parameters:
The Beneficiary Nickname
The Beneficiary Account Number
The Beneficiary Bank Code (BIC)
The payment type (domestic or international)
5.7.1 Create a beneficiary
To create a new beneficiary, perform the following steps:
Step Action
1 Select the Manage Beneficiaries option from the Fund Transfer top or left hand menu.
2 Click on the Create new Beneficiary button on top of the page
3 Select the payment type that applies to the beneficiary

B-Web V5.5
Quick User Guide
Version 1.0 © Clear2Pay - Strictly Confidential Page 42 of 77
Step Action
Beneficiary for Domestic payments
4 Fill out the Beneficiary details. The Account Number and Nickname are mandatory, all other fields are optional.
5 Optionally, you can also store payment details like the transaction amount and a transaction description for this beneficiary.
6 Click on the Save button to store the beneficiary.
Beneficiary for International payments
4’’ Select the Destination Country from the drop down list.
You can still modify the destination country by clicking on the Modify Destination
Country link:
Beneficiary
5’’ Select the format in which you want to enter the account number from the drop down list next to the Account Number field. Note that for some countries, only one option is supported.

B-Web V5.5
Quick User Guide
Version 1.0 © Clear2Pay - Strictly Confidential Page 43 of 77
Step Action
6’’ Fill out the beneficiary account number in the To – Beneficiary Account Details section. This field is mandatory.
7’’ Optionally, enter the beneficiary name and address.
Beneficiary Bank
8’’ You can either enter the Beneficiary Bank’s BIC code or the Bank’s Name and Address. To enter the Bank Code (BIC), select the first option from the list and enter the BIC code in the text field:
To enter the Bank’s name and address, select the second option from the list and fill
out the name and address fields:
Payment Details
9’’ Optionally, you can store payment details like the transaction amount and a transaction description for this beneficiary. You can also indicate if the charges are shared, paid by the Beneficiary or paid by the Originator.
10’’ Click on the Save button to store the beneficiary.

B-Web V5.5
Quick User Guide
Version 1.0 © Clear2Pay - Strictly Confidential Page 44 of 77
5.7.2 Edit a beneficiary
You can edit a beneficiary from the list of beneficiaries by clicking on the corresponding Edit
icon in the result list.
Figure 30: Edit Beneficiary
The application will show you the details stored for the selected beneficiary. You can edit any of
the fields and save your changes by clicking on the Save button.
Figure 31: Update Beneficiary screen

B-Web V5.5
Quick User Guide
Version 1.0 © Clear2Pay - Strictly Confidential Page 45 of 77
5.7.3 Delete a beneficiary
You can remove a beneficiary from the list of beneficiaries by clicking on the corresponding
Delete icon in the result list. The application will ask you to confirm before the beneficiary is
deleted.
Figure 32: Delete Beneficiary
5.8 View Payment history
To view your payment history, select the Payment History entry from the Fund Transfer top or
left hand menu:
Figure 33: View Payment History
For each payment, a number of actions are available:
B-Web V5.5
Quick User Guide
Version 1.0 © Clear2Pay - Strictly Confidential Page 46 of 77
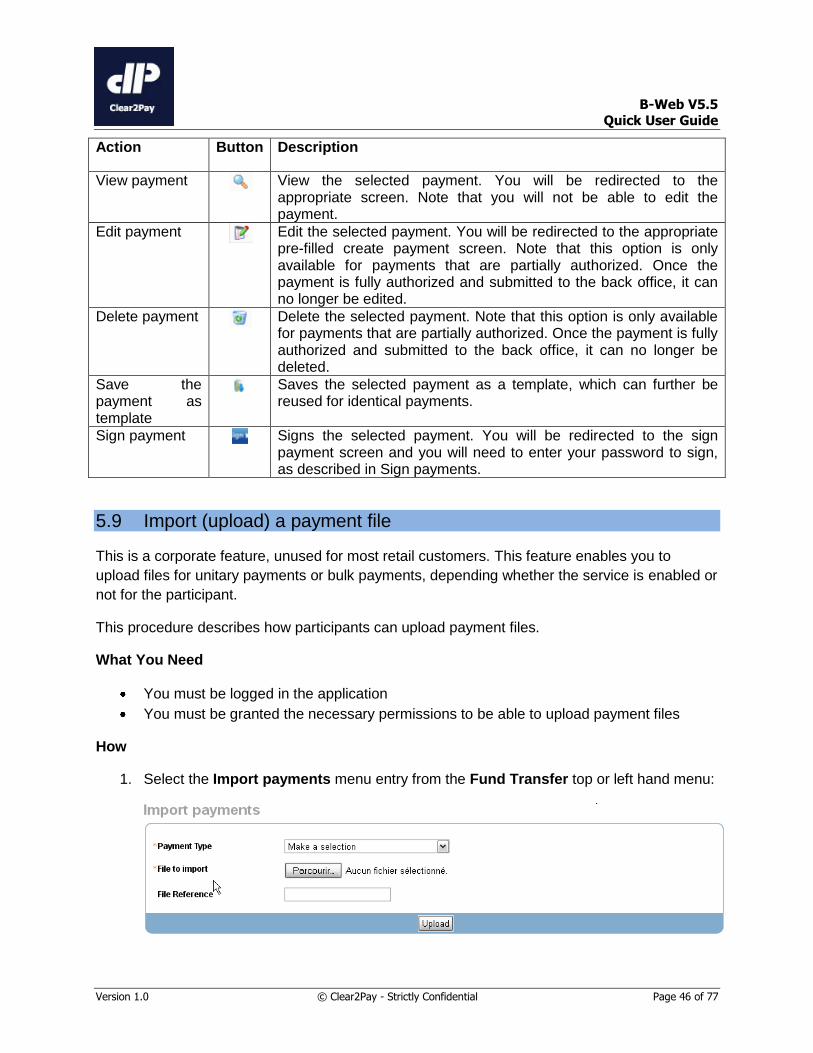
Action Button Description
View payment View the selected payment. You will be redirected to the appropriate screen. Note that you will not be able to edit the payment.
Edit payment Edit the selected payment. You will be redirected to the appropriate pre-filled create payment screen. Note that this option is only available for payments that are partially authorized. Once the payment is fully authorized and submitted to the back office, it can no longer be edited.
Delete payment Delete the selected payment. Note that this option is only available for payments that are partially authorized. Once the payment is fully authorized and submitted to the back office, it can no longer be deleted.
Save the payment as template
Saves the selected payment as a template, which can further be reused for identical payments.
Sign payment Signs the selected payment. You will be redirected to the sign payment screen and you will need to enter your password to sign, as described in Sign payments.
5.9 Import (upload) a payment file
This is a corporate feature, unused for most retail customers. This feature enables you to
upload files for unitary payments or bulk payments, depending whether the service is enabled or
not for the participant.
This procedure describes how participants can upload payment files.
What You Need
You must be logged in the application
You must be granted the necessary permissions to be able to upload payment files
How
1. Select the Import payments menu entry from the Fund Transfer top or left hand menu:

B-Web V5.5
Quick User Guide
Version 1.0 © Clear2Pay - Strictly Confidential Page 47 of 77
Figure 34: Import Payments
2. In the Payment Type drop-down list, select the payment type in the following list:
Domestic credit transfer for payments to a beneficiary whose bank is in the same
country as the participant
International credit transfer for payments to a beneficiary whose bank is in a
different country
This field is mandatory.
3. In the File to import field, click the Browse… button and select the file to be imported in
the dialog box that opens.
4. Optionally, enter a file reference.
5. Click the Upload button.
The system checks that the file size is under the limit configured. If so, the file is processed by
the system and the underlying payments are created. If the file size is greater than the limit
configured, a message appears indicating the file size and the limit that must not be exceeded
for payment files to be uploaded, as described in the figure below.
Note
Authorization is still required after the upload.
Important
Payment files can contain instructions with one single transaction (unitary payment) or with multiple transactions (bulk payment).
5.10 Manage Imported Files
This procedure describes how participants can upload payment files.
What You Need
You must be logged in the application
You must be granted the necessary permissions to be able to manage imported
payment files

B-Web V5.5
Quick User Guide
Version 1.0 © Clear2Pay - Strictly Confidential Page 48 of 77
How
1. Select the Manage Imported Files menu entry from the Fund Transfer top or left hand
menu:
Figure 35: Manage Imported Files
For each of the uploaded files, you can find the following information on this screen:
The unique File ID assigned to the file
The File Reference entered during file import
The format of the file
The payment type
The total transaction amount
The number of remittances (instructions)
The number of transactions in the file
The date the file was imported
The status of the file
2. To view the issue history details for a file, click the icon next to the file or click the file
identifier in the File ID column.

B-Web V5.5
Quick User Guide
Version 1.0 © Clear2Pay - Strictly Confidential Page 49 of 77
Figure 36: View issue history
Note
If you want to invalidate one or several payments imported, you can also click the X icon in the row corresponding to the imported file, provided the file is in the Validated state. All transactions contained in the imported files will be cancelled.
5.11 Managing Templates for Manual Payments
From the Web Client application, customer users can use templates to manually manage their
payments. A template is used to record an instruction with one or several transactions (unitary
or bulk payment), typically for recurring or regular payments to the same beneficiaries.
5.11.1 Creating Templates
This procedure describes how customer users can create templates to be used for recurring or
regular payments from the application.
What You Need
You must be logged in the application
You must be granted the necessary permissions to be able to create templates and
associated transactions
How
1. From the Fund Transfer menu, click Manage templates.
2. Click the Create new template button.
The Template creation page appears.
3. Set the general information for the template:
a. In the Bulk Payment name field, enter a name for the payment template.
This field is mandatory.

B-Web V5.5
Quick User Guide
Version 1.0 © Clear2Pay - Strictly Confidential Page 50 of 77
b. In the Payment type drop-down list, select a type of payment in the following list:
Domestic credit transfer: for payments where the bank of the beneficiary is in
the same country
International credit transfer: for payments where the bank of the beneficiary is
in another country
This field is mandatory.
c. In the Debited Account drop-down list, select the customer user account to be
debited.
This field is mandatory.
d. In the Due Date field, select the date the payment is due.
This field is mandatory.
e. In the Currency drop-down list, select the currency used for the transaction(s).
This currency will be used for all transactions defined in the template.
Figure 37: Template general information
4. In the Transaction panel, enter the transaction details:
a. In the Transaction reference field, enter a reference for the transaction.
This field is mandatory.
b. In the Amount field, enter the transaction amount.
This field is mandatory. Please make sure that you use the . character as decimal
mark.
c. In case of international credit transfer, determine who is charged for the transfer by
selecting one of the following option in the Charges drop-down list:
Shared: the international credit transfer charges are shared between the
originator and the beneficiary
Paid by beneficiary: the international credit transfer charges are paid by the
beneficiary (creditor)
Paid by originator: the international credit transfer charges are paid by the
originator (debtor)
This field is mandatory.
d. If the beneficiary is declared in the list of beneficiaries, click Search for beneficiary
and select a beneficiary for the transaction in the Select a Beneficiary page that

B-Web V5.5
Quick User Guide
Version 1.0 © Clear2Pay - Strictly Confidential Page 51 of 77
appears. The fields are automatically filled. Otherwise, go to next step to declare the
beneficiary of the transaction to be saved in the template.
e. For international credit transfers only, select the country of the beneficiary’s bank.
f. In the Bic code field, enter the bank code of the beneficiary’s account. You can click
Search for Bank Code (BIC) to select the bank code in the Select a bank code
(BIC) page.
g. In the Beneficiary account field, enter the target account number of the beneficiary
(creditor’s account). For international credit transfers only, you must first select the
format in which you enter the account number in the drop-down list (IBAN or Free).
h. In the Beneficiary name field, enter the name of the beneficiary.
i. If necessary, select the Save beneficiary check box if you want to record the
beneficiary in your managed list of beneficiaries, so as to reuse it for another
transaction.
j. Click Save to save the transaction within the template.
The transaction is added to the template list, in the Payment list panel.
Figure 38: Transaction in template
5. If you create a template for a bulk payment, repeat step 4 for every transaction to be
added to the bulk payment template.
6. Do one of the following:
a. Click the Save button to save the template only. In that case, the template is not
available for signature.
b. If you want to make the template available for signature and sign the payments later,
click the Save & Sign Later button. You will still need to sign the payments for the
credit transfer(s) to be performed.

B-Web V5.5
Quick User Guide
Version 1.0 © Clear2Pay - Strictly Confidential Page 52 of 77
c. If you want to sign the payments defined within the template, click the Sign button.
In such a case, the template is available for signature and the Sign payments page
appears. For more information about signing payments, see 5.6 Sign payments.
The template and the associated payments have been created and possibly signed. You can
reuse the template in the future to repeat the same payment(s). However, you will need to
modify the date whenever you use the template.
5.11.2 Modifying Templates
This procedure describes how customer users can modify templates to be used for entering
credit transfers manually from the application.
What You Need
You must be logged in the application
You must be granted the necessary permissions to be able to modify templates
How
1. From the Fund Transfer menu, click Manage templates.
2. If necessary, use the search feature to list the relevant template.
3. In the Results panel, select the template you want to modify and click the icon.
The Template creation page appears.
Note
You can also click the icon and then click the Modify button.
4. Enter your modifications. You can:
Modify the template general information (due date, account, etc.)
Add transactions to the template
Modify or delete transactions within the template
For more information about the fields, see 5.11.1 Creating Templates.
5.11.3 Deleting Templates
This procedure describes how customer users can delete templates to be used for entering
credit transfers manually from the application.
What You Need
You must be logged in the application
You must be granted the necessary permissions to be able to delete templates
B-Web V5.5
Quick User Guide
Version 1.0 © Clear2Pay - Strictly Confidential Page 53 of 77
How
1. From the Fund Transfer menu, click Manage templates.
2. If necessary, use the search feature to list the relevant template.
3. In the Results panel, select the template you want to delete and click the icon.
4. In the Deletion confirmation dialog box that appears, click Delete to confirm the
template deletion.
5. Repeat the procedure for every template to be deleted.
The deleted template(s) are no longer available to create credit transfers from the Web Client
application.

B-Web V5.5
Quick User Guide
Version 1.0 © Clear2Pay - Strictly Confidential Page 54 of 77
6 EXCHANGE RATES
The Exchange rates module allows you to:
View a summary table of main currencies and associated exchange rates
View the detailed list of exchange rates
Use a converter tool to convert amounts between a source and a target currency
6.1 Viewing the Exchange Rates Summary Table
This procedure describes how customer users can view the main currencies and the associated
exchange rates between these currencies in a summary table.
What You Need
You must be logged in the Web Client user interface
You must have been granted the necessary permissions to view the exchange rates
How
From the main menu, select Exchange > Exchange rate summary.
The Exchange rate summary page appears with the six default currencies configured by the
bank.
Figure 39: Exchange rate summary
The table summarizes for each currency the exchange rates with the five other currencies
configured in the preferences.

B-Web V5.5
Quick User Guide
Version 1.0 © Clear2Pay - Strictly Confidential Page 55 of 77
From this table, you can:
Define the list of the six currencies to be displayed in the exchange rate summary table, by
clicking Preferences in the table header. Then, select the currencies you want to appear in
the summary table in the drop-down lists and click the Save button. The summary table
appears with the new currencies and associated exchange rates.
Note The first currency is always the reference currency defined for the bank. It cannot
be modified.
Figure 40: Exchange rate preferences
View the exchange rate history for a given currency, by clicking the icon in the row
corresponding to the currency. The graph representing the exchange rate history between
the reference currency and the selected currency appears, as described in the figure below.

B-Web V5.5
Quick User Guide
Version 1.0 © Clear2Pay - Strictly Confidential Page 56 of 77
Figure 41: Exchange rate history
View the detailed list of currencies and associated exchange rates, as described in Viewing
the Detailed List of Exchange Rates.
6.2 Viewing the Detailed List of Exchange Rates
This procedure describes how customer users can view the detailed list of currencies and the associated
exchange rates between these currencies and the reference currency for the bank.
What You Need
You must be logged in the Web Client user interface
You must have been granted the necessary permissions to view the list of currencies and
associated exchange rates
How
1. From the main menu, select Exchange > Exchange rate list.
The Exchange rate list page appears with the list of all currencies for which the exchange rates
have been imported by the bank. Exchange rates are all expressed against the reference
currency defined for the bank.
Note
The exchange rates are always computed against the reference currency defined for the bank.

B-Web V5.5
Quick User Guide
Version 1.0 © Clear2Pay - Strictly Confidential Page 57 of 77
For each currency, the following information is displayed:
ISO code of the currency
Name of the currency
Last modification date for the currency exchange rate
The processing rate
Tip
If the currency you are looking for is not listed in the first page of the table, you can use the navigation buttons at the bottom of the table. You can also search for the currency by selecting the currency ISO code in the Currency drop-down list at the top of the page and by clicking the Search button.

B-Web V5.5
Quick User Guide
Version 1.0 © Clear2Pay - Strictly Confidential Page 58 of 77
From this table, you can:
See the exchange rate history for a given currency, by clicking the icon in the row
corresponding to the currency. The graph representing the exchange rate history between
the reference currency and the selected currency appears.
Use the converter tool to convert an amount using the selected currency, by clicking the
icon in the row corresponding to the currency. The currencies will automatically be selected
in the Amount converter page that opens. For more information about the converter tool,
see Converting Amounts Using the Converter.
6.3 Converting Amounts Using the Converter
This procedure describes how customer users can use the converter tool to convert amounts between a
source currency and a target currency.
What You Need
You must be logged in the Web Client user interface
You must have been granted the necessary permissions to use the converter
How
1. From the main menu, select Exchange > Amount converter.
The Amount converter page appears.
Figure 42: Amount converter
2. In the From: drop-down list, select the source currency from which you want to run the
conversion.
3. In the to: drop-down list, select the target currency in which you want to see the converted
amount.
4. In the Amount field, enter the amount (in the source currency) to be converted.
5. Click the icon.
B-Web V5.5
Quick User Guide
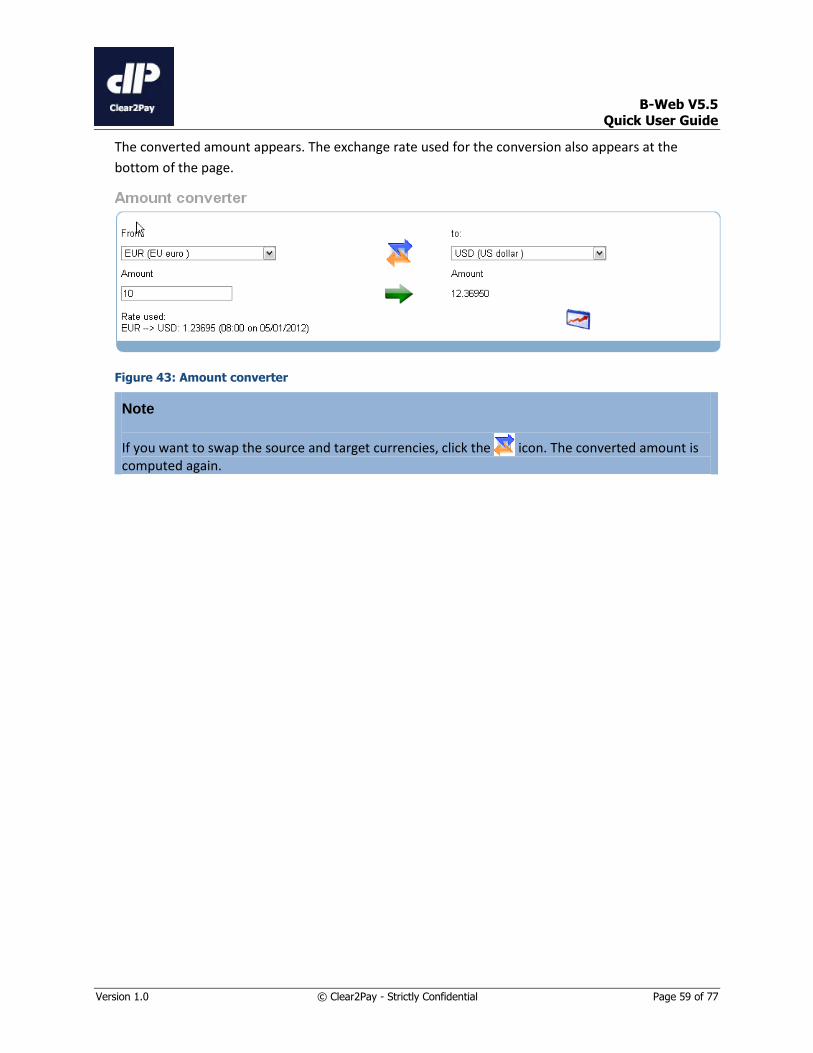
Version 1.0 © Clear2Pay - Strictly Confidential Page 59 of 77
The converted amount appears. The exchange rate used for the conversion also appears at the
bottom of the page.
Figure 43: Amount converter
Note
If you want to swap the source and target currencies, click the icon. The converted amount is computed again.

B-Web V5.5
Quick User Guide
Version 1.0 © Clear2Pay - Strictly Confidential Page 60 of 77
7 PERSONAL SETTINGS
The personal settings module allows you to:
View your account details and customize the account nicknames
Manage your contact details
7.1 Manage your accounts
To view your accounts, select the My Accounts entry from the Personal Settings top or left
hand menu:
For each of your accounts, you can consult the account details and customize the account
nickname.
Figure 44: My Accounts
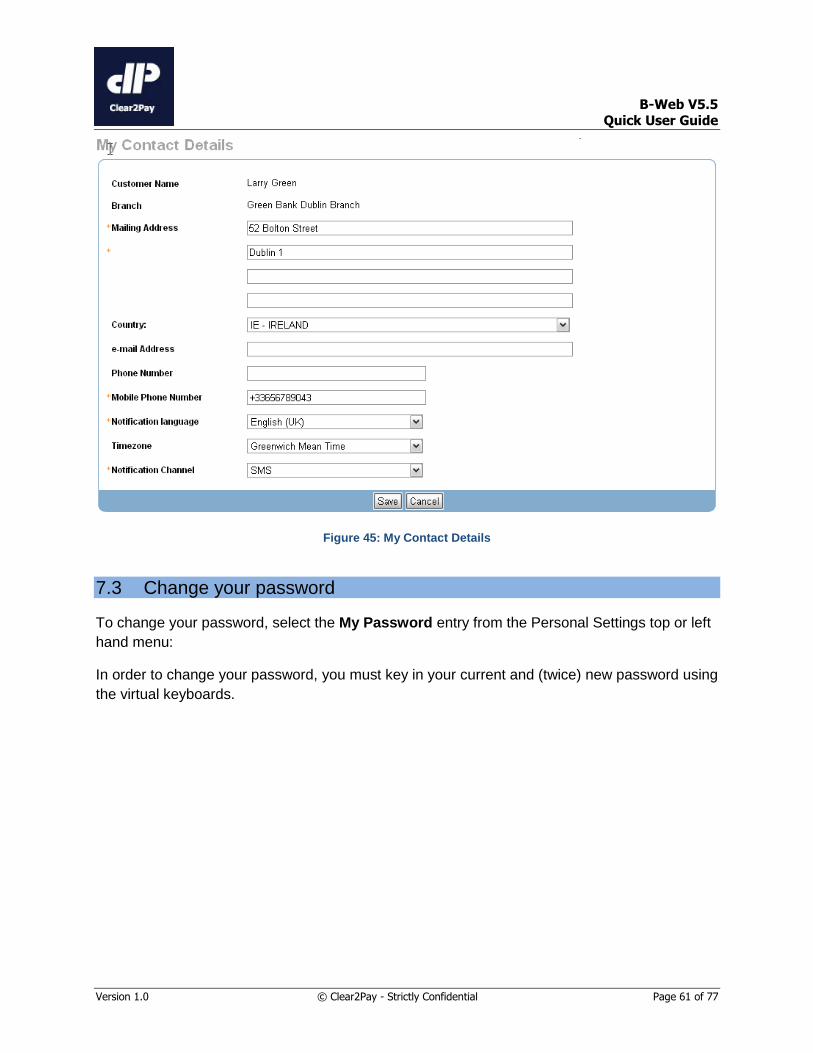
7.2 Manage your contact details
To view or edit your contact details for your bank, select the My Contact details entry from the
Personal Settings top or left hand menu:
B-Web V5.5
Quick User Guide
Version 1.0 © Clear2Pay - Strictly Confidential Page 61 of 77
Figure 45: My Contact Details
7.3 Change your password
To change your password, select the My Password entry from the Personal Settings top or left
hand menu:
In order to change your password, you must key in your current and (twice) new password using
the virtual keyboards.

B-Web V5.5
Quick User Guide
Version 1.0 © Clear2Pay - Strictly Confidential Page 62 of 77
Figure 46: Change your password
Whenever your password is changed, by you or by a bank administrator, you will receive a
notification in the form of an SMS or email message.
7.4 Manage your security details
To update your security details used with password management, select the My Security
Details entry from the Personal Settings top or left hand menu:
These will have been configured at the time of your first login to the system. This information is
being used when you request a new virtual keyboard password (via the “forgot password” link).

B-Web V5.5
Quick User Guide
Version 1.0 © Clear2Pay - Strictly Confidential Page 63 of 77
Figure 47: My Security Details
7.5 Access your Inbox
To access your inbox, select the Inbox entry from the Personal Settings top or left hand menu:
All messages received from your bank will be displayed.
Figure 48: Inbox
To read a message, click on its subject line.
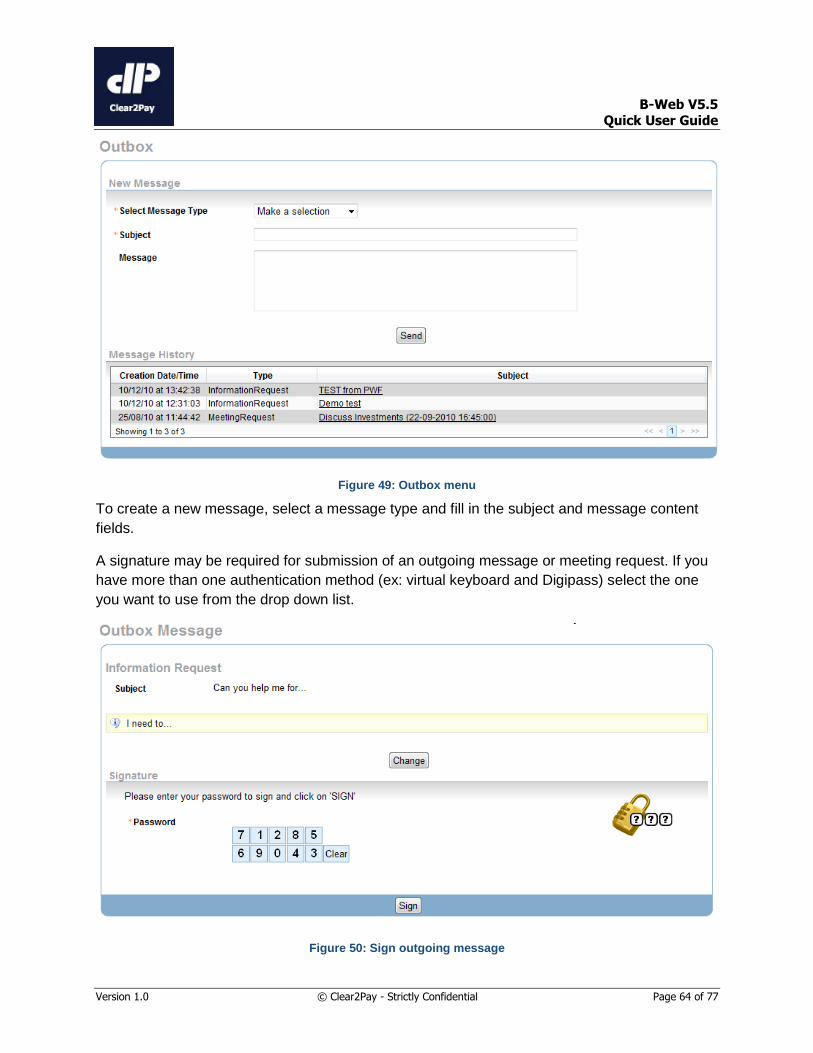
7.6 Send a message to your bank (Outbox)
To send a message to your bank, select the Outbox entry from the Personal Settings top or left
hand menu:
On this page, you can find an overview of the information requests and meeting requests you
sent to your bank.
B-Web V5.5
Quick User Guide
Version 1.0 © Clear2Pay - Strictly Confidential Page 64 of 77
Figure 49: Outbox menu
To create a new message, select a message type and fill in the subject and message content
fields.
A signature may be required for submission of an outgoing message or meeting request. If you
have more than one authentication method (ex: virtual keyboard and Digipass) select the one
you want to use from the drop down list.
Figure 50: Sign outgoing message

B-Web V5.5
Quick User Guide
Version 1.0 © Clear2Pay - Strictly Confidential Page 65 of 77
7.7 Manage your alerts
Alerts are SMS messages or emails sent to you by the application in order to notify you of
payments or account balance related events. To manage your alerts, select the My Alerts entry
from the Personal Settings top or left hand menu:
This page will display an overview of the alerts you have set up.
Figure 51: My Alerts
A number of actions are available for each alert:
Action Button Description
View alert View the selected alert. You will be redirected to the appropriate screen. Note that you will not be able to edit the alert.
Edit alert Edit the selected alert. You will be redirected to the appropriate pre-filled create alert screen.
Delete alert Delete the selected alert.
You can search for an alert based on:
The account number for which the alert is set up
The type of alert
The channel via which the alert is sent
The start and/or end date of the alert

B-Web V5.5
Quick User Guide
Version 1.0 © Clear2Pay - Strictly Confidential Page 66 of 77
You can create a new alert by clicking on the Create new Alert button. Several alerts type can
be selected:
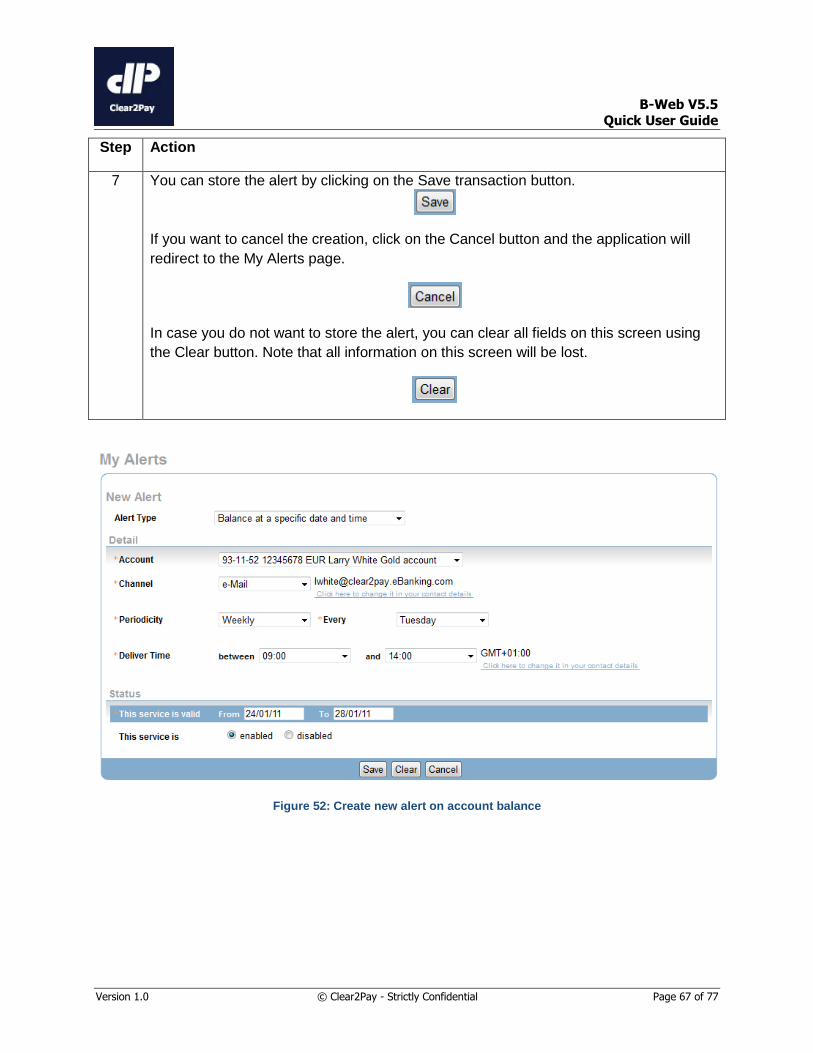
7.7.1 Create an alert on account balance at a specified date and time
Step Action
1 Select the Balance at a specific date and time from the drop down list to set the alert type. This field is mandatory.
2 Select the Account for which you want to set up an alert from the Account drop down list. This field is mandatory.
3 Select the Channel on which you want to receive the alert. When the Channel is selected, the application will automatically display the e-mail address or mobile phone number that will be used. Click on the hyperlink to modify your contact details if required. In case you select a channel for which the necessary contact details have not been configured, the eBanking application will inform you and redirect you the My Contact Details page to complete this information. This field is mandatory.
4 Select the Periodicity of the alert. In case you select Weekly, indicate on which day the alert needs to be sent. In case you select Monthly, indicate the day on which the alert needs to be sent. This field is mandatory.
5 Set the timeframe in which the alert needs to be sent. The start and end time are mandatory.
6 Set the Start and End date of the alert. In addition, you can enable or disable an alert. These fields are mandatory.
B-Web V5.5
Quick User Guide
Version 1.0 © Clear2Pay - Strictly Confidential Page 67 of 77
Step Action
7 You can store the alert by clicking on the Save transaction button.
If you want to cancel the creation, click on the Cancel button and the application will
redirect to the My Alerts page.
In case you do not want to store the alert, you can clear all fields on this screen using
the Clear button. Note that all information on this screen will be lost.
Figure 52: Create new alert on account balance

B-Web V5.5
Quick User Guide
Version 1.0 © Clear2Pay - Strictly Confidential Page 68 of 77
7.7.2 Create an alert on account balance exceeding a specified amount
Step Action
1 Select the Balance rising above a specified amount from the drop down list to set the alert type. This field is mandatory.
2 Select the Account for which you want to set up an alert from the Account drop down list. This field is mandatory.
3 Select the Channel on which you want to receive the alert. When the Channel is selected, the application will automatically display the e-mail address or mobile phone number that will be used. Click on the hyperlink to modify your contact details if required. In case you select a channel for which the necessary contact details have not been configured, the eBanking application will inform you and redirect you the My Contact Details page to complete this information. This field is mandatory.
4 Set the timeframe in which the alert needs to be sent. The start and end time are mandatory.
5 Define the limit amount. This field is mandatory.
6 Set the Start and End date of the alert. In addition, you can enable or disable an alert. These fields are mandatory.

B-Web V5.5
Quick User Guide
Version 1.0 © Clear2Pay - Strictly Confidential Page 69 of 77
Step Action
7 You can store the alert by clicking on the Save transaction button.
If you want to cancel the creation, click on the Cancel button and the application will
redirect to the My Alerts page.
In case you do not want to store the alert, you can clear all fields on this screen using
the Clear button. Note that all information on this screen will be lost.
Figure 53: Create new alert on account balance

B-Web V5.5
Quick User Guide
Version 1.0 © Clear2Pay - Strictly Confidential Page 70 of 77
7.7.3 Create an alert on account balance below a specified amount
Step Action
1 Select the Balance falling below a specified amount from the drop down list to set the alert type. This field is mandatory.
2 Select the Account for which you want to set up an alert from the Account drop down list. This field is mandatory.
3 Select the Channel on which you want to receive the alert. When the Channel is selected, the application will automatically display the e-mail address or mobile phone number that will be used. Click on the hyperlink to modify your contact details if required. In case you select a channel for which the necessary contact details have not been configured, the eBanking application will inform you and redirect you the My Contact Details page to complete this information. This field is mandatory.
4 Set the timeframe in which the alert needs to be sent. The start and end time are mandatory.
5 Define the limit amount. This field is mandatory.
6 Set the Start and End date of the alert. In addition, you can enable or disable an alert. These fields are mandatory.

B-Web V5.5
Quick User Guide
Version 1.0 © Clear2Pay - Strictly Confidential Page 71 of 77
Step Action
7 You can store the alert by clicking on the Save transaction button.
If you want to cancel the creation, click on the Cancel button and the application will
redirect to the My Alerts page.
In case you do not want to store the alert, you can clear all fields on this screen using
the Clear button. Note that all information on this screen will be lost.
Figure 54: Create new alert on account balance

B-Web V5.5
Quick User Guide
Version 1.0 © Clear2Pay - Strictly Confidential Page 72 of 77
7.7.4 Create an alert on a debit operation
Step Action
1 Select the Debit of a specified amount from the drop down list to set the alert type. This field is mandatory.
2 Select the Account for which you want to set up an alert from the Account drop down list. This field is mandatory.
3 Select the Channel on which you want to receive the alert. When the Channel is selected, the application will automatically display the e-mail address or mobile phone number that will be used. Click on the hyperlink to modify your contact details if required. In case you select a channel for which the necessary contact details have not been configured, the eBanking application will inform you and redirect you the My Contact Details page to complete this information. This field is mandatory.
4 Set the timeframe in which the alert needs to be sent. The start and end time are mandatory.
5 Define the debit amount and the condition (equal to, lower than or higher than). This field is mandatory.
6 Set the Start and End date of the alert. In addition, you can enable or disable an alert. These fields are mandatory.

B-Web V5.5
Quick User Guide
Version 1.0 © Clear2Pay - Strictly Confidential Page 73 of 77
Step Action
7 You can store the alert by clicking on the Save transaction button.
If you want to cancel the creation, click on the Cancel button and the application will
redirect to the My Alerts page.
In case you do not want to store the alert, you can clear all fields on this screen using
the Clear button. Note that all information on this screen will be lost.
Figure 55: Create new alert on debit operation

B-Web V5.5
Quick User Guide
Version 1.0 © Clear2Pay - Strictly Confidential Page 74 of 77
7.7.5 Create an alert on a credit operation
Step Action
1 Select the Credit of a specified amount from the drop down list to set the alert type. This field is mandatory.
2 Select the Account for which you want to set up an alert from the Account drop down list. This field is mandatory.
3 Select the Channel on which you want to receive the alert. When the Channel is selected, the application will automatically display the e-mail address or mobile phone number that will be used. Click on the hyperlink to modify your contact details if required. In case you select a channel for which the necessary contact details have not been configured, the eBanking application will inform you and redirect you the My Contact Details page to complete this information. This field is mandatory.
4 Set the timeframe in which the alert needs to be sent. The start and end time are mandatory.
5 Define the credit amount and the condition (equal to, lower than or higher than). This field is mandatory.
6 Set the Start and End date of the alert. In addition, you can enable or disable an alert. These fields are mandatory.

B-Web V5.5
Quick User Guide
Version 1.0 © Clear2Pay - Strictly Confidential Page 75 of 77
Step Action
7 You can store the alert by clicking on the Save transaction button.
If you want to cancel the creation, click on the Cancel button and the application will
redirect to the My Alerts page.
In case you do not want to store the alert, you can clear all fields on this screen using
the Clear button. Note that all information on this screen will be lost.
Figure 56: Create new alert on credit operation
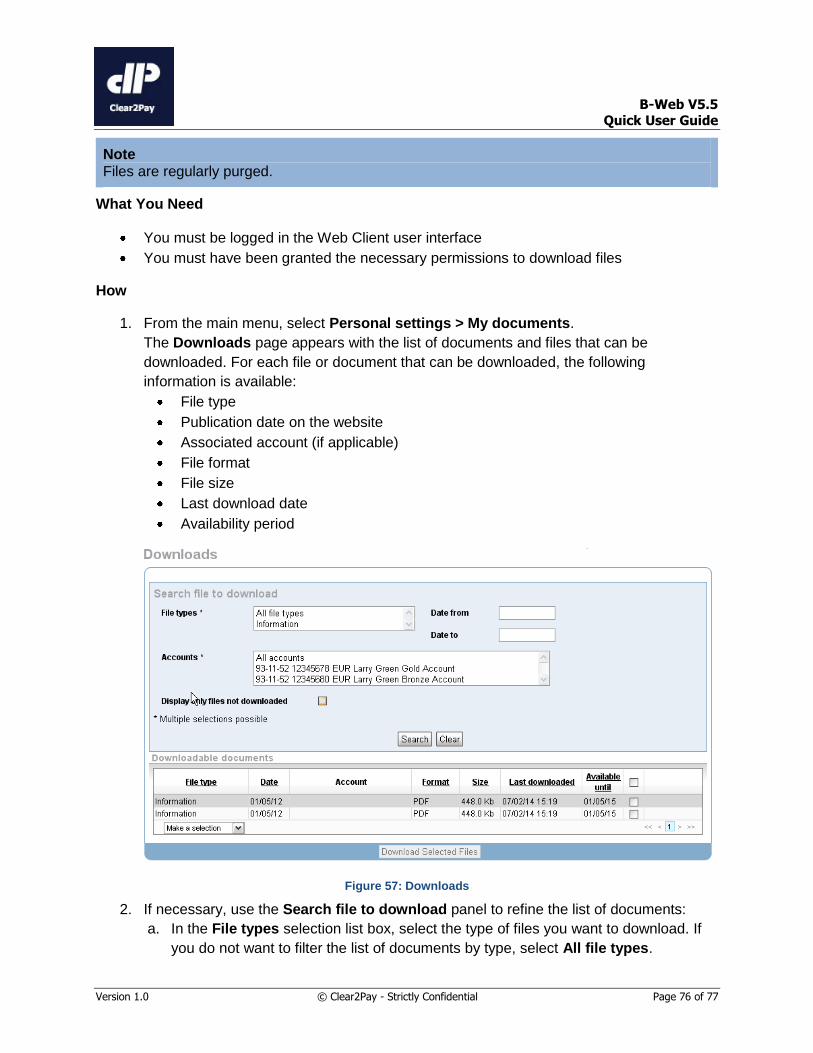
7.8 Downloading files
This procedure describes how users can download files and documents from the Web Client
user interface.
B-Web V5.5
Quick User Guide
Version 1.0 © Clear2Pay - Strictly Confidential Page 76 of 77
Note Files are regularly purged.
What You Need
You must be logged in the Web Client user interface
You must have been granted the necessary permissions to download files
How
1. From the main menu, select Personal settings > My documents.
The Downloads page appears with the list of documents and files that can be
downloaded. For each file or document that can be downloaded, the following
information is available:
File type
Publication date on the website
Associated account (if applicable)
File format
File size
Last download date
Availability period
Figure 57: Downloads
2. If necessary, use the Search file to download panel to refine the list of documents:
a. In the File types selection list box, select the type of files you want to download. If
you do not want to filter the list of documents by type, select All file types.

B-Web V5.5
Quick User Guide
Version 1.0 © Clear2Pay - Strictly Confidential Page 77 of 77
Note You can select multiple types.
b. In the Date from and Date to fields, enter the dates of the period of time during
which the document was published on the website.
c. In the Accounts selection list box, select the account for which you want to
download files or documents. Select All accounts if you want to list all files.
Note You can select multiple accounts.
d. Select the Display only files not downloaded check box if you do not want the
files and documents already downloaded to appear in the list.
e. Click the Search button.
3. In the Downloadable documents panel, select the check box next to every document
you want to download and click the Download Selected Files button.
4. In the dialog box that opens, indicate whether you want to open or save the file(s).
Note If you download multiple files, the system will create a zip file with all files you want to download. Note that the number of documents that can be downloaded at once may be limited by the bank. In such a case, you will get a message indicating that the request exceeds the maximum number of documents that can be downloaded at once.