Embed Size (px)
Citation preview

eBanking – Automated Online Enrollment Instructions

Step 5: Click the Send Email Verification button. An email is sent to the email address entered in the application. After clicking the Send Email Verification button, a verification message appears.
Step 6: Click the link contained in the verification email within one hour.
You must click the link in the email from the same computer and the same browser you used to complete the application form. For example, if you completed the application in Internet Explorer but your email program uses Firefox to open links, your enrollment will not be successful.
Step 7: A confirmation screen displays your new NetTeller ID. Select Login to access your account information. The initial password is the last four digits of your Social Security number (SSN) or Tax ID number (TIN).
If you opt to not login at this time, make sure to record your NetTeller ID so you may ! access it in the future. Remember, your initial password is the last four digits of your
Social Security number.
When you Click the Send Email Verification button below. you will be sent an email to verify your online
Enrollment w it 1 n o t complet e suc c essfully unti l you c lick the verifi cati on lfnk in the email!
Please Cllc< tne Sen d Email Verification button nelow t□ continue
Click the Login button below to continue
!
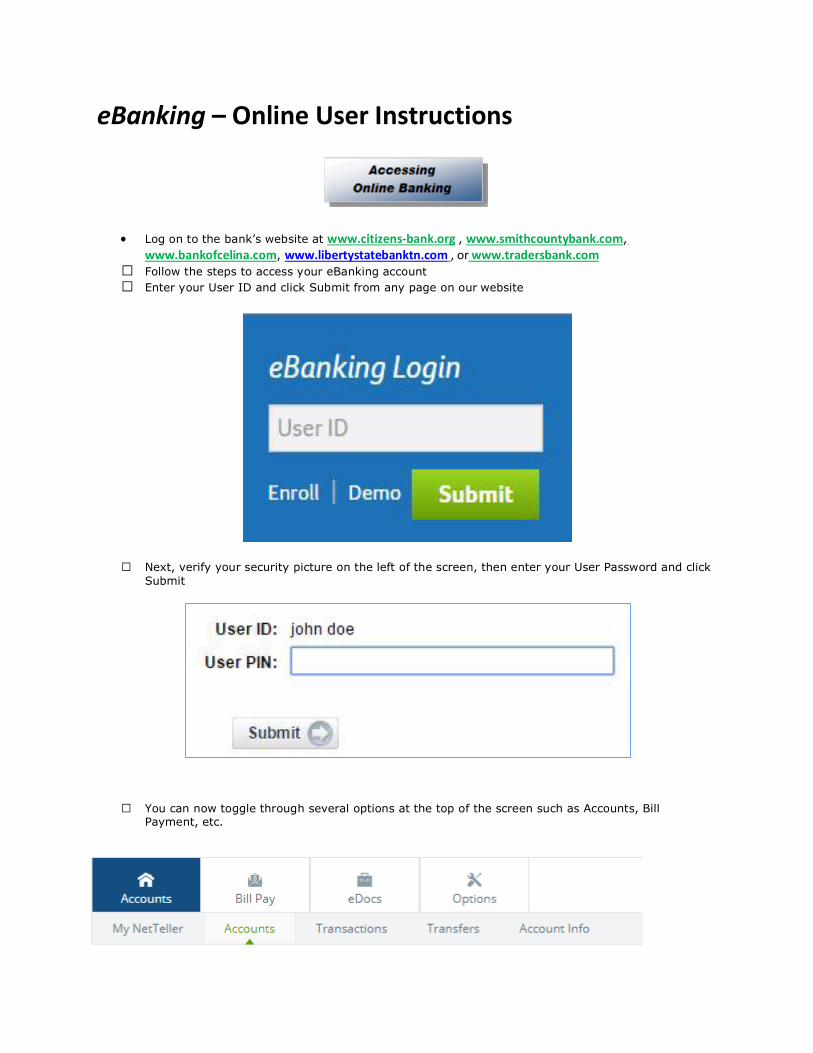
eBanking – Online User Instructions
• Log on to the bank’s website at www.citizens-bank.org , www.smithcountybank.com, www.bankofcelina.com, www.libertystatebanktn.com , or www.tradersbank.com
� Follow the steps to access your eBanking account � Enter your User ID and click Submit from any page on our website
� Next, verify your security picture on the left of the screen, then enter your User Password and click
Submit
� You can now toggle through several options at the top of the screen such as Accounts, Bill Payment, etc.

� A listing of your accounts accessible through eBanking will be displayed. � Next to each account is a drop-down menu with the list of activities available for each account.
(Some account options may not be available or may require additional fees)
Select ‘Transactions’ from the account drop-down menu to view transactions that have posted to the
account since your last statement.
To view other transactions, use the View Transactions for the drop-down menu.
To view a check image or deposit ticket, click the ‘View Image’ link or the Check Number.
Click on the column headings to change the order in which transactions are displayed. If sorting by any column other than ‘Date’, the running balance column will not be shown.
Click ‘Search’ option under the transactions tab. Enter the search criteria and click ‘Submit’.

Select ‘Transfers’ from the Account drop-down menu or click the ‘Transfer’ tab.
� Choose Add Transfer from and select the from account. � Choose the account to transfer the funds to • Select ‘One Time’ or select the frequency and date(s) the transfer is to be made. The ‘Expiration
Date’ is required for recurring transfers.
The cut-off time for funds transfers made via EBanking is 12:00 p.m Monday thru Friday.
Transfers entered after this time will be processed on the following business day.
Click ‘Submit’ when you are ready to complete the funds transfer. A confirmation of the transfer will display
Select ‘Stop Payments’ from the Account drop-down menu or click the ‘Stop Payment’ tab.

Fill in the required fields and click ‘Submit’.
A confirmation page will display.
To view stop payments already placed on an account, select ‘Stop Payments’ from the drop-down menu or the ‘Stop Payments’ tab.
To view Stop Payments for other accounts, use the ‘View Stop Payments for:’ drop-down menu.
You can make many changes to your eBanking account by Options from the NetTeller tab.
There are three options to edit:
Personal Options:
� Change your eBanking 12-digit ID to a name or number that is easily remembered. (You can still
use the 12-digit ID at any time) � Change your PIN � Change your e-mail address
Account Options:
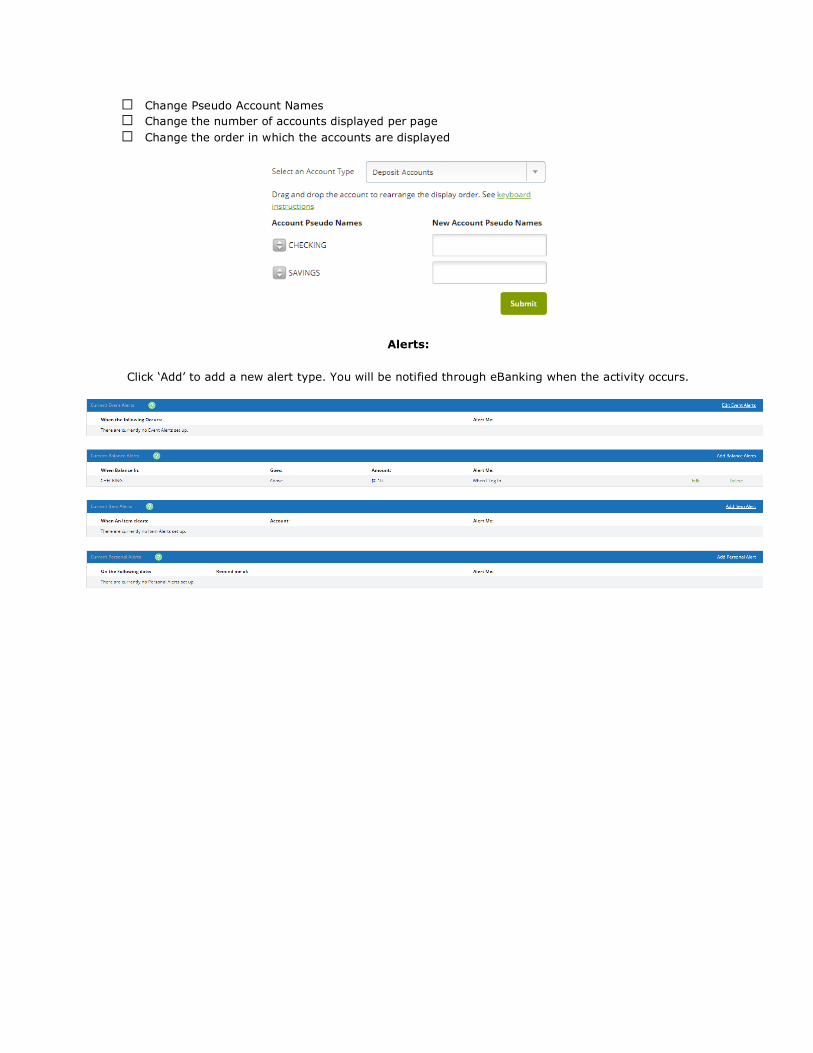
� Change Pseudo Account Names � Change the number of accounts displayed per page � Change the order in which the accounts are displayed
Alerts:
Click ‘Add’ to add a new alert type. You will be notified through eBanking when the activity occurs.

eBanking – Reset Password Instructions


![Ebanking 4th sem[1]](https://img.dokumen.tips/doc/110x75/577d2c731a28ab4e1eac3f73/ebanking-4th-sem1.jpg)