Embed Size (px)
Citation preview

First
Alcatel-Lucent
OmniTouch™ 8082 My IC Phone
User manual
8AL90835USCBed.01 R01.030.8
OpenTouch™ Business Edition 1.0
OpenTouch™ Multimedia Services Edition 1.0


User manual
3
IntroductionThank you for choosing an Alcatel-Lucent phone.This model offers enhanced ergonomical features for more effective communication.Its innovative and high-quality design will improve your corporate communications and allow access to a variety of services.
How to use this guide
• Actions • Keypad
Lift the receiver Numeric keypad.
Hang up Alphabetic keypad
Your phone has a touch screen. You can interact with your phone by touching the screen. The following symbols describe the possible actions on the touch screen.
Press the touch screen once
Press the touch screen twice
Move your finger while keeping it in contact with the screen
• Audio keysHandsfree/Loudspeaker Mute key
Phone key to increase ring, handset or speaker volume
Phone key to decrease ring, handset or speaker volume
• Other phone keysUser information and forward management Phone events
Keypad Alarms
Homepage

4
How
Contents
5
Toc
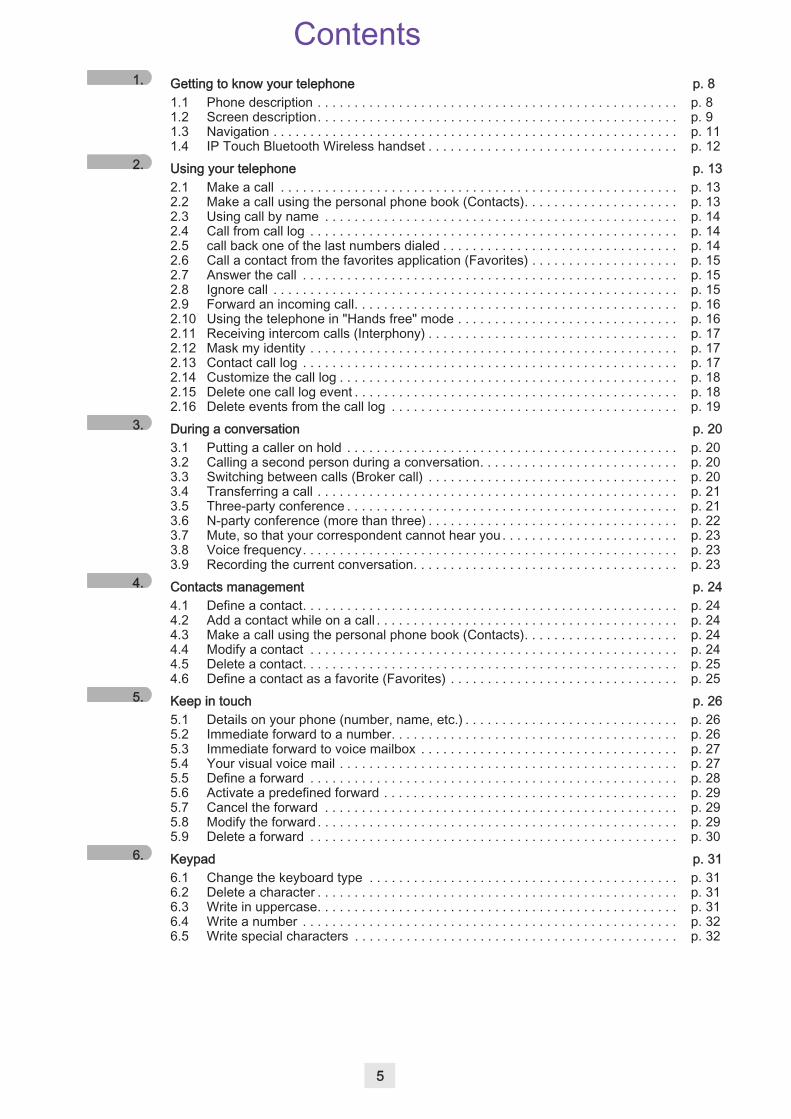
1. Getting to know your telephone p. 81.1 Phone description . . . . . . . . . . . . . . . . . . . . . . . . . . . . . . . . . . . . . . . . . . . . . . . . . p. 81.2 Screen description. . . . . . . . . . . . . . . . . . . . . . . . . . . . . . . . . . . . . . . . . . . . . . . . . p. 91.3 Navigation . . . . . . . . . . . . . . . . . . . . . . . . . . . . . . . . . . . . . . . . . . . . . . . . . . . . . . . p. 111.4 IP Touch Bluetooth Wireless handset . . . . . . . . . . . . . . . . . . . . . . . . . . . . . . . . . . p. 12
2. Using your telephone p. 132.1 Make a call . . . . . . . . . . . . . . . . . . . . . . . . . . . . . . . . . . . . . . . . . . . . . . . . . . . . . . p. 132.2 Make a call using the personal phone book (Contacts). . . . . . . . . . . . . . . . . . . . . p. 132.3 Using call by name . . . . . . . . . . . . . . . . . . . . . . . . . . . . . . . . . . . . . . . . . . . . . . . . p. 142.4 Call from call log . . . . . . . . . . . . . . . . . . . . . . . . . . . . . . . . . . . . . . . . . . . . . . . . . . p. 142.5 call back one of the last numbers dialed . . . . . . . . . . . . . . . . . . . . . . . . . . . . . . . . p. 142.6 Call a contact from the favorites application (Favorites) . . . . . . . . . . . . . . . . . . . . p. 152.7 Answer the call . . . . . . . . . . . . . . . . . . . . . . . . . . . . . . . . . . . . . . . . . . . . . . . . . . . p. 152.8 Ignore call . . . . . . . . . . . . . . . . . . . . . . . . . . . . . . . . . . . . . . . . . . . . . . . . . . . . . . . p. 152.9 Forward an incoming call. . . . . . . . . . . . . . . . . . . . . . . . . . . . . . . . . . . . . . . . . . . . p. 162.10 Using the telephone in "Hands free" mode . . . . . . . . . . . . . . . . . . . . . . . . . . . . . . p. 162.11 Receiving intercom calls (Interphony) . . . . . . . . . . . . . . . . . . . . . . . . . . . . . . . . . . p. 172.12 Mask my identity . . . . . . . . . . . . . . . . . . . . . . . . . . . . . . . . . . . . . . . . . . . . . . . . . . p. 172.13 Contact call log . . . . . . . . . . . . . . . . . . . . . . . . . . . . . . . . . . . . . . . . . . . . . . . . . . . p. 172.14 Customize the call log . . . . . . . . . . . . . . . . . . . . . . . . . . . . . . . . . . . . . . . . . . . . . . p. 182.15 Delete one call log event . . . . . . . . . . . . . . . . . . . . . . . . . . . . . . . . . . . . . . . . . . . . p. 182.16 Delete events from the call log . . . . . . . . . . . . . . . . . . . . . . . . . . . . . . . . . . . . . . . p. 19
3. During a conversation p. 203.1 Putting a caller on hold . . . . . . . . . . . . . . . . . . . . . . . . . . . . . . . . . . . . . . . . . . . . . p. 203.2 Calling a second person during a conversation. . . . . . . . . . . . . . . . . . . . . . . . . . . p. 203.3 Switching between calls (Broker call) . . . . . . . . . . . . . . . . . . . . . . . . . . . . . . . . . . p. 203.4 Transferring a call . . . . . . . . . . . . . . . . . . . . . . . . . . . . . . . . . . . . . . . . . . . . . . . . . p. 213.5 Three-party conference . . . . . . . . . . . . . . . . . . . . . . . . . . . . . . . . . . . . . . . . . . . . . p. 213.6 N-party conference (more than three) . . . . . . . . . . . . . . . . . . . . . . . . . . . . . . . . . . p. 223.7 Mute, so that your correspondent cannot hear you . . . . . . . . . . . . . . . . . . . . . . . . p. 233.8 Voice frequency. . . . . . . . . . . . . . . . . . . . . . . . . . . . . . . . . . . . . . . . . . . . . . . . . . . p. 233.9 Recording the current conversation. . . . . . . . . . . . . . . . . . . . . . . . . . . . . . . . . . . . p. 23
4. Contacts management p. 244.1 Define a contact. . . . . . . . . . . . . . . . . . . . . . . . . . . . . . . . . . . . . . . . . . . . . . . . . . . p. 244.2 Add a contact while on a call . . . . . . . . . . . . . . . . . . . . . . . . . . . . . . . . . . . . . . . . . p. 244.3 Make a call using the personal phone book (Contacts). . . . . . . . . . . . . . . . . . . . . p. 244.4 Modify a contact . . . . . . . . . . . . . . . . . . . . . . . . . . . . . . . . . . . . . . . . . . . . . . . . . . p. 244.5 Delete a contact. . . . . . . . . . . . . . . . . . . . . . . . . . . . . . . . . . . . . . . . . . . . . . . . . . . p. 254.6 Define a contact as a favorite (Favorites) . . . . . . . . . . . . . . . . . . . . . . . . . . . . . . . p. 25
5. Keep in touch p. 265.1 Details on your phone (number, name, etc.) . . . . . . . . . . . . . . . . . . . . . . . . . . . . . p. 265.2 Immediate forward to a number. . . . . . . . . . . . . . . . . . . . . . . . . . . . . . . . . . . . . . . p. 265.3 Immediate forward to voice mailbox . . . . . . . . . . . . . . . . . . . . . . . . . . . . . . . . . . . p. 275.4 Your visual voice mail . . . . . . . . . . . . . . . . . . . . . . . . . . . . . . . . . . . . . . . . . . . . . . p. 275.5 Define a forward . . . . . . . . . . . . . . . . . . . . . . . . . . . . . . . . . . . . . . . . . . . . . . . . . . p. 285.6 Activate a predefined forward . . . . . . . . . . . . . . . . . . . . . . . . . . . . . . . . . . . . . . . . p. 295.7 Cancel the forward . . . . . . . . . . . . . . . . . . . . . . . . . . . . . . . . . . . . . . . . . . . . . . . . p. 295.8 Modify the forward . . . . . . . . . . . . . . . . . . . . . . . . . . . . . . . . . . . . . . . . . . . . . . . . . p. 295.9 Delete a forward . . . . . . . . . . . . . . . . . . . . . . . . . . . . . . . . . . . . . . . . . . . . . . . . . . p. 30
6. Keypad p. 316.1 Change the keyboard type . . . . . . . . . . . . . . . . . . . . . . . . . . . . . . . . . . . . . . . . . . p. 316.2 Delete a character . . . . . . . . . . . . . . . . . . . . . . . . . . . . . . . . . . . . . . . . . . . . . . . . . p. 316.3 Write in uppercase. . . . . . . . . . . . . . . . . . . . . . . . . . . . . . . . . . . . . . . . . . . . . . . . . p. 316.4 Write a number . . . . . . . . . . . . . . . . . . . . . . . . . . . . . . . . . . . . . . . . . . . . . . . . . . . p. 326.5 Write special characters . . . . . . . . . . . . . . . . . . . . . . . . . . . . . . . . . . . . . . . . . . . . p. 32

Contents
6
7. Programming your telephone p. 337.1 Define the phone language . . . . . . . . . . . . . . . . . . . . . . . . . . . . . . . . . . . . . . . . . . p. 337.2 Favorites . . . . . . . . . . . . . . . . . . . . . . . . . . . . . . . . . . . . . . . . . . . . . . . . . . . . . . . . p. 337.3 Lock / unlock your telephone. . . . . . . . . . . . . . . . . . . . . . . . . . . . . . . . . . . . . . . . . p. 347.4 Adjusting the audio functions. . . . . . . . . . . . . . . . . . . . . . . . . . . . . . . . . . . . . . . . . p. 357.5 Activate/deactivate silent mode . . . . . . . . . . . . . . . . . . . . . . . . . . . . . . . . . . . . . . . p. 357.6 Ring tones . . . . . . . . . . . . . . . . . . . . . . . . . . . . . . . . . . . . . . . . . . . . . . . . . . . . . . . p. 357.7 Progressive ringing . . . . . . . . . . . . . . . . . . . . . . . . . . . . . . . . . . . . . . . . . . . . . . . . p. 367.8 Adjusting the ringer volume. . . . . . . . . . . . . . . . . . . . . . . . . . . . . . . . . . . . . . . . . . p. 367.9 Adjust ringer volume while a call arrives . . . . . . . . . . . . . . . . . . . . . . . . . . . . . . . . p. 367.10 Adjust the loudspeaker and the handset volume. . . . . . . . . . . . . . . . . . . . . . . . . . p. 367.11 Activate/deactivate key vibration . . . . . . . . . . . . . . . . . . . . . . . . . . . . . . . . . . . . . . p. 367.12 Activating headset mode . . . . . . . . . . . . . . . . . . . . . . . . . . . . . . . . . . . . . . . . . . . . p. 377.13 Install a bluetooth device (pairing). . . . . . . . . . . . . . . . . . . . . . . . . . . . . . . . . . . . . p. 377.14 Install the Alcatel-Lucent IP Touch Bluetooth® Wireless handset. . . . . . . . . . . . . p. 387.15 Uninstall a Bluetooth® device (unpairing) . . . . . . . . . . . . . . . . . . . . . . . . . . . . . . . p. 397.16 Hearing aid kit . . . . . . . . . . . . . . . . . . . . . . . . . . . . . . . . . . . . . . . . . . . . . . . . . . . . p. 397.17 Activate the magnifying glass feature . . . . . . . . . . . . . . . . . . . . . . . . . . . . . . . . . . p. 407.18 Magnifying glass . . . . . . . . . . . . . . . . . . . . . . . . . . . . . . . . . . . . . . . . . . . . . . . . . . p. 407.19 Set an alarm . . . . . . . . . . . . . . . . . . . . . . . . . . . . . . . . . . . . . . . . . . . . . . . . . . . . . p. 407.20 File Manager . . . . . . . . . . . . . . . . . . . . . . . . . . . . . . . . . . . . . . . . . . . . . . . . . . . . . p. 417.21 Delete a file . . . . . . . . . . . . . . . . . . . . . . . . . . . . . . . . . . . . . . . . . . . . . . . . . . . . . . p. 417.22 Rename a file . . . . . . . . . . . . . . . . . . . . . . . . . . . . . . . . . . . . . . . . . . . . . . . . . . . . p. 417.23 Copy a file from the external storage device to the phone internal memory . . . . . p. 427.24 Listen to an audio file. . . . . . . . . . . . . . . . . . . . . . . . . . . . . . . . . . . . . . . . . . . . . . . p. 427.25 Play all audio files . . . . . . . . . . . . . . . . . . . . . . . . . . . . . . . . . . . . . . . . . . . . . . . . . p. 437.26 Phone wallpaper . . . . . . . . . . . . . . . . . . . . . . . . . . . . . . . . . . . . . . . . . . . . . . . . . . p. 437.27 Phone screensaver . . . . . . . . . . . . . . . . . . . . . . . . . . . . . . . . . . . . . . . . . . . . . . . . p. 447.28 Customize the user picture . . . . . . . . . . . . . . . . . . . . . . . . . . . . . . . . . . . . . . . . . . p. 457.29 Configure your homepage . . . . . . . . . . . . . . . . . . . . . . . . . . . . . . . . . . . . . . . . . . . p. 457.30 Change the theme of your phone . . . . . . . . . . . . . . . . . . . . . . . . . . . . . . . . . . . . . p. 46
8. Manager/Assistant p. 478.1 Manager/Assistant. . . . . . . . . . . . . . . . . . . . . . . . . . . . . . . . . . . . . . . . . . . . . . . . . p. 478.2 Select and activate the filtering mode between the manager and assistant phones p. 478.3 Transfer a call to the manager phone . . . . . . . . . . . . . . . . . . . . . . . . . . . . . . . . . . p. 488.4 Define a priority number ("White List") . . . . . . . . . . . . . . . . . . . . . . . . . . . . . . . . . p. 488.5 Delete a priority number ("White List") . . . . . . . . . . . . . . . . . . . . . . . . . . . . . . . . . p. 49
9. My IC Phone Synchronizer p. 509.1 Introduction . . . . . . . . . . . . . . . . . . . . . . . . . . . . . . . . . . . . . . . . . . . . . . . . . . . . . . p. 509.2 Prerequisites . . . . . . . . . . . . . . . . . . . . . . . . . . . . . . . . . . . . . . . . . . . . . . . . . . . . . p. 509.3 Installing the application on your PC . . . . . . . . . . . . . . . . . . . . . . . . . . . . . . . . . . . p. 509.4 Uninstalling the application . . . . . . . . . . . . . . . . . . . . . . . . . . . . . . . . . . . . . . . . . . p. 519.5 Repairing the application . . . . . . . . . . . . . . . . . . . . . . . . . . . . . . . . . . . . . . . . . . . . p. 519.6 Configuration . . . . . . . . . . . . . . . . . . . . . . . . . . . . . . . . . . . . . . . . . . . . . . . . . . . . . p. 529.7 Synchronize your phone and your PC. . . . . . . . . . . . . . . . . . . . . . . . . . . . . . . . . . p. 539.8 Troubleshooting. . . . . . . . . . . . . . . . . . . . . . . . . . . . . . . . . . . . . . . . . . . . . . . . . . . p. 54Guarantee and clauses . . . . . . . . . . . . . . . . . . . . . . . . . . . . . . . . . . . . . . . . . . . . . . . . . . . p. 55

7
How

Getting to know your telephone 1
8
Other
1.1 Phone description
A sensitive LED wide screen
Quick access to the main phones features
Mute keyDuring a conversation, press the Mute key to stop your caller from hearing you
To adjust the loudspeaker or handset volume up or down
Hands-freeLoudspeaker Key: to make or answer a call without lifting the receiver.ForwardThe forward key is blue when a forward is activatedPress this key to access the call application. This key flashes if there are call events that have not been picked up (unanswered calls blinking in case of non consulted communication events such as missed calls, callback requests, new voice message, etc.)Display the keyboard on the screenAlarmsThis key lights blue when there is a wake-up alarmBack to homepage
A bluetooth handset for optimized communication
A wide speaker for optimized sound
LEDArrival of a new call (Flashing)
An adjustable and stable foot
One 3.5 mm headset connector
Good connectivity to allow phone extensions
A 10/100/1,000 Ethernet connection to connect to enterprise networks and a PC
Bluetooth 2 USB connectors 1 mini-USB connector for a keyboard

9
1.2 Screen description
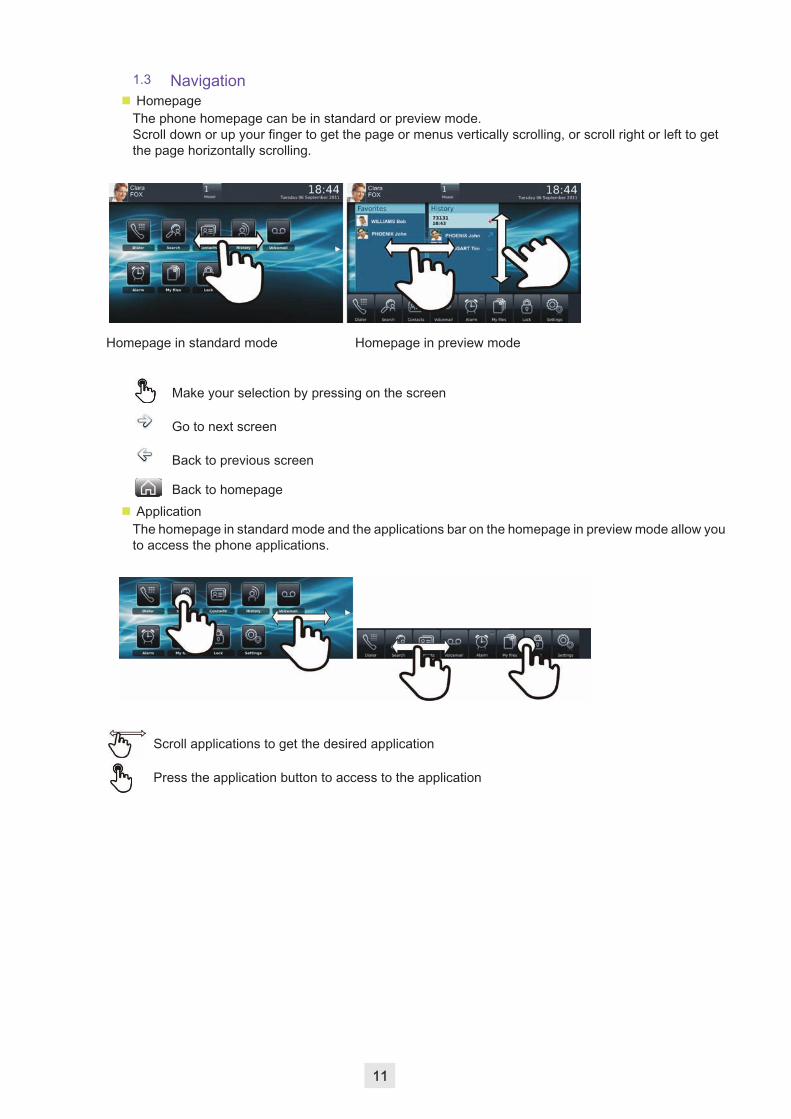
Homepage in preview mode Homepage in standard mode
Personal area
This area displays information on the phone user (last name, first name, number, avatar, telephone status, forward, etc.). There are 2 parts :Routing Access forward programming and configuration functions
UserInfo Information about the user
Select this area to access the user parameters and status of the phone
Notifications area
In idle state :This area displays information on the latest telephone events such as missed calls, callback requests, messages, etc. During a call: The name of your caller and the status of the call (ongoing, on hold, incoming call) are displayed in this area. Pressing on this area during the conversation takes you back to the call screen.
Call status
Incoming call
Ongoing call
Call on hold
Three-party conference

Date, time and connectivity area
10
This area displays time, date, connectivity and customization information (wake-up on, intercom mode on).
Security mode
Storage device connected to USB port
Bluetooth device pairing in progress
Bluetooth device connected (Other than your Bluetooth handset)
Headset plugged in
Wake-up feature activated
Silent ring activated
Interphony (See chapter: : Receiving intercom calls)
Active area
This area is reserved for running applications and for previews of applications selected by the user. When you start an application, it is displayed in the active zone. If no application has been launched, the active zone displays the application previews that you have preset on the homepage. One application preview allows you to view this application information and easily access it. You can view all previews of the homepage by a horizontal screen scrolling.
Add or delete an application on the homepageSelect the applicationSettingsApplication
Select the application that you want to add to the homepage or delete from the homepage
Activate or deactivate preview mode
Back to homepage
Applications area (Homepage in preview mode)
This area allows access to all set applications and to different features of the running application.
Applications area (Homepage in standard mode)
You can access your phone applications from this area. Press the application button to access the application.Once you run an application, the display is the same as the preview mode display.
11
1.3 Navigation Homepage
The phone homepage can be in standard or preview mode.Scroll down or up your finger to get the page or menus vertically scrolling, or scroll right or left to get the page horizontally scrolling.
Homepage in standard mode Homepage in preview mode
Make your selection by pressing on the screen
Go to next screen
Back to previous screen
Back to homepage Application
The homepage in standard mode and the applications bar on the homepage in preview mode allow you to access the phone applications.
Scroll applications to get the desired application
Press the application button to access to the application

12
1.4 IP Touch Bluetooth Wireless handset
Off-hook/On-hook and Volume/Mute keys
LED Off: operating normally.Blinking green: in communication.Green steady: handset charging.Orange flashing: battery charge low or handset outside coverage zone.Orange steady: malfunction.
Off-hook/On-hook: press this key to take or terminate a call
Volume/Mute:
• short successive presses to change the handset volume level (3 levels)
• long press to activate or deactivate mute mode
Location of the battery
If the Bluetooth handset is on its base, you do not need to press the Off-hook/On-hook key to take or terminate the call. Just off-hook/on-hook the Bluetooth handset.
To install the IP Touch Bluetooth® Handset, refer to chapter: Install the Alcatel-Lucent IP Touch Bluetooth® Wireless handset. Your Bluetooth® device needs to be prepared for pairing. Take the handset off the hook and long press on both handset buttons at the same time. You will hear a 3-note tone and the LED will flash green and orange. The default PIN code is 0000.
• Installing or replacing the Bluetooth handset battery
• Lift up the battery cover
• Slide out the battery holding part
The battery recharges when the Bluetooth handset is on its base.
There is a danger of explosion if the battery is replaced incorrectly - use only the battery with the reference 3GV28041AB (1.2V 1500 mAh).

Using your telephone 2
13
Other
2.1 Make a call
Take the handset off the hook
ORPress the phone keyboard keyORHands-free keyORDialer
OROff-hook key on the Bluetooth handset
Dial the number for your call
Call
To make an external call, dial the outside line access code before dialing your contact number The default outside-line access code is usually 0. However, please check this code with your administrator.
• End the call
Hang up the handsetOR
End call
OR
On-hook key on the Bluetooth handset
2.2 Make a call using the personal phone book (Contacts)Select the applicationContacts
select the contact to callInformation regarding your contact is displayed on the screenPress the call icon to call your contact
If there are several numbers for the same contact, select the desired number.

14
2.3 Using call by name
Search
Enter the first letters of your contactâ € s nameOkThe names of contacts matching your search criteria are automatically displayed on the screen
Call your contact by choosing himher in the list
If you wish you can also display your contactâ € s complete file
2.4 Call from call log All incoming, outgoing, missed or unanswered calls are displayed in the call log.You can call back from your phone call log.
Select the applicationHistory
Select the contact to call
Call
If there are several numbers for the same contact, select the desired number.
You can also access the feature by selecting the application preview History.
2.5 call back one of the last numbers dialed
Select the applicationHistory
From the call log, select one of the last numbers dialed Answered outgoing call
Unanswered outgoing call
Call
You can also access the feature by selecting the application preview History.

15
2.6 Call a contact from the favorites application (Favorites)Favorites : This application contains favorite contacts that you have selected in your personal directory.
Select the applicationFavoritesAll contacts defined as a favorite are displayed
Select the contact to call
Call
If there are several numbers for the same contact, select the desired number.
You can also access the feature by selecting the application preview Favorites.
Refer to chapter: "Define a contact as a favorite".
2.7 Answer the call
Answer call
ORTake the handset off the hook
ORHands-free keyOROff-hook key on the Bluetooth handset
• End the call
Hang up the handsetOREnd call
OR
Off-hook key on the Bluetooth handset
2.8 Ignore callA call is received:
Ignore
Your phone no longer rings but your caller still hears the ringing tone
You can still answer the call after you have ignored it.

16
2.9 Forward an incoming callA call is received: your telephone rings. Forward to voicemail
Deflect to VMThe call is directly forwarded to your voice mail
Forward to another number
Deflect
call the recipient of the transfer :
Search
ORTo dialer
ORSelect the recipient from the call log
The call is immediately forwarded
Forward to the personal assistant
Deflect DVAForward to the personal assistant
2.10 Using the telephone in "Hands free" modeYou are in communication
Hands-free key
Select the desired audio mode:
Handfree
Speaker (Group Listening)
• To take the call back with the handset
Take the handset off the hook
ORHandset
OROff-hook key on the Bluetooth handset
• To go back to "handsfree" mode ;Press the "handsfree" key againYou can hang-up the handset

17
2.11 Receiving intercom calls (Interphony)You can answer a call without lifting the receiver. When you receive a call, you are automatically connected in hands-free mode. The identity of the caller is displayed on the screen.• To answer in intercom mode:
Select the applicationSettings
Application
Telephony
InterphonyYes / No
2.12 Mask my identityYou can hide your identity before sending your call.
Select the applicationSettings
Application
Telephony
Hide identityYes / No
Back to homepage
2.13 Contact call logYou can display your contactâ € s call details (received calls, missed calls, callback requests, etc.).
Select the applicationHistory
Select the recipient from the call log
HistoryList your contactâ € s calls (outgoing, incoming, missed, etc.)The associated LED is on: the feature is enabled
You can also access the feature by selecting the application preview History.

18
2.14 Customize the call logYou can filter the calls displayed in the call log according to their type: missed calls, callback requests, received calls, etc.
Select the applicationHistory
Filter
Select the call types that you want to display:• All : all calls• Missed calls : Unanswered incoming calls • Call back : Callback requests
Back
Call log customization is active
The filter remains active once you have left the application.
You can also access the feature by selecting the application preview History.
• Display all calls
Filter
All
Back
2.15 Delete one call log eventSelect the applicationHistory
Press the desired event
Delete
You can also access the feature by selecting the application preview History.
19
2.16 Delete events from the call logSelect the applicationHistory
Delete all
Select the type of events to be deleted• All : all calls• Missed calls : Unanswered incoming calls • Call back : Callback requests
Confirm deletion of all call log events :Delete
If your call log contains unread events, a warning message is displayed on the screen.
If a filter is activated, you will only be able to delete events sorted by the filter.
You can also access the feature by selecting the application preview History.

During a conversation 3
20
Other
3.1 Putting a caller on holdYou are in communicationOn holdYour call is placed on holdYour caller hears on-hold music until you pick the call up again
• Recover the correspondent on holdSelect the caller on hold from the call log or the notification areaORRetrieveYou are back on the call with your caller
3.2 Calling a second person during a conversationYou are in communication.DialerCall the second person :Dial the number for your call
ORFrom the dialpad you can call the second party by directly dialing the number or through the call log (history), the contacts, the search by name or the favorites features :Search
History
Contacts
Favorites
Call
The first call is on hold
3.3 Switching between calls (Broker call)You are in communication with a first correspondentA second correspondent is on holdSwitch from one caller to another by selecting the caller on hold in the call logYou are in communication with the second contact : first call is automatically placed on hold

21
3.4 Transferring a callDuring a conversation, to transfer the call to another number: You are in communication with a first correspondent
Transfer to
Call the recipient of the transfer :
Dialer
Dial the number for your call
ORFrom the dialpad you can call the second party by directly dialing the number or through the call log (history), the contacts, the search by name or the favorites features :Search
History
Contacts
Favorites
TransferThe two correspondents are connected
You are in communication with a first correspondent. A second correspondent is on hold.You want to connect the first caller with the second.
Transfer
The two correspondents are connected
3.5 Three-party conferenceYou are in communication with a first correspondent. A second correspondent is on hold.Conference
You are in conference modeDuring the conversation, you can:
Leave confThe other participants can continue the conference without youEnd confhang up on all correspondents
Hang up the handsetThe other participants can continue the conference without you

22
3.6 N-party conference (more than three)
If allowed by the system, you can establish an N-party conference (more than three callers including you).
You are in communication with a first correspondent.
Add participant
SearchORDialer
Dial the number for your call
ORFrom the dialpad you can call the second party by directly dialing the number or through the call log (history), the contacts, the search by name or the favorites features :Search
History
Contacts
Favorites
Call
You are in conference mode
You can add new participants to the conference by following the same procedure.
During the conversation, you can:End confhang up on all correspondentsLeave confThe other participants can continue the conference without youHang up the handsetThe other participants can continue the conference without youRemove participantYou can remove a participant from the conferenceYou must first select the participant you want to remove from the conference

23
3.7 Mute, so that your correspondent cannot hear youDuring the call, you do not wish your callee to hear you.
Press your phone Mute keyMute mode is activated (The key is blue)Your caller can no longer hear youPress the key again to go back to normal modeORLong press on the Mute key on the IP Touch Bluetooth® Wireless handsetPress the key again to go back to normal mode
3.8 Voice frequencyDuring a conversation you sometimes have to send DTMF signals, such as with a voice server, an automated attendant or a remotely consulted answering machine. If DTMF is activated by default on your system
Keyboard
OR
Enter the requested codes If DTMF is not activated by default on your system
DTMF
Enter the requested codes
The function is automatically cancelled when you hang up.
Depending on the system configuration, the DTMF can be activated by default. For more information, contact your installer or administrator.
3.9 Recording the current conversationWhen you are on a call with one or more callees, you can record the conversation.
To record the conversation during communication:RecordRecording in progress...
Stop
The user must have the appropriate rights to use this feature.

Contacts management 4
24
Other
4.1 Define a contactSelect the applicationContacts
Add new contact
Fill in the contact file.You must provide at least a last name.
Save Contact
For an external number, enter the number directly without the outside line access code. Please use the following (canonical) format: +33 390670000.
4.2 Add a contact while on a callYou are on a call and wish to add the caller to your contacts list.
You are in communication
Add Contact
Fill in the contact file
Save Contact
If you donâ € t have enough time to fill in the contact file, you can do it later by modifying the contact.
4.3 Make a call using the personal phone book (Contacts)Select the applicationContacts
select the contact to callInformation regarding your contact is displayed on the screenPress the call icon to call your contact
If there are several numbers for the same contact, select the desired number
4.4 Modify a contactSelect the applicationContactsSelect the contact to modify Edit
Fill in the contact file
Save Contact
You can modify a contact while you are on a call.

25
4.5 Delete a contactSelect the applicationContactsSelect the contact to deleteDeleteDelete Contact ?Yes
4.6 Define a contact as a favorite (Favorites)Most frequently called contacts can be defined as a favorite.Favorite contacts are displayed in the application Favorites.
Select the applicationContacts
Select the contact to add to favorites
FavoritesThe contact has been added to FavoritesThe associated key light is on
The green light indicates that the contact has been assigned to Favorites.
To remove a contact from Favorites
FavoritesThe feature associated led goes off
Keep in touch 5
26
Other
5.1 Details on your phone (number, name, etc.)You want to know all of your phone information, such as your phone number or your phone forward status,.
Press the forward keyORPress your information area in the top left corner of the screen
UserInfo
5.2 Immediate forward to a numberThe number can be your home, portable or car phone, voice mailbox or an internal extension (operator, etc.).
Press the forward keyORPress your information area in the top left corner of the screen
Routing
Immediate forward to...
No. of diversion telephone
OkTo confirm
Forward is activated (The key is blue)The activated feature is indicated in your personal information area in the top left corner of the screen
The forward key is not lit when no forward is activated.
When you create a forward, it will be added to the list of available forwards so that you can reuse it.

27
5.3 Immediate forward to voice mailboxPress the forward key
VoicemailForward is activated (The key is blue)The activated feature is indicated in your personal information area in the top left corner of the screen
The forward key is not lit when no forward is activated.
When you create a forward, it will be added to the list of available forwards so that you can reuse it.
5.4 Your visual voice mail Visual voicemail displays and manages voicemail messages left by your contacts.
You are notified of a new voicemail message (notification zone)Press the voicemail messages notification button in the top middle area of the screenORSelect the applicationHistoryVoicemailSelect the contact who has left a voice messageOROn the homepage, press the voice mail key
Information regarding your contact is displayed on the screenPlay VMListen to messagePause VMPause while listening to message
Stop VMStop listening
When you have played the message you can:CallbackCall back sender of message
DeleteDelete the current messageDelete allDelete all messages
Call VMConsulting your voice mailboxPasswordEnter your passwordFollow the voice guide instructions

28
5.5 Define a forwardYour phone allows you to define different types of forwards.
• Immediate forward to a number All your calls are forwarded to another phone
• Forward if busy Callers can be diverted to another telephone if you are already on the line
• Forward if no answer When you are absent, all your calls are forwarded to the number of your choice (delayed forwarding on no answer)
• Forward if busy or no answer When you are absent or already in communication, all your calls are forwarded to the number of your choice (delayed forwarding on no answer or busy)
• Immediate forward to voice mailbox
Press the forward keyORPress your information area in the top left corner of the screen
Routing
Add routingSelect the forward type to program
• Immediate forward• Forward if no reply• Forward if busy• Forward if busy or no reply
NextSelect where to forward the calls: associate, operator, voice mail, mobile or directly dialed number
Other...
Enter the forward destination number
ValidateForward is activated (The key is blue)The activated feature is indicated in your personal information area in the top left corner of the screen
Associate, attendant, voicemail, mobileSaveSave the forwardForward is activated (The key is blue)The activated feature is indicated in your personal information area in the top left corner of the screen
The different numbers are defined in the phone parameters.
The forward key is not lit when no forward is activated.

29
5.6 Activate a predefined forwardYour phone allows you to activate predefined forwards or forwards that you created previously.
Press the forward keyORPress your information area in the top left corner of the screen
Routing
The predefined forwards list is displayed on the screen
Select the desired forwardForward is activated (The key is blue)The activated feature is indicated in your personal information area in the top left corner of the screenBack to homepage
The forward key is not lit when no forward is activated.
5.7 Cancel the forwardForward is active (forward key lit).
Press the forward keyORPress your information area in the top left corner of the screen
Routing
None
Back to homepage
5.8 Modify the forwardYou can modify the forwards that you have programmed.
Press the forward keyORPress your information area in the top left corner of the screen

Routing
Modify routing
Select the forward to modifySelect the forward type to program
• Immediate forward• Forward if no reply• Forward if busy• Forward if busy or no reply
NextSelect where to forward the calls: associate, operator, voice mail, mobile or directly dialed number
30
Other...
Enter the forward destination number
ValidateForward is activated (The key is blue)The activated feature is indicated in your personal information area in the top left corner of the screen
Associate, attendant, voicemail, mobileSaveSave the forwardForward is activated (The key is blue)The activated feature is indicated in your personal information area in the top left corner of the screen
The different numbers are defined in the phone parameters.
The forward key is not lit when no forward is activated.
5.9 Delete a forwardYou can delete forwards that you have programmed.
Press the forward keyORPress your information area in the top left corner of the screen
Delete routingSelect the forward to deleteYesConfirm deletion

Keypad 6
31
Other
6.1 Change the keyboard typeWhile editing text, you can change the keyboard type to match the language you are writing: : AZERTY, QWERTY, QWERTZ
The keyboard is displayed on the screen
Select the keypad type (AZERTY, QWERTY, QWERTZ,...)OkValidate your choice
6.2 Delete a characterWhen editing a text you might have to correct it.
Place the cursor after the text to delete by touching the screen
Press the delete key of your keyboard
When you edit a text, you can delete several characters at once
Place the cursor before the first character to delete and, keeping your finger in contact with the screen, move to the last character to delete
Press the delete key of your keyboard
6.3 Write in uppercaseBy default, the written characters are in lowercase.
Press this key onceThe next character will be written in uppercase and then you will automatically switch to lowercasePress this key twice. The associated key light is on.
Uppercase mode is used for all written charactersTo go back to lowercase mode, press the key againThe associated key light is off
This green key light is on. Upper case mode is activated.

32
6.4 Write a number
Press this key once
Write a number, then the alphabetic mode is automatically reactivated
Press this key twice. The associated key light is on.
Write numbers
To go back to alphabetic mode, press the key againThe associated key light is off
This green key light is on. The numerical keyboard is locked.
6.5 Write special characters
Press this key onceThe associated key light is onSelect a characterThe special characters associated to the selected character are displayed
Select the desired character
Press this key again to go back to the standard keyboardThe associated key light is off

Programming your telephone 7
33
Other
7.1 Define the phone languageSelect the applicationSettings
Device
Phone configuration
Language
Select the language of your choice
Ok
Back to homepage
7.2 FavoritesThis application contains favorite contacts that you have selected in your personal directory (Address book).Most frequently called contacts can be defined as a favorite.
Select the applicationContacts
Select the contact to add to favorites
FavoritesThe contact has been added to FavoritesThe associated key light is on
The green light indicates that the contact has been assigned to Favorites.
You can call your contact directly without selecting them from the personal directory.From the homepage : FavoritesSelect the correspondent.ORSelect the applicationFavorites
Select the correspondent
To remove a contact from Favorites
FavoritesThe feature associated led goes off

34
7.3 Lock / unlock your telephoneOnce the phone is locked, you can only call special numbers such as emergency, security or standard (3 max configured by the administrator).• locking your terminal
Press the forward keyORPress your information area in the top left corner of the screen
UserInfo
Lock
Confirm :LockTelephone locked.
If the phone is ringing, a basic popup appears prompting you to answer or ignore the call. If you are on a call, you can only end the call.
From the homepage
Lock
Confirm :LockTelephone locked
To lock your phone from the homepage, you must set the feature:
Select the applicationSettings
Application
Lock
Enable or disable the feature
• Unlock your terminal
Enter your password to unlock the phone The default password is 1515
35
7.4 Adjusting the audio functions
Select the applicationSettings
Device
AudioYour handset allows you to set different ringtones depending on the type of incoming callOn-site ringingOff-site ringingSpecial ringingEvent ringing
Choose ringer
OkValidate your choice
7.5 Activate/deactivate silent mode
Select the applicationSettings
Device
Audio
Silent ringingEnable or disable the feature
7.6 Ring tonesYou can choose to have 1, 2 or 3 beeps before the ring
Select the applicationSettingsDevice
Audio
Beeps before ringing
Beeps before ringingone beep
• one beep : One beep before ringing• two beep : Two beeps before ringtone• three beep : Three beeps before ringing• no beep : Ring without beep
OkValidate your choice

36
7.7 Progressive ringing
Select the applicationSettings
Device
Audio
Ascending ringingEnable or disable the feature
7.8 Adjusting the ringer volume
Select the applicationSettings
Device
Audio
Ringing volume
Adjusting the ringer volume (0 to 9)
7.9 Adjust ringer volume while a call arrives
The telephone rings when a call is receivedDecrease volume
Increase volume
7.10 Adjust the loudspeaker and the handset volume
During a call, to adjust the volume level of the loudspeaker or receiver:Decrease volume
Increase volume
7.11 Activate/deactivate key vibrationWhen you press one of your phone keys, a vibration confirms that the action has been taken into account by the system.To activate or deactivate key vibration:
Select the applicationSettings
Device
Phone configurationHaptic feedbackEnable or disable the feature

37
7.12 Activating headset modeThe side of the telephone features a headphone / external microphone socket. Contact your retailer for information on the various headphone models.By default, the audio jack of your telephone can be used to connect a headset, hands-free kit or loudspeaker.
Activating headset modeSelect the applicationSettings
Device
Audio
Accessory type
Jack
Ok
After selecting the accessory type, you must specify the jack accessory:
Jack accessory• headset• handsfree• loudspeaker
Ok
7.13 Install a bluetooth device (pairing)You can use Bluetooth devices such as handsets or headsets with your phone.To use your Bluetooth device, it must be paired to the set. To manage the pairing, the Bluetooth device must be in detectable mode. Refer to your Bluetooth device documentation to find out how to activate detectable mode.
Your Bluetooth device is ready to be pairedSelect the applicationSettings
Device
Bluetooth
Add device
Scan
The set scans for available Bluetooth devicesSelect the Bluetooth device to be paired
Add the device to the device list
Enter the device PIN code
Ok
Bluetooth device connected
38
After pairing the Bluetooth accessory, you must define the accessory type in the audio settings.
Select the applicationSettings
Device
Audio
Accessory type
BT
Ok
After selecting the accessory type, you must specify the jack accessory:
Jack accessory• headset• handsfree• loudspeaker
Ok
7.14 Install the Alcatel-Lucent IP Touch Bluetooth® Wireless handset
Select the applicationSettings
Device
Bluetooth
Add device
Scan
The set scans for available Bluetooth devices...Your Bluetooth® device needs to be prepared for pairing. Take the handset off the hook and long press on both handset buttons at the same time. You will hear a 3-note tone and the LED will flash green and orange.
Searching for Bluetooth® equipment. Wait for the detected equipment type and address to be displayedSelect the relevant equipment
Add the device to the device list
Enter the device PIN code (The default PIN code is 0000)
Ok The 3-note tone indicates that the handset has been installed correctly (the LED flashes green or orange depending on the battery charge level)

39
After pairing the Bluetooth accessory, you must define the accessory type in the audio settings.
Select the applicationSettings
Device
Audio
Accessory type
BT
Ok
After selecting the accessory type, you must specify the jack accessory :
Jack accessory
headset
Ok
• Error messages
The Bluetooth® handset emits a sequence of 4 beeps
Your set is an older generation than your Bluetooth® handset
The set displays an error message indicating that the set and the Bluetooth® handset are incompatible
Your Bluetooth® handset is an older generation than your set
7.15 Uninstall a Bluetooth® device (unpairing)
Select the applicationSettings
Device
Bluetooth
Select the Bluetooth® device to unpair
Delete
The Bluetooth® device is uninstalled (unpaired)
7.16 Hearing aid kitIf you are using your phone with a hearing device, you must install and activate the hearing aid device (HAC) to avoid hearing discomfort.
Install the hearing aid kit using the instruction guide suppliedSelect the applicationSettings
Device
Audio
Hearing aidEnable the feature : YESThe hearing aid kit is activated

40
7.17 Activate the magnifying glass feature
You must be identified as an administrator to be able to modify this feature.
Select the applicationSettings
Admin
Device
Phone configuration
Enter the administrator password
Enable magnifyEnable or disable the feature
Back to homepage
7.18 Magnifying glassThe magnifying glass feature allows you to zoom in on the active area of the screen.
MagnifyThe magnifying glass keyfeature lights green when activated The active area of the screen is magnified. You can move this area and zoom any part of the screen you wantPress the feature key again to go back to normal view ; :Magnify
The application bar cannot be magnified.
The magnifying glass feature must be activated in order to be used.
7.19 Set an alarm
Alarm
Hour:Enter the alarm timeAlarm sound:Select the melody of your choiceVolume:Adjust the alarm volumeAlarm statusEnable the feature
The associated LED is on: the feature is enabled The icon is displayed (connectivity information zone)
When the alarm bell rings, you can choose to repeat the alarm or turn it off.

41
7.20 File ManagerThis application allows you to manage audio files, images, webradios and other media.
Select the applicationMy filesSelect the file type you want:
• Audio• Picture
All available files of the selected type (on set or storage media connected on USB port) are displayed.You can also manage your phone multimedia files.
The display time may take longer if the USB storage device contains too many files.
7.21 Delete a file Select the applicationMy filesSelect the file type you want:
• Audio• Picture
Enter delete modeDelete
Select the file to delete
Yes / NoConfirm deletion
Exit delete mode
You cannot delete a file stored on an external device.
7.22 Rename a fileSelect the applicationMy filesSelect the file type you want:
• Audio• Picture
Select the file to rename
Rename
Enter the new file name
OkApply
ORCancel the operationCancel
You cannot rename a file stored on an external device.

42
7.23 Copy a file from the external storage device to the phone internal memory Select the applicationMy filesSelect the file type you want:
• Audio• Picture
FiltersSelect the storage device
Select the file to copy
Copy
7.24 Listen to an audio file Select the applicationMy files
Audio FiltersDisplay the files for the selected storage device (the phone internal memory or external storage device)Select the audio fileThe audio file plays automaticallyPause:PauseStart listening again:Play
Stop listening:Stop
When released from the manufacturing plant, the audio files hosted on My IC Phone are Alcatel-Lucent property and can be used as is. When a installer or End-User downloads MP3 files via a USB link, they are responsible for the Intellectual Property Right requirements related to such downloads.

43
7.25 Play all audio filesSelect the applicationMy files
AudioFiltersDisplay the files for the selected storage device (the phone internal memory or external storage device)
Play all
Listening of all audio files has started
Stop listening:Stop allStart listening again:PlaySwitch to next track:NextListen to tracks in random order:Random
When released from the manufacturing plant, the audio files hosted on My IC Phone are Alcatel-Lucent property and can be used as is. When a installer or End-User downloads MP3 files via a USB link, they are responsible for the Intellectual Property Right requirements related to such downloads.
7.26 Phone wallpaperYou can change the wallpaper on your phone. The image must be stored in the set or on a USB storage device.If the image is on the USB storage device, you must connect it to the phone:
Insert your USB device at the back of the phone
The icon is displayed (connectivity information zone) ;
Change the wallpaper:Select the applicationMy files
PictureThe list of images on the USB device is also displayedFiltersDisplay the files for the selected storage device
Select the image
WallpaperThe selected image is set as wallpaper
44
7.27 Phone screensaverYou can change your phone screensaver to a default or a personal screensaver. The default screensaver uses predefined images. The personal screensaver uses images you have stored in your phone memory and set up in a screensaver pool.
Select the applicationSettings
Application
Screensaver
Screensaver : yes / noEnable or disable the feature Select the screensaver typeScreensaver type :
• Default screensaver• Personal screensaver
You can set the screensaver timeout, the backlight timeout, the brightness when the backlight is on or off and the refresh images interval.
Add an image for your personal screensaver
The images have to be stored in the phone memory.
Select the applicationMy files
Picture
Select the image
Add to Wakeup Pool
The image is added to your personal screensaver pool Remove an image from your personal screensaver pool
Select the applicationMy files
Picture
Select the image
Remove from SsPool
The image is removed from your personal screensaver pool
45
7.28 Customize the user pictureYou can change the picture displayed in your personal information area in the top left corner of the screen. The image must be stored in the set or on a USB storage device.If the image is on the USB storage device, you must connect it to the phone:
Insert your USB device at the back of the phoneThe icon is displayed (connectivity information zone)
Change the avatar:Select the applicationMy files
PictureThe list of available pictures is displayedFiltersDisplay the files for the selected storage device
Select the image
My pictureThe picture is updated
The recommended size for the avatar is 100x100 pixels.
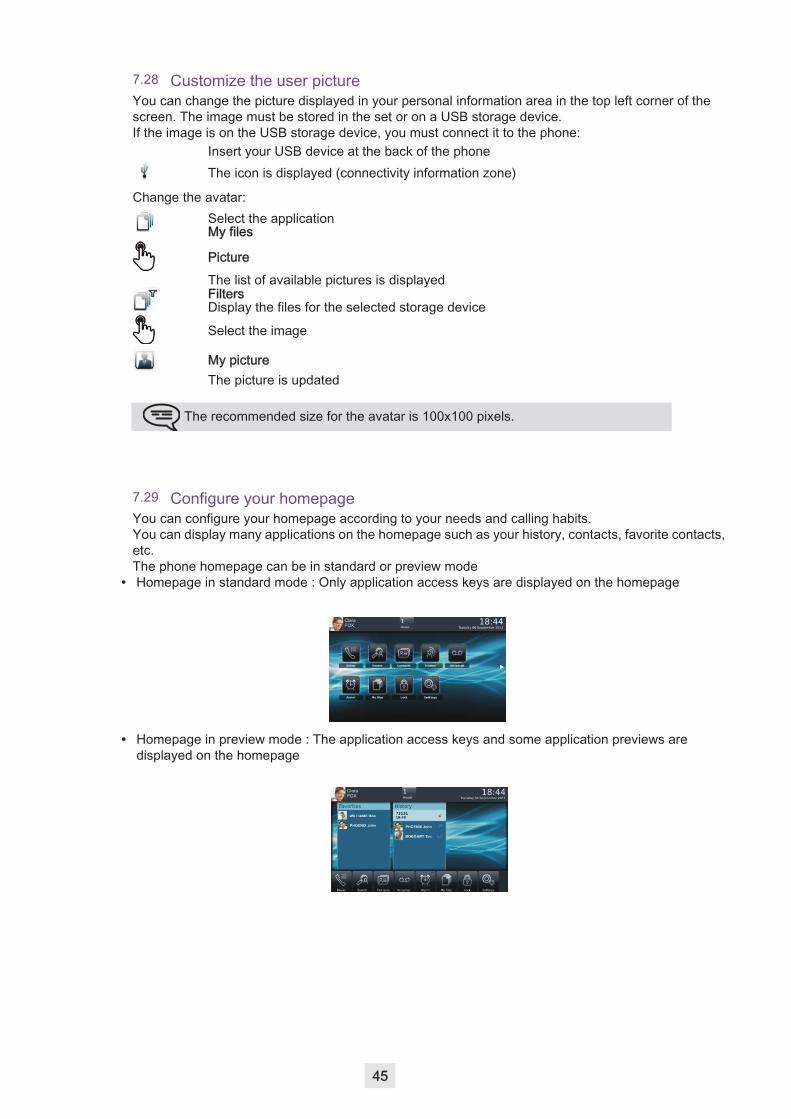
7.29 Configure your homepageYou can configure your homepage according to your needs and calling habits.You can display many applications on the homepage such as your history, contacts, favorite contacts, etc.The phone homepage can be in standard or preview mode
• Homepage in standard mode : Only application access keys are displayed on the homepage
• Homepage in preview mode : The application access keys and some application previews are displayed on the homepage
46
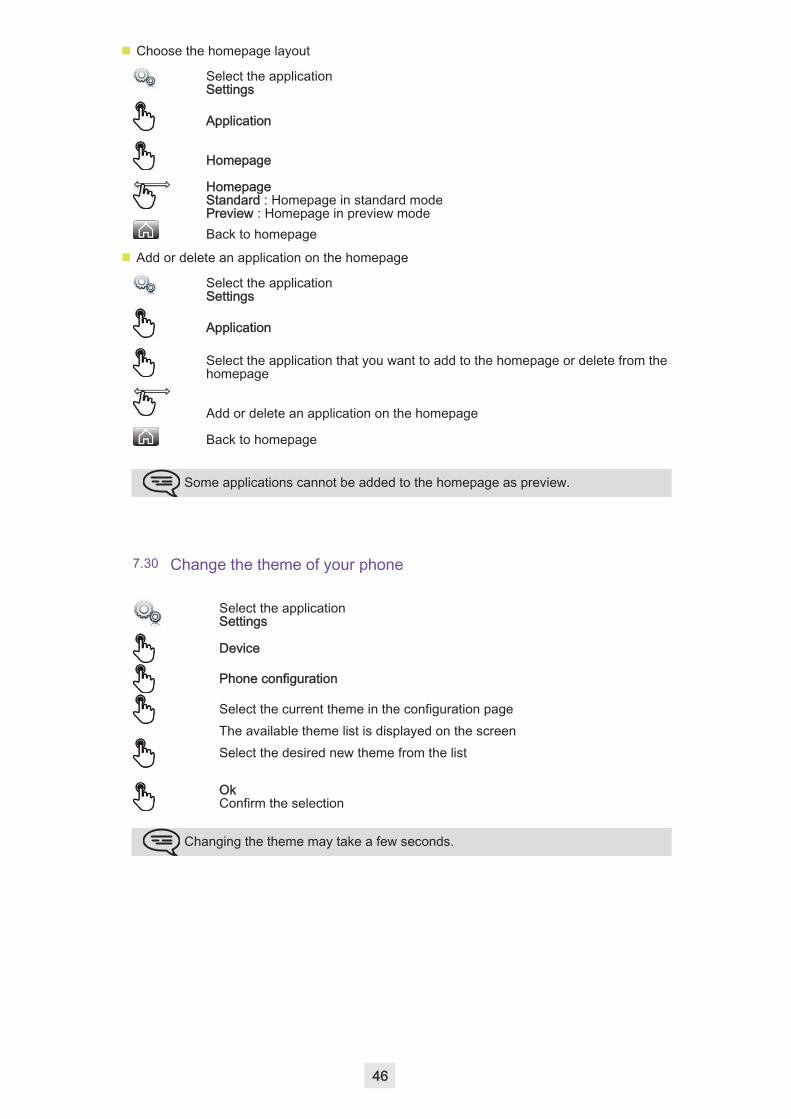
Choose the homepage layout
Select the applicationSettings
Application
Homepage
HomepageStandard : Homepage in standard modePreview : Homepage in preview modeBack to homepage
Add or delete an application on the homepage
Select the applicationSettings
Application
Select the application that you want to add to the homepage or delete from the homepage
Add or delete an application on the homepage
Back to homepage
Some applications cannot be added to the homepage as preview.
7.30 Change the theme of your phone
Select the applicationSettings
Device
Phone configuration
Select the current theme in the configuration pageThe available theme list is displayed on the screenSelect the desired new theme from the list
OkConfirm the selection
Changing the theme may take a few seconds.

Manager/Assistant 8
47
Other
8.1 Manager/AssistantThe manager/secretary application is a special configuration of at least two multiline stations offering specific additional features via programmable keys.On each manager/assistant phone, a dedicated application window shows the name of the manager or assistant, the phone presence of the manager or the assistant, the direct call feature access button and the filtering mode access button. The assistant/manager application window can only be displayed when homepage is in preview mode. Assistant station
CallCall your managerIf you are already on a call, the first caller is placed on holdFilterEnable ManagerAssistant filtering and call monitoring
Manager Station,CallCall your assistantIf you are already on a call, the first caller is placed on holdFilterEnable ManagerAssistant filtering and call monitoring
On both sets the header of the dedicated assistant/manager application shows the phone presence of the assistant or manager and the filtering mode activated
The assistant or the manager is on a call with a contact
The assistant or the manager is not on a call with a contact
8.2 Select and activate the filtering mode between the manager and assistant phones
The filtering mode allows the assistant and the manager to choose how to route and monitor incoming calls to the manager.
Mode
Select the filtering mode to activate
Filtering is activated on the Manager and the associated Assistant phones
There are four filtering modes.
Manager doesn’t receive the calls and Assistant receives them
Manager monitors the calls & Assistant receives them
Manager receives the calls & Assistant monitors them
Off
• Manager doesn’t receive the calls and Assistant receives themWhen a caller is calling the Manager phone, the call is directly forwarded to the Assistant phone if the caller is not a priority caller (not registered on the "White list").
48
• Manager monitors the calls & Assistant receives themWhen a caller is calling the Manager phone, the call is directly forwarded to the Assistant phone if the caller is not a priority caller (not registered on the "White list").In this filtering mode, the manager is notified of the incoming call routed to the assistant. If necessary, the manager can pick up the incoming call before the assistant answers the call. The assistant can see the name of the caller in the history preview pane and the manager’s presence status changes to "busy".The manager picks up the incoming call:
Monitored call
Control
Answer displayed call
• Manager receives the calls & Assistant monitors themIn this filtering mode, the assistant is notified of the incoming call on the manager phone. If necessary, the assistant can pick up the incoming call before the manager answers the call.The assistant picks up the incoming call:
Monitored call
Control
Answer displayed call
• OffThe manager/assistant feature is deactivated. There is no routing and monitoring between the two phones.
8.3 Transfer a call to the manager phoneWhen on a call, the assistant can directly transfer the call to the manager.
The assistant is on a call
To manager
The call is forwarded to the manager
8.4 Define a priority number ("White List")A registered number in the "White List" is a priority number. A priority number will always directly reach the Manager phone even if a call filtering mode is activated.
Only the manager set can add a priority number
You are on a call. You wish to add your contact to the list.If the "White List" button is green, it means that your contact is already registered and you do not need to add the contact to your "White List".
White List
The contact is added to the listThe "White List" green light is on.

49
You are not on a call. You wish to add a contact to the list.
Settings
Application
White List
Add ContactEnter the first letters of the name, name-first name or the initials of your correspondent
Select your correspondent from the list
The contact is added to the list
8.5 Delete a priority number ("White List") You are on a call. You wish to remove your contact from the White list.
The "White List" green light is off.
White ListThe contact is removed from the listIf the "White List" button is not green, it means that your contact is not registered so you do not need to remove them from your "White List".
You are not on a call. You wish to remove your contact from the White list.
Settings
Application
White List
Delete
The contact is removed from the list
My IC Phone Synchronizer 9
50
Other
9.1 IntroductionThis application is for synchronizing your address book between your phone and your PC Outlook application. The default maximum number of contacts you can synchronize between your phone and your PC is 500. However, your administrator can increase this to up to 1,000. Please ask your administrator for the maximum number of contacts.
9.2 Prerequisites The supported operating systems are:• Microsoft® Windows® XP Service Pack 2 and higher (32 bits)• Microsoft® Windows® VISTA (32 bits and 64 bits)• Microsoft® Windows® 7 (32 bits and 64 bits) The Outlook supported versions are: Microsoft® Outlook 2000, Microsoft® Outlook 2002, Microsoft®
Outlook 2003, Microsoft® Outlook 2007, Microsoft® Outlook 2010. The minimal system requirements are:• Processor : P4 Class or higher• RAM memory: at least 256 Mo• Minimum available disk space: 100 Mo• Screen: 800x600 True Color• Network card is required
9.3 Installing the application on your PCThe application comes as an executable installation file (.exe).
1) Run the application executable file2) Select the language: this defines the installation and the applicatio language
3) Read and agree the license Agreement

51
4) Select the application destination folder on your PC (make sure you have the necessary administration rights to install the application in the selected folder)
5) Follow the installation steps.
9.4 Uninstalling the applicationThere are two different ways for uninstalling the application:
• Access the feature "Add/remove programs" (Windows® XP) or "Programs and features" (Windows® Vista ou Windows® 7).
• Run the installation executable file and select the "Remove" option.
9.5 Repairing the applicationIf the application becomes corrupted, you can repair it.
1) Run the application installation executable file.2) Select the "Repair" option.3) follow information displayed on the screen
52
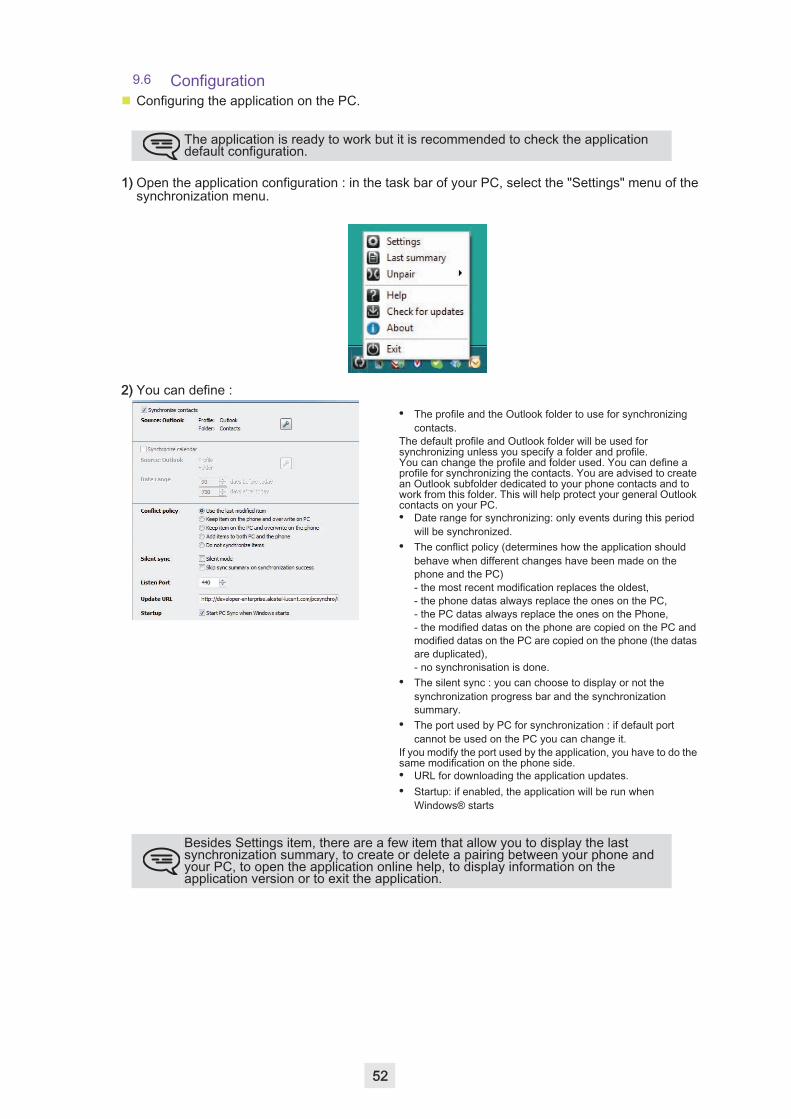
9.6 Configuration Configuring the application on the PC.
The application is ready to work but it is recommended to check the application default configuration.
1) Open the application configuration : in the task bar of your PC, select the "Settings" menu of the synchronization menu.
2) You can define :• The profile and the Outlook folder to use for synchronizing
contacts.The default profile and Outlook folder will be used for synchronizing unless you specify a folder and profile.You can change the profile and folder used. You can define a profile for synchronizing the contacts. You are advised to create an Outlook subfolder dedicated to your phone contacts and to work from this folder. This will help protect your general Outlook contacts on your PC.• Date range for synchronizing: only events during this period
will be synchronized.• The conflict policy (determines how the application should
behave when different changes have been made on the phone and the PC) - the most recent modification replaces the oldest, - the phone datas always replace the ones on the PC, - the PC datas always replace the ones on the Phone, - the modified datas on the phone are copied on the PC and modified datas on the PC are copied on the phone (the datas are duplicated), - no synchronisation is done.
• The silent sync : you can choose to display or not the synchronization progress bar and the synchronization summary.
• The port used by PC for synchronization : if default port cannot be used on the PC you can change it.
If you modify the port used by the application, you have to do the same modification on the phone side.• URL for downloading the application updates.• Startup: if enabled, the application will be run when
Windows® starts
Besides Settings item, there are a few item that allow you to display the last synchronization summary, to create or delete a pairing between your phone and your PC, to open the application online help, to display information on the application version or to exit the application.

53
Configuring the phone
Settings
Application
Synchronization
Server address
Enter the IP address or the complete network name on which the synchronization application is installed.
Server port This data defines the port used on the PC for synchronization. The port must be the same as the one filled in the PC application.
Warning when exceed
Choose if you wish to be informed when a maximum number of items for synchronization is reached (the default setting is 500 items but this may have been changed by the administrator - ask your administrator for the maximum number of contacts).
Sync. button
Choose to display the synchronization button in the applications bar of your My IC Phone.
Back to homepage
If you try to start the synchronization before configuring it, you will access the Synchronization settings.
9.7 Synchronize your phone and your PC Start synchronization
Synchronization (if enabled in the synchronization settings)
ORSettings
Application
Synchronization
Synchronization : start
If not deactivated in the application configuration (Silent Sync) you can see the synchronization summary on the screen.
During the synchronization, you can at anytime: - see synchronization progress and phases, - display details of synchronized items, - cancel the synchronisation.
The synchronization summary lists all the synchronized items.
From the application menu on the PC (Task bar), you can see at anytime the summary from the last synchronization.

54
Pairing your phone and your PCWhen you run the synchronization for the first time, you must pair your phone and your PC.
1) Accept the certificate required by the phone (ensure that the certificate comes from the target PC),2) A pairing PIN code (PIN) is displayed on the phone screen.3) The phone is detected by the PC and you are prompted to enter this PIN code and a name for the
pairing.4) The synchronization is automatically started when the pairing is established.
This pairing has to be done only for the first synchronization.
From the PC application menu, you can delete this pairing.
SynchronizationDuring the synchronization, you can monitor progress and view the summary once the process is completed. Make sure this option ("Silent Sync") is configured correctly in the Synchronization settings on the PC side. You can also see which items are modified and where by clicking on the detailed view button.
Synchronization takes about 15 seconds for 500 contacts. You can receive and make calls during synchronization but this can make the synchronization process longer.
The synchronization function is most commonly used to synchronize your PC Outlook contacts with your phone contacts list. Once you have run the initial synchronization, if you delete a contact from the phone contacts list, the contact will be deleted from Outlook during the next synchronization (and vice versa). You are advised to create an Outlook subfolder dedicated to your phone contacts and to work from this folder. This will help protect your general Outlook contacts on your PC.
9.8 TroubleshootingBelow is a troubleshooting guide that can help you resolve any problems that might occur. Installation says you do not have write permissions in this folder
You are probably not permitted to change the folder in which you are trying to install PC Sync. Try installing it in another location.
Phone displays "HTTP error, HTTP request failed"
Please make sure PC Sync is started in the PC.Please check if the same port is set on the phone and on the PCPlease check you correctly entered PC address.Please check your firewall settings. The port may be closed by the firewall. Try to change the port.
PC Sync displays "Unable to listen to the port"
Please make sure no other applications are using this port. Please make sure the firewall allows listening to this port. Try to change the port.
PC Sync displays "Selected folder has been deleted" or "Cannot open Outlook profile"
The profile or the folder that My IC Phone Synchronizer is configured to synchronize with has been deleted. Select another profile or folder in settings.
PC Sync displays "Outlook is not installed"
My IC Phone Synchronizer could not find a supported version of Outlook on the PC. Install Outlook.
PC Sync displays "Error communicating with Outlook"
My IC Phone Synchronizer could not communicate with Outlook. This might be because Outlook has been installed but not yet set up properly or is malfunctioning. Starting Outlook itself may provide information on what is wrong.

Guarantee and clauses
55
howtoc
Safety Instructions Changes or modifications to the equipment not expressly approved by the party responsible for
compliance could void the user’s authority to operate the equipment. Intellectual Property Rights
When released from the manufacturing plant, the audio files hosted on My IC Phone are Alcatel-Lucent property and can be used as is. When a installer or End-User downloads MP3 files via a USB link, they are responsible for the Intellectual Property Right requirements related to such downloads.
To limit the risk of interference, people with pacemakers must keep the wireless telephone away from their equipment (minimum distance of 15 cm).
It is recommended to follow the standard acceptance procedures before using this equipment in human safety critical areas (hospitals...).
The headset includes magnetic elements that may attract sharp metallic objects. There is a danger of explosion if the battery is replaced incorrectly - use only the battery with the
reference 3GV28041AB (1.2V 1500 mAh) 3GV28041AB (1.2V 1500 mAh) (Bluetooth Handset only). Battery charge (Bluetooth Handset only) : Charge the battery for about 16 hours before initial use.
Regulatory StatementsEU/EFTAThis equipment is in compliance with the essential requirements of R & TTE Directive 1999/5/EC.The Declaration of Conformity may be obtained from your installer.USA and CanadaThis device complies with Part 15 of the FCC Rules and with RSS-210 of Industry Canada. Operation is subject to the following two conditions : (1) this device may not cause harmful interference, and (2) this device must accept any interference received, including interference that may cause undesired operation. This equipment has been tested and found to comply with the limits for a class B digital device, pursuant to Part 15 of the FCC Rules and ICES-003 of Canada. These limits are designed to provide reasonable protection against harmful interference in a residential installation. This equipment generates, uses and can radiate radio frequency energy and, if not installed and used in accordance with the instructions, may cause harmful interference to radio communications. However, there is no guarantee that interference will not occur in a particular installation. If this equipment does cause harmful interference to radio or television reception, which can be determined by turning the equipment off and on, the user is encouraged to try correct the interference by consulting the dealer.Exposure to Radio Frequency Signals.This device has been designed and manufactured not to exceed the SAR (Specific Absorption Rate) radio frequency power transmission limits established by the different countries concerned. The SAR value for the Bluetooth handset is 0.09 W/kg (the globally accepted maximum limit being 1.6 W/kg).

Guarantee and clauses
56
User InstructionsOnly use the handset in temperatures between -5° C to +45° C (23° F to 113° F).This apparatus is Hearing Aid Compatible (HAC).Acoustic shock protectionThe acoustic level of the signal generated by the handset earpiece is less than 130 dBspl for a transient signal (123 dBspl for Australia) and less than 118 dBspl (rms) for a continuous signal (120 dBA for Australia).Directive 2003/10/EC specifying the risks inherent in noise at workThe ring contributes towards overall daily noise; at its maximum setting, the level is 105 dBA at 60 cm from terminal. To reduce the level, the following is recommended: - reduce the setting (9 levels of 5 dB) - program a progressive ring. This device can be used for indoor operation in all the countries; you must consult your installer for an outdoor usage.PrivacyPrivacy of communications may not be ensured when using the Bluetooth handset or any additionnal Bluetooth device
DisposalThe equipment must be returned to a collection point for electronic equipment waste disposal.Defective batteries must be returned to a collection point for chemical waste disposal.Alcatel, Lucent, Alcatel-Lucent and the Alcatel-Lucent logo are trademarks of Alcatel-Lucent. All other trademarks are the property of their respective owners. The information
presented is subject to change without notice. Alcatel-Lucent assumes no responsibility for inaccuracies contained herein. Copyright 2012 Alcatel-Lucent. All rights reserved.