Embed Size (px)
Citation preview
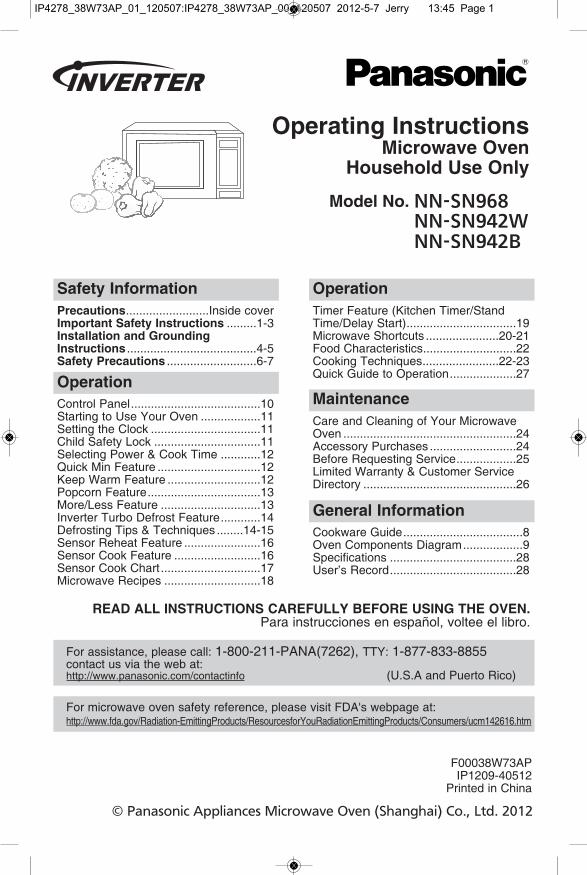
operating instructionsMicrowave oven
household use only
Model: nn-sn968
safety informationPrecautions.........................Inside coverimportant safety instructions .........1-3installation and groundinginstructions .......................................4-5safety Precautions ...........................6-7
operationTimer Feature (Kitchen Timer/StandTime/Delay Start).................................19Microwave Shortcuts ......................20-21Food Characteristics............................22Cooking Techniques.......................22-23Quick Guide to Operation....................27
operationControl Panel.......................................10Starting to Use Your Oven ..................11Setting the Clock .................................11Child Safety Lock ................................11Selecting Power & Cook Time ............12Quick Min Feature ...............................12Keep Warm Feature ............................12Popcorn Feature..................................13More/Less Feature ..............................13Inverter Turbo Defrost Feature............14Defrosting Tips & Techniques ........14-15Sensor Reheat Feature .......................16Sensor Cook Feature ..........................16Sensor Cook Chart ..............................17Microwave Recipes .............................18
MaintenanceCare and Cleaning of Your MicrowaveOven ....................................................24Accessory Purchases ..........................24Before Requesting Service..................25Limited Warranty & Customer ServiceDirectory ..............................................26
general informationCookware Guide....................................8Oven Components Diagram..................9Specifications ......................................28User’s Record......................................28
read all instructions carefully before using the oven.Para instrucciones en español, voltee el libro.
F00038W73APIP1209-40512
Printed in China
For assistance, please call: 1-800-211-PANA(7262), TTY: 1-877-833-8855contact us via the web at:http://www.panasonic.com/contactinfo (U.S.A and Puerto Rico)
For microwave oven safety reference, please visit FDA's webpage at: http://www.fda.gov/Radiation-EmittingProducts/ResourcesforYouRadiationEmittingProducts/Consumers/ucm142616.htm
© Panasonic Appliances Microwave Oven (Shanghai) Co., Ltd. 2012
IP4278_38W73AP_01_120507:IP4278_38W73AP_00_120507 2012-5-7 Jerry 下下13:45 Page 1
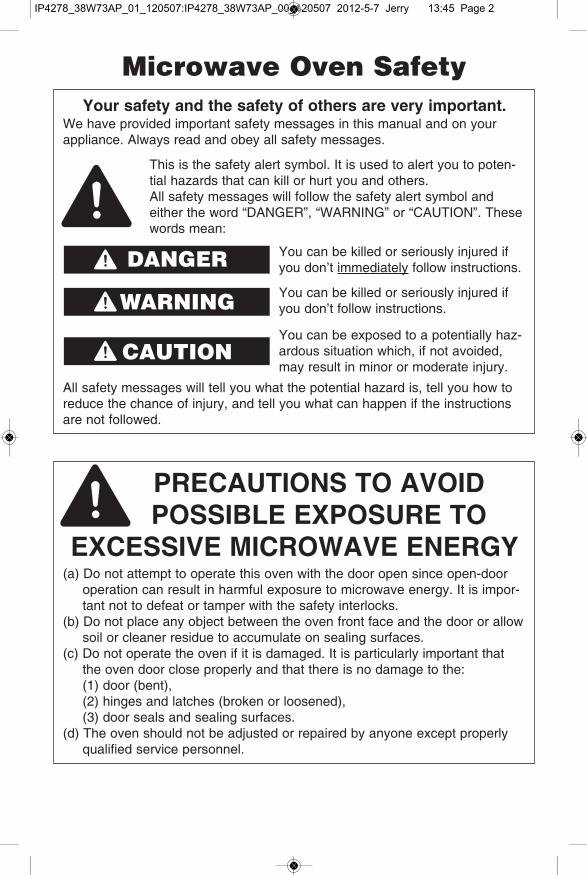
your safety and the safety of others are very important.We have provided important safety messages in this manual and on yourappliance. Always read and obey all safety messages.
Precautions to avoid Possible eXPosure to
eXcessive MicroWave energy(a) Do not attempt to operate this oven with the door open since open-door
operation can result in harmful exposure to microwave energy. It is impor-tant not to defeat or tamper with the safety interlocks.
(b) Do not place any object between the oven front face and the door or allowsoil or cleaner residue to accumulate on sealing surfaces.
(c) Do not operate the oven if it is damaged. It is particularly important thatthe oven door close properly and that there is no damage to the: (1) door (bent), (2) hinges and latches (broken or loosened), (3) door seals and sealing surfaces.
(d) The oven should not be adjusted or repaired by anyone except properlyqualified service personnel.
All safety messages will tell you what the potential hazard is, tell you how toreduce the chance of injury, and tell you what can happen if the instructionsare not followed.
This is the safety alert symbol. It is used to alert you to poten-tial hazards that can kill or hurt you and others.All safety messages will follow the safety alert symbol andeither the word “DANGER”, “WARNING” or “CAUTION”. Thesewords mean:
You can be killed or seriously injured ifyou don’t immediately follow instructions.
You can be killed or seriously injured ifyou don’t follow instructions.
Microwave oven Safety
danGeR
WaRninG
You can be exposed to a potentially haz-ardous situation which, if not avoided,may result in minor or moderate injury.
caution
IP4278_38W73AP_01_120507:IP4278_38W73AP_00_120507 2012-5-7 Jerry 下下13:45 Page 2
1
iMPortant safety instructions
—to reduce the risk of burns, electric shock, fire, injury to persons, or exposure to excessive microwave energy:
1. Read all instructions before using this appliance.2. Read and follow the specific “PRECAUTIONS TO AVOID POSSIBLE EXPO-
SURE TO EXCESSIVE MICROWAVE ENERGY,” found on the inside front cover.
3. This appliance must be grounded. Connect only to a properly grounded outlet. See “GROUNDING INSTRUCTIONS” found on page 4.
4. As with any cooking appliance, do not leave oven unattended while in use.5. Install or locate this appliance only in accordance with the installation instruc-
tions found on page 4.6. do not cover or block any openings on this appliance. 7. do not store this appliance outdoors. do not use this product near water—
for example, near a kitchen sink, in a wet basement, or near a swimming pool or similar locations.
8. Use this appliance only for its intended use as described in this manual. do not use corrosive chemicals, vapors or non-food products in this appliance. This type of oven is specifically designed to heat, or cook food. It is not designed for industrial or laboratory use. The use of corrosive chemicals in heating or cleaning will damage the appliance and may result in radiation leaks.
9. When cleaning surfaces of the door and oven that come together on closing the door, use only mild, non-abrasive soaps or detergents applied with a sponge or soft cloth.
10. do not allow children to use this appliance, unless closely supervised by an adult. do not assume that because a child has mastered one cooking skill he/she can cook everything.
11. do not operate this appliance if it has a damaged cord or plug, if it is not working properly, or if it has been damaged or dropped.
12. do not immerse cord or plug in water. 13. Keep cord away from heated surfaces.14. do not let cord hang over edge of a table or counter.15. This appliance should be serviced only by qualified service personnel. Contact
the nearest authorized service center for examination, repair or adjustment.
Your microwave oven is a cooking appliance and you should use as much careas you use with a stove or any other cooking appliance. When using this electricappliance, basic safety precautions should be followed, including the following:
Thank you for purchasing a Panasonic Microwave Oven.
WaRninG
IP4278_38W73AP_01_120507:IP4278_38W73AP_00_120507 2012-5-7 Jerry 下下13:45 Page 3
2
16. Some products such as whole eggs with or without shell, narrow neck bottles and sealed containers—for example, closed glass jars—may explode and should not be heated in this oven.
17. To reduce the risk of fire in the oven cavity:(a) do not overcook food. Carefully attend appliance when paper, plastic, or
other combustible materials are placed inside the oven to facilitate cooking.(b) Remove wire twist-ties from paper or plastic bags before placing bag in
oven. (c) if material inside the oven ignites, keep oven door closed, turn oven
off, and disconnect the power cord, or shut off power at the fuse or circuit breaker panel.
(d) do not use the cavity for storage purposes. do not leave paperproducts, cooking utensils or food in the cavity when not in use.
18. superheated liquidsLiquids, such as water, coffee or tea are able to be overheated beyond theboiling point without showing evidence (or signs) of boiling. Visible bubblingis not always present when the container is removed from the microwaveoven. ThIS COULD RESULT IN VERY hOT LIQUIDS SUDDENLY BOILINGOVER WhEN ThE CONTAINER IS DISTURBED OR A UTENSIL ISINSERTED INTO ThE LIQUID.To reduce the risk of injury to persons:(a) stir the liquid both before and halfWay through
heating it.(b) do not heat water and oil, or fats together. the film of oil will trap
steam, and may cause a violent eruption.(c) do not use straight-sided containers with narrow necks.(d) After heating, allow the container to stand in the microwave oven for a
short time before removing the container.19. do not cook directly on the turntable. It can crack, and cause injury or
damage to the oven.
iMPortant safety instructions(continued)
IP4278_38W73AP_01_120507:IP4278_38W73AP_00_120507 2012-5-7 Jerry 下下13:45 Page 4
3
iMPortant safety instructions(continued)
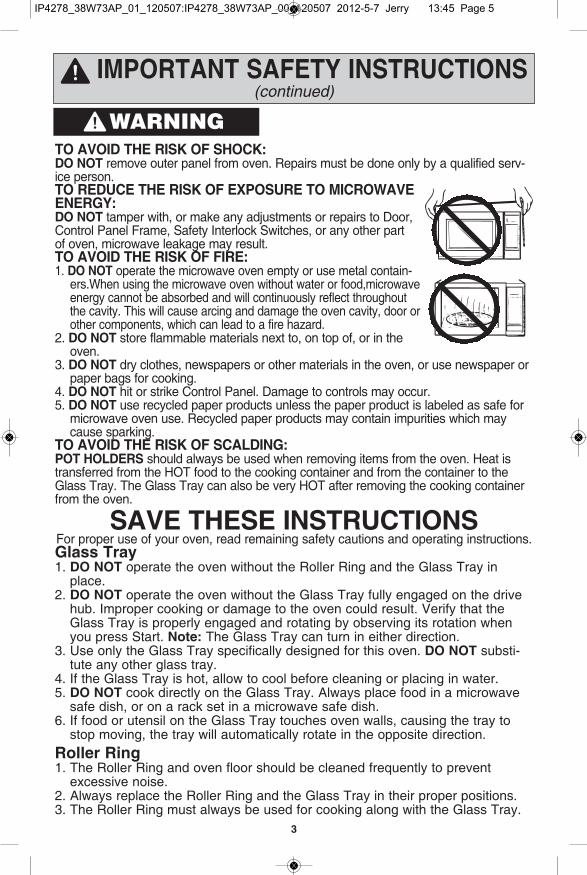
to avoid the risK of shocK: do not remove outer panel from oven. Repairs must be done only by a qualified serv-ice person. to reduce the risK of eXPosure to MicroWaveenergy: do not tamper with, or make any adjustments or repairs to Door,Control Panel Frame, Safety Interlock Switches, or any other partof oven, microwave leakage may result. to avoid the risK of fire: 1. do not operate the microwave oven empty or use metal contain-
ers.When using the microwave oven without water or food,microwaveenergy cannot be absorbed and will continuously reflect throughoutthe cavity. This will cause arcing and damage the oven cavity, door orother components, which can lead to a fire hazard.
2. do not store flammable materials next to, on top of, or in theoven.
3. do not dry clothes, newspapers or other materials in the oven, or use newspaper orpaper bags for cooking.
4. do not hit or strike Control Panel. Damage to controls may occur. 5. do not use recycled paper products unless the paper product is labeled as safe for
microwave oven use. Recycled paper products may contain impurities which maycause sparking.
to avoid the risK of scalding: Pot holders should always be used when removing items from the oven. heat istransferred from the hOT food to the cooking container and from the container to theGlass Tray. The Glass Tray can also be very hOT after removing the cooking containerfrom the oven.
WaRninG
save these instructionsFor proper use of your oven, read remaining safety cautions and operating instructions.glass tray1. do not operate the oven without the Roller Ring and the Glass Tray in
place.2. do not operate the oven without the Glass Tray fully engaged on the drive
hub. Improper cooking or damage to the oven could result. Verify that theGlass Tray is properly engaged and rotating by observing its rotation whenyou press Start. note: The Glass Tray can turn in either direction.
3. Use only the Glass Tray specifically designed for this oven. do not substi-tute any other glass tray.
4. If the Glass Tray is hot, allow to cool before cleaning or placing in water.5. do not cook directly on the Glass Tray. Always place food in a microwave
safe dish, or on a rack set in a microwave safe dish.6. If food or utensil on the Glass Tray touches oven walls, causing the tray to
stop moving, the tray will automatically rotate in the opposite direction.roller ring1. The Roller Ring and oven floor should be cleaned frequently to prevent
excessive noise.2. Always replace the Roller Ring and the Glass Tray in their proper positions.3. The Roller Ring must always be used for cooking along with the Glass Tray.
IP4278_38W73AP_01_120507:IP4278_38W73AP_00_120507 2012-5-7 Jerry 下下13:45 Page 5
4
—iMProPer use of the grounding Plugcan result in a risK of electric shocK. Consult a qualified electrician or service person if the grounding instructions are not com-pletely understood, or if doubt exists as to whether the appliance is properly grounded. If itis necessary to use an extension cord, use only a three wire extension cord that has athree-prong polarized grounding plug, and a three-slot receptacle that will accept the plugof the appliance. The marked rating of the extension cord should be equal to or greaterthan the electrical rating of the appliance.
grounding instructionsthis aPPliance Must be grounded. In the event of an electrical short circuit,grounding reduces the risk of electric shock by providing an escape wire for the electriccurrent. This appliance is equipped with a cord having a grounding wire with a groundingplug. The plug must be plugged into an outlet that is properly installed and grounded.• Plug into properly installed and grounded 3-prong outlet.• do not remove ground prong.• do not use an adapter.
WaRninG
installation and groundinginstructions (continued)
examine your ovenUnpack oven, remove all packing material and examine the oven for any dam-age such as dents, broken door latches or cracks in the door. Notify dealerimmediately if oven is damaged. do not install if oven is damaged.Placement of oven1. The oven must be placed on a flat, stable surface. Place the front surface of
the door three inches or more from the counter top edge to avoid accidentaltipping of the microwave oven during normal use. For proper operation, theoven must have sufficient air flow. Allow 3-inches (7.6 cm) of space on bothsides of the oven and 1-inch (2.5 cm) of space on top of the oven.(a) do not block air vents. If they are blocked during operation, the oven
may be overheated and damaged.(b) do not place oven near a hot, damp surface such as a gas or electric
range, or dishwasher. (c) do not operate oven when room humidity is excessive.
2. This oven is manufactured for counter top household use only. It is not intend-ed for built-in operation and is not approved or tested for mobile vehicle,marine, or commercial use.
installationdo not block air vents. If they are blocked during operation, the oven mayoverheat. If the oven overheats, a thermal safety device will turn the oven off.The oven will remain inoperable until it has cooled.
installation andgrounding instructions
IP4278_38W73AP_01_120507:IP4278_38W73AP_00_120507 2012-5-7 Jerry 下下13:45 Page 6
5
Power supply1. A short power-supply cord is provided to reduce the risks resulting from becoming
entangled in or tripping over a longer cord.2. Longer cord sets or extension cords are available and may be used if care is exercised
in their use. do not let cord hang over edge of a table or counter.3. If a long cord or extension cord is used, (1) the marked electrical rating of the cord set
or extension cord should be at least as great as the electrical rating of the appliance, (2)the extension cord must be a grounding-type 3-wire cord, and (3) the longer cordshould be arranged so that it will not drape over the counter top or table-top where it can be pulled on by children or tripped over accidentally.
Wiring requirementsThe oven must be operated on a SEPARATE CIRCUIT. No other appliance should sharethe circuit with the microwave oven. If it does, the branch circuit fuse may blow or the cir-cuit breaker may trip. The oven must be plugged into at least a 20 AMP, 120 VOLT, 60 hzGROUNDED OUTLET. Where a standard two-prong outlet is encountered, it is thepersonal responsibility and obligation of the consumer to have it replaced with a properlygrounded three-prong outlet. The VOLTAGE used must be the same as specified on thismicrowave oven (120 V, 60 hz). Using a higher voltage is dangerous and may result in afire or oven damage. Using a lower voltage will cause slow cooking. Panasonic is NOTresponsible for any damages resulting from the use of the oven with any voltage otherthan specified.
tv / radio interference1. Operation of the microwave oven may cause interference to your radio, TV or similar
equipment.2. When there is interference, it may be reduced or eliminated by taking the following
measures:(a) Place the radio, TV, etc. away from the microwave oven as far as possible. (b) Use a properly installed antenna to obtain stronger signal reception.(c) Clean door and sealing surfaces of the oven. (See Care and Cleaning of Your
Microwave Oven)
installation and groundinginstructions (continued)
IP4278_38W73AP_01_120507:IP4278_38W73AP_00_120507 2012-5-7 Jerry 下下13:45 Page 7

6
Follow These Safety Precautions When Cooking in Your Oven.
iMPortantProper cooking depends upon the power, the time setting and quantity offood. if you use a smaller portion than recommended but cook at the timefor the recommended portion, fire could result. 1) hoMe canning / steriliZing / drying foods /
sMall quantities of foods• do not use your oven for home canning. Your oven cannot maintain the food
at the proper canning temperature. The food may be contaminated and thenspoil.
• do not use the microwave oven to sterilize objects (baby bottles, etc.). It isdifficult to keep the oven at the high temperature needed for sterilization.
• do not dry meats, herbs, fruits or vegetables in your oven. Small quantitiesof food or foods with low moisture content can dry out, scorch or catch on fire ifoverheated.
2) PoPcornPopcorn may be popped in a microwave oven corn popper. Microwave pop-corn which pops in its own package is also available. Follow popcorn manu-facturers’ directions and use a brand suitable for the cooking power of yourmicrowave oven. caution: When using pre-packaged microwave popcorn, you can follow recommended package instructions or use the popcorn button (refer to page 13).Otherwise, the popcorn may not pop adequately or may ignite and cause a fire.Never leave oven unattended when popping popcorn. Allow the popcorn bag tocool before opening, always open the bag facing away from your face and bodyto prevent steam burns.
3) deeP fat frying• do not deep fat fry in your microwave oven. Cooking oils may burst into flames
and may cause damage to the oven and perhaps result in burns. Microwave utensilsmay not withstand the temperature of the hot oil, and can shatter or melt.
4) foods With nonPorous sKins• do not cooK/reheat Whole eggs, With or Without the shell.
Steam buildup in whole eggs may cause them to explode, and possibly damage theoven or cause injury. Reheating SLICED hard-boiled eggs and cooking SCRAM-BLED eggs is safe.
• Potatoes, apples, whole squash and sausages are examples of foods with non-porous skins. These types of foods must be pierced before microwave cooking toprevent them from exploding.caution: Cooking dry or old potatoes can cause fire.
safety Precautions
IP4278_38W73AP_01_120507:IP4278_38W73AP_00_120507 2012-5-7 Jerry 下下13:45 Page 8

7
5) glass tray / cooKing containers / foil• Cooking containers get hot during microwaving. heat is transferred from the
hOT food to the container and the Glass Tray. Use pot holders when removingcontainers from the oven or when removing lids or plastic wrap covers fromcooking containers, to avoid burns.
• The Glass Tray will get hot during cooking. It should be allowed to cool beforehandling or before paper products, such as paper plates or microwave popcornbags, are placed in the oven for microwave cooking.
• When using foil in the oven, allow at least 1-inch (2.5 cm) of space betweenfoil and interior oven walls or door.
• Dishes with metallic trim should not be used, as arcing may occur.
6) PaPer toWels / cloths• do not use paper towels or cloths which contain a synthetic fiber woven into
them. The synthetic fiber may cause the towel to ignite. Use paper towelingunder supervision.
7) broWning dishes / oven cooKing bags• Browning dishes or grills are designed for microwave cooking only. Always fol-
low instructions provided by the manufacturer. do not preheat browning dishmore than 6 minutes.
• If an oven cooking bag is used for microwave cooking, prepare according topackage directions. do not use a wire twist-tie to close bag, instead useplastic ties, cotton string or a strip cut from the open end of the bag.
8) therMoMeters• do not use a conventional meat thermometer in your oven. Arcing may
occur. Microwave safe thermometers are available for both meat and candy.
9) baby forMula / baby food• do not heat baby formula or baby food in the microwave oven. The glass jar
or surface of the food may appear warm while the interior can be so hot as toburn the infant’s mouth and esophagus.
10) reheating Pastry Products• When reheating pastry products, check temperatures of any fillings before eat-
ing. Some foods have fillings which heat faster and can be extremely hot, whilethe surface remains warm to the touch (ex. Jelly Donuts).
11) general oven usage guidelines• do not use the oven for any purpose other than the preparation of food.
safety Precautions (continued)
IP4278_38W73AP_01_120507:IP4278_38W73AP_00_120507 2012-5-7 Jerry 下下13:45 Page 9
8
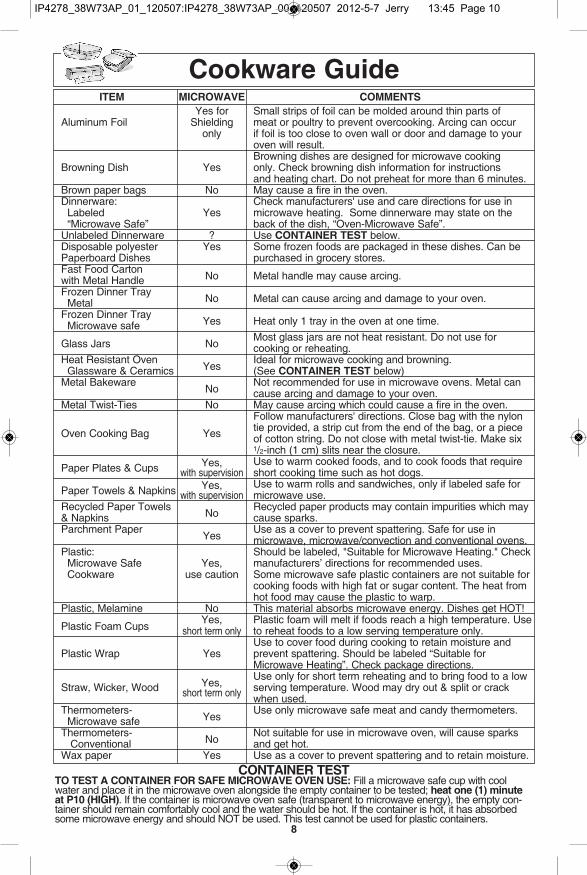
cookware guideiteM MicroWave coMMents
Yes for Small strips of foil can be molded around thin parts of Aluminum Foil Shielding meat or poultry to prevent overcooking. Arcing can occur
only if foil is too close to oven wall or door and damage to your oven will result.Browning dishes are designed for microwave cooking
Browning Dish Yes only. Check browning dish information for instructions and heating chart. Do not preheat for more than 6 minutes.
Brown paper bags No May cause a fire in the oven.Dinnerware: Check manufacturers' use and care directions for use in
Labeled Yes microwave heating. Some dinnerware may state on the “Microwave Safe” back of the dish, “Oven-Microwave Safe”.
Unlabeled Dinnerware ? Use container test below.Disposable polyester Yes Some frozen foods are packaged in these dishes. Can be Paperboard Dishes purchased in grocery stores.Fast Food Carton
No Metal handle may cause arcing.with Metal handleFrozen Dinner Tray
No Metal can cause arcing and damage to your oven. MetalFrozen Dinner Tray
Yes heat only 1 tray in the oven at one time.Microwave safe
Glass Jars NoMost glass jars are not heat resistant. Do not use forcooking or reheating.
heat Resistant OvenYes
Ideal for microwave cooking and browning. Glassware & Ceramics (See container test below)
Metal BakewareNo
Not recommended for use in microwave ovens. Metal cancause arcing and damage to your oven.
Metal Twist-Ties No May cause arcing which could cause a fire in the oven.Follow manufacturers' directions. Close bag with the nylon tie provided, a strip cut from the end of the bag, or a piece Oven Cooking Bag Yes of cotton string. Do not close with metal twist-tie. Make six 1/2-inch (1 cm) slits near the closure.
Paper Plates & Cups Yes, Use to warm cooked foods, and to cook foods that require with supervision short cooking time such as hot dogs.
Paper Towels & Napkins Yes, Use to warm rolls and sandwiches, only if labeled safe for with supervision microwave use.
Recycled Paper TowelsNo
Recycled paper products may contain impurities which may & Napkins cause sparks.Parchment Paper
YesUse as a cover to prevent spattering. Safe for use in microwave, microwave/convection and conventional ovens.
Plastic: Should be labeled, "Suitable for Microwave heating." CheckMicrowave Safe Yes, manufacturers’ directions for recommended uses. Cookware use caution Some microwave safe plastic containers are not suitable for
cooking foods with high fat or sugar content. The heat from hot food may cause the plastic to warp.
Plastic, Melamine No This material absorbs microwave energy. Dishes get hOT!
Plastic Foam CupsYes, Plastic foam will melt if foods reach a high temperature. Use
short term only to reheat foods to a low serving temperature only.Use to cover food during cooking to retain moisture and
Plastic Wrap Yes prevent spattering. Should be labeled “Suitable for Microwave heating”. Check package directions.
Yes,Use only for short term reheating and to bring food to a low
Straw, Wicker, Wood short term only serving temperature. Wood may dry out & split or crack when used.
Thermometers-Yes
Use only microwave safe meat and candy thermometers.Microwave safe
Thermometers-No
Not suitable for use in microwave oven, will cause sparks Conventional and get hot.
Wax paper Yes Use as a cover to prevent spattering and to retain moisture.container test
to test a container for safe MicroWave oven use: Fill a microwave safe cup with coolwater and place it in the microwave oven alongside the empty container to be tested; heat one (1) minuteat P10 (high). If the container is microwave oven safe (transparent to microwave energy), the empty con-tainer should remain comfortably cool and the water should be hot. If the container is hot, it has absorbedsome microwave energy and should NOT be used. This test cannot be used for plastic containers.
IP4278_38W73AP_01_120507:IP4278_38W73AP_00_120507 2012-5-7 Jerry 下下13:45 Page 10
9
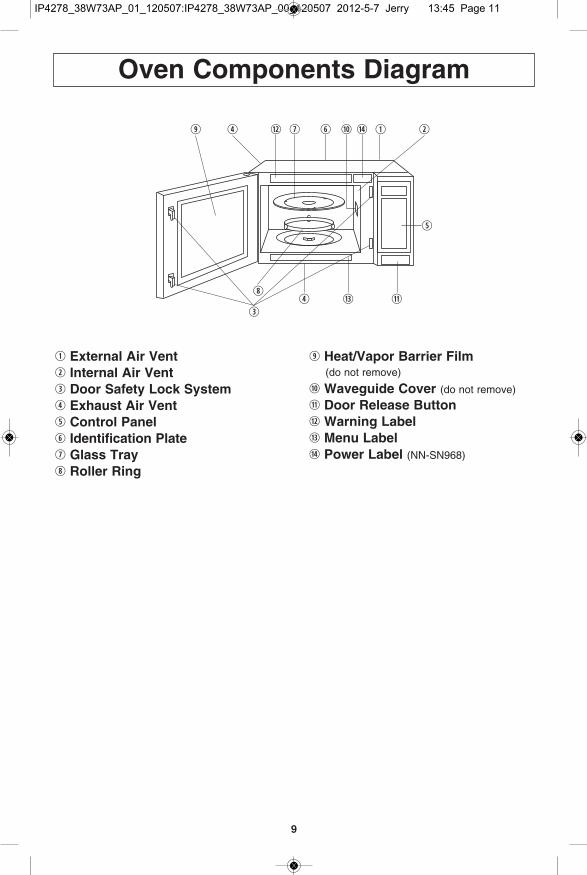
oven components diagram
ydo r u a qg w
t
r f si
e
q external air ventw internal air vente door safety lock systemr exhaust air ventt control Panely identification Plateu glass trayi roller ring
o heat/vapor barrier film(do not remove)
a Waveguide cover (do not remove)
s door release buttond Warning labelf Menu labelg Power label (NN-SN968)
IP4278_38W73AP_01_120507:IP4278_38W73AP_00_120507 2012-5-7 Jerry 下下13:45 Page 11

10
beep sound:When a pad is pressed correctly, a beep will be heard.If a pad is pressed and no beep is heard, the unit did not or cannot accept the instruction.When operating, the oven will beep twice between programmed stages. At the end of anycomplete program, the oven will beep 5 times.
note:If no operation after cooking program setting, 6 minutes later, the oven will automaticallycancel the cooking program. The display will return to clock or colon display.
sensor reheat Button(* page 16)
Popcorn Button(* page 13)
display Window
timer Pad(* page 19)
quick Min Pad(* page 12)
Power level Pad(* page 12)
stop/reset Button
Number Pads
sensor cook Button(* page 16)
Keep Warm Pad(* page 12)
less Pad (* page 13)More Pad (* page 13)
clock Pad(* page 11)
inverter turbo defrostPad (* page 14)
start Buttonbefore cooking: One tapclears all your instructions.during cooking: One taptemporarily stops the cookingprocess. Another tap cancelsall your instructions, and timeof day or colon appears in thedisplay Window.
After cooking programsetting, one tap allowsoven to begin functioning.If door is opened orstop/reset Button ispressed once during ovenoperation, start Buttonmust be pressed again torestart oven.
control Panel
* The control panel ofNN-SN942W/SN942Bhave the same keylayout.
IP4278_38W73AP_01_120507:IP4278_38W73AP_00_120507 2012-5-7 Jerry 下下13:45 Page 12

11
setting the clockexample: to set 11:25 a.m. or p.m.
1. • Press clock once.Colon flashes.
2. • Enter time of day usingthe number pads.Time appears in
the display window;colon continues flashing.
3. • Press clock.Colon stops flash-
ing; time of day is entered.
notes:1. To reset the clock, repeat step 1-3.2. The clock will retain the time of day as
long as the oven is plugged in andelectricity is supplied.
3. Clock is a 12-hour display.4. Oven will not operate while colon is
flashing.
starting to useyour oven
1. • Plug into a properlygrounded electricaloutlet.The oven automatical-ly defaults to the impe-rial measure system(oz/lb).
2. • Press start to convertto metric. Verify yourselection in the dis-play window.
3. • Press stop/reset.Colon appears in
the display window.
Display Window
If you wish touse metricsystem (g/kg):
child safety lockThis feature prevents the electronic oper-ation of the oven until cancelled. It doesnot lock the door.
note:You can set Child Safety Lock featurewhen the display shows a colon or time ofday.
to set: • Press start 3 times."Child" appears in thedisplay window."Child" continues to
be displayed until Child Safety Lock iscancelled. Any but-ton or pad may bepressed but themicrowave will notstart.
to cancel: • Press stop/reset 3times. The display will
return to colon or time of day when Child Safety Lock has been cancelled.
IP4278_38W73AP_01_120507:IP4278_38W73AP_00_120507 2012-5-7 Jerry 下下13:45 Page 13
12
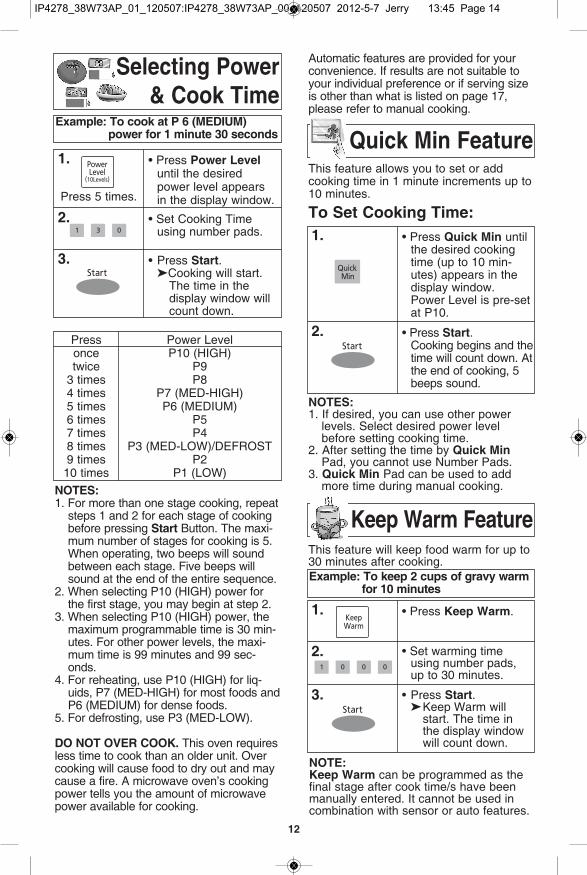
selecting Power& cook time
notes:1. For more than one stage cooking, repeat
steps 1 and 2 for each stage of cookingbefore pressing start Button. The maxi-mum number of stages for cooking is 5.When operating, two beeps will soundbetween each stage. Five beeps willsound at the end of the entire sequence.
2. When selecting P10 (hIGh) power forthe first stage, you may begin at step 2.
3. When selecting P10 (hIGh) power, themaximum programmable time is 30 min-utes. For other power levels, the maxi-mum time is 99 minutes and 99 sec-onds.
4. For reheating, use P10 (hIGh) for liq-uids, P7 (MED-hIGh) for most foods andP6 (MEDIUM) for dense foods.
5. For defrosting, use P3 (MED-LOW).
do not over cooK. This oven requiresless time to cook than an older unit. Overcooking will cause food to dry out and maycause a fire. A microwave oven’s cookingpower tells you the amount of microwavepower available for cooking.
example: to cook at P 6 (MediuM) power for 1 minute 30 seconds
1. • Press Power leveluntil the desiredpower level appearsin the display window.
2. • Set Cooking Timeusing number pads.
3. • Press start.Cooking will start.
The time in the display window will count down.
Press 5 times.
Pressoncetwice
3 times4 times5 times6 times7 times8 times9 times
10 times
Power LevelP10 (hIGh)
P9P8
P7 (MED-hIGh)P6 (MEDIUM)
P5P4
P3 (MED-LOW)/DEFROSTP2
P1 (LOW)
quick Min featureThis feature allows you to set or addcooking time in 1 minute increments up to10 minutes.
to set cooking time:
notes:1. If desired, you can use other power
levels. Select desired power levelbefore setting cooking time.
2. After setting the time by quick MinPad, you cannot use Number Pads.
3. quick Min Pad can be used to addmore time during manual cooking.
1. • Press quick Min untilthe desired cookingtime (up to 10 min-utes) appears in thedisplay window.Power Level is pre-setat P10.
2. • Press start.Cooking begins and thetime will count down. Atthe end of cooking, 5beeps sound.
Keep Warm featureThis feature will keep food warm for up to30 minutes after cooking.example: to keep 2 cups of gravy warm
for 10 minutes
1. • Press Keep Warm.
2. • Set warming timeusing number pads,up to 30 minutes.
3. • Press start.Keep Warm will
start. The time in the display window will count down.
note:Keep Warm can be programmed as thefinal stage after cook time/s have beenmanually entered. It cannot be used incombination with sensor or auto features.
Automatic features are provided for yourconvenience. If results are not suitable toyour individual preference or if serving sizeis other than what is listed on page 17,please refer to manual cooking.
IP4278_38W73AP_01_120507:IP4278_38W73AP_00_120507 2012-5-7 Jerry 下下13:45 Page 14
13
notes on PoPcorn feature:1. Pop one bag at a time.2. Place bag in oven according to manu-
facturers’ directions.3. Start with popcorn at room tempera-
ture.4. Allow popped corn to sit unopened for
a few minutes.5. Open bag carefully to prevent burns,
because steam will escape.6. Do not reheat unpopped kernels or
reuse bag.
note:If popcorn is of a different weight than list-ed, follow instructions on popcorn pack-age. never leave the oven unattended.If popping slows to 2 to 3 secondsbetween pops, stop oven. overcookingcan cause fire.
reMarKs:When popping multiple bags one rightafter the other, the cooking time may varyslightly. This does not affect the popcornresults.
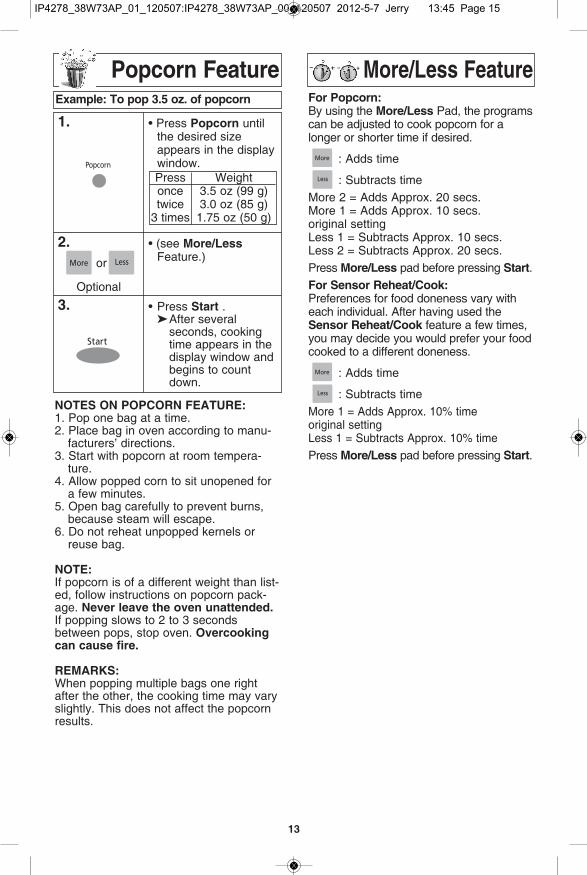
example: to pop 3.5 oz. of popcorn
1. • Press Popcorn untilthe desired sizeappears in the displaywindow.
2. • (see More/lessFeature.)
3. • Press start .After several
seconds, cooking time appears in the display window and begins to count down.
Optional
Pressoncetwice
3 times
Weight3.5 oz (99 g)3.0 oz (85 g)
1.75 oz (50 g)
Popcorn feature More/less feature
or
for Popcorn:By using the More/less Pad, the programscan be adjusted to cook popcorn for alonger or shorter time if desired.
: Adds time
: Subtracts timeMore 2 = Adds Approx. 20 secs.More 1 = Adds Approx. 10 secs.original settingLess 1 = Subtracts Approx. 10 secs.Less 2 = Subtracts Approx. 20 secs.Press More/less pad before pressing start.for sensor reheat/cook:Preferences for food doneness vary witheach individual. After having used thesensor reheat/cook feature a few times,you may decide you would prefer your foodcooked to a different doneness.
: Adds time
: Subtracts timeMore 1 = Adds Approx. 10% timeoriginal settingLess 1 = Subtracts Approx. 10% timePress More/less pad before pressing start.
IP4278_38W73AP_01_120507:IP4278_38W73AP_00_120507 2012-5-7 Jerry 下下13:45 Page 15

14
This feature allows you to defrost foods such as: meat, poultry and seafood simply byentering the weight.
Place food on microwave safe dish.
example: to defrost 1.5 pounds of meat
1. • Press inverter turbodefrost.
2. • Enter weight of thefood using the num-ber pads.
3. • Press start.Defrosting will start.The time will countdown. Larger weightfoods will cause a sig-nal midway throughdefrosting. If 2 beepssound, turn over,rearrange foods orshield with aluminumfoil.
conversion chart:Follow the chart to convert ounces orhundredths of a pound into tenths of apound. To use Inverter Turbo Defrost,enter the weight of the food in lbs. (1.0)and tenths of a lb. (0.1). If a piece ofmeat weighs 1.95 lbs. or 1 lb. 14 oz.,enter 1.9 lbs.
Ounces
01 - 23 - 4
56 - 7
89 - 10
11 - 1213
14 - 15
hundredthsof a Pound
.01 - .05
.06 - .15
.16 - .25
.26 - .35
.36 - .45
.46 - .55
.56 - .65
.66 - .75
.76 - .85
.86 - .95
Tenths ofa Pound
0.00.10.20.30.40.50.60.70.80.9
Preparation for freezing:1. Freeze meats, poultry, and fish in packages with only 1 or 2 layers of food. Place
wax paper between layers.2. Package in heavy-duty plastic wraps, bags (labeled “For Freezer”), or freezer paper.3. Remove as much air as possible.4. Seal securely, date, and label.
to defrost:1. Remove wrapper. This helps moisture to evaporate. Juices from food can get hot and
cook the food. 2. Set food in microwave safe dish. 3. Place roasts fat-side down. Place whole poultry breast-side down.4. Select power and minimum time so that items will be under-defrosted.5. Drain liquids during defrosting.6. Turn over (invert) items during defrosting.7. Shield edges and ends if needed. (See Cooking Techniques).
after defrosting:1. Large items may be icy in the center. Defrosting will complete during STANDING TIME.2. Let stand, covered, following stand time directions on page 15.3. Rinse foods indicated in the chart.4. Items which have been layered should be rinsed separately or have a longer stand time.
inverter turbo defrost feature
defrosting tips & techniques
IP4278_38W73AP_01_120507:IP4278_38W73AP_00_120507 2012-5-7 Jerry 下下13:45 Page 16
15
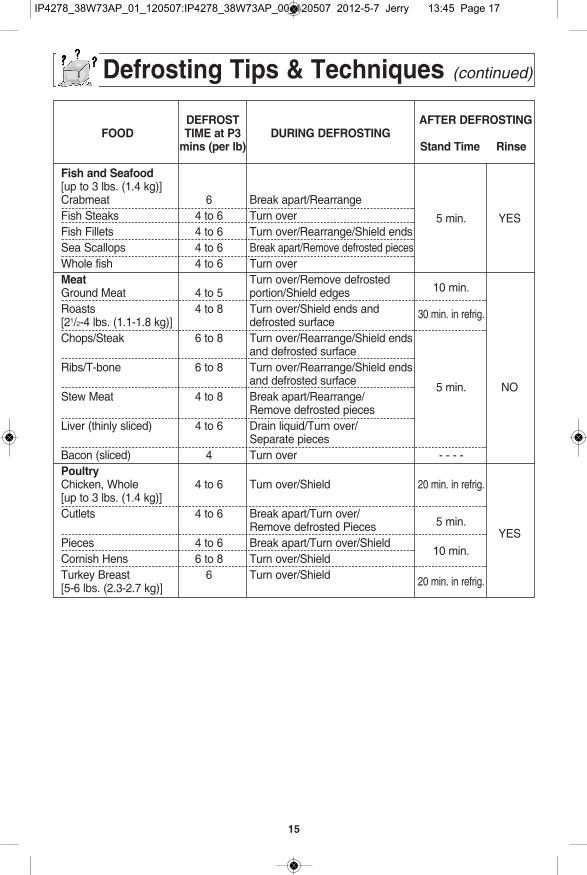
defrosting tips & techniques (continued)
defrost after defrostingfood tiMe at P3 during defrosting
mins (per lb) stand time rinse
fish and seafood[up to 3 lbs. (1.4 kg)]Crabmeat 6 Break apart/RearrangeFish Steaks 4 to 6 Turn over 5 min. YESFish Fillets 4 to 6 Turn over/Rearrange/Shield endsSea Scallops 4 to 6 Break apart/Remove defrosted piecesWhole fish 4 to 6 Turn overMeat Turn over/Remove defrostedGround Meat 4 to 5 portion/Shield edges 10 min.
Roasts 4 to 8 Turn over/Shield ends and 30 min. in refrig.[21/2-4 lbs. (1.1-1.8 kg)] defrosted surfaceChops/Steak 6 to 8 Turn over/Rearrange/Shield ends
and defrosted surfaceRibs/T-bone 6 to 8 Turn over/Rearrange/Shield ends
and defrosted surface 5 min. NOStew Meat 4 to 8 Break apart/Rearrange/
Remove defrosted piecesLiver (thinly sliced) 4 to 6 Drain liquid/Turn over/
Separate piecesBacon (sliced) 4 Turn over - - - -PoultryChicken, Whole 4 to 6 Turn over/Shield 20 min. in refrig.[up to 3 lbs. (1.4 kg)]Cutlets 4 to 6 Break apart/Turn over/
Remove defrosted Pieces 5 min. YES
Pieces 4 to 6 Break apart/Turn over/ShieldCornish hens 6 to 8 Turn over/Shield
10 min.
Turkey Breast 6 Turn over/Shield 20 min. in refrig.[5-6 lbs. (2.3-2.7 kg)]
IP4278_38W73AP_01_120507:IP4278_38W73AP_00_120507 2012-5-7 Jerry 下下13:45 Page 17

16
sensor reheat feature
sensor cook feature
note:casseroles - Add 3 to 4 tablespoons of liquid,cover with lid or vented plastic wrap. Stir whentime appears in the display window.canned foods - Empty contents into casse-role dish or serving bowl, cover dish with lid orvented plastic wrap. After reheating, let standfor a few minutes.Plate of food - Arrange food on plate; top withbutter, gravy, etc. Cover with lid or ventedplastic wrap. After reheating, let stand for afew minutes.do not use sensor reheat:1. To reheat bread and pastry products. Use
manual power and time for these foods.2. For raw or uncooked foods.3. If oven cavity is warm.4. For beverages.5. For frozen foods.
This sensor feature allows you to reheatcooked, refrigerated food without settingtime. The oven simplifies programming.
This sensor feature allows you to cookfood without setting time. The oven sim-plifies programming.
before Reheating/Cooking:1. The room temperature surrounding the
oven should be below 95° F (35° C).2. Food weight should exceed 4 oz. (110 g).3. Be sure the glass tray, the outside of the
cooking containers and the inside of themicrowave oven are dry before placingfood in the oven. Residual beads of mois-ture turning into steam can mislead thesensor.
4. Cover food with lid, or with vented plasticwrap. Never use tightly sealed plasticcontainers—they can prevent steam fromescaping and cause food to overcook.
during Reheating/Cooking:DO NOT open the oven door until 2 beepssound and cooking time appears on theDisplay Window. Doing so will cause inac-curate cooking since the steam from food isno longer contained within the oven cavity.Once the cooking time begins to countdown, the oven door may be opened to stir,turn or rearrange foods.after Reheating/Cooking:All foods should have a stand time.
example: to reheat a plate of food
1. • Press sensor reheat.
2. • (see More/lessFeature)(*page 13)
3. • Press start.Cooking starts.
Cooking is complete when 5 beepssound. (When steam is detected by theGenius Sensor and 2 beeps sound, theremaining cooking time will appear in thedisplay window.)
for the best results with theGENIUS SENSor, follow these rec-ommendations.
example: to cook frozen entrées
1.
3. • Press start.Cooking starts.
Cooking is complete when 5 beepssound. (When steam is detected by theGenius Sensor and 2 beeps sound, theremaining cooking time will appear in thedisplay window.)
• Press until the desiredfood appears on thedisplay window.
2. • (see More/lessFeature)(*page 13)Optional
Press 4 times
Optional
oror
IP4278_38W73AP_01_120507:IP4278_38W73AP_00_120507 2012-5-7 Jerry 下下13:45 Page 18
17
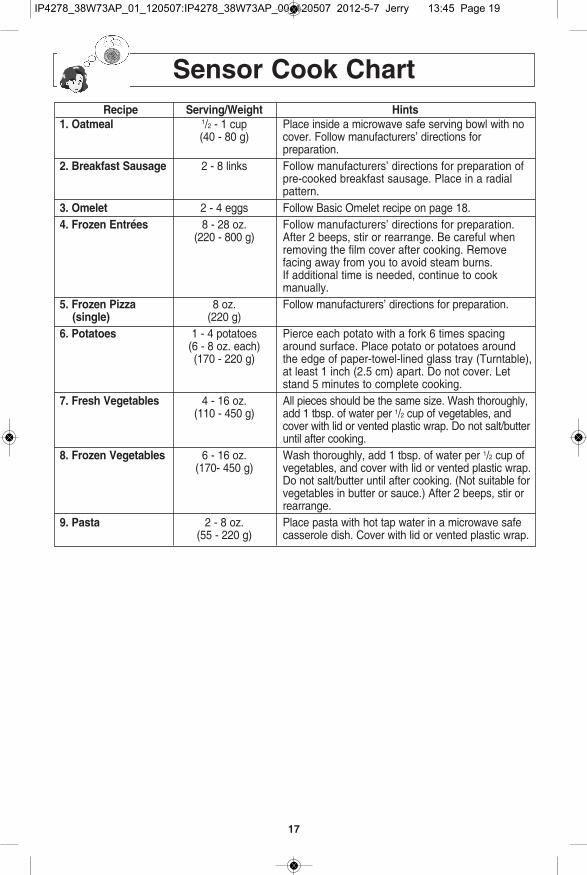
sensor cook chartrecipe serving/Weight hints
1. oatmeal 1/2 - 1 cup Place inside a microwave safe serving bowl with no (40 - 80 g) cover. Follow manufacturers’ directions for
preparation.2. breakfast sausage 2 - 8 links Follow manufacturers’ directions for preparation of
pre-cooked breakfast sausage. Place in a radial pattern.
3. omelet 2 - 4 eggs Follow Basic Omelet recipe on page 18.4. frozen entrées 8 - 28 oz. Follow manufacturers’ directions for preparation.
(220 - 800 g) After 2 beeps, stir or rearrange. Be careful when removing the film cover after cooking. Removefacing away from you to avoid steam burns.If additional time is needed, continue to cookmanually.
5. frozen Pizza 8 oz. Follow manufacturers’ directions for preparation.(single) (220 g)
6. Potatoes 1 - 4 potatoes Pierce each potato with a fork 6 times spacing (6 - 8 oz. each) around surface. Place potato or potatoes around (170 - 220 g) the edge of paper-towel-lined glass tray (Turntable),
at least 1 inch (2.5 cm) apart. Do not cover. Let stand 5 minutes to complete cooking.
7. fresh vegetables 4 - 16 oz. All pieces should be the same size. Wash thoroughly, (110 - 450 g) add 1 tbsp. of water per 1/2 cup of vegetables, and
cover with lid or vented plastic wrap. Do not salt/butter until after cooking.
8. frozen vegetables 6 - 16 oz. Wash thoroughly, add 1 tbsp. of water per 1/2 cup of (170- 450 g) vegetables, and cover with lid or vented plastic wrap.
Do not salt/butter until after cooking. (Not suitable for vegetables in butter or sauce.) After 2 beeps, stir or rearrange.
9. Pasta 2 - 8 oz. Place pasta with hot tap water in a microwave safe (55 - 220 g) casserole dish. Cover with lid or vented plastic wrap.
IP4278_38W73AP_01_120507:IP4278_38W73AP_00_120507 2012-5-7 Jerry 下下13:45 Page 19
18
Microwave recipesoMeletBasic omelet1 tablespoon butter or margarine2 eggs2 tablespoons milk
salt and ground black pepper, if desiredheat butter in a microwave safe 9-inch pieplate, 20 seconds at P10, or until melted.Turn the plate to coat the bottom with butter.Meanwhile, combine the remaining ingredients in a separate bowl, beat togetherand pour into the pie plate. Cook, covered with vented plastic wrap,using OMELET selection. Let stand 2 min-utes. With a spatula, loosen the edges of theomelet from the plate, fold into thirds toserve. always use scrambled eggs.yield: 1 servingapprox. cooking time: 4 minutes.note: Double ingredients for a 4 egg Omelet.
casseroleShepherd’s Pie1 pound lean ground beef1/2 cup frozen peas, thawed1/4 cup chopped onion1 tablespoon gravy powder1/2 teaspoon curry powder1/4 teaspoon salt1/4 teaspoon ground black pepper2 cups mashed potatoesIn a 2-Qt. casserole dish, crumble theground beef and cook for 5-7 minutes at P6or until the meat is cooked, stirring twice.Add the remaining ingredients, except forpotatoes. Stir well, and then spread thepotatoes evenly on the top. Cover with a lidor vented plastic wrap and cook at P6 powerfor 16-18 minutes.yield: 4 servings
Macaroni and Cheese1/4 cup butter2 tablespoons chopped onion1 clove minced garlic1/4 cup all-purpose flour1 teaspoon dry mustard1 teaspoon salt1/4 teaspoon ground black pepper2 cups milk2 cups grated cheddar cheese8 oz. (1/2 lb dry weight) macaroni, cooked
and drained1/3 cup bread crumbs1 teaspoon paprika
In a 2-Qt. casserole, melt the butter for 40 seconds at P10. Add onion and garlicand cook for 1 minute at P10. Stir in flour,mustard, salt and pepper, and gradually addthe milk. Cook for 3-4 minutes at P10 untilsauce thickens, stirring once. Add the cheddar cheese, stirring thoroughly. Pourand stir the sauce into the macaroni, in a 3-Qt. casserole.Top with bread crumbs andpaprika. Cover with lid or vented plasticwrap. Cook at P6 power for 16-18 minutes.yield: 6 servings
Beef and Macaroni Casserole1 pound lean ground beef1 small onion, chopped1/2 green bell pepper, chopped1 cup chopped celery2 15 oz. cans tomato sauce 11/4 cups water1 cup uncooked elbow macaroni1 teaspoon parsley1/2 teaspoon salt1/4 teaspoon ground black pepper1/2 cup grated cheddar cheeseCrumble the ground beef in a 3-Qt. casserole. Cook for 5-7 minutes at P6 oruntil the meat is cooked, stirring twice. Stir in onion, peppers and celery. Cook for 3-4 minutes at P10. Stir in the remaining ingredients, except cheese. Cover with lid orvented plastic wrap. Cook at P6 power for16-18 minutes. Sprinkle with cheese. Coverand let stand 5 minutes.yield: 4-6 servings
Tuna Casserole1 6 oz. can tuna, drained and flaked4 cups cooked and drained noodles1 103/4 oz. can condensed cream of
mushroom soup1 4 oz. can mushroom pieces and stems,
drained1 16 oz. package frozen peas, defrosted3/4 cup milk1 cup crushed potato chips1/2 cup grated cheddar cheeseIn a 3-Qt. casserole, combine tuna, noodles, soup, mushrooms, peas and milk;mix well. Cover with lid or vented plasticwrap. Cook at P6 power for 16-18 minutes.Top with potato chips and cheese beforeserving.yield: 4-6 servings
IP4278_38W73AP_01_120507:IP4278_38W73AP_00_120507 2012-5-7 Jerry 下下13:45 Page 20

19
timer feature
notes:1. When each stage finishes, a two-beep
signal sounds. At the end of the pro-gram, the oven will beep five times.
2. If the oven door is opened duringStand Time, Kitchen Timer or DelayTime, the time on the display will con-tinue to count down.
3. Stand time and Delay start cannot beprogrammed before any automaticFunction. This is to prevent the startingtemperature of food from rising beforedefrosting or cooking begins. A changein starting temperature could causeinaccurate results.
caution:if oven lamp is lit while using the timerfeature, the oven is incorrectly pro-gramed. stop oven immediately and re-read instructions.
This feature allows you to program theoven as a kitchen timer. It can also beused to program a standing time aftercooking is completed and/or to program adelay start.
to use as a Kitchen timer:example: to count down 5 minutes.
1. • Press timer.
2. • Set desired amount oftime using numberpads.(up to 99 minutes and99 seconds).
3. • Press start.Time will count
down without oven operating.
to set stand time:example: to cook at P6 power for 3
minutes, with stand time of5 minutes.
1. • Enter the desiredPower level (seepage 12 for direc-tions).
• Set desired cookingtime using numberpads.
3.
2.
• Press timer.
4. • Set desired amount ofStand Time usingnumber pads. (up to99 minutes and 99seconds)
5. • Press start.Cooking will start.
After cooking, stand time will count downwithout ovenoperating.
to set delay start:example: to delay the start of cooking
for 5 minutes, and cook at P6 power for 3 minutes.
1.
• Enter the desiredPower level (seepage 12 for direc-tions).
• Set desired cookingtime using numberpads.
3.
• Press timer.
2. • Enter desired amountof delay time usingnumber pads. (up to99 minutes and 99seconds)
5.
4.
• Press start.Delay time will
count down. Then cooking will start.
Press 5 times
Press 5 times
IP4278_38W73AP_01_120507:IP4278_38W73AP_00_120507 2012-5-7 Jerry 下下13:45 Page 21
20
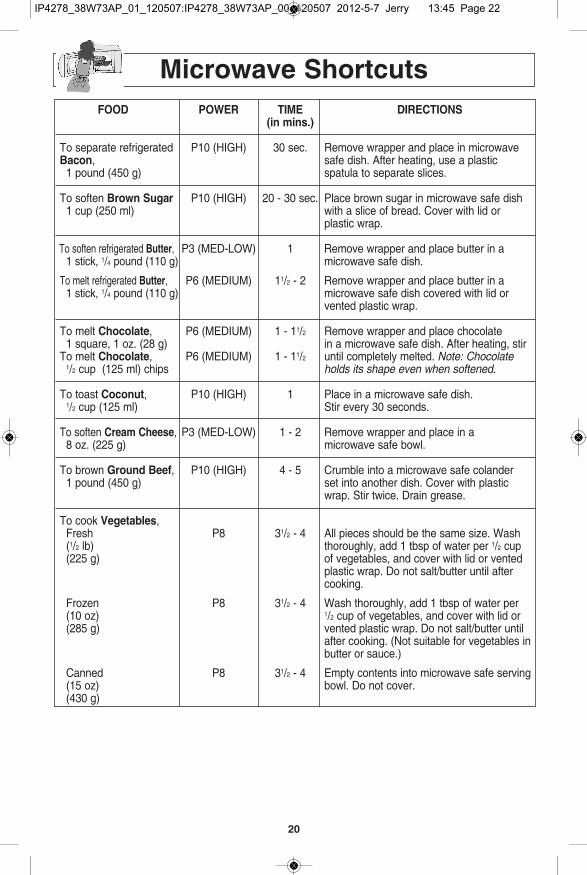
Microwave shortcutsfood PoWer tiMe directions
(in mins.)
To separate refrigerated P10 (hIGh) 30 sec. Remove wrapper and place in microwave bacon, safe dish. After heating, use a plastic
1 pound (450 g) spatula to separate slices.
To soften brown sugar P10 (hIGh) 20 - 30 sec. Place brown sugar in microwave safe dish 1 cup (250 ml) with a slice of bread. Cover with lid or
plastic wrap.
To soften refrigerated butter, P3 (MED-LOW) 1 Remove wrapper and place butter in a 1 stick, 1/4 pound (110 g) microwave safe dish.
To melt refrigerated butter, P6 (MEDIUM) 11/2 - 2 Remove wrapper and place butter in a1 stick, 1/4 pound (110 g) microwave safe dish covered with lid or
vented plastic wrap.
To melt chocolate, P6 (MEDIUM) 1 - 11/2 Remove wrapper and place chocolate1 square, 1 oz. (28 g) in a microwave safe dish. After heating, stir
To melt chocolate, P6 (MEDIUM) 1 - 11/2 until completely melted. Note: Chocolate 1/2 cup (125 ml) chips holds its shape even when softened.
To toast coconut, P10 (hIGh) 1 Place in a microwave safe dish.1/2 cup (125 ml) Stir every 30 seconds.
To soften cream cheese, P3 (MED-LOW) 1 - 2 Remove wrapper and place in a 8 oz. (225 g) microwave safe bowl.
To brown ground beef, P10 (hIGh) 4 - 5 Crumble into a microwave safe colander1 pound (450 g) set into another dish. Cover with plastic
wrap. Stir twice. Drain grease.
To cook vegetables,Fresh P8 31/2 - 4 All pieces should be the same size. Wash (1/2 lb) thoroughly, add 1 tbsp of water per 1/2 cup (225 g) of vegetables, and cover with lid or vented
plastic wrap. Do not salt/butter until after cooking.
Frozen P8 31/2 - 4 Wash thoroughly, add 1 tbsp of water per (10 oz) 1/2 cup of vegetables, and cover with lid or (285 g) vented plastic wrap. Do not salt/butter until
after cooking. (Not suitable for vegetables inbutter or sauce.)
Canned P8 31/2 - 4 Empty contents into microwave safe serving(15 oz) bowl. Do not cover.(430 g)
IP4278_38W73AP_01_120507:IP4278_38W73AP_00_120507 2012-5-7 Jerry 下下13:45 Page 22
21
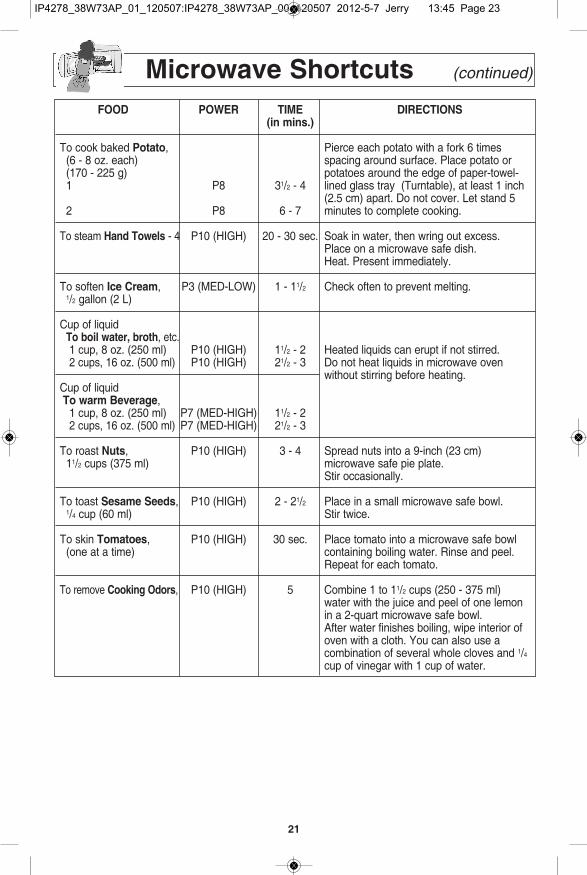
Microwave shortcuts (continued)
food PoWer tiMe directions(in mins.)
To cook baked Potato, Pierce each potato with a fork 6 times(6 - 8 oz. each) spacing around surface. Place potato or(170 - 225 g) potatoes around the edge of paper-towel-1 P8 31/2 - 4 lined glass tray (Turntable), at least 1 inch
(2.5 cm) apart. Do not cover. Let stand 5 2 P8 6 - 7 minutes to complete cooking.
To steam hand towels - 4 P10 (hIGh) 20 - 30 sec. Soak in water, then wring out excess.Place on a microwave safe dish.heat. Present immediately.
To soften ice cream, P3 (MED-LOW) 1 - 11/2 Check often to prevent melting.1/2 gallon (2 L)
Cup of liquidto boil water, broth, etc.1 cup, 8 oz. (250 ml) P10 (hIGh) 11/2 - 2 heated liquids can erupt if not stirred.2 cups, 16 oz. (500 ml) P10 (hIGh) 21/2 - 3 Do not heat liquids in microwave oven
without stirring before heating.Cup of liquidto warm beverage,
1 cup, 8 oz. (250 ml) P7 (MED-hIGh) 11/2 - 22 cups, 16 oz. (500 ml) P7 (MED-hIGh) 21/2 - 3
To roast nuts, P10 (hIGh) 3 - 4 Spread nuts into a 9-inch (23 cm) 11/2 cups (375 ml) microwave safe pie plate.
Stir occasionally.
To toast sesame seeds, P10 (hIGh) 2 - 21/2 Place in a small microwave safe bowl. 1/4 cup (60 ml) Stir twice.
To skin tomatoes, P10 (hIGh) 30 sec. Place tomato into a microwave safe bowl(one at a time) containing boiling water. Rinse and peel.
Repeat for each tomato.
To remove cooking odors, P10 (hIGh) 5 Combine 1 to 11/2 cups (250 - 375 ml) water with the juice and peel of one lemon in a 2-quart microwave safe bowl. After water finishes boiling, wipe interior of oven with a cloth. You can also use acombination of several whole cloves and 1/4
cup of vinegar with 1 cup of water.
IP4278_38W73AP_01_120507:IP4278_38W73AP_00_120507 2012-5-7 Jerry 下下13:45 Page 23
22
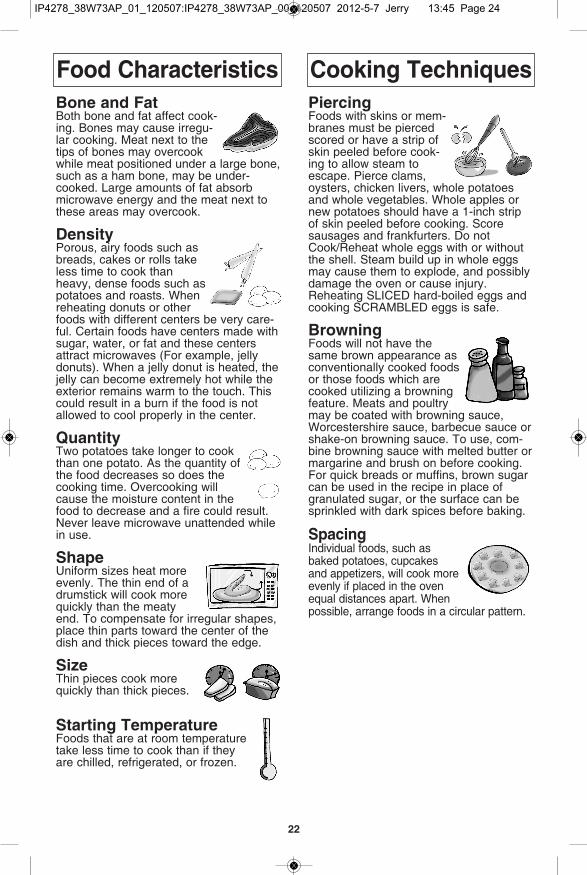
food characteristics cooking techniquesbone and fatBoth bone and fat affect cook-ing. Bones may cause irregu-lar cooking. Meat next to thetips of bones may overcookwhile meat positioned under a large bone,such as a ham bone, may be under-cooked. Large amounts of fat absorbmicrowave energy and the meat next tothese areas may overcook.
densityPorous, airy foods such asbreads, cakes or rolls takeless time to cook thanheavy, dense foods such aspotatoes and roasts. Whenreheating donuts or otherfoods with different centers be very care-ful. Certain foods have centers made withsugar, water, or fat and these centersattract microwaves (For example, jellydonuts). When a jelly donut is heated, thejelly can become extremely hot while theexterior remains warm to the touch. Thiscould result in a burn if the food is notallowed to cool properly in the center.
quantityTwo potatoes take longer to cookthan one potato. As the quantity ofthe food decreases so does thecooking time. Overcooking willcause the moisture content in thefood to decrease and a fire could result.Never leave microwave unattended whilein use.
shapeUniform sizes heat moreevenly. The thin end of adrumstick will cook morequickly than the meatyend. To compensate for irregular shapes,place thin parts toward the center of thedish and thick pieces toward the edge.
sizeThin pieces cook morequickly than thick pieces.
starting temperatureFoods that are at room temperaturetake less time to cook than if theyare chilled, refrigerated, or frozen.
PiercingFoods with skins or mem-branes must be piercedscored or have a strip ofskin peeled before cook-ing to allow steam toescape. Pierce clams,oysters, chicken livers, whole potatoesand whole vegetables. Whole apples ornew potatoes should have a 1-inch stripof skin peeled before cooking. Scoresausages and frankfurters. Do notCook/Reheat whole eggs with or withoutthe shell. Steam build up in whole eggsmay cause them to explode, and possiblydamage the oven or cause injury.Reheating SLICED hard-boiled eggs andcooking SCRAMBLED eggs is safe.
browningFoods will not have thesame brown appearance asconventionally cooked foodsor those foods which arecooked utilizing a browningfeature. Meats and poultrymay be coated with browning sauce,Worcestershire sauce, barbecue sauce orshake-on browning sauce. To use, com-bine browning sauce with melted butter ormargarine and brush on before cooking. For quick breads or muffins, brown sugarcan be used in the recipe in place ofgranulated sugar, or the surface can besprinkled with dark spices before baking.
spacingIndividual foods, such asbaked potatoes, cupcakesand appetizers, will cook moreevenly if placed in the ovenequal distances apart. Whenpossible, arrange foods in a circular pattern.
IP4278_38W73AP_01_120507:IP4278_38W73AP_00_120507 2012-5-7 Jerry 下下13:45 Page 24
23
cooking techniques (continued)
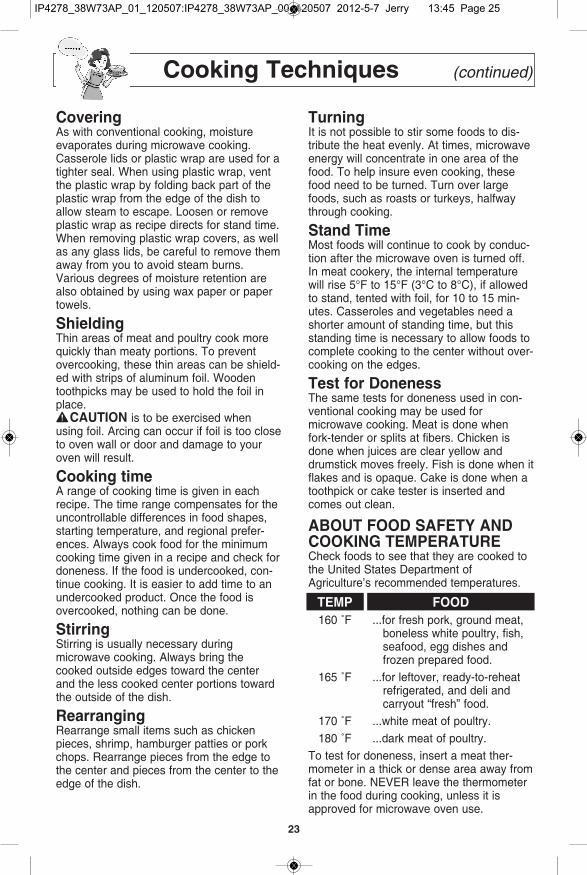
coveringAs with conventional cooking, moistureevaporates during microwave cooking.Casserole lids or plastic wrap are used for atighter seal. When using plastic wrap, ventthe plastic wrap by folding back part of theplastic wrap from the edge of the dish toallow steam to escape. Loosen or removeplastic wrap as recipe directs for stand time.When removing plastic wrap covers, as wellas any glass lids, be careful to remove themaway from you to avoid steam burns.Various degrees of moisture retention arealso obtained by using wax paper or papertowels.
shieldingThin areas of meat and poultry cook morequickly than meaty portions. To preventovercooking, these thin areas can be shield-ed with strips of aluminum foil. Woodentoothpicks may be used to hold the foil inplace.
caution is to be exercised whenusing foil. Arcing can occur if foil is too closeto oven wall or door and damage to youroven will result.
cooking timeA range of cooking time is given in eachrecipe. The time range compensates for theuncontrollable differences in food shapes,starting temperature, and regional prefer-ences. Always cook food for the minimumcooking time given in a recipe and check fordoneness. If the food is undercooked, con-tinue cooking. It is easier to add time to anundercooked product. Once the food isovercooked, nothing can be done.
stirringStirring is usually necessary duringmicrowave cooking. Always bring thecooked outside edges toward the centerand the less cooked center portions towardthe outside of the dish.
rearrangingRearrange small items such as chickenpieces, shrimp, hamburger patties or porkchops. Rearrange pieces from the edge tothe center and pieces from the center to theedge of the dish.
turningIt is not possible to stir some foods to dis-tribute the heat evenly. At times, microwaveenergy will concentrate in one area of thefood. To help insure even cooking, thesefood need to be turned. Turn over largefoods, such as roasts or turkeys, halfwaythrough cooking.
stand timeMost foods will continue to cook by conduc-tion after the microwave oven is turned off.In meat cookery, the internal temperaturewill rise 5°F to 15°F (3°C to 8°C), if allowedto stand, tented with foil, for 10 to 15 min-utes. Casseroles and vegetables need ashorter amount of standing time, but thisstanding time is necessary to allow foods tocomplete cooking to the center without over-cooking on the edges.
test for donenessThe same tests for doneness used in con-ventional cooking may be used formicrowave cooking. Meat is done whenfork-tender or splits at fibers. Chicken isdone when juices are clear yellow anddrumstick moves freely. Fish is done when itflakes and is opaque. Cake is done when atoothpick or cake tester is inserted andcomes out clean.
about food safety andcooKing teMPeratureCheck foods to see that they are cooked tothe United States Department ofAgriculture’s recommended temperatures.
teMP food160 ˚F ...for fresh pork, ground meat,
boneless white poultry, fish, seafood, egg dishes and frozen prepared food.
165 ˚F ...for leftover, ready-to-reheat refrigerated, and deli and carryout “fresh” food.
170 ˚F ...white meat of poultry.180 ˚F ...dark meat of poultry.
To test for doneness, insert a meat ther-mometer in a thick or dense area away fromfat or bone. NEVER leave the thermometerin the food during cooking, unless it isapproved for microwave oven use.
IP4278_38W73AP_01_120507:IP4278_38W73AP_00_120507 2012-5-7 Jerry 下下13:45 Page 25

24
before cleaning:Unplug oven at wall outlet. If outlet is inacces-sible, leave oven door open while cleaning.
after cleaning:Be sure to place the Roller Ring and theGlass Tray in the proper position and pressstop/reset Button to clear the Display.
oven door:Wipe with a soft drycloth when steamaccumulates inside oraround the outside ofthe oven door. Duringcooking, especiallyunder high humidityconditions, steam isgiven off from thefood. (Some steamwill condense on cool-er surfaces, such asthe oven door. This isnormal.)Inside surface is cov-ered with a heat andvapor barrier film. donot remove.
glass tray:Remove and wash in warm soapywater or in a dishwasher.
outside oven surfaces:Clean with a damp cloth. To prevent damage to theoperating parts inside theoven, water should not beallowed to seep into ventila-tion openings.
do not remove waveguide cover:it is important to keep coverclean in the same manner as theinside of the oven.
control Panel:* Covered with a
removable protectivefilm to preventscratches duringshipping. Small bub-bles may appearunder this film.(Hint - To removefilm, apply maskingor clear tape to anexposed corner andpull gently.)
* If the Control Panelbecomes wet, cleanit with a soft drycloth. Do not useharsh detergents orabrasives.
roller ring and oven cavity floor:Clean the bottom surface of the ovenwith mild detergent water or windowcleaner, and dry. Roller Ring may bewashed in mild soapy water or dish-washer. These areas should be keptclean to avoid excessive noise.
Parts descriPtion Part nuMber
Instructions / Operating Manual (this book) F00038W70AP
Glass Tray A06014M00AP
Roller Ring Assembly F290D9330AP
label:Do not remove, wipe witha damp cloth.
inside of the oven:Wipe with a damp clothafter using. Mild detergentmay be used if needed.Do not use harsh deter-gents or abrasives.
care and cleaning of your Microwave oven
it is iMPortant to KeeP the oven clean and dry.food residue and condensation May cause rust-ing or arcing and daMage to the oven. after use,WiPe dry all surfaces-including vent oPenings,oven seaMs, and under glass tray.
Purchase Parts, Accessories and Instruction Books online for all Panasonic Products by visiting ourWeb Site at: http://www.pstc.panasonic.comOr, send your request by E-mail to: [email protected] may also contact us directly at:1-800-332-5368 (Phone) 1-800-237-9080 (Fax Only) (Monday-Friday 9am-9pm EST)Panasonic National Parts Center20421 84th Avenue SouthKent, WA 98032(We accept Visa, MasterCard, Discover Card, American Express)
For hearing or speech impaired TTY users, TTY: 1-866-605-1277
Accessory Purchases (United States and Puerto rico)
IP4278_38W73AP_01_120507:IP4278_38W73AP_00_120507 2012-5-7 Jerry 下下13:45 Page 26
25
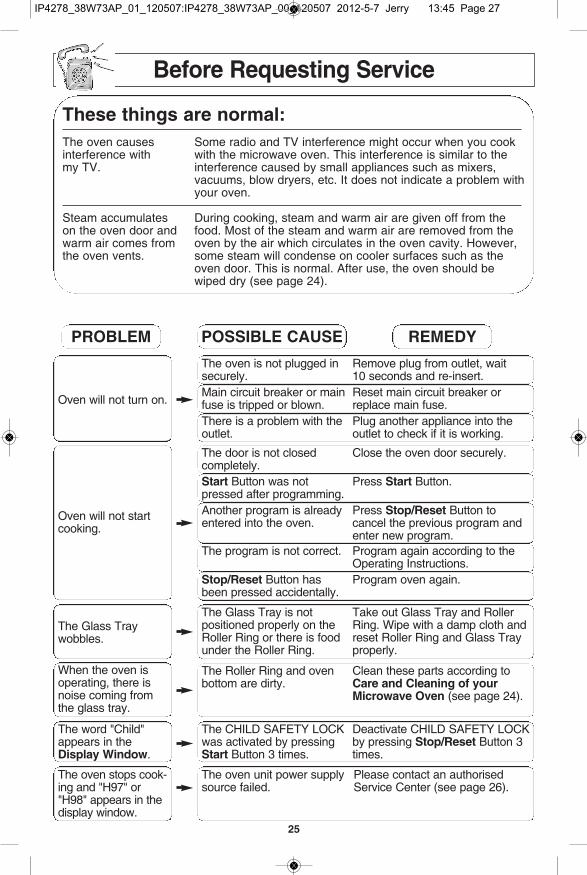
these things are normal:The oven causes Some radio and TV interference might occur when you cook interference with with the microwave oven. This interference is similar to the my TV. interference caused by small appliances such as mixers,
vacuums, blow dryers, etc. It does not indicate a problem withyour oven.
Steam accumulates During cooking, steam and warm air are given off from the on the oven door and food. Most of the steam and warm air are removed from the warm air comes from oven by the air which circulates in the oven cavity. however, the oven vents. some steam will condense on cooler surfaces such as the
oven door. This is normal. After use, the oven should be wiped dry (see page 24).
The oven is not plugged in Remove plug from outlet, waitsecurely. 10 seconds and re-insert.Main circuit breaker or main Reset main circuit breaker or fuse is tripped or blown. replace main fuse.There is a problem with the Plug another appliance into theoutlet. outlet to check if it is working.
The door is not closed Close the oven door securely.completely.start Button was not Press start Button.pressed after programming.Another program is already Press stop/reset Button to entered into the oven. cancel the previous program and
enter new program.The program is not correct. Program again according to the
Operating Instructions.stop/reset Button has Program oven again.been pressed accidentally.
The Glass Tray is not Take out Glass Tray and Roller positioned properly on the Ring. Wipe with a damp cloth and Roller Ring or there is food reset Roller Ring and Glass Trayunder the Roller Ring. properly.
The Roller Ring and oven Clean these parts according to bottom are dirty. care and cleaning of your
Microwave oven (see page 24).
Oven will not turn on.
Oven will not startcooking.
The Glass Traywobbles.
When the oven isoperating, there isnoise coming fromthe glass tray.
The oven unit power supplysource failed.
Please contact an authorisedService Center (see page 26).
The oven stops cook-ing and "h97" or"h98" appears in thedisplay window.
ProbleM Possible cause reMedy
before requesting service
The ChILD SAFETY LOCK Deactivate ChILD SAFETY LOCK was activated by pressing by pressing stop/reset Button 3 start Button 3 times. times.
The word "Child"appears in thedisplay Window.
IP4278_38W73AP_01_120507:IP4278_38W73AP_00_120507 2012-5-7 Jerry 下下13:45 Page 27
26
limited Warranty & customer services directory(for u.s.a and Puerto rico only)
PAnASOnIC COnSuMer MArketIng COMPAny Of nOrth AMerICA, DIVISIOn Of PAnASOnIC COrPOrAtIOn Of nOrth AMerICAOne Panasonic Way, Secaucus, new Jersey 07094
Panasonic consumer Microwave ovenlimited Warranty
limited Warranty coverage (for usa and Puerto rico only)If your product does not work properly because of a defect in materials or workmanship, Panasonic Consumer MarketingCompany (referred to as “the warrantor”) will, for the length of the period indicated on the chart below, which starts with thedate of original purchase (“warranty period”), at its option either (a) repair your product with new or refurbished parts, (b)replace it with a new or a refurbished equivalent value product, or (c) refund your purchase price. The decision to repair,replace or refund will be made by the warrantor.
Product or Part name labor Partsall Parts (EXCEPT MAGNETRON TUBE) 1 (one) year 1 (one) yearMagnetron tube 1 (one) year 5 (five) year
During the “Labor” warranty period there will be no charge for labor. During the “Parts” warranty period, there will be nocharge for parts.This warranty only applies to products purchased and serviced in the United States or Puerto Rico. This warranty is extend-ed only to the original purchaser of a new product which was not sold “as is”.carry-in or Mail in service:To find a service center please visit http://www.panasonic.com/help or call 1-800-211-PANA (7262).When shipping the unit, carefully pack and send it in the original (or supplied) carton. Include a letter detailing the complaintalong with the bill of sales and provide a daytime phone number where you can be reached.if rePair is needed during the Warranty Period, the Purchaser Will be required to furnish asales receiPt/Proof of Purchase indicating date of Purchase, aMount Paid and Place of Pur-chase. custoMer Will be charged for the rePair of any unit received Without such Proof ofPurchase.limited Warranty limits and exclusionsThis warranty ONLY COVERS failures due to defects in materials or workmanship, and DOES NOT COVER glass, plasticparts, temperature probes (if included) and normal wear and tear or cosmetic damage. The warranty ALSO DOES NOTCOVER damages which occurred in shipment, or failures which are caused by products not supplied by the warrantor, or fail-ures which result from accidents, misuse, abuse, neglect, bug infestation, mishandling, misapplication, alteration, faulty instal-lation, set-up adjustments, maladjustment of consumer controls, improper maintenance, power line surge, lightning damage,modification, or commercial use (such as in a hotel, office, restaurant, or other business), rental use of the product, service byanyone other than a Factory Service center or other Authorized Servicer, or damage that is attributable to acts of God.there are no eXPress Warranties eXcePt as listed under “liMited Warranty coverage”.the Warrantor is not liable for incidental or consequential daMages resulting froM theuse of this Product, or arising out of any breach of this Warranty. (As examples, this excludesdamages for lost time, travel to and from the servicer, loss of or damage to media or images, data or other memory orrecorded content. The items listed are not exclusive, but for illustration only.) all eXPress and iMPlied Warranties, including the Warranty of Merchantability, are liMitedto the Period of the liMited Warranty.Some states do not allow the exclusion or limitation of incidental or consequential damages, or limitations on how long animplied warranty lasts, so the exclusions may not apply to you.This warranty gives you specific legal rights and you may also have other rights which vary from state to state. If a problemwith this product develops during or after the warranty period, you may contact your dealer or Service Center. If the problemis not handled to your satisfaction, then write to:
Consumer Affairs DepartmentPanasonic Consumer Marketing Company661 Independence PkwyChesapeake, VA 23320
Parts and serivce, Which are not covered by this liMited Warranty, are your resPonsibility.
Obtain Product Information and Operating Assistance; locate your nearest Dealer or Service Center; purchase Partsand Accessories; or make Customer Service and Literature requests by visiting our Web Site at:http://www.panasonic.com/helpor, contact us via the web at: http://www.panasonic.com/contactinfo
You may also contact us directly at:1-800-211-Pana (7262)Monday-Friday 9am-9pm, Saturday-Sunday 10am-7pm EST
Customer Services Directory (United States and Puerto rico)
For hearing or speech impaired TTY users, TTY: 1-877-833-8855
IP4278_38W73AP_01_120507:IP4278_38W73AP_00_120507 2012-5-7 Jerry 下下13:45 Page 28
27
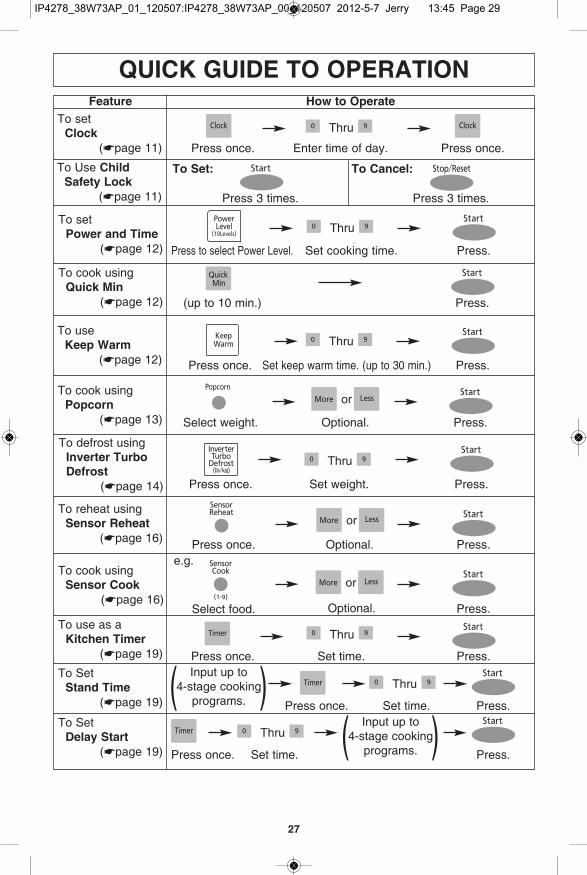
quicK guide to oPerationfeature how to operate
To setclock
(*page 11)
Thru
Thru
Thru
Thru
Thru
Press once. Enter time of day. Press once.
To setPower and time
(*page 12) Press to select Power Level. Set cooking time. Press.
To defrost usinginverter turbo defrost
(*page 14) Press once. Set weight. Press.
To use as aKitchen timer
(*page 19) Press once. Set time. Press.To Set
stand time(*page 19) Press once. Set time. Press.
To reheat usingsensor reheat
(*page 16) Press once. Press.
To cook usingPopcorn
(*page 13) Select weight. Optional. Press.
To cook usingquick Min
(*page 12) (up to 10 min.) Press.
To useKeep Warm
(*page 12) Press once. Set keep warm time. (up to 30 min.) Press.
To cook usingsensor cook
(*page 16)Select food.
e.g.
Press.
( )Input up to4-stage cooking
programs.
To Setdelay start
(*page 19) Press once. Set time. Press.( )Input up to
4-stage cookingprograms.
Thru
Thru
Optional.
or
Optional.
or
or
To Use child safety lock
(*page 11) Press 3 times. Press 3 times.
to set: to cancel:
IP4278_38W73AP_01_120507:IP4278_38W73AP_00_120507 2012-5-7 Jerry 下下13:45 Page 29
28
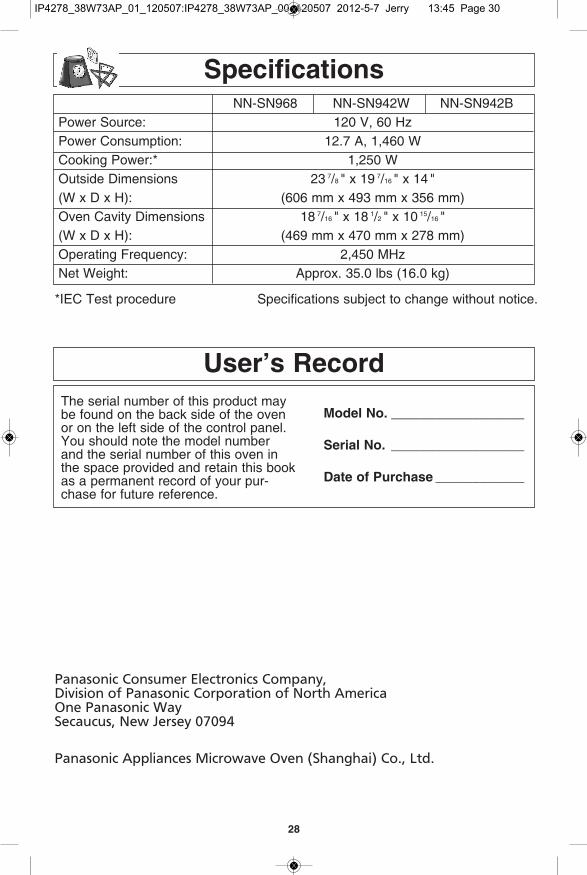
user’s recordThe serial number of this product maybe found on the back side of the ovenor on the left side of the control panel.You should note the model numberand the serial number of this oven inthe space provided and retain this bookas a permanent record of your pur-chase for future reference.
Model no. __________________
serial no. __________________
date of Purchase ____________
specifications
Power Source:Power Consumption:Cooking Power:*Outside Dimensions(W x D x h):Oven Cavity Dimensions(W x D x h):Operating Frequency:Net Weight:
NN-SN968 NN-SN942W NN-SN942B120 V, 60 hz
12.7 A, 1,460 W1,250 W
23 7/8 " x 19 7/16 " x 14 "(606 mm x 493 mm x 356 mm)
18 7/16 " x 18 1/2 " x 10 15/16 "(469 mm x 470 mm x 278 mm)
2,450 MhzApprox. 35.0 lbs (16.0 kg)
*IEC Test procedure Specifications subject to change without notice.
Panasonic Consumer electronics Company, Division of Panasonic Corporation of north AmericaOne Panasonic WaySecaucus, new Jersey 07094
Panasonic Appliances Microwave Oven (Shanghai) Co., Ltd.
IP4278_38W73AP_01_120507:IP4278_38W73AP_00_120507 2012-5-7 Jerry 下下13:45 Page 30
instrucciones de operaciónhorno de Microondas
solo para uso domestico
Modelo: nn-sn968
información de seguridadPrecauciones ...............Cubierta Interiorinstrucciones importantes deseguridad .........................................1-3instrucciones para instalación yconexión a tierra ..............................4-5Precauciones de seguridad ............6-7
operaciónGráfico de cocción por Sensor............17Recetas de Microondas.......................18Función de Cronómetro (Cronómetro deCocción/Cronómetro de reposo/Comienzo tardío) .................................19Consejos Rápidos ..........................20-21Características de los alimentos .........22Técnicas para cocinar ....................22-23Guía rápida de Operación ...................27
operaciónPanel de Control..................................10Vamos a empezar a usar su horno ....11Para ajuste del reloj.............................11Seguro Para Niños ..............................11Para seleccionar potencia y tiempo deCocción................................................12Función de minuto automático ............12Función de mantener caliente .............12Función de Palomitas de Maíz............13Función de Más/menos .......................13Función de Descongelación TurboInverter ................................................14Consejos y Técnicas deDescongelación..............................14-15Función de Cocción por Sensor..........16Función de Recalentamiento por Sensor .................................................16
Mantenimiento
información generalGuía de utensilios..................................8Diagrama de Componentes del horno ...9Especificaciones..................................28Registro del usuario ............................28
antes de oPerar este Producto, lea este instructivo en su totalidad.For English Instructions, turn over the book.
F00038W73APIP1209-40512
Impreso en China
Cuidado y Limpieza de su horno deMicroondas ..........................................24Compra de Accesorios ........................24Antes de solicitar Servicio Técnico .....25Garantía Limitada y Directorio deServicios al Consumidor......................26
Para asistencia, por favor llame: 1-800-211-PANA(7262), TTY: 1-877-833-8855contáctenos nuestro sitio web en: http://www.panasonic.com/contactinfo (U.S.A y Puerto Rico)
Para obtener referencias sobre la seguridad de hornos de microondas, visite la páginaweb de la FDA en:http://www.fda.gov/Radiation-EmittingProducts/ResourcesforYouRadiationEmittingProducts/Consumers/ucm142616.htm
© Panasonic electrodomésticos horno de Microondas de Shanghai 2012
IP4278_38W73AP_01_120507:IP4278_38W73AP_00_120507 2012-5-7 Jerry 下下13:45 Page 31

su seguridad y la seguridad de otros es muy importante.hemos proporcionado mensajes de seguridad importantes en este manual yen su aparato. Lea y obedezca siempre todos los mensajes de seguridad.
Precauciones Para evitar Posible eXPosiciÓn eXcesiva
a energÍa de Microondas(a) No intente hacer funcionar este horno con la puerta abierta ya que esto
puede resultar peligroso. Es importante no anular o forzar los mecanismosde seguridad.
(b) No coloque ningún objeto entre el panel frontal del horno y la puerta, nipermita que se acumule basura o residuos de limpiadores en lassuperficies de sellado.
(c) No haga funcionar el horno si está dañado, es importante que la puertadel horno abra y cierre apropiadamente y no haya ningún daño en: (1) la puerta (combada), (2) bisagras y seguro de la puerta (rotos o sueltos), (3) sellos de las puertas y superficies de sellado.
(d) El horno no deberá ser ajustado o reparado por ninguna persona, exceptoel personal de servicio debidamente calificado.
Todos los mensajes de seguridad le indicaran cuál es el peligro potencial, elcómo reducir la posibilidad de lesionarse y le advierte qué puede suceder alno seguir las instrucciones.
Éste es el símbolo de la alarma de seguridad, se utiliza paraalertarle de los peligros potenciales que pueden dañar o lastimar austed y a otros. Todos los mensajes de seguridad seguirán el símbolo de la alarmade seguridad y cualquiera de las siguientes palabras PELIGRO,ADVERTENCIA o PRECAUCIÓN. Estas palabras significan:
Usted puede resultar lastimado o dañadoseriamente si usted no sigue las instruc-ciones de inmediato.Usted puede resultar lastimado o dañadoseriamente si usted no sigue lasinstrucciones.
información de Seguridad del Horno de Microondas
peLiGRo
adVeRtencia
PRECAUCIÓN indica una situaciónpotencialmente peligrosa que, si no esevitada, puede dar lugar a lesión demenor importancia o moderada.
pRecaución
IP4278_38W73AP_01_120507:IP4278_38W73AP_00_120507 2012-5-7 Jerry 下下13:45 Page 32
1
instrucciones iMPortantes de seguridad
—Para reducir el riesgo de quemaduras,descarga eléctrica, incendio, heridas a personas o exposición excesiva a energíade microondas:1. Lea todas las instrucciones antes de usar el aparato.2. Lea y siga las “PRECAUCIONES PARA EVITAR POSIBLE EXPOSICIÓN
EXCESIVA A ENERGÍA DE MICROONDAS” específicas, que se encuentran abajo.3. Este aparato debe ser conectado a tierra. Conecte solamente a la toma eléctrica
debidamente conectada a tierra. Vea las “instrucciones Para coneXiÓn a tierra” que se encuentran en la página 4.
4. Como cualquier otro aparato para cocinar, no deJe el horno desatendido cuando esta en uso.
5. Instale o ubique este aparato solamente de acuerdo con las instrucciones deinstalación que se encuentran en la página 4.
6. no cubra ni tape ninguna de las rendijas de este aparato. 7. no almacene o use este aparato en exteriores. No use este aparato cerca del
agua - por ejemplo, cerca del fregadero de la cocina, en una base mojada, o cerca de una alberca, y similares.
8. Use este aparato sólo para los fines para los que fue hecho, tal como se describen en este manual. no use químicos o vapores corrosivos en este aparato. Este tipo de horno está específicamente diseñado para calentar o cocinar alimentos. No fue diseñado para uso industrial o de laboratorio.
9. Cuando limpie las superficies de la puerta y el horno que vienen juntas al cerrar la puerta, use solamente jabones no abrasivos o detergentes suaves aplicados con una esponja o con tela suave.
10. no permita a los niños usar este aparato, a menos que sean supervisados muy de cerca por un adulto. no asuma que porque un niño ha dominado una habilidad para cocinar el/ella puede cocinar todo sin supervisión.
11. no use este aparato si tiene dañado el cordón o la clavija, si no está trabajando adecuadamente, o si ha sido dañado o se ha dejado caer.
12. no sumergir en agua el cable o la clavija.13. Mantenga el cable lejos de superficies calientes.14. no deje el cable colgando en el borde de la mesa o mostrador.15. Este aparato debe recibir mantenimiento sólo de personal calificado. Contacte las
instalaciones de servicio autorizadas más cercanas para revisión, reparación o ajuste.
Su horno de microondas es un artículo para cocinar y usted debe usarlo contanto cuidado como usa una estufa o cualquier otro artículo para cocinar.Cuando utilice este aparato eléctrico, se deben seguir precauciones básicas deseguridad, incluyendo las siguientes:
Gracias por comprar este horno de Microondas Panasonic.
adVeRtencia
IP4278_38W73AP_01_120507:IP4278_38W73AP_00_120507 2012-5-7 Jerry 下下13:45 Page 33

2
16. Algunos productos, tales como los huevos completos y contenedores sellados - por ejemplo frascos de vidrio cerrados - pueden explotar y no deben ser calentados en este horno.
17. Para reducir el riesgo de incendio en la cavidad del horno:(a) no sobrecocine los alimentos. Preste atención cuidadosa al aparato. El papel,
plástico u otros materiales combustibles son colocados dentro del horno para facilitar la cocción pero si no se utilizan adecuadamente esto puede producir incendio en su horno.
(b) Quite los sujetadores de alambre de las bolsas de papel o plástico antes de colocar la bolsa en el horno.
(c) si el material dentro del horno se enciende, mantenga la puerta del hornocerrada, apáguelo y desconecte el cable eléctrico o apague la energía en elinterruptor (braker) del fusible o del circuito.
(d) No use la cavidad con propósitos de almacenaje. No deje productos de papel, utensilios de cocina o alimentos en la cavidad cuando no esté en uso.
18. liquidos muy calientesLiquidos como agua, café o té pueden ser sobrecalentados abajo del punto deebullición sin mostrar una ebullión o signos de este. No siempre burbujea cuando el recipiente se retira del Microondas. ESTO PUEDE RESULTAR ENUNA EBULLICIÓN REPENTINA DEL LÍQUIDO MUY CALIENTE CUANDO SEINTRODUZCA UNA CUChARA U OTRO UTENSILIO DENTRO DEL LÍQUIDO. Para reducir el riesgo de heridas a personas:(a) revuelva el lÍquido antes y durante el calentaMiento.(b) no caliente el agua y aceite, o las grasas juntas. la película del
aceite atrapará vapor, y puede causar una erupción violenta.(c) no utilice recipientes de lados rectos con cuello angosto.(d) Luego del calentamiento, deje el recipiente dentro del horno de microondas
por un corto tiempo antes de retirarlo.19. no cocine directamente sobre el plato giratorio. Este puede quebrarse,
causando lesiones o daño al horno.
instrucciones iMPortantes de seguridad(continuación)
IP4278_38W73AP_01_120507:IP4278_38W73AP_00_120507 2012-5-7 Jerry 下下13:45 Page 34
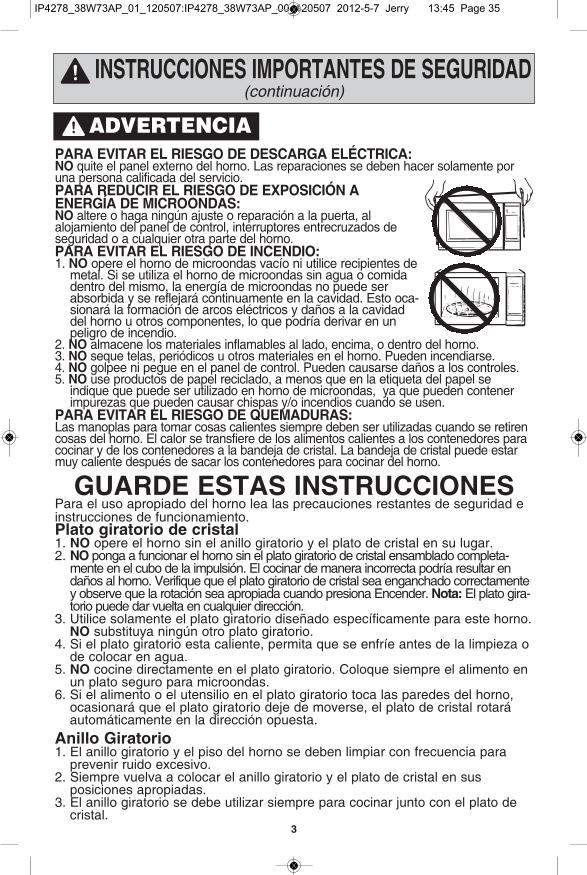
3
instrucciones iMPortantes de seguridad(continuación)
Para evitar el riesgo de descarga elÉctrica: no quite el panel externo del horno. Las reparaciones se deben hacer solamente poruna persona calificada del servicio. Para reducir el riesgo de eXPosiciÓn aenergÍa de Microondas: no altere o haga ningún ajuste o reparación a la puerta, alalojamiento del panel de control, interruptores entrecruzados deseguridad o a cualquier otra parte del horno. Para evitar el riesgo de incendio: 1. no opere el horno de microondas vacío ni utilice recipientes de
metal. Si se utiliza el horno de microondas sin agua o comidadentro del mismo, la energía de microondas no puede serabsorbida y se reflejará continuamente en la cavidad. Esto oca-sionará la formación de arcos eléctricos y daños a la cavidaddel horno u otros componentes, lo que podría derivar en unpeligro de incendio.
2. no almacene los materiales inflamables al lado, encima, o dentro del horno. 3. no seque telas, periódicos u otros materiales en el horno. Pueden incendiarse. 4. no golpee ni pegue en el panel de control. Pueden causarse daños a los controles. 5. no use productos de papel reciclado, a menos que en la etiqueta del papel se
indique que puede ser utilizado en horno de microondas, ya que pueden contenerimpurezas que pueden causar chispas y/o incendios cuando se usen.
Para evitar el riesgo de queMaduras: Las manoplas para tomar cosas calientes siempre deben ser utilizadas cuando se retirencosas del horno. El calor se transfiere de los alimentos calientes a los contenedores paracocinar y de los contenedores a la bandeja de cristal. La bandeja de cristal puede estarmuy caliente después de sacar los contenedores para cocinar del horno.
guarde estas instruccionesPara el uso apropiado del horno lea las precauciones restantes de seguridad einstrucciones de funcionamiento.Plato giratorio de cristal1. no opere el horno sin el anillo giratorio y el plato de cristal en su lugar.2. no ponga a funcionar el horno sin el plato giratorio de cristal ensamblado completa-
mente en el cubo de la impulsión. El cocinar de manera incorrecta podría resultar endaños al horno. Verifique que el plato giratorio de cristal sea enganchado correctamentey observe que la rotación sea apropiada cuando presiona Encender. nota: El plato gira-torio puede dar vuelta en cualquier dirección.
3. Utilice solamente el plato giratorio diseñado específicamente para este horno.no substituya ningún otro plato giratorio.
4. Si el plato giratorio esta caliente, permita que se enfríe antes de la limpieza ode colocar en agua.
5. no cocine directamente en el plato giratorio. Coloque siempre el alimento enun plato seguro para microondas.
6. Si el alimento o el utensilio en el plato giratorio toca las paredes del horno,ocasionará que el plato giratorio deje de moverse, el plato de cristal rotaráautomáticamente en la dirección opuesta.
anillo giratorio1. El anillo giratorio y el piso del horno se deben limpiar con frecuencia para
prevenir ruido excesivo.2. Siempre vuelva a colocar el anillo giratorio y el plato de cristal en sus
posiciones apropiadas.3. El anillo giratorio se debe utilizar siempre para cocinar junto con el plato de
cristal.
adVeRtencia
IP4278_38W73AP_01_120507:IP4278_38W73AP_00_120507 2012-5-7 Jerry 下下13:45 Page 35
4
—el uso inaProPiado de la claviJaPara coneXiÓn a tierra Puede resultar en riesgo de descarga elÉc-trica. Si es necesario usar un cable de extensión, use solamente cable de extensión de treshilos que tenga una clavija de tres entradas para conectar a tierra, y un receptor de tresranuras que acepte la clavija del aparato. El calibre marcado en el cable de extensióndebe ser igual o mayor al calibre eléctrico del aparato.
instrucciones de conexión a tierraeste aParato debe ser conectado a tierra. En el caso de un corto circuito,la conexión a tierra reduce el riesgo de una descarga eléctrica proporcionando una líneade escape para la corriente eléctrica. Este aparato está equipado con un cable y clavijapara conexión a tierra. La clavija debe ser conectada en un receptor que esté instaladoadecuadamente y conectado a tierra.• enchufe en la conexión correctamente instalada y puesta a tierra de 3 entradas.• no quite el diente de tierra. • no utilice adaptador.
instrucciones de instalaciÓn(continuación)
adVeRtencia
examine su hornoDesempaque el horno, quite todo el material de empaque y examine que su hornono tenga ningún daño, tal como abolladuras, seguros de la puerta rotos oresquebrajaduras en la puerta. Notifique inmediatamente a su distribuidor si el hornoestá dañado.ubicación del horno1. El horno debe ser colocado en una superficie plana y estable. Ponga la superficie
delantera de la puerta tres pulgadas o más del borde superior contrario para evitarinclinar accidentalmente el horno de microondas durante su uso normal. Para suoperación apropiada, el horno debe tener suficiente corriente de aire. Deje 7,6 cm(3-pulgadas) de espacio de ambos lados del horno y 2,5 cm (1-pulgada) de espa-cio en la parte superior del horno.(a) no bloquear la ventilación del aire. Si es bloqueada la ventilación del aire
durante la operación, el horno puede sobrecalentarse y quemarse.(b) no coloque el horno cerca de una superficie húmeda caliente, tal como
un registro de gas o eléctrico. (c) no haga funcionar el horno cuando la humedad del lugar es excesiva.
2. Este horno esta fabricado solamente para el uso del hogar. No fue construidoni probado para su uso en ningún tipo de vehículo (terrestre, marítimo, o deuso comercial).
instalaciónno bloquee las salidas de aire. Si se bloquean durante la operación, el horno puederecalentarse. Si el horno se recalienta, un dispositivo de seguridad termal apagará elhorno. El horno seguirá siendo inoperable hasta que se haya enfriado.
instrucciones de instalaciÓn
IP4278_38W73AP_01_120507:IP4278_38W73AP_00_120507 2012-5-7 Jerry 下下13:45 Page 36

5
suministro eléctrico1. Se provee un cable de suministro eléctrico corto para reducir los riesgos resultantes de
enredarse o tropezarse con un cable más largo.2. Juegos de cable más largos o extensiones están disponibles y pueden utilizarse si se
usan con cuidado. no deje el cable colgar sobre el borde de la mesa o mostrador.3. Si se usa un cable más largo o extensión, (1) el calibre eléctrico marcado en el juego
de cable o extensión debe ser al menos tan grande como el calibre eléctrico delaparato, (2) el cable de extensión debe ser de tres hilos del tipo de conexión a tierra, y(3) un cable más largo debe ser arreglado de tal forma que no caiga sobre la cubiertadel mostrador o de la mesa donde pueda ser jalado por niños o alguienpueda tropezarse accidentalmente
requerimientos de cableadoEl horno debe estar en un circuito separado. Ningún otro aparato debe compartir el circuitocon el horno. Si lo hace el fusible del circuito puede estallar, el bloqueador del circuitotrabarse o la comida cocinarse más lento que en los tiempos recomendados en estemanual. El horno debe ser conectado en un enchufe a tierra de al menos 20 A, 120 V, 60hz. Donde se encuentre un enchufe estándar de 2 entradas será responsabilidad - yobligación - del consumidor reemplazarlo por un enchufe a tierra de 3 entradas. El voltajeusado debe ser el mismo al especificado en el horno de microondas (120 V, 60 hz) Usarun voltaje más alto es peligroso y puede resultar en fuego u otro accidente causando dañoal horno. Usar un bajo voltaje dará como resultado un cocinado más lento.Panasonic NO es responsable por cualquier daño que haya resultado del uso del hornocon un voltaje distinto al especificado.
interferencia de radio o televisión1. La operación de su horno de microondas puede causar interferencia en su radio, TV o
equipo similar.2. Cuando hay interferencia, se puede reducir o eliminar tomando las siguientes medidas:
(a) Limpie la puerta y las superficies selladoras del horno. (b) Ponga el radio, TV, etc. lo más lejos posible del horno de microondas.(c) Use una antena instalada adecuadamente para obtener una recepción de señal
más fuerte.
instrucciones de instalaciÓn(continuación)
IP4278_38W73AP_01_120507:IP4278_38W73AP_00_120507 2012-5-7 Jerry 下下13:45 Page 37
6
Siga Estas Precauciones de Seguridad Cuando Cocine en Su horno
iMPortantela cocción adecuada depende del tiempo designado y del peso de los ali-mentos. si usa una porción menor de la recomendada y cocina por eltiempo para la porción recomendada, puede resultar en un incendio. siocurre un incendio, ponga el horno en posición de apagado y manténgalocerrado. desconecte la energía eléctrica o desconecte la caja de fusibles oel panel de control.1) enlatado casero / esteriliZaciÓn / aliMentos
deshidratados / PequeÑas cantidades dealiMentos
• no use el horno para el enlatado casero o para calentar cualquier frascocerrado. La presión aumentará y el frasco puede explotar. Su horno no puedemantener los alimentos a la temperatura apropiada de enlatado.
• no use el horno de microondas para esterilizar objetos (mamilas de bebe,etc). Es difícil mantener el horno a la temperatura necesaria para laesterilización.
• no seque carne, hierbas, frutas o vegetales en su horno. Pequeñascantidades de alimento o alimentos con bajo contenido de humedad sepueden secar, quemar o incendiarse.
2) PaloMitas de MaÍZLas palomitas de maíz deben prepararse en un recipiente para palomitas demaíz adecuado para horno de microondas. Palomitas de maíz para horno demicroondas que se preparan en su propio paquete también están disponibles.Siga las instrucciones del fabricante de palomitas de maíz y use una marcaadecuada para la potencia de su horno de microondas. Nunca dejedesatendido el horno cuando prepare palomitas de maíz. PrecauciÓn: Cuando use palomitas de maíz para microondas previamenteempacadas siga las instrucciones recomendadas en el paquete o utilice labotón de palomitas de maíz (revise página 13). Si no se siguen estasinstrucciones, las palomitas de maíz pueden no reventar adecuadamente opueden encenderse y causar un incendio.Nunca deje el horno desatendido, cuando están reventando las palomitas.Permita que la bolsa de palomitas se enfríe antes de abrirse, abra siempre labolsa lejos de su cara y cuerpo para prevenir quemaduras del vapor.
3) freir con Mucha grasa• no trate de freír con mucha grasa en su horno de microondas. Cocinar aceites
puede estallar en flamas y puede causar daño al horno y quizá acabar enquemaduras. Los utensilios de microondas pueden no ser útiles para soportarla temperatura del aceite caliente, y podrían romperse
4) aliMentos con Pieles no Porosas• no cocine / recaliente huevos enteros, con o sin la
cÁscara. La acumulación del vapor en huevos enteros puede hacerlosestallar, y es causa de daño al horno o causa de lesión. Recalentar los huevosduros REBANADOS y cocinar los huevos revueltos es seguro.
• Papas, manzanas, calabazas completas y salchichas son ejemplos dealimentos con pieles no porosas. Estos tipos de alimentos deben serperforados antes de cocinarlos en microondas para evitar que estallen.PrecauciÓn: Cocinar papas secas o viejas pueden ocasionar fuego.
sugerencias Útiles
IP4278_38W73AP_01_120507:IP4278_38W73AP_00_120507 2012-5-7 Jerry 下下13:45 Page 38

7
5) bandeJa de cristal / utensilios de cocina / PaPel aluMinio
• Los utensilios para cocinar se calientan durante la cocción en microondas. Usesoportes para lo caliente, cuando saque los utensilios del horno o cuando quitetapas o cubiertas de envoltura de plástico de los utensilios de cocina, paraevitar quemaduras.
• La bandeja de cristal se calentará durante la cocción. Debe permitirse que seenfríe antes de manejarla o antes de colocar productos de papel, tales comoplatos de papel o bolsas de palomitas de maíz para microondas, para cocinar.
• Al usar papel aluminio en el horno, permita por lo menos de 1 pulgada (2,5centímetros) de espacio entre el papel aluminio y las paredes del horno o lapuerta interior.
• Platos con adornos metálicos no deberán ser usados, ya que puedeproducirse arco eléctrico.
6) toallas de PaPel / telas• no use toallas de papel o telas que contengan fibras sintéticas en su tejido. La
fibra sintética puede causar que la toalla se incendie. Utilice toallas de papelbajo supervisión.
7) bandeJa doradora / bolsas Para cocinar en horno
• Las bandejas doradoras o asadoras son diseñadas para cocinar enmicroondas solamente. Siempre siga las instrucciones dadas por el fabricante.no precaliente la bandeja doradora más de 6 minutos.
• Si se utiliza una bolsa para cocinar en Microondas, prepare de acuerdo a lasinstrucciones del paquete. no use sujetadores de alambre para cerrar labolsa, en su lugar utilice sujetadores de plásticos, un cordón de algodón, o latira del extremo abierto de la bolsa.
8) terMÓMetros• no use termómetros convencionales para alimentos en su horno. Puede
producir arco. Están disponibles termómetros seguros para microondas paracarne y dulce.
9) fÓrMula de bebÉ / aliMentos Para bebÉ• no caliente la fórmula o los alimentos para el bebé en el horno de microondas.
El tarro o la superficie de cristal del alimento pueden parecer tibios mientrasque el interior puede resultar tan caliente que podría ocasionar quemaduras enla boca y esófago del bebe.
10) recalentaMiento de Productos de rePosterÍa• Cuando recaliente productos de repostería, compruebe la temperatura de
cualquier relleno antes de comer. Algunos alimentos tienen rellenos que secalientan más rápidamente y puedan resultar extremadamente calientes,mientras que la superficie sigue siendo tibia al tacto (Ej. Donas de jalea).
11) guÍa de uso general del horno / Puerta del horno
• no use el horno por cualquier razón que no sea la preparación de alimentos.
sugerencias Útiles (continuación)
IP4278_38W73AP_01_120507:IP4278_38W73AP_00_120507 2012-5-7 Jerry 下下13:45 Page 39
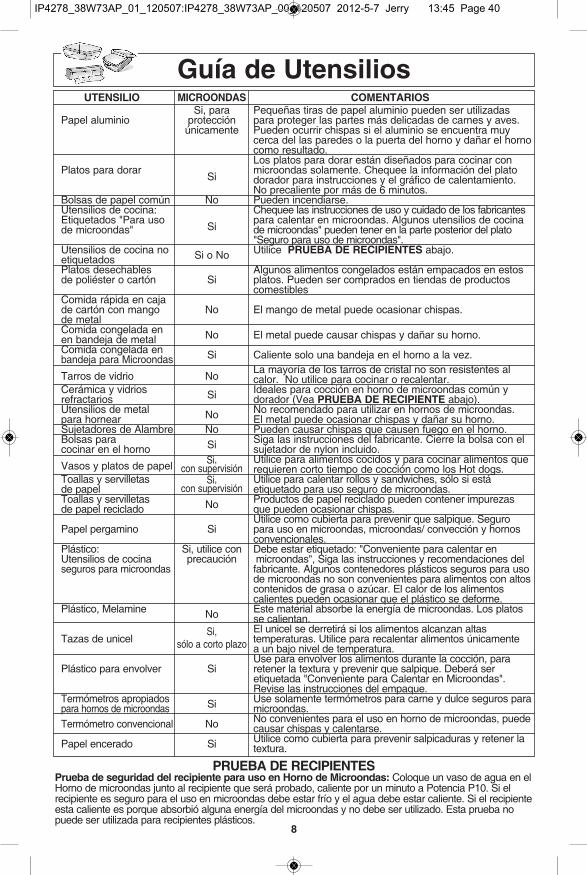
8
guía de utensilios utensilio Microondas coMentarios
Si, para Pequeñas tiras de papel aluminio pueden ser utilizadas Papel aluminio protección para proteger las partes más delicadas de carnes y aves.
únicamente Pueden ocurrir chispas si el aluminio se encuentra muy cerca del las paredes o la puerta del horno y dañar el hornocomo resultado.Los platos para dorar están diseñados para cocinar con
Platos para dorarSi
microondas solamente. Chequee la información del plato dorador para instrucciones y el gráfico de calentamiento.No precaliente por más de 6 minutos.
Bolsas de papel común No Pueden incendiarse.Utensilios de cocina: Chequee las instrucciones de uso y cuidado de los fabricantes Etiquetados "Para uso
Sipara calentar en microondas. Algunos utensilios de cocina
de microondas" de microondas" pueden tener en la parte posterior del plato "Seguro para uso de microondas".
Utensilios de cocina no Si o No Utilice Prueba de reciPientes abajo.etiquetadosPlatos desechables Algunos alimentos congelados están empacados en estos de poliéster o cartón Si platos. Pueden ser comprados en tiendas de productos
comestiblesComida rápida en cajade cartón con mango No El mango de metal puede ocasionar chispas.de metalComida congelada en No El metal puede causar chispas y dañar su horno. en bandeja de metalComida congelada en Si Caliente solo una bandeja en el horno a la vez.bandeja para Microondas
Tarros de vidrio NoLa mayoría de los tarros de cristal no son resistentes alcalor. No utilice para cocinar o recalentar.
Cerámica y vidrios Si Ideales para cocción en horno de microondas común y refractarios dorador (Vea Prueba de reciPiente abajo).Utensilios de metal No No recomendado para utilizar en hornos de microondas. para hornear El metal puede ocasionar chispas y dañar su horno.Sujetadores de Alambre No Pueden causar chispas que causen fuego en el horno. Bolsas para Si Siga las instrucciones del fabricante. Cierre la bolsa con el cocinar en el horno sujetador de nylon incluido.
Vasos y platos de papel Si, Utilice para alimentos cocidos y para cocinar alimentos que con supervisión requieren corto tiempo de cocción como los hot dogs.
Toallas y servilletas Si, Utilice para calentar rollos y sandwiches, sólo si está de papel con supervisión etiquetado para uso seguro de microondas.Toallas y servilletas No Productos de papel reciclado pueden contener impurezas de papel reciclado que pueden ocasionar chispas.
Utilice como cubierta para prevenir que salpique. Seguro Papel pergamino Si para uso en microondas, microondas/ convección y hornos
convencionales.Plástico: Si, utilice con Debe estar etiquetado: "Conveniente para calentar en Utensilios de cocina precaución microondas", Siga las instrucciones y recomendaciones del seguros para microondas fabricante. Algunos contenedores plásticos seguros para uso
de microondas no son convenientes para alimentos con altoscontenidos de grasa o azúcar. El calor de los alimentos calientes pueden ocasionar que el plástico se deforme.
Plástico, Melamine No Este material absorbe la energía de microondas. Los platos se calientan.
Si, El unicel se derretirá si los alimentos alcanzan altasTazas de unicel sólo a corto plazo temperaturas. Utilice para recalentar alimentos únicamente
a un bajo nivel de temperatura.Use para envolver los alimentos durante la cocción, para
Plástico para envolver Si retener la textura y prevenir que salpique. Deberá seretiquetada "Conveniente para Calentar en Microondas". Revise las instrucciones del empaque.
Termómetros apropiados Si Use solamente termómetros para carne y dulce seguros parapara hornos de microondas microondas.Termómetro convencional No No convenientes para el uso en horno de microondas, puede
causar chispas y calentarse.Papel encerado Si Utilice como cubierta para prevenir salpicaduras y retener la
textura.
Prueba de reciPientesPrueba de seguridad del recipiente para uso en horno de Microondas: Coloque un vaso de agua en elhorno de microondas junto al recipiente que será probado, caliente por un minuto a Potencia P10. Si elrecipiente es seguro para el uso en microondas debe estar frío y el agua debe estar caliente. Si el recipienteesta caliente es porque absorbió alguna energía del microondas y no debe ser utilizado. Esta prueba nopuede ser utilizada para recipientes plásticos.
IP4278_38W73AP_01_120507:IP4278_38W73AP_00_120507 2012-5-7 Jerry 下下13:45 Page 40
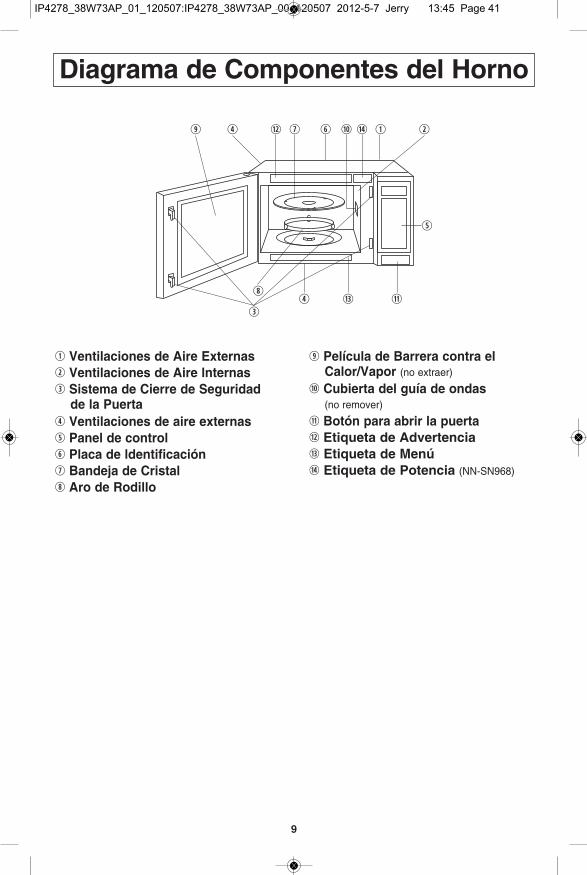
9
diagrama de componentes del horno
q ventilaciones de aire externasw ventilaciones de aire lnternase sistema de cierre de seguridad
de la Puertar ventilaciones de aire externast Panel de controly Placa de ldentificaciónu bandeja de cristali aro de rodillo
o Película de barrera contra el calor/vapor (no extraer)
a cubierta del guía de ondas(no remover)
s botón para abrir la puertad etiqueta de advertenciaf etiqueta de Menúg etiqueta de Potencia (NN-SN968)
ydo r u a qg w
t
r f si
e
IP4278_38W73AP_01_120507:IP4278_38W73AP_00_120507 2012-5-7 Jerry 下下13:45 Page 41
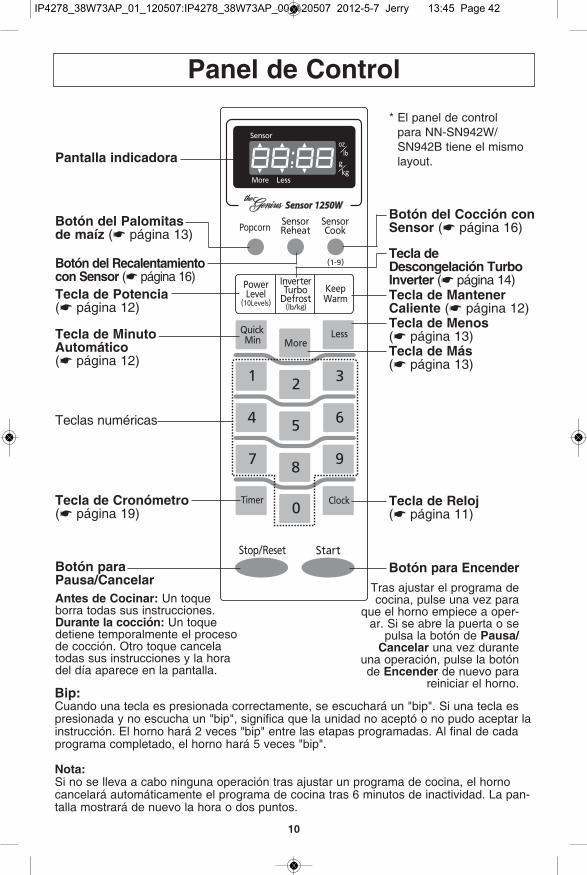
10
Panel de control
antes de cocinar: Un toque borra todas sus instrucciones.durante la cocción: Un toquedetiene temporalmente el procesode cocción. Otro toque cancelatodas sus instrucciones y la horadel día aparece en la pantalla.
Tras ajustar el programa decocina, pulse una vez para
que el horno empiece a oper-ar. Si se abre la puerta o se
pulsa la botón de Pausa/cancelar una vez durante
una operación, pulse la botónde encender de nuevo para
reiniciar el horno.bip:Cuando una tecla es presionada correctamente, se escuchará un "bip". Si una tecla espresionada y no escucha un "bip", significa que la unidad no aceptó o no pudo aceptar lainstrucción. El horno hará 2 veces "bip" entre las etapas programadas. Al final de cadaprograma completado, el horno hará 5 veces "bip".
nota:Si no se lleva a cabo ninguna operación tras ajustar un programa de cocina, el hornocancelará automáticamente el programa de cocina tras 6 minutos de inactividad. La pan-talla mostrará de nuevo la hora o dos puntos.
botón del recalentamientocon sensor (* página 16)
botón del Palomitasde maíz (* página 13)
Pantalla indicadora
tecla de cronómetro(* página 19)
tecla de Minutoautomático(* página 12)
tecla de Potencia(* página 12)
botón paraPausa/cancelar
Teclas numéricas
botón del cocción consensor (* página 16)
tecla de Mantenercaliente (* página 12)tecla de Menos(* página 13)tecla de Más(* página 13)
tecla de reloj (* página 11)
tecla dedescongelación turboinverter (* página 14)
botón para encender
* El panel de controlpara NN-SN942W/SN942B tiene el mismo layout.
IP4278_38W73AP_01_120507:IP4278_38W73AP_00_120507 2012-5-7 Jerry 下下13:45 Page 42

11
relojejemplo: Para ajustar 11:25 am o pm
1. • Presione la tecla de reloj.punto comienza a
parpadear.
2. • Fije la hora correctadel día.11:25 aparece en la
pantalla indicadora.
3. • Presione la tecla de reloj.punto deja de
parpadear. La hora está ingresada y ubicada en lapantalla indicadora.
notas:1. Para reiniciar el reloj. Repetir el paso
1 hasta el 3.2. El Reloj seguirá marcando la hora siempre
que siga recibiendo alimentación eléctrica.3. El Reloj visualiza el horario normal basado
en las 12 horas, no utiliza el horario militar.4. El horno no funcionará mientras los dos
puntos estén parpadeando.
seguro Para niñosEsta función evita la operación del hornohasta que se cancela. No asegura lapuerta.
Para activar: • Presione encender 3veces. "Child"aparecerá en laventana devisualización."Child" se
mantendrá hasta que el seguro de niños seacancelado. Puedepresionarsecualquier botón otecla, pero el hornono arrancará.
Para cancelar: • Presione Pausa/cancelar 3 veces. La Ventana de
Visualizaciónregresa a los dos puntos o la hora cuando el seguro deniños ha sidocancelado.
nota:Se puede configurar la función de"Seguro para niños" cuando lavisualización muestra dos puntos otiempo del día.
¡vamos a empezar ausar su horno!
1. • Enchufe en una tomaeléctrica debidamenteconectada a tierra.Este hornoautomáticamenteajusta el sistemainglés de medida.
2. • Presione encenderpara convertir elsistema de medida.Verifique su selecciónen la ventana devisualización.
3. • Presione Pausa/cancelar.Dos puntos apare-
cerán en la Ventanade Visualización.
Ventana deVisualización
Si desea usarg/kg:
IP4278_38W73AP_01_120507:IP4278_38W73AP_00_120507 2012-5-7 Jerry 下下13:45 Page 43
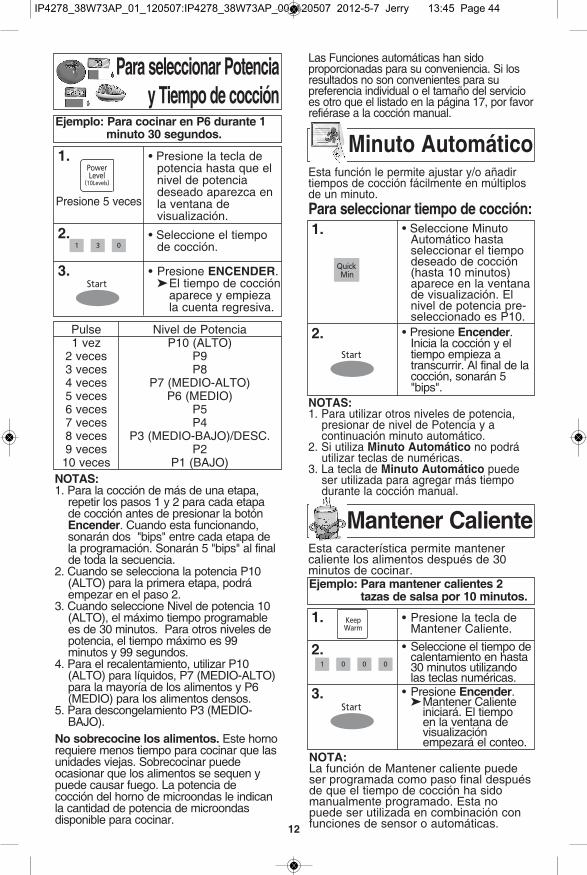
12
notas:1. Para utilizar otros niveles de potencia,
presionar de nivel de Potencia y acontinuación minuto automático.
2. Si utiliza Minuto automático no podráutilizar teclas de numéricas.
3. La tecla de Minuto automático puedeser utilizada para agregar más tiempodurante la cocción manual.
Para seleccionar Potenciay tiempo de cocción
notas:1. Para la cocción de más de una etapa,
repetir los pasos 1 y 2 para cada etapade cocción antes de presionar la botónencender. Cuando esta funcionando,sonarán dos "bips" entre cada etapa dela programación. Sonarán 5 "bips" al finalde toda la secuencia.
2. Cuando se selecciona la potencia P10(ALTO) para la primera etapa, podráempezar en el paso 2.
3. Cuando seleccione Nivel de potencia 10(ALTO), el máximo tiempo programablees de 30 minutos. Para otros niveles depotencia, el tiempo máximo es 99minutos y 99 segundos.
4. Para el recalentamiento, utilizar P10(ALTO) para líquidos, P7 (MEDIO-ALTO)para la mayoría de los alimentos y P6(MEDIO) para los alimentos densos.
5. Para descongelamiento P3 (MEDIO-BAJO).
no sobrecocine los alimentos. Este hornorequiere menos tiempo para cocinar que lasunidades viejas. Sobrecocinar puedeocasionar que los alimentos se sequen ypuede causar fuego. La potencia decocción del horno de microondas le indicanla cantidad de potencia de microondasdisponible para cocinar.
ejemplo: Para cocinar en P6 durante 1 minuto 30 segundos.
1. • Presione la tecla depotencia hasta que elnivel de potenciadeseado aparezca enla ventana devisualización.
2. • Seleccione el tiempode cocción.
3. • Presione encender.El tiempo de cocción
aparece y empieza la cuenta regresiva.
Presione 5 veces
Pulse1 vez
2 veces3 veces4 veces5 veces6 veces7 veces8 veces9 veces
10 veces
Nivel de PotenciaP10 (ALTO)
P9P8
P7 (MEDIO-ALTO)P6 (MEDIO)
P5P4
P3 (MEDIO-BAJO)/DESC.P2
P1 (BAJO)
Minuto automáticoEsta función le permite ajustar y/o añadirtiempos de cocción fácilmente en múltiplosde un minuto.Para seleccionar tiempo de cocción:1. • Seleccione Minuto
Automático hastaseleccionar el tiempodeseado de cocción(hasta 10 minutos)aparece en la ventanade visualización. Elnivel de potencia pre-seleccionado es P10.
2. • Presione encender.Inicia la cocción y eltiempo empieza atranscurrir. Al final de lacocción, sonarán 5"bips".
ejemplo: Para mantener calientes 2tazas de salsa por 10 minutos.
1. • Presione la tecla deMantener Caliente.
2. • Seleccione el tiempo decalentamiento en hasta30 minutos utilizandolas teclas numéricas.
3. • Presione encender.Mantener Caliente
iniciará. El tiempo en la ventana de visualización empezará el conteo.
nota:La función de Mantener caliente puedeser programada como paso final despuésde que el tiempo de cocción ha sidomanualmente programado. Esta nopuede ser utilizada en combinación confunciones de sensor o automáticas.
Las Funciones automáticas han sidoproporcionadas para su conveniencia. Si losresultados no son convenientes para supreferencia individual o el tamaño del servicioes otro que el listado en la página 17, por favorrefiérase a la cocción manual.
Mantener caliente Esta característica permite mantenercaliente los alimentos después de 30minutos de cocinar.
IP4278_38W73AP_01_120507:IP4278_38W73AP_00_120507 2012-5-7 Jerry 下下13:45 Page 44
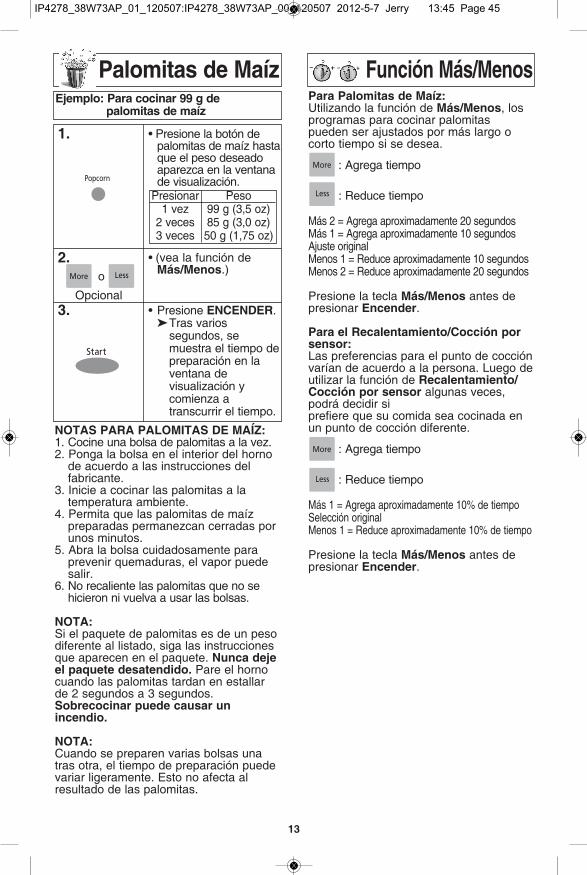
13
Palomitas de Maíz
notas Para PaloMitas de MaÍZ:1. Cocine una bolsa de palomitas a la vez.2. Ponga la bolsa en el interior del horno
de acuerdo a las instrucciones delfabricante.
3. Inicie a cocinar las palomitas a latemperatura ambiente.
4. Permita que las palomitas de maízpreparadas permanezcan cerradas porunos minutos.
5. Abra la bolsa cuidadosamente paraprevenir quemaduras, el vapor puedesalir.
6. No recaliente las palomitas que no sehicieron ni vuelva a usar las bolsas.
nota:Si el paquete de palomitas es de un pesodiferente al listado, siga las instruccionesque aparecen en el paquete. nunca dejeel paquete desatendido. Pare el hornocuando las palomitas tardan en estallarde 2 segundos a 3 segundos.sobrecocinar puede causar unincendio.
nota:Cuando se preparen varias bolsas unatras otra, el tiempo de preparación puedevariar ligeramente. Esto no afecta alresultado de las palomitas.
ejemplo: Para cocinar 99 g depalomitas de maíz
1. • Presione la botón depalomitas de maíz hastaque el peso deseadoaparezca en la ventanade visualización.
2. • (vea la función deMás/Menos.)
3. • Presione encender.Tras varios
segundos, semuestra el tiempo depreparación en la ventana devisualización y comienza a transcurrir el tiempo.
Presionar1 vez
2 veces3 veces
Peso99 g (3,5 oz)85 g (3,0 oz)50 g (1,75 oz)
Opcional
o
función Más/MenosPara Palomitas de Maíz:Utilizando la función de Más/Menos, losprogramas para cocinar palomitaspueden ser ajustados por más largo ocorto tiempo si se desea.
: Agrega tiempo
: Reduce tiempo
Más 2 = Agrega aproximadamente 20 segundosMás 1 = Agrega aproximadamente 10 segundosAjuste originalMenos 1 = Reduce aproximadamente 10 segundosMenos 2 = Reduce aproximadamente 20 segundos
Presione la tecla Más/Menos antes depresionar encender.
Para el recalentamiento/cocción porsensor:Las preferencias para el punto de cocciónvarían de acuerdo a la persona. Luego deutilizar la función de recalentamiento/cocción por sensor algunas veces,podrá decidir siprefiere que su comida sea cocinada enun punto de cocción diferente.
: Agrega tiempo
: Reduce tiempo
Más 1 = Agrega aproximadamente 10% de tiempoSelección originalMenos 1 = Reduce aproximadamente 10% de tiempo
Presione la tecla Más/Menos antes depresionar encender.
IP4278_38W73AP_01_120507:IP4278_38W73AP_00_120507 2012-5-7 Jerry 下下13:45 Page 45
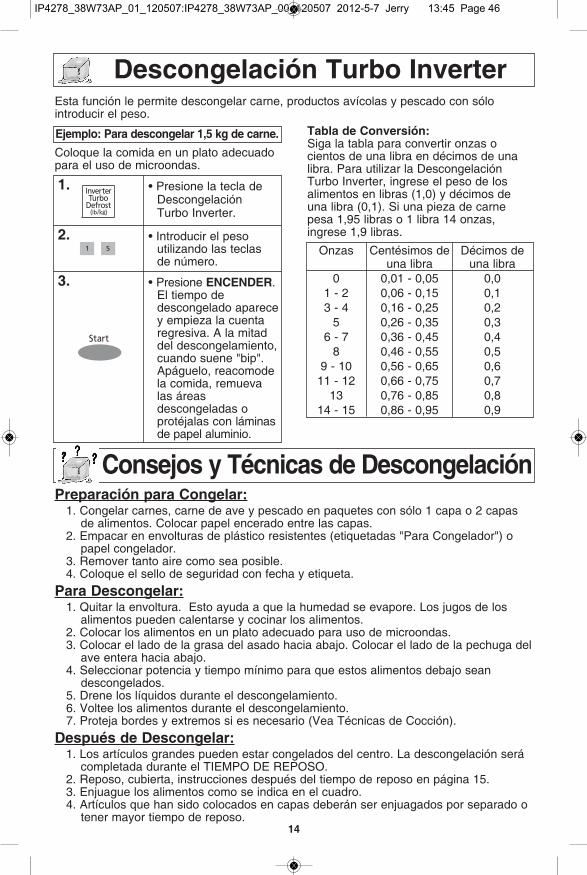
14
descongelación turbo inverterEsta función le permite descongelar carne, productos avícolas y pescado con sólointroducir el peso.
Coloque la comida en un plato adecuadopara el uso de microondas.
ejemplo: Para descongelar 1,5 kg de carne.
1. • Presione la tecla deDescongelaciónTurbo Inverter.
2. • Introducir el pesoutilizando las teclasde número.
3. • Presione encender.El tiempo dedescongelado aparecey empieza la cuentaregresiva. A la mitaddel descongelamiento,cuando suene "bip".Apáguelo, reacomodela comida, remuevalas áreasdescongeladas oprotéjalas con láminasde papel aluminio.
tabla de conversión:Siga la tabla para convertir onzas ocientos de una libra en décimos de unalibra. Para utilizar la DescongelaciónTurbo Inverter, ingrese el peso de losalimentos en libras (1,0) y décimos deuna libra (0,1). Si una pieza de carnepesa 1,95 libras o 1 libra 14 onzas,ingrese 1,9 libras.
Onzas
01 - 23 - 4
56 - 7
89 - 10
11 - 1213
14 - 15
Centésimos deuna libra
0,01 - 0,050,06 - 0,150,16 - 0,250,26 - 0,350,36 - 0,450,46 - 0,550,56 - 0,650,66 - 0,750,76 - 0,850,86 - 0,95
Décimos deuna libra
0,00,10,20,30,40,50,60,70,80,9
consejos y técnicas de descongelaciónPreparación para congelar:
1. Congelar carnes, carne de ave y pescado en paquetes con sólo 1 capa o 2 capas de alimentos. Colocar papel encerado entre las capas.
2. Empacar en envolturas de plástico resistentes (etiquetadas "Para Congelador") o papel congelador.
3. Remover tanto aire como sea posible. 4. Coloque el sello de seguridad con fecha y etiqueta.
Para descongelar:1. Quitar la envoltura. Esto ayuda a que la humedad se evapore. Los jugos de los
alimentos pueden calentarse y cocinar los alimentos. 2. Colocar los alimentos en un plato adecuado para uso de microondas. 3. Colocar el lado de la grasa del asado hacia abajo. Colocar el lado de la pechuga del
ave entera hacia abajo.4. Seleccionar potencia y tiempo mínimo para que estos alimentos debajo sean
descongelados.5. Drene los líquidos durante el descongelamiento.6. Voltee los alimentos durante el descongelamiento.7. Proteja bordes y extremos si es necesario (Vea Técnicas de Cocción).
después de descongelar:1. Los artículos grandes pueden estar congelados del centro. La descongelación será
completada durante el TIEMPO DE REPOSO.2. Reposo, cubierta, instrucciones después del tiempo de reposo en página 15.3. Enjuague los alimentos como se indica en el cuadro.4. Artículos que han sido colocados en capas deberán ser enjuagados por separado o
tener mayor tiempo de reposo.
IP4278_38W73AP_01_120507:IP4278_38W73AP_00_120507 2012-5-7 Jerry 下下13:45 Page 46
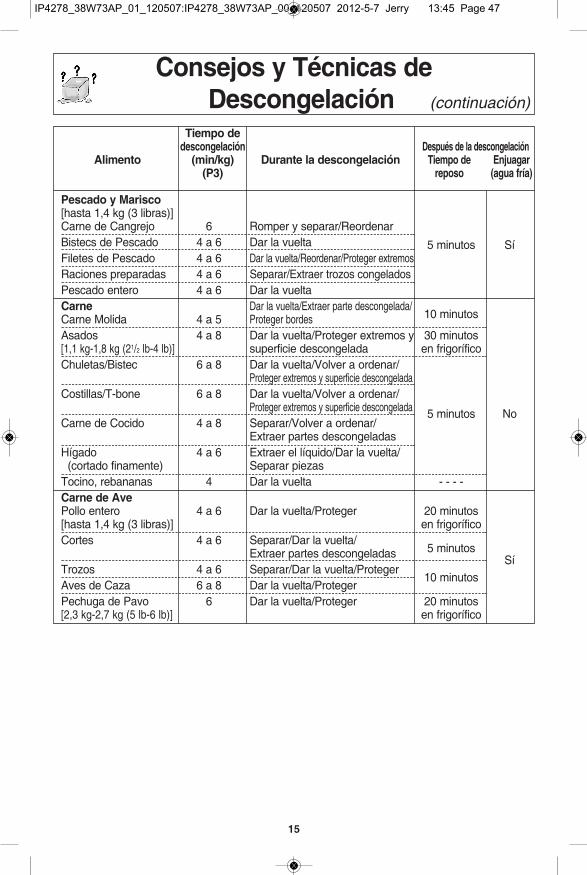
15
consejos y técnicas dedescongelación (continuación)
tiempo dedescongelación después de la descongelación
alimento (min/kg) durante la descongelación tiempo de enjuagar(P3) reposo (agua fría)
Pescado y Marisco[hasta 1,4 kg (3 libras)]Carne de Cangrejo 6 Romper y separar/ReordenarBistecs de Pescado 4 a 6 Dar la vuelta 5 minutos SíFiletes de Pescado 4 a 6 Dar la vuelta/Reordenar/Proteger extremosRaciones preparadas 4 a 6 Separar/Extraer trozos congeladosPescado entero 4 a 6 Dar la vueltacarne Dar la vuelta/Extraer parte descongelada/Carne Molida 4 a 5 Proteger bordes 10 minutos
Asados 4 a 8 Dar la vuelta/Proteger extremos y 30 minutos[1,1 kg-1,8 kg (21/2 lb-4 lb)] superficie descongelada en frigoríficoChuletas/Bistec 6 a 8 Dar la vuelta/Volver a ordenar/
Proteger extremos y superficie descongeladaCostillas/T-bone 6 a 8 Dar la vuelta/Volver a ordenar/
Proteger extremos y superficie descongelada 5 minutos NoCarne de Cocido 4 a 8 Separar/Volver a ordenar/
Extraer partes descongeladashígado 4 a 6 Extraer el líquido/Dar la vuelta/
(cortado finamente) Separar piezasTocino, rebananas 4 Dar la vuelta - - - -carne de avePollo entero 4 a 6 Dar la vuelta/Proteger 20 minutos[hasta 1,4 kg (3 libras)] en frigoríficoCortes 4 a 6 Separar/Dar la vuelta/
Extraer partes descongeladas 5 minutos Sí
Trozos 4 a 6 Separar/Dar la vuelta/ProtegerAves de Caza 6 a 8 Dar la vuelta/Proteger
10 minutos
Pechuga de Pavo 6 Dar la vuelta/Proteger 20 minutos[2,3 kg-2,7 kg (5 lb-6 lb)] en frigorífico
IP4278_38W73AP_01_120507:IP4278_38W73AP_00_120507 2012-5-7 Jerry 下下13:45 Page 47
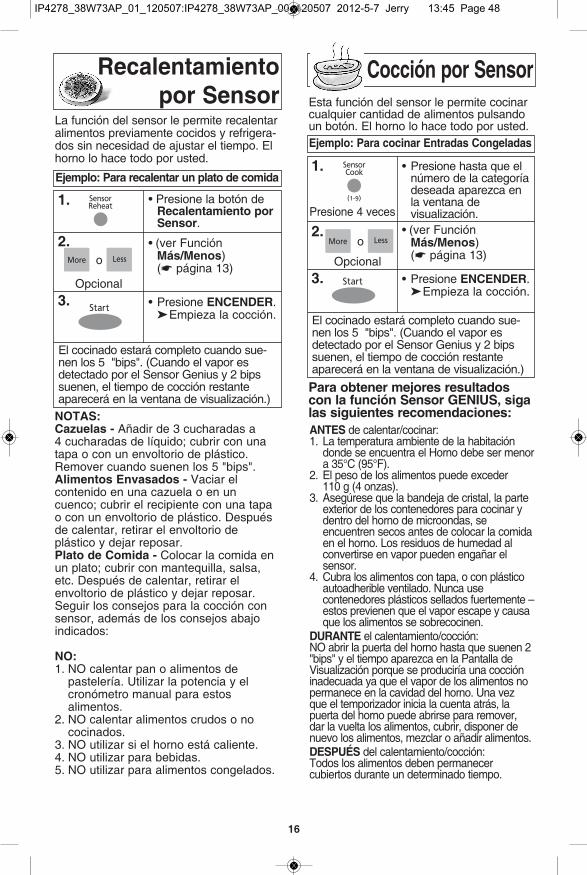
16
notas:cazuelas - Añadir de 3 cucharadas a4 cucharadas de líquido; cubrir con unatapa o con un envoltorio de plástico.Remover cuando suenen los 5 "bips".alimentos envasados - Vaciar elcontenido en una cazuela o en uncuenco; cubrir el recipiente con una tapao con un envoltorio de plástico. Despuésde calentar, retirar el envoltorio deplástico y dejar reposar.Plato de comida - Colocar la comida enun plato; cubrir con mantequilla, salsa,etc. Después de calentar, retirar elenvoltorio de plástico y dejar reposar.Seguir los consejos para la cocción consensor, además de los consejos abajoindicados:
no:1. NO calentar pan o alimentos de
pastelería. Utilizar la potencia y elcronómetro manual para estosalimentos.
2. NO calentar alimentos crudos o nococinados.
3. NO utilizar si el horno está caliente.4. NO utilizar para bebidas.5. NO utilizar para alimentos congelados.
La función del sensor le permite recalentaralimentos previamente cocidos y refrigera-dos sin necesidad de ajustar el tiempo. Elhorno lo hace todo por usted.
Esta función del sensor le permite cocinarcualquier cantidad de alimentos pulsandoun botón. El horno lo hace todo por usted.
antes de calentar/cocinar:1. La temperatura ambiente de la habitación
donde se encuentra el horno debe ser menora 35°C (95°F).
2. El peso de los alimentos puede exceder110 g (4 onzas).
3. Asegúrese que la bandeja de cristal, la parteexterior de los contenedores para cocinar ydentro del horno de microondas, seencuentren secos antes de colocar la comidaen el horno. Los residuos de humedad alconvertirse en vapor pueden engañar elsensor.
4. Cubra los alimentos con tapa, o con plásticoautoadherible ventilado. Nunca usecontenedores plásticos sellados fuertemente –estos previenen que el vapor escape y causaque los alimentos se sobrecocinen.
durante el calentamiento/cocción:NO abrir la puerta del horno hasta que suenen 2"bips" y el tiempo aparezca en la Pantalla deVisualización porque se produciría una coccióninadecuada ya que el vapor de los alimentos nopermanece en la cavidad del horno. Una vezque el temporizador inicia la cuenta atrás, lapuerta del horno puede abrirse para remover,dar la vuelta los alimentos, cubrir, disponer denuevo los alimentos, mezclar o añadir alimentos.desPuÉs del calentamiento/cocción:Todos los alimentos deben permanecercubiertos durante un determinado tiempo.
ejemplo: Para recalentar un plato de comida
1. • Presione la botón derecalentamiento porsensor.
2. • (ver FunciónMás/Menos)(* página 13)
3. • Presione encender.Empieza la cocción.
El cocinado estará completo cuando sue-nen los 5 "bips". (Cuando el vapor esdetectado por el Sensor Genius y 2 bipssuenen, el tiempo de cocción restanteaparecerá en la ventana de visualización.)
Opcional
Para obtener mejores resultadoscon la función sensor genius, sigalas siguientes recomendaciones:
ejemplo: Para cocinar entradas congeladas
1.
3. • Presione encender.Empieza la cocción.
El cocinado estará completo cuando sue-nen los 5 "bips". (Cuando el vapor esdetectado por el Sensor Genius y 2 bipssuenen, el tiempo de cocción restanteaparecerá en la ventana de visualización.)
• Presione hasta que elnúmero de la categoríadeseada aparezca enla ventana devisualización.
2. • (ver FunciónMás/Menos)(* página 13)
Presione 4 veces
recalentamientopor sensor
cocción por sensor
Opcional
o
o
IP4278_38W73AP_01_120507:IP4278_38W73AP_00_120507 2012-5-7 Jerry 下下13:45 Page 48
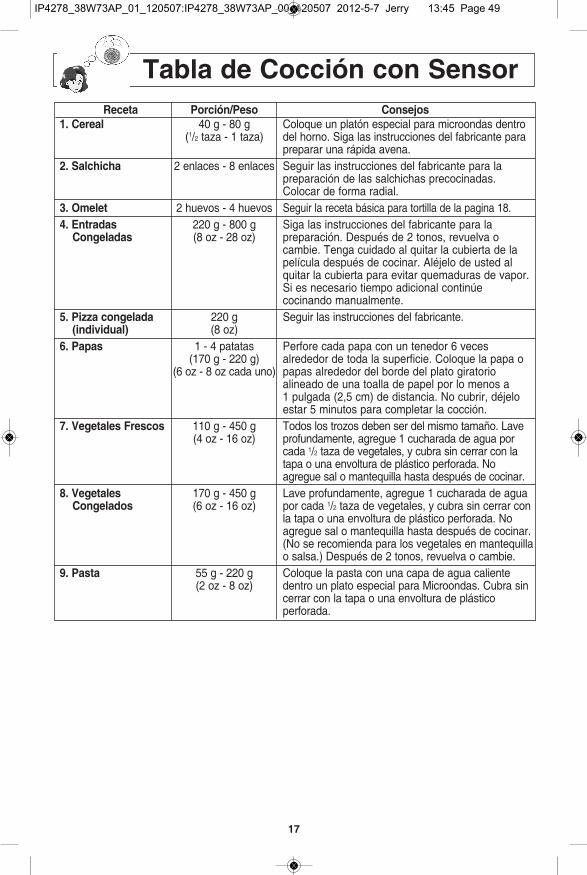
17
tabla de cocción con sensorreceta Porción/Peso consejos
1. cereal 40 g - 80 g Coloque un platón especial para microondas dentro (1/2 taza - 1 taza) del horno. Siga las instrucciones del fabricante para
preparar una rápida avena.2. salchicha 2 enlaces - 8 enlaces Seguir las instrucciones del fabricante para la
preparación de las salchichas precocinadas. Colocar de forma radial.
3. omelet 2 huevos - 4 huevos Seguir la receta básica para tortilla de la pagina 18.4. entradas 220 g - 800 g Siga las instrucciones del fabricante para la
congeladas (8 oz - 28 oz) preparación. Después de 2 tonos, revuelva ocambie. Tenga cuidado al quitar la cubierta de la película después de cocinar. Aléjelo de usted al quitar la cubierta para evitar quemaduras de vapor. Si es necesario tiempo adicional continúecocinando manualmente.
5. Pizza congelada 220 g Seguir las instrucciones del fabricante.(individual) (8 oz)
6. Papas 1 - 4 patatas Perfore cada papa con un tenedor 6 veces (170 g - 220 g) alrededor de toda la superficie. Coloque la papa o
(6 oz - 8 oz cada uno) papas alrededor del borde del plato giratorioalineado de una toalla de papel por lo menos a1 pulgada (2,5 cm) de distancia. No cubrir, déjelo estar 5 minutos para completar la cocción.
7. vegetales frescos 110 g - 450 g Todos los trozos deben ser del mismo tamaño. Lave (4 oz - 16 oz) profundamente, agregue 1 cucharada de agua por
cada 1/2 taza de vegetales, y cubra sin cerrar con la tapa o una envoltura de plástico perforada. No agregue sal o mantequilla hasta después de cocinar.
8. vegetales 170 g - 450 g Lave profundamente, agregue 1 cucharada de agua congelados (6 oz - 16 oz) por cada 1/2 taza de vegetales, y cubra sin cerrar con
la tapa o una envoltura de plástico perforada. No agregue sal o mantequilla hasta después de cocinar.(No se recomienda para los vegetales en mantequillao salsa.) Después de 2 tonos, revuelva o cambie.
9. Pasta 55 g - 220 g Coloque la pasta con una capa de agua caliente (2 oz - 8 oz) dentro un plato especial para Microondas. Cubra sin
cerrar con la tapa o una envoltura de plásticoperforada.
IP4278_38W73AP_01_120507:IP4278_38W73AP_00_120507 2012-5-7 Jerry 下下13:45 Page 49
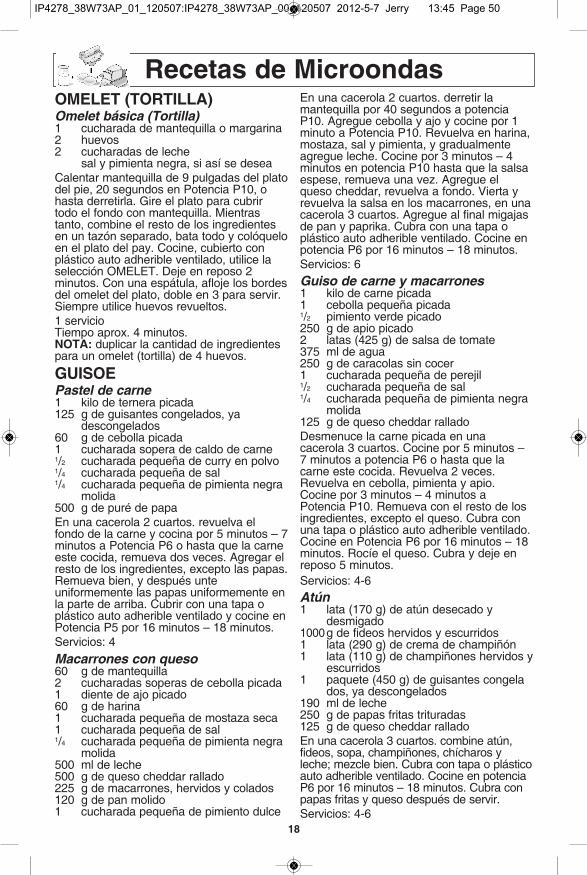
18
recetas de MicroondasoMelet (tortilla)omelet básica (Tortilla)1 cucharada de mantequilla o margarina2 huevos2 cucharadas de leche
sal y pimienta negra, si así se deseaCalentar mantequilla de 9 pulgadas del platodel pie, 20 segundos en Potencia P10, ohasta derretirla. Gire el plato para cubrirtodo el fondo con mantequilla. Mientrastanto, combine el resto de los ingredientesen un tazón separado, bata todo y colóqueloen el plato del pay. Cocine, cubierto conplástico auto adherible ventilado, utilice laselección OMELET. Deje en reposo 2minutos. Con una espátula, afloje los bordesdel omelet del plato, doble en 3 para servir.Siempre utilice huevos revueltos.1 servicioTiempo aprox. 4 minutos.nota: duplicar la cantidad de ingredientespara un omelet (tortilla) de 4 huevos.
guisoePastel de carne1 kilo de ternera picada125 g de guisantes congelados, ya
descongelados60 g de cebolla picada1 cucharada sopera de caldo de carne1/2 cucharada pequeña de curry en polvo1/4 cucharada pequeña de sal1/4 cucharada pequeña de pimienta negra
molida500 g de puré de papaEn una cacerola 2 cuartos. revuelva elfondo de la carne y cocina por 5 minutos – 7minutos a Potencia P6 o hasta que la carneeste cocida, remueva dos veces. Agregar elresto de los ingredientes, excepto las papas.Remueva bien, y después unteuniformemente las papas uniformemente enla parte de arriba. Cubrir con una tapa oplástico auto adherible ventilado y cocine enPotencia P5 por 16 minutos – 18 minutos.Servicios: 4Macarrones con queso60 g de mantequilla2 cucharadas soperas de cebolla picada1 diente de ajo picado60 g de harina1 cucharada pequeña de mostaza seca1 cucharada pequeña de sal1/4 cucharada pequeña de pimienta negra
molida500 ml de leche500 g de queso cheddar rallado225 g de macarrones, hervidos y colados120 g de pan molido1 cucharada pequeña de pimiento dulce
En una cacerola 2 cuartos. derretir lamantequilla por 40 segundos a potenciaP10. Agregue cebolla y ajo y cocine por 1minuto a Potencia P10. Revuelva en harina,mostaza, sal y pimienta, y gradualmenteagregue leche. Cocine por 3 minutos – 4minutos en potencia P10 hasta que la salsaespese, remueva una vez. Agregue elqueso cheddar, revuelva a fondo. Vierta yrevuelva la salsa en los macarrones, en unacacerola 3 cuartos. Agregue al final migajasde pan y paprika. Cubra con una tapa oplástico auto adherible ventilado. Cocine enpotencia P6 por 16 minutos – 18 minutos. Servicios: 6Guiso de carne y macarrones1 kilo de carne picada1 cebolla pequeña picada1/2 pimiento verde picado250 g de apio picado2 latas (425 g) de salsa de tomate 375 ml de agua250 g de caracolas sin cocer1 cucharada pequeña de perejil1/2 cucharada pequeña de sal1/4 cucharada pequeña de pimienta negra
molida125 g de queso cheddar ralladoDesmenuce la carne picada en unacacerola 3 cuartos. Cocine por 5 minutos –7 minutos a potencia P6 o hasta que lacarne este cocida. Revuelva 2 veces.Revuelva en cebolla, pimienta y apio.Cocine por 3 minutos – 4 minutos aPotencia P10. Remueva con el resto de losingredientes, excepto el queso. Cubra conuna tapa o plástico auto adherible ventilado.Cocine en Potencia P6 por 16 minutos – 18minutos. Rocíe el queso. Cubra y deje enreposo 5 minutos.Servicios: 4-6Atún1 lata (170 g) de atún desecado y
desmigado1000g de fideos hervidos y escurridos1 lata (290 g) de crema de champiñón1 lata (110 g) de champiñones hervidos y
escurridos 1 paquete (450 g) de guisantes congela
dos, ya descongelados190 ml de leche250 g de papas fritas trituradas125 g de queso cheddar ralladoEn una cacerola 3 cuartos. combine atún,fideos, sopa, champiñones, chícharos yleche; mezcle bien. Cubra con tapa o plásticoauto adherible ventilado. Cocine en potenciaP6 por 16 minutos – 18 minutos. Cubra conpapas fritas y queso después de servir.Servicios: 4-6
IP4278_38W73AP_01_120507:IP4278_38W73AP_00_120507 2012-5-7 Jerry 下下13:45 Page 50
19
temporizador
notas:1. Cuando cada etapa finalice, sonarán 2
bips como indicación. Al final delprograma, el horno hará 5 bips.
2. Si la puerta del horno es abierta duranteel Tiempo de Reposo, El Cronómetrode Cocina o el comienzo tardío, el tiem-po en la ventana de visualizaciónseguirá contando el tiempo.
3. El tiempo de reposo y comienzo tardíono pueden ser programados antes deninguna función automática. Estopreviene que el inicio de temperatura delos alimentos de antes de descongelar oal comienzo de la cocción. Un cambioen la temperatura de inicio puedecausar resultados inapropiados.
PrecauciÓn.si la lámpara del horno está encendidacuando se está utilizando el temporizador,el horno esta programado incorrectamente.detenga el horno inmediatamente y vuelvaa leer las instrucciones.
Esta característica le permite programarel tiempo después de que la cocción hasido completada y programar el hornocon un tiempo de espera y/o un comienzotardío.
Para usar como temporizadoren la cocina:ejemplo: Para contar 5 minutos
1. • Presione cronómetro.
2. • Indique la cantidad detiempo (hasta 99minutos y 99segundos).
3. • Presione encender.El Temporizador
realizará la cuenta regresiva. No se realizará ningún tipode cocción.
Para fijar un tiempo deespera o tiempo de reposo:ejemplo: después de la cocción dejar
reposar el alimento durante 3 minutos(Medio)
1. • Indique el programade cocción deseado(ver página 12 parainstrucciones).
• Seleccione el tiempodeseado de cocciónutilizando las teclasnuméricas.
3.
2.
• Presione cronómetro.
4. • Indique la cantidad detiempo (hasta 99minutos y 99segundos).
5. • Presione encender.Después de la
cocción el tiempo dereposo empezará a contar en forma descendente sin que el horno esté funcionando.
Presione 5 veces
Para programar un comienzotardío:ejemplo: Para un comienza tardío de 5
minutos, y cocción en potencia P6 for 3 minutos.
1.
• Seleccione el programade cocción (verpágina 12 parainstrucciones).
• Seleccione el tiempodeseado de cocciónutilizando las teclasnuméricas.
3.
• Presione cronómetro.
2. • Introduzca la cantidadde tiempo de esperaque se desea utilizandolas teclas numéricas:(hasta 99 minutos y 99segundos)
5.
4.
• Presione encender.Cuando el tiempo
demorado comiencecon la cuentaregresiva, y éste haya finalizado, lacocción iniciará.
Presione 5 veces
IP4278_38W73AP_01_120507:IP4278_38W73AP_00_120507 2012-5-7 Jerry 下下13:45 Page 51
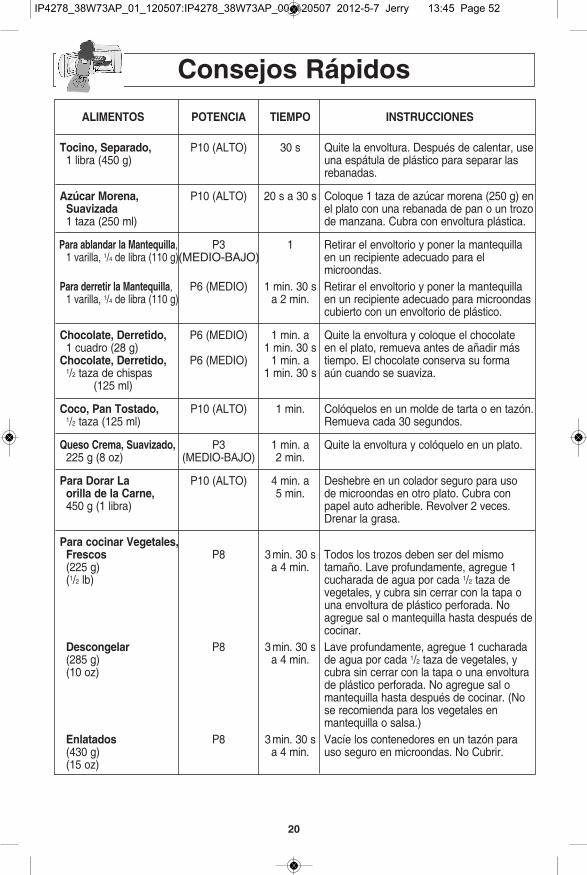
20
consejos rápidos
aliMentos Potencia tieMPo instrucciones
tocino, separado, P10 (ALTO) 30 s Quite la envoltura. Después de calentar, use 1 libra (450 g) una espátula de plástico para separar las
rebanadas.
azúcar Morena, P10 (ALTO) 20 s a 30 s Coloque 1 taza de azúcar morena (250 g) ensuavizada el plato con una rebanada de pan o un trozo1 taza (250 ml) de manzana. Cubra con envoltura plástica.
Para ablandar la Mantequilla, P3 1 Retirar el envoltorio y poner la mantequilla 1 varilla, 1/4 de libra (110 g)(MEDIO-BAJO) en un recipiente adecuado para el
microondas.Para derretir la Mantequilla, P6 (MEDIO) 1 min. 30 s Retirar el envoltorio y poner la mantequilla
1 varilla, 1/4 de libra (110 g) a 2 min. en un recipiente adecuado para microondascubierto con un envoltorio de plástico.
chocolate, derretido, P6 (MEDIO) 1 min. a Quite la envoltura y coloque el chocolate1 cuadro (28 g) 1 min. 30 s en el plato, remueva antes de añadir más
chocolate, derretido, P6 (MEDIO) 1 min. a tiempo. El chocolate conserva su forma1/2 taza de chispas 1 min. 30 s aún cuando se suaviza.
(125 ml)
coco, Pan tostado, P10 (ALTO) 1 min. Colóquelos en un molde de tarta o en tazón.1/2 taza (125 ml) Remueva cada 30 segundos.
queso crema, suavizado, P3 1 min. a Quite la envoltura y colóquelo en un plato. 225 g (8 oz) (MEDIO-BAJO) 2 min.
Para dorar la P10 (ALTO) 4 min. a Deshebre en un colador seguro para uso orilla de la carne, 5 min. de microondas en otro plato. Cubra con 450 g (1 libra) papel auto adherible. Revolver 2 veces.
Drenar la grasa.
Para cocinar vegetales,frescos P8 3 min. 30 s Todos los trozos deben ser del mismo (225 g) a 4 min. tamaño. Lave profundamente, agregue 1 (1/2 lb) cucharada de agua por cada 1/2 taza de
vegetales, y cubra sin cerrar con la tapa o una envoltura de plástico perforada. No agregue sal o mantequilla hasta después decocinar.
descongelar P8 3 min. 30 s Lave profundamente, agregue 1 cucharada (285 g) a 4 min. de agua por cada 1/2 taza de vegetales, y (10 oz) cubra sin cerrar con la tapa o una envoltura
de plástico perforada. No agregue sal o mantequilla hasta después de cocinar. (No se recomienda para los vegetales enmantequilla o salsa.)
enlatados P8 3 min. 30 s Vacíe los contenedores en un tazón para(430 g) a 4 min. uso seguro en microondas. No Cubrir. (15 oz)
IP4278_38W73AP_01_120507:IP4278_38W73AP_00_120507 2012-5-7 Jerry 下下13:45 Page 52
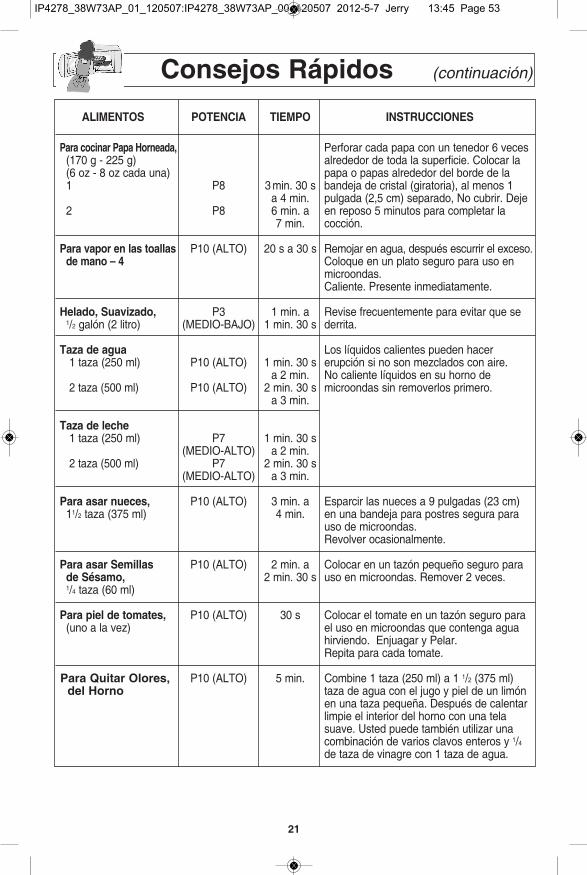
21
consejos rápidos (continuación)
aliMentos Potencia tieMPo instrucciones
Para cocinar Papa horneada, Perforar cada papa con un tenedor 6 veces (170 g - 225 g) alrededor de toda la superficie. Colocar la(6 oz - 8 oz cada una) papa o papas alrededor del borde de la 1 P8 3 min. 30 s bandeja de cristal (giratoria), al menos 1
a 4 min. pulgada (2,5 cm) separado, No cubrir. Deje 2 P8 6 min. a en reposo 5 minutos para completar la
7 min. cocción.
Para vapor en las toallas P10 (ALTO) 20 s a 30 s Remojar en agua, después escurrir el exceso.de mano – 4 Coloque en un plato seguro para uso en
microondas.Caliente. Presente inmediatamente.
helado, suavizado, P3 1 min. a Revise frecuentemente para evitar que se 1/2 galón (2 litro) (MEDIO-BAJO) 1 min. 30 s derrita.
taza de agua Los líquidos calientes pueden hacer1 taza (250 ml) P10 (ALTO) 1 min. 30 s erupción si no son mezclados con aire.
a 2 min. No caliente líquidos en su horno de2 taza (500 ml) P10 (ALTO) 2 min. 30 s microondas sin removerlos primero.
a 3 min.
taza de leche1 taza (250 ml) P7 1 min. 30 s
(MEDIO-ALTO) a 2 min.2 taza (500 ml) P7 2 min. 30 s
(MEDIO-ALTO) a 3 min.
Para asar nueces, P10 (ALTO) 3 min. a Esparcir las nueces a 9 pulgadas (23 cm) 11/2 taza (375 ml) 4 min. en una bandeja para postres segura para
uso de microondas.Revolver ocasionalmente.
Para asar semillas P10 (ALTO) 2 min. a Colocar en un tazón pequeño seguro para de sésamo, 2 min. 30 s uso en microondas. Remover 2 veces.1/4 taza (60 ml)
Para piel de tomates, P10 (ALTO) 30 s Colocar el tomate en un tazón seguro para (uno a la vez) el uso en microondas que contenga agua
hirviendo. Enjuagar y Pelar.Repita para cada tomate.
Para quitar olores, P10 (ALTO) 5 min. Combine 1 taza (250 ml) a 1 1/2 (375 ml) del horno taza de agua con el jugo y piel de un limón
en una taza pequeña. Después de calentar limpie el interior del horno con una tela suave. Usted puede también utilizar unacombinación de varios clavos enteros y 1/4
de taza de vinagre con 1 taza de agua.
IP4278_38W73AP_01_120507:IP4278_38W73AP_00_120507 2012-5-7 Jerry 下下13:45 Page 53

características de los alimentos
técnicas para cocinar
huesos y grasasTanto los huesos como la grasaafectan la cocción. Los huesospueden causar cocciónirregular. La carne cercana a laspuntas de los huesos puede sobrecocinarseen tanto que la carne ubicada bajo un huesolargo, tal como un hueso de jamón, puederesultar crudo. Grandes cantidades de grasaabsorben energía de microondas y la carnecercana a estas áreas puedesobrecocinarse.densidadAlimentos porosos, comopanes, pasteles o rollostoman menos tiempo paracocinar que los alimentospesados y densos comopapas y asados. Cuandorecalienta donas o otros alimentos condiferentes centros sea muy cuidadoso.Algunos alimentos tienen centros hechoscon azúcar, agua, o grasa y estos centrosatraen las microondas (Por ejemplo, donasde jalea). Cuando la jalea de la dona escalentada, la jalea esta extremadamentecaliente y el exterior solo parece tibio altacto. Esto puede resultar en unaquemadura si no se permite que el alimentose enfríe apropiadamente del centro.cantidadDos papas toman más tiempo paracocinarse que una papa. Así comose aumenta la cantidad de alimentose incrementa el tiempo de cocción.Cuando se cocinan cantidadespequeñas de alimento, tales como una odos papas, no deje el horno desatendido. Elcontenido de humedad en el alimento puededisminuir y puede resultar un incendio.formaTamaños uniformes secalentarán más uniforme-mente. El final delgado deun muslo se cocinará masrápido que un final carnoso. Paracompensar las formas irregulares, coloquelas partes delgadas hacia el centro del platoy las piezas gruesas hacia la orilla.tamañoPiezas delgadas se cocinanmás rápido que piezasgruesas.temperatura para empezar:Los alimentos que están a temperaturaambiente toman menos tiempo paracocinarse que aquellos que estánrefrigerados o congelados.
PerforadoAlimentos con piel omembrana deben serperforados, abiertos otener abierta una tira depiel antes de cocinar,para permitir que el vaporescape. Perforar las yemas y claras delos huevos enteros, almejas, ostiones,hígados de pollo, papas enteras yvegetales enteros. Las manzanas enteraso las papas sin pelar deben tener una tirade 2,5 cm de piel pelada antes decocinarse. Perfore salchichas yembutidos.
doradorLos alimentos no tendrán lamisma apariencia doradaque aquellos que soncocidos convencionalmenteo aquellos alimentos quesean cocinados utilizando lacaracterística de dorado. Las carnes yaves pueden ser bañados con salsa paradorar: salsa inglesa, salsa de barbacoa ola salsa para dorar con aplicador. Parausarlas combine la salsa para dorar conmantequilla o margarina derretidas;barnícelas antes de cocinarlas.Para dorar panes o panecillos rápidos sepuede usar azúcar morena en la recetaen lugar de azúcar granulada y se puedeespolvorear la superficie con especiesobscuras antes de hornear.
espaciadoAlimentos individuales, talescomo papas cocidas,panquecitos y aperitivos, secocinarán más parejo si secolocan en el horno a distancias iguales.Cuando sea posible, arregle los alimentos enun platón circular.
22
IP4278_38W73AP_01_120507:IP4278_38W73AP_00_120507 2012-5-7 Jerry 下下13:45 Page 54
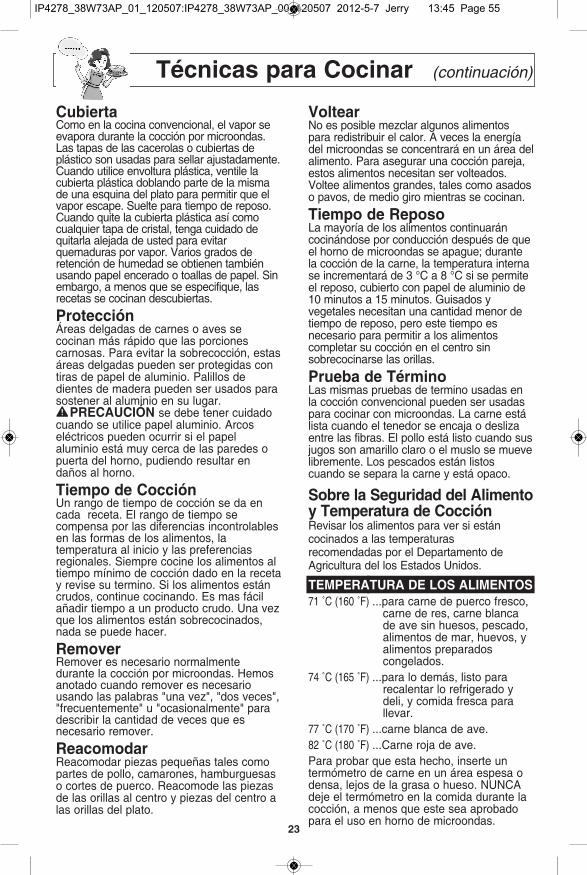
23
técnicas para cocinar (continuación)
cubiertaComo en la cocina convencional, el vapor seevapora durante la cocción por microondas.Las tapas de las cacerolas o cubiertas deplástico son usadas para sellar ajustadamente.Cuando utilice envoltura plástica, ventile lacubierta plástica doblando parte de la mismade una esquina del plato para permitir que elvapor escape. Suelte para tiempo de reposo.Cuando quite la cubierta plástica así comocualquier tapa de cristal, tenga cuidado dequitarla alejada de usted para evitarquemaduras por vapor. Varios grados deretención de humedad se obtienen tambiénusando papel encerado o toallas de papel. Sinembargo, a menos que se especifique, lasrecetas se cocinan descubiertas.
ProtecciónÁreas delgadas de carnes o aves secocinan más rápido que las porcionescarnosas. Para evitar la sobrecocción, estasáreas delgadas pueden ser protegidas contiras de papel de aluminio. Palillos dedientes de madera pueden ser usados parasostener al aluminio en su lugar.
PrecauciÓn se debe tener cuidadocuando se utilice papel aluminio. Arcoseléctricos pueden ocurrir si el papel aluminio está muy cerca de las paredes opuerta del horno, pudiendo resultar endaños al horno.
tiempo de cocciónUn rango de tiempo de cocción se da encada receta. El rango de tiempo secompensa por las diferencias incontrolablesen las formas de los alimentos, latemperatura al inicio y las preferenciasregionales. Siempre cocine los alimentos altiempo mínimo de cocción dado en la recetay revise su termino. Si los alimentos estáncrudos, continue cocinando. Es mas fácilañadir tiempo a un producto crudo. Una vezque los alimentos están sobrecocinados,nada se puede hacer.
removerRemover es necesario normalmentedurante la cocción por microondas. hemosanotado cuando remover es necesariousando las palabras "una vez", "dos veces","frecuentemente" u "ocasionalmente" paradescribir la cantidad de veces que esnecesario remover.
reacomodarReacomodar piezas pequeñas tales comopartes de pollo, camarones, hamburguesaso cortes de puerco. Reacomode las piezasde las orillas al centro y piezas del centro alas orillas del plato.
voltearNo es posible mezclar algunos alimentospara redistribuir el calor. A veces la energíadel microondas se concentrará en un área delalimento. Para asegurar una cocción pareja,estos alimentos necesitan ser volteados.Voltee alimentos grandes, tales como asadoso pavos, de medio giro mientras se cocinan.
tiempo de reposoLa mayoría de los alimentos continuaráncocinándose por conducción después de queel horno de microondas se apague; durantela cocción de la carne, la temperatura internase incrementará de 3 °C a 8 °C si se permiteel reposo, cubierto con papel de aluminio de10 minutos a 15 minutos. Guisados yvegetales necesitan una cantidad menor detiempo de reposo, pero este tiempo esnecesario para permitir a los alimentoscompletar su cocción en el centro sinsobrecocinarse las orillas.
Prueba de términoLas mismas pruebas de termino usadas enla cocción convencional pueden ser usadaspara cocinar con microondas. La carne estálista cuando el tenedor se encaja o deslizaentre las fibras. El pollo está listo cuando susjugos son amarillo claro o el muslo se muevelibremente. Los pescados están listoscuando se separa la carne y está opaco.
sobre la seguridad del alimentoy temperatura de cocciónRevisar los alimentos para ver si estáncocinados a las temperaturasrecomendadas por el Departamento deAgricultura del los Estados Unidos.
teMPeratura de los aliMentos71 ˚C (160 ˚F) ...para carne de puerco fresco,
carne de res, carne blanca de ave sin huesos, pescado, alimentos de mar, huevos, y alimentos preparadoscongelados.
74 ˚C (165 ˚F) ...para lo demás, listo para recalentar lo refrigerado y deli, y comida fresca parallevar.
77 ˚C (170 ˚F) ...carne blanca de ave.82 ˚C (180 ˚F) ...Carne roja de ave.Para probar que esta hecho, inserte untermómetro de carne en un área espesa odensa, lejos de la grasa o hueso. NUNCAdeje el termómetro en la comida durante lacocción, a menos que este sea aprobadopara el uso en horno de microondas.
IP4278_38W73AP_01_120507:IP4278_38W73AP_00_120507 2012-5-7 Jerry 下下13:45 Page 55
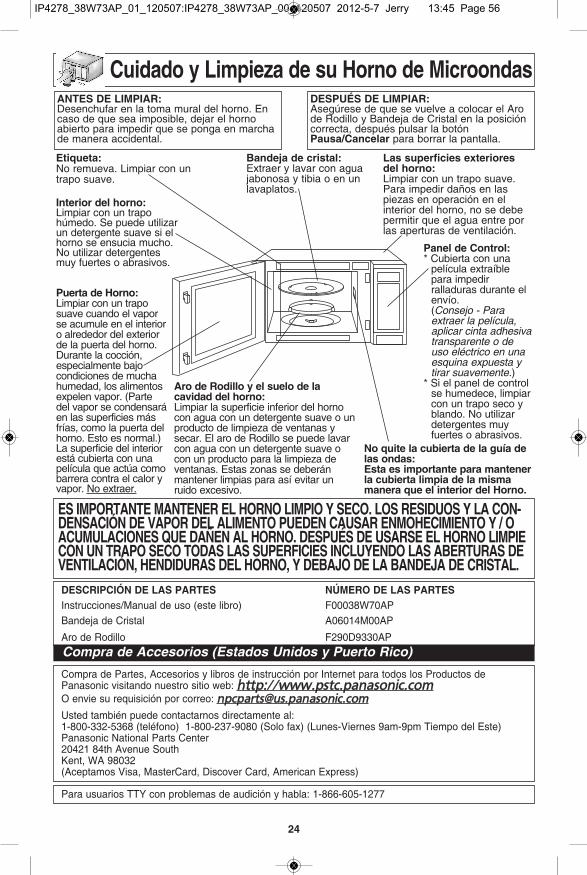
24
cuidado y limpieza de su horno de Microondasantes de liMPiar:Desenchufar en la toma mural del horno. Encaso de que sea imposible, dejar el hornoabierto para impedir que se ponga en marchade manera accidental.
desPuÉs de liMPiar:Asegúrese de que se vuelve a colocar el Arode Rodillo y Bandeja de Cristal en la posicióncorrecta, después pulsar la botónPausa/cancelar para borrar la pantalla.
etiqueta:No remueva. Limpiar con untrapo suave.
interior del horno:Limpiar con un trapohúmedo. Se puede utilizarun detergente suave si elhorno se ensucia mucho.No utilizar detergentesmuy fuertes o abrasivos.
Puerta de horno:Limpiar con un traposuave cuando el vaporse acumule en el interioro alrededor del exteriorde la puerta del horno.Durante la cocción,especialmente bajocondiciones de muchahumedad, los alimentosexpelen vapor. (Partedel vapor se condensaráen las superficies másfrías, como la puerta delhorno. Esto es normal.)La superficie del interiorestá cubierta con unapelícula que actúa comobarrera contra el calor yvapor. No extraer.
bandeja de cristal:Extraer y lavar con aguajabonosa y tibia o en unlavaplatos.
no quite la cubierta de la guía delas ondas:esta es importante para mantenerla cubierta limpia de la mismamanera que el interior del horno.
aro de rodillo y el suelo de lacavidad del horno:Limpiar la superficie inferior del hornocon agua con un detergente suave o unproducto de limpieza de ventanas ysecar. El aro de Rodillo se puede lavarcon agua con un detergente suave ocon un producto para la limpieza deventanas. Estas zonas se deberánmantener limpias para así evitar unruido excesivo.
las superficies exterioresdel horno:Limpiar con un trapo suave.Para impedir daños en laspiezas en operación en elinterior del horno, no se debepermitir que el agua entre porlas aperturas de ventilación.
Panel de control:* Cubierta con una
película extraíblepara impedirralladuras durante elenvío.(Consejo - Paraextraer la película,aplicar cinta adhesivatransparente o deuso eléctrico en unaesquina expuesta ytirar suavemente.)
* Si el panel de controlse humedece, limpiarcon un trapo seco yblando. No utilizardetergentes muyfuertes o abrasivos.
es iMPortante Mantener el horno liMPio y seco. los residuos y la con-densaciÓn de vaPor del aliMento Pueden causar enMoheciMiento y / oacuMulaciones que daÑen al horno. desPuÉs de usarse el horno liMPiecon un traPo seco todas las suPerficies incluyendo las aberturas deventilaciÓn, hendiduras del horno, y debaJo de la bandeJa de cristal. descriPciÓn de las Partes nÚMero de las PartesInstrucciones/Manual de uso (este libro) F00038W70APBandeja de Cristal A06014M00AP
Aro de Rodillo F290D9330AP
Compra de Partes, Accesorios y libros de instrucción por Internet para todos los Productos dePanasonic visitando nuestro sitio web: http://www.pstc.panasonic.comO envie su requisición por correo: [email protected] también puede contactarnos directamente al:1-800-332-5368 (teléfono) 1-800-237-9080 (Solo fax) (Lunes-Viernes 9am-9pm Tiempo del Este)Panasonic National Parts Center20421 84th Avenue SouthKent, WA 98032(Aceptamos Visa, MasterCard, Discover Card, American Express)
Para usuarios TTY con problemas de audición y habla: 1-866-605-1277
Compra de Accesorios (Estados Unidos y Puerto rico)
IP4278_38W73AP_01_120507:IP4278_38W73AP_00_120507 2012-5-7 Jerry 下下13:45 Page 56
25
antes de acudir a servicio
estos casos son normales:Mi horno de En algunos radios y televisores puede ocurrir interferencia microondas causa cuando usted cocine con su horno de microondas. Estainterferencia con interferencia es similar a la interferencia por pequeñosmi televisor. aparatos eléctricos como batidoras, aspiradoras, secadoras
de aire, esto no indica ningún problema.
Se acumula vapor en Durante la cocción los alimentos despiden vapor. La mayoría la puerta del horno y de este vapor es removido por el aire que circula en la aire caliente sale de cavidad del horno, sin embargo, algo de vapor se condensará las rejillas de en las superficies frías tales como la puerta del horno. Estoventilación. es normal. Después de usarse el horno se debe limpiar en
seco (ver página 24).
El horno no está enchufado Extraer el enchufe de la toma, esperarde manera segura. 10 segundos y volver a enchufar.El interruptor (breaker) del Reinicie el interruptor (breaker) delcircuito o el fusible se ha circuito o reemplace el fusible.fundido o disparado. Existe un problema con la Enchufar otro electrodomésticotoma eléctrica. en la toma para comprobar si
ésta funciona correctamente.La puerta no está cerrada Cerrar bien la puerta del horno.completamente.La botón encender Presione encender.no ha sido presionada.Ya se había introducido Presione Pausa/cancelar para otro programa en el horno. anular el programa anterior e
introducir un programa nuevo.El programa no es correcto. Programar otra vez de acuerdo
con las instrucciones de Operación.La botón Pausa/cancelar Programar el horno otra vez.se presionó accidentalmente.
El plato giratorio no está Retire la Bandeja de Cristal y el Arocolocado correctamente en de Rodillo. Limpie con un paño el Aro del Rodillo o existen húmedo y reajuste el Aro de Rodillo alimentos debajo del Aro del y la Bandeja de Cristal Rodillo. correctamente.
El(Los) Anillo(s) del Rodillo y Limpie estas partes de acuerdo al el fondo del horno están cuidado y limpieza de su hornosucios. de Microondas (ver página 24).
El horno no se poneen marcha.
El horno no empiezaa cocinar.
El plato giratoriotambalea.
Cuando el hornoestá funcionando, laBandeja de Cristalproduce ruidos.
ProbleMa Posible causa acciÓn
La fuente de suministrode energía del horno hafallado.
Favor contactar a su Centro deServicios Autorizado (vea pag. 26).
El horno detiene lacocción y en la pantallaindicadora aparece"h97" o "h98".
El SEGURO DE NIÑOS fue Desactivar el SEGURO al presionar activado al presionar la la botón de Pausa/cancelar 3 veces.botón de encender 3 veces.
La palabra "Child"aparece en la ventanade visualización.
IP4278_38W73AP_01_120507:IP4278_38W73AP_00_120507 2012-5-7 Jerry 下下13:45 Page 57
26
garantÍa liMitada y directorio de servicios al consuMidor(u.s.a. y Puerto rico)
COMPAÑÍA eLeCtrÓnICA De COnSuMIDOreS PAnASOnIC,DIVISIÓn De PAnASOnIC COrPOrACIOn De nOrte AMÉrICAOne Panasonic Way, Secaucus, new Jersey 07094
garantía limitada del horno Microonda Panasoniccobertura de garantía limitada (solo para usa y Puerto rico) Si su producto no funciona apropiadamente debido a un defecto en materiales o mano de obra, Panasonic Consumer MarketingCompany of North America (referido como el “ Emisor de la garantía”) podrá, por la duración del periodo indicado en la tabla deabajo, la cual inicia con la fecha de la compra original (“periodo de garantía”), las opciones (a) de reparar su producto con partesnuevas o restaurado, (b) reemplazo con un nuevo o producto restaurado de valor equivalente, o (c) rembolsar el precio pagado.La decisión de reparar, reemplazar o rembolsar será realizada por el Emisor de la garantía.
Producto o nombre de la parte Mano de obra Partestodas las Partes (EXCEPTO EL TUBO MAGNETRÓN) 1 (un) aÑo 1 (un) aÑotubo Magnetrón 1 (un) aÑo 5 (cinco) aÑos
Durante el período de la garantía de “Trabajo” no habrá cobros por el trabajo de reparacion o mano de obra. Durante el períodode la garantía de “Partes” no habrá cargo alguno del costo de las piezas . Usted debe llevar o enviar por correo su productodurante el período de garantía. Esta garantía sólo se aplica a productos comprados y pagados en Estados Unidos y Puerto Rico.Esta garantía se extiende solamente al comprador original de un producto nuevo y no a quien lo compre de segunda mano. Parael servicio de garantía se requiere una prueba de la fecha de compra original para obtener servicio bajo esta garantia limitadaservicio de entrega o envío por correo: Para el Servicio de Entrega o Envío por Correo en Estados Unidos y Puerto Rico, por favor llame al 1-800-211- PANA(7262) o vis-ite nuestro Sitio Web Panasonic: http://www.panasonic.comAl enviar la unidad, embálela y envíe cuidadosamente en cartón original (o proveído) . Incluir una carta detallando la queja, juntocon la factura de la venta y proporcione un numero de teléfono durante el dia donde se puede ser contactado.si la reParaciÓn es necesaria durante el Periodo de garantia,el coMPrador serÁ obligado a Pro-Porcionar una Prueba de recibo de coMPra indicando la fecha de coMPra,la cantidad Pagada ylugar de coMPra, el cliente sera resPonsable for la reParacion de cualquier unidad recibida sinesa Prueba de la coMPralimites y exclusiones de la garantía limitadaEsta garantía SÓLO CUBRE fallos debido a defectos en materiales o en la fabricación y NO CUBRE vidrios, piezas plásticas, oalgún tipo de termómetro (si es que está incluído), deterioros o rasguños normales o daños cósmeticos. La garantía TAMPOCOCUBRE daños producidos por el transporte o fallas causadas por productos no proporcionados por el garante, o fallas que hayansido el resultado de accidentes, mal uso, abuso, negligencia, plaga de insectos, mal embalaje, mala aplicación, alteración, insta-lación defectuosa, ajustes de montaje, mal ajuste del control del consumidor, mantenimiento inapropiado, sobretensión en la líneade conducción eléctrica, daños en la iluminación, modificaciones, o uso comercial (por ejemplo en un hotel, oficina, restaurante uotros usos comerciales), arriendo del producto, reparado por cualquier otro servicio que no sea el Servicio Técnico de la Fábrica oalgún Servicio Técnico Autorizado, o cualquier daño que se atribuya a un acto de Dios. no hay garantia eXPresa, eXceP-to las Mencionadas en “la cobertura de la garantia liMitada”. el eMisor de la garantia no esresPonsible Por daÑos, incidentes o consecuentes que resulten del uso de este Producto o quesurJa de cualquier incuMPliMiento de esta garantia. (Como ejemplo, excluye los daños de perdida de tiempo,viaje hacia y del Centro de Servicio, la perdida de medios o imágenes, datos u otra memoria o registros. Los aspectos enlistadosno son exclusivos, solo como ilustración) todas las garantias eXPresa e iMPlícitas, incluyendo la garantiade coMerciabilidad, estan liMitadas a la duracion de la garantia liMitada. Algunos estados no permiten laexclusión o limitación por incidentes o daños consecuentes, o limitaciones en cuánto tiempo una garantía implicada dura, así quelas exclusiones tal vez no le apliquen.Esta garantía le da derecho legales específicos y tal vez tenga otros derechos que pueden variar de estado en estado. Si sedesarrolla un problema con este producto durante o después del periodo de la garantía, puede contactar a su Proveedor o Centrode Servicio. Si el problema no es manejado a su satisfacción, entonces escriba al:
Consumer Affairs DepartmentPanasonic Consumer Marketing Company661 Independence Pkwy Chesapeake, VA 23320
Partes y servicios que no estan cubierto Por esta garantia liMitada, son su resPonsabilidad.
Obtenga información sobre Productos y Asistencia de funcionamento; localizar su distribuidor mas cercano o Centrode Servicio; compra de partes y accesorios; o solicitud de servicio para cliente y literatura,Visite nuestro sitio Weben: http://www.panasonic.com/helpo, contáctenos vía web a: http://www.panasonic.com/contactinfo
Usted también puede contactarnos directamente a: 1-800-211-PANA (7262)Lunes-Viernes 9am-9pm, Sabado-Domingo 10am-7pm Tiempo del Este
Directorio de Servicio a Clientes (Estados Unidos y Puerto rico)
Para usuarios TTY con problemas de audición y habla: 1-877-833-8855
IP4278_38W73AP_01_120507:IP4278_38W73AP_00_120507 2012-5-7 Jerry 下下13:45 Page 58
27
guÍa raPida de oPeraciÓncaracterística como operarla
Para Poner elReloj en la hora
(*página 11)
a
a
a
a
Presione 1 vez. Registre la hora. Presione 1 vez.
Para Ajuste dePotencia y Tiempo
(*página 12) Seleccione potencia. Establezca el tiempo de cocción. Presione.
Para Descongelar usandola tecla DescongelaciónTurbo Inverter
(*página 14) Presione 1 vez. Fije el peso. Presione.
Para Recalentamientousando la botónRecalentamiento deSensor (*página 16) Presione 1 vez. Presione.
Para Cocinar usando labotón de Palomitas
(*página 13) Registre el peso del paquete. Opcional. Presione.
Minuto Automático(*página 12)
(hasta 10) Presione.
Para utilizarMantener Caliente
(*página 12) Presione 1 vez. Seleccione el tiempo de mantener caliente ( hasta 30 minutos) Presione.
Para Cocinar usandobotón de Cocción deSensor
(*página 16) Seleccione categoría.
e.x.
Presione.
Opcional.
o
Opcional.
o
o
Para utilizar Candadode Seguridad deNiños (*página 11) Presione 3 veces. Presione 3 veces.
Paraseleccionar:
Paracancelar:
Para Usar comotemporizador decocina
(*página 19) Presione 1 vez. Introducir hora. Presione.
Para Establecer elTiempo de Reposo
(*página 19) Presione 1 vez. Introducir hora. Presione.( )Registre el
programa deCocción deseado.
Para Establecer unComienzo Tardío
(*página 19) Presione 1 vez. Introducir hora. Presione.( )Registre el
programa deCocción deseado.
a
a
a
IP4278_38W73AP_01_120507:IP4278_38W73AP_00_120507 2012-5-7 Jerry 下下13:45 Page 59
28
registro de usuarioEl número de serie de este producto selocaliza en la parte trasera del horno oen la parte izquierda del panel decontrol. Usted debería anotar el númerode modelo y número de serie de estehorno en el espacio indicado y guardareste libro como un registro permanentede su compra para futuras referencias.
número de modelo:_________
número de serie: ___________
fecha de compra: __________
especificaciones
Fuente de Energia:Potencia Fuente de Poder:Potencia de Cocción:*Dimensiones Exteriores(Ancho x Fondo x Alto):Dimensiones Cavidad del horno(Ancho x Fondo x Alto):Frecuencia:Peso Neto:
NN-SN968 NN-SN942W NN-SN942B120 V, 60 hz
12,7 A, 1 460 W1 250 W
606 mm x 493 mm x 356 mm(23 7/8 " x 19 7/16 " x 14 ")
469 mm x 470 mm x 278 mm(18 7/16 " x 18 1/2 " x 10 15/16 ")
2 450 MhzAprox. 16,0 kg (35,0 lb)
*Determinado de acuerdo a procedimientos contemplados en la norma IEC.Las especificaciones están sujetas a cambios sin previo aviso.
Compañía electrónica de Consumidores Panasonic, División de Panasonic Corporacion de norte AméricanaOne Panasonic WaySecaucus, new Jersey 07094, uSA
Panasonic electrodomésticos horno de Microondas de Shanghai
IP4278_38W73AP_01_120507:IP4278_38W73AP_00_120507 2012-5-7 Jerry 下下13:45 Page 60