Embed Size (px)
Citation preview

Rowing machine RX7
Assembly and operating instructions
Art. No. TF-RX7-2

2 RX7

3RX7
Dear Customer,
Thank you for deciding for a high-quality training equipment of the brand Taurus, the brand that makes athlete‘s hearts beat faster. Taurus offers a wide range of home fitness equipment like elliptical cross trainers, ergometers, treadmills and rowing machines. Taurus equipment is the optimal equipment for all those who want to train at home independent of goals and fitness level. For further information please visit www.sport-tiedje.com or www.taurus-fitness.de.
SAFETY NOTICE
Please read all of the instructions carefully before assembly and first use. These instructions are intended to ensure speedy assembly and explain safe usage. Make sure that all people exercising with the equipment (in particular children and persons with limited physical, sensory, mental or motor
capabilities) are informed about these instructions and its content in advance. In case of doubt, a responsible person must supervise the use of the equipment.
This equipment has been manufactured according to the latest safety knowledge. As far as possible, potential safety hazards which could cause injury have been eliminated. Make sure to follow the instructions carefully and that all parts are securely in place. If required, read through the instructions again to correct any mistakes.
Please pay close attention to the safety and maintenance instructions given here. The contract partner cannot be held liable for damage to health, accidents or damage to the equipment when it is not used in accordance with these instructions.
The equipment is suitable for home use as well as semi-professional use (e. g., hospitals, clubs, hotels, schools, etc.). It is not suitable for commercial or professional use (e. g., commercial gyms).
Retain these instructions in a safe place for future reference, maintenance or when ordering replacement parts.
4 RX7
CONTENTS
1 GENERAL INFORMATION 6
1.1 Technical data 61.2 Personal safety 71.3 Electrical safety 81.4 Set-up place 8
2 ASSEMBLY INSTRUCTIONS, MAINTENANCE AND CARE 9
2.1 General instructions 92.2 Faults and troubleshooting 112.3 Maintenance and service calendar 12
3 ASSEMBLY 13
3.1 Package contents 133.2 Assembly instructions 143.3 Settings / setting up the rowing machine 18 4 OPERATING INSTRUCTIONS 24
4.1 Console display 244.2 Button functions 264.3 Programs 27 4.3.1 Speed or Pace boat program 28 4.3.2 Race Program 29 4.3.3 Interval distance and interval time programs 31 4.3.4 60%, 75%, 90 % heart rate program 33 4.3.5 Target heart rate program (THR Program) 34 4.3.6 Watt program 35 4.3.7 Profile program 37 4.3.8 Fitness Test 39 4.3.9 Game 39 4.3.10 User settings 404.4 Operation infrared remote control 48 4.4.1 Introduction 48 4.4.2 Inserting batteries 48 4.4.3 List of parts 49 4.4.4 Main functions of the infrared transmitter 49 4.4.5 Replacing batteries 50 4.4.6 Infrared range and direction 51

5RX7
4.4.7 Angle of the infrared transmitter 524.4.8 Code from the remote control 524.4.9 Troubleshooting manual 53
5 WORKOUT INSTRUCTIONS 55
5.1 Heart rate measuring 555.2 Notes for correct rowing 575.3 10 tips for effective rowing training 605.4 Designing a workout 615.5 Stretching exercises for leg & chest muscles 635.6 Workout journal 65
6 WARRANTY INFORMATION 66
7 DISPOSAL 68
8 ORDERING ACCESSORIES 69
9 ORDERING SPARE PARTS 70
9.1 Service hotline 709.2 Serial number and model name 709.3 Part list and exploded drawing - rowing machine 719.4 Part list and exploded drawing - infrared remote control 74

6 RX7
1 GENERAL INFORMATION
1.1 Technical data
LCD display of
+ strokes, strokes per minute + training time in min + distance in m + time/500 m: average / current + calories burnt in kcal + heart rate (when using a chest strap) + Watt + resistance level
Resistance system: combined air/magnet brake system Resistance level: 24Watt: 30 - 300 Watt
User memory: 5Total number of training programs: 40Pacer program: 1Pre-set programs: 25Watt-controlled programs: 1Heart rate controlled programs: 4User defined programs: 5
Weight and dimensions:
Article weight (gross, including packaging): 52 kg Article weight (net, without packaging): 50.45 kg Packaging dimensions (L x W x H): approx. 1480 mm x 800 mm x 310 mm Set-up dimensions (L x W x H): approx. 2430 mm x 560 mm x 1100 mmSet-up folded (L x W x H): approximately 1300 mm x 600 mm x 1700 mm maximumUser weight: 150 kg/330 lbs

7RX7
1.2 Personal safety
+ Before you start using the equipment, you should consult your physician that this type of exercise is suitable for you from a health perspective. Particularly affected are persons who: have a hereditary disposition to high blood pressure or heart disease, are over the age of 45, smoke, have high cholesterol values, are overweight and/or have not exercised regularly in the past year.
+ Please note that working out excessively can seriously damage your health. Please also be aware that heart rate monitoring systems might be imprecise.
+ The equipment may only be used for its intended purpose; that means for whole body training by adults.
+ Any other usage is prohibited and potentially dangerous. The contract partner cannot be held liable for damage resulting from improper use.
+ The equipment is strictly for use by one person at a time. + Children should not be allowed unsupervised access to the equipment.+ Before starting your training, make yourself familiar with all of the equipment‘s
functions and setting options. Have an expert explain the correct usage of the product to you.
+ Make sure that nobody is in the range of motion of the equipment while exercising.+ Keep your hands, feet and other body parts, hair, clothing, jewelry and other
objects well clear of moving parts.+ During use, wear suitable sports clothing rather than loose or baggy clothing.
When selecting sports shoes, think about the suitability of the sole – preferably this should be made of rubber or other non-slip materials. Shoes with heels, leather soles, studs or spikes are not suitable. Never work out in bare feet.
+ It is also important to take note of the information given in the workout instructions for creating a workout plan.
+ At the first signs of weakness, nausea, dizziness, pain, difficulty in breathing or other abnormal symptoms, stop your workout immediately and, if necessary, consult your physician.
+ Without prior agreement from your authorized contract partner, opening the equipment is prohibited.
+ Be careful when you get on or off the equipment.

8 RX7
1.3 Electrical safety
+ The equipment requires a 220 - 230V / 50 Hertz mains power supply.+ The equipment should be connected directly to a grounded plug socket only by
means of the power cable supplied. The use of multi-socket adapters or similar is not recommended. Extension leads must comply with local electrical safety guidelines. Always fully unwind the power cable.
+ The outlet should be secured with a fuse with a minimum value of „16 amperes, slow“.
+ In order to reduce the risk of an electric shock, always unplug the equipment from the mains socket immediately after your workout, before assembly or dismantling, and before maintenance or cleaning. Do not pull on the cable.
+ When plugged in, do not leave the equipment unattended at any time. To avoid use by anyone unfamiliar with the operating instructions, the power cable should be removed when the equipment is not in use.
+ Keep the power cable away from heat, oil and sharp edges. Do not route the power cable underneath the equipment or under a carpet or rug, and do not place any objects on top of it.
+ Make no modifications to either the power cable or the mains plug. + If the power cable or the plug are damaged or defective, contact your authorized
contract partner. Do not use the equipment in the meantime. + Do not keep electrical devices (e. g., mobile phones) in close proximity to the
console or the control electronics, otherwise display values (e. g., pulse measuring) could be inaccurate.
1.4 Set-up place
+ The equipment should only be used indoors, in a sufficiently heated and dry area (ambient temperature between 10°C and 35°C). The equipment should not be used outdoors or in rooms with high humidity (over 70%) like swimming pools. The equipment should only be stored in surroundings with an ambient temperature between 5°C and 45°C.
+ The training room should be well ventilated during training and not be exposed to any draughts.
+ Always keep the power cable away from hot surfaces and grounds and make sure that the cable is not stuck somewhere or becomes a „trip hazard“.
+ No objects of any type should be inserted into the openings of the equipment.+ The equipment should be placed on a level and solid surface, any unevenness in
the floor should be leveled out.

9RX7
+ A floor protective mat / equipment underlay can help to protect high-quality floor coverings (parquet, laminate, cork, carpets) from dents and sweat and can help to level out slight unevenness.
+ Choose a location in which to place the equipment such that there is enough free space/clearance to the front, the rear and to the sides of the equipment. Make sure that you leave at least 30 cm on each side of the equipment and at least 15 cm in front of and behind the equipment as a training zone. This is the minimum required area in order to safely use the equipment.
The recommended free zone around the equipment should be at least 60 cm on each side and 45 cm in front of and behind the equipment.
Furthermore, the equipment should not be set up in main entrances or on escape routes.
2 ASSEMBLY INSTRUCTIONS, MAINTENANCE AND CARE
2.1 General instructions
+ Please check if all parts and tools belonging to the equipment are included in the delivery and if there is any transport damage. If there are any complaints, please contact your contract partner directly.
+ Some of the nuts and bolts to be used in assembly are already pre-mounted in order to make set-up as easy as possible.
+ The equipment must be assembled by adults. In case of doubt, ask for assistance from another person with technical skills.
+ Keep children away from the equipment during assembly, because small parts are included in the delivery and may be swallowed.
+ Make sure that you have enough space (at least 1.50 m) in every direction during assembly.

10 RX7
+ Do not leave any tools and packaging materials like plastic sheeting laying around to avoid danger of suffocation for children.
+ Assemble the equipment on an underlay mat or on the cardboard packaging in order to avoid damage to the equipment and to the floor (scratches).
+ Before starting assembly, all individual parts should be placed on the floor next to each other.
+ Read the assembly instructions carefully and assemble the equipment according to the illustrations. Proceed carefully and cautiously.
+ First loosen all parts and check for their correct fitting. Then tighten the screws using a tool.
+ Modifications to the design or improper repairs may pose a hazard to the user and should not be carried out. The product warranty may be void as a result.
+ Only authorized service technicians are permitted to carry out all servicing and/or repairs – it excludes maintenance and care.
+ Damaged or worn components may impair your safety and the lifespan of the equipment. You should therefore immediately replace damaged or worn components. Please contact your contract partner in such a case. The equipment should no longer be used until it has been repaired. When needed, only use original Taurus spare parts.
+ Check the tightness of all screw connections once a month.+ In order to be able to guarantee the constructively defined safety level of this
equipment, we recommend having the equipment regularly maintained (at least once a year) by specialists (service technicians of your contract partner).
+ The equipment may be cleaned of dust, dirt and sweat using a damp cloth. The use of solvents should be strictly avoided. Also, make sure that no liquids (e. g. sweat) get into the openings of the equipment (e. g. console).
+ It is recommended to have a safety check before each training session and to examine the equipment for wear or damage. If you determine damaged or defective parts, the equipment should not be used until it is repaired. Please contact the contract partner for the repair.
+ Manufacturer note: The pull strap is equipped with a return spring so that the pull strap is automatically wound up again. The return spring is equipped with the lowest possible power. The reason for the light return spring is to give the user a better training effect for the rear thigh muscles. These muscles are stressed when the user moves the seat forward. If the return power is strong, the person using the equipment would be pulled.

11RX7
2.2 Faults and troubleshooting
PROBLEM “NO PULSE” / heart rate detected SOLUTION1) If your skin is too dry, your chest strap cannot detect the electrical impulse from your heart rate. Moisten the sensors of the chest strap slightly in order to improve the contact. For longer units, like a marathon, we recommend using contact gel for the chest strap.2) Make sure that you use a compatible analog chest strap with a frequency of 5 kHz.3) Change the batteries in your chest strap even if the chest strap is new.4) If you are using a 5 kHz frequency chest strap, there may be interfering signals. Move your rowing machine to another place and, if applicable, remove all electrical devices out of the surrounding area. Then check the heart rate signal again.5) Check if your chest strap is working correctly. Test it on a different equipment (on site by the contract partner, local health club, etc.).6) Contact your contract partner in order to confirm the compatibility of your chest strap.
PROBLEM LCD blurs - divided LCD - software error, etc.SOLUTION1) Computer reset: Press the RESET button for a few seconds.2) Restart the computer: Disrupt the power supply for about 15 seconds.3) Reconnect all cable plug connections, see assembly instructions.3) Ask for replacement console and install it.
FAQ – FREQUENTLY ASKED QUESTIONS
Q: Chest strap - does my old chest strap work with the rowing machine?A1: 5 kHz chest strap = mostly - provided that your computer is 5 kHz compatible. A2: Digital chest strap (2.4 GHz) = no - digital chest straps are coded and normally only compatible with one equipment.Q: How does the computer determine and calculate the distance (e. g. meters) and speed (e. g. time/500m)?A: Distance - This rowing machine has two sensors on the pull strap, Sensor A and Sensor B. Thus, the computer can determine if the strap moves backwards (stroke pull) or forwards (release of a stroke). The computer measures the rotations per stroke, combined with a factor for the resistance level, a higher resistance results in more meters. The speed is calculated from this combined with the time factor.

12 RX7
Pull strap [part 709]The pull strap [709] is made of high-quality nylon fabric and extremely resilient. It is nearly impossible to tear the pull strap. Nevertheless, it is important to inspect it for wear. Make sure that there are no cuts or frays or other types of damage. Also check the seam on the handle. If you determine any impairments, you should no longer use the rowing machine until you have replaced the pull strap.
Footrest[Partl#014, 126, 127, 128, 300, 306, 710]The footrest has many mobile parts and it is important that they are always in a good state. Check if the buckle and the foot loop are connected with each other. Check to see if the locking mechanism from the footrest [126] works properly as well.Make sure that all screws are tight. If you determine any errors, contact your contract partner immediately and use the rowing machine again only after it has been repaired.
Part Weekly Monthly 2x annually
Display console C I
Lubrication of mobile parts I
Plastic cover C I
Screws & cable connections I
Legends: C = cleaning; I = inspect
2.3 Maintenance and service calendar
The following routine work must be executed in the specified time intervals:

13RX7
3 ASSEMBLY
3.1 Package contents
The package contains the parts represented in the illustration, including a power cable with mains plug. If one of the illustrated parts is missing, please contact your contract partner.

14 RX7
3.2 Assembly manual
Before starting assembly, look carefully through the individual assembly steps shown and assemble the equipment in the order indicated.
Step 1: Before you unpack the RX7 rowing machine, make sure that you have a work space of 2m x 2.5 m.
Step 2: Open the box as shown in the figure below.
NOTE: In order to protect the RX7 rowing machine from damage as long as possible, you should only remove the protective packaging when it is necessary.
Step 3: a) Place the frame [002] in the carton lid as shown in the image on the right.
b) Loosen the four pre-mounted screws [300] from the frame [002].
c) Mount the front supporting foot [005] as in the illustration with the previously loosened screws [300] and tighten them..

15RX7
Step 4: a) For the next step, turn the frame as shown in the figure.
b) Remove the safety belt and dispose of it. Place the handle in the appropriate holder.
c) Loosen the four pre-mounted screws (300) from the frame (002) with the included tool.
d) Mount the two foot supports [013 & 014] with the previously loosened four screws [300] and tighten them.
Step 5: a) Remove the rail [001] from the carton and place it on the carton lid as in the figure below.
b) Loosen the four screws [300] from the rail [001] and the two screws [302] from the rear supporting foot [006] with the included tool.
c) Mount the rear supporting foot [006] with the previously loosened four screws [300] and tighten them.
d) Mount the cover cap for the rail [116] with the two screws [302] and tighten them.
e) Remove the binding wire.

16 RX7
Step 6: a) Loosen the screws [300] eight times from the rotating joint [300] tool.
b) Mount the rail [001] with the previously loosened screws [300] and tighten them.
Step 7: a) Loosen the four screws (300) from the seat (119) with the included tool.
b) Mount the seat [119] with the previously loosened four screws [300] and tighten them.

17RX7
Step 8:a) Loosen the four screws (303) from the seat frame with the included tool.
b) Mount the two seat frame covers [117] with the previously loosened four screws [303] and tighten them.
Note: Make sure that the two seat frame covers [117] are correctly connected with each other as in the figure below.
Step 9:a) Connect the power supply [715] to the outlet.

18 RX7
3.3 Settings / setting up the rowing machine
Opening up
Important: Clear an area of 1 x 2.5 meters before you begin setting up the rowing machine. Make sure that the floor is solid and level.Two people are needed to open up the RX7 rowing machine. One person holds the rail [001], while the other presses the mounting button [125].
1) Turn the mounting button [125] five to seven times counterclockwise.2) While the first person holds the rail [001], the second person pulls out the mounting button [125] in order to release the safety mechanism and open up the rail.
3) Then tighten the mounting button [125] in a clockwise direction.
NOTE: While opening and closing the rowing machine, keep your fingers and hands away from rotating joints in order to avoid injury.

19RX7
Sit up securely
Make sure that the seat [119] is directly below you before you sit down.
1) Straddle the rail [001].2) Position the seat [119] directly below you.3) When sitting down, make sure that the seat does not move.
Presetting of the heel support
There are 10 marked settings for the heel support. Before you begin training, set the heel support [126] to the first setting.
1) Press the two levers from the heel support together in order to open the locking mechanism.2) Slide the heel supports [126] to the first setting.3) Release the lever in order to enable the locking mechanism.

20 RX7
Setting of the foot straps
The correct position of the foot straps [710] is located directly behind the toes, appro-ximately above the joints. Make sure that the foot straps [710] are tightened.
1) Slide your feet with the heel support [126] to the first setting under the foot strap [710].2) The correct position for the foot straps [710] is located directly behind the toes, approximately above the joints.3) Tighten the foot loops [710] as in the illustration above.
Setting the heel support
The heel support [126] has a spring-loaded locking system for simple setting. Simply slide the heel support up to the heel.Remember the setting for the next training.
1) Use your foot under the tightened foot strap to simply slide the heel support [126] up to your heel as in the image above.2) Remember the setting for the next training.

21RX7
Setting the console
The console [714] and the console mast [015] can be set to nearly any height and any angle. Note: Due to safety reasons, you should avoid having the pull strap [709] touch the console [714] during training.
1) Hold the console [714] with both hands as in the image above.2) Move the console [714] to the desired height and set the desired angle.
Setting the fan
The RX7 rowing machine creates an air flow, which can be aimed toward a certain di-rection through the air slits.
1) Turn the setting wheel for the air slits in order to change the air direction.2) In order to stop the air flow, turn the wheel all the way down.
22 RX7
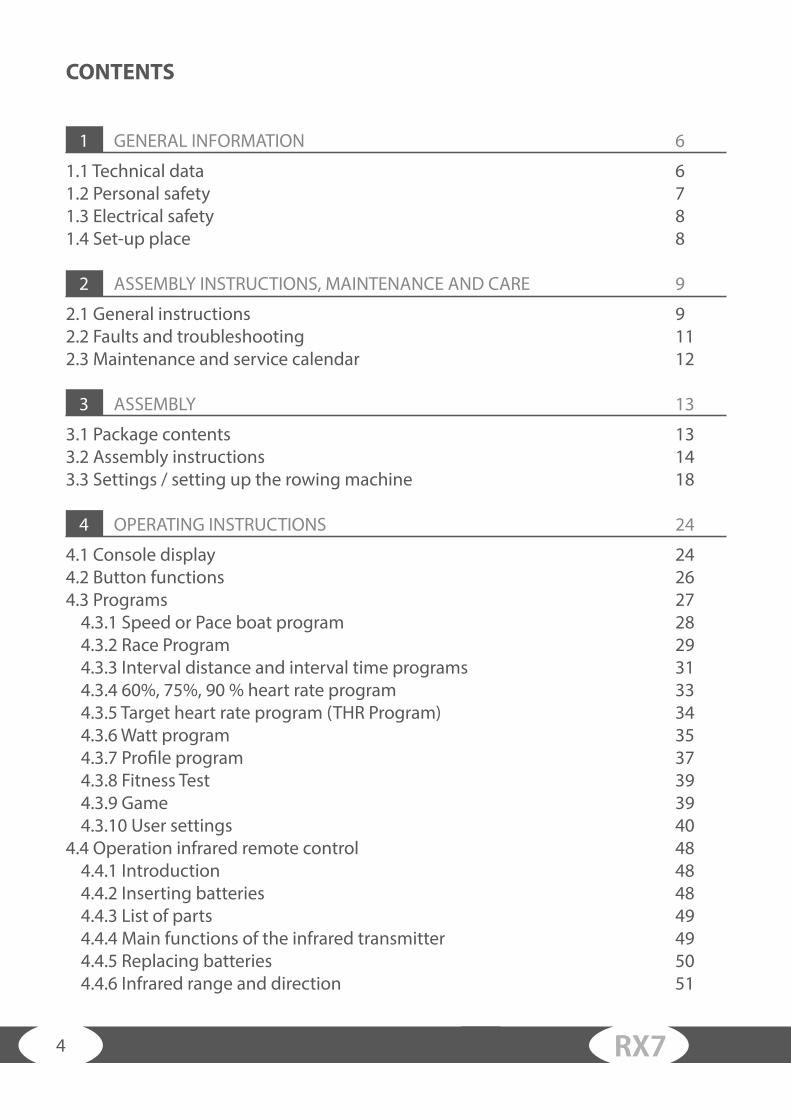
Handle holder
Once you have completed your training, remember to hook the handle into the holder [108].
Folding up
If you would like to fold up the rowing machine, follow the steps for opening the ro-wing machine in reverse order.NOTE: While opening and closing the rowing machine, keep your fingers and
hands away from rotating joints in order to avoid injury.1) Turn the mounting button five to seven times counterclockwise.2) While the first person holds the rail [001], the second person pulls out the mounting button [125] in order to release the safety mechanism and fold up the rail.3) Then tighten the mounting button [125] in a clockwise direction.

23RX7
Loosen the foot strap
You can very easily open the foot strap with the quick release flap.
1) Lift the flap with your thumbs as in the image above.
Transport and storage
he Taurus RX7 rowing machine is equipped with transport wheels, which makes it very easy to move by one person. However, the Taurus RX7 rowing machine weighs 44 kg, which may make the help of a second person necessary.
1) Stand next to the rowing machine as in figure 1. Hold it tight with both hands. With the help of your body weight, slowly tilt the RX7 forward while you simultaneously move to the front side.2) After this, you can easily move the rowing machine to a new position.The rowing machine is equipped with soft PVC wheels in order to protect your carpet or flooring.3) If you would like to fold up the rowing machine, follow the previously described steps in reverse order.

24 RX7
4 OPERATING MANUAL
4.1 Console display
METERS Covered distance is displayed in meters.
BAR CHART Program profiles and text messages are shown here.16 rows high = 24 resistance levels20 columns long = 20 time intervals
SPM Strokes per minute
RUDERSCHLAG Total strokes
CALORIES Calorie consumption/energy turnover in kilo calories (Kcal)NOTE: Your user data serves for a better calculation of the calorie turnover. You can select it in the main menu.

25RX7
WATTS Estimated Watt per stroke, calibrated according to EN 957. 1 Watt corresponds to an output of 1 Joule per second.
HEART RATE RECEIVER FREQUENCY
Depending on model 5 kHz or 2.5 GHz or both
PULSE Your heart rate is specified in strokes per minute.NOTE: “---” indicates that the computer is not receiving a heart rate/pulse signal.
LEVEL 24 resistance levels are available to choose from level 1 = minimum resistancelevel 24 = maximum resistance
TIME/500m CURRENT Only indicates the current time/500 m.
TIME/500m AVERAGE Only indicates the average time/500m.
TIME Indicates the training time in minutes and seconds.
BATTERY Full, half full or emptyNOTE: - Only applies for A/C operated computers - Battery operation & battery type
RUNNING TEXT Text messages support you and guide you through each computer program.

26 RX7
MENU A button shortcut for the main menu.NOTE: Does not work in the workout mode, works in the menu mode and pause mode.
RECOVERY
Two functions
1. Kilometer counter: Hold the RECOVERY button.
2. Start RECOVERY program: The recovery program automatically evaluates your heart rate recovery for a minute directly after training.
SELECT
Four functions
1. Before the workout (e. g. menu mode): Press the SELECT buttons in order to scroll through the available selection. 2. Before the workout (e. g. menu mode): Hold one of the SELECT but-tons in order to accelerate the selection.
3. During the workout (e. g. workout mode): Press one of the SELECT buttons to set the resistance level.
4. Before the workout (e. g. menu mode): Hold both SELECT buttons for three seconds in order to get to the measuring system (metric or Impe-rial). Only applies to the user data for size and weight.
ENTER
Two functions
1. Before the workout (e. g. menu mode): Press the ENTER button in order to confirm a selection.
2. Before the workout (e. g. menu mode): Hold the ENTER button for three seconds in order to skip the selection process.
NOTE: The ENTER button does not work in the workout mode.START/STOP/RESET button
Three functions
1. Before the workout (e. g. menu mode): Press the START button to begin the workout. 2. During the workout (e. g. workout mode): Press the STOP button to complete the workout. The computer will automatically go to the “End of Workout Display” 3. Any time / any mode: Hold the RESET button for three seconds in order to return the computer to the main menu. NOTE: Unsaved data will be lost. Any saved data will be maintained.
4.2 Button functions
27RX7
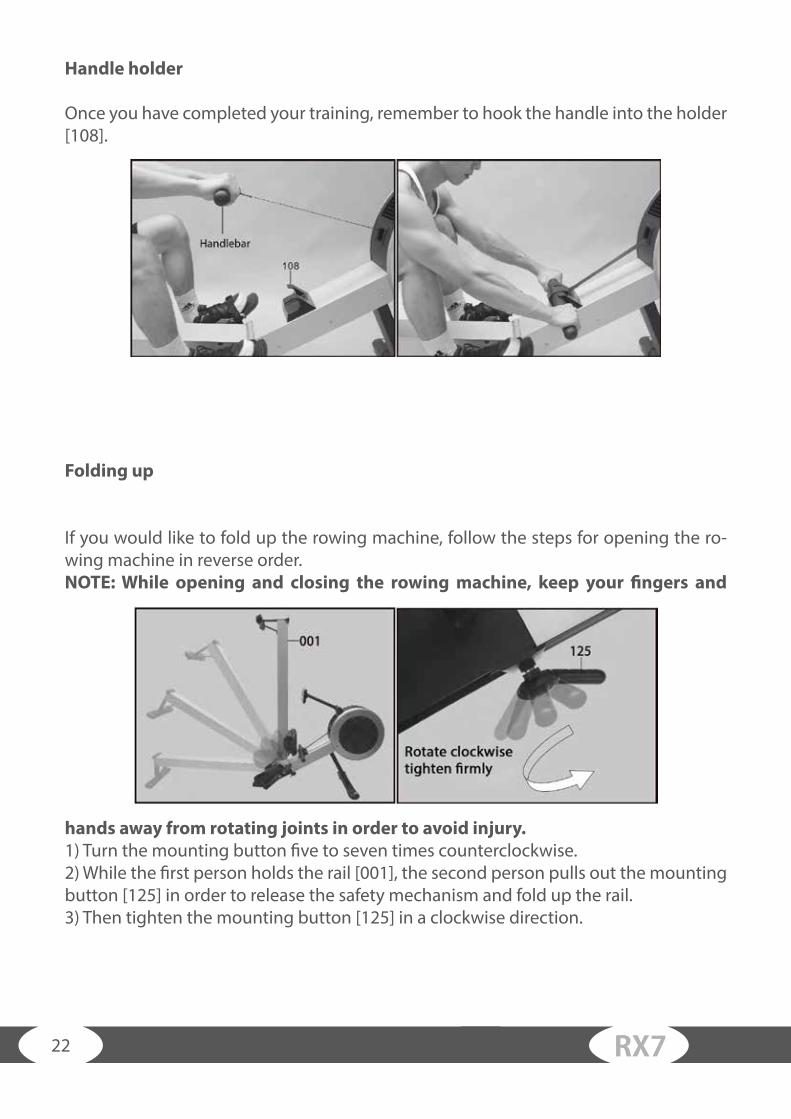
4.3 Operation
ProgramsThis computer has the following programs: 1 PACE BOAT PROGRAM (speed specification)1 RACING PROGRAM2 INTERVAL PROGRAMS ~ INTERVAL DISTANCE and INTERVAL TIME4 HEART RATE CONTROLLED PROGRAMS 60%, 75%, 90% and target heart rate1 WATT PROGRAM5 USER PROFILE PROGRAM a user saved on the computer memory 25 PROFILE PROGRAMS that contain unlimited RANDOM PROFILES1 FITNESS TEST1 GAME1 RECOVERY PROGRAM40 (+2) PROGRAMS total
Start rowing JUST START ROWINGSimple begin rowing. The computer will go on automatically and starts the Pace boat program with a default of 2:15 min / 500 m.
STARTEnter your user data so that the computer can calculate the following:BMI = Body Mass IndexBMR = Basal Metabolic Rate TDEE = Daily calorie intakeYour user data allows the computer to calculate your calorie consumption in a more precise manner. Enter your user data under the USER DATA point in the main menu.
Main menuThe main menu has 12 options:1. Pace boat program (speed default)2. Race Program3. Interval: distance and time interval4. Heart rate: four programs 60%, 75% or 90% of the maximum heart rate and target heart rate5. Watt program6. Profile: five user profiles + 25 saved programs

28 RX7
7. Fitness Test8. Game9. User data: Setting user data10. User profile11. Delete users12. Manual
The computer automatically starts in the main menu. Simply press the MENU button if you would like to return to the main menu.
4.3.1 Speed or Pace boat program
The Pace boat program allows you to row next to a race boat in order to accelerate your workout.There are two possibilities to program the race boat time: (1.) Set time/500m (pace)(2.) Set time and meters
1) Speed programPress the SELECT button in the main menu and select the Pace boat program. Then confirm with ENTER.NOTE: Press the MENU button to return to the main menu.
2) SELECT USERPress the SELECT button and select GUEST USER or one of the five possible users (e. g. USER 1 or USER 2, etc.). Then confirm with ENTER.
3a) TIME/500MPress SELECT and select TIME/500M or go to step 3b. Then confirm with ENTER.
3b) TIME and METERPress ENTER to skip the TIME/500M selection. Press SELECT and select a TIME.Then confirm with ENTER. Press SELECT and select METER.Then confirm with ENTER.NOTE: Press START to immediately begin your workout.
4) RESISTANCE LEVELSPress SELECT and select a resistance level.Then confirm with ENTER.

29RX7
5) TARGET VALUESTarget values are optional. Hold ENTER in order to skip all target value settings.Press ENTER shortly in order to skip the individual target values. Press the SELECT buttons to select a target value. Then confirm with ENTER.
6) ALARMWith the alarm, you can define the upper and lower limits for your training.Press START in order to skip every alarm.Press ENTER in order to skip an individual minimum and/or maximum alarm. Then confirm with ENTER.This function is optional.
7) START ROWINGIf you get to the end of the selection process, the display will show:START ROWING. Now you can either start to row or press ENTER to enter target values and alarms.NOTE: During your workout, you can adjust the resistance levels with the SELECT buttons.
4.3.2 Race Program
The RACE program allows you to drive against the average time/500 m of a random user (USERS AVERAGE TIME/500M). Row as a father against a son, mother against a daughter, etc. Be the best of your family.
1) RACE PROGRAMHold the SELECT button in the main menu in order to scroll to the race program and to select it. Then confirm with ENTER.NOTE: Press the MENU button to return to the main menu.
2) SELECT USERHold the SELECT button and scroll to the sub-point GUEST USER or to one of five possible preset users. Then confirm with ENTER.
3) OPPONENT USERHold the SELECT button to scroll to the user against whom you would like to row and select them. Then confirm with ENTER.Press the START button in order to immediately begin training.

30 RX7
4) RESISTANCE LEVELIn the main menu, hold the SELECT button to scroll and to select the resistance level. Then confirm with ENTER.
5) TARGET VALUESTarget values are optional. Hold ENTER in order to skip all target value settings.Press ENTER shortly in order to skip the individual target values. Press the SELECT buttons to select a target value. Then confirm with ENTER.
6) ALARMWith the alarm, you can define the upper and lower limits for your training.Press START in order to skip every alarm.Press ENTER in order to skip an individual minimum and/or maximum alarm. Then confirm with ENTER.This function is optional.
7) START ROWINGIf you get to the end of the selection process, the display will show:START ROWING. Now you can either start to row or press ENTER to enter target values and alarms.NOTE: You can set the resistance levels during your workout with the help of the SELECT buttons.
31RX7
4.3.3 Interval distance and interval time programs
With these interval programs, intense training phases alternate with short recovery phases. It is scientifically proven that interval training burns more calories than cardio training with consistent intensity. You have the possibility to choose between two interval methods:
Interval distance program = stress distance in meters + individually definable recovery phase in seconds
Interval time program = stress time in seconds + individually definable recovery phase
1) INTERVAL PROGRAMPress the SELECT buttons in the main menu and select the interval program. Then confirm with ENTER.NOTE: Press the MENU button in order to return to the main menu.
2a) INTERVAL DISTANCE PROGRAMPress the SELECT buttons and select INTERVAL DISTANCE. Then confirm with ENTER.
2b) INTERVAL TIME PROGRAMPress the SELECT buttons and select INTERVAL TIME. Then confirm with ENTER.
3) SELECT USERPress the SELECT buttons and select the GUEST USER or one of the five available users. Then confirm with ENTER.
4) NUMBER OF INTERVALSPress the SELECT buttons and choose the number of intervals/stress phases. Then confirm with ENTER.
5a) INTERVAL DISTANCE PROGRAMPress the SELECT buttons and select the stress distance in meters. Then confirm with ENTER.
5b) INTERVAL TIME PROGRAMPress the SELECT buttons and select the interval time in seconds. Then confirm with ENTER.

32 RX7
6) REST TIMEPress the SELECT buttons and select REST TIME. Then confirm with ENTER.NOTE: You can immediately begin to train with the START button.
7) RESISTANCE LEVELIn the main menu, hold the SELECT button to scroll and to select the resistance level. Then confirm with ENTER.
8) TARGET VALUESTarget values are optional. Hold ENTER in order to skip all target value entries.Press ENTER shortly in order to skip the individual target values. Press the SELECT buttons to select a target value. Then confirm with ENTER.
9) ALARMWith the alarm, you can define the upper and lower limits for your training.Press START in order to skip every alarm.Press ENTER in order to skip an individual minimum and/or maximum alarm. Then confirm with ENTER.This function is optional.
10) START ROWINGIf you get to the end of the selection process, the display will show: START ROWING. Now you can either start to row or press ENTER to enter target values and alarms.NOTE: You can set the resistance levels during your workout with the help of the SELECT buttons.

33RX7
4.3.4 60%, 75%, 90 % heart rate program
The heart rate program allows you to control the load through your heart rate. The rowing machine resistance here is set automatically so that you always train with your selected heart rate. Every 30 seconds, the computer compares your pulse with the selection and adjusts the resistance correspondingly. The percentage numbers indicate the value % of the maximum heart rate. The rule of thumb for the calculation of the maximum heart rate is:
HRmax = 220 - age
This program requires a pulse signal from a compatible chest strap.
These three % heart rate programs work with the data from the selected user in order to better calculate your performance data. Thus, enter a user when possible.NOTE: During your workout, you cannot adjust % HR or the resistance levels.
In order to determine the optimal training pulse for your goals, continue to read Chapter 5.1 of these instructions. However, we recommend initially starting your training at an easy level. Begin training at 60 % and increase it with your progress.
1) HEART RATE PROGRAMPress the SELECT buttons and select HEART RATE. Then confirm with ENTER.NOTE: By pressing the MENU button, you can return to the main menu.
2) % HEART RATE PROGRAMPress the SELECT buttons and select %HR program. Then confirm with ENTER.
3) SELECT USERPress the SELECT button and choose one of the five user profiles (e. g. USER 1 or USER 2, etc.). Then confirm with ENTER.NOTE: The user data is required here to design the training, thus, a guest user cannot be selected.
4) 60%, 75%, 90% HEART RATE PROGRAMPress the SELECT buttons and select desired heart rate range: 60 %, 75 %, 90 %. The computer then calculates the optimal pulse in beats per minute based on your user date. Then confirm with ENTER.NOTE: You can immediately begin to train with the START button.

34 RX7
5) RESISTANCE LEVELIn the main menu, hold the SELECT button to scroll and to select the resistance level. Then confirm with ENTER.
6) TARGET VALUESTarget values are optional. Hold ENTER in order to skip all target value entries.Press ENTER shortly in order to skip the individual target values. Press the SELECT buttons to select a target value. Then confirm with ENTER.
7) ALARMWith the alarm, you can define the upper and lower limits for your training. Press START in order to skip every alarm.Press ENTER in order to skip an individual minimum and/or maximum alarm. Then confirm with ENTER.This function is optional.
8) START ROWINGIf you get to the end of the selection process, the display will show:START ROWING. Now you can either start to row or press ENTER to enter target values and alarms.NOTE: You cannot change the resistance manually during your workout.
4.3.5 TARGET HEART RATE PROGRAM (THR)
In addition to the preset heart rate zones, you can also manually set a target heart rate. Every 30 seconds the computer will compare your current pulse with your target heart rate and automatically adjusts the resistance level correspondingly. You can change the target heart rate at any time while training by using the SELECT buttons.
NOTE: During your workout, you cannot adjust the resistance levels. This program requires a pulse signal from a compatible chest strap.NOTE: When selecting the heart rate, please make sure that it is not too high. The rule of thumb for the maximum heart rate is 220 BPM minus age. Training with the maximum heart rate is an extreme load. Those without training should begin training with at most 60% of the maximum heart rate and initially increase their fitness level slowly.
1) HEART RATE PROGRAMPress the SELECT buttons in the main menu and select HEART RATE. Then confirm with ENTER.NOTE: By pressing the MENU button, you can return to the main menu.

35RX7
2) THR PROGRAMPress the SELECT buttons and select THR (Target Heart Rate). Then confirm with ENTER.
3) SELECT USERPress the SELECT buttons and select GUEST USER or one of the five saved user profiles (e. g. USER1 or USER2, etc.). Then confirm with ENTER.NOTE: Press START to immediately begin your workout.
4) RESISTANCE LEVELIn the main menu, hold the SELECT button to scroll and to select the resistance level. Then confirm with ENTER.
5) TARGET VALUESTarget values are optional. Hold ENTER in order to skip all target value entries.Press ENTER shortly in order to skip the individual target values. Press the SELECT buttons to select a target value. Then confirm with ENTER.
6) ALARMWith the alarm, you can define the upper and lower limits for your training.Press START in order to skip every alarm.Press ENTER in order to skip an individual minimum and/or maximum alarm. Then confirm with ENTER.This function is optional.
7) START ROWINGIf you get to the end of the selection process, the display will show: START ROWING. Now you can either start to row or press ENTER to enter target values and alarms.NOTE: You can set the resistance levels during your workout with the help of the SELECT buttons
4.3.6 Watt program
With the Watt program, you can constantly train with your selected output (Watt). The computer will compare the selected value with the actual output every 20 seconds and adjust the resistance if needed. You can adjust the target value with the SELECT buttons while you are working out.NOTE: During the workout, you cannot adjust the resistance levels; the target wattage is adjusted in five-Watt increments with the SELECT buttons.
36 RX7
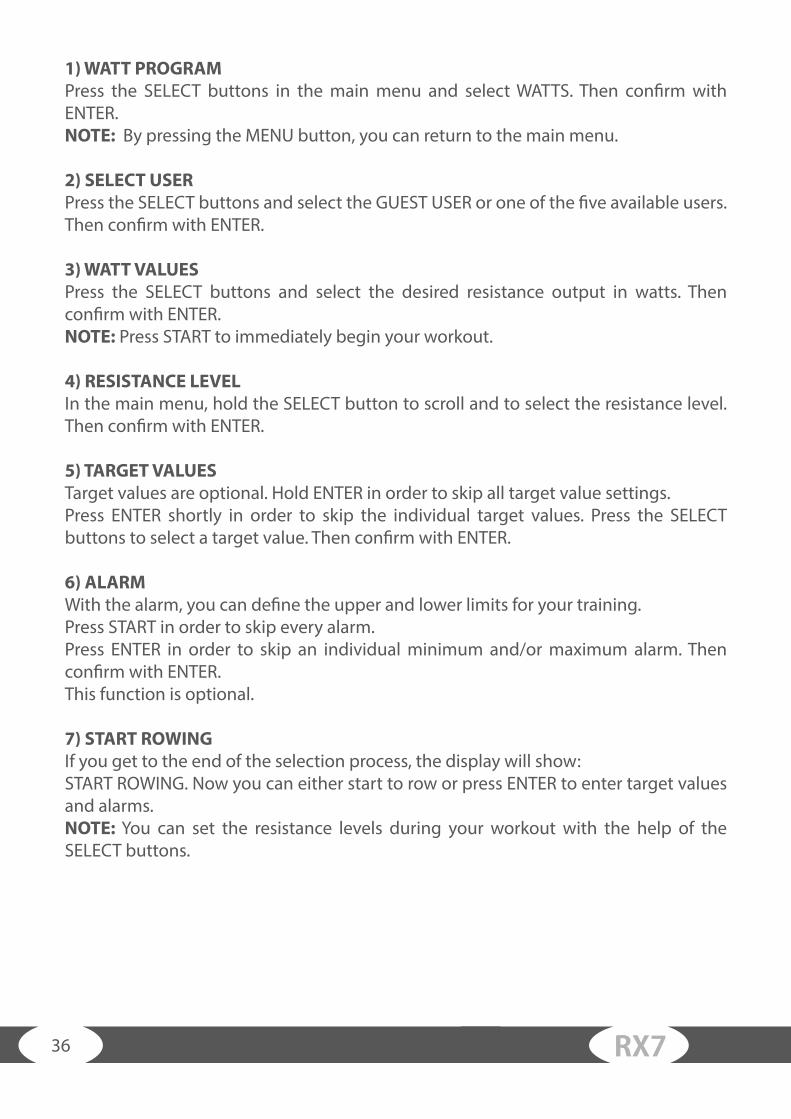
1) WATT PROGRAMPress the SELECT buttons in the main menu and select WATTS. Then confirm with ENTER.NOTE: By pressing the MENU button, you can return to the main menu.
2) SELECT USERPress the SELECT buttons and select the GUEST USER or one of the five available users. Then confirm with ENTER.
3) WATT VALUESPress the SELECT buttons and select the desired resistance output in watts. Then confirm with ENTER.NOTE: Press START to immediately begin your workout.
4) RESISTANCE LEVELIn the main menu, hold the SELECT button to scroll and to select the resistance level. Then confirm with ENTER.
5) TARGET VALUESTarget values are optional. Hold ENTER in order to skip all target value settings.Press ENTER shortly in order to skip the individual target values. Press the SELECT buttons to select a target value. Then confirm with ENTER.
6) ALARMWith the alarm, you can define the upper and lower limits for your training.Press START in order to skip every alarm.Press ENTER in order to skip an individual minimum and/or maximum alarm. Then confirm with ENTER.This function is optional.
7) START ROWINGIf you get to the end of the selection process, the display will show:START ROWING. Now you can either start to row or press ENTER to enter target values and alarms.NOTE: You can set the resistance levels during your workout with the help of the SELECT buttons.

37RX7
4.3.7 Profile programs
With the profile programs, the computer adjusts the resistance level corresponding to the terrain profile. 24 preset programs, one random program and five individually programmable programs are available to choose from. The resistance can also be adjusted with the SELECT buttons during the workout.
1) PROFILE PROGRAMPress the SELECT buttons in the main menu and select PROFILE. Then confirm with ENTER.NOTE: By pressing the MENU button, you can return to the main menu.
2) PROFILE SELECTIONChoose the desired profile program with the SELECT buttons. Then confirm with ENTER.NOTE: By pressing the MENU button, you can return to the main menu.

38 RX7
3) SELECT USERPress the SELECT buttons and select GUEST USER or one of the five saved user profiles (e. g. USER1 or USER2, etc.). Then confirm with ENTER.NOTE: Press START to immediately begin your workout.
4) RESISTANCE LEVELIn the main menu, hold the SELECT button to scroll and to select the resistance level. Then confirm with ENTER.
5) TARGET VALUESTarget values are optional. Hold ENTER in order to skip all target value entries.Press ENTER shortly in order to skip the individual target values. Press the SELECT buttons to select a target value. Then confirm with ENTER.
6) ALARMWith the alarm, you can define the upper and lower limits for your training.Press START in order to skip every alarm.Press ENTER in order to skip an individual minimum and/or maximum alarm. Then confirm with ENTER.This function is optional.
7) START ROWINGIf you get to the end of the selection process, the display will show: START ROWING. Now you can either start to row or press ENTER to enter target values and alarms.NOTE: You can set the resistance levels during your workout with the help of the SELECT buttons.

39RX7
4.3.8 Fitness Test
This is a six-minutes fitness test on the basis of your recovery heart rate. The computer must receive your heart rate signal through a chest strap. Row for five minutes as fast as you can in order to achieve your maximum heart rate. The computer will then test your heart rate recovery for one minute.
1) FITNESS TESTChoose the Fit Test point in the main menu with the SELECT buttons. Then confirm with ENTER. NOTE: Press the MENU button in order to return to the main menu.
2) ROWINGRow for five minutes as intensively as you can. Complete the training exactly after five minutes.NOTE: You cannot set the resistance levels during your workout with the help of the SELECT buttons.
4.3.9 Game
The GAME program offers a motivating change of pace. Row for five minutes and beat the high score.
1) GAMEChoose the Game point in the main menu with the SELECT buttons. Then confirm with ENTER.NOTE: You can return to the main menu with the MENU button.
2) ROWINGYou can repeat the race by pressing START again at the end of the race. You can leave the game with the MENU button.NOTE: You can set the resistance levels during your workout with the help of the SELECT buttons.
FITNESS TEST RESULTS
SUPER FIT 90~100
EXTREMELY FIT 80~89
VERY FIT 70~79
GOOD FITNESS 60~69
AVERAGE FITNESS 50~59
FAIR FITNESS 40~49
POOR FITNESS 30~39
UNFIT 20~29
VERY UNFIT 10~19
EXTREMELY UNFIT 0~9

40 RX7
4.3.10 User settings (USER DATA)
Under this menu item, you can enter your personal data for the computer to calculate your personal calories burnt and heart rate zones.The computer can save five user profiles. Your physical basic values are calculated based on this data as well. BBMI = Body Mass Index BMR = Basal Metabolic Rate TDEE = Daily calorie intake
NOTE: Update your user data regularly, otherwise the computer will provide you with incorrect values (e. g. heart rate percent, consumed calories, BMI, BMR, TDEE).NOTE: The data from the guest users will not be saved.
USER DATA INPUT
You can enter the following values for the user data input. Hold ENTER in order to skip a setting.NAME max. 12 characters letters and numbers AGE in yearsSEX male or femaleHEIGHT in cm or ft/inches (see measurement selection for conversion) WEIGHT in kg or lbs (see measurement selection for conversion)ACTIVE FACTOR Your activity influences your metabolism; this influences the calories burnt during training. The active factor adjusts the calorie calculation of the computer and your TDEE total calories burnt.
1-SITTING: Desk job with little or no daily sports 2-SLIGHTLY ACTIVE: easy exercises one to three days a week3-MODERATELY ACTIVE: moderate exercises three to five days a week 4-VERY ACTIVE: intense exercises six to seven days a week5-EXTREMELY ACTIVE: extremely active all day every day or fitness of a marathon runner
1) USER DATAPress the SELECT buttons in the main menu and select USER DATA. Then confirm with ENTER.NOTE: You can return to the main menu with the MENU button.

41RX7
2) SELECT USERPress the SELECT buttons and select NEW USER or one of the existing users (max. five). Then confirm with ENTER.
3) NAMEPress the SELECT buttons and select a character. Then confirm with ENTER. Repeat the process until your name is complete. Hold ENTER to skip the remaining characters.
4) SEXPress the SELECT buttons and select your sex. Then confirm with ENTER.
5) AGEPress the SELECT buttons and select your age in years. Then confirm with ENTER.
6) HEIGHTPress the SELECT buttons and select your height. Then confirm with ENTER.
7) WEIGHTPress the SELECT buttons and select your age in weight. Then confirm with ENTER.
8) ACTIVE FACTORPress the SELECT buttons and select your active factor. Then confirm with ENTER.
USER PROGRAMS
Each user can save their own program (PROFILE). To do this, select CREATE YOUR OWN PROFILE. All profiles use the bar graph display (16 rows = 24 resistance levels and 20 columns = 20 time intervals). These user programs are very useful, because the profile program is geared towards the user. This keeps motivation high.The computer adjusts the resistance levels corresponding to the set profile. You can set the resistance levels during your workout with the help of the SELECT buttons.
1) USER PROFILEChoose the USER PROFILE point in the main menu using the SELECT buttons. Then confirm with ENTER.NOTE: You can return to the main menu with the MENU button.
2) SELECT USERSelect one of the five existing users. Then confirm with ENTER. If no users have been created, you must first create a user.

42 RX7
3) PROFILE PROGRAM CREATIONSelect the resistance level with the SELECT buttons. Then confirm with ENTER. Repeat the process until your profile is complete.NOTE: Hold ENTER to skip all remaining columns.This is very useful if you only want to make small adjustments to your profile program.
USER DELETE
Es ist sehr einfach einen vorhandenen Benutzer zu löschen.
1) USER DELETEChoose the USER DELETE point with the SELECT buttons. Then confirm with ENTER..NOTE: Press the MENU button in order to return to the main menu.
2) SELECT USERPress the SELECT buttons and select one of a maximum of five saved users. Then confirm with ENTER.
3) CONFIRM DELETEPress ENTER again to confirm the deletion.
HEART RATE RECEIVER FREQUENCY
Dealer optional 5 kHz or 2.4 GHz or both 5 kHz and 2.4 GHz together.We the manufacturer sell to Dealers who in turn sell to shops around the world. The Dealers have requested that this computer have Optional Analog and/or Digital Heart Rate Receiver Frequencies.Unfortunately, you the consumer do not have the choice.So your computer will either be:1)Fixed 5kHz Analog or2)Fixed 2.4 GHz Digital or3)Optional 5kHz Analog or 2.4 GHz Digital.
If the Main Menu does NOT display an „Optional Heart Rate Receiver Frequency“ choice, then your computer has a fixed Heart Rate Receiver Frequency. At the top of the LCD next to the Pulse Display Window the Heart Rate Receiver Frequency is displayed.
Although the 5kHz Analog Heart Rate Frequency (HRF) is the most common international HRF it has problems with interference from a wide range of electrical devices, and has a limited working distance.

43RX7
The 2.4 GHz Digital Frequency is rapidly becoming the new standard for a wide range of electrical products and has no working distance issues. However, it is more expensive and it has compatibility issues. Therefore this computers 2.4 GHz Digital HRF Receiver is only compatible with the provided 2.4 GHz Digital HRF Chest Strap. And the provided Digital Chest Strap must be “Linked” with this computer using the “LINK 2.4GHz” Program which can be accessed via the Main Menu providing that your computer is 2.4 GHz compatible.
1) OPTIONAL HEART RATE FREQUENCY 5 kHz or 2.4 GHzFrom the Main Menu, press the SELECT Keys to scroll and select “5kHz 2.4GHz”.Then press the ENTER Key to confirm your selection.NOTE: To return to the Main Menu press the MENU Key.
2) 5 kHz or 2.4 GHzPress the SELECT Keys to scroll and select either “5kHz” or “2.4GHz”.Then press the ENTER Key to confirm your selection.
HOW TO
The HOW TO is the last menu point and briefly explains the functions of the buttons:
SELECT BUTTONS: SCROLLING AND SELECTING HOLDING SELECT BUTTON TO MOVE QUICKLY ENTER BUTTON: CONFIRM A SELECTION HOLDING ENTER BUTTON TO SKIP AN ENTIRE SELECTIONSTART/STOP/RESET BUTTON: START WORKOUT
PRESS STOP TO STOP THE WORKOUTHOLD RESET TO RESET THE COMPUTER MENU BUTTON = RETURN TO THE MAIN MENURECOVERY BUTTON = START RECOVERY PROGRAM
1) HOW TOOUse the SELECT buttons to select the HOW TO point. A running text with the key functions will be displayed in the bottom of the display.

44 RX7
RECOVERY PROGRAM
The recovery program evaluates your fitness level by measuring how fast your heart rate recovers within a minute directly after a workout. The computer must receive your heart rate signal during the entire 60 second countdown. Then the computer will indicate the points from your heart cardiovascular system fitness recovery from 0 to 100.
1) ACTIVATE RECOVERY PROGRAM Immediately after your workout, press the RECOVERY button and remain seated for a minute while the program measures your heart rate. You will receive your fitness value after a minute.
2) RETURN TO THE MAIN MENUYou can return to the main menu at any time with the MENU button.
DISPLAY AFTER WORKOUT
At the end of your workout, the computer will automatically display the following based on your user data:
BMI: Body Mass Index
RECOVERY TEST RESULTS
SUPER FIT 90~100
EXTREMELY FIT 80~89
VERY FIT 70~79
GOOD FITNESS 60~69
AVERAGE FITNESS 50~59
FAIR FITNESS 40~49
POOR FITNESS 30~39
UNFIT 20~29
VERY UNFIT 10~19
EXTREMELY UNFIT 0~9
Anzahl Klassifikation Risiko
Unter 18 Untergewicht Geringes Risilo
19 - 25 Normal Duchschnittiiches Risiko
26 - 30 Übergewicht Hohes Risiko
31 Darüber Adiposita Extremes Risiko

45RX7
BMR: The Basal Metabolic Rate indicates the minimum required number of calories to supply a human in a rest state. This calorie amount (in kcal) would be consumed by the body during a day of rest.If you count the calories from your food every day, subtract the BMR and the burnt calories during training - the result is an approximate indicator of if you will lose or gain weight.If you would like to lose weight, you have to reduce your calorie intake.Slowly reduce your calorie intake over two to three weeks so that your metabolism can adjust. Never reduce your daily calorie intake below you BMR.
TDEE: The total daily intake is an estimate of your daily intake of calories. We recommend lowering your calorie intake moderately. Keep your calorie intake about half way between your BMR and TDEE.(TDEE + BMR) / 2 = WEIGHT LOSS
Target values
For many of the programs, you have the possibility to define target values (time, distance, strokes, calories). The targets are optional if you do not enter a row, the computer will automatically count up starting at one.If you select one or several target values, the computer will count down from it. If the first target value is reached, the workout will end.You can set the following targets.
TIME 1:00 ~ 99:00 minutes (in 1-min increments) METER 100 ~ 99.900 m (in 100-m increments)STROKES 10 ~ 990 strokes (in 10-stroke intervals) CALORIES 10 ~ 990 calories (in 10-calorie increments)TARGET VALUES ~ TARGET VALUES are optional.Hold ENTER in order to skip all TARGET VALUES. Press ENTER to skip an individual TARGET VALUE.Press the SELECT buttons to select a TARGET VALUE. Then confirm with ENTER.
Classification Woman (% fat) Man (% fat)Essential fat 10-13% 2-4%Extremely low 14-20% 6-13%Lower 21-24% 14-17%Average 25-31% 18-25%Obese 32% plus 26% plusBODY FAT %: Your estimated body fat percentage

46 RX7
Alarm
The alarm function is optimal for precise training control. You can replace maximum or minimum alarms. If you exceed or do not meet the set value, an acoustic signal can be heard with the note that you should row faster or slower.
You can choose between the following values:
TIME/500m 01:00 ~ 9:55 minutes and seconds (in 5-second increments)TIME/500m DIVISION 10 secondsPULSE 30 ~ 220 BPM (in 1-BPM-increments) PULSE DISTRIBUTION 4 BPMSPM 15 ~ 60 SPM (in 1-SPM increments) SPM DISTRIBUTION 4 SPMWATT 10 ~ 995 Watt (in 5-Watt increments) WATT DISTRIBUTION 20 Watt
Choose the desired alarm value with the SELECT buttons. Then confirm with ENTER.The alarm function is available for many programs, it is always optional.
If you would like to skip all alarm functions, hold START. Then you can start right way with training.
Guidelines
Selection processResistance LEVELS 10 (1 ~ 24 in 1-LEVEL increments)TIME/500M 2:15Target valuesTIME 20:00 minutes (1:00 ~ 99:00 in 1-minute increments)METER 2000 m (100 ~ 99.900 m in 100-m increments)STROKES 300 strokes (10 ~ 990 strokes in 10-stroke increments)CALORIES 160 calories (10 ~ 990 calories in 10-calorie increments) alarm min and maxTIME/500m Min 2:10 ~ Max 2:20 (01:00 ~ 9:55 minutes and seconds in five-seconds increments, division into 10 seconds)PULSE Min 138 BPM ~ Max 142 (30 ~ 220 BPM in 1-BPM increments, division 4 BPM) SPM Min 23 SPM ~ Max 27 SPM (15 ~ 60 SPM in 1-SPM icnrements, division 4 SPM) WATT Min 95 ~ Max 105 (10 ~ 995 Watt in 5-Watt increments, division 20 Watt)

47RX7
Interval programNUMBER of INTERVALS 10 (2 ~ 99 in 1-interval increments) INTERVALDISTANCE 500 m (100 ~ 99.900 m in 100-m increments)INTERVAL TIME 60 seconds (0:30 ~ 10:00 in five seconds increments)REST TIME 30 seconds (0:30 ~ 10:00 in five seconds increments)
Target heart rate programTARGET HEART RATE 140 BPM (30 ~ 220 BPM in 1-increments)
User dataYEARS 35 (10 ~ 99 in 1-year increments) SEX Female (or male)HEIGHT METRIC Female 163 cm ~ Male 178 cm (90 ~ 240 cm in 1-cm increments) HEIGHT IMPERIAL Female 5 ft 4 ~ Male 5 ft 10 (3 ~ 8 ft in 1-Inch increments) WEIGHT METRIC Female 60 kg ~ Male 86 kg (30 ~ 200 kg in 1-kg increments) WEIGHT IMPERIAL Female 135 lbs ~ Female 190 lbs (60 ~ 440 lbs in 1-lb increments) ACTIVE FACTOR 2-slightly active (1 sitting, 2 slightly active, 3 moderately active, 4 very active, 5 extremely active)
Measurement selection METRIC or IMPERIALThe user data HEIGHT and WEIGHT can be entered either as metric or imperial measurements.HEIGHT in cm or ft and inches WEIGHT in kg or lbs MEASUREMENT SELECTION ~ ManualHold both SELECT buttons for three seconds.Press the SELECT buttons and select METRIC or IMPERIAL. Then confirm with ENTER.

48 RX7
4.4 Operation infrared remote control
4.4.1 Introduction
Everybody knows how to use a TV remote control. The remote control from this rowing machine uses the same technology. By pressing the remote control, the handle remote control forwards data to the computer.The INFRARED REMOTE CONTROL is a wireless data transmission system with a short range, which requires a clear line of sight, this means there must be a clear, straight line between the remote control and the training computer.
4.4.2 Inserting batteries
The battery compartment is delivered with plastic spacers, which separate the battery from the battery clamp. This stops the battery from discharging during transport and keeps it charged.
1) Inserting batteriesRemove the plastic spacer. Press the top of the battery compartment.
INFRARED RECEIVER
COMPUTER
INFRARED LED TRANSMITTER
HANDLEBAR
MENU Key ENTER - DISPLAY Key
SELECT Keys
DOWN & UP- +-
BATTERY HOLDER
BATTERYHOLDERLOCKING
TAB
PLASTIC SPACER
BATTERY HOLDER LOCKING TAB engaged
INFRARED RECEIVER
COMPUTER
INFRARED LED TRANSMITTER
HANDLEBAR
MENU Key ENTER - DISPLAY Key
SELECT Keys
DOWN & UP- +-
BATTERY HOLDER
BATTERYHOLDERLOCKING
TAB
PLASTIC SPACER
BATTERY HOLDER LOCKING TAB engaged

49RX7
4.4.3 List of parts
The remote control consists of two parts.1) INFRARED TRANSMITTER (the source)2) INFRARED RECEIVER
The infrared transmitter is mounted on the handle. The infrared receiver is installed in the computer.
4.4.4 Main functions of the infrared transmitter
The infrared transmitter has four buttons = MENU button - ENTER button - SELECT button (DOWN - UP). These four buttons are exactly the same buttons as those on the COMPUTER.See COMPUTER MANUAL for detailed information about the button functions.
INFRARED RECEIVER
COMPUTER
INFRARED LED TRANSMITTER
HANDLEBAR
MENU Key ENTER - DISPLAY Key
SELECT Keys
DOWN & UP- +-
BATTERY HOLDER
BATTERYHOLDERLOCKING
TAB
PLASTIC SPACER
BATTERY HOLDER LOCKING TAB engaged
INFRARED RECEIVER
COMPUTER
INFRARED LED TRANSMITTER
HANDLEBAR
MENU Key ENTER - DISPLAY Key
SELECT Keys
DOWN & UP- +-
BATTERY HOLDER
BATTERYHOLDERLOCKING
TAB
PLASTIC SPACER
BATTERY HOLDER LOCKING TAB engaged
50 RX7
4.4.5 Replacing batteries
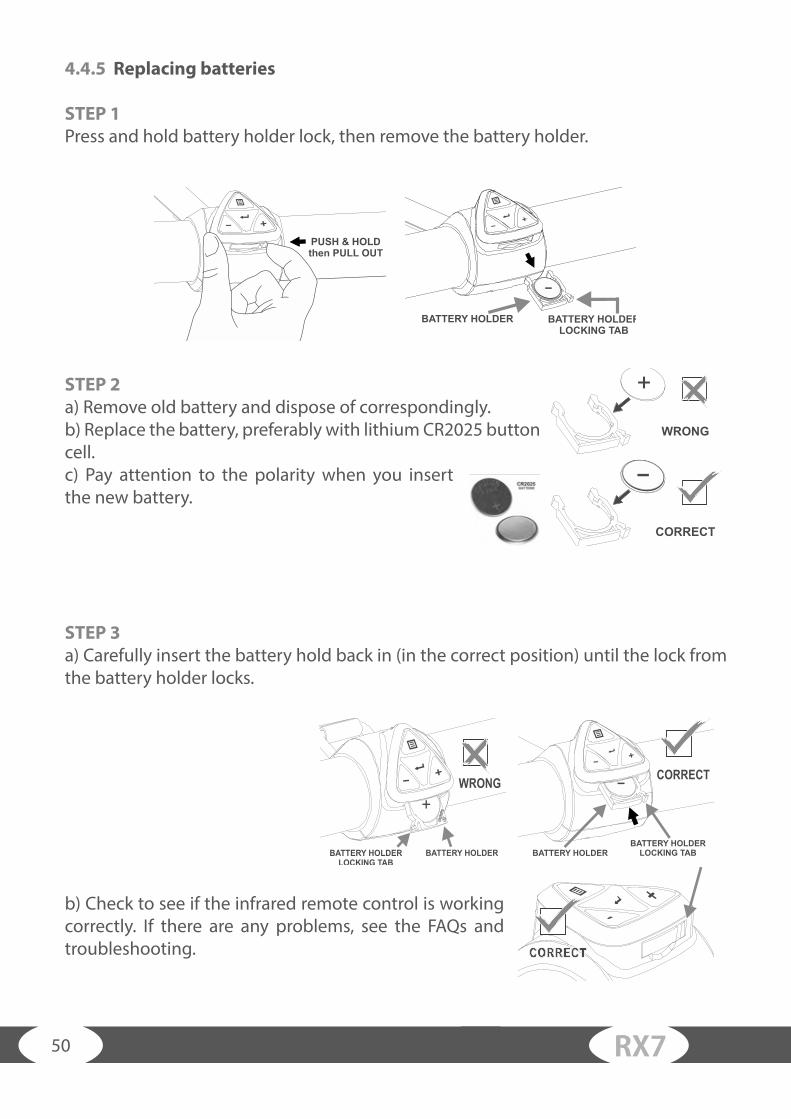
STEP 1Press and hold battery holder lock, then remove the battery holder.
STEP 2a) Remove old battery and dispose of correspondingly.b) Replace the battery, preferably with lithium CR2025 button cell.c) Pay attention to the polarity when you insert the new battery.
STEP 3a) Carefully insert the battery hold back in (in the correct position) until the lock from the battery holder locks.
b) Check to see if the infrared remote control is working correctly. If there are any problems, see the FAQs and troubleshooting.
PUSH & HOLDthen PULL OUT
BATTERY HOLDER BATTERY HOLDERLOCKING TAB
+
WRONG
-
CORRECT
+
BATTERY HOLDERBATTERY HOLDER
LOCKING TABBATTERY HOLDER
LOCKING TABBATTERY HOLDER
WRONG CORRECT
CORRECT
+
BATTERY HOLDERBATTERY HOLDER
LOCKING TABBATTERY HOLDER
LOCKING TABBATTERY HOLDER
WRONG CORRECT
CORRECT

51RX7
4.4.6 Infrared range and direction
The remote control should be directly aligned with the training computer.

52 RX7
4.4.7 ANGLE OF THE INFRARED TRANSMITTER FROM THE HANDLE
4.4.8 Code from the remote control
The code from the remote control (or RMC code in short) allows you to reprogram the code from the infrared remote control. There are two reasons to reprogram the RMC code:
1) There are several rowing machines with remote controls nearby and the infrared rays overlap. This may be the case at health clubs and commercial facilities.
2) Disruption with existing infrared signals, for example, television or TV remote control, etc. This happens primarily with home use.WARNING: Do not reprogram the RMC code as long as it is not necessary, because the infrared remote control may stop working if you make a mistake.
STEP 1
1a) Place the handle in the handle holder and avoid touching the handle again until step 3a.
In fr a r e d R a n g e a n d D ir e c tio n
INFRARED REMOTE CONTROL INSTRUCTIONS
T his INF R AR E D R E MO T E C O NT R O L is a s hort ra nge wireles s communica tion s ys tem tha t re lies on a c lea r L INE -O F -S IG H T, this mea ns tha t there mus t be vis ua lly unobs tructed s tra ight line through s pa ce between theT R A N S MIT T E R ( the s ourc e )
and theR E C E IV E R ( the d e s tina tion) . WRONG
WRONG
CORRECT
The Computers I nfrared Receiver Angle vs . the Handlebar Pos ition
CORRECT
CORRECTCORRECT
In this i llus tra tion the C O MP U T E R S I N F R A R E D R E C E IV E ngl omple te ly wron nd the H A N D L E B A R S I N F R A R E D T R A N S MIT T E s to a wa y
from the C O MP U T E R S I N F R A R E D R E C E IV E ngle .
In this i llus tra tion the C O MP U T E R S I N F R A R E D
R E C E IV E R a ngle i s c orre c t a nd the H A N D L E B A R S I N F R A R E D
T R A N S MIT T E R i s i ns ide t he C O MP U T E R S I N F R A R E D
R E C E IV E R a ngle .
In this i llus tra tion the H A N D L E B A R S
IN F R A R E D T R A N S MIT T E R i s
pointing u p a nd down, whic h i s n o w he re c los e t o p ointing
towa rds t he C O MP U T E R S
IN F R A R E D R E C E IV E R .
In this i llus tra tion the H A N D L E B A R S
IN F R A R E D T R A N S MIT T E R
is p ointing d ire c tly towa rds t he
C O MP U T E R S IN F R A R E D R E C E IV E R .
The Handlebars I nfrared Transmitter Angle
Handlbar
HandelbarHolder

53RX7
1b) Hold the RESET button for three seconds to return to the main menu.
STEP 22a) Im Hauptmenü drücken Sie die S ELECT Tasten und wählen “RMC CODE” Programm. Dann drücken Sie ENTER, um Ihre Auswahl zu bestätigen.
2b) Now the computer displays your current IR CODE.
STEP 3
3a) Take the handle and point it with the infrared transmitter of the handle towards the infrared receiver of the computer.
3b) Hold the handle button MENU. Then press either “-”or “+” to select a new infrared card.
3c) Then press the ENTER computer button to confirm the selection. The computer will return to the main menu.Note: The “Current Infrared IR Code Display” does not change here. The change is first displayed the next time the IR code is changed.
HANDLEBARHOLDER
HANDLEBAR
Current Infra-Red (IR) CodeNew IR Code
New IR Code
New IR Code

54 RX7
4.4.10 Troubleshooting manual
PROBLEM: The IR system only works with interferences.
SOLUTION 1) Clean the IR receiver on the computer with a little window cleaner.2) Clean the IR transmitter on the handle with a little window cleaner.3) Replace batteries. See point “Replace batteries”.4) Program the IR/RMC code again. See point “Remote Control Code (RMC Code)”.5) Ask for a service technician.
PROBLEM : The IR system does not work!
SOLUTION 1) Replace batteries. See point “Replace batteries”.2) Program the IR/RMC code again. See point “Remote Control Code (RMC Code)”.3) Ask for a service technician.

55RX7
5 WORKOUT INSTRUCTIONS
5.1 Heart-rate measuring
Telemetric heart rate measuringThis rowing machine is already equipped with a heart rate receiver as standard. Using a chest strap makes it possible for you to have a wireless heart rate measuring. This optimal and ECG-precise type of measuring reads the heart rate directly from the skin through a transmitting chest strap. The chest strap then sends the impulse to the receiver integrated in the console.
Positioning the chest strap and moistening the electrodes: Place the belt directly below the chest, while the transmitter should be placed on the middle of the chest. The chest strap should sit comfortably, but not too loose. If the belt is too loose, the contact to the electrodes may be disrupted or the belt may slip while exercising. The transmitter turns on automatically once it is put on. In order to allow for a precise measuring, you should moisten the rubber electrodes. This is best done with a special chest strap contact gel, which is also used for ultrasound scans.
Note:If you have not been active in doing sports for a longer period of time, you should first go to your physician in order to discuss your training with them. You should also contact your physician in advance in the event of heart problems, high/low blood pressure and obesity.
Training with heart rate orientationHeart rate orientation guarantees an extremely effective and healthy training. Through your age and the following table, you can quickly and easily read and determine the optimal pulse for your training. An acoustic alarm will sound if your heart rate exceeds the set target heart rate. Which target heart rate is important for which training goal can be found out in the following.
Fat burning (weight management): The main goal here is to burn deposits of fat. In order to achieve this training goal, a low training intensity (approximately 55% of the maximum heart rate) and a longer training period are required.
Cardiovascular training (cardio training): The primary goal is to increase endurance and fitness through an improved provision of oxygen through the cardiovascular system. In order to achieve this training goal, medium intensity (approximately 75%

56 RX7
of the maximum heart rate) with a medium training period is required.
Anaerobic (maximum) load training: The main goal of maximum load training is to improve recovery after short, intense loads in order to be able to quickly return to the aerobic zone. In order to achieve this training goal, a high intensity (approximately 90% of the maximum heart rate) with short, intense load is required, which is followed by a recovery phase in order to prevent muscle fatigue.
Example:For a 45-year-old man or woman, the maximum heart rate is 175 (220 - 45 = 175).
• The fat burning target zone (55%) is at approximately 96 beats/min. = (220 - age) x 0.55.• The cardio target zone (75%) is at approximately 131 beats/min. = (220 - age) x 0.75.• The maximum heart rate for an anaerobic load training (90%) is at approximately 157 beats/min. = (220 - age) x 0.9.
2080
100
120
140
160
180
200
220
65 7060555045403525 30
200 195 190185 180
175170
180
150
110
146
107
175171 166
162 157153
148143 139 135 131 128 124
105 102 99 96 94 91 88 85 83
113116120
144 139136
150155160
165
Heart rate diagram for training intensity
Maximum pulse (220-age)
90% of maximum pulse - anaerobic (maximum) intensity training
75% of maximum pulse - cardiovascular training (cardio training)
55% of maximum pulse - fat burning (weight control)
Hea
rtbe
ats
Age

57RX7
5.2 Notes on correct rowing
Body moves towards the handle
WrongAt the end of the movement, the body will be pulled forwards towards the handles instead the handles to the body.
RightAt the end of the movement, the user slightly leans back, holds the legs down, keeps the upper body straight and pulls the handle to the body.
Straddled elbows
WrongThe user’s elbows are straddled from the body at the end of the movement and the handle is at the height of the breast.
RightPull the handle to the body with straight wrists and the elbows close to the body. The elbows are brought behind the head while the handle is pulled to your waist.

58 RX7
Do not completely extend
WrongAt the end of the movement, the user completely stretches the leg and knee.
RightKeep your knee slightly bent at all times even at the end of the movement instead of stretching it completely.
Leaning too far forward
WrongThe body is bent too far forward. The shins are no longer vertical. The head and shoulders are facing the feet. The body is therefore in a weak position to execute the movement.
RightThe shins are vertical. The body is pressed against the legs, the arms are completely stretched out in front and the body is slight bent forward. This position should be pleasant.

59RX7
Rowing with bent arms
WrongThe user begins the movement with the arms instead of first pressing with the legs.
RightThe user begins by stretching out the legs, relaxing the back and stretching the arms.
Bent wrists
WrongThe user bents the wrists during the movement.
RightAlways execute the rowing movement with straight wrists.

60 RX7
5.3 10 tips for effective rowing training
1. Set goalsWhat would you like to achieve with your training? Weight regulation, improved en-durance, prevent risk of disease, more mobility, cardiovascular training, etc. In order to achieve your long-term training goal, set individual partial goals, e. g., weekly or monthly goals.
2. Concentration on trainingTry to only dedicate yourself to your training unit and do not be distracted.
3. Position yourself correctly while exercisingWhen you execute the movement, your upper body should lean forward slightly and your back should be straight. Avoid evasive movements in the hip or back area.
4. Correct breathing / appropriate resistance levelDo not overexert yourself physically and mentally by starting with resistance levels that are too high. Start slowly and increase the resistance steadily. Aim for regular and calm breathing.
5. Keep yourself properly hydratedDrink, drink, drink! Have a drinking bottle close by during your workout.
6. Sufficient recovery phasesAllow your body and your muscles enough time to recover after your workout. Only a relaxed muscle will be fully operational again.
7. Choose a diversified programSwitch your focus between different muscle groups and different levels of intensity during your workout.
8. Creating the right workoutEvery training session should have a warm-up phase, a cool-down phase and a tar-geted stretching. It increases physical and mental performance and prevents injuries and sore muscles.
9. Workout journalKeep a record of your training sessions. Note the date, resting pulse, active pulse, reco-very pulse, resistance level, time, distance, calories burnt and fitness level.

61RX7
10. Reward yourselfDo something good for you and your body after training or after achieving a partial goal. Go to the sauna or a swimming pool. Mix a protein shake or enjoy a delicious salad.
5.4 Designing a workout
We recommend two or three workouts per week. Warm up for about five minutes be-fore starting each workout. Finish the workout with a cool-down and targeted stret-ching.
Warm-up approx. five minutes Dynamic movement of large muscle groups at a low intensity. Core body temperature increases and the metabolic process is speeded up.
WEEK 1 + 2
Beginner Advanced
Days Duration Intensity Duration Intensity
Mon 20 min. Slow speed, no resistance
30 min. Moderate speed, keep resistance low
Wed 20 min. Slow speed, no resistance
30 min. Moderate speed, keep resistance low
Fri 20 min. Slow speed, no resistance
30 min. Moderate speed, keep resistance low
In the first week, increase the speed in between for two-minutes. Maintain heart rate.
In the second week, increase the speed for brief periods.
WEEK 3 + 4
Beginner Advanced
Days Duration Intensity Duration Intensity
Mon 25 min. Slow speed, no resistance
35 min. Vary speed, keep resistance low
Wed 25 min. Slow speed, no resistance
35 min. Vary speed, keep resistance low

62 RX7
Fri 25 min. Slow speed, no resistance
35 min. Vary speed, keep resistance low
In the third week, increase the resistance slightly.
In the fourth week, combine forwards and backwards movements.
WEEK 5 + 6
Beginner Advanced
Days Duration Intensity Duration Intensity
Mon 30 min. Moderate speed, keep resistance low low
40 min. Vary speed, keep resistance low
Wed 30 min. Moderate speed, keep resistance low
40 min. Vary speed, keep resistance low
Fri 30 min. Moderate speed, keep resistance low
40 min. Vary speed, keep resistance low
In the fifth week, increase the resistance slightly at moderate speed.
In the sixth week, alternate between forwards and backwards movements.
WEEK 7 + 8
Beginner Advanced
Days Duration Intensity Duration Intensity
Mon 35 min. Vary speed, keep resistance low
45 min. Vary speed, increase resistance
Wed 35 min. Vary speed, keep resistance low
45 min. Vary speed, increase resistance
Fri 35 min. Vary speed, keep resistance low
45 min. Vary speed, increase resistance
In the seventh week, include short sprints. In the eighth week, alternate between forwards and backwards movements.
Cool-down approx. five minutes Finish your training at low resistance and at slow speed. Allow your body to gently slow back down.
63RX7
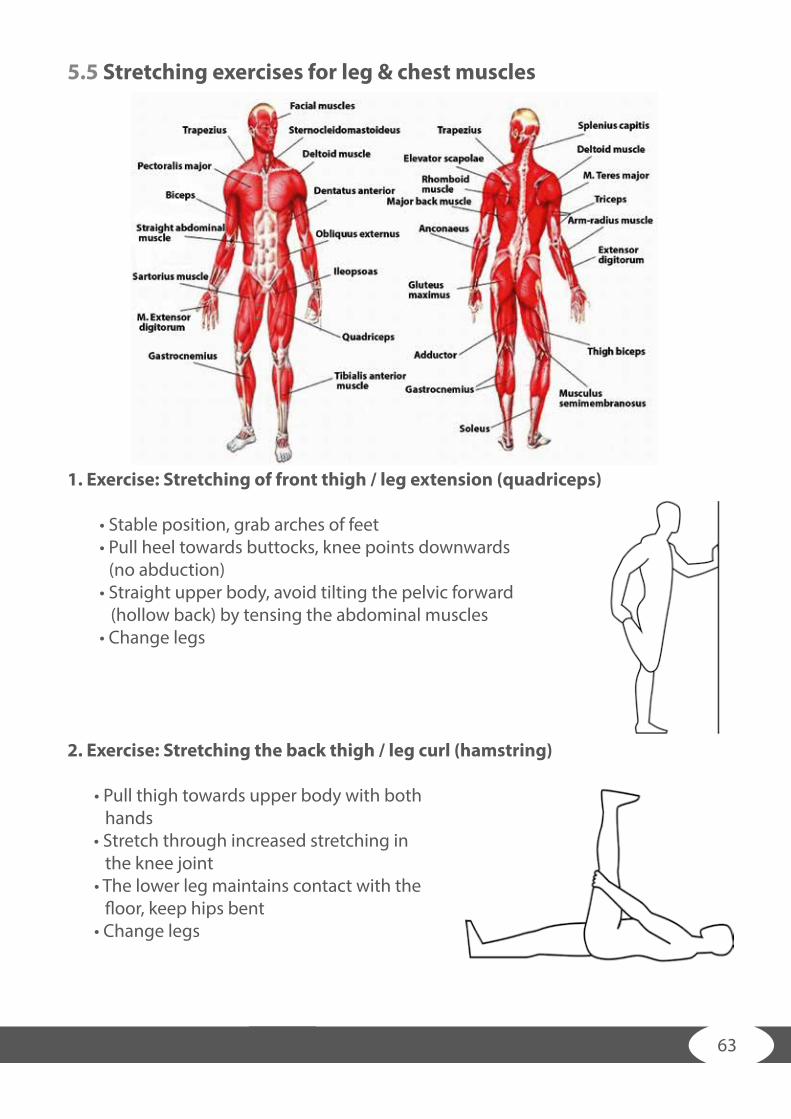
5.5 Stretching exercises for leg & chest muscles
1. Exercise: Stretching of front thigh / leg extension (quadriceps)
• Stable position, grab arches of feet• Pull heel towards buttocks, knee points downwards (no abduction)• Straight upper body, avoid tilting the pelvic forward (hollow back) by tensing the abdominal muscles• Change legs
2. Exercise: Stretching the back thigh / leg curl (hamstring)
• Pull thigh towards upper body with both hands
• Stretch through increased stretching in the knee joint
• The lower leg maintains contact with the floor, keep hips bent• Change legs

64 RX7
3. Exercise: Stretching the calf muscles (gastrocnemius)
• Place feet parallel to each other pointing forward, the heels touch the floor • Support yourself on a chair coming from a lunge • Move your body weight to the front leg, press your heel from the rear leg towards the floor and hold the contact • Slowly stretch your knee of the rear leg until you feel the stretch in your calves • Change legs
4. Exercise: Stretching the chest muscles (pectoralis major)
• Stand parallel to a wall • Place your forearm at 90° to the wall with the elbow just above shoulder height • Turn your head and upper body gradually to the opposite sides until you feel a stretch in the front chest, of the shoulder being leaned on • Pay attention to tension in your abdominal and gluteal muscles • Your weight is on your front leg • Change legs
All recommendations of these instructions apply solely to healthy persons and are not suitable for those with heart or cardiovascular problems. All of the tips are intended only as a guide to help you create a workout. Your physician can offer appropriate advice for particular, personal requirements.
We hope you enjoy your workout and have a lot of success!

65RX7
5.6 Workout journal
Date Training weightTime (min.) Calories burnt Body weight
Distance Ø PulseResistance level I feel ...
(Cop
y te
mpl
ate)

66 RX7
6 WARRANTY INFORMATION
Taurus training fitness equipment is subject to strict quality controls. However, if a fitness equipment purchased from us does not work perfectly, we take it very seriously and ask you to contact our customer service as indicated. We are happy to help you by phone via our service hotline.
Error descriptionsYour fitness equipment is developed for long-term, high-quality training. However, should a problem arise, please first read the operating instructions. For further assistance, please contact your contract partner or call our service hotline. To ensure your problem is solved as quickly as possible, please describe the defect as exactly as possible.
In addition to the statutory warranty, we provide a warranty for every fitness equipment purchased from us according to the following provisions.
Your statutory rights are not affected.
WarranteeThe warrantee is the first/original buyer and/or any person who received a newly purchased product as a gift from the original buyer.
Warranty periodsThe following warranty periods begin on delivery of the fitness equipment.
Model Use Full warranty Frame
RX7-2Home use 24 months 30 years
Semi-professional use 12 months
Repair costsAccording to our choice, there will either be a repair, a replacement of individual damaged parts or a complete replacement. Spare parts, that have to be mounted while assembling the equipment, have to be replaced by the warrantee personally and are not a part of repair. After the expiration of the warranty period for repair costs, a pure parts warranty applies, which does not include the repair, installation and delivery costs.

67RX7
The terms of use are defined as follows:
• Home use: solely for private use in private households up to 3 hours per day• Semi-professional use: up to 6 hours per day (e. g. rehabilitation centers, hotels, clubs, company gyms)• Professional use: more than 6 hours per day (e. g. commercial gyms)
Warranty serviceWithin the warranty period, equipment which develops faults as a result of material or manufacturing defects, will be repaired or replaced at our discretion. Ownership of equipment or parts of equipment which have been replaced is transferred to us. The warranty period is not extended nor does a new warranty period begin following repair or replacement under the warranty.
Warranty conditionsFor the warranty to be valid, the following steps must be taken:
Please contact our customer service by email or phone. If the product under warranty has to be sent in for repair, the seller bears costs. After expiry of the warranty, the buyer bears the costs of transport and insurance. If the fault is covered by our warranty, you will receive a new or repaired equipment in return.
Warranty claims are invalid in case of damage resulting from:• misuse or improper handling• environmental influences (moisture, heat, electrical surge, dust, etc.)• failure to follow the current safety measures for the equipment• failure to follow the operating instructions• use of force (e. g. hitting, kicking, falling)• interventions which were not carried out by one of our authorized service centers• unauthorized repair attempts
Proof of purchase and serial numberPlease make sure that you are able to provide the appropriate receipt when claiming on your warranty. So that we can clearly identify the model of your equipment, and for the purposes of our quality control, you will need to give the serial number of your equipment, when contacting the service team. Where possible please have your serial number and your customer number ready when you call our service hotline. It will help us to deal with your request swiftly.

68 RX7
If you have trouble finding the serial number on your fitness equipment, our service team is at your disposal to offer further information.
Service outside the warranty periodWe are also happy to issue an individual cost estimate if there is a problem with your fitness equipment after the warranty has expired, or in cases which do not fall under the terms of the warranty, e. g. normal wear and tear. Please contact our customer service team to find a quick and cost-effective solution to your problem. In such a case you will be responsible for the delivery costs.
CommunicationMany problems can be solved just by speaking to us as your contract partner. We know how important it is to you as a user of the fitness equipment to have problems solved quickly and simply, so you can enjoy working out with minimal interruption. For that reason, we also want to resolve your queries quickly and in a straightforward manner. Thus, please always keep your customer number and the serial number of the faulty equipment handy.
7 DISPOSAL
At the end of its operational life, this equipment cannot be disposed of in normal household waste. Instead, it must be disposed of via an electricals recycling centre. Further information can be obtained from your local authority‘s recycling service.
The materials can be recycled as per their symbols. Through the reuse, recycling of materials or other forms of recovery of old equipment, you make an important contri-bution to the protection of the environment.
Note for battery disposalDo not dispose of used batteries in the household waste. Being the end-user, you are obliged to dispose of used batteries at a commercial or municipal collection point. You can also give the batteries, which you received from us, to one of our stores or send these to our warehouse postage free (see contact details at the end of these instructions). Pb = Battery contains more than 0.004 percent by weight of lead.Cd = Battery contains more than 0.002 percent by weight of cadmium.Hg = Battery contains more than 0.0005 percent by weight of mercury.

69RX7
8 ORDERING ACCESSORIES
Sport-Tiedje floor mat size XXXL
Art. No. ST-FM-XXXL
Polar transmitter chest strap T34 uncodedArt. No. T34
Chest strap contact gel 250ml
Art. No. BK-250

70 RX7
9 ORDERING SPARE PARTS
9.1 Service hotline
So that we can give you the best possible service, please have your model name, part number, serial number, exploded drawing and parts list ready.
SERVICE-HOTLINE
9.2 Serial number and model name
Before assembling your equipment, find the serial number on the white sticker and enter it in the appropriate space.
Serial number:
Brand / category: Model name:
Taurus rowing machine RX7-2
+31 172 619961
[email protected]. - Do. 9:00 - 17:00 Vr. 9:00 - 21:00Za. 10:00 - 17:00
+33 (0) 172 770033
+49 4621 4210-933
[email protected]. - Ven. 8:00 - 18:00 Sam. 9:00 - 18:00
80 90 16 50
+49 4621 4210-945
[email protected]. - Fr. 8:00 - 18:00 Lø. 9:00 - 18:00
+44 141 876 3972
Mon. - Fri. 9:00 - 17:00
+49 4621 4210-0
[email protected] - Fri 8:00 - 18:00 Sat 9:00 - 18:00
+49 4621 4210-0
+49 4621 [email protected]
Mo. - Fr. 8:00 - 18:00Sa. 9:00 - 18:00
DE
NL
DK
UK
FR
INT

71RX7
9.3 Part list and explosed drawing - rowing machine
No. Qty. Description No. Qty. Description
001 1 Aluminiumträger 109 1 Abdeckung vorne
002 1 Hauptrahmen 110 2 Innenabdeckung
003 1 Drehgelenk 111 2 Hauptabdeckung
004 1 Drehgelenkachse 112 1 Gitter
005 1 Vorderer Standfuss 113 1 Rollenabdeckung - Links
006 1 Hinterer Standfuss 114 1 Rollenabdeckung - Rechts
007 1 Hintere Halterung 115 2 Standfussabdeckung
008 1 Handgriff 116 1 Aluminiumträger Endkappe
009 2 Sitzgestell - Seitenplatte 117 2 Sitzgestell Abdeckung
010 2 Sitzgestell - Schaft 118 4 Sitzgestell - Rollen
011 2 Führungsrolle - Schraube 119 1 Sitz
012 2 Führungsrolle – Platte 120 1 Griffabdeckung oben
013 1 Fussstütze – Rechts 121 1 Griffabdeckung unten
014 1 Fussstütze – Links 122 2 Anschluss
015 1 Konsolenmast 123 1 Schaumstoffgriff
016 1 Halterung 124 1 Sitzstopper
017 1 Kupplungswelle 125 1 Feststellknauf
018 1 Rückholfeder 126 2 Versenablage
019 2 Führungsrolle - Abstands-halter
127 4 Versenablage - Stopper
100 1 Schieber 128 4 Führungsschien Versenab-lage
101 1 Schieberrolle 129 1 Lüftungsabdeckung
102 3 Kabelführung 130 1 Aluminium Drehkreuz
103 2 Konsolenmast Anschluss 131 2 Buchse
104 2 Konsolenmast Drehgelenk 132 1 Verkleidung Zugbandöffnu
105 2 Konsolenmast Endkappen 133 1 Batterieabdeckung
106 2 Abdeckung Konsolengehäu-se
134 1 Poly “V” Riemen
107 2 Konsolenmast - Abstands-halter
135 1 Antriebsrad
108 1 Handgriffablage 136 1 Drehtrommel
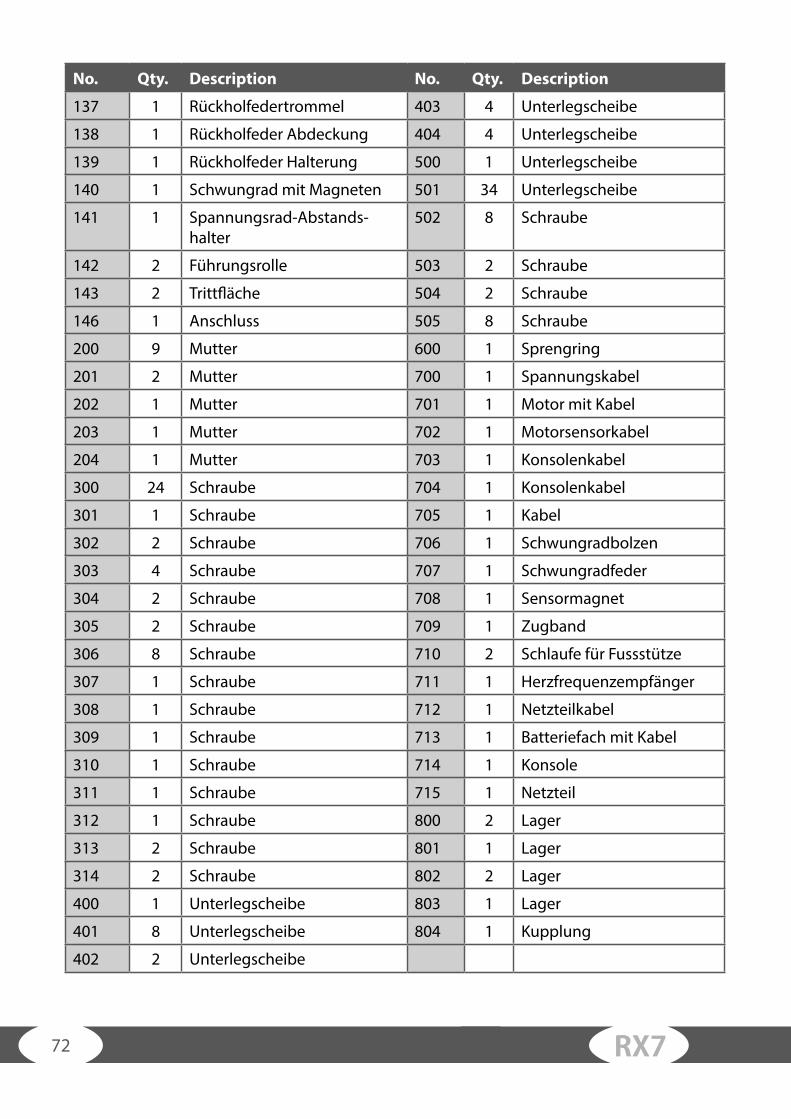
72 RX7
No. Qty. Description No. Qty. Description
137 1 Rückholfedertrommel 403 4 Unterlegscheibe
138 1 Rückholfeder Abdeckung 404 4 Unterlegscheibe
139 1 Rückholfeder Halterung 500 1 Unterlegscheibe
140 1 Schwungrad mit Magneten 501 34 Unterlegscheibe
141 1 Spannungsrad-Abstands-halter
502 8 Schraube
142 2 Führungsrolle 503 2 Schraube
143 2 Trittfläche 504 2 Schraube
146 1 Anschluss 505 8 Schraube
200 9 Mutter 600 1 Sprengring
201 2 Mutter 700 1 Spannungskabel
202 1 Mutter 701 1 Motor mit Kabel
203 1 Mutter 702 1 Motorsensorkabel
204 1 Mutter 703 1 Konsolenkabel
300 24 Schraube 704 1 Konsolenkabel
301 1 Schraube 705 1 Kabel
302 2 Schraube 706 1 Schwungradbolzen
303 4 Schraube 707 1 Schwungradfeder
304 2 Schraube 708 1 Sensormagnet
305 2 Schraube 709 1 Zugband
306 8 Schraube 710 2 Schlaufe für Fussstütze
307 1 Schraube 711 1 Herzfrequenzempfänger
308 1 Schraube 712 1 Netzteilkabel
309 1 Schraube 713 1 Batteriefach mit Kabel
310 1 Schraube 714 1 Konsole
311 1 Schraube 715 1 Netzteil
312 1 Schraube 800 2 Lager
313 2 Schraube 801 1 Lager
314 2 Schraube 802 2 Lager
400 1 Unterlegscheibe 803 1 Lager
401 8 Unterlegscheibe 804 1 Kupplung
402 2 Unterlegscheibe

73RX7

74 RX7
No. Qty. Description No. Qty. Description
008 1 ALI HANDLE BAR 212 2 NUT
122 2 PLUG 213 2 NUT
123 1 FOAM GRIP 384 1 U-BOLT
161 1 INFRARED TRANSMITTER - TOP 461 2 WASHER PLATE
162 1 INFRARED TRANSMITTER - BAT-TERY HOLDER
529 4 SCREW
163 1 INFRARED TRANSMITTER - BOT-TOM
709 1 DRIVE STRAP ASSEMBLY
9.4 Part list and explosion drawing - infrared remote control
(

75RX7

76 RX7
CONTACT
Company head officeSport-Tiedje GmbHFlensburger Str. 5524837 SchleswigGermany
Hotline for Technical Information
DISCLAIMER
©2011 TAURUS is a registered brand of the company Sport-Tiedje GmbH. All rights reserved. Any use of this trademark without the explicit written permission of Sport-Tiedje is prohibited.
Product and instructions are subject to change. Technical data can be changed without advance notice.
+31 172 619961
+33 (0) 172 770033
+49 4621 4210-933
80 90 16 50
+49 4621 4210-945
+44 141 876 3986
+49 4621 4210-0
www.sport-tiedje.comwww.taurus-fitness.de
+49 4621 4210-0
+49 4621 [email protected]
DE
NL
DK
UK
FR
INT
Please find a detailed overview including address and opening hours for all specialist fitness stores of the Sport-Tiedje Group in Germany and abroad on the following website.
www.sport-tiedje.com/en/stores

77RX7
Note

78 RX7
Note

79RX7

Rowing machine RX7