Embed Size (px)
Citation preview

Utility Guide
Patron ConversionPatron Conversion
Utility Guideversion 2.1version 2.1
Portions Copyright 1984-2000Faircom CorporationAll Rights Reserved

2 06/04
Copyright 2001
by Follett Software Company 1391 Corporate Drive McHenry, Illinois 60050(800) 323-3397 or (815) 344-8700
Email: [email protected] [email protected]
All rights reserved. This book and application, or parts thereof, may not be reproduced inany form without permission.
This software application and the information contained in this manual are subject tochange without notice.
Circulation Plus, Catalog Plus, WebCollection Plus, Union Catalog Plus, Alliance Plus,Find-a-Book, Find-It-All, One Search, Knowledge Links, and TitlePeek are trademarks ofFollett Software Company.
TextLink is a registered trademark of Follett Educational Services and Follett SoftwareCompany.
TITLEWAVE Copyright �2000 Follett Library Resources.
All other trademarks are the property of their respective third-party owners.

306/04
FOLLETT SOFTWARE COMPANYPRODUCT LICENSING TERMS***IMPORTANT***
This legal document (the �Agreement") is an agreement between you and Follett SoftwareCompany governing the use of Follett Software Company's library management productslisted on Follett's Web sites, including at www.fsc.follett.com, and any revisions andupdates (the �Product"). The Product may include software, data, and/or otherinstructional materials. By installing, accessing, or using all or any portion of the Product,you agree to be bound by the terms of this Agreement. If you do not agree to the terms ofthis Agreement, do not install, access, or use the Product and promptly return anyProduct to Follett Software Company.
The Product is owned by Follett Software Company and/or its third party licensors.Please see www.fsc.follett.com/destiny/licenseagreement/License_agreement_3_04.pdffor a complete list of the third party open source contributors to the Product and theirlicense terms. The Product is protected by U.S. and international copyright law andFollett Software Company and its licensors retain all title to and ownership of theProduct, with the exception of the following limited use license:
1. Windows and MacOS-Based Products. If you have obtained a single-user license fora MacOS or Windows-based Product, you may install and use one copy of theProduct on one computer not attached to your network at your site for the purpose ofmanaging your site's library collection. If you have obtained a multiple-user licensefor a MacOS or Windows-based Product, you may install and use one copy of theProduct on one system or one network at your site for the purpose of managing yoursite's library collection.
2. Web-Enabled Products. If you have obtained a single site license for a Web-enabledProduct, you may install and use one copy of the Product on a central server locatedwithin and under the control of your site for the purpose of managing your site'slibrary collection. If you have acquired a district license to use the Product, you mayinstall a copy of the Product on a central server or servers located within and underthe control of your district for the purpose of managing the library collections of thesites within your district and for whom you have paid a license fee.
3. Subscription ID and Password. Follett will provide you with a subscriberidentification number and user password enabling you to access and allow access toany Follett-hosted subscription Product you have licensed, which may be accessedthrough your library management system or Follett's Internet sites, depending on thelicense you have paid for. You are responsible for maintaining the security of yourpassword and agree not to post it on any Web site accessible to the public. You agreeto assume responsibility for the results of any misuse of your password and to reportany misuse of the password immediately to Follett.
4. Prohibited Use. You may not copy the Product or any accompanying writtenmaterials without Follett's permission, except as necessary to use the Product in itsintended manner. You may not use the Product or allow any third party to use theProduct for any commercial purpose or in any manner not set forth in thisAgreement. You may not loan, sublicense, rent, lease, transfer, or assign the Productor any portion thereof to any third party, with the following exception: You maydownload and post MARC records solely for the purpose of importing them into andmanaging them from your duly licensed Follett library automation managementsystem. You may not reverse engineer, decompile, disassemble, or in any waymodify the Product or any portion thereof without prior written consent of Follett

4 06/04
Software Company. Any modifications you make to the Product will remain theproperty of Follett Software Company and/or its licensor(s).
5. New Versions. When you install a new version of the Product accompanied by a newlicense, provided your license fee entitles you to the new version, your use of the newversion constitutes your acceptance of the new license and the termination of yourlicense to use any previous version of the Product.
6. Termination for Breach. If you breach any material terms of this Agreement or fail topay license fees as they become due, Follett Software Company may immediatelyterminate your license to use the Product, including by disabling any on-line access,in addition to taking any other legal remedies available to it. Upon termination ofyour license, you must either return any copies of the Product and any data takenfrom the Product, including any MARC records, to Follett Software Company ordestroy the copies and data and certify in writing that you have done so.
7. Third Party Web Sites. The Product may provide you and your patrons with links tothird party Web sites. You acknowledge that Follett Software Company does notendorse or maintain control over and will not be liable for the content, advertising orother materials contained on such third party sites. Your use and your patrons' useof the content, goods or services on any third party site will be governed by the termson that site, if any. You will be responsible for understanding and complying withthird party sites' terms of use and instructing your patrons and employees on thesame.
8. Third Party Subscription Databases. The Product may enable you and your patronsto search all of your sites' third party subscription databases simultaneously. Becauseaccess to many of these databases is strictly regulated under the terms of the licenseagreements between you and the third party database owners, you agree that it isyour obligation to ensure against the unauthorized access of such third party-ownedsubscription databases. If the Product provides access to password protectedcontent, you agree to password protect such access at your library's server level toensure that only your patrons can use the Product, and to protect against theunauthorized use of third party-owned content, such as subscription databases.
9. Student Privacy. As part of your subscription, you may be able to allow your patronsto set up their own individual login accounts. If you do so, you agree that you aresolely responsible for complying with all applicable state and federal laws regardingstudent privacy, including the federal Family Education and Privacy Act (FERPA).Follett warrants that it will not use any information you provide from students'accounts for any purpose other than servicing your subscription, and that it will notdisclose such information to any third party unless required by law. FOLLETTSOFTWARE COMPANY DOES NOT KNOWINGLY COLLECT ANY PERSONALLYIDENTIFYING INFORMATION ABOUT CHILDREN UNDER THE AGE OF 13THROUGH THE PRODUCTS. However, Follett cannot make that claim on behalf ofthird party sites found through the Product. You therefore agree to inform andeducate patrons under the age of 13 that they should not provide any personallyidentifying information on any third party sites without the involvement andverifiable consent of their parents.
10. Limited Warranty. Follett Software Company warrants that for a period of 1 yearfrom its delivery to your site or access, in the case of online subscriptions, the Productwill perform in substantial compliance with its specifications and be free of materialdefects. As your sole and exclusive remedy for this warranty, Follett SoftwareCompany will either repair the Product or refund your prorated license fee, providedyou report to Follett Software Company in writing the material defect ornoncompliance within the 1 year warranty period. This limited warranty does not

506/04
cover any material defect resulting from any accident, abuse, or misapplication of theProduct caused by you, your employees, end users, agents or contractors, or anymodification you, your employees, end users, agents or contractors make to theProduct, whether or not such modification is authorized by Follett SoftwareCompany.
11. DISCLAIMER OF WARRANTY. FOLLETT SOFTWARE COMPANY DISCLAIMSALL OTHER WARRANTIES, EITHER EXPRESS OR IMPLIED, INCLUDING BUTNOT LIMITED TO IMPLIED WARRANTY OF MERCHANTABILITY, FITNESS FORA PARTICULAR PURPOSE, WARRANTY OF TITLE, OR WARRANTY OFNON-INFRINGEMENT. FOLLETT SOFTWARE COMPANY AND ITS LICENSORSARE NOT RESPONSIBLE FOR AND MAKE NO REPRESENTATIONS ORWARRANTIES WITH REGARD TO THIRD PARTY NETWORK OPERATINGSYSTEMS, COMPUTER HARDWARE, SOFTWARE OR PERIPHERALS THAT YOUUSE IN CONJUNCTION WITH THE PRODUCT, OR THAT ANYNETWORK-ACCESSIBLE FEATURES OF THE PRODUCT WILL BECONTINUALLY ACCESSIBLE OR ACCESSIBLE AT ANY TIME.
THE THIRD PARTY SOURCE CODE USED IN THE PRODUCT AND LISTED, WITHITS LICENSING TERMS, ATwww.fsc.follett.com/destiny/licenseagreement/License_agreement_3_04.pdf ISPROVIDED BY THIRD PARTY LICENSORS "AS IS," WHO DISCLAIM ANYEXPRESSED OR IMPLIED WARRANTIES, INCLUDING, BUT NOT LIMITED TO,IMPLIED WARRANTIES OF MERCHANTABILITY AND FITNESS FOR APARTICULAR PURPOSE. IN NO EVENT SHALL ANY SUCH THIRD PARTYLICENSOR OR ITS CONTRIBUTORS OR FOLLETT SOFTWARE COMPANY BELIABLE FOR ANY DIRECT, INDIRECT, INCIDENTAL, SPECIAL, EXEMPLARY, ORCONSEQUENTIAL DAMAGES (INCLUDING, BUT LIMITED TO LOSS OF USE ORDATA), HOWEVER CAUSED AND ON ANY THEORY OF LIABILITY, WHETHERIN CONTRACT, STRICT LIABILITY, OR TORT (INCLUDING NEGLIGENCE OROTHERWISE) ARISING OUT OF THE USE OF THE PRODUCT, SOFTWARE ORSOURCE CODE, EVEN IF ADVISED OF THE POSSIBILITY OF SUCH DAMAGE.IN NO EVENT WILL FOLLETT SOFTWARE COMPANY OR ITS LICENSORS BELIABLE TO YOU IN ANY AMOUNT EXCEEDING THE TOTAL FEES YOU HAVEPAID TO FOLLETT SOFTWARE COMPANY DURING THE TWELVE MONTHSPRECEDING YOUR CLAIM.
FOLLETT SOFTWARE COMPANY IS NOT RESPONSIBLE FOR AND MAKES NOREPRESENTATIONS OR WARRANTIES THAT THIRD PARTY PRODUCTS,SERVICES OR WEB SITES WILL WORK WITH THE PRODUCT, OR THAT ACCESSTO THE PRODUCT OR THIRD PARTY SITES FOUND THROUGH THE PRODUCTWILL BE UNINTERRUPTED OR ERROR-FREE. FOLLETT MAKES NOWARRANTY THAT THE INFORMATION OBTAINED FROM THE PRODUCT ISACCURATE OR RELIABLE OR THAT ANY GOODS OR SERVICES MADEAVAILABLE THROUGH THE PRODUCT WILL MEET YOUR EXPECTATIONS.YOU AGREE THAT ANY MATERIAL OR DATA DOWNLOADED OR OTHERWISEOBTAINED FROM USE OF THE COLLECTION IS DONE OR ALLOWED AT YOURSOLE RISK AND THAT YOU WILL BE SOLELY RESPONSIBLE FOR ANYDAMAGE THAT RESULTS FROM THE DOWNLOADING OF SUCH MATERIALOR DATA.
12. Indemnification. To the extent you are permitted under applicable law, you agree todefend, indemnify and hold harmless Follett Software Company, its parentcorporation, subsidiaries, affiliates, and their respective officers, directors, employees,attorneys and agents from and against any and all third party claims, liability, andexpenses, including attorneys' fees and legal costs, that arise out of the use of the

6 06/04
Products by you or your patrons in violation of this Agreement. This provision willnot apply if you are a public school or public library.
13. Arbitration. You agree to submit any dispute, controversy or claim you may havearising out of or relating to this Agreement solely to binding arbitration to beconducted pursuant to the Commercial Rules of the American Arbitration then ineffect.
14. Right to Audit Compliance. Follett will have the right to conduct or direct anindependent accounting firm to conduct, during normal business hours and no morethan twice during any calendar year, an audit of your relevant records to verify yourcompliance with the terms of this Agreement. This provision does not limit Follett'sright to monitor its server logs for accesses made by you, or using any access codeissued to you, to any on-line features, or to investigate any conduct Follett believeseither may be a breach of the licensing terms or otherwise threatening to the integrityof its products or services.
15. Entire Agreement. This Agreement constitutes the entire agreement of the partieswith respect to the use of the Product. The failure by Follett to enforce any of itsrights hereunder will not constitute a waiver of such rights. If any portion of thisAgreement is found by a court of competent jurisdiction to be invalid, the otherprovisions will remain in full force and effect.
16. Intellectual Property. Follett Software Company is the owner or licensee of copyright,trademark, and other intellectual property and proprietary rights in the Product. Alltrademarks appearing in the Product are the property of Follett or their respectivethird party owners. Follett disclaims any affiliation or endorsement of such thirdparties' goods or services, and does not intend to imply any such endorsement oraffiliation by using such marks. Likewise, such use is not meant to imply any thirdparty's endorsement of Follett's goods or services. Please be aware and inform yourpatrons that copyright, trademark and other intellectual property rights may protectcontent on third party Web sites and databases accessed through the Product.Nothing in this Agreement affects such rights or implies that you, your patrons orFollett has any rights in this content. Use of third party content may be governed bya separate agreement with the third party owner and you agree not to use the contentin any way that violates this Agreement or the intellectual property rights of the thirdparty owner. You also agree to take reasonable measures to make your patrons awareof all provisions in this section.
17. Exporting Products. This Agreement will not be governed by the United NationsConvention on Contracts for the International Sale of Goods, the application of whichis expressly excluded. You agree not to ship, transfer or export the Product or anydata obtained from the Product into any country or use the Product or data obtainedfrom the Product in any manner prohibited by the United States ExportAdministration Act or any other export laws or regulations.
U.S. GOVERNMENT RESTRICTIONS1. If the Product is acquired by or on behalf of a unit or agency of the United States
Government this provision applies. The Product: (a) was developed at privateexpense, and no part of it was developed with government funds; (b) contains tradesecret information of Follett Software Company for all purposes of the Freedom ofInformation Act; (c) is "commercial computer software" subject to limited utilizationas provided in the contract between Follett Software Company and the governmentalentity; and (d) in all respects contains proprietary data belonging solely to FollettSoftware Company.
2. For units of the Department of Defense (DOD), this Product is sold only with"Restricted Rights" as that term is defined in the DOD Supplement to the Federal

706/04
Acquisition Regulations ("DFARS") 52.227-7013(c) (1) (ii) and use, duplication ordisclosure is subject to restrictions as set forth in subparagraph (c) (1) (ii) of the Rightsin Technical Data and Computer Product clause at DFARS 52.227-7013.Manufacturer: Follett Software Company, 1391 Corporate Drive, McHenry, IL60050-7041.
3. If the Product is acquired under a GSA Schedule, the U.S. Government has agreed: (a)to refrain from changing or removing any insignia or lettering from the Product thatis provided or from producing copies of manuals or disks (except one copy forbackup purposes); (b) title to and ownership of the Product and any reproductionthereof shall remain with Follett Software Company; (c) use of the Product anddocumentation shall be limited to the facility for which it is acquired; and (d) if use ofthe Product is discontinued at the installation specified in the purchase/deliveryorder and the Government desires to use it at another location, it may do so by givingprior written notice to Follett Software Company, specifying the type of computerand new location site.
4. U.S. Government personnel using the Product, other than under a DOD contract orGSA Schedule, are hereby on notice that use of the Product is subject to restrictionswhich are the same as, or similar to, those specified above.
Follett Software Company1391 Corporate DriveMcHenry, Illinois 60050-7041(800)323-3397 Email: [email protected] or [email protected]
Copyright © 2003 - 2004, Follett Software Company. All rights reserved.

8 06/04
Notes

Contents
Chapter 1 The Patron Conversion Utility 11
Before you convert any data 11
Starting the Patron Conversion Utility 12
Columbia 13
Extracting patron records 13
Converting Columbia patron records 13
Osiris 15
Exporting student records 15
Converting Osiris student records 15
Pre�Unison 17
Exporting patron records 17
Converting pre�Unison patron records 17
SASI 3 19
Exporting student records 19
Converting SASI 3 student records 19
SASI XP 22
Exporting student records 22
Converting SASI XP patron records 22
SIMS 25
Exporting student records 25
Converting SIMS student records 25
User Defined 27
Evaluating your source file 27
Opening your file 27
Setting your options 28
Determining your file format 29
Checking for a header record 30
Mapping fixed-length fields 31
Mapping delimited fields 32
Defining the format of your number fields 34
Finishing up 34
Converting User Defined patron records 34
10 06/04
Winnebago 35
Examining your barcodes 35
The Barcode Wizard 36
Exporting your patron records 37
Converting Winnebago patron records 39
Chapter 2 Patron file formats 45
Follett's patron import file formats 45
File format basics 45
Before you begin 46
Header portion of the file 46
Patron record portion of the file 47
35-field format 47
31-field format 49

11
Chapter 1 The Patron Conversion Utility
The Patron Conversion Utility can help you convert student or patron recordsinto the current Follett patron format. This utility provides options for convertingdata from seven different systems: Columbia, Osiris, SASI 3, SASI XP, SIMS,Winnebago�; as well as Follett's own pre�Unison software.
The Patron Conversion Utility also offers a user�defined option that lets youconvert any fixed�length, comma� or tab�delimited ASCII text file.
You can run this utility only on Windows 95/98 or NT/2000.Once they are converted, however, you can import these records into Follett'sCirculation Plus (v1.60 for MS�DOS, v4.x and higher for Windows or Mac OS)and TextLink (v4.1 or higher for Windows).
See also: If you need to install the Patron Conversion Utility, see the InstallationGuide.For specific information on the import file format and contents, see Chapter 2.
Before you convert any data
Before converting any data, there are a few configurations you need to have athand. To get this information, open the System Setup | Setup | PatronMaintenance | Patron Defaults tab. Determine the following:
� Your Required Patron Field(s): Barcode number; patron ID; or both. If yourconverted records don't contain the required field, Patron Maintenancecannot import them.
If your Required Patron Field is Barcode, do you prefer to use thestudent/patron numbers in the source file or assign new barcode numbers?This utility can automatically assign new 7�digit barcode numbers thatcorrespond to the Follett Classic barcode symbology.
If you're using the Columbia or Osiris conversion option, you need to knowwhether or not to assign the student's ID Number to Follett's ID field.
If you're using the SASI 3 conversion option, you need to know where to putthe District Number and/or Student Number.
If you're using the SASI XP conversion option, you need to know whether ornot to assign the student's Permanent Number to Follett's ID field.
� Your User-Defined Patron Field Names.
If you're using the User Defined conversion option, you need to know howyour library has set up the User-Defined Patron Field Names. Record the

06/0412 Patron Conversion Utility
prompts (names) for Location 1, Location 2, User Field 1, and User Field 2.You'll need to know them when setting up the conversion.
If you're using the SASI XP conversion option, you need to know which ofthese four fields (if any) holds the grade level of the student.
Once you've gathered the necessary information, you're ready to proceed. Thefollowing section provides instructions for starting the Patron Conversion Utilityand an overview of the application's features. Specific instructions for each of thesupported source formats follow that.
Starting the Patron Conversion Utility
To start the Patron Conversion Utility, from the computer desktop, open theFollett Applications folder and double�click the Patron Conversion Utility icon,or access it from the Windows Start| Programs | Follett Applications menu.
The Patron Conversion Utility main window appears:
In the Patron Record Source group box,you select the format of the patron (student) records you want to convert,specify the location and name of the file that contains the records,and access your conversion options.
In the Patron Record Destination group box,all you need to do is specify a name and a destination for the converted file.This is the file you'll import into Patron Maintenance.
The following sections provide specific conversion instructions for each of thesupported source formats:
� Columbia (page 13)
� Osiris (page 15)
� Pre�Unison (page 17)
� SASI 3 (page 19)
� SASI XP (page 22)
� SIMS (page 25)
� User Defined (page 27)
� Winnebago (page 35)

06/04 Chapter 1 The Patron Conversion Utility 13
Columbia
You can use this option to convert patron records from a Columbia system intothe Follett patron format.
Extracting patron records
To extract patron records from Columbia, select Option #11 (Library Extract File)from the system's Main Menu. The default file name is LIBEXTR.BLD.
For a list of the patron fields in the LIBEXTR.BLD file and how they map to theFollett patron fields, look up �Columbia data map" in the Patron ConversionUtility's online help.
Note: If the LIBEXTR.BLD file does not contain the patron information you want,you can convert any fixed�length or delimited (comma or tab) ASCII textfile with the User Defined option. Instructions for the User Definedconversion option begin on page 27.
Converting Columbia patron records
Now that you've extracted your patron records (LIBEXTR.BLD file format) andgathered any information you might need (see page 11), you're ready to convertyour records.
a. If you haven't already, start the Patron Conversion Utility (see page 12for instructions). From the Patron Conversion Utility main window:
Select the Columbia option from the Source Format drop�down list,then click Browse to locate and open the file you want to convert.By default, the application looks for �libextr.bld" but any file name isacceptable as long as the file is in the LIBEXTR.BLD format.
Click Browse to select a location and name for the converted file.By default, the application names the file �patrons.out" and saves it to your computer's Desktop.This is the file you'll import into Patron Maintenance.

06/0414 Patron Conversion Utility
b. Click the Options button in the Patron Record Source group box. Fromthe Conversion Options window:
If you want the conversion to automatically assign barcode numbers, select theAssign Barcodes option, then enter a starting barcode number of 1 or greater.
What do you want to do with your Columbia patron IDs? If you're assigning new barcodes, you can usethem as Follett IDs, or you can discard them by selecting the Don't Assign option. If you're not assign�ing new barcodes, you can use them as Follett barcodes or IDs.
Important: If you do not assign new barcodes, you can choose to discard your Columbia patron IDnumbers by selecting Don't Assign. We do not recommend this option; if you choose it, you will need toedit the converted file to add the required patron field(s) as defined in System Setup before you canimport it into Patron Maintenance.
After selecting the options you want, click OK to retain your settings andreturn to the Patron Conversion Utility main window.
c. To start your conversion, click the Convert button on the PatronConversion Utility main window. A progress dialog appears as therecords are converted.
When processing completes, verify the numbers in the Records Read andRecords Written fields and close the progress dialog. Unless you have otherpatron records to convert, you can now close Patron Conversion Utility andimport the converted patron records into Patron Maintenance.

06/04 Chapter 1 The Patron Conversion Utility 15
Osiris
You can use this option to convert student records exported from an Osirissystem into the Follett patron format.
Exporting student records
This conversion option will only convert Osiris student records exported usingthe FOLLETT.EXP (1993 version) file format.
For a list of the fields in the FOLLETT.EXP file and how they map to the Follettpatron fields, look up �Osiris data map" in the Patron Conversion Utility's onlinehelp.
Note: If the FOLLETT.EXP file does not contain the information you want, youcan convert any fixed�length or delimited (comma or tab) ASCII text filewith the User Defined option. Instructions for the User Defined conversionoption begin on page 27.
Converting Osiris student records
Now that you've exported your student records (FOLLETT.EXP file format) andgathered any information you might need (see page 11), you're ready to convertyour records.
a. If you haven't already, start the Patron Conversion Utility (see page 12for instructions). From the Patron Conversion Utility main window:
Select the Osiris option from the Source Format drop�down list,then click Browse to locate and open the file you want to convert.By default, the application looks for �follett.exp" but any file name isacceptable as long as the file is in the FOLLETT.EXP format.
Click Browse to select a location and name for the converted file.By default, the application names the file �patrons.out" and saves it to your computer's Desktop.This is the file you'll import into Patron Maintenance.

06/0416 Patron Conversion Utility
b. Click the Options button in the Patron Record Source group box. Fromthe Conversion Options dialog:
If you want the conversion to automatically assign barcode numbers, select theAssign Barcodes option, then enter a starting barcode number of 1 or greater.
What do you want to do with your Osiris student IDs? If you're assigning new barcodes, you can usethem as Follett IDs, or you can discard them by selecting the Don't Assign option. If you're not assign�ing new barcodes, you can use them as Follett barcodes, IDs, or both.
Important: If you do not assign new barcodes, you can choose to discard your Osiris student IDnumbers by selecting Don't Assign. We do not recommend this option; if you choose it, you will needto edit the converted file to add the required patron field(s) as defined in System Setup before youcan import it into Patron Maintenance.
After selecting the options you want, click OK to retain your settings andreturn to the Patron Conversion Utility main window.
c. To start your conversion, click the Convert button on the PatronConversion Utility main window. A progress dialog appears as therecords are converted.
When processing completes, verify the numbers in the Records Read andRecords Written fields and close the progress dialog. Unless you have otherstudent records to convert, you can now close the Patron Conversion Utilitymain window and import the converted patron records from the destinationfile into Patron Maintenance.

06/04 Chapter 1 The Patron Conversion Utility 17
Pre�UnisonUse this option to convert patron records exported from a pre�Unison version ofCirculation Plus (v7.xx for MS�DOS) into the current Follett patron format.
Exporting patron records
Export your patron records from Circulation Plus v7.xx and name the filePATRONS.DAT.
Converting pre�Unison patron records
Now that you've exported your patron records (pre�Unison v7.xx file format) andgathered any information you might need (see page 11), you're ready to convertyour records.
a. If you haven't already, start the Patron Conversion Utility (see page 12for instructions). From the Patron Conversion Utility main window:
Select the Pre-Unison option from the Source Format drop�down list,then click Browse to locate and open the file you want to convert.By default, the application looks for �patrons.dat" but any file name isacceptable as long as the file is in the pre-Unison v7.xx file format.
Click Browse to select a location and name for the converted file.By default, the application names the file �patrons.out" and saves it to your computer's Desktop.This is the file you'll import into Patron Maintenance.
b. Click the Options button in the Patron Record Source group box. Fromthe Conversion Options dialog:
If you want the conversion to automatically assign barcode numbers, select theAssign Barcodes option, then enter a starting barcode number of 1 or greater.
After setting the options you want, click OK to retain your settingsand return to the Patron Conversion Utility main window.

06/0418 Patron Conversion Utility
c. To start your conversion, click the Convert button on the PatronConversion Utility main window. A progress dialog appears as therecords are converted.
When processing completes, verify the numbers in the Records Read andRecords Written fields and close the progress dialog. Unless you have otherpatron records to convert, you can now close the Patron Conversion Utilitymain window and import the patron records from the destination file intoPatron Maintenance.

06/04 Chapter 1 The Patron Conversion Utility 19
SASI 3You can use this option to convert student records exported from a SASI 3 systeminto the Follett patron format.
Exporting student recordsExporting student records from a SASI 3 system is a matter of querying the SASI3 application and saving the results of the query to floppy disk.
Important: We recommend that a qualified SASI system administrator performthe tasks in this section. For more information about the SASI 3system, see your SASI 3 user documentation.
a. From a workstation with access to the SASI 3 student information, startthe SASI 3 application and insert a blank, formatted disk into thecomputer 's floppy drive (usually A:).
b. To create the required query:
� Type QUERY, and then press ENTER.
� Type FIXED, and then press ENTER.
� Type UPPER, and then press ENTER.
� To select all the student records in the SASI 3 system, type SAVE STU LNFN CL AD CY ZC SN AC TL GR ID TG , and then press ENTER.
Note: You can limit the export to a specific grade level by adding IFGR=[grade] to the end of the save command.
For example, if you want limit the export to students in the ninthgrade, the command would be SAVE STU LN FN CL AD CY ZCSN AC TL GR ID TG IF GR=9 .
� Type STOP, and then press ENTER.
c. To copy the query to the floppy disk, type COPY QUERY [your SASI 3operator 's number].SAV A: PAT.DAT , and then press ENTER.
For example, if your SASI 3 operator's number is 54321, you would type thecommand COPY QUERY 54321.SAV A: PAT.DAT .
If more that one disk is needed to copy the selected student information, thesystem prompts you for additional disks.
The resulting export file is named PAT.DAT. For a list of the fields in the PAT.DATfile and how they map to the Follett patron fields, look up �SASI 3 data map" inthe Patron Conversion Utility's online help.
Note: If the PAT.DAT file does not contain the information you want, you canconvert any fixed�length or delimited (comma or tab) ASCII text file withthe User Defined option. Specifications for the User Defined conversionoption begin on page 27.
Converting SASI 3 student recordsNow that you've exported your student records (PAT.DAT file format) andgathered any information you might need (see page 11), you're ready to convertyour records.
06/0420 Patron Conversion Utility
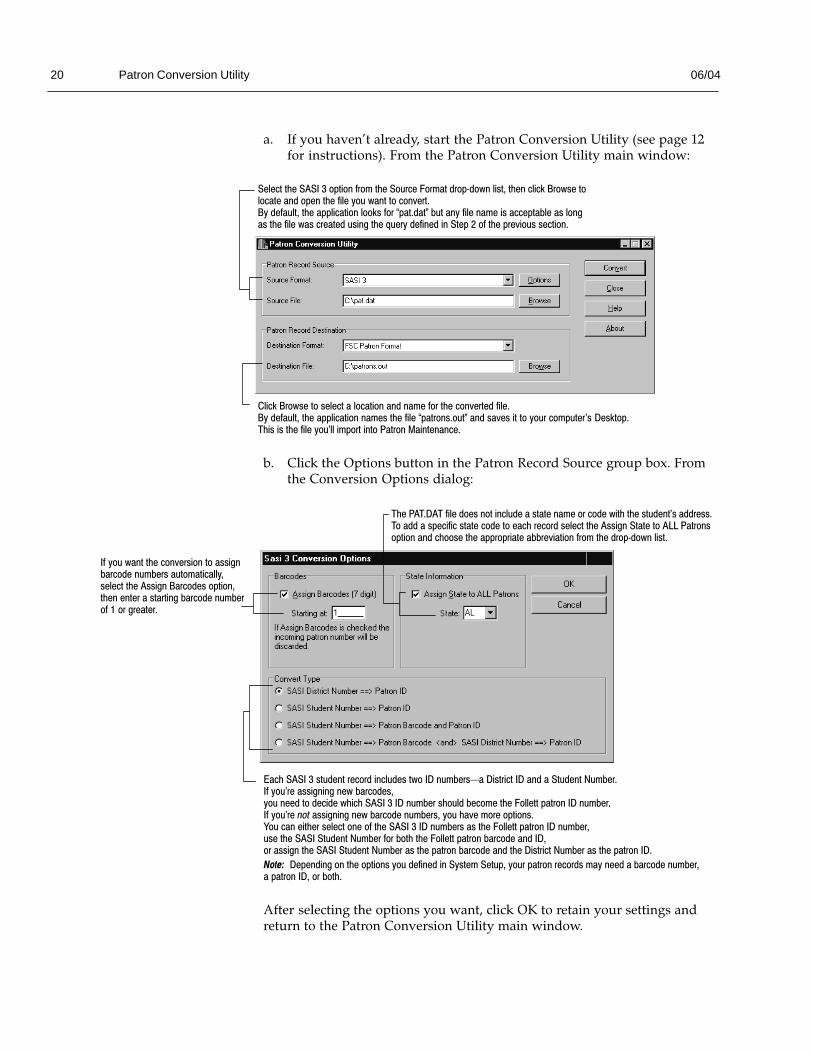
a. If you haven't already, start the Patron Conversion Utility (see page 12for instructions). From the Patron Conversion Utility main window:
Select the SASI 3 option from the Source Format drop�down list, then click Browse tolocate and open the file you want to convert.By default, the application looks for �pat.dat" but any file name is acceptable as longas the file was created using the query defined in Step 2 of the previous section.
Click Browse to select a location and name for the converted file.By default, the application names the file �patrons.out" and saves it to your computer's Desktop.This is the file you'll import into Patron Maintenance.
b. Click the Options button in the Patron Record Source group box. Fromthe Conversion Options dialog:
If you want the conversion to assignbarcode numbers automatically, select the Assign Barcodes option,then enter a starting barcode numberof 1 or greater.
The PAT.DAT file does not include a state name or code with the student's address.To add a specific state code to each record select the Assign State to ALL Patronsoption and choose the appropriate abbreviation from the drop�down list.
Each SASI 3 student record includes two ID numbersa District ID and a Student Number.If you're assigning new barcodes,you need to decide which SASI 3 ID number should become the Follett patron ID number.If you're not assigning new barcode numbers, you have more options.You can either select one of the SASI 3 ID numbers as the Follett patron ID number,use the SASI Student Number for both the Follett patron barcode and ID,or assign the SASI Student Number as the patron barcode and the District Number as the patron ID.
Note: Depending on the options you defined in System Setup, your patron records may need a barcode number,a patron ID, or both.
After selecting the options you want, click OK to retain your settings andreturn to the Patron Conversion Utility main window.

06/04 Chapter 1 The Patron Conversion Utility 21
c. To start your conversion, click the Convert button on the PatronConversion Utility main window. A progress dialog appears as therecords are converted.
When processing completes, verify the numbers in the Records Read andRecords Written fields and close the progress dialog. Unless you have otherstudent records to convert, you can now close the Patron Conversion Utilitymain window and import the converted records from the destination file intoPatron Maintenance.
06/0422 Patron Conversion Utility
SASI XPYou can use this option to convert student records exported from a SASI XPsystem into the Follett patron format. Please note that this conversion optionassumes that you are consistently using the counselor field in your studentrecords. If you are not, you can create and export a custom query that can then beconverted with the User Defined option (see page 27 for specifications).
Important: We recommend that a qualified SASI XP system administratorperform the tasks in this section. For more information about the SASIXP system, see your SASI XP user documentation.
Exporting student records
Exporting student records from SASI XP is a matter of querying the application,and then saving and exporting the results of the query.
a. From a workstation with access to the SASI XP student information, startthe SASI XP application.
b. In SASI XP, create and save the following query:
Export ASTU ATCH PermNum 1,LastName 1,FirstName1,MiddleName Birthdate 1,Gender Grade 1,TelephoneMailAddr City State ZipCode ResAddr ResCity ResStateResZipCode OrigYrGrad AbbrevName ?13 ?10
Note: Make certain you include the ?13[space]?10 at the end of the query. Itindicates that every student record in the export file should end with acarriage return/line feed. The file won't convert without it.
c. Once you've saved the query, click the Export button. From the OutputFormat drop�down list, choose FIXED LENGTH.
d. When the Field Length screen appears, verify that the Last Name fieldlength equals 20 and the Telephone field length equals 10. If they don't,you must change them.
e. Name your export file SASIXP.DAT and make note of the file's location.
For a list of the fields in the SASIXP.DAT file and how they map to the Follettpatron fields, look up �SASI XP data map" in the Patron Conversion Utility'sonline help.
Note: If the SASIXP.DAT file does not contain the patron information you want,you can convert any fixed�length or delimited (comma or tab) ASCII textfile with the User Defined option. Specifications for the User Definedconversion option begin on page 27.
Converting SASI XP patron records
Now that you've exported your student records (your SASIXP.DAT file) andgathered any information you might need (see page 11), you're ready to convertyour records.

06/04 Chapter 1 The Patron Conversion Utility 23
a. If you haven't already, start the Patron Conversion Utility (see page 12for instructions). From the Patron Conversion Utility main window:
Select the SASI XP option from the Source Format drop�down list,then click Browse to locate and open the file you want to convert.By default, the application looks for �sasixp.dat" but any file name is acceptable as longas the file was created using the query defined in Step 2 of the previous section.
Click Browse to select a location and name for the converted file.By default, the application names the file �patrons.out" and saves it to your computer's Desktop.This is the file you'll import into Patron Maintenance.
b. Click the Options button in the Patron Record Source group box. Fromthe Conversion Options dialog:
If you want the conversion to automatically assign barcode numbers, select theAssign Barcodes option, then enter a starting barcode number of 1 or greater.
What do you want to do with your SASI XP permanent numbers and grade information?
� If you're assigning new barcodes, you can use the permanent numbers as Follett IDs, or you candiscard them by selecting the Don't Assign option. If you're not assigning new barcodes, you canuse them as Follett barcodes or IDs.
� You can also assign SASI XP's grade information to any of Follett's four user�defined fields(Location 1, Location 2, User Field 1, or User Field 2).
Important: If you do not assign new barcodes, you can choose to discard your SASI XP permanentnumbers by selecting Don't Assign. We do not recommend this option; if you choose it, you will needto edit the converted file to add the required patron field(s) as defined in System Setup before youcan import it into Patron Maintenance.
After selecting the options you want, click OK to retain your settings andreturn to the Patron Conversion Utility main window.
c. To start your conversion, click the Convert button on the PatronConversion Utility main window. A progress dialog appears as therecords are converted.
When processing completes, verify the numbers in the Records Read andRecords Written fields and close the progress dialog. Unless you have other

06/0424 Patron Conversion Utility
patron records to convert, you can now close the Patron Conversion Utilitymain window and import the patron records from the destination file intoPatron Maintenance.

06/04 Chapter 1 The Patron Conversion Utility 25
SIMS
You can use this option to convert student records exported from a SIMS systeminto the Follett patron format.
Exporting student records
This conversion option will only convert SIMS student records exported usingthe BDMCEXTR.BLD file format.
For a list of the fields in the BDMCEXTR.BLD file and how they map to theFollett patron fields, look up �SIMS data map" in the Patron Conversion Utility'sonline help.
Note: If the BDMCEXTR.BLD file does not contain the information you want,you can convert any fixed�length or delimited (comma or tab) ASCII textfile with the User Defined option. Specifications for the User Definedconversion option begin on page 27.
Converting SIMS student records
Now that you've exported your student records (BDMCEXTR.BLD file format)and gathered any information you might need (see page 11), you're ready toconvert your records.
a. If you haven't already, start the Patron Conversion Utility (see page 12for instructions). From the Patron Conversion Utility main window:
Select the SIMS option from the Source Format drop�down list, thenclick Browse to locate and open the file you want to convert.By default, the application looks for �bdmcextr.bld" but any file name isacceptable as long as the file is in the BDMCEXTR.BLD format.
Click Browse to select a location and name for the converted file.By default, the application names the file �patrons.out" and saves it to your computer's Desktop.This is the file you'll import into Patron Maintenance.

06/0426 Patron Conversion Utility
b. Click the Options button in the Patron Record Source group box. Fromthe Conversion Options dialog:
If you want the conversion to automatically assign barcode numbers, select theAssign Barcodes option, then enter a starting barcode number of 1 or greater.
After selecting the options you want, click OK to retain your settings andreturn to the Patron Conversion Utility main window.
c. To start your conversion, click the Convert button on the PatronConversion Utility main window. A progress dialog appears as therecords are converted.
When processing completes, verify the numbers in the Records Read andRecords Written fields and close the progress dialog. Unless you have otherstudent records to convert, you can now close the Patron Conversion Utilitymain window and import the converted patron records from the destinationfile into Patron Maintenance.

06/04 Chapter 1 The Patron Conversion Utility 27
User Defined
You can use this option with any student management or library system that canexport records in a fixed�length or delimited (comma or tab) file format.
Evaluating your source file
Although this conversion option can convert a wide variety of files, there are afew requirements that your source file (the file from your student administrationsystem) must meet:
� The file must be in a fixed�length, or comma� or tab�delimited ASCII textformat.
� The file cannot have more than one header record.
� The file must have one patron record per line.
� Each record must end with a hard return (�).
� Each record cannot exceed 512 characters.
The fields in the file do not need to be in any particular order.The conversion process puts the fields in the correct order.
Opening your file
Once you've exported your student records and gathered any information youmight need (see page 11), you're ready to begin.
1. If you haven't already, start the Patron Conversion Utility by opening theFollett Applications folder and double�clicking the Patron Conversion Utilityicon, or accessing it from the Start| Programs | Follett Applications menu.The Patron Conversion Utility main window appears:
2. Select the User Defined option from the Source Format drop-down list.
3. Click Browse (in the top box) to locate and open the file you want to convert.
4. Click Browse (in the lower box) to select a location and name for theconverted file. By default, the application names the file �patrons.out" and

06/0428 Patron Conversion Utility
saves it to your Desktop. This is the file you'll import into PatronMaintenance when you're done here.
If you're using the User Defined option to convert patron records fromColumbia, Osiris, SASI 3, SASI XP, SIMS or Winnebago Spectrum v3.0 orv4.0, you can find their format types and data maps in the Patron ConversionUtility's online help. Click the Help button, select Data Maps, and then yoursource file type.You can use this information to assist you in setting up the options.
Tip: To make it easier, leave the Help file's Data Map window open, thenswitch back to the Patron Conversion Utility window. After you clickOptions, in the next step, use your mouse to arrange the Help andOptions windows so that they are side by side.
Setting your options
5. Click the Options button in the Patron Record Source box.The User Defined Conversion Options dialog appears:
You can see the first 3 recordsin the file.
Note: If no records appear inthis area, the file is not in afixed�length or delimited format.
If you want the conversion to assign barcode numbers automatically, select the AssignBarcodes option, then enter a starting barcode number of 1 or greater.
Select the format of the fileyou're converting (Fixed Lengthor Delimited,Comma or Tab).For help,see the following section,�Determining your file format."
Map the fields in your source fileto the appropriate target fieldsin Follett's patron record format.
Indicate whether the first recordis a header record or not.For help, see�Checking for a header record,"on page 30.

06/04 Chapter 1 The Patron Conversion Utility 29
Note: If you've converted this type of file in the past and saved your conversiondefinitions, you don't have to start from scratch. Simply click the Loadbutton, then locate and open your definition file. It has an extension of .cvt.Make certain you have mapped all the fields you need, verifying theinformation in the Example column.Once everything is correct, click OK, and skip to �Converting User Definedpatron records� on page 34.
Determining your file format
6. Next, determine what the format of your file actually is. If you already knowyour format, skip to either �Mapping fixed length fields" on page 31, or�Mapping delimited fields" on page 32.
Examine the records in the Source File Data box.In a fixed�length file, the fields of each record line up. Each field is allotted somany positions. Any positions that don't contain letters, contain spaces.There is no marker between the fields in the record.
In this Fixed-length example,the barcode field starts in position 1 and ends with position 4, so it has a length of 4 positions.The last name field starts in position 5 and ends with position 16, so its length is 12.
Barcode field Last Name field
For Fixed-lengthfiles, use theposition numbers.
In a comma or tab delimited file, the fields adjoin each other. All thatseparates one field from the next is a comma (and possibly quotation marks)in a comma�delimited file, or a vertical bar (|) in a tab�delimited file.There are no spaces between the data.
In this Tab Delimited example, the barcode field starts in position 1and ends with position 4 only because all the barcodes are 4 digits long.The tab symbol (a vertical line, | ) takes up position 5.The last name field starts in position 6 and ends in different positions, depending on the length of the last name.

06/0430 Patron Conversion Utility
In a Comma Delimited format, you can see that the fields do not line up.
Each field is followed by a comma:
For Delimited files,ignore theseposition numbers.
Or, some or all of the fields may be enclosed in quotation marks, with a comma between them:
7. Once you determine your file format, select the appropriate radio buttonunder Source File and, if it's delimited, select your Delimiter.
Checking for a header record
8. Next, we need to determine if your file has a header record.
A header record contains summary information about the file; it doesn'tcontain patron information. (For an explanation of the contents of thePatron Maintenance header record, see page 46.)
Examine the three records in the Source File Data box. As the followingcomma�delimited file shows, the header record is noticeably different thanthe patron records.
Header record
First twopatron records
9. If your file has a header record, select the �Input file has header record"check box. This tells the utility to skip the first record (line) in the file, and touse the second record in the mapping procedure (next).
If your file contains more than one header record, you need to stop at thispoint and edit your file in a text editor and delete all but one header record.If you do not, the utility will try to convert the extra header records intopatron records.

06/04 Chapter 1 The Patron Conversion Utility 31
Once you determine your file's format and whether or not it has a headerrecord, continue with the next section if your file has fixed-length fields. Ifnot, skip to �Mapping delimited fields" on page 32.
Mapping fixed-length fields
Now that you've determined that your file has fixed-length fields, you need tomap (or point) them to the corresponding fields in Follett's patron record format.For each field in your record, you need to enter two numbers:
� In what position (of the record line) each field starts
� How long the field is
Fixed-length means that a certain field is the same length in every record. All thefields in a record, however, are not the same length. In our examples, all of theLast Name fields are 12 characters long, but the First Name fields are only 10, andthe State, only 2.
10. Examine the records in the Source File Data box and enter your findings inthe Source Fields box. You don't need to map all the fields in your source file;you only need to map the fields that you want to import into PatronMaintenance.
If there is a field in your source file that contains information that you wantto keep, but there isn't a corresponding Follett field, consider putting theinformation into one of the Location or User Fields. You can define specificnames for these fields on the System Setup | Setup | Patron Maintenance |Patron Defaults tab.(See �Preparing to circulate your collection� in the User's Guide.)

06/0432 Patron Conversion Utility
Position numbers
For example, in this fixed�length file, the barcode starts at position 1 and has a length of 4; the last name starts atposition 5 and has a length of 12.
Positions don'thave to be innumerical orderin this column.
You'll need to provide the format for some fields, too.See �Defining the format of your number fields," on page 34.
11. After entering a starting position and a field length, check the Examplecolumn. The utility looks at the first patron record in your file for the fieldyou just defined, and enters the value in the Example column. If you don'tsee the correct value for the first patron record, recheck your numbers and tryagain.
12. Continue in this manner, entering all your fields and checking the Examplecolumn.
When you are finished, skip to �Defining the format of your number fields"on page 34.
Mapping delimited fields
Now that you've determined that your file has delimited fields, you need to map(or point) them to the fields in Follett's patron record. Follow these instructionswhether your file has tabs, commas, or commas and quotes.
10. Examine the records in the Source File Data box and enter your findings inthe Source Fields box. Indicate the position (order) of each field in therecord that you want to map to the Follett patron data format.For example, if the Barcode field is the fifth field in your records, enter a 5in the Position column for Barcode.Do not use the position numbers in the row above the records.
Tip: It may help to make a numbered list for your source file, indicating theordinal position of every field and what it contains.

06/04 Chapter 1 The Patron Conversion Utility 33
You don't need to map all the fields in your source file; you only need to mapthe fields that you want to import into Patron Maintenance.
If there is a field in your source file that contains information that you wantto keep, but there isn't a corresponding Follett field, consider putting theinformation into one of the Location or User Fields. You can define specificnames for these fields on the System Setup | Setup | Patron Maintenance |Patron Defaults tab.(See �Preparing to circulate your collection� in the User's Guide.)
You'll need to provide the format for some fields, too.See �Defining the format of your number fields," on page 34.
Ignore these position numbers.
A field delimiter, not the positionnumber, indicates the starting pointof the next field.In this example, it is a tab (|).
In this example,
Barcode is 1, Last Name is 2, First Name is 3 in the Position column.
Two consecutive field delimiters indicate a blankfield (3 delimiters indicate 2 blank fields, etc.).You must include these fields when counting them.
11. After entering the position, check the Example column. The utility looks atthe first patron record in your file for the field you just defined, and entersthe value in the Example column. If you don't see the correct value for thefirst patron record, recheck your number and try again.
Tip: One way to double-check the position of a field: Count the number oftab symbols that precede the field and add 1 (e.g., If there are six tabsymbols to the left, the field is the seventh one in the file. Enter 7 next to thename of the field).
12. Continue in this manner, entering all your fields and checking the Examplecolumn. When you are finished, continue with the next section.

06/0434 Patron Conversion Utility
Defining the format of your number fields
13. In addition to mapping the fields you want to convert, you may also need toenter specific format information in the Format column of certain fields:
� DatesThe Birth Date and Card Expiration fields require the source'sdate format. For example, consider a patron with a birth date of May 17,1995. If the source file displays the date as 19950517, enter YYYYMMDDto define its format.The Patron Conversion Utility supports the following date formats:YYYYMMDD, YYMMDD, YY/MM/DD, MMDDYY, and MM/DD/YY.
� Graduation yearIf the graduation year in your source file is only twodigits long, enter YEAR in the Format column to convert it into a 4�digityear. If your source file does use four digits, leave the column blank.
� GenderIf your source file uses a 0 or 1 (rather than an M or F) toindicate gender, you must enter GENDER in the Format column.If your source file does use M and F, leave the column blank.
� Telephone numbersThis utility expects the phone numbers in yoursource file to include an area code. If your phone numbers do not includean area code, enter PHONE in the Format column of the Phone targetfields. This instructs the utility to add three zeros in front of any 7�digitphone numbers.If your source file does contain area codes, leave the column blank.
Finishing up
14. If you want the conversion to automatically assign barcode numbers, selectthe Assign Barcodes checkbox at the top of the dialog, then enter a startingbarcode number of 1 or greater.If you select this option, this number sequence overwrites any values fromthe source file that you may have mapped (above) to the Barcode field.
15. To save this Options setup to use at a later date, click Save As, provide a filename (don't change the extension of .cvt ), and location. By default, theapplication names the file �userdef.cvt" and saves it to the Patron ConversionUtility folder.
16. Back on the Options dialog, click OK to retain your settings for thisconversion and to return to the Patron Conversion Utility main window.
Converting User Defined patron records
To start your conversion, click the Convert button on the Patron ConversionUtility main window. A progress dialog appears as the records are converted.
When processing completes, verify the numbers in the Records Read and RecordsWritten fields and close the progress dialog.
Unless you have other student records to convert, you can now close the PatronConversion Utility main window and import the converted patron records (the
06/04 Chapter 1 The Patron Conversion Utility 35
destination file) into Patron Maintenance.See �Importing patron information," in the User's Guide.
WinnebagoThe Winnebago conversion option can be used to convert patron recordsexported from Winnebago CIRC/CAT� v6.7 or Spectrum� v3.0 and v4.0 in thePATRON.WIN file format. Winnebago CIRC/CAT v6.7 exports patron records inthis format automatically.
If you want to continue to use your Winnebago patron numbers as barcodes, youneed to determine if any additional processing is necessary. For details, see thefollowing section, �Examining your barcodes."
If you plan to assign new patron barcodes, you can skip to �ConvertingWinnebago patron records" on page 39.
Important: If you export records from Spectrum v3.0 or v4.0 in the PATRON.WINfile format, certain fields will be truncated. Depending on yoursituation, the User Defined conversion may be a better option.
� If you plan to assign new patron barcodes, we recommendexporting your patron records in a fixed�length or delimited fileformat and using the User Defined option. For instructions onrunning a User Defined conversion, see page 27.
� If you want to continue to use your Winnebago patron numbersas barcodes, you first need to determine if any additionalprocessing is necessary (see the following section for details).
Examining your barcodes
If you want to continue to use your Winnebago patron numbers as barcodes, youneed to examine your barcodes to determine if additional processing is necessary.
Standard 14�character barcodes usually contain a type identifier, location code,item/patron number, and possibly a check digit. Typically, only part of thebarcode (the item/patron number) is used by the Winnebago applications andsubsequently exported. When you convert your patron records to the Follettformat, the barcodes may need to be reconstructed. Before that can happen, youneed to determine what information from your printed patron barcodes isactually in the Winnebago database and what is missing.
You'll need to gather a few printed patron barcodes, preferably barcodes thatwere issued or printed at different times (e.g., last week, six months ago, twoyears ago, etc.). Use your Winnebago software to look up each item and comparethe patron/barcode number that appears in the Winnebago application with thenumber on the barcode label.
Important: The Follett applications let you use any Follett Classic symbology(seven digits or less) and one additional eight to fourteen charactersymbology for your patron barcodes. Barcodes longer than 14characters are not supported. Patron barcodes that do not meet theserequirements will need to be replaced with barcodes that do.

06/0436 Patron Conversion Utility
� If the numbers on the barcode labels exactly match the patron/barcodenumbers in the application, your barcodes don't need to be reconstructed.
Note: If you're exporting records from Spectrum v3.0 or v4.0 and yourbarcodes are intact, we recommend using the User Defined option inplace of the Winnebago conversion option. If you decide to use theUser Defined option, export your patron records in the Spectrumfixed�length or delimited file format. For instructions on running aUser Defined conversion, see page 27.
� Are some of the numbers on the barcode labels not displayed in theapplication? To be recognized by the Follett applications, your barcodes needto be reconstructed. Make a note of what numbers are displayed in theapplication and what numbers are missing.
� Do both of the above apply to your collection? By looking at thepatron/barcode number (in the Winnebago software), can you determinewhich barcodes are which? If so, and you can export the complete barcodesseparately from the incomplete barcodes, it's possible to convert yourbarcodes accurately. If not, you may need to replace some of your patronbarcodes; contact Follett Software's Customer Service department.
If your barcodes don't need to be reconstructed, you are ready to start exportingyour patron records from the Winnebago applications (see page 37).If you've discovered that additional processing is necessary, you'll need to gathersome information for the Barcode Wizard (see the following section).
The Barcode Wizard
To accurately reconstruct your barcodes, you must provide the Barcode Wizardwith some specific information about your barcodes. Before you start aconversion, you'll need the information outlined below.
Note: Even if your barcodes are intact, if you use the Winnebago conversionoption, you'll need to provide the Barcode Wizard with a barcode format.
� The barcode format uses the following key to show how long the barcodes onyour labels are and what they contain.
I = Type Indicator/Identifier L = Location Code
B = Item/Patron Number F = Fill Character or Check Digit
For example, a typical 14�digit barcode3123400010001Econtains a typeidentifier (3), location code (1234), item/patron number (00010001), and acheck digit (E). The format for this barcode would be ILLLLBBBBBBBBF.
Important: Use a B to indicate each digit that is stored in your Winnebagodatabase as a patron/barcode number. What should you do if, asin the example above, the item/patron number has leading zeros,which may or may not be in your database? You can either use B(as above) which will automatically pad the number with leadingzeros or F set to a value of zero (see �fill character" below).

06/04 Chapter 1 The Patron Conversion Utility 37
If you're converting from Winnebago's CIRC/CAT v6.7 or Spectrum v4, youcan look up the barcode format.
� In Spectrum v4.0 from the main program window, select Winnebago |Setup | Location. On the Location Setup dialog, open the Numbers taband click the Configurations button.
� In CIRC/CAT v6.7, start from the system's main menu and selectWinnebago CIRC/CAT | Setup/Utilities | System Utilities | SetupBarcodes.
If you're converting from a Winnebago Spectrum v3.0 database, you'll needto examine your barcodes to determine what they contain. For help, see�What does a barcode contain?".
� Unless it's �Follett Classic," you'll need the name of the barcode symbologyyou're importing. For descriptions of the different symbologies, see.
� If the barcode format includes a type indicator, you must know the alpha ornumeric character that is used. Please note that even though a symbology canhave up to six type identifiers, you must convert only one identifier at a time.
� You'll need the four�digit location code that identifies your library if thebarcode format includes one. If you're converting from Winnebago Spectrumv3 or v4, the location code is stored with your setup information.
� In Spectrum v3.0 from the main program window, select Winnebago |Setup | System. The location code appears on the Partition tab.
� In Spectrum v4.0 from the main program window, select Winnebago |Setup | Location. The location code appears on the General tab.
If you're converting from Winnebago's CIRC/CAT v6.7, you'll need toexamine your barcodes to determine the location code. For help, see �Whatdoes a barcode contain?".
� If your barcode format includes any fill charactersnot including the checkdigit, the last character in the barcodeyou must know the alpha or numericcharacter that is used. Typically, the fill character is a zero.
Important: The barcode information you enter in the Barcode Wizard shouldmatch the symbology you defined for your patrons in System Setup.
With this information, the Barcode Wizard can rebuild almost any barcode.However, to make sure that the reconstructed barcodes are accurate, it is crucialthat you provide the right information. One extra character in the barcode formatcan make a difference.
Once you've gathered all the information the Barcode Wizard will need, you'reready to start exporting patron records (see the following section).
Exporting your patron records
The Winnebago conversion option will only convert Winnebago patron recordsexported using the PATRON.WIN file format. Winnebago CIRC/CAT v6.7automatically exports patron records in this format.
06/0438 Patron Conversion Utility
To help ensure that your patron barcodes are converted accurately, it is criticalthat you export (and convert) one symbology at a time. Depending on thecontents of your database, multiple exports may be necessary.
Note: This precaution is not necessary if you are assigning new barcodes duringconversion or if you are exporting records from Spectrum v3.0 or v4.0 andcan use the User Defined conversion option.
For example, some of your patrons have Follett Classic barcodes and others haveCode 39 Mod 10 barcodes. Export the patrons with Follett Classic barcodes to onefile and the patrons with Code 39 Mod 10 barcodes to a second file. Make certainto note what symbology each file contains.
To limit your export to patron records that use a certain symbology, you'll need todefine a range of patron numbers. But how do you know where one symbologyends and another begins?
� If the numbers on the barcode labels exactly match the patron/barcodenumbers in the application, the length of the patron number is the key. Patronnumbers of seven digits or less are considered Follett Classic; eight tofourteen digit patron numbers are not.
Note: Remember that the Follett applications recognize one eight to fourteencharacter symbology for your patron barcodes. In this scenario, patronnumbers that are greater than seven digits must be the same length(e.g., fourteen digits long). If you have patron numbers of varyinglengths, some of your patrons will need new barcodes.
� If some of the numbers on the barcode labels are not displayed in theapplication, the actual patron number is the key. A patron's number shouldbe the basis for their barcode.
When you ordered your barcodes, in addition to specifying a symbology, youprobably also provided your vendor with a range of numbers for the labels.These numbers should match the patron numbers of the patrons that use thatsymbology; simply export the records in that patron number range.
When you look up your barcode information, you should also take note ofthe type identifier specified for each order. Even if the symbology is the same,the type identifier can be different from one order to the next. Although asymbology can have up to six defined type identifiers, you need to exporteach type identifier separately.
Note: If you do not have a record of the barcode numbers you purchased,please check with your barcode vendor.
If you can't limit your export to a single symbology (or type identifier), you mayneed to replace some of your patron barcodes. Please contact Follett Software'sCustomer Service department.
Once you have exported your patron records, you're ready to start the conversionprocess. For details, see the following section, �Converting Winnebago patronrecords."

06/04 Chapter 1 The Patron Conversion Utility 39
Converting Winnebago patron records
Now that you've exported your patron records (PATRON.WIN file format) andgathered any information you might need, you're ready to convert your records.
1. If you haven't already, start the Patron Conversion Utility (see page 12 forinstructions). From the Patron Conversion Utility main window:
Select the Winnebago� option from the Source Format drop�down list, then click Browse to locate and open the file you want to convert.By default, the application looks for �patron.win" but any file name is acceptable as long as the file is in the PATRON.WIN format.
Click Browse to select a location and name for the converted file. By default, the application names the file �patrons.out"and saves it to your computer's Desktop. This is the file you'll import into Patron Maintenance.
2. If you want to continue to use your Winnebago patron numbers as barcodes,skip to step 3.
If you want to assign new patron barcodes, click the Options button in thePatron Record Source group box. From the Conversion Options dialog:
Select the Assign Barcodes option, then enter a startingbarcode number of 1 or greater.
After setting the options, click OK to retain your settings and returnto the Patron Conversion Utility main window.
3. To start your conversion, click the Convert button on the Patron ConversionUtility main window.
If you're not assigning new barcodes, continue with step 4.
If you're assigning new barcodes, a progress dialog appears as the patronrecords are converted. When processing completes, verify the numbers in the

06/0440 Patron Conversion Utility
Records Read and Records Written fields and close the progress dialog. Ifyou have no other patron records to convert, you can now close the PatronConversion Utility main window and import the patron records from thedestination file into Patron Maintenance.
4. If you're not assigning new barcodes, a message appears informing you thatadditional processing may be necessary. To proceed with your conversion,click OK. The Barcode Wizard dialog appears.
The first piece of information you need to provide is your barcode format. Inaddition to showing your barcodes' length and setup, the barcode formattells the Barcode Wizard what is missing from the patron/barcode numbers inthe source file. For more information, see page 36.
Select or enter the barcode formatfor the records you're converting.
Important: The Bs (item number)in your barcode format must not beseparated by any other letter.
After entering your barcode format, click Next to proceed.
Important: Make certain that the barcode information you enter in theBarcode Wizard matches the symbology you defined in SystemSetup.
5. If your barcode format indicates that the barcodes in the source file are intactand are a Follett Classic symbology (e.g., BBBBBBB), the Barcode Wizardskips to step 9 (page 42).

06/04 Chapter 1 The Patron Conversion Utility 41
If your barcodes need to be reconstructed or are longer than seven characters,you'll need to supply the name of your barcode symbology.
Select the barcode symbology ofthe records you're converting.
After selecting your barcode symbology, click Next to proceed.
6. If your barcode format doesn't include a type identifier (indicated by an I),the Barcode Wizard skips to step 7.
If your format does include a type identifier, enter the alpha or numericcharacter that is used by this set of barcodes.
Enter the type identifier for therecords you're converting.
Note: Remember that even though a symbology can have up to six typeidentifiers, you must convert only one identifier at a time.
After entering the type identifier, click Next to proceed.
7. If your barcode format doesn't include a location code (indicated by an L orLs), the Barcode Wizard skips to step 8.

06/0442 Patron Conversion Utility
If your format does include a location code, enter the four�digit code thatidentifies your library.
Enter the four�digit location codefor your library.
After entering the location code, click Next to proceed.
8. If your barcode format doesn't include any fill characters (indicated by an F),the Barcode Wizard skips to step 9.
Note: Remember the last character in your barcode format is disregarded ifit's represented by an F. It's a check digit, not a fill character.
If your format does include fill character(s), enter the alpha or numericcharacter that is used. Typically, the fill character is a leading zero.
Enter the fill character used bythe records you're converting.
After entering the fill character, click Finish.
9. A progress dialog appears as the patron records are converted. Whenprocessing completes, verify the numbers in the Records Read and RecordsWritten fieldsnote any processing errorsand close the progress dialog.

06/04 Chapter 1 The Patron Conversion Utility 43
If any errors were encountered, the application generates an exception reportand prompts you to review it. To view the exception report, click Yes.
The exception report lists any errors that occurred during the reconstructionof your barcodes and the patron numbers that caused them. Typically, theseerrors occur when the information you gave to the Barcode Wizard doesn'tagree with the incoming patron number. Since the barcode can't be rebuilt,the patron is skipped.
Examine the exception report carefully. If nearly all your patrons wereskipped, it's likely that your barcode format is defined incorrectly. If blocks ofpatrons were skipped, your source file might contain multiple symbologies(see �Exporting your patron records" on page 37NO TAG). If only a fewpatrons were missed, you may need to export these patrons separately andeither convert their patron numbers or give them new barcodes. So thatyou'll have a reference when making any of these changes, we suggest thatyou print the exception report and save it when prompted.
Once you've converted all your patron records, close the Patron ConversionUtility main window. To import the converted patron records from thedestination file into Patron Maintenance, see �Importing PatronInformation," in the User's Guide.

06/0444 Patron Conversion Utility
Notes

45
Chapter 2 Patron file formats
To be imported successfully into Patron Maintenance, a patron file must be in thecorrect format. This chapter contains detailed information about the files, theacceptable formats, and the record and field contents.
You can create your own import file, or edit an export file using a text editor. Ifthe patron information you have is from another vendor, a school administrationsystem, or was exported from a pre�Unison database, you can, instead, convert itwith the Patron Conversion Utility (see Chapter 1). If you prefer to create yourown file, this chapter explains the formatting details for a patron import file.
Note: This information is provided to help you or your technical personnelprepare a patron file for import into Patron Maintenance. If you don't haveexperience creating or editing comma�delimited text files, you may want toseek additional assistance.
Follett's patron import file formats
The Patron Maintenance module, versions 4.x and 5.x, accepts either of twoformats. These are the 35-field and the 31-field format.
The older 35-field format was developed for Circulation Plus version 1.22 and isalso produced by the Patron Conversion Utility. It has the following limitations:In the address section, it's State field is limited to two characters; and there arefields for phone numbers (ten characters) and phone extensions (four characters).
The 31-field format was introduced with Circulation Plus version 4.00. Thisnewer format has a larger (32-character) State/Province field, four 28-characterphone fields, and two fields for e-mail addresses.
File format basics
These files can be created with any text editor, such as the Windows Notepadapplication. Do not use a word processor such as Microsoft Word. You can alsoexport patron records using the Export Patrons function, modify the data in a texteditor, and then re�import the data (choosing to replace existing records).
The import file format is flat ASCII text, comma�delimited. It consists of a headerline and patron record lines, and must meet the following requirements:
� The file must have one header record.

06/0446 Patron Conversion Utility
� Each patron record takes up one line of the file.
� Each record must end with a hard return (�).
� String fields in the record are surrounded by quotes (e.g., �Smith").
� Numbers, including dates, are the actual numeric value.
� Each field is separated from the one after it by a comma.
� Each record in the file cannot exceed 512 characters.
Before you begin
Patron Maintenance performs several checks when importing your file. Toensure a successful import, make sure to verify the following items:
Check the barcodes used in the records being imported. They must match thebarcode symbology set up for patrons on the System Setup | Setup| Site |Barcodes tab, including the Type Identifier character(s). Barcodes, of any type,may not be longer than 14 characters. For more information, see Appendix D,�Barcode symbologies," in the User's Guide.
Check the Default Patron Type on the System Setup | Setup| PatronMaintenance | Patron Defaults tab. If you are importing patron records that don'thave patron types, Patron Maintenance assigns this default patron type to therecords being imported.
On the same tab (System Setup | Setup| Patron Maintenance | Patron Defaults),check the required patron fields. If the records in the import file do not containthe field(s) specified, the import will fail.
In addition, be aware of the following:
� Import checks the maximum length of each field. Any field larger than themaximum length is truncated when imported.
� Any trailing spaces in string fields are deleted. Leading spaces are not.
� Import applies standard month/day checking. Patron Maintenance stores alldate fields as numbers, YYYYMMDD. Years must be between 1900 and 2037.
� Any record that is invalid generates a line in the exception report, listing thepatron name (if possible) and a brief error message.
Header portion of the file
The first line in the import file must be a header line. It is a file identifier.
Although it is not required that the header fields contain data, each field, listedthe following table, must exist in the header. The one exception is the third field,Patron file format version. If you are creating or editing a file with the 35�fieldformat, enter a number less than 4.00; if you are creating or editing a file with the

06/04 Chapter 2 Patron file formats 47
31�field format, the third field must contain 4.00. Do not enter a higher number.Do not enter the current application version that you are running.
Field Format Maximum length Example
School name String 30 �Anytown Elementary"
Program name String 20 �Patron Maintenance"
Patron fileformat version
String 10 �4.00"
Date created Num, YYYYMMDD 8 (exactly) 19990901
Patron count Num 4 (exactly, zero�padded) 0009
Disk number Num 2 (exactly, zero�padded) 01
Final disk? String, Y or N 1 �Y"
The following example of a file header indicates that patrons from AnytownElementary were exported by Patron Maintenance module version 4.00 on Sept.1, 2002 (20020901). There are 9 (0009) patrons records. This is the first disk (01) inthe series and is also the last disk (�Y") in the series.
“Anytown Elementary”,“Patron Maintenance”,“4.00”,20020901,0009,01,“Y”
Patron record portion of the file
The remaining lines in the import file are patron records. Each record mustcontain all of the fields, whether or not they contain data. String fields must besurrounded by quotation marks, and all fields are separated (delimited) bycommas. Each record must end with a hard return; there must not be any trailingspace after the last field.
The Last Name field must contain data. In addition, the Barcode and/orAlternate ID field(s) must contain data. This second requirement depends onyour preference. Refer to your System Setup | Patron Maintenance | PatronDefaults for your Required Patron Field(s).
35-field format
The following table contains the specific information for each field:
Field Format Maximum length Example
Barcode String 14 �P 52"
Alternate ID String 20 �241661234"
Last name String 20 �Sellers"
First name String 20 �Patty"
Middle name String 10 �Jo"

06/0448 Patron Conversion Utility
Field ExampleMaximum lengthFormat
Card expiration date NumYYYYMMDD
8 (exactly) 20050630
Graduation year Num, YYYY 4 (exactly) 2005
Birth date NumYYYYMMDD
8 (exactly) 19880214
Occupation String 0 (not in use) �"
Gender String 1 (M, F, U, or blank) �F"
Patron Type code String 3 (all caps) �S"
Is Faculty flag String 1 (used only in DOSversions)
�"
Patron status String 1 (A, I, or R) �A"
Location 1 String 15 �Johnson"
Location 2 String 15 �Gymnasium"
User field 1 String 15 �4th Period"
User field 2 String 15 �ESL"
Address 1 Line 1 String 32 �19 Ridge St"
Address 1 Line 2 String 32 �Route 3"
Address 1 City String 20 �Sycamore"
Address 1 State String 2 �IL"
Address 1 Zip Code String 9 (numbers only, no hyphens)
�60987"
Address 1 Primary Phone String 10 (exactly; numbersonly, no hyphens)
�8158289598"
Address 1Primary extension
String 4 (numbers only, no hyphens)
�1234"
Address 1 Other Phone String 10 (exactly; numbersonly, no hyphens)
�8959828518"
Address 1 Other extension String 4 (numbers only, no hyphens)
�5678"
Address 2 Line 1 String 32 �1037 Tame Rd"
Address 2 Line 2 String 32 �P O Box 1972"
Address 2 City String 20 �McHenry"
Address 2 State String 2 �WI"
Address 2 Zip Code String 9 (numbers only, no hyphens)
�70998"
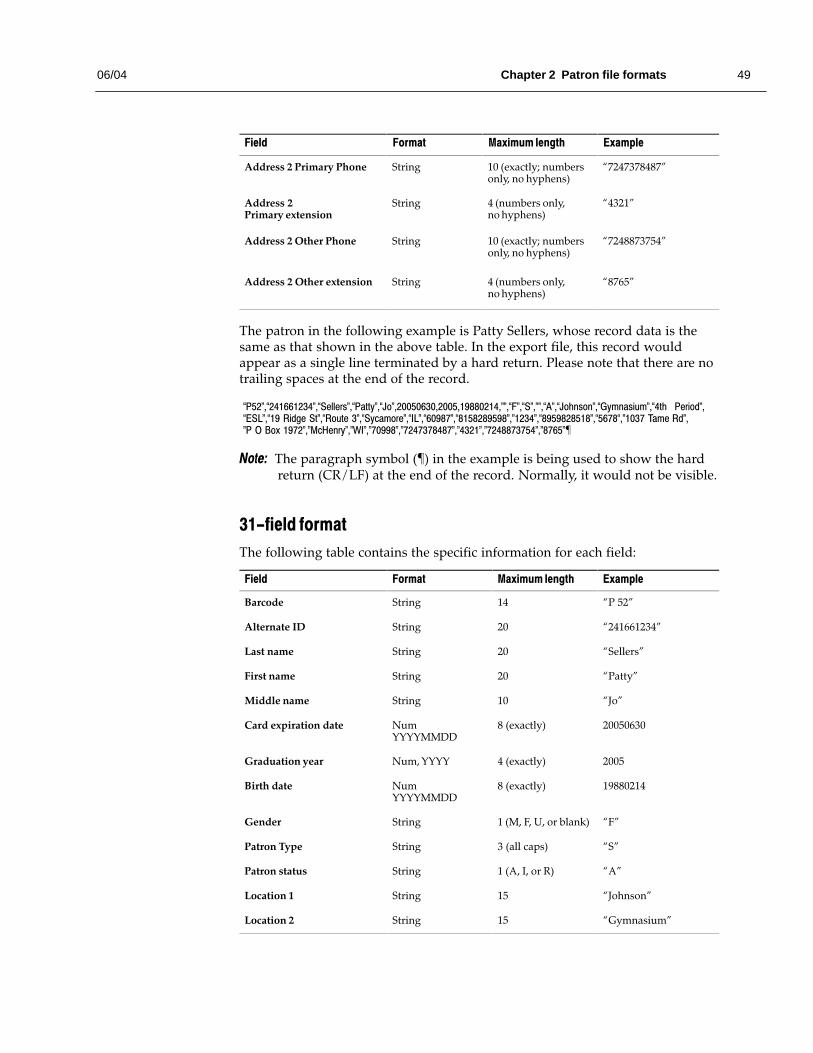
06/04 Chapter 2 Patron file formats 49
Field ExampleMaximum lengthFormat
Address 2 Primary Phone String 10 (exactly; numbersonly, no hyphens)
�7247378487"
Address 2Primary extension
String 4 (numbers only, no hyphens)
�4321"
Address 2 Other Phone String 10 (exactly; numbersonly, no hyphens)
�7248873754"
Address 2 Other extension String 4 (numbers only, no hyphens)
�8765"
The patron in the following example is Patty Sellers, whose record data is thesame as that shown in the above table. In the export file, this record wouldappear as a single line terminated by a hard return. Please note that there are notrailing spaces at the end of the record.
�P52",�241661234",�Sellers",�Patty",�Jo",20050630,2005,19880214,"",�F",�S","",�A",�Johnson",�Gymnasium",�4th Period",�ESL",�19 Ridge St",�Route 3",�Sycamore",�IL",�60987",�8158289598","1234",�8959828518",�5678�,"1037 Tame Rd","P O Box 1972","McHenry","WI","70998","7247378487","4321","7248873754","8765"�
Note: The paragraph symbol (�) in the example is being used to show the hardreturn (CR/LF) at the end of the record. Normally, it would not be visible.
31-field format
The following table contains the specific information for each field:
Field Format Maximum length Example
Barcode String 14 �P 52"
Alternate ID String 20 �241661234"
Last name String 20 �Sellers"
First name String 20 �Patty"
Middle name String 10 �Jo"
Card expiration date NumYYYYMMDD
8 (exactly) 20050630
Graduation year Num, YYYY 4 (exactly) 2005
Birth date NumYYYYMMDD
8 (exactly) 19880214
Gender String 1 (M, F, U, or blank) �F"
Patron Type String 3 (all caps) �S"
Patron status String 1 (A, I, or R) �A"
Location 1 String 15 �Johnson"
Location 2 String 15 �Gymnasium"

06/0450 Patron Conversion Utility
Field ExampleMaximum lengthFormat
User field 1 String 15 �4th Period"
User field 2 String 15 �ESL"
Address 1 Line 1 String 32 �19 Ridge St"
Address 1 Line 2 String 32 �Route 3"
Address 1 Line 3 / City String 32 �Sycamore"
Address 1 Line 4State/Province
String 32 �Illinois"
Address 1 Zip/Postal Code String 20 �60987"
Address 1 Email String 32 �[email protected]"
Address 1 Phone 1 String 28 �815-828-9598"
Address 1 Phone 2 String 28 �(895) 982-8518"
Address 2 Line 1 String 32 �1037 Tame Rd"
Address 2 Line 2 String 32 �P O Box 1972"
Address 2 Line 3 / City String 32 �McHenry"
Address 2 Line 4State/Province
String 32 �Wisconsin"
Address 2 Zip/Postal Code String 20 �70998"
Address 2 Email String 32 �[email protected]"
Address 2 Phone 1 String 28 �(724) 737-8487"
Address 2 Phone 2 String 28 �724-887-3754"
The patron in the following example is Patty Sellers, whose record data is thesame as that shown in the above table. In the export file, this record wouldappear as a single line terminated by a hard return. Please note that there are notrailing spaces at the end of the record.
�P52",�241661234",�Sellers",�Patty",�Jo",20050630,2005,19880214,�F",�S",�A",�Johnson",�Gymnasium",�4th Period",�ESL",�19 Ridge St",�Route 3",�Sycamore",�Illinois",�60987",�[email protected]",�815-828-9598",�(895) 982-8518",�1037 Tame Rd",�PO Box 1972",�McHenry",�Wisconsin",�70998",�[email protected]",�(724) 737-8487",�724-887-3754"�
Note: The paragraph symbol (�) in the example is being used to show the hardreturn (CR/LF)at the end of the record. Normally, it would not be visible.


![Ken Follett - Saginaw Valley State University...Ken Follett From: Daniel Starer [dstarer@researchforwriters.com] Sent: 07 November 2000 16:34 To: Ken Follett Subject: 2of3 Dear Ken,](https://img.dokumen.tips/doc/110x75/611243a026737230c3353da1/ken-follett-saginaw-valley-state-ken-follett-from-daniel-starer-dstarerresearchforwriterscom.jpg)