Embed Size (px)
Citation preview
© London School of Economics & Political Science lse.ac.uk/IMT/training 21/03/2017
Prepared by
Zoë Harney / Karen Fisher
For
London School of Economics
Houghton St, London WC2A 2AE
LSE Rezlynx Training Work
Book

1 Zoë Harney / Karen Fisher 21/03/2017
Table of contents
INTRODUCTION ................................................................................................................................................ 5
SITE ID’S ............................................................................................................................................................... 5
LOGGING ON .......................................................................................................................................................... 5
HOME PAGE CONFIGURATION ................................................................................................................................... 5
HOME PAGE ..................................................................................................................................................... 6
Explanation of Home Page Tabs .................................................................................................................... 6
MAIN MENUS ........................................................................................................................................................ 7
Explanation of menu icons ............................................................................................................................. 7
Quick Access, Reservation Search, Log Off and the “Hamburger” ................................................................ 8
HOT KEYS .............................................................................................................................................................. 8
Add a new hot key ......................................................................................................................................... 8
Explanation of the ‘Add Hot Key’ drop-down menus ..................................................................................... 9
Edit a Hot Key ................................................................................................................................................ 9
Delete a Hot Key ............................................................................................................................................ 9
CRS RESERVATION .......................................................................................................................................... 10
MAKING A RESERVATION ........................................................................................................................................ 10
Quote an option to a potential customer .................................................................................................... 10
Converting an Enquiry Straight Away .......................................................................................................... 12
Taking Payment via Secure Trading ............................................................................................................ 15
Invoicing Set Up ........................................................................................................................................... 16
Converting an Enquiry Not Straight Away ................................................................................................... 17
SENDING A CONFIRMATION ..................................................................................................................................... 19
Enquiry ......................................................................................................................................................... 19
Converted .................................................................................................................................................... 19
SEGMENTS ........................................................................................................................................................... 21
Adding a New Segment ............................................................................................................................... 21
Adding a room onto a segment ................................................................................................................... 22
MID STAY CHANGES (BOOKING LINES) ...................................................................................................................... 23
CROSS PROPERTY BOOKING TRANSFERS ..................................................................................................................... 24
CANCELLING A RESERVATION ................................................................................................................................... 26
CIM INVOICING ***STUDENT BOOKINGS ONLY*** ........................................................................................ 27
CIM TERMINOLOGY............................................................................................................................................... 27
HOW DOES THE INVOICING PROCESS WORK WITH CIM ................................................................................................. 28
HEADER VS SEGMENT INVOICING ............................................................................................................................. 29
TRANSACTION PLAN USE IN BOOKINGS ....................................................................................................................... 29
PERSONAL PAYMENT ACCOUNTS .............................................................................................................................. 30
COMPANY PAYMENT ACCOUNTS .............................................................................................................................. 32
PAYMENT PLAN USE .............................................................................................................................................. 33
AMENDING DETAILS FOR A GUEST PAYMENT ACCOUNT ................................................................................................ 33
CREATING INVOICES ............................................................................................................................................... 35
VIEWING PRO-FORMA & TRANSACTIONS ................................................................................................................... 38
INVOICE REPRINT .................................................................................................................................................. 40
AMENDING DATES ................................................................................................................................................. 42
With Invoices having been Created Only ..................................................................................................... 42

2 Zoë Harney / Karen Fisher 21/03/2017
With Invoices having been Generated ......................................................................................................... 43
ADDING UPSELLS................................................................................................................................................... 44
With Invoices having been Created Only ..................................................................................................... 44
With Invoices having been Generated ......................................................................................................... 44
AGED DEBTORS – *** COMMERCIAL BOOKINGS ONLY *** .......................................................................................... 45
Account Status ............................................................................................................................................. 46
Create To Do ................................................................................................................................................ 46
Edit Company ............................................................................................................................................... 46
Pay/Allocate ................................................................................................................................................ 46
Payment ....................................................................................................................................................... 47
Credit ........................................................................................................................................................... 48
Invoice .......................................................................................................................................................... 48
View ............................................................................................................................................................. 49
Chase Activity .............................................................................................................................................. 49
PROFILES ........................................................................................................................................................ 50
PEOPLE PROFILES .................................................................................................................................................. 50
COMPANY PROFILES .............................................................................................................................................. 51
PROFILE MERGE .................................................................................................................................................... 53
Batch Merge ................................................................................................................................................ 53
Individual Merge .......................................................................................................................................... 54
PROFILE EXPORT ................................................................................................................................................... 55
BATCH PRINTING ................................................................................................................................................... 56
PMS................................................................................................................................................................ 57
AVAILABILITY ........................................................................................................................................................ 57
PLANNER ............................................................................................................................................................. 58
SPECIAL EVENTS .................................................................................................................................................... 59
RESIDENT (IN-HOUSE) RESERVATION SEARCH ............................................................................................................. 60
GROUPS .............................................................................................................................................................. 61
Creating a group .......................................................................................................................................... 61
Linking a Company and/or Agent ................................................................................................................ 61
Details Section ............................................................................................................................................. 62
Group Booking Tabs .................................................................................................................................... 63
Add/Remove Rooms .................................................................................................................................... 65
Block Rhythm ............................................................................................................................................... 67
Override ....................................................................................................................................................... 68
Rate Plan Change ........................................................................................................................................ 68
Group Series ................................................................................................................................................. 69
Release Rules ............................................................................................................................................... 71
Picking Up Rooms ........................................................................................................................................ 72
Pick List ........................................................................................................................................................ 73
Group Changes ............................................................................................................................................ 74
Copy Properties ............................................................................................................................................ 76
Guest List ..................................................................................................................................................... 77
Print Options ................................................................................................................................................ 77
Pro Forma .................................................................................................................................................... 78
Print Templates............................................................................................................................................ 78
ROOM BLOCKS ..................................................................................................................................................... 79
3 Zoë Harney / Karen Fisher 21/03/2017
Creating a Room Block................................................................................................................................. 79
Linking a Company and/or Agent ................................................................................................................ 79
Details Section ............................................................................................................................................. 80
Room Block Booking Tabs ............................................................................................................................ 81
Add/Remove Rooms .................................................................................................................................... 82
Block Rhythm ............................................................................................................................................... 84
Pick Up Rooms ............................................................................................................................................. 85
ROOM MOVE CHANGES ......................................................................................................................................... 86
CRS Module – Search ................................................................................................................................... 86
Guest Journey – Planner .............................................................................................................................. 88
ALLOCATING ......................................................................................................................................................... 89
CRS Level ...................................................................................................................................................... 89
PMS Level ..................................................................................................................................................... 90
PRINTING REGISTRATION CARDS .............................................................................................................................. 91
CHECK IN ............................................................................................................................................................. 91
Q-ROOMS ........................................................................................................................................................... 94
To place a room on the Q-Room report ....................................................................................................... 94
To view your Q-Room Report ....................................................................................................................... 95
Removing your room from the Q-Room report ........................................................................................... 95
ROOM BILLING ..................................................................................................................................................... 95
CHECK OUT ** CIM INCORPORATED** .................................................................................................................... 97
NRAS ................................................................................................................................................................. 99
RECONCILIATION .......................................................................................................................................... 101
BANKING RECONCILIATION EXPLANATION ................................................................................................................ 101
Banking reconciliation in Rezlynx .............................................................................................................. 101
Payments in Halls ...................................................................................................................................... 101
Payments processed by the CRT ................................................................................................................ 102
STEPS TO RECONCILE EACH SHIFT ............................................................................................................................ 104
End of Shift................................................................................................................................................. 104
PMS REPORTS .............................................................................................................................................. 107
Housekeeping ............................................................................................................................................ 107
Front of House ........................................................................................................................................... 107
Reservation ................................................................................................................................................ 108
Revenue ..................................................................................................................................................... 108
Forecast ..................................................................................................................................................... 108
Sales & Marketing ..................................................................................................................................... 109
OFFLINE REPORTS ........................................................................................................................................ 109
LOGS ............................................................................................................................................................ 111
SYSTEM ........................................................................................................................................................ 112
ANALYSIS CODES ................................................................................................................................................. 112
ATTRIBUTES ....................................................................................................................................................... 113
TEMPLATES ........................................................................................................................................................ 114
Creating a Template .................................................................................................................................. 114
Subject Field ............................................................................................................................................... 115
Header Field ............................................................................................................................................... 115
Body Field .................................................................................................................................................. 115

4 Zoë Harney / Karen Fisher 21/03/2017
Footer Field ................................................................................................................................................ 115
Segment Templates ................................................................................................................................... 115
AUTOMATED TEMPLATES ...................................................................................................................................... 116
How to Create a New Automated Template Schedule .............................................................................. 116
CREATING TRANSACTION PLANS ............................................................................................................................. 119
CREATING PAYMENT PLANS................................................................................................................................... 121
USER SET-UP ...................................................................................................................................................... 122

5 Zoë Harney / Karen Fisher 21/03/2017
Introduction
Site ID’s
A site ID is a unique identifier to tell the ‘Rezlynx browser’ what PMS site it should be loading.
Logging On
In order to log on, the Rezlynx browser must first be launched. This is located on your desktop.
1. Type in your User ID (surname & first initial) and Password
(This must be changed every 3 months for security purposes and must contain a minimum of
10 characters, 2 of which must be numerical).
Home Page Configuration
Upon your first login you will see the Home Page Configuration screen where you can select the
relevant tabs you wish to see on your home screen.
1. Tick the corresponding boxes in the Display column for each item you want to select
2. Tick in the corresponding logon and navigation default columns
3. Click Save
You will see your Home Page and the relevant tabs during your first log in.
6 Zoë Harney / Karen Fisher 21/03/2017
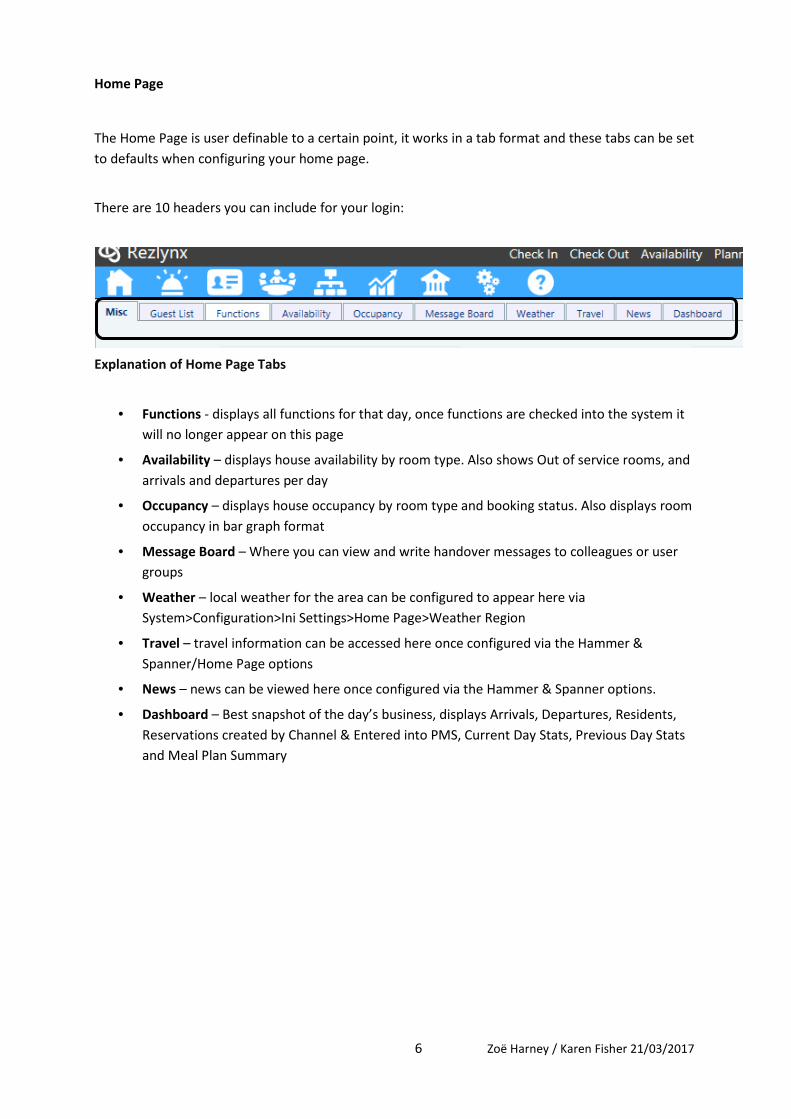
Home Page
The Home Page is user definable to a certain point, it works in a tab format and these tabs can be set
to defaults when configuring your home page.
There are 10 headers you can include for your login:
Misc. – displays links to websites the user will typically need to access on a daily basis.
Guest List – displays live Arrivals, Residents and Departures.
Explanation of Home Page Tabs
• Functions - displays all functions for that day, once functions are checked into the system it
will no longer appear on this page
• Availability – displays house availability by room type. Also shows Out of service rooms, and
arrivals and departures per day
• Occupancy – displays house occupancy by room type and booking status. Also displays room
occupancy in bar graph format
• Message Board – Where you can view and write handover messages to colleagues or user
groups
• Weather – local weather for the area can be configured to appear here via
System>Configuration>Ini Settings>Home Page>Weather Region
• Travel – travel information can be accessed here once configured via the Hammer &
Spanner/Home Page options
• News – news can be viewed here once configured via the Hammer & Spanner options.
• Dashboard – Best snapshot of the day’s business, displays Arrivals, Departures, Residents,
Reservations created by Channel & Entered into PMS, Current Day Stats, Previous Day Stats
and Meal Plan Summary
7 Zoë Harney / Karen Fisher 21/03/2017
Main Menus
Hovering over the menu icons will show the drop down menu to access other areas of the system.
Explanation of menu icons
• Home - Home Icon returns the user to the main screen in Rezlynx
• Front Desk Bell - Guest Journey – Property, Reservations, Groups (if activated), Room Blocks
(if activated), Front Office and Billing
• Profile (ID) Card - Profiles – Companies and People
• Boardroom - Conference and Banqueting Menus – Diary - Search, Create & Edit - Function
Sheets.
Organisational Chart
CRS Module – Reservations, Property, Reports, Rates and Configuration.
• Reports Graph - Reports – House Keeping, Front of House, Reservation, Revenue, Forecast
and Sales and Marketing
• Bank -Accounting – Reports, Period End, Company and Central Invoicing Module
• Cogs - System – Codes & Rules, Rates, System and Tools
Question Mark
Help – Help, Logs and CRS Logs
• Star - If and when favourites have been selected a star will appear with your favorited menu
options
8 Zoë Harney / Karen Fisher 21/03/2017
Quick Access, Reservation Search, Log Off and the “Hamburger”
• Quick Access – typing part or all of the menu header will return the appropriate menu in the
drop down menus.
• Reservations Search – typing the booking reference number in the reservation search will
return reservations search result
• Log Off (Power Symbol) – Click to log yourself out of Rezlynx
• “Hamburger” – To Do’s and Email (Rezlynx not Outlook) – where you can send and see your
messages internal and email external and send To-Do’s to users and groups within Rezlynx,
Switch Property to change to view another Site in your group and also My User Account, this
password protected area allows the user to define and set Hot Keys (shown below), Home
Page set up, Passwords & Email Masking by User
Hot Keys
Hot keys can be configured by the operator to display at the top of the Rezlynx page as shown below:
Add a new hot key
1. From the My User Account within the ‘Hamburger’ click Hot Keys.
2. Click the Add Hot Key button.
9 Zoë Harney / Karen Fisher 21/03/2017
3. Complete the Add Hot Key dialogue box and click Save.
Explanation of the ‘Add Hot Key’ drop-down menus
• Page - Select the page that the new hot key should open when clicked.
• Display Text - Enter the name that will be displayed on the hot key button.
• Keyboard Shortcut - Add a keyboard shortcut.
• Background Colour - The default colour for a hot key is blue and matches the Rezlynx colour
theme however, selecting a different colour from here will change the colour of the button.
Edit a Hot Key
1. From the Hot Keys screen, click the Edit button next to the relevant hot key.
2. Make the changes, click Save and Close.
Delete a Hot Key
1. From the Hot Keys screen, click the Delete button next to the required hot key.
2. Click Save and Close.
The Up and Down keys can be used to reorder the display of the hot keys.
Clicking the Save Order button will save the reordered hot keys; clicking the Close button will close
the page.

10 Zoë Harney / Karen Fisher 21/03/2017
CRS Reservation
Making a Reservation
1. Click on the CRS Module icon (organisational chart).
2. From reservations click on Enquiries.
3. This will take you through to the enquiry section.
4. Click create to start.
Quote an option to a potential customer
1. From Option 1, click the add quote button.
This will take you to the rate search screen and you can search by the customer’s
requirements.
2. When you have chosen the right requirements click on the total cost button to add the
option to the customer’s quote. (You can add many quotes to the enquiry).
3. Enter the customers surname into the surname box and click the Link.
From clicking the Link button this will search the system to see if the customer has stayed before.

11 Zoë Harney / Karen Fisher 21/03/2017
• If the customer has stayed before click on the Profile Ref Number
• If the guest has not, click on the Add New Profile button
4. Click on the Notes tab to add notes onto the enquiry. Notes will copy when converted.
5. Click Save.
Information with a * is a mandatory
field and must be completed before
saving.
• Title
• Surname
• Address – Post Code Search
(enter code select search to
pre populate address)
• Contact Telephone Number
Email is optional but always ask as
confirmations are sent via email and
for marketing purposes.
Click Save

12 Zoë Harney / Karen Fisher 21/03/2017
• Assigned To – automated to the person creating the Enquiry
• Chase Date - 3 days after creation
• Contact Method – How the guest would like to be contacted
Converting an Enquiry Straight Away
1. From the Option click the convert button
This will take you through to the CRS reservation screen
2. Click Edit to edit the contact details if required or Unlink to amend to another profile.
3. Click Search to enter a company or agent profile to the booking.
4. From the Rooming List tab details can be edited if the person staying differs from the
contact. Enter the surname, click options, link, select profile, if no profile, add a new profile.

13 Zoë Harney / Karen Fisher 21/03/2017
5. From the Room & Rate tab, details of the reservation can be amended.
• Options to ‘change’ the room, rate or dates selected, Override which lets you overtype the
rate per night
• Remove All Line to completely and add a new room, date & rate
• Rate Analysis to see the rate per night
• Add to add a change, room rate or room type
• Use Room Block to link the booking to an existing Room Block/Allocation of rooms
• Add Room to go back to rate plan search and add another room to this segment
• Back takes you to the previous screen with no save
• Close goes to previous screen and saves
• Save stays on same screen and saves booking/where you are up to
6. From the Upsells tab you can add extra’s to the room. If you have more than one room on
the segment you can select which room you wish to add the extra’s onto.
14 Zoë Harney / Karen Fisher 21/03/2017
7. From the Misc. tab you can amend the following:
Purchase Order Allow Room Moves Alarm Call
Credit Limit Media Source Exclude from Template Automation
Notes can also be added to each segment within the booking.
8. From the Policies & Payment tab, the following can be amended:
Booking Status – Provisional or Confirmed
Guarantee Type – credit card, ledger or both

15 Zoë Harney / Karen Fisher 21/03/2017
Taking Payment via Secure Trading
Deposits/Payments must be taken via Secure Trading if the guest is not present.
Payment MUST be taken before saving the reservation.
1. Click the Magnetic North button and this will start the payment process
2. From entering the details state to the guest they will be transferred to a secure line to give
their card details to complete the payment process.
3. Click Transfer Call
A progress box will appear letting you know the stages of the information being taken.
4. Click Abort process and retrieve call to bring the customer back.
5. From ending the Magnetic North process, a Deposit pop up will appear
6. Deposit Payment Type - PCI_Property as the money has been processed at property level
7. Click Yes
• Value – Payment Due
• Transaction Type – Guarantee or Take
Payment
• Card Type – the make of the card being
used for payment

16 Zoë Harney / Karen Fisher 21/03/2017
From completing the process, a PCILynx Ref number is generating that stores all the details regarding
the transaction behind. This can be used later to Re-Auth for more monies or Refund the money.
8. Click Save on the booking and an Invoicing tab appears on the segment of the booking.
Invoicing Set Up
This segment is where you will set the plans, accounts and create accounts. You will also see a
Reservations Total.
See CIM Invoicing to complete this process.
17 Zoë Harney / Karen Fisher 21/03/2017
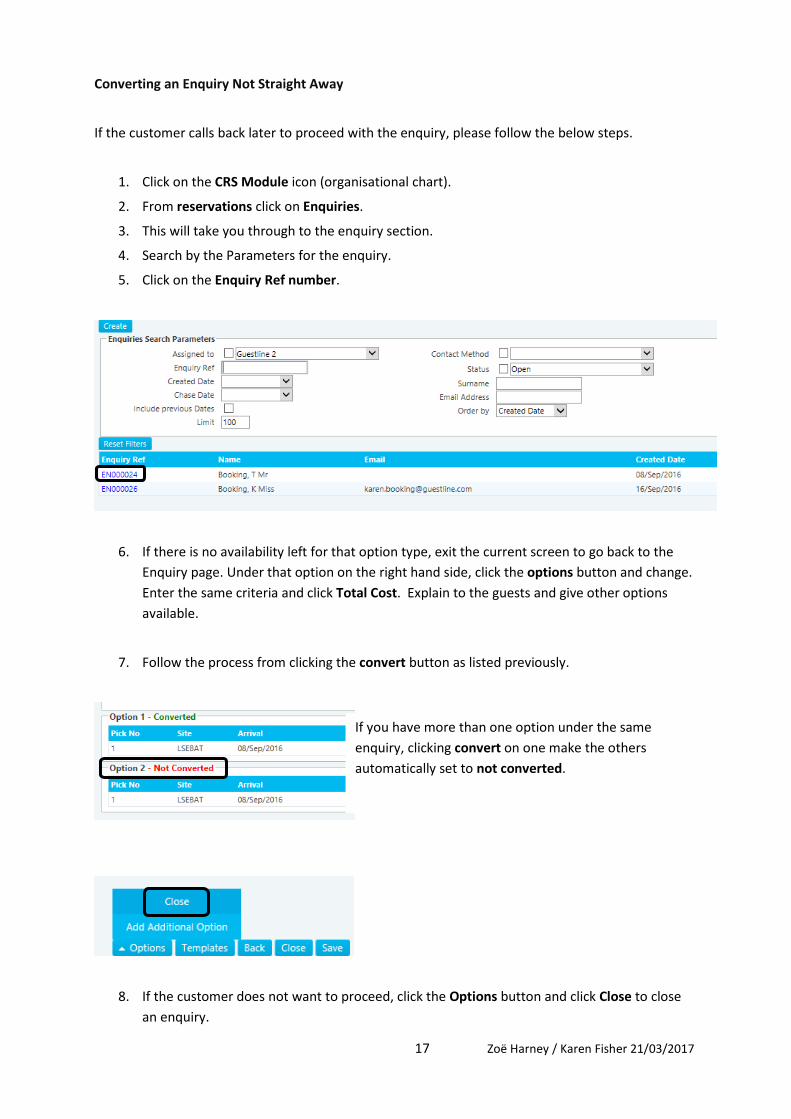
Converting an Enquiry Not Straight Away
If the customer calls back later to proceed with the enquiry, please follow the below steps.
1. Click on the CRS Module icon (organisational chart).
2. From reservations click on Enquiries.
3. This will take you through to the enquiry section.
4. Search by the Parameters for the enquiry.
5. Click on the Enquiry Ref number.
6. If there is no availability left for that option type, exit the current screen to go back to the
Enquiry page. Under that option on the right hand side, click the options button and change.
Enter the same criteria and click Total Cost. Explain to the guests and give other options
available.
7. Follow the process from clicking the convert button as listed previously.
8. If the customer does not want to proceed, click the Options button and click Close to close
an enquiry.
If you have more than one option under the same
enquiry, clicking convert on one make the others
automatically set to not converted.

18 Zoë Harney / Karen Fisher 21/03/2017
.
9. The Enquiry Close box will appear on the screen. The following must be completed before
clicking Save:
• Code
• Description
• Reason
10. Click Save.

19 Zoë Harney / Karen Fisher 21/03/2017
Sending a Confirmation
Enquiry
1. Click the Template button.
The Enquiry Template box will appear. Complete the following:
• Print - Tick the box
• Options - Select the option you wish to print
• Template - choose your template
2. Click Execute.
You can also print view and document view should you wish to edit further.
Converted
1. From the CRS header tabs on the reservation, select the Confirmation tab.
2. Tick which confirmation or tick the top box to select all confirmations to send.
CRSBookRef Summary – Summary of all rooms booked on the different segments.
CRSBookRef – CRS00139/1 BookRef – Summary Booking Summary just for that segment

20 Zoë Harney / Karen Fisher 21/03/2017
Under the top two each individual reservation can be sent its own confirmation.
3. Choose the correct template from the Template dropdown.
4. Click Execute – to send confirmation from Rezlynx
5. Click Confirm To Property - confirmation of the booking to the property you are booking on
behalf

21 Zoë Harney / Karen Fisher 21/03/2017
Segments
Adding a New Segment
To add a new segment onto an existing booking:
1. Click on the CRS Module icon (organisational chart)
2. From reservations click on Search.
3. This will take you through to the reservation search
4. Search by the parameters
5. Click on the CRSBookRef
6. Once you are in the reservation
click on the + beside the existing
segment
This creates i.e. Segment 2 depending on the
number of segments already created on the CRS
reservation
Once the + has been selected and Segment 2
appears it will redirect automatically to the rate
search page.
The booking information i.e. stay dates, nights,
number of people, will have to be inputted again.
7. Once changes have been made the Total
Cost button will change to red.
8. Select the button to add the segment onto
the reservation.
This creates a new booking number (BK) for the segment but
it is still a part of the original CRS booking reference number.

22 Zoë Harney / Karen Fisher 21/03/2017
Change the name if it differs as it will pull through the contact name onto the rooming list.
Just like the segment before remember to complete the following:
• Market Segment
• Guarantee Type
• Booking Notes
• Payment if required
Adding a room onto a segment
1. Click Add Room to add a room onto an existing segment.
You will now see the rate search screen.
2. The booking information i.e. stay dates, nights, number of people, will have to be inputted
again.
3. Click Total Cost once the relevant fields have been inputted.
Change the name if it differs as it will pull through the contact name onto the rooming list.
Just like the segment before remember to complete the following:
• Market Segment
• Guarantee Type
• Booking Notes
• Payment if required

23 Zoë Harney / Karen Fisher 21/03/2017
This booking will have the same booking reference number (BK) but will have /2 at the end
depending on the number of the room added.
Mid Stay Changes (Booking Lines)
1. Click Add to add a booking line
2. Select the different rate plan or a different room type and room id.
You can have as many booking lines as you wish.
*Please note that the booking line will add a night, if you wish to amend a booking line a warning
message will populate.
3. Click Rate Analysis to see if this has applied correctly and click Close.

24 Zoë Harney / Karen Fisher 21/03/2017
Cross Property Booking Transfers
1. Click on the Guest Journey icon (bell)
2. From reservations click on Search.
3. Search for the reservation needing to transfer to another property.
To transfer the reservation must not have the following status’:
• Waitlist
• Resident
• Cancelled
• No Show
• Checked out
Roomlynx OTA/GDS created reservations will have restraints on the ability to be transferred based
on a channel by channel basis. Rezlynx will deal with this by either permitting or restricting property
transfer
If a booking is part of a group/multi-room when transferred it will be created as an individual booking
on the destination site
4. Within the reservation from the Options button, click the Transfer Booking.
5. Select the Property drop down box to select the new property to transfer the booking.
25 Zoë Harney / Karen Fisher 21/03/2017
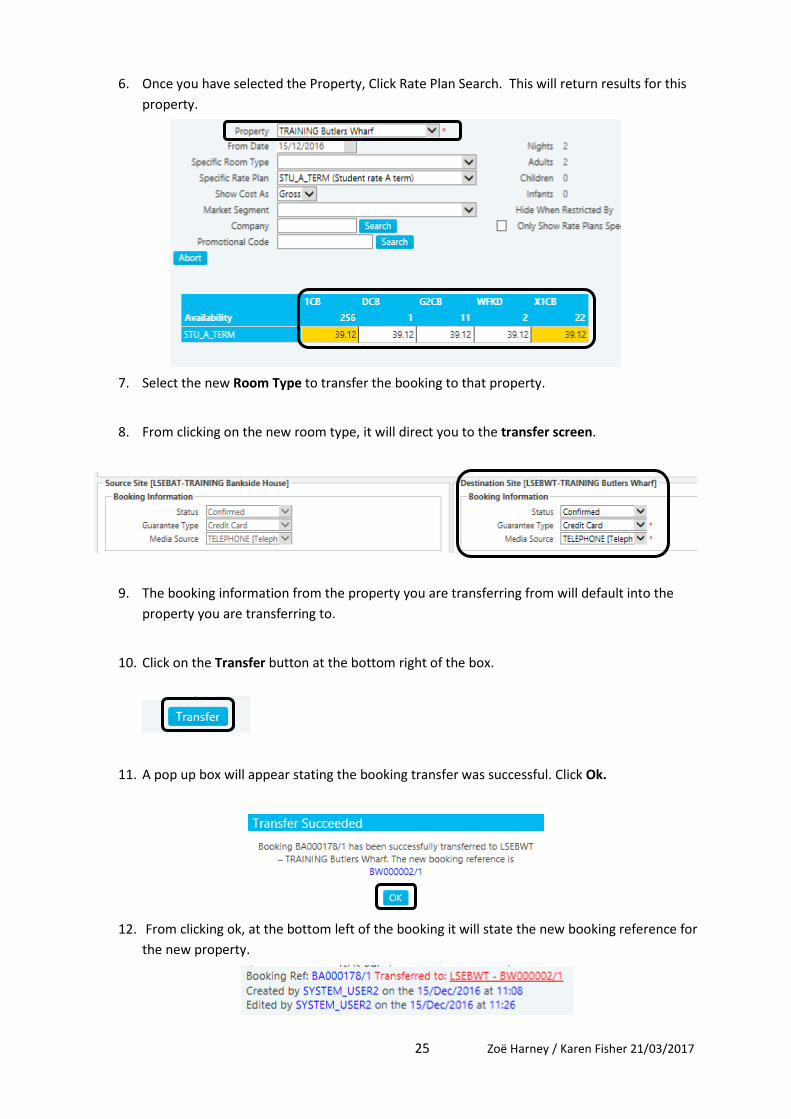
6. Once you have selected the Property, Click Rate Plan Search. This will return results for this
property.
7. Select the new Room Type to transfer the booking to that property.
8. From clicking on the new room type, it will direct you to the transfer screen.
9. The booking information from the property you are transferring from will default into the
property you are transferring to.
10. Click on the Transfer button at the bottom right of the box.
11. A pop up box will appear stating the booking transfer was successful. Click Ok.
12. From clicking ok, at the bottom left of the booking it will state the new booking reference for
the new property.

26 Zoë Harney / Karen Fisher 21/03/2017
Cancelling a Reservation
Cancel in full – received no payment and there are no charges
1. Cancel the booking from Rezlynx
2. If the invoice has been generated, the system will credit this automatically once it has been
cancelled. Send the credit note to the booker.
Cancel in full – no payment received with charges to apply – Individual booking
1. Search for the booking via the CRS Module icon, Reservations and Search. Select the correct
booking.
2. Take the payment via Secure Trading under the Policies & Payment tab within the segment.
3. Click Cancel Reservation, select the booking you wish to cancel and against the booking
there should be a Deposit button. Click the Deposit button.
4. As the booking has been charged for cancelling, select the Refund Payment Code as the
same that the payment was originally taken by. Select your Analysis Code as ‘No Show Fees’,
enter your Retained Comment and select either the Percentage or Value that is being
retained and the amount will now jump to Total to Retain. Click OK.
5. Vice Versa if the payment had been taken at the time of booking and you wished to refund it
simple enter the Refund Comment and select the Percentage or Value of the refund you
wish to make.

27 Zoë Harney / Karen Fisher 21/03/2017
CIM Invoicing ***STUDENT BOOKINGS ONLY***
CIM Terminology
CIM – Central Invoicing Module
This is the programme associated with Rezlynx and CRS (Central Reservations System) which allows
for the creation and generation of invoices from within a reservation at any point prior to arrival.
Transaction Plan
A transaction plan determines how the charges to a reservation are to split over the invoice.
For Example, Accommodation to One Account and Extras to Another.
Payment Plan
A payment plan determines how the invoices are created.
For Example, one invoice for the total stay from the arrival date, or an Invoice every 30 days starting
from today.
Account
The Account is the Company or Person who is responsible for paying the invoice for the stay.
Also the payment due days are defined within an account, i.e. Zoe Harney pays 14 days in arrears
NB: The account reference and detail should always be linked to a Personal Profile.
Invoice
The document indicating the charges raised for the stay in a description one line format. NB: This
does have a tax breakdown.
Credit Note
The document highlighting any credits to the invoice/account.
For example, when a stay is reduced a credit note will credit to the original invoice raised. NB. A new
invoice would already have been raised in this case
Create Invoice Set
This will create the invoices in preparation for when they need to be sent out. They will be in a ‘Pro-
Forma’ state at this stage.
Generate Invoice
This will generate the invoice into an official document. NB: You can only generate invoices after
creating the invoice.
Take Payment
Taking Payment directly against an invoice. This will then appear on that person Central Account.

28 Zoë Harney / Karen Fisher 21/03/2017
Pro-forma
The document highlighting the proposed charges on the invoice. NB: this does not have a tax
breakdown.
Unallocated Payments
Payment’s that have been received but not allocated to an invoice.
Debtors
The list of Accounts that have invoices outstanding for payment.
Cancel Invoicing
This will completely remove and / or credit all invoicing, transaction plans and accounts from a
booking. You will need to add back in after to correct set up.
How does the invoicing process work with CIM
Rezlynx functionality which is called CIM (Central Invoicing Module) allows for booking information
to be directly entered on to an invoice from the Rezlynx browser. This allows Reservation and Front
Desk teams to quickly send a full VAT invoice at any time prior to or on receipt of payment.
Rezlynx decides what information to put on an invoice based on the following steps which are loaded
at the time of booking, or later once details are confirmed: -
Transaction Plan – this determines how many payment accounts will be added to a booking and
what charges those accounts will pay. PLEASE NOTE once this is set it cannot be changed.
Account
The Account is the Company or Person who is responsible for paying the invoice for the stay.
Also the payment due days are defined within an account, i.e. Zoe Harney pays 14 days in arrears
NB: The account reference and detail should always be linked to a Personal Profile.
Payment Plan – various ways a person can pay either up front at time of booking or on an agreed
credit agreement. These will be pre-set based on the account profile e.g. a student account should
always have the ‘immediate’ unticked in their account, and then the number of days in arrears of
invoice they required to pay by in the box. i.e. 14.

29 Zoë Harney / Karen Fisher 21/03/2017
Header Vs Segment Invoicing
Header – When invoicing from the header, it applies to all segments within that CRS reservation. If
you have different properties or rooms booked within the segments under that CRS reservation it
will not allow you to unselect for certain segments.
Segment – When invoicing from the segment it only applies to rooms booked under that particular
segment. Each segment under one CRS reservation can have different invoicing methods applied.
If you have set the transaction plan via the Invoicing tab in the Header and try to change in the
segment it will not allow you and state an invoice already exists. (This will also apply to creating at
segment level)
Once you have selected your invoice level and confirm it, if an error has occurred where you have
selected the wrong transaction plan or it changes, then you will need to cancel invoicing and start
again.
Transaction plan use in bookings
When coming to the Invoicing tab, the first task to set is the invoice Transaction Plan.
The Transaction Plan determines how many payment accounts will be added to the booking, and
what charges those payment accounts will be invoiced for.
Each plan should be designed to be self-explanatory for quick reference.
Some example transaction plans are:
All charges to one account – All charges on the booking can be assigned to one payment account.
Useful for consumer stay bookings, or direct corporate bookings. This is only used if one
person/company is paying for accommodation and any upsells on the booking.
2 Accounts; Acc1=Accom; Acc2=Upsells - This will split charges between 2 accounts. The first profile
will take the accommodation charges; the second profile will take any other upsells. This is suitable
for corporate and agent bookings where the booker is paying for accommodation only and the guest
settles the upsells.

30 Zoë Harney / Karen Fisher 21/03/2017
3 accounts. Account 1 = accommodation; account 2 = 50% upsells; account 3 = 50% upsells – This
will split the charges between 3 payment accounts. The first payment account will accept the
accommodation charges only, and any upsells will be split 50/50 between accounts 2 and 3. This is
useful for a shared two bed booking, where the accommodation is being paid by their corporate
booker or agent and the guests are sharing the cost of the upsells.
You can set a preferred transaction plan within their payment account profile.
NB. It is crucial your client confirms how they wish to pay prior to the transaction plan being set.
Personal Payment Accounts
1. Select the Transaction Plan that applies to this booking. Click Confirm.
2. Search for the Account for each section of your Transaction Plan if selected. Two types of
Payment Accounts can be attached: Personal Account and Company Account.
3. If there are no accounts found, click on Show Relevant Accounts just to double check.
4. If the account does not exist create a new account by clicking on Add New Account button.

31 Zoë Harney / Karen Fisher 21/03/2017
5. Any relevant profiles linked to the booking will now pop up - Select the P profile you are
looking for and click Create.
6. This will bring up the account create screen. The payment account profile is linked to the
selected P profile, and has the same reference.
7. Add the guest’s First name in the Name field (Surname is automatically populated). This
helps ensure the payment account is assigned to specific profile and easier to locate.

32 Zoë Harney / Karen Fisher 21/03/2017
8. The account will automatically default to Immediate payment terms, you will need to untick
and change this. See above.
NB. you can add notes specific to their account in the ‘Notes’ Tab – You can also add extra Payment
Plans that are agreed for this account in the ‘Payment Plans’ Tab.
9. Select Save Changes on profile.
- Proceed to complete invoicing tab. NB. To Add Extra Payment & Transaction Plans
Company Payment Accounts
1. If there are no accounts found, click on Show Relevant Accounts just to double check.
2. If the account does not exist create a new account by clicking on Add New Account button.
3. Any relevant accounts to the booking will now pop up. Select the C profile you are looking for
and click Create.
NB. If your C profile does not exist or does exist but needs to be sent to a new address, you would
need to create a new company profile (follow “Guest Journey - Profiles – Company Search, Create”).
4. This will bring up the account create screen. The payment account profile is linked to the
selected ‘C’ profile, and has the same reference.
5. The account will automatically default to ‘Immediate’ payment terms, you will need to untick
and change this.
- You can add notes specific to their account in the Notes Tab – You can also add extra Payment
Plans that are agreed for this account in the Payment Plans Tab.
6. Select Save Changes on profile.
- Proceed to complete invoicing tab. NB. To Add Extra Payment & Transaction Plans
33 Zoë Harney / Karen Fisher 21/03/2017
Payment Plan Use
When selecting the payment account, you will only see applicable payment plans for that profile (see
previous). Please find some examples of payment plans and their explanations:
Payment in full – no credit: This will apply to most ‘P’ accounts (i.e. a person paying for the booking)
and to some ‘C’ accounts (i.e. a company with no credit agreement). Payment is required at the time
of booking in full by credit/debit card or BACS transfer, if there is sufficient time. See Reservations
SSP on Provisional bookings.
Payment in Full 14 Days after Check in: This may apply to ‘P’ or ‘C’ Accounts where they pay a
deposit and then pay in full 14 days in arrears of Check IN. Payment Date can be set manually when
generating the invoice.
Monthly invoice in Advance - choose 1st of month of arrival: This could apply to a ‘C’ account where
their credit agreement states the invoice must be sent on the 1st
of the arrival month. When creating
the invoice set the First Invoice Date to the 1st
of the month of arrival, for the correct invoice
schedule to be created.
Monthly Invoice in Arrears - choose 1st of month following arrival: This will apply to a ‘C’ account
where their credit agreement states the invoice must be sent on the 1st
of the month after arrival.
When creating the invoice set the First Invoice Date to the 1st
of the month after arrival, for the
correct invoice schedule to be created.
Payment on departure – This could apply to specific ‘P’ or ‘C’ accounts where you have agreed to
take payment on departure.
Amending Details for a Guest Payment Account
If a guest has a profile which is missing details, we must attempt to get this information at every
possible opportunity. This will update in two locations:
• The guest’s contact profile i.e. their ‘P’ Profile Record
• The guest’s payment account i.e. their payment ledger
By following both of these steps you will ensure that the:
• Profile record for the guest is updated
• The payment ledger for the guest will be updated for future invoices
34 Zoë Harney / Karen Fisher 21/03/2017
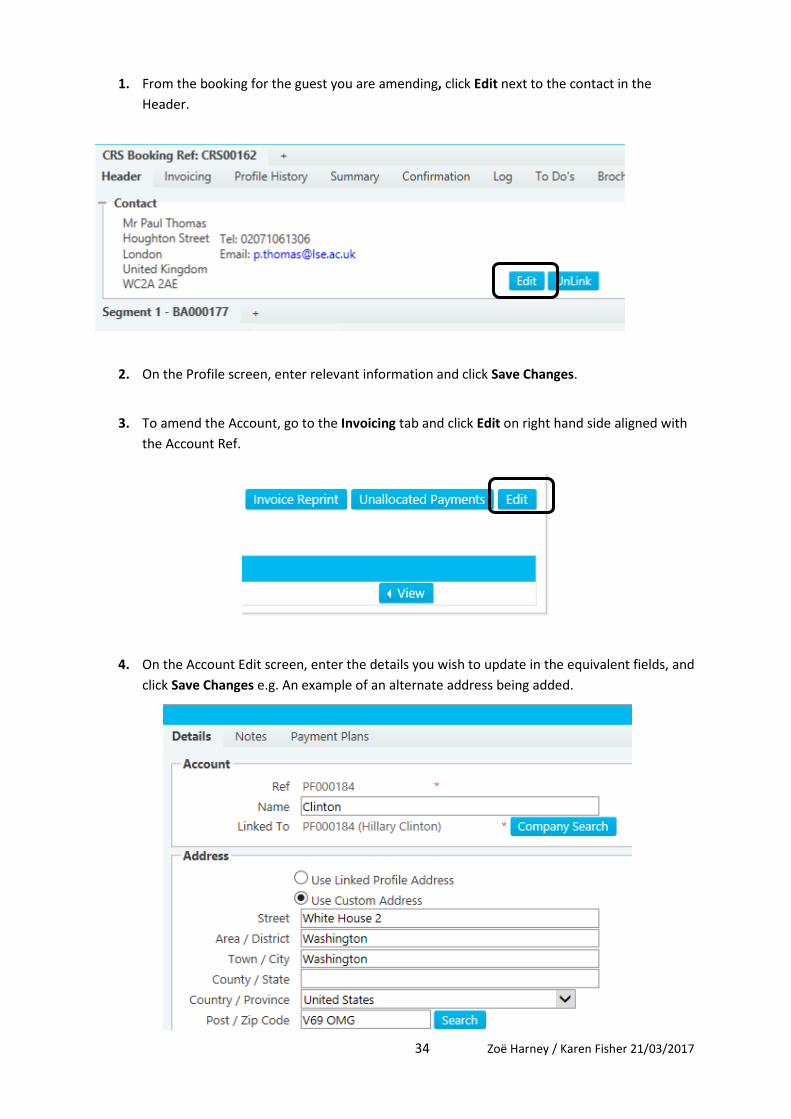
1. From the booking for the guest you are amending, click Edit next to the contact in the
Header.
2. On the Profile screen, enter relevant information and click Save Changes.
3. To amend the Account, go to the Invoicing tab and click Edit on right hand side aligned with
the Account Ref.
4. On the Account Edit screen, enter the details you wish to update in the equivalent fields, and
click Save Changes e.g. An example of an alternate address being added.

35 Zoë Harney / Karen Fisher 21/03/2017
Creating Invoices
1. Click on Create Invoice Set button.
This will populate the information for the invoice. The Amount column displays the total cost of
this invoice.
The Balance column shows the total to be paid on the invoice.
2. Click View to view pro-forma prior to generating the invoice to CHECK if all the details are
accurate. See image below.
3. Click on Generate Invoice.

36 Zoë Harney / Karen Fisher 21/03/2017
4. An information pop up box will appear.
5. If you are taking payment at this point, ensure the “Take payment directly after generation
of the Document” box is ticked prior to selecting Yes.
If you are not taking payment at this point, ensure the “Take payment directly after
generation of the Document” box is not ticked prior to selecting Yes (default).
6. If you wish to take payment via Secure Trading, click on the relevant button which will take
you directly to the right page to take payment.
Once payment has been authorised, the Transaction (PCILynx) Reference must be copied from
the pop up and pasted in to the Private notes within the booking.
7. If the payment is not taken via online source, click Other and select relevant payment type.

37 Zoë Harney / Karen Fisher 21/03/2017
8. Once you have taken the payment or selected Other the following box will appear, select
your payment type from the drop down box and click on Yes.
Select the Payment Type based on the method of payment used and the type of card used
to pay – if applicable.
:
9. You will then see the following window. Click Yes to email invoice immediately to the
payment account email address.
If you require a hard copy of the invoice, select No to the above
The invoice will now show a zero balance as it has been paid.
10. Move to the Policies and Payments tab, change the Booking Status to Confirmed if not done
so already and make sure you click Save.
Please note that the remaining balance on the policies and payments tab should be ignored as this
is not relevant. Unless this person is a VACATION/COMMERCIAL stay – where you will not
complete any Invoicing and you will refer to Room Billing under the PMS section.
11. Send confirmation to the guest.
38 Zoë Harney / Karen Fisher 21/03/2017
Viewing Pro-forma & Transactions
Pro-forma’s can be generated at any stage throughout the reservation prior to an invoice being
generated for Student accounts, and at any point prior to check in for a commercial booking.
Commercial
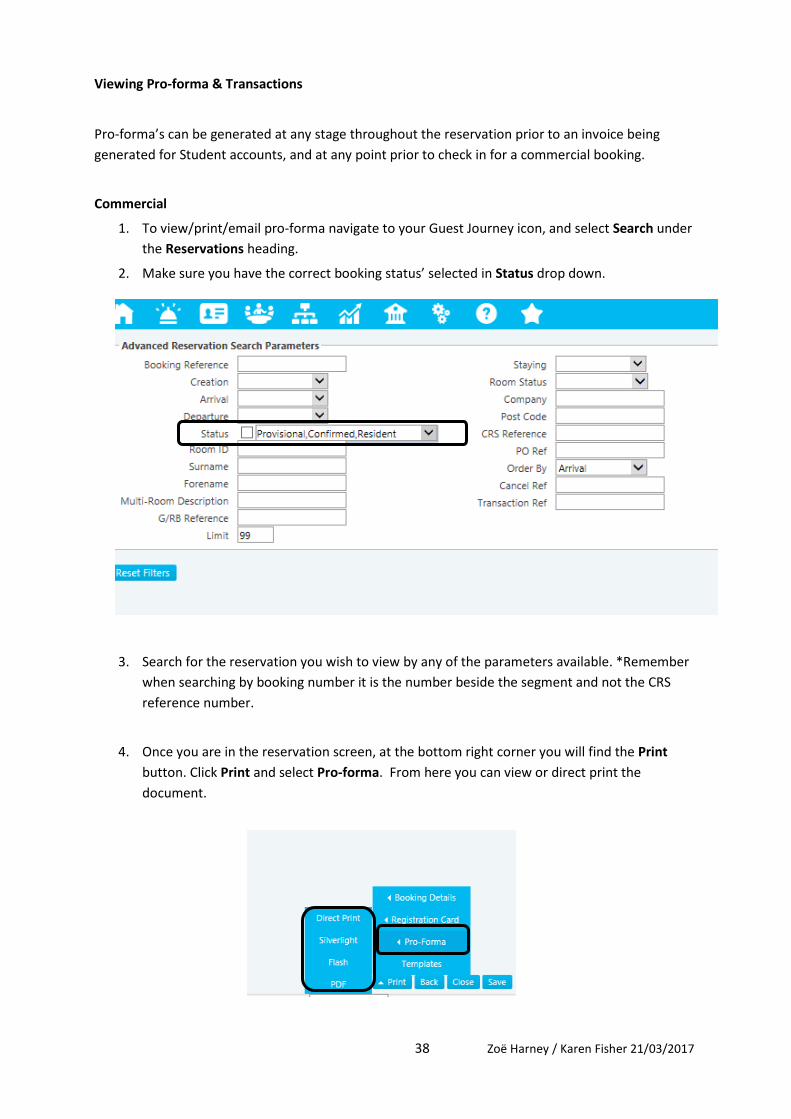
1. To view/print/email pro-forma navigate to your Guest Journey icon, and select Search under
the Reservations heading.
2. Make sure you have the correct booking status’ selected in Status drop down.
3. Search for the reservation you wish to view by any of the parameters available. *Remember
when searching by booking number it is the number beside the segment and not the CRS
reference number.
4. Once you are in the reservation screen, at the bottom right corner you will find the Print
button. Click Print and select Pro-forma. From here you can view or direct print the
document.

39 Zoë Harney / Karen Fisher 21/03/2017
NB. Pro-forma Example View
Student Pro-Forma
1. To view/print/email pro-forma go to CRS Module – Search
2. Search for the reservation you wish to view by any of the parameters available.

40 Zoë Harney / Karen Fisher 21/03/2017
3. Once you have found the booking required, click the CRS booking reference.
4. When in the reservation click the Invoicing tab. Hover over View, Proforma against each
invoicing line and choose your viewing method or print or email. See image below:
Invoice Reprint
Student
1. Go to the Invoicing tab.
2. Click Invoice Reprint - **The most recent invoice generated will sit at the bottom of the list
(above credit notes if created)**
The following box will appear:

41 Zoë Harney / Karen Fisher 21/03/2017
3. Click on the relevant invoice you wish to resend/print.
OR
Go to the Bank icon, Central Invoicing and Invoice Reprint
1. You can search by many parameters to find the invoice you require.
2. However, when the results are returned it will not state the name of the booking, it will state
the following:
- Document Ref - Document
Type
- CRS Book Ref - Site ID
- Book Ref - Account Ref - Account
Description
- Amount
3. Once you have found the invoice you require, then you can hover over View and choose your
method to print, view or email. You can also select more than one.

42 Zoë Harney / Karen Fisher 21/03/2017
Amending Dates
With Invoices having been Created Only
1. Make sure you are in the CRS booking.
2. Click into the Rate Plan tab and hover over Options button.
3. Click Change which will bring up the Rate Plan Search box.
4. Amend the date as agreed, or number of nights, click Rate Plan Search.
•
5. select the relevant Rate Plan appropriate to the length of the extension.
NB. If no results are shown it may be because the rate plan has changed or isn’t available for
the new range, to change the rate plan, choose Specific Rate Plan or select blank space at top
to see all available plans.
6. Once you have identified the correct rate plan, hover over it and click the monetary value to
select the new rate plan.
7. The rate plan change will be applicable from the date of when the booking was changed, not
the dates of the extension period.
8. Save the booking.
9. As the invoice has only been created and not generated it will only update the invoiced
created to the new cost of the stay.
**Please note if you have sent the pro-forma to the client/company then this will have to be re-
sent with the new cost of the stay**

43 Zoë Harney / Karen Fisher 21/03/2017
With Invoices having been Generated
1. Follow the process above until saving the booking.
Once the booking has been saved the below pop up box will appear. This is prompting you
to remember that an invoice has previously been generating in the system.
2. Click OK
3. Click back into the invoicing tab – the invoice now needs to be regenerate as changes have
been made.
If payment was taken for the initial booking on the creation date, this process will differ.
It will unallocated the payment and you will have to re-allocate the payment to the booking.
4. Click on Unallocated Payment and then choose the allocate button.
5. Choose if you wish to match/part match the payment and click Save once you have chosen.

44 Zoë Harney / Karen Fisher 21/03/2017
**Please note if you have sent the pro-forma to the client/company then this will have to be re-sent
with the new cost of the stay.
Adding Upsells
With Invoices having been Created Only
1. Click on the Upsells tab within the segment you wish to add an upsell to. Select the product
you wish to add to the segment.
2. Save the booking.
3. This will add the upsell onto the invoice total cost and no other changes are required.
**Please note if you have sent the pro-forma to the client/company then this will have to be re-sent
with the new cost of the stay**
With Invoices having been Generated
1. Please follow as above until saving the booking.
2. The only difference is you will have to generate the invoice again and if payment was taken
before adding the upsell then you will have to allocate the payment by clicking on
unallocated payments.
45 Zoë Harney / Karen Fisher 21/03/2017
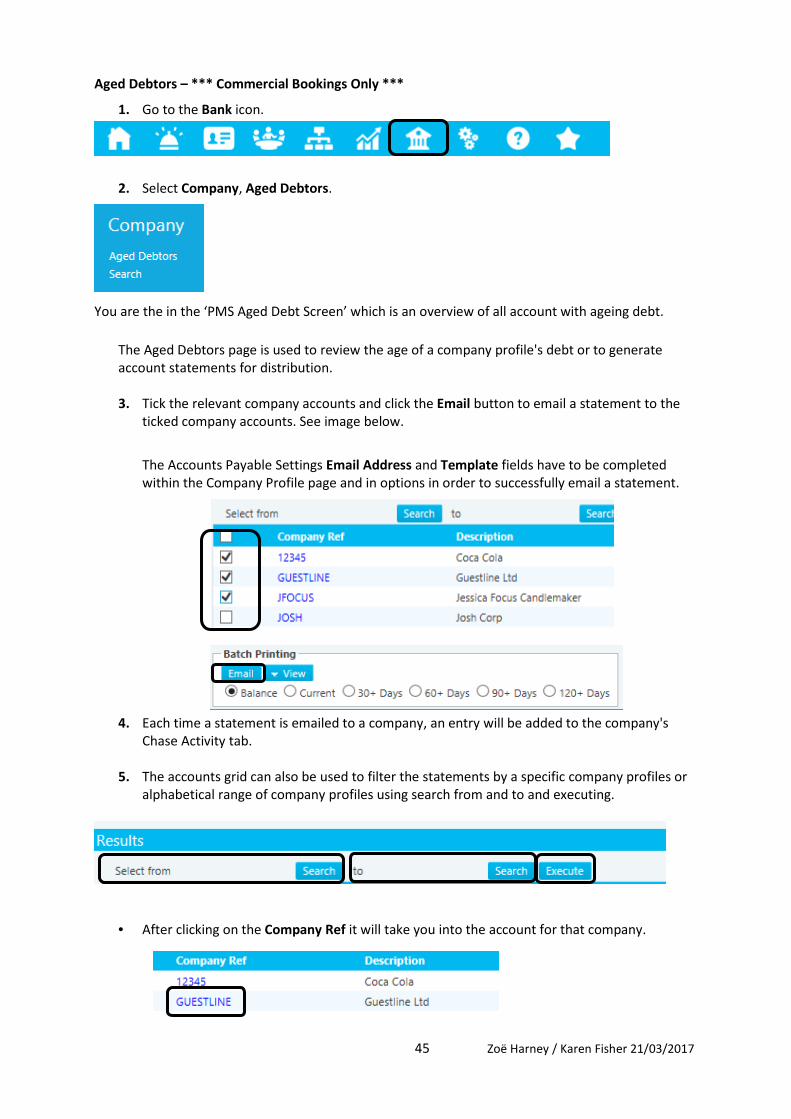
Aged Debtors – *** Commercial Bookings Only ***
1. Go to the Bank icon.
2. Select Company, Aged Debtors.
You are the in the ‘PMS Aged Debt Screen’ which is an overview of all account with ageing debt.
The Aged Debtors page is used to review the age of a company profile's debt or to generate
account statements for distribution.
3. Tick the relevant company accounts and click the Email button to email a statement to the
ticked company accounts. See image below.
The Accounts Payable Settings Email Address and Template fields have to be completed
within the Company Profile page and in options in order to successfully email a statement.
4. Each time a statement is emailed to a company, an entry will be added to the company's
Chase Activity tab.
5. The accounts grid can also be used to filter the statements by a specific company profiles or
alphabetical range of company profiles using search from and to and executing.
• After clicking on the Company Ref it will take you into the account for that company.

46 Zoë Harney / Karen Fisher 21/03/2017
Account Status
Please find below description of button uses:
The 'Account Status' tab is used to maintain the selected company profile's ledger account and
displays the outstanding ledger balance and the age of that debt.
Create To Do - Operational reminders for all areas of the business; they can be assigned to a specific
operator or an operator group.
Edit Company - If any details i.e. address for the company were to change, this is one place where
the information can be changed to the correct details.
Pay/Allocate - If amount paid is incorrect in the payment screen you can use ‘Adjust’ to amend.
Use ‘Allocate’ to set(match) part/all of the payment against an invoice(s).
‘Tracking’ will display all the activity within the selected transaction.
Click on ‘Allocate’ and the Allocating Ledger Payment pop-up page will list the details of each invoice
with an outstanding balance – the balance of each invoice is displayed.

47 Zoë Harney / Karen Fisher 21/03/2017
• The 'Payment Balance' value, displayed at the bottom of the page, is the value of the
payment/credit note to be allocated.
• To allocate the payment/credit note transaction, a combination of the following methods
can be used:
1. Clicking the 'Match' tick box of an invoice will allocate the full outstanding balance of the
selected invoice, the 'Payment Balance' value will be reduced by the 'matched' amount
2. Where the 'Payment Balance' value is less that the invoice being match, the full 'Payment
Balance' value will be allocated to the invoice, leaving an outstanding balance the 'Part
Match' field can be used to allocate
3. Or (match) a specific amount of the 'Payment Balance' to an invoice
4. Click the 'Save' button
Payment
Adding a payment made by the company for their balance in arrears.
1. Click Payment Button
2. To make a payment, enter the amount against the relevant pay type and update the
payment received (For Date) and description if required.
3. Clicking the 'Post' button will close the page and return the operator to the 'Account Status'
tab; the new payment will be listed; clicking the 'Cancel' button will close the page.

48 Zoë Harney / Karen Fisher 21/03/2017
Credit
Create A Credit Note: if the debt against a company profile has to be reduced, as the business has
already 'gone through the sales of the property', a credit note has to be raised; clicking the 'Credit
Note' button will display the Credit Note Transactions
Invoice
Create An Invoice: an invoice can be raised against a company profile account, increasing the debt.
1. To raise an invoice, click Invoice and the Invoice Transactions page will be displayed
The Invoice Transactions page is used to build up a list of transactions which are then charged to the
ledger account. When adding a charge to a ledger account, the correct analysis code has to be used
in order to increase the correct type of business.
1. To build the invoice, enter a description of the charge into the 'Description' field and click the
'Add' button to display the Add Charge page; enabling a charge transaction to be added for
each of the relevant analysis codes.
• Once a charge transaction has been added to the invoice, it will be displayed in the Invoice
Transactions page.
• Ticking the tick box, adjacent to a transaction listed, and clicking the 'Delete' button will
delete that transaction.
• Clicking the 'Cancel' button will close the page and return the operator to the 'Account
Status' tab;
• clicking the 'Post' button will post the credit transactions and display the Print Bill page:
49 Zoë Harney / Karen Fisher 21/03/2017
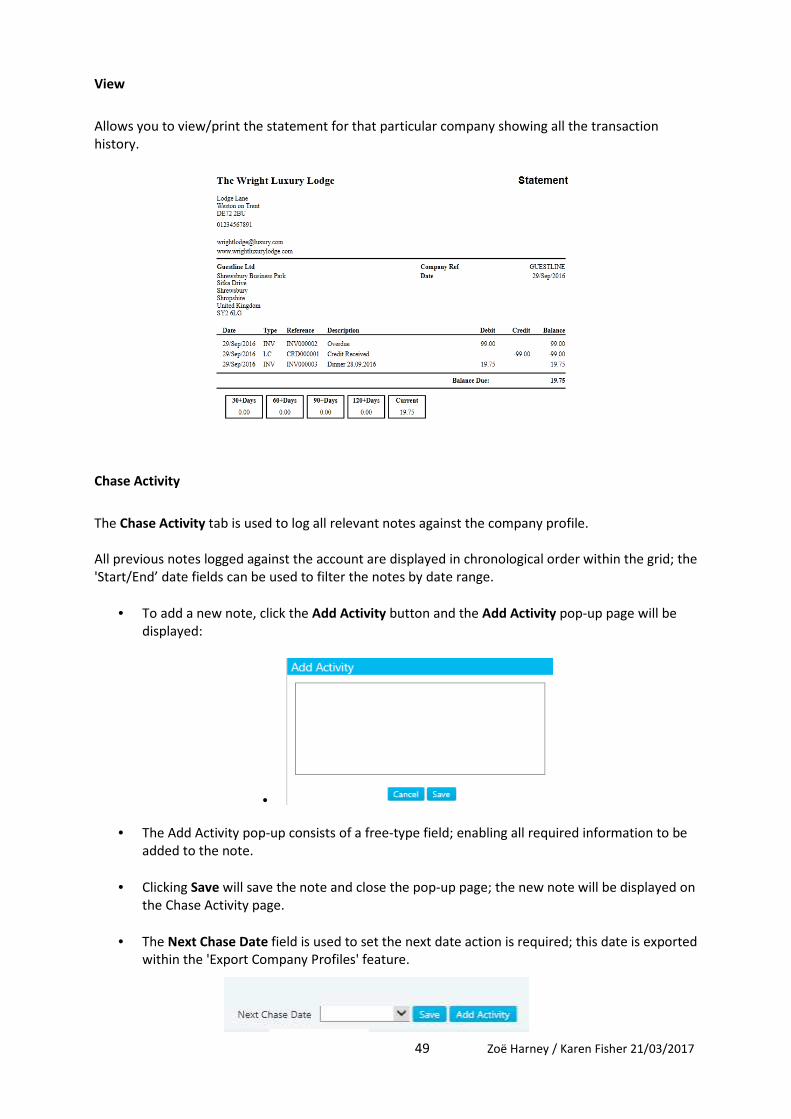
View
Allows you to view/print the statement for that particular company showing all the transaction
history.
Chase Activity
The Chase Activity tab is used to log all relevant notes against the company profile.
All previous notes logged against the account are displayed in chronological order within the grid; the
'Start/End’ date fields can be used to filter the notes by date range.
• To add a new note, click the Add Activity button and the Add Activity pop-up page will be
displayed:
•
• The Add Activity pop-up consists of a free-type field; enabling all required information to be
added to the note.
• Clicking Save will save the note and close the pop-up page; the new note will be displayed on
the Chase Activity page.
• The Next Chase Date field is used to set the next date action is required; this date is exported
within the 'Export Company Profiles' feature.

50 Zoë Harney / Karen Fisher 21/03/2017
Profiles
People Profiles
Profiles can be searched/created/edited.
1. Click on the Profiles icon (ID Card).
2. From People click on Search.
3. This will take you through to the search section.
4. Under Smart Search, enter the surname and hit enter.
5. This will search for an exisitng profiles in the system. If the profile exists click on the Profile
Ref, if it does not exist click on Add New Profile.
6. From clicking Add New Profile, if you need to create one only, will take you through to the
profile card. The 2 sections to fill in first are as follows:
Details tab
Personal Inormation, Address, Contact Information, Perferences, Attributtes
Notes tab
Any notes and details specific to this profile can be added i.e. allergic to feather pillows
51 Zoë Harney / Karen Fisher 21/03/2017
These notes will follow the profile to any future bookings made. You will be prompted and asked if
you wish to add these notes to the reservation.
7. More tabs will appear upon saving the profile.
There is a History tab showing all previous stays, dates, rates and total charges. In group mode this
will show history across all the properties.
Statistics shows profile statistics as a booker and as a guest. Highlighting average spend, average rate
plan, etc.
The Correspondence tab shows all emails sent from Rezlynx to the guest.
8. At the bottom of the page from clicking Billing Addresses, you can to add three further
addresses which you can use to replace the profile address on an invoice with an alternative
one.
9. Once are relevant fields are completed, click on Save Changes.
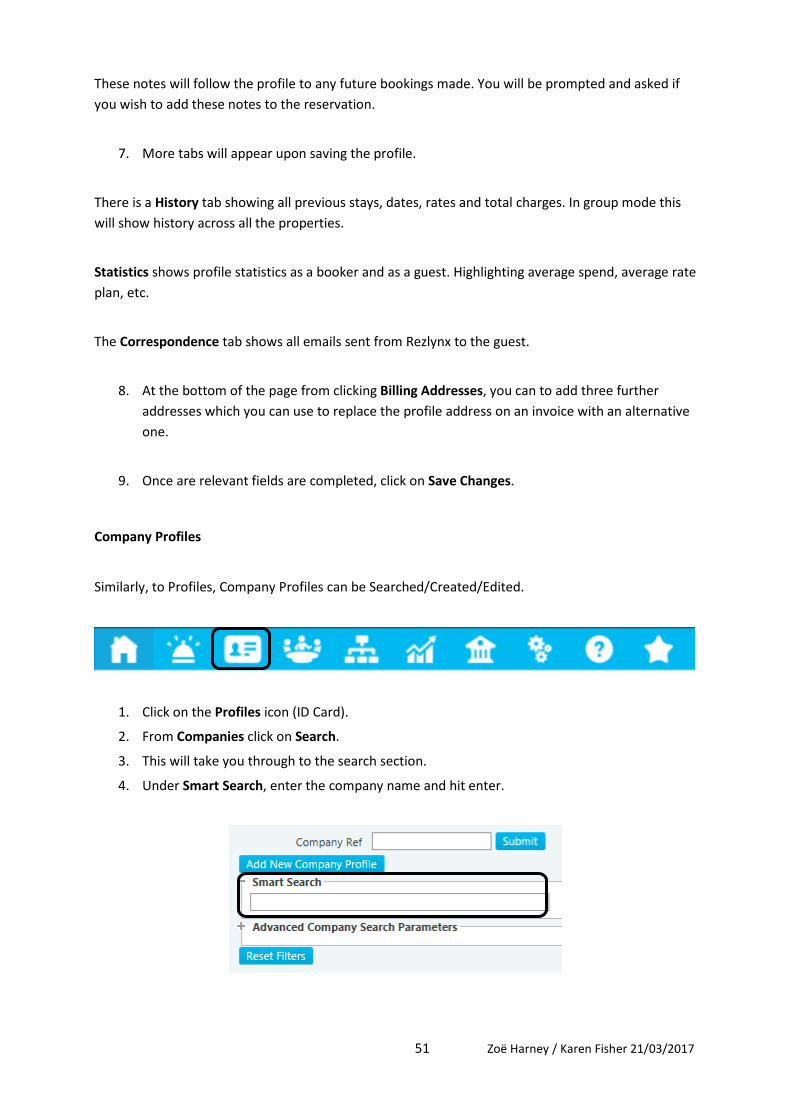
Company Profiles
Similarly, to Profiles, Company Profiles can be Searched/Created/Edited.
1. Click on the Profiles icon (ID Card).
2. From Companies click on Search.
3. This will take you through to the search section.
4. Under Smart Search, enter the company name and hit enter.

52 Zoë Harney / Karen Fisher 21/03/2017
5. This will search for an exisitng compay profiles in the system. If the profile exists click on the
Company Ref, if it does not exist click on Add New Company Profile.
6. From clicking Add New Company Profile, if you need to create one only, will take you
through to the company card. The 2 sections to fill in first are as follows:
Details tab
Company Information, Address, Contact Information, Default & Misc, Credit Control
Notes tab
Any notes and details specific to this Company, i.e. Rate agreed notes, room nights
7. More tabs will appear upon saving the profile.
Statistics will take you to the Company Production report showing the details for the company
regarding number of nights sold, company revenue generated, etc.
The Activities tab can be used by Accounts/Sales to show the Activities specific to this company such
as invoice chasing or sales call.
8. Once are relevant fields are completed, click Save Changes.

53 Zoë Harney / Karen Fisher 21/03/2017
Profile Merge
1. Click on the Profiles icon (ID Card).
2. From People click on Merge Profiles.
3. A pop up box will appear, you will need to input your password again.
There are 2 options to merge profiles. Batch Merge or Individual Merge. See below.
Batch Merge
3 fields must be completed before the search can take place (surname is compulsory).
Click Get Duplicates.
From the results returned you can decide which profile to retain or if you do not want to merge a
particular profile.

54 Zoë Harney / Karen Fisher 21/03/2017
Individual Merge
1. Search for the surname of the profile you would like to merge.
2. Select the Duplicate profile and then click on the dot beside retained profile.
3. Select the profile your wish to retain, then click Merge.

55 Zoë Harney / Karen Fisher 21/03/2017
Profile Export
1. Click on the Profiles icon (ID Card).
2. From People click on Search.
3. Click Search to return all profiles.
4. Click Export Results to create and a box will pop up to ask if you wish to Open, Save or Cancel
the download.
If you Save or Open the file it will export the profiles into an excel spreadsheet for you to
manipulate.
56 Zoë Harney / Karen Fisher 21/03/2017
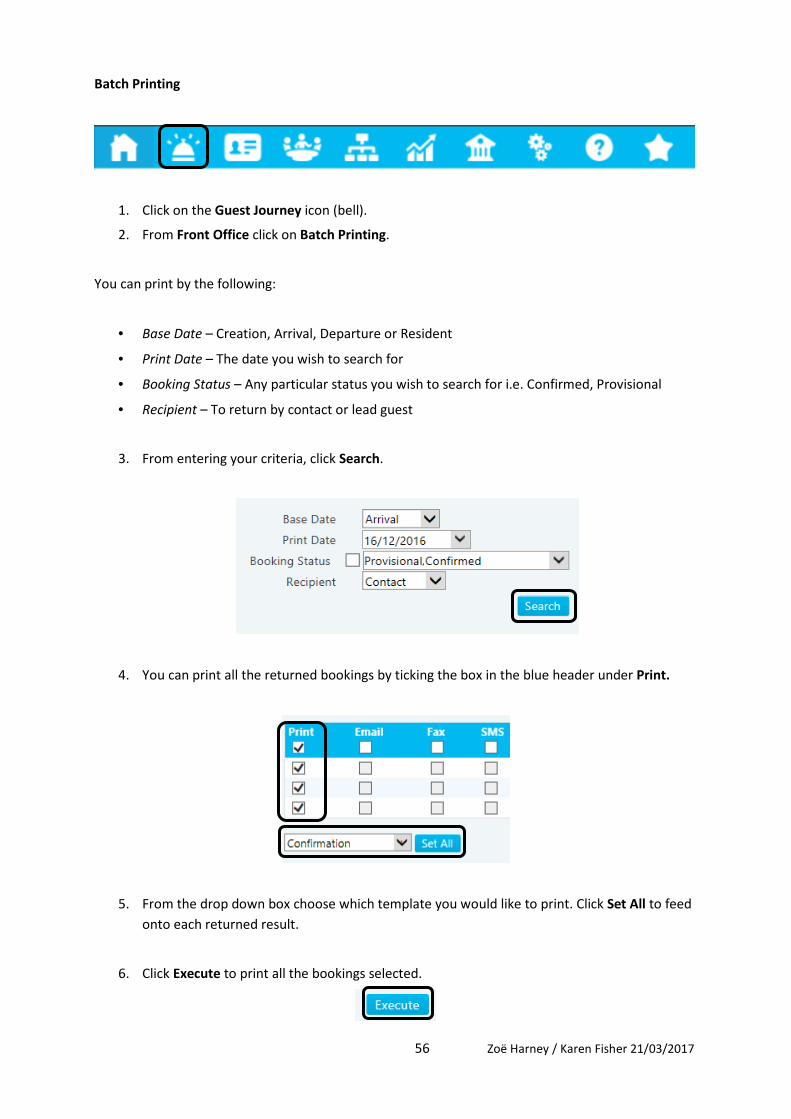
Batch Printing
1. Click on the Guest Journey icon (bell).
2. From Front Office click on Batch Printing.
You can print by the following:
• Base Date – Creation, Arrival, Departure or Resident
• Print Date – The date you wish to search for
• Booking Status – Any particular status you wish to search for i.e. Confirmed, Provisional
• Recipient – To return by contact or lead guest
3. From entering your criteria, click Search.
4. You can print all the returned bookings by ticking the box in the blue header under Print.
5. From the drop down box choose which template you would like to print. Click Set All to feed
onto each returned result.
6. Click Execute to print all the bookings selected.

57 Zoë Harney / Karen Fisher 21/03/2017
PMS
Availability
1. Click on the Guest Journey icon (bell).
2. From Property click on Availability.
** NB – Occupancy figures are shown based on ‘BEDS or Level 1 Combination rooms’ sold only. **
At the top of the availability screen:
• Date – Along the top
• Room Type – Down the side
• Numbers – Rooms available to sell
At the bottom of the availability screen:
• Statistics based on the number of rooms booked, less deductions and products.

58 Zoë Harney / Karen Fisher 21/03/2017
Planner
1. Click on the Guest Journey icon (bell).
2. From Property click on Planner.
• Shows property level room stock in room number order
• Rooms allocated shows as a block, colour’s depend on booking status
• Allocated rooms can be dragged and dropped between rooms from this screen
• Filters to narrow down your viewing to the specific rooms you want to see.
59 Zoë Harney / Karen Fisher 21/03/2017
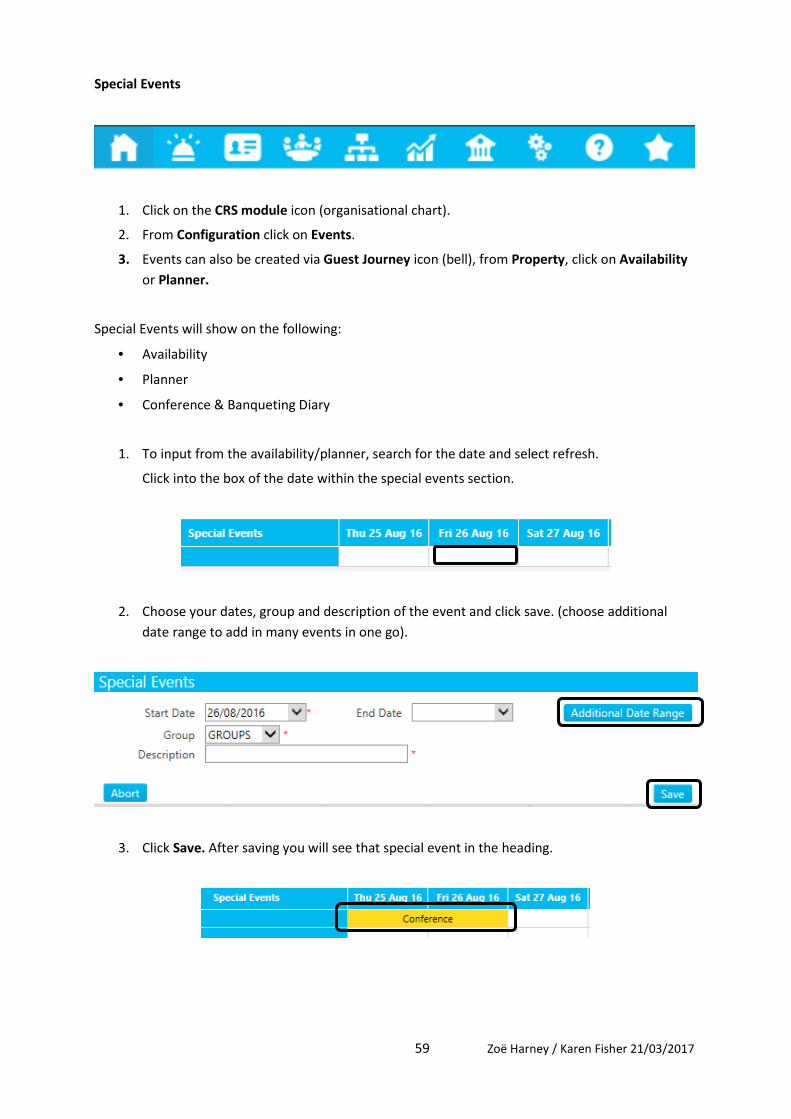
Special Events
1. Click on the CRS module icon (organisational chart).
2. From Configuration click on Events.
3. Events can also be created via Guest Journey icon (bell), from Property, click on Availability
or Planner.
Special Events will show on the following:
• Availability
• Planner
• Conference & Banqueting Diary
1. To input from the availability/planner, search for the date and select refresh.
Click into the box of the date within the special events section.
2. Choose your dates, group and description of the event and click save. (choose additional
date range to add in many events in one go).
3. Click Save. After saving you will see that special event in the heading.

60 Zoë Harney / Karen Fisher 21/03/2017
Resident (In-House) Reservation Search
1. Click on the Guest Journey icon (bell).
2. From Reservations click on Search.
3. Search for the booking using the search parameters.
4. Click on the BookRef to enter the booking.
5. PMS level search field for reservations, for viewing only, mainly for FOH information.
**NB Bookings cannot be amended here **, when you click into a booking a notification appears
like this image on the top right of the reservation.
61 Zoë Harney / Karen Fisher 21/03/2017
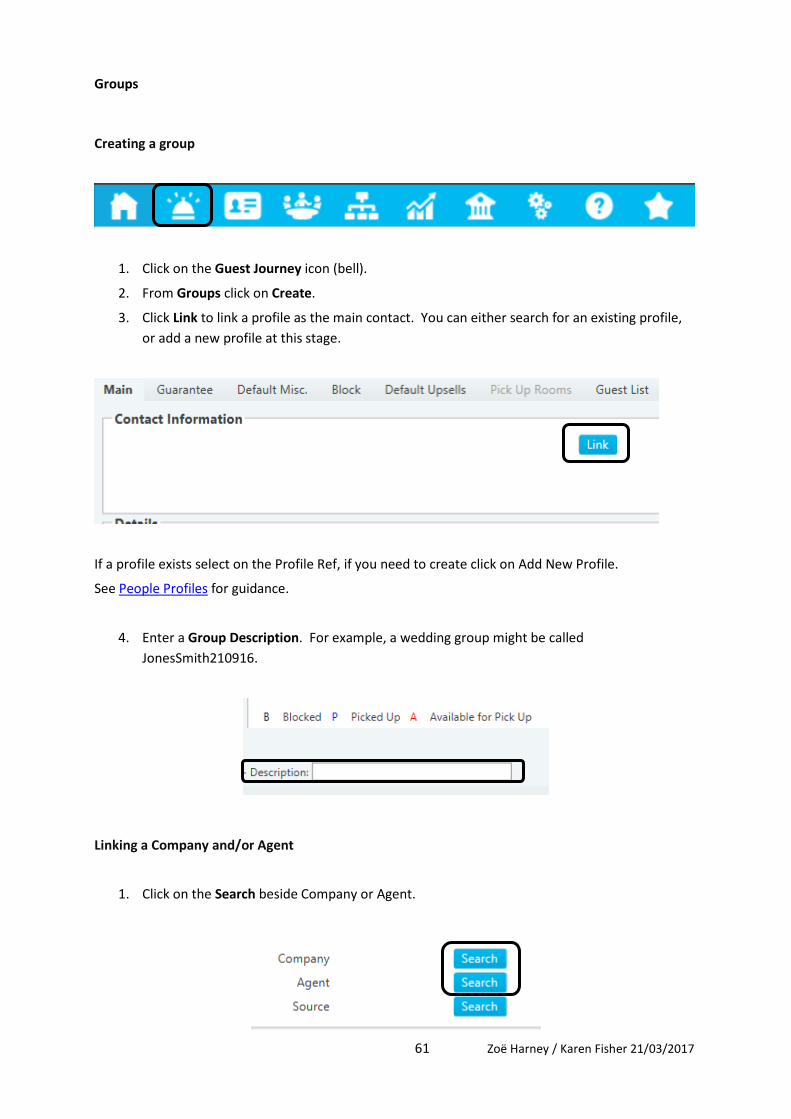
Groups
Creating a group
1. Click on the Guest Journey icon (bell).
2. From Groups click on Create.
3. Click Link to link a profile as the main contact. You can either search for an existing profile,
or add a new profile at this stage.
If a profile exists select on the Profile Ref, if you need to create click on Add New Profile.
See People Profiles for guidance.
4. Enter a Group Description. For example, a wedding group might be called
JonesSmith210916.
Linking a Company and/or Agent
1. Click on the Search beside Company or Agent.
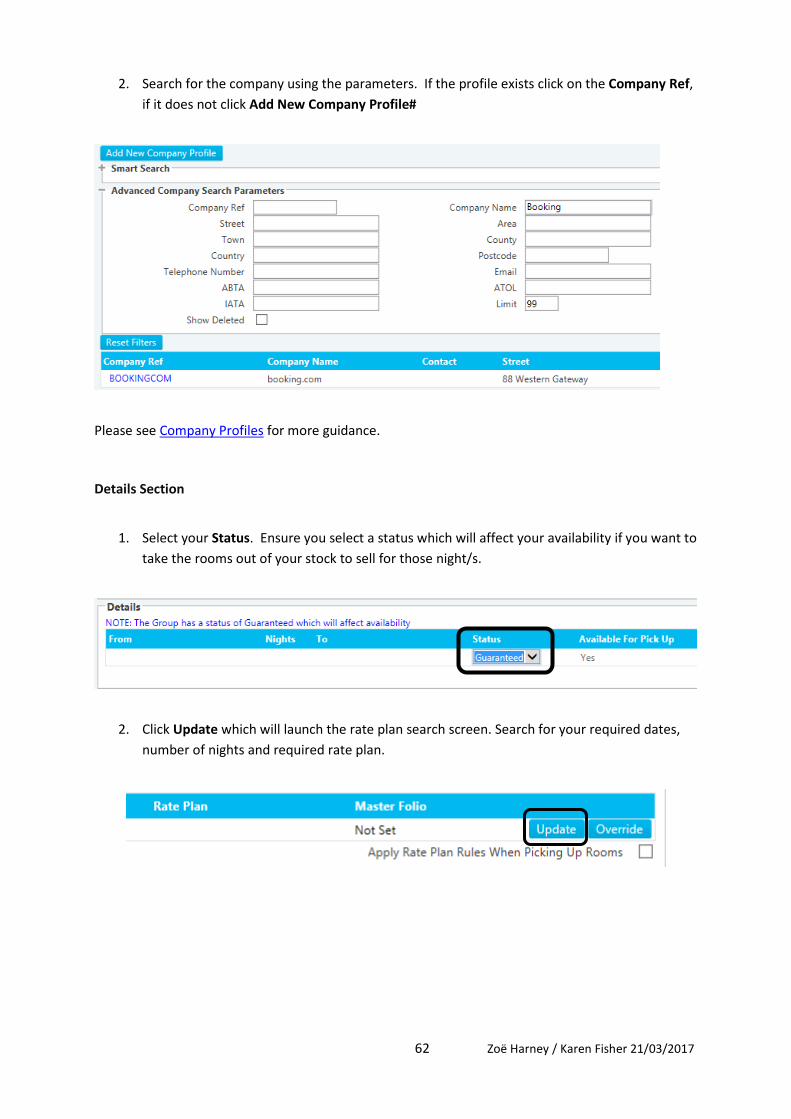
62 Zoë Harney / Karen Fisher 21/03/2017
2. Search for the company using the parameters. If the profile exists click on the Company Ref,
if it does not click Add New Company Profile#
Please see Company Profiles for more guidance.
Details Section
1. Select your Status. Ensure you select a status which will affect your availability if you want to
take the rooms out of your stock to sell for those night/s.
2. Click Update which will launch the rate plan search screen. Search for your required dates,
number of nights and required rate plan.
63 Zoë Harney / Karen Fisher 21/03/2017
3. Select the Specific Rate Plan for the group. Note, room types will be picked up later.
4. Group Notes can be added. These notes will only stay on the main page of the group
booking.
Group Booking Tabs
5. Click on the Guarantee tab and select your pay Type information.
6. Click Save to generate the Group Booking Reference.

64 Zoë Harney / Karen Fisher 21/03/2017
7. Click in the Default Misc. tab to enter notes to each room, any notes populated here will
copy to bedroom bookings as they are picked up.
8. Select the Deposit Due Date and Deposit Due Amount if applicable. Change the Media
Source Code to the relevant option.
9. Select the Default Upsells tab this can be used at any stage prior to picking up your rooms to
ensure that chosen products are posted onto the reservations as they are picked up.

65 Zoë Harney / Karen Fisher 21/03/2017
Add/Remove Rooms
1. Click the Block tab at the top of the screen. Click on Show Availability to see available rooms
for the night(s) selected.
2. Add rooms by clicking Add Combination. This will firstly ask for the room type, and then the
number of adults, children and infants. E.g. If all your rooms are for single occupancy, simply
fill in the number of adults as 1, then press apply.
66 Zoë Harney / Karen Fisher 21/03/2017
If you wish to have some room types with various occupants, simply add another combination of
rooms. This will add another line against the room type, or select add additional pax in the original
combination.
3. Add the number of rooms per room type under the R column.
A = number of rooms of that type available
B = number of rooms blocked of that type (as above)
P = number of rooms picked up (at this point this will always show 0)
R = number of rooms remaining to be picked up
4. Click Save for the B column to update.
5. To remove one of your combinations, select the room type and click Remove. The following
warning message appear. Click Yes.

67 Zoë Harney / Karen Fisher 21/03/2017
Block Rhythm
Allows you to add the number of rooms required per night in one step, rather than filling in each box
individually.
1. Click Block Rhythm and fill in the required fields:
2. Fill in the criteria required.
• Block Value: Number of rooms required
• Room Type: Select which combination you want to fill, so if you’ve select a combination
for 1 adult and 2 adults, it will provide a drop down for this selection
• Start/End Date: Which nights you wish to use the block rhythm feature for. This will
default to the group start and end dates already entered.
• Cycle: Select one of these options: Daily, Weekly or Monthly. When using groups, the
most common option would be to select daily, as this will block off the number of rooms
selected above on each day of your block.
3. Click OK. Room summary will appear on the group main page.
68 Zoë Harney / Karen Fisher 21/03/2017
Override
1. From the Main tab, click on Override on the Details section.
2. Type the desired rate into the box next to the room combination.
3. Type in an override reason.
4. Click Save.
Rate Plan Change
Rate changes from the mid stay change section are only available prior to picking up rooms.
1. From the Main tab under Mid Stay Changes, click on the Add button.
2. The rate search page will pop up, change the date for the mid stay change and the rate plan.

69 Zoë Harney / Karen Fisher 21/03/2017
3. Click on Rate Plan Search to generate the rate return and select the rate plan.
4. The Mid Stay Change once selected will update on the line.
Group Series
1. Select Options button, click on Group Series.
2. Click on Search. This will show any groups already associated.
3. Click on Create Group Series to begin.
70 Zoë Harney / Karen Fisher 21/03/2017
4. Complete the details for the Group Series you are creating. Click Save once completed.
• Group Details - This section shows what has already been built for the existing group
• Date Series - How far out will your copied groups go? So here we’ve set the date until the
end of 2016, because the group is being copied 5 times until the end of the year.
• Weekly/Monthly - If the group is repeated on a weekly or monthly basis, these areas can be
used when there is a defined day/week/month that the tour always stays on
• Copy Options - Select which areas of the group you want to copy to your series
• Create Grid - Using this area will allow you to create up to 10 entries in the grid, with dates
selected by you.
Group Series Grid
5. Free-type the name of the group, set the arrival date on each row & change the booking
status.

71 Zoë Harney / Karen Fisher 21/03/2017
6. Click Save.
Release Rules
Allows automated room release into availability, avoids having to manually release rooms.
1. Select Options button, click on Release Rules.
2. Click the Add button.
3. Fill in the required field to complete the release rule.
• Room Type - all room types, or specific ones?
• Lead in Days - days before arrival would you like to release the rooms?
• Type - Are you releasing your rooms by a percentage, a fixed number, or all of them?
• By - release all at once, or one day at a time?
• Value - filled in your type column with percentage or fixed, you will need to fill in your value
box.
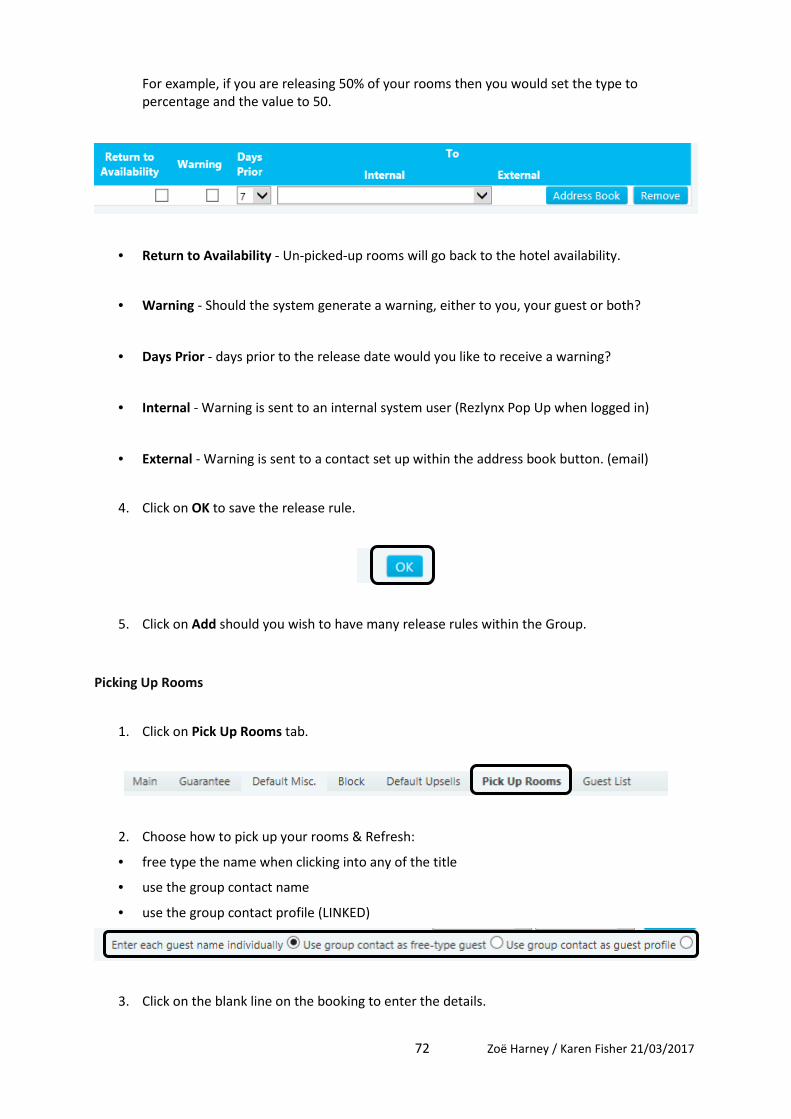
72 Zoë Harney / Karen Fisher 21/03/2017
For example, if you are releasing 50% of your rooms then you would set the type to
percentage and the value to 50.
• Return to Availability - Un-picked-up rooms will go back to the hotel availability.
• Warning - Should the system generate a warning, either to you, your guest or both?
• Days Prior - days prior to the release date would you like to receive a warning?
• Internal - Warning is sent to an internal system user (Rezlynx Pop Up when logged in)
• External - Warning is sent to a contact set up within the address book button. (email)
4. Click on OK to save the release rule.
5. Click on Add should you wish to have many release rules within the Group.
Picking Up Rooms
1. Click on Pick Up Rooms tab.
2. Choose how to pick up your rooms & Refresh:
• free type the name when clicking into any of the title
• use the group contact name
• use the group contact profile (LINKED)
3. Click on the blank line on the booking to enter the details.
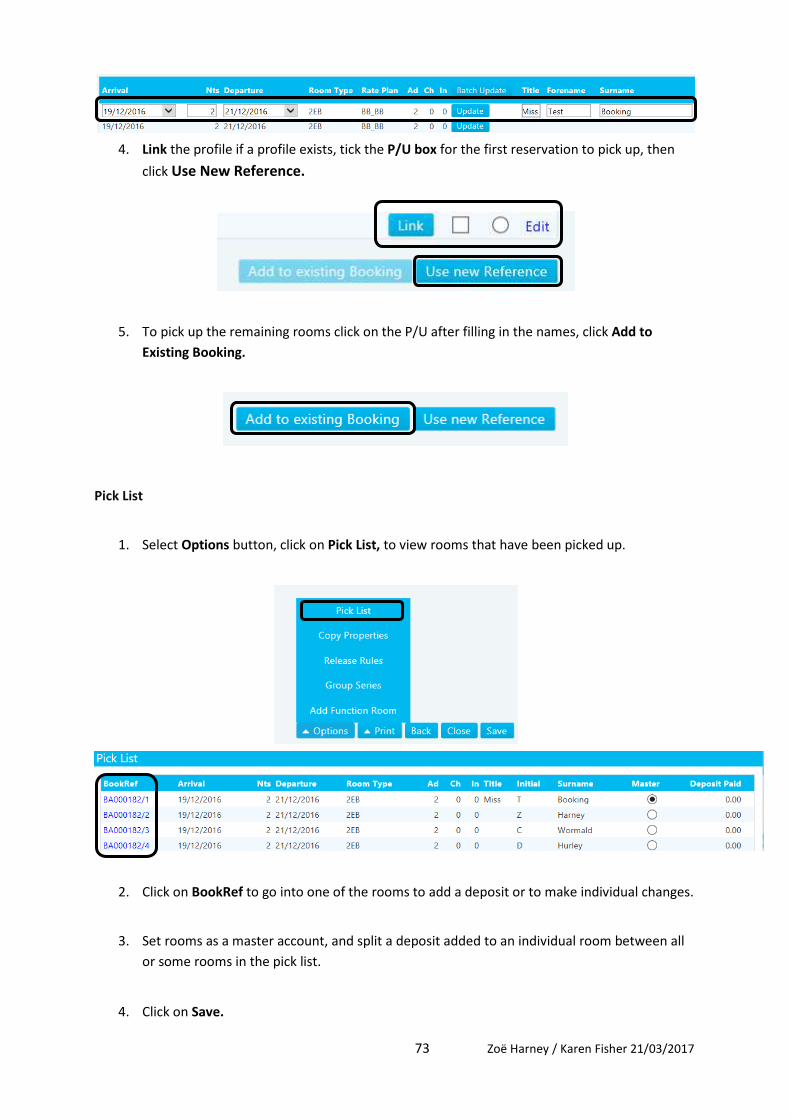
73 Zoë Harney / Karen Fisher 21/03/2017
4. Link the profile if a profile exists, tick the P/U box for the first reservation to pick up, then
click Use New Reference.
5. To pick up the remaining rooms click on the P/U after filling in the names, click Add to
Existing Booking.
Pick List
1. Select Options button, click on Pick List, to view rooms that have been picked up.
2. Click on BookRef to go into one of the rooms to add a deposit or to make individual changes.
3. Set rooms as a master account, and split a deposit added to an individual room between all
or some rooms in the pick list.
4. Click on Save.

74 Zoë Harney / Karen Fisher 21/03/2017
5. To spilt a deposit, click on Split Deposit, the amount is automatically split. If you need to
create a different split, click on Clear All and enter the actual amounts.
6. Click on Split.
Group Changes
Depending on whether your rooms have been picked up defines how you make changes.
Rooms which have been blocked, but not picked up:
1. To change the number of rooms on a block, from the Block tab, adjust the number of rooms
in the R column.
2. Click Save.
3. To change to a whole new set of dates, remove the blocked rooms first.
4. Click Save.
5. From the Main tab, click on Update within the Details section.

75 Zoë Harney / Karen Fisher 21/03/2017
You will see the below message:
6. Click Ok to proceed to Rate Plan Search and then search for availability/rates based on the
new dates required.
7. Go to the Block tab, add your rooms back on.
8. Click on Save.
Rooms which have been picked up:
1. Go to the Batch Changes tab.
2. Click on the room (s) you need to amend. **Please note must be done by Room Type**
You will have Four Options:
• Add Booking Line – Allows you to add additional nights following on from the previous nights
booked
• Replace Existing Booking Line – Allows you to remove the current rate or room type and
change them to a new selection and reduce nights
• Rate Override Booking Lines – To override the rate for specific booking lines

76 Zoë Harney / Karen Fisher 21/03/2017
• Rate Override Reservations – To override the rate for all nights of a booking
Copy Properties
Allows you to copy data to all or some of the rooms within your group, without the need to go into
each reservation individually and amend.
1. From the Options button, click on Copy Properties.
2. Select the room you wish to copy properties from, click Ok
3. Select the section you wish to copy properties from. Tick the box on that section or add
more notes and the box will auto tick
4. Scroll down and tick the rooms you wish to copy to

77 Zoë Harney / Karen Fisher 21/03/2017
5. Click Copy Properties, a box will appear to state if it was successful or not, click Ok.
Guest List
1. From the Guest List tab, if you have already picked up your rooms when you receive a
rooming list, you are able to edit this using the Guest List:
2. Click the Add Pax button to add extra Adults/Children/Infants to the room.
3. Either free-type or Options & link each guest name, filling in an ETA if known.
Print Options
Print Rooming List
1. From the Print button, click on Rooming List. Select any Notes to Print if required.

78 Zoë Harney / Karen Fisher 21/03/2017
2. Click the View button, to view, print or email.
Pro Forma
1. From the Print button, click on Pro-Forma.
2. Choose Direct Print, Silverlight Viewer or PDF viewer.
Note that this report will not show individual rooms and prices. If the customer requires a
breakdown of this, it is advisable to use a confirmation template.
Print Templates
1. From the Print button, click on Print Templates.
• BookRef – Summary, will always detail every room pick
• BookRef – Individual Booking Numbers, are individual Confirmations per room.
2. To email select the Email box for that particular booking. Select the Template, click Execute

79 Zoë Harney / Karen Fisher 21/03/2017
Room Blocks
Creating a Room Block
1. Click on the Guest Journey icon (bell).
2. From Room Blocks click on Create.
3. Click Link to link a profile as the main contact. You can either search for an existing profile,
or add a new profile at this stage.
If a profile exists select on the Profile Ref, if you need to create click on Add New Profile.
See People Profiles for guidance.
4. In Description enter a room block description. For example, a wedding group might be
called JonesSmith210916.
Linking a Company and/or Agent
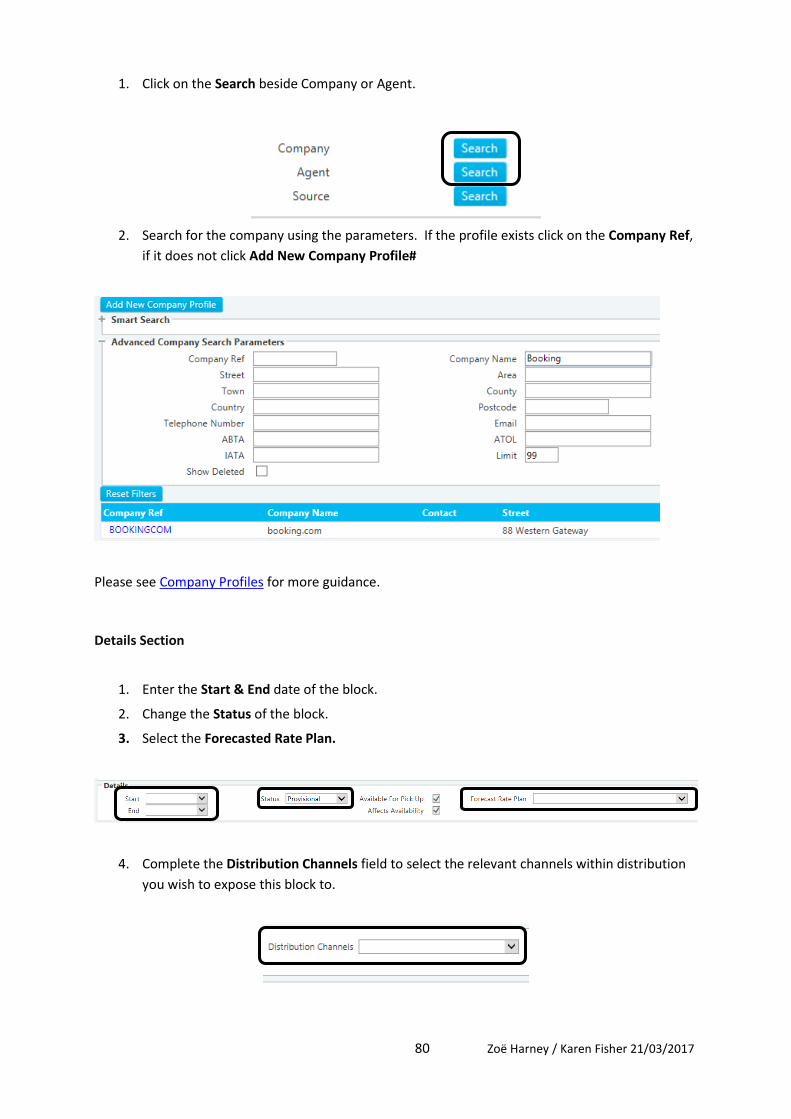
80 Zoë Harney / Karen Fisher 21/03/2017
1. Click on the Search beside Company or Agent.
2. Search for the company using the parameters. If the profile exists click on the Company Ref,
if it does not click Add New Company Profile#
Please see Company Profiles for more guidance.
Details Section
1. Enter the Start & End date of the block.
2. Change the Status of the block.
3. Select the Forecasted Rate Plan.
4. Complete the Distribution Channels field to select the relevant channels within distribution
you wish to expose this block to.

81 Zoë Harney / Karen Fisher 21/03/2017
Room Block Booking Tabs
1. Click on the Guarantee tab and select your pay type information.
2. Click Save to generate the Room Block Booking Reference.
3. Click in the Defaults tab to enter notes to each room, any notes populated here will copy to
bedroom bookings as they are picked up.
4. Change the Media/Market Source Code to the relevant option.

82 Zoë Harney / Karen Fisher 21/03/2017
5. Select the Upsells tab this can be used at any stage prior to picking up your rooms to ensure
that chosen products are posted onto the reservations as they are picked up.
Add/Remove Rooms
1. Click the Block tab at the top of the screen. Click Show Availability to see available rooms
for the night(s) selected.
2. Add rooms by clicking Add Combination. This will firstly ask for the room type, and then the
number of adults, children and infants. E.g. If all your rooms are for single occupancy, simply
fill in the number of adults as 1, then press apply.

83 Zoë Harney / Karen Fisher 21/03/2017
If you wish to have some room types with various occupants, simply add another combination of
rooms. This will add another line against the room type, or click Add additional pax in the original
combination.
3. Add the number of rooms per room type under the R column
A = number of rooms of that type available
B = number of rooms blocked of that type (as above)
P = number of rooms picked up (at this point this will always show 0)
R = number of rooms remaining to be picked up
4. Click Save for the B column to update.
5. To remove one of your combinations, select the room type and click Remove. The following
warning message appear. Click Yes.

84 Zoë Harney / Karen Fisher 21/03/2017
Block Rhythm
Allows you to add the number of rooms required per night in one step, rather than filling in each box
individually.
1. Click Block Rhythm and fill in the required fields:
2. Fill in the criteria required.
• Block Value: Number of rooms required
• Room Type: Select which combination you want to fill, so if you’ve select a combination
for 1 adult and 2 adults, it will provide a drop down for this selection
• Start/End Date: Which nights you wish to use the block rhythm feature for. This will
default to the group start and end dates already entered.
• Cycle: Select one of these options: Daily, Weekly or Monthly. When using groups, the
most common option would be to select daily, as this will block off the number of rooms
selected above on each day of your block.
3. Click OK. Room summary will appear on the group main page.

85 Zoë Harney / Karen Fisher 21/03/2017
Pick Up Rooms
To Pick up an existing booking against the room block room please refer to (Making a reservation)
1. Once the reservation has been created under the Rate Plan tab click Use Room Block.
2. Click Search, it will return Room Blocks active for the booking date.
3. To attached click on Use.
4. Once attached the View Room Block and Remove Room Block button will appear.

86 Zoë Harney / Karen Fisher 21/03/2017
Room Move Changes
There are two main ways of changing the room type of a booking whilst keeping the original room
rate.
CRS Module – Search
1. Click on the CRS Module icon (organisational chart).
2. From Reservations click Search.
3. Click on the CRSBookRef to enter the booking.
4. Under the Rate Plan tab, click on Options, Override

87 Zoë Harney / Karen Fisher 21/03/2017
5. Enter the rate under Target Override Rate (per night) and enter the Override Reason.
6. Click on the Override button, Click Yes to proceed.
7. **MAKE SURE ROOM IS NOT ALLOCATED** - Click Options, Change and select the room
type you wish to give them, or select the blank space at the top of specific room type to see
all options/availability.
8. Select the new Rate Plan if applicable for the room type you wish to change it to, then click
on the new choice.
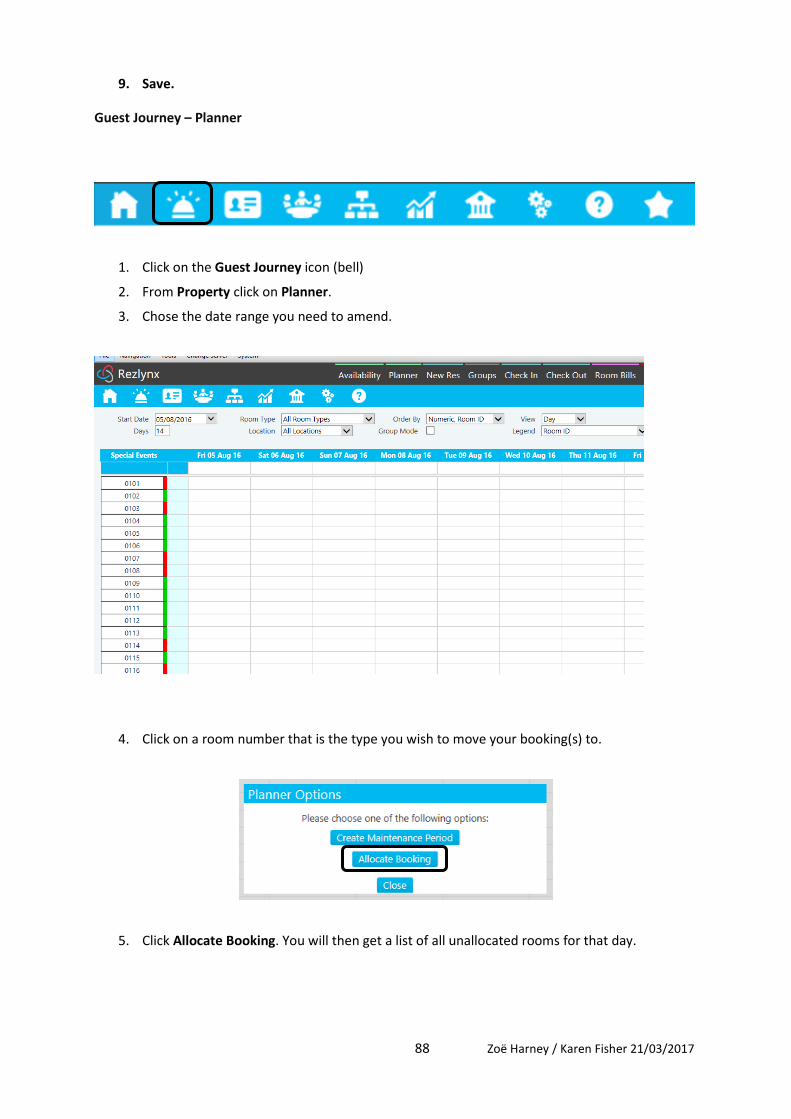
88 Zoë Harney / Karen Fisher 21/03/2017
9. Save.
Guest Journey – Planner
1. Click on the Guest Journey icon (bell)
2. From Property click on Planner.
3. Chose the date range you need to amend.
4. Click on a room number that is the type you wish to move your booking(s) to.
5. Click Allocate Booking. You will then get a list of all unallocated rooms for that day.

89 Zoë Harney / Karen Fisher 21/03/2017
6. Click Allocate on one you want to change
7. If the room type you are selecting is a different rate, then the below will pop up. Select
Retain Original Rate and Confirm. (If there is no change in rate this will not show).
Repeat this process with all other rooms you wish to move.
Allocating
CRS Level
When creating a booking at CRS level the rooms booked can be allocated at this stage.
To allocate a room within the booking there are two ways:
1. Click on the Allocate button to the bottom right hand side of the rate plan tab within the
segment.
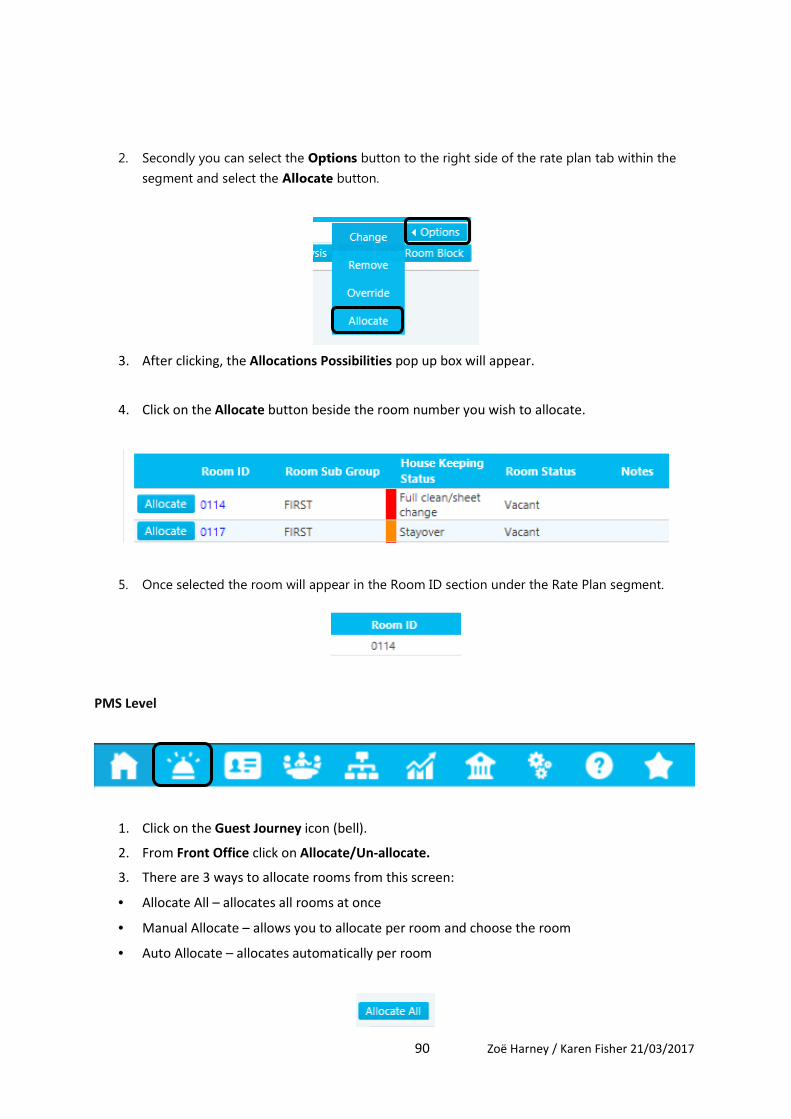
90 Zoë Harney / Karen Fisher 21/03/2017
2. Secondly you can select the Options button to the right side of the rate plan tab within the
segment and select the Allocate button.
3. After clicking, the Allocations Possibilities pop up box will appear.
4. Click on the Allocate button beside the room number you wish to allocate.
5. Once selected the room will appear in the Room ID section under the Rate Plan segment.
PMS Level
1. Click on the Guest Journey icon (bell).
2. From Front Office click on Allocate/Un-allocate.
3. There are 3 ways to allocate rooms from this screen:
• Allocate All – allocates all rooms at once
• Manual Allocate – allows you to allocate per room and choose the room
• Auto Allocate – allocates automatically per room
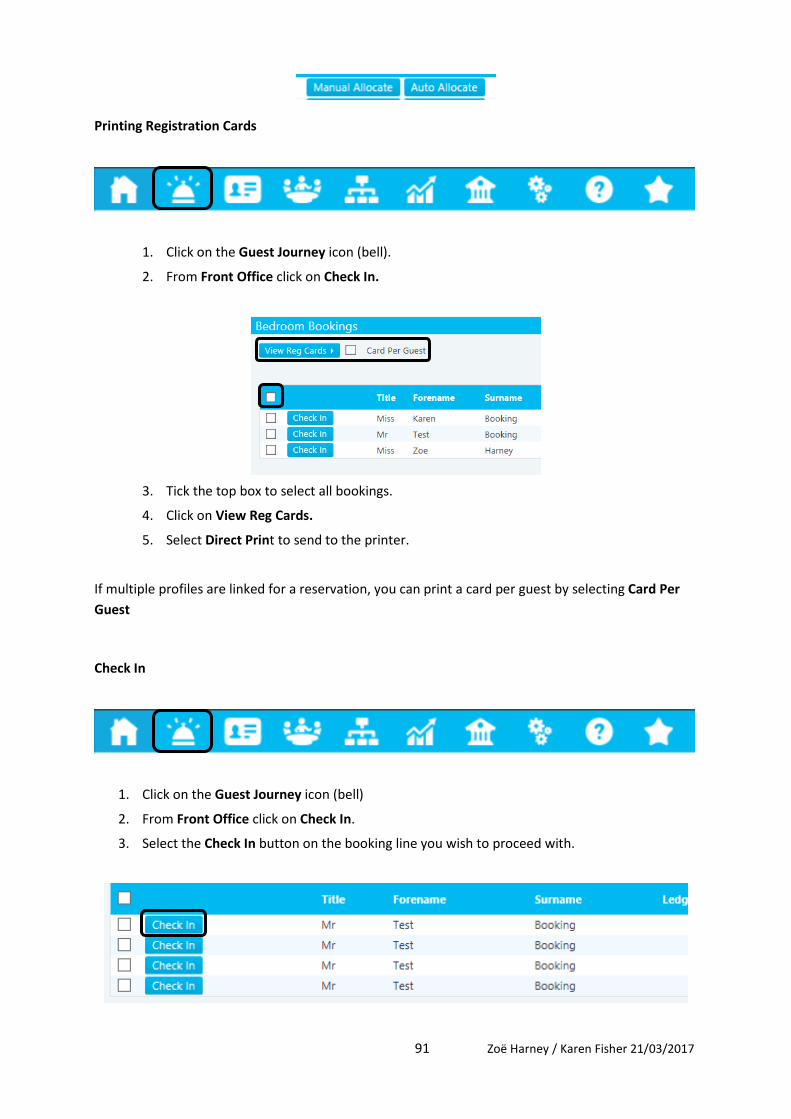
91 Zoë Harney / Karen Fisher 21/03/2017
Printing Registration Cards
1. Click on the Guest Journey icon (bell).
2. From Front Office click on Check In.
3. Tick the top box to select all bookings.
4. Click on View Reg Cards.
5. Select Direct Print to send to the printer.
If multiple profiles are linked for a reservation, you can print a card per guest by selecting Card Per
Guest
Check In
1. Click on the Guest Journey icon (bell)
2. From Front Office click on Check In.
3. Select the Check In button on the booking line you wish to proceed with.

92 Zoë Harney / Karen Fisher 21/03/2017
4. Check the summary to ensure that all the information is correct. i.e Amount of the
stay/Deposit Paid & Remaining Balance.
5. You can view notes added to the reservation and add any additional notes you wish to make.
6. Under Folios, stores the guest name(s) and you have the options to edit the profile or unlink
the profile.
7. You can Set Alarm Call and Update Credit Limit.
8. Click on the Confirm button.

93 Zoë Harney / Karen Fisher 21/03/2017
9. A message will appear confirming the Check In.
From this screen you can either:
• Click Back to go to the Check In screen again.
• Click back into the actual Reservation.
• Click onto the room’s Room Billing screen.
You can also perform a group check in or choose multiple guests to check in at once.
1. Click on group mode and click on one guest in a group/multi-room, alternatively you can just
tick multiple guests.
2. Please select Check in Checked, the system gives you the option to Check in each guest
individually or Check in All

94 Zoë Harney / Karen Fisher 21/03/2017
3. Check in All will bypass the Check In Summary screen and Rezlynx will display a warning to
advise all the areas of the system you are choosing to bypass.
4. Once you select OK the following message appears.
Q-Rooms
1. Click on the Guest Journey icon (bell).
2. From Front Office click on Check In.
To place a room on the Q-Room report
1. Select your check in by ticking the box.
2. Select Q-Checked this will place a Q on the check in line.
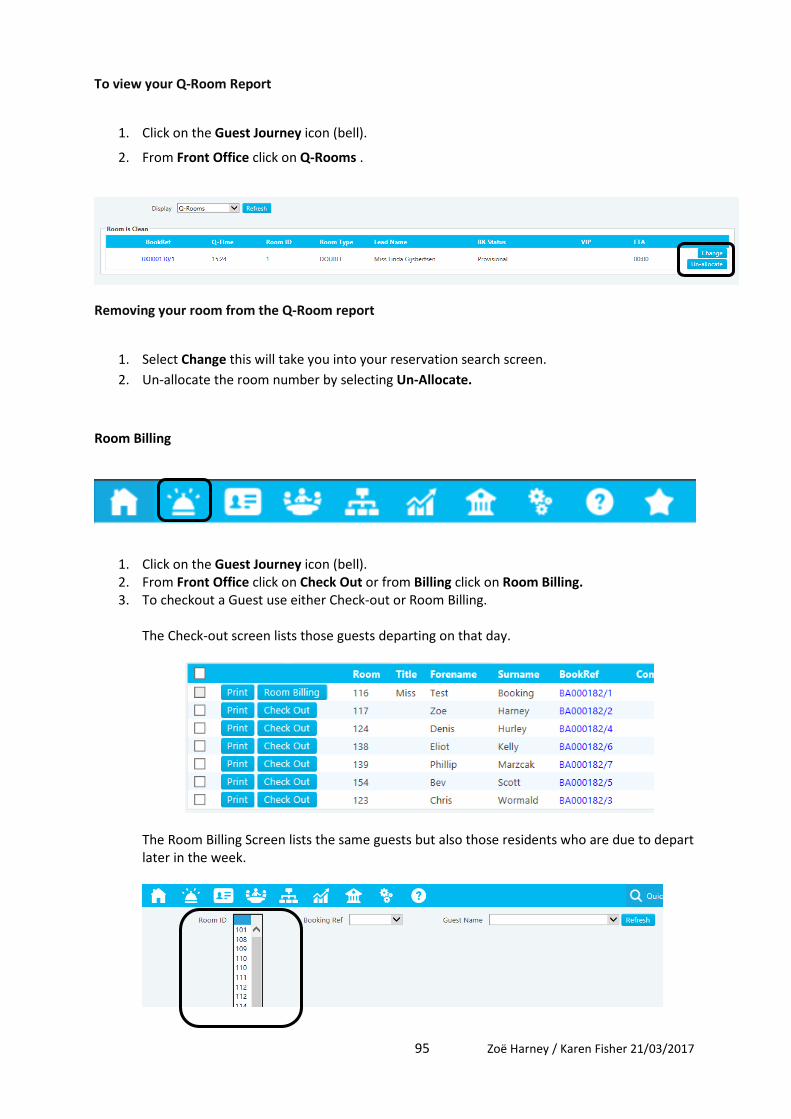
95 Zoë Harney / Karen Fisher 21/03/2017
To view your Q-Room Report
1. Click on the Guest Journey icon (bell).
2. From Front Office click on Q-Rooms .
Removing your room from the Q-Room report
1. Select Change this will take you into your reservation search screen.
2. Un-allocate the room number by selecting Un-Allocate.
Room Billing
1. Click on the Guest Journey icon (bell).
2. From Front Office click on Check Out or from Billing click on Room Billing.
3. To checkout a Guest use either Check-out or Room Billing.
The Check-out screen lists those guests departing on that day.
The Room Billing Screen lists the same guests but also those residents who are due to depart
later in the week.

96 Zoë Harney / Karen Fisher 21/03/2017
The following options will be available within the room billing screen.
Add Payment
Allows you to process a payment from a guest.
New Charge
Allows you to add new charges to the guest folio.
Options
• Amend - any charges that have already been charged to the folio.
• Delete – refund any charges that have been incorrectly posted.
• Split – split an existing charge to be able to transfer to an additional folio or room.
• Edit Description – change the description of the charge as it appears on the folio.
• Group Transactions - take three individual charges to appear as one. Note this can only be
done if the charges are posted on the same date.
• Ungroup transactions – reverse the above transaction.
Transfer To
• Room - transfer an existing charge to another room, Folio – transfer an existing charge to a
second folio within the room
• Bill Split - Transfer an existing charge to a second person folio or to transfer bill items to a
second bill split
Additional options available include:
Show individual view
Shows the total amount on the folio grouped by bill splits and folios.
Options
Shows Central Account reprint and auto poster to post charges for the remainder of the stay
Assign Ledger Acc

97 Zoë Harney / Karen Fisher 21/03/2017
If the bill is going to be sent back to the company. This may already have been set up at the time of
reservation or check in.
Allows you to select which folio or bill split you want to print.
Check Out ** CIM incorporated**
Payment Required from Guest/Booker
If a room has still a balance to be paid as per below. Click on Add Payment.
Select the relevant pay type that the guest/booker is wishing to pay by. Enter the amount or you can
select Auto to auto fill in. Click the Post button at the bottom right of the box.
1. Payment to the Ledger Account – PMS Level
If the booking has not yet been assigned to a ledger account, click on the Assign Ledger Acc button at
the bottom right
Click on Aged Debtors & Search.
You can either then search for an existing profile, if the profile does not exist and you have the access
and detail you can Add New Company Profile here.

98 Zoë Harney / Karen Fisher 21/03/2017
When you find the company you wish to attach for the ledger account click on the Company Ref
number
This will create a Ledger Folio within the room billing for that room. Select transactions, click transfer
to and Aged Debtors.
2. Payment to the Student Account – CIM Level
• Click on the Assign to Ledger Acc button.
• Click on Central Account. Click Search.
• You can either Add New Account or Search for an existing one.
When you find the company you wish to attach for the ledger account click on the Account Ref
number
This will create a Central Ledger Folio within the room billing for that room. Transfer any charges
from the bill to the Ledger if applicable
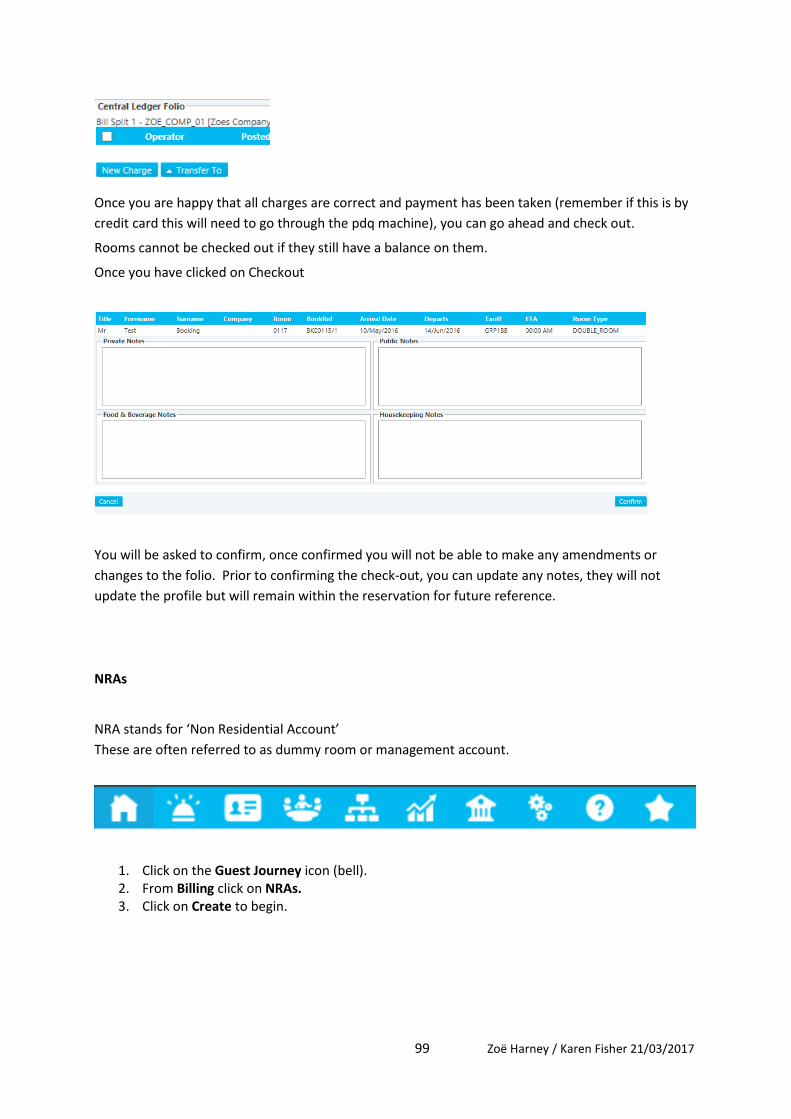
99 Zoë Harney / Karen Fisher 21/03/2017
Once you are happy that all charges are correct and payment has been taken (remember if this is by
credit card this will need to go through the pdq machine), you can go ahead and check out.
Rooms cannot be checked out if they still have a balance on them.
Once you have clicked on Checkout
You will be asked to confirm, once confirmed you will not be able to make any amendments or
changes to the folio. Prior to confirming the check-out, you can update any notes, they will not
update the profile but will remain within the reservation for future reference.
NRAs
NRA stands for ‘Non Residential Account’
These are often referred to as dummy room or management account.
1. Click on the Guest Journey icon (bell).
2. From Billing click on NRAs.
3. Click on Create to begin.

100 Zoë Harney / Karen Fisher 21/03/2017
4. Enter the NRA Description.
5. Enter the NAME and options/link the profile if possible.
6. Complete the Market Segment & Media Source.
7. Select the interface posting mode.
8. Input credit limit.
9. Complete the purchase order number if required on the invoice.
10. Click Save to create the NRA.
You can have multiple accounts open at any time
11. You can edit your NRA account information at any time by selecting Edit.

101 Zoë Harney / Karen Fisher 21/03/2017
12. To open your NRA account for posting charges, please select Billing.
Reconciliation
Banking Reconciliation Explanation
Banking reconciliation in Rezlynx
Moving from Opera to Rezlynx will introduce a number of changes to the way we process payments
for bookings in Residential Services.
This is the proposed method of reconciling the different methods of receiving payments.
Payments in Halls
Cash
Cash payments will be accepted in the halls at reception only. Students wanting to pay term fees by
cash will be given a bank giro credit form and asked to take their cash to the bank.
Receptions staff will cash up at the end of their shift. They will balance the cash in their till to the
cash figure entered in Rezlynx.
Card Payments
We have a number of routes for payment by cards each will be processed slightly differently
Payments in person
A customer wanting to pay by card in person will have the payment processed in Rezlynx using
Payment Express chip and pin devices. These devices are linked to a MID per property. Reception
staff will check Chip and Pin payments processed in Rezlynx against payments process by First Data
as part of their cashing up procedure.
Bookings process via OTAs
Some OTAs provide a virtual credit card with the booking made online. The reception staff in the hall
will log in to the OTA’s extranet to obtain the virtual card details on the day of arrival so they can
process the card payment in Rezlynx. The payment will be processed using the MOTO MID for that

102 Zoë Harney / Karen Fisher 21/03/2017
particular hall. These payments will appear on the reception staff’s cashing up report. The reception
staff member will check this amount against the total processed by secure trading MOTO MID at that
hall for that day.
Payments processed by the CRT
Card Payments
Bookings process via OTAs
Bookings through some OTAs pre authorise the card payment and pass a secure trading token with
the reservation. Our central sales staff then login to the secure trading virtual terminal to process
the payment using the ST token. Each sales staff member will have their own ST VT login. At the end
of their shift they will print a list of payment taken using their ID and compare this to their cashing up
sheet. The log in details for the central staff will be linked to a central MOTO MID.
Payments over the telephone
Only the central reservation team will process payments over the telephone. Payments will be
processed by the magnetic north system. The sales agent will past the payment using the Telephone
Payment pay type. At the end of their shift they will ensure the total of payments posted in Rezlynx
matches the total processed by magnetic north for that day.
Automatic payments processed online
Bookings processed online via our own booking engines process card payment automatically. These
will use a central ECOM MID. The booking engines are
• LSE Vacations
• Summer School
• Faculty Accommodation
• Hallpad deposits
• Student Payments portal
At the end of each day or the next day a check is made between the amount posted in Rezlynx and
the amount authorised by ST for the central ECOM MID for that day. This is will be done by the CRT
shift leader.
Student Bank Transfers via the payment portal
Term time students and summer school students are offered a method of paying by bank transfer.
They are offered a Western Union quote which can be used to pay the fees in a local currency but
guarantees we receive the correct sterling amount. Bank payments that appear in the residences
bank account are identified by the central cashiers and the payment is entered in to Rezlynx by the
central reservations team or residences fees. The payment should be processed automatically but at
the moment this process is failing it is hoped to improve this mechanism as part of the move to
Rezlynx.
Payments by Invoice

103 Zoë Harney / Karen Fisher 21/03/2017
A number of groups pay on invoice. The central reservations team will generate an invoice in Rezlynx
and send this out to the group co-ordinator. When the payment is received in the bank account the
cashiers notify central reservations team to post the payment in Rezlynx.
Cashing up
Reception staff
Halls reception staff will use the Rezlynx cashing up reports to get a shift total for
• Cash
• Payments in person
• Payments processed via ST in Rezlynx.
Central reservation staff
Central reservation will need a report that shows for each user
• Payments process via ST across all halls
• Bank transfer payments across all halls
• Automatic payments processed online
Payment types in Rezlynx
In order to reconcile we will need a number of different payment types in Rezlynx.
Cash – Cash payment over the counter
BACS – Bank transfer received in to bank account
GIRO – Cash payment made at a bank
Card types
• Bank Card Automatic Online (website processed payments)
• Bank card Chip and Pin (payment in person)
• Bank Card processed manually (via virtual terminal in Rezlynx) (Agoda payments)
• Bank card using ST ref (via ST website outside Rezlynx) (Bookings.com and laterooms)
• Bank Card over the telephone (magnetic north processed payments)
Refunds and Chargebacks
Refunds will be processed by the CRT shift leader. Any refund request will be authorised by the CRT
manager before being actioned. The CRT shift leader will have access to all the ST MIDs so they can
search for transactions by the transaction reference across all MIDs.
Chargebacks requests will be managed by the CRT manager. All chargeback requests from any card
processor will be forwarded to the CRT manager so they can investigate the claim. The claim will
then either be authorised by the CRT manager for processing or challenge with the payment
processor using the agreed process.
Rezlynx will be configured with the following MIDs
Central ECOM ST MID – for processing online payments from all websites
Central MOTO ST MID – for processing payments made by CRT from bookings.com and Laterooms
also used for Magnetic north payments.
Per property MOTO FD MID – for processing payments in person
Per property MOTO ST MID – for processing payments at reception using virtual cards (agoda)
Glossery
OTA - Online Travel Agent

104 Zoë Harney / Karen Fisher 21/03/2017
MID - Merchant ID
ST – Secure trading card payment provider for online payments
FD – First data card payment processor for chip and pin payments
CRT – central reservation team
Steps to Reconcile each shift
End of Shift
1. Click on the Accounting icon (bank).
2. From Period End click on Current Periods.
3. Click on View beside End of Shift.
4. Click on Direct Print to have the report to hand.
5. Look for the Payment Totals section.

105 Zoë Harney / Karen Fisher 21/03/2017
6. Match your Cash, BACS, Cheque payments first.
7. Click on the Accounting icon (bank).
8. From Period End click on Payment Analysis.
This allows you to view all the individual transactions should you have a discrepancy.
9. Select the Start/End Date & Time period.
10. Select the Operator.
11. Select the Payment Type.
12. Click on Refresh.
13. Cross match all payments to locate the imbalance.
If there is an imbalance e.g. £100.00 more on Visa card, and £100.00 less on MasterCard you need to
correct this within the system.
1. Go to the Guest Journey icon (bell).
2. From Billing, click on Post Cash.
106 Zoë Harney / Karen Fisher 21/03/2017
3. Select the code as accommodation.
4. Enter a description similar to what is opposite.
5. Select the Payment type of which you shall be refunding.
6. Enter the value as a minus figure.
7. Remember to click on View to direct print this so you can attach it to with your banking.
8. You then need go to your cashiering report under the bank – operator shifts report and
review your banking balance. All personnel or shifts you have balanced can be ticked and
viewed/printed.
9. Once all balances you can tick the boxes for operators balanced, then click Close Selected
Shifts and click Yes.
107 Zoë Harney / Karen Fisher 21/03/2017
10. Once the Operators shift(s) have been closed the new shift for that person opens as and
when they take their first payment.
PMS Reports
Most used reports within Rezlynx
Housekeeping
• Cleaning Forecast
• House Status
• Room Maintenance
• Room Status
Notes
__________________________________________________________________________________
__________________________________________________________________________________
__________________________________________________________________________________
__________________________________________________________________________________
__________________________________________________________________________________
Front of House
• Guest List
• Room Move
• Meal Plan
Notes
__________________________________________________________________________________
__________________________________________________________________________________
__________________________________________________________________________________
__________________________________________________________________________________
__________________________________________________________________________________

108 Zoë Harney / Karen Fisher 21/03/2017
Reservation
• Cancellations
• Daily New Reservations
• No Shows
Notes
__________________________________________________________________________________
__________________________________________________________________________________
__________________________________________________________________________________
__________________________________________________________________________________
__________________________________________________________________________________
Revenue
• Actual & Forecast
• Rate Override
• Revenue By
Notes
__________________________________________________________________________________
__________________________________________________________________________________
__________________________________________________________________________________
__________________________________________________________________________________
__________________________________________________________________________________
Forecast
• Revenue by Market Segment
• Future Reservations

109 Zoë Harney / Karen Fisher 21/03/2017
Notes
__________________________________________________________________________________
__________________________________________________________________________________
__________________________________________________________________________________
__________________________________________________________________________________
__________________________________________________________________________________
Sales & Marketing
• Booking Source
• Design Query
Notes
__________________________________________________________________________________
__________________________________________________________________________________
__________________________________________________________________________________
__________________________________________________________________________________
__________________________________________________________________________________
Offline Reports
Offline reports are an emergency back-up system. They should only be displayed and used in the
event that you lose your Internet Connection.
This back-up facility is installed onto a minimum of 2 PC’s per property and will be labelled with a
sticker with the Guestline logo saying ‘Offline Reports’, in the event of a failure they will contain the
most current information on each of the ‘Offline Reports’. Rezlynx will do continuous updates to the
‘Offline Reports’ in the back ground. Should your system have not updated the ‘Offline Reports’
within a 24-hour period your will have an error pop up on the screen to advise you they are not
updating. Please call support if you experience this error.

110 Zoë Harney / Karen Fisher 21/03/2017
You are able to manually update these reports, should you wish, by selecting the option Update
Offline Reports within tools.
The reports available are as follows;
• Room Balances
• Arrivals
• Departures
• Residents
• Availability (for the next 10 weeks)
Room Status
You are able to use these reports to guide you through a period Manual Operation until you regain
access to the internet. See screen view below.

111 Zoë Harney / Karen Fisher 21/03/2017
Logs
1. Click on the Help icon (question mark).
2. PMS Logs or CRS Logs.
The 'Logs' section is used to audit system activity; this section is further broken down by the
following logs:
Groups/Room Blocks Log - provides an audit of most group and room block activity; the report is
used to audit a specific group or room block.
Reservation Log - provides an audit of most reservation activity; the report is used to audit a specific
reservation.
Restrictions Log - provides an audit of most restriction activity; the report is used to audit a specific
restriction.
System Log - provides an audit of most system activity; the report is used to audit a specific action
112 Zoë Harney / Karen Fisher 21/03/2017
System
Analysis Codes
1. Click on the CRS Module icon (organisational chart).
2. From Configuration, click Analysis Codes.
Defines what charges can be added to a guest’s bill.
They are grouped together into ‘Analysis Groups’ for ease of location and reporting purposes.
3. Click New Analysis Code.
4. Select the Analysis Group.
5. Enter the Analysis Code/Descritpion.
6. Select the Tax Rule.
7. Select the Usage options are:
• Internal Postings Only (charges to the analysis code can be made from within PMS)
• External Postings Only (charges to the analysis code can be made from a third party)
• No Restrictions (internal and external postings are allowed)
113 Zoë Harney / Karen Fisher 21/03/2017
8. Select the Revenue Type options are:
• Accommodation
• Food & Drink
• Other
9. Click Save.
Attributes
1. Click on the CRS Module icon (organisational chart).
2. From Configuration, click Analysis Codes.
3. Click New Attribute.
4. Select the Attribute Group.
5. Enter the Attribute Code/Description.
6. Select the Field Type i.e. Yes/No, Small Text Box.
7. Click Save.

114 Zoë Harney / Karen Fisher 21/03/2017
Templates
Creating a Template
1. Click on the CRS Module icon (organisational chart).
2. From Configuration, click Template Editor.
3. Select the section to create your template under.
4. Click Add New Template.
5. Enter the New Template Name.
6. Click Ok.

115 Zoë Harney / Karen Fisher 21/03/2017
Then this will display the new template (as shown below)
Within the Sections area, select the section of the template to be updated: There are four sections of
a template that can be updated:
• Subject
• Header
• Body
• Footer
Subject Field
The subject field is only used when creating either an email or fax template
The text added to this section will appear in the message subject line for emails or faxes.
Header Field
The header field is used to start creating your template – usually the beginning of your template – on
the right hand side there are tags which populate for this area that you can add in.
Body Field
The body field is where the body of your template needs to be written up. There are more tags in
this section as it will be the main part of your template.
Footer Field
The footer field is where you end your template. There are also tags provided to put in this area too.
Segment Templates
When creating a template CRS segments can be created separately should they need to be used
more than once. Creating these allows for the segments to be pulled into the main template.

116 Zoë Harney / Karen Fisher 21/03/2017
Automated Templates
1. Click on the System icon (cogs).
2. From Tools, click Template Automation.
3. Click New Schedule button.
How to Create a New Automated Template Schedule
The New Schedule Template page is broken down into the following sections:
• Schedule
• Recipients
• Templates
• Rate Plans
• Inclusion

117 Zoë Harney / Karen Fisher 21/03/2017
Schedule
The Schedule section contains the following fields:
• Description is the name of the template schedule
• Issue/Days determines when the template schedule should be sent; how many days before/
after: Reservation Creation, Arrival Date, Departure Date, Deposit Due Date
• Delivery Method options are either email or SMS
• Room Pick Handling determines if the templates should be sent to each room pick within a
group or multi-room or if just one template should be sent for the whole reservation
Recipients
The Recipients section contains the following fields:
• From/Reply to, masks where the email is sent from and guests can reply to
• Recipients option to send the template to the contact, lead guest or both
• No Contact if a reservation does not contain a contact, and contact is included in the
previous selection, either 'do not send' or send to lead guest

118 Zoë Harney / Karen Fisher 21/03/2017
• Duplicate Profiles if the template schedule is configured to send to both the contact and the
lead guest, and both profiles are the same, option to send to either the lead guest or the
contact
Templates
The Templates section contains the following fields:
• Contact Template select the template to be sent to the contact
• Lead Guest Template select the template to be sent to the lead guest
Rate Plans
The Rate Plans section contains the following fields:
• Include All Rate Plans tick box, when ticked will send to all rate plans
• Include Only These Rate Plans multi-select drop-down box of rate plans; enabling specific
rate plans to be selected
• Rate Plan Selection determines if the rate plans selected (above) should be calculated based
on either the 'Base' rate plan or the most used rate plan
Inclusions
119 Zoë Harney / Karen Fisher 21/03/2017
The Inclusions section contains the following fields:
• Booking Statuses multi-select drop-down list of bookings statuses; enabling specific statuses
to be selected
• Media Source/ Market Segment, by ticking the box will include all or you can choose certain
options from the drop down menus.
• System Sources multi-select drop-down list of booking sources
• Multi Rooms tick box, when ticked will include multi-room reservations
• Groups tick box, when ticked will include all group reservations
• Room Blocks tick box, when ticked will include all group reservations
Click the Save button to save the changes made.
Creating Transaction Plans
1. Click on the CRS Module icon (organisational chart).
2. From Configuration, click Transaction Plans.

120 Zoë Harney / Karen Fisher 21/03/2017
3. Click on New Transaction Plan.
4. Create a Code/Description.
5. Select the Number of Accounts.
6. Select the Transaction Rules.
7. Click Save.
Transaction Rules
Simple
Allows you to simple select Accept or Refuse per each different account across the 3 charge modes.
Advanced
Allows you to select from all the analysis codes. Once you have selected your choice tick the boxes
relevant and click Edit.
121 Zoë Harney / Karen Fisher 21/03/2017
This allows you to choose what each account will allow and select a certain amount or percentage to
allow charging by also.
Once you are happy click on Apply and Save to save the Transaction Plan. Repeat until all of your
Transaction plans have been created.
Creating Payment Plans
1. Click on the CRS Module icon (organisational chart).
2. From Configuration, click Payment Plans.
3. Click on New Payment Plan.
4. Enter a Plan Code and give the code a Description.

122 Zoë Harney / Karen Fisher 21/03/2017
5. Complete First Invoice and the Frequency field.
First Invoice
• Frequency – Days/Months and the Value
• Starting – Arrival/Current or Departure for the invoice to be created
• Handling Mode – In advance or arrears of the booking
• User Defined – for the user to decide each time
Frequency
• Whole Stay – from the arrival to the departure date, 1 invoice with 1 line within the invoice to
be created
• Every – Day/Month – this will create an invoice with a line being created depending on the
choice
• Every Month – will create an invoice each month
6. Click Save.
User Set-up
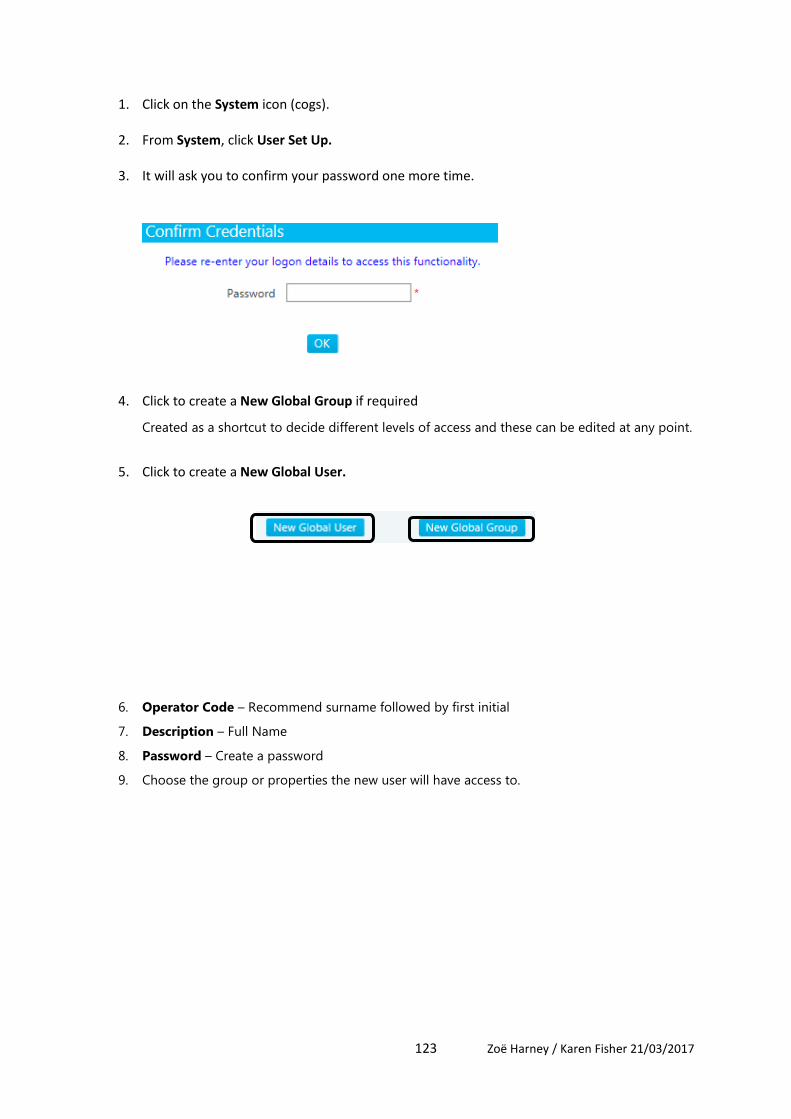
123 Zoë Harney / Karen Fisher 21/03/2017
1. Click on the System icon (cogs).
2. From System, click User Set Up.
3. It will ask you to confirm your password one more time.
4. Click to create a New Global Group if required
Created as a shortcut to decide different levels of access and these can be edited at any point.
5. Click to create a New Global User.
6. Operator Code – Recommend surname followed by first initial
7. Description – Full Name
8. Password – Create a password
9. Choose the group or properties the new user will have access to.

124 Zoë Harney / Karen Fisher 21/03/2017