Embed Size (px)
Citation preview

Google Earth for Real Estate Professionals
E-Learning for the GIS Professional – Any Time, Any Place!
geospatialtraining.com

Course Outline • Module 1: Google Earth Pro Fundamentals
• Module 2: Adding Properties to the Map
• Module 3: Attaching Property Information
• Module 4: Adding Neighborhood Information
• Module 5: Creating Thematic and 3D Maps
• Module 6: Presentation and Communication
• Module 7: Adding Images to the Display
• Module 8: Sharing your Data
• Module 9: Terrain Information
• Module 10: Using Historical Imagery
• Module 11: Taking Advantage of Google Search
2

GOOGLE EARTH PRO FUNDAMENTALS
3

Module Outline
• Navigation
• Creating Features
• Search
• Places and Layers Panel
4

Navigation
• Many ways to navigate
– User interface components
– Mouse
– Keyboard
• Can zoom, pan, tilt, change orientation, rotate
• Demonstration
5

Search Panel
• Google Earth recognizes the following search types – City, State
– City, Country
– Number, Street, City, State
– Zipcode or Postal Code
– Latitude, Longitude (Decimal Degrees)
– Latitude, Longitude (Degrees, Minutes, Seconds)
– Free form (Museums in New York City)
6

Places Panel • Contains temporary datasets
– Temporary Places folder
– Only used for current GE session
– Removed when you close GE
• Datasets saved to your local computer – My Places
– Persist between sessions
– Right click a layer from Temporary Places folder and select Save to My Places
7
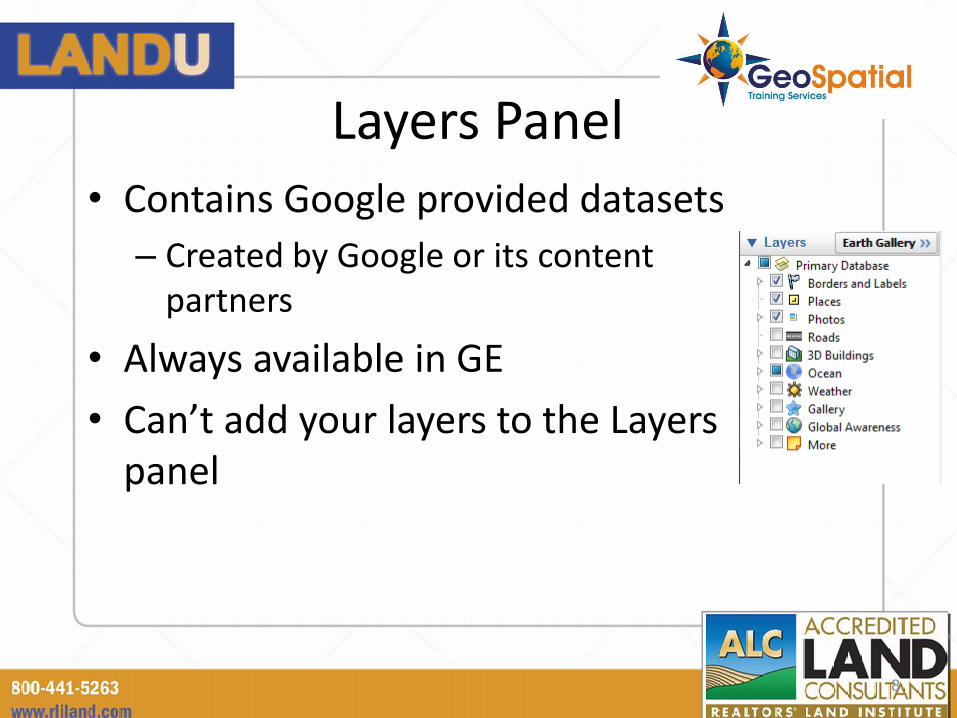
Layers Panel
• Contains Google provided datasets
– Created by Google or its content partners
• Always available in GE
• Can’t add your layers to the Layers panel
8

Data is Easy to Distribute • All content contained within KML or KMZ file
• Can be distributed via
– Internet
– Network Server
– Web Services
9

ADDING PROPERTIES TO THE MAP
10

Module Outline
• Address geocoding
• Adding all your properties to Google Earth using geocoding
• Adding properties manually as points
• Creating land parcels as polygons
11

What is Geocoding? • Process of converting physical addresses into geographic
coordinates – Address can’t be added to map without geographic coordinates
– Example: 1202 Sand Wedge, San Antonio, TX = -98.4743, 29.6618
12

Rooftop Geocoding
• Also called “point-level” geocoding • Most accurate determination • More accurate for long street segments, cul-de-sacs, or
irregularly spaced addresses • Assigns a geographic coordinate to the actual rooftop of
an address
13

Street Segment Geocoding • Assigns latitude/longitude coordinates based on know geocodes at
the intersection of the block or street segment containing an address
• Uses a process of interpolation – Example: If a block runs from 100-200 Main Street, then 150 Main Street would
be approximately halfway between 100 and 200 Main Street
• Most commonly used method at this time
• More accurate in urban areas – Rural areas are less complete
14
Main St.
100 200 150
Longitude: -96.3462, Latitude: 20.4521

Geocoding in Google Earth Pro
• GE Pro can import a text file containing a batch set of addresses
• Text file is typically delimited by a comma or tab
• Supported countries – United States, United Kingdom, Canada, France, Italy, Germany,
Spain
• Each address converted into a Placemark
15

Geocoding in Google Earth Pro • Starts with a text file containing addresses
• Address components can be in separate columns or a single column
16

Geocoding in Google Earth Pro • Go to File Import
• Find the file and open
• Data Import Wizard
17
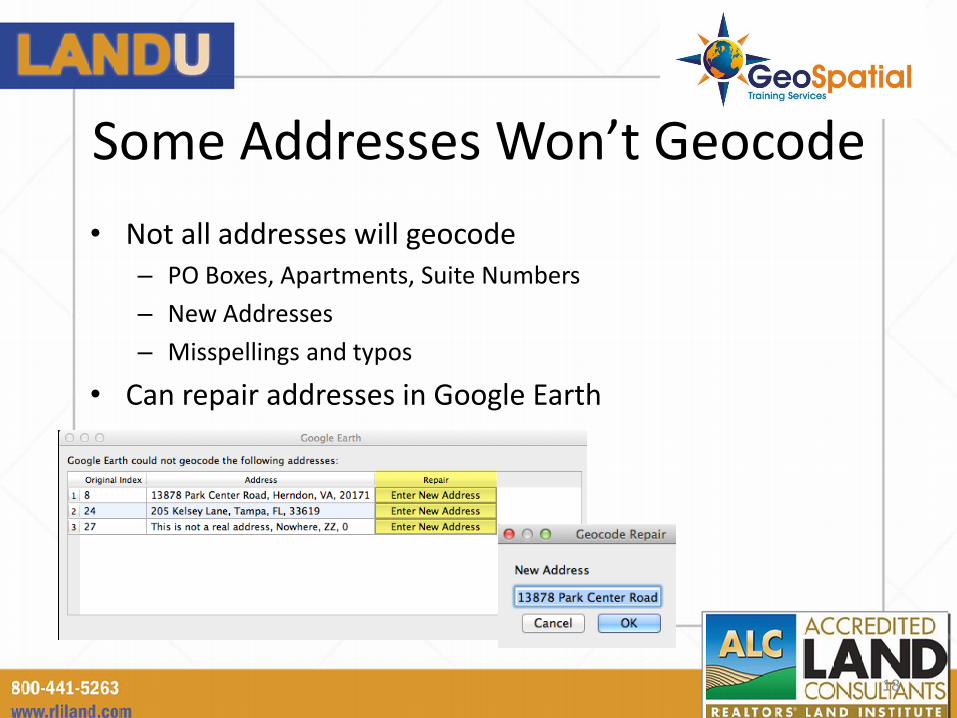
Some Addresses Won’t Geocode
• Not all addresses will geocode – PO Boxes, Apartments, Suite Numbers
– New Addresses
– Misspellings and typos
• Can repair addresses in Google Earth
18

Defining the Address Placemark Icon • Can apply a style template to the features
• Can define
– Name
• Defines how the Placemark will be labeled
– Color
• Icon color
– Icon
• Style
– Height
• Clamp features to ground or set height from a field
19

Geocoding Results • Addresses added as Placemarks
• Saved in a KML file
20

Demonstration
• Demonstration: Adding Addresses to Google Earth with Geocoding
21

Adding Properties Manually • Use the Add Placemark tool
• Click the location of the property in GE
22
Demonstration

Styling the Property • Properties can be styled by changing
the icon – Click the icon button to display list of icons
– Can also add your own custom icons
• Increase or decrease size of icon – Use Scale property
• Default is 1.1 (higher number increases size)
23

Custom Icons • Can add your own custom icons
• Many available on the web
• Map icons collection http://mapicons.nicolasmollet.com
• KML4Earth http://kml4earth.appspot.com/icons.html
24

Creating Land Parcels
25
Demonstration

Perimeter and Area of a Parcel • Measurements tab
• Automatically determines perimeter and area
• Can change units of measurement – Feet, miles, meters, etc
26

Exercise
• Demonstration: Manually Creating Properties with Google Earth
27

ADDING PROPERTY INFORMATION
28

Module Outline
• Introduction to info balloons
• Adding text, photos, video, links to info balloons
• Using templates to create info balloons
29

Introduction to Balloons • Balloons provide a way of
communicating information about a place to your users
– Attached to Placemarks
– Can include
• Plain text, HTML, photos, video, links to files
• Excellent tool for presenting property information to users
– Pricing, detailed property information, photos, video, your logo
30

Adding Information to Info Balloons
• Add information to balloons by editing Placemark – Select Placemark and then Get Info
• Description tab
31
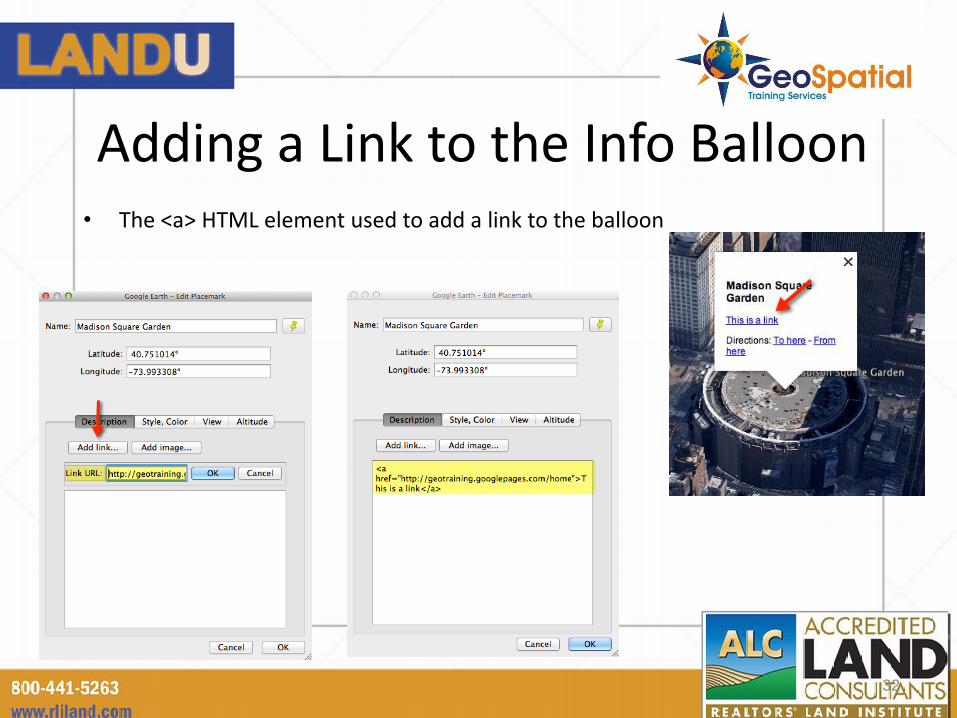
Adding a Link to the Info Balloon • The <a> HTML element used to add a link to the balloon
32

Adding a Link to a PDF File to an Info Balloon
• Can also link to PDF and other file formats
• Use <a> HTML element
– Provide a URL to the file
33

Adding a Photo to an Info Balloon • The <img> HTML element adds an image to the balloon
34

Adding Video to an Info Balloon
• Use <iframe> HTML element to add video to an info balloon
35

Exercise
• Demonstration: Adding Property Information to Info Balloons
36

ADDING NEIGHBORHOOD INFORMATION
37

Module Outline
• Demographic information
• Parcel information
• Traffic counts
38

Demographic Information • Google Earth Pro includes census demographic
information
• Layers Earth Pro US Demographics
• Various Levels
– State
– County
– Census Tract
– Census Block
• Most current year (2011)
• Projections (2016)
• Age, education, gender, households, income, marital status, vehicle availability
39

Demographic Information • Can also create a thematic map from any of the demographic
variables
40
Exercise
• Demonstration: Displaying Demographic Data in Google Earth Pro
41

Parcel Information • Earth Pro dataset
• Parcel boundaries
• Parcel information
• Layers Earth Pro US Parcel Data
42

Traffic Counts
• Google Earth Pro dataset
• Layers Earth Pro US Daily Traffic Counts
• Lists traffic counts by year for that location
43

ADDING IMAGES TO THE DISPLAY
44
Module Outline
• Overview of adding images to Google Earth
• Add Image Overlay tool
• Defining coordinates for the image
45

Adding Images to the Google Earth Display
• Graphic files can be imported to GE as overlays
• Drape across the underlying terrain
• Image file formats include jpeg, bmp, gif, tiff, tga, and png
• You can also set a transparency on the image to see the underlying terrain.
46

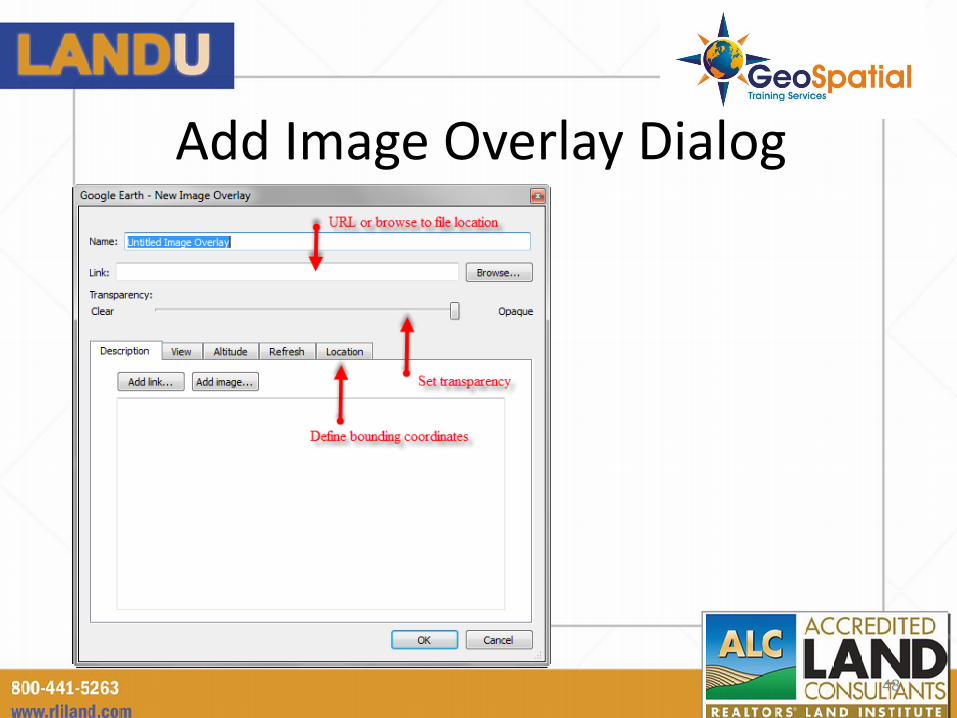
Add Image Overlay Tool • Use the Add Image Overlay
tool
• Browse to an image file
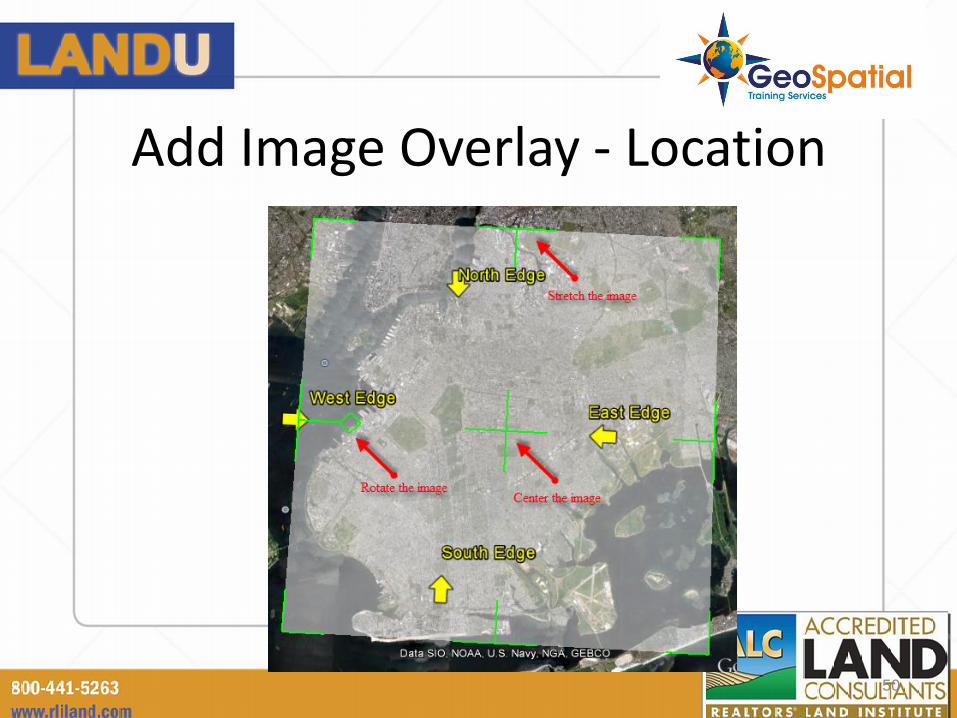
• GE doesn’t necessarily know where to place the image on the earth
– Need to know bounding coordinates of image OR
– Use the tools to center, rotate, and stretch the image
47
Add Image Overlay Dialog
48

Add Image Overlay - Location
49
Add Image Overlay - Location
50

Exercise
• Demonstration: Adding an Image Overlay to Google Earth
51

Google Earth for Real Estate Professionals
• 1 Day Self-Paced Online Course - $129.00
• http://geospatialtraining.com – Link to course • Learn how to import all your properties into Google Earth in seconds
• Symbolize your properties with built in real estate icons or custom icons that represent your agency
• Add property information including photos, videos, links to files and websites, sales information, detailed property information
• Display neighborhood information including census demographics, school districts, traffic counts, detailed tax appraisal information
• Provide driving directions to properties
• Email information to clients or place on a web server
• Printing maps
• Embed maps into presentations
• Get terrain information
52

ERIC PIMPLER
210.260.4992
GeoSpatial Training Services
http://geospatialtraining.com
53