Embed Size (px)
Citation preview

FD 2054 AutoSeal®Pressure Sealer
OPERATOR MANUAL FIRST EDITION8/2011

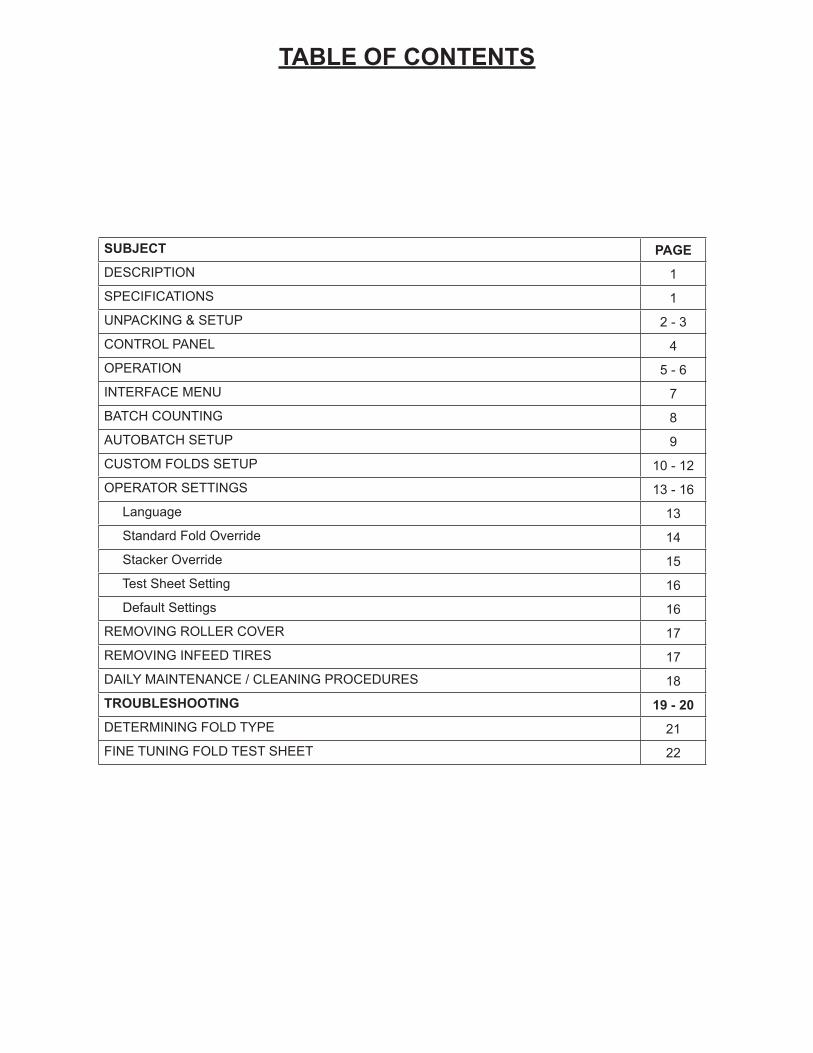
SUBJECT PAGEDESCRIPTION 1
SPECIFICATIONS 1
UNPACKING & SETUP 2 - 3
CONTROL PANEL 4
OPERATION 5 - 6
INTERFACE MENU 7
BATCH COUNTING 8
AUTOBATCH SETUP 9
CUSTOM FOLDS SETUP 10 - 12
OPERATOR SETTINGS 13 - 16
Language 13
Standard Fold Override 14
Stacker Override 15
Test Sheet Setting 16
Default Settings 16
REMOVING ROLLER COVER 17
REMOVING INFEED TIRES 17
DAILY MAINTENANCE / CLEANING PROCEDURES 18
TROUBLESHOOTING 19 - 20DETERMINING FOLD TYPE 21
FINE TUNING FOLD TEST SHEET 22
TABLE OF CONTENTS


DESCRIPTION
The FD 2054 Pressure Sealer is designed to process a variety of form sizes and weights. The fold tables are automatically adjusted for standard folds and custom folds. Documents that are 8 ½” x 11”/14” and 11” x 17” (A5, A4, A3, B4, B5 & B6) are detected by sensors on the in-feed tray. Batch counting, and self-centering side guides are added features. Three standard folds are pre-programmed for 11”, 14” and 17” forms, uneven C and Z folds for 14” forms, and up to 35 custom folds can be programmed. The sealer will stop automatically after the last document has been processed.
SPECIFICATIONS
1
Upper Fold Table
Telescoping Outfeed Stacker
Self Centering Paper Side Guides
Infeed Tray
Infeed TrayExtension
Infeed Tray Lever
Lower Fold Table
Non Operator Side
Operator Side
Stacker Wheels
Top Cover
Control Panel
Speed: Up to 16,450 forms per hour – based on 11” (279mm) Z-FoldHopper Capacity: Up to 500 forms 20# (75gsm)Pre-Set Folds: Pre-programmed for C, V, Z in 11 - 17” forms, uneven C, Z in 14” formsPre-Set Paper Sizes:
FD Model: 11”, 14”, 17”FE Model: A5, A4, A3, B6, B5, B4
Custom Folds: Stores up to 35 custom folds into memoryPaper Size: Min: 3.5” W x 5” L (88.9 W x 127 L mm)
Max: 12.25” W x 17” L (311 W x 432 L mm)Languages: English, Spanish, French, German, Italian & DutchDimensions: Closed: 43” L x 21.28” W x 16” H (109 L x 54 W x 41 H cm)
Fully Extended: 55” L x 21.28” W x 16” H (140 L x 54 W x 41 H cm)Weight: 127 lbs (97kg) Power: 110-240VAC 50/60 HzSafety Certifications: UL & CE applied for

Fig. 1b Locating Pins
2
Lower Fold Table Pins
Fig. 1a Locating Pins
Upper Fold Table Pins
UNPACKING & SETUP
1. Check package for shipping damage. If there is shipping damage, do not discard the box.
2. Remove the machine and packed components from the box. The fold tables, telescoping stacker, and power cord are wrapped separately in the box.
NOTE: Two people must lift the machine from the box.
3. Place the folder on a solid stand.
Install upper and lower fold tables, telescoping conveyor and power cord
1. Be sure the tables are set firmly on the locating pins (Fig 1a & 1b). Slide each fold table in until it meets the first locating pin then push down to set in place.
2. Lock the fold table into position (Fig. 2)
3. Repeat the same steps for the lower fold table.
Fold Table LockFig. 2

Upper Fold Table Receptacle Location
Lower Fold Table Receptacle Location
Plug in Receptacle
Plug in ReceptacleFig. 4
Fig. 3
4. Plug the fold table cables into the receptacles on the side frame (Fig. 3 & 4).
5. Insert the telescoping extension tray into the end of the outfeed conveyor (Fig. 5).
6. Make sure the power switch is in the “OFF” position. Plug the power cord into the power inlet and the wall outlet.
Fig. 5
3
Telescoping extension tray

CONTROL PANEL
4
No. NAME FUNCTION1 Standard Fold Button Select the desired pre-programmed fold.2 LCD Interface Displays current settings and used for setup and programming.3 Start Button Press to start the folder.4 Stop Button Press to stop the folder.
5 Clear/Reset Button Clears operation and returns to main screen. NOTE: this button can be pressed at any time to return to the main screen. Resets the counter and clears fault indications.
6 Test Button “1x” Test fold documents.7 Enter Arrow Used to save settings or advance to the next screen.8 Up and Down Arrows Used to scroll up and down through settings or change settings.9 Speed Control Buttons Increase or decrease speed
10 Custom Fold Buttons Select and program a custom fold (see page 10).
10
9 8 7 56
3 41 2
Self centering side guides
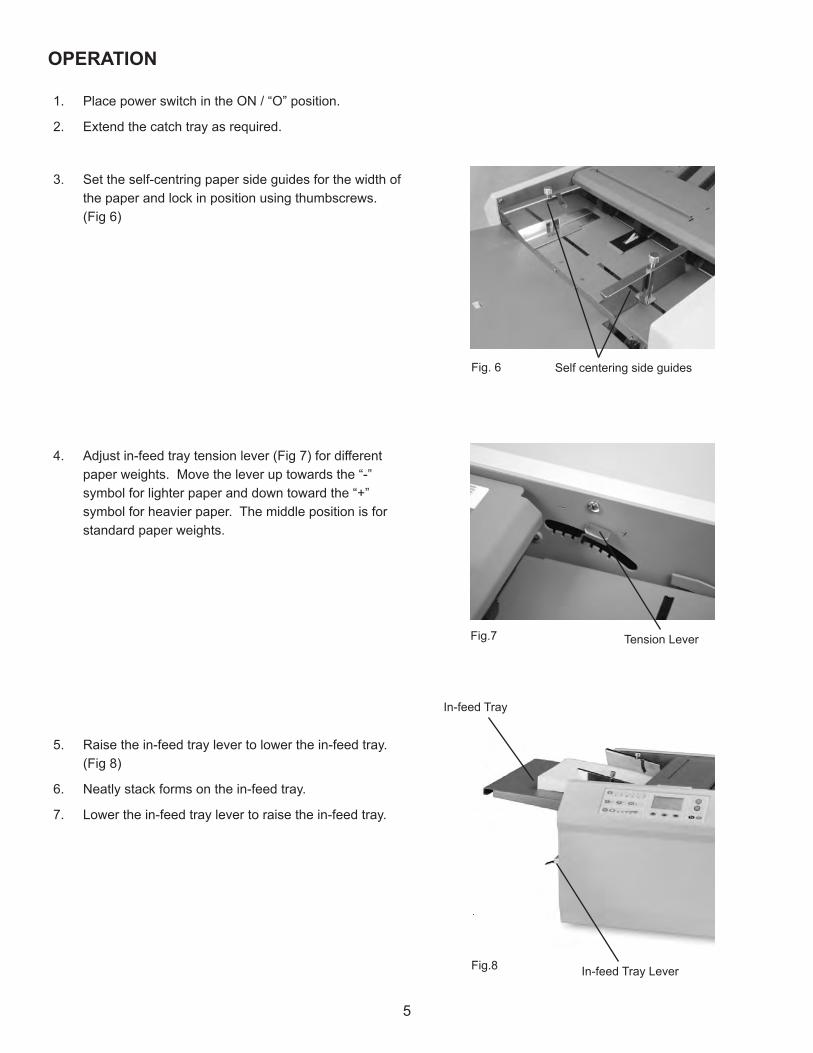
OPERATION
1. Place power switch in the ON / “O” position.
2. Extend the catch tray as required.
3. Set the self-centring paper side guides for the width of the paper and lock in position using thumbscrews. (Fig 6)
4. Adjust in-feed tray tension lever (Fig 7) for different paper weights. Move the lever up towards the “-” symbol for lighter paper and down toward the “+” symbol for heavier paper. The middle position is for standard paper weights.
5. Raise the in-feed tray lever to lower the in-feed tray.(Fig 8)
6. Neatly stack forms on the in-feed tray.
7. Lower the in-feed tray lever to raise the in-feed tray.
Fig. 6
5
Tension LeverFig.7
Fig.8 In-feed Tray Lever
In-feed Tray
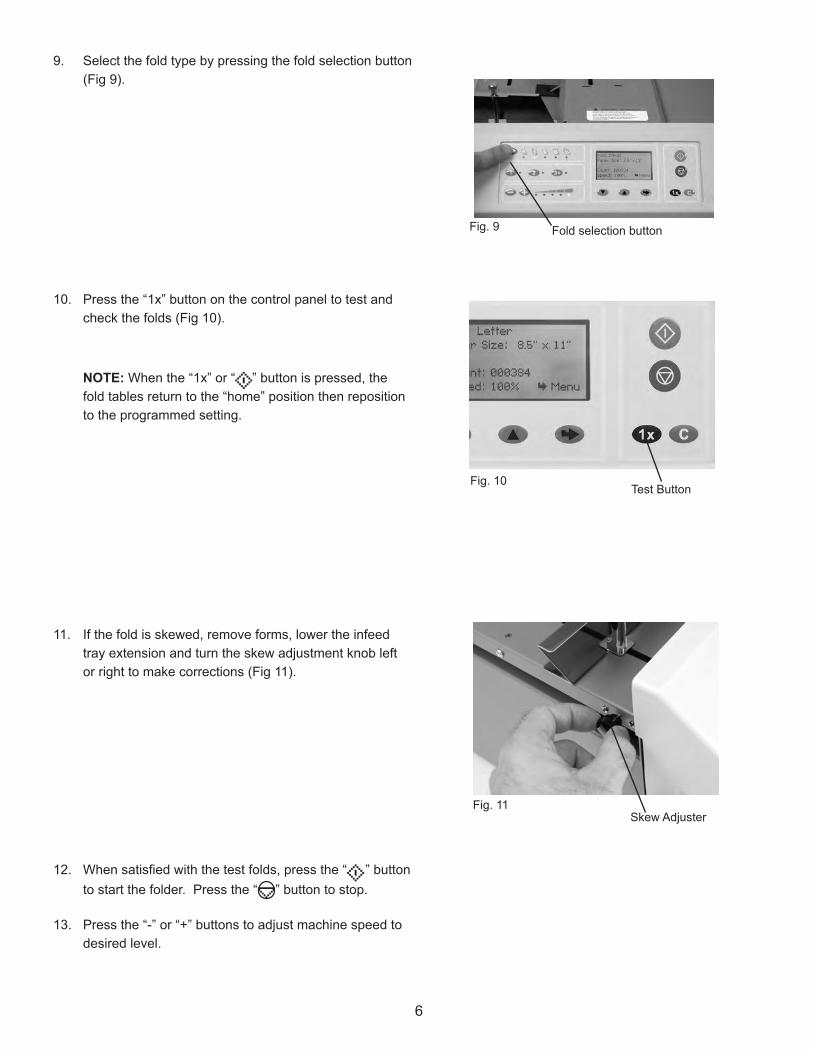
Fig. 11Skew Adjuster
9. Select the fold type by pressing the fold selection button (Fig 9).
10. Press the “1x” button on the control panel to test and check the folds (Fig 10).
NOTE: When the “1x” or “ ” button is pressed, the fold tables return to the “home” position then reposition to the programmed setting.
11. If the fold is skewed, remove forms, lower the infeed tray extension and turn the skew adjustment knob left or right to make corrections (Fig 11).
12. When satisfied with the test folds, press the “ ” button to start the folder. Press the “ ” button to stop.
13. Press the “-” or “+” buttons to adjust machine speed to desired level.
Fig. 9 Fold selection button
6
Fig. 10Test Button
INTERFACE MENU
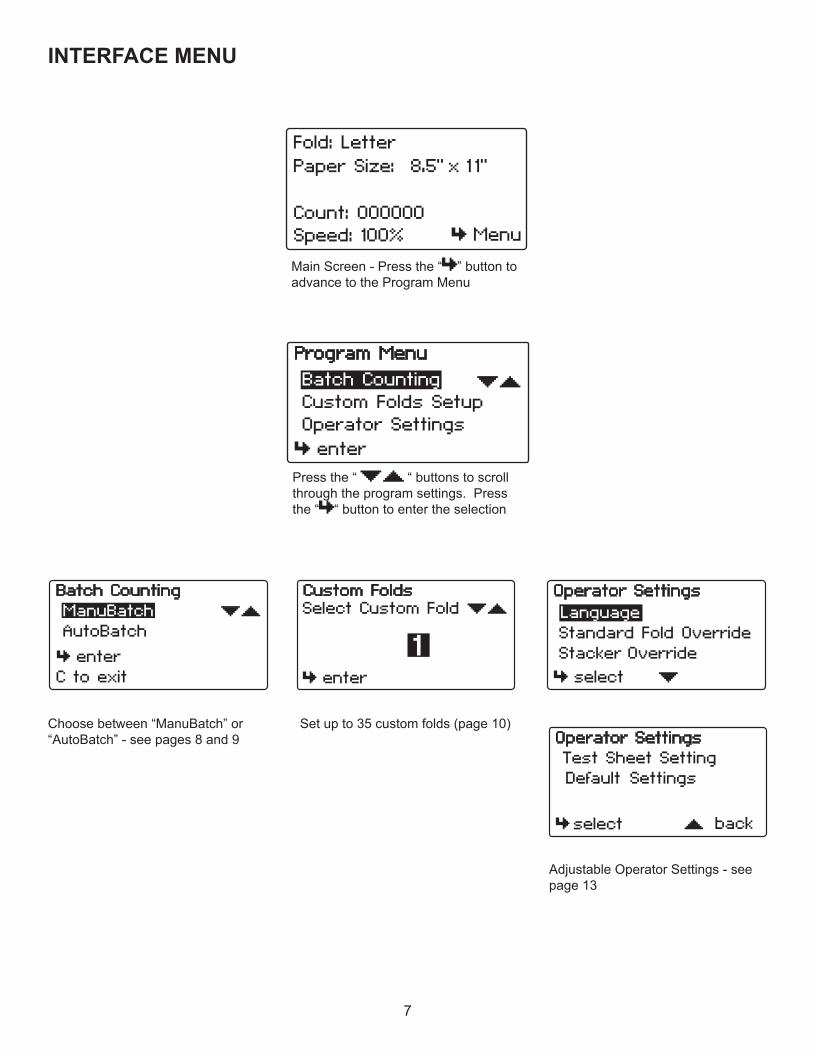
Main Screen - Press the “ ” button to advance to the Program Menu
Press the “ “ buttons to scroll through the program settings. Press the “ “ button to enter the selection
Choose between “ManuBatch” or “AutoBatch” - see pages 8 and 9
Set up to 35 custom folds (page 10)
Adjustable Operator Settings - see page 13
7
BATCH COUNTING
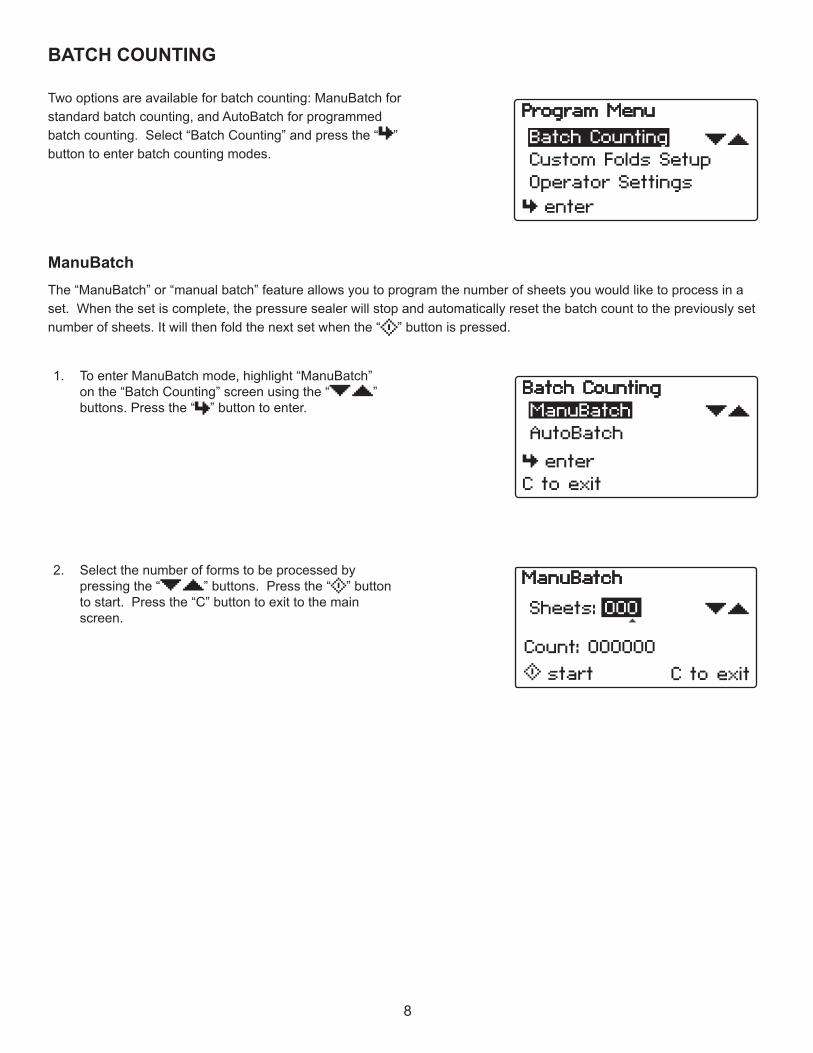
1. To enter ManuBatch mode, highlight “ManuBatch” on the “Batch Counting” screen using the “ ” buttons. Press the “ ” button to enter.
2. Select the number of forms to be processed by pressing the “ ” buttons. Press the “ ” button to start. Press the “C” button to exit to the main screen.
8
ManuBatchThe “ManuBatch” or “manual batch” feature allows you to program the number of sheets you would like to process in a set. When the set is complete, the pressure sealer will stop and automatically reset the batch count to the previously set number of sheets. It will then fold the next set when the “ ” button is pressed.
Two options are available for batch counting: ManuBatch for standard batch counting, and AutoBatch for programmed batch counting. Select “Batch Counting” and press the “ ” button to enter batch counting modes.

9
AutoBatch“AutoBatch” or “automatic batch” allows you to batch count with automated features. In the Autobatch mode you can program the number of sheets you would like to process in a set, the total number of sets and the delay between each set. For example: you can program 10 sheets to be pulled to create a set, then program 100 sets to be processed with a3-second time delay between each set.
1. To enter AutoBatch mode, highlight “AutoBatch” on the “Batch Counting” screen using the “ ” buttons. Press the “ ” button to enter.
2. “Sheets” is highlighted. Press the “ ” buttons to set the number of sheets for each set. Press the “ ” button to enter your selection and advance to the next screen.
3. “Sets” is highlighted. Press the “ ” buttons to select the number of sets. Press the “ ” button to enter your selection and advance to the next screen.
4. “Delay” is highlighted. Press the “ ” buttons to set the time delay between each set. Press the “ ” button to enter your selection and advance to the next screen.
5. Press the “ ” button to begin folding. The “ ” button can be pressed to edit the settings. Press the “C” button to exit to the main screen.
NOTE: If a fault occurs during a set the set will be completed when the fault is reset.

CUSTOM FOLDS SETUP
1. Select the custom fold number you want to program using the “ ” buttons. Press the “ ” button to enter number and advance to the next screen.
2. The current settings for the custom fold and stacker position will be displayed. Press the “ ” button to edit the settings or the “ ” to go back and select a different custom fold number.
Note: All custom folds are pre-set for a standard 11” C-fold.
3. Adjust Fold Table screen will be displayed. Use the “ ” buttons to change the upper fold table setting. Press the “ ” button to enter and advance to the lower fold table setting. Adjust the lower fold table and press the “ ” button to enter and advance to Stacker Position screen.
The FD 2054 has 35 custom fold settings that can be stored into memory for recurring jobs with fold settings that vary from the standard fold settings. To create or edit custom folds se-lect “Custom Folds Setup” from the Program Menu screen and press the “ ” button to enter. See page 12 to help determine the new fold measurements.
10
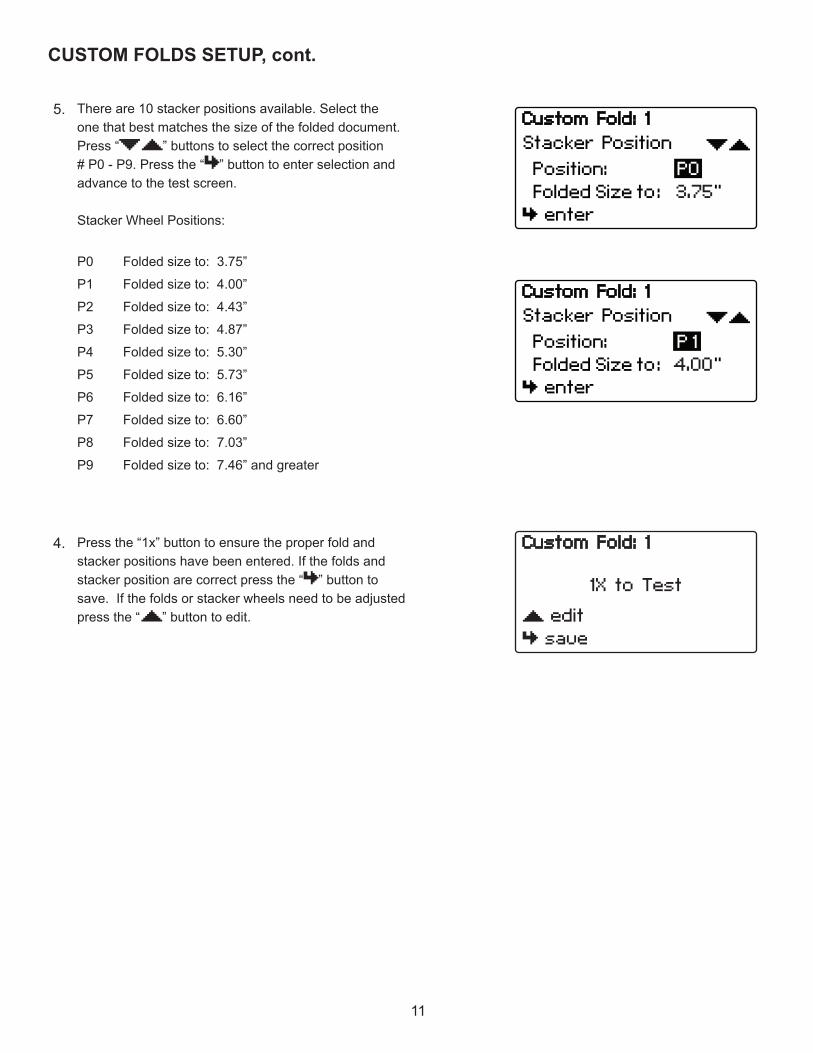
5. There are 10 stacker positions available. Select the one that best matches the size of the folded document. Press “ ” buttons to select the correct position # P0 - P9. Press the “ ” button to enter selection and advance to the test screen.
Stacker Wheel Positions:
P0 Folded size to: 3.75”
P1 Folded size to: 4.00”
P2 Folded size to: 4.43”
P3 Folded size to: 4.87”
P4 Folded size to: 5.30”
P5 Folded size to: 5.73”
P6 Folded size to: 6.16”
P7 Folded size to: 6.60”
P8 Folded size to: 7.03”
P9 Folded size to: 7.46” and greater
4. Press the “1x” button to ensure the proper fold and stacker positions have been entered. If the folds and stacker position are correct press the “ ” button to save. If the folds or stacker wheels need to be adjusted press the “ ” button to edit.
CUSTOM FOLDS SETUP, cont.
11

Example 1: “Z” Fold
1. Measure the length of panel “A” + “B”, enter this number as the upper fold table measurement.
2. Measure the length of panel “B”, enter this number as the lower fold table measurment.
Example 2: “C” Fold
1. Measure the length of panel “A”, enter this number as the upper fold table measurement.
2. Measure the length of panel “B”, enter this number as the lower fold table measurement.
Measuring Fold Lengths
Panel A
Panel B
Panel A
Panel B
Use the examples below to help determine the fold lengths for custom fold settings.
12
OPERATOR SETTINGS
Language
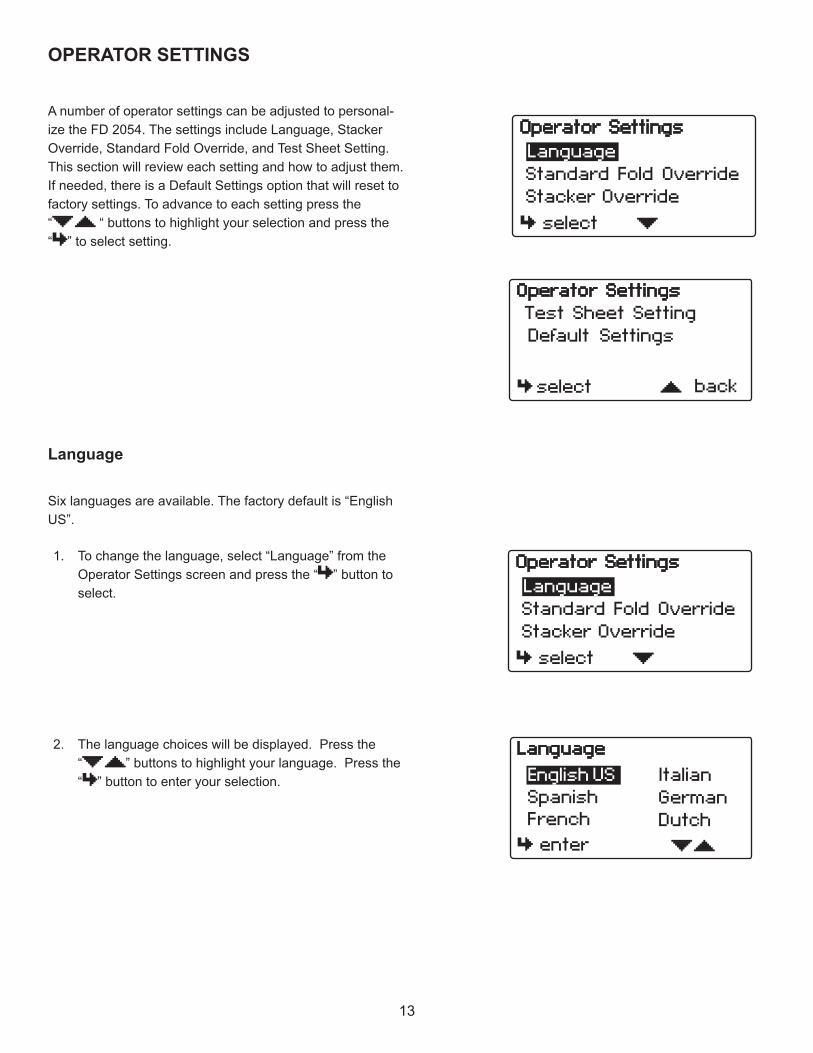
A number of operator settings can be adjusted to personal-ize the FD 2054. The settings include Language, Stacker Override, Standard Fold Override, and Test Sheet Setting. This section will review each setting and how to adjust them. If needed, there is a Default Settings option that will reset to factory settings. To advance to each setting press the “ “ buttons to highlight your selection and press the “ ” to select setting.
Six languages are available. The factory default is “English US”.
1. To change the language, select “Language” from the Operator Settings screen and press the “ ” button to select.
2. The language choices will be displayed. Press the “ ” buttons to highlight your language. Press the “ ” button to enter your selection.
13

Standard Fold Override
1. It may be necessary to adjust the factory set standard fold settings for a particular fold type and paper size. This can be done in the Standard Fold Override Mode. From the Operator Settings menu select “Standard Fold Override” and press the “ ” button to select.
2. “Standard folds will be modified from factory settings” will be displayed. Press “ ” to continue or “C” to exit and return to the main screen.
3. Use the “ ” buttons to select the fold type to be modified. Press the “ ” button to enter.
4. Use the “ ” buttons to select the paper size. Press the “ ” button to enter.
5. Adjust Fold Table screen will be displayed. Use the “ ” buttons to change the upper fold table setting. Press the “ ” button to enter and advance to the lower fold table setting. Adjust the lower fold table and press the “ ” button to enter and advance to the test screen.
6. Press the “1x” button to ensure the proper folds have been entered. If the folds are correct press the “ ” button to save and return to the main screen. If the folds need to be adjusted press the “ ” button to edit.
14

Stacker Override
The FD 2054 automated stacker positions may need to be overridden to accommodate different types of paper in order to improve the outfeed stacking. The positions are preset at the factory and should only be changed if needed. From the Operator Settings screen select “Stacker Override”, and press the “ ” to select.
1. “Stacker Override Positions are preset by fold settings only change if needed” will be displayed. Press the “ ” to enter the stacker override setup or the “C” button to exit.
2. Using the “ ” buttons, select the standard fold that the stacker position needs to be adjusted for. Press the “ ” button to enter the selection.
3. Select the paper size using the “ ” buttons. Press the “ ” button to advance.
4. Adjust the stacker wheel position up or down using the “ ” buttons. The number shown “P1” is the factory setting for the fold type and paper size selected.
5. Press the “ ” to save. To adjust stacker settings for ad-ditional folds, repeat steps 1 through 4.
15

Test Sheet Setting
Default Settings
The number of test sheets can be changed between 1, 2 or 3.
1. From the Operator Settings Menu press the “ ” button to highlight Test Sheet Setting. Press the “ ” button to select.
2. Press the “ ” buttons to change the test sheet value. Press the “ ” button to save and exit.
The factory default settings can be reset by accessing the Default Settings mode.
1. From the Operator Settings Menu press the “ ” button to highlight Default Settings. Press the “ ” button to select.
2. Press and hold the “ ” button to reset to the factory default settings. Press the “C” button to exit.
16

17
REMOVING ROLLER COVER
The roller cover can be removed to access the sealing rollers. To remove, unscrew thumbscrews that hold the cover in place. (Fig. 12)
REMOVING INFEED TIRES
The infeed tires can easily be removed for cleaning and replace-ment. Remove the Allen screw located on the left side of the feed tire shaft (Fig. 13). Slide the shaft to the right to release from the side frame and remove (Fig. 14).
Thumbscrews
Allen Screw
Fig. 12
Fig. 13
Fig. 14
Roller cover
18
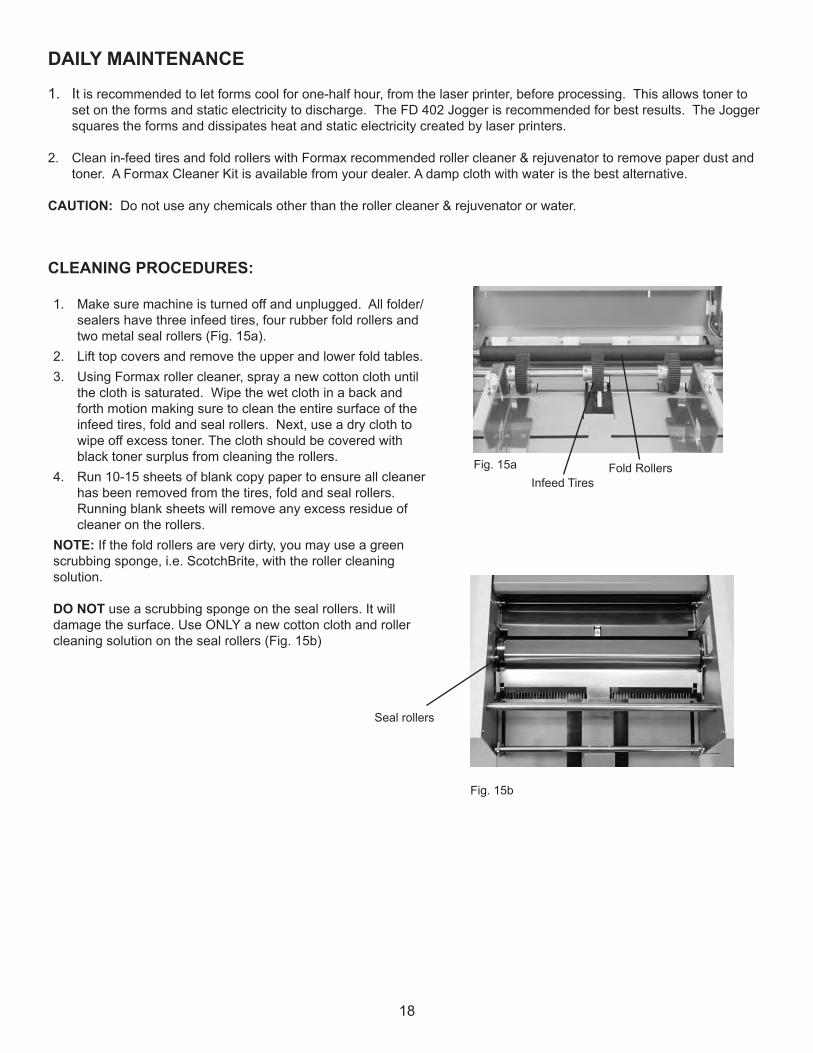
DAILY MAINTENANCE
1. It is recommended to let forms cool for one-half hour, from the laser printer, before processing. This allows toner to set on the forms and static electricity to discharge. The FD 402 Jogger is recommended for best results. The Jogger squares the forms and dissipates heat and static electricity created by laser printers.
2. Clean in-feed tires and fold rollers with Formax recommended roller cleaner & rejuvenator to remove paper dust and toner. A Formax Cleaner Kit is available from your dealer. A damp cloth with water is the best alternative.
CAUTION: Do not use any chemicals other than the roller cleaner & rejuvenator or water.
Fig. 15a Fold Rollers
1. Make sure machine is turned off and unplugged. All folder/sealers have three infeed tires, four rubber fold rollers and two metal seal rollers (Fig. 15a).
2. Lift top covers and remove the upper and lower fold tables. 3. Using Formax roller cleaner, spray a new cotton cloth until
the cloth is saturated. Wipe the wet cloth in a back and forth motion making sure to clean the entire surface of the infeed tires, fold and seal rollers. Next, use a dry cloth to wipe off excess toner. The cloth should be covered with black toner surplus from cleaning the rollers.
4. Run 10-15 sheets of blank copy paper to ensure all cleaner has been removed from the tires, fold and seal rollers. Running blank sheets will remove any excess residue of cleaner on the rollers.
NOTE: If the fold rollers are very dirty, you may use a green scrubbing sponge, i.e. ScotchBrite, with the roller cleaning solution.
DO NOT use a scrubbing sponge on the seal rollers. It will damage the surface. Use ONLY a new cotton cloth and roller cleaning solution on the seal rollers (Fig. 15b)
CLEANING PROCEDURES:
Infeed Tires
Fig. 15b
Seal rollers

19
TROUBLESHOOTING
TROUBLE POSSIBLE CAUSE REMEDYControl panel lights are not illuminated.
No power at the wall outlet.
No power to the machine inlet.
No power to the control panel.
Internal electrical failure
Check wall outlet.
Check power cord for frayed/broken wires.
Press the button on the circuit breaker.
Call for service.
Fold table stop not moving when “Test”/ “Start” is pressed.
Fold table is not plugged in.
Electrical or mechanical failure
Plug in fold table.
Call for service.“Cover Open” is displayed. Cover open
Magnetic switch is broken.
Close cover.
Call for service.“Paper out “ is displayed. In-feed tray is empty. Place documents on the in-feed tray.
“Paper Jam” is displayed. Paper misfeed
Paper jammed at exit of pressure sealer
Reload paper and press “Counter Reset” button.
Remove paper and press “Counter Reset” button. (See Fig. 16, page 20)
Black marks on the folded paper.
In-feed tires, separator, and/or fold rollers are dirty.
Clean the parts with approved roller cleaner and rejuvenator.
Fold is skewed. In-feed tray is out of adjustment.
Turn skew adjuster knob to remove the skew.
Stacker belts do not turn. Broken drive belt, worn drive gear.
Call for service.
Documents are wrinkled or crunched.
Fold tables are not inserted correctly.
Piece of paper or other material is stuck in the fold table.
Remove and reinstall fold tables. Be sure they’re properly positioned.
Remove object from the fold table.
In-feed tray lever does not work
Broken spring Call for service.
Double feeding forms Documents stuck together
More tension is needed
Feed tire or separator worn
Jog forms to remove static electricity.
Adjust the infeed tension lever
Call for serviceNot feeding documents Feed tire is dirty
Feed tire or separator worn
Clean feed tire
Call for ServicePower loss Circuit Breaker tripped
Under adverse conditions, power input level may drop below acceptable limits
Press black reset button on back of machine.
When power is restored, turn off machine, then turn on again to restore normal operations.

20
TROUBLESHOOTING
WARNING: Turn off machine and unplug cord from its receptacle
If a jam occurs between the metal seal rollers, open the top cover, unplug and remove the upper fold table.
Remove the jam clearing tool (located under the upper fold table), apply the tool to the upper metal roller (see photo), and turn clockwise until the paper jam is clear.
NOTE: Do not turn counter-clockwise and force the forms to exit machine as rollers may be damaged. Remove the jammed form, return tool to holder and reinstall upper fold table. Reinstall cover and press reset button.
Clearing Paper Jams
Using the Jam Clearing Tool
Fig. 16
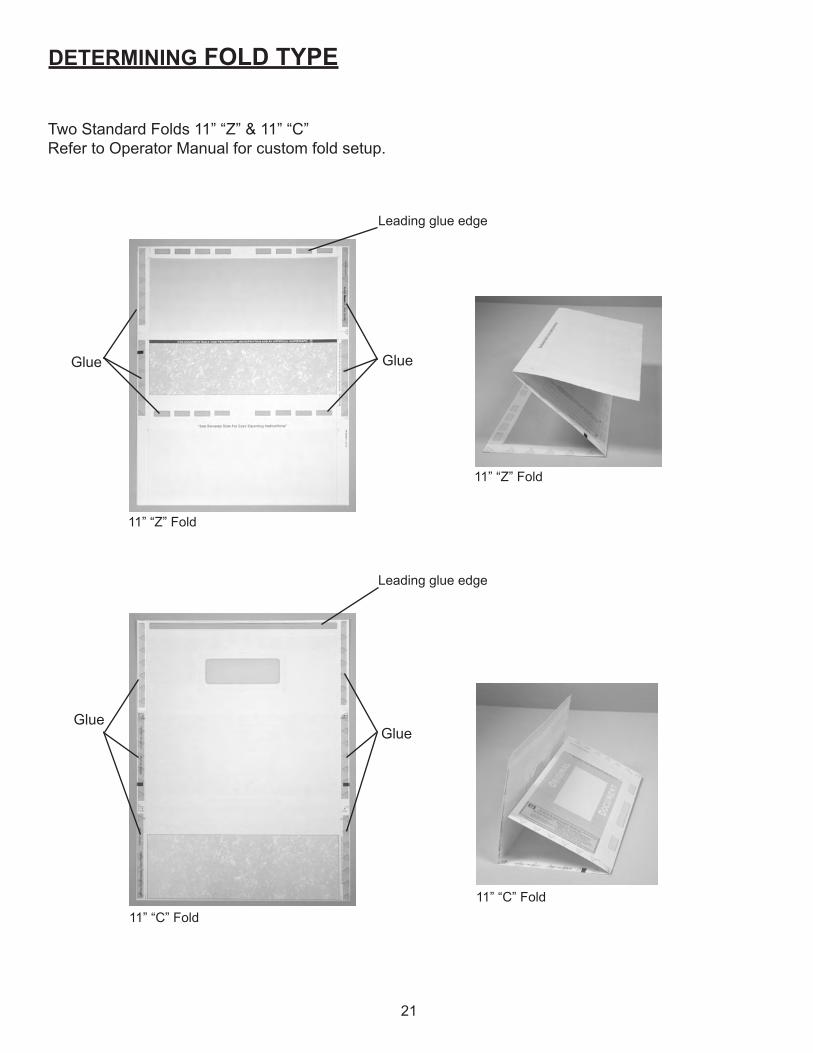
DETERMINING FOLD TYPE
Two Standard Folds 11” “Z” & 11” “C” Refer to Operator Manual for custom fold setup.
11” “Z” Fold
11” “C” Fold
Leading glue edge
Leading glue edge
11” “Z” Fold
11” “C” Fold
GlueGlue
Glue Glue
21
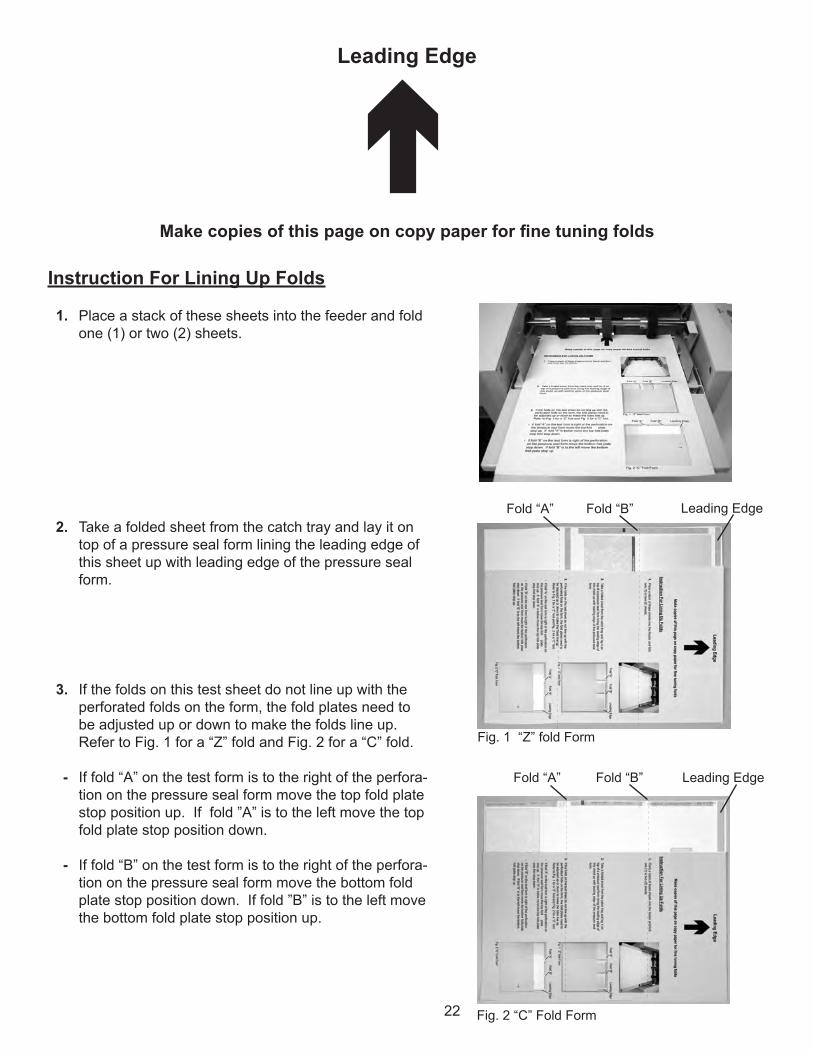
hLeading Edge
Make copies of this page on copy paper for fine tuning folds
Instruction For Lining Up Folds
Fig. 2 “C” Fold Form
Fold “A” Fold “B” Leading Edge
Fig. 1 “Z” fold Form
Leading EdgeFold “A” Fold “B”
1. Place a stack of these sheets into the feeder and fold one (1) or two (2) sheets.
2. Take a folded sheet from the catch tray and lay it on top of a pressure seal form lining the leading edge of this sheet up with leading edge of the pressure seal form.
3.
-
-
If the folds on this test sheet do not line up with the perforated folds on the form, the fold plates need to be adjusted up or down to make the folds line up. Refer to Fig. 1 for a “Z” fold and Fig. 2 for a “C” fold.
If fold “A” on the test form is to the right of the perfora-tion on the pressure seal form move the top fold plate stop position up. If fold ”A” is to the left move the top fold plate stop position down.
If fold “B” on the test form is to the right of the perfora-tion on the pressure seal form move the bottom fold plate stop position down. If fold ”B” is to the left move the bottom fold plate stop position up.
22