Embed Size (px)
Citation preview

Movavi Video Converter 8 for Mac
Don't know where to start?Read these tutorials:
Converting videosChange the video format
Converting for devicesWatch videos on your
phone or tablet
Converting audioPlay any audio anywhere
More questions?
Write us an e-mail at [email protected]

2
Table of ContentsQuick start guide ...................................................................................................................................................................................................2Remove trial restrictions .......................................................................................................................................................................................3
How to get an activation key .........................................................................................................................................................................4Activating Video Converter .............................................................................................................................................................................5Activating without Internet access ..................................................................................................................................................................5
Converting video ...................................................................................................................................................................................................7Converting for social networks .......................................................................................................................................................................9Convert videos for the web ..........................................................................................................................................................................11Converting DVDs ..........................................................................................................................................................................................12Creating GIFs from videos ...........................................................................................................................................................................14
Convert for devices .............................................................................................................................................................................................15Device recognition ........................................................................................................................................................................................17
Converting audio .................................................................................................................................................................................................18Converting images ..............................................................................................................................................................................................20Opening media ....................................................................................................................................................................................................22Media streams ....................................................................................................................................................................................................23
Choosing audio tracks ..................................................................................................................................................................................24Choosing a subtitle track ..............................................................................................................................................................................25Extract audio from video ..............................................................................................................................................................................26Compressing videos .....................................................................................................................................................................................27Media information .........................................................................................................................................................................................29
Choosing output format ......................................................................................................................................................................................29Devices ..........................................................................................................................................................................................................30Image formats ...............................................................................................................................................................................................31Audio formats ................................................................................................................................................................................................32Customizing presets .....................................................................................................................................................................................32
Renaming files ....................................................................................................................................................................................................33Changing output folder .......................................................................................................................................................................................34Uploading files to iTunes ....................................................................................................................................................................................34Energy-saving options ........................................................................................................................................................................................35SuperSpeed acceleration ....................................................................................................................................................................................35Saving a snapshot ..............................................................................................................................................................................................36Preferences .........................................................................................................................................................................................................37
General preferences .....................................................................................................................................................................................37Conversion preferences ................................................................................................................................................................................38Acceleration preferences ..............................................................................................................................................................................38
Help and support ................................................................................................................................................................................................39System requirements ....................................................................................................................................................................................39Supported formats ........................................................................................................................................................................................39Codec activation ...........................................................................................................................................................................................41Glossary ........................................................................................................................................................................................................41
Quick start guideConverting media files
Step 1: Open media filesFind the files you want to convert in Finder and drag them onto the Movavi Video Converter window. The files will now be added to the conversionqueue.Learn about adding media
Step 2: Choose output format1. Click the Video tab to show a list of video formats and presets.2. The video formats are sorted into groups. Click the group with the output format you want to use.3. A list of presets will appear. Here, you can choose a different resolution for the files, or choose the preset without a specified resolution to convert withthe original resolution (for example, "MOV").The currently selected output format will be shown at the bottom of the window.

3
Step 3: Choose output folderAt the bottom of the window, check the Save to box to see where the new converted files will be saved. To save them to a different folder, click the folder
icon and choose the new location in the Finder box.Learn moreUploading files to iTunes
Step 4: ConvertFinally, click Convert in the bottom right-hand corner to start processing the files.
Remove trial restrictionsWhen you first open your copy of Movavi Video Converter, it will be running in LIMITED TRIAL MODE. In trial mode, you can try out all of themain features, but the following trial restrictions will apply:

4
What's the difference between trial mode and the full version?In trial mode, you can try all of the features of the full version, however, several restrictions apply: TRIAL VERSION FULL VERSION
Movavi Video Converter stops working after 7 days Lifetime license
A trial watermark will be applied to all converted videos No annoying watermarks
Audio files are converted or exported only halfway Unlimited audio conversion
SuperSpeed conversion only processes ½ length of all video files Fast SuperSpeed mode for quickly changing video format
Free updates Discounts on other Movavi products and upgrades Step 1: Buy activation key1. Click the button below to go to the purchase page and click the Buy Now button there.2. You will be taken to our web store. Fill in your billing information and payment options and proceed with the purchase form. IMPORTANT! Be sure toenter a valid e-mail address: it will be used to deliver your activation key.3. Once you have placed your order, you will shortly receive a confirmation for your order and an e-mail from [email protected] containing youractivation key.
Step 2: Open the activation window1. Launch Movavi Video Converter.2. Open the Movavi Video Converter application menu and select Activate Software. The activation window will appear.
Step 3: Enter your activation key1. Enter or paste your activation key into the corresponding box of the Activation window.2. Click Activate to verify your activation key.
If you have entered the key correctly, you should see a message confirming successful activation. Click OK to complete the activation process and restartthe program.
Having problems with activation?If activation is not working as expected, try the following:• Make sure that the activation key is entered correctly and is intended for the program you are activating.• Try activating offline via e-mail.• Contact us at [email protected] and we'll help you solve the problem! Activating without Internet accessIf the computer you have installed Movavi Video Converter on is not connected to the Internet, you can activate the program via e-mail.See detailed instructions
How to get an activation keyYou can get an activation key either from our official website or from any of our partners in your region. Follow the steps below to buy an activation keyfrom the Movavi website: Step 1: Go to the purchase pageTo open the purchase page for Movavi Video Converter:• In the Movavi Video Converter application menu, choose Buy Activation Key, or

5
• Follow the link below...
Step 2: Choose a license type• If you plan to use Movavi Video Converter at home, click Buy Now on the purchase page to proceed with buying the personal license.• If you plan to use Movavi Video Converter at work, in a government institution, or gain profit in any way, click Business license on the purchase page. After that, you will be redirected to an online store depending on your region and the available payment methods. All of our vendor partners are secure andcompletely safe. Step 3: Fill in your billing details1. Choose any of the available payment methods.2. Fill in the information required on the page.3. Enter a valid e-mail address. This e-mail will be used to deliver your activation key. Step 4: Get your activation keyAfter the purchase has been verified, you will receive a letter containing your activation key. Now you can use it to activate the program.Activation instructionsActivating without Internet access
If you haven't received your activation key within the hour:• Check the Spam folder of your mailbox• Contact support
Activating Video ConverterActivating Movavi Video Converter will allow you to remove all of the trial restrictions and use the program forever. You will need:Movavi Video Converter activation key. You should receive your key via e-mail right after your purchase is completed. Don't have a key? Buy now• Internet access. Don't have Internet access? See this guide on offline activation Step 1: Open the activation window1. Launch Movavi Video Converter.2. Open the Movavi Video Converter application menu and select Activate Software.
Step 2: Enter your activation key1. Enter or paste your activation key into the corresponding box of the Activation window.2. Click Activate to verify your activation key.
If you have entered the key correctly, you should see a message confirming successful activation. Click OK to complete the activation process and restartthe program.
Having problems with activation?• Check that the activation key is entered correctly and is intended for the program you are activating.• Try offline activation.• Contact our support team
Activating without Internet accessActivating Movavi Video Converter will allow you to remove all of the trial restrictions and use the program forever. If you don't have Internet access onyour computer, you can use any other computer or mobile device to complete the steps that require a connection.

6
You will need:Movavi Video Converter activation key. You should receive your key via e-mail right after your purchase is completed. Don't have a key? Buy now• A device or another computer that can be used to send and receive e-mail Step 1: Open the activation window1. Launch Movavi Video Converter.2. Open the Movavi Video Converter application menu and select Activate Software. The following box will appear:
Step 2: Enter your activation key1. Enter or paste your activation key into the corresponding field.2. Select the Activate offline option.3. Click Activate to proceed to the next step.
Step 3: Send an e-mail with the provided informationThe next window contains important activation information that you will need to send us via e-mail in order to activate your program.
1. Click the Copy button to copy the information in the window. If necessary, save or transfer this information to the computer or device that you will besending the e-mail from. 2. On the computer with an Internet connection, open your mail client and compose a new e-mail. Paste the information you've copied earlier into themessage body and send this e-mail to [email protected]. The activation server will then verify your activation key and send you an automatic responsecontaining a registration key, which you will need to enter into the Activation window. You should receive the server's reply within an hour.

7
To ensure a quick reply from our activation server, please do not alter the message subject or body
Step 4: Enter your registration key1. When you have received your registration key, save it and go back to the Activation window.2. Enter the registration key into the corresponding box.3. Click Activate to submit the information.
If everything is correct, you will see a successful activation message. Click Finish to complete the activation and close the activation wizard. Once activation is complete, you may be asked to restart the application. If you have entered the key correctly, you should see a message confirming successful activation. Click OK to complete the activation process and restartthe program. If offline activation doesn't work:• Make sure you have entered the activation key and the registration key correctly and try again• Check that you are activating the right application.• Make sure you have administrator rights on your computer
If you have any questions or problems while activating your Movavi software, feel free to contact us and we'll help you out!Our e-mail: [email protected] here to open live chat
Converting videoStep 1: Open the videosBefore you start, you will need to open the videos in Movavi Video Converter.1. Click the Add Media button at the top and choose Add Video from the pop-up menu.2. A Finder dialog box will open. Select the files you want to convert.3. Click Open. The files will now be added to the file list.

8
Step 2: Choose output formatIn the lower half of the window, you will find a list of output formats.1. Click the Video tab.2. Click the format you want to use. For example, MOV.3. Choose the preset with the codec and resolution that you want to use. To convert without changing the resolution, click the line marked "Same as input".For example: "MOV", or "AVI MPEG-4 - Original size"Customizing presets
Step 3: Check output folder
At the bottom of the window, check the Save to box. This is where the output files will be saved. To use a different folder, click the folder icon andselect the new output folder.Changing output folder

9
Finally, click the Convert button to start processing the videos. This may take anywhere from a few seconds to several hours, depending on the size andnumber of video files.
Converting for social networksSocial networks like YouTube or Facebook don't accept all video formats. Follow the steps below to convert your videos to a format compatible with thesocial networks. Step 1: Open the videos1. Click Add Media and choose Add Video from the pop-up menu.2. A Finder window will open. Choose the videos you want to convert and click Open. The videos will be added to the file list.
Step 2: Choose a social network preset1. In the lower half of the window, click the Video tab to show all video formats.

10
2. Use the arrow on the right to scroll through the list and click the Online Video group.3. Choose the social network and resolution that you want to use. This will set the optimal format and codec settings for uploading to this social network.
Step 3: Convert and share
1. Click the folder icon next to the Save to box to choose where the output files will be stored.2. To share the videos right away, click the Upload to button and choose the services that you want to upload videos to.Note: to upload videos, you will need Movavi Share Online, a free add-on that you can use for batch uploading. If Share Online is not installed, you willbe prompted to download and install it .
3. Finally, click Convert to start converting the videos.

11
4. If you've selected sharing options, the files will open in Share Online as soon as conversion has finished. There, log in to the services, provide a titleand description for each video and click Upload.
Convert videos for the webTo upload a video online, whether to a personal website or to a video hosting service, you will need to do two things: convert it into a suitable format andupload it onto the web. Step 1: Open videos1. Click the Add Media button and choose Add Video from the pop-up list.2. A Finder box will open. Select the files you want to convert and click Open.How to open videos
Step 2: Choose a web preset1. Click the Video tab for video output formats and presets.

12
2. Use the arrow on the right to scroll through the list and click the Web-Compatible Video group.3. In the pop-up list, choose the format and resolution that you want to use.
Step 3: Convert and upload
Check the Save to box to see where your web-ready files will be saved. To change the folder, click the folder icon . When you're ready, click Convertto start processing your videos. When conversion is finished, you can start uploading your files to your blog or website.
Converting DVDsThe era of the DVD disc is coming to an end, and not all homes now have a DVD drive. Make your favorite movies future-proof by backing them up toyour computer. Step 1: Open DVD1. Insert the disc into your DVD drive. If you have an external DVD drive, connect it to the computer.2. Click Add Media in the upper left-hand corner of the window.

13
3. Hold your mouse pointer over Add DVD.4. Click the disc name in the menu that appears. If you don't see the DVD in the list, click Open DVD and find the DVD location.
Tip: some DVDs are protected from illegal copying and cannot be converted. Movavi Video Converter is not intended for copying protected media. Step 2: Choose video format1. In the lower part of the window, click the Video tab to see a list of video formats.2. Choose the group with the format you like.3. Click that format and pick a video resolution. To convert with the original resolution, choose the line marked with "Same as input".
Step 3: Choose files and streams (optional)Many DVDs come with bonus clips, as well as a number of subtitle tracks. Select just the files you need to save disk space: Bonus files
To remove bonus files that you don't need, click the icon to the right of the video. Audio tracks1. Find the audio information in the right-hand part of the file list and click on it to open the list of audio tracks.2. Deselect the audio tracks that you don't want to keep.Learn more about audio tracks Subtitles1. Find the subtitle information in the right-hand part of the file list and click on it to open a list of available subtitles.2. Choose the subtitle track that you want to keep.Learn more about subtitles

14
Step 4: ConvertThe Save to box at the bottom shows where the DVD movies will be saved after conversion. To save the files to a different location, click the folder iconand choose the new destination folder. When you're ready, click Convert to start processing the videos.
Creating GIFs from videosStep 1: Open a video1. Click Add Media in the upper left-hand corner of the window and choose Add Video from the pop-up menu.2. Find the video you want to turn into a GIF and click Open.
Step 2: Choose GIF format1. In the lower half of the window, click the Images tab to see image formats.2. Click GIF to see GIF conversion options.3. Choose a size for your animated GIF. For example, "Medium GIF".

15
4. (Advanced) To change the frame rate, click the Customize button next to the output format at the bottom to customize the selected preset. In thesettings window, choose the frame rate you need and click OK. Higher frame rates will make the movements seem smoother, but will increase the GIF'sfile size.
Step 3: Save the GIFTake a look at the Save to box at the bottom of the window: this is where the finished file will be created. To choose a different location, click the folder
icon and select the new output folder. Click Convert to save your animated GIF.
Convert for devicesHow to convert video for devices
Each device has specific requirements to the type of video it can play, with some older devices supporting only a handful of video formats. To make sureyou'll be able to watch the videos on your device, convert them using the output preset created specifically for your device, and all the necessary outputsettings will be selected automatically. This way, you don't have to look for what formats your phone supports, as it's all selected for you. Find your device automaticallyIf you're converting for a smartphone or tablet, connect the device via USB, and the converter will automatically detect it and recommend the best outputformat.

16
Learn more Step 1: Add filesOpen the files you want to convert. Step 2: Open the Devices tabIn the lower half of the window, click the Devices tab so see a list of device presets.
Step 3: Find your brandIn the Devices list, use the arrows on the left and right to scroll through the list and find your device's manufacturer and click on it to see a list of devicemodels. If you don't see the device's brand in the list, try the search bar, or use a general category, such as Android, TVs, or Tablets.
Step 4: Find your deviceChoose your device from the selected brand's list and click on it to select it as the output format. Now, the format, codec, and resolution is automaticallyselected to be optimal for your device.

17
For example, to convert videos for the iPhone 6s, find Apple in the list, and then choose the iPhone 6s preset.Step 5: Convert
Click the folder icon next to Save to to select where you want to save the videos, and then click Convert to start processing the files.
After the videos are ready, all you need is to upload them to the device.
* A preset is a pre-made configuration for a specific device that contains all necessary media properties required by this device.
Device recognitionConverting videos for devices such as smartphones and tablets is quick and easy: all you need to do is connect the device and the program will suggest therecommended format and resolution for it. Step 1: Add filesDrag the files you want to convert onto the converter window.How to open files Step 2: Connect the deviceConnect the smartphone or tablet to your computer using a USB cord. Step 3: Confirm the device1. Once the device is recognized, a dialog box will appear with the device name and the recommended preset. Check that the device name matches yourdevice. If the dialog box doesn't appear, click the Device Detection button to the right of the search bar.2. If the device is correct, click Use These Settings to use the recommended output format, resolution, and other parameters.

18
Several devices are listedSometimes, the device detection box shows a list of several devices. This can happen if you have more than one connected device, or with some devicesthat are very similar and can't be identified precisely. In this case, open the Choose your device list and select the device model that you want to convertfor. Then, click Use These Settings to use the recommended format, resolution, and other settings. Device was not detected• If the dialog box does not appear, try clicking the Device Detection button to the right of the search bar.• Try reconnecting the device and wait for the system to detect it.• If that doesn't help, you can still find a preset for your device manually on the Devices tab. Detailed instructions The wrong device was detectedIf the dialog box shows the wrong device, and that device isn't also connected to your computer, you can still find it manually on the Devices tab of thepreset list. If you want to report this mistake, write to us at [email protected] and tell us your device model, and which device was shown instead.Detailed instructions Step 4: Convert!
1. Click the folder icon next to the Save to box and choose where to store the files after converting.2. Click Convert to start converting the videos for your device.3. After conversion has finished, upload the videos to your device and enjoy.
Converting audioEven though MP3 is the most commonly used format, you may also encounter other formats, such as AAC or FLAC, which can preserve audio qualitybetter, but aren't supported by all devices. Converting audio will not only let you play music on any device or player, but also organize and compress yourmedia library. Step 1: Open music1. Click Add Media in the upper left-hand corner.2. Click Add Audio in the pop-up list.3. A Finder dialog box will appear. Choose the audio files you want to convert.Or simply drag the audio files onto the converter window.

19
Step 2: Choose audio format1. In the lower part of the window, click the Audio tab to see the list of audio formats.2. Click the format you want to convert the audio to.3. Choose the bitrate that you want to use. To convert without changing the bitrate, choose the preset marked with "Original bitrate". Bitrate – the bitrate reflects the amount of data in kilobits that is played back each second (measured in kbps). Higher bitrate usually means higher audioquality as well as larger file size, as extra data needs to be stored within the file. For audio presets, the bitrate is listed next to the format. When youconvert a file to lower bitrate, the extra bits of data are irretrievably lost, meaning that you cannot increase quality by converting audio to a higher bitrate,because the file no longer contains the data that can be used to restore higher quality.
0Step 3: Edit audio (optional)Rename file

20
Renaming media files helps keep the music library in order.
1. Click the pencil icon next to the file you want to rename.2. Enter the file's new name.3. Click OK.Renaming files Step 4: Convert and upload
1. To change where the files are stored, click the folder icon next to the Save to box and choose the output folder.
2. If you want to upload the music to iTunes after converting, click the upload button at the top of the window and select iTunes from the pop-upwindow.3. When you're ready, click Convert to start the audio processing. Your files will be ready in a few minutes at most.
Converting imagesMost applications and web services are limited to just a few image formats, and working with rare formats usually requires expensive software. Convertimages to be able to use them wherever you like! Step 1: Open images1. Click Add Media in the upper left-hand corner of the window.2. Click Add Images in the pop-up menu.3. Choose the images you want to convert and click Open.
Step 2: Choose format1. In the lower half of the window, click the Images tab to see a list of image formats.

21
2. Click the format you want to use.Hint: not all formats support transparency. If the images have transparent areas, choose the PNG or BMP format.
Step 3: Resize images (optional)To batch resize the images:
1. At the bottom of the window, click the cogwheel icon next to Output format. 2. Click the box under Frame size and choose a size that you want to use for all images, or choose any of the following and enter the size into the widthand height boxes on the right:
Custom: scales the images to exactly the size you specify.Smart fit: scales the images up or down as close as possible to the specified size without changing the proportions.Up to size: scales the images down as close as possible to the specified size without changing the proportions. Images smaller than this size willremain unchanged.
To allow changing the image proportions, click the link icon next to the width and height boxes: – locked, – unlocked. 3. If the new size is different from the original image proportions, choose a resize method for your images:
Letter box – unused space will be filled with black.Stretch – the image will stretch to fill the entire area.Crop – the image will be resized to fill the entire area, and overflowing edges will be cut off.
4. Click OK to accept the changes. If you want to preview the result, click the Edit button next to an image.

22
Step 4: Convert
1. Check the output folder in the Save to box. To change where the files are saved, click the folder icon next to it.2. Click Convert to start processing the images.
Opening mediaTo begin converting media files, you will first need to open them in Movavi Video Converter. 1. Click Add Media at the top of the window. 2. Click one of the buttons to open files of that media type. 3. A Finder window will open. Find the files you want to convert and click Open to add them to the queue.

23
Drag and drop from FinderOr simply drag the files from any Finder window onto Movavi Video Converter to add them to the queue.
File listAfter you have opened the files, they will all appear in the file list. Here, you can view information about the files, choose audio and subtitle tracks, andmanage the output file.
On the left, you can see the file's media information, and on the right you can manage the output file's name, media streams, and edit the file.
To remove a file from the list, click the X button on the right:
Media streams

24
Every media file is made up of streams for each data type. A video can contain a video stream, a couple of audio streams, and several subtitle streams.When converting files, you can find the information about these streams in two columns on the right. Here, you can manage the streams that end up in theoutput file.
Compress videoYou can compress a video to reduce its output file size by sacrificing some of the quality. To do that, click the output file size and move the slider to thenecessary file size while keeping an eye on the quality.Compressing videos Choose audio tracksIf a file comes with a number of audio tracks for different languages, you can keep just the ones you need. To do that, click the audio stream and deselectthe audio tracks that you don't want to keep.Choosing audio tracks Choose a subtitle trackWhen you convert videos, you can permanently overlay subtitles on top of the video. To do that, click the subtitle stream and choose or add the subtitletrack that you want to use.Choosing a subtitle track Information about the original fileTo find detailed information about the video and audio streams of the original file, right-click anywhere on the file and choose File Information from thepop-up menu.Media information
Choosing audio tracksIt isn't uncommon to find videos with several audio tracks, whether it's a different language or a director's commentary. Removing tracks you don't needwill reduce the output file size. Step 1: Open audio track listIn the rightmost column of the file list, click the audio track information box. The audio track list will appear.
Step 2: Choose audio tracksIn the box with the audio tracks, deselect the audio tracks that you don't want to appear in the output video. If you want to completely remove audio fromthe file, select the No Audio option.

25
Step 3: Apply changesClick Apply in the audio track box to accept the changes. Now, when you convert the videos, the output file will contain just the tracks you've selected.
Note: not all formats support multiple audio tracks. The table below shows the maximum number of audio tracks for each format:
Format Number of audio tracks supported
3GP 1
AVI 16
DVD 8
FLV, SWF 1
MKV 16
MOV 16
MP4 16
MPEG-1, MPEG-2 16
OGV 1
WebM 16
WMV 16
Choosing a subtitle trackWhen you convert videos, you can permanently overlay any subtitle track onto the original video. This can be useful if you're watching videos on a device,or your player doesn't support subtitles. Step 1: Open the subtitle listIn the rightmost column of the file list, you can see the subtitle and audio track information for each file. Click the information next to the subtitle balloon
to open the list of subtitles.
Step 2: Choose a subtitle trackIn the subtitle list, click the subtitle track that you want to use. You can choose soft or hard subtitles. Softsubs are stored as a separate track and you can add several subtitle tracks to one file. All the subtitle tracks will be saved if you choose this option. Hardsubs are permanently drawn on top of the video and cannot be turned off, but they are guaranteed to be visible in any player.

26
Adding subtitles from fileTo add your own subtitles that aren't stored inside the original file, click the Add button above the subtitle list and then open the subtitle file that you wantto add. You can use *.srt, *.ass, or *.ssa subtitle files. Subtitle encodingIf the subtitle text looks scrambled, open the Subtitle encoding box and try setting the encoding with the right language.
Extract audio from videoYou can quickly save your favorite song from any movie by converting the video to an audio format. Step 1: Open the videoOpen the video file that you want to extract the soundtrack from.
Step 2: Choose an audio format1. Click the Audio tab in the lower half of the window.

27
2. Click the audio format you want to use.• If you're not sure, use the MP3 format: it is supported by most players and allows for a decent quality.• If you want to convert audio with multichannel sound, you can use WAV, OGG, or FLAC formats.3. Choose the necessary bitrate (quality) from the pop-up list. Choose Original bitrate if you want to keep the original quality.
Step 3: ConvertClick Convert to save the selected audio fragment.
Compressing videosCompressing videos can help reduce the size of the output file by reducing their bitrate. When you compress a video, it loses some of its original quality,but even a small bitrate reduction can make the file significantly smaller. Step 1: Add filesOpen the files you want to compress. Step 2: Choose the output formatThe video's format and resolution play a very important role in the output file size. 1. Click the Video tab to see a list of video formats. 2. Click the format you want to convert the videos to.Hint: Some formats and codecs compress video better than others. If you're not sure which format to choose, use the MP4 format with the H.264 codec forthe best size to quality ratio. 3. From the format list, choose the resolution that you want to use.

28
Choosing the resolutionA video's resolution is the number of pixels in every frame. A higher resolution can preserve more information and quality, but it also requires more diskspace. Select a slightly lower resolution if the video is very large. For example, you can convert 1080p videos to 720p.Learn more Step 3: Compress video1. In the file list, check the file's output size in the second column from the left.
2. Click the file size information to show compression options. There, drag the file size slider to the necessary file size while keeping an eye on the qualitybelow. 3. Click Apply in the compression box to accept the changes.
Step 4: ConvertClick Convert to start processing the compressed file.

29
Media informationIn the leftmost column of the file list, you can see the general information about the file, including its original size, video codec, resolution, and bitrate.
To get more details, right-click the file and choose File Information from the pop-up menu. Here, you can see all the information about the original file'svideo and audio streams.
Choosing output formatAfter you've added media files, it's time to choose the output format for converting all of the files in the list. Follow the steps below to choose a videooutput format. Step 1: In the lower half of the window, click the Video tab to see a list of video formats.

30
Step 2: Click the video format that you want to convert the files to. A list of presets for this format will appear.
Step 3: Choose the video codec and resolution that you want to use.To convert without changing the resolution, choose the preset marked with "Original size" or "Same as input".
Each preset displays information about the video, audio, and other output parameters that can help you choose the right one.
Choosing the right resolutionA video's resolution is its size in pixels, horizontally and vertically. It is usually listed as the width times height: 1920x1080, or just the height: 1080p. Thismeans that the video is 1920 pixels long and 1080 pixels tall. The higher a video's resolution, and the more pixels it has, the more detail it can preserve. First of all, you need to know the original file's resolution. To do that, check the video information next to the file's preview. When you choose the outputresolution, select the same resolution to preserve the original quality, or choose a lower resolution to reduce the file size. Advanced settingsIf you can't find a suitable preset, you can select the necessary properties manually. Click the Customize button next to the 'Output format box to modifythe video and audio properties of the currently selected preset.Learn more
Choosing a format for devicesIf you are planning to watch some videos on your device, convert them first to save space and make sure that they can be opened with the built-in player. Step 1: Click the Devices tab in the lower half of the window.

31
Step 2: Use the arrows to scroll through the list and find your device's manufacturer. Step 3: Click on the manufacturer to open the list of devices. Choose your device model from the list. Now, the output format, resolution and otherparameters have been set to what's best for this device.If you cannot find your device in the list, try choosing a preset for a similar model.
See also:Automatic device recognition
Choosing an image formatIf you come across a rare image format, you can batch convert images to a more popular format. Step 1: Click the Images tab to see a list of image formats.
32
Step 2: Click the format you want to use and then click the preset for that format. Social networkingWebsites often have limits on the maximum image size you can upload. If you're planning to upload the photos to a social network or make an avatar,click the Social Networking group and select where you want to upload the files. The image size and format will be set to those accepted by the selectedwebsite. GIF imagesUsing the image presets in the GIF format group, you can create both static and animated GIFs. Simply choose the GIF size that you want: smaller GIFswill load much faster, but larger GIFs let you see all the detail.How to create animated GIFs
See also:How to convert images
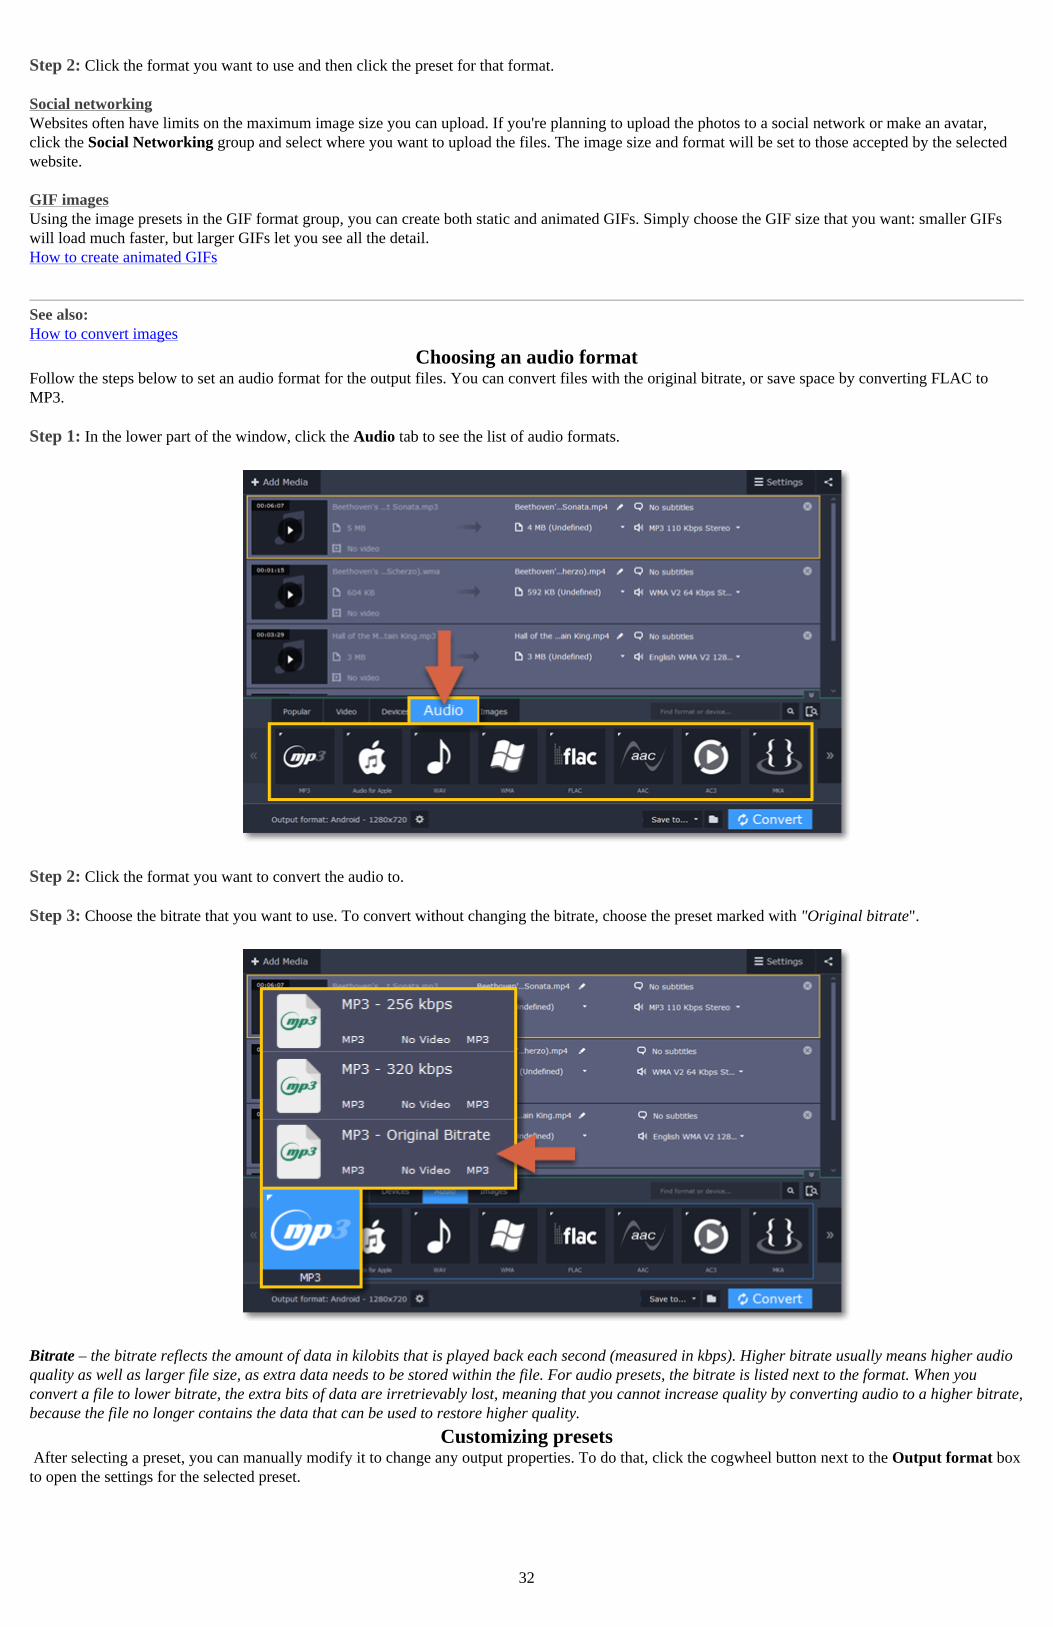
Choosing an audio formatFollow the steps below to set an audio format for the output files. You can convert files with the original bitrate, or save space by converting FLAC toMP3. Step 1: In the lower part of the window, click the Audio tab to see the list of audio formats.
Step 2: Click the format you want to convert the audio to. Step 3: Choose the bitrate that you want to use. To convert without changing the bitrate, choose the preset marked with "Original bitrate".
Bitrate – the bitrate reflects the amount of data in kilobits that is played back each second (measured in kbps). Higher bitrate usually means higher audioquality as well as larger file size, as extra data needs to be stored within the file. For audio presets, the bitrate is listed next to the format. When youconvert a file to lower bitrate, the extra bits of data are irretrievably lost, meaning that you cannot increase quality by converting audio to a higher bitrate,because the file no longer contains the data that can be used to restore higher quality.
Customizing presets After selecting a preset, you can manually modify it to change any output properties. To do that, click the cogwheel button next to the Output format boxto open the settings for the selected preset.

33
To see more settings, click Show Advanced at the bottom of the settings window. Two Pass EncodingEncoding videos in two passes means that the encoder will go over the media file twice: first, to analyze the file and then to convert it using the collecteddata. This takes extra conversion time, however it allows for a higher output quality and possibly a slight reduction in file size. To enable two pass encoding:1. Inside the Settings window, click Show Advanced to show the encoding settings.2. Under Encoding type, choose Two Pass.3. Click OK to accept the changes.
Tune settingsYou can use Tune for advanced settings of H.264 videos.
Tune optimizes the preset settings for the best quality depending on the type of the input video: • Film – for action movie content• Animation – for animated cartoons• Grain – for grainy, detailed video material• Stillimage – for still image footage• PSNR – for achieving high peak signal to noise ratio• SSIM – optimization for structural similarity• Fast Decode – for faster decoding• Zero Latency – for streaming video.
Renaming filesBefore you convert files, you can change the name of each output file.
Step 1: Click the pencil icon next to the output file name in the second column of the file list. Step 2: Enter the new name into the Output file name box. Step 3: Click OK to accept the changes.

34
Now, the output file will be converted with this name.
Changing output folderWhen your files are converted, the new files will be created in the folder listed in the Save to box at the bottom of the window:
To change where new files are stored, click the folder icon next to the Save to box and choose the folder you want to use. If you want to save the new files in the same folder as the original files, click the arrow on the Save to box and choose Save converted files next to theoriginals.
Uploading files to iTunesAdding converted videos and music to your iTunes library will allow you to play them on any of your devices connected to the same iTunes account. Before you startTo upload files to iTunes, you will need iTunes 6.0 or higher installed on your computer. Download iTunes Step 1: Prepare the files1. Open the files you want to convert. Opening media2. Choose an output format. Choosing output format Step 2: Choose iTunes uploading
1. Click the upload button at the top of the window.2. Select iTunes from the pop-up list.

35
Step 3: Convert filesClick Convert to start processing your files. After conversion is completed, the files will be uploaded to your iTunes cloud storage.
iTunes® is a trademark of Apple Inc.
Energy-saving optionsIf you are running a batch conversion for very large files, the process may take a while even on fast computers. The energy-saving options allow you toshut down or hibernate your computer after it is done converting the files. 1. Click the Settings button in the upper right-hand corner of the window. 2. Click the When finished menu to see the energy-saving options. 3. Select one of the following:• Do nothing – the conversion will run as usual, and your computer will stay on.• Hibernate – your computer will hibernate after conversion is completed.• Shut down – your computer will turn off after conversion is completed. We recommend that you close any other applications that may prevent yourcomputer from shutting down.
If you change your mind, you will be able to disable shutdown or hibernation during conversion. Please note that if you use any of the energy-savingoptions, iTunes and web uploading will be temporarily disabled. The next time you start the converter, the energy-saving options will be automaticallyturned off.
SuperSpeed accelerationSuperSpeed mode allows you to convert video files much faster than usual without losing any quality. When you convert videos, encoding the video fromone codec to another takes the most time. If you don't need to change the video codec or resolution, the video data can simply be copied to the new file,without having to convert it. This is also sometimes called remultiplexing or remuxing. When can it be used?SuperSpeed mode can be used any time when the video stream in the output file is the same as the original:• The output codec is the same as the video codec in the original file (e.g. when converting MKV files with the H.264 codec to MP4 files with the H.264codec)• The output resolution is the same as the original

36
• No video adjustments are used. This includes stabilization, video adjustments, denoising, subtitles, watermark, crop, and rotation.• No video compression is used.• You can still enjoy SuperSpeed conversion when trimming files. How to use SuperSpeed conversionTo use SuperSpeed conversion mode, choose output presets marked with the SuperSpeed badge:
This can be a video format or a device preset that has the same codec and resolution as your original files. Enabling SuperSpeedTo enable these acceleration options, click the Settings button in the converter window, and choose Preferences from the pop-up menu. In the preferences,switch to the Acceleration tab and select the available acceleration options.
Saving a snapshotTo save a single frame from the video: Step 1: Click the Play button on the video's thumbnail in the list to view the original file.
Step 2: In the player window, move to the frame you want to save and click the Take a Snapshot button.

37
Step 3: A Finder window will open. Choose where you want to save the snapshot and click Save.
The snapshot will be saved with the original video's size and quality.
Movavi Video Converter Settings and PreferencesTo open the converter preferences, click the Settings button at the top of the window to open the settings menu. There, click Preferences.
The preferences are organized into tabs at the top: General, Conversion, and Acceleration. Click the related tab to find the preferences you need.General preferencesConversion preferencesAcceleration preferences
General preferencesOn the General tab of the preferences, you can choose the interface language and control how the application behaves.
Automatically check for updates – select this option and you'll be notified whenever a new version is available. Updates within your version areabsolutely free (e.g. 1.0 to 1.1), while new releases are offered with a hefty discount to registered users. Send anonymous usage stats to Movavi – checking this box will allow the program to send usage statistics to our development team, enabling us to fixany bugs you may encounter much faster, as well as add new features that you might be missing. The data contains no personal information, will not bedisclosed to third parties and will be used for software improvement purposes only.

38
Learn more about how we use the statisticsRead our Privacy Policy
Conversion preferencesOn the Conversion tab of the preferences, you can manage how files are converted. Under Output file name, you can choose what happens if a file with the same name already exists in the output folder: • Overwrite existing file: the old file will be permanently replaced with the newly converted file.• Automatically rename files: new files will be automatically renamed, and both files will be preserved. Under After conversion, you can choose what happens when conversion is finished: • Open output folder: shows the converted files in the output folder.• Play notification sound: the program will notify you when it has finished converting your files.
Acceleration preferencesOn the Acceleration tab of the Preferences, you can accelerate conversion using the latest technologies.

39
Enable SuperSpeed conversion• SuperSpeed is an express conversion mode that converts compatible formats over 50x faster than regular conversion.• SuperSpeed works if the output codec is the same as the original codec, and no effects have been applied to the video.• When choosing an output format, look for presets with the SuperSPEED badge. This means that converting to this format will be much faster thanothers.Learn more about superspeed
Help and supportIf you have any questions or concerns regarding Movavi software, you are welcome to contact our support team. You can contact us using:E-mail: [email protected] – guaranteed response in 3 business daysLive Chat – available 12 A.M. — 6 P.M. GMT \ 4 P.M. — 10 A.M. PSTOr use the contact form Please describe your problem in as much detail as possible; any screenshots, log files, or information about your system will allow us to help you faster. Frequently asked questions:Why is "Trial Version" written on my videos?The watermark is only placed on videos in the trial version. Buy an activation key and use it to activate the program. After that, you can convert fileswithout the watermark.Removing trial restrictions My file does not open• Check the list of supported formats to see if this file format is supported by the converter.• If the format and codec are supported, the file may be damaged.• Some DVDs and files can be protected with DRM against copying. The converter is not intended to make illegal copies of such files.Supported formats
System requirements Minimum system requirements Recommended configurationOperating system Mac OS #® 10.7 or higher
Processor 64-bit Intel® processor
Resolution 1280x768 screen resolution, 32-bit color 1280x1024 or higher
RAM 128 MB RAM 2 GB
Available disk space 120 MB available hard disk space forinstallation,750 MB for ongoing operations
2 GBVideo conversion may require several GB ofadditional space.
Additional features Sound card for audio playbackAdministrator permissions are required for installation
Movavi Video Converter may also run on slower machines, however, we cannot guarantee stable performance if the minimum requirements are not met.
Supported formatsVideo Formats Supported Codecs
Input Output
3GP, 3G2 H.263, H.264, MPEG-4
ASF MPEG-4, VC-1, WMV V7
AVCHD H.264
AVI H.264, MPEG-4, MJPEG

40
DivX, Xvid, DV, Cinepack, Fraps, TechSmith, Uncompressed
DivX DivX
DVD MPEG-1, MPEG-2
FLV1, H.264FLV
H.263, VP6, Flash Screen Video
M2TS MPEG-2, H.264
M2TS, TS, MTS, M2T MPEG-2, H.264
H.264, MPEG-4, MJPEG, Theora, VP9MKV
DV, Uncompressed
MOV H.264, MPEG-4, MJPEG
MOV, QT H.264, MPEG-4, MJPEG, AIC, ProRes, Sorenson 1/3, PNG
MP4 MPEG-4, H.264
MP4, M4V MPEG-4, H.263, H.264, MJPEG, ProRes
MPG, VOB MPEG-1, MPEG-2
MPG, MPEG, MPE, M1V, VOB, DAT, MOD, TOD, VRO MPEG-1, MPEG-2, H.264
MXF MPEG-2, DV
TheoraOGV
MPEG-4
RM, RMVB Real Video 2/3/4, Cooker
FLV1SWF
MJPEG
VP8, VP9WebM
VP7
WMV V8WMV
WMV V7, WMV 9, WMV 9 Screen,WMV 9Advanced profile, MPEG-4,WMV 9.1 Image V2
WTV H.264, MPEG-2
Audio Formats
Supported Codecs Input Output
AAC AAC
AIF, AIFF Uncompressed
APE Monkey's Audio
AU, SND PCM
FLAC FLAC
M4A, M4B AAC, ALAC, PCM
M4A AAC, ALAC
MP3 MP3
OGG Vorbis
Opus Opus
WAV PCM, AAC, MP3
WMA Pro, WMA Voice WMA
WMA 9
Image Formats Input Output
APNG
BMP
DPX
GIF
JPEG (.jpg, .jp2, .jls)
JPEG (.jpg)
Netpbm formats (.pam, .pbm, .pgm, .ppm)
PCX
PNG
PTX
SGI
TGA
TIFF
WebP
XBM
XWD

41
Codec activationSome video and audio codecs are patented by other companies, and it is required that new users activate the codecs they use to comply with patent law. 1. When you open a media file or export your project with one of these codecs, you may see a Codec Activation message. 2. Select the Activate other codecs without asking box to activate all codecs automatically in the future. The codecs will be activated automatically, butan Internet connection is still necessary. 3. Click Activate to complete the codec activation. Codec could not be activatedIf you see a codec activation error, make sure that you have a working Internet connection. Without Internet, the codecs cannot be activated even if you'vechosen to activate them automatically. After you've restored the network connection, please restart the application. What kind of data is being sent?The data we send does not contain any information that can personally identify you. We only receive information about which codecs were used.
GlossaryGeneralContainer Format (Video Format)A container format is a file format for storing video or audio files that contains video and audio data in separate streams, as well as any other associateddata, such as subtitle tracks and additional data about the file. You can think of a container format as a box that holds together all the parts that make up avideo file, as illustrated below. The container format is what you usually see when you work with video files: you can judge which format your video is inby the file extension: *.mp4 corresponds to MP4 format, *.mkv to Matroska format, etc.
CodecWhile a video file contains video and audio streams, these streams are in turn encoded using a video or audio codec that compresses the data. You canthink of a codec as a language: to play a video encoded with a certain codec, your player needs to be able to 'understand' how it was encoded, so that itcan decode or decipher the file. If your computer does not know how to decode a new codec, you can fix this by converting the file to a different format orby installing a codec pack. However, please keep in mind that a lot of malware programs disguise themselves as codec packs; you should only downloadcodec packs directly from codec manufacturers or from trusted sources. BitrateWhen referring to media, bitrate is the number of bits that is played back each second. The higher the bitrate, the more details that can be conveyed witheach second of the video or audio stream, and therefore, the higher the quality. There are two types of bitrate: constant bitrate (CBR) and variable bitrate(VBR). Videos with constant bitrate, as you can probably guess from the name, have the same bitrate for each and every frame of the video, no matterthe complexity of the frame: simple frames, for example, those completely filled with black, have the same number of bits as complex, colorful frames.This has a number of limitations, since the simple frames take up more bits than needed to convey them, while complex frames are limited in quality. Withvariable bitrate, however, each frame is allotted only as many bits as it needs, without limiting quality or wasting data. In most cases, we recommend thatyou use variable bitrate, however, CBR is sometimes useful for streaming media. Frame RateThe frame rate, or frames per second (FPS) is the number of video frames that is contained in a second of video. At low frame rates, you may notice thatthe video is 'jittery', while higher frame rates produce a smooth high-quality video. Shooting videos at high frame rates (48 or 60 FPS) requires moreresources and disc space, but you can easily slow down a high-FPS video to produce a slow-motion effect without producing visual stutter. The industrystandard for cinema frame rate is 24 or 25 frames per second, which is perceived as comfortable to the human eye. Resolution (Frame Size)Resolution is the number of pixels that can fit inside the video frame. It is usually presented as "width x height" of the frame, for example, 1280x720 or1920x1080. Sometimes, resolutions may also be referred to as "720p" or "1080p", by the number of pixels in a frame vertically. At high resolutions, eachframe is conveyed using more pixels, therefore allowing for more detail and higher quality, though taking up more disc space. Whenever you convert avideo to a lower resolution, you irretrievably lose some data, but if you convert a low-resolution video to HD, the quality will stay the same. If you need todo so, however, we recommend that you use Upscale SD, DVD to HD presets in Movavi Video Converter, as they use an algorythm that slightly improvesvideo quality when converting to larger resolutions. Aspect RatioA video's aspect ratio is the ratio of a video's width to its height in pixels. The two most frequently used aspect ratios are 4:3 and 16:9. The former is usedby most analog television broadcasts, while the latter, also referred to as widescreen – in films, DVDs, and modern HD video. When the aspect ratios ofyour screen and a video do not match, you may notice black bars on two sides of the video. Sample RateSample rate, measured in Hertz, determines how many samples of digital audio are recorded each second. Higher sample rates allow to record higherquality audio, although the files will take up slightly more space. The recommended sample rate is 44100 Hz, which is the standard for audio CDs,delivering sound that covers the full range of human hearing. To reduce file size, you can convert audio with lower sample rates, as low as 22 kHz, butkeep in mind the quality deterioration.

42
Video FormatsAudio Video Interleaved – AVI (*.avi)AVI is a multimedia container format created by Microsoft in the early 1990s. AVI supports multiple video and audio codecs and can contain up to 16audio and 16 subtitle tracks. While support for AVI is widespread on all operating systems, it is steadily being replaced by more efficient formats. DivX (*.divx)DivX is a proprietary video format developed by DivX, Inc. Using its own codec, DivX allows for high compression rates while retaining high quality.Sometimes the DivX codec is also used to encode video in AVI files. DivX is not supported by many media players, and requires a codec pack to play, butyou can convert DivX files into AVI or other formats using Movavi Video Converter. QuickTime – MOV (*.mov)Developed by Apple, QuickTime is natively supported on Macs and iOS devices, so if you need to be sure that your video can be played on a Mac,converting it to MOV would be a good idea. To play MOV files on Windows, you can either download and install the QuickTime player from Apple'sofficial website, or view it using Movavi 3D Media Player. OtherInterlaced Video, Deinterlacing VideoVideo interlacing is a method used in traditional analogue video broadcasting that arose due to the limitations of early television. Each frame of the videois split into half-frames, each frame containing even and odd rows consecutively. This allows to broadcast at double the frame rate, producing a seeminglysmoother video stream, while the eye does not notice the missing rows. However, on digital displays, interlaced video may produce visible defects in theform of horizontal lines. Deinterlacing helps remove these defects using algorythms by merging the two half-frames into one. Movavi Video Converterautomatically deinterlaces output videos, and you can use the Deinterlace effect if you are editing analogue video in Movavi Video Editor. PresetA preset is a pre-made configuration that contains all the necessary properties to convert a video file, including format, codec, resolution, etc.