Embed Size (px)
Citation preview

© Freescale Semiconductor, Inc., 2009. All rights reserved.
Freescale Semiconductor
Document Number: AN3812Rev. 3, 01/2009
1 AbstractWith increasing board densities, multilayer boards, the use of ball grid arrays, and the limited space for test points, Design for Test (DFT) is crucial for being designed into the board from the onset. This application note discusses how a board should be designed to optimize its DFT capabilities.
For the purposes of this document, an actual board design was selected and its test coverage analyzed. The board was then redesigned, using the DFT strategies discussed here. The board’s test coverage was then analyzed again. The test coverage had increased form 55% to 77%.
2 IntroductionThis section provides an overview of test methods and how boundary scan works.
Architecting DFT into Board Design to Leverage Board-level Boundary Scanby: Rod Watt
Contents1 Abstract . . . . . . . . . . . . . . . . . . . . . . . . . . . . . . 12 Introduction . . . . . . . . . . . . . . . . . . . . . . . . . . 1
2.1 The Need for Test . . . . . . . . . . . . . . . . . . . 22.2 Traditional Testing Methods . . . . . . . . . . . . 22.3 Boundary Scan Testing . . . . . . . . . . . . . . . 3
3 Design for Test Guidelines . . . . . . . . . . . . . . 53.1 System Specification/Architecture . . . . . . . 53.2 Board Design . . . . . . . . . . . . . . . . . . . . . . . 9
4 Design Example . . . . . . . . . . . . . . . . . . . . . . 154.1 Overview . . . . . . . . . . . . . . . . . . . . . . . . . 154.2 Pre-DFT . . . . . . . . . . . . . . . . . . . . . . . . . . 164.3 Post-DFT . . . . . . . . . . . . . . . . . . . . . . . . . 174.4 DFT Board Improvements . . . . . . . . . . . . 18
5 Test Summary . . . . . . . . . . . . . . . . . . . . . . . . 20

Introduction
Architecting DFT into Board Design to Leverage Board-level Boundary Scan, Rev. 3
2 Freescale Semiconductor
2.1 The Need for TestIn any system development, test is key to ensure the final product works in a reliable way as intended. During the development cycle, various tests are carried out on the board (Figure 1). These costs incurred by an error tend to compound as a design progresses through development. The strategy is to identify and correct errors as early as possible in the design cycle.
Figure 1. Typical PCB Test Strategy
As board technology matures, testing becomes more difficult. The use of BGA technology and multi layer boards make it impossible to physically probe every pin on the board. Figure 2 shows the progress of technology and package size reduction over time.
Figure 2. Package and PBC Trend
2.2 Traditional Testing MethodsTraditional testing methods rely on physical connectivity to the board to provide a stimulus and to monitor the response. Two methods used are used—both of which require that specific points of interest on the board be accessible, such as pins of the IC under test:
Missing parts
Process faults
Solder problems
Stuck @ 0/1
Bridges
At-speed problems
Device problems
Configuration problems
Environmental testing
Assembly Optical Inspection
Structural Test
Functional Test
System Test
CustomerAssemblyAssembly Optical Inspection
Optical Inspection
Structural Test
Functional Test
Functional Test
System Test
System Test
Customer
Targeted fault types

Introduction
Architecting DFT into Board Design to Leverage Board-level Boundary Scan , Rev. 3
Freescale Semiconductor 3
• Placing the board on fixed probes (for example, a “bed of nails”)• Using moving connections (for example, “flying probe”)
Figure 3 shows limitations of traditional testing methods. Access to all the points of interest might not always be possible. For example, accessing a pin on a BGA package is not possible unless the signal is brought out to an external layer.
Figure 3. Traditional Testing Methods
2.3 Boundary Scan TestingJoint Test Action Group (JTAG), created the concept of boundary scan testing as a method to overcome limitations of bed-of-nails testing. IEEE standardized the method and is now known as IEEE 1149.1 specification. Any device that supports boundary scan is sometime referred to as a “1140.1 compliant device”.
In boundary scan testing, each primary input and output signal on a device is supplemented with a multi-purpose memory element called a boundary scan cell. These cells are configured into a parallel-in, parallel-out shift register. A parallel load (“capture”) loads the values on the input pins to be loaded into input cells and the values inside the device to be loaded to the output cells. A parallel unload (“update”) places the values in the output cells to be passed to the devices output pins. Depending on the type of input cells, the values in the input scan cells are passed into the device. Figure 4 shows the principle of a boundary scan.
Inner board layers, blind vias
Bridging fault
Potentially defective wire bond
Open under BGA
Power or GND
BGA BGA
Short to power or groundESD damage

Introduction
Architecting DFT into Board Design to Leverage Board-level Boundary Scan, Rev. 3
4 Freescale Semiconductor
Figure 4. Principle Of Boundary Scan
If a board contains several 1149.1 compliant devices, they should be connected together in a daisy chain, with the test data out from one device going to the test data in of the next device on the chain. Figure 5 shows an example of the boundary scan chaining.
Figure 5. Boundary Scan Chain
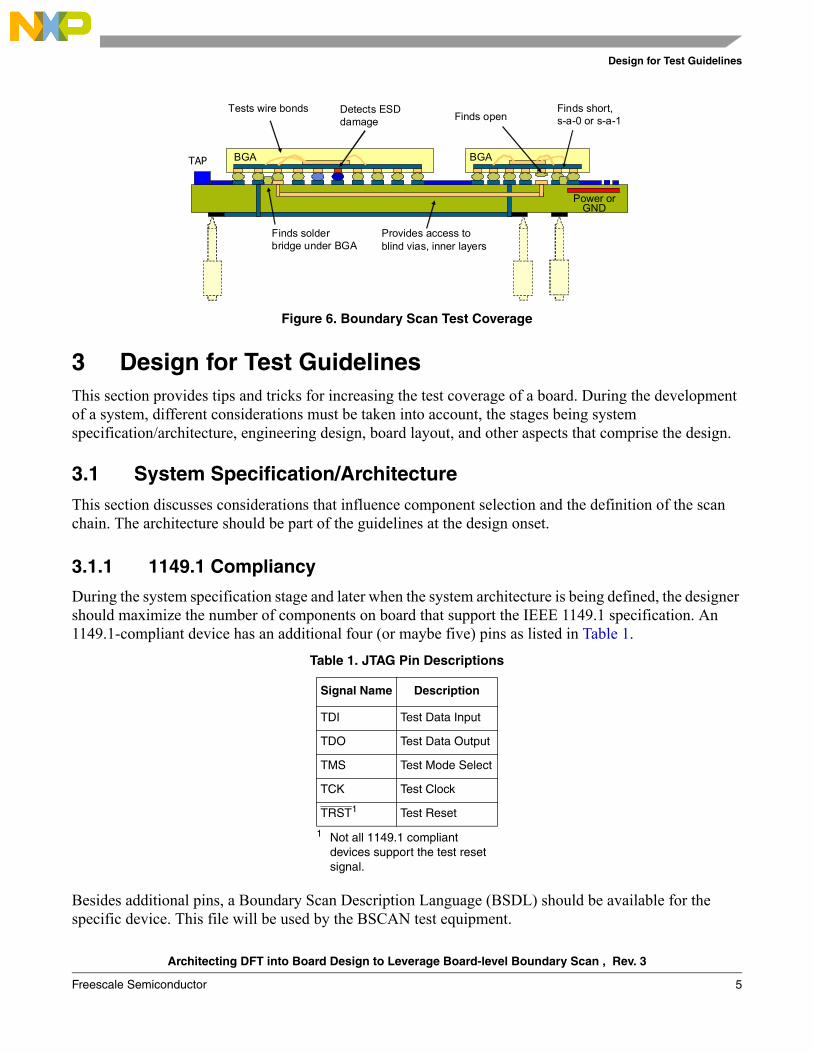
Boundary scan testing overcomes the limitations of traditional “probe” methods by eliminating the need to probe the pins of interest. Instead, all the test stimulus and test results can be accessed via a standard test header. As long as the test chain has been set up correctly, all 1149.1 compliant devices in the chain can be tested. Figure 6 shows boundary scan test coverage.
IC Core
TMS
TCK
TDI TDO
TMS
TCK
TDI TDO
Instruction Reg.Instruction Reg.
ID RegisterID Register
BypassBypass
ControllerController
TAP
TDI
Scan device #1
#2
#3
TDOTMSTCK
Design for Test Guidelines
Architecting DFT into Board Design to Leverage Board-level Boundary Scan , Rev. 3
Freescale Semiconductor 5
Figure 6. Boundary Scan Test Coverage
3 Design for Test GuidelinesThis section provides tips and tricks for increasing the test coverage of a board. During the development of a system, different considerations must be taken into account, the stages being system specification/architecture, engineering design, board layout, and other aspects that comprise the design.
3.1 System Specification/ArchitectureThis section discusses considerations that influence component selection and the definition of the scan chain. The architecture should be part of the guidelines at the design onset.
3.1.1 1149.1 Compliancy
During the system specification stage and later when the system architecture is being defined, the designer should maximize the number of components on board that support the IEEE 1149.1 specification. An 1149.1-compliant device has an additional four (or maybe five) pins as listed in Table 1.
Besides additional pins, a Boundary Scan Description Language (BSDL) should be available for the specific device. This file will be used by the BSCAN test equipment.
Table 1. JTAG Pin Descriptions
Signal Name Description
TDI Test Data Input
TDO Test Data Output
TMS Test Mode Select
TCK Test Clock
TRST1
1 Not all 1149.1 compliant devices support the test reset signal.
Test Reset
Provides access to blind vias, inner layers
Finds solder bridge under BGA
Finds open
Power or GND
BGATAP
Tests wire bonds
BGA
Finds short,s-a-0 or s-a-1
Detects ESD damage

Design for Test Guidelines
Architecting DFT into Board Design to Leverage Board-level Boundary Scan, Rev. 3
6 Freescale Semiconductor
3.1.2 Optional Instruction Support
In addition to the IEEE 1149.1 specification, optional instructions have been defined to enhance the test capabilities of the device. Table 2 shows details of these optional instructions. (The designer should choose devices that support these optional instructions to enhance the overall testability of the system.)
3.1.3 IEEE 1532 Support
Although the 1149.1 JTAG standard provides a method for the testing of circuits; it is also used as a programming interface for CPLDs and FPGAs. IEEE 1532 is an extension to the IEEE 1149.1 JTAG standard and provides additional flexibility for configuring programmable logic devices. IEEE 1532 provides a standard methodology for accessing and configuring programmable devices that already support IEEE 1149.1.
Table 2. Optional Instructions
Instruction Description
INTEST Places the device in an internal boundary-test mode and selects the boundary-scan register to be connected between TDI and TDO. During this instruction, the boundary-scan register is accessed to drive test data on-chip via the boundary inputs and receive test data on-chip via the boundary outputs.The bit code of this instruction is defined by the vendor.
RUNBIST Places the device in a self-test mode, enabling a comprehensive self-test of its core logic, and selects a user-specified data register to be connected between TDI and TDO. During this instruction, the boundary outputs are controlled so that they cannot interfere with other devices during the RUNBIST operation. The boundary inputs are controlled so that external signals cannot interfere with the RUNBIST operation.The bit code of this instruction is defined by the vendor.
CLAMP Sets the outputs of the device to logic levels determined by the contents of the boundary-scan register and selects the bypass register to be connected between TDI and TDO. Before loading this instruction, the contents of the boundary-scan register can be preset with the SAMPLE/PRELOAD instruction. During this instruction, data can be shifted through the bypass register from TDI to 3-14 Boundary-Scan Architecture and IEEE 1149.1 TDO without affecting the condition of the outputs.The bit code of this instruction is defined by the vendor.
HIGHZ Sets all of the device’s outputs (including two-state as well as three-state types) to a disabled (high-impedance) state and selects the bypass register to be connected between TDI and TDO. During this instruction, data can be shifted through the bypass register from TDI to TDO without affecting the condition of the device’s outputs.The bit code of this instruction is defined by the vendor.
IDCODE Allows the device to remain in its functional mode and selects the optional device identification register to be connected between TDI and TDO. The device identification register is a 32-bit shift register containing information regarding the device manufacturer, device type, and version code. Accessing the device identification register does not interfere with the operation of the device. Also, access to the device identification register should be immediately available, via a TAP data-scan operation, after power-up of the device or after the TAP has been reset using the optional TRST pin or by otherwise moving to the Test-Logic-Reset state.The bit code of this instruction is defined by the vendor.
USERCODE Allows the device to remain in its functional mode and selects the device identification register to be connected between TDI and TDO. During the USERCODE instruction, the optional 32-bit device identification register captures user-defined information about the device. Accessing the device identification register does not interfere with the operation of the device.The bit code of this instruction is defined by the vendor.

Design for Test Guidelines
Architecting DFT into Board Design to Leverage Board-level Boundary Scan , Rev. 3
Freescale Semiconductor 7
The IEEE 1532 in-system programmability (ISP) standard simplifies manufacturing support for ISP devices. The IEEE 1532 specification enables concurrent in-system programming of multiple devices while minimizing production programming times. The standard builds on the 1149.1 JTAG boundary-scan architecture standard by addressing both silicon and software issues to create a simplified and homogeneous ISP environment. The standard specifies a common software platform for programming many device types, including memory devices and PLDs. It enables common programming operation for all IEEE 1532-compliant devices on a system board.
Ensuring that all the programmable devices on the board are compliant to the 1532 standard allow these devices to be connected together in a single chain and be programmed via a single interface.
3.1.4 Scan Chain, an Example of a Simple Case
In its simplest form, all of the JTAG devices on the board can simply be connected together in a single chain—assuming they are all electrically compatible. In such a chain, TDO of one device is connected to TDI of the next device on the chain. The “control” signals—TMS, TCK and TRST (if present)—are common to all devices in the chain, as depicted in Figure 7.
Figure 7. Simple Scan Chain
There are some considerations which may lead a designer to segment a design into multiple chains, explained in Section 3.1.5, “Scan Chain Partitioning”.
3.1.5 Scan Chain Partitioning
This section explains segmenting a design into multiple chains. Although simply connecting all of the 1149.1 devices together in a single chain may be the simple to implement, there are a number of reasons that should be considered beforehand—such as muxed pins, programmable devices, and I/O voltage.
3.1.5.1 Muxed Pins
Some devices share their JTAG signal pins with other functions. For example, Freescale’s processors typically mux these pins with their OnCE/COP/BDM pins. Typically, a third-party tool requires access to this OnCE/COP/BDM port to allow access to the processor. If the specific processor is in a scan chain with other devices, the third-party OnCE/COP/BDM tool might not work correctly. In such a scenario, such devices (with multiple uses for their JTAG pins) should be on a separate scan chain.
IC1 IC2 IC3 IC4 IC5 IC6
IC12 IC11 IC10 IC9 IC8 IC7
TDI
TDO
TDI
TDO

Design for Test Guidelines
Architecting DFT into Board Design to Leverage Board-level Boundary Scan, Rev. 3
8 Freescale Semiconductor
3.1.5.2 Programmable Devices
In addition to board testing, it is common to use the JTAG pins on a CPLD or FPGA to program it. If these programmable devices are at the end of a long scan chain of other devices, the time taken to program them increases. In such a situation, it is preferable to keep any programmable devices on a separate, shorter chain.
Additionally, some devices may be programmed indirectly from a device on the scan chain, For example, a flash device is not programmable directly from JTAG; however, it may be programmed by a processor or FPGA that is on the scan chain. Besides the programmability, the programming is faster.
3.1.5.3 I/O Voltage
All of the devices on a particular chain should be all at the same voltage or voltage tolerant, thereby avoiding potential damage to either the devices or the test equipment.
Figure 8 shows an example of a board with multiple devices and multiple scan chain partitioning. The board has five distinct scan chains.
1. Chain 1—a generic scan chain2. Chain 2—a chain of DSP devices that will also use a third-party tool for programming and debug3. Chain 3—programmable devices, separated to speed up the program cycle4. Chain 4—devices running at a separate voltage; in this case 1.8V5. Chain 5—a flash device (connected to an 1149.1 compliant device), separated to speed up
programming.
Figure 8. Multiple Scan Chains
IC3 IC4
IC9
Generic Device
IC1
IC12 IC11
DSP (Compliant with 3rd party Debugger Tools)
IC2
IC10
FPGA/CPLD (IEEE 1532 Std. Compliant)
IC5 IC6
1.8V Devices
IC8 IC7
Flash Device (To be programmed via JTAG)
IC7
Flash Device (To be programmed via JTAG)
KEY: Note
• Design partitioning does NOT result in a loss of test coverage
TDI
TDO
TDI
TDO
TDO
TDI
TDITDI
TDO
TDO
Design for Test Guidelines
Architecting DFT into Board Design to Leverage Board-level Boundary Scan , Rev. 3
Freescale Semiconductor 9
3.1.6 Board-to-board Interconnect Testing
The complete system may be composed of several boards. The scan chain should be implemented so it can extend to any other boards as required, thus allowing testing of the entire system using a single access point.
3.1.7 Edge Connector Access
Care should be taken on the placement of the JTAG header to allow easy access for the test equipment, particularly for a board that is plugged into a rack environment.
3.2 Board DesignThis section explains various board design considerations.
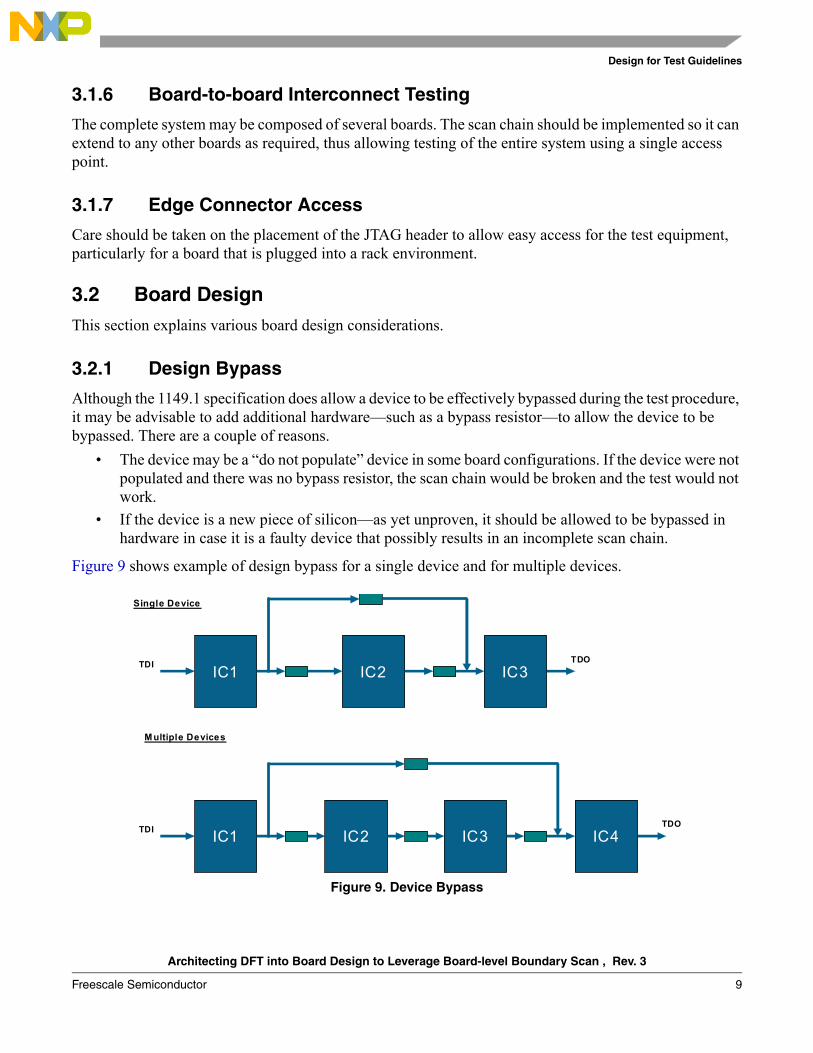
3.2.1 Design Bypass
Although the 1149.1 specification does allow a device to be effectively bypassed during the test procedure, it may be advisable to add additional hardware—such as a bypass resistor—to allow the device to be bypassed. There are a couple of reasons.
• The device may be a “do not populate” device in some board configurations. If the device were not populated and there was no bypass resistor, the scan chain would be broken and the test would not work.
• If the device is a new piece of silicon—as yet unproven, it should be allowed to be bypassed in hardware in case it is a faulty device that possibly results in an incomplete scan chain.
Figure 9 shows example of design bypass for a single device and for multiple devices.
Figure 9. Device Bypass
IC1TDI TDOIC2 IC3
Single Device
Multiple Devices
IC1TDI TDOIC2 IC3 IC4

Design for Test Guidelines
Architecting DFT into Board Design to Leverage Board-level Boundary Scan, Rev. 3
10 Freescale Semiconductor
3.2.2 TAP Signal Buffering
Buffering should be added between the scan chain header and the devices on the board for the following reasons:
• The scan “control” lines (TCK, TMS and TRST) fan out to all of the devices on the scan chain. It is important to ensure that sufficient drive is provided for all the devices on the scan chain.
• Buffering protects scan chain devices from the tester. For example, the tester might be driving its signals at 5 V, while the scan chain on the board might be operating at 3.3 V. Buffering could protect the devices on board.
• Buffering can protect the tester’s I/O circuitry from incompatible signal levels from the board under test.
Figure 10 shows an example of signal buffering.
Figure 10. Signal Buffering
3.2.3 Signal Terminations
To ensure correct operation, the scan signals should be correctly terminated on the board. Table 3 lists the recommended terminations, and Figure 11 shows examples.
Table 3. JTAG Signal Recommended Terminations
Signal Name Recommended Termination
TDI 10K pullup
TMS 10K pullup
TRST 10K pullup
TCK Series 68 ohm resistor and 100 pf capacitor to ground
TDO 22 ohm resistor in series (next to last device in chain) and a 10K resistor pullup

Design for Test Guidelines
Architecting DFT into Board Design to Leverage Board-level Boundary Scan , Rev. 3
Freescale Semiconductor 11
Figure 11. Signal Termination
3.2.4 Controlling of Non-BSCAN Devices
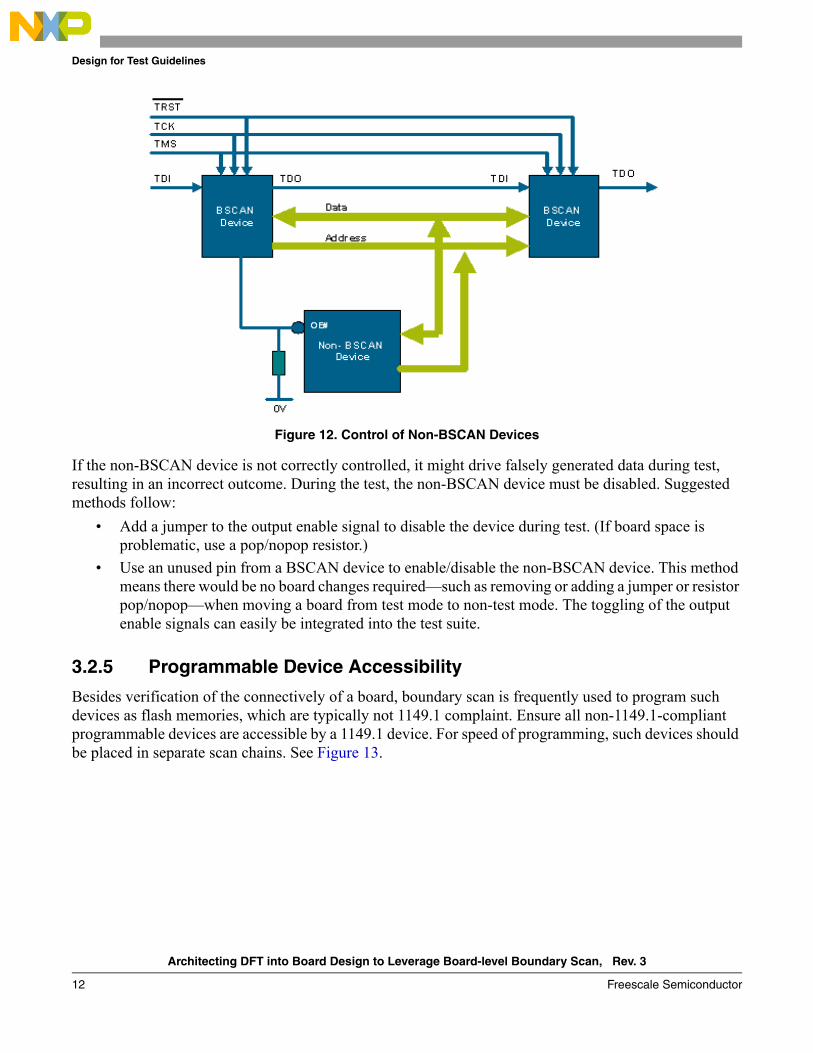
Because not all devices on the board will be 1149/1 compliant, ensure that all non-BSCAN devices are correctly controlled so they do not cause bus conflicts. Figure 12 shows an example of three devices connected to the same bus, two devices 1149.1 compliant, and one not.
Design for Test Guidelines
Architecting DFT into Board Design to Leverage Board-level Boundary Scan, Rev. 3
12 Freescale Semiconductor
Figure 12. Control of Non-BSCAN Devices
If the non-BSCAN device is not correctly controlled, it might drive falsely generated data during test, resulting in an incorrect outcome. During the test, the non-BSCAN device must be disabled. Suggested methods follow:
• Add a jumper to the output enable signal to disable the device during test. (If board space is problematic, use a pop/nopop resistor.)
• Use an unused pin from a BSCAN device to enable/disable the non-BSCAN device. This method means there would be no board changes required—such as removing or adding a jumper or resistor pop/nopop—when moving a board from test mode to non-test mode. The toggling of the output enable signals can easily be integrated into the test suite.
3.2.5 Programmable Device Accessibility
Besides verification of the connectively of a board, boundary scan is frequently used to program such devices as flash memories, which are typically not 1149.1 complaint. Ensure all non-1149.1-compliant programmable devices are accessible by a 1149.1 device. For speed of programming, such devices should be placed in separate scan chains. See Figure 13.

Design for Test Guidelines
Architecting DFT into Board Design to Leverage Board-level Boundary Scan , Rev. 3
Freescale Semiconductor 13
Figure 13. Making Programmable Devices Accessible
3.2.6 BSCAN Devices Surrounding Logic Clusters
Functionalities of non-BSCAN logic such as buffers, multiplexers, etc., can be verified if they are surrounded by 1149.1-compliant devices. Figure 14 shows an example of two BSCAN devices connected together by a logic cluster.
Figure 14. Surround Logic Clusters with BSCAN Devices
Assuming the logic cluster is a simple buffer, any data driven by BSCAN device 1 will be seen by BSCAN device 2. (after a finite delay, depending on the complexity and characteristics of the logic cluster). By knowing the data BSCAN device1 drove and monitoring the data seen by BSCAN device 2, the connectivity and functionality of the logic cluster is verifiable.

Design for Test Guidelines
Architecting DFT into Board Design to Leverage Board-level Boundary Scan, Rev. 3
14 Freescale Semiconductor
3.2.7 Clock Control
To enable testing of synchronous devices and the relevant controller, ensure the clocks are under BSCAN control from the same device. Suggested methods follow:
• The BSCAN device could act as a buffer for the clock signal—possible if the BSCAN device is a CPLD or an FPGA (for examples).
• If the clock is not routable through the BSCAN device, then it is permissible to use the device to control the clock. For example, if the BSCAN device has a spare output pin, use the pin to gate the clock to the synchronous device.
• Additional control (such as a jumper or pop/no pop resistor) could be used to allow routing and clock control change. This would be the least attractive option because the board would require a physical change in moving the board from “normal operation” to “test operation”.
Figure 15 shows clock control methods.
Figure 15. Clock Control
3.2.8 Use of BSCAN-device Spare Pins
Frequently, spare pins will be available on some of the BSCAN devices. For example, the board might have a CPLD with unused pins. Or maybe the processor has spare general purpose I/O pins. As long as it does not interfere with the functionality of the design, these spare I/O pins should be used to monitor non-BSCAN circuitry on the board. Figure 16 shows use of spare pins on BSCAN devices.
B SC AN D evice
S yn c.D eviceAd d ress
D ata
C on trol
“T rad itio nal C lo ckin g”
C LK
B SC A N De vice
S ync .De vice
Ad d re ss
D ata
C on tro l
“D FT C lo ckin g”
CL K
B SC A N De vice
S ync .De vice
Ad d re ss
D ata
C on tro l
“D FT C lo ckin g”
CL K
C LK

Design Example
Architecting DFT into Board Design to Leverage Board-level Boundary Scan , Rev. 3
Freescale Semiconductor 15
Figure 16. Use of Spare Pins on BSCAN Devices
3.2.9 Add-in Boards
Any add-in boards should also be included in the SCAN chain. If the board is an option, board detect logic can be added so the scan chain is complete whether the board is populated or not. See Figure 17.
Figure 17. Add-in Boards
4 Design ExampleThis section provides a board design example to examine how test coverage can be increased by using the DFT guidelines discussed elsewhere.
4.1 OverviewThe design example is a typical design, later modified using some of the tip and techniques discussed in Section 3, “Design for Test Guidelines”. Both boards were analyzed for test coverage.

Design Example
Architecting DFT into Board Design to Leverage Board-level Boundary Scan, Rev. 3
16 Freescale Semiconductor
The board design is a Digital Subscriber Line Access Multiplexer (DSLAM), a networking application based on an MPC8360 that supports DRAM and flash. The main data flow is by way of a GBit Ethernet connected to a SONET interface. A CPLD cleans up some simple logic and also provides sequencing for power and resets.
4.2 Pre-DFTFigure 18 shows the block diagram of the initial DSLAM board.
Figure 18. System Block Diagram (Pre-DFT)
On this board, the JTAG signals would be typically be available on two headers:• One header is available on the CPLD, used to program it.• Another header is available on the MPC8360, pinned out as a Common On-chip Processor (COP),
which allows a third-part tool connection to aid in software development.
Per analysis of this board, of the 1056 nets on the board, 55% were covered by test. Table 4 shows full analysis.
RS232
Flash
MPC8360(U33)
PHY(U41)
GbitEthernet Mag. PHY
(U10)
Buffer(U15)
Buffer(U18)
Flash
ROM
Config.
Sw
itches
Buffer
SONET Framer(U45)
SPF
CPLD(U49)
VoltageRegulation
DDRDDRDDR
JTAG CO
P
(Y7)
(Y2)
DDR

Design Example
Architecting DFT into Board Design to Leverage Board-level Boundary Scan , Rev. 3
Freescale Semiconductor 17
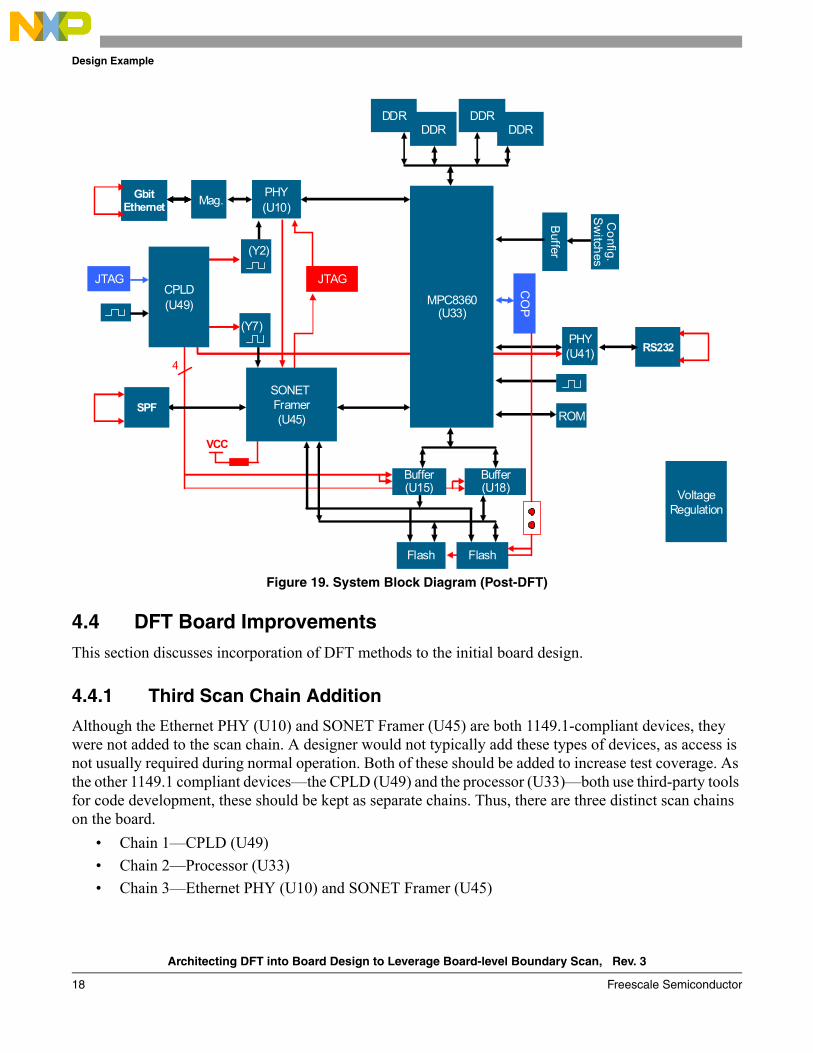
4.3 Post-DFTFigure 19 shows the block diagram of the DFT-improved DSLAM board.
Table 4. Initial Test Coverage
Design Feature Pre-DFT
Net Statistics Testability % Covered %
Total number of nets 1056 100% 1056 100%
Nets in netlist 909 909
Nets added for NC pins 147 147
Sensed and driven nets 848 80% 580 55%
Sensed by BSCAN device (direct) 434 348
Sensed through transparent device (Indirect) 350 200
Sensed ground/power nets 48 16
Implicitly tested nets 16 16
Nets not tested by BSCAN 208 20% 476 45%
Design Example
Architecting DFT into Board Design to Leverage Board-level Boundary Scan, Rev. 3
18 Freescale Semiconductor
Figure 19. System Block Diagram (Post-DFT)
4.4 DFT Board ImprovementsThis section discusses incorporation of DFT methods to the initial board design.
4.4.1 Third Scan Chain Addition
Although the Ethernet PHY (U10) and SONET Framer (U45) are both 1149.1-compliant devices, they were not added to the scan chain. A designer would not typically add these types of devices, as access is not usually required during normal operation. Both of these should be added to increase test coverage. As the other 1149.1 compliant devices—the CPLD (U49) and the processor (U33)—both use third-party tools for code development, these should be kept as separate chains. Thus, there are three distinct scan chains on the board.
• Chain 1—CPLD (U49)• Chain 2—Processor (U33)• Chain 3—Ethernet PHY (U10) and SONET Framer (U45)
4
JTAG CO
P
Buffer(U18)
PHY(U41)
(Y7)
MPC8360(U33)
DDR
RS232
Flash
Buffer(U15)
Flash
ROM
Config.
Sw
itches
Buffer
SONET Framer(U45)
SPF
CPLD(U49)
PHY(U10)
GbitEthernet Mag.
PHY(U10)
GbitEthernet Mag.GbitEthernet Mag.
VoltageRegulation
DDRDDRDDR
(Y2)
JTAG
VCC

Design Example
Architecting DFT into Board Design to Leverage Board-level Boundary Scan , Rev. 3
Freescale Semiconductor 19
NOTEThere is no decrease in the amount of test coverage attained by having separate scan chains; however, the designer should check the specification of the JTAG test hardware to ensure there are no limitations to the number of chains for simultaneous tools support.
4.4.2 Additional Configuration Settings
Before using the Ethernet PHY (U10) and the SONET Framer (U45) in a test mode, the designer checked for any compliance enable pins on the devices and ensured they were set correctly. In this design, the SONET Framer has configuration pins (SCAN_MODE, SCAN_EN, DEVHIGHZ, etc.), now tied to unused CPLD I/O pins so they can be correctly driven during test time.
4.4.3 Clock Control Addition
In the initial design, the clock enable control lines for Y2 (the Ethernet PHY clock) and Y7 (the SONET framer clock) were floating. In the newer design, the enable signals from both devices now connect to CPLD I/O pins that were unused. This action allows the clocks to be enabled/disabled as required during testing.
4.4.4 Buffer OE Control Addition
In the initial design, the output enable signals for the flash muxes/buffers (U15 & U18) were tied directly to ground, permanently enabling them. In the newer design, separate enable signals driven from an unused CPLD I/O pins were added, which allowed the buffers to be disabled/enabled during test.
4.4.5 RS232 PHY Control Change
In the initial design, the FORCEOFF control lines for the RS232 Transceiver (U41) were tied high. In the newer design, they were connected to an enable signal driven from an unused CPLD I/O pin. This action allows the transceiver to be enabled/disabled during test.
4.4.6 “Fast Write” Control Signal Addition
Besides checking the connectivity on the board, JTAG tools can also be used to program memory devices. In this case, the board uses two flash devices, which are connected to a 1149.1 compliant device, U33. To facilitate a faster programming cycle, some JTAG tools support a faster write control signal.
In the newer design, the additional write enable signal was added to JTAG header to support this faster programming feature. A jumper was used so this signal could be disabled without interfering with third-party COP tools that are typically used with the processor, U33.
4.4.7 Loopback Addition
Three loopback connectors were added to the I/O to allow loopback tests to be carried out:.

Test Summary
Architecting DFT into Board Design to Leverage Board-level Boundary Scan, Rev. 3
20 Freescale Semiconductor
• GBit Ethernet connector• SPF (SONET) connector• RS232 connector.
4.4.8 Use of Third-party Plug-in Modules
Third-party JTAG tool vendors provide plug-in modules that can be used to test areas of the design not covered by 1149.1 compliant devices. In the newer design, test points were added to signals, which were subsequently pinned out to a header, thereby providing connectivity to such a module.
4.4.9 Other Design Considerations
The newer design reflect the following changes, checks, and considerations: • Ensured there was no logical inversion of TCK or TMS.• Each TDI signal was pulled high with a resistor at least 1K.• Each TCK signal was terminated with a 68-ohm resistor in series with a 100 pf capacitor to ground.• Each TMS signal was pulled high with a resistor at least 1K.• The TDO signal of the last device in each chain had a 22-ohm resistor placed as close as possible
to its output.
NOTETRST, if present, is an active low and can be pulled in either direction with at least a 1K resistor. Pulling TRST low ensures that the device stays in functional mode during normal operation; however, care must be taken to ensure that the line can be driven high for boundary scan testing.
5 Test SummaryTable 5 lists the tests and their descriptions performed on post-DFT board.
Table 5. Post-DFT Board Tests
Test Explanations
Infrastructure • Checked the integrity of the scan path signals TDI-TDO. • Using the device ID codes, validated correct devices’ placements. • Checked for the functionality of the TRST pin that was present on devices in the chains.
Interconnect Checked the integrity of the connections between boundary scan devices. The majority of the test coverage was achieved here; the test checked for opens and shorts between pure boundary scan nodes.
DDR memory Checked the functionality of the DDR devices by writing to and reading from each device. Tests were generated for each of the four DDR devices—U56, U57, U58, and U63.
Serial EEPROM Checked for the functionality of serial EEPROM devices on the assembly. This test can also be used to write a data file to the device.

Test Summary
Architecting DFT into Board Design to Leverage Board-level Boundary Scan , Rev. 3
Freescale Semiconductor 21
NOTETests have been generated for the AT24C04 device, U43, and can be used if the device is populated.
Flash programming • Checked for the functionality of the flash devices on the assembly. • Allowed for the programming and verification of the two flash devices, U52 and U53. • Checked the functionality of the two transceiver devices, as the flash components were
connected directly to U15 and U18.
LED cluster Checked for the functionality of the LEDs (LD1-LD8) by lighting each device. In a production environment, the test can be paused so that the operator can verify the color of each before moving on. Tests for the three LEDs in P2 were not possible as the boundary scan cells were controlled by a pin that was also used to control the clocks on the device.
Switch clusters Checked for the functionality of the switches on the assembly. Switches were toggled to inject faults and verify that each was working properly. Test have been generated for SW9, SW10, and SW11.
Power cluster Checked for the functionality of the powerup circuitry. Verified the state of the “Power OK” signals by applying stimulus to the “Power On” signals.
RS232 cluster Loopback test verified the functionality of the RJ22 header and the Intersil ICL3225, U41. Checked to ensure that data fed into U41 can be read back through the device.
Table 5. Post-DFT Board Tests (continued)
Test Explanations

Document Number: AN3812Rev. 301/2009
Information in this document is provided solely to enable system and software implementers to use Freescale Semiconductor products. There are no express or implied copyright licenses granted hereunder to design or fabricate any integrated circuits or integrated circuits based on the information in this document.
Freescale Semiconductor reserves the right to make changes without further notice to any products herein. Freescale Semiconductor makes no warranty, representation or guarantee regarding the suitability of its products for any particular purpose, nor does Freescale Semiconductor assume any liability arising out of the application or use of any product or circuit, and specifically disclaims any and all liability, including without limitation consequential or incidental damages. “Typical” parameters that may be provided in Freescale Semiconductor data sheets and/or specifications can and do vary in different applications and actual performance may vary over time. All operating parameters, including “Typicals”, must be validated for each customer application by customer’s technical experts. Freescale Semiconductor does not convey any license under its patent rights nor the rights of others. Freescale Semiconductor products are not designed, intended, or authorized for use as components in systems intended for surgical implant into the body, or other applications intended to support or sustain life, or for any other application in which the failure of the Freescale Semiconductor product could create a situation where personal injury or death may occur. Should Buyer purchase or use Freescale Semiconductor products for any such unintended or unauthorized application, Buyer shall indemnify and hold Freescale Semiconductor and its officers, employees, subsidiaries, affiliates, and distributors harmless against all claims, costs, damages, and expenses, and reasonable attorney fees arising out of, directly or indirectly, any claim of personal injury or death associated with such unintended or unauthorized use, even if such claim alleges that Freescale Semiconductor was negligent regarding the design or manufacture of the part.
Freescale™ and the Freescale logo are trademarks of Freescale Semiconductor, Inc. All other product or service names are the property of their respective owners.
© Freescale Semiconductor, Inc. 2009. All rights reserved.
How to Reach Us:
Home Page:www.freescale.com
Web Support:http://www.freescale.com/support
USA/Europe or Locations Not Listed:Freescale Semiconductor, Inc.Technical Information Center, EL5162100 East Elliot RoadTempe, Arizona 852841-800-521-6274 or +1-480-768-2130www.freescale.com/support
Europe, Middle East, and Africa:Freescale Halbleiter Deutschland GmbHTechnical Information CenterSchatzbogen 781829 Muenchen, Germany+44 1296 380 456 (English)+46 8 52200080 (English)+49 89 92103 559 (German)+33 1 69 35 48 48 (French)www.freescale.com/support
Japan:Freescale Semiconductor Japan Ltd.HeadquartersARCO Tower 15F1-8-1, Shimo-Meguro, Meguro-ku,Tokyo 153-0064Japan0120 191014 or +81 3 5437 [email protected]
Asia/Pacific:Freescale Semiconductor China Ltd.Exchange Building 23FNo. 118 Jianguo RoadChaoyang DistrictBeijing 100022 China +86 10 5879 [email protected]
For Literature Requests Only:Freescale Semiconductor Literature Distribution CenterP.O. Box 5405Denver, Colorado 802171-800-441-2447 or +1-303-675-2140Fax: [email protected]