Embed Size (px)
Citation preview

Dayton Kellya, Sarah L Westb* a Department of Psychology, Trent University, 1600 West Bank Drive, Peterborough, Ontario, Canada, K9L 0G2 b Department of Biology, Trent University, 1600 West Bank Drive, Peterborough, Ontario, Canada, K9L 0G2 * Correspondence to: [email protected] Received: April 30, 2019; Accepted: December 22, 2019; Published: December 31, 2019 Abstract
Keywords: Athlete, Exercise, Lactate, Oxygen Consumption, Rowing
Preface, Purpose and Scope This laboratory manual was written to establish techniques for conducting research in exercise science at Trent University. This manual contains detailed procedures for conducting maximal voluntary uptake testing in elite athletes, blood lactate threshold validation and determination techniques, and a variety of blood draw and analysis procedures. This manual may be used by new undergraduate, graduate, and/or Faculty researchers in order to gain an understanding of the equipment for exercise testing at Trent University and how it has been
This laboratory manual was written to establish techniques for conducting research in exercise science at Trent University. Currently, in its first iteration, this manual contains detailed procedures for conducting maximal voluntary uptake testing in elite athletes, blood lactate threshold validation and determination, and power testing in rowing. All procedures include a description of the purpose and application of the procedure, the materials required, and step-by-step instructions. This manual differs from commercially available alternatives in that it has been tailored to the equipment and resources currently available to researchers at the Trent University. After reading this document, new undergraduate, graduate, and/or faculty researchers can expect to obtain improved understanding of how to use the equipment for exercise testing that is available at Trent University, the practical considerations that should be incorporated into novel experimental design, and the manners in which Trent exercise equipment has been purposed to date. The procedures contained in this document should be used as a guide and modified to meet the demands of the future experimental protocol.
Journal of Multidisciplinary Research at Trent
Volume 2 Issue 1
Operating Procedure
Standard Operating Procedures: Trent Kinesiology Lab

Kelly and West (2019)
JMRT 2(1): Page 147-170
148
developed to date. It may be used as a guide for potential exercise-based procedures at the university. This manual refers to equipment currently available at the Trent Kinesiology Laboratory. Some procedures within this document require professional certifications (for example, phlebotomy). It is the reader’s responsibility to ensure they have completed the necessary certifications and training to conduct these procedures. If special certification is necessary, it has been listed within the procedure’s respective “Procedure description” section. Any new research projects will be required to undergo research ethics evaluation and discussion of safety protocols as per Trent University policy. This manual only serves as a reference (starting point) as to the currently developed exercise testing methodologies. Some procedures reference the “National Rowing Hub”. These procedures have been developed from existing procedures used by Rowing Canada Aviron to test prospective Olympic athletes. They have been included to allow for exercise researchers at Trent to continue with existing partnerships by supporting the collection of this data at our Trent University National Training Hub. Abbreviations Term Abbreviation Anaerobic-aerobic threshold AAT
Cardiopulmonary Exercise Testing CPET
Rating of perceived exertion RPE
Rowing Canada Aviron RCA
Standard Operating Procedure SOP
Minutes Min
Maximal lactate steady state MLSS
Maximal voluntary oxygen consumption VO2 max
Watts W

Kelly and West (2019)
JMRT 2(1): Page 147-170
149
0. Maximal voluntary oxygen consumption (VO2 max) testing with the MetaLyzer 3B 0.1. Purpose To standardize the methods of maximal oxygen consumption testing used for rowers at Trent University. 0.2. Procedure description Maximal oxygen consumption testing is a gold standard indicator of aerobic fitness. Elite athletes use maximal oxygen consumption testing to identify their current fitness state and track improvements over time. Oxygen consumption can be measured using a metabolic cart which samples an athlete’s inspiration volume, expiration volume, and expiration oxygen and carbon dioxide content -- breath by breath -- to calculate the amount of oxygen used by the body. When measured during a bout of exercise, the peak values obtained can be used to infer an athlete’s fitness state and inform their training. These standard operating procedures (SOPs) describe a process for conducting such testing in elite rowers using an incremental step, and then ramp, test to exhaustion on the rowing ergometer. Currently, two variations of this protocol are used at Trent University. Readers are referred to the “1.9 Protocol Variations” subsection when deciding between protocols. These procedures have been designed to be accompanied by blood lactate testing throughout the exercise protocol (hereon referred to as “blood lactate sampling”). Readers should either ignore this step in the protocol or be referred to “2.5 Procedures: Sampling Blood Lactate” for SOP pertaining to blood lactate sampling. The following procedures were adapted from the cardiopulmonary exercise testing (CPET) procedures outlined in the Cortex: CPET Systems Instruction Manual. The procedures assume that MetaSoft Studio has been downloaded on the computer to be used, and the devices to be used have been configured with the MetaSoft Studio software (for instructions to complete these steps, see the Cortex: CPET Systems Instruction Manual). 0.3. Interested Parties These procedures have been designed specifically to test elite rowers on a rowing ergometer. These procedures may be used by:
• Rowing Canada Aviron (RCA) and their associated divisions (i.e the Trent University Training Hub).
• Researchers at Trent University
Adaptations to this protocol should be made if individuals from other populations are tested. 0.4. Locations The following procedures are designed specifically for Trent University’s Kinesiology Laboratory.

Kelly and West (2019)
JMRT 2(1): Page 147-170
150
0.5. Procedures: Setting up the Metabolic Cart Materials
Common Name Brand Name Online Resource Metabolic cart MetaLyzer 3B Main Unit https://cortex-
medical.com/media/boxes/medium/CORTEX-METALYZER-3B.jpg
Black cable attached to the turbine
Flow Sensor https://cortex-medical.com/media/boxes/medium/LP_ML_Mood_METALYZER_1.jpg
Gas sampling line Sampling line (p.14) https://www.procarebv.nl/wp-content/uploads/2016/11/Cortex-Metalyzer-3B_-Handleiding.pdf
Grey USB cable USB cable https://encrypted-tbn0.gstatic.com/images?q=tbn:ANd9GcQWZx7V0coyBUMx2eNTMjTFud2XCxK3L5VqgCYg_QDyaFSpMrBc
Power cord Medical power supply cord https://img.auctiva.com/imgdata/1/6/2/6/8/0/2/webimg/975122498_tp.jpg
Access key MetaSoft Studio Dongle http://app.vip-software.com/templates/Gemini/img/slide2.jpg
Laptop & MetaSoft Studio software
Any laptop containing the programs MetaSoft Studio and MetaSoft Studio Toolbox (version 5.1.3)
https://encrypted-tbn0.gstatic.com/images?q=tbn:ANd9GcQBSQbuR3NW68K-hp8Ej311VEGNIZU-kiQge6ktlL9xQ0_rbq5rqA
Procedure 1. Plug the black MetaLyzer power cord into the back of the MetaLyzer 3B main unit and into a
wall outlet. 2. Plug the grey USB cable into the back of the MetaLyzer 3B main unit and into the computer
running MetaSoft Studio. 3. Plug the blue access key into a USB port on the computer running MetaSoft Studio. 4. Plug the white end (pneumatic plug) of the clear sample line into the “Gas” port on the front of
the MetaLyzer 3B main unit. 5. Plug the black flow sensor (attached to the black turbine) into the volume port (“Vol”) on the
front of the MetaLyzer 3B main unit using the end marked in blue. To insert: a. Retract the black tip (distal to the blue marker) of the flow sensor. b. Ensure to the red dot on the flow sensor is in line with the red dot on the “Volume”
port of the MetaLyzer 3B main unit. c. Insert the flow sensor into the MetaLyzer 3B main unit.
6. Turn on the MetaLyzer 3B main unit using the “on/off” switch. A single beeping noise should be emitted and the white power light on the MetaLyzer 3B main unit should begin flashing.

Kelly and West (2019)
JMRT 2(1): Page 147-170
151
7. Allow the MetaLyzer 3B main unit to warm up for 30 minutes under thermoneutral conditions (longer warm up time should be provided in the cold). When the white flashing power light on the MetaLyzer 3B main unit changes to solid white, the MetaLyzer 3B has indicated readiness to use.
8. Turn on the computer running MetaSoft Studio.
0.6. Procedures: Executing a VO2 Max Test
Materials Common Name Brand Name Online Resource Metabolic cart MetaLyzer 3B Main Unit https://cortex-
medical.com/media/boxes/medium/CORTEX-METALYZER-3B.jpg
Black cable attached to the turbine
Flow Sensor https://cortex-medical.com/media/boxes/medium/LP_ML_Mood_METALYZER_1.jpg
Breathing Mask Cortex Breathing Mask (S or M) https://encrypted-tbn0.gstatic.com/images?q=tbn:ANd9GcSQaX4JAgvhsr7a8hIovDwIyidHuQfkKHfAWnM4ivBOxP8Yz_De
Gas sampling line Sampling line (p.14) https://www.procarebv.nl/wp-content/uploads/2016/11/Cortex-Metalyzer-3B_-Handleiding.pdf
Grey USB cable USB cable https://encrypted-tbn0.gstatic.com/images?q=tbn:ANd9GcQWZx7V0coyBUMx2eNTMjTFud2XCxK3L5VqgCYg_QDyaFSpMrBc
Power cord Medical power supply cord https://img.auctiva.com/imgdata/1/6/2/6/8/0/2/webimg/975122498_tp.jpg
Heart rate monitor Polar H7 transmitter (Bluetooth LE) with elastic belt
https://cdn.shopify.com/s/files/1/0904/0726/products/polar-polar-accessories-black-retail-package-med-xl-30-45-inches-polar-h7-bluetooth-smart-chest-transmitter-7795311878_x700.png?v=1538423599
Access key MetaSoft Studio Dongle http://app.vip-software.com/templates/Gemini/img/slide2.jpg
Body weight scale Health-O-Meter 349KLX https://images-na.ssl-images-amazon.com/images/I/41zlknZnnGL.jpg

Kelly and West (2019)
JMRT 2(1): Page 147-170
152
Stadiometer Health-O-Meter Professional https://images.schoolspecialty.com/images/010735_DAAA320601D640CEB5D5CD683FD91DB5.jpg
Rowing ergometer Concept II Model D Ergometer https://images-na.ssl-images-amazon.com/images/I/517wbxG6btL._SX425_.jpg
Laptop & MetaSoft Studio software
Any laptop containing the programs MetaSoft Studio and MetaSoft Studio Toolbox (version 5.1.3)
https://encrypted-tbn0.gstatic.com/images?q=tbn:ANd9GcQBSQbuR3NW68K-hp8Ej311VEGNIZU-kiQge6ktlL9xQ0_rbq5rqA
Electrode gel Spectra 360 Electrode Gel https://cdn.bio-medical.com/media/catalog/product/cache/e4d64343b1bc593f1c5348fe05efa4a6/s/p/spectra_360_gel_bmi-cg05.pn
PAR-Q PAR-Q & YOU http://uwfitness.uwaterloo.ca/PDF/par-q.pdf
Rating of perceived exertion (RPE) scale
Rating of perceive exertion Borg RPE scale
https://bmjopensem.bmj.com/content/bmjosem/3/1/e000164/F2.large.jpg
Procedure 1. Arrive ~30 minutes prior to testing to set up the metabolic cart (see “1.5 Procedure: Setting up
the Metabolic Cart). The metabolic cart requires ~30 minutes to warmup. 2. Position the rowing ergometer within two meters of the MetaLyzer main unit, such that the
flow sensor and sampling tube will reach an exercising participant. 3. Calibrate the metabolic cart if necessary (for instructions see “1.7 Procedures: Calibrating the
MetaLyzer 3B”). 4. When the participant arrives, provide him/her an overview of the test to be conducted. 5. Ask the participant to sign the informed consent form. 6. Ask the participant to complete the health screening tool mandated by the present laboratory.
For the Trent University Kinesiology Laboratory, instruct participants to complete the PAR-Q screening tool. Allow individuals to proceed with exercise if the test returns unflagged.
7. Instruct the participant to change into their clothing for testing. 8. Weigh the participant using the body weight scale. 9. Measure the participant’s height using the stadiometer. 10. Instruct the participant to use the bathroom and drink water if they are thirsty. They will be
unable to drink or use the bathroom during the test. 11. Fit either the small or medium Cortex Breathing Mask to the participant. To do this:
a. Attach the head strap to the Cortex Breathing Mask by clipping the right clips on the head strap to the right clasps on the Cortex Breathing Mask.
b. Have the participant press the mask over their mouth and nose. c. Wrap the head strap around the participant’s head and clip the left clips on the head
strap into the left clasps on the Cortex Breathing Mask.

Kelly and West (2019)
JMRT 2(1): Page 147-170
153
d. Tighten the Velcro straps on the head strap as needed to adjust the fit. e. Test the fit of the mask by having the participant cover the hole of the mask with their
palm and blow to see if air escapes. If air escapes, re-adjust the Velcro straps and repeat or switch to another mask size.
12. Wet the Polar H7 heart monitor chest strap with water or an electrode gel. 13. Fit the Polar H7 heart monitor to the participant with the Polar H7 transmitter over the
participant’s solar plex. Tighten the chest strap until the Polar H7 transmitter does not move with exercise.
14. Instruct the participant to begin warming up for 10 minutes on the rowing ergometer while wearing the Cortex Breathing Mask and the Polar H7 heart rate monitor.
15. Open the MetaSoft Studio program to create a workflow for testing. Note: the program will offer warning if the access key is not plugged into the USB port of the laptop.
16. To test a participant that has been previously tested, click once on their user profile to highlight it. Then click the “edit” button. To test a new participant, click on “New Patient” and then click the “New” button to create a user profile by filling out the following sections:
a. Participant first and last name b. Participant sex c. Participant date of birth d. Mask size e. Participant height f. Participant weight
17. Click on the “Variables to be monitored during CPET” window on the left of the screen. Ensure that HR (heart rate) and V’O2 (oxygen consumption) are being monitored. If they do not appear in one of the center screen boxes, add them. To do this:
a. Click “Add Variable”. b. Toggle through the variable options using the white option box in the variable box that
has been newly added to the screen and select the variable of interest. 18. Click on the flashing “Ok” button at the bottom of the screen to return to the participant
selection window. 19. Ensure the participant to be tested is highlighted by clicking on their name. 20. Click on the “Next” button to progress to the next component of the workflow. 21. Click on the “Create Regular” heading to create the exercise protocol to be used. To create a
protocol: a. Click the “Step” and “Running” options at the top of the test protocol window. b. Adjust the rest duration and step duration to match the desired protocol. For the
recommended protocols, see “1.9 Protocol Variations” subsection. c. Adjust the warm up time to 1 minute. d. Set the speed for the “Warm up”, “Exercise”, and “Recovery” to 1.0 km/h and the grade
to 0.1%. Set the speed and grade “Increase” to 1.0 km/h and 0%, respectively. Note: The true initial wattage and wattage increases are to be verbally communicated to the participant and do not reflect these placeholders. The initial wattage and wattage increase to be communicated can be found in “1.9 Protocol Variations”.
e. Add a final ramp by clicking the “Add final ramp” button. f. Specify a speed and grade of 1.0 km/h and 0.1%, respectively. g. Enter a name for the protocol in the “Test Protocol” box. h. Save the protocol by clicking “save”.

Kelly and West (2019)
JMRT 2(1): Page 147-170
154
22. Click on the “Sensor Adjustment” window on the left side of the screen. Perform a sensor adjustment. To do this:
a. Leave the black end of the clear sample tube in an enclosed space (for example, a drawer) such that it is away from any air movement in the room (for example, breathing).
b. Press the “Start Sensor Adjustment” button. c. Once complete, the program will notify you by reading “Sensor adjustment
successful!”. 23. Click on the “Device Configuration” window on the left side of the screen. Check that the Polar
H7 heart rate monitor is connected. To do this: a. Click on the “Check connection to all devices” button. b. If the Polar H7 heart rate monitor is not connected, ensure the heart rate monitor chest
strap is wet and click on the arrow underneath the Polar H7 heart rate symbol. Click “Search”.
c. If the Polar H7 heart rate monitor connects, the flashing green heart light on the MetaLyzer 3B main unit will begin flashing to indicate heart rate data is being collected. This may not occur until “Next” is clicked in the next step.
24. Click on the flashing “Next” button. 25. Remove the black plug from the flow sensor turbine and insert the free end of the sample line
into the, now, unplugged hole. 26. Fit the flow sensor turbine into the Cortex Breathing Mask with the flow sensor cable and
sample line facing upwards. 27. Carry out a maximum flow-volume-loop test. To do this:
a. Click the blue triangular start button at the top of the screen. b. Instruct the participant to inhale until their maximum lung volume is achieved. c. Instruct the participant to exhale completely as quickly as possible. d. Repeat steps “b” and “c” three times. e. Click the orange square stop button to finish the test. f. Select the best recorded breathing maneuver by clicking it among the recorded options
at the bottom of the screen. g. Click the “Confirm” button.
28. Click the “Next” button to proceed to the testing component of the workflow. 29. Instruct the participant to set the rowing ergometer to the drag factor they most commonly train
with. To do this: a. Pull the rowing ergometer handle to turn it on. b. Press the “Menu” button on the rowing ergometer. c. Press the “More Options” button using the buttons on the side of the rowing ergometer
monitor. d. Press the “Display Drag Factor” button using the buttons on the side of the rowing
ergometer monitor. e. Instruct the participant to row on the rowing ergometer. f. Adjust the damper stick on the side of the flywheel on the rowing ergometer until the
drag factor read from the rowing ergometer monitor matches the participant’s training drag factor.
g. Press the “Menu” button on the rowing ergometer twice to return to the home screen. 30. Instruct the participant to set the ergometer to create a timed workout. To do this:

Kelly and West (2019)
JMRT 2(1): Page 147-170
155
a. Pull the ergometer handle to turn it on. b. Press “Select Workout” using the buttons on the side of the rowing ergometer monitor. c. Press “New Workout” using the buttons on the side of the rowing ergometer monitor. d. Press “Intervals: Time” using the buttons on the side of the rowing ergometer monitor e. Adjust the “Set Time” and “Set Rest Time” to the step and rest durations specified by
the protocol used (see “1.9 Protocol Variations”). f. Press the checkmark button using the buttons on the side of the rowing ergometer
monitor. 31. Instruct the participant to begin rowing on the count of three. At three, press the triangle button
under the “Test Control” heading in the MetaSoft Studio program. 32. The participant should begin a second warm up for 1 min at 50 watts below their initial pace
(to determine initial pace see “1.9 Protocol Variations”). 33. After the warm up, instruct the participant to begin rowing for 7 minutes at the initial pace. 34. After 7 minutes, instruct the participant to rest for 1 minute and pull the ergometer handle
lightly to keep the timer counting. During the rest period, sample blood lactate as described in “2.5. Procedures: Sampling Blood Lactate”. Ask the participant to report their perceived exertion on the Rating of Perceived Exertion Borg (RPE) scale. Record the blood lactate and RPE achieved.
35. Instruct the participant to resume rowing for another 7 minutes at 35 W higher (as described in “1.9 Protocol Variations”) than the previous wattage.
36. Repeat steps 34-35 until a blood lactate >4 mmol/L is achieved. Once achieved, instruct the participant to begin a final 7-minute exercise bout at 35 W higher than the previous wattage after finishing their 1 minute of rest.
37. After 7 minutes, instruct the participant to rest a final time for 1 minute and sample blood lactate and RPE.
38. Click on the lowest, widest button under the “Test control” heading to start the final ramp. 39. Instruct the participant to begin rowing at 35 W higher than the previous wattage. Increase this
wattage by 35 W every minute (as described in “1.9 Protocol Variations”). Provide verbal encouragement.
40. When the participant cannot perform 3 consecutive strokes at the prescribed wattage, instruct them to perform a final 15 second burst at maximum intensity.
41. Terminate the test after 15 seconds, by clicking the square stop button under the “Test Control” heading.
42. Sample blood lactate and RPE. 43. Unclasp the Cortex Breathing Mask from the participant’s face. 44. Allow the participant to begin cooling down on the rowing ergometer at any desired wattage
for 5 minutes. 45. Click on the flashing “Next” button at the bottom of the screen. 46. Click on the “X” shaped button at the top left corner of the screen to export the data from the
test to Microsoft Excel. 47. Click on the flashing “Finish” button at the bottom of the screen. 48. Clean and sterilize the equipment used during the test by following “1.8 Procedures: Cleaning
the MetaLyzer 3B”.
Kelly and West (2019)
JMRT 2(1): Page 147-170
156
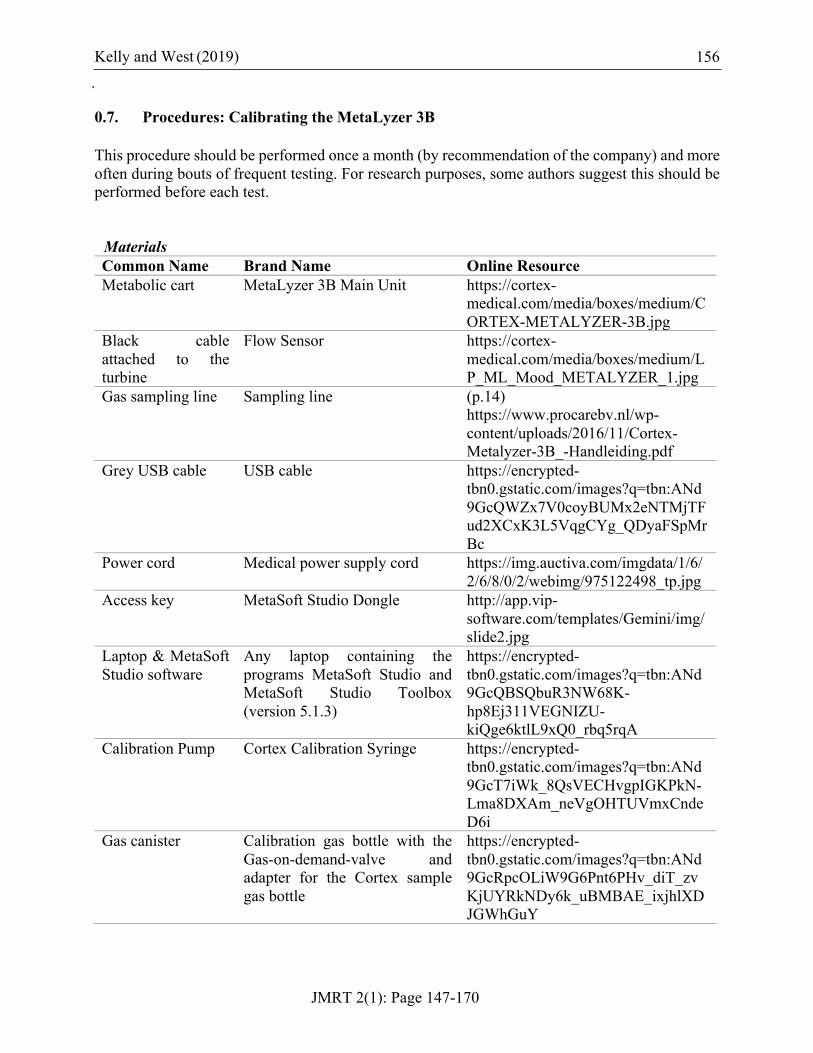
0.7. Procedures: Calibrating the MetaLyzer 3B This procedure should be performed once a month (by recommendation of the company) and more often during bouts of frequent testing. For research purposes, some authors suggest this should be performed before each test.
Materials Common Name Brand Name Online Resource Metabolic cart MetaLyzer 3B Main Unit https://cortex-
medical.com/media/boxes/medium/CORTEX-METALYZER-3B.jpg
Black cable attached to the turbine
Flow Sensor https://cortex-medical.com/media/boxes/medium/LP_ML_Mood_METALYZER_1.jpg
Gas sampling line Sampling line (p.14) https://www.procarebv.nl/wp-content/uploads/2016/11/Cortex-Metalyzer-3B_-Handleiding.pdf
Grey USB cable USB cable https://encrypted-tbn0.gstatic.com/images?q=tbn:ANd9GcQWZx7V0coyBUMx2eNTMjTFud2XCxK3L5VqgCYg_QDyaFSpMrBc
Power cord Medical power supply cord https://img.auctiva.com/imgdata/1/6/2/6/8/0/2/webimg/975122498_tp.jpg
Access key MetaSoft Studio Dongle http://app.vip-software.com/templates/Gemini/img/slide2.jpg
Laptop & MetaSoft Studio software
Any laptop containing the programs MetaSoft Studio and MetaSoft Studio Toolbox (version 5.1.3)
https://encrypted-tbn0.gstatic.com/images?q=tbn:ANd9GcQBSQbuR3NW68K-hp8Ej311VEGNIZU-kiQge6ktlL9xQ0_rbq5rqA
Calibration Pump Cortex Calibration Syringe https://encrypted-tbn0.gstatic.com/images?q=tbn:ANd9GcT7iWk_8QsVECHvgpIGKPkN-Lma8DXAm_neVgOHTUVmxCndeD6i
Gas canister Calibration gas bottle with the Gas-on-demand-valve and adapter for the Cortex sample gas bottle
https://encrypted-tbn0.gstatic.com/images?q=tbn:ANd9GcRpcOLiW9G6Pnt6PHv_diT_zvKjUYRkNDy6k_uBMBAE_ixjhlXDJGWhGuY

Kelly and West (2019)
JMRT 2(1): Page 147-170
157
2% bleach Diluted Clorox® Disinfecting Bleach - 3.58 L Bottle
https://www.uline.ca/Product/Detail/S-20294/Cleaning-Supplies/Clorox-Disinfecting-Bleach-358-L-bottle
Procedure 1. Set up the MetaLyzer 3B as indicated in “1.5 Procedures: Setting up the Metabolic Cart” 2. Turn on the computer running MetaSoft Studio and MetaSoft Toolbox. 3. Open MetaSoft Studio. Note: this procedure assumes the MetaSoft Toolbox settings already
correspond to calibrating for a VO2 max procedure (Volume of calibration pump = 3L). These settings can be modified by opening MetaSoft Toolbox and following the instructions in the Cortex: CPET Systems Instruction Manual.
4. Click on the “Calibrate Flow Sensor” button on the bottom of the screen. 5. Insert the turbine of the flow sensor into the calibration syringe. 6. Insert the black plug into the Flow Sensor. 7. Click on the “Start” button. 8. Pull out and depress the handle on the calibration syringe until five registered pulls are
recorded. During the pulls, the volume of air passing through the Flow Sensor is tracked by a red line on a graph. When the red line reaches both blue regions of the graph presented in the software, a registered pull occurs. When five successful pulls have been registered, a “Successful Calibration!” message will appear on the screen.
9. Click on the “Back” button on the bottom of the screen to return to the home program screen. 10. Click on the “Calibrate CPET device” button on the bottom of the screen. 11. Perform a sensor adjustment. To do this:
a. Leave the black end of the clear sample tube in an enclosed space (for example, a drawer) such that it is away from any air movement in the room (for example, breathing).
b. Press the “Start Calibration Step 1” button. c. Once complete, the program will notify you by reading “Calibration successful!”.
12. Perform a gas adjustment. To do this: a. Insert the black tip of the sample line into the clear adaptor tube on the gas canister. b. Click the “Start Calibration Step 2” button. c. Once complete the program, will notify you by reading “Calibration successful!”.
13. Click the “Back” button to return to the program home screen. 14. Shut down the Laptop and Metasoft Studio software by exiting the program and pressing the
computer’s “Off” button. 15. Shut off the MetaLyzer 3B Main Unit by flicking its “On/Off” switch to “Off”. 16. Clean and sterilize the equipment used during the test by following “1.8 Procedures: Cleaning
the MetaLyzer 3B”. 17. Wipe down all other surfaces used with 2% bleach solution.

Kelly and West (2019)
JMRT 2(1): Page 147-170
158
0.8. Procedures: Cleaning the MetaLyzer 3B Materials Common Name Brand Name Online Resource Black cable attached to the turbine
Flow Sensor https://cortex-medical.com/media/boxes/medium/LP_ML_Mood_METALYZER_1.jpg
Breathing Mask Cortex Breathing Mask (S or M) https://encrypted-tbn0.gstatic.com/images?q=tbn:ANd9GcSQaX4JAgvhsr7a8hIovDwIyidHuQfkKHfAWnM4ivBOxP8Yz_De
Cleaning solution Cidex OPA https://cdn.shopify.com/s/files/1/2406/9143/products/Johnson-_-Johnson-Cidex-OPA-20394_700x700.jpg?v=1508517296
Distilled water President’s Choice: Distilled Water
https://www.presidentschoice.ca/content/dam/lclonline/images/products/3327411.jpg.thumb.420.420.margin.png
Heart rate monitor Polar H7 transmitter (Bluetooth LE) with elastic belt
https://cdn.shopify.com/s/files/1/0904/0726/products/polar-polar-accessories-black-retail-package-med-xl-30-45-inches-polar-h7-bluetooth-smart-chest-transmitter-7795311878_x700.png?v=1538423599
Corrosion resistant gloves
Showa® N-DEX® Plus Gloves https://images-na.ssl-images-amazon.com/images/I/313Py4Gju3L._SX342_.jpg
Drying rack Kitchen Drying Tray Organizer Double Layer Dish Rack Storage Tableware Holder
https://i.pinimg.com/originals/4a/8e/a0/4a8ea0dcb3811de8542dbf20d81803f5.jpg
Procedure
Note: For steps involving Cidex, a solution can be premade and preserved for 14 days following creation. If an existing solution is available, use the existing solution.
1. Put on corrosion resistant gloves before beginning cleaning. 2. Clean the Cortex Breathing Mask. To do this, separate the Cortex Breathing Mask into its head
strap and mask components. Then: a. Add lukewarm water to a tub large enough to fit the equipment to be cleaned. b. Add dish soap to the tub and mix. c. Submerge the mask in the tub to clean. d. Add Cidex to another tub. e. Place the mask into the Cidex tub for 5 minutes at room temperature. f. Rinse the mask in warm water and leave it to dry on the drying rack.
3. Clean the Cortex Breathing Mask head strap. To do this: a. Rinse the mask in warm water.

Kelly and West (2019)
JMRT 2(1): Page 147-170
159
b. Scrub the mask lightly with dish soap. c. Hang the Cortex Breathing Mask head strap to dry on the drying rack.
4. Clean the flow sensor. To do this: a. Dismantle the flow sensor. To do this:
i. Turn to the left the grooved ring on the side of the flow sensor proximal to the flow sensor cable.
ii. Pull out the U-shaped, half ring attached to the flow sensor cable, gently. iii. Push the flow sensor turbine innards out by pushing with one finger into the
hole of the turbine the participant breaths into. b. Clean the U-shaped, half ring attached to the flow sensor cable by wiping it with a
medical disinfectant wipe (for example, Green Works Cleaning Wipes). c. Fill a tub with lukewarm, distilled water. d. Add dish soap to the tub and mix. e. Submerge the turbine and its innards (but not the cable or the half ring) in the tub. f. Fill a separate tub with Cidex in accordance to the instructions on its packaging. g. Submerge the turbine and its innards (but not the cable or the half ring) in the tub of
Cidex for 5 minutes a room temperature. h. Fill another tub with lukewarm distilled water i. Submerge the turbine and its innards (but not the cable or the half ring) in the tub of
distilled water to wash off the cleaner residue. Note: The turbine and housing unit should never be washed in running water. Any running water through the turbine could damage the unit.
j. Allow the turbine and its innards to dry on the drying rack. k. Reassemble the flow sensor before the next test.
5. Clean the Polar H7 heart rate monitor. To do this: a. Remove the Polar H7 transmitter from the Polar H7 chest strap. b. Wipe the Polar H7 transmitter with a medical disinfectant wipe (for example, Green
Works Cleaning Wipes). c. Add lukewarm water to a tub large enough to fit the equipment to be cleaned. d. Add dish soap to the tub and mix. e. Submerge and lightly scrub the Polar H7 chest strap in the tub of water and dish soap. f. Rinse the Polar H7 chest strap under warm water. g. Add Cidex to another tub in accordance to the instructions on the cleaner. h. Place the Polar H7 chest strap into the Cidex tub for 5 minutes at room temperature. i. Rinse the Polar H7 chest strap in warm water and leave it to dry on the drying rack.
6. Order and replace the sampling line if 6 months or 500 tests have passed since its last replacement.
7. Order and replace the gas cannister if >15 calibrations have passed since its last replacement (Note: an existing cannister can be used until the MetaLyzer 3B Main Unit will no longer calibrate within ~90 seconds, even after 15 calibrations).
8. Order and replace the O2 sensor CPET device in the MetaLyzer 3B main unit if 6 months have passed since its last replacement.
9. Order and replace the Cortex Breathing Mask if 12 months or 400 tests have passed since its last replacement.
Kelly and West (2019)
JMRT 2(1): Page 147-170
160
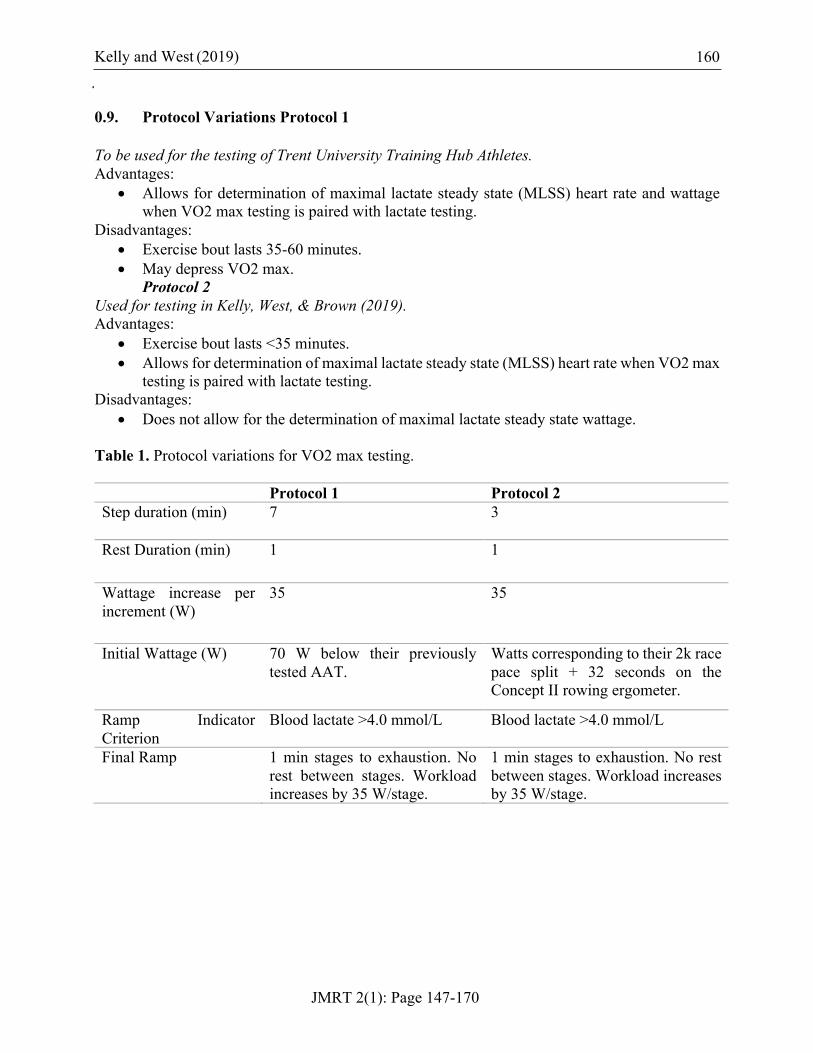
0.9. Protocol Variations Protocol 1 To be used for the testing of Trent University Training Hub Athletes. Advantages:
• Allows for determination of maximal lactate steady state (MLSS) heart rate and wattage when VO2 max testing is paired with lactate testing.
Disadvantages: • Exercise bout lasts 35-60 minutes. • May depress VO2 max.
Protocol 2 Used for testing in Kelly, West, & Brown (2019). Advantages:
• Exercise bout lasts <35 minutes. • Allows for determination of maximal lactate steady state (MLSS) heart rate when VO2 max
testing is paired with lactate testing. Disadvantages:
• Does not allow for the determination of maximal lactate steady state wattage.
Table 1. Protocol variations for VO2 max testing. Protocol 1 Protocol 2 Step duration (min) 7 3
Rest Duration (min) 1 1
Wattage increase per increment (W)
35 35
Initial Wattage (W) 70 W below their previously tested AAT.
Watts corresponding to their 2k race pace split + 32 seconds on the Concept II rowing ergometer.
Ramp Indicator Criterion
Blood lactate >4.0 mmol/L Blood lactate >4.0 mmol/L
Final Ramp 1 min stages to exhaustion. No rest between stages. Workload increases by 35 W/stage.
1 min stages to exhaustion. No rest between stages. Workload increases by 35 W/stage.
Kelly and West (2019)
JMRT 2(1): Page 147-170
161
1. Blood lactate testing with the Lactate Edge Analyzer 1.1. Purpose To standardize the methods of blood lactate testing used for rowers at Trent University. 1.2. Procedure description Blood lactate testing is the leading standard for determination of an athlete’s training zones. Exercise can be broadly grouped into three training intensities: low, moderate and high intensity exercise. These three intensities are divided by the anaerobic-aerobic threshold (which separates the low and moderate training zones) and maximal metabolic steady state (which separates the moderate and high training zones). The anaerobic-aerobic threshold can be defined as the highest intensity of exercise at which there is no sustained increase in blood lactate. The maximal metabolic steady state can be defined as the highest intensity of exercise at which elevated blood lactate can plateau. These SOPs detail the blood lactate collection procedure to be used as part of a blood lactate testing protocol. Note: These procedures should only be performed by a trained phlebotomist. 1.3. Interested Parties These procedures have been designed for testing healthy individuals. These procedures may be used by:
• Rowing Canada Aviron (RCA) and their associated divisions (i.e the Trent University Training Hub).
• Researchers at Trent University with adequate training and certifications.
Adaptations to this protocol should be made if individuals from other populations are tested.
1.4. Locations The following procedures can be conducted in any approved space (in other words, it is not lab specific). 1.5. Procedures: Sampling Blood Lactate Materials Common Name Brand Name Online Resource Glove(s) Nitech Examination Gloves https://s3.ca-central-
1.amazonaws.com/shopperplusca/uploads/product/image/364728/large_becad-RONCO-852-375-Gloves-Masks-RONCO-Nitech-5-mil-Examination-Gloves.jpg

Kelly and West (2019)
JMRT 2(1): Page 147-170
162
Finger lance(s) Unistick 3 Normal: Single Use Safety Lancets
https://images-na.ssl-images-amazon.com/images/I/419sVBpnKLL.jpg
Alcohol wipe(s) Alcohol Swabs: Isopropyl Alcohol 70% V/v
https://5.imimg.com/data5/SL/AG/MY-18807460/bd-alcohol-swabs-500x500.jpg
Gauze swab(s) Gauze Swabs: 5 x 5cm 8 Ply x 100
https://www.medisave.co.uk/swabs-gauze-50-x-50cm-8-ply-bp-type-13-per-pack-of-100-p-1283.html
Lactate meter Lactate Edge Analyzer https://www.amazon.co.uk/EDGE-Lactate-Analyser-Starter-Kit/dp/B0057NBB6W
Garbage container
Rubbermaid® Office Trash Can - 7 Gallon, Black
https://www.google.com/search?q=Rubbermaid%C2%AE+Office+Trash+Can+-+7+Gallon,+Black&source=lnms&tbm=isch&sa=X&ved=0ahUKEwjb-fi6qJHgAhUG4IMKHVl6DMoQ_AUIDigB&biw=1536&bih=723#imgrc=6TcnsFxPpBQ33M:
Sharps container
Sharps-A-Gator https://www.ecs-cares.com/products/medical/sharps-a-gator/?attribute_pa_quantity=single
Hand sanitizer Purell Advanced Hand Rub https://i5.walmartimages.com/asr/f1728857-3120-4a4e-b474-d66f8ad1bc77_1.7e41f79bcada186bbbc136d1094be906.jpeg
Lactate test strip(s)
Edge: Blood Lactate Test Strips https://www.anats.gr/images/thumbs/0001717_edge-test-strips-of-25-pcs-for-the-measurement-of-blood-lactate_550.jpeg
2% bleach Diluted Clorox® Disinfecting Bleach - 3.58 L Bottle
https://www.uline.ca/Product/Detail/S-20294/Cleaning-Supplies/Clorox-Disinfecting-Bleach-358-L-bottle
Procedure 1. Wash hands using soap and water, and/or hand sanitizer. 2. Open finger lances by removing the protective sheath. To do this:
a. Grasp the finger lance by its yellow base. b. Turn the grey sheath at its upper end until it releases. c. Pull the grey sheath out of the finger lance.
3. Open an alcohol wipe package without touching the wipe. 4. Remove two gauze swabs from the package. 5. Wear proper Personal Protective Equipment (PPE), including gloves, laboratory coat, and
safety glasses.

Kelly and West (2019)
JMRT 2(1): Page 147-170
163
6. Insert a lactate test strip into the slot at the bottom of the lactate meter which should turn on automatically.
7. Clean the lateral aspect of the distal-most pad of the ring finger with an alcohol wipe to remove sweat.
8. Allow the finger to dry for 2-3 seconds. 9. Lance the finger at the cleaned site using the finger lance by pressing the spring-loaded button
on its side. 10. Roll the hand lanced, to a supine position to allow the blood to pool. 11. Wipe away the first two blood drops produced with the gauze swab. 12. Collect the third drop of blood by contacting the blood droplet (but not the finger) with the
white capillary in the middle of the lactate test strip (protruding from the lactate meter). Allow the entire capillary of this lactate test strip to fill with blood.
13. Leave the lactate meter to analyze the sample. 14. Again, wipe the finger with the gauze swab and leave the swab with the participant to apply
pressure. 15. Dispose of the used lactate strips, alcohol wipes, and gauze swabs and gloves in designated
biohazard waste container. 16. Dispose of the used finger lances in a Sharps Container. 17. Wipe down all surfaces used with 2% bleach. 2. Lactate testing for verification/tracking of the anaerobic-aerobic threshold 2.1. Purpose To standardize the methods of anaerobic-aerobic threshold testing used for rowers at Trent University. 2.2. Procedure description Blood lactate testing is the leading standard for determination of an athlete’s training zones. Exercise can be broadly grouped into three training intensities: low, moderate and high intensity exercise. These three intensities are divided by the anaerobic-aerobic threshold (which separates the low and moderate training zones) and maximal metabolic steady state (which separates the moderate and high training zones). The anaerobic-aerobic threshold can be defined as the highest intensity of exercise at which there is no sustained increase in blood lactate. The maximal metabolic steady state can be defined as the highest intensity of exercise at which elevated blood lactate can plateau. These SOPs detail the testing procedure to be used to verify a determined anaerobic-aerobic threshold and track the changes in the anaerobic-aerobic threshold that occur with training. When completed serially at increasing wattage, this procedure is the research gold standard for determination of the anaerobic-aerobic threshold (Bourdon, Woolford, & Buckley, 2018). The following procedures were adapted from Rowing Canada Aviron’s existing protocols. Note: These procedures should only be performed by a trained phlebotomist.
Kelly and West (2019)
JMRT 2(1): Page 147-170
164
2.3. Interested Parties These procedures have been designed specifically to test elite rowers on a rowing ergometer. These procedures may be used by:
• Rowing Canada Aviron (RCA) and their associated divisions (i.e the Trent University Training Hub).
Adaptations to this protocol should be made if individuals from other populations are tested. 2.4. Locations The following procedures can be conducted in any approved space (in other words, it is not lab specific). 2.5. Procedures: Testing for the anaerobic-aerobic threshold
Materials Common Name Brand Name Online Resource Glove(s) Nitech Examination Gloves https://s3.ca-central-
1.amazonaws.com/shopperplusca/uploads/product/image/364728/large_becad-RONCO-852-375-Gloves-Masks-RONCO-Nitech-5-mil-Examination-Gloves.jpg
Finger lance(s) Unistick 3 Normal: Single Use Safety Lancets
https://images-na.ssl-images-amazon.com/images/I/419sVBpnKLL.jpg
Alcohol wipe(s) Alcohol Swabs: Isopropyl Alcohol 70% V/v
https://5.imimg.com/data5/SL/AG/MY-18807460/bd-alcohol-swabs-500x500.jpg
Gauze swab(s) Gauze Swabs: 5 x 5cm 8 Ply x 100
https://www.medisave.co.uk/swabs-gauze-50-x-50cm-8-ply-bp-type-13-per-pack-of-100-p-1283.html
Lactate meter Lactate Edge Analyzer https://www.amazon.co.uk/EDGE-Lactate-Analyser-Starter-Kit/dp/B0057NBB6W
Garbage container
Rubbermaid® Office Trash Can - 7 Gallon, Black
https://www.google.com/search?q=Rubbermaid%C2%AE+Office+Trash+Can+-+7+Gallon,+Black&source=lnms&tbm=isch&sa=X&ved=0ahUKEwjb-fi6qJHgAhUG4IMKHVl6DMoQ_AUIDigB&biw=1536&bih=723#imgrc=6TcnsFxPpBQ33M:
Kelly and West (2019)
JMRT 2(1): Page 147-170
165
Rowing ergometer Concept II Model D Ergometer https://images-na.ssl-images-amazon.com/images/I/517wbxG6btL._SX425_.jpg
Sharps container
Sharps-A-Gator https://www.ecs-cares.com/products/medical/sharps-a-gator/?attribute_pa_quantity=single
Hand sanitizer Purell Advanced Hand Rub https://i5.walmartimages.com/asr/f1728857-3120-4a4e-b474-d66f8ad1bc77_1.7e41f79bcada186bbbc136d1094be906.jpeg
Lactate test strip(s)
Edge: Blood Lactate Test Strips https://www.anats.gr/images/thumbs/0001717_edge-test-strips-of-25-pcs-for-the-measurement-of-blood-lactate_550.jpeg
Posture reference figures
Supplied by Rowing Canada if necessary
Rating of perceived exertion (RPE) scale
Rating of perceive exertion Borg RPE scale
https://bmjopensem.bmj.com/content/bmjosem/3/1/e000164/F2.large.jpg
Procedure 1. The participant performs a 10-minute warm up on the rowing ergometer at 10 watts below their
previously determined anaerobic-aerobic threshold wattage (115 watts for lightweight women [≤ 59.0 kg], 140 watts for heavyweight women [> 59.0 kg], 155 watts for Lightweight men [≤ 72.5 kg], and 180 watts for heavyweight males [> 72.5 kg] if unknown).
2. The participant rests for 5 minutes. 3. Blood lactate is sampled. For Instructions, see “2.5. Procedures: Sampling Blood Lactate”. 4. The participant begins 20 minutes of rowing on the rowing ergometer at an anticipated current
anaerobic-aerobic threshold wattage. 5. In the final minute of exercise, athletes are asked to provide a rating of perceived exertion on
the RPE Scale. 6. Upon completing the ergometer session, blood lactate is sampled. If blood lactate has increased
less than 1 mmol/L from the first reading, the anaerobic-aerobic threshold is at or above the anticipated wattage. If not, the anaerobic-aerobic threshold is below the anticipated wattage.

Kelly and West (2019)
JMRT 2(1): Page 147-170
166
3. Lactate testing for verification/tracking of the maximal lactate steady state 3.1. Purpose To standardize the methods of maximal lactate steady state testing used for rowers at Trent University. 3.2. Procedure description Blood lactate testing is the leading standard for determination of an athlete’s training zones. Exercise can be broadly grouped into three training intensities: low, moderate and high intensity. These three intensities are divided by the anaerobic-aerobic threshold (which separates the low and moderate training zones) and the maximal metabolic steady state (which separates the moderate and high training zones). The anaerobic-aerobic threshold can be defined as the highest intensity of exercise at which there is no sustained increase in blood lactate. The maximal metabolic steady state can be defined as the highest intensity of exercise at which elevated blood lactate can plateau. These SOP detail the testing procedure to be used to verify a determined anaerobic-aerobic threshold and track changes in the anaerobic-aerobic threshold that occur with training. When completed serially at increasing wattage, this procedure is the research gold standard for determination of the anaerobic-aerobic threshold (Bourdon, Woolford, & Buckley, 2018). The following procedures were adapted from Rowing Canada Aviron’s existing protocols. Note: These procedures should only be performed by a trained phlebotomist. 3.3. Interested Parties These procedures have been designed specifically to test elite rowers on a rowing ergometer. These procedures may be used by:
• Rowing Canada Aviron (RCA) and their associated divisions (i.e the Trent University Training Hub).
Adaptations to this protocol should be made if individuals from other populations are tested. 3.4. Locations The following procedures can be conducted in any approved space (in other words, it is not lab specific). 3.5. Procedures: Testing for the maximal lactate steady state
Materials Common Name Brand Name Online Resource Glove(s) Nitech Examination Gloves https://s3.ca-central-
1.amazonaws.com/shopperplusca/uploads/product/image/364728/large_becad-RONCO-852-375-Gloves-
Kelly and West (2019)
JMRT 2(1): Page 147-170
167
Masks-RONCO-Nitech-5-mil-Examination-Gloves.jpg
Finger lance(s) Unistick 3 Normal: Single Use Safety Lancets
https://images-na.ssl-images-amazon.com/images/I/419sVBpnKLL.jpg
Alcohol wipe(s) Alcohol Swabs: Isopropyl Alcohol 70% V/v
https://5.imimg.com/data5/SL/AG/MY-18807460/bd-alcohol-swabs-500x500.jpg
Gauze swab(s) Gauze Swabs: 5 x 5cm 8 Ply x 100
https://www.medisave.co.uk/swabs-gauze-50-x-50cm-8-ply-bp-type-13-per-pack-of-100-p-1283.html
Rowing ergometer Concept II Model D Ergometer https://images-na.ssl-images-amazon.com/images/I/517wbxG6btL._SX425_.jpg
Lactate meter Lactate Edge Analyzer https://www.amazon.co.uk/EDGE-Lactate-Analyser-Starter-Kit/dp/B0057NBB6W
Garbage container
Rubbermaid® Office Trash Can - 7 Gallon, Black
https://www.google.com/search?q=Rubbermaid%C2%AE+Office+Trash+Can+-+7+Gallon,+Black&source=lnms&tbm=isch&sa=X&ved=0ahUKEwjb-fi6qJHgAhUG4IMKHVl6DMoQ_AUIDigB&biw=1536&bih=723#imgrc=6TcnsFxPpBQ33M:
Sharps container
Sharps-A-Gator https://www.ecs-cares.com/products/medical/sharps-a-gator/?attribute_pa_quantity=single
Hand sanitizer Purell Advanced Hand Rub https://i5.walmartimages.com/asr/f1728857-3120-4a4e-b474-d66f8ad1bc77_1.7e41f79bcada186bbbc136d1094be906.jpeg
Lactate test strip(s)
Edge: Blood Lactate Test Strips https://www.anats.gr/images/thumbs/0001717_edge-test-strips-of-25-pcs-for-the-measurement-of-blood-lactate_550.jpeg
Posture reference figures
Supplied by Rowing Canada if necessary
Rating of perceived exertion (RPE) scale
Rating of perceive exertion Borg RPE scale
https://bmjopensem.bmj.com/content/bmjosem/3/1/e000164/F2.large.jpg

Kelly and West (2019)
JMRT 2(1): Page 147-170
168
Procedure 1. The participant performs a 10-minute warm up on the rowing ergometer at 10 watts below their
previously determined anaerobic-aerobic threshold wattage (115 watts for lightweight women [≤ 59.0 kg], 140 watts for heavyweight women [> 59.0 kg], 155 watts for Lightweight men [≤ 72.5 kg], and 180 watts for heavyweight males [> 72.5 kg] if unknown).
2. The participant rests for 5 minutes. 3. Blood lactate is sampled. For Instructions, see “2.5. Procedures: Sampling Blood Lactate”. 4. The participant begins 10 of 30 minutes of rowing on the rowing ergometer at their anticipated
maximal lactate steady state. 5. Rowing is halted 10 minutes into exercise for 30 seconds. 6. Blood lactate is sampled a second time. 7. Rowing is resumed for the final 20 of 30 minutes. 8. In the final minute of exercise, athletes are asked to provide a rating of perceived exertion on
the Rating of Perceived Exertion Borg RPE Scale. 9. Upon completing the ergometer session, blood lactate is sampled a third time. If blood lactate
has increased less than 1 mmol/L from the second reading to the third reading, the maximal lactate steady state is at or above the anticipated wattage. If not, the maximal lactate steady state is below the anticipated wattage (if blood lactate has increased less than 1 mmol/L from the first reading to the second reading, the anaerobic-aerobic threshold is at or above the anticipated wattage, also indicating that the test was not performed at a high enough wattage).
4. Max wattage testing on the rowing ergometer 4.1. Purpose To standardize the methods of max wattage testing used for rowers at Trent University. 4.2. Procedure description The ability to generate rowing specific power on the rowing ergometer predicts better on-water rowing performance (Ingham, Whyte, Jones, & Nevill, 2002). As such, testing batteries for rowing should include some marker of a rower’s power. These procedures detail a 10-stroke rowing protocol for the determination of maximum rowing power. The following procedures were adapted from Rowing Canada Aviron’s existing protocols. 4.3. Interested Parties These procedures have been designed specifically to test elite rowers on a rowing ergometer. These procedures may be used by:
• Rowing Canada Aviron (RCA) and their associated divisions (in other words, the Trent University Training Hub).
• Researchers at Trent University
Adaptations to this protocol should be made if individuals from other populations are tested.
Kelly and West (2019)
JMRT 2(1): Page 147-170
169
4.4. Locations The following procedures can be conducted in any approved space (in other words, it is not lab specific). 4.5. Procedures: Testing for the maximal lactate steady state
Materials
Common Name Brand Name Online Resource Rowing ergometer Concept II Model D Ergometer https://images-na.ssl-images-
amazon.com/images/I/517wbxG6btL._SX425_.jpg
Procedure 1. The participant performs a 10-minute warm up on the rowing ergometer at 10 watts below their
previously determined anaerobic-aerobic threshold wattage (115 watts for lightweight women [≤ 59.0 kg], 140 watts for heavyweight women [> 59.0 kg], 155 watts for Lightweight men [≤ 72.5 kg], and 180 watts for heavyweight males [> 72.5 kg] if unknown).
2. The participant rests for 3 minutes. 3. The drag factor on the rowing ergometer is set to 200 (slightly less than its maximum to allow
room to adjust drag factor to a consistent setting in different environments). 4. Participants are instructed to row ten consecutive strokes, building power over the first six
strokes and exerting maximum effort over the final four strokes at a stroke rate close to, but less than, 40 strokes/min. The highest wattage obtained at an acceptable stroke rate (≤40 strokes/min) is recorded.
5. The participant rests for 1-3 minutes. 6. Step 4 is repeated. 7. Maximum wattage is taken as the average of the two maximum wattage trials. Acknowledgements: The authors have no acknowledgements to declare. Author Contributions: This manuscript was written by Dayton Kelly (MSc candidate) under the guidance and supervision of Dr. Sarah West Conflicts of Interest: The authors have no conflicts to declare. Funding: Funding used to create these documents and the equipment used within them was derived from Dr. Sarah West’s Kinesiology Laboratory at Trent University.

Kelly and West (2019)
JMRT 2(1): Page 147-170
170
References Advanced Instruments. (2005). The Advanced Micro-Osmometer Model 3320 User's Guide.
Norwood: Advanced Instruments. Bourdon, P. C., Woolford, S. M., & Buckley, J. D. (2018). Effects of Varying the Step Duration
on the Determination of Lactate Thresholds in Elite Rowers. International journal of sports physiology and performance, 13(6), 687-693. doi:https://doi.org/10.1123/ijspp.2017-0258
Dill, D. B., & Costill, D. L. (1974). Calculation of percentage changes in volumes of blood, plasma,
and red cells in dehydration. Journal of Applied Physiology, 37(2), 247-248. doi:10.1152/jappl.1974.37.2.247.
Hess, J. R. (2010). Conventional blood banking and blood component storage regulation:
Opportunities for improvement. Blood Transfusion, 8(3), 9-15. doi:10.2450/2010.003S. Ingham, S., Whyte, G., Jones, K., & Nevill, A. (2002). Determinants of 2,000 m rowing ergometer
performance in elite rowers. European Journal of Applied Physiology, 88(3), 243-246. doi:10.1007/s00421-002-0699-9.
Kelly D. J., West S., Brown L. (2019). A Comparison of Dehydration Techniques for Acute Weight
Management in Rowing. ProQuest Theses and Dissertations. McGovern, J. J., Jones, A. R., & Steinberg, A. G. (1955). The hematocrit of capillary blood. New
England Journal of Medicine, 253(8), 308-312. doi:10.1056/NEJM195508252530802. Schoen, I., & Solomon, M. (1962). Control of blood haemoglobin determinations by a simple
effective method. Journal of Clinical Pathology, 15(1), 44-6. doi:10.1136/jcp.15.1.44. Sigma-Aldrich. (2015). Product Information: Drabkin's Reagent, 1-3. Retrieved from
https://www.sigmaaldrich.com/content/dam/sigma-aldrich/docs/Sigma/Datasheet/3/d5941dat.pdf.
World Health Organization. (2010). WHO guidelines on drawing blood: best practices in
phlebotomy, Retrieved from World Health Organization: http://apps.who.int/iris/bitstream/handle/10665/44294/9789241599221_eng.pdf;jsessionid=2ABCDB0DE0297EADE2CC42304A0ED367?sequence=1.