Embed Size (px)
Citation preview
assembly instructions
HamsterPlaza

Check listBefore you start assembling your cage, please check if you have all the components. If any part is missing or damaged, do not use your cage.
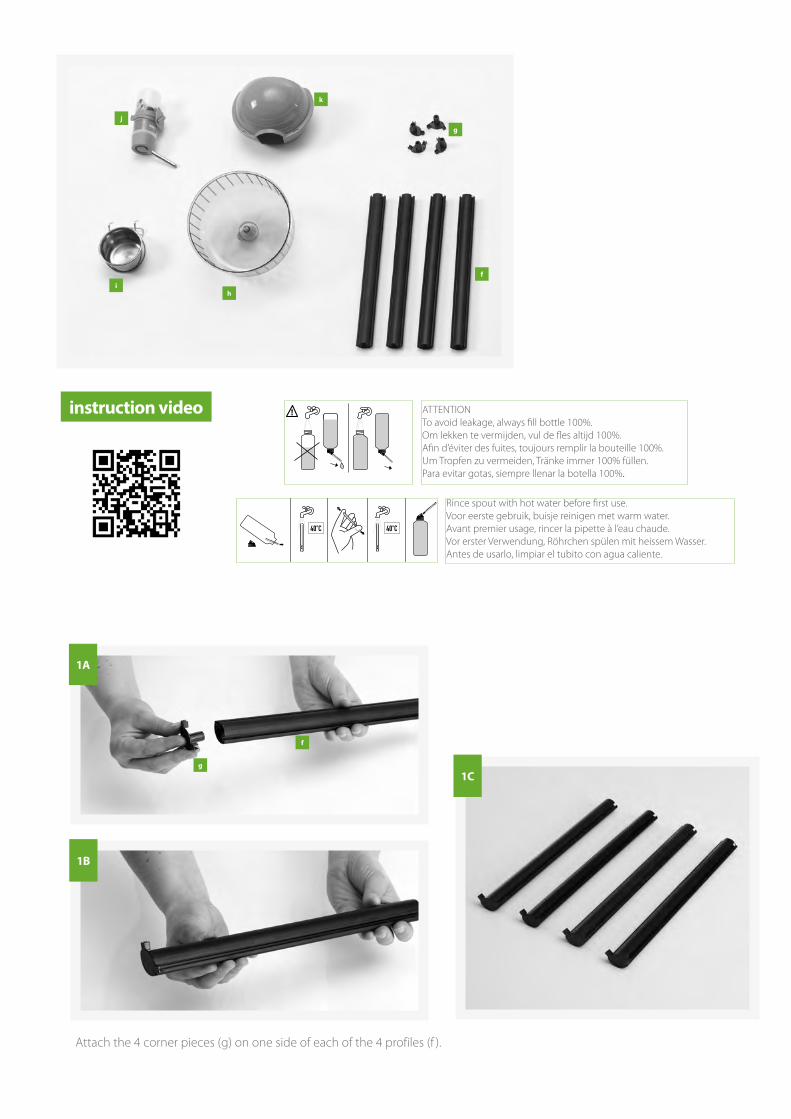
A 1 plastic bottom trayB 1 platformC+ D 4 fixings for platformE 1 ladderF 4 side profilesG 4 corner piecesH 1 wheel
I 1 stainless steel feeding bowlJ 1 drinking bottle + holderK 1 small animal houseL 2 side panelsM 1 front panel with doorN 1 back panelO 1 roof panel
a
o
n
mI
I
e
d
b
c
j
k
g
ih
f
instruction video ATTENTIONTo avoid leakage, always fill bottle 100%.Om lekken te vermijden, vul de fles altijd 100%.Afin d’éviter des fuites, toujours remplir la bouteille 100%.Um Tropfen zu vermeiden, Tränke immer 100% füllen.Para evitar gotas, siempre llenar la botella 100%.
Rince spout with hot water before first use.Voor eerste gebruik, buisje reinigen met warm water.Avant premier usage, rincer la pipette à l’eau chaude.Vor erster Verwendung, Röhrchen spülen mit heissem Wasser.Antes de usarlo, limpiar el tubito con agua caliente.
1A
Attach the 4 corner pieces (g) on one side of each of the 4 profiles (f ).
g
f
1B
1C

Slide the back panel (n) in the third profile. Make sure that the vertical wires of the back panel and the closure of the side panel are facing outwards.
2A
Slide one side panel (l) into two profiles (f ).
2B
I
f
n
3A
3B
4
Slide the second side panel (l) into the final profile. Make sure the closure is facing outwards.

Put the cage part on the bottom tray as shown in the picture.
3B
Insert 4 x d in the platform (b). Place the platform in the corner of the side and back panel. Do not tighten the screws (c) too strongly.
6A 6B
6C 6D
d
b
c

The platform has now been installed. Attach the ladder (e) to the platform.
Assemble the remaining accessories: wheel (h), feeding bowl (i), small animal house (k) and drinking bottle (j).
Slide the front panel with door (m) into the profiles.
7A 7B
8
9A 9B
e
h + i + k + j
m

Finally, fix the closures of the side panels well to the bottom. Your cage is now ready to be used.
Place the roof panel (o) on top. Make sure that the thick horizontal wires of the front, back and side panels are well assembled in the roof panel. (see detail).
10A 10B
11A 11B
o

www.savic.beRinglaan 10 • B-8501 Heule • BelgiumTel. +32 56 35 33 45 • Fax +32 56 35 77 [email protected] Doc.nr.: 931920