Embed Size (px)
Citation preview
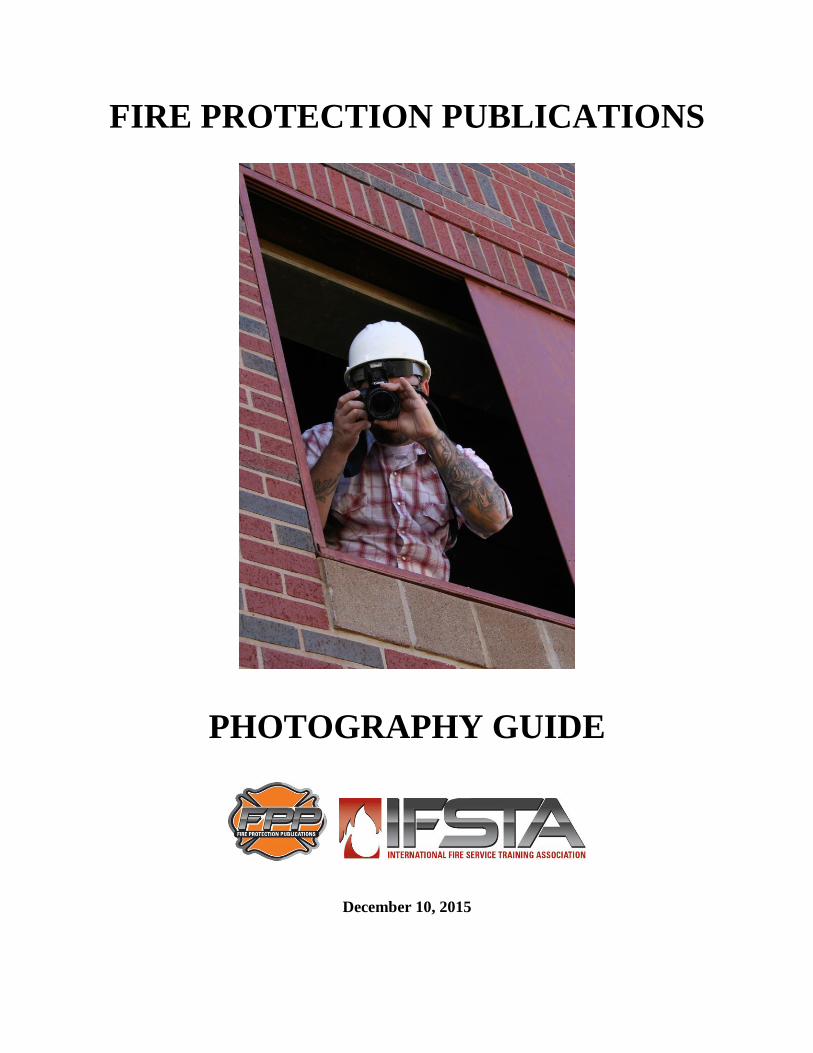
FIRE PROTECTION PUBLICATIONS
PHOTOGRAPHY GUIDE
December 10, 2015
2
TABLE OF CONTENTS
FPP Photographic Needs 3
Photographic Support 3
Photographic Policies 4
Color vs. Black and White 4
90% New Images 4
Technical Accuracy 4
Style and Composition 7
Images from the Internet 8
Working with Photo Shoot Lists 8
Color Print Requirements 9
Acceptable Formats 9
Sending Color Prints to FPP 10
Digital Photo Requirements 10
Formats 10
Resolution 11
Sending Digital Image Files to FPP 12
FPP Photography Forms 14
Copyright Permission Forms 14
Talent Releases 16
Always List for Photographers 19
NOTES 19
3
FPP Photographic Needs
FPP personnel and our photographers strive to shoot, select, and otherwise provide images for
our products that are current, technically accurate, and represent the broadest possible spectrum
of the best practices followed by the Fire Service.
During the 75 year history of Fire Protection Publications, numerous members of the fire
service, fire departments, and many other individuals have played an integral role in taking
and/or acquiring photographs for use in our manuals. FPP does not have a warehouse full of fire
service apparatus, tools, equipment, protective clothing, hose, and other items that we can use as
props for our photo shoots. We are dependent on the fire service and others to help us by
providing us with the means to shoot or otherwise acquire the images we need. Some folks take
the photographs themselves and submit them to us while others provide us with a location,
equipment, and talented people to help us conduct our photo shoots.
We thank you for helping us with our photographic needs. This guide has been compiled
to help you with this process. If you have any questions regarding our Photo Policies, please feel
free to discuss them with your Project Manager or the individual responsible for photography on
your project.
Photographic Support
As stated before some folks provide us with photos taken at their location while others host us at
their location and allow us to conduct photo shoots there. There are three basic opportunities for
taking photos:
• At actual emergencies.
• During classes, drills, and exercises.
• At photo shoots specifically staged to shoot pictures for a given project.
There are pros and cons to each of these opportunities. The best opportunity to gather the
largest number of technically accurate images designed to specifically meet needs of an IFSTA
project are at staged events. The next best is during classes, drills, and exercises. While
extremely realistic, photos taken at actual emergencies often pose problems of technical
accuracy, safety questions, and applicability to a specific project.
4
Basic Photographic Policies
The following are FPP’s basic policies relating to conducting photography for our various
projects. These policies include:
• Use of Color vs. Black and White Photos
• 90% New Images in each project
• Technical Accuracy
• Style and Composition
• Images from the Internet
Color vs. Black And White
Our use of illustrations and photographs has evolved over the years. FPP’s current policy is to
use full color photographs throughout each of our IFSTA and FPP products. An occasional black
and white image may be used, if the image is historical in nature and no corresponding color
image is available.
90% New Images
Because our manuals have a shelf-life of 5-plus years, we try to avoid using images that give a
dated appearance. Historically, we used direct pulls of images from existing manuals to augment
the photo selection process for new/revised manuals. This has occasionally contributed to a dated
appearance in some publications. We endeavor to have at least 90% NEW photographs in our
new/revised manuals to show the newest equipment, apparatus, and procedures.
Technical Accuracy
Images to be used in our manuals MUST be technically accurate. The following are some of the
guidelines to follow to ensure this accuracy:
1) All appropriate protective clothing and equipment MUST be worn properly by participants.
This includes helmet, flash hoods, gloves, coats, trousers, boots, and such that are appropriate
to the scene being photographed. Coats and trousers will be properly sealed. Helmet visors
and flaps will be down to protect the participant’s eyes and necks respectively. Flash hoods
will be properly positioned around SCBA facepieces when appropriate. PPE and SCBA
5
should be clean and soot free. Damaged equipment should not be shown unless the damage is
being illustrated.
2) The appropriate tool or tools must be used to demonstrate specific tasks. The tools will be in
fully functional and safe condition and will be operated appropriately.
3) All appropriate safety equipment and procedures must be demonstrated in the images. For
example, appropriate safety glasses may be worn during vehicle extrication operations with
faceshields down. Ground ladders will be properly footed or secured during laddering
operations, and so on.
4) Parked apparatus should be chocked, as appropriate.
5) Firefighters and other participants must NOT demonstrate unsafe practices.
6) Ground ladders must NOT be positioned in front of doors or over in ground grates or
elevators.
7) Aerial apparatus should NOT be shown extending ladders/booms into overhead wires.
8) Avoid taking pictures of the NO-NO variety…the type that use the red circle and slash that
mean DON’T DO THIS!
9) And so on…
The following pages provide some examples of technical errors found in photos taken at two
different training drills. These photos demonstrate how easy it can be to miss potential safety
related issues during a photo shoot.
6
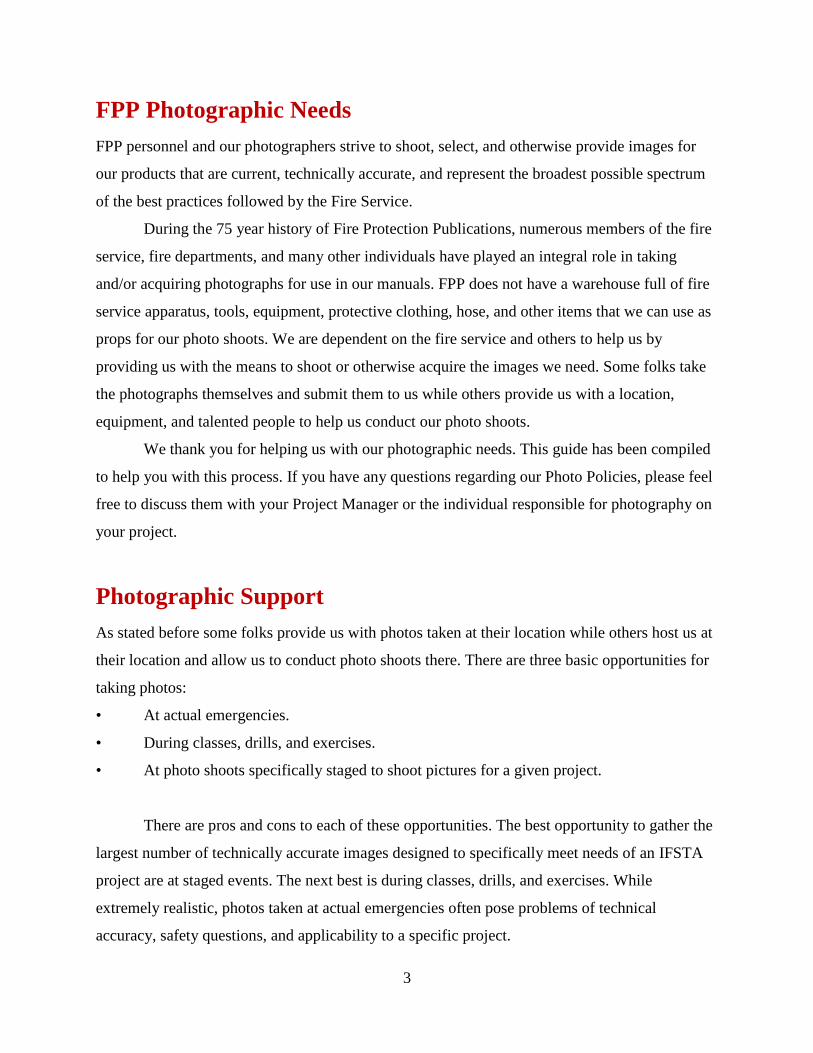
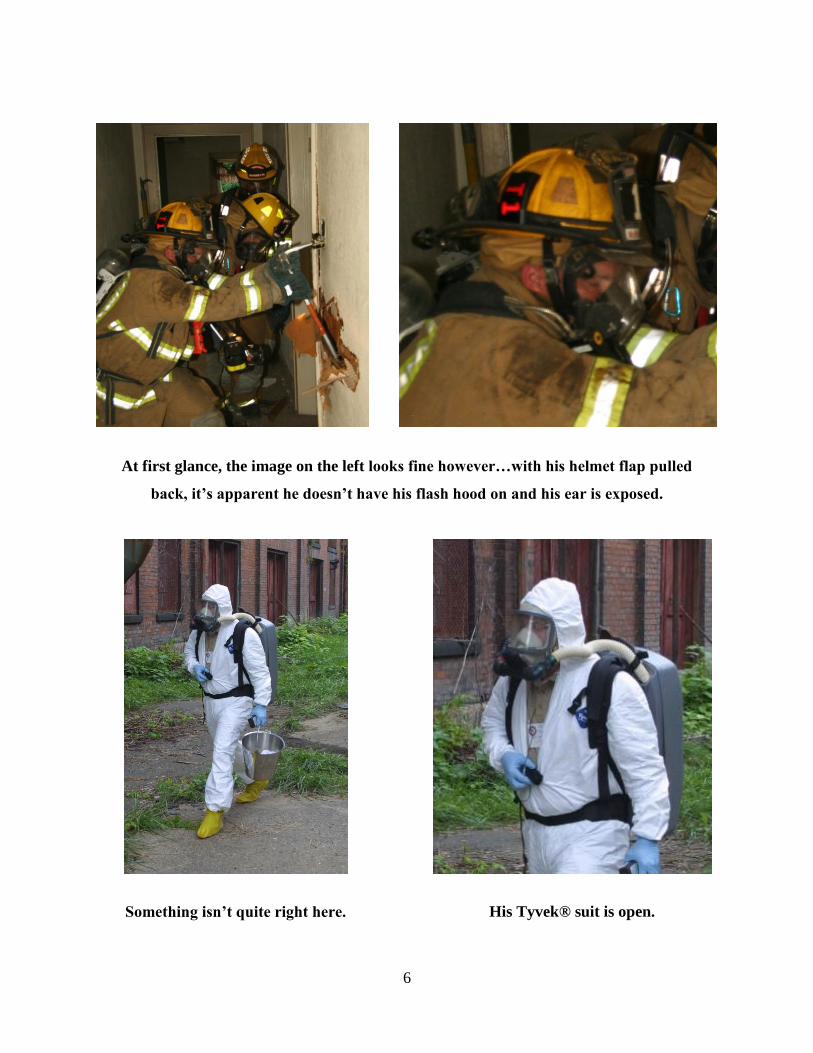
At first glance, the image on the left looks fine however…with his helmet flap pulled
back, it’s apparent he doesn’t have his flash hood on and his ear is exposed.
Something isn’t quite right here.
His Tyvek® suit is open.
7
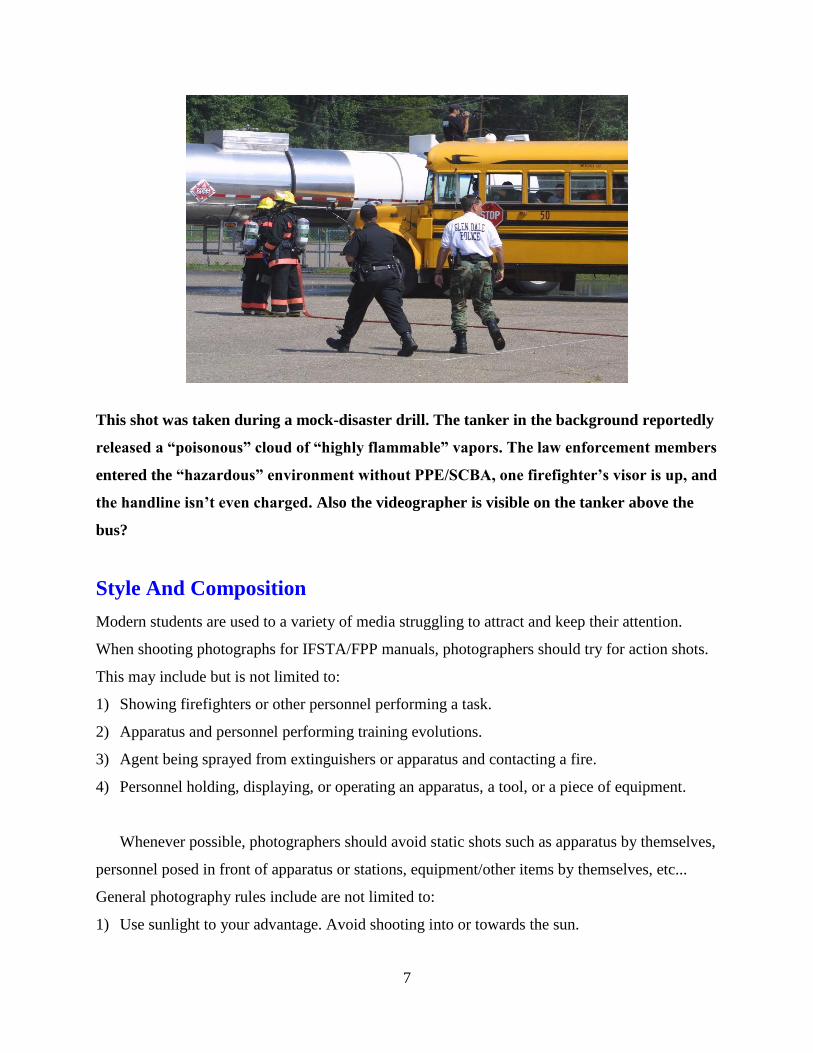
This shot was taken during a mock-disaster drill. The tanker in the background reportedly
released a “poisonous” cloud of “highly flammable” vapors. The law enforcement members
entered the “hazardous” environment without PPE/SCBA, one firefighter’s visor is up, and
the handline isn’t even charged. Also the videographer is visible on the tanker above the
bus?
Style And Composition
Modern students are used to a variety of media struggling to attract and keep their attention.
When shooting photographs for IFSTA/FPP manuals, photographers should try for action shots.
This may include but is not limited to:
1) Showing firefighters or other personnel performing a task.
2) Apparatus and personnel performing training evolutions.
3) Agent being sprayed from extinguishers or apparatus and contacting a fire.
4) Personnel holding, displaying, or operating an apparatus, a tool, or a piece of equipment.
Whenever possible, photographers should avoid static shots such as apparatus by themselves,
personnel posed in front of apparatus or stations, equipment/other items by themselves, etc...
General photography rules include are not limited to:
1) Use sunlight to your advantage. Avoid shooting into or towards the sun.
8
2) Try to center the action in the frame.
3) Avoid cluttered backgrounds (too much equipment, too many people, junk, debris, etc…).
4) Shoot a variety of portrait (vertical) AND landscape (horizontal) shots.
5) Watch for reflections in apparatus trim, windows, and paint.
6) Our Graphics personnel can lighten a darker image but cannot darken a washed out image.
7) And so on…
While shooting photographs for a specific manual, try to take several shots for each figure
reference using different angles and with differing camera orientations, portrait (vertical) or
landscape (horizontal). This gives the project manager a larger pool of images to select from and
increases the likelihood that the project manager gets exactly the shot needed for the project.
Images from the Internet
Because of copyright restrictions and generally lower image resolutions, we CANNOT accept
images downloaded from the Internet. The fact that an individual or agency has posted these on
the Internet grants them copyright protection. Additionally, to save space on web page servers,
many images are uploaded in lower resolutions (commonly 72 or 96 ppi/dpi) and thus are
unusable for our manuals.
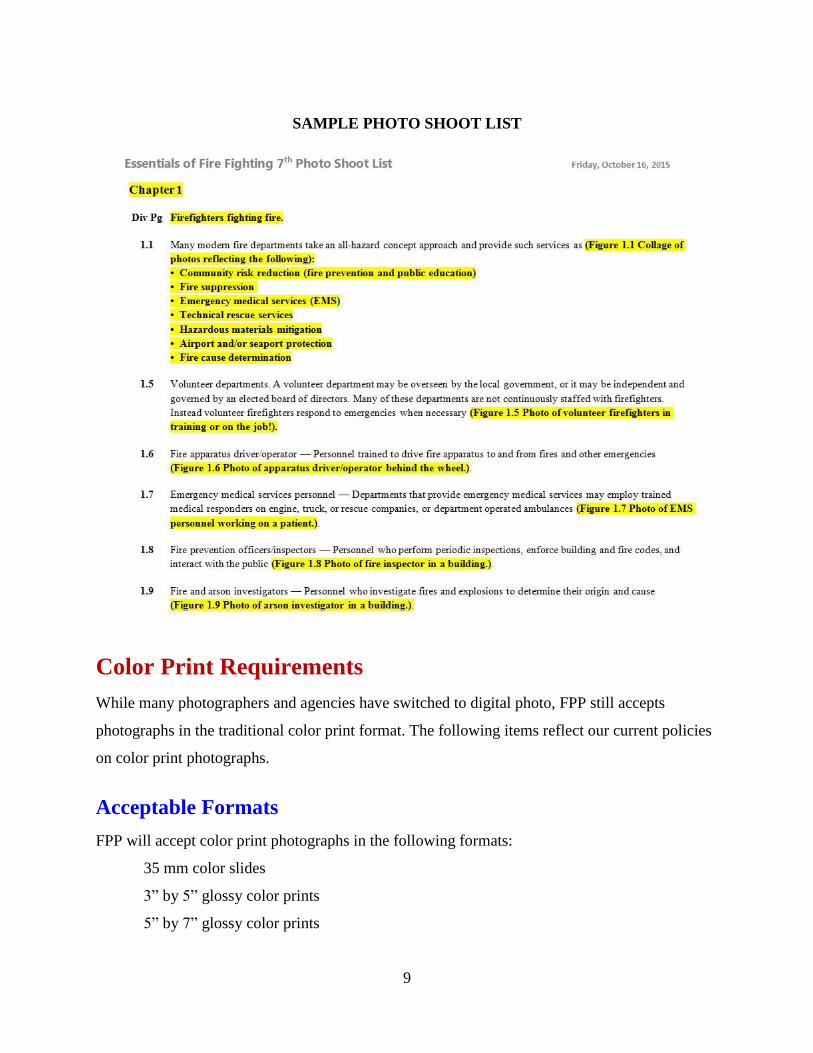
Working With Photo Shoot Lists
To assist our photographers in shooting specific images for a project, we use photo shoot lists to
describe each image we are seeking for that project. The following are some guidelines for
working with our photo shoot lists:
1) We will send out photo shoot lists for each chapter of a project to those who wish to help us
with the photography for a project
2) The shoot list identifies the figure reference #s: 2.3, 2.4, 2.5, etc…
3) It contains a short description of the picture and…
4) It also contains a 2 to 4 sentence section of the text around the figure reference to give you
the context of what we’re looking for in that image.
5) If a description is not clear enough, the photographer should contact the Project Manager for
clarification. This reduces the possibility of shooting something that may not get used.
9
SAMPLE PHOTO SHOOT LIST
Color Print Requirements
While many photographers and agencies have switched to digital photo, FPP still accepts
photographs in the traditional color print format. The following items reflect our current policies
on color print photographs.
Acceptable Formats
FPP will accept color print photographs in the following formats:
35 mm color slides
3” by 5” glossy color prints
5” by 7” glossy color prints
10
8” by 10” glossy color prints
NOTE: Textured prints will be rejected as unusable.
It is very important that photographers do NOT write on the back of the photographs.
This can leave raised markings on the front of the photograph that our scanner might pick up
when the photo is scanned. Such markings could render an image unusable. Please write any
notes on a separate piece of paper or a sticky note and then attach it to the back of the photo.
Sending Color Prints To FPP
Please send your color print photographs to FPP in a mailing envelope or box that is sufficiently
rigid to protect the photographs from damage that might be incurred during shipping. Even
minor impressions in the surface of a photo or minor creases can create problems when the
image is scanned into a digital format. Color prints should be shipped to the project manager or
to the editor responsible for photography.
Our mailing address is:
Fire Protection Publications
930 N. Willis
Stillwater, OK 74078
Attn: (appropriate recipients name)
Digital Photo Requirements
Digital photos for reproduction carry many of the same requirements as conventional
photos/slides in that they should be well-composed, properly focused, and have good color
values. Further, the subject matter must be technically accurate.
Formats
FPP can accept digital photos in any of the following formats, either for Macintosh or Windows
computers. (Windows formats are in parentheses) The formats are listed in their order of
preference.
11
JPEG (.jpg) – Joint Photographic Experts Group format (WIN/MAC)
TIFF (.tif) – Tagged Image File Format (WIN/MAC)
EPS (.eps) – Encapsulated PostScript (WIN/MAC)
PSD (.psd) – Photoshop native file format (WIN/MAC)
PCD (.pcd) – Kodak photo-CD (WIN/MAC)
NOTE: BMP (.bmp) – Windows bitmap format are NOT recommended
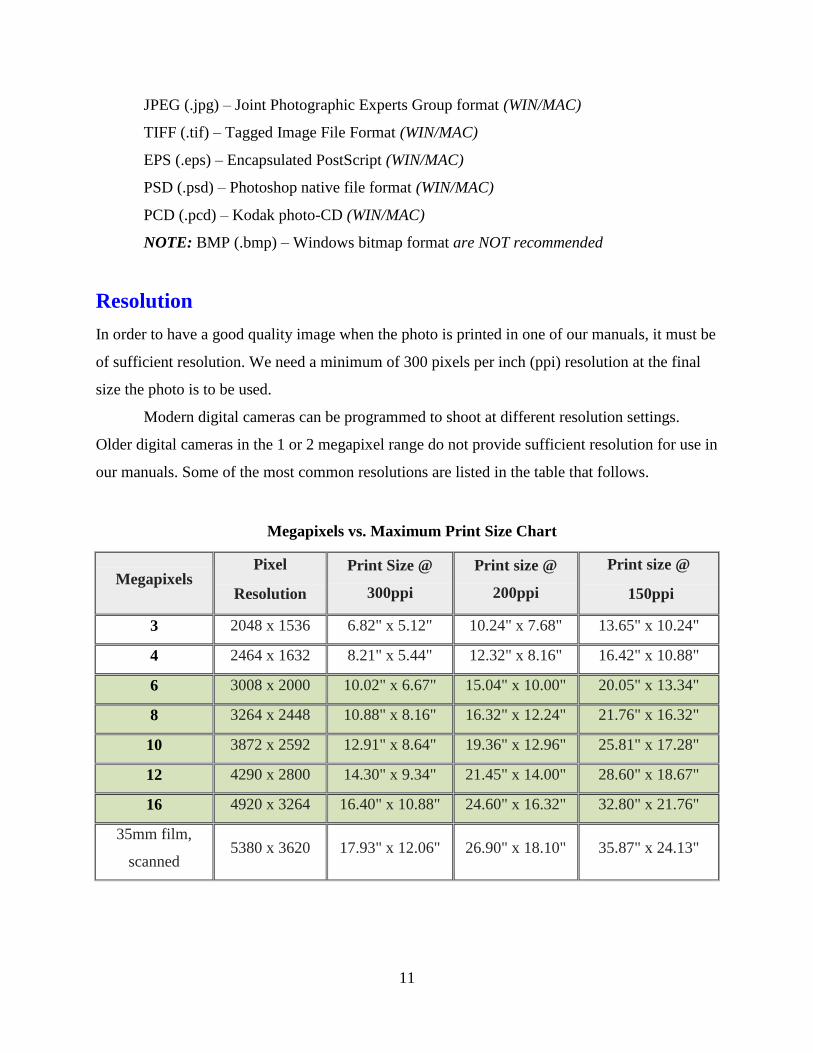
Resolution
In order to have a good quality image when the photo is printed in one of our manuals, it must be
of sufficient resolution. We need a minimum of 300 pixels per inch (ppi) resolution at the final
size the photo is to be used.
Modern digital cameras can be programmed to shoot at different resolution settings.
Older digital cameras in the 1 or 2 megapixel range do not provide sufficient resolution for use in
our manuals. Some of the most common resolutions are listed in the table that follows.
Megapixels vs. Maximum Print Size Chart
Megapixels Pixel
Resolution
Print Size @
300ppi
Print size @
200ppi
Print size @
150ppi
3 2048 x 1536 6.82" x 5.12" 10.24" x 7.68" 13.65" x 10.24"
4 2464 x 1632 8.21" x 5.44" 12.32" x 8.16" 16.42" x 10.88"
6 3008 x 2000 10.02" x 6.67" 15.04" x 10.00" 20.05" x 13.34"
8 3264 x 2448 10.88" x 8.16" 16.32" x 12.24" 21.76" x 16.32"
10 3872 x 2592 12.91" x 8.64" 19.36" x 12.96" 25.81" x 17.28"
12 4290 x 2800 14.30" x 9.34" 21.45" x 14.00" 28.60" x 18.67"
16 4920 x 3264 16.40" x 10.88" 24.60" x 16.32" 32.80" x 21.76"
35mm film,
scanned 5380 x 3620 17.93" x 12.06" 26.90" x 18.10" 35.87" x 24.13"
12
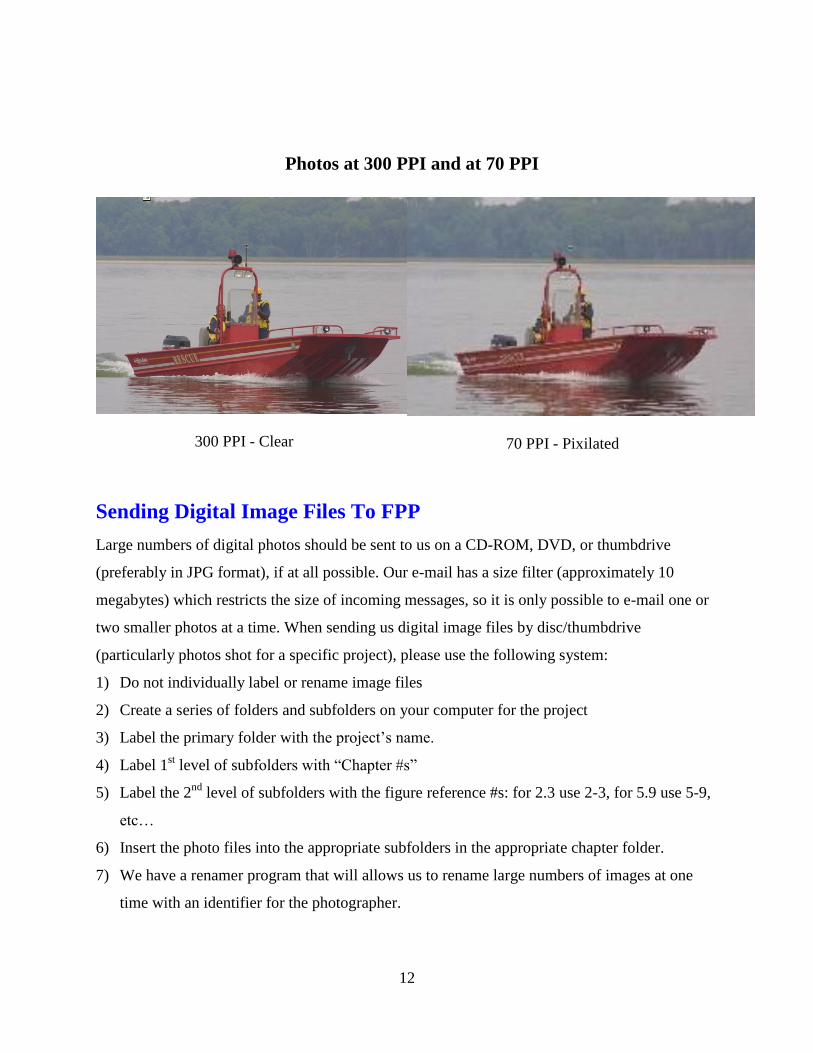
Photos at 300 PPI and at 70 PPI
300 PPI - Clear
70 PPI - Pixilated
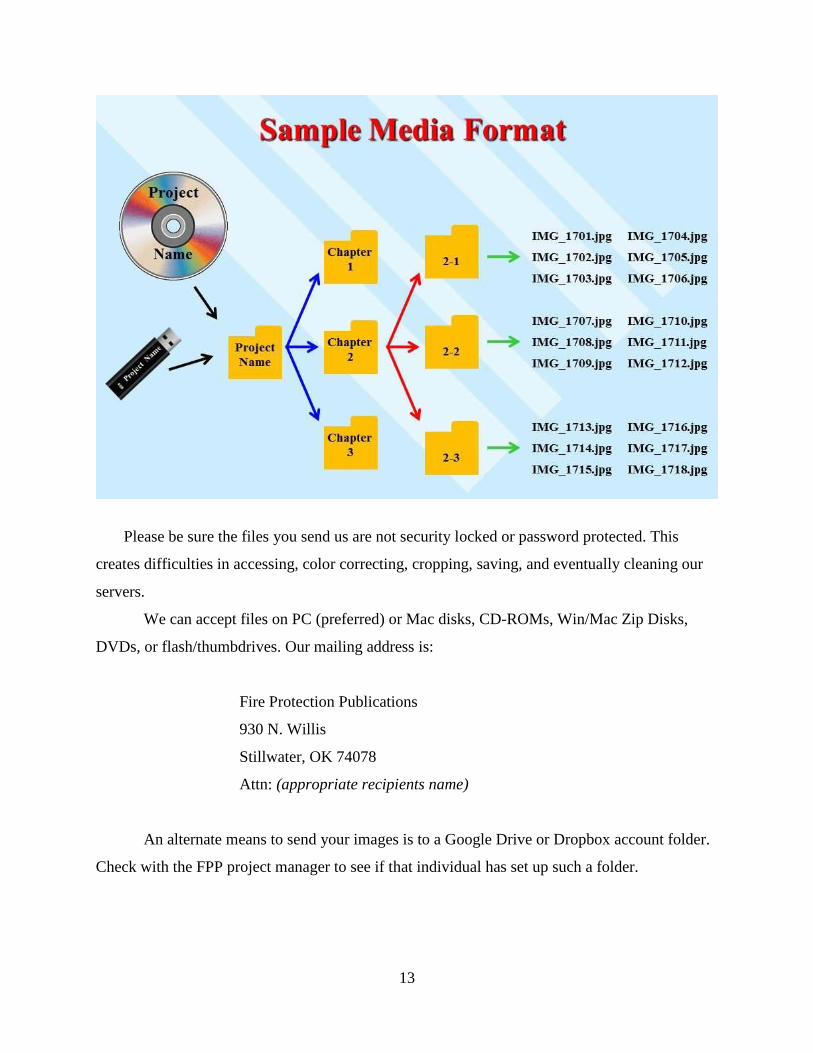
Sending Digital Image Files To FPP
Large numbers of digital photos should be sent to us on a CD-ROM, DVD, or thumbdrive
(preferably in JPG format), if at all possible. Our e-mail has a size filter (approximately 10
megabytes) which restricts the size of incoming messages, so it is only possible to e-mail one or
two smaller photos at a time. When sending us digital image files by disc/thumbdrive
(particularly photos shot for a specific project), please use the following system:
1) Do not individually label or rename image files
2) Create a series of folders and subfolders on your computer for the project
3) Label the primary folder with the project’s name.
4) Label 1st level of subfolders with “Chapter #s”
5) Label the 2nd
level of subfolders with the figure reference #s: for 2.3 use 2-3, for 5.9 use 5-9,
etc…
6) Insert the photo files into the appropriate subfolders in the appropriate chapter folder.
7) We have a renamer program that will allows us to rename large numbers of images at one
time with an identifier for the photographer.
13
Please be sure the files you send us are not security locked or password protected. This
creates difficulties in accessing, color correcting, cropping, saving, and eventually cleaning our
servers.
We can accept files on PC (preferred) or Mac disks, CD-ROMs, Win/Mac Zip Disks,
DVDs, or flash/thumbdrives. Our mailing address is:
Fire Protection Publications
930 N. Willis
Stillwater, OK 74078
Attn: (appropriate recipients name)
An alternate means to send your images is to a Google Drive or Dropbox account folder.
Check with the FPP project manager to see if that individual has set up such a folder.
14
FPP Photography Forms
FPP is very conscious of the rights of photographers who take photographs for us and the people
who appear in those images. We do require copyright releases from photographers and talent
releases from participants (in specific instances). Please do NOT submit images if they have
appeared in other publications. Also, please provide us with the proper courtesy line information
such as the photographer’s name and fire department or organization.
Copyright Permission Forms
All photographers submitting images to FPP must complete a copyright release form signifying
that they are granting us permission to use the image(s) in our manuals, clip-art CDs, training
materials, advertisements, and other productions. A copyright release form is NOT required for
each individual image, rather ONE copyright release can be used to cover a series of images
submitted simultaneously or for one project. Photographers can grant an “open” or “blanket”
copyright release by signifying this in the appropriate location (lower half) on the release form.
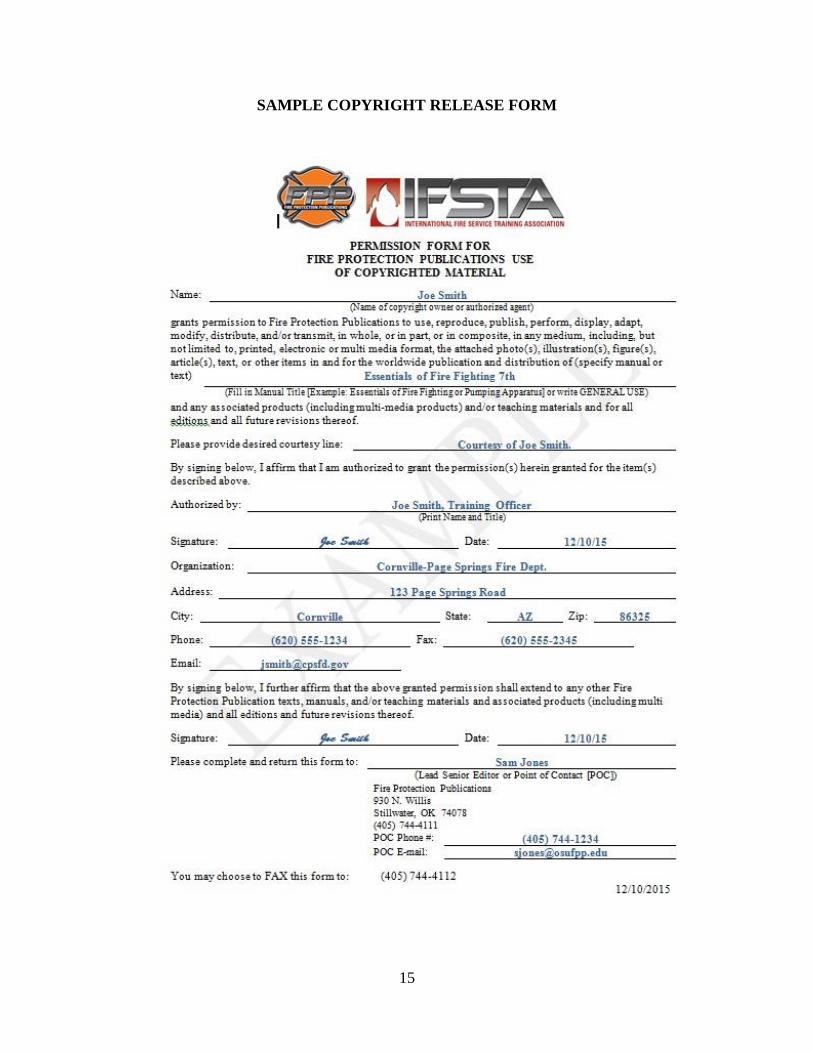
15
SAMPLE COPYRIGHT RELEASE FORM
16
Talent Releases
The policy for talent release forms is fairly simple:
1) A talent release is NOT needed for anyone appearing in a photo taken at an actual
emergency/incident/accident or during post incident activities (equipment pickup, return to
station, etc…).
2) Talent releases ARE required when photographs are taken at a staged event such as a/an
class, exercise, drill, or event specifically staged for photographic intentions. All
personnel/performers/talent who will appear in photographs taken at these events must sign a
talent release form signifying that they are granting us permission to use their image(s) in our
manuals, clip-art CDs, training materials, advertisements, and other productions.
NOTE: There is one exception to this: if news media (newspaper, radio, or television
reporters and camera personnel) are covering the event, then they have made it a news event.
Shoot pictures of the media personnel interacting with the personnel at the event and include
these shots with the other shots being taken!
3) The talent release form must be counter-signed by a witness such as the photographer or
another participant.
4) For minor children who appear in staged photographs to be submitted to FPP, a talent release
must be signed by the parent or guardian of the child(ren).
5) The title of the project should appear in the blank in the first paragraph. If photos are being
taken for general use, print or type in “General Use.”
6) The “talent” completes the YELLOW highlighted sections.
7) A witness must complete the BLUE highlighted section.
8) Note the “talent’s” department or agency affiliation in the Department line at the bottom of
the page. For example, Cornville-Page Springs Fire Department, AZ.

17
SAMPLE TALENT RELEASE FORM
18
Always List for Photographers
1) Ensure safety is observed and demonstrated at ALL times during a photo shoot. We do not
want anyone injured or equipment damaged during the shoot.
a. Monitor weather conditions (heat, cold, humidity) carefully
b. Ensure personnel stay hydrated
c. Allow time for breaks to allow personnel to cool off or warm up, as appropriate
2) Recent NFPA 1500 changes which need to be reflected in photos for FPP/IFSTA:
a. Helmets will NOT be worn inside apparatus during emergency response
b. Reflective safety vests MUST be worn during roadway incidents, apparatus backing
operations, night-time operations, hose loading operations in roadways, etc…
c. Safety harnesses MUST be worn when on apparatus loading hose
d. Humans will NOT be used as “victims” during ladder or rope rescue training evolutions
or photo shoots
3) Have ALL personnel appearing in the photos (the talent) wear appropriate PPE for the
operation being shot:
a. Structural fires – structural PPE and self-contained breathing apparatus
b. Aircraft rescue –structural or proximity PPE and self-contained breathing apparatus
c. Automobile extrication – structural PPE or technical rescue PPE (jump suits)
d. Hazardous materials – appropriate level of hazmat level A, B, or C ensemble or structural
PPE and appropriate breathing apparatus
e. Equipment inspection/maintenance/operation – appropriate safety glasses, gloves,
hearing protection, and helmet or hard hat (include fiber mask if dusts, particulates, etc…
are possible)
4) Ensure the talent wears their PPE properly:
a. All snaps snapped
b. All Velcro sealed
c. Coat collars up and sealed
d. Helmet flaps down
e. Helmet chin straps under chin and fastened snuggly
19
f. Eye protection worn. Helmet visors (if so equipped) down even if wearing safety glasses.
Safety glasses on if the helmet has no visor.
g. Coat wristlets are used so that no skin is exposed between the coat sleeves and the gloves
5) Ensure all PPE is clean and serviceable
6) Manikins used in photo shoots should have some type of clothing on. Minimum of t-shirt,
pants, and shoes.
7) Talent Release Forms must be signed by each individual appearing in a staged photography
session.
NOTES