Embed Size (px)
Citation preview

eBanking Guide

inside front cover
BLANK

Contents
Dashboard .................................................................................................... 2
Accounts ....................................................................................................... 3
Transfers ....................................................................................................... 6
Deposit a Check ........................................................................................... 8
Message Center ........................................................................................... 9
Bill Pay ........................................................................................................ 10
Budgets ...................................................................................................... 12
Savings Goal ............................................................................................... 13
eDocs ......................................................................................................... 14
Pay a Friend ................................................................................................ 15
Settings ....................................................................................................... 16
Shared Access ............................................................................................ 16
Check Services ........................................................................................... 17

DASHBOARD
The dashboard is the homepage a member sees when they log into online banking. It provides access to many of the features in online banking, including widgets (the features in the left-hand column), message center, settings, and more.
To hide an account from Dashboard:
1. Click on the cogwheel settings icon2. Uncheck the box on the account you’d like to hide3. Click Save
Your recent and upcoming history displays on the righthand side of the dashboard. You can adjust the amount of days that it shows, as well as what types of activities. To adjust this:
1. Click on the cogwheel settings icon2. Choose from the dropdown how many days to display3. Choose what actions to display by checking the relevant boxes4. Click Save
The following icons may display next to your accounts if applicable.
Formatted: Font: (Default) Arial
Dashboard
The dashboard is the homepage a member sees when they log into online banking. It provides access to many of the features in online banking, including widgets (the features in the left-hand column), message center, settings, and more.
To hide an account from Dashboard: 1. Click on the cogwheel settings icon 2. Uncheck the box on the account you’d like to hide 3. Click Save
Your recent and upcoming history displays on the righthand side of the dashboard. You can adjust the amount of days that it shows, as well as what types of activities. To adjust this: 1. Click on the cogwheel settings icon 2. Choose from the dropdown how many days to display 3. Choose what actions to display by checking the relevant boxes 4. Click Save
The following icons may display next to your accounts if applicable.
DASHBOARD
The dashboard is the homepage a member sees when they log into online banking. It provides access to many of the features in online banking, including widgets (the features in the left-hand column), message center, settings, and more.
To hide an account from Dashboard:
1. Click on the cogwheel settings icon2. Uncheck the box on the account you’d like to hide3. Click Save
Your recent and upcoming history displays on the righthand side of the dashboard. You can adjust the amount of days that it shows, as well as what types of activities. To adjust this:
1. Click on the cogwheel settings icon2. Choose from the dropdown how many days to display3. Choose what actions to display by checking the relevant boxes4. Click Save
The following icons may display next to your accounts if applicable.
Formatted: Font: (Default) Arial
2

View Non-cPort Accounts
View Non-cPort Accounts is a secure way to view external accounts that you have with other financial institutions under one login. It is a view-only feature which means you cannot do any transactions for these non-cPort accounts; however you can view transactions and include these accounts in Budgets.
Setting up View Non-cPort Accounts:
1. From the Dashboard, click the blue Get Started under View Non-cPort Accounts2. Search for your other financial institution’s name3. Enter in the credentials of your online banking login4. Hit Submit
a. If your other financial institution uses multi-factor authenticators, you will be prompted for those
5. Once your account is finished syncing, a green checkmark will appear6. Refresh your dashboard screen for the non-cPort accounts to populate
View Non-cPort Accounts
View Non-cPort Accounts
View Non-cPort Accounts is a secure way to view external accounts that you have with other financial institutions under one login. It is a view-only feature which means you cannot do any transactions for these non-cPort accounts; however you can view transactions and include these accounts in Budgets.
Setting up View Non-cPort Accounts:
1. From the Dashboard, click the blue Get Started under View Non-cPort Accounts2. Search for your other financial institution’s name3. Enter in the credentials of your online banking login4. Hit Submit
a. If your other financial institution uses multi-factor authenticators, you will be prompted for those
5. Once your account is finished syncing, a green checkmark will appear6. Refresh your dashboard screen for the non-cPort accounts to populate
View Non-cPort Accounts is a secure way to view external accounts that you have with other financial institutions under one login. It is a view-only feature which means you cannot do any transactions for these non-cPort accounts; however you can view transactions and include these accounts in Budgets.
Setting up View Non-cPort Accounts: 1. From the Dashboard, click the blue Get Started under View Non-cPort Accounts 2. Search for your other financial institution’s name 3. Enter in the credentials of your online banking login 4. Hit Submit a. If your other financial institution uses multi-factor authenticators, you will be prompted for those 5. Once your account is finished syncing, a green checkmark will appear 6. Refresh your dashboard screen for the non-cPort accounts to populate.
3

ACCOUNTS
To hide an account from Dashboard, Accounts, and Transfers:
1. Click on the pencil icon next to the name of the account2. Check the Hide This Account box3. Click Save
To nickname an account:
1. Click on the pencil icon next to the name of the account 2. Update the nickname field 3. Click Save
Downloading transactions:
You can download your transfer from any account to a CSV, OFX, QFX, and QBO file for Excel or to Quicken or Quickbooks.
1. From your transactions, click the arrow symbol above your most recent transaction2. Select your file type3. Click Export
Print transactions:
You can print your last 100 transactions from any account.
1. From your transactions, click the printer symbol above your most recent transaction2. Adjust any necessary printing settings
Accounts
To hide an account from Dashboard, Accounts, and Transfers: 1. Click on the pencil icon next to the name of the account 2. Check the Hide This Account box 3. Click Save
To nickname an account: 1. Click on the pencil icon next to the name of the account 2. Update the nickname field 3. Click Save
Downloading transactions:You can download your transfer from any account to a CSV, OFX, QFX, and QBO file for Excel or to Quicken or Quickbooks. 1. From your transactions, click the arrow symbol above your most recent transaction 2. Select your file type 3. Click Export
Print transactions:You can print your last 100 transactions from any account. 1. From your transactions, click the printer symbol above your most recent transaction 2. Adjust any necessary printing settings 3. Click Print
ACCOUNTS
To hide an account from Dashboard, Accounts, and Transfers:
1. Click on the pencil icon next to the name of the account2. Check the Hide This Account box3. Click Save
To nickname an account:
1. Click on the pencil icon next to the name of the account 2. Update the nickname field 3. Click Save
Downloading transactions:
You can download your transfer from any account to a CSV, OFX, QFX, and QBO file for Excel or to Quicken or Quickbooks.
1. From your transactions, click the arrow symbol above your most recent transaction2. Select your file type3. Click Export
Print transactions:
You can print your last 100 transactions from any account.
1. From your transactions, click the printer symbol above your most recent transaction2. Adjust any necessary printing settings
3. Click Print
Account Details*
In account details, you can find additional information about your account including member number, checking account number, interest rate, upcoming payment information and share open date depending on the type of account.
Categorizing Transactions* *need screenshot of add category
Categories allow you to tag transactions to see your different types of expenses and income. Tagging transactions allows you to better manage your budgets and see your spending habits in the Analytics section of your account.
4

Account Details*
In account details, you can find additional information about your account including member number, checking account number, interest rate, upcoming payment information and share open date depending on thetype of account.
Categorizing Transactions
Categories allow you to tag transactions to see your different types of expenses and income. Tagging transactions allows you to better manage your budgets and see your spending habits in the Analytics section of your account.
5
3. Click Print
Account Details*
In account details, you can find additional information about your account including member number, checking account number, interest rate, upcoming payment information and share open date depending on the type of account.
Categorizing Transactions
Categories allow you to tag transactions to see your different types of expenses and income. Tagging transactions allows you to better manage your budgets and see your spending habits in the Analytics section of your account.
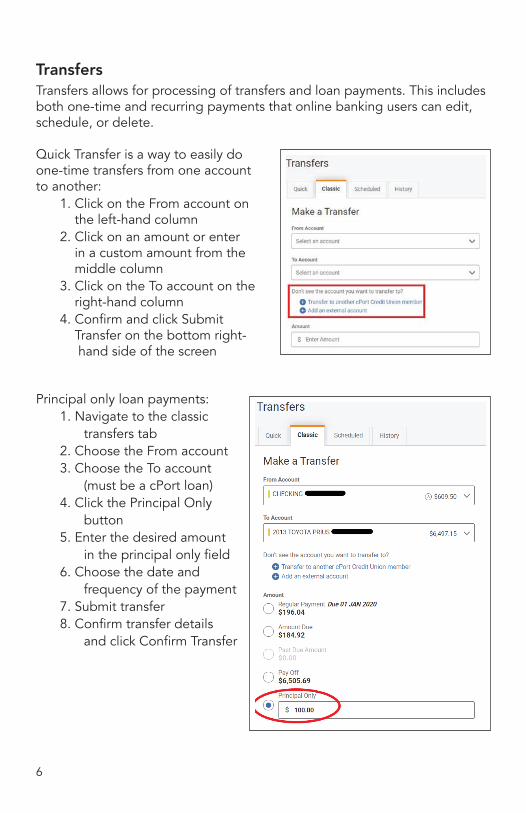
TransfersTransfers allows for processing of transfers and loan payments. This includes both one-time and recurring payments that online banking users can edit, schedule, or delete.
Quick Transfer is a way to easily do one-time transfers from one account to another: 1. Click on the From account on the left-hand column 2. Click on an amount or enter in a custom amount from the middle column 3. Click on the To account on the right-hand column 4. Confirm and click Submit Transfer on the bottom right- hand side of the screen
Principal only loan payments: 1. Navigate to the classic transfers tab 2. Choose the From account 3. Choose the To account (must be a cPort loan) 4. Click the Principal Only button 5. Enter the desired amount in the principal only field 6. Choose the date and frequency of the payment 7. Submit transfer 8. Confirm transfer details and click Confirm Transfer
Transfer to another cPort Credit Union member is another way to transfer money to a fellow cPort member without having to call or come in. You will be able to transfer funds from your shares to their shares within cPort:
1. Click Transfer to another cPort Credit Union member2. Enter in the recipient’s last name3. Enter in the recipient’s member number4. Enter in the appropriate share ID or change the dropdown to Loan ID if transferring to a
loan5. Assign a nickname 6. Click Save7. The other cPort account will then appear in your transfer to account options
6
TRANSFERS
Transfers allows for processing of transfers and loan payments. This includes both one-time and recurring payments that online banking users can edit, schedule, or delete.
Quick Transfer is a way to easily do one-time transfers from one account to another:
1. Click on the From account on the left-hand column2. Click on an amount or enter in a custom amount from the middle column3. Click on the To account on the right-hand column4. Confirm and click Submit Transfer on the bottom right-hand side of the screen
Principal only loan payments:
1. Navigate to the classic transfers tab2. Choose the From account3. Choose the To account (must be a cPort loan)4. Click the Principal Only button5. Enter the desired amount in the principal only field6. Choose the date and frequency of the payment7. Submit transfer8. Confirm transfer details and click Confirm Transfer

Transfer to another cPort Credit Union member is another way to transfer money to a fellow cPort member without having to call or come in. You will be able to transfer funds from your shares to their shares within cPort: 1. Click Transfer to another cPort Credit Union member 2. Enter in the recipient’s last name 3. Enter in the recipient’s member number 4. Enter in the appropriate share ID or change the dropdown to Loan ID if transferring to a loan 5. Assign a nickname 6. Click Save 7. The other cPort account will then appear in your transfer to account options
External transfers allow members to transfer funds to or from their own checking or savings account at other financial institutions.
Adding an external account: 1. Under Classic Transfers, select the option for Add an External Account 2. Choose from the dropdown the account type 3. Enter in the routing number 4. Enter in the account number 5. Assign a nickname 6. Click Save 7. In 3 – 5 business days, you will be notified in online banking to confirm two small deposits that were made into your external account 8. To validate, enter in the two deposit amounts on the Dashboard or in Settings 9. Once validated, the external account will appear in the transfer to and/or from options
External transfers allow members to transfer funds to or from their own checking or savings account at other financial institutions.
Adding an external account:
1. Under Classic Transfers, select the option for Add an External Account2. Choose from the dropdown the account type3. Enter in the routing number4. Enter in the account number5. Assign a nickname6. Click Save7. In 3 – 5 business days, you will be notified in online banking to confirm two small
deposits that were made into your external account8. To validate, enter in the two deposit amounts on the Dashboard or in Settings9. Once validated, the external account will appear in the transfer to and/or from options
7

DEPOSIT A CHECK
Deposit A Check allows members to deposit a check at their convenience without needing to stop by a branch. We recommend you use the mobile app version of Deposit Check instead of desktop.
Deposit a check:
1. Select the account you want to deposit a check2. Click Open3. Click Load4. Upload a properly endorsed image of the front and back of your check5. Click Save6. Confirm amount and click the green Submit button
View deposit history:
1. Click the folder icon in the top right-hand corner of the screen2. Click on the PDF icon under the action’s column
a. If you see an image of the check, it has been acceptedb. If you do not see an image, there will be a reason provided regarding why the
check has not been accepted
Deposit a CheckDeposit A Check allows members to deposit a check at their convenience without needing to stop by a branch. We recommend you use the mobile app version of Deposit Check instead of desktop. Deposit a check: 1. Select the account you want to deposit a check 2. Click Open 3. Click Load 4. Upload a properly endorsed image of the front and back of your check 5. Click Save 6. Confirm amount and click the green Submit button
View deposit history: 1. Click the folder icon in the top right-hand corner of the screen 2. Click on the PDF icon under the action’s column a. If you see an image of the check, it has been accepted b. If you do not see an image, there will be a reason provided regarding why the check has not been accepted
8

MESSAGE CENTER
The message center allows members to securely communicate with cPort staff.
To compose a message:
1. Go to the Message Center2. Click Compose3. Choose your subject4. Choose the account5. Add a message6. Attach files if applicable7. Click Send Message
A member service representative will respond within one business day. You will receive an email notification when you have a new message in the Message Center.
Message CenterThe message center allows members to securely communicate with cPort staff.
To compose a message: 1. Go to the Message Center 2. Click Compose 3. Choose your subject 4. Choose the account 5. Add a message 6. Attach files if applicable 7. Click Send Message
A member service representative will respond within one business day. You will receive an email notification when you have a new message in the Message Center.
9

10
Bill Pay allows online banking users to submit immediate, scheduled, and recurring bill payments to pay individuals or businesses via electronic ACH or physical check.
Adding a payee: 1. Click Add Payee 2. Choose the payee type: business or person 3. Click Next a. If business: i. Enter in name of business, choose funding account, enter in account number and click Next ii. Enter in address information, phone number, and nickname and click Next
Make a payment: 1. Choose payee from My Payees on Bill Pay Dashboard 2. Confirm your account 3. Enter in amount 4. Choose the frequency, start date, and delivery method 5. Enter a memo if applicable 6. Confirm payment details and click Confirm Payment
Bill Pay
BILL PAY
Bill Pay allows online banking users to submit immediate, scheduled, and recurring bill payments to pay individuals or businesses via electronic ACH or physical check.
Adding a payee:
1. Click Add Payee2. Choose the payee type: business or person3. Click Next
a. If business:i. Enter in name of business, choose funding account, enter in account
number and click Nextii. Enter in the address information, phone number, and nickname and click
Next
Make a payment:
1. Choose payee from My Payees on Bill Pay Dashboard2. Confirm from account3. Enter in amount4. Choose the frequency, start date, and delivery method5. Enter a memo if applicable6. Confirm payment details and click Confirm Payment
Make multiple payments at once using MultiPay:
1. Click on the MultiPay tab2. Select the payees on the left-hand column that you would like to include for MultiPay by
clicking on the checkboxes3. For each payee, choose the pay from account, the amount, and the send on date4. Click the Submit Payment button 5. Confirm payment details and click Confirm Payment button

11
Make multiple payments at once using MultiPay: 1. Click on the MultiPay tab 2. Select the payees on the left-hand column that you would like to include for MultiPay by clicking on the checkboxes 3. For each payee, choose the pay from account, the amount, and the send on date 4. Click the Submit Payment button 5. Confirm payment details and click Confirm Payment button
Make multiple payments at once using MultiPay:
1. Click on the MultiPay tab2. Select the payees on the left-hand column that you would like to include for MultiPay by
clicking on the checkboxes3. For each payee, choose the pay from account, the amount, and the send on date4. Click the Submit Payment button 5. Confirm payment details and click Confirm Payment button

BudgetsBudgets is a money management tool for online banking users to define and monitor budgets. The more transactions you categorize, the more detailed your budget will be.
Creating a budget: 1. Name your budget 2. Select the accounts you would like to assign to the budget 3. Add expense categories 4. Add Income categories 5. Click Create Budget
12
BUDGETS
Budgets is a money management tool for online banking users to define and monitor budgets.The more transactions you categorize, the more detailed your budget will be.
Creating a budget:
1. Name your budget2. Select the accounts you would like to assign to the budget3. Add expense categories4. Add Income categories5. Click Create Budget
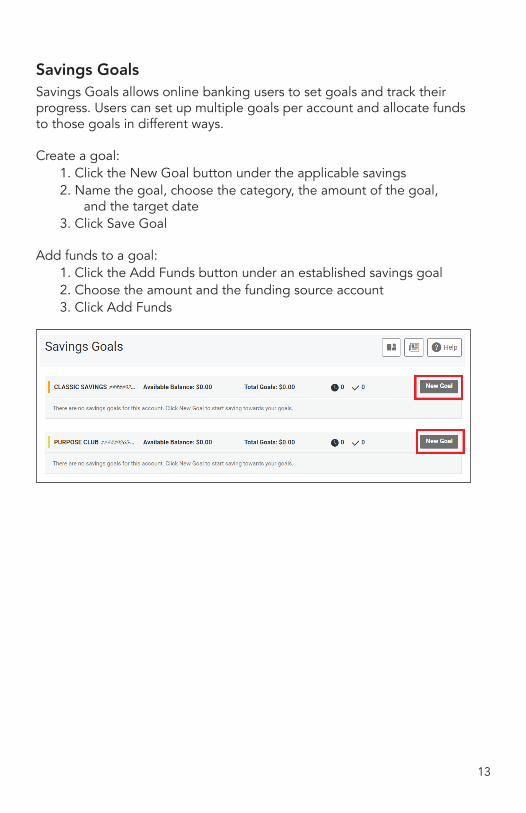
Savings GoalsSavings Goals allows online banking users to set goals and track their progress. Users can set up multiple goals per account and allocate funds to those goals in different ways.
Create a goal: 1. Click the New Goal button under the applicable savings 2. Name the goal, choose the category, the amount of the goal, and the target date 3. Click Save Goal
Add funds to a goal: 1. Click the Add Funds button under an established savings goal 2. Choose the amount and the funding source account 3. Click Add Funds
SAVINGS GOALS
Savings Goals allows online banking users to set goals and track their progress. Users can set up multiple goals per account and allocate funds to those goals in different ways.
Create a goal:
1. Click the New Goal button under the applicable savings2. Name the goal, choose the category, the amount of the goal, and the target date3. Click Save Goal
Add funds to a goal:
1. Click the Add Funds button under an established savings goal2. Choose the amount and the funding source account3. Click Add Funds
13

eDocseDocs allows online banking users to view their statements and tax forms electronically at your convenience.
Opt-In to eStatements: 1. Click Subscribe 2. Agree to the Terms & Conditions 3. Open the PDF and confirm the five-character code 4. Click the Subscribe button
View Statements:
To view statements: 1. Click on the eDocs widget 2. Click on the statements tab 3. Click on the statement below that you would like to view
14
eDOCS
eDocs allows online banking users to view their statements electronically at your convenience.
Opt-In to eStatements:
1. Click Subscribe2. Agree to the Terms & Conditions3. Open the PDF and confirm the five-character code4. Click the Subscribe button
View Statements:
To view Statements:
1. Click on the eDocs widget2. Click on the statements tab3. Click on the statement below that you would like to view

Pay A FriendPay A Friend allows cPort debit card holders to send money to anyone via text or email. Money is accepted by the recipient through their own debit card or via ACH. If the recipient uses a debit card to receive funds, they will receive funds instantaneously.
To send money: 1. Under About Your Recipient, enter in the recipient’s email or phone number 2. Confirm the recipient’s email or phone number 3. Under About Your Payment, add a memo if applicable 4. Enter in the amount to transfer 5. Under About Your Account, enter in your debit card information 6. Click the checkbox to accept the terms and conditions 7. Click Send 8. For verification, enter in your PIN number for your cPort debit card. Please keep in mind that each time you click a number, the numbers will shuffle for security purposes 9. Click Submit 10. The recipient will receive an email or text to enter in their debit card information or checking account information to accept the payment
15
PAY A FRIEND
Pay A Friend allows cPort debit card holders to send money to anyone via text or email. Money is accepted by the recipient through their own debit card or via ACH. If the recipient uses a debit card to receive funds, they will receive funds instantaneously.
To send money:
1. Under About Your Recipient, enter in the recipient’s email or phone number2. Confirm the recipient’s email or phone number3. Under About Your Payment, add a memo if applicable4. Enter in the amount to transfer5. Under About Your Account, enter in your debit card information6. Click the checkbox to accept the terms and conditions7. Click Send8. For verification, enter in your PIN number for your cPort debit card. Please keep in mind
that each time you click a number, the numbers will shuffle for security purposes9. Click Submit10. The recipient will receive an email or text to enter in their debit card information or
checking account information to accept the payment

Settings
16
SETTINGS
Settings allows online banking users to customize their online banking experience, as well as update their username and password, set notification alerts, update their contact information, enable shared access, and more.
• Securityo Change your username and passwordo Change your contact info for multi-factor authenticator
• Contacto Change your address, phone numbers, or emailo Enroll in SMS text messages here to receive notifications via SMS text
• Notificationso Establish notifications alert that can be delivered by email, text, or push
notification. These alerts can be general alerts or account specific alerts
Shared Access
Shared Access allows online banking users to share their accounts with another individual, including non-cPort members. The user can assign permissions and restrictions by account for the other individual to transfer to, transfer from, view balances, and/or pay bills.
Please set up shared access only with people you know and trust.
Setting up Shared Access:
1. Click Add a user2. Enter the first name, last name, and email address of the person you are sharing access
with3. Choose the specific permissions by account that you would like to allow the individual4. Click Save5. Click the checkmark box to acknowledge and click Confirm6. This will send the individual an email address where they will be given a link to enter in a
code and create a username and password7. Click on the pending invitation to view the confirmation code that you will have to provide
to the shared access user
Settings allows online banking users to customize their online banking experience, as well as update their username and password, set notification alerts, update their contact information, enable shared access, and more.
• Security - Change your username and password - Change your contact info for multi-factor authenticator• Contact - Change your address, phone numbers, or email - Enroll in SMS text messages here to receive notifications via SMS text• Notifications - Establish notifications alert that can be delivered by email, text, or push notification. These alerts can be general alerts or account specific alerts
Shared Access allows online banking users to share their accounts with another individual, including non-cPort members. The user can assign per-missions and restrictions by account for the other individual to transfer to, transfer from, view balances, and/or pay bills. Please set up shared access only with people you know and trust.
Setting up Shared Access: 1. Click Add a user 2. Enter the first name, last name, and email address of the person you are sharing access with 3. Choose the specific permissions by account that you would like to allow the individual 4. Click Save 5. Click the checkmark box to acknowledge and click Confirm 6. This will send the individual an email address where they will be given a link to enter in a code and create a username and password 7. Click on the pending invitation to view the confirmation code that you will have to provide to the shared access user
Shared Access

Check ServicesCheck services allows online banking users to do a stop payment on a per-sonal check or re-order checks.
To process a stop payment: 1. Click on New Stop Pay Request 2. Choose the account the check is drawn off of 3. Enter the check number 4. Click Search to determine if the check has already cleared the account a. If it has cleared, the check is not eligible for a stop pay 5. Click I agree 6. Click Submit Request
Reorder checks:If you have previously ordered cPort checks, you can reorder additional checks in eBanking. If you have not previously ordered checks from cPort, please call us at 1-800-464-0253 for your first order.
1. Select Reorder Checks 2. Click Proceed to continue to the Harland Clarke site 3. Enter cPort’s routing number 211288239 and your checking account number to log in
17
CHECK SERVICES
Check services allows online banking users to do a stop payment on a personal check or re-order checks.
To process a stop payment:
1. Click on New Stop Pay Request2. Choose the account the check is drawn off of3. Enter the check number4. Click Search to determine if the check has already cleared the account
a. If it has cleared, the check is not eligible for a stop pay5. (Optional) Enter in a payee name and stop pay reason6. Click I agree7. Click Submit Request
Reorder checks:
If you have previously ordered cPort checks, you can reorder additional checks in eBanking. If you have not previously ordered checks from cPort, please call us at 1-800-464-0253 for your first order.
1. Select Reorder Checks2. Click Proceed to continue to the Harland Clarke site3. Enter cPort’s routing number 211288239 and your checking account number to log in

back cover
BLANK


![Ebanking 4th sem[1]](https://img.dokumen.tips/doc/110x75/577d2c731a28ab4e1eac3f73/ebanking-4th-sem1.jpg)