Embed Size (px)
Citation preview

Leaves on the Wind
In this tutorial we are going to use particle flow to create an effect like leaves blowing around in the wind, or perhaps as a car drives over them and creates a gust.
First thing we will need is a surface for our ground, in the future we can model a road, or a rooftop, or whatever but for this demonstrational purpose we will just make a plane with 1x1 segments and dimensions of 125 by 400.
I made it long to match the image in my head of a road with fallen leaves all over it. This plane will simulate our road. Next, we are going to need a leaf. All of these things can be modeled out more detailed and textured at a later date, this tutorial is just a how to get your particles behaving like leaves. So we are going to create a second plane, much smaller this time that later we could texture to look like a leaf.
Create a new plane, 6x6 dimensions with only 1 segment in each length and width.
I recommend giving both items we have created names so they are easy to see when we get to the particle flow chart, mine are now road and leaf.
1

Next we are going to need to create a few space warps so that our leaves have something to react to just like in the physical world.
First, we will need gravity. So go over to the Spacewarps button on your create tab and select it from the menu.
<---Spacewarps
<--- Gravity
Create the gravity by drawing it out in your top viewport, this allows the arrow to be pointing in the correct direction without changing anything.
It doesn't matter where you put the gravity icon or how big you make it.
All that matters is that the arrow points down towards the surface of your road.
Then go to your modify tab, and adjust the Strength setting of the gravity. We want a very low number here, these are leaves and if our gravity is too high they will fall like rocks rather than float down gently.
Set your strength to about 0.05, we can always adjust this later on.
2

Next we are going to need a wind which will act on our leaves as it passes over them. Simulating the same effects as a car whizzing past or a gust of wind blowing down the road. In the future you might link this wind to your car so that it goes where your car does, but for this demonstration we are simply going to animate the wind itself.
Before you draw your wind in the viewport we will make some changes to the settings. Click on the wind button and you should see the settings appear below it.
When you click the button your settings appear below, these settings will be in the next wind icon you create in your viewport.
We want our wind to suck up, rather than blow out so set the strength to a negative value. I chose -1.0 for now.
I have added a very small decay, so that the farther away the wind is from the leaves the less hold it has on them.
Make sure you select Spherical for the wind type on this one, the wind will draw in towards the middle of the sphere shape.
Next we want the wind to move sporadically and not evenly. So adjust your Turbulence settings a little. I chose the numbers on the side based on experience and experimentation.... they should work well for now and we can always adjust them later.
3
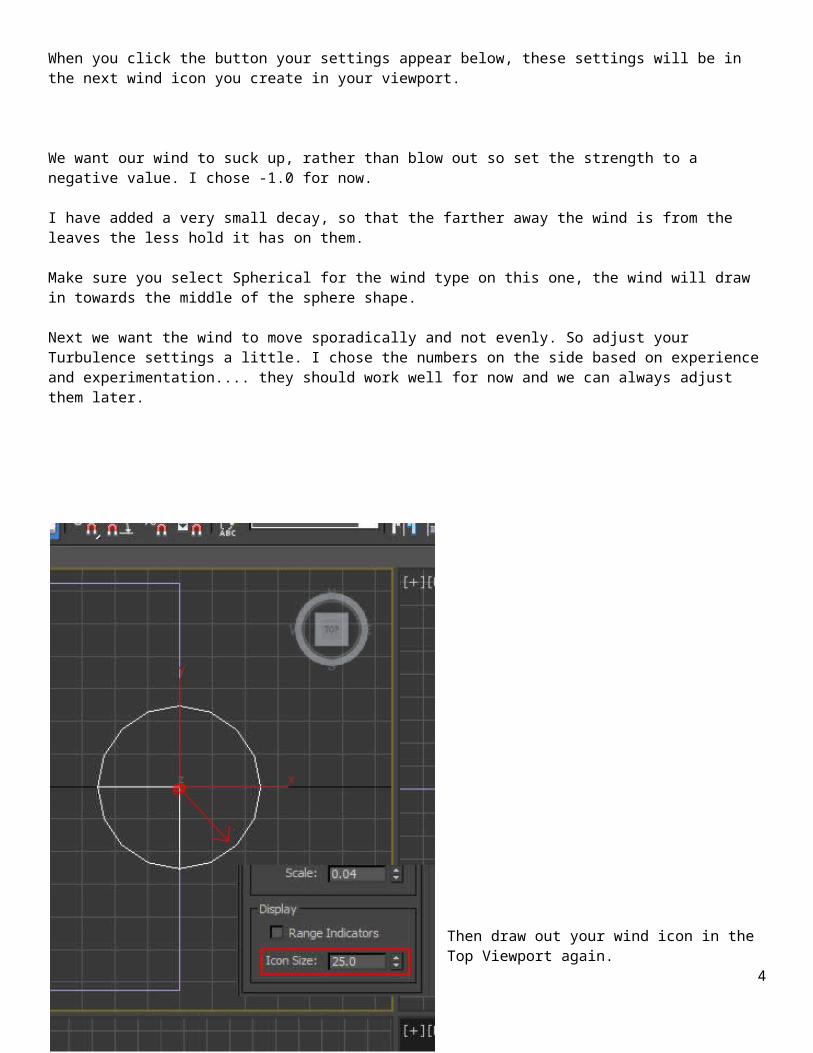
Then draw out your wind icon in the Top Viewport again.
On the modify tab you can set the size of your icon, I have set mine to 25.0
The size does make a difference in this case as we don't want our leaves to blow around until the wind gets over top of them.
Last force we will make is called a Drag. This force will help add some more wind resistance to our leaves so they may fall and move a bit more naturally.
4
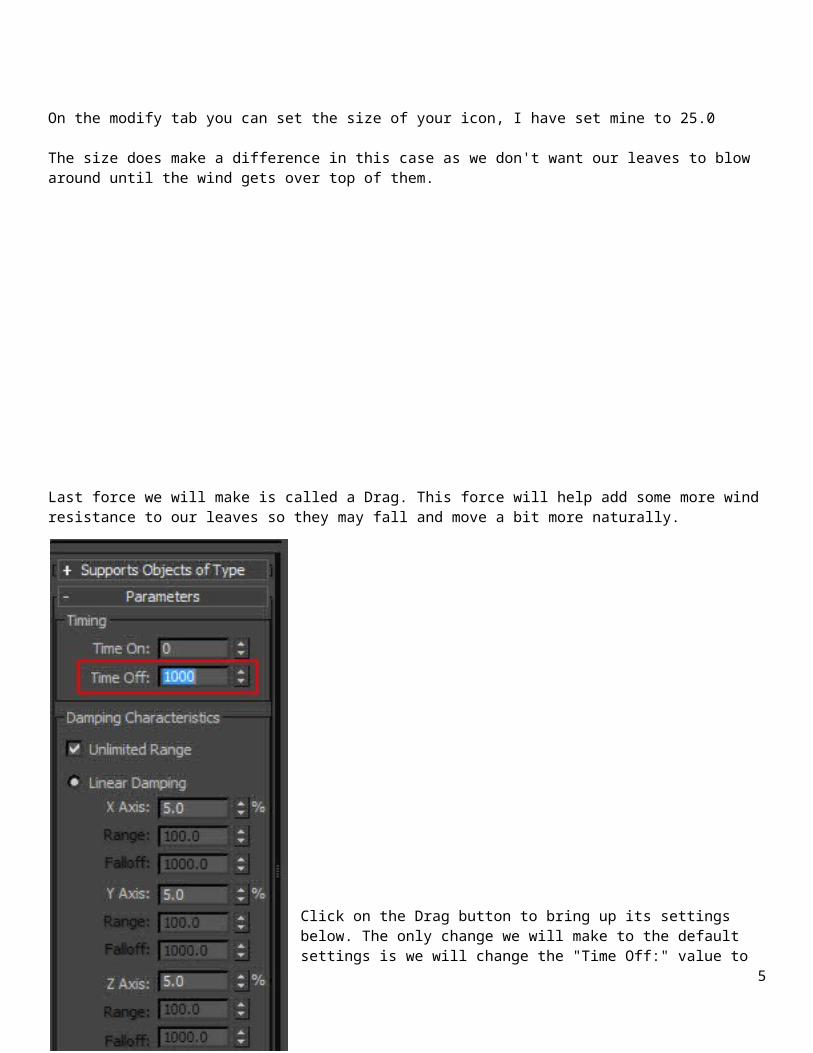
Click on the Drag button to bring up its settings below. The only change we will make to the default settings is we will change the "Time Off:" value to 1000, this way it is active for a thousand frames and we won't have to worry about it shutting off prematurely.
The default values will work well enough for us this time, but you can tweak these values in the future to get more or less drag along each axis.
If things fall too quickly and you'd like more resistance going up and down, increase the drag in the Z axis etc.
Then simply draw out an icon in your viewport, it does not matter where you make it.
5

Now that we have all the items and forces necessary, we need to create some deflectors so the leaves know what to land on and bounce off of.
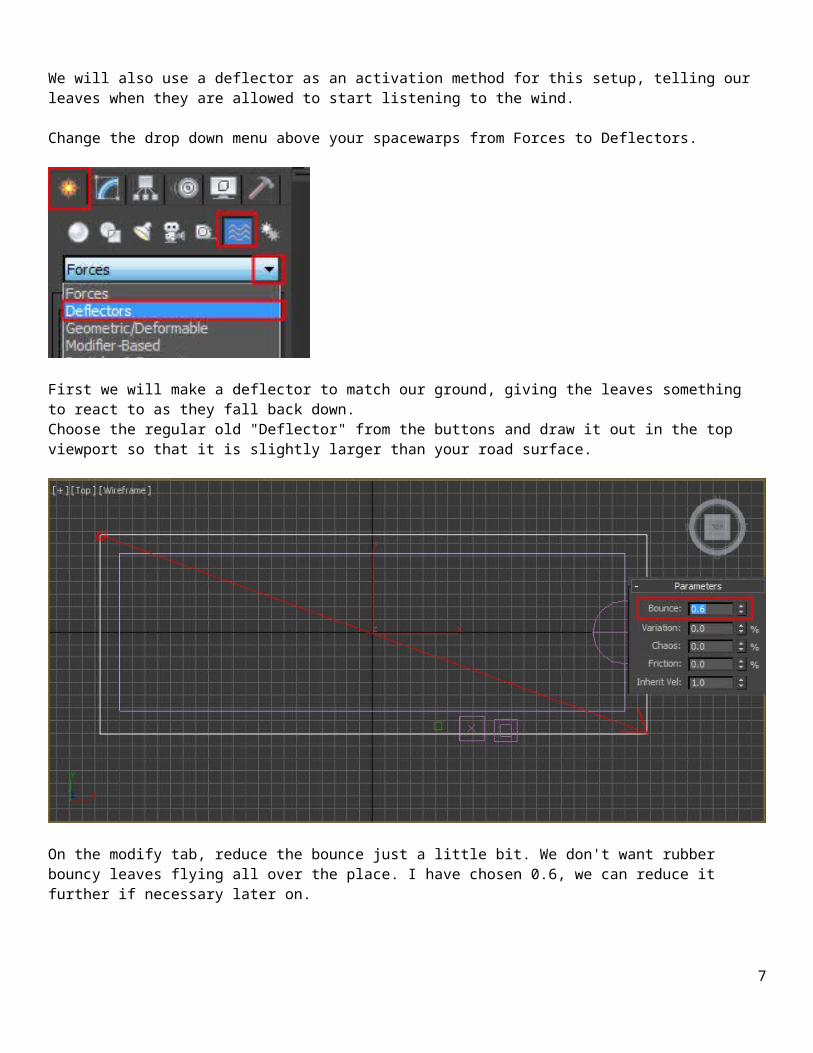
We will also use a deflector as an activation method for this setup, telling our leaves when they are allowed to start listening to the wind.
Change the drop down menu above your spacewarps from Forces to Deflectors.
First we will make a deflector to match our ground, giving the leaves something to react to as they fall back down. Choose the regular old "Deflector" from the buttons and draw it out in the top viewport so that it is slightly larger than your road surface.
On the modify tab, reduce the bounce just a little bit. We don't want rubber bouncy leaves flying all over the place. I have chosen 0.6, we can reduce it further if necessary later on.
6
One more deflector to create, this one will surround the wind and will not be used to deflect particles so much as it will be used to activate them. This will allow us to make the particles stay laying flat on the ground until the wind gets closer to them.
Choose SDeflector from the menu, the S stands for Spherical. Then click and draw out an SDeflector around your spherical wind and make it almost as wide as the road itself.
In order to make animation simpler, we will now Link our wind, to our new SDeflector, then we can animate the SDeflector and the wind will go wherever it does.
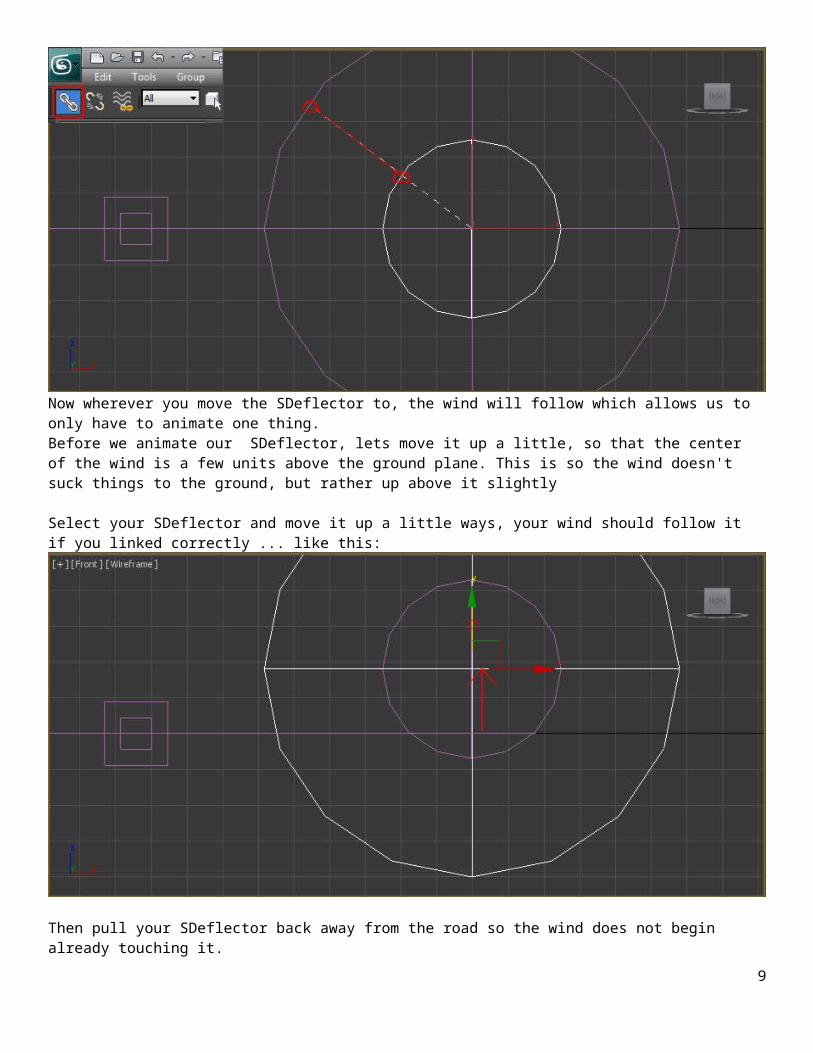
Click the link button in the upper left corner of your screen, then click and drag from the wind, to the SDeflector to link them... like this:
Now wherever you move the SDeflector to, the wind will follow which allows us to only have to animate one thing.
7

Before we animate our SDeflector, lets move it up a little, so that the center of the wind is a few units above the ground plane. This is so the wind doesn't suck things to the ground, but rather up above it slightly
Select your SDeflector and move it up a little ways, your wind should follow it if you linked correctly ... like this:
Then pull your SDeflector back away from the road so the wind does not begin already touching it.
8
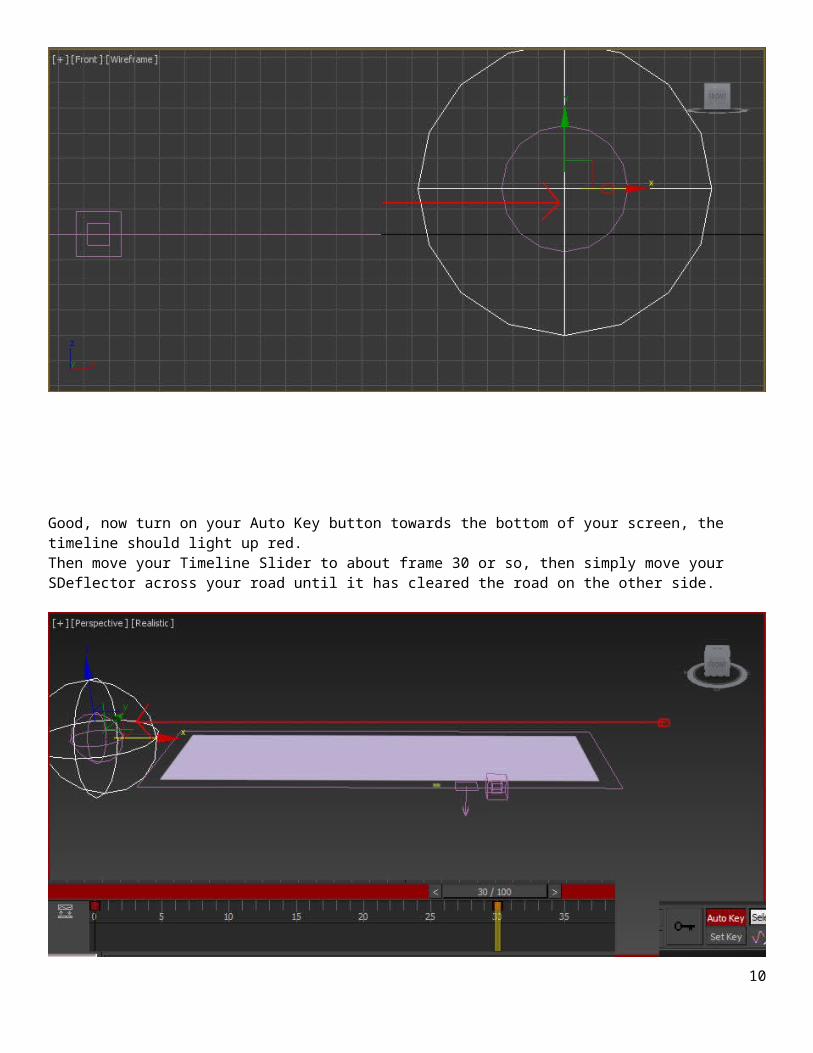
Good, now turn on your Auto Key button towards the bottom of your screen, the timeline should light up red. Then move your Timeline Slider to about frame 30 or so, then simply move your SDeflector across your road until it has cleared the road on the other side.
Then turn your auto key button off.
If you did this correctly, scrubbing back and forth across your timeline should show you that your SDeflector and Wind now move from one end of the road to the other .
Now that the creation and animation stage of our project is completed we can finally begin making the particle flow system!
Lets open up particle view by hitting 6 on the number row above your keyboards. If this does not work you may need to turn on the Keyboard Shortcut Override Toggle button which is located in the middle of the top ribbon on your screens and looks like this...
Once it is depressed 6 should bring up particle view. You can also find particle view in your Graph Editors menu, or in the creation of a PF Source with the rest of your particle systems. I urge you to get used to using the hotkey in order to bring it up though. (6)
9
Particle View opens up and you will get a floating window that has a light grey area, a dark grey command panel area, and a Depot at the bottom with a list of event operators to choose from.
This is where we will create our particle flow charts, each operator allows us to custom build systems to do pretty much anything in the world with our particles. Our original systems like Super Spray become obsolete when you get to know Particle Flow.
The light grey area I will call the Stage from here on out, the Dark grey area to the side is our Command Panel, and the list in white is our Depot.
10

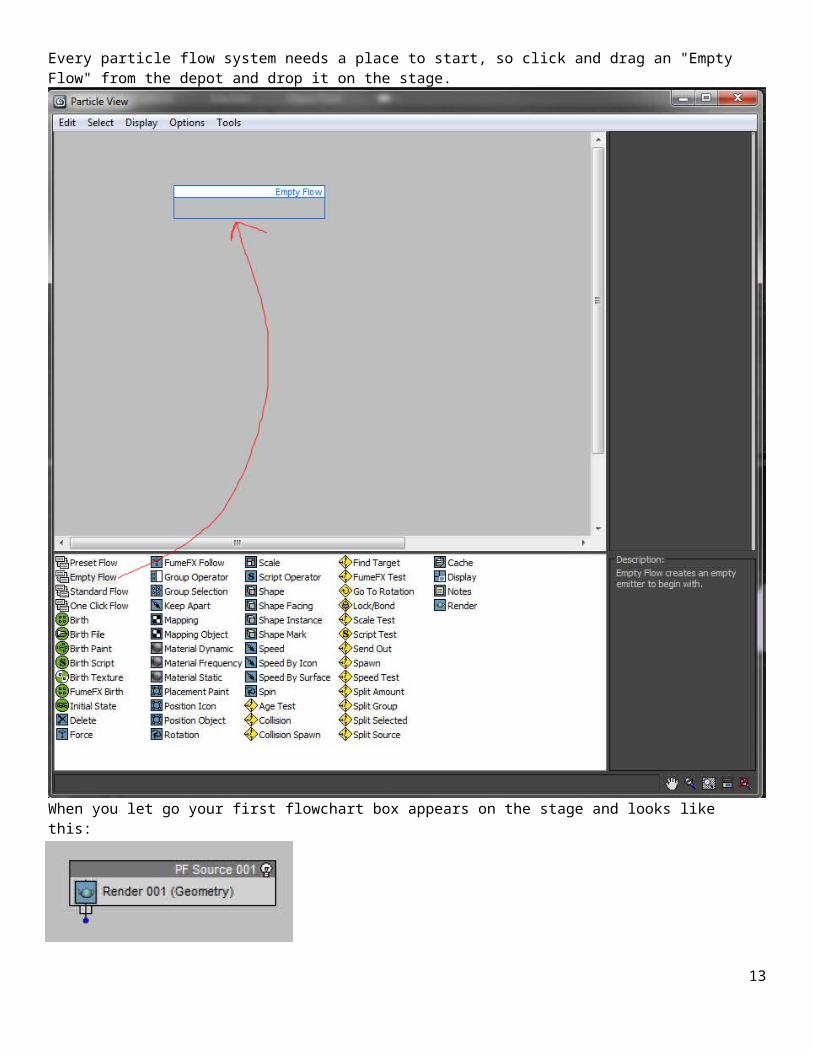
Every particle flow system needs a place to start, so click and drag an "Empty Flow" from the depot and drop it on the stage.
When you let go your first flowchart box appears on the stage and looks like this:
You should also notice a new orange icon has appears in the middle of your viewports. This creates the PF source and is necessary to build any and all types of particle systems off of this starting point.
11

Then drag a Birth from the depot and drop it in the stage below the first box.
Some of the operators we will drop directly on the stage and others we will add to the Event boxes themselves creating seperate Events that happen as we go down the chart.
The birth operator will allow our particles to be created in the scene.
Once you have added the birth we need to attach our boxes together. We do this by dragging the blue node from the PF Source box, and dropping it in the empty circle node on the new Event01 box.
This connects the boxes with a blue arrow, the arrow tells us the flow of the particle system through these operators in stages.
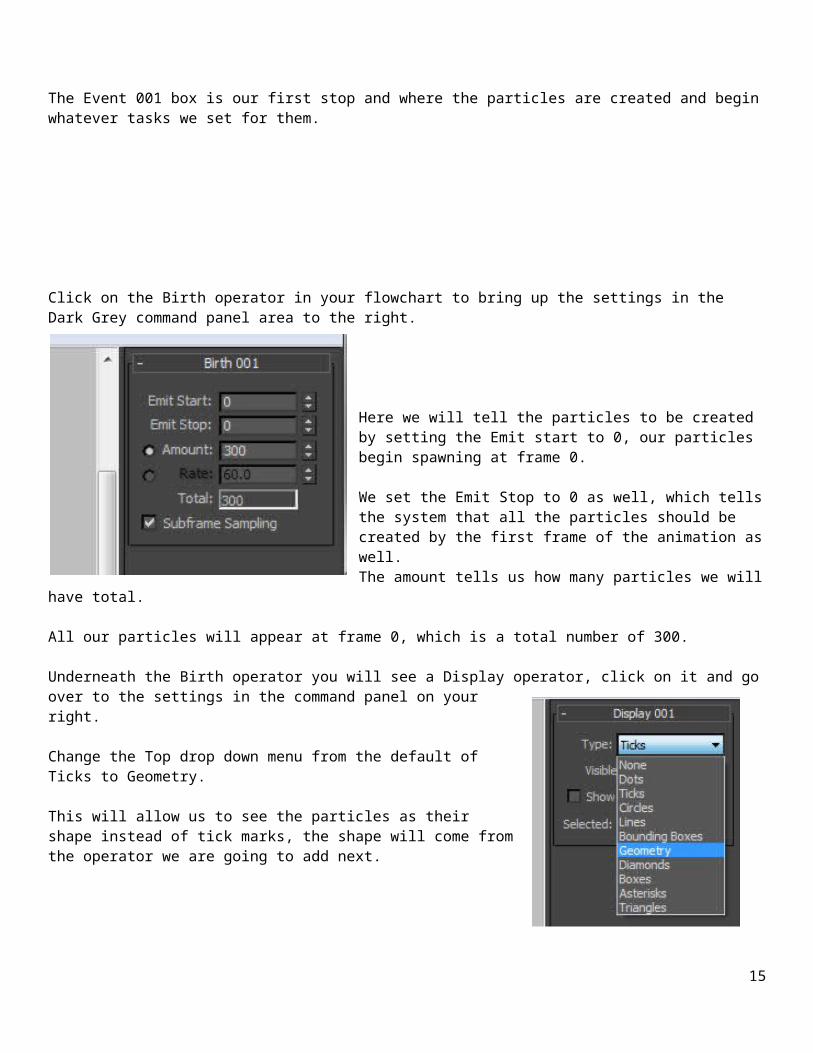
The Event 001 box is our first stop and where the particles are created and begin whatever tasks we set for them.
12
Click on the Birth operator in your flowchart to bring up the settings in the Dark Grey command panel area to the right.
Here we will tell the particles to be created by setting the Emit start to 0, our particles begin spawning at frame 0.
We set the Emit Stop to 0 as well, which tells the system that all the particles should be created by the first frame of the animation as well. The amount tells us how many particles we will have total.
All our particles will appear at frame 0, which is a total number of 300.
Underneath the Birth operator you will see a Display operator, click on it and go over to the settings in the command panel on your right.
Change the Top drop down menu from the default of Ticks to Geometry.
This will allow us to see the particles as their shape instead of tick marks, the shape will come from the operator we are going to add next.
From the depot, find and drag out a "Shape Instance" operator and drop it inside the Event001 box right after the display. Like this.
Be sure to get it inside the second box, before you drop it you will see a blue line show up below the Display.
If it shows up as a red line crossing through the display it means you are about to replace one operator with another and we don't want that.
Likewise, if you see a blue box shape it means you are placing a new event on the stage, and we want to add it to the current event.
13

Once you drop the Shape Instance, it should look like this if you did it correctly:
Now click on the Shape Instance and adjust its settings to the right in the command panel.
In order to get our customized textured object to show up as our particles we have to use the Shape Instance which references an object in our scene to use as a particle. In our case we created a small 6x6 plane to take the place of our leaf. So in the settings click on the large channel box button that says "None" and then find and click on your leaf in your scene. When you are finished the word None should be replace with "leaf" or whatever you called yours.
In other tutorials we will use these other settings to obtain several different effects, but for this one we don't have to change anything else here.
Now, we have told our particles that they are allowed to be born and where on our timeline, we have told our particles to be displayed as the leaf we created earlier in the tutorial, now we have to tell them where to appear in our scene.
Remember that little orange icon which was created for us when we began our PFlow chart? We have the option of using it to spawn our particles, or using a shape or model of our choice. We are going to use the Icon for this so from your depot find and drag and drop a "Position Icon" underneath our shape Instance in the same event box.
The settings for this one can stay at their default, but now minimize your particle view window and look at your scene.
14
You should see the orange PF Source icon, and now you should see a lot of "leaf" particles within the confines of the icon. Something like this:
This is good, but we need to stretch out the size of the icon so our leaves have some room to breathe. Our animated wind would blow them all around all at once, we want it to appear as though it's blowing down the street.
Select the orange icon in your scene and go to your modify tab.
Under the Emission rollout we have the option to change the Length and Width settings of the icon itself.
Make your Length 100 and your Width 350. Basically we set these to be just a little smaller than our road. So all our leaves appear inside the
confines of the road.
Also make sure to go down to the Viewport %: number and change it from its default value of 50%, to 100% so we can actually see all of our
particles and not only half of them.
Then open Particle View again by either going to the Graph Editor menu, by hitting the hotkey which is 6, or you can see a "Particle View" button now under the Setup rollout of your PF Source icon. If you just minimized it you should also find the minimized window at the bottom left of the screen.
15

You should now be able to see 300 leaves scattered all across the surface of your road. You may need to move the icon up in the Z axis slightly so they sit above the road. If you see your leaves flickering in and out of view, or you can't see them at all this is probably the case. Just move the icon up a fraction.
If yours looks like this, you are right on target:
We have successfully scattered leaves all along our road. Now we need to blow them around a bit. Remember the SDeflector we created and linked our wind to? We are going to use this deflector to "activate" our leaves so they don't start blowing around too early. From your depot, find a Collision operator and drag and drop it under our Position Icon.
Select the collision and go to the right to adjust the settings in the command panel.
Click on the By List button, and find the "SDeflector001" to add it to the collsion.
Then make sure the Collides radial button is marked and the dropdown under it should be changed from Bounce to Continue like shown.
16

This means that our particles will not bounce off the sides of our deflector, but rather just move on to the next event in our particle system. You may have also noticed that with the Collision operator, we also received another new blue node to attach it to another Event box within our system. This lets us use these special Test operators to move from the current event into a brand new one.
We want the leaves to start listening to the wind only after the SDeflector comes in contact with them. Our wind is a force so we are going to find "Force" in our depot and drag and drop it into the empty light grey area below our Event001 box making a new Event002 box.
Then we need to connect the blue node from our Collision operator, to the empty circle connector on our new Event002 box.
17

You will see a new Display also comes with our force, make sure it is set to Geometry just like the last one, and change the color to match if you like.
Then select the Force operator and change its settings to the right.
Click on the By List button, and make sure to add all 3 forces from your scene to the Force operator in your PFlow chart.
Drag, Gravity, and Wind.
This makes the particles immediately upon contact with the sdeflector pay attention to our forces. The wind will now suck them in, the Gravity will make them fall, and the Drag will add wind resistance. Test your scene by scrubbing back and forth along your timeline.
You will notice that they are being disturbed as our animated wind runs over them. This is great, but they are all floating around and falling in their flat horizontal state, then falling right through the ground and vanishing! So we still have some work to do.
We want these particles to move a bit differently from the next, instead of all at the same right like they are doing now. To accomplish this we will add a "speed" operator under our force in the Event002 box.
18

Select the Speed and adjust its settings to the right in the command panel.
Lets give them a bit of extra lift by adding a speed value of 30Give or take 45 to make them all move quite differently.
Mark the box that says reverse to make them move up in the opposite direction as our PFSource icon arrow is pointing
And add a Divergence of 10.0 which will make them capable of moving slightly off course instead of straight up in the air. Diversity is almost always a pretty
good idea.
Next, find a Spin operator and drag and drop it into the Event002 box under your speed.
Then select the spin and change the settings to the right.
We will leave the spin rate of 360, but add a variation of 100. So that all the leaves don't spin at the same speed.
Change the drop down menu from random 3D, to Speed Space Follow... this lets our particles spin in the direction that they are being pulled and adds a more realistic spin effect.
Put a 1.0 in all 3 of the Axis fields, so the leaves are allowed to spin in all directions.
19

If you test your animation again now, you will notice that the leaves are all moving much more accurately to our original idea.
They lift and spin and fall like you would expect something of their weight and size to spin and fall right? Now we need to deal with the issue of the leaves falling through the ground.
To do this, add another Collision to your second event under your spin, and in the settings add the regular "Deflector" to the list.
--> Click the By List button, and select the regular Deflector to add it to the list.
This time mark the Collide Multiple Times radial button, and put a 3 in the # Times field.
20

This will let our leaves bounce off of the surface of our road a few times before moving into the next operator. We get another new blue node so after the leaves bounce a few times, we want them to settle back down to a rest. Drag and drop a Speed to the empty light grey area in the stage.
---->
Select the Speed we just added and go to the right to adjust its settings.
We want to set the speed value to 0.0 this time, so that our leaves come to a full stop after they bounce a few times against the ground.
If you test your scene now you will see that this does indeed happen, but our leaves come to a stop in all kinds of positions and they keep spinning forever instead of laying down flat again and stopping fully.
Our next step is to add another Spin operator under our speed.
We will set the Spin rate and variation to 0.0 here as well, so that our particles stop spinning.
We want them to stop where they are so set the drop down to Speed Space Follow and mark a 1.0 in all the Axis fields.
This will get our leaves to stop spinning and come to a rest right where they were, but now our leaves are stuck in our road like knives rather than resting flat.
21

In order to fix this we are going to tell our leaves to rotate back to flat from where they stopped spinning.
Find a Go to Rotation operator in the depot, and drag and drop it to our 3rd Event box below our last spin.
Then adjust its settings to the right.
We make our Duration 4, and variation of 2 so that once the leaves stop spinning that have 4 frames (give or take 2) to find a settling position.
Unmark Match Initial Spin just to avoid any extra spin.
22

Now, you will notice another blue note appear because this operator is in fact a test. We are not going to use it to move into another event however because we want our particles to stop in this event. So just let that node hang out there in space doing nothing, and under the Go To Rotation drag and drop a regular "Rotation" operator beneath it in the same Event box.
Our go to rotation in this case gives our particles 4 frames (give or take 2) to move to the next step which is the Rotation operator we just added.
Select the Rotation and adjust its settings to the right.
The only change we need to make here is to set the drop down to Random Horizontal.
This should bring all of our particles to a flat lying position once again. Completing our Particle Effect.
23

To see a sample animation of this effect with textures and everything you can go here.
http://animation.diclementi.com/tutorials/onthewind.mov
Hopefully you enjoyed this Particle Flow Tutorial, and there are many more where that came from both on the site and to come in the future!
24