Embed Size (px)
Citation preview

Shape Mark Painting with Particle Flow!
In this tutorial we will look at creating a digital effect with Particle Flow that will use particles to create a solid shape after some clever movement.
Give yourself some extra time in your animation by clicking on the time configuration button, and changing the end time to 500.
We will first need to build a scene for our particles, this can be as simple as a plane for ground, a box as a room, with some text in it.
I'm going to begin by creating a box that I will use to house my particle flow scene, 300 length, 300 width, and 100 height.
Then add a shell modifier to it so the walls are thick and the normals appear on both sides, inside and out.
This kind of stuff you should have done many times before and shouldn't cause you any trouble, if it does then you need to go back and do some of the more basic tutorials as this one is meant for a more advanced student.
1

Next zoom inside your box until you get a good wide view of the interior of your box, which is now our scene.
We will create everything else so that it appears inside this box which will help us with lighting and keeping everything together in the end. It gives us walls and a floor as well so we can ground our particles and objects. At this point it is a good idea to create a camera (Ctrl+C) out of your perspective viewport so you can easily get back to your view.
Next we are going to make some text, as it is one of the simples things to make and will represent our idea for this tutorial quite nicely.
On your create tab under your shapes button, you'll find the text.
2

Create your text at a size of 35.0 I just used Arial to keep things simple, and center it like the settings show above.
Then, add an Extrude modifier to your text, and make the Amount: 10.0. This should give some thickness and make your text an actual shape now.
Our next step is textures.
I'm going to create 2 textures, one flat white to put on our walls and floor, and the other a rainbow colored glow so our lettering has some character to it.
The flat white, just make a texture with a white diffuse, no need for any fancy specular or glossyness or anything else on this one, just white.
The second one, we are going to add a Gradient Ramp to the diffuse color map.Get your new texture, and click on the empty box next to the Diffuse color, then select Gradient Ramp from the list.
Make the colors and add a few tabs on the ramp to create yourself a rainbow colored image like above. It really doesn't matter as long as your colors change so you can see the end result of the shape mark.
Once you finished with your rainbow, hit the Go To Parent button and return to the main menu of your texture.Then click and drag the M next to diffuse, and drop it in the empty box next to the Self Illumination map. Also be sure to check the box that says Color, like below:
3
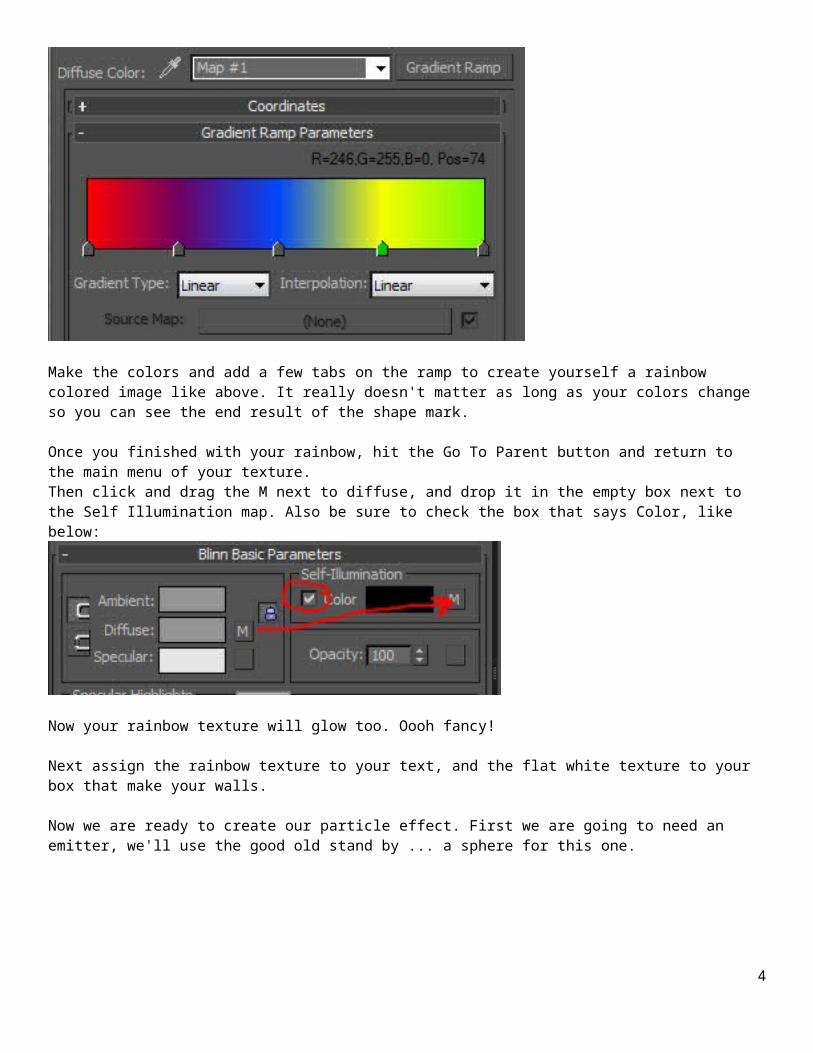
Now your rainbow texture will glow too. Oooh fancy!
Next assign the rainbow texture to your text, and the flat white texture to your box that make your walls.
Now we are ready to create our particle effect. First we are going to need an emitter, we'll use the good old stand by ... a sphere for this one.
Create a small sphere and place it in your scene somewhere in the upper left corner of the view, like the image above.I gave my sphere a radius of 2.5 so it's nice and compact.
Then right click on your sphere and go to the object properties. When the dialogue box opens uncheck the box marked "Renderable" so that your sphere won't show up in your final render. Only our text and our particles.
Then hit 6 on your keyboard to open up the Particle Flow Window.
You can also get there by going to the Graph Editors menu at the top of the screen, and finding Particle View.
Drag an "Empty Flow" from the list at the bottom of the screen and drop it in the empty grey area to create your particle flow source.
This is where our particles begin, now we need to add all the events and tasks that our particles must complete to make their actions appear on screen.
We can set up some of the basic information now that will be carried through the entire effect.
4

Drag up a few more things and drop them directly under the "Render 01 (Geometry)" tag in your PF Source node.
Add a Mapping Object, Material Dynamic, Shape, and a Display to the list like it's shown above.
Click on the Mapping Object 01 to adjust its settings to the right.
All we want to do here is define the mapping of our objects based on a current object in our scene, in our case ... the text.
Click on the "By List" button and then select your text object from the list and hit OK so your text appears in the grey box in our settings like this:
<----
Next click on the Material Dynamic that we just added to the particle flow so we can adjust those settings.
Here we want to add our rainbow material to our particles as well so they can change colors that will eventually make up the shape of our words.
5

Open up your material editor again, and click and drag our rainbow texture to the "None" button in the Material Dynamic 01 settings.
That's it, now click on the Shape event we added under that to adjust its settings.
Make the Shape settings to Sphere - 20sides, and change the size of the spheres to 1.0 like below:
Then go to your Display which we added under the shape, and change the first drop down from Ticks to Geometry.
<---
6

Next drag a birth out to the empty grey area under our PF Source 01, delete the display that comes with it, and attach the blue wire node to the empty ring above the Birth, like this:
Then click on the Birth to adjust its settings. We will have to come back and add more particles later, but for now make your Particle count 500, and your Birth Emit Start 0 and Emit Stop 20.
Next drag a Position Object out and drop it underneath the birth to add it to our Event01 list.
----> In the settings, Click the By List button and select your sphere from the list. The one we made unrenderable, this will make our sphere emit the particles.
7

Scrub back and forth along your timeline, you should see a lot of tiny spheres being made on the surface of our emitter.
Next drag out a force and drop it under the Position object.
We are going to use wind to control the movement of our particles, in order to do that we need to create it and then add it to our Force in our Particle Flow chart.
Go to your create tab, and find the spacewarps button. Then click the wind and drag one out in your viewport.On the modify tab, we will change the settings of our wind.
Set the strength to a negative number, this will suck our particles inward instead of blowing them away.
Make the wind Spherical, this is important or the wind will just blow in only one direction.
Set your turbulence, Frequency, and scale to something like the settings to the left, this is always adjustable to your own project by changing these settings.
Your wind icon should now look like a sphere gizmo instead of the default wind arrow. Move your wind sphere directly over the sphere we are using as an emitter. With the wind here it will keep our particles moving and in this general vicinity until we decide to let them go elsewhere.
Wind placement.
8

Back in your Particle View, add the new wind to the Force settings by clicking the By List button and selecting Wind01 from the list.
Scrub back and forth along your timeline and you should now see your particles swirling around like a swarm.
Now we come to the first part of our particle system that we want to tell our particles to do something. We want them to check their own ages.
Drag an "Age Test" from the list below and drop it under our Force.
The Age test does exactely that, it tests how long the particles have been alive for, and then once they meet the requirement the age test then sends the particles onward to their next task in line.
Click on the Age Test so we can adjust its settings.
Set your Value to 80, with a variation of 10. This means that when the particles get to 80 frames old, they will be sent off to their next instruction, give or take 10 frames randomly.
For our next task, we want the particles to move from their initial location and head somewhere else in our scene.
Drag a Find Target out and drop it in the empty grey area under our Event01.
Delete the display that comes out with it, and attach the blue wire node from the Age test, to the empty circle in our new Event02 above Find Target.
9

Click on the Find Target to adjust its settings.
You should first notice that a new speed setting is given to us with a find target, this is the speed at which the particles will seek out their new target. I have set mine at about 175 to slow them down from their default of 300. This will always change based on what you want your particles to do.
The next thing you should notice is that a new icon has been created for you in our scene.
The target that our particles will seek out, is now a little round icon that looks like the one above. Particle Flow probably created yours a little big so we can adjust its size to fit our scene by scrolling to the bottom of the settings and changing the Icon Size: setting. I have made mine 5, and then placed the icon in the lower right hand corner of my scene.
<----
Scrub back and forth along your timeline. You should see that the particles begin and swirl around their origin point until they get to about 80 frames old, then they all take off towards wherever you placed your new target icon. You probably also notice that the particles take off towards the target and then fly right on past it. They do this as they have no other information yet, but if we want them to hang out for a bit longer at the new target, simply create another spherical wind like we did for the emitter and place it on top of the target icon with a negative strength. I just copied the wind I already created and drug it over to the new icon.
Next we have to drag out another "Force" Event and place it under our Find Target event in our particle flow, and this time add the second wind to it. "Wind02"
10

Below that I've added another age test and set the value of this one to 160 with a variation of 10. So the particles head towards their new target at a life of 80 frames, then swirl around that target until they are 160 frames old and then we can send them off to the next thing in line.
The next thing in line can be another Find target and we can continue adding these find targets and having our particles follow the lines for as long as we like. Lets add a few more find targets, this time without a pause between each or without winds to keep them in line. We'll just send them to the next target the second they reach the first.
Drag another Find Target out to the empty grey area under our second Age Test.
connect the second age test to our Event 03 now, and adjust the new find targets settings to your liking. I have given the new find target a speed of 120 and reduced the icon size to 5.0. I have also found a new spot in the upper right corner of the scene getting a little closer to the text in the background. Once you have done this, create another find target, and then another and string them together in a line. Adjust each find targets settings to slow the particles down a little and make your particles move one after the other through your scene. You can delete all the extra displays that come along with your find targets.
I created 4 total targets, Find Target 1 - 3 are all sphere icons but the last one, Find Target 04 I want to make our Text.
11

Our find targets can be nicely strung together to create a path for our particles to follow, from one target to the next. When you are done creating targets for your particles to follow, make your very last in the line have some different settings.
Click on the last Find Target and go to the settings to the right.
In the Target settings, select Mesh Objects like above, and then select your text from the By List button to add it to the target list.
If you scrub back and forth through your animation you should see them follow each of the targets until the last one and the particles all fly off in the direction of your text. All that is left to do now is have the particles leave a mark where they hit our text in order to create our final shape.
12

Under your last Find Target, drag out a Shape Mark to the empty grey area and connect the nodes.
You can delete the display that comes out with it. Under the shape mark add another Mapping Object, and then a Material Dynamic just like in our very first PFSource.
This is the final step of our animation, so we will tell it to map our object using the places the particle make contact with our original text. Click on the Shape Mark and adjust its settings to the right.
In the large button at the top that is marked Contact Object: click the button and add your Text.
Scroll down to the Size: parameters. The In World Space allows you to adjust how big the mark being made will be by Length and Width. If you want a few particles to cover the entire surface of the object, make this larger.
The In Local Space: lets you choose to take a percentage of the actual particle size. from 100% of the size of the particle, to double, triple, or even less than the original size based on your needs.
I have set mine to World Space with a Width and Height of 2.0, I have also put 100.0% variation in so the marks can be different sizes give or take from the original 2.0.
In the Shape: settings, be sure to check the Box Intersection selection, and turn the box height down a little. This is what happens when the particle does come into contact with the surface of the object, reducing the box height makes that large Blip of exploded color smaller in size, unless you like that I recommend turning it down... I've made mine 1.0
13

Also make sure you check the following boxes as well The "Allow Multiple Elements" and the "Continuous Update" boxes should be marked to allow for better coverage and updating.
Compare your settings to mine and make any adjustments you like, then move to the Mapping Object we added below the Shape Mark.
In the settings for the Mappnig Object, once again add the Text to the Mapping From Objects.
and then in the Material Dynamic, Add the Rainbow texture we made to the material button.
Now click on your text01 object, and hide it. If you scroll back across your animation you should see that in the end when the particles hit the shape of your letters (even though they are now hidden) it leaves a mark in mid are, as though our particles were building our text out of themselves.
At this point you might also notice that there are large gaps missing from your text, remember when I said we would more than likely have to go back and add more particles to our Birth. This is why. The more particles we have means more calculation time and render time, but we'll get more coverage if we change the Amount in our Birth from 500 to something larger like a couple thousand or so.
14

Now once you have adjusted your particle amount and your mark sizes to your liking all that's left is rendering, and of course maybe some lights to make your scene work a little better.
Make your final render sure to use Force Two Sided, as always set your Indirect Illumination and Final Gather settings up and allow your glowing materials to bounce color and light around your scene, add another photometric light to the scene so you aren't in total darkness (or default lighting for that matter) and render your animation! It might take awhile but the results are fun! This can be done with any texture, any shape as well so don't stop here!
15

See a full animated demo here:http://animation.diclementi.com/strikeback.html
16