Embed Size (px)
Citation preview

Video Post - Star Field
In this tutorial we will create several effects using 3DS Max's built in Video Post effects.
The first of which is the ever useful, Star field.
Everyone at some point in their lives has been making a super cool sci fi space scene and thought... "If only there were a way to generate stars automatically!"
Well, you are in luck. 3D Studio Max comes with a tool called Video Post, which hosts a multitude of post production effects like Glows, Lens Flares, and yes .... even Stars.
To start, lets open a new 3DS Max scene and create a camera out of our Perspective viewport, by hitting " Ctrl + C " with the Perspective view highlighted.
It should immediately turn your view from Perspective to Camera 01, like below. Once your camera is created, you can hit "Shift + f" on your keyboard to turn on your safe frames.
Since we are going to create a star field based on the camera's view, this is the only thing we need in our scene for now.

Next, go up to the top of your screen to the Rendering menu, and then down to Video Post... like below.

It will open up a new dialogue window which is the central hub for your Video Post effects that looks like this:
Remember how to get here, because this is where we will put all of our video post effects. It is called video post for a simple enough reason, all the effects are added to the video AFTER the scene renders, or Post scene.
Inside this window you will have access to several new buttons, we are going to focus on 3 of them to start out.
The first is the "Add Scene Event" button. It is the one that looks like a little blue teapot with an arrow on its way down and toward it. I have marked it with a red border below.

Click the Add Scene Event button and bring up the next dialogue window. This is where you will tell Video Post what camera or view to use in your final render. The dialogue looks like this:
For now we are only concerned with the Drop Down menu near the top of the window. This is where you tell Video Post which camera to use in creating the stars. Make sure to select the camera we made out of our perspective view when we first opened up 3DS Max. It should probably still be default named at Camera01.
You can also set things up like Scene Motion Blur, Start and Stop of your animation, as well as when to start and stop your Video Post effects should it differ from your actual scene time.

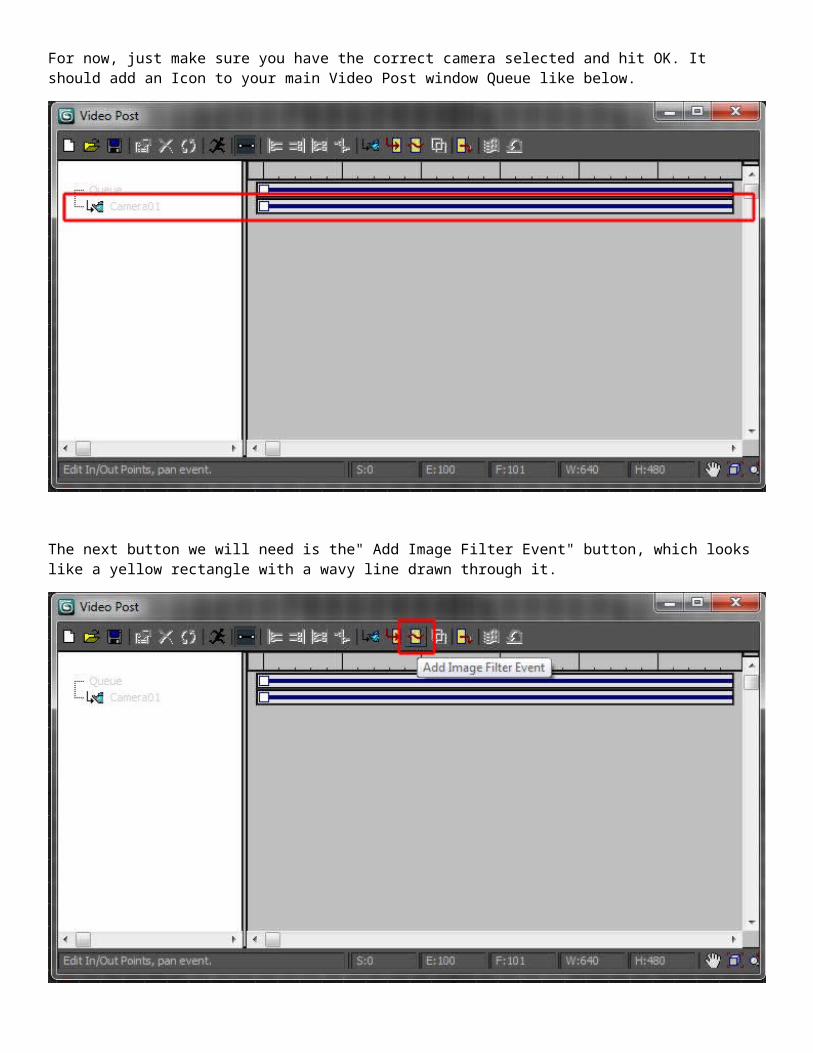
For now, just make sure you have the correct camera selected and hit OK. It should add an Icon to your main Video Post window Queue like below.
The next button we will need is the" Add Image Filter Event" button, which looks like a yellow rectangle with a wavy line drawn through it.

Click the Add Image Filter Event, and bring up our next dialogue window which looks like this:
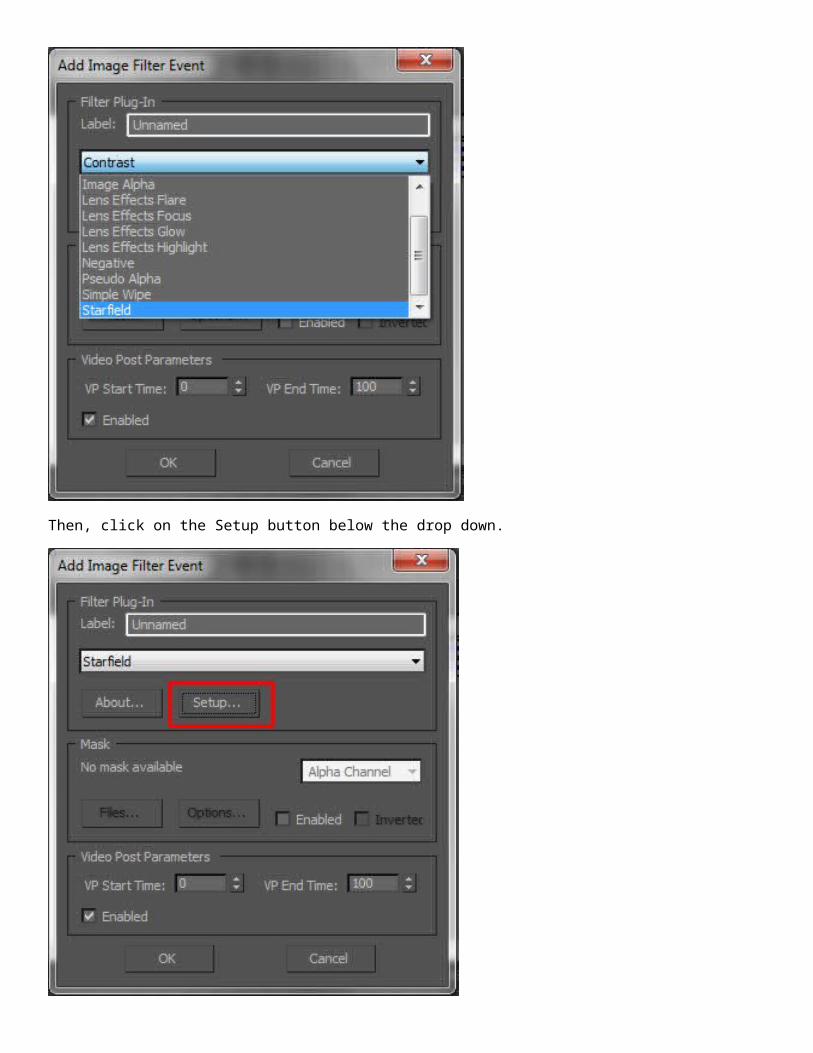
We are again concerned with the Drop Down list near the top of the window. Click on it, and then find Starfield in the resulting list.
Then, click on the Setup button below the drop down.

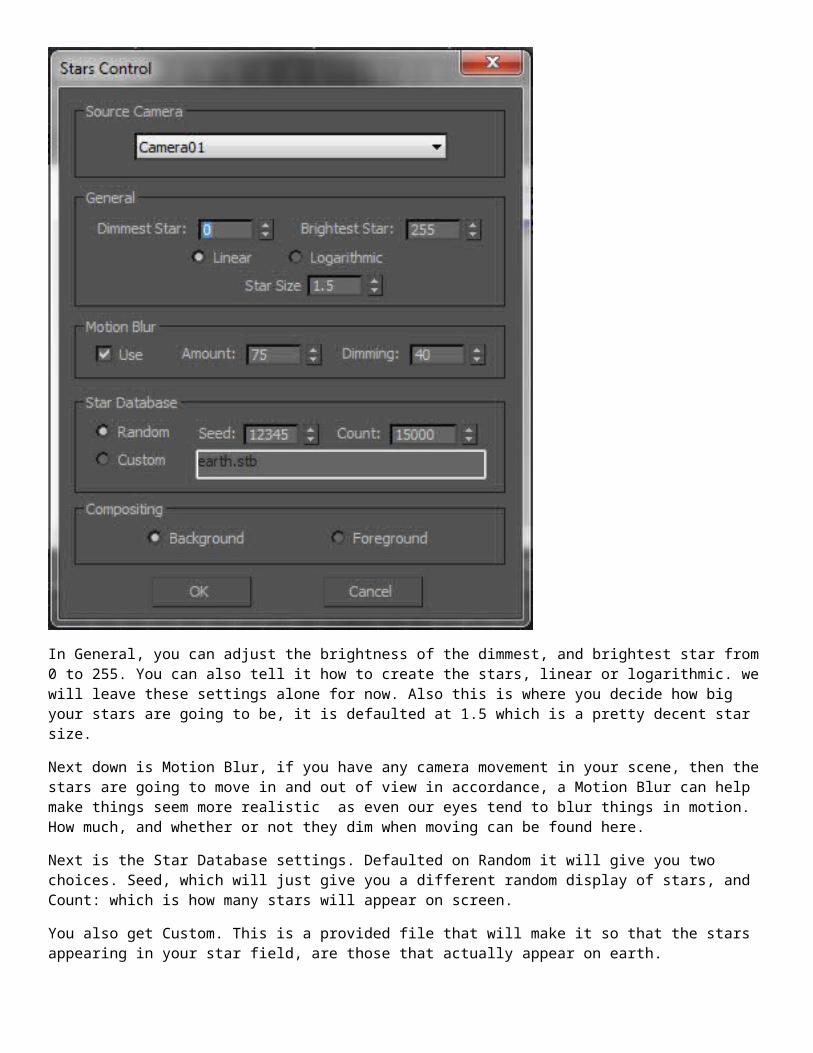
In the next window, you will find all the settings you need to create your star field. The first is the Source Camera at the top of the window. This should be set to Camera01, it needs to match the added Scene Event that we did first. Starfield is using the camera's viewing plane, as a guide to tell it where the stars need to be placed.
In General, you can adjust the brightness of the dimmest, and brightest star from 0 to 255. You can also tell it how to create the stars, linear or logarithmic. we will leave these settings alone for now. Also this is where you decide how big your stars are going to be, it is defaulted at 1.5 which is a pretty decent star size.
Next down is Motion Blur, if you have any camera movement in your scene, then the stars are going to move in and out of view in accordance, a Motion Blur can help make things seem more realistic as even our eyes tend to blur things in motion. How much, and whether or not they dim when moving can be found here.
Next is the Star Database settings. Defaulted on Random it will give you two choices. Seed, which will just give you a different random display of stars, and Count: which is how many stars will appear on screen.
You also get Custom. This is a provided file that will make it so that the stars appearing in your star field, are those that actually appear on earth.
Last, in the Compositing area. You can tell the stars whether to appear in the background or the foreground of your scene. As stars are normally very distant objects, we will leave it in the Background. Make any changes you desire, and click OK.
Click OK again to close both dialogues, you will notice another icon has been added to the main window of your Video Post.
Lastly we will have to tell Video Post what to save your rendered image as. To do this we will talk about the third button, the "Add Image Output Event"

Click on it to bring up our last box of settings for the star field.
Here, we are concerned with the Files... button. This is where we tell it what to save our final image (s) as.
Click on Files...
Name your File name just as you would when saving any file, change the Save as type: to JPEG. (You can change it to anything you want, but for our purposes JPEG is quick and easily previewable.
Then click Save.

Move the top slider in the JPEG settings to Best, so that we get the best image we can for our stars, and then click OK.
It will return you to the original Output Event dialogue window, just hit OK again to return to the main Video Post window.
The final icon is added to your main Video Post window. Now all that is left is to render.

Click on the Render button inside the Video Post window. It looks like a little running stick figure.
The render settings dialogue will open.
Choose either Single or Animation, for testing our stars I have selected Single. Then choose an Output Size, I have gone with 800x600, and then click Render.

You should now have many a distant twinkling stars in the background. All that is left to do is model a spaceship.