Embed Size (px)
Citation preview

A Shrubbery
In this tutorial we are going to take a look at how Particle Flow can help us in making high poly photorealistic foliage using Shape Instances.
The example we will use for our tutorial here, is a hedge.
We are going to need a couple of things in order to get started, first we will need a generic shape for our hedge, although in the future this can be anything we want (anyone else thinking about Edward Scissorhands right now?).
We will also need a couple of shapes to use in our particle event. A leaf, and a Twig with a couple leaves. Keeping in mind that we are going to duplicate these by the hundreds of thousands so let's try to remain as low poly in their creation as we can.
For time's sake, I am going to give you a starter file for this one, which will contain the above objects. If you are not comfortable in your knowledge of how to create these simple shapes perhaps you should try some of the more basic tutorials first and come back to this one later.
You can find the starter file here, it was made with 3DS 2010 so please make sure you have a workable version installed:
http://animation.diclementi.com/tutorials/hedgestart.max
Copy and paste the above link in your internet browser and download to begin.
Once you have the file open it in 3DS Max and take a quick look around, you should see three objects.
A slightly modified long pink box, this will represent the shape of our hedge.
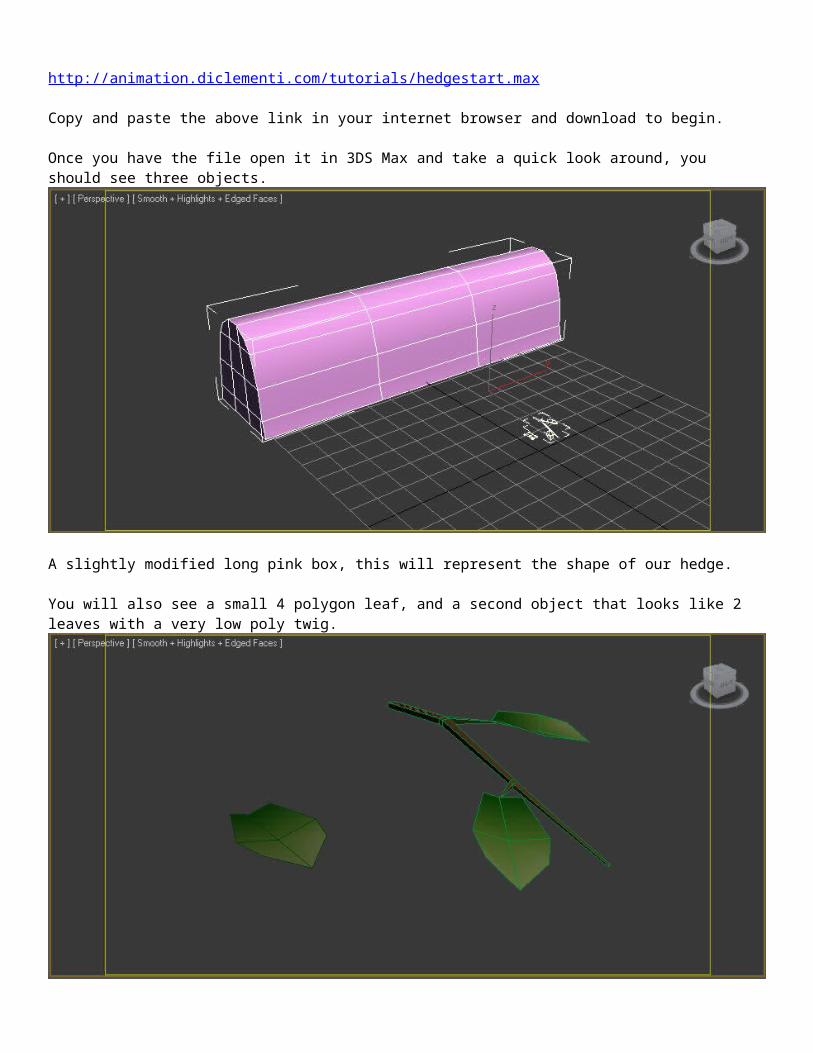
You will also see a small 4 polygon leaf, and a second object that looks like 2 leaves with a very low poly twig.
We don't need anything more elaborate than these because they are going to be duplicated by our particle effect many many times, and from a distance our viewers eyes will fill in all the blanks for us, creating the illusion of something in nature. It is only fair to mention that I have faced each of these leaf models pointing out along the X axis. This is important for later because it will let us know which direction the leaves will face outward from our hedge.
I recommend trying to create these things on your own later, if you have trouble try practicing your polygon modeling skills before you dig too much farther into particle systems.

Let's get going, to begin make sure you have the Keyboard Shortcut Override Toggle button turned on!It is on the top of your screen in the middle of your main ribbon and looks like this:
This will allow you to use the shortcut key (the number 6) to open up the particle view window. Once you have the toggle button in the on position, press 6 in the top row of numbers on your keyboard to open particle view.
A large window that looks like this should open. You can also get here by going to the Graph Editors menu, and selecting Particle View from the list.
Particle Flow is the main area for particle effects in 3DS Max where you are able to custom build your own events based on a series of event lists which appear in the large white area below the empty light grey area. The dark grey area to the side is where you will change the settings for each individual event.
The light grey area is where we will drag and drop the events we select from the list below it building a flowchart of our events as they will happen.
To begin, we have to start an Empty Flow, click and drag the Empty Flow selection from the list and drop it anywhere in the light grey area.
When you let go you should see a box appear in the light grey area that looks like this.
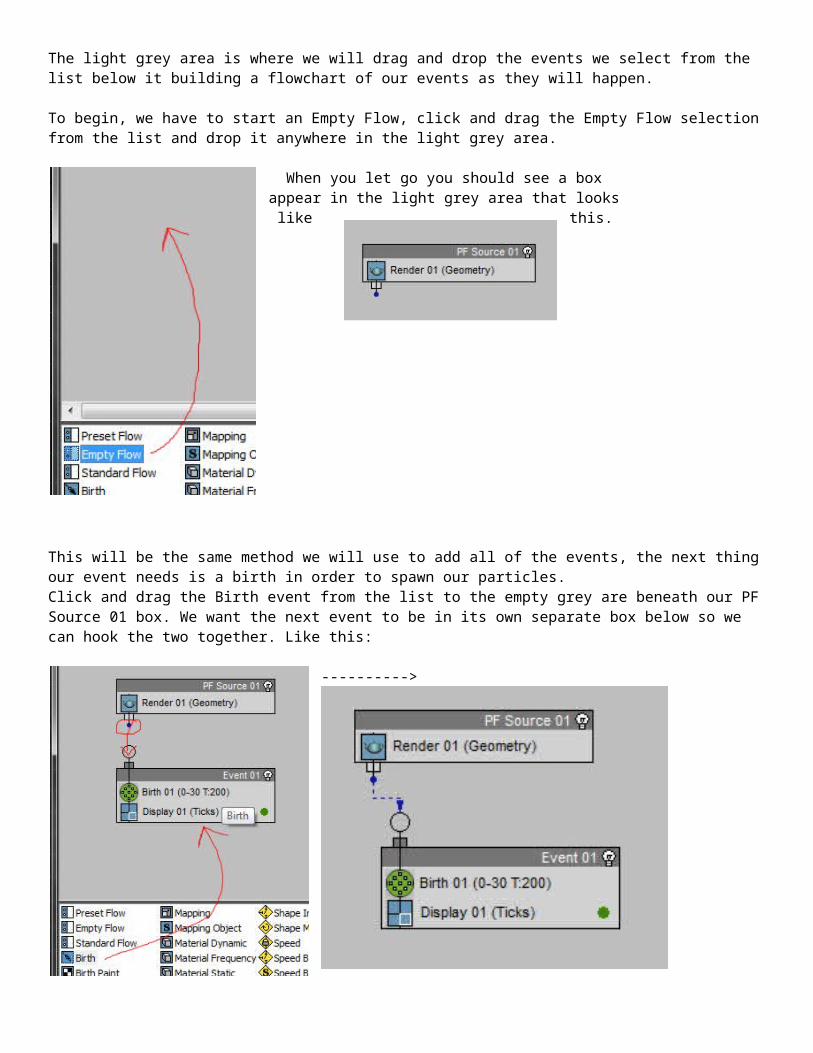
This will be the same method we will use to add all of the events, the next thing our event needs is a birth in order to spawn our particles.Click and drag the Birth event from the list to the empty grey are beneath our PF Source 01 box. We want the next event to be in its own separate box below so we can hook the two together. Like this:
----------> Grab the blue dongle and drag it to the empty circle node in the Event01.
Then select our new birth and go to the right hand side of the window to adjust its settings as shown.
We set the emit start and stop to 0 because we want all of our particles to be born by the first frame in our animation. I have started us with 2000 particles just so our computers don't crash right away. We will up this number to something much larger once we are finished.
Next we will add a position object from the list, this time however instead of dragging and dropping it into the empty light grey area, we are going to want to drag and drop it right underneath the birth we just made. Click and drag the Position Object and hover under the birth between it and the display until you see a blue line appear, red will replace blue means drop underneath.

Like this:
-------->
Select it and move over to the right to adjust the settings.
-------> Click on the by list button to bring up the list of objects in your scene, and select Box02 (which is our hedge shape) as the emitter.
It should show up in the Emitter Objects list.

Once these settings are made, you can hide the Box02 to see your resulting particles.
Each of these little tick marks represents a leaf/leaf and twig. You can definitely see why we will need to increase our birth number to something far above 2000 when we are done.
Next add a "Speed by Surface" to the list just under the Position Object. This will let us define how the leaves leave the surface of our hedge shape. We don't want our leaves flying outwards from the object, but giving them an initial very slow speed lets us define how they might fly away from our object.
------ We will set our speed at .1 so that the particles don't move much at all, and then we shall select our Box02 as the Surface Geometry for our speed. (If you still have it hidden, unhide it so you can select it here).
Speed is very slow, so our leaves don't fly away.
Add Box02 to the surface Geometry.

Next add a Rotation to our list of events. With a Speed by Surface in front of it, the rotation will allow us to use the direction the particles are moving to face our leaves outward.
----->
Select Speed Space from the Orientation drop down menu, and give it a divergence of 90.0. This will point all the leaves out away from the Box, and then give them a 90 degree angle in which to vary from each other slightly.
Next we will add a Shape Instance to the events. This will let us turn our particles into leaves.
In the settings click the large None button and then select Plane01 (which is our single leaf shape)
----->
At this point you can right click on the large pink Box02 and select Hide Selection. We don't need it visible at all anymore.

Now you can select the Display 01 (Ticks) from our event, and change it's settings to the right.
Find the Type dropdown menu, and change it from Ticks to Geometry.
The tickmarks in your viewport should now look like a bunch of single leaves.

Next we will add a Scale to our list of Events, and set the scale to 40% of its original size, as well as add in a 10% variation so the leaves aren't all the same size.
----->
Changing the first of the three numbers in each should automatically change them all if you have the "Constrain Proportions" box check marked beneath them.
Next, add a Material Static to the end of the list.
If you open your material Editor "M". You should see several simple textures created for you already.

The first leaf texture is simply a fairly glossy green gradient. You can use almost anything here, and it does not have to be exceptionally detailed as each leaf is going to end up a minute part of the overall detail.
Drag the first texture over to our Material Static none button, and select Instance when asked. Like this:
This means it will use this texture for all the single leaves that we have created thus far.
Next add in a Split Amount to our events list, and adjust the percentage of the split to 20%. This will take 20% of our current leaves, and send them on to our next step.
----->
Now, drag and drop another Material Static from our list of options, but instead of dropping it in the current list of events, drop it outside in the empty light grey space, we are going to make it so that 20% of our leaves are a brown color instead of green. This will add to the illusion of our natural living (and slightly dying) plant.
Connect the blue dongle to our new Event 02, from our Split Amount. Then drag the brown texture in the material editor below our first one, over to the none button of the new Material Static settings. Like this:

Change the new Display 02 (Ticks) the same way we changed the first one, from Ticks to Geometry.
Now 20% of our leaves will appear brown instead of green.
Next, add another Split Amount event to the bottom of our first Event01 box. Like this:
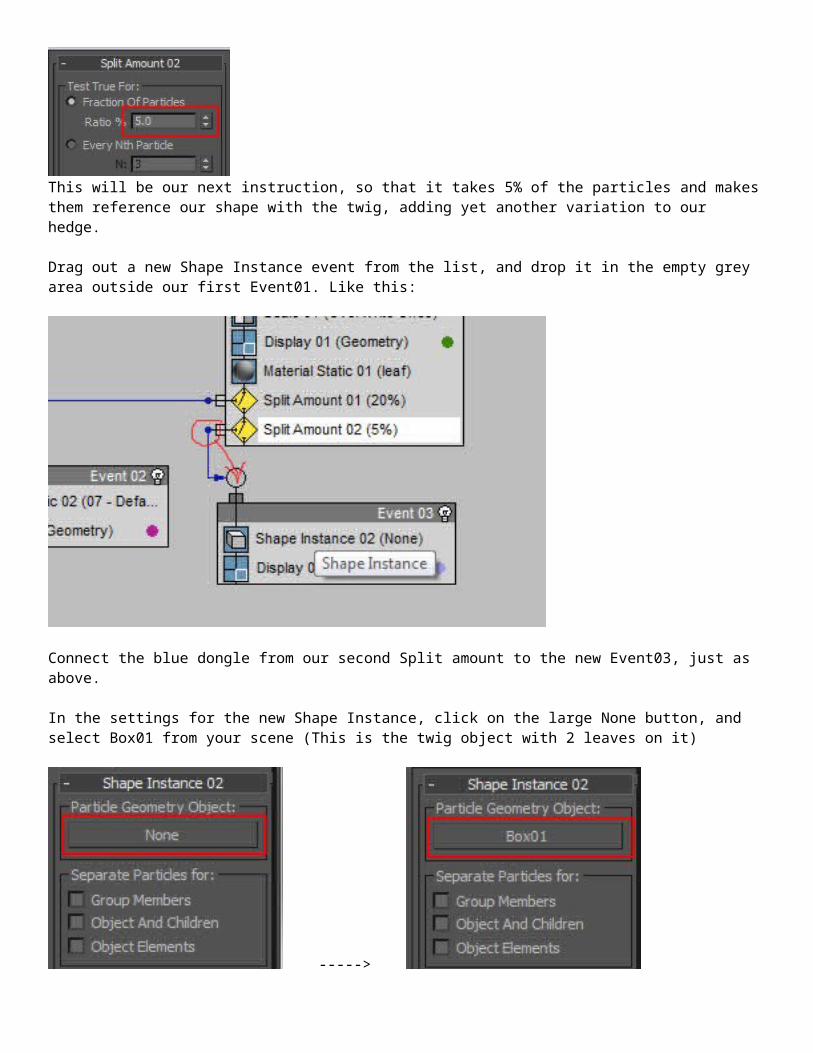
Change the setting amount to 5% on this one.

This will be our next instruction, so that it takes 5% of the particles and makes them reference our shape with the twig, adding yet another variation to our hedge.
Drag out a new Shape Instance event from the list, and drop it in the empty grey area outside our first Event01. Like this:
Connect the blue dongle from our second Split amount to the new Event03, just as above.
In the settings for the new Shape Instance, click on the large None button, and select Box01 from your scene (This is the twig object with 2 leaves on it)
----->
This means that 5% of our particles will now use the new twig and leaves object.
Add a scale below the new shape instance in Event03.

And adjust the settings in the Scale to match the ones below, adding a bit of variety to our twigs:
Finally add yet another Material Static, below the new Scale. This is the last one we need to give the twigs their texture.
Drag the third texture over, (The Multi Sub Object) texture, this should be a combination texture of brown for the twigs and green for the leaves. (don't worry if the image doesn't show up like mine, you can always add a wood texture later.) Then make sure to change the last Display03 in the third event box to Geometry as well.
The particles system is now fully built. All that is left is to turn up the number of particles.
Go back up to the birth event from earlier in the tutorial and change from 2000 particles, to 200,000. If you have a decent computer this shouldn't (hopefully) crash it.
Your viewport should default at only about 50% of the particles, but the final render will show them all.
Now add a light or two and do a render, with any luck you'll have yourself one natural looking shrubbery!