Embed Size (px)
Citation preview

THOMSON REUTERS
DataScope Select
OCTOBER 2017 – USER GUIDE
VERSION 11.2

Legal Information
DataScope Select User Guide 11.2 Page 2 of 198
© Thomson Reuters 2017. All Rights Reserved.
Thomson Reuters, by publishing this document, does not guarantee that any information contained herein is and will remain accurate or that use of the information will ensure correct and faultless operation of the relevant service or equipment. Thomson Reuters, its agents and employees, shall not be held liable to or through any user for any loss or damage whatsoever resulting from reliance on the information contained herein.
This document contains information proprietary to Thomson Reuters and may not be reproduced, disclosed, or used in whole or part without the express written permission of Thomson Reuters.
Any Software, including but not limited to, the code, screen, structure, sequence, and organization thereof, and Documentation are protected by national copyright laws and international treaty provisions. This manual is subject to U.S. and other national export regulations.
Nothing in this document is intended, nor does it, alter the legal obligations, responsibilities or relationship between yourself and Thomson Reuters as set out in the contract existing between us.

DataScope Select User Guide 11.2 Page 3 of 198
Contents
Preface: About this Guide ............................................................................................ 6
How to Use this Guide ............................................................................................................................ 6
Feedback ................................................................................................................................................ 7
Support ................................................................................................................................................... 8
Your Personal Information ...................................................................................................................... 8
Chapter 1: About DataScope Select Custom Solutions ............................................. 9
Features at a Glance ............................................................................................................................ 10
Extraction Coverage ............................................................................................................................. 13
Extraction Files ..................................................................................................................................... 22
Extraction Policies ................................................................................................................................ 23
Chapter 2: Getting Started .......................................................................................... 26
Accessing DataScope Select ............................................................................................................... 27
Understanding the Workspace ............................................................................................................. 30
Setting Preferences .............................................................................................................................. 34
Extraction Process Overview ................................................................................................................ 42
Chapter 3: Creating Input Lists for Extraction .......................................................... 44
Creating Input Lists ............................................................................................................................... 45
Adding Instruments/Entities .................................................................................................................. 46
Viewing Instrument/Entity Details ......................................................................................................... 54
Managing Input Lists ............................................................................................................................ 55
Managing Instruments & Entities .......................................................................................................... 56
Creating Criteria Lists ........................................................................................................................... 57
Creating User Instruments .................................................................................................................... 66
Adding User Instruments to Instrument Lists ....................................................................................... 68
Chapter 4: Defining Report Templates ...................................................................... 70
Selecting Report Templates ................................................................................................................. 71
Formatting Report Templates ............................................................................................................... 72
Managing Report Templates ................................................................................................................ 99
Managing an Existing Report Template ............................................................................................. 100
Importing Report Templates ............................................................................................................... 101
Chapter 5: Scheduling Extraction Executions ........................................................ 102
Creating Extraction Schedules ........................................................................................................... 103
Importing Schedules ........................................................................................................................... 110
Tracking Extraction Executions .......................................................................................................... 111
Viewing Schedule Details ................................................................................................................... 112
Managing Schedules .......................................................................................................................... 114

Contents
DataScope Select User Guide 11.2 Page 4 of 198
Chapter 6: Retrieving Extracted Files ...................................................................... 115
Viewing Extractions ............................................................................................................................ 116
Identifying Your Extractions ................................................................................................................ 117
Previewing & Downloading Extraction Files ....................................................................................... 118
Managing Extraction Files .................................................................................................................. 119
About Embargoed Extractions ............................................................................................................ 120
Downloading Evaluated Pricing Files ................................................................................................. 123
Chapter 7: Understanding Extraction Output ......................................................... 124
Extraction Format ............................................................................................................................... 125
Extraction Content .............................................................................................................................. 126
Universal Bid, Ask & Close Pricing Logic ........................................................................................... 128
About Extraction Notes ....................................................................................................................... 133
About RIC Maintenance Reports ........................................................................................................ 136
About Platts Files ................................................................................................................................ 138
Chapter 8: Searching & Viewing Details ................................................................. 140
Search Options ................................................................................................................................... 141
Performing an All Search .................................................................................................................... 142
Performing Criteria-Based Searches .................................................................................................. 144
Searching Entities ............................................................................................................................... 147
Searching Funds & Commodities ....................................................................................................... 152
Viewing Recent Searches .................................................................................................................. 153
Viewing Details ................................................................................................................................... 153
Chapter 9: Understanding Usage Reports .............................................................. 156
Viewing Usage Summary ................................................................................................................... 157
About the Extraction & Rental Usage Screens ................................................................................... 158
Viewing Instrument Extraction Usage ................................................................................................ 159
Viewing Legal Entity Extraction Usage ............................................................................................... 161
Viewing Instrument Rental Usage ...................................................................................................... 162
Viewing Entity Rental Usage .............................................................................................................. 163
Chapter 10: Submitting Price Challenges & Price Requests ................................. 164
About AskTRPS .................................................................................................................................. 165
Launching the Challenge Dashboard ................................................................................................. 166
Creating a Price Challenge ................................................................................................................. 168
Creating Batch Challenge Files .......................................................................................................... 174
Using the Batch Challenge Wizard ..................................................................................................... 177
Chatting with TRPS ............................................................................................................................ 182
Exporting Challenges ......................................................................................................................... 183
Submitting Pricing Requests .............................................................................................................. 185
Viewing & Exporting Statistics Reports .............................................................................................. 186
About Thomson Reuters Valuation Navigator .................................................................................... 188

Contents
DataScope Select User Guide 11.2 Page 5 of 198
Chapter 11: DataScope Select Standard Solutions ................................................ 189
About DataScope Select Standard Solutions ..................................................................................... 190
About the Standard Solutions Screens .............................................................................................. 191
Retrieving Bulk Files ........................................................................................................................... 195
Related Documentation ...................................................................................................................... 196
DataScope Plus .................................................................................................................................. 197

DataScope Select User Guide 11.2 Page 6 of 198
Preface
About this Guide
Thomson Reuters DataScope Select is a hosted data extraction platform that provides access to global pricing, validated terms and conditions, historical data content, corporate actions, cross-reference data, and legal entity data. Supported instruments include equities, funds, derivatives, money/foreign exchange, warrants, fixed income securities, commodities data and sell-side estimates, as well as user-defined instruments (Credit Default Swaps, Interest Rate Swaps and Over-The-Counter Equity Options).
DataScope Select is presented across two offerings: Custom Solutions and Standard Solutions. The Custom Solutions offering identifies all functions for creating and scheduling extractions and searching and viewing content. The Standard Solutions offering provides bulk capability for delivering packaged content sets from a single site.
This guide gets you started using the DataScope Select browser-based interface and takes you through the process of creating and scheduling extractions, searching and viewing details, and tracking extraction usage. See the DataScope Select FTP User Guide, the DataScope Select SOAP API Programmer Guides, and the REST API Help (available online via the DataScope Select Help menu) for instructions on using DataScope Select via the FTP and API platforms. It also introduces DataScope Select Standard Solutions, and describes the available subscriptions and provides information on the available feeds files.
NOTE: Details on using the Tick History product via the DataScope Select platform are provided in a separate document. Please see the Tick History User Guide for information.
How to Use this Guide
This guide is organized as follows:
Chapter 1: About DataScope Select Custom Solutions
This chapter introduces DataScope Select and describes its features and users types. An overview of the extraction process is provided, along with general information about extraction files.
Chapter 2: Getting Started
This chapter gets you started using DataScope Select and provides instructions on how to login and change your password. It includes an overview of the DataScope Select user interface and describes the features that are common to all pages. Instructions for setting your user preferences are also provided.
Chapter 3: Creating Input Lists for Extraction
This chapter takes you through the process of creating instrument lists, entity lists, criteria lists and user-defined instruments (credit default swap, interest rate swap, and over-the-counter equity option contracts).

About this Guide
DataScope Select User Guide 11.2 Page 7 of 198
Chapter 4: Defining Report Templates
This chapter takes you through the process of defining a reports template. It consists of selecting a report type and then formatting the report (defining report parameters, selecting fields and specifying optional header and trailer information). Support for importing a report template from an XML-formatted file is also provided.
Chapter 5: Scheduling Extraction Executions
This chapter takes you through the process of scheduling an extraction execution. You can create a new or new immediate schedule via the DataScope Select user interface or import a previously exported schedule.
Chapter 6: Retrieving Extracted Files
This chapter provides instructions for previewing and downloading your extractions, related notes, and optional reports.
Chapter 7: Understanding Extraction Output
This chapter describes the extraction format and content. Details on understanding the corresponding notes file and optional RIC Maintenance report are also provided.
Chapter 8: Searching & Viewing Details
This chapter provides instructions for searching instruments and legal entities to add to your input lists. Information about viewing and printing details for any selected instrument or legal entity is also provided.
Chapter 9: Understanding Usage Reports
This chapter provides an overview of the Usage Reporting tool for viewing billable regular and rental extraction usage for a specified period.
Chapter 10: Submitting Price Challenges & Price Requests
This chapter provides an overview of AskTRPS, which supports the creation of challenges for Asian, European and US securities/issues evaluated by Thomson Reuters Pricing Service (TRPS). You can also request pricing for new issues and unpriced bonds.
Chapter 11: DataScope Select Standard Solutions
This chapter describes the Standard Solutions feeds offering. An overview of the available subscriptions and files is provided, along with links to related documentation. Information about the DataScope Equities Plus+ offering available via DataScope Select is also provided.
Feedback
We invite your comments, corrections, and suggestions about this document: contact Thomson Reuters Customer Support at 1-800-738-8377 or your Technical Account Manager (TAM). Your feedback helps us continue to improve our user assistance.

About this Guide
DataScope Select User Guide 11.2 Page 8 of 198
Support
My Account is a Thomson Reuters portal that provides a single access point for timesaving support services, along with billing, user management, and information. For support using DataScope Select, please raise a query online by clicking Contact Us in My Account.
The following support channels are available to keep informed of changes to products and data, and to be notified of any service issues or changes:
Change Notifications
You can subscribe to the following change notifications:
Product change notifications detailing new, enhanced, or changed functionality, which may require your action, in products that you use.
Content change notifications alerting you to upcoming changes to real-time and historical data across all asset classes that are relevant to you.
RIC change notifications informing you of planned changes to Thomson Reuters Instrument Codes.
Service Alerts
You can subscribe to alerts about planned maintenance and unplanned service issues affecting your products and services, and be notified via SMS or email.
Documentation
You can access product documentation in My Account. DataScope Select offers a comprehensive documentation set that includes user guides, a data dictionary, online Help and FAQs.
Your Personal Information
Thomson Reuters is committed to the responsible handling and protection of personal information. We invite you to review our Privacy Statement, which describes how we collect, use, disclose, transfer, and store personal information when needed to provide our services and for our operational and business purposes.

DataScope Select User Guide 11.2 Page 9 of 198
Chapter
1
About DataScope Select Custom Solutions
This chapter introduces DataScope Select Custom Solutions and describes its features and users types. An overview of the extraction process is provided, along with general information about extraction files.
For details, see:
Features at a Glance
Extraction Coverage
Extraction Files
Extraction Policies

About DataScope Select Custom Solutions
DataScope Select User Guide 11.2 Page 10 of 198
Features at a Glance
DataScope Select Features REST API GUI FTP
Instruments & Entities
Generate instrument & entity lists
Define criteria used as input for extraction
Create CDS, IRS & Equity Option user instruments
Import/export XML & CSV formatted input lists
Extraction Coverage (Report Templates)
Pricing
Commodities Corrections History
EOD Pricing
Intraday Pricing
Premium EOD Pricing
Premium Pricing
Single Historical Pricing
Timeseries Pricing
Analytics
Fixed Income Analytics
Technical Indicators
StarMine
Corporate Actions
Standard Events
IPO Events
15022 Events
Entity Data
Audit
Details

About DataScope Select Custom Solutions
DataScope Select User Guide 11.2 Page 11 of 198
DataScope Select Features REST API GUI FTP
Hierarchy
Estimates
Summary Estimates
Actuals Estimates
Detail Estimates
Company Level Footnotes
Detail Level Footnotes
News
News Analytics
News Analytics Commodities
News Items
Pricing and Reference Data
Composite
Reference Data
Bond Schedules
MBS Factor History
Tranche Factor History
Fund Allocation
Ownership – Owners
Ratings
Symbol Cross Reference
Terms and Conditions

About DataScope Select Custom Solutions
DataScope Select User Guide 11.2 Page 12 of 198
DataScope Select Features REST API GUI FTP
Report Format
Select & format fields
Define file & compression format
Define FTP automated or manual delivery
Define optional headers & trailers
Import/export XML formatted report templates
Extraction Execution
Schedule immediate extraction executions
Schedule extraction execution for a future date (run-once or recurring)
Initiate extraction at a specified time or pricing trigger
Retrieve optional reports (early, non-embargoed data & RIC maintenance)
Search
Perform identifier-based searches
Construct criteria-based searches
View instrument/entity pricing & reference details
Usage
Track instrument & entity extraction/rental usage
AskTRPS
Create & submit single bond price challenges & price requests
Creating batch challenge files
Tracking price challenges
View & export statistic reports

About DataScope Select Custom Solutions
DataScope Select User Guide 11.2 Page 13 of 198
Extraction Coverage
Commodities
Commodities data is available for viewing and extracting pricing and reference data in Composite, EOD Pricing, Intraday Pricing, Premium EOD Pricing, Terms and Conditions and Timeseries Pricing reports. This offering provides access to over 105,000 active instruments covering commodity asset and supply chain information for agriculture, energy and metals markets.
The Commodities Corrections History report is available for retrieving historical corrections for specialist commodities content. Commodities Corrections History supports the retrieval of up to 12 months of rolling history based on a defined query. Corrections history includes field type, original assessment values and dates, and corrected values and dates. Additional fields, including identifiers and terms and conditions, are also available.
Commodities data is available from a variety of specialists, including Argus, ICIS, OPIS, Platts and RIM, with additional specialists to be added in future DataScope Select releases. These specialists offer independent benchmark price assessments for short- and long-term action and analysis. This data is available by subscription and offered across a variety of package options. Please contact your local account manager or sales specialist for details.
Corporate Actions
DataScope Select provides standard corporate actions data on over 95,000 companies from over 145 countries, listed on more than 200 exchanges globally. Supported events and coverage include:
Event Description
Capital Changes Coverage includes Stock Distributions (Rights Issues, Bonus Issues, Splits, Demergers and other capital restructures) and Cash Events (Return of Capital, Share Buybacks).
You can retrieve the events by Announcement Date, Deal Date, Effective Date, Ex Date and Record Date
Dividends Coverage comprises Regular, Special and Extraordinary Distributions (including cash dividends, dividend reinvestments, dividends with stock options, capital gains payments as well as stock dividends) with relevant tax details, such as withholding tax, QDI, franked rates.
You can retrieve the events by Announcement Date, End Date, Ex Date and Pay Date, and Record Date.
Earnings Coverage includes Year to date and interim results, as well as As-reported and annualized figures. You can retrieve the data by Announcement Date and Period End Date.
Equity Offerings Coverage comprises IPO data. You can retrieve the data for All Pending Deals or by First Trading Date.
Mergers & Acquisitions Coverage includes Mergers of Equals, Open Market Purchases, Tender Offers, Strategic Investments, Joint Ventures, Venture Capital, Reverse Takeovers, Asset Acquisitions and Consolidations

About DataScope Select Custom Solutions
DataScope Select User Guide 11.2 Page 14 of 198
Event Description
for Public Target companies. You can retrieve the data by Announcement Date, Cancel Date, Close Date, Effective Date, Revised Proposal Date, and Tender Offer Date.
Nominal Value You can retrieve nominal value amount and currency by Nominal Value Date.
Shares Coverage includes the default share amount type and/or multiple types, including Outstanding, Issued, Listed, Closely Held, Treasury, Authorized and Unclassified. You can retrieve the number of shares by Shares Amount Date.
Voting Rights You can retrieve the voting rights per share by Voting Rights Date.
Please see the DataScope Select ISO 15022 Events User Guide for details on Thomson Reuters ISO 15022 Service.
Estimates Data
Thomson Reuters I/B/E/S service provides expected and reported earnings of global corporations across a variety of financial measures. This service gathers data from contributors that collectively follow active public companies worldwide and process estimate updates.
DataScope Select offers four reports for retrieving estimates data: Summary Estimates, Actuals Estimates, Detail Estimates, Detail Level Footnotes and Company Level Footnotes. For all report types except Company Level Footnotes, you can select the types of estimates to retrieve, detailed below. All estimate types are available for Summary Estimates and Details Estimates. All but Price Target and Recommendation are available for Actuals Estimates and Detail Level Footnotes. Estimate types are not reported for Company-Level Footnotes.
Estimate Type Description
BPS – Book Value per Share A company's common stock equity as it appears on a balance sheet equal to total assets minus liabilities, preferred stock, and intangible assets such as goodwill, divided by the weighted average number of total shares outstanding for the year.
CPS – Cash Flow per Share A corporation’s cash flow from operations, before investing and financing activities, divided by the weighted average number of common shares outstanding for the year.
CPX – Capital Expenditure Identifies funds used by a company to acquire or upgrade physical assets or the amount used during a particular period to acquire or improve long term assets such as property, plant, or equipment.
CSH – Cash Earnings per Share A company’s net income, plus depreciation, amortization of goodwill, intangibles, and prepaid assets (non-cash items); divided by weighted average number of shares outstanding.
DPS – Dividend per Share A corporation’s common stock dividends on an annualized basis, divided by the weighted average number of common shares outstanding for the year.

About DataScope Select Custom Solutions
DataScope Select User Guide 11.2 Page 15 of 198
Estimate Type Description
EBG – Earnings per Share Before Goodwill
A corporation’s net income from continuing operations before goodwill amortization divided by the weighted average number of shares outstanding.
EBI-EBIT – Earnings Before Interest and Taxes (Non per Share)
A company’s earnings before interest expense and income taxes paid.
EBS-EBITDA per Share Identifies EBITDA divided by the weighted average number of shares outstanding.
EBT-EBITDA (Non per Share) The raw earnings power of a company before debt servicing, corporate taxes, and any allowances made for depreciation and amortization costs the company faces.
ENT – Enterprise Value Calculated as market capitalization plus debt, minority interest and preferred shares, minus total cash and cash equivalents.
EPS – Earnings per Share EPS that the contributing analyst considers to be that with which to value a security.
EPX – Earnings per Share – Alternate
A corporation’s net income from continuing operations, divided by the weighted average number of shares outstanding.
FFO – Funds from Operations per Share
A measure used by real estate and other investment trusts to define the cash flow from trust operations.
GPS – GAAP/Earnings per Share - Fully Reported
Statutory or reported earnings per share, defined as net profit (on continuous activities) divided by the weighted average number of shares outstanding during the period.
GRM – Gross Margin A company's total sales revenue minus cost of goods sold, divided by the total sales revenue, expressed as a percentage.
NAV – Net Asset Value (Non per Share)
The total book value of a company’s securities, calculated in general form by taking the total assets of a company and subtracting the value of the company’s intangible assets (goodwill, patents, etc.) minus current and long-term liabilities.
NDT – Net Debt Calculated as short and long term interest bearing debt minus cash (and equivalents).
NET Income – (Non per Share) A corporation’s after-tax income. This item varies significantly from market to market as regards the inclusion or exclusion of non-recurring items.
OPR – Operating Profit (Non per Share)
The difference between a company’s revenues and its costs and expenditures arising directly out of a company’s regular operations.
PRE – Pre-tax Profit (Non per Share)
Profit before taxes is net income before tax expense.
PTG – Price Target The projected price level forecasted by the analyst within a specific time horizon.

About DataScope Select Custom Solutions
DataScope Select User Guide 11.2 Page 16 of 198
Estimate Type Description
REC – Recommendation The recommendation value reflects the contributing analyst’s rating for a particular company.
ROA – Return On Asset (Percent)
A company’s operating efficiency regardless of its financial structure (in particular, without regard to the degree of leverage a company uses).
ROE – Return on Equity Return on Equity is another profitability ratio, which gauges return on investment by measuring how effectually the company is employing stockholder money.
Revenue (Sales) The Revenue measure is a corporation’s net revenue, generally derived from core business activities.
Fund Allocations
The Fund Allocation report template identifies allocations of Lipper Funds across the following schemes: Asset, Currency, Holdings Top 10, Industry Sector and Investment Country. Scheme allocations for supported funds are expressed as a percentage, and then ranked as of the posting date on which the holdings data was added to Thomson Reuters Lipper Fund database. Full Holdings are also available for permissioned clients via the GUI and FTP platforms only.
Thomson Reuters gathers holdings contributed by fund management companies and prospectuses. New data is monitored and populated continuously with updates occurring as often as provided by the fund management company. Ninety percent of the allocation data is current as of the most recent four months. The allocation schemes are as follows:
Fund Allocation Scheme Description
Asset Identifies the percentage of the fund’s total net assets for each asset allocation rank.
Currency Identifies the percentage of the fund’s total net assets for each ISO currency allocation rank.
Holdings Top Ten Identifies the top ten investments in the portfolio.
Industry Sector Identifies the percentage of the fund’s total net assets for each sector rank.
Investment Country Identifies the percentage of the fund’s total net assets for each ISO country allocation rank. Country is determined based on the security’s country of headquarters.
Full Holdings Retrieve all holdings data available for the fund.

About DataScope Select Custom Solutions
DataScope Select User Guide 11.2 Page 17 of 198
Legal Entities
The Legal Entity database provides access to global content across nearly 250 markets with coverage on over one million verified/managed entities, including corporate (public and private), regulated, fund and public entities, such as municipalities. Entities are uniquely linked to pricing and reference data across an organization, as well as other essential data such as corporate actions and terms and conditions.
Legal Entity coverage includes core data attributes linked by a primary identifier, including company reference data (e.g., registration information and jurisdiction data), compliance and regulatory IDs that provide information about legal permissions to run operations, and entity hierarchy data. Supporting source information also is provided for core data attributes. Source types include regulatory filings, regulators and exchange information.
Verified & Managed Entities
Legal entity records are identified with two flags to indicate their statuses: Verified and Managed. Verified entities have been manually confirmed on primary and secondary source documents, including audit sources. Managed entities are actively maintained by Thomson Reuters on a regular basis.
All verified entities are part of the Thomson Reuters managed universe. However, once the entity becomes inactive, it is no longer maintained. Thomson Reuters does not actively maintain or enhance data for any third-party owned entities. It is important to understand how legal entities qualify in DataScope Select as their statuses determine extraction usage and rental reporting. Only verified records count towards usage and rental.
Fund-Level Data
DataScope Select’s legal entity content offering includes fund-level descriptive data (addresses, legal form, etc.) and fund relationships (Custodian, Advisor, Sub-Advisor, etc.). This content is available for extraction via Legal Entity Detail reports, as well as for viewing via the Entities search screen. Access to fund-level descriptive data and relationships is available via the GUI platform only to clients who subscribe to the legal entity content offering. No additional permissions are required for accessing this content. Please contact your local account manager or sales specialist for more information.
News
News Analytics
News Analytics is a resilient server system that converts news stories into quantitative scores that can be incorporated into trading and investment models to exploit market opportunities and manage risk. Using sophisticated Natural Language Processing (NLP) techniques, the system can analyze news items in real-time on thousands of companies in milliseconds, scoring text across measures related to sentiment, relevance, novelty and volume.
News Analytics can also read and process Thomson Reuters News Archive files to obtain and publish score history. Instrument scoring can be directly consumed by your own internal systems to guide in investment, surveillance, compliance and trading decisions. This comprehensive content is now available for extraction and viewing in DataScope Select.
A news item can be a single-line alert, full news article, or an update to an existing news article, as determined by the news feed handler. Each news item is assigned a unique identifier that you can include in your extractions (Item ID). This identifier is prefixed with a string that identifies the feed and feed-specific id data to identify the news item within the feed.

About DataScope Select Custom Solutions
DataScope Select User Guide 11.2 Page 18 of 198
News items are scored separately for each instrument in your instrument list that is mentioned in the news item. For example, an item that mentions three companies will generate three scores in total. The scores will be different because separate linguistic processing takes place for each instrument. Each news item is stamped with the date and time (GMT) by the News Archive in millisecond precision.
News Analytics extractions can be performed with or without a corresponding instrument list. If no instrument list is used, sentiment analysis and metadata will be retrieved using the criteria defined in your selected News Analytics report template.
News Analytics Commodities
News Analytics Commodities supports the retrieval of sentiment analysis and metadata from global news sources covering commodities and energy assets. This report template builds off of the existing News Analytics report template without requiring an input list for extraction. Instead, the selected commodities/energy assets, along with other criteria defined in your report template, are used as input for retrieving data upon extraction.
News Items
The News Items report template supports viewing and extraction of current and historical story bodies from Reuters and global third-party sources published in a variety of languages. Instrument-less News Items extractions are also supported. In this instance, the criteria defined in your report template are used as input for extracting news.
NOTE: Access to third-party content news via News Items reports requires additional permissions from Thomson Reuters. No additional permissioning is required for retrieving third-party meta data via News Analytics reports. Please contact your local account manager or sales specialist for information.
Pricing
DataScope Select offers the following pricing data:
EOD Pricing extractions provide initial and validated end of day prices for all exchange‐traded
instruments from Thomson Reuters real‐time network. Non‐exchange‐traded instruments are sourced from TRPS, as well as from various contributors.
Intraday Pricing extractions provide intraday pricing from Thomson Reuters real-time network, as well as from various contributors
Premium EOD Pricing extractions provide Thomson Reuters validated premium end of day snapshot at optimal retrieve times to ensure the delivery of the “best” official close prices for global equity, futures & options, money/foreign exchange and fixed income instruments.
Premium Pricing extractions provide evaluated pricing from Thomson Reuters Pricing Service (TRPS), an independent, global evaluated pricing source covering fixed income securities, derivatives and bank loans. Coverage spans all major financial markets and prices are available at multiple times daily.
Historical pricing is available via Single Historical Price and Timeseries Pricing extractions. Use Single Historical Price extractions to retrieve the most recent prices for a specific date. To retrieve historical pricing for a range of dates, use Timeseries Pricing extractions.
Composite extractions combine pricing, reference, technical indicators, and corporate actions data in a single report template. This report combines fields from the End of Day Pricing and Terms and Conditions reports, as well as certain key Corporate Actions and Technical Indicator fields and report-specific fields for extraction.

About DataScope Select Custom Solutions
DataScope Select User Guide 11.2 Page 19 of 198
Ratings
The Ratings report template lets you retrieve current and historical ratings data provided by active ratings sources for global government/corporate, collateralized mortgage obligations (CMO), asset-back securities (ABS) and US municipal bonds. Ratings for issuers of securities (excluding CMO/ABS) are also available.
This report template expands upon the current ratings offering available via the Terms and Condition report template to offer detailed data from active ratings providers with, for some securities, approximately 30 years of historical ratings data available. It is intended to assist fund administrators in tracking local credit ratings globally.
Ratings report templates can be used with both instrument and entity lists. Entity lists can be used for retrieving issuer-level ratings only.
StarMine
StarMine report template supports extractions of credit risk data for global equity/ordinary share instruments that relate directly to entities. This report is intended for Fund Administrators and Custodians who manage and report risk on the securities held in their portfolios, regardless of whether the corresponding companies have credit ratings from the traditional credit ratings agencies.
Data from the following credit risk models published by StarMine is available each trading day following the market close in the Asia, EMEA and AMERS regions:
SmartRatios
The StarMine SmartRatios Credit Risk Model utilizes accounting ratio analysis, incorporating data from both reported financial statements and forward-looking analyst estimates via the StarMine SmartEstimate. The model combines financial ratios and metrics that are predictive of credit risk into five components: profitability, leverage, debt coverage, liquidity, and growth. The model also incorporates industry-specific metrics where appropriate, particularly for banks and insurance companies but also for retailers, utilities, airlines, and others.
The model output includes 1-100 scores for each of the five components, default probabilities, overall 1-100 percentile scores, and letter ratings. The SmartRatios model is more effective at predicting defaults than commonly used alternatives, such as the Altman Z-score or the Ohlson O-score. The model can also be used to enhance equity selection performance, and in fixed income and cross-asset strategies.
Text Mining
This unique component of StarMine Credit Risk applies sophisticated text mining algorithms to StreetEvents earnings conference call transcripts, financial statements and other regulatory filings, Reuters News, and select broker research reports to identify language that is predictive of credit risk.
The model allows analysts to quickly identify the most important documents for a company out of the potentially hundreds they may be responsible for, and it gives quants a powerful new quantitative signal by systematically analyzing a large body of previously untapped qualitative data.
Structural Credit Risk
The StarMine Structural Credit Risk Model evaluates the equity market’s view of the probability that a company will go bankrupt or default on its debt obligations over the next one-year period. The model is StarMine’s proprietary extension of the structural default prediction framework introduced by Robert Merton that models a company’s equity as a call option on its assets.

About DataScope Select Custom Solutions
DataScope Select User Guide 11.2 Page 20 of 198
The equity volatility, market value of equity, and liability structure are used to infer a market value and volatility of assets. The final default probability is equivalent to the probability that the market value of assets will fall below a default point, which is a function of the company’s liabilities, within one year. The model output includes default probabilities, 1-100 percentile scores, and letter ratings.
Combined Credit Risk
The StarMine Combined Credit Risk Model (CCR) is StarMine’s best estimate of credit risk at the company level that incorporates information from the StarMine Structural, SmartRatios, and Text Mining Credit Risk models into one final estimate of corporate credit risk.
By incorporating information from multiple independent data sources – from the equity market, from analyst estimates and financials, and from analysis of the language in important textual documents – and placing the most emphasis on the inputs that are most effective for a given company, StarMine CCR creates powerful default predictions and assessments of credit risk that are more accurate than using any one data source alone.
Technical Indicators
The Technical Indicators report template combines price volume analytics with correlating reference data, allowing you to enhance predictive modeling capabilities for equity instruments. Technical Indicators include average volume, price change, historical volatility calculations, moving averages and price-momentum signals. Each represents market price reactions that capture information relevant for forecasting market returns. Technical Indicators are sourced from a new Pricing Volume Analytics (PVA) database that provides global coverage equities, including stocks, ADRs, GDRs.
Two technical indicator types are available for extraction: Core Analytics and Relative Analytics. Both analytic sets are calculated off of end of day prices. Core Analytics are calculated for a base instrument (for example, Average Volume for a base instrument); while calculations for Relative Analytics are dependent on a benchmark RIC (for example, the percent change price, or the base instrument close price relative to the benchmark RIC).
Trigger capabilities are also supported for executing your Technical Indicators extraction as a result of the release of core or relative analytics for the trading day. Because benchmark data is always published after base instrument data, we recommended that you create separate reports for extracting Core and Relative analytics.

About DataScope Select Custom Solutions
DataScope Select User Guide 11.2 Page 21 of 198
Core & Relative Analytics
DataScope Select supports the following technical indicators. Relative Percent Change – Close Price are applicable to Relative Analytics, while all others are applicable to Core Analytics. Each technical indicator below can be accessed for a specified time period.
For example, you can retrieve Average Volume for the previous 10, 20, 30 days, etc.
Terms and Conditions & Symbol Cross Reference Data
Full terms and conditions data, including ratings and descriptive content are provided via Terms and Conditions extractions. All terms and conditions data is validated by Thomson Reuters.
Symbol Cross Reference extractions provide extensive instrument identification and industry classification systems for all identifier types including RICs.
Technical Indicators
Alpha Average Volume
Beta Moving Average Close Price
Moving Average Net Change – Close Price Moving Average Percent Change – Close Price
Net Change – Close Price Percent Change – Close Price
Relative Percent Change – Close Price Sharpe Ratio
Volatility

About DataScope Select Custom Solutions
DataScope Select User Guide 11.2 Page 22 of 198
Extraction Files
An extraction consists of an input file, report template and schedule.
Extraction File Description
Input List Identifies the instruments or entities to include in an extraction.
Created from Search or via a CSV or XML import file.
Not applicable for Corporate Actions – IPO Events and “RIC-less” News extractions.
Criteria List Defines the criteria that are used as input for the extraction.
Available for retrieving end of day prices and terms and conditions for global bank loans, DTC money market instruments, and commodities.
Each time your extraction executes, the criteria are run to provide the most current set of instruments available at that time.
Report Template Defines the report type, output format and delivery, output fields and field formats.
Supported output formats are CSV, XML, and Delimited.
Extraction output can be compressed in ZIP and GZIP formats and retrieved manually from the user interface or via FTP. FTP automated delivery is available for DDN & BT MPLS users.
Schedule Identifies the extraction execution type:
New Schedule – Extraction executes once or on a recurring basis (daily, weekly, or monthly).
New Immediate Schedule – Extraction executes within 10 seconds of request.
Created in the DataScope Select user interface or via an XML import file.

About DataScope Select Custom Solutions
DataScope Select User Guide 11.2 Page 23 of 198
Extraction Policies
Please contact your local account manager or sales specialists for more information on any of the items defined below.
Importing
Limited to maximum of 85,000 instrument identifiers imported into an instrument list. Identifiers are imported before being validated to account for duplicate and invalid identifiers, etc. as defined in Preferences. The first 75,000 validated identifiers are added to the input list for extraction. Any remaining identifiers are excluded. File Codes and Chains do not expand upon import. Only the File Code or Chain itself is validated during the import. Not the File Code or Chain’s constituents.
Up to 50,000 entities can be imported into an entity list.
Extraction Processing
Extraction processing limits for the GUI, FTP and REST API platforms are identified below by report type. Limits for File Codes and Chains both before and after expansion are shown. File Codes and Chains are expanded upon extraction only. A row of data will be returned for each expanded instrument in the File Code or Chain, up to the expansion limit identified below.
Pricing
Commodities Corrections History: 75,000 instruments before file code and chain expansion; 150,000 instruments after expansion
EOD Pricing: 75,000 instruments before file code and chain expansion; 150,000 instruments after expansion
Intraday Pricing: 50,000 instruments before and after file code and chain expansion
Premium EOD Pricing: 25,000 instruments before and after file code and chain expansion
Premium Pricing: 50,000 instruments before file code and chain expansion; 150,000 instruments after expansion
Single Historical Price: 50,000 instruments
Timeseries Pricing: 1,000 instruments
Reference Data
Bond Schedules: 150,000 instruments
Fund Allocation: 600 instruments before and after file code and chain expansion
MBS-Factor History: 20,000 instruments before and after file code and chain expansion
Ownership: 500 instruments
Ratings: 50,000 instruments before file code and chain expansion; 150,000 instruments after expansion; 1,000 legal entities before and after file code and chain expansion
Symbol Cross Reference: 50,000 instruments before file code and chain expansion; 150,000 instruments after expansion
Terms and Conditions: 50,000 instruments before file code and chain expansion; 150,000 instruments after expansion; 1,000 legal entities before file code and chain expansion; 150,000 after instrument expansion
Tranche-Factor History: 3,000 instruments before and after file code and chain expansion

About DataScope Select Custom Solutions
DataScope Select User Guide 11.2 Page 24 of 198
Pricing & Reference Data
Composite: 50,000 instruments before file code and chain expansion; 150,000 instruments after expansion
Analytics Data
Fixed Income Analytics: 50,000 instruments before and after file code and chain expansion
StarMine: 50,000 instruments before and after file code and chain expansion
Technical Indicators: 50,000 instruments before and after file code and chain expansion
Corporate Actions
Standard Events: 150,000 instruments
IPO Events: 150,000 instruments
ISO 15022: 150,000 instruments
Entity Data
Entity Audit: 10,000 rows of entity data
Entity Detail: 50,000 rows of entity data
Entity Hierarchy: 75,000 rows of entity data
Estimates Data
Actual Estimates: 3,000 instruments before and after file code and chain expansion
Detail Estimates: 3,000 instruments before and after file code and chain expansion
Summary Estimates: 3,000 instruments before and after file code and chain expansion
Company Level Footnotes: 3,000 instruments before and after file code and chain expansion
Details Level Footnotes: 3,000 instruments before and after file code and chain expansion
News
News Analytics & News Items: Instrument limits are dependent on the number of days for which you want to retrieve news:
0-7 Days – 50,000 instruments
8-31 Days – 25,000 instruments
32-366 Days – 10,000 instruments
367+ Days – 5,000 instruments
The maximum number of records that can be returned for RIC-less extractions for News Analytics and News Items is 400,000.
News Analytics Commodities: For extractions with a specified date range of 32 or more days, only the first 15 commodity codes in your input list will return data.

About DataScope Select Custom Solutions
DataScope Select User Guide 11.2 Page 25 of 198
Extraction File Limits & Ages
There is no limit on the amount of extractions that you can execute. The maximum number of extractions that can be stored in your account at any one time is 1000 extractions.
Limit is enforced via a background process that runs every calendar day at 00:00 UTC. Process deletes extractions with an execution date greater than 24-hours, starting with the oldest file first. Extractions less than 1 day old are skipped and not part of the process.
All extractions older than 45 calendar days are automatically deleted from the DataScope Select database.
Extraction Size Limit & Timeouts
Extraction output file names are limited to 128 supported characters.
Largest file that can be processed is approximately 2 Gigabytes (GB). Extraction processing stops automatically when the file size reaches 2 GB.
Notes file is generated that identifies that the extraction failed due to the file size, along with the date and time of the failure.
Timeseries Pricing extractions can take up to 24-hours to process; after which time the extraction will timeout.
Automatic Deletions of Unused Input List, Report Template & Schedules
DataScope Select limits the number of unused input lists (instrument, entity and criteria lists), report templates and schedules to a maximum of 100 files each per file type (that is, 100 instrument lists, 100 entity lists, 100 criteria lists, 100 report templates and 100 schedules). This rule applies currently to input lists, report templates and schedules older than seven days.
The automated removal process runs each Saturday, beginning at approximately 00:00 UTC (7:00 PM EST). When the 100-file limit is exceeded, the process deletes input lists, report templates and schedules with a last update date greater than seven days, starting with the oldest file first and deleting all applicable files until the maximum number of unused files for each file type reaches 100.
Input lists, report templates and schedules that are less than seven days old are not part of this process, nor are input lists and report templates tied to a recurring schedule or future one-time schedule. Because of these exceptions, it is possible to have more than 100 of each of these file types tied to your account.
Automatic Removal of Inactive User Accounts
User accounts that have been inactive for 9 months or longer that are not under contract are automatically deleted, as well as any associated files tied to the account.
Users under contract can re-activate their accounts by logging in to DataScope Select.
No extraction files or preference settings will exist for re-activated users.

DataScope Select User Guide 11.2 Page 26 of 198
Chapter
2
Getting Started
This chapter gets you started using DataScope Select and provides instructions on how to login and change your password. An overview of the DataScope Select user interface is provided, along with information about configuring your user preferences.
For details, see:
Accessing DataScope Select
Understanding the Workspace
Setting Preferences
Extraction Process Overview

Getting Started
DataScope Select User Guide 11.2 Page 27 of 198
Accessing DataScope Select
Access to the DataScope Select user interface is available via the Internet, Delivery Direct or a BT Radianz (MPLS) connection as follows:
Internet – https://hosted.datascope.reuters.com
Delivery Direct or BT Radianz (MPLS) – https://select.datascope.extranet.reuters.biz
Browser Support
DataScope Select officially supports Internet Explorer 11, Mozilla Firefox and Google Chrome. A warning alerts you that your browser is outdated if you access DataScope Select using IE 8, IE 9 or IE 10. You will continue to get this warning each time you login until you upgrade to a modern browser.
Signing In
To login to DataScope Select, you must enter your user ID and password, and then click Sign In. Once you login, you are able to use the DataScope Select features and functionality that are available to you based on your user type and access permissions. DataScope Select provides exclusive sign-ins capability for all users of the web interface. An exclusive sign-on means that you can only be signed on to one session of DataScope Select at a time.
Concurrent sessions launched from the web interface are not supported. If you are signed in to DataScope Select and you or another user signs in with your credentials, you will be logged off automatically on your next web page request since the other user's session will supersede your session.

Getting Started
DataScope Select User Guide 11.2 Page 28 of 198
Changing Your Password
1. Click Preferences in the tool bar, and then click Change Password at the top of the screen.
The Change Password screen appears:
2. Update your password in the fields provided.
Note the following password policies:
Passwords must be between 8 and 20 characters
Passwords with fewer or more characters will be rejected.
Passwords must have characters from at least 2 character classes
Supported character classes are letters, numbers, and the following symbols:
# $ % & @ * + - = ! . ? : ; ( ) [ ] { } ^ _ ~
Passwords cannot consist entirely of your email address, in full or in part
For example, if your email address is [email protected], you cannot set your password to johnsmith12, ohnsmith12, @company.com, etc. Your password can contain all or part of your email address if it also contains other characters.
In the example above, you can set your password to johnsmith123, ohnsmith@456, [email protected], etc.
3. Click Update password, and then click OK when prompted.
Password Policies
You will be logged out automatically when your session is inactive for 60 minutes. Your user ID is automatically assigned to you and cannot be changed. There is no limit on the number of password retries. If you forgot your password, click forgot your
password? to request a new one.

Getting Started
DataScope Select User Guide 11.2 Page 29 of 198
About the Home Page
Upon a successful login, the Home Page appears. This screen includes dashboards for viewing release notes, along with your recent activity and extractions.
Release Notes
This dashboard highlights the new features in the current release. Links to the Product Change Notifications (PCNs) related to the release are also provided.
Activity Stream
This dashboard shows your 25 most recent instrument lists, entity lists, report templates and schedules. DataScope Select captures your activity performed across all platforms (GUI, FTP and API) and displays the resulting items in chronological order, with your most recent activity appearing first. The icons identify the activity and are color-coded to denote the item type:
Input List = - Created; - Updated
Report Template = - Created; - Updated
Schedule = - Created; - Updated
You can click on the input list, report template or schedule name to go directly to the related screen.
Today’s Extractions
This dashboard shows all of your completed and pending scheduled and immediate extractions that have executed or will execute today. Your extractions are listed in chronological order, with the most recently completed extraction appearing first. If the extraction has executed already, Completed appears; otherwise, the time at which the extraction is scheduled to execute is shown. You can click on an extraction to go directly to the Extracted Files screen.

Getting Started
DataScope Select User Guide 11.2 Page 30 of 198
Understanding the Workspace
DataScope Select consists of several screens that guide you through the process of creating and scheduling extractions, searching and viewing details, and tracking usage. The following features are common across all screens. See the below for descriptions of common workspace features.
Use the menu bar to initiate all tasks related to DataScope Select, including setting user preferences, getting help and accessing the REST API Help. Please see the next section for details.
Use these buttons to initiate a task, such as create or import a new input list, report template or schedule.
Use the Find box to search for an item, such as an input list, report template, schedule or extraction output file, listed in the screen grid. When you enter text, only the items matching that text appear
Use these buttons to perform a task on one or more selected items, such as delete or export. These buttons are disabled until an item is selected.
Use to export the grid and all of its contents to a comma separate value (csv) formatted file. The file takes the name of the selected screen. This functionality is available for instrument lists, entity lists, report templates, schedules and extracted files.
Use to refresh the screen.
Use the column headers to sort the grid items in ascending or descending order. The arrow indicates the direction in which the items are sorted.
Click on a row to expand the screen to show details about the selected item and to perform specific tasks on that item.
2
3 4 5
6
1
2
5
4
6
7
7
3
1

Getting Started
DataScope Select User Guide 11.2 Page 31 of 198
About the Menu Bar
All tasks associated with DataScope Select are initiated via the menu bar. It consists of a main menu a global search box and menus related to your user profile and for getting help.
Main Menu
To launch the main menu, click DataScope Select. Click DataScope Select again or outside of the menu to exit.
The menu presents all screens that you can navigate and is split into two sections:
Custom Solutions identifies all functions for creating and scheduling extractions and searching and viewing content, as well as additional permissionable features, including access to Thomson Reuters Pricing Services (TRPS) files.
Standard Solutions identifies the screens for viewing available subscriptions and bulk files.
Top-level screens are presented in bold. Actions that you can perform from those screens are presented below them.
Screens are presented in a logical order; items for creating and scheduling an extraction are presented on the left and additional capabilities, such as searching and submitting price challenges are on the right.

Getting Started
DataScope Select User Guide 11.2 Page 32 of 198
Global Search Box
Use this text box to perform quick searches of identifiers, input lists, report templates and schedules. You can also enter a screen name to go directly to that screen.
When you enter a search string and click GO, a drop-down appears listing all of your input lists, report templates, and schedules that match the search string.
Tasks that match the search string also appear. For example, entering Equity reveals a Search selection for OTC Equity Options. If you enter Import, selections for Importing report templates and schedules would appear instead. Clicking these selections bring you directly to those screens.
When you enter a valid identifier (for example, RIC, CUSIP, SEDOL, ISIN, etc.) and click Go, you will go to the Instrument Details screen for that instrument or legal entity. You can also prefix the identifier with the identifier type (for example, RIC IBM.N).
Supported identifier types are: Common Code, CUSIP, ISIN, ISMA, LIN, Lipper ID, OrgID, RCPID, RIC, SEDOL, SICC, Sicovam, Valoren and Wertpapier. These identifier types are not supported: MIC, IPC, Ticker and Chain RIC. Wildcards are not supported.
When searching instruments, please note that this box can return instruments that are not found using the Search screens. For example, the Go box supports ISINs for looking up Mortgages, while the All and Mort-Pass Thurs (MBS) search screens do not. These two features will be aligned in a future DataScope Select release.
Recent
This menu appears after you view the details of instrument or legal entity from Search or an input list. Clicking it reveals a drop down, showing the most recently viewed items for your current DataScope Select session.
Up to 15 instruments or legal entities can appear in the lists. Items appear in the order in which they were viewed, with the most recently viewed item appearing first.
Click on the identifier to go directly to the Details screen for that instrument or legal entity.
The menu is cleared when you sign out of your DataScope Select session.

Getting Started
DataScope Select User Guide 11.2 Page 33 of 198
User Menu
This menu is identified by your user name.
Use this menu to define your user preferences and change your DataScope Select password.
Screens for viewing a summary of instrument extraction usage, as well as instrument and legal entity extraction and rental usage details are available from this menu.
Help Menu
The Help menu provides external links for getting help with DataScope Select from the online help file or Frequently Asked Questions (FAQs).
The REST API Help link provides integrated online help and tools for using the REST API platform.
Click My Account and Contact Us to view support services for DataScope Select.
Use the Subscribe link to signup for Product Change and Data Notifications.

Getting Started
DataScope Select User Guide 11.2 Page 34 of 198
Setting Preferences
You can set and view your preferences and permissions by clicking on your username, and then selecting Preferences. Note that your selected preferences also apply to extractions processed via the FTP and REST API platforms.
Your preferences are defined across the following tabs: General, FTP Automated Delivery, User Permissions, Third-Party Content Permissions, and Broker Entitlements. To enable the General and FTP Automated Delivery tabs, click Edit Preferences. The selections you make here are applicable across all DataScope Select platforms (browser, FTP and API). Once you have specified your preferences, click Save. You cannot edit the other tabs.
General
This tab consists of the following sections: General Preferences, FTP Access, Instrument Lists and Reports:
General Preferences
Your general preferences define the default identifier type and time, as well as the formats used to show dates, times, and valuations. These settings default to US values.
NOTE: If you update the time zone or formats in your user preferences, the new formats will be reflected in all subsequent extractions, while all existing scheduled extractions will remain unchanged. To have your extractions execute with the updated settings, you must export the schedule, and then re-import it.

Getting Started
DataScope Select User Guide 11.2 Page 35 of 198
To set general preferences:
1. Select a default identifier type from the Preferred Identifier Type drop-down list. This selection is used to identify instruments returned in Search.
2. Select a time zone from the Time Zone drop-down list. This selection identifies the time zone for extracting data. When you select a Time Zone, the screen refreshes to indicate whether that time zone observes day light saving time (DST).
Since time zones in DataScope Select are provided by Microsoft, you can specify whether your extraction times will be impacted by daylight saving in the Windows Control Panel. In the Date and Time Properties screen, select the Time Zone tab, and then select Automatically adjust clock for daylight saving changes.
3. Select formats from the Date Format, Time Format, and Number Format drop-down lists.
Your selections are used as the default formats for displaying date, time and numeric output fields in your extractions. Whenever you create a new report template, the time zone and formats selected in your Preferences will automatically appear as the default formats.
FTP Access
For Custom Solutions clients, FTP is supported for transferring input lists, report templates, and schedules to and from the DataScope Select FTP server. Standard Solutions clients must use FTP to retrieve their bulk feed files. To enable your account, make sure Enable FTP Access is selected. Note that there is a one-time delay of up to 15 minutes between logging in and being able to access the Standard Solutions files via the FTP site.
If you plan to download your extractions and/or bulk feed files from the FTP server manually (FTP Pull), you can begin using DataScope Select FTP Service once this option is selected.
If you connect to DataScope Select through Thomson Reuters private network via Delivery Direct or BT Radianz (MPLS) and plan to use FTP Automated Delivery to retrieve your extractions from the FTP server (FTP Push), you must also specify settings in the FTP Automated Delivery tab. Note that this capability is available for Custom Solutions clients only. See FTP Automated Delivery for information.
Instrument Lists
This section lets you specify how DataScope Select treats instruments during the import and extraction execution process. The following options are available:
Allow Import of Inactive Instruments into Instrument Lists
Select this option to allow inactive instruments to be imported into your instrument lists. Inactive instruments exist in Thomson Reuters databases, but are no longer trading. They include instruments that have a status of Cancelled, Called, Exchanged/Converted, Funged, Liquidated, Expired/Matured, Not Active, Put, Repaid Before Maturity, or Redenominated. Equities, derivatives, and money instruments are simply no longer traded.
Clear this option to allow only active instruments to be imported into your instrument lists.
Allow Import of Open Access Instruments from Real-Time Feed
Select this option to allow import and intraday extractions of Open Access Instruments, including Open Access Constituents of Chains, on the real-time network. Open Access Instruments cannot be validated on DataScope Select and include, but are not limited to, illiquid bonds (not priced in the last 30 days), contributed foreign exchange/money markets, certain hybrid instruments, cash commodities etc.

Getting Started
DataScope Select User Guide 11.2 Page 36 of 198
Note that certain RICs are restricted from Open Access functionality, including those that require third-party content permissioning, as well as unsupported content (e.g., news headlines or stories, navigation RICs, ICW information, pages, etc.).
Clear this option to allow only import and intraday extractions of instruments that can be validated via DataScope Select. Open Access instruments will be ignored during the import process.
Allow Import of Historical Instruments
Select this option to allow import of historical instruments into instrument lists for use in Tick History extractions. Historical instruments cannot be validated by default. Make sure to select this preference if you are a Tick History client.
Clear this option to allow only instruments that can be validated in Thomson Reuters database to be imported into your instrument lists. Historical instruments will be ignored.
Include OTC Derivatives or Unspecified Instruments with Minimal Terms and Conditions into the Input List
Select this option to allow import OTC derivatives with limited terms and conditions data into your instrument lists. These instruments are primarily to support MiFID (Markets in Financial Instruments Directive) with ESMA-mandated reference attributes available.
Clear this option to ignore OTC derivatives with limited terms during the import process.
Allow Import of Unsupported Instruments into Instrument Lists
Select this option to allow unsupported instruments to be imported into your instrument lists. Unsupported instruments do not exist in Thomson Reuters databases and no data is available for them. A blank row will be returned for each unsupported instrument in your extractions. To identify unsupported instruments in your extractions, make sure to include the Instrument ID and Instrument ID Type output fields in your report templates. Selecting this option ensures that the same number of rows will be returned in your extraction as the number of instruments in your instrument list.
Clear this option to allow only instruments that can be validated in Thomson Reuters database to be imported into your instrument lists. All unsupported instruments will be ignored. As a result, your extractions may not return the same number of rows as the number of instruments in your import files.
Allow Import of Duplicate Items into Input Lists & Allow Import of Duplicate Items into Legal Entity Lists
Select this option to import all instruments and legal entities into your input lists, regardless of duplication. Doing so ensures your extraction output files reflect the same number of items as ordered in your import files. Each valid identifier type and identifier assigned to the instrument or legal entity is imported, as well as all duplicate instances of the same identifier type (e.g., identical RICs, CUSIPs or ORGID). For entities, “duplicate” means that identical ORGIDs appear twice in the input list.
Clear this option to prevent duplicate items from being imported into your input lists. Only the first identifier type and identifier are imported. All other identifier types and identifiers for the instrument or legal entity are ignored and identified in the Duplicate Identifier List following import. In this case, the number and order of the items in your extraction output file will not match your import file.
Note that this preference applies to import only and not to extractions.

Getting Started
DataScope Select User Guide 11.2 Page 37 of 198
Exclude FINR as Pricing Source for Bonds
Select this option to retrieve prices from a source other than FINR for the bonds in your import files. This option applies when you do not specify a pricing source when importing bonds into an instrument list. EJV is used as the default pricing source. If no EJV price is available, then the price is retrieved from an alternative source, but never FINR, even if FINR is the only source that has a price for the bond.
Clear this option to allow FINR as a price source for the bonds in your import file. Note that FINR enforces a 4-hour embargo for users who are not permissioned for real-time FINR data. If you clear this option and you are NOT permissioned for FINR data, your Intraday Pricing extraction will be delayed for 4 hours after executing.
Contact your local account manager or sales specialist for information about accessing real-time intraday data.
Use Exchange Codes Instead of Lipper as Mutual Fund Default Source
This preference applies to importing secondary identifiers without a price source. When selected, DataScope Select retrieves exchange-sourced pricing and reference data facts for the mutual funds in your import files.
Clear this option to retrieve Lipper-sourced values for the mutual funds in your import files. Note that access to Lipper data requires additional permissioning from Thomson Reuters. No data is returned in your extractions if you select this option and you are NOT permissioned for Lipper data.
Use a U.S. Quote Instead of a Canadian Quote When Importing Dual-listed Instruments
Select this option to default to a U.S. quote over a Canadian quote, and not a U.S. quote over other countries, during the import validation process when a secondary identifier is used without a price source.
When cleared, DataScope Select follows the normal validation process for determining the primary quote for the instrument. See Validating Instruments for information.
USA - Use consolidated quote source rather than primary quote source
Select this option to default to a USA consolidated quote over the primary exchange quote when importing secondary identifiers (SEDOL, CUSIP, ISIN) without a specified price source.
When cleared, DataScope Select follows the normal validation process for determining the primary quote for the instrument. See Validating Instruments for information.
Canada - Use consolidated quote source rather than primary quote source
Select this option to default to a Canadian consolidated quote over the primary exchange quote when importing secondary identifiers (SEDOL, CUSIP, ISIN) without a specified price source. Your import validation results shown on screen or in the FTP notes file indicate whether the user preference source was overridden by the user specified source. Both the user preference source and user specified source codes are identified in the message. This information appears under Warnings.
When cleared, DataScope Select follows the normal validation process for determining the primary quote for the instrument. See Validating Instruments for information.

Getting Started
DataScope Select User Guide 11.2 Page 38 of 198
Hybrid Instruments – Use EJV Fixed Income Price Source
Select this option to validate hybrid instruments as TRPS fixed income quotes instead of equity during the import process.
This preference is available for preferred shares, convertible bonds, and other hybrid instruments that have both equity and bond quote sources. It applies when these instruments are imported using secondary identifiers, including CUSIP, ISIN and SEDOL, without specified price sources. Hybrid instruments that are imported using RICs, or secondary identifiers with price sources, are excluded.
When cleared, DataScope Select follows the normal validation process for determining the primary quote for the instrument. See Validating Instruments for information.
Reports
This section lets you specify whether you want to receive optional reports, as well as to indicate how NULL codes are identified in your extractions. The following options are available:
Enable RIC Maintenance Reports
This optional report lets you view descriptive and reference data fact changes to the equity-related RIC identifiers in your instrument lists that have occurred over the past ten days, including deletions, renames, currency conversions, delists, relists, and file code updates, as well as stock split adjustment factors.
This report is available for equities, funds, derivatives, money/foreign exchange, and warrants. When you select this option, the report is generated with your extraction and delivered to the RIC Maintenance column in the Extracted Files screen.
Enable Early Partial Delivery of Embargoed Reports
This optional report lets you receive early, non-embargoed intraday data prior to receiving the complete extraction following all required exchange delays.
When this option is selected, the following options are enabled:
Enable Intermediate Embargoed Reports
Select this option to receive intermediate embargoed extractions as soon as the data is available from the exchange. For extractions with multiple embargoes, a partial extraction will be delivered each time an embargo expires. In this instance, the complete file will be delivered repeatedly until all the embargoes have expired, each time adding the data for the instruments that have been released from embargo.
When cleared, the non-embargoed extraction is delivered first, followed by the completed extraction with all embargoed data. No intermediate embargoed extractions will be delivered.
If you clear the intermediate embargo report preferences, the file name for all previously scheduled and all new extractions going forward will no longer include Xmins.
Enable Delta Capabilities for Embargoed Reports
Select this option to receive delta reports. If Enable Intermediate Embargoed Reports is also selected, only data that has changed since the previous intermediate embargoed report is output. If it is cleared, all embargoed data is output in a single report. Note that this report will be released once the exchange with the longest embargo has expired. Non-embargoed data released in the initial report will be excluded.
Clear this preference to retrieve a cumulative list of data each time an embargo expires.

Getting Started
DataScope Select User Guide 11.2 Page 39 of 198
Return Null Codes Values in Extraction Pricing Fields
Select this option to retrieve the appropriate null code value when the instrument’s price is not available due to exchange events (e.g., Public Holiday) or certain data conditions (e.g., Invalid Format). Null code values are available in EOD Pricing, Premium EOD Pricing and Timeseries Pricing extractions for Fixed Income, Equity, Derivatives, Money and Fund instruments. For Estimates extractions, generic null codes only are reported for Equity instruments.
When this option is cleared, a blank field appears when the instrument’s price is not available.
Exclude Null Codes For Universal Close Price
Select this option to return the previous trading day’s prices for universal close fields when extractions run on days with no trading activity. Null code values are available in EOD Pricing and Premium EOD Pricing extractions for Equity, Derivatives, Money and Fund instruments. This option is not available for Timeseries Pricing extractions.
Clear this option to return null code values or blank fields for universal close fields when extractions run on days with no trading activity.
To return null code values, make sure Return Null Code Values in Extraction Pricing Fields is also selected. To return blank fields, make sure to clear Return Null Code Values in Extraction Pricing Fields in addition to this option. Null code values are delivered with the EOD prices. When Premium EOD Prices are delivered prior to the EOD prices, your extraction will output the previous day's prices, even if you have Exclude Null Codes for Universal Price cleared. In instances when your input list contains instruments and/or file codes from different regions, it is possible for DataScope Select to retrieve a mix of null codes and the previous day's close prices.
Expand File Codes on Extraction to Include Delisted RICs
Select this option to include delisted RICs in file codes expanded on extraction. Including delisted RICs can result in the total number of instruments exceeding the extraction limit. Excess instruments will be excluded from the extraction and identified in the corresponding notes file.
Clear this option to exclude delisted RICs in file codes expanded on extraction. Only active instruments will be included. Delisted RICs will be ignored in file codes expanded on extraction.
Return Fixed Income Global Snapshot (FIGS) Prices in US 3 & PM Premium Pricing Extractions
Select this option to retrieve TRPS evaluated fair market values on all Asian and European government/corporate and CMO/ABS instruments in your US 3 & 4PM Premium Pricing extractions. Asia and European instruments with updated benchmark curves and credit spreads that occur after the Asia and European markets close will be updated in the AMERS time zone. Clients can look at the FIGS price versus the earlier Asia and EMEA Premium Pricing prices.
Clear this option to suppress fair market values for Asian and European government/corporate CMO/ABS instruments in your US 3 & 4 PM Premium Pricing extractions. Clients who are permissioned for FIGS prices can apply this preference to specific report templates.
Generate Platts Corrections File
Select this option to retrieve the daily Platts Corrections File for tracking and maintaining an accurate history of Platts assessments. The file is available to clients who subscribe to the Platts offering as an optional report that can be downloaded from the DataScope Select user interface or via FTP.
Clients who are permissioned for Platts data, but do not wish to receive the file can clear this option. For non-permissioned clients, this option is hidden.

Getting Started
DataScope Select User Guide 11.2 Page 40 of 198
Generate Platts Weekend File
Select this option to receive a weekly Platts Weekend File with end of day assessments for the universe of Platts RICs each Monday. The file is available to clients who subscribe to the Platts offering as an optional report that can be downloaded from the DataScope Select user interface or via FTP.
Clients who are permissioned for Platts data, but do not wish to receive the file can clear this option. For non-permissioned clients, this option is hidden.
AskTRPS
This section enables clients who subscribe to Thomson Reuters Pricing Service (TRPS) for price challenge submissions to receive email notifications when their price challenges have been resolved or comments have been added.
To enable alerting, select Send Challenge Notifications. If you want your notifications delivered to an email other than the email tied to your DataScope Select account, enter it in the Notify Email box. Leave the box empty to use your DataScope Select email account.
Clients who select to receive challenge notifications will be alerted when a single or batch challenge has been resolved or when a new comment has been added to a resolved challenge. When a single challenge has been resolved, the notification will identify the challenge reference number, the submission date, instrument identifier, resolution date and time, and evaluator assigned to the challenge. When the challenge is part of a batch challenge, the notification will be sent when the entire batch challenge is resolved. The notification will identify the batch challenge reference number, date of submission and resolution date. You will be required to login to DataScope Select to view the details related to the challenge resolution or comment.
FTP Automated Delivery
DataScope Select supports automated delivery of extractions via FTP/SFTP (FTP Push). This functionality is only available through the private network via Delivery Direct or BT Radianz (MPLS). From this tab, you can define and test the primary and optional secondary server destinations used for FTP Push. You can also download the public keys required to configure SFTP Push. For instructions, see the DataScope Select FTP User Guide.
For automated FTP/SFTP access, clients also require a ‘static NAT’ configuration, which has to be requested from your Technical Account Manager. If you are interested in Delivery Direct or BT Radianz (MPLS) connectivity, contact your Technical Account Manager for more information. If you are not using FTP Push, leave the FTP Automated Delivery tab blank.
NOTE: FTP automated delivery is not applicable to DataScope Select Standard Solutions. Your bulk feed files must be downloaded manually via FTP.

Getting Started
DataScope Select User Guide 11.2 Page 41 of 198
Third-Party Content Permissions
This tab identifies the third-party content available in DataScope Select by category: All, Exchange and Specialists (that is, third-party content, such as BBA LIBOR, CFETS, DJI, FSID, Platts, etc.).
For each category, you can view the available content and your corresponding permission:
Realtime: View the fee-liable exchanges or specialists for which you can access real-time content (this also includes fee-liable delayed exchanges you are subscribing to). You will receive this content in extractions as soon as it is available.
Delayed: View the fee-liable exchanges or specialists for which you will access delayed content. You will receive delayed content in extractions once the embargo period applied by the exchange or specialist has expired.
No Intraday: View the fee-liable exchanges or specialists for which you cannot access content during normal trading hours. Note that content snapped outside of market hours is free of fees.
None: View the fee-liable content for which you have no access to content, regardless of the time of day. Content is available upon subscription.
On/Off: View the non-fee-liable specialists content for which you are permissioned. (On) or not permissioned (Off) based on client subscriptions.
User Permissions
This tab identifies what you can do in DataScope Select based on your user type and access permissions. All of the reports for which you are permissioned as also identified. You cannot edit this tab. Contact your local account manager or sales specialist to update.
Broker Entitlements
This tab identifies the individual brokers from Thomson Reuters I/B/E/S Service who require entitlements for viewing their data in Estimates - Details and Detail Level Footnotes reports. You cannot edit these settings.
Pre-Approval Brokers require you to be pre-approved before you can extract their estimates. You must submit your request for each broker to Thomson Reuters, who will seek the approval on your behalf. Pre-approval is dependent on the decision of the broker.
Post-Approval Brokers do not require you to be pre-entitled, meaning you can retrieve their estimates once you have signed-up for their data as part of your DataScope Select subscription. Post-approval brokers reserve the right to review and to remove your entitlements at any point.
Permissioned users can view and retrieve estimates data for all brokers regardless of your entitlements. If your extraction includes a broker for whom you are not entitled, the requested data will be output; however, broker-specific fields, such as Analyst Name and Broker Name, will display Name Withheld.

Getting Started
DataScope Select User Guide 11.2 Page 42 of 198
Extraction Process Overview
This section provides an overview for creating and scheduling extractions via DataScope Select Custom Solutions. The key steps are identified below. See the remaining chapters of this guide for details.
To create and schedule an extraction:
1. Specify your user preferences.
Use Preferences to define your preferences for handling instrument lists and report templates, defining FTP automated delivery, and viewing your user permissions and third-party content permissions.
For instructions, see:
Setting Preferences
2. Create the input for extraction.
Your input list can contain any combination of supported instruments (equity, derivatives, money/foreign exchange, and fixed income securities), entities (legal entities, funds and issuer-level ratings), and user-defined instruments (credit default swap, interest rate swap, and over-the-counter equity option contracts).
You can also define criteria for global bank loans, commodity instruments, and Depository Trust & Clearing (DTC) Corporation-sourced Money Market Instruments for US Commercial Papers (CP) and US Institutional Certificates of Deposit (CD) that are used as input for the extraction. Each time your extraction executes, the criteria are run to provide the most current set of instruments available at that time, up to extraction limits.
For instructions, see:
Creating Input Lists for Extraction
Creating Criteria Lists
Creating User Instruments
3. Define the report template.
Your report template defines the pricing or reference data to retrieve and the format in which the data is output. A series of screens guide you through the process for defining report options, selecting fields, and adding optional header and footers. As an alternative, you can import a report template via an XML formatted file.
For instructions, see:
Selecting Report Templates
Formatting Report Templates
Selecting Fields
Importing Report Templates

Getting Started
DataScope Select User Guide 11.2 Page 43 of 198
4. Schedule the extraction execution.
You can create a new schedule or import a schedule via an XML formatted file. You define whether you want to execute the extraction once, on a recurring basis, or immediately. You also define if you want the extraction to execute at a scheduled time or as a result of pricing data.
For instructions, see
Creating Extraction Schedules
Importing Schedules
Tracking Extraction Executions
Viewing Schedule Details
5. Retrieve your Extraction Results.
Extraction results include the actual extraction, including embargoed intraday pricing extractions, notes related to the extraction execution, and optional reports.
For instructions, see:
Viewing Extractions
Identifying Your Extractions
Previewing & Downloading Extraction Files
About Embargoed Extractions
6. Review your Extraction Files.
Your extraction includes the output file for the specified report template and a corresponding notes file. You can also select to receive an optional RIC maintenance report and Platts Corrections file.
For information, see:
Understanding Extraction Output
About Extraction Notes
About RIC Maintenance Reports
About Platts Files

DataScope Select User Guide 11.2 Page 44 of 198
Chapter
3
Creating Input Lists for Extraction
The first step in the extraction process is to create the input list. This chapter provides detailed instructions for creating instrument, entity and criteria-based lists. Instructions for creating user-defined instruments (credit default swap, interest rate swap, and over-the-counter equity option contracts) are also provided.
For details, see:
Creating Input Lists
Adding Instruments/Entities
Viewing Instrument/Entity Details
Managing Input Lists
Managing Instruments & Entities
Creating Criteria Lists
Creating User Instruments
Adding User Instruments to Instrument Lists

Creating Input Lists for Extraction
DataScope Select User Guide 11.2 Page 45 of 198
Creating Input Lists
This section provides instructions for creating instrument and entity lists for extraction, collectively referred to as “Input Lists.” This task consists of creating a new input list, and then adding instruments or entities from an import file or via Search. Note that instruments and entities must be maintained in separate lists and cannot be combined.
To create an input list:
1. Click DataScope Select, and under Instrument Lists or Entities Lists, click Create:
The screen updates to show the Create New List wizard.
2. Enter an input list name in the corresponding box.
An error message appears when an invalid character is entered. Note that double-byte character sets are not supported.
3. Click Create.
The screen expands to show the list at the bottom of the screen. Use the Add and Import buttons to add instruments or entities to the new list, as described in the next section.

Creating Input Lists for Extraction
DataScope Select User Guide 11.2 Page 46 of 198
Adding Instruments/Entities
You can use the Search or Import capabilities to add instruments or entities to your input list.
Searching Instruments
1. Create your new instrument list according to the instructions in the previous section.
2. Click Add Instruments to access the Search screen.
3. Perform your search as follows:
To perform an identifier-based search:
Select the identifier type from the Identifier drop-down list, and then enter the identifier code in the corresponding box.
You can clear the asset type check boxes to narrow your search as appropriate.
To perform a criteria-based search:
Select the asset type to search for from the Search Type drop-down list. The screen updates to show the supported search fields.
Enter criteria in the input boxes as appropriate.
4. Click the check box next to the instrument that you want to add to the instrument list.
You can select multiple instruments.
5. Click Add at the top of the table.
Searching Entities
NOTE DataScope Select differentiates searches for fund-level and fund shares class data. Use the Entities search to search for fund-level data. To search for fund shares class data, use the Funds search.
1. Create your new entity list according to the instructions in the previous section.
2. Click Add Entities to access the search screen.
To perform an identifier-based or company name search:
Enter an identifier or company name in the corresponding box. Supported identifiers for entities are Org ID, RCP ID, LEI, CIK, Regulator ID, Tax File ID or Company/Registration Number.
You can also enter a Domicile, Country of Incorporation, Derived Parent and Derived Ultimate Parent. Supported identifiers for retrieving fund-level data are Fund Lipper ID (FLI), ISIN, CUSIP or RIC.
To perform an advanced search for entities or funds:
Select Legal Entity or Fund from the All drop-down list. The screen updates to show the supported search fields.
Enter criteria in the input boxes as appropriate.

Creating Input Lists for Extraction
DataScope Select User Guide 11.2 Page 47 of 198
3. Click Search.
Your search results are returned to the table at the bottom of the screen. When you do an All search, each entity returned is identified by its Identifier (OrgID for legal entities and Fund Lipper ID for funds) and Official Name. The entity is also identified as a Legal Entity or Fund.
4. Click on one or more entities to add to your entity list.
When you select an item, the Select All button updates to Select None, and the Add item to list and Add item to list with derived parents buttons become enabled with the number of items selected identified.
When you click either Add to button, a new window appears displaying your entity lists. If you do not have any lists, you are prompted to create one.
All of your existing entity lists appear under Available Lists. Click on one or more of them to add the selected entities.
5. Click Add Entries to Selected Lists.
A separate window appears, confirming the lists in which the selected legal entities were added.
Importing Instruments
You can import instruments from a CSV or XML file. The file can be created from scratch or generated automatically via the DataScope Select user interface using the Export function.
DataScope Select allows import of 85,000 instruments, but only 75,000 instruments will be validated. The instrument import limit is set 10,000 instruments above the instrument list limit to allow for instrument validation. Instruments are validated after being imported; therefore it is possible that some imported instruments will not be added to the input list due to preference settings, instrument duplication, and not found instruments. The first 75,000 validated instruments will be added to the input list. All other imported instruments will be ignored.
The table below provides key information on generating CSV files. For XML formats, see the DataScope Select FTP User Guide. This guide provides an overview of the XML Report Request file, including definitions of the supported XML tags and related elements.
Generating Instrument Lists for Import via CSV Files
File Format:
Each instrument in the file must appear on a separate line, and required and optional content must be delimited by commas.
Identifiers are case-sensitive and must be entered as upper-case letters. Lower-cased letters are not recognized during the import process.
If you are using Microsoft Excel to create your file, make sure you have the program set to display zeros in numeric fields. This will ensure that DataScope Select interprets your instruments correctly when importing the file.
Required Content:
Each instrument must be identified by its 3-character identifier type and corresponding identifier code.
The following identifier types are supported. Note that not all identifier types are available for all supported asset types.

Creating Input Lists for Extraction
DataScope Select User Guide 11.2 Page 48 of 198
Generating Instrument Lists for Import via CSV Files
CHR – Chain RIC
CIN – CUSIP International Number
COM – Common Code
CSP – CUSIP
IPC – File Code
ISM – ISMA
ISN – ISIN
LIN – Loan ID
LIP – Lipper ID
SED – SEDOL
LOC – Local Code
RIC – Reuters Instrument Code
SIC – SICC
SVM – Sicovam
SYM – Trading Symbol (available for importing Futures and Options; not supported for commodities.)
VAL – Valoren
WPK – Wertpapier
ZPG – ZPage
Optional Content:
User defined identifiers, exchange and price source codes are optional.
Exchange codes/pricing sources must be separated with a pipe character (|).
Use an asterisk (*) to obtain all available pricing sources for non-quote level identifiers (e.g., CUSIP, ISIN, etc.).
The optional pricing source code is not applicable to Chain RICs, as these instruments are sourced from Thomson Reuters real-time network. You can include them in your import file, but they will be ignored. The price source is only provided as an output for the Chain RIC constituents.
Examples:
The possible scenarios for identifying instruments are identified below.
The spaces are optional, as well as the commas at the end. For non-exchange traded instruments, PRICING SOURCE replaces EXCHANGE CODE in the following examples:
IDENTIFIER TYPE,IDENTIFIER,USER DEFINED IDENTIFIER,EXCHANGE CODE1
IDENTIFIER TYPE,IDENTIFIER,USER DEFINED IDENTIFIER,EXCHANGE CODE1|EXCHANGE CODE2
IDENTIFIER TYPE,IDENTIFIER, USER DEFINED IDENTIFIER,*
IDENTIFIER TYPE,IDENTIFIER,,
IDENTIFIER TYPE,IDENTIFIER
IDENTIFIER TYPE,IDENTIFIER,, EXCHANGE CODE1
IDENTIFIER TYPE,IDENTIFIER,,EXCHANGE CODE1|EXCHANGE CODE2

Creating Input Lists for Extraction
DataScope Select User Guide 11.2 Page 49 of 198
Generating Instrument Lists for Import via CSV Files
IDENTIFIER TYPE,IDENTIFIER,, *
IDENTIFIER TYPE, IDENTIFIER, USER DEFINED IDENTIFIER, EXCHANGES, USER DEFINED IDENTIFIER2, USER DEFINED IDENTIFIER3
IDENTIFIER TYPE, IDENTIFIER, USER DEFINED IDENTIFIER, EXCHANGES, USER DEFINED IDENTIFIER2
IDENTIFIER TYPE, IDENTIFIER,, EXCHANGES,, USER DEFINED IDENTIFIER3
IDENTIFIER TYPE, IDENTIFIER, USER DEFINED IDENTIFIER, EXCHANGES,, USER DEFINED IDENTIFIER3
IDENTIFIER TYPE, IDENTIFIER, USER DEFINED IDENTIFIER, EXCHANGES,, USER DEFINED IDENTIFIER2
IDENTIFIER TYPE, IDENTIFIER, USER DEFINED IDENTIFIER, EXCHANGES,, USER DEFINED IDENTIFIER2, USER DEFINED IDENTIFIER3, USER DEFINED IDENTIFIER4, USER DEFINED IDENTIFIER5, USER DEFINED IDENTIFIER6
NOTE: The order of user defined identifier fields is not sequential. User Defined Identifier precedes the Exchanges. User Defined Identifier2, User Defined Identifier3, User Defined Identifier4, User Defined Identifier5 and User Defined Identifier6 appear at the end of the row.
Importing Entities
You can import a list of entity identifiers or entity names into a new or existing entity list from a CSV- or XML-formatted file. The file can be created from scratch or generated automatically via the DataScope Select user interface using the Export function.
Up to 50,000 entities can be imported into a Legal Entity list.

Creating Input Lists for Extraction
DataScope Select User Guide 11.2 Page 50 of 198
The table below provides key information on generating CSV files for importing entities and funds into entity lists. See the DataScope Select FTP User Guide for details on creating XML formatted files for identifying entity lists.
Generating Entity Lists for Import via CSV Files
File Format:
The first row of your file must contain the heading Company ID, followed by the entities identifiers for import.
Required Content:
Each entity record must appear on a separate line and consist of a supported 3-character identifier type and identifier, separated by commas.
BIC – Business Identifier Code
CSP – CUSIP
FLI – Fund Lipper ID
ISN – ISIN
LEI – Legal Entity Identifier
LIN – Loan Identifier Number
ORG – OrgID
RCP – Reuters Counterparty ID
RIC – Reuters Instrument Code
SED – SEDOL
OrgID is the recommended identifier for importing legal entities. Fund Lipper ID is the recommended identifier for funds.
Optional Content:
The user-defined identifier is optional, and follows the identifier.
Examples:
Company ID
RCP,300017142
ISN,US097023AD79
RIC,063840AE2=RRPS
ORG,101459626
FLI,30002184

Creating Input Lists for Extraction
DataScope Select User Guide 11.2 Page 51 of 198
To import instruments/entities into an input list:
1. Create a new input list as described earlier in this section.
2. Click Import Instruments or Import Entities.
The Import screen appears. This example shows the Import screen for a new instrument list:
3. Click Browse to navigate to the import file.
4. Select the file to import.
5. If you want to rename the list, enter a new name in the box provided.
For example, if you are importing an input list with the same name as an existing list, you can specify a new name and not overwrite the existing list.
6. If you want to replace an existing list with the same name as the import file, click If instrument list name exists, replace list.
7. Click Submit.
DataScope Select automatically detects the file type. An error message appears when the file type is not supported.
A dialog appears to indicate that the import is underway. It remains on the screen until the import has completed.

Creating Input Lists for Extraction
DataScope Select User Guide 11.2 Page 52 of 198
The following table identifies the standard process for validating instruments during the import:
Validating Instruments
NOTE: Your preferences determine how instruments are treated during the import and extraction process..
Secondary Identifiers:
If you import an issue-level identifier (ISIN, CUSIP, SEDOL, etc.), DataScope Select uses the following methodology to retrieve the quote asset for it:
If an exchange/source is specified and a single quote is available for that exchange/source, then retrieve that quote.
If the identifier is for a hybrid, retrieve the equity quote over the corporate bond quote.
If the identifier is for a fund, retrieve the mutual fund quote over the equity quote.
For equity instruments:
If the identifier is for an equity instrument and no exchange is specified, then retrieve the quote from the primary exchange.
If the primary exchange is not available, retrieve the OPOL quote or retrieve the quote with the highest volume.
If no quote exists for OPOL, then retrieve the SEDOL quote.
If there are multiple OPOL or SEDOL quotes, then retrieve the quote with the higher volume.
If the identifier is for multiple Exchange Traded Fund (ETF) equities on a non-primary exchange, retrieve the first available quote in the order of: iv, nv, tc, so, ec or dv.
Otherwise, retrieve an arbitrary quote.
For fixed income instruments:
If the identifier is for a fixed income instrument, default to the EJV price source.
If the EJV price source is not available, then try to match the preferred RIC price source.
If the preferred RIC price source is not available, retrieve any contributor instead.
If there are multiple quotes per exchange, retrieve the OPOL quote.
If no quote exists for OPOL, then retrieve the SEDOL quote.
If there are multiple OPOL or SEDOL quotes, then retrieve the quote with the higher volume.
Otherwise, retrieve an arbitrary quote.
Check-Digit Conversions:
Automatic conversions are done for CUSIPs, ISINs, and SEDOLs when the last digit of the identifier is missing or incorrect. In this case, DataScope Select will identify the correct identifier and replace it in the instrument list.
No updates will be made when importing a valid identifier. In this case, the identifier you specify in your input list will always be imported, regardless of whether other identifiers exist for the instrument.

Creating Input Lists for Extraction
DataScope Select User Guide 11.2 Page 53 of 198
Once the validation process completes, the total number of successfully imported items, the import processing time and import request id (used for internal troubleshooting) are identified. The total number of not found or restricted items is also identified at the bottom of the screen. You can click + to expand the list and view the import errors for the individual items.
Possible messages include:
Not Found – The indicated instrument is not supported on the DataScope Select database (standard segments) or real-time network (Open Access instruments).
Duplicate – Duplicate instrument exists in the instrument list.
RIC not supported - content not applicable to DSS – Indicated RIC identifies news headlines or stories, navigation, ICW information, pages, etc. Applicable to Open Access RICs.
RIC not supported - part of restricted content – The indicated RIC identifies third-party content that is restricted in DataScope Select. Applicable to Open Access RICs.
RIC not supported at this time - under review – The indicated RIC is newly added on the real-time network and cannot be validated at this time. Applicable to Open Access RICs.
CHR not supported - part of restricted content – Import of Chain not permitted due to restricted content.
CHR not supported at this time - under review – Chain RIC is newly added on the real-time network and cannot be validated at this time.
CHR not supported - content not applicable to DSS – Indicated Chain RIC identifies content not applicable to DataScope Select.
CHR not supported - chain of chains – Chains of chains are not supported for import.
CHR not supported - chain contains invalid links – Data error with the chain. Error should be reported to the contributor of the chain in order to be fixed.
CHR not supported - not the beginning of the chain – Chain is not the base (beginning) of the Chain.
NOTE: If your imported instrument list contains Open Access RICs, a breakdown of those instruments by asset type will also appear. Open Access Instruments that cannot be mapped to a specific security type are identified as Non-DSS Security Type.
Unlike Open Access RICs, the chain’s open access constituents are not automatically verified during the import process, even when Allow Import of Open Access Instruments from Real-Time Feed is selected.
This is because chains, like file codes, do not expand until the extraction executes. Only the chain is verified during import. Upon a successful import, the chain is categorized under the Standard Segments count and not under Real-Time Open Access Segment count as open access instruments are.

Creating Input Lists for Extraction
DataScope Select User Guide 11.2 Page 54 of 198
Viewing Instrument/Entity Details
The instruments or entities added to the selected input list appear at the bottom of the screen. Each item is identified by the list order, identifier and identifier type, description and optional user defined identifier. Instruments can have up to three user defined identifiers, while entities can have only one.
Viewing Instruments
You can view the details for any instrument by clicking on the corresponding identifier. Details appear across multiple screens and include summary information, valuations pricing, and cross-reference identifiers. Other screens, such as corporate actions, ratings and prepayment terms appear for the applicable asset types.
See Searching & Viewing Details for more information.
Viewing Entities
To view the details of a selected verified entity, you must rent the record. You do not need to rent an unverified record to view its details.
When you first view a verified entity record, only the Summary screen appears. It shows the entity’s legal and official name, Org ID, entity type, TRBC sectors, headquarters address and hierarchy overview. From this screen, you can confirm that the selected entity is the one you want to rent and/or add to any of your entity lists.
To enable the other screens for the verified entity, you must click Rent Legal Entity. A confirmation dialog alerts you that you will begin to be charged for the verified legal entity’s data, and asks if you want to continue. Rental charges do not apply to unverified entities.
All Details screens appear by default when you load an unverified legal entity:
a. NOTE: The “Verified” flag applies to legal entities only. It is not applicable to funds.

Creating Input Lists for Extraction
DataScope Select User Guide 11.2 Page 55 of 198
Managing Input Lists
You can manage your existing input lists by clicking DataScope Select, and then selecting Instrument Lists or Entity Lists. All of your existing instrument or entity list appear in a scrolling list. For each list, the number of instruments or entities in the list are identified, along with the list creation and last modified dates.
You can manage your input lists as follows:
To initiate a new input list, click New Instrument List or New Entity List. Click ▼in the button to create the list from an import file.
Use the Find box to search for an input list. When you enter a text string, only the lists matching that text appear.
To enable the Delete x Items and Export x Items buttons, click on one or more check boxes. The buttons update to show the number of lists selected.
To delete one or more selected lists, click Delete x Items. Note that deleted input lists cannot be restored. Therefore, try to export the instruments or entities before you delete the list. If you delete a list that is part of a pending extraction, you must remove or update the extraction schedule. Otherwise, the scheduler will continue to attempt to execute the extraction and the extraction will fail.
To export one or more selected lists, click Export x Items. You can export a maximum of up to 100 input lists simultaneously to a CSV or XML formatted file. Multiple files are saved to a zipped file with a default name of InstrumentLists.zip or EntityLists.zip.
To export the grid and all of the contents in it, click . This action launches a separate window from where you can open or save the grid to a comma separated value (csv) file. The file takes the name of the selected screen and the entire contents of the grid are exported. For example, exporting this screen will result in a file named InstrumentList.csv that includes your instrument list details under the following columns: Name, Count, CreatedDateTime and ModifiedDateTime.

Creating Input Lists for Extraction
DataScope Select User Guide 11.2 Page 56 of 198
Managing Instruments & Entities
To view the instruments or entities in an input list, click on the list. The window expands to show the items in that list.
You can manage the instruments or entities in your input lists as follows:
Use the Find box to search for a particular instrument or entity. When you enter a text string, only the items matching that text appear.
To enable the Delete button, click on one or more items in the list. Click the button to delete the items. You will be prompted to confirm the deletion.
To assign an identifier to use for internal auditing and tracking purposes, click on an item, and then select User Defined Identifiers (this button is disabled when multiple items are selected). In the Edit User Defined Identifier screen, enter up to three identifiers for a selected instrument. Entities can have only one identifier assigned. When you click Save, the screen updates to show the identifier(s) that you entered.
To add items to the list, click the Add or Import buttons. See Adding Instruments/Entities for instructions.
To view the extractions schedules that include the selected input list, click Schedules. The screen updates to show the schedule name, extraction recurrence, report tied to the extraction and report template type. You can click on the schedule or report template name to edit it.
To create a new schedule with the selected input list, click New Schedule. The screen refreshes to show the Create New Schedule screen. To create an immediate schedule, click the ▼ in the New Schedule button, and then click New Immediate Schedule. When the Schedule wizard appears, the Instrument List or Entity List box is automatically populated with the input list name.
For instructions on creating extraction schedules, see Creating Extraction Schedules.

Creating Input Lists for Extraction
DataScope Select User Guide 11.2 Page 57 of 198
Creating Criteria Lists
Criteria-based extraction support allows you to define the criteria that are used as input for the extraction. Each time your extraction executes, the criteria are run to provide the most current set of instruments available at that time, up to the maximum number of rows allowed for that extraction type.
Criteria based extraction support is available currently for global bank loans, commodity instruments, and Depository Trust & Clearing (DTC) Corporation-sourced Money Market Instruments for US Commercial Paper (CP) and US Institutional Certificate of Deposit (CD) in EOD Pricing and Terms and Conditions reports.
NOTE: Reference data available in the existing Depository Trust & Clearing Corporation (DTCC) Money Market and DTCC CMORT is orderable and fee-liable. Entitled clients, can use the DTC Screener to create input for extractions. Non-entitled clients can create criteria and instrument lists with DTCC instruments, but no data will be output for them in extractions.
Defining Criteria
1. Click DataScope Select and under Criteria Lists, select Commodities, DTC or Loans.
The Screener for the selected instrument type appears. The total number of available instruments without filtering applied is shown at the bottom of the screen under Applied Filters. This number will update as filters are applied. A message at the top of the screen prompts you to enter criteria, as with this example showing the Commodities Screener:

Creating Input Lists for Extraction
DataScope Select User Guide 11.2 Page 58 of 198
2. In the Universe section, select options for filtering the universe of instruments as follows:
For Commodities, use the Active Status and Basis Gap drop-downs to filter the universe of instruments. For Active Status, you can select Active, Inactive or All to include both active and inactive instruments. For Basis Gap Adjusted you can select True, False or All to indicate whether the returned instruments are subject to a basis gap adjustment.
For DTC instruments and Loans, use the Active Status drop-down to filter on Active only, Inactive only or both Active and Inactive instruments.
3. Select one or more filters for defining your criteria.
When you select a filter, a separate window appears, listing the available items for that filter.
The numbers listed in parentheses beside the item name is the dynamically-updated number of instruments that will result from choosing that item. Items that will not return a result do not appear in the list.
Commodity Filters
Filter Type Description
Asset Categories TEXT Select one or more commodities type.
BTU Per Barrel NUMERIC Enter a specific number of range to indicate the British Thermal Units (BTU) per barrel.
Barrels Per Ton NUMERIC Enter a specific number of range to indicate the barrels per ton.
Currencies TEXT Select one or more market level ISO currency codes for the trading instrument.
Exchanges TEXT Select one or more exchanges identifying where the instrument trades.
Expiration Date DATE Enter a date or date range identifying when the instrument expires or matures.
File Code TEXT Select one or more file codes representing the grouping of commodity instruments.
Frequency of Update
TEXT Select one or more occurrences indicating how often pricing for the instrument updates.
Lot Units TEXT Select the physical units in which a contract trades.
PDP Code TEXT Select one or more PDP codes for identifying the list of instruments relevant to a specialist's packages.
Primary Chain TEXT Select one or more primary Chain RICs.
RCS Underlying Product
TEXT Select one or more underlying product classifications as provided by Thomson Reuters.

Creating Input Lists for Extraction
DataScope Select User Guide 11.2 Page 59 of 198
Filter Type Description
Source Name TEXT Select one or more descriptions of the source of the data.
Source Type TEXT Select one or more labels for the type of institution related to the Source Name.
Staleness Indicator
TEXT Select one or more indicators for the RIC: Good, Suspect or NA.
This indicator holds a pre-defined value determined from the difference between the confirmed time series update frequency for a Commodity RIC and its most recent update. If the last update on the RIC in history is more distant than the defined frequency for the RIC, then that RIC will be marked as “Suspect”.
TR Classification TEXT Select one or more instrument's asset classification schemes as provided by Thomson Reuters.
Underlying Asset TEXT Select one or more commodity categories for the RIC of the asset into which the instrument converts.
DTC Filters
Filter Type Description
Instrument Type TEXT Select one or more DTCC instrument types:
Certificate of Deposit – Institutional
Commercial Paper
Asset Backed Commercial Paper
Certificate of Deposit
Issue Date DATE Use the calendar to enter the instruments’ issue date or date range.
Maturity Date DATE Use the calendar to enter the instruments’ maturity date or date range.
TR Classification TEXT Select the instruments’ classification as defined by Thomson Reuters:
Certificate of Deposit
Commercial Paper

Creating Input Lists for Extraction
DataScope Select User Guide 11.2 Page 60 of 198
Loan Filters
Filter Type Description
Base Rate TEXT Select the type of interest rate by which the company's facility is tied.
Bid Price NUMERIC Specify the last bid price for the trading day.
Currency Code TEXT Select one or more Currencies for the bank loan.
Domicile TEXT Select one or more current countries belonging to the company's principal executive offices.
Facility Type TEXT Select one or more classifications of the facility type.
Industry TEXT Select one or more industries for the loan.
Margin NUMERIC Specify the value added to the indicated base rate on the facility.
Maturity DATE Specify the maturity date for the bank loan.
4. Use the text, date and numeric filters as follows:
Text
Click on one or more items under Available Items to move them to the Selected Items list. You can quickly filter the list by entering text in the Filter List box. When you enter text, only the items matching that text appear. Use the IN (default) / NOT IN selections to specify include/exclude conditions around the selected items.

Creating Input Lists for Extraction
DataScope Select User Guide 11.2 Page 61 of 198
Date
Use the calendar to select the desired date or date range, and then specify a condition for that value from the drop-down list: < Less Than, <= Less than or equal, = Equals, != Not Equals, > Greater Than, >= Greater than or equal, or BETWEEN.
Numeric
The default value is displayed in an editable text box. Enter a new value directly in this box. You can also use the range button to increase or decrease the numeric value, and then specify a condition for that value from the dropdown list: < Less Than, <= Less than or equal, = Equals, != Not Equals, > Greater Than, >= Greater than or equal, or BETWEEN.
NOTE: The default value for a filter can be different from an extracted value of the same field (for example, Bid Price). The difference can occur as a result of the window between when the filter results are cached and when the extraction is executed. In most instances, the differences will be minor.
For example, some numeric values can have different decimal precision; while some text values can have slightly different wording, though the same meaning. Price fields are based on the last end of day value at the time the criteria list is saved, whereas prices output in extractions reflect the current end of day prices.

Creating Input Lists for Extraction
DataScope Select User Guide 11.2 Page 62 of 198
Applied Filters
This section lists the filters you have applied and the resulting number of matching instruments for that filter, displayed in parenthesis. This number updates with each filter applied in the order in which the filters are applied.
For example, if Currency Code is the first filter applied, the number in parenthesis will show the number of instruments matching the selected currencies. If the Domicile filter is applied next, the number of matching instruments will be the results of the number of matching domiciles from the list of matching currencies, and so on.
The item or number of items selected is identified below the filter name. For example, if you selected multiple currencies, the number selected will appear. If you selected one item, for example one industry, the selected value is shown instead. The resulting number of instruments appears below the applied filters. This number updates with each filter applied.
You can change the order of the filters by clicking on the vertical gray bar on the left-hand side of the filter and dragging the filter to the desired location in the list. The number of matching instruments will update to reflect the filter ordering.
To update a filter, click on the filter name. To remove the filter, click on the . Your results will update to reflect the removed filter.
Viewing Results
Each time you apply a filter, the screen updates to show the matching instruments in a table with identifying information about each instrument.
Your results are truncated at 500 and 100 instruments are shown on screen at one time. Use the > and < arrows to navigate the list.
Instruments are identified by the preferred identifier type, which defaults to the selection made in your user preferences. Use the Preferred Identifier drop-down to display another identifier type. Supported identifier types for commodities are RIC and Trading Symbol. For loans, CUSIP, LIN and RIC are supported.
Click on the identifier in the table to view additional information about the instrument via the Details screens.
Note that the resulting instruments are not a static list that remains fixed once the criteria is defined. It is possible for the list of instruments to change from day to day.

Creating Input Lists for Extraction
DataScope Select User Guide 11.2 Page 63 of 198
Saving Criteria & Results
To save the selected criteria as a new criteria list:
1. Click Save Screen.
2. Enter a screen name, and then click Save.
The screen is added to the Criteria Lists screen. See the next section for details on managing your criteria lists.
3. To update a previously saved screen, click Update Screen.
4. To save the screen filter as a new criteria list, click Save as New, and then enter a screen name, and click Save.
To add results to an instrument list:
1. Click Add Results to List to add all returned items to one or more of your instrument lists.
This button will be disabled when the number of results is more than 75,000 to align with instrument processing limits for EOD Pricing and Terms and Conditions extractions.
2. To add selected instruments, select one or more instruments in the results screen, and then click Add n items To List.
To export results to a comma delimited (.csv) file:
1. Click the export button at the top of the results table.
The first 75,000 instruments will be exported to the file, along with all of the content under the column headers. The 75,000-instrument limit aligns with instrument processing limits for EOD Pricing and Terms and Conditions extractions
The file is assigned the default name of CommoditiesScreenerResults or LoansScreenerResults,
2. Enter a name for the file, if desired, and then click Save.
3. Repeat as needed to save additional instruments beyond the 75,000 limit to separate files.

Creating Input Lists for Extraction
DataScope Select User Guide 11.2 Page 64 of 198
Clearing Filters
To clear all selected filters:
Use the clear button to simultaneously clear all filters.
To revert to saved:
Use the Revert to Saved button to undo any changes you have made since your last save.
Managing Criteria Lists
Your saved screener is added to the Criteria List screen, which you can access from the DataScope Select main menu.
You can manage your criteria lists as follows:
To create a new criteria list, click New Criteria List, and then select New Commodities Screen or New Loans Screen.
Use the Find box to search for a particular criteria list.
To enable the Delete button, click on one or more items in the list. Click the button to delete the items. You will be prompted to confirm the deletion.
To manage a selected criteria lists:
Click on the criteria list. The screen expands to show the schedule details.
To view the extractions schedules that include the selected criteria list, click Schedules. The screen shows the schedule name, extraction recurrence, report tied to the extraction and report template type. You can click on the schedule or report template to edit it.
To create a new schedule with the selected criteria list, click New Schedule. The screen shows the Create New Schedule screen from where you can create a new or new immediate extraction schedule with the selected criteria list.

Creating Input Lists for Extraction
DataScope Select User Guide 11.2 Page 65 of 198
To perform a task on the selected criteria list, use the Edit, Rename, Copy and Delete buttons.
When you click Edit, the screen refreshes to show the selected screener with the applied filters shown. Make any necessary edits, and the do any of the following:
Click Update Screen to save the existing filter with your changes applied.
Click the drop-down, and then select Save as New to save your applied filters as a new criteria list. You are then prompted to enter a new name for the criteria list.
Click Cancel to cancel your edits. Your criteria list will revert to its previously saved state.
To rename the criteria list, click Rename, and then enter a new name in the Rename List box.
No action is required if you renamed a criteria list that is tied to a pending extraction schedule. DataScope Select will detect the new name automatically and the new name will appear in the Schedules list.
To duplicate the selected criteria list, click Copy.
The name of the list prefixed with Copy_of appears in the Copy List box. Accept the default name or enter a new one.
To delete the selected criteria list, click Delete.
You will need to update any schedule that includes the deleted criteria list.

Creating Input Lists for Extraction
DataScope Select User Guide 11.2 Page 66 of 198
Creating User Instruments
This section provides instructions for creating user instruments (credit default swap, interest rate swap, and over-the-counter equity instruments). You can do this by defining a single-named user instrument in the User Instrument screen or by importing bulk user instruments into an input list via the Instrument Lists screen. Both actions are performed from the Extractions drop-down menu.
NOTE: Creating a user instrument via the DataScope Select user interface only saves the instrument to Thomson Reuters database. To retrieve evaluated prices, you must add the user instrument to an instrument list, and then schedule that list for an extraction execution.
Defining Single-Name User Instruments
Use the User Instrument screen to define the attributes for any single name CDS (Bond, Index, or Loan), IRS or OTC Equity Option contract. The user interface supports single security creation only.
To create a user instrument:
1. Click DataScope Select and select User Instrument.
2. Select the Bond CDS, Index CDS, Loan CDS, IRS or OTC Equity Option tab.
The screen updates to show the relevant input fields for the selected instrument type.

Creating Input Lists for Extraction
DataScope Select User Guide 11.2 Page 67 of 198
3. Specify the instrument’s attributes in the fields provided.
Required fields are indicated with an asterisk (*). Tool tips are also provided to guide you through the user instrument creation process.
Note the following:
The underlying instrument on which the CDS, IRS or OTC Equity Option contract is based must exist in Thomson Reuters Database and be identified a supported identifier type.
OTC Equity Option user instruments are valued in the currency of the exchange on which the underlying instrument trades. Currency conversions are not supported.
Access to Markit RED Identifiers requires third-party content permissions. Contact your local account manager or sales specialist if you need access to this content.
Exchange is an optional field for creating OTC Equity Option user instruments. If you specify an exchange, DataScope Select uses that exchange to retrieve the closing price for the underlying instrument. If an exchange is not specified, DataScope Select defaults to the primary exchange RIC linked to the specified ISIN/SEDOL/Ticker.
Make sure to enter numeric values in the format specified in your user Preferences; otherwise, the field will return an error message when you attempt to create the instrument.
4. For Bond and Loan CDS, use the Search button to quickly look up issuers:
You can enter all or part of the issuer name (e.g., ‘Dow Chemical’ or ‘Dow’), and then click Search Issuers. The Issuer Name drop-down list will be reduced so that only the issuers matching your input appear in the list. All other issuers are hidden. If more than one issuer is returned, you must select the issuer you want from the abbreviated list.
The box is blank if no issuers match your input. Click Reset Issuers to clear the search.
If you are permissioned for Markit RED Identifiers and select a valid Issuer Name, the corresponding identifier is automatically populated in the Markit RED ID field, if one exists in the DataScope database. The Markit RED ID field remains blank if you are not permissioned for Markit RED Identifiers.
5. Click Create.
Your input is validated and if no errors are identified, your user instrument is added to Thomson Reuters database. When validation fails, one or more error messages appear at the bottom of the screen. The field in which the error occurred is identified.
To resolve any errors, try the following:
Make sure that all required fields (*) are specified.
Make sure that numeric values are formatted as specified in your user Preferences.
Make sure that text fields use supported characters.
Important!
You cannot update a user instrument once it has been created. To make changes, you must delete the existing instrument, and then enter recreate it with the new attributes.

Creating Input Lists for Extraction
DataScope Select User Guide 11.2 Page 68 of 198
Adding User Instruments to Instrument Lists
Once created, the user instrument is added to Thomson Reuters database, and the screen updates to show your instrument in the Instrument Details screen. The Summary screen fields are populated with the terms and conditions that you specified for the instrument.
To add the new user instrument to an instrument list:
1. Click Add To Lists.
NOTE: Remember this process creates the user instrument only. To retrieve evaluated prices, you must add your user instrument to an instrument list, and then schedule that list for an extraction.
The screen updates to show all of your existing instruments lists
2. Use the check boxes to select the instrument lists.
3. Click Add New Instruments.
NOTE: You can also add any of your previously created user instruments to an instrument list. This is done via Search. See Searching User Instruments for instructions.
Importing Bulk User Instruments
You can import bulk CDS, IRS and OTC Equity Option user instruments into a new or existing input list using a CSV or XML formatted file. CSV capabilities enable you to import existing user instruments only.
With XML, you can create and add user instruments to an input list simultaneously. Note that your import list can contain any mix of user instruments, as well as other supported asset types. For instructions on creating the XML-formatted file, see the DataScope Select FTP User Guide.
To import bulk user instruments:
1. Create your CSV or XML formatted bulk instrument list.
2. Click DataScope Select, select Instrument Lists, and then create a new or select an existing input list.
3. Select XML or CSV for the file type.
4. Click Import Instruments.
5. Click Browse, locate the file, and then select Append to existing instruments or Replace existing instruments.
6. Click Import.
After the instruments are processed, the import results appear at the bottom of the screen. Your validated CDS, IRS, and OTC Equity Option user instruments are collectively identified as User Defined.
Any user instruments that could not be validated are also identified. These instruments are not imported into the list.

Creating Input Lists for Extraction
DataScope Select User Guide 11.2 Page 69 of 198
Searching User Instruments
Once you create a CDS, an IRS or OTC Equity Option user instrument, that instrument is added to Thomson Reuters database. During the life of the instrument, you can access it at any time and add it to any of your instrument lists and/or view and print the instrument’s details.
Your user instrument is permanently deleted from Thomson Reuters database 30 days after the instrument’s maturity. Alternatively, you can delete one or more of your user instruments any time before they are automatically deleted. Deleted user instruments cannot be restored, so make sure you want to delete them before doing so.
You can access your user instruments from Search via the CDS, IRS or OTC Equity Options search screens. Search returns only your user instruments. You cannot search for another user’s CDS, IRS, or OTC Equity Option user instruments.
To search for your user instruments:
1. Click on the DataScope Select menu, and then under Search, select either CDS, IRS or OTC Equity Options.
2. Perform the search as follows:
To search for a specific CDS, IRS or OTC Equity Option user instruments, enter the security identifier in the Identifier box, and then click Search. This is the identifier that you assigned the user instrument when you created it. If you did not assign a security identifier An identifier is assigned automatically if you did not assign one.
To construct a criteria-based query, enter search criteria in the fields provided, and then click Search.
Your matching user instruments appear in the results table at the bottom of the screen, listed in chronological order, with the most recently updated instrument appearing first. You can reverse the sort order by clicking on the column header.
3. Do one of the following:
To add one or more user instruments to any of your instrument lists:
a. Click the check boxes next to one or more instruments.
b. Click Add To Instrument Lists.
To view the details of a selected user instrument:
a. Click the check box next to the instrument to view.
b. Click Instrument Details at the top or bottom of the table.
To delete one or more of your user instruments:
a. Click the check box next to one or more instruments.
b. Click Delete at the top or bottom of the table, and then click Delete again when prompted.
NOTE: The Delete function deletes the user instrument from Thomson Reuters database. It does not delete the instrument from your existing instrument lists. You must also delete the instrument from the corresponding instrument list.

DataScope Select User Guide 11.2 Page 70 of 198
Chapter
4
Defining Report Templates
This chapter takes you through the process of defining a reports template. It consists of selecting a report type and then formatting the report (defining report parameters, selecting fields and specifying optional header and trailer information). You can accept the default field formatting or apply your own formatting to meet your needs. Support for importing a report template from an XML-formatted file is also provided.
For details, see:
Selecting Report Templates
Formatting Report Templates
Managing Report Templates
Managing an Existing Report Template
Importing Report Templates

Defining Report Templates
DataScope Select User Guide 11.2 Page 71 of 198
Selecting Report Templates
NOTE: You can create report templates for any report available in DataScope Select. However, no extraction will be generated for a report for which you are not permissioned.
To create a new report template:
1. Click DataScope Select, and then under Report Templates, click Create.
This action launches the Create New Report Template screen.
The available report templates appear in the scrolling list, located on the left side of the screen. Report templates are grouped by type, meaning all pricing reports are grouped under Pricing Data, Reference reports are grouped under Reference Data, and so on.
Use the Template Filter to filter the available report templates. You can filter report templates by permissions (show all report templates or only those for which you are or are not permissioned) or by asset type:

Defining Report Templates
DataScope Select User Guide 11.2 Page 72 of 198
2. Select a report type to view details of that report.
3. Click Create to create a new report template for the selected report type.
4. Format your report as described in the next section.
5. Click Save to save your report.
Formatting Report Templates
You format your report across the following tabs: Report Options, Fields, Header and Trailer. The Header and Trailer tabs are optional.
Defining Report Options
The Report Options tab consists of two sections. All input specific to the report type are defined in the middle of the screen, while input common to all report types, such as report name, output format, delivery method, etc. is defined in the box, located on the right:

Defining Report Templates
DataScope Select User Guide 11.2 Page 73 of 198
To a define report template:
1. Enter report-specific information, if applicable, in the fields provided.
For instructions, see the next section, Report Inputs. This section is blank for report templates that do not have specific inputs.
2. Enter a name for the report template in the Report Name box.
An error message appears if you enter an invalid character. Note that double-byte character sets are not supported.
3. Check Include Column Labels to include column labels in your extraction output file.
4. Select an output file format from the Output Format drop-down list.
The file can be formatted as a CSV, an XML, or a Delimiter file. For delimiter files, select a field separator from the drop-down list.
5. Select a file compression format from the Compression Format drop-down list.
6. Select a delivery method: FTP, SFTP or None.
Your files are automatically delivered to the Extracted Files screen. If you are a BT Radianz (MPLS) or Delivery Direct user, you can also specify FTP/SFTP automated delivery of your extraction files by defining one or more destination servers in the FTP Automated Delivery tab via Preferences, and then selecting FTP or SFTP for the Delivery Method.
7. Click on the Fields tab to select fields for your report template.
For instructions, see Selecting Fields.
8. Click on the Header and Trailer tabs to define these optional sections for your report template.
For instructions, see Specifying Header & Trailer Information.
9. Click Save to save the fields as part of the report with their default formats.

Defining Report Templates
DataScope Select User Guide 11.2 Page 74 of 198
Report Inputs
Bond Schedules
Select one or more schedule type check boxes. Note that access to MACE Convertible schedules content requires separate permissions and is offered as a fee-liable service.
Commodities Corrections History
Select a query for retrieving commodities corrections history:
Range:
Use this query to return all corrections within specified start and end dates. For example, to backfill prices.
NOTE: Although the Query Start and Query End calendars enable you to select dates as far back as 1996, only 12 months of rolling history are available for Commodities Corrections History reports. No data exists for dates earlier than 2016.

Defining Report Templates
DataScope Select User Guide 11.2 Page 75 of 198
Delta:
Use this query to return corrections for the current date through a previous number of days (Today-31). Use it when you want to query at a less than daily frequency (for example, each Friday for corrections within the past week). It can also be used with a recurring daily schedule and a lookback of 1 Days Ago to retrieve the previous day’s correction.
Last Update:
Use this query to return the most recent correction records from the past 12 months. Use it when you want to query daily for the latest corrections and can tolerate corrections from dates greater than yesterday. If earlier dates’ corrections are not desired, Delta is recommended. There are no inputs for this query type.
Composite, EOD Pricing, Intraday Pricing
1. Select Currency Scaling to extract certain prices in major currencies instead of the minor currencies in which some equity, funds, futures & options, and money/foreign exchange instruments are denominated.
This option works for converting minor currencies to major currencies only. It does not convert major currencies to minor currencies. For example, if an instrument is quoted in GBp, this option will convert the pricing to GBP. However, if the instrument is in GBP, no conversion will be performed.
See the DataScope Select Data Content Guide (“Scaled Currency Field” column) for supported fields. For currency scaling factors, see the “Factor” column of the Currency Codes table in the GCODES Viewer.
2. To output converted currencies in extractions, make sure to include the Currency Code Scaled fields in your extractions.
These fields output the converted minor currency code when Currency Scaling is selected in your report template. When the option is cleared, the default currency code will be output instead.

Defining Report Templates
DataScope Select User Guide 11.2 Page 76 of 198
Corporate Actions – Standard Events (Range Query)
1. Select the Query Start for extracting event data:
All Historical Events – Retrieve all events occurring today or in the past.
Previous Days – Retrieve all events that have occurred within a specified number of days in the past. This selection is similar to All Historical Events; however, you can narrow the historical date range to a specified number of days.
Previous days are calculated based on the time zone specified in your user Preferences. Selecting 1 day ago will return all events that have occurred since 00:00 one day ago in your time zone (in this case, 1 day is not the equivalent of 24 hours).
Calendar – Retrieve all events as of the indicated date. You can select the current date or a historical or future date.
To extract events occurring today (Current Events), select today’s date in the calendar in both the Query Start and Query End sections. Select the Query End for extracting event data.
All Future Events – Retrieve all events occurring today or on some future date. Selecting this option includes today and beyond.
Next Days – Retrieve all events that will occur within a specified number of days in the future. This selection is similar to All Future Events; however, you can narrow the future date range to a specific number of days. All events that will occur within the specified number of days, beginning at 00:00 on the first date in the date range will be returned in your extraction.
Calendar – Retrieve all events as of the indicated date. The date that you specify must be greater than or equal to the calendar date specified in the Query Start section.

Defining Report Templates
DataScope Select User Guide 11.2 Page 77 of 198
2. Optionally, specify preferences for extracting standard events:
Include instruments with no events – Select to include or suppress instruments with no event data for all standard events.
Include NULL dates for 'All Historical Events' query – You can specify whether to extract or suppress historical records with null value(s) for the event date(s) selected from the dropdowns in the Corporate Actions Events section of the report template (see below).
This preference is enabled by default for all event/data types; however, it is not relevant for Nominal Value, Shares and Voting Rights. This is because the available dates for these event types, Nominal Value Date, Shares Amount Date and Voting Rights Date, are never null.
Exclude deleted events – You can specify whether to include or exclude deleted records. This box is cleared by default. When selected, only currently valid records are included in the extraction.
3. Select one or more Corporate Actions Events, and then select the data to retrieve for that event from the corresponding drop-down lists.
Corporate Actions – Standard Events (Delta Query)
1. Select a range for extracting event data:
Hours/Mins Ago – Retrieve all events that have occurred within the specified number of hours and minutes of the extraction execution. Minutes are specified in 15-minute intervals.
Days Ago – Retrieve all events that have been announced within the specified number of days of the extraction execution. This option will return all events that have occurred beginning at 00:00 x number of days ago.
2. Optionally, specify preferences for extracting standard events as described in the Range Query section.
3. Select one or more Corporate Actions Events, and then select the data to retrieve for those events from the corresponding drop-down lists.
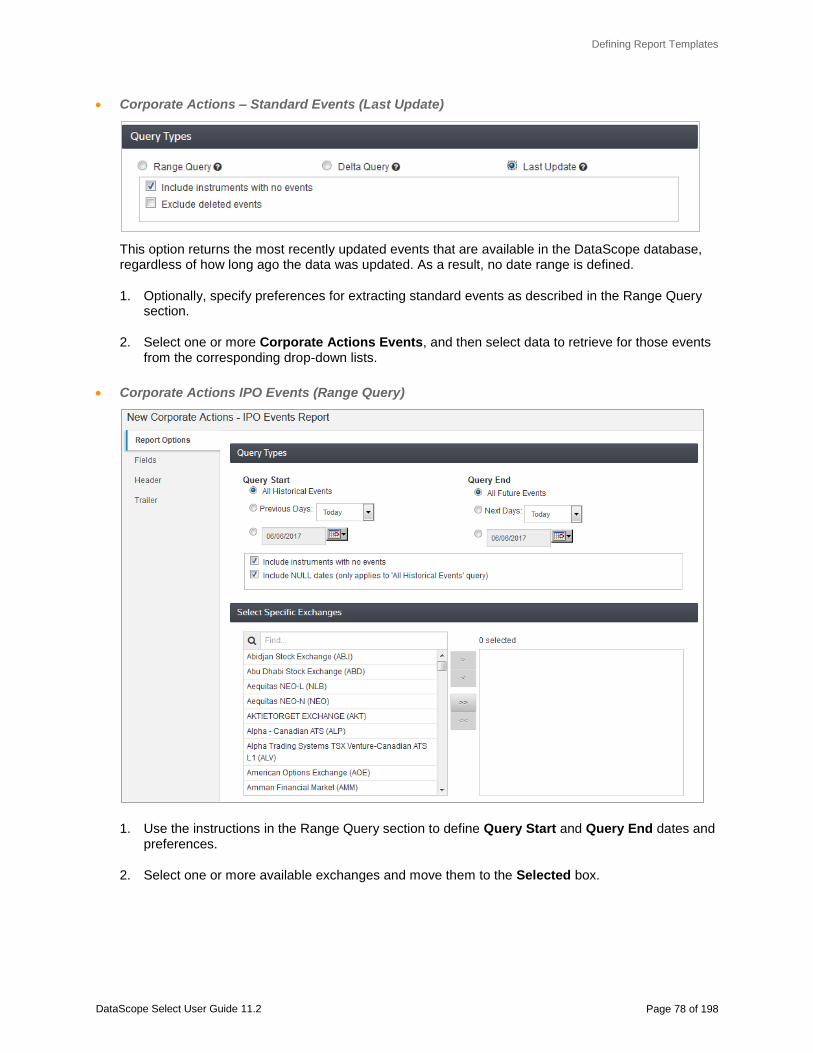
Defining Report Templates
DataScope Select User Guide 11.2 Page 78 of 198
Corporate Actions – Standard Events (Last Update)
This option returns the most recently updated events that are available in the DataScope database, regardless of how long ago the data was updated. As a result, no date range is defined.
1. Optionally, specify preferences for extracting standard events as described in the Range Query section.
2. Select one or more Corporate Actions Events, and then select data to retrieve for those events from the corresponding drop-down lists.
Corporate Actions IPO Events (Range Query)
1. Use the instructions in the Range Query section to define Query Start and Query End dates and preferences.
2. Select one or more available exchanges and move them to the Selected box.

Defining Report Templates
DataScope Select User Guide 11.2 Page 79 of 198
Corporate Actions – ISO 15022 Events
See the DataScope Select ISO 15022 Service User Guide for information on creating ISO 15022 Event extractions.
Entity - Audit
No report-specific parameters are required for this report type.
Entity - Detail & Hierarchy
1. Specify the last extraction execution by selecting a time from the Include entities that have changed drop-down.
2. Select at any time (default) to retrieve all content available or narrow your search by selecting today, since yesterday or within n days, where n indicates a number of days ranging from two to 31 days.

Defining Report Templates
DataScope Select User Guide 11.2 Page 80 of 198
Estimates – Summary, Actual, Detail and Detail-Level Footnotes
1. Select the query type.
Query types are calculated based on the time zone specified in your Preferences.
Range
Return all available estimates data for the defined fiscal period. When this option is selected instruments with no estimates are included in your extraction.
Delta
Return all available estimates data reported over the past X number of days. You select the number of days, including today, up to 31, from the Days Ago drop-down list.
Tip: For best performance, you should run a range query initially, and then run delta extractions thereafter. Delta queries will result in faster extraction delivery.

Defining Report Templates
DataScope Select User Guide 11.2 Page 81 of 198
2. Use the drop-down lists to select start and end periods for retrieving estimates data:
Periods are applicable for all Estimate Types except Price Target and Recommendation. The defined period can be for a fiscal year, quarter or semi-annual. Because not all companies have the same fiscal year end, DataScope Select uses the FY+1, Q+1, S+1, etc. conventions to identify Estimates and FY-1, Q-1, S-1, etc. to identify Actuals for each unique period.
Actuals are available for the following periods:
Fiscal Year (-1, -2, -3, -4, -5)
Quarter (-1, -2, -3, -4, -5, -6, -7, -8)
Semi Annual (-1, -2, -3, -4)
Summary and Detail Estimates and Detail Level Footnotes are available for the following periods:
Fiscal Year (+1, +2, +3, +4, +5)
Quarter (+1, +2, +3, +4, +5, +6, +7, +8)
Semi Annual (+1, +2, +3, +4)
For Summary and Details Estimates and Detail Level Footnotes, the current period for any given period is **+1, where **can be FY, Q or S. Period **+1 translates to the current period, **+2 translates to the next period, **+3 translates to two forward periods and so on.
For Actuals, a company’s last reported annual earnings is reported in time period **-1, where **can be FY, Q or S. Time period **-1 translates to the last reported period, **-2 translates to the previous period, **-3 translates to the previous two periods and so on.
Because fiscal periods are relative to the company, it is possible, for example, for FY-1 to be 2016 for one company and 2017 for another, depending on when the company reports its earnings. For example, consider a Non-U.S. company that does not report earnings for six months after the fiscal year end. If that company’s fiscal year ended December 2016, and its earnings have not been reported to date, FY-1 would translate to the fiscal year ending 2015.
3. Use the radio buttons to select the types of estimates to retrieve: Parent Only, Consolidated Only (default) or Parent & Consolidated.
Companies are considered “parent” or “consolidated” based on the majority of the earnings estimates received. Parent companies are those where only the earnings of the reporting entity, including dividends, interest, royalties, etc. received from its investee companies, are presented as net income.
Parent and Consolidated estimates are available for 23 estimate types (Parent estimates are not available for PTG – Price Target and REC – Recommendation).
Tip: You can differentiate parent and consolidated estimates by including the Measure field in your report template. Parent estimates are denoted with PAR appended to the estimate type name. For example, EPSPAR denotes Earning per Share (parent company), while EPS denotes Earnings per Share (consolidated company).
4. Select one or more Estimate Types in the Available box, and then use the Add >> button to move them to the Selected box.

Defining Report Templates
DataScope Select User Guide 11.2 Page 82 of 198
5. For Actuals only, select Exclude Restated Actuals to retrieve originally reported actuals over restated actuals if they exist for the company for the same financial measures and specified fiscal periods.
Estimates – Company-Level Footnotes
1. Select the query type.
2. Query types are calculated based on the time zone specified in your user Preferences.
Range Query – Return all available footnotes. When this option is selected instruments with no estimates are included in your extraction.
Delta Query – Return all available footnotes reported over the past X number of days. You select the number of days, including today, up to 31, from the Days Ago drop-down list.

Defining Report Templates
DataScope Select User Guide 11.2 Page 83 of 198
Factor History – MBS & Tranche
No report-specific parameters are required for these report types.
Fixed Income Analytics
No report-specific parameters are required for these report types.
Fund Allocation
Select one or more allocation schemes:
Note that permissioned clients can select Full Holdings to retrieve all holdings data available for the Lipper Funds in your instrument list, up to the maximum 600 Fund limit. This check box is hidden if you are not permissioned for this data.

Defining Report Templates
DataScope Select User Guide 11.2 Page 84 of 198
News Analytics
1. Select a query type.
You can retrieve news scores related to the instruments in your input lists or only the new or updated scores over a specified number of days and hours/minutes. Use the calendar to specify the query dates.
2. In the Filters section, define type of news analytics output in your extractions:
Relevance: Select an operator (>, >=, <, <= or =) from the drop-down list, and then enter a value between 0.0 - 1.0 to indicate the relevance of the news item to the instruments in your input list.
Relevance is calculated by comparing the relative number of occurrences of the instruments with the number of occurrences of other organizations and commodities within the text of the item. In addition, if the instrument is mentioned in the headline, the relevance is set to 1.0. For stories with multiple instruments, the instrument with the most mentions will have the highest relevance. An instrument with a lower amount of mentions will have a lower relevance score.
Prevailing Sentiment: Select Positive, Neutral or Negative to denote the manner in which the instrument is addressed in the news item.

Defining Report Templates
DataScope Select User Guide 11.2 Page 85 of 198
Novelty: Select one of five period linked counts that are used in the comparison to the news item’s time stamp: (12 & 24 hours or 3, 5, or 7 days), enter an operator, and then specify a value.
For example, if you select 12 hrs Linked Count, and then select = and enter 7, DataScope Select will extract 7 related stories in the past 12 hours. If you enter 0, only new stories are extracted. If you specify that the linked counts to be > a certain value, your extraction will return stories that have been repeated x number of times.
Topics: This field is used to indicate the story topic. Click to reveal an alphabetical listing of the available source codes and their corresponding descriptions. Click one or more sources to include them in your extraction.
Include Imbalance: Select this option to include imbalance messages that result from an automatically generated news item.
3. In the Return section, select the type of news to retrieve and the sources from where to retrieve that data.
Articles only, Alerts Only and Both: Select the news item type to retrieve in your extractions.
Reuters Only, All News (inc. third parties) and Selected Sources: Select the news sources for retrieving data:
When Selected Sources is chosen, click to reveal an alphabetical listing of the available attribution codes and their corresponding descriptions. Select at least one data source for the news item.
Selecting All News includes all attributions when your extraction executes, even those that
did not exist when you created your report template.
News Analytics Commodities
1. Select the commodities to use as input for extraction.
Clicking in the Commodity Selection group launches a separate window identifying the available commodities, listed alphabetically by the corresponding three or four digit commodity code. Use the check boxes to make your selections.
2. Follow the instruction in the News Analytics section to define Query, Filter and Return criteria.

Defining Report Templates
DataScope Select User Guide 11.2 Page 86 of 198
News Items
1. Select a query type.
2. In the Filters section, click to launch the Select Topic Codes screen. This screen presents an alphabetical listing of the 1,200+ story topics available for selection. Click one or more sources to include them in your extraction
3. In the Return section, use the radio buttons to narrow your search by language and to select the sources from where to retrieve that data.
English Only, All Languages or Selected Languages:
News stories are encoded in the UTF-8 character set, which allows DataScope Select to output the related text in a variety of languages supported by your operating system.
For example, if you select Korean, only stories for the companies in your input list that are reported in Korean will be output in your extraction. Note that your operating system must support the selected language in order to display the story correctly. Unsupported characters will appear in your extraction results if your operating does not support the selected language.
When Selected Languages is chosen, click to launch a screen that presents an alphabetical listing of the available languages.
Reuters Only, All News and Selected Sources:
When Selected Sources is chosen, click to reveal an alphabetical listing of the available attribution codes and their corresponding descriptions. Select at least one data source for the news item. Selecting All News includes all attributions when your extraction executes, even those that did not exist when you created your report template. Note that access to third-party news sources requires permissioning through Thomson Reuters. Contact your local account manager or sales specialist for information.

Defining Report Templates
DataScope Select User Guide 11.2 Page 87 of 198
Ownership
No report-specific parameters are required for this report type.
Premium EOD Pricing
Select the following preferences, as needed:
Currency Scaling
Select this option to extract certain prices in major currencies instead of minor currencies in which some equity and futures & options are denominated.
When selecting this option, make sure to also include the Currency Code field in your report. Currency scaling will not occur unless this field appears in your Premium EOD Pricing report, even when you have Currency Scaling selected.
Include the Intraday Pricing rule in the capture of the Premium EOD price.
Upon extraction, DataScope Select checks for the current day's end of day price. If no price is found, DataScope Select performs a premium end of day price snap using the rules defined for the field.
If no price is found when this preference is selected, the intraday pricing rules are also checked to see if a price is available. If neither real-time check finds a price, then the previous end of day price or a null is returned.
Selecting this preference also means that the premium end of day price may not match the end of day price. This discrepancy can occur because the additional intraday pricing rule can snap values that are not snapped by the end of day source. If this preference is cleared, the additional intraday pricing rule will be excluded from the real-time price capture described above, returning the previous end of day price or null (depending on settings), when no current end of day price or real-time price from the premium end of day snap is found.

Defining Report Templates
DataScope Select User Guide 11.2 Page 88 of 198
Capture Intraday Pricing for non-evaluated Fixed Income
Upon extraction, DataScope Select attempts to retrieve the current day's prices for non-evaluated government/corporate bonds.
If the current day's price is not available, DataScope Select performs an intraday snapshot to retrieve the current day's price. If an intraday price is not available, then the previous end of day price is output instead for Last Update schedules or no value for Today Only schedules.
When this preference is cleared, the bond's current or previous end of day price is output. No intraday snapshot is attempted.
Premium Pricing
1. Select the desired premium pricing region and cycle:
Permissions are applied to each premium pricing cycle and region.
Appearing next to any selection indicates that you are not permissioned for that pricing cycle. Please contact your local account manager or sales specialist for permissioning information.
2. Select the corresponding check box to retrieve FIGS Prices for this report template.
This check box only appears for permissioned users when a US Premium Pricing cycle is selected. It allows you to retrieve FIGS prices for the selected report template and defaults to the selection made in your preferences.
This check box is hidden when an Asia or EMEA cycle is selected.

Defining Report Templates
DataScope Select User Guide 11.2 Page 89 of 198
Ratings
1. Select the ratings-level information to retrieve: issuer or issue-level rating.
Issue is disabled if you do not have Terms and Conditions permissions.
2. Select the query type.
Range Query – Select to identify the issuers/issues ratings that have updated during the specified date range. Date refers to the effective date. Use the calendars to define the query start and end dates. Select this query to return all instruments in your input list, regardless of whether the issuer/issuer ratings have updated.
Delta Query – Select to retrieve only new and updated issuer/issue ratings data that have occurred over a specified number of days. Issuer/issue ratings that have not changed will not be returned in your extraction. Use the Days Ago drop-down to specify the number of days, which can be from today through the past 31 calendar days.
Last Update – Select to retrieve the most recent ratings data for the instruments in your input list.
Optionally, for Range and Last Update queries, select Include Instruments with no ratings to output all instruments in your input list, even instruments for which no ratings data is available. In these instances, blank ratings fields will be output instead.
3. Select one or more ratings sources.
Clicking launches a separate window that identifies the available ratings sources, listed alphabetically by the corresponding three-digit code. You can scroll the list or use the Search box to find a specific source. Use the check boxes to make your selections. You can also enter the 3-character code directly in the box, separating multiple sources with a space.

Defining Report Templates
DataScope Select User Guide 11.2 Page 90 of 198
Single Historical Price
1. Use the calendar to select the historical Price Date for retrieving non-null prices from Thomson Reuters database.
2. Use the Lookback drop-down list to select an additional period to look back in the database for non-null prices when null prices exist on the specified trade date.
The Lookback period is expressed in months (1 month, 3 months, 4 months [default], 6 months or 12 months). The Lookback is added to the Price date.
That means if you selected January 2, 2015 as your Price Date and 4 months as your Lookback, DataScope Select would look back as far as September 2, 2014 if null prices were reported for the instruments on January 2, 2015.
StarMine
No report-specific parameters are required for this report type.

Defining Report Templates
DataScope Select User Guide 11.2 Page 91 of 198
Symbol Cross Reference
1. Select the identifier types for which you want to access cross-referenced symbols. All supported identifier types are listed in the Identifier Types box.
This option lets you create an extraction that contains only data for non-fixed income symbols that have changed since the last extraction execution.
2. In the Delta Extraction section, select Limit report to cross-references symbols that have changed, if desired.
3. Specify the last extraction execution by either:
Selecting the Days Ago radio button, and then selecting the number of days from the drop-down list. You can go back as far as 31 days.
Use the calendar to select a specific date.
Technical Indicators
No report specific parameters required for this report type.
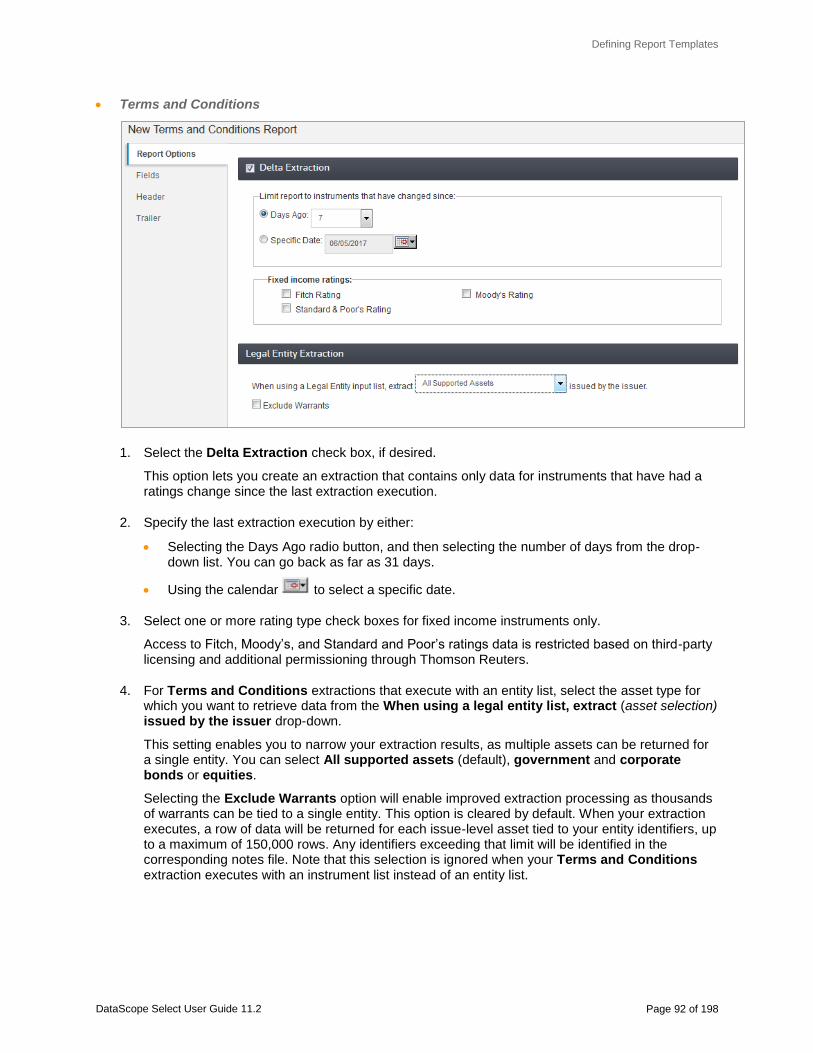
Defining Report Templates
DataScope Select User Guide 11.2 Page 92 of 198
Terms and Conditions
1. Select the Delta Extraction check box, if desired.
This option lets you create an extraction that contains only data for instruments that have had a ratings change since the last extraction execution.
2. Specify the last extraction execution by either:
Selecting the Days Ago radio button, and then selecting the number of days from the drop-down list. You can go back as far as 31 days.
Using the calendar to select a specific date.
3. Select one or more rating type check boxes for fixed income instruments only.
Access to Fitch, Moody’s, and Standard and Poor’s ratings data is restricted based on third-party licensing and additional permissioning through Thomson Reuters.
4. For Terms and Conditions extractions that execute with an entity list, select the asset type for which you want to retrieve data from the When using a legal entity list, extract (asset selection) issued by the issuer drop-down.
This setting enables you to narrow your extraction results, as multiple assets can be returned for a single entity. You can select All supported assets (default), government and corporate bonds or equities.
Selecting the Exclude Warrants option will enable improved extraction processing as thousands of warrants can be tied to a single entity. This option is cleared by default. When your extraction executes, a row of data will be returned for each issue-level asset tied to your entity identifiers, up to a maximum of 150,000 rows. Any identifiers exceeding that limit will be identified in the corresponding notes file. Note that this selection is ignored when your Terms and Conditions extraction executes with an instrument list instead of an entity list.

Defining Report Templates
DataScope Select User Guide 11.2 Page 93 of 198
Timeseries Pricing
Use the calendars to select start and end dates for accessing historical data.
Selecting Fields
Use the Fields tab to select fields to include in your report template. The drop-down identifies the total number of fields available for your report type by default. You can view fields by asset class or category, with the number of fields for each asset class indicated in parentheses. You can also look-up a field using the search box.

Defining Report Templates
DataScope Select User Guide 11.2 Page 94 of 198
To select fields for your report template:
1. Select one or more fields in the list.
To select a single field, click on it. The corresponding definition and supported asset types appear in the bottom left side of the screen, along with the field type. Field formatting details appear on the right side.
To select multiple fields in a range, click on the first field in the range, press and hold Shift, and then select the last field in the range.
To select multiple fields out of range, press and hold Ctrl while making your selections.
2. Use ► to move the fields to the selected list.
3. Use the up and down arrows to order the fields.
4. Use x to delete a selected field and return it to the list of available field.
When you add a single field to the selected fields list, the field type and width style appears at the bottom of the screen, along with an indicator that the field is not yet saved.
5. Click Save to save the fields with their default formats.
Understanding Field Types
Fields are color-coded in the Fields selection screen to indicate their status:
Field
Access to content via these fields is available to all DataScope Select users. No additional permissioning is required.
Entitled, Premium, Entitled & Premium Fields and Prohibited Fields
Access to content via these fields is restricted based on third-party licensing and additional permissioning. You can include these fields in your report template. However, no data will be returned if you do not have permissions and/or third-party licensing. Fields that you are not permissioned for are identified in your extraction notes file. Contact your local account manager or sales specialist for information about subscribing to restricted data content
Entitled Field examples include certain instrument identifiers (SEDOL, CUSIP, GIC, etc.) and Ratings information (Moody’s, Standard & Poor's, Fitch, etc.)
Premium Field examples include certain fixed income valuations fields (End of Month, Maturity, & Option-Adjusted values, etc.)
Entitled & Premium Field examples include EOM Moodys Rating/EOM Moodys Rating Change, EOM S&P Rating/EOM S&P Rating Change and Previous Moody's Rating Change
Prohibited Fields are applicable to Composite report templates only. The padlock indicates that you are not permissioned for the underlying report template from which the field is sourced (EOD Pricing, Terms and Conditions, Technical Indicators or Corporate Actions).
Note: A field will be identified as Prohibited unless you have all of the applicable permissions. However, that field will still output data when the missing permission is not applicable to the requested data.

Defining Report Templates
DataScope Select User Guide 11.2 Page 95 of 198
Understanding Field Types
For example, the Trading Status field requires both EOD Pricing and Lipper permissions. A padlock will appear next to this field if you are permissioned for EOD Pricing, but not Lipper data. In this case, you will be able to access Trading Status for all supported instruments except Lipper. To view permissions at the field level, please see the Permission Rules column in DataScope Select Data Content Guide.
Removed Fields are those that have been removed from DataScope Select.
For example, if you import an old report template that contains a removed field, that field will now be flagged as Removed.
A field identified as Requires Additional Report Options indicates that the field is not applicable for the selected report template type.
For example: You create a Bond Schedules report template with Call and Capitalization schedules selected, and then you select fields for those schedule types. Now, if you update your report template to include Call schedules only, when you go to the Fields tab, the Capitalization fields will be flagged as Requires Additional Report Options, as these fields are no longer applicable to the report template.
You cannot save removed fields and fields that require additional report options to a report template. A message will alert you to remove the fields prior to saving.
Formatting & Deleting Fields
You can format or delete fields for a report template by selecting the Reports in the Report Templates screen, and then selecting the Fields tab in the report window at the bottom of the screen.
To format fields:
1. Click the check boxes next to the fields to format, and then select Format Fields.
To format multiple fields simultaneously, the fields must be the same field type. For example, you can simultaneously format multiple Numeric fields.
2. Update the format as needed, according to the field type:
Item Description
Label Enter a text string that identifies the field. If you leave this field blank, the default label is used.
Justification Select a position for the field's horizontal alignment from the drop-down list.
Width Style Select Fixed, and then enter the fixed width in the Width box (maximum =
9999).
Field widths are applied to fixed width fields only. If you select Variable, and then specify a field width, that value will be ignored and TRN (truncated) will not appear if the field length exceeds the maximum width value.

Defining Report Templates
DataScope Select User Guide 11.2 Page 96 of 198
Item Description
Capitalization Select a case format for the text.
When you select Name, only the initial letter is capitalized (available for
data output fields only; not for formatting header/trailer text).
Integer Places Enter the number of integers (positive or negative whole numbers) to show for the value, up to 50 integer places.
If the output value is larger than the specified number of integer places, your extraction will show TRN (truncated) instead of the actual value. You must update the number of integer places in order to fit the output value in the column.
Include Thousand Separator
Select to include a thousand separator (comma) in numeric values (e.g., 1,000.00).
When cleared, no comma is inserted in the value (e.g., 1000.00).
Pad with Leading Zeros
Select to add zeros in front of the numeric value. The number of zeros is based on the number of integer places specified.
Decimal Places Enter the number of decimal places (base 10) to show for the numeric value, up to 14 decimal places.
Pad with Trailing Zeros
Select to add zeros at the end of the numeric value.
The number of zeros is based on the number of decimal places specified.
Date Format Select a format for displaying dates from the drop-down list.
3. Click Save to save the field formatting.
To delete fields:
1. Click the check boxes next to the fields to delete.
This action enables the Delete X Fields button, where X indicates the number of fields selected.
2. Click Delete.
A confirmation window appears listing the fields you have selected to delete.
3. Click Delete again to confirm the deletion.

Defining Report Templates
DataScope Select User Guide 11.2 Page 97 of 198
Specifying Header & Trailer Information
Your report template can include optional header and trailer sections that identify the extraction start and end times, optional text, and row count. Note that the input parameters are identical in both the Header and Trailer tabs.
To specify header and trailer information:
1. Click Add Line.
The Header/Trailer Lines box updates to show <no selected fields>.
2. Click on one or more header/trailer fields in the Available Fields box, and then click >> to add them to the Selected Fields list.
StartTime – Show the extraction start date and time.
EndTime – Show the extraction end date and time.
RowCount – Show the extraction row count. The reported row count is the number of data rows only, and does not include the column labels or the actual header and trailer sections.
Text – Show the user-supplied text string. You can enter up to 255 characters. Supported values are A-Z, a-z, spaces and the following symbols: $ , : _ - . !
TimeZone – Show the time zone in which extraction StartTime and EndTime executed.
If you select multiple fields, they will all appear on the same line in header/trailer section of your extraction output file.
For example:
09-05-2017 12:53 09-05-2017 12:55

Defining Report Templates
DataScope Select User Guide 11.2 Page 98 of 198
If you want each field to appear on a separate line, click Add Line after selecting each field. In this case, the fields will appear in the header/trailer section of your extraction output file like this:
09-05-2017 12:53
09-05-2017 12:55
3. Use the Move Up and Move Down buttons next to the Selected Fields box to order the fields in the selected line.
To order the lines within the header/trailer sections, use the Move Up and Move Down buttons next to the Header/Trailer Lines box.
4. Use the Field Settings section to format the fields.
This section shows the default formatting for the selected field type. The default format is based on your date, time, and number formats set in Preferences. The available formats depend on the selected field type.

Defining Report Templates
DataScope Select User Guide 11.2 Page 99 of 198
Managing Report Templates
You can manage your existing reports by clicking DataScope Select, and then selecting Report Templates. All of your existing reports appear in a scrolling list. For each list, the report name, template type and number of fields are identified, along with the list creation and last modified dates.
You can manage your reports as follows:
To initiate a new report template, click New Report Template. Click Import Report Template to create the report from an import file.
Use the Find box to search for a report template. When you enter a text string, only your reports matching that text appear.
To enable the Delete x Items and Export x Items buttons, click on one or more check boxes. The buttons update to show the number of reports selected.
To delete one or more selected reports, click Delete x Items. Note that deleted reports cannot be restored. If you delete a report that is part of a pending extraction, you must remove or update the extraction schedule. Otherwise, the scheduler will continue to attempt to execute the extraction and the extraction will fail.
To export one or more selected reports, click Export x Items. You can export a maximum of 100 reports simultaneously to a CSV or XML formatted file. Multiple files are saved to a zipped file with a default name of RPT_Definitions.zip.
To export the grid and all of the contents in it, click . This action launches a separate window from where you can open or save the grid to a comma separated value (csv) file. The file takes the name of the selected screen. The entire contents of the grid are exported. For example, exporting this screen will result in a file named ReportTemplates.csv that includes your report template details under the following columns: Name, TypeDescription, FieldCount, CreateDate and ModifiedDate

Defining Report Templates
DataScope Select User Guide 11.2 Page 100 of 198
Managing an Existing Report Template
To manage an existing report, click on the report. The screen expands to show the report details at the bottom of the screen.
You can manage the selected report as follows:
To export the report to an XML-formatted file, click Export.
To edit the report’s layout, format and fields, click Edit. This action launches the Report Template screen, from where you can make your edits. For instructions, see Formatting Report Templates.
To duplicate the report, click Copy. This action launches the Report Template screen with the report identified as Copy of report template name. You can assign a new report name and update the report parameters as needed. For instructions, see Formatting Report Templates.
To delete the report, click Delete. You are prompted to confirm the deletion. Note that deleted reports cannot be restored. If you delete a report that is part of a pending extraction, you must remove or update the extraction schedule. Otherwise, the scheduler will continue to attempt to execute the extraction and the extraction will fail.
Use the tabs located on the left side of the screen to view the report details, format or delete fields and create a new schedule for the report. See the next section for instructions on formatting and deleting fields.
To create a new schedule with the selected report, click on the Schedules links, and then click New Schedule. The screen refreshes to show the Create New Schedule screen. For instructions, see Creating Extraction Schedules.

Defining Report Templates
DataScope Select User Guide 11.2 Page 101 of 198
Importing Report Templates
The import file must be XML-formatted. You can import a previously exported report (all exported reports are XML-formatted) or generate the file using an XML editor.
NOTE: For XML file requirements, see the DataScope Select FTP User Guide.
To import a report template:
1. Click DataScope Select, and then select Report Templates.
2. Click Import Report Template.
The screen updates to show the Report Definition Import screen.
3. Click Browse to navigate to the file.
4. Select the file in the Choose File window, and then click Open.
5. Optionally, select Replace report if it already exists if you want to overwrite an existing report with the current one.
6. Click Import.
The file is validated prior to being imported. Any errors are listed at the bottom of the screen. If no errors exist, the report is automatically added to your report templates.

DataScope Select User Guide 11.2 Page 102 of 198
Chapter
5
Scheduling Extraction Executions
This chapter takes you through the process of scheduling an extraction execution. You can schedule your extraction to execute on request, once on some future date or on a recurring basis at a specified time or as a result of pricing availability.
For details, see:
Creating Extraction Schedules
Importing Schedules
Tracking Extraction Executions
Viewing Schedule Details
Managing Schedules

Scheduling Extraction Executions
DataScope Select User Guide 11.2 Page 103 of 198
Creating Extraction Schedules
NOTE: You can schedule an extraction for any report available in DataScope Select. However, no extraction file will generated for a report for which you do not have permissions and the schedule will fail. You must be permissioned for a report in order to retrieve data for it.
To create a new schedule:
1. Click DataScope Select, and under Schedules, click Create for a new schedule or Immediate for an immediate extraction.
The screen updates to show the New Schedules wizard. Note that the Extraction Frequency section is hidden when you create an immediate extraction.
2. See the next section for details on scheduling the extraction.

Scheduling Extraction Executions
DataScope Select User Guide 11.2 Page 104 of 198
Scheduling the Extraction
Scheduling the extraction consists of the following steps: Selecting Extraction Content, Specifying the Extraction Frequency and Creating the Extraction Schedule. These steps are defined in the sections that follow.
Selecting Extraction Content
1. Under List Type, select the type of input to use in your extraction.
Instrument (default) – Select for all extraction types, except Criteria, Entity, Corporate Actions – IPO Events, News Analytics Commodities and Instrument-less News Analytics and Instrument-less News Items.
Entity – Select for Entity Detail, Hierarchy, Audit and StarMine extractions, and for retrieving issuer-level data via Terms and Conditions and Ratings extractions.
Criteria – Select for criteria-based EOD Pricing and Terms and Conditions extractions for bank loans.
None – Select for Corporate Actions – IPO Events, News Analytics Commodities and Instrument-less News Items extractions.
2. Under List, select the corresponding input list to use in the extraction.
This option is hidden when the selected list type is None.
The list shows only your input lists that are supported for the selected list type. For example, only instrument lists appear when Instrument List is selected.
A message appears when there are no corresponding lists for the selected list type.
3. Under Report Template, select the report to use in your extraction.
The list shows only your report templates that are supported for the selected list type. For example, only Entity, Terms and Conditions, Ratings and StarMine reports appear when Entity is selected.
A message appears when there are no corresponding lists for the selected list type.
4. Click Last Updated or Today Only to specify the type of pricing or analytics to retrieve.
This option appears for Pricing reports (Composite, EOD, Intraday, Premium EOD and Premium) and Technical Indicators reports only.
Last Updated
Retrieve the most recent validated prices or analytics, regardless of when the instruments were priced (default).
The previous trading day’s validated prices are retrieved, if available; otherwise, null values can be output instead for Fixed Income, Equity, Derivatives, Money and Fund instruments.
For Premium EOD Pricing extractions, this option returns today’s validated end of day prices, if available, or the validated price from the intraday-pre-extraction that executes at an optimal time to capture prices for the instruments in your input list.
If neither price is available, the previous validated end of day value is retrieved instead.
Scheduling Extraction Executions
DataScope Select User Guide 11.2 Page 105 of 198
Today Only
Instruments with prices or analytics from dates prior to today will be suppressed and identified in your extraction notes file. Today is calculated using the time zone set in your Preferences. For example, if your time zone is set to Eastern Time (US & Canada), then today is considered the time period from 12:00 AM EST/EDT to 11:59 PM EST/EDT on today's date.
For Premium EOD Pricing extractions, this option returns today’s validated end of day prices, if available, or the validated price from the intraday-pre-extraction that executes at an optimal time to capture and store pricing for the instruments in your input list. If neither price is available, a null or blank field is returned, depending on the null code settings defined in your Preferences.
Note that Universal Close Price will not be suppressed and return a blank field if the Exclude Null Codes For Universal Close Price is selected in your Preferences. The Universal Close Price Date will indicate the trade date of the Universal Close Price. If this is not desired, then this preference should be unchecked.
NOTE: For a list of fields subject to Today Only suppression see the DataScope Select Data Content Guide. The Today Only column will identify the fields subject to suppression and the price date used in the comparison with the current date.
Defining the Extraction Frequency & Initiation
You can schedule your extraction to occur once or on a recurring basis at some future point at a fixed time or based on data availability. The initiation selections depend on the extraction type. See Scheduling Considerations for more information.
1. Under On, select when you want the extraction to execute:
Once - Use the calendar to select the execution date. (Required for Single Historical Price, Timeseries Pricing & historical Corporate Actions).
Weekly - Use the check boxes to select one or more days of the week. Click Business Week to select Monday-Friday simultaneously.
Monthly - Select the day of the month, where 1st and Last are calendar days, not business days. You can select only one day of the month.
2. Specify the extraction initiation:
Fixed Time
Under At, specify the time (hour and minutes) at which you want the extraction to execute from the drop-down lists. When this option is selected, the extraction executes at a specified time, regardless of data availability.
The specified time should be at some future point. The extraction will execute immediately if the scheduled time is two or less minutes in the past to accommodate processing times and differences in machine clocks. If the specified time is more than two minutes in the past, you will not be able to create the schedule.
NOTE: This section is hidden for immediate extractions.

Scheduling Extraction Executions
DataScope Select User Guide 11.2 Page 106 of 198
For Intraday Pricing extractions, you can schedule up to five extraction executions in a single schedule. By default, extractions are scheduled to execute on the hour, in one-hour intervals. The minimum time between extractions should be no less than 15 minutes.
Data Availability
This option is applicable for Composite, EOD Pricing (excluding EOD Pricing extractions that use Criteria Lists as input), Premium EOD Pricing, Premium Pricing and Technical Indicators extractions.
The extraction will execute upon the release of today’s prices or analytics for the instruments in your instrument list, if applicable. DataScope Select automatically detects the type of instruments in your instrument list and waits for the release of those prices or analytics to initiate the extraction.
DataScope Select will display a warning message when your input list contains instruments that are not associated with a data arrival event.
To ensure optimal delivery of the current day’s prices or analytics, make sure your instruments are all regionally based (from the same time zone) and are the same asset type. At least one instrument must be associated with a trigger in order to schedule a triggered extraction.
For Composite & EOD Pricing Extractions:
Select the type of equity end of day prices to retrieve: Use initial end of day prices or Use validated end of day prices. When Use validated end of day prices is selected, the page updates to show Return corrected prices only.
Select Return corrected prices only to retrieve validated prices for the trading day. All other instruments will be excluded.
For Premium Pricing Extractions:
Optionally, select Wait for today’s tolerances comments. This option allows you to track daily movements for the TRPS-priced instruments in US 3 PM and EMEA and ASIA 4 PM Premium Pricing cycles.
When this option is selected, your extraction will wait to execute until today’s tolerance comments have been received. An error message appears when the instruments in the input list are not associated with a pricing trigger.
For Technical Indicators Extractions:
Select the type of equity end of day prices to retrieve: Use initial end of day prices or Use validated end of day prices.
Select the type of analytics data to retrieve: Core Analytics or Relative Analytics.
Core Analytics refer to calculations for a base instrument; while Relative Analytics refer to calculations that are dependent on a benchmark RIC. Core Analytics should always arrive before Relative Analytics. Therefore, it is recommended that you schedule separate extractions for retrieving both Core and Relative Analytics.
.
NOTE: For details on pricing delivery times, please see the Data Arrival Time Guide on the Customer Zone.

Scheduling Extraction Executions
DataScope Select User Guide 11.2 Page 107 of 198
For all Triggered Extraction Types:
Select Extract if data does not arrive by (optional).
This option enables you to forego the trigger and execute the extraction at the specified time, regardless of whether today’s prices are available. In this case, you get all of today’s prices that are available for the instrument in your input list as of the extraction execution. For all other instruments, the previous trading day’s prices are output instead. To identify the instrument’s pricing date, make sure to include the Trade Date field in your extraction.
Times is based on the time zone specified in Preferences, and should be used as the reference for selecting the time at which to execute the extraction. You can specify whether the time applies to today or tomorrow by selecting Same Day or Next Day from the
corresponding drop-down list.
Creating the Schedule
1. Enter a schedule name in the Schedule Name box.
Double-byte character sets are not supported.
2. Enter a name for the extraction in the Output File Name box (optional).
Double-byte character sets are not supported.
Tips: If you specify an output file name for a recurring extraction, DataScope Select will overwrite the extraction each time it executes. To ensure that your extraction is not overwritten, you can do either of the following:
Leave the box blank. DataScope Select will automatically generate a default name to the extraction, consisting of your DataScope Select ID, and the extraction date and time, among other characters to identify the file. Time is shown in UTC.
Enter an output file name and append %D and/or %T. DataScope Select will automatically insert the extraction date and/or time into the output file name. The time zone defaults to the value selected in your Preferences. You can update the time zone for any selected schedule via the Time Zone drop-down.
Thomson Reuters does not guarantee that automatically-generated extraction output file names will not change from release to release. To ensure consistent extraction output file names across releases, specify a file name with %D and %T appended.
3. Optionally, under Time Zone, select the time zone in which to schedule the extraction.
The time zone defaults to the time zone specified in your Preferences. The updated time zone applies to the selected schedule only.
4. Click Create.
Your extraction is added to the Schedules screen. You can check the status of the extraction in the Status column. Once the extraction executes, you can retrieve your output file from the Extracted Files page.
A warning message will appear if the schedule cannot be created. For example, if you attempt to create a schedule with an entity list and an issue-level Ratings report template.

Scheduling Extraction Executions
DataScope Select User Guide 11.2 Page 108 of 198
Scheduling Considerations
Consider the following information when scheduling extractions:
EOD Pricing Extractions for Lipper Fund & Lipper TASS
Lipper fund prices for all regions are processed approximately every two hours each trading. Today’s prices are available at approximately 2:00 p.m. and are updated every two hours thereafter. An exception is between 12:00 p.m. - 1:30 p.m. EST/EDT during the regularly scheduled maintenance window.
The file includes the most recent end of day prices for all global regions, plus the entire universe of funds with any updates that had occurred since the last file processing. Note that due to the nature of fund pricing and when source data is available, Thomson Reuters does not guarantee that all funds will price at the same time each trading day.
Same-Day EOD Pricing & Premium Pricing Extractions for New User Instruments
Thomson Reuters does not guarantee that any user instrument created after 12:00 p.m. (London and New York times) will be available in today’s pricing. If you create a user instrument after this time, your instrument may not be evaluated until the next business day. To ensure that you retrieve the most recent evaluations for your CDS, IRS, and OTC Equity Option contract, schedule your extraction to execute as a result of data availability and not at a specified time.
Intraday Pricing Extractions
You can schedule up to five extraction executions in a single schedule. By default, extractions are scheduled to execute on the hour, in one-hour intervals. You can update the times as needed.
Scheduling Considerations for Intraday Pricing Extractions
Consider embargoes and other delays when scheduling multiple Intraday Pricing extractions. If the extraction is subject to embargo, the extraction will not post until all required delays have elapsed. This can delay the execution of the other scheduled extractions.
Similarly, if there is a delay in processing your extraction, the next scheduled extraction may be skipped or delayed until the previous one has completed, regardless of the scheduled extraction execution time. You should create separate extraction schedules if you need to schedule multiple Intraday Pricing extractions to execute within a timeframe that is less than the extraction’s required embargo delays (e.g., schedule an extraction with a 20 minute embargo delay to execute 5 times, every 15 minutes).
To ensure that your Intraday Pricing extraction retrieves prices that reflect the last “official” tick of the trading day, consider scheduling your timed extraction to execute no earlier than 15 minutes after market close.
Premium EOD Pricing
To ensure you retrieve today’s official close prices as soon as they are available, always use the trigger option to schedule your Premium EOD Pricing extractions. Timed extractions snap data at the time of the extraction. They do not snap data at intermediate intervals, as pricing triggered extractions do. DataScope Select performs one “behind the scenes” pre-extractions that execute at optimal times to capture and store pricing for the instruments in your input list. The pre-extraction process identifies the latest optimal retrieval time for the instruments, and then schedules the pre-extraction to execute three hours earlier.

Scheduling Extraction Executions
DataScope Select User Guide 11.2 Page 109 of 198
The process initiates 15-minutes prior to the first scheduled snap time. At that point, DataScope Select checks the database for any instrument whose optimal retrieve time has already occurred. If end of day data is found, that data is retrieved. If end of day data is not available, an intraday snapshot is performed at the instrument’s optimal retrieve time. This process is repeated for each instrument in the input list at the instrument’s optimal retrieve time. If no data is available as of the intraday snapshot, DataScope Select can return the previous day’s price or a blank field, depending on how your preference for excluding null codes for universal close.
The extraction will be available following the latest snapshot unless there is an embargo on any instruments that has not expired. In this instance, the extraction will be available once the embargo has expired.
Premium EOD Prices that fail validation will not be verified or corrected as this data is provided in the EOD Pricing report. If you want to see verifications and corrections to Premium EOD Prices, you should schedule an EOD Pricing extraction using the same instrument list.
Additional Notes on Scheduling Premium EOD Pricing Extractions
Pricing snap times are dependent on the market and/or instrument type. Please contact your local account manager or sales specialists for inquiries.
Equity markets in Botswana, Cote D’Ivore, Ghana, Uganda and Zimbabwe update on the Thomson Reuters Real-time network once a day after the market close times for each exchange. These markets will update at the approximate times (in GMT) below rather than within 30 minutes of market close:
Botswana – 15:30
Cote D'Ivore – 16:00 GMT
Ghana – 15:00
Uganda – 15:30
Zimbabwe – 15:00
Due to the nature of when the official EOD price becomes available, exchange-traded funds, evening trading equities, and composite markets such as MiFID, will deliver pricing later than the 30 minutes from market close standard.
Trade Date updates differently based on the field selection. Include Universal Close Price to retrieve a Trade Date matching that on the Universal Close Price Date. Otherwise, the Trade Date will display the last update date from the EOD database.
StarMine
StarMine updates data daily following the close of the Asia, EMEA and AMERS markets. Updates are delivered after the region’s market close and before the market open on the next business day. Data arrival times are between 3:00 and 4:00 a.m. local time in each region. Consider this delivery time and schedule your extractions to execute accordingly to receive the most current data.
Timeseries Pricing
To expedite extraction processing, do not schedule multiple Timeseries Pricing requests simultaneously. Instead, schedule your extractions to execute one at a time. Simultaneous multiple extraction requests are processed with similar requests from other clients. Those requests are slower than single extraction requests by design to prevent clients from dominating the Timeseries Pricing queue.

Scheduling Extraction Executions
DataScope Select User Guide 11.2 Page 110 of 198
Importing Schedules
1. Click DataScope Select, and under Schedules, click Import.
The Import Schedule screen appears.
2. Click Browse to locate the XML-formatted schedule on your computer.
3. Click Replace schedule if it already exists, if you are replacing an existing file.
An error message will appear if you do not check this option when replacing an existing file.
4. Click Import.
Any errors are listed at the bottom of the screen. If no errors exist, the report is automatically added to the Schedules screen.
Important Notes about Importing Schedules
When importing a schedule, the corresponding input list and report template must exist in your DataScope Select account in order for the extraction to execute. The file is validated prior to being imported.
If you import a recurring schedule, the extraction will execute at the next scheduled date and time/trigger.
If you import an immediate schedule, the extraction will execute immediately upon import.
If you import a one-time schedule, the extraction will execute immediately only if the scheduled execution time is not earlier than midnight (start of the calendar day) based on the time zone specified in your user preferences; or if the scheduled extraction time is earlier than the current Universal Time Clock (UTC), minus 24-hours.

Scheduling Extraction Executions
DataScope Select User Guide 11.2 Page 111 of 198
Tracking Extraction Executions
You can track your scheduled extraction executions from the Schedules screen. By default, the screen shows Today’s Schedules (all completed and pending extractions schedules).
Use the drop-down to show your Active Schedules (All scheduled extractions that will execute today or at some future point, once or on a recurring basis. Immediate extractions are excluded) or All Schedules (All pending and completed extraction schedules, up to the 100-schedule limit.). Alternatively, use the Find box to search your schedules and related details. When you enter a text string or numerical value, only schedules matching your input appear:
For each schedule, the following information appears:
Name – Name of the extraction schedule. Note that a clock appearing next to the schedule name indicates that the schedule has a time zone other than the time zone selected in your Preferences. All times shown are relevant to your preferred time zone.
List – The instrument or entity list tied to the extraction. A dash – appears in this column for scheduled instrument-less News Analytics, News Analytics Commodities and News Items extractions.
Report – The report template tied to the extraction.
Frequency – The frequency of the extraction (Once, Weekly or Monthly). For immediate extractions, Immediate appears in this column.
Day – The day of the extraction execution based on the selected frequency. For weekly extractions, the letter(s) representing the day(s) of the week are shown. For monthly extractions, the calendar day is shown. For one-time extractions, the execution date is shown in the date format selected in your Preferences.
Time/Trigger Initiation – The time or trigger that initiates the extraction. When your extraction has multiple triggers, the number of triggers are shown instead of the actual triggers.
For Composite and Equity EOD Pricing extractions, the column shows the 4-digit IPC code prefixed with DSE. The file code is appended with either P (initial prices) or E (corrected prices) to indicate the type of pricing to extract. For multiple IPC triggers, the column shows the number of triggers in the schedule.
For Fixed Income Premium Pricing and EOD Pricing extractions, the trigger identifies the extraction type and the pricing trigger for that schedule (e.g., Premium US - 3 PM GORP).

Scheduling Extraction Executions
DataScope Select User Guide 11.2 Page 112 of 198
For Premium EOD Pricing extractions, the pricing trigger is identified as Premium intraday xx:xx PM, where the time indicates the last pre-extraction time before the extraction (not the market close time).
For example, a triggered Premium EOD Pricing extraction with U.S. exchange-traded instruments would display Premium intraday 04:15 PM. For fixed income instruments, the trigger is identified as Premium, followed by the region and premium pricing cycle and fixed income instrument type, for example, Premium US 3PM-GORP. Multiple triggers are presented in a tool tip (for example, if you have a mixed instrument list or instruments from different markets).
Time is provided in the time zone and format specified in your Preferences. The date is also provided if the snap time happens yesterday or tomorrow, relative to your time zone. For example, if you are in China and schedule your extraction to execute at the close of the U.S. market for the trading day, the extraction will execute tomorrow with respect to your time zone. In this instance, the snap date will also be included.
Status – The scheduled extraction’s status (waiting, queued, submitted, completed, etc.). As your extraction executes, the percent completed is shown, enabling you to track the extraction execution progress. Note that an extraction will automatically fail when the extraction size reaches approximately 2 GB. In this instance, no extraction file is generated and the Status column will show Failed.
Last Status – Status of the previous extraction execution for this schedule. Only applies to recurring extractions. The symbol - - appears for immediate extractions, as well as for new recurring schedules.
Next Execution – Date of the extraction’s next scheduled execution. The execution time is also shown for timed extractions. The symbol - - appears for immediate extractions.
Viewing Schedule Details
When you click on a schedule, the screen expands to show the corresponding details at the bottom of the screen:

Scheduling Extraction Executions
DataScope Select User Guide 11.2 Page 113 of 198
Schedule details include the following information:
Report – The report template tied to the extraction schedule. Click on the name to edit the report.
List – The input list tied to the extraction. Click on the name to edit the list. The list type appears below the list name.
Recurrence – The frequency of the extraction execution.
Trigger – The trigger(s) or time that initiate the extraction. Click View Triggers to launch a new screen that shows the trigger mappings for each instrument in the corresponding instrument list in summary or detail format.
The Summary view shows each instrument’s trigger, status (e.g., waiting, queued, completed, etc.), the most recent trigger date, last arrival date and time and average arrival time. Average arrival time shows the arrival time for the indicated file code averaged over a two-week period and adjusted for processing and any unusual arrival times. Note that the Timezone drop-down list can be used when the instruments in the input list are not all regionally based. For details on pricing delivery times, please see the Data Arrival Time Guide on the Customer Zone.
The Detail view shows the information above, along with instrument’s unique identifier, pricing source and description.
Type – Type of pricing or analytics to retrieve for Composite, EOD Pricing, Premium EOD Pricing, Premium Pricing or Technical Indicators extractions: Today Only or Last Updated.
Timezone – The time zone in which the extraction was scheduled.
Last Execution – Date and time of the last extraction execution for this schedule. Date and time are shown in the format selected in Preferences. The symbol - - appears in this column for immediate extractions, as well as for new recurring schedules.
Created/Modified – Date and time when the extraction schedule was created and last updated. Date and time are shown in the format selected in Preferences.
Completed/Pending – By default, up to 5 completed extractions are shown. Click Pending to show the dates and times of the next five extraction executions for the selected schedule. Use the View ▼ drop-down to preview or download the extraction or view the corresponding notes file. Click View All Files to launch the Extracted Files screen. The screen has two tabs for viewing completed and pending extractions.
Completed Extractions – Shows today’s schedules by default. Use the drop-down to show schedules for a specified time frame. You can view all completed extractions that have executed prior to today and within the past 45 calendar days, including extractions that have executed but failed. Extractions that are older than 45 calendar days are automatically deleted from the DataScope Select server.
Use the Actions column to preview or download the extraction and view the corresponding notes file or optional RIC maintenance and early non-embargoed Intraday Pricing reports.
Pending Extractions – Shows pending extraction executions for today through the next five calendar days The symbol - - appears in this column for immediate extractions. Note that the number of pending extractions shown can vary, depending on whether the schedule is for an Intraday Pricing extraction with multiple executions.
For example, if you have an EOD Pricing extraction (or any other extraction type other than Intraday Pricing) that executes daily, this screen will show five pending extractions for that
schedule (that is, 1 daily extraction execution x 5 calendar days = five pending extractions).
If you have an Intraday Pricing extraction scheduled to execute 3 times each day, the page will show 15 pending extractions for that schedule (that is, 3 daily extraction executions x 5 calendar days = 15 pending extractions).

Scheduling Extraction Executions
DataScope Select User Guide 11.2 Page 114 of 198
To export the selected schedule to an XML-formatted file, click Export. The file is automatically assigned the same name as the schedule with _SCHED_Definition appended.
To copy the selected schedule, click Copy. Note that you cannot copy immediate schedules.
To delete the selected schedule, click Delete.
To execute the scheduled extraction now, click Extract. The extraction snaps pricing or analytics for either the current day (today) or the last validated update, depending on the schedule’s settings. Extract Now is just like running an immediate extraction without having to create a new schedule.
Managing Schedules
You can manage your existing schedules by clicking DataScope Select, and then selecting Schedules. See Tracking Extraction Executions for descriptions of the content displayed for each schedule.
You can manage your schedules follows:
Use the Find box to search for a particular schedule. When you enter a text string or numerical value, only the schedules matching that information appear.
Use the buttons above the table to create a new or new immediate schedule or to import a schedule from an xml-formatted file.
Use the check boxes to select one or more schedules. This action enables the Delete x Items and Extract x Items buttons. The number appearing in these buttons identifies the number of items selected.
Click the Delete x Items button to delete the selected schedules. You will be prompted to confirm the deletion.
Use Extract x Items to execute one or more scheduled extraction immediately. The extraction snaps pricing or analytics for either the current day (today) or the last validated update, depending on your schedule’s settings. Note that Extract is just like running an immediate extraction without having to create a new immediate schedule.
To export the grid and all of the contents in it, click . This action launches a separate window from where you can open or save the grid to a comma separated value (csv) file. The file takes the name of the selected screen and the entire contents of the grid are exported. For example, exporting this screen will result in a file named Schedules.csv that includes your schedule details under the following columns: Name, SubjectListName, ReportName, Frequency, Day, TriggerTime, Status, PreviousStatus, LastExecutionDateTime and NextExecutionDateTime.

DataScope Select User Guide 11.2 Page 115 of 198
Chapter
6
Retrieving Extracted Files
This chapter provides instructions for previewing and downloading your extraction files (extractions, related notes and optional reports) for use in your internal systems. Information about Intraday embargoes is also provided, along with instructions for retrieving evaluated pricing files from Thomson Reuters Pricing Service (TRPS).
For details, see
Viewing Extractions
Identifying Your Extractions
Previewing & Downloading Extraction Files
Managing Extraction Files
About Embargoed Extractions
Downloading Evaluated Pricing Files

Retrieving Extracted Files
DataScope Select User Guide 11.2 Page 116 of 198
Viewing Extractions
You can view your extractions, related notes, and optional reports by clicking DataScope Select, and then selecting Extracted Files. Completed and Pending Extractions appear across two tabs.
Completed Extractions
Identifies your completed extractions that have executed, as well as extractions that have failed.
All immediate and run-once extraction executions are shown, along with recurring extractions. The number of extracted files for any recurring extraction will vary, depending on how you have named the extraction file.
For example, if you appended %D and/or %T to the output file name or left the output file name blank, all of your recurring extractions for that schedule will appear. This is because the extraction date and time are automatically part of the extraction name. If you specified an extraction name, the file will be overwritten each time the recurring extraction executes
Extractions are listed chronologically with the most recent executed extraction listed first. Extractions that are older than 45 calendar days are automatically deleted.
To filter your completed extractions, select a time period from the drop-down. Supported views are: Today, Yesterday, Last 7 Days (default), Last 30 Days, This Month, Last Month, and Custom Range. You can also search for one or more extraction files matching a text string on numerical value. When you enter text in the Find box, only extractions matching that text appear.
To enable the Delete button, click on a row. To select all extractions in the view, click Select All.
Pending Extractions
Identifies all of your upcoming extraction executions for today through the next two calendar days.
NOTE: It is possible that no extraction will be generated when the file size reaches approximately 2 GB. The status column on the Schedules screen will show Failed. The corresponding notes file will also indicate that the extraction failed due to its size.

Retrieving Extracted Files
DataScope Select User Guide 11.2 Page 117 of 198
Identifying Your Extractions
Your extractions, corresponding notes, and optional files are identified as follows:
If you assigned an output file name in the Schedules screen, the file is identified by that name in the File Name column. The date and time will be appended to the file name only if you append %D and/or %T.
Recurring extractions with %D and %T appended to the extraction output file name reflect the date and time of the time zone selected in the Schedules screen. The time zone is either the default value selected in your user preferences or a different one selected from the Time Zone drop-down list.
If did not assign as file name, the file is identified by your DataScope Select ID, and the extraction date and time. Time is shown in UTC.
If you set your preferences to receive optional RIC maintenance reports, the file is identified as download maint. notes in the Actions column.
If you set your preferences to Enable Early Partial Delivery of Embargoed Reports, the early file is identified as download partial in the Actions column. The complete file will be identified by its assigned name when all embargoed data is released.
If you set your preferences to Enable Early Partial Delivery of Embargoed Reports and Enable Intermediate Embargoed Reports, you will receive an initial file and subsequent files when prices are released.
The initial intermediate embargoed file is identified as Filename.0min and contains prices for instruments that are available immediately. All subsequent files will be identified as Filename.Xmin, where X indicates the five minute interval during which prices were released.
NOTE: You will not receive an intermediate embargoed report every five minutes.
You will only receive a report when prices have been released within that five minute interval. That means if a price is released five minutes following the extraction execution and the next price is released within 20 minutes, two intermediate embargoed extractions will be delivered: Filename.5mins and Filename.20mins.
See Setting Preferences for information on Early Delivery of Non-Embargoed data and Intermediate Embargoed reports for Intraday Pricing and Premium EOD Pricing extractions.

Retrieving Extracted Files
DataScope Select User Guide 11.2 Page 118 of 198
Previewing & Downloading Extraction Files
1. Click DataScope Select, and then click Extracted Files.
2. Select the file to download in the Actions column as follows:
Preview
Click Preview to show your extraction in HTML format.
Extractions
Click Download. A dialog appears prompting you to save the file in the format specified in
your report template.
Non-Embargoed Intraday Pricing & Premium EOD Pricing Reports
Click Download partial. The completed extraction will be available from the Download column once all embargoed data has been released.
Notes
Click Notes. The file appears in a separate browser window formatted as a text file. Note that the early partial Intraday Pricing report and full extraction share the same notes file.
RIC Maintenance Reports
Click download maint. notes. The file takes the same format as your extraction output file
(CSV or XML).
Platts Files
Click PlattsCorrections or PlattsWeekend. The file is CSV formatted. Note that you must be permissioned for Platts content in order to receive the optional daily corrections or weekend file.
3. Save the file to your computer (recommended).
NOTE: You must configure your Preferences to receive optional reports. See
Setting Preferencesfor instructions.

Retrieving Extracted Files
DataScope Select User Guide 11.2 Page 119 of 198
Managing Extraction Files
You can manage your existing extraction files as follows:
Use the Select All button to select all extractions in the current view.
Use the Find box to search for an extraction. When you enter a text string, only your extractions matching that text appear.
To enable the Delete button, click on one or more extractions. The buttons update to show the number of extractions selected for deletion Note that deleted extractions cannot be restored.
To export the grid and all of the contents in it, click . This action launches a separate window from where you can open or save the grid to a comma separated value (csv) file. The file takes the name of the selected screen. The entire contents of the grid are exported. For example, exporting this screen will result in a file named CompletedExtractions.csv that includes your extracted files details under the following columns: FileName, IsPartial, FormattedFileSize, and ReceivedDate.

Retrieving Extracted Files
DataScope Select User Guide 11.2 Page 120 of 198
About Embargoed Extractions
DataScope Select is governed by exchange rules that require delays in the release of intraday and premium end of day data.
Embargo delays apply only to users who are not permissioned to receive real-time intraday data during the exchange’s operating hours. No embargo is applied if you are permissioned for real-time intraday data or if you request data outside of the exchange’s operating hours.
Please contact your local account manager or sales specialist for information about real-time intraday permissions.
Viewing Embargo Delay Details
To retrieve embargo information for the instruments in your input list, you should run an Intraday Pricing or Premium EOD Pricing extraction using the following fields:
Current Embargo Delay
Embargo Times
Embargo Window
Exchange Requiring Embargo
Instrument Snap Time
Last Intraday Update Time
Maximum Embargo Delay
PE Code
Real Time Permitted
Your specific exchange entitlements are identified in the Current Embargo Delay and Maximum Embargo Delay fields based on the following logic in the following table. Current Embargo Delay represents, where applicable, the remaining amount of time (in minutes) until the exchange embargo is lifted. This is driven by the Last Intraday Update Time and is relative to the Maximum Embargo Delay required by the exchange. It is linked to the specific user exchange permissions. Maximum Embargo Delay is the maximum number of minutes required by the exchange that the instrument must be embargoed for, based on the specific users’ exchange permissions.
Exchange User Exchange Permission
Current Embargo Delay Maximum Embargo Delay
Real Time Real Time 0 0
Delayed Relevant exchange embargo Relevant exchange embargo
Delayed* Real Time 0 0
During Trading Hours
No Intraday N/A - Data available outside of embargo window
N/A - Data available outside of embargo window
At all times None N/A – Clients need to subscribe to access the content
N/A – Clients need to subscribe to access the content
* Embargo delay=0. In this case, content is already delayed upstream, so no further embargo is applied.

Retrieving Extracted Files
DataScope Select User Guide 11.2 Page 121 of 198
Please note that the Current Embargo Delay and Maximum Embargo Delay fields can output either a numeric value to indicate the delay time in minutes or a text value (i.e., N/A) to identify exchanges marked as No Intraday or None. As a reminder, your exchange entitlements can be found under Third-Party Content Permissions via the Preferences screen. See Third Party Content Permissions for details.
You can also view embargo details for a selected instrument via the Embargo tab via the Details screen for equity instruments and futures & options. This screen shows key details, including exchange information, embargo delay times, instrument snap times, and last update times. Times are displayed in the time zone specified in your Preferences. The time zone is reflected in the Preferred Time Zone field.
Calculating Embargo Delays
The calculation method used to determine extraction release times for embargoed Intraday Pricing and Premium EOD Pricing extractions enables DataScope Select to deliver your files at the earliest delivery time permitted. DataScope Select uses the last intraday update time plus the maximum embargo delay to calculate extraction delivery times. Last intraday update time is the time at which DataScope Select received an update (‘tick’) for the instruments in your input list prior to the extraction snap time. Maximum embargo delay is the maximum number of minutes that the instruments must be embargoed as required by your exchange entitlements.
For extractions executed after an exchange closes, but before the last embargo period has expired, the embargo delay is less than the maximum delay. For example, say you scheduled your extraction to execute a 4:05 p.m. with instruments sourced from the NYSE. NYSE closes at 4:00 p.m. and has a 15-minute embargo. When the extraction executes at 4:05 p.m., the resulting file will be embargoed for 10 minutes at most.

Retrieving Extracted Files
DataScope Select User Guide 11.2 Page 122 of 198
Explanations of the calculation method are identified below, along with examples of how embargoed data is delivered. Note that the identifiers below are used for example purposes and do not reflect actual instruments.
Calculation Method for a Single Exchange
Extraction delivery time is calculated using the last update time for the most recently updated instrument plus the maximum embargo delay for a single exchange.
Inst. Snap Time
Last Update Time Embargo Delay Release Time
1234= 12:00:00 11:46:55 30 min 12:16:55
AB.C 12:00:00 11:57:59 30 min 12:27:59
DEF.G 12:00:00 11:58:47 30 min 12:28:47
In this example, DEF.G was the last instrument to be updated prior to the 12:00:00 snap time, at 11:58:47. DataScope Select uses this time instead of the snap time to initiate the exchange delay (11:58:47 instead of 12:00:00). When the maximum 30-minute delay required for all of the instruments is applied, the extraction release time is 12:28:47.
Calculation Method for Multiple Exchanges
When your extraction includes instruments from multiple exchanges with varying delays, the delay is calculated using the instrument with the maximum last update time and embargo delay.
Inst. Snap Time Last Update Time Embargo Delay Release Time
1234= 12:00:00 11:46:55 30 min 12:16:55
AB.C 12:00:00 11:57:59 15 min 12:12:59
DEF.G 12:00:00 11:58:47 20 min 12:18:47
In this example, the maximum embargo is 30 minutes. This delay applies to the entire extraction. It begins on the last update time for instrument 1234= (11:46:55). The next instrument to be updated is AB.C at 11:57:59 with a 15-minute delay, followed by DEF.G, at 11:58:47 with a 20-minute delay. When the 20-minute delay for DEF.G has elapsed at 12:18:47, so have the 15 and 30-minute delays for the other two instruments. Therefore, the extraction can be released at 12:18:47.

Retrieving Extracted Files
DataScope Select User Guide 11.2 Page 123 of 198
Downloading Evaluated Pricing Files
The Pricing Service screen enables permissioned users to download a subset of evaluated pricing from Thomson Reuters Pricing Service. These instruments include derivatives, difficult to value bonds, private placements, and collateralized debt obligations (CDOs), including asset-backed security CDOs, commercial real estate CDOs, and trust preferred security CDOs, as well as new asset classes.
Thomson Reuters strives to provide complete coverage. You can use this tab to obtain pricing on instruments covered by Thomson Reuters Pricing Service that have not been fully integrated into the DataScope suite of products.
This screen can be accessed by clicking DataScope Select and then selecting Pricing Service. It is enabled when Pricing Customer Access (FTTM External) is selected in your User Permissions. The screen is hidden for all other users.
The pricing file is immediately available for retrieval once it is uploaded by Thomson Reuters Pricing Service.
Files are listed in chronological order and can be sorted by File Date by default. You can click download to save the selected file to your own computer and use Delete to remove one or more files that you no longer need.
NOTE: To avoid downloading issues, do not include ampersands (&) in pricing file names.

DataScope Select User Guide 11.2 Page 124 of 198
Chapter
7
Understanding Extraction Output
This chapter describes the extraction output file format and details some of the content the file can contain. Details on the corresponding notes file and optional RIC Maintenance report are also provided.
For details, see:
Extraction Format
Extraction Content
Universal Bid, Ask & Close Pricing Logic
About Extraction Notes
About RIC Maintenance Reports
About Platts Files

Understanding Extraction Output
DataScope Select User Guide 11.2 Page 125 of 198
Extraction Format
Your extraction output file is formatted according to the settings specified in your report template. In the following example, the report is formatted as a CSV file and displays column headers:
Table Format – Extracted data is presented in a table, where each column represents a field and each row represents an instrument or entity.
File Codes (IPC) – If the instrument list tied to the extraction contains file codes (IPC), a row of data will be returned for each instrument tied to the IPC. If the IPC contains a RIC that already exists in the instrument list, the RIC will only appear once in your extraction output file. However, your extraction output file will indicate that duplicate RICs were found. In such instances, you will not be billed for the duplicate RIC.
File Codes & Chains – File codes can include delisted RICs and Chains can include Open Access constituents, depending on your Preferences. Whether these items are included will be indicated in the corresponding notes file.
Historical Extractions – For historical extractions, the instruments in your output file will have a separate row for each trading day in the historical date range.
Report Order – Fields and instruments are ordered as specified in your report template and input list; Column headers only appear when specified in your report template.
ISO 15022 Event Extractions – DataScope Select outputs all ISO 15022 events in the standardized MT564 (Notification) and MT568 (Narrative) message formats expressed in the SWIFT proprietary syntax. ISO 15022 Events extractions are output as text files. See the DataScope Select ISO 15022 Service User Guide for details.

Understanding Extraction Output
DataScope Select User Guide 11.2 Page 126 of 198
Extraction Content
Your extraction contains data for the fields selected in your report template and the instruments specified in your input list. Data is formatted according to their default values or in the formats specified in the Format Fields screen.
Below are highlights for understanding your extraction content:
Trade Date – The trade date associated with any given item is the date of the last validated price rather than the date the price was requested. For Premium EOD Pricing extractions, the Trade Date is updated only when the Universal Close Price is updated. To determine other relevant price dates, use the Date field specific to the fact, Close Price & Close Price Date.
Code Values – DataScope Select uses code fields for displaying certain values in extractions. You can find code descriptions for any field in the DataScope Select Data Content Guide.
Blank Fields – Indicates that data was restricted (e.g., Premium and Entitled fields), not available or not applicable to the asset type. The restricted data is identified in the corresponding notes file.
Invalid Instruments – No data will be returned for an invalid instrument. Only the instrument’s identifier type and identifier will be displayed in your extracted output file, if these fields are selected in your report template. See Setting Preferences for information about inactive bonds and unsupported instruments in your extraction output files.
Numeric Fields – Numeric fields will output 0.000000000 when the value of that field is greater than nine decimals. This is expected behavior in DataScope Select for fields with a default setting of N/12.9.
Inactive Instruments – Mortgage TBAs that were active on import, but have since become inactive will result in blank fields output in extractions. To resolve this issue, you should re-import the impacted instrument lists, making sure that Allow Import of Inactive Instruments into Instrument Lists is selected in your Preferences.
#### appearing in any field means that the output value does not fit the column width specified in Microsoft Excel. To expand the column width, drag the left column border in the column header to the width you want or select Format > Column > Auto Fit Selection.
Close & Alternate Close fields in EOD Pricing & Timeseries Pricing extractions – See the DataScope Select Data Content Guide for explanations of Close and Alternate Close fields in EOD Pricing and Timeseries Pricing extractions.
User Pricing Methodology – Full descriptions of the methodology used to evaluate Credit Default Swap (CDS), Interest Rate Swap (IRS), and Over-The-Counter (OTC) Equity Option user instruments are detailed on the Customer Zone.
Fund Allocations – The first 600 validated Lipper Funds will be processed in your Fund Allocation extraction, and a separate row of data will be output for each allocation rank per allocation scheme. DataScope Select will provide all requested data that exists in the Lipper Fund database for the instruments in your input list. Note that allocations are not offered for every Lipper Fund and some schemes may not have data populated for every field.
Allocation rankings are presented in descending order, where 1 represents the highest percentage ranking of the fund’s allocation items as of the current posting date. Because rankings are based on the posting date, it is possible that an allocation percentage for the current posting date will be ranked above a higher allocation percentage for a historical posting date.

Understanding Extraction Output
DataScope Select User Guide 11.2 Page 127 of 198
RIC Output – DataScope Select uses the following methodology for outputting RIC identifiers:
When your instrument list contains non-RIC identifiers for Gov/Corp instruments:
The GovCorp RIC displayed in your extraction output file will be the RIC associated with a contributed price, if one exists. If not, then the preferred RIC is shown.
When your instrument list contains old RIC identifiers:
DataScope Select will output current RICs, instead of any old RICs that exist in your instrument lists. As a result, the RIC field and pricing fields in your extraction may be affected. For all other reports, only the RIC field is affected.
A message appears in the notes file when a new RIC is used in place of the RIC in the input list.
Example:
New RIC CGJ.AX was used in place of instrument list RIC CML.AX.
New RIC LMSO.L^B07 was used in place of delisted instrument list RIC LMSO.L.
The first message indicates that the input list contains RIC CML.AX. The new RIC for that instrument is now CGJ.AX.
The second message indicates that the input list contains RIC LMSO.L, but that instrument has been delisted. The new RIC for that delisted instrument is now LMSO.L^B07.
When your instrument list contains invalid or RIC identifiers for which you are not permissioned:
No data, including the RIC identifier, will be output in your extraction. All output fields for the invalid or non-permissioned RIC will be blank in your extraction.
To ensure that invalid and non-permissioned RIC identifiers are included in your extraction, include the Instrument ID and Instrument ID Type fields in your report template.
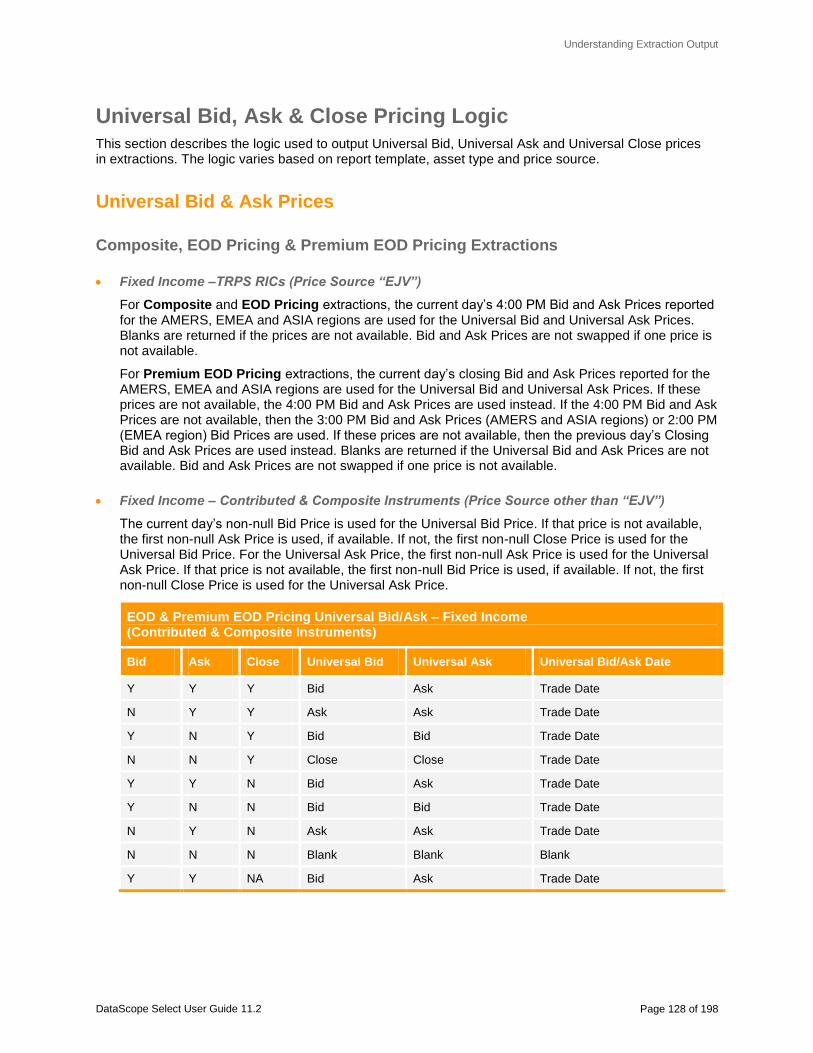
Understanding Extraction Output
DataScope Select User Guide 11.2 Page 128 of 198
Universal Bid, Ask & Close Pricing Logic
This section describes the logic used to output Universal Bid, Universal Ask and Universal Close prices in extractions. The logic varies based on report template, asset type and price source.
Universal Bid & Ask Prices
Composite, EOD Pricing & Premium EOD Pricing Extractions
Fixed Income –TRPS RICs (Price Source “EJV”)
For Composite and EOD Pricing extractions, the current day’s 4:00 PM Bid and Ask Prices reported for the AMERS, EMEA and ASIA regions are used for the Universal Bid and Universal Ask Prices. Blanks are returned if the prices are not available. Bid and Ask Prices are not swapped if one price is not available.
For Premium EOD Pricing extractions, the current day’s closing Bid and Ask Prices reported for the AMERS, EMEA and ASIA regions are used for the Universal Bid and Universal Ask Prices. If these prices are not available, the 4:00 PM Bid and Ask Prices are used instead. If the 4:00 PM Bid and Ask Prices are not available, then the 3:00 PM Bid and Ask Prices (AMERS and ASIA regions) or 2:00 PM (EMEA region) Bid Prices are used. If these prices are not available, then the previous day’s Closing Bid and Ask Prices are used instead. Blanks are returned if the Universal Bid and Ask Prices are not available. Bid and Ask Prices are not swapped if one price is not available.
Fixed Income – Contributed & Composite Instruments (Price Source other than “EJV”)
The current day’s non-null Bid Price is used for the Universal Bid Price. If that price is not available, the first non-null Ask Price is used, if available. If not, the first non-null Close Price is used for the Universal Bid Price. For the Universal Ask Price, the first non-null Ask Price is used for the Universal Ask Price. If that price is not available, the first non-null Bid Price is used, if available. If not, the first non-null Close Price is used for the Universal Ask Price.
EOD & Premium EOD Pricing Universal Bid/Ask – Fixed Income (Contributed & Composite Instruments)
Bid Ask Close Universal Bid Universal Ask Universal Bid/Ask Date
Y Y Y Bid Ask Trade Date
N Y Y Ask Ask Trade Date
Y N Y Bid Bid Trade Date
N N Y Close Close Trade Date
Y Y N Bid Ask Trade Date
Y N N Bid Bid Trade Date
N Y N Ask Ask Trade Date
N N N Blank Blank Blank
Y Y NA Bid Ask Trade Date

Understanding Extraction Output
DataScope Select User Guide 11.2 Page 129 of 198
Equities, Futures & Options, Money & Exchange-Traded Funds
The current day’s end of day Bid and Ask Prices are used as the Universal Bid and Ask Prices. If the Bid Price is not available, then the Ask Price is used in its place as Universal Bid price. If the Ask Price is not available, then the Bid Price is used as the Universal Ask Price. If neither price is available, the Rollover Bid and Ask prices for the previous trading day are used instead. Premium EOD Pricing extractions will follow the same logic for the Universal Bid and Ask Price, unless the price is snapped from the intraday source as part of the extraction. In this case the price will come from a single price field determined to retrieve the best available price.
Lipper Funds
For Lipper funds, the current day’s Closing Bid and Ask Prices are used as the Universal Bid and Ask Prices. If the Closing Bid Price is not available, then the Closing Ask Price is used as the Universal Bid Price. If the Closing Ask Price is not available, the Closing Bid Price is used as the Universal Ask Price. If neither price is available, then the Rollover Bid and Ask Prices for the previous trading day are used. If the Rollover Bid and Ask Prices are not available, then the Rollover Mid Price is used. If the Rollover Mid Price is also not available, then the Rollover Net Asset Value (NAV) is used. If the Rollover NAV is not available, the Universal Bid and Ask Price fields will be blank.
Intraday Pricing Extractions
Intraday Bid and Ask Prices are used for the Universal Bid and Ask Prices for all supported instrument types.
If the Intraday Bid Price is not available, then the Intraday Ask Price is used instead as the Universal Bid Price. If the Intraday Ask Price is not available, then the Intraday Bid Price is used as the Universal Ask Price.
If both the Intraday Bid and Intraday Ask Price are not available, then the Closing Universal Bid or Ask Price is used instead. If the Closing Universal Bid or Ask Prices are available, then the Universal Bid and Ask prices will be blank.
Intraday Universal Bid/Ask – All Supported Instrument Types
Intraday Bid
Intraday Ask
Closing Universal Bid
Closing Universal Ask
Universal Bid Universal Ask
Y Y Y Y Intraday Bid Intraday Ask
N Y Y Y Intraday Ask Intraday Ask
Y N Y Y Intraday Bid Intraday Bid
N N Y Y EOD-UB EOD-UA
N N N N Blank Blank
NOTE: For some exchanges, Universal Bid and Ask will reflect the previous day’s Close Bid or Ask Price if the extraction is scheduled during market hours before the current day’s Close Bid or Ask Prices have updated. Because Premium EOD Pricing is designed to return official closing prices, it is not always possible to retrieve intraday values.

Understanding Extraction Output
DataScope Select User Guide 11.2 Page 130 of 198
Timeseries Pricing Extractions
Fixed Income – TRPS RICs (Price Source “EJV”)
Closing Bid or Ask Prices are used for the Universal Bid and Ask Prices, as Premium Prices are not stored for historical retrieval. Bid and Ask Prices are not swapped if one price is not available.
Fixed Income – Contributed & Composite Instruments (Price Source other than “EJV”)
Closing Bid or Ask Prices are used for the Universal Bid and Ask Prices. Prices are not swapped if one price is not available. Bid and Ask Prices are not swapped if one price is not available.
Equity, Money, Futures & Options
Closing Bid or Ask Prices are used for the Universal Bid and Ask Prices. Prices are not swapped if one price is not available. Bid and Ask Prices are not swapped if one price is not available.
Lipper Funds
Closing Bid or Ask Prices are used for the Universal Bid and Ask Prices. Prices are not swapped if one price is not available. Bid and Ask Prices are not swapped if one price is not available.
Universal Close Prices
Composite, EOD Pricing & Premium EOD Pricing Extractions
Fixed Income –TRPS RICs (Price Source “EJV”)
For Composite and EOD Pricing extractions, the current day’s 4:00 PM Bid Price is used as the Universal Close Price. Note that Close Price may not match the Universal Close Price because a 4:00 PM price may be used instead of the Closing Bid Price.
For Premium EOD Pricing extractions, the current day’s closing Bid Prices reported for the AMERS, EMEA and ASIA regions are used for the Universal Close Prices. If these prices are not available, the 4:00 PM Bid Prices are used instead. If the 4:00 PM Bid Prices are not available, then the 3:00 PM Bid Prices (AMERS and ASIA regions) or 2:00 PM (EMEA region) Bid Prices are used. If these prices are not available, then the previous day’s Closing Bid Prices are used instead.
Fixed Income – Contributed & Composite Instruments (Price Source other than “EJV”)
If the pricing method is Yield or Discount Price, then the corresponding Bid Yield or Bid Discount price value is used for the Universal Close Price. If the pricing method is Price, then the Closing Price is used for the Universal Close Price except for Composite RICs (price source = CPL, CPN or CPT), where the Bid Price is used for Universal Close Price.
NOTE: Exclude Null Codes for Universal Close Price can be checked In Preferences to retrieve the previous business day’s universal close price when the extraction executes on a non-trading day or does not have a value for the current trading day, eliminating null code values in extractions. Leaving the preference unchecked will mean the current day’s null code is returned. (Preference is not applicable to Timeseries Pricing extractions).

Understanding Extraction Output
DataScope Select User Guide 11.2 Page 131 of 198
Equity, Money, Futures & Options
A Universal Close Price is provided per file code. The value is mapped to a price fact that the corresponding exchange deems to be the official closing price (for example, Official Close, Bid, Ask, etc.). In cases where the exchange does not provide an official Closing Price, Thomson Reuters determines the Closing Price. See the DataScope Select Data Content Guide for mappings by exchange. Note that the Universal Close Price Date will appear current despite the Universal Close Price being from a previous trade date for suspended or illiquid instruments.
Lipper Funds
DataScope Select determines the Universal Close Price for Lipper Funds based on a hierarchy of the first non-null price from Net Asset Value, Bid Price, Mid Price or Ask Price.
Timeseries Pricing Extractions
Fixed Income – TRPS RICs (Price Source “EJV”)
Closing Bid Prices are used for the Universal Close Prices as Premium Prices are not stored for historical retrieval.
Fixed Income – Contributed & Composite Instruments (Price Source other than “EJV”)
If the pricing method is Yield or Discount Price, then the corresponding Bid Yield or Bid Discount price value is used for the Universal Close Price. If the pricing method is Price, then the Closing Price is used for the Universal Close Price except for Composite RICs (price source = CPL, CPN or CPT), where the Bid Price is used for Universal Close Price.
Equity, Money, Futures & Options
A Universal Close Price is provided per file code. The value is mapped to a price fact that the corresponding exchange deems to be the official closing price (for example, Official Close, Bid, Ask, etc.). In cases where the exchange does not provide an official Closing Price, Thomson Reuters determines the Closing Price. See the DataScope Select Data Content Guide for mappings by exchange.
Lipper Funds
DataScope Select determines the Universal Close Price for Lipper Funds based on a hierarchy of the first non-null price from Net Asset Value, Bid Price, Mid Price or Ask Price.

Understanding Extraction Output
DataScope Select User Guide 11.2 Page 132 of 198
Premium EOD Pricing Validation Codes
Validation checks are reported for the following fields: Ask Price, Alternate Close, Bid Price, Close Price, High Price, Low Price, Mid Price, Settlement Price, Universal Ask Price, Universal Bid Price, Universal Close Price, Volume and SWAP Price. Multiple codes are presented in a comma-separated list. Possible values that can be returned include.
Code Description
OPT Price captured after Market Close Time but before Optimal Retrieve Time
PRE Price captured prior to Market Close Time
EOD Validated EOD Price
PFI Verified Premium Fixed Income Price
JMP Price increased/decreased beyond expected percentage from the previous day's price
FLT Price is the same as the previous day's price
MIS No price found for this instrument
NEG Illogical negative price
BGA Bid is higher than Ask
AOK Price passed all Premium EOD validations
TMD Price not captured at Scheduled Retrieve Time
Null Code Values
If you have Return Null Code Values in Extraction Pricing Fields selected in your Preferences, your extraction will reflect the appropriate null code value when the instrument’s price is not available due to exchange events (e.g., Public Holiday) or certain data conditions (e.g., Invalid Format). This setting applies to EOD Pricing, Premium EOD Pricing and Timeseries Pricing extractions for Fixed Income, Equity, Derivatives, Money, and Open Funds, as well as Estimates extractions for equity instruments.
Supported null code values are as follows:
Code Description
-9999201 Invalid format (e.g., character instead of numeric)
-9999202 Source-reported error
-9999301 No data applicable (e.g., this fact is not available from this exchange)
-9999401 No trade, including suspended; no activity for money data *
-9999402 Market holiday *
-9999403 Non-trading day (e.g., Saturday for US stocks)
-9999999 or null Generic null, no data available (EOD Pricing and Timeseries Pricing extractions)
-9999 or null Generic null, no data available (Estimates extractions only)
* Applicable to EOD Pricing, Single Historical Price and Timeseries Pricing extractions. All other codes are for EOD Pricing extractions only.

Understanding Extraction Output
DataScope Select User Guide 11.2 Page 133 of 198
About Extraction Notes
A corresponding notes file is generated with your extraction. It provides information about the extraction execution, including processing statistics, embargo delays, suppressed items, and warnings.
NOTE: To expedite troubleshooting of extractions, always provide the notes file, along with the corresponding input list and report template, when raising a client inquiry.

Understanding Extraction Output
DataScope Select User Guide 11.2 Page 134 of 198
Processing Statistics
The following statistics are always provided:
User ID
Extraction ID
Schedule Name and ID
Input List, # of items in list, name and ID, creation date and last modified date
Schedule Time or Trigger
Report Template, # of fields, name and ID, creation date and last modified date
Processing completion date, time and number of seconds to complete
Processing time is shown in the time zone selected in your user preferences.
The processing time is the total time elapsed while extracting the data from the database and external sources and formatting the report for delivery.
Extraction finish date, time (UTC) and servers used in processing
Processing Completion and Extraction Finished are the same except that the extraction finished time is output in UTC for troubleshooting purposes.
Usage Summary
Notes and warnings for the specific extraction type that are identified during the extraction execution are also provided. These include notes related to instruments, exchange embargoes, scheduling times, data fields, etc. See the FAQ link in the DataScope Select Help for specific warning messages.
TRPS Derivatives and Structured Notes Tiers
Pricing for TRPS Derivatives and Structured Notes Tiers involves more research, analysis and price modeling per security by the TRPS Evaluators than pricing of standard securities. Access requires additional permissions.
The types of complex instruments priced by TRPS are grouped as follows:
Derivatives and Structured Notes Tier 1: Includes Credit Linked (CRL) notes.
Derivatives and Structured Notes Tier 2: Includes Equity Linked Reverse Convertible (ELR), Equity Linked Exchangeable Notes (ELX) and Interest Rate Linked CPI Linked (IRC) notes.
Derivatives and Structured Notes Tier 3: Includes Commodity linked (CML), Currency linked (CUL), Equity Linked (ELI), Hybrid (HYB), Interest Rate Lined Steepeners (IRS) and Interest Rate Linked Coupon (IRR).
TRPS Derivatives and Structured Notes pricing usage is reported in your extraction notes file. It shows the total count of instruments by complex instrument type, along with the complex instrument group type and the pricing source, which will always be TRPS.

Understanding Extraction Output
DataScope Select User Guide 11.2 Page 135 of 198
Embargo Delays
Each exchange and its corresponding embargo delay are identified on a separate line. Delivery times are presented in the time zone set in your user preferences.
For more information about embargo delays, see About Embargoed Extractions.
Intermediate Embargo Reports
The initial intermediate embargoed file is identified as Filename.0min and contains prices for instruments that are available as of the extraction execution. All subsequent files are identified as Filename.Xmin, where X indicates the five-minute interval during which prices are released.
The time of the initial intraday snapshot, embargoes and the exchanges requiring those embargoes are identified first. The last intermediate embargoed report that will be delivered follows. This report will contain prices for the exchange with the longest delay. All intermediate embargoed reports and the times at which they will be delivered appear next.
Invalid Instruments
Invalid instruments are those that appear in your instrument list, but could not be validated. Invalid instruments are:
Inactive or Unsupported.
Assigned a pricing source that cannot be found
Not found in Thomson Reuters database
Suppressed Items
Suppressed items can include:
Third-Party Content & Entitled and Premium Data Fields – All data fields that you are not entitled to will be identified as suppressed. Each data field will be listed on a separate line.
Certain Prices – Prices that are older than today will be suppressed for extractions that are scheduled to retrieve Today Only prices. Each instrument will be identified on a separate line with the instrument’s last trade date being identified as greater than the extraction execution date.
NOTE: If you run an Intraday Pricing or Premium EOD Pricing extraction that requires exchange delays, your notes file will be delivered before the output file. It will identify the exchange delays and the expected delivery time of the output file. Once the extraction is delivered, the notes file will be updated to reflect the actual delivery time for the embargoed extraction.
NOTE: If you clear the intermediate embargo report preferences, the file name for the previously scheduled and all new extractions going forward will no longer have Xmins. Please note the impact of this change on automatic processing of your extraction reports. See
Setting Preferences for details on setting embargo preferences.

Understanding Extraction Output
DataScope Select User Guide 11.2 Page 136 of 198
Warnings
Warnings alert you to any problems with your extraction, such as missing prices invalid/missing identifiers. Details on specific warnings are provided in FAQs, which you can access via the Help menu.
ISO 15022 Events
For information on the notes file for ISO 15022 event extractions, see the DataScope Select ISO 15022 Service User Guide.
StarMine Notes
The notes file for StarMine extractions includes enhanced and expanded data that is not reported currently, or is different from the notes file, for all other extraction types. The expanded and different data includes:
Truncation lengths are tracked separately for all fields, including fields with the same name.
Fields that have leading or trailing tabs, etc. are quoted.
The order of lines in the notes file may differ from other extraction types.
Extractions that fail and generate a partial report are identified with a stamp indicating the actual processing end date and time in the header/trailer (instead of a dummy date).
Input lists will be identified with a hexadecimal radix indicator (0x).
About RIC Maintenance Reports
The RIC maintenance report lets you view descriptive and reference data fact changes to the equity-related RIC identifiers in your instrument lists. This optional report identifies RIC maintenance changes that have occurred over the past ten days and is available for equities, warrants, funds, derivatives, and money/foreign exchange.
The report is generated simultaneously with your extraction output file. It appears in the RIC Maintenance column in the Extracted Files screen. The file takes the same format as your extraction output file (CSV or XML). Additionally, if you have Column Headers selected in your report template, column headers will appear in your RIC Maintenance report and vice versa.
NOTE: To generate and view RIC maintenance reports, you must have Enable RIC Maintenance Reports selected in your Preferences. Setting Preferences for instructions.

Understanding Extraction Output
DataScope Select User Guide 11.2 Page 137 of 198
Report Contents
The RIC maintenance report contains the following information:
Column Description
Identifier Identifier for the equity instrument in your instrument list whose data facts have changed over the past ten days.
Identifier Type Identifier type for the equity instrument.
Source Three-digit exchange code for the equity instrument.
RIC Updated RIC for the instrument in your instrument list based on the maintenance changes. This value matches the RIC in the New Value column, not the RIC in your instrument list.
Record Date Date on which the RIC maintenance event occurred. Note that the record dates are not listed chronologically. That means an instrument can be identified as DLST (delisted) in row 1, and then identified as RENM (Renamed) in row 2, when the instrument was actually renamed first, and then delisted.
MainType Code representing the RIC maintenance type:
CCNV – Currency Conversion
DELT – Deleted (RIC permanently removed)
DLST –Delisted (No new pricing information)
FLCH – File Code Change
RENM – Rename (RIC name change)
RLST – Relisted (Pricing will start again)
SPLT – Stock Split
Old Value RIC for the instrument before the maintenance updates. This value matches the RIC in your instrument list.
New Value Updated RIC for the instrument in your instrument list based on the maintenance changes. This value matches the RIC in the New Value column, not the RIC in your instrument list.
Factor Numeric value indicating the adjustment of per share values applicable for split and currency conversion records.
A value of 1 in this field indicates that you should apply the CU Factor to all relevant non-grade fields, except volume.
A value of 2 indicates that the CU Factor should be applied to the Turnover fact only, as prices are quoted on a percentage basis.
Factor Type Factor type applicable for currency conversion records.

Understanding Extraction Output
DataScope Select User Guide 11.2 Page 138 of 198
About Platts Files
Optional daily and weekend files allow permissioned clients to track and maintain an accurate history of Platts assessments. To receive the daily corrections or weekend file, you must have Generate Platts Corrections File and Generate Platts Weekend File selected in your Preferences. See Setting Preferences for instructions.
Both the daily corrections and weekend file are provided in comma separated value (csv) format in the style of an Intraday Pricing extraction, with a fixed date format to prevent conversion errors when opened in Excel. The files are available for download for 30 calendar days from generation.
Platts Corrections File
The file name uses the format PlattsCorrectionsyyyymmddhhmmss.csv to identify the date and time of the corrections file.
Corrections are listed in chronological order with the most recent corrections appearing first. Approximately one week's worth corrections are shown, with the oldest corrections being dropped when new ones are added.
The file is generated each trading day at approximately 01:15 GMT and is available for client download approximately 15 minutes later, around 01:30 GMT.
The file includes the following fields. Note that fields are not subject to the preferred formats selected in the Preferences screen. They are output in the following formats:
Accumulated Volume – N/18.9
Ask Price – N/12.5
Assessment Date – DD-MMM
Bate Code – One-letter code
Bid Price – N/12.5
Correction Date – DD-MMM
Last Price – N/12.5
Mid Price – N/12.5
New Assessment – N/5.3
Old Assessment – N/5.3
Primary Activity – N/12.5
RIC – Eight-character code
Secondary Activity – N/12.5
Universal Ask Price – N/12.5
Universal Bid Price – N/12.5

Understanding Extraction Output
DataScope Select User Guide 11.2 Page 139 of 198
Platts Weekend File
The file uses the format PlattsWeekendyyyymmddhhmmss.csv to identify the date and time of the weekend file. It is generated each Monday (excluding holidays) between 23:00-24:00 GMT. Note that the file generation is dependent upon the receipt of Platts prices so this window is subject to change.
The file contains the following fields. Note that fields are output in the default formats identified in the DataScope Select Data Content Guide. Please see the Intraday Pricing fields section of the guide for details:
Accumulated Volume
Ask Price
Assessment Frequency Code
Bid Price
Currency Code
Delivery Date
Energy Terms 1
Energy Terms 2
High Yield
Instrument Long Name
Instrument Name
Last Price
Low Yield
Mid Price
Platts Category Code
Previous Close Date
Previous Close Price
Primary Activity
Primary Activity 2
Region/Country
RIC
Secondary Activity
Secondary Activity Type
Settlement Date
Trade Date
Units of Measure
Universal Ask Price
Universal Bid Ask Date
Universal Bid Price

DataScope Select User Guide 11.2 Page 140 of 198
Chapter
8
Searching & Viewing Details
This chapter provides instructions for searching and viewing instrument and entity details. DataScope Select supports both quick identifier-based lookups and comprehensive criteria-based searches. You can view and print the details of any item returned by Search, and then add one or more items to your input lists.
For details, see:
Search Options
Performing an All Search
Performing Criteria-Based Searches
Searching Entities
Searching Funds
Viewing Recent Searches
Viewing Details

Searching & Viewing Details
DataScope Select User Guide 11.2 Page 141 of 198
Search Options
Search options are available from the DataScope Select menu under Search:
Note the following:
When you click Search, the All search screen appears. From this screen, you can search across one or more asset classes based on a specified identifier type and identifier.
Alternatively, you can enter Search All in the global search text box, and then click GO.
To perform a criteria-based search based for a specific asset type, click on the asset type. This option enables you to lookup one or more instruments that match your criteria.
Alternatively, you can enter Search and the asset type in the global search text box, and then click GO. For example, Search Entities or Search Gov/Corp.
Searches are not supported for Open Access Instruments, ISO 15022 Events or Estimates.

Searching & Viewing Details
DataScope Select User Guide 11.2 Page 142 of 198
Performing an All Search
You can use the All search screen to perform quick, identifier-based searches across the following asset classes: CMO/ABS, Equities, Futures & Options, Gov/Corp, MBS, Money, US Municipals and Funds.
To perform an identifier-based search for entities, see Searching Entity Identifiers & Company Names.
To perform an All search:
1. Click DataScope Select, and then select Search.
The screen updates to show the All search screen.
2. Clear the check boxes as appropriate to exclude asset classes from your search.
For example, clear Equities to exclude equities/warrants and fair value pricing from your search. Alternatively, use Check All and Clear All to make your selection.
3. Select an identifier type to search on from the Identifier drop-down list.
4. Enter the corresponding identifier code in the corresponding box.
You can enter a complete or partial unique identifier code. An exception is with chains, where the complete identifier is required.
5. Optionally, update the preferred identifier. The identifier type defaults to the preferred identifier type selected in your Preferences.
6. Click Search.
NOTE: The All search may not return the same number of instruments that are returned using the global search box, located at the top of the screen. For example, the global search box supports ISINs for Mortgages, while the All and Mort Pass-Thrus (MBS) search screens do not. These features will be aligned in a future DataScope Select release.

Searching & Viewing Details
DataScope Select User Guide 11.2 Page 143 of 198
Search returns all instruments matching your input to the results table.
Note the following:
Use the Limit Search Results To drop-down to limit the number of instrument returned in the search: 1, 10, 50, 500, 1000, 2000 or 5000. The limit you select will be remembered as part of Recent searches. When you navigate to another Search screen, the default limit returns to 2000.
Multiple items can be returned for a single identifier when the item has more than one exchange/pricing source.
If the identifier type does not exist for the items identified in search, then an alternative identifier is used. The alternate identifier follows this hierarchy:
RIC
CUSIP
ISIN
Valoren
Wertpapier
Common Code
For example, if a RIC does not exist for the instrument, then the CUSIP is shown, and so on.

Searching & Viewing Details
DataScope Select User Guide 11.2 Page 144 of 198
Performing Criteria-Based Searches
You can perform criteria-based searches on a particular asset type. The following asset types are supported: Benchmarks, CDS/IRS, Chains, CMO/ABS, Corporate Actions, Deals, Entities, Equities, File Codes, Funds, Futures & Options, Gov/Corp, Loans, Money, Mortgage Pass Thrus (MBS), OTC Equity Options, and US Municipals.
To perform a criteria-based search for entities, see Searching Entity Identifiers & Company Names.
Key Information about Criteria-Based Searches
When searching for Chain RICs, you must specify the full RIC identifier. Wildcards and partial text searches are not supported for Chains.
Chains for MSCI, FTSE and Dow Jones indices are not supported in this DataScope Select Release, nor are Chains of Chains or Benchmark Chains in extractions.
Search capabilities are not supported for Open Access Instruments or ISO 15022 Events. Note that you can search for Chains that contain Open Access constituents; however, you must know the complete identifier for the Chain RIC.
The Deals screen contains selections for defining equity offering searches that are not yet implemented and planned for a future DataScope Select release. These selections are the Equity Options check box and the Implemented and Withdrawn selections from the Status drop-down lists. In the interim, you should continue to perform equity offering searches from the Corporate Actions search screen.
When searching for Deals and specifying a RIC, you must enter a primary RIC. Search will not return any deals if you specify a RIC for another exchange on which the instrument trades.
Functionality for searching on secondary RICs will be implemented in a future DataScope Select release. Note that this issue relates to Deal searches only. If you include secondary RICs in your input list, you will get deals returned in your extraction file.
Support for searching on Rumored Deals is planned for a future DataScope Select release.
Exchanges are listed alphabetically in the Exchange drop-down list. Some exchange names are preceded with “The”. If you cannot find an exchange in the list, try looking under “The”.
See Specifying Search Criteria for details on entering criteria.

Searching & Viewing Details
DataScope Select User Guide 11.2 Page 145 of 198
To perform a criteria-based search:
1. Click DataScope Select, and then under Search, select the asset type:
The screen updates to the search screen for the selected asset type.
For fund searches, see Searching Funds.
2. Enter search criteria in the fields provided.
See Specifying Search Criteria for details.
To select multiple items in the drop-down lists, press Ctrl while making your selections.
3. Optionally, update the preferred identifier.
See Performing an All Search for instructions.
4. Click Search.

Searching & Viewing Details
DataScope Select User Guide 11.2 Page 146 of 198
Specifying Search Criteria
The following tables identify supported formats for specifying search criteria:
Type Formats
Numeric Whole Numbers – 7; 125; 5,000,000
Float Numbers – 7.25; 6.075
Conditions – <10; <=10; >10; >=10
Ranges – 8-9.5; 500-1,200
NOT Criteria – NOT 10 (access all non-10 securities)
Text Exact Word(s) – IBM; ADVANCED MICRO DEVICES,, INC. (note double comma)
Important! To search for a specific issuer whose name contains a comma (for example, ADVANCED MICRO DEVICES, INC.), you must enter a double-comma (for example, ADVANCED MICRO DEVICES,, INC.). If you enter a single comma, the search assumes that you are entering a list and will not return any results.
Lists – Separated by commas: IBM,MCD,DO (no spaces allowed)
Tip: You can specify multiple File Codes (IPCs) in Equity and File Code searches. File codes must be separated with a comma.
Wildcard Matches – Supports * (asterisk) for wildcards.
For example - IB* (match any number of characters)
You cannot combine wildcard matches and lists. For example, the search string "A*,B*" will look for a string that contains A followed by any number of characters, followed by [comma]B, followed by any number of characters. The search will not look for all strings that begin with an A or a B.
Please note that using a leading asterisk (for example, *A) will significantly slow down search performance and is therefore not recommended.
NOT Criteria – NOT IBM
Dates Exact Date – 4/13/17; 04/11/2017 4/17; 2017
Conditions – <2017; >2017; <=4/15/17; >=17
Ranges – 02/27/17-04/08/17; 02-17; 2012-2017
NOT Criteria – 02/27/17-04/08/17 NOT 01/01/7
FROM/TO – FROM 02/27/17 TO 04/08/17

Searching & Viewing Details
DataScope Select User Guide 11.2 Page 147 of 198
Searching Entities
Use Search to look up entities and fund-level data in Thomson Reuters database. You can search entity identifiers or company names. Advanced searches (criteria-based) are also supported. Search accepts complete and partial input and wildcard. DataScope Select uses your input to identify all matching records.
Searching Entity Identifiers & Company Names
To search for entities:
1. Click DataScope Select, and under Search, select Entities.
2. Click Add Entities.
The screen defaults to a simplified text-entry search (All search) in which you can search by identifier or company name.
3. Enter an identifier or company name in the corresponding box.
Supported identifiers for entities are Org ID, RCP ID, LEI, CIK, Regulator ID, Tax File ID or Company/Registration Number. You can also enter a Domicile, Country of Incorporation, Derived Parent and Derived Ultimate Parent.
For funds, supported identifiers are Fund Lipper ID (FLI), ISIN, CUSIP or RIC .
4. Click to display a drop-down with help on entering search criteria.
For best results with simple searches, make sure to do the following:
Prefix the Not operator with an asterisk (for example, *NOT IBM).
Make sure compound key words are enclosed in quotes (for example, “United States”).
NOTE: DataScope Select differentiates searches for fund-level and fund shares class data. Use the Entities search to search for fund-level data. To search for fund shares class data, use the Funds search. You can access the Funds search directly from the DataScope Select menu.

Searching & Viewing Details
DataScope Select User Guide 11.2 Page 148 of 198
Performing an Advanced Search
To perform an advanced search for entities:
1. Click DataScope Select, and under Search, select Entities.
2. Click Add Entities.
3. Click the All menu and choose either Legal Entity or Fund.
4. Go to Step 5 to perform a Fund search. To search for legal entities, select Legal entity from the All menu, and then enter criteria in the following fields.
Identifier – Enter the identifier, and then select the corresponding identifier type from the drop-down. Supported identifiers are: RCP ID, Org ID, BIC and LEI. Other supported identifiers are CIK, Regulator ID, Tax File ID and Company/Registration Number.
Name – Enter all or part of the entity’s name. Select Official Name Only to restrict your search to the entity’s official name. If you do not select this option, the search will be expanded to include trading name(s) by which the entity is known in the market place.
Country – Click Domicile to select one or more countries in which the entity is based. This location can differ from the entity’s country of incorporation for entities registered in offshore locations or entities that operate in multiple locations. Click Incorporation to select the country in which the entity is incorporated.

Searching & Viewing Details
DataScope Select User Guide 11.2 Page 149 of 198
Classification – Click TRBC to select the Thomson Reuters Business Code for the business of the entity.
NOTE: TRBC codes and descriptions are presented in a hierarchical list representing the different sectors and the length of the associated codes. Supported sector and code lengths are Economic -2, Business -4, Industry Group -6 and Industry - 8.
When you click on Domicile, Incorporation or TRBC, a separate window appears listing all of the available items for that option. Click on one or more items to make your selections, and then click Done.
.
When you click Done, the button updates to show the number of items selected for this criteria:
Verified Only – Select to return only verified records in the search results.
Regulated Only – Select to constrain your search to return regulated legal entities only. When cleared, both regulated and non-regulated legal entities are returned.
Issuers Only – Select to return only legal entities that are issuers of securities.
Active Only – Select to return active entity records only.

Searching & Viewing Details
DataScope Select User Guide 11.2 Page 150 of 198
5. To search for funds, select Fund from the All menu, and the enter criteria in the following fields:
Identifier – Enter the eight-digit code assigned by Lipper to identify the fund. Note that only Fund Lipper IDs are supported for search.
Name – Enter the fund name in full or in part.
Related Party – Select a related party from the drop-down list, and then enter the corresponding name.
Administrator – Fund support company responsible for regular daily operations of a fund, such as maintaining financial records, NAV calculation, data processing, and compliance services. The Administrator may coincide with the fund management company name in case the fund management company appoints no specific administrator.
Advisor – Fund support company responsible for the day-to-day asset management of a fund's portfolio of investments. The Advisor may coincide with the fund management company name in case the fund management company appoints no specific advisor.
Auditor – Company that provides an annual professional examination of a company's accounting records and supporting data for the purpose of issuing an opinion regarding fairness and conformity with accepted accounting principles. Also known as an Independent Registered Public Accounting Firm.
Custodian – Fund support company, typically a bank or trust company, responsible for the holding and safekeeping of a fund's securities. In most jurisdictions this company needs to be registered as a Bank with the local regulator.
Distributor – Fund support company responsible for facilitating the distribution and sale of a fund's shares, sometimes known as underwriter, which may sell shares directly to investors and act as a wholesaler of the shares to broker-dealers and other financial intermediaries. It may also provide marketing, sales materials and support. All U.S. open-end mutual funds are required to have a distributor. Distribution services for non-U.S. open-end mutual funds may be provided by different fund support companies.
Fund Manager – Fund support company responsible for managing all legal and financial aspects of the fund and appointing the advisor, administrator, custodian, and other support companies. This company acts in the role of investment advisor or other support companies if not separately appointed.

Searching & Viewing Details
DataScope Select User Guide 11.2 Page 151 of 198
Sub Advisor – Fund support company hired by the Fund Management Company or Investment Advisor to support the fund's day-to-day asset management. The Sub Advisor may or may not be affiliated with the Investment Advisor and may manage some or all of a fund's assets.
Country – The country or countries in which the fund invests.
6. Click Search.
Your search results are returned to the table at the bottom of the screen. When you do an All search, each entity returned is identified by its Identifier (OrgID for legal entities and Fund Lipper ID for funds) and Official Name. The entity is also identified as a Legal Entity or Fund.
Descriptive information about each item returned by search appears in the table at the bottom of the screen. From here, you can select an item and view related details, print item details, and add items to one or more selected input lists.
Key Information about Search Results
All items matching your input appear in the results table. The symbol – appearing in any search results column indicates that data was not available for that item. Additionally note the following:
The Source/Exchange column can show these results:
N/P – Denotes an instrument without a price
N/E – Denotes an instrument without an exchange
Deal searches can return these results:
When the Target Company is known (e.g., public), but the Acquirer Company is undisclosed (e.g., private), Search identifies the deal parties in both the Target Name and Acquirer Name columns, as well as the Target Company’s RIC identifier in the Target RIC column. Because the Acquirer Company is private, the Acquirer RIC column shows – instead of an actual RIC.
In other instances, the RIC for the Target Company likely delists upon consolidation. In this case, the Target RIC column will be blank and the Acquirer RIC column will be populated.
Chain RICs can return an error message when:
The Chain is not permitted (e.g., the Chain is found, but not available in DataScope Select)
The RIC is not a Chain
The Chain contains other Chains
The Chain is not the base (beginning) of the Chain (e.g., one of the Chain’s constituents is specified instead)
Automatic conversions are done for CUSIPs, ISINs, and SEDOLs (both London Stock Exchange (LSE) and Irish Stock Exchange (ISE) SEDOLs) when the last digit of the identifier is missing or incorrect. In this case, DataScope Select will identify the correct identifier and replace it in the instrument list.

Searching & Viewing Details
DataScope Select User Guide 11.2 Page 152 of 198
Searching Funds & Commodities
The Funds and Commodities search screens follow a format than that is aligned with the Entities search. This more intuitive format will be adopted for other search types in future DataScope Select releases.
Default Search
The Funds search screen defaults to a text box from where you can lookup active funds using a supported fund share class identifier (RIC, CUSIP, ISIN, Sedol, Valoren, Wertpapier or LipperID) or fund name, administrator or manager. Note that Boolean operators (AND, OR and NOT) and wildcard searches using the asterisk (*) are also supported.
The Commodities search screen defaults to a keyword search, where you can enter an identifier (RIC, Chain or File Code), description or other identifying text. For example, D-AI00266, 6254, AISI Steel Carbon, Metal, etc.
Advanced Search
To perform a criteria based search, click Advanced▼. This screen follows the same general instructions for entering criteria as described in Searching Entities.

Searching & Viewing Details
DataScope Select User Guide 11.2 Page 153 of 198
Viewing Recent Searches
This option appears in the menu bar after you view the details of an instrument or an entity from Search or an input list. Clicking Recent reveals a drop down, showing the most recently viewed items for your current DataScope Select session. Up to 15 instruments or legal entities can appear in the list. Items appear in the order in which they were viewed, with the most recently viewed item appearing first. Click on the identifier to go directly to the Details screen for that instrument or entity. The menu is cleared when you sign out of your DataScope Select session.
Viewing Details
You can view the details of any selected item returned by Search or imported into an input list in Details. The screen includes links to other screens that show details, valuations pricing, and cross-reference information for the selected item. Other screens, such as corporate actions, ratings, and prepayment terms, appear for the appropriate instrument type or entity.
To view details, select the identifier to view by either clicking on the identifier link or clicking on the check box next to the identifier, and then selecting Instrument Details. For legal entities, click on the OrgID, Derived Parent or Derived Ultimate Parent links.
By default, the Summary screen appears with the other available screens. Click on the links to navigate the screens. Note that blank fields or screens indicate that no data exists or you are not permissioned for the data.
Below the list of available screens are the function that you can perform for the selected item, for example Add to List and Print. Add to List allows you to add the item to one or more input lists; while Print lets you print the details of the selected screen or print all Details screens.
Additional functions can appear, depending on the selected item and screen. For example, for a TRPS-priced instrument, a Submit Challenge function appears when you select the Pricing and Analytics screen. When the selected item is an entity, a Rent Entity button appears for entities that are not currently rented by you or your company.

Searching & Viewing Details
DataScope Select User Guide 11.2 Page 154 of 198
Viewing TRPS Premium Prices
Asia, EMEA, and U.S. premium prices are available from the Pricing and Analytics tab for government/corporate, CMO/ABS and MBS instruments. The tab shows the instrument’s most recent premium prices evaluated by Thomson Reuters Pricing Service. Pricing information includes the premium pricing region (ASIA, EMEA or US) and pricing cycle, along with bid, ask, and mid prices and bid ask spread. Prices are formatted to three decimal precision.
Today’s premium prices for the indicated region and pricing cycle are available each trading day approximately 45 minutes after the pricing snapshot (for example, US 3 and 4 p.m. premium prices are available at approximately 3:45 and 4:45 p.m. EST/EDT, respectively). Prior to these times, the previous day’s (or most recent) price is shown. Use the Trade Date column to track this information. Trade date is shown in the date format specified in your Preferences. Always review the Trade Date to ensure you are viewing today’s prices. Click Reload Prices to ensure the most recent prices are shown.
This tab also shows tolerance comments for TRPS prices in all regions. Comments apply to the first pricing cycles and are carried over to the later cycles. TRPS provides tolerance comments on government/corporate instruments in all regions. For the US region only, tolerance comments are also reported for CMO and a subset of MBS instruments. This enables you to view pricing information at the portfolio-level, alongside other key premium pricing fields. Comments, if reported, are available as of the pricing cycle time (for example, US 3 PM); otherwise - - appears in this section to indicate that no comments were reported. Tolerance comments remain in this screen until they are cleared for the next trading day.
From this tab, permissioned users can submit a price challenge for the selected TRPS-evaluated bond via the Submit Challenge button at the bottom of the screen. See Submitting Price Challenges for details.

Searching & Viewing Details
DataScope Select User Guide 11.2 Page 155 of 198
Viewing Structured Note Evaluations
Access to TRPS-evaluated structured notes pricing in DataScope Select requires permissioning. Because of the complex nature of these products, additional fees may be required.
Clients who would like receive structured note evaluations should contact a Thomson Reuters Pricing Service Specialist. For non-permissioned clients, structured note evaluations will not be displayed on-screen or output in extractions. The corresponding extraction notes file will indicate that the content is suppressed due to lack of permissioning.
Note that there are three separate permissions for TRPS Derivatives and Structured Notes Tiers, representing the individual groupings. A separate TRPS+ for Derivatives and Structured Notes permission also appears for viewing the underlying transparency of the selected structured note.
Full transparency into the underlying pricing methodology of structured note evaluations is available for permissioned clients via the TRPS+ link on the Pricing and Analytics screen. The link, visible only for clients who have the TRPS+ for Derivatives and Structured Notes permission, is located in the Valuation section next to the Close Price.
Clicking TRPS+ launches a separate window that provides detailed transparency into the evaluated price and the methodology used to price derivatives and structured notes, and for running different pricing scenarios.
Viewing Historical Prices
Historical prices appear on the Price History tab for fixed income, equity, funds, futures & options, money and US municipal instruments. The tab shows the instrument’s prices for the past 30-calendar days (excluding weekends), as provided by the specified contributor.
Bid, ask, mid, and close prices are shown for all supported instruments.
For equities, Alternate Close, Net Asset Value and Volume are also shown.
For futures & options, Settlement Price and Volume are also shown.
For US municipals, Bid Yield, Ask Yield and Mid Yield are also shown.
For funds, Alternate Close Price, NAV and Volume are also shown
Weekends are excluded in the price history; therefore, it is possible that fewer than 30 rows of data are shown. Additionally, a dash (–) appearing in any price column denotes that no price is available for the indicated trade date.
NOTE: Permissions are required for structured notes pricing only. Non-permissioned clients can continue to view and extract terms and conditions content. Permissions are also not required for structured notes with a contributed price.
Tip: DataScope Select displays whatever price history is available for the specified contributor for the past 30 days. To view the depth of historical fixed income prices available from Thomson Reuters Evaluators, make sure to view instruments with EJV as the price source.

DataScope Select User Guide 11.2 Page 156 of 198
Chapter
9
Understanding Usage Reports
DataScope Select tracks your extraction and rental usage. Extraction usage tracks the number of instrument or legal entity extractions performed for a specified time period. You can view this information at the user or company level. The rental usage screens show the number of extractions with rental data for a specified time period reported at the company level.
Important!
You will continue to be billed for rental data until you cancel your rental agreement via a formal written submission process. This means if you request rental data for 100 instruments in one month but none in the subsequent month, your subsequent month’s bill will still reflect 100 since you are still renting the data. Contact your local account manager or sales specialist for more information.
For details, see:
Viewing Usage Summary
About the Extraction & Rental Usage Screens
Viewing Instrument Extraction Usage
Viewing Legal Entity Extraction Usage
Viewing Instrument Rental Usage
Viewing Entity Rental Usage

Understanding Usage Reports
DataScope Select User Guide 11.2 Page 157 of 198
Viewing Usage Summary
The Summary screen provides graphical views of your company-level instrument extraction usage for the last 30 days grouped by, report template, asset class, users in your company and daily usage.
The Recent Activity stream shows the last 30 days of activity or last 30 extractions. You can hover the mouse over any part of the pie or bar charts to view the specific usage amount for that portion of the chart. Usage updates each time you refresh the screen.
To access the Summary screen, click Usage under your user name. You can navigate to the Instrument Extraction, Legal Entity Extraction, Instrument Rental and Legal Entity Rental screens using the links at the top of the screen.
NOTE: The Summary screen shows usage for instrument extractions only. Entity activity is not shown. Use the Legal Entity Extraction and Legal Entity Rental links at the top of the screen to view entity usage.

Understanding Usage Reports
DataScope Select User Guide 11.2 Page 158 of 198
About the Extraction & Rental Usage Screens
The instrument/legal entity extraction and rental screens share an identical format for viewing usage as defined in the following table :
Use the radio buttons to display usage as billed in GMT or in the local time zone specified in your user preferences.
Use the Find box to search the contents of the table displaying your extraction usage. When you enter text, only the items matching that text appear.
Use this drop down to select a view for displaying usage. Data can be viewed in summary or detail format
Use this drop-down to display usage at the user or company level for a specified time period.
Use this drop-down to specify the time period for viewing usage. You can view usage for this month (default), the last month or for a custom date range.
Use to export the grid and all of its contents to a comma separate value (csv) formatted file. The file takes the name of the selected screen.
Use to refresh the screen.
1
2 3 4 5
6
1
2
5
4
6
3

Understanding Usage Reports
DataScope Select User Guide 11.2 Page 159 of 198
Viewing Instrument Extraction Usage
The Instrument Extraction screen shows your billable items for the current month, the previous month or for a specified date or date range. You can view your usage or usage at the company level
Data can be viewed as billed (extraction time in GMT) or using the local time zone specified in your Preferences. Use the boxes at the top of the screen to find specific usage, select a view for displaying usage (Summary, Detail By Date, Full Detail or Detail By User) and to specify the period for viewing data.
The Full Details view contains the following items:
Extract Date – Identifies the extraction execution date, displayed in the format specified in your Preferences.
User – Shows the users tied to the indicated extraction when viewing usage at the company level.
Asset Class – Identifies instruments by asset class for which you have accessed data for the indicated period. Note that Open Access are identified as Non-DSS Security Type.
Sub-Class – Identifies the asset sub classification type for the indicated asset class. For example: Convertible, High Yield, Investment Grade, Loans, Open Access Instruments, etc. For Platts Market Data, Platts, along with the code for the specific package is shown.
Report Template – Identifies the report type used to extract data for the indicated asset class, as well as API usage.
List – Identifies the instrument list used in the extraction.
Report – Identifies the report template used in the extraction.

Understanding Usage Reports
DataScope Select User Guide 11.2 Page 160 of 198
Count – Identifies the total number of instruments used for the indicated period. If no data is returned for any item in your extraction, then that instrument is not included in the item count. An exception is with Corporate Actions reports. All instruments are counted regardless of data is returned. Note that for intermediate embargoed reports for Intraday Pricing extractions, instruments are counted only once and not each time an intermediate report is delivered.
Fixed Income Valuations – Identifies the total number of instruments by asset class for which fixed income valuations (e.g., Premium Data) was extracted for the indicated period.
This value is determined by totaling the number of instruments for which at least one premium data field was extracted. The value does not reflect the total number of fixed income premium pricing fields.
For example, say you ran only one extraction to date for the current month. In that extraction, you have 10 US Treasury instruments and two fixed income premium pricing fields. Your extracted output file shows data for eight instruments only. For the other two instruments, no data is returned (the two rows are entirely empty). When you look at your extraction usage for the current month, the Fixed Income Valuations column will show 8 for the Govt/Treasury/Central Bank row.
Equity Fair Value – Identifies the total number of instruments by asset class for which equity fair value content (e.g., Premium Data) was extracted for the indicated period.
This value is determined by totaling the number of instruments for which at least one premium data field was extracted. The value does not reflect the total number of equity fair value fields (see the example above).
NOTE: The number of instruments displayed in the Fixed Income Valuations and Equity Fair Value columns are inclusive of the total number of instruments shown in the Instrument Count column.

Understanding Usage Reports
DataScope Select User Guide 11.2 Page 161 of 198
Viewing Legal Entity Extraction Usage
Entity extraction usage can be viewed at the user or company level. The screen shows your billable items for the current month, the previous two months or for a specified date or date range. Data can be viewed as billed (extraction time in GMT) or using the local time zone specified in your Preferences. Use the buttons to display details: Summary, Detail By Date, Detail By User and Full Detail.
In the following example, entity extraction usage is shown at the company level with full details for the current month:
The Full Details view contains the following items:
Extract Date – Identifies the extraction execution date in the format specified in your preferences.
User – Shows the users tied to the indicated extraction when viewing usage at the company level.
Report Template – Identifies the report type used to extract data.
Verified – Displays Yes or No to indicate whether the record is verified.
List – Identifies the entity list used in the extraction.
Report – Identifies the report template used in the extraction.
Count – Identifies the total number of entities and funds used for the indicated period. If no data is returned for an entity. that item is not included in the item count.

Understanding Usage Reports
DataScope Select User Guide 11.2 Page 162 of 198
Viewing Instrument Rental Usage
Bond Schedules, Commodities Correction History, Composite, historical Corporate Actions (excluding IPO Events), Fund Allocation, Ownership – Owners, Ratings, StarMine, Symbol Cross Reference, Terms and Conditions, and Timeseries Pricing (excluding Single Historical Prices) are all considered “rental data.” Rental usage is reported at the company level.
You can view current rental usage, usage for a specified date range (cumulative rental usage as of the specified date) and new items added over a specified date range across three tabs: Current, As Of Date and New During Period. Dates are displayed in the format selected in Preferences. Use the buttons to display rental details: Summary, Detail By Date and Full Detail. Make sure to click Go to display rental data.
In the following example, instrument rental usage is shown with full details:
The full details view contains the following items:
First Extract Date – Identifies the first date on which rental data was extracted for the indicated item.
Last Extract Date – Identifies the most recent date on which rental data was extracted for the indicated item.
Expiration Date – Identifies the effective date for when you will no longer receive rental data for the indicated record. You provide the expiration date in your written rental cancellation (see the note at the beginning of this chapter for details).
Rental Type – Identifies the type of rental data that was extracted.
Count – Identifies the total number of instruments that you have used for the indicated period. For Corporate Actions reports, this value includes instruments for which no data was returned. Note that for intermediate embargoed reports for Intraday Pricing extractions, instruments are counted only once and not each time an intermediate report is delivered.

Understanding Usage Reports
DataScope Select User Guide 11.2 Page 163 of 198
Viewing Entity Rental Usage
The Legal Entity Rental screen shows the number of extractions of rental data (verified entities) for a specified time period reported at the company level. Note that unverified entities do not count as rental data. Usage is reported at the company level.
You can view current rental usage, usage for a specified date range (cumulative rental usage as of the specified date) and new items added over a specified date range across three tabs: Current, As Of Date and New During Period. Make sure to click Go to display rental data.
In the following example, legal entity rental usage is shown with full details:
The full details view contains the following items:
Added Date – Identifies the date on which the entity was rented.
Last Extract Date – Identifies the most recent date on which rental data was extracted for the indicated item. The date is displayed in the format specified in your Preferences.
Expiration Date – Identifies the effective date for when you will no longer receive rental data for the indicated record. You provide the expiration date in your written rental cancellation Until such notification is received, you will continue to be billed for rental data.
Count – Identifies the total number of entity records used for the indicated period.

DataScope Select User Guide 11.2 Page 164 of 198
Chapter
10
Submitting Price Challenges & Price Requests
This chapter takes you through the process of challenging Thomson Reuters Pricing Service (TRPS) evaluated prices via DataScope Select. AskTRPS provides automated bond price challenges for Asian, European and US securities/issues evaluated by TRPS, including government/corporate, CMO/ABS, MBS, US Municipal instruments. Single and multi-bond challenge support is provided. You can also request pricing for new issues and unpriced bonds.
For details, see:
About AskTRPS
Launching the Challenge Dashboard
Creating a Price Challenge
Creating Batch Challenge Files
Chatting with TRPS
Exporting Challenges
Submitting Pricing Requests
Viewing & Exporting Statistics Reports
About Thomson Reuters Valuation Navigator

Submitting Price Challenges & Price Requests
DataScope Select User Guide 11.2 Page 165 of 198
About AskTRPS
AskTRPS is an automated process for challenging TRPS evaluated prices via DataScope Select. This service provides a centralized source for creating, tracking and managing price challenges through intuitive on-screen controls and report generation capabilities. AskTRPS is available automatically to all clients who subscribe to TRPS data. No additional permissions or subscription is required.
AskTRPS provides automated single and multi-bond price challenges for Asian, European and US securities/issues evaluated by TRPS, including government/corporate, CMO/ABS, MBS, US Municipal and Bank Loan instruments. Supported challenge types include Tolerance, Unchanged, Trade, Vendor to Vendor and Confirm.
You can also submit pricing requests via AskTRPS for new issues and unpriced bonds. This capability applies to Gov/Corp bonds with price source = EJV and CMO/ABS, MBS and municipal bonds with price source= N/P that can be validated by TRPS (that is, TRPS has the terms and conditions content for the requested instrument). You must also be permissioned for the instrument for which you are requesting pricing.
NOTE: Thomson Reuters Fixed Income Global Snapshot (FIGS) Prices available for Asian and European instruments in US 3 & 4 PM Premium Pricing extractions are not supported as part of the AskTRPS offering currently.
AskTRPS Highlights
Integrated as part of the DataScope Select web-interface with intuitive screens for entering bond price challenges and requesting pricing for new issues and unpriced bonds.
Multi-bond challenge support via an imported comma separated value (CSV) file that includes predefined columns for simplified input and a wizard that supports import of client challenge files with customized columns.
Challenge support for TRPS evaluated premium, end of day and intraday pricing.
Track and monitor progress of existing challenges and requests from submission through resolution via on-screen controls that allow filtering and sorting.
Instrument validation and input checks to prevent delays in challenge processing
Receive responses within 24 hours of submission to TRPS with optional email notification.
Consistent responses provided with evaluator details to enable audit trails
Export challenges to customizable comma separated value (CSV) files.
Online reports for viewing challenge statistics.

Submitting Price Challenges & Price Requests
DataScope Select User Guide 11.2 Page 166 of 198
Launching the Challenge Dashboard
You can launch the Challenge Dashboard by clicking DataScope Select, and then selecting AskTRPS. Single price challenge capabilities can also be launched from the Pricing and Analytics tab in the Details screen.
NOTE: Access to these screens requires additional permissions from Thomson Reuters. Please contact your local account manager or sales specialist for details.
Challenge Dashboard
From the Challenge Dashboard, you can initiate both single and multi-bond challenges.
The screen contains the following items:
Navigation Bar – Use to navigate single or batch challenges submitted by you or your company. You can also view pricing challenge statistics reports.
Create Challenge – Use to launch the Single Challenge, Batch Challenge, Confirm Batch Challenge or Start Batch Challenge Wizard screen.
My Challenges/My Company’s Challenges – Click to view all challenges submitted by you or your company.
Date Range – Use the drop-down to reveal views for displaying price challenges: Today, Yesterday, Last 7 Days, Last 30 Days, This Month, Last Month and Custom Range.
Export – Click to export selected challenges to a comma separate value (CSV) file. See Exporting Challenges.
Filter – Use the filter box to search on a text string. When begin entering text, only the challenges matching that text appear.
Table – The table shows all of your challenges or all of your company’s challenges, based on your selection. The
The Ref# column identifies the challenge at the instrument level. The Batch # column identifies the batch reference number associated with a challenge. Previously, reference numbers were assigned at the instrument level. Now, you can also track challenges at the portfolio level.
Batch # is populated only for challenges that are part of a batch file. The column is blank for single price challenges.

Submitting Price Challenges & Price Requests
DataScope Select User Guide 11.2 Page 167 of 198
Pricing and Analytics Tab
From this tab, you can view additional details related to the selected instrument’s TRPS evaluated price that may satisfy your pricing inquiry, including valuation, pricing recipe, premium prices and tolerance comments.
To initiate a pricing challenge after reviewing this information, click Submit Challenge. Note that this button appears only for bonds priced by TRPS (price source = EJV); otherwise, the button is hidden. The selected instrument is automatically loaded into the Challenge Dashboard, from where you can enter the details of your challenge.

Submitting Price Challenges & Price Requests
DataScope Select User Guide 11.2 Page 168 of 198
Creating a Price Challenge
To initiate a price challenge from the Challenge Dashboard, click Create Challenge. You are then prompted to enter the identifier of the bond to challenge, and then click Begin Challenge. Otherwise, click Cancel to exit the screen and return to the Challenge Dashboard.
Note the following key information:
You must know the complete identifier of the instrument to challenge.
If you do not know the complete identifier, use Search to look up the instrument.
Any instrument you enter must be a bond priced by TRPS.
If the instrument is not priced by TRPS (for example, you enter an equity instrument or the bond is not priced by TRPS), an error message will appear and you will not be able to continue the price challenge.
The identifier type defaults to your selection in Preferences.
For example, if RIC is selected as your Preferred Identifier Type in Preferences, RIC will be the default identifier for entering the bond.
Review My Company’s Challenges to check whether a challenge has been entered already.
The Challenge Dashboard shows all of your submitted challenges by default. You can click My Company’s Challenges to see if a price challenge on the bond has been submitted by someone in your organization already.

Submitting Price Challenges & Price Requests
DataScope Select User Guide 11.2 Page 169 of 198
Selecting the Price Challenge
Once the bond is validated, DataScope Select checks to see if the bond has already been challenged today. If it has, a message appears at the top of the screen showing the number of challenges for each challenge type.
The most recent resolution will appear (accept or reject), along with the associated accept or reject reason. The pricing cycle and timestamp indicating when the challenge was updated last will also be shown. Note that only resolved challenges are shown. Pending challenges are not included in the count. The names of clients challenging the bond’s price are also hidden, along with any related comments and attachments.
The bond’s premium prices for the indicated region and cycle are shown, along with close price. The prices reflect the most recent available. If any of the current trading day’s prices are not yet available (for example, you initiate the challenge before the premium pricing cycle runs for that region) then the previous day’s price is shown instead.
You can challenge a historical close price from as far back as 30 days by selecting a date from the End of Day drop-down. This action will populate the Bid Price for the selected date. A warning will appear if a bid price does not exist for the selected date.
Additional inputs are provided for challenging the bond’s intraday price. Use the time dropdowns to select the hour and minute at which the intraday price was snapshot, if desired. Note that this information is available in your extraction notes file. Time is optional and can be left blank. Time defaults to the time zone selected in your user preferences. Toggle the mouse over the clock to view your time zone selection. Use the date dropdown to select the intraday price date (today or previous trade date), and then click the radio button and enter the intraday price to challenge (bid price).
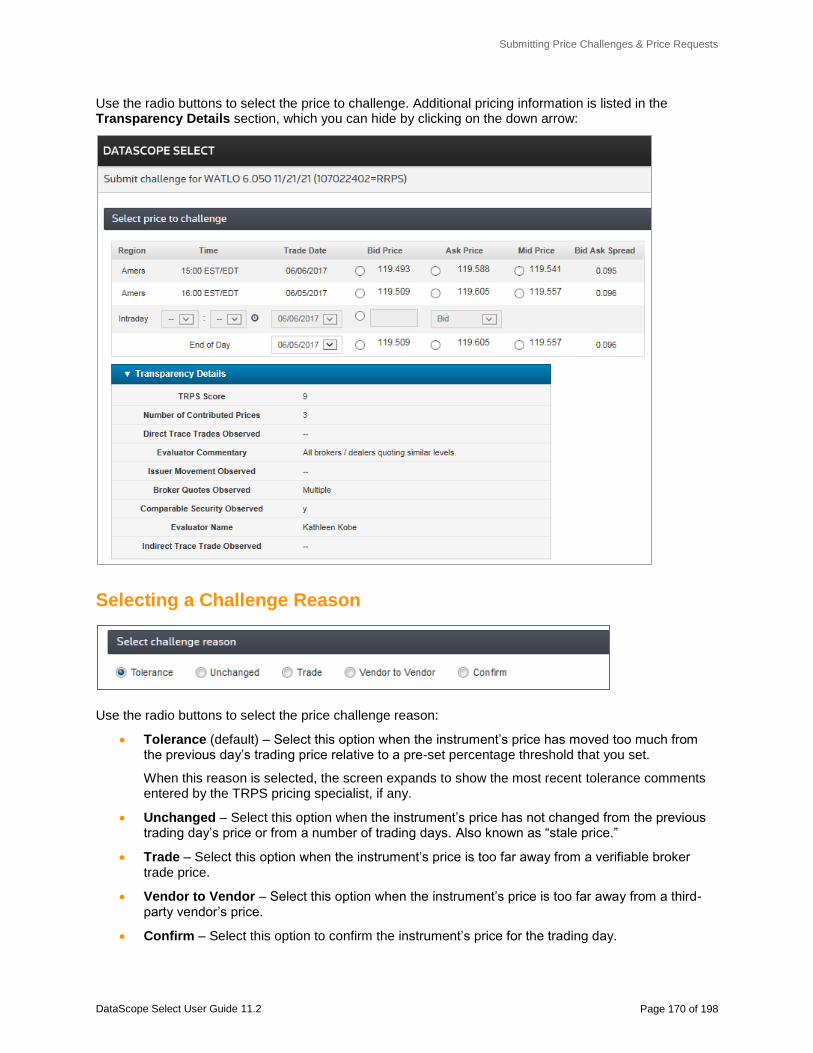
Submitting Price Challenges & Price Requests
DataScope Select User Guide 11.2 Page 170 of 198
Use the radio buttons to select the price to challenge. Additional pricing information is listed in the Transparency Details section, which you can hide by clicking on the down arrow:
Selecting a Challenge Reason
Use the radio buttons to select the price challenge reason:
Tolerance (default) – Select this option when the instrument’s price has moved too much from the previous day’s trading price relative to a pre-set percentage threshold that you set.
When this reason is selected, the screen expands to show the most recent tolerance comments entered by the TRPS pricing specialist, if any.
Unchanged – Select this option when the instrument’s price has not changed from the previous trading day’s price or from a number of trading days. Also known as “stale price.”
Trade – Select this option when the instrument’s price is too far away from a verifiable broker trade price.
Vendor to Vendor – Select this option when the instrument’s price is too far away from a third-party vendor’s price.
Confirm – Select this option to confirm the instrument’s price for the trading day.

Submitting Price Challenges & Price Requests
DataScope Select User Guide 11.2 Page 171 of 198
The screen updates to show the inputs for the selected challenge type. Note the following:
Optionally, enter a client price to compare to the current TRPS-evaluated price.
Make sure to enter a numerical value when entering prices for Trade and Vendor to Vendor challenges. Thousands separators and decimals to indicate trailing zeros are supported.
Text boxes for Trade and Vendor to Vendor challenges are optional and free form.
Comments for Tolerance, Unchanged and Confirm challenges are optional, however, entering the details of your challenge can clarify your request and expedite a response from TRPS. You can enter up to 500 characters.
Attaching Supporting Documentation
You can submit supporting documents to TRPS Evaluators for consideration during the price challenge review. This capability is available for single price challenges only.
Click Browse to open a window from where you can navigate to the file on your computer, and then add it to the challenge. When you add a document, a new Browse box appears for adding another document. You can attach up to three documents.
You can upload the following document types, with each document limited to a maximum size of 3 MB: Microsoft Word (.doc and .docx formats), Microsoft Excel (.xls and .xlsx formats), Adobe PDF, Text Files (.txt), jpeg and bmp.
To remove an attachment prior to submitting the challenge, click Remove. This capability is supported only prior to submitting the challenge. Attachments cannot be deleted once the challenge is submitted. Submitted documents remain part of the challenge for one calendar year. Once this period has expired, the documents are deleted from the challenge.

Submitting Price Challenges & Price Requests
DataScope Select User Guide 11.2 Page 172 of 198
Excluding Challenges from Statistic Reports
AskTRPS provides statistic reports detailing monthly challenges and sector directions. In some instances, you may not want to identify a submission as a challenge, for example, when submitting trade data to TRPS. You can do this by selecting Exclude From Statistic Report in the Select challenge reason section of the price challenge. This option is cleared by default.

Submitting Price Challenges & Price Requests
DataScope Select User Guide 11.2 Page 173 of 198
Submitting a Price Challenge
Once you submit your challenge, you are presented with a confirmation that you can print as a paper copy for your records. You can exit this screen and return to the Challenge Dashboard or the Valuations Pricing tab if you launched the challenge from that tab.
Submitted price challenges are automatically routed to TRPS for assignment and review. Your challenge is added to the submission table from where you can track its progress through completion. While being routing to the appropriate TRPS evaluator, the challenge will have a status of Unassigned. Once under review by TRPS, the status of the challenge will update to Assigned.
Note the following key information about submitting price challenges:
If you exit the Challenge Dashboard before submitting the challenge, your submission will not be saved; similarly, the Challenge Dashboard will timeout after 30 minutes of inactivity (standard DataScope Select policy).
You can challenge a bond only once for a particular trading date and pricing cycle.
Once a challenge is submitted, you cannot update it. If you make an error in a challenge (for example, you enter a wrong price) and want to delete it, you can do so only when the challenge has a status of Unassigned. Thereafter, you cannot delete the challenge.
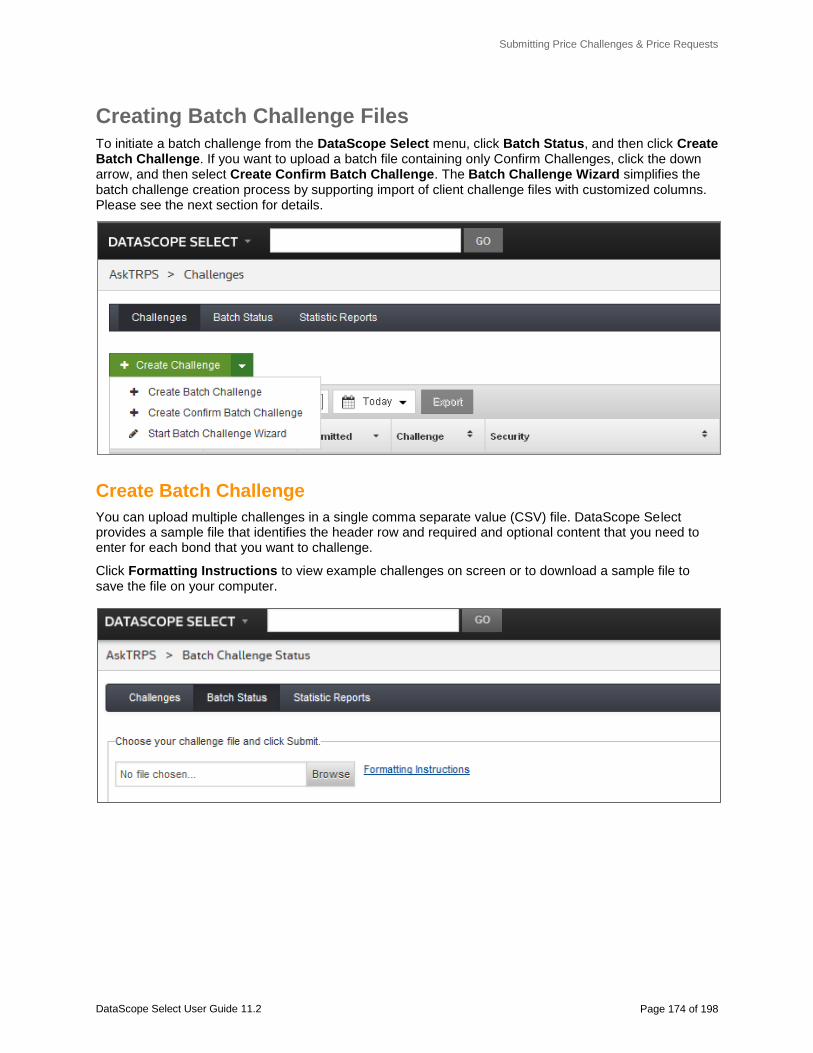
Submitting Price Challenges & Price Requests
DataScope Select User Guide 11.2 Page 174 of 198
Creating Batch Challenge Files
To initiate a batch challenge from the DataScope Select menu, click Batch Status, and then click Create Batch Challenge. If you want to upload a batch file containing only Confirm Challenges, click the down arrow, and then select Create Confirm Batch Challenge. The Batch Challenge Wizard simplifies the batch challenge creation process by supporting import of client challenge files with customized columns. Please see the next section for details.
Create Batch Challenge
You can upload multiple challenges in a single comma separate value (CSV) file. DataScope Select provides a sample file that identifies the header row and required and optional content that you need to enter for each bond that you want to challenge.
Click Formatting Instructions to view example challenges on screen or to download a sample file to save the file on your computer.

Submitting Price Challenges & Price Requests
DataScope Select User Guide 11.2 Page 175 of 198
You can update the sample file with your own challenges. Please pay particular attention to the input and formatting requirements. For example, you must enter dates in the format specified in your Preferences. Please make sure to remove the sample challenges and instructions prior to saving your file.
Uploading Batch Challenges
To upload a batch file, click Browse in the Batch Challenge screen, and then locate the CSV file on your computer and click Submit.
When you import a bulk file that contains Tolerance and Unchanged challenges, a Batch Challenge Confirmation screen will appear, identifying the total number of challenges and a breakdown of Tolerance and Unchanged challenges.
You can review these challenges and decide if you want to proceed with importing them. If so, you must click the check box next to the challenge identifiers, and then click Confirm Challenges. Keep the check boxes cleared if you do not want to import the challenges.

Submitting Price Challenges & Price Requests
DataScope Select User Guide 11.2 Page 176 of 198
This screen is bypassed for all other challenge types except Tolerance and Unchanged.
Your batch file is added to the table, identified with a reference number, the submission date, upload status, and number of challenges.
The upload status is initially Processing, and then becomes Partial Success or Success, depending on whether import errors are detected.
Viewing Batch Challenges
You can click on the batch challenge to view the details of your upload validation. If no errors exist, Success appears in the status column and the message below identifies the number of challenges imported.
Partial Success appears with a message identifying the number of challenges imported successfully first, followed by the number of challenges that failed. The error messages include the identifiers of the failed challenges for your reference.
For example:
Partial Success 9 challenges have been imported and are ready for review by our evaluators 1 error occurred during import: 'RIC 44924EAB6=RRPS' was not found or is not priced by TRPS, please contact a Pricing Service Specialist at [email protected]
Once you correct the errors, you can import the file again. The import process checks for challenges that have already been imported to prevent duplicates.
For example:
1 challenge has been imported and is ready for review by our evaluators 9 duplicate challenges have been identified and discarded

Submitting Price Challenges & Price Requests
DataScope Select User Guide 11.2 Page 177 of 198
Using the Batch Challenge Wizard
The Batch Challenge Wizard simplifies the batch challenge creation process by supporting import of client challenge files with customized columns. DataScope Select remembers the columns of the customized batch challenge file so that you only have to use the wizard once for that file. Thereafter, DataScope Select automatically recognizes the customized file columns and import the batch challenges automatically.
The wizard supports comma separated value (.csv) formatted files only. The file can contain up to 1000 challenges of current day’s end of day and premium prices for one or more pricing cycles. Batch challenge files containing historical prices are not supported nor are batch files containing more than 1000 challenges.
You can launch the Batch Challenge Wizard from the Create Challenge drop-down on the Challenges screen:
You are promoted to navigate to the csv file to import.
As part of the validation process, DataScope Select automatically detects the columns in the file and uses them as input for configuring the batch challenge file.
The wizard then guides you through a series of questions for identifying the price challenge types, price cycles and identifiers for the instruments to challenge and asks you to identify the column in the file containing that detail.

Submitting Price Challenges & Price Requests
DataScope Select User Guide 11.2 Page 178 of 198
The questions can vary, depending on the challenge type, as in this example:
You must answer each question in order to move on to the next one. You can make changes to any previously answered question.
Once all questions are answered, click the Submit Challenges to import the file. It is automatically added to the Batch Challenge screen for review by TRPS.

Submitting Price Challenges & Price Requests
DataScope Select User Guide 11.2 Page 179 of 198
Tracking Your Price Challenges
All of your submitted challenges appear in the submission table by default. You can also view the challenges submitted by others in your organization by clicking My Company’s Challenges. Challenges are listed chronologically by submission date.
For each submission, the following details are provided:
Ref. # – Submission reference number assigned to the challenge.
Batch # – Reference Id for which this challenge is a part. Blank when the challenge is not associated with a batch file.
Submitted – Date on which the challenge was submitted, presented in the date format specified in your preferences.
Challenge – The price challenge reason: Tolerance, Unchanged, Trade, Vendor to Vendor and Confirm.
Security – Description and identifier of the instrument being challenged.
Db Type – Asset type / subtype for the instrument being challenged.
Valuation – The selected premium or closing price for the instrument being challenged shown with the premium pricing region and cycle.
Status – The current state of the challenge: Unassigned, Assigned and Resolved.
You can sort on any of the column headers to view your challenges in ascending/descending order. The Filter by batch drop-down, visible when viewing your company’s challenges only, shows all of the submitted batch files. You can select a batch file to view only the individual challenges in that file. The filter box lets you filter your challenges based on a text string or numerical value. You can click on any individual challenge to view its details in a separate window that you can print as a paper copy for your records. The details available depend on the challenge status. For example, if the submission is Assigned, the screen will show, Assigned to an evaluator, with the corresponding date and time of the assignment.

Submitting Price Challenges & Price Requests
DataScope Select User Guide 11.2 Page 180 of 198
Adding Comments & Attachments
Both clients and TRPS evaluators can add comments and up to three attachments to an assigned or a resolved challenge. This capability enables the two parties to record comments, questions or requests for additional information directly in the existing single or batch challenge via the Comments box that you can launch by clicking the comments button at the top of the challenge.
You can enter up to 500 characters in this box:
You can upload the following document types, with each document limited to a maximum size of 3 MB: Microsoft Word (.doc and .docx formats), Microsoft Excel (.xls and .xlsx formats), Adobe PDF, Text Files (.txt), jpeg and bmp.
NOTE: No more than three attachments can be included to the challenge. This includes any attachments submitted when you created the challenge. For example, if you attached one file when you created the challenge, you will be able to add only two additional files thereafter.
When you click Submit, the comment is added to the challenge and a notification is sent to the evaluator who is assigned or resolved the challenge.
If the evaluator entered the comment, you will be alerted via email if you have Send Challenge Notifications enabled in your user preferences. Otherwise, you must check the challenge.

Submitting Price Challenges & Price Requests
DataScope Select User Guide 11.2 Page 181 of 198
Viewing Challenge Responses
TRPS will respond to all inquiries within 24 hours of submission and indicate whether your challenge was accepted or rejected. Accepted challenges will result in price adjustments, as appropriate. No adjustments will be made to price challenges that have been rejected. Once the challenge is resolved, you can click on it to view the challenge response and name of the TRPS evaluator assigned to challenge.
The response will include an explanation for why the challenge was accepted or rejected, along with tolerance/unchanged comments, when available, and evaluator notes, if provided. Comments exchanged between the evaluator and client are also listed, if provided.
Click Show Detail to view all of the values used to derive the bond’s price in the Challenge Assumptive Data window.

Submitting Price Challenges & Price Requests
DataScope Select User Guide 11.2 Page 182 of 198
Chatting with TRPS
Instant messaging capabilities enable you to talk directly with a TRPS Evaluator on business days between 3:00 p.m. – 6:00 p.m. (Eastern Time). Chat with TRPS is available via the Eikon Messenger, which you can launch via the Challenge Dashboard and Pricing and Analytics screens.
When you click the link, DataScope Select detects whether Eikon Messenger is installed. If not, you are prompted to install it directly from DataScope Select. If you do not want to install the tool, you can communicate with TRPS by logging in directly to the Eikon Messenger web site: (https://eikonmessenger.com/eikonmessenger/login). Accessing to the Eikon Messenger site requires Google Chrome. An error will appear if you try to access this site with another browser type.
During the designated hours, the status button next to Chat with TRPS turns green to let you know that a TRPS Evaluator is available to provide immediate responses to your inquiries. Outside of these hours, the status button is disabled, and if you click Chat with TRPS, a message alerts you that the service is unavailable. In this instance, you should submit your question directly via AskTRPS.
NOTE: The Chat with TRPS status button is supported in Internet Explorer 9 and later, as well as in other modern browsers. Legacy browsers are not supported.

Submitting Price Challenges & Price Requests
DataScope Select User Guide 11.2 Page 183 of 198
Exporting Challenges
In the Challenge Dashboard screen, use the date range filter to reveal the possible views for displaying price challenges: Today, Yesterday, Last 7 Days, Last 30 Days, This Month, Last Month and Custom Range. When you select Custom Range, calendars appear for selecting the From and To dates.
Click the Export button to export the displayed challenges to a CSV file. Note that this button appears only when you have submitted challenges. This button is hidden if you do not have any challenges submitted.
In the Choose Fields to Export window, select and order the fields for your exported file:
By default, the following fields are selected:
Batch Reference Number – ID of batch file challenge of which the challenge is a part.
Bond Db Type – Code indicating the asset type for the instrument being challenged.
Bond Description – Description of the instrument being challenged.
Challenge Result – Outcome of the challenge: Accepted or Rejected.
Challenge Type – The price challenge type: Tolerance, Unchanged, Trade, Vendor to Vendor or Confirm.
Challenged Valuation Price At – Date and time at which the instrument being challenged was priced by TRPS.
Challenged Valuation Price Value – Instrument’s price for the date and pricing cycle as provided by TRPS.
Challenged Valuation Run – Valuation cycle for the price being challenged.
Evaluator Comment – Optional comments provided by the TRPS evaluator, along with the accept/reject reason.
ID – Submission reference number assigned to the challenge.
Submission Date – Date and time at which the challenge was submitted.

Submitting Price Challenges & Price Requests
DataScope Select User Guide 11.2 Page 184 of 198
TRPS Adjusted Price – Returns the bond’s updated price, if applicable, provided by TRPS as part of the challenge resolution.
User Provided Identifier exports the identifier that you used to create the challenge.
You can also include the following fields:
Bond Asset Id – Unique system-assigned identifier for the instrument being challenged.
Bond CUSIP – Committee on Uniform Security Identification Procedures (CUSIP) code for the instrument being challenged.
Bond Db Sub Type – Code indicating the asset subtype for the instrument being challenged.
Bond ISIN – International Securities Identification Numbering (ISIN) code for the instrument being challenged.
Bond RIC – Reuters Instrument Code (RIC) for the instrument being challenged.
Bond SEDOL - Stock Exchange Daily Official List identifier for the instrument being challenged.
Client Name – Name of the company submitting the challenge.
Exclude From Statistic Report – Yes or No to indicate whether the challenge is excluded from Statistic reporting.
Submitter Name – Name of the client who submitted the challenge. If you are viewing your challenges, your name will be shown. If you are viewing your company’s challenges, your name or the name of your co-worker who submitted the challenge will be shown.
To add, remove and order fields:
1. Click on a field to select it, and then use to move it to the field selection window.
2. Use to return the field back to the selection list so that it is not included in your exported file.
3. Use and to order the fields in the selected fields list. The order you specify is how the fields will appear in your exported file.
4. When you click Export, all of the challenges shown for the selected filter are exported to a CSV file. Note that you cannot select individual challenges to export.
NOTE: The fields that you select are saved for future exports while you remain the on the Challenge Dashboard. Once you navigate to a new screen, and then return to the Challenge Dashboard and do a new export, your selections are cleared.

Submitting Price Challenges & Price Requests
DataScope Select User Guide 11.2 Page 185 of 198
Submitting Pricing Requests
You can submit pricing requests via AskTRPS for new issues and unpriced bonds. This capability applies to Gov/Corp bonds with price source = EJV and CMO/ABS, MBS and municipal bonds with price source= N/P that can be validated by TRPS (that is, TRPS has the terms and conditions content for the requested instrument). You must also be permissioned for the instrument for which you are requesting pricing.
The process for requesting pricing is the same as for submitting a price challenge with these variations:
Pricing requests are available for single bonds only; batch pricing requests are not supported currently.
You can request pricing for an unpriced instrument from the existing Create Challenge screen or via a new Submit For Pricing button on the Pricing and Analytics page on the Details screen. This button replaces the Submit Challenge button that appears for priced securities.
Previously, when you tried to submit a challenge for an unpriced security via the Submit Challenge button, an error message would appear stating that the challenge could not continue because there was no pricing information available. Now, clicking Submit For Pricing launches the Pricing Request form:
The Pricing Request form is similar to the existing Price Challenge screen without the Select Price to Challenge section. The existing Select challenge reason section has been renamed Complete the Pricing Request Form where you can enter confirmation, trade and vendor-to-vendor details. You can also enter comments and attach supporting documents, as you would for a price challenge.
Once submitted, the pricing request is automatically routed to TRPS for assignment and review, just like a price challenge. Your request is added to the Challenges table from where you can track its progress through completion. While under review, the Status column will show Unpriced.
As with price challenges, TRPS will respond to all accepted requests within 24 hours of submission and you can review the response by clicking on the request in the Challenge table.
When the TRPS Evaluator can price the instrument, the resulting response will include TRPS Price Adjusted or TRPS price confirmed to indicate that the security has been priced and optional evaluator comments added. If the TRPS Evaluator cannot price the instrument, Unable to Price: Observable market information is not available to price this issue will appear in the response instead.
Like price challenges, price requests are tracked as part of the Statistics report. This document provides a breakdown of changed and unchanged prices for a specified time period based on the challenges/requests submitted by you or your company.
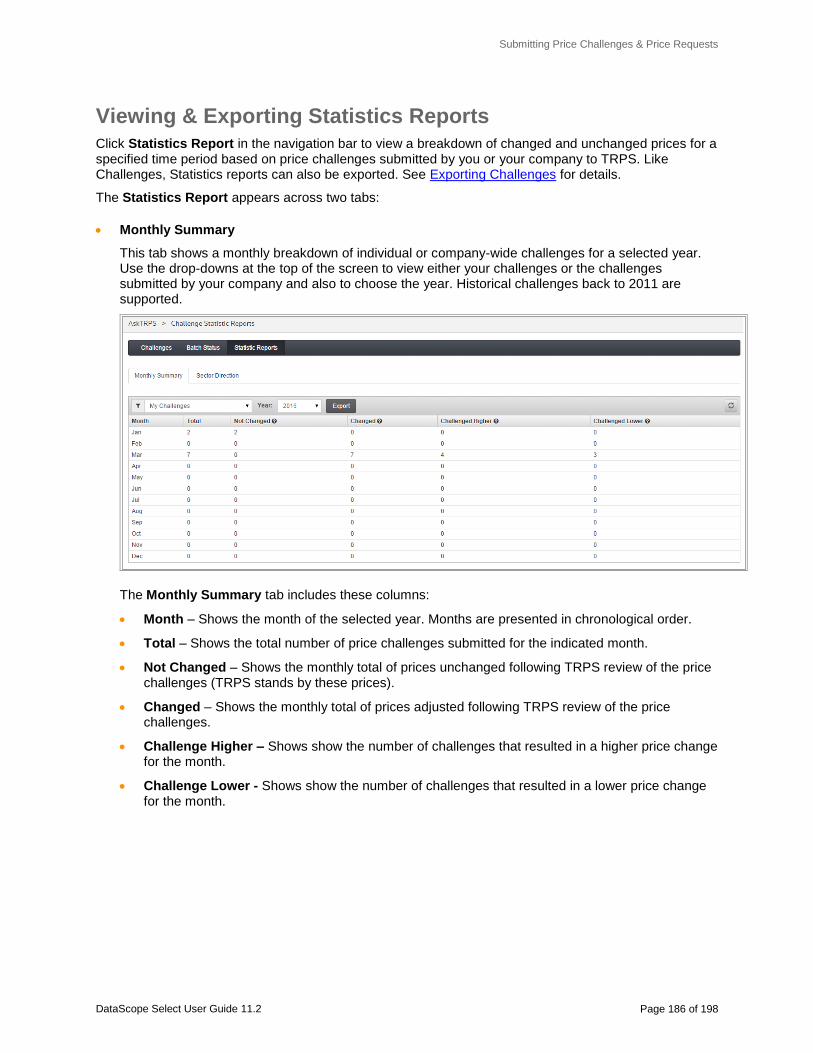
Submitting Price Challenges & Price Requests
DataScope Select User Guide 11.2 Page 186 of 198
Viewing & Exporting Statistics Reports
Click Statistics Report in the navigation bar to view a breakdown of changed and unchanged prices for a specified time period based on price challenges submitted by you or your company to TRPS. Like Challenges, Statistics reports can also be exported. See Exporting Challenges for details.
The Statistics Report appears across two tabs:
Monthly Summary
This tab shows a monthly breakdown of individual or company-wide challenges for a selected year. Use the drop-downs at the top of the screen to view either your challenges or the challenges submitted by your company and also to choose the year. Historical challenges back to 2011 are supported.
The Monthly Summary tab includes these columns:
Month – Shows the month of the selected year. Months are presented in chronological order.
Total – Shows the total number of price challenges submitted for the indicated month.
Not Changed – Shows the monthly total of prices unchanged following TRPS review of the price challenges (TRPS stands by these prices).
Changed – Shows the monthly total of prices adjusted following TRPS review of the price challenges.
Challenge Higher – Shows show the number of challenges that resulted in a higher price change for the month.
Challenge Lower - Shows show the number of challenges that resulted in a lower price change for the month.

Submitting Price Challenges & Price Requests
DataScope Select User Guide 11.2 Page 187 of 198
Sector Direction
This tab shows a monthly breakdown of price challenges for a selected year by asset type. Use the drop-downs at the top of the screen to view your challenges or the challenges submitted by your company and month and year in which you are interested. Historical challenges back to 2011 are supported.
The Sector Direction tab includes these columns:
Sector – Shows fixed income sector type: CMO Whole Loan, Home ABS, Other ABS, Corporate Bond, CMO Agency Tranche, CMBS, Sovereign Government, Other, Mortgage Pool, Agency, SBA and CDO. A subtotal of all sectors appears at the bottom of the list.
Total – Shows the total number of price challenges submitted for the indicated month.
Not Changed – Shows the monthly total of prices unchanged following TRPS review of the price challenges (TRPS stands by these prices).
Changed Up – Shows the monthly total of prices adjusted above the original prices following TRPS review of the price challenges.
Changed Down – Shows the monthly total of prices adjusted below the original prices following TRPS review of the price challenges.
Percent of Total Changed – Shows the percent of price changed based on the total number of challenges submitted for the indicated asset type.

Submitting Price Challenges & Price Requests
DataScope Select User Guide 11.2 Page 188 of 198
About Thomson Reuters Valuation Navigator
Thomson Reuters Valuation Navigator is a software solution for rapid automation of reference data and pricing workflows. The solution is designed to enable back-, middle- and front-office teams to analyze and search across a wide range of complex data sources, compare multiple pricing options and optimize valuation and risk activities.
Valuation Navigator improves transparency by streamlining data collection while eliminating tedious spreadsheet–based processes to simplify Net Asset Value (NAV) and Profit and Loss calculations. Through data consolidation and reformatting, clients can integrate feeds directly into existing internal systems and gain enhanced insight through access to market-observable inputs and source data that supports evaluated pricing.
Built-in high-performance search technology enables clients to easily navigate through vast amounts of consolidated pricing and reference data, while the individual asset drill-down function provides a side-by-side view of all current data vendors. This overview of available data allows clients to create customized analytics and visualizations that guide evaluated pricing decisions, leading to more accurate and transparent portfolio valuation.
Valuation Navigator is available from the user interface via the DataScope Select menu.
Access to this new offering requires permissioning from Thomson Reuters. Please contact a Thomson Reuters Pricing Service Specialist at [email protected] for more information.
DataScope Select User Guide 11.2 Page 189 of 198
Chapter
11
DataScope Select Standard Solutions
This chapter describes Standard Solutions, DataScope Select’s bulk capability for delivering packaged content sets from a single site. An overview of the available subscriptions and files is provided, along with links to related documentation about the feeds offering. Information on DataScope Equities Plus+, Thomson Reuters customizable bulk file offering for receiving a continuous flow of reference data delta files delivered daily at 15-minute intervals, is also provided.
For details, see:
About DataScope Select Standard Solutions
About the Standard Solutions Screens
Retrieving Bulk Files
Related Documentation
DataScope Plus

DataScope Select Standard Solutions
DataScope Select User Guide 11.2 Page 190 of 198
About DataScope Select Standard Solutions
Standard Solutions is DataScope Select’s bulk capability for delivering packaged content sets from a single site. Permissioned clients can view their subscriptions and files from intuitive screens, and then download daily, weekly and quarterly bulk files via FTP. Content is offered via subscriptions that contain complete asset sets grouped by region.
Standard Solutions screens are launched from the DataScope Select menu and consists of two screens for viewing available subscriptions and bulk files. You can download these files via FTP.

DataScope Select Standard Solutions
DataScope Select User Guide 11.2 Page 191 of 198
About the Standard Solutions Screens
Available Subscriptions
The Available Subscriptions screen identifies all packaged content that is available for subscription. In this release, the following content is available:
Insider
Ownership and Profiles
Street Events
Tick History (covered under separate documentation)
Each data feed subscription contains different packages that are available for subscription. For example, the Ownership and Profiles subscription is available across six packages, broken down by asset class and region: Equity Ownership Current and Historical Global, Equity Ownership Current and Historical Americas, Equity Ownership Current and Historical Asia Pacific, Equity Ownership Current and Historical EMEA, Institutional and Professional Profiles Feed Add On and Institutional and Professional Profiles Feed Standalone.
Please note that you will also need third-party entitlements in order to access CUSIPs and SEDOLs via these packages. Entitlements are not included automatically as part of your Ownership and Profiles subscription. Please contact your local account manager or specialists for details.
The packages to which you are subscribed are identified without a lock. You can filter this content using the search box or by checking the Show Only Subscribed Packages box:

DataScope Select Standard Solutions
DataScope Select User Guide 11.2 Page 192 of 198
When you click on a package, the screen updates to show details about the subscription and selected package and whether you are subscribed to it. If you are not subscribed, selections for contacting Thomson Reuters Sales for subscription information and for viewing sample data are also provided. Details of the selected package include the frequency of files.
If you are interested in subscribing to the selected package, click Contact Sales. This action will create an email that you can submit to Thomson Reuters. Please complete the required fields before sending:
Name
Phone
Company
City
Country
Content Sets of Interest
Optional Comments

DataScope Select Standard Solutions
DataScope Select User Guide 11.2 Page 193 of 198
Click See a Sample to launch a separate window displaying the Thomson Reuters Data feeds Sample Site. From this site, you can navigate to the appropriate feeds page by selecting the corresponding link in the Products List. In this example, Ownership & Profiles is selected.
Available Files
This screen lets you preview the current bulk files that have been generated for your subscription, which you can then download via FTP as described in the next section.
The available subscriptions appear in the drop-down at the top of the screen. The table identifies the package(s) in your selected subscription, provides a description of the package and identifies the date and time of the current file generated for the package:

DataScope Select Standard Solutions
DataScope Select User Guide 11.2 Page 194 of 198
When you click on a package, the screen expands to show the current daily, weekly or quarterly compressed (zip) files generated for that package. You can sort the column headers by File Name, Frequency, Creation Date or File Size.
The number of files in the list is dependent on the frequency on which the files are generated. For example for daily files, a week’s worth of files is shown by default, while weekly and quarterly files are replaced when the next weekly or quarterly file is delivered.
When you click on a file, the screen expands to show the uncompressed files. Five files are shown by default, listed by File Name, Creation Date and File Size. Click Preview to view the first 100 lines of the selected file. If more than five files exist, you can click View All Files to view all of the uncompressed files in a separate window.

DataScope Select Standard Solutions
DataScope Select User Guide 11.2 Page 195 of 198
Retrieving Bulk Files
You can retrieve your bulk files from the DataScope Select FTP Server only. This is the same server that DataScope Select clients use to upload input lists, report templates and schedules and to download extractions. See the DataScope Select FTP User Guide for information.
The FTP directory structure contains a Feeds folder, which includes separate folders for each of your subscriptions. These folders contain sub-folders, organized by region and frequency, from where you can access your files:

DataScope Select Standard Solutions
DataScope Select User Guide 11.2 Page 196 of 198
Related Documentation
For details on the feeds subscriptions, please see the following documents on the Customer Zone at https://customers.reuters.com:
Insider Filing
DataScope Select Standard Solutions: Asian Insider Transaction/Holdings Feed
DataScope Select Standard Solutions: Canadian Insider Transaction / Holdings Feed Specification
DataScope Select Standard Solutions: Insider Trading Model Version 3 Specification
DataScope Select Standard Solutions: UK Insider Data Feed Specification
DataScope Select Standard Solutions: US Insider Filing Feed Specification
Ownership and Profiles
DataScope Select Standard Solutions – Equity Ownership Data Feed Specification (AMERS)
DataScope Select Standard Solutions – Equity Ownership Data Feed Specification (APAC)
DataScope Select Standard Solutions – Equity Ownership Data Feed Specification (UK & EMEA)
DataScope Select Standard Solutions – Global Equity Ownership Data Feed Specification
DataScope Select Standard Solutions – Institutional & Professional Profiles Data Feed Specification
DataScope Select Standard Solutions – TFO Daily Feed (Ownership)
DataScope Select Standard Solutions – TFO Daily Feed (Profiles)

DataScope Select Standard Solutions
DataScope Select User Guide 11.2 Page 197 of 198
DataScope Plus
DataScope Plus provides customizable bulk file offering for receiving a continuous flow of reference data delta files delivered daily at 15-minute intervals. It includes reference updates with new issues and corrections reflected in near real-time. Price corrections, including late market changes, are delivered as they are available for each market and are bundled with the 15-minute incremental files. DataScope Plus is integrated as part of the DataScope Select user interface with no additional login required.
Key features include:
Client customization of feed reports. You can define both pricing and reference extraction files with the following preferences:
receive XML or pipe-delimited files
control column inclusion and order
combine or separate asset types in files
control file size
set start times for when a feed report will become active
choose to display or filter delisted instruments (by subscription)
Rich content sets of global equities, derivatives, funds, indices, money and fixed income instruments in the ASIA, EMEA and AMERS regions are offered via subscription. Subscriptions data and third-party content will be restricted for non-entitled clients.
Reference files are delivered in compressed format that you can download to your internal systems from an FTP Server. Files are delivered in sequential order, every 15 minutes, 24 hours/7 days a week (total of 96 files per day). Files from the past 10 calendar days will be available for download.
Price corrections, including late market changes, are delivered as they are available.
Technical Indicators and Future Dated reports are also available. Technical Indicators provide price volume analytics with correlating reference data to support predictive modeling capabilities for equity instruments. Future Dated Reference files provide advanced notice of reference changes at the time they are announced, but before they take effect.
A corresponding Notes file is delivered with each report that provides business and product event information, such as EOD pricing available for an asset group, analyst sign-off for the pricing.
Report Recovery capabilities are available that allow you to recover an existing report that has been executed within the last 60 days for a specified date and report segment. You can use this feature to reload data older than 10 days.
Change flags and previous values available for reference content.
Documentation for using DataScope Plus is available on My Account.

© 2017 Thomson Reuters. All rights reserved. Republication or redistribution of Thomson Reuters content, including by framing or similar means, is prohibited without the prior written consent of Thomson Reuters. 'Thomson Reuters' and the Thomson Reuters logo are registered trademarks and trademarks of Thomson Reuters and its affiliated companies.
For more information:
Send us a sales enquiry at thomsonreuters.com/about/contact_us
Read more about our products at thomsonreuters.com/products_services
Find out how to contact your local office thomsonreuters.com/about/locations