Embed Size (px)
Citation preview

Oracle CPQ Cloud Release 17D
What's New

2
TABLE OF CONTENTS REVISION HISTORY ................................................................................................................................................. 4
OVERVIEW ............................................................................................................................................................. 5
FEATURE SUMMARY .............................................................................................................................................. 6
MODERN SELLING EXPERIENCE .............................................................................................................................. 7 Oracle Alta UI Enhancements . . . . . . . . . . . . . . . . . . . . . . . . . . . . . . . . . . . . . . . . . . . . . . . . . . . . . . . . . . . . . . . . . . . . . . . . . . . . . . . . . . . . . . . . . . . . . . . . . . . . . . . . . . . 7
Secure Text Attributes ...................................................................................................................................................... 7 Copy Transaction Action ................................................................................................................................................... 8 Deal Management Support .............................................................................................................................................. 8 Advanced Panel Options................................................................................................................................................... 9
LEAD INNOVATION .............................................................................................................................................. 13 Deal Management Enhancements . . . . . . . . . . . . . . . . . . . . . . . . . . . . . . . . . . . . . . . . . . . . . . . . . . . . . . . . . . . . . . . . . . . . . . . . . . . . . . . . . . . . . . . . . . . . . . . . . . . 13
Price Optimization .......................................................................................................................................................... 14 Win Probability Enhancements ...................................................................................................................................... 29 Deal Comparison Enhancements .................................................................................................................................... 34 Price Score Enhancements ............................................................................................................................................. 37 Last Price Enhancements ................................................................................................................................................ 39
ENTERPRISE PLATFORM ....................................................................................................................................... 40 System Configuration Enhancements . . . . . . . . . . . . . . . . . . . . . . . . . . . . . . . . . . . . . . . . . . . . . . . . . . . . . . . . . . . . . . . . . . . . . . . . . . . . . . . . . . . . . . . . . . . . . . . 40
BML Functions for System Configuration ....................................................................................................................... 40 JSON Object for System Configuration Data ................................................................................................................... 43 Use BML for Cross-Model Configuration Rules .............................................................................................................. 44
Subscript ion Ordering Enhancements . . . . . . . . . . . . . . . . . . . . . . . . . . . . . . . . . . . . . . . . . . . . . . . . . . . . . . . . . . . . . . . . . . . . . . . . . . . . . . . . . . . . . . . . . . . . . . 47 View a List of Asset Defined Fields and Asset Available Fields ....................................................................................... 48 Create Custom Attributes ............................................................................................................................................... 51 Delete Custom Asset Attributes ..................................................................................................................................... 52 Deploy Custom Asset Attributes ..................................................................................................................................... 52 Add Custom Asset Attributes as Fields on the Customer Assets List Layout .................................................................. 54
Migration Enhancements . . . . . . . . . . . . . . . . . . . . . . . . . . . . . . . . . . . . . . . . . . . . . . . . . . . . . . . . . . . . . . . . . . . . . . . . . . . . . . . . . . . . . . . . . . . . . . . . . . . . . . . . . . . . . . . 56
INTEGRATED SUITE .............................................................................................................................................. 59 Use OAuth Tokens in BML Libraries . . . . . . . . . . . . . . . . . . . . . . . . . . . . . . . . . . . . . . . . . . . . . . . . . . . . . . . . . . . . . . . . . . . . . . . . . . . . . . . . . . . . . . . . . . . . . . . . . 59
Insert Token In Header of URL Data Function ................................................................................................................ 59 User Integration for Microsoft Azure Active Directory . . . . . . . . . . . . . . . . . . . . . . . . . . . . . . . . . . . . . . . . . . . . . . . . . . . . . . . . . . . . . . . . . . . . . . 61
Locate Your Tenant Name .............................................................................................................................................. 61 Create an App Registration............................................................................................................................................. 62 Define Permissions ......................................................................................................................................................... 63 Prepare the Azure App for CPQ Cloud App Integration .................................................................................................. 64 Prepare CPQ Cloud for Azure App Integration ............................................................................................................... 64
JD Edwards Integration .. . . . . . . . . . . . . . . . . . . . . . . . . . . . . . . . . . . . . . . . . . . . . . . . . . . . . . . . . . . . . . . . . . . . . . . . . . . . . . . . . . . . . . . . . . . . . . . . . . . . . . . . . . . . . . . . . 69 Create an Order in JD Edwards ....................................................................................................................................... 69 Receive Order Status Updates from JD Edwards ............................................................................................................ 72
Commerce Cloud Integration Enhancements . . . . . . . . . . . . . . . . . . . . . . . . . . . . . . . . . . . . . . . . . . . . . . . . . . . . . . . . . . . . . . . . . . . . . . . . . . . . . . . . . . . . 75 Enhanced Integration Cloud Service Flows ..................................................................................................................... 75

3
SIMPLIFY .............................................................................................................................................................. 77 Hiding Rules for Commerce Actions .. . . . . . . . . . . . . . . . . . . . . . . . . . . . . . . . . . . . . . . . . . . . . . . . . . . . . . . . . . . . . . . . . . . . . . . . . . . . . . . . . . . . . . . . . . . . . . . . 77
Hide Actions on Desktop or Mobile UI ........................................................................................................................... 77 View Commerce Actions as Components to Hide .......................................................................................................... 78 Create a Hiding Rule for Commerce Actions .................................................................................................................. 79 View Hiding Rules from the Commerce Action List ........................................................................................................ 81 View Actions Associated with a Hiding Rule in the Migration Center ............................................................................ 82 REST API Action State for Hidden Commerce Actions .................................................................................................... 82
Document Designer Enhancements . . . . . . . . . . . . . . . . . . . . . . . . . . . . . . . . . . . . . . . . . . . . . . . . . . . . . . . . . . . . . . . . . . . . . . . . . . . . . . . . . . . . . . . . . . . . . . . . . . 84 Date Format Enhancements ........................................................................................................................................... 84 Condition and Loop Enhancements ................................................................................................................................ 87
Single Select Pick L ist Enhancements . . . . . . . . . . . . . . . . . . . . . . . . . . . . . . . . . . . . . . . . . . . . . . . . . . . . . . . . . . . . . . . . . . . . . . . . . . . . . . . . . . . . . . . . . . . . . . . 90 Set the Value of a Single Select Pick List Using a Punch-In Value ................................................................................... 90 Set the Value of a Single Select Pick List Using a Recommendation Rule Action............................................................ 91 Apply Message Properties to Single Select Pick Lists in Configuration ........................................................................... 95 Set the Value of a Single Select Pick List Attribute Using a SOAP API ............................................................................. 97 Sort the Order of Display Values for Data Table-Based Single Select Pick Lists ............................................................ 100
ADDITIONAL CPQ CLOUD ENHANCEMENTS ....................................................................................................... 102 Transaction Archive Enhancements ............................................................................................................................. 102 Add Patch Support to the URLData BML Function ....................................................................................................... 104 FTP Uploads Provide Email Status Notifications ........................................................................................................... 104
PRE-UPGRADE CONSIDERATIONS ............................................................................................................... 105 Migration ...................................................................................................................................................................... 105 Resolved Known Issues ................................................................................................................................................. 105 Translation .................................................................................................................................................................... 105 Translation Status ......................................................................................................................................................... 106
POST-UPGRADE CONSIDERATIONS............................................................................................................. 107 Browser Support ........................................................................................................................................................... 107 Salesforce Managed Package Support ......................................................................................................................... 108 Training ......................................................................................................................................................................... 108 Additional Information ................................................................................................................................................. 108 Disclaimer ..................................................................................................................................................................... 108

4
REVISION HISTORY
This document will continue to evolve as existing sections change and new information is added. All updates appear in the following table:
Date What's Changed Notes 12 DEC 2017 Created initial document.

5
OVERVIEW
This guide outlines the information you need to know about new or improved functionality in Oracle CPQ Cloud 17D and describes any tasks you might need to perform for the update. Each section includes a brief description of the feature, the steps you need to take to enable or begin using the feature, tips or considerations that you should keep in mind, and the resources available to help you.
SECURITY & NEW FEATURES
We would like to remind you if your system has modified security structures you may need to advise your security administrator of new features you would like to take advantage of. To assist you Appendix A provides a listing of the new features and the security attributes needed to employ the new features when you have decided to implement them.
GIVE US FEEDBACK
We welcome your comments and suggestions to improve the content. Please send us your feedback at [email protected].

FEATURE SUMMARY
We continue to add many new features to Oracle Cloud Applications and we now give you the option to take advantage of new functionality at a pace that suits you. The 'New Features UI' is available to you from your cloud homepage, where you can make your choices and do any configuration necessary. The table below offers a quick view of the actions required to enable each of the new features.
Action Required to Enable Feature
Feature Automatically
Available
End User Action
Required
Administrator Action
Required
Oracle Service Request Required
Modern Selling Experience
Oracle Alta UI Enhancements Lead Innovation
Deal Management Enhancements Enterprise Platform
System Configuration Enhancements Subscription Ordering Enhancements Migration Enhancements Integrated Suite
Use OAuth Tokens in BML Libraries User Integration for Microsoft Azure Active Directory
JD Edwards Integration Commerce Cloud Integration Enhancements Simplify
Hide Commerce Actions with Hiding Rules Document Designer Enhancements Single Select Pick List Enhancements Additional CPQ Cloud Enhancements Upgrade Consideration
Pre-Upgrade Considerations Post-Upgrade Considerations

MODERN SELLING EXPERIENCE
Leverage the rich interface and interactive capabilities available in CPQ Cloud to provide a smarter selling experience.
ORACLE ALTA UI ENHANCEMENTS
Alta UI is a design system that delivers modern, simple, and more engaging UIs across Oracle's web-based and mobile applications. Alta is the new standard for Oracle applications and Oracle Cloud-based services.
Introduced in CPQ Cloud 2017 R2, the Alta Responsive Transaction UI provides sales users with an improved user experience by focusing on fewer elements and a cleaner design aimed at accelerating performance and information delivery. As part of continuing improvements to the Alta Responsive Transaction UI, the following enhancements are available in CPQ Cloud 17D:
• Secure Text Attribute Support• Copy Transaction Action• Deal Management Support• Advanced Panel Options
SECURE TEXT ATTRIBUTES
CPQ Cloud 17D supports Secure Text attributes in the Alta Responsive Transaction layout. Secure Text attributes can be placed in both the Document and Sub-Document layouts, providing the same functionality as in the Legacy Desktop layout. This attribute can be used to handle sensitive data with encryption when a user enters user IDs or passwords. The administrator adds the Secure Text attribute to a Commerce Process and then places it in the Alta Responsive Layout.
Alta Transaction UI with Secure Text Attributes

8
COPY TRANSACTION ACTION
CPQ Cloud 17D allows a user to create a new Transaction from an existing Transaction in the Alta UI. From the Transaction Manager, the user can select a Transaction and click Copy to create a copy of the selected Transaction. The copied Transaction will contain the attributes as defined by the Copy action Initialization tab. The Transaction ID, User Name, and Creation Date are updated accordingly.
Copy Transaction in Transaction Manager with Alta UI
DEAL MANAGEMENT SUPPORT
The option to display Price Scores and Deal Comparison Scatter Plots in the Alta Transaction UI layout is supported for CPQ Cloud 17D sites. Administrators can add Price Score and Deal Comparison attributes to the Alta Transaction layout.
Alta UI Line Item Grid with Price Score

9
Alta UI Transaction Line Detail with Deal Comparison Scatter Plot
ADVANCED PANEL OPTIONS
CPQ Cloud 17D supports the ability to perform the following adjustments of a panel using the Alta Responsive layout:
• Hide panel labels• Set collapsible panels• Set panels to default collapsed position
To access the advanced panel settings for the Alta Responsive UI, the administrator should first navigate to the Alta Responsive Layout.
Access Alta Responsive Layout

10
From the layout editor, select the Cog icon of a panel to view these settings.
Access Panel Settings
The Panel dialog appears. This dialog has four options: Plain Display, Collapsible, Hide Label, and Start Collapsed.
Plain Display
The Plain Display option displays the panel without labels or the ability to expand or collapse. If this option is selected, Collapsible, Hide Label, and Start Collapsed options are disabled.
To hide the panel header, select Plain Display.
Plain Display Option for Alta UI Panel
Collapsible
The Collapsible option allows users to collapse and expand the panel by clicking in the header. If the Collapsible option is not selected, the Start Collapsed option will be disabled.
To allow the panel to collapse, select Collapsible.

11
Collapsible Option for Alta UI Panel
Hide Label
The Hide Label option will display the panel without a label.
To hide the panel title, select Hide Label.
Hide Label Option for Alta UI Panel
Start Collapsed
The Start Collapsed option will collapse the panel when the page is initially loaded. The Collapsible option must be enabled to use this option.
To set a panel to appear collapsed by default, select both Collapsible and Start Collapsed.

12
Start Collapsed Option for Alta UI Panel
STEPS TO ENABLE
For instructions on how to enable this feature, refer to the Alta Responsive Layout topic in the CPQ Cloud Administration Online Help.
TIPS AND CONSIDERATIONS
For a list of Oracle Alta UI limitations refer to the Alta Responsive Layout topic in the CPQ Cloud Administration Online Help.
KEY RESOURCES
Refer to the CPQ Cloud Administration Online Help for additional information
13
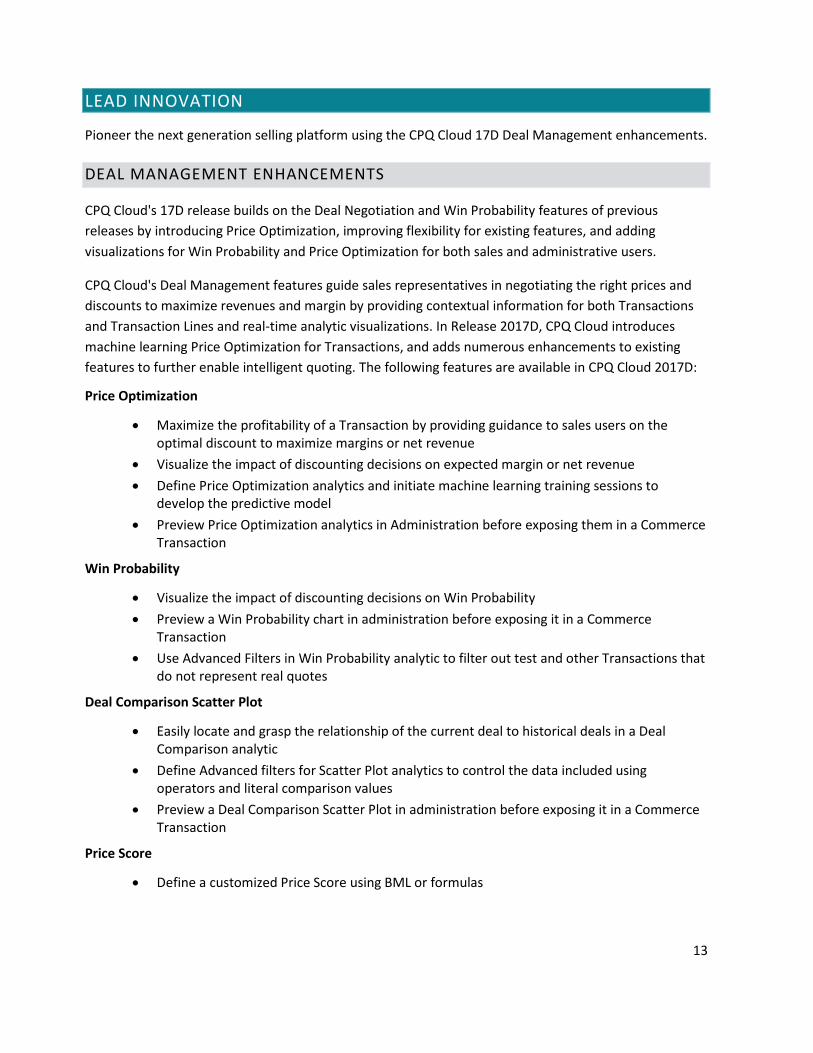
LEAD INNOVATION
Pioneer the next generation selling platform using the CPQ Cloud 17D Deal Management enhancements.
DEAL MANAGEMENT ENHANCEMENTS
CPQ Cloud's 17D release builds on the Deal Negotiation and Win Probability features of previous releases by introducing Price Optimization, improving flexibility for existing features, and adding visualizations for Win Probability and Price Optimization for both sales and administrative users.
CPQ Cloud's Deal Management features guide sales representatives in negotiating the right prices and discounts to maximize revenues and margin by providing contextual information for both Transactions and Transaction Lines and real-time analytic visualizations. In Release 2017D, CPQ Cloud introduces machine learning Price Optimization for Transactions, and adds numerous enhancements to existing features to further enable intelligent quoting. The following features are available in CPQ Cloud 2017D:
Price Optimization
• Maximize the profitability of a Transaction by providing guidance to sales users on theoptimal discount to maximize margins or net revenue
• Visualize the impact of discounting decisions on expected margin or net revenue• Define Price Optimization analytics and initiate machine learning training sessions to
develop the predictive model• Preview Price Optimization analytics in Administration before exposing them in a Commerce
Transaction
Win Probability
• Visualize the impact of discounting decisions on Win Probability• Preview a Win Probability chart in administration before exposing it in a Commerce
Transaction• Use Advanced Filters in Win Probability analytic to filter out test and other Transactions that
do not represent real quotes
Deal Comparison Scatter Plot
• Easily locate and grasp the relationship of the current deal to historical deals in a DealComparison analytic
• Define Advanced filters for Scatter Plot analytics to control the data included usingoperators and literal comparison values
• Preview a Deal Comparison Scatter Plot in administration before exposing it in a CommerceTransaction
Price Score
• Define a customized Price Score using BML or formulas

14
• Define Advanced Price Score calculations on a Transaction Line through point and clickselection of expressions, boundary conditions, and override values
Last Price Paid
• Use a status filter to filter "Won" prices for the Last Price Paid value
PRICE OPTIMIZATION
CPQ Cloud 2017D provides an out-of-the-box machine learning Price Optimization feature to maximize either margins or net revenue. Customers with low or zero marginal costs, such as software companies, typically manage the discount percentages off standard list prices, without capturing costs or margins. Customers with meaningful variable costs, such as manufacturers, typically capture costs and margins in CPQ Cloud, and manage either net revenue or margin percentages. CPQ Cloud's Price Optimization feature supports both use cases in predicting the optimal discount percentage for a Transaction.
Since CPQ Cloud customers use different metrics to determine profitability, the Price Optimization feature supports selection of the site specific custom attributes to optimize to provide easy, code free setup. Administrators can define which attribute value to maximize, attributes to be considered in the optimization (i.e. driver attributes), and which attributes will be populated with the optimization results.
After set up and the initial machine learning tasks are complete, the predictive model produced by the machine learning training is applied to generate optimization results that can be displayed to sales users in the Commerce UI. Sales users can view the optimal value attributes, including the optimal discount percentage, and the optimization functions can be visualized on a Price Optimization analytic. The optimal discount percentage value may also be used as a basis for discounting guidelines (e.g. the discount cannot exceed 120% of the optimal discount). The discounting guidelines can then be enforced via approval reasons.
Administrators can present optimization results to sales users in two ways, optimal value attributes and a visual representation or chart.
• Optimal Value Attributes require users to perform a 'Trigger Action' specified inOptimization setup to update the values for the current Transaction (e.g. UpdatePredictions).

15
Optimize Values to Maximize Net Revenue
• Visual Representation or Chart - the Price Optimization Chart updates dynamically as theTransaction is edited.
Price Optimization Chart for Maximize Net Revenue
Price Optimization Chart
Sales users can now visualize the Price Optimization functions for a Transaction to negotiate optimal pricing. The Price Optimization chart depicts the following functions: Win Probability (shown below in red), the Target Profitability (shown below in blue), and the Expected Target (shown below in green).

16
Interactive hover actions on the chart enable sales users to understand the relationship of discounts to Win Probability and profitability, and to visualize the resulting optimization or Expected Target.
Price Optimization Chart
The predicted Win Probability for the range of possible discounting levels displays as a red curve on the chart, enabling users to understand the price sensitivity of the customer. Users can hover on the function line to see the exact Win Probability and Discount Values. In the following chart, the customer is predicted to buy 24% of the time given no discount, but 97% of the time given a discount of 50%.
Price Optimization Chart with Win Probability Hover
The Target function (i.e. profitability or objective function) displays as a blue line indicating the profitability objective or target of the optimization over the range of possible discounts. In Release 17D, the Target or objective to be maximized may be either Net Revenue or Margin, as defined by the administrator. In the following Price Optimization Chart, Net Revenue is used as the Target function.

17
Hovering on the Target function line in the chart below indicates that the Target (Net Revenue in this example) for the Transaction will be $7,000 when the Total Discount % is 30%.
Price Optimization Chart with Target Hover
The Expected Target function (i.e. optimization function), displays as a green line, depicting the expected value of the Net Revenue or Margin Target predicted by CPQ Cloud's Price Optimization machine learning for the range of possible discounts. This function represents the combination of the Win Probability and Target Profitability functions. Hovering on the Expected Target function line in the example below informs the user that the Expected Target value (Net Revenue in this example) is predicted to be $5,880 given a discount of 30%. As delineated in the chart, this is also the maximum or optimal value for expected net revenue predicted by the machine learning model.
Price Optimization Chart with Expected Target Hover
The Price Optimization Chart enables sales users to easily discover how near or far the Transaction's current discount is from the optimal value by plotting the Current value as a grey dashed line, and the

18
Optimal value as a gold dashed line. Sales users can hover on of either the dashed lines or the legend entry for Current and Optimal values to discover the exact values for each.
Price Optimization Chart with Current Value Line Hover
Price Optimization Chart with Optimal Value Legend Hover
Administrators enable the Price Optimization Chart by creating a Price Optimization analytic, then creating a Commerce HTML attribute and selecting the analytic as the default value on the attribute Default tab.

19
Analytic Selection on Attribute Editor Page
Enable Price Optimization
Price Optimizations are implemented as a type of Commerce Process analytic. Since Price Optimization incorporates Win Probability as a factor in the optimization, the setup process for a Price Optimization analytic is similar to that for a Win Probability analytic. Both apply machine learning to generate a predictive model, require model training, can be previewed by administrators, and are exposed to sales users as Commerce attributes and analytic charts.

20
Define Price Optimization Analytic
Perform the following steps to define a Price Optimization analytic:
1. Navigate to the Admin Home page.
2. Click Process Definition in the Commerce and Documents section.The Processes page opens.
3. Select Analytics from the Navigation menu, next to the applicable process, then click List.The Analytics List page opens.
4. Click Add.The Analytics Definition Editor page opens.
Analytics Definition Editor
5. Select Win Probability from the Type menu, enter the following variables, and then clickNext.
o *Name: The name for the analytico *Variable Name: The variable name for the analytico Description: The description for the analytico *Type: The type of analytico *Document: The selected Commerce document. For Price Optimization and Win
Probability, the analytic can only be defined for the Main Commerce Document (i.e. Transaction).

21
NOTES: -Variables preceded by an asterisk (*) are required. -Since the Price Optimization analytic adds optimization to a Win Probability analytic, the administrator initially selects Win Probability as the analytic Type.
The Analytics Definition Editor displays the settings for the Win Probability analytic.
Enable Optimization for Win Probability
6. Select the Optimization checkbox to enable price optimization.The Analytics Definition Editor page will display Win Probability and Price Optimizationsettings.
7. Define Win Probability Settings
Win Probability Settings
• *Primary Driver Attribute: The attribute name for the primary input value from the Transaction. This attribute is the primary driver of the customer's acceptance or rejection of

22
a quote for the analytic. While any numeric Main Document Data Column attribute may be selected from the drop-down, release 17D requires the selection of a Transaction-level discount percentage attribute as the Primary Driver Attribute for optimization.
• Additional Driver Attributes: The attribute name(s) for the secondary input value(s) fromthe Transaction. Additional Driver Attributes are additional factors that may drive pricesensitivity for a Transaction (e.g. industry, customer segment, geography, or lead time tofulfillment). One or more numeric or text Main Document Data Column attributes may beselected. Administrators may define an unlimited number of Additional Driver Attributes.
• *Status Attribute: The name of the Main Document attribute that indicates if the Transaction was won or lost.
• *Won Value: The Status Attribute value that indicates that a Transaction was won. The drop-down displays all possible values for the Status Attribute.
• Lost Value: The Status Attribute value that indicates that a Transaction was lost. Thedrop-down displays all possible values for the Status Attribute.
NOTES: Variables preceded by an asterisk (*) are required. The Lost Value is not required. If no Lost Value is specified, all Transactions with values other than the Won Value will be evaluated as Lost in the machine learning.
8. Define Filters
Price Optimization Filters
• Date Filter: The name of the Commerce date attribute used to filter historical Transactionsfor the analysis. System attributes such as 'System Last Modified Date' may also be selected.
• Duration: The time period prior to today's date to include in the analysis. The data selectionduration is cumulative. Administrators may select from options including Last 30 days, Last90 days, Last 6 months, Last 12 months, and All Transactions.
• Advanced Filters: Advanced Filters provide a means for administrators to select theTransactions to be included in the optimization. Only those Transactions meeting the filtercriteria will be included in the machine learning to build the predictive model. Attributesmapped to a Data Column will display in the drop-down list of available attribute names, theData Column label is not displayed. The administrator can perform the following:

23
o Select one or more Query Attributes from Data Columns,o Select an Operator to be applied, ando Select or define the Specified Value:
Select a value from a drop-down list (Menu or Boolean attributes), Select a date (Date attributes), Enter a value (Text or Numeric attributes) to be used in the query filter.
Operators relevant to the query data type display to enable adminstrators easy and accurate editing of filters. Attributes without values can also be filtered out using the 'Is Empty' and 'Is Not Empty' operators, providing administrators with flexibility to assure that only clean data is included in their predictive model.
NOTE: Administrators can create an unlimited number of filters for each Optimization analytic.
9. Define Optimization Settings
The following settings are used to select the optimization function and identify the site-specific Commerce attributes used to measure profitability.
• Optimization Function: Select to Maximize Margin or Maximize Net Revenue as the Targetor objective of the optimization.o Maximize Margin will provide the optimal discount amount to maximize expected or
realized margin.o Maximize Net Revenue will provide the optimal discount to maximize expected or
realized net revenue.
• Total Revenue at List Price: Select the attribute for gross revenue or total revenue at listprice used in this implementation. Attributes must be mapped to a Data Column to beavailable for selection.
• Total Cost (this attribute is only required for Maximize Margin): Select the attribute for totalTransaction cost used in this implementation. Attributes must be mapped to a Data Columnto be available for selection.
• Total Discount %: Release 17D supports maximizing net revenue or margin based upon aTransaction-level discount percentage attribute such as 'Total Discount %' as the PrimaryDriver Attribute for optimization. The Primary Driver Attribute specified in the WinProbability portion of the analytic displays as the attribute used in optimization.

24
10. Define Output Attribute Settings
The Output settings are used to identify attributes to display on the Transaction UI. These are optional and need only be selected when the values will be displayed to sales users in Commerce. Output attributes do NOT need to be mapped to Data Columns.
Output Settings
• Trigger Action: Select the Commerce Modify-type Action that will be used to update theWin Probability and Optimization Output attributes.
NOTE: Commerce Output attributes are only updated when the Action is invoked, whereas the analytic charts are updated real-time as data on Transaction are edited.
• Win Probability Value Prediction Attribute: Select the Commerce Attribute to be populatedwith the predicted Win Probability.
• Optimal Primary Driver Attribute: Select the Commerce Attribute to be populated with thepredicted optimal value for the Primary Drive Attribute. Typically, this will be the optimalTotal Discount percentage for the Transaction. This is the most important output attributeand may be used to drive other logic on the quote related to approvals or scoring.
• Optimal Win Probability Value: Select the Commerce Attribute to be populated with thepredicted Win Probability at the optimal discount.
• Optimal Target Value: Select the Commerce Attribute to be populated with the predictedTarget Value (net revenue or margin) at the optimal discount.
11. Click Update.
Train the Analytic
Administrators initiate machine learning sessions (i.e. 'training') in order to build the predictive optimization model. Perform the following steps to train a Price Optimization analytic:
1. Navigate to the Admin Home page.

25
2. Click Process Definition in the Commerce and Documents section. The Processes pageopens.
3. Select Analytics from the Navigation menu, next to the applicable process, then click List.The Analytics List page opens.
4. Select the applicable Price Optimization analytic link.The Analytics Definition Editor page opens.
Machine Learning Training
5. Click the Train tab.The Training History is displayed.
Training History
6. Click Train to initiate a training session.When the training session is finished, the results will be displayed in the Training History.The Refresh button may be used to refresh the training results.
7. Evaluate the training session results. Modify the analytic filters and initiate a new trainingsession if the results are unacceptable.
NOTE: Thirty Transactions must be created before initiating a Training session. Training and Test Error Rates measure the accuracy of the predictions made by the Win Probability model. If the Training or Test Error Rates are too high, messages will display with recommended actions to improve the model's predictions.

26
Training Session Warning Message
Assess and Preview Results
Administrators can preview the Price Optimization Chart for a training session to assess the quality of the optimization functions visually. Refer to the Preview Price Optimization Chart procedure for steps to preview.
Enable Display to Sales Users
1. Display Price Optimization Chart in Commerce UIAdministrators enable the Win Probability chart by creating a Commerce HTML attributeand selecting an Optimization analytic as the default value on the attribute Default tab.
Select Optimization Analytic in Attribute Editor
Once enabled, the associated HTML attribute displays as a Related Attribute on the Analytics Definition Editor page.

27
Analytics Definition Editor - Related Attributes
2. Display Optimal Value Attributes in Commerce UIAdministrators add the Optimization Output attributes and action in the Commerce UI.
Preview Price Optimization Chart
Administrators can preview the Price Optimization chart before displaying it in a Commerce Transaction. To initiate a preview, the administrator clicks the Train tab on the Analytics Definition Editor page.
Analytics Definition Editor Preview
The Train tab displays the Training History. Click on the link for a completed session to view Training Details.

28
Training History
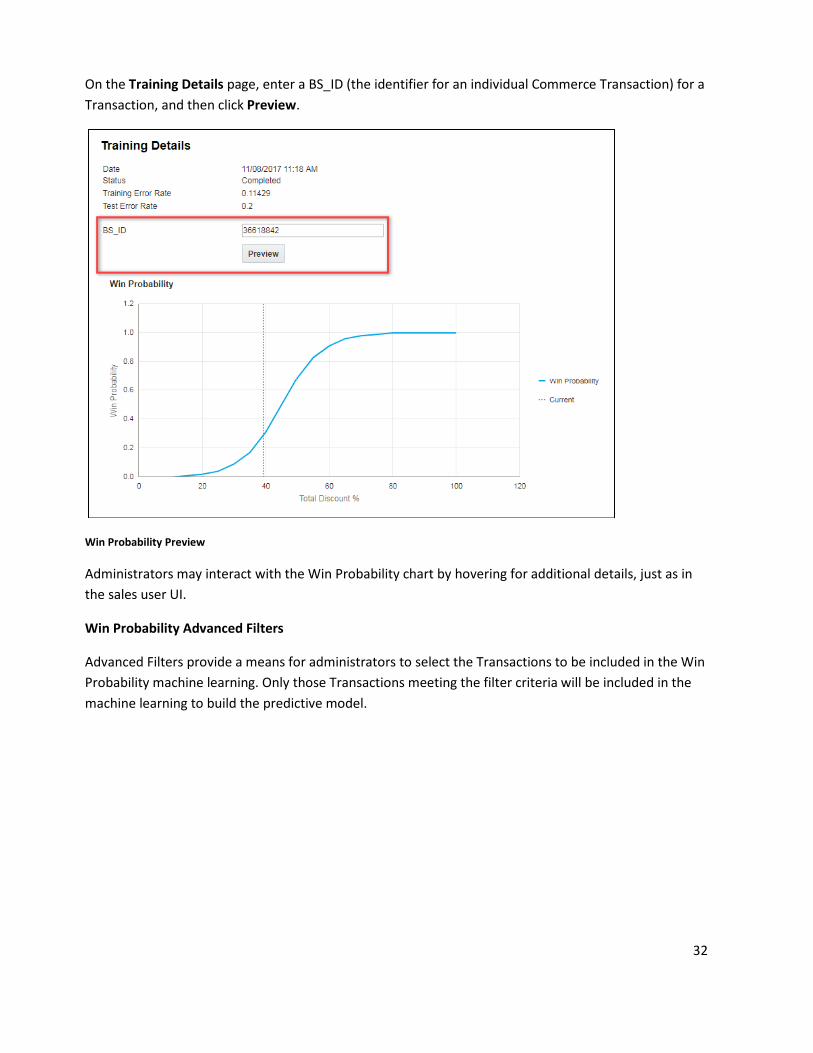
On the Training Details page, enter a BS_ID (the identifier for an individual Commerce Transaction) for a Transaction, and then click Preview.
Price Optimization Preview
Administrators may interact with the Price Optimization Chart by hovering for additional details, just as in the sales user UI.

29
WIN PROBABILITY ENHANCEMENTS
In 2017 R2, CPQ Cloud introduced the machine learning-based Win Probability feature to guide sales users in their negotiation of pricing and discounts by predicting the likelihood that a customer will buy at the current level of pricing of a Transaction. In Release 17D, CPQ Cloud enhances the feature with a visualization of the Win Probability function for sales users and administrators, and the ability to fine tune the predictive model with advanced filtering of the Transactions included in the analytic.
Win Probability Chart
Sales user can now visualize the Win Probability function for a Transaction to better negotiate pricing with customers. The predicted Win Probability for the range of possible discounting levels displays as a curve on the Win Probability Chart, enabling users to understand the price-sensitivity of the customer.
In the example chart below, the customer is predicted to buy 24% of the time given no discount, but 97% of the time given a discount of 50%. The chart indicates that increasing the discount from the current level of 5% to 40% will yield the greatest gain in Win Probability. Users can hover on the function line to see the exact Win Probability and discount values.
Win Probability Chart Function Line Hover
The current discount on the Transaction is displayed as a dashed line on the chart to indicate the relationship of current discounting to the Win Probability function. Hovering on either the dashed line or the Current legend displays the current discount value on the Transaction.

30
Win Probability Chart Current Hover
Administrators enable the Win Probability chart by creating a Commerce HTML attribute and selecting a Win Probability analytic as the default value on the attribute Default tab.
Select Win Probability Analytic in Attribute Editor
Once enabled, the associated HTML attribute displays as a Related Attribute in the Analytics Definition Editor page.

31
Analytics Definition Editor - Related Attributes
Preview Win Probability Chart
Administrators can now preview a Win Probability analytic before displaying it in a Commerce Transaction. To initiate a preview the administrator would click on the Train tab on the Analytics Definition Editor page.
Analytics Definition Editor Preview
The Train tab displays the Training History. Click on the link for a completed session to view the Training Details for that machine learning session.
Training History
32
On the Training Details page, enter a BS_ID (the identifier for an individual Commerce Transaction) for a Transaction, and then click Preview.
Win Probability Preview
Administrators may interact with the Win Probability chart by hovering for additional details, just as in the sales user UI.
Win Probability Advanced Filters
Advanced Filters provide a means for administrators to select the Transactions to be included in the Win Probability machine learning. Only those Transactions meeting the filter criteria will be included in the machine learning to build the predictive model.

33
Advanced Filters for Win Probability
The administrator can perform the following:
• Select one or more Query Attributes from Data Columns,• Select an operator to be applied, and• Select or define the Specified Value:
o Select a value from a drop-down list (Menu or Boolean attributes),o Select a date (Date attributes), oro Enter a value (Text or Numeric attributes) to be used in the query filter.
Operators relevant to the query data type display to enable administrators easy and accurate editing of filters. Attributes without values can also be filtered out using the 'Is Empty' and 'Is Not Empty' operators, providing administrators with flexibility to assure that only clean data is included in their predictive model.
NOTE: Administrators can create an unlimited number of filters for each Win Probability analytic.

34
DEAL COMPARISON ENHANCEMENTS
Deal Comparison Scatter Plots provide sales users a visual means for understanding the relationship of the pricing on the current Transaction or Transaction Line to historical pricing. In Release 17D, CPQ Cloud provides additional functionality for Deal Comparison Scatter Plots, an advanced filter for Deal Comparison, and preview capability for administrators.
Deal Comparison Scatter Plot Enhancements
With Release 17D, current deal information is more easily discoverable on Transaction and Transaction Line Scatter Plots as a circular purple symbol. Sales users can better visualize the relationship of the current deal to historical deals and the historical trend line. When a customer hovers over the data point, or on the legend for the Current Deal, information for the current deal is displayed.
Deal Comparison Scatter Plot with 'Current Deal' Hover
Deal Comparison Advanced Filters
Advanced Filters allow administrators to limit the results displayed in Transaction and Transaction Line scatter plots. The administrator can select one or more Query Attributes from Data Columns, and compare them with Transaction Attributes from the current Transaction. In Release 17D, the administrator can use operators other than equals "=" to match criteria. Specified Values can also be used in the filter. Administrators can create an unlimited number of filters for each Scatter Plot.

35
Data is filtered dynamically based upon the current Transaction's characteristics with only Transactions or lines meeting the specified criteria included in the Scatter Plot. For example, Scatter Plots can display only data for the same industry or customer present on the current Transaction.
Deal Comparison Advanced Filter
Deal Comparison Preview
Administrators can now use a Preview function to view a Scatter Plot before displaying it in a Commerce Transaction. The ability for administrators to view deal comparisons can aid the analysis and definition of pricing rules and guidelines.
To preview a Scatter Plot, navigate to the Analytics Definition Editor and click the Preview tab.
Analytics Definition Editor Preview

36
On the Preview Scatter Plot page, enter a BS_ID (the identifier for an individual Commerce Transaction) for a Transaction, and then click Preview. To preview a Line-level Scatter Plot, enter both a BS_ID and the 'Document Number' integer value for the line to be displayed.
Deal Comparison Scatter Plot Preview
Administrators may interact with the Scatter Plot chart by hovering for additional details, just as in the sales user UI.

37
PRICE SCORE ENHANCEMENTS
Price Scores enable companies to display a proxy indicator of profitability to sales users, without revealing sensitive cost or margin information. In Release 17D, CPQ Cloud provides greater flexibility for customers to calculate Price Scores. These enhancements include an Advanced Calculation method and Custom Calculations using formulas or BML.
When defining a Price Score attribute in Commerce, Administrators select the method for calculating the Price Score from out-of-the-box calculation methods, custom, or advanced calculation methods.
Price Score Method
Custom Calculation
Many enterprise CPQ customers have already built customized price scoring calculations into their implementations. The Custom Calculation method allows customers to utilize their custom calculations that have been defined using BML or Formulas. The Custom Calculation method is available for both Transaction and Transaction Line integer attributes.
Custom Calculation Price Score Method
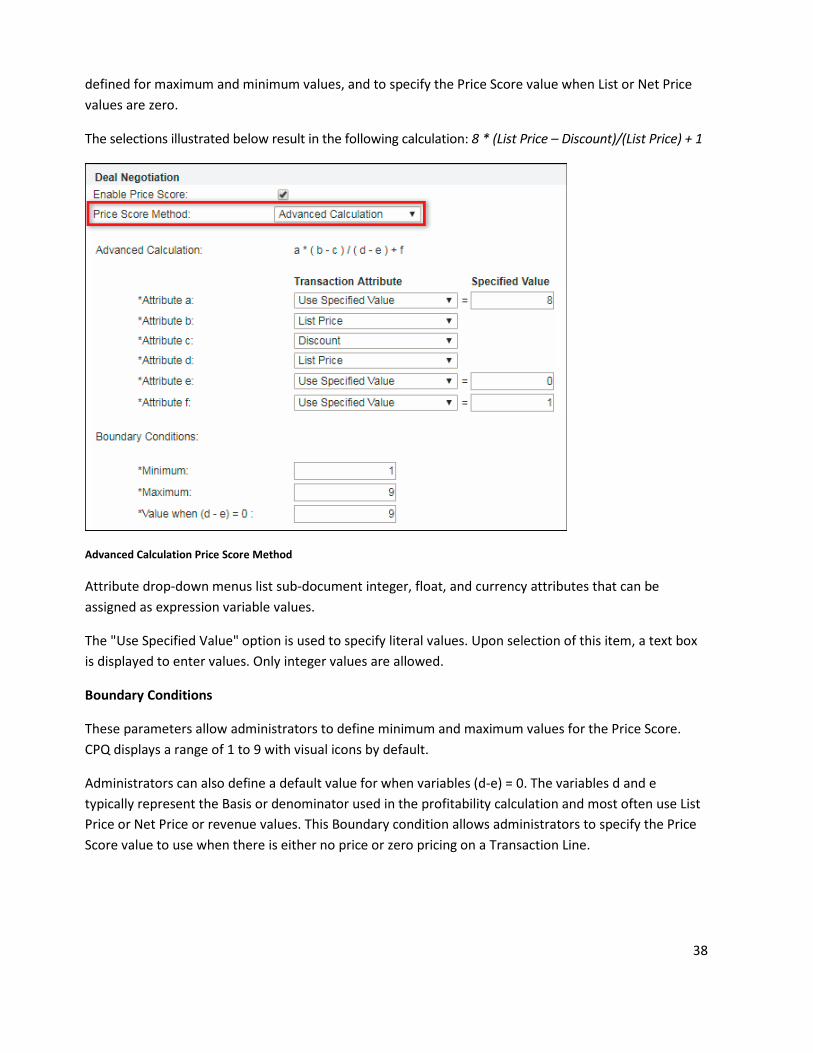
Advanced Calculation
The Advanced Calculation method is only available for Sub-Document (i.e. Transaction Line) integer attributes. Using Advanced Calculation administrators can select defined attributes or specify literal values to represent the variables for the given expression: a * ( b - c ) / ( d - e ) + f
By selecting the variables to be used in the calculation expression, Administrators can create a customized calculation of Price Score, without writing BML or Formulas. The expression is designed to support the majority of use cases for calculating profitability, while including a range of values and factors to deter reverse engineering of the calculation by sales users. Boundary Conditions can be
38
defined for maximum and minimum values, and to specify the Price Score value when List or Net Price values are zero.
The selections illustrated below result in the following calculation: 8 * (List Price – Discount)/(List Price) + 1
Advanced Calculation Price Score Method
Attribute drop-down menus list sub-document integer, float, and currency attributes that can be assigned as expression variable values.
The "Use Specified Value" option is used to specify literal values. Upon selection of this item, a text box is displayed to enter values. Only integer values are allowed.
Boundary Conditions
These parameters allow administrators to define minimum and maximum values for the Price Score. CPQ displays a range of 1 to 9 with visual icons by default.
Administrators can also define a default value for when variables (d-e) = 0. The variables d and e typically represent the Basis or denominator used in the profitability calculation and most often use List Price or Net Price or revenue values. This Boundary condition allows administrators to specify the Price Score value to use when there is either no price or zero pricing on a Transaction Line.

39
LAST PRICE ENHANCEMENTS
In Release 17D, CPQ Cloud provides an additional filter attribute for the Last Price Paid metric. Administrators can now exclude test, lost, or "in progress" Transactions by filtering the results to consider only Transactions with a "WON" status.
Last Price Paid Filter Attribute
STEPS TO ENABLE
Deal Management Enhancements are automatically available on CPQ Cloud 17D sites.
TIPS AND CONSIDERATIONS
Consider the following tips when using Deal Management Enhancements:
• The accuracy of Win Probability predictions will increase when the number of quotesprovided for the training session is increased. A minimum of 30 transactions are required togenerate the machine learning model.
• In order to initiate a Win Probability training session, customers must have an establishedprocess to capture which quotes are won and ideally, which quotes are lost.
• Attributes pertinent to price management should be captured as transaction attributes foruse in filtering and analysis (ex. trash or test quotes).
• Price sensitivity driver attributes need to be captured for each Transaction (ex. Industry).• Commerce attributes used in the analysis must exist as Data Columns.• Price Optimization is only available on the Transaction level in Release 17D.• Price Optimizations are useful for pricing analysis even if never exposed to sales users.• Price Optimization and Win Probability visualizations are not yet available in the Oracle Alta
UI. Price Optimization, Win Probability, and Scatterplot charts are not yet available in theLightning sales user UI.
KEY RESOURCES
Refer to the CPQ Cloud Administration Online Help for additional information.

40
ENTERPRISE PLATFORM
Upgrade the functionality of CPQ Cloud's open and flexible platform to create value and drive results using the following CPQ Cloud 17D features.
• System Configuration Enhancements• Subscription Ordering Enhancements• Migration Enhancements
SYSTEM CONFIGURATION ENHANCEMENTS
System Configuration refers to the manner in which customers use CPQ Cloud to configure and bundle the product or series of products they wish to sell using a group of models that together define an entire system. The ability to display BOM Mapping Rule items in Configuration, define any child item in the BOM hierarchy as a model, and reconfigure child models from the Commerce line item grid are all enhancements introduced over the past several releases in support of System Configuration.
As in prior releases, a BOM instance refers to a set of products that customers buy together on a quote. When a number of independent models from different product families or product lines are part of a single BOM instance, there are typically relationships among these models. In Release 17D, CPQ Cloud provides BML functions that allow administrators to configure rules for System Configurations. This section contains the following topics:
• BML Functions for System Configuration• JSON Object for System Configuration Data• Use BML for Cross-Model Configuration Rules
BML FUNCTIONS FOR SYSTEM CONFIGURATION
In Release 17D, CPQ Cloud introduces three new BML functions to retrieve System Configuration attribute values from other configured models within the system. The new BML functions are available in Library functions, Util libraries, Configuration Advanced rules, Commerce Advanced rules, Step Transitions, Advanced Step Notifications, and mass update of Transactions. The new BML functions are getSystemData, getSystemAttrValues, and getSystemMultipleAttrValues.
NOTES:
-These functions should only be used with System Configurations. System Configurations are BOM hierarchies that contain one or more nested child models. -BML functions getSystemMultipleAttrValues, getSystemAttrValues, getSystemData will not return the value of HTML attributes. This behavior is consistent with other configuration rules that do not allow the selection of HTML attributes.

41
getSystemData
This BML function returns a JSON object representing the entire System Configuration for the current Transaction.
Syntax: Json getsystemdata()
Example:
NOTES: -When not in the context of a Transaction, an empty JSON object is returned. -If System Configuration Data does not exist, an empty JSON object is returned. -This function will also return an empty JSON object if a System Configuration has not yet been configured. The empty JSON object should be handled accordingly.
getSystemAttrValues
This BML function returns a string containing a single attribute's values from a System Configuration.
Syntax: String[] getsystemattrvalues(String jsonPath)
Parameters: A string containing the JSON path
Example:
NOTES:
-If the JSON Path does not return an array of single values, empty string array ("[]") will be returned. -The function will also return empty values for any models that are yet to be configured and paths that do not return values. The empty array should be handled accordingly.
getSystemMultipleAttrValues
This BML function returns dictionary key and value string arrays containing attribute values from a System Configuration.
Syntax: Dictionary<String[]> getsystemmultipleattrvalues(Dictionary<String>)

42
Parameters: Dictionary string (JSON path)
• The key should be an identifier for the attributes identified in the associated value.• The values are expected to be JSON Path expressions that identify the location of the
attribute in the fully expanded system definition (BOM).
Returns: Dictionary (string keys and string values) of attributes' values
• The keys will be the identifiers provided in the input Dictionary.• The values will be the configured attribute values of the attribute(s) at the JSON Path
expressions associated with the input key.
Example:
NOTES:
-If a JSON Path does not return an array of single values, that key-value pair will result in an empty array. -The function will return empty arrays for models that have not been configured and paths that do not return values. The empty arrays should be handled accordingly.
Debugging Advanced System Configuration Rules
A Transaction ID and the document number of the root system can be used to debug system configuration inter-model rules. The Context Parameters field has been added to Debugger tab for BML Function Editor.
To debug system configuration inter-model rules, enter the bsId and documentNumber, and then run the script using the Debugger's Run action. This will automatically pull the specified system into memory and evaluate the attributes based on the specified system's data.
Syntax: bsId=#######,documentNumber=#

43
Context Parameters for BML Function Editor
JSON OBJECT FOR SYSTEM CONFIGURATION DATA
In Release 17D, CPQ Cloud provides a new JSON data object for System Configuration. The System Configuration Data JSON is accessible via the getSystemData BML function and has four key value pairs. The following are the JSON key names and type:
• id - Type: StringContains the BOM variable name from the BOM Item Definition table.
• documentNumber - Type: IntegerContains the line item document number from Commerce for the system root. This is usefulwhen there is more than one system per Transaction.
• configAttributes - Type: JSON ObjectContains a model's attributes and values with the attribute variable name being the key. Theattribute values reflect the configuration selections. The configuration attribute values areonly updated in this structure during invocation (i.e. transitioning from Configuration toCommerce).
• children - Type: JSON ArrayThis array contains JSON objects of additional System Configuration data nodes. Each JSONobject contains the id, documentNumber, configAttributes, and children keys as mentionedin this list.
System Configuration JSON Structure
The following image displays a sample System Configuration JSON Structure along with a hierarchy diagram and a corresponding Line Item Grid. The System Configuration Hierarchy provides a visual representation of the items in the JSON Structure. This image also shows the relationship between the JSON Structure "documentNumber" field and the Line Item Grid "Doc #" attribute.

44
System Configuration JSON Structure
NOTE: If a child model within a system configuration does not have a corresponding BOM Item Definition and BOM Mapping Rule associated to it, the child model will not be included within the System Configuration JSON Structure. Attributes from this model cannot be retrieved using getSystemData, getSystemAttrValues, and getSystemMultipleAttrValues BML functions. Child models within a system configuration that do not have a corresponding BOM Item Definition and BOM Mapping Rule associated to it are not supported.
USE BML FOR CROSS-MODEL CONFIGURATION RULES
In Release 17D, administrators can use Advanced Conditions and the new BML functions to retrieve System Configuration attribute values from other configured system models. They can set the configuration flow and build rules to constrain, hide, recommend, and price sub model values.

45
Cross-model Constraint Rules
Constraint rules are used to let the user know which values are allowed for selection in a particular configuration. Refer to the following use case examples:
• A user changes the power supply on a parent server rack from an American option to a European option, but one of the configured sub model servers does not support the European power supply. The administrator can use a constraint rule on the parent server rack or power supply options to require sub model reconfiguration when a parent attribute is changed.
• An insurance company offers services based on location, as well as other personal information. An administrator can use constraint rules on a root customer model to capture user information and limit sub model services based on location.
Cross-model Hiding Rules
Hiding rules tell the system to hide select attributes when a pre-defined condition is satisfied. Like other rules, hiding rules are made up of a condition and an action. The value of the selected condition attribute determines the result of the condition, which when true triggers the hiding of the selected action attributes. Refer to the following use case example:
• A telecommunication provides various cell phone device models. An administrator can use cross-model hiding rules on the device models to hide attributes on an accessory configurator based on the device model selection.
Cross-model Recommendation Rules
Recommendation Rules can be used to help buyers configure products by offering suggested attribute values. When an administrator sets up a System Configuration, they can use cross-model recommendation rules to set recommended sub model attributes. Refer to the following use case example:
• As part of a training package, Silver certification is available without charge. The administrator can use an array in the certification model sets to set all the values to silver. In addition, the bronze value could be constrained using a constraint rule.
Cross-model Recommended Item Rules
Recommended Item rules enable administrators to associate parts and models with products based on user-configured values. If the recommended item is mandatory, then the user must buy the selected model with the recommended item. If the item is not mandatory, then the user does not have to buy the recommended item. Refer to the following use case example:
• A telecommunications company is having a VoIP promotion, where, if a customer orders over 100 Bluetooth headsets, they will each come with an additional free battery pack. The promotional batteries are not part of a BOM, and have a lower cost to the company than

46
the battery packs regularly offered. The administrator can use a cross-model recommended item rule add the free battery packs when the VOIP promotion is selected.
Cross-model Pricing Rules
Pricing rules are used to calculate price based on how a product is configured. Pricing rules can be based on a combination of one or more configured values. Like most rules, a pricing rule also has a condition and an action. The action determines the price of the model being configured. Refer to the following use case example:
• A telecommunication company has a pricing rule on a phone plan model to cover initial connection fees. The company is offering a promotional bundle with 90% off the connection fee. The administrator can use a cross-model pricing rule on promotional bundle that will set the price for sub model phone plan. The original rule will not fire on the phone plan sub model.
Cross-model Configuration Flows
Configuration Flows are used to walk buyers through the Configuration Process. Configuration Flows help arrange and organize configuration attributes to make Configuration user-friendly. For products with large sets of configuration attributes, Configuration Flows can be used to group different attributes and display them on separate tabs. Configuration Flows can also be set up to direct users to different pages or flows based on their input selections.
• A user selects an Android or Apple phone, and the phone model determines which configuration flow to show the user based on the parent selection.
STEPS TO ENABLE
System Configuration Enhancements are automatically available on CPQ Cloud 17D sites.
TIPS AND CONSIDERATIONS
Rules should be unidirectional (i.e. they travel in one direction) to simplify maintenance of System Configurations.
KEY RESOURCES
Refer to the CPQ Cloud Administration Online Help for additional information.

SUBSCRIPTION ORDERING ENHANCEMENTS
Using the Subscription Ordering enhancements available in CPQ Cloud 17D, administrators can extend the asset table by adding custom asset attributes that suit their company's business needs. In support of this functionality, 15 Integer and Float (includes Currency) columns and 35 String and Single Select Menu columns are available in the asset table. Administrators can use these columns to create custom asset attributes. Upon creating and deploying the custom asset attributes, administrators can then modify the Customer Assets page by displaying the custom asset attributes as fields.
In support of the CPQ Cloud 17D Subscription Ordering enhancements, an Assets option is available under the Products section on the Admin Home page.
Admin Home Page – Assets Option
If using the Alta Navigation option introduced in CPQ Cloud 2017 R2, an Assets option is also available on the Admin Navigation Drawer.
Assets Option on Admin Navigation Drawer

48
VIEW A LIST OF ASSET DEFINED FIELDS AND ASSET AVAILABLE FIELDS
By clicking Assets on the Admin Home page, administrators can access an interface for viewing, creating, modifying, deleting, and deploying custom asset attributes. The interface consists of a new page containing an Asset Defined Fields section and an Asset Available Fields section.
Asset Defined Fields
The Asset Defined Fields section contains a list of the custom asset attributes created by the CPQ Cloud administrator. Custom asset attributes displayed in red indicate an un-deployed attribute. After the successful deployment of a custom asset attribute, the attribute no longer displays in red. Administrators can use the Asset Defined Fields section to select one or more custom asset attributes to delete.
Asset Defined Fields Section
Alternatively, administrators can select a link in the Field Name column to open the corresponding attribute editor and modify the associated attribute properties. For all custom asset attribute types, administrators can update the name of the attribute. Upon deploying the custom asset attribute, the attribute name displays in UI Designer under the list of attributes. Administrators can then modify the Customer Assets page by displaying the custom asset attribute as a field on the page. The name given to the custom asset attribute becomes the field name.
String Editor

49
Integer Attribute Editor
Float Attribute Editor
Menu Editor
Asset Available Fields

50
The Asset Available Fields section contains the 15 pre-defined Integer and Float columns and the 35 String and Single Select Menu columns available in the asset table, which stores the details of un-deployed custom asset attributes. Administrators can use these 50 columns to extend the asset schema by creating custom asset attributes.
Asset Available Fields

51
CREATE CUSTOM ATTRIBUTES
The creation of custom asset attributes works similarly to the creation of custom part fields, where pre-defined fields of various types exist in a table. Administrators use these pre-defined fields to create custom asset attributes. The variable name for all custom asset attributes contains the "_asset_custom_" prefix followed by the field name provided by the administrator.
Complete the following steps:
1. Navigate to the Admin Home page.
2. Under Products, click Assets.
3. Under the Asset Available Fields section, find a row with the data type for the custom attribute you want to create.
4. From the Type menu, select the type of custom attribute you want to create.
o For the Text Data Type, String and Single Select Menu options are available. o For the Number Data Type, Float and Integer options are available.
16. Click Create Field. The corresponding attribute editor opens.
17. Populate the associated fields.
Attribute Type Associated Fields
String Field Name Variable Name
Float Field Name Variable Name Currency checkbox Number of Decimal Places
Integer Field Name Variable Name
Single Select Menu Field Name Variable Name Displayed Text (i.e. the 'Displayed Text' and 'Variable Name' UI attribute names)
18. Click Add. The newly created custom asset attribute displays in red under Asset Defined Fields, indicating it is an un-deployed attribute.
52
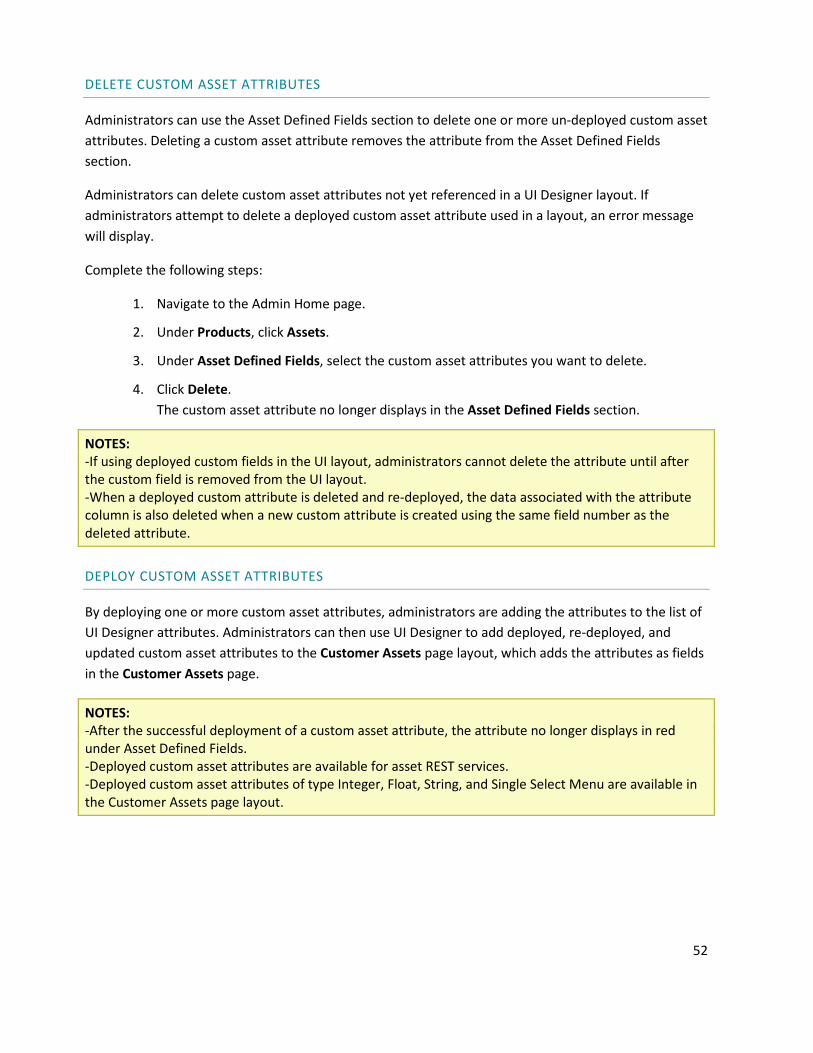
DELETE CUSTOM ASSET ATTRIBUTES
Administrators can use the Asset Defined Fields section to delete one or more un-deployed custom asset attributes. Deleting a custom asset attribute removes the attribute from the Asset Defined Fields section.
Administrators can delete custom asset attributes not yet referenced in a UI Designer layout. If administrators attempt to delete a deployed custom asset attribute used in a layout, an error message will display.
Complete the following steps:
1. Navigate to the Admin Home page.
2. Under Products, click Assets.
3. Under Asset Defined Fields, select the custom asset attributes you want to delete.
4. Click Delete. The custom asset attribute no longer displays in the Asset Defined Fields section.
NOTES: -If using deployed custom fields in the UI layout, administrators cannot delete the attribute until after the custom field is removed from the UI layout. -When a deployed custom attribute is deleted and re-deployed, the data associated with the attribute column is also deleted when a new custom attribute is created using the same field number as the deleted attribute.
DEPLOY CUSTOM ASSET ATTRIBUTES
By deploying one or more custom asset attributes, administrators are adding the attributes to the list of UI Designer attributes. Administrators can then use UI Designer to add deployed, re-deployed, and updated custom asset attributes to the Customer Assets page layout, which adds the attributes as fields in the Customer Assets page.
NOTES: -After the successful deployment of a custom asset attribute, the attribute no longer displays in red under Asset Defined Fields. -Deployed custom asset attributes are available for asset REST services. -Deployed custom asset attributes of type Integer, Float, String, and Single Select Menu are available in the Customer Assets page layout.

Complete the following steps:
1. Navigate to the Admin Home page.
2. Under Products, click Assets. Under the Asset Defined Fields section, all newly created or modified custom asset attributes display in red.
NOTE: Administrators do not need to select the custom attributes to deploy. Upon clicking Deploy, all custom attributes displayed in red are deployed.
Custom Asset Attribute Selected for Deployment
19. Click Deploy. The deployed custom asset attribute remain in the Asset Defined Fields section, but no longer display in red.
Custom Asset Attribute After Deployment

54
As shown below, the deployed custom asset attribute displays among the list of attributes in UI Designer.
Deployed Asset Displayed in the UI Designer Attributes List
ADD CUSTOM ASSET ATTRIBUTES AS FIELDS ON THE CUSTOMER ASSETS LIST LAYOUT
After deploying a custom asset attribute, the attribute displays in the list of UI Designer attributes. Administrators can use the standard UI Designer drag-and-drop functionality to add the custom asset attribute as a field in the Customer Assets List layout. When referenced in a layout, custom asset attributes display as read-only fields.
Customer Assets List Layout with Custom Asset Attribute as Field

NOTES: -New and updated custom asset attributes are visible in UI Designer after the custom asset attributes are deployed. -Administrators can add updated and re-deployed custom asset attributes to the Customer Assets page layout. -To update a field name in UI Designer, administrators must use UI Designer to remove the attribute from the layout, update the attribute, deploy the changes, and then add the attribute back to the layout. -For more information about UI Designer, refer to the CPQ Cloud Administration Online Help.
STEPS TO ENABLE
Subscription Ordering Enhancements are automatically available on CPQ Cloud 17D sites.
TIPS AND CONSIDERATIONS
Consider the following tips when using the Subscription Ordering integration.
• The Assets option on the Admin Home page and the Admin Navigation Drawer is available upon upgrading to CPQ Cloud 17D.
• Administrators can successfully migrate all CRUD operations performed on custom asset attributes, similar to regular asset attributes using Asset Import-Export Action REST endpoints.
KEY RESOURCES
• CPQ Cloud Administration Online Help

MIGRATION ENHANCEMENTS
CPQ Cloud 17D extends the functionality available in the Migration Center by providing migration status notifications. When a migration completes, CPQ Cloud currently sends an email notification to the email address provided in the profile of the administrator who initiated the migration. Prior to initiating a migration in CPQ Cloud 17D, administrators can now specify the email address of each individual who is to receive the migration status notification.
NOTE: Migrations will successfully complete if notification emails fail to send.
Complete the following steps:
1. Navigate to the Admin Home page.
2. Under Utilities, click Migration. The Migration Center opens.
3. From the Select A Mode drop-down, select a Migration Mode.
4. Complete online prompts to perform one of the following migrations: Import From Source, Import Package, or Connect to Destination.
5. Select the components to migrate.
6. Click Migrate. The Migration dialog opens.
Migration Dialog with Send Notification Option
20. Mark the Send Notification? checkbox. A text box displays and is by default populated with the email address of the logged in user.
21. (Optional) Enter the email addresses of any additional individuals who are to receive the status notification. Separate each email address with a semi-colon.

57
Populated Migration Dialog
22. When the migration completes, a status notification is sent to each email address specified in the Migration dialog. The email indicates the success or failure of the migration.
Status Notification - Migration Success

58
Status Notification – Migration Failure
STEPS TO ENABLE
The Migration enhancements are automatically available on CPQ Cloud 17D sites.
KEY RESOURCES
CPQ Cloud Administration Online Help

INTEGRATED SUITE Leverage the power of CPQ Cloud by integrating with other software applications. CPQ Cloud administrators can use the following pre-defined integrations out-of-the-box or enhance the provided integration patterns to build a strong Oracle Cloud suite.
USE OAUTH TOKENS IN BML LIBRARIES
OAuth is an industry standard technology that allows customers to grant third-party access to their application without sharing their passwords. When integrating CPQ Cloud with a CRM system such as Salesforce or Microsoft Dynamics 365, the integration uses an OAuth access token to authenticate user access to the CRM system. Generated automatically when the user accesses CPQ Cloud from the CRM system, the token supports the synchronization of data between CPQ Cloud and the CRM system.
INSERT TOKEN IN HEADER OF URL DATA FUNCTION
In prior releases, administrators could not use BML to access generated tokens. CPQ Cloud 17D allows administrators to use a BML function to retrieve a user's access token during a Microsoft Dynamics 365 or a Salesforce v5 or greater integrated session. By inserting an access token into the header of a BML URL data function, CPQ Cloud can securely write data to the CRM system.
$_access_token_dynamics365$ - For Microsoft Dynamics 365 integrated sessions $_access_token_salesforce$ - For Salesforce integrated sessions
When a user has used an OAuth-based Single Sign-On from their CRM to access CPQ Cloud, the system will replace the access token variables above in an "urlData" function with the user's active access token. This establishes a secure connection between CPQ Cloud and the CRM system.
For example: The header would appear as follows to request a list of Microsoft Dynamics 365 opportunities:

60
NOTES: -If the user does not have an integrated session, the access token variable is replaced with a blank. -The partner login icon will generate a token for the user as long as the user has generated a token and logged in at least once in the past. -An invalid or expired access token results in an error from the target system.
STEPS TO ENABLE
This enhancement is available on all CPQ Cloud 17D sites.
TIPS AND CONSIDERATIONS
Consider the following tips when using this enhancement:
• Administrators and users can use the CPQ Cloud User Integration page to generate an OAuth access token to enable the synchronization of data between CPQ Cloud and a CRM system, such as Salesforce or Microsoft Dynamics 365. Likewise, they can use the User Integration page to revoke the token.
• If a user's CRM access token has expired, the CRM system will not allow the user to synchronize data and will return an error. The user must refresh their token by clicking the partner login icon or by returning to the quote through the CRM system.
KEY RESOURCES
CPQ Cloud Administration Online Help

USER INTEGRATION FOR MICROSOFT AZURE ACTIVE DIRECTORY
The CPQ Cloud and Microsoft Dynamics 365 user integration supports the use of Microsoft Azure Active Directory to grant application access to user data. This enhancement provides initial functionality in support of a BML-based integration between CPQ Cloud and Microsoft Dynamics 365. Using Azure Active Directory as the identify provider (IdP), Microsoft Dynamics 365 users can seamlessly access CPQ Cloud using the integration's Single-Sign On (SSO) functionality.
LOCATE YOUR TENANT NAME
An organization receives a tenant ID upon signing up for a Microsoft cloud service. The tenant ID is used as a reference in Azure Active Directory and Microsoft Dynamics 365. The tenant name is the domain name of the Azure Active Directory.
In CPQ Cloud 17D, administrators can configure SSO between Azure Active Directory and CPQ Cloud by completing the following steps:
• Locate your tenant name in Azure Active Directory • Create an app registration in Azure Active Directory • Define Permissions in Azure Active Directory • Prepare the Azure App for CPQ Cloud integration • Prepare CPQ Cloud for Azure App integration
Complete the following steps:
1. Log in to Microsoft Azure.
2. Navigate to Azure Active Directory > Domain names.
Domain Name in Azure Active Directory
23. Copy the domain name. You will use the domain name (i.e. tenant name) when creating an app registration.

62
CREATE AN APP REGISTRATION
Register Microsoft Dynamics 365 in the Azure portal to add the application to the Microsoft Azure Active Directory and create an Application ID. The Application ID allows Microsoft Dynamics 365 to receive access tokens.
Complete the following steps:
1. Log in to Microsoft Azure.
2. Navigate to Azure Active Directory > App registrations.
Microsoft Azure Portal
24. Click New application registration. A dialog for creating the registration opens.

63
Registration Details
25. In the Name field, enter a name for the app registration.
26. In the Application type field, enter Web app / API.
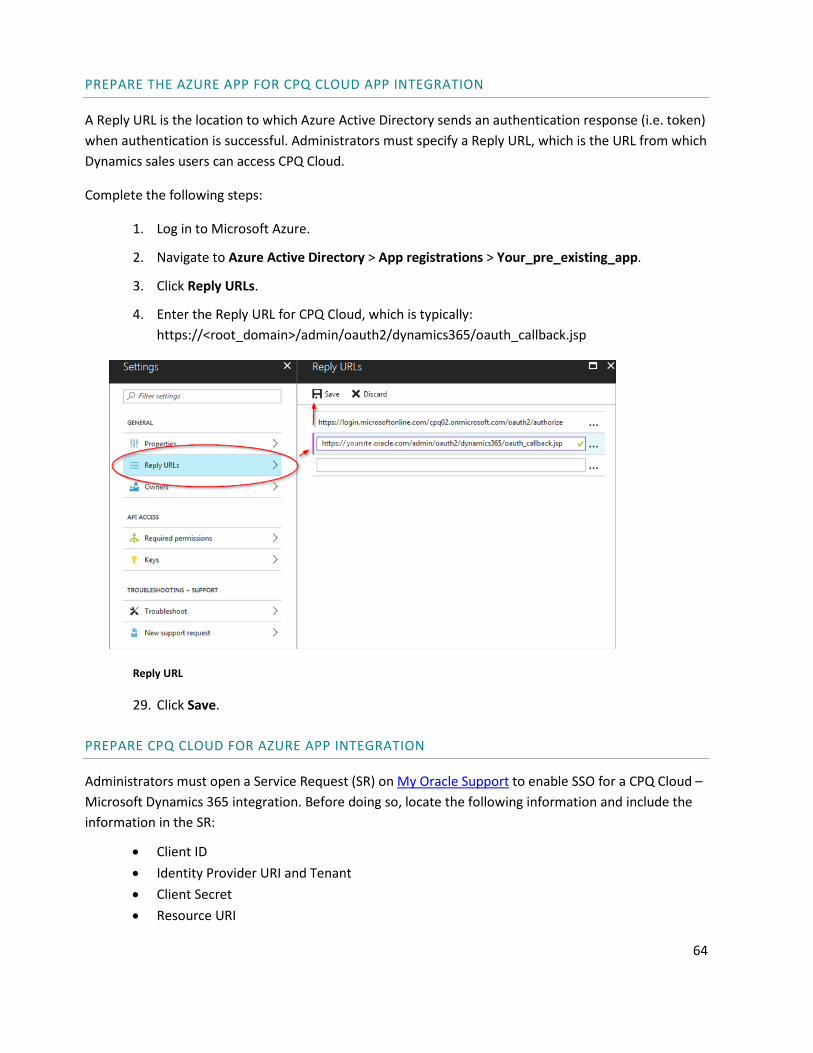
27. In the Sign-on URL field, enter the following: https://<root_domain>/admin/oauth2/dynamics365/oauth_callback.jsp
NOTE: The Sign-on URL is used to populate the default "Reply URLs".
28. Click Save.
DEFINE PERMISSIONS
Define the permissions to which the Microsoft Dynamics 365 app requires access. Select the following options when setting permissions:
• Application Permissions • Delegated Permissions • Access CRM Online as organization users
NOTE: For additional information, refer to the Azure Active Directory documentation.
64
PREPARE THE AZURE APP FOR CPQ CLOUD APP INTEGRATION
A Reply URL is the location to which Azure Active Directory sends an authentication response (i.e. token) when authentication is successful. Administrators must specify a Reply URL, which is the URL from which Dynamics sales users can access CPQ Cloud.
Complete the following steps:
1. Log in to Microsoft Azure.
2. Navigate to Azure Active Directory > App registrations > Your_pre_existing_app.
3. Click Reply URLs.
4. Enter the Reply URL for CPQ Cloud, which is typically: https://<root_domain>/admin/oauth2/dynamics365/oauth_callback.jsp
Reply URL
29. Click Save.
PREPARE CPQ CLOUD FOR AZURE APP INTEGRATION
Administrators must open a Service Request (SR) on My Oracle Support to enable SSO for a CPQ Cloud – Microsoft Dynamics 365 integration. Before doing so, locate the following information and include the information in the SR:
• Client ID • Identity Provider URI and Tenant • Client Secret • Resource URI

65
Get the Client Id
A Client ID is a unique ID synonymous with the Application ID that allows Microsoft Dynamics 365 to receive access tokens.
Complete the following steps:
1. Log in to Microsoft Azure.
2. Navigate to Azure Active Directory > App registrations > Your_pre_existing_app.
3. Copy the Application ID.
Application ID
Get the Identity Provider URI and Tenant
In a CPQ Cloud – Microsoft Dynamics 365 integration, Microsoft Azure functions as a cloud-based identity and access management solution. The Identity Provider URI is the domain of the Azure Active Directory URL. The tenant is the first path in the Azure Active Directory URL and proceeds the Identity Provider URI. Only the Active Directory URLs specified can authenticate users.
Complete the following steps:
1. Log in to Microsoft Azure.
2. Navigate to Azure Active Directory > App registrations.
3. Click Endpoints.
4. Copy the OAUTH 2.0 AUTHORIZATION ENDPOINT.

66
OAuth 2.0 Authorization Endpoint
30. Locate the Identity Provider URI and the tenant.
• The Identity Provider URI is the domain of the Azure Active Directory URL and looks similar to: https://login.microsoftonline.com
• The tenant is the first path in the Azure Active Directory URL and looks similar to: 38ef3fd8-dad2-4d94-b186-f508effa50af
Identity Provider URI and Tenant
NOTE: The tenant ID shown above and the tenant name referenced in the Locate Your Tenant Name section are interchangeable. Microsoft accepts both the Azure Portal's domain and the ID as acceptable tenants. The values both point to the same location.

67
Get the Client Secret
SSO between Dynamics and CPQ Cloud requires a client secret.
Complete the following steps:
1. Log in to Microsoft Azure.
2. Navigate to Azure Active Directory > App registrations > Your_pre_existing_app.
3. Click Keys.
4. Create your key, which will generate your secret.
o Provide a description for the key. o Select Never expires from the Expires menu. o Leave the Value field blank.
Key Details
31. Click Save to generate the client secret.
32. Copy the value in plain text and include it in the Service Request (SR) you create on My Oracle Support. An Oracle support technician will encrypt your client secret.
Client Secret

68
NOTE: Administrators must copy the client secret. They cannot access the client secret at a later time.
Get the Resource URI
The Resource URI is the environment to which the app registration has data access, which is either the Dynamics 365 production or sandbox environment.
Complete the following steps:
5. Log in to the Microsoft Dynamics 365 site that will use SSO to access CPQ Cloud.
6. Copy the URL, trimming off everything except the domain. For example: https://yoursite.crm.dynamics.com
STEPS TO ENABLE
After completing the above steps, open a Service Request (SR) on My Oracle Support. Include the following information in the SR:
• Client ID • Identity Provider URI and Tenant • Client Secret • Resource URI
KEY RESOURCES
• Azure Active Directory Documentation • CPQ Cloud Administration Online Help

JD EDWARDS INTEGRATION
CPQ Cloud 17D provides JD Edwards customers with an integration that enhances their direct, channel, and web Commerce sales experience. After receiving customer approval of a quote, CPQ Cloud sales users can use the information in the quote to create an order in JD Edwards and maintain an up-to-date view of order status in CPQ Cloud.
Supported by Oracle Integration Cloud Service (ICS) and Commerce attributes, actions, and BML functions created within the CPQ Cloud platform, the integration substantially reduces the risk, time, and effort associated with implementing a custom integration between CPQ Cloud and JD Edwards.
NOTE: For information about how to implement the integration, refer to the Oracle CPQ Cloud – JD Edwards Implementation Guide.
CREATE AN ORDER IN JD EDWARDS
As part of the order creation process, CPQ Cloud sales users retrieve the customer's Sold To, Ship To, and Bill To address information from JD Edwards, add line items to a Transaction, generate a quote, and invoke a Create Order action to create the order in JD Edwards.
Complete the following steps:
1. Create a CPQ Cloud Transaction.
2. In the Customer ID field, enter the Customer ID of the JD Edwards customer for whom you are creating an order. The Customer ID is used to retrieve the customer's Sold To, Ship To, and Bill To address information.
3. From the Business Unit drop-down menu, select the business unit associated with this Customer ID.
CPQ Cloud Transaction and Associated Business Unit

70
4. Click Get Customer Details. The customer Sold To Party ID, Ship To Party ID, and Billing Company Name is retrieved from JD Edwards. Company Name, Address, City, State, Zip, and Country information is also retrieved.
Customer Information from JD Edwards
NOTE: If the Customer ID field is left blank or an invalid value is entered, an error message will display upon clicking Get Customer Details. The sales user must correct the invalid entry in order to proceed.
5. Click Add Line Item to add one or more line items to the Transaction. If a non-existing JD Edwards part is added, the sales users are unable to create the order.
List of Potential Line Items to Add to Transaction

71
6. Click Add to Transaction. As shown below, the line items are added to the CPQ Cloud Transaction.
Line Items Added to Transaction
7. Click Submit to invoke the Create Order action. An order is placed in the JD Edwards system. The pricing details of the entire CPQ Cloud Transaction are transferred to the order.
Order ID and Status in CPQ Cloud

72
NOTE: As shown above, the order ID is returned to CPQ Cloud and the Status field populates with an "Ordered" status.
RECEIVE ORDER STATUS UPDATES FROM JD EDWARDS
Once an order is created in JD Edwards, CPQ Cloud sales users can obtain order status updates from JD Edwards using a Check Order Status action, which is invoked from a button on the CPQ Cloud Transaction page. When an order status changes at the Transaction or Transaction Line level, CPQ Cloud sales users can click Check Order Status to retrieve the latest status information from JD Edwards.
Check Order Status Button
The Status field in the CPQ Cloud Transaction changes to the most advanced line item. For example: If the status of one line item is "Shipment Confirmation," then the status of the Transaction reflects the line item status. In the below screenshot, the Transaction status is "Awaiting Shipment".

73
Status Field Reflecting Most Advanced Line Item
NOTE: Once the status of an order is "Shipped," CPQ Cloud sales users cannot cancel or modify the Transaction.

74
STEPS TO ENABLE
Refer to the Integrating Oracle CPQ Cloud and JD Edwards Implementation Guide.
TIPS AND CONSIDERATIONS
Consider the following tips when using the Oracle CPQ Cloud – JD Edwards' integration.
• CPQ Cloud sales users can only retrieve the Sold To, Ship To, and Bill To information for a single customer at a time.
• Upon creating an order in JD Edwards, sales users cannot modify the order. • Administrators can extend the integration to implement configurable and recurring pricing
items.
KEY RESOURCES
• Integrating Oracle CPQ Cloud and Oracle JD Edwards Implementation Guide • CPQ Cloud Administration Online Help

75
COMMERCE CLOUD INTEGRATION ENHANCEMENTS
The Commerce Cloud integration allows CPQ Cloud to deliver Configuration and quoting functionality to Commerce Cloud self-service users. The integration uses Oracle Integration Cloud Service (ICS) to provide pre-built integrations for the Configurator and Request for Quote flows. As part of continuing improvements to the Commerce Cloud integration, CPQ Cloud 17D enhances the ICS flows to reflect new asset and part fields in the "getConfigurations" SOAP API and the "getConfigBom" action for the "configBomInstance" REST API.
These enhancements support the following functionality:
• Verification of recurring charges and service periods during price validation, which occurs at checkout.
• Retrieval of service and billing account information as well as recurring charges and service periods when using a Configuration's BOM for pending orders or performing actions such as Suspend, Resume, Terminate, or Renew.
ENHANCED INTEGRATION CLOUD SERVICE FLOWS
As in prior releases, administrators must import an ICS Integration Package to an ICS environment that connects Commerce Cloud and CPQ Cloud through a common configuration. The ICS Integration Package creates connections that allow users to adjust order and quote details in CPQ Cloud, approve or reject changes in Commerce Cloud, and complete or cancel orders in Commerce Cloud. Each connection corresponds to a different CPQ Cloud SOAP API.
New Fields for getConfigurations SOAP API
The "getConfigurations" SOAP API returns data related to adding items to a Commerce Cloud cart using the "Add to Cart" action. The following new asset fields are available in the "getConfigurations" SOAP API:
• assetKey • startDate • endDate • actionCode
New Fields for configBomInstance REST API
The following new asset fields are available in the "getConfigBom" action for the "configBomInstance" REST API:
• assetId • billingAccountId • serviceAccountId • startDate • endDate • amount
Part Custom Fields
Part custom fields are always included in the "getConfigurations" SOAP API and the "getConfigBom" action for the "configBomInstance" REST API.
STEPS TO ENABLE
Refer to the Integrating Oracle Commerce Cloud Service and CPQ Cloud Service Implementation Guide.
TIPS AND CONSIDERATIONS
Consider the following tips when using the CPQ Cloud 17D Commerce Cloud integration enhancements.
• The asset fields are always included in the "getConfigurations" SOAP API. If there is no asset associated to the Configuration, blank values display.
• The asset fields are only included in "getConfigBom" when there is an asset associated to the Configuration.
• The asset and Configuration are related by matching the asset's "assetKey" with the "bomInstanceId" of the configBomInstance. The "bomInstanceId" is also known as "itemInstanceId_l" when running the "getConfigBom" action.
KEY RESOURCES
CPQ Cloud Administration Online Help

SIMPLIFY Provide a simple way for administrators and end users to leverage CPQ Cloud using the following enhancements.
• Hiding Rules for Commerce Actions • Document Designer Enhancements • Single Select Pick List Enhancements
HIDING RULES FOR COMMERCE ACTIONS
As in prior releases, customers can use hiding rules in Commerce to hide select attributes when a pre-defined condition is satisfied. CPQ Cloud 17D extends this functionality by providing customers with the flexibility of using hiding rules to limit access to Commerce actions.
This section contains the following topics:
• Hide Actions on Desktop or Mobile UI • View Commerce Actions as Components to Hide • Create a Hiding Rule for Commerce Actions • View and Access Hiding Rules from the Commerce Action List • View Actions Associated with a Hiding Rule in the Migration Center • REST API Action State for Hidden Commerce Actions
HIDE ACTIONS ON DESKTOP OR MOBILE UI
Administrators can now use hiding rules to hide Commerce actions on the Desktop or Mobile UI when certain conditions are satisfied.
For example: an administrator can build a hiding rule to hide the Save button unless the Sales Region is specified. This would prevent a sales user from saving Transactions without Sales Region information.

78
Transaction without Region
In the following image, the Sales Region has been provided and the Save button is displayed. Since the sales user has provided Sales Region information, they will be allowed to save the Transaction.
Transaction with Region
VIEW COMMERCE ACTIONS AS COMPONENTS TO HIDE
In CPQ Cloud 17D, administrators have the ability to hide attribute or action components when using a Commerce hiding rule. The Rule Editor now displays Main Document and Subdocument components to hide under Actions and Attributes folders. Hierarchical drop-down menus display available attributes and actions for the specified Commerce process.

79
Attribute and Action Components for Commerce Hiding Rules Creating a Hiding Rule
CREATE A HIDING RULE FOR COMMERCE ACTIONS
Like other rules, hiding rules are made up of a condition and an action. The values of the attribute(s) selected as the condition attribute(s) determines the result of the condition, which when true triggers the hiding of the action.
Perform the following steps to create a hiding rule for a Commerce action.
1. Navigate to the Admin Home page.
2. Click Process Definition in the Commerce and Documents section. The Processes page opens.
3. Select Documents from the Navigation drop-down menu for the applicable Commerce process.
4. Click List. The Document List page opens.
5. Select Rules from the Navigation drop-down menu for the applicable Commerce document.
Select Rules from the Navigation Drop-Down Menu

80
6. Click List. The Commerce Rule Editor page opens.
7. Select Hiding from the Add drop-down menu. The Hiding Rule: New Rule page opens.
Add Hiding Rule
8. Enter the Name, Variable Name, Description, and Status of the rule.
9. Select the Condition Type.
• Always True - The rule will fire automatically, every time, because a specific condition does not need to be met.
• Simple - Use the rule editor to define condition attribute values. Choose from System, Main Document, and/or Sub-Document attributes.
• Advanced - Define advanced conditions using BML.
Define Simple Condition for Hiding Rule
10. Click Add under the Components to Hide section.

81
Add Commerce Action to Hide
11. Select the applicable action from the Components drop-down.
12. Click Save.
VIEW HIDING RULES FROM THE COMMERCE ACTION LIST
Hiding rules that affect actions are now displayed on the Commerce Action List in the Related Rules column. Administrators can click on the rule name under the Related Rules column to open the associated hiding rule.
Navigate to Admin > Commerce and Documents > Process Definition > Documents > Actions to view the Action List page.
Action List Related Rules

82
VIEW ACTIONS ASSOCIATED WITH A HIDING RULE IN THE MIGRATION CENTER
Administrators can migrate Commerce hiding rules that affect actions as granular items or as part of the migration for an entire Commerce process. The Migration Center reflects changes made to hiding rules and allows administrators to migrate the changes between sites.
Commerce Action Hiding Rule in Migration Center
REST API ACTION STATE FOR HIDDEN COMMERCE ACTIONS
REST API responses for Commerce interact and action services will reflect the hidden state for actions that are hidden using Hiding Rules. When an action is hidden, the state object for the appropriate action will show "visible": false.
Sample Request:
Sample Response:

83
STEPS TO ENABLE
Hiding Rules for Commerce actions are automatically available on CPQ Cloud 17D sites.
KEY RESOURCES
Refer to the CPQ Cloud Administration Online Help for additional information.
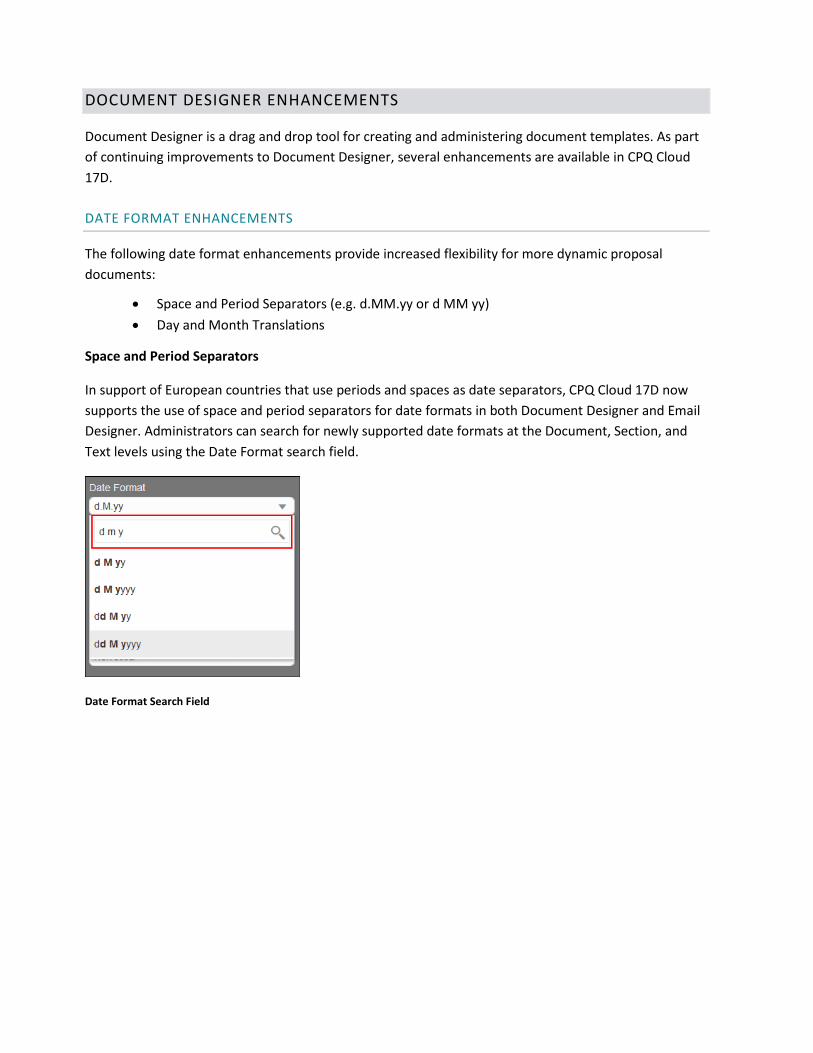
DOCUMENT DESIGNER ENHANCEMENTS
Document Designer is a drag and drop tool for creating and administering document templates. As part of continuing improvements to Document Designer, several enhancements are available in CPQ Cloud 17D.
DATE FORMAT ENHANCEMENTS
The following date format enhancements provide increased flexibility for more dynamic proposal documents:
• Space and Period Separators (e.g. d.MM.yy or d MM yy) • Day and Month Translations
Space and Period Separators
In support of European countries that use periods and spaces as date separators, CPQ Cloud 17D now supports the use of space and period separators for date formats in both Document Designer and Email Designer. Administrators can search for newly supported date formats at the Document, Section, and Text levels using the Date Format search field.
Date Format Search Field

85
The following screenshots show examples of the space and period separators in Document Properties, Section Properties, and Text Properties.
NOTE: When a user switches to a different language when using a multi-language template, the date format is editable at the Document, Section, and Text level.
Day and Month Translations
For multi-language templates, dates (i.e. month and day labels) are now translated to the output document language and visible when previewing the template in Document Designer or Email Designer.
In the following example, an administrator selected French as the template's language. The date translations do not appear when viewing the template in Document Designer Editor.

86
Multi-Language Template in Document Designer Editor
As shown below, the dates translate to their French equivalent when previewing the template in Document Designer or Email Designer.
Preview of Multi-Language Template with Translated Date Format
NOTE: The grammar for translated languages is set in the Java Library. French, Italian, and Spanish months and days are not capitalized. This is grammatically correct and the capitalization is not modifiable.
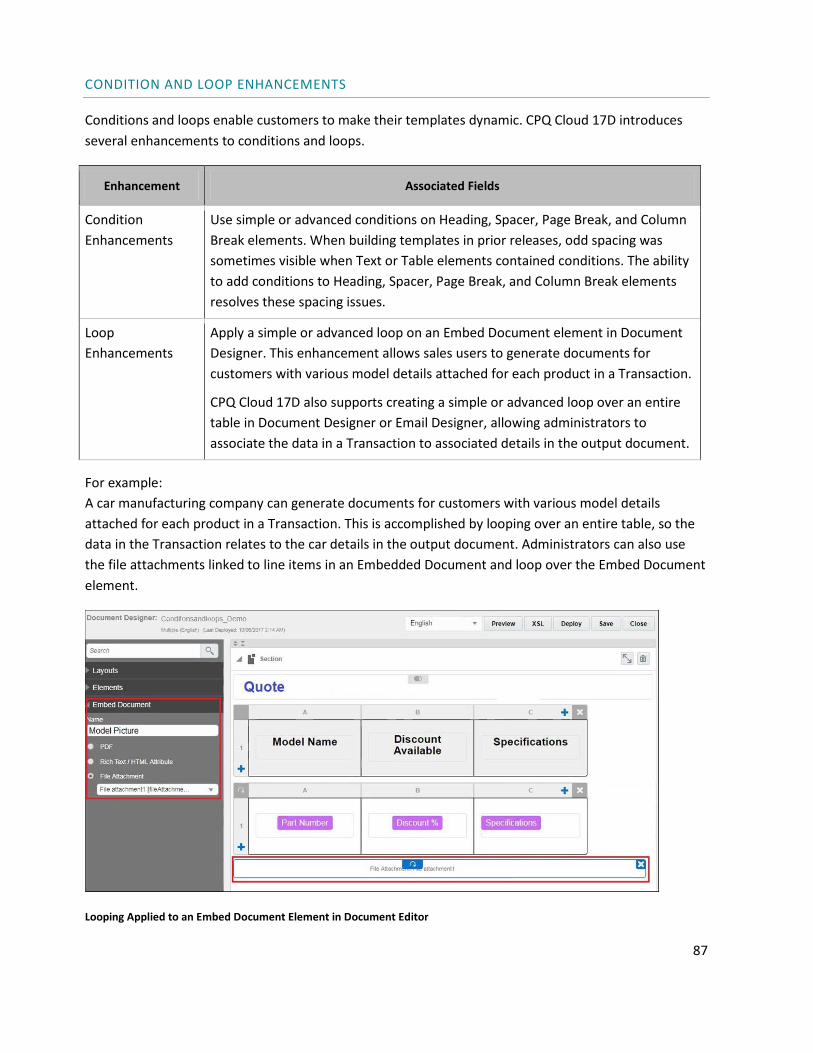
87
CONDITION AND LOOP ENHANCEMENTS
Conditions and loops enable customers to make their templates dynamic. CPQ Cloud 17D introduces several enhancements to conditions and loops.
Enhancement Associated Fields
Condition Enhancements
Use simple or advanced conditions on Heading, Spacer, Page Break, and Column Break elements. When building templates in prior releases, odd spacing was sometimes visible when Text or Table elements contained conditions. The ability to add conditions to Heading, Spacer, Page Break, and Column Break elements resolves these spacing issues.
Loop Enhancements
Apply a simple or advanced loop on an Embed Document element in Document Designer. This enhancement allows sales users to generate documents for customers with various model details attached for each product in a Transaction.
CPQ Cloud 17D also supports creating a simple or advanced loop over an entire table in Document Designer or Email Designer, allowing administrators to associate the data in a Transaction to associated details in the output document.
For example: A car manufacturing company can generate documents for customers with various model details attached for each product in a Transaction. This is accomplished by looping over an entire table, so the data in the Transaction relates to the car details in the output document. Administrators can also use the file attachments linked to line items in an Embedded Document and loop over the Embed Document element.
Looping Applied to an Embed Document Element in Document Editor

88
As shown below, the model details from the Transaction display in the output document and when previewing the output document.
Model Details from Transaction
Embedded files also display in the output document and when previewing the output document.
Embedded Document Displayed when Previewing Output Document
89
STEPS TO ENABLE
The Document Designer enhancements are automatically available on CPQ Cloud 17D sites.
KEY RESOURCES
CPQ Cloud Administration Online Help

SINGLE SELECT PICK LIST ENHANCEMENTS
A Single Select Pick List is an attribute type created in Configuration for Text, Integer, and Float data types. Administrators manage the value for a Single Select Pick List attribute within a defined resource. As part of continuous improvements to Single Select Pick Lists, administrators have new ways to set the value for a Single Select Pick List.
SET THE VALUE OF A SINGLE SELECT PICK LIST USING A PUNCH-IN VALUE
A punch-in is a link used to navigate users directly from one page to another. CPQ Cloud 17D extends the functionality available in Configuration by allowing administrators to set the initial value of a Single Select Pick List by specifying a parameter in a punch-in value.
Complete the following steps:
1. Navigate to the Admin Home page.
2. Under Styles and Templates, select Home Page. The Home Page Setup page opens.
Home Page Setup Page
3. Select the icon under the Model Punch-In column. The Model Punch-ins List page opens.
4. Click New.
5. Set the initial value for the Single Select Pick List by browsing to a specific variable name and specifying a parameter in the URL. Sample Parameter: exampleSSPL=<variable value>

91
Model Punch-ins List Page
6. Click Save. In the following example, the initial value of the Single Select Pick List is set to Phone 1.
Initial Single Select Pick List Value
NOTE: The phone attribute is a Single Select Pick List attribute. Administrators can map the various phone attributes to the associated phone descriptions by creating pick maps. As shown below, the description will then change when users select a different phone option. For additional information about pick maps, refer to the Single Select Pick List topic in the CPQ Cloud Administration Online Help.
Different Phone Option and Different Description
SET THE VALUE OF A SINGLE SELECT PICK LIST USING A RECOMMENDATION RULE ACTION
As in prior releases, Recommendation Rules help buyers configure products by offering suggested attribute values. For each Configuration where a model or part likely has certain attribute values, administrators can create a Recommendation Rule. For example: If a Meat Lovers' pizza has only

92
pepperoni and sausage as toppings, administrators can create a recommendation rule allowing users to modify the toppings.
In CPQ Cloud 17D, administrators can use a Single Select Pick List attribute in a standard action in a Recommendation Rule. When recommendations trigger, they appear to buyers on the Model Configuration page.
Complete the following steps:
1. Navigate to the Admin Home page.
2. Under Products, click Catalog Definition. The Supported Products page opens.
3. From the Navigation menu, select Recommendations.
4. Click List. The Recommendation: Rules List page opens.
5. Click Add. The Recommendation: New Rule page opens.
6. In the Name field, enter a name for the Recommendation Rule.
7. Click in the Variable Name field to auto-populate the field.
8. Select Simple Condition as the Condition Type.
9. Under Action: (Values to Set), click Add Attributes. The Attributes dialog opens.
10. Select the Single Select Pick List attributes to include as actions in the Recommendation Rule.

93
Single Select Pick List Attributes in List of Attributes
11. Click Add. The Recommendation Rule displays.
12. Use the Value to Set text entry field to set a value for the Single Select Pick List attribute.
13. As with other Recommendation Rules, use the Set Type menu to auto-populate the recommended values in the attribute field.
Set Type Description
None The selected value for the action attribute in the rule is the recommended value for the attribute. It will show as a message and it can be modified by the user.
Set The setting of a recommended value can be prevented by locking the attribute, in which case, only the recommended values message is shown. This can be modified by the user.
Forced Set The rule will set the attribute value to the value chosen in the rule. This value is read-only and cannot be modified by the user.

94
Sample Recommendation Rule with Single Select Pick List Attributes as Actions
NOTES: -When using Static Text to set the value of a Single Select Pick List via a standard action in a Recommendation Rule, the value is validated in the data table upon performing a Save. If the value does not exist in the data table, an error displays at the top of the Recommendation page noting that the attribute and value are invalid. If the entry is invalid, administrators can insert a correct value to save the Recommendation Rule. -If a Single Select Pick List has an invalid entry and administrators choose to set the entry via BML, they must first remove the Static Text entries before setting up the BML action for the attribute. Otherwise, administrators cannot save the Recommendation Rule unless they revert, remove the entries, and re-select the BML.

95
Shown below is an example of the Single Select Pick List attributes in Configuration. The attributes are used as actions in a Recommendation Rule and display under the Content heading.
Single Select Pick List Attributes as Recommendation Rule Actions in Configuration
APPLY MESSAGE PROPERTIES TO SINGLE SELECT PICK LISTS IN CONFIGURATION
In CPQ Cloud 17D, the Attribute Properties dialog for Single Select Pick Lists contains message properties. Administrators can use these properties to specify how to display the messages that display when the Recommendation Rule's Set Type is set to "None" or "Set".
The following properties are available:
• Show Recommendation Message: When the Set Type is "None" and administrators select this option, the recommended value for the action attribute displays as a message to the user. When the Set Type is "Set," the setting of a recommended value is prevented by locking the attribute. The recommended values' message will display in Configuration.
• Show Previous Value: By selecting this option, the previous message displayed for the recommended value will display.
• Message Placement: Specify the location in which to place the recommendation message in Configuration (i.e. Below Attribute, Right of Value, Bottom of Group, Bottom of Page, or Top of Page.

Complete the following steps:
1. Navigate to the Admin Home page.
2. Under Products, click Catalog Definition. The Supported Products page opens with Product Families displaying by default in the Navigation menu.
3. Click List. The Supported Product Families page opens.
4. Locate the product family to which you want to apply message settings.
5. From the Navigation menu, select Configuration Flows.
6. Click List. The Configuration Flow: Rules List page opens.
7. In the Layout column, click Desktop. The Layout Editor opens with gear icons next to the Single Select Pick List attributes.
Layout Editor with Gear Icons Next to Single Select Pick List Attributes
8. Click the gear icon next to a Single Select Pick List attribute. The Attribute Properties dialog opens.

97
Messages Section in Attribute Properties Dialog
9. Select the message properties to apply to the Single Select Pick List attribute in Configuration.
10. Click OK.
NOTE: After upgrading to CPQ Cloud 17D, Single Select Pick Lists by default have the Show Recommendation Message selected and the Message Placement option set to Below Attribute. These are the defaults for any attribute added to the layout. If users add a Single Select Pick List to a Recommendation Rule as an action, the messages display by default.
SET THE VALUE OF A SINGLE SELECT PICK LIST ATTRIBUTE USING A SOAP API
Administrators can use a SOAP API call to set the value of a Single Select Pick List attribute using a punch-in URL or a Recommendation Rule. When sending a SOAP request to set a value for a Single Select Pick List attribute, administrators must use a value in the request. The default value for <displayedValue> is false. Administrators can specify the <displayedValue> as true in the request to show the display value in the response.

Sample Text Single Select Pick List SOAP API request:
Sample Text Single Select Pick List SOAP API response:
NOTE: In prior releases, the SOAP response used the display value for Text Single Select Pick Lists as the value response. In CPQ Cloud 17D, the SOAP response displays the value of Single Select Pick Lists in the Value column. The default value for <displayedValue> is false. Administrators can specify the <displayedValue> as true in the request to show the display value in the response.

Sample Integer and Float Single Select Pick List SOAP API request:
Sample Integer and Float Single Select Pick List SOAP API response:
NOTE: If a SOAP API calls a Single Select Pick List entry that does not exist or is invalid, the Web Service call is still passed. However, the Single Select Pick List value is not populated and the following error message displays: The value for the attribute is not among the menu items.
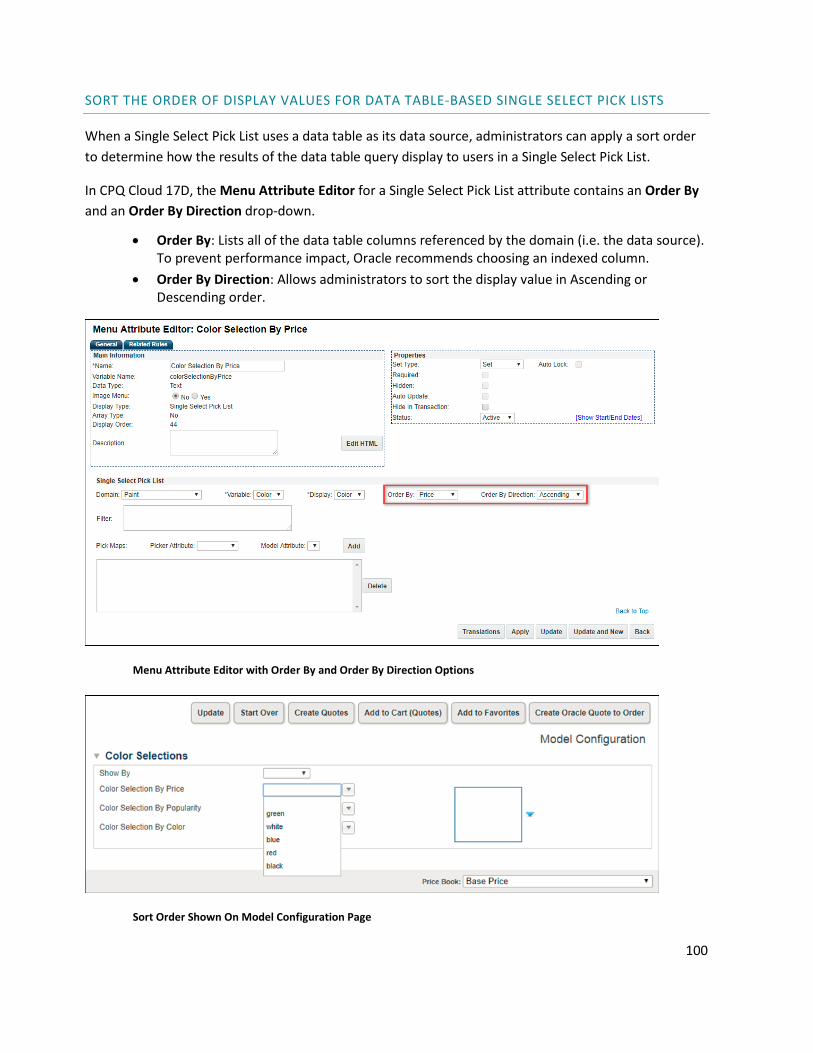
100
SORT THE ORDER OF DISPLAY VALUES FOR DATA TABLE-BASED SINGLE SELECT PICK LISTS
When a Single Select Pick List uses a data table as its data source, administrators can apply a sort order to determine how the results of the data table query display to users in a Single Select Pick List.
In CPQ Cloud 17D, the Menu Attribute Editor for a Single Select Pick List attribute contains an Order By and an Order By Direction drop-down.
• Order By: Lists all of the data table columns referenced by the domain (i.e. the data source). To prevent performance impact, Oracle recommends choosing an indexed column.
• Order By Direction: Allows administrators to sort the display value in Ascending or Descending order.
Menu Attribute Editor with Order By and Order By Direction Options
Sort Order Shown On Model Configuration Page

101
NOTES: -If a data table is not used as the data source, administrators cannot sort the display value. -When administrators create a new Single Select Pick List, Order By is set to the Display value and "Ascending" is the default Order By Direction.
STEPS TO ENABLE
The Single Select Pick List enhancements are automatically available on CPQ Cloud 17D sites.
TIPS AND CONSIDERATIONS
The default sort order for Single Select Pick Lists matches the sort on Single Select Pick Lists created prior to Release 17D.
KEY RESOURCES
• CPQ Cloud Administration Online Help

102
ADDITIONAL CPQ CLOUD ENHANCEMENTS
The CPQ Cloud 17D introduces the following enhancements to improve performance and simplify CPQ Cloud integrations.
• Provide SuperUser access to restore and delete archived Commerce Transactions and enhance archival selection
• Add key words to urldata BML function to support REST API Patch method • Provide email notifications for scheduled and manual FTP uploads to CPQ Cloud
TRANSACTION ARCHIVE ENHANCEMENTS
The Archive Functionality allows an administrator with SuperUser access to restore or permanently delete archived Transactions and immediately view restored quotes from the Transaction Manager.
NOTE: If Transaction archiving is disabled on your site open a Service Request (SR) on My Oracle Support to enable Transaction archiving.
Perform the following steps to access and manage Transaction archives:
1. Navigate to the Transaction Manager of your site.
2. Select View Archives.
View Archives from Transaction Manager
A list of archived Transactions appears.
NOTE: The default setting for cleaning up archived Transactions is 30 days after the Transaction was archived. Open a ticket on My Oracle Support to change this setting.

103
Quote Archives Screen
3. To permanently delete archived Transactions, select the appropriate Transaction(s) then click Delete.
NOTE: Use caution when deleting archived Transactions. Transactions deleted from the archive are immediately removed from the database and cannot be restored.
4. To restore archived Transactions, select the appropriate Transaction(s) then click Restore.
Archive All Results
SuperUsers can now archive all search results using Archive All Results. This action archives all search results at once rather than archiving only the Transactions visible on a single page.
Archive All Results Button

104
ADD PATCH SUPPORT TO THE URLDATA BML FUNCTION
In Release 17D, CPQ Cloud provides support for REST integrations that use urldata functions to invoke HTTP Patch operations. Administrators can now add Patch key words to the urldata BML function.
To invoke a PATCH request, refer to the following example:
NOTE: Refer to the URL Access topic in CPQ Cloud Administration Online Help and the appropriate integration instructions for additional information.
FTP UPLOADS PROVIDE EMAIL STATUS NOTIFICATIONS
When an administrator uploads data to their CPQ Site using FTP, upon completion an e-mail notification is sent to the SuperUser of that site. The e-mail includes a success or failure status, as well as details regarding the upload. The FTP upload can be either scheduled or manual.
STEPS TO ENABLE
The additional CPQ Cloud enhancements are automatically available on CPQ Cloud 17D sites.
KEY RESOURCES
CPQ Cloud Administration Online Help

105
PRE-UPGRADE CONSIDERATIONS
MIGRATION
When migrating from one site to another using the Migration Center, both sites must use the same major release. Content may only be migrated across minor releases within the same major release. Migration across major releases cannot occur.
"Major release" = A major product release, e.g. Release 17D "Minor release" = A release update, e.g. Release 17D Update 1
RESOLVED KNOWN ISSUES
For information on bugs fixed in Release 17D, refer to the CPQ Cloud 17D Resolved Known Issues document available on My Oracle Support and the CPQ Cloud Online Help.
TRANSLATION
For some system-defined messages and components, strings were removed and others added in CPQ Cloud 17D. If you have created your own implementation-specific translations of system-defined strings, some of these strings may no longer appear. Other strings may appear in English. The strings appearing in English are new and require translation.
Most of these messages and components are on the Admin side of CPQ Cloud, but you should review both your end user and administration pages before deploying your updated installation to confirm that all strings appear in the desired language.

106
TRANSLATION STATUS
CPQ Cloud supports the consumption of both single and multi-byte character sets. Submit a service request on My Oracle Support to enable your site for a new language.
For the following languages, a translation of the CPQ Cloud user interface is available for both the platform and the reference application:
• Chinese (Simplified) [China] • Chinese (Traditional) [Taiwan] • Czech [Czech Republic] • Danish [Denmark] • Dutch [Netherlands] • English • Finnish [Finland] • French • French [Canada] • German • Hungarian [Hungary] • Italian • Japanese [Japan] • Korean [South Korea] • Norwegian (Bokmål) [Norway] • Polish [Poland] • Portuguese [Brazil] • Romanian [Romania] • Russian [Russia] • Spanish (Worldwide) • Swedish [Sweden] • Turkish [Turkey]
POST-UPGRADE CONSIDERATIONS
Upgrade and test all test instances on Oracle CPQ Cloud 17D before upgrading to production.
BROWSER SUPPORT
CPQ Cloud supports all browser versions that meet the criteria of the Oracle Software Web Browser Support Policy.
SUPPORTED BROWSERS
Windows
• Major releases of Google Chrome upon general browser availability and until Google no longer supports the version
• Major releases of Mozilla Firefox upon general browser availability and until Mozilla no longer supports the version
• Major releases of Internet Explorer/Microsoft Edge within nine months of general browser availability and until Microsoft no longer supports the version
Mac OS X
• Major releases of Google Chrome upon general browser availability and until Google no longer supports the browser version
• Major releases of Mozilla Firefox upon general browser availability and until Mozilla no longer supports the version
• Major releases of Safari within nine months of general browser availability and until Apple no longer supports the version
iOS
• Major releases of Safari within nine months of general browser availability, and until Apple no longer supports the browser version.
If you experience issues using a supported browser version, open a ticket on My Oracle Support to resolve the issue. If an issue arises when using a supported browser, use a certified browser version until the delivery of a fix. Certified browsers are selected based on current market share and thoroughly tested to work with the current version's standard functionality.
CERTIFIED BROWSERS
Windows
• Google Chrome 62.x • Mozilla Firefox 56.x • Internet Explorer 11.x
108
NOTE: Compatibility issues with the selected browsers may exist when sites contain additional JavaScript, alternate CSS, or other custom functionality. Customizations may require add-on work. Contact My Oracle Support to determine the availability of workarounds and minor fixes.
SALESFORCE MANAGED PACKAGE SUPPORT
CPQ Cloud no longer releases updates to the Salesforce Managed Packages prior to v7.0. With the release of 2017 R2, Oracle only officially supports Managed Package v7.x. Although Oracle expects Salesforce integrations that use a Managed Package prior to v7.0 to function, CPQ Cloud does not address new issues that arise in these versions.
TRAINING
Please refer to the release documentation for all versions between your current version and the version to which you are upgrading to see all new functionality, resolved known issues, and functional known issues.
Refer to the CPQ Cloud Online Help to become familiar with the new features introduced in Oracle CPQ Cloud 17D. For additional help, see My Oracle Support.
Verify any information not explicitly mentioned in this document as supported by the software against the product help for Oracle CPQ Cloud 17D or the Oracle CPQ Cloud Consulting team.
ADDITIONAL INFORMATION
For more information on Oracle CPQ Cloud, visit the Oracle CPQ Cloud documentation site.
DISCLAIMER
The details in this document are provided for high-level informational purposes only and are not intended to function as a specification or to replace the Online Help. Upgrading to a subsequent release may require the re-deployment of Commerce Processes, Configuration, or global function settings. Modifications to integration XSL files or APIs may also be required.
---

109
Copyright © 2017 Oracle and/or its affiliates. All rights reserved.
This software and related documentation are provided under a license agreement containing restrictions on use and disclosure and are protected by intellectual property laws. Except as expressly permitted in your license agreement or allowed by law, you may not use, copy, reproduce, translate, broadcast, modify, license, transmit, distribute, exhibit, perform, publish, or display any part, in any form, or by any means. Reverse engineering, disassembly, or decompilation of this software, unless required by law for interoperability, is prohibited.
The information contained herein is subject to change without notice and is not warranted to be error-free. If you find any errors, please report them to us in writing.
If this is software or related documentation that is delivered to the U.S. Government or anyone licensing it on behalf of the U.S. Government, then the following notice is applicable:
U.S. GOVERNMENT END USERS: Oracle programs, including any operating system, integrated software, any programs installed on the hardware, and/or documentation, delivered to U.S. Government end users are "commercial computer software" pursuant to the applicable Federal Acquisition Regulation and agency-specific supplemental regulations. As such, use, duplication, disclosure, modification, and adaptation of the programs, including any operating system, integrated software, any programs installed on the hardware, and/or documentation, shall be subject to license terms and license restrictions applicable to the programs. No other rights are granted to the U.S. Government.
This software or hardware is developed for general use in a variety of information management applications. It is not developed or intended for use in any inherently dangerous applications, including applications that may create a risk of personal injury. If you use this software or hardware in dangerous applications, then you shall be responsible to take all appropriate fail-safe, backup, redundancy, and other measures to ensure its safe use. Oracle Corporation and its affiliates disclaim any liability for any damages caused by use of this software or hardware in dangerous applications.
Oracle and Java are registered trademarks of Oracle and/or its affiliates. Other names may be trademarks of their respective owners.
Intel and Intel Xeon are trademarks or registered trademarks of Intel Corporation. All SPARC trademarks are used under license and are trademarks or registered trademarks of SPARC International, Inc. AMD, Opteron, the AMD logo, and the AMD Opteron logo are trademarks or registered trademarks of Advanced Micro Devices. UNIX is a registered trademark of The Open Group.
This software or hardware and documentation may provide access to or information about content, products, and services from third parties. Oracle Corporation and its affiliates are not responsible for and expressly disclaim all warranties of any kind with respect to third-party content, products, and services unless otherwise set forth in an applicable agreement between you and Oracle. Oracle Corporation and its affiliates will not be responsible for any loss, costs, or damages incurred due to your access to or use of third-party content, products, or services, except as set forth in an applicable agreement between you and Oracle.