Embed Size (px)
Citation preview

© 2015 Phil Service ([email protected]) Last revised: 15 April 2015
Olympus OM-D E-M5 II. Analysis of High-Resolution Images and Comparison to Sigma DP2 Merrill
Phil Service Flagstaff, Arizona, USA
5 April 2015
Summary High-resolution (64MP) and standard-resolution (16MP) images from the Olympus OM-D E-M5 II are compared. The high-resolution images have substantially more fine detail “information” than do the standard-resolution images. That is demonstrably true even when the high-resolution images are down-sampled to 16MP for 1:1 comparison with the standard images. The Olympus high-resolution images are also compared to images from a Sigma DP2 Merrill (14.75MP). Images from both cameras were resampled to dimensions appropriate for making 18-inch-long prints. When viewed on-screen at 100% magnification, the E-M5 II images were clearly superior to the DP2M images. However, when printed, the DP2M images exhibited greater apparent detail. Much of the difference in detail rendition in these comparisons is qualitative rather than quantitative. The E-M5 II high-resolution mode appears to offer considerable advantage if the images are intended for display at large sizes. That advantage must be balanced against the fact that it is appropriate only for tripod shooting of motionless subjects, and the fact that the improved detail is not apparent when images are sized for typical viewing on a computer display.
Key words: Olympus OM-D E-M5 II, Sigma DP2 Merrill, PhotoZoom Pro, sensor shift, image detail, resolution
1. Introduction The Olympus OM-D E-M5 Mark II, announced in early 2015, has a special high- resolution mode in which the sensor is shifted between exposures in an eight-frame sequence that is divided into two sets of four exposures. Within each set of four, the sensor is shifted in steps of one photosite. The result is that full RGB color information is obtained for every image pixel, avoiding the need to demosaic by interpolation. The two sets of four exposures are offset by a one-half photosite shift. That doubles the linear sampling frequency achieved by the sensor. The image pixels corresponding the half-photosite shift are inserted between the pixels obtained for the unshifted image. The resulting raw images are 64MP, compared to 16MP for standard-resolution images. The theoretical effect of the half-photosite shift on resolution (lp/mm) and micro-contrast was examined in a previous paper. That analysis indicated that half-photosite 1
shifting can theoretically double linear resolution when using apertures larger than about f/5.6.
Service, Phil. 2015. Limits of Resolution. 5. Sensor Shift.1
�1

© 2015 Phil Service ([email protected]) Last revised: 15 April 2015
However micro-contrast is much less than would be the case if the linear photosite density were actually doubled (to produce a “true” 64MP image). The present paper compares high-resolution and standard-resolution images from the E- M5 II. It also compares the high-resolution images to those from a 14.75MP Sigma DP2 2
Merrill. The latter comparison is presented for images resampled to sizes appropriate for making 18-inch-long prints at 360 ppi.
2. Methods 2.1. Image Capture A tripod and delayed shutter release were used for all images. Each camera was used at its base ISO — 200 and 100 for the E-M5 and DP2M, respectively. I relied on single-area auto focus and matrix metering for both cameras. Five-image exposure bracketing with 0.3EV steps was used, and I choose the “best” images for analysis. The lens on the Olympus was a Panasonic Leica DG Summilux 25mm f/1.4 ASPH. The Sigma has a fixed 30mm f/2.8 lens. All exposures with the Olympus were made at f/4. All exposures with the Sigma were made at f/5, which is the approximate equivalent aperture given that the Olympus has a m4/3 sensor and the Sigma an APS-C sensor.
2.2. Image Processing – Olympus In high-resolution mode, the Olympus outputs three images: a 40MP JPEG, a 16MP .ORI raw file, and a 64MP .ORF file. The paired .ORI and .ORF files were used for these comparisons. Raw images were opened in Adobe Camera Raw and passed to Photoshop CC2014 without changing the ACR defaults. The working color space was 16-bit ProPhoto 3
RGB. Raw images were sharpened using Smart Sharpen. The high-resolution images were down-sampled with PhotoZoom Pro 6, using the S-Spline Max method.
2.3. Image Processing – Sigma The DP2M raw files (.X3F) were opened in Sigma Photo Pro 5.5. Sharpening was set to the lowest value. Exposure was adjusted, and the images were exported as 16-bit ProPhoto 4
RGB TIFF files. Final image adjustments were made in Photoshop CC2014. In general, I attempted to match the appearance of the Sigma images (color balance, brightness, contrast, saturation) to that of the E-M5 images. Additional sharpening, if necessary beyond that applied during up-sampling, was by Smart Sharpen.
The E-M5 II and lens were rented from lensrentals.com.2
Bridge and Camera Raw can be made to open .ORI files by the simple expedient of adding the .ORF 3
extension. For example, change [filename].ORI to [filename]ORI.ORF
The lowest setting in SPP is a rather ambiguous -2 Does that mean “no sharpening” or “negative 4
sharpening” (i.e., addition of blur)?.
�2

© 2015 Phil Service ([email protected]) Last revised: 15 April 2015
2.4. Image Resampling for Comparisons between the E-M5 II and the DP2M Two factors complicated comparisons between the DP2M and E-M5 II. First, the cameras have different aspect ratios — 3:2 and 4:3, respectively. Second, the 30mm DP2M lens has a wider field of view than the 25mm lens used on the E-M5 — 45mm vs. 50mm “equivalent”. In order to deal with these issues, the high-resolution E-M5 images were first made 3:2 by cropping pixels off the short dimension. That produced 9216 x 6144 images. The DP2M images were then cropped to match the narrower field-of-view of the E-M5 images. That resulted in DP2 images that were approximately 4026 x 2684 pixels. The remaining issue was to decide on the appropriate common resampled resolution for comparing images. I am interested in producing prints. The largest size that I normally print is 18-inches on the long dimension. The corresponding linear image resolution for printing at 360 ppi is 6480 pixels. For an un-cropped DP2M image (4704 x 3136), that requires up-sampling by a linear factor of 1.378. Therefore, I chose to up-sample the cropped 4026 x 2684 DP2M images by the same factor. The resulting images were 5547 x 3698 (20.5MP). The previously cropped E-M5 images (9216 x 6144) were down-sampled to the same size for comparison. All resampling was done with PhotoZoom Pro 6, using S-Spline Max.
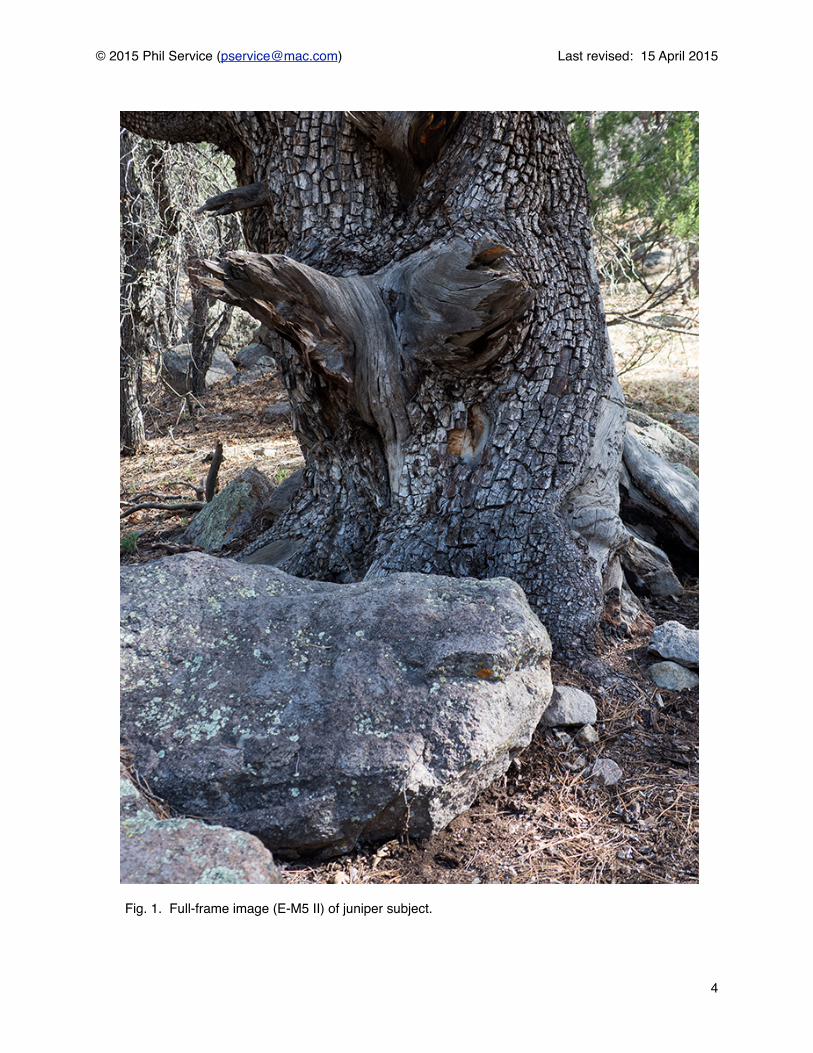
3. Results Comparisons are shown for images of two subjects: the lower trunk of a juniper photographed from a distance of about 3.8 m (Fig. 1); and lichen growing on the side of a large boulder photographed from a distance of 1.25 m (Fig.2). Actual pixel comparisons (100% magnification) are shown for the central areas of the images. The images are in separate files that can be accessed by clicking on the in-text links.
3.1. Comparison of High- and Standard-Resolution E-M5 II Images 3.1.1. Juniper — Fig. 3 shows the comparison for the juniper. Differences in detail rendition are subtle, but careful inspection should show that very fine details are sharper in the high-resolution image, and indeed that it is possible to see some details that are only hinted at in the standard-resolution image. I have circled three areas for close inspection and focused comparison. Note, for example, the area of bare wood within the green ovals in Fig. 3. Very fine vertical lines of wood grain can be seen in the high-resolution image. Only the widest lines are visible in the standard-resolution image, and then not as clearly defined. Overall, the high-resolution image gives the impression of delicate, finely rendered detail. By comparison, the detail in standard-resolution image seems coarse. Sharpening is a matter of judgment and taste, and different degrees of sharpening could alter the overall character of these two images. However, my sense is that the differences in fine detail rendition are not a sharpening artifact. The high-resolution image was sharpened before downsampling. The Smart Sharpen settings were Amount 300%, Radius 2.0 px, Reduce Noise 10%. The corresponding settings for the standard resolution image were 200%, 1.0 px, and 10%. 3.1.2. Lichen — The amount of detail in this image is almost overwhelming (Fig. 4). The better detail rendition of the E-M5 II high-resolution image is evident almost anywhere one cares to look. In fact, the overall effect of greater sharpness is easily seen when the image is
�3
© 2015 Phil Service ([email protected]) Last revised: 15 April 2015
�4
Fig. 1. Full-frame image (E-M5 II) of juniper subject.

© 2015 Phil Service ([email protected]) Last revised: 15 April 2015
�5
Fig. 2. Full-frame image (E-M5 II) of lichen subject.

© 2015 Phil Service ([email protected]) Last revised: 15 April 2015
viewed from a normal distance. However, I have circled three areas for closer inspection. Smart Sharpen settings for the high-resolution image were: Amount 280%, Radius 2.0 px, and Reduce Noise 10%. The corresponding settings for the standard-resolution image were 200%, 1.0 px, and 10%. It seems unlikely that differences in sharpening underlie the differences in detail.
3.2. Comparison between E-M5 II and DP2M — On-Screen Images 3.2.1. Juniper — The Olympus image was processed with the settings used for the previous comparison (Sec. 3.1.1). The Sigma image received minimal sharpening beyond that which might have been applied during up-sampling (Smart Sharpen settings: Amount 75%, Radius 0.8 px, Reduce Noise 10%). The E-M5 high-resolution image is superior (Fig. 5). By comparison, the DP2M image seems rough, with slightly less detail. The difference is rather similar to the difference between the high- and standard-resolution E-M5 images (Fig. 3). 3.2.2. Lichen — Again, the E-M5 high-resolution image has superior detail rendition (Fig. 6), and the difference is readily apparent in virtually all areas of the central crop. Sharpening of the Olympus image was as before (Sec. 3.1.2). Smart Sharpen settings for the Sigma image were: Amount 200%, Radius 1.0 px, and Reduce Noise 10%. 3.3. Comparison between E-M5 II and DP2M — Prints The intended end-use for the Olympus-Sigma comparison is 18-inch-long prints of un- cropped DP2M images. To that end, each complete 3698 x 5547 cropped and resampled image was printed on an Epson 3880 at 360 ppi, using Epson Ultra Premium Luster Photo Paper. I suggest that print evaluation is likely to be more subjective than evaluation by pixel-peeping at 100% magnification. Fine-art printing by definition implies personal preferences that are related to artistic intent. What seems “best” on a display may not be what makes the preferred print. I can’t show you the prints, so I ask that you trust my hopefully objective descriptions. With regard to the juniper, the DP2M print has has considerably more apparent sharpness than the E-M5 print. The relatively coarse texture that makes the Sigma image look worse at 100% on-screen results in an accentuated sharpness at print size. In fact, the DP2M print verges on hyper-realistic — particularly in the strongly rendered grain of the bare wood in the “V” formed by the dead branch stumps (above the region chosen for crops in Figs. 3 and 4); and in the sharp delineation of individual bark platelets. By comparison, the E-M5 image also seems sharp, but in a more subtle way. Preference for one print over the other would be a matter of taste. 5
One issue with this comparison is that the overall sharpness of the E-M5 II image falls off quickly away from the center. The E-M5 focus appears to be toward the rear, whereas the DP2M focus looks to have been more forward. That could account for the difference in wood grain appearance just mentioned. Also, the large boulder in the foreground is quite sharp in the Sigma image, but out-of-focus in the Olympus image. There is enough difference between these two prints to leave a lot of room for personal preference. As they stand, I’m undecided. If I thought
That the DP2M image fares well as a print, despite looking less than wonderful on-screen at actual 5
pixels, is consistent with the conventional wisdom that when images are optimally sharpened for printing, they often look over-sharp on screen.
�6

© 2015 Phil Service ([email protected]) Last revised: 15 April 2015
this were an image that I would like to have mounted for display, I would probably go back and re-work the E-M5 image to try and make a more pleasing (to me) print. That probably would entail making it a bit sharper. Or, if I still had the camera, I would take the photograph again. For the lichen, the story is much the same. The detail in the DP2M print is more immediately apparent, particularly in the yellow-orange lichen “tufts”. The coarseness seen in the 100% on-screen view translates into greater micro-contrast. The greater subtlety and delicacy of detail in the E-M5 II print becomes apparent only with longer study. Again, preference for one print over the other is a matter of taste. For this case also, the sharpness of the E-M5 image falls off noticeably away from center; whereas the DP2M image is sharp everywhere except in the upper-right corner. Given that apertures were chosen to give approximately the same depth of field, this seems to be a focusing or possibly field-curvature issue. The boulder was not flat — the areas away from the center being closer to the camera.
4. Discussion The detail rendering of the high-resolution mode of the E-M5 II is clearly superior to both its standard-resolution mode and to the Sigma DP2 Merrill, at least in the two examples presented here, when viewed at 100% magnification on a conventional display. At the sizes 6
shown here, the high-resolution images do not seem to reveal appreciably more detail. The difference is rather more qualitative — the finest details are wrought with noticeably more smoothness and delicacy. On the other hand, when these images are printed at a size equivalent to an 18-inch-long un-cropped DP2M print, the difference in apparent sharpness of the images can be reversed. There are at least three possible reasons for the on-screen superiority of the high- resolution E-M5 II images. First, and perhaps most obviously, the linear sampling rate is doubled by the half-photosite shift to produce 64MP raw files. Second, full photosite shifting means that trichromatic color information is obtained for each image pixel, making it unnecessary to demosaic the image by interpolation. Thirdly, the fact that the high-resolution images are composites of eight exposures suggests that they may have considerably less noise. I will speculate that of these factors, the last two are more important than the first for the image sizes presented here. The high acuity of images from the Sigma DP Merrills is generally attributed to their Foveon sensor and, therefore, the fact that images do not need to be demosaiced by interpolation. That suggests that lack of interpolation is a significant contributor to the quality of the high-resolution E-M5 II images. Secondly, Lloyd Chambers provides compelling evidence (by subscription only) that high-resolution E-M5 II images can have much less noise than their standard-resolution (.ORI) counterparts. Lastly, although my simulation analysis indicates that the half-photosite shift can double linear resolution (lp/mm), micro-contrast is much less than would be the case if the linear density of photosites were actually doubled to produce a true 64MP sensor. That suggests that the higher sampling rate may not be 7
revealing much additional detail. Nevertheless, subject detail that can be captured in standard-
I am working with a 27-inch Apple Thunderbolt display. Resolution is approximately 109 ppi.6
Service, Phil. 2015. Limits of Resolution. 5. Sensor Shift7
�7

© 2015 Phil Service ([email protected]) Last revised: 15 April 2015
resolution mode is effectively oversampled in the high-resolution mode. That should result in some detail enhancement — particularly small improvements in micro-contrast and therefore better edge sharpness. The most obvious benefit of the high-resolution images is that they can be displayed or printed at larger sizes while maintaining sharpness. As the comparisons here show, even at image sizes as small as 16MP, the high-resolution images are superior (when viewed at 100% magnification). At sizes above 16MP, the advantage of the high-resolution images is progressively greater. Lloyd Chambers shows comparisons between standard- and high-resolution images that have both been resampled to 39.9MP (7296 x 5472). The superiority of 8
the high-resolution images is obvious, although once again differences are not readily apparent unless the images are viewed at relatively high magnification (perhaps >50%). I enjoy pixel peeping as much as the next person, but the lesson of the prints is clear — peeping can be highly misleading about the relative merits of images when printed. On-screen image differences at 100% magnification may not be a reliable guide to print differences. As another example, at 360 ppi, a standard-resolution E-M5 II image will make a 12.8 x 9.6 inch print. At 720 ppi, a high-resolution image will also print to 12.8 x 9.6 inches. I tried that comparison, printing on Epson Ultra Premium Luster Photo Paper. Both prints were highly detailed and excellent quality. They could not be reliably distinguished under normal viewing conditions, despite the fact that differences could be seen on-screen at 100%. Nevertheless, as print size increases, the high-resolution files will certainly produce the better prints. And the same would be true for the Sigma-Olympus comparison — the E-M5 II will be progressively favored as print size increases and more and more up-sampling is required of the DP2M images. Image resampling and print size play a crucial role in relative print quality. For photographers interested in printing, camera and lens evaluation should ideally include printing at commonly used sizes. The high resolution capture mode of the E-M5 II is a valuable feature, although the situations in which it can be used are restrictive. The images, while not “true” 64MP, can be displayed at much larger sizes than standard-resolution images. If I am correct that non-interpolative demosaicing is a significant contributor to image quality, it is disappointing that Olympus has not seen fit to include an “enhanced resolution” (ER?), four-capture shooting mode that would employ only full photosite shifts to obtain trichromatic information for each image pixel. That would be a particularly useful feature when 64MP files are not needed, when faster shooting is required, or when memory card space is limited.
http://diglloyd.com/prem/prot/ALLVIEW/OlympusOMD_EM5M2/hiRes.html (by subscription only)8
�8