Embed Size (px)
Citation preview

Embedded Linux for the Xilinx MicroBlaze Soft Processor lab 5
Xilinx EDK Tool Lab www.xilinx.com 1-1
Lab 5: MicroBlaze Hardware Design
Targe t ing Linux Kerne l in MicroBlaze™ on Spartan™-3E Starter Kit

Embedded Linux for the Xilinx MicroBlaze Soft Processor lab 5
Xilinx EDK Tool Lab www.xilinx.com 1-2
Lab 5.1 – Base System Builder and Board Bring up � Rationale The real power of Linux on an FPGA platform comes when the custom logic resources of the FPGA are combined with the usability and software infrastructure of the operating system. Xilinx provides a powerful tool to ease FPGA design.
� Objectives l Use BSB and EDK to create a simple Linux-capable design l Use Standard Linux to create a new Embedded Linux target for the hardware platform l Build and boot the new Embedded Linux system
� Introduction In previous labs, we have learned how to configure and build Embedded Linux systems. Embedded Linux always runs on a certain hardware platform. In this lab session, you will create a Linux capable Spartan3e 500 FPGA platform from scratch.
� Before you start
l Hardware Preparation
l Ensure the power switch is in 'off' position. l Ensure Spartan3E500 serial cable is connected to the PC. l Ensure Spartan3E500 is connected to 10/100 Ethernet. l Ensure the host's IP is '192.168.123.1'. l Start the Hyperterminal terminal software.

Embedded Linux for the Xilinx MicroBlaze Soft Processor lab 5
Xilinx EDK Tool Lab www.xilinx.com 1-3
� Use Xilinx EDK BSB to Create a FPGA System
l Start Xilinx Platform Studio (XPS)
The XPS GUI will pop up.
l Use Base System Builder (BSB) wizard to create a simple Spartan3E500 platform.
l Select `Base System Builder wizard` and click `OK` button.
Click `Browse...` button to select a directory to hold the project.
Let's create a directory called lab5 in E:\labs\ directory to hold the project file `system.xmp` by clicking the new folder icon at the right side of the panel and changing the new folder name to linux_sp3. And then click the `Save` button to save the project file into the new folder. Click `OK` button to go forward.

Embedded Linux for the Xilinx MicroBlaze Soft Processor lab 5
Xilinx EDK Tool Lab www.xilinx.com 1-4
l Now, it is back to `Create New XPS Project Using BSB Wizard` dialog.
l Select `I would like to create a new design` on the `Base System Builder – Welcome` window and
then click `next` button to move forward.
In the following steps, we will go through the wizard to select a target board and configure peripherals.
l Step 1: Selec t a target board. l In the `Select Board` window, � Select `Xilinx` as board vendor � Select `Spartan-3E Starter Board` as board name.

Embedded Linux for the Xilinx MicroBlaze Soft Processor lab 5
Xilinx EDK Tool Lab www.xilinx.com 1-5
Click `Next`.
l Step 2: Selec t Processor . Click `Next` button in the `Base System Builder - Select Processor` Window without changing anything. The default processor for Spartan3E 500 is MicroBlaze.
l Step 3: Conf igure Processor l In the `Base System Builder – Configure MicroBlaze Processor` window: � Processor-Bus clock frequency: 50 MHz � Debug I/F: select On-chip H/W debug module � Local memory: 8 KB � Cache setup: select Enable

Embedded Linux for the Xilinx MicroBlaze Soft Processor lab 5
Xilinx EDK Tool Lab www.xilinx.com 1-6
Click `Next`.
l Step 4: Conf igure IO Inter face . � Select RS232_DCE:
l Baudrate: 115200 l Use interrupt: On. l Data bits: 8 l Parity: NONE l Select Use interrupt.
� Select LEDs_8Bit l Peripheral: XPS_GPIO

Embedded Linux for the Xilinx MicroBlaze Soft Processor lab 5
Xilinx EDK Tool Lab www.xilinx.com 1-7
� Select DIP_Switches_4Bit l Peripheral: XPS_GPIO
� Select Buttons_4Bit
l Peripheral: XPS_GPIO
� Select FLASH l Peripheral: XPS_MCH_MEM

Embedded Linux for the Xilinx MicroBlaze Soft Processor lab 5
Xilinx EDK Tool Lab www.xilinx.com 1-8
l Select DDR_SDRAM: � Peripheral: MPMC
l Select Ethernet_MAC: � Peripheral: XPS_ETHERNETLITE � Select Use Interrupt.

Embedded Linux for the Xilinx MicroBlaze Soft Processor lab 5
Xilinx EDK Tool Lab www.xilinx.com 1-9
Click `Next`.
l Step 5: Add Internal Per ipherals . l We will add a timer in this step. Timer is not configured by default. Because Embedded Linux OS relies on timer ticks, we need to configure a timer. � Click `Add Peripheral` button and then select `XPS TIMER`.

Embedded Linux for the Xilinx MicroBlaze Soft Processor lab 5
Xilinx EDK Tool Lab www.xilinx.com 1-10
l Click 'OK`.
� Configure xps_timer_1: l Counter bit width: 32 l Timer mode: Two timers are present l Select Use interrupt.

Embedded Linux for the Xilinx MicroBlaze Soft Processor lab 5
Xilinx EDK Tool Lab www.xilinx.com 1-11
Click `Next`.
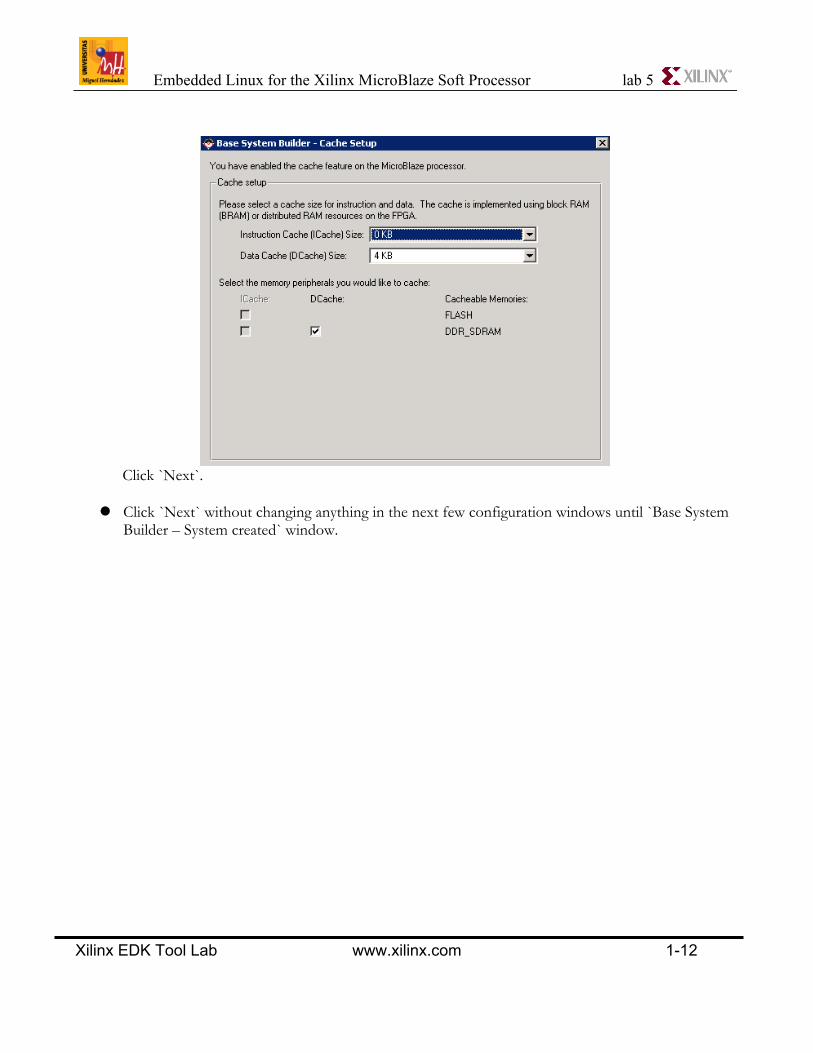
l Step 6: Cache Setup (We have enabled cache when conf iguring MicroBlaze) � Instruction Cache (ICache) Size: 4 KB � Data Cache (Dcache) Size: 0 KB (Disabled). � Cacheable Memory: DDR_SDRAM:
l Select Dcache;
Embedded Linux for the Xilinx MicroBlaze Soft Processor lab 5
Xilinx EDK Tool Lab www.xilinx.com 1-12
Click `Next`.
l Click `Next` without changing anything in the next few configuration windows until `Base System Builder – System created` window.

Embedded Linux for the Xilinx MicroBlaze Soft Processor lab 5
Xilinx EDK Tool Lab www.xilinx.com 1-13
In this window, it shows information about the MicroBlaze processor settings and lists the Cores selected and their memory mappings and Local Memory Bus (LMB) settings.
Click `Generate` button to generate the platform.

Embedded Linux for the Xilinx MicroBlaze Soft Processor lab 5
Xilinx EDK Tool Lab www.xilinx.com 1-14
l Browse the information shown in the `Finish` window. If the BSB succeeds in building the platform, a list of files it created in the project folder will be shown on this window. Have a look at the files and click `Finish` button.
l Click `OK` button to start using platform studio in `The Next Step` window.
Embedded Linux for the Xilinx MicroBlaze Soft Processor lab 5
Xilinx EDK Tool Lab www.xilinx.com 1-15
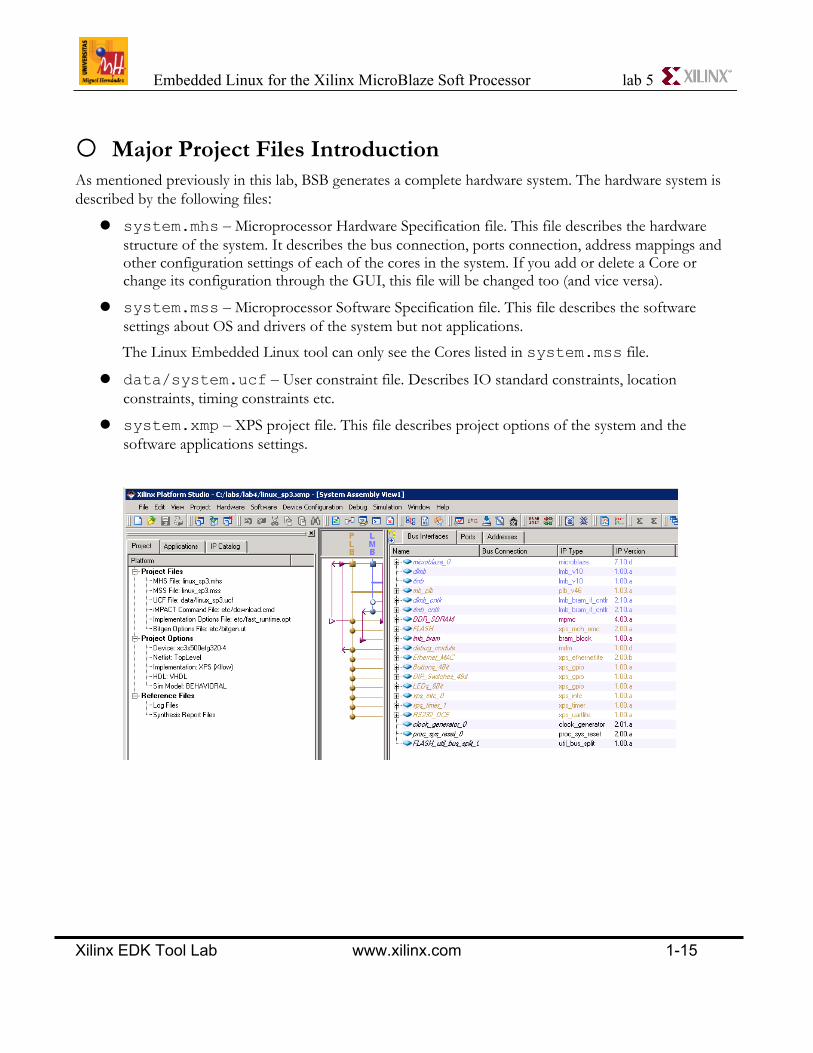
� Major Project Files Introduction As mentioned previously in this lab, BSB generates a complete hardware system. The hardware system is described by the following files:
l system.mhs – Microprocessor Hardware Specification file. This file describes the hardware structure of the system. It describes the bus connection, ports connection, address mappings and other configuration settings of each of the cores in the system. If you add or delete a Core or change its configuration through the GUI, this file will be changed too (and vice versa).
l system.mss – Microprocessor Software Specification file. This file describes the software settings about OS and drivers of the system but not applications.
The Linux Embedded Linux tool can only see the Cores listed in system.mss file.
l data/system.ucf – User constraint file. Describes IO standard constraints, location constraints, timing constraints etc.
l system.xmp – XPS project file. This file describes project options of the system and the software applications settings.

Embedded Linux for the Xilinx MicroBlaze Soft Processor lab 5
Xilinx EDK Tool Lab www.xilinx.com 1-16
� Configure the MicroBlaze to Enable Barrel Shifter Barrel shifter can shift a data word by a specified number of bits in one clock cycle. Including Barrel shifter will dramatically improve the performance but will increase the size of the processor.
Now, we will change the MicroBlaze configuration to include Barrel Shifter through GUI and see the change on system.mhs file.
We can change system through `System Assembly View` or modify the `system.mhs` file directly.
l Open the `system.mhs` file by double clicking the `system.mhs` item from `Project` tab. And then read the settings of `microblaze` component.
BEGIN microblaze
PARAMETER INSTANCE = microblaze_0
PARAMETER C_INTERCONNECT = 1
PARAMETER HW_VER = 7.10.d
PARAMETER C_USE_ICACHE = 0
PARAMETER C_USE_DCACHE = 1
PARAMETER C_DCACHE_BYTE_SIZE = 4096
PARAMETER C_DEBUG_ENABLED = 1
PARAMETER C_DCACHE_BASEADDR = 0x8c000000
PARAMETER C_DCACHE_HIGHADDR = 0x8fffffff
PARAMETER C_AREA_OPTIMIZED = 1
BUS_INTERFACE DLMB = dlmb
BUS_INTERFACE ILMB = ilmb
BUS_INTERFACE DPLB = mb_plb
BUS_INTERFACE IPLB = mb_plb
BUS_INTERFACE dxcl = dxcl
BUS_INTERFACE DEBUG = microblaze_0_dbg
PORT MB_RESET = mb_reset
PORT Interrupt = Interrupt
END
l Right click `microblaze_0` on `System Assembly View` and select `Configure IP ...` from the menu.

Embedded Linux for the Xilinx MicroBlaze Soft Processor lab 5
Xilinx EDK Tool Lab www.xilinx.com 1-17
And then the MicroBlaze configuration window will pop up
l Change the settings to enable Barrel Shifter
Tick `Enable Barrel Shifter` on `Instructions` tab.
Click `OK` button to apply the change.
l See the change in `system.mhs` file.

Embedded Linux for the Xilinx MicroBlaze Soft Processor lab 5
Xilinx EDK Tool Lab www.xilinx.com 1-18
“PARAMETER C_USE_BARREL = 1” is added. BEGIN microblaze PARAMETER INSTANCE = microblaze_0 PARAMETER HW_VER = 7.10.d PARAMETER C_USE_DCACHE = 1 PARAMETER C_DCACHE_BYTE_SIZE = 4096 PARAMETER C_DEBUG_ENABLED = 1 PARAMETER C_DCACHE_BASEADDR = 0x8c000000 PARAMETER C_DCACHE_HIGHADDR = 0x8fffffff PARAMETER C_AREA_OPTIMIZED = 1 PARAMETER C_USE_BARREL = 1 PARAMETER C_FAMILY = spartan3e PARAMETER C_INSTANCE = microblaze_0 BUS_INTERFACE DPLB = mb_plb BUS_INTERFACE IPLB = mb_plb BUS_INTERFACE dxcl = dxcl BUS_INTERFACE DEBUG = microblaze_0_dbg BUS_INTERFACE DLMB = dlmb BUS_INTERFACE ILMB = ilmb PORT MB_RESET = mb_reset PORT Interrupt = Interrupt END
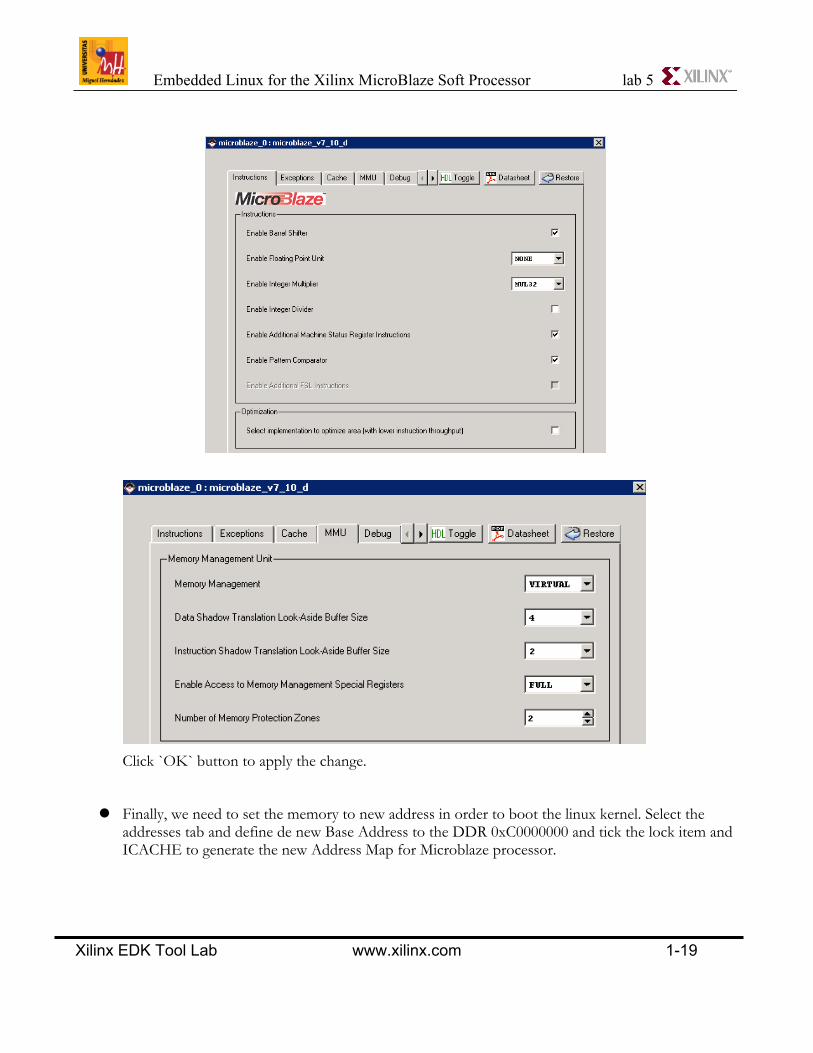
� Configure the MicroBlaze to Enable MMU
Memory Management Unit (MMU) is a computer hardware component responsible for handling access to memory. Its functions include translation of virtual address to physical address, memory protection and so on. If the processor is configured to have MMU and Embedded Linux is configured to support MMU, memory management will protect processes from accessing the other's memory space; otherwise, all the processes including those in user space can access the whole memory. Now, we will change the MicroBlaze configuration to include MMU through GUI and see the change on system.mhs file.
l Right click `microblaze_0` on `System Assembly View` and select `Configure IP ...` from the menu. Change the settings to enable MMU
UnTick `Select Implementation to optimize area ..` on `Instructions` tab and go to `MMU` tab
Embedded Linux for the Xilinx MicroBlaze Soft Processor lab 5
Xilinx EDK Tool Lab www.xilinx.com 1-19
Click `OK` button to apply the change.
l Finally, we need to set the memory to new address in order to boot the linux kernel. Select the
addresses tab and define de new Base Address to the DDR 0xC0000000 and tick the lock item and ICACHE to generate the new Address Map for Microblaze processor.

Embedded Linux for the Xilinx MicroBlaze Soft Processor lab 5
Xilinx EDK Tool Lab www.xilinx.com 1-20
� Modify the Software Specification to Target Embedded Linux By default, the OS running on MicroBlaze is `standalone` and the clock frequency is not specified. We will change the OS to `Device-Tree`. We will make the modification through GUI and watch the changes to `system.mss` file. For use a Device-Tree, we must to copy a bsp folder provided by the sources lab4 to the project folder. Finally select Rescan User Repositories in Project menu. The device tree generator is a Xilinx EDK tool that plugs into the Automatic BSP Generation features of the tool, XPS. The purpose of the device tree generator is to produce a device tree file (xilinx.dts) that has the information for the hardware design in your EDK project. This alleviates having to create a device tree file with a text editor, which can be quite tedious.

Embedded Linux for the Xilinx MicroBlaze Soft Processor lab 5
Xilinx EDK Tool Lab www.xilinx.com 1-21
l At first, have a look at the OS settings and processor settings in `system.mss` file.
Double click `MSS File: system.mss` from `Project Files` list in `Project` tab.
Below is the OS and processor default settings in `system.mss` file.
BEGIN OS
PARAMETER OS_NAME = standalone
PARAMETER OS_VER = 2.00.a
PARAMETER PROC_INSTANCE = microblaze_0
PARAMETER STDIN = RS232_DCE
PARAMETER STDOUT = RS232_DCE
END
l Open `System Software Settings`
Select `Software --> Software Platform Settings` on menu bar.

Embedded Linux for the Xilinx MicroBlaze Soft Processor lab 5
Xilinx EDK Tool Lab www.xilinx.com 1-22
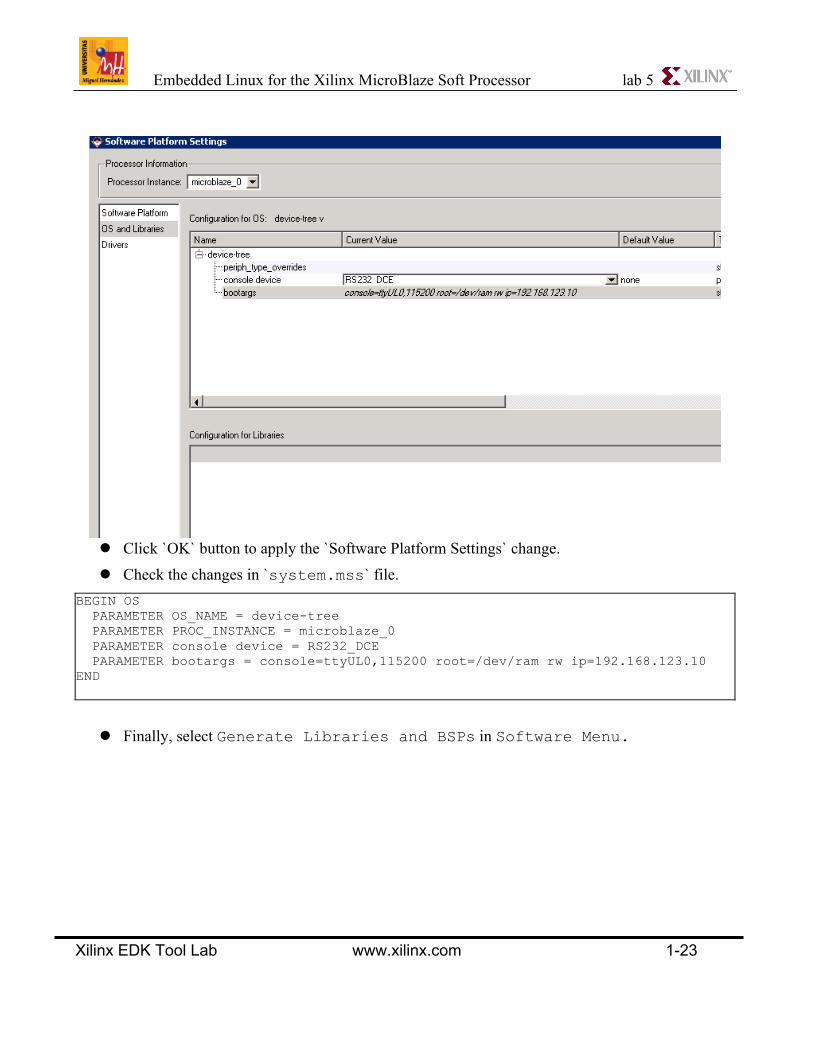
This operation will open `Software Platform Settings` dialog.
l Set OS to `Device-Tree` in `Software Platform` tab.
l Select xmdstub_peripheral and configure debug_module.
l Select `OS and Libraries` tab and configure `Device-Tree`.
� Console device : RS232_DCE � Bootargs: console=ttyUL0,115200 root=/dev/ram rw ip=192.168.123.10
Embedded Linux for the Xilinx MicroBlaze Soft Processor lab 5
Xilinx EDK Tool Lab www.xilinx.com 1-23
l Click `OK` button to apply the `Software Platform Settings` change. l Check the changes in `system.mss` file.
BEGIN OS PARAMETER OS_NAME = device-tree PARAMETER PROC_INSTANCE = microblaze_0 PARAMETER console device = RS232_DCE PARAMETER bootargs = console=ttyUL0,115200 root=/dev/ram rw ip=192.168.123.10 END
l Finally, select Generate Libraries and BSPs in Software Menu.

Embedded Linux for the Xilinx MicroBlaze Soft Processor lab 5
Xilinx EDK Tool Lab www.xilinx.com 1-24
l Ignore this warnings. The resulting device tree file (xilinx.dts) will reside in your project directory
in <processor instance>/libsrc/device-tree/xilinx.dts.
Bootargs Option The 'bootargs' option lets you type in the text for the linux kernel bootargs. The default value (at the time of this writting) is
console=ttyS0 root=/dev/ram Change the text to what is needed for your system. The following section describes a few of the common options given in bootargs.
Embedded Linux for the Xilinx MicroBlaze Soft Processor lab 5
Xilinx EDK Tool Lab www.xilinx.com 1-25
console The value for console=… needs to select the same device given in the 'console device' option. The following is a table showing what device to select in 'console=' based on Xilinx device types commonly used for the console.
device type console text xps_uart16550 console=ttySN xps_uartlite console=ttyULN N is 0 for the first device of the type. N is 1 for the second device of the type etc.
ip The option ip=… specifies the ip address used. To use dhcp to dynamically assign an ip address, specify ip=on To specify a static ip address, for example 192.168.1.10, use ip=192.168.1.10 root The option root=… tells the linux kernel where to find the root filesystem. The root filesystem can be in ram, on the compact flash disk, or even on an nfs share on a remote computer. Add the option rw after the option if you would like the filesystem to be read/writeable. Please note that for ramdisk images, any changes will be in ram only and lost on reboot. The following is a table showing various bootarg options for different root filesystem locations.
root filesystem location
bootarg options
ramdisk root=/dev/ram compact flash disk
root=/dev/xsysace/disc0/partN (where N is the partition number of the root file system.)
nfs root=/dev/nfs nfsroot=<nfs server>:<nfs share>,tcp (e.g. root=/dev/nfs nfsroot=192.168.1.1:/nfsroots/development,tcp)

Embedded Linux for the Xilinx MicroBlaze Soft Processor lab 5
Xilinx EDK Tool Lab www.xilinx.com 1-26
� Build the Hardware Bitstream l Build bitstream through XPS GUI.
Select `Device Configuration` --> `Update Bitstream` on menu bar to build the bitstream. Or click the `Update Bitstream` icon on the `Device Configuration` toolbar directly.
l This operation includes:
� Generate Netlist: `Hardware` --> `Generate Netlist`
� Generate Bitstream: `Hardware` --> `Generate Bitstream`
� Update Bitstream with application to initialize BRAM: `Device Configuration` --> `Update Bitstream`
� Build the Linux Kernel (linux host) Download the Linux Kernel
Xilinx maintains a public GIT tree for each of its open source projects. For more detailed information about GIT and how to use it, please refer to http://git-scm.com.
Xilinx Git Trees
The public Git tree is located at git://git.xilinx.com. The http site, http://git.xilinx.com, can be used to browse the code. The main branch of the public repository is the master branch. This is considered the most stable and tested code from Xilinx. � The following projects are supported on the Git repository:
Project name Description linux-xlnx.git Linux sources u-boot-xlnx.git U-boot sources qemu-xarm.git Zynq-7000 AP SoC QEMU system model
Without GIT Installed A snapshot of a repository can be created using the snapshot feature at http://git.xilinx.com. There are specific instructions on the web page about how to use the snapshot feature. This is not a recommended approach as there is no history in a snapshot.

Embedded Linux for the Xilinx MicroBlaze Soft Processor lab 5
Xilinx EDK Tool Lab www.xilinx.com 1-27
Cloning a Xilinx Repository with GIT
git clone git://git.xilinx.com/<project name>
Microblaze toolchain
The MicroBlaze toolchain contains all of the compiler and support libraries you need to build executables and libraries for a MicroBlaze architecture. MicroBlaze is both big endian (PLB based systems) and little endian (AXI based systems) such that the correct tools must be used.
The following command can be used to get the tools from the Xilinx GIT server.
bash> git clone git://git.xilinx.com/microblaze-gnu.git
The tools binaries are located in the binaries directory of the GIT repository.
Configuration Of The Tools The name of the tools specifies the endian-ness (little or big). The name microblazeel-unknown-linux-gnu specifies the little endian tools. The name microblaze-unknown-linux-gnu specifies the big endian tools.
Set the path to access the tools and setup the environment variable for the Linux kernel build process with the following commands.
export PATH=<dir where tools are located>/microblaze-unknown-linux-gnu/bin:$PATH export CROSS_COMPILE=microblaze-unknown-linux-gnu-
Device-Tree
The device tree generator is called device-tree, which is at:
git://git.xilinx.com/device-tree.git.
The repository can be cloned with the following command which does not need to create any additional directory structure.
bash> git clone git://git.xilinx.com/device-tree.git
Device Tree Documentation
The Device Tree Generator is a best effort attempt to generate a device tree and some hand editing of the device tree file may be required. The device tree is documented (somewhat) in the Linux kernel at Documentation/powerpc/booting-without-of.txt and in the dts-bindings directory.

Embedded Linux for the Xilinx MicroBlaze Soft Processor lab 5
Xilinx EDK Tool Lab www.xilinx.com 1-28
The following link, http://ozlabs.org/~dgibson/papers/dtc-paper.pdf, also has some useful information. Also, http://www.devicetree.org/Device_Tree_Usage is a wiki with some good information and links to more official documents.
The Linux Kernel For MicroBlaze
Getting the Kernel From Xilinx The following command gets the kernel tree from the Xilinx Git server.
bash> git clone git://git.xilinx.com/linux-xlnx.git master
Configuring The Kernel Configuration of the kernel is done in the same manner as any other Linux kernel. The kernel should be configured to a known configuration before building it.
bash> make ARCH=microblaze menuconfig

Embedded Linux for the Xilinx MicroBlaze Soft Processor lab 5
Xilinx EDK Tool Lab www.xilinx.com 1-29
bash> make ARCH=microblaze xconfig
There is a default kernel configuration file provided with the kernel for the Xilinx Microblaze MMU reference design.
bash> make ARCH=microblaze xilinx_mmu_defconfig
Kernel Configuration Details A significant difference with the MicroBlaze Linux kernel configuration is that it must contain parameters to match the processor hardware configuration (barrel shifter, multiplier, etc). This is because the GCC must be passed flags when the kernel is built to build code that matches the processor hardware.
From the top level menu in the kernel configuration, select "Platform options" such that a menu similar as shown below is displayed. The values in this menu should match the values for the Microblaze in the device tree file that was generated from the EDK project.

Embedded Linux for the Xilinx MicroBlaze Soft Processor lab 5
Xilinx EDK Tool Lab www.xilinx.com 1-30
Building The Linux Kernel Building the kernel is done in a similar manner as the PowerPC kernel. The result of building the kernel is an elf file in arch/microblaze/boot named simpleImage.<dts file name> based on the dts specified. The build process for the kernel searches in the arch/microblaze/boot/dts directory for a specified device tree file and then builds the device tree into the kernel image. The following command shows the general format for the build target name. Note that the <dts file name> does not include the file extension ".dts".
bash> make ARCH=microblaze simpleImage.<dts file name>
To build a kernel for the generated Spartan3e reference design, using the following command.
bash> make ARCH=microblaze simpleImage.xilinx
To build a clean kernel, use the folllowing command.
bash> make ARCH=microblaze clean

Embedded Linux for the Xilinx MicroBlaze Soft Processor lab 5
Xilinx EDK Tool Lab www.xilinx.com 1-31
If the Powerpc kernel has been built in the tree, the following command should be ran before building the MicroBlaze Linux kernel to get the links setup in the kernel tree for Microblaze. Remember this wipes out any kernel configuration.
bash> make ARCH=microblaze mrproper
No DTS In Raw Linux When using the "linux.bin" to load the kernel, it seems that the DTS file is not compiled to DTB. When "linux.bin" is linked, the DTB is missing and when executing the kernel it seems to hang (no output). To check if this might be an issue for you, check the "arch/microblaze/boot" directory for a file with "dtb" extension. If you see your "linux.bin" but no "dtb" file, it is likely the build is incomplete. To solve, first build the simple image (which depend on the dtb and as such will generate it) and then the raw linux binary like this:
bash> make clean bash> make simpleImage.xilinx linux.bin
Loading The Kernel Using A Xilinx Probe In Debug menu, use Launch XMD to load and run the kernel.
xmd> dow –data linux.bin 0xC0000000 xmd> rwr pc 0xC0000000 xmd> rwr pc 0xC0000000
The kernel should start booting in less than 20 seconds showing the console output.

Embedded Linux for the Xilinx MicroBlaze Soft Processor lab 5
Xilinx EDK Tool Lab www.xilinx.com 1-32
Early console on uartlite at 0x84000000 bootconsole [earlyser0] enabled Ramdisk addr 0x0000003f, Compiled-in FDT at 0xc01b8f00 Linux version 3.8.0 (vlsi@VLSI-Lab) (gcc version 4.6.2 20111018 (prerelease) (crosstool-NG 1.14.1) ) #2 Wed May 8 15:18:02 CEST 2013 setup_cpuinfo: initialising setup_cpuinfo: No PVR support. Using static CPU info from FDT cache: wt_msr setup_memory: max_mapnr: 0x4000 setup_memory: min_low_pfn: 0xc0000 setup_memory: max_low_pfn: 0xc4000 setup_memory: max_pfn: 0xc4000 Zone ranges: DMA [mem 0xc0000000-0xc3ffffff] Normal empty HighMem empty Movable zone start for each node Early memory node ranges node 0: [mem 0xc0000000-0xc3ffffff] On node 0 totalpages: 16384 free_area_init_node: node 0, pgdat c025435c, node_mem_map c036c000 DMA zone: 128 pages used for memmap DMA zone: 0 pages reserved DMA zone: 16256 pages, LIFO batch:3 early_printk_console remapping from 0x84000000 to 0xff7ff000 pcpu-alloc: s0 r0 d32768 u32768 alloc=1*32768 pcpu-alloc: [0] 0 Built 1 zonelists in Zone order, mobility grouping on. Total pages: 16256 Kernel command line: console=ttyUL0,115200 root=/dev/ram rw ip=on PID hash table entries: 256 (order: -2, 1024 bytes) Dentry cache hash table entries: 8192 (order: 3, 32768 bytes) Inode-cache hash table entries: 4096 (order: 2, 16384 bytes) High memory: 0k Memory: 61352k/65536k available (2296k kernel code, 4184k reserved, 92k data, 207k bss, 890k init) Kernel virtual memory layout: * 0xfffea000..0xfffff000 : fixmap * 0xff800000..0xffc00000 : highmem PTEs * 0xff7ff000..0xff800000 : early ioremap * 0xf0000000..0xff7ff000 : vmalloc & ioremap NR_IRQS:33 interrupt-controller #0 at 0xf0000000, num_irq=3, edge=0x6 No chosen timer found, using default timer #0 at 0xf0002000, irq=1 microblaze_timer_set_mode: shutdown microblaze_timer_set_mode: periodic Calibrating delay loop... 23.55 BogoMIPS (lpj=117760) pid_max: default: 4096 minimum: 301 Mount-cache hash table entries: 512 bio: create slab <bio-0> at 0

Embedded Linux for the Xilinx MicroBlaze Soft Processor lab 5
Xilinx EDK Tool Lab www.xilinx.com 1-33
Switching to clocksource microblaze_clocksource Skipping unavailable RESET gpio -2 (reset) ROMFS MTD (C) 2007 Red Hat, Inc. msgmni has been set to 119 io scheduler noop registered io scheduler deadline registered io scheduler cfq registered (default) Serial: 8250/16550 driver, 4 ports, IRQ sharing disabled 84000000.serial: ttyUL0 at MMIO 0x84000000 (irq = 3) is a uartlite console [ttyUL0] enabled, bootconsole disabled console [ttyUL0] enabled, bootconsole disabled uartlite 84400000.serial: failed to get alias id, errno -19 uartlite 84400000.serial: failed to get port-number brd: module loaded Key type encrypted registered Freeing unused kernel memory: 890k freed Starting rcS... ++ Creating device points ++ Mounting filesystem mount: mounting none on /tmp failed: Invalid argument ++ Loading system loggers ++ Starting telnet daemon rcS Complete /bin/sh: can't access tty; job control turned off / # ls -l drwxr-xr-x 2 10042 2223 0 Oct 1 2009 bin drwxrwxrwx 4 10042 2223 0 Jan 1 00:00 dev drwxr-xr-x 3 10042 2223 0 Jan 1 00:00 etc lrwxrwxrwx 1 10042 2223 11 Oct 1 2009 init -> bin/busybox drwxrwxrwx 2 10042 2223 0 Oct 1 2009 mnt dr-xr-xr-x 30 0 0 0 Jan 1 00:00 proc drwxr-xr-x 2 10042 2223 0 Oct 1 2009 sbin dr-xr-xr-x 11 0 0 0 Jan 1 00:00 sys drwxrwxrwx 2 10042 2223 0 Oct 1 2009 tmp drwxrwxrwx 3 10042 2223 0 Oct 1 2009 var /# cd proc /proc # more cpuinfo CPU-Family: MicroBlaze FPGA-Arch: spartan3e CPU-Ver: 7.10.d, big endian CPU-MHz: 50.00 BogoMips: 23.55 HW: Shift: yes MSR: yes PCMP: yes DIV: no MMU: 3 MUL: v1 FPU: no
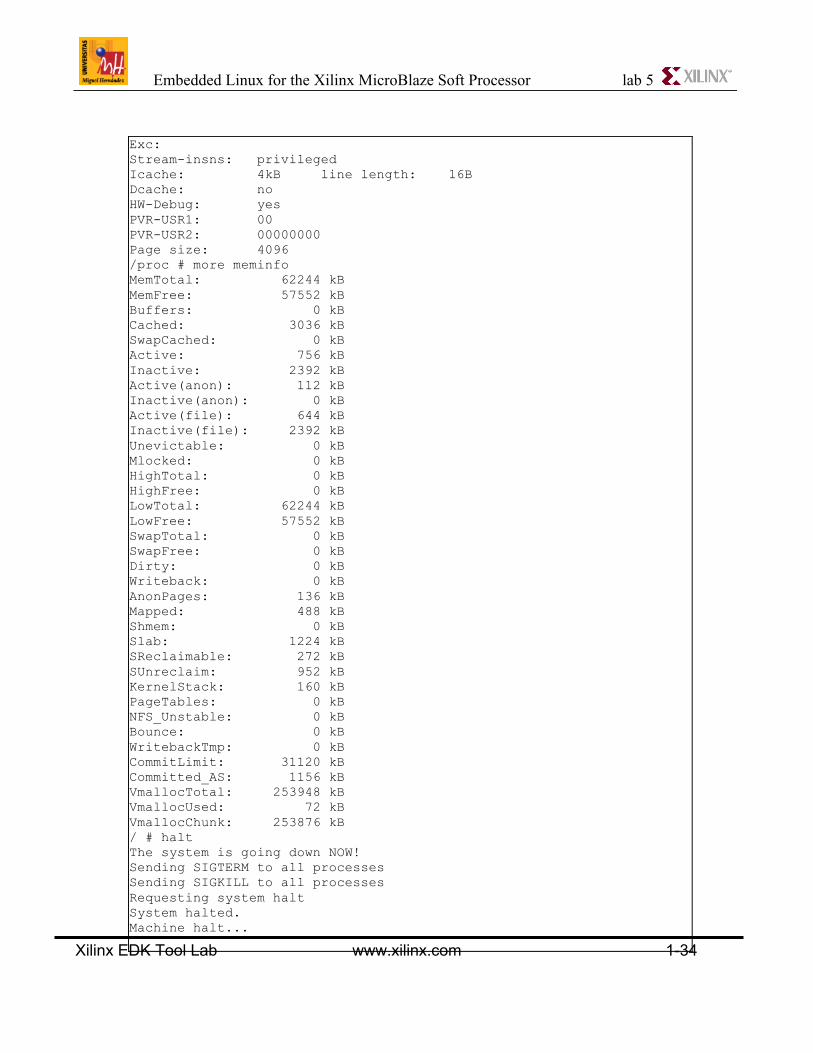
Embedded Linux for the Xilinx MicroBlaze Soft Processor lab 5
Xilinx EDK Tool Lab www.xilinx.com 1-34
Exc: Stream-insns: privileged Icache: 4kB line length: 16B Dcache: no HW-Debug: yes PVR-USR1: 00 PVR-USR2: 00000000 Page size: 4096 /proc # more meminfo MemTotal: 62244 kB MemFree: 57552 kB Buffers: 0 kB Cached: 3036 kB SwapCached: 0 kB Active: 756 kB Inactive: 2392 kB Active(anon): 112 kB Inactive(anon): 0 kB Active(file): 644 kB Inactive(file): 2392 kB Unevictable: 0 kB Mlocked: 0 kB HighTotal: 0 kB HighFree: 0 kB LowTotal: 62244 kB LowFree: 57552 kB SwapTotal: 0 kB SwapFree: 0 kB Dirty: 0 kB Writeback: 0 kB AnonPages: 136 kB Mapped: 488 kB Shmem: 0 kB Slab: 1224 kB SReclaimable: 272 kB SUnreclaim: 952 kB KernelStack: 160 kB PageTables: 0 kB NFS_Unstable: 0 kB Bounce: 0 kB WritebackTmp: 0 kB CommitLimit: 31120 kB Committed_AS: 1156 kB VmallocTotal: 253948 kB VmallocUsed: 72 kB VmallocChunk: 253876 kB / # halt The system is going down NOW! Sending SIGTERM to all processes Sending SIGKILL to all processes Requesting system halt System halted. Machine halt...

Embedded Linux for the Xilinx MicroBlaze Soft Processor lab 5
Xilinx EDK Tool Lab www.xilinx.com 1-35
Initramfs Root File System A RAM disk is a portion of RAM which is being used as if it were a disk drive. RAM disks have fixed sizes, and act like regular disk partitions. Access time is much faster for a RAM disk than for a real, physical disk. However, any data stored on a RAM disk is lost when the system is shut down or powered off. RAM disks can be a great place to store temporary data.
A ramdisk image, microblaze.cpio.gz, is provided in the repository of the Xilinx Git server. Microblaze.cpio.gz is a prebuilt ramdisk image that Xilinx provides to get us started with a basic or bare bones Linux system. It contains a minimal set of files that are required to boot and run the Linux kernel on MicroBlaze. The kernel allows you to point to a directory containing the root file system it and this is not unique to Microblaze. If you're using a directory and letting the kernel build process build the cpio archive, there MUST be a link in the root of the file system, named init, that points to the initialization binary.
For busybox, create a link named init in the root directory of the filesystem to /bin/busybox. Without this link, you get an error that isn’t real useful as shown below.
VFS: Cannot open root device "<NULL>" or unknown-block(0,0) Please append a correct "root=" boot option; here are the available partitions: Kernel panic - not syncing: VFS: Unable to mount root fs on unknown-block(0,0)
Buildroot: making Embedded Linux easy Buildroot is a set of Makefiles and patches that makes it easy to generate a complete embedded Linux system. Buildroot can generate any or all of a cross-compilation toolchain, a root filesystem, a kernel image and a bootloader image. Buildroot is useful mainly for people working with small or

Embedded Linux for the Xilinx MicroBlaze Soft Processor lab 5
Xilinx EDK Tool Lab www.xilinx.com 1-36
embedded systems, using various CPU architectures (x86, ARM, MIPS, MicroBlaze , etc.) : it automates the building process of your embedded system and eases the cross-compilation process.
The major Buildroot features are:
• Can handle everything in your embedded system development project: cross-compiling toolchain, root filesystem generation, kernel image compilation and bootloader compilation. Buildroot is also sufficiently flexible that it can also be used for only one or several of these steps.
• Is very easy to set up, thanks to its menuconfig, gconfig and xconfig configuration interfaces, familiar to all embedded Linux developers. Building a basic embedded Linux system with Buildroot typically takes 15-30 minutes.
• Supports several hundreds of packages for userspace applications and libraries: X.org stack, Gtk2, Qt, DirectFB, SDL, GStreamer and a large number of network-related and system-related utilities and libraries are supported.
• Supports multiple filesystem types for the root filesystem image: JFFS2, UBIFS, tarballs, romfs, cramfs, squashfs and more.
• Can generate an uClibc cross-compilation toolchain, or re-use your existing glibc, eglibc or uClibc cross-compilation toolchain
• Has a simple structure that makes it easy to understand and extend. It relies only on the well-known Makefile language.

Embedded Linux for the Xilinx MicroBlaze Soft Processor lab 5
Xilinx EDK Tool Lab www.xilinx.com 1-37
� Explore the Network Kernel Settings The vendor/platform that we are using already has networking enabled by default. However, this is a good opportunity to explore the kernel configuration menu. It uses the same mechanism as the user/vendor menu tools, however the options and parameters affect the Linux kernel, rather than the user applications and libraries etc. From the `~/linux-xlnx ` directory, run `make menuconfig`. There are lots of interesting sub-menus here that control various configuration options of the kernel. Feel free to explore them later, but for now, go down to the 'Networking support' option and select it
by pressing <Enter> Key. Please go down to `Networking options` and select it by pressing <Enter> key.

Embedded Linux for the Xilinx MicroBlaze Soft Processor lab 5
Xilinx EDK Tool Lab www.xilinx.com 1-38
And then then `Network options` window will pop up. By default, the necessary network related options are selected:
[*] Packet socket and
[*] TCP/IP networking Even though packet socket is not required for most operations - the most that is required is to enable main TCP/IP networking - it is selected because some applications communicate directly with the network without an intermediate network protocol implemented in the kernel, e.g. NFS. To see more information about each option, go down to that option and then enter <?> or <h> for help.
In addition, a device driver is required that interfaces between the TCP/IP stack and the physical Ethernet device. The driver required by Spartan3e is found at:

Embedded Linux for the Xilinx MicroBlaze Soft Processor lab 5
Xilinx EDK Tool Lab www.xilinx.com 1-39
Linux Kernel Configuration -> Device Drivers -> Network device support -> Ethernet (10 or 100Mbit) -> Xilinx 10/100 Ethernet lite support. Finally, we need to configure the Spartan 3e board with these instructions:
1. Ip Board : ifconfig eth0 192.168.123.10 up
2. Probe this configuration using Ping command in host [Marduk]:~ $ ping 192.168.123.10 PING 192.168.123.10 (192.168.123.10): 56 data bytes 64 bytes from 192.168.123.10: icmp_seq=0 ttl=64 time=3.319 ms 64 bytes from 192.168.123.10: icmp_seq=1 ttl=64 time=2.836 ms 64 bytes from 192.168.123.10: icmp_seq=2 ttl=64 time=2.700 ms 64 bytes from 192.168.123.10: icmp_seq=3 ttl=64 time=2.728 ms 64 bytes from 192.168.123.10: icmp_seq=4 ttl=64 time=2.696 ms ^Z
� Connecting to the board with telnet [Marduk]$ telnet 192.168.123.10
Trying 192.168.123.10...
Connected to 192.168.123.10.
Escape character is '^]'.
/ # ls -l
drwxr-xr-x 2 10042 2223 0 Oct 1 2009 bin
drwxrwxrwx 4 10042 2223 0 Jan 1 00:00 dev
drwxr-xr-x 3 10042 2223 0 Jan 1 00:08 etc
lrwxrwxrwx 1 10042 2223 11 Oct 1 2009 init -> bin/busybox
drwxrwxrwx 2 10042 2223 0 Oct 1 2009 mnt
dr-xr-xr-x 37 0 0 0 Jan 1 00:00 proc
drwxr-xr-x 2 10042 2223 0 Oct 1 2009 sbin
dr-xr-xr-x 11 0 0 0 Jan 1 00:00 sys
drwxrwxrwx 2 10042 2223 0 Oct 1 2009 tmp
drwxrwxrwx 3 10042 2223 0 Oct 1 2009 var
/ #

Embedded Linux for the Xilinx MicroBlaze Soft Processor lab 5
Xilinx EDK Tool Lab www.xilinx.com 1-40
� Transferring files with FTP Your Spartan3e board can work with a FTP server. To connect, simply launch the ftp application from your development host:
[host] $ ftp 192.168.123.10 You can now transfer files to and from the board. If you are sending files to the MicroBlaze, remember that only the /tmp subdirectory is writable. � Using NFS NFS (Network File System) is a long-supported capability of Linux (and thus Embedded Linux). It allows a remote file system to be mounted over the network, and used as though it were physically on the local host. In the context of cross-compiled embedded Linux systems, this can be invaluable. Instead of rebuilding and downloading an entire image every time you make a change to your application, you can simply mount your development directory on the Microblaze board. When you recompile your application, the new version is immediately available to run on the target. The necessary options are already enabled for the Spartan3e platform, but we will browse through the configuration menu just to take a look. From the main kernel configuration menu (“Linux Kernel Configuration” menu), scroll down and select the “File Systems” sub-menu. This is where you can configure which of the many supported file systems to build into your kernel. Scrolling down a few lines, choose the “Network File Systems” sub-menu, under which you will see the NFS option. It should already be selected.


![[XLS] · Web viewUMH QI - Corporate UMH Managed Care Admin UMH Ophthy Ypsi Pediatric-PRO UMH Ophthy Milford - Pro UMH KEC - Canton UMH H.O. Dentistry UMH Photochem/Psoriasis Svcs](https://img.dokumen.tips/doc/110x75/5afe913e7f8b9a814d8f3677/xls-viewumh-qi-corporate-umh-managed-care-admin-umh-ophthy-ypsi-pediatric-pro.jpg)