Embed Size (px)
Citation preview

Introduction to PTC Windchill PDMLink 11.0 for theImplementation TeamOverview
Course Code TRN-4752-T
Course Length 16 Hours
In this course, you will learn how to completebasic Windchill PDMLink functions. Youwill learn how to access and navigate theWindchill PDMLink environment, use WindchillPDMLink's visualization tools, manage CADand product information, and manage productinformation changes. Other topics include howto use Windchill PDMLink's communicationand collaboration tools, and access usersupport functions and information.This course is designed to provide broadand basic coverage of Windchill PDMLinkfunctionality to members of the ImplementationTeam. After completing the course, you willhave a comprehensive understanding ofWindchill PDMLink capabilities, which willenable you to contribute to the successfulimplementation of Windchill PDMLink tomeet your company's Product LifecycleManagement goals.At the end of each module, you will completea set of review questions to reinforce criticaltopics from that module. At the end of thecourse, you will complete a course assessmentin PTC University Proficiency intended toevaluate your understanding of the course asa whole.This course has been developed usingWindchill 11.0 F000 / Creo Parametric 3.0M070.
Course Objectives
• Understand the Windchill PDMLink environmentand terminology
• Locate and view product information• View information using Creo View Lite• Understand the principles of CAD data
management• Initiate new designs and share design
information• Modify and manage design information• Understand the principles of product structure
management• Create and manage product structures• Create and manage documents
• Understand the Windchill PDMLink changeprocess
• Initiate and implement product change
• Use Windchill PDMLink tools to manage yourwork
Prerequisites
• Basic browser and Web navigation skills
• Basic understanding of product management processes and deliverables
Audience
• This course is intended for members of the Implementation Team who require a broad understandingof Windchill PDMLink functionality to successfully implement the system.
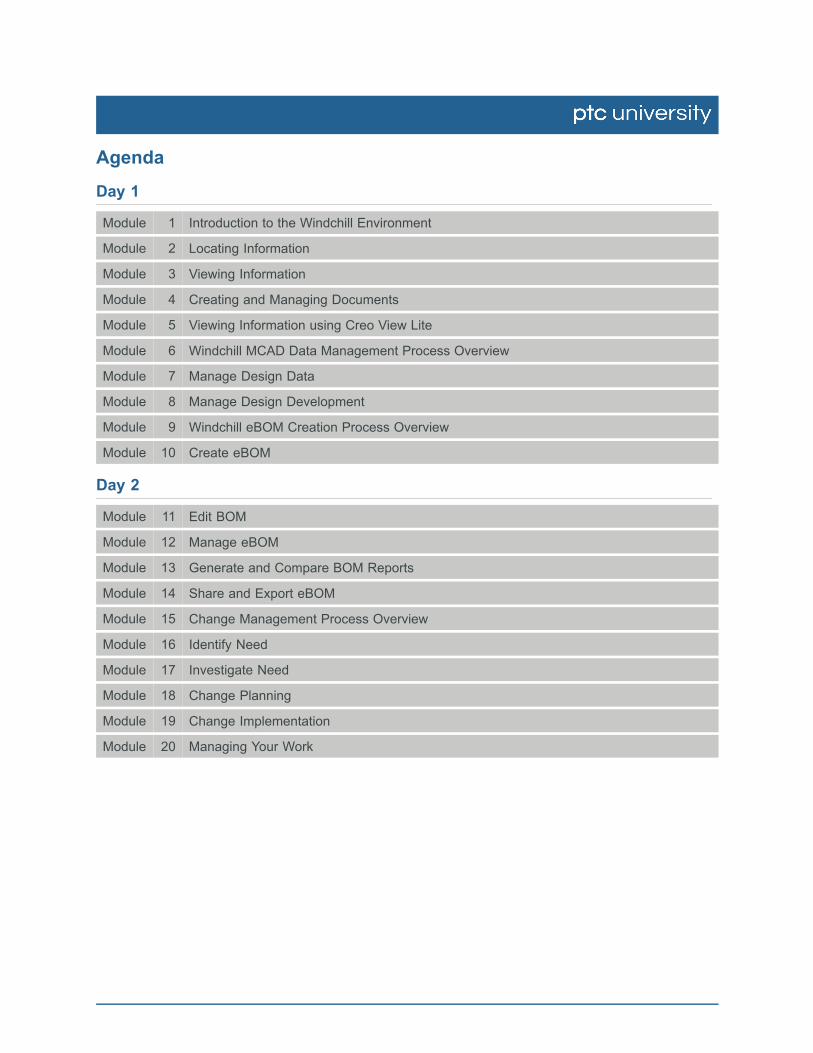
Agenda
Day 1
Module 1 Introduction to the Windchill Environment
Module 2 Locating Information
Module 3 Viewing Information
Module 4 Creating and Managing Documents
Module 5 Viewing Information using Creo View Lite
Module 6 Windchill MCAD Data Management Process Overview
Module 7 Manage Design Data
Module 8 Manage Design Development
Module 9 Windchill eBOM Creation Process Overview
Module 10 Create eBOM
Day 2
Module 11 Edit BOM
Module 12 Manage eBOM
Module 13 Generate and Compare BOM Reports
Module 14 Share and Export eBOM
Module 15 Change Management Process Overview
Module 16 Identify Need
Module 17 Investigate Need
Module 18 Change Planning
Module 19 Change Implementation
Module 20 Managing Your Work
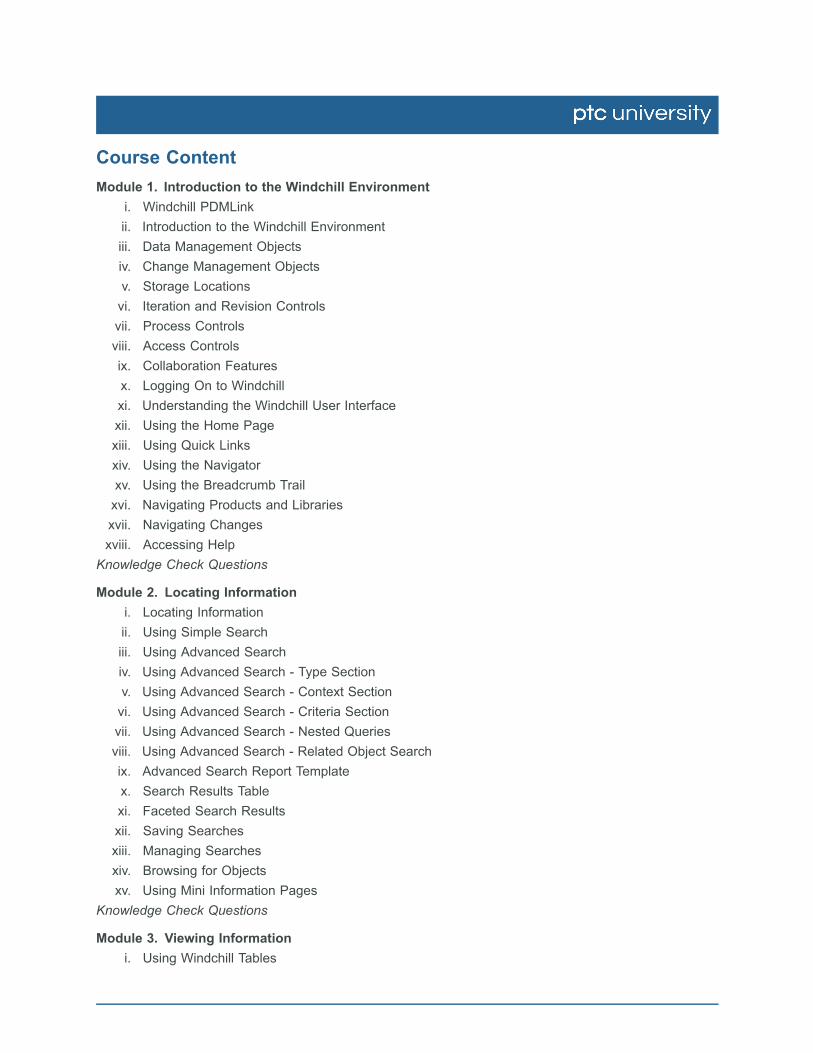
Course ContentModule 1. Introduction to the Windchill Environment
i. Windchill PDMLinkii. Introduction to the Windchill Environmentiii. Data Management Objectsiv. Change Management Objectsv. Storage Locationsvi. Iteration and Revision Controlsvii. Process Controlsviii. Access Controlsix. Collaboration Featuresx. Logging On to Windchillxi. Understanding the Windchill User Interfacexii. Using the Home Pagexiii. Using Quick Linksxiv. Using the Navigatorxv. Using the Breadcrumb Trailxvi. Navigating Products and Librariesxvii. Navigating Changesxviii. Accessing Help
Knowledge Check Questions
Module 2. Locating Informationi. Locating Informationii. Using Simple Searchiii. Using Advanced Searchiv. Using Advanced Search - Type Sectionv. Using Advanced Search - Context Sectionvi. Using Advanced Search - Criteria Sectionvii. Using Advanced Search - Nested Queriesviii. Using Advanced Search - Related Object Searchix. Advanced Search Report Templatex. Search Results Tablexi. Faceted Search Resultsxii. Saving Searchesxiii. Managing Searchesxiv. Browsing for Objectsxv. Using Mini Information Pages
Knowledge Check Questions
Module 3. Viewing Informationi. Using Windchill Tables
ii. Working with Table Columnsiii. Managing Windchill Table Viewsiv. New View: Set Namev. New View: Choose Object Typesvi. New View: Set Filtersvii. New View: Set Column Displayviii. New View: Set Sortingix. Understanding Information Pagesx. Customizing Information Pages
Knowledge Check Questions
Module 4. Creating and Managing Documentsi. Document Capabilitiesii. Creating Documents and Linksiii. New Document: Set Attributes - Typeiv. New Document: Set Attributes - Templatev. New Document: Set Attributes (Primary Content)vi. New Document: Set Attributes (Attributes)vii. New Document: Set Attachmentsviii. Modifying Documents - Check Outix. Modifying Documents - Editx. Modifying Documents - Check Inxi. Modifying Documents - Undo Checkoutxii. Modifying Documents - Replace Contentxiii. Associating Documents with Windchill Parts
Knowledge Check Questions
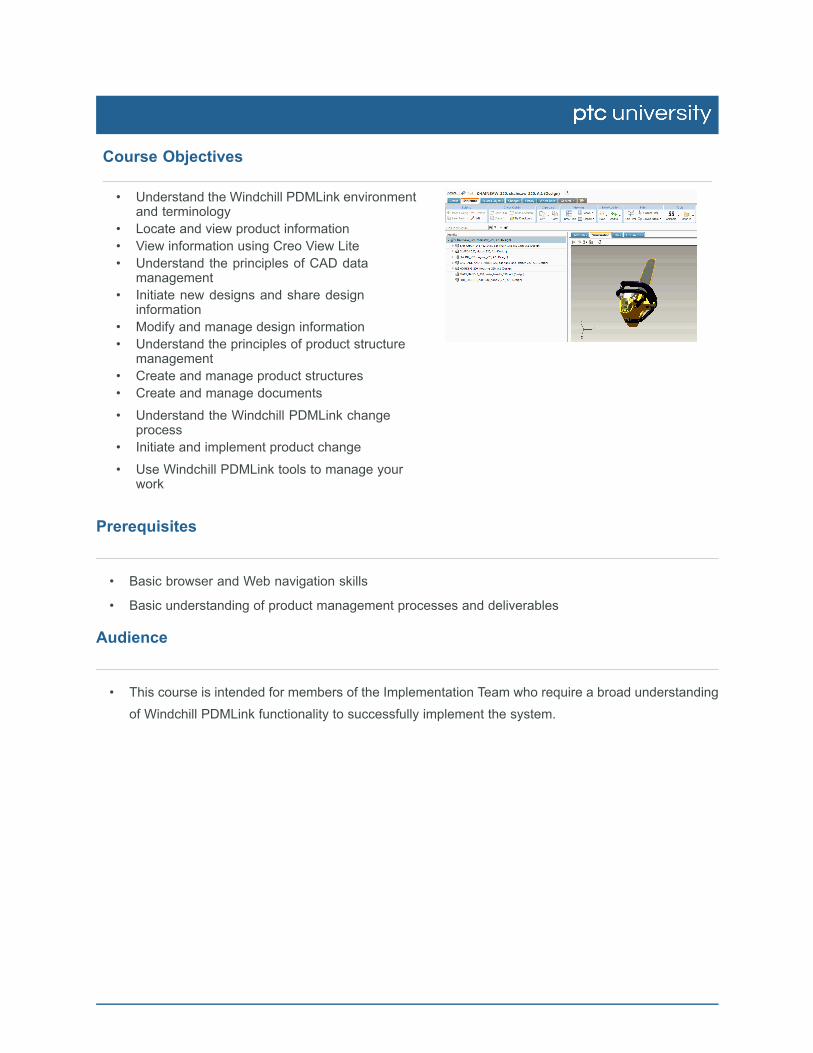
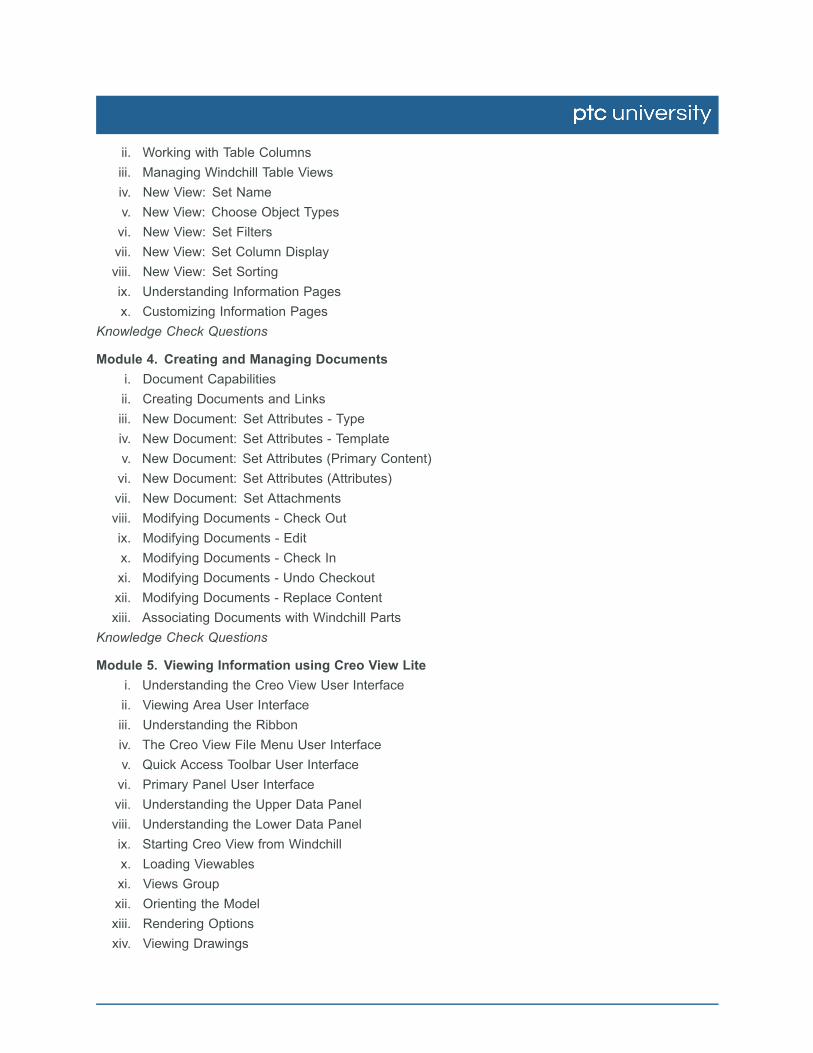
Module 5. Viewing Information using Creo View Litei. Understanding the Creo View User Interfaceii. Viewing Area User Interfaceiii. Understanding the Ribboniv. The Creo View File Menu User Interfacev. Quick Access Toolbar User Interfacevi. Primary Panel User Interfacevii. Understanding the Upper Data Panelviii. Understanding the Lower Data Panelix. Starting Creo View from Windchillx. Loading Viewablesxi. Views Groupxii. Orienting the Modelxiii. Rendering Optionsxiv. Viewing Drawings
xv. Working with Pages and SheetsKnowledge Check Questions
Module 6. Windchill MCAD Data Management Process Overviewi. CAD Data Management Process Overviewii. Introduction to CAD Documentsiii. Introduction to Windchill Partsiv. Windchill Integrationv. Windchill Integration CAD Menusvi. Windchill Integration – Model Treevii. Windchill Integration – Folder Browserviii. Windchill Integration – Searchix. Windchill Integration – Embedded Browserx. Windchill Integration – Event Managementxi. Registering a Windchill Serverxii. Configuring the Creo Parametric Browserxiii. Introduction to the Workspacexiv. Workspace Layoutxv. Understanding the Workspace Architecture
Knowledge Check Questions
Module 7. Manage Design Datai. Manage Design Data Process Overviewii. Activate Workspaceiii. Creating a Workspaceiv. Setting the General Workspace Preferencesv. Changing the Workspace Table Viewvi. Customizing Workspace Table Viewsvii. Creating CAD Modelsviii. Importing CAD Data to Workspaceix. Set Parameter Valuesx. Setting the CAD Document Storage Locationxi. WTPart CAD Document Linksxii. WTPart CAD Document Links Examplexiii. Understanding Calculated and Content Linksxiv. Associating WTParts with CAD Documentsxv. Automatically Associating WTParts in the Workspacexvi. Typical CAD Data Management Conflictsxvii. Incomplete Objectsxviii. Resolving Incomplete Objects From the Information Pagexix. Resolving Incomplete Objects During Check Inxx. Understanding Check In
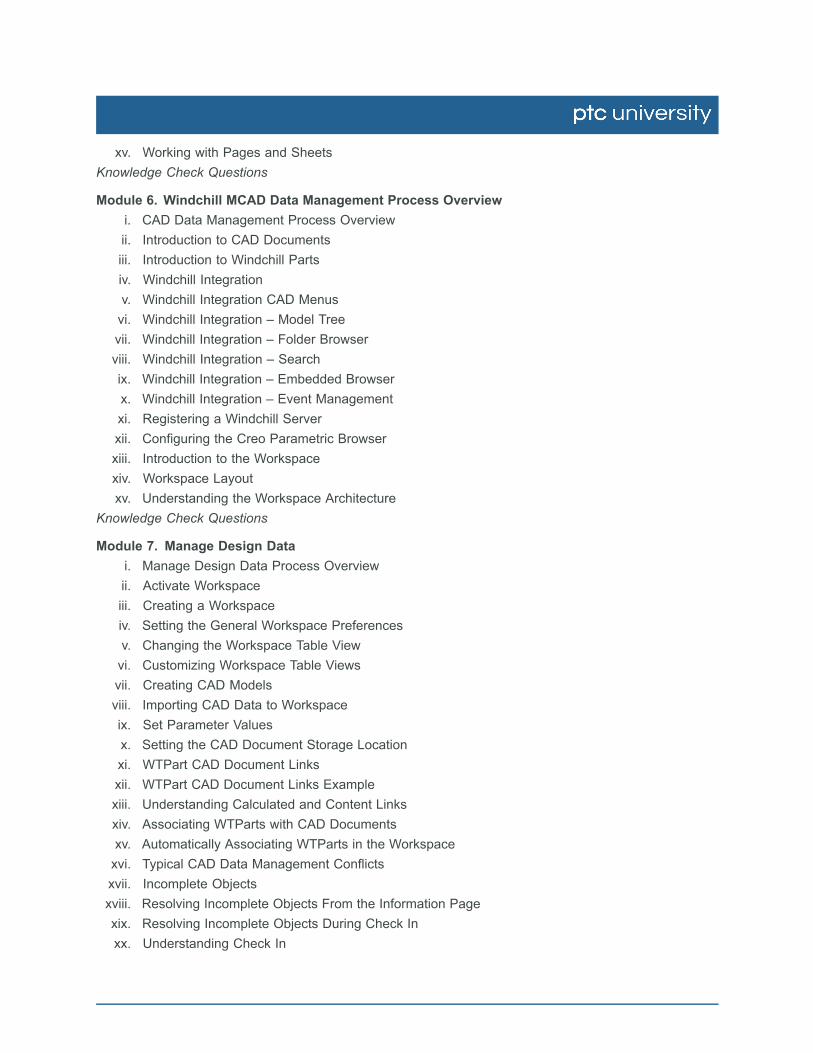
xxi. Understanding the Check In OptionsKnowledge Check Questions
Module 8. Manage Design Developmenti. Manage Design Development Process Overviewii. Locating Design Information with Creo Parametriciii. Searching for Design Informationiv. Browsing for Design Informationv. Preview Informationvi. Add to Workspacevii. Checking Out CAD Documentsviii. Make Necessary Changesix. Modification Process – Check Out a CAD Documentx. Modification Process – Modify a CAD Documentxi. Modification Process – Check In a CAD Documentxii. Using Workspace Save As to Create New Designsxiii. Check for Updatesxiv. Updating and Synchronizing Workspace Objectsxv. Updating CAD Documents in the Workspacexvi. Data Organization - Manage Conflicts - Check In
Knowledge Check Questions
Module 9. Windchill eBOM Creation Process Overviewi. eBOM Creation Process Overviewii. Product Structures and BOMsiii. End Item Parts in Product Structuresiv. CAD Documents in Product Structuresv. Documents in Product Structuresvi. Creating Product Structures using a CAD-centric Approachvii. Creating Product Structures using a Part-centric Approachviii. The Product Structure Browserix. The PSB Command Ribbonx. The Part Structure Panesxi. PSB Occurrences Tabxii. Finding Components in the Product Structurexiii. PSB Layout Optionsxiv. Product Structure Related Objectsxv. PSB Visualization Tabxvi. Show Hide Related Informationxvii. PSB Uses Tab
Knowledge Check Questions
Module 10. Create eBOM
i. Create eBOM Process Overviewii. Create the eBOM Using CAD Auto Associateiii. Understanding Auto Associate for Creating Product Structuresiv. The Auto Associate Actionv. Create the eBOM Using the PSBvi. Building Product Structuresvii. Create the eBOM Using Import From Spreadsheetviii. Create the eBOM Using Save As
Knowledge Check Questions
Module 11. Edit BOMi. Edit eBOM Process Overviewii. Use the CAD Tool to Edit the eBOMiii. Use the PSB to Edit the eBOMiv. Use a Spreadsheet to Edit the eBOM
Knowledge Check Questions
Module 12. Manage eBOMi. Manage eBOM Process Overviewii. Characteristics of Managed Baselinesiii. Adding Objects to Baselinesiv. Manage Life Cyclev. Usages and Occurrencesvi. Assigning a Reference Designatorvii. Editing Usage Attributesviii. WTPart and CAD Document Associationsix. Editing WTPart and CAD Document Associationsx. Associating WTParts with Documentsxi. Managing Structure Filtersxii. Setting the Latest Filterxiii. Setting the Baseline Filterxiv. Setting the Effectivity Filterxv. Setting the Promotion Request Filterxvi. Setting the Attribute Filterxvii. Setting the Spatial Filterxviii. Bill of Materials Notesxix. Creating Bill of Materials Notesxx. Creating Bill of Materials Notes from Templates
Knowledge Check Questions
Module 13. Generate and Compare BOM Reportsi. Generate and Compare BOM Reports Overviewii. Generating BOM Reports

Knowledge Check Questions
Module 14. Share and Export eBOMi. Share and Export eBOM Overviewii. Export Using Import–Exportiii. Export Using PSBiv. Export Using Packagev. Share BOM to Projectvi. Export from Visualization
Knowledge Check Questions
Module 15. Change Management Process Overviewi. Change Management Process Overviewii. Change Objectsiii. Roles in the Change Process
Knowledge Check Questions
Module 16. Identify Needi. Identify Need Process Overviewii. Creating Problem Reportsiii. New Problem Report: Set Attributesiv. New Problem Report: Select Affected End Itemsv. New Problem Report: Select Affected Objectsvi. New Problem Report: Set Attachmentsvii. New Problem Report: Select Associationsviii. Analyzing Problem Reports - Task Details
Knowledge Check Questions
Module 17. Investigate Needi. Investigate Need Process Overviewii. Creating Change Requestsiii. New Change Request - Set Attributesiv. New Change Request - Select Affected End Itemsv. New Change Request - Select Affected Objectsvi. New Change Request - Set Attachmentsvii. New Change Request - Select Associationsviii. Impact Analysisix. Effectivity Planningx. Analyzing Change Requests - Task Detailsxi. Investigate Need Full Track Process Overviewxii. Schedule CRB Review - Task Details
Knowledge Check Questions
Module 18. Change Planning
i. Change Planning Process Overviewii. Creating Change Noticesiii. New Change Notice - Set Attributesiv. New Change Notice - Define Implementation Planv. New Change Task - Set Attributesvi. New Change Task - Select Affected/Resulting Objectsvii. Setting Effectivityviii. Setting the Disposition of the Affected Objectsix. Superseding an Affected Objectx. New Change Notice - Set Attachmentsxi. New Change Notice - Select Associationsxii. Change Planning Full Track Process Overviewxiii. Change Implementation Board Review
Knowledge Check Questions
Module 19. Change Implementationi. Change Implementation Process Overviewii. Implementing Changeiii. Reviewing Implementation Resultsiv. Review and Audit Change - Process Overviewv. Auditing Change Noticevi. Reviewing Business Rule Conflictsvii. Executing Ad Hoc Modificationsviii. Completing the Change Process
Knowledge Check Questions
Module 20. Managing Your Worki. Managing Your Workii. Participating in Processesiii. Completing Tasksiv. Viewing Processesv. Promotion Requestsvi. Viewing Promotion Requestsvii. Completing Promotion Tasksviii. Introduction to Communication Mechanismsix. Managing Subscriptionsx. Holding Discussionsxi. Preference Managerxii. Using the Windchill Clipboardxiii. Managing Foldersxiv. Software Downloads
Knowledge Check Questions