Embed Size (px)
Citation preview
1
Introduction to the AirWatch Inbox Guide
Overview
AirWatch Inbox is a fully containerized email management solution for iOS, Windows 8 RT, and Android devices. The AirWatch Inbox enables administrators to remotely configure and manage enterprise email accounts while keeping personal and enterprise data separate for end users. The application features support for Exchange ActiveSync and offers encryption for email messages and attachments. Some of its data loss prevention features include: setting a passcode to access the application, configuring restrictions such as disable copy/paste, and removing email messages and attachments upon an enterprise wipe.
In This Guide
Before You Begin – Explains the basic requirements and other topics to help you get started.
AirWatch Inbox Security and Encryption – Details how to better secure your email through the various security settings available for a profile on the AirWatch Admin Console.
AirWatch Inbox for Android – Covers how to configure, authenticate, and update the AirWatch Inbox through the AirWatch Admin Console for Android devices.
AirWatch Inbox for iOS – Summarizes how to configure, authenticate, and update the AirWatch Inbox through the AirWatch Admin Console for iOS devices.
AirWatch Inbox for Windows 8/RT – Details how to configure, authenticate, and update the AirWatch Inbox through the AirWatch Admin Console for Windows 8/RT devices.
Using the AirWatch Inbox for Android –Explains how to use the AirWatch Inbox application on an Android device.
Using the AirWatch Inbox for iOS – Details how to use the AirWatch Inbox application on an iOS device.
Using the AirWatch Inbox for Windows 8.1/RT – Explores how to use the AirWatch Inbox application on a Windows 8/RT device.
AirWatch Inbox Comparison Matrix – Lists the differences and comparisons in the features and functions of the different device versions of AirWatch Inbox.
2
Before You Begin
Overview
Prior to implementing the AirWatch Inbox, you should consider the following pre-requisites, requirements, supporting materials, and helpful suggestions. Familiarizing yourself with the information available in this section will help prepare you for implementing the AirWatch Inbox application.
In This Section
Requirements – Lists out the basic requirements to get started with the solution.
Recommended Reading – This section provides helpful background and supporting information available from other AirWatch guides.
Getting Started – Some recommendations and tips to streamline the migration process using an email profile.
3
Requirements
Android
Requires AirWatch Admin Console v6.5 and higher.
Requires Android 4.0 devices and higher.
Requires AirWatch Android MDM Agent v4.0.1010 or higher.
Requires Exchange ActiveSync 2003/2007/2010/2013, Office 365, or Google Apps.
iOS
Requires AirWatch Admin Console v7.0 and higher.
Requires iPhone, iPad, iPad Air, and iPod Touch devices running iOS 6 and higher.
Requires AirWatch iOS MDM Agent v4.9.1110 or higher.
Requires Exchange ActiveSync 2007/2010/2013 or Office 365.
Windows 8/RT
Requires AirWatch Admin Console v7.0 and higher.
Requires Windows 8.1/Pro/Enterprise and higher or Windows RT 8.1 and higher.
Requires AirWatch Windows MDM Agent v1.1.0.23 and higher.
Recommended Reading
Mobile Email Management Guide - A comprehensive guide of the AirWatch's mobile email management functionality.
Mobile Device Management Guide - A comprehensive guide of the AirWatch's device management functionality.
Getting Started
Migration from Other Clients
If you already have an AirWatch email profile that you have deployed for devices, then you will need to follow these corresponding notes:
If migrating from NitroDesk TouchDown to the AirWatch Inbox , then you can simply publish the AirWatch Inbox profile. Users will receive a notification and be prompted to switch over to using the AirWatch Inbox instead of TouchDown.
If migrating from Native Mail Client to AirWatch Inbox, then you will first need to deactivate the Native Mail Client profile and then publish the AirWatch Inbox profile.
4
AirWatch Inbox Security and Encryption
Overview
Using an AES 256-bit encryption algorithm, the AirWatch Inbox secures email content by encrypting message data such as email addresses and message text and storing it in a local database. The email database and attachments are stored in a protected app space that is inaccessible to third-party applications.
In This Section
Account Information/Email Message Encryption – Describes the ways account information and email messages are encrypted, for non-rooted devices.
Email Attachment Encryption – Explains the ways AirWatch Inbox protects attachments sent and received via email.
SEG/PowerShell Support – Profiles how AirWatch Inbox functions using SEG and PowerShell.
Secured Syncing – Details how to sync native contacts and calender with AirWatch Inbox.
The following security features can be configured within the AirWatch email profile.
Account Information/Email Message Encryption
Account information, including email password and message information such as the message body, is encrypted when written to the application database. The application database is not accessible on non-rooted devices. If the device is rooted, the information will still not be readable because it will be encrypted.
Email Attachment Encryption
AirWatch Inbox provides you the option of using the Secure Email Gateway to perform email stripping. All email attachments are downloaded to the internal application space, which like email messages can only be accessed if the device is rooted.
SEG/PowerShell Support
When configured, the AirWatch Inbox automatically sends a unique EAS identifier that is written to the AirWatch database. This EAS identifier is used to identify the device as a managed device through the Secure Email Gateway or via PowerShell commands. As a managed device, the administrator can create different email compliance policies using the SEG or PowerShell commands.
5
Email Stripping via SEG
In addition to supporting email compliance policies, the email client supports downloading “awsec” file attachments through Secure Email Gateway.
1. A user navigates to attachments in email message. The attachment is listed with an .awsec file extension.
2. The user downloads the attachment.
3. Once downloaded, the user is presented with a Save/View button.
6
AirWatch Inbox for Android
Overview
The AirWatch Inbox can be remotely provisioned and configured by creating an Exchange ActiveSync payload as part of a configuration profile. Only accounts provisioned by AirWatch can be configured to work with AirWatch Inbox, because the application does not allow the end user to manually configure an account within the client.
In This Section
Deploying EAS Mail via AirWatch Inbox – Details deploying an EAS payload leveraging the AirWatch Inbox email client.
Deploying Credentials – Details how to deploy corporate certificates for user authentication to managed devices.
Deploying EAS Mail via AirWatch Inbox
Use the following steps to create a configuration profile for the AirWatch Inbox:
1. Navigate to Device ► Profiles ► List View.
2. Click Add and select Android as the platform.
3. Configure General profile settings as appropriate.
4. Select the Exchange ActiveSync payload and then select the AirWatch Mail Client from the Mail Client drop-down.
5. Enter the Exchange ActiveSync Host, which is the information from your EAS server. For example, webmail.corpmdm.com.
6. Enter Login Information, which is the information used to authenticate user connections to your EAS Host. The profile supports lookup fields for inserting enrollment user’s information and login information. See Username and Password for more information.
You can also select an Identity Certificate that you have defined in the AirWatch Admin Console.
7. Configure general email Settings, such as:
Past Days of Mail to Sync
Sync Interval
Past Days of Calendar to Sync
Email Signature
8. Set which Contacts and Calendar data to use within the AirWatch Inbox:
Native Contacts/Calendars – Syncs the native calendar and contact app with AirWatch Inbox.
AirWatch Contacts/Calendars – AirWatch has now introduced its own Contacts and Calendar applications as an add-on to the AirWatch Inbox. These applications are downloaded together as a single app from the Play Store.
7
Unlike Native Contacts/Calendars application, AirWatch Contacts/Calendars application encrypts the contacts and calendar data.
o Additionally, AirWatch Inbox allows you to export individual contacts or in bulk from the corporate contact to the AirWatch Contacts app.
Do Not Sync – You can disable the sync of contacts and calendars within the AirWatch Inbox profile.
9. Configure a Passcode for AirWatch Inbox. You can require an end user to enter a passcode when the AirWatch Inbox is opened. This is not the email account password, but the passcode the user enters to access the application. The following passcode settings are available:
Authentication Type
To allow Android users to log in using their Active Directory credentials, select Active Directory Password as the Authentication Type under the Passcode section.
Passcode Complexity.
Minimum Passcode Length.
Minimum Number of Complex Characters.
Maximum Passcode Age (days).
Passcode History.
Auto-Lock Timeout (min).
Auto-Lock When Device Locks.
Maximum Number of Failed Attempts.
10. Configure additional restrictions and security settings. The following restrictions are available:
Allow Copy and Paste:
o Disable user’s ability to long press email text and copy it to the clipboard.
o Disable user’s ability to copy text from outside of the email client and paste it into a mail message.
Allow Attachments.
Restrict attachments to set which applications can open attachments.
Restrict taking screenshots in the app.
Restrict domains by creating either a blacklist or whitelist of domain names.
Allow opening of links only through the AirWatch Browser.
11. Select Save & Publish when you are done.
Username and Password
You can define the username that is used for users to log in to the AirWatch Inbox. This could be their actual email address or an email username that is different from their actual email address. When configuring the Exchange ActiveSync (EAS) payload in the AirWatch Inbox profile settings, there is a User field under Login Information that you can set to a predefined lookup value.
8
If you have email usernames that are different than users' email addresses, you can use the {EmailUserName} field, which corresponds to the email usernames imported during directory service integration. If your users' email usernames are same as their email addresses, you would still use the {EmailUserName} field, which would use their email addresses as they were imported during directory service integration.
Deploying Credentials
Credentials profiles deploy corporate certificates for user authentication to managed devices. Configure the following options to apply corporate certificates:
1. Navigate to Devices ► Profiles ► List View ► Add. Select Android.
2. Select Device to deploy your profile to a device.
Alternatively, select Container to deploy your profile to a container within a Samsung KNOX device.
Note: For more information on Samsung KNOX containerization, please see the Containerization with Samsung KNOX section.
3. Configure General profile settings as appropriate.
4. Select the Credentials payload.
5. Use the drop-down menu to select either Upload, Defined Certificate Authority or User Certificate for the Credential Source.
Note: The remaining payload options are source-dependent. If you select Upload, you must enter a Credential Name and upload a new certificate. If you select Defined Certificate Authority, you must choose a predefined Certificate Authority and Template. If you select User Certificate select either a S/MIME Certificate or a S/MIME Encryption Certificate.
6. Select Save & Publish.
9
AirWatch Inbox iOS
Overview
The AirWatch Inbox can be remotely provisioned and configured by creating an Exchange ActiveSync payload as part of a configuration profile. Only accounts provisioned by AirWatch can be configured to work with AirWatch Inbox, because the application does not allow the end user to manually configure an account within the client.
In This Section
Deploying EAS Mail via AirWatch Inbox – Details deploying an EAS payload leveraging the AirWatch Inbox email client.
Removing Profile or Enterprise Wiping – Explains what data are removed if a profile is removed or enterprise wiped.
Associating a SCEP/Credentials Payload with a Profile – Details certificate-based authentication for iOS devices and the configuration options available in the AirWatch Admin Console.
Deploying EAS Mail via AirWatch Inbox for iOS Devices
Use the following steps to create a configuration profile for the AirWatch Inbox. For more information about AirWatch Inbox, please see the AirWatch Inbox Guide.
1. Navigate to Device ► Profiles ► List View.
2. Click Add and select iOS as the platform.
3. Configure General profile settings as appropriate.
4. Select the Exchange ActiveSync payload and then select the AirWatch Inbox from the Mail Client drop-down.
5. Enter the Exchange ActiveSync Host, which is the information of your EAS server. For example: webmail.airwatchmdm.com.
Enable Ignore SSL Errors to allow the devices to ignore Secure Socket Layer errors from agent processes.
Enable Use S/MIME to select the certificate/smart card for signing and encrypting email messages. Prior to enabling this option, ensure you have uploaded necessary certificates under Credentials profile settings.
Note: You do not need to upload any certificates if a smart card is selected as the credential source in the Credentials profile settings.
Select the certificate/smart card to sign only email messages in the S/MIME Certificate field.
Select the certificate/smart card to both sign and encrypt email messages in the S/MIME Encryption Certificate field.
If the smart card is selected, default information populates the Smart Card Reader Type and Smart Card Type.
Choose the Smart Card Timeout interval.
10
6. Enter Login Information, which is the information used to authenticate user connections to your EAS Host. The profile supports lookup fields for inserting enrollment user’s information and login information. See Username and Password for more information.
7. Configure Settings, such as:
Enable Email
Enable Calendar
Enable Contacts
Sync Interval – The frequency with which the AirWatch Inbox app syncs with the email server.
Email Notifications – Configure how end users can be notified of new emails. Disabled means they will not receive a notification. You can also trigger the device to play an alert sound, or allow the device to display specific email message details such as the sender, subject, and message preview.
Past Days of Mail to Sync
Past Days of Calendar to Sync
Email Size (default is unlimited)
Email Signature
Enable Signature Editing
8. Configure a Passcode for AirWatch Inbox. You can require an end user to enter a passcode when the AirWatch Inbox is opened. This is not the email account password, but the passcode the user will have to enter to access the application. The following passcode settings are available:
Authentication Type
To allow iOS users to log in using their AirWatch credentials, select Username and Password as the Authentication Type under the Passcode section.
Complexity, including whether to allow simple passcodes (e.g. 1111).
Minimum Length
Minimum Number of Complex Characters, if your Complexity is set to Alphanumeric.
Maximum Passcode Age (days)
Passcode History
Auto-Lock Timeout (min)
Maximum Number of Failed Attempts
9. Configure additional restrictions and security settings. The following restrictions are available:
Allow/Disable Copy and Paste:
o Disable user’s ability to long press email text and copy it to the clipboard.
o Disable user’s ability to copy text from outside of the email client and paste it into a mail message.
Restrict all links to open in the AirWatch Browser app only.
Restrict attachments to open only in the Secure Content Locker, or in other apps of your choosing.
11
Set a Maximum Attachment Size (MB).
Allow Printing.
10. Select Save & Publish when you are done.
Username and Password
You can define the username that is used for users to log in to the AirWatch Inbox. This could be their actual email address or an email username that is different from their actual email address. When configuring the Exchange ActiveSync (EAS) payload in the AirWatch Inbox profile settings, there is a User field under Login Information that you can set to a predefined lookup value.
If you have email usernames that are different than users' email addresses, you can use the {EmailUserName} field, which corresponds to the email usernames imported during directory service integration. If your users' email usernames are same as their email addresses, you would still use the {EmailUserName} field, which would use their email addresses as they were imported during directory service integration.
Removing Profile or Enterprise Wiping
If the profile is removed via the remove profile command, compliance policies, or through an enterprise wipe, all email data gets deleted, including:
User account/login information.
Email message data.
Contacts and calendar information.
Attachments that were saved to the internal application storage.
Note: Attachments saved outside of AirWatch Inbox will not be deleted.
Associating a SCEP/Credentials Payload with a Profile
Even if you protect your corporate email, Wi-Fi and VPN with strong passcodes and other restrictions, your infrastructure still remains vulnerable to brute force and dictionary attacks, in addition to employee error. For greater security, you can implement digital certificates to protect corporate assets. To do this, you must first define a certificate authority, then configure a Credentials payload alongside your Exchange ActiveSync (EAS), Wi-Fi or VPN payload. Each of these payloads has settings for associating the certificate authority defined in the Credentials payload.
To push certificates down to devices, you need to configure a Credentials or SCEP payload as part of the profiles you created for EAS, Wi-Fi and VPN settings. Use the following instructions to create a certificate-enabled profile:
1. Navigate to Devices ► Profiles ► List View ► Add and select iOS from the platform list.
2. Configure General profile settings as appropriate.
3. Select either an EAS, Wi-Fi or VPN payload to configure. Fill out the necessary information, depending on the payload you selected.
12
4. Select the Credentials (or SCEP) payload and Upload a certificate. Or, select Defined Certificate Authority from the Credential Source drop-down menu and select the Certificate Authority and Certificate Template from their respective drop-down menu. Or, select User Certificate and the intended use for the S/MIME certificate.
5. Navigate back to the previous payload for EAS, Wi-Fi or VPN.
6. Specify the Identity Certificate in the payload:
EAS – Select the Payload Certificate under Login Information.
Wi-Fi – Select a compatible Security Type (WEP Enterprise, WPA/WPA2 Enterprise or Any (Enterprise)) and select the Identity Certificate under Authentication.
VPN – Select a compatible Connection Type (for example, CISCO AnyConnect, F5 SSL) and select Certificate from the User Authentication dropdown. Select the Identity Certificate.
7. Select Save & Publish when you are done configuring any remaining settings.
13
AirWatch Inbox for Windows 8.1 RT
Overview
Remotely provision and configure the AirWatch Inbox by creating an Exchange ActiveSync (EAS) payload as part of a configuration profile. Only accounts provisioned by AirWatch can be configured to work with AirWatch Inbox, because the application does not allow the end user to manually configure an account within the client.
In This Section
Configuring the AirWatch Inbox Profile – Covers the steps required to configure an email profile.
Configuring the AirWatch Inbox Profile
Use the following steps to create a configuration profile for the AirWatch Inbox:
1. Navigate to Device ► Profiles ► List View.
2. Select Add and choose Windows 8/RT as the platform.
3. Configure General settings for the profile.
4. Select the Exchange ActiveSync payload, by default AirWatch Inbox is selected in the Mail Client field.
5. Enter the Exchange ActiveSync Host, which is the information of your EAS server. For example: webmail.airwatchmdm.com.
6. Enter Login Information, which is the information used to authenticate user connections to your EAS Host. The profile supports lookup fields for inserting enrollment user login information. For more information, see Username and Password below.
7. Configure the Settings section to enable or disable the following:
Enable Email
Enable Calendar
Enable Contacts
Sync Interval
Past Days of Mail to Sync
Past Days of Calendar to Sync
Email Signature
Enable Signature Editing

14
8. Configure a Passcode for AirWatch Inbox. You can require an end user to enter a passcode when the AirWatch Inbox is opened. This is not the email account password, but the passcode the user will have to enter to access the application. The following passcode settings are available:
Type
To allow users to log in using their AirWatch credentials, select Username and Password as the Authentication Type under the Passcode section.
Complexity
Minimum Length
Allow Simple Value
Minimum Number of Complex Characters
Maximum Age
History
Auto Lock When Device Locks
Grace Period
Maximum Number of Failed Attempts
9. Configure additional restrictions and security settings. The following restrictions are available:
Allow/Disable Copy and Paste:
o Disable user’s ability to long press email text and copy it to the clipboard.
o Disable user’s ability to copy text from outside of the email client and paste it into a mail message.
Restrict attachments to set which applications can open attachments.
Set a Maximum Attachment Size (MB).
Enable Restrict Domain to restrict the mail flow to specific domains.
o Select the Restriction Type either as Blacklist or Whitelist and specify single or multiple domain name. If the restriction type is Whitelist, the user can only send mails to the specified whitelisted domains. If the restriction type is Blacklist, the user cannot send any mails to the specified blacklisted domains.
10. Select Save to keep the profile in the console or Save & Publish to push the profile to the devices.
Username and Password
You can define the username that is used for users to log in to the AirWatch Inbox. This could be their actual email address or an email username that is different from their actual email address. When configuring the Exchange ActiveSync (EAS) payload in the AirWatch Inbox profile settings, there is a User field under Login Information that you can set to a predefined lookup value.
If you have email usernames that are different than users' email addresses, you can use the {EmailUserName} field, which corresponds to the email usernames imported during directory service integration. If your users' email usernames are same as their email addresses, you would still use the {EmailUserName} field, which would use their email addresses as they were imported during directory service integration.
15
Profile Removal/Enterprise Wipe
If the profile is removed via the remove profile command, compliance policies, or through an enterprise wipe, all email data will be deleted, including:
User account/login information.
Email message data.
Contacts and calendar information.
Attachments that were saved to the internal application storage.
16
Using the AirWatch Inbox on Android Devices
Overview
The intuitive user interface of the AirWatch Inbox v1.4 provides a very smooth user experience. This topic explains how to install, use, and configure the AirWatch Inbox app on Android devices.
In This Section
Downloading and Logging In – Walks through the basic steps required to install and log into the AirWatch Inbox app.
Viewing Emails – Details the basics of accessing and managing email messages within the AirWatch Inbox app.
Composing a New Message – Covers how to create and send a new email message.
Viewing Attachments – Details the various ways to open and view email attachments.
Configuring AirWatch Inbox Settings – Outlines the information available within the AirWatch Inbox Settings page.
Syncing Contacts and Calendars – Walks through the various settings and features involving synced Calendars and Contacts within the AirWatch Inbox app.
Troubleshooting – Details the additional steps for troubleshooting common access issues involving AirWatch Inbox.
Downloading and Logging In
A typical enrollment process flow to provision and configure the AirWatch Inbox with the user’s corporate email credentials is described below:
1. Navigate to the Google Play Store. Search for "AirWatch Inbox" app and tap Install.
Note: Only Android 4.0 device users and higher can view the application.
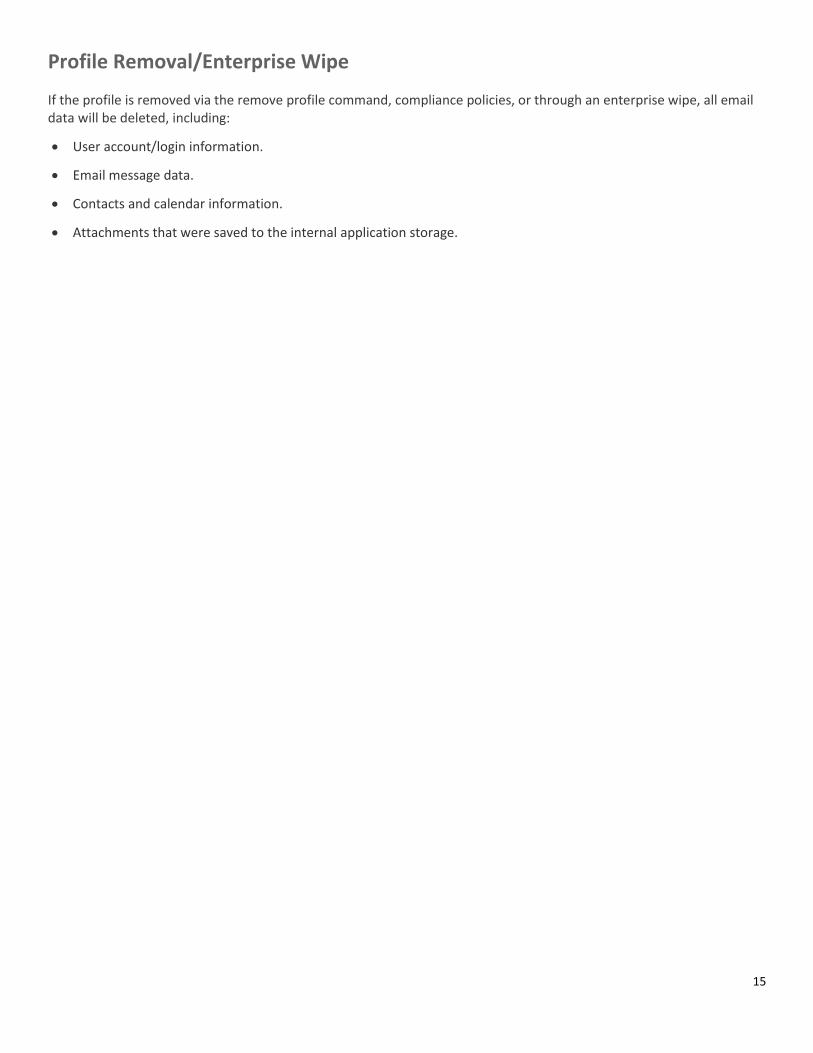
2. Open the newly installed AirWatch Inbox application.
3. Enter your credentials, if necessary, and tap Login. If using AirWatch Workspace, it may prompt you to enter your unique security PIN.
17
4. Begin using the AirWatch Inbox.
Viewing Emails
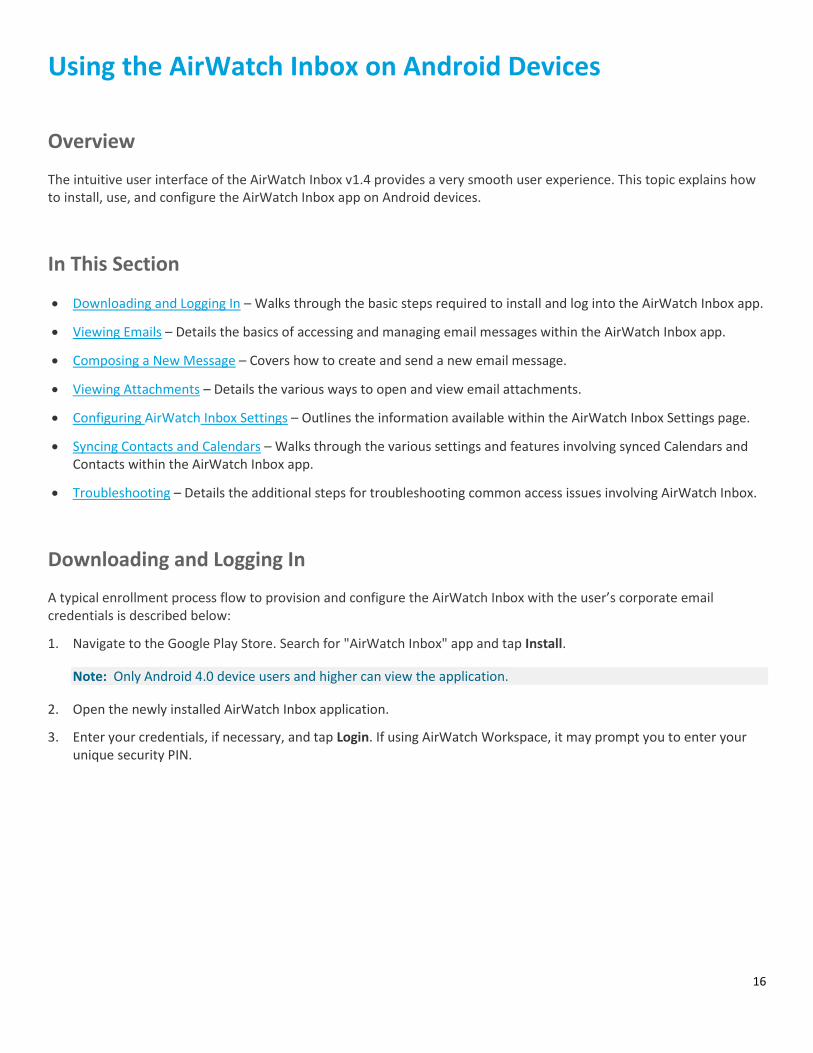
When you first launch the AirWatch Inbox, your Inbox displays lists all of your recent emails.
Tap an email message to view it.
Tap the Folder icon to see a list of email folders. Tap a folder to view the email contents of that folder.
18
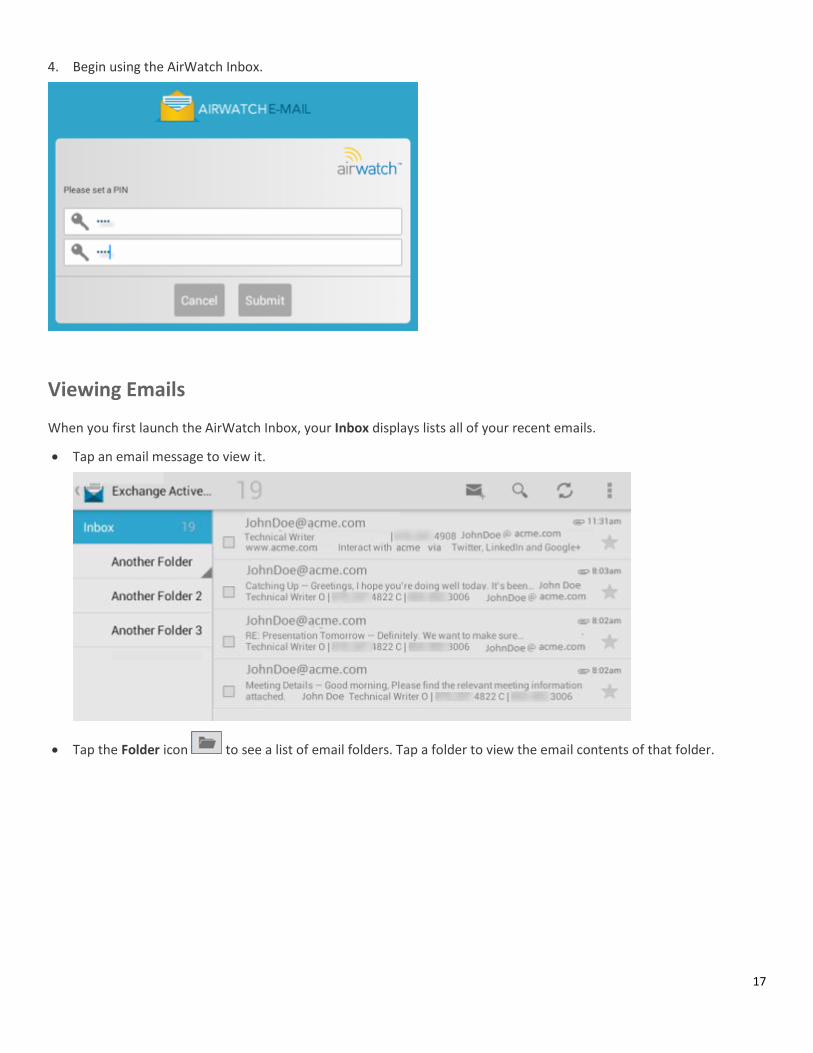
Tap the Sync icon to perform a manual sync of your email.
Composing a New Message
Tap the Compose Email icon to create an email message. From here you can add attachments and add CC or BCC recipients.
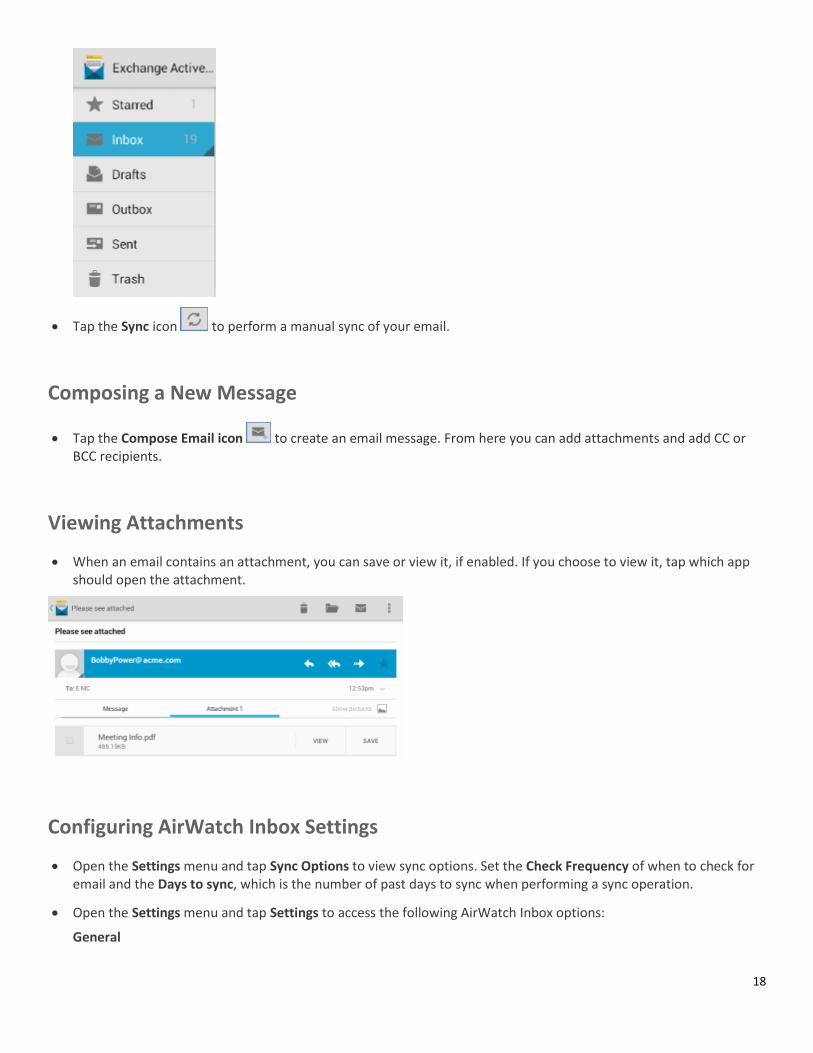
Viewing Attachments
When an email contains an attachment, you can save or view it, if enabled. If you choose to view it, tap which app should open the attachment.
Configuring AirWatch Inbox Settings
Open the Settings menu and tap Sync Options to view sync options. Set the Check Frequency of when to check for email and the Days to sync, which is the number of past days to sync when performing a sync operation.
Open the Settings menu and tap Settings to access the following AirWatch Inbox options:
General
19
o Auto-advanced – Choose which screen to show after you delete a message.
o Message text size – Select the size of text when using the AirWatch Inbox.
o Reply all – Select this check box to make Reply All the default for message replies.
o Ask to Show pictures – Select whether or not to display pictures in the email message. On clicking Show pictures in an email, the Always show pictures from this sender option appears. On tapping this option, the email's sender name gets added to the senders list in the AirWatch Inbox and the pictures in that sender's email will always get displayed. If you wish to clear the show pictures feature for this sender, then once again tap on the Show Pictures option in the email.
o Change Passcode – Select to reset the login passcode.
Exchange ActiveSync
o Append a signature to the messages you send.
o Use quick responses to edit text you frequently insert when composing emails.
o Choose which items to sync (email, contacts, and calendar).
o Create Out of Office automatic replies.
o Set whether to auto download attachments to recent messages via Wi-Fi.
o Set notification options for when you receive a new email.
o Reset your Exchange Server login password under Incoming Settings if you have forgotten your password or if it has expired. Please note only the Password field is available for editing.
Debug
o Enable Advanced settings to send an email with the debug logs to the AirWatch support.
20
Syncing Contacts and Calendar
AirWatch provides the flexibility of syncing your corporate contacts and calendar information with the AirWatch Inbox. You can push the sync settings to AirWatch Inbox through the Exchange ActiveSync payload. The AirWatch Calendar and AirWatch Contacts Apps are downloaded and installed when you install the AirWatch Inbox. You can access them via the All Apps screen on your device.
Features of AirWatch Contacts and Calendar Apps
AES 256 Encryption for the apps.
Single sign on authentication for the apps.
Email Client passcode settings applies to the Contacts and Calendar apps so that there is a single passcode throughout. Once you enter the passcode for one of the three apps, it is not required to passcode authenticate any of the three apps for the duration the token is valid.
AirWatch Contacts
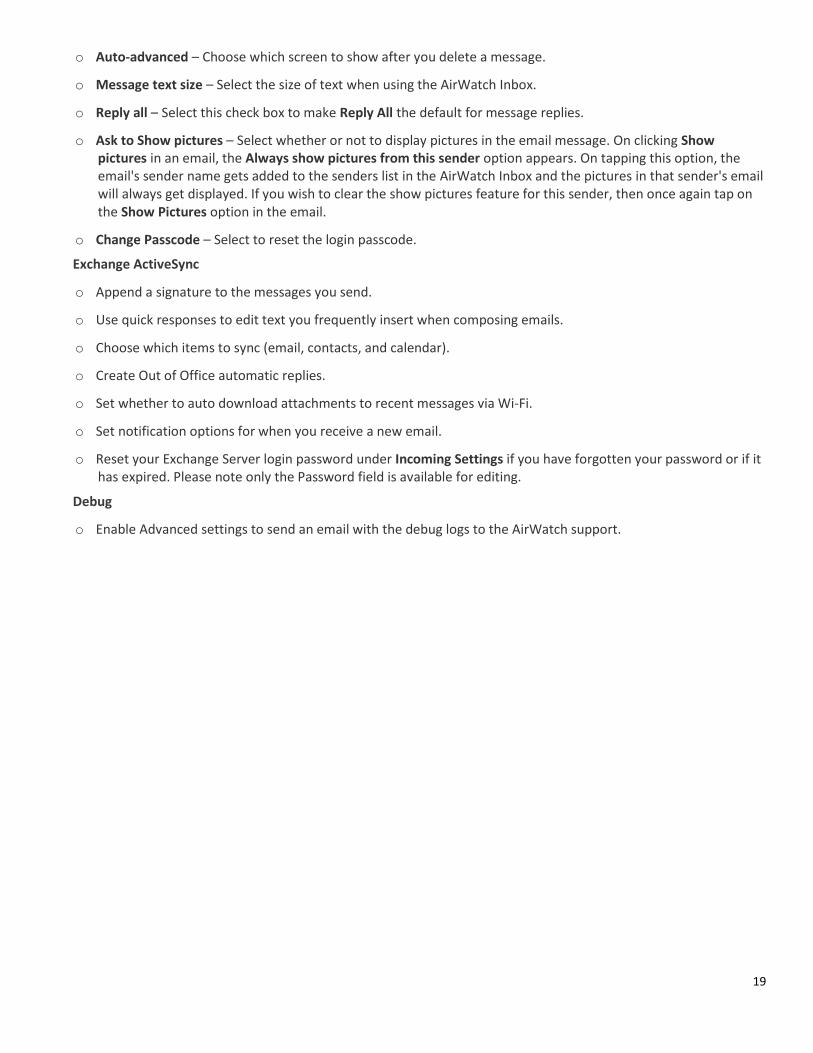
View your contacts list. The following actions are available:
Search – Search for contacts in your contacts list.
Add Contact – Add a new contact to your contacts list.
Edit Contact – Edit an existing contact.
Call Logs – View the call logs.
Settings – View settings and options for exporting contacts, choosing which contacts to display, configuring the display, and deleting contacts.
Note: You cannot export contacts without phone numbers.
21
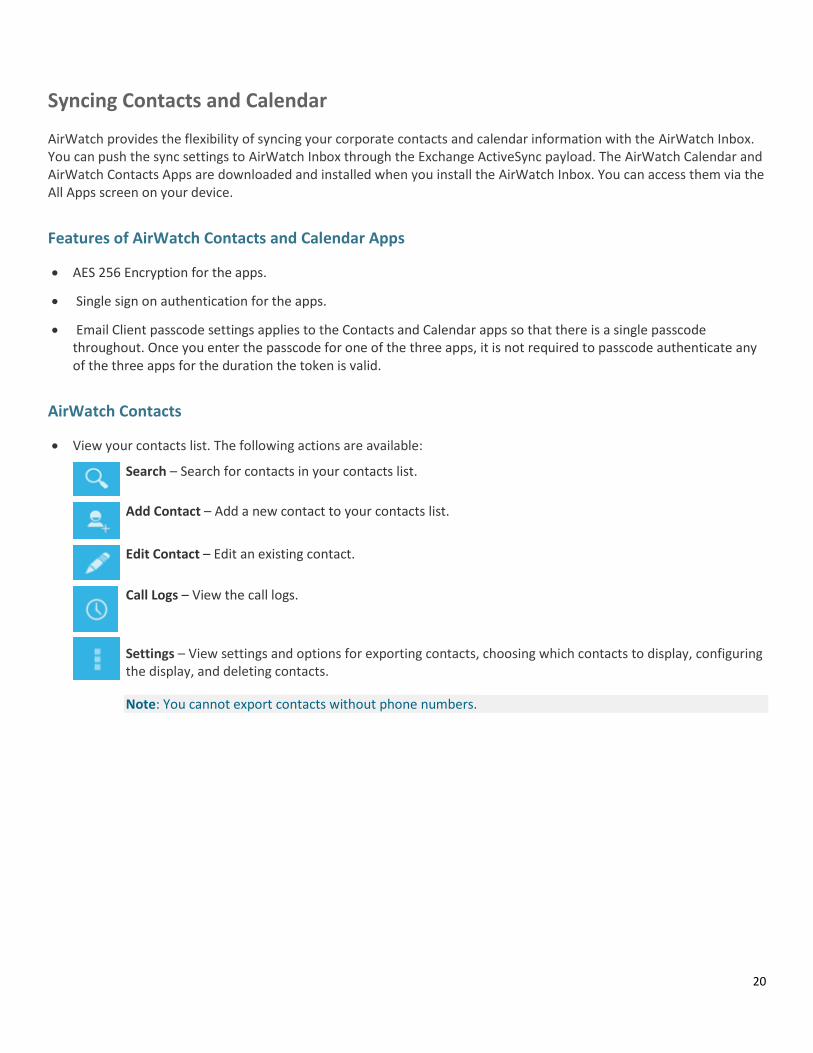
AirWatch Calendar
View your calendar, which displays scheduled meetings and appointments.
Remove canceled events from the calendar.
Set an end-date to a recurring event. You can set it as Forever, until a date, or to a specified number of events.
Set the Use home time zone in the General Preference settings. This displays the calendars and event times in your home time zone.
22
Troubleshooting
AirWatch provides you the ease of troubleshooting any errors, such as email client crashes, that you might face during the initial configuration or after configuration. The Debug option available under Settings ► Debug enables you to send error logs directly to AirWatch.
On the Debug Setting screen, find the following features:
o Enable extra debug logging – Select the check box to enable sending email client UI logs through email.
o Enable Exchange parser logging (extremely verbose) – Select the check box to enable sending Exchange service logs through email.
23
During the initial configuration, if the AirWatch Email Client crashes, follow the below steps:
1. Tap the device menu button on the AirWatch Email Client default screen, and then tap Send Debug Logs option that appears at the bottom of the screen.
Note: After performing the above step, all the email accounts configured on your device get displayed. Please note that since the AirWatch Inbox is not yet configured on your device, it does not get displayed here.
2. Choose an email application. The Compose Message window launches.
3. Enter the default To mail address, for example [email protected] and attach a log file as an attachment in the email body. You can edit the 'To' address if required and then, tap Send.
After configuration and mail sync, if the AirWatch Inbox crashes, follow the below steps:
1. Tap the device menu button on the Settings screen and then, tap the Email Debug Logs option that appears at the bottom of the screen. All the email accounts configured on your device are displayed.
2. Choose an email account. The Compose Message window launches.
3. Enter the default To mail address, for example [email protected] and attach a log file as an attachment in the email body. You can edit the 'To' address if required and then, tap Send.
Migration from Other Clients
If you already have an AirWatch email profile that you have deployed for devices, then you will need to follow these corresponding notes:
If migrating from NitroDesk TouchDown to the AirWatch Inbox, then you can simply publish the AirWatch Inbox email profile. Users receive notifications and are prompted to switch over to using the AirWatch Inbox instead of TouchDown.
If migrating from Native Mail Client to the AirWatch Inbox, then you will first need to deactivate the Native Mail Client profile and then publish the AirWatch Inbox profile.

24
Using the AirWatch Inbox on iOS Devices
Overview
The intuitive user interface of the AirWatch Inbox provides a very smooth user experience. This topic explains how to install, use, and configure settings for the AirWatch Inbox app on iOS devices.
Note: iOS devices must be enrolled and have the AirWatch MDM Agent installed before taking advantage of the AirWatch Inbox.
In This Section
Downloading and Logging In – Walks through the basic steps required to install and log into the AirWatch Inbox app.
Viewing and Managing Email – Details the basics of accessing and managing email messages within the AirWatch Inbox app.
Composing a New Message – Covers the steps and fields available to create and send a new email message.
Navigating AirWatch Inbox – Profiles the available views and options within the AirWatch Inbox app.
Reviewing AirWatch Inbox Account Settings – Outlines the information available within the AirWatch Inbox Settings page.
Viewing Contacts and Calendar – Walks through the various settings and features involving synced Calendars and Contacts within the AirWatch Inbox app.
Troubleshooting – Details the additional steps for troubleshooting common access issues involving AirWatch Inbox.
Downloading and Logging In
A typical enrollment process flow to provision and configure the AirWatch Inbox with the user’s corporate email credentials is described below:
1. Navigate to the App Store. Search for "AirWatch Inbox" app and tap Install.
2. Open the newly installed AirWatch Inbox app. Upon opening the app, you will encounter a "Not Configured" screen and will be asked to authenticate within the AirWatch MDM Agent. Once authenticated, you will be brought back to the AirWatch Inbox app.
3. Enter the Username and Password.
4. Tap Login.
5. Begin using the AirWatch Inbox.

25
Viewing and Managing Email
When you first launch the AirWatch Inbox, your Inbox displays, listing all of your recent email messages.
Tap present at the bottom pane to pull helpful email management actions to:
Move
Mark Unread
Delete
Some important email notifications/icons available in inbox are:
Indicates the email message is signed.
Indicates the email message is encrypted.
Indicates the email messages are important.
Additionally, use the top Search bar to search all messages by a particular phrase or keyword.
Pull down the inbox or any email folder to refresh and get any newly received messages.
Note: Flagged items do not sync with the email server.
26
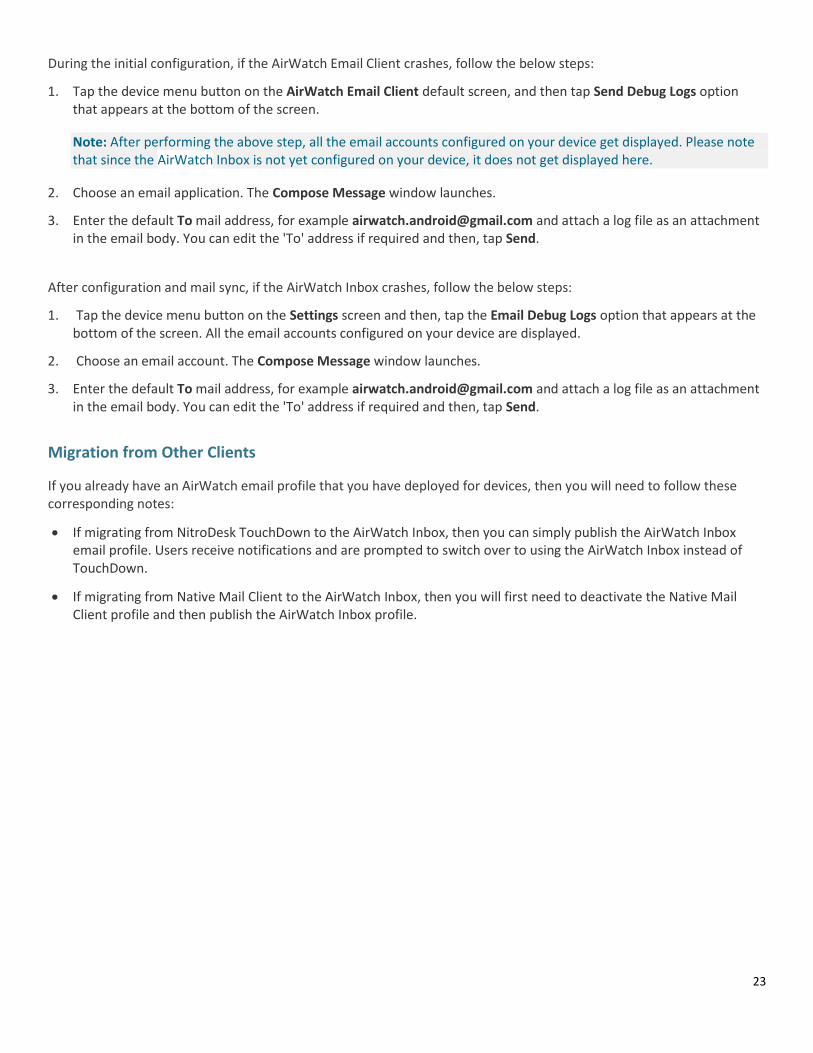
Swipe right-to-left on a message to access the message command bar's action buttons, including:
Delete
Use the three round buttons to pull up additional options to:
Flag/Unflag
Mark Unread/Read
Move
Tap a single email to open and read the message. Once you've opened a single message, use the available options to:
Reply
Forward
Delete
Use the App Bar Hint (three dotted buttons on the right bottom) to pull up additional options to manage email such as Compose, Move, Flag, and Mark Unread.
If the email message contains attachments, select an attachment to view all attachments in a list. Select a single attachment to open it in the available apps.

27
Composing a New Message
Create a new email message by selecting the bottom-right icon, accessible from Inbox tab. The compose message screen provides useful email message options, including:
To – Manually type an email address or use the Contacts icon to access available contacts.
Cc/Bcc – Copy or blind copy recipients to the message.
Subject – Enter a subject for the message, as with any standard email.
Body – Click the body box to compose your message.
Use the exclamation mark icon to mark the message as important. Additionally, tap the paperclip icon to attach photos, documents, and videos.
Once your message is ready, tap Send to send the email. You may choose to sign or encrypt the email message by selecting the tick icon and lock icon available above the keyboard.
Navigating AirWatch Inbox
Tap the top center banner menu from the inbox or any folder view to access additional AirWatch Inbox, including:
Inbox
o Unread
o Read
o Flagged
Folders and Sub-folders
Deleted Items
Drafts
Outbox
Junk Email
Sent Items
Click any of the available labels to access each area of the AirWatch Inbox. Additionally, the top-right settings icon is used to view current AirWatch Inbox settings.
28
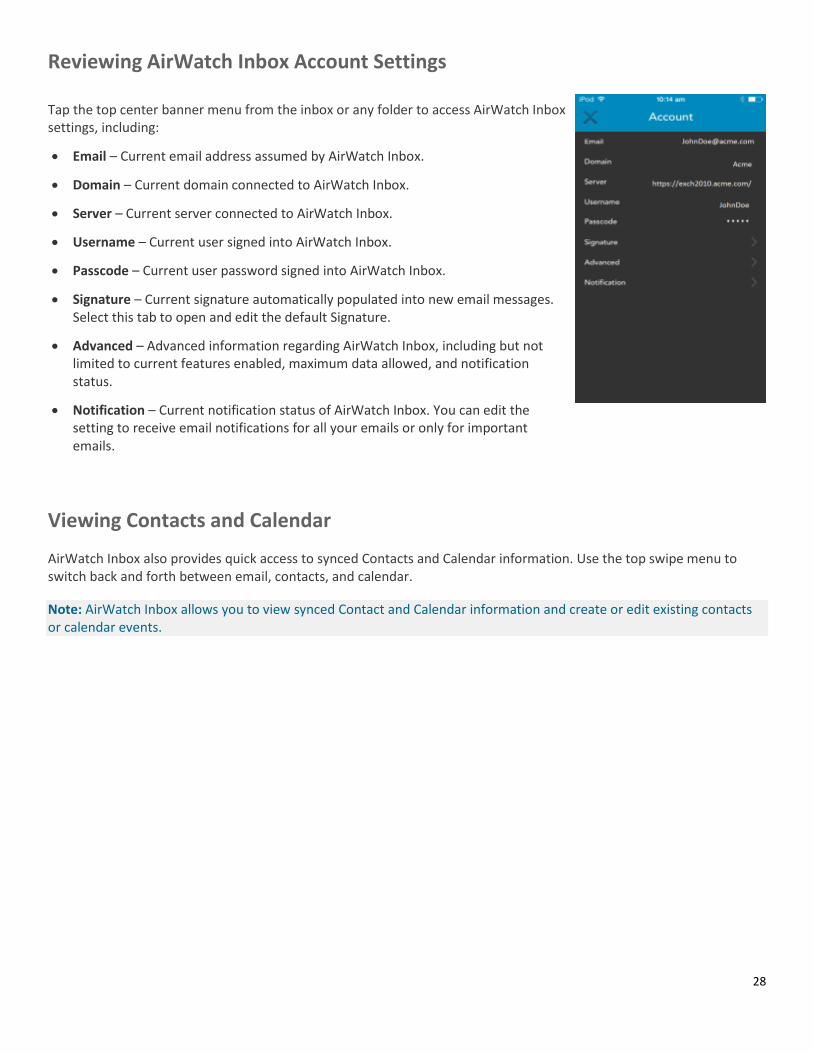
Reviewing AirWatch Inbox Account Settings
Tap the top center banner menu from the inbox or any folder to access AirWatch Inbox settings, including:
Email – Current email address assumed by AirWatch Inbox.
Domain – Current domain connected to AirWatch Inbox.
Server – Current server connected to AirWatch Inbox.
Username – Current user signed into AirWatch Inbox.
Passcode – Current user password signed into AirWatch Inbox.
Signature – Current signature automatically populated into new email messages. Select this tab to open and edit the default Signature.
Advanced – Advanced information regarding AirWatch Inbox, including but not limited to current features enabled, maximum data allowed, and notification status.
Notification – Current notification status of AirWatch Inbox. You can edit the setting to receive email notifications for all your emails or only for important emails.
Viewing Contacts and Calendar
AirWatch Inbox also provides quick access to synced Contacts and Calendar information. Use the top swipe menu to switch back and forth between email, contacts, and calendar.
Note: AirWatch Inbox allows you to view synced Contact and Calendar information and create or edit existing contacts or calendar events.
29
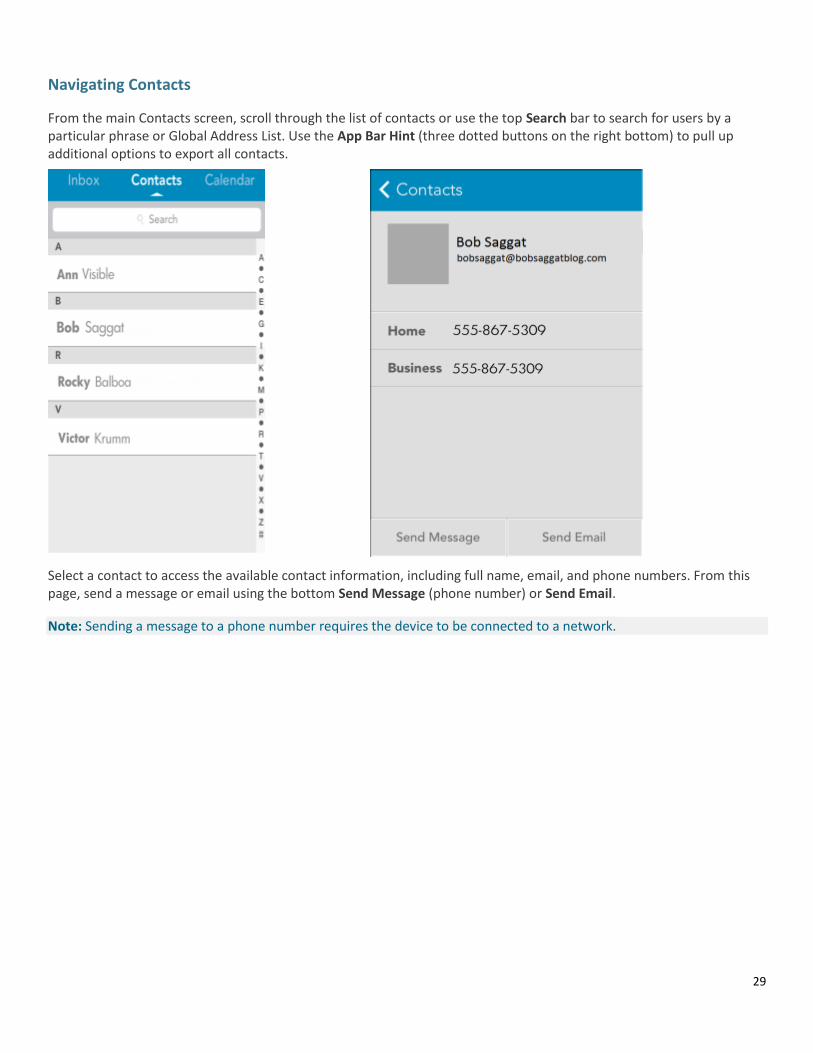
Navigating Contacts
From the main Contacts screen, scroll through the list of contacts or use the top Search bar to search for users by a particular phrase or Global Address List. Use the App Bar Hint (three dotted buttons on the right bottom) to pull up additional options to export all contacts.
Select a contact to access the available contact information, including full name, email, and phone numbers. From this page, send a message or email using the bottom Send Message (phone number) or Send Email.
Note: Sending a message to a phone number requires the device to be connected to a network.
30
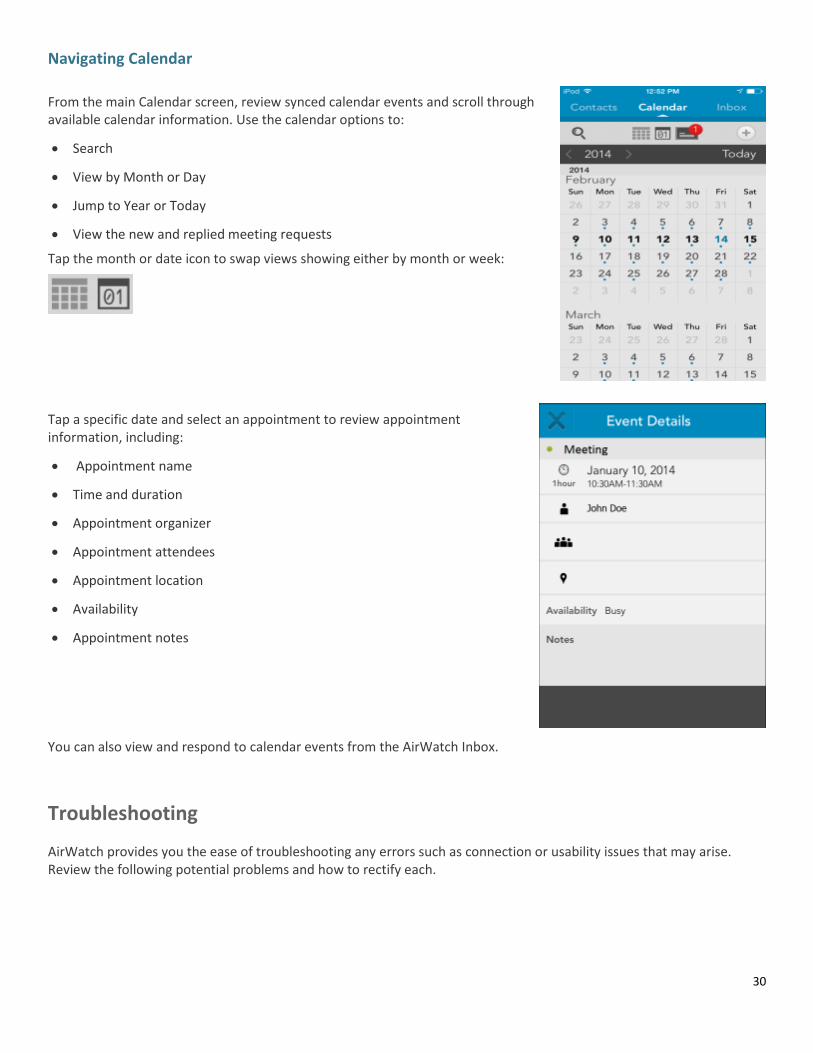
Navigating Calendar
From the main Calendar screen, review synced calendar events and scroll through available calendar information. Use the calendar options to:
Search
View by Month or Day
Jump to Year or Today
View the new and replied meeting requests
Tap the month or date icon to swap views showing either by month or week:
Tap a specific date and select an appointment to review appointment information, including:
Appointment name
Time and duration
Appointment organizer
Appointment attendees
Appointment location
Availability
Appointment notes
You can also view and respond to calendar events from the AirWatch Inbox.
Troubleshooting
AirWatch provides you the ease of troubleshooting any errors such as connection or usability issues that may arise. Review the following potential problems and how to rectify each.

31
Not Configured Screen
I. Possible Cause:
o AirWatch Inbox did not authenticate
Fixes:
Ask user if prompted with AirWatch Authentication Request.
Close/kill and re-open AirWatch Inbox.
Un-enroll and uninstall AirWatch Inbox and re-enroll and re-install AirWatch Inbox.
II. Possible Cause:
o Profile is Not Installed
Fixes:
Verify profile configured is for AirWatch Inbox and not the Native Email Client (first image below).
Click Try Again on device prompt.
Verify profile configured is published and is set to Pending Install.
Verify user is enrolled.
Re-push the profile to the user (user must not close/kill app and re-launch.
Network connection problem to AirWatch Server (Device Services).
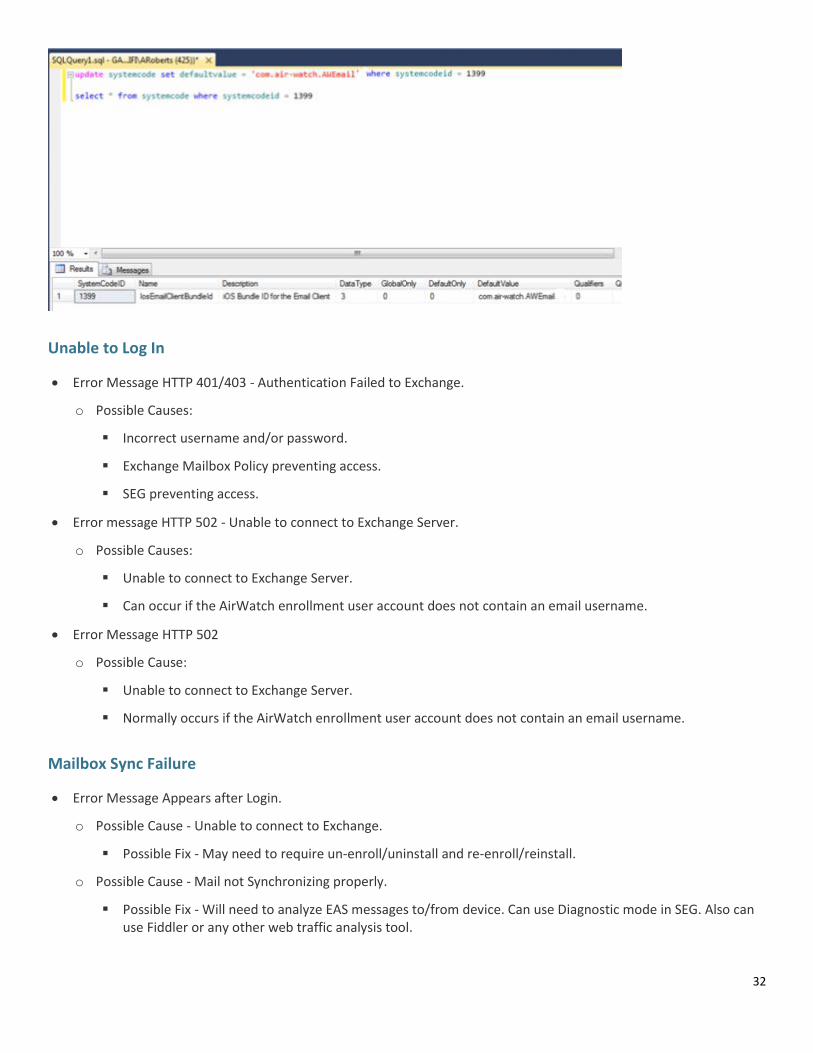
Upload enterprise cert and select Bundle ID.
Verify the bundle ID for the AirWatch Inbox matches the values set in the System Code table (second image below).
32
Unable to Log In
Error Message HTTP 401/403 - Authentication Failed to Exchange.
o Possible Causes:
Incorrect username and/or password.
Exchange Mailbox Policy preventing access.
SEG preventing access.
Error message HTTP 502 - Unable to connect to Exchange Server.
o Possible Causes:
Unable to connect to Exchange Server.
Can occur if the AirWatch enrollment user account does not contain an email username.
Error Message HTTP 502
o Possible Cause:
Unable to connect to Exchange Server.
Normally occurs if the AirWatch enrollment user account does not contain an email username.
Mailbox Sync Failure
Error Message Appears after Login.
o Possible Cause - Unable to connect to Exchange.
Possible Fix - May need to require un-enroll/uninstall and re-enroll/reinstall.
o Possible Cause - Mail not Synchronizing properly.
Possible Fix - Will need to analyze EAS messages to/from device. Can use Diagnostic mode in SEG. Also can use Fiddler or any other web traffic analysis tool.
33
No Messages Appear in AirWatch Inbox
Potential Cause - Device Limit for an EAS mailbox has been reached.
o Verify limit set on Exchange Mailbox.
Fixes:
o Connect the device to a web debugging tool such as Fiddler. Evaluate Response Header. Messages such as the following indicate a problem with Exchange restrictions:
X-MS-ASError: Message = The element 'FolderSync' in namespace 'FolderHierarchy:' has incomplete content. List of possible elements expected: 'SyncKey' in namespace 'FolderHierarchy:'.; Severity = Error.
o Verify the response from Exchange/SEG is within 10 seconds of the request. A ‘-’ indicates the client is waiting for a response.
34
Using the AirWatch Inbox for Windows 8.1 RT
Overview
The intuitive user interface of the AirWatch Inbox provides a very smooth user experience. This topic explains how to install, use, and configure settings for the AirWatch Inbox app on Windows 8.1 RT devices.
In This Section
Downloading and Logging In – Explains the steps to download and install the AirWatch Inbox App.
Viewing and Managing Email – Details the basics of accessing and managing email messages within the AirWatch Inbox app.
Composing a New Message – Covers the steps and fields available to create and send a new email message.
Navigating AirWatch Inbox – Profiles the available views and options within the AirWatch Inbox app.
Viewing Contacts and Calendar – Walks through the various settings and features involving synced Calendars and Contacts within the AirWatch Inbox app.
Creating New Contact – Walks through the steps to create new contact and edit the existing contact.
Creating New Event – Walks through the steps to create new event and edit the existing event.
Downloading and Logging In
A typical enrollment process flow to provision and configure the AirWatch Inbox with the user’s corporate email credentials is described below:
1. Navigate to the Windows Store and search "AirWatch Inbox."
2. Open the newly installed AirWatch Inbox app. Upon opening the app, the app prompts you to enter enrollment username and password. Click Submit.
3. Now, the device starts looking for an EAS profile from the AirWatch Admin Console. If the profile is not available, the app prompts you to verify that you are enrolled and have a profile configured for your device. To configure an email profile, see Configuring AirWatch Inbox Profile. If the profile is available you are prompted to enter the Exchange
35
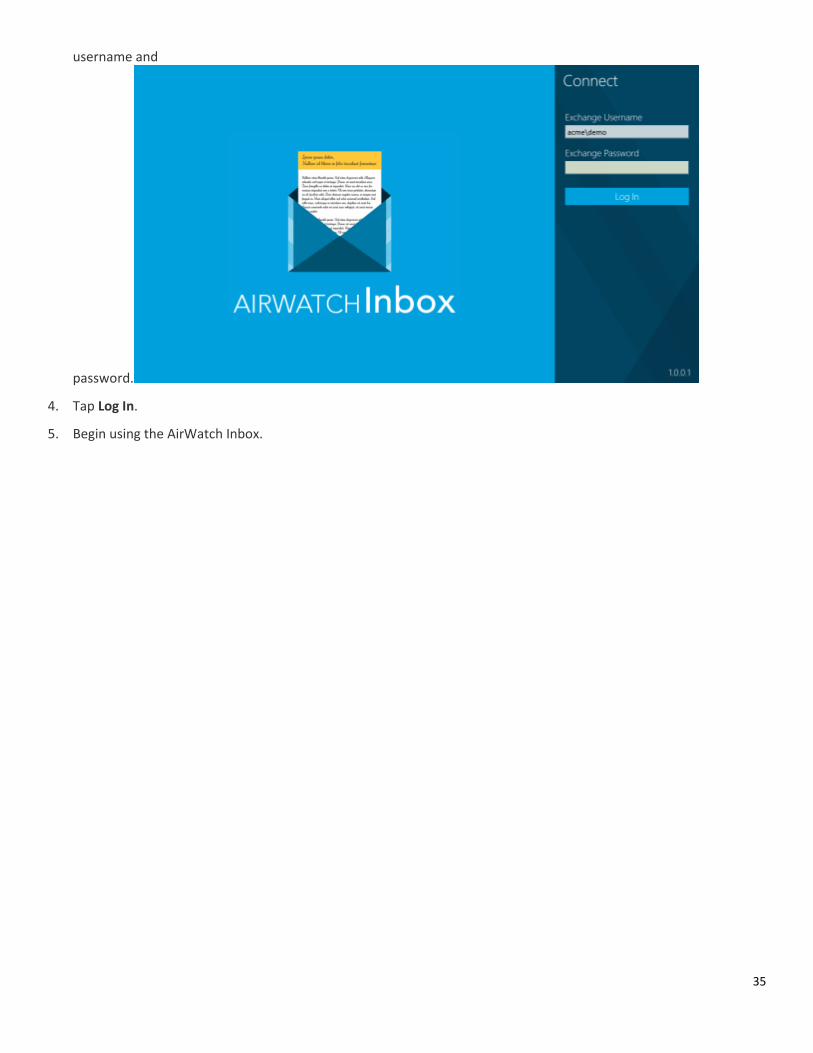
username and
password.
4. Tap Log In.
5. Begin using the AirWatch Inbox.
36
Viewing and Managing Email
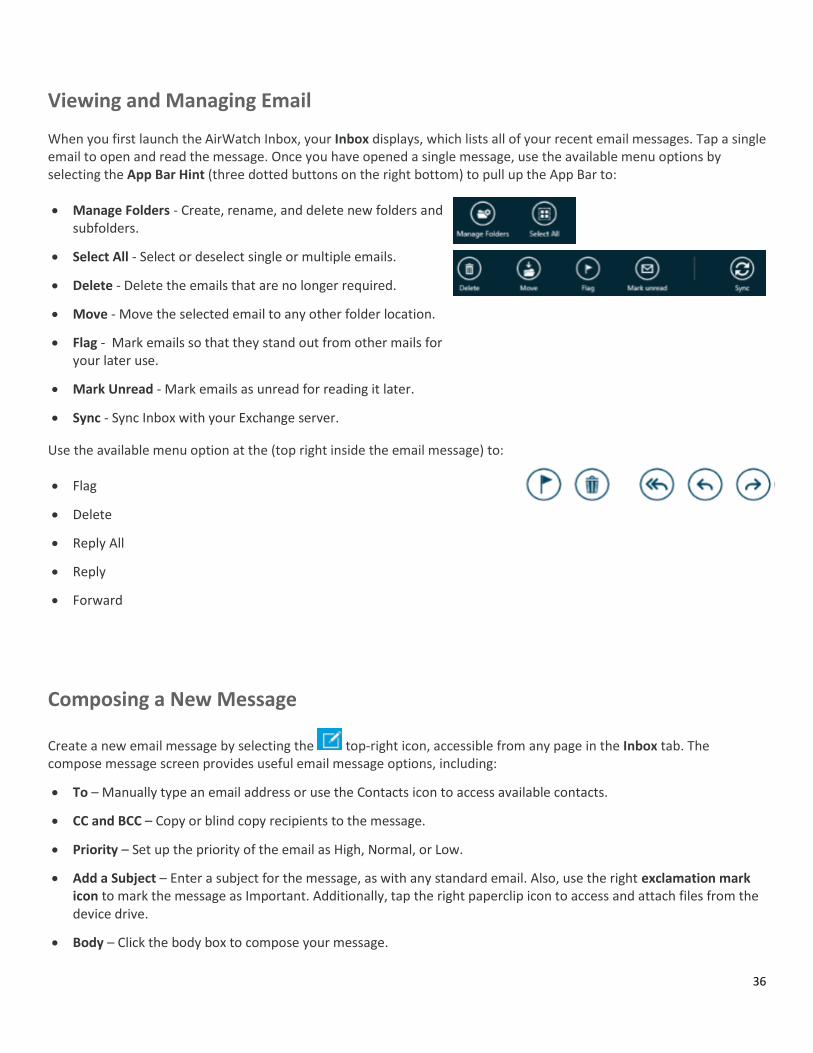
When you first launch the AirWatch Inbox, your Inbox displays, which lists all of your recent email messages. Tap a single email to open and read the message. Once you have opened a single message, use the available menu options by selecting the App Bar Hint (three dotted buttons on the right bottom) to pull up the App Bar to:
Manage Folders - Create, rename, and delete new folders and subfolders.
Select All - Select or deselect single or multiple emails.
Delete - Delete the emails that are no longer required.
Move - Move the selected email to any other folder location.
Flag - Mark emails so that they stand out from other mails for your later use.
Mark Unread - Mark emails as unread for reading it later.
Sync - Sync Inbox with your Exchange server.
Use the available menu option at the (top right inside the email message) to:
Flag
Delete
Reply All
Reply
Forward
Composing a New Message
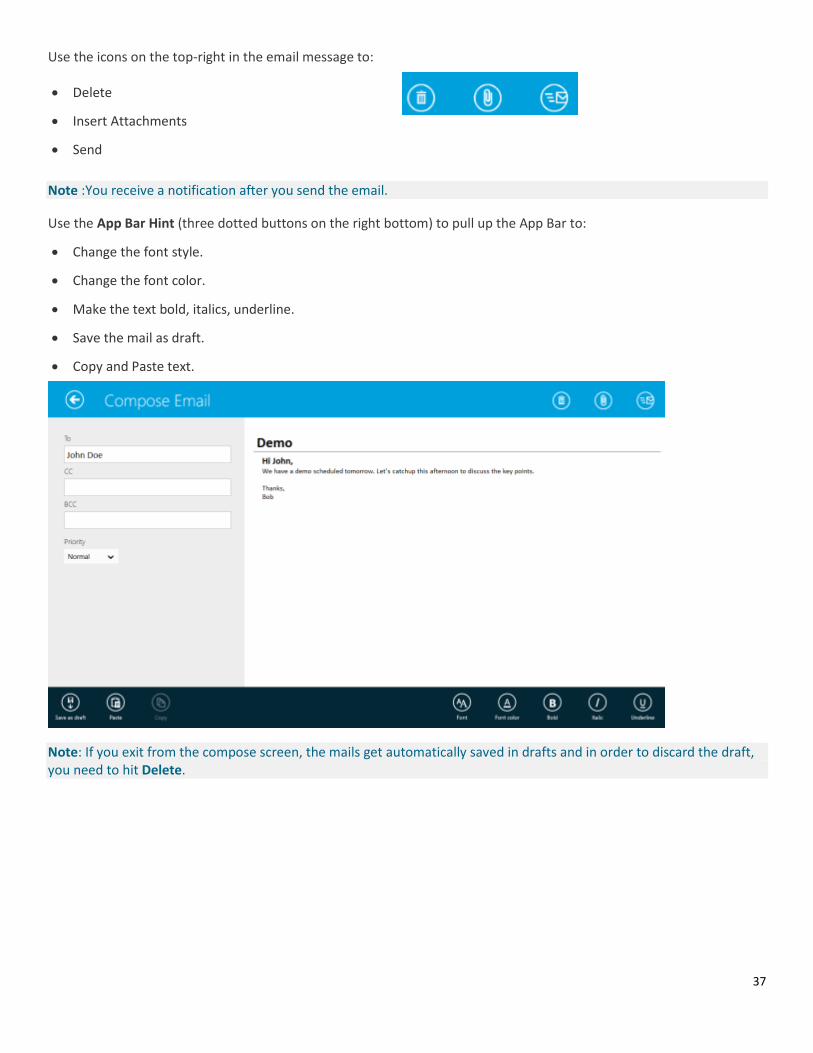
Create a new email message by selecting the top-right icon, accessible from any page in the Inbox tab. The compose message screen provides useful email message options, including:
To – Manually type an email address or use the Contacts icon to access available contacts.
CC and BCC – Copy or blind copy recipients to the message.
Priority – Set up the priority of the email as High, Normal, or Low.
Add a Subject – Enter a subject for the message, as with any standard email. Also, use the right exclamation mark icon to mark the message as Important. Additionally, tap the right paperclip icon to access and attach files from the device drive.
Body – Click the body box to compose your message.
37
Use the icons on the top-right in the email message to:
Delete
Insert Attachments
Send
Note :You receive a notification after you send the email.
Use the App Bar Hint (three dotted buttons on the right bottom) to pull up the App Bar to:
Change the font style.
Change the font color.
Make the text bold, italics, underline.
Save the mail as draft.
Copy and Paste text.
Note: If you exit from the compose screen, the mails get automatically saved in drafts and in order to discard the draft, you need to hit Delete.
38
Navigating AirWatch Inbox
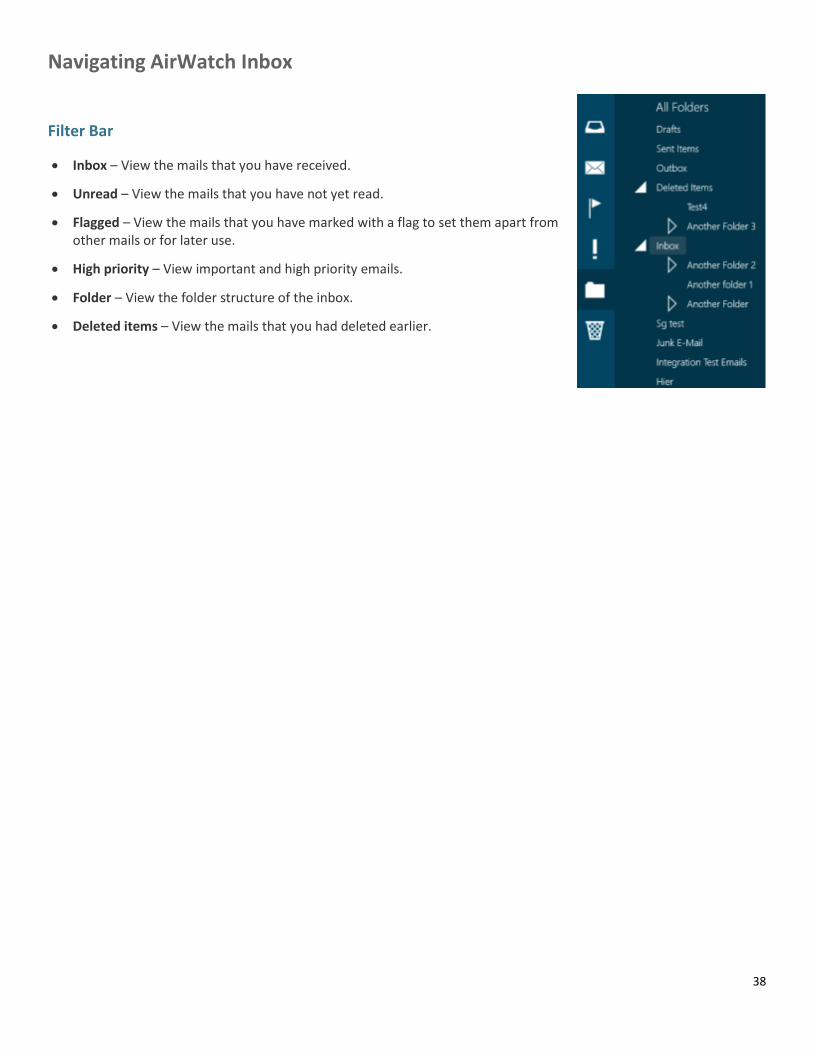
Filter Bar
Inbox – View the mails that you have received.
Unread – View the mails that you have not yet read.
Flagged – View the mails that you have marked with a flag to set them apart from other mails or for later use.
High priority – View important and high priority emails.
Folder – View the folder structure of the inbox.
Deleted items – View the mails that you had deleted earlier.
39
Viewing Contacts and Calendar
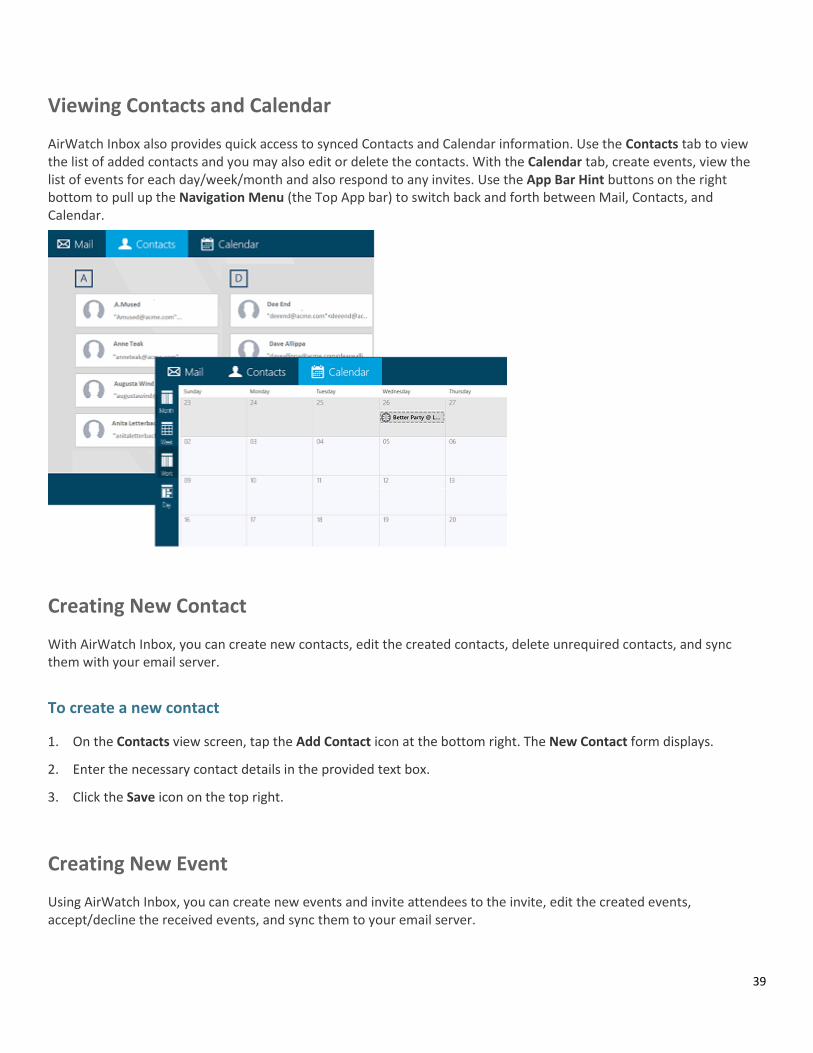
AirWatch Inbox also provides quick access to synced Contacts and Calendar information. Use the Contacts tab to view the list of added contacts and you may also edit or delete the contacts. With the Calendar tab, create events, view the list of events for each day/week/month and also respond to any invites. Use the App Bar Hint buttons on the right bottom to pull up the Navigation Menu (the Top App bar) to switch back and forth between Mail, Contacts, and Calendar.
Creating New Contact
With AirWatch Inbox, you can create new contacts, edit the created contacts, delete unrequired contacts, and sync them with your email server.
To create a new contact
1. On the Contacts view screen, tap the Add Contact icon at the bottom right. The New Contact form displays.
2. Enter the necessary contact details in the provided text box.
3. Click the Save icon on the top right.
Creating New Event
Using AirWatch Inbox, you can create new events and invite attendees to the invite, edit the created events, accept/decline the received events, and sync them to your email server.

40
To create a new event
1. On the Calendar view screen, tap the Add Event icon at the bottom right. The New Event page displays.
2. Enter the necessary details such as the event title, location, start and end time.
3. Enter the attendee's email address in the Add Attendees field to invite to the event and enter the event notes in the Note field.
4. Click the Save icon on the top right.
41
AirWatch Inbox Comparison Matrix
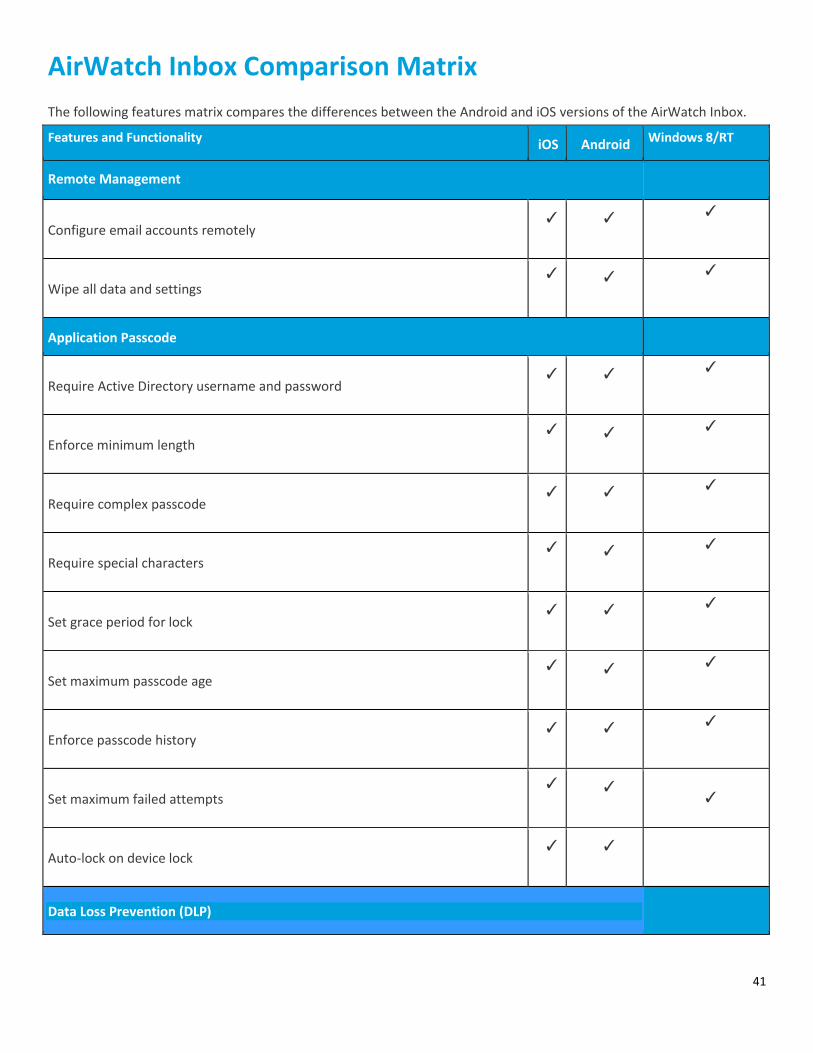
The following features matrix compares the differences between the Android and iOS versions of the AirWatch Inbox.
Features and Functionality iOS Android
Windows 8/RT
Remote Management
Configure email accounts remotely ✓
✓
✓
Wipe all data and settings ✓
✓
✓
Application Passcode
Require Active Directory username and password ✓
✓
✓
Enforce minimum length ✓
✓
✓
Require complex passcode ✓
✓
✓
Require special characters ✓
✓
✓
Set grace period for lock ✓
✓
✓
Set maximum passcode age ✓
✓
✓
Enforce passcode history ✓
✓
✓
Set maximum failed attempts ✓
✓
✓
Auto-lock on device lock ✓
✓
Data Loss Prevention (DLP)
42
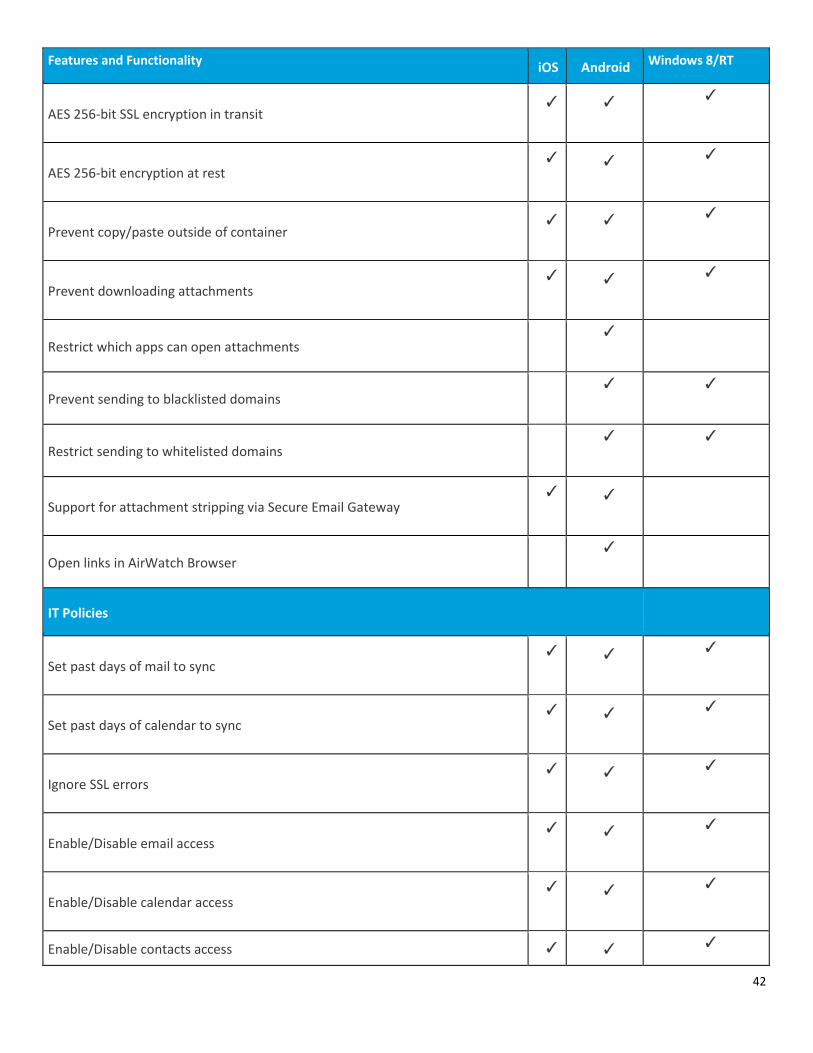
Features and Functionality iOS Android Windows 8/RT
AES 256-bit SSL encryption in transit ✓
✓
✓
AES 256-bit encryption at rest ✓
✓
✓
Prevent copy/paste outside of container ✓
✓
✓
Prevent downloading attachments ✓
✓
✓
Restrict which apps can open attachments ✓
Prevent sending to blacklisted domains ✓
✓
Restrict sending to whitelisted domains ✓
✓
Support for attachment stripping via Secure Email Gateway ✓
✓
Open links in AirWatch Browser ✓
IT Policies
Set past days of mail to sync ✓
✓
✓
Set past days of calendar to sync ✓
✓
✓
Ignore SSL errors ✓
✓
✓
Enable/Disable email access ✓
✓
✓
Enable/Disable calendar access ✓
✓
✓
Enable/Disable contacts access ✓ ✓ ✓
43
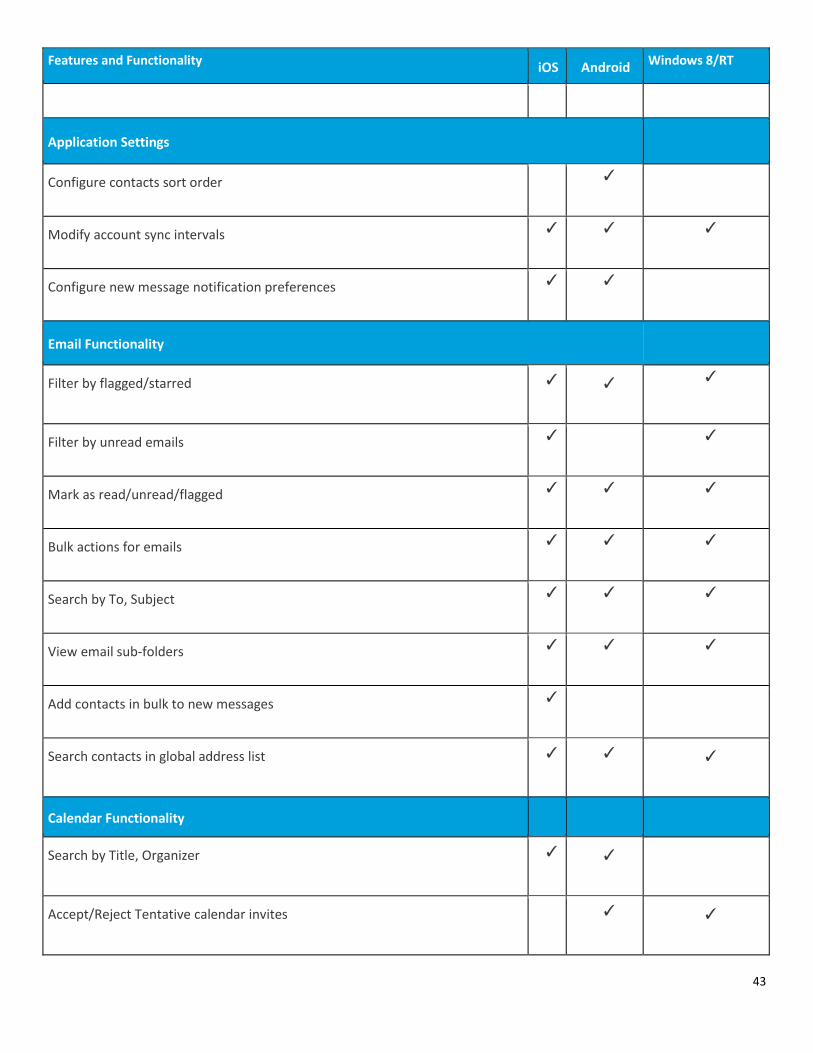
Features and Functionality iOS Android Windows 8/RT
Application Settings
Configure contacts sort order
✓
Modify account sync intervals ✓
✓
✓
Configure new message notification preferences ✓
✓
Email Functionality
Filter by flagged/starred ✓
✓
✓
Filter by unread emails ✓
✓
Mark as read/unread/flagged ✓
✓
✓
Bulk actions for emails ✓
✓
✓
Search by To, Subject ✓
✓
✓
View email sub-folders ✓
✓
✓
Add contacts in bulk to new messages ✓
Search contacts in global address list ✓
✓
✓
Calendar Functionality
Search by Title, Organizer ✓
✓
Accept/Reject Tentative calendar invites
✓
✓
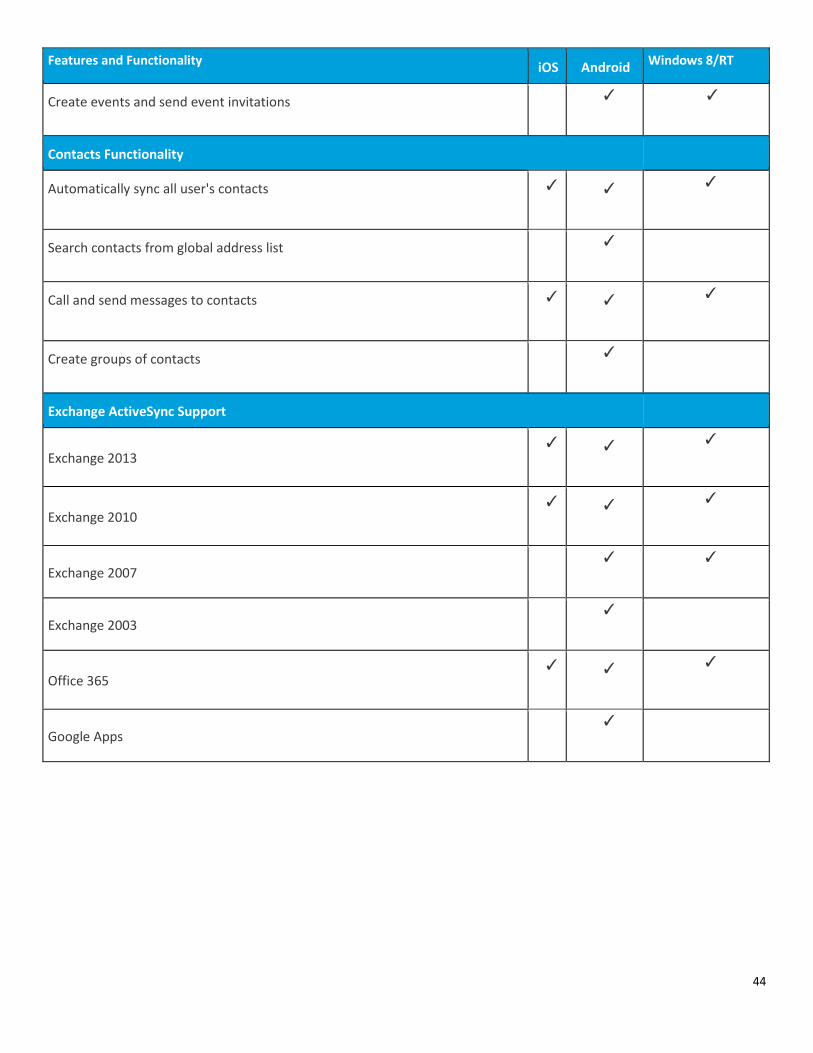
44
Features and Functionality iOS Android Windows 8/RT
Create events and send event invitations
✓
✓
Contacts Functionality
Automatically sync all user's contacts ✓
✓
✓
Search contacts from global address list
✓
Call and send messages to contacts ✓
✓
✓
Create groups of contacts
✓
Exchange ActiveSync Support
Exchange 2013 ✓
✓
✓
Exchange 2010 ✓
✓
✓
Exchange 2007 ✓
✓
Exchange 2003 ✓
Office 365 ✓
✓
✓
Google Apps ✓


![VMware AirWatch Mobile Device Management … · VMware AirWatch Mobile Device Management . Supplemental Administrative Guidance . ... and Syslog Guide [8] VMware AirWatch ... Installation](https://img.dokumen.tips/doc/110x75/5b04e5a37f8b9a2d518e4108/vmware-airwatch-mobile-device-management-airwatch-mobile-device-management-.jpg)