Embed Size (px)
Citation preview
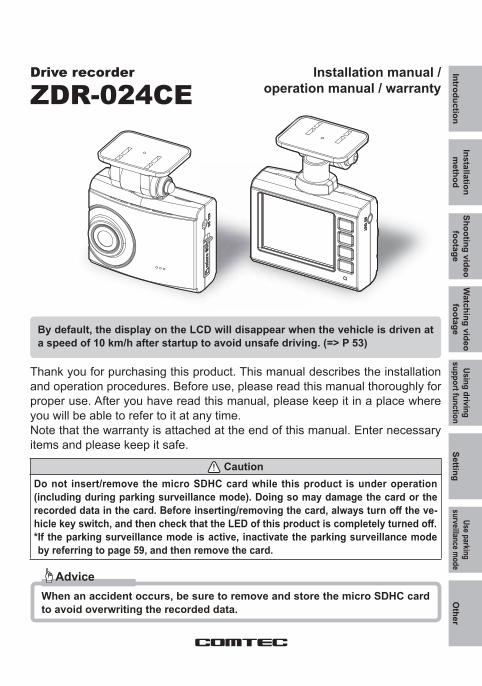
Drive recorder
ZDR-024CEInstallation manual /
operation manual / warranty
By default, the display on the LCD will disappear when the vehicle is driven at a speed of 10 km/h after startup to avoid unsafe driving. (=> P 53)
Thank you for purchasing this product. This manual describes the installation and operation procedures. Before use, please read this manual thoroughly for proper use. After you have read this manual, please keep it in a place where you will be able to refer to it at any time.Note that the warranty is attached at the end of this manual. Enter necessary items and please keep it safe.
CautionDo not insert/remove the micro SDHC card while this product is under operation (including during parking surveillance mode). Doing so may damage the card or the
-
* If the parking surveillance mode is active, inactivate the parking surveillance mode by referring to page 59, and then remove the card.
AdviceWhen an accident occurs, be sure to remove and store the micro SDHC card to avoid overwriting the recorded data.
IntroductionInstallation
method
Watching video
footageUsing driving
support functionUse parking
surveillance modeSetting
Shooting video footage
Other

2
Table of Contents …………… 2
Introduction ………………… 3Safety precautions ……………… 3Precautions for use …………… 5For your knowledge …………… 7When using a brand new microSDHC card ………………… 9Regarding ejecting a microSDHC card ………………… 9Packing content ………………… 10Main unit section names ……… 11Options (sold separately) ……… 11
Installation method ………… 12
method …………………………… 12Connecting the cigar plug cord 12Checking the installation position 13Installing the main unit ………… 14Checking the operation ………… 18
Shooting video footage …… 20Regarding recording of video footage …………………… 20Turning the power ON ………… 24Turning the power OFF ………… 24LCD display ……………………… 25Adjust the sound volume of the main unit ………………………… 26
Watching video footage …… 27Playing video footage with the main unit ………………………… 27Play video footage on a television ………………………… 30Playing video footage on a personal computer ……………… 31Saving the recorded data to the personal computer ……………… 36
Regarding map display ………… 38
Using the driving support function ……………………… 39
Regarding the driving support function …………………………… 39Performing calibration ………… 42
Setting ………………………… 44Setting method ………………… 44List of settings …………………… 45Picture/sound recording settings 47Function settings ………………… 51Language settings ……………… 57Time zone settings ……………… 57
Using parking surveillance mode (optional) ……………… 58
Regarding parking surveillance mode ……………………………… 58Regarding parking surveillance mode operation ………………… 59Various settings for parking surveillance mode ……………… 61
Appendix ……………………… 64FAQ ……………………………… 64LED lamp check list …………… 65Error check list ………………… 65Reference for recording time … 66List of announcements/alarms … 68
………… 69
Index …………………………… 70
Warranty Statement (please read) ………………… 71
ZDR-024CE Warranty ……… 72
Table of Contents
3
Introduction
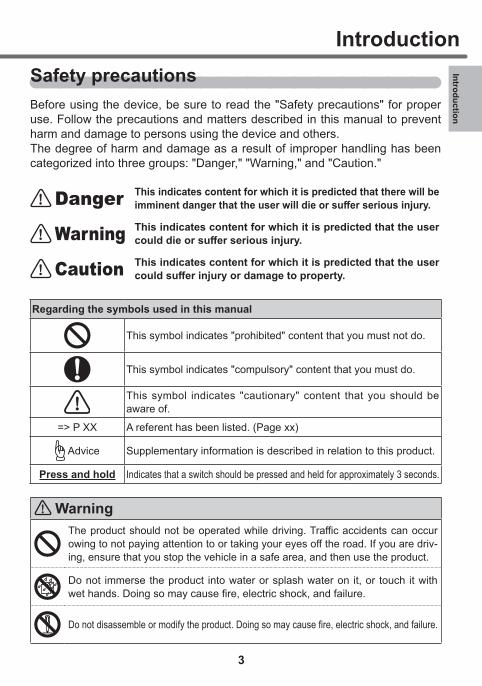
IntroductionSafety precautionsBefore using the device, be sure to read the "Safety precautions" for proper use. Follow the precautions and matters described in this manual to prevent harm and damage to persons using the device and others.The degree of harm and damage as a result of improper handling has been categorized into three groups: "Danger," "Warning," and "Caution."
! Danger This indicates content for which it is predicted that there will be
! Warning This indicates content for which it is predicted that the user
! Caution This indicates content for which it is predicted that the user
Regarding the symbols used in this manual
This symbol indicates "prohibited" content that you must not do.
This symbol indicates "compulsory" content that you must do.
This symbol indicates "cautionary" content that you should be aware of.
=> P XX A referent has been listed. (Page xx)
Advice Supplementary information is described in relation to this product.
Press and hold Indicates that a switch should be pressed and held for approximately 3 seconds.
! Warning
-ing, ensure that you stop the vehicle in a safe area, and then use the product.
Do not immerse the product into water or splash water on it, or touch it with

4
Introduction! Warning
In case this product is damaged or fails, immediately stop using it, and return it to a
breakdown of your car.
Do not use this product nearby medical devices as it may affect proper function of those medical devices.
Do not insert a pin or wire in pits or gaps of the product. Doing such may lead to elec-tric shock or failure.
Do not use the product in abnormal conditions such as insertion of debris, smoking, or
Keep microSDHC cards away from babies and children. They may swallow those cards by mistake.
double-sided adhesive tape as it may disturb operation or lead to an accident.
! CautionThere is a chance of condensation inside the product if it is moved from a cooler loca-tion to hotter one. Do not operate the product at the condition of condensation as it may cause failure or heat production.
Do not keep this product in locations as shown below. It may lead to failure such as discolor, deformation of the main unit.・A place of extreme high temperature such as under direct sunlight or under the blaz-ing sun in the summer.・A place of high temperature or air full of dusts.
Do not mistake the slide direction when inserting a microSDHC card to the main unit, as error in the insertion may lead to failure or damage of the main unit.
As this product consists of precise electronics parts, it may lead to data damage or fail-ure if you handle it in a way as mentioned below.・・When immersing into water, dropping or adding strong physical shock.・When unused for long periods of time.
When using this product outside Japan, follow the applicable laws and regulations of a country/state/region of your use. Further, we shall bear no responsibility in regard to your use of this product outside Japan.
5
IntroductionIntroduction
Precautions for usePlease note that this product does not guarantee to record all video footage.
This product is aimed to be used as a reference material at the time of accidents. It does not guar-antee validity as a complete proof.
This product is designed as a car-mount drive recorder. Do not use it for any purpose other than that. We shall bear no responsibility in regard to any trouble during your use other than that pur-pose.
Be careful as this product may infringe other people’s rights including privacy according to how you use it. Do not use it for mischievous purpose. We shall bear no responsibility in regard to any trouble for all these occasions.
When an accident occurs, be sure to remove and store the micro SDHC card to avoid overwriting the recorded data.
data on the card, it may cause broken or deleted data and failure of the card.
Do not save any data other than those related with this unit to the microSDHC card as doing so may lead to unstable operation of the unit.
We shall bear no responsibility in regard to any guarantee of your data in cases where it is deleted during operation of this product.
You are recommended to save all necessary data on your personal computer in case of data loss.
This product may not function properly or record video footage smoothly if used outside the range of operational temperatures.
This product may not function properly when used under the blazing summer sun, displaying "Heat Alert" on the LCD. As the temperature inside vehicles becomes very high particularly in summer time, use the product after lowering the inside temperature by opening windows and by other means.
-
to their backlight or a lower brightness of the signal itself. In such occasions, view the before and after conditions in the video footage to make a determination, or check the other vehicles around
This product uses a wide angle lens and may present a portion of the video footage with distor-tion or shadows. Furthermore, the perspective seen in the video footage is not identical to reality. These are characteristics of the wide angle lens and do not indicate abnormalities.
6
Introduction
from the GPS satellites.
A one year warranty is provided with this product from the date of purchase. (However, the warranty shall not apply to all consumables including the microSDHC cards and double-sided adhesive tape.)
This product is dedicated for DC12V vehicles.
Please contact your retailer for exchange, repair, or purchase of parts.
We do not lend out substitutes in case of any failure of this product.
without prior notice for improvement.
Regarding the built-in battery for retention of date informationThis product is equipped with a battery to retain time and date information. When using the
first drive for about one hour to sufficiently recharge the battery before using the product. The built-in battery is a consumable. When the device is unable to retain the date information even after recharging, please contact our service center as described on the warranty. We will exchange the built-in battery at our service center.
Please note that we shall bear no responsibility in regard to non-recording of video footage at the time of an accident, or damage relating to recorded video footage regardless of whether or not the product worked properly.

7
IntroductionIntroduction
For your knowledge What is GPS?
‘Global Positioning System’ means a system to measure a current position on the ground by utilizing satellites of the Department of Defense of the United States.
What is the ‘Michibiki’ quasi zenith satellite system (QZSS)? The "Quasi Zenith Satellites System" is a system to measure the current position over Japan
using satellites of the Japan Aerospace Exploration Agency (JAXA). By receiving signals from the Michibiki satellites, it has become possible to measure more accurate positions over conventional GPS-only measurements, even within mountain areas or under high rising buildings in the center of cities.
What is GLONASS?
positions on the ground by using the satellites of the Russian Space Force.
Satellite data This product computes and memorizes the motion trajectory of GPS satellites after receiving
signals successfully. This is to expedite processing to re-receive signals from the satellites in cases where the product becomes unable to receive signals when running inside a tunnel, etc. However, there may be rare cases when it becomes unable to receive the signals from the GPS satellites for a long time.
Receiving GPS satellite signals and car-mounted electronics There are some occasions when the unit becomes unable to receive GPS satellite signals
when receiving (or setting to receive) UHF channel 56 by a car-mounted television or owing to radio wave leakage from car-mounted electronics such as the main unit of car navigation systems, terrestrial digital broadcasting tuners or satellite broadcasting receivers. In such a case, you are requested to mount this product by keeping it away from other car-mounted electronics devices to ensure there is no interference in receiving signals from GPS satellites.
Regarding measurement errors of GPS The GPS functions of this product may produce measurement errors by as much as 50 m
depending on conditions of the received signal.
Regarding speed indications by GPS・
measured by the speedometer in your car, as the method employed to measure speed by
・ There are some occasions when the product indicates a speed that is not 0 km/h even during your car is completely stopped. However, please note that this is not a failure of the product, as it is due to a measurement error in the GPS signal.・ This product displays the speed only in ‘km/h.’

8
Introduction Regarding the LCD・
some pixels that don’t emit light or those that are constantly lit. Please understand that these are not regarded as faulty.・Owing to its properties, the images of the LCD may appear darker as a whole when the ambient
temperature exceeds approximately 75 degrees Celsius, or the display may delayed when it goes lower than about -10 degrees Celsius. However, these occurrences are not failures of the display. In either case, it resumes the original display state as the ambient temperature becomes within a range of stable operation.
Regarding microSDHC cards・ The included microSDHC card is exclusively for the use of this unit.・ The use of this unit calls for a microSDHC card.・ A microSDHC card is a consumable accessory and has a service life such as the number of
times it can have data written to it. Replacing it every 2-3 years is recommended. Depending on
* MicroSDHC cards that have reached their service life become unable to operate properly in-cluding being read by a PC.
・ For the stable use of microSDHC cards, it is recommendable to reformat the cards periodically at
・ Formatting of a microSDHC card will erase all of the recorded data.・ When using this product, use only the included microSDHC card. We shall bear no responsibility
in regard to any erroneous operation of the product due to incompatibility with microSDHC cards other than the one that is included.
Regarding the ・
used in PCs such as FAT, this exclusive system has fewer chances for damaging saved data, and ensures a higher chance to recover the saved data when it is damaged.・
deletion.・
of the main unit.・ When inserting another microSDHC card into this unit that has been formatted by a PC, an SD
card reformatting screen will be displayed. Reformat it if you wish to use the card as it is.

9
IntroductionIntroduction
When using a brand new microSDHC cardWhenever using a brand new microSDHC card and other microSDHC cards other than the one that comes included, you need to format the SD card
When you want to take a microSDHC card out, push the card gently once, then take it out as it pops out a little. When inserting the card, press it in until a ‘click’ sound is heard.
then pull it out when it pops out slightly.
Lightly push the microSDHC card,
Pull the cover forward and fold it horizontally.
* Insert the card by following the steps for ejecting in reverse order. Ensure that you insert the microSDHC card so its logo can be seen at the side of the camera. If you try to insert it upside down by force, it will break.
CautionDo not insert/remove the micro SDHC card while this product is under operation (including during parking surveillance mode). Doing so may damage the card or
the vehicle key switch, and then check that the LED of this product is completely
* If the parking surveillance mode is active, inactivate the parking surveillance mode by referring to page 59, and then remove the card.

10
IntroductionPacking content
ZDR-024CE main unit
Accessories
Cigar plug cord(About 4 m, 1A fuse contained)
Double-sided adhesive tape
(1 pcs)Degreasing cleaner
(1 pcs)
Hexagon wrench
(2.5 mm/1 pcs)microSDHC card
(8GB/1 pcs)Operation Manual
(this document/1 pcs)
*It is installed to themain unit by default.
AdviceWhenever using other microSDHC cards other than the one included, you need to

11
IntroductionIntroduction
Main unit section names
! Caution • A microSDHC card is a consumable accessory. Replacing it every 2-3 years is recommended. • A microSDHC card has a service life, such as the number of times it can have data written to it, owing to the properties of the card.
• If you use a microSDHC card other than the one included, its operation cannot be ensured. • Do not block the vent of the main unit, as accumulated heat may cause failure.
Options (sold separately)Part name Purpose of use Part number
Direct wiring cord for parking surveil lance
mode
By connecting to a supported drive recorder, power is supplied and recording continues even after turning
option, there is no need to connect a cigar plug cord or other direct wiring cord in addition.
HDROP-09
AV cable A cable for playing video footage from this unit on your television. VC-100
AC adapter Power can be supplied from your household electrical power outlet (AC100 V). SS-065

12
Carry out the installation while referring to the procedure below.
Connect the cigar plug cord to the vehicle. (P 12)
Install this product to the vehicle. (P 13 to P 17)
Check the operation. (P 18)
Check the video footage with the LCD of the main unit.
(P 27 to P 29)
Check the video footage with a personal computer.
(P 31 to P 35)
End
Connecting the cigar plug cord
power plug to the power jack of the main unit.
Power jack
Cigar plug cord
Installation method
13
Installation m
ethod
13
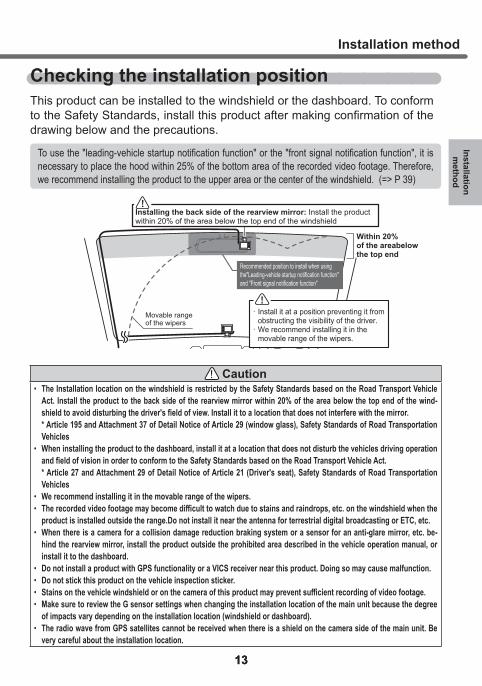
Checking the installation positionThis product can be installed to the windshield or the dashboard. To conform
drawing below and the precautions.
necessary to place the hood within 25% of the bottom area of the recorded video footage. Therefore, we recommend installing the product to the upper area or the center of the windshield. (=> P 39)
Movable rangeof the wipers
Within 20%of the areabelowthe top end
・Install it at a position preventing it from obstructing the visibility of the driver.・We recommend installing it in the movable range of the wipers.
!
Installing the back side of the rearview mirror: Install the productwithin 20% of the area below the top end of the windshield
Recommended position to install when usingthe"Leading-vehicle startup notification function"and "Front signal notification function"
!
Caution • The Installation location on the windshield is restricted by the Safety Standards based on the Road Transport Vehicle
Act. Install the product to the back side of the rearview mirror within 20% of the area below the top end of the wind-
* Article 195 and Attachment 37 of Detail Notice of Article 29 (window glass), Safety Standards of Road Transportation Vehicles
• When installing the product to the dashboard, install it at a location that does not disturb the vehicles driving operation
* Article 27 and Attachment 29 of Detail Notice of Article 21 (Driver's seat), Safety Standards of Road Transportation Vehicles
• We recommend installing it in the movable range of the wipers. •
product is installed outside the range.Do not install it near the antenna for terrestrial digital broadcasting or ETC, etc. • When there is a camera for a collision damage reduction braking system or a sensor for an anti-glare mirror, etc. be-
hind the rearview mirror, install the product outside the prohibited area described in the vehicle operation manual, or install it to the dashboard.
• Do not install a product with GPS functionality or a VICS receiver near this product. Doing so may cause malfunction. • Do not stick this product on the vehicle inspection sticker. • • Make sure to review the G sensor settings when changing the installation location of the main unit because the degree
of impacts vary depending on the installation location (windshield or dashboard). • The radio wave from GPS satellites cannot be received when there is a shield on the camera side of the main unit. Be
very careful about the installation location.
Installation method

14
Installing the main unit* This manual explains the installation procedure using an installation to a windshield
as an example.
and then adjust the installation angle of the main unit. Tighten the screw with the attached hexagonal wrench after adjustment.・ Temporarily attach the stay of the main unit to the windshield, and adjust the
angle to make the main unit perpendicular to the ground surface by checking the video footage on the LCD.・ To make adjusting the angle easier, adjust the angle before sticking the mounting
stay to the windshield.
Angle adjustment screwAngle adjustment screw■Horizontal adjustment■Backward and forward adjustment
Tighten
Loosen
Tighten Loosen
Caution • Be sure to adjust the angle with the angle adjusting screw loosened. Failure to do so may cause damage.
• Make sure you tighten the angle adjusting screw after adjusting the angle. Loose screws may detach while the vehicle is running.
• Be aware that overtightened stay angle adjusting screws may cause damage. • Periodically check that there is no loosened screws.
recording of the video footage by detection of impacts or by pressing the switch.
Advice • If the display on the LCD disappears owing to the settings of the screen display, shortly pressing the [Menu/Return] switch allows the LCD to turn on for 30 seconds. (=> P 53)
• If the recorded video footage is dark, change the settings of the camera brightness ad-justment or adjust the angle of the product to move it slightly downward.
• Since touching the camera lens causes the lens to become foggy which results in to out-of-focus video footage, be careful not to touch the lens when installing the product.
Installation method

15
Installation m
ethod
2) Clean the mounting stay and windshield with the attached degreasing cleaner. After drying them, use double-sided adhesive tape to stick the mounting stay to the windshield.
Advice• When sticking the stay, start sticking it from one side little
by little in order to achieve proper adhesion with less air bubbles.* Sticking the stay in one go allows air bubbles to get in, leading
to easy detachment of the stay.
• Firmly press the stay on the back side of the sticking face by hand to avoid uneven adhesion. In addition, check that the sticking face is even by looking at it from the outside of the vehicle after sticking it.
Press the sticking face of the stay from th b k id
Check from the outside of the vehicle th t th i
◇Stay sticking face
Sticking entirely
Bubbles and colorunevenness found
Sticking entirely
Bubbles and colorunevenness found
Stick it from oneside, little by little
Installation method

16
Caution • Install the product so as not to obstruct the functions of the vehicle (airbags,
•-
ed adhesive tape because the sticking face may be damaged due to aging deterioration. If such a situation can be anticipated, install the product to the windshield of the back side of the rearview mirror.
Always check the following details. Failure to check them may cause
• Make sure you clean any stains (oil, water drops, etc.) on the sticking face and the mounting stay with the included cleaner. Install the product after drying them.Do not use a parts cleaner and glass cleaner, etc. Doing so may
• When using a shade such as a sunshade, be careful not to place the main unit between the windshield and the
• The adhesive power of the double-sided tape will become weak when the air temperature is extremely low. Warm up the adhesive face with a dryer, etc. to attach the product. Also, be careful not to allow the heat of the dryer to come into direct contact with the product.
• Do not reuse the double-sided adhesive tape because the adhesive power of the used tape becomes weak.• Be careful not to pull nor apply unreasonable pressure to the product after installing it until the double-sided adhe-
• the double-sided tape is not adhered to the windshield or the dashboard.
3) Arrange the wiring of the cigar plug cord.* Use a commercial cord clamp, etc. to arrange the
wiring in order to avoid interference with driving.* Do not bundle the cords for terrestrial digital broad-
casting and ETC, etc. together. Push in
Cigar plug cord
Commerciallyavailable cordclamps, etc.
Installation method

17
Installation m
ethod
When installing on the dashboardThis product judges the up/down direction of the product automatically using the built-in G sensor to inverse the LCD display.
Installing to a windshield Installing to a dashboard
AdviceThe up/down direction of the screen is judged when the product is started up. Therefore, inverting the main unit does not cause the screen to be inversed while being active. When the screen is inverted, restart the product.
CautionInstalling the product on the dashboard causes the product to heat up owing to heat trans-ferring from the dashboard. Therefore, "High temperature caution: Recording is stopped until the temperature of the main unit decreases." be displayed to call for attention. Install-ing the device to the windshield is recommended if the display above appears frequently.* Recording stops while the attention screen is being displayed. Please wait until the tem-
perature of the main unit decreases.
Removing the main unitLoosen the angle adjusting screws at 2 locations with the attached hexagonal wrench to pull it out and then remove the main unit.
Loosen the angle adjustingscrew at 2 locations
(1) Lean the mainunit forward
(2) Pull it out
Loosen
Loosen
Caution • •
screws may be detached while the vehicle is running. • • Periodically check that there is no loosened screw.
Installation method

18
Checking the operation1. Checking the GPS reception
1) Turn the vehicle key switch on. Start up the main unit and then check that the GPS icon is displayed.* Receiving GPS sets the date and time in the main unit.
AdviceThe GPS function of this product does not operate at places listed below, where a signal from satellites cannot be received. This will cause the display of the GPS function to not operate properly. Move to another location and check if the GPS function is working. (Places include: tunnels, underpasses, the inside of buildings, places surrounded by buildings, etc., places under elevated railway tracks, forests, etc.)
2. Checking the operation of manual recording1) Press the switch other than the [Menu/Re-
turn] switch while the green LED lamp is lit and the radio or audio on.
2) A beep sound will be generated. [REC] display turns to [REC M] and recording of the sound and video starts.* The green LED is lit during manual recording.* Sound is automatically recorded.
AdviceThe setting for recording is [ON] as the default. This can be switched to [OFF].(=> P 49)
Press any switch otherthan [Menu/Return]
Icon display will change
LED lamp flashing in green
Blip
Installation method

19
Installation m
ethod
3. Checking the recorded video footageCheck the video footage recorded by the main unit.hexago(=> P 27 and 28)<<Check items>>
• The video footage that was recorded from the time of Power ON to Power OFF should be properly recorded in the folder based on the present date and time in "Continuous Recording."
• The video footage recorded by the switch operation should be recorded properly in the folder based on the present date and time in "Manual Re-cording."
• The sound should be recorded in the recorded data.
Installation method

20
Regarding recording of video footageThis product has two ways of recording: "continuous recording" and "event recording."
About 30 seconds
Event recording data
Continuouslyrecorded data
Engine OFFStop continuous recording
Engine ONStarts continuous recording
About 30 secondsAbout 30 secondsAbout 30 secondsAbout 30 seconds
Impact detection/switch operationVehicle status
Recorded content1 file
*Saves a file on the occasion of an event (impact detection/switch operation) and two files before and after that event.*Recording time length for files differ when the frame rate settings are set to ‘time lapse 1 frame’ or ‘time lapse 3 frames.’
If a weak impact occurs at the time of an accident, there are cases where record-ing of video footage may not be performed even though an impact has occurred. Check the video footage of the continuous recording in such cases.
Advice• By default, when the capacity of the micro SDHC card is fully occupied, the oldest data in the
respective recording area for continuous recording or event recording will be overwritten to record new data.Operations while overwriting can be changed through the settings.(=> P 50)
• Video footage may not be recorded by means of operating the switch or after receiving an im-pact immediately after starting up the main unit.
• When saving recorded data by operating the switch or when an impact occurs, new video footage will not be recorded even when the switch is being operated or an impact is detected.
• Video footage cannot be recorded when the LED lamp is lit or blinking in orange. Finish set-ting or clearing the error.
Regarding continuous recording• Automatic continuous recording is performed as a sequence from the time after the en-
gine is turned on (vehicle key switch is set to ACC or ON) to the time when the engine -
cro SDHC card.• By default, when the maximum data capacity is reached, the oldest video footage is
deleted in chronological order, and then new video footage is continued to be recorded.• Changing the setting to [Overwriting prevention] does not delete the old video footage
and allows stopping the recording as well. (=> P. 50)
Shooting video footage

21
Watching video
footage
21
Regarding event recording•
when the switch is operated, and "parking surveillance impact recording data" to record
• By default, when the maximum data capacity is reached, the oldest video footage is deleted in chronological order, and then new video footage is continued to be recorded.
• Changing the setting to [Overwriting prevention] does not delete the old video footage and allows stopping the recording as well. (=> P 50)
Impact recording data• When the G sensor detects an impact which is equal to or more than the
-
• The sensitivity of the G sensor can be adjusted individually for the front/back, left/right, top/bottom by 0.1 G via the settings.(=> P 51)
1 file1 file
Impact
Recording as impact recording data
When an impact is detected within 2/3 of the latter part When an impact is detected within 1/3 of the first part
1 file1 file
Impact
Recording as impact recording data
Manual recording dataPressing a switch other than the [Menu/Return] switch of this product
1 file1 file
Records as manual recording data
When operating the switch within 2/3 of the latter partWhen operating the switch within 1/3 of the first part
1 file1 file
Records as manual recording data
Press any switch other than[Menu/Return]
Press any switch other than[Menu/Return]
Shooting video footage

22
Regarding recording area• By default, 80% of the entire microSDHC card is set as the continuous re-
cording area and 20% of it is set as the event recording (impact recording/manual recording) area.
• The ratio of the data saving capacity for event recording can be selected from [10% / 20% / 30%].(=> P 50)
• Changing the settings of the event recording area changes the ratio of the saving capacity of the continuous recording together.
• The parking surveillance continuous recording is included in the continuous
in the event recording area. Therefore, when the maximum data capacity is reached under parking surveillance mode, the oldest video footage of the normal continuously-recorded data or event recorded data is deleted in chronological order, and new video footage is continued to be recorded.
Setting range
30% 10%
・Impact recording・Manual recording
・Parking surveillance impact recording
・Continuous recording・Parking surveillance continuous recording
* To change the recording area, reformatting of the SD card is required, and all of the recorded data will be deleted when reformatted. If you are changing the recording area settings, backup the data to a personal computer as needed before doing so.
Shooting video footage

23
Watching video
footage
Regarding the saving destination folder name
started to be recorded and the type of the recorded data into the folder of each item.● Folder configuration
UPDATE
P_NORMAL
P_GSENSOR
MANUAL
GSENSOR
NORMAL Save all recorded data
Only save impact recording data within event recording data
Only save manual recording data within event recording data
Used when updating the software of the main unit
Save all recorded data while in parking surveillance mode
Only save impact recording data while in parking surveillance mode
SD card
Example) Names of the folder and file in which continuous recording commenced on 2019/10/30 17:23:45
2019_10_30_17_23_45_Nor.MOV2019_10_30_17_24_15_Nor.MOV2019_10_30_17_24_45_Nor.MOV
・・・
NORMAL
● The folder name is saved with the content belowSecondMinuteHour
YYYY_MM_DD_hh_mm_ss_ XXX .MOVDayMonthYearRecording has started
Recorded data type
*
* Recording is based on the time zone settings including date and time, and daylight saving time settings (the time and date information displayed on the main unit.)
Display Content Display ContentNor Continuously recorded data Gsn Impact recorded data
Man Manually recorded data P_Nor Parking surveillance continuously recorded data
P_Gsn Parking surveillance impact recorded data
* In addition, the following items may be added depending on the recording situation.
Display Content Display Content
Restore Restored data c to an error caused by high or low temperature
SDExit Data for which the power source s the emergency recording stop function
Shooting video footage

24
Turning the power ONSet the vehicle key switch to ACC or ON.
ONENGINESTARTSTOP
ON
Dong♪ dong♪
Recording in process(Green LED is lit)
Or
Advice
microSD card check functionThis product checks the microSDHC card when starting up, and can prevent a shooting miss by indicating an error on the LCD when the card is damaged.* For the countermeasures, refer to P 64.
Turning the power OFFSet the vehicle key switch to OFF.
ENGINESTARTSTOPOFF
OFF
Check that the LED lampis turned off
Or
Shooting video footage

25
Watching video
footage
LCD displayRecording screen
⑤ ⑥
⑦
④③②①
Icon Display content
(1)
Displays the settings for the recording size. (=> P 47)
(2)
(3)
Displays the recording typeREC: Continuous recording / REC G: Impact recording REC M: Manual recordingREC T1: Time lapse 1 frame /REC T3: Time lapse 3 frames
(4) Displays the settings for the image correction function. (=> P 49)
(5) Displays the settings for overwriting prevention. (=> P 50)
(6) Displays the settings for audio recording. (=> P 49)
(7) Displays the receiving status of GPS.
Shooting video footage
26
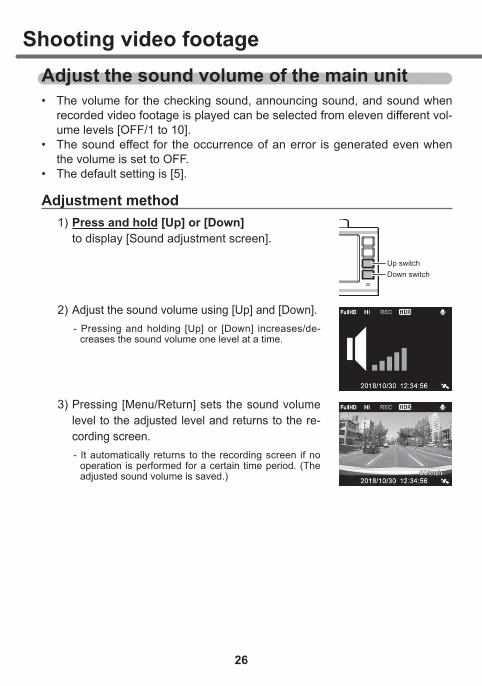
• The volume for the checking sound, announcing sound, and sound when recorded video footage is played can be selected from eleven different vol-ume levels [OFF/1 to 10].
• The sound effect for the occurrence of an error is generated even when the volume is set to OFF.
• The default setting is [5].
1) Press and hold [Up] or [Down] to display [Sound adjustment screen].
2) Adjust the sound volume using [Up] and [Down].- Pressing and holding [Up] or [Down] increases/de-
creases the sound volume one level at a time.
3) Pressing [Menu/Return] sets the sound volume level to the adjusted level and returns to the re-cording screen.- It automatically returns to the recording screen if no
operation is performed for a certain time period. (The adjusted sound volume is saved.)
Down switchUp switch
Shooting video footage

27
Watching video
footage
Playing video footage with the main unit1.Press and hold [Menu / Return] and display the main menu.
Menu / Return
2. Select [Play] by pressing [Up] or [Down], and then press [OK].
OKUpDown
3. Select the video footage type by pressing [Up] or [Down], and then press [OK]. • [Continuous recording] ...Displays the continuously recorded data. • [Impact recording] ..........Displays the data recorded by impact detection. • [Manual recording] .........Displays the data recorded by switch operation. • [Parking continuous recording] ...Displays the data recorded by parking surveillance mode. • [Parking impact recording] ...Displays the data recorded by impact detection during
parking surveillance mode.
OKUpDown
4. Select a folder by using [Up] or [Down], and then press [OK].* The main unit displays a folder name based on the recorded date and time and a
OKUpDown
Watching video footage
28
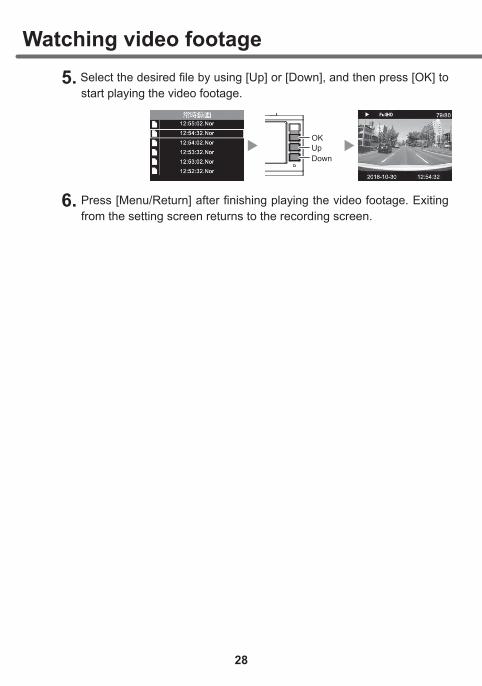
5. [Up] or [Down], and then press [OK] to start playing the video footage.
OKUpDown
6. Press [Menu/Return] Exiting from the setting screen returns to the recording screen.
Watching video footage

29
Watching video
footage
Playback screenDisplays playback number and total played number for video footage* Displays the number of images inside the play folder
Displays the operation status
Displays the recording size
Displays the shooting date
Displays the recording type
Displays the shooting time
Not displayed:G:M:P:
PG:
Continuously recorded dataImpact recording dataManual recording dataParking surveillance continuously recording dataParking surveillance impact recording data
Menu/Return switchOK switch
Down switchUp switch
Operation switch Press Press and holdMenu/Return switch Returns to the previous screen Returns to the main menu.
OK switch Performs playing / pausing Plays from the beginning of the currently playing data
Down switch Advances to the previous data Turns down the volume
Up switch Returns to the next data Turns up the volume
Watching video footage
30
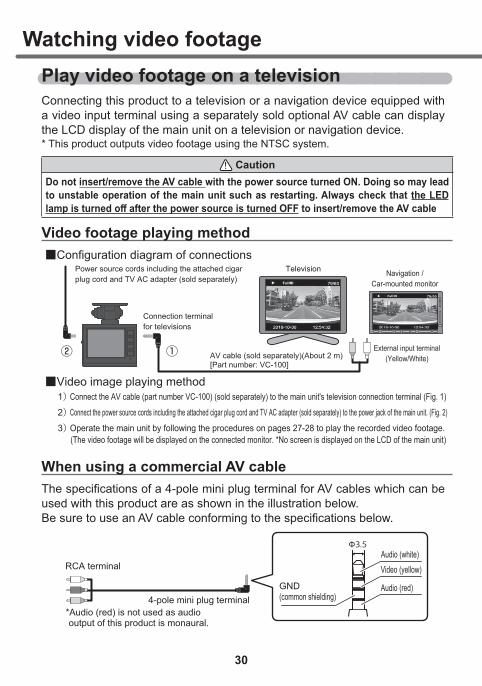
Play video footage on a televisionConnecting this product to a television or a navigation device equipped with a video input terminal using a separately sold optional AV cable can display the LCD display of the main unit on a television or navigation device.* This product outputs video footage using the NTSC system.
CautionDo not insert/remove the AV cable with the power source turned ON. Doing so may lead to unstable operation of the main unit such as restarting. Always check that the LED
to insert/remove the AV cable
Video footage playing method
AV cable (sold separately)(About 2 m) [Part number: VC-100]
Power source cords including the attached cigar plug cord and TV AC adapter (sold separately)
External input terminal (Yellow/White)
Connection terminalfor televisions
■Video image playing method
■Configuration diagram of connections
①②
1) Connect the AV cable (part number VC-100) (sold separately) to the main unit's television connection terminal (Fig. 1)
2) Connect the power source cords including the attached cigar plug cord and TV AC adapter (sold separately) to the power jack of the main unit. (Fig. 2)
3) Operate the main unit by following the procedures on pages 27-28 to play the recorded video footage. (The video footage will be displayed on the connected monitor. *No screen is displayed on the LCD of the main unit)
Navigation / Car-mounted monitor
Television
When using a commercial AV cable
used with this product are as shown in the illustration below.
RCA terminal
*Audio (red) is not used as audiooutput of this product is monaural.
4-pole mini plug terminalGND(common shielding)
Audio (white)Φ3.5
Video (yellow)
Audio (red)
Watching video footage

31
Watching video
footage
Playing video footage on a personal computerThe video footage recorded by this product can be watched together with in-formation such as vehicle acceleration by installing dedicated viewer software which can be downloaded from our website. In addition, since the recorded
Advice
・ the viewer software.
OS: Japanese version of Windows 7 / 8.1 / 10 CPU: Core 2 Duo processor 2.8 GHz or higher recommended Memory: 4 GB or higher recommended Monitor resolution: SXGA (1280 x 1024 pixels) or higher recommended * Except a tablet-type personal computer・
being updated, download and try the latest version of the viewer software from our website.
Before using viewer software
- To take a microSDHC card out, push the card gently once, then take it out as it pops out a little.
then pull it out when it pops out slightly.
Lightly push the microSDHC card,
Pull the cover forward and fold it horizontally.
* Insert the card by following the steps for ejecting in reverse order. Ensure that you insert the microSDHC card so its logo can be seen at the side of the camera. If you try to insert it upside down by force, it will break.
! CautionDo not insert/remove the micro SDHC card while this product is under operation (including during parking sur-veillance mode). Doing so may damage the card or recorded data in the card. Before inserting/removing the card,
* If the parking surveillance mode is active, inactivate the parking surveillance mode referring to page 59, and then remove the card.
Watching video footage
32
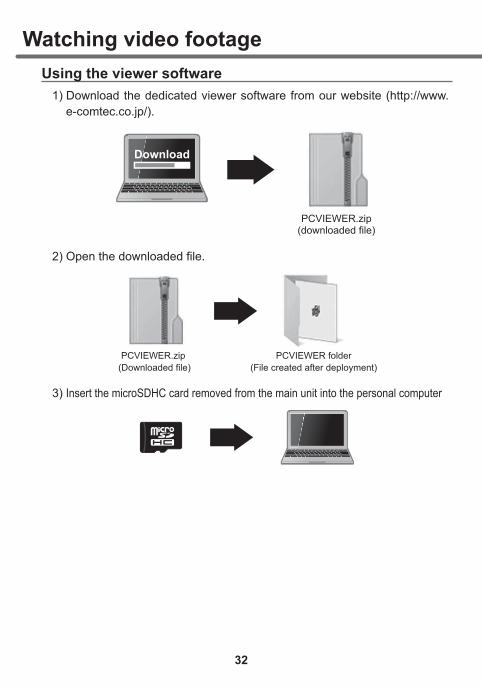
Using the viewer software1) Download the dedicated viewer software from our website (http://www.
e-comtec.co.jp/).
Download
PCVIEWER.zip(downloaded file)
PCVIEWER folder(File created after deployment)
PCVIEWER.zip (Downloaded file)
3) Insert the microSDHC card removed from the main unit into the personal computer
Watching video footage

33
Watching video
footage
4) Double-click the viewer software in the folder opened in 2).
5) Click the [Load] button and then [Open folder].
AdviceClicking [Open file] allows you to select desired video footage to play, and can be
6) Select “SDHC.” Load button
Watching video footage

34
7) video footage.
■
①
㉒ ㉓㉔
㉑⑳⑲
⑱
⑮⑭⑬⑫⑪⑩⑨⑧
⑥⑤④
⑯
③
② ㉕
⑦
⑰
㉖㉗
Advice
of this product when the viewer software is started up (only when connected to the
the screen and the procedure shown on our website.
Watching video footage

35
Watching video
footage
(1)・ Double-clicking displays the video footage in full screen
mode, and double-clicking again returns to the normal display
・ Dragging enlarges of the video footage
(15) Displays the currently playing position of the video footage
(16) Adjusts the volume and sound playing speed of the viewer software
(17)Displays the range of the maximum acceleration display.
the display
(2)
Displays Google maps* Nothing is displayed for the recorded video footage while GPS is not being received or when not connected to the Internet
(18)
Displays the acceleration graph and various detection icons
Green line: Forward/backward acceleration (X axis) Red line: Left/right acceleration (Y axis) Blue line: Upward/downward acceleration (Z axis)
........ Location where the impact is detected
........ Location where the switch operation is detected
........ Location where the emergency recording stop is
detected
(3) Displays the playing time of the current video footage
(4) Displays the travelling speed of your car* Displays only when receiving GPS
(5) Displays the recorded date and time of the data being played
(6)Displays the acceleration with numeral valuesIn addition, checking/unchecking the check box allows the graph to be displayed/hidden
(19) Displays the data in the continuous recording folder
(7) [Previous] button (20) Displays the data in the impact recording folder
(8)[Cue] buttonReturns to the beginning of the currently playing video foot-age
(21) Displays the data in the manual recording folder
(9)[Play / Pause] buttonStarts playing* The button is switched to the pause button while playing
(22) Displays the data in the continuous recording folder during parking surveillance mode
(10) [Next] button (23) Displays the data in the impact recording folder during park-ing surveillance mode
(11)
[Still image] buttonSaves the video footage at the time from when the button is pressed as only one still image (jpeg) to a personal comput-er, or prints out the still image
(24)
(12)[Video] buttonSaves the recorded data to a personal computer with the (25) Minimization button
(13) [Rotate] buttonRotates the video footage 180 degrees (26) Changes the display size of the video footage
(14) [Load] button
-ware
(27) Exits the viewer software
Watching video footage

36
Saving the recorded data to the personal computerPressing the [Video] or [Still image] button in the viewer software enables saving the recorded data as a video or still image.
Saving the recorded data as a video
2) Press the [Video] button in the viewer software. Select the save destina-tion for the video, and then press [Select a folder].
(1) After selecting the saving destination,
(2) Press [Select the folder]
Check box
Watching video footage

37
Watching video
footage
Saving the recorded data as still images1) Press the [Still image] button in the view-
er software.
2) After the output screen is displayed, press [Save].・ Moving the slide bar enables adjusting the brightness of the image to be saved.・ The scaling button is for how the image is displayed. For printing or saving, the
image is saved/printed out at the original size. Pressing the button located at the center changes the size to the original size.
Press [Save]
Brightness control
Reduce/enlarge
■Output screen
3) Enter the file name after selecting the save destination for the still image, and then press [Save].
Advice
・ Pressing the [Still image] button and then [Print] allows direct printing of the still image.・ Only video footage is saved or printed out. The date, time, and acceleration are not
printed out.
Still image button
(1) After selecting the saving destination,
(2) Enter the file name, and (3) Press [Save](2) Enter the file name, and (3) Press [Save]
Watching video footage

38
Regarding map display・ The travel speed and Google maps are displayed when there is GPS infor-
mation present. In addition, Google maps is not displayed when there is no Internet connection.・ The map displays the running path and the locations where an impact, man-
ual recording, and emergency recording stop was detected for each file.The map display is valid only in Japan. The operation of this product is not guaranteed outside Japan.
Running path of your car is displayed in red
Your car's positionDetection position
Reduce/enlarge map
<<Display content>>Icon Content Icon Content
G Impact detection icon MM Manual recordingdetection icon
E Emergency recording stop detection icon
* Google, the Google logo, Google maps, the Google map logo, and Street View are the trademarks or registered trademarks of Google Inc.
Watching video footage

39
Using the driving support function
Regarding the driving support function・ This product has a built-in driving support function that supports safe and
comfortable driving.・ Make sure you perform calibration (correction) (=> P 42, 43) when using this function.・
Item Content-
cation functionDetects and notifies when the leading vehicle starts moving.
Front signal your car is green.
Drive support function"G (acceleration/deceleration)," being exceeded such as when there is sudden acceleration and deceleration, etc.
Vehicle speed alarmfunction Noti f ies when the pre-set speed has been exceeded.
Read the details below before using the driving support function.・ The driving support function aims to reduce the burden on drivers by providing
circumstances and the driving status. It cannot make judgements on all changes in surrounding conditions and the driving status. Drivers must always check the
・ There are cases where the function does not operate properly, owing to the main
・ be cases where it makes notifications based on changes of scenery and sur-
・ -tion function," they can be set only when the framerate is set to [19.1 fps/29.1 fps] and the recording size is set to [HD/FullHD]. When these functions cannot be selected on the setting screen, check the framerate and recording size settings.
Using the driving support function
40
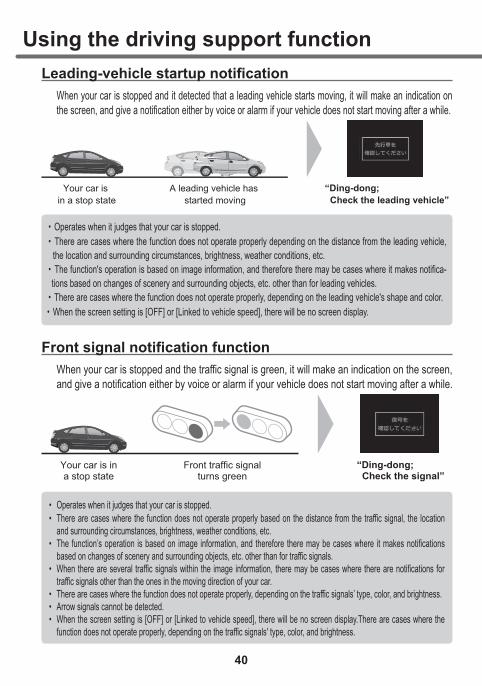
When your car is stopped and it detected that a leading vehicle starts moving, it will make an indication on
Your car is in a stop state
“Ding-dong; Check the leading vehicle”
A leading vehicle has started moving
・ Operates when it judges that your car is stopped. ・ There are cases where the function does not operate properly depending on the distance from the leading vehicle,
the location and surrounding circumstances, brightness, weather conditions, etc.・ -
tions based on changes of scenery and surrounding objects, etc. other than for leading vehicles. ・ ・ When the screen setting is [OFF] or [Linked to vehicle speed], there will be no screen display.
“Ding-dong; Check the signal”
Your car is ina stop state
Front traffic signalturns green
• Operates when it judges that your car is stopped.•
and surrounding circumstances, brightness, weather conditions, etc.•
•
• • Arrow signals cannot be detected.• When the screen setting is [OFF] or [Linked to vehicle speed], there will be no screen display.There are cases where the
Using the driving support function

41
Using the driving support function
Drive support function・
"G (acceleration/deceleration)" has been exceeded, such as when there is sudden acceleration and deceleration, etc.・ Announcements will vary depending on the driving circumstances.
Driving circumstances ContentSudden acceleration
Sudden deceleration
Abrupt steering
“Beep, beep; Detected sudden braking.”
Detected G at a certain level orhigher after sudden braking
Example) A case of sudden braking
Sudden braking
Advice
・ Levels of detection changes based on the G sensor settings.・ -
erating, can be used as a guide for driving. ・ Drive support may not operate when video footage is being recorded owing to
switch operation or an impact.
Vehicle speed alarm function・ -
ceeded.・ The alarm is not repeated for one minute after the alert.
“Bing-bong, bing-bong, bing-bong”
Exceeds a preset speed
Using the driving support function

42
Performing calibrationMake sure to perform a calibration when using the driving support function. There are cases where the driving support function does not function properly.
・ Perform the calibration at a safe location where it does not become an ob-struction for other vehicles. In addition, it is preferable to perform the cali-
・ Drivers should never operate the main unit while driving. Always stop the vehicle to operate the main unit.
Calibration method1. Press and hold [Menu/Return] and display the main menu
Menu / Return
2. Select [Function settings] by [Up] or [Down], and press [OK]
OKUpDown
3. Select [Calibration] by [Up] or [Down], and press [OK]
OKUpDown
Using the driving support function

43
Using the driving support function
4. Adjust the angle of the main unit (=> P 14). Make upward and down-
Adjust so that the horizontal lines of the road fit within the two traverse lines.
Adjust so that the hood fits within 25% of the bottom area of the video footage.
5. After the adjustment of procedure 4, press [OK] to complete.
Using the driving support function
44
Setting methodThe settings of this product can be changed from the main menu of the main unit.
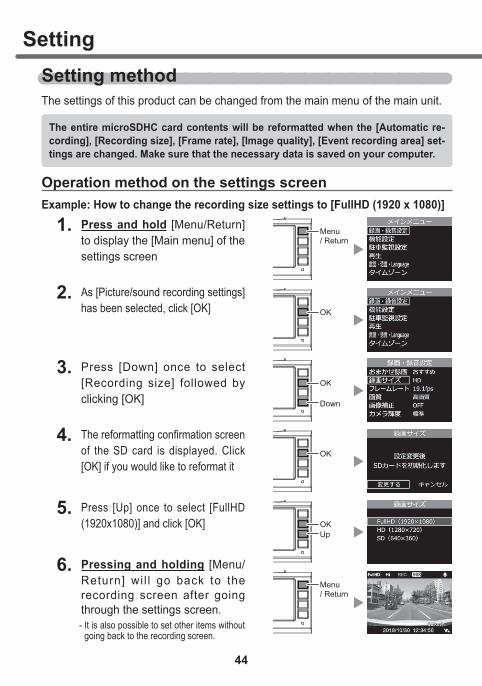
The entire microSDHC card contents will be reformatted when the [Automatic re-cording], [Recording size], [Frame rate], [Image quality], [Event recording area] set-tings are changed. Make sure that the necessary data is saved on your computer.
Operation method on the settings screenExample: How to change the recording size settings to [FullHD (1920 x 1080)]
1. Press and hold [Menu/Return] to display the [Main menu] of the settings screen
2. As [Picture/sound recording settings] has been selected, click [OK]
3. Press [Down] once to select [Recording size] followed by clicking [OK]
4. of the SD card is displayed. Click [OK] if you would like to reformat it
5. Press [Up] once to select [FullHD (1920x1080)] and click [OK]
6. Pressing and holding [Menu/Return] wi l l go back to the recording screen after going through the settings screen.- It is also possible to set other items without
going back to the recording screen.
Setting
OK
Menu / Return
OK
Down
OK
OKUp
Menu/ Return

45
Setting
45
List of settingsList of picture/sound recording settings
Item Settings content Default settings Notes
Automatic recording Recommended / Fine / Longer Recommended
Your microSDHC card will be reformatted
Recording size Full HD (1920×1080)/HD (1280×720)/SD (640×360)
HD(1280x720)
Frame rate 9.1 fps / 19.1 fps / 29.1 fps /Time lapse 1 frame /Time lapse 3 frames 19.1 fps
Image quality High image quality / Low image quality High image qualityImage correction OFF / HDR-ON OFFCamera luminance Bright / Standard / Dark StandardMirror image True image / Mirror image True imageSound recording OFF / ON ON
Event recording area 10% / 20% / 30% 20% Your microSDHC card will be reformatted
Overwriting prevention OFF / Event recording / All recording OFF
List of function settingsItem Settings content Default settings Notes
G sensor OFF / 0.1G to 1.0G 0.6G Front-Back / Left-Right / Top-Bottom
Time stamp OFF / ON OFFEmergency recording stop OFF / 1.1G to 2.0G 1.5GLCD brightness Bright / Standard / Dark Standard
Screen display OFF / Speed-linked / ON (continuously) /Clock (small) / Clock (large) Speed-linked
OFF / Alarm / Voice Alarm [Voice] can be set only when select-ing [Japanese] for the language
Calibration - -Leading-vehicle startup OFF / Alarm / Voice OFF [Voice] can be set only
when selecting [Japa-nese] for the language
OFF / Alarm / Voice OFFDrive support OFF / Alarm / Voice OFF
Vehicle speed alarm OFF / 30-140 km/h OFF km/h increments
Password settings Invalid / Valid / Password registration InvalidSD card formatting - -Reset to factory setting status - -
Setting

46
List of parking surveillance settingsItem Settings content Default settings Notes
Parking surveillance mode OFF / ON OFF
See P 58 for the details
Parking surveillance record-ing methods
Impact quick recording / Continuous-impact recording / Time lapse recording
Continuous / Impact recording
Night vision OFF / ON OFFParking surveillance impact sensitivity
High-sensitivity / Medium sensitivity / Low sensitivity Medium sensitivity
Parking surveillance recording time
30 min / 1-3-6-9-12 hrs. / Continuous ON 30 min
Parking surveillance recording stop voltages
11.9 V / 12.0 V /12.1 V / 12.2 V 12.2 V
Parking surveillance recording 1 minute / 3 minutes 1 minute
Parking surveillance recordingGet-on cancel 1 minute / 3 minutes 1 minute
Language settingsItem Settings content Default settings Notes
言語・ ・Language 日本語 / / English Japanese
List of time zones settingsItem Settings content Default settings Notes
Daylight saving time OFF / ON OFF
Time zone
Japan / China-Hong Kong-Taiwan / USA EST/ USA CST/ USA MST/ USA PST/ USA AKS/ USA HAST
Japan
* This unit does not support US Virgin Islands, Guam and Saipan time zones.
Setting

47
Setting
Picture/sound recording settingsAutomatic recording settings *By changing the settings, the microSDHC card will be reformatted.
• The [Recording size], [Frame rate] and [Image quality] settings can be changed quickly and easily.
• Settings can be selected from [Recommended / Fine / Longer].* When having changed the settings individually, it will show [User settings].
•
• function], you cannot select [Long].
Settings Recommended Fine LongRecording size HD FullHD SD
Frame rate 19.1fps 29.1fps 9.1fps
Image quality High image quality High image quality Low image quality
Recording size settings *By changing the settings, the microSDHC card will be reformatted
• Recording footage size can be selected from [Full HD (1920x1080) / HD (1280x720) / SD (640x360)].
• By default, it is set to [HD (1280x720)].
•
• function], you cannot select [SD (640x360)].
Setting

48
Frame rate settings *By changing the settings, the microSDHC card will be reformatted
• Frame rate of video footage to record can be selected from [9.1 fps / 19.1 fps / 29.1 fps / time lapse 1 frame / time lapse 3 frames]. [9.1 fps / 19.1 fps / 29.1 fps] .........Records video footage by the selected frame rate.[Time lapse 1 frame] .........Takes one picture in a second and records the video foot-
age by reducing those pictures to a 15 fps moving picture.[Time lapse 3 frames] .........Takes three pictures in a second and records the video foot-
age by reducing those pictures to a 15 fps moving picture.
• By default, it is set to [19.1 fps].
Caution• When setting it to [Time lapse 1 frame] or [Time lapse 3 frames], it will record one
frame per second as a maximum, so there may be cases where the exact moment of an accident is not recorded depending on the timing.
• There may be cases where LED light sources including signals, brake lights, turn signals or tail lamps are not recorded.
• If you set it to [9.1 fps], [Time lapse 1 frame] or [Time lapse 3 frames], you cannot set
• function], you cannot select [9.1 fps], [Time lapse 1 frame] or [Time lapse 3 frames].
Advice
Regarding frame rateFrame rate means the number of recorded frames per second and it is measured by the unit of frames per second (fps). The larger the fps value, the smoother the video
-ings can be stored on a microSDHC.
Regarding [Time lapse 1 frame] and [Time lapse 3 frames] settings• When changing the settings to [Time lapse 1 frame] or [Time lapse 3
• Regardless of the settings for [Sound record setting], it will not record sound.
Image quality settings *By changing the settings, the microSDHC card will be reformatted
• You can select the video footage image quality from [High quality / Low quality].
• By default, it is set to [High quality].
Setting

49
Setting
Image correction settings• This product is installed with High Dynamic Range (HDR) as an image
correction function.• By turning the HDR function on, you can record video data by correcting
overexposure and underexposure.[OFF] Recording the video data as it is, without image correction.
• By default, it is set to [OFF]. Advice
What is overexposure/underexposure?Overexposure refers to a state of showing a brighter spot in all white.Underexposure refers to a state of showing a darker spot in all black.
Camera brightness settings• The brightness of the video footage can be selected from [Bright/
Standard/Dark].• By default, it is set to [Standard].
Mirror image settings• Video footage can be selected from [True image/Mirror image].• By setting it to [Mirror image], you can record video footage with the left and right inverted.• By default, it is set to [True image].
■Mirror image settings■True image settings
*Records mirrored video footage
Sound recording settings• You can select [ON/OFF] for sound recording.• By default, it is set to [ON].
Setting

50
Event recording area settings **By changing the settings, the microSDHC card will be reformatted
• As for event recording (impact recording, manual recording and parking surveillance impact recording), you can select the ratio of data storage from [10% / 20% / 30%] (=> P 22)
• By changing event recording area settings, the ratio of data storage for continuous recording will be changed accordingly.
• By default, it is set to [20%].
AdviceBy default, the recording areas of a microSDHC card have been set as follows: 80% for continuous recording, and 20% for event recording (impact recording, manual recording, and parking surveillance impact recording).
Settings micro SDHC card capacity4GB 8GB 16GB 32GB
10%20%30%
•
Overwrite prevention settings• When recorded data reaches the upper limit of a microSDHC card, you can select the next
action from [OFF / Event recording / All recording].• By default, it is set to [OFF].
Settings When reaching upper limitContinuous recording Event recording
OFF Overwrites all recorded data. Continues recording by overwriting
Continues recording by overwriting
Event recording
Event recording data onlyDoes not overwrite.
Continues recording by overwriting Stops recording
All recording Does not overwrite any recorded data. Stops recording Stops recording
AdviceAn image as shown on the right will be displayed to call your attention, when recorded data reaches the upper limit of the microSDHC card while the overwriting prevention setting is set as [Event Recording] or [All recording].
Setting

51
Setting
Function settingsG sensor settings
• Sensitivity to detect an impact can be selected from [OFF / 0.1G (sensitive) to 1.0G (insensitive)] for front-back / left-right/ top-bottom respectively.
• It does not record when detecting an impact with the [OFF] setting.• By default, it is set to [0.6G] respectively.
Time stamp settings• By turning this setting ON, you can include the time and date of the recording
in recorded data.• By default, it is set to [OFF].
As the time stamp function includes the time and date while recording video footage, there may be a small time-lag owing to its state of processing.
Setting
52
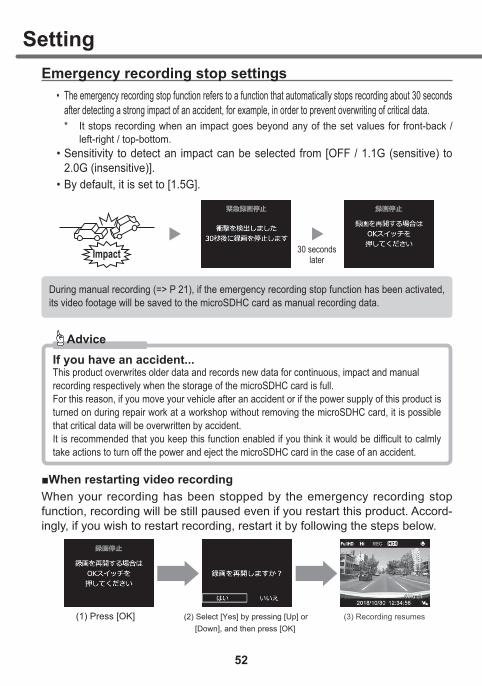
Emergency recording stop settings• The emergency recording stop function refers to a function that automatically stops recording about 30 seconds
after detecting a strong impact of an accident, for example, in order to prevent overwriting of critical data.* It stops recording when an impact goes beyond any of the set values for front-back /
left-right / top-bottom.• Sensitivity to detect an impact can be selected from [OFF / 1.1G (sensitive) to
2.0G (insensitive)].• By default, it is set to [1.5G].
Impact 30 secondslater
During manual recording (=> P 21), if the emergency recording stop function has been activated, its video footage will be saved to the microSDHC card as manual recording data.
AdviceIf you have an accident... This product overwrites older data and records new data for continuous, impact and manual recording respectively when the storage of the microSDHC card is full.For this reason, if you move your vehicle after an accident or if the power supply of this product is turned on during repair work at a workshop without removing the microSDHC card, it is possible that critical data will be overwritten by accident.
When your recording has been stopped by the emergency recording stop function, recording will be still paused even if you restart this product. Accord-ingly, if you wish to restart recording, restart it by following the steps below.
(2) Select [Yes] by pressing [Up] or [Down], and then press [OK]
(3) Recording resumes(1) Press [OK]
Setting

53
Setting
LCD brightness settings• The brightness of video images can be selected from [Bright/Stan-
dard/Dark].• By default, it is set to [Standard].
Screen display settings• Display settings for the LCD can be selected from [OFF/Speed-
linked/ON (continuous)/Clock (small)/Clock (large)].• By default, it is set to [Speed-linked].
[OFF] ................... Does not show the LCD. Each time the [Menu/Return] switch is pressed,
[Speed-linked] ....... When travelling at 10km/h or faster after receiving a GPS signal, the LCD will be switched to non-display mode.
The LCD will still be in non-display mode after stopping your car. However, by pressing the [Menu/Return] switch, the LCD will show video footage until your car once again reaches a speed of over 10 km/h.
[ON (continuous)] ....... The LCD is displayed continuously.[Clock (small)] ....... At start up and after operating the main unit, it will show the recording
screen for 30 seconds before switching to a display of a clock.[Clock (large)] ....... At start up and after operating the main unit, it will show the recording
screen for 30 seconds before switching to a display of a clock/calendar.
• You can select the sound at startup from [OFF/Alarm/Voice].• By default, it is set to [Alarm].
You cannot select [Voice] when [Language] has been set to a language other than [Japanese]. (=> P 57)
• As for detection and notifications for cars ahead of you that start moving when your car is stopped, you can select from [OFF/Alarm/Voice].
• By default, it is set to [OFF].
You cannot select [Voice] when [Language] has been set to a language other than [Japanese]. (=> P 57)
Setting

54
• As for detection and notifications of green traffic signals ahead of your car while stopped, you can select from [OFF/Alarm/Voice].
• By default, it is set to [OFF].
You cannot select [Voice] when [Language] has been set to a language other than [Japanese]. (=> P 57)
Drive support settings•
and decelerating too abruptly, etc., you can select from [OFF/Alarm/Voice]. You can use this function as a guide for eco-driving. The long-drive announcement function will be turned ON/OFF by linking it to this function.
• By default, it is set to [OFF].* It does not notify you when the G sensor has been set at 0.3G or less.
You cannot select [Voice] when [Language] has been set to a language other than [Japanese]. (=> P 57)
Advice• Levels of detection will change in accordance with the settings of the G sensor.• By driving without activating the alarm, you can avoid accelerating/decelerating too abruptly.• Drive support may not work when you are recording video footage owing to switch operation
or an impact.• You cannot turn on only the long-drive announcement function.
◇ Long-drive announcement functionWhen you have been driving for two hours without a rest, the following announcement will be made.
* The message will be announced even when the main unit has been set to [Alarm].
“It has been two hours since you started driving. It is about time for a break.”
Vehicle speed alarm settings• It makes an announcement when you exceed a preset speed. It
does not repeat the alarm for one minute after the alert.• You can select from [OFF/30 to 140 km/h]• By default, it is set to [OFF].
Setting

55
Setting
Password settings• By setting a password, you can strengthen privacy protection and security
by making it impossible for any other persons to see your recorded data.• After setting a password, the menu screen will not be displayed unless the
password is input at the settings menu.• By default, it is set to [Disabled].
1) Select [Password registration] using the [Up] and [Down] buttons, then press [OK]
2) Select numbers using the [Up] and [Down] buttons, finalize by [OK] to make your four-character password, and press [OK] to register it.
3) Select [Enabled] using the [Up] and [Down] buttons, and press [OK] to finish setting it. From the next time, you need to input your password when you enter the settings menu.
• Please do not forget your password.• If you enter a wrong password, it displays "Passwords do not match. Enter the cor-
rect password again" prompting you to re-enter the password.• When removing the password, enter your current password and go to the settings
menu to select [Disabled] at the password settings screen.[If you have forgotten your password]The password input setting can be cleared by failing to enter the correct password six times. However, note that all recorded data will be erased as well.
Setting
56
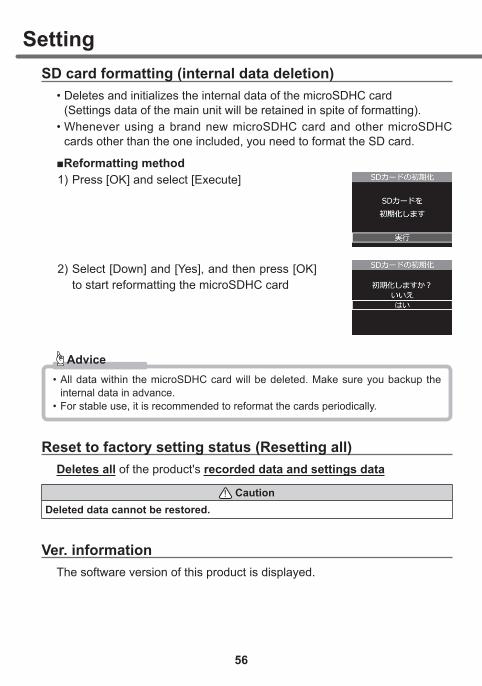
SD card formatting (internal data deletion)• Deletes and initializes the internal data of the microSDHC card
(Settings data of the main unit will be retained in spite of formatting).• Whenever using a brand new microSDHC card and other microSDHC
cards other than the one included, you need to format the SD card.
1) Press [OK] and select [Execute]
2) Select [Down] and [Yes], and then press [OK] to start reformatting the microSDHC card
Advice• All data within the microSDHC card will be deleted. Make sure you backup the
internal data in advance.• For stable use, it is recommended to reformat the cards periodically.
Reset to factory setting status (Resetting all)Deletes all recorded data and settings data
CautionDeleted data cannot be restored.
Ver. informationThe software version of this product is displayed.
Setting

57
Setting
Language settingsFor this product, you can switch a display language of the settings screen
[Japanese] [English] [Chinese]
■ Examples of languages used in the settings screen
• Switching is only applicable for the display languages found in settings screen. Various voice announcements are all output by alarm sounds.
• You cannot select [Voice] for the [Recording notification], [Leading vehicle
[Language] has been set to a language other than [Japanese].
Time zone settingsYou can select one of the following preset areas as the standard time for the time display of this product. It is also possible to set the daylight saving time. * This unit does not support US Virgin Islands, Guam and Saipan time zones.
[Japan] ............................Use Japanese Standard Time (UTC+9).[China, Hong Kong, Taiwan] ..... Use the standard time for China, Hong Kong and Taiwan (UTC+8).[USA EST] .......................Use Eastern Standard Time of USA (UTC-5).[USA CST] .......................Use Central Standard Time of USA (UTC-6).[USA MST] .......................Use Mountain Standard Time of USA (UTC-7).[USA PST] .......................[USA AKS] .......................Use Alaska Standard Time of USA (UTC-9).[USA HAST] .......................Use Hawaii-Aleutian Standard Time of USA (UTC-10).
Daylight saving time settingsBy turning on this setting, it will display the time in the selected time zone by adding an hour.
Setting
58
Using parking surveillance mode (optional)Regarding parking surveillance mode• Using the HDROP-09 "Parking Surveillance / Direct Wiring Cord," which is an
optional item sold separately, it allows a power source to be supplied after the vehicle key switch is turned off, and enables recording.
• an additional cigar plug cord or other direct wiring cord.
• After connecting the HDROP-09 "Parking Surveillance / Direct Wiring Cord," make sure to change the [Parking surveillance mode] settings from the setting mode. You cannot use parking surveillance mode just by connecting the cord.
! Caution •vehicle batteries. Inspect the vehicle batteries periodically.
• Please refrain from using the device in the following cases as they may be the cause for the vehicle batteries to discharge. (Not driving the vehicle daily / driving for less than one hour per day / vehicle batteries are in use for over a year)
• After using parking surveillance mode, the voltage of the vehicle battery will be decreased. Make sure to start the engine and charge the vehicle batteries. Not doing so can cause the vehicle bat-teries to discharge.
• Please note that we shall bear no responsibility in regard to vehicle batteries being discharged. • Please be aware that there are cases where recorded data may be overwritten when recording

59
Using parking surveillance mode (optional)
Using parking surveillance mode
59
Regarding parking surveillance mode operationChanging to parking surveillance mode
• After connecting the HDROP-09 "Parking Surveillance/ Direct Wiring Cord," change the [Parking surveillance mode] setting to something other than OFF. When the vehicle key switch is turned OFF, it will change to parking surveillance mode.
• When parking surveillance mode is in operation, the
* When the [Parking surveillance recording method] setting is set as [Impact quick recording], the LED lamp is turned
• Continuously recorded data in parking surveillance mode is recorded as "parking surveillance continuous recording" data, and impact recording data is saved as "parking surveillance impact recording" data.
Advice
cancel] set time, impacts will be considered as vibration caused when exiting the vehicle and will not be recorded as parking surveillance impact recording data.
Ending parking surveillance mode• Parking surveillance mode can be ended at the point when the vehicle key
switch is turned ON or ACC, or by pressing and holding the OK button.• Parking surveillance mode ends after the time set in [Parking surveillance
recording time] has elapsed, and in cases where the voltage goes below the set value.
AdviceAnnouncement for impacts detected when the vehicle is parked• When an impact is detected during parking surveillance mode, an announcement will be made at the
time when the vehicle is started up next to notify you of an impact that occurred during parking sur-veillance mode. After the announcement, recording will not start until the [OK] switch is pressed.
• After the vehicle key switch is turned ON or ACC, and within the [Parking surveillance get-on cancel] set time, impacts will be considered as vibrations caused when exiting the vehicle, and the above
■Parking surveillancemode is active
Flashes ingreen 3 times
60
Using parking surveillance mode (optional)One time parking surveillance mode function
• When the parking surveillance mode setting is OFF, parking surveillance mode can be turned on temporarily by pressing and holding the OK button.
• From the point when the OK button is pressed and held, parking surveillance
• Recommended for use when using parking surveillance mode only when you are outside.
Advice• The detailed settings for normal parking surveillance mode are reflected for parking surveillance
mode in "one time parking surveillance mode".• "One time parking surveillance mode" is cancelled by turning on the vehicle key switch and the main
unit power source. It then returns to the settings which are set in "parking surveillance mode setting".
Parking surveillance mode pass function• Even when the parking surveillance mode setting is [ON], pressing and
holdingIn addition, operating while parking surveillance mode is in operation will allow parking surveillance mode to end.
• Recommended for use when parking at locations where this product may detect impacts, such as mechanical multistory parking garages and at locations where there are many vibrations, and on days with strong wind.
In cases where the [Parking surveillance recording method] setting is set as [Impact quick recording], the parking surveillance mode pass function cannot be used because operation
* Parking surveillance mode pass function can be used while recording a detected impact.
Advice"Parking surveillance mode pass function" is cancelled by turning ON the vehicle key switch and the main unit power source. It then returns to using the settings in "parking surveillance mode setting".

61
Using parking surveillance mode (optional)
Using parking surveillance mode
Various settings for parking surveillance mode Parking surveillance mode setting
• • By default, it is set to [OFF].
Parking surveillance recording method setting
[Impact quick recording / Continuous-impact recording / Time lapse recording].[Impact quick recording] ..... It starts up when an impact is detected and records video footage. Parking
surveillance mode can be in operation for a long period of time as it stops (sleeps) at normal times, and thus power consumption is restricted.
[Continuous-impact recording] ..... Performs continuous recording and impact recording during parking surveillance mode.[Time lapse recording] ..... Records one still image per second during parking surveillance mode. By
saving them as videos shorter than the actual time, it allows continuous recording and impact recording for a long period of time.
AdviceRegarding time lapse recording•
on the recording size setting (=> P 47), frame rate setting (=> P 48), and image quality setting (=> P 48).For example, a 420 second recording can be checked by 28 seconds of video footage, when the recording size is set as [FullHD], the frame rate is set as [29.1 fps], and the image quality is set as [High image quality].
Time inrecorded data
Actual time
Example) Recording size: FullHD; Image quality: High image quality420 seconds 840 seconds
・・・1 second 1 second 1 second
1 file
28 seconds
1 file
28 seconds ・・・
■ An image of a time lapse recording
* •
• maximum 1 second) is saved, such as when the power source plug gets unplugged during parking surveil-lance mode, or the constant power source line being disconnected.
62
Using parking surveillance mode (optional)Night vision setting
• Turning this setting ON will allow comparably clearer video footage to be recorded during parking at night time where there are not many lights. However, in circumstanc-
• • By default, it is set to [OFF].
Impact sensitivity setting• The sensitivity to detect an impact during parking surveillance mode can
be selected from [High-sensitivity / Medium sensitivity / Low sensitivity].• By default, it is set to [Medium sensitivity].
Recording time setting• The operation time for parking surveillance mode can be selected from [30
minutes / 1 hour / 3 hours / 6 hours / 9 hours / 12 hours / Always ON].• When set as [Always on], it operates until the vehicle battery voltage is reduced
to the voltage set by [Parking surveillance recording stop voltage setting].• By default, it is set to [30 minutes].
Recording stop voltage setting• The vehicle battery voltage to stop parking surveillance mode can be se-
lected from [11.9 V / 12.0 V / 12.1 V / 12.2 V].• By default, it is set to [12.2 V].
• The time set for not recording impacts or vibration as parking surveillance impact recording data, which is detected at the time of exiting the vehicle, can be selected from [1 minute / 3 minutes].
impact quick recording is set).• By default, it is set to [1 minute].
Get-on cancel setting• The time set for not announcing "Announcement for impact detected when
vehicle is parked" (=> P 59) when an impact or vibration is detected at the time of exiting the vehicle can be selected from [1 minute / 3 minutes].
• By default, it is set to [1 minute].
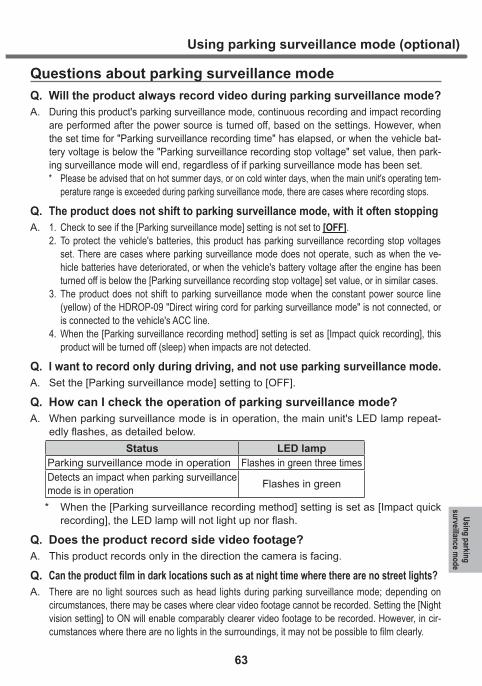
63
Using parking surveillance mode (optional)
Using parking surveillance mode
Questions about parking surveillance modeQ. Will the product always record video during parking surveillance mode?A.
the set time for "Parking surveillance recording time" has elapsed, or when the vehicle bat-tery voltage is below the "Parking surveillance recording stop voltage" set value, then park-ing surveillance mode will end, regardless of if parking surveillance mode has been set.
* -perature range is exceeded during parking surveillance mode, there are cases where recording stops.
Q. The product does not shift to parking surveillance mode, with it often stoppingA. 1. Check to see if the [Parking surveillance mode] setting is not set to [OFF].
set. There are cases where parking surveillance mode does not operate, such as when the ve-
3. The product does not shift to parking surveillance mode when the constant power source line (yellow) of the HDROP-09 "Direct wiring cord for parking surveillance mode" is not connected, or
4. When the [Parking surveillance recording method] setting is set as [Impact quick recording], this
Q. I want to record only during driving, and not use parking surveillance mode.A. Set the [Parking surveillance mode] setting to [OFF].
Q. How can I check the operation of parking surveillance mode?-
Status LED lampParking surveillance mode in operation Flashes in green three timesDetects an impact when parking surveillance mode is in operation Flashes in green
* When the [Parking surveillance recording method] setting is set as [Impact quick
Q. Does the product record side video footage?A. This product records only in the direction the camera is facing.
Q. A.
circumstances, there may be cases where clear video footage cannot be recorded. Setting the [Night vision setting] to ON will enable comparably clearer video footage to be recorded. However, in cir-

64
FAQListed are frequently asked questions. Please read the following details.
Symptoms Points to check Reference page
LED lamps are not lighting up. terminals
-
P 12
P 11,12
Does not receive GPS satellite.P 6
P 15
How can the recorded footage be delete.
P 56
Video footage of an impact from an accident is not saved.
where impact recording does not take place. To be sure, recording by switch control is recommended.
-
How can the recording t ime be -
tings will allow you change the recording time. *Changing the above settings will reformat the SDHC card.
P 47, 48
What happens if the microSDHC card
When the microSDHC card capacity is full, video footage is deleted in chronological order, and new video footage is continued to be recorded.
displayed when [Event recording] or [All recording] is set for the over-writing prevention setting, and they will not be overwritten. To restart recording, set the overwriting prevention setting to [OFF].
P 20
P 50
Recorded data is not saved on the microSDHC card.
service life, such as the number of times it can have data written to it. Replacing it every 2-3 years is recommended. Depending on the use
P 8
Does not start up, or operation be-comes unstable.
video footage on a personal computer.
P 5
P 8
Is recorded video footage accepted as of accidents. It does not guarantee validity as a complete proof.
-
The microSDHC card is not recog-nized on the computer.
--
Appendix
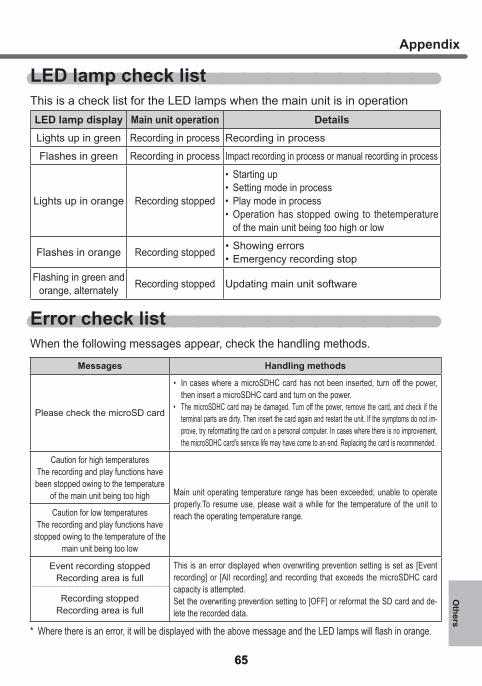
6565
LED lamp check listThis is a check list for the LED lamps when the main unit is in operationLED lamp display Main unit operation DetailsLights up in green Recording in process Recording in process
Flashes in green Recording in process Impact recording in process or manual recording in process
Lights up in orange Recording stopped
• Starting up• Setting mode in process• Play mode in process• Operation has stopped owing to thetemperature
of the main unit being too high or low
Flashes in orange Recording stopped • Showing errors• Emergency recording stop
Flashing in green and orange, alternately Recording stopped Updating main unit software
Error check listWhen the following messages appear, check the handling methods.
Messages Handling methods
Please check the microSD card
• then insert a microSDHC card and turn on the power.
• terminal parts are dirty. Then insert the card again and restart the unit. If the symptoms do not im-prove, try reformatting the card on a personal computer. In cases where there is no improvement,
Caution for high temperaturesThe recording and play functions have been stopped owing to the temperature
of the main unit being too highproperly.To resume use, please wait a while for the temperature of the unit to reach the operating temperature range.Caution for low temperatures
The recording and play functions have stopped owing to the temperature of the
main unit being too low
Event recording stoppedRecording area is full
This is an error displayed when overwriting prevention setting is set as [Event recording] or [All recording] and recording that exceeds the microSDHC card capacity is attempted.Set the overwriting prevention setting to [OFF] or reformat the SD card and de-lete the recorded data.
Recording stoppedRecording area is full
*
AppendixO
thers

66
Reference for recording timeReference for recording time based on microSDHC card capacity
size setting, and the image quality setting, etc. Refer to the following table.* Supported microSDHC cards:4GB to 32GB (class 10 or above is recommended)* microSDHC card included with the main unit: 8GB (class 10)
Recording size
Frame rate Image quality microSDHC card capacity
8GB 16GB 32GB
Full HD
29.1 fpsHigh image quality About 90 minutes About 180 minutes About 360 minutesLow image quality About 100 minutes About 200 minutes About 400 minutes
19.1 fpsHigh image quality About 100 minutes About 200 minutes About 400 minutesLow image quality About 120 minutes About 240 minutes About 480 minutes
9.1 fpsHigh image quality About 120 minutes About 240 minutes About 480 minutesLow image quality About 180 minutes About 360 minutes About 720 minutes
Time lapse1 frame
High image quality About 1740 minutes About 3480 minutes About 6960 minutesLow image quality About 1740 minutes About 2600 minutes About 5200 minutes
Time lapse3 frames
High image quality About 1740 minutes About 2600 minutes About 5200 minutesLow image quality About 1740 minutes About 2600 minutes About 5200 minutes
HD
29.1 fpsHigh image quality About 100 minutes About 200 minutes About 400 minutesLow image quality About 120 minutes About 240 minutes About 480 minutes
19.1 fpsHigh image quality About 120 minutes About 240 minutes About 480 minutesLow image quality About 150 minutes About 300 minutes About 600 minutes
9.1 fpsHigh image quality About 180 minutes About 360 minutes About 720 minutesLow image quality About 180 minutes About 360 minutes About 720 minutes
Time lapse1 frame
High image quality About 1740 minutes About 3480 minutes About 6960 minutesLow image quality About 1740 minutes About 3480 minutes About 6960 minutes
Time lapse3 frames
High image quality About 1740 minutes About 3480 minutes About 6960 minutesLow image quality About 1740 minutes About 3480 minutes About 6960 minutes
SD
29.1 fpsHigh image quality About 120 minutes About 240 minutes About 480 minutesLow image quality About 150 minutes About 300 minutes About 600 minutes
19.1 fpsHigh image quality About 150 minutes About 300 minutes About 600 minutesLow image quality About 180 minutes About 360 minutes About 720 minutes
9.1 fpsHigh image quality About 180 minutes About 360 minutes About 720 minutesLow image quality About 250 minutes About 500 minutes About 1000 minutes
Time lapse1 frame
High image quality About 1740 minutes About 3480 minutes About 6960 minutesLow image quality About 1740 minutes About 3480 minutes About 6960 minutes
Time lapse3 frames
High image quality About 1740 minutes About 3480 minutes About 6960 minutesLow image quality About 1740 minutes About 3480 minutes About 6960 minutes
* The thick bordered box indicates the included microSDHC card.
Appendix
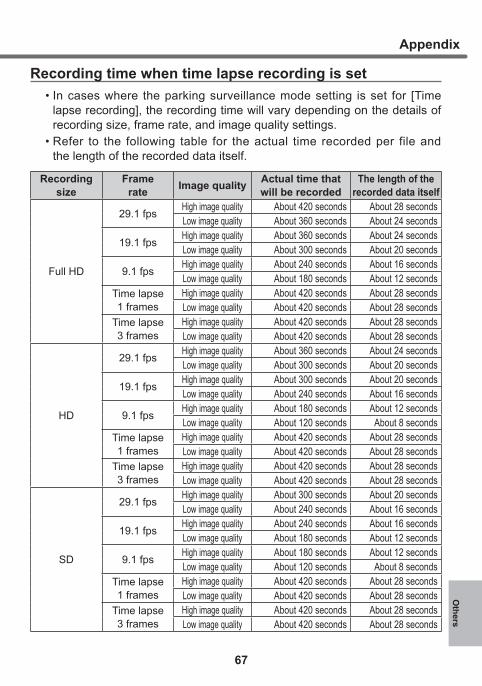
67
Recording time when time lapse recording is set• In cases where the parking surveillance mode setting is set for [Time
lapse recording], the recording time will vary depending on the details of recording size, frame rate, and image quality settings.
• Refer to the following table for the actual time recorded per file and the length of the recorded data itself.
Recording size
Framerate Image quality Actual time that
will be recordedThe length of the
recorded data itself
Full HD
29.1 fps High image quality About 420 seconds About 28 secondsLow image quality About 360 seconds About 24 seconds
19.1 fps High image quality About 360 seconds About 24 secondsLow image quality About 300 seconds About 20 seconds
9.1 fps High image quality About 240 seconds About 16 secondsLow image quality About 180 seconds About 12 seconds
Time lapse1 frames
High image quality About 420 seconds About 28 secondsLow image quality About 420 seconds About 28 seconds
Time lapse3 frames
High image quality About 420 seconds About 28 secondsLow image quality About 420 seconds About 28 seconds
HD
29.1 fps High image quality About 360 seconds About 24 secondsLow image quality About 300 seconds About 20 seconds
19.1 fps High image quality About 300 seconds About 20 secondsLow image quality About 240 seconds About 16 seconds
9.1 fps High image quality About 180 seconds About 12 secondsLow image quality About 120 seconds About 8 seconds
Time lapse1 frames
High image quality About 420 seconds About 28 secondsLow image quality About 420 seconds About 28 seconds
Time lapse3 frames
High image quality About 420 seconds About 28 secondsLow image quality About 420 seconds About 28 seconds
SD
29.1 fps High image quality About 300 seconds About 20 secondsLow image quality About 240 seconds About 16 seconds
19.1 fps High image quality About 240 seconds About 16 secondsLow image quality About 180 seconds About 12 seconds
9.1 fps High image quality About 180 seconds About 12 secondsLow image quality About 120 seconds About 8 seconds
Time lapse1 frames
High image quality About 420 seconds About 28 secondsLow image quality About 420 seconds About 28 seconds
Time lapse3 frames
High image quality About 420 seconds About 28 secondsLow image quality About 420 seconds About 28 seconds
AppendixO
thers

68
List of announcements/alarms
Chinese] or [English], it will switch to alarms. See the following table for alarm sounds that correspond to each announcement and the announcement details.
Conditions When set to Japanese Chinese or EnglishWhen an event occurs
At the start of normal recording Dong, dong
At the start of impact recording Beep, beep
At the start of manual recording Beep, beep
Emergency recording stop 1In 30 seconds, recording will stop.
Beep, beepBeep beep beep
Emergency recording stop 2 -tus. Press the OK switch to resume recording.
Beep, beepBeep beep beep
At parking surveillance mode
Parking surveillance recordingSetting time elapsed owing to elapsed setting time.
DongBeep beep
Parking surveillance recordingWhen the voltage is lower than the set value to the voltage going lower than the set value.
DongBeep beep beep
Parking surveillance recordingWhen overwriting is prevented due to the recording area being full.
Dong, beep
Parking surveillance modeWhen the pass function is operating
Dong
At the start of one-time parking surveillance mode
-lance mode.
Dong, beep
When one-time parking surveil-lance mode is set
-lance mode.
Dong, beep
When one-time parking surveil-lance mode is canceled
Dong
Parking surveillanceCheck the recorded data Press the OK switch to start recording
Dong, beep beep
Safety driv-ing support function
Sudden braking Beep, beep, beep, beep
Sudden start Beep, beep, beep, beep
Abrupt steering (left-right) Beep, beep, beep, beep
Notice for 2 hours passingstarted driving. It is about time for a break.
Ding-dongDing-dong
Ding-dong
Ding-dong
Related to errors
High temperature caution -ping record/play functions
Bzz, bzzzzzzz
Low temperature caution no-record/play functions
Bzz, bzzzzzzz
Appendix

69
Power supply voltage DC12 VMaximum current consumption 400 mA or lessOperating environment temperature range -10℃ to 60℃Camera Imaging device 1/2.7 model CMOS sensor
Total number of pixels 2 megapixelsValid number of pixels Maximum 2 megapixelsLens angle of view Horizontal 118 degrees, vertical 59 degrees (diagonal 150 degrees)F value F2.2Lens material Glass
Recorded video footage size
FullHD (1920×1080)HD (1280×720)SD (640×360)
Image quality for recording
FullHD High image quality (8 Mbps average) Low image quality (6 Mbps average)HD High image quality (6 Mbps average) Low image quality (4 Mbps average)SD High image quality (4 Mbps average) Low image quality (3 Mbps average)
GPSG sensorRecording method Continuous recording / Event recording / Manual recording
Unit of 30 secondsSound recording ON/OFF possibleFrame rate 9.1 fps / 19.1 fps / 29.1 fps / Time lapse 1 frame/
Time lapse 3 framesMOV (MPEG-4 AVC/ H.264)
Method to play recorded video footage
Dedicated viewer software *Specialized for Windows 7/8.1 (excluding tablet personal computers)Video output (sold separately: AV cable) *NTSC methodMain unit LCD
Recording media microSDHC card (included: 8GB/class 10)LCD size / resolution 2.0 inch full color TFT LCD / 320×240Body size 63 (W) × 49 (H) × 26.9 (D) /mm
When wearing mounting stay: 63 (W) ×72 (H) × 26.9 (D) /mmWeight 83 g
*
Vertical angle of view
59° 118°
Horizontal angle of view
AppendixO
thers

70
IndexAAutomatic recording..............................47
CCalibration ............................................42Camera brightness settings ..................49Continuous recording ...........................20
DDaylight saving time .............................57Direct wiring cord for parking surveillance ........................................58Drive support function...........................41Driving support function ........................39
EEmergency recording stop function ......52Event recording ....................................21Event recording area ............................50
FFile name ..............................................23File system .............................................8Folder name .........................................23
...........40
G ......................................62
Get-on cancel ......................................62GPS ........................................................7G sensor ...............................................51
HHDR ......................................................49HDROP-09 ...........................................58
IImage correction function .....................49Impact recording ...................................21Impact sensitivity .................................62
LLCD brightness settings .......................53
function .................................................40Long-drive announcement function ......54
MManual recording ..................................21Mirror image settings ............................49
NNight vision ...........................................62
OOne time parking surveillance mode function ................................................60Overexposure .......................................49Overwrite prevention settings ...............50
PPassword ..............................................55Parking surveillance mode pass function .................................................60
RRecording area .....................................22Recording method ...............................61Recording stop voltage ........................62Recording time ..............................62, 66Regarding microSDHC cards .................8Rest all..................................................56
SScreen display settings.........................53SD card formatting..........................56, 70Sound recording settings ......................49Standard time .......................................57
T .....50
Time lapse recording ...........................61Time stamp ...........................................51Time zone .............................................57
UUnderexposure .....................................49
VVehicle speed alarm function................41
.................53Video recording size settings ................47Viewer software ....................................31

71
ZDR-024CE WarrantyWarranty period One year from the day of purchase
Target parts Main unit * Excluding other accessories
Warranty Statement (please read)1. Warranty contentsIn cases where defects occur by using the main unit in ways that follow the contents of the operation manual, repairs are provided free of charge (warranty repair) in accordance with the conditions and warranty period stated.(This free-of-charge repair is hereinafter referred to as "Warranty Repair").
-pany will have the ownership of the replaced parts/products. On the basis of this Warranty Statement, the coverage of Warranty Repairs is limited only to target parts mentioned in this document. Note that this product does not guarantee to record all video footage.
2. Receiving a Warranty RepairTo receive a Warranty Repair, show this warranty to the retailer where this product was purchased and request for a Warranty Repair. A Warranty Repair cannot be received in cases where the warranty is not presented.In cases where the retailer has not provided proof for the date of pur-chase on the warranty, please attach documents (such as receipts) to
In cases where the products are sent to the retailer, this warranty should be at-tached to the product. In cases where products are sent, they should be sent in a way that delivery receipts can be kept, such as by using a courier service.Note that other expenses such as shipping fees, and travel expenses for pick-ups shall be borne by the customer. In cases where products are sent by cash on delivery, we will send them back to the customer by cash on delivery. Please be aware of this before sending your unit for repair.
3. Items not covered by warranty1) Warranty Repairs are not provided even within the warranty period
for the following cases: (1) Damage or failure which has occurred as a result of not
complying with the "Warning, Caution, Precautions for use"
(2) Damage or failure which has occurred as a result of using the main unit other than as an automotive drive recorder (for
(3) Damage or failure which has occurred as a result of using a
(4)
(5) Damage or failure which has occurred as a result of condensation,
(6)
(7) Damage or failure which has occurred as a result of using
(8) Recorded data that is lost or corrupted as a result of using an SDHD card with data recorded for use for any purpose
(9) (10) Recorded data lost or corrupted as a result of using an SDHC
(11) Data lacking in clarity, owing to the footage being recorded through a dirty camera lens, or a windshield that has dirt,
(12) Damage to and failure of the main unit, or lost or corrupted recorded data triggered by a malfunction, etc. of products
(13) Changes in the external appearance, such as fading of color, aesthetic properties, external appearance, which has
(14) Damage and failure which has occurred as a result of using the main unit in an environment where it exceeds the tem-perature range mentioned in the operation manual.
2) Expenses will not be borne by us for the following stated items. (1) Inconvenience and loss as a result of not being able to use
(2) Consumable parts (microSDHC card, 1A glass fuse) and
(3) Compensation for secondary damage (shipping fees for repair, desorption fees) in association with use, failure, and repair of this product.
necessary items on the warranty.Keep this document safe. Do not lose this document as it will not be re-issued.
5. Application of the warrantyThis warranty is applied only for use in Japan.(This warranty is valid only in JAPAN)
6. OthersThis warranty guarantees a Warranty Repair based on the conditions and period stated in this document.
issue the warranty (person in charge of warranty) and any other business operators.
Should there be questions regarding repairs, etc. after the expiration of the warranty period, contact the retailer where the product was purchased.

ZDR-024CE Warranty Copying is prohibitedThis document guarantees repairs under warranty, free of charge, based on the conditions mentioned in the warranty statement (refer to the reverse side). In the case a failure occurs upon normal condition of use, show this document to the retailer where the product was purchased and request for a repair.
Part number ZDR-024CE Serial number
Purchase date Purchase date:
Warranty period 1 year from the date of purchase
Target parts Main unit *Other accessories excluded
Customer
Name
★Retailer
Name of the store/address/telephone number/seal
Address
Seal*
sure to attach the proof of purchase date, and the name of the store, etc., such as receipts issued by the retailer.Phone number ( )
Product-in-stalled vehicle
Manufacturer Vehiclename Model year Model Grade
Failure content
* In cases where the warranty is missing proof of a retailer name, purchase date, or proof of purchase (statement of delivery, re-ceipts), the unit in question will not be subject to warranty. Shipping fees charged upon shipping are not covered by the warranty.
InquiryFor inquiries regarding the product installation method, repairs, etc., contact the retailer where the product was purchased, or our service center shown below.We do not give support for installations conducted by the customers themselves. * Support is given in Japanese .
Service hours: 10:00-17:00* Excluding Saturdays and Sundays, national holidays, year-end/New Year holidays, summer holidays, Golden Week as specified by the company.* This service is not available from mobile phones, PHS, public telephones and IP phones with numbers starting from 050. The service may not be available from some kinds of optical fiber IP phones as well. In that case, please call the following number.
0800-200-5654
+81-561-56-1814 (charged calling)
*Available only in Japan
First edition 618091-EM
Ikegami 1-1, Morowa, Togo Town, Aichi County, Aichi Prefecture 470-0151 Homepage: http://www.e-comtec.co.jp

The abbreviations displayed on the setting screen of this product are as shown in the table below.
DISPLAY TEXT ORIGINAL
Main menu Main menuPic/sd rc sets Picture/sound recording settingsFunc settings Function settingsPrkng srv sets Parking surveillance settingsPlay Play言語・ ・Language 言語・ ・LanguageTime zone Time zoneInformation Information
Pic/snd recding settings Picture/sound recording settingsAuto settings Automatic settings
Recommendatn RecommendationBeautiful BeautifulLong LongUser setting User setting
Rec'ing size Recording sizeFullHD FullHDHD HDSD SD
Frame rate Frame rate9.1fps 9.1fps19.1fps 19.1fps29.1fps 29.1fpsT. lapse 1 fr Time lapse 1 frameT. lapse 3 fr Time lapse 3 frame
Image quality Image qualityHi img qualty High image qualityLo img qualty Low image quality
OFF OFFHDR-ON HDR-ON
List of abbreviations

DISPLAY TEXT ORIGINAL
Cam brightns Camera brightnessBright BrightStandard StandardDark Dark
Mirror image Mirror imageNormal image Normal imageMirror image Mirror image
Snd recording Sound recordingOFF OFFON ON
Evnt rec area Event recording areaOvrwrt prohib Overwriting prohibited
OFF OFFEvnt rec'ing Event recordingWhole rec'ing Whole recording
Function settings Function settingsG sensor G sensorTime stamp Time stamp
OFF OFFON ON
Emerg rec stop Emergency recording stopOFF OFF1.1G~2.0G 1.1G~2.0G
LCD brightns LCD brightnessBright BrightStandard StandardDark Dark
Scrn disp Screen displayOFF OFFIntloc w/ spd Interlocked with speedON (always) ON (always)Clock (sm) Clock (small)Clock (lg) Clock (large)
List of abbreviationsO
thers

DISPLAY TEXT ORIGINAL
OFF OFFAlarm Alarm
Calibration CalibrationPrec v st ntf
OFF OFFAlarm Alarm
Fr trf lt ntfOFF OFFAlarm Alarm
Drive support Drive supportOFF OFFAlarm Alarm
Vh spd alarm Vehicle speed alarmOFF OFF30km/h~2.0G 30km/h~2.0G
Pwd setting Password settingSD card fmting SD card formattingRst to fac stg Reset to factory setting
Parking srv settings Parking surveillance settingsPrkg srv mode Parking surveillance mode
OFF OFFON ON
Rec meth Recording methodImp qck rec Impact quick recordingAws / impt rec Always / impact recordingTime lapse rec Time lapse recording
Night vision Night visionOFF OFFON ON
Imp snsy Impact sensitivityHi snsy High sensitivityMed snsy Medium sensitivityLo snsy Low sensitivity
List of abbreviations

DISPLAY TEXT ORIGINAL
Recording time Rec time30 minutes ~ Always ON 30 minutes ~ Always ON
Rec stop volt Recording stop voltages11.9V ~ 12.2V 11.9V ~ 12.2V
1 minutes 1 minutes3 minutes 3 minutes
Get-on cnl Get-on cancel1 minutes 1 minutes3 minutes 3 minutes
Play PlayPlay PlayCont recording Continuous recordingImpt recording Impact recordingMan recording Manual recordingPk srv con rc Parking surveillance continuous
recordingPk srv imp rc Parking surveillance impact
recording
Language setting Language settingLanguage setting Language setting
Japanese JapaneseSimp Chinese Simp ChineseEnglish EnglishTime zone Time zone
Version information Version informationVersion information Version information
ver.1.0 728091
List of abbreviationsO
thers