Embed Size (px)
Citation preview

EMC® ViPR™Version 1.1.0
Controller REST API Developer Guide302-000-496
01

Copyright © 2013-2014 EMC Corporation. All rights reserved. Published in USA.
Published February, 2014
EMC believes the information in this publication is accurate as of its publication date. The information is subject to changewithout notice.
The information in this publication is provided as is. EMC Corporation makes no representations or warranties of any kind withrespect to the information in this publication, and specifically disclaims implied warranties of merchantability or fitness for aparticular purpose. Use, copying, and distribution of any EMC software described in this publication requires an applicablesoftware license.
EMC², EMC, and the EMC logo are registered trademarks or trademarks of EMC Corporation in the United States and othercountries. All other trademarks used herein are the property of their respective owners.
For the most up-to-date regulatory document for your product line, go to EMC Online Support (https://support.emc.com). Fordocumentation on EMC Data Domain products, go to the EMC Data Domain Support Portal (https://my.datadomain.com).
EMC CorporationHopkinton, Massachusetts 01748-91031-508-435-1000 In North America 1-866-464-7381www.EMC.com
2 EMC ViPR 1.1.0 Controller REST API Developer Guide

Getting Started with the ViPR Controller REST API 7
Welcome to the ViPR Controller REST API......................................................... 8ViPR REST API access.......................................................................................8
API Ports............................................................................................ 8Identifying resources.......................................................................................9Controller API authentication overview............................................................ 9
Building an API super user............................................................... 10Authentication and cookies..............................................................11Authentication redirects...................................................................12
Logout...........................................................................................................15Whoami........................................................................................................ 15Proxyuser...................................................................................................... 16
Using proxyuser to run a controller REST API script........................... 16Destroying a proxy token..................................................................17
Setting Up a Single Tenant Environment 19
Single Tenancy vs Multitenancy.....................................................................20Adding users to the provider tenant with authentication providers................ 20
Adding an authentication provider................................................... 20Changing the user mapping in the provider tenant........................... 22Assigning roles to a tenant...............................................................23
Authorization 25
Authorization overview..................................................................................26Virtual data center roles................................................................................ 26Tenant roles.................................................................................................. 28ACLs..............................................................................................................29Virtual array and virtual pool ACLs................................................................. 29
Examples: Virtual array and virtual pool ACL APIs............................. 30Project ACLs.................................................................................................. 31
Examples: Project ACL APIs.............................................................. 32Examples: Changing a project's owner............................................. 33
ViPR REST API Resources 35
ViPR services overview.................................................................................. 36System resources..........................................................................................38
System resources: virtual array........................................................ 38System resources: virtual pool......................................................... 39System resources: networks and network systems........................... 41API review: storage systems............................................................. 49
Tenant and project resources........................................................................ 50
Setting Up a Multi-tenant Environment 51
Prerequisites for creating multiple tenants.................................................... 52Example format: XML....................................................................... 52
Configuring multiple tenants with the REST API..............................................52
Chapter 1
Chapter 2
Chapter 3
Chapter 4
Chapter 5
CONTENTS
EMC ViPR 1.1.0 Controller REST API Developer Guide 3

Common Operations 59
Bulk operations.............................................................................................60Searching API resources................................................................................61Tagging API resources................................................................................... 62Tracking asynchronous operations................................................................ 62Deactivating, or decommissioning, resources................................................63
Setting Up a Virtual Data Center 65
Setting up the virtual data center...................................................................66Example format: JSON................................................................................... 66Adding a storage system............................................................................... 66Registering network systems......................................................................... 67Registering a RecoverPoint protection system................................................68Host.............................................................................................................. 70Registering hosts and assigning initiators and IP interfaces...........................70Setting up the virtual array............................................................................ 72Setting up the virtual pool............................................................................. 83Creating a project for a tenant....................................................................... 90
Managing File Systems and Snapshots 91
File system.................................................................................................... 92Creating a file system.................................................................................... 92Expanding a file share................................................................................... 94Exporting a file system.................................................................................. 96Unexporting a file share................................................................................ 97Deleting a file system export......................................................................... 99Deleting a file system.................................................................................. 101Snapshot.................................................................................................... 102Creating a file system snapshot...................................................................102Exporting a file system snapshot................................................................. 104Restoring a file system snapshot................................................................. 106Unexporting a file system snapshot.............................................................107Deleting a file system snapshot...................................................................109
Managing Volumes 111
Create block volume....................................................................................112Exporting a volume to a host....................................................................... 114Creating a block volume snapshot...............................................................116Deleting a block volume snapshot...............................................................118Unexporting a volume from a host...............................................................121Deleting a block volume.............................................................................. 123
Managing Hosts 125
Host API Overview....................................................................................... 126Adding and discovering a Windows host..................................................... 127
Windows clusters...........................................................................128Adding and discovering a LINUX host.......................................................... 130Adding and discovering a vCenter Server.....................................................131
Examples: Accessing vCenter resources......................................... 133
Chapter 6
Chapter 7
Chapter 8
Chapter 9
Chapter 10
CONTENTS
4 EMC ViPR 1.1.0 Controller REST API Developer Guide
Discovering Storage Systems 137
Registering and discovering physical storage systems in VNX Block and VMAX................................................................................................................... 138Registering and discovering a VPLEX........................................................... 139Registering and discovering an Isilon storage system.................................. 140Registering and discovering a NetApp storage system................................. 142Registering and discovering a VNX File storage system................................ 143
User Interface Services 145
Catalog, Services, Orders, and Approvals.................................................... 146Accessing UI services.................................................................................. 148UI Services response formats...................................................................... 148Approval requests....................................................................................... 149Approving or rejecting................................................................................. 149Retrieving a list of pending approvals..........................................................150URL notification...........................................................................................150Asset options.............................................................................................. 151Upstream values......................................................................................... 151Executing a service......................................................................................153Service catalog............................................................................................154Service descriptors......................................................................................156Field descriptors......................................................................................... 156Field validation........................................................................................... 157Type field values......................................................................................... 157Tracking orders........................................................................................... 158
Error Codes and HTML Return Codes 161
Error code descriptions............................................................................... 162HTTP return codes....................................................................................... 163
Chapter 11
Chapter 12
Chapter 13
CONTENTS
EMC ViPR 1.1.0 Controller REST API Developer Guide 5

CONTENTS
6 EMC ViPR 1.1.0 Controller REST API Developer Guide

CHAPTER 1
Getting Started with the ViPR Controller REST API
This chapter contains the following topics.
u Welcome to the ViPR Controller REST API................................................................. 8u ViPR REST API access...............................................................................................8u Identifying resources...............................................................................................9u Controller API authentication overview.................................................................... 9u Logout...................................................................................................................15u Whoami................................................................................................................ 15u Proxyuser.............................................................................................................. 16
Getting Started with the ViPR Controller REST API 7

Welcome to the ViPR Controller REST APIThe ViPR Controller REST API describes the programmatic interfaces that allow you tocreate, read, update, and delete resources in a ViPR data center.
This guide should be used in conjunction with the ViPR REST API Reference, whichcontains a comprehensive description of all ViPR resources, and the REST API calls thatmanage them.
This guide assumes that you have ViPR installed. For information on installing ViPR, referto the EMC ViPR Installation and Configuration Guide.
ViPR REST API accessThe ViPR REST API is accessible using any web browser or programming platform that canissue HTTP requests.
For example, after you log into ViPR, you could type the following URL into a browser toretrieve the current user's tenant.
RequestGET https://<ViPR_VIP>:4443/tenant
ResponseHTTP 200{ "name": "Provider Tenant", "id": "urn:storageos:TenantOrg:d61d9fa1-9886-40ef-85d3-c40b6de2c72f:", "link": { "rel": "self", "href": "/tenants/urn:storageos:TenantOrg:d61d9fa1-9886-40ef-85d3-c40b6de2c72f:" }}u <ViPR_VIP> is the IP address or fully qualified domain name (FQDN) of the public
virtual IP address of your ViPR vApp.
u Port 4443 is the HTTP port used for REST client access to many services on the ViPRvirtual appliance. Other REST services are accessed through port 443. (See APIPorts on page 8.)
To issue POST, PUT, and DELETE HTTP requests from a web browser, you need browserplugins, such as Internet Explorer's httpAnalyzer. Most major browsers, such as Firefoxand Chrome, have a poster plugin that will allow you to call HTTP commands directly fromyour browser.
You can also access the REST API using scripting platforms such as curl and perl. EMCalso provides a Java client that wraps the ViPR Controller REST API calls in a set of Javaclasses.
API PortsThe ViPR Controller REST API uses two different ports.
The following table show the services available on each of the two ports used by the ViPRREST API.
Getting Started with the ViPR Controller REST API
8 EMC ViPR 1.1.0 Controller REST API Developer Guide

REST API Service Port Description- - -ViPR API 4443 (HTTPS) Send ViPR REST API calls to port 4443 to
manage resources controlled by the followingservices:
l Block services (volumes, consistencygroups, snapshots, exports)
l File services (file systems, snapshots)
l Computer services (cluster, host, hostdiscovery, ip interface, initiators, vCenterdata center, vCenter
l Virtual Data Center services (block virtualpools, file virtual pools, networks, Storagesystems, storage pools, and others.)
l Tenant and Project services
ViPR UI Services API 443 (HTTPS) Send ViPR REST API calls to port 443 to managethe following resources:
l Approvals
l Asset options
l Catalog
l Execution window
l Orders
l Schema
Identifying resourcesEach ViPR managed storage resource is uniquely identified by an ID that is generated byViPR when it is created. A URN is a Uniform Resource Name.
The URN for a resource is a unique identifier for the resource and cannot be changed.
To find the URN of a particular resource, you can use the GET {resource_URL}/bulkAPI call, which gives you a list of all the URNs of a given resource class. Then you can usethe URNs obtained from this GET call and use them in the payload of the POST{resource_URL}/bulk call to obtain more detailed information about the specifiedresources.
See Bulk Operations on page 60 for more information on how to retrieve URNs anddetails associated with a given resource URN.
Controller API authentication overviewBefore you call any ViPR Controller REST API, you must successfully authenticate a user.
Clients pass security credentials to ViPR using Basic HTTP Authentication. All API requestsare delivered over secure sockets (https). ViPR accepts security credentials, and usesthem to authenticate the user against LDAP or Active Directory.
You can login to ViPR by calling this API:
Getting Started with the ViPR Controller REST API
Identifying resources 9

RequestGET https://<ViPR_VIP>:4443/login?using-cookies
Response
ViPR challenges the user with a dialog box. Enter the name of the user in the User Namefield, and the password of the user in the Password field.
The ViPR API is always accessed over secure sockets, so use HTTPS instead of HTTP.
ViPR_VIP is the IP address or Fully Qualified Domain Name(FQDN) of the virtual IP of theViPR vApp.
Use port 4443 for logging in to ViPR with the API.
With some application development platforms, you can pass in user credentials withoutinteracting with the ViPR login dialog box. For example, this curl command allows youto log in as the root user with a password of ChangeThis:curl <ViPR_VIP>:4443/login -u "root:ChangeThis" -k
where <ViPR_VIP> is https://<ViPR Public IP Address>.
Note
The <ViPR_VIP> token is used throughout this documentation.
Building an API super userThe user with which you log in to ViPR must have access to the ViPR resources you wantto manage. It may be convenient to build a general-purpose super user with wide accessto ViPR to run your API scripts.
The root user is a built-in user in ViPR. It is commonly used for initial ViPR setup, and canbe used by a Controller REST API application as a super user. The root user has thefollowing roles:
u SECURITY_ADMIN
u SYSTEM_ADMIN
u SYSTEM_MONITOR
u TENANT_ADMIN
u SYSTEM_AUDITOR
In some data centers, the root user may be rendered unavailable by your data centeradministrator. You can assign the roles used by root to a standard LDAP user by callingthe following REST calls:
u PUT <ViPR_VIP>:4443/tenants/{id}/role-assignmentsu PUT <ViPR_VIP>:4443/vdc/role-assignmentsTo call either of these APIs, you need to be authenticated as a user with theSECURITY_ADMIN role.
Authorization on page 25 contains a full description of the user roles you can assign ina ViPR environment.
Setting up a single tenant environment on page 19 contains a full description of settingup ViPR users and tenants, and assigning roles to those users.
Getting Started with the ViPR Controller REST API
10 EMC ViPR 1.1.0 Controller REST API Developer Guide
Authentication and cookiesViPR uses a token-based authentication system for all its public API calls. Once a user isauthenticated against ViPR, an authentication token is returned and can be used toauthenticate the user in subsequent calls.
Authentication tokens expire after eight hours or after two hours of idle time. Onceexpired, the token is internally destroyed and any attempt to call an API with that tokenreturns an HTTP 401 code. This code indicates you need to login and authenticate againto obtain a new token.
You can retrieve and use authentication tokens by:
u Reading the X-SDS-AUTH-TOKEN HTTP header from a successful authenticationrequest and copying that header into any subsequent request.
u Saving the X-SDS-AUTH-TOKEN cookie from a successful authentication request andsending that cookie along in subsequent requests.
Authentication with cookiesThis example shows how to use authentication tokens by reading the X-SDS-AUTH-TOKENhttp header from a successful authentication request, copying that information into acookie, then passing the cookie in a subsequent request. The examples here are writtenin curl and formatted for readability.
curl -L --location-trusted -k https://<ViPR_VIP>:4443/login?using-cookies=true -u "root:Password" -c cookiefile -v
In this example, you specify the ?using-cookies=true parameter to indicate thatyou want to receive cookies in addition to the normal HTTP header. This curl commandsaves the authentication token to a file named cookiefile in the current directory. Thenext command passes the cookie with the authentication token through the -b switch,and returns the user's tenant information.curl -k https://10.247.100.247:4443/tenant -b cookiefile -v
<?xml version="1.0" encoding="UTF-8" standalone="yes"?><tenant_info><name>Provider Tenant</name> <link href="/tenants/urn:storageos:TenantOrg:d61d9fa1-9886-40ef-85d3-c40b6de2c72f:" rel="self"/> <id>urn:storageos:TenantOrg:d61d9fa1-9886-40ef-85d3-c40b6de2c72f:</id></tenant_info>
Authentication without cookiesThis example shows how to use authentication tokens by reading the X-SDS-AUTH-TOKENhttp header from a successful authentication request and copying that header into asubsequent request. This example does not use cookies. The examples here are writtenin curl and formatted for readability.
curl -L --location-trusted -k https://10.247.100.247:4443/login -u "root:ChangeMe" -v
> GET /login HTTP/1.1> Authorization: Basic cm9vdDpDaGFuZ2VNZQ==> User-Agent: curl/7.24.0 (i386-pc-win32) libcurl/7.24.0 OpenSSL/0.9.8t zlib/1.2.5> Host: 10.247.100.247:4443> Accept: */*
Getting Started with the ViPR Controller REST API
Authentication and cookies 11

>< HTTP/1.1 200 OK< Date: Tue, 26 Nov 2013 22:18:25 GMT< Content-Type: application/xml< Content-Length: 93< Connection: keep-alive< X-SDS-AUTH-TOKEN: BAAcQ0xOd3g0MjRCUG4zT3NJdnNuMlAvQTFYblNrPQMAUAQADTEzODU0OTQ4NzYzNTICAAEABQA5dXJu OnN0b3JhZ2VvczpUb2tlbjo2MjIxOTcyZS01NGUyLTRmNWQtYWZjOC1kMGE3ZDJmZDU3MmU6AgAC0A8=<<?xml version="1.0" encoding="UTF-8" standalone="yes"?><loggedIn> <user>root</user></loggedIn>* Connection #0 to host 10.247.100.247 left intact* Closing connection #0* SSLv3, TLS alert, Client hello (1):
This executes a GET on the /login resource. The -u option indicates the user of basicauthentication header. The user designation must be included in the request. Uponsuccessful authentication, a HTTP 200 code is returned as well as the X-SDS-AUTH-TOKENheader containing the encoded token.
The token can then be passed back in the next API call. You can copy the X-SDS-AUTH-TOKEN contents and pass it to the next request through curl's -H switch.
curl https://10.247.100.247:4443/tenant -k -H "X-SDS-AUTH-TOKEN: BAAcOHZLaGF4MTl3eFhpY0czZ0tWUGhJV2xreUE4PQMAUAQADTEzODU0OTQ4NzYzNTICAAEABQA5dXJu OnN0b3JhZ2VvczpUb2tlbjpkYzc3ODU3Mi04NWRmLTQ2YjMtYjgwZi05YTdlNDFkY2QwZDg6AgAC0A8="
<?xml version="1.0" encoding="UTF-8" standalone="yes"?><tenant_info> <name>Provider Tenant</name>\ <link href="/tenants/urn:storageos:TenantOrg:d61d9fa1-9886-40ef-85d3-c40b6de2c72f:" rel="self"/> <id>urn:storageos:TenantOrg:d61d9fa1-9886-40ef-85d3-c40b6de2c72f:</id></tenant_info>
Authentication redirectsIf you try to access a ViPR REST resource without a valid token, ViPR will issue an HTTP302 redirect code.
An HTTP 302 redirect code includes the URL of the authentication resource, appendedwith a service= parameter that indicates where to be redirected after successfulauthentication. It also includes a signature parameter to prevent forgery on theservice= parameter.
Getting Started with the ViPR Controller REST API
12 EMC ViPR 1.1.0 Controller REST API Developer Guide

Handling authentication redirects without using cookiesThis example shows what to do when you authenticate with an invalid security token orno token. This example does not use cookies. The examples in this section are written incurl.
In this example, the initial request for the current user's tenant returns an HTTP 302 error.Note the following:
u The X-SDS-AUTH-TOKEN header has to be copied into each request.
u The X-SDS-AUTH-TOKEN header is a custom HTTP header.
u If you are not using cookies, HTTP clients that use the automatically followredirects option need to disable it. Automatically following redirects would meanthe client follows all HTTP 302 responses without copying the custom header. Thisresults in an authentication failure.
Procedure
1. Request the current user's tenant.
Requestcurl -k "<ViPR_VIP>:4443/tenant" -v
ResponseGET /tenants HTTP/1.1User-Agent: curl/7.24.0 (i386-pc-win32) libcurl/7.24.0 OpenSSL/0.9.8t zlib/1.2.5Host: 10.247.100.247:4443Accept: */*
HTTP/1.1 302 FoundDate: Wed, 27 Nov 2013 15:30:13 GMTContent-Length: 0Connection: keep-aliveLocation: <ViPR_VIP>/login?service={LocationString}
2. Perform a GET against the location in the response body.
Requestcurl -k "<ViPR_VIP>:4443/login?service={LocationString} -v
Response
HTTP/1.1 401 Unauthorized
WWW-Authenticate: basic realm="ViPR"3. Present basic authentication credentials to the URL returned in step 1.
Requestcurl -k "<ViPR_VIP>:4443/login?service={LocationString} -v -u "root:ChangeMe"
On successful authentication, you see another 302 code, this time redirecting you tothe original service. The authentication token is also in the HTTP header or cookie(depending on whether ?using-cookies=true appeared in the original request).
ResponseGET /login?service={LocationString} HTTP/1.1> Authorization: Basic cm9vdDpDaGFuZ2VNZQ==> User-Agent: curl/7.24.0 (i386-pc-win32) libcurl/7.24.0 OpenSSL/0.9.8t zlib/1.2.5> Host: 10.247.100.247:4443> Accept: */*>< HTTP/1.1 302 Found
Getting Started with the ViPR Controller REST API
Authentication redirects 13

< Date: Wed, 27 Nov 2013 16:53:28 GMT< Content-Type: application/xml< Content-Length: 0< Connection: keep-alive< Location: https://10.247.100.247:4443/tenant?auth-redirected< X-SDS-AUTH-TOKEN: {Token_String}
4. Access the location, making sure to supply either the cookie or the http header.
Requestcurl -k <ViPR_VIP>:4443/tenant?auth-redirected -H"X-SDS-AUTH-TOKEN:{token_text}"
Response<?xml version="1.0" encoding="UTF-8" standalone="yes"?><tenant_info><name>Provider Tenant</name><link href="/tenants/urn:storageos:TenantOrg:d61d9fa1-9886-40ef-85d3-c40b6de2c72f:" rel="self"/><id>urn:storageos:TenantOrg:d61d9fa1-9886-40ef-85d3-c40b6de2c72f:</id></tenant_info>
Authentication redirects using cookiesUsing cookies, you can automatically following redirects.
The following curl example allows access to the API resource by passing credentials to it:
Requestcurl -k "<ViPR_VIP>:4443/tenant?using-cookies=true" -u "root:ChangeMe" -c cookie1 -b cookie1 -L -v
Response
HTTP 302
In this example, curl's -L option indicates that we want to follow redirects.
Response Body
GET /tenant?using-cookies=true HTTP/1.1Authorization: Basic cm9vdDpDaGFuZ2VNZQ==User-Agent: curl/7.24.0 (i386-pc-win32) libcurl/7.24.0 OpenSSL/0.9.8t zlib/1.2.5Host: 10.247.100.247:4443Accept: */*Cookie: X-SDS-AUTH-TOKEN=BAAcVlM5TkkwdnRvUFBJbXJkbzVqSzB3azZBQ0VnPQMAUAQADTEzODU0OTQ4NzYzNTICAAEABQA5dXJuOnN0b3JhZ2VvczpUb2tlbjo3OGM4ODljOS1hZTE5LTQ2NTgtODYxNS00ZDk5YTYxNWVmOTU6AgAC0A8=
HTTP/1.1 200 OKDate: Wed, 27 Nov 2013 18:57:12 GMTContent-Type: application/xmlContent-Length: 276Connection: keep-alive
<?xml version="1.0" encoding="UTF-8" standalone="yes"?><tenant_info><name>Provider Tenant</name><link href="/tenants/urn:storageos:TenantOrg:d61d9fa1-9886-40ef-85d3-c40b6de2c72f:" rel="self"/><id>urn:storageos:TenantOrg:d61d9fa1-9886-40ef-85d3-c40b6de2c72f:</id></tenant_info>
Getting Started with the ViPR Controller REST API
14 EMC ViPR 1.1.0 Controller REST API Developer Guide
LogoutThe logout API ends a session.
A given user is allowed a maximum of 100 concurrent authentication tokens. Past thislimit, the system refuses any new connection for this user until tokens free up. They canfree up by expiring naturally, or by explicitly calling this URI:
https://<ViPR_VIP>:4443/logout
If you have multiple sessions running simultaneously, this URI forces the termination ofall tokens related to the current user.
GET <ViPR_VIP>:4443/logout?force=true
An example logout request follows.
Request
GET: <ViPR_VIP>:4443/logout
X-SDS-AUTH-TOKEN:{Auth_Token}
Pass in the header or cookie with the authentication token to logout.
ResponseHTTP 200
WhoamiA ViPR user can view their own user name, tenant association, and roles using thewhoami API call.
Request
GET <ViPR_VIP>:4443/user/whoami
Response
HTTP 200
GET /user/whoami<user> <common_name>root</common_name> <distinguished_name>root</distinguished_name> <roles> <role>SYSTEM_AUDITOR</role> <role>SECURITY_ADMIN</role> <role>SYSTEM_ADMIN</role> <role>SYSTEM_MONITOR</role> <role>TENANT_ADMIN</role> </roles> <subtenant_roles/> <tenant> urn:storageos:TenantOrg:7985d438-9980-41df-bba1-29d6a873f811: </tenant></user>
This example shows the whoami output for the Root user. Root is associated with thetenant indicated in the <tenant> field. Root has the roles listed in the <roles> field.
Getting Started with the ViPR Controller REST API
Logout 15

ProxyuserBecause standard ViPR security tokens expire after 8 hours, ViPR provides a special userID that can run a Controller REST API script on a schedule without having to repeatedly login. For example, you might set up a script to check particular file services every 12 hours,and take appropriate action in the presence of certain conditions.
The proxy token feature allows a user to retrieve a persistent security token from ViPR,then pass that token to a special user called proxyuser, who runs the script. Theproxyuser is a built-in user in ViPR. This user has the PROXY_USER role, and is the onlyViPR user that can have that role.
The proxyuser cannot perform any security-related operations. For example, a proxy usercannot register an authentication provider, or do role assignments for a user. Theproxyuser is best used for monitoring and provisioning operations.
Using proxyuser to run a controller REST API scriptViPR provides a way to run a Controller REST API script on a schedule without having torepeatedly log in. For example, you might set up a script to check particular file servicesevery 12 hours, and take appropriate action in the presence of certain conditions. Theexamples in this section are written in curl, and formatted for readability.
Before you begin
You must have a user from your LDAP repository mapped to a tenant in ViPR.
Note
Built-in users, such as root, can also use proxy tokens.
Procedure
1. Log in to ViPR.curl -k <ViPR_VIP>:4443/login?using-cookies -c cookie2 -u "[email protected]:ChangeThis"
ViPR delivers a standard ViPR authentication token. (This token has an 8 hourtimeout.)
2. Retrieve your user’s proxy token. Each ViPR user has one – and only one – proxytoken.curl -k <ViPR_VIP>:4443/proxytoken -b cookie2 -v
GET /proxytoken HTTP/1.1User-Agent: curl/7.24.0 (i386-pc-win32) libcurl/7.24.0 OpenSSL/0.9.8t zlib/1.2.5Host: 10.247.100.247:4443Accept: */*Cookie: X-SDS-AUTH-TOKEN={Token_Text}
HTTP/1.1 200 OKDate: Wed, 27 Nov 2013 20:05:02 GMTContent-Type: application/xmlContent-Length: 0Connection: keep-aliveX-SDS-AUTH-PROXY-TOKEN: {Token_Text}
The user's proxy token is contained in the header X-SDS-AUTH-PROXY-TOKEN.
3. Schedule your script to run – say, once every 12 hours. You can use standardscheduling software provided by your platform operating system to do this. Forexample, CRON is available for most LINUX workstations.
Getting Started with the ViPR Controller REST API
16 EMC ViPR 1.1.0 Controller REST API Developer Guide

4. Pass the proxy token - X-SDS-AUTH-PROXY-TOKEN - for your user to the proxyuser.How you do this is specific to your application. One method is to save the token to afile that is accessible by the proxyuser.
5. The proxyuser logs in, and uses the LDAP user’s proxy token to run the scheduledscript as that user. For example, if vipr_user passes a proxy token to proxyuser,proxyuser can run vipr_user’s script as vipr_user using vipr_user’s proxy token. Theproxy token does not age out. The script can run repeatedly for an indefinite period oftime.
Destroying a proxy tokenA proxy token does not expire, but it can be destroyed by the user who created it, or by aViPR SECURITY_ADMIN. The examples in this section are written in curl, and formatted forreadability.
To destroy your own proxy token, call:curl -k "<ViPR_VIP>:4443/logout?force=true&proxytokens=true" -b cookie1 -v
GET /logout?force=true&proxytokens=true HTTP/1.1User-Agent: curl/7.24.0 (i386-pc-win32) libcurl/7.24.0 OpenSSL/0.9.8t zlib/1.2.5Host: 10.247.100.247:4443Accept: */*Cookie: X-SDS-AUTH-TOKEN={Token_Text}
HTTP/1.1 200 OKDate: Wed, 27 Nov 2013 20:49:06 GMTContent-Type: application/xmlContent-Length: 95Connection: keep-alive
<?xml version="1.0" encoding="UTF-8" standalone="yes"?><LoggedOut> <user>root</user></LoggedOut>
To destroy another user’s proxy token, call:curl -k "<ViPR_VIP>:4443/logout?force=true&proxytokens=true&username={ViPR_User}" -b cookie1 -v
Getting Started with the ViPR Controller REST API
Destroying a proxy token 17


CHAPTER 2
Setting Up a Single Tenant Environment
This chapter contains the following topics.
u Single Tenancy vs Multitenancy.............................................................................20u Adding users to the provider tenant with authentication providers........................ 20
Setting Up a Single Tenant Environment 19

Single Tenancy vs MultitenancyViPR automatically includes a provider tenant.
Tenants allow you to separate groups of users and give those groups access to differentresources in your data center. In some environments, a single tenant is all that is requiredto manage your data center. In other environments, you may need multiple tenants. Forexample, if you are a service provider, a multi-tenant environment may be necessary toseparate users and protect their data.
This chapter describes how to use authentication providers to map LDAP users into theViPR provider tenant. For information on building a multi-tenant environment with theViPR REST API, see Setting up a Multi-tenant Environment on page 51.
Adding users to the provider tenant with authentication providersAuthentication providers are added to ViPR to allow users from Active Directory (AD) orLightweight Directory Access Protocol (LDAP) v3 compliant servers to authenticate usersand allows those users to participate in ViPR operations.
The first authentication provider you add to ViPR maps users from Active Directory orLDAP into the provider tenant.
Once an authentication provider is registered, tenants can be configured to restrictaccess to a subset of users and groups obtained from the provider. For example, if anauthentication provider is created for domain mycompany.com, the provider tenant canbe configured to only accept users from this domain by adding a tenant user mapping toit.
User mappings for a tenant can be as simple as a single domain name, or as complex asa combination of domain names, group names and specific user attributes found in theLDAP/AD schema.
You can use authentication providers to create multi-tenancy environments where youcreate two or more groups of users , and give those groups access to different resourcesin your data center. Setting up a Multi-tenant Environment on page 51 describes the APIcalls required to set up a multi-tenant environment.
Adding an authentication providerAn authentication provider defines a set of LDAP or Active Directory users who are initiallyassigned to the provider tenant. Each of those users has access to ViPR resourcesaccording to the roles and ACLs assigned to the provider tenant.
Before you begin
In this example, you login as the root user. By default, the root user has the SecurityAdministrator (SECURITY_ADMIN) role on the entire virtual data center. The root user isallowed to add an authentication provider for the mycompany.com domain.
Procedure
1. Login to ViPR as the root user and obtain an authentication token that can then beused in subsequent ViPR API calls.
RequestGET <ViPR_VIP>:4443/login?using-cookies
Provide credentials to satisfy the authentication challenge.
Setting Up a Single Tenant Environment
20 EMC ViPR 1.1.0 Controller REST API Developer Guide

ResponseHTTP 200X-SDS-AUTH-TOKEN:{Token_Text}
<loggedIn> <user>root</user></loggedIn>
2. POST an authentication provider for the mycompany.com domain.
RequestPOST <ViPR_VIP>:4443/vdc/admin/authnproviders
{'Content-Type': 'application/xml', 'X-SDS-AUTH-TOKEN': '{Token_Text}','ACCEPT': 'application/xml'}
<authnprovider_create> <server_urls> <server_url>ldap://10.247.100.165</server_url> </server_urls> <domains> <domain>sanity.local</domain> </domains> <group_whitelist_values> <group_whitelist_value>*Admin*</group_whitelist_value> <group_whitelist_value>*Test*</group_whitelist_value> </group_whitelist_values> <mode>ad</mode> <name>ad configuration2</name> <description>ad configuration2</description> <disable>no</disable> <manager_dn>CN=Administrator,CN=Users,DC=mycompany,DC=com</manager_dn> <manager_password>P@ssw0rd</manager_password> <search_base>CN=Users,DC=mycompany,DC=com</search_base> <search_filter>userPrincipalName=%u</search_filter> <search_scope>SUBTREE</search_scope> <group_attribute>CN</group_attribute></authnprovider_create>
The ViPR Installation and Configuration Guide has more information about themeaning of each authentication provider parameter.
ResponseHTTP 200 <authnprovider> <creation_time>1386017748095</creation_time> <id>urn:storageos:AuthnProvider:0555dc65-598f-4dea-951a-d9f5b2b61c5e:</id> <inactive>false</inactive> <link href="/vdc/admin/authnproviders/urn:storageos:AuthnProvider:0555dc65-598f-4dea-951a-d9f5b2b61c5e:" rel="self"/> <name>ad configuration2</name> <tags/> <description>ad configuration2</description> <disable>false</disable> <domains> <domain>mycompany.com</domain> </domains> <group_attribute>CN</group_attribute> <group_whitelist_values> <group_whitelist_value>*Admin*</group_whitelist_value> <group_whitelist_value>*Test*</group_whitelist_value> </group_whitelist_values> <manager_dn>CN=Administrator,CN=Users,DC=mycompany,DC=com</manager_dn> <mode>ad</mode>
Setting Up a Single Tenant Environment
Adding an authentication provider 21

<search_base>CN=Users,DC=mycompany,DC=com</search_base> <search_filter>userPrincipalName=%u</search_filter> <search_scope>SUBTREE</search_scope> <server_urls> <server_url>ldap://192.247.100.165</server_url> </server_urls></authnprovider>
Changing the user mapping in the provider tenantIn this example, you modify the provider tenant to include a subset of users from thedomain mycompany.com.
Before you begin
Follow the instructions in the topic Adding an authentication provider on page 20 to setup an authentication provider. This example uses the same authentication token as thatprocedure. Headers are hidden for brevity.
In this example, you modify the provider tenant to only map users from the groupsAdminUsers and TestUsers in the domain mycompany.com. Users in the domainmycompany.com that are not members of the AdminUsers and TestUsers groups will nolonger be mapped into the provider tenant.
Modify the provider tenant by sending a PUT request to the resource
PUT <ViPR_VIP>:4443/tenants/{tenant_urn}
where {tenant_urn} is the URN ID of the tenant. In this example, you authenticate as rootand are modifying the provider tenant.
Procedure
1. Obtain the URN ID of the provider tenant. The following API call returns the currentuser's tenant. The current user is root.
RequestGET <ViPR_VIP>:4443/tenant
ResponseHTTP 200
GET /tenant
<tenant_info> <name>Provider Tenant</name> <link href="/tenants/urn:storageos:TenantOrg:d61d9fa1-9886-40ef-85d3-c40b6de2c72f:" rel="self"/> <id>urn:storageos:TenantOrg:d61d9fa1-9886-40ef-85d3-c40b6de2c72f:</id></tenant_info>
2. Use that URN ID to access the provider tenant and modify it, adding the desired usermapping.
RequestPUT <ViPR_VIP>:4443/tenants/{Tenant_URN}
<tenant_update> <name>Provider Tenant</name> <user_mapping_changes> <add> <user_mapping> <domain>mycompany.com</domain> <groups> <group>TestUsers</group> <group>AdminUsers</group>
Setting Up a Single Tenant Environment
22 EMC ViPR 1.1.0 Controller REST API Developer Guide

</groups> </user_mapping> </add> </user_mapping_changes></tenant_update>
ResponseHTTP 200
<tenant> <creation_time>1383585703830</creation_time> <id>urn:storageos:TenantOrg:d61d9fa1-9886-40ef-85d3-c40b6de2c72f:</id> <inactive>false</inactive> <link href="/tenants/urn:storageos:TenantOrg:d61d9fa1-9886-40ef-85d3-c40b6de2c72f:" rel="self"/> <name>Provider Tenant</name> <tags/> <description>Root Provider Tenant</description> <user_mappings> <user_mapping> <attributes/> <domain>mycompany.com</domain> <groups> <group>TestUsers</group> <group>AdminUsers</group> </groups> </user_mapping> </user_mappings></tenant>
For the mapping to be valid, AdminUsers and TestUsers need to be available to ViPRthrough the white list parameter of the authentication provider that this tenant uses.The *Admin* and *Test* expressions (see Adding an authentication provider on page20) make this possible.
Assigning roles to a tenantOnce an authentication provider is available and users can be mapped to a tenant, rolescan be assigned to users and groups.
For example, the Tenant Administrator (TENANT_ADMIN) role can be assigned to a user.This allows that user to perform administrative tasks on the tenant, such as looking at thetenant information. It also allows that user to assign roles to other users within thetenant.
Assigning the Tenant Administrator role to an Active Directory userBy assigning the TENANT_ADMIN role to a user, you allow that user to performadministrative tasks on the tenant, such as looking at the tenant information.
Before you begin
You must be logged in as a user with the SECURITY_ADMIN role.
The [email protected] user is a valid AD user who is part of a group calledAdminUsers. This user is eligible to be TENANT_ADMIN because the tenant listsAdminUsers as one of the acceptable groups for user mapping.
Procedure
1. Call the following API to apply the role assignment to [email protected].
RequestPUT <ViPR_URL>:4443/tenants/{tenant_URN}/role-assignments.json
Setting Up a Single Tenant Environment
Assigning roles to a tenant 23

{ "add": [{"subject_id": "[email protected]", "role": ["TENANT_ADMIN"]}]}
where tenant_URN is the ID of the ViPR tenant to which you are applying the roleassignment. The following API returns the URIs of all tenants known to ViPR.GET <ViPR_URL>:4443/tenants/bulk
ResponseHTTP 200
{ "link":{"rel":"self","href":"/tenants/{tenant_URN}/role-assignments"}, "role_assignments": [ {"role":["TENANT_ADMIN"],"subject_id":"[email protected]"}, {"role":["TENANT_ADMIN"],"subject_id":"root"} ]}
2. To test out that [email protected] has TENANT_ADMIN privileges in thistenant, login with that user and request role assignment information for the providertenant.
RequestGET <ViPR url>:4443/login.json -u [email protected]:password
ResponseHTTP 200
X-SDS-AUTH-TOKEN:{Token_text}
{ "user":"[email protected]"}
RequestGET <ViPR_URL>:4443/tenants/{Privider_Tenant_URI}/role-assignments.json
X-SDS-AUTH-TOKEN:{Token_text}
ResponseHTTP 200{ "link":{"rel":"self","href":"/tenants/urn:storageos:TenantOrg:d082a5b2-3201-4faf-9e62-ae1c989f1995:/role-assignments"}, "role_assignments": [ {"role":["TENANT_ADMIN"],"subject_id":"[email protected]"}, {"role":["TENANT_ADMIN"],"subject_id":"root"} ]}
Setting Up a Single Tenant Environment
24 EMC ViPR 1.1.0 Controller REST API Developer Guide

CHAPTER 3
Authorization
This chapter contains the following topics.
u Authorization overview..........................................................................................26u Virtual data center roles........................................................................................ 26u Tenant roles.......................................................................................................... 28u ACLs......................................................................................................................29u Virtual array and virtual pool ACLs......................................................................... 29u Project ACLs.......................................................................................................... 31
Authorization 25

Authorization overviewAuthorization in ViPR is controlled by roles and Access Control Lists (ACLs). There are twotypes of roles (virtual data center roles and tenant level roles), and different types ofACLs.
Virtual data center rolesVirtual data center roles are scoped to the entire ViPR virtual data center. Note that theycan only be assigned to users and groups that belong to the top level provider tenant.These roles define what the user can do at the virtual data center level.
The virtual data center level roles are:
u Security Administrator
u System Administrator
u System Monitor
u System Auditor
A user with a Security Administrator role can assign roles to users. In the example below,a Security Administrator assigns the Security Admin role to a user with a subject_id [email protected].
Request:
PUT <ViPR_VIP>/vdc/role-assignments
Request body
<role_assignment_change> <add> <role>SECURITY_ADMIN</role> <subject_id>[email protected]</subject_id> </add></role_assignment_change>
Response
HTTP 200
<role_assignments_create> <role_assignment> <role>SYSTEM_ADMIN</role> <subject_id>[email protected]</subject_id> </role_assignment> <role_assignment> <role>SYSTEM_AUDITOR</role> <role>SECURITY_ADMIN</role> <role>SYSTEM_MONITOR</role> <role>SYSTEM_ADMIN</role> <subject_id>[email protected]</subject_id> </role_assignment> <link href="/vdc/role-assignments" rel="self"/></role_assignments_create>
The following table lists the authorized actions for each ViPR virtual data center level role.
Virtual Data Center-Level Role
Authorized Actions
- -Security Administrator l Manages the authentication provider configuration for the ViPR
virtual data center to identify and authenticate users. Authentication
Authorization
26 EMC ViPR 1.1.0 Controller REST API Developer Guide

Virtual Data Center-Level Role
Authorized Actions
- -providers are configured to add specified users into ViPR usingexisting Active Directory/Lightweight Directory Access Protocol (AD/LDAP) user accounts/domains.
l Assigns roles and project ACLs to users or groups.
l Configures ACLs for virtual arrays and virtual pools to control whichtenants may use them.
l Restores access to tenants and projects, if needed. (For example, inthe event that the Tenant Administrator locks himself/herself out,the Security Administrator can reset user roles to restore access.)
l Changes ViPR virtual data center properties.
l Shuts down/reboots/restarts ViPR services.
l Manages ViPR virtual data center software and license updates.
System Administrator l Sets up the physical storage infrastructure of the ViPR virtual datacenter and carves the physical storage into two types of virtualresources: virtual arrays and virtual pools. Authorized actionsinclude:
l Adding physical storage resources into ViPR such as arrays,ports, pools, switches, and networks.
l Creating virtual pools; defining storage capabilities andassigning physical storage pools to virtual pools.
l Creating virtual arrays; partitioning storage into discrete pods ofcompute, network, and storage resources to control file system/volume/object pathing through SAN/IP networks.
l Sets up object storage in the ViPR virtual data center; this includescreating the object virtual pool and data stores, assigning an IPnetwork to the Object Data Service, and assigning an objectnamespace to the tenant.
l Configures Access Control Lists (ACLs) for virtual arrays and virtualpools to control which tenants may use them.
l Manages the ViPR virtual data center resources that are notmanaged by tenants.
l Retrieves ViPR virtual data center status and health information.
l Retrieves bulk event and statistical records for the ViPR virtual datacenter.
System Monitor l Has read-only access to all resources in the ViPR virtual data center.
l Retrieves bulk event and statistical records for the ViPR virtual datacenter.
l Does not have visibility into security-related resources, such asauthentication providers, ACLs, and role assignments.
l Retrieves ViPR virtual data center status and health information.
System Auditor Has read-only access to the ViPR virtual data center audit logs.
Authorization
Virtual data center roles 27

Tenant rolesTenant roles are scoped to the tenant in which the assignment is made. TenantAdministrator, Tenant Approver, and Project Administrator are tenant-level roles.
Tenant roles can be assigned to users/groups from the corresponding tenant. These rolesdefine what the user can do at the tenant level. The tenant level roles are:
u Tenant Administrator
u Tenant Approver
u Project Administrator
A user with a Security Admin or Tenant Admin role can assign roles to users within atenant. The URL indicates the tenant. In the following example, a Security or TenantAdministrator with access to the tenant assigns a Tenant Administrator role to a user witha subject ID of [email protected].
PUT: <ViPR url>:4443/tenants/<tenant urn>/role-assignments.json
Request body:
{ "add": [{"subject_id": "[email protected]", "role": ["TENANT_ADMIN"]}] }
Response:
HTTP 200
The following table lists the authorized actions for each ViPR tenant-level role.
Tenant-Level Role Authorized Actions- -Tenant Administrator l Creates tenants under the provider tenant (in a multi-tenant
environment). (In a single-tenant enterprise private cloudenvironment, there is just the provider tenant and the TenantAdministrator(s) has access to all projects.)
l Maps AD/LDAP users into their tenant to define who can log into thetenant.
l Creates, modifies, and deletes projects in their tenant.
l Manages resources in the tenant's projects.
l Configures ACLs for projects and the Service Catalog in their tenant.
l Assigns roles to tenant users. (Can assign Tenant Administrator orProject Administrator roles to other users.)
Tenant Approver l Approves or rejects Service Catalog orders in their tenant.
l Views all approval requests in their tenant.
Project Administrator l Creates projects in their tenant, getting an OWN ACL on the created
project.
Authorization
28 EMC ViPR 1.1.0 Controller REST API Developer Guide

ACLsAn Access Control List (ACL) is a list of permissions attached to a ViPR resource thatspecifies which tenants are authorized to access that resource as well as what operationsare allowed on that resource.
ACLs can be assigned to the following ViPR resources:
u Block virtual pool
u File virtual pool
u Projects
u Virtual arrays
Note
Only Project ACLs are managed through the ViPR user interface. Other ACLs must bemanaged using the API.
For each virtual array, virtual pool, or project resource, there is a limit of 100 ACLs. Inother words, there is a maximum of 100 user/group assignments for projects and 100tenant assignments for a virtual array or virtual pool.
Virtual array and virtual pool ACLsAt creation time, virtual arrays and virtual pools are public. They are accessible to alltenants.
A System or Security Administrator can assign an ACL to a virtual pool or virtual array torestrict them to be used by specified tenants.
The ACL permission associated with virtual arrays and pools is of the type USE. If aspecific tenant has a USE ACL on a virtual pool, this means that all the users who aremapped to that tenant will be allowed to use that virtual pool in their provisioningoperations.
All newly created virtual arrays and pools will have an empty ACL. The System or SecurityAdministrator is responsible for managing the ACL. If no ACLs are set, the virtual arraysand pools remain accessible to the provider tenant and all other tenants in the ViPRsystem.
For virtual pools and virtual arrays, you cannot assign an ACL to a user (subject ID) orgroup. Only tenants can be assigned ACLs for these resources.
The following table shows the APIs that allow a system or security administrator to modifyACLs for virtual arrays and virtual pools. Note that there are separate API calls for file andblock virtual pools.
API Description- -GET /block/vpools/{id}/acl Show ACL assignment for block store virtual pool .
PUT /block/vpools/{id}/acl Add or remove block store virtual pool ACL entries.
GET /file/vpools/{id}/acl Show ACL entries for file store VirtualPool.
PUT /file/vpools/{id}/acl Add or remove ACL entries from file store VirtualPool.
GET /vdc/varrays/{id}/acl Show VirtualArray ACL Virtual Array.
Authorization
ACLs 29

API Description- -PUT /vdc/varrays/{id}/acl Add or remove ACL for VirtualArray Virtual Array.
Examples: Virtual array and virtual pool ACL APIsThe examples in this section show some commonly-used APIs for managing virtual arrayand virtual pool ACLs.
Virtual array: Assigning the USE ACL to a tenantThe following example shows how to give a tenant privileges to use a virtual array. If noACL exists on the virtual array, all tenants have access to it.
Request
PUT https://<ViPR_VIP>:4443/vdc/varrays/urn:storageos:VirtualArray:f49f6e36-0fe5-4181-9622-49d116204d86:/acl
<acl_assignment_changes> <add> <privilege>USE</privilege> <tenant>urn:storageos:TenantOrg:7985d438-9980-41df-bba1-29d6a873f811:</tenant> </add></acl_assignment_changes>
Response:
HTTP 200
<acl_assignments> <acl_assignment> <privilege>USE</privilege> <tenant>urn:storageos:TenantOrg:7985d438-9980-41df-bba1-29d6a873f811:</tenant> </acl_assignment></acl_assignments>
Virtual array: Removing the USE ACL from a tenantRequest
PUT https://<ViPR_VIP>:4443/vdc/varrays/urn:storageos:VirtualArray:f49f6e36-0fe5-4181-9622-49d116204d86:/acl
<acl_assignment_changes> <remove> <privilege>USE</privilege> <tenant>urn:storageos:TenantOrg:7985d438-9980-41df-bba1-29d6a873f811:</tenant> </remove></acl_assignment_changes>
Response:
HTTP 200
<acl_assignments/>
Virtual pool: Assigning the USE ACL to a tenantThe following example shows how to give a tenant privileges to use a virtual pool. If noACL exists on the virtual pool, all tenants have access to it.
Authorization
30 EMC ViPR 1.1.0 Controller REST API Developer Guide

Request
PUT <ViPR_VIP>/file/vpools/urn:storageos:VirtualPool:4394653f-cf2e-4301-8f11-9e8d3e7e7fa9:/acl
<acl_assignment_changes> <add> <privilege>USE</privilege> <tenant>urn:storageos:TenantOrg:d61d9fa1-9886-40ef-85d3-c40b6de2c72f:</tenant> </add></acl_assignment_changes>
Response:
HTTP 200
<acl_assignments> <acl_assignment> <privilege>USE</privilege> <tenant>urn:storageos:TenantOrg:d61d9fa1-9886-40ef-85d3-c40b6de2c72f:</tenant> </acl_assignment></acl_assignments>
Project ACLsA Tenant Administrator can access all projects for their tenant. Project Administrators canonly access projects that they own.
The ACL permissions associated with projects are listed in the following table.
The project ACLs can be created or modified by a Tenant Administrator, a SecurityAdministrator, or a project owner. Project owners are assigned the OWN ACL. The userthat creates the project is the owner of that project unless they, or a tenant administrator,transfers ownership of that project to another user.
The default ACL behavior of a project is different from the default ACL behavior of a VirtualArray or Virtual Pool. Whereas, the default ACL for a Virtual Array or Virtual Pool enablesanyone to use them, the default ACL for the Project prevents all but the Tenant Admin,Security Admin, or Project owner from using it. For other users or groups to use a project,that user or group must be explicitly added to the ACL for that project.
Project ACL Description- -ALL The user can perform create, read, update, and delete (CRUD) operations
on file systems, volumes, snapshots, exports, and buckets within theproject.
BACKUP The user has read-only access to volumes, file systems and buckets inthe project. The user can create, delete, and export snapshots forvolumes and file systems in the project.
OWN The user with the OWN ACL is the project owner. A project owner can doall of the following:
l Perform CRUD operations on project resources.
l Set ACLs on the project.
l Transfer ownership of the project to another user.
l Delete the project.
l Set project properties, such as the project name and owner.
Authorization
Project ACLs 31

Project ACL Description- -ANY The ANY ACL appears in the EMC ViPR REST API Reference Guide. It
means "any user that has either the BACKUP or ALL ACL".
Newly created projects will have an empty ACL. The Tenant Administrator or the projectowner is responsible for managing the ACL.
Examples: Project ACL APIsThe examples in this section show some commonly-used APIs for managing project ACLs.
Get the ACLs for a projectRequestGET /projects/{Project_URN}/acl
Response<acl_assignments> <acl_assignment> <privilege>ALL</privilege> <subject_id>[email protected]</subject_id> </acl_assignment> <acl_assignment> <privilege>BACKUP</privilege> <subject_id>[email protected]</subject_id> </acl_assignment></acl_assignments>
Assigning the USE ACL to a userThe following example sets the project ACL using a user's subject_id. A subject_id orgroup can be assigned the ALL or BACKUP permission.
Request
PUT <ViPR_VIP>/projects/<project urn>/acl
<acl_assignment_changes> <add> <privilege>ALL</privilege> <subject_id>[email protected]</subject_id> </add></acl_assignment_changes>
Response
HTTP 200
<acl_assignments> <acl_assignment> <privilege>ALL</privilege> <subject_id>[email protected]</subject_id> </acl_assignment> <acl_assignment> <privilege>ALL</privilege> <privilege>BACKUP</privilege> <subject_id>[email protected]</subject_id> </acl_assignment></acl_assignments>
Authorization
32 EMC ViPR 1.1.0 Controller REST API Developer Guide

Examples: Changing a project's ownerThe example in this section shows how to change the owner of a project.
The OWN ACL is assigned to a project's creator, giving that user ownership rights to thatproject. A tenant admin, a project admin or the project's owner can reassign theownership of the project to another user.
Checking the owner of a projectThe user that owns the project is displayed in the <owner> field of the project resource.Here, the user [email protected] is displayed as the project owner.GET /projects/{Project_urn} <project> <creation_time>1384272649906</creation_time> <id>urn:storageos:Project:2c4d5503-a935-405d-9795-3a08e4bd3ee3:</id> <inactive>false</inactive> <link href="/projects/urn:storageos:Project:2c4d5503-a935-405d-9795-3a08e4bd3ee3:" rel="self"/> <name>project1</name> <tags/> <owner>[email protected]</owner> <tenant> <id>urn:storageos:TenantOrg:d61d9fa1-9886-40ef-85d3-c40b6de2c72f:</id> <link href="/tenants/urn:storageos:TenantOrg:d61d9fa1-9886-40ef-85d3-c40b6de2c72f:" rel="self"/> </tenant></project>
Changing the owner of a projectThis example changes the ownership of the project shown in the previous example [email protected]. Note that this is done by changing the owner attribute of theproject, rather than through an ACL call.
RequestPUT /projects/{Project_URN}
<project_update> <owner>[email protected]</owner></project_update>
ResponseHTTP 200
Authorization
Examples: Changing a project's owner 33

CHAPTER 4
ViPR REST API Resources
This chapter contains the following topics:
u ViPR services overview.......................................................................................... 36u System resources..................................................................................................38u Tenant and project resources................................................................................ 50
ViPR REST API Resources 35

ViPR services overviewThe ViPR Controller REST API includes services that allow you to programmaticallymanage a wide variety of resources in your data center.
This chapter describes each API service, and the data center components that thoseservices manage. For specific information on each ViPR Controller REST API call, see theEMC ViPR REST API reference.
API Service Description Example API Calls- - -Block services ViPR supports block storage on
VMAX, VNX Block and other arrays.The following ViPR resources aremanaged using Block Service APIcalls.
l Volumes
l Protection systems (block)
l Consistency groups
l Snapshots
l Exports
POST /block/volumes
GET /block/volumes/{id}
File services ViPR supports file storage on VNX file,NetApp and other arrays. Thefollowing ViPR resources aremanaged using File Service API calls.
l File systems
l File system snapshots
GET /file/filesystems/{id}
POST /file/filesystems
GET /file/snapshots/{id}
Compute services Compute services are used tomanage hosts in a data center. Theseresources are managed through thecompute services.
l Cluster
l Host
l Host discovery
l IP interface
l Initiator
l vCenter data center
l vCenter
GET /compute/hosts/{id}
PUT /compute/clusters/{id}
Virtual DataCenter Services
Virtual data center services manageresources that are built from thephysical assets in your data center.Virtual data center services include:
l Authentication providers
l Block virtual pools
l File virtual pools
GET /vdc/admin/authnproviders
GET /block/vpools
GET /file/vpools
POST /vdc/networks/{id}/register
POST /vdc/storage-systems/discover
GET /vdc/varrays
ViPR REST API Resources
36 EMC ViPR 1.1.0 Controller REST API Developer Guide

API Service Description Example API Calls- - -
l Networks
l SMI Providers
l Storage systems
l Virtual arrays
Setting up a virtual data center onpage 65 describes how to set up avirtual data center using the ViPRController REST API.
Setting Up a Single TenantEnvironment on page 19 and Settingup a Multi-tenant Environment onpage 51 describe how to useauthentication providers to buildsingle tenant and multi-tenantenvironments.
Tenant services Tenant services allow developers tomanage tenants, projects, andassociated resources.
GET /tenants/{id}
GET /projects/{id}/acl
PUT /projects/{id}
GET /tenants/{id}/role-assignments
UI Services The UI services include the followingresources:
l Approvals
l Asset options
l Execution windows
l Orders
l Schema
UI Services on page 145 describesthe UI Service resources and containsexamples of how these are used.
GET /api/approvals
POST /api/services/{serviceId}
POST /api/executionwindows
GET /api/orders
GET /api/schema.xsd
Other Services ViPR offers a number of services forlogging in and out of ViPR, viewingaudit logs, monitoring and metering,and building workflows.
l Audit
l Authentication
l User Info
l Monitoring
l Metering
l Workflow
GET /audit/logs
GET /monitoring/events
GET /metering/stats
GET /vdc/workfloww
GET /vdc/workflows/active
ViPR REST API Resources
ViPR services overview 37

System resourcesSystem resources are the physical and virtual data center resources managed by a userwith a System Administrator role.
Physical storage resources are only visible to and managed by the System Administrator.These resources include:
u Physical storage systems (EMC VNX, VMAX, VPLEX, Isilon, and NetApp arrays).
u Storage Pools and Storage Ports that are discovered through SMI-S providers.
u Switches from Brocade and Cisco. (Switches are called Network-Systems in the ViPRAPI.
u Auto-tiering policies such as Fully Automated Storage Tiering (FAST).
u IP and fibre channel network connectivity. Networks are ViPR resources that includeswitches, host ports, and array ports.
The System Administrator is also responsible for setting up two types of virtual resources:virtual arrays and virtual pools.
System resources: virtual arrayA virtual array is a container of networks with their connected storage system ports andhost initiator ports. A virtual array represents a realm of connectivity of host, network,and storage resources grouped together for purposes of fault tolerance.
Virtual arrays are set up to define and ensure connectivity from host to array. Theresources in the virtual array allow for multiple potential paths between the hosts andarrays through your SAN. ViPR uses the hosts ports, array ports and switches in the virtualarray to define multiple paths from your hosts to your arrays to enable the mostredundant communication path possible.
The following table shows some important REST calls that manage virtual arrays.
ViPR REST API Call Description- -GET /vdc/varrays Get a list of all virtual arrays configured in ViPR.
POST /vdc/varrays Create a virtual array.
GET /vdc/varrays/{id} Get information on a single virtual array.
POST /vdc/varrays/{id}/networks
Create a network for a virtual array. This call is needed to create an IPnetwork. Fibre Channel networks are created by registering a network-system.
GET /vdc/varrays/{id}/storage-pools
Get a list of physical storage pools that have been assigned to thevirtual array. This call displays pools explicitly assigned to the virtualarray through this API:PUT /vdc/storage-pools/{id}If no pools have been explicitly assigned to the virtual array,GET /vdc/varrays/{id}/storage-pools returns all
storage pools allocated on arrays whose endpoints are included innetworks assigned to your virtual array.
ViPR REST API Resources
38 EMC ViPR 1.1.0 Controller REST API Developer Guide

ViPR REST API Call Description- -GET /vdc/varrays/{id}/vpools
Returns a list of virtual pools that have been assigned to a virtual array.
System resources: virtual poolVirtual pools are created in ViPR by the System Administrator to define the storageservice capabilities associated with file, block, and object data services.
The System Administrator associates physical storage pools to defined virtual pools.Once the physical storage pools are associated to virtual pools, the virtual pools can beused by self-service provisioning end users (no role required) to provision storageresources such as volumes, file systems, and buckets. Virtual pools are visible to self-service provisioning end users, but the underlying physical storage systems, pools, ports,and networks are not.
There is also an object virtual pool that is backed by file-based storage to store objectdata.
A virtual pool contains a very large amount of information about the underlying physicalstorage. The following shows an example of a file virtual pool.
Request
GET /block/vpools/urn:storageos:VirtualPool:2eaacbc2-a3a2-4491-9ddd-9d4c4c4c9ae2:
Response<block_vpool> <creation_time>1382552786501</creation_time> <id>urn:storageos:VirtualPool:2eaacbc2-a3a2-4491-9ddd-9d4c4c4c9ae2:</id> <inactive>false</inactive> <link href="/block/vpools/urn:storageos:VirtualPool:2eaacbc2-a3a2-4491-9ddd-9d4c4c4c9ae2:" rel="self"/> <name>Pauls_virtual_pool thin block symm 1185</name> <tags/> <assigned_storage_pools> <storage_pool> <id>urn:storageos:StoragePool:a8e049d4-491a-4de2-ba2f-2f2be502601b:</id> <link href="/vdc/storage-systems/urn:storageos:StorageSystem:54c9a969-b8ba-4a68-862c-ac214f0453a9:/storage-pools/urn:storageos:StoragePool:a8e049d4-491a-4de2-ba2f-2f2be502601b:" rel="self"/> </storage_pool> </assigned_storage_pools> <description>Pauls_virtual_pool</description> <invalid_matched_pools> <storage_pool> <id>urn:storageos:StoragePool:fc9ae4f6-e32b-4503-97b6-fcbafe6eb4c3:</id> <link href="/vdc/storage-systems/urn:storageos:StorageSystem:6b23e681-b3da-4a7f-a4f0-4da6bf50cad9:/storage-pools/urn:storageos:StoragePool:fc9ae4f6-e32b-4503-97b6-fcbafe6eb4c3:" rel="self"/> </storage_pool> <!-- More Storage Pools --> </invalid_matched_pools> <matched_storage_pools/> <num_paths>1</num_paths> <num_resources>0</num_resources> <protocols> <protocol>FC</protocol>
ViPR REST API Resources
System resources: virtual pool 39
</protocols> <provisioning_type>Thin</provisioning_type> <system_type>NONE</system_type> <type>block</type> <use_matched_pools>false</use_matched_pools> <varrays> <varray> <id>urn:storageos:VirtualArray:339a534e-f69b-495b-87b2-c95a4a8f71c9:</id> <link href="/vdc/varrays/urn:storageos:VirtualArray:339a534e-f69b-495b-87b2-c95a4a8f71c9:" rel="self"/> </varray> </varrays> <drive_type>NONE</drive_type> <expandable>true</expandable> <multi_volume_consistency>false</multi_volume_consistency> <protection> <snapshots> <max_native_snapshots>0</max_native_snapshots> </snapshots> <continuous_copies> <max_native_continuous_copies>0</max_native_continuous_copies> </continuous_copies> </protection> <raid_levels/> <unique_auto_tier_policy_names>false</unique_auto_tier_policy_names></block_vpool>
The following table shows some commonly used calls for file, block, and object virtualpools.
ViPR REST API Call Description- -POST /block/vpools Create a block virtual pool.
GET /block/vpools Get a list of block virtual pools.
GET /block/vpools/{id} Get information on a specific block virtual pool.
PUT /block/vpools/{id} Update a block virtual pool.
POST /file/vpools Create a file virtual pool.
GET /file/vpools Get a list of file virtual pools.
GET /file/vpools/{id} Get information on a specific file virtual pool.
PUT /file/vpools/{id} Update a block file pool.
GET /object/data-services-vpools/{id}/data-stores
Get data stores
POST /object/data-services-vpools Create a data services virtual pool
GET /object/data-services-vpools List all data services virtual pools
GET /object/data-services-vpools/{id} Get data services virtual pool details
PUT /object/data-services-vpools/{id} Update data services virtual pool details
POST /object/data-services-vpools/{id}/deactivate
Delete data services virtual pool
ViPR REST API Resources
40 EMC ViPR 1.1.0 Controller REST API Developer Guide

System resources: networks and network systemsViPR can manage switches and fabrics through the network and network-systemsresources.
A network in a virtual array represents connectivity within the virtual array and the controlpath of volumes and file systems exposed by that virtual array.
ViPR supports two types of networks: Fibre Channel networks and IP networks. ViPRautomatically discovers fibre channel networks during network-system (SAN switch)discovery. IP networks must be built manually by the System Administrator or ViPR APIdeveloper.
A network-system is the virtual representation of a physical switch. The most efficientmethod of adding fibre channel networks to ViPR is to register a network-system. Whenthe Brocade or Cisco switch is registered, ViPR automatically executes a discovery on thatswitch. Any VSANs or FABRICS configured on the switch are ingested into ViPR as networkresources. You can see the network-system resource referenced in the fibre channelnetwork representation.
<network_systems> <network_system>urn:storageos:NetworkSystem:76adbd2a-6827-405d-870d-79606342807b:</network_system> </network_systems>
One network maps to each VSAN/fabric discovered on a switch with its collection ofendpoints; that is, the storage system ports and host ports (initiator ports on a host ESXserver) to which the switch is connected.
Note
In the ViPR user interface, a network-system is called a Fabric Manager.
API review - Fibre Channel networksNetworks are part of a virtual storage array. ViPR handles Fibre Channel networksdifferently from IP networks.
The following APIs allow the ViPR system administrator to create Fibre Channel networksand add them to virtual storage arrays. Note that fibre channel networks are not directlycreated through the API. Fibre channel networks are created by ViPR when yousuccessfully discover either a Cisco or Brocade switch.
ViPR REST API Call Description- -/vdc/network-systems Creates a network-system. To create Fibre Channel networks, you
must:
l Create a network-system.
l Register it with ViPR.
After a successful network-system registration, the fibre channelswitch, its host ports and its array ports are discovered, and one ormore networks is built from that information.
/vdc/network-systems/{id}/register
GET /vdc/networks List networks.
POST /vdc/networks/{id}/deactivate
Delete a network from ViPR.
POST /vdc/varrays Creates a virtual array
ViPR REST API Resources
System resources: networks and network systems 41

ViPR REST API Call Description- -POST /vdc/varrays/{id}/networks
Add a network to the virtual array
The following shows a fibre channel network resource.GET /vdc/networks/urn:storageos:Network:9afa585c-8411-43e8-9abc-8d1eb80d03e5:
<network> <creation_time>1382128881407</creation_time> <id>urn:storageos:Network:9afa585c-8411-43e8-9abc-8d1eb80d03e5:</id> <inactive>false</inactive> <link href="/vdc/networks/urn:storageos:Network:9afa585c-8411-43e8-9abc-8d1eb80d03e5:" rel="self"/> <name>FABRIC_losbe175</name> <tags/> <native_guid>FC+BROCADE+10:00:00:05:1E:35:C0:30</native_guid> <discovered>true</discovered> <endpoints> <endpoint>21:00:00:1B:32:08:74:1F</endpoint> <endpoint>10:00:00:00:C9:62:CB:10</endpoint> <endpoint>50:06:01:60:47:20:26:1A</endpoint> <endpoint>50:01:24:82:67:64:A0:C7</endpoint> </endpoints> <endpoints_discovered> <endpoint_discovered> <name>21:00:00:1B:32:08:74:1F</name> <value>true</value> </endpoint_discovered> <endpoint_discovered> <name>10:00:00:00:C9:62:CB:10</name> <value>true</value> </endpoint_discovered> <endpoint_discovered> <name>50:06:01:60:47:20:26:1A</name> <value>true</value> </endpoint_discovered> <endpoint_discovered> <name>50:01:24:82:67:64:A0:C7</name> <value>true</value> </endpoint_discovered> </endpoints_discovered> <fabric_id>losbe175</fabric_id> <network_systems> <network_system>urn:storageos:NetworkSystem:76adbd2a-6827-405d-870d-79606342807b:</network_system> </network_systems> <registration_status>REGISTERED</registration_status> <transport_type>FC</transport_type> <varray> <id>urn:storageos:VirtualArray:339a534e-f69b-495b-87b2-c95a4a8f71c9:</id> <link href="/vdc/varrays/urn:storageos:VirtualArray:339a534e-f69b-495b-87b2-c95a4a8f71c9:" rel="self"/> </varray></network>
API review: IP networksNetworks are part of a virtual storage array. Unlike fibre channel networks, IP networksmust be built by the system administrator by hand and added to the virtual storage array.
The following APIs allow the ViPR system administrator to create IP networks and addthem to a virtual storage array. Note that IP networks must be explicitly created andpopulated - they cannot be discovered like fibre channel networks.
ViPR REST API Resources
42 EMC ViPR 1.1.0 Controller REST API Developer Guide

ViPR REST API Call Description- -POST /vdc/varrays/{varray_id}/networks
Creates an IP network resource.
GET /vdc/networks List all networks in the virtual data center.
POST /vdc/storage-systems Add storage systems to ViPR.
POST /vdc/storage-systems/{id}/register
Register a storage system with ViPR
GET /vdc/storage-systems/{id}/storage-ports/{storage_port_id}
Retrieve information on a storage port. The informationrequired to add an array endpoint is contained in theport_network_id field in the response body.
<port_network_id>50:00:09:82:A1:7E:70:C4</port_network_id>
GET /compute/hosts/bulk Get a list of ViPR hosts.
GET /compute/hosts/{id} Get information about a host. The id provided here is the URNof a host. This returns an IP Interface for the host.
GET /compute/ip-interfaces/{ip_interface_id}
Retrieve information on the IP Interface. Information aboutthe Host endpoint is in the ip_address field in the
response body for this call.
PUT /vdc/networks/{id}/endpoints
Add storage ports and host ports to the IP network.
The following shows a ViPR representation of an IP network.GET /vdc/networks/urn:storageos:Network:7e92077c-cd55-4264-ae79-7b51cd1f35dc:
<network> <creation_time>1384888781885</creation_time> <id>urn:storageos:Network:7e92077c-cd55-4264-ae79-7b51cd1f35dc:</id> <inactive>false</inactive> <link href="/vdc/networks/urn:storageos:Network:7e92077c-cd55-4264-ae79-7b51cd1f35dc:" rel="self"/> <name>bobs ip</name> <tags/> <native_guid/> <discovered>false</discovered> <endpoints> <endpoint>10.247.166.180</endpoint> </endpoints> <endpoints_discovered> <endpoint_discovered> <name>10.247.166.180</name> <value>false</value> </endpoint_discovered> </endpoints_discovered> <registration_status>REGISTERED</registration_status> <transport_type>IP</transport_type> <varray> <id>urn:storageos:VirtualArray:b60def12-a703-4be6-9505-369af471f6e7:</id> <link href="/vdc/varrays/urn:storageos:VirtualArray:b60def12-a703-4be6-9505-369af471f6e7:" rel="self"/> </varray></network>
ViPR REST API Resources
System resources: networks and network systems 43

API review - network systemsNetwork systems are physical switches in your data center.
Network systems come in two types:u Brocadeu Cisco
Brocade switches are discovered through CMCNE software, which must be installed on ahost in your network. CiSCO switches are discovered through an SMI-S provider.
ViPR REST API Call Description- -GET /vdc/network-systems List switches registered with ViPR.
POST /vdc/network-systems/{id}/discover
Discover a network-system. This is rarely called directly bythe API programmer. Network-system discoveries areperformed automatically by ViPR when you successfullyregister a network system.
POST /vdc/network-systems/{id}/register
Register a network system.
Example: <ViPR_URL>/vdc/network-systemsIn this example, the Brocade CMCNE host based management software is installed on aWindows host in the data center. This API call returns a list of network-systems. In thisexample, ViPR has only one network-system resource discovered.
RequestGet <ViPR_VIP>/vdc/network-systems
Response<?xml version="1.0" encoding="UTF-8" standalone="yes"?><network_systems> <network_system> <id>urn:storageos:NetworkSystem:8ef79865-c829-48c6-84d1-b184e63025c6:</id> <link href="/vdc/network-systems/urn:storageos:NetworkSystem:8ef79865-c829-48c6-84d1-b184e63025c6:" rel="self"/> <name>CMCNE 10.247.71.183</name> </network_system></network_systems>
Example: <ViPR_URL>/vdc/network-systems/{network-system_URN}This example shows the information returned for a single network-system resource.
RequestGet <VIPR_VIP>/vdc/network-systems/{network-system_URN}
Response
<network_system> <creation_time>1384377287345</creation_time> <id>urn:storageos:NetworkSystem:8ef79865-c829-48c6-84d1-b184e63025c6:</id> <inactive>false</inactive> <link href="/vdc/network-systems/urn:storageos:NetworkSystem:8ef79865-c829-48c6-84d1-b184e63025c6:" rel="self"/> <name>CMCNE 10.247.71.183</name> <tags/> <native_guid>BROCADE+10.247.71.183+5989</native_guid> <compatibility_status>COMPATIBLE</compatibility_status> <job_discovery_status>COMPLETE</job_discovery_status> <last_discovery_run_time>1384542614578</last_discovery_run_time>
ViPR REST API Resources
44 EMC ViPR 1.1.0 Controller REST API Developer Guide

<last_discovery_status_message>Discovery completed successfully for Network System : urn:storageos:NetworkSystem:8ef79865-c829-48c6-84d1-b184e63025c6:</last_discovery_status_message> <last_metering_run_time>0</last_metering_run_time> <job_metering_status>CREATED</job_metering_status> <next_discovery_run_time>1384546213777</next_discovery_run_time> <next_metering_run_time>0</next_metering_run_time> <registration_status>REGISTERED</registration_status> <system_type>brocade</system_type> <ip_address>10.247.71.183</ip_address> <port_number>5989</port_number> <smis_port_number>5989</smis_port_number> <smis_provider_ip>10.247.71.183</smis_provider_ip> <smis_use_ssl>true</smis_use_ssl> <smis_user_name>administrator</smis_user_name> <uptime>2 days, 10 hours, 51 minutes, 33 seconds</uptime> <user_name>administrator</user_name> <version>11.2.1 build 165</version></network_system>
Adding an IP network to a virtual arrayViPR supports two types of networks: fibre channel and IP. This procedure shows how tobuild an IP network, and add it to a virtual array.
Before you begin
You must have the following resources available in ViPR:
u At least one storage system
u At least one host
u A virtual array
For simplicity, the following procedure shows how to add a single host port and a singlearray port to the IP network. Typically, an IP network would include multiple host andarray ports.
Procedure
1. Retrieve the URN of a valid virtual array.
RequestGET /vdc/varrays
Response<varrays> <varray> <id>urn:storageos:VirtualArray:339a534e-f69b-495b-87b2-c95a4a8f71c9:</id> <link href="/vdc/varrays/urn:storageos:VirtualArray:339a534e-f69b-495b-87b2-c95a4a8f71c9:" rel="self"/> <name>pauls_virtual_array</name> </varray> <varray> <id>urn:storageos:VirtualArray:b60def12-a703-4be6-9505-369af471f6e7:</id> <link href="/vdc/varrays/urn:storageos:VirtualArray:b60def12-a703-4be6-9505-369af471f6e7:" rel="self"/> <name>new test</name> </varray></varrays>
Use the ID of a listed virtual array to create an IP network resource in the next step.
2. Build a new IP network.
RequestPOST /vdc/varrays/{id}/networks
ViPR REST API Resources
System resources: networks and network systems 45

<network_create> <name>NewIPNetwork</name> <transport_type>IP</transport_type></network_create>
Response<network> <creation_time>1385067752563</creation_time> <id>urn:storageos:Network:26f3efbf-9afd-4a23-b828-ae5aba0d3a81:</id> <inactive>false</inactive> <link href="/vdc/networks/urn:storageos:Network:26f3efbf-9afd-4a23-b828-ae5aba0d3a81:" rel="self"/> <name>NewIPNetwork</name> <tags/> <native_guid/> <discovered>false</discovered> <endpoints/> <endpoints_discovered/> <registration_status>REGISTERED</registration_status> <transport_type>IP</transport_type> <varray> <id>urn:storageos:VirtualArray:339a534e-f69b-495b-87b2-c95a4a8f71c9:</id> <link href="/vdc/varrays/urn:storageos:VirtualArray:339a534e-f69b-495b-87b2-c95a4a8f71c9:" rel="self"/> </varray></network>
3. Get a list of hosts.
RequestGET /compute/hosts/bulk
Response<ids> <id>urn:storageos:Host:44295238-9d8e-44ad-940d-0272483b772e:</id> <id>urn:storageos:Host:4f8ccf42-f9fb-4088-a46f-791ed7afc110:</id> <id>urn:storageos:Host:62d77c0b-83e5-4fa8-a6e9-10b0291c1bad:</id> <id>urn:storageos:Host:71c0513f-38fe-45d8-a07e-55856965f53a:</id> <id>urn:storageos:Host:8bb9081b-94cf-4694-8952-f4f8f6739c1d:</id> <id>urn:storageos:Host:cc7d6de2-05cc-485a-b9ba-7196ddf060c1:</id> <id>urn:storageos:Host:d683a9bf-358b-40ad-89e3-db22acef1e50:</id> <id>urn:storageos:Host:ed2b0a9a-f3a3-4d4d-9e9d-3b6449513995:</id> <id>urn:storageos:Host:f06a2acc-2d9f-4105-8804-a0f4019bc6e5:</id> <id>urn:storageos:Host:f6ad7311-10eb-4f3b-8b00-7becff73b84d:</id></ids>
4. Choose a host from the list, and retrieve the IP interfaces for that host.
RequestGET /compute/hosts/{Host_URN}/ip-interfaces
Response<ip_interfaces> <ip_interface> <id>urn:storageos:IpInterface:4f518e6e-8e0d-4a4c-84ee-95a683f923f1:</id> <link href="/compute/ip-interfaces/urn:storageos:IpInterface:4f518e6e-8e0d-4a4c-84ee-95a683f923f1:" rel="self"/> <name>10.247.71.11</name> </ip_interface></ip_interfaces>
Choose an IP Interface. (In the above example, there is only 1.)
5. Call the following API to get detailed information about the interface.
RequestGET /compute/ip-interfaces/{IpInterface_urn}
ViPR REST API Resources
46 EMC ViPR 1.1.0 Controller REST API Developer Guide

Response<ip_interface> <creation_time>1382128965902</creation_time> <id>urn:storageos:IpInterface:4f518e6e-8e0d-4a4c-84ee-95a683f923f1:</id> <inactive>false</inactive> <link href="/compute/ip-interfaces/urn:storageos:IpInterface:4f518e6e-8e0d-4a4c-84ee-95a683f923f1:" rel="self"/> <name>7/ipv4</name> <tags/> <host> <id>urn:storageos:Host:f6ad7311-10eb-4f3b-8b00-7becff73b84d:</id> <link href="/compute/hosts/urn:storageos:Host:f6ad7311-10eb-4f3b-8b00-7becff73b84d:" rel="self"/> </host> <protocol>IPV4</protocol> <ip_address>10.247.71.11</ip_address> <netmask>255.255.255.0</netmask></ip_interface>
The <ip_address> field has information you need to add a host endpoint to the IPnetwork.
6. Get a list of storage systems.
RequestGET /vdc/storage-systems
Response<storage_systems> <storage_system> <id>urn:storageos:StorageSystem:ab79974d-2097-4666-bebe-25a299d8211b:</id> <link href="/vdc/storage-systems/urn:storageos:StorageSystem:ab79974d-2097-4666-bebe-25a299d8211b:" rel="self"/> <name>SYMMETRIX+999024668923</name> </storage_system></storage_systems>
7. Get a list of storage ports for that storage system.
RequestGET /vdc/storage-systems/{StorageSystem_URN}/storage-ports
Response
<storage_ports> <storage_port> <id>urn:storageos:StoragePort:00c2a754-b67a-4b1c-b7e2-8e0b583e408c:</id> <link href="/vdc/storage-systems/urn:storageos:StorageSystem:d53ee95e-ee7f-4f8a-bd1c-923bd6ec840a:/storage-ports/urn:storageos:StoragePort:00c2a754-b67a-4b1c-b7e2-8e0b583e408c:" rel="self"/> <name>SYMMETRIX+000195700932+PORT+50:00:09:73:00:0E:91:5D</name> </storage_port> <storage_port> <id>urn:storageos:StoragePort:241b767f-afd7-4c4c-8136-b1d59dd61ea1:</id> <link href="/vdc/storage-systems/urn:storageos:StorageSystem:d53ee95e-ee7f-4f8a-bd1c-923bd6ec840a:/storage-ports/urn:storageos:StoragePort:241b767f-afd7-4c4c-8136-b1d59dd61ea1:" rel="self"/> <name>SYMMETRIX+000195700932+PORT+iqn.1992-04.com.emc:50000973000e91e0</name>
ViPR REST API Resources
System resources: networks and network systems 47

</storage_port></storage_ports>
8. Get information for a storage port in the list.
RequestGET /vdc/storage-ports/{StoragePort_urn}
Response<storage_port> <creation_time>1384185364056</creation_time> <id>urn:storageos:StoragePort:00c2a754-b67a-4b1c-b7e2-8e0b583e408c:</id> <inactive>false</inactive> <link href="/vdc/storage-systems/urn:storageos:StorageSystem:d53ee95e-ee7f-4f8a-bd1c-923bd6ec840a:/storage-ports/urn:storageos:StoragePort:00c2a754-b67a-4b1c-b7e2-8e0b583e408c:" rel="self"/> <name>SYMMETRIX+000195700932+PORT+50:00:09:73:00:0E:91:5D</name> <tags/> <native_guid>SYMMETRIX+000195700932+PORT+50:00:09:73:00:0E:91:5D</native_guid> <operational_status>OK</operational_status> <port_group>FA-8F</port_group> <port_name>FA-8F:1</port_name> <port_network_id>50:00:09:73:00:0E:91:5D</port_network_id> <port_speed_gbps>8</port_speed_gbps> <port_type>frontend</port_type> <registration_status>REGISTERED</registration_status> <storage_system> <id>urn:storageos:StorageSystem:d53ee95e-ee7f-4f8a-bd1c-923bd6ec840a:</id> <link href="/vdc/storage-systems/urn:storageos:StorageSystem:d53ee95e-ee7f-4f8a-bd1c-923bd6ec840a:" rel="self"/> </storage_system> <transport_type>FC</transport_type></storage_port>
The <port_network_id> holds the information for the endpoint you want to add to the IPnetwork.
9. Add the host and array ports to the IP network.
RequestPUT /vdc/networks/{id}/endpoints
<network_endpoints> <endpoints> <endpoint>10.247.71.11</endpoint> <endpoint>50:00:09:73:00:0E:91:5D</endpoint> <!--...more "endpoint" elements...--> </endpoints> <op>add</op></network_endpoints>
The network id is the one you generated in step 2.
10.Update the network with the ID of the virtual array to which you want to assign thevirtual array.
RequestPUT /vdc/networks/{network_urn}
<network_update> <name>NewIPNetwork</name> <varrays> <varray>pauls_virtual_array</varray>
ViPR REST API Resources
48 EMC ViPR 1.1.0 Controller REST API Developer Guide
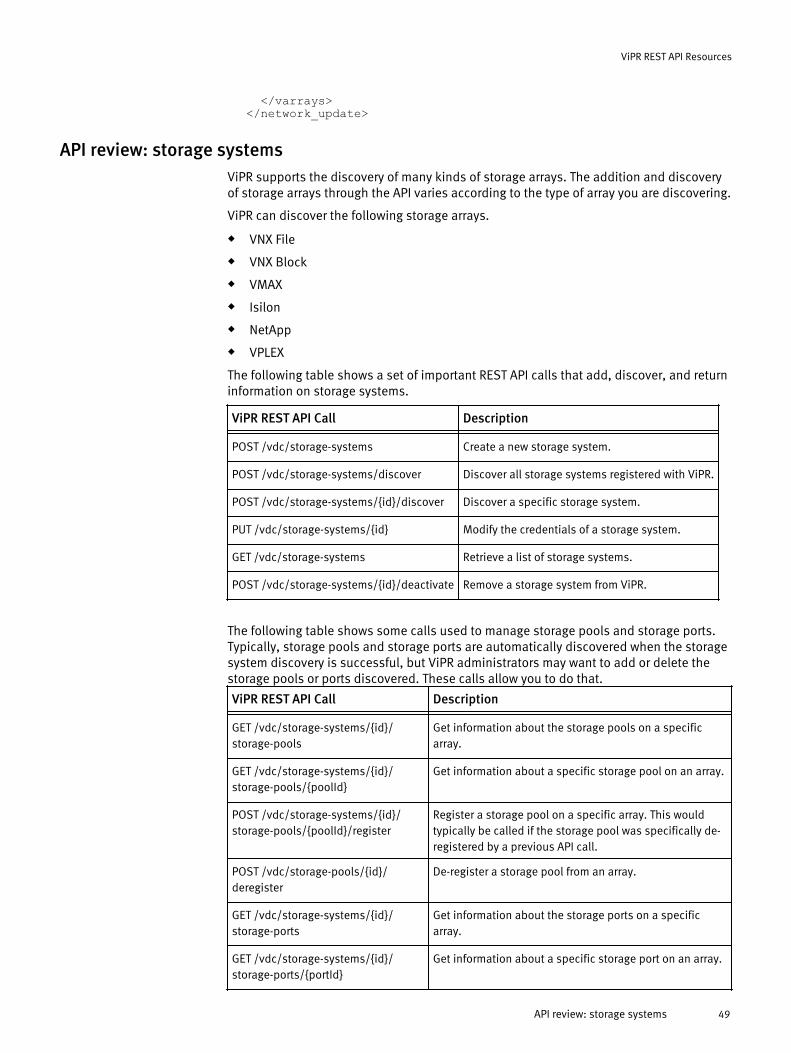
</varrays></network_update>
API review: storage systemsViPR supports the discovery of many kinds of storage arrays. The addition and discoveryof storage arrays through the API varies according to the type of array you are discovering.
ViPR can discover the following storage arrays.
u VNX File
u VNX Block
u VMAX
u Isilon
u NetApp
u VPLEX
The following table shows a set of important REST API calls that add, discover, and returninformation on storage systems.
ViPR REST API Call Description- -POST /vdc/storage-systems Create a new storage system.
POST /vdc/storage-systems/discover Discover all storage systems registered with ViPR.
POST /vdc/storage-systems/{id}/discover Discover a specific storage system.
PUT /vdc/storage-systems/{id} Modify the credentials of a storage system.
GET /vdc/storage-systems Retrieve a list of storage systems.
POST /vdc/storage-systems/{id}/deactivate Remove a storage system from ViPR.
The following table shows some calls used to manage storage pools and storage ports.Typically, storage pools and storage ports are automatically discovered when the storagesystem discovery is successful, but ViPR administrators may want to add or delete thestorage pools or ports discovered. These calls allow you to do that.
ViPR REST API Call Description- -GET /vdc/storage-systems/{id}/storage-pools
Get information about the storage pools on a specificarray.
GET /vdc/storage-systems/{id}/storage-pools/{poolId}
Get information about a specific storage pool on an array.
POST /vdc/storage-systems/{id}/storage-pools/{poolId}/register
Register a storage pool on a specific array. This wouldtypically be called if the storage pool was specifically de-registered by a previous API call.
POST /vdc/storage-pools/{id}/deregister
De-register a storage pool from an array.
GET /vdc/storage-systems/{id}/storage-ports
Get information about the storage ports on a specificarray.
GET /vdc/storage-systems/{id}/storage-ports/{portId}
Get information about a specific storage port on an array.
ViPR REST API Resources
API review: storage systems 49

ViPR REST API Call Description- -POST /vdc/storage-systems/{id}/storage-ports/{portId}/register
Register a storage port on a specific array. This wouldtypically be called if the storage port was specifically de-registered by a previous API call.
POST /vdc/storage-ports/{id}/deregister
De-register a storage port from an array.
ViPR also discovers the Fully Automated Storage Tiering (FAST) policies (called auto tierpolicies in ViPR) and the storage tiers associated with the physical storage pools onVPLEX, VMAX, and VNX block arrays.
ViPR REST API Call Description- -GET /vdc/storage-systems/{id}/auto-tier-policies List storage system autotier policies
Tenant and project resourcesIn the ViPR virtual data center, there is a top level provider tenant (this would be a serviceprovider or an enterprise IT department in a private cloud deployment). This providertenant can contain one level of subtenants.
ViPR users reside in your corporate Active Directory or LDAP repository and are mapped toViPR tenants through an authentication provider. Users are then assigned roles, whichgrant them privileges to create, read, update and delete resources in the ViPRenvironment. Users mapped to a tenant and assigned sufficient privileges can create onelevel of projects within their tenancy, and allocate the appropriate storage resources (thatis, volumes, file systems, and objects) to each project.
In an enterprise environment, the provider tenant is used and no additional subtenantsare needed. So for example, the ABC enterprise would be the provider tenant and wouldcreate one level with many projects within its tenancy. (There are no subtenants underthe ABC enterprise provider tenant.)
In a service provider environment, the provider tenant (that is, the service provider) cancreate one level of tenants. For example, suppose the Acme Service Provider is theprovider tenant and this service provider has two customers: the ABC and XYZcompanies. The service provider could then create two subtenants within ViPR namedABC and XYZ. These tenants represent organizations operating within the ViPRenvironment.
Tenants are created in ViPR for the purpose of strict security isolation. Typically, eachtenant is configured with its own Authentication Provider. The users in the ABC and XYZtenants see a URL namespace that is limited to the information associated with theirtenancy. There is no provision to create the tenants from the ViPR Administration and SelfService UI. The ViPR REST API can be used to create tenants if needed.
As shown in the resource model, users can create their own projects within their tenant.Projects are used to create enterprise departments or organizations. A user in the ABCtenant could create projects for HR, Sales, and Payroll; these projects are a way ofgrouping resources mapped to specific applications.
Users can provision multiple storage resources from different data services (block, file,and object stores) to their projects (that is, storage volumes, file systems, or objects suchas files or images). Resources from one project can be shared between users under thesame tenant.
ViPR REST API Resources
50 EMC ViPR 1.1.0 Controller REST API Developer Guide

CHAPTER 5
Setting Up a Multi-tenant Environment
This chapter contains the following topics.
u Prerequisites for creating multiple tenants............................................................ 52u Configuring multiple tenants with the REST API......................................................52
Setting Up a Multi-tenant Environment 51
Prerequisites for creating multiple tenantsViPR can be configured with multiple tenants. Each tenant has its own environment forcreating and managing storage. Storage resources assigned to a tenant cannot beaccessed by users from other tenants.
Before creating additional tenants, you must have performed the deployment and initialconfiguration of the ViPR controller described in the EMC ViPR Installation andConfiguration Guide chapter entitled "Initial configuration of ViPR virtual appliance".
The initial configuration of ViPR sets up a single-tenant environment. Only the providertenant is available by default. To set up a multi-tenant ViPR environment, you must usethe API procedure described in this chapter. (An analogous procedure using the ViPR CLIis also available.) You cannot create subtenants under the provider tenant from the ViPRUser Interface.
Physical assets, such as storage systems and fabrics, added to ViPR are available to thevirtual data center and can be assigned to any tenant. Similarly, virtual arrays and virtualpools created in ViPR are virtual data center assets and can be assigned to any tenant,including new tenants that you create. For example, the configuration of virtual arraysand virtual pools can be performed for the provider tenant from the UI. Those virtualarrays and virtual pools can then be assigned to new tenants.
ViPR role requirementsThe root user for your ViPR vApp has all the role assignments you need to complete themulti-tenant setup.
Example format: XMLThe ViPR Controller REST API can accept and deliver request and response data in eitherXML or JSON format.
The examples in this chapter show requests and responses in XML format.
Configuring multiple tenants with the REST APIThis section shows how to configure multiple tenants with the ViPR API.
Before you begin
Complete the deployment and initial configuration steps in the EMC ViPR Installation andConfiguration Guide.Procedure
1. Authenticate with ViPR using an account that has Security Administrator and SystemAdministrator roles. The root user has these roles and can be used.
How you authenticate depends on the HTTP client that you are using. If you are using abrowser-based client, you could log in at the ViPR UI and the session cookie createdwill authenticate the HTTP client connection.
2. Ensure you have an authentication provider configured that will authenticate users inyour domain.
Either:
l Create an authentication provider at the Admin > Security > AuthenticationProviders menu of the ViPR UI.
l Use the /vdc/admin/authnproviders API. For example:
Setting Up a Multi-tenant Environment
52 EMC ViPR 1.1.0 Controller REST API Developer Guide
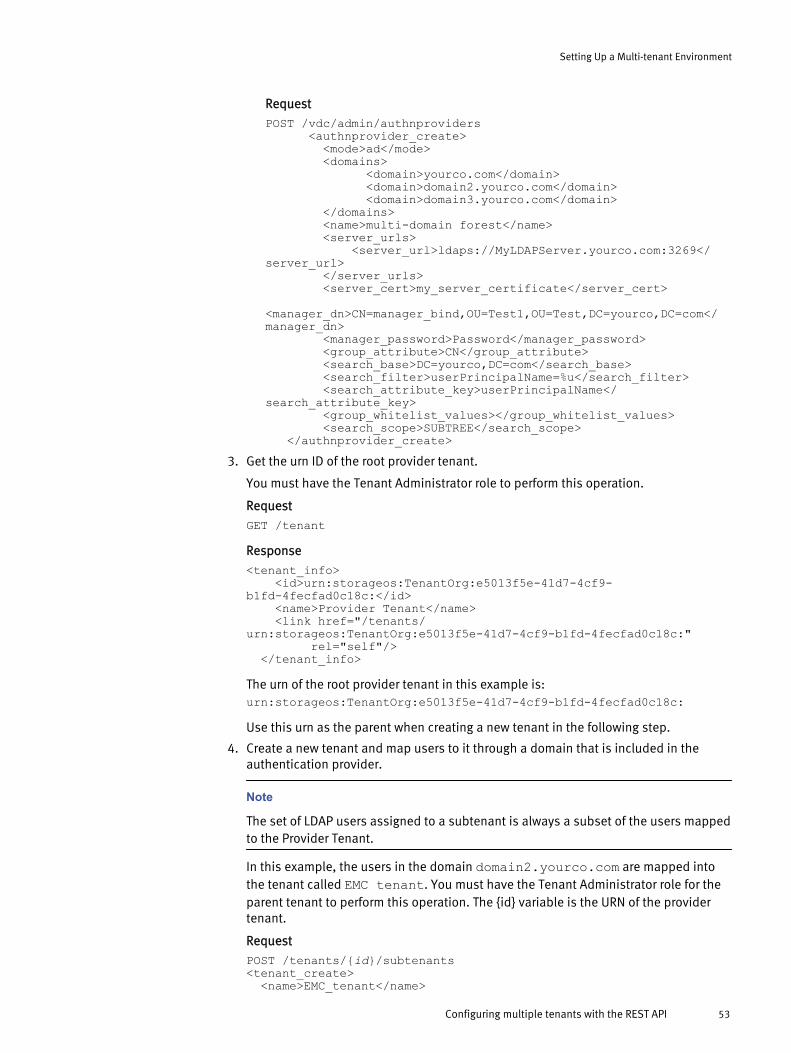
Request
POST /vdc/admin/authnproviders <authnprovider_create> <mode>ad</mode> <domains> <domain>yourco.com</domain> <domain>domain2.yourco.com</domain> <domain>domain3.yourco.com</domain> </domains> <name>multi-domain forest</name> <server_urls> <server_url>ldaps://MyLDAPServer.yourco.com:3269</server_url> </server_urls> <server_cert>my_server_certificate</server_cert> <manager_dn>CN=manager_bind,OU=Test1,OU=Test,DC=yourco,DC=com</manager_dn> <manager_password>Password</manager_password> <group_attribute>CN</group_attribute> <search_base>DC=yourco,DC=com</search_base> <search_filter>userPrincipalName=%u</search_filter> <search_attribute_key>userPrincipalName</search_attribute_key> <group_whitelist_values></group_whitelist_values> <search_scope>SUBTREE</search_scope> </authnprovider_create>
3. Get the urn ID of the root provider tenant.
You must have the Tenant Administrator role to perform this operation.
Request
GET /tenant
Response
<tenant_info> <id>urn:storageos:TenantOrg:e5013f5e-41d7-4cf9-b1fd-4fecfad0c18c:</id> <name>Provider Tenant</name> <link href="/tenants/urn:storageos:TenantOrg:e5013f5e-41d7-4cf9-b1fd-4fecfad0c18c:" rel="self"/> </tenant_info>
The urn of the root provider tenant in this example is:urn:storageos:TenantOrg:e5013f5e-41d7-4cf9-b1fd-4fecfad0c18c:
Use this urn as the parent when creating a new tenant in the following step.
4. Create a new tenant and map users to it through a domain that is included in theauthentication provider.
Note
The set of LDAP users assigned to a subtenant is always a subset of the users mappedto the Provider Tenant.
In this example, the users in the domain domain2.yourco.com are mapped intothe tenant called EMC tenant. You must have the Tenant Administrator role for theparent tenant to perform this operation. The {id} variable is the URN of the providertenant.
Request
POST /tenants/{id}/subtenants<tenant_create> <name>EMC_tenant</name>
Setting Up a Multi-tenant Environment
Configuring multiple tenants with the REST API 53

<user_mappings> <user_mapping> <domain>domain2.yourco.com</domain> </user_mapping> </user_mappings></tenant_create>
You can control the users mapped into a tenant by specifying attributes. For example,if you only want users assigned to a specific department in AD to be mapped into thetenant, you can set key/value attributes. For example:<user_mapping> <domain>domain2.yourco.com</domain> <attributes> <attribute> <key>department</key> <value>development</value> </attribute> <attributes> </user_mapping>
Alternatively, you can map users into the tenant based on their AD group. Thefollowing user mapping maps members of the "lab users" group into the tenant:<user_mapping> <domain>domain2.yourco.com</domain> <groups> <group>lab users</group> </groups> </user_mapping>
You can include more than one <user_mapping> to enable users to be mapped fromany of the specified mappings.
If you included more than one group in a <user_mapping>, the user must belong to allgroups. In the example below, users must belong to both "lab users" and "labadministrators" groups to be mapped into the tenant.<user_mapping> <domain>domain2.yourco.com</domain> <groups> <group>lab users</group> <group>lab administrators</group> </groups> </user_mapping>
Response
<tenant> <creation_time>1378919846777</creation_time> <id>urn:storageos:TenantOrg:4edc456c-c7f5-4c54-84b2-29715cc8f504:</id> <inactive>false</inactive> <link href="/tenants/urn:storageos:TenantOrg:4edc456c-c7f5-4c54-84b2-29715cc8f504:" rel="self"/> <name>EMC tenant</name> <tags/> <parent_tenant> <id>urn:storageos:TenantOrg:e5013f5e-41d7-4cf9-b1fd-4fecfad0c18c:</id> <link href="/tenants/urn:storageos:TenantOrg:e5013f5e-41d7-4cf9-b1fd-4fecfad0c18c:" rel="self"/> </parent_tenant> <user_mappings> <user_mapping> <attributes/> <domain>domain2.yourco.com</domain> <groups/> </user_mapping>
Setting Up a Multi-tenant Environment
54 EMC ViPR 1.1.0 Controller REST API Developer Guide
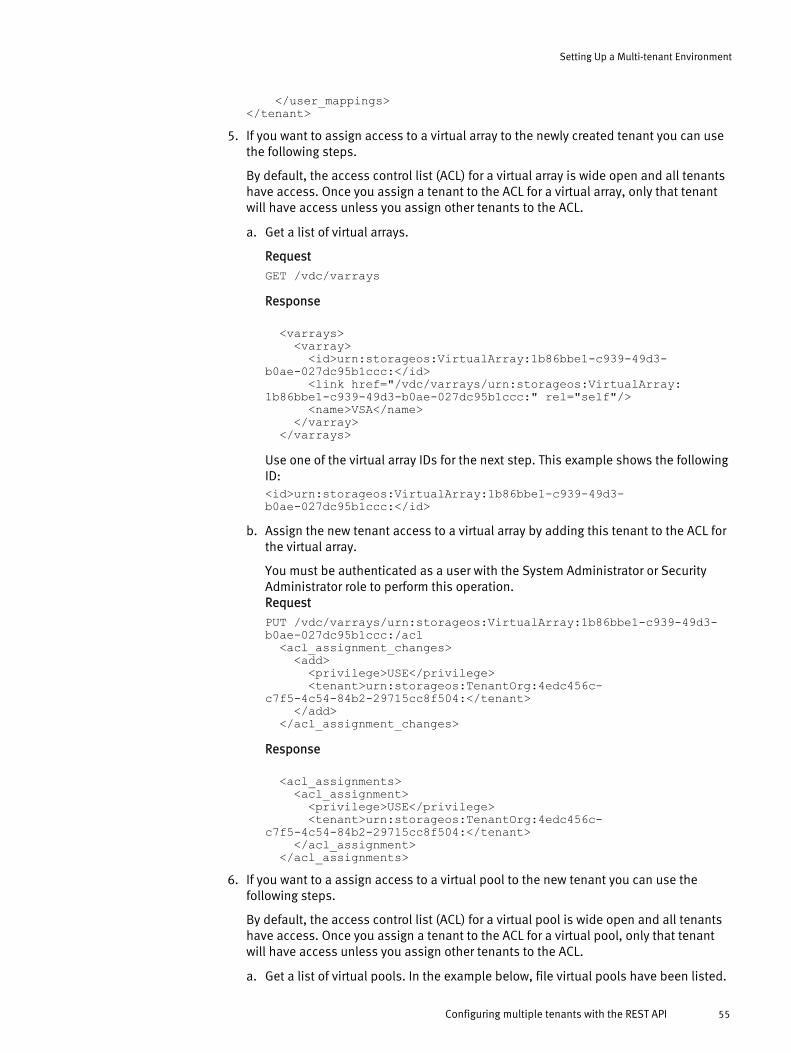
</user_mappings></tenant>
5. If you want to assign access to a virtual array to the newly created tenant you can usethe following steps.
By default, the access control list (ACL) for a virtual array is wide open and all tenantshave access. Once you assign a tenant to the ACL for a virtual array, only that tenantwill have access unless you assign other tenants to the ACL.
a. Get a list of virtual arrays.
Request
GET /vdc/varrays
Response
<varrays> <varray> <id>urn:storageos:VirtualArray:1b86bbe1-c939-49d3-b0ae-027dc95b1ccc:</id> <link href="/vdc/varrays/urn:storageos:VirtualArray:1b86bbe1-c939-49d3-b0ae-027dc95b1ccc:" rel="self"/> <name>VSA</name> </varray> </varrays>
Use one of the virtual array IDs for the next step. This example shows the followingID:<id>urn:storageos:VirtualArray:1b86bbe1-c939-49d3-b0ae-027dc95b1ccc:</id>
b. Assign the new tenant access to a virtual array by adding this tenant to the ACL forthe virtual array.
You must be authenticated as a user with the System Administrator or SecurityAdministrator role to perform this operation.Request
PUT /vdc/varrays/urn:storageos:VirtualArray:1b86bbe1-c939-49d3-b0ae-027dc95b1ccc:/acl <acl_assignment_changes> <add> <privilege>USE</privilege> <tenant>urn:storageos:TenantOrg:4edc456c-c7f5-4c54-84b2-29715cc8f504:</tenant> </add> </acl_assignment_changes>
Response
<acl_assignments> <acl_assignment> <privilege>USE</privilege> <tenant>urn:storageos:TenantOrg:4edc456c-c7f5-4c54-84b2-29715cc8f504:</tenant> </acl_assignment> </acl_assignments>
6. If you want to a assign access to a virtual pool to the new tenant you can use thefollowing steps.
By default, the access control list (ACL) for a virtual pool is wide open and all tenantshave access. Once you assign a tenant to the ACL for a virtual pool, only that tenantwill have access unless you assign other tenants to the ACL.
a. Get a list of virtual pools. In the example below, file virtual pools have been listed.
Setting Up a Multi-tenant Environment
Configuring multiple tenants with the REST API 55

Request
GET /file/vpools
Response
<vpool_list> <virtualpool> <id>urn:storageos:VirtualPool:58406f8b-5a0e-41c0-a91b-5a8c59ac3a02:</id> <link href="/file/vpools/urn:storageos:VirtualPool:58406f8b-5a0e-41c0-a91b-5a8c59ac3a02:" rel="self"/> <name>vsp1</name> <vpool_type>file</vpool_type> </virtualpool> </vpool_list>
b. Retrieve the urn of a virtual pool and add the tenant to the ACL for that pool.
You must be authenticated as a user with the System Administrator or SecurityAdministrator role to perform this operation.Request
PUT /file/vpools/urn:storageos:VirtualPool:58406f8b-5a0e-41c0-a91b-5a8c59ac3a02:/acl <acl_assignment_changes> <add> <privilege>USE</privilege> <tenant>urn:storageos:TenantOrg:4edc456c-c7f5-4c54-84b2-29715cc8f504:</tenant> </add> </acl_assignment_changes>
Response
<acl_assignments> <acl_assignment> <privilege>USE</privilege> <tenant>urn:storageos:TenantOrg:4edc456c-c7f5-4c54-84b2-29715cc8f504:</tenant> </acl_assignment> </acl_assignments>
7. To perform any tenant-specific administration, you need to have a TenantAdministrator for the tenant. You can create a Tenant Administrator using the /tenants/{id}/role-assignments path, as shown below:
Request
PUT /tenants/urn:storageos:TenantOrg:4edc456c-c7f5-4c54-84b2-29715cc8f504:/role-assignments
<role_assignment_change><add><role>TENANT_ADMIN</role><subject_id>[email protected]</subject_id></add></role_assignment_change>
8. For users to provision file or block storage, or to access object storage, the user mustbe assigned to a project. To create projects for the tenant, you can use /tenants/{id}/projects. For example:
Request
POST /tenants/urn:storageos:TenantOrg:4edc456c-c7f5-4c54-84b2-29715cc8f504:/projects
<project_create> <name>marketing_project</name></project_create>
Setting Up a Multi-tenant Environment
56 EMC ViPR 1.1.0 Controller REST API Developer Guide
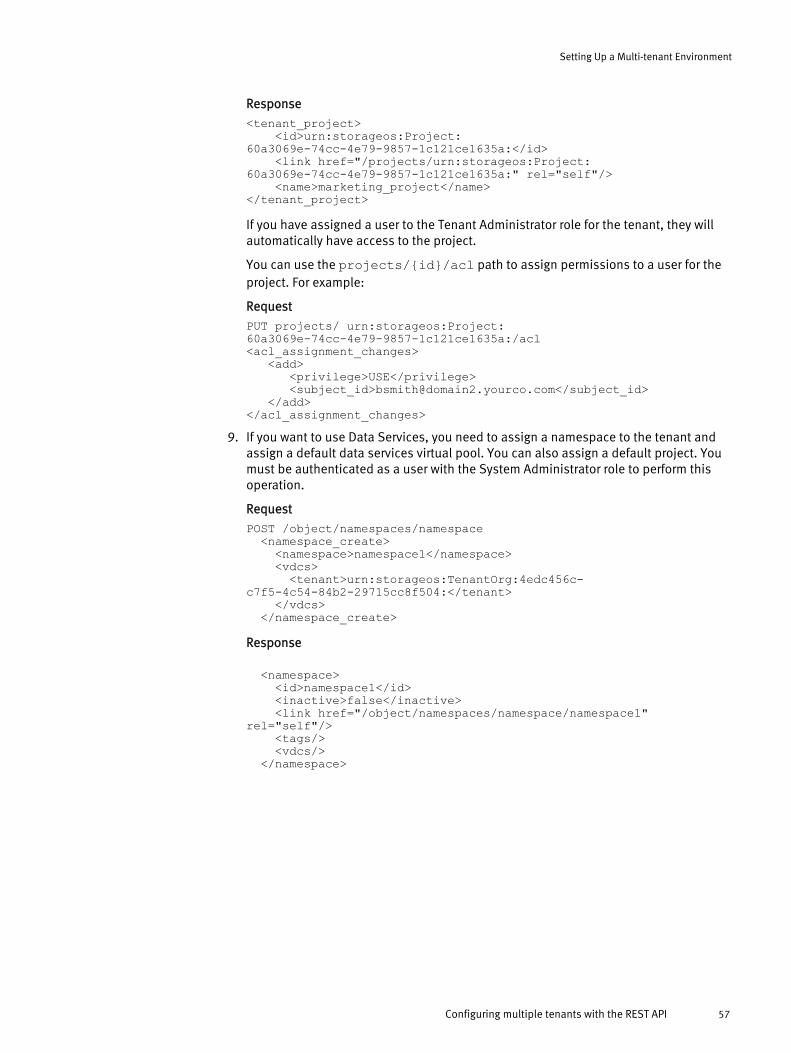
Response
<tenant_project> <id>urn:storageos:Project:60a3069e-74cc-4e79-9857-1c121ce1635a:</id> <link href="/projects/urn:storageos:Project:60a3069e-74cc-4e79-9857-1c121ce1635a:" rel="self"/> <name>marketing_project</name></tenant_project>
If you have assigned a user to the Tenant Administrator role for the tenant, they willautomatically have access to the project.
You can use the projects/{id}/acl path to assign permissions to a user for theproject. For example:
Request
PUT projects/ urn:storageos:Project:60a3069e-74cc-4e79-9857-1c121ce1635a:/acl<acl_assignment_changes> <add> <privilege>USE</privilege> <subject_id>[email protected]</subject_id> </add></acl_assignment_changes>
9. If you want to use Data Services, you need to assign a namespace to the tenant andassign a default data services virtual pool. You can also assign a default project. Youmust be authenticated as a user with the System Administrator role to perform thisoperation.
Request
POST /object/namespaces/namespace <namespace_create> <namespace>namespace1</namespace> <vdcs> <tenant>urn:storageos:TenantOrg:4edc456c-c7f5-4c54-84b2-29715cc8f504:</tenant> </vdcs> </namespace_create>
Response
<namespace> <id>namespace1</id> <inactive>false</inactive> <link href="/object/namespaces/namespace/namespace1" rel="self"/> <tags/> <vdcs/> </namespace>
Setting Up a Multi-tenant Environment
Configuring multiple tenants with the REST API 57


CHAPTER 6
Common Operations
This chapter contains the following topics.
u Bulk operations.....................................................................................................60u Searching API resources........................................................................................ 61u Tagging API resources........................................................................................... 62u Tracking asynchronous operations........................................................................ 62u Deactivating, or decommissioning, resources........................................................63
Common Operations 59

Bulk operationsEach ViPR storage resource class has a pair of /bulk APIs - a GET and a POST call.
These calls do the following:
u GET {resource_URN}/bulk returns a list of all resource names (URNs) of thegiven resource class.
u POST {resource_URN}/bulk returns all available detail information for eachresource in the given resource class.
The following GET example returns a list of storage system URNs in the ViPR virtual datacenter.
Request
GET <ViPR_VIP>/vdc/storage-systems/bulk
Response
<ids> <id>urn:storageos:StorageSystem:0e0f247c-7fde-41e2-b704-15acd21ae311:</id> <id>urn:storageos:StorageSystem:164749e2-e5c5-4f05-b315-1ff6ab2e496f:</id> <id>urn:storageos:StorageSystem:1bc24c32-e3f0-41ca-925e-410187258236:</id></ids>
The following POST example using the same storage system resource class returnsdetailed information for each storage system URN listed in the POST request payload. ThePOST request payload is usually a subset of the resource URNs returned by the GETrequest. In the example below, three storage system URNs returned by the GET call areincluded in the payload for the PUT request. Only information pertaining to thoseresources is returned.
Request
POST <ViPR_VIP>/vdc/storage-systems/bulk
Request body
<ids> <id>urn:storageos:StorageSystem:0e0f247c-7fde-41e2-b704-15acd21ae311:</id> <id>urn:storageos:StorageSystem:164749e2-e5c5-4f05-b315-1ff6ab2e496f:</id> <id>urn:storageos:StorageSystem:1bc24c32-e3f0-41ca-925e-410187258236:</id></ids>
Response
<bulk_storage_systems> <storage_system> <creation_time>1379347335171</creation_time> <id>urn:storageos:StorageSystem:164749e2-e5c5-4f05-b315-1ff6ab2e496f:</id> <inactive>false</inactive> <link href="/vdc/storage-systems/urn:storageos:StorageSystem:164749e2-e5c5-4f05-b315-1ff6ab2e496f:" rel="self"/> <name>SYMMETRIX+999316031302</name> <...> </storage_system> <storage_system> <creation_time>1379347335171</creation_time> <id>urn:storageos:StorageSystem:0e0f247c-7fde-41e2-
Common Operations
60 EMC ViPR 1.1.0 Controller REST API Developer Guide

b704-15acd21ae311:</id> <inactive>false</inactive> <link href="/vdc/storage-systems/urn:storageos:StorageSystem:0e0f247c-7fde-41e2-b704-15acd21ae311:" rel="self"/> <name>CLARIION+APM12381623880</name> <...> </storage_system> <storage_system> <creation_time>1379347335171</creation_time> <id>urn:storageos:StorageSystem:1bc24c32-e3f0-41ca-925e-410187258236:</id> <inactive>false</inactive> <link href="/vdc/storage-systems/urn:storageos:StorageSystem:1bc24c32-e3f0-41ca-925e-410187258236:" rel="self"/> <name>SYMMETRIX+999000414197</name> <...> </storage_system></bulk_storage_systems>
Searching API resourcesThe REST API call GET <ViPR_VIP>:4443/<resource_URN>/search?<search_options> allows you to perform search API operations on ViPR resources byname, tag, project, and/or WWN.
<ViPR_VIP>/<resource_URN> is a base resource URN such as https://<ViPR_VIP>/file/filesystems.
Note
This example URL only returns resources that the user is authorized to see. The user musthave an ACL privilege to the project in which the file systems reside in order to get a validsearch result.
Search option Required? Description Example- - - -/search?name={namevalue}
Yes Search for resourcesby name. This optionis case-insensitiveand matches name.
/block/volumes/search?name=vnx(search for all volumesnamed vnx)
/search?tag={tagvalue}
No Search for resourcesby tag. This option iscase-insensitive andmatches tag.
/block/volumes/search?tag=export1&name=vnx (search for all
volumes tagged withexport1 and named vnx)
/search?project={projectID}
No Limit search resultsto resources in aspecific project.Note: User musthave access rights tothe project.
/block/volumes/search?name=VNX&project=urn:storageos:Project:XXX: (search for all volumes
named vnx in the projectwith a project ID ofurn:storageos:Project:XXX:)
/search?wwn={wwnvalue}
No Search for volumes,exports, or networksby a specific wwn.
/block/volumes/search?wwn=50:00:09:72:c0:0
Common Operations
Searching API resources 61

Search option Required? Description Example- - - -
5:3d:1c (search for
volumes with a WWN of50:00:09:72:c0:05:3d:1c)
Tagging API resourcesA tag is a key word or label that you can add to a resource to make it easier to find. Youcan tag a resource with words like production, dev, provisioning, testgroup, VMAX,RAID-5, and so on.
For example, you could search for all volumes with tags containing the word VNX byissuing the following GET request:
GET <ViPR_VIP>/block/volumes/search?tag=VNX.xml
This URL returns a list of volumes tagged with VNX in XML format.
<volumes> <volume> <id>urn:storageos:Volume:60d64226-7c11-49b4-8233-90fc352eedb6:</id> <link href="/block/volumes/urn:storageos:Volume:60d64226-7c11-49b4-8233-90fc352eedb6:" rel="self" /> <tag>VNX30Sept</tag> </volume></volumes>
URL Description- -GET <ViPR_VIP>/{resource_URL}/tags Get tags for a specific storage
resource.
POST <ViPR_VIP>/{resource_URL}/tags Add or remove tag(s) to/from aspecific storage resource.
Tracking asynchronous operationsA number of APIs operate asynchronously. Asynchronous APIs return a task (or list oftasks) with a self link to the created resource and operation that uniquely identifies thisrequest.
This task can be polled to check if the operation has succeeded, failed or is in progress. Ifthe request was successful and the asynchronous operation is being processed, theservice returns status code 202 (Accepted). Note that this status code does not indicatewhether the operation itself has been processed successfully, but only that the requesthas been received by the service.
Task response contains status information. This information is set to pending initially.Polling on task URI can be done until the returned state is error or ready. If the operationfails, the response includes additional error information. If there are multiple tasks, eachtask URI can be polled to determine that particular operation status.
Common Operations
62 EMC ViPR 1.1.0 Controller REST API Developer Guide

Note
An asynchronous operation takes an unspecified amount of time to complete. Yourapplication should poll every 10 seconds to see when the operation is complete.
GET {resource_URL}/tasks returns a list of tasks created by asynchronousoperations. The resource_URL is the path to the resource. For example: GET /block/volume/tasks.
GET {resource_URL}/tasks/{op_id} returns detailed information about a task.The resource_URL is the path to the resource. The op_id is the operation ID returnedfrom an asynchronous API. For example: GET /block/volume/tasks/{op_id}The following example shows how to track asynchronous operation status.
Request:
POST /block/volumes
Request body
<volume_create> <name>Sample_Volume</name> <size>1073741824</size> <count>1</count> <vpool>{vpool_id}</vpool> <varray>{varray_id}</varray> <project>{project_id}</project> </volume_create>
Response
202
Response body
<tasks> <task> <resource> <name>Sample_Volume</name> <id>urn:storageos:Volume:5ba5b8d8-a0ca-4827-84f9-c1fef57733f5:</id> <link rel="self" href="/block/volumes/urn:storageos:Volume:5ba5b8d8-a0ca-4827-84f9-c1fef57733f5:" /> </resource> <state>pending</state> <start_time>1379398608574</start_time> <op_id>265cf333-76a1-4129-903e-fac63f9b4adc</op_id> <link rel="self" href="/block/volumes/urn:storageos:Volume:5ba5b8d8-a0ca-4827-84f9-c1fef57733f5:/tasks/265cf333-76a1-4129-903e-fac63f9b4adc" /> </task></tasks>
Deactivating, or decommissioning, resourcesViPR resources are not deleted, but are marked as Inactive. Inactive resources areperiodically collected and removed permanently from the database by an internalprocess called garbage collection.
ViPR allows ten minutes to settle all current activities with a resource before it is eligiblefor garbage collection.
Common Operations
Deactivating, or decommissioning, resources 63

The garbage collection process collects all resources that have been inactive for morethan 10 minutes and removes them from the database if no related resources exist in thedatabase. Thus, a resource is mostly likely to be garbage collected within 20 minutesafter it was made inactive.
Most (but not all) API requests return resources that might be inactive. For example, bulksearch APIs do not filter out inactive resources. Inactive resources are not appropriate forany operations as they can disappear from the database at any moment. It is theresponsibility of the API developer to determine if a resource is active before engaging itin further processing. You can check the state of the resource by checking the inactiveproperty of that resource.
Common Operations
64 EMC ViPR 1.1.0 Controller REST API Developer Guide

CHAPTER 7
Setting Up a Virtual Data Center
This chapter contains the following topics.
u Setting up the virtual data center...........................................................................66u Example format: JSON........................................................................................... 66u Adding a storage system....................................................................................... 66u Registering network systems................................................................................. 67u Registering a RecoverPoint protection system........................................................68u Host...................................................................................................................... 70u Registering hosts and assigning initiators and IP interfaces...................................70u Setting up the virtual array.................................................................................... 72u Setting up the virtual pool..................................................................................... 83u Creating a project for a tenant............................................................................... 90
Setting Up a Virtual Data Center 65

Setting up the virtual data centerThe virtual data center represents the ViPR storage control point in a physical data center.Storage resources, such as volumes, file systems, and objects are provisioned into thevirtual data center.
Before you begin
u An authentication provider has been added to ViPR as described in the chapter Setting Up a Single Tenant Environment on page 19
u Roles have been assigned to users.
Procedure
1. Log into ViPR with credentials that match the roles required for the REST requestsused to setup the virtual data center.
The root user for your ViPR vApp has all the role assignments you need.
2. Register and discover the physical storage systems.
3. Register the network systems.
4. Register the RecoverPoint protection system, if applicable.
5. Register Host and assign initiators.
6. Set up the virtual array.
7. Set up the virtual pool.
8. Create a project for a tenant.
Example format: JSONThe ViPR Controller REST API can accept and deliver request and response data in eitherXML or JSON format.
The examples in this chapter show requests and responses in JSON format.
Adding a storage systemThe first step in configuring ViPR after deploying the virtual appliance is to add physicalstorage systems into the ViPR virtual data center.
Adding storage systems to ViPR can only be performed by a user with a SystemAdministrator role. When storage systems are added, ViPR automatically discovers thestorage pools and ports on each storage system and adds them into the ViPR virtual datacenter.ViPR supports the following types of storage systems:
u EMC VPLEX, VMAX, VNX, Isilon, and NetApp storage systems for block and file storageprovisioning.
u VNX file, Isilon, and NetApp filers for object storage.
Add your storage system, using one of the following procedures:
u Registering and discovering physical storage systems in VNX Block and VMAX onpage 138
u Registering and discovering an Isilon storage system on page 140
Setting Up a Virtual Data Center
66 EMC ViPR 1.1.0 Controller REST API Developer Guide

u Registering and discovering a NetApp storage system on page 142
u Registering and discovering a VPLEX on page 139
Registering network systemsA network system describes and manages the SAN. This can represent an SSH connectionto a Cisco MDS or Nexus switch, or an SMI-S connection to the Brocade Network Advisor.Once a network system is registered, the SAN groups, zones, and initiators of the networksystem can be discovered.
Before you begin
You need the following information:
u The IP address of the network system for SSH communication and only applicable fornetwork systems of type mds.
u The username and password used for SSH login to the network system.
u The TCP port number to be used for SSH communication.
u The TCP port number used for communication with the SMI-S provider.
Procedure
1. Register a network system that describes and manages the SAN by sending aPOST /vdc/network-systems request.
The request returns a task whose URI can be queried to determine the status of thetask such as completion, any failures, time of task request, and time of taskcompletion
In this example, a network system with an IP address of 10.247.99.250 is beingregistered.
RequestPOST https://<ViPR_VIP>:4443/vdc/network-systems{ 'Content-Type': 'application/json', 'X-SDS-AUTH-TOKEN': '{Token_Text}', 'ACCEPT': 'application/json'}
{ "network_system_create": { "name": "Brocade1", "ip_address": "192.168.0.100", "port_number": "5989", "smis_provider_ip": "192.168.0.0", "smis_user_name": "Administrator", "smis_password": "password", "smis_use_ssl": "true", "smis_port_number": "5989", "system_type": "brocade" }}
ResponseHTTP 202 Accepted{ "task": { "op_id": "e97d0f47-bc42-4095-830a-b8c0fa4df71e", "resource": { "id": "urn:storageos:NetworkSystem:241cd3d2-825a-44f1-86de-2c0d23417b1e:", "link": { "-href": "/vdc/network-systems/urn:storageos:NetworkSystem:
Setting Up a Virtual Data Center
Registering network systems 67

241cd3d2-825a-44f1-86de-2c0d23417b1e:", "-rel": "self" }, "name": "Brocade1" }, "link": { "-href": "/vdc/network-systems/urn:storageos:NetworkSystem:241cd3d2-825a-44f1-86de-2c0d23417b1e:/tasks/e97d0f47-bc42-4095-830a-b8c0fa4df71e", "-rel": "self" }, "start_time": "1386950209819", "state": "pending" }}
2. Query the discover network system task URI until the message attribute of the task isOperation completed successfully .
RequestGET https://<ViPR_VIP>:4443/vdc/network-systems/urn:storageos:NetworkSystem:241cd3d2-825a-44f1-86de-2c0d23417b1e:/tasks/e97d0f47-bc42-4095-830a-b8c0fa4df71e{ 'Content-Type': 'application/json', 'X-SDS-AUTH-TOKEN': '{Token_Text}', 'ACCEPT': 'application/json'}
ResponseHTTP 200 OK{ "task": { "end_time": "1386950212551", "message": "Operation completed successfully", "op_id": "e97d0f47-bc42-4095-830a-b8c0fa4df71e", "resource": { "id": "urn:storageos:NetworkSystem:241cd3d2-825a-44f1-86de-2c0d23417b1e:", "link": { "-href": "/vdc/network-systems/urn:storageos:NetworkSystem:241cd3d2-825a-44f1-86de-2c0d23417b1e:", "-rel": "self" }, "name": "Brocade1" }, "link": { "-href": "/vdc/network-systems/urn:storageos:NetworkSystem:241cd3d2-825a-44f1-86de-2c0d23417b1e:/tasks/e97d0f47-bc42-4095-830a-b8c0fa4df71e", "-rel": "self" }, "start_time": "1386950209819", "state": "ready" }}
Registering a RecoverPoint protection systemRegister a RecoverPoint protection system using POST /vdc/protection-systems.This step only applies if you have a RecoverPoint appliance.
Before you begin
You need the following information:
u The fully qualified domain name or IP address of the host.
Setting Up a Virtual Data Center
68 EMC ViPR 1.1.0 Controller REST API Developer Guide

u The username and password for connecting to the protection system devicemanagement port. The credentials must be for an account that has the RecoverPointadmin role to access the RecoverPoint site.
u The management port number of the protection system device. The default port tocommunicate with RecoverPoint is 7225.
Procedure
1. Register the protection system by sending a POST <ViPR_VIP>:4443/ vdc/protection-systems request.
The request returns a task whose URI can be queried to determine the status of thetask such as completion, any failures, time of task request, and time of taskcompletion.
RequestPOST https://<ViPR_VIP>:4443/vdc/protection-systems { 'Content-Type': 'application/json', 'X-SDS-AUTH-TOKEN': '{Token_Text}', 'ACCEPT': 'application/json'}
{ "ip_address": "192.168.0.10", "name": "RP_DEV_MET", "password": "admin", "port_number": "7225", "system_type": "rp", "user_name": "admin"}
Response 202 Accepted{ "task": { "op_id": "f39b188a-472f-4e2c-8079-01cf0f0a48b2", "resource": { "id": "urn:storageos:ProtectionSystem:70f63a68-5d69-4fe4-9934-847f23a9db5a:", "link": { "-href": "/vdc/protection-systems/urn:storageos:ProtectionSystem:70f63a68-5d69-4fe4-9934-847f23a9db5a:", "-rel": "self" }, "name": "RP_DEV_MET" }, "link": { "-href": "/vdc/protection-systems/urn:storageos:ProtectionSystem:70f63a68-5d69-4fe4-9934-847f23a9db5a:/tasks/f39b188a-472f-4e2c-8079-01cf0f0a48b2", "-rel": "self" }, "start_time": "1386302068992", "state": "pending" }}
2. Repeat the query of the protection system registration task, using the task URI fromthe response body of the POST request, until the message attribute of the task isOperation completed successfully.
RequestGET https://<ViPR_VIP>:4443/vdc/protection-systems/urn:storageos:ProtectionSystem:
Setting Up a Virtual Data Center
Registering a RecoverPoint protection system 69
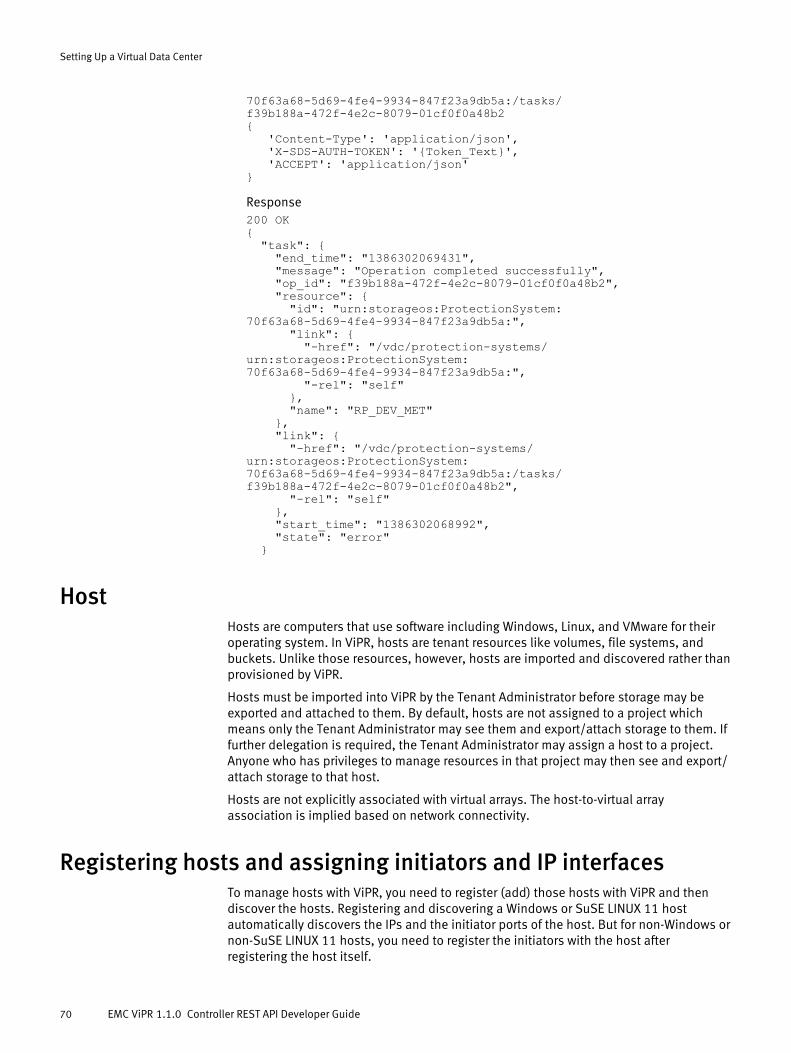
70f63a68-5d69-4fe4-9934-847f23a9db5a:/tasks/f39b188a-472f-4e2c-8079-01cf0f0a48b2{ 'Content-Type': 'application/json', 'X-SDS-AUTH-TOKEN': '{Token_Text}', 'ACCEPT': 'application/json'}
Response200 OK{ "task": { "end_time": "1386302069431", "message": "Operation completed successfully", "op_id": "f39b188a-472f-4e2c-8079-01cf0f0a48b2", "resource": { "id": "urn:storageos:ProtectionSystem:70f63a68-5d69-4fe4-9934-847f23a9db5a:", "link": { "-href": "/vdc/protection-systems/urn:storageos:ProtectionSystem:70f63a68-5d69-4fe4-9934-847f23a9db5a:", "-rel": "self" }, "name": "RP_DEV_MET" }, "link": { "-href": "/vdc/protection-systems/urn:storageos:ProtectionSystem:70f63a68-5d69-4fe4-9934-847f23a9db5a:/tasks/f39b188a-472f-4e2c-8079-01cf0f0a48b2", "-rel": "self" }, "start_time": "1386302068992", "state": "error" }
HostHosts are computers that use software including Windows, Linux, and VMware for theiroperating system. In ViPR, hosts are tenant resources like volumes, file systems, andbuckets. Unlike those resources, however, hosts are imported and discovered rather thanprovisioned by ViPR.
Hosts must be imported into ViPR by the Tenant Administrator before storage may beexported and attached to them. By default, hosts are not assigned to a project whichmeans only the Tenant Administrator may see them and export/attach storage to them. Iffurther delegation is required, the Tenant Administrator may assign a host to a project.Anyone who has privileges to manage resources in that project may then see and export/attach storage to that host.
Hosts are not explicitly associated with virtual arrays. The host-to-virtual arrayassociation is implied based on network connectivity.
Registering hosts and assigning initiators and IP interfacesTo manage hosts with ViPR, you need to register (add) those hosts with ViPR and thendiscover the hosts. Registering and discovering a Windows or SuSE LINUX 11 hostautomatically discovers the IPs and the initiator ports of the host. But for non-Windows ornon-SuSE LINUX 11 hosts, you need to register the initiators with the host afterregistering the host itself.
Setting Up a Virtual Data Center
70 EMC ViPR 1.1.0 Controller REST API Developer Guide

Before you begin
You need the following information:
u A valid authentication token.
u The OS version, name, credentials, and port number of the host being registered.
u Whether SSL will be used to communicate with the host.
u The node address of an initiator.
u The port address of an initiator.
In this example, a Windows host is registered and instead of using the discovery toautomatically discover the initiator ports, an initiator is manually registered with the host. Adding and discovering a Windows host on page 127 , Adding and discovering a LINUXhost on page 130, and Adding and discovering a vCenter Server on page 131 providethe steps to register a Windows, Linux, and vCenter host, respectively.
Procedure
1. Get the URN of your tenant.
RequestGET https://<ViPR_VIP>:4443/tenant
2. Use the tenant URN to register the host with ViPR.
Request
PUT https://<ViPR_VIP>:4443/tenants/urn:storageos:TenantOrg:757053b7-b952-41b9-83e1-44204b67a368:/hosts { 'Content-Type': 'application/json', 'X-SDS-AUTH-TOKEN': '{Token_Text}', 'ACCEPT': 'application/json'}
{ "host_name": "myhost", "name": "myhost", "os_version": "1.0", "password": "password", "port_number": "8111", "type": "Windows", "use_ssl": null, "user_name": "user"}
Response
HTTP 202 Accepted
{ "link": { "href": "/compute/hosts/{Host_URN}", "rel": "self" }, "message": "Operation completed successfully", "op_id": "674689c2-74fd-45f8-a13a-8ee48525ffe3", "resource": { "id": "urn:storageos:Host:037aeb4e-c6e4-4fa3-8a67-6db94a93a6c5:", "link": { "href": "/compute/hosts/urn:storageos:Host:037aeb4e-c6e4-4fa3-8a67-6db94a93a6c5:", "rel": "self"
Setting Up a Virtual Data Center
Registering hosts and assigning initiators and IP interfaces 71

}, "name": "myhost" }, "start_time": 1379202603051, "state": "ready"}
3. Register an initiator associated with the host by calling the following POST.
RequestPOST https://<ViPR_VIP>:4443/compute/hosts/{Host_URN}/initiators { 'Content-Type': 'application/json', 'X-SDS-AUTH-TOKEN': '{Token_Text}', 'ACCEPT': 'application/json'}
{ "initiator_node": "20:99:59:52:95:00:92:BE", "initiator_port": "10:13:27:65:60:38:68:BE", "protocol": "FC"}
Response
HTTP 200 OK
{ "creation_time": 1379202603661, "host": { "id": "urn:storageos:Host:037aeb4e-c6e4-4fa3-8a67-6db94a93a6c5:", "link": { "href": "/compute/hosts/urn:storageos:Host:037aeb4e-c6e4-4fa3-8a67-6db94a93a6c5:", "rel": "self" } }, "hostname": "myhost", "id": "urn:storageos:Initiator:07b2e71d-cb4c-49c9-94fe-1feab7878d35:", "inactive": false, "initiator_node": "20:99:59:52:95:00:92:BE", "initiator_port": "10:13:27:65:60:38:68:BE", "link": { "href": "/compute/initiators/urn:storageos:Initiator:07b2e71d-cb4c-49c9-94fe-1feab7878d35:", "rel": "self" }, "protocol": "FC", "tags": []}
Setting up the virtual arrayThe virtual array is created and an ACL is assigned to it. A physical storage pool is thenassociated with the virtual array so it can be used for self-service provisioning.
Procedure
1. Create a virtual array by sending a POST request to /vdc/varrays.
The request returns the representation of the new virtual array.
RequestPOST: https://<ViPR_VIP>:4443/vdc/varrays
{'Content-Type': 'application/json',
Setting Up a Virtual Data Center
72 EMC ViPR 1.1.0 Controller REST API Developer Guide

'X-SDS-AUTH-TOKEN': '{Token_Text}', 'ACCEPT': 'application/json'}
{ "auto_san_zoning": "true", "name": "Freemont"}
ResponseHTTP 200 OK{ "auto_san_zoning": true, "creation_time": 1379202577579, "id": "urn:storageos:VirtualArray:dc09417d-9028-40de-8bff-74574996f2d5:", "inactive": false, "link": { "href": "/vdc/varrays/urn:storageos:VirtualArray:dc09417d-9028-40de-8bff-74574996f2d5:", "rel": "self" }, "name": "Freemont", "tags": []}
2. Create an ACL for the varray and assign the tenant user to the ACL by sending aPUT /vdc/varrays/{identifier}/acl request.
The request returns the representation of the new ACL.
RequestPUT https://<ViPR_VIP>:4443/vdc/varrays/urn:storageos:VirtualArray:dc09417d-9028-40de-8bff-74574996f2d5:/acl
{'Content-Type': 'application/json', 'X-SDS-AUTH-TOKEN': '{Token_Text}', 'ACCEPT': 'application/json'}
{ "add": [ { "privilege": [ "USE" ], "tenant": "urn:storageos:TenantOrg:757053b7-b952-41b9-83e1-44204b67a368:" } ]}
ResponseHTTP 200 OK{ "acl": [ { "privilege": [ "USE" ], "tenant": "urn:storageos:TenantOrg:757053b7-b952-41b9-83e1-44204b67a368:" } ]}
3. Get the ID of the physical storage array, on which the storage pools were created, bysending a POST request to /vdc/storage-systems.
Setting Up a Virtual Data Center
Setting up the virtual array 73

This request returns a list of all of the physical storage arrays.GET https://<ViPR_VIP>:4443/vdc/storage-systems
{'Content-Type': 'application/json', 'X-SDS-AUTH-TOKEN': '{Token_Text}', 'ACCEPT': 'application/json'}
ResponseHTTP 200 OK{ "storage_system": [ { "id": "urn:storageos:StorageSystem:56d8aa7e-45fe-4383-b49a-fec72e9927d3:", "link": { "href": "/vdc/storage-systems/urn:storageos:StorageSystem:56d8aa7e-45fe-4383-b49a-fec72e9927d3:", "rel": "self" }, "name": "CLARIION+APM00121500018" } ]}
4. Use the storage array ID to get detailed information about the storage array bysending a GET/vdc/storage-systems/{identifier} request.
The request returns the representation of the storage array.GET https://<ViPR_VIP>:4443/vdc/storage-systems/urn:storageos:StorageSystem:56d8aa7e-45fe-4383-b49a-fec72e9927d3:
{'Content-Type': 'application/json', 'X-SDS-AUTH-TOKEN': '{Token_Text}', 'ACCEPT': 'application/json'}
ResponseHTTP 200 OK{ "active_provider_uri": { "id": "urn:storageos:SMISProvider:dce4a4c4-334b-4353-9484-c7b225f413d5:", "link": { "href": "/vdc/smis-providers/urn:storageos:SMISProvider:dce4a4c4-334b-4353-9484-c7b225f413d5:", "rel": "self" } }, "assocociated_systems": [], "async_actions": [ "CreateGroupReplica", "CreateElementReplica" ], "compatibility_status": "COMPATIBLE", "creation_time": 1379202543258, "export_masks": [], "firmware_version": "05.32.000.5.207", "id": "urn:storageos:StorageSystem:56d8aa7e-45fe-4383-b49a-fec72e9927d3:", "inactive": false, "ip_address": "10.247.99.27", "job_discovery_status": "COMPLETE", "job_metering_status": "CREATED", "last_discovery_run_time": 1379202575496, "last_discovery_status_message": "Discovery completed successfully for Storage System: urn:storageos:StorageSystem:56d8aa7e-45fe-4383-b49a-fec72e9927d3:", "last_metering_run_time": 0, "link": { "href": "/vdc/storage-systems/urn:storageos:StorageSystem:
Setting Up a Virtual Data Center
74 EMC ViPR 1.1.0 Controller REST API Developer Guide

56d8aa7e-45fe-4383-b49a-fec72e9927d3:", "rel": "self" }, "max_resources": -1, "model": "Rack Mounted VNX5500", "name": "CLARIION+APM00121500018", "native_guid": "CLARIION+APM00121500018", "next_discovery_run_time": 1379206145976, "next_metering_run_time": 0, "num_resources": 0, "protocols": [], "reachable": true, "registration_status": "REGISTERED", "secondary_ips": [], "serial_number": "APM00121500018", "smis_port_number": 5988, "smis_provider_ip": "10.247.99.27", "smis_providers": [ { "id": "urn:storageos:SMISProvider:dce4a4c4-334b-4353-9484-c7b225f413d5:", "link": { "href": "/vdc/smis-providers/urn:storageos:SMISProvider:dce4a4c4-334b-4353-9484-c7b225f413d5:", "rel": "self" } } ], "smis_use_ssl": false, "smis_user_name": "admin", "supported_provisioning_type": "THIN_AND_THICK", "system_type": "vnxblock", "tags": []}
5. Get the list of virtual arrays by sending a GET /vdc/varrays request.GET https://<ViPR_VIP>:4443/vdc/varrays{'Content-Type': 'application/json', 'X-SDS-AUTH-TOKEN': '', 'ACCEPT': 'application/json'}
ResponseHTTP 200 OK{ "varray": [ { "id": "urn:storageos:VirtualArray:dc09417d-9028-40de-8bff-74574996f2d5:", "link": { "href": "/vdc/varrays/urn:storageos:VirtualArray:dc09417d-9028-40de-8bff-74574996f2d5:", "rel": "self" }, "name": "Freemont" } ]}
6. Use the virtual array ID to get detailed information about the virtual array by sending aGET /vdc/varrays/{identifier} request.GET https://<ViPR_VIP>:4443/vdc/varrays/urn:storageos:VirtualArray:dc09417d-9028-40de-8bff-74574996f2d5:
{'Content-Type': 'application/json', 'X-SDS-AUTH-TOKEN': '{Token_Text}', 'ACCEPT': 'application/json'}
ResponseHTTP 200 OK{
Setting Up a Virtual Data Center
Setting up the virtual array 75

"auto_san_zoning": true, "creation_time": 1379202577579, "id": "urn:storageos:VirtualArray:dc09417d-9028-40de-8bff-74574996f2d5:", "inactive": false, "link": { "href": "/vdc/varrays/urn:storageos:VirtualArray:dc09417d-9028-40de-8bff-74574996f2d5:", "rel": "self" }, "name": "Freemont", "tags": []}
7. Get the list of storage pools on the physical storage array by sending a GET /vdc/storage-systems/{identifier}/storage-pools request.GET https://<ViPR_VIP>:4443/vdc/storage-systems/urn:storageos:StorageSystem:56d8aa7e-45fe-4383-b49a-fec72e9927d3:/storage-pools
{'Content-Type': 'application/json', 'X-SDS-AUTH-TOKEN': '', 'ACCEPT': 'application/json'}
ResponseHTTP 200 OK{ "storage_pool": [ { "id": "urn:storageos:StoragePool:0d3c05e3-40f6-4044-89c6-5067e87d24c4:", "link": { "href": "/vdc/storage-systems/urn:storageos:StorageSystem:56d8aa7e-45fe-4383-b49a-fec72e9927d3:/storage-pools/urn:storageos:StoragePool:0d3c05e3-40f6-4044-89c6-5067e87d24c4:", "rel": "self" }, "name": "CLARIION+APM00121500018+POOL+C+0008" }, { "id": "urn:storageos:StoragePool:62d2e40d-ced0-4114-8bb7-8d333e7ef878:", "link": { "href": "/vdc/storage-systems/urn:storageos:StorageSystem:56d8aa7e-45fe-4383-b49a-fec72e9927d3:/storage-pools/urn:storageos:StoragePool:62d2e40d-ced0-4114-8bb7-8d333e7ef878:", "rel": "self" }, "name": "CLARIION+APM00121500018+POOL+U+Pool 2" }, { "id": "urn:storageos:StoragePool:7537a16d-0901-4ded-af7b-fbb9a9ec6ac9:", "link": { "href": "/vdc/storage-systems/urn:storageos:StorageSystem:56d8aa7e-45fe-4383-b49a-fec72e9927d3:/storage-pools/urn:storageos:StoragePool:7537a16d-0901-4ded-af7b-fbb9a9ec6ac9:", "rel": "self" }, "name": "CLARIION+APM00121500018+POOL+C+0000" }, { "id": "urn:storageos:StoragePool:78caaf4a-673e-4580-ae41-a545a45e5e28:", "link": { "href": "/vdc/storage-systems/urn:storageos:StorageSystem:56d8aa7e-45fe-4383-b49a-fec72e9927d3:/
Setting Up a Virtual Data Center
76 EMC ViPR 1.1.0 Controller REST API Developer Guide

storage-pools/urn:storageos:StoragePool:78caaf4a-673e-4580-ae41-a545a45e5e28:", "rel": "self" }, "name": "CLARIION+APM00121500018+POOL+U+Pool 1" }, { "id": "urn:storageos:StoragePool:84f2d5f0-4e7c-4914-903c-c6abb7015229:", "link": { "href": "/vdc/storage-systems/urn:storageos:StorageSystem:56d8aa7e-45fe-4383-b49a-fec72e9927d3:/storage-pools/urn:storageos:StoragePool:84f2d5f0-4e7c-4914-903c-c6abb7015229:", "rel": "self" }, "name": "CLARIION+APM00121500018+POOL+C+0002" }, { "id": "urn:storageos:StoragePool:9ae020ba-544b-4ce3-88b7-f1019cd7a9eb:", "link": { "href": "/vdc/storage-systems/urn:storageos:StorageSystem:56d8aa7e-45fe-4383-b49a-fec72e9927d3:/storage-pools/urn:storageos:StoragePool:9ae020ba-544b-4ce3-88b7-f1019cd7a9eb:", "rel": "self" }, "name": "CLARIION+APM00121500018+POOL+C+0001" }, { "id": "urn:storageos:StoragePool:ad0dae57-d318-409c-a859-6c9e59a28251:", "link": { "href": "/vdc/storage-systems/urn:storageos:StorageSystem:56d8aa7e-45fe-4383-b49a-fec72e9927d3:/storage-pools/urn:storageos:StoragePool:ad0dae57-d318-409c-a859-6c9e59a28251:", "rel": "self" }, "name": "CLARIION+APM00121500018+POOL+U+Pool 0" } ]}
8. Get the detailed information of the storage pool to add to the virtual array by sendinga GET /vdc/storage-systems/{identifier}/storage-pools/{pool_id} request.
In this example the detailed information of two different storage pools is beingobtained.GET https://<ViPR_VIP>:4443/vdc/storage-systems/urn:storageos:StorageSystem:56d8aa7e-45fe-4383-b49a-fec72e9927d3:/storage-pools/urn:storageos:StoragePool:0d3c05e3-40f6-4044-89c6-5067e87d24c4:{'Content-Type': 'application/json', 'X-SDS-AUTH-TOKEN': '{Token_Text}', 'ACCEPT': 'application/json'}
ResponseHTTP 200 OK{ "assigned_varrays": [], "connected_varrays": [], "controller_params": [], "copy_types": [ "UNSYNC_UNASSOC", "SYNC", "UNSYNC_ASSOC" ],
Setting Up a Virtual Data Center
Setting up the virtual array 77

"creation_time": 1379202572346, "drive_types": [ "SAS" ], "free_gb": 0, "id": "urn:storageos:StoragePool:0d3c05e3-40f6-4044-89c6-5067e87d24c4:", "inactive": false, "link": { "href": "/vdc/storage-systems/urn:storageos:StorageSystem:56d8aa7e-45fe-4383-b49a-fec72e9927d3:/storage-pools/urn:storageos:StoragePool:0d3c05e3-40f6-4044-89c6-5067e87d24c4:", "rel": "self" }, "max_pool_utilization_percentage": 75, "max_resources": -1, "maximum_thick_volume_size_gb": 0, "maximum_thin_volume_size_gb": 0, "minimum_thick_volume_size_gb": 0, "minimum_thin_volume_size_gb": 0, "name": "CLARIION+APM00121500018+POOL+C+0008", "native_guid": "CLARIION+APM00121500018+POOL+C+0008", "operational_status": "READY", "percent_subscribed": 101, "percent_used": 100, "pool_name": "0008", "pool_service_type": "block", "protocols": [ "iSCSI", "FC" ], "raid_levels": [ "RAID5" ], "registration_status": "REGISTERED", "storage_system": { "id": "urn:storageos:StorageSystem:56d8aa7e-45fe-4383-b49a-fec72e9927d3:", "link": { "href": "/vdc/storage-systems/urn:storageos:StorageSystem:56d8aa7e-45fe-4383-b49a-fec72e9927d3:", "rel": "self" } }, "subscribed_gb": 1606, "supported_resource_types": "THICK_ONLY", "tagged_varrays": [], "tags": [], "thin_volume_preallocation_supported": false, "tier_utilization_percentages": [], "usable_gb": 1605, "used_gb": 1605}
Send another request to get the details of a second storage pool.GET https://<ViPR_VIP>:4443/vdc/storage-systems/urn:storageos:StorageSystem:56d8aa7e-45fe-4383-b49a-fec72e9927d3:/storage-pools/urn:storageos:StoragePool:62d2e40d-ced0-4114-8bb7-8d333e7ef878:{'Content-Type': 'application/json', 'X-SDS-AUTH-TOKEN': '{Token_Text}', 'ACCEPT': 'application/json'}
ResponseHTTP 200 OK{ "assigned_varrays": [], "connected_varrays": [], "controller_params": [],
Setting Up a Virtual Data Center
78 EMC ViPR 1.1.0 Controller REST API Developer Guide

"copy_types": [ "UNSYNC_UNASSOC", "SYNC", "UNSYNC_ASSOC" ], "creation_time": 1379202572346, "drive_types": [ "SAS" ], "free_gb": 294, "id": "urn:storageos:StoragePool:62d2e40d-ced0-4114-8bb7-8d333e7ef878:", "inactive": false, "link": { "href": "/vdc/storage-systems/urn:storageos:StorageSystem:56d8aa7e-45fe-4383-b49a-fec72e9927d3:/storage-pools/urn:storageos:StoragePool:62d2e40d-ced0-4114-8bb7-8d333e7ef878:", "rel": "self" }, "max_pool_utilization_percentage": 75, "max_resources": -1, "max_thin_pool_subscription_percentage": 300, "maximum_thick_volume_size_gb": 285, "maximum_thin_volume_size_gb": 16384, "minimum_thick_volume_size_gb": 0, "minimum_thin_volume_size_gb": 0, "name": "CLARIION+APM00121500018+POOL+U+Pool 2", "native_guid": "CLARIION+APM00121500018+POOL+U+Pool 2", "operational_status": "READY", "percent_subscribed": 108, "percent_used": 45, "pool_name": "Pool 2", "pool_service_type": "block", "protocols": [ "iSCSI", "FC" ], "raid_levels": [ "RAID10" ], "registration_status": "REGISTERED", "storage_system": { "id": "urn:storageos:StorageSystem:56d8aa7e-45fe-4383-b49a-fec72e9927d3:", "link": { "href": "/vdc/storage-systems/urn:storageos:StorageSystem:56d8aa7e-45fe-4383-b49a-fec72e9927d3:", "rel": "self" } }, "subscribed_gb": 568, "supported_resource_types": "THIN_AND_THICK", "tagged_varrays": [], "tags": [], "thin_volume_preallocation_supported": false, "tier_utilization_percentages": [ { "name": "SATA", "value": "100" } ], "usable_gb": 528, "used_gb": 234}
9. Assign a storage pool to the virtual array by sending a PUT /vdc/storage-pools/{identifier} request.
PUT https://<ViPR_VIP>:4443/vdc/storage-pools/urn:storageos:StoragePool:62d2e40d-ced0-4114-8bb7-8d333e7ef878:{'Content-Type': 'application/json',
Setting Up a Virtual Data Center
Setting up the virtual array 79

'X-SDS-AUTH-TOKEN': '{Token_Text}', 'ACCEPT': 'application/json'}
{ "varray_assignment_changes": { "add": { "varrays": [ "urn:storageos:VirtualArray:dc09417d-9028-40de-8bff-74574996f2d5:" ] } }}
ResponseHTTP 200 OK{ "assigned_varrays": [ "urn:storageos:VirtualArray:dc09417d-9028-40de-8bff-74574996f2d5:" ], "connected_varrays": [], "controller_params": [], "copy_types": [ "UNSYNC_UNASSOC", "SYNC", "UNSYNC_ASSOC" ], "creation_time": 1379202572346, "drive_types": [ "SAS" ], "free_gb": 294, "id": "urn:storageos:StoragePool:62d2e40d-ced0-4114-8bb7-8d333e7ef878:", "inactive": false, "link": { "href": "/vdc/storage-systems/urn:storageos:StorageSystem:56d8aa7e-45fe-4383-b49a-fec72e9927d3:/storage-pools/urn:storageos:StoragePool:62d2e40d-ced0-4114-8bb7-8d333e7ef878:", "rel": "self" }, "max_pool_utilization_percentage": 75, "max_resources": -1, "max_thin_pool_subscription_percentage": 300, "maximum_thick_volume_size_gb": 285, "maximum_thin_volume_size_gb": 16384, "minimum_thick_volume_size_gb": 0, "minimum_thin_volume_size_gb": 0, "name": "CLARIION+APM00121500018+POOL+U+Pool 2", "native_guid": "CLARIION+APM00121500018+POOL+U+Pool 2", "operational_status": "READY", "percent_subscribed": 108, "percent_used": 45, "pool_name": "Pool 2", "pool_service_type": "block", "protocols": [ "iSCSI", "FC" ], "raid_levels": [ "RAID10" ], "registration_status": "REGISTERED", "storage_system": { "id": "urn:storageos:StorageSystem:56d8aa7e-45fe-4383-b49a-fec72e9927d3:", "link": { "href": "/vdc/storage-systems/urn:storageos:StorageSystem:56d8aa7e-45fe-4383-b49a-fec72e9927d3:",
Setting Up a Virtual Data Center
80 EMC ViPR 1.1.0 Controller REST API Developer Guide

"rel": "self" } }, "subscribed_gb": 568, "supported_resource_types": "THIN_AND_THICK", "tagged_varrays": [ "urn:storageos:VirtualArray:dc09417d-9028-40de-8bff-74574996f2d5:" ], "tags": [], "thin_volume_preallocation_supported": false, "tier_utilization_percentages": [ { "name": "SATA", "value": "100" } ], "usable_gb": 528, "used_gb": 234}
10.Repeat steps to add more storage pools to the virtual arrray.11.The virtual array must be associated with a network. You can get which networks are
available by sending a GET /vdc/networks request.GET https://<ViPR_VIP>:4443/vdc/networks
{'Content-Type': 'application/json', 'X-SDS-AUTH-TOKEN': '{Token_Text}', 'ACCEPT': 'application/json'}
ResponseHTTP 200 OK{ "network": [ { "id": "urn:storageos:Network:416c286c-3bbd-4923-840d-07945db2705b:", "link": { "href": "/vdc/networks/urn:storageos:Network:416c286c-3bbd-4923-840d-07945db2705b:", "rel": "self" }, "name": "FABRIC_losam082-fabric" }, { "id": "urn:storageos:Network:7bc25e2b-2221-48f9-9234-087096d71520:", "link": { "href": "/vdc/networks/urn:storageos:Network:7bc25e2b-2221-48f9-9234-087096d71520:", "rel": "self" }, "name": "FABRIC_VPLEX_WAN_lglw9208/lglw9209" }, { "id": "urn:storageos:Network:1253ec15-3ef9-4c73-a9e1-785904d17ff1:", "link": { "href": "/vdc/networks/urn:storageos:Network:1253ec15-3ef9-4c73-a9e1-785904d17ff1:", "rel": "self" }, "name": "FABRIC_fake array fabric" }, { "id": "urn:storageos:Network:6e7069ed-ba69-4342-90d4-ffdaed89aff8:", "link": { "href": "/vdc/networks/urn:storageos:Network:
Setting Up a Virtual Data Center
Setting up the virtual array 81

6e7069ed-ba69-4342-90d4-ffdaed89aff8:", "rel": "self" }, "name": "FABRIC_lglah043_11-10:00:00:05:1e:9b:49:9a" }, { "id": "urn:storageos:Network:22a50b48-1cb6-4948-96f3-57c546724333:", "link": { "href": "/vdc/networks/urn:storageos:Network:22a50b48-1cb6-4948-96f3-57c546724333:", "rel": "self" }, "name": "FABRIC_VPlex_LGL6220_FID_30-10:00:00:27:f8:58:f6:c1" }, { "id": "urn:storageos:Network:ef704425-95b4-4f7a-9fce-91f4ddb322c6:", "link": { "href": "/vdc/networks/urn:storageos:Network:ef704425-95b4-4f7a-9fce-91f4ddb322c6:", "rel": "self" }, "name": "FABRIC_VPlex_Meta_Fid_20" }, { "id": "urn:storageos:Network:d9abe55b-7b0c-43a5-aaa6-5ddeb769f32f:", "link": { "href": "/vdc/networks/urn:storageos:Network:d9abe55b-7b0c-43a5-aaa6-5ddeb769f32f:", "rel": "self" }, "name": "FABRIC_VPlex_LGL6221_FID_40" }, { "id": "urn:storageos:Network:c11db7cd-3f26-42a4-894c-f476d06c7f36:", "link": { "href": "/vdc/networks/urn:storageos:Network:c11db7cd-3f26-42a4-894c-f476d06c7f36:", "rel": "self" }, "name": "FABRIC_vplex154nbr2" }, { "id": "urn:storageos:Network:2973cd79-b9c1-4a20-9466-95ad06d5f192:", "link": { "href": "/vdc/networks/urn:storageos:Network:2973cd79-b9c1-4a20-9466-95ad06d5f192:", "rel": "self" }, "name": "FABRIC_Vplex_WAN-10:00:00:27:f8:58:f6:bc" } ]}
12.Assign the VSAN to the virtual array (endpoints trimmed) by sending a PUT /vdc/networks/{identifier} request.
PUT https://<ViPR_VIP>:4443/vdc/networks/urn:storageos:Network:416c286c-3bbd-4923-840d-07945db2705b:
{'Content-Type': 'application/json', 'X-SDS-AUTH-TOKEN': '{Token_Text}', 'ACCEPT': 'application/json'}
{ "varrays": [
Setting Up a Virtual Data Center
82 EMC ViPR 1.1.0 Controller REST API Developer Guide

"urn:storageos:VirtualArray:dc09417d-9028-40de-8bff-74574996f2d5:" ]}
ResponseHTTP 200 OK{ "creation_time": 1379202583924, "discovered": true, "endpoints": [ "10:00:00:90:FA:13:83:97", "10:00:00:00:C9:47:25:9E" ], "endpoints_discovered": [ { "name": "10:00:00:00:C9:47:25:9E", "value": "true" }, { "name": "10:00:00:90:FA:13:83:97", "value": "true" } ], "fabric_id": "losam082-fabric", "id": "urn:storageos:Network:416c286c-3bbd-4923-840d-07945db2705b:", "inactive": false, "link": { "href": "/vdc/networks/urn:storageos:Network:416c286c-3bbd-4923-840d-07945db2705b:", "rel": "self" }, "name": "FABRIC_losam082-fabric", "native_guid": "FC+BROCADE+10:00:00:27:F8:49:E8:7C", "network_systems": [ "urn:storageos:NetworkSystem:518f41d0-ab22-4267-b558-0d366e4ffc42:" ], "registration_status": "REGISTERED", "tags": [], "transport_type": "FC", "varray": { "id": "urn:storageos:VirtualArray:dc09417d-9028-40de-8bff-74574996f2d5:", "link": { "href": "/vdc/varrays/urn:storageos:VirtualArray:dc09417d-9028-40de-8bff-74574996f2d5:", "rel": "self" } }}
Setting up the virtual poolPhysical storage pools on a physical storage system are automatically discovered andadded into ViPR when the physical storage system is added into the ViPR virtual datacenter. A physical storage pool has to be associated to a virtual pool before it can beused for self-service provisioning .
Before you begin
You need the following information.
u The URNs of the virtual arrays to which the virtual pool is assigned.
u The URNs of the storage pools to be assigned to the virtual pool.
Setting Up a Virtual Data Center
Setting up the virtual pool 83

u The URN of the tenant to be assigned as the ACL to the virtual pool.
u A valid authentication token.
This example shows how to create a virtual pool, find storage pools that match yourrequired properties, and then assign those storage pools to the virtual pool. The finalstep applies an ACL to the virtual pool.
Procedure
1. Create a virtual pool by sending a POST request to /block/vpools.
The representation of the new virtual pool is returned.
RequestPOST https://<ViPR_VIP>:4443/block/vpools
{'Content-Type': 'application/json', 'X-SDS-AUTH-TOKEN': '{Token_Text}', 'ACCEPT': 'application/json'}
{ "description": "Basic Virtual Pool for Block Provisioning", "name": "basic_vpool", "num_paths": "1", "protection": { "snapshots": { "max_native_snapshots": "10" } }, "protocols": [ "FC" ], "provisioning_type": "Thin", "use_matched_pools": "true", "varrays": [ "urn:storageos:VirtualArray:dc09417d-9028-40de-8bff-74574996f2d5:" ]}
ResponseHTTP 200 OK{ "assigned_storage_pools": [], "creation_time": 1379202604198, "description": "Basic Virtual Pool for Block Provisioning", "expandable": true, "id": "urn:storageos:VirtualPool:6cd9f843-1b41-4b9f-8eb1-a26797d0a268:", "inactive": false, "invalid_matched_pools": [], "link": { "href": "/block/vpools/urn:storageos:VirtualPool:6cd9f843-1b41-4b9f-8eb1-a26797d0a268:", "rel": "self" }, "matched_storage_pools": [ { "id": "urn:storageos:StoragePool:78caaf4a-673e-4580-ae41-a545a45e5e28:", "link": { "href": "/vdc/storage-systems/urn:storageos:StorageSystem:56d8aa7e-45fe-4383-b49a-fec72e9927d3:/storage-pools/urn:storageos:StoragePool:78caaf4a-673e-4580-ae41-a545a45e5e28:", "rel": "self" } }, {
Setting Up a Virtual Data Center
84 EMC ViPR 1.1.0 Controller REST API Developer Guide

"id": "urn:storageos:StoragePool:ad0dae57-d318-409c-a859-6c9e59a28251:", "link": { "href": "/vdc/storage-systems/urn:storageos:StorageSystem:56d8aa7e-45fe-4383-b49a-fec72e9927d3:/storage-pools/urn:storageos:StoragePool:ad0dae57-d318-409c-a859-6c9e59a28251:", "rel": "self" } }, { "id": "urn:storageos:StoragePool:62d2e40d-ced0-4114-8bb7-8d333e7ef878:", "link": { "href": "/vdc/storage-systems/urn:storageos:StorageSystem:56d8aa7e-45fe-4383-b49a-fec72e9927d3:/storage-pools/urn:storageos:StoragePool:62d2e40d-ced0-4114-8bb7-8d333e7ef878:", "rel": "self" } } ], "name": "basic_vpool", "num_paths": 1, "protection": { "continuous_copies": { "max_native_continuous_copies": 0 }, "snapshots": { "max_native_snapshots": 10 } }, "protocols": [ "FC" ], "provisioning_type": "Thin", "raid_levels": [], "tags": [], "type": "block", "unique_auto_tier_policy_names": false, "use_matched_pools": true, "varrays": [ { "id": "urn:storageos:VirtualArray:dc09417d-9028-40de-8bff-74574996f2d5:", "link": { "href": "/vdc/varrays/urn:storageos:VirtualArray:dc09417d-9028-40de-8bff-74574996f2d5:", "rel": "self" } } ]}
2. Find the list of storage pools that match the properties of the virtual pool that was justcreated by sending a POST /block/vpools/matching-pools request.
Note
There is also a comparable /file/vpools/matching-pools for file virtual pools.
RequestPOST https://<ViPR_VIP>:4443/block/vpools/matching-pools{'Content-Type': 'application/json', 'X-SDS-AUTH-TOKEN': '{Token_Text}', 'ACCEPT': 'application/json'}
{ "num_paths": "1",
Setting Up a Virtual Data Center
Setting up the virtual pool 85

"protection": { "snapshots": { "max_native_snapshots": "10" } }, "protocols": [ "FC" ], "provisioning_type": "Thin", "use_matched_pools": "true", "varrays": [ "urn:storageos:VirtualArray:dc09417d-9028-40de-8bff-74574996f2d5:" ]}
Response200 OK{ "storage_pool": [ { "id": "urn:storageos:StoragePool:62d2e40d-ced0-4114-8bb7-8d333e7ef878:", "name": "SYMMETRIX+000198700420+POOL+TP+3R5-A", "link": { "rel": "self", "href": "/vdc/storage-systems/urn:storageos:StorageSystem:56d8aa7e-45fe-4383-b49a-fec72e9927d3:/storage-pools/urn:storageos:StoragePool:62d2e40d-ced0-4114-8bb7-8d333e7ef878:" } }, { "id": "urn:storageos:StoragePool:9e551963-d596-48ae-b208-1b870126d195:", "name": "SYMMETRIX+000198700420+POOL+TP+M3", "link": { "rel": "self", "href": "/vdc/storage-systems/urn:storageos:StorageSystem:56d8aa7e-45fe-4383-b49a-fec72e9927d3:/storage-pools/urn:storageos:StoragePool:9e551963-d596-48ae-b208-1b870126d195:" } }, { "id": "urn:storageos:StoragePool:ad0dae57-d318-409c-a859-6c9e59a28251:", "name": "SYMMETRIX+000198700420+POOL+TP+M2", "link": { "rel": "self", "href": "/vdc/storage-systems/urn:storageos:StorageSystem:56d8aa7e-45fe-4383-b49a-fec72e9927d3:/storage-pools/urn:storageos:StoragePool:ad0dae57-d318-409c-a859-6c9e59a28251:" } }, { "id": "urn:storageos:StoragePool:78caaf4a-673e-4580-ae41-a545a45e5e28:", "name": "SYMMETRIX+000198700420+POOL+TP+data", "link": { "rel": "self", "href": "/vdc/storage-systems/urn:storageos:StorageSystem:56d8aa7e-45fe-4383-b49a-fec72e9927d3:/storage-pools/urn:storageos:StoragePool:78caaf4a-673e-4580-ae41-a545a45e5e28:" } }, { "id": "urn:storageos:StoragePool:38e2a0c2-89c9-4ec7-ad9b-29420e464012:", "name": "SYMMETRIX+000198700420+POOL+TP+t3", "link": { "rel": "self",
Setting Up a Virtual Data Center
86 EMC ViPR 1.1.0 Controller REST API Developer Guide

"href": "/vdc/storage-systems/urn:storageos:StorageSystem:56d8aa7e-45fe-4383-b49a-fec72e9927d3:/storage-pools/urn:storageos:StoragePool:38e2a0c2-89c9-4ec7-ad9b-29420e464012:" } }, { "id": "urn:storageos:StoragePool:dbdcd42a-b0a4-49b4-8a6e-204a09b8b1ef:", "name": "SYMMETRIX+000198700420+POOL+TP+3R5-B", "link": { "rel": "self", "href": "/vdc/storage-systems/urn:storageos:StorageSystem:56d8aa7e-45fe-4383-b49a-fec72e9927d3:/storage-pools/urn:storageos:StoragePool:dbdcd42a-b0a4-49b4-8a6e-204a09b8b1ef:" } } ]}
3. Using the URN returned for the new virtual pool returned from the POST /block/vpools request, assign one or more of the storage pools that match the properties ofthe virtual pool by sending a PUT/block/vpools/{identifier}/assign-matched-pools request. The representation of the updated virtual pool is returned.
RequestPUT https://<ViPR_VIP>:4443/block/vpools/urn:storageos:VirtualPool:6cd9f843-1b41-4b9f-8eb1-a26797d0a268:/assign-matched-pools
{'Content-Type': 'application/json', 'X-SDS-AUTH-TOKEN': '{Token_Text}', 'ACCEPT': 'application/json'}
{ "assigned_pool_changes": { "add": { "storage_pool": [ "urn:storageos:StoragePool:62d2e40d-ced0-4114-8bb7-8d333e7ef878:", "urn:storageos:StoragePool:78caaf4a-673e-4580-ae41-a545a45e5e28:", "urn:storageos:StoragePool:ad0dae57-d318-409c-a859-6c9e59a28251:" ] } }}
ResponseHTTP 200 OK{ "assigned_storage_pools": [ { "id": "urn:storageos:StoragePool:78caaf4a-673e-4580-ae41-a545a45e5e28:", "link": { "href": "/vdc/storage-systems/urn:storageos:StorageSystem:56d8aa7e-45fe-4383-b49a-fec72e9927d3:/storage-pools/urn:storageos:StoragePool:78caaf4a-673e-4580-ae41-a545a45e5e28:", "rel": "self" } }, { "id": "urn:storageos:StoragePool:ad0dae57-d318-409c-a859-6c9e59a28251:", "link": { "href": "/vdc/storage-systems/urn:storageos:StorageSystem:56d8aa7e-45fe-4383-b49a-fec72e9927d3:/
Setting Up a Virtual Data Center
Setting up the virtual pool 87

storage-pools/urn:storageos:StoragePool:ad0dae57-d318-409c-a859-6c9e59a28251:", "rel": "self" } }, { "id": "urn:storageos:StoragePool:62d2e40d-ced0-4114-8bb7-8d333e7ef878:", "link": { "href": "/vdc/storage-systems/urn:storageos:StorageSystem:56d8aa7e-45fe-4383-b49a-fec72e9927d3:/storage-pools/urn:storageos:StoragePool:62d2e40d-ced0-4114-8bb7-8d333e7ef878:", "rel": "self" } } ], "creation_time": 1379202604198, "description": "Basic Virtual Pool for Block Provisioning", "expandable": true, "id": "urn:storageos:VirtualPool:6cd9f843-1b41-4b9f-8eb1-a26797d0a268:", "inactive": false, "invalid_matched_pools": [], "link": { "href": "/block/vpools/urn:storageos:VirtualPool:6cd9f843-1b41-4b9f-8eb1-a26797d0a268:", "rel": "self" }, "matched_storage_pools": [ { "id": "urn:storageos:StoragePool:78caaf4a-673e-4580-ae41-a545a45e5e28:", "link": { "href": "/vdc/storage-systems/urn:storageos:StorageSystem:56d8aa7e-45fe-4383-b49a-fec72e9927d3:/storage-pools/urn:storageos:StoragePool:78caaf4a-673e-4580-ae41-a545a45e5e28:", "rel": "self" } }, { "id": "urn:storageos:StoragePool:ad0dae57-d318-409c-a859-6c9e59a28251:", "link": { "href": "/vdc/storage-systems/urn:storageos:StorageSystem:56d8aa7e-45fe-4383-b49a-fec72e9927d3:/storage-pools/urn:storageos:StoragePool:ad0dae57-d318-409c-a859-6c9e59a28251:", "rel": "self" } }, { "id": "urn:storageos:StoragePool:62d2e40d-ced0-4114-8bb7-8d333e7ef878:", "link": { "href": "/vdc/storage-systems/urn:storageos:StorageSystem:56d8aa7e-45fe-4383-b49a-fec72e9927d3:/storage-pools/urn:storageos:StoragePool:62d2e40d-ced0-4114-8bb7-8d333e7ef878:", "rel": "self" } } ], "name": "basic_vpool", "num_paths": 1, "protection": { "continuous_copies": { "max_native_continuous_copies": 0 },
Setting Up a Virtual Data Center
88 EMC ViPR 1.1.0 Controller REST API Developer Guide
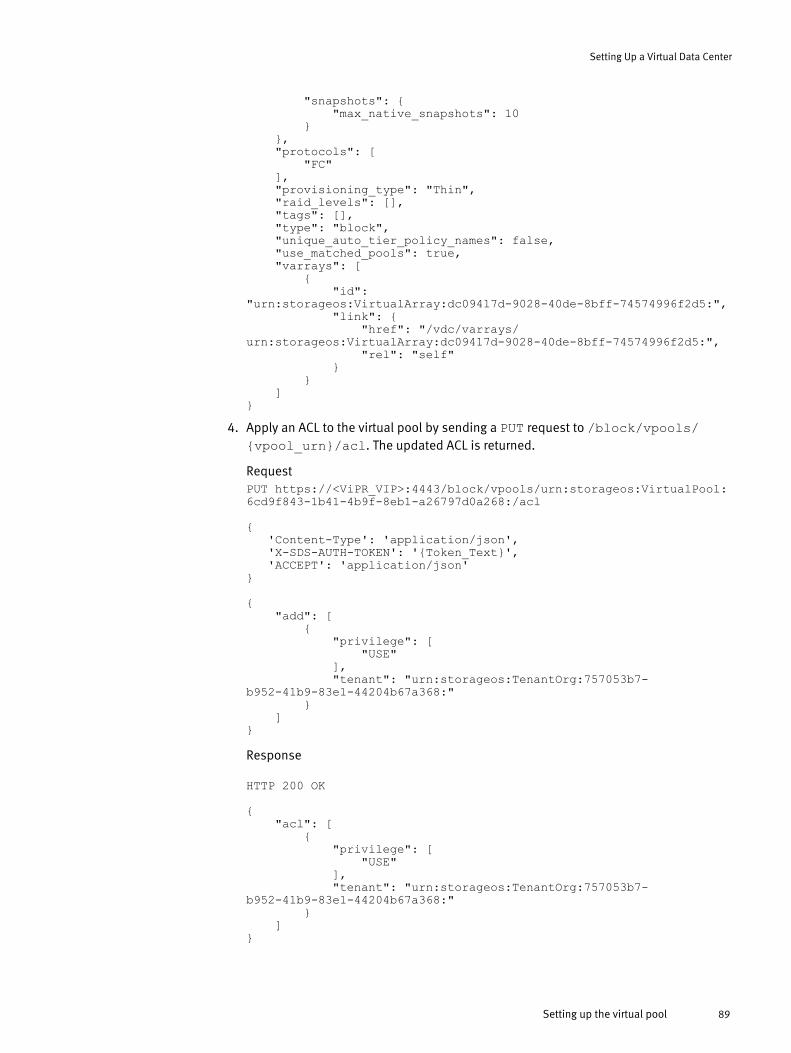
"snapshots": { "max_native_snapshots": 10 } }, "protocols": [ "FC" ], "provisioning_type": "Thin", "raid_levels": [], "tags": [], "type": "block", "unique_auto_tier_policy_names": false, "use_matched_pools": true, "varrays": [ { "id": "urn:storageos:VirtualArray:dc09417d-9028-40de-8bff-74574996f2d5:", "link": { "href": "/vdc/varrays/urn:storageos:VirtualArray:dc09417d-9028-40de-8bff-74574996f2d5:", "rel": "self" } } ]}
4. Apply an ACL to the virtual pool by sending a PUT request to /block/vpools/{vpool_urn}/acl. The updated ACL is returned.
RequestPUT https://<ViPR_VIP>:4443/block/vpools/urn:storageos:VirtualPool:6cd9f843-1b41-4b9f-8eb1-a26797d0a268:/acl
{ 'Content-Type': 'application/json', 'X-SDS-AUTH-TOKEN': '{Token_Text}', 'ACCEPT': 'application/json'}
{ "add": [ { "privilege": [ "USE" ], "tenant": "urn:storageos:TenantOrg:757053b7-b952-41b9-83e1-44204b67a368:" } ]}
Response
HTTP 200 OK
{ "acl": [ { "privilege": [ "USE" ], "tenant": "urn:storageos:TenantOrg:757053b7-b952-41b9-83e1-44204b67a368:" } ]}
Setting Up a Virtual Data Center
Setting up the virtual pool 89

Creating a project for a tenantA project is a container for ViPR resources that are accessible by users in a tenant. Youcan successfully create a project as root, or you can log in as a Tenant Administrator orProject Administrator to complete this task
Procedure
1. Create a project for a tenant by sending a POST /tenants/{identifier}/projects request.
RequestPOST https://<ViPR_VIP>:4443/tenants/urn:storageos:TenantOrg:757053b7-b952-41b9-83e1-44204b67a368:/projects{ 'Content-Type': 'application/json', 'X-SDS-AUTH-TOKEN': '{Token_Text}', 'ACCEPT': 'application/json'}
{ "name": "myproject"}
ResponseHTTP 200{ "id": "urn:storageos:Project:cdb26784-9d70-413a-998c-8e6b7cd95719:", "link": { "href": "/projects/urn:storageos:Project:cdb26784-9d70-413a-998c-8e6b7cd95719:", "rel": "self" }, "name": "myproject"}
Setting Up a Virtual Data Center
90 EMC ViPR 1.1.0 Controller REST API Developer Guide

CHAPTER 8
Managing File Systems and Snapshots
This chapter contains the following topics.
u File system............................................................................................................ 92u Creating a file system............................................................................................ 92u Expanding a file share........................................................................................... 94u Exporting a file system.......................................................................................... 96u Unexporting a file share........................................................................................ 97u Deleting a file system export................................................................................. 99u Deleting a file system.......................................................................................... 101u Snapshot............................................................................................................ 102u Creating a file system snapshot...........................................................................102u Exporting a file system snapshot......................................................................... 104u Restoring a file system snapshot......................................................................... 106u Unexporting a file system snapshot.....................................................................107u Deleting a file system snapshot...........................................................................109
Managing File Systems and Snapshots 91

File systemA file system is a unit of file storage capacity that has been allocated by a user to aproject.
File system provisioning operations are performed after the System Administrator has setup the ViPR virtual data center. File systems are provisioned within the context of aproject by users who meet one of the following criteria:
u have a Tenant Administrator role.
u are a project owner.
u have an ALL access control list (ACL) permission on the project.
When a file system is created, the user must select the project and virtual array in whichthe file system will reside, and the virtual pool that will define the file system's storageperformance characteristics. Once the file system is created, it can be exported tomultiple hosts. In this way, a host cluster can be provisioned with shared file storage.
Unlike block volumes, there is no virtual array restriction when exporting file systems. Filesystems can be exported from any virtual array specified by the user. If no virtual array isselected for the file system export, the ViPR file store will pick the virtual array.
Creating a file systemWhen you create a file system you select the project and virtual array in which the filesystem will reside, and the virtual pool that will define the file system's storageperformance characteristics. Once the file system is created, you can provision a hostcluster with shared file storage by exporting the file system to multiple hosts.
Before you begin
You need this information:
u Name of the file system being created
u Size of the file system
u URN of the virtual array that contains the file system
u URN of the virtual pool supporting the file system
Procedure
1. Create a file system by sending a POST /file/filesystems request.
The request returns a task whose URI can be queried to determine the status of thetask.
RequestPOST https://<ViPR_VIP>:4443/file/filesystems?project=urn:storageos:Project:d456ae4d-da1a-4488-9e59-1b6e9dc59d78:{ 'Content-Type': 'application/json', 'X-SDS-AUTH-TOKEN':{token_text}, 'ACCEPT': 'application/json'}{
"name": "fs-cosnetappf-00:50:56:91:58:91", "size": "20MB", "varray": "urn:storageos:VirtualArray:69df596a-34b3-4d23-aaea-1da667593b74:", "vpool": "urn:storageos:VirtualPool:0d5f110f-af0d-4af8-bd71-
Managing File Systems and Snapshots
92 EMC ViPR 1.1.0 Controller REST API Developer Guide

a04635eba8be:"}
Response202 Accepted { "description": "Filesystem create",
"link": { "href": "/file/filesystems/urn:storageos:FileShare:840d01a9-8836-4c53-a95a-c6efedc81fc3:/tasks/252396af-e4e5-4ee0-a6b5-6606aeeaaf55", "rel": "self" },
"op_id": "252396af-e4e5-4ee0-a6b5-6606aeeaaf55",
"resource": { "id": "urn:storageos:FileShare:840d01a9-8836-4c53-a95a-c6efedc81fc3:", "link": { "href": "/file/filesystems/urn:storageos:FileShare:840d01a9-8836-4c53-a95a-c6efedc81fc3:", "rel": "self" }, "name": "fs-cosnetappf-00:50:56:91:58:91" }, "start_time": 1379958410262, "state": "pending" }
2. Send a GET request to the task URI that was returned by the POST request to returnthe status of the task.
When the task completes successfully, the message attribute is set to Operationcompleted successfully.
RequestGET https://<ViPR_VIP>:4443/file/filesystems/urn:storageos:FileShare:840d01a9-8836-4c53-a95a-c6efedc81fc3:/tasks/252396af-e4e5-4ee0-a6b5-6606aeeaaf55{ 'Content-Type': 'application/json', 'X-SDS-AUTH-TOKEN':{token_text}, 'ACCEPT': 'application/json'}
Response200 OK { "description": "Filesystem create", "end_time": 1379958413504, "link": { "href": "/file/filesystems/urn:storageos:FileShare:840d01a9-8836-4c53-a95a-c6efedc81fc3:/tasks/252396af-e4e5-4ee0-a6b5-6606aeeaaf55", "rel": "self" },
"message": "Operation completed successfully", "op_id": "252396af-e4e5-4ee0-a6b5-6606aeeaaf55",
"resource": { "id": "urn:storageos:FileShare:840d01a9-8836-4c53-a95a-c6efedc81fc3:", "link": { "href": "/file/filesystems/urn:storageos:FileShare:840d01a9-8836-4c53-a95a-c6efedc81fc3:",
Managing File Systems and Snapshots
Creating a file system 93

"rel": "self" },
"name": "fs-cosnetappf-00:50:56:91:58:91" },
"start_time": 1379958410262, "state": "ready" }
Expanding a file shareA file share may be expanded by sending a POST to /file/filesystems/{id}/expand.
Before you begin
You need this information:
u The URN of the file system which is being expanded
u The size to which the file system is being expanded
Procedure
1. Expand a file system by sending a POST /file/filesystems/{id}/expandrequest.
The request returns a task whose URI can be queried to determine the status of thetask.
RequestPOST https://<ViPR_VIP>:4443/file/filesystems/urn:storageos:FileShare:840d01a9-8836-4c53-a95a-c6efedc81fc3:/expand{'Content-Type': 'application/json','X-SDS-AUTH-TOKEN': {token_text},'ACCEPT': 'application/json'}
{ "new_size": "26214400"}
Response202 Accepted{ "link": { "href": "/file/filesystems/urn:storageos:FileShare:840d01a9-8836-4c53-a95a-c6efedc81fc3:/tasks/2f108ca5-6cb0-44c0-b4bb-f6aed1324520", "rel": "self" }, "op_id": "2f108ca5-6cb0-44c0-b4bb-f6aed1324520", "resource": { "id": "urn:storageos:FileShare:840d01a9-8836-4c53-a95a-c6efedc81fc3:", "link": { "href": "/file/filesystems/urn:storageos:FileShare:840d01a9-8836-4c53-a95a-c6efedc81fc3:", "rel": "self" }, "name": "fs-cosnetappf-00:50:56:91:58:91" },
"start_time": 1379958417856, "state": "pending" }
Managing File Systems and Snapshots
94 EMC ViPR 1.1.0 Controller REST API Developer Guide

{ 'op_id': '2f108ca5-6cb0-44c0-b4bb-f6aed1324520', 'link': { 'href':'/file/filesystems/urn:storageos:FileShare:840d01a9-8836-4c53-a95a-c6efedc81fc3:/tasks/2f108ca5-6cb0-44c0-b4bb-f6aed1324520', 'rel': 'self' }, 'state': 'pending', 'resource': { 'link': {'href': '/file/filesystems/urn:storageos:FileShare:840d01a9-8836-4c53-a95a-c6efedc81fc3:', 'rel': 'self'}, 'name': 'fs-cosnetappf-00:50:56:91:58:91', 'id': 'urn:storageos:FileShare:840d01a9-8836-4c53-a95a-c6efedc81fc3:' }, 'start_time': 1379958417856 }
2. Send a GET request to the task URI that was returned by the POST request to returnthe status of the task.
When the task completes successfully, the message attribute is set to Operationcompleted successfully.
RequestGET https://<ViPR_VIP>:4443/file/filesystems/urn:storageos:FileShare:840d01a9-8836-4c53-a95a-c6efedc81fc3:/tasks/2f108ca5-6cb0-44c0-b4bb-f6aed1324520{'Content-Type': 'application/json','X-SDS-AUTH-TOKEN': {token_text},'ACCEPT': 'application/json'}
Response200 OK{ "end_time": 1379958418794, "link": { "href": "/file/filesystems/urn:storageos:FileShare:840d01a9-8836-4c53-a95a-c6efedc81fc3:/tasks/2f108ca5-6cb0-44c0-b4bb-f6aed1324520", "rel": "self" },
"message": "Operation completed successfully", "op_id": "2f108ca5-6cb0-44c0-b4bb-f6aed1324520", "resource": { "id": "urn:storageos:FileShare:840d01a9-8836-4c53-a95a-c6efedc81fc3:", "link": { "href": "/file/filesystems/urn:storageos:FileShare:840d01a9-8836-4c53-a95a-c6efedc81fc3:", "rel": "self" }, "name": "fs-cosnetappf-00:50:56:91:58:91" },
"start_time": 1379958417856, "state": "ready" }
Managing File Systems and Snapshots
Expanding a file share 95

Exporting a file systemOnce a file system is created, it can be exported to multiple hosts. In this way, a hostcluster can be provisioned with shared file storage.
Before you begin
You need this information:
u URN of the file system being exported
u Security type for the file export
u Permissions for the file export
u The user with root permissions
u The file system export protocol
u Endpoints
Procedure
1. Export the file system by sending a POST /file/filesystems/{id}exportsrequest.
The request returns a task whose URI can be queried to determine the status of thetask.
In this example, the sub_directory element is not included in the payload.Therefore, the entire file system is exported.
RequestPOST https://<ViPR_VIP>:4443/file/filesystems/urn:storageos:FileShare:840d01a9-8836-4c53-a95a-c6efedc81fc3:/exports{ 'Content-Type': 'application/json', 'X-SDS-AUTH-TOKEN': {Token_text} 'ACCEPT': 'application/json' }{ "endpoints": [ "www.ford.com", "www.gmc.com", "www.pontiac.com" ], "permissions": "rw", "protocol": "NFS", "root_user": "nobody", "type": "sys"}
Response202 Accepted{ "link": { "href": "/file/filesystems/urn:storageos:FileShare:840d01a9-8836-4c53-a95a-c6efedc81fc3:/tasks/7770ff2a-433b-480c-aef6-8c64e924339b", "rel": "self" }, "op_id": "7770ff2a-433b-480c-aef6-8c64e924339b", "resource": { "id": "urn:storageos:FileShare:840d01a9-8836-4c53-a95a-c6efedc81fc3:", "link": { "href": "/file/filesystems/urn:storageos:FileShare:
Managing File Systems and Snapshots
96 EMC ViPR 1.1.0 Controller REST API Developer Guide

840d01a9-8836-4c53-a95a-c6efedc81fc3:", "rel": "self" }, "name": "fs-cosnetappf-00:50:56:91:58:91" }, "start_time": 1379958422465, "state": "pending"}
2. Send a GET request to the task URI that was returned by the POST request to returnthe status of the task.
When the task completes successfully, the message attribute is set to Operationcompleted successfully.
RequestGET https://<ViPR_VIP>:4443/file/filesystems/urn:storageos:FileShare:840d01a9-8836-4c53-a95a-c6efedc81fc3:/tasks/7770ff2a-433b-480c-aef6-8c64e924339b{ 'Content-Type': 'application/json', 'X-SDS-AUTH-TOKEN': {Token_text} 'ACCEPT': 'application/json' }
Response200 OK{ "end_time": 1379958422816, "link": { "href": "/file/filesystems/urn:storageos:FileShare:840d01a9-8836-4c53-a95a-c6efedc81fc3:/tasks/7770ff2a-433b-480c-aef6-8c64e924339b", "rel": "self" }, "message": "Operation completed successfully", "op_id": "7770ff2a-433b-480c-aef6-8c64e924339b", "resource": { "id": "urn:storageos:FileShare:840d01a9-8836-4c53-a95a-c6efedc81fc3:", "link": { "href": "/file/filesystems/urn:storageos:FileShare:840d01a9-8836-4c53-a95a-c6efedc81fc3:", "rel": "self" }, "name": "fs-cosnetappf-00:50:56:91:58:91" }, "start_time": 1379958422465, "state": "ready"}
Unexporting a file shareUnexport a file system by updating the list of endpoints of the file system export. A PUTrequest is sent to /file/filesystems/{id}/exports/{protocol},{secType},{perm},{root_mapping} .
Before you begin
You need this information:
Requirement Description- -{id} URN of the file system export being deleted
{protocol} protocol of the file system export
Managing File Systems and Snapshots
Unexporting a file share 97
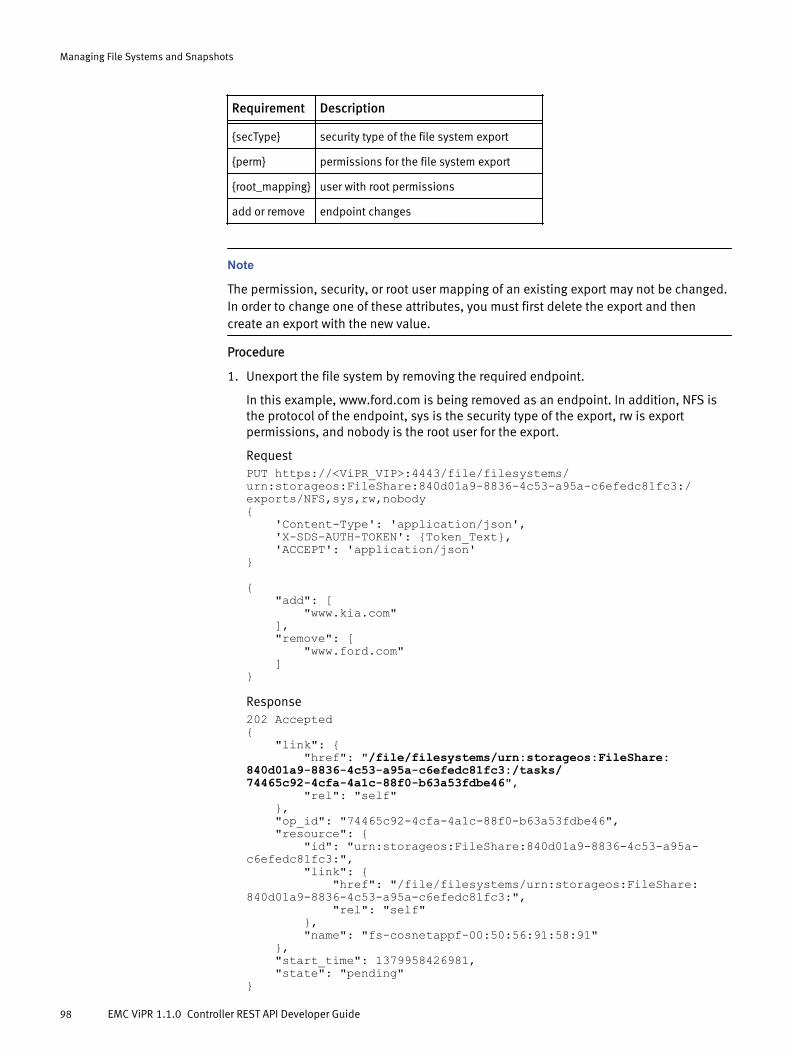
Requirement Description- -{secType} security type of the file system export
{perm} permissions for the file system export
{root_mapping} user with root permissions
add or remove endpoint changes
Note
The permission, security, or root user mapping of an existing export may not be changed.In order to change one of these attributes, you must first delete the export and thencreate an export with the new value.
Procedure
1. Unexport the file system by removing the required endpoint.
In this example, www.ford.com is being removed as an endpoint. In addition, NFS isthe protocol of the endpoint, sys is the security type of the export, rw is exportpermissions, and nobody is the root user for the export.
RequestPUT https://<ViPR_VIP>:4443/file/filesystems/urn:storageos:FileShare:840d01a9-8836-4c53-a95a-c6efedc81fc3:/exports/NFS,sys,rw,nobody{ 'Content-Type': 'application/json', 'X-SDS-AUTH-TOKEN': {Token_Text}, 'ACCEPT': 'application/json'}
{ "add": [ "www.kia.com" ], "remove": [ "www.ford.com" ]}
Response202 Accepted{ "link": { "href": "/file/filesystems/urn:storageos:FileShare:840d01a9-8836-4c53-a95a-c6efedc81fc3:/tasks/74465c92-4cfa-4a1c-88f0-b63a53fdbe46", "rel": "self" }, "op_id": "74465c92-4cfa-4a1c-88f0-b63a53fdbe46", "resource": { "id": "urn:storageos:FileShare:840d01a9-8836-4c53-a95a-c6efedc81fc3:", "link": { "href": "/file/filesystems/urn:storageos:FileShare:840d01a9-8836-4c53-a95a-c6efedc81fc3:", "rel": "self" }, "name": "fs-cosnetappf-00:50:56:91:58:91" }, "start_time": 1379958426981, "state": "pending"}
Managing File Systems and Snapshots
98 EMC ViPR 1.1.0 Controller REST API Developer Guide

2. Send a GET request to the task URN that was returned by the PUT request to returnthe status of the task.
When the task completes successfully, the message attribute is set to Operationcompleted successfully.
RequestGET https://<ViPR_VIP>:4443/file/filesystems/urn:storageos:FileShare:840d01a9-8836-4c53-a95a-c6efedc81fc3:/tasks/74465c92-4cfa-4a1c-88f0-b63a53fdbe46{ 'Content-Type': 'application/json', 'X-SDS-AUTH-TOKEN': {Token_Text}, 'ACCEPT': 'application/json'}
Response200 OK
{ "end_time": 1379958427315, "link": { "href": "/file/filesystems/urn:storageos:FileShare:840d01a9-8836-4c53-a95a-c6efedc81fc3:/tasks/74465c92-4cfa-4a1c-88f0-b63a53fdbe46", "rel": "self" }, "message": "Operation completed successfully", "op_id": "74465c92-4cfa-4a1c-88f0-b63a53fdbe46", "resource": { "id": "urn:storageos:FileShare:840d01a9-8836-4c53-a95a-c6efedc81fc3:", "link": { "href": "/file/filesystems/urn:storageos:FileShare:840d01a9-8836-4c53-a95a-c6efedc81fc3:", "rel": "self" }, "name": "fs-cosnetappf-00:50:56:91:58:91" }, "start_time": 1379958426981, "state": "ready"}
Deleting a file system exportA file system export is deleted by sending a DELETE file/filesystems/{id}/exports/{protocol},{secType},{perm},{root_mapping} request.
Before you begin
You need this information:
Requirement Description- -{id} URN of the file system
{protocol} protocol of the file system export
{secType} security type of the file system export
{perm} permissions for the file system export
{root_mapping} user with root permissions
Managing File Systems and Snapshots
Deleting a file system export 99
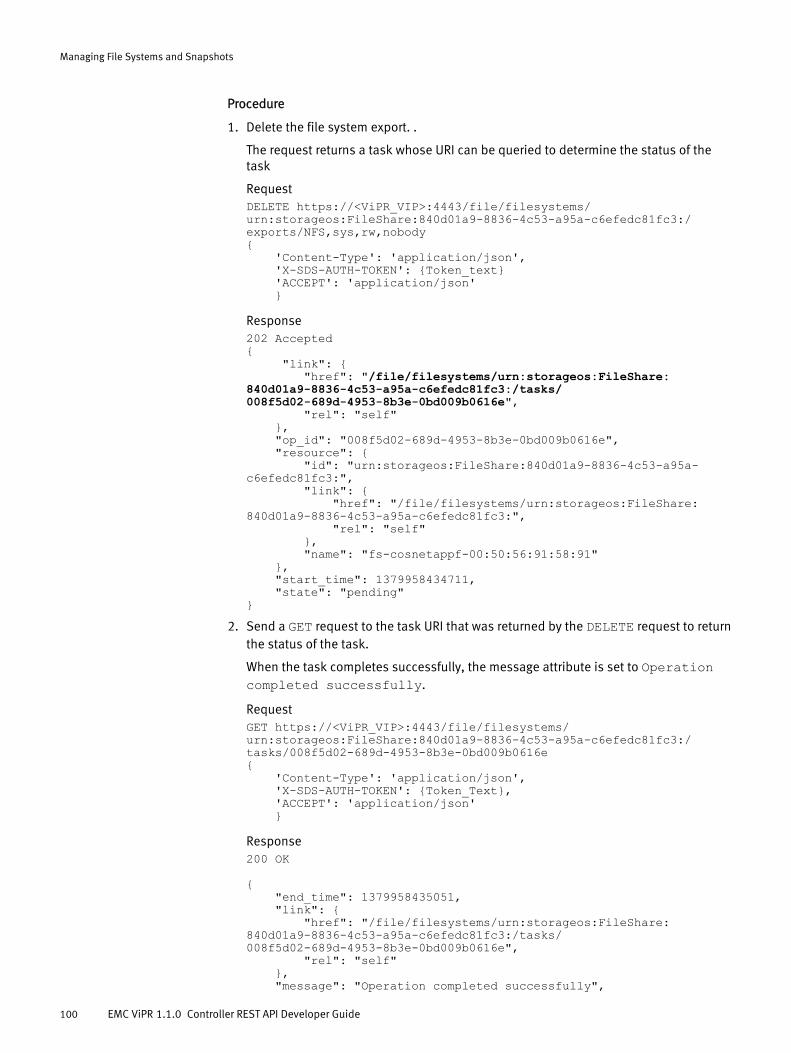
Procedure
1. Delete the file system export. .
The request returns a task whose URI can be queried to determine the status of thetask
RequestDELETE https://<ViPR_VIP>:4443/file/filesystems/urn:storageos:FileShare:840d01a9-8836-4c53-a95a-c6efedc81fc3:/exports/NFS,sys,rw,nobody{ 'Content-Type': 'application/json', 'X-SDS-AUTH-TOKEN': {Token_text} 'ACCEPT': 'application/json' }
Response202 Accepted{ "link": { "href": "/file/filesystems/urn:storageos:FileShare:840d01a9-8836-4c53-a95a-c6efedc81fc3:/tasks/008f5d02-689d-4953-8b3e-0bd009b0616e", "rel": "self" }, "op_id": "008f5d02-689d-4953-8b3e-0bd009b0616e", "resource": { "id": "urn:storageos:FileShare:840d01a9-8836-4c53-a95a-c6efedc81fc3:", "link": { "href": "/file/filesystems/urn:storageos:FileShare:840d01a9-8836-4c53-a95a-c6efedc81fc3:", "rel": "self" }, "name": "fs-cosnetappf-00:50:56:91:58:91" }, "start_time": 1379958434711, "state": "pending"}
2. Send a GET request to the task URI that was returned by the DELETE request to returnthe status of the task.
When the task completes successfully, the message attribute is set to Operationcompleted successfully.
RequestGET https://<ViPR_VIP>:4443/file/filesystems/urn:storageos:FileShare:840d01a9-8836-4c53-a95a-c6efedc81fc3:/tasks/008f5d02-689d-4953-8b3e-0bd009b0616e{ 'Content-Type': 'application/json', 'X-SDS-AUTH-TOKEN': {Token_Text}, 'ACCEPT': 'application/json' }
Response200 OK
{ "end_time": 1379958435051, "link": { "href": "/file/filesystems/urn:storageos:FileShare:840d01a9-8836-4c53-a95a-c6efedc81fc3:/tasks/008f5d02-689d-4953-8b3e-0bd009b0616e", "rel": "self" }, "message": "Operation completed successfully",
Managing File Systems and Snapshots
100 EMC ViPR 1.1.0 Controller REST API Developer Guide

"op_id": "008f5d02-689d-4953-8b3e-0bd009b0616e", "resource": { "id": "urn:storageos:FileShare:840d01a9-8836-4c53-a95a-c6efedc81fc3:", "link": { "href": "/file/filesystems/urn:storageos:FileShare:840d01a9-8836-4c53-a95a-c6efedc81fc3:", "rel": "self" }, "name": "fs-cosnetappf-00:50:56:91:58:91" }, "start_time": 1379958434711, "state": "ready"}
Deleting a file systemDeactivating a file system moves the file system to a marked-for-delete state, and it willbe deleted when all references to this file system of type Snapshot are deleted. Theoptional forceDelete param will delete snapshots and exports when set to true in thecase of VNXFile.
Before you begin
You need this information:
u URN of the file system being deleted
u value of the forceDelete parameter
Procedure
1. Delete the file system by sending a POST /file/filesystems/{id}/deactivate request.
The request returns a task whose URI can be queried to determine the status of thetask.
RequestPOST https://<ViPR_VIP>:4443/file/filesystems/urn:storageos:FileShare:2105a51d-c867-4f2c-a779-68ae0c282d03:/deactivate<?xml version="1.0" encoding="UTF-8" standalone="yes"?><filesystem_deactivate> <forceDelete>true</forceDelete></filesystem_deactivate>
Response202 Accepted<?xml version="1.0" encoding="UTF-8" standalone="yes"?><task> <associated_resources/> <op_id>6a8b1c38-f60f-4470-a200-3efca9231d4b</op_id> <resource> <id>urn:storageos:FileShare:2105a51d-c867-4f2c-a779-68ae0c282d03:</id> <link href="/file/filesystems/urn:storageos:FileShare:2105a51d-c867-4f2c-a779-68ae0c282d03:" rel="self"/> <name>prov_NetApp_UnexportFilesystemWithInvalidPermissions_39</name> </resource> <link href="/file/filesystems/urn:storageos:FileShare:2105a51d-c867-4f2c-a779-68ae0c282d03:/tasks/6a8b1c38-f60f-4470-a200-3efca9231d4b" rel="self"/> <start_time>1388787072029</start_time> <state>pending</state></task>
Managing File Systems and Snapshots
Deleting a file system 101

2. Send a GET request to the task URI that was returned by the POST request to returnthe status of the task.
When the task completes successfully, the message attribute is set to Operationcompleted successfully.
RequestGET https://<ViPR_VIP>:4443/file/filesystems/urn:storageos:FileShare:2105a51d-c867-4f2c-a779-68ae0c282d03:/tasks/6a8b1c38-f60f-4470-a200-3efca9231d4b
Response200 OK<?xml version="1.0" encoding="UTF-8" standalone="yes"?><task> <associated_resources/> <end_time>1388787074391</end_time> <message>Operation completed successfully</message> <op_id>6a8b1c38-f60f-4470-a200-3efca9231d4b</op_id> <resource> <id>urn:storageos:FileShare:2105a51d-c867-4f2c-a779-68ae0c282d03:</id> <link href="/file/filesystems/urn:storageos:FileShare:2105a51d-c867-4f2c-a779-68ae0c282d03:" rel="self"/> <name>prov_NetApp_UnexportFilesystemWithInvalidPermissions_39</name> </resource> <link href="/file/filesystems/urn:storageos:FileShare:2105a51d-c867-4f2c-a779-68ae0c282d03:/tasks/6a8b1c38-f60f-4470-a200-3efca9231d4b" rel="self"/> <start_time>1388787072029</start_time> <state>ready</state></task>
SnapshotA snapshot is a point-in-time copy of a volume or a file system. Snapshots are intendedfor short-term operational recovery.
Snapshots have the following properties:
u A snapshot can be exported/unexported to a host, and you can delete it.
u A snapshot’s lifetime is tied to the original volume/file system: when the originalvolume/file system is deleted, all of its snapshots will also be deleted.
u A volume/file system may be restored in place based on a snapshot.
u A snapshot is associated with the same project as the original volume/file system.
u A new volume/file system may be created using a snapshot as a template.
u Multi-volume consistent snapshots can be used to snapshot multiple volumes atonce.
Creating a file system snapshotA file system snapshot is created by sending a POST /file/filesystems/{id}/protection/snapshots request.
Before you begin
You need this information:
Managing File Systems and Snapshots
102 EMC ViPR 1.1.0 Controller REST API Developer Guide
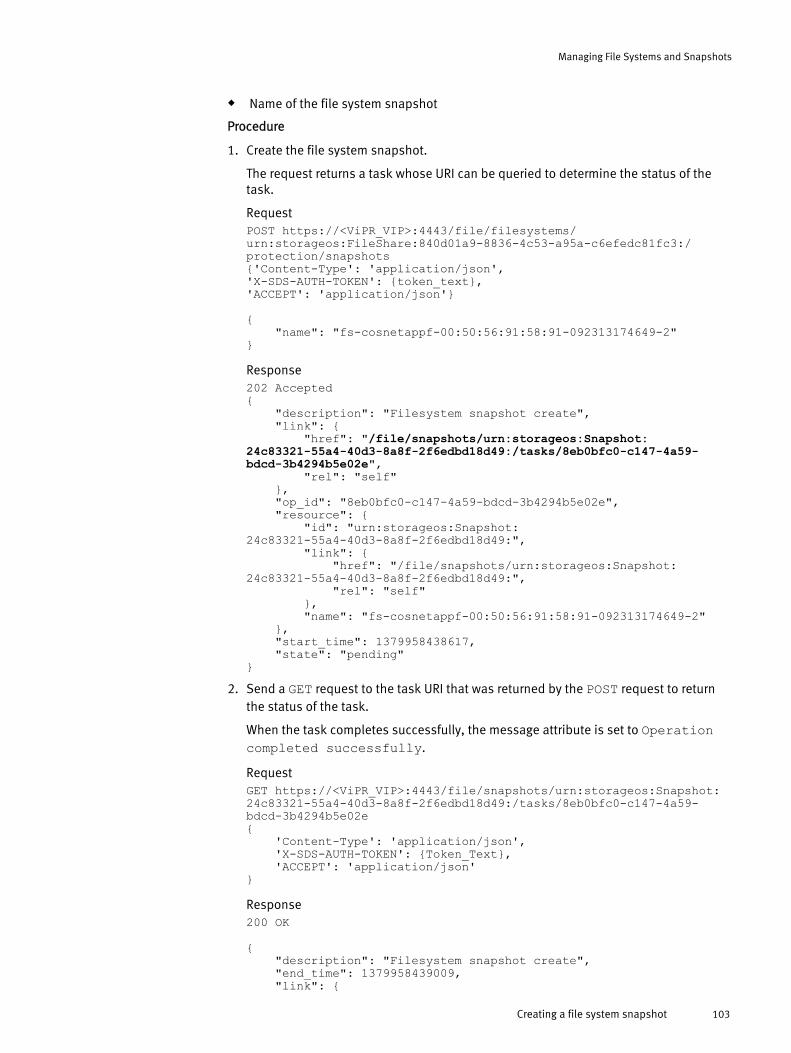
u Name of the file system snapshot
Procedure
1. Create the file system snapshot.
The request returns a task whose URI can be queried to determine the status of thetask.
RequestPOST https://<ViPR_VIP>:4443/file/filesystems/urn:storageos:FileShare:840d01a9-8836-4c53-a95a-c6efedc81fc3:/protection/snapshots{'Content-Type': 'application/json', 'X-SDS-AUTH-TOKEN': {token_text}, 'ACCEPT': 'application/json'} { "name": "fs-cosnetappf-00:50:56:91:58:91-092313174649-2"}
Response202 Accepted{ "description": "Filesystem snapshot create", "link": { "href": "/file/snapshots/urn:storageos:Snapshot:24c83321-55a4-40d3-8a8f-2f6edbd18d49:/tasks/8eb0bfc0-c147-4a59-bdcd-3b4294b5e02e", "rel": "self" }, "op_id": "8eb0bfc0-c147-4a59-bdcd-3b4294b5e02e", "resource": { "id": "urn:storageos:Snapshot:24c83321-55a4-40d3-8a8f-2f6edbd18d49:", "link": { "href": "/file/snapshots/urn:storageos:Snapshot:24c83321-55a4-40d3-8a8f-2f6edbd18d49:", "rel": "self" }, "name": "fs-cosnetappf-00:50:56:91:58:91-092313174649-2" }, "start_time": 1379958438617, "state": "pending"}
2. Send a GET request to the task URI that was returned by the POST request to returnthe status of the task.
When the task completes successfully, the message attribute is set to Operationcompleted successfully.
RequestGET https://<ViPR_VIP>:4443/file/snapshots/urn:storageos:Snapshot:24c83321-55a4-40d3-8a8f-2f6edbd18d49:/tasks/8eb0bfc0-c147-4a59-bdcd-3b4294b5e02e{ 'Content-Type': 'application/json', 'X-SDS-AUTH-TOKEN': {Token_Text}, 'ACCEPT': 'application/json'}
Response200 OK
{ "description": "Filesystem snapshot create", "end_time": 1379958439009, "link": {
Managing File Systems and Snapshots
Creating a file system snapshot 103

"href": "/file/snapshots/urn:storageos:Snapshot:24c83321-55a4-40d3-8a8f-2f6edbd18d49:/tasks/8eb0bfc0-c147-4a59-bdcd-3b4294b5e02e", "rel": "self" }, "message": "Operation completed successfully", "op_id": "8eb0bfc0-c147-4a59-bdcd-3b4294b5e02e", "resource": { "id": "urn:storageos:Snapshot:24c83321-55a4-40d3-8a8f-2f6edbd18d49:", "link": { "href": "/file/snapshots/urn:storageos:Snapshot:24c83321-55a4-40d3-8a8f-2f6edbd18d49:", "rel": "self" }, "name": "fs-cosnetappf-00:50:56:91:58:91-092313174649-2" }, "start_time": 1379958438617, "state": "ready"}
Exporting a file system snapshotA snapshot of a file system can be exported by sending a POST /file/snapshots/{id}/exports request.
Before you begin
You need this information:
u URN of the file system snapshot being exported
u Security type for the file snapshot export
u Permissions for the file snapshot export
u The user with root permissions
u The file snapshot export protocol
u Endpoints
Procedure
1. Export the file system snapshot.
The request returns a task whose URI can be queried to determine the status of thetask.
RequestPOST https://<ViPR_VIP>:4443/file/snapshots/urn:storageos:Snapshot:24c83321-55a4-40d3-8a8f-2f6edbd18d49:/exports{'Content-Type': 'application/json', 'X-SDS-AUTH-TOKEN': {token_text}, 'ACCEPT': 'application/json'}{ "endpoints": [ "www.endpoint1.com", "www.endpoint2.com", "www.endpoint3.com" ], "permissions": "ro", "protocol": "NFS", "root_user": "nobody", "type": "sys"}
Response202 Accepted{
Managing File Systems and Snapshots
104 EMC ViPR 1.1.0 Controller REST API Developer Guide

"link": { "href": "/file/snapshots/urn:storageos:Snapshot:24c83321-55a4-40d3-8a8f-2f6edbd18d49:/tasks/aac817fa-72d1-4b8c-ae73-5b02e6553242", "rel": "self" }, "op_id": "aac817fa-72d1-4b8c-ae73-5b02e6553242", "resource": { "id": "urn:storageos:Snapshot:24c83321-55a4-40d3-8a8f-2f6edbd18d49:", "link": { "href": "/file/snapshots/urn:storageos:Snapshot:24c83321-55a4-40d3-8a8f-2f6edbd18d49:", "rel": "self" }, "name": "fs-cosnetappf-00:50:56:91:58:91-092313174649-2" }, "start_time": 1379958442647, "state": "pending"}
2. Send a GET request to the task URI that was returned by the POST request to return thestatus of the task.
When the task completes successfully, the message attribute is set to Operationcompleted successfully.
RequestGET https://<ViPR_VIP>:4443/file/snapshots/urn:storageos:Snapshot:24c83321-55a4-40d3-8a8f-2f6edbd18d49:/tasks/aac817fa-72d1-4b8c-ae73-5b02e6553242{ 'Content-Type': 'application/json', 'X-SDS-AUTH-TOKEN': {Token_Text}, 'ACCEPT': 'application/json' }
Response 200 OK
{ "end_time": 1379958443025, "link": { "href": "/file/snapshots/urn:storageos:Snapshot:24c83321-55a4-40d3-8a8f-2f6edbd18d49:/tasks/aac817fa-72d1-4b8c-ae73-5b02e6553242", "rel": "self" }, "message": "Operation completed successfully", "op_id": "aac817fa-72d1-4b8c-ae73-5b02e6553242", "resource": { "id": "urn:storageos:Snapshot:24c83321-55a4-40d3-8a8f-2f6edbd18d49:", "link": { "href": "/file/snapshots/urn:storageos:Snapshot:24c83321-55a4-40d3-8a8f-2f6edbd18d49:", "rel": "self" }, "name": "fs-cosnetappf-00:50:56:91:58:91-092313174649-2" }, "start_time": 1379958442647, "state": "ready"}
Managing File Systems and Snapshots
Exporting a file system snapshot 105

Restoring a file system snapshotA file system snapshot is restored by sending a POST /file/snapshots/{id}/restore request.
Before you begin
You need this information:
u URN of the file system snapshot which is being restored
Procedure
1. Restore the file system snapshot.
The request returns a task whose URI can be queried to determine the status of thetask.
RequestPOST https://<ViPR_VIP>:4443/file/snapshots/urn:storageos:Snapshot:24c83321-55a4-40d3-8a8f-2f6edbd18d49:/restore{ 'Content-Type': 'application/json', 'X-SDS-AUTH-TOKEN': {Token_Text}, 'ACCEPT': 'application/json' }
Response202 Accepted{ "link": { "href": "/file/snapshots/urn:storageos:Snapshot:24c83321-55a4-40d3-8a8f-2f6edbd18d49:/tasks/6fcfd9ba-772b-4dc0-a5c6-76f93a5919ef", "rel": "self" }, "op_id": "6fcfd9ba-772b-4dc0-a5c6-76f93a5919ef", "resource": { "id": "urn:storageos:Snapshot:24c83321-55a4-40d3-8a8f-2f6edbd18d49:", "link": { "href": "/file/snapshots/urn:storageos:Snapshot:24c83321-55a4-40d3-8a8f-2f6edbd18d49:", "rel": "self" }, "name": "fs-cosnetappf-00:50:56:91:58:91-092313174649-2" }, "start_time": 1379958447488, "state": "pending"}
2. Send a GET request to the task URI that was returned by the POST request to returnthe status of the task.
When the task completes successfully, the message attribute is set to Operationcompleted successfully.
RequestGET https://<ViPR_VIP>:4443/file/snapshots/urn:storageos:Snapshot:24c83321-55a4-40d3-8a8f-2f6edbd18d49:/tasks/6fcfd9ba-772b-4dc0-a5c6-76f93a5919ef{ 'Content-Type': 'application/json', 'X-SDS-AUTH-TOKEN': {Token_Text}, 'ACCEPT': 'application/json' }
Managing File Systems and Snapshots
106 EMC ViPR 1.1.0 Controller REST API Developer Guide

Response200 OK
{ "link": { "href": "/file/snapshots/urn:storageos:Snapshot:24c83321-55a4-40d3-8a8f-2f6edbd18d49:/tasks/6fcfd9ba-772b-4dc0-a5c6-76f93a5919ef", "rel": "self" }, "message": "Operation completed successfully", "op_id": "6fcfd9ba-772b-4dc0-a5c6-76f93a5919ef", "resource": { "id": "urn:storageos:Snapshot:24c83321-55a4-40d3-8a8f-2f6edbd18d49:", "link": { "href": "/file/snapshots/urn:storageos:Snapshot:24c83321-55a4-40d3-8a8f-2f6edbd18d49:", "rel": "self" }, "name": "fs-cosnetappf-00:50:56:91:58:91-092313174649-2" }, "state": "ready"}
Unexporting a file system snapshotA file system snapshot export is removed by sending a DELETE /file/snapshots/{id}/exports/{protocol},{secType},{perm},{rootMapping} request.
Before you begin
You need this information:
Requirement Description- -{id} URN of the file system export being deleted
{protocol} protocol of the file system export
{secType} security type of the file system export
{perm} permissions for the file system export
{root_mapping} user with root permissions
Procedure
1. Remove the file system snapshot export.
The request returns a task whose URI can be queried to determine the status of thetask.
RequestDELETE https://<ViPR_VIP>:4443/file/snapshots/urn:storageos:Snapshot:24c83321-55a4-40d3-8a8f-2f6edbd18d49:/exports/NFS,sys,ro,nobody{ 'Content-Type': 'application/json', 'X-SDS-AUTH-TOKEN': {Token_Text}, 'ACCEPT': 'application/json' }
Response202 Accepted
Managing File Systems and Snapshots
Unexporting a file system snapshot 107

{ "link": { "href": "/file/snapshots/urn:storageos:Snapshot:24c83321-55a4-40d3-8a8f-2f6edbd18d49:/tasks/e2c8382b-c5e4-43ac-93dd-549e06ee97cf", "rel": "self" }, "op_id": "e2c8382b-c5e4-43ac-93dd-549e06ee97cf", "resource": { "id": "urn:storageos:Snapshot:24c83321-55a4-40d3-8a8f-2f6edbd18d49:", "link": { "href": "/file/snapshots/urn:storageos:Snapshot:24c83321-55a4-40d3-8a8f-2f6edbd18d49:", "rel": "self" }, "name": "fs-cosnetappf-00:50:56:91:58:91-092313174649-2" }, "start_time": 1379958451444, "state": "pending"}
2. Send a GET request to the task URI that was returned by the DELETE request to returnthe status of the task.
When the task completes successfully, the message attribute is set to Operationcompleted successfully.
RequestGET https://<ViPR_VIP>:4443/file/snapshots/urn:storageos:Snapshot:24c83321-55a4-40d3-8a8f-2f6edbd18d49:/tasks/e2c8382b-c5e4-43ac-93dd-549e06ee97cf{ 'Content-Type': 'application/json', 'X-SDS-AUTH-TOKEN': {Token_Text}, 'ACCEPT': 'application/json' }
Response200 OK
{ "end_time": 1379958451797, "link": { "href": "/file/snapshots/urn:storageos:Snapshot:24c83321-55a4-40d3-8a8f-2f6edbd18d49:/tasks/e2c8382b-c5e4-43ac-93dd-549e06ee97cf", "rel": "self" }, "message": "Operation completed successfully", "op_id": "e2c8382b-c5e4-43ac-93dd-549e06ee97cf", "resource": { "id": "urn:storageos:Snapshot:24c83321-55a4-40d3-8a8f-2f6edbd18d49:", "link": { "href": "/file/snapshots/urn:storageos:Snapshot:24c83321-55a4-40d3-8a8f-2f6edbd18d49:", "rel": "self" }, "name": "fs-cosnetappf-00:50:56:91:58:91-092313174649-2" }, "start_time": 1379958451444, "state": "ready"}
Managing File Systems and Snapshots
108 EMC ViPR 1.1.0 Controller REST API Developer Guide

Deleting a file system snapshotA file system snapshot is deleted by sending a POST /file/snapshots/{id}/deactivate request which moves the snapshot to the marked-for-delete state. Thesnapshot is deleted by the garbage collector on a subsequent iteration.
Before you begin
You need this information:
u URN of the file system snapshot being deleted
Procedure
1. Delete the file system snapshot.
The request returns a task whose URI can be queried to determine the status of thetask.
RequestPOST https://<ViPR_VIP>:4443/file/snapshots/urn:storageos:Snapshot:24c83321-55a4-40d3-8a8f-2f6edbd18d49:/deactivate{ 'Content-Type': 'application/json', 'X-SDS-AUTH-TOKEN': {Token_Text}, 'ACCEPT': 'application/json' }
Response202 Accepted{ "link": { "href": "/file/snapshots/urn:storageos:Snapshot:24c83321-55a4-40d3-8a8f-2f6edbd18d49:/tasks/116cccf9-3cd1-4f77-bb44-08d09ea7e772", "rel": "self" }, "op_id": "116cccf9-3cd1-4f77-bb44-08d09ea7e772", "resource": { "id": "urn:storageos:Snapshot:24c83321-55a4-40d3-8a8f-2f6edbd18d49:", "link": { "href": "/file/snapshots/urn:storageos:Snapshot:24c83321-55a4-40d3-8a8f-2f6edbd18d49:", "rel": "self" }, "name": "fs-cosnetappf-00:50:56:91:58:91-092313174649-2" }, "start_time": 1379958455395, "state": "pending"}
2. Send a GET request to the task URI that was returned by the POST request to returnthe status of the task.
When the task completes successfully, the message attribute is set to Operationcompleted successfully.
RequestGET https://<ViPR_VIP>:4443/file/snapshots/urn:storageos:Snapshot:24c83321-55a4-40d3-8a8f-2f6edbd18d49:/tasks/116cccf9-3cd1-4f77-bb44-08d09ea7e772{ 'Content-Type': 'application/json', 'X-SDS-AUTH-TOKEN': {Token_Text},
Managing File Systems and Snapshots
Deleting a file system snapshot 109

'ACCEPT': 'application/json' }
Response200 OK
{ "end_time": 1379958455916, "link": { "href": "/file/snapshots/urn:storageos:Snapshot:24c83321-55a4-40d3-8a8f-2f6edbd18d49:/tasks/116cccf9-3cd1-4f77-bb44-08d09ea7e772", "rel": "self" }, "message": "Operation completed successfully", "op_id": "116cccf9-3cd1-4f77-bb44-08d09ea7e772", "resource": { "id": "urn:storageos:Snapshot:24c83321-55a4-40d3-8a8f-2f6edbd18d49:", "link": { "href": "/file/snapshots/urn:storageos:Snapshot:24c83321-55a4-40d3-8a8f-2f6edbd18d49:", "rel": "self" }, "name": "fs-cosnetappf-00:50:56:91:58:91-092313174649-2" }, "start_time": 1379958455395, "state": "ready"}
Managing File Systems and Snapshots
110 EMC ViPR 1.1.0 Controller REST API Developer Guide

CHAPTER 9
Managing Volumes
This chapter contains the following topics.
u Create block volume............................................................................................112u Exporting a volume to a host............................................................................... 114u Creating a block volume snapshot.......................................................................116u Deleting a block volume snapshot.......................................................................118u Unexporting a volume from a host....................................................................... 121u Deleting a block volume...................................................................................... 123
Managing Volumes 111

Create block volumeCreating a block volume requires you to issue a POST against the resource /block/volumes, and supply information defining the volume.
This API allows a user to create one or more volumes. The volumes are created in thesame storage pool. All users can create a block volume. This is an asynchronous request.
Procedure
1. Call the following API to create the block volume.
RequestPOST https://<ViPR_VIP>:4443/block/volumes
{'Content-Type': 'application/json', 'X-SDS-AUTH-TOKEN': '{Token_Text'}'ACCEPT': 'application/json'}
{ "count": 1, "name": "myvolume", "project": "urn:storageos:Project:cdb26784-9d70-413a-998c-8e6b7cd95719:", "size": "1GB", "varray": "urn:storageos:VirtualArray:dc09417d-9028-40de-8bff-74574996f2d5:", "vpool": "urn:storageos:VirtualPool:6cd9f843-1b41-4b9f-8eb1-a26797d0a268:"}
Response
Response code 202
{ "task": [ { "link": { "href": "/block/volumes/urn:storageos:Volume:46a3f479-7bb0-446f-b2b3-6ef77ea27d0d:/tasks/ac441447-3c88-4b62-b8e3-a38fcae4767a", "rel": "self" }, "op_id": "ac441447-3c88-4b62-b8e3-a38fcae4767a", "resource": { "id": "urn:storageos:Volume:46a3f479-7bb0-446f-b2b3-6ef77ea27d0d:", "link": { "href": "/block/volumes/urn:storageos:Volume:46a3f479-7bb0-446f-b2b3-6ef77ea27d0d:", "rel": "self" }, "name": "myvolume" }, "start_time": 1379202606192, "state": "pending" } ]}RESP = {'task': [{'op_id': 'ac441447-3c88-4b62-b8e3-a38fcae4767a', 'link': {
Managing Volumes
112 EMC ViPR 1.1.0 Controller REST API Developer Guide

'href': '/block/volumes/{Volume_URN}/tasks/ac441447-3c88-4b62-b8e3-a38fcae4767a', 'rel': 'self'}, 'state': 'pending', 'resource': {'link': {'href': '/block/volumes/{Volume_URN}', 'rel': 'self'}, 'name': 'myvolume', 'id': '{Volume_URN}': 1379202606192}]} [{'op_id': 'ac441447-3c88-4b62-b8e3-a38fcae4767a', 'link': {'href': '/block/volumes/{Volume_URN}/tasks/ac441447-3c88-4b62-b8e3-a38fcae4767a', 'rel': 'self'}, 'state': 'pending', 'resource': {'link': {'href': '/block/volumes/{Volume_URN}', 'rel': 'self'}, 'name': 'myvolume', 'id': '{Volume_URN}': 1379202606192}]
2. Monitor the task to see when the volume create operation is complete. To do this,issue a GET on the task ID returned from the Volume Create API call.
RequestGET https://<ViPR_VIP>:4443/block/volumes/{Volume_ID}/tasks/{Task_ID}
Headers: { 'Content-Type': 'application/json', 'X-SDS-AUTH-TOKEN': '{Token_ID}', 'ACCEPT': 'application/json'}
ResponseHTTP 200{ "link": { "href": "/block/volumes/urn:storageos:Volume:46a3f479-7bb0-446f-b2b3-6ef77ea27d0d:/tasks/ac441447-3c88-4b62-b8e3-a38fcae4767a", "rel": "self" }, "op_id": "ac441447-3c88-4b62-b8e3-a38fcae4767a", "resource": { "id": "urn:storageos:Volume:46a3f479-7bb0-446f-b2b3-6ef77ea27d0d:", "link": { "href": "/block/volumes/urn:storageos:Volume:46a3f479-7bb0-446f-b2b3-6ef77ea27d0d:", "rel": "self" }, "name": "myvolume" }, "start_time": 1379202606192, "state": "pending"}
3. Call the URL in step 2 periodically.
The task is complete when the message is Operation completedsuccessfully.
Response
{ "end_time": 1379202631981, "link": { "href": "/block/volumes/urn:storageos:Volume:46a3f479-7bb0-446f-b2b3-6ef77ea27d0d:/tasks/ac441447-3c88-4b62-b8e3-a38fcae4767a", "rel": "self" }, "message": "Operation completed successfully", "op_id": "ac441447-3c88-4b62-b8e3-a38fcae4767a",
Managing Volumes
Create block volume 113

"resource": { "id": "urn:storageos:Volume:46a3f479-7bb0-446f-b2b3-6ef77ea27d0d:", "link": { "href": "/block/volumes/urn:storageos:Volume:46a3f479-7bb0-446f-b2b3-6ef77ea27d0d:", "rel": "self" }, "name": "myvolume" }, "start_time": 1379202606192, "state": "ready"}
Exporting a volume to a hostIn a ViPR environment, hosts that below to the same export group as a volume can accessthat volume.
Before you begin
You need this information:
u The URN of a host in the ViPR environment.
u The URN of a project
u The URN of a virtual array
u The URN of a volume
u A valid authentication token
This is an asynchronous task.
Procedure
1. Call the following POST to create an export group and add a host and a volume to thatexport group.
The request returns a task whose URI can be queried to determine the status of thetask.
RequestPOST https://<ViPR_VIP>:4443/block/exports
{'Content-Type': 'application/json', 'X-SDS-AUTH-TOKEN': '{Token_Text}', 'ACCEPT': 'application/json'}
{ "hosts": [ "urn:storageos:Host:037aeb4e-c6e4-4fa3-8a67-6db94a93a6c5:" ], "name": "myhost-exports", "project": "urn:storageos:Project:cdb26784-9d70-413a-998c-8e6b7cd95719:", "type": "Host", "varray": "urn:storageos:VirtualArray:dc09417d-9028-40de-8bff-74574996f2d5:", "volumes": [ { "id": "urn:storageos:Volume:46a3f479-7bb0-446f-b2b3-6ef77ea27d0d:" } ]}
Managing Volumes
114 EMC ViPR 1.1.0 Controller REST API Developer Guide
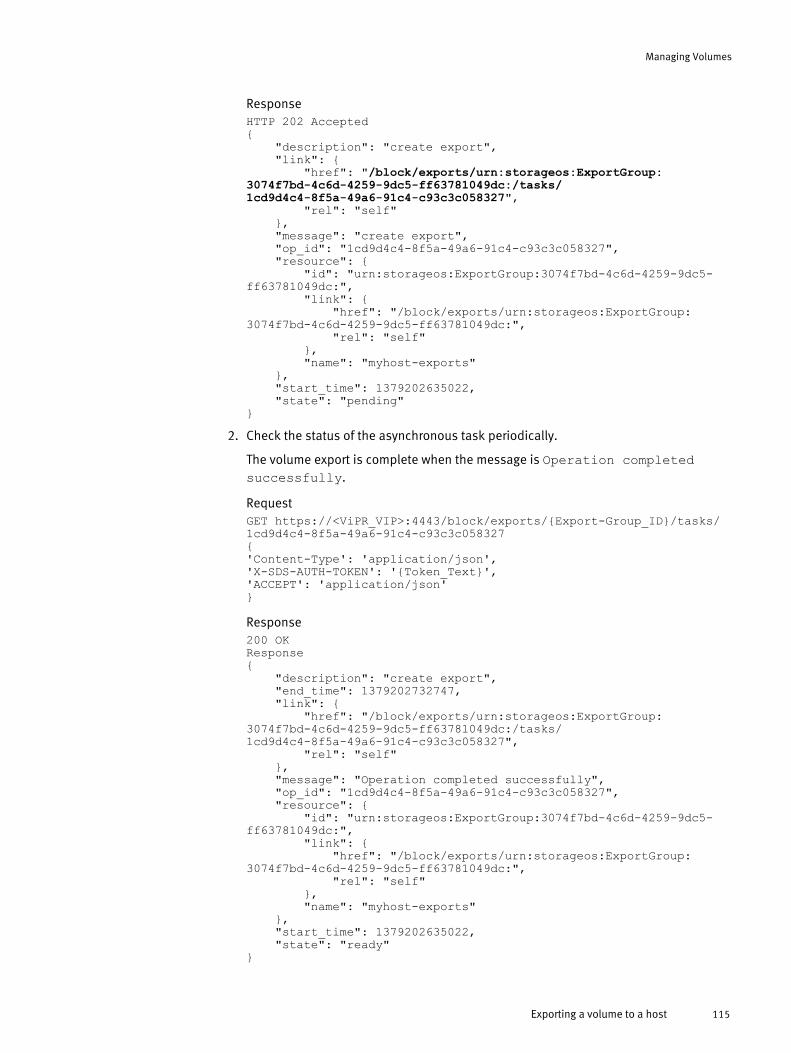
ResponseHTTP 202 Accepted{ "description": "create export", "link": { "href": "/block/exports/urn:storageos:ExportGroup:3074f7bd-4c6d-4259-9dc5-ff63781049dc:/tasks/1cd9d4c4-8f5a-49a6-91c4-c93c3c058327", "rel": "self" }, "message": "create export", "op_id": "1cd9d4c4-8f5a-49a6-91c4-c93c3c058327", "resource": { "id": "urn:storageos:ExportGroup:3074f7bd-4c6d-4259-9dc5-ff63781049dc:", "link": { "href": "/block/exports/urn:storageos:ExportGroup:3074f7bd-4c6d-4259-9dc5-ff63781049dc:", "rel": "self" }, "name": "myhost-exports" }, "start_time": 1379202635022, "state": "pending"}
2. Check the status of the asynchronous task periodically.
The volume export is complete when the message is Operation completedsuccessfully.
RequestGET https://<ViPR_VIP>:4443/block/exports/{Export-Group_ID}/tasks/1cd9d4c4-8f5a-49a6-91c4-c93c3c058327{'Content-Type': 'application/json', 'X-SDS-AUTH-TOKEN': '{Token_Text}', 'ACCEPT': 'application/json'}
Response200 OKResponse{ "description": "create export", "end_time": 1379202732747, "link": { "href": "/block/exports/urn:storageos:ExportGroup:3074f7bd-4c6d-4259-9dc5-ff63781049dc:/tasks/1cd9d4c4-8f5a-49a6-91c4-c93c3c058327", "rel": "self" }, "message": "Operation completed successfully", "op_id": "1cd9d4c4-8f5a-49a6-91c4-c93c3c058327", "resource": { "id": "urn:storageos:ExportGroup:3074f7bd-4c6d-4259-9dc5-ff63781049dc:", "link": { "href": "/block/exports/urn:storageos:ExportGroup:3074f7bd-4c6d-4259-9dc5-ff63781049dc:", "rel": "self" }, "name": "myhost-exports" }, "start_time": 1379202635022, "state": "ready"}
Managing Volumes
Exporting a volume to a host 115

Creating a block volume snapshotYou can archive a copy of a volume at a specific point in time by sending a POST /block/volumes/{id}/protection/snapshots request to create a snapshot.
Before you begin
You need the following information:
u A valid authentication token.
u The URN of a ViPR volume.
Procedure
1. Call the following POST to create the volume snapshot.
The request returns a task whose URI can be queried to determine the status of thetask.
RequestPOST https://<ViPR_VIP>:4443/block/volumes/{Volume_URN}/protection/snapshots{ 'Content-Type': 'application/json', 'X-SDS-AUTH-TOKEN': '{Token_Text}', 'ACCEPT': 'application/json'}
{ "create_inactive": null, "name": "mysnapshot", "type": null}
ResponseHTTP 202 Accepted
{ "task": [ { "description": "Block snapshot create", "link": { "href": "/block/snapshots/urn:storageos:BlockSnapshot:e8b3170b-65c3-4d2f-ac36-01468bf73975:/tasks/29875573-5d2f-46f9-9522-609311786120", "rel": "self" }, "message": "Block snapshot create", "op_id": "29875573-5d2f-46f9-9522-609311786120", "resource": { "id": "urn:storageos:BlockSnapshot:e8b3170b-65c3-4d2f-ac36-01468bf73975:", "link": { "href": "/block/snapshots/urn:storageos:BlockSnapshot:e8b3170b-65c3-4d2f-ac36-01468bf73975:", "rel": "self" }, "name": "mysnapshot" }, "start_time": 1379202733863, "state": "pending" } ]}
Managing Volumes
116 EMC ViPR 1.1.0 Controller REST API Developer Guide

2. Call the following GET on the task ID to check the status of the create snapshotoperation.
GET https://<ViPR_VIP>:4443/block/snapshots/{Snapshot_URN}/tasks/29875573-5d2f-46f9-9522-609311786120{ 'Content-Type': 'application/json', 'X-SDS-AUTH-TOKEN': '{Token_Text}', 'ACCEPT': 'application/json'}
ResponseHTTP 200 OK
{ "description": "Block snapshot create", "link": { "href": "/block/snapshots/urn:storageos:BlockSnapshot:e8b3170b-65c3-4d2f-ac36-01468bf73975:/tasks/29875573-5d2f-46f9-9522-609311786120", "rel": "self" }, "message": "Block snapshot create", "op_id": "29875573-5d2f-46f9-9522-609311786120", "resource": { "id": "urn:storageos:BlockSnapshot:e8b3170b-65c3-4d2f-ac36-01468bf73975:", "link": { "href": "/block/snapshots/urn:storageos:BlockSnapshot:e8b3170b-65c3-4d2f-ac36-01468bf73975:", "rel": "self" }, "name": "mysnapshot" }, "start_time": 1379202733863, "state": "pending"}
3. Check the status of the asynchronous task periodically.
The volume export is complete when the message is Operation completedsuccessfully.
GET https://<ViPR_VIP>:4443/block/snapshots/{Snapshot_URN}/tasks/29875573-5d2f-46f9-9522-609311786120{ 'Content-Type': 'application/json', 'X-SDS-AUTH-TOKEN': '{Token_Text}', 'ACCEPT': 'application/json'}
Response200 OK{ "description": "Block snapshot create", "end_time": 1379202798024, "link": { "href": "/block/snapshots/urn:storageos:BlockSnapshot:e8b3170b-65c3-4d2f-ac36-01468bf73975:/tasks/29875573-5d2f-46f9-9522-609311786120", "rel": "self" }, "message": "Operation completed successfully", "op_id": "29875573-5d2f-46f9-9522-609311786120", "resource": { "id": "urn:storageos:BlockSnapshot:e8b3170b-65c3-4d2f-ac36-01468bf73975:", "link": { "href": "/block/snapshots/urn:storageos:BlockSnapshot:e8b3170b-65c3-4d2f-ac36-01468bf73975:",
Managing Volumes
Creating a block volume snapshot 117

"rel": "self" }, "name": "mysnapshot" }, "start_time": 1379202733863, "state": "ready"}
Deleting a block volume snapshotTo delete a block volume snapshot, you must deactivate the snapshot and delete theexport group to which it belongs.
Before you begin
You need the following information:
u The URN of the volume snapshot you want to delete.
u The URN of the volume from which the snapshot was created.
u The URN of the export group to which the snapshot belongs.
u A valid ViPR authentication token.
This is an asynchronous request.
Procedure
1. Call the following POST to deactivate the snapshot.
The request returns a task whose URI can be queried to determine the status of thetask.
Request
POST https://<ViPR_VIP>:4443/block/volumes/{Volume_URN}/protection/snapshots/{snapshot_urn}/deactivate
{ 'Content-Type': 'application/json', 'X-SDS-AUTH-TOKEN': '{Token_Text}', 'ACCEPT': 'application/json'}
ResponseHTTP 202 Accepted{ "link": { "href": "/block/snapshots/urn:storageos:BlockSnapshot:e8b3170b-65c3-4d2f-ac36-01468bf73975:/tasks/c04b87a6-7802-4d81-8081-eb57fce8317a", "rel": "self" }, "op_id": "c04b87a6-7802-4d81-8081-eb57fce8317a", "resource": { "id": "urn:storageos:BlockSnapshot:e8b3170b-65c3-4d2f-ac36-01468bf73975:", "link": { "href": "/block/snapshots/urn:storageos:BlockSnapshot:e8b3170b-65c3-4d2f-ac36-01468bf73975:", "rel": "self" }, "name": "mysnapshot" }, "start_time": 1379202799026, "state": "pending"}
Managing Volumes
118 EMC ViPR 1.1.0 Controller REST API Developer Guide

2. Call the following GET to monitor the delete snapshot operation status.
RequestGET https://<ViPR_VIP>:4443/block/snapshots/{snapshot_urn}/tasks/c04b87a6-7802-4d81-8081-eb57fce8317a{ 'Content-Type': 'application/json', 'X-SDS-AUTH-TOKEN': '{Token_Text}', 'ACCEPT': 'application/json'}
Response200 OK{ "link": { "href": "/block/snapshots/urn:storageos:BlockSnapshot:e8b3170b-65c3-4d2f-ac36-01468bf73975:/tasks/c04b87a6-7802-4d81-8081-eb57fce8317a", "rel": "self" }, "op_id": "c04b87a6-7802-4d81-8081-eb57fce8317a", "resource": { "id": "urn:storageos:BlockSnapshot:e8b3170b-65c3-4d2f-ac36-01468bf73975:", "link": { "href": "/block/snapshots/urn:storageos:BlockSnapshot:e8b3170b-65c3-4d2f-ac36-01468bf73975:", "rel": "self" }, "name": "mysnapshot" }, "start_time": 1379202799026, "state": "pending"}
3. Call the GET described in step 2 periodically.
Snapshot deactivation is complete when message is Operation completedsuccessfully.
{ "end_time": 1379202843313, "link": { "href": "/block/snapshots/urn:storageos:BlockSnapshot:e8b3170b-65c3-4d2f-ac36-01468bf73975:/tasks/c04b87a6-7802-4d81-8081-eb57fce8317a", "rel": "self" }, "message": "Operation completed successfully", "op_id": "c04b87a6-7802-4d81-8081-eb57fce8317a", "resource": { "id": "urn:storageos:BlockSnapshot:e8b3170b-65c3-4d2f-ac36-01468bf73975:", "link": { "href": "/block/snapshots/urn:storageos:BlockSnapshot:e8b3170b-65c3-4d2f-ac36-01468bf73975:", "rel": "self" }, "name": "mysnapshot" }, "start_time": 1379202799026, "state": "ready"}
4. Call the following POST to delete the export group that contains the snapshot.
POST https://<ViPR_VIP>:4443/block/exports/{exportgroup_urn}/deactivate{ 'Content-Type': 'application/json',
Managing Volumes
Deleting a block volume snapshot 119

'X-SDS-AUTH-TOKEN': '{Token_Text}', 'ACCEPT': 'application/json'}
This is an asynchronous request.
5. Call the following GET to monitor the export group delete status.
RequestGET https://<ViPR_VIP>:4443/block/exports/export_groupurn:storageos:ExportGroup:3074f7bd-4c6d-4259-9dc5-ff63781049dc:/tasks/8eecbaa2-b6b5-4075-b723-9eea93d51e72{ 'Content-Type': 'application/json', 'X-SDS-AUTH-TOKEN': '{Token_Text}', 'ACCEPT': 'application/json'}
ResponseHTTP 200{ "description": "delete export", "link": { "href": "/block/exports/urn:storageos:ExportGroup:3074f7bd-4c6d-4259-9dc5-ff63781049dc:/tasks/8eecbaa2-b6b5-4075-b723-9eea93d51e72", "rel": "self" }, "message": "delete export", "op_id": "8eecbaa2-b6b5-4075-b723-9eea93d51e72", "resource": { "id": "urn:storageos:ExportGroup:3074f7bd-4c6d-4259-9dc5-ff63781049dc:", "link": { "href": "/block/exports/urn:storageos:ExportGroup:3074f7bd-4c6d-4259-9dc5-ff63781049dc:", "rel": "self" }, "name": "myhost-exports" }, "start_time": 1379202845761, "state": "pending"}
6. Call the GET described in step 5 periodically.
The export group delete is complete when message is Operation completedsuccessfully.
{ { "description": "delete export", "end_time": 1379202949620, "link": { "href": "/block/exports/urn:storageos:ExportGroup:3074f7bd-4c6d-4259-9dc5-ff63781049dc:/tasks/8eecbaa2-b6b5-4075-b723-9eea93d51e72", "rel": "self" }, "message": "Operation completed successfully", "op_id": "8eecbaa2-b6b5-4075-b723-9eea93d51e72", "resource": { "id": "urn:storageos:ExportGroup:3074f7bd-4c6d-4259-9dc5-ff63781049dc:", "link": { "href": "/block/exports/urn:storageos:ExportGroup:3074f7bd-4c6d-4259-9dc5-ff63781049dc:", "rel": "self" }, "name": "myhost-exports" },
Managing Volumes
120 EMC ViPR 1.1.0 Controller REST API Developer Guide
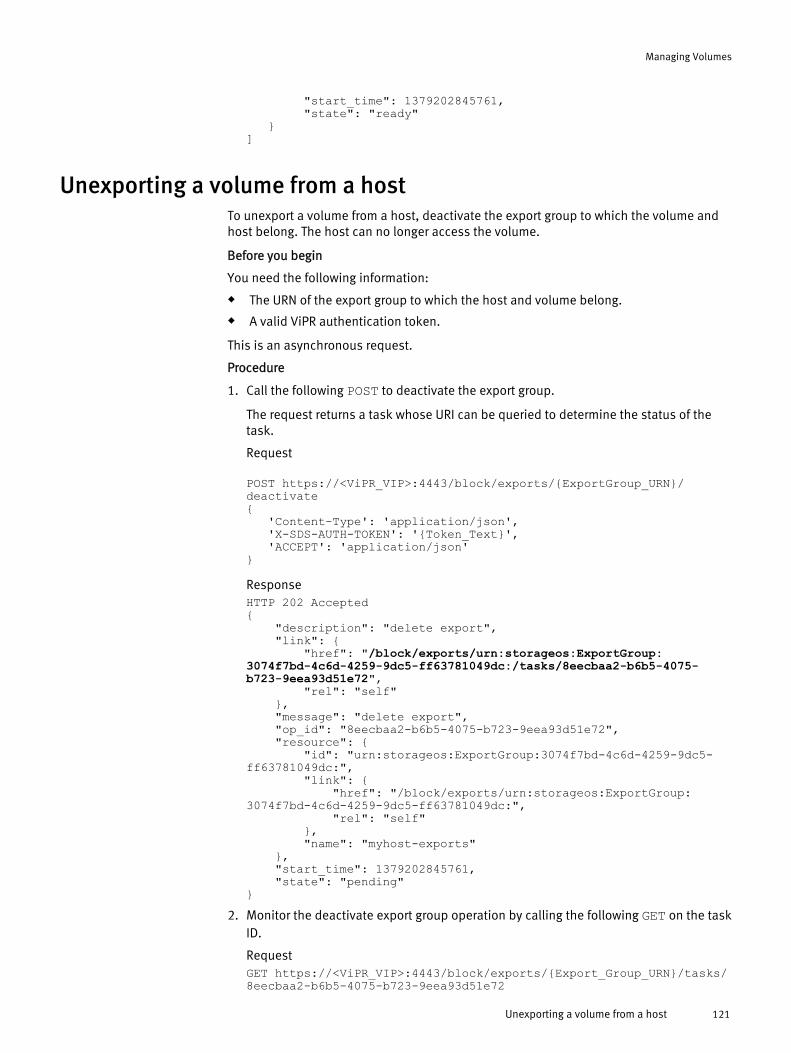
"start_time": 1379202845761, "state": "ready" }]
Unexporting a volume from a hostTo unexport a volume from a host, deactivate the export group to which the volume andhost belong. The host can no longer access the volume.
Before you begin
You need the following information:
u The URN of the export group to which the host and volume belong.
u A valid ViPR authentication token.
This is an asynchronous request.
Procedure
1. Call the following POST to deactivate the export group.
The request returns a task whose URI can be queried to determine the status of thetask.
Request
POST https://<ViPR_VIP>:4443/block/exports/{ExportGroup_URN}/deactivate{ 'Content-Type': 'application/json', 'X-SDS-AUTH-TOKEN': '{Token_Text}', 'ACCEPT': 'application/json'}
ResponseHTTP 202 Accepted{ "description": "delete export", "link": { "href": "/block/exports/urn:storageos:ExportGroup:3074f7bd-4c6d-4259-9dc5-ff63781049dc:/tasks/8eecbaa2-b6b5-4075-b723-9eea93d51e72", "rel": "self" }, "message": "delete export", "op_id": "8eecbaa2-b6b5-4075-b723-9eea93d51e72", "resource": { "id": "urn:storageos:ExportGroup:3074f7bd-4c6d-4259-9dc5-ff63781049dc:", "link": { "href": "/block/exports/urn:storageos:ExportGroup:3074f7bd-4c6d-4259-9dc5-ff63781049dc:", "rel": "self" }, "name": "myhost-exports" }, "start_time": 1379202845761, "state": "pending"}
2. Monitor the deactivate export group operation by calling the following GET on the taskID.
RequestGET https://<ViPR_VIP>:4443/block/exports/{Export_Group_URN}/tasks/8eecbaa2-b6b5-4075-b723-9eea93d51e72
Managing Volumes
Unexporting a volume from a host 121

{ 'Content-Type': 'application/json', 'X-SDS-AUTH-TOKEN': '{Token_Text}', 'ACCEPT': 'application/json'}
ResponseHTTP 200 OK
{ "description": "delete export", "link": { "href": "/block/exports/{Export_Group_URN}/tasks/8eecbaa2-b6b5-4075-b723-9eea93d51e72", "rel": "self" }, "message": "delete export", "op_id": "8eecbaa2-b6b5-4075-b723-9eea93d51e72", "resource": { "id": "urn:storageos:ExportGroup:3074f7bd-4c6d-4259-9dc5-ff63781049dc:", "link": { "href": "/block/exports/urn:storageos:ExportGroup:3074f7bd-4c6d-4259-9dc5-ff63781049dc:", "rel": "self" }, "name": "myhost-exports" }, "start_time": 1379202845761, "state": "pending"}
3. Call the GET request in step 2 periodically. The export group deactivation is completewhen the message is Operation completed successfully.
Response
HTTP 200{ "description": "delete export", "end_time": 1379202949620, "link": { "href": "/block/exports/urn:storageos:ExportGroup:3074f7bd-4c6d-4259-9dc5-ff63781049dc:/tasks/8eecbaa2-b6b5-4075-b723-9eea93d51e72", "rel": "self" }, "message": "Operation completed successfully", "op_id": "8eecbaa2-b6b5-4075-b723-9eea93d51e72", "resource": { "id": "urn:storageos:ExportGroup:3074f7bd-4c6d-4259-9dc5-ff63781049dc:", "link": { "href": "/block/exports/urn:storageos:ExportGroup:3074f7bd-4c6d-4259-9dc5-ff63781049dc:", "rel": "self" }, "name": "myhost-exports" }, "start_time": 1379202845761, "state": "ready"}
Managing Volumes
122 EMC ViPR 1.1.0 Controller REST API Developer Guide

Deleting a block volumeA block volume is deleted by sending a POST /block/volumes/{Volume_URN}/deactivate request.
Before you begin
You need the following information:
u The volume must not be part of any export group.
u The URN of the volume you want to delete.
u A valid ViPR authentication token.
This is an asynchronous request.
Procedure
1. Call the following POST to deactivate the volume.
The request returns a task whose URI can be queried to determine the status of thetask.
Request
POST https://<ViPR_VIP>:4443/block/volumes/{Volume_URN}/deactivate
Headers: {'Content-Type': 'application/json', 'X-SDS-AUTH-TOKEN': '{Token_Text}', 'ACCEPT': 'application/json'}
ResponseHTTP 202 Accepted{ "link": { "href": "/block/volumes/urn:storageos:Volume:46a3f479-7bb0-446f-b2b3-6ef77ea27d0d:/tasks/4c9b1cc6-47ce-4158-88df-2ee12322ef59", "rel": "self" }, "op_id": "4c9b1cc6-47ce-4158-88df-2ee12322ef59", "resource": { "id": "urn:storageos:Volume:46a3f479-7bb0-446f-b2b3-6ef77ea27d0d:", "link": { "href": "/block/volumes/urn:storageos:Volume:46a3f479-7bb0-446f-b2b3-6ef77ea27d0d:", "rel": "self" }, "name": "myvolume" }, "start_time": 1379202950804, "state": "pending"}
2. Monitor the volume delete operation by calling the following GET on the task ID.
RequestGET https://<ViPR_VIP>:4443/block/volumes/{Volume_URL}/tasks/4c9b1cc6-47ce-4158-88df-2ee12322ef59{ 'Content-Type': 'application/json', 'X-SDS-AUTH-TOKEN': '{Token_Text}', 'ACCEPT': 'application/json'}
Managing Volumes
Deleting a block volume 123

ResponseHTTP 200 OK{ "link": { "href": "/block/volumes/urn:storageos:Volume:46a3f479-7bb0-446f-b2b3-6ef77ea27d0d:/tasks/4c9b1cc6-47ce-4158-88df-2ee12322ef59", "rel": "self" }, "op_id": "4c9b1cc6-47ce-4158-88df-2ee12322ef59", "resource": { "id": "urn:storageos:Volume:46a3f479-7bb0-446f-b2b3-6ef77ea27d0d:", "link": { "href": "/block/volumes/urn:storageos:Volume:46a3f479-7bb0-446f-b2b3-6ef77ea27d0d:", "rel": "self" }, "name": "myvolume" }, "start_time": 1379202950804, "state": "pending"}
3. Call the GET request in step 2 periodically. The volume delete is complete when themessage is Operation completed successfully.
Response
HTTP 200 OK{ "end_time": 1379203014362, "link": { "href": "/block/volumes/urn:storageos:Volume:46a3f479-7bb0-446f-b2b3-6ef77ea27d0d:/tasks/4c9b1cc6-47ce-4158-88df-2ee12322ef59", "rel": "self" }, "message": "Operation completed successfully", "op_id": "4c9b1cc6-47ce-4158-88df-2ee12322ef59", "resource": { "id": "urn:storageos:Volume:46a3f479-7bb0-446f-b2b3-6ef77ea27d0d:", "link": { "href": "/block/volumes/urn:storageos:Volume:46a3f479-7bb0-446f-b2b3-6ef77ea27d0d:", "rel": "self" }, "name": "myvolume" }, "start_time": 1379202950804, "state": "ready"}
Managing Volumes
124 EMC ViPR 1.1.0 Controller REST API Developer Guide

CHAPTER 10
Managing Hosts
This chapter contains the following topics:
u Host API Overview............................................................................................... 126u Adding and discovering a Windows host............................................................. 127u Adding and discovering a LINUX host.................................................................. 130u Adding and discovering a vCenter Server.............................................................131
Managing Hosts 125

Host API OverviewHosts that are part of your data center can be added and managed using the ViPRController REST API.
The following table shows some important APIs that are used to manage hosts, vCentersand Windows clusters.
ViPR REST API Call Description- -POST /tenant/{tenant_urn}/hosts
Create a host resource in ViPR.
PUT /compute/hosts/{Host_URN}
Modify parameters for a host.
POST /admin/api/hosts/{{Host_URN}}/discover
Add a host to the discovery queue. Host discovery is performedasynchronously. This call is directed to port 443.
POST /tenants/{Tenant_URN}/vcenters
Add a vCenter resource to the tenant organization.
GET /compute/vcenters/{Vcenter_URN}/clusters
List the clusters in a vCenter.
GET /compute/vcenters/{Vcenter_URN}/hosts
List the hosts in a vCenter.
POST <ViPR_VIP>:443/admin/api/vcenters/{vcenter_URN}/discover
Discover a vCenter. This call is directed to port 443.
GET /compute/clusters/{Cluster_URN}/hosts
Lists the hosts in a cluster.
GET /tenants/{Tenant_URN}/clusters
List all clusters that belong to the specified tenant. Clusters, likehosts and vCenters, are tenant-level resources.
GET /compute/clusters/{Cluster_URN}
Retrieve a cluster resource.
POST /tenants/{id}/clusters Build a ViPR cluster.
PUT /compute/hosts/{id} Add a host to a cluster. The payload for this call allows you tospecify a cluster name.<host_update> <type>Windows</type> <host_name>myhost.corp.com</host_name> <name>myHost</name> <user_name>admin</user_name> <password>password</password> <cluster>vipr_cluster</cluster></host_update>
Managing Hosts
126 EMC ViPR 1.1.0 Controller REST API Developer Guide

Adding and discovering a Windows hostTo manage a Windows host in ViPR, you must register and discover that host.
Before you begin
Your Windows host must be running the correct version of Windows, and be properlyconfigured. In particular, your ViPR installation, the Windows host, and the user nameyou use to authenticate must all be in the same Windows domain.
You must be logged in as a tenant administrator to perform the commands in thisprocedure.
Note
Some of the API calls in the following procedure are sent to Port 4443, and others aresent to port 443. The port number is included in th examples for clarity.
Procedure
1. Get your tenant's URN.
GET https://<ViPR_VIP>:4443/tenant2. Use the tenant URN to create a host.
RequestPOST https://<ViPR_VIP>:4443/tenants/{Tenant_URN}/hosts
<host_create> <type>Windows</type> <host_name>lglbc012.lss.emc.com</host_name> <name>lglbc012</name> <port_number>5985</port_number> <user_name>Administrator</user_name> <password>Dangerous01</password> <use_ssl>No</use_ssl></host_create>
ResponseHTTP 202 Accepted
<task> <associated_resources/> <message>Operation completed successfully</message> <op_id>f50ca6c4-d66c-4ddf-868f-3703c2a092df</op_id> <resource> <id>urn:storageos:Host:e34e171a-97b7-4dc9-b3b7-c57fb9c3e45c:</id> <link href="/compute/hosts/urn:storageos:Host:e34e171a-97b7-4dc9-b3b7-c57fb9c3e45c:" rel="self"/> <name>lglbc012</name> </resource> <link href="/compute/hosts/urn:storageos:Host:e34e171a-97b7-4dc9-b3b7-c57fb9c3e45c:/tasks/f50ca6c4-d66c-4ddf-868f-3703c2a092df" rel="self"/> <start_time>1386365633873</start_time> <state>ready</state></task>
If the message from the returned task is Operation completedsuccessfully, the host is now added to ViPR. You will not be able to fully managethe host until you discover it.
Managing Hosts
Adding and discovering a Windows host 127

3. Get the URN of the new host from the response to the host create call, and call thefollowing API to discover the host, and its initiator ports.
POST https://<ViPR_VIP>:443/admin/api/hosts/urn:storageos:Host:e34e171a-97b7-4dc9-b3b7-c57fb9c3e45c:/discover
4. Check the user interface to see if the host has completed discovery, or check the hostresource. The host should contain the status shown in the following example.
RequestGET https://<ViPR_VIP>:4443/compute/hosts/urn:storageos:Host:e34e171a-97b7-4dc9-b3b7-c57fb9c3e45c:
ResponseHTTP 200 OK<host> <creation_time>1386365633865</creation_time> <id>urn:storageos:Host:e34e171a-97b7-4dc9-b3b7-c57fb9c3e45c:</id> <inactive>false</inactive> <link href="/compute/hosts/urn:storageos:Host:e34e171a-97b7-4dc9-b3b7-c57fb9c3e45c:" rel="self"/> <name>lglbc012</name> <tags/> <native_guid/> <compatibility_status>COMPATIBLE</compatibility_status> <job_discovery_status>COMPLETE</job_discovery_status> <last_discovery_run_time>1386366866868</last_discovery_run_time> <last_discovery_status_message/> <last_metering_run_time>0</last_metering_run_time> <job_metering_status>CREATED</job_metering_status> <next_discovery_run_time>0</next_discovery_run_time> <next_metering_run_time>0</next_metering_run_time> <registration_status>REGISTERED</registration_status> <tenant> <id>urn:storageos:TenantOrg:d61d9fa1-9886-40ef-85d3-c40b6de2c72f:</id> <link href="/tenants/urn:storageos:TenantOrg:d61d9fa1-9886-40ef-85d3-c40b6de2c72f:" rel="self"/> </tenant> <host_name>lglbc012.lss.emc.com</host_name> <os_version>6.2.9200 Microsoft Windows Server 2012 Standard</os_version> <port_number>5985</port_number> <type>Windows</type> <use_ssl>false</use_ssl> <user_name>Administrator</user_name></host>
Windows clustersWhen you discover a Windows host that is part of a windows cluster, that cluster is addedto ViPR. ViPR clusters allow you to allocate block storage to a group of hosts.
ViPR does not directly discover Windows clusters. Windows clusters are discovered whenyou discover a host belonging to that cluster. Windows host resources specify the ID ofthe cluster when the host belongs to a cluster.
<cluster> <id>urn:storageos:Cluster:37dcbba9-2158-4976-b937-c167e8e738a2:</id> <link href="/compute/clusters/urn:storageos:Cluster:37dcbba9-2158-4976-b937-c167e8e738a2:" rel="self"/> </cluster>
If the host does not belong to a cluster, the cluster is omitted from the resource.
The following shows a Windows host that belongs to a cluster.
Managing Hosts
128 EMC ViPR 1.1.0 Controller REST API Developer Guide

RequestGET https://<ViPR_VIP>:4443/compute/hosts/urn:storageos:Host:0f034ce7-b830-4a47-8cc4-71b6b792589b:
ResponseHTTP 200 OK<host> <creation_time>1386882454404</creation_time> <id>urn:storageos:Host:0f034ce7-b830-4a47-8cc4-71b6b792589b:</id> <inactive>false</inactive> <link href="/compute/hosts/urn:storageos:Host:0f034ce7-b830-4a47-8cc4-71b6b792589b:" rel="self"/> <name>lglw7150.lss.emc.com</name> <tags/> <native_guid/> <compatibility_status>COMPATIBLE</compatibility_status> <job_discovery_status>COMPLETE</job_discovery_status> <last_discovery_run_time>1386882462221</last_discovery_run_time> <last_discovery_status_message/> <last_metering_run_time>0</last_metering_run_time> <job_metering_status>CREATED</job_metering_status> <next_discovery_run_time>0</next_discovery_run_time> <next_metering_run_time>0</next_metering_run_time> <registration_status>REGISTERED</registration_status> <success_discovery_time>0</success_discovery_time> <success_metering_time>0</success_metering_time> <tenant> <id>urn:storageos:TenantOrg:7985d438-9980-41df-bba1-29d6a873f811:</id> <link href="/tenants/urn:storageos:TenantOrg:7985d438-9980-41df-bba1-29d6a873f811:" rel="self"/> </tenant> <cluster> <id>urn:storageos:Cluster:37dcbba9-2158-4976-b937-c167e8e738a2:</id> <link href="/compute/clusters/urn:storageos:Cluster:37dcbba9-2158-4976-b937-c167e8e738a2:" rel="self"/> </cluster> <discoverable>true</discoverable> <host_name>lglw7150.lss.emc.com</host_name> <os_version>6.2.9200 Microsoft Windows Server 2012 Standard</os_version> <port_number>5985</port_number> <type>Windows</type> <use_ssl>false</use_ssl> <user_name>administrator</user_name></host>
The following shows a cluster resource.
RequestGET https://<ViPR_VIP>:4443/compute/clusters/urn:storageos:Cluster:37dcbba9-2158-4976-b937-c167e8e738a2:
ResponseHTTP 200 OK<cluster> <creation_time>1386882461075</creation_time> <id>urn:storageos:Cluster:37dcbba9-2158-4976-b937-c167e8e738a2:</id> <inactive>false</inactive> <link href="/compute/clusters/urn:storageos:Cluster:37dcbba9-2158-4976-b937-c167e8e738a2:" rel="self"/> <name>VIPR-WINDOWS</name> <tags/> <tenant> <id>urn:storageos:TenantOrg:7985d438-9980-41df-bba1-29d6a873f811:</id> <link href="/tenants/urn:storageos:TenantOrg:7985d438-9980-41df-bba1-29d6a873f811:" rel="self"/>
Managing Hosts
Windows clusters 129

</tenant></cluster>
Adding and discovering a LINUX hostTo manage a LINUX host in ViPR, you have to register the host, then successfully discoverit.
Before you begin
Your LINUX host must be running the correct version of LINUX and be properly configured.In particular, your ViPR installation, the LINUX host, and the user name that you use toauthenticate must all be in the same network domain. See the EMC ViPR Installation andConfiguration Guide for more information.
You must be logged in as a tenant administrator to perform the commands in thisprocedure.
Note
Some of the API calls in the following procedure are sent to port 4443, and others aresent to port 443. The port number is included in the examples for clarity.
Procedure
1. Get your tenant's URN.
GET https://<ViPR_VIP>:4443/tenant2. Use the tenant URN to create a host.
RequestPOST https://<ViPR_VIP>:4443/tenants/{Tenant_URN}/hosts
<host_create> <type>Linux</type> <host_name>lglw7141.lss.emc.com</host_name> <name>lglw7141</name> <port_number>22</port_number> <user_name>root</user_name> <password>dangerous</password> <use_ssl>No</use_ssl></host_create>
ResponseHTTP 202 Accepted
<task> <associated_resources/> <message>Operation completed successfully</message> <op_id>90827e3a-ce0f-42b3-9499-d43986dba44b</op_id> <resource> <id>urn:storageos:Host:ead39b5a-07f4-4cb4-8124-35aa864fe760:</id> <link href="/compute/hosts/urn:storageos:Host:ead39b5a-07f4-4cb4-8124-35aa864fe760:" rel="self"/> <name>lglw7141</name> </resource> <link href="/compute/hosts/urn:storageos:Host:ead39b5a-07f4-4cb4-8124-35aa864fe760:/tasks/90827e3a-ce0f-42b3-9499-d43986dba44b" rel="self"/> <start_time>1386618442169</start_time> <state>ready</state></task>
Managing Hosts
130 EMC ViPR 1.1.0 Controller REST API Developer Guide

If the message from the returned task is Operation completedsuccessfully, the host is now added to ViPR. You will not be able to fully managethe host until you discover it.
3. Get the URN of the new host from the response to the host create call, and call thefollowing API to discover the host, and its initiator ports.
POST https://<ViPR_VIP>:443/admin/api/hosts/urn:storageos:Host:ead39b5a-07f4-4cb4-8124-35aa864fe760:/discover
4. Check the user interface to see if the host has completed discovery, or check the hostresource. It should contain the information shown in the following example.
RequestGET https://<ViPR_VIP>:4443/compute/hosts/urn:storageos:Host:ead39b5a-07f4-4cb4-8124-35aa864fe760:
Response
<host> <creation_time>1386618442154</creation_time> <id>urn:storageos:Host:ead39b5a-07f4-4cb4-8124-35aa864fe760:</id> <inactive>false</inactive> <link href="/compute/hosts/urn:storageos:Host:ead39b5a-07f4-4cb4-8124-35aa864fe760:" rel="self"/> <name>lglw7141</name> <tags/> <native_guid/> <compatibility_status>COMPATIBLE</compatibility_status> <job_discovery_status>COMPLETE</job_discovery_status> <last_discovery_run_time>1386619685871</last_discovery_run_time> <last_discovery_status_message/> <last_metering_run_time>0</last_metering_run_time> <job_metering_status>CREATED</job_metering_status> <next_discovery_run_time>0</next_discovery_run_time> <next_metering_run_time>0</next_metering_run_time> <registration_status>REGISTERED</registration_status> <tenant> <id>urn:storageos:TenantOrg:d61d9fa1-9886-40ef-85d3-c40b6de2c72f:</id> <link href="/tenants/urn:storageos:TenantOrg:d61d9fa1-9886-40ef-85d3-c40b6de2c72f:" rel="self"/> </tenant> <host_name>lglw7141.lss.emc.com</host_name> <os_version>RHEL 5.9.0.2</os_version> <port_number>22</port_number> <type>Linux</type> <use_ssl>false</use_ssl> <user_name>root</user_name></host>
Adding and discovering a vCenter ServerTo manage a vCenter server in ViPR, you have to add the server to ViPR through the ViPRuser interface or through the ViPR REST API. ViPR automatically discovers the hosts,clusters and other resources managed by that server.
Before you begin
Your vCenter server must adhere to the parameters specified in the VMWareRequirements section of the EMC ViPR Data Sheet and Compatibility Matrix.
You must be logged in as a system administrator to perform the commands in thisprocedure.
Managing Hosts
Adding and discovering a vCenter Server 131

Note
Some of the API calls in the following procedure are sent to Port 4443, and others aresent to port 443. The port number is included in the examples for clarity.
Procedure
1. Get your tenant's URN.
GET https://<ViPR_VIP>:4443/tenant2. Use the tenant URN to create a host.
RequestPOST https://<ViPR_VIP>:4443/tenants/{Tenant_URN}/vcenters
<vcenter_create> <ip_address>myvcenter.corp.emc.com</ip_address> <name>myvcenter.corp.emc.com</name> <user_name>domain\username</user_name> <password>pa$$words</password></vcenter_create>
ResponseHTTP 202 Accepted
<task> <associated_resources/> <message>Operation completed successfully</message> <op_id>1bbd3c99-5f59-4eef-9152-f149357e7acb</op_id> <resource> <id>urn:storageos:Vcenter:5bb76aae-1b75-4fca-89ec-e463df0cba13:</id> <link href="/compute/vcenters/urn:storageos:Vcenter:5bb76aae-1b75-4fca-89ec-e463df0cba13:" rel="self"/> <name>my_vcenter</name> </resource> <link href="/compute/vcenters/urn:storageos:Vcenter:5bb76aae-1b75-4fca-89ec-e463df0cba13:/tasks/1bbd3c99-5f59-4eef-9152-f149357e7acb" rel="self"/> <start_time>1386705168500</start_time> <state>ready</state></task>
If the message from the returned task is Operation completedsuccessfully, the vCenter is now added to ViPR. You will not be able to fullymanage the vCenter until you discover it.
3. Get the URN of the new vcenter from the response to the vcenter create call,and call the following API to discover the vcenter.
POST <ViPR_VIP>:443/admin/api/vcenters/urn:storageos:Vcenter:5bb76aae-1b75-4fca-89ec-e463df0cba13:/discover
4. Check the user interface to see if the host has completed discovery, or check thevcenter resource. It should contain the information shown in the following example.
RequestGET https://<ViPR_VIP>:4443/compute/vcenters/urn:storageos:Vcenter:5bb76aae-1b75-4fca-89ec-e463df0cba13:
ResponseHTTP 200 OK<vcenter> <creation_time>1386860663431</creation_time> <id>urn:storageos:Vcenter:5bb76aae-1b75-4fca-89ec-e463df0cba13:</id> <inactive>false</inactive>
Managing Hosts
132 EMC ViPR 1.1.0 Controller REST API Developer Guide

<link href="/compute/vcenters/urn:storageos:Vcenter:5bb76aae-1b75-4fca-89ec-e463df0cba13:" rel="self"/> <name>Lglba041</name> <tags/> <native_guid/> <compatibility_status>COMPATIBLE</compatibility_status> <job_discovery_status>COMPLETE</job_discovery_status> <last_discovery_run_time>1386860840239</last_discovery_run_time> <last_discovery_status_message/> <last_metering_run_time>0</last_metering_run_time> <job_metering_status>CREATED</job_metering_status> <next_discovery_run_time>0</next_discovery_run_time> <next_metering_run_time>0</next_metering_run_time> <registration_status>REGISTERED</registration_status> <success_discovery_time>0</success_discovery_time> <success_metering_time>0</success_metering_time> <tenant> <id>urn:storageos:TenantOrg:7985d438-9980-41df-bba1-29d6a873f811:</id> <link href="/tenants/urn:storageos:TenantOrg:7985d438-9980-41df-bba1-29d6a873f811:" rel="self"/> </tenant> <ip_address>10.247.166.41</ip_address> <os_version>5.1.0</os_version> <user_name>cc-ro</user_name></vcenter>
Examples: Accessing vCenter resourcesvCenters contain clusters and hosts. The hosts contain initiator ports that allow the hostto access storage. All of these resources are accessible from ViPR.
Listing vCenter clustersRequestGET https://<ViPR_VIP>:4443/compute/vcenters/urn:storageos:Vcenter:ce774753-3cbb-4b3e-845c-feb6ef29428e:/clusters
ResponseHTTP 200 OK<clusters> <cluster> <id>urn:storageos:Cluster:c8fe93d7-a7c2-4c93-a338-a31e22aab490:</id> <link href="/compute/clusters/urn:storageos:Cluster:c8fe93d7-a7c2-4c93-a338-a31e22aab490:" rel="self"/> <name>Mgmt-Cluster</name> </cluster> <cluster> <id>urn:storageos:Cluster:37e6b15a-d503-47cc-b18a-6d59594001b9:</id> <link href="/compute/clusters/urn:storageos:Cluster:37e6b15a-d503-47cc-b18a-6d59594001b9:" rel="self"/> <name>CSE-Cluster-CISCO</name> </cluster></clusters>
Listing hosts in a vCenterRequestGET https://<ViPR_VIP>:4443/compute/vcenters/urn:storageos:Vcenter:ce774753-3cbb-4b3e-845c-feb6ef29428e:/hosts
ResponseHTTP 200 OK<hosts> <host> <id>urn:storageos:Host:003422cf-6596-43da-b382-816486fd58e9:</id> <link href="/compute/hosts/urn:storageos:Host:003422cf-6596-43da-
Managing Hosts
Examples: Accessing vCenter resources 133

b382-816486fd58e9:" rel="self"/> <name>lglba180.lss.emc.com</name> </host> <host> <id>urn:storageos:Host:492ed254-282f-4cd4-bb76-34777db9152e:</id> <link href="/compute/hosts/urn:storageos:Host:492ed254-282f-4cd4-bb76-34777db9152e:" rel="self"/> <name>lglac019.lss.emc.com</name> </host> <host> <id>urn:storageos:Host:8e854ee0-ca64-4642-9cea-527dfb1b19a8:</id> <link href="/compute/hosts/urn:storageos:Host:8e854ee0-ca64-4642-9cea-527dfb1b19a8:" rel="self"/> <name>lglba181.lss.emc.com</name> </host> <host> <id>urn:storageos:Host:27dab0f2-70cc-4bbe-81ef-a9b66ddb14ca:</id> <link href="/compute/hosts/urn:storageos:Host:27dab0f2-70cc-4bbe-81ef-a9b66ddb14ca:" rel="self"/> <name>lglba241.lss.emc.com</name> </host> <host> <id>urn:storageos:Host:8ea2ef78-a072-41df-ada9-951433cc6464:</id> <link href="/compute/hosts/urn:storageos:Host:8ea2ef78-a072-41df-ada9-951433cc6464:" rel="self"/> <name>lglba046.lss.emc.com</name> </host> <host> <id>urn:storageos:Host:807d346a-3b47-4412-9ab5-8f516e792b71:</id> <link href="/compute/hosts/urn:storageos:Host:807d346a-3b47-4412-9ab5-8f516e792b71:" rel="self"/> <name>lglba243.lss.emc.com</name> </host> <host> <id>urn:storageos:Host:e7f67b93-8090-4316-a800-7f826d415bb8:</id> <link href="/compute/hosts/urn:storageos:Host:e7f67b93-8090-4316-a800-7f826d415bb8:" rel="self"/> <name>lglba242.lss.emc.com</name> </host></hosts>
Listing initiator ports for a host in a vCenterRequestGET https://<ViPR_VIP>:4443/compute/hosts/urn:storageos:Host:8ea2ef78-a072-41df-ada9-951433cc6464:/initiators
ResponseHTTP 200 OK<initiators> <initiator> <id>urn:storageos:Initiator:97a5bfd2-5981-401c-ba52-3bf002a63470:</id> <link href="/compute/initiators/urn:storageos:Initiator:97a5bfd2-5981-401c-ba52-3bf002a63470:" rel="self"/> <name>iqn.1998-01.com.vmware:localhost:1161951551:36</name> </initiator> <initiator> <id>urn:storageos:Initiator:b70c8916-e415-4f71-9e46-34fd73c9488f:</id> <link href="/compute/initiators/urn:storageos:Initiator:b70c8916-e415-4f71-9e46-34fd73c9488f:" rel="self"/> <name>iqn.1998-01.com.vmware:localhost:1161951551:34</name> </initiator> <initiator> <id>urn:storageos:Initiator:ebe54432-3bba-4bf6-a5b4-0af274d96b53:</id> <link href="/compute/initiators/urn:storageos:Initiator:ebe54432-3bba-4bf6-a5b4-0af274d96b53:" rel="self"/>
Managing Hosts
134 EMC ViPR 1.1.0 Controller REST API Developer Guide
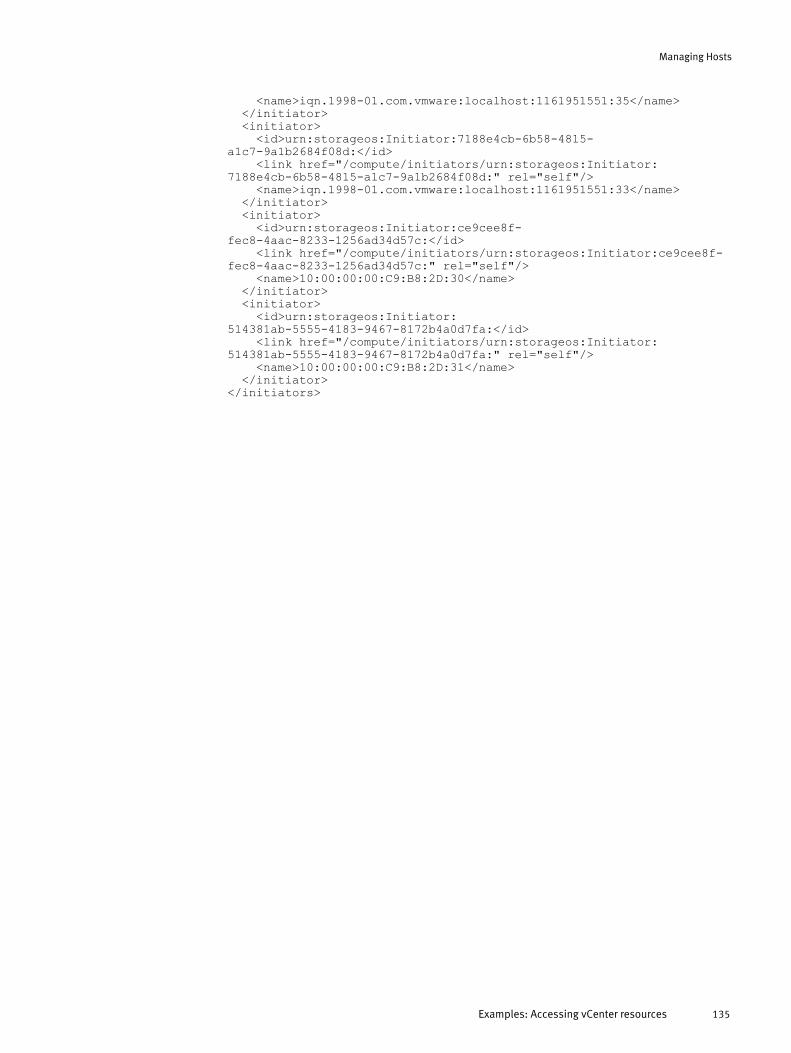
<name>iqn.1998-01.com.vmware:localhost:1161951551:35</name> </initiator> <initiator> <id>urn:storageos:Initiator:7188e4cb-6b58-4815-a1c7-9a1b2684f08d:</id> <link href="/compute/initiators/urn:storageos:Initiator:7188e4cb-6b58-4815-a1c7-9a1b2684f08d:" rel="self"/> <name>iqn.1998-01.com.vmware:localhost:1161951551:33</name> </initiator> <initiator> <id>urn:storageos:Initiator:ce9cee8f-fec8-4aac-8233-1256ad34d57c:</id> <link href="/compute/initiators/urn:storageos:Initiator:ce9cee8f-fec8-4aac-8233-1256ad34d57c:" rel="self"/> <name>10:00:00:00:C9:B8:2D:30</name> </initiator> <initiator> <id>urn:storageos:Initiator:514381ab-5555-4183-9467-8172b4a0d7fa:</id> <link href="/compute/initiators/urn:storageos:Initiator:514381ab-5555-4183-9467-8172b4a0d7fa:" rel="self"/> <name>10:00:00:00:C9:B8:2D:31</name> </initiator></initiators>
Managing Hosts
Examples: Accessing vCenter resources 135


CHAPTER 11
Discovering Storage Systems
This chapter contains the following topics
u Registering and discovering physical storage systems in VNX Block and VMAX....138u Registering and discovering a VPLEX................................................................... 139u Registering and discovering an Isilon storage system.......................................... 140u Registering and discovering a NetApp storage system......................................... 142u Registering and discovering a VNX File storage system........................................ 143
Discovering Storage Systems 137

Registering and discovering physical storage systems in VNXBlock and VMAX
For VNX Block and VMAX, registering an SMI-S provider provides access to the storagesystems. Once the SMI-S providers are registered, then the underlying storage systems,storage pools, and storage ports are discovered automatically without any further userinput.
Before you begin
You need the following information:
u The IP address of the SMI-S provider.
u The username and password for connecting to the SMI-S provider.
u The port number used to connect to the SMI-S provider.
Procedure
1. Register the SMI-S Provider by sending a POST to /vdc/smis-providers.
The request returns a task whose URI can be queried to determine the status of thetask such as completion state, any failures, and the start time of the task request.
In this example, the SMI-S Provider with the IP address of 192.168.0.0 is beingregistered.
RequestPOST https://<ViPR_VIP>:4443/vdc/smis-providers{'Content-Type': 'application/json', 'X-SDS-AUTH-TOKEN': {Token_Text}', 'ACCEPT': 'application/json'}{ "ip_address": "192.168.0.0", "name": "mysmis", "password": "#1Password", "port_number": "5988", "use_ssl": "false", "user_name": "admin"}
Response
HTTP 202 Accepted{ "link": { "href": "/vdc/smis-providers/urn:storageos:SMISProvider:dce4a4c4-334b-4353-9484-c7b225f413d5:/tasks/e393ece4-44eb-42d2-9d8a-33e28b436daf", "rel": "self" }, "op_id": "e393ece4-44eb-42d2-9d8a-33e28b436daf", "resource": { "id": "urn:storageos:SMISProvider:dce4a4c4-334b-4353-9484-c7b225f413d5:", "link": { "href": "/vdc/smis-providers/urn:storageos:SMISProvider:dce4a4c4-334b-4353-9484-c7b225f413d5:", "rel": "self" }, "name": "mysmis" }, "start_time": 1379202542423, "state": "pending"}
Discovering Storage Systems
138 EMC ViPR 1.1.0 Controller REST API Developer Guide

2. Repeat the query of the SMI-S registration task, using the task URL from the responsebody of the POST request, until the message attribute of the task is Operationcompleted successfully.
RequestGET https://<ViPR_URL>:4443/vdc/smis-providers/urn:storageos:SMISProvider:dce4a4c4-334b-4353-9484-c7b225f413d5:/tasks/e393ece4-44eb-42d2-9d8a-33e28b436daf
{'Content-Type': 'application/json', 'X-SDS-AUTH-TOKEN': '{Token_Text}', 'ACCEPT': 'application/json'}
ResponseHTTP 200 OK{ "end_time": 1379202543299, "link": { "href": "/vdc/smis-providers/urn:storageos:SMISProvider:dce4a4c4-334b-4353-9484-c7b225f413d5:/tasks/e393ece4-44eb-42d2-9d8a-33e28b436daf", "rel": "self" }, "message": "Operation completed successfully", "op_id": "e393ece4-44eb-42d2-9d8a-33e28b436daf", "resource": { "id": "urn:storageos:SMISProvider:dce4a4c4-334b-4353-9484-c7b225f413d5:", "link": { "href": "/vdc/smis-providers/urn:storageos:SMISProvider:dce4a4c4-334b-4353-9484-c7b225f413d5:", "rel": "self" }, "name": "mysmis" }, "start_time": 1379202542423, "state": "ready"}
Registering and discovering a VPLEXWhen you add a VPLEX to ViPR, the array is automatically added to the ViPR discoveryqueue. If the credentials are correct, the array is automatically discovered.
Before you begin
You need the following information:
u The IP address of the storage system.
u The username and password for connecting to the storage system.
u The port number used to connect to the storage system.
Procedure
1. Register a VPLEX by sending a POST /vdc/storage-systems request.
The request returns a task whose URI can be queried to determine the status of thetask such as completion, any failures, time of task request, and time of taskcompletion.
RequestPOST https://<ViPR_VIP>:4443/vdc/storage-systems{ "ip_address": "192.168.0.0", "name": "VPLEX_MET", "password": "Mi@Dim7T",
Discovering Storage Systems
Registering and discovering a VPLEX 139

"port_number": "443", "system_type": "vplex", "user_name": "service"}
Response202 Accepted<task> <op_id>d6860996-be16-42f8-8d81-e35b0ba63fc9</op_id> <resource> <id>urn:storageos:StorageSystem:75b2adfb-47c9-45d6-a5be-76e400e328fb:</id> <link href="/vdc/storage-systems/urn:storageos:StorageSystem:75b2adfb-47c9-45d6-a5be-76e400e328fb:" rel="self" /> <name>VPLEX_MET</name> </resource> <link href="/vdc/storage-systems/urn:storageos:StorageSystem:75b2adfb-47c9-45d6-a5be-76e400e328fb:/tasks/d6860996-be16-42f8-8d81-e35b0ba63fc9" rel="self" /> <start_time>1386301587343</start_time> <state>pending</state></task>
2. Repeat the query of the VPLEX create task, using the task URL from the response bodyof the POST request, until the message attribute of the task is Operationcompleted successfully.
RequestGET https://<ViPR_VIP>:4443/vdc/storage-systems/urn:storageos:StorageSystem:75b2adfb-47c9-45d6-a5be-76e400e328fb:/tasks/d6860996-be16-42f8-8d81-e35b0ba63fc9
Response<task> <end_time>1386301599628</end_time> <message>Operation completed successfully</message> <op_id>d6860996-be16-42f8-8d81-e35b0ba63fc9</op_id> <resource> <id>urn:storageos:StorageSystem:75b2adfb-47c9-45d6-a5be-76e400e328fb:</id> <link href="/vdc/storage-systems/urn:storageos:StorageSystem:75b2adfb-47c9-45d6-a5be-76e400e328fb:" rel="self" /> <name>VPLEX_MET</name> </resource> <link href="/vdc/storage-systems/urn:storageos:StorageSystem:75b2adfb-47c9-45d6-a5be-76e400e328fb:/tasks/d6860996-be16-42f8-8d81-e35b0ba63fc9" rel="self" /> <start_time>1386301587343</start_time> <state>ready</state></task>
Registering and discovering an Isilon storage systemWhen you add an Isilon to ViPR, the array is automatically added to the ViPR discoveryqueue. If the credentials are correct, the array is automatically discovered.
Before you begin
You need the following information:
u System Type - Isilon.
u SmartConnect IP Address - Direct the discovery request to the Isilon SmartConnecthost IP.
Discovering Storage Systems
140 EMC ViPR 1.1.0 Controller REST API Developer Guide

u Port Number - 8080.
u user_name - name of the root account on the Isilon array.
u password - password of the root account on the Isilon array.
Procedure
1. Register an Isilon by sending a POST /vdc/storage-systems request.
The request returns a task whose URI can be queried to determine the status of thetask such as completion state, any failures, and the time of the task request.
RequestPOST https://<ViPR_VIP>:4443/vdc/storage-systems
<storage_system_create> <name>isilon1</name> <system_type>isilon</system_type> <ip_address>192.168.0.0</ip_address> <port_number>8080</port_number> <user_name>rootid</user_name> <password>password</password></storage_system_create>
Response202 Accepted
<task> <associated_resources/> <op_id>63719ec8-211e-41ae-a0a6-2a7a9c3a97e8</op_id> <resource> <id>urn:storageos:StorageSystem:473d0990-742b-4035-b360-933f3f189ba8:</id> <link href="/vdc/storage-systems/{StorageSystem_urn}" rel="self"/> <name>isilon1</name> </resource> <link href="/vdc/storage-systems/{StorageSystem_urn}/tasks/63719ec8-211e-41ae-a0a6-2a7a9c3a97e8" rel="self"/> <start_time>1387486656968</start_time> <state>pending</state></task>
2. Query the Isilon create task, using the task URL from the response body of the POSTrequest, until the state attribute of the task is ready which indicates that theoperation has completed.
RequestGET https://<ViPR_VIP>:4443/vdc/storage-systems/{StorageSystem_urn}/tasks/63719ec8-211e-41ae-a0a6-2a7a9c3a97e8
Response<task> <associated_resources/> <end_time>1387486658727</end_time> <message>Operation completed successfully</message> <op_id>63719ec8-211e-41ae-a0a6-2a7a9c3a97e8</op_id> <resource> <id>urn:storageos:StorageSystem:473d0990-742b-4035-b360-933f3f189ba8:</id> <link href="/vdc/storage-systems/urn:storageos:StorageSystem:473d0990-742b-4035-b360-933f3f189ba8:" rel="self"/> <name>isilon1</name> </resource> <link href="/vdc/storage-systems/urn:storageos:StorageSystem:473d0990-742b-4035-b360-933f3f189ba8:/tasks/63719ec8-211e-41ae-a0a6-2a7a9c3a97e8" rel="self"/> <start_time>1387486656968</start_time>
Discovering Storage Systems
Registering and discovering an Isilon storage system 141

<state>ready</state></task>
Once the task is complete, this storage system is automatically discovered by ViPR.
Registering and discovering a NetApp storage systemWhen you add an NetApp to ViPR, the array is automatically added to the ViPR discoveryqueue. If the credentials are correct, the array is automatically discovered.
Before you begin
To successfully complete this procedure, you need the following information:
u System Type - netapp.
u IP Address - Direct the discovery request to the NetApp OnTap IP.
u Port Number - 443.
u user_name - name of the root account on the NetApp array.
u password - password of the root account on the NetApp array.
Procedure
1. Register the NetApp by sending a POST /vdc/storage-systems request. Therequest returns a task whose URI can be queried to determine the status of the task.
RequestPOST https://<ViPR_VIP>:4443/vdc/storage-systems
<storage_system_create> <name>NetApp2</name> <system_type>netapp</system_type> <ip_address>192.168.0.0</ip_address> <port_number>443</port_number> <user_name>root</user_name> <password>dangerous1</password></storage_system_create>
Response202 Accepted
<task> <op_id>937200f1-16ef-4bd3-8c13-b79e6651f967</op_id> <resource> <id>urn:storageos:StorageSystem:b4c6efa0-bf8b-416a-9c01-5fc0a19f27a8:</id> <link href="/vdc/storage-systems/urn:storageos:StorageSystem:b4c6efa0-bf8b-416a-9c01-5fc0a19f27a8:" rel="self" /> <name>ISI_RAH</name> </resource> <link href="/vdc/storage-systems/urn:storageos:StorageSystem:b4c6efa0-bf8b-416a-9c01-5fc0a19f27a8:/tasks/937200f1-16ef-4bd3-8c13-b79e6651f967" rel="self" /> <start_time>1386303328118</start_time> <state>pending</state></task>
2. Query the NetApp create task, using the task URL from the response body of the POSTrequest. When the state attribute of the task is ready, the operation hascompleted.
Discovering Storage Systems
142 EMC ViPR 1.1.0 Controller REST API Developer Guide

RequestGET https://<ViPR_VIP>:4443/vdc/storage-systems/{StorageSystem_urn}/tasks/937200f1-16ef-4bd3-8c13-b79e6651f967
Response<task> <associated_resources/> <end_time>1387489906247</end_time> <message>Operation completed successfully</message> <op_id>937200f1-16ef-4bd3-8c13-b79e6651f967</op_id> <resource> <id>urn:storageos:StorageSystem:0dfd2dfc-e097-4af4-94f2-5e08f41a6fad:</id> <link href="/vdc/storage-systems/urn:storageos:StorageSystem:0dfd2dfc-e097-4af4-94f2-5e08f41a6fad:" rel="self"/> <name>NetApp2</name> </resource> <link href="/vdc/storage-systems/urn:storageos:StorageSystem:0dfd2dfc-e097-4af4-94f2-5e08f41a6fad:/tasks/ba2b50b3-b5ad-44a7-bbfd-bd51dc58f9d9" rel="self"/> <start_time>1387489905274</start_time> <state>ready</state></task>
Registering and discovering a VNX File storage systemWhen you add an VNX File storage system to ViPR, the array is automatically added to theViPR discovery queue. If the credentials are correct, the array is automatically discovered.
Before you begin
VNX File arrays are discovered by providing two sets of credentials:
u A user name and password for the VNX File Control Stationu A user name and password for the on-board SMI-S provider.
The following table shows the complete set of information you need to successfullydiscover a VNX File array.
Requirement Description- -System type vnxfile
IP address The IP address of the VNX File control station.
Port number 443
user_name An admin user for the VNX File control station
password A password for the VNX File control station admin user
SMI-S provider IP address The IP address of the on-board SMI-S provider
SMI-S user_name An admin user for the SMI-S provider
SMI-S password A password for the SMI-S provider
smi-s port number 5989
smi-s_user_ssl true
Procedure
1. Register a VNX File system by sending a POST /vdc/storage-systems request.The request returns a task whose URI can be queried to determine the status of thetask.
Discovering Storage Systems
Registering and discovering a VNX File storage system 143
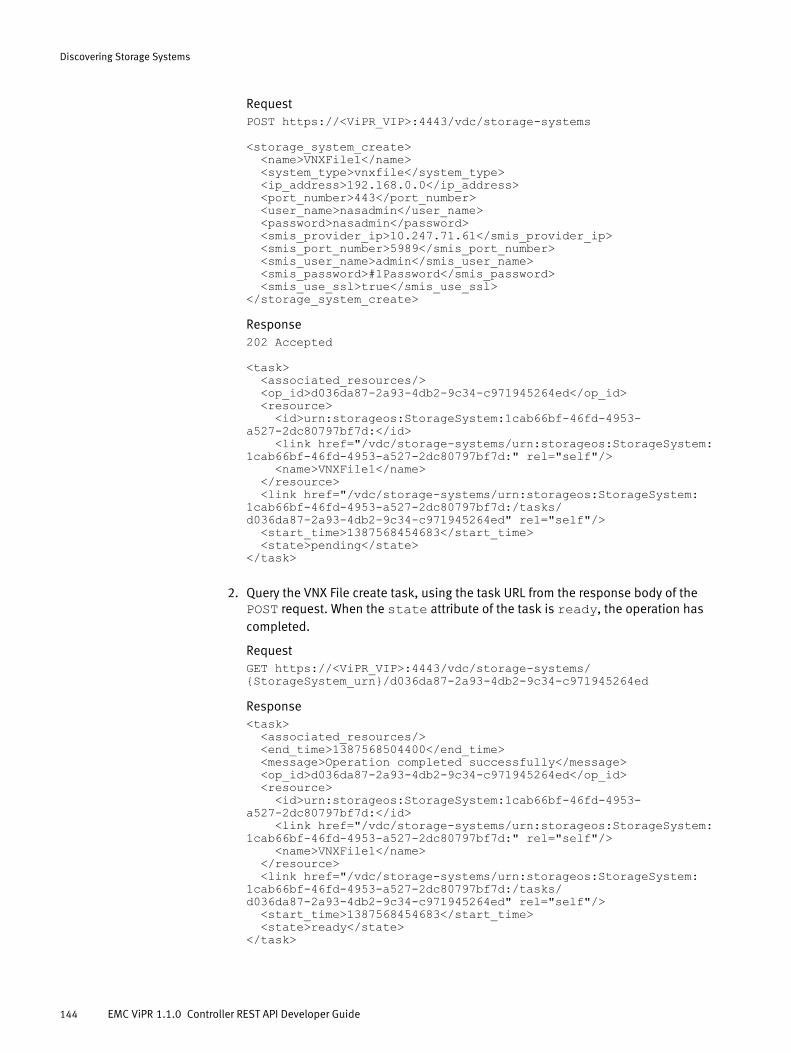
RequestPOST https://<ViPR_VIP>:4443/vdc/storage-systems
<storage_system_create> <name>VNXFile1</name> <system_type>vnxfile</system_type> <ip_address>192.168.0.0</ip_address> <port_number>443</port_number> <user_name>nasadmin</user_name> <password>nasadmin</password> <smis_provider_ip>10.247.71.61</smis_provider_ip> <smis_port_number>5989</smis_port_number> <smis_user_name>admin</smis_user_name> <smis_password>#1Password</smis_password> <smis_use_ssl>true</smis_use_ssl></storage_system_create>
Response202 Accepted
<task> <associated_resources/> <op_id>d036da87-2a93-4db2-9c34-c971945264ed</op_id> <resource> <id>urn:storageos:StorageSystem:1cab66bf-46fd-4953-a527-2dc80797bf7d:</id> <link href="/vdc/storage-systems/urn:storageos:StorageSystem:1cab66bf-46fd-4953-a527-2dc80797bf7d:" rel="self"/> <name>VNXFile1</name> </resource> <link href="/vdc/storage-systems/urn:storageos:StorageSystem:1cab66bf-46fd-4953-a527-2dc80797bf7d:/tasks/d036da87-2a93-4db2-9c34-c971945264ed" rel="self"/> <start_time>1387568454683</start_time> <state>pending</state></task>
2. Query the VNX File create task, using the task URL from the response body of thePOST request. When the state attribute of the task is ready, the operation hascompleted.
RequestGET https://<ViPR_VIP>:4443/vdc/storage-systems/{StorageSystem_urn}/d036da87-2a93-4db2-9c34-c971945264ed
Response<task> <associated_resources/> <end_time>1387568504400</end_time> <message>Operation completed successfully</message> <op_id>d036da87-2a93-4db2-9c34-c971945264ed</op_id> <resource> <id>urn:storageos:StorageSystem:1cab66bf-46fd-4953-a527-2dc80797bf7d:</id> <link href="/vdc/storage-systems/urn:storageos:StorageSystem:1cab66bf-46fd-4953-a527-2dc80797bf7d:" rel="self"/> <name>VNXFile1</name> </resource> <link href="/vdc/storage-systems/urn:storageos:StorageSystem:1cab66bf-46fd-4953-a527-2dc80797bf7d:/tasks/d036da87-2a93-4db2-9c34-c971945264ed" rel="self"/> <start_time>1387568454683</start_time> <state>ready</state></task>
Discovering Storage Systems
144 EMC ViPR 1.1.0 Controller REST API Developer Guide

CHAPTER 12
User Interface Services
This chapter contains the following topics.
u Catalog, Services, Orders, and Approvals............................................................ 146u Accessing UI services.......................................................................................... 148u UI Services response formats.............................................................................. 148u Approval requests............................................................................................... 149u Approving or rejecting......................................................................................... 149u Retrieving a list of pending approvals..................................................................150u URL notification...................................................................................................150u Asset options...................................................................................................... 151u Upstream values................................................................................................. 151u Executing a service..............................................................................................153u Service catalog....................................................................................................154u Service descriptors..............................................................................................156u Field descriptors..................................................................................................156u Field validation................................................................................................... 157u Type field values................................................................................................. 157u Tracking orders................................................................................................... 158
User Interface Services 145
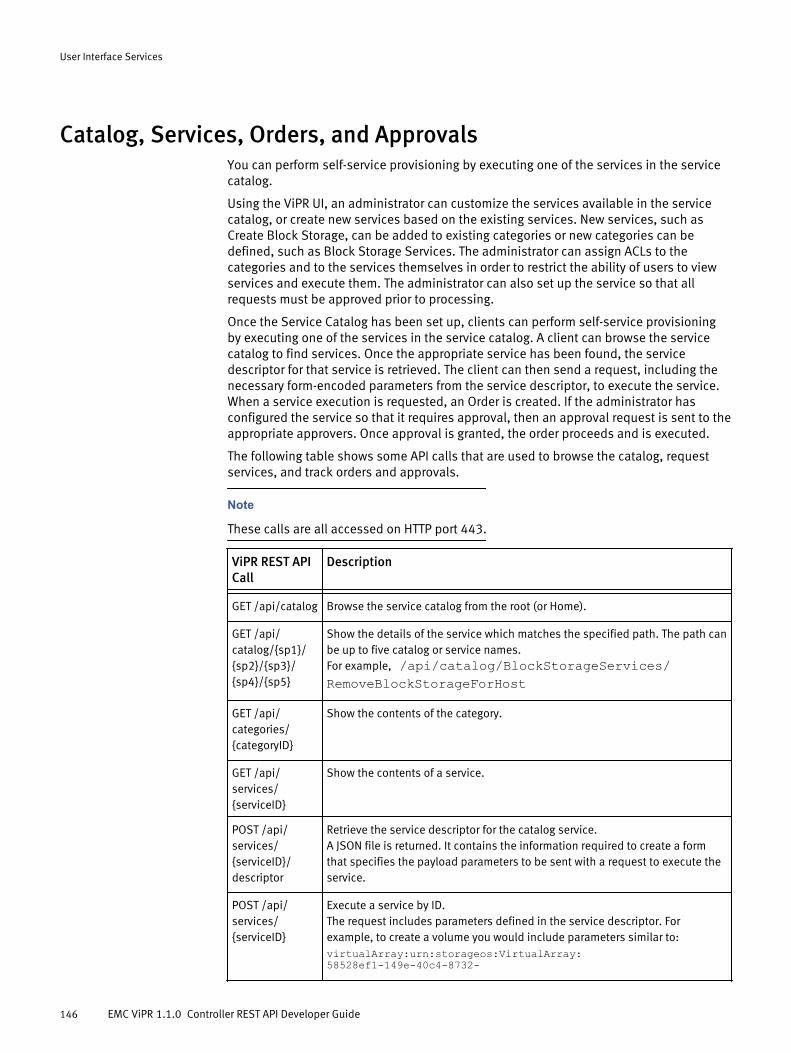
Catalog, Services, Orders, and ApprovalsYou can perform self-service provisioning by executing one of the services in the servicecatalog.
Using the ViPR UI, an administrator can customize the services available in the servicecatalog, or create new services based on the existing services. New services, such asCreate Block Storage, can be added to existing categories or new categories can bedefined, such as Block Storage Services. The administrator can assign ACLs to thecategories and to the services themselves in order to restrict the ability of users to viewservices and execute them. The administrator can also set up the service so that allrequests must be approved prior to processing.
Once the Service Catalog has been set up, clients can perform self-service provisioningby executing one of the services in the service catalog. A client can browse the servicecatalog to find services. Once the appropriate service has been found, the servicedescriptor for that service is retrieved. The client can then send a request, including thenecessary form-encoded parameters from the service descriptor, to execute the service.When a service execution is requested, an Order is created. If the administrator hasconfigured the service so that it requires approval, then an approval request is sent to theappropriate approvers. Once approval is granted, the order proceeds and is executed.
The following table shows some API calls that are used to browse the catalog, requestservices, and track orders and approvals.
Note
These calls are all accessed on HTTP port 443.
ViPR REST APICall
Description
- -GET /api/catalog Browse the service catalog from the root (or Home).
GET /api/catalog/{sp1}/{sp2}/{sp3}/{sp4}/{sp5}
Show the details of the service which matches the specified path. The path canbe up to five catalog or service names.For example, /api/catalog/BlockStorageServices/RemoveBlockStorageForHost
GET /api/categories/{categoryID}
Show the contents of the category.
GET /api/services/{serviceID}
Show the contents of a service.
POST /api/services/{serviceID}/descriptor
Retrieve the service descriptor for the catalog service.A JSON file is returned. It contains the information required to create a formthat specifies the payload parameters to be sent with a request to execute theservice.
POST /api/services/{serviceID}
Execute a service by ID.The request includes parameters defined in the service descriptor. Forexample, to create a volume you would include parameters similar to:virtualArray:urn:storageos:VirtualArray:58528ef1-149e-40c4-8732-
User Interface Services
146 EMC ViPR 1.1.0 Controller REST API Developer Guide

ViPR REST APICall
Description
- -df3ddf108a22:virtualPool:urn:storageos:VirtualPool:7aa0c6f0-5f47-423b-9b1eeda98c838bc7:project:urn:storageos:Project:b161965b-4fb1-439e-8224-ed47840487e0:name:ViPR-Test2consistencyGroup:numberOfVolumes:1size:5
The service parameters in the payload must be form encoded using the contenttype: application/x-www-form-urlencoded.
POST /api/catalog/{sp1}/{sp2}/{sp3}/{sp4}/{sp5}
Execute the service matching the specified path.The request includes parameters defined in the service descriptor. Forexample, to create a volume you would include parameters similar to:virtualArray:urn:storageos:VirtualArray:58528ef1-149e-40c4-8732-df3ddf108a22:virtualPool:urn:storageos:VirtualPool:7aa0c6f0-5f47-423b-9b1eeda98c838bc7:project:urn:storageos:Project:b161965b-4fb1-439e-8224-ed47840487e0:name:ViPR-Test2consistencyGroup:numberOfVolumes:1size:5
The service parameters in the payload must be form encoded using the contenttype: application/x-www-form-urlencoded.
GET /api/orders Returns a list of IDs for orders which you own.
GET /api/orders/all
Returns a list of IDs for all orders in the current tenant. You must have theTenant Administrator role.
GET /api/orders/{orderID}
Show the details of a specific order. You must be the owner of the order orhave the Tenant Administrator or Tenant Approval role.
GET /api/orders/{orderID}/execution
Show the execution information for an order, including all log information.
GET /api/approvals
List all approvals for the tenant of which you are a member.
GET /api/approvals/pending
List all approvals that are in the pending state.
GET /api/approvals/{approvalID}
Show the details for the specified approval request.
POST /api/approvals/{approvalID}/approve
Approve the specified approval request
POST /api/approvals/
Reject the specified approval request
User Interface Services
Catalog, Services, Orders, and Approvals 147
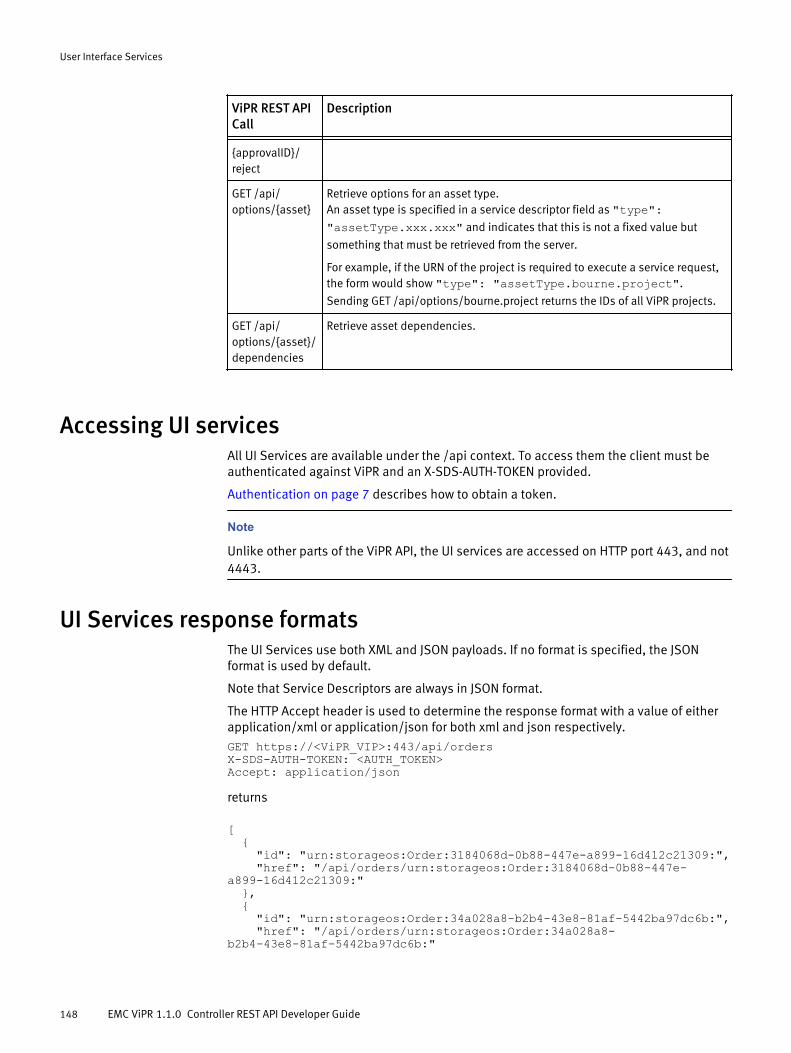
ViPR REST APICall
Description
- -{approvalID}/reject
GET /api/options/{asset}
Retrieve options for an asset type.An asset type is specified in a service descriptor field as "type":"assetType.xxx.xxx" and indicates that this is not a fixed value but
something that must be retrieved from the server.
For example, if the URN of the project is required to execute a service request,the form would show "type": "assetType.bourne.project".
Sending GET /api/options/bourne.project returns the IDs of all ViPR projects.
GET /api/options/{asset}/dependencies
Retrieve asset dependencies.
Accessing UI servicesAll UI Services are available under the /api context. To access them the client must beauthenticated against ViPR and an X-SDS-AUTH-TOKEN provided.
Authentication on page 7 describes how to obtain a token.
Note
Unlike other parts of the ViPR API, the UI services are accessed on HTTP port 443, and not4443.
UI Services response formatsThe UI Services use both XML and JSON payloads. If no format is specified, the JSONformat is used by default.
Note that Service Descriptors are always in JSON format.
The HTTP Accept header is used to determine the response format with a value of eitherapplication/xml or application/json for both xml and json respectively.
GET https://<ViPR_VIP>:443/api/ordersX-SDS-AUTH-TOKEN: <AUTH_TOKEN>Accept: application/json
returns
[ { "id": "urn:storageos:Order:3184068d-0b88-447e-a899-16d412c21309:", "href": "/api/orders/urn:storageos:Order:3184068d-0b88-447e-a899-16d412c21309:" }, { "id": "urn:storageos:Order:34a028a8-b2b4-43e8-81af-5442ba97dc6b:", "href": "/api/orders/urn:storageos:Order:34a028a8-b2b4-43e8-81af-5442ba97dc6b:"
User Interface Services
148 EMC ViPR 1.1.0 Controller REST API Developer Guide

}]GET https://<ViPR_VIP>:443/api/ordersX-SDS-AUTH-TOKEN: <AUTH_TOKEN>Accept: application/xml
returns
<?xml version="1.0" encoding="UTF-8" standalone="yes"?><list> <reference> <href>/api/orders/urn:storageos:Order:3184068d-0b88-447e-a899-16d412c21309:</href> <id>urn:storageos:Order:3184068d-0b88-447e-a899-16d412c21309:</id> </reference> <reference> <href>/api/orders/urn:storageos:Order:34a028a8-b2b4-43e8-81af-5442ba97dc6b:</href> <id>urn:storageos:Order:34a028a8-b2b4-43e8-81af-5442ba97dc6b:</id> </reference></list>
Approval requestsYou can set up a service in the Service Catalog to require approval before beingprocessed. These Approval Requests can be listed and actioned using either the UI or theApproval Service.
Note that to make any calls against the Approval Service, the authenticated user musthave the TENANT_APPROVER role.
Approving or rejectingApproval Requests can be either approved or rejected using POST /api/approvals/<ApprovalRequest_ID>/approve and /reject .
POST https://<ViPR_VIP>:443/api/approvals/<ApprovalRequest_ID>/approvePOST https://<ViPR_VIP>:443/api/approvals/<ApprovalRequest_ID>/reject
The following shows a response to an Approval Request being rejected.
{ "dateActioned": "Oct 2, 2013 4:42:55 PM", "status": "REJECTED", "approvedBy": "[email protected]", "order": { "id": "urn:storageos:Order:7f9e7e1f-d765-498c-a320-5840ade14da1:", "href": "/api/orders/urn:storageos:Order:7f9e7e1f-d765-498c-a320-5840ade14da1:" }, "tenant": "urn:storageos:TenantOrg:66e1c6ce-d133-42bb-b90f-f7c3334599bb:", "id": "urn:storageos:ApprovalRequest:ad0f1973-514f-42e9-8186-ebd121198e16:", "inactive": false, "link": { "rel": "self", "href": "/api/approvals/urn:storageos:ApprovalRequest:ad0f1973-514f-42e9-8186-ebd121198e16:" }}
User Interface Services
Approval requests 149

Retrieving a list of pending approvalsA list of pending approvals for the authenticated user can be retrieved with GET /api/approvals/pending.
GET https://<ViPR_VIP>:443/api/approvals/pending
returns a list of ids for approval requests that require approval:
[ { "id": "urn:storageos:ApprovalRequest:ad0f1973-514f-42e9-8186-ebd121198e16:", "href": "/api/approvals/urn:storageos:ApprovalRequest:ad0f1973-514f-42e9-8186-ebd121198e16:" }]
An individual Approval Request can then be retrieved with
GET https://<ViPR_VIP>:443/api/approvals/<ApprovalRequest_ID>
which returns
{ "status": "PENDING", "order": { "id": "urn:storageos:Order:7f9e7e1f-d765-498c-a320-5840ade14da1:", "href": "/api/orders/urn:storageos:Order:7f9e7e1f-d765-498c-a320-5840ade14da1:" }, "tenant": "urn:storageos:TenantOrg:66e1c6ce-d133-42bb-b90f-f7c3334599bb:", "id": "urn:storageos:ApprovalRequest:ad0f1973-514f-42e9-8186-ebd121198e16:", "inactive": false, "link": { "rel": "self", "href": "/api/approvals/urn:storageos:ApprovalRequest:ad0f1973-514f-42e9-8186-ebd121198e16:" }}
URL notificationOrdinarily when an Approval Request is created ViPR will send an email to the approvers.You can however also setup ViPR to call a URL by providing a URL in the UI Admin > Tenant> Approval Settings page. The URL can be any address visible to the ViPR cluster.
The following shows an example of the JSON Approval Information resource that ViPRwould send to the specified URL.
{ "message":null, "dateActioned":null, "status":"PENDING", "approvedBy":null, "order":{ "id":"urn:storageos:Order:2792d568-034a-42d0-b0da-f39b32fa9074:", "href":"/api/orders/urn:storageos:Order:2792d568-034a-42d0-b0da-f39b32fa9074:" }, "tenant":"urn:storageos:TenantOrg:66e1c6ce-d133-42bb-b90f-f7c3334599bb:", "id":"urn:storageos:ApprovalRequest:739ff36b-ce89-41ff-a22e-5c572f861da7:",
User Interface Services
150 EMC ViPR 1.1.0 Controller REST API Developer Guide

"inactive":false, "link":{ "rel":"self", "href":"/api/approvals/urn:storageos:ApprovalRequest:739ff36b-ce89-41ff-a22e-5c572f861da7:" }}
Asset optionsThere is a special field type that starts with AssetType.XXX. This indicates that options forthat field are not supplied statically with the form, but should be retrieved from theserver.
To retrieve values for an assetType you call the AssetOption API using the name of theasset (the part after "AssetType."). So for example, to get the name of all hosts for thetype AssetType.bourne.hosts, you would call:
GET https://<ViPR_VIP>:443/api/options/bourne.hosts
The response returned contains a JSON array of key value pairs; the key being the valuewhich should be sent to ViPR as the field value when executing the service, and the valuebeing the display label for that option.
[ { "key": "urn:storageos:Host:4c4b7da7-61ee-4384-afb9-87e1fa3d045b:", "value": "linux2" }, { "key": "urn:storageos:Host:4c4b7da7-61ee-9783-afb9-87e1fa3d045b:", "value": "linux1" }]
Upstream valuesSome asset option fields require previous options in order to determine possible validoptions. For example, the "Create Block Volume for a Host" service requires that the userselect a protocol so that it can display only the hosts that support that particularprotocol.
In order to support this, the Asset Option API requires that you pass all current fieldvalues that have been selected when asking for the options. This is why the ordering ofthe field descriptors in the Service Descriptor is important.
For example, the "Export Volume To Host" service includes the following fields :
u Block Protocol (bourne.blockProtocol)
u Project (bourne.project)
u Host (bourne.host)
u Volume (bourne.unassignedBlockVolume)
The first call will be made against the first field, Block Protocol:
GET https://<ViPR_VIP>:443/api/options/bourne.blockProtocol
which returns
[ { "key": "FC",
User Interface Services
Asset options 151

"value": "FC" }, { "key": "iSCSI", "value": "iSCSI" }]
The next call will be to retrieve options for the bourne.Project field. Note that we mustpass in all proceeding values that have been chosen so far.
GET https://<ViPR_VIP>:443/api/options/bourne.project?bourne.blockProtocol=FC
Returns the following options
[ { "key": "urn:storageos:Project:b161965b-4fb1-439e-8224-ed47840487e0:", "value": "ViPR Project 1" }]
We then pass the two values so far when getting the bourne.Host field:
GET https://<ViPR_VIP>:443/api/options/bourne.host?bourne.blockProtocol=FC&bourne.project=urn:storageos:Project:b161965b-4fb1-439e-8224-ed47840487e0:
Returns the following options:
[ { "key": "urn:storageos:Host:4c4b7da7-61ee-4384-afb9-87e1fa3d045b:", "value": "windows-vipr1" }, { "key": "urn:storageos:Host:b8006b82-b60c-433b-abda-ef533e60c7cb:", "value": "suse-vipr1" }]
Lastly we can get the options for unassignedBlockVolume. Note that this example is onseparate lines for readability, however it should all be submitted as a single line.
GET https://<ViPR_VIP>:443/api/options/bourne.unassignedBlockVolume ?bourne.host=urn:storageos:Host:4c4b7da7-61ee-4384-afb9-87e1fa3d045b: &bourne.project=urn:storageos:Project:b161965b-4fb1-439e-8224-ed47840487e0: &bourne.blockProtocol=FC
Which returns
[ { "key":"urn:storageos:Volume:39149c88-46ea-4aec-ac51-46bd58a01e5c:", "value":"ViPR-TestVolume-1" } ]
If you attempt to get the bourne.unassignedBlockVolume option without passing in theprevious options, a 400 Bad Request is returned indicating that more options arerequired before the list of options can be calculated :
400 : Bad Request : Query for Asset 'bourne.unassignedBlockVolume' requires additional asset dependencies. Supplied: []
User Interface Services
152 EMC ViPR 1.1.0 Controller REST API Developer Guide

Executing a serviceServices are executed by POSTing the required service values to the service as form-url-encoded.
Use the following URL path:
POST https://<ViPR_VIP>:443/api/services/<serviceId>
For example, in order to execute the Create Volume service you would post thefollowing parameters:
virtualArray:urn:storageos:VirtualArray:58528ef1-149e-40c4-8732-df3ddf108a22:virtualPool:urn:storageos:VirtualPool:7aa0c6f0-5f47-423b-9b1e-eda98c838bc7:project:urn:storageos:Project:b161965b-4fb1-439e-8224-ed47840487e0:name:ViPR-Test2consistencyGroup:numberOfVolumes:1size:5
These would be URL encoded as the body of the request, with the following being sent:
POST https://<ViPR_VIP>:443/api/services/urn:storageos:CatalogService:672fa6b6-b17e-49f3-ad11-b6c43c3680cb:Accept: application/jsonContent-Length: 420Content-Type: application/x-www-form-urlencodedX-SDS-AUTH-TOKEN: <AUTH-TOKEN>
virtualArray=urn%3Astorageos%3AVirtualArray%3A58528ef1-149e-40c4-8732-df3ddf108a22%3A&virtualPool=urn%3Astorageos%3AVirtualPool%3A7aa0c6f0-5f47-423b-9b1e-eda98c838bc7%3A&project=urn%3Astorageos%3AProject%3Ab161965b-4fb1-439e-8224-ed47840487e0%3A&name=ViPR-Test3&consistencyGroup=&numberOfVolumes=1&size=5size:5
If a 200 OK response is returned, the submission has been accepted and a link to theorder is returned:
{ "orderNumber": "5", "service": { "id": "urn:storageos:CatalogService:672fa6b6-b17e-49f3-ad11-b6c43c3680cb:", "href": "/api/services/urn:storageos:CatalogService:672fa6b6-b17e-49f3-ad11-b6c43c3680cb:" }, "summary": "Create a block volume", "message": "", "createdDate": "Sep 10, 2013 1:26:24 PM", "status": "PENDING", "execution": { "id": "urn:storageos:Order:34a028a8-b2b4-43e8-81af-5442ba97dc6b:", "href": "/api/orders/urn:storageos:Order:34a028a8-b2b4-43e8-81af-5442ba97dc6b:/execution" }, "id": "urn:storageos:Order:34a028a8-b2b4-43e8-81af-5442ba97dc6b:", "inactive": false, "link": { "rel": "self", "href": "/api/orders/urn:storageos:Order:34a028a8-b2b4-43e8-81af-5442ba97dc6b:" }}
User Interface Services
Executing a service 153

Orders are visible in the ViPR Portal when submitted via the API as if they had beensubmitted directly via the catalog.
If any of the required fields are missing, the Portal API will reject the submission, andreturn a 400 BAD REQUEST with a JSON resource explaining what's wrong. For example, ifthe previous request were submitted with the size parameter is missing, the responsewould be:
400 BAD_REQUEST[ { "field": "size", "error": "Required" }]
The Portal API will also validate all parameters against the Service Descriptorrequirements, and any errors could lead to multiple errors for the same field beingreturned. If the following example, were submitted the numberOfVolumes parameterwith a non numeric value of asd the response would be:
400 BAD_REQUEST[ { "field": "numberOfVolumes", "error": "Must be a valid integer" }, { "field": "numberOfVolumes", "error": "Cannot be lower than 1" }, { "field": "numberOfVolumes", "error": "Cannot be greater than 2" }]
Service catalogThe Service Catalog API allows a REST client to browse the ViPR Self Service Catalogconfigured in the ViPR Portal. The catalog itself is structured as a tree of Categories, eachCategory can contain a list of Sub-Categories and a list of Services in that category.
Information about a category can be retrieved by path using the category titles (withspaces removed) to form a path. For example, the following will retrieve the Block StorageServices -> Protection Services category:
GET https://<ViPR_VIP>:443/api/catalog/BlockStorageServices/ProtectionServices
The Root (or 'Home') category is retrieved using the following URL (note that there is no /on the end of the URL)
GET https://<ViPR_VIP>:443/api/catalog
The following shows an example category descriptor returned by ViPR.
{ "name": "BlockStorageServices", "title": "Block Storage Services", "description": "Block storage services for fibre channel and iSCSI", "image": "icon_host.png", "subCategories": [ { "name": "Protection", "id": "urn:storageos:CatalogCategory:67218dcf-9330-4822-9b67-137f3a0de2b5:",
User Interface Services
154 EMC ViPR 1.1.0 Controller REST API Developer Guide

"href": "/api/categories/urn:storageos:CatalogCategory:67218dcf-9330-4822-9b67-137f3a0de2b5:" } ], "services": [ { "name": "CreateBlockVolumeforaHost", "title": "Create Block Volume for a Host", "description": "Create block volume and export it for a host", "image": "icon_array_host_add.png", "approvalRequired": false, "executionWindowRequired": false, "defaultExecutionWindowId": "urn:storageos:ExecutionWindow:NEXT::NEXT", "baseService": "CreateBlockStorageForHost", "maxSize": 10, "id": "urn:storageos:CatalogService:5ee6e282-bf83-457f-bc4f-48c3b94e0648:", "inactive": false, "link": { "rel": "self", "href": "/api/services/urn:storageos:CatalogService:5ee6e282-bf83-457f-bc4f-48c3b94e0648:" } }, { "name": "RemoveBlockStorageForHost", "title": "Remove Volume by Host", "description": "Removes an unmounted block volume assigned to a host and all of its exports. The volume will no longer be available from any host.", "image": "icon_array_host_remove.png", "approvalRequired": false, "executionWindowRequired": false, "baseService": "RemoveBlockStorageForHost", "id": "urn:storageos:CatalogService:aef84673-2f98-41f9-b74b-32c6e75ee7d5:", "inactive": false, "link": { "rel": "self", "href": "/api/services/urn:storageos:CatalogService:aef84673-2f98-41f9-b74b-32c6e75ee7d5:" } } } ], "id": "urn:storageos:CatalogCategory:1ee6d153-5809-45c5-962f-fc91f255a0d9:", "inactive": false, "link": { "rel": "self", "href": "/api/categories/urn:storageos:CatalogCategory:1ee6d153-5809-45c5-962f-fc91f255a0d9:" }}
The id and link fields at the end of the descriptor provide identification information aboutthis category.
ViPR also allows you to retrieve the category descriptor directly with the Category ID(shown as the "id":"urn:CatalogCategory:XXXX" values in the above example), using thefollowing URL:
GET https://<ViPR_VIP>:443/api/categories/<Catalog_ID>
User Interface Services
Service catalog 155

Service descriptorsEach service in the catalog is represented by a service descriptor which providesconfiguration information about the service as well as a list of field descriptors. The fielddescriptors tell clients (such as the portal) what fields values are required and anyconstraints on those fields values.
Service descriptors can be retrieved with the ID of the service (id's starting withurn:storageos:CatalogService:XXXX), using the following URL
GET https://<ViPR_VIP>:443/api/services/<service_id>/descriptor
The following shows a basic Service descriptor with one field of Virtual Array.
{ "serviceId": "CreateVolume", "category": "Block Services", "title": "Create Block Volume", "description": "Create a Block Volume", "roles": [], "destructive": false, "fields": { "virtualArray": { "name": "virtualArray", "label": "Virtual Array", "type": "assetType.bourne.virtualArray", "required": true, "select": "one", "lockable": true, "validation": { "min": 0, "max": 2147483647, "regEx": "", "failureMessage": "" }, "options": {} },}
Field descriptorsField descriptors describe the fields required by the service in order to perform therequested operation. For example, the Export Volume to Host service requires the userselect a host and a target volume.
Each descriptor provides information such as the label, the type of the field, and then anyconstraints on that field which a UI can use to provide further hints to a user. Thefollowing is an example of a field descriptor:
"host": { "name": "host", "label": "Host", "type": "assetType.bourne.host", "description": "If the host is in a cluster, storage will be allocated to all hosts in the cluster.", "required": true, "select": "one", "lockable": false, "validation": { "min": 0, "max": 2147483647, "regEx": "", "failureMessage": "" },
User Interface Services
156 EMC ViPR 1.1.0 Controller REST API Developer Guide

"options": {} }
A field descriptor contains the following values:
name The symbolic name of the field. This is the name by which the field isreferenced when executing the service
label The user readable label for the field
type The type of the field (see section on field types)
required True if a value MUST be supplied for the field
select The type of selection for field types that support it. A value of oneindicates only one value can be selected from the options, a value ofmany indicates one or more values can be selected
lockable Indicates to the user should have the option of locking this field to aparticular value when editing the service
validation Validation rules that should be applied to the field. See section onvalidation
options If the field type is choice, this provides a map of value to label for all thepossible choices
Field validationFor text and number field types, the validation resource provides information on theconstraints around acceptable values.
Note that the validation resource will always contain all the fields, but only values thatmake sense against the type should be used.
Field Applies to type Description- - -min number The minumum allowed value
number number A numerical value
regEx text A regular expression which the value mustmatch in order to be considered valid
failureMessage A message that can be displayedto users if validation fails.
Type field valuesThe type field can have one of several possible values.
text A plain text value
number A numerical value
choice A choice of one of the options from the options field of the descriptor
storageSize A value that represents a storage size
User Interface Services
Field validation 157

assetType.XXXXX If the field type begins with assetType, this indicates a dynamic value.See Asset Options for how to retrieve the possible options.
A field type can have a type that begins with assetType, for example assetType.vipr.host.If the field type begins with assetType it indicates that the field is dynamic and a furthercall should be made back to ViPR to get possible values. See section on retrieving AssetType Values, or the AssetOptions API on how to retrieve these values.
Tracking ordersOnce a service has been submitted, a link to the order ID is returned, which can be usedto retrieve the status of the order.
For example, calling:
GET https://<ViPR_VIP>:443/api/orders/urn:storageos:Order:34a028a8-b2b4-43e8-81af-5442ba97dc6b:X-SDS-AUTH-TOKEN: <AUTH_TOKEN>
would return the summary information for order urn:storageos:Order:34a028a8-b2b4-43e8-81af-5442ba97dc6b:.
{ "orderNumber": "5", "service": { "id": "urn:storageos:CatalogService:672fa6b6-b17e-49f3-ad11-b6c43c3680cb:", "href": "/api/services/urn:storageos:CatalogService:672fa6b6-b17e-49f3-ad11-b6c43c3680cb:" }, "summary": "Create a block volume", "message": "", "createdDate": "Sep 10, 2013 1:26:24 PM", "status": "SUCCESS", "execution": { "id": "urn:storageos:Order:3184068d-0b88-447e-a899-16d412c21309:", "href": "/api/orders/urn:storageos:Order:3184068d-0b88-447e-a899-16d412c21309:/execution" }, "id": "urn:storageos:Order:3184068d-0b88-447e-a899-16d412c21309:", "inactive": false, "link": { "rel": "self", "href": "/api/orders/urn:storageos:Order:3184068d-0b88-447e-a899-16d412c21309:" }}
The status of an order will be one of the following:
User Interface Services
158 EMC ViPR 1.1.0 Controller REST API Developer Guide

PENDING Order has been accepted, but hasn't started executing.
EXECUTING The order is currently being processed.
SUCCESS The order has completed successfully.
ERROR The order has completed, but with an error.
SCHEDULED The order has been scheduled in an Execution Window.
APPROVAL The order requires, and is awaiting approval.
APPROVED The order has been approved and is awaiting execution.
REJECTED The order has been rejected by an approver and will not be executed.
User Interface Services
Tracking orders 159


CHAPTER 13
Error Codes and HTML Return Codes
This chapter contains the following topics.
u Error code descriptions....................................................................................... 162u HTTP return codes............................................................................................... 163
Error Codes and HTML Return Codes 161

Error code descriptionsWhenever a HTTP method request encounters an error, the response includes an HTTPreturn code, an error code, and a description of the error.
Error code Description Retryable HTTP return code- - - -1003 Some parameters are missing or are
incorrectNo 400 Bad Request
1004 This operation is not authorized forthis resource using the specifiedcredentials
No 401 Unauthorized
1005 This operation in this resource isforbidden
No 403 Forbidden
1006 Unable to find a suitable placementto handle the request
No 500 Internal Server Error
1007 Method not allowed No 405 Method not allowed
1008 An error occurred while finding asuitable placement to handle therequest
No 500 Internal Server Error
2000 An error occurred in the database No 500 Internal Server Error
2001 Unable to find the object with thegiven id
No 404 Not Found
2002 The object has been marked asinactive for deletion
No 500 Internal Server Error
2003 Unable to connect to the databaseservice
Yes 503 Service Unavailable
4000 An error occurred in the controller No 500 Internal Server Error
4001 error occurred in the networkcontroller
No 500 Internal Server Error
4002 An error occurred in the storagecontroller
No 500 Internal Server Error
4003 An error occurred in the objectcontroller
No 500 Internal Server Error
4004 Unable to find a suitable controllerto handle the request
No 500 Internal Server Error
4005 An error occurred executing a stepin the controller workflow
No 500 Internal Server Error
5000 A general error occurred in theIsilon node
No 500 Internal Server Error
5001 An error occurred communicatingwith the Isilon node using REST
No 500 Internal Server Error
5002 Unable to contact Isilon node Yes 503 Service Unavailable
Error Codes and HTML Return Codes
162 EMC ViPR 1.1.0 Controller REST API Developer Guide

Error code Description Retryable HTTP return code- - - -6000 An error occurred in the coordinator No 500 Internal Server Error
6001 The coordinator was unable tolocate the service
Yes 503 Service Unavailable
6002 Unable to queue the job, we havereached the maximum capacity forthis queue
Yes 503 Service Unavailable
6003 Unable to queue the job No 500 Internal Server Error
10000 Unable to connect to the service.The service is unavailable, try againlater
Yes 503 Service Unavailable
10001 An unexpected error occurred,please check the ViPR logs for moreinformation
No 500 Internal Server Error
HTTP return codesWhenever a HTTP method request is sent to the API, the response includes one of thefollowing HTTP codes.
Response code Description- -200 OK Standard response for successful HTTP requests. The actual
response depends on the request method used:
l In a GET request, the response contains an entitycorresponding to the requested resource.
l In a POST request, the response contains an entitydescribing or containing the result of the action.
201 Created The requested entity has been created and can be found at theURL specified in the Location header.
202 Accepted The request has been accepted for processing, but theprocessing has not been completed. A task has been created forthe request. The response provides a task URI in the Locationheader and usually has a task document in the response body.
204 No Content The request is valid and has been completed. The responseincludes no document body.
301 Moved Permanently This and all future requests should be directed to the given URL.
302 Found The redirected URL has been found.
400 Bad Request The request contains bad syntax or cannot be fulfilled.
401 Unauthorized An Authorization header was expected, but not found. Theresponse includes a WWW-Authenticate header field containinga challenge applicable to the requested resource.
403 Forbidden The client does not have adequate privileges to access one ormore resources specified in the request.
Error Codes and HTML Return Codes
HTTP return codes 163

Response code Description- -404 Not Found The requested resource could not be found.
405 Method Not Allowed A request was made of a resource using a request method notsupported by that resource. For example, a PUT on a read-onlyresource.
406 Non Acceptable The requested resource is incapable of generating content asspecified in the Accept headers sent in the request, or theversion set in the X-UIM-Accept-Version header of the request isnot supported by the resource.
500 Internal Server Error The request could not be completed due to an internal error atthe server.
501 Not Implemented The server either does not recognize the request method, or itlacks the ability to fulfill the request.
503 Service Unavailable Services that are needed to complete the request on the serverare currently unavailable. This state is usually temporary.
Error Codes and HTML Return Codes
164 EMC ViPR 1.1.0 Controller REST API Developer Guide