Embed Size (px)
Citation preview

7/27/2019 Diagnosing the Causes of Stones Throwing Mini Cams
http://slidepdf.com/reader/full/diagnosing-the-causes-of-stones-throwing-mini-cams 1/11
WHAT IS CAUSING THE STONES TO THROW ALL OVER THE
PLACE ON MY MINI CAMS
A few things to ensure you check prior to replacing solenoids on the machine are normalmaintenance routines that may have been missed or neglected. Be sure to check these thingsbefore jumping in and changing a solenoid out as it is not a cost effective correction to your issue, and the issue may still be resident even after replacing them. 1. Ensure that there is 6 bar of air pressure going to the machine, At the rear of the
machine where your air service is located, you will see a dial face, Ensure that theneedle is reading 6 bars, if it is at 4 bars or lower, you will not have enough air pressure to hold the stone to any gun nozzle via the vacuum (See picture below of rear air service assembly and check dial)
• If dial is reading below 6 bar, check air compressor to ensure it is on and onits pressure dial it has more than 80 PSI. If not and air compressor is on, callyour air compressor support department for corrective action.
• If air compressor is on and registers 100 – 120 psi on its dial then air
pressure must be adjusted on your machine by lifting the Blue or black knobon top of the air service assembly and turning it clockwise you will see theneedle start to rise, set it to 6 bars {May be illustrated as 0.6 on the dial) thenlock the top knob back down.
7/27/2019 Diagnosing the Causes of Stones Throwing Mini Cams
http://slidepdf.com/reader/full/diagnosing-the-causes-of-stones-throwing-mini-cams 2/11
2. Check air flow through the swing gun and the setter gun to see if there isobstruction lodged inside making it difficult for vacuum to have maximum holdwhen stone is grabbed. To test do the following.
• from the main menu TAB to OUPUT and press the SET button, on the
Screen you will see on the left "OUT0" and a row of 0's and above the dots And 0’s you will see setting 7 through 0. Set your cursor on the number “0”By using your right arrow () button and press SET. If the number is above44.0 then there is a clog in the Swing Gun nozzle, Remove it with your 8mmBox wrench and clear debris and remount it and retest.

7/27/2019 Diagnosing the Causes of Stones Throwing Mini Cams
http://slidepdf.com/reader/full/diagnosing-the-causes-of-stones-throwing-mini-cams 3/11
3. If stones are throwing to the right hand side of your transfer paper duringoperation then we must check air flow through the setter gun nozzle to ensurethere is no clog.
• Remove the vacuum tube that is inserted into the Swing Guns Fitting, and
remove the vacuum tube coming from the Spin Gun, Insert the Swing Gunsvacuum tube into the Spin Guns vacuum fitting and press the SET button on theoutput menu under the number “0”. Normal air flow should read higher than whatwe see on the swing gun during its test as the spin guns nozzle hole is muchsmaller than the swing gun so normal air flow will read higher. Normal readingshould be 52-54 displayed on the vacuum sensor, if it is higher than you mustremove the spin guns nozzle tip and clear out the debris.
Another cause for stones to place haphazardly or upside down or even thrown can be the lack
of maintenance done to the Spin Gun. Air is used to push the Spin Gun up towards the Swing
Gun during stone exchange, if the Spin Gun cannot fully extend to take stone, then when
vacuum is finally cut off on the Swing Gun, the stone drops and hits the partially extended Spin
Gun causing the stone to throw to one side or the other. To correct you must on a monthly basis
disassemble the Spin Gun and clean the black micro particle from the “O” ring found at its base,
and then Re-lubricate with either 30 weight sewing machine oil, or the preferred Silicone
Grease. Silicone grease is white translucent in color and primarily used for lubricating rubber
parts like “O” rings and seals. Hayne’s makes a 4 0z tube of Silicone grease and can be
purchased online.

7/27/2019 Diagnosing the Causes of Stones Throwing Mini Cams
http://slidepdf.com/reader/full/diagnosing-the-causes-of-stones-throwing-mini-cams 4/11
4. To Disassemble the Spin Gun you must first detach the Vacuum tube from itsfitting, and then located on top of the Spin Gun, remove the 4 black Allenscrews, and then lift the Spin Gun out of it housing assembly.
• After re-lubricating the “O” ring (and only the “O: ring gets lubrication)
Be sure to clean out inside the Spin Gun Housing Assembly and upon insertingthe Spin gun back into the housing, be sure to manipulate it up and down in thehousing to dispense some of that lubrication on the side walls of the housingassembly, then secure your Allen screws (Be sure not to apply too much torqueon Allen screws, just snug it down. Then reattach your Vacuum tubing to theFitting and retest machine.

7/27/2019 Diagnosing the Causes of Stones Throwing Mini Cams
http://slidepdf.com/reader/full/diagnosing-the-causes-of-stones-throwing-mini-cams 5/11
5. One more thing to check prior to replacing the Solenoids is the centering screwfor the Spin Gun. The centering screw is located in front and middle of the SpinGun (See image below)
• Often times the upwards impact the Spin Gun has when it is taking the stone
from the Swing Gun causes the centering screw to become chipped or misshaped. When this occurs what may happen is when the Spin Gun takes thestone from the Swing Gun and begins to rotate to the right to ready itself to placestone on the transfer sheet, the tug from the vacuum tube can twist the SpinGuns gun nozzle causing it to get hung up on the misshaped centering screwdisallowing the spin gun to fully descend to the transfer sheet, so when vacuumcuts off on the Spin Gun, the stone just drops and can contact a previously laidstone which would make that stone that dropped bounce to a different thenintended location on the transfer sheet.
If all these steps fail to produce positive results, then the solenoids on your machine will need to
be replaced. The following instructions will guide you through the removal of the shell of the
machine so you can access the solenoids to replace them. Be sure to take your time and be
careful of the connections and wires on the main board located behind the rear panel when
working. Also take care not to damage the Emergency stop button when lifting the shell off of
the machine.

7/27/2019 Diagnosing the Causes of Stones Throwing Mini Cams
http://slidepdf.com/reader/full/diagnosing-the-causes-of-stones-throwing-mini-cams 6/11
To replace the solenoids in your machine, we must first ensure the Air Compressor is off and allair is bled from the machine. To bleed the air simply turn the air valve on the rear of the machineto ON and then go to OUTPUT and turn on Setting “0” and “1”, air will bleed from the machineuntil devoid of air pressure. Then you can disconnect the tubing coming from your Drier to themachine and the blue tubing coming out of the air system that feeds to your machine. 1. Power off the machine and unplug it, Remove the Air system from the back of the
machine after air has been bled and air tubes have been disconnected. Thenremove the back panel of the machine, the two Phillip screws that hold the air system to the back panel of the machine, Loosen them up enough so you can lift theair system up and off the machine, then remove the 7 Phillip screws from the paneland set the panel in a safe place.

7/27/2019 Diagnosing the Causes of Stones Throwing Mini Cams
http://slidepdf.com/reader/full/diagnosing-the-causes-of-stones-throwing-mini-cams 7/11
2) Next remove the Fan assembly located on the left side as you are looking from the rear of the machine. Remove the Fan Cover by simply pulling it off, this will expose 4 Brass coloredPhillip screws on the corner. Inside of the machine (With Rear Cover removed) you will see thatthere are 4 Nuts that secure the 4 Phillip screws of the fan. Hold the Nuts with one hand thenloosen and remove the 4 Phillip screws. Then inside of the machine you will see the wire thatconnects the fan to the Main board. Carefully unseat the connector from the main board and
note its location so you can plug it back in. Also inside you will see that the fan has a metalshroud that the wire is fed through. Once you remove the 4 Phillip screws set the fan with all thenuts and screws and the metal shroud in a safe place.

7/27/2019 Diagnosing the Causes of Stones Throwing Mini Cams
http://slidepdf.com/reader/full/diagnosing-the-causes-of-stones-throwing-mini-cams 8/11
3) Once the fan is removed, there are 9 more Phillip screws we need to remove so we can liftthe shell of the machine off. 3 are located on the top of the machine (these are the Shortest of the 9 Phillip Screws. The other 6 Phillip screws are longer and located at bottom of the left andright side of the machine. Once these are removed, carefully lift the Shell of the machine up andoff and set in a safe place. On some newer machine, lifting the shell completely off will not bepossible due to an air inlet port located on the left side of the machine just on the inside of the
shell where. In this case, simply lift the shell up enough to slide a coffee can insde the top tokeep the shell up and out of your way to access the solenoids.

7/27/2019 Diagnosing the Causes of Stones Throwing Mini Cams
http://slidepdf.com/reader/full/diagnosing-the-causes-of-stones-throwing-mini-cams 9/11
4) Once the shell is removed, locate the 4 Solenoids on the top of the machine after removingthe Shell, Each solenoid will have two small Phillip screws on each side and a black wireconnector on the left side of them. Remove one solenoid at a time, then clean the Solenoidblock with paper towel, and then replace solenoid with new one and remount using the twosmall Phillip screws on each side, then reconnect the wire, and then move onto the nextsolenoid. (Doing this will help eliminate connecting the wrong connector to the wrong solenoid).
After removing each solenoid one at a time, it is important to wipe off the solenoid block under the solenoids to ensure dirt and moisture does not get into the new solenoids.
• It is my recommendations that you remove and replace one solenoid at atime to avoid confusion on which electrical connector goes to whichsolenoid, as mixing these connectors up will cause the wrong solenoid tofire at the wrong time during operation of the machine.
7/27/2019 Diagnosing the Causes of Stones Throwing Mini Cams
http://slidepdf.com/reader/full/diagnosing-the-causes-of-stones-throwing-mini-cams 10/11
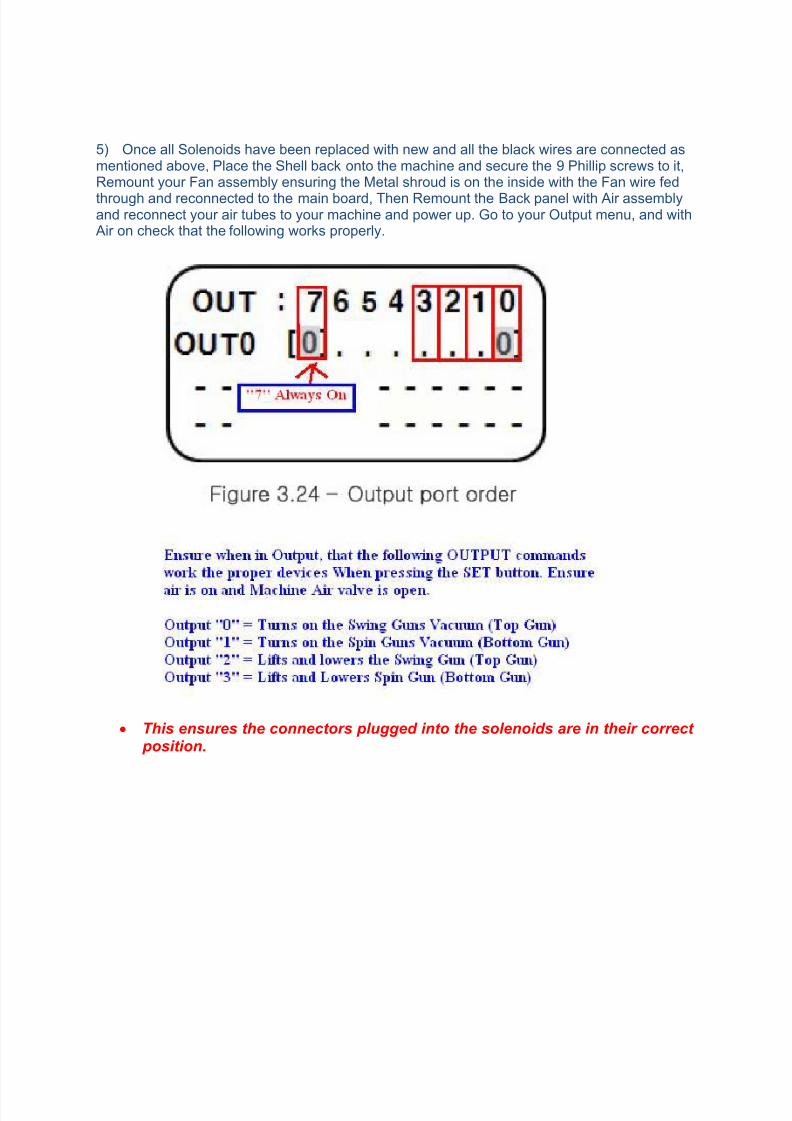
5) Once all Solenoids have been replaced with new and all the black wires are connected asmentioned above, Place the Shell back onto the machine and secure the 9 Phillip screws to it,Remount your Fan assembly ensuring the Metal shroud is on the inside with the Fan wire fed
through and reconnected to the main board, Then Remount the Back panel with Air assemblyand reconnect your air tubes to your machine and power up. Go to your Output menu, and with
Air on check that the following works properly.
• This ensures the connectors plugged into the solenoids are in their correct position.

7/27/2019 Diagnosing the Causes of Stones Throwing Mini Cams
http://slidepdf.com/reader/full/diagnosing-the-causes-of-stones-throwing-mini-cams 11/11
Check the Spin Gun lifting action to ensure it is not impacting too harshly. Go to OUTPUTsetting “3” and press SET to lift the Bottom Spin Gun and see if the new solenoid causes aharder lift to it. If it does you may want to slightly close the Flow Control Fitting a bit.
Remount your shell and ensure you plug the fan back into the main board prior to remountingthe rear cover. Then test machines operation.