Embed Size (px)
Citation preview

D.E.I.S.S.
Dual Extruder Interfacing Single Stepper
Setup guide
Revision: 1.01
Date: 26.01.2015
Author: Stargrove1
Thingiverse-Link: http://www.thingiverse.com/thing:651723

Introduction
The DEISS extruder provides a dual extruder with only one stepper motor by the help of an RC servo.
This makes it possible to realize a dual direct drive extruder which is lightweight and space efficient,
it only slightly bigger than a wade extruder. Because it is a direct driven extruder with PTFE tube, it is
possible to use flexible filament as well as PLA or ABS.
The extruder was designed for the Robo3D printer, but could be adapted to many printers by
adapting the x-carriage. This guide will describe how to assemble the DEISS and how to integrate it to
a printer at the example of the Robo3D.
An adaption of the firmware is required to drive the extruder, since this concept is new, it is not
prepared in Marlin firmware, the changes are documented in this guide.
Disclaimer: I am not responsible in case of damage, use the guide at your own risk.
Features
Direct drive dual extrusion
Body fully printable
Compact setup, comparable to stock wade extruder
Low mass due to single motor setup
Nozzle level mechanism
Quick extruder change setup
Supports flexible filament

BOM:
Printed parts:
1 x X-carriage (no support required, included in stl file)
1 x Servo-arm (needs to be printed with support, used Slicer)
1 x Motor-carriage or Motor-carriage-geared
1 x Lever-axis
2 x Lever a & b
1 x Hotend-lock
1 x Base-top
1 x Base (needs to be printed with support, used Slicer)
Additional parts:
2 x E3D hotend (or any kind of similar hotend)
1 x Nema 17 stepper or Nema 17 planetary geared stepper 5.18:1
1 x RC servo (MG996 55g metal geared from ebay)
1 x 40 x 40 fan (for cooling print)
1 x 40 x 40 fan (for cooling hotends)
1 x GT2 belt (~1m)
2 x 5cm PTFE tube for 1.75mm filament
2 x 694 (4x11x4 mm) ball bearings
1 x MK8 drive gear pulley for 1.75mm filament
2 x Small wire strips
4 x LM8UU linear bearing
12 x M3 x 10 screw
6 x M3 x 10 flat hat screws
1 x M3 x 20
1 x ~10mm spring (push)
1 x M4 x 16 screw
1 x M4 nut
2 x Spring or some rubber bands
1 x 5V power supply for servo

Setup:
The setup is split into the following parts:
Assembly x-carriage
Assembly extruder
Implementation of the x-carriage
Implementation of the extruder
Setup of the electronics
Firmware adaption

Assembly x-carriage
The x-carriage is designed for the Robo3D printer, to use the extruder with another printer, this part
needs to be adapted to the used printer.
1. Insert the four LM8UU linear bearings at each corner and push them against a hard surface
until they are aligned with the surface.

2. Use a M3 x 10 screw and insert it half way at the hole where the end switch is located. The
screw could be later be used adjust the end position like at the stock carriage of Robo3D
3. Mount the two fans with four of the M3 x 10 screws at the front of the carriage, the blowing
direction points towards the print bed.

Assembly extruder
The extruder is assembled in one step and then mounted to the x carriage (x carriage installed or not
installed). The extruder could be removed by three screws to be exchanged quickly by a single direct
drive extruder.
1. Install the motor (geared or non-geared) to the corresponding motor carriage with the four
M3 x 10 flat head screws. Keep in mind to limit the motor current and to update the steps
per mm in case of using a geared stepper.

2. Mount the lever axis with two M3 x 10 flat heat screws from the backside to the extruder
base. The screws must be completely sunk that the motor carriage can move freely.
3. Put the assembled motor carriage in place and fix it by assembling the base top part with
three M3 x 10 screws.

4. Screw the servo arm to servo with a flat head screw, if the servo didn’t come with a flat head
screw, it is possible to take a normal M3 screw with the correct length. The servo arm must
be installed in the right position to move from left to right, it needs to be checked before it is

mounted to the mechanism, if you are not sure, remove the servo before the first test.
5. Insert the servo from the bottom of the extruder and fix it with four M3 x 10 screws, take
care that the top of the servo arm fits into the slot of the motor carriage.

6. Assemble the drive gear pulley to the motor axis, the pulley needs to be aligned to the
filament path.
7. Put the two levers for the filament path together, insert the two bearings at the lower
cylinder and push the two parts of the levers together.

8. Slide the two levers over the axis and turn them to the center.
9. Use springs or rubber bands or something else to put tension on the levers, it should be
adjustable (different springs, more or less bands, different bands) for best functionality.

10. Slide in the M4 nut for the hotend lock.
11. Insert the PTFE tubes at the filament channels

12. Install the hotends and lock them in place with the hotend lock mounted with the M4 x 16
screw

Implementation x-carriage
For the assembly of the x-carriage, the Robo3D must be partly disassembled, the top housing must
be removed.
1. Remove the filament and spool if still installed
2. Remove the four screws at the side of the printer
3. Remove the housing and put it aside
4. Disconnect the connectors of the x end switch
5. Remove the whole x axis by pulling it upwards of the z rods
6. Take the GT2 belt of the pulley and the ball bearings on the other side
7. Carefully remove the side part from the x rods and pull of the whole x-carriage. Replace the
old carriage with the new one and put back the side part.
8. Return the x axis by sliding it over the z rods, take care to insert the z nuts back in the
hexagonal holes.
9. Use the replacement GT2 belt and the wire strips to mount it like it was done at the stock
setup. The belt should have the same tension as before, the belt tensioner should be reused
to maintain the tension.
10. Reconnect the x axis end switch.
11. Reassemble the housing and lock it with the four screws

Implementation extruder
The installation of the extruder is quite simple, it was designed to be exchangeable with my single
direct drive extruder.
1. Put the extruder in place, the hotends pointing to the fans.
2. Use two M3 x 10 to create a hinge on the right side, don’t lock the screws to tight or to loose,
the hinge should be movable but still remain in position.

3. Put the 10mm spring between the x carriage and the extruder base, install the M3 x 20 screw
and use it to level the two nozzles.
4. Wire the electronics to the RAMPS board

Setup electronics
The servo needs to be powerful enough to move the motor and provide the torque to move it
against the spring of the levers. Therefor it was necessary to use a servo with a certain amount of
current consumption, unfortunately is the RAMPs (the Arduino Mega) not suitable to provide enough
power, it will run into resets if the servo is connected directly. This could be prevented by adding a
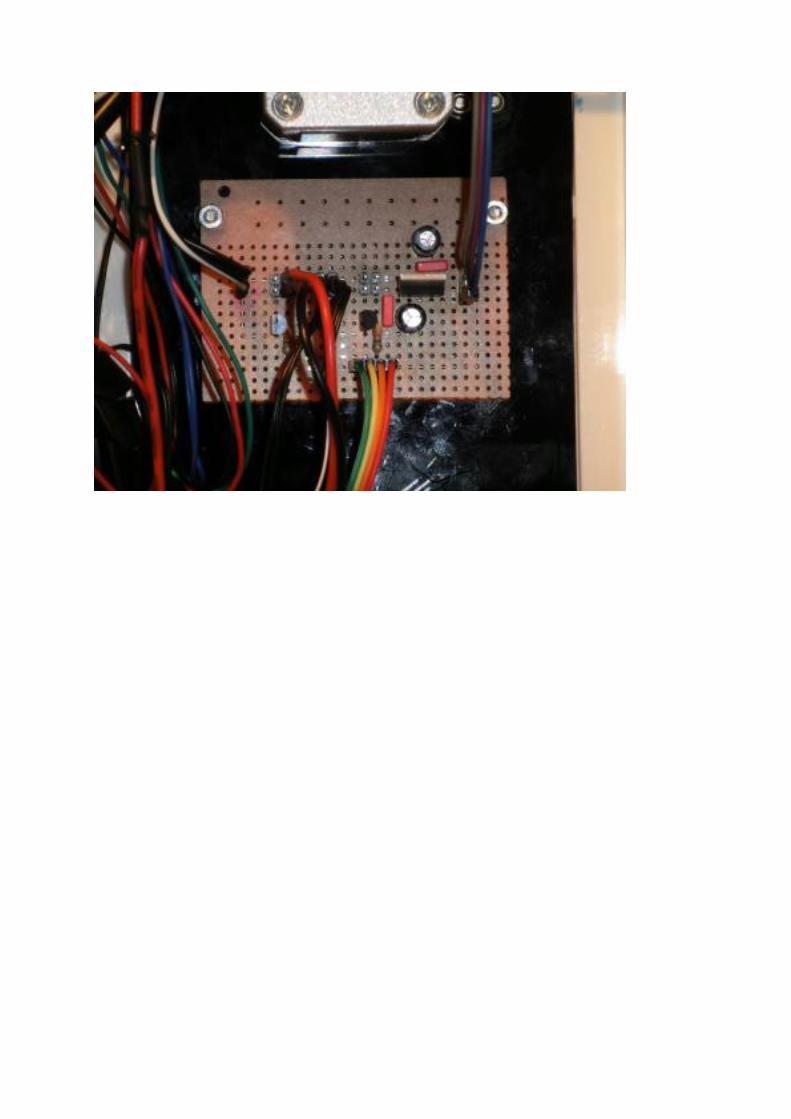
5V regulator which is directly driven by the 12V power supply. I created a small hand soldered PCB
which also expands the D4 to D6 to drive a fan. The schematics are shown below. From this PCB, the
servo is supplied with 5V as well as the servo signal, the hotend fan, the cooling fan and a spare
channel for the RAMPs board to cool down the stepper driver and polyswitch (prevents the bed cut
off at higher temperatures). There are several pre-soldered 5V step down regulators and fan
expanders available on the internet which could be used without soldering.
D4 = Print fan
D5 = Hotend fan (activated at Hotend temperature above 50°C)
D6 = Unused (Stepper driver fan)
D11 = Servo output

Firmware adaption
Since the change of the extruder requires a servo movement, it is not possible to use the Marlin
firmware without additional code. I found a thread discussing this exact topic, davew_tx provided all
information how to adapt the firmware.
I created a summary of what to add or change to run the extruder. Changed values are shown in
Blue, the old value is added as a comment (after //). Added code is written in red. The file to edit is
written in bold letters:
Configuration.h:
#define MOTHERBOARD 34 // 33
#define EXTRUDERS 2 // 1
//Added for DEISS dual extruder after “#define EXTRUDERS 2”
#define servopos_extruder_0 10
#define servopos_extruder_1 180
#define servopos_delay 1000
#define TEMP_SENSOR_1 1 // 0
#define INVERT_E1_DIR true // false
#define NUM_SERVOS 1 // 3 (needs to be uncommented)
Marlin_Main.cpp:
Search for the line “else if(code_seen('T'))” and modify the code as shown:
else if(code_seen('T'))
{
tmp_extruder = code_value();
//Added for DEISS dual extruder
if(tmp_extruder == 0) {
st_synchronize();
servos[0].attach(SERVO0_PIN);
servos[0].write(servopos_extruder_0);
delay (servopos_delay);
servos[0].detach();
}
if(tmp_extruder == 1) {

st_synchronize();
servos[0].attach(SERVO0_PIN);
servos[0].write(servopos_extruder_1);
delay(servopos_delay);
servos[0].detach();
}
//end
if(tmp_extruder >= EXTRUDERS) {
pins.h:
Search for the line “#if MOTHERBOARD == 33 || MOTHERBOARD == 34 || MOTHERBOARD == 35 ||
MOTHERBOARD == 77 || MOTHERBOARD == 67 || MOTHERBOARD == 68”, then search for the next
“#else” and edit the following entries:
#define E1_STEP_PIN 26 // 36
#define E1_DIR_PIN 28 // 26
#define E1_ENABLE_PIN 24 // 30

Testprint
First print test

Next steps
Long term durability testing of the shifting mechanism (servo arm, servo gear, sliding setup
of the stepper)
Adding wire management
Test of geared stepper setup


![[CO] EXTRUDER](https://img.dokumen.tips/doc/110x75/6254afa501a5a4553c5e5652/co-extruder.jpg)