Embed Size (px)
Citation preview

Twin Screw Compounding Extruder
User's Manual
BA-11, BA-19
1. Introduction
2. Safety Precaution
3. Specification
4. Settings
Bautek
http://www.bautek.co.kr

1. Introduction
1. Bautek Twin Compounding Extruder BA-11, BA-19 is the machinery which produces
new material by compounding different types of base resin.
2. Bautek Twin Compounding Extruder is suitable for test & experiment high molecular
materials such as Nano, PE, PP, PC and even metalized powder.
3. Please be careful to use electricity. This machine needs 200V 3PH electricity.
4. Please kindly notice that this machinery casues high heat which is dangerous,
study operation manual before operation to prevent safety accident.

2. Safety Precaution
This manual contains the safety method to use this machinery, please study carefully.
1. Use right electricity.
2. Machinery should be away at least 20cm away from the wall.
3. Be careful about the heat during the operation.
4. Fix the machine not to shake before operation.
5. Be careful not to input contamination material into the Barrel.
6. Don’t open the Screw Motor Cover unnecessarily.
7. Don’t open the Front Cover unnecessarily.
8. If problem happens, please contact us.
220V 3PH Connector
<Switch Box>
Power SW, Motor SW,
Heater SW
Feeder Motor Power Cable
Emergency Switch

3. Specification
Technical Data
Extruder <Modular Design> BA-19 BA-11
Barrel Diameter(mm) 19mm 11mm
Temperature Control Electrically Heated / Optionally Water Cooled
Motor Power(KW) 2Kw(3HP), 2000rpm 400W(1/2HP), 3000rpm
Screw Speed(rpm) 0 - 600
Mounting Bench Top
Barrel Length : Diameter L/D=40, Co-Rotating Intermeshing
Barrel Heating Power(KW) 6Kw
Dimension
Length(mm) 1520 860
Width(mm) 500 400
Height(mm) 1700 1400
Weight(kg) 270
Voltage/Power 220V,1/3HP ,60Hz, 6.5KVA 3KVA
Extrusion Pressure(Max) 100Bar(1500psi)
Maximum Operating Temperature 400℃
Typical Output(kg/hr) 5-25

Electricity Line Diagram
① ② ③ ④ ⑤ ⑥ ⑦ ⑧ ⑨ ⑩ ⑪ ⑫ ⑬
<19mm> <11mm>
3PH AC 200 ~ 230V, Single PH 230V
R S T
19mm ① ③ ⑥ ⑨ ② ④ ⑦ ⑩ ⑤ ⑧ ⑪
11mm ① ③ ⑥ ⑫ ② ④ ⑦ ⑬
Specification 19mm
Screw Motor Feeder Motor
Servo Motor Mitsubishi HC-SFS 202 Simens 1LA7063-4AB11
N. Generate(KW) 2.0 0.21, 4P 3PH
N. Torque(N.m) 9.55
Max. Torque(N.m) 28.5 1.45
N. Electric Current(A) 11 0.58
Max. Electric Current(A) 33
Specification 11mm
Screw Motor Feeder Motor
Servo Motor Mitsubish HC-KFS 43 Sumitomo RNYM
009-17-150
N. Generate(KW) 400 90, 4P, 3 상
N. Torque(N.m) 1.3 53.9
Max. Torque(N.m) 3.8
N. Electric Current(A) 2.3 0.57
Max. Electric Current(A) 6.9

4. Settings
Operation Procedure
1. Electric Plug In.
2. Electric Power On.
3. Heater Switch On.
4. Motor Switch On
5. Setting the condition in the touch panel.

Settings touch panel
1. Operation Setup
Main Setting window
1.1 Main Menu
1) Temperature / Barrel temperature setting
2) Normal / Screw Motor, Feeder Motor’s Speed and Torque setting
3) Manual / Barrel Heater switch checking
1.2 System Operation Status
1) Display Barrel Pressure
2) In case of <RESET>, please check the machinery
1.3 Screw Motor Velocity, Torque
1) Display Velocity, Torque in Screw Motor
2) Setting Potentiometer
3) Setting Motor
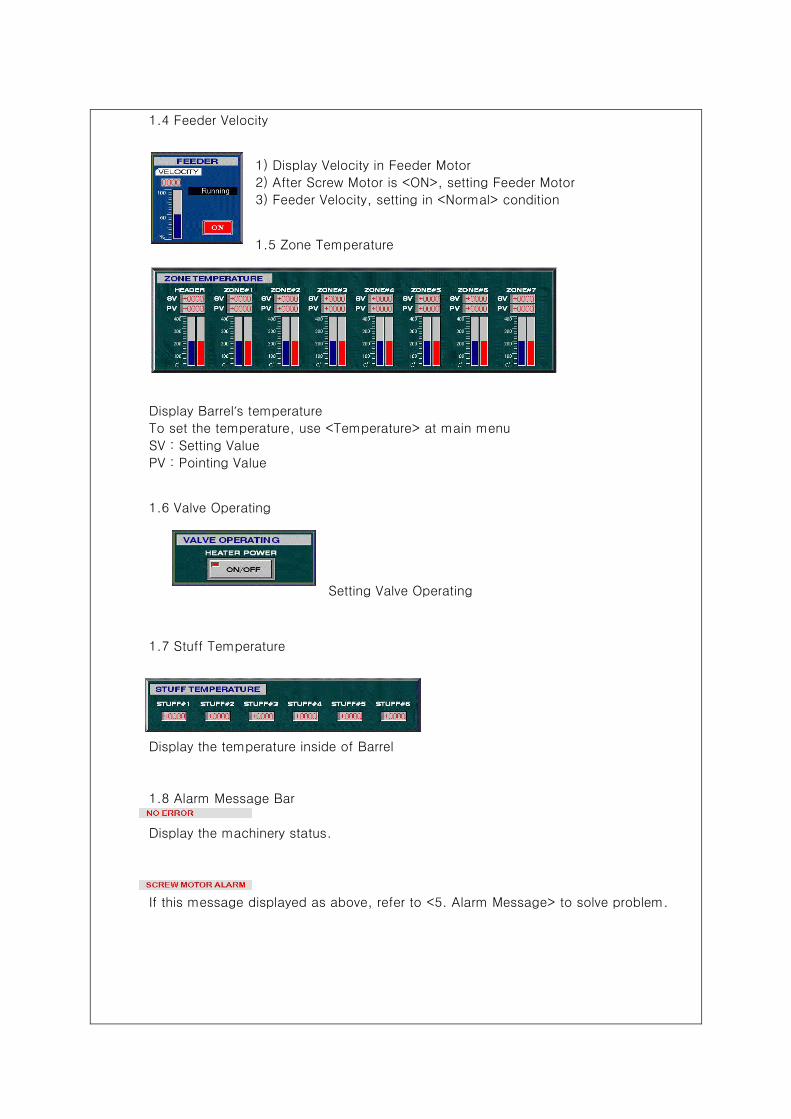
1.4 Feeder Velocity
1) Display Velocity in Feeder Motor
2) After Screw Motor is <ON>, setting Feeder Motor
3) Feeder Velocity, setting in <Normal> condition
1.5 Zone Temperature
Display Barrel’s temperature
To set the temperature, use <Temperature> at main menu
SV : Setting Value
PV : Pointing Value
1.6 Valve Operating
Setting Valve Operating
1.7 Stuff Temperature
Display the temperature inside of Barrel
1.8 Alarm Message Bar
Display the machinery status.
If this message displayed as above, refer to <5. Alarm Message> to solve problem.

2. Temperature Settings
Display the Barrel’s Setting Temperature.
(Main Menu)
To set the Barrel’s temperature,
click <TEMPERATURE> in main menu. Password will be displayed.
Input Password (1234), and click.
** To change Password, use ‘Password’
in <NORMAL> menu.
<TEMPERATURE SETUP> window will open.
2.1Temperature Setup Windows
Setting the temperature in each zone of Barrel.
<TEMPERATURE SETUP>
window
2.2 Temperature Setup
2.2.1 SV(Setting Value) setting
Click SV value, setting the temperature from Header to Zone #1 - Zone #7.
Click the SV value in each zone
After click, the value will be change to ‘0’(default value).
After default, input the number and <ENT>.
2.2.2 PV(Pointing Value) displays the present temperature in each zone of Barrel.

** 주의 **
** To protect machinery **
After temperature setting, machine will start after reaching 80% of setting temperature.
No need to setting
2.2.3 <COOL>
This is to control temperature by using <COOL> value.
If <PV> value over <SV> value, <Cooling Valve> will automatically operates to the
<COOL> value not to over <SV> value.
2.2.4 COOLING VALVE
<COOLING VALVE> is an option.
Heater inside of Barrel can’t keep the temperature sometimes.
<Cooling Valve> controls the temperature to <SV> value.
If <PV> value over <COOL> value, automatically changes to <COOL> value.
<COOLING VALVE> ON.
This function works when <COOL> value is under the <PV> value.
After <PV> value reaches <COOL> value, automatically <OFF>
<COOLING VALVE> OFF
2.2.5 AUTO TUNING SETTING
By setting this function, we can reach faster to SV value.
Click <AT> button for 5~6 seconds.
Color will change to Red from Blue.
<AT> Function ON
P; Proportional Band, I; Integral Time, D; Derivative Time
2.2.6 Finish Setting
Close windows.

2. Normal Setup
Setting FEEDER, SCREW MOTOR Speed & Torque’s SV, MAX value.
SCREW TORQUE 1ST Warning, 2nd Stop, Check Delay, Barrel Pressure Alarm,
Password etc.
2.1 Feeder Motor Velocity Settings
Setting Feede’s RPM
SV : Setting Value
max : Maximum Velocity of Feeder Motor
2.1.1 Feeder Motor Speed
Click <SV> Value, then change <0>
Input the No. and <ENT>
Setting Motor RPM
Click <max> value, then change <0>
Input the No. and <ENT>
** Feeder Motor runs in Screw Motor Power <ON>
** max : Don’t change the basic setting.

2.2 Screw Motor Settings
Setting the Screw Motor Speed & Torque
2.2.1 Screw Motor Velocity Setting
<SV> setting : Setting Motor speed
Click <SV> value, then change ‘0’
Input the No, and <ENT>
<max> setting : Setting Motor highest speed
Click <max> value, then change ‘0’
.
Input the No. and <ENT>
** max : Don’t change basic setting value.
2.2.2 Screw Motor Torque Settings
<1st Warning>
Setting ‘Warning Message’ value when overload, and Torque value is over.
If over this value, Running message will be changed to <1st Warning> in main menu.
Click <1st Warning> No. then change <0>
Input the No. & <ENT>
<2nd STOP>
After 1st Warning, if reach this value, machinery will stop operation.
If over this value, Running message will be changed to <2nd
STOP> in main menu.
Motor will get break & stopped.
Click <2nd STOP> No., then change <0>
Input No. then <ENT>
<Check Delay> :
If <Mode> is <Use>, Motor will be stopped cause of setting value.

Click <2nd STOP> No., then change <0>
Input No. and <ENT>. (UNIT : sec)
** Notice **
You can input from (0,1). If input (0,1), it means (1)sec
Click <USE/UNUSE> mode.
In this status, Torque Alarm will be stopped
Choose <Use>, then setting.
2.2.3 Pressure Alarm
Barrel Pressure warning
Cick <Pressure Alarm>, then changes <0>
Input the No. then <ENT>
2.2.4 Password
You can change the Password. Please don’t forget the password.
Click <Pressure Alarm>, then change <0>
Input No. then <ENT>

3.Manual Setup
3.1 Check the Barrel Heater Power Switch
3.2 Check <Cooling Solenoid> Power Switch
After ‘ON’, it will change to ‘OFF’ after 5 seconds
If you click in <ON>,
automatically it changes to <OFF> after 5 seconds
** If not <OFF> after 5 seconds, it means <Cooling Valve> is working.

4. Screw Motor Operation
4.1 To control Screw Motor Velocity with Potentiometer Volume,
You can use <Volume> button in Screw Window in main screen to control
Motor Velocity by out Potentionmeter.
Potentiometer Volume
This function is used to control Screw Motor by using outside <Potentiometer
Volume>, not by setting value in Touch Panel
1) After setting Screw Velocity in Normal Setup Menu, setting in Screw Window
in main screen as below.
Main Screen Screw/ Feeder Window
2) Screw Motor <ON>
3) To control Screw Motor Velocity by using <Potentiometer Volume>,
the <Volume> button has to be on.
<Potentiometer is in top-right side of the Touch Panel>
<OFF> : By setting Nomal Setup value, Screw Motor works.
Blue Color Button.
<ON> : With Potentiomete, we can control speed.
Red Color Button.
4.2 Operate with Normal Setup Setting Value
By click <Volume> button in Screw Window to Blue button, Screw Motor operates
in Normal Setup Condition.
Blue Button Click

5. Alarm Message
If <RESET> messages appears in Extruder, <Alarm> message will appear
at the bottom line.
<RESET> Message
<Screw Motor Alarm> Message
<Feeder Motor Alarm> Message
<Pressure Alarm> Message
<Screw Torque Alarm> Message
<Emergency Alarm> Message
<No Error> Message
5.1 Screw Motor Alarm
If Alarm message appears, please click <RESET> button.
Then <ERROR> message will disappear and start operation.
** In case <ERROR> message is not disappeared after <RESET>,
please turn off Power SW, Heater SW, Motor SW and re-start.
<No Error> message will appear in main screen.

5.2 Feeder Motor Alarm
If this Alarm message appears, it means overload in Feeder Motor
<RESET> will be appeared in main screen.
1) Motor will be stopped by break because of Feeder Overload.
2) After remove the cause, click <RESET> and <No Error> appears,
3) Click Feeder .<ON/OFF> in main screen and re-operate.
** Attention
In Screw Motor <ON>, Operate Feeder Motor.
In Screw Motor <OFF>, Feeder Motor doesn’t work.
After changing <Screw Motor Velocity> to [0], re-start.
If don’t change the value to <0>, it may cause damage to the screw.
5.3 Pressure Alarm
This message means the pressure is over than setting value.
1) If the Bareel Pressure over than setting value in <Pressure Alarm> in Normal
Setup Menu, all operations will be stopped to protect the machinery.
2) In Main screen <RESET>, warning message <Pressure Alarm>,
3) after removing the reason of over pressure, and click <RESET> and
<No Error> message comes,
4) Re-operate
** Attention **
After input <Screw Motor Velocity> to [0], then re-operate.
Otherwise, it may cause damange to screw.
5.4 Screw Torque Alarm
If over Torque happens inside of Barrel Screw, all operation will be stopped.
1) If Screw Torque Value shows over than <2nd
STOP> which was set in
<Screw Torque> in <Normal Setup> menu,
2) Main Screen <RESET>, warning message <Screw Torque Alarm> appears,
and all operation will be stopped.
3) After removing the reason of overload,
click <RESET> and <No Error> message appears,
4) Re-operate
** Attention **
After changing <Screw Motor Velocity> to [0], re-operate.
Otherwise, It may damage the screw.

5.5 Emergency Alarm
<Emergency Alarm> Message
If <Emergency Alarm> appears as in the picture above, click the emergency switch
and turn off all power.
After removing the cause, turn right the ‘emergency switch’,
everything will be back to normal.
Click <RESET> button in main screen, and <No Error> message appears,
Re-operate.
Emergency Switch
5.6 No Error
1) If all the condition is normal, <Running> message will appear in screen.
2) <No Error> message will be showed.