Embed Size (px)
Citation preview
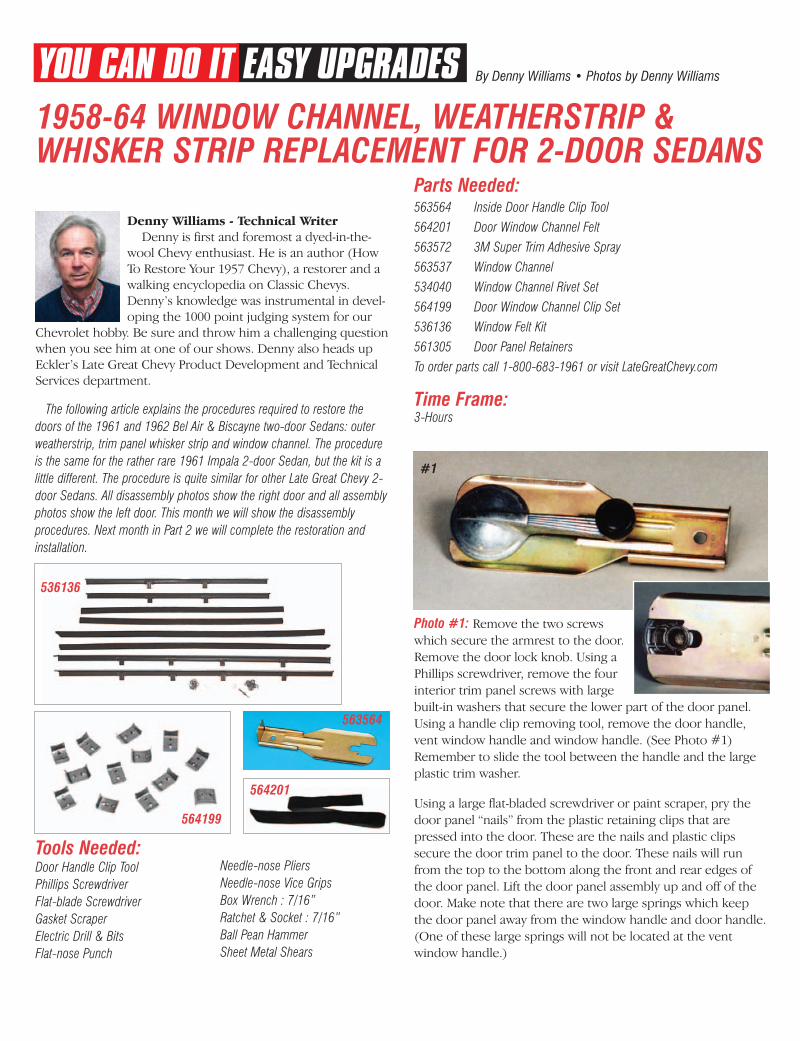
By Denny Williams • Photos by Denny Williams
1958-64 WINDOW CHANNEL, WEATHERSTRIP &WHISKER STRIP REPLACEMENT FOR 2-DOOR SEDANS
The following article explains the procedures required to restore thedoors of the 1961 and 1962 Bel Air & Biscayne two-door Sedans: outerweatherstrip, trim panel whisker strip and window channel. The procedureis the same for the rather rare 1961 Impala 2-door Sedan, but the kit is alittle different. The procedure is quite similar for other Late Great Chevy 2-door Sedans. All disassembly photos show the right door and all assemblyphotos show the left door. This month we will show the disassemblyprocedures. Next month in Part 2 we will complete the restoration andinstallation.
Denny Williams - Technical WriterDenny is first and foremost a dyed-in-the-
wool Chevy enthusiast. He is an author (HowTo Restore Your 1957 Chevy), a restorer and awalking encyclopedia on Classic Chevys.Denny’s knowledge was instrumental in devel-oping the 1000 point judging system for our
Chevrolet hobby. Be sure and throw him a challenging questionwhen you see him at one of our shows. Denny also heads upEckler’s Late Great Chevy Product Development and TechnicalServices department.
Tools Needed: Door Handle Clip ToolPhillips ScrewdriverFlat-blade ScrewdriverGasket ScraperElectric Drill & BitsFlat-nose Punch
Needle-nose PliersNeedle-nose Vice GripsBox Wrench : 7/16”Ratchet & Socket : 7/16”Ball Pean HammerSheet Metal Shears
Time Frame: 3-Hours
536136
564199
563564
564201
Parts Needed: Catalog price Member price
563564 Inside Door Handle Clip Tool $3.99 $3.79 ea.
564201 Door Window Channel Felt 6.99 6.64 pr.
563572 3M Super Trim Adhesive Spray 19.99 18.99 ea.
563537 Window Channel 22.99 21.84 ea.
534040 Window Channel Rivet Set 2.99 2.84 set
564199 Door Window Channel Clip Set 10.99 10.44 set
536136 Window Felt Kit 89.99 85.49 kit
561305 Door Panel Retainers 8.99 8.54 set
To order parts call 1-800-683-1961 or visit LateGreatChevy.com
Photo #1: Remove the two screwswhich secure the armrest to the door.Remove the door lock knob. Using aPhillips screwdriver, remove the fourinterior trim panel screws with largebuilt-in washers that secure the lower part of the door panel.Using a handle clip removing tool, remove the door handle,vent window handle and window handle. (See Photo #1)Remember to slide the tool between the handle and the largeplastic trim washer.
Using a large flat-bladed screwdriver or paint scraper, pry thedoor panel “nails” from the plastic retaining clips that arepressed into the door. These are the nails and plastic clipssecure the door trim panel to the door. These nails will runfrom the top to the bottom along the front and rear edges ofthe door panel. Lift the door panel assembly up and off of thedoor. Make note that there are two large springs which keepthe door panel away from the window handle and door handle.(One of these large springs will not be located at the ventwindow handle.)
#1
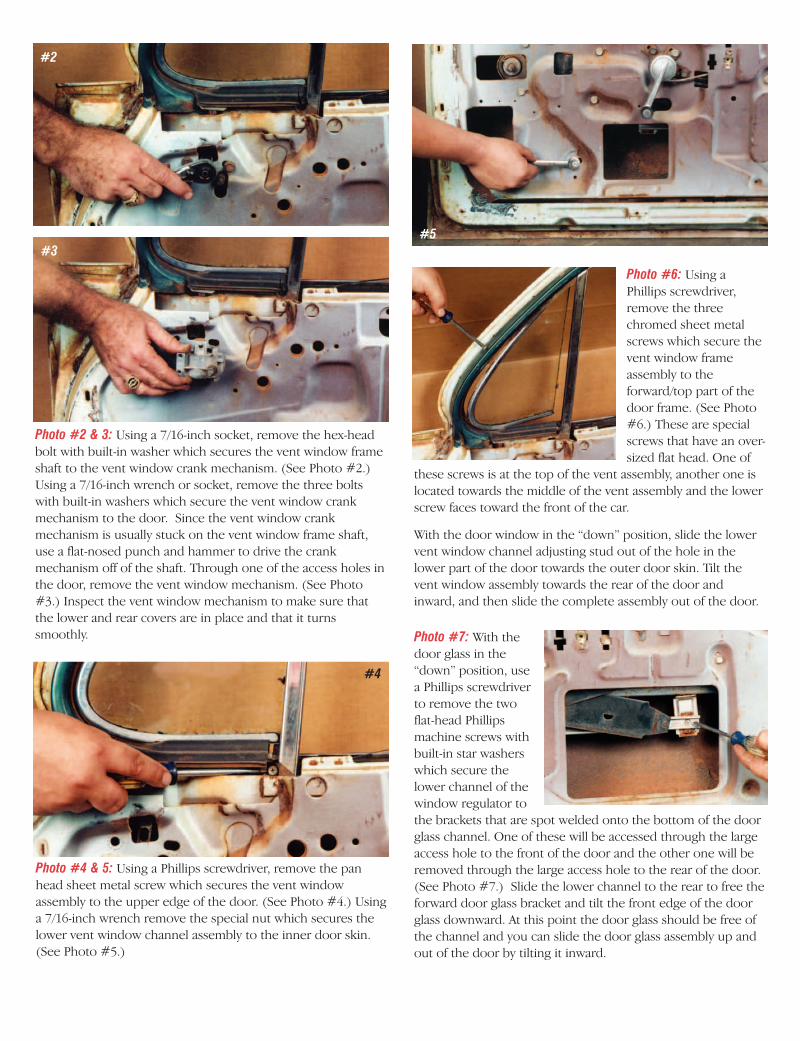
#2
Photo #2 & 3: Using a 7/16-inch socket, remove the hex-headbolt with built-in washer which secures the vent window frameshaft to the vent window crank mechanism. (See Photo #2.)Using a 7/16-inch wrench or socket, remove the three boltswith built-in washers which secure the vent window crankmechanism to the door. Since the vent window crankmechanism is usually stuck on the vent window frame shaft,use a flat-nosed punch and hammer to drive the crankmechanism off of the shaft. Through one of the access holes inthe door, remove the vent window mechanism. (See Photo#3.) Inspect the vent window mechanism to make sure thatthe lower and rear covers are in place and that it turnssmoothly.
Photo #6: Using aPhillips screwdriver,remove the threechromed sheet metalscrews which secure thevent window frameassembly to theforward/top part of thedoor frame. (See Photo#6.) These are specialscrews that have an over-sized flat head. One of
these screws is at the top of the vent assembly, another one islocated towards the middle of the vent assembly and the lowerscrew faces toward the front of the car.
With the door window in the “down” position, slide the lowervent window channel adjusting stud out of the hole in thelower part of the door towards the outer door skin. Tilt thevent window assembly towards the rear of the door andinward, and then slide the complete assembly out of the door.
#4
#5
Photo #4 & 5: Using a Phillips screwdriver, remove the panhead sheet metal screw which secures the vent windowassembly to the upper edge of the door. (See Photo #4.) Usinga 7/16-inch wrench remove the special nut which secures thelower vent window channel assembly to the inner door skin.(See Photo #5.)
#3
Photo #7: With thedoor glass in the“down” position, usea Phillips screwdriverto remove the twoflat-head Phillipsmachine screws withbuilt-in star washerswhich secure thelower channel of thewindow regulator tothe brackets that are spot welded onto the bottom of the doorglass channel. One of these will be accessed through the largeaccess hole to the front of the door and the other one will beremoved through the large access hole to the rear of the door.(See Photo #7.) Slide the lower channel to the rear to free theforward door glass bracket and tilt the front edge of the doorglass downward. At this point the door glass should be free ofthe channel and you can slide the door glass assembly up andout of the door by tilting it inward.
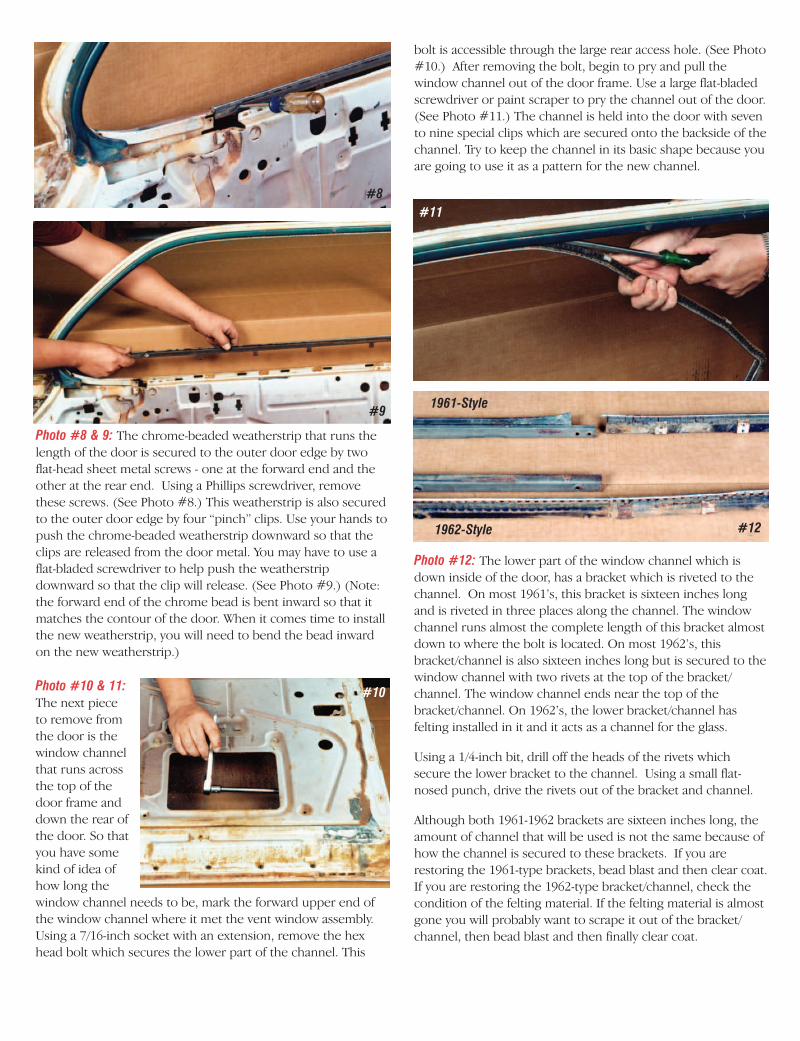
Photo #8 & 9: The chrome-beaded weatherstrip that runs thelength of the door is secured to the outer door edge by twoflat-head sheet metal screws - one at the forward end and theother at the rear end. Using a Phillips screwdriver, removethese screws. (See Photo #8.) This weatherstrip is also securedto the outer door edge by four “pinch” clips. Use your hands topush the chrome-beaded weatherstrip downward so that theclips are released from the door metal. You may have to use aflat-bladed screwdriver to help push the weatherstripdownward so that the clip will release. (See Photo #9.) (Note:the forward end of the chrome bead is bent inward so that itmatches the contour of the door. When it comes time to installthe new weatherstrip, you will need to bend the bead inwardon the new weatherstrip.)
Photo #10 & 11:The next pieceto remove fromthe door is thewindow channelthat runs acrossthe top of thedoor frame anddown the rear ofthe door. So thatyou have somekind of idea ofhow long thewindow channel needs to be, mark the forward upper end ofthe window channel where it met the vent window assembly.Using a 7/16-inch socket with an extension, remove the hexhead bolt which secures the lower part of the channel. This
Photo #12: The lower part of the window channel which isdown inside of the door, has a bracket which is riveted to thechannel. On most 1961’s, this bracket is sixteen inches longand is riveted in three places along the channel. The windowchannel runs almost the complete length of this bracket almostdown to where the bolt is located. On most 1962’s, thisbracket/channel is also sixteen inches long but is secured to thewindow channel with two rivets at the top of the bracket/channel. The window channel ends near the top of thebracket/channel. On 1962’s, the lower bracket/channel hasfelting installed in it and it acts as a channel for the glass.
Using a 1/4-inch bit, drill off the heads of the rivets whichsecure the lower bracket to the channel. Using a small flat-nosed punch, drive the rivets out of the bracket and channel.
Although both 1961-1962 brackets are sixteen inches long, theamount of channel that will be used is not the same because ofhow the channel is secured to these brackets. If you arerestoring the 1961-type brackets, bead blast and then clear coat.If you are restoring the 1962-type bracket/channel, check thecondition of the felting material. If the felting material is almostgone you will probably want to scrape it out of the bracket/channel, then bead blast and then finally clear coat.
#8
#9
#10
#11
1961-Style
1962-Style
bolt is accessible through the large rear access hole. (See Photo#10.) After removing the bolt, begin to pry and pull thewindow channel out of the door frame. Use a large flat-bladedscrewdriver or paint scraper to pry the channel out of the door.(See Photo #11.) The channel is held into the door with sevento nine special clips which are secured onto the backside of thechannel. Try to keep the channel in its basic shape because youare going to use it as a pattern for the new channel.
#12

Photo #13: If you are using the 1961-type lower bracket, skip toStep #15. To restore the 1962-type bracket/channel, use somefelting material to line the channel. This felting material isavailable as P/N 564201. The best product used to install thisfelting material is 3M’s Super Trim Adhesive, P/N 563572. Afterdetermining how long the felting will be in the bracket/channel,cut it to that length so that the overall length will not have tobe trimmed. (See Photo #13.)
Photo #14: So that the installationof the felting material is made alittle easier, I “spread” the bracket/channel a small amount sothat the channel was a little more accessible. Spray some trimadhesive into the channel and also spray some trim adhesiveonto the back of the felting material. After allowing the trimadhesive to set up just a little bit, carefully position the feltingmaterial down into the channel. “Work” the felting materialdown into the bottom and along the sides with a large flat-bladed screwdriver. If you have a couple of paint mixing sticks,you can use these to push the felting material into position.Allow the trim adhesive to dry for several hours and then verycarefully trim the excess felting material with a new razor blade.
The window channel brackets will now be secured to thewindow channel. The procedure is a little different dependingon if you have 1961 or 1962-type lower brackets. The sedanwindow channel is available as P/N 563537. These channels willbe secured to the brackets with some oval-head semi-tubularrivets. (See Photo #14.) Ten of these special rivets are availableas P/N 534040. The procedure will be explained for the 1962-type brackets, but the procedure is the same for the 1961except that the new channel will run almost the completelength of the bracket and will be secured with three rivetsrather than two rivets.
Since it is such a tight fit, I trimmed a little bit of the black clothaway from the end of the new window channel so that the fit
#14
will be better. Position the bracket onto the end of the channeland mark where the two holes will be drilled. After drilling thetwo holes in the new channel, position the rivets into the holeswith the heads on the inside of the channel where the glasswill ride. (Again, refer to Photo #14.) To flare the rivets, I useda 1/4-inch thick piece of steel plate which was held in a vise. Ifyou have an extra “set of hands” available, have them help youhold the bracket, the channel and the rivets over the steelplate. Use a ball-peen hammer to flare the rivets.
Photo #15: Thewindow channelclips will now beinstalled onto thenew windowchannel. A set offourteen clips areavailable as P/N564199. I suggestinstalling nine clips to the channel on each side, as a result youwill need two sets of P/N 564199. (See Photo #15.) It appearsthat the original clips were not installed at a uniform distancebetween them and the spacing even varies from one side of thecar to the other. As a result, I suggest laying the old channelnext to the new channel and determine the basic positions ofthe clips. Carefully determine and mark where the upper rearcorner of the channel will be located so that you don’t put aclip any closer than about one inch from the very sharp cornerof the window channel. You will also need to determine wherethe forward clip will be located. The forward clip should beabout 1-1/2 inches from the end of the channel. (You will notuse the full length of the channel.)
#15
#16
Photo #16 & 17 &18: After marking thelocation of the clipson the new windowchannel, position apiece of 3/8-inchthick wood into thechannel so that theclips can be installed.(See Photo #16.)The strip of woodthat I used was a piece of 3/8-inch plywood that was about 1-inch wide by 5-inches long. This piece of wood will support the
#17
#21
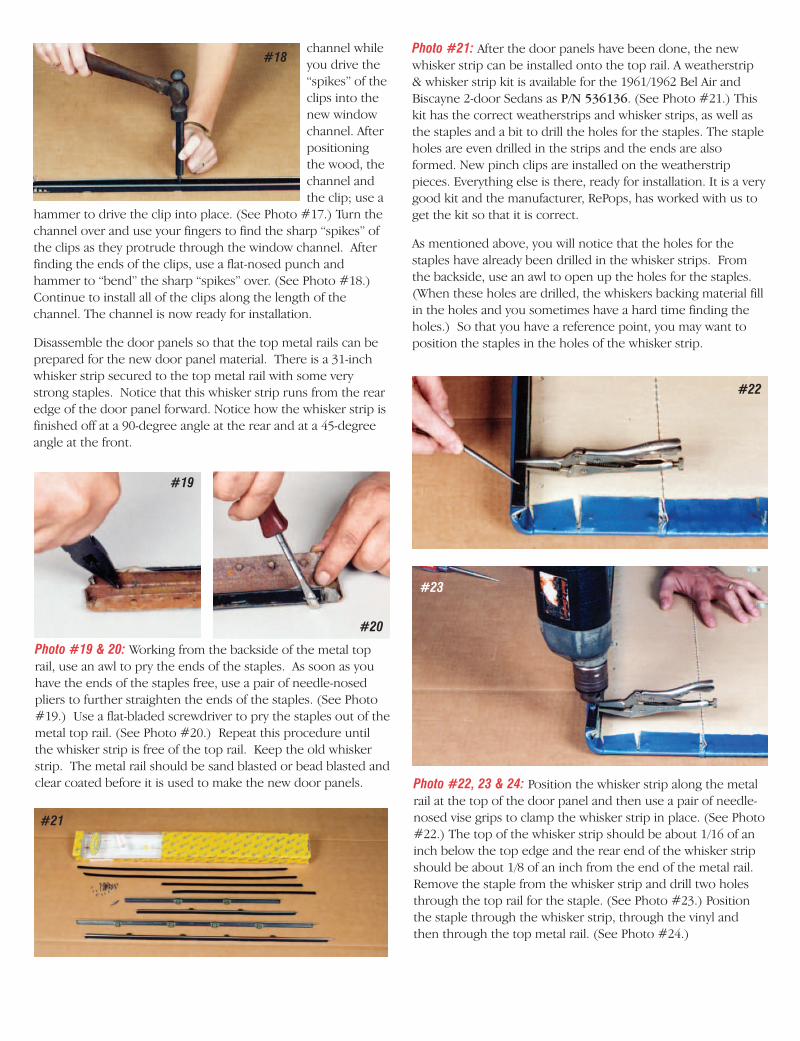
Photo #22, 23 & 24: Position the whisker strip along the metalrail at the top of the door panel and then use a pair of needle-nosed vise grips to clamp the whisker strip in place. (See Photo#22.) The top of the whisker strip should be about 1/16 of aninch below the top edge and the rear end of the whisker stripshould be about 1/8 of an inch from the end of the metal rail.Remove the staple from the whisker strip and drill two holesthrough the top rail for the staple. (See Photo #23.) Positionthe staple through the whisker strip, through the vinyl andthen through the top metal rail. (See Photo #24.)
Photo #19 & 20: Working from the backside of the metal toprail, use an awl to pry the ends of the staples. As soon as youhave the ends of the staples free, use a pair of needle-nosedpliers to further straighten the ends of the staples. (See Photo#19.) Use a flat-bladed screwdriver to pry the staples out of themetal top rail. (See Photo #20.) Repeat this procedure untilthe whisker strip is free of the top rail. Keep the old whiskerstrip. The metal rail should be sand blasted or bead blasted andclear coated before it is used to make the new door panels.
#19
#20
#22
#23
channel whileyou drive the“spikes” of theclips into thenew windowchannel. Afterpositioningthe wood, thechannel andthe clip; use a
hammer to drive the clip into place. (See Photo #17.) Turn thechannel over and use your fingers to find the sharp “spikes” ofthe clips as they protrude through the window channel. Afterfinding the ends of the clips, use a flat-nosed punch andhammer to “bend” the sharp “spikes” over. (See Photo #18.)Continue to install all of the clips along the length of thechannel. The channel is now ready for installation.
Disassemble the door panels so that the top metal rails can beprepared for the new door panel material. There is a 31-inchwhisker strip secured to the top metal rail with some verystrong staples. Notice that this whisker strip runs from the rearedge of the door panel forward. Notice how the whisker strip isfinished off at a 90-degree angle at the rear and at a 45-degreeangle at the front.
#18Photo #21: After the door panels have been done, the newwhisker strip can be installed onto the top rail. A weatherstrip& whisker strip kit is available for the 1961/1962 Bel Air andBiscayne 2-door Sedans as P/N 536136. (See Photo #21.) Thiskit has the correct weatherstrips and whisker strips, as well asthe staples and a bit to drill the holes for the staples. The stapleholes are even drilled in the strips and the ends are alsoformed. New pinch clips are installed on the weatherstrippieces. Everything else is there, ready for installation. It is a verygood kit and the manufacturer, RePops, has worked with us toget the kit so that it is correct.
As mentioned above, you will notice that the holes for thestaples have already been drilled in the whisker strips. Fromthe backside, use an awl to open up the holes for the staples.(When these holes are drilled, the whiskers backing material fillin the holes and you sometimes have a hard time finding theholes.) So that you have a reference point, you may want toposition the staples in the holes of the whisker strip.

Photo #25: At thispoint the chrome-beaded rubberweatherstrip will besecured to theouter edge of thedoor. The correctweatherstrip willhave the flat rubberpart pointingtowards the insideof the car and thechrome bead end that is notched will go towards the front ofthe car. Using some needle-nosed pliers, bend the chromebead towards the center of the car so that it matches thecontour of the door at that position. The end of the bead maybe just a little too long and you may have to trim it with somemetal shears or diagonal cutters. (See Photo #25.)
#25
From thebackside,bend thestaples over.Since thestaples areso strong,here is theprocedure Iused to bendthe staplesinto place.
Clamp the needle-nosed vice grips in the center of the staple.Using a flat-bladed screwdriver and hammer, tap the ends ofthe staple inward. Use a pair of needle-nosed pliers to finishbending the ends into place, once the ends are bent inward.After finishing the staple, reposition the whisker strip along thetop of the rail and secure it in place at the next staple positionwith the needle-nosed vise grips. Repeat the above two stepsfor the complete length of the whisker strip.
Photo #26: Work from the outside of the door and use yourhands to “pull” the rubber weatherstrip onto the metal lip ofthe door. The four pinch-type clips are very strong and quite abit of pressure must be applied to pull them into place. (SeePhoto #26.)
Photo #29: After the rubber weatherstrip has been installedonto the door, the window channel with the lower bracket canbe installed. Determine where the sharp bend will be in thenew window channel and carefully begin to work the bend atthat position. (See Photo #29.) Don’t make the bend too tightat this time in the installation. As seen in Photo #29, one ofthe clips is quite close to the bend. Do not get the clips anycloser than that. If by some chance one of the clips is at thebend, remove the clip and reposition it about an inch away.Temporarily position the vent window assembly into the doorand determine where the new window channel will end. Placea mark on the door frame just behind the vent windowassembly. The new window channel will come right up againstthe vent window assembly.
#27
#28
Photo #27 & 28: Once the rubber weatherstrip is in place, theforward and rear screws can be installed. I used a grease pencilto mark the location of the rear screw which will secure therubber weatherstrip to the door. This mark will help you findthe hole in the door. (See Photo #27.) Mark the position of theforward screw in the same manner. When you use the awl tofind these holes, this mark will come in handy. It takes a littlepressure to press the awl through the metal ìbackboneî of therubber weatherstrip piece. (See Photo #28.) After making thehole in the weatherstrip, find the hole in the door and thenreinstall the special flat head #8 x 1/4-inch Phillips sheet metalscrew. Repeat this procedure for the forward hole.
#24
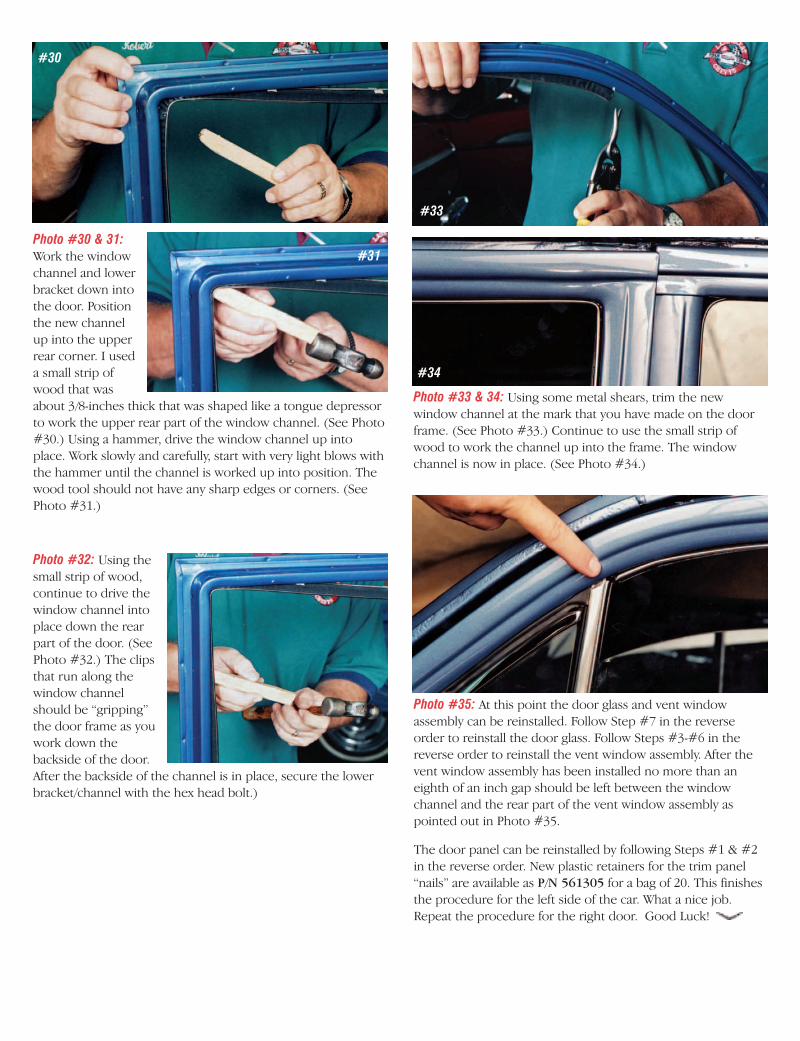
Photo #33 & 34: Using some metal shears, trim the newwindow channel at the mark that you have made on the doorframe. (See Photo #33.) Continue to use the small strip ofwood to work the channel up into the frame. The windowchannel is now in place. (See Photo #34.)
Photo #35: At this point the door glass and vent windowassembly can be reinstalled. Follow Step #7 in the reverseorder to reinstall the door glass. Follow Steps #3-#6 in thereverse order to reinstall the vent window assembly. After thevent window assembly has been installed no more than aneighth of an inch gap should be left between the windowchannel and the rear part of the vent window assembly aspointed out in Photo #35.
The door panel can be reinstalled by following Steps #1 & #2in the reverse order. New plastic retainers for the trim panel“nails” are available as P/N 561305 for a bag of 20. This finishesthe procedure for the left side of the car. What a nice job.Repeat the procedure for the right door. Good Luck!
Photo #32: Using thesmall strip of wood,continue to drive thewindow channel intoplace down the rearpart of the door. (SeePhoto #32.) The clipsthat run along thewindow channelshould be “gripping”the door frame as youwork down thebackside of the door.After the backside of the channel is in place, secure the lowerbracket/channel with the hex head bolt.)
#33
#34
Photo #30 & 31:Work the windowchannel and lowerbracket down intothe door. Positionthe new channelup into the upperrear corner. I useda small strip ofwood that wasabout 3/8-inches thick that was shaped like a tongue depressorto work the upper rear part of the window channel. (See Photo#30.) Using a hammer, drive the window channel up intoplace. Work slowly and carefully, start with very light blows withthe hammer until the channel is worked up into position. Thewood tool should not have any sharp edges or corners. (SeePhoto #31.)
#30
#31