Embed Size (px)
Citation preview

AT&T Voice Mail How to Put Voice Mail to Work for You
Easy to UseReliableConvenientPrivate
© 2006 AT&T Knowledge Ventures. All rights reserved. 08/06 AB-0829
TERMS AND CONDITIONS
1. AT&T Voice Mail Service (the Service) is provided in accordance with the terms andconditions set forth in this AT&T Voice Mail User Guide (the Guide). This Guide setsforth the entire terms and conditions for the Service and supersedes any prior writtenor oral statements concerning the Service.
2. You are responsible for payment of all charges including taxes and surcharges, ifapplicable, for the Service. You will pay AT&T Connecticut (Us or We) our establishedrates or any revised rates for the Service. The charges for the Service will appear onyour AT&T monthly telephone bill and will be due upon receipt of the bill. If payment isnot received within thirty (30) days of the bill date, you may be charged a late chargeof 1% per month on the unpaid balance.
3. If required, you are responsible for obtaining and paying for any equipment for theService. A touch-tone telephone is required for mailbox access and to utilize theavailable features.
4. We may, at our discretion, revise the rates, change the customer interface such as therecorded prompts and directions, the length of time available for leaving messages,the number of messages which may be left, thelength of time a message will bestored and other aspects of the Service without notice.
5. WE DISCLAIM ALL WARRANTIES WITH RESPECT TO OUR PROVISION OF THE SERVICE,INCLUDING THE IMPLIED WARRANTIES OF MERCHANTABILITY AND FITNESS FOR APARTICULAR PURPOSE. Our sole liability for any failure, defect, error, loss or omissionin the provision of the Service is limited to the proportionate charge for the periodduring which the Service was affected. WE WILL NOT BE LIABLE, NOR WILL OURAFFILIATES, FOR INCIDENTAL, SPECIAL, OR CONSEQUENTIAL DAMAGES OF ANY KINDWHATSOEVER. Service is subject to availability.
6. You are solely responsible for the content of any transmission including messages overthe Service, as well as any connection of any equipment to the Service, if applicable,and will not use the Service for any unlawful purpose. If any claims are made againstus arising out of any transmission over the Service, or the connection of anyequipment to the Service (such as patent infringement claims arising out of suchconnection), or any other acts or omissions on your part, you shall indemnify us,defend and hold us harmless from and against any and all claims, damages andexpenses (including our attorney’s fees) incurred in defending any such claim.
AT&T local service and Voice Mail is provided by AT&T Connecticut. If your AT&T localservice is billed on a per-call, per-minute or measured service basis, you will be chargedfor all local calls associated with the use of your Voice Messaging Service. You will becharged for a local call every time you retrieve a message or otherwise access yourmailbox using your local business telephone number. You will also be charged for a localcall every time a caller leaves or attempts to leave you a message. For customers oncalling plans, such calls will be counted against your monthly allowance. If you accessyour mailbox from outside your local calling area, you will incur applicable in-state toll,long distance or other usage charges. Voice Mail services use Complementary NetworkServices such as Call Forwarding and Messaging Indicator.
Business User Guide

1
Contents & IntroductionVoice Mail – TYPE 2&3 CUSTOMERS
Setting Up Voice Mail for the First Time 2
Using Voice Mail 2
Main Menu 3
Easy Access Via Telephone Answering Mode 3
When Listening to Messages 4
Playback Features 5
Personal Options 5
Changing Your Password 6
Greetings 6
Changing Your Greeting 7
Notification On/Off 7
Changing Your Voice Prompt Levels 8
Activating Date and Time Feature 8
Sending a Message 9
Delivery Options 9
Private Messages 10
Urgent Messages 10
Message Confirmation 11
Future Delivery 11
Sending the Message 12
Check Receipt 12
Replying to a Message 12
Sending a Copy of a Message 13
Sending a Copy to Someone Else 13
Group Distribution Lists 14
Setting Up a Group Distribution List 14
Editing an Existing Group List 15
Deleting an Existing Group List 15
Reviewing or Renaming Lists 15
Voice Mail – TYPE 3 CUSTOMERS
“0” Out to Attendant 16
Alpha Paging on “0” Out to Attendant 16
Outcall to Pager 17
Cut Thru Paging on Outcall to Pager 18
Time Periods for Pager Notification 20
Setting Up a Pager Notification Schedule 21
Outcall to Pager Notification 22
Extension Option 22
Setting Up an Extension Mailbox 23
Personalizing an Extension Mailbox 24
Greetings 24
Deleting an Extension Mailbox 25
Delivery Options 25
Sending a Message within Your Mailbox 26
Sending a Copy of a Message 26
Replying to a Message 27
Quick Reference and Helpful Hints
Quick Reference Chart 28-29
Helpful Hints for You 30
Helpful Hints for Your Callers 31
Helpful Telephone Numbers 31
Useful Definitions 32
Other Sources of Information 32
IntroductionWelcome to your new voice mail system. With Voice Mailservice, your calls can be answered automatically if you’re notthere to take the call or even if you’re already on the phone.Callers will be greeted by your personalized greeting and canleave a message up to 3 minutes long. You can listen to yourmessages any time, from any touch-tone phone. To check fornew messages, just pick up your phone and listen for anintermittent dial tone. (If you have compatible equipment, alight will alert you of new messages.)

Voice Mail for Type 2 & 3 CustomersVoice Mail – TYPE 2&3 CUSTOMERS
Setting Up Voice Mail for the First Time
1. Dial *98 (where available) from your business phone. If *98 is not available in your area or you are away fromyour office, dial your Voice Mail access number.
2. If you are calling from a phone other than your officephone, you will be prompted to press { # } and enter yourmailbox – this is always your area code + 7-digit telephone number.
3. Enter your temporary password – this is also your area code + 7-digit telephone number.
4. Change your temporary password. Enter a new passwordbetween 6–15 digits long.
5. Record your name as personal identification.
6. Record your personal greeting.
YOUR MAILBOX IS NOW SET UP!
Note: For your security, you should change your temporarypassword immediately, even if you are not yet using yourmailbox. When choosing a password, do not use your telephoneor mailbox number (or any part of the telephone or mailboxnumber) as part of the password. Do not repeat digits (e.g.,444444), do not use sequential digits (e.g., 123456) and donot use easily identifiable numbers (e.g., ZIP code, streetaddress, etc.). Treat your password as you would your ATMPIN. We recommend that you select a password of at least6 digits, up to a maximum of 15. For added security, youshould change your password periodically and check yourgreetings to make sure they have not been changed.
Using Voice Mail1. Dial *98 (where available) from your business phone.
If *98 is not available in your area or you are away fromyour office, dial the local Voice Mail access number.
2. If you hear your recorded name skip to step 5.
3. Press {#} to indicate you have a mailbox on the system.
4. Enter your mailbox number.
5. Enter your password.
6. You are now at the Main Menu.
Voice Mail – TYPE 2&3 CUSTOMERS
Main Menu
Voice Mail – TYPE 2 CUSTOMERS
Easy Access Via TelephoneAnswering ModeEasy Access allows subscribers the option to access theirmailbox messages when away from the office by dialing thesubscribing telephone number or the hub number. A subscribercan call the subscribing phone number, and if no one answerslive, they can choose to enter the mailbox to check messages. (It works similarly to remote access on telephone answeringmachines – but there is no machine to maintain or replace!)
Easy Access will not work with the following:
• Type 1 or Type 3 services
• Type 2 mailbox that has extension mailboxes
* Easy Access will not work if the subscriber presses “9” AFTER they hear the beep.
2
OPTIONS PRESS
Check NEW, unheard messages { 1 }{ 1 }
Listen to ALL messages { 1 }
Enter Personal Options { 2 }
RESTART { 5 }
DISCONNECT { * }
FOLLOW THESE STEPS PRESS
1. Dial the telephone number on whichVoice Mail is subscribed.
2. As soon as the greeting begins press { 9 }*
3. The caller will hear “Please enter your password.”
4. From this point the customer would continue as usual.
3

Voice Mail – TYPE 2&3 CUSTOMERS
When Listening to Messages
Note: New and saved messages will be stored for a total of 15 days. Messages will be automatically deleted fromyour mailbox after the allotted storage period.
UndeleteVoice Mail has the deleted message recovery feature whichallows you to review messages that you have previously markedfor deletion during your mailbox session. To review messagesyou have erased while using your mailbox, go to the Main Menuand press 1-9. While listening to messages marked for deletion,you can use any of the available message review options. If youerase a message from the erased-message queue, it is permanentlyremoved from your mailbox. When you exit your mailbox, allmessages marked for deletion are permanently removed.
Voice Mail – TYPE 2&3 CUSTOMERS
Playback Features
Voice Mail – TYPE 2&3 CUSTOMERS
Personal OptionsFeatures under Personal Options allow you to “customize” yourmailbox. These options give you the flexibility to change yourpassword, greeting or prompt levels, establish Outcall to PagerSchedule and activate date and time playback. By referring tothe steps outlined on the following pages and listening to theprompts, you can move easily through these options.
4 5
OPTIONS PRESS
To hear a NEW message { 1 } { 1 }
To REVIEW all messages { 1 }
To SAVE a message { 9 }
To EXIT mailbox { * }
To ERASE a message { 7 }
To ERASE a message without listening to the complete message { 3 }{ 3 }{ 7 }
To SKIP a message { # }
To CANCEL message review { * }
To obtain envelope information { 5 }
WHILE LISTENING TO A MESSAGE PRESS
To REWIND 10 seconds { 1 }
To rewind to BEGINNING { 1 } { 1 }
To PAUSE for 15 seconds { 2 }
To RESTART the message { 2 }
To FAST FORWARD 10 seconds { 3 }
To fast forward to END { 3 } { 3 }
To play message SLOWER { 4 }
To play message FASTER { 6 }
NORMAL volume { 8 }
LOUDER volume { 9 }

Voice Mail – TYPE 2&3 CUSTOMERS
Changing Your PasswordYou recorded a personal password when you entered Voice Mail for the first time to set up your mailbox. To change yourpassword, enter the Personal Options Menu by pressing { 2 } atthe Main Menu. You can change your personal password at anytime and as often as you like. Choose a password that you canremember but is hard for others to guess. Passwords can bebetween 6 and 15 digits in length. Each password you createmust be different. Your password cannot begin with “0.” If youforget your password, call AT&T repair service at 1-203-420-3131to have it reset.
Voice Mail – TYPE 2&3 CUSTOMERS
GreetingsYour greeting is the message your callers hear when Voice Mail answers for you. You may choose one of the followinggreeting types:
• Standard Greeting Voice Mail will play a greeting which says, “At the tone pleaserecord your message to (recorded name). At the end of yourmessage press { 1 }.”
• Personalized Greeting This type allows you to record your own greeting that yourcallers will hear. When recording your greeting, keep in mind that Voice Mail will automatically add at the end of your greeting, “At the tone please record your message. At the end of your message press { 1 }.”
• Extended Absence Greeting*You may record an extended absence greeting to be played tocallers in place of your personal greeting. This greeting advisescallers that you are away from the office and will be checkingmessages infrequently. They may leave you a message or youcan refer them to someone else. Callers cannot skip yourextended absence greeting. (Note: While your extendedabsence greeting is on, you will be reminded of it each time youenter Voice Mail. You will then be prompted to delete or retainit. Your personal greeting is reinstated as soon as the extendedabsence greeting is deleted.)
*Not available with Extension Option feature.
Voice Mail – TYPE 2&3 CUSTOMERS
Changing Your GreetingTo change your greeting and name or to record an extendedabsence greeting:
Voice Mail – TYPE 2&3 CUSTOMERS
Notification On/OffVoice Mail can notify you of messages in several ways:
Message Waiting Indicator Either a message waiting light on your phone (if you havecompatible equipment) or intermittent dial tone tells you thatyou have new unheard messages. Voice Mail has been set upwith the message waiting indicator turned on.
6 7
FOLLOW THESE STEPS PRESS
1. Select Personal Options { 2 }
2. Select Administrative Options { 1 }
3. To CHANGE your password { 1 }
4. Follow the voice prompts
5. When done, to EXIT { * } FOLLOW THESE STEPS PRESS
1. Select Personal Options { 2 }
2. To CHANGE your greeting { 2 }
3. CHOOSE:record your personal GREETING { 1 }record your NAME { 2 }record your extended absence greeting { 3 }
5. When done, to EXIT { * }
Voice Mail – TYPE 2&3 CUSTOMERS
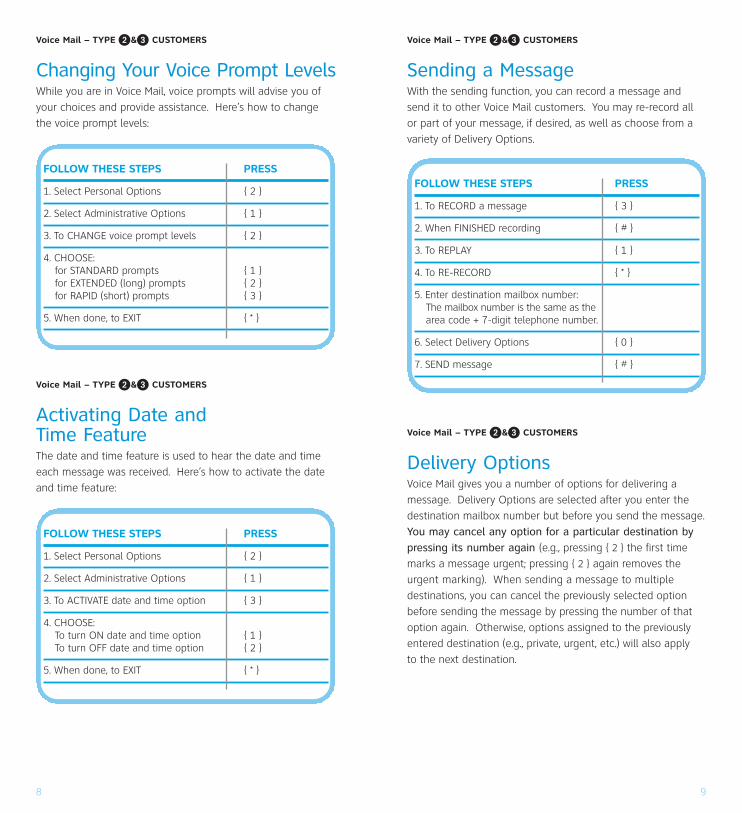
Changing Your Voice Prompt LevelsWhile you are in Voice Mail, voice prompts will advise you ofyour choices and provide assistance. Here’s how to change the voice prompt levels:
Voice Mail – TYPE 2&3 CUSTOMERS
Activating Date andTime FeatureThe date and time feature is used to hear the date and time each message was received. Here’s how to activate the date and time feature:
Voice Mail – TYPE 2&3 CUSTOMERS
Sending a MessageWith the sending function, you can record a message andsend it to other Voice Mail customers. You may re-record allor part of your message, if desired, as well as choose from avariety of Delivery Options.
Voice Mail – TYPE 2&3 CUSTOMERS
Delivery OptionsVoice Mail gives you a number of options for delivering amessage. Delivery Options are selected after you enter thedestination mailbox number but before you send the message.You may cancel any option for a particular destination bypressing its number again (e.g., pressing { 2 } the first time marks a message urgent; pressing { 2 } again removes theurgent marking). When sending a message to multipledestinations, you can cancel the previously selected optionbefore sending the message by pressing the number of thatoption again. Otherwise, options assigned to the previouslyentered destination (e.g., private, urgent, etc.) will also apply to the next destination.
8 9
FOLLOW THESE STEPS PRESS
1. Select Personal Options { 2 }
2. Select Administrative Options { 1 }
3. To CHANGE voice prompt levels { 2 }
4. CHOOSE:for STANDARD prompts { 1 }for EXTENDED (long) prompts { 2 }for RAPID (short) prompts { 3 }
5. When done, to EXIT { * }
FOLLOW THESE STEPS PRESS
1. To RECORD a message { 3 }
2. When FINISHED recording { # }
3. To REPLAY { 1 }
4. To RE-RECORD { * }
5. Enter destination mailbox number: The mailbox number is the same as thearea code + 7-digit telephone number.
6. Select Delivery Options { 0 }
7. SEND message { # }
FOLLOW THESE STEPS PRESS
1. Select Personal Options { 2 }
2. Select Administrative Options { 1 }
3. To ACTIVATE date and time option { 3 }
4. CHOOSE:To turn ON date and time option { 1 }To turn OFF date and time option { 2 }
5. When done, to EXIT { * }

Voice Mail – TYPE 2&3 CUSTOMERS
Private MessagesA private message prevents the recipient from sending a copy of your message to anyone else. You can designate amessage private by pressing { 1 } after recording it. Then press { # } to send it.
Voice Mail – TYPE 2&3 CUSTOMERS
Urgent MessagesA message marked “urgent” is available for review before non-urgent messages. Use the urgent delivery option withdiscretion because some Voice Mail customers may haveOutcall to Pager Notification set to call them immediately forurgent messages. Do not use urgent for routine messages.You can designate a message urgent by pressing { 2 } afterrecording it. Then press { # } to send it.
We make it easy to take care ofyour important communications,wherever your business takes you.
Voice Mail – TYPE 2&3 CUSTOMERS
Message ConfirmationThe Message Confirmation option allows you two choices:
• Confirmation of Receipt
• Notification of Non-Receipt
When you select Confirmation of Receipt, Voice Mail sends amessage to your mailbox telling you when the recipient haslistened to your entire message. When you select Notificationof Non-Receipt, Voice Mail sends a message to your mailbox ifthe recipient does not review the message within five days.
For Message Confirmation:
Voice Mail – TYPE 2&3 CUSTOMERS
Future DeliveryWith Voice Mail, you can choose to deliver your message at a specific time in the future. A mailbox can have up to fivefuture delivery messages waiting to be delivered. To requestfuture delivery:
10
FOLLOW THESE STEPS PRESS
1. After recording message { 3 }
2. CHOOSE:For CONFIRMATION of Receipt { 1 }For NOTIFICATION of Non-Receipt { 2 }
3. To SEND { # }
FOLLOW THESE STEPS PRESS
1. After recording message { 4 }
2. To SPECIFY THE DATE { 1 }
3. Select the MONTH (Jan. = { 1 }, Dec. = { 1 }{ 2 }, etc.)
4. Select the DATE ({ 1 } to { 3 }{ 1 })
5. Select the HOUR AND MINUTES (2:00 as { 2 }{ 0 }{ 0 },10:15 as { 1 }{ 0 }{ 1 }{ 5 })
6. Select A.M. or P.M. ({ 1 } for a.m. { 2 } for p.m.)
11

Voice Mail – TYPE 2&3 CUSTOMERS
Sending the MessageAfter choosing your delivery option(s), you must press { # } tosend the message. Your message will be lost if you do not do so. After sending a message, you have the option of enteringanother destination or pressing { * } to return to the Main Menu.
Remember, once you’ve sent a message, you cannot get it back.
Voice Mail – TYPE 2&3 CUSTOMERS
Check Receipt*Any time after you have sent a message to a subscriber, youcan check to see whether the recipient has listened to yourmessage. Voice Mail plays each message you’ve sent that hasnot been listened to by the recipient.
*This option is available to host mailbox only.
Voice Mail – TYPE 2&3 CUSTOMERS
Replying to a MessageYou can reply to a message sent to you by another Voice Mailcustomer within Connecticut immediately after reviewing itwithout hanging up and re-dialing. Your reply is received bythat person like any other message. While recording your reply, you can use the playback controls to review and edit yourresponse before sending it. You can also use Delivery Optionssuch as private and urgent. To reply to a message:
Voice Mail – TYPE 2&3 CUSTOMERS
Sending a Copy of a MessageYou can send a copy of a message you have received to anotherVoice Mail customer, adding your introductory comments sothe person receiving the copy will know it has been forwardedby you. This feature is useful when you receive a message thatcan be handled or should be heard by another subscriber. Youcan send a copy of any message unless it has been markedprivate by the sender.
Voice Mail – TYPE 2&3 CUSTOMERS
Sending a Copy to Someone Else
12
FOLLOW THESE STEPS PRESS
1. Select Check Receipt { 4 }
2. Enter RECIPIENT’S MAILBOX NUMBER
3. To CANCEL Check Receipt { * }
FOLLOW THESE STEPS PRESS
After listening to the message:
1. To send a COPY { 6 }
2. RECORD your introductory comments
3. To indicate END of comments { # }
4. To REVIEW your comments (if desired) { 1 }
5. Enter destination mailbox number: The mailbox number is the same as thearea code + 7-digit telephone number.
6. To SEND the copy { # }
7. CHOOSE (if desired):To ERASE original message { 7 }To SAVE original message { 9 }
FOLLOW THESE STEPS PRESS
After listening to the message:
1. To RECORD your reply { 8 }
2. To indicate END of message { # }
3. To select Delivery Options { 0 }
4. To send your REPLY { # }
13

Voice Mail – TYPE 2&3 CUSTOMERS
Group Distribution ListsWhen sending messages to the same group of people regularly(e.g., to set up a weekly meeting), group distribution lists cansave you time. Each list can storeup to 25 mailbox numbers.Messages can be sent to all members of the list using a two-digit destination number. You can create new group distributionlists, delete lists, or review and modify existing lists at any time.
Note: You can have as many as 15 group distribution lists(numbered from 11 through 25), each with up to 25mailbox numbers. Voice Mail tells you when you haveexceeded your allowable number.
Voice Mail – TYPE 2&3 CUSTOMERS
Setting Up a Group Distribution List
Voice Mail: the easy solution withexceptional features.
Voice Mail – TYPE 2&3 CUSTOMERS
Editing an Existing Group List
Voice Mail – TYPE 2&3 CUSTOMERS
Deleting an Existing Group List
Voice Mail – TYPE 2&3 CUSTOMERS
Reviewing or Renaming Lists
14 15
FOLLOW THESE STEPS PRESS
1. Select Personal Options { 2 }
2. Select Administrative Options { 1 }
3. Select Group Lists { 4 }
4. To CREATE a list { 1 }
5. ASSIGN a 2-digit number (between 11 and 25) to the list you want
6. RECORD the NAME for the list
7. Enter mailbox number (area code + 7-digit telephone number) of each person you want on the list.
8. REVIEW all names on list (if desired) { 1 }
9. EXIT and SAVE completed list { * }
FOLLOW THESE STEPS PRESS
1. Select Personal Options { 2 }
2. Select Administrative Options { 1 }
3. Select Group Lists { 4 }
4. Then, to select EDIT { 2 }
5. Then follow voice prompts
FOLLOW THESE STEPS PRESS
1. Select Personal Options { 2 }
2. Select Administrative Options { 1 }
3. Select Group Lists { 4 }
4. Then, to select DELETE { 3 }
5. Then follow voice prompts
FOLLOW THESE STEPS PRESS
1. Select Personal Options { 2 }
2. Select Administrative Options { 1 }
3. Select Group Lists { 4 }
4. Then, to select LIST NAMES { 4 }
5. Then follow voice prompts

Voice Mail for Type 3 CustomersVoice Mail Type 3 service provides additional features notavailable to Type 2 customers.
Customers with Type 3 service must also read the Type 2section of this user guide.
Voice Mail – TYPE 3 CUSTOMERS
“0” Out to Attendant*The “0” Out to Attendant feature* allows callers who needassistance either before, during or after leaving a message topress { 0 } and be redirected to an attendant. The attendant’stelephone number was programmed when Voice Mail wasordered. If you need to change the attendant’s number, callthe AT&T Business Office to have your mailbox reprogrammed.The number used for the “0” Out to Attendant feature must be toll free or local to the Voice Mail Access Number.
Voice Mail customers with the “0” Out to Attendant feature can include this as a choice in their personal greeting. Forexample, “Hello, this is Matt Smith. I’m not available right now, but please leave me a detailed message, or if you needto speak to someone immediately, please press { 0 } and yourcall will be transferred to an attendant.”
*Can be purchased as an optional feature on a Type 2 Mailbox for an additional charge.
Voice Mail – TYPE 3 CUSTOMERS
Alpha Paging on “0” Out to Attendant*“0” Out to Attendant is a feature that allows the subscriber to designate a telephone number that calls can be transferredto if the caller presses { 0 } as prompted by the subscribergreeting.
The Alpha Paging application allows the subscriber’s alphapaging company to be the recipient of the “0 Out.” Thepaging center number used by the customer must be local or toll free to the serving voice mail hub in order for thecustomer to take advantage of this service.
The subscriber should be advised to include in the greeting:
• Any PIN/reference number for the paging company
• That the caller must press 0 to access the alpha paging company
Important Reminder: The customer must choose from one of two schedules for “0” Out to Attendant: 8 a.m.–5 p.m.Monday–Friday, or 24 hours a day, 7 days a week.
Note: Customers who do not already subscribe to “0” Out to Attendant will incur installation and monthly recurringcharges to initiate the feature. Alpha Paging is simply anapplication for subscribers of “0” Out to Attendant.
Voice Mail – TYPE 3 CUSTOMERS
“Outcall to Pager*With Outcall to Pager,* Voice Mail can call you at your pager numberto notify you when there are new messages in your mailbox.
You can control the hours when outcalling is in effect. You canset up the outcall schedule in your mailbox to have Voice Mailcall you immediately when a message is delivered, or you canselect intervals of time between when a new message reachesyour mailbox and when Voice Mail calls to notify you. You canalso be more selective and have Voice Mail call you only whenyou have urgent messages.
Voice Mail allows you to set up one Pager Notification Schedule.Outcall to Pager is most often used by subscribers who arefrequently out of the office and want to be notified of newmessages. It is also helpful if a subscriber wishes to be notifiedof messages after hours or on weekends. If you change pagercompanies or pager telephone number, call the AT&T BusinessOffice to have your mailbox reprogrammed. The number used for the Outcall to Pager feature must be toll free or local to theVoice Mail Access Number.
*Can be purchased as an optional feature on a Type 2 Mailbox for an additional charge.
16 17

Voice Mail – TYPE 3 CUSTOMERS
Cut Thru Paging on Outcall to PagerOutcall to Pager allows the subscriber to be notified of messagesdeposited in their mailbox via their pager. The subscriber sets upa schedule that allows them to choose when (time of day and dayof week) and which calls (urgent or all) trigger the notification.
Cut Thru Paging on Outcall to Pager allows the caller to:
• Send page with a callback number after the greeting is heard
• Leave a voice message for the subscriber (which will also page the subscriber, depending on how the outcall is set up)
• Both
A voice prompt offers the customer the option of leaving acallback number by pressing the designated key on their touch-tone pad. The subscriber’s pager is notified with the callbacknumber if the option is selected. A special code appears afterthe callback number if a voice message was deposited alongwith the callback number. When a voice message is left byitself, the existing notification process occurs. The subscriberuses the “Pager Notification Schedule” to control this feature.
Note: Customers who do not already subscribe to Outcallto Pager will incur installation and monthly recurringcharges to activate the feature. Cut Thru Paging is a freeenhancement for Outcall to Pager.
Important Reminder: The Outcall to Pager setup remains thesame as today; this enhancement will follow the same settings.
The table on the following page illustrates what the subscriberwill see displayed on their pager depending on:
• The presence or absence of a PIN on the subscriber’s pager
• What the caller chooses to leave
Voice Mail makes it easy to listento your messages from anywhere.
18 19
FOLLOW THESE STEPS PRESS
1. Immediately following the initial greeting- Caller will hear “To leave your
callback number press 5.”If they press 5, go to step 2. If not, the caller can leave a message just as they do today, after the beep.
2. If they pressed 5- Caller will hear “Please enter your
callback number, then press” { # }
3. If there is no response- Caller will hear “Are you still there?
Please enter your callback number,then press” { # }
FOLLOW THESE STEPS (cont.) PRESS
4. If the caller enters a callback number- Caller will hear “You entered xxxxxxx.
If this is correct press” { 1 }- To re-enter press” { 2 }- To cancel press” { 3 }
5. If the caller presses { 1 }- Caller will hear “Thank you. Your
callback number has been entered. You may hang up or to leave a voice message, please wait for the tone.”
The caller can then leave a voice message (which will follow the setup of the Outcall to Pager).
6. If the caller presses 2- Caller will hear “Please enter your
callback number, then press” { # }
7. If the caller presses 3- Caller will hear subscriber’s greeting

Voice Mail – TYPE 3 CUSTOMERS
Time Periods for PagerNotificationYou can control the hours when you will be accepting calls. You will be prompted to enter a start and stop time for the Pager Notification Schedule from your mailbox. You candecide whether the schedule applies on weekdays, weekendsor both. For example, you can use the schedule for daytimenotification to your pager from 9 a.m. to 5 p.m., and you canspecify a limited time on the weekend (e.g., 5:00–7:00) onSaturday and Sunday. On holidays, your weekend schedule will automatically apply.
Voice Mail – TYPE 3 CUSTOMERS
Setting Up a Pager Notification Schedule
Important Reminder: Even if a schedule has been set, Voice Mailwill not place calls to your pager unless notification has beenturned ON. See below to turn on a Pager Notification Schedule.
Note: Outcall to Pager is for host mailbox only; it does NOT apply to extension mailboxes.
20 21
IF THE AND THE THEN THE SUBSCRIBERCALLER… SUBSCRIBER… WILL RECEIVE…
Leaves a message Has no PIN The hub number
Leaves a message Has a PIN The hub number
Leaves a callback Has no PIN The callback numbernumber entered by calling party
Leaves a callback Has a PIN The hub number and number the callback number in
the form of a long stream of numbers (ex. 59626707711)
Leaves both a Has no PIN The caller’s callbackcallback number number and “88” toand a message indicate a message
was left
Leaves both a Has a PIN The hub number, thecallback number callback number and and a message “88” in the form of a
long stream of numbers(ex. 59626707711-88)
FOLLOW THESE STEPS PRESS
For 7:00 { 7 }{ 0 }{ 0 }
For 10:30 { 1 }{ 0 }{ 3 }{ 0 }
To select a.m. { 1 }
To select p.m. { 2 }
For 24-hour notification: { 1 }{ 2 }{ 0 }{ 0 }{ 1 };{ 1 }{ 2 }{ 0 }{ 0 }{ 1 }
FOLLOW THESE STEPS PRESS
1. Select Personal Options { 2 }
2. Select Notification Options { 5 }
You will hear “Pager Schedule”
3. Enter weekday notification time period
4. To CONTINUE { 1 }or CHANGE the schedule { 2 }
5. Enter weekend notification time period
6. To CONTINUE { 1 }or CHANGE the schedule { 2 }
7. Select whether you want to be notified ofall messages or only urgent messages
8. Select how soon Voice Mail shouldcall you after a new message arrives. (It can be different for urgent and non-urgent.)
9. CONFIRM the schedule { 1 }or CHANGE the schedule { 2 }

Voice Mail – TYPE 3 CUSTOMERS
Outcall to Pager Notification Even though a schedule is set, the system does not place callsunless Outcall Notification is turned ON. You can turn theOutcall to Pager Notification schedule ON or OFF at yourconvenience. Your schedule will not be erased.
When you press { 4 } in Personal Options, the system tells youwhether Outcall Notification is turned ON or OFF and that yourmessage waiting indicator is on. If Outcall Notification is on,press { 2 } to turn it off; if it is off, press { 1 } to turn it on.
Voice Mail – TYPE 3 CUSTOMERS
Extension Option*The Extension Option provides individual, personal mailboxes forup to four individuals, while ensuring complete privacy andsecurity for each user.
The Extension Option is composed of one host mailbox andthree extension mailboxes. Each mailbox is individual and hascomplete privacy.
A host with three extension mailboxes can hold a total of 45**messages. You can add or delete an extension mailbox at anytime. Extension users can check who has messages simply bypressing { 0 } at the Main Menu. Both the host and extensionusers must review the entire guide.
* Can be purchased as an optional feature on a Type 2 Mailbox for an additional charge.
** An AT&T Type 2 customer who purchases Extensions as an optional feature will be able to hold a total of 35 messages.
Extension MailboxesYou need to set up your host and extension mailboxes only once.You will not be able to receive messages until you do. First youmust set up your host mailbox, then each extension mailbox.
Voice Mail – TYPE 3 CUSTOMERS
Setting Up an Extension Mailbox
Note: Extension mailbox passwords cannot be reset. Ifyou forget your extension mailbox password, the hostuser will need to delete and rebuild that extension. Themailbox will need to be reinitialized and messages in themailbox extension will be lost.
22 23
FOLLOW THESE STEPS PRESS
1. Follow steps 1-6 on page 2 for SETUPThis will bring you to the MAIN MENU
2. Enter the host mailbox password
3. Select Personal Options { 2 }
4. Select Extension Mailboxes { 9 }
5. Select number of extension users to add: { 1 }, { 2 } or { 3 }
6. Voice Mail assigns a password for yourextension user. You can change or retainthis password. (Write this password down.You must give it to extension user.)
7. Record name of person using the extension
8. Record PERSONALIZED GREETING orSelect STANDARD GREETING
9. Change personal greeting recorded earlierIf you add more extension users, remember to re-record your personal greeting to tell callers how to reach youand each extension user. You have the option of recording a personalized greeting or using the standard greeting.
10. Return to PREVIOUS MENU { * }

Voice Mail – TYPE 3 CUSTOMERS
Personalizing an Extension Mailbox
Voice Mail – TYPE 3 CUSTOMERS
GreetingsListed below are examples of personal greetings for the host’sand extension users’ mailboxes. Remember, your greeting mustnot exceed 45 seconds in length.
Host’s Personal Greeting“Hello, you have reached the ABC Company. We are unable totake your call at the moment. If you wish to leave a message for Amy, press { 1 }. If you wish to leave a message for Doug,press { 2 }. If you wish to leave a message for ABC Companyor if you are calling from a rotary telephone, please stay on theline. We will get back to you as soon as we can. Thank you.”
Extension’s Personal Greeting“Hello, this is Amy. I am either on the phone or unable to takeyour call right now, but please leave a message and I will getback to you as soon as I can. Bye.”
If you do not wish to record a personal greeting, you may usethe standard greeting.
• Host’s Standard Greeting“You have reached (recorded name). If you want (Extension 1 recorded name), press { 1 }. If you want (Extension 2 recorded name), press { 2 }. If you want (recorded name), just wait for the tone. At the tone, please record your message.”
• Extension’s Standard Greeting“You have reached (extension’s recorded name). At the tone, please record your message.”
Voice Mail – TYPE 3 CUSTOMERS
Deleting an Extension MailboxIf a user name changes or leaves the business, you will wantto be sure to delete their mailbox.
Voice Mail – TYPE 3 CUSTOMERS
Delivery OptionsExtension mailboxes can send a message, send a copy of amessage, or reply to a message from the other extensionswithin the mailbox or the host mailbox only. The host mailboxcan send messages to other Voice Mail users.
24 25
FOLLOW THESE STEPS PRESS
1. Dial the local Voice Mail access numberVoice prompts guide you through steps:
2. Enter PASSWORD set up by the host mailbox user or Change password to one only you knowChoose a password 4–15 digits in length that you remember but is hard for others to guess.
3. Recorded name and greeting is played.These have been recorded for you by host.Change them by following voice prompts.You are now at the MAIN MENU
4. DISCONNECT or make menu selection { * }
FOLLOW THESE STEPS PRESS
1. Dial the local Voice Mail access number
2. Enter host mailbox number
3. Select Personal Options { 2 }
4. Select Extension Mailboxes { 9 }
5. Select number of extension users to delete: { 1 }, { 2 } or { 3 }
6. DELETE the extension mailbox { 7 }
7. CONFIRM the deletion { # }or CANCEL the deletion { * }
Voice Mail – TYPE 3 CUSTOMERS
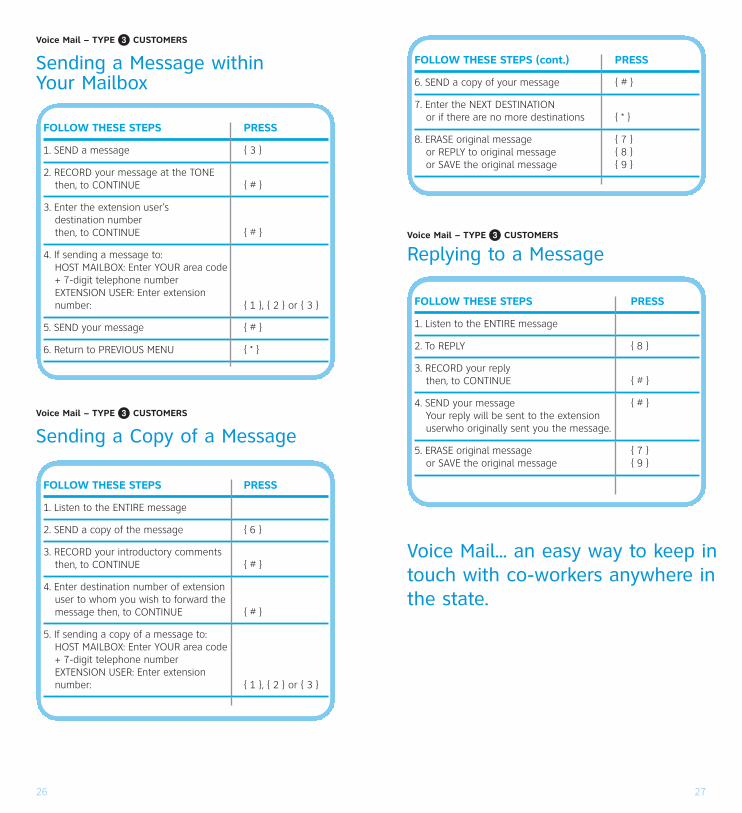
Sending a Message within Your Mailbox
Voice Mail – TYPE 3 CUSTOMERS
Sending a Copy of a Message
Voice Mail – TYPE 3 CUSTOMERS
Replying to a Message
Voice Mail... an easy way to keep intouch with co-workers anywhere inthe state.
26 27
FOLLOW THESE STEPS PRESS
1. SEND a message { 3 }
2. RECORD your message at the TONEthen, to CONTINUE { # }
3. Enter the extension user’s destination numberthen, to CONTINUE { # }
4. If sending a message to:HOST MAILBOX: Enter YOUR area code + 7-digit telephone numberEXTENSION USER: Enter extension number: { 1 }, { 2 } or { 3 }
5. SEND your message { # }
6. Return to PREVIOUS MENU { * }
FOLLOW THESE STEPS PRESS
1. Listen to the ENTIRE message
2. SEND a copy of the message { 6 }
3. RECORD your introductory commentsthen, to CONTINUE { # }
4. Enter destination number of extension user to whom you wish to forward the message then, to CONTINUE { # }
5. If sending a copy of a message to:HOST MAILBOX: Enter YOUR area code + 7-digit telephone numberEXTENSION USER: Enter extension number: { 1 }, { 2 } or { 3 }
FOLLOW THESE STEPS (cont.) PRESS
6. SEND a copy of your message { # }
7. Enter the NEXT DESTINATION or if there are no more destinations { * }
8. ERASE original message { 7 }or REPLY to original message { 8 }or SAVE the original message { 9 }
FOLLOW THESE STEPS PRESS
1. Listen to the ENTIRE message
2. To REPLY { 8 }
3. RECORD your replythen, to CONTINUE { # }
4. SEND your message { # }Your reply will be sent to the extensionuserwho originally sent you the message.
5. ERASE original message { 7 }or SAVE the original message { 9 }

Quick Reference Chart for Type 2 & 3 Customers
28 29
From Another Phone..
1. Dial your access number.
2. Listen to the introductory system greeting.
3. Press {#}.
4. Enter your mailbox number This is also your telephone number.
5. Enter your password. For your first time this is also your telephone number.
From Office Phone...
Dial *98 (where available) from yourbusiness phone. If *98 is not availablein your area or you are away fromyour office, dial your access numberand enter your passcode.
Playback Controls AFTER Listening
Replay {4}
Envelope {5}
Send Copy {6}
Erase {7}
Reply {8}
Save {9}
Return to Main Menu {*}
Date and Time Option
On {1}
Off {2}
Group Lists
Create {1}
Edit {2}
Delete {3}
List Names {4}
Main Menu
Check Status† {0}
Check Unheard Messages {1}{1}
Listen {1}
Personal Options {2}
Send {3}
Check Receipt†† {4}
Restart {5}
Exit {*}
These controls are always available:
Help/System Prompts {0}
Exit/Back Up {*}
Complete/Skip {#}
Personal Options
Administrative Options {1}
Greetings {2}
Notification ON/OFF {4}
Extension Mailboxes† {9}
Notification Options** {5}
Exit {*}
Administrative Options
Password {1}
Voice Prompt Levels {2}
Date & Time Option {3}
Group Lists {4}
Exit {*}
Delivery Options
Private {1}
Urgent {2}
Message Confirmation {3}
Future Delivery {4}
Cancel Delivery {*}
Greetings
Personal Greeting {1}
Name {2}
Extended Absence§
{3}
Exit {*}
Voice Prompt Levels
Standard {1}
Extended {2}
Rapid {3}
Hear Message
Enter SBC Voice Mail...
Hear Date & Time Stamp*
Record Message
Send
Confirm Receipt {1}
Notify of Non-Receipt {2}
Enter Additional Destinations
No More Destinations
End {#}
Enter Destination
Replay {1}
Send {#}
No More Destinations {*}
Enter Mailbox Number
Enter Extension Number Add or Delete
Playback Controls WHILE Listening
Position {1} {2} {3}
Speed {4} {5} {6}
Volume {7} {8} {9}
Rewind Pause/Restart Forward
Slower Envelope Faster
Normal Louder
† Only available with Extension Option feature†† This option is available to host mailbox only* If turned on through Personal Options** Applies only to customers who have purchased Outcall to Pager§ Not available with Extension Option feature

Helpful Hints for You1. To disconnect, press { * } until Voice Mail says “Good-bye.”
Do not just hang up.
2. The star key { * }can be used to cancel a command, to return to the previous menu, or to exit. For example, you canreturn to the Main Menu by pressing { * } until you hear theMain Option Menu.
3. The pound key { # } is used to skip a message or completean option. Skipped messages are held and can be reviewed later.
4. If you are calling to retrieve your messages from anotherVoice Mail customer’s telephone, dial your access number,press { * } (not { # }) and then enter your mailbox number.
5. You may override most Voice Mail prompts by pressing thecorrect key for the option you want before the prompt iscompleted. This will save you time once you are familiar with Voice Mail.
6. If you forget your password, call the AT&T repair service at 1-203-420-3131 to have it reset. The repair service willreset your password and call you back. Your messages willnot be lost. Please protect your password and any otherinformation pertaining to your Voice Mail. Extension mailboxpasswords cannot be reset. If you forget your password, the host will need to delete and rebuild that extension. Themailbox will need to be reinitialized and any messages inthat extension mailbox will be lost.
7. If you have Call Waiting and are on the phone, you canchoose not to answer the second call. If you choose not to answer, the caller will be forwarded to Voice Mail.
8. If your telephone is equipped with memory keys, you maystore your Voice Mail access number on one of the memorykeys for quick and easy access to Voice Mail.
9. To exit your mailbox without reviewing the messages youhave marked for deletion during that mailbox session, press{ * }{ * } after listening to the system prompt.
Helpful Hints for Your Callers1. Callers may skip your greeting by pressing the { # } key.
2. Callers may leave you an urgent message by pressing { 1 }{ 1 } {2}after leaving you a message (before hanging up).Urgent messages are always heard first and are announcedas urgent messages.
3. Callers may delete their message by pressing { * } beforehanging up. Voice prompts then give them the option ofrecording another message.
4. A touch-tone phone is required to access Voice Mail.However, a touch-tone phone is not needed to leave a message.
5. If your mailbox is full, a caller will hear an announcementthat a message cannot be left.
Helpful Telephone NumbersFor User Instructions:AT&T Helpline 1-800-575-5552For example, to initialize the mailbox or create greeting.
For Service Problems:AT&T Repair 1-203-420-3131For example, forgot password, need to reset password or no message waiting indication.
30 31

Useful DefinitionsAccess Number – the number you call to listen to yourmessages and change your mailbox options.
Intermittent Dial Tone – a series of short dial tones indicatingthat you have new, unheard messages.
Mailbox – where Voice Mail stores your messages.
Mailbox Number – this is the same as your area code + 7-digittelephone number.
Password – a series of 6 to 15 numbers you select to gainaccess to your Voice Mail mailbox. (Your temporary password the first time you access your mailbox is your area code + 7-digit telephone number.)
Voice Prompts – automated voice instructions that guide youthrough using Voice Mail.
This is the “pound” key { # }
This is the “star” key { * }
Other Sources of Information
AT&T website: TheNewATT.com
AT&T Helpline: 1-800-575-5552
In the front of the AT&T white pages under AT&T Productsand Services
Wallet cards (attached on the bottom of your welcome letter)
32 33
AT&T Voice Mail How to Put Voice Mail to Work for You
Easy to UseReliableConvenientPrivate
© 2006 AT&T Knowledge Ventures. All rights reserved. 08/06 AB-0829
TERMS AND CONDITIONS
1. AT&T Voice Mail Service (the Service) is provided in accordance with the terms andconditions set forth in this AT&T Voice Mail User Guide (the Guide). This Guide setsforth the entire terms and conditions for the Service and supersedes any prior writtenor oral statements concerning the Service.
2. You are responsible for payment of all charges including taxes and surcharges, ifapplicable, for the Service. You will pay AT&T Connecticut (Us or We) our establishedrates or any revised rates for the Service. The charges for the Service will appear onyour AT&T monthly telephone bill and will be due upon receipt of the bill. If payment isnot received within thirty (30) days of the bill date, you may be charged a late chargeof 1% per month on the unpaid balance.
3. If required, you are responsible for obtaining and paying for any equipment for theService. A touch-tone telephone is required for mailbox access and to utilize theavailable features.
4. We may, at our discretion, revise the rates, change the customer interface such as therecorded prompts and directions, the length of time available for leaving messages,the number of messages which may be left, thelength of time a message will bestored and other aspects of the Service without notice.
5. WE DISCLAIM ALL WARRANTIES WITH RESPECT TO OUR PROVISION OF THE SERVICE,INCLUDING THE IMPLIED WARRANTIES OF MERCHANTABILITY AND FITNESS FOR APARTICULAR PURPOSE. Our sole liability for any failure, defect, error, loss or omissionin the provision of the Service is limited to the proportionate charge for the periodduring which the Service was affected. WE WILL NOT BE LIABLE, NOR WILL OURAFFILIATES, FOR INCIDENTAL, SPECIAL, OR CONSEQUENTIAL DAMAGES OF ANY KINDWHATSOEVER. Service is subject to availability.
6. You are solely responsible for the content of any transmission including messages overthe Service, as well as any connection of any equipment to the Service, if applicable,and will not use the Service for any unlawful purpose. If any claims are made againstus arising out of any transmission over the Service, or the connection of anyequipment to the Service (such as patent infringement claims arising out of suchconnection), or any other acts or omissions on your part, you shall indemnify us,defend and hold us harmless from and against any and all claims, damages andexpenses (including our attorney’s fees) incurred in defending any such claim.
AT&T local service and Voice Mail is provided by AT&T Connecticut. If your AT&T localservice is billed on a per-call, per-minute or measured service basis, you will be chargedfor all local calls associated with the use of your Voice Messaging Service. You will becharged for a local call every time you retrieve a message or otherwise access yourmailbox using your local business telephone number. You will also be charged for a localcall every time a caller leaves or attempts to leave you a message. For customers oncalling plans, such calls will be counted against your monthly allowance. If you accessyour mailbox from outside your local calling area, you will incur applicable in-state toll,long distance or other usage charges. Voice Mail services use Complementary NetworkServices such as Call Forwarding and Messaging Indicator.
Business User Guide