Embed Size (px)
Citation preview
SUGGESTED POLICY for Using the ACCUPoint® ATP
Environmental Surface monitoring system
SUBJECT: ATP Environmental Surface Monitoring DEPARTMENT: Sterile Processing Department APPROVED BY: EFFECTIVE: 11/2011 REVISED: 11/2011 PURPOSE: To monitor the cleanliness of environmental surfaces and to reduce risk to personnel or patients acquiring a hospital infection by using an ATP monitoring system. POLICY: ATP monitoring is designed to provide a method for healthcare facilities to monitor the effectiveness of their environmental surface cleaning efforts and make adjustments as necessary.1 The ATP monitoring system is to be used according to the manufacture's guidelines to ensure that the environmental surface cleaning process is occurring and reduce risk to staff and patients when it comes to hospital acquired infections(HAI).2,3,4,5,6 RATIONALE : ATP monitoring is a common tool utilized in the food service industry to test a surface or food/beverages for contamination. More recently, ATP-based methods have emerged as a possible solution in the healthcare industry, specifically for verification of the cleanliness of environmental surfaces. HAIs are caused by a variety of pathogens, including Costridium difficile and Staphylococcus aureus. Data indicates that 13 out of every 1,000 patients in a survey were either infected or colonized with C.difficie alone (94.4%). A study done by APIC National Prevalence on Clostridium difficile in US Health Care facilities showed that 7,178 inpatients are infected with C.difficile alone on any given day. This in turns increases the cost to a medical facility by increasing the length of stay for these patients. It was also noted that on average 301 patients per day die from C.difficile.7 Verifying a medical facilities environmental cleaning process is vital. Using an ATP system is part of that process. After any environmental cleaning, the amount
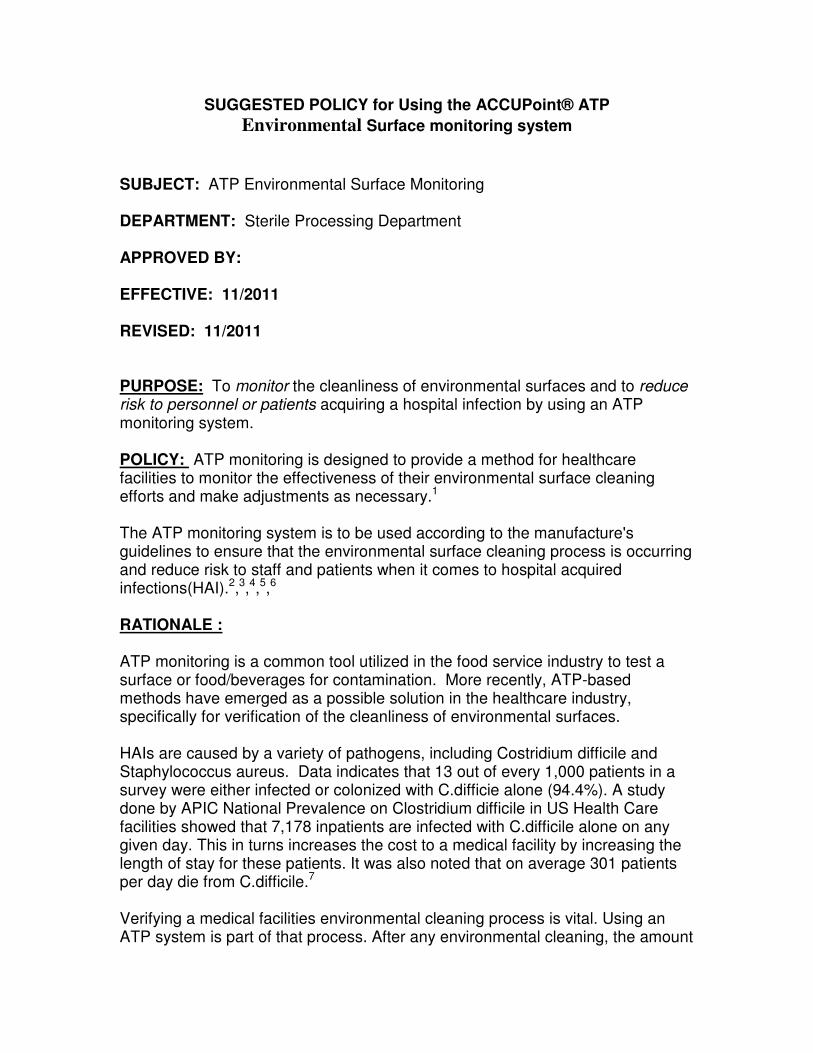
of ATP that remains is a direct indication of cleaning effectiveness. Monitoring the environmental cleaning process will allow a medical facility to spot trends and adjust as needed their environmental cleaning process. What is ATP? ATP or adenosine triphosphate is the energy currency of all living cells, both human and microbial. Cells can store energy as ATP for later use, making it a predominant molecule within cells. Since ATP cannot be produced by anything other than a living cell, it can be used as an indicator for the presence of viable cells. ATP testing entails the detection of bioluminescence or light emitted that is produced by a chemical reaction of ATP with firefly luciferase. An instrument, called a luminometer, is used to take the measurement of light. In essence, the same reaction that creates the light produced by a firefly produces light from ATP. The amount of light is directly proportional to the amount of ATP present. The limit of detection of the test is quite sensitive; however, it does not differentiate the source of the ATP. As noted there is ATP in living eukaryotic (animal) and in self-replicating prokaryotic (microbial) cells. Detection of ATP on a cleaned environmental surface would indicate that it still has microorganisms or human cells on it. It should be noted that ATP is NOT present in viruses nor is it present in components such as protein, carbohydrate, hemoglobin, lipids, etc.8
Environmental surface cleaning could be the top of a work area surface,an infusion pump surface,gomco pump,bed rail, wall, door knob,etc, this (environmental surface) is defined by the meidcal facility. The basic concept of the testing process A swab that is free of any ATP is moistened with water, buffer, or a solution that breaks down cell membranes and destroys enzymes that degrade ATP. The area to be tested is then swabbed but depending on the system in use, a very specific surface area my need to be swabbed (i.e. 10x10 cm2). The swab is placed into the solution in the swab holder, closed, and shaken. The swab is then placed in the luminometer, which determines the relative light units or RLU emitted from the swab. RLU values vary from system-to-system and are

not a standard unit of measurement across systems. Obtaining the number zero after testing is the optimal result. What to monitor Depending on the area and the equipment suggestions have been made by the CDC in there document entitled “Options for Evaluating Environmental Cleaning”.9 Other equipment found in the various departments can also be monitored beside the equipment and touch spots listed (suggested list is below).
All available objects noted below should be marked in each room.
Patient Area
High Touch Object
Bed Control
Phone and Call button
Chair
Light switch
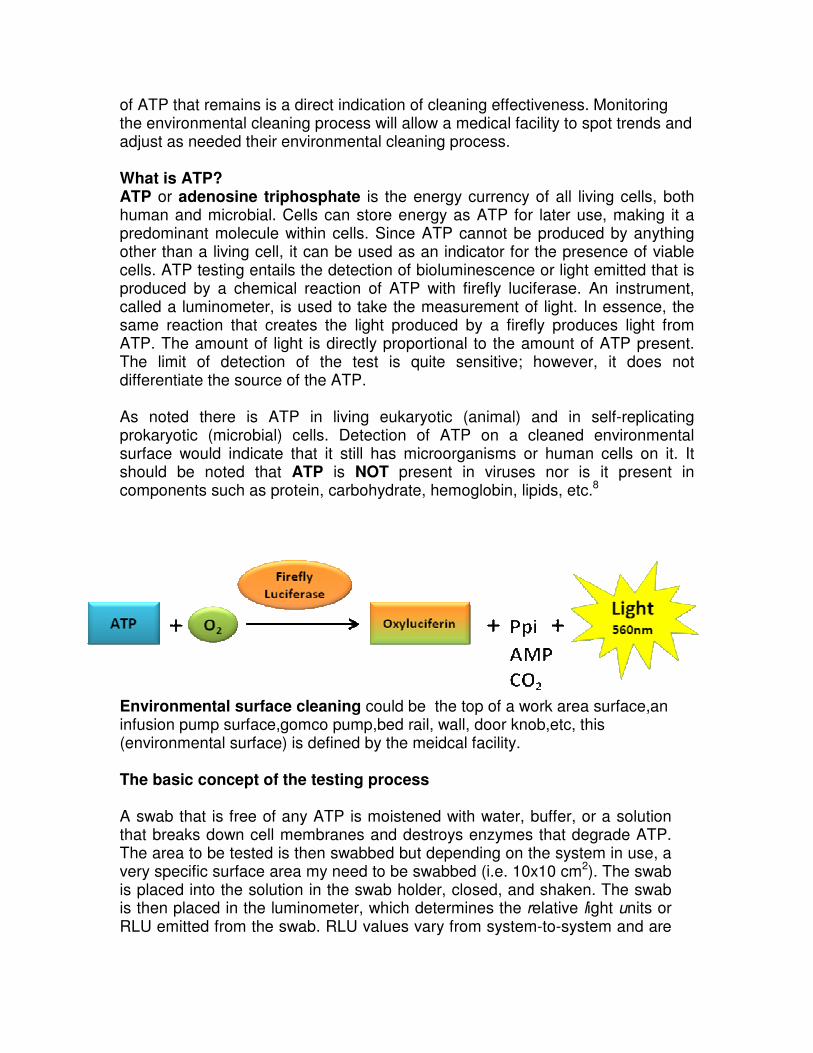
Sink top
Flush handle
Bed rails – If the bed rail incorporates bed controls, evaluate the control area (on the patient side) slightly away from the control buttons. If the rails do not contain the new style control areas, the rails are best evaluated on the smooth inner surface in an area easily accessible to cleaning.
Tray table - The top of the tray table should be evaluated in one corner.
Call boxes – Evaluation is done on the back mid portion of the call box in an area easily accessible to cleaning. If tiny call buttons are used, mark the separate TV control box instead if feasible.
Telephones – Evaluation is best done on the back side of the hand-held portion of the telephone near the top of the phone, away from the end that is attached to the phone wire.
Bedside tables – The drawer pull is evaluated.
Patient chair – Evaluation is done in the center of the seat of the chair close to the rear of the cushion. If the cushion is covered in textured fabric, evaluate the arm of the chair.
IV pole – For hanging IV poles, the shaft of the pole just above the textured grab area should be evaluated. For standing IV poles, the chest-high portion where hand contact is most common should be evaluated.
Toilet Area Sinks – If using a targeting system, the best place to mark the sink rim is towards the rear in order to avoid water splash interference with evaluation of the target. If direct evaluation is used, the faucet handle should be evaluated.
Bathroom and patient room light switches – When using a targeting method, a target is placed on the plate portion of the light switch. When using a direct evaluation system, the switch or plate should be evaluated because of its relatively large surface area.

Door knobs and door levers – The inside door knob or lever is marked for each bathroom door and each patient room door. If using a targeting system on a round door knob, the mark is best placed as close to the middle of the face of the door knob as possible. If the knob has a locking mechanism, place the target on the circular door plate that surrounds the handle. Lever-type handles are marked on any easily cleanable surface somewhat away from the end of the lever where direct hand contact would be most frequent. Similarly, when using a fluorescent system, door push plates are marked in the middle of the smooth part of the plate. When using direct evaluation systems, the most frequently contacted portion of the door knob, lever or push plate should be evaluated.
Toilet area hand holds (bathroom handrails) – Evaluate the most accessible surface of the hand hold just off the edge of the textured surface at the curve where the hand hold goes towards the wall. If there are two hand holds, mark the one most likely to be touched by a patient using the toilet.
Toilet seats –When using a targeting method, the target is placed on the back of the toilet seat just below the outside edge of the seat in an area readily accessible to cleaning activities. When using a direct evaluation method, the surface of the toilet seat should be evaluated, being sure to evaluate the same area before and after cleaning.
Toilet handles – When using a targeting method, the target is placed on top of the handle approximately two thirds away from the end of the handle.
Bed pan cleaning equipment – Two types of bed pan cleaning equipment designed as part of toilet units are in general use in hospitals.
o Hinged pipe type cleaner - The most commonly used bed pan cleaner consists of a pipe with
a small shower head type device that is lowered over the toilet bowl by the user. When the arm is lowered,
the toilet flush water is sprayed in a stream through the cleaner head. This device is best targeted by
marking the spray head (the most common area which would be touched by users).
o Spray hoses – Some toilets have a spray hose with a lever-type trigger on the handle which is
depressed to activate the spray head. Evaluate the handle itself.
Where Applicable IV Pump control panel –Evaluate an area that is just adjacent to the portion of the panel that is most frequently touched by healthcare providers.
Monitor control panel – When using a targeting method, the control panel should be evaluated in an area immediately adjacent to a part of the panel which is directly contacted by caregivers’ hands. When using a direct method, the control area itself is evaluated.
Monitor touch screen – The touch screen should be evaluated in the lower right hand corner in an area easily accessible to cleaning.
Monitor cables – Evaluate the junction box area.
Ventilator control panel – Evaluate an area immediately adjacent to a part of the panel which is most frequently touched by healthcare provider This is just a suggested list for testing and each facility will base their monitoring on their needs and the various pieces of equipment that can and will be monitored.
Frequency of Testing
The CDC suggests that risk management, infection control, and various other departments are needed to establish the frequency of monitoring. Each program will be hospital-specific and based on a joint definition of institutional expectations consistent with the CDC standards.10 The pass / fail RLU limit is also set by each medical facility based on their benchmarking and test data. It should be noted that with any type of monitoring / testing that direct observation is still needed of the staff and there cleaning practice. It is important to make sure that a Hawthorne type effect is not induced during the monitoring / testing process. PROCEDURE: Equipment need to perform an environmental surface cleaning test.
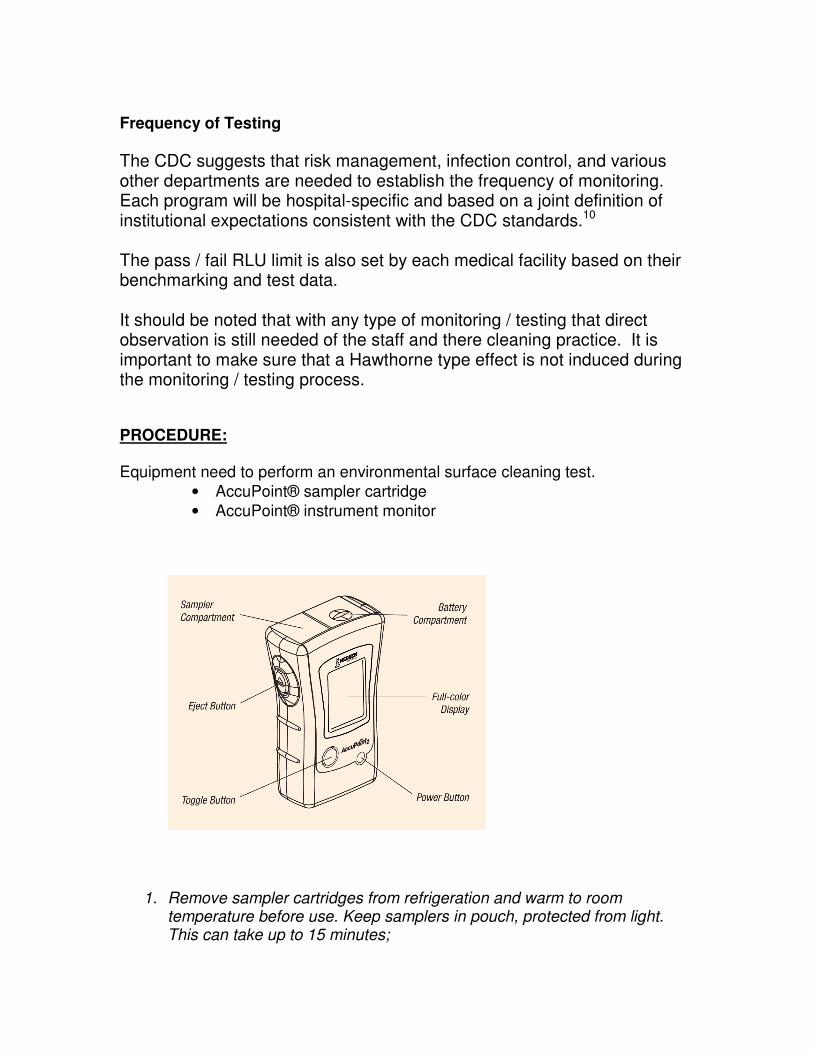
• AccuPoint® sampler cartridge
• AccuPoint® instrument monitor
1. Remove sampler cartridges from refrigeration and warm to room temperature before use. Keep samplers in pouch, protected from light. This can take up to 15 minutes;

2. Turn the instrument on and allow warming up for 5–10 minutes before taking the first reading.
3. Check the display to make sure that the instrument is ready. Note: If the instrument is not ready, there may be a used sampler cartridge inside. Press the eject button to discard the cartridge, close the sampler door, and turn the instrument off, then back on to clear the error.
4. Toggle to the appropriate testing site.
5. After an area is cleaned, a technician uses a self contained sampler to swab the cleaned items surface.
6. Grasp a sampler by its handle and pull it out of its cartridge. When collecting a sample, make sure to use aseptic technique. To ensure accurate test results, do not touch the tip of the sampler, or let the tip touch any other surface prior to testing. Do not touch the swab or the inside of the sampling device with fingers.
7. Surface sampling. Sample a surface of approximately 10 cm by 10 cm (4
in. by 4 in.) this is the ideal area to test whenever possible. Sample by starting in one corner of the square and forming a continuous line going back and forth across the square. Repeat the procedure with slightly less pressure from a starting point 90° from the first (see illustration). Note: If a sampled area is a different size, be sure to be consistent whenever retesting the surface. Depending on the environmental surface the area could be different if so make a note on what area is tested so it is the same each time.
8. Reinsert the sampler into its cartridge and fully depress. Shake the cartridge twice.
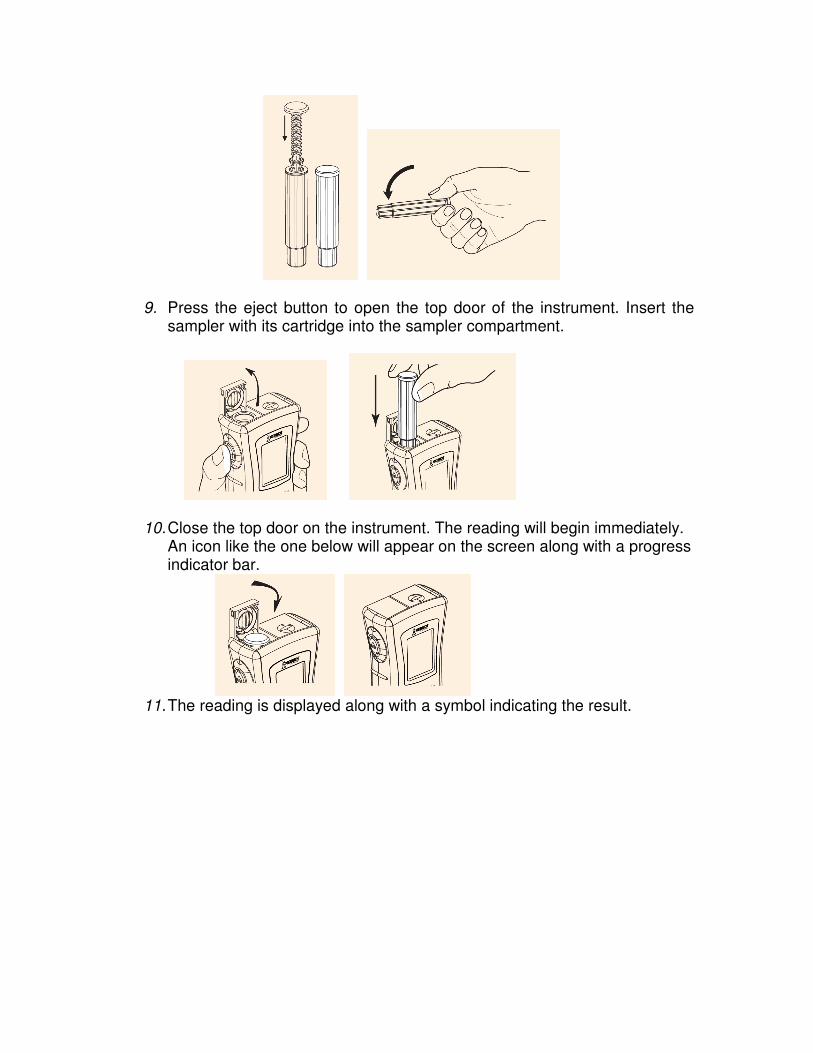
9. Press the eject button to open the top door of the instrument. Insert the sampler with its cartridge into the sampler compartment.
10. Close the top door on the instrument. The reading will begin immediately. An icon like the one below will appear on the screen along with a progress indicator bar.
11. The reading is displayed along with a symbol indicating the result.

12. Press the eject button and remove the sampler from the chamber. Samplers and their cartridges are non-toxic and may be disposed of without any special considerations.
13. Record the results according to policy. Repeat to step 5 to sample more
environmental surfaces. Note: once the readings have been taken, results can be transferred to the Windows-compatible data Manager software. See manufactures instructions for Use if using this software.
Maintenance of Accupoint® monitor
Clean the outer surfaces of the instrument with mild detergent and a slightly moistened cloth. If liquid spills inside the sampler compartment, turn the instrument off and use the AccuPoint cleaning kit to clean the interior surfaces. Turn the instrument upside-down when cleaning the sampler compartment with the AccuPoint cleaning kit.
Note: The use of unapproved solvents and swabs inside the sampler compartment may damage the unit or leave behind swab debris, adversely affecting instrument performance and test results. For more detailed cleaning information refer to the manufactures User’s guide for the AccuPoint® system by Neogen.

ATP Monitoring Log Sheet Date of Swabbing
Location Item Equipment Swabbed
ATP Result in RLU
Initials of person sampling
Comments
10/11/11 CSSD assembly area
Work surface table #2
15 smk Sample taken after cleaning - pass
10/11/11 CSSD decontam area
IV pole wheels
450 smk Failed and recleaned
The Pass / Fail RLU limit is set by each medical facility.

REFERENCES: 1 Infection control Today;9/2009;ATP Testing Helps ensure effectiveness of sanitation efforts (
pages 44-48) 2 Neogen Corporation ; AccuPoint® ; User’s Guide; release 2.0
3 Davidson, C. A.. Evaluation of two methods for monitoring surface cleanliness--ATP
bioluminescence and traditional hygiene swabbing. Luminescence, 1999; 33-38. 4 Griffith, C. J. et al. An evaluation of hospital cleaning regimes and standards. J Hosp Inf 2000; 19-
28 5 McDonnell, G. and P. A. Burke. An update on device cleaning technologies. Int J Inf Control
2009; v5:i2. 6 Powitz, R. W. The “M’ in ICM: Using ATP to evaluate sanitation. Food Safety Mag. 2009; 28-31
7 Neogen Corporation product information handouts; FS137-0909
8 Disinfection, Sterilization, ad Antisepsis : Principles, Practices, current issues, and new
research; 2006;Cleanig: recent advances in Products and Processes ad Real-Time Monitoring; Alfa. M; page 66. 9 http://www.cdc.gov/HAI/toolkits/Appendices-Evaluating-Environ-Cleaning.html#b
10 http://www.cdc.gov/HAI/pdfs/toolkits/Environ-Cleaning-Eval-Toolkit12-2-2010.pdf