Embed Size (px)
Citation preview

AirWatch ExpressVMware Workspace ONE UEM 1902

AirWatch Express
VMware, Inc. 2
You can find the most up-to-date technical documentation on the VMware website at:
https://docs.vmware.com/
If you have comments about this documentation, submit your feedback to
Copyright © 2019 VMware, Inc. All rights reserved. Copyright and trademark information.
VMware, Inc.3401 Hillview Ave.Palo Alto, CA 94304www.vmware.com

Contents
1 Introduction to AirWatch Express 5
Upgrade From AirWatch Express 6
Privacy 6
Terms of Use 7
2 Express Setup 8
Introduction and Survey 8
Apple Push Notification Service 9
Set Up VMware Enterprise Systems Connector 10
Set Up Active Directory 11
Set Up Apple's Volume Purchase Program 12
Devices & Users / Apple / VPP Managed Distribution 13
3 Blueprints 15
Create a Blueprint 15
Name the Blueprint 16
Add Applications to a Blueprint 16
Workspace ONE UEM and Valid Google Play Store URLs 17
Add Resources to a Blueprint 18
Adding Policies to a Blueprint 19
Add Policies to a Blueprint 20
Android Policy Support 20
Adding Users and User Groups to a Blueprint 22
Add Existing Users to a Blueprint 22
Add New Users to a Blueprint 22
Add Group to a Blueprint 23
4 Enrollment 24
Enroll a Device with Workspace ONE Intelligent Hub 24
Integrate Device Enrollment Program 25
Complete the DEP Enrollment Profile 26
5 Admin View 30
Admin Console at a Glance 30
Header Menu 30
Admin Console Notifications 31
Main Menu 33
Monitor 34
VMware, Inc. 3

Admin Panel Dashboard 34
Exporting Reports 34
Blueprints 35
Managing Blueprints 35
Devices Dashboard 35
Device List View 37
Device Details 39
Enrollment Status 40
User and Admin Accounts 43
Basic and Directory Accounts 44
User Accounts List View 48
User Groups List View 51
Admin Accounts 52
6 Install VMware Enterprise Systems Connector 56
Enable VMware Enterprise Systems Connector From AirWatch Console 58
Install the VMware Enterprise Systems Connector 59
Using VMware Enterprise Systems Connector Auto-Update 59
Verify a Successful VMware Enterprise Systems Connector Installation 61
7 Introduction to Directory Services 62
Directory Services Setup 63
Set up Directory Services with a Wizard 63
Set Up Directory Services Manually 64
Directory Service User Integration 70
Map Directory Services User Information 70
Directory User Group Integration 72
Configure Map Directory Services Group Settings 73
Add Directory Service User Groups to AirWatch Express 74
Remove Users From User Groups Based on Directory Service Group Membership 77
AirWatch Express
VMware, Inc. 4

Introduction to AirWatchExpress 1Mobile devices are valuable enterprise tools. They allow employees to have immediate access to yourinternal content and resources. However, the diversity of mobile platforms, operating systems, andversions can make managing devices difficult. VMware AirWatch® Express solves this problem byenabling you to configure, secure, monitor, and manage the most popular types of mobile devices in theenterprise.
AirWatch Express provides an affordable solution to security concerns and accessibility inherent toenterprise mobility.
n Manage small-scale deployments (500 device maximum) from a single console.
n Enroll devices in your enterprise environment quickly and easily.
n Configure and update device settings over the air.
n Secure mobile access to corporate resources by regulating applications, email and connectivity, andsecurity policies.
n Remotely lock, send messages, and enterprise wipe managed devices.
Supported BrowsersThe AirWatch Express console supports the latest stable builds of the following web browsers.
n Chrome
n Firefox
n Safari
n Internet Explorer 11
n Microsoft Edge
Note If using IE to access the AirWatch Express console, navigate to Control Panel > Settings >Internet Options > Security and ensure you have a security level or custom security level that includesthe Font Download option being set to Enabled.
VMware, Inc. 5

If you are using a browser older than those listed above, upgrade your browser to guarantee theperformance of the AirWatch Express console. Comprehensive platform testing has been performed toensure functionality using these web browsers. The AirWatch Express console may experience minorissues if you choose to run it in a non-certified browser.
Supported PlatformsAirWatch Express supports the following devices and operating systems.
n Android 3.0+ n Apple iOS 7.0+
n Apple macOS 10.9+ n Windows 10 devices (mobile and desktop)
This chapter includes the following topics:
n Upgrade From AirWatch Express
n Privacy
n Terms of Use
Upgrade From AirWatch ExpressWhen your organization needs mobile device management features beyond what AirWatch Expressoffers, you can upgrade to the full Workspace ONE UEM product at any time.
Contact Workspace ONE Support for more information.
PrivacyIt is important that you inform your end users about how their data is collected, stored, and displayedwhen they enroll into AirWatch Express.
User Information Displayed in Console
First Name Yes
Last Name Yes
Phone Number Yes
Email Accounts Yes
User name Yes
Privacy settings in AirWatch Express are dependent upon the ownership level of the enrolled device.
Privacy Setting Corporate-Dedicated Employee-Owned
GPS Data Collection On Off
Personal Apps Install Data Collection On Off
Prevention of Unmanaged Profile Installation On On
AirWatch Express
VMware, Inc. 6
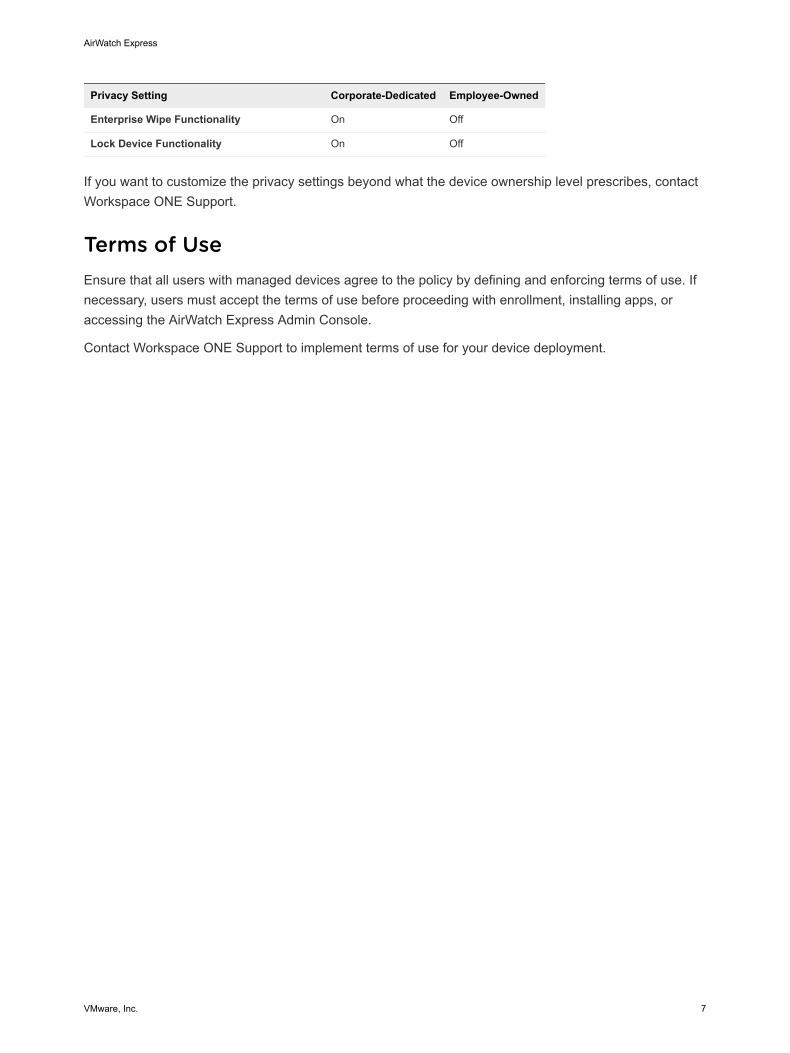
Privacy Setting Corporate-Dedicated Employee-Owned
Enterprise Wipe Functionality On Off
Lock Device Functionality On Off
If you want to customize the privacy settings beyond what the device ownership level prescribes, contactWorkspace ONE Support.
Terms of UseEnsure that all users with managed devices agree to the policy by defining and enforcing terms of use. Ifnecessary, users must accept the terms of use before proceeding with enrollment, installing apps, oraccessing the AirWatch Express Admin Console.
Contact Workspace ONE Support to implement terms of use for your device deployment.
AirWatch Express
VMware, Inc. 7

Express Setup 2Setting up AirWatch Express is as easy as logging in to the website. Upon the initial login, a step-by-stepwizard guides you through the process of configuring the software.
The Setup Wizard runs when you log in to AirWatch Express for the first time. If you stop and log out atany point during setup, the wizard saves your place. The next time you log in, the wizard returns you tothe same spot.
1 Introduction and Survey.
2 Apple Push Notification Service.
3 Set Up VMware Enterprise Systems Connector.
4 Set Up Active Directory.
5 Set Up Apple's Volume Purchase Program.
This chapter includes the following topics:n Introduction and Survey
n Apple Push Notification Service
n Set Up VMware Enterprise Systems Connector
n Set Up Active Directory
n Set Up Apple's Volume Purchase Program
Introduction and SurveyThe Introduction and Survey page briefly acquaints you with AirWatch Express and asks you threequestions about your deployment.
VMware, Inc. 8

1 Are your employees using Apple devices?
2 Do you use Active Directory?
Active Directory is Microsoft's directory service developed for Windows domain networks and is by farthe most popular directory service. AirWatch Express also supports other directory services such asLotus Domino and Novell e-Directory.
3 Do you plan to use an Apple Volume Purchase Program (VPP) to add apps?
While you can supply apps to your devices without participating in Apple's Volume PurchaseProgram, the program affords some advantages that may be of value: you can purchase apps &books in volume, get access to custom B2B apps, and buy content with purchase orders.
Apple Push Notification ServiceIf you plan to have Apple devices in your device fleet, you must establish connectivity between Apple andAirWatch Express before those devices can be managed.
You can always request Apple Push Notification Services (APNs) after the initial Express Setup.
AirWatch Express
VMware, Inc. 9

Procedure
1 Navigate to Groups & Settings > Devices & Users > Apple > APNs for MDM.
2 Download a Certificate Request.
a Download the AirWatch Express-generated certificate request file (PLIST) by selecting theMDM_APNsRequest.plist link and saving the file to your device.
b Select Save to proceed.
3 Create an Apple Certificate.
a Enter your corporate Apple ID. If you do not have a corporate Apple ID, you can create one fromthis setup page.
b Next, select the Apple Push Certificates Portal to sign in with your corporate Apple ID anddownload the PEM file. You need this PEM file for the following step.
4 Upload the Apple Certificate.
a Upload the AirWatch MDM certificate file (PEM) you received from Apple.
b Select Save to proceed.
Set Up VMware Enterprise Systems ConnectorThe VMware Enterprise Systems Connector Setup screen prompts you to download and run the VMwareEnterprise Systems Connector Installer.
AirWatch Express
VMware, Inc. 10

Once installed, it also prompts you to test the connection to the VMware Enterprise Systems Connectorserver.
Set Up Active DirectoryThe AirWatch Active Directory Setup screen prompts you to enter the settings for your existing activedirectory service, including server information and binding authentication information.
AirWatch Express
VMware, Inc. 11

Once completed, AirWatch Express integrates with your existing directory service making user and deviceintegration much easier. For more information about individual settings, see Set Up Directory ServicesManually.
Set Up Apple's Volume Purchase ProgramWhile you can supply apps to your devices without participating in Apple's Volume Purchase Program, itmay be of value to your organization. You can purchase apps & books in volume, get access to customB2B apps, and use purchase orders.
If you do not yet have a VPP account, the setup page enables you to create one. You can then upload theVPP token and Sync all your purchased apps, making them available to add to Blueprints.
AirWatch Express
VMware, Inc. 12

For more information, see Add Applications to a Blueprint.
Devices & Users / Apple / VPP Managed DistributionUse Apple's Managed Distribution system integrated with Workspace ONE UEM to distribute your freeand purchased Volume Purchase Program (VPP) applications and books to Apple iOS 7+ devices. Themanaged distribution model uses service tokens (also called sTokens) to retrieve your VPP contents anddistribute them to devices using the UEM console.
Navigate to Groups & Settings > All Settings > Devices & Users > Apple > VPP ManagedDistribution.
Setting Description
Description Enter your VPP Account ID.
Using your VPP Account ID as the description has several advantages:n Identifies the correct account if you use multiple sTokens.n Reminds you the correct account when you renew the sToken.n Identifies the correct account to others in your organization who take over managing the VPP account.
SToken Upload Select Upload to navigate to the sToken on your network.
Country Select where Workspace ONE UEM should validate the sToken.
This value reflects the region from where you bought content and ensures Workspace ONE UEM uploads thecorrect versions of your purchases.
When you sync your licenses, Workspace ONE UEM pulls the correct regional version of the content.
If Workspace ONE UEM cannot find the content in the app store from the region entered,Workspace ONE UEM automatically searches the iTunes App Store in the United States.
AirWatch Express
VMware, Inc. 13

Setting Description
AutomaticallySend Invites
Send invitations to all the users immediately after you save the token. This is an invitation to join and registerwith Apple's VPP, so that users access the terms of use for participating in the program.
Use the Message Preview option to review the invitation.
Note If your environment includes VPP applications set to the Assignment Type, Auto, then WorkspaceONE UEM sends invitations no matter how you configure this option. This behavior facilitates quick access toapplications upon enrollment.
Workspace ONE UEM automatically sends users of Apple iOS 7.0.3+ an invite command when you enablethis option. It does not send them an email message.
You do not have to enable this immediately. You can leave it disabled and still upload your token. Return andenable this feature to send invitations to all the enrolled devices whose users have not yet accepted to jointhe VPP.
MessageTemplate
Select an email template for an email message invitation for Apple iOS devices on Apple iOS 7.0.0 through7.0.2.
AirWatch Express
VMware, Inc. 14
Blueprints 3Blueprints ensure that users have the apps they need, email and Wi-Fi configurations to stay in touch,and security settings to keep the corporate content safe.
Blueprints are saveable, editable, reusable device configurations for your organization.
This chapter includes the following topics:n Create a Blueprint
n Name the Blueprint
n Add Applications to a Blueprint
n Add Resources to a Blueprint
n Adding Policies to a Blueprint
n Adding Users and User Groups to a Blueprint
Create a BlueprintYou can create blueprints quickly and easily by following the step-by-step blueprint wizard. You can optout of the blueprint creation process at any time. The wizard saves your progress, allowing you to pick upwhere you left off later.
VMware, Inc. 15

Procedure
1 From the main menu, navigate to Blueprints > List View and select Add Blueprint.
2 Select Continue to begin the blueprint creation process.
3 Name the Blueprint.
Name the BlueprintThe first step in creating a blueprint is determining what it is called and whether the blueprint applies toeveryone by default.
Setting Description
Name This required step is how the blueprint appears in the listing.
Include All UsersIn Blueprint
This optional setting ensures that all current and future users in your environment receive this "GlobalBlueprint" containing settings that all users need by default.
You cannot manually remove users from Global Blueprints. If it comes down to removing individual usersfrom the Global Blueprint, consider instead altering the content of the blueprint to make it truly global.
Add Applications to a BlueprintAfter you have named the blueprint, include apps so that when it is assigned to devices, your users haveeasy access to the apps they need.
This step is optional and you can skip ahead by selecting Continue to Resources. You can also Save &Exit at any time.
Procedure
1 Select Add App.
AirWatch Express
VMware, Inc. 16

2 Select the Type of App to add: Public App, Purchased App, or Web App.
n Public App
Add an app available in any of the major app stores to your blueprint. Choose among Android,Apple, Windows Phone, and Windows Desktop.
n Purchased App
Add an app to a blueprint that has been purchased with the Volume Purchasing Program (VPP)by Apple. Requires VPP configuration during Chapter 2 Express Setup or Devices & Users /Apple / VPP Managed Distribution.
You can search for a purchased app by name or keyword. VPP information includes a licensecount information.
n Web App
Add an app that links to a specific website, such as email, wiki, or online auction house.
You must supply the URL, Name, and App Delivery method, described in step 4. Optionally, youcan Upload Icon representing the Web app. When adding an application using a Google PlayStore URL, additional information such as name and application icons cannot be retrieved.
3 Select the country in which the app is used.
This selection determines where AirWatch searches for the app.
4 Search the applicable app stores (Google, Apple, and Windows) for the apps you want to add. Onceyou have located and selected the app, you must select how you want the app to be delivered.
n On Demand: users download
The app must be downloaded to the device by the user. This option reduces the time it takes topush the blueprint to devices. However, it also means that the user can opt out of installing theapp.
n Automatic: system push
The app is installed when the blueprint gets pushed to devices. This option increases the time ittakes to push the blueprint to devices but it means that the app is installed automatically.
Only Android and Apple offer these options. Users must download apps from the Windows Store.
5 Select Continue to save your settings and proceed to the next step.
You can alternatively go back and add another app type from step 2.
Workspace ONE UEM and Valid Google Play Store URLsWhen you add an Android public application, you can enter the Google Play Store URL. You can also adda URL that you know to be valid but that is not from the Google Play Store. This method is useful todeploy applications when Workspace ONE UEM cannot validate URLs with the Google Play Store.
AirWatch Express
VMware, Inc. 17

The AirWatch Catalog uses the entered URL as a link so end users can access the application. Thesystem can manage these applications depending on where your source the URL.
n Valid Google Play Store URL – The Workspace ONE UEM system can manage these applicationsbut it cannot retrieve the application icons.
n Valid URLs From Other Sources – The Workspace ONE UEM system cannot manage theseapplications and it cannot return the application in its results because it cannot validate the URL withthe store.
Add Resources to a BlueprintOnce you have added applications, you can include email and Wi-Fi configuration settings in yourblueprints, enabling users to receive email and connect to network resources. This step is optional. SelectContinue to skip this section.
Procedure
1 Complete the Configure Email settings.
Setting Description
Mail Client Choose the email client your users run on their devices. The default selection isNative for all platforms.
Account Name Enter the unique name of the email account, for example, Secure CorporateEmail.
Exchange ActiveSync Host Enter the domain name of the Exchange ActiveSync Host that your devicesconnect with to send and receive email.
Use SSL Choose to use Secure Socket Layer for your email configuration.
Domain Enter the login domain by which the user email is recognized. The default is the{EmailDomain}, entered as a lookup value.
A lookup value is a variable that represents the user or the device. In this case,the domain the blueprint uses to log the user in is the email domain. Theadvantage to using a lookup value over entering a static text domain is that usersdo not necessarily all have the same email domain. No matter what email domaineach user uses to retrieve their email, the lookup value represents that user (ordevice) accurately.
User name Enter the login user name. The default is {EmailUserName} lookup value.
Email Address Enter the login email address. The default is {EmailAddress} lookup value.
Password Enter the login password. Select Show Characters check box to replace theredacted password and view the password as entered.
2 Complete the Configure Wi-Fi settings.
Setting Description
Service Set Identifier (SSID) Enter a unique identifier for the wireless access point.
Hidden Network Choose whether or not you want the network access point to be visible in the Wi-Fi listing.
AirWatch Express
VMware, Inc. 18

Setting Description
Auto-Join Choose whether or not you want authenticated devices to be automatically joinedupon return to the Wi-Fi hot spot.
Security Type Choose the type of wireless network encryption: None, WEP, WPA, and WPA2.
Password Enter the wireless network password. Select the Show Characters check box toreplace the redacted password entry and view the password as entered.
This setting is only available when a Security Type selection is made.
3 When finished configuring the settings described below, select Continue to save your settings andmove to the next step, Policies.
Adding Policies to a BlueprintBlueprints can contain Device Feature, Application, and Data Loss Prevention policies, which determinewhich permissions are available.
Device Feature Policiesn Allow use of camera.
n Allow use of Bluetooth.
n Allow use of AirDrop/Near Field Communication (NFC).
n Allow use of Siri or Cortana.
n Allow Enterprise Wipe.
n Allow use of Google/iCloud Backup.
Application Policiesn Allow access to the App store.
n Allow use of YouTube – Allow access to YouTube. For Apple devices, applicable only to iOS 5.0 andearlier.
n Allow use of GameCenter – Allow your users to access Apple's social gaming network.
n Allow untrusted applications – Enable your users to install apps that are not obtained from anofficial repository of apps (App Store, Microsoft Store, Google Play).
n Allow Native Browser.
Data Loss Prevention Policiesn Allow screen capture.
n Allow copy/paste between apps.
n Allow SD card.
AirWatch Express
VMware, Inc. 19

n Allow unmanaged use of managed documents – Managed documents refers to corporate assets.Enable this setting to allow your users to open and edit corporate content with unmanaged apps. Forexample, opening a Word Document using Google Docs instead of MS Word).
n Do Not require device encryption – Remove the requirement for device encryption, a secure datastorage methodology.
Add Policies to a BlueprintOnce you have added resources to the blueprint, you can define how the device is used while beingmanaged. This definition can include a passcode requirement, length, and complexity of the passcode,camera use, native browser use, copy/paste capability, and many other options. This step is optional.
Procedure
1 Complete each of the policy settings that reflect your security concerns and operating norms.
Not all options are applicable to all platforms. Consult the chart that is included on the Edit Policiespage in AirWatch Express and the Android Policy Support.
2 After completing each of the sections detailed below, select Continue to proceed to the next step,adding users and user groups.
3 Insert check marks to enable each applicable policy setting.
Setting Description
Require Passcode Choose whether or not to require a passcode for the device.
Minimum Passcode Length Choose the minimum passcode length from 4 to 16 characters.
Auto-Lock (in min) Choose the time in minutes that the device automatically locks.
Maximum Number of Failed Attempts Choose the number of times the user is allowed to fail to authenticate beforelocking the device.
Password Complexity Choose the complexity of the password, between Simple and Alphanumericcharacters.
Maximum Password Age (days) Choose the number of days before the user is required to change their password.
Android Policy SupportGiven the divergent nature of the Android platform, support for all resources and policies sometimesdepends upon a device-specific application programming interface (API). The original equipmentmanufacturer (OEM) authors this API.
Table 3‑1. Android OEM Support
Standard SAFE LG Lenovo HTCMotoMX
Pana-sonic Amazon Nook Sony Intel ASUS
Blue-bird
Native EmailConfiguration
v1.0+ v1.0+ v1.0+ v5.0+
AirWatch Express
VMware, Inc. 20

Table 3‑1. Android OEM Support (Continued)
Standard SAFE LG Lenovo HTCMotoMX
Pana-sonic Amazon Nook Sony Intel ASUS
Blue-bird
Device Functionality
AllowCamera
v4.0+ v2.0+ v1.0+ MXv1.3+
v1.0+ v1.0
Allow ScreenCapture
v2.0+ v1.0+ v1.0+ v5.0+ v1.0+
Allow NFC v2.0+ v2.0+ v7.0
EnterpriseWipe
✓ ✓ ✓ ✓ ✓ ✓ ✓ ✓ ✓ ✓ ✓ ✓ ✓
Allow EmailAccountAddition
v5.0+ v6.0+
Encryption
RequireStorageEncryption
v3.0+ v2.0+ v1.0+ v1.0+ v1.0+ MXv1.3+
Sync and Storage
Allow GoogleBackup
v2.0+ v2.2+
Allow SDCard Access
v2.0+ v1.0+ v1.0+ v2.0+ MXv1.3+
v1.0+ v2.0+ v1.0+
Applications
Allow GooglePlay
v2.0+ v1.0+ v1.0+
AllowYouTube
v2.0+ v1.0+ v1.0+
Allow Copy &PasteBetweenApplications
v4.0+ v1.0+
AllowUntrustedApps
v2.0+ v1.0+ v1.0+ v2.0+ MXv1.3+
v1.0+ v5.0 v1.0
Bluetooth
AllowBluetooth
v2.0+ v1.0+ v1.0+ v2.0+ MXv1.3+
v1.0+ v2.0+ v1.0
Browser
Allow NativeAndroidBrowser
v2.0+ v1.0+ v2.0+
AirWatch Express
VMware, Inc. 21

Adding Users and User Groups to a BlueprintOnce you have added policies to the blueprint, you can add new and existing users and active directory-based user groups to your blueprint.
When users Chapter 4 Enrollment, they receive all the apps, resources, and policies from the blueprint.
Add Existing Users to a BlueprintAdd existing users to a blueprint using the search bar.
Procedure
1 Search current users with the search bar.
2 Add the search results to your blueprint.
Add New Users to a BlueprintYou can add new users to a blueprint as Basic users or Directory users.
Procedure
1 Select Add User.
You must Basic and Directory Accounts.
a For Basic users, complete the user information.
Setting Description
Security Type Choose Basic to add a basic user.
Email Address Enter or edit the user's email address.
User Name Enter a user name with which the new user is identified.
Password Enter a password that the user can use to log in.
Confirm Password Confirm the password.
First Name Enter the first name of the user.
Middle Name Optional. Enter the middle name of the user.
Last Name Enter the last name of the user.
b For Directory users, complete the user information.
Setting Description
Security Type Add an active directory user by choosing Directory from the drop-down menu.
Directory Name This pre-populated setting identifies the Active Directory name.
Domain Choose the domain name from the drop-down menu.
User Name Enter the directory user name and select Find User. If the system finds amatch, the user information is populated automatically in the Name and Emailsettings.
AirWatch Express
VMware, Inc. 22

2 Once all the settings have been completed, add the Basic or Directory user to the blueprint byselecting Add User at the bottom of the page.
You can assign multiple blueprints to users.
Apps and resources that are unique to the assigned blueprint are installed on the user device. Appsand resources that are duplicated across multiple blueprints do not get duplicated on the device.
Add Group to a BlueprintUse the Add Group button to search for existing directory-based user groups to assign blueprints tousers and their devices.
Procedure
1 Complete the group settings.
Setting Description
Directory Name Read-only option displaying the address of your directory services server.
Domain The domain automatically populates based on the directory services serverinformation you enter on the Directory Services page (System > EnterpriseIntegration > Directory Services).
Group Base DN The group base distinguished name is used as a starting point for the user groupsearch. Information in this setting populates automatically based on the Domainsetting.
Group Name Identify the name of a user group in your active directory and select Search tosearch for it. If a directory group contains your search text, a list of group namesdisplays.
Select a Group Name from your Search Results list.
2 Select Add Group to add the user group to the list of users and user groups to be added to theblueprint.
3 Once your list of users and user groups is complete, select Continue to save your settings and applyyour users to the blueprint.
4 Select Publish to finalize and push the blueprint out to user devices. You can return to the Blueprintslisting to edit your blueprint configurations at any time.
AirWatch Express
VMware, Inc. 23

Enrollment 4Even if users are added to a blueprint and the blueprint is published, those users must complete theenrollment process first before their devices are managed. The enrollment process may differ slightlydepending on the device platform (iOS, Android, Windows Phone).
Apple DEP IntegrationTo maximize the benefits of Apple devices enrolled in Mobile Device Management (MDM), Apple hasintroduced the Device Enrollment Program (DEP). With DEP, you can perform the following.
n Install a non-removable MDM profile on a device, preventing end users from being able to delete it.
n Provision devices in Supervised mode (iOS only). Devices in Supervised mode can access additionalsecurity and configuration settings.
n Enforce an enrollment for all end users.
n Meet your organization's needs by customizing and streamline the enrollment process.
n Prevent iCloud back up by disabling users from signing in with their Apple ID when generating a DEPprofile.
n Force OS updates for all end users.
This chapter includes the following topics:n Enroll a Device with Workspace ONE Intelligent Hub
n Integrate Device Enrollment Program
n Complete the DEP Enrollment Profile
Enroll a Device with Workspace ONE Intelligent HubEnrolling a device with the Workspace ONE Intelligent Hub is the main option for Android, iOS, andWindows devices.
VMware, Inc. 24

Procedure
1 Navigate to AWAgent.com from the native browser on the device that you are enrolling.
Workspace ONE UEM auto-detects if the Workspace ONE Intelligent Hub is already installed andredirects to the appropriate mobile app store to download the Workspace ONE Intelligent Hub ifneeded.
Downloading the Workspace ONE Intelligent Hub from public application stores requires either anApple ID or a Google Account.
2 Run the Workspace ONE Intelligent Hub upon the completion of the download or return to yourbrowser session.
Important To ensure a successful installation and running of the Workspace ONE Intelligent Hub onyour Android device, it must have a minimum of 60 MB of space available. CPU and Run TimeMemory are allocated per app on the Android platform. If an app uses more than allocated, Androiddevices optimize themselves by killing the app.
3 Enter your email address. Workspace ONE UEM checks if your address has been previously addedto the environment. In which case, you are already configured as an end user and your organizationgroup is already assigned.
If Workspace ONE UEM cannot identify you as an end user based on your email address, you areprompted to enter your Environment URL, Group ID, and Credentials. If your environment URL andGroup ID are needed, your Workspace ONE UEM Administrator can provide it.
4 Finalize the enrollment by following all remaining prompts. You can use your email address in place ofuser name. If two users have the same email, the enrollment will fail.
Integrate Device Enrollment ProgramIntegrating AirWatch Express with Apple Device Enrollment Program (DEP) requires completing tasks inboth the AirWatch Express Console and in Apple's DEP portal. Your organization must already beregistered with Apple's Deployment Programs.
When you begin the integration process, AirWatch suggests that you do not use Internet Explorer as yourbrowser. Also, once you begin configuring the DEP wizard in the AirWatch Express Console, keep thebrowser session open. You cannot save your activity until you complete the final configuration step, so itis important to finish the entire configuration in one browser session.
Procedure
1 Start in the AirWatch Express Console to begin integrating with DEP.
2 Move between the DEP portal to create a virtual MDM server container for devices and the AirWatchExpress Console to create an initial profile.
3 Assign devices to the virtual MDM container in Apple's portal, so they can be managed throughAirWatch Express.
AirWatch Express
VMware, Inc. 25

Complete the DEP Enrollment ProfileAfter you register devices with Apple, use the Workspace ONE UEM DEP profile wizard to create a DEPenrollment profile. An enrollment profile is a collection of DEP settings assigned to your registereddevices. You can create more profiles later if needed.
Create a new DEP enrollment profile or edit an existing profile.
1 In the Workspace ONE UEM console, navigate to Groups & Settings > All Settings > Devices &Users > Apple > Device Enrollment Program.
2 Select Upload and select Apple Server Token File (.p7m). Select Next. Now Workspace ONE UEMand Apple can authenticate each other.
For clarity, use only one token at the customer organization group. Only add multiple tokens if yourorganization has a complex configuration, or if you are enrolling devices with multiple DEP accounts.
3 Configure the Authentication settings, based on whether you turn authentication On or Off.Authentication settings are only available for devices running iOS 7.1 and higher. If devices runningiOS 7.0 and lower are assigned an authentication profile, the devices are automatically enrolled usingstaging authentication.
n If you turn on Authentication, each user must tie a DEP device to their own user account.
n If you turn off Authentication, you can enable staging of all devices under a single user account,and extra configuration options appear on the Settings page to accommodate this option.
If you set Authentication to On, then configure:
Setting Description
Device OwnershipType
Determines the ownership type of the device upon enrollment, which can be either Corporate-Dedicated or Employee-Owned.
Device OrganizationGroup
Select the organization group your where your end users authenticate. Only end-user accountscreated at this level or a parent above it can authenticate their devices.
End users may authenticate using either their Active Directory credentials or basicWorkspace ONE UEM credentials, depending on which authentication type you have enabled underEnrollment settings.
Custom Prompt Turn On Custom Prompt to enable custom text to appear on the device authentication screenduring the Setup Assistant. Authentication occurs when end users are prompted for theircredentials.
Message Template Choose a message template to send as a Custom Prompt. (Supported for English-language only.)This option is not available when Custom Prompt is Off.
AirWatch Express
VMware, Inc. 26

If you turn Authentication Off, then configure:
Setting Description
Default Staging User Select the Enrollment User assigned to the device.
Device Ownership Type Select the ownership type of the device upon enrollment, which can be either Corporate-Dedicated or Employee-Owned.
Device Organization Group Select the organization group where your devices are enrolled.
4 Configure MDM features of the device.
Setting Description
Profile Name Enter the name of the profile as it appears in the UEM console.
Department Enter the name of your department as it appears in the device's About Configuration panel uponsetup and enrollment.
Support Number Enter your organizational support contact phone number as it appears in the device's AboutConfiguration panel upon setup and enrollment.
RequireMDM Enrollment
Select Enable to require end users to enroll into Workspace ONE UEM MDM. Use this setting toensure end-user devices cannot be activated unless they enroll into Workspace ONE UEM MDM.
Supervision Enable to set the device in Supervised mode, which is an alternative to configuring Superviseddevices using Apple Configurator. Supervision is required for shared devices.
Shared Devices Enable this option to use shared devices with education functionality.
Lock MDM Profile Select Enable to prevent end users from unenrolling from Workspace ONE UEM MDM. Thissetting ensures that end users cannot remove the Workspace ONE UEM MDM profile installed onthe device. This option may only be enabled if Supervision is enabled.
Anchor Certificate Enable this option to upload certificates as trusted anchor certificate and push to devices duringDEP enrollment. These certificates are used as trusted anchor certificates when evaluating thetrust of the connection to the MDM server URL. If no certificate is uploaded, the built-in rootcertificates will be used.
Device pairing Enable to allow the device to sync with any workstation through iTunes, Configurator, and iPCU.Optionally, set Device Pairing to Disable when deploying education functionality, and Upload aDevice Pairing Certificate for supervised identities.
From Workspace ONE UEM 9.2.2, you can upload Device Pairing Certificates whether DevicePairing is set to Enabled or Disabled.
Await Configuration Enable this setting if the MDM server is expected to send extra commands before the device canallow the user to proceed in the Setup Assistant. Await Configuration is required for educationfunctionality.
To override the Await Configuration setting on a device, navigate to Device > Details View andselect the device to override. Select More Actions > Device Configured to note the device asconfigured and skip the Awaiting Configuration screen during enrollment.
If you enable Await Configuration, more options appear in the Setup Assistant section.
Auto Advance Setup Enable this setting to automatically apply DEP configuration to an enrolling device. Users can skipall setup panes, and the device is automatically set to the most restrictive option by default withinaround 30 seconds after network active. Applies to ethernet-connected tvOS devices only.
AirWatch Express
VMware, Inc. 27

5 Choose the items seen by end users during the Apple Setup Assistant workflow that appears afterthe device is powered on for the first time.
Setting Description
Passcode Select Don't Skip to require user to set a passcode during setup. If an MDM passcode profile isalready set up through Workspace ONE UEM, select Skip.
Touch ID Select Don't Skip to prompt user to configure Touch ID during setup.
Location Services Select Don't Skip to prompt user to enable or disable Location Services during setup. If youplan on tracking GPS locations for your devices, select Don't Skip.
Restoring from Backup Select Don't Skip to prompt user to restore from backup during setup. You must select Don'tSkip to allow users to move data from a previous device, including an Android Device.
Move from Android If Restoring from Backup is set to Don't Skip, select Don't Skip in this pane to prompt usersto move accounts and data from an Android device during setup.
Sign in with Apple IDand iCloud
Select Don't Skip to prompt user to sign in with an Apple ID and iCloud account during setup.
Terms of Use andConditions
Select Don't Skip to prompt users to read and accept the Terms of Use and Conditions duringsetup.
Siri Select Don't Skip to prompt user to configure Siri. If you select Skip, Siri is disabled on enrolleddevices.
Diagnostics Select Don't Skip to prompt user to enable or disable sending diagnostic data to Apple. If youselect Skip, sending diagnostic data is disabled on enrolled devices.
Registration Select Don't Skip to prompt user to register the device with Apple during setup.
Apple Pay Select Don't Skip to prompt user to set up an Apple Pay account during setup. If you selectSkip, Apple Pay is disabled on enrolled devices.
Zoom Select Don't Skip to prompt user to enable zoom functionality during setup.
FileVault 2 Select Don't Skip to prompt user to set up a FileVault account.
Display Tone Select Skip to allow users to skip the display tone setup step for enrolling iOS devices.
Home Button Sensitivity Select Skip to allow users to enroll devices without configuring the Home button sensitivity onenrolling iOS devices.
Tap to Setup Select Skip to allow enrolling tvOS devices to enroll without an associated iOS device.
Screen Saver Select Skip to allow users to enroll a tvOS device without configuring a screen saer.
Keyboard Select Skip to omit the prompt for users to select a keyboard type during the Setup Assistantprocess.
Onboarding Select Skip to prevent users from viewing on-boarding informational screens for user educationduring the Setup Assistant process.
Watch Migration Set to Skip to prevent users from viewing options for watch migration during the Setup Assistantprocess.
iCloud Analytics Set to Skip to omit a user prompt to send analytics to iCloud during setup.
iCloud Documents andDesktop
Set to Skip to prevent users from viewing iCloud Documents and Desktop screen in macOS.
TV Home Screen Sync Set to Skip to prevent users from toggling the TV home screen layout during setup.
TV Provider Sign In Set to Skip to prevent users from signing in to a TV provider during setup.
AirWatch Express
VMware, Inc. 28

Setting Description
Where is the TV? Set to Skip to omit the Where is this Apple TV screen on tvOS devices enrolling through DEP.
Privacy Set to Skip to omit the Privacy screen in DEP setup assistant while onboarding.
iMessage And FaceTime Set to Skip to prevent the iMessage and FaceTime prompt during setup.
Software Update Set to Skip to prevent informing users about Software Updates during setup.
Screen Time Set to Skip to prevent informing users about Screen Time during setup.
6 For certain configurations detailed in the Setup Assistant configuration, use the Admin AccountCreation section to create an admin account for local and remote macOS device admin actions.
Setting Description
Account Setup This item appears only if Await Configuration is set to Enabled.
Select Don't Skip to require users to create an account during setup. Configure the type of account theuser creates in Account Type.
Select Skip if you have created a Directory Profile for the user and they do not need to create anaccount. Configure the admin account for this selection in the Admin Account Creation section.
Account Type This item appears only if Account Setup is set to Don't Skip.
Select Standard to give users access to a standard user account on their macOS device. If you selectStandard, you must create an admin account to manage the Standard account.
Select Administrator to allow users to create an Administrator account on their macOS device.
Password Create a password for the admin account.
Hidden Select Enabled to hide the admin account on the macOS device. Hidden admin accounts can enhancesecurity and user experience.
Select Disabled to make the admin account visible when a user logs in.
Choose YourLook
Set to Skip to the prompt for users to choose between Light and Dark mode on macOS Mojave 10.14.
Display Tone Set to Skip to prevent the Display Tone screen during Setup Assistant.
7 Select Save to view the Summary page and review the settings you have selected. Assign thesettings to devices registered in the Device Enrollment Program.
Setting Description
Sync Now andAssign to AllDevices
Select Yes to save and deploy the DEP profile settings to all devices that are currently registered withthe MDM server that you just created in the DEP portal.
Selecting No saves the DEP profile settings but does not deploy them to devices.
Auto AssignDefault Profile
Select Yes to push the DEP profile settings to all devices that are currently registered once they aresynced with Workspace ONE UEM and any devices from that point on as they are newly registeredwith Apple and synced with Workspace ONE UEM.
Selecting No means newly-registered devices do not automatically receive the DEP profile settings.Enable this setting if you plan to create multiple DEP profiles for different devices.
8 Once the deployment options are configured, select Save. You are now ready to manage profiles onDEP-enabled devices from the UEM console.
AirWatch Express
VMware, Inc. 29

Admin View 5Once the Express Setup, device enrollment, and blueprint creation processes are complete, the AdminConsole allows you to manage every aspect of your device deployment.
With this single, web-based resource, you can quickly and easily add new devices and users to your fleet,manage blueprints, and configure system settings.
This chapter includes the following topics:n Admin Console at a Glance
n Blueprints
n Devices Dashboard
n User and Admin Accounts
Admin Console at a GlanceBefore you begin managing devices with AirWatch Express, acquaint yourself with the Admin Consolebuttons and panels containing the most helpful information about your device fleet.
Collapse and Expand the Main MenuCollapse or close the secondary menu, which creates more space on the screen for device information,
by selecting the bottom-left arrow . To expand or reopen the secondary menu, select the modified
right arrow .
Header MenuThe Header Menu appears at the top of nearly every page of the Admin Console. The header menuenables you to view summary panels, run searches, and get online help.
VMware, Inc. 30

n Organization Group – Displays the Organization Group (the tab labeled AirWatch Express 1005 inthe screenshot) under which your device fleet is managed.
n Add – Get quick access to adding an admin, device, or user.
nGlobal Search – ( ) Search for devices, users, and administrators using the global search bar.
nNotifications – ( ) Stay informed about expired APNs certificates with Admin ConsoleNotifications. The number badge on the Notifications icon indicates the number of alerts requiringyour attention.
nSaved – ( ) Access your favorite and most-utilized pages within the Admin Console.
nHelp – ( ) Browse or search the available guides and feature documentation.
n Account – View your account information. Change the Account Role that you are assigned to withinthe current environment. Customize settings for contact information, language, Admin ConsoleNotifications, view history of Logins, and Security settings including PIN reset. You can also Log outof the AirWatch Console and return to the Login screen.
n Refresh – ( ) Resend a query to the console and retrieve an up-to-date listing of devices and otherdata. Such a refresh can be useful in high-volume, high-activity environments.
n Home – ( ) Use this icon to assign any screen in the AirWatch Console as your home page. Thenext time you open the Admin Console, your selected screen displays as your home page.
n Save – ( ) Save the current page or view for quick access from your list of Saved pages.
Admin Console NotificationsThe Notifications button is located next to the Global Search bar. Notifications appear when APNs forMDM certificates expire within 30 days.
Notifications help you avoid the hassles involved with expired certificates and keep your devices in touchwith the AirWatch Express Admin Console.
AirWatch Express
VMware, Inc. 31

n APNs Expiration and APNs Expired – You are notified 30 days before APNs for MDM certificatesexpire. APNs alerts are Critical Priority alerts. After the APNs certificate expires, the Critical Priorityalert is reduced to a High Priority alert.
Manage Console NotificationsWhen there are active notifications that require your attention, a numeral badge appears on the alert iconindicating the number of active alerts. Selecting the Notifications icon displays the Notifications pop-upscreen.
You can manage the notifications you receive including view the list of active alerts. You can also renewyour APNs, dismiss expired alerts, view the list of dismissed alerts, and Configure Notifications Settings.
Each alert displays the organization group under which the APNs certificate is located, the certificateexpiration date, and a link to Renew your APNs.
n View Active Alerts – The default view displays the list of active alerts.
n Renew your APNs – Selecting the link displays the APNs For MDM settings page. Renew thelicense by following the on-screen instructions.
AirWatch Express
VMware, Inc. 32

n Dismiss Alert – Close the expired alert and send it to the Dismissed alert listing by selecting the Xbutton. You cannot close critical priority notifications.
n View Dismissed Alerts – Select the Dismissed tab at the top of the Notifications pop-up to view thelisting of dismissed alerts.
Configure Notifications SettingsYou can use the Notifications settings page to enable or disable APNs Expiration alerts. You can alsochoose whether to receive console alerts, email alerts, or both, and change the email address to which itsends alerts.
Procedure
1 Select the Account button, which is accessible from almost every page on the AirWatch ExpressConsole, then select Manage Account Settings and click the Notifications tab.
You can also access the notification settings page by selecting the gear icon located in the lower-rightcorner of the Notifications pop-up screen.
2 Complete the notification settings.
Setting Description
APNs Expiration Trigger alerts when APNs licenses expire or are in jeopardy of expiring.
Notification Select the notification delivery method. Choose from Console, Email, or Both.
Send email to Enter the email address for when Email or Both is selected in Notification.
3 Save or Cancel your changes.
Main MenuThe Main Menu allows you to navigate to all the features available to your role and Mobile DeviceManagement (MDM) deployment.
Monitor View and manage MDM information that drives decisions you must make and access a quick overview ofyour device fleet.
Blueprints Manage the applications, resources, and policies that you have created and assigned to users, user groups,and their devices with the Blueprints List View. Perform edits to any individual blueprint element, add ablueprint, and delete unused blueprints.
Devices Access a dashboard overview of common aspects of devices in your fleet. Display and customize the view ofan entire list of all devices in your deployment and filter them by platform, ownership type, OS version, andmore.
AirWatch Express
VMware, Inc. 33

Accounts Survey and manage users and administrators involved with your MDM deployment. Access and manage usergroups, roles, enrollment status, and settings associated with your users.
Groups &Settings
Configure system settings for the VMware Enterprise Systems Connector and Directory Services. Requestand renew Apple Push Notification Service certificates.
MonitorThe VMware AirWatch Express Monitor is your central portal for fast access to critical information. Selectany metric to open the List View for that specific set of devices.
It is from this screen where you can perform actions such as sending a message to a device.
Admin Panel DashboardAccess an at-a-glance overview of AirWatch Express license information.
Navigate to Monitor > Admin Panel.
Exporting ReportsYou can save a downloadable comma-separated values (CSV) file of the exported list views from twolocations in AirWatch Express.
n Enrollment Status List View.
n Device List View.
Save the exported listings by selecting the Export button ( ) from these locations.
You can view and download the comma-separated values (CSV) file for viewing with Excel by navigatingto Monitor > Reports & Analytics > Exports.
AirWatch Express
VMware, Inc. 34

BlueprintsOnce you have created a library of blueprints, you may find that editing an existing blueprint is preferableto creating a blueprint from scratch. You can also delete unwanted blueprints.
View the listing and make desired changes by navigating to Blueprints.
Managing BlueprintsYou can manage blueprints including renaming, deleting, and editing the configuration of blueprints.
Rename the Blueprint
Change the name of the blueprint as it appears in the listing by selecting the edit icon ( ) next to theblueprint name.
Edit the Blueprint ConfigurationYou can edit the Applications, Resources, Policies, Users, and Groups that are defined in a blueprintand view those Devices they are assigned to. Select the icon that corresponds to the specific blueprintelement you want to edit.
Selecting the Devices icon only displays those devices to which a blueprint has been assigned. Editingthe users changes the devices of a blueprint.
Delete the BlueprintYou can delete an unwanted blueprint by selecting the Delete Blueprint link above the Devices icon. Youare asked to confirm the deletion.
Devices DashboardYou can view and manage enrolled devices from the AirWatch Express Device Dashboard. The devicedashboard provides a high-level view of your entire device fleet and allows you to examine individualdevices and take MDM actions.
AirWatch Express
VMware, Inc. 35

You can view graphical representations of relevant device information for your fleet, such as deviceownership type, compliance statistics, and platform and OS breakdowns. Access each set of devices inthe List View quickly by selecting any of the available data views from the Device Dashboard.
From the List View, you can take administrative action: send messages, lock devices, delete devices,and change groups associated with the device.
n Security – View the top causes of security issues in your device fleet. Selecting any of the donutcharts displays a filtered Device List view comprised of devices affected by the selected securityissue. If supported by the platform, you can configure a compliance policy and act on these devices.
n Compromised – The number and percentage of compromised devices (jailbroken or rooted) inyour deployment.
n No Passcode – The number and percentage of devices without a passcode configured forsecurity.
n No Encryption – The number and percentage of devices that are not encrypted for security. Thisreported figure excludes Android SD Card encryption. Only those Android devices lacking discencryption are reported in the donut graph.
AirWatch Express
VMware, Inc. 36

n Ownership – View the total number of devices in each ownership category. Selecting any of the bargraph segments displays a filtered Device List view comprised of devices affected by the selectedownership type.
n Last Seen Overview/Breakdown – View the number and percentage of devices that have recentlycommunicated with the AirWatch Express server. For example, if devices have not been seen in over30 days, select the bar graph to display a filtered Device List of only those devices. You can addmore filters if needed (for example, Corporate Dedicated), and follow-up with the users accordingly.
n Platforms – View the total number of devices in each device platform category. Select any bar graphto displays a filtered Device List view comprised of devices under the selected platform.
n Enrollment – View the total number of devices in each enrollment category. Selecting any of the bargraph segments displays a filtered Device List view comprised of devices with the selectedenrollment status.
n Operating System Breakdown – View devices in your fleet based on operating system. There areseparate charts for Apple iOS, Android, Windows Phone, and Windows Rugged. Display a filteredDevice List view comprised of devices running the selected OS version by selecting any bar graph.
Device List ViewUse the UEM console's Device List View to see a full listing of all devices in the currently selectedorganization group.
The Last Seen column displays an indicator showing the number of minutes elapsed since the devicehas checked-in. The indicator is red or green, depending on the number of minutes defined in DeviceInactivity Timeout (min). This indicator can be set by navigating to Groups & Settings > All Settings >Devices & Users > General > Advanced.
Select a device in the General Info column at any time to open the details page for that device.
Sort by columns and configure information filters to review device activity based on specific information.For example, sort by the Compliance Status column to view only devices that are currently out-of-compliance and target only those devices. Search all devices for a friendly name or user name to isolateone device or user.
Customize Device List View LayoutDisplay the full listing of visible columns in the Device List view by selecting the Layout button and selectthe Custom option. This view enables you to display or hide Device List columns per your preferences.
There is also an option to apply your customized column view to all administrators. For instance, you canhide 'Asset Number' from the Device List views of the current OG and of all the OGs underneath.
Once all your customizations are complete, select the Accept button to save your column preferencesand apply this new column view. You can return to the Layout button settings at any time to tweak yourcolumn display preferences.
AirWatch Express
VMware, Inc. 37

Search in Device List ViewYou can search for a single device for quick access to its information and take remote action on thedevice.
To run a search, navigate to Devices > List View, select the Search List bar and enter a user name,device friendly name, or other device-identifying element. This action initiates a search across all devices,using your search parameter, within the current organization group and all child groups.
Add a Device from List ViewYou can add or register a device including user assignment, custom attributes, and tagging.
Procedure
1 Navigate to Devices > List View or Devices > Lifecycle > Enrollment Status.
2 Select the Add Device button. The Add Device page displays. Complete the following in the Usertab.
Setting Description
User
Search Text Each device must be assigned to a user. Search for a user with this text box by enteringsearch parameters and select the Search User button. You can select a user from amongthe search results or select the link Create New User.
Create New User
Security Type Select between Basic and Directory users.
User name Enter the user name by which your user is identified in your Workspace ONE UEMenvironment.
Password, ConfirmPassword
Enter and confirm the password that corresponds to the user name.
Email Address Enter the email address for the user account.
Enrollment OrganizationGroup
The organization group (OG) that serves as the enrollment OG for the device enrollment.
Show advanced user details Display all the advanced user details, including comprehensive information covering username, user phone number, and manager name. Also included are optional identificationsettings such as department, employee ID, and cost center.
Select the default User Role for the user you are adding which determines whichpermissions the user has while using a connected device.
Device
Expected Friendly Name Enter the name of the device that appears in the device list view. You can also incorporatelookup values.
Organization Group Pre-populated setting reflects the existing organization group.
Ownership Select the device ownership from the drop-down menu. Select between None, Corporate- Dedicated, Corporate - Shared, and Employee-Owned.
Platform Select the platform of the device from the drop-down menu.
AirWatch Express
VMware, Inc. 38

Setting Description
Show advanceddeviceinformation options
Display all the advanced device information settings.
Advanced Device Information Settings
Model Select the device model from the drop-down listing. The contents of this drop-down menudepend upon the selection made in the Platform drop-down menu.
OS Select the device's operating system from the drop-down listing. The contents of this drop-down menu depend upon the selection made in the Platform drop-down menu.
UDID Enter the device's Unique Device Identifier.
Serial Number Enter the device's serial number.
IMEI Enter the device's 15-digit International Mobile Station Equipment Identity.
SIM Enter the device's SIM card specifications.
Asset Number Enter the asset number for the device. This number is created internally from within yourorganization and this setting is provided to hold this data point.
Messaging
Message Type Select the type of message you want to send (None or Email) to the device upon asuccessful enrollment to the Workspace ONE UEM environment.
Email Address Enter the email address to which you want the enrollment message sent.
This text box is only available when Email is selected as the Message Type.
Email Message Template Select the email template from the drop-down menu. There is a link you can use to openthe Message Template page where you can create an email message template.
3 (Optional) Assign Custom Attributes to the device. Select the Add button and supply an Attributeand its Value.
4 Select Save.
Device DetailsThe Device Details page contains detailed information for a single device and grants access to user anddevice management actions quickly.
Access Device Details by selecting a device friendly name from one of the available Dashboards, or bynavigating to Devices > Details View.
The main page features several major sections.
n Notification Badges – Displays the Compromised State, Enrollment Date, time Last Seen, and theDo Not Disturb setting for the selected device.
n Device Info – Displays details such as organization group, smart groups, phone number, serialnumber, UDID, asset number, power status, storage capacity, physical memory, and availableupdates.
n Profiles – Displays all profiles such as installed (active), assigned (inactive), and unmanaged(sideloaded).
AirWatch Express
VMware, Inc. 39

n Apps – Displays all installed apps, both automatic apps and on-demand apps.
Device Details DashboardThe dashboard shows you basic information such as the device type, device model, OS version number,ownership type, device action button cluster, and Recent List indicator.
Selecting the arrow buttons in the Recent List indicator changes the device in the Device Details viewbased on its position in the filtered List View.
Device Details Action Button Cluster
The device action button cluster found on the Device Details dashboard enables you to perform commondevice actions such as Send [Message], Lock, and More Actions.
Available Device Actions vary by platform, device manufacturer, model, and enrollment status, and thespecific configuration of your AirWatch Express Console.
Enrollment StatusUse the Enrollment Status page to assess enrollment status on a per-device basis and revoke/resetdevice tokens.
Select Devices > Lifecycle > Enrollment Status to see a full list of all devices by enrollment status inthe currently selected organization group.
Sort by columns and configure information filters to review device activity based on specific information.For example, sort by the Token Status column to view only devices whose registration is not applicableand act only on those specific devices. Search all devices for a friendly name or user name to isolate onedevice or user.
Setting Description
Filters You can filter out entire device categories by using filters which enable you to see only those devices thatyou are interested in.n Enrollment Statusn Platformn Ownershipn Token Statusn Token Typen Sourcen First Seen
Resend Message Resend the original message sent to a user, including Self-Service Portal URL, Group ID, and logincredentials.
AirWatch Express
VMware, Inc. 40

Setting Description
More Actions
ChangeOrganizationGroup
Pre-populated setting reflects the existing organization group.
Change Ownership Change the type of ownership for the selected device.
Delete Permanently delete the registration information for selected devices. This action forces the user to re-register to enroll. Where applicable, you must first revoke the token before deleting a device registration.
Reset Token Reset the status of a token if it has been revoked or is expired.
Revoke Token Force the registration token status of selected devices to expire, essentially blocking access for unwantedusers or devices.
For the Reset Token and Revoke Token actions, you can select to disable the Notify Users settingwhich prevents the default email notification from being sent.
Selecting MultipleDevices
Act on individual devices or multiple devices by selecting the check box next to each device and using theaction buttons.
Once you have applied a filter to show a specific set of devices, you can perform bulk actions to multipleselected devices. Perform this action by selecting the devices and selecting an action from the ResendMessage and More Actions buttons.
You can select individual check boxes. You can also select the entire set of filtered devices by selectingthe global check box located atop the check box column.
When you select an action for one or more devices, a confirmation screen displays allowing you to Saveor Cancel the action.
Layout Display the full listing of visible columns or choose to display or hide columns per your preferences byselecting the Custom option.
There is also an option to apply your customized column view to all administrators.
You can return to the Layout button settings at any time to modify your column display preferences.
Enrollment Status Details ViewSelect a device friendly name in the General Info column at any time to open the Details View for thatdevice.
From the Details View, you can resend the enrollment message by selecting the Resend Messagebutton. You can also edit a device registration info by selecting the Edit Registration button andcompleting the Advanced Device Information section.
The Details View displays a series of tabs, each containing relevant enrollment information about thedevice.
n Summary – View the registration date, time elapsed since the device was first seen, basic deviceand user info.
n Message – View the outgoing Device Activation email message including credential information andQR code. There is a resource available, called "User Registration Message," that allows theWorkspace ONE UEM administrator to hide the Message tab after the device has successfullyenrolled.
AirWatch Express
VMware, Inc. 41

n Offline Enrollment – If available, this tab allows you to enroll the device while it is offline. Thisfeature is useful for when you want to make the most of scheduled time for a device in an unavailablestate (for example, while traveling).
Add a Blacklisted or Whitelisted DeviceYou can add a blacklisted (device restricted from enrollment) or whitelisted (device cleared for enrollment)based on various device attributes.
Procedure
1 Navigate to Devices > Lifecycle > Enrollment Status and select Add.
2 Select Blacklisted Devices or Whitelisted Devices from the Add drop-down menu and completethe settings.
Setting Description
Blacklisted/Whitelisted Devices Enter the list of whitelisted or blacklisted devices (by the Device Attribute selection), upto 30 at a time.
Device Attribute Select the corresponding device attribute type. Select IMEI, Serial Number, or UDID.
Organization Group Confirm to which Organization Group the devices are blacklisted or whitelisted.
Ownership You can allow devices only with the selected ownership type.
This option is only available while Whitelisting devices.
Additional Information Allows you to select a platform to apply your whitelist or blacklist.
Platform You can blacklist or whitelist all devices belonging to an entire platform.
This option is only available when the Additional Information check box is enabled.
3 Select Save to confirm the settings.
Batch Import Users or DevicesTo save time, you can batch import multiple users and devices into the UEM console. Users can be basic(stored on the database), directory-based (LDAP), or authentication proxy.
Procedure
1 Navigate to Accounts > Users > Batch Status or Devices > Lifecycle > Enrollment Status > Addand select Batch Import.
2 Enter the basic information including a Batch Name and Batch Description in the Workspace ONEUEM console.
3 Select the applicable batch type from the Batch Type drop-down menu.
4 Select and download the template that best matches the kind of batch import you are making.
n Blacklisted Devices
AirWatch Express
VMware, Inc. 42

Import a list of known, non-compliant devices by IMEI, Serial Number, or UDID. Blacklisteddevices are not allowed to enroll. If a blacklisted device attempts to enroll, it is automaticallyblocked.
n Whitelisted Devices
Import pre-approved devices by IMEI, Serial Number, or UDID. Use this template to import a listof known, trusted devices. The ownership and group ID associated to this device is automaticallyapplied during enrollment.
n User and/or Device
Select between a Simple and an Advanced CSV template. The simple template features onlythe most often-used options while the advanced template features the full, unabridgedcompliment of import options.
n Change Organization Group
Move users to a different organization group.
5 Open the CSV file. Confirm whether or not users are part of the enrollment organization group (OG).
The CSV file features several columns corresponding to the options on the Add / Edit User page.When you open the CSV template, notice that sample data has been added to each column in thetemplate. The sample data is presented to inform you what kind of data is required and what format itmust be in.
Note A CSV file (comma-separated values) is simply a text file whose extension has been changedfrom "TXT" to "CSV". It stores tabular data (text and numbers) in plain text. Each line of the file is adata record. Each record consists of one or more fields, separated by commas. It can be opened andedited with any text editor. It can also be opened and edited with Microsoft Excel.
a Navigate to Groups & Settings > All Settings > Devices & Users > General > Enrollment andselect the Grouping tab.
For a directory-based enrollment, the Security Type for each user must be Directory.
If the Group ID Assignment Mode is set to Default, your users are part of the enrollment OG.
6 Enter data for your organization's users, including device information (if applicable) and save the file.
7 Return to the Batch Import page and select Choose File to locate and upload the CSV file that youhad previously downloaded and filled out.
8 Select Save.
User and Admin AccountsYou must create and integrate user accounts for devices to enroll into Workspace ONE UEM. Likewise,administrator accounts must be created and assigned so Admins can easily manage users and devices.
The UEM console allows you to establish a complete user and admin infrastructure. It providesconfiguration options for authentication, enterprise integration, and ongoing maintenance.
AirWatch Express
VMware, Inc. 43

Basic and Directory AccountsThe type of authentication you choose depends on the amount of administrator setup work and thenumber of login steps by the end user at enrollment.
If you want the enrollment process to be as simple as possible for the end user, the administrator must domore work to set it up. Likewise, a lighter workload for the administrator means that there is more setup todo by the end user.
Basic User AccountsYou can use Basic Authentication to identify users in the AirWatch Express architecture but this methodoffers no integration to existing corporate user accounts.
Pros
n Basic users require no enterprise infrastructure.
n Requires no technical integration.
Cons
n Offers no federated security and no single sign-on.
n Credentials for basic users only exist in AirWatch Express and do not necessarily match existingcorporate credentials.
n Basic user names and passwords are stored in AirWatch Express.
Directory User AccountsActive Directory (AD)/Lightweight Directory Access Protocol (LDAP) authentication is used to integrateuser and admin accounts of AirWatch Express with existing corporate accounts.
Pros
n Directory users authenticate with existing corporate credentials.
n Secure method of integrating with LDAP/AD.
n Standard integration practice.
Cons
n Requires an active directory or other LDAP server.
Create Basic User AccountAfter you decide which Authentication Type you want to use, you can create users in the AirWatchConsole. If your authentication type is Basic, then consider creating Basic User Accounts.
Procedure
1 Navigate to Accounts > Users > List View, select Add then Add User. The Add / Edit User pagedisplays.
AirWatch Express
VMware, Inc. 44

2 In the General tab, complete the following settings to add a basic user.
Setting Description
Security Type Select Basic to add a basic user.
User name Enter a user name with which the new user is identified.
Password Enter a password that the user can use to log in.
Confirm Password Confirm the password.
Full Name Complete the First Name, Middle Name, and Last Name of the user.
Display Name Represent the user in the UEM console by entering a name.
Email Address Enter or edit the user's email address.
Email user name Enter or edit the user's email user name.
Domain Select the email domain from the drop-down setting.
Phone Number Enter the user's phone number including plus sign, country code, and area code.
Enrollment Organization Group Pre-populated setting reflects the existing organization group.
Allow the user to enroll into additionalOrganization Groups
If you Enable this option but leave Additional Organization Groups blank, thenany child OG created under the Enrollment Organization Group can be used asa point of enrollment.
Workspace ONE UEM Express customers have a single organization group toenroll into. Contact Support to inquire about upgrading to benefit from havingmultiple organization groups.
Additional Organization Groups This setting only appears when the option to allow the user to enroll intoadditional OGs is Enabled.
This setting allows you to add additional organization groups from which yourbasic user can enroll.
User Role Select the role for the user you are adding from this drop-down setting.
Message Type Select the type of message you want to send to the user, Email or None.
Message Template The basic user activates their account with this notification. For security reasons,this notification does not include the user's password. Instead, a password resetlink is included in the notification. The basic user selects this link to define anotherpassword. This password reset link expires in 24 hours automatically.
Select the template for email messages by selecting one from this drop-downsetting. Optionally, select Message Preview to preview the template and selectthe Configure Message Template to create a template.
3 (Optional) Select the Advanced tab and complete the following settings.
Setting Description
Email Password Enter the email password of the user you are adding.
Confirm Email Password Confirm the email password of the user you are adding.
User Principal Name Enter the principal name of the basic user. This setting is optional.
Category Select the User Category for the user being added.
Department Enter the user's department for administrative purposes.
Employee ID Enter the user's employee ID for administrative purposes.
Cost Center Enter the user's cost center for administrative purposes.
AirWatch Express
VMware, Inc. 45

Setting Description
Use S/MIME Enable or Disable Secure Multipurpose Internet Mail Extensions (S/MIME).
If enabled, you must have an S/MIME-enabled profile and you must upload anS/MIME certificate by selecting Upload.
Separate Encryption Certificate Enable or Disable encryption certificate.
If enabled, you must upload an encryption certificate using Upload. Generally, thesame S/MIME certificate is used for signing and encryption, unless a differentcertificate is expressly being used.
Old Encryption Certificate Enable or disable a legacy version encryption certificate.
If enabled, you must Upload an encryption certificate.
Enable Device Staging Enable or disable the staging of devices.
If enabled, you must select between Single User Devices and Multi UserDevices. If Single User Devices, you must select between Standard, whereusers themselves log in and Advanced, where a device is enrolled on behalf ofanother user.
4 Select Save to save only the new user or select Save and Add Device to save the new user and
proceed to the Add Device page.
Create Directory User AccountAfter you decide which Authentication Type you want to use, you can create users in the AirWatchConsole. If your authentication type is based on your existing active directory structure, then considercreating Directory User Accounts.
Procedure
1 Navigate to Accounts > Users > List View and select Add and then Add User.
The Add / Edit User page displays.
2 In the General tab, complete the following settings to add a directory user.
Setting Description
Security Type Add an Active Directory user by choosing Directory as the Security Type.
Directory Name This pre-populated setting identifies the Active Directory name.
Domain Choose the domain name from the drop-down menu.
User name Enter the user's directory user name and select Check User. If the system finds amatch, the user's information is automatically populated. The remaining settingsin this section are only available after you have successfully located an activedirectory user with the Check User button.
Full Name Use Edit Attributes to allow any option that syncs a blank value from thedirectory to be edited. Edit Attributes also enables you to populate matchinguser's information automatically.
If a setting syncs an actual value from the directory, then that setting must beedited in the directory itself. The change takes effect on the next directory sync.Complete any blank option returned from the directory in Full Name and selectEdit Attributes to save the addition.
Display Name Enter the name that displays in the admin console.
AirWatch Express
VMware, Inc. 46

Setting Description
Email Address Enter or edit the user's email address.
Email user name Enter or edit the user's email user name.
Domain (email) Select the email domain from the drop-down menu.
Phone Number Enter the user's phone number including plus sign, country code, and area code.
Enrollment Organization Group For AirWatch Express customers, this setting is pre-populated and reflects theexisting organization group.
Allow the user to enroll into additionalOrganization Groups
AirWatch Express customers have a single organization group to enroll into. Ifyou want to inquire about upgrading to benefit from having multiple organizationgroups, contact Support.
User Role Select the role for the user you are adding from this drop-down menu.
Message Type Choose the type of message you may send to the user, Email or None.
Message Template Choose the template for email messages from this drop-down setting. Optionally,select the Message Preview to preview the template and select the ConfigureMessage Templates link to create a template.
3 (Optional) Select the Advanced tab and complete the following settings.
Setting Description
Email Password Enter the email password of the user you are adding.
Confirm Email Password Confirm the email password of the user you are adding.
Distinguished Name For directory users recognized by Workspace ONE UEM, this text box is pre-populated with the distinguished name of the user. Distinguished Name is a stringrepresenting the user name and all authorization codes associated with an ActiveDirectory user.
Manager Distinguished Name Enter the distinguished name of the user's manager. This text box is optional.
Category Choose the user category for the user being added.
Department Enter the user's department for your company's administrative purposes.
Employee ID Enter the user's employee ID for your company's administrative purposes.
Cost Center Enter the user's cost center for your company's administrative purposes.
Enable Device Staging Enable or disable the staging of devices.
If enabled, you must choose between Single User Devices and Multi UserDevices.
If Single User Devices, you must select between Standard, where usersthemselves log in and Advanced, where a device is enrolled on behalf of anotheruser.
4 Select Save to save only the new user or select Save and Add Device to save the new user and
proceed to the Add Device page.
AirWatch Express
VMware, Inc. 47

User Accounts List ViewThe List View page, which you can find by navigating to Accounts > Users > List View, provides usefultools for common user account maintenance and upkeep.
Customize List ViewYou can use the User Accounts List View to create customized lists of users immediately. You can alsocustomize the screen layout based on criteria that is most important to you. You can export thiscustomized list for later analysis and add new users.
AirWatch Express
VMware, Inc. 48

Action Description
Filters View only the desired users by using the following filters.n Security Typen Enrollment Organization Groupn Enrollment Statusn User Groupn User Role
Add n Add User – Perform a one-off addition of a basic user account. Add an employee or a newly promoted employeethat needs access to MDM capabilities.
n Batch Import – Add multiple users into Workspace ONE ™ UEM by importing a comma-separated values (CSV)file. Enter a unique name and description to group and organize multiple users at a time. For more information,see Batch Import Users or Devices.
Layout Enables you to customize the column layout.n Summary – View the List View with the default columns and view settings.n Custom – Select only the columns in the List View you want to see. You can also apply selected columns to all
administrators.
Sorting Most columns in the List View (in both Summary and Custom Layout) are sortable including Devices, User Groups,and Enrollment Organization Group.
Export Save a comma-separated values (CSV) file of the entire List View that can be viewed and analyzed in Excel.
Interact with User AccountsThe list view also features a check box to the left of each user account. View user details by selecting thehypertext user name in the General Info column.
The Edit icon enables you to make basic changes to the user account. Selecting a single check boxcauses three action buttons to appear, Send Message, Add Device, and More Actions.
You can select multiple user accounts using the check box, which, in turn, modifies the available actions.
Action Description
Send Message. Provide immediate support to a single user or group of users. Send a User Activation (user template)email to a user notifying them of their enrollment credentials.
Add Device. Add a device for the selected user. Only available for single user selections.
More Actions Display the following options.
Remove from UserGroup.
Remove selected users from the existing user group.
ChangeOrganization Group
Pre-populated setting reflects the existing organization group.
Delete If a member of your organization permanantly terminates employment, you can quickly and completelydelete a user account. Deleting account information is the equivalent of the account never having existedin the first place. A deleted account cannot be reactivated. If a deleted account owner returns, a newaccount must be created for them.
AirWatch Express
VMware, Inc. 49

Action Description
Activate Activate a previously deactivated account if a user returns to an organization or must be reinstated in thecompany.
Deactivate Deactivation is a security measure. Deactivate is used when a user is missing in action, their device isout-of-compliance, or their device is lost or stolen. All of the information about a deactivated account iskept, such as name, email address, password, enrollment organization group, and so forth.
A deactivated account simply means no one with these account credentials will be able to log in toWorkspace ONE UEM console while the account is deactivated. Once the security issue is resolved (useris located, device becomes compliant, the device is recovered) then you can Activate the account.
Batch Import Users or DevicesTo save time, you can batch import multiple users and devices into the UEM console. Users can be basic(stored on the database), directory-based (LDAP), or authentication proxy.
Procedure
1 Navigate to Accounts > Users > Batch Status or Devices > Lifecycle > Enrollment Status > Addand select Batch Import.
2 Enter the basic information including a Batch Name and Batch Description in the Workspace ONEUEM console.
3 Select the applicable batch type from the Batch Type drop-down menu.
4 Select and download the template that best matches the kind of batch import you are making.
n Blacklisted Devices
Import a list of known, non-compliant devices by IMEI, Serial Number, or UDID. Blacklisteddevices are not allowed to enroll. If a blacklisted device attempts to enroll, it is automaticallyblocked.
n Whitelisted Devices
Import pre-approved devices by IMEI, Serial Number, or UDID. Use this template to import a listof known, trusted devices. The ownership and group ID associated to this device is automaticallyapplied during enrollment.
n User and/or Device
Select between a Simple and an Advanced CSV template. The simple template features onlythe most often-used options while the advanced template features the full, unabridgedcompliment of import options.
n Change Organization Group
Move users to a different organization group.
AirWatch Express
VMware, Inc. 50

5 Open the CSV file. Confirm whether or not users are part of the enrollment organization group (OG).
The CSV file features several columns corresponding to the options on the Add / Edit User page.When you open the CSV template, notice that sample data has been added to each column in thetemplate. The sample data is presented to inform you what kind of data is required and what format itmust be in.
Note A CSV file (comma-separated values) is simply a text file whose extension has been changedfrom "TXT" to "CSV". It stores tabular data (text and numbers) in plain text. Each line of the file is adata record. Each record consists of one or more fields, separated by commas. It can be opened andedited with any text editor. It can also be opened and edited with Microsoft Excel.
a Navigate to Groups & Settings > All Settings > Devices & Users > General > Enrollment andselect the Grouping tab.
For a directory-based enrollment, the Security Type for each user must be Directory.
If the Group ID Assignment Mode is set to Default, your users are part of the enrollment OG.
6 Enter data for your organization's users, including device information (if applicable) and save the file.
7 Return to the Batch Import page and select Choose File to locate and upload the CSV file that youhad previously downloaded and filled out.
8 Select Save.
User Groups List ViewThe User Groups List View page features useful tools for common user group maintenance and upkeep,including viewing, merging, deleting user groups, and adding missing users.
Navigate to Accounts > User Groups > List View.
You can use the User Groups List View to create lists of user groups immediately, based on criteria that ismost important to you. You can also add new user groups individually or in bulk.
Action Description
Filters Display only the desired user groups by using the following filters.n User Group Type.n Sync Status.n Merge Status.
Add
Add User Group. Perform a one-off addition of.
Sorting and ResizingColumns
Columns in the List View that are sortable are Group Name, Last Sync On, Users, and Merge Status.Columns that can be resized are Group Name and Last Sync On.
Details View View basic user group information in the Details View by selecting the link in the Group Name column.This information includes group name, group type, external type, manager, and number of users. .
Export ( )Save a comma-separated values (CSV) file of the entire unfiltered or filtered List View that can beviewed and analyzed in Excel.
AirWatch Express
VMware, Inc. 51

The User Groups List View also features a selection check box and Edit icon to the left of the user.
Selecting the Edit icon ( ) enables you to make basic changes to the user group. You can make bulkactions on user groups by selecting one or more groups which reveals the action buttons for the listing.
You can select more than one user group by selecting as many check boxes as you like. Doing somodifies the available action buttons and also makes the available actions apply to multiple groups andtheir respective users.
Action Description
Sync Copy recently added user group users to the temporary table, manually, ahead of the scheduled,automated Active Directory sync by Workspace ONE UEM.
View Users Displays the User Group Members screen, enabling you to review the user names of all the members inthe selected user group.
More Actions
View and Merge View, Add, and Remove users recently added to the temporary user group table. User group users thatappear in this table await the automated Workspace ONE UEM user group sync.
Add Missing Users Combine the temporary user group table with the Active Directory table, making the addition of these newusers in the user group official.
Delete Delete a user group.
Admin AccountsAdministrator Accounts enable you to maintain Mobile Device Management (MDM) settings, push, orrevoke features and content, and much more from the UEM Console.
Also, a Temporary Admin Account enables a remote assistance feature within the Unified EndpointManagement Console. These Temporary Admin Accounts, which have a configurable expiration, can beused to access areas normally reserved for permanent admin account-holders.
Create an Admin AccountYou can create as many administrator accounts, each with a unique set of permissions or roles, that youmay need to manage your device fleet. For more information, see Create an Admin Account.
Create a Temporary Admin AccountBecause of their configurable expiration date, temporary admin accounts are ideal for recruiting help fromthe larger group of users for troubleshooting, testing, and training exercises. For more information, see Create a Temporary Admin Account.
Add, Edit, and Delete Admin AccountsAs the number of administrator accounts expand, you can perform housekeeping duties to reassignpermissions or roles, reset a password, or deactivate and delete admin accounts. For more information,see Managing Admin Accounts.
AirWatch Express
VMware, Inc. 52

Create an Admin AccountYou can add Admin Accounts from the Administrators List View page, providing access to advancedfeatures of the Workspace ONE UEM console. Each admin that maintains and supervises the consolemust have an individual account.
Procedure
1 Navigate to Accounts > Administrators > List View, select Add, then Add Admin. The Add/EditAdmin page displays.
2 Under the Basic tab, for the User Type setting, select either Basic or Directory.
n If you select Basic, then fill in all required settings on the Basic tab, including user name,password, First Name, and Last Name.
n You can enable Two-Factor Authentication where you select between Email and SMS as adelivery method and the token expiration time in minutes.
n You can also select a Notification option, choosing between None, Email, and SMS. The Adminreceives an auto-generated response.
n If you select Directory, then enter the Domain and user name of the admin user.
3 Select the Details tab and enter additional information, if necessary.
4 Select the Roles tab and then select the Organization Group followed by the Role you want toassign to the new admin. Add new roles by using Add Role.
5 Select the API tab and choose the Authentication type.
6 Select the Notes tab and enter additional Notes for the admin user.
7 Select Save to create the admin account with the assigned role.
Create a Temporary Admin AccountYou can grant temporary administrative access to your environment for support, demonstrations, andother time limited use cases.
Procedure
1 Navigate to Accounts > Administrators > List View, select Add. Select the Add Temporary Adminoption.
Alternatively, you can select the Help button from the header bar that appears at the top-right cornerof almost every page of Workspace ONE UEM and select Add Temporary Admin.
AirWatch Express
VMware, Inc. 53

2 In the Basic tab, select to add a temporary admin account based on Email Address or user nameand complete the following settings.
Setting Description
Email Address Enter the email address on which the temporary admin account is based. Available only whenEmail Address radio button is selected.
User name Enter the user name on which the temporary admin account is based. Available only when theuser name radio button is selected.
Password / ConfirmPassword
Enter and confirm the password that is associated with the Email Address or user name.
Expiration Period Select an Expiration Period which defaults to 6 hours. You can also set this drop-down menu toInactive to create the account now and activate it later.
Ticket Number Optionally, you can add the Ask Ticket Number from ZenDesk as a reference marker.
3 In the Roles tab, you can add, edit, and delete roles applicable to the temporary admin account.
n Add a role by selecting the Add Role button and then select the organization group and role forwhich the temporary admin account applies.
n Edit an existing role by selecting the edit icon ( ) and select a different role.
n Delete a role by selecting the delete icon ( ).
4 Select Save.
Managing Admin AccountsYou can implement key management functions for ongoing maintenance and upkeep of admin accountsby navigating to Accounts > Administrators > List View.
Display the Add/Edit Admin page by selecting the hypertext link in the user name column. This linkenables you to update current roles assigned quickly or change roles within your organization quickly tokeep their privileges up-to-date. You can also alter general admin information and reset a password.
You can Filter the list of administrators to include all roles or limit the listing to only a specific role youwant to see.
Display the action buttons applicable to that admin by selecting the radio button next to the administratoruser name.
n View History – Track when admins log in and out of the Workspace ONE UEM console.
n Deactivate – Change the status of an admin account from active to inactive. This feature allows youto suspend the management functions and privileges temporarily. At the same time, this featureenables you to keep the defined roles of the admin account for later use.
n Activate – Change the status of an admin account from inactive to active.
n Delete – Remove the admin account from the UEM console. Such an action is useful for when anadministrator ends employment.
AirWatch Express
VMware, Inc. 54

n Reset Password – Available to basic administrators only. Sends an email to the basic admin's emailaddress on record. The email contains a link that expires in 48 hours. To reset the password, thebasic admin must select the link, answer the password recovery question, allowing the basic admin tochange their own password.
Directory-based administrators must reset their passwords using the active directory system.
Temporary administrators cannot reset their password. Another admin must delete then re-create thetemporary admin account.
AirWatch Express
VMware, Inc. 55

Install VMware EnterpriseSystems Connector 6The VMware Enterprise Systems Connector runs in the internal network. The connector serves as aproxy that securely transmits requests from AirWatch Express to the organization's critical enterpriseinfrastructure components.
It runs from within your internal network and allows you to benefit from AirWatch Mobile DeviceManagement (MDM). VMware Enterprise Systems Connector works with your existing Active Directory(AD), Lightweight Directory Access Protocol (LDAP), email, and other internal systems.
While completion of the Chapter 2 Express Setup configures the VMware Enterprise Systems Connector,refer to this section for information which has been designed for AirWatch Express. If you need furtherdetails about any specific VMware Enterprise Systems Connector element, consult the VMwareEnterprise Systems Connector Documentation (available on docs.vmware.com) or contact WorkspaceONE Support.
Prerequisites
Ensure that your system meets the necessary Hardware Requirements to deploy VMware EnterpriseSystems Connector as part of a SaaS deployment.
n Virtual Machine or Physical Server, one CPU Core, 2.0+ GHz, Intel processor required.
n 2-GB RAM or higher.
n 6-GB disk space for the VMware Enterprise Systems Connector application, Windows OS, .NETruntime, and AirWatch Express logging operations.
Ensure the server running AirWatch Express meets the necessary Software Requirements.
n Windows Server 2008 R2, Windows Server 2012, or Windows Server 20012 R2.
n .NET Framework version 4.6.2.
n The VMware Enterprise Systems Connector auto-update feature does not function correctly untilyour VMware Enterprise Systems Connector server is updated to .NET Framework 4.6.2.
n The VMware Enterprise Systems Connector auto-update feature does not update the .NETFramework automatically.
n Install .NET 4.6.2 manually on the VMware Enterprise Systems Connector server beforeperforming an upgrade.
VMware, Inc. 56

Ensure that the Network Requirements for the VMware Enterprise Systems Connector Server are met.
n AirWatch Console (for example, https://cn274.awmdm.com)
n Protocol: HTTP or HTTPS
n Port: 80 or 443
n Verify by entering https://cnXXX.awmdm.com and ensure that there is no certificate trust error.
n Replace 'XXX' with the same number as used in your environment URL, for example, '100' forcn100.
n If an auto-update is enabled, VMware Enterprise Systems Connector must query AirWatchConsole for updates using port 443.
n AirWatch API (for example, https://cn274.awmdm.com)
n Protocol: HTTPS
n Port: 443
n Verify by entering https://asXXX.awmdm.com/api/help and ensure that you are prompted forcredentials.
n Replace 'XXX' with the same number as used in your environment URL, for example, '100' forcn100.
n VMware Enterprise Systems Connector to API access is required for the proper functioning of theAirWatch Diagnostics service.
n CRL (for example http://csc3-2010-crl.verisign.com/CSC3-2010.crl)
n Protocol: HTTP
n Port: 80
n For various services to function properly.
n Optional Network Requirements
n Internal SMTP using port 25.
n Internal LDAP under protocol LDAP or LDAPS using port 389, 636, 3268, or 3269.
Procedure
1 Enable VMware Enterprise Systems Connector From AirWatch Console.
a Generate certificates and select the enterprise services and AirWatch services to be integrated.
2 Install the VMware Enterprise Systems Connector.
a Run the VMware Enterprise Systems Connector installer on your configured server that meets allthe prerequisites.
3 Verify a Successful VMware Enterprise Systems Connector Installation from within the AirWatchConsole.
AirWatch Express
VMware, Inc. 57

This chapter includes the following topics:
n Enable VMware Enterprise Systems Connector From AirWatch Console
n Install the VMware Enterprise Systems Connector
n Using VMware Enterprise Systems Connector Auto-Update
n Verify a Successful VMware Enterprise Systems Connector Installation
Enable VMware Enterprise Systems Connector FromAirWatch ConsoleBefore you install VMware Enterprise Systems Connector, you must first enable it, generate certificates,and select the enterprise services and AirWatch services to be integrated. After completing this step, youcan install VMware Enterprise Systems Connector.
Important Perform the following steps on the server running VMware Enterprise Systems Connector. Donot download the installation application onto another computer and copy it to the VMware EnterpriseSystems Connector server.
Procedure
1 Navigate to Groups & Settings > All Settings > System > Enterprise Integration > VMwareEnterprise Systems Connector.
2 Configure the following settings on the General tab.
Setting Description
Enable VMware Enterprise SystemsConnector
Enable VMware Enterprise Systems Connector and display the General tab.
Enable Auto Update Enable VMware Enterprise Systems Connector to update automatically when anewer version is available.
3 Configure the following settings on the Advanced tab.
Setting Description
Enterprise Services Enable or disable Enterprise Services. The services you select (enabled)integrate with VMware Enterprise Systems Connector.n SMTP (Email Relay), AirWatch SaaS offers email delivery through its own
SMTP.n Directory Services (LDAP/AD).
AirWatch Services Enable or disable AirWatch Services. The AirWatch components you select(enabled) integrate with VMware Enterprise Systems Connector. AirWatchsuggests leaving all services enabled.n Device Services (Admin Console and all services required for it to operate,
including related Windows services).n Device Management (Enrollment, App Catalog, and related Windows
services).
AirWatch Express
VMware, Inc. 58

4 Select Save to keep all these settings.
5 Navigate back to the General tab and select Download Cloud Connector Installer.
6 A Download VMware Enterprise Systems Connector Installer screen displays. Enter a passwordfor the VMware Enterprise Systems Connector certificate in the text box. The password is neededlater when you run the VMware Enterprise Systems Connector installer.
7 Select Download and save the VMware Enterprise Systems Connector x.x Installer.exe file onthe VMware Enterprise Systems Connector server.
Use this file later in Install the VMware Enterprise Systems Connector.
Install the VMware Enterprise Systems ConnectorThe VMware Enterprise Systems Connector must be installed and running for AirWatch Express tomanage your devices.
Procedure
1 Open the installer on the VMware Enterprise Systems Connector server.
2 When the Welcome screen appears, select Next.
The installer verifies prerequisites on your VMware Enterprise Systems Connector server.
3 Accept the license agreement, and then select Next.
4 Select Change and choose the installation directory. Select Next.
5 Enter the Certificate Password that you provided on the System Settings page in AirWatch. SelectNext.
6 If you plan on proxying VMware Enterprise Systems Connector traffic through an outbound proxy,select the check box and provide proxy server information. Enter the User Name and Passwordcredentials and then select Next.
7 When the installation screen appears, select Install to begin the installation.
The installer displays a check box for auto-updating VMware Enterprise Systems Connector.
8 Select Finish.
By default, the Install the VMware Enterprise Systems Connector check box is selected. It updateswithout any user intervention by querying AirWatch for newer versions of VMware Enterprise SystemsConnector.
Using VMware Enterprise Systems Connector Auto-UpdateAuto-update allows VMware Enterprise Systems Connector to upgrade automatically to the latest version.
AirWatch Express
VMware, Inc. 59

While you are Install the VMware Enterprise Systems Connector, by default, the auto-update check box isselected. It updates without any user intervention by querying AirWatch for newer versions of VMwareEnterprise Systems Connector.
Benefitsn No requirement to determine manually if you must upgrade and then have to search for the latest
version – the software does it for you.
n Since it assures you stay updated, you always have the latest features, enhancements, and fixes.
n Most importantly, it ensures that you have the most up-to-date security.
Update ProcessVMware Enterprise Systems Connector auto-update is performed using the Bank1 and Bank2 foldersinside the CloudConnector folder. AirWatch detects which of these folders is empty and streams into itthe appropriate VMware Enterprise Systems Connector files. Also, the update process empties thecontents of the other folder. For the following update, AirWatch repeats the process except for thealternate folder. This process repeats each time a new version is auto-updated.
Important Do not delete the Bank1 or Bank2 folders. The Bank1 and Bank2 folders are integral to theVMware Enterprise Systems Connector auto-update process.
Auto-Update SecurityVMware Enterprise Systems Connector auto-updates are performed with security in mind. The AirWatchExpress Console signs every update and VMware Enterprise Systems Connector verifies it. It onlyupdates itself with a signed and verified upgrade. The upgrade process is also transparent to theAirWatch Admin. VMware Enterprise Systems Connector knows when a newer version is available byquerying the AirWatch Express Console on port 443. An upgrade only occurs after this newer versionbecomes available.
While VMware Enterprise Systems Connector is upgrading to the latest version, it is temporarilyunavailable. Therefore, there is a short loss of service of approximately 1 minute. Customers with multipleVMware Enterprise Systems Connector servers benefit from AirWatch incorporating a random timer todirect the upgrade process. This random timer means that outages occur at different times. Such anarrangement ensures that all VMware Enterprise Systems Connector services are not down at the sametime.
AirWatch Express
VMware, Inc. 60
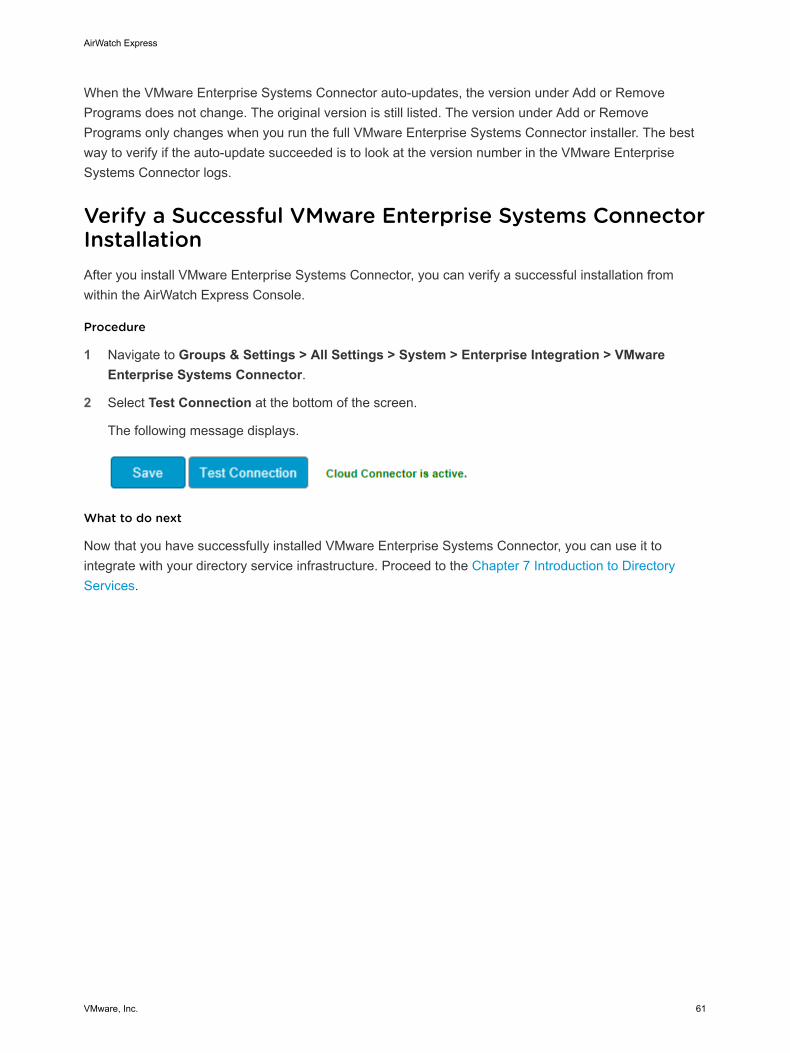
When the VMware Enterprise Systems Connector auto-updates, the version under Add or RemovePrograms does not change. The original version is still listed. The version under Add or RemovePrograms only changes when you run the full VMware Enterprise Systems Connector installer. The bestway to verify if the auto-update succeeded is to look at the version number in the VMware EnterpriseSystems Connector logs.
Verify a Successful VMware Enterprise Systems ConnectorInstallationAfter you install VMware Enterprise Systems Connector, you can verify a successful installation fromwithin the AirWatch Express Console.
Procedure
1 Navigate to Groups & Settings > All Settings > System > Enterprise Integration > VMwareEnterprise Systems Connector.
2 Select Test Connection at the bottom of the screen.
The following message displays.
What to do next
Now that you have successfully installed VMware Enterprise Systems Connector, you can use it tointegrate with your directory service infrastructure. Proceed to the Chapter 7 Introduction to DirectoryServices.
AirWatch Express
VMware, Inc. 61

Introduction to DirectoryServices 7AirWatch Express integrates with your organization's existing directory service – such as Active Directory,Lotus Domino, and Novell e-Directory – to provide directory-based account access. This integration letsusers authenticate with AirWatch apps and enroll devices using their existing directory servicecredentials.
Integrating with directory services eliminates the need to create basic user accounts for everyone in yourorganization. Integration can also help simplify the enrollment process for end users by using informationthey already know.
Ongoing LDAP synchronization detects any changes within the system and can automatically performnecessary updates across all devices for affected users. This ongoing synchronization also means thatchanges do not occur without required administrative approval.
Integrating AirWatch with your directory service provides many benefits.
n Conduct an easy enrollment for both users and administrators.
n Map directory groups to AirWatch user groups.
n Control AirWatch Console access.
n Apply existing credentials for VMware Content Locker access.
n Assign apps, profiles, and policies by user group.
n Automatically retire end users when they go inactive.
The following sections explain how to integrate your AirWatch environment with your directory service ofchoice. The sections also describe how to add directory user accounts to AirWatch and how to integrateuser groups with AirWatch Express.
Important The Directory Service information presented in this guide has been designed for AirWatchExpress customers. If you need details about any Directory Service element or concept, consult theVMware AirWatch Directory Services Guide.
This chapter includes the following topics:
n Directory Services Setup
n Set up Directory Services with a Wizard
n Set Up Directory Services Manually
VMware, Inc. 62
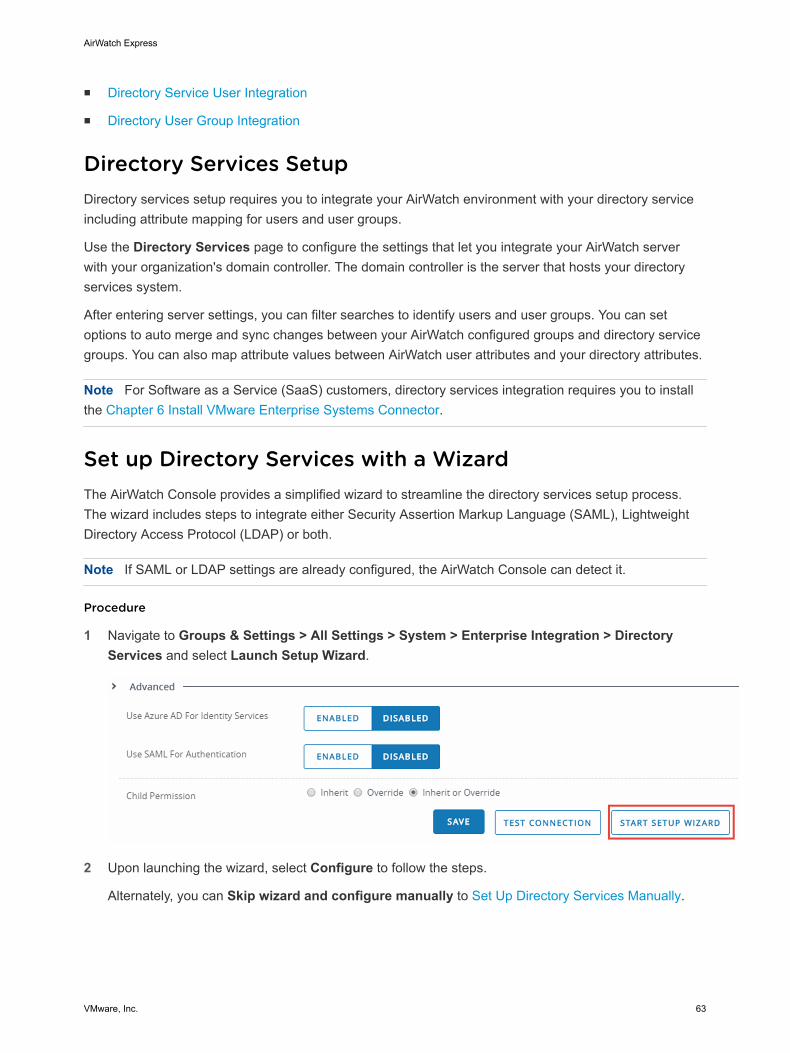
n Directory Service User Integration
n Directory User Group Integration
Directory Services SetupDirectory services setup requires you to integrate your AirWatch environment with your directory serviceincluding attribute mapping for users and user groups.
Use the Directory Services page to configure the settings that let you integrate your AirWatch serverwith your organization's domain controller. The domain controller is the server that hosts your directoryservices system.
After entering server settings, you can filter searches to identify users and user groups. You can setoptions to auto merge and sync changes between your AirWatch configured groups and directory servicegroups. You can also map attribute values between AirWatch user attributes and your directory attributes.
Note For Software as a Service (SaaS) customers, directory services integration requires you to installthe Chapter 6 Install VMware Enterprise Systems Connector.
Set up Directory Services with a WizardThe AirWatch Console provides a simplified wizard to streamline the directory services setup process.The wizard includes steps to integrate either Security Assertion Markup Language (SAML), LightweightDirectory Access Protocol (LDAP) or both.
Note If SAML or LDAP settings are already configured, the AirWatch Console can detect it.
Procedure
1 Navigate to Groups & Settings > All Settings > System > Enterprise Integration > DirectoryServices and select Launch Setup Wizard.
2 Upon launching the wizard, select Configure to follow the steps.
Alternately, you can Skip wizard and configure manually to Set Up Directory Services Manually.
AirWatch Express
VMware, Inc. 63

Set Up Directory Services ManuallyIf you want to customize your directory service settings, you can skip the wizard and configure yoursettings manually.
Navigate to Accounts > Administrators > Administrator Settings > Directory Services to manuallyconfigure the Server, User and Group settings for the Directory service.
Procedure
1 Navigate to Accounts > Administrators > Administrator Settings > Directory Services > Serverto configure LDAPsettings.
Setting Description
Directory Type Select the type of directory service that your organization uses.
Workspace ONE UEM supports open source LDAP for directory services. Formore information on the best Practices that can be followed while Configuringopen source LDAP Directory Service, see the Workspace ONE DirectoryService Integration guide.
DNS SRV Allow the Domain Name System Service Record to decide which server in itsprioritized list of servers can best support LDAP requests. This feature ensurescontinuity of services in a high availability environment. The default setting isDisabled.
With this option disabled, Workspace ONE UEM uses your existing directoryserver, the address of which you enter in the Server setting.
Supported DNS servers:n Active Directory integrated Microsoft DNS serversn Standalone Microsoft DNS servers
Server Enter the address of your directory server. This setting is only available whenEnable DNS SRV is Disabled.
Encryption Type Select the type of encryption to use for a directory services communication. Theoptions available are None (unencrypted), SSL, and Start TLS.
Port Enter the Transmission Control Protocol (TCP) port used to communicate with thedomain controller.
The default for unencrypted LDAP directory service communication is port 389. Toview a KnowledgeBase article that lists the most up-to-dateWorkspace ONE UEM SaaS data center IP ranges, refer to https://support.air-watch.com/articles/115001662168.n When you change the Encryption Type setting to SSL, the Port setting
automatically changes to 636.n When you select the Add Domain button, the Port setting automatically
changes to 3268.
Verify SSL Certificate This setting is only available when the Encryption Type is SSL or Start TLS.Receive SSL errors by selecting the SSL check box.
Protocol Version Select the version of the Lightweight Directory Access Protocol (LDAP) that is inuse. Active Directory uses LDAP versions 2 or 3. If you are unsure of whichProtocol Version to use, try the commonly used value of '3'.
AirWatch Express
VMware, Inc. 64

Setting Description
Use Service Account Credentials Use the App pool credentials from the server on which the VMware EnterpriseSystems Connector is installed for authenticating with the domain controller.Enabling this option hides the Bind user name and Bind Password settings.
Bind Authentication Type Select the type of bind authentication to enable the AirWatch server tocommunicate with the domain controller.
You can select Anonymous, Basic, Digest, Kerberos, NTLM, or GSS-NEGOTIATE. If you are unsure of which Bind Authentication Type to use, start bysetting the bind authentication type to Basic. You will know if your selection is notcorrect when you click Test Connection.
Bind User Name Enter the credentials used to authenticate with the domain controller. Thisaccount (which the entered user name identifies) allows a read-accesspermission on your directory server and binds the connection when authenticatingusers. If you are unsure of which Bind Authentication Type to use, try thecommonly used GSS-NEGOTIATE. You will know if your selection is not correctwhen you click Test Connection. Clear the bind password from the database byselecting the Clear Bind Password check box.
Bind Password Enter the password for the bind user name to authenticate with the directoryserver.
Domain /Server Enter the default domain and server name for any directory-based user accounts.If only one domain is used for all directory user accounts, fill in the text box withthe domain. This entry means that users are authenticated without explicitlystating their domain.
You can add more domains by selecting the Add Domain option. Make sure thatall the domains are in the same forest. In this case, Workspace ONE UEMautomatically changes the port setting to 3268 for global catalog. You may chooseto change the port setting to 3269 for SSL encrypted traffic, or override itcompletely by entering a separate port.
Is there a trust relationship between alldomains?
This setting is available only when you have more than one domain added.
Select Yes if the binding account has permission to access other domains youhave added. This added permission means that the binding account cansuccessfully log in from more domains.
a Complete the following options are available after selecting the Advanced section drop-down.
Setting Description
Search Subdomains Enable subdomain searching to find nested users.
Leaving this option disabled can make searches faster and avoids networkissues. However, users and groups located in subdomains under the baseDomain Name (DN) are not identified.
Connection Timeout Enter the LDAP connection timeout value (in seconds).
Request Timeout Enter the LDAP query request timeout value (in seconds).
Search without base DN Enable this option when using a global catalog and when you do not want torequire a base DN to search for users and groups.
Use Recursive OID at Enrollment Verify user group membership at the time of enrollment. As the system runsthis feature at enrollment time, your performance may decrease with somedirectories.
Use Recursive OID For Group Sync Verify user group membership at the time of Group synchronization.
AirWatch Express
VMware, Inc. 65

Setting Description
Object Identifier Data Type Select the unique identifier that never changes for a user or group. Theoptions available are Binary and String. Typically, the Object Identifier is in aBinary format.
Sort Control Option to enable sorting. If this option is disabled, it can make searches fasterand you can avoid sync timeouts.
b (Optional) Configure Azure AD For Identity Services.
The following settings are available only if enabling Use Azure AD for Identity Services and areonly applicable if you are integrating with Azure Active Directory.
Azure AD integration with Workspace ONE UEM must be configured at the tenant where ActiveDirectory (such as LDAP) is configured.
Setting Description
MDM Enrollment URL Enter the URL address used to enroll devices.
MDM Terms of Use URL Enter the URL address of your terms of use agreement.
There is a helpful link that displays exactly where in the Workspace ONE UEMin Azure AD config panel these MDM URLs belong. This link is labeled,"Where in AAD do I paste this info?"
Directory ID Enter the identification number used to authenticate your Azure AD license.
The Azure Directory ID is found in your Azure AD Directory Instance URL.For example, if your URL is acme.com/WS/ADExt/Dir/0a12bc34-56d7-93f1-g2h3-i4-jk56lm78n, only the last section (0a12bc34-56d7-93f1-g2h3-i4-jk56lm78n) is your Directory ID.
Tenant Name Enter the tenant name of your Azure AD instance.
There is a helpful link that displays exactly how to obtain the tenant info fromyour AAD Directory Instance. This link is labeled, "How To Obtain Tenant Info"
Immutable ID Mapping Attribute The Immutable ID Mapping Attribute points to the sourceAnchor field in ActiveDirectory that is mapped to Azure AD. This enables Workspace ONE UEM tomatch the Azure AD immutable ID to the correct local active directory attribute.
Mapping Attribute Data Type Choose the mapping attribute data type of the field used by Workspace ONEUEM as the sourceAnchor for Azure AD. The default type is Binary.
Automatically revoke user tokenswhen wiping devices
Enable this option to revoke Microsoft Azure AD user tokens when a device orenterprise wipe is executed. It is not a best practice to disable this functionalityas it may reduce the security posture of your configuration. If a wiped device islost, it may still contain a valid AAD authentication token.
c (Optional) Configure SAML For Authentication.
The following Security Assertion Markup Language (SAML) options are available after enablingUse SAML for Authentication.
These options are only applicable if you are integrating with a SAML identity provider.
AirWatch Express
VMware, Inc. 66

Setting Description
Enable SAMLauthentication For
You have the choice of using SAML authentication for Admin, Enrollment, or SelfService Portal.UEM console administrators can select all three, or any combination of two, or selectany one of the three components.
Use new SAMLAuthentication endpoint
A new SAML authentication endpoint has been created for end-user authentication(device enrollment and login to SSP). This authentication replaces the two dedicatedenrollment and SSP endpoints with a single endpoint.
While you may choose to keep your existing settings, Workspace ONE UEM suggestsupdating your SAML settings to take advantage of the new combined endpoint.
If you want to use the new endpoint, enable this setting and save the page. Then use theExport Service Provider Settings to export the new metadata file and upload it to yourIdP. Doing so establishes trust between the new endpoint and your IdP.
SAML 2.0
Import Identity ProviderSettings
Upload a metadata file obtained from the identity provider. This file must be in ExtensibleMarkup Language (XML) format.
Service Provider(Workspace ONE UEM) ID
Enter the Uniform Resource Identifier (URI) with which Workspace ONE UEM identifiesitself to the identity provider. This string must match the ID that has been established astrusted by the identity provider.
Identity Provider ID Enter the URI that the identity provider uses to identify itself. Workspace ONE UEMchecks authentication responses to verify that the identity matches the ID provided here.
REQUEST
Request Binding Type Select the binding types of the request. The options include Redirect, POST, andArtifact.
Identify Provider SingleSign On URL
Enter the identity provider's Uniform Resource Locator (URL) that Workspace ONE UEMuses to send requests.
NameID Format Enter the format in which the identity provider sends a NameID for an authenticateduser. This value is not required as Workspace ONE UEM obtains the user name from theFriendlyName “uid” required attribute.
Authentication RequestSecurity
Select from the dropdown whether or not the Service Provider (Workspace ONE UEM)signs the authentication requests. You can select None, Sign Authentication Requests(SHA1), and Sign Authentication Requests (SHA256). Consider selecting SignAuthentication Requests (SHA256) for a more secure authentication.
RESPONSE
Response Binding Type Select the binding types of the response. The options include Redirect, POST, andArtifact.
Sp Assertion URL Enter the Workspace ONE UEM URL that the identity provider configures to direct itsauthentication responses. “Assertions” regarding the authenticated user are included insuccess responses from the identity provider.
Authentication ResponseSecurity
This value specifies whether the IdP signs the response. You can select between None,Validate Response Signatures, and Validate Assertions Signatures. Considerselecting Validate Response Signatures for a more secure authentication.
CERTIFICATE
Identity ProviderCertificate
Upload the identity provider certificate.
AirWatch Express
VMware, Inc. 67

Setting Description
Service Provider(AirWatch) Certificate
Upload the service provider certificate.
Export Service ProviderSettings button
Exports the metadata file for uploading to your Identity Provider (IdP). This settingestablishes trust between the new SAML endpoint (for enrollment and SSP login) andyour IdP.
2 Navigate to Accounts > Administrators > Administrator Settings > Directory Services > User toconfigure the User settings.
Setting Description
User ObjectClass
Enter the appropriate Object Class. In most cases, this value is "user."
UserSearchFilter
Enter the search parameter used to associate user accounts with Active Directory accounts. The suggestedformat is "<LDAPUserIdentifier>={EnrollmentUser}" where <LDAPUserIdentifier> is the parameter used onthe directory services server to identify the specific user.n For AD servers, use
(&(objectCategory=person)(sAMAccountName={EnrollmentUser}))
n For other LDAP servers, use
(&(objectClass=inetOrgPerson)(uid={EnrollmentUser}))
This format, (&(…)), must be used even when only a single search parameter is specified in either ADservers or other LDAP servers.n For example,
(&(uid={EnrollmentUser}))
Advanced
Setting Description
Auto Merge Enable setting to allow user group updates from your directory service to merge with the associatedusers and groups in Workspace ONE UEM automatically.
Automatically SetDisabled Users toInactive
Select Enable to deactivate the associated user in Workspace ONE UEM when that user is disabledin your LDAP directory service (for example, Novell e-Directory).n Value For Disabled Status – Enter a numeric value and select the type of Lightweight Directory
Access Protocol (LDAP) attribute used to represent a user’s status. Select “Flag Bit Match” if theuser status is designated by a bitwise flag (which is the default for Active Directory).
When “Flag Bit Match” is selected, if any bits from the property match the entered numeric value,then directory service considers the user to be disabled. This setting is only visible when theoption Automatically Set Disabled Users to Inactive is checked.
Note If you select this option, then Workspace ONE UEM administrators set as inactive in yourdirectory service are not able to log in to the Workspace ONE UEM console. In addition, enrolleddevices assigned to users who are set as inactive in your directory service are automaticallyunenrolled.
AirWatch Express
VMware, Inc. 68

Setting Description
Enable CustomAttributes
Enable custom attributes. Custom Attributes is a section that appears under the main Attribute –Mapping Value table. You must scroll down to the bottom of the page to see the Custom Attributes.
Attributes Review and edit the Mapping Values for the listed Attributes, if necessary. These columns showthe mapping between Workspace ONE UEM user attributes (left) and your directory serviceattributes (right). By default these attributes are values most commonly used in Active Directory (AD).Update these mapping values to reflect the values used for your own or other directory service types.
If you add or remove a custom attribute, you should initiate a manual sync afterward by selecting theSync Attributes button.
Sync Attributesbutton
Manually sync the attributes mapped here to the user records in Workspace ONE UEM. Attributessync automatically on the time schedule configured for the Workspace ONE UEM environment.
3 Navigate to Accounts > Administrators > Administrator Settings > Directory Services > Groupto configure Group settings.
Setting Description
Group Object Class Enter the appropriate Object Class. In most cases this value should be group.
Organizational Unit Object Class Enter the appropriate Organizational User Object Class.
Advanced
Setting Description
Group SearchFilter
Enter the search parameter used to associate user groups with directory service accounts.
Auto Sync Default Select this checkbox to automatically add or remove users in Workspace ONE UEM configured usergroups based on their membership in your directory service.
Auto MergeDefault
Select this check box to automatically apply sync changes without administrative approval.
MaximumAllowableChanges
Enter the number of maximum allowable group membership changes to be merged intoWorkspace ONE UEM. Any number of changes detected upon syncing with the directory servicedatabase under this number are automatically merged.
If the number of changes exceed this threshold, an administrator must manually approve the changesbefore they are applied. A single change is defined by a user either leaving or joining a group. Asetting of 100 Maximum Allowable Changes means the Console does not need to sync with yourdirectory service as much.
Conditional GroupSync
Enable this option to sync group attributes only after changes occur in Active Directory. Disable thisoption to sync group attributes regularly, regardless of changes in Active Directory.
Auto-UpdateFriendly Name
When enabled, the friendly name is updated with group name changes made in active directory.
When disabled, the friendly name can be customized so admins can tell the difference between usergroups with identical common names. This can be useful if your implementation includesorganizational unit (OU)-based user groups with the same common name.
Attribute Review and edit the Mapping Value for the listed Attribute, if necessary. These columns show themapping between Workspace ONE UEM user attributes (left) and your directory service attributes(right). By default these attributes are values most commonly used in AD. Update these mappingvalues to reflect the values used for your own or other directory service types.
AirWatch Express
VMware, Inc. 69

4 Verify that you have established proper connectivity by selecting the Test Connection button.
5 Select Save.
Directory Service User IntegrationEvery directory user you want to manage through AirWatch Express must have a corresponding AirWatchExpress user account.
Integrating directory service users into AirWatch Express users is entirely optional. However, the benefitsof applying the user data already stored within your directory service are of a high order.
Integrating the two systems means that you gain the benefit of having the two systems linked. When auser becomes inactive in directory services, their linked user account status and device enrollment inAirWatch Express come to an end automatically. User inactivity includes employment termination,retirement, and so on.
Linking the two systems means mapping your directory service user information onto AirWatch Express.
Map Directory Services User InformationAfter entering server settings, you can filter searches to identify users and map values betweenWorkspace ONE UEM user attributes and your directory attributes.
Procedure
1 Navigate to Accounts > Administrators > Administrator Settings > Directory Services.
2 Select the User tab. By default, only the Base DN information displays.
3 Select the Fetch DN plus sign (+) next to the Base DN column.
This plus sign displays a list of Base DNs from which you can select to populate this text box. If itdoes not, revisit the settings you entered on the Server tab before continuing.
AirWatch Express
VMware, Inc. 70

4 Enter data in the following settings.
Setting Description
User ObjectClass
Enter the appropriate Object Class. In most cases, this value is "user."
UserSearchFilter
Enter the search parameter used to associate user accounts with Active Directory accounts. The suggestedformat is "<LDAPUserIdentifier>={EnrollmentUser}" where <LDAPUserIdentifier> is the parameter used onthe directory services server to identify the specific user.n For AD servers, use
(&(objectCategory=person)(sAMAccountName={EnrollmentUser}))
n For other LDAP servers, use
(&(objectClass=inetOrgPerson)(uid={EnrollmentUser}))
This format, (&(…)), must be used even when only a single search parameter is specified in either ADservers or other LDAP servers.n For example,
(&(uid={EnrollmentUser}))
5 Display more settings by selecting Show Advanced.
Setting Description
Auto Merge Enable setting to allow user group updates from your directory service to merge with the associatedusers and groups in Workspace ONE UEM automatically.
Automatically SetDisabled Users toInactive
Select Enable to deactivate the associated user in Workspace ONE UEM when that user is disabledin your LDAP directory service (for example, Novell e-Directory).n Value For Disabled Status – Enter a numeric value and select the type of Lightweight Directory
Access Protocol (LDAP) attribute used to represent a user’s status. Select “Flag Bit Match” if theuser status is designated by a bitwise flag (which is the default for Active Directory).
When “Flag Bit Match” is selected, if any bits from the property match the entered numeric value,then directory service considers the user to be disabled. This setting is only visible when theoption Automatically Set Disabled Users to Inactive is checked.
Note If you select this option, then Workspace ONE UEM administrators set as inactive in yourdirectory service are not able to log in to the Workspace ONE UEM console. In addition, enrolleddevices assigned to users who are set as inactive in your directory service are automaticallyunenrolled.
Enable CustomAttributes
Enable custom attributes. Custom Attributes is a section that appears under the main Attribute –Mapping Value table. You must scroll down to the bottom of the page to see the Custom Attributes.
AirWatch Express
VMware, Inc. 71

Setting Description
Attributes Review and edit the Mapping Values for the listed Attributes, if necessary. These columns showthe mapping between Workspace ONE UEM user attributes (left) and your directory serviceattributes (right). By default these attributes are values most commonly used in Active Directory (AD).Update these mapping values to reflect the values used for your own or other directory service types.
If you add or remove a custom attribute, you should initiate a manual sync afterward by selecting theSync Attributes button.
Sync Attributesbutton
Manually sync the attributes mapped here to the user records in Workspace ONE UEM. Attributessync automatically on the time schedule configured for the Workspace ONE UEM environment.
Directory User Group IntegrationAn alternative to custom user groups without active directory integration is through user group integrationthat applies your existing active directory structure, providing many benefits.
Once you import existing directory service user groups as AirWatch Express user groups, you canperform tasks in the following areas.
n User Management – Reference your existing directory service groups (such as security groups ordistribution lists) and align user management in AirWatch Express with the existing organizationalsystems.
n Profiles and Policies – Assign profiles, applications, and policies across an AirWatch Expressdeployment to groups of users.
n Integrated Updates – Automatically update user group assignments based on group membershipchanges.
n Management Permissions – Set management permissions to allow approved administrators only tochange policy and profile assignments for certain user groups.
n Enrollment – Allow users to enroll in AirWatch Express using their existing credentials.
Similar to the way Map Directory Services User Information, mapping user group data integrates yourexisting directory service groups into AirWatch Express user groups.
AirWatch Express
VMware, Inc. 72

Configure Map Directory Services Group SettingsAfter entering server settings, you can filter searches to identify user groups. You can also set options toauto merge and sync changes between your Workspace ONE UEM groups and directory service groups.
Note No AD passwords are stored in the Workspace ONE UEM database except the Bind accountpassword used to link directory services into your Workspace ONE UEM environment. The Bind accountpassword is stored in an encrypted form in the database and is not accessible from the console. Uniquesession keys are used for each sync connection to the Active Directory server.
Note In some instances, global catalogs are used to manage multiple domains or AD Forests. Delayswhile searching for or authenticating users may be due to a complex directory structure. You can integratedirectly with the global catalog to query multiple forests using one Lightweight Directory Access Protocol(LDAP) endpoint for better results. To integrate with the global catalog directly, configure the followingsettings.
n Encryption Type = None
n Port = 3268
n Verify that your firewall allows for this traffic on port 3268.
Procedure
1 Navigate to Accounts > Administrators > Administrator Settings > Directory Services.
2 Select the Group tab. By default, only the Base DN information displays.
3 For Base DN, select the Fetch DN plus sign (+) next to the Base DN setting to display a list of BaseDNs. Populate this text box by selecting from the list.
a If a list of Base DNs does not display, revisit the settings you entered on the Server tab beforecontinuing.
4 Enter data in the following settings.
Setting Description
Group Object Class Enter the appropriate Object Class. In most cases this value should be group.
Organizational Unit Object Class Enter the appropriate Organizational User Object Class.
5 To display more settings, select Advanced. Enter data in the following text boxes.
Setting Description
Group SearchFilter
Enter the search parameter used to associate user groups with directory service accounts.
Auto Sync Default Select this checkbox to automatically add or remove users in Workspace ONE UEM configured usergroups based on their membership in your directory service.
Auto MergeDefault
Select this check box to automatically apply sync changes without administrative approval.
AirWatch Express
VMware, Inc. 73

Setting Description
MaximumAllowableChanges
Enter the number of maximum allowable group membership changes to be merged intoWorkspace ONE UEM. Any number of changes detected upon syncing with the directory servicedatabase under this number are automatically merged.
If the number of changes exceed this threshold, an administrator must manually approve the changesbefore they are applied. A single change is defined by a user either leaving or joining a group. Asetting of 100 Maximum Allowable Changes means the Console does not need to sync with yourdirectory service as much.
Conditional GroupSync
Enable this option to sync group attributes only after changes occur in Active Directory. Disable thisoption to sync group attributes regularly, regardless of changes in Active Directory.
Auto-UpdateFriendly Name
When enabled, the friendly name is updated with group name changes made in active directory.
When disabled, the friendly name can be customized so admins can tell the difference between usergroups with identical common names. This can be useful if your implementation includesorganizational unit (OU)-based user groups with the same common name.
Attribute Review and edit the Mapping Value for the listed Attribute, if necessary. These columns show themapping between Workspace ONE UEM user attributes (left) and your directory service attributes(right). By default these attributes are values most commonly used in AD. Update these mappingvalues to reflect the values used for your own or other directory service types.
Add Directory Service User Groups to AirWatch ExpressUser groups added in AirWatch Express can be synced – automatically when configured with a scheduler– with your directory service groups to merge changes or add missing users.
n Pros
You have the option of restricting the enrollment to only known groups, which lets you restrict on auser group level who can enroll. This method also keeps your existing directory service groupinfrastructure and allows you to assign profiles, policies, content, and apps based on these existinggroup setups.
n Cons
Uploading directory service user groups does not automatically create AirWatch user accounts.Therefore, if you have restricted enrollment for known users, you must add those user accounts intothe AirWatch Express Admin Console manually.
Procedure
1 Navigate to Accounts > User Groups > List View, select Add, then Add User Group.
AirWatch Express
VMware, Inc. 74

2 Complete the settings in the Add User Group screen as applicable, ensuring the user group Type isDirectory.
Setting Description
Type Select the type of User Group.n Directory – Create a user group that is aligned with your existing active directory structure.n Custom – Create a user group outside of your organization's existing Active Directory structure.
This user group type grants access to features and content for basic and directory users tocustomize user groups according to your deployment. Custom user groups can only be addedat a customer level organization group.
External Type Select the external type of group you are adding.n Group – Refers to the group object class on which your user group is based. Customize this
class by navigating to Groups & Settings > All Settings > System > Enterprise Integration >Directory Services > Group.
n Organizational Unit – Refers to the organizational unit object class on which your user group isbased. Customize this class by navigating to Groups & Settings > All Settings > System >Enterprise Integration > Directory Services > Group.
n Custom Query – You can also create a user group containing users you locate by running acustom query. Selecting this external type replaces the Search Text function but displays theCustom Query section.
Search Text Identify the name of a user group in your directory by entering the search criteria and selectingSearch to search for it. If a directory group contains your search text, a list of group namesdisplays.
This option is unavailable when External Type is set to Custom Query.
Directory Name Read-only setting displaying the address of your directory services server.
Domain and GroupBase DN
This information automatically populates based on the directory services server information youenter on the Directory Services page (Groups & Settings > System > Enterprise Integration >Directory Services).
Select the Fetch DN plus sign (+) next to the Group Base DN setting, which displays a list ofdistinguished name elements from which you can select.
Custom ObjectClass
Identifies the object class under which your query runs. The default object class is 'person' but youcan supply a custom object class to identify your users with a greater success and accuracy.
This option is available only when Custom Query is selected as External Type.
Group Name Select a Group Name from your Search Text results list. Selecting a group name automaticallyalters the value in the Distinguished Name setting.
This option is available only after you have completed a successful search with the Search Textsetting.
DistinguishedName
This read-only setting displays the full distinguished name of the group you are creating.
This option is available only when Group or Organizational Unit is selected as External Type.
Custom Base DN Identifies the base distinguished name which serves as the starting point of your query. The defaultbase distinguished name is 'AirWatch' and 'sso'. However, if you want to run the query with adifferent starting point, you can supply a custom base distinguished name.
This option is available only when Custom Query is selected as External Type.
Organization GroupAssignment
This optional setting enables you to assign the user group you are creating to a specificorganization group.
This option is available only when Group or Organizational Unit is selected as External Type.
AirWatch Express
VMware, Inc. 75

Setting Description
User GroupSettings
Select between Apply default settings and Use Custom settings for this user group. See theCustom Settings section for additional setting descriptions. You can configure this option from thepermission settings after the group is created.
This option is available only when Group or Organizational Unit is selected as External Type.
Custom Query
Query This setting displays the currently loaded query that runs when you select the Test Query buttonand when you select the Continue button. Changes you make to the Custom Logic setting or theCustom Object Class setting are reflected here.
Custom Logic Add your custom query logic here, such as user name or admin name. For example, "cn=jsmith".You can include as much or as little of the distinguished name as you like. The Test Query buttonallows you to see if the syntax of your query is correct before selecting the Continue button.
Custom Settings
ManagementPermissions
You can allow or disallow all administrators to manage the user group you are creating.
Default Role Select a default role for the user group from the drop-down menu.
Default EnrollmentPolicy
Select a default enrollment policy from the drop-down menu.
Auto Sync withDirectory
This option enables the directory sync, which detects user membership from the directory serverand stores it in a temporary table. Administrators approve changes to the console unless the AutoMerge option is selected.
If you want to prevent user groups from automatically syncing during a scheduled sync, this settingmust be disabled.
Auto MergeChanges
Enable this option to apply sync changes automatically from the database without administrativeapproval.
MaximumAllowable Changes
Use this setting to set a threshold for the number of automatic user group sync changes that areallowed to occur before approval must be given.
Changes more than the threshold are in need of admin approval and a notification is sent to thiseffect. For more information, see the VMware AirWatch Mobile Device Management Guide.
This option is available only when Auto Merge Changes is enabled.
Add GroupMembersAutomatically
Enable this setting to add users to the user group automatically.
If you want to prevent user groups from automatically syncing during a scheduled sync, this settingmust be disabled.
Send Email to Userwhen AddingMissing Users
You can send an email to users while adding missing users. Adding missing users meanscombining the temporary user group table with the Active Directory table.
Message Template Select a message template to be used for the email notification during the addition of missing usersto the user group.
This option is available only when Send Email to User when Adding Missing Users is enabled.
3 Select Save.
AirWatch Express
VMware, Inc. 76

Remove Users From User Groups Based on Directory ServiceGroup MembershipYou can enable Workspace ONE UEM to detect when a directory service user account is removed andautomatically remove its associated user account from the associated group.
Procedure
1 Navigate to Accounts > User Groups > Settings > Directory Services.
2 Select the Group tab.
3 See advanced configuration options by selecting the Show Advanced hyperlink.
4 Select the Auto Sync Default check box.
AirWatch Express
VMware, Inc. 77