Embed Size (px)
Citation preview

SOLIDWORKS SETUP PACKAGE by Jordan Tadic
INTRODUCTION USER INTERFACE
Top Toolbar CommandManager
Large Button Display Features Sketch Surfaces Sheet Metal Weldments Mold Tools Assembly
Heads-up View Toolbar Parts & Assemblies Drawings
Shortcut Bars Sketch Part Assembly Drawing
Context Toolbars FeatureManager Tree Graphics Area
Right Click Customizations Spline Toolbar Mouse Gestures Keyboard Shortcuts GCMY Highlight Color Scheme
SYSTEM OPTIONS General Drawings Colors Sketch Display/Selection Performance Assemblies External References Default Templates File Locations FeatureManager Spin Box Increments View Backup/Recover Touch Hole Wizard/Toolbox File Explorer Search Collaboration Messages/Errors/Warnings
TEMPLATE FILES Document Templates Custom Property Files Sheet Formats Drafting Standards
SOLIDWORKS Setup Package - 1 of 12
SOLIDWORKS SETUP PACKAGE
INTRODUCTION The SOLIDWORKS user interface is ready to use right out of the box, but there are plenty of little things that can be customized to make your life a bit easier. There are a lot of tweaks that I’ve learned throughout my career that can benefit a new user/company like you. Take note that my recommendations are just that - “recommendations”. As you grow more familiar with the software, you’ll hopefully feel more comfortable to customize your experience even more.
● First, I’ll introduce you to a bunch of User Interface customizations - SOLIDWORKS Settings Directory ● Then, I’ll share my document templates to help you get standardized - SOLIDWORKS Templates Directory
NOTE: If you’re new to SOLIDWORKS, it’s always a good idea to sign up for an account at my.solidworks.com. When you do, make sure to register your SOLIDWORKS serial number so you can unlock additional features that are exclusive to SOLIDWORKS subscription customers.
USER INTERFACE Each section below will contain a SOLIDWORKS Copy Settings Wizard file that you will be able to download. Once downloaded, a settings file can be double clicked to easily load the pre-configured customizations to your workstation. Before proceeding, make sure to backup your entire SOLIDWORKS settings profile by saving your settings with the Copy Settings Wizard. Also note that all of these settings are for SOLIDWORKS 2015 and later.
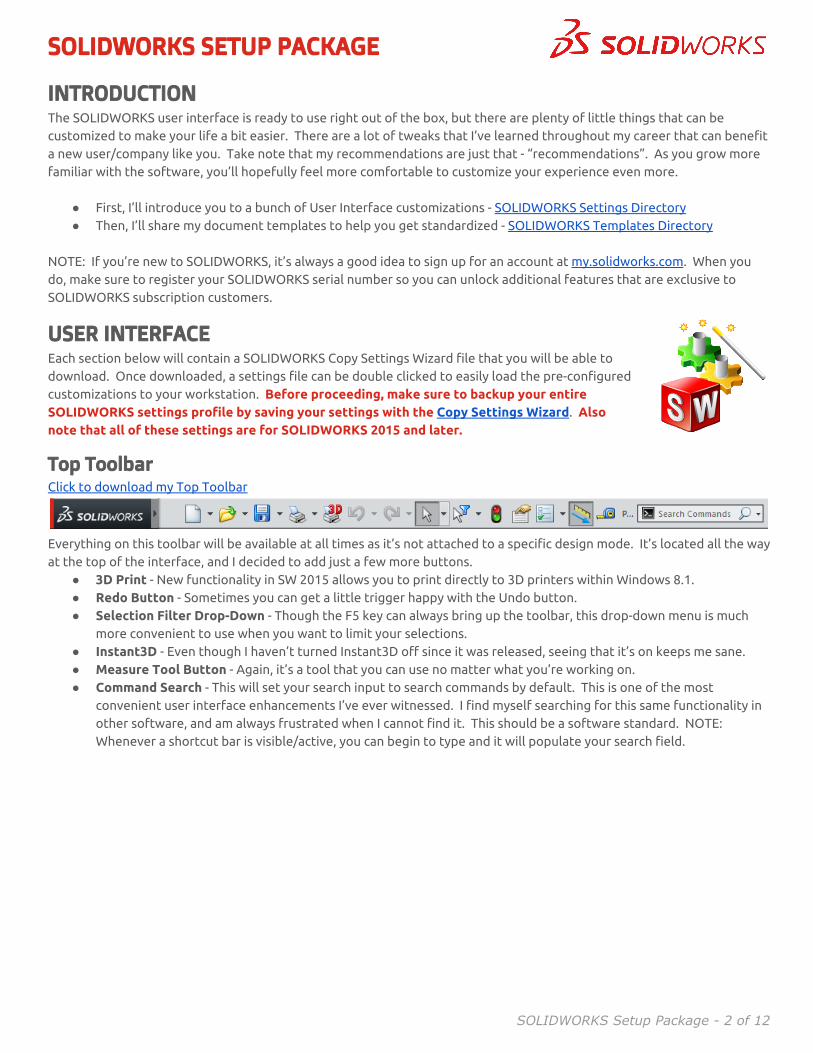
Top Toolbar Click to download my Top Toolbar
Everything on this toolbar will be available at all times as it’s not attached to a specific design mode. It’s located all the way at the top of the interface, and I decided to add just a few more buttons.
● 3D Print - New functionality in SW 2015 allows you to print directly to 3D printers within Windows 8.1. ● Redo Button - Sometimes you can get a little trigger happy with the Undo button. ● Selection Filter Drop-Down - Though the F5 key can always bring up the toolbar, this drop-down menu is much
more convenient to use when you want to limit your selections. ● Instant3D - Even though I haven’t turned Instant3D off since it was released, seeing that it’s on keeps me sane. ● Measure Tool Button - Again, it’s a tool that you can use no matter what you’re working on. ● Command Search - This will set your search input to search commands by default. This is one of the most
convenient user interface enhancements I’ve ever witnessed. I find myself searching for this same functionality in other software, and am always frustrated when I cannot find it. This should be a software standard. NOTE: Whenever a shortcut bar is visible/active, you can begin to type and it will populate your search field.
SOLIDWORKS Setup Package - 2 of 12
SOLIDWORKS SETUP PACKAGE
CommandManager Click to download all my CommandManager tabs at once I mostly use my shortcut menus and keyboard shortcuts, so I do not see any disadvantage to including as many tools as possible on to CommandManager.
Large Button Display Click to download my Large Button Display It’s my preference to display large buttons to make them easier to decipher on a high resolution screen. Because SOLIDWORKS icons are so detailed the text descriptions just waste space. So, if you’d like, Right click anywhere on the CommandManager and deselect “Use Large Buttons with Text” to remove the text entirely.
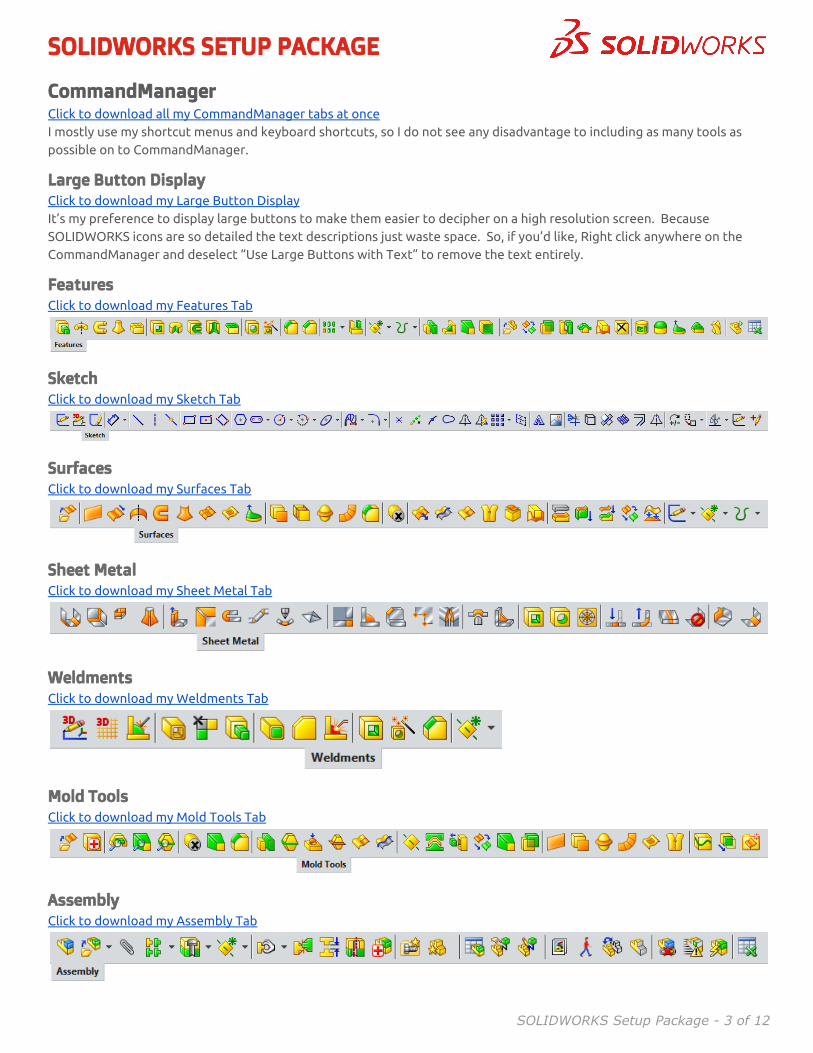
Features Click to download my Features Tab
Sketch Click to download my Sketch Tab
Surfaces Click to download my Surfaces Tab
Sheet Metal Click to download my Sheet Metal Tab
Weldments Click to download my Weldments Tab
Mold Tools Click to download my Mold Tools Tab
Assembly Click to download my Assembly Tab
SOLIDWORKS Setup Package - 3 of 12
SOLIDWORKS SETUP PACKAGE
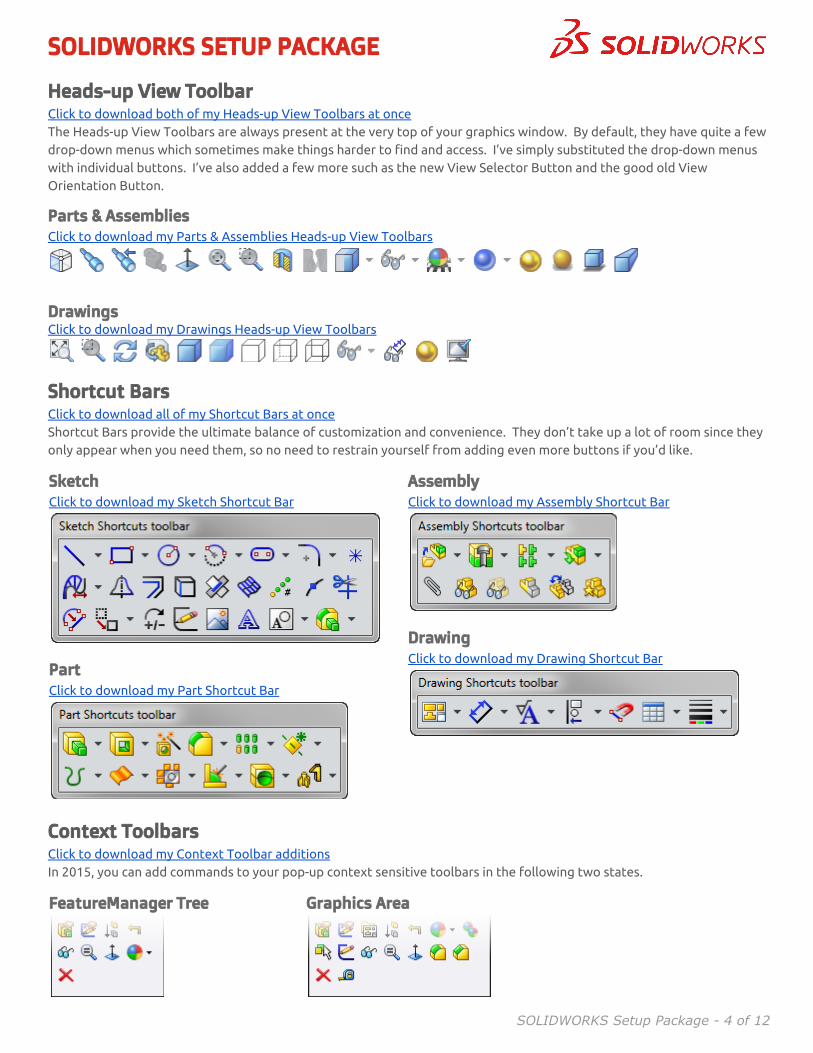
Heads-up View Toolbar Click to download both of my Heads-up View Toolbars at once The Heads-up View Toolbars are always present at the very top of your graphics window. By default, they have quite a few drop-down menus which sometimes make things harder to find and access. I’ve simply substituted the drop-down menus with individual buttons. I’ve also added a few more such as the new View Selector Button and the good old View Orientation Button.
Parts & Assemblies Click to download my Parts & Assemblies Heads-up View Toolbars
Drawings Click to download my Drawings Heads-up View Toolbars
Shortcut Bars Click to download all of my Shortcut Bars at once Shortcut Bars provide the ultimate balance of customization and convenience. They don’t take up a lot of room since they only appear when you need them, so no need to restrain yourself from adding even more buttons if you’d like.
Sketch Click to download my Sketch Shortcut Bar
Part Click to download my Part Shortcut Bar
Assembly Click to download my Assembly Shortcut Bar
Drawing Click to download my Drawing Shortcut Bar
Context Toolbars Click to download my Context Toolbar additions In 2015, you can add commands to your pop-up context sensitive toolbars in the following two states.
FeatureManager Tree
Graphics Area
SOLIDWORKS Setup Package - 4 of 12
SOLIDWORKS SETUP PACKAGE
Right Click Customizations Click to download my Rick Click Menu Customizations On the other hand, sometimes less is more. Right click menus in SOLIDWORKS are getting ridiculously long due to all the new functionality SOLIDWORKS adds each year. Thankfully, you can choose which items appear when you right click and which items are initially hidden until you expand the menu. These customizations have filtered the initial right click menus to what’s most important so you can find what you’re looking for faster.
Spline Toolbar Click to download my Spline Toolbar Modifications
If you plan to use any of the Spline tools, it’s really convenient to have them all located in one place. I have combined the two standard spline toolbars into one. This modification allows all of the Spline tools to be accessible from a single Spline Drop-Down I added to the part environment’s Shortcut Bar (see above). *Props to Randy Simmons for introducing me to this trick
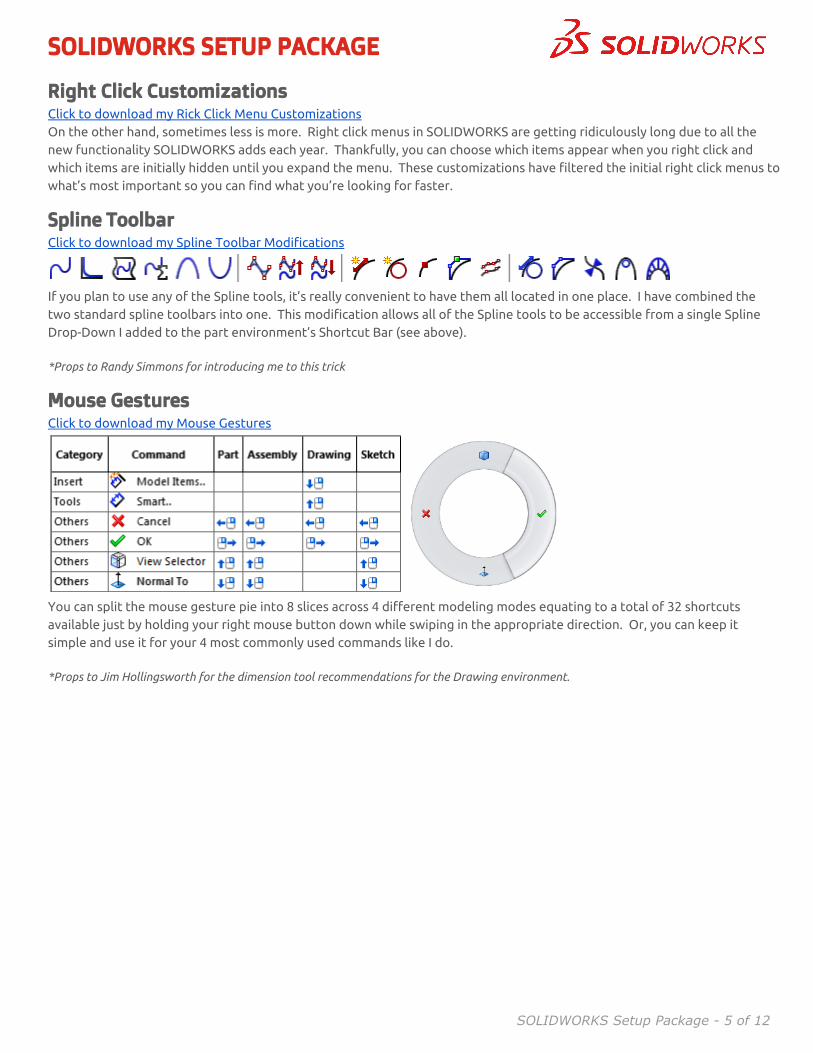
Mouse Gestures Click to download my Mouse Gestures
You can split the mouse gesture pie into 8 slices across 4 different modeling modes equating to a total of 32 shortcuts available just by holding your right mouse button down while swiping in the appropriate direction. Or, you can keep it simple and use it for your 4 most commonly used commands like I do. *Props to Jim Hollingsworth for the dimension tool recommendations for the Drawing environment.
SOLIDWORKS Setup Package - 5 of 12
SOLIDWORKS SETUP PACKAGE
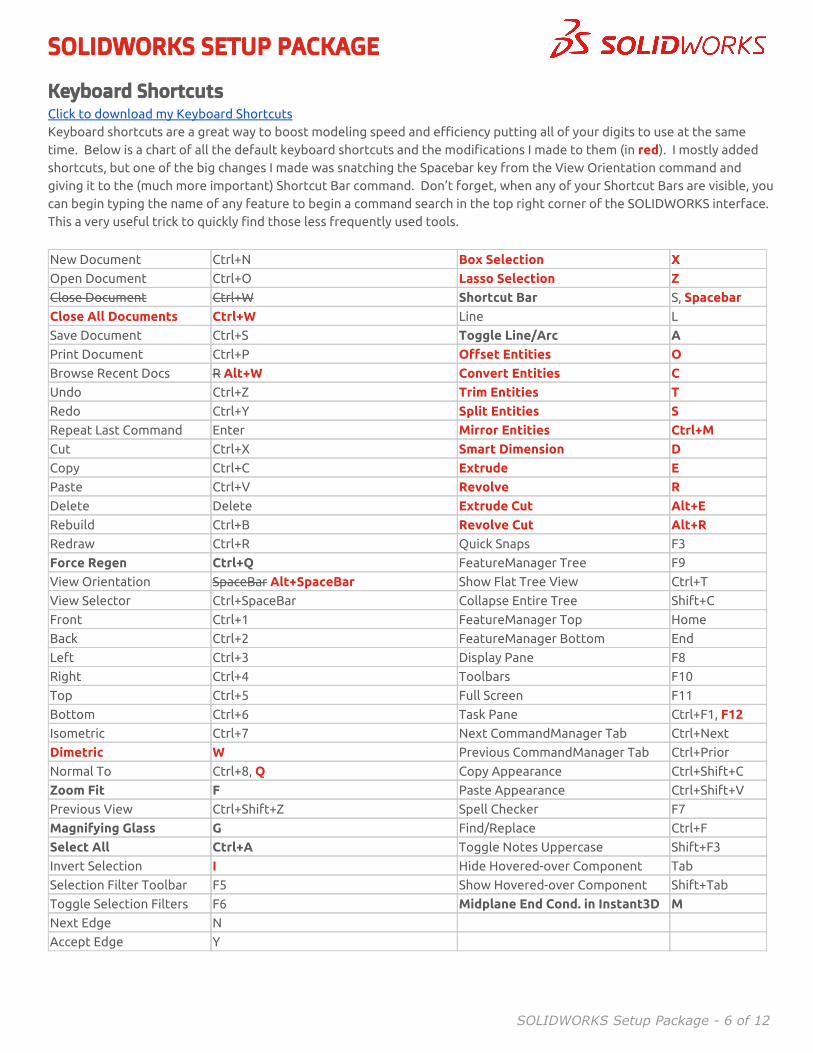
Keyboard Shortcuts Click to download my Keyboard Shortcuts Keyboard shortcuts are a great way to boost modeling speed and efficiency putting all of your digits to use at the same time. Below is a chart of all the default keyboard shortcuts and the modifications I made to them (in red). I mostly added shortcuts, but one of the big changes I made was snatching the Spacebar key from the View Orientation command and giving it to the (much more important) Shortcut Bar command. Don’t forget, when any of your Shortcut Bars are visible, you can begin typing the name of any feature to begin a command search in the top right corner of the SOLIDWORKS interface. This a very useful trick to quickly find those less frequently used tools.
New Document Ctrl+N Box Selection X Open Document Ctrl+O Lasso Selection Z Close Document Ctrl+W Shortcut Bar S, Spacebar Close All Documents Ctrl+W Line L
Save Document Ctrl+S Toggle Line/Arc A Print Document Ctrl+P Offset Entities O Browse Recent Docs R Alt+W Convert Entities C Undo Ctrl+Z Trim Entities T Redo Ctrl+Y Split Entities S Repeat Last Command Enter Mirror Entities Ctrl+M Cut Ctrl+X Smart Dimension D Copy Ctrl+C Extrude E Paste Ctrl+V Revolve R Delete Delete Extrude Cut Alt+E Rebuild Ctrl+B Revolve Cut Alt+R Redraw Ctrl+R Quick Snaps F3
Force Regen Ctrl+Q FeatureManager Tree F9
View Orientation SpaceBar Alt+SpaceBar Show Flat Tree View Ctrl+T
View Selector Ctrl+SpaceBar Collapse Entire Tree Shift+C
Front Ctrl+1 FeatureManager Top Home
Back Ctrl+2 FeatureManager Bottom End
Left Ctrl+3 Display Pane F8
Right Ctrl+4 Toolbars F10
Top Ctrl+5 Full Screen F11
Bottom Ctrl+6 Task Pane Ctrl+F1, F12 Isometric Ctrl+7 Next CommandManager Tab Ctrl+Next
Dimetric W Previous CommandManager Tab Ctrl+Prior
Normal To Ctrl+8, Q Copy Appearance Ctrl+Shift+C
Zoom Fit F Paste Appearance Ctrl+Shift+V
Previous View Ctrl+Shift+Z Spell Checker F7
Magnifying Glass G Find/Replace Ctrl+F
Select All Ctrl+A Toggle Notes Uppercase Shift+F3
Invert Selection I Hide Hovered-over Component Tab
Selection Filter Toolbar F5 Show Hovered-over Component Shift+Tab
Toggle Selection Filters F6 Midplane End Cond. in Instant3D M Next Edge N
Accept Edge Y
SOLIDWORKS Setup Package - 6 of 12
SOLIDWORKS SETUP PACKAGE
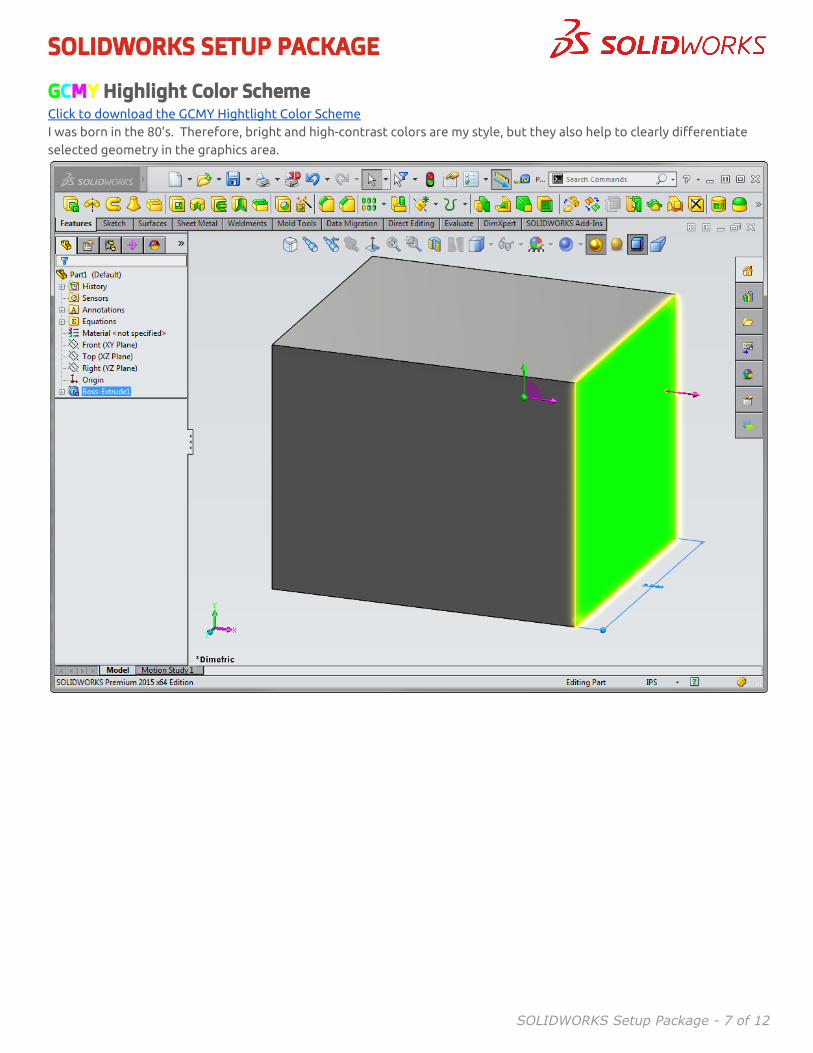
GCMY Highlight Color Scheme Click to download the GCMY Hightlight Color Scheme I was born in the 80’s. Therefore, bright and high-contrast colors are my style, but they also help to clearly differentiate selected geometry in the graphics area.
SOLIDWORKS Setup Package - 7 of 12
SOLIDWORKS SETUP PACKAGE
SYSTEM OPTIONS
General
Drawings
Colors
Sketch
Display/Selection
Performance
Assemblies
External References
Default Templates
File Locations
FeatureManager
Spin Box Increments
View
Backup/Recover
Touch
Hole Wizard/Toolbox
File Explorer
Search
Collaboration
Messages/Errors/Warnings
SOLIDWORKS Setup Package - 8 of 12
SOLIDWORKS SETUP PACKAGE
TEMPLATE FILES Click here to access all of my SOLIDWORKS Template Files The key to standardization across an entire team of designers is template files. SOLIDWORKS provides some templates, but their lack of detail makes it clear that it’s your responsibility to create your own. To kickstart this process, I’m sharing my most popular template files for you to use as a starting point. The task of generating a library of templates will seem a lot less daunting with this file set. Rather than a single settings file, each section in this portion will contain a directory of files. Each directory can be placed on a centralized server location that your entire design team can access. You will then need to customize your users’ System Options to reference these file locations (Options > System Options > File Locations).
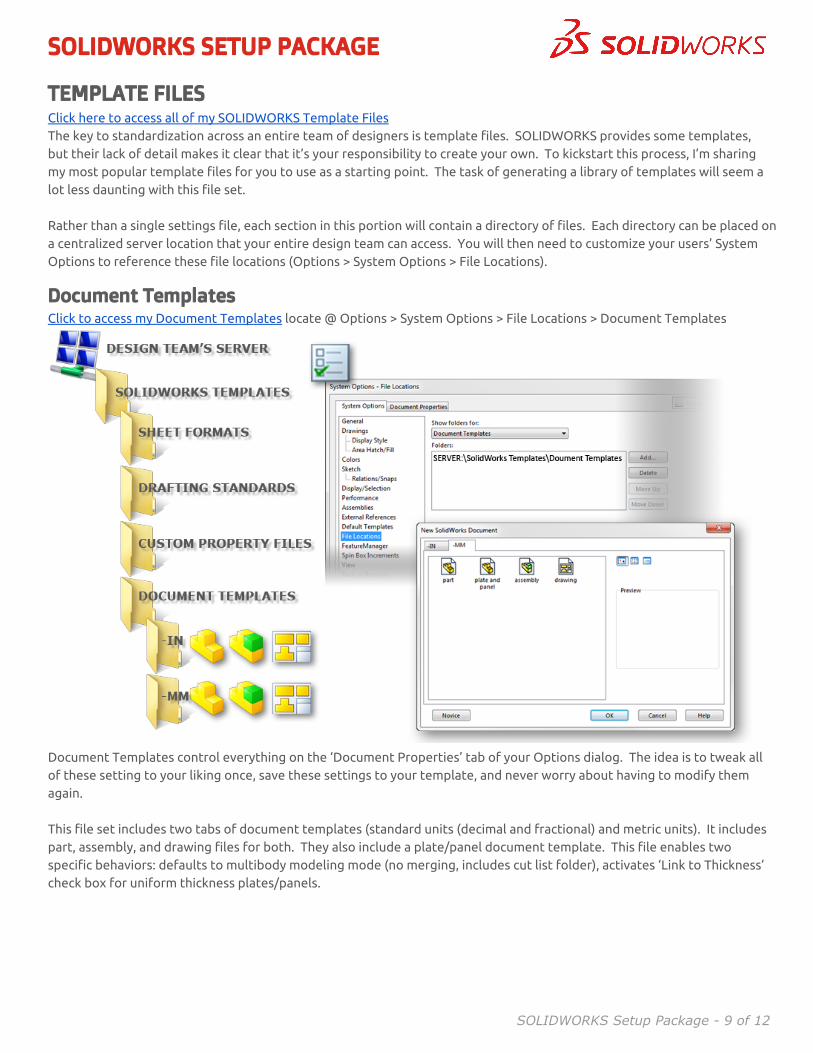
Document Templates Click to access my Document Templates locate @ Options > System Options > File Locations > Document Templates
Document Templates control everything on the ‘Document Properties’ tab of your Options dialog. The idea is to tweak all of these setting to your liking once, save these settings to your template, and never worry about having to modify them again. This file set includes two tabs of document templates (standard units (decimal and fractional) and metric units). It includes part, assembly, and drawing files for both. They also include a plate/panel document template. This file enables two specific behaviors: defaults to multibody modeling mode (no merging, includes cut list folder), activates ‘Link to Thickness’ check box for uniform thickness plates/panels.
SOLIDWORKS Setup Package - 9 of 12
SOLIDWORKS SETUP PACKAGE
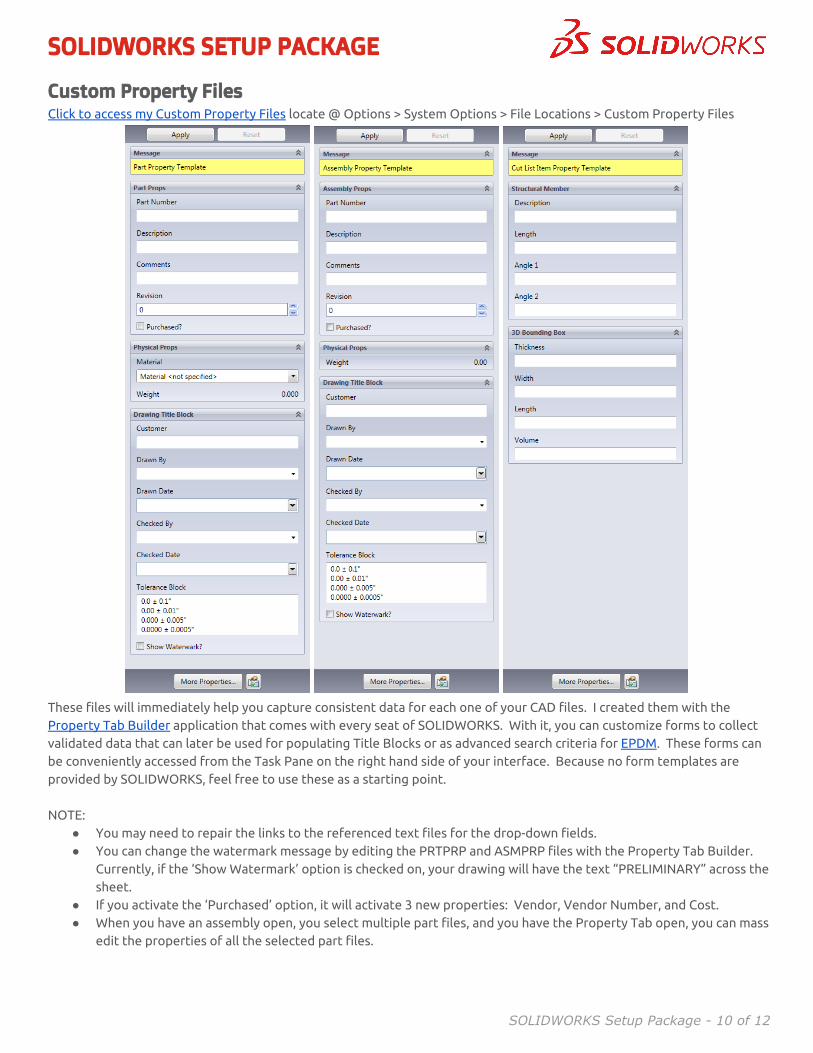
Custom Property Files Click to access my Custom Property Files locate @ Options > System Options > File Locations > Custom Property Files
These files will immediately help you capture consistent data for each one of your CAD files. I created them with the Property Tab Builder application that comes with every seat of SOLIDWORKS. With it, you can customize forms to collect validated data that can later be used for populating Title Blocks or as advanced search criteria for EPDM. These forms can be conveniently accessed from the Task Pane on the right hand side of your interface. Because no form templates are provided by SOLIDWORKS, feel free to use these as a starting point. NOTE:
● You may need to repair the links to the referenced text files for the drop-down fields. ● You can change the watermark message by editing the PRTPRP and ASMPRP files with the Property Tab Builder.
Currently, if the ‘Show Watermark’ option is checked on, your drawing will have the text “PRELIMINARY” across the sheet.
● If you activate the ‘Purchased’ option, it will activate 3 new properties: Vendor, Vendor Number, and Cost. ● When you have an assembly open, you select multiple part files, and you have the Property Tab open, you can mass
edit the properties of all the selected part files.
SOLIDWORKS Setup Package - 10 of 12
SOLIDWORKS SETUP PACKAGE
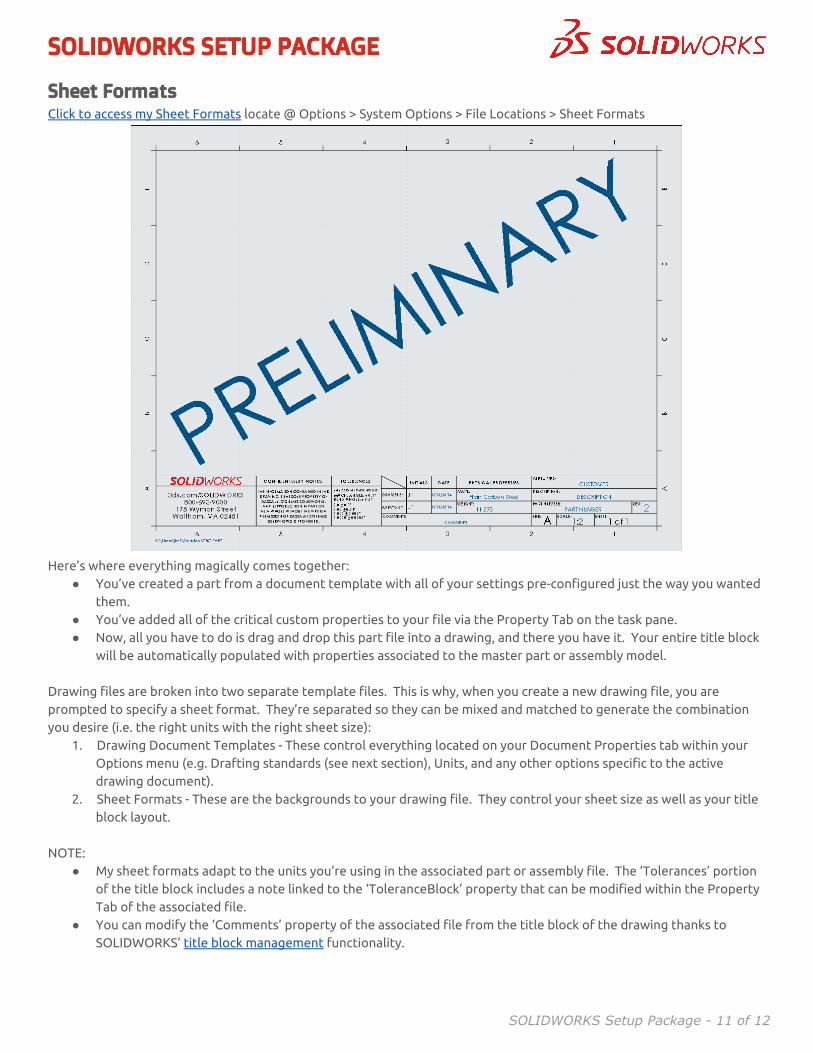
Sheet Formats Click to access my Sheet Formats locate @ Options > System Options > File Locations > Sheet Formats
Here’s where everything magically comes together: ● You’ve created a part from a document template with all of your settings pre-configured just the way you wanted
them. ● You’ve added all of the critical custom properties to your file via the Property Tab on the task pane. ● Now, all you have to do is drag and drop this part file into a drawing, and there you have it. Your entire title block
will be automatically populated with properties associated to the master part or assembly model. Drawing files are broken into two separate template files. This is why, when you create a new drawing file, you are prompted to specify a sheet format. They’re separated so they can be mixed and matched to generate the combination you desire (i.e. the right units with the right sheet size):
1. Drawing Document Templates - These control everything located on your Document Properties tab within your Options menu (e.g. Drafting standards (see next section), Units, and any other options specific to the active drawing document).
2. Sheet Formats - These are the backgrounds to your drawing file. They control your sheet size as well as your title block layout.
NOTE:
● My sheet formats adapt to the units you’re using in the associated part or assembly file. The ‘Tolerances’ portion of the title block includes a note linked to the ‘ToleranceBlock’ property that can be modified within the Property Tab of the associated file.
● You can modify the ‘Comments’ property of the associated file from the title block of the drawing thanks to SOLIDWORKS’ title block management functionality.
SOLIDWORKS Setup Package - 11 of 12
SOLIDWORKS SETUP PACKAGE
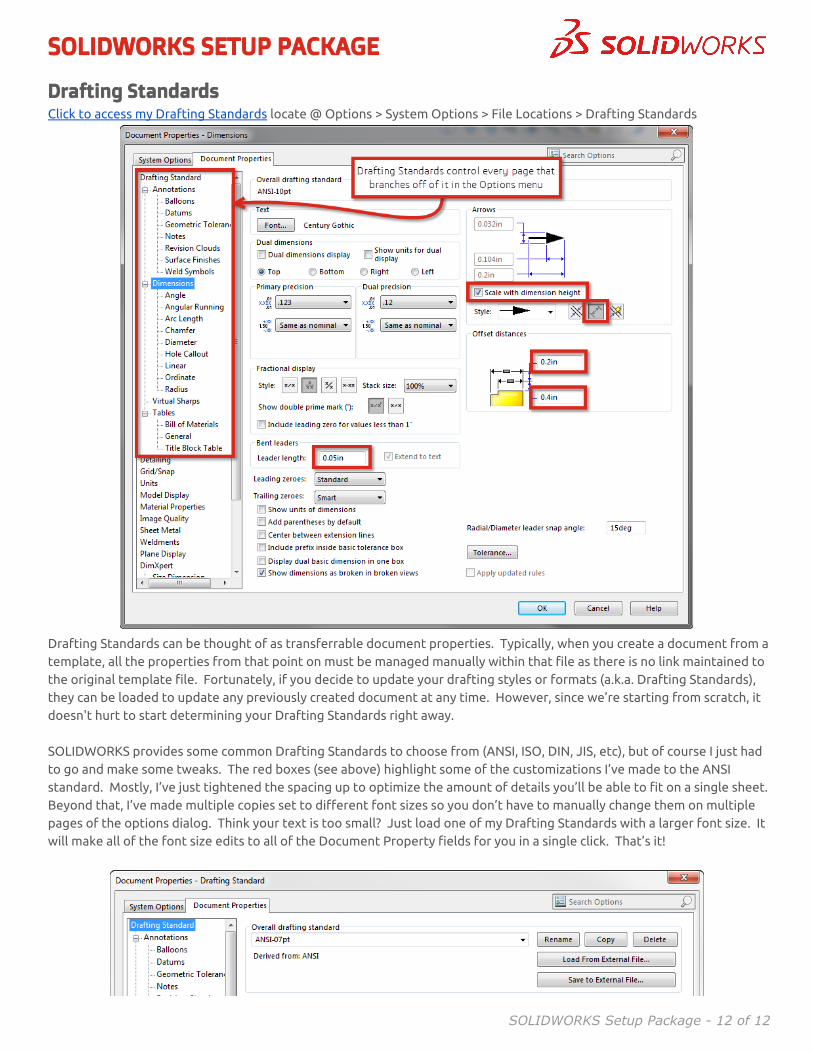
Drafting Standards Click to access my Drafting Standards locate @ Options > System Options > File Locations > Drafting Standards
Drafting Standards can be thought of as transferrable document properties. Typically, when you create a document from a template, all the properties from that point on must be managed manually within that file as there is no link maintained to the original template file. Fortunately, if you decide to update your drafting styles or formats (a.k.a. Drafting Standards), they can be loaded to update any previously created document at any time. However, since we’re starting from scratch, it doesn't hurt to start determining your Drafting Standards right away. SOLIDWORKS provides some common Drafting Standards to choose from (ANSI, ISO, DIN, JIS, etc), but of course I just had to go and make some tweaks. The red boxes (see above) highlight some of the customizations I’ve made to the ANSI standard. Mostly, I’ve just tightened the spacing up to optimize the amount of details you’ll be able to fit on a single sheet. Beyond that, I’ve made multiple copies set to different font sizes so you don’t have to manually change them on multiple pages of the options dialog. Think your text is too small? Just load one of my Drafting Standards with a larger font size. It will make all of the font size edits to all of the Document Property fields for you in a single click. That’s it!
SOLIDWORKS Setup Package - 12 of 12