Embed Size (px)
Citation preview

Storage Center™
Enterprise Manager 5.5
Installation and Setup Guide

© 2011 Dell Inc. All rights reserved.
Enterprise Manager 5.5 Installation and Setup Guide680-028-010
DisclaimersInformation in this document is subject to change without notice.
Trademarks and CopyrightTrademarks used in this text: DellTM, the DELLTM logo, and CompellentTM are trademarks of Dell Inc.
Other trademarks and trade names may be used in this document to refer to either the entities claiming the marks and names or their products. Dell Inc. disclaims any proprietary interest in trademarks and trade names other than its own.
Revision Date Description
A March 2011 Initial release.
B April 2011 Updated to include new locations for contacting Dell technical support, downloading product manuals, as well as miscellaneous corrections. This edition obsoletes all previous revisions.

iii
Contents
PrefacePurpose viiRelated Publications viiContacting Dell Support Services vii
1 WelcomeIntroduction 2Installation Requirements 3Installation and Upgrade Process Overview 5
To perform a first-time installation of Enterprise Manager 5To upgrade Enterprise Manager 5.4 to a newer version of Enterprise Manager 5
Special Instructions for Installing on 64-Bit Machines 6Information Required During Installation 7
2 Installing and Configuring a Primary Data CollectorIntroduction 10Installing the Primary Data Collector 11Adding an Environment Path for Java 18Database Configuration 19
To configure MySQL 4.1 19To configure MySQL 5.0 or MySQL 5.1 20To configure Microsoft SQL Servers 2005/2008 21
3 Installing and Configuring a Remote Data CollectorRequirements 24Installation Procedure 25Disconnecting and Reconnecting a Remote Data Collector 28
To temporarily disconnect a remote Data Collector 28To remove a Remote Data Collector 28To reconnect a remote Data Collector 28
4 Using Data Collector ManagerOpening Data Collector Manager 30Using Data Collector Controls 31
iv Enterprise Manager 5.5 Installation and Setup Guide
To get help 31To go to the Data Collector Website 31To check for updates 32To enter and activate a license key 33To minimize Data Collector Manager 33To exit Data Collector Manager 33
Updating Data Collector Properties 34To view Data Collector general information 35To update Data Collector service properties 36To change Data Collector data source 37To update server port usage 39To enable or disable the use of a proxy server 40To change the Data Collector network adaptor 41To set or change an alternate phone home IP address 42To change SMTP Server properties 43To update Data Collector reporting configuration limits 44To change SMI-S properties 45To change Available Storage Centers 46To change Data Collector user security 47To update users and user maps 48To view log entries 49To set debug log options 50
Cleaning Up Data Collector Databases 51Using Data Collector to Phone Home Data 52Migrating the Primary Data Collector 53Migrating a Microsoft SQL Server Database 54
5 Using Enhanced SecurityIntroduction 56Enhanced Security User Group Roles 57Implementing Enhanced User Security 58
To enable enhanced security 58To disable enhanced security 58
Managing Enhanced Security 59To create a Data Collector user 59To set or change Storage Center Mappings for a user 59To change the user group for a Data Collector user 60To change a user password 60To delete a user 61
6 Installing and Configuring Enterprise Manager ClientsClient Port Usage Requirements 64Installation Procedure 65Enterprise Manager Client Configuration 67
To identify the Data Collector server 67To add Storage Centers 67
Installing Additional Enterprise Manager Clients 69

v
7 Installing and Registering Server AgentsIntroduction 72Installing Server Agents 73
To install the Enterprise Manager Server Agent for Microsoft Servers 73Completing Server Agent Setup for iSCSI HBAs 75Configuring IPMI on Dell Compellent Hardware 76
Generation 2 Hardware Platform 76To configure IPMI 76To change the default password for the IPMI ADMIN user 78Generation 3 Hardware Platform 79To configure IPMI 79To change the default password for the IPMI ADMIN user 81
8 Using Server Agent ManagerIntroduction 84Using Server Agent Manager Controls 85
To set Server Agent Manager properties 85To minimize Server Agent Manager 86To exit Server Agent Manager 86
9 Using the Data Collector WebsiteIntroduction 88Updating Enterprise Manager Software 89
10 Using the Dell Compellent SMI-S ProviderAbout SMI-S 92
Dell Compellent SMI-S Provider 92Dell Compellent-Supported SMI-S 1.4 Profiles 93
Setting Up SMI-S 94To select the Data Collector Service User Type 94To set SMI-S properties 95To enable a domain or local user account to log on as a service 96
Manually Managing Pegasus Users 97To add a user 97To remove a user 97
Supported Storage Management Applications 98To enable HP Storage Essentials to discover the Dell Compellent SMI-S Provider: 98
Glossary 99

vi Enterprise Manager 5.5 Installation and Setup Guide
vii
Preface
PurposeEnterprise Manager allows an administrator to view and manage one or more Storage Centers. This guide describes how to install and set up Enterprise Manager.
Related PublicationsWhile using this guide to install and set up Enterprise Manager, you may also want to refer to the following related publications:
• Storage Center Enterprise Manager User Guide
Describes how to use Enterprise Manager to view and manage one or more Storage Centers, as well as generate and view charts and reports on Storage Center usage statistics. In addition, describes how to use Remote Instant Replay to replicate Replays to one or more Storage Centers.
• Storage Center System Manager User Guide
Describes how to use Storage Center Manager to manage a single Storage Center.
To download Dell Compellent product manuals, go to:
http://www.dell.com/manuals
Contacting Dell Support ServicesPlease contact Dell Technical Support Services from the following address if you need support assistance:
http://support.dell.com/compellent

viii Enterprise Manager 5.5 Installation and Setup Guide

1
1 Welcome
Introduction 2
Installation Requirements 3
Installation and Upgrade Process Overview 5
Special Instructions for Installing on 64-Bit Machines 6
Information Required During Installation 7
2 Enterprise Manager 5.5 Installation and Setup Guide
IntroductionEnterprise Manager allows you to monitor, manage, and analyze Storage Centers from a centralized management console.
Enterprise Manager consists of the following components:
• Data Collector: Data Collector is a service that gathers reporting data and alerts from all Storage Centers. There are two types of Data Collectors: Primary and Remote. All installations must include one primary Data Collector. Installing a remote Data Collector is optional. Each Data Collector service (primary or remote) is managed using a Data Collector Manager.
• Database: Data Collector stores data in a database or flat file. The database can run on the same or a different platform from Data Collector. See Installation Requirements on page 3 for a list of supported databases.
• Enterprise Manager Clients: An Enterprise Manager Client connects to the Data Collector Service to provide a centralized management console for one or more Storage Centers. Additional clients can be connected to the same Data Collector Service to provide management from more than one location.
• Server Agents: By installing a Server Agent for Microsoft Windows on each Windows server using a Storage Center, Data Collector can gather local volume information from a Windows server. Using this information, Enterprise Manager can free volume storage space from expired Replays that would otherwise remain locked by Windows. Each Server Agent is managed by a Server Agent Manager.
This guide describes how to install and configure Enterprise Manager components. It also describes how to use Data Collector Manager and Server Agent Manager. For information on using Enterprise Manager clients, refer to the Storage Center Enterprise Manager User Guide.

3
Installation Requirements
Installation RequirementsAll Enterprise Manager components (Data Collector, Database, Server Agent, and Client) can be run on either x86-32 or x86-64 processors. For 64-bit processors, only AMD64-compatible, including Intel 64, are supported. Itanium 32 and Itanium 64 are not supported.
The following table lists requirements for Enterprise Manager components:
Component Requirements
Storage Centers • Storage Center versions 4.1 thru 5.5.
Data Collector • Data Collector can be installed on any of the following operating systems:
Microsoft Windows Server 2003Microsoft Windows Server 2008Microsoft Windows Server 2008 R2
with the latest service packs
• Minimum 1GB of RAM
• Minimum 20 GB of available storage
• Microsoft .NET Framework 2.0 (included)
• Java Runtime Environment (JRE) 1.6 (included)
Database One of the following:
• Flat file (maximum of 30 days of data or 2GB)
• MySQL (4.1 or 5.0 or 5.1)
• Microsoft SQL Server 2005
• Microsoft SQL Server 2008
Note Microsoft SQL Server 2005 Express and Microsoft SQL Server 2008 Express are supported. These databases are limited to a maximum of 4GB of Enterprise Manager data.
Enterprise Manager Client Enterprise Manager Charting Viewer
• Operating systems:
Microsoft Windows XPMicrosoft Windows VistaMicrosoft Windows 7Microsoft Windows Server 2003Microsoft Windows Server 2008Microsoft Windows Server 2008 R2
with the latest service packs.
• Java Runtime Environment (JRE) 1.6 (included)

4 Enterprise Manager 5.5 Installation and Setup Guide
Server Agent for Microsoft Windows Servers
• Microsoft .NET Framework 2.0 (included)
• Operating systems:
Microsoft Windows Server 2003Microsoft Windows 2008Microsoft Windows 2008 R2
with the latest service packs
• For NAS support:
Microsoft Windows Storage Server (WSS) 2008, SP 2, Enterprise Edition (x64).
Component Requirements

5
Installation and Upgrade Process Overview
Installation and Upgrade Process Overview
To perform a first-time installation of Enterprise Manager
The process for performing a first-time installation of all Enterprise Manager components consists of these steps:
To upgrade Enterprise Manager 5.4 to a newer version of Enterprise Manager
If your current Enterprise Manager is version 5.4 or above, follow these general steps for upgrading Enterprise Manager:
Installation Step Description
(Optional) Installing database software for the primary Enterprise Manager Data Collector.
See Installing and Configuring a Primary Data Collector on page 9.
Installing a primary Enterprise Manager Data Collector and configuring the Data Collector database.
See Installing and Configuring a Primary Data Collector on page 9.
(Optional) Installing a remote Data Collector that connects to the primary Data Collector.
See Installing and Configuring a Remote Data Collector on page 23.
Installing and configuring one or more Enterprise Manager Clients on a Windows workstation.
See Installing and Configuring Enterprise Manager Clients on page 63.
(Optional) Installing Enterprise Manager Server Agent for Microsoft Windows on all Windows servers
See Installing and Registering Server Agents on page 71.
(Optional) Enable and implement enhanced security.
See Using Enhanced Security on page 55.
Installation Step Description
Upgrade the primary Enterprise Manager Data Collector.
See Installing and Configuring a Primary Data Collector on page 9. There is no need to uninstall the previous version of the Enterprise Manager Data Collector—just run the Enterprise Manager Data Collector installation package on the Data Collector Server.
(Optional) Upgrade the remote Data Collector that connects to the primary Data Collector.
See Installing and Configuring a Remote Data Collector on page 23. There is no need to uninstall the previous version of Enterprise Manager Data Collector—just run the Enterprise Manager Data Collector installation package on the Data Collector Server.
Upgrade all Enterprise Manager Clients on Windows workstations.
Go to the Enterprise Manager Data Collector Website to download updates for Enterprise Manager clients. See Updating Enterprise Manager Software on page 89.
Upgrade all Enterprise Manager Server Agents for Microsoft Windows on all Windows servers
Go to the Enterprise Manager Data Collector Website to download updates for Enterprise Manager Server Agents. See Updating Enterprise Manager Software on page 89.
6 Enterprise Manager 5.5 Installation and Setup Guide
Special Instructions for Installing on 64-Bit MachinesIf you are installing Data Collector or Enterprise Manager Client on a 64-bit machine, follow these additional instructions:
Note Only AMD64-compatible 64-bit processors, including Intel 64, are supported by Enterprise Manager. Itanium 64 is not supported.
1 During installation on a 64-bit machine, you may be prompted to install the Java Runtime Environment two times: once for the 32-bit version and again for the 64-bit version. Make sure you install the Java Runtime Environment both times you are prompted to do so. (The 64-bit version requires elements in the 32-bit version.)
2 If you are prompted to reboot the system, perform the reboot. Enterprise Manager installation will continue after the reboot.
7
Information Required During Installation
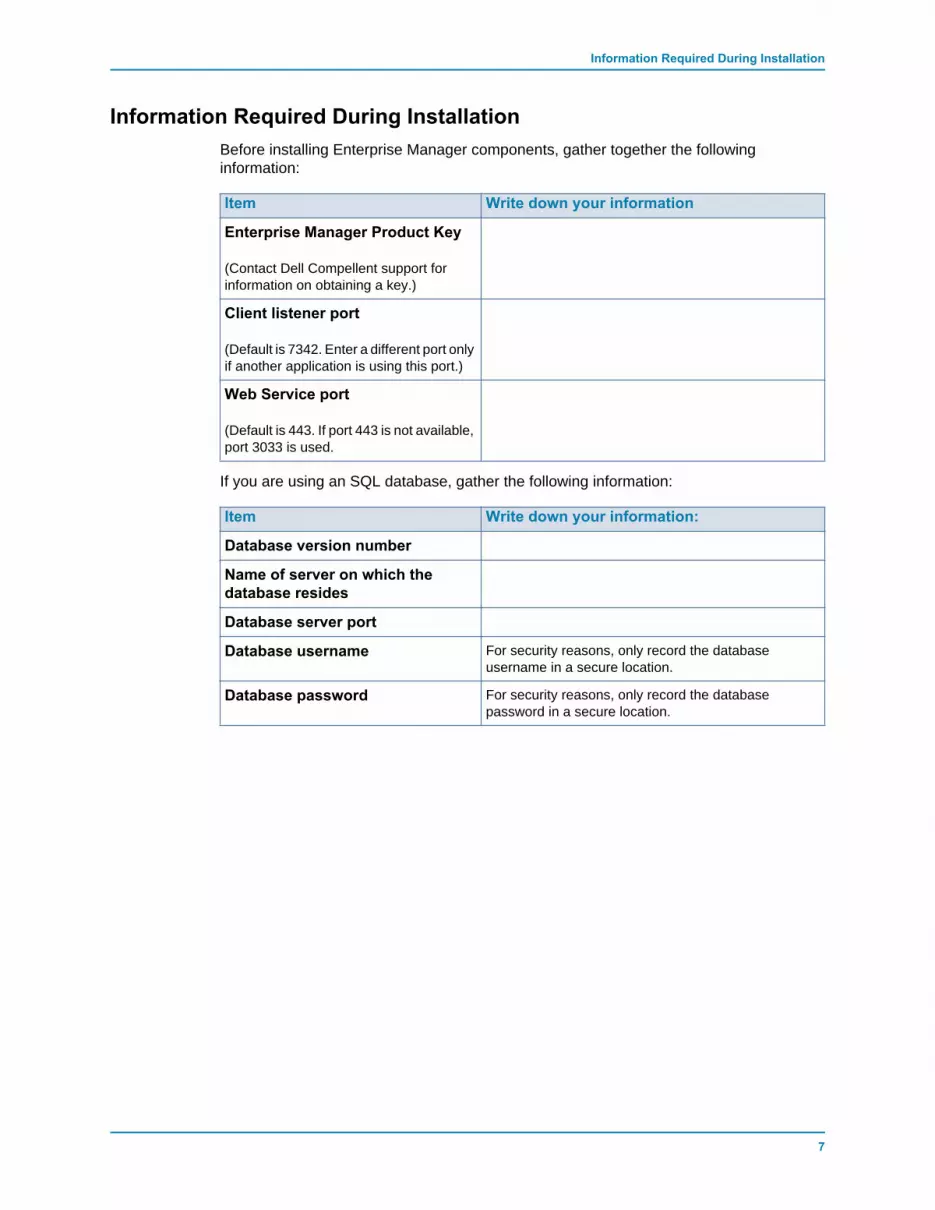
Information Required During InstallationBefore installing Enterprise Manager components, gather together the following information:
If you are using an SQL database, gather the following information:
Item Write down your information
Enterprise Manager Product Key
(Contact Dell Compellent support for information on obtaining a key.)
Client listener port
(Default is 7342. Enter a different port only if another application is using this port.)
Web Service port
(Default is 443. If port 443 is not available, port 3033 is used.
Item Write down your information:
Database version number
Name of server on which the database resides
Database server port
Database username For security reasons, only record the database username in a secure location.
Database password For security reasons, only record the database password in a secure location.

8 Enterprise Manager 5.5 Installation and Setup Guide

9
2 Installing and Configuring a Primary Data Collector
Introduction 10
Installing the Primary Data Collector 11
Adding an Environment Path for Java 18
Database Configuration 19

10 Enterprise Manager 5.5 Installation and Setup Guide
IntroductionEnterprise Manager Data Collector gathers data and alerts from the connected Storage Centers and stores the data in a database or flat file. Enterprise Manager clients, in turn, connect to the Data Collector to send and receive information to and from managed Storage Centers.
Primary and Remote Data CollectorsAll Enterprise Manager installations require a primary Data Collector to store and manage Storage Center data. In addition to the primary Data Collector, you can optionally install a remote Data Collector.
A remote Data Collector is connected to the primary Data Collector and can be used to activate a disaster recovery site if the primary Data Collector becomes unavailable. To install a remote Data Collector, first install and configure the primary Data Collector using the instructions in this section. After the primary Data Collector is installed, configured, and running, you can then install a remote Data Collector that connects to the primary Data Collector. See Installing and Configuring a Remote Data Collector on page 23 for details on installing a remote Data Collector.
Primary Data Collector Database OptionsBefore installing the primary Data Collector, determine the database to be used by Data Collector to store data. Data can be stored using any of the following:
Note The database option for storing data can be changed after installation. For information on changing the Data Collector database after installation, see To change Data Collector data source on page 37 for details.
Installation ProcedureInstalling and configuring the primary Data Collector includes these steps:
1 If necessary, install database software.If you already have database software installed or if you want to use a flat file for storing data, skip this step. Otherwise, install the database software you want to use for creating the Data Collector database.
2 Install the primary Data Collector.
3 Configure the database and complete the Data Collector installation.
Database Installation Instructions
Flat file No database installation required.
MySQL 4.1 or 5.0 or 5.1Microsoft SQL Server 2005(or Microsoft SQL Server 2005 Express)Microsoft SQL Server 2008(or Microsoft SQL Server 2008 Express)
Complete installation before installing Data Collector.
11
Installing the Primary Data Collector
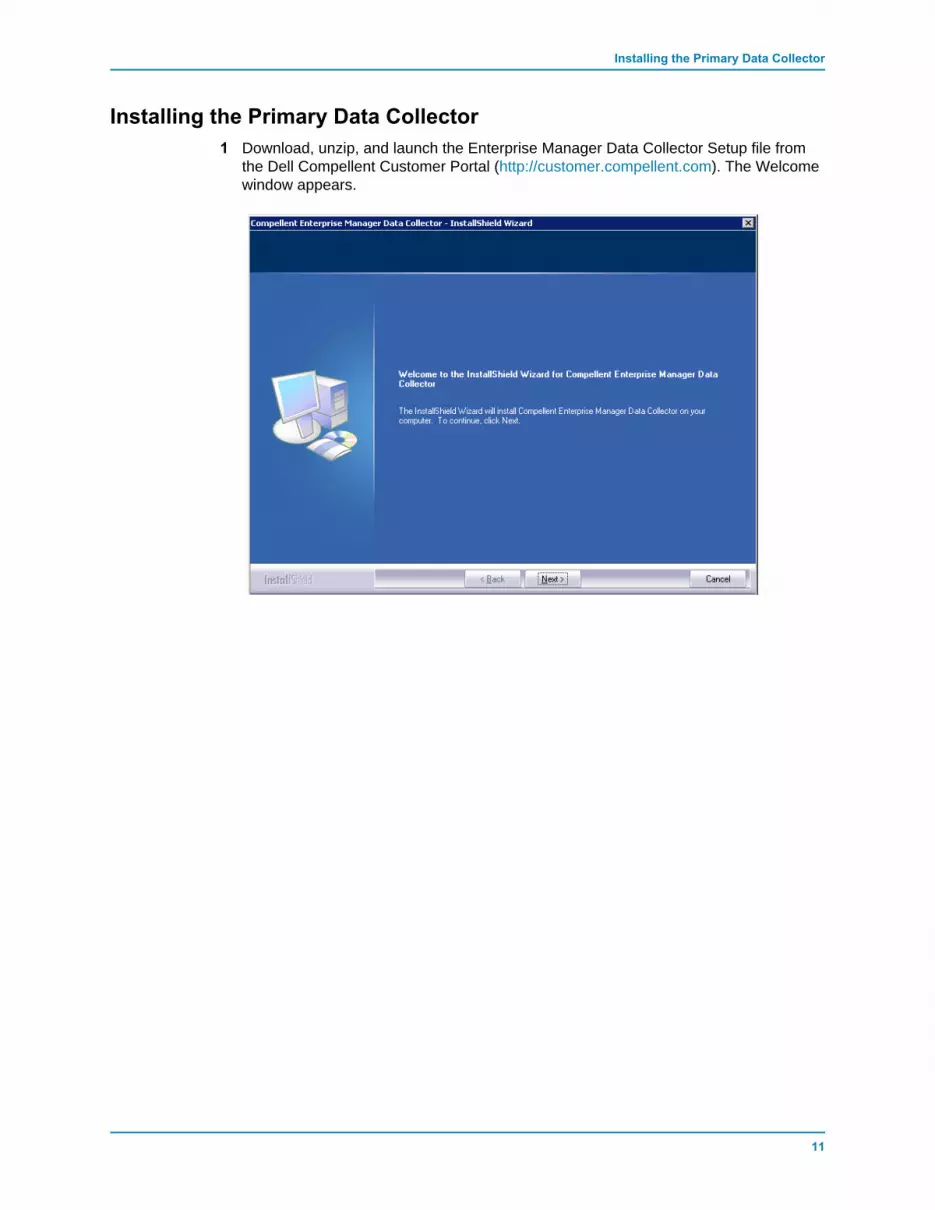
Installing the Primary Data Collector1 Download, unzip, and launch the Enterprise Manager Data Collector Setup file from
the Dell Compellent Customer Portal (http://customer.compellent.com). The Welcome window appears.

12 Enterprise Manager 5.5 Installation and Setup Guide
2 Click Next. The license agreement appears.
3 Click Yes to accept the license agreement. The InstallShield Wizard Complete window appears.

13
Installing the Primary Data Collector
4 Click Finish. The Enterprise Manager Data Collector Setup appears.
Note Data Collector can be used for 30 days without activation.
5 Enter the Product Key.
If you have internet access:
a Enter the Product Key provided by Dell Compellent. b Select Activate over Internet. c Click Next.
If you do not have internet access:
a Enter the Product Key provided by Dell Compellent. b Select Activate over Email/Phone. c Contact Dell Product Support (see http://support.dell.com/compellent).d Enter the Activation Number provided by support.e Click Next.

14 Enterprise Manager 5.5 Installation and Setup Guide
When the product key is accepted, the Data Collector Setup appears.
6 Select the following:
Select Data Collector Type: Select to configure the Data Collector as a Primary Data Collector. For information on installing a remote Data Collector, see Installing and Configuring a Remote Data Collector on page 23.
Data Collector Service Properties: Select service properties for the Data Collector.
Service User Type: Select the service account: Local Service Account, Local User Account, Domain User Account. For Local User Account and Domain User Accounts, you must also enter the domain name (for domain accounts), the user name, and the password.
Note User accounts (local or domain) must be able to log in as a service and must have administrator privilege.
Client Listener Port: Enter the client listener port. The default is 7342.
Web Service Port: Enter the web service port. The default is 8080.
Web Server/Api Services Port: Enter the web services port for use by the Enterprise Manager Website. The default is 443 or if 443 is unavailable, port 3033 is used. For information on the Data Collector Website, see Using the Data Collector Website on page 87.
15
Installing the Primary Data Collector
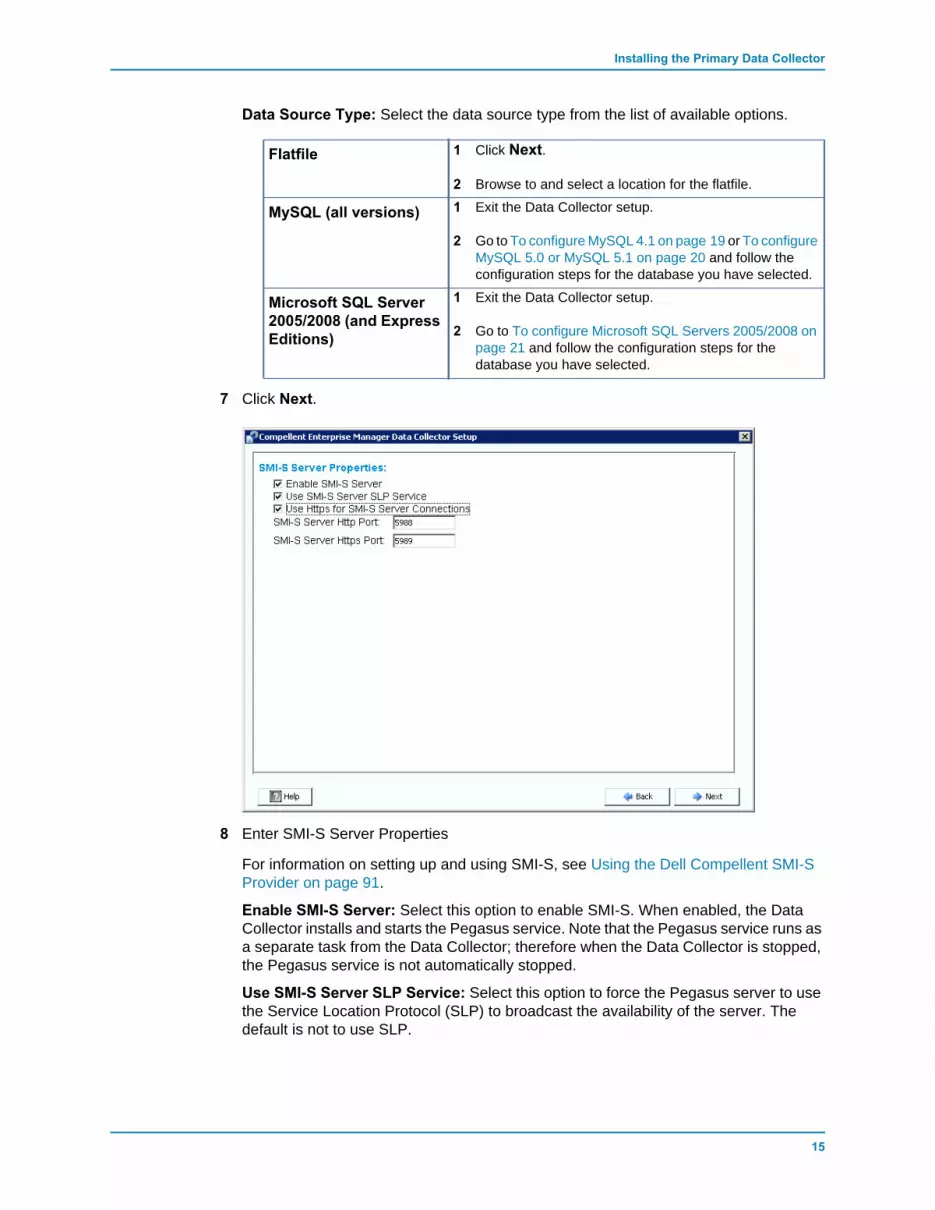
Data Source Type: Select the data source type from the list of available options.
7 Click Next.
8 Enter SMI-S Server Properties
For information on setting up and using SMI-S, see Using the Dell Compellent SMI-S Provider on page 91.
Enable SMI-S Server: Select this option to enable SMI-S. When enabled, the Data Collector installs and starts the Pegasus service. Note that the Pegasus service runs as a separate task from the Data Collector; therefore when the Data Collector is stopped, the Pegasus service is not automatically stopped.
Use SMI-S Server SLP Service: Select this option to force the Pegasus server to use the Service Location Protocol (SLP) to broadcast the availability of the server. The default is not to use SLP.
Flatfile 1 Click Next.
2 Browse to and select a location for the flatfile.
MySQL (all versions) 1 Exit the Data Collector setup.
2 Go to To configure MySQL 4.1 on page 19 or To configure MySQL 5.0 or MySQL 5.1 on page 20 and follow the configuration steps for the database you have selected.
Microsoft SQL Server 2005/2008 (and Express Editions)
1 Exit the Data Collector setup.
2 Go to To configure Microsoft SQL Servers 2005/2008 on page 21 and follow the configuration steps for the database you have selected.

16 Enterprise Manager 5.5 Installation and Setup Guide
Use Https for SMI-S Server Connections: Select this option to force the Pegasus server to use Https for connections. The default is to not use Https. When enabled, specify the Https port for the SMI-S server. When disabled, specify the Http port to use for the SMI-S server. The the default Http port is 5988; the default Https port is 5989.
9 Click Next.
10 Select to use Open (no security) or Enhanced (secure) security. For Enhanced Security, specify a username/password to administer the Data Collector. For complete information on using Enhanced security, see Using Enhanced Security on page 55.
11 Click Next. The Data Collector folders and files are created and the Data Collector Service is started.

17
Installing the Primary Data Collector
12 Note the location of the Data Collector Website. You can install Enterprise Manager Clients and Enterprise Manager Server Agents from the website. For complete information on using the website, see Using the Data Collector Website on page 87.
13 Click Next.
14 Click Finish.
You are finished installing the Data Collector. The Data Collector Manager icon appears in the task bar.

18 Enterprise Manager 5.5 Installation and Setup Guide
Adding an Environment Path for JavaIn some installations, the Data Collector Service fails to start after installation is complete. This can occur when the Data Collector is re-directed to use an older version of Java that was installed prior to the Data Collector installation. To correct the problem, update the system PATH environment variable to point to the new version of Java.
To update the PATH environment variable:
1 Go to My Computer > Properties > Advanced > Environmental Variables > System Variables > Path.
2 In the PATH variable, add the path to the correct version of Java:
c:\Program Files\Java\jre6\bin
Separate the java path from other paths using the semicolon (;).
3 Click Apply to save changes to the Path variable.
The change to the variable takes effect immediately.

19
Database Configuration
Database ConfigurationFollow the instructions for the database you are using:
To configure MySQL 4.11 Exit the Enterprise Manager Setup.
2 Make sure that you have administrator rights for remote servers (preferably root user).
3 Replace the current mysql.jar file with a new mysql.jar file. To do this, from a web browser, go to the following location:
http://dev.mysql.com/downloads/connector/j
to find the current Connector J download.
4 Download the .tar or .zip JDBC driver for MySQL.
5 Unzip the JDBC driver.
6 Change the name of the .jar file from:
mysql-connector-java-<version>-bin.jar
to
mysql.jar
7 Replace the current mysql.jar file in C:\Program Files\Compellent Technologies\Compellent Enterprise Manager\msaservice\lib\ with the mysql.jar file you downloaded.
8 Restart the Enterprise Manager Setup application by double-clicking on it or entering in a command line. For example:
C:\Program Files\Compellent Technologies\Compellent EnterpriseManager\msaservice\EnterpriseServiceSetup.exe
9 Return to the Enterprise Manager Setup window, and complete the Change Data Source Wizard:
Server: Enter the DNS name or the IP address of the server that has the database installed.
If you select this type of database Turn to
Flat file No additional configuration is required.
MySQL 4.1 To configure MySQL 4.1 on page 19
MySQL 5.0 or MySQL 5.1 To configure MySQL 5.0 or MySQL 5.1 on page 20
MS SQL Server 2005 MS SQL Server 2008 MS SQL Server 2005 Express EditionMS SQL Server 2008 Express Edition
To configure Microsoft SQL Servers 2005/2008 on page 21

20 Enterprise Manager 5.5 Installation and Setup Guide
Port: Enter the number of the TCP port that was configured during the SQL TCP/IP setup. (The default for MySQL 4.1 is 3306.)
Username/Password: Enter the username and password for a user defined in the database that has administrator rights.
10 Click Next and go to Enter SMI-S Server Properties on page 15 to continue the Data Collector setup.
To configure MySQL 5.0 or MySQL 5.11 In the Data Source Type field, select MySQL 5.0 or MYSQL 5.1. Do not press Next at
this time.
2 Exit the Enterprise Manager Setup.
3 Make sure that you have administrator rights from remote servers (preferably root user).
4 Enter the following commands from the mysql admin tool, where root is the name of the admin user:
UPDATE mysql.user SET Create_view_priv='Y' WHERE User='root';UPDATE mysql.user SET Show_view_priv='Y' WHERE User='root'; UPDATE mysql.user SET Create_routine_priv='Y' WHERE User='root';UPDATE mysql.user SET Alter_routine_priv='Y' WHERE User='root';UPDATE mysql.user SET Create_user_priv='Y' WHERE User='root';FLUSH PRIVILEGES;
5 You must replace the current mysql.jar file with a new mysql.jar file. To do this, from a web browser, go to the following location:
http://dev.mysql.com/downloads/connector/j
6 Download the .tar or .zip JDBC driver for MySQL.
7 Unzip the JDBC driver.
8 Change the name of the .jar file from:
mysql-connector-java-<version>-bin.jar
to
mysql.jar
9 Replace the current mysql.jar file in C:\Program Files\Compellent Technologies\Compellent Enterprise Manager\msaservice\lib\ with the mysql.jar file you downloaded.
10 Restart the Enterprise Manager Setup application by double-clicking on or entering in a command line:
C:\Program Files\Compellent Technologies\Compellent Enterprise Manager\msaservice\EnterpriseServiceSetup.exe
11 Complete the Change Data Source Wizard:

21
Database Configuration
Server: Enter the DNS name or the IP address of the server that has the database installed.
Port: Enter the number of the TCP port that was configured during the database TCP/IP setup. (The released default for MySQL 5.0 is 3306.)
Username/Password: Enter the username and password for a user defined in the database that has administrator rights.
12 Click Next and go to Enter SMI-S Server Properties on page 15 to continue the Data Collector setup.
To configure Microsoft SQL Servers 2005/20081 In the Data Source Type field, select MS SQL 2005 or MS SQL 2008. Do not press
Next at this time.
2 Go to Start>All Programs>Microsoft SQL Server 2005 (or 2008)>Configuration Tools>SQL Server Configuration Manager.
3 Set the TCP/IP ports:
a Expand the SQL Server 2005 Network configuration.b Click on Protocols for MSSQLSERVER (or SQLEXPRESS for MS SQL Server
2005 Express Edition).c Right-click TCP/IP Protocol, and select Properties.d Click on the IP Addresses tab.
e Under IPALL: set the TCP Dynamic port to blank and set the TCP Port to a valid port number.
f Click Apply and click OK to close the dialog.
4 Enable TCP/IP protocol:
a Click on Protocols for MSSQLSERVER (or SQLEXPRESS for MS SQL Server 2005 Express Edition).
TCP Dynamic Ports = blankTCP Port = accept the default or enter a valid port number and enter this same port number on the Enterprise Manager Change Data Source Wizard dialog. (Default for SQL Server 2005/2008 is 1433; default for SQL Server 2005 Express is 3306.)

22 Enterprise Manager 5.5 Installation and Setup Guide
b Right-click on TCP/IP and select enable.
5 Restart SQL Server
a Click SQL Server 2005 Services.b Right click MSSQLSERVER (or SQLEXPRESS for MS SQL Server 2005 Express
Edition) and click restart.
6 Open the SQL Server Management Studio, and select SQL Server and Windows Authentication Mode. (SQL 2005 Server Management Studio is available for download from the Microsoft website.)
7 Return to the Enterprise Manager Setup window, and complete the Change Data Source Wizard:
Server: Enter the DNS name or the IP address of the server that has the database installed.
Port: Enter the number of the TCP port that was configured during the database TCP/IP setup.
Username/Password: Enter the database server username and password that has system administrator (SA) rights.
8 Click Next and go to Enter SMI-S Server Properties on page 15 to continue the Data Collector setup.
23
3 Installing and Configuring a Remote Data Collector
Requirements 24
Installation Procedure 25
Disconnecting and Reconnecting a Remote Data Collector 28

24 Enterprise Manager 5.5 Installation and Setup Guide
RequirementsIf installed and configured, a remote Data Collector can activate a disaster recovery site if the primary Data Collector becomes unavailable.
Note A remote Data Collector uses a flat file to store data. That is, there are no database options for a remote Data Collector.
Requirement Description
Primary Data Collector Before installing and configuring a remote Data Collector, the primary Data Collector must be installed, configured, and started (running). The remote Data Collector connects to the primary Data Collector.
License An Enterprise Manager Foundation license is required to install a remote Data Collector. The same license is used for both the primary and remote Data Collectors.
Enterprise Manager Version Enterprise Manager 5.0 and above. In addition, the primary and remote versions must exactly match.
Enterprise Manager Username and password
To connect the remote Data Collector to the primary Data Collector, you must provide an existing Enterprise Manager username and password. For Enterprise Managers running in Enhanced Security mode, the user must be a member of the Administrator group. (For information on Enterprise Manager enhanced security, see Using Enhanced Security on page 55.)
25
Installation Procedure
Installation Procedure1 Download and unzip the Enterprise Manager 5 Data Collector Setup file from the Dell
Compellent Customer Portal (http://customer.compellent.com), and launch Setup.exe. The Welcome window appears.
2 Click Next. The license agreement appears.
3 Click Yes to accept the license agreement. The InstallShield Wizard Complete window appears.
4 Click Finish. The Enterprise Manager Activation window appears.
Note Data Collector can be used for 30 days without activation.
5 Enter the Product Key.
Note The Product Key must match the product key used by the primary Data Collector.
If you have internet access:
a Enter the Product Key provided by Dell Compellent. b Select Activate over Internet. c Click Activate Now.
If you do not have internet access:
a Enter the Product Key provided by Dell Compellent. b Select Activate over Email/Phone. c Contact Dell Technical Support services. (See http://support.dell.com/compellent).d Enter the Activation Number provided by support.e Click Activate Now.
6 When the product key is accepted, the Successful Activation window appears.
26 Enterprise Manager 5.5 Installation and Setup Guide
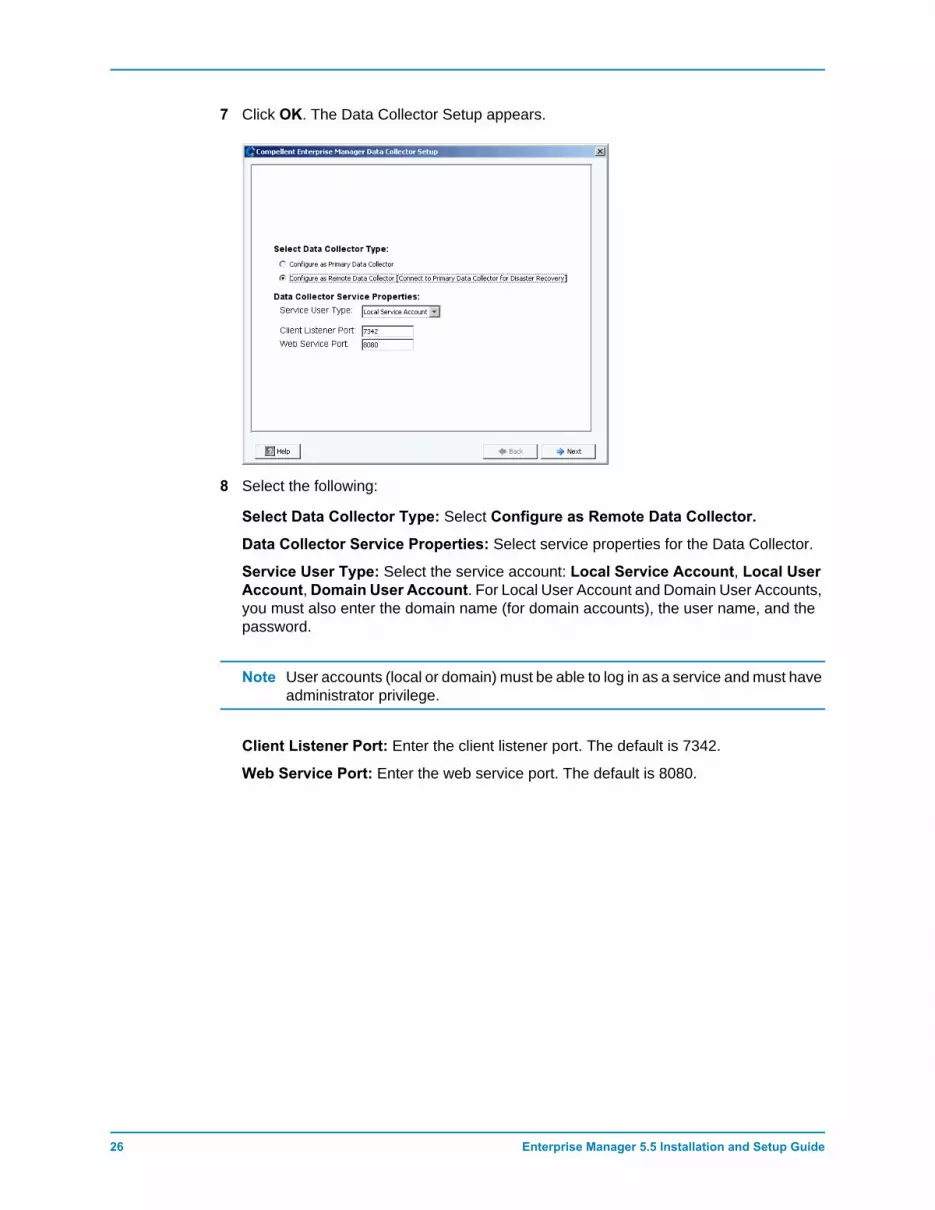
7 Click OK. The Data Collector Setup appears.
8 Select the following:
Select Data Collector Type: Select Configure as Remote Data Collector.
Data Collector Service Properties: Select service properties for the Data Collector.
Service User Type: Select the service account: Local Service Account, Local User Account, Domain User Account. For Local User Account and Domain User Accounts, you must also enter the domain name (for domain accounts), the user name, and the password.
Note User accounts (local or domain) must be able to log in as a service and must have administrator privilege.
Client Listener Port: Enter the client listener port. The default is 7342.
Web Service Port: Enter the web service port. The default is 8080.
27
Installation Procedure
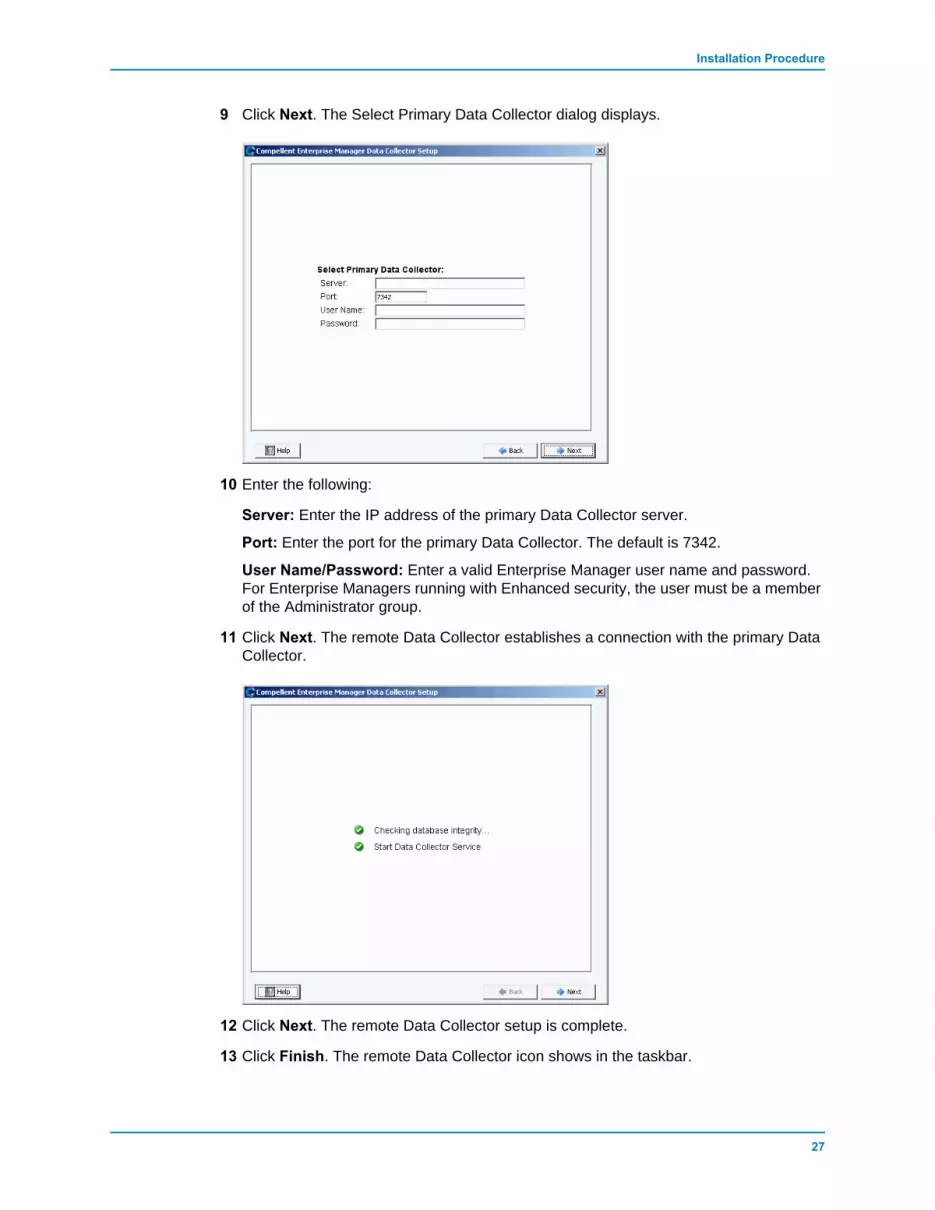
9 Click Next. The Select Primary Data Collector dialog displays.
10 Enter the following:
Server: Enter the IP address of the primary Data Collector server.
Port: Enter the port for the primary Data Collector. The default is 7342.
User Name/Password: Enter a valid Enterprise Manager user name and password. For Enterprise Managers running with Enhanced security, the user must be a member of the Administrator group.
11 Click Next. The remote Data Collector establishes a connection with the primary Data Collector.
12 Click Next. The remote Data Collector setup is complete.
13 Click Finish. The remote Data Collector icon shows in the taskbar.

28 Enterprise Manager 5.5 Installation and Setup Guide
Disconnecting and Reconnecting a Remote Data Collector
To temporarily disconnect a remote Data Collector1 On the remote Data Collector server:
a Open the Data Collector Manager.b Click to stop the Data Collector Manager service.
2 Log on to the Enterprise Manager client, and display the Remote Data Collector viewer. The State for the remote Data Collector shows Not Connected the next time the primary Data Collector attempts to synchronize with the remote Data Collector.
To remove a Remote Data Collector1 On the remote Data Collector server:
a Open the Data Collector Manager.b Click to stop the Data Collector Manager service.
Note If you intend to permanently remove the remote Data Collector, uninstall the Data Collector using Add/Remove Programs.
2 Log on to the Enterprise Manager client, and display the Remote Data Collector viewer.
3 Click Remove Remote Data Collector.
To reconnect a remote Data Collector1 On the remote Data Collector server:
a Open the Data Collector Manager.b Click to start the Data Collector Manager service.
2 Log on to the Enterprise Manager client, and display Remote Data Collector viewer. When the remote Data Collector service has established a connection with the primary Data Collector, the state shows as Connected.

29
4 Using Data Collector Manager
Opening Data Collector Manager 30
Using Data Collector Controls 31
Updating Data Collector Properties 34
Cleaning Up Data Collector Databases 51
Using Data Collector to Phone Home Data 52
Migrating the Primary Data Collector 53
Migrating a Microsoft SQL Server Database 54
30 Enterprise Manager 5.5 Installation and Setup Guide
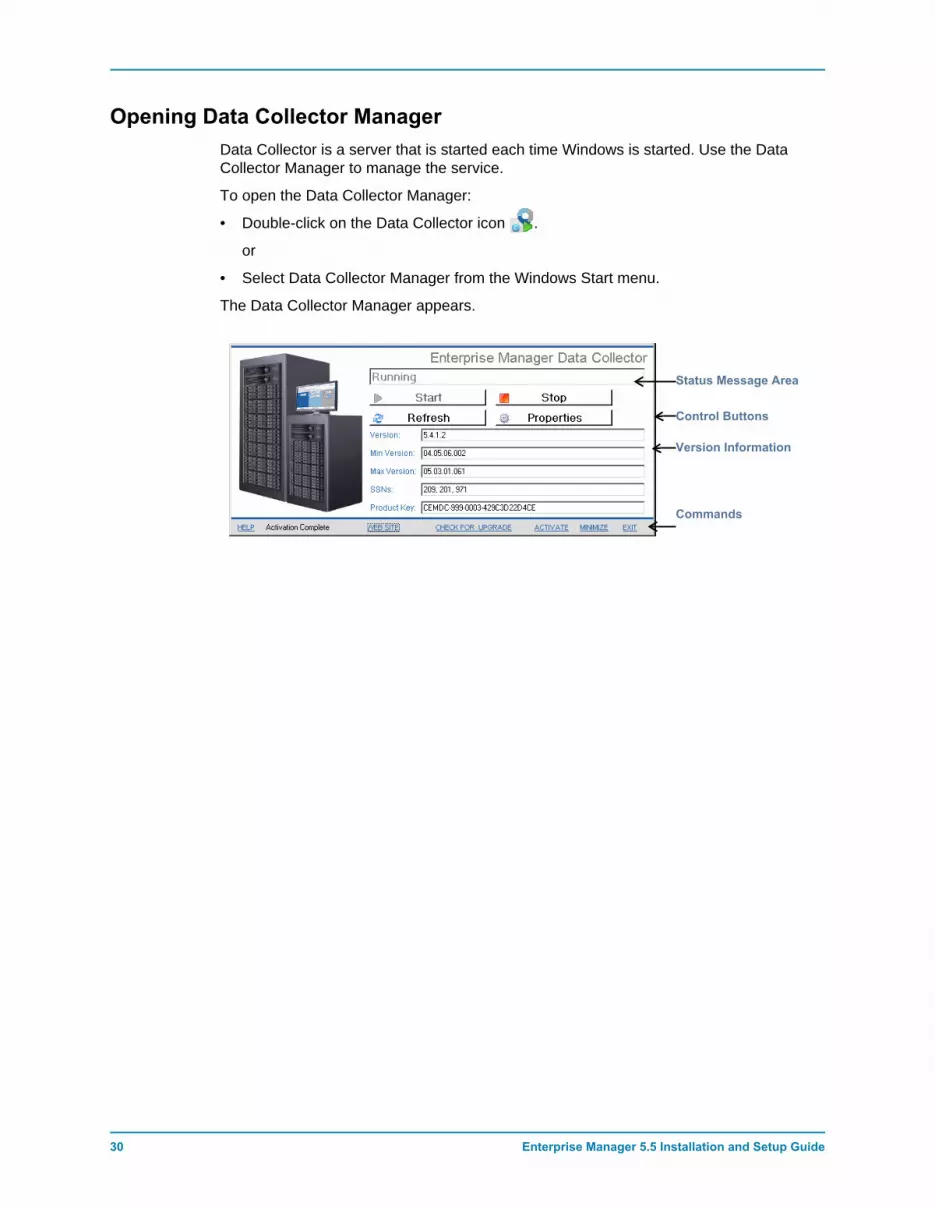
Opening Data Collector ManagerData Collector is a server that is started each time Windows is started. Use the Data Collector Manager to manage the service.
To open the Data Collector Manager:
• Double-click on the Data Collector icon .
or
• Select Data Collector Manager from the Windows Start menu.
The Data Collector Manager appears.
Status Message Area
Control Buttons
Version Information
Commands
31
Using Data Collector Controls
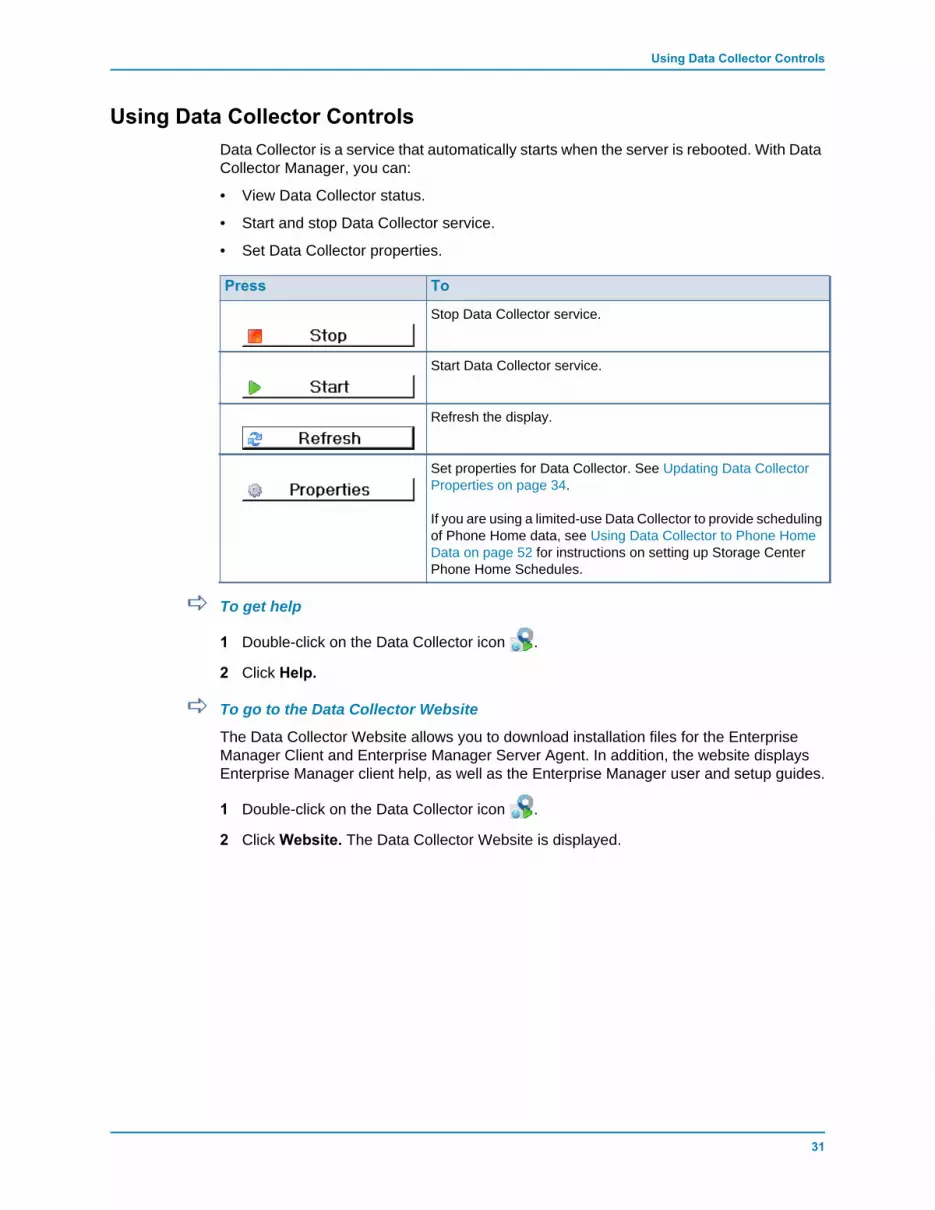
Using Data Collector ControlsData Collector is a service that automatically starts when the server is rebooted. With Data Collector Manager, you can:
• View Data Collector status.
• Start and stop Data Collector service.
• Set Data Collector properties.
To get help
1 Double-click on the Data Collector icon .
2 Click Help.
To go to the Data Collector Website
The Data Collector Website allows you to download installation files for the Enterprise Manager Client and Enterprise Manager Server Agent. In addition, the website displays Enterprise Manager client help, as well as the Enterprise Manager user and setup guides.
1 Double-click on the Data Collector icon .
2 Click Website. The Data Collector Website is displayed.
Press To
Stop Data Collector service.
Start Data Collector service.
Refresh the display.
Set properties for Data Collector. See Updating Data Collector Properties on page 34.
If you are using a limited-use Data Collector to provide scheduling of Phone Home data, see Using Data Collector to Phone Home Data on page 52 for instructions on setting up Storage Center Phone Home Schedules.

32 Enterprise Manager 5.5 Installation and Setup Guide
To check for updates
1 Double-click on the Data Collector icon .
2 Click Check for Upgrade.
3 The Data Collector Manager informs you if there are upgrades available.
4 If there is an upgrade, click Yes. Enterprise Manager asks you if you want to install the new version.
5 Click Yes.
33
Using Data Collector Controls
To enter and activate a license key
Note Data Collector can be used for 30 days without activation.
1 Double-click on the Data Collector icon .
2 Click Activate. The Enterprise Manager Activation dialog appears.
3 Enter the Enterprise Manager product key. (If you are activating with a new product key, click New Product Key.
If you have internet access:
a Select Activate over Internet.b Click Activate Now.
If you do not have internet access:
a Select Activate over Email/Phone.b Contact Dell Technical Support services. (See http://support.dell.com/compellent).c Enter the Activation Number provided by support.d Click Activate Now.
To minimize Data Collector Manager
• Click Minimize. Data Collector Manager is returned to the System Tray.
To exit Data Collector Manager
• Click Exit. When prompted to confirm the exit, click Yes.

34 Enterprise Manager 5.5 Installation and Setup Guide
Updating Data Collector PropertiesThe options displayed on property dialogs depend on whether the Data Collector is currently running or stopped, as well as the Enterprise Manager licensed features.
Note If the Data Collector Enhanced security is enabled, you are prompted to log in to the Data Collector to access the Data Collector Properties, and your user name must be a member of the Administrator group. See Using Enhanced Security on page 55 for more information on Data Collector Enhanced security.
35
Updating Data Collector Properties
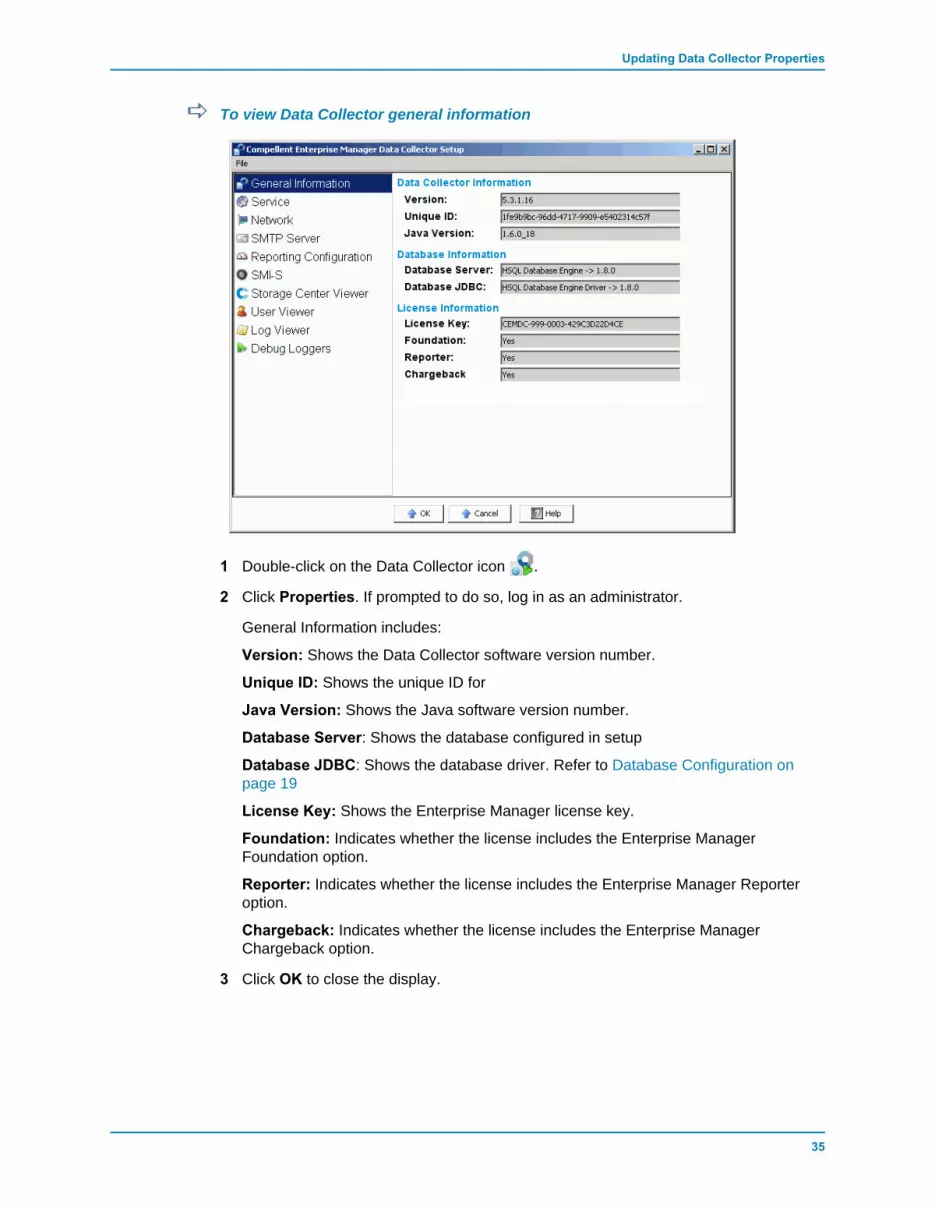
To view Data Collector general information
1 Double-click on the Data Collector icon .
2 Click Properties. If prompted to do so, log in as an administrator.
General Information includes:
Version: Shows the Data Collector software version number.
Unique ID: Shows the unique ID for
Java Version: Shows the Java software version number.
Database Server: Shows the database configured in setup
Database JDBC: Shows the database driver. Refer to Database Configuration on page 19
License Key: Shows the Enterprise Manager license key.
Foundation: Indicates whether the license includes the Enterprise Manager Foundation option.
Reporter: Indicates whether the license includes the Enterprise Manager Reporter option.
Chargeback: Indicates whether the license includes the Enterprise Manager Chargeback option.
3 Click OK to close the display.

36 Enterprise Manager 5.5 Installation and Setup Guide
To update Data Collector service properties
1 Double-click on the Data Collector icon .
2 Click Properties. If prompted to do so, log in as an administrator.
3 Click Service.
4 In the bottom right of the properties display, click Change.
5 Change any of the following:
Service User Type: Select the user account type under which to run the Data Collector. Options include Local Service Account, Local User Account, and Domain User Account. The default is Local User Account.
Note If SMI-S is enabled and you want to manually manage SMI-S users, you must set up the Data Collector to run under either a Local User Account or Domain User Account, and the account must have administrative privilege. See Using the Dell Compellent SMI-S Provider on page 91 for details.
Service User Domain: If the Service User Type is Domain User Account, enter the domain name for the user account.
Service User Name: If the Service User Type is either Local User Account or Domain User Account, enter the account user name.
Service User Password: If the Service User Type is either Local User Account or Domain User Account, enter the password for the account user name.
37
Updating Data Collector Properties
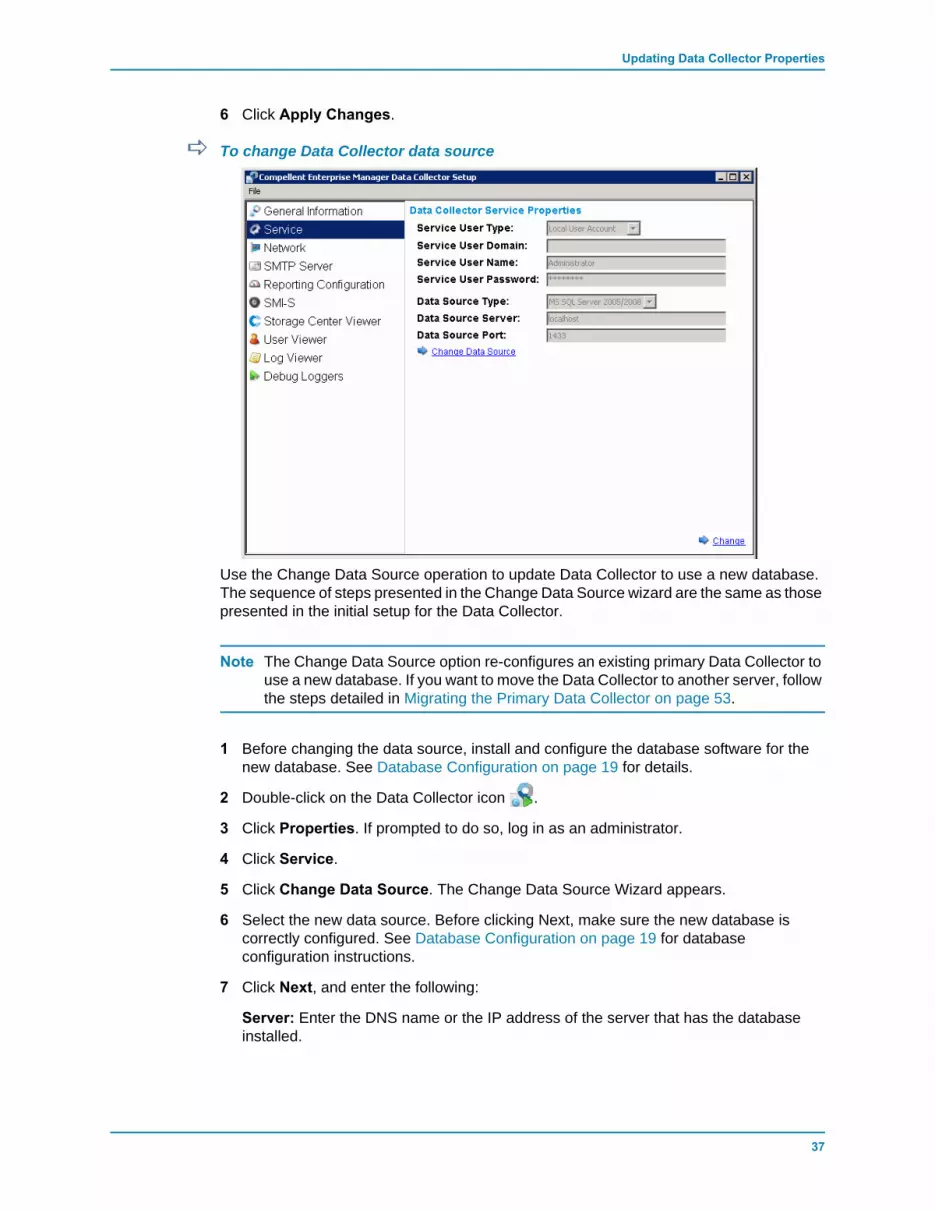
6 Click Apply Changes.
To change Data Collector data source
Use the Change Data Source operation to update Data Collector to use a new database. The sequence of steps presented in the Change Data Source wizard are the same as those presented in the initial setup for the Data Collector.
Note The Change Data Source option re-configures an existing primary Data Collector to use a new database. If you want to move the Data Collector to another server, follow the steps detailed in Migrating the Primary Data Collector on page 53.
1 Before changing the data source, install and configure the database software for the new database. See Database Configuration on page 19 for details.
2 Double-click on the Data Collector icon .
3 Click Properties. If prompted to do so, log in as an administrator.
4 Click Service.
5 Click Change Data Source. The Change Data Source Wizard appears.
6 Select the new data source. Before clicking Next, make sure the new database is correctly configured. See Database Configuration on page 19 for database configuration instructions.
7 Click Next, and enter the following:
Server: Enter the DNS name or the IP address of the server that has the database installed.

38 Enterprise Manager 5.5 Installation and Setup Guide
Port: Enter the number of the TCP port that was configured during the database TCP/IP setup.
Username/Password: Enter the username and password for a user defined in the database that has administrator rights.
8 Click Next and specify the historical data from the current database you want to move to the new database.
9 Click Finish.

39
Updating Data Collector Properties
To update server port usage
1 Double-click on the Data Collector icon .
2 Click Properties. If prompted to do so, log in as an administrator.
3 Click Network.
4 In the bottom right of the properties display, click Change.
Web Service Port: Enter the port for the web service. The default is 8080.
Client Listener Port: Enter the port at which the Data Collector Manager listens for the client. The default is 7342.
Web Server/API Services Port: Enter a port on which to run the web server and API web services. The default is 443.
5 Click Apply Changes.

40 Enterprise Manager 5.5 Installation and Setup Guide
To enable or disable the use of a proxy server
1 Double-click on the Data Collector icon .
2 Click Properties. If prompted to do so, log in as an administrator.
3 Click Network.
4 In the bottom right of the properties display, click Change.
Use Proxy Server: Enable or disable the use of a proxy server.
Proxy Server IP Address/Hostname: Enter the IP address or host name of the proxy server.
Proxy Server Port: Enter a port for the proxy server.
5 Click Apply Changes.

41
Updating Data Collector Properties
To change the Data Collector network adaptor
1 Double-click on the Data Collector icon .
2 Click Properties. If prompted to do so, log in as an administrator.
3 Click Network.
4 In the bottom right of the properties display, click Change.
Automatically Select Network Adaptor: Enable this option to have the system automatically select a network adaptor. Disable this option if you want to select the network adaptor.
Available Network Adaptor: Select an available network adaptor.
5 Click Apply Changes.
42 Enterprise Manager 5.5 Installation and Setup Guide
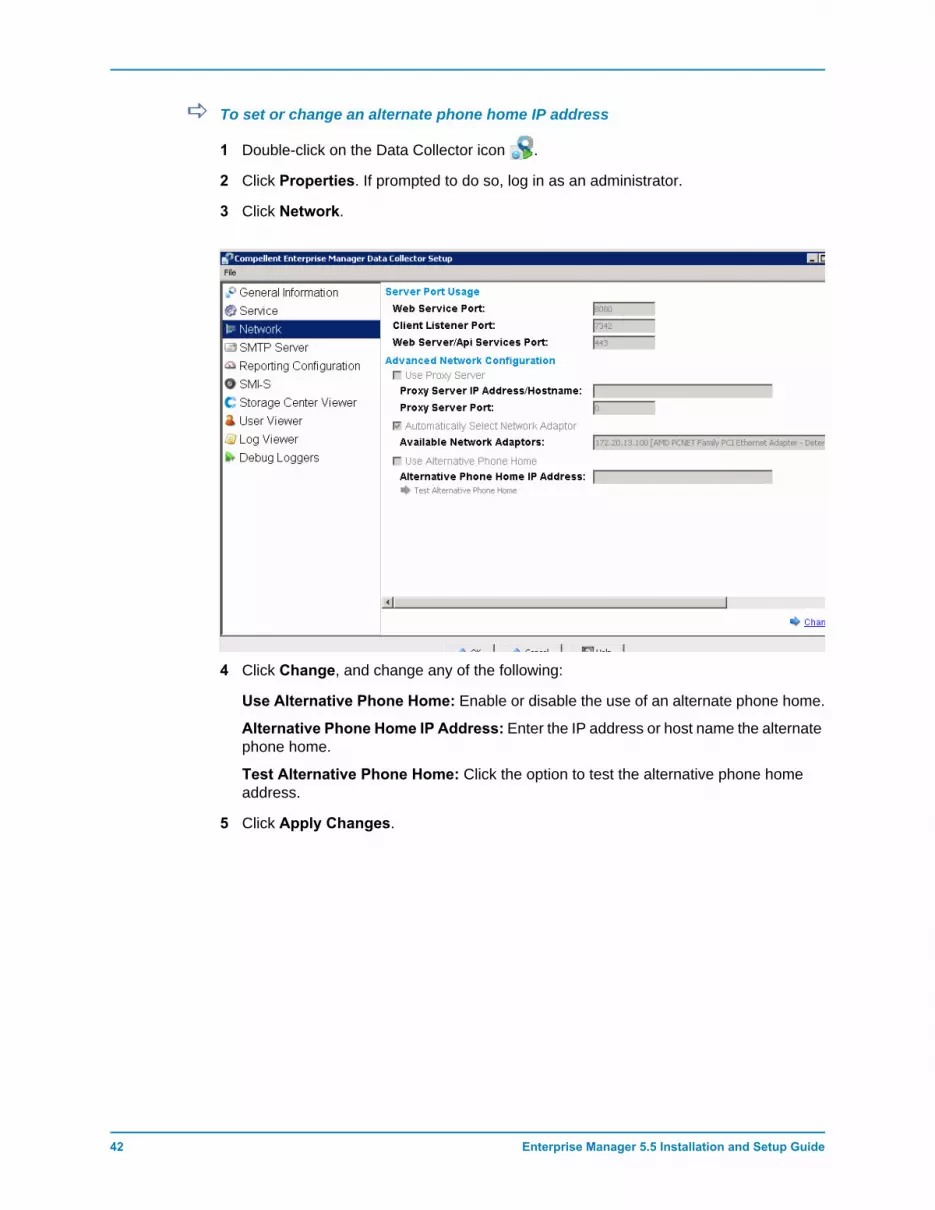
To set or change an alternate phone home IP address
1 Double-click on the Data Collector icon .
2 Click Properties. If prompted to do so, log in as an administrator.
3 Click Network.
4 Click Change, and change any of the following:
Use Alternative Phone Home: Enable or disable the use of an alternate phone home.
Alternative Phone Home IP Address: Enter the IP address or host name the alternate phone home.
Test Alternative Phone Home: Click the option to test the alternative phone home address.
5 Click Apply Changes.

43
Updating Data Collector Properties
To change SMTP Server properties
1 Double-click on the Data Collector icon .
2 Click Properties. If prompted to do so, log in as an administrator.
3 In the left pane, click SMTP Server.
4 Click Change and change the following:
From Email Address: Enter the from address for Data Collector emails.
SMTP Server (IP Address or Host Name): Enter the IP address or host name for the SMTP server.
SMTP Server Port: Enter the SMTP server port.
Use SMTP Authentication: Enable or disable SMTP Authentication.
User Name/Password: Enter the user name and password for SMTP authentication.
5 Click Apply Changes.

44 Enterprise Manager 5.5 Installation and Setup Guide
To update Data Collector reporting configuration limits
1 Double-click on the Data Collector icon .
2 Click Properties. If prompted to do so, log in as an administrator.
3 In the left pane, click Reporting Configuration.
4 Click Change, and change any of the following:
Maximum log file size (KB): Minimum is 1024.
Maximum number of logs files: Minimum is 4.
Maximum number of alerts transferred: Minimum is 500.
Maximum number of logs transferred: Minimum is 500.
Expire logs after (days): Number of days after which to expire a log entry. For flat file, value is 30.
Expire alerts after (days): The number of days after which to expire an alert entry. For flat file, value is 30.
Expire reporting data after (days): Number of days after which to expire a reporting entry. For flat file, value is 30. For all other database source types, the default is 365 days.
5 Click Apply Changes.
45
Updating Data Collector Properties
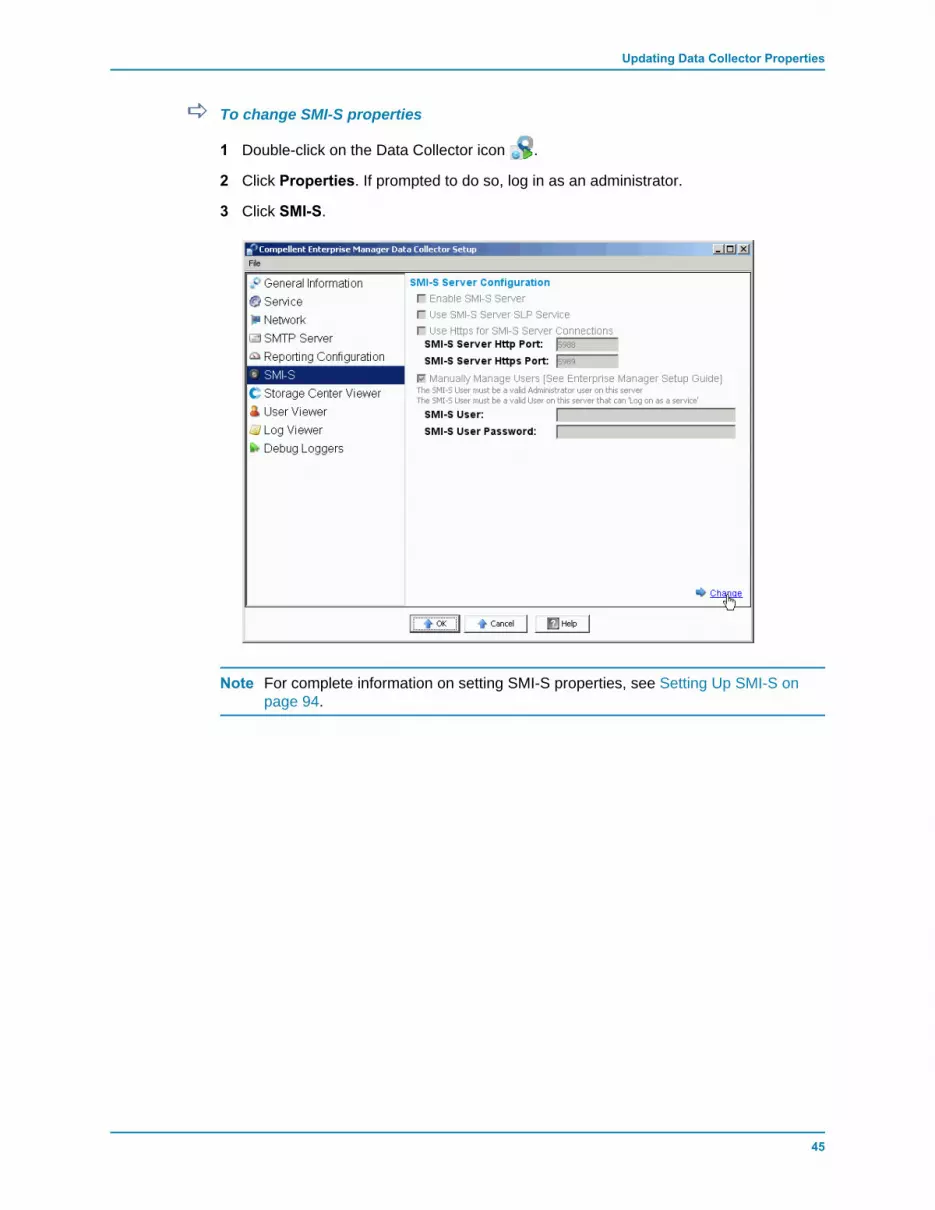
To change SMI-S properties
1 Double-click on the Data Collector icon .
2 Click Properties. If prompted to do so, log in as an administrator.
3 Click SMI-S.
Note For complete information on setting SMI-S properties, see Setting Up SMI-S on page 94.

46 Enterprise Manager 5.5 Installation and Setup Guide
To change Available Storage Centers
1 Double-click on the Data Collector icon .
2 Click Properties. If prompted to do so, log in as an administrator.
3 In the left pane, click Storage Center Viewer.
To delete an available Storage Center:
a Click on the Storage Center you want to delete, and click Delete System. A warning message displays.
b Click OK to the delete the Storage Center from the Data Collector.
To clear all data for a Storage Center:
a Click on the Storage Center for which you want to clear all data, and click Clear System Data. A warning message displays.
b Click OK to clear all data for the Storage Center.
To clear a user map to a Storage Center:
a Click on the Storage Center for which you want to delete a user map.b Click on the user for which you want to delete the user map, and click Delete User
Map. A warning message displays.c Click OK to clear the user map.
47
Updating Data Collector Properties
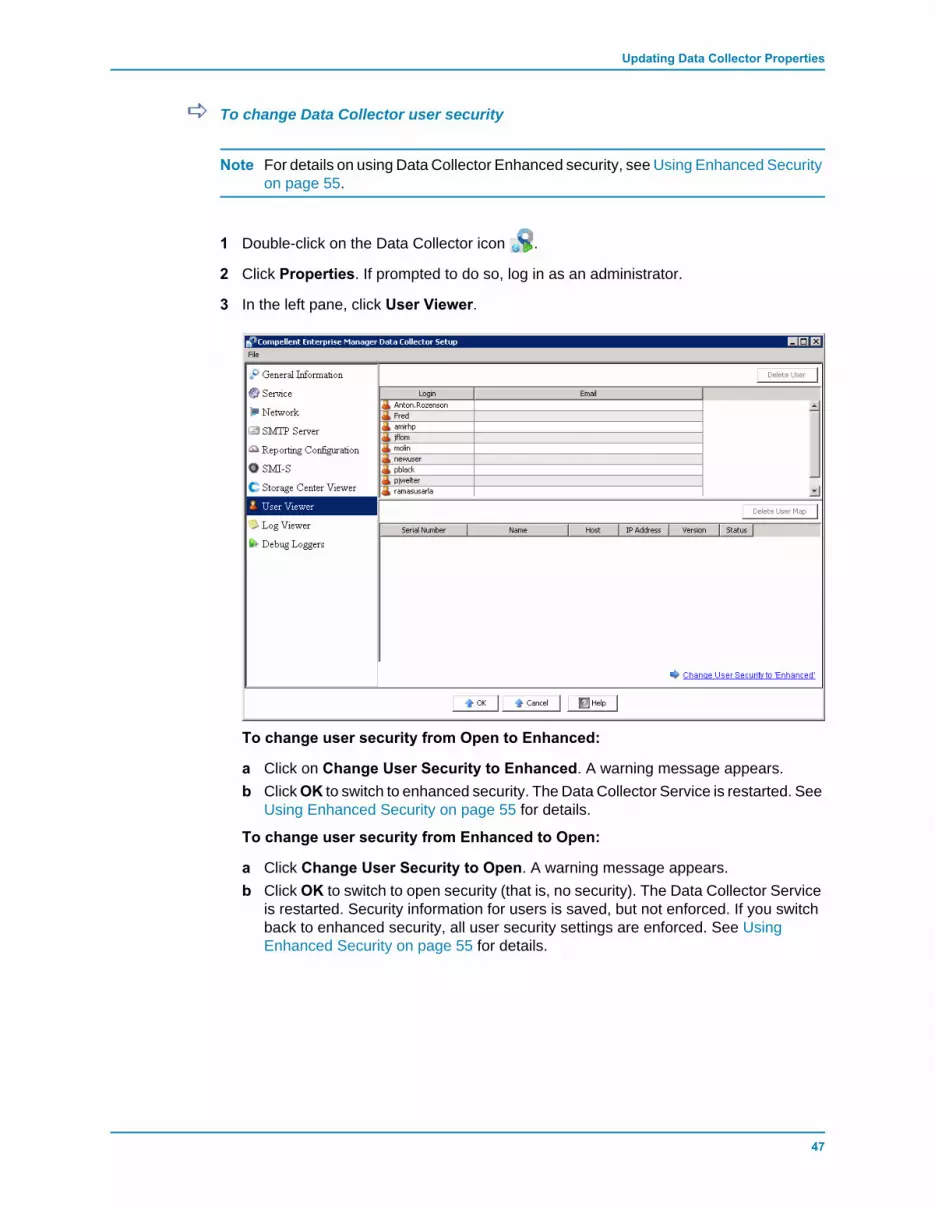
To change Data Collector user security
Note For details on using Data Collector Enhanced security, see Using Enhanced Security on page 55.
1 Double-click on the Data Collector icon .
2 Click Properties. If prompted to do so, log in as an administrator.
3 In the left pane, click User Viewer.
To change user security from Open to Enhanced:
a Click on Change User Security to Enhanced. A warning message appears.b Click OK to switch to enhanced security. The Data Collector Service is restarted. See
Using Enhanced Security on page 55 for details.
To change user security from Enhanced to Open:
a Click Change User Security to Open. A warning message appears.b Click OK to switch to open security (that is, no security). The Data Collector Service
is restarted. Security information for users is saved, but not enforced. If you switch back to enhanced security, all user security settings are enforced. See Using Enhanced Security on page 55 for details.
48 Enterprise Manager 5.5 Installation and Setup Guide
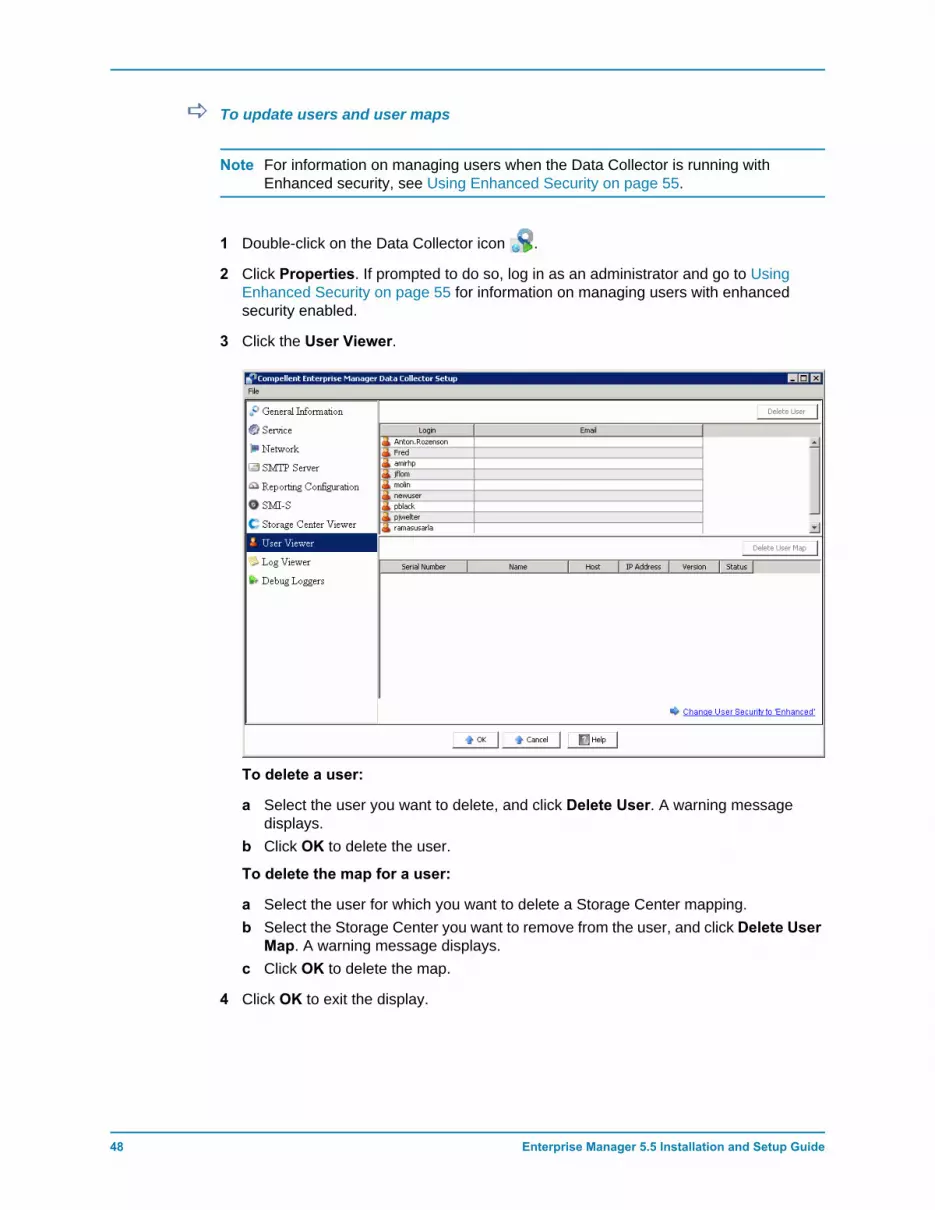
To update users and user maps
Note For information on managing users when the Data Collector is running with Enhanced security, see Using Enhanced Security on page 55.
1 Double-click on the Data Collector icon .
2 Click Properties. If prompted to do so, log in as an administrator and go to Using Enhanced Security on page 55 for information on managing users with enhanced security enabled.
3 Click the User Viewer.
To delete a user:
a Select the user you want to delete, and click Delete User. A warning message displays.
b Click OK to delete the user.
To delete the map for a user:
a Select the user for which you want to delete a Storage Center mapping.b Select the Storage Center you want to remove from the user, and click Delete User
Map. A warning message displays.c Click OK to delete the map.
4 Click OK to exit the display.
49
Updating Data Collector Properties
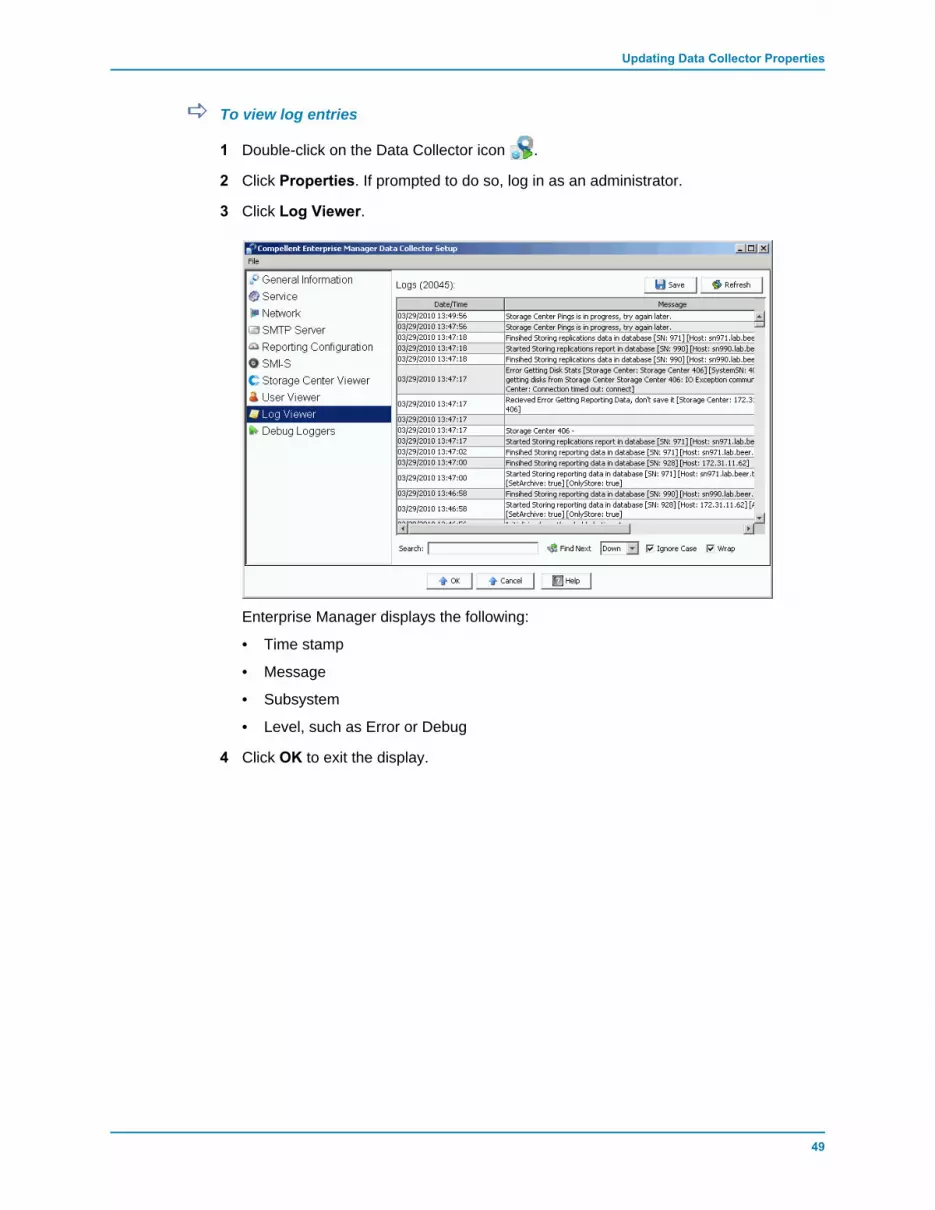
To view log entries
1 Double-click on the Data Collector icon .
2 Click Properties. If prompted to do so, log in as an administrator.
3 Click Log Viewer.
Enterprise Manager displays the following:
• Time stamp
• Message
• Subsystem
• Level, such as Error or Debug
4 Click OK to exit the display.

50 Enterprise Manager 5.5 Installation and Setup Guide
To set debug log options
Note Set debug log options only when instructed to do so by a Copilot.
1 Double-click on the Data Collector icon .
2 Click Properties. If prompted to do so, log in as an administrator.
3 Click Debug Loggers.
4 Click Change and enable or disable the one or more logs as directed by a Copilot.
5 Click Apply Changes.
51
Cleaning Up Data Collector Databases
Cleaning Up Data Collector DatabasesTo clean up a Data Collector database:
1 Do one of the following:
MySQL (all versions)
Enter the following SQL commands as an Admin user:
mysql> Drop Database compmsadb;mysql> DELETE FROM mysql.user WHERE User = 'compmsauser';mysql> FLUSH PRIVILEGES;
MS SQL (all versions)
Enter the following SQL commands as an Admin user:
Drop Database compmsadb;EXEC SP_DropLogin 'compmsauser';
2 Reinstall the Enterprise Manager Data Collector.
Note For a Flat File system, reinstall the Enterprise Manager Data Collector. The flat file is automatically cleaned up.

52 Enterprise Manager 5.5 Installation and Setup Guide
Using Data Collector to Phone Home DataDell Compellent offers a Data Collector license that allows only the Phone Home feature. This option allows Data Collector to phone home Storage Center data not included in the standard Storage Center Phone Home.
To set up Phone Home schedules:
1 Double-click on the Data Collector icon .
2 Click Properties. If prompted to do so, log in as an administrator.
3 Add Storage Centers for which you want to Phone Home data:
a Click Add Storage Center.b Enter the Host Name, User Name, and Password for the Storage Center you want
to Add.c Click OK.d Repeat for each Storage Center you want to add.
4 For each Storage Center:
a Select Enable Phone Home for each Storage Center to Phone Home data.b Select the data to phone home: IO Usage, Storage Usage, Replication Usage.c Click OK to close the dialog.
53
Migrating the Primary Data Collector
Migrating the Primary Data CollectorYou can migrate the primary Data Collector to a different server by following these general steps:
1 Install the primary Data Collector on the server to which you want to migrate the Data Collector:
a Download and unzip the Enterprise Manager 5 installation files from the Dell Compellent Customer Portal (http://customer.compellent.com), and launch Setup.exe.
b Click Data Collector. The Welcome window appears.c Click Next. The license agreement appears. d Click Yes to accept the license agreement. The InstallShield Wizard Complete
window appears. e Click Finish. The Enterprise Manager Activation window appears.f Enter and activate the Product Key. Use the same product key as the original
primary Data Collector.g When the product key is accepted, the Successful Activation window appears. h Click OK. The Data Collector Setup appears.i Select Data Collector options that match the selections for the original primary Data
Collector. Make sure you opt to install as a primary Data Collector and that the Data Source Type matches the Data Source Type of the original primary Data Collector.
j Click Next. When the wizard for setting up the database appears, cancel the wizard.
2 Copy the /etc folder and all contents from the original primary Data Collector to the new primary Data Collector. The default installed location for the etc folder is as follows:
C:\Program Files\Compellent Technologies\Compellent Enterprise Manager\msaservice\etc
3 Start the primary Data Collector on the new server.

54 Enterprise Manager 5.5 Installation and Setup Guide
Migrating a Microsoft SQL Server DatabaseTo migrate a Microsoft SQL Server (2005/2008) database used by the primary Data Collector, follow these general steps.
1 Back up the database on the original Microsoft SQL Server.
2 Perform a restore of the database on the new Microsoft SQL Server.
3 Once restored, create a login of compmsauser. Do not assign to a schema at this point.
4 Run the following query on the compmsadb:
“sp_change_users_login ‘update_one’, ‘compmsauser’, ‘compmsauser’”
5 Once the query finishes, update the Enterprise Manager Data Collector to point to the new database:
a Start the Data Collector Manager and click Properties.b Click Service to display Data Collector Service properties.c Click Change Data Source.d For the New Data Source, select the data source type that matches the original
database type, and click Next.e Enter the following:
Server: Enter the DNS name or the IP address of the server on which the migrated database resides.
Port: Enter the number of the TCP port that was configured during the database TCP/IP setup.
Username/Password: Enter the username and password for a user defined in the database that has administrator rights.
f Click Next.g When the checkmarks are green, click Next.h Click Finish.
55
5 Using Enhanced Security
Introduction 56
Enhanced Security User Group Roles 57
Implementing Enhanced User Security 58
Managing Enhanced Security 59
56 Enterprise Manager 5.5 Installation and Setup Guide
IntroductionData Collector provides two levels of user security:
• Open Open security mode is the default mode. When running in open security mode, all Enterprise Manager users have access to all Enterprise Manager functions. New users can be created by an Enterprise Manager client when the client connects to the Data Collector.
• Enhanced When running in enhanced security mode, the Data Collector controls user access to Enterprise Manager functions and associated Storage Centers based on the group role to which a user is assigned: a Viewer, Creator, or Administrator group. New users, as well as the associated Storage Centers can be created and managed only by the Data Collector Manager.
Note Before enabling enhanced security for the Data Collector, make sure there is at least one user defined for the Data Collector. When running the Data Collector in the default open security, you can define a Data Collector user by installing and configuring an Enterprise Manager client and then connecting to the Data Collector. See Installing and Configuring Enterprise Manager Clients on page 63.

57
Enhanced Security User Group Roles
Enhanced Security User Group RolesThe following table shows the Data Collector access capability of the three user group roles:
Capability Viewer Creator Administrator
View Storage Center Data ■ ■ ■
View Chargeback Data ■ ■ ■
View Automated Reports ■ ■ ■
View Threshold Alert ■ ■ ■
View Server Agent Information ■ ■ ■
Manage Storage Centers ■ ■
Manage Replications ■ ■
Manage Automated Reports ■ ■
Manage Chargeback ■ ■
Manage Server Agent Information ■ ■
Manage Threshold Alerts ■ ■
Manage Data Collector Properties ■
Manage Phone Home Properties ■
Manage Data Collector Users ■

58 Enterprise Manager 5.5 Installation and Setup Guide
Implementing Enhanced User Security
To enable enhanced security
Note Before enabling enhanced security, make sure you have already created at least one Data Collector user via an Enterprise Manager client. To do so, install an Enterprise Manager client and then create a new user. See Installing and Configuring Enterprise Manager Clients on page 63.
1 Double-click on the Data Collector icon .
2 Click Properties. The Enterprise Manager Setup window appears.
3 Click User Viewer.
4 Click Change User Security to Enhanced. A warning message appears.
5 Click Yes to change to enhanced security and restart the Data Collector service.
To disable enhanced security
1 Double-click on the Data Collector icon .
2 Click Properties, and log on to the Data Collector as an administrator.
3 Click User Viewer.
4 Change User Security to Open. A warning message appears.
5 Click Yes to change to open security and restart the Data Collector service.

59
Managing Enhanced Security
Managing Enhanced SecurityOnce the Data Collector security mode is set to enhanced, all users and corresponding Storage Centers are managed via the Data Collector Manager.
To create a Data Collector user
1 Double-click on the Data Collector icon .
2 Click Properties, and log on to the Data Collector as an administrator.
3 Click User Viewer.
4 Click Create User.
5 Enter the following:
User: Enter a name for the user.
New Password: Enter a password for the user.
Confirm Password: Re-enter the user password.
Require Password Change on Next Login: Select this option to require the user to change the password at next login.
User Group: Select the user group for the user. Viewer, Creator, or Administrator. The default is Viewer. For information on Enterprise Manager user groups, see Enhanced Security User Group Roles on page 57.
6 Click OK.
To set or change Storage Center Mappings for a user
1 Double-click on the Data Collector icon .
2 Click Properties, and log on to the Data Collector as an administrator.
3 Click User Viewer tab.
4 Click on the user for whom you want to set Storage Center mappings, and click Set Storage Center Mappings.

60 Enterprise Manager 5.5 Installation and Setup Guide
Note You can set or change Storage Center mappings only for users that belong to the Viewers group. Users that belong to either the Administrator or Creator groups manage their own Storage Center mappings via the Enterprise Manager client.
5 Select the Storage Centers for the user, and click OK.
To change the user group for a Data Collector user
1 Double-click on the Data Collector icon .
2 Click Properties, and log on to the Data Collector as an administrator.
3 Click User Viewer tab.
4 Select the user you want to modify, and click Modify User.
5 Select the following:
Require Password Change on Next Login: Select this option to require the user to change the password at next login.
User Group: Select the user group for the user. Viewer, Creator, or Administrator. The default is Viewer. For information on Enterprise Manager user groups, see Enhanced Security User Group Roles on page 57.
6 Click OK.
To change a user password
1 Double-click on the Data Collector icon .
2 Click Properties, and log on to the Data Collector as an administrator.
3 Click User Viewer tab.
4 Select the user for which you want to change the password, and click Change Password.

61
Managing Enhanced Security
5 Select the following:
New Password: Enter a password for the user.
Confirm Password: Re-enter the user password.
Require Password Change on Next Login: Select this option to require the user to change the password at next login.
6 Click OK.
To delete a user
1 Double-click on the Data Collector icon .
2 Click Properties, and log on to the Data Collector as an administrator.
3 Click User Viewer tab.
4 Select the user you want to delete, and click Delete. A warning message appears.
5 Click Yes to delete the user.

62 Enterprise Manager 5.5 Installation and Setup Guide
63
6 Installing and Configuring Enterprise Manager Clients
Client Port Usage Requirements 64
Installation Procedure 65
Enterprise Manager Client Configuration 67
Installing Additional Enterprise Manager Clients 69

64 Enterprise Manager 5.5 Installation and Setup Guide
Client Port Usage RequirementsIf you are installing Enterprise Manager Client on a system that has the firewall feature enabled, open the following ports on your system:
Port Usage Port
Client Listener 9852
Data Collector Listener 7342
Data Collector Web Services 8080

65
Installation Procedure
Installation Procedure
Note Before installing Enterprise Manager Client, make sure you exit all applications.
The Data Collector Website allows you to download installation files for the Enterprise Manager Client and Enterprise Manager Server Agent. In addition, the website displays Enterprise Manager client help, as well as the Enterprise Manager user and setup guides.
1 Go to the Enterprise Manager Data Collector Website. The default location for the website is https://<dc_hostname_ip/web/index.htm. Replace <dc_hostname_ip> with the IP address for the server on which you installed the primary Data Collector.
2 Click Install Enterprise Manager Client.
3 Click Run to start the installation. If a security message prompts you to verify the installation, click Run again.

66 Enterprise Manager 5.5 Installation and Setup Guide
4 Click Next. The License Agreement window displays.
5 Click Yes. The InstallShield wizard installs the Enterprise Manager client. When complete, the installation complete window displays.
6 Click Finish. The Enterprise Manager icon appears on the desktop.
67
Enterprise Manager Client Configuration
Enterprise Manager Client ConfigurationAfter installing the client, configure the client by identifying the Data Collector for the client and adding Storage Centers to manage.
Note If your site has enabled enhanced security for the Data Collector, you cannot create a new user via the Enterprise Manager client. Contact the Data Collector administrator to obtain your username and password, as well as the IP address for the Data Collector.
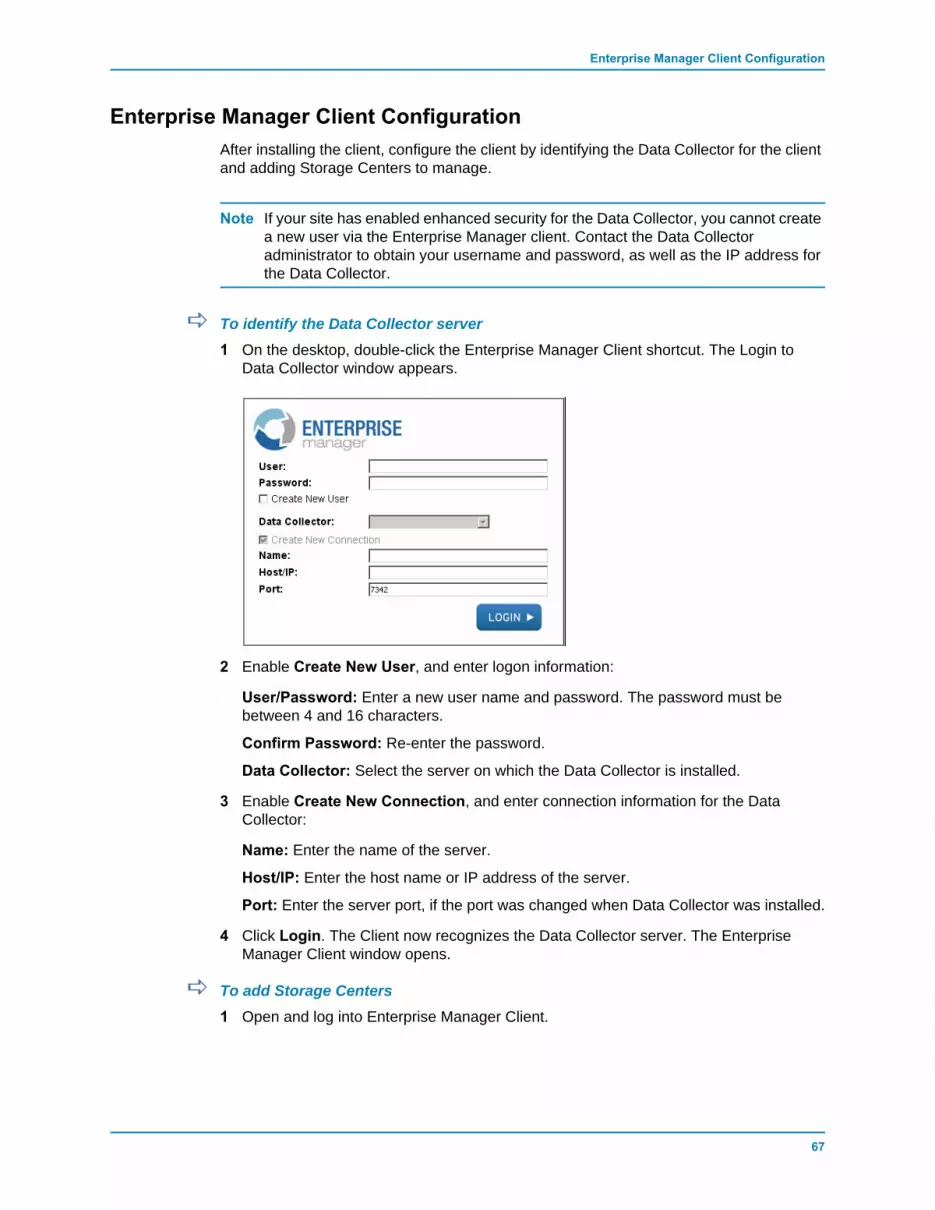
To identify the Data Collector server1 On the desktop, double-click the Enterprise Manager Client shortcut. The Login to
Data Collector window appears.
2 Enable Create New User, and enter logon information:
User/Password: Enter a new user name and password. The password must be between 4 and 16 characters.
Confirm Password: Re-enter the password.
Data Collector: Select the server on which the Data Collector is installed.
3 Enable Create New Connection, and enter connection information for the Data Collector:
Name: Enter the name of the server.
Host/IP: Enter the host name or IP address of the server.
Port: Enter the server port, if the port was changed when Data Collector was installed.
4 Click Login. The Client now recognizes the Data Collector server. The Enterprise Manager Client window opens.
To add Storage Centers1 Open and log into Enterprise Manager Client.

68 Enterprise Manager 5.5 Installation and Setup Guide
2 From the Management menu, select Add Storage Center. The Add New Storage Center window appears.
3 Select one of the following:
• Add new Storage Center: Select this option to add a Storage Center that does not appear in the list of Storage Centers.
• Select Storage Center from list: Select this option to add a Storage Center that appears in the list of Storage Centers, and then select the Storage Center from the list.
4 Click Next.
5 Enter Storage Center logon information:
• Host Name: For a new Storage Center only. Enter the host name or IP address of a Storage Center controller. For a dual-controller Storage Center, enter the management IP address or host name of the management controller. You can find this information in Storage Center System Manager by clicking Storage Center Management > Properties >System> General Tab.
• User Name and Password: Enter an Administrative Storage Center user name and password.
6 Click Finish.

69
Installing Additional Enterprise Manager Clients
Installing Additional Enterprise Manager ClientsInstall additional Enterprise Manager Clients as needed. Follow the instructions in Installation Procedure on page 65 and Enterprise Manager Client Configuration on page 67 for each client you want to install.

70 Enterprise Manager 5.5 Installation and Setup Guide

71
7 Installing and Registering Server Agents
Introduction 72
Installing Server Agents 73
Completing Server Agent Setup for iSCSI HBAs 75
Configuring IPMI on Dell Compellent Hardware 76

72 Enterprise Manager 5.5 Installation and Setup Guide
IntroductionThe Enterprise Manager Server Agent for Microsoft Windows is an optional utility that allows you to see server information as reported by a Windows operating system. In addition, the Server Agent allows you to:
• Recover unused storage space from Windows NTFS
• Monitor and control Dell Compellent NAS and zNAS servers
For information on setting up and using a Dell Compellent NAS server, refer to:
• Storage Center NAS Storage Solution Setup Guide
• Storage Center NAS Storage Solution User Guide.
For information on setting up and using a Dell Compellent zNAS server, refer to:
• Storage Center zNAS Storage Solution Setup Guide
• Storage Center zNAS Storage Solution User Guide
For information on configuring IPMI on the Dell Compellent NAS and zNAS servers, see Configuring IPMI on Dell Compellent Hardware on page 76.

73
Installing Server Agents
Installing Server AgentsInstall and register a Server Agent on each Microsoft Windows server attached to the Storage Center:
• Microsoft Windows Server 2003 or 2008 with the latest service packs installed.
• Microsoft Windows Storage Server (WSS) 2008, SP 2, Enterprise Edition (x64). Before installing a Server Agent, make sure you have configured IPMI on the Dell Compellent NAS server. See Configuring IPMI on Dell Compellent Hardware on page 76.
• If you want to report information on Microsoft Hyper-V servers, install a Server Agent on each Hyper-V virtual server.
Note Server Agents can be registered after installation using the Enterprise Manager Client. For details, refer to the Enterprise Manager User Guide.
To install the Enterprise Manager Server Agent for Microsoft Servers
The Data Collector Website allows you to download installation files for the Enterprise Manager Client and Enterprise Manager Server Agent. In addition, the website displays Enterprise Manager client help, as well as the Enterprise Manager user and setup guides.
1 Go to the Enterprise Manager Data Collector Website. The default location for the website is https://<dc_hostname_ip/web/index.htm. Replace <dc_hostname_ip> with the IP address for the server on which you installed the primary Data Collector.
2 Click Enterprise Manager Server Agent.
3 Click Run to start the installation. If a security message prompts you to verify the installation, click Run again.
4 Click Next. The license agreement appears.
5 Click Yes to accept the license agreement. InstallShield installs the Server Agent and then displays the Server Agent Properties dialog.
6 To register the Server Agent with Enterprise Manager Data Collector, enter the following:

74 Enterprise Manager 5.5 Installation and Setup Guide
Socket Listening Port: Enter the socket listening port for the Server Agent Service. The default is 27355.
Enable Enhanced Debugging: Enable enhanced debugging only when instructed to do so by Copilot Services.
Host/IP Address: Enter the host name or IP address of the Data Collector.
Web Service Port: Enter the web service port for the Data Collector. The default is 8080.
Automatically Manage on Storage Center: Select this checkbox to automatically create and manage the server on the Storage Center.
For Dell Compellent NAS server only:
IPMI IP Address: Enter the IP address of the IPMI interface card.
IPMI User Name: Enter the IPMI username.
IPMI Password: Enter the IPMI password.
7 Click OK.
8 When the InstallShield complete dialog is displayed, click Finish.
Once a Server Agent is installed and registered with the Data Collector, use the Enterprise Manager client to view server information and configure Server Agent features. See the Enterprise Manager User Guide for details.

75
Completing Server Agent Setup for iSCSI HBAs
Completing Server Agent Setup for iSCSI HBAsFor servers running iSCSI HBAs, Enterprise Manager does not automatically recognize the WWNs for the server when the server is registered. To populate the list of WWNs, you must manually map the server to the Storage Center(s) using the Enterprise Manager Client. See the Enterprise Manager User Guide for details on Server Agents and manually mapping servers to Storage Centers.
76 Enterprise Manager 5.5 Installation and Setup Guide
Configuring IPMI on Dell Compellent HardwareEnterprise Manager communicates with Dell Compellent NAS and zNAS servers via the IP address of the Intelligent Platform Management Interface (IPMI) card. For this release:
• The Microsoft-based NAS server Generation 2 hardware.
• The Open-Source-based zNAS server Generation 3 hardware.
The next subsections explain how to configure the IPMI card and change the default ADMIN password on both hardware platforms.
Generation 2 Hardware Platform
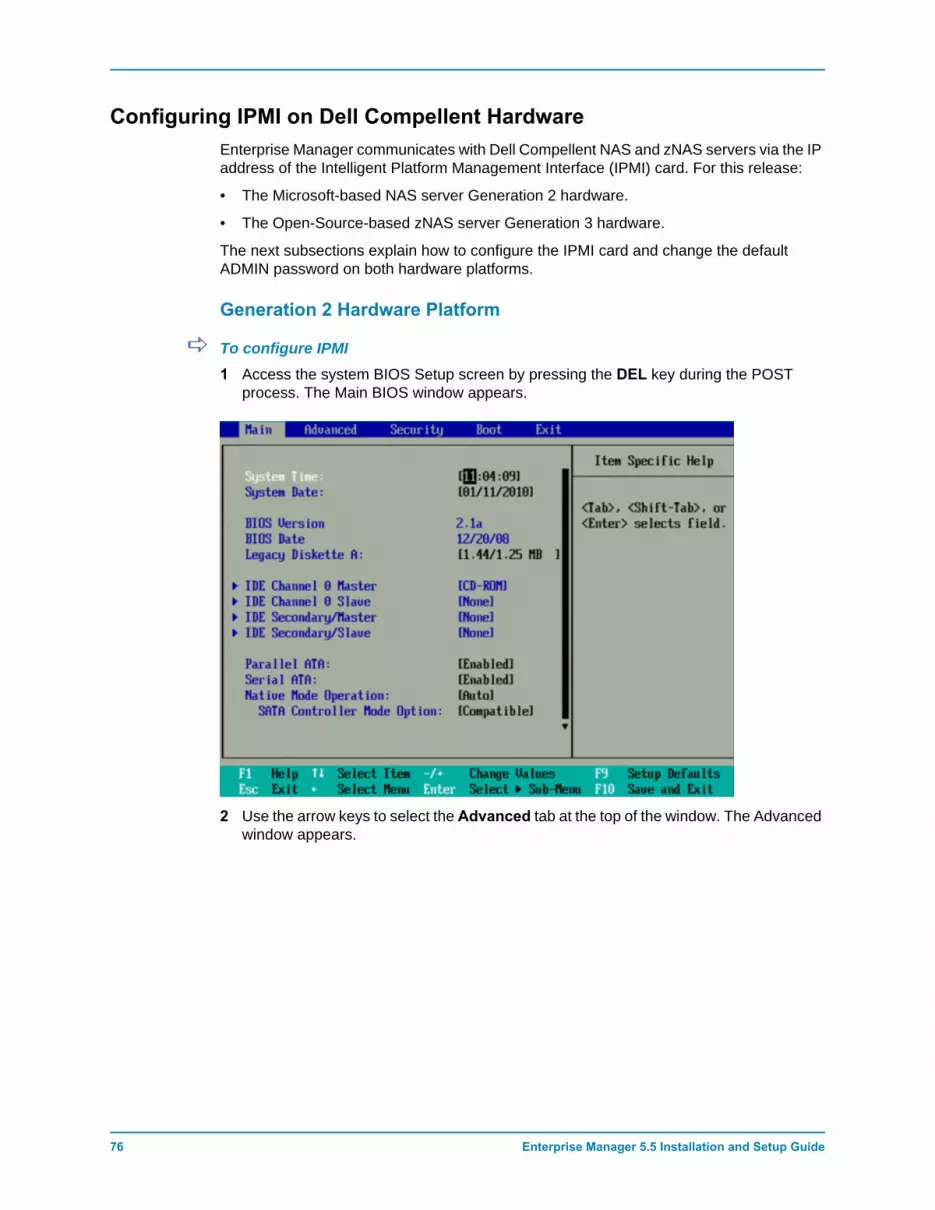
To configure IPMI1 Access the system BIOS Setup screen by pressing the DEL key during the POST
process. The Main BIOS window appears.
2 Use the arrow keys to select the Advanced tab at the top of the window. The Advanced window appears.

77
Configuring IPMI on Dell Compellent Hardware
3 From the Advanced menu, arrow down and click IPMI. The IPMI window appears.
4 On the IPMI window, scroll down and select the IPMI LAN Configuration option. The IPMI Lan Configuration window appears.
5 Set the following:
• VLAN Tagging: Enable or disable as appropriate for your site.
• VLAN ID: Set a value appropriate for your site.
• IP Address: Set an IP address for IPMI.
• IP Subnet Mask: Set the IP subnet mask for IPMI.
• Default Gateway: Set the default gateway for IPMI.
• MAC Address: Set the MAC address for IPMI.

78 Enterprise Manager 5.5 Installation and Setup Guide
Note The IPMI menu does not provide options for setting an IPMI username and password. The default username is ADMIN and the default password is ADMIN.
6 Press F10 to Save and Exit. The Setup Confirmation window appears.
7 Click Yes to save your changes.
8 Reboot the server.
To change the default password for the IPMI ADMIN user1 Browse to the IP address for the IPMI card.
2 Enter the default username ADMIN and the default password ADMIN.
3 Click on User Management, and select Change Password.
4 Enter the following:
• New Password: Enter the new password.
• Confirm Password: Enter the new password Again.
5 Click Apply.
6 Click Logout to close the session.

79
Configuring IPMI on Dell Compellent Hardware
Generation 3 Hardware Platform
To configure IPMI1 Access the system BIOS Setup Utility by pressing the DEL key during the POST
process.
2 Use the arrow keys to select the Advanced tab at the top of the window. The Advanced window appears.
3 From the Advanced menu, select IPMI. The Advanced – IPMI Configuration menu appears.
80 Enterprise Manager 5.5 Installation and Setup Guide
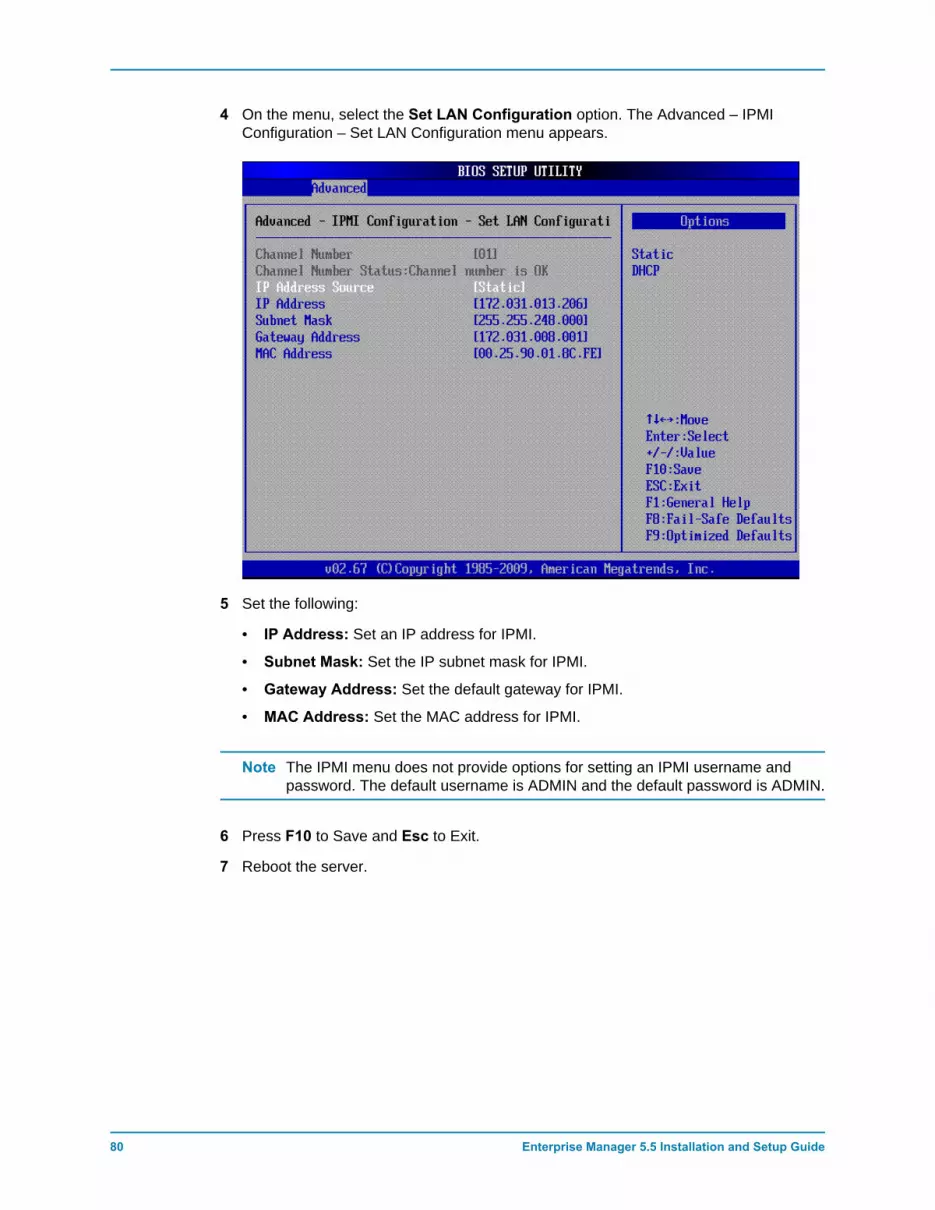
4 On the menu, select the Set LAN Configuration option. The Advanced – IPMI Configuration – Set LAN Configuration menu appears.
5 Set the following:
• IP Address: Set an IP address for IPMI.
• Subnet Mask: Set the IP subnet mask for IPMI.
• Gateway Address: Set the default gateway for IPMI.
• MAC Address: Set the MAC address for IPMI.
Note The IPMI menu does not provide options for setting an IPMI username and password. The default username is ADMIN and the default password is ADMIN.
6 Press F10 to Save and Esc to Exit.
7 Reboot the server.

81
Configuring IPMI on Dell Compellent Hardware
To change the default password for the IPMI ADMIN user1 Browse to the IP address for the IPMI card.
2 Enter the default username ADMIN and the default password ADMIN. The System Information Summary window appears.
3 Click the Configuration tab. the Options window appears.
4 Click Users. The User List window appears.
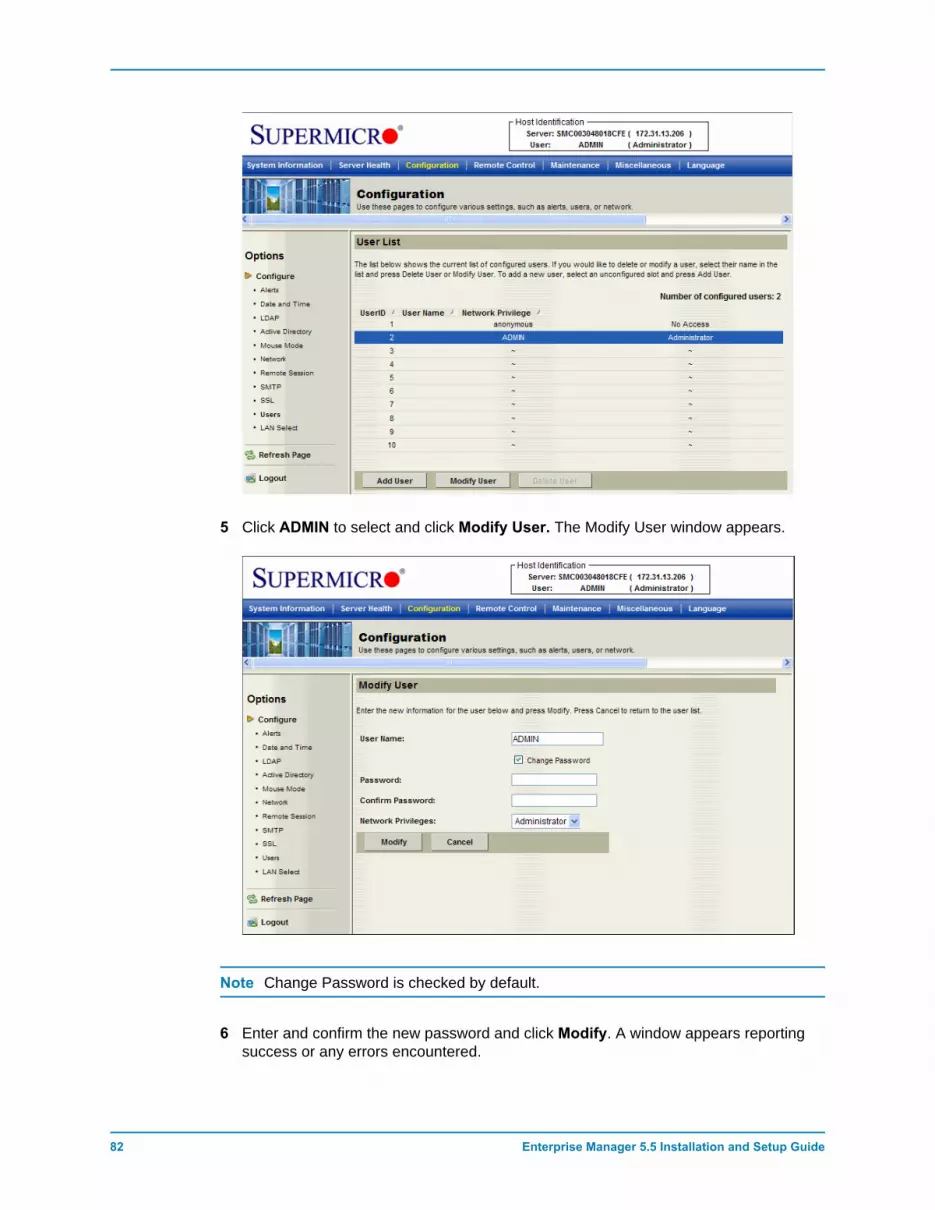
82 Enterprise Manager 5.5 Installation and Setup Guide
5 Click ADMIN to select and click Modify User. The Modify User window appears.
Note Change Password is checked by default.
6 Enter and confirm the new password and click Modify. A window appears reporting success or any errors encountered.
83
8 Using Server Agent Manager
Introduction 84
Using Server Agent Manager Controls 85
84 Enterprise Manager 5.5 Installation and Setup Guide
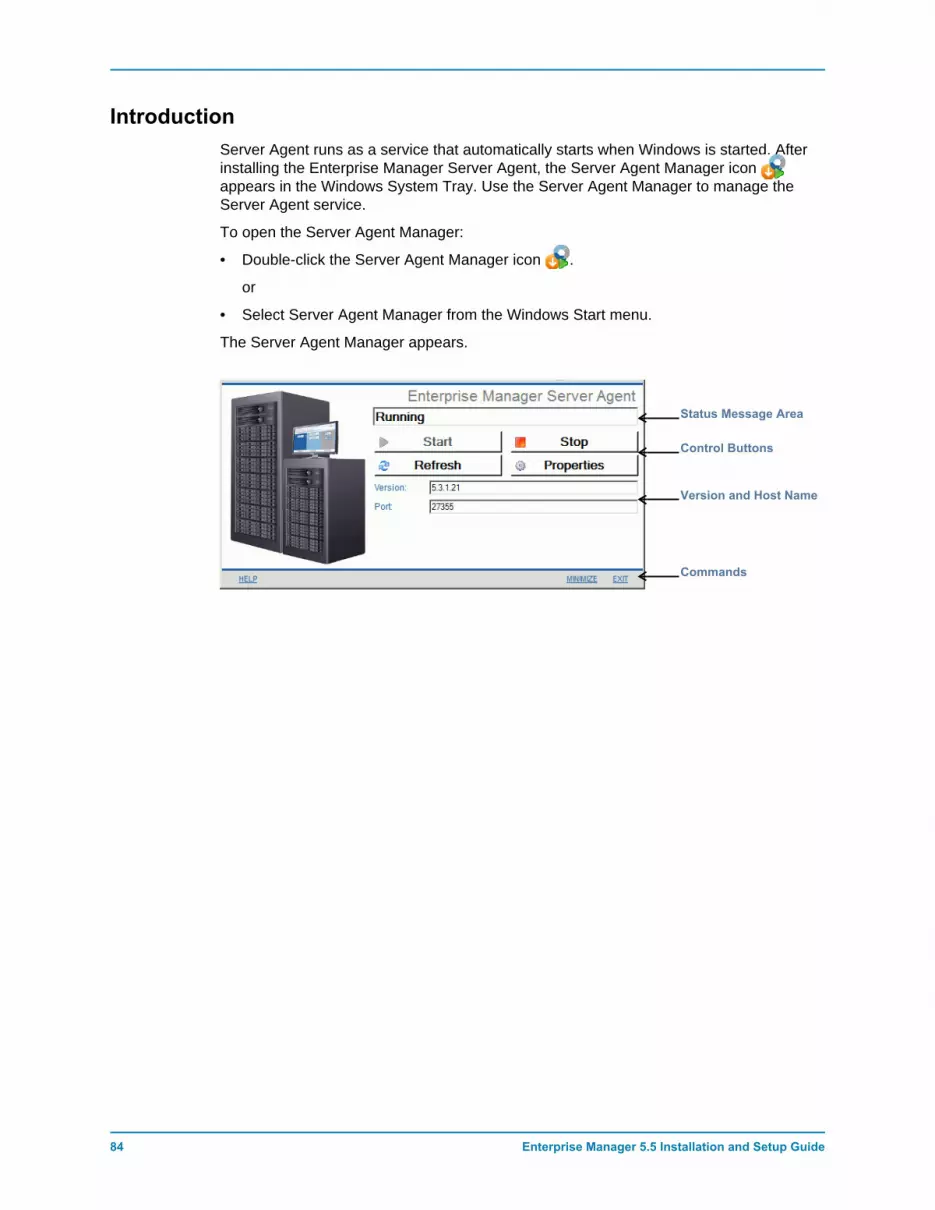
IntroductionServer Agent runs as a service that automatically starts when Windows is started. After installing the Enterprise Manager Server Agent, the Server Agent Manager icon appears in the Windows System Tray. Use the Server Agent Manager to manage the Server Agent service.
To open the Server Agent Manager:
• Double-click the Server Agent Manager icon .
or
• Select Server Agent Manager from the Windows Start menu.
The Server Agent Manager appears.
Status Message Area
Control Buttons
Version and Host Name
Commands
85
Using Server Agent Manager Controls
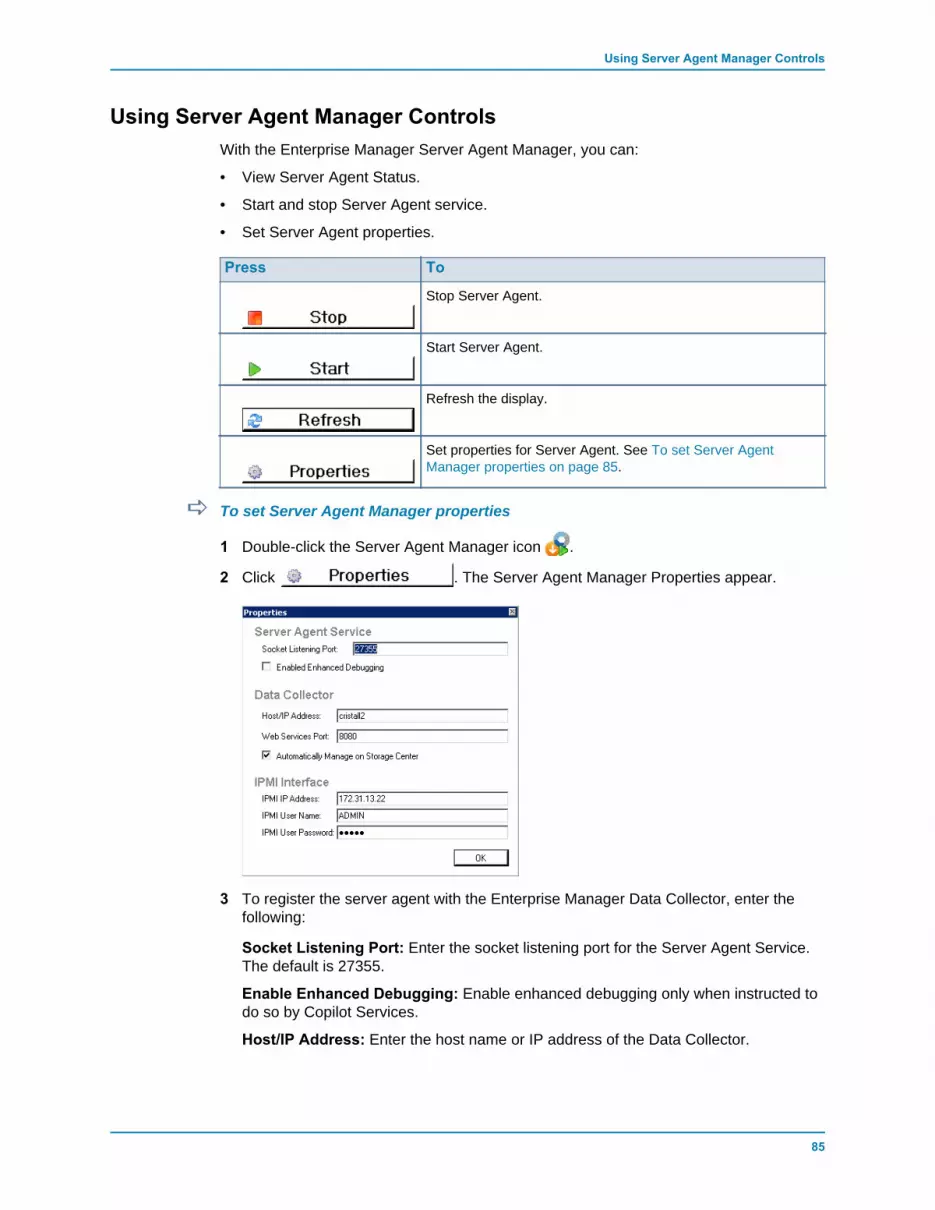
Using Server Agent Manager ControlsWith the Enterprise Manager Server Agent Manager, you can:
• View Server Agent Status.
• Start and stop Server Agent service.
• Set Server Agent properties.
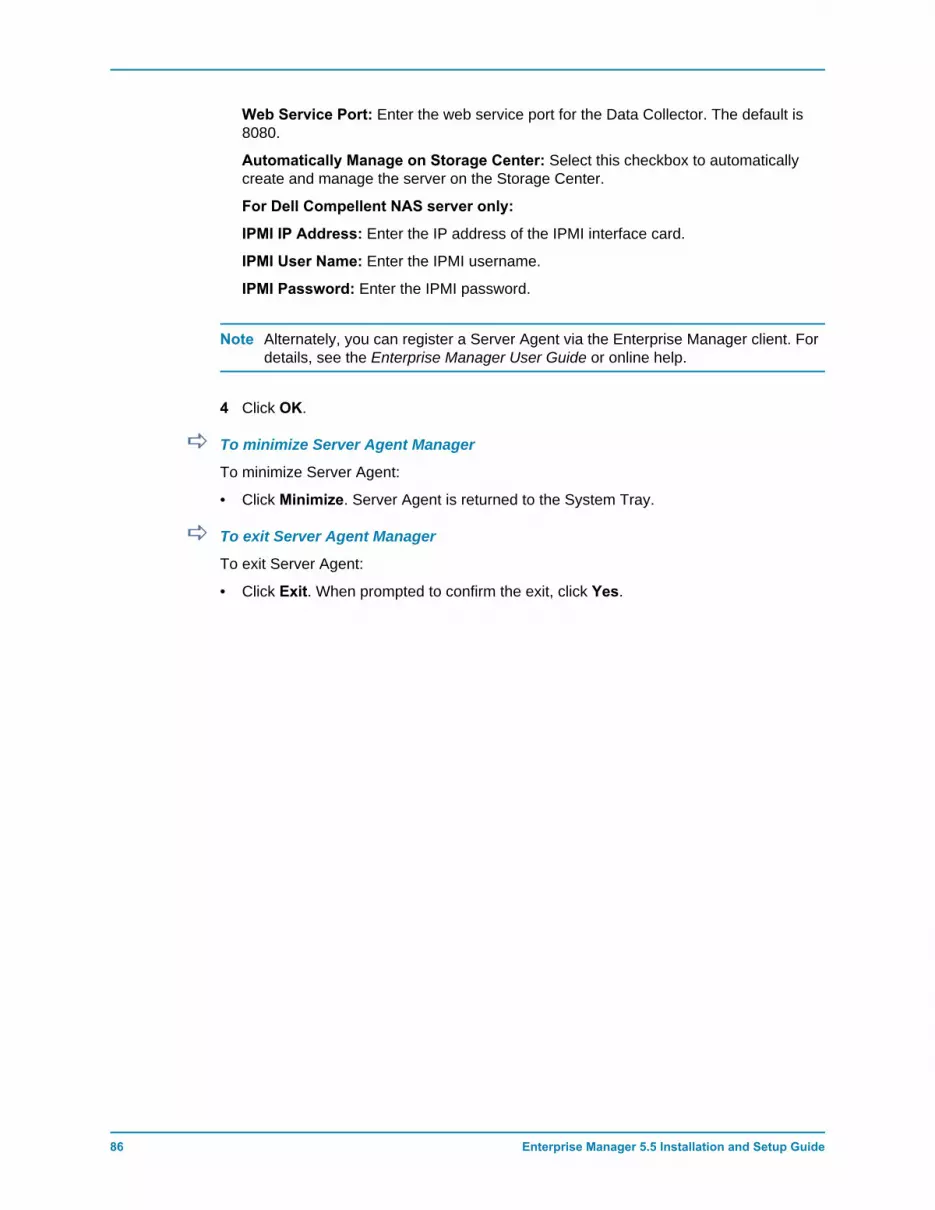
To set Server Agent Manager properties
1 Double-click the Server Agent Manager icon .
2 Click . The Server Agent Manager Properties appear.
3 To register the server agent with the Enterprise Manager Data Collector, enter the following:
Socket Listening Port: Enter the socket listening port for the Server Agent Service. The default is 27355.
Enable Enhanced Debugging: Enable enhanced debugging only when instructed to do so by Copilot Services.
Host/IP Address: Enter the host name or IP address of the Data Collector.
Press To
Stop Server Agent.
Start Server Agent.
Refresh the display.
Set properties for Server Agent. See To set Server Agent Manager properties on page 85.
86 Enterprise Manager 5.5 Installation and Setup Guide
Web Service Port: Enter the web service port for the Data Collector. The default is 8080.
Automatically Manage on Storage Center: Select this checkbox to automatically create and manage the server on the Storage Center.
For Dell Compellent NAS server only:
IPMI IP Address: Enter the IP address of the IPMI interface card.
IPMI User Name: Enter the IPMI username.
IPMI Password: Enter the IPMI password.
Note Alternately, you can register a Server Agent via the Enterprise Manager client. For details, see the Enterprise Manager User Guide or online help.
4 Click OK.
To minimize Server Agent Manager
To minimize Server Agent:
• Click Minimize. Server Agent is returned to the System Tray.
To exit Server Agent Manager
To exit Server Agent:
• Click Exit. When prompted to confirm the exit, click Yes.

87
9 Using the Data Collector Website
Introduction 88
Updating Enterprise Manager Software 89
88 Enterprise Manager 5.5 Installation and Setup Guide
IntroductionThe Enterprise Manager Data Collector Website is set up automatically when a primary Data Collector is installed on a server. The default location of the website is as follows:
https://<EMDC_IP_ADDRESS>:<EMDC_Web_Server_Port>/web/index.htm
The website allows you to:
• Update Enterprise Manager clients to the same software version as the installed Data Collector.
• View webhelp for the Enterprise Manager client.
• Update Enterprise Manager server agents to the same software version as the installed Data Collector.
• View the PDF of Enterprise Manager Setup Guide.
• View the PDF of the Enterprise Manager User Guide.
Variable Description
EMCD_IP_ADDRESSThe IP address of the Enterprise Manager Data Collector server.
EMDC_Web_Server_PortThe web server port. If the default port 443 is used, you can omit the port.

89
Updating Enterprise Manager Software
Updating Enterprise Manager SoftwareOnce a new version of the Enterprise Manager Data Collector is installed, the corresponding versions of the Enterprise Manager Client and Enterprise Manager Server Agents are available via the Data Collector Website.
When a client or server agent connects to a Data Collector that is newer than the connecting client or server agent software, the user is prompted to update the software. If the user agrees to update the software, the software setup file is downloaded and opened from the Data Collector website.

90 Enterprise Manager 5.5 Installation and Setup Guide
91
10 Using the Dell Compellent SMI-S Provider
About SMI-S 92
Setting Up SMI-S 94
Manually Managing Pegasus Users 97
Supported Storage Management Applications 98
92 Enterprise Manager 5.5 Installation and Setup Guide
About SMI-SThe Storage Management Initiative Specification (SMI-S) is a standard interface specification developed by the Storage Networking Industry Association (SNIA).
Based on the Common Information Model (CIM) and Web-Based Enterprise Management (WBEM) standards, SMI-S defines common protocols and data models that enable interoperability between storage vendor software and hardware.
Dell Compellent SMI-S ProviderThe Dell Compellent SMI-S Provider works with the open source Pegasus CIM Server.
Once SMI-S is enabled and configured via the Enterprise Manager Data Collector properties, the Data Collector automatically installs and manages the Dell Compellent SMI-S Provider and the Pegasus CIM Server; no additional installation is required.
You can configure SMI-S so that the Data Collector automatically sets up and manages one Pegasus user; or you can choose to manually manage Pegasus CIM server users.
93
About SMI-S
Dell Compellent-Supported SMI-S 1.4 ProfilesThe following SMI-S profiles are supported:
• Server
• Array
• Block Services
• FC Target Ports
• iSCSI Target Ports
• Physical Package
• Access Points
• Block Server Performance
• Disk Drive Lite
• Software
• Masking and Mapping
• Extent Composition
• Multiple Computer System
• Thin Provisioning

94 Enterprise Manager 5.5 Installation and Setup Guide
Setting Up SMI-SThe Dell Compellent SMI-S Provider is set up via the Enterprise Manager Data Collector Manager properties. SMI-S can be set up during the Data Collector installation or at a later time. Setting up the Dell Compellent SMI-S provider consists of setting the following Data Collector Manager properties:
• On the General properties tab, select the Service User Type for the Data Collector Service. The User Type you select determines the options that are available for managing Pegasus users. To automatically add and manage a Pegasus user, run the Data Collector as either a Domain User Account or a Local User Account. To manually manage Pegasus users, run the Data Collector as a Local Service Account (the default).
• On the SMI-S properties tab, enable SMI-S and set SMI-S properties. SMI-S properties include enabling SLP and/or https services, as well as selecting to manually manage Pegasus users or not.
To select the Data Collector Service User Type1 In the Enterprise Manager Data Collector, click Properties.
Note The Data Collector Properties are automatically displayed during installation. If you have already installed the Data Collector, right-click the Data Collector icon in the system tray. Select Show.
2 In the left pane of the properties display, click Service.
3 Click Change. Select one of the following Service User Type:
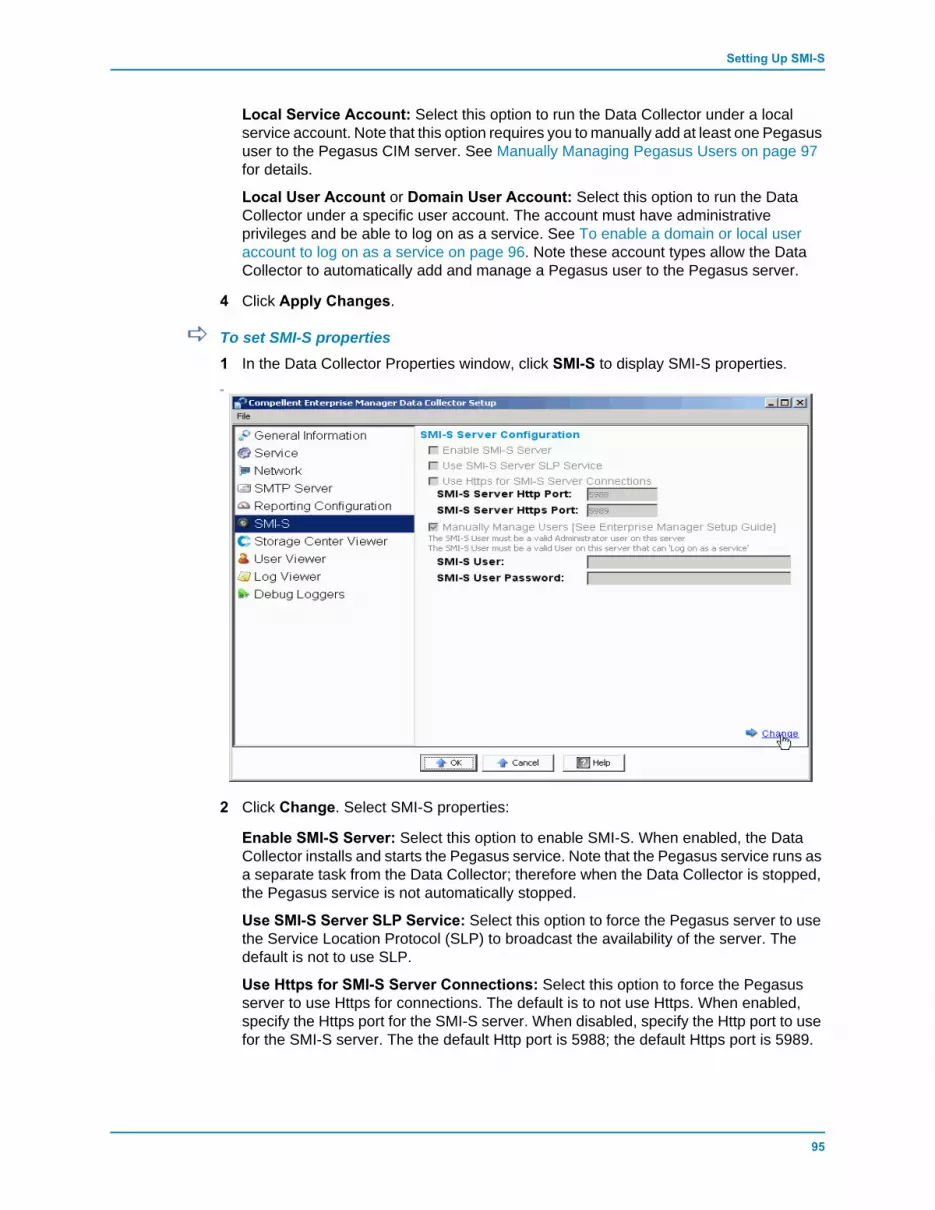
95
Setting Up SMI-S
Local Service Account: Select this option to run the Data Collector under a local service account. Note that this option requires you to manually add at least one Pegasus user to the Pegasus CIM server. See Manually Managing Pegasus Users on page 97 for details.
Local User Account or Domain User Account: Select this option to run the Data Collector under a specific user account. The account must have administrative privileges and be able to log on as a service. See To enable a domain or local user account to log on as a service on page 96. Note these account types allow the Data Collector to automatically add and manage a Pegasus user to the Pegasus server.
4 Click Apply Changes.
To set SMI-S properties1 In the Data Collector Properties window, click SMI-S to display SMI-S properties.Se
2 Click Change. Select SMI-S properties:
Enable SMI-S Server: Select this option to enable SMI-S. When enabled, the Data Collector installs and starts the Pegasus service. Note that the Pegasus service runs as a separate task from the Data Collector; therefore when the Data Collector is stopped, the Pegasus service is not automatically stopped.
Use SMI-S Server SLP Service: Select this option to force the Pegasus server to use the Service Location Protocol (SLP) to broadcast the availability of the server. The default is not to use SLP.
Use Https for SMI-S Server Connections: Select this option to force the Pegasus server to use Https for connections. The default is to not use Https. When enabled, specify the Https port for the SMI-S server. When disabled, specify the Http port to use for the SMI-S server. The the default Http port is 5988; the default Https port is 5989.
96 Enterprise Manager 5.5 Installation and Setup Guide
Manually Manage Users: Select this option if you want to manually manage SMI-S users. See Manually Managing Pegasus Users on page 97. If the Data Collector Service User Type (see To select the Data Collector Service User Type on page 94) is set to Local Service Account, you must manually add at least one Pegasus user to the Pegasus server to support SMI-S, and this option is automatically enabled. For all other Service Types (Local User Account or Domain User Account), the default is disabled.
SMI-S User and SMI-S User Password: If Manually Manage Users is disabled, specifies the user you want the Data Collector to automatically add to the Pegasus server. The user must be a valid system user on the server running the Data Collector.
3 Click Apply Changes.
To enable a domain or local user account to log on as a service1 From the Windows Start menu on the Data Collector server (Windows 2003 or 2008),
select Local Security Policy from the Programs>Administrative Tools menu. The Local Security Policy window appears.
2 Expand the Local Policies>User Rights Management node and double-click on the Log on as a service policy. The Log on as a service properties dialog appears.
3 Click Add User Group.
4 Enter the user name of the local user account or domain user account you configured for the Data Collector. Make sure you enter the name correctly. Use the Check Names option to validate the name.
5 Click Ok.

97
Manually Managing Pegasus Users
Manually Managing Pegasus Users
Pegasus Command-Line Tools
To manually manage users for the Pegasus Server, use the following Pegasus command-line tools located in the \Pegasus\bin\ subdirectory of the installed Data Collector:
• cimuser.exeAllows you to add and manage Pegasus users.
• cimtrust.exeFor Https, allows you to add Pegasus users to the list of trusted users.
Pegasus User Requirements
A Pegasus user must be a valid system user that has access to the server running the Data Collector. In addition:
• Usernames cannot exceed eight characters in length.
• Passwords cannot exceed eight characters in length.
To add a user
To add a user, use the following command syntax:
cimuser.exe -a -u username -w password
where username is a valid system user on the server running the Data Collector; and password is the password for the username.
To remove a user
To remove a user, use the following command syntax:
cimuser.exe -r -s username
where username is the name of the user to remove.
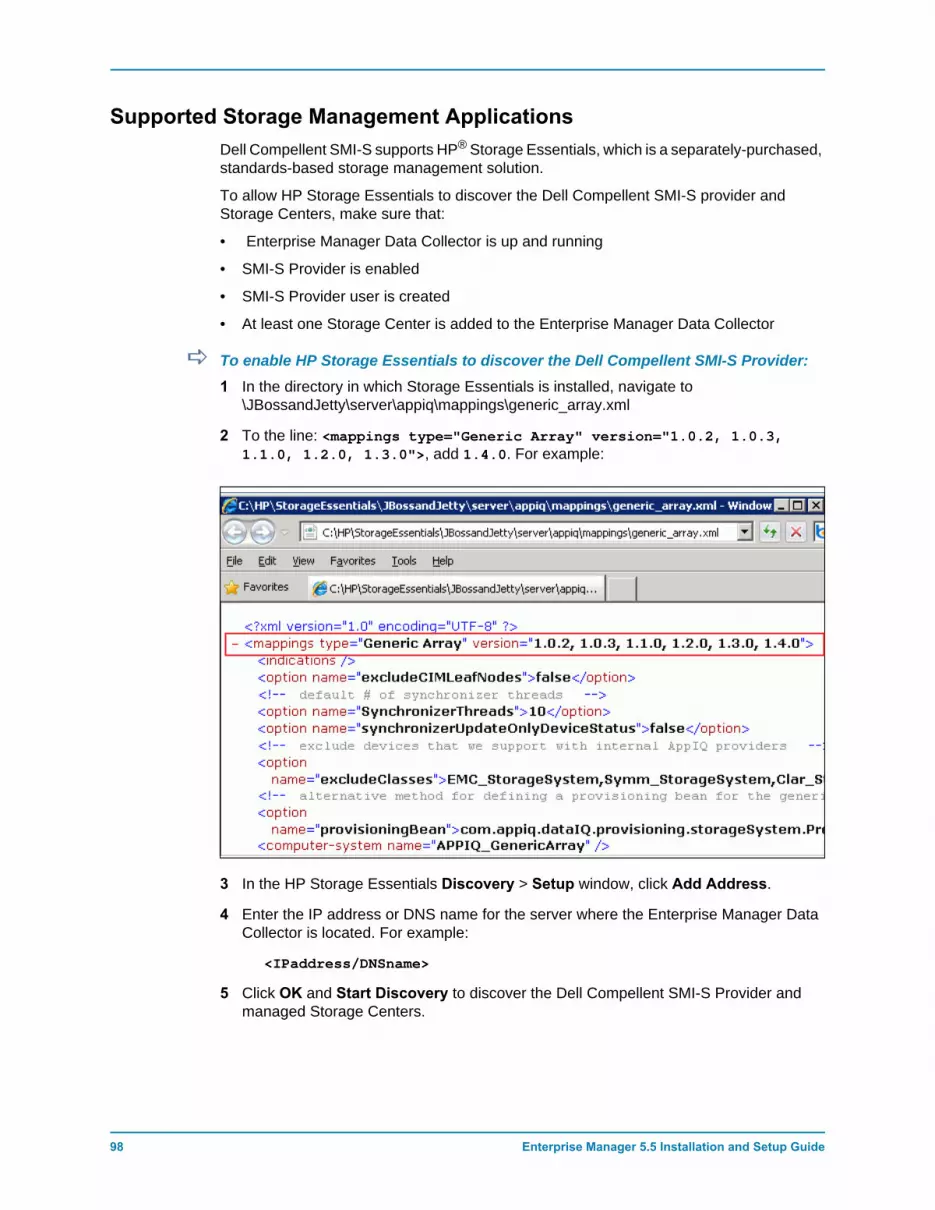
98 Enterprise Manager 5.5 Installation and Setup Guide
Supported Storage Management ApplicationsDell Compellent SMI-S supports HP® Storage Essentials, which is a separately-purchased, standards-based storage management solution.
To allow HP Storage Essentials to discover the Dell Compellent SMI-S provider and Storage Centers, make sure that:
• Enterprise Manager Data Collector is up and running
• SMI-S Provider is enabled
• SMI-S Provider user is created
• At least one Storage Center is added to the Enterprise Manager Data Collector
To enable HP Storage Essentials to discover the Dell Compellent SMI-S Provider:1 In the directory in which Storage Essentials is installed, navigate to
\JBossandJetty\server\appiq\mappings\generic_array.xml
2 To the line: <mappings type="Generic Array" version="1.0.2, 1.0.3, 1.1.0, 1.2.0, 1.3.0">, add 1.4.0. For example:
3 In the HP Storage Essentials Discovery > Setup window, click Add Address.
4 Enter the IP address or DNS name for the server where the Enterprise Manager Data Collector is located. For example:
<IPaddress/DNSname>
5 Click OK and Start Discovery to discover the Dell Compellent SMI-S Provider and managed Storage Centers.
99
Glossary
A
activate disaster recovery
Process of mapping a volume to a server so that you can use it to run IO through.
active space
Amount of space that is used by a volume if the volume has no Replays attached to it. This number does not include RAID overhead.
actual space
Amount of active space plus Replay space.
assigned disks
Disks that have been assigned to a folder and are part of the Dell Compellent page pool.
async/asynchronous replication
A write is written to the local system, then queued for delivery to the remote system. If the local system fails before the write is delivered, it is possible that writes will not be delivered to the remote system.
available space
Amount of total storage available on all drives.
B
bandwidth
Amount of data that can be sent to or from Storage Center per internal time.
base price
Agreed upon price for basic storage.
BE (back end)
Connection between controller and disks.
100 Enterprise Manager 5.5 Installation and Setup Guide
C
cache
A high speed memory or storage device used to reduce the time required to read data from or write data to a lower speed memory or device.
CHAP (Challenge Handshake Authentication Protocol)
An option for authentication of iSCSI communications, particularly between two Storage Centers when replicating over iSCSI.
CIM
Common Information Model: A conceptual schema that defines how storage area networks are represented as a common set of objects and relationships between them
Client
Enterprise Manager component that manages and displays Storage Centers.
D
Data Collector
Enterprise Manager component that runs in the background on a server, collecting information on all Storage Center systems connected to the server.
Data Instant Replay
Captures a point in time copy (PITC) of a volume, based on defined intervals, providing the ability to roll back a volume to a previous point in time.
Data Progression
Automatically migrates data to higher or to lower performance devices, based on data access requirements.
deduplication
Copies only the changed portions of the replay history on the source volume, rather than all data captured in each replay.
destination system
Storage Center system that volumes are being replicated to (same as the Target System).
disk folder
A collection of physical disks that can be assigned attributes by the user. Performance is improved by maximizing the number of disk drives in a folder. Volumes draw storage from disk folders. Folders may be associated with multiple page pools.
DMTF
Distributed Management Task Force: An industry organization that develops, maintains, and promotes standards for systems management in enterprise IT environments.

101
E
enclosure
A physical enclosure that provides a single interface, power and cooling to multiple disks. Also known as Just a Bunch of Disks (JBOD).
F
FC (Fibre Channel)
High-speed, fully duplexed serial communication protocol permitting data transfer rates of up to 8 Gigabits per second with a roadmap extending up to 10 Gigabit.
FE (front end)
Connection between controller and server.
free space
Total available space minus used space.
H
HBA (Host Bus Adapter)
An I/O adapter that provides connectivity from a server to the Storage Center.
I
IO (input/output)
Moving data into a system memory, and moving data from system memory to another location.
IO pending
Number of IO operations that are currently in the queue to be run for an object.
IO usage
Speed at which data is being transferred.
iSCSI
Specification that defines the encapsulation of SCSI packets over Ethernet using the TCP/IP transport protocol.
L
latency
Delay in data transmission measured in milliseconds.
102 Enterprise Manager 5.5 Installation and Setup Guide
M
management controller
In a clustered-controller environment, the controller that is communicating with the server.
migrate volume
Copies data to a new volume, and then erases the original volume. Migrate has the same effect as moving a volume.
mirror volume
Copies volume data to the remote site and maintains updates between the local volume and the remote volume until the mirror is manually broken.
N
NAT (Network Address Translation)
Also known as network masquerading or IP-masquerading. NAT involves rewriting the source or destination addresses of IP packets as they pass through a router or firewall. Most systems use NAT to enable multiple hosts on a private network to access the Internet using a single public IP address.
O
object
Logical components of a Storage Center, such as a system, volume folder, volume, server, and so on.
oversubscribed space
Configured space minus available space.
P
page pool
Group of data pages taken from a disk folder. Page pools provide storage for dynamic volumes, manage storage allocations, and can have a variety of disk types and RAID selections.
price multiplier
In Chargeback, a number applied to the storage costs of a department to add a premium or discount to the price.
Q
QoS (Quality of Service)
Rules for replications, including link speed, number of links, and replication schedule.

103
R
RAID 0
Data is striped across the available disks providing improved performance. RAID 0 does not provide any data redundancy.
RAID 5
Maintains a logical copy of the data using a mathematically derived rotating parity stripe. The parity stripe is derived from the data stripes. This method has less overhead for the redundant information than RAID 10; however, write performance is slower than RAID 10 due to the calculation of the parity stripe for every write. Read performance is similar to RAID 10.
RAID 6
Has striped data with dual distributed parity and provides fault tolerance from two drive failures. The array can continue to operate with up to two failed drives. This makes larger RAID groups more practical, especially for high availability systems. This becomes increasingly important because large-capacity drives lengthen the time needed to recover from the failure of a single drive. Single parity RAID levels are vulnerable to data loss until the failed drive is rebuilt: the larger the drive, the longer the rebuild will take. Dual parity gives time to rebuild the array without the data being at risk if a (single) additional drive fails before the rebuild is complete.
RAID 10
Data is striped across available disk drives and mirrored, providing data availability and improved performance. Maintains a minimum of one full copy of all data on the volume. RAID 10 provides optimum Read / Write performance, increased probability of withstanding multiple failures, and the quickest restoration of data.
redundancy
Fault tolerance such that if some disks fail, all or part of the data stored by the array is not lost. The cost of providing this feature is most typically increased disk space; RAID 10 requires a duplication of the entire data set. RAID 5-5 and 5-9 contain an error-correcting algorithm stored on the array.
Remote Instant Replay
Point-in-time copy of a volume over a distance to a remote site. The sites can be active-active, with bidirectional remote copies that can either have matched or split intervals.
Replay
Fully usable copy of data that contains an image of the data as it appeared at the point in time at which the copy was initiated.
Replay space
Amount of space that is not actively being used by a volume and is contained in its replays. This number does not include RAID overhead.
104 Enterprise Manager 5.5 Installation and Setup Guide
Replay profile
Collection of Replay rules that can be used for creating a Replay.
replicating system
Storage Center system being Replicated.
replication
Copying data to a remote location, online and in real time, via the internet or a corporate-leased line connection.
restore points
Information stored by the Data Collector about the current state of Replications between Storage Centers, including what volumes are being replicated, to where, what QoS node Replications are using, and Source volume properties
S
SCSI (Small Computer Systems Interface)
Collection of ANSI standards which define I/O buses primarily intended for connecting storage devices to servers.
server
Name representing the actual WWNs installed on the server.
Space Recovery
Utility that recovers space that Windows reports as being used but is actually empty, available space that can be used by Storage Center.
spare disk
Disk reserved to replace a disk of same or smaller size in the event a disk in RAID 5 logical unit fails. The controller rewrites the data from the failed disk to the replacement disk on the fly.
starting base price
In Chargeback: The actual amount of storage that the base price covers before the Department is charged for storage.
storage usage
Amount of space consumed by volumes on the disk (including Replays and RAID overhead).
synchronous replication
Each write to the local site is written to the remote site before the application receives an I/O complete message. The local volume and remote volume are fully synchronized at all times. This redundancy ensures a near-zero loss of data and very quick recovery times from failures at the local site.

105
T
target system
Storage Center to which volumes are being replicated.
threshold alert definition
Defines the event or condition that triggers an alert.
threshold alert object
Defines what logical objects are monitored, such as a system, volume folder, or volume.
total available space
Same as Available Space.
total storage
Actual Space plus the amount of space taken up by RAID overhead.
total storage space
Amount of space the volume takes of actual disk space, including RAID overhead.
U
unassigned disks
Disks not yet managed by the Storage Center. Unassigned disks are not available for use by the Storage Center.
used space
Storage written to by servers or consumed in Replays.
used space growth rate
Average amount of additional storage consumed per day (in GB). If number is negative, storage is being reclaimed for reuse.
V
volume
A virtual disk drive. A volume is created through and managed by Storage Center software.
W
WBEM
Web-Based Enterprise Management: Defines protocols for the interaction between systems management infrastructure components implementing CIM; a concept of DMTF management profiles that allows defining the behavior of the elements defined in the CIM schema, the CIM Query Language (CQL) and other specifications needed for the interoperability of CIM infrastructure.

106 Enterprise Manager 5.5 Installation and Setup Guide
WWN
World Wide Name.

107

680-028-010 B