Embed Size (px)
DESCRIPTION
BeAnywhere's Support Express User Guide - find out how to master the best remote support solution in the market.
Citation preview

©2012 BeAnywhere. All rights reserved.
BeAnywhere Support Express
Get Live From the CloudTMs
USER GUIDERevision August 2013

2©2013 BeAnywhere. All rights reserved.
CHAPTER I | GETTING STARTED System Requirements
CHAPTER II | INSTALLING BEANYWHERE SUPPORT EXPRESS Definitions
CHAPTER III | BEANYWHERE SUPPORT EXPRESS COMPONENTS Portal Console Applet Agent
CHAPTER IV | LOGIN AND START TostartBeAnywhereSupportExpress Console’sstartscreen CloseorExitBeAnywhereSupportExpress
CHAPTER V | SUPPORT SESSIONS StartaSupportSession Generate a PIN Code Share the PIN Code with your client Alternativewaystostartasession Site Integration Calling Card Support Link Exclusive Link Software API EndingaSupportSession
CHAPTER VI | PROVIDING ASSISTANCE TO YOUR CLIENT MainConsoleelements Chat With a client With a potential client on the Web With colleagues
VoiceCalls Making calls to clients Making calls to other techs AdministratorPrivilegesandWindowsUserAccessControl(UAC) PerformingaSupportSession Quick Dashboard Request Details Footer Menu Bar UsingRemoteDesktop Footer Menu Bar StatusBar SystemShell Footer Menu Bar PortForwarding ConfiguringBeAnywhereAgent ConfiguringBeAnywhereConsole HowtoconfigureanFTPconnection FileTransfer SystemInfo CHAPTER VII | UNATTENDED SUPPORT Duringasupportsession ByClicking“GenerateLink”
CHAPTER VIII | ENHANCING THE AGENT’SSECURITY AddingamasterpasswordtoaBeAnywhereAgent
CHAPTERIX|SHARINGANDTRANSFERRINGSESSIONS PriortothecreationofanewPINCode BeforeacceptingaSupportRequest DuringaSupportSession
CHAPTER X | CALLING CARDS Pre-ConfiguringtheAdminArea CreatingasingleCallingCardintheconsole
24242526272727272929323333343434353637
383939
4142
44454545
464748
45
67
89
101112
13141415
1617171718181818181819
202123232323
Index

3©2013 BeAnywhere. All rights reserved.
CreatingabatchofCallingCardsintheAdminArea CallingCardManagement Manage a group of cards Manage one or more cards
CHAPTER XI | USING BASE PROXY Standard DirectConnect InstallBASEProxy Set up the computer in wich the proxy is installed Download and install the proxy Configuretheproxyinterface View installed proxies SettingtheBASEAgentorApplet
CHAPTER XII | ADMINISTRATIVE AREA Wizard Homepage PanicButton Profile Identification E-mail templates Applet Setup Agent Setup Integration Management Technicians Departments My Computers Surveys Calling Cards Creating a single Calling Card in the console Creating a batch of Calling Cards in the Admin Area Calling Card Management Tickets
CreatingaTicket WarningsReports Session History Missed Sessions Running Sessions TechPerformance Tickets Reports SurveysBilling InvoicesHELP FAQ Documentation Contacts
CHAPTER XIII | BEANYWHERE INSIGHT LITE EDITIONIntroductionAlertsandMonitoring Monitoring and setting up alerts Scriptsexecution Scripts Deployment>Adding a new script to the Repository Scripts Deployment>Create a new script deployment jobAuditingdevices
ADDENDUMShortcuts
49515151
535454555555555758
5960616263636566686971717374767879808183
85868787888990919293949495959595
96979898
103103104106
107108
Index

Chapter I
GettingStarted

5©2013 BeAnywhere. All rights reserved.
Getting StartedSYSTEM REQUIREMENTS
Technician’s System
Operating System: Any Windows® version since Server 2003 - 32 or 64bit. CertifiedforWindows8® and Windows Server® 2012. Compatible with Mac® OS 10.7.5 or newer (64bit).
Network:AbilitytomakedirectoutgoingTCPconnectionsoravailabilityofanHTTPproxy or a SOCKS server.
CPU&RAM:MinimumofPentium450with128MBofRAM.
Control your clients’ Mac® or Windows® machine from anywhere;
Talkwithclients,usingtextchatorVoIP;
Access,auditandmonitorunattendedcomputers;
Share your screen and allow control of your keyboard and mouse;
Block remote input and blank the remote screen;
Shutdown and reboot remote computers;
Collect advanced system information; run scripts and commands;
Use your own branding on remote support sessions;
Perform collaborative sessions with multiple technicians;
Pause or transfer sessions. Handle several simultaneously;
AccessanyTerminalServicessessionontheremotemachine;
Record videos of sessions and access them anywhere;
Transferanyfile,ofanysize;
Generate reports of your support activity;
Send surveys to clients and technicians.
T hankyouforusingBeAnywhereSupportExpress(BASE). You’renowpartofaworldwidecommunityabletoprovide livetechnical
remoteassistancewithoutanygeographicalrestrictions.Connectwithanyone,anywhereintheworld.
With BeAnywhere technology you’ll be empowered to...
Client’s System
Operating System: Any Windows® version since Server 2003 - 32 or 64bit. CertifiedforWindows8® and Windows Server® 2012. Compatible with Mac® OS 10.7.5 or newer (64bit).
Network: AbilitytomakedirectoutgoingTCPconnectionsoravailabilityofanHTTPproxy or a SOCKS server.
CPU&RAM:MinimumofPentium450with128MBofRAM.
Check our video tutorial and get a quick overview about BeAnywhere’s main features and advantages.

InstallingBeAnywhereSupportExpress
Chapter II

7©2013 BeAnywhere. All rights reserved.
DownloadingandinstallingBeAnywhereSupportExpress:
1. Go to www.beanywhere.com. Hit the orange FreeDownload button.2. Download the tech console and run it.3. Select the download destination and click Next.
It’spossibletoinstallBeAnywhereinasmanycomputersandpendrivesasyou’dlike,but only a predetermined number of licensed technicians will be able to login to it concurrently. But feel free to create as many techs as you need.
Installing BeAnywhere Support Express4. Select the components that you wish to install and click Install when done.
DEFINITIONSPortal– Thiswillbe theWebpage towhichyou’lldirect yourclient to initiateasupportsession.TherearevariousURLsyoucanchoosefrom–tosetupyourportalURL,pleasegototheProfile>Integration>ExclusiveLink in the AdminArea (see Administration Area chapter to learn more).
PINCode–Thisisthe6-digitcodeprovidedtoaclient.Theclientintroducesthiscode on the Portal in order to launch a support request.
Console–TheConsoleistheinterfacefromwhichthetechnicianisabletomanageclients,requestandinteractwithothertechinicians.TheConsolewindowpresentsa number of different assistance and management tools. An unlimited number of simultaneous sessions is possible.
Applet–TheAppletistheinterfacefromwhichtheclientcanendasupportsessionatanytimeandinitiate/maintainachatwiththetechnician.Therearetwoversionsof the Applet: One for Windows and the other one for Mac computers.
Agent -ContrarytotheApplet,theAgentremainsinstalledonaremotemachine(Windowsonly).TheAgentallowsunattendedaccesstothecomputerbutalsoenablesit to take advantage of advanced Remote Management and Monitoring features.

BeAnywhereSupportExpressComponents
Chapter III

9©2013 BeAnywhere. All rights reserved.
T hesearethemainelementsofaBeAnywhere SupportExpresssession:
PORTAL Throughthiswebsite,aclientcansendasupportrequestandestablishaconnection with the technician.
A client using Windows only needs to enter the previously provided PIN Code or the Calling Card activation code (Calling Cards are not available for Mac users). Then, justclickontheDOWNLOAD button.ThesearetwoofthesimplestwaystoconnecttoaBeAnywheretechnician,buttherearealternatives(seeAlternative ways to start a session).
BeAnywhere Support Express Components

10©2013 BeAnywhere. All rights reserved.
CONSOLETheConsoleprovidesaninterfacefromwhichyou’reabletomanageincomingrequests and start providing the needed support to any given client. The latestconsole versions are available in www.beanywhere.com.
It’s possible to install it directly to a computer or take advantage of its portable features by installing it into an USB pen drive. A lite Web Console is also available from BeAnywhere’s public site or from the client’s Admin Area, allowing remoteaccess from any device compatible with Java 1.6 or later.
Youcantrulyprovideassistancetoyourclientsfromanywhere–allyouneedisaPCwith an Internet connection.
BeAnywhere Support Express Components

11©2013 BeAnywhere. All rights reserved.
APPLET TheAppletisasmallWindowsorMacapplicationrunningontheclient’scomputer –butnotpermanentlyinstalled.
This interface allows the client to maintain a conversation with the technician.As longas thiswindow isactive (openedorminimized), the technician isable toperformallthenecessarysupporttasks,includingfeaturesasremotecontrol,systeminformation,chatandVoIPcommunications,amongmanyothers.
BeAnywhere Support Express Components

12©2013 BeAnywhere. All rights reserved.
AGENTLike theApplet, theAgentenables remoteaccess,but it’s installedasaWindowsService.Thismeanstheapplicationenablesunattendedaccesstothecomputerinwhich it is deployed. It also provides a different set of features.
FeaturesNothing is installed on the client’s computer
Clients can block features during a session
SupportsdirectTCPmode
Supports RDP sessions directly
Is available for Mac computers
Can share the screen with the client
Supports a second layer of authentication
Applet Agent
Has VoIP communications
Supports RMM functionality (inSight Lite)
Allows for unattended access
Can raise differred support tickets
Can access multiple terminal services sessions
BeAnywhere Support Express Components
Table1-ThistableshowsthemaindifferencesbetweentheAppletandtheAgent.

Chapter 4
LoginandStart
Chapter IV

14©2013 BeAnywhere. All rights reserved.
Login and StartAt the bottom right of the window you will see the NetworkStatuslink.Throughityou will be able to access information about the health and load of the infrastructure supportingBeAnywhere Support Express. This pagealsomeasures the connectionfrom your computer to BASE services.
TostartBeAnywhereSupportExpress:
A ftertheconsole’sinstallation,justinitiatetheapplicationand beginthenecessaryloginprocedures.
Ifyouhaven’tyetinstalledBASE,pleasegotowww.beanywhere.com,whereyou’llfindthemostrecentversion.
CONSOLE’SSTARTSCREENEnter your e-mail address and password in the login window and click LOGIN. If you don’thaveanaccountyet,clickNEW ACCOUNT.
You can also use the dropdown box to change the language.
Inspecificcases,aProxySettings link may also be shown on the bottom of the login Windowtoallowthecorrectconfigurationofthenetworkaccess.
15©2013 BeAnywhere. All rights reserved.
CLOSE OR EXIT BEANYWHERE SUPPORT EXPRESSTocloseBeAnywhereSupportExpresssimplyclickthe“X”placedonthetoprightcorner of the Console window. However, keeping the Console running in thebackgroundisstronglyadvised–that’stheonlywaytotakenotice,inrealtime,ofany incoming session requests.
To keep the console running in the background, just minimize the Consolewindow. You can restore it anytime by clicking the BASE icon - - placed on your system tray.
Login and Start

Chapter 5Chapter 4
SupportSessions
Chapter V
17©2013 BeAnywhere. All rights reserved.
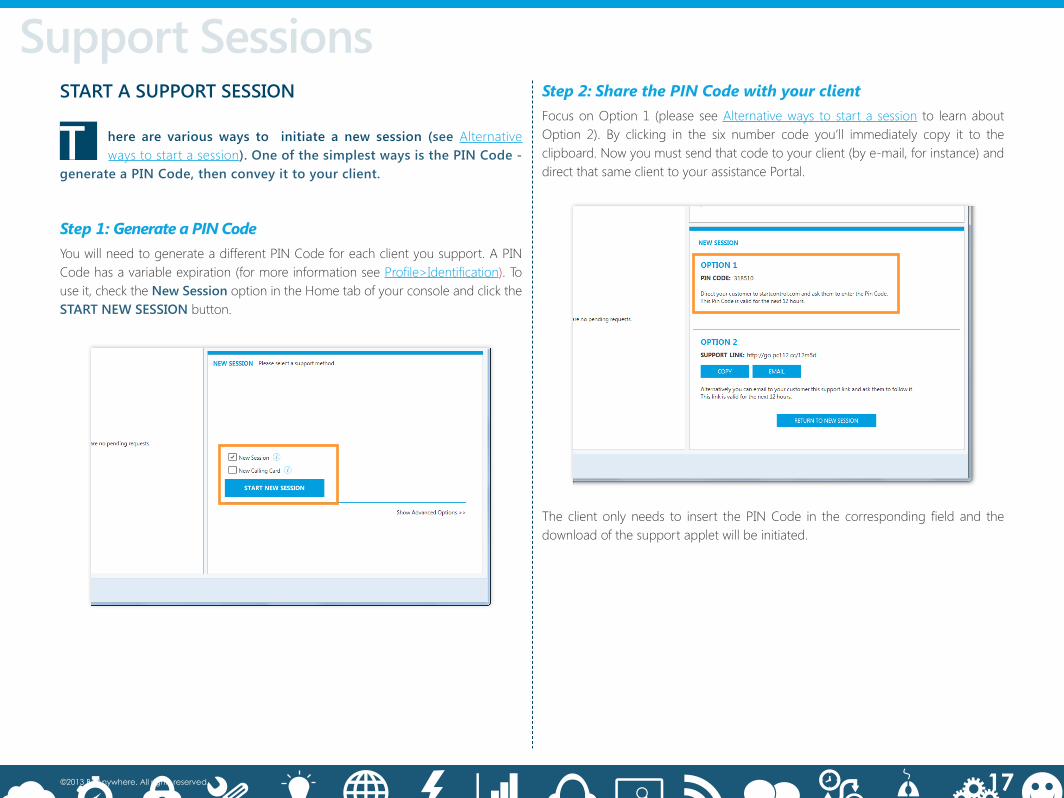
Support SessionsStep 2: Share the PIN Code with your client Focus on Option 1 (please see Alternative ways to start a session to learn about Option 2). By clicking in the six number code you’ll immediately copy it to the clipboard.Nowyoumustsendthatcodetoyourclient(bye-mail,forinstance)anddirect that same client to your assistance Portal.
START A SUPPORT SESSION
T here are various ways to initiate a new session (see Alternative ways to start a session).OneofthesimplestwaysisthePINCode-
generateaPINCode,thenconveyittoyourclient.
Step 1: Generate a PIN Code You will need to generate a different PIN Code for each client you support. A PIN Code has a variable expiration (for more information see Profile>Identification).Touseit,checktheNewSession option in the Home tab of your console and click the START NEW SESSION button.
The client only needs to insert thePINCode in the corresponding field and thedownload of the support applet will be initiated.

18©2013 BeAnywhere. All rights reserved.
ALTERNATIVE WAYS TO START A SESSIONThePinCodeoptionisprobablythemostimmediateandeasiestwaytoattendtoa client.
Site Integration: TakeadvantageofaGetSupportbuttonintegratedwithinany of your web sites or applications, enabling your clients to send a supportrequest with a simple touch of a button. Please check the section Site Integration for more information.
Exclusive Link: In order to improve your brand awareness and make it easy foryourclientstorememberthesupportURL,you’llbeabletocreateanExclusiveLink,whichmaynotevenrequireaPINCode.Youcanintegrate,forinstance,yourcompany’s name in the actual URL (see Admin Area chapter for more ).
Software API: Our powerful API empowers you to integrate BeAnywhere inanysoftware,enablingyourclients tosendasupportrequest inaneasyandseamless fashion.
Support Link:VerysimilartothePINCode,youonlyhavetocopytheSupportLink fromtheconsole interfaceandprovide it to theclient.Followingthelink,theclient will initiate the simple procedures needed to engage in a Remote Session.
Support Sessions
Calling card: ThetechnicianisabletogenerateaCallingCard,intheformofadownload link or of a reference to be used in the assistance portal. In the Home tab oftheConsole,makesuretoselecttheNewCallingCardoption and click on the GENERATE CALLING CARD button. You can copy the reference or the link to the clipboard,or justsendthelinkthroughyourownregulare-mailaccount(refertoAdmin Area>E-Mail templates for more information).
Your client only needs to download the special Calling Card applet and run it anytime. Clicking on it will launch a new support request without further PIN codes ordownloads.CallingCardscanbereusedanunlimitednumberoftimes,whenevertheclientneedstocontactthesupportservices(formoreinformation,pleasecheckthe Calling Cards chapter).
Check our video tutorial to learn about all the Alternative Ways to start a session.

19©2013 BeAnywhere. All rights reserved.
ENDING A SUPPORT SESSIONThetechor theclientcanendasupportsessionatanytime.Toendasession, the technician simply needs to click on the Closebutton,atthetoprightoftheConsole.
Toendasession,theclientsimplyneedstoclickthe“X”atthetoprightoftheApplet.
Support Sessions
IMPORTANT: BASE Agent writes several events to the Windows Application Log, including the beginning and the end of unattended sessions.
!

Chapter 6Chapter 5Chapter 4
ProvidingAssistancetoYourClients
Chapter VI

21©2013 BeAnywhere. All rights reserved.
Providing Assistance to Your ClientsMAIN CONSOLE ELEMENTS
T heconsoleisdevideintofourmainelements:theheader,thefooter,theleftpane and the right pane.
IMPORTANT: Log files are crucial to diagnose any issues that may occur. When contacting BeAnywhere’s support, please provide the Console log files, as well as the ones pertaining to the remote Applet ( just right-click over the Applet logo to open the log folder) or to the remote Agent (use the Send troubleshoot report option available on the context menu of the BeAnywhere Agent tray icon).
IMPORTANT: BASE console uses the proxy information stored on Internet Explorer. In certain scenarios, further configuration may be required.
IMPORTANT: Besides the Windows® Console, there is also a basic Java™ console functionality, meant to be used on other operating systems and also in situations where the regular console cannot be installed. This option only provides basic remote access and chat (i.e. no VoIP, File Transfer, System Shell, System Information, etc.). While it is expected to be updated from time to time, to keep compatibility and, eventually, to add some features, it will never provide the same amount of tools present on the regular console.
!!
!
Ontheheader,you’llfindvariousoptions.
You can use the Admin Area link (see Admin Area chapter),theChatlink(seeChat) ortheOptionslink–hereyou’llbeabletosetupanarrayofsimplesettings(hearasoundwheneveranewrequestarrives,automaticallylaunchwithWindows,changepassword,setuptheproxysettingsorgetdirectaccesstothelogfolder).
On the header menu there are also two other options that might open inside the consoleor in thedefaultwebbrowser,dependingon theconfiguration:History(list of previous sessions from one or all techs) and Inbox (deferred support tickets associatedwiththetech).Finally,attheright,youwillfindtheLogOffoption.Clickit to Log Off.

22©2013 BeAnywhere. All rights reserved.
IMPORTANT: After accepting the request, the remote session will start. A new Viewer window will open If the session is being made using an Applet, and, depending on the settings defined on your Admin Area, the client may or may not have the option to block all the session features (except chat). If that option is enabled, some or all of the tabs except General and System Information might be disabled.
!
Thefooter of the console window is reserved to display tabs of the current sessions being performed. Clicking on each tab with the left mouse button will bring the corresponding session to focus; a right-click allows you to copy the session details to the clipboard.
On the top of the rightpane,alltheuserswhoareloggedinthehelpdeskcenterarelisted,alongwiththenumberofsessionscurrentlyhandledbyeachone.
Allthependingsupportrequestsyoumighthavewillbepresentedonthefirsttabofthe leftpane. Clicking on a request will activate the associated details (on the right pane).Youcanaccepttherequest,thusinitiatingaremotesupportsession,transfertherequestforanothertechnician,orsimplyrejectit(whichwilldeleteitfromthequeue,sopleasedouble-checkbeforerejectingrequeststhatwerenotmeantspecificallytoyou).
Providing Assistance to Your Clients
ThesecondtabshowsthelistofcomputerswithBeAnywhereAgentinstalled,readyto receive unattended support (see more at the Unattended Support chapter).

23©2013 BeAnywhere. All rights reserved.
Providing Assistance to Your Clients
IMPORTANT: Switching to any tab other than General while on chat will open it in a popup which will always be on top of the corresponding viewer. This way, the technician can continue to send and receive messages during the course of the session without having to go back and forth tabs.
CHATTechnicianshavetheabilitytochatwithothers,usingtheirSupportExpressconsole, and engage in three different scenarios:
a)Withaclient,inthecontextofaremotesession;
b)WithapotentialclientontheWeb,beforetheestablishmentofaremote session;
c) With colleagues.
a) With a client, in the context of a remote sessionTo make use of chat within a remote session, select the General tab in thecorresponding Viewer window and type your message in the textbox located at the lower-rightarea.Tosend,clickonthesendiconorpressthe<Enter>key.
Inordertousethisfeature,twostepsmustbetaken:
1. Provide permissions for the intended technicians, using the Admin Area,
under Management>Technicians.
2.Toaddflexibility,eachtechnicianhas itsown link,whichwillopenawebpagewithachatbox.ThelinkscanbefoundontheAdminArea>Profile>Integration.
Formoreinformation,pleaserefertotheAdmin Area chapter.
c) With colleaguesAttheconsole’shomepage,you’llnoticetheChatoptionatthetopright.Clickit.
Thenewwindowthatwillopenisdividedinthree:aheaderandtwomainpanes(leftandright).Theleftpaneisdividedintotwotabs:Thefirstone–ChatSessions–liststhecurrentchats,whilethesecond–Technicians–willshowthetechsofthehelpdeskcenter.Itispossibletoviewtheavailabilityofeachtech,aswellasstartaconversationbyselectingoneorseveralsimultaneously.Therightpanecontainsthechatarea.
!
b) With a potential client in the Web, before the establishment of a remote sessionBeAnywhere Support Express provides a very simple tool to integrate chat with techniciansonawebsiteorapplication,whichcanbeusefulinmanydifferentsituations(e.g. to assess the need of further support, to provide a direct communicationchannelbetweenaprospectingvisitorinawebsiteandsalesrep,etc.).
Ontheleftoftheheaderyou’llfindtwoiconswhichallowsyoutochangetheavailabilityof the current technician to chat with clients or with colleagues.

24©2013 BeAnywhere. All rights reserved.
VOICE CALLSBesidestextchat,BASEalsoprovidestheabilitytoperformvoicecallstoboth clients and other technicians.
Making calls to clientsThisoptioncanonlybeusedonApplets,regardlessrunningonlimitedorprivilegedmode on UAC systems.
ThetechnicianhastheabilitytostartthecallbyclickingontheSessionmenu in the footeroftheviewer,andthenonStartVoIPCall.
Anewwindowwillappear,pinnedontheinterface,showingmicandspeakervolumemeters,asettingslink(allowingthetechtochoosetheappropriateaudiodevices)and a button to end the call.
Clickingoneofthetwoiconsshownwillmutetherespectivedevice,andit isalsopossible to adjust the speaker volume by moving the slider presented.
To end the call, the technician just needs to click the END CALL button or on Session>StopVoIPCall. It is not possible for the remote client to start a call or to hang up. He can simply mute both local audio devices or close the applet.
A technician can have multiple simultaneous calls with clients and with colleagues. All theaudio streamsarecompletely independent, so the techmicwillbeabletoreacheveryone,buteachseparatedcallwillnotgetaudiodirectlyfromothercalls.Thetechnicianmighttakeadvantageofthisandkeepseveralconversationsat the same time,mutingandunmuting calls atwill. The sameoccurswith theapplet. Multiple applets can run at the same time in the client’s computer (or the sameappletcanbesharedbyseveraltechnicians),soseveralconversationscanbe maintained simultaneously.
IMPORTANT: BASE uses an advanced audio codec to transport the call between computers. It has several enhancements to assure the best performance in every scenario: if a session with an ongoing VoIP call is disconnected, the call will be resumed when the session reconnects. Also, if no sound is detected by the mic for a certain time, the audio transmission will be paused to limit the bandwidth of the call; when sound is picked up again by the microphone, the transmission will automatically resume.
!
Providing Assistance to Your Clients

25©2013 BeAnywhere. All rights reserved.
Making calls to other TechsThe ability to do VoIP calls is available on the chat window of the console (byselecting the Chatlinkontheconsoleheader).Onthelistoftechnicians,right-clickthe relevant technician and select StartVoIPcallwithTech.
Contrarytoclients,techshavetheabilitytorefusecalls.Apopupsimilartotheonepresentedonnewsessionswillappeartothereceiverofthecall,givingtheoptionto accept or reject the call.
Providing Assistance to Your Clients
It is also possible to call multiple techs at the same time and, contrary to whathappenswithclientcalls,tocreateaconference.
Check our video tutorial about Chat and VoIP.

26©2013 BeAnywhere. All rights reserved.
Providing Assistance to Your ClientsADMINISTRATOR PRIVILEGES AND WINDOWS USER ACCESSCONTROL(UAC)BASE is fully compatible with Windows UAC (User Access Control).When you’re controllingacomputerwithWindowsVista(ornewer),youcanaskforadministrativeprivilegestoyourclient,allowingyoutohavefullaccesstotheircomputer.

27©2013 BeAnywhere. All rights reserved.
Providing Assistance to Your ClientFooter menu bar:
●AddPCtoMyComputerslist(Appletonly)– tries to install a BASE Agent on theremotecomputer.IftheAppletisnotbeingrunwiththenecessarypermissions,awarningwillpopupinordertofixthat.
●RequestAdministratorPrivileges(Appletonly)–if the Applet is being run with limitedprivileges, thisoptionwill be available. RequiredAdministrator credentialscanbeprovidedeitherbytheclientorbythetechnician,buttheclientalwayshastoexplicitly authorize theelevation ifUAC is enabled. The remoteAppletwill berestarted,whichwillcausetheconnectiontobreak.Thesessionwillberesumedassoon as the Applet comes back online.
●AskRemoteUserCredentials (AppletOnly)– This setting requireselevatedprivileges and is used for completely unattended restart and reconnect operations duringasession.ThisisnotthesameasinstallingaBASEAgent,asitistemporaryand might not work in some scenarios (e.g. blank Windows password or non-standard security policies in the remote computer).
● Emergency Reboot –Using this option restarts the computer immediately,forcefully terminating all the programs and the Operating System as quickly as possible.Asitcandamageopenedfiles,it’smeanttobeusedonlyasalastresource.
●Restart&Shutdown–Allows the shutdown or the regular restart of the remote computer.Theoptionscontainedvaryaccordingwiththeprivilegesofthesessionand its type (Agent or Applet).
PERFORMINGASUPPORTSESSIONAfter accepting a request (or accessing an unattended computer), the Viewerwindowwillopen.Itisdividedintothreemainareas:aheaderwithtabs,afooterwithcontextualoptionsandacentralpane,whichisalsocontextual.
IMPORTANT: The session context is showed at the title bar: “[*]” for connections to the Agent, “[-] “ when the connection is made to an Applet in user mode, and “[+]” when the connection is to an Applet with elevated privileges. The computer name is also on the title bar.
!
On the central pane of the General tab, besides the Chat feature alreadydiscussed, technicians have at their disposal the Quick Dashboard and the RequestDetails areas.
Quick DashboardThis area shows an overview of the computer current configuration, like the operatingsystem,CPU,memoryandharddisk,andthenetworksetup.
Request DetailsUnder this area, the technician can add or change the client’s details and theproblem description. It’s also possible to add notes that will be associated with the session,forfuturereference.Thereisalsothepossibilitytoselectane-mailaddressto where a report of the session can be sent. Any change has to be saved before selecting other tabs.
ComputerThismenucombinesalltheoperationsthat can be performed on the computer atagloballevel.Theoptionsavailablewill be slightly different depending on the access being made through an Applet or through a BASE Agent:

28©2013 BeAnywhere. All rights reserved.
Providing Assistance to Your Client
●UseRDP(Agentonly)–Whentheremotecomputersettingsarecorrect,techscan use Microsoft’s Remote Desktop Protocol instead of BeAnywhere’s. While the RDPclientisopened,theremotetabontheViewerwillbedisabled.
●PortForward–AllowstheforwardingofTCPtrafficfromalocalporttoaportontheremotecomputer,insidetheBeAnywheresession.Formoreinformation,pleaserefer to Port Forwarding.
●SendSurvey–Dependingonthetechpermissionsandhelpdeskcenterconfigurations(setup in Management>Surveys in the Admin Area), a completely customizedsurvey may be sent to the client during a support session. Clicking on this item will open the list of Surveys currently available. Please select one and click OK.Thesurveywillbeopenedinabrowserwindowoftheremotecomputer.Theanswerscan then be viewed on Reports>Surveys in the Admin Area.
SessionThismenucombinesthefeaturesneededtomanageaspecificsession:
●Transfer/Share–Transfersasessiontoanothertechnician,orallowstheinvitationofmultipletechnicianstothesamesession.Formoreinformation,pleaserefertotheSharingandTransferringSessions chapter.
●PausethisSession–Putsthesessionintherequestqueueagain,toresumeatalatertime.TechnicianswillhavetokeepinmindthatifanAppletisterminatedorifthecomputerwiththeBASEAgentshutsdown,orotherwisebecomesdisconnected,the paused session will be removed from the queue.
●Start VoIPCall – Using a fast, high quality voice codec, techs can easily andseamlessly communicate with the supported clients inside the BeAnywhere session. For more information please refer to the Using Voice Calls.
●Disconnect–Endstheremotesession,butdoesnotclosetheviewer,sothesessionmightberestarted.ThisisveryusefullinAppletsessions,becauseitispossibletostopand restart the session without requiring the user to insert another PIN Code.
AdvancedUnder this menu, technicians will findmorespecificoptions:
29©2013 BeAnywhere. All rights reserved.
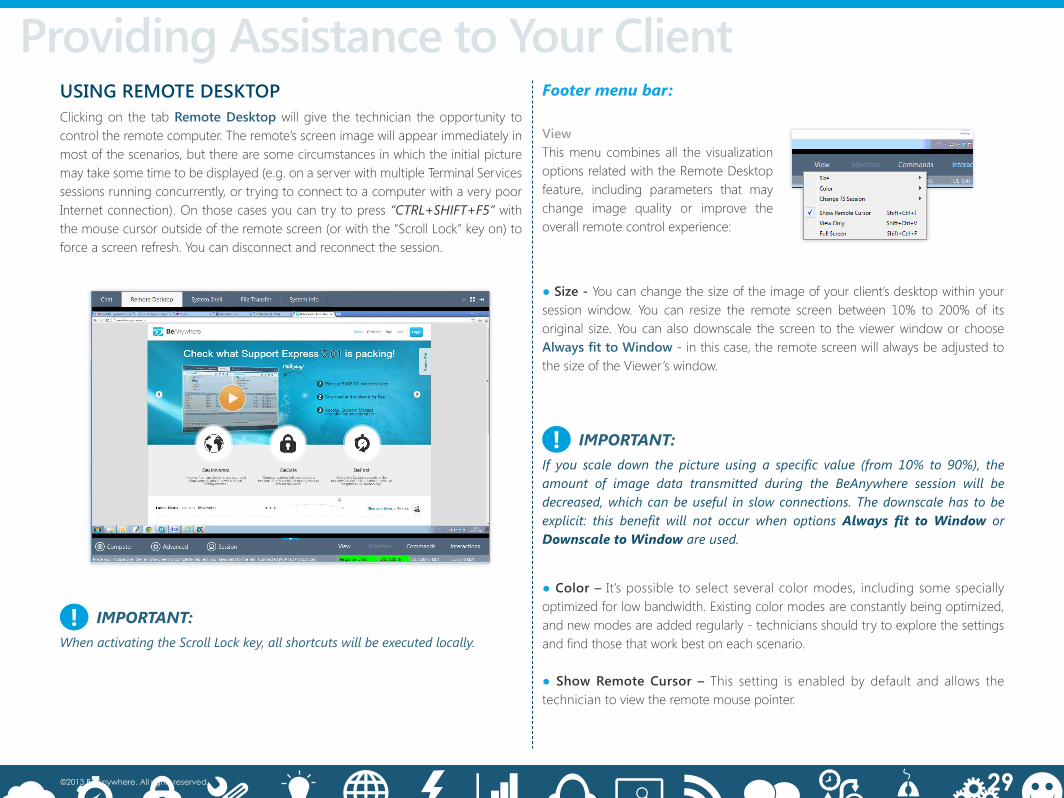
USING REMOTE DESKTOPClicking on the tab RemoteDesktop will give the technician the opportunity to controltheremotecomputer.Theremote’sscreenimagewillappearimmediatelyinmostofthescenarios,buttherearesomecircumstancesinwhichtheinitialpicturemaytakesometimetobedisplayed(e.g.onaserverwithmultipleTerminalServicessessionsrunningconcurrently,ortryingtoconnecttoacomputerwithaverypoorInternet connection). On those cases you can try to press “CTRL+SHIFT+F5” with themousecursoroutsideoftheremotescreen(orwiththe“ScrollLock”keyon)toforce a screen refresh. You can disconnect and reconnect the session.
Footer menu bar:
ViewThismenu combines all the visualizationoptions related with the Remote Desktop feature, including parameters that maychange image quality or improve the overall remote control experience:
IMPORTANT: If you scale down the picture using a specific value (from 10% to 90%), the amount of image data transmitted during the BeAnywhere session will be decreased, which can be useful in slow connections. The downscale has to be explicit: this benefit will not occur when options Always fit to Window or Downscale to Window are used.
!
Providing Assistance to Your Client
●Color– It’spossibletoselectseveralcolormodes, includingsomespeciallyoptimizedforlowbandwidth.Existingcolormodesareconstantlybeingoptimized,and new modes are added regularly - technicians should try to explore the settings andfindthosethatworkbestoneachscenario.
●ShowRemoteCursor –This setting is enabled by default and allows thetechnician to view the remote mouse pointer.
●Size -Youcanchangethesizeoftheimageofyourclient’sdesktop within your session window. You can resize the remote screen between 10% to 200% of itsoriginalsize.Youcanalsodownscale thescreento theviewerwindoworchooseAlwaysfittoWindow-inthiscase,theremotescreenwillalwaysbeadjustedtothesizeoftheViewer’swindow.
IMPORTANT: When activating the Scroll Lock key, all shortcuts will be executed locally.!

30©2013 BeAnywhere. All rights reserved.
Providing Assistance to Your Client●ChangeTSSession(AgentOnly)–Bydefault,theAgentwillremotelycontrolthelocalTerminalServices(TS)sessiononacomputer.IfthecomputerisaTerminalServerwithseveralconcurrentusers,thisfeaturewillallowthecyclingthroughdifferentTSsessions. BASE can only control active sessions (a user has to be interacting with the TSsession,it’snotenoughjusttobeloggedon).
●ViewOnly– Disables local input to the client’s machine. Can be very useful when the technician only needs to monitor the screen activity without disrupting the activities that are being performed on the remote computer.
●FullScreen–Bringstheconsoletofullscreen,hidingtheheaderandfooterbarsintheRemoteDesktopmode.Toexit thismode, justapproachthemousetotheupperedgeofthescreenandwaitfortheheadertoreappear.Thendouble-clickonanyemptyspace.Youcanalsousetheicon,placedontherightcorneroftheheader,orusetheshortcutkeys:firstpressthescrolllockkeyandthen“SHIFT+CTRL+F”.
MonitorsThismenulistsallthemonitorsoftheremotecomputerandallowsthetechniciantocyclethroughalltheavailabledevices.Aleft-clickliststhemonitors,whilearightclick lets you cycle between each of them.
●Send“CTRL+ALT+DEL”(Agentonly)–Sendsthe“CTRL+ALT+DEL” command to the remote machine.
●BlockRemoteKeyboardandMouse– Disables the physical keyboard and mouse oftheremotemachine.Forsecurityreasons,remoteuserscanstopthisblockagebypressing“CTRL+ALT+DEL”.
●BlankScreen–Blankstheremotemonitor,inordertoprotecttheconfidentialityoftheremotecontroloperations.ItisnotadvisabletousethisfeatureonCRTmonitors.
●RemoveDesktopBackground (Appletonly) – Removes the background of the remotedesktopinordertosavebandwidth,orrestoresit,ifthespeedisnotconstrained.The default configuration for this option can be setup in theAdminArea (formoreinformation,pleaserefertothe Admin Area chapter).
●LockRemoteOperatingSystem(Agentonly)–Locks the remote Windows session.
●LaserPointer–Thetechnician’smousemovementsarereproducedasacoloreddotintheremotecomputer,whichisusefulfortraining.Therearedifferentcolorsforeachmousestate(normal,left-click,middle-click,right-click).
●Start/StopRecordingVideo–Initiates or stops the video recording of the session (FLVformat).Therecordingisperformedonthetech’sconsolesideandthevideosare automatically uploaded to the cloud as soon as no sessions are being performed bythetechnician.Whilethevideosarenotfullyuploaded,theywillbestoredintheFLVfolder,undertheConsoleinstallationfolder.
●TakeScreenshot–Savesascreenshotoftheremotescreen,inJPGformat.
●ShareMyScreen(ViewOnly)[Appletonly]–Sharesthetechscreenwiththeremoteclient.Theclientcanadjusttheimagesize(andplacetheimageinfullscreen),apart from color.
CommandsUnder this menu you are going to findthoseactions,intendedtodirectanorderto the remote computer:
InteractionsThismenucontains the features thatwilldirectly interact with the remote computer:

31©2013 BeAnywhere. All rights reserved.
Providing Assistance to Your Client●ShareControlofMyScreen (KeyboardandMouse) [Appletonly]– Gives theremoteclientfullcontroloverthetech’skeyboardandmouse.Thesesharescreenfeatures are completely compatible with having multiple techs on a session and with VoIP,soaremoteclientcanbetalkingwithmultiplesupportrepresentatives,allofthemcontrolling his machine and showing their remote screens at the same time.
●Copy / Paste>Get RemoteClipboard – Gets the remote clipboard contents (textonly)andcopiesthosetothelocalclipboard.This isusefulwhen“CTRL+C / CTRL+V” commands are not working.
●Copy/Paste>SendLocalClipboard– Gets the local clipboard contents (text only) and copies those to the remote clipboard. This is usefulwhen “CTRL+C / CTRL+V” commands are not working.
Check our video tutorial about the Remote Desktop.
IMPORTANT: When accessing a computer in a Terminal Services session, remember that when minimizing the RDP client you will automatically prevent the remote image transmission to any software, including BeAnywhere Support Express (an error message will be presented). Please, don’t use the Applet in these circumstances or - in the agent’s case - switch the view to a TS session that hasn’t been disconnected or minimized. If you fail to find a valid alternative, make sure that the Terminal Service session user does not minimize the RDP client.
!

32©2013 BeAnywhere. All rights reserved.
STATUS BARTheTechConsoleusesatrafficlightsystemtoidentifythestatusoftheconnectionbetween the technician and the client. The connection status can influence theperformanceof the solution.Both theResponseTimeand the LossPercentageregisteredinasessionarenowclassifiedbyseverityandshowntothetechnician.
Green means a good performance - no problems are expected due to this indicator. Yellow means that the performance may decrease. Red appears when the session is being disrupted by connection problems between the both parties.
Whatdothosetwoindicatorsmean?
Response - It’s the time that the information takes to travel between the TechConsoleandtheclient’sPC,orvice-versa.ThisvaluedependsonthequalityoftheInternetconnectioninbothmachines,andalsoontheamountoftraffichandledbytheISPsparticipatingintheconnectionatagivenmoment(ex.ClientISP+TechISPorClientISP+IntermediaryISP+TechISP).Hardwarefailuresonbothcomputersand on ISP devices can also hamper the connection.
Whyitmatters:Thismetric influencestheresponsivenessoftheRemoteControlfeature (i.e. the time between the moment the tech moves the mouse in the console andthemomentthatcommandisexecutedintheclientcomputer-andtheTechConsole screen is refreshed). The more network problems that exist, the moreadverse user experience will be.
Loss - It’sthepercentageof lostpacketsduringthetimeoftheconnection.ThisvaluedependsonthequalityoftheInternetconnectioninbothmachines,andideallyshouldbezeroeveninslowconnections.Itcanbeinfluencedbyhardwareproblemson the machines or with the ISPs participating in the connection. Bad networking is alsoabigfactor(damagedcabling,poorqualitysignalonWi-Finetworks…)
Whyitmatters:ItinfluencestheRemoteControluserexperience(lessinformationcorrectlytransmittedmeansaslowerremotecontrol,orproblemswiththerefreshonthescreen)andalsoonthespeedoftheFileTransferfeature(becauseallthelostpackages have to be resent until everything has been correctly received).
Thestatusbaralsoshowstwomorevalues:
UL - It shows the upload speed at a given moment.DL - It shows the download speed at a given moment.
Providing Assistance to Your Client

33©2013 BeAnywhere. All rights reserved.
SYSTEM SHELLMost of the remote support or system administration tasks can be performed at a lowlevel,notrequiringafullremotedesktopconnection.
Onthosescenarios,acommandlineisnotonlymoreflexibleandfaster,butitalsoaddstheadvantageofbeinglessdemandingonbandwidth.Also,therearesituations,especiallyduringsupportsessions,inwhichtheremotegraphicalenvironmentmaybe damaged or unresponsive. BASE provides an emulated command line that can be used to speed up the most common tasks.
BASE System Shell can be used in two different ways : a standard windows CMD prompt or a Powershell prompt (if available). Both of them have full administrative privilegesandcanbeusedtorunbatchfilesorWSH(WindowsScriptingHost)scripts(iftheycanbeinterpretedbytheremotesystem).OnthetopleftoftheWindow,you’llseethecommandprompt’smode,alongwiththeprivilegesofthecurrentsession.
Footer menu bar
EndIncludes actions to stop the shell or theexecution of commands:
●RestartShell–Terminatestheactualshellprocessandstartsanother.
●CTRL+Break–Stopsaprocessfromexecutinginsidetheshell,withoutterminatingthe shell itself.
●ClearOutput– Clears the current output of the shell.
●StandardCommandPrompt– Uses the Windows Command Processor (cmd.exe)
●WindowsPowershell–UsestheWindowsPowershell,ifavailable.BASEiscompatible with any version of Powershell.
ShellTypeDefinesthetypeofshell tobeexecuted.Changing from one type to the other will terminate the first one. It is notpossibleto have the two types of shell open at the same time and alternate between them.
RunAllows the execution of a script loaded from the technician’s computer. It is compatible with any Windows Scripting Host languages.
Navigating through the command boxYou can access the command history in the command box through the following keys:
●Ctrl+Home–Presentsthefirstcommandinserted●Ctrl+End– Presents the last command inserted●Ctrl+Up– Previous command history●Ctrl+Down– Next command in history
Providing Assistance to Your Client
Check our video tutorial about the System Shell.

34©2013 BeAnywhere. All rights reserved.
PORTFORWARDINGBeAnywhereAgentscanbeconfiguredtoactasagatewaybetweenlocalapplicationsand services on the remote LAN that normally are not accessible from an outside network,beingable toprovidealmost thesame levelof functionalityasaVirtualPrivate Network. Use BeAnywhere to create temporary or permanent port forwards to the remote network and enjoy increased performance, security and simplicityin connecting to remote services. This feature is setup per remote machine forsecurity reasons, and thepermanent forwards are savedon the configurationofeachconsole,whichmeansthattheywillhavetoberecreatedifthetechnicianusesanother console.
Tousethisfeature,followthesesteps:
Configuring BeAnywhere Agent1.OpentheBeAnywhereAgentconfigurationwindowontheremotemachine:rightclick on thecorrespondingicononthesystemtray and choose Restorefrom the context menu.
2. If the local remote user is not running with Administrator permissions (Windows Vista,7…),clickonManage.Adialogwillopen,warningtheuserthattheconfigurationprogram will have to be restarted with elevated privileges. Click Yes. A Windows UAC promptwillbeshown,andiftheprocessiscompletedcorrectly,theprogramwillrestart.
3. Click on Settings.
4. Onthenewwindow,selectEnableTCPportforwarding.
5. If you want to enable automatic port forwarding of the Windows Remote Desktop Protocol to that same machine, select also Enable RDP Tunneling.This optiononly affects the usability of the Use RDPbuttonintheconsole,whichautomaticallylaunches the Windows RDP client pointed to the remote machine in session. You can establish an RDP tunnel to that machine or to any other computer in the network by manually setting up the relevant ports.
TheoptionUseTCPportforincomingconnectionsallowstheuseofaspecificporttoenabletheTCPnativepeer-to-peermode,whichprovidesoptimalspeedsin LAN (FTP transfers can be up to 20 times faster), also ensuringmore reliableconnectionsinsomeproblematicWANscenarios.InordertouseTCPP2PfeatureinsessionsoutsidetheLAN,youhavetoconfigureaportforwardingfromthenetworkgateway to each Agent using this mode.
Configuring BeAnywhere Console1.Duringasession,clickontheoptionAdvanced>PortForward,locatedonthefooter menu.
Providing Assistance to Your Client

35©2013 BeAnywhere. All rights reserved.
2.Now,tocreateanewPortForwarding,clickNew.
5. BASE also allows you to setup a specific app to be associated with a specific port forward. While any application can use the forwards configured using this feature, thisallowsyou to invokepre-configuredprograms from theconsole.Toaddanapplication,clickonthefoldericon,immediatelyattherightoftheRunApplication option.
6. Ifyouwanttopassparameterstotheapplication(e.g.theremoteaddress),fill the Application Parameters.
7. Use the Description field to enter a description about the port forward.Thisisespeciallyusefulifyouwantpermanentforwards.
How to configure an FTP connectionFileTransferProtocol(FTP)serversneedseveralportstocommunicatewithclients. In ordertosetupanFTPconnectionusingtheBASEPortForwardingfeature,youneedtoknowwhatportstheserverisusing,bothforcontrolandfordataconnections.YoualsowillhavetomakesurethatyourFTPclientisrunningonPassiveMode.Then,youcanseteachportmanuallyontheBASEconsole,oryoucanjustuseaport-range.Forexample,ifanFTPserverusesport21forcontrolandthen5000to5010fordataconnections,youwillhavetoaddtwoforwards:oneforport21(anyportonthelocalcomputer and port 21 on the remote machine) and another one for the ports used on dataconnections.OnthespecificcaseoftheFTP,youhavetouseaslocalthesameones thatareconfiguredon the remotehost.So, for thisexample,youwoulduse5000-5010asthelocalportrange,andthen5000astheremoteport.
Providing Assistance to Your Client
3. Inthenewwindow,therearethreemandatoryparameters:
a.LocalPort–Refers to the local port number on which BeAnywhere console willlistenforincomingTCPconnectionsthatwillthenbeforwardedtotheremotenetwork.Thelocalportis,asthenameimplies,theportbelongingtothemachinewheretheconsoleisrunning.Inordertoavoidconflicts,youcanuse0andafreeportwillbeassignedautomatically.Youcanalsoinsertaportrange,usingthefollowingsyntax:startport-endport(i.e.5000-5100).This isespeciallyuseful forservices likeFTP(seeHowtoconfigureanFTPconnectionbelow).Ifyouuseaportrange,pleasebe sure to check if that range is free on the local machine.
b.RemoteHost–TheDNSorIPaddresswheretheremoteserviceis.IftheserviceisonthemachinehostingtheBeAnywheresessions,pleaseuse“localhost”or“127.0.0.1”.
c. Remote Port – This is the port where the remote service is listening forconnections. BASE needs both the remote host and the remote port values in order toknowwheretoroutethelocaltraffic.Youcannotusearangeonthisfield:ifyouinsertaport range in theLocalPort, thatrangewillbe forwardedtotheremotecomputerstartingfromtheportdefinedhere(i.e.Localportrangeis5000-5100;ifyouhadsetupport1000astheremoteport,BASEwillforwardthelocaltrafficto1000-1099 on the remote computer).
4. Ifyoudon’tneedanythingelse,assurethattheEnabled box is checked and click OK. Not having the Enable box checked will save the port forward but you will need to activate it before use.
Check our video tutorial about Port Forwarding.

36©2013 BeAnywhere. All rights reserved.
Providing Assistance to Your CostumerFILETRANSFERTheFileTransferfeatureenablesthetechniciantoexchangefilesandfolderswiththeclient.Therearenorestrictionstothetypeorsizeofthefilestransferred.
ThisfeatureisselectedbyclickingontheFileTransfertab,ontheViewerwindow.Tostartatransfer,justdraganddropfilesorentirefoldersfromonesidetotheother.
Thetransferwillberegisteredonthesessionreportandalsoonthechatwindowoftheapplet,foraccountabilitypurposes.
Thefiletransferqueuebelowwilltransfereachfileatatimeanditwillshowyouaprogressionbar.Youcanchangethepriorityofeachfiletransferbychangingafile’spositioninthefiletransferqueue.
Additionally you can pause and cancel each transfer.
Itisalsopossibletodeleteandrenamefilesusingthefollowingicons:
Providing Assistance to Your Client
Check our video tutorial about the File Transfer.

37©2013 BeAnywhere. All rights reserved.
SYSTEMINFOTheSystem Info tab provides a wide variety of information about the assisted remotecomputer.The technician isable toeasily consultparameters related tohardware, drivers, windows services, software, system temperatures, windowsupdatepolicies,etc.
AlltheinformationcanbeexportedtoaCSVfile.Todoso,pleaseusethebuttonontheupper-rightareaoftheWindow.Theexportwillonlyrefertothecategoryselected. Inorder toexportall the informationofall thecategories, youhave toexporteachonetoadifferentfile.
IntheProcessescategory,itispossibletoseegraphicswiththeCPUandmemoryconsumptions.Thetechjustneedstoenabletheregularupdateoftheinformation,using the context menu.
Providing Assistance to Your ClientAlso,insessionsmadeusingaBASEAgentoranelevatedApplet,techscanviewtheownership of processes and terminate them.
Inthesamesense,it isalsopossibletostart,stop,restartandchangethestartuptype of services during the sessions with administrative privileges.
Check our video tutorial about the System Info.

Unattended support
Chapter VII
UnattendedSupport

39©2013 BeAnywhere. All rights reserved.
T oinitiateunattendedsupportsessions,thetechnicianneedstoadd the client’s computer to his list of computers. There are twoways
ofcompletingthisprocess:A)-duringasupportsession; orB)-byclickingGenerateLink.
A) During a support sessionClick on the footer menu of the Viewer and select Computer>Add PC toMyComputerslist.
Byselectingthisoption,thetechwillbeaskedtoprovideanameforthecomputer,andtheinstallationwillstartsilently.Thecomputerwillcomeonlineinthetechnicianconsole as soon as the installation is completed.
B) By clicking Generate LinkIntheconsole’shomepage,selecttheMyComputers tab.Next,onthebottomleft,theAddComputerbutton will appear. Click on this button to add a new computer to the My Computers list.
In the right pane, a new form will appear for the technician to insert the newcomputer details.
Besides the link expiration date and the number of installations allowed by a given link/PIN,youcanalsosetanexpirationdatefortheagent.Reachingthatdate,theAgentwillbeuninstalledanddeletedfromyourcomputerlist.Thisisveryusefultosetup temporary unattended access to a machine.
By clicking GenerateLink,twooptionswillbemadeavailable:acomputerPINcodeand an InstallLink. Both methods work exactly as the applet: the client just needs to go to the Portal and use the PIN code or simply follow the direct link to download the agent installer.
Theinstallationneedsadministrativeprivileges,anditisrecommendedthatonlyoneuser is logged onto the remote computer.
It is also fairly easy to setup the automatic deployment of multiple Agents in a network. TheAgent installer can run unattended and silently by using the /S /Rswitches(“BAManagement.exe /S /R”).Thisway,aninstallercanbedeployedusingaLogonScriptorMicrosoftSystemCenterConfigurationManager.
Unattended Support

40©2013 BeAnywhere. All rights reserved.
Assoonasthenewcomputerislistedontheconsole,technicianswillbeabletoselect it on the MyComputerstab.Afterselectingacomputer,aneditableformwill appear at the right pane.
ThesedetailsarealsoavailableontheAdminArea.
Right-clickingonacomputerinthelistwill also provide several options (which canbeequallyinvokedintheAdminArea):Createanewgroup,delete,rename,ormovethecomputertoanothergroup,refreshthelistofcomputers;andalsorestarttheremoteAgent,orcreateanewticketfortheAgent(tolearnmoreaboutthisoption,pleasechecktheTickets).
Unattended Support
- A remote session is taking place;
- Agent is disabled or unable to connect to the BeAnywhere infrastructure;
- Agent is running normally.
AftertheBASEAgent’sinstallation,anewiconwillappearintheSystemTrayoftheremotecomputer.Thisiconhasthreestates:
IMPORTANT: To perform a silent deployment, be sure to enable the relevant Profile>Agent Setup options in the Admin Area. For more information, please check the Admin Area chapter.
!

Master Password
Chapter VIII
EnhancingtheAgent’sSecurity

42©2013 BeAnywhere. All rights reserved.
T o increase theglobal securityof theBASE infrastructure, aMasterPassword canbe setonevery computerwhereaBeAnywhereAgent
is installed. This feature greatly diminishes security breaches related withmisconfigurationsorwiththeleakofBeAnywherecredentials.Settingupamasterpasswordisespeciallyrecommendedonmachinesthatperformkeyrolesontheirrespectivenetworks(e.g.domaincontrollers,databaseserers,webormailservers)ormachineswithsensitive information.This featurecanbeused inconjuctionwithlockingWindowsattheendofeachBASEsession,aswellaswiththeoptionRequire local user authorization on starting a session,whichwill require theexplicitpermissionofauserloggedonlocallybeforestartinganysession.
Enhacing the Agent’s Security
Adding a master password to a BeAnywhere Agent
Eachmasterpasswordhastobesetindividuallyoneachmachine.Inordertodoit,the following procedures must be completed:
1.OpentheBeAnywhereAgentconfigurationwindowontheremotemachine:rightclick on the corresponding icononthesystemtray- - and choose Restore from the context menu.
2. If the local remote user is not running with Administrator permissions (Windows Vista,Windows7, etc.), clickonManage. Adialogwill open,warning theuserthattheconfigurationprogramwillhavetoberestartedwithelevatedprivileges.Click Yes.AWindowsUACpromptwillbeshowed,andiftheprocessiscompletedcorrectly,theprogramwillrestart.
4. Onthenewwindow,youwillbeabletochoosetheauthenticationtypeforthatspecificcomputer:
3. Click on Security.
a. None–Thefeaturewillbedisabledandbydefaultthemachinewillbeaccessiblebyallthetechniciansthatcanaccessunattendedcomputers.Pleasenotethat,bydefault,BeAnywhere locksWindowsat theendofeachsession,whichby itself isanother layer of security.
b. BeAnywherePassword–Youcanchooseapasswordwithatleast8characters,includingletters,numbersandsymbols.
c. WindowsAccount – This optionusesWindows authentication, allowingthesessiontobeauthorizedonthebasisofavalidlocalordomain-basedWindowsaccount.Forsecurityreasons,onlyaccountswhichalreadyhaveaprofilecreatedonthe local machine will be correctly authenticated.

43©2013 BeAnywhere. All rights reserved.
●Allowrestrictedaccountstologintothisserver–ifthisoptionisunchecked,only local or domain administrators can login to the computer through BeAnywhere.
5. You may also select the option Requirelocaluserauthenticationonstartingasession.
Click Apply.Thesettingswillbeusedonthenextsession.
IMPORTANT: Requiring local authorization disables the possibility of unattended setup. Please use this setting carefully or you may lose access to a computer.
!
Enhacing the Agent’s Security
Check our video tutorial about the Agent’s Setup.

ChapterIX
SharingandTransferringSessions

45©2013 BeAnywhere. All rights reserved.
Session Transfer
T herearethreewaystotransfersessionsbetweendifferenttechnicians and/ordepartments:(A)-priortothecreationofanewPINCode;
(B)-beforeacceptingasupportrequest;and(C)-duringasupportsession.
A – Prior to the creation of a new PIN CodeWhile creating the new session or the calling card in the Console window, thetechnician should click on Show Advanced Options. He can then change the queue of the request by clicking on the Change... button.
B – Before accepting a support requestIncoming support requests can also be redirected to any specific technician/department. ThePendingRequest tab (top left) showsa listof sessions that,atthatmoment,arewaitingtobeaccepted.Clickingonanyofthosewillpresenttherequest details in the right pane, along with the options to accept, transfer or cancelthe request.
C – During a Support SessionSometimes it might be necessary to transfer the session to another tech after it hasalreadystarted.Thetechniciancurrentlyhandlingthesession justhastoclickon Session>Transfer / Share in the footer menu of the Viewer and select the appropriate queue.
Sharing and Transferring SessionsSHAREANDTRANSFERASESSION
Anewwindowwillappear,whereadepartmentoratechcanbespecified,followedby clicking on the OK button.
Requestscreatedthiswaywillbesenttoaspecificqueue.
TheTRANSFERREQUESTTO... will forward it to the technician or department you specify. You can also add a note in the process - e.g. explaining the context of the request or the transfer reason.
Likeinthepreviousscenario,itispossibletoaddsomenotes.

Chapter 10ChapterX
CallingCards

47©2013 BeAnywhere. All rights reserved.
A Callingcardisaspecialversionoftheappletthatcanbedropped on a client’s computer and, therefore, used every time he needs
remote assistance. Calling Cards have a reference ID, composed by analphanumericprefixand13algorisms-thisIDisusedfordownloadingthisspecial applet. TheCallingCards canbe setwithanexpirationdateandamaximumsession time,allowingagreatdealofflexibility forproviders tolaunch special promotions or different support products. BASE allows thecreationofsingleCallingCards-throughtheconsole-butalsobatchescanbegenerated.ThemanagementofalltheCallingCardsisalsomadethroughtheAdminArea.
PRE-CONFIGURINGTHEADMINAREABeforeusingtheCallingCardfeatureyoushouldchoosetheprefixthatwillbeusedon all of them.1.Theprefixconfigurationiscentral.ThisoptionispresentedtoyouontheStartupWizard.Ifyoumissedthewizard,orifyouwanttochangeyourcallingcardprefix,go to Profile>Identification>4.CallingCards.
2.There,youcanchooseacallingcard,composedby4to8digits(lettersA-Zornumbers0-9,caseinsensitive).
4. Clicking on the Save icon will save all of the information in Profile>Identification,notonlythesettingsconfiguredonthecallingcardstab.
5.YoumayalsowanttosetthescenariosinwhichadefinedURLisautomaticallyopened:
a. Before the beginning of the session i. When the Calling Card’s date has expired ii. When the Calling Card has no time left b. After the session is started i. When the Calling Card’s date has expired ii. When the Calling Card has no time left
3.Iftheprefixyouinsertedmeetsthedefinitionsdescribedbefore,agreencheckmarkwill appear and the format of your calling cards will be previewed below.
YoucanfindthescenariosinManagement>Warnings>4.CallingCards. None of theseoptionsismandatory.Ifnoinformationisinserted,anerrormessagewillbepresented to your user when trying to establish a connection or during a calling card session–inthesescenarios,nowebpagewillbepresentedtoyourclient.
6.Clicking on the save icon will save all of the information in Management>Warnings.
Calling Cards
48©2013 BeAnywhere. All rights reserved.
CREATING A SINGLE CALLING CARD IN THE CONSOLE
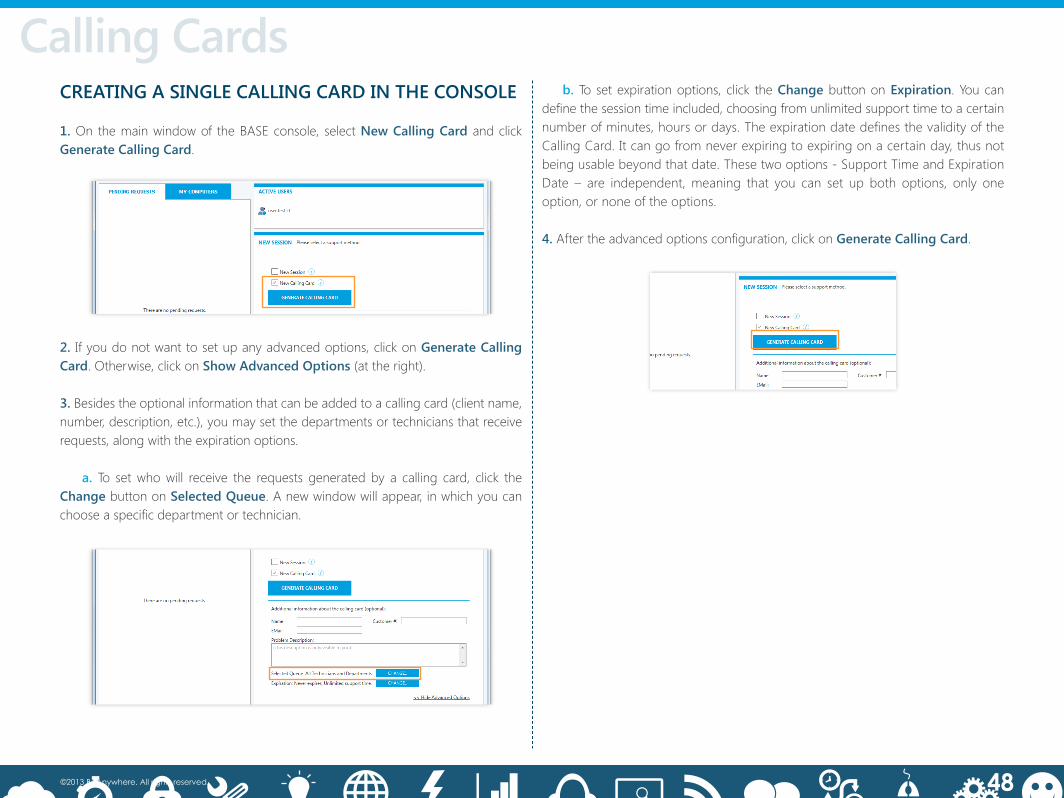
1.Onthemainwindowof theBASEconsole, selectNewCallingCard and click GenerateCallingCard.
Calling Cards
2. Ifyoudonotwanttosetupanyadvancedoptions,clickonGenerateCallingCard.Otherwise,clickonShowAdvancedOptions (at the right).
3.Besidestheoptionalinformationthatcanbeaddedtoacallingcard(clientname,number,description,etc.),youmaysetthedepartmentsortechniciansthatreceiverequests,alongwiththeexpirationoptions.
a.To setwhowill receive the requests generated by a calling card, click theChangebutton onSelectedQueue.Anewwindowwillappear,inwhichyoucanchooseaspecificdepartmentortechnician.
b.Tosetexpirationoptions, click theChangebutton onExpiration. You can definethesessiontimeincluded,choosingfromunlimitedsupporttimetoacertainnumberofminutes,hoursordays.TheexpirationdatedefinesthevalidityoftheCallingCard.Itcangofromneverexpiringtoexpiringonacertainday,thusnotbeingusablebeyondthatdate.Thesetwooptions-SupportTimeandExpirationDate – are independent,meaning that you can set up both options, only oneoption,ornoneoftheoptions.
4.Aftertheadvancedoptionsconfiguration,clickonGenerateCallingCard.

49©2013 BeAnywhere. All rights reserved.
Calling CardsCREATINGABATCHOFCALLINGCARDSINTHEADMINAREA
1.Ontheadminarea,clickonManagement>CallingCards.
2.Onthefirst tab,clickonCreateNew,whichwilldirectyoutothethirdtab (3.GenerateCards).
Calling Cards
3.InsertthenameofthebatchtobecreatedinGroupName.Toaddcallingcardstoanexistingbatch,seeCalling Card Management.
4.Insertthenumberofcodes.Ifyoudonotwanttosetupanyadvancedoptions,click on Generate.Otherwise,continuetothefollowingfields.
5. Ifyouwantto limitthedepartmentswhowillreceivetherequests,clickontherespective checkbox and select a department from the dropdown list.
6.Inordertolimitthetechnicianswhowillreceivetherequests,clickontherespectivecheckbox and select a tech from the dropdown list.
7. For limiting the session time included, selectDuration and define a certainnumberofminutes,hoursordays.Tomanagetheduration,usethetwoadvancedoptions: Countinblocksof... and MinimumPeriod.
- In the Count in blocks of… option, it is possible to specify aminimum initialperiod that will be deducted from the available time of the calling card whenever a newsessionstarts(e.g.eachnewsessionwilldeductatleastfiveminutesfromtheavailable time on the calling cards).
-TheMinimumPeriod option will round the time counted in each session to the nearest superior block (e.g. the session time will deduct 15 minutes from the available time on the calling card even it only lasted 11 minutes).
8.Todeterminetheexpirationdate,selectExpirationDate and click on a desired date.Anewwindowwithacalendarwillappear,allowingyoutoselectaspecificday.
9.Then,youneedtomakesurethatthecheckboxApplytoNewCodesisselected,otherwise the new codes will not be created.
10. If you click on CustomizeURLwarnings,youcanalsodesignateifaURListobe open on the following scenarios:
a. Before the beginning of the session i. When the Calling Card’s date has expired ii. When the Calling Card has no time left
b. After the session is started i. When the Calling Card’s date has expired ii. When the Calling Card has no time left
Noneoftheseoptionsismandatory,andifnoinformationisinserted,thesystemwilllookforadefaultconfiguration,whichcanbedefinedonWarnings>CallingCards.
Ifno information isdefinedthere,anerrormessagewillbepresented toyouruserwhen trying toestablisha connectionorduringacallingcard session– in thesescenarios,nowebpagewillbepresentedtoyourclient.

50©2013 BeAnywhere. All rights reserved.
11. Click on Generate or on the Saveicon.Thesecondtab(2.ActiveCards) will beopened,listingallthecallingcardsyouhavejustgenerated.
12.IfyouwanttodownloadthelistofcardstoaCSVfile,clickon3.GenerateCards TabandhittheDownload button.
Calling Cards
Check our video tutorial about Calling Cards.

51©2013 BeAnywhere. All rights reserved.
Calling CardsCALLING CARD MANAGEMENTBesidesmanagingtheglobalsettingsforgroupsofcallingcards,youcanmanagesingle calling cards or several calling cards at the same time (belonging to the same or to different groups).
Calling Cards
Manage a group of cards1.Tomanagetheglobalsettingsforagroupofcallingcards,click its name,at the list on the left.
2.Select the third tab (3.GenerateCards).
3. Changetherelevantoptions(NumberofCodes,Duration,Department,etc.).
4. Select the scope of the changes by clicking on one of the following checkboxes:
a.ApplytoNewCodes-Thesettingswillbeappliedonlytonewcodescreatedin thegroup. If youareaddingcodes to thegroup, youmust select thisoption,otherwise the new codes will not be created.
b.ApplytoUnused-Thesettingswillbeappliedtoalloftheunusedcodes,regardless of being new or not.
c. ApplytoAll-Thesettingswillbeappliedtoallcodes.
5.YoucanalsochangetheCustomizeURLwarnings.Thesesettingswillalwaysbeapplied toallof thecodeson thegroup, regardlessof thescopedefinedontheprevious point.
6. Click on Generate or on the Saveicon.Aconfirmationwindowwillappear.
Manage one or more cardsThemanagementofoneormorecardsisdoneatthesecondtab(2.ActiveCards). Bydefault,allthecardsfromallthegroupswillbelistedhere,unlessyouselectoneofthegroupsfromthelisttotheleft.Inthatcase,thetablewillbeshowingonlythecallingcardsbelongingtothatgroup.Thetableincludesthefollowinginformation:
●ID - Thecallingcardnumber,whichwillbeusedfordownloadingthespecialapplet.●CREATED -Thedatethecardwascreated.●#MADE/LOST- Number of sessions made and number of sessions that were not answered by the technicians.●TIME USED -Timealreadyusedonsessions.●TIMELEFT- Remaining time for support.●EXPIRES -Thedateofexpirationforeachcard.●STATUS -Visualindicationofthestatusofthecallingcard.Ifitisstillvalid,agreencheckmarkwillbeshown.Ared“X”meansthecodeisexpiredorwasrevoked.
Tomanageoneormorecards,pleaseperformthefollowingsteps:
1. Select the checkbox corresponding to the code or codes you want to change.

52©2013 BeAnywhere. All rights reserved.
Calling Cards
3. Youcanchangetheexpirationdate,theduration(totaltimeofthecard),andthetime left.
4. Clicking on Resetcodestatus reactivates a revoked code (bottom left).
5. Afterchangingtherelevantfields,clickonSave.TheRevoke button disables the useofoneormorecodes,thusblockingthem.Clickingonthisbuttonwillpromptaconfirmationwindow–ifyouagree,thecodewillbepermanentlybannedfromtheBeAnywhere network.
2. Click on Edit. Tosearchforcodes,clickontheSearch button and a new window will appear. Here you will be able to choose from several options:
●ID -Thecallingcardnumber,whichwillbeusedfordownloadingthespecialapplet.●Duration(From-To)-Timeconfiguredtothecard.●Timeleft(From-To)-Timeleftonthecard.●Expired- Selecting this option will include expired cards on the search.●Allgroups- Searches cards from all of the existing groups.●AllHistory- Search from the beginning.
UsedateasCreationdate/Expirationdate(From-To):allowadelimitationofthesearchbycreationdateorbytheexpirationdatedefined.Selecttheparametersrelevanttoyour search and click Search.Thetablewillthendisplaythefilteredresults.
Calling Cards

Calling Cards
ChapterXI
UsingBASEProxy

54©2013 BeAnywhere. All rights reserved.
B eAnywhere’sSupportExpressProxycanbeusedinsituationswhere the remote machine has no connection to the Internet or when it
connectstotheInternetusinganunsupportedtypeofproxyorauthentication.ItmustbeinstalledontheremoteLAN,inacomputernotonlyreachablebytheBASEAgentsandApplets,butalsowithfreeaccesstotheInternet(e.g.amachineontheDMZoreventhefirewallmachine).ItcanbeconfiguredtorestrictwhichBASEAgentsorAppletsareabletouseit,anditcanalsobindtomultiplenetworkadaptors.ItiscompletelytransparentandsupportseveryfeatureontheBeAnywhereprotocol(includingPortForwarding).Italsohasaveryflexibleconfiguration,beingabletorunasanapplication,withlimitedprivileges,butalsoasaWindowsService.
Using BASE Proxy
BASEProxysupportstwotypesofconnections(fig.1):
Standard AlltheinboundconnectionsareinitiatedthroughBASEgateways.Thisisthefailsafe modeofoperation,anditiscompatiblewithalltheconfigurationsandtopologies.
Direct ConnectTheBASEgateways areonly used in the context of establishing remote sessionsduringtheinitiationprocess.Afterthat,theconnectionbetweentheBASEProxyandtheBASEConsolesismadedirectly.Thismodeisfasterbecauseitusesonelesshop,diminishingthelatency,butitislesscompatiblewithmorerestrictedconfigurations.
Figure1 - BASE Proxy - Standard Connection Method
Figure1.1-BASE Proxy - Direct Connect Method

55©2013 BeAnywhere. All rights reserved.
INSTALLING BASE PROXYInordertoinstallBASEProxy,youwillhavetoperformthefollowingsteps:
I. Set up the computer in which the proxy is installed ThefollowingportsmustbeopenedintheProxymachine,forbothinboundandoutbound connections:
TCP 8082 (only for LAN traffic) - Port used for BASE Agents/Applets to communicatewiththeproxy.ThisistheportdefinedontheBindings tab of the proxyinterface,soifyouchangeit,youwillhavetoconfigureyourfirewallaccordingly.
TCP443(forLANandWANtraffic)-ThisistheportusedbytheDirectConnectfeature, so itonlyneeds tobeset ifDirectConnect is tobeenabled.Youwillalsoneed to route this port from the WAN to the proxy machine. If you change the Direct Connectportontheproxyinterface,thisconfigurationhastobeupdatedaccordingly.
UDP43210(onlyforLANtraffic)-ThisportisusedontheautomaticsetupoftheAgentsandApplets.Ifitisnotreachable,additionalsetupswillberequiredoneach computer with the BASE Agent installed or running the Applet.
II. Download and install the proxy 1. OntheAdminArea,gotoProfile>Integration>5.Proxy and hit the Downloadbutton,underStep1-InstallinganewBASEProxyserver.Anewwindowwillappear,explaining the basic requirements to install the proxy. Click OK.
2. Thedownloadoftheinstallerwillbegin.
3.Attheendoftheinstallation,you’llhavetonameyournewproxyandpreferablyaddadescription.Afterperformingthisstep,clickonRegister.
4.The proxy will return a message confirming its registration on theBeAnywhere network.
Using BASE ProxyThe installation is very straightforward; theonlycustomizableoption iswhetheror not to create the Desktop and Start Menu shortcuts (the default option is recommended).

56©2013 BeAnywhere. All rights reserved.
III. Configure the Proxy interfaceAfter installing BASE Proxy and running it for the first time, youwill have severalconfigurationoptionsavailable:
●Home-Itallowsstartingandstoppingtheproxyfunctionality,aswellascheckingiftheproxyisrunning.Itusesatrafficlightsystemtoidentifyitsstate:red(stopped),yellow(errororbusy),green(working).
●Bindings -Whileon this tab, you can specifywhich IP addresses andports fromthe machine running the proxy will be used to receive connections from BASE Agents within the LAN. By default, the IP will be 0.0.0.0, which basically means all theNetworkInterfaceCardswithanyIPaddress.IfyouhavemorethanoneNIC,itisrecommended you specify which adaptor or IP address is to be used in order to receivetherequestsexclusivelywithintheLAN,forsecurityreasons.Thedefaultportis8082.Pleasecheckifanyotherservicesareusingitontheproxymachine.
●DirectConnect - Enables the Direct Connect feature through the activation of thecorrespondingcheckbox.Youcanalsochangethedefaultport.However, thisprocedure isn’t recommended because it will diminish the possibilities of successfully establishingaconnectionthroughthismethod.Ifyouneedtodoit,pleaseclickonthe Testbuttontoverifyiftheportisreachable,andthenclickSave.
●IPFilter - Here you can choose which BASE Agents/Applets are reachable through this proxy. You can add a mixture of single IP addresses (only the BASE Agents or Applets on those specific IPwill be reachable) and IP address ranges (all theBASE Agents or Applets running on machines within that IP address range will be reachable).Thiscanbeusedasanextrasecuritymeasure.
●Log-Thistabpresentsalltheeventsrelatedtotheuseoftheproxy,likeconnectedmachines,sessionsestablishedorIPchanges.Youcansuspendorclearthelog.Both these options are cosmetic: the proxy continues to register activity and debuginformation,whichcanbefoundat%16419%\BeAnywhere\BASupProxyforWindows2000andXP,andatc:\programdataforWindowsVistaorlaterOS.
Using BASE Proxy
57©2013 BeAnywhere. All rights reserved.
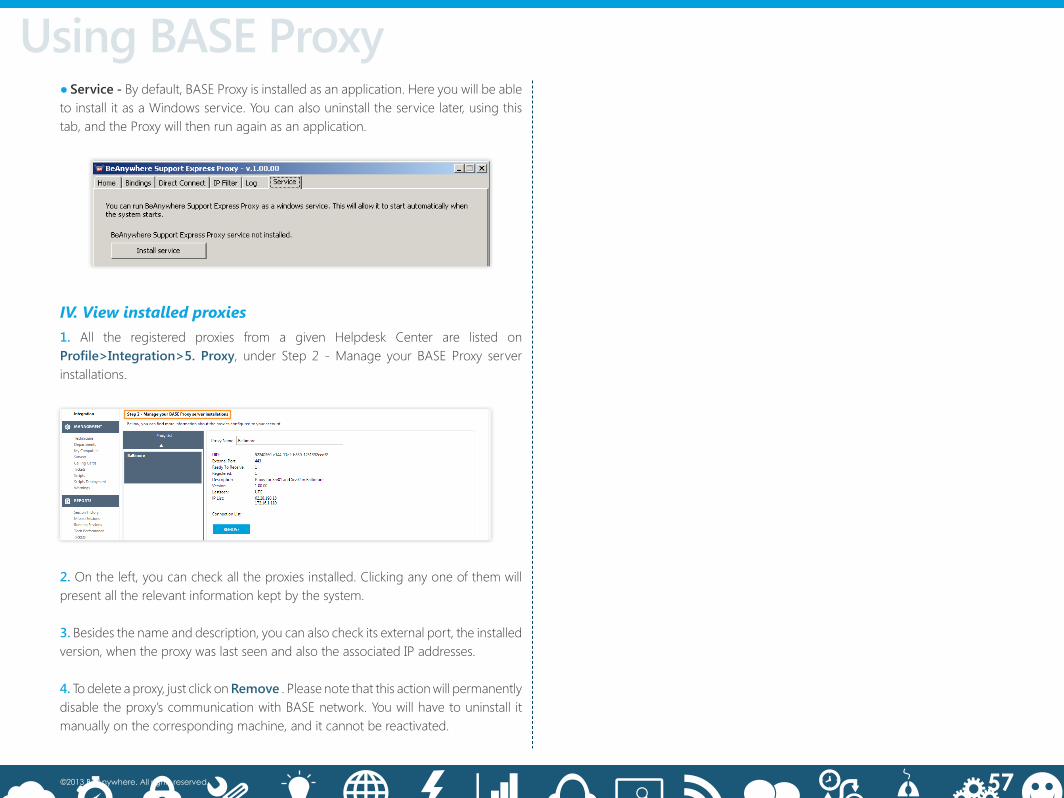
●Service-Bydefault,BASEProxyisinstalledasanapplication.HereyouwillbeabletoinstallitasaWindowsservice.Youcanalsouninstalltheservicelater,usingthistab,andtheProxywillthenrunagainasanapplication.
IV. View installed proxies1. All the registered proxies from a given Helpdesk Center are listed on Profile>Integration>5. Proxy, under Step 2 -Manage your BASE Proxy serverinstallations.
2. Ontheleft,youcancheckalltheproxiesinstalled.Clickinganyoneofthemwillpresent all the relevant information kept by the system.
3.Besidesthenameanddescription,youcanalsocheckitsexternalport,theinstalledversion,whentheproxywaslastseenandalsotheassociatedIPaddresses.
4.Todeleteaproxy,justclickonRemove . Please note that this action will permanently disable the proxy’s communication with BASE network. You will have to uninstall it manuallyonthecorrespondingmachine,anditcannotbereactivated.
Using BASE Proxy

58©2013 BeAnywhere. All rights reserved.
SETTING THE BASE AGENT OR THE APPLETBoththeBASEAgentsandtheBASEAppletareautomaticallyconfigured,andnomanualsetupisrequiredinmostsituations.However,intheeventthatconnectivityproblems or incorrect configuration of the proxymachine impairs the automaticsetup,someconfigurationmightberequired:
1.RuntheappletorstartBASEAgentconfigurationprogramonacomputerwithalimited or nonexistent connection to the Internet.
2.Afterawhile,amessagewillappear,asking if thecomputer isbehindaproxyserver. Click YES.
3.ThenextmessagewillaskifthereisadedicatedBAProxyserver.ClickYES.
4.Select UseBeAnywhereProxyserver.
5. Insert the ProxyIPaddress (recommended) or the name of the server; and the relevant port.
6. If the proxy is usingDirectConnect, select the corresponding checkbox andinsert the port number for this feature. Please note that the computer will be able toestablishsessionsevenifDirectConnectfailsorismisconfigured.
7. Click Test my proxy settings to verify if the connection to the proxy is correctly established.
8. Click Apply.
Using BASE Proxy

ChapterXII
AdministrativeArea

60©2013 BeAnywhere. All rights reserved.
Administrative AreaB eAnywhere’sSupportExpressAdministrativeAreaallowsadministrators
tosetuptheircompany’sprofileandmanagetheirBASEaccount.Youcanfollowthehttp://base.beanywhere.comURLtoaccesstheAdminAreaorgodirectlyfromthemenuatthetopoftheconsolewindow.
WIZARDInthefirstvisittotheAdministrativeArea,youwillbewelcomedbyaWizardwindow.
It is intended to help the Administrator in the process of setting up a few of the account’s basic aspects.
Itis,however,alwaysatyourdisposal;itcanbetriggeredthroughthelinkplacedontherightsideoftheAdminAreahomepage–StartupWizard.
TheWizardhelpstosetupyourProfile(basicsettingsregardingtheidentificationof the administrator and the represented company); the Applet and the Agent main startupoptions;theExclusiveLink(definitionofthelinkfromwhichaclientmaysenda support request); your Website (integration options) and Calling Cards (establish aCallingCardprefix).
61©2013 BeAnywhere. All rights reserved.
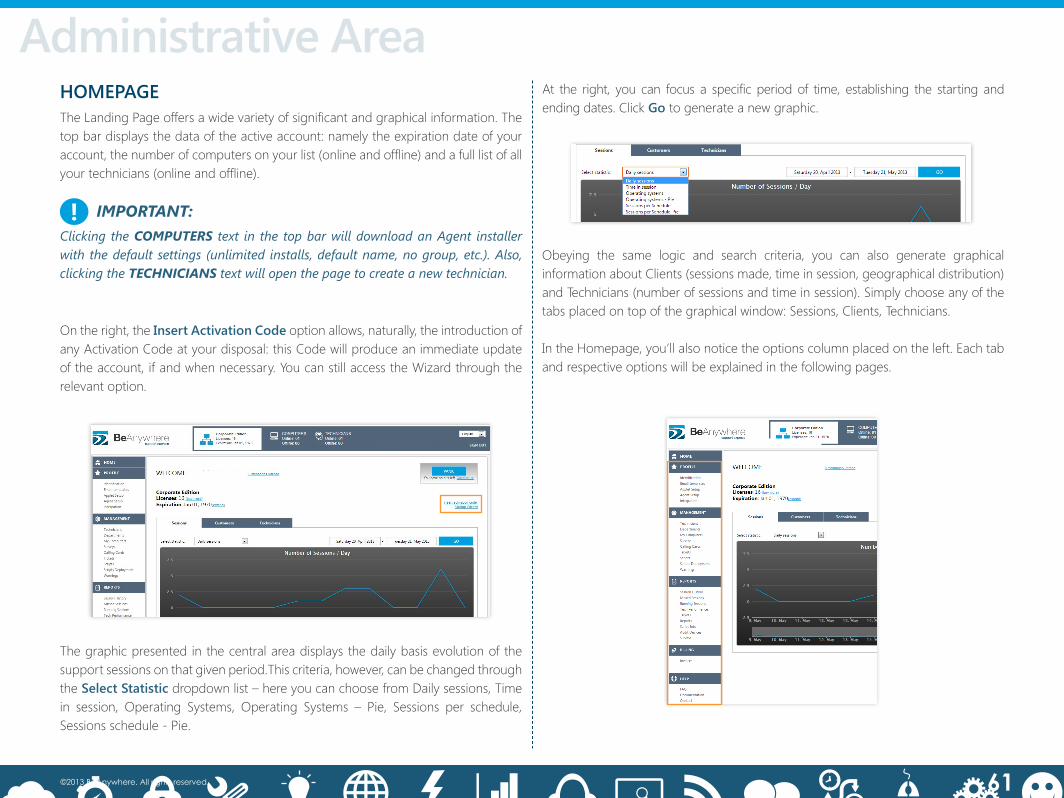
Administrative AreaHOMEPAGETheLandingPageoffersawidevarietyofsignificantandgraphicalinformation.Thetop bar displays the data of the active account: namely the expiration date of your account,thenumberofcomputersonyourlist(onlineandoffline)andafulllistofallyourtechnicians(onlineandoffline).
Thegraphicpresentedinthecentralareadisplaysthedailybasisevolutionofthesupportsessionsonthatgivenperiod.Thiscriteria,however,canbechangedthroughthe SelectStatisticdropdownlist–hereyoucanchoosefromDailysessions,Timein session, Operating Systems, Operating Systems – Pie, Sessions per schedule,Sessions schedule - Pie.
At the right, you can focus a specific periodof time, establishing the starting andending dates. Click Go to generate a new graphic.
Ontheright,theInsertActivationCodeoptionallows,naturally,theintroductionofany Activation Code at your disposal: this Code will produce an immediate update oftheaccount,ifandwhennecessary.YoucanstillaccesstheWizardthroughtherelevant option.
Obeying the same logic and search criteria, you can also generate graphicalinformationaboutClients(sessionsmade,timeinsession,geographicaldistribution)andTechnicians(numberofsessionsandtimeinsession).Simplychooseanyofthetabsplacedontopofthegraphicalwindow:Sessions,Clients,Technicians.
IntheHomepage,you’llalsonoticetheoptionscolumnplacedontheleft.Eachtaband respective options will be explained in the following pages.
IMPORTANT: Clicking the COMPUTERS text in the top bar will download an Agent installer with the default settings (unlimited installs, default name, no group, etc.). Also, clicking the TECHNICIANS text will open the page to create a new technician.
!

62©2013 BeAnywhere. All rights reserved.
Administrative AreaPANIC BUTTONAt the top right side of your Admin Area homepage you’ll easily notice a Panicbutton standingout.This isyetanotherexclusivepower featureofBeAnywhereSupportExpress. Using the Panicbuttonwillnotonlyunlockalloftheservicefeatures,butwill also allow unlimited simultaneous technicians (during the subsequent 10 straight hours after any hit).
This feature is intended to help you deal with emergency scenarios (e.g. a virusoutbreak), circumstances thatdemandmuchmore fromyour support solution. Ifyou can’t access this feature, please contact your accountmanager. To use yourPanicbutton,simplyclickon it.Youwill thenbeaskedtoconfirmyour intention.Afterwards, youwill immediately receiveane-mail confirmingyourPanic Button hit,aswellasthebeginningandtheendoftherespective10hourperiod.Oncethis10hourperiodreachesitsend,yournormallicensestandardswillbeautomaticallyreplaced.
To further enjoy BeAnywhere’s premium services, please consider updating yourlicense or getting more hits for yourPanic Button.

63©2013 BeAnywhere. All rights reserved.
Administrative AreaPROFILEThe Profile section displays several configuration options associated to thecompany’sprofile.
IdentificationHereyou’llfindavastarrayofconfigurationoptions.
1.BasicInformationDefinitionofthecompany’sbiographicaldetails:name,e-mail,address,telephonenumber,VAT,CountryandRegion.
2.CompanyLogoInsert the Company Logo. TostartuploadingtheLogo,simplyclickonUpload Logo.Besuretorespectthesizeandextensionrestrictions–JPEG,maxsize:200KB,578X98pixels).
3.PIN/CallingCardsThefirstareaofthiswindow–PINCodeOptions–enablesthetechniciantosettheexpirationdateofboththegeneratedPINCodes,butalsotheApplets.Justusethedropdown boxes to choose the desired expiration date.
Apre-visualizationof yourCallingCard formatwill be immediately available. Formoreinformation,pleasechecktheCalling Cards chapter. 4.AdministratorUsethetextentryfieldavailable,statingyournewpassword-wheneveryoudecideto change it. Your username will be displayed at all times.
Inthesecondarea,youcanchooseaprefixtoaddtoyourCallingCards.Pleaseusethe YourCallingCardPrefixtextentryfieldtocomposethedesiredprefix–itmustbecomposedby4to8digits(lettersA-Zornumbers0-9,caseinsensitive).
Thewaiting time is roundeddown tominutes, and it isobtainedbydividing thenumberofpendingsupportrequestsbythenumberofonlinetechs,multipliedbythe average duration of a session (which has to be set by the administrator).
Here it is also possible to enable and configure the ExpectedWait TimeInformation feature:Thiswillactivate thepresentationofawebpagewhiletheAppletisbeingdownloaded,informingtheclientabouthowmanyothersupport requests are on the queue and what is the waiting time expected for a request to be accepted.
ExpectedWait Time only works with PIN codes under the general page of thesupportportal,orusingaDirectLink.

64©2013 BeAnywhere. All rights reserved.
5.AccessControlLimit access to theConsole and/or theAdministrativeArea. Toestablish accessrestrictions,simplyselecttheLimittheAccesstoAdminAreabyIP option and/or LimittheaccesstoTechConsolebyIP.
Secondly, insert in theavailabletextentryfieldswhichof the IPswillbenefit fromaccess to each of the functional areas of BASE.
Afterthesetupiscomplete,the SAVEbutton,placedatthelowerrightcorner,willvalidate and save all changes.
65©2013 BeAnywhere. All rights reserved.
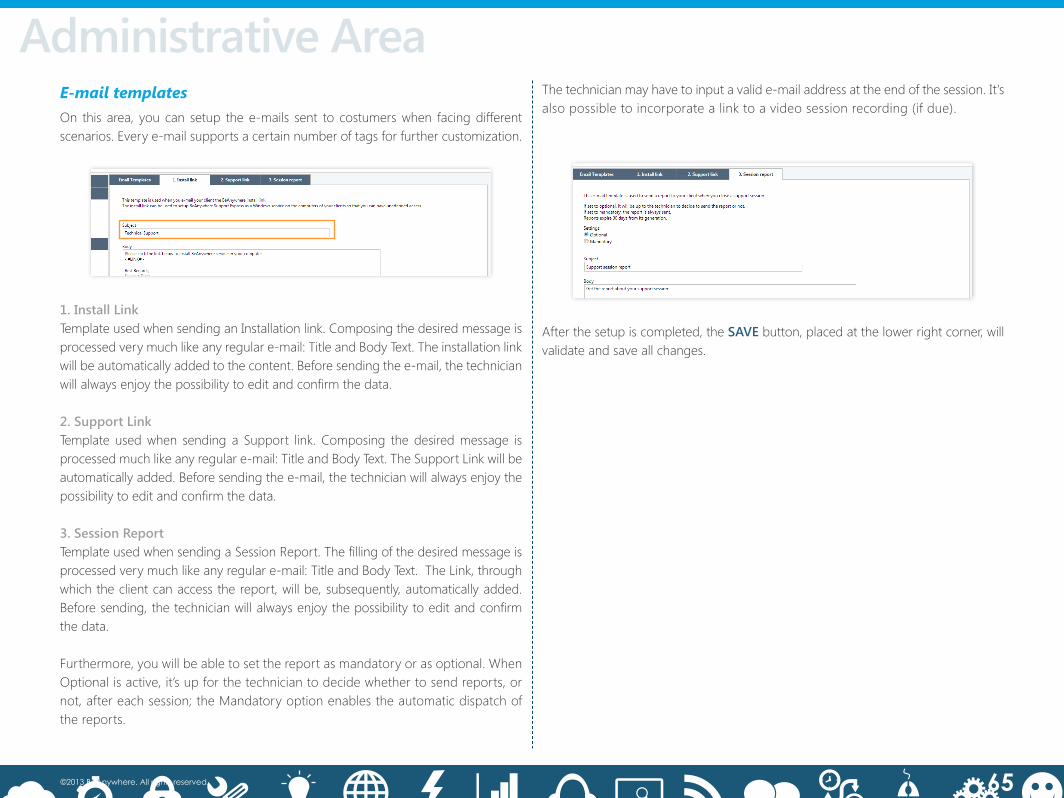
Administrative AreaE-mail templatesOn this area, you can setup thee-mails sent to costumerswhen facingdifferentscenarios.Everye-mailsupportsacertainnumberoftagsforfurthercustomization.
1.InstallLinkTemplateusedwhensendinganInstallationlink.Composingthedesiredmessageisprocessedverymuchlikeanyregulare-mail:TitleandBodyText.Theinstallationlinkwillbeautomaticallyaddedtothecontent.Beforesendingthee-mail,thetechnicianwillalwaysenjoythepossibilitytoeditandconfirmthedata.
2.SupportLinkTemplate usedwhen sending a Support link. Composing the desiredmessage isprocessedmuchlikeanyregulare-mail:TitleandBodyText.TheSupportLinkwillbeautomaticallyadded.Beforesendingthee-mail,thetechnicianwillalwaysenjoythepossibilitytoeditandconfirmthedata.
3.SessionReportTemplateusedwhensendingaSessionReport.Thefillingofthedesiredmessageisprocessedverymuchlikeanyregulare-mail:TitleandBodyText.TheLink,throughwhichtheclientcanaccessthereport,willbe,subsequently,automaticallyadded.Beforesending,thetechnicianwillalwaysenjoythepossibilitytoeditandconfirmthe data.
Furthermore,youwillbeabletosetthereportasmandatoryorasoptional.WhenOptionalisactive,it’supforthetechniciantodecidewhethertosendreports,ornot,aftereachsession;theMandatoryoptionenablestheautomaticdispatchofthe reports.
Thetechnicianmayhavetoinputavalide-mailaddressattheendofthesession.It’salso possible to incorporate a link to a video session recording (if due).
Afterthesetupiscompleted,theSAVE button,placedatthelowerrightcorner,willvalidate and save all changes.

66©2013 BeAnywhere. All rights reserved.
Administrative AreaAdministrative AreaApplet SetupConfigurationoftheApplet’sappearanceandbehavior(WindowsAppletonly).
1.Name/LogoInthisfirstsectionyou’llbeabletoeditthefilenameusedbytheappletsyougenerate.Furthermore,youcanAdddepartmentnametofilename and/or Deleteappletaftersessionends,byactivatingeachoption.
AttheLogosection,theUploadLogo button initiates the transfer process of the imageyouwishtopresentyourclientsasyourcompanyLogo–simplyupload it,aslongasitrespectstherequirements(JPEG,200KB,578x98pixels).Theimagewillbepresented in the preview box laid out at the center of the screen.
Byclickingdirectlyontopofthispreview,you’llbeabletochangeitsbackgroundcolor: simply choose one of the colors available in the spectrum and click the Save Button.
2.TermsofserviceInthiswindowyouwillbeabletosetyourownTermsofService.Usethetextboxin themiddle to insertyourownor justuploadapre-configured textusing theLoadDefaultbutton.
3.InitialFormWhensendingasupportrequest,theclientwillbeaskedtofilloutanInitialForm.Theincludedfieldscanbeconfiguredasmandatorytotheformsubmissionbyselectingthemonthisscreen.Itisevenpossibletoaddacustomfield;tomakeitmandatory;andtopresentaspecificerrormessage if it is leftblank-allof theseoptionscanthenbeusedtogetherwiththeSessionValidationAPItoefficientlydistributesupportrequestsamongtheappropriatedqueues.Someotheroptionsmaybedefined:
The two options at the top of the windowwill help you set up the behavior oftheapplet, enabling the terms tobe visiblewhen theapplet starts and/or tobeautomatically accepted after a certain number of seconds without input from the client (keystrokes or mouse-clicks).
●TheEnable option lets you activate or deactivate this Initial Form;
●TheSubmitTimeoutentryfieldallowsyoutosetthetime, inseconds,duringwhich the Initial Form is presented on the client’s screen;
●TheReset Timeronkeypresswill,whenclicked,allowtheclienttoenterhisdatawithoutworryingaboutthetimelimit.Theclockwillresetaftereachandevery keystroke.

67©2013 BeAnywhere. All rights reserved.
Administrative Area4.Messages1of4ThenextfourtabsallowthecustomizationofthemessagespresentedtotheclientontheApplet.Thefirstoneoccurswhentheappletissendingthesupportrequest.
Thesemessagesaresenttoyoure-mailaddress(definedinthecompanyprofile)and are also available at Reports>MissedSessions.
5.Messages2of4The second message is presented when the support request has beensuccessfully sent.
7.Messages4of4Definethemessagepresentedtoyourclientwhenthetechniciantakestoolongtoreplytoachatmessage.Simplyusetheavailabletextentryfield.Inthiscase,youalsohavethepossibilitytodeterminethewaitingtimelimit–simplychangethevalueinthe Timeouttextentryfield.Themessageyouhavedefinedwillappearintheclient’schat box whenever this time limit runs out.
8.SettingsThe last tab allows the customization of the default behavior of theApplet: it ispossible to remove the remote desktop background automatically (recommended) whileonsession,andit isalsopossibletoconfiguretheApplettoalwaysrequestadministration privileges in Operating Systems with User Account Control enabled.
6.Messages3of4In this tab, it is possible to set whatmessage is displayed when no techniciananswersthesupportrequest.Firstofall,determinethewaitingtimelimit–simplychange the value manually in the Timeout text entry field. It’s alsopossible toallowclientstoleaveamessage–selecttheLetclientsleaveamessage option and determine how to introduce this possibility to the client.

68©2013 BeAnywhere. All rights reserved.
Administrative AreaAgent SetupThis area allows the configuration of the default options for theAgents. Theseoptionsareonlyvalidtonewinstallations,whichmeanstheyarenotenforced(auser with local administration privileges can change them later on each agent) nor applicable to Agents previously installed.
Onthefirsttab,itispossibletoselectifanewAgentwillusethecomputername,and also if the installation will be silent (without any intervention from a local user).Besidesthenameandregistration,newAgentscanbeconfiguredtoenablethe default settings and give the local user the option to override them (or disable this possibility).
1.SettingsThis tabcontainsmostof theconfigurationsavailableontheAgent (clickingonthe SETTINGS button of the Graphic User Interface). It includes graphics and performance optimization settings, as well as connectivity features discussedthroughout this manual.
2.SecurityAll the items under Security can also be set on the Agent. These settingsincrease the sessions’ security performed through the BASE Agent. It is very important to understand and set these options because a bad configuration on this tab can render an Agent inaccessible.
●Remote sessions require localuserauthorization– All the sessions made totheAgenthavetobeauthorizedbyalocaluser. Enabling this will effectively disallow unattended access to the computer. Use with care.
●LockWindowswhentheremotesessionends– Protects the local Windows sessionagainstunauthorizeduseafteraremoteaccess.
●RequireauthenticationthroughWindowscredentials– A second layer of securityisaddedtotheAgent,whichwillonlyacceptconnectionsifthecredentialsare locally validated (either on the local computer or in the domain). For security reasons,onlycredentialsfromuserswithacreatedprofileontheremotecomputerwill be accepted.
●Allowrestricteduseraccountstologin–Usingthisoption,theaccesstotheremoteAgentcanbe restricted toprivilegedWindowsaccountsonly,or toanyWindowsaccountwithaprofileontheremotecomputer.
IMPORTANT: For security reasons, the BeAnywhere Password setting cannot be defined by default on the Admin Area. If you want to use this setting, please set a password locally.
!

69©2013 BeAnywhere. All rights reserved.
IntegrationBASE’s advanced integration forms.
1.YourwebsiteYou can integrate a Support request button into any of your websites. Simply copy the code presented at the center of the screen and paste it on the code of your own webpages.Thebuttonpresentedinthiswindowismerelyanexample.
2.StartAPIs
I. New session APIThisAPI (ApplicationPrograming Interface) allowsnew sessions tobegeneratedwithouthavingtousetheconsole–forexample,itispossibletogeneratesessionsfromyourCRMsoftware.TheDownload button will grant you access to the user manual of the API.
II. Landing Page APIEasilyplaceanAPIonyourownwebsite,enablingyourclientstodirectly insertaPINCodeoruseaCallingCardbuilt intoyourwebsite.Theparametersshowninthiswindowaremandatoryontheform,whichmeansthattheyneedtobeinsertedexactlyaspresented, inordertobefullyfunctional.TheWizardpresentedonthebottom lets you generate an example of how these parameters should look.
Simply choose the desired language from the dropdown list (English or Portuguese); do the same with the desired feature (PIN Code or Calling Card).
Tomodify theaestheticsof thebuttonyouwishtoplaceonyourwebsite,simplyuncomment the colored code and use your own URL.
Finally,clickGenerate.
3.OtherAPIs
I. New Support Ticket APIDownload the manual describing how to use this feature to create deferred support ticketsdirectly fromanyapplication.Using thisAPI,nocustomquestionsorattachmentscanbeaddedontheticketcreation(filescouldbeaddedatalatertime,editingtheticket).
II. Validation APIA checkbox to activate the UseValidationAPI option. Bydefault, this option isnotchecked, thusbeing inactive.ThisAPI’sobjective is topre-process theclient’sdata gathered by the BeAnywhere Support Express Applet before the creation of a support request.
4.ExclusiveLinkDefinitionoftheexclusivelink,fromwhichyourclientswillbeabletosendarequestforsupport.Toestablishthedesireddomain,chooseoneoftheavailableoptionsofferedbythedropdownboxattheleft.Toestablishthedesiredsuffixofthelink,usethetextentryfield,placedattheleft,freely.
Directlybeneath,youcanpreviewtheExclusiveLink(usedbytheclientstosendasupport request) and the Applet direct download link (used by the clients to initiate the download of the Applet).
Administrative Area

70©2013 BeAnywhere. All rights reserved.
6.WebchatTheWebChatallowstheestablishmentofachatconversationbetweenaclientandaspecifictechnician,evenbeforetheactualremotesessionkicksin(pleaseseeChat chapter for more information).
Onthistab,it ispossibletocustomizethelookandfeelofthechatWindow(anychangewillberevisedbytheBeAnywhereteambeforebeingapplied),aswellastoget links to chat with each technician.
7.NotificationsChoosewhicheventswill triggere-mailnotifications foryourHelpdeskCenterandcustomize recipients for eachmessage. There are four possible events, and eachone can notify a different e-mail recipient: New session request, survey answered(regardlessofthetypeofsurvey),missedsessionrequestwithmessageandwarningisarequestiswaitingmorethanthedefinedthreshold.
IMPORTANT: Use e-mail filtering rules to forward these messages to different technicians, based on certain conditions (e.g. client number, computer name, request queue).
!
5.ProxyBeAnywhere Support Express Proxy allows you to provide remote support sessions to computers without Internet connection. Please use the Download button to downloadtheproxyinstaller.Below,youcanchecktheintegratedproxyserversandtheir detailed information.
Administrative Area
Check our video tutorial about the Profile tab at the Admin Area.

71©2013 BeAnywhere. All rights reserved.
Administrative AreaMANAGEMENT
TechniciansManaging technicians and departments.
TechniciansThe Create New button lets you initiate the simple process of creating a new technician.Ontheleftside,theSearchentryfieldallowsyoutosearchforthedesiredtechnician(typing,forexample,hisname).TheDepartmentdropdownlistnarrowsthesearchtoaspecificdepartment.
IdentificationSelectaname,theusername(ane-mailaddress)andthepasswordofthenewtechnician.
It is also possible to upload a picture (which will appear on the Applet - otherwise the default picture will be used) and to set an expiration date - useful to create temporary technicians (e.g. third party contractors).
PermissionsThefirstthingonthistabistheoptionResetSettingsto,allowingtheestablishmentofaprofiletoneworexistingusers,combiningallthefeaturesthatcanbesetinthispage.Therearethreedefaultprofiles: JuniorTech(limitedremoteaccess throughApplets),SeniorTech(mostoftheoptions,exceptingadministrationfeatures)andAdmin (full features). Clicking the Help button will show a table with the detailed configurationsforeachone.
This feature is helpfulwhen settingupnew technicians, or if aquickdowngradeorupgradetoa techaccount isneeded.Theprofileswerechosenwith themostcommon options selected but they are meant to be used just as guidelines.
ThefollowingoptionistheabilitytoaccesstheAdminArea,whichcanbefurthercustomizedusingtheoptionsetcustomaccess.ThiswillallowtheconfigurationofseveralspecificAdminAreasectionstobeinaccessible,read-onlyorfullyaccessible.
Clicking on Next continues the process.

72©2013 BeAnywhere. All rights reserved.
WhenconfiguringtheAccessSessionHistory you can disable the access to this featureor,onthecontrary,providefullaccess;also,youcansetittoonlyshowthesessions belonging to this particular technician.
Simplyuncheckthefirstoptionifyoudonotwanttoofferthisparticulartechnicianthe possibility to disconnect others. Uncheck the second option if you do not want this particulartechniciantobedisconnectedbyothers.Todisconnectanonlinetechnician,just select one technician from the list presented at the moment you try to log in.
ThedisconnectedtechnicianwillloseallaccesstoBASEfeaturesandwillneedtorepeathisloginproceduresinordertogetbackonline(ifthere’senoughroomforhim,obviously).
Each technician can also have his or her access to unattended devices limited on MyComputerManagementPermissions. It is possible not only to disable the access tospecificcomputersbutalso tocustomize themanagementpermissionsassociated with this feature.
ThelastoptionistoenabletheaccessandtheadministrationofBeAnywhereinSightLite. Please note that this setting only establishes whether a technician can use inSight Lite-itdoesnotactivatethisfeatureontheremotemachines.Formoreinformation,please refer to the inSight Lite chapter.
On Console Features, granular permissions for each technician can be defined,restrictingaccess toproduct features, inorder tocustomize theworkflowsof theHelpdesk Center. Click SetDetails to access these options.
Technicians KickOut -OneparticularfeatureyoucansetatthispointistheTechniciansKickOut. If your account reaches the maximum number of simultaneous technicians online,you’llbegiventheopportunitytodisconnectoneoftheonlinetechnicians,thus finding room for another technician to log in.The permission to deactivateothers or the chance of being deactivated by others are determined through the Candisconnectanyother techs and the Canbedisconnectedoptions.Bydefault,both are checked.
DefaultSettingsTechnician’sworkdefaultsettings.
●The Receive Requests sent to option allows the definition of which supportrequests are received by the technician;●TheGenerateRequeststooptionallowsthedefinitionofthedestinationofthesupport requests issued by the technician;●TheRecordSessionVideoallowsthedefinitionofthevideorecordsettings.
Department(s)Definewhich department(s) the technician will be incorporated into – to do so,simply click on the desired department(s).
Administrative Area

73©2013 BeAnywhere. All rights reserved.
2.TechniciansSelect the technicians that should be incorporated into the selected department (the activedepartmentisvisibleontheleftcolumn)–justcheckthedesiredtechnicians.Forsavingtime,youcanusetheSelectAlloption.
Administrative Area
IMPORTANT: Besides creating and deleting Departments, this page also allows you to edit them. When deleting a department, all the technicians that belong ONLY to that department will be marked as inactive.
!
DepartmentsNew department creation and management.
IntroductionTheCreateNewbuttoninitiatesthenewdepartmentcreationprocess.Firstofall,you will be asked to name the new department. Simply use the available text entry fieldandclickCreatewhenfinished.
1.IdentificationAgain,you’llhavetheopportunitytodecidetheDepartment’sname.TheDepartmentIDisautomaticallyassigned.ThesamegoesfortheDepartmentLink–throughthislink,supportrequestswillbedirectedtothisparticulardepartment.Toenablethedepartment,justchecktheEnableoption.
Whendone,theSavebutton,placedonthelowerrightcorner,willsaveandvalidatethe new data.
TheDeletebutton will disable this department and hide it from the list.
Check our video tutorial on how to create departments and technicians.
IMPORTANT: If you select the Expected Wait Time information checkbox and choose the desired language, additional parameters will be included in the Department Link. This checkbox will not be saved along with the rest of the page, it is just meant to add the relevant option to the link, when needed.
!

74©2013 BeAnywhere. All rights reserved.
My ComputersThisareashowsthe listofcomputers installedasaWindowsService.Onthetopof the page there is a tree with all devices and their groups. It is possible to search for any of these elements by using the top search box, or otherwise filter themwiththethreeoptionsplacedatthetop.Thelasttwooftheseoptionsarerelatedwith BeAnywhereinSightLiteAdd-On(formoreinformation,pleaserefertotheinSight Lite Edition chapter).
Thecomputerslistedonthetablewillhaveadifferenticontohighlighttheironlinestate.Thecomputersonlinewillalsohaveanother iconontherightsideof thetable,allowingtheestablishmentofaremotecontrolsessiondirectlyfromtheAdminArea,usingtheJavaviewer.Whenestablishingthesession,thepasswordoftheAdminAreauserwillbeaskedagain,forsecurityreasons.
GroupOptionsIfagroupisselectedonthetree,threetabswillbemadeavailablebelow.Generalallowsglobalinformationofthegrouptobechanged,aswellasdeleted.Thereisalsoa SESSIONS button,whichwilltaketheAdministratortoafilteredlistofsessions,containing only those made to computers inside the relevant group.
ThePermissions tab will enable the management of access permissions. It is possible tolistallthetechniciansregisteredortofilterthembygroup.
Thesechangescanbeappliedtothecurrentgrouporbereplicatedto itschild groups.
Administrative Area
IMPORTANT: If a group is deleted, the Administrator has the option to uninstall all the computers on it or simply move them to a parent group.
!
Thefinaloptionallowstheusertochoosewhetherthechangesaretobeappliedtoall the computers in the group.
On the bottom of the table there is an export link,whichwillsavethewhole listofdevices to anexcel spreadsheet, completedwith all the relevant information (GroupName,DomainName,AgentVersion,etc.).

75©2013 BeAnywhere. All rights reserved.
Also on the Advancedtab,AdministratorshavetheabilitytoperformamassrestartoftheremoteAgentsofthegroup(onlytheBeAnywhereServiceisrestarted,notthecomputeritself ),aswellasamassuninstallationoftheAgents,effectivelylosingaccess to the computers.
TheAdministratorcanchangethenameandthedescriptionofthecomputeralongwithadditionalclientdata.Theserverversionandthelastaccessarealsopresented(they are also on the table).
Onthisareaitcanalsobedefinedifaremoteusercanstartasupportrequestorusethedeferredsupporttickets.Regardingthislastoption,itcanalsobesetifahistorytab (listing all the tickets on the machine) will be shown on the ticket creation page.
ComputerOptionsIfacomputer is selectedon the table, several tabswillbemadeavailablebelow.The first tab isGeneral, inwhich the first option is to enable themonitoring ofthe computer, effectively activating the inSight Litemodule on it, andmaking allthe remaining tabs usable. We will discuss BeAnywhere inSight Lite on a separate chapter,solet’sjustfocusontheotheroptionsofthistab.
Besidestherestartanduninstalloptions,theSESSIONS button will present a list of all the sessions made to the computer.
TheAdvanced tabdefines ifa localuseronacomputerpertainingtothegroupcanstartaremoterequest(andifso,whatisthequeuefortherequest)andalsoifasupportticketcanbelocallycreated.Asalways,thesechangescanbereplicatedtoall the computers in the group.
Administrative Area

76©2013 BeAnywhere. All rights reserved.
SurveysCreation of surveys intended for technicians and/or clients.
InformationTocreateanewsurveyclicktheCreateNew button.
1.SurveySettingsDefinitionofthesurvey’sname,itsrecipient(clientortechnician),itstype(optional,atthediscretionofthetechnician;ormandatory,automaticallysent),thelanguage(byselectingoneoffiveavailableonthedropdownlist)and,finally,thedescriptionofthesurvey(itwillbevisibleatthetopofthesurvey).TheEnableoption lets you activatethissurvey,makingitreadytobesent.
Administrative Area
●TheDelete button commands the extinction of the previously created survey;
●ThePreview button offers you a preview of the survey;
●TheShowReport button presents the received answers.
2.ListofQuestions
●The buttonisusedtodeleteacreatedquestion; ●Thebuttonhelpstoreorganizetheorderofeachquestionwithinthesurvey.Eachclick on this icon will move the corresponding question to a lower position; ●Theiconshowsthestatusofthequestion–Active,inthiscase.Whenyouseetheicon,youwillknowthatthequestionisnotactive;
●TheTypeoptionshowsyouwhat typeofanswer is reservedfor theassociatedquestion.Youcanchoose fromquantitative responses (1-5),Yes/No, FreeTextorofferanumberofpre-definedanswerstochoosefrom.
Toaddanewquestion,justclickontheNewQuestionbutton. Toeditanyoftheexistingquestions,justclickonthequestionyouwishtoedit.
Thefollowingwindowwillletyoueditthequestionitself,throughasimpletextentry field.

77©2013 BeAnywhere. All rights reserved.
You can set the type of answer you prefer (if you choose ListofChoices,anAdd button will enable you to specify the list of possible answers).
Another option is Checkbeforesubmit: you may want a survey to be mandatory asawhole,butwithonlysomemandatoryquestions.Ifthisoptionisnotenabled,aquestion may be left blank on a mandatory survey.
Administrative Area
Finally, the Active checkbox establishes whether or not the question should be included in the survey.
Click the Add button to add this new question.
Click the Closebutton placed at the top right corner of the window to close it without adding a question.
Check our video tutorial about Surveys.

78©2013 BeAnywhere. All rights reserved.
Administrative AreaCalling CardsA calling card is a special version of the applet that can be dropped on a client’s computerand,therefore,usedeverytimeheneedsremoteassistance.
CallingCardshaveareferenceID,composedbyanalphanumericprefixand13digits–thisIDisusedfordownloadingthisspecialapplet.TheCallingCardscanbesetwithanexpirationdateandamaximumsessiontimedefined,allowingagreatdealofflexibilityforproviderstolaunchspecialpromotionsordifferentsupportproducts.
BASE allows the creation of single Calling Cards - through the console - but also enablesthecreationofbatches-usingtheAdminArea.ThemanagementofalltheCalling Cards is also made through the Admin Area.
Pre-ConfiguringtheAdminAreaBeforeusingtheCallingCardfeature,youshouldchoosetheprefixthatwillbeusedon all the calling cards generated through your account.
1. The prefix configuration is central. This option is presented to you on theStartupWizard.
2.Thereyoucanchooseacallingcard,composedby4to8digits(lettersA-Zornumbers0-9,caseinsensitive).
3. Iftheprefixyouinsertedmeetsthedefinitionsdescribedbefore,agreencheckmarkwillappear.Theformatofyourcallingcardswillbepreviewedbelow.
4. Clicking on the Save icon will save all of the information in Profile>Identification,notonlythesettingsconfiguredonthecallingcardstab.
5. You may also want to set if an URL is to be open on the following scenarios: a. Before the beginning of the session a.i. When the Calling Card’s date has expired a.ii. When the Calling Card has no time left b. After the session is started b.i. When the Calling Card’s date has expired b.ii. When the Calling Card has no time left
YoucanfindtheseinManagement>Warnings>5.CallingCards. None of these optionsismandatory.Ifnoinformationisinserted,anerrormessagewillbepresentedtoyouruserwhentryingtoestablishaconnectionorduringthecallingcardsession,but no webpage will be presented to your client.
6. Clicking on theSave icon will save all of the information in Management>Warnings,notonlythesettingsconfiguredonthecallingcardstab.
Ifyoumissedthewizard,or ifyouwanttochangeyourcallingcardprefix,gotoProfile>Identification>4.CallingCards.

79©2013 BeAnywhere. All rights reserved.
Creating a single Calling Card in the console
1. Onthemainwindow,selectNewCallingCard and click StartNewSession.
2. Ifyoudonotwanttosetanyadvancedoptions,clickonGenerateCallingCard. Otherwise,clickonShowAdvancedOptions.
3.Besidestheoptionalinformationthatcanbeaddedtoacallingcard(clientname,number,description,etc.),youmaysetthedepartmentsortechniciansthatreceiverequests,alongwiththeexpirationoptions.
a.To setwhowill receive the requestsgeneratedbya callingcard, click theChange button on SelectedQueue. Anewwindowwill appear, inwhich youcanchooseaspecificdepartmentortechnician. b.Tosetexpirationoptions,click theChangebutton on Expiration. You can definethesessiontimeincluded,choosingfromunlimitedsupporttimetoacertainnumberofminutes,hoursordays.Theexpirationdatedefines thevalidityof theCallingCard.Itcangofromneverexpiringtoexpiringonacertainday.Thesetwooptions-SupportTimeandExpirationDate–areindependent,meaningthatyoucansetupbothoptions,onlyoneoption,ornoneoftheoptions.
4.Aftertheconfiguration,clickonGenerateCallingCard.
Administrative Area
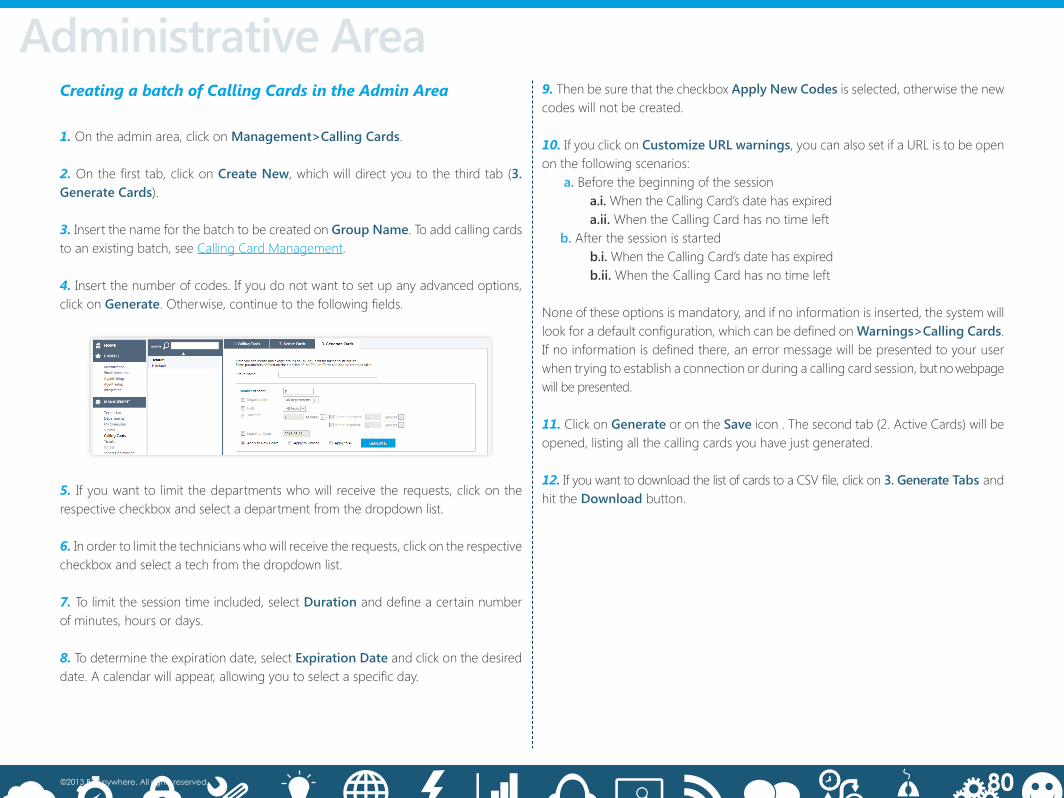
80©2013 BeAnywhere. All rights reserved.
Creating a batch of Calling Cards in the Admin Area
1. Ontheadminarea,clickonManagement>CallingCards.
2.Onthefirsttab,clickonCreateNew,whichwilldirectyoutothethirdtab(3.GenerateCards).
3. Insert the name for the batch to be created on GroupName.Toaddcallingcardstoanexistingbatch,seeCalling Card Management.
4.Insertthenumberofcodes.Ifyoudonotwanttosetupanyadvancedoptions,click on Generate.Otherwise,continuetothefollowingfields.
5. Ifyouwanttolimitthedepartmentswhowillreceivetherequests,clickontherespective checkbox and select a department from the dropdown list.
6. Inordertolimitthetechnicianswhowillreceivetherequests,clickontherespectivecheckbox and select a tech from the dropdown list.
7.Tolimitthesessiontimeincluded,selectDurationanddefineacertainnumberofminutes,hoursordays.
8. Todeterminetheexpirationdate,selectExpirationDate and click on the desired date.Acalendarwillappear,allowingyoutoselectaspecificday.
9.ThenbesurethatthecheckboxApplyNewCodesisselected,otherwisethenewcodes will not be created.
10. If you click on CustomizeURLwarnings,youcanalsosetifaURListobeopenon the following scenarios: a. Before the beginning of the session a.i. When the Calling Card’s date has expired a.ii. When the Calling Card has no time left b. After the session is started b.i. When the Calling Card’s date has expired b.ii. When the Calling Card has no time left
Noneoftheseoptionsismandatory,andifnoinformationisinserted,thesystemwilllookforadefaultconfiguration,whichcanbedefinedonWarnings>CallingCards.Ifnoinformationisdefinedthere,anerrormessagewillbepresentedtoyouruserwhentryingtoestablishaconnectionorduringacallingcardsession,butnowebpagewill be presented.
11. Click on Generate or on the Saveicon.Thesecondtab(2.ActiveCards)willbeopened,listingallthecallingcardsyouhavejustgenerated.
12.IfyouwanttodownloadthelistofcardstoaCSVfile,clickon3.GenerateTabs and hit the Downloadbutton.
Administrative Area

81©2013 BeAnywhere. All rights reserved.
Administrative AreaCalling Card ManagementBesidesmanaging theglobal settings forgroupsofcallingcards,youcanmanagesingle calling cards or several calling cards at the same time (belonging to the same or to different groups).
Manageagroupofcards
1.Tomanagetheglobalsettingsofagroupofcallingcards,click on its name,atthe list on the left.
2. Select the third tab (3.GenerateCards).
3.Changetherelevantoptions(NumberofCodes,Duration,Department,etc.).
4.Select the scope of the changes by clicking on one of the following checkboxes: a.ApplytoNewCodes-Thesettingswillbeappliedonlytonewcodescreatedin thegroup. If youareaddingcodes to thegroup, youmust select thisoption,otherwise the new codes will not be created. b.Apply toUnused - The settingswill be applied to all of the unused codes,regardless of being new or not. c.ApplytoAll-Thenewsettingswillbeappliedtoallcodes.
5. You can also change the CustomizeURLwarnings. These settingswill alwaysbeappliedtoallofthecodesonthegroup,regardlessofthescopedefinedontheprevious point.
6.Click on Generate or on theSaveicon.Aconfirmationwindowwillappear.
Manageoneormorecards
Themanagementofoneormorecardsisdoneatthesecondtab(2.ActiveCards). Bydefault,allthecardsfromallthegroupswillbelistedhere,unlessyouselectoneofthegroupsfromthelisttotheleft.Inthatcase,thetablewillbeshowingonlythecallingcardsbelongingtothatgroup.Thetableincludesthefollowinginformation:
● ID - The calling card number, which will be used for downloading thespecial applet.
●CREATED -Thedatethecardwascreated.
●#MADE/LOST-Number of sessions made and number of sessions that were not answered by the technicians.
●TIME USED -Timealreadyusedonsessions.
●TIMELEFT- Remaining time for support.
●EXPIRES -Thedateofexpirationforeachcard.
●STATUS -Visualindicationofthestatusofthecallingcard.Ifitisstillvalid,agreencheckmarkwillbeshown.Ared“X”meansthecodeisexpiredorwasrevoked.
Tomanageoneormorecards,pleaseperformthefollowingsteps:
1.Select the checkbox corresponding to the code or codes you want to change.
2. Click on the Edit button.
3.Youcanchangetheexpirationdate,theduration(totaltimeofthecard),andthetime left.
4.Clicking on Resetcodestatus reactivates a code that has been revoked.
5.Afterchangingtherelevantfields,clickonSave.TheRevokebutton disables the useofoneormorecodes,thusblockingthem.
Clickingonthisbuttonwillpromptaconfirmationwindow–ifyouagree,thecodewill be permanently banned from the BeAnywhere network.
Administrative Area

82©2013 BeAnywhere. All rights reserved.
Tosearchforcodes,clickontheSearchbutton and a new window will appear. Here you will be able to choose from several options:
●ID -Thecallingcardnumber,whichwillbeusedtodownloadthespecialapplet.
●Duration(From-To):Timeconfiguredtothecard.
●Timeleft(From-To):Timeleftonthecard.
●Expired-Selecting this option will include expired cards in the search.
●Allgroups- Searches cards from all of the existing groups.
●AllHistory- Search from the beginning.
●UsedateasCreationdate/Expirationdate(From-To): allow a delimitation of thesearchbycreationdateorbytheexpirationdatedefined.Selecttheparametersrelevant to your search and click Search.Thetablewillthendisplaythefilteredresults.
Administrative Area

83©2013 BeAnywhere. All rights reserved.
TicketsComputerswithBASEAgentinstalled,aswellasrequestingremoteassistance,canalso generate a support ticket.
Note: All associated requests can be checked at Reports>Tickets.
1.IntroInthistabyoucandefinetheintrodutorytextthatwillbeusedontheticketcreationform - just use the text box at the center. Below you can also choose the desired language.
2.UserContentYou can add up to 10 customized questions that can be added to your ticketcreation form.
Use the NewQuestionbutton not only to add any questions, but also to setthe type of answers. If you choose ListofChoices, youwillhave toalsosetuppredefinedanswers.
Lastly,checktheActiveoptionandclickAdd to include a question in your ticket form.
3.ForwardingNew tickets can be automatically forwarded to a technician or a department (the ticketwillbeinvisibletoothers).Thiscanbeusefulinanumberofsituations(e.g.:aspecifictechoradepartmenthandletheinitialscreeningofnewtickets,andthenforwardthemtotheappropriaterecipients).Ifnoautomaticforwardingissetup,tickets created will be visible to all the technicians with the adequate permissions.
Anytechwithaccess toa ticketcan forward it later,whichwill render the ticketinvisible to all the other techs.
Administrative Area

84©2013 BeAnywhere. All rights reserved.
4.NotificationsSupport Express can email both the helpdesk center and the relevant end users about ticketupdates.Enduserswillbenotifiedat theemailprovidedwhen theticketiscreated.Itispossibletoenablethreetypesofnotifications:whenaticketiscreated,whenaticketisupdatedandwhenithasbeenclosed.
Messages sent to the helpdesk center - internal notifications - contain moreinformationthantheonesemailedtoendusers(adding,forexample,thelastnoteaddedtotheticket).Also, there isaspecial typeof internalnotificationwhich ismandatory: when a NextActionscheduleisdefined,thehelpdeskcenterwillbenotifiedonthescheduleddate.
Internalnotificationswillbesenttothee-mailofthetechnicianwhichhastheticketattributed. If the ticket has been forwarded to a department or it is not forwarded toanytechordepartment,thenotificationwillbeemailedtotheaddresssetupon this page.
Administrative Area
Check our video tutorial about Tickets.

85©2013 BeAnywhere. All rights reserved.
Creating a TicketTheclientcanaccesshisBASEAgentthroughthesystemtrayicon: Click on SupportTickets.
InthisfirstwindowtheclientwillseetheTicketcreationform.ThetextshownatthetopofthepageisdefinedbythetechnicianintheAdminArea,aswellasanypredefinedform questions (Management>Tickets–pleasesee the respective chapter).
Theclientneedsonlytofilloutthethreetextboxeswithhisname,e-mailandtheproblem description (e-mail IS mandatory).
TheUploadbutton enables the upload of attachments that will be associated with theticket(screenshotsshowingtheerror,forinstance).
Finally,clickCreateTicket to send the ticket.
Ifthecomputerhaspermissions,therewillalsobeanothertab-History - in which the remote user can access all the tickets already created on that computer. Clicking on any of them will show more information.
The client can check the related Info (Number, E-mail, Agent name, etc), checkthe Custom Answers in the respective tab (if the creation ticket form includes any questions)andtheattachedfiles(ifany).Moreimportantly,theproblemdescriptioncan,atthispoint,beedited;anusefulfeaturethatenablestheclienttoupdatehisproblemdescription,possiblyaddingtohisoriginalticketotherpressingissues.
ClickSavewhen done and the ticket information will be updated.
Administrative Area
IMPORTANT: Technicians can also start a support ticket for the end user, using the Console, by selecting a device from the My Computers tab and clicking on Create Support Ticket.
!
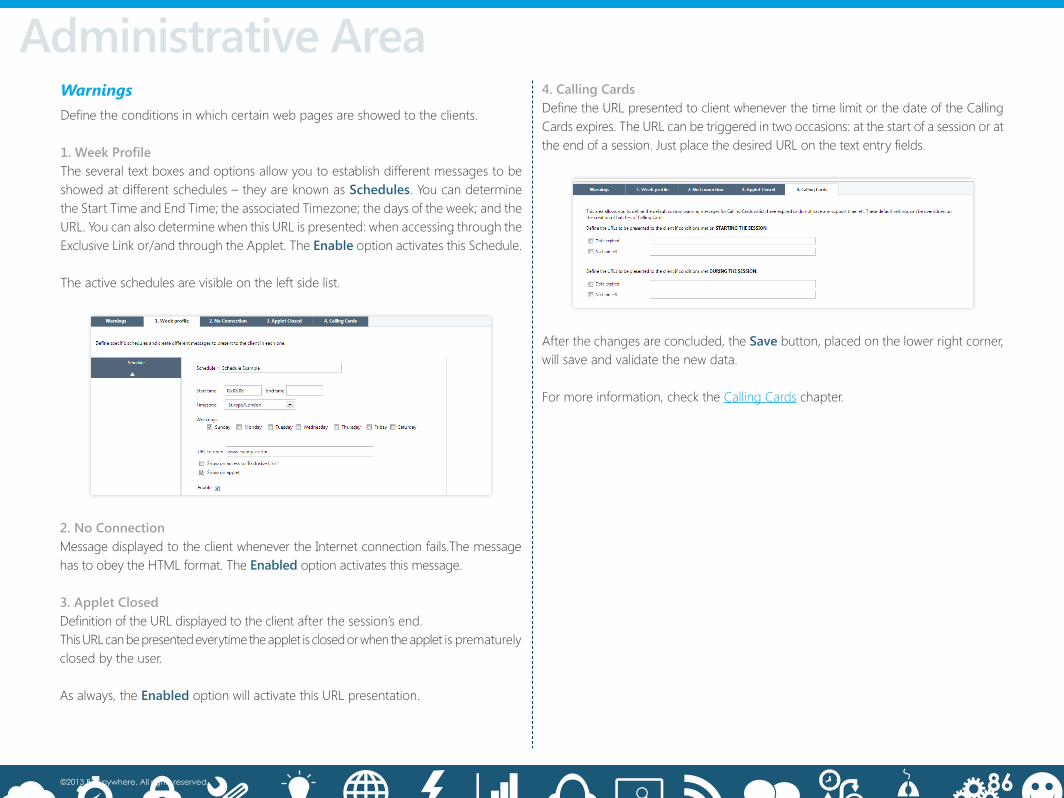
86©2013 BeAnywhere. All rights reserved.
WarningsDefinetheconditionsinwhichcertainwebpagesareshowedtotheclients.
1.WeekProfileTheseveraltextboxesandoptionsallowyoutoestablishdifferentmessagestobeshowedatdifferentschedules–theyareknownasSchedules. You can determine theStartTimeandEndTime;theassociatedTimezone;thedaysoftheweek;andtheURL. You can also determine when this URL is presented: when accessing through the ExclusiveLinkor/andthroughtheApplet.TheEnable option activates this Schedule.
Theactiveschedulesarevisibleontheleftsidelist.
2.NoConnectionMessagedisplayedtotheclientwhenevertheInternetconnectionfails.ThemessagehastoobeytheHTMLformat.TheEnabled option activates this message.
3.AppletClosedDefinitionoftheURLdisplayedtotheclientafterthesession’send.ThisURLcanbepresentedeverytimetheappletisclosedorwhentheappletisprematurelyclosed by the user.
Asalways,theEnabledoption will activate this URL presentation.
4.CallingCardsDefinetheURLpresentedtoclientwheneverthetimelimitorthedateoftheCallingCardsexpires.TheURLcanbetriggeredintwooccasions:atthestartofasessionorattheendofasession.JustplacethedesiredURLonthetextentryfields.
Afterthechangesareconcluded,theSavebutton,placedonthelowerrightcorner,will save and validate the new data.
Formoreinformation,checktheCalling Cards chapter.
Administrative Area

87©2013 BeAnywhere. All rights reserved.
REPORTSVarious reports about BeAnywhere activity.
Session History
Thebutton placed on the upper right corner of the window lets youdeterminethesortingorderandcriteria–thesubsequentlyaccessedmenuoffersanarrayofdifferentparameters(nameofthetechnician,client,computer,domainor length). You can also sort them in ascending or descending order.
Thesesettings,alongwiththesearchfiltersthatcanbeapplied,willbepermanentlysavedontheuserprofile.
Administrative Area
TheExportbutton starts the download of the data.
TheSearchbuttonallows you toperforma search through theentiredatabase,offeringvarioussearchcriteria(date,clientname,videorecording,domain,technicians,clientnumber,etc.);
TheAssigntobuttonletsyouassociatetheselectedsessionstoaclientnumber,ane-mail,aclientnameand/oraticketnumber;
To study each one of the sessions in detail, simply double-click on the desiredsession–itispossible,throughthisdetailedwindow,toExport(runthedownloadto your computer).
The Email Report button enables the tech to choose what to include in the webpagereport–Chatlog,FTP,SystemShell,Video,RemoteSystemInformation,Global Info (the Assign to and Email Report options are placed on the lower left corner of the window).
Ifavideowasrecordedduringtheremotesession,youwillbeabletowatchitorshare it using the Videotab;bychoosinganyvideo,youwillalsobeabletoSave thatsamefiletoyourcomputer.
Atthebottomofthewindow,thesearchresultscanbefoundingraphicalform.TheChartTypeoption,letsyouchoosebetweenagraphofColumns/RowsorPie.
TheGraphObjectoptionshows, incascade, thevariouscriteriaonwhicheachgraph can be build upon. In order to display a new chart, youmust click theGeneratebutton.

88©2013 BeAnywhere. All rights reserved.
Administrative AreaMissed SessionsRegistry of all unanswered session requests. Byclickingonanyoftheregisters,youcan consult any messages left by the clients.
●TheExportbuttonstartsthedata’sdownloadtoyourPC,inExcelformat;●TheSearchbuttonallowsyoutoperformasearchthroughtheentiredatabase,offeringvarioussearchcriteria(nameofclient,domain,computer,etc);
Atthebottomofthewindow,thesearchresultscanbefoundingraphicalform.TheChartTypeoption,letsyouchoosebetweenagraphofColumns/RowsorPie.TheGraphObjectoptionshows,incascade,thevariouscriteriaeachgraphcanbe built upon.
You must click the Generatebutton to display a new chart.
Check our video tutorial about Sessions Reports.

89©2013 BeAnywhere. All rights reserved.
Running SessionsAlistoftheactivesessionsandonlinetechnicians,updatedevery30seconds. By clickingonanytechnician,youareabletoviewallofhisdealtsessions;byclickingon any session, youwill access amore detailed data about that same supportsession.
TheForceLogoutbuttondisconnectsthatparticulartechnician.Thecurrentsessionswillremainactive,butnonewsessionsorsessionreconnectioncanbeperformeduntil the technician logs in again.
Thelowerpanealsopresentsthependingrequests.Therearetwooptionsonthese:ASSIGN (transfers the request to a different department or tech queue) or CANCEL (cancels the request).
Administrative Area

90©2013 BeAnywhere. All rights reserved.
Administrative AreaTech PerformancePerformance Report related to each of the technicians.TheExportbuttoninitiatesthedata’sdownloadtoyourPC,inExcelformat;TheSearchbuttonallowsyoutoperformasearchforaspecifictechnicianand/orforadefinedperiodoftime;
Atthebottomofthewindow,thesearchresultscanbefoundingraphicalform.TheChartType option lets you choose between a graph of Columns/Rows or Pie.
TheGraphObject option shows, in cascade, the various criteria onwhich eachgraph can be build upon. You must click the Generatebutton to display a new chart.

91©2013 BeAnywhere. All rights reserved.
TicketsList of tickets sent by clients.
Simply double-click on each one to check for more information.
Administrative AreaTheSearchbuttonwillhelpyoufindaspecificticket,usingfiltersliketicketnumber,status,agentname,assigned technicianordate.Note that themainfilteringandsorting options applied are persistent.
Note: Theattachmentsfromtheclosedticketswillbedeletedafteronemonth.
● On the Infotab,itispossible,apartfromcheckingmoreinformationabouttheticket,toforwardatickettoaspecificdepartmentortoatechnician(ortoremoveapriorforwarding),tochangeitsstatus(existingpossibilitiesareOpened,InProgressandClosed)andalsotoscheduleaNextAction.Thislastsettingwillsendane-mailreminder about the ticket to the helpdesk center or to the attributed technician.
●TheCustomAnswers tab will show the answers provided by the end user when creating the ticket.
●TheFilestabwillallowthedownloadoffilesincludedwiththeticket,aswellasthedeletionoffilesortheuploadofmore.
● In the Notestab,technicianscanaddmoreinformationtohelptrackingincidents.Foraccountabilitypurposes,thenoteswillsavetheinputtime(inUTC)andcannotbe deleted.
●TheSessionstablistsallthesessionsaddedtotheticket,byusingtheAssignto… option on Reports>SessionHistory.
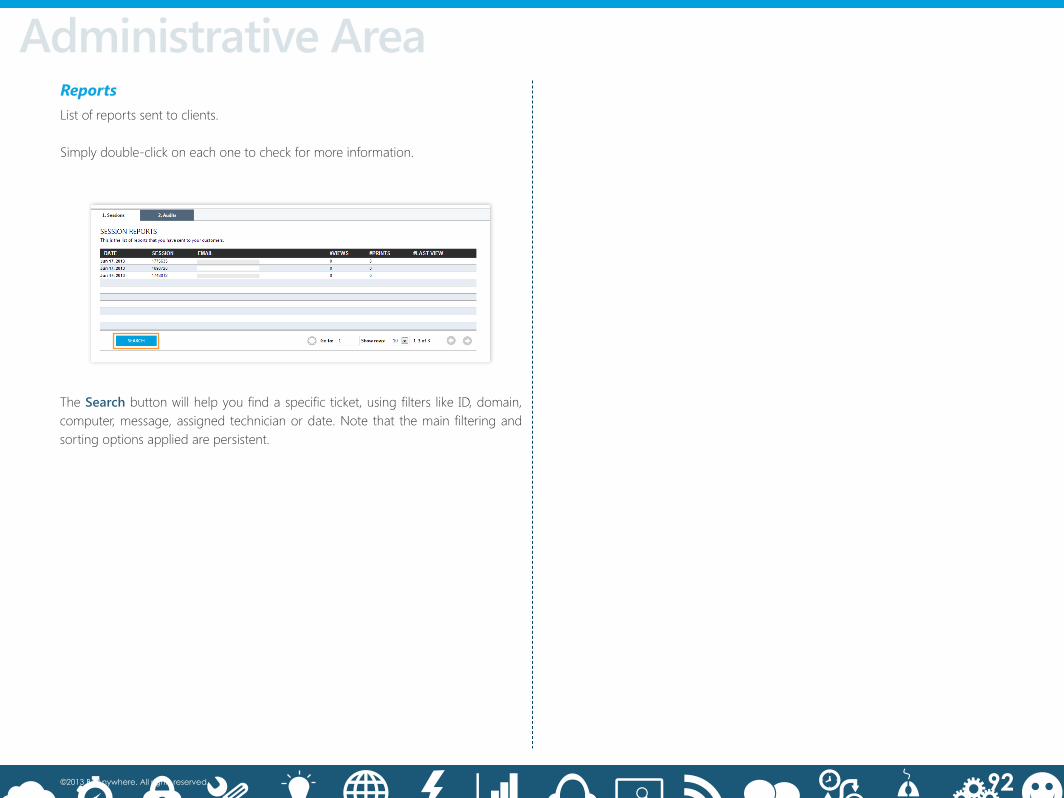
92©2013 BeAnywhere. All rights reserved.
Administrative AreaReportsList of reports sent to clients.
Simply double-click on each one to check for more information.
TheSearchbutton willhelpyoufindaspecificticket,usingfilters likeID,domain,computer,message,assignedtechnicianordate.Notethat themainfilteringandsorting options applied are persistent.

93©2013 BeAnywhere. All rights reserved.
SurveysList of surveys.
Toseethereportofasurvey,youshouldtakethefollowingsteps:
1- ClickSearch,selectsurveyandanyotherrelevantsearchcriteriayoufindessential;
Administrative Area
2 - Click on each of the search results (on the list placed on the upper area of the window) to access the report or click on the ShowReport button;

94©2013 BeAnywhere. All rights reserved.
BILLING
InvoicesRecordofthereceiptsassociatedtoBeAnywheresubscriptionpayments.Thereportindicatesvaluableinformationlikethedate,theamount,thecurrencyusedortheduration of the session.
TheExportbutton,atthebottomleft,initiatesthedata’sdownloadtoyourPC,inExcel format;
Administrative Area

95©2013 BeAnywhere. All rights reserved.
HELPHereyou’llfindContacts,DocumentsandanswerstoallFrequentlyAskedQuestions.
FAQFrequently Asked Questions (FAQ) and theiranswers.Thequestionsaredividedintofour different topics. Just click on each of topics to access the questions and answers.
Administrative Area
ContactsTheChatNowbutton allows you to start a conversation in real time with the BeAnywhereSupportservices.Incaseofunavailability,youcanleaveamessagethat will be handled with the utmost brevity.
If you find any problemwith BeAnywhere Support Express, and the User Guidecouldn’thelpyou,pleasedonothesitatetocontactus:
Website: www.beanywhere.comE-mail: [email protected]
DocumentationSimply click on SupportExpress–UserGuide to startdownloadingthePDFfile.

ChapterXIII
BeAnywhereinSightLiteEdition

97©2013 BeAnywhere. All rights reserved.
BeAnywhere inSight Lite EditionINTRODUCTIONTheBeAnywhereinSightLiteEditionisthenewSimpleRemoteManagementandMonitoring (S-RMM) add-on featured on Support Express. Despite being purchased asanindependentmodule,itcanonlybeusedwhenassociatedwithBusinessorCorporate licenses.
MajorFeatures:
Alert creation based on the agent’s OS;
Graphical information about the agent’s resources usage and status;
Detailed information about the agent’s hardware and software;
Audit reports based on all gathered information;
Software’s vulnerability alerts;
Massive and remote script’s deployment.
EveryBASECorporatelicenseisentitledwith10BAinSightLitelicenses,completelyfree; BASE Busines clients will also enjoy 5 free BA InSight Lite licenses.
Pre-RequisitesBeAnywhere inSight Edition requires the 4.80 Agent or newer. There is no needfor local configuration – the module is managed through the Admin Area. Alltechnicians must be allowed to use it at Management>Technicians,selectingthePermissionstab.ThisprocedureisnecessaryevenfortechnicianswithAdminArea’sadministrator privileges.
Therearetwodifferentkindsofprivileges:AccessandManagement
Access-Thetechniciancancreatenewalerts,runexistingscriptsandauditmachines.
Can’t: 1. Activate/deactivate inSight monitoring in selected computers; 2. Delete Alerts; 3. Add/Delete/Edit Scripts.
Management - The technician enjoys total control over inSight Lite licensesand features.

98©2013 BeAnywhere. All rights reserved.
ALERTS AND MONITORINGThe inSight Lite Edition features an advanced system health-status monitoringmodule,aswellasa real-timealertengine;both toolsallowforaswiftsituation-awarenessofallconnecteddevices.Technicianswillalsobeabletoestablishspecificrulesforspecificsituations,activatingautomaticandimmediatemeasureswheneverthe situation dictates an intervention.
Monitoring and setting up alerts:
MyComputers
ThankstotheBeAnywhereinSightLiteEditionfeature,theMyComputerscategory,attheAdminArea,nowlookslikethis:
Agent’sSearchfeatures:
●inSightPCsonlyfield–Computersbeingmonitored.
● With applied rules only field – Computers being monitored and withassociated alerts.
Generaltabspecificoptions:
●Option Enablemonitoring(YouhaveusedXofYmonitoringlicenses.)
●Specifiestheagentsbeingmonitoredandthenumberofremainingavailable monitoring licenses.
Alerts
BeAnywhere inSight Lite Edition
Thistabshowsalltheavailablealertsandtherulesthatactivateeachone.Listedaretheactiveandinactivealerts,enablingyoutodelete,createoractivate/deactivateany of them. Listed are also the available alerts (each machine can be associated with10activealerts,plus20moreinactivealerts).
NOTE:Deactivatinganalertmeansthattheassociatedruleswillnolongerbeapplied,buttheAlertsHistory will remain intact and the alert will be ready for immediate reactivation. Deleting an alert means that the history of occurrences will alsobelostandyouwon’tbeabletoreactivatethatalert–you’llneedtocreateanewonefromscratch.

99©2013 BeAnywhere. All rights reserved.
BeAnywhere inSight Lite EditionAlerts>AddNew
Thetypeofrulesthatcanbecreatedarethefollowing:
●CPU-IftheCPUusageisbigger/smallerthanX%forYminutes/hours...
●Memory-Ifthephysicalmemoryoccupationisbigger/smallerthanX%/MB/GBfor Y minutes/hours...
●Diskspace-IftheusedspaceforthedriveXisbigger/smallerthanY%/MB/GBfor Y minutes/hours...
●Processnotexecuted-IftheprocessXisnotinexecution...
●Processexecuted-IftheprocessXisbeingexecuted...
●Servicenotexecuted–IftheserviceXisnotinexecution...
●Serviceexecuted–IftheserviceXisbeingexecuted...
●Serviceexecutiontype–IftheserviceXhasthetypeofexecutionY…
●WindowsEvents–Detect intheApplication/System/Securityregistries fromtheEventViewer;detect textstrings in theCategory,Source,Event ID,User,ComputerName,MessageandDescriptionfields.
● There is also a customizable threshold for this kind of alert: ignores everysubsequentidenticaleventthatoccursduringaspecifiedtime-period.
●ONLINE/OFFLINE - If the computer remains without communication for more than 10 minutes...
Everyruleallowsthefollowingactions:
● Register Only (information will be stored in the AlertsHistory tab)
● Send E-mail (the alert is registered and sent to the provided e-mail address)
● Deploy script (executes a script from the scripts repository)
You can apply the same rule to more than one computer: you only need to select therelevantmachinesontheright.Thelistwillshowtheamountofalertsthatcanstill be set on each PC.
NOTE:Youcan’tgivethesamenametotwodifferentalerts–inthatevent,thesecondalertwillbeautomaticallyrenamed(e.g.“HighCPU”willberenamedto“HighCPU(2)”).
AlertsHistory
Thistabkeepsrecordofallalertsassociatedtorulesthathaven’tbeendeleted.Inadditiontothedate,therulenameandthesettingsthattriggerandstopthem,youcanalsocheckwhatactiontheruleoriginatedandtowhichaddressanotificatione-mail was sent (if sent).

100©2013 BeAnywhere. All rights reserved.
BeAnywhere inSight Lite EditionSystemInfo>Dashboard
TheDashboardistheonlyindicatoravailabletoallcomputers,eventheoneswithnoactivemonitoring.ThetechniciancanrapidlycheckthemajorfeaturesoftheentireBASE Agents lot.
NOTE:TheREFRESHbutton,availableineachcategoryoftheSystemInfotab,willonlyworkforthatparticularcategory(avoidinganoverchargeoftheremotecomputersandBeAnywhere’sdatabases)–theremainingcategorieswillstaythesame.Ifyouneedtoupdatethemall,youwillhavetodoitone-by-one.
SystemInfo>Applications
SystemInfo>Processes
Thiscategoryshowsallthecomputer’sinstalledprograms(andregisteredintheOS),sortedbymanufacturer.Whenasecurityupdate isavailable, theprogramwillbemarked with red colors and a link for the update will be provided.
TheProcessescategoryfeaturesall theprocessesthathavebeendetected inthemomentthedatawasgathered.Thisinformationisquitevolatile,sotheuseofalertsis recommended over this category.
Theindicatorsare:
● Name●CPUoccupation%● Occupied memory (KB)● Priority● Number of threads● User that houses the process●Physicalmemoryoccupation%

101©2013 BeAnywhere. All rights reserved.
Inthisareayouwillfindthephysicalandvirtualmachineadapters,aswellasthefieldsthatfollow:
● MAC address● Machine DNS● Domain DNS● Address assigned by DHCP (Yes/No)● DHCP Server
BeAnywhere inSight Lite EditionSystemInfo>Network
SystemInfo>Services
Thistabshowsthesystemservices,includingname,status,modeandtype.
SystemInfo>Drivers
Thiscategorypresentsallsystemregistereddrivers,statingthefollowingfields:
●Name–Driverregistryname.● Type–Typeofdriver(kernel,filesystem).● Path–Driver ’sregisteredlocation.● X–Driverstatus,statingitseffectivepresenceonthesystem.
SystemStats

102©2013 BeAnywhere. All rights reserved.
BeAnywhere inSight Lite EditionThistabpresentsthehistoryforthelast15daysforthefollowingindicators:
●CPU 1- inserverswithmultiplerealprocessors,onlyshowsthefirstCPU;whendealingwithprocessorswithmultiple cores/threads, all of themwill bepartof theCPU’s metrics (usage percentage). ●Physicalmemory-in Gigabytes.●HardDrive space used - in Gigabytes. It is possible to select any of the available drives.
Thistableindicatesnotonlythegraph’sinformationbutalsowhatinformationisstoredonrecord–theBeAnywhere’sdata-baseonlystoresdetailedinformationfor the last six hours.
Itisalsopossibletoselectthevisualizationmetricsincludedinthechart-thisisparticularlyusefulforlongerperiodsoftime,withlowergraphresolution.
Last hour3 hours6 hours12 hours24 hours2 days7 days15 days
Each5minutes
Eachminute
Table2- Granularity of the information stored.
EachHour
Time-lapse Resolution
Check our video tutorial about Alerts.

103©2013 BeAnywhere. All rights reserved.
BeAnywhere inSight Lite Edition
Thisinterfaceallowsthecreationofscriptgroupsandscriptsub-groups.Tocreateanewgroup,simplyclickonADD GROUP.
Equally,addinganewscriptstartsbyclickingtheADD SCRIPT button.
Inthiswindow,specifyanameandadescriptionforthenewscript.Youcancheckit immediately as active or choose to do it later; then click on ADD SCRIPT. In the event that the script needs one or more resources available for download through theweb,addthemthroughtheADDFILE button.
NOTE:Youareentitledtoaddanunlimitednumberofresources.Atthisscreenyoumayalsodeleteoreditthesettings already set.
SCRIPTS EXECUTIONTheinSightLiteEditionallowsadvancedsettingsliketheimmediateorscheduled script deployment in any of the listed computers. It is directly compatible with Batchefiles,VisualBasicScriptandPowershell.As longas themachinehas theappropriateruntimeinstalledandcorrectlyconfigured,thescriptdeploymentwillwork, regardlessof the languageused.Youcanalsoset thescriptsdeploymentthrough alerts.
Scripts deployment>Adding a new script to the RepositoryTo runa script taskyouneed tofirstaddandset the script in the repository,byclicking in Management>Scripts.
In thiswindow,specifyanamefor thefile. It isalsopossibletoaddaMD5hash,enablingthefile’sintegrityvalidation.Next,indicatetheURLfromwheretheresourcewillbedownloaded,aswell as the localdevice’sdestiny folder. It is alsopossibletospecify if thefilewillbealwaysdownloadedordownloadedonlywhenthefiledoesn’texistlocally.Thefirstoptionisusefulwhentheresourceisconstantlyupdatedthrough the same URL.
Whenfinished,clickSAVE.NOTE:TheinSightLiteEditiononlynativelysupportsfiledownloadingthroughtheweb,frominternetorintranet,usingHTTPandHTTPSprotocols(thetechnicianisabletocopyfilesfromthelocalnetwork,enjoyingtheextendedpowerand versatility of script’s commands).

104©2013 BeAnywhere. All rights reserved.
Afterwards,atScriptContent,youcansetwhetherthescripttextisdirectlyinsertedinBASEinterface,throughtheExplicitScriptoption,orwhetheritisavailableinatextfilelocatedinanexternalURL,byselectingExternalScript.
Inthefirstcase,thetechnicianshouldpastethenecessarycommandstotheScriptBodyfieldandthenselectthetypeofscriptbeingadded.
If the technician chooses ExternalScript,hewillneedtoenteraURL– it isalsopossibletoaddanMD5tovalidatethefile’sintegrity–andselectthescripttype.
By clicking SAVE,datawillbesavedandthescriptwillbereadytodeploy.
You canmove it to a different group, using theMOVE TO button; or delete it,clicking the DELETE button.
Scripts deployment>Create a new script deployment jobAftersettinguponeormorescriptsattherepository,youwillbeabletocreate a deploymentjob.Thescriptcanbedistributedtooneormoredevices,makingitpossibletoschedulethebeginningofthedeployment,setthecontextandsettheresultnotification.
NOTE:Todeploymultiplescriptsinasinglejob,addtotherepositoryascriptcontainingdifferentscripts.
If a technician chooses to use the standard settings, it will only be necessary tonamethejobonthefirstwindowandthenclickNEXT.However,therearemultipleparameters that can be set:
TheoptionStartonallowsthetechniciantossetaspecifictimeanddatetolaunchthejob(standardsettingordersanimmediatestart).However,jobswillalwayskeeptoa5minutedelayaftercreation,toallowtheircancellation.Whenexpandingthisoption,twoextraconfigurationoptionswillappear:
● Deploymentwillstop–Ifthejobisn’toverwhentimelimitisreached,youwill get a report about the current status and the job will be marked as completed.
● Computerswilldiscardthisjobifnotcompletedin–Ifthejobisn’tconcludedinoneormoredeviceswhentimelimitisreached,thejobwillbemarkedasfailed.
Bydefault,theRunas option is set for the script to be deployed in the system account context.Thetechniciancanalsochoosetodeploythescriptinanothercontext,localor from the network (for instance, usingdomain administration credentials),withlimited or unlimited privileges.
BeAnywhere inSight Lite Edition

105©2013 BeAnywhere. All rights reserved.
Inanyofthecontexts,thefollowingoptionsarepossible:
● Deploy only when the user has an active session;
●Allowscriptinteractionwiththelocaluser–Forinstance,wheninstallingsoftwareincapable of performing a silent installment or when trying to make sure that the user is able to cancel the script deployment.
In the last tab,youneed toselect thedevice(s) thatwillperformthe jobandclick DEPLOY SCRIPT. It will be deployed according to the specified options. It is also possible to specify whether the script resources should be erased after a successful deployment.
After setting up these elements, clickNEXT. Now select the script to deploy (the description of the chosen element will be visible). After the job setting is complete,clickNEXT.
TofollowthescriptjobstatusortocheckthescriptHistoryyoushouldchoosethe REPORTS>ScriptJobs link.
Hereyouwillbeabletocheckwhenajobhasstartedandended,itsstatus,itsauthorandthescriptcontent,whenapplicable.
Using the REPLICATE NOWbutton,thetechniciancanrepeatthejobexecution.
BeAnywhere inSight Lite Edition
Check our video tutorial about Scripts.

106©2013 BeAnywhere. All rights reserved.
AUDITING DEVICESTheinSightLiteEditionalsoallowstheauditingofoneormoredevices.Throughthisfeature you will be able to obtain detailed reports about the activities performed in theselecteddevices,aswellasdetailedinformationaboutthosesamedevices.
Tostartanaudit,gotoREPORTS>AuditDevices.
A similar screen to the Script deployment screen will pop-up. It is possible to choose one or multiple computers inside each group. After selecting the computers to audit you will only need to click the AUDIT button.
At the new window you can choose which report you want to generate and a destination e-mail address for that report. Just like in all the other reports generatedbyBeAnywhere,alinkwillbesentbye-mail.
BeAnywhere inSight Lite Edition

Addendum

108©2013 BeAnywhere. All rights reserved.
SHORTCUTS
Ctrl+N - New Computer Group
Ctrl+D - Delete Computer/Group
F2 - Rename Computer/Group
Ctrl+M - Move Computer/Group
F5 - Refresh
ADDENDUM
IMPORTANT: When using the Remote Desktop tab, make sure the mouse is outside the remote desktop area for the shortcuts to work locally and not be passed through the remote computer. The other option is to click the “Scroll Lock” key: this way, the shortcuts will always be executed locally, regardless of the mouse position.
!
Console
“MYCO
MPUTERS”TAB
Ctrl+BkSp - Restart and Shutdown the remote computer Ctrl+Space - Disconnect the Session
Ctrl+Shift+F5 - Force the Refresh of the remote imageCtrl+Shift+1-Imagescale100%Ctrl+Shift+2-Imagescale90% Ctrl+Shift+W - Image downscale to the BASE viewer Window Ctrl+Shift+D - Low Color Ctrl+Shift+M - Medium Color Ctrl+Shift+H - High Color Ctrl+Shift+T - Show Remote Cursor Ctrl+Shift+V - View OnlyCtrl+Shift+F - Full Screen Ctrl+Shift+Del - Send Ctrl+Shift+Del Ctrl+Shift+B - Block Remote Keyboard and Mouse Ctrl+Shift+N - Blank Screen Ctrl+Shift+K - Lock Remote Operating System Ctrl+Shift+L - Laser Pointer Ctrl+Shift+R - Start/Stop Recording Video Ctrl+Shift+P-TakeScreenshot
Ctrl+A - Select all Ctrl+O - Open F5 - Refresh BkSp - Up One Level Ctrl+N - New Folder Del - Delete F2 - Rename Ctrl+M-MoveTo… Shift+Ctrl+A - Set Attributes Ctrl+U - Upload Selected
Viewer
GLO
BAL
REMOTEDESKTOP
FILETRANSFER

109©2013 BeAnywhere. All rights reserved.
THANK YOU!+1 650 353 3227
Don’t hesitate to contact us if you didn’t findtheansweryouwerelookingfor.

110©2013 BeAnywhere. All rights reserved.
INDEXAgent,6Applet,6BASEaudiocodec,24Bindings,56Chatpopup,23Console,6DirectConnect,56ForceLogout,89Imagedownscale,29Javaconsole, 21LaserPointer,30LocalPort,35Localshortcuts,29NetworkStatuslink,14PINcode,6Portal,6RemoteHost,35RemotePort,35Schedules,86SessionContext,27SilentDeployment,40StartAPIs,69TCP8082, 55TCP443,55
TechniciansKickOut,72Trafficlightsystem,32TroubleshootReport,21TSSession,30UDP43210,55Webchat,70
VIDEO TUTORIALS IN THE WEB1. Alerts
2. Calling Cards
3. Chat and VoIP
4. File transfer
5.HowToStartNewSessions
6.ManageTechniciansandDepartments
7. Overview
8. Port forwarding
9.Profile
10. Remote Desktop
11. Reports
12. Scripts
13.SupportTickets
14. Surveys
15. System Info
16. System Shell
17. Unattended Remote Support

111©2013 BeAnywhere. All rights reserved.
©2012 BeAnywhere. All rights reserved.
BeAnywhere Europe
Rua Professor Henrique de Barros, 4Edifício Sagres, 4º C2685-338 Prior VelhoSacavém, Portugal
Contact: [email protected]: +351 210 441 550
©2012 BeAnywhere. All rights reserved.
BeAnywhereNorthAmerica
5811CooneyRoad,Suite305,SouthTower
Richmond,BritishColumbiaV6X3M1
Canada
Get Live From the CloudTMs
+1 650 353 3227
© 2013 BeAnywhere.com. All rights reserved