1
Company Name: Mine Name: Date of Analysis:
Equipment/Job Identification: HOISTMAN (Shaft Sinking) Type of Equipment: Make: Model: Year: Use:
Pre-Assessment
• List pre-requisites here
Bell Signals Centers Control Functions Hoist Manual Experienced Shaft Worker (1 year minimum) Hoistman JTA
Duty 1: Start of Shift Activities Learner will demonstrate how to conduct a safe and thorough start of the shift activities. Learner will also explain the job duties, why they are conducted, any associated risk, and how to implement appropriate controls. A thorough and safe start of the shift activity includes the following job steps:
Job Steps Importance Narrative
(Consider Safety, Production, Maintenance)
Importance Ranking
1=Important 2=Very
Important 3=Critical
Satisfactory
or Needs Work
Procedures/Risk Resolution/
Notes/Comments
Sign in at mailbox 1 Proceed to dry house to change clothes
1
Check in at lamp house or dry house 1 Obtain PPE Prevent long-term hearing loss;
prevent eye injuries; prevent foot injuries; prevent hand injuries; PPE is for your protection – wear it and wear
2 Hard hat with hearing muffs and/or
ear plugs, safety glasses, metatarsal boots, leg bands, florescent and reflective vest, rain
2
Job Steps Importance Narrative
(Consider Safety, Production, Maintenance)
Importance Ranking
1=Important 2=Very
Important 3=Critical
Satisfactory
or Needs Work
Procedures/Risk Resolution/
Notes/Comments
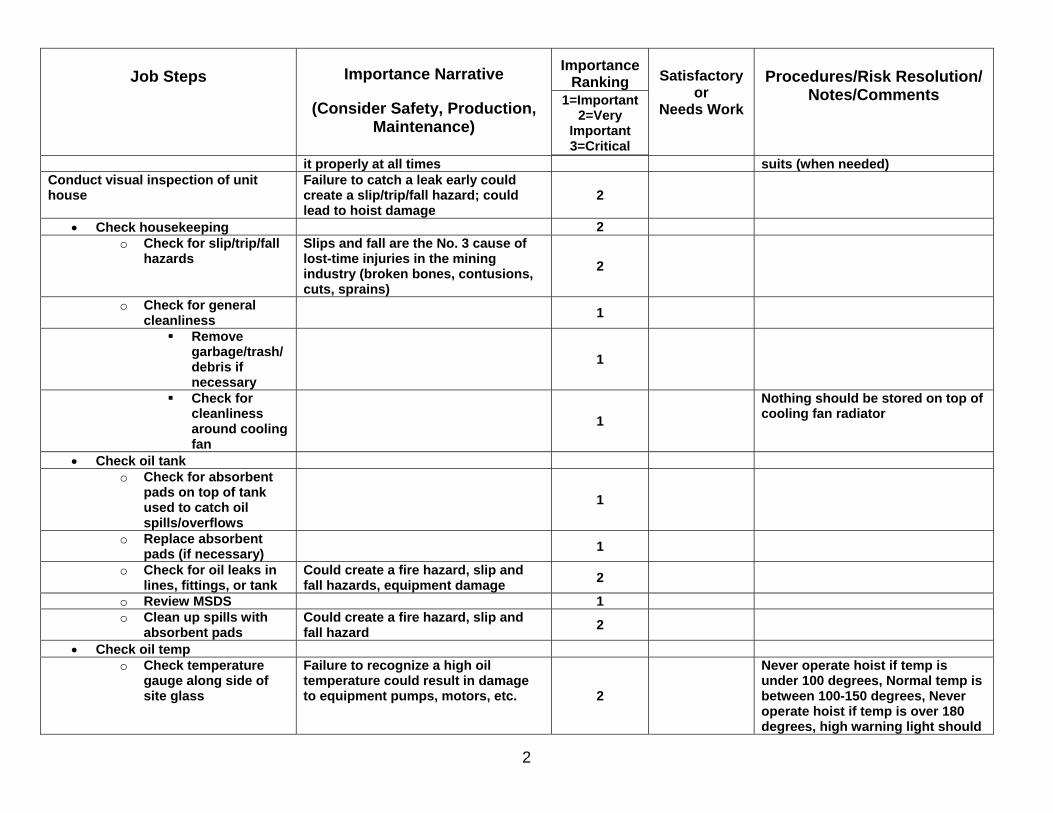
it properly at all times suits (when needed) Conduct visual inspection of unit house
Failure to catch a leak early could create a slip/trip/fall hazard; could lead to hoist damage
2
• Check housekeeping 2 o Check for slip/trip/fall
hazards Slips and fall are the No. 3 cause of lost-time injuries in the mining industry (broken bones, contusions, cuts, sprains)
2
o Check for general cleanliness
1
Remove garbage/trash/debris if necessary
1
Check for cleanliness around cooling fan
1
Nothing should be stored on top of cooling fan radiator
• Check oil tank o Check for absorbent
pads on top of tank used to catch oil spills/overflows
1
o Replace absorbent pads (if necessary)
1
o Check for oil leaks in lines, fittings, or tank
Could create a fire hazard, slip and fall hazards, equipment damage 2
o Review MSDS 1 o Clean up spills with
absorbent pads Could create a fire hazard, slip and fall hazard 2
• Check oil temp o Check temperature
gauge along side of site glass
Failure to recognize a high oil temperature could result in damage to equipment pumps, motors, etc. 2
Never operate hoist if temp is under 100 degrees, Normal temp is between 100-150 degrees, Never operate hoist if temp is over 180 degrees, high warning light should

3
Job Steps Importance Narrative
(Consider Safety, Production, Maintenance)
Importance Ranking
1=Important 2=Very
Important 3=Critical
Satisfactory
or Needs Work
Procedures/Risk Resolution/
Notes/Comments
come on @ 180 degrees o Continue to let hoist
idle if high temp is observed until temp returns to normal (as long as oil is at correct level)
Failure to cool a high oil temperature occurrence could result in damage to equipment pumps, motors, etc. 2
• Check oil level (site glass) Low oil level will cause overheating and potential damage to equipment, controls may not function properly causing a safety hazard
2 Should be near low level when unit
is cold Should be near high level when unit is warm
• Add oil to unit tank as needed Low oil level will cause overheating and potential damage to equipment, controls may not function properly causing a safety hazard
2
o Clean area around cap on top of tank
Dirt will damage hydraulic system 2
o Remove cap 1 o Use only clean
containers to add oil (ISO 46)
Dirt will damage hydraulic system 2
Refer to MSDS for ISO 46
o Fill to just under half on gauge
1
o Replace cap 1 o Clean up any spills Could result in fire hazard, slip and
trip hazard 2
• Check pump coupler (MCH 200 Hoist only)
Failure to recognize movement in coupler could cause damage to coupler and put hoist out of commission
2
o Look at marks to ensure coupler hasn’t moved from side to side
Failure to recognize movement in coupler could cause damage to coupler and put hoist out of commission
2
• Report any problem to mechanic or superintendent
1
Check hoist house phone 1

4
Job Steps Importance Narrative
(Consider Safety, Production, Maintenance)
Importance Ranking
1=Important 2=Very
Important 3=Critical
Satisfactory
or Needs Work
Procedures/Risk Resolution/
Notes/Comments
• Check battery posts for tightness
1
• Check phone by blowing into receiver and push button - listen for sound
1
• Check terminal posts for wire connections
1
Meet with other hoist operators 1 • Discuss condition of hoist 1 • Discuss work phase 1 • Discuss location of backhoe 1 • Discuss bottom marks on
cable 1
• Discuss locations of steady marks
1
• Discuss boom centers 1 • Discuss settings of limit
switches (upper and lower) 1
• Discuss slow down switch setting (lower)
1

5
Duty 2: Hoist Pre-op Learner will demonstrate how to conduct a safe and thorough hoist pre-operational inspection. Learner will also explain the job duties, why they are conducted, any associated risk, and how to implement appropriate controls. A thorough and safe hoist pre-operational inspection includes the following job steps:
Job Steps Importance Narrative
(Consider Safety, Production, Maintenance)
Importance Ranking
1=Important 2=Very
Important 3=Critical
Satisfactory
or Needs Work
Procedures/Risk Resolution/
Notes/Comments
Check hoist book for any documented problems/hoist condition
1
Conduct inside walk-a-round • Check for oil leaks/spills Could create fire hazard, slip and trip
hazard 2
• Check tightness of turn buckles
1
• Check arm on disc brake for cracks/loose bolts, loose pins
1
• Check hoist, boom, drum and load cables
1
o Check that cables are wrapping correctly on drum
1
Conduct outside walk-a-round • Check bolts for tightness on
both legs and on top of pedestal
1
• Check pins on mast and boom and ensure cotter keys are in place
1
• Ensure cables are on sheaves Could cause damage to cable, downtime 2
• Ensure neoprene (plastic) block is in position under foot sheave
1
• Ensure cable rollers are in place and cable is centered on the rollers
1

6
Job Steps Importance Narrative
(Consider Safety, Production, Maintenance)
Importance Ranking
1=Important 2=Very
Important 3=Critical
Satisfactory
or Needs Work
Procedures/Risk Resolution/
Notes/Comments
• Ensure wooden block is under boom cable on the derrick pipes
1
• Check derrick pipes for cracks or movement
1
• Ensure a tight fit between foot block and hoist
1
• Check swinger chain for too much slack in chain, loose bolts or oil around motor
1
• Ensure swinger chain plate is tight
1
• Check swinger hoses going back into the hoist house for leaks and loose fittings and ensure they are secured to the derrick pipe
1
• Return to hoist house 1 Operating Examination
• Sit in operators seat 1 • Place hand on E-stop prior to
starting hoist This allows for quick shut off in case of hoist malfunction during startup, may prevent equipment damage
2 This allows for quick shut off in
case of hoist malfunction during startup
• Press start button 1 • Observe pressure gauge
1 Gauge should rise slowly to
approximately 1,000 lbs and settle to approximately 500 lbs
• Release load cable 1 • Instruct topman to remove
hook from leg 1
• Swing boom to center 1 • Check drum and motor brakes 1
o Turn load line brake switch to drive brake test and hold
1

7
Job Steps Importance Narrative
(Consider Safety, Production, Maintenance)
Importance Ranking
1=Important 2=Very
Important 3=Critical
Satisfactory
or Needs Work
Procedures/Risk Resolution/
Notes/Comments
o Move the load line control to the lower position to ensure the load line drive brake is holding
1
This is indicated by an increase in pressure (up to 3,000 lbs). Hoist should not move. Do not overpower, do not release switch until pressure comes back down (approximately 500 lbs)
o Release load line brake switch
1
o Turn load line brake switch to caliper brake test and hold
1
o Move the load line control to the lower position to ensure the load line drive brake is holding
1
This is indicated by an increase in pressure (up to 3,000 lbs). , do not release switch until pressure comes back down (approximately 500 lbs), Hoist should not move. Do not overpower
o Release load line brake switch
1
o Turn load line brake switch to caliper brake test and hold
1
o Move the load line control to the lower position to ensure the load line caliper brake is holding
1
This is indicated by an increase in pressure (up to 3,000 lbs). , do not release switch until pressure comes back down (approximately 500 lbs), Hoist should not move. Do not overpower
o Repeat this process for boom line drum
1
• Manually check slow down limit switches (top)
1
o Move arm on slow down limit switch to the right (counter-clockwise)
1
o Pull back on load controller
1 Hoist will run at slow speed

8
Job Steps Importance Narrative
(Consider Safety, Production, Maintenance)
Importance Ranking
1=Important 2=Very
Important 3=Critical
Satisfactory
or Needs Work
Procedures/Risk Resolution/
Notes/Comments
• Manually check the upper limit switch
1
o Move arm on upper limit switch to the right (counter-clockwise)
1
o Pull back on load controller
1 Hoist should not move Over-travel light should come on
• Visually inspect dial indicator chain
1
o Check light 1 o Ensure chain is in
place 1
• Visually check dial indicator coupler pin
1
o Ensure set screw is secure and pin is engaged into the shaft
1
• Check over-speed indicator 1 o Open door on dial
indicator 1
o Manually raise the weights on the governor
1
o Check to see that over-speed indicator console light comes on
1
Only applies when in personnel model on MCH 200 Model
• Check anti-piling limit switch 1 o Pull piling bar either
way and check to ensure anti-piling consol light comes on
1
Hoist should not move with controller
o Reset the anti-piling limit switch by shutting hoist off and restarting
1

9
Job Steps Importance Narrative
(Consider Safety, Production, Maintenance)
Importance Ranking
1=Important 2=Very
Important 3=Critical
Satisfactory
or Needs Work
Procedures/Risk Resolution/
Notes/Comments
• Check boom limit switch 1 o Swing boom to left or
right so that breast sheave is visible
1
o Raise the boom slowly and note where boom stops
1
o Ensure boom stops before reaching breast sheave
1
• Swing boom over to the crows nest for topman to check hook makeup
1
o Lower cable for topman to check hook makeup, hook attachment, crosby clamps, swivel, and thimble handle and handle extensions
1
• Check hook for cracks
1
• Check self-closing hook handle for smooth operation
1
• Check handle operations
1
• Check hook handle extension for tightness
1
• Check crosby clamps for tightness
1
• Check swivel 1

10
Job Steps Importance Narrative
(Consider Safety, Production, Maintenance)
Importance Ranking
1=Important 2=Very
Important 3=Critical
Satisfactory
or Needs Work
Procedures/Risk Resolution/
Notes/Comments
• Check swivel pin
1
• Ensure cotter key is in place
1
• Check for cracks
1
• Ensure it spins freely
1
• Check width of gap in swivel
1
Normally 1/8 inch; wider gap could indicate wear
• Check thimble 1 o Check for
loose bolt should be over two more
1
o Check for cracks
1
• Remove hoist from service if defects are observed on hook makeup
1
Record pre-op examination in hoist book (record any defects, sign and date)
1

11
Duty 3: Cable Examination Learner will demonstrate how to conduct a safe and thorough pre-operational cable inspection. Learner will also explain the job duties, why they are conducted, any associated risk, and how to implement appropriate controls. A thorough pre-operational inspection includes the following job steps:
Job Steps Importance Narrative
(Consider Safety, Production, Maintenance)
Importance Ranking
1=Important 2=Very
Important 3=Critical
Satisfactory
or Needs Work
Procedures/Risk Resolution/
Notes/Comments
Place boom over crows nest 1 Allow topman to place chalk mark on cable directly in front of hoist
1
Instruct Topman to go to crows nest with a piece of burlap and wrap lightly around cable
1
Lower cable into hole while topman holds burlap around cable and checks for burs, broken wires, deformities
1
Lower hoist until mark on cable reaches the topman
1
Topman removes the mark when mark reaches him
1
Swing boom to center 1 Have another person position himself in front of hoist house
1
Lower cable into the hole while this person rags remaining cable with burlap
1
Lower cable to approximately 20 feet from bottom
1
Discuss any defects found with foreman
1 Refer to Subpart O for guidance on out of service criteria
Raise cable back out of hole 1 Attach shaft bucket and make a trail run in the hole
1
• Run bucket to steady mark 1

12
Job Steps Importance Narrative
(Consider Safety, Production, Maintenance)
Importance Ranking
1=Important 2=Very
Important 3=Critical
Satisfactory
or Needs Work
Procedures/Risk Resolution/
Notes/Comments
• Check lower slow down and lower limit
1
Slow down usually set to 3 to 4 wraps above lower limit Should stop approximately 40 feet from the bottom
• Pull the bucket back out of the hole
1
Should be into hitting the slow down switch when you begin to see the makeup at the top of the hole
Conduct every 7 days (Usually Sunday day shift) and if hoist has been down for a full operating shift
1
Record cable examination in hoist book (date and time ragged) and initialed by hoist operator
1

13
Duty 4: Preventative Maintenance Learner will demonstrate how to conduct safe and thorough preventative maintenance. Learner will also explain the job duties, why they are conducted, any associated risk, and how to implement appropriate controls. A thorough and safe preventative maintenance includes the following job steps:
Job Steps Importance Narrative
(Consider Safety, Production, Maintenance)
Importance Ranking
1=Important 2=Very
Important 3=Critical
Satisfactory
or Needs Work
Procedures/Risk Resolution/
Notes/Comments
Grease zoned fittings of derrick 1 Obtain grease gun 1 Instruct topman to take
extra tube of grease 1
Pump 12 pumps of multipurpose grease into each fitting
1
Grease fittings at top of the mast
1
Grease derrick fittings 1 Use two hoists 1 Boom the hoist to be greased
all the way down, dog off boom, and shut hoist down
1
Travel to other derrick 1 Instruct topman and helper to
get into bucket of 2nd hoist 1 Consider tie-off options
Watch for topman or helper to signal hoist operator for bucket positioning
Lack of positive communication could result in equipment damage or personal injury
2
Boom bucket of 2nd hoist so it is positioned to grease boom block
1
Reposition boom to grease the second boom block
1
Follow top man’s directions/signals
Lack of positive communication could result in equipment damage or personal injury
2
Reposition boom to grease 1

14
Job Steps Importance Narrative
(Consider Safety, Production, Maintenance)
Importance Ranking
1=Important 2=Very
Important 3=Critical
Satisfactory
or Needs Work
Procedures/Risk Resolution/
Notes/Comments
the fittings on top of derrick Grease/lube hoist (Model MCH 200) 1
One located on each side of load drums
One located on right side of boom drum ( two on MCH 140)
One located inside dial indicator chain (sprocket side)
One located on the end of the transmission
Lubricate the ring gear using molly gear lube on the load line drum
Door located to the right rear of the operator
Grease/lube hoist (Model MCH140) One located on each side of
load drums 1
One on each side of boom drum
1
One on each end of jack shaft on the load
1
One on each end of jack shaft on the boom
1
One on the dial indicator chain (sprocket side)
1
One located on each brake 1 Lock and tag out electric
motor before removing guard to grease
Failure to lockout/tagout prior to removal of guard could result in personal injury (amputation, crushing, broken bones, contusions, potentially fatal)
3
Grease three fittings on each end of the electrical motor coupler in the unit house
Failure to lockout/tagout prior to removal of guard could result in personal injury (amputation, crushing, broken bones, contusions, potentially fatal)
3
One grease fitting on each end of the electrical motor for
1 One pump, once a month

15
Job Steps Importance Narrative
(Consider Safety, Production, Maintenance)
Importance Ranking
1=Important 2=Very
Important 3=Critical
Satisfactory
or Needs Work
Procedures/Risk Resolution/
Notes/Comments
bearings Lubricate the ring gear using
molly gear lube on the load line drum (as needed)
1
Door located on top middle of the guard on the far side of the load drum

16
Duty 5: Drilling Learner will demonstrate how to conduct safe and thorough drilling processes. Learner will also explain the job duties, why they are conducted, any associated risk, and how to implement appropriate controls. A thorough and safe process for drilling includes the following job steps:
Job Steps Importance Narrative
(Consider Safety, Production, Maintenance)
Importance Ranking
1=Important 2=Very
Important 3=Critical
Satisfactory
or Needs Work
Procedures/Risk Resolution/
Notes/Comments
Put in drill Remove all personnel from
hole Loose equipment falling from drill rig would result in fatal injuries 3
Instruct topman to hook to the drill rig
1
Place in low speed Failure to run in low speed would result in equipment damage 2
Pick up drill rig 1 Over-ride the upper limit to
get over the fence 1
Ensure the make-up does not go into the point sheave
Contact with point sheave could result in cable damage, sheave damage
2
Swing over the shaft 1 o Ensure you are
centered on shaft using center mark on boom drum and center mark on the swing circle
1
o Ensure drill is entirely steady after placing over the shaft
1

17
Job Steps Importance Narrative
(Consider Safety, Production, Maintenance)
Importance Ranking
1=Important 2=Very
Important 3=Critical
Satisfactory
or Needs Work
Procedures/Risk Resolution/
Notes/Comments
Steady up (if necessary) by having someone stand in crows nest to steady the rig with a wooden loading pole
1
Lower drill rig to the bottom allowing for the height of the drill rig
1
Allow 3 wraps of cable to cover the height of the drill rig on the MCH 200
1
Stop at 3 wraps and ease to the bottom of shaft
1
o Observe pressure gauge – pressure will reduce when rig is on the bottom
1
Raise approximately 1 foot 1 Swing drill off center 1 Set drill back on the bottom 1 Shut hoist off 1 Travel to the No. 2 hoist
house 1
Ensure topman is in crows nest
Failure to have topman observing mantrip entering shaft could result in personal injury/damage to equipment
2
Send in mantrip on mantrip center
1
Once personnel are on the bottom, pull bucket back out and place on ground out of way
1
Shut No. 2 hoist off 1 Return to No. 1 hoist 1

18
Job Steps Importance Narrative
(Consider Safety, Production, Maintenance)
Importance Ranking
1=Important 2=Very
Important 3=Critical
Satisfactory
or Needs Work
Procedures/Risk Resolution/
Notes/Comments
Wait for signal from hole boss to center rig in shaft
1
Wait for signal from hole boss to lower rig onto blocks
1
Observe pressure gauge for dropping pressure
1
Allow a small amount of slack in the cable
Too much slack would result in rig falling from blocks (crushing injuries)
2
CAUTION: These moves are made very slowly and deliberately. Requires clear communication between the hole boss and hoistman. If unsure of communications, stop until clear.
Shut hoist off 1 Travel back to No. 2 hoist 1 Instruct topman to unhook
shaft bucket 1
Place hook on water tank 1 Pick up out of holder ensuring
it is steady 1
Place on proper water center 1 Lower into the hole high
speed 1
Stop 2 wraps before steady Failure to stop before steady could result in collision with drill rig/equipment damage/personal injury
2
Switch to low speed 1 Wait for signal from hole boss 1 Lower water tank down (upon
signal) until you receive a signal to stop
1
Set hoist on dog and set brake
1
Place reference mark on cable 1 This will serve as a guide for future entry into the hole
Stop 2 wraps above steady mark
1

19
Job Steps Importance Narrative
(Consider Safety, Production, Maintenance)
Importance Ranking
1=Important 2=Very
Important 3=Critical
Satisfactory
or Needs Work
Procedures/Risk Resolution/
Notes/Comments
Wait for bell before lowering to reference mark
1
Pull drill rig Upon signal from hole
foreman, go to No. 1 hoist 1
Pick up drill rig off bottom approximately 1 – 1 ½ feet
1
This allows crew to remove blocking and load materials onto drill rig at the end of cycle
Travel to No. 2 hoist house 1 Instruct topman to hook up
mantrip 1
Lower mantrip down to steady mark
1
Wait on signal from hole boss 1 Lower mantrip bucket to
bottom
Ensure topman is in crows nest
Lack of positive communication could result in personal injury or equipment damage
2
Wait for bell signal to raise mantrip to surface
1
Once mantrip is on surface, travel back to No. 1 hoist house
1
Pull drill rig on low speed 1 Over-ride the upper limit to
get over the fence 1
Ensure the make-up does not go into the point sheave
Contact with point sheave could result in cable damage, sheave damage
2
Swing drill rig back to drill rig pad
1
Lower to ground 1 Instruct topman to unhook 1

20
Job Steps Importance Narrative
(Consider Safety, Production, Maintenance)
Importance Ranking
1=Important 2=Very
Important 3=Critical
Satisfactory
or Needs Work
Procedures/Risk Resolution/
Notes/Comments
Swing empty hook over and leave hanging over the backhoe
1
Shut hoist off 1 Travel back to No. 2 hoist to
begin blasting cycle 1

21
Duty 6: Blasting Learner will demonstrate how to conduct safe and thorough blasting procedures. Learner will also explain the job duties, why they are conducted, any associated risk, and how to implement appropriate controls. A thorough and safe procedure for blasting includes the following job steps:
Job Steps Importance Narrative
(Consider Safety, Production, Maintenance)
Importance Ranking
1=Important 2=Very
Important 3=Critical
Satisfactory
or Needs Work
Procedures/Risk Resolution/
Notes/Comments
Ensure topman is in crows nest Lack of positive communication could result in personal injury or equipment damage
2
Lower mantrip w/men back into the hole
1
Wait for signal from hole boss to raise bucket and swing into position to remove bull hose
1
Once bull line is removed on signal lower bucket back down to bottom on center to allow workers to exit bucket
1
Raise bucket on signal and place outside
1
Instruct topman to unhook shaft bucket and hook up powder magazine
1
Ensure loading poles and blow pipe are secured to the magazine
Failure to secure items could allow them to fall and injure persons in shaft
2
Pick up magazine 1 Ensure bottom of magazine is clean before lowering into hole
Failure to clean magazine could cause debris to fall and injure persons in shaft
2
Center magazine and lower into hole 1 Stop at steady mark and wait for signal
Failure to stop at steady mark could result in contact with persons in the shaft (crushing injuries/death)
3
Upon signal, lower slowly until you are signaled to stop (usually 6-8” from bottom)
1
Prevent stray current from outside source coming in contact with the magazine

22
Job Steps Importance Narrative
(Consider Safety, Production, Maintenance)
Importance Ranking
1=Important 2=Very
Important 3=Critical
Satisfactory
or Needs Work
Procedures/Risk Resolution/
Notes/Comments
Wait for signal to pull magazine out of hole
1
Instruct topman to unhook magazine and hook up to gravel bucket
1
Raise gravel bucket enough for topman to clean bottom of bucket and trip the top
Failure to clean bucket could cause debris to fall and injure persons in shaft
2
Lower into hole on center stopping at steady mark
Failure to stop at steady mark could result in contact with persons in the shaft (crushing injuries/death)
3
Wait for signal before lowering gravel bucket to bottom
1 Crew will unhook gravel bucket
Upon signal, pull up the empty hook 1 Instruct topman to hook up to bulk loader
Lack of positive communication could result in personal injury or equipment damage
2
Raise bulk loader enough to allow topman to clean and trim
1
Lower into hole on center stopping at steady mark
Failure to stop at steady mark could result in contact with persons in the shaft (crushing injuries/death)
3
Stop approximately 3’ above ground to allow crew to connect hoses
1
Wait for signal to raise bulk loader slowly until signaled to stop
1
Wait for signal to lower bulk loader again to remove hoses
1
Wait for signal to pull bulk loader back out of the hole
1
Instruct topman to unhook bulk loader and send empty hook back into the hole stopping at the steady mark
1
Wait for signal to lower empty hook to pick up empty gravel bucket
1
Wait for signal to pull empty gravel bucket back out of hole
1

23
Job Steps Importance Narrative
(Consider Safety, Production, Maintenance)
Importance Ranking
1=Important 2=Very
Important 3=Critical
Satisfactory
or Needs Work
Procedures/Risk Resolution/
Notes/Comments
Instruct topman to hook back up to shaft bucket
1
Wait for signal to send shaft bucket back in stopping at steady mark
Failure to stop at steady mark could result in contact with persons in the shaft (crushing injuries/death)
3
Wait on signal to lower shaft bucket 3-4” above ground
1
Wait for signal to raise bucket to remove remaining hoses
1
Wait for signal to lower bucket 1 Wait for signal to raise bucket with materials and phone
1
Instruct topman to unhook bucket with materials and remove from hook
1
If within 100 – 150 feet of top of hole or when applicable, send in blasting mats
Instruct topman to hook empty bucket back up
1
Place electric cap in bucket 1 Lower bucket back down into hole to steady mark
Failure to stop at steady mark could result in contact with persons in the shaft (crushing injuries/death)
3
Wait for signal to lower bucket 3-4 inches above bottom
1
Wait for signal for raise mantrip 1 Ensure topman is in crows nest Lack of positive communication
could result in personal injury or equipment damage
2 If topman is not in crow’s nest,
sound horn three times to alert the extraction of personnel from shaft
Lower bucket to ground 1 Allow crew to exit 1 Shut hoist down 1

24
Duty 7: Hoisting Personnel CAUTION: slower speeds may be required if there is other equipment in the hole or immediately after a blast Learner will demonstrate how to conduct safe and thorough hoisting of personnel. Learner will also explain the job duties, why they are conducted, any associated risk, and how to implement appropriate controls. A thorough and safety hoisting of personnel includes the following job steps:
Job Steps Importance Narrative
(Consider Safety, Production, Maintenance)
Importance Ranking
1=Important 2=Very
Important 3=Critical
Satisfactory
or Needs Work
Procedures/Risk Resolution/
Notes/Comments
Place bucket alongside shaft on the ground
1
Allow personnel to enter 1 Raise bucket approximately 4-5 feet for cleaning underneath bucket
1
Instruct topman to be in crows nest anytime no one is on the bottom
Lack of positive communication could result in personal injury or equipment damage
2
Place the No. 1 hoist (MCH 200) in personnel mode
Will lessen degree of personal injury in case of sudden stop 2
Ensures compliance with regulations for speed and this is the only way to engage over-speed on this hoist
Keep speed under 500 feet per minute on either hoist
Will lessen degree of personal injury in case of sudden stop 2 MCH 140 requires manual speed
control Slow to less than 200 feet per minute within 100 feet of a stop on either hoist
Failure to slow before stop could result in personal injury 2
Stop at the steady mark if persons are in the hole; otherwise, continue to bottom
Failure to stop at steady mark could result in contact with persons in the shaft (crushing injuries/death)
3
Maintain constant communication via radio with fireboss and crew leader while they are conducting any examination
Breakdown of communication could result in lag time between an occurrence and action to prevent injury
2

25
Duty 8: Mucking Learner will demonstrate how to conduct safe and thorough mucking procedures. Learner will also explain the job duties, why they are conducted, any associated risk, and how to implement appropriate controls. A thorough and safe procedure of mucking includes the following job steps:
Job Steps Importance Narrative
(Consider Safety, Production, Maintenance)
Importance Ranking
1=Important 2=Very
Important 3=Critical
Satisfactory
or Needs Work
Procedures/Risk Resolution/
Notes/Comments
Instruct topman to place the hook on the shaft bucket
1
Drop fireboss in hole to make examination
1 Refer to Hoisting Personnel
Bring fireboss back out 1 Instruct topman to hook the work scaffold to the No. 2 hoist
1
Allow men to get on scaffold 1 Place on center Failure to place on proper center
could cause scaffold to contact rib and injure personnel
2
Run hoist on low speed Failure to run hoist low speed may result in swaying which could cause scaffold to contact rib or service lines and cause personal injury or damage to lines
2
Lower scaffold and personnel 1 Follow signals Making unexpected movements could
cause injury to personnel on scaffold 2
Compensate for height of scaffold Failure to compensate for the height of the scaffold could result in unexpected stops and cause injury to personnel on scaffold
2
Bring scaffold and all personnel back out of hole
1
Place scaffold out of the way 1 Travel back to No. 1 hoist house 1 Instruct topman to hook up backhoe to No. 1 hoist
1

26
Job Steps Importance Narrative
(Consider Safety, Production, Maintenance)
Importance Ranking
1=Important 2=Very
Important 3=Critical
Satisfactory
or Needs Work
Procedures/Risk Resolution/
Notes/Comments
Place on center Failure to place on proper center could cause scaffold to contact rib and injure personnel
2
Run hoist on low speed Failure to run hoist low speed may result in swaying which could cause scaffold to contact rib or service lines and cause personal injury or damage to lines
2
Lower backhoe to the bottom 1 • Observe gauge for pressure
drop when backhoe touches bottom
1
Raise backhoe back up approximately 1-2 feet above bottom and swing off center
1
• Observe cable location for guidance on placement of backhoe
1
• Check with fireboss prior to lowering backhoe for bottom conditions
Uneven ground conditions could result in damage to backhoe or cause mantrip bucket to come in contact with it
2
Lower back to bottom until pressure drops
1
You may have to maintain slight tension on the hoist cable to keep the backhoe level until bottom can be leveled out
Travel to the No. 2 hoist house 1 Instruct topman to hook shaft bucket up to hoist
1
Place hoist on personnel center Being on proper center will ensure personnel are hoisted safely 2
Ensure topman is in crows nest Lack of positive communication could result in personal injury or equipment damage
2
Lower personnel back into the hole 1 Lower personnel through the steady mark until the topman signals you to
1

27
Job Steps Importance Narrative
(Consider Safety, Production, Maintenance)
Importance Ranking
1=Important 2=Very
Important 3=Critical
Satisfactory
or Needs Work
Procedures/Risk Resolution/
Notes/Comments
stop • Travel very slowly after going
through the steady Traveling slowly will give personnel time to alert topman if bucket will not land properly and clear backhoe
2
Follow signals to bring bucket back out of the hole and place on ground out of the way
1
• Don’t leave bucket hanging on the hoist
1
Return to No. 1 hoist house 1 Wait for instruction from hole boss to turn on the air
1
Instruct topman to turn on the air 1 Follow signals for final adjustment of equipment in the hole
1
Wait for signal to bring hook back out 1 Instruct topman to hook muck bucket to No. 1 hoist
1
Boom hoist to muck center Failure to be on proper center could potentially result in contact with backhoe
2
Lower to steady mark and switch to low speed
1
Wait for signals to lower to bottom Lowering bucket without signals could result in crushing injuries to personnel below or damage to backhoe
3
Observe for pressure drop and allow approximately 1 foot slack in order for crew to unhook bucket
1
• Use numbers on the drum as guidance on location to set next bucket
1
Wait for signal to bring hook back out 1 Instruct topman to hook another muck bucket down
1
Lower bucket stopping at steady 1

28
Job Steps Importance Narrative
(Consider Safety, Production, Maintenance)
Importance Ranking
1=Important 2=Very
Important 3=Critical
Satisfactory
or Needs Work
Procedures/Risk Resolution/
Notes/Comments
mark Wait for signal to continue lowering bucket
Lowering bucket without signals could result in crushing injuries to personnel below or damage to backhoe
3
Observe for pressure drop and allow approximately 1 foot of slack in order for crew to unhook bucket
1
• Use numbers on the drum as guidance on location to set next bucket
1
Wait for bell signal (1 bell) and slowly pick up loaded muck bucket and wait for crew to clean and trim bucket
Coming up slowly allows personnel to steady bucket 2
• Use numbers on the drum as guidance on location to steady bucket
1
Once muck bucket is established it’s your responsibility to stop bucket for each load
Wait for signal for hole boss to pull bucket out of the hole (1 bell)
1
Operate hoist in low speed until you reach approximately 325 feet per minute
1
Switch to high speed and continue to bring bucket back outside
1
Limit switches will automatically slow the bucket down at it comes back outside if properly set
Switch back over to low speed once bucket clears the fence
1
Swing bucket over and hold approximately 3 – 3 ½ feet above ground so topman can dump bucket (designated location) and you can observe the bucket dump in designated location
1
The distance from the ground may vary due to the height of individual of dumping bucket. Bucket may need to be set on the ground to flip ears if it is loaded backwards
Instruct topman to position himself when dumping buckets so that he can be seen by the hoist operator at all times
Losing sight of the topman could result in crushing injuries due to contact with bucket or other contact with unexpected movement
2
Wait for topman to flip ears back up, 1

29
Job Steps Importance Narrative
(Consider Safety, Production, Maintenance)
Importance Ranking
1=Important 2=Very
Important 3=Critical
Satisfactory
or Needs Work
Procedures/Risk Resolution/
Notes/Comments
steady and clean bucket Repeat mucking cycle until hole boss instructs you to reposition backhoe
1
• Observe temperature gauges for overheating conditions. If overheating occurs, lighten load on bucket or allow hoist to idle for a few minutes to lower temperature
Could cause malfunction/damage to hoist motor, pump and gear box causing downtime 2
Follow signals to retrieve backhoe 1 Pull backhoe 1
Upon signal from hole foreman, go to No. 1 hoist
1
Travel to No. 2 hoist house 1 Instruct topman to hook up
mantrip 1
Ensure topman is in crows nest
Lack of positive communication could result in equipment damage or personal injury
2
Lower mantrip down to steady mark
Failure to stop at steady mark could result in contact with persons in the shaft (crushing injuries/death)
2
Wait on signal from hole boss 1 Lower mantrip bucket to
bottom 1
Wait for bell signal to raise mantrip to surface
1
Once mantrip is on surface, travel back to No. 1 hoist house
1
Pull backhoe on low speed Failure to run hoist low speed may result in swaying which could cause backhoe to contact rib or service lines and cause equipment damage
2
Swing backhoe to designated location
1
Lower to ground 1

30
Job Steps Importance Narrative
(Consider Safety, Production, Maintenance)
Importance Ranking
1=Important 2=Very
Important 3=Critical
Satisfactory
or Needs Work
Procedures/Risk Resolution/
Notes/Comments
Instruct topman to unhook 1
31
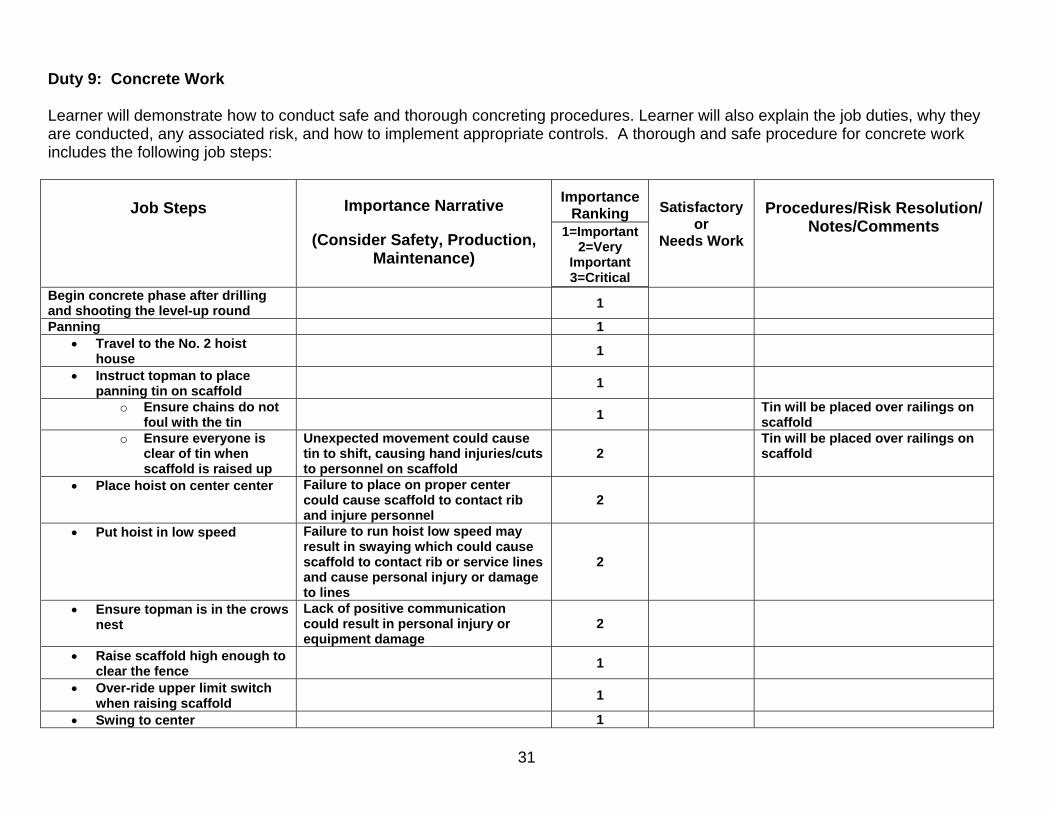
Duty 9: Concrete Work Learner will demonstrate how to conduct safe and thorough concreting procedures. Learner will also explain the job duties, why they are conducted, any associated risk, and how to implement appropriate controls. A thorough and safe procedure for concrete work includes the following job steps:
Job Steps Importance Narrative
(Consider Safety, Production, Maintenance)
Importance Ranking
1=Important 2=Very
Important 3=Critical
Satisfactory
or Needs Work
Procedures/Risk Resolution/
Notes/Comments
Begin concrete phase after drilling and shooting the level-up round
1
Panning 1 • Travel to the No. 2 hoist
house 1
• Instruct topman to place panning tin on scaffold
1
o Ensure chains do not foul with the tin
1 Tin will be placed over railings on scaffold
o Ensure everyone is clear of tin when scaffold is raised up
Unexpected movement could cause tin to shift, causing hand injuries/cuts to personnel on scaffold
2 Tin will be placed over railings on
scaffold
• Place hoist on center center Failure to place on proper center could cause scaffold to contact rib and injure personnel
2
• Put hoist in low speed Failure to run hoist low speed may result in swaying which could cause scaffold to contact rib or service lines and cause personal injury or damage to lines
2
• Ensure topman is in the crows nest
Lack of positive communication could result in personal injury or equipment damage
2
• Raise scaffold high enough to clear the fence
1
• Over-ride upper limit switch when raising scaffold
1
• Swing to center 1
32
Job Steps Importance Narrative
(Consider Safety, Production, Maintenance)
Importance Ranking
1=Important 2=Very
Important 3=Critical
Satisfactory
or Needs Work
Procedures/Risk Resolution/
Notes/Comments
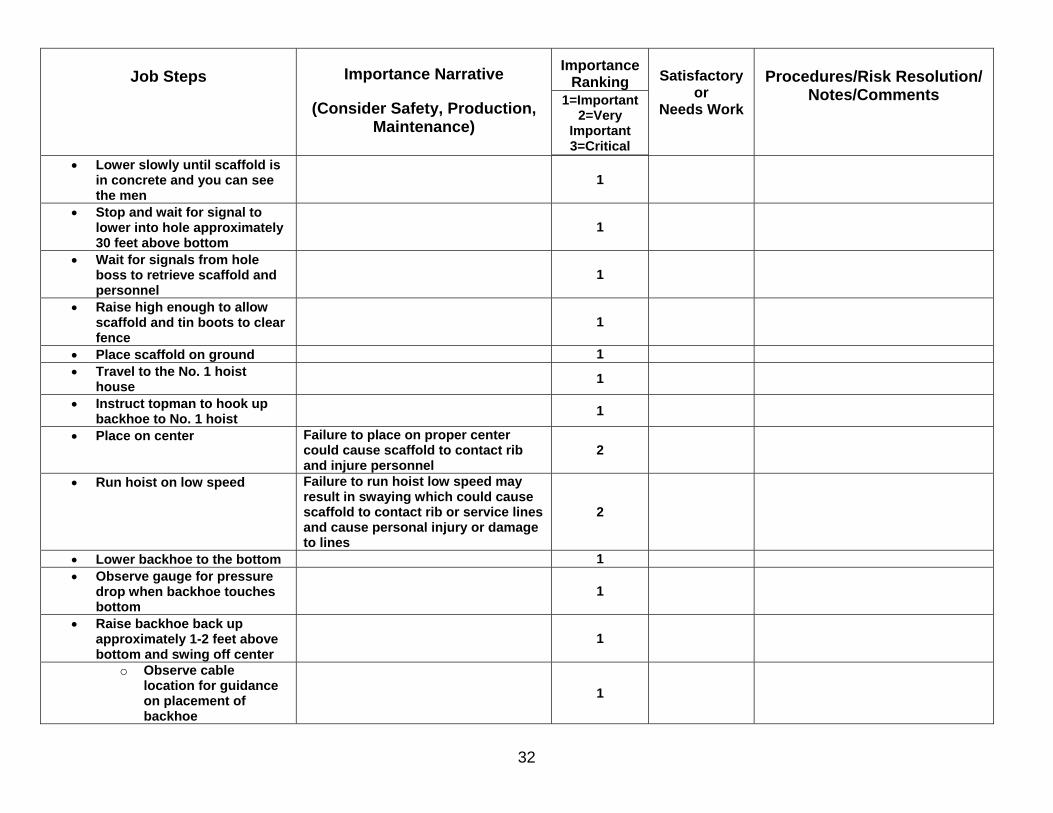
• Lower slowly until scaffold is in concrete and you can see the men
1
• Stop and wait for signal to lower into hole approximately 30 feet above bottom
1
• Wait for signals from hole boss to retrieve scaffold and personnel
1
• Raise high enough to allow scaffold and tin boots to clear fence
1
• Place scaffold on ground 1 • Travel to the No. 1 hoist
house 1
• Instruct topman to hook up backhoe to No. 1 hoist
1
• Place on center Failure to place on proper center could cause scaffold to contact rib and injure personnel
2
• Run hoist on low speed Failure to run hoist low speed may result in swaying which could cause scaffold to contact rib or service lines and cause personal injury or damage to lines
2
• Lower backhoe to the bottom 1 • Observe gauge for pressure
drop when backhoe touches bottom
1
• Raise backhoe back up approximately 1-2 feet above bottom and swing off center
1
o Observe cable location for guidance on placement of backhoe
1
33
Job Steps Importance Narrative
(Consider Safety, Production, Maintenance)
Importance Ranking
1=Important 2=Very
Important 3=Critical
Satisfactory
or Needs Work
Procedures/Risk Resolution/
Notes/Comments
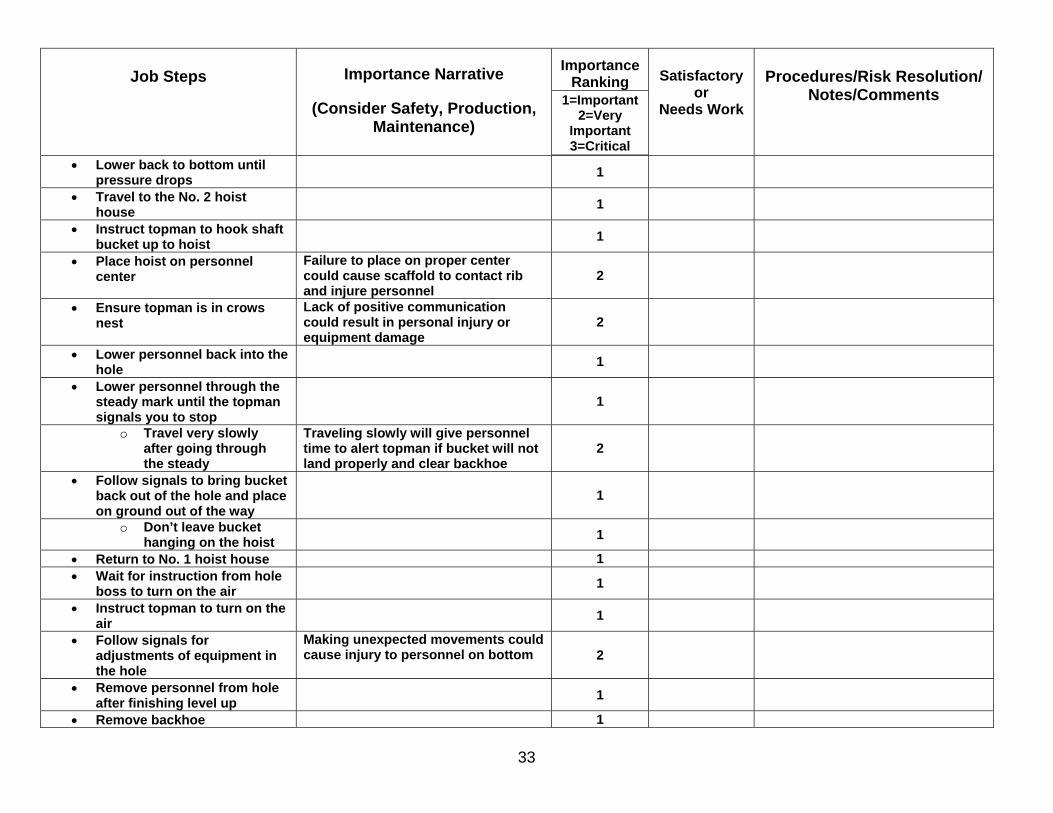
• Lower back to bottom until pressure drops
1
• Travel to the No. 2 hoist house
1
• Instruct topman to hook shaft bucket up to hoist
1
• Place hoist on personnel center
Failure to place on proper center could cause scaffold to contact rib and injure personnel
2
• Ensure topman is in crows nest
Lack of positive communication could result in personal injury or equipment damage
2
• Lower personnel back into the hole
1
• Lower personnel through the steady mark until the topman signals you to stop
1
o Travel very slowly after going through the steady
Traveling slowly will give personnel time to alert topman if bucket will not land properly and clear backhoe
2
• Follow signals to bring bucket back out of the hole and place on ground out of the way
1
o Don’t leave bucket hanging on the hoist
1
• Return to No. 1 hoist house 1 • Wait for instruction from hole
boss to turn on the air 1
• Instruct topman to turn on the air
1
• Follow signals for adjustments of equipment in the hole
Making unexpected movements could cause injury to personnel on bottom 2
• Remove personnel from hole after finishing level up
1
• Remove backhoe 1

34
Job Steps Importance Narrative
(Consider Safety, Production, Maintenance)
Importance Ranking
1=Important 2=Very
Important 3=Critical
Satisfactory
or Needs Work
Procedures/Risk Resolution/
Notes/Comments
• Travel to the No. 2 hoist house
1
Set Pads 1 • Instruct topman to hook shaft
bucket up to No. 2 hoist 1
• Place hoist on personnel center
Failure to place on proper center could cause scaffold to contact rib and injure personnel
• Ensure topman is in crows nest
Lack of positive communication could result in equipment damage or personal injury
2
• Lower personnel back into the hole
1
• Lower personnel through the steady mark until topman signals you to stop
1
o Travel very slowly after going through the steady
Traveling slowly will give personnel time to alert topman if bucket will not land properly
2
• Wait for signal to retrieve bucket
1
• Send in pad bucket 1 • Wait for signal to retrieve pad
bucket 1
• Send in gravel bucket 1 • Wait for signal to retrieve
gravel bucket 1
• Send mantrip back in with foreman
1
• Wait for signal to retrieve bucket
1
Load scaffold with straight steel 1 • Instruct topman to hook sling
on each end of straight steel 1
• Lift up with hoist 1 • Swing over top of scaffold 1

35
Job Steps Importance Narrative
(Consider Safety, Production, Maintenance)
Importance Ranking
1=Important 2=Very
Important 3=Critical
Satisfactory
or Needs Work
Procedures/Risk Resolution/
Notes/Comments
• Lower down onto hand railing until boot hook locks
1
Send starting rings into the hole 1 • Instruct topman to hook two
sections of starting ring to hoist
1
• Perform a light drop test before lowering into the hole
This ensures your load is secure 2
• Send starting ring sections into the hole on center center
Failure to place on proper center could cause starting ring to contact rib and injure personnel
2
• Maintain two wraps above your steady
Failure to stop above steady mark could result in contact with personnel causing personal injury
2 Starting rings hang roughly 20 ft
below hook
• Wait from signal from hole boss to completely lower and set starting ring sections
1
• Wait for signal from hole boss to retrieve hook and rigging
1
• Repeat process for other two sections of starting ring
1
• Wait for signal from hole boss to retrieve hook and rigging
1
• Instruct topman to hook up gravel bucket to hoist
1
• Send gravel bucket into hole on center center
1
• Stop at steady and wait for signal to lower gravel bucket to bottom
Failure to stop at steady mark could result in contact with personnel below and cause personal injury
2
• Wait for signal from hole boss to retrieve gravel bucket
1
• Place gravel bucket out of the way
1
Send radius steel into the hole 1 • Instruct topman to hook up
radius steel to hoist 1

36
Job Steps Importance Narrative
(Consider Safety, Production, Maintenance)
Importance Ranking
1=Important 2=Very
Important 3=Critical
Satisfactory
or Needs Work
Procedures/Risk Resolution/
Notes/Comments
• Swing hoist to center center Failure to place on proper center could cause scaffold to contact rib and injure personnel
2
• Drop into the hole and stop at 3-4 wraps above steady
Failure to stop at steady mark could result in contact with personnel below and cause personal injury
2 Radius steel hangs roughly 30 ft
below hook
• Wait for signal from hole boss for final positioning of radius steel
1
• Wait for signal to send hook back out
1
• Retrieve men from the hole 1 Send scaffold with straight steel into the hole
1
• Instruct topman to place hook on scaffold
1
o Ensure chains do not foul with the steel
1 Steel will be placed over railings on scaffold
o Ensure everyone is clear of steel when scaffold is raised up
Unexpected movement could cause steel to shift, causing hand injuries/cuts to personnel on scaffold
2 Steel will be placed over railings on
scaffold
• Place hoist on center center Failure to place on proper center could cause scaffold to contact rib and injure personnel
2
• Put hoist in low speed Failure to run hoist low speed may result in swaying which could cause scaffold to contact rib or service lines and cause personal injury or damage to lines
2
• Ensure topman is in the crows nest
Lack of positive communication could result in equipment damage and personal injury
2
• Raise scaffold high enough to clear the fence
1
• Over-ride upper limit switch when raising scaffold
1
• Swing to center of hole 1

37
Job Steps Importance Narrative
(Consider Safety, Production, Maintenance)
Importance Ranking
1=Important 2=Very
Important 3=Critical
Satisfactory
or Needs Work
Procedures/Risk Resolution/
Notes/Comments
• Lower slowly until scaffold is in concrete and you can see the men
1
• Stop and wait for signal to lower into hole approximately 30 feet above bottom
1
• Wait for signals from hole boss to set steel
1
o After steel is set the hole boss will signal for pipe to be lowered into the hole
1
• Drop pipe into the hole when signaled by the hole boss
1
• Stop 5 or 6 wraps before steady mark and switch to slow speed
Failure to stop above steady mark could result in contact with personnel below and cause personal injury
2 Pipe is roughly 35 ft below hook
and scaffold is about 30 ft off bottom
• Wait for bell signals by hole boss to place or install the pipe
1
• Repeat cycle until all pipe is installed
1
• Swing out of way 1 • Wait for signals from hole
boss to pull the scaffold out of the hole
1
• Unload the personnel 1 • Set the scaffold out of the way 1
Send personnel back into hole 1 • Ensure topman is in crows
nest Lack of positive communication could result in equipment damage or personal injury
2
• Refer to Hoisting Personnel 1 Wait for signal from hole boss to retrieve bucket
1
Place bucket out of the way 1 Send shaft form into the hole 1

38
Job Steps Importance Narrative
(Consider Safety, Production, Maintenance)
Importance Ranking
1=Important 2=Very
Important 3=Critical
Satisfactory
or Needs Work
Procedures/Risk Resolution/
Notes/Comments
• Instruct topman to hook to shaft form
1
• Raise form section high enough to allow topman to clean bottom, steady
1
• Swing over hole to center center and ensure it is steady
Failure to place on proper center could cause from to contact rib and injure personnel
2
• Lower into hole two wraps above steady
Failure to stop above steady could result in contact with personnel below and cause personal injury
2 Form is roughly 16 ft below hook
• Switch to low speed 1 • Wait for signal from hole boss
to continue lowering form until foreman stops you about 1 foot from bottom
1
• Lower the form very slowly when signaled - this allows the crew to line up the form
1
o Place new bottom reference mark for next ring of forms
1
o Place new steady mark approximately 8 feet above the old and erase old mark and adjust limit settings accordingly
Failure to place new steady mark could result in over travel of hoist causing personal injury to personnel on bottom 2
• Follow hole boss signals 1 • Wait for signal to raise empty
hook to surface 1
• Repeat process until all four form sections are in the hole
1
• Send bucket back into the hole and bring the crew up
1

39
Job Steps Importance Narrative
(Consider Safety, Production, Maintenance)
Importance Ranking
1=Important 2=Very
Important 3=Critical
Satisfactory
or Needs Work
Procedures/Risk Resolution/
Notes/Comments
o Ensure topman is in the crows nest
Lack of positive communication could result in equipment damage or personal injury
2
Set form scaffold, forms, and concrete pour
1
• Instruct topman to place hook on scaffold
1
o Ensure chains do not foul with the steel
1 Steel will be placed over railings on scaffold
o Ensure everyone is clear of steel when scaffold is raised up
Unexpected movement could cause steel to shift, causing hand injuries/cuts to personnel on scaffold
2 Steel will be placed over railings on
scaffold
• Place hoist on center center Failure to place on proper center could cause scaffold to contact rib and injure personnel
2
• Put hoist in low speed Failure to run hoist low speed may result in swaying which could cause scaffold to contact rib or service lines and cause personal injury or damage to lines
2
• Ensure topman is in the crows nest
Lack of positive communication could result in equipment damage or personal injury
2
• Raise scaffold high enough to clear the fence
1
• Over-ride upper limit switch when raising scaffold
1
• Swing to center of hole 1 • Lower slowly until scaffold is
in concrete and you can see the men
1
• Stop and wait for signal to lower into hole approximately 30 feet above bottom
1

40
Job Steps Importance Narrative
(Consider Safety, Production, Maintenance)
Importance Ranking
1=Important 2=Very
Important 3=Critical
Satisfactory
or Needs Work
Procedures/Risk Resolution/
Notes/Comments
• Wait for bell signals by hole boss to place the form scaffold and then send the hook out
1
• Instruct topman to hook up radius rebar
1
• Go to center shaft, steady and wait for signal to lower
1
• Maintain two wraps above the steady
Failure to stop above steady could result in contact with personnel below and cause personal injury
2 Steel is roughly 20 ft below hook
• Wait for signal to lower radius steel and allow crew to unhook
1
• Wait for signal from hole boss to retrieve empty hook
1
• Instruct topman to hook up concrete bucket
1
• Boom up to concrete center 1 • Lower bucket and set on
ground 1
• Place hoist in low speed Failure to run hoist on low speed may result in damage to hoist 2
• Swing filled bucket back over hole to concrete center
Failure to place on proper center could cause bucket to contact rib and spill concrete, injuring personnel
2
• Lower to steady and wait for signal
1
• Hole boss will signal to send on down
1
• Lower slowly until stopped by hole boss
1
• Note reference number off of drum
1 This is your reference number for this ring for this pour

41
Job Steps Importance Narrative
(Consider Safety, Production, Maintenance)
Importance Ranking
1=Important 2=Very
Important 3=Critical
Satisfactory
or Needs Work
Procedures/Risk Resolution/
Notes/Comments
• Repeat process from dropping forms four more times changing reference marks accordingly
After setting each ring of forms, the forms scaffold will need to be slowly raised and reset on hole bosses signals
Pull forms and retrieve 1 • Pick scaffold up and slowly
lower to the next ring of forms following signals from hole boss
1
• Wait for signal from hole boss to hook to and slowly pull form pieces free
1
Hole boss will signal you to stop once form is broken free
o CAUTION: Never exceed 2000 psi when breaking forms loose
Exceeding 2000 psi could cause form to break loose and strike personnel causing injury
3
• Wait for signal from hole boss to raise form out of hole
1
• Repeat process until you get to the No. 1 ring
1
• Wait for signal to remove form scaffold and crew from hole
1
• Drop crew back into hole in bucket
1
• Wait for signal from hole boss to take bucket out
1
• Store bucket out of the way 1 • Send hook back in center
center to retrieve No. 1 ring 1
• Wait for signal from hole boss to hook to and slowly pull form pieces free
1
Hole boss will signal you to stop once form is broken free
o CAUTION: Never exceed 2000 psi when breaking forms loose
Exceeding 2000 psi could cause form to break loose and strike personnel causing injury
3
• Wait for signal from hole boss to raise form out of hole
1

42
Job Steps Importance Narrative
(Consider Safety, Production, Maintenance)
Importance Ranking
1=Important 2=Very
Important 3=Critical
Satisfactory
or Needs Work
Procedures/Risk Resolution/
Notes/Comments
• Repeat process until you get all remaining forms
1
After final form is pulled, foreman will request bucket to bring crew out
• Wait for signal from hole boss to bring crew out
1
• Set new bottom and steady marks and readjust limits accordingly after bucket is on bottom for mantrip
1
• Bring crew out 1

43
Duty 10: Hang Service Lines Learner will demonstrate how to conduct safe and thorough hanging of service lines. Learner will also explain the job duties, why they are conducted, any associated risk, and how to implement appropriate controls. A thorough and safe hanging of service lines includes the following job steps:
Job Steps Importance Narrative
(Consider Safety, Production, Maintenance)
Importance Ranking
1=Important 2=Very
Important 3=Critical
Satisfactory
or Needs Work
Procedures/Risk Resolution/
Notes/Comments
Instruct topman to place service lines on scaffold
1
• Ensure chains do not foul with the pipe
1
• Ensure everyone is clear when scaffold with pipe is raised up
Unexpected movement could cause pipe to shift, causing hand injuries/cuts to personnel on scaffold
2
Place hoist on center center Failure to place on proper center could cause scaffold to contact rib and injure personnel
2
Put hoist in low speed Failure to run hoist low speed may result in swaying which could cause scaffold to contact rib or service lines and cause personal injury or damage to lines
2
Ensure topman is in the crows nest Lack of positive communication could result in personal injury or equipment damage
2
Raise scaffold high enough to clear the fence
1
Over-ride upper limit switch when raising scaffold
1
Swing to center of hole 1 Lower slowly until scaffold is in concrete and you can see the men
1
Stop and wait for signal to lower into hole
1
Follow directions from hole boss to install service lines
Failure to follow the proper directions could cause pinching/crushing 2 CAUTION: When installing service
lines, all moves must be very slow

44
Job Steps Importance Narrative
(Consider Safety, Production, Maintenance)
Importance Ranking
1=Important 2=Very
Important 3=Critical
Satisfactory
or Needs Work
Procedures/Risk Resolution/
Notes/Comments
injuries to personnel installing service lines
to allow crew time to make connections, anchor, etc.
Wait for signal from hole boss to bring crew back outside
1

45
Duty 11: End of Shift Activities Learner will demonstrate how to conduct safe and thorough end of shift activities. Learner will also explain the job duties, why they are conducted, any associated risk, and how to implement appropriate controls. A thorough and safe end of shift activity includes the following job steps:
Job Steps Importance Narrative
(Consider Safety, Production, Maintenance)
Importance Ranking
1=Important 2=Very
Important 3=Critical
Satisfactory
or Needs Work
Procedures/Risk Resolution/
Notes/Comments
Swing boom to stiff leg, dog boom, hook with strap and tighten until snug
1 Only required if there is no follow up shift
Return PPE 1 Talk to oncoming hoist operator It is necessary for hoist operators to
communicate existing conditions/activities
2
Proceed to dry house to change clothes
1
Check out at lamp house or dry house
1
Sign out at mailbox 1

46
Duty 12: Emergency/Non-routine Tasks Learner will demonstrate how to conduct safe and thorough emergency/non-routine tasks. Learner will also explain the job duties, why they are conducted, any associated risk, and how to implement appropriate controls. A thorough and safe emergency/non-routine task includes the following job steps:
Job Steps Importance Narrative
(Consider Safety, Production, Maintenance)
Importance Ranking
1=Important 2=Very
Important 3=Critical
Satisfactory
or Needs Work
Procedures/Risk Resolution/
Notes/Comments
Review/Discuss procedures for utilizing generator
Failure to understand use of generator could result in the inability to retrieve personnel in the event of a power outage
2 Only way to retrieve personnel in the event of a power outage
• Follow start up procedure listed on generator
Operate generator weekly (Sunday) while checking cables
To familiarize personnel with proper use of generator and functionality
2
Provide task training 1 Rag cables weekly (Sunday day shift) Failure to identify defects in the cable
could result in equipment damage or personal injury
2 See cable examination

47
Duty 13: Centers/Bell Signals/ Reference Marks/Best Practice Tips for Hoistman Learner will demonstrate his/her understanding of centers/bell signals/reference marks/best practice tips for hoistman. Learner will also explain the job duties, why they are conducted, any associated risk, and how to implement appropriate controls. A thorough understanding of centers/bell signals/reference marks/best practice tips for hoistman includes the following job steps:
Job Steps Importance Narrative
(Consider Safety, Production, Maintenance)
Importance Ranking
1=Important 2=Very
Important 3=Critical
Satisfactory
or Needs Work
Procedures/Risk Resolution/
Notes/Comments
Know your centers Failure to place on proper center could cause contact with rib or equipment and injure personnel
2
• Personnel Center • Muck Center • Center Center • Water Center • Concrete Center • Slab Center
Communications • Know your bell signals Failure to properly identify and follow
bell signals could result in severe property damage or fatal injuries
3 See bell signal code card or
posting in hoist house
Best Practice Tips for Hoistmen • Never move the hoist if a
signal is not clear Don’t guess at bell signals)
Failure to properly identify and follow bell signals could result in severe property damage or fatal injuries
3
• Always check the cable after an unusual occurrence, i.e., coming off the sheave, drug across the coping
Failure to identify defects in the cable could result in equipment damage or personal injury 3
o Never move the hoist if the bell signal doesn’t match the task you are doing
Making an unexpected move could result in equipment damage or personal injury 3
• Always move the hoist slowly if persons are working from scaffolds
Sudden movements could result in injury to personnel on scaffold 2
• Remember your last move All shaft workers depend on you to 3

48
Job Steps Importance Narrative
(Consider Safety, Production, Maintenance)
Importance Ranking
1=Important 2=Very
Important 3=Critical
Satisfactory
or Needs Work
Procedures/Risk Resolution/
Notes/Comments
function in a safe and logical manner • Always communicate with the
hole boss Communication is the key to an accident-free performance 2
• Keep the boom dogged when you are not using it
To prevent unexpected release of the boom 2
• If hoist gets out of control, press the E-stop
E-stop engages ALL brakes regardless of the position of the controls
3
• Pay attention to the sound of your motor and pumps when lowering equipment, etc., into the shaft
Could identify maintenance issues or malfunction prior to failure 2
o Don’t let it cavitate Cavitation will cause damage to motor 2
• Keep your attention focused on the task at hand
All shaft workers depend on you to function in a safe and logical manner 3
• Always keep an eye on the drum
Watch for indications of malfunction. Unobserved freewheeling would result in fatal injuries to workers below
3
• Don’t put your trust in the dial indicator
Indicators could potentially move and give erroneous readings 2
o Use as a general guide 1 • Run slabs in with the limit
switch engaged 1
• Always do a self-evaluation at the beginning of the shift for work fitness
All shaft workers depend on you to function in a safe and logical manner 3
• Ensure brake test is done prior to shift
Brake failure would result in severe injuries/death and/or equipment damage
3
• Test cable and chain loads prior to shift
This ensures your load is secure 2
• Don’t swing and drag items on the ground with the hoist
Could result in cable coming off sheave and result in cable damage 2
• Always make sure you have 3 wraps left on the drum
Could result in cable coming off drum 3

49
Job Steps Importance Narrative
(Consider Safety, Production, Maintenance)
Importance Ranking
1=Important 2=Very
Important 3=Critical
Satisfactory
or Needs Work
Procedures/Risk Resolution/
Notes/Comments
• Don’t continue operating hoist if you feel something is not right – stop and have it checked out
All shaft workers depend on you and the hoist to function in a safe manner 3
Recommended