Embed Size (px)
Citation preview

WILDLAND URBAN INTERFACE
SAN FRANCISCO FIRE DEPARTMENT

blank page

Wildland Urban Interface January 2008
San Francisco Fire Department
698 - 2nd Street San Francisco, CA 94107

Joanne Hayes-White Chief of Department
Manual Revision Project
Deputy Chief Gary P. Massetani Acting Assistant Chief James A. Barden
Assistant Deputy Chief Thomas A. Siragusa Captain Jose L. Velo
Project Manager, Wildland Urban Interface manual
Battalion Chief Michael S. Kearny
Contributors: Firefighter Paramedic Ronald Johanssen Firefighter Paramedic Jason M. Simmons
Firefighter Paramedic Brock Wells Firefighter Steve M. Finnegan
Captain John F. Hanley
Editor: Firefighter Dawn DeWitt
Published by:
Division of Training 2310 Folsom Street San Francisco, CA
Phone: (415) 970-2000 Revised: January 2008
This manual is the sole property of the San Francisco Fire Department
FOREWORD
The goal of this manual is to establish standard operating practices as authorized by the Chief of Department and implemented by the Division of Training. The purpose of this manual is to provide all members with the essential information necessary to fulfill the duties of their positions, and to provide a standard text whereby company officers can:
• Enforce standard drill guidelines authorized as a basis of operation for all companies.
• Align company drills to standards as adopted by the Division of Training. • Maintain a high degree of proficiency, both personally and among their
subordinates. All manuals shall be kept up to date so that all officers may use the material contained in the various manuals to meet the requirements of their responsibility. Conditions will develop in fire fighting situations where standard methods of operation will not be applicable. Therefore, nothing contained in these manuals shall be interpreted as an obstacle to the experience, initiative, and ingenuity of officers in overcoming the complexities that exist under actual fire ground conditions. To maintain the intent of standard guidelines and practices, no correction, modification, expansion, or other revision of this manual shall be made unless authorized by the Chief of Department. Suggestions for correction, modification or expansion of this manual shall be submitted to the Division of Training. Suggestions will be given due consideration, and if adopted, notice of their adoption and copies of the changes made will be made available to all members by the Division of Training.
Joanne Hayes-White Chief of Department

blank page

Table of Contents
INTRODUCTION ............................................................................................... i SECTION 1. FIRE BEHAVIOR ..........................................................................1.1
Fire Behavior Triangle .....................................................................................1.1 Weather ...........................................................................................................1.1
SECTION 2. TOPOGRAPHY.............................................................................2.1 SECTION 3. SUPPRESSION ............................................................................3.3
The Attack........................................................................................................3.4 Progressive Hose Lays ....................................................................................3.6
Equipment (Hose Packs) .........................................................................3.7 The Evolution of a Progressive Hose Lay ...............................................3.8 Order of Dropping Donut Hose Rolls .......................................................3.9 Engine Operator (Additional Duties) ........................................................3.9
Air Resources ..................................................................................................3.10 Safety Considerations Around Aircraft .............................................................3.10
Air Tankers ..............................................................................................3.10 Helicopters ..............................................................................................3.10
Safety Considerations Around Dozers .............................................................3.10 Hand Tools ......................................................................................................3.11 Mop-Up ............................................................................................................3.12
Techniques of Mop-Up ............................................................................3.12 General Mop-Up Tips ..............................................................................3.12
SECTION 4. INCIDENT MANAGEMENT ..........................................................4.1 Background ......................................................................................................4.1 Incident Command System ..............................................................................4.1 Organizational Structure With Branches And Divisions ...................................4.3 Safety ..............................................................................................................4.3
Ten Standard Firefighting Orders ............................................................4.4 Eighteen Watch Out Situations ...............................................................4.5
Fire Shelters ....................................................................................................4.7 Fire Shelters—New Generation .......................................................................4.8
SECTION 5. STRUCTURE PROTECTION ........................................................5.1 Structure Triage In Wildland Urban Interface Fires ..........................................5.1 Action Plan .......................................................................................................5.1 Structure Triage ...............................................................................................5.2 Factors To Consider During Structure Triage ..................................................5.3 Engine Company Operations ...........................................................................5.4
Engine Position and Setup ......................................................................5.4 The Four Structure Protection Standards ........................................................5.6 Engine Positioning Highlights ..........................................................................5.7 Strike Team Dynamics .....................................................................................5.7 Catch Alls .........................................................................................................5.9 How to Properly Refuse Risk ...........................................................................5.9

Code of Conduct For SFFD Strike Teams ....................................................... 5.11 San Francisco Fire Department Strike Team Check List ................................. 5.13
Prior To Departure .................................................................................. 5.13 Rendezvous Point ................................................................................... 5.13 Check-In ................................................................................................. 5.13 Active Line Assignment ........................................................................... 5.14 Demobilization and Check-Out ............................................................... 5.14
Responsibilities of Strike Team Leader ........................................................... 5.14 Tailgate Briefing ............................................................................................... 5.15
Establish Chain of Command.................................................................. 5.15 Suggested Personal Equipment ...................................................................... 5.16
Fire Line Equipment ................................................................................ 5.16 For the Fire Camp ................................................................................... 5.16 Other Items ............................................................................................. 5.16 Optional Equipment ................................................................................ 5.16
Safety Equipment To Be Worn by Personnel .................................................. 5.17 SECTION 6. OES ENGINE ............................................................................... 6.1
Equipment For Engine Strike Teams ............................................................... 6.2 BIBLIOGRAPHY .............................................................................................. 7.1

i
INTRODUCTION
The increasing growth of the Wildland/Urban Interface in California is placing a tremendous burden on those agencies required to protect its residents and their property. Shrinking budgets equates to less equipment and fewer personnel necessary to operate that equipment. Communities are relying more on mutual aid than ever before to compensate for their lack of resources. San Francisco like any other political subdivision, fire district or State agency is a signatory to the California Master Mutual Aid Agreement. In effect it says it must provide aid to requesting agencies. Our role as a mutual aid provider over the past few years has grown and will continue to grow. It is our duty as a provider to respond with competent, trained personnel who are capable of cooperating with other agencies and at the same time safely accomplish the goals assigned. This Manual was written to provide the reader with a basic understanding of fire behavior, tactics and safety considerations in order to minimize the chances of mistakes and injury. It is by no means an attempt to encompass all aspects of wildland firefighting. There are literally hundreds of books written about this subject which can be very complex. A list of publications in the appendix of this Manual will provide a much more in depth study of this topic. Throughout this Manual reference is made to the South Canyon Fire which occurred near Glenwood Springs, Colorado in July 1994. The fire exhibited some extreme fire behavior but none that was unusual or that could not be predicted. A mixture of helitack, smokejumpers, hot shot crew personnel, and local initial attack forces were assigned to the incident. A cold front with very strong winds moved into the fire area. All 49 firefighters on the incident at this time were forced to abandon the line and escape the 100 foot flames. Thirty-five firefighters survived; 14 did not. References are made so that firefighters will learn the lessons that will help prevent such a tragic event from happening again. At the Esperanza Incident in 2006, 5 US Forest Service firefighters were killed when their engine was burned over in Southern California during Structure Protection. This unfortunate incident was an example of how quickly conditions can change in the Wildland/Urban Interface environment and how important it is for crews to evaluate safety zones and escape routes during the Risk Management decision process during structure Triage.


SECTION 1. FIRE BEHAVIOR
1.1
SECTION 1. FIRE BEHAVIOR
FIRE BEHAVIOR TRIANGLE In the wildland environment fire behaves according to the influences of weather, fuel and topography. These 3 factors make up what is known as the Fire Behavior Triangle. Why does one fire react differently from another? How can an innocuous fire suddenly blow up in a deadly rage as was seen at the South Canyon Fire in Colorado? It claimed the lives of 14 firefighters. The degree to which each factor influences the other determines how a fire will behave. Our understanding of these influences will increase our ability to predict fire behavior.
WEATHER Weather is the most critical factor affecting fire behavior because it is dynamic and unpredictable. Components of weather with which we need to be concerned include wind, temperature, and air stability. Wind is the primary factor that influences fire spread. This includes both the rate and direction of spread. It is also the most variable and least predictable fire weather element. Wind direction is always described as the direction the wind in coming from. Local winds are a byproduct of the daily heating and cooling patterns. Land heats faster than water during the day and cools faster at night. During the day as the air over the land is heated it rises taking in cooler air from over the ocean. During the day upslope and up-canyon winds may develop while at night downslope and down-canyon winds may occur. This may occur on a smaller scale in side drainages depending on slope aspect. Gradient winds are caused by the differential between a high pressure system and a low pressure system. The greater the pressure differential is, the greater the winds produced. A type of gradient wind which is influenced by the slopes of a mountain range is known as a Foehn wind. It is a wind which flows down the leeward side of mountain ranges where air is forced across the range by a pressure gradient. In the West there are occasions when a high pressure system over the Great Basin area acts in conjunction with a low off the coast of California. The air flow will be from the high to the low. Because the Sierra Nevada mountain range and the Cascades block the flow of surface air, the airflow comes from aloft. The air above is dry and warm and flows

ERROR! REFERENCE SOURCE NOT FOUND.FIRE BEHAVIOR
1.2
down the slopes of the mountains compressing and heating as is descends. The warmth and dryness of this air combined with the strong wind flow produces some of the most critical fire weather situations anywhere. In Southern California these winds are known as Santa Ana’s where in Central California they are called Mono Winds. In Northern California they are known as Diablo Winds in the East Bay Hills and simply the North Winds in the Redding area. Frontal Winds occur at the boundary between two air masses of different temperature and moisture characteristics. With the passage of a cold front the wind shift is abrupt and can vary from 45 degrees up to 180 degrees. Winds can be come very gusty sometimes with violent turbulence. Such was the case at South Canyon. At 15:15 hours on July 6, 1994, a cold front moved into the area. At 16:00 hours the fire blew up and by 16:10 hours 14 firefighters were dead. Thunderstorms develop from cumulus cloud growth. Cumulus growth can occur for a variety of reasons. Strong updrafts are always present within a growing cumulus. As clouds grow and moisture condenses it is released in the form of rain or hail. The falling rain or hail drags air causing extreme downdrafts. The wind direction becomes very erratic with speeds sometimes reaching 70 to 75 mph. A thunderhead can be identified by the anvil shape at the top of towering cumulus clouds. This type of cloud is called a cumulonimbus. Temperature affects the combustion process, relative humidity and air movement. Higher fuel temperature means less energy required for ignition. Ground temperatures in unshaded areas sometimes reach 180 degrees. As the temperature increases during the day the relative humidity decreases, and then increases as the temperature decreases at night. Relative humidity is defined as the ratio, in percent, of the amount of moisture in a volume of air to the total amount which that volume can hold at the given temperature and atmospheric pressure.1 A relative humidity below 30% is cause for concern since this is favorable for increasing the risk of spot fires. The dryer air is more capable of picking up moisture from fuel which means less time is required to cause ignition. A relative humidity below 10% is considered critical. Air stability is defined as the resistance of the atmosphere to vertical motion.2 Vertical motion in the atmosphere encounters resistance because of temperature or density of the atmosphere. If the air is unstable, updrafts may be present. This will draw in air from the sides, increasing fire intensity. Unstable air can also have several indirect influences on fire behavior. Winds tend to be gusty causing erratic fire behavior. Other indicators of unstable air are smoke columns which rise to great height, good visibility, dust whirls, and clouds that grow vertically such as cumulus.
1 Fire Weather, U.S. Department of Agriculture Handbook 360, Forest Service. 2 Ibid.

SECTION 1. FIRE BEHAVIOR
1.3
Stable air conditions exist when there is little or no vertical movement of air. Fires are generally less active while stable air conditions exist. Indicators of stable air are smoke columns that flatten out, clouds in layers, or poor visibility due to haze and smoke. A stable air condition, with which firefighters need to be concerned are temperature inversions. This inversion layer is a layer of warm air over a layer of cold air. It usually
forms at night when cold air flows down slope and settles in valley floors. In mountainous areas the top of the inversion is usually below the main ridges. The warmest nighttime temperatures are found here. This area is known as the thermal belt. Within the thermal belt fires can remain active during the night. A thermal belt is an example of the local weather and elevation influencing fire behavior with which firefighters should become familiar. After sunrise, dissipation of the inversion begins when surface heating warms the cold air. The heating destroys the inversion along the slopes and upslope winds begin. Continued heating and mixing will eliminate the inversion. The behavior of a fire burning beneath an inversion may change abruptly when the inversion is destroyed.3
Fuel is all vegetation since it has the potential to burn. Because of their variety and changing condition, the degree of flammability will fluctuate. A method of fuel classification is to group them according to their position on the ground or in the air. Fuels are classified as ground, surface, and aerial. Ground fuels include all combustible materials lying beneath the surface including deep duff, roots rotten buried logs, and other woody fuels. Duff refers to ground litter as it begins to decompose. It is compact and burns slowly, usually smoldering and 3 Fire Weather, U.S. Department of Agriculture Handbook 360, Forest Service.

ERROR! REFERENCE SOURCE NOT FOUND.FIRE BEHAVIOR
1.4
creeping. Fire can travel underground in dead roots, especially in large partially decayed roots extending from snags.4 It is not uncommon for fires to “jump” the fireline in this manner. Flooding fires in ground fuels is ineffective. These fuels should be dug up and carefully extinguished using hand tools and water or Class A foam. Surface fuels include loose surface litter such as leaves, needles, twigs and branches. They also include grasses, low shrubs, seedlings and logs. Ladder fuels are surface fuels of increasing height which provide a pathway for fire to enter the crowns of trees. This process of fire extending from surface to aerial fuels is known as the ladder effect. Aerial fuels consist of tree branches, crowns, high brush, snags and moss. They are physically separated from the ground. Once fire reaches aerial fuels and starts running the crowns (sustained crown fire) there is very little that suppression efforts can accomplish. We tend to think live trees resist the burning process. In the case of evergreens, live needles are highly flammable. The oils and resins they contain make them susceptible to ignition. In addition to fuel classification, fuel characteristics must also be considered. For example, fuel size will determine their ease of ignition and rate of burning. We know that fuel with a high surface to volume ratio such as grass will ignite easier than a log. These small or light fuel particles not only ignite easily but are fast burning. These light fuels are sometimes referred to as flash fuels. Examples are dead leaves, brush and dry grass. Heavy fuels are slow burning and seldom ignite without a boost from lighter fuels. However, once ignited they give off large volumes of heat and are more difficult to extinguish than light fuels. Logs, stumps and limbs are examples of heavy fuel. Compactness refers to the proximity of fuel particles to one another in respect to the free movement of air.5 Ground fuels and some surface fuels tend to be tightly compacted and as a result have less air available. An example is duff. It is the degree of compactness of certain fuels that cause them to burn more readily than other fuel types. Continuity relates to the position of fuel particles to each other, that is, the distance which allows, or refuses to allow, heat to move from one particle to another.6 Continuity is either uniform or patchy. Uniform fuels are distributed evenly and continuously over the area permitting rapid and uninterrupted spread. The primary carrier of fire spread is continuous fine fuel. Patchy fuels have definite breaks in the ground cover such as bare
4 A snag is defined as a dead, standing tree. 5 Ground Cover Firefighting Practices, Second Edition, IFSTA. 6 Principles of Forest Fire Management, C. Raymond Clar and Leonard R. Chatten

SECTION 1. FIRE BEHAVIOR
1.5
ground, rocky outcrops or plots of vegetation with lower flammability than the general area. Volume is the amount of fuel present in a given area. The total volume of fuel in any given area is going to determine how intense the fire will burn. Volume is usually expressed in terms of tons per acre. Grassy fuels can range from 1 to 5 tons per acre; brush ranges from 20 to 40 tons per acre; slash can range from 30 to 200 tons per acre; and timber can range from 100 to 600 tons per acre.7 Firefighters usually think of fuel as a stable element. That it is not changing flammability hour by hour. This is incorrect. Considering the fuel an unstable element is necessary to predict fire behavior changes from the fire line. Portions of the fuel bed are heated by solar radiation while other fuels nearby may be shaded and thus cool.8 The temperature of fine fuels can vary by as much as 80 degrees. Shading created by trees, smoke, clouds or topography can cause differences in fuel flammability. One side of a bush may be more flammable than the opposite side. Learn to use observed sun and shade patterns to see fuel flammability variations. Predict fire behavior potentials based upon your observations.
7 Firefighter’s Handbook on Wildland Firefighting, William C. Teie 8 The Campbell Prediction System, A Wildland Fire Prediction System and Language, Doug Campbell


SECTION 3. SUPPRESSION
2.1
SECTION 2. TOPOGRAPHY Topography refers to the configuration of the earth's surface, or more simply the lay of the land. Of the three major factors influencing wildland fires topography is the most static. Factors associated with topography are aspect, steep slopes, narrow canyons, box canyons and saddles. Aspect is the direction a slope faces. Because we are located in the Northern Hemisphere south facing slopes receive maximum influence from the sun, while north facing slopes receive the least. Aspect also influences the type of vegetation. Southern aspects are generally warmer and drier with flashy fuels and therefore more fire prone. Northern aspects generally have heavier fuels. While fires here may move slower they may also present a greater resistance to control. Western aspects also receive a substantial influence from the sun. With sunrise eastern aspects receive direct sunlight. While not directly influenced by the sun at this time, fuel on western aspects are warming to a lesser degree. By afternoon fuel on eastern aspects are beginning to feel the cooling effects from shading. Western aspects indirectly influenced from the morning sun now feel the full effect of direct sunlight. Because of this both south and west aspects are considered to have a higher degree of flammability. Fuel temperatures play a critical role in fire behavior as was discussed on page 2.2. Because of this it is important that aspects are given serious consideration when predicting fire behavior. Aspects reach their peak flammability potential at different times of the day. South aspects reach their peak about 12 noon while West aspects reach theirs about 4 PM. Eastern aspects reach their peak potential about 10 AM and North aspects about 12 noon but fuel temperatures here will be less during these peaks than the peaks of South and West aspects. How does this affect firefighters? Consider this. You are given an assignment to protect structures at the top of a west facing ridge which is experiencing spot fires. It is 3 PM. What actions do you take? Rather than commit resources to losing cause, risking the lives of firefighters, it may be prudent to fall back and attack when conditions are more favorable to success. Statistics have shown that a wildland fire starting at the base of a steep slope has a greater chance to escape initial attack than one on any other position on the slope. A fire burning on level ground (up to 5% slope) will spread twice as fast when it reaches a 30% slope. The rate of spread will double again as the slope reaches 55%. Another hazard associated with steep slopes is burning material rolling downhill starting fires down the slope which then burns back to the main fire possibly outflanking the crew above.

SECTION 3. SUPPRESSION
2.2
Narrow canyons allow both slopes in the canyon to be preheated to the point of spotting and area ignition. Area ignition is defined as the ignition of a number of individual fires throughout an area, either simultaneously or in close succession and so spaced as to add to and influence the main body of the fire to create a blow-up condition and large continuous fire spread.9 Indicators of area ignition are high sustained rate of spread, well developed convection column, long distance spotting and fire whirlwinds. Firefighting is too hazardous to risk in this situation. Box canyons are narrow canyons with only one way in or out. Fires starting near the base of box canyons or chutes react similar to fire in a stove. Air is drawn in from the bottom, creating very strong updrafts. Saddles are the low topography between two high points. Because saddles are points of least resistance for wind, and fires are pushed through saddles faster during upslope runs, they provide the potential for rapid rates of spread. Personnel or equipment should not be placed in or near saddles because of the tremendous heat and smoke drafting through this area. Many fatalities have occurred in saddles. Two of the firefighters at South Canyon were killed when fire funneled through a saddle and cut off their escape route. Wind, like water, is fluid and will tend to seek areas of least resistance. Topographical features such as canyons, chutes, and saddles make ideal channels where wind will not only flow but increase in velocity. Unlike water however, wind flows uphill
10
9 Wildland Firefighting, Fire Behavior, Tactics,& Command, 2nd Edition, Donald G. Perry. 10 Firefighters Fast Check Guide, 1998 William Teie, Deer Valley Press.

SECTION 3. SUPPRESSION
3.3
SECTION 3. SUPPRESSION The typical parts of a wildland fire:
The head is the part of the fire that spreads the fastest. It is usually found on the side of the fire opposite the direction from which the wind is blowing. A finger is a long narrow strip extending out from the main fire. It usually occurs when the fire hits an area that has both light and heavy fuels in patches. The light fuel burns faster than the heavy fuel which gives the fingered effect. When fingers are not controlled they may form new heads. The rear, also known as the heel, is the side opposite the head. It usually burns slowly and quietly. The flanks are the sides of the fire. The right and left flank separate the head from the rear. Flanks are identified as left or right when facing the head from the rear. A shift in wind direction can change a flank into a head. Islands are unburned areas inside the fire line. They should be cold trailed and if they are close to the fires edge should be burned out to prevent later flare-up. Cold trailing and burning out will be discussed in the Attack section. Deep indentations of unburned fuel along the fires edge are called a pocket. The fire line should be built across the mouth of the pocket and then burned out.

SECTION 3. SUPPRESSION
3.4
A spot fire is a fire caused by flying sparks or embers landing outside the main fire. They present a hazard in that personnel and equipment become trapped between two fires. Burning snags ( dead/standing tree) may increase the risk of spot fires. A convection column is the rising column of smoke, gases, and debris produced by the fire. A column rising thousands of feet in the air is an indication of unstable air with resulting increased fire activity, possibly extreme. Columns in unstable air will be stronger and carry embers to a considerable height. It may allow these potential firebrands to lose most of their heat. Less intense updrafts will cause firebrands to drop sooner, closer, and hotter in front of the advancing fire.
THE ATTACK There are two basic methods of attack. They are the direct and indirect methods. Regardless of the method the basic technique of suppressing forest fires is one of perimeter control. The objective is to establish cleared breaks that completely encircle the fire with all of the fuel inside of the breaks burned out or otherwise rendered harmless. The two most common methods of perimeter control are progressive hose lays and hand line construction. These will be discussed in detail in later sections. With direct attack the control line is established along or directly on the edge of the fire. It is used mostly on light running fires in grass, leaves, small brush, and duff and at the rear of large intense fires. The advantages of the direct attack are:
1. No dangerous backfiring is used. 2. Full advantage is taken of burned-out areas along the control line 3. No need for standby personnel to watch unburned areas
The disadvantages of the direct attack are:
1. The attack is hampered by heat and smoke.
2. The control line is long, irregular and must follow the fire edge.
3. It does not take advantage of natural fire barriers.
A direct attack technique where you stop the fire where the flame meets the fuel is called working the fire edge. It can be done with hand tools, dozers, water, helicopters or air tankers. Another direct attack technique called cold trailing is the construction of a minimum trail along the fire perimeter to prevent further advance of the fire after the fire is relatively cold. Before any portion of what was formerly considered
Fireline
Anchor Point
Road

SECTION 3. SUPPRESSION
3.5
to be the hot fire perimeter can be left unattended there must be absolute certainty that the fire is out. Indirect attack is the construction of a control line at a distance from the fire in unburned fuels and then backfired or burned out. It is most effective against large fires where there is intense burning, a high rate of spread or when working conditions are extremely hazardous. The advantages of the indirect attack are:
1. It is easier on the line workers. 2. There is more time to construct a
line 3. It makes use of natural barriers 4. It develops the shortest line 5. It takes advantage of the easiest
location for line construction The disadvantages of the indirect attack are:
1. More acreage is usually burned. 2. Backfiring or burning-out can get out of control.
As defined, backfiring and burning- out are not the same operation. The only similarity between them is using live fire as a tactical tool to accomplish operational objectives. It is imperative that the decision to use either technique not be made haphazardly or without proper planning and training. Serious and deadly consequences can result. The safety of the public, incident personnel and equipment should never be unduly compromised. Firing Operations are normally conducted by resources that have met red card qualifications. Circumstances may dictate engines to take independent action for crew safety. Firing tactics should always be discussed with strike team leaders in communication with Division Group Supervisors and the Incident Commander as a component of any action plan.11 Backfiring is a fire set to spread against the influence of wind and slope to widen the burn zone ahead of the main fire. It may be used to change the direction of the fire and to slow its progress. This tactic is usually used only when other wildland fire control methods are judged impractical. Some of the conditions which may warrant the use of a backfire include:
1. Rapid rate of spread of the main fire. 2. Fire intensity is too severe for direct attack.
11CDF Firing Operations Basic Firing Methods, Unit 2-Topic 1, page 4

SECTION 3. SUPPRESSION
3.6
3. Immediate threat or hazard to life property. 4. Resistance to direct attack due to terrain.
Burning-out is defined as setting fire inside a control line to consume fuel between the edge of the fire and the control line. This technique is used when the main fire is not an immediate threat and may be used to:
1. Strengthen, widen and secure control lines. 2. Reduce mop up and the need to cold trail 3. Cut across fingers. 4. Incorporate spot fires. 5. Move a line to light fuels. 6. Utilize natural or existing barriers. 7. Provide safety zones and escape routes.
PROGRESSIVE HOSE LAYS The progressive hose lay consists of advancing a hose line from a fire apparatus along the edge of the fire, extinguishing the fire, connecting another section of hose, and advancing the new length of hose to extinguish more fire. A progressive hose lay allows for a fast, aggressive attack while maintaining a continuous water supply. This requires coordination, team work, and communication. It should be begin with an anchor point and progress on one or both of the flanks while conserving water use. The fire should be approached with a charged hose on the edge of the burn to ensure a good safety zone at all times. In a progressive hose lay there are three basic positions: the nozzle person, the hose person, and the clamp person or “clamper”. These assigned positions are required; however, each person’s individual assignment has tasks associated with their position that may change as conditions dictate. The Nozzle Person will establish an anchor point and use a straight stream nozzle to sweep the flames toward the black while conserving water. One should not waste water on heavy fuel concentrations; rather, let them burn out and resume attack around them. Occasionally, direct the hose stream up the line in the direction of travel to slow the progression of fire and to minimize exposure to radiant and thermal columns of heat. This is especially important before clamping the hose and removing the nozzle. The two commands to memorize are “Clamp On” and “Nozzle Ready”. The Hose Person will be responsible for deploying each length of hose as it is dropped from the pack. Remove the securing black hose rubber band and place it in your pocket or through the hose before coupling the hose. In flat terrain with little obstructions such as branches, snags or boulders, the Hose Person may unravel the donut roll by rolling it out into the green while holding the two coupling ends. With all other terrain conditions the Hose Person should carry forward the couplings to the point at which the exchange

SECTION 3. SUPPRESSION
3.7
will occur, leaving the donut roll where it was dropped. This is sometimes referred to as “drop and drag”. The donut roll will unravel as the Hose Person advances forward. The Hose Person will assure that the hose advances without difficulty while trying to prevent kinks in the hose as the Nozzle Person moves forward along the fire line. The command to memorize is “Hose Ready”. The Engine Boss or Clamper should be the lookout, observing the fire behavior ahead and behind them to assure that no rekindles have occurred on the fire line behind or below their location. The Clamper will identify the length of hose remaining to be extended by yelling “Last 25” and Final 10.” “Final 10” prompts the Nozzle Person to begin wetting the fire line ahead. They should also wet down the area well to minimize any potential rekindle or flare-up when the hose is broken down to add the next length. Immediately after wetting down the area directly in front of the nozzle person, the nozzle person will step forward into the wet area which now can be identified as a safe zone. Nozzle Person will then yell out to the Clamper, “Clamp On”. The Engine Boss clamps the hose, identifying to the crew “Clamp On”. After the additional hose length has been added the Clamper removes the clamp and yells “Clamp Off”. The Engine Boss will drop one bundle of 100’ of 1 inch hose with its 1 inch nozzle from his pack at the location of each “Tee” in the progressive hose lay. They will not unravel the hose at this time. The Engine Boss will also assist the Nozzle Person and Hose Person in extending the line forward as they progress along the fire line. The Engine Boss’s commands to memorize are “Last 25”, “Final 10”, Clamp On” and “Clamp Off”.
Equipment (Hose Packs)
• Pack 1 is for the Nozzle Person and has 200 Feet (2x100’ lengths of 1½ inch Wildland Hose cotton jacketed rubber lined CJRL).
• Pack 2 is for the Hose Person and has 200 Feet (2x100’ lengths of 1½ inch Wildland Hose CJRL). Each length has a “Tee” (a controlled valve 1 ½ x 1 x 1 ½) attached to the male (threaded) coupling.
• Pack 3 is for the Engine Boss (Clamper) and has 200 Feet (2x100’ lengths of 1 inch Wildland Hose CJRL)
• Each length has a 1 inch Nozzle attached. The Engine Boss may take an additional 1½ inch hose length if available and there is not a need for 1 inch hose.
• A starter roll consists of 100 Feet (1 length of 1½ inch Wildland Hose CJRL) with an adjustable gallonage nozzle with a shut off when available.
• The driver should deploy this hose and attach it to the pump panel via a gated wye. This evolution should be conducted while the crew dons their hose packs. The driver will hand off the nozzle of this line to the Nozzle Person.
Note: All hose is rolled into a donut roll and will be maintained with a black rubber band (Engine Boss and Hose Person should collect all black bands as they are removed from

SECTION 3. SUPPRESSION
3.8
each donut roll and keep them secure for use when the packs are placed back in service).
The Evolution of a Progressive Hose Lay
1. Nozzle Person moves forward along fire line with assistance of Hose Person.
2. Engine Boss (Clamper) yells “Last 25”; this indicates 25 feet of hose left to advance.
3. Hose Person drops first bundle from his pack. Nozzle Person continues to move forward.
4. Hose Person removes black rubber band, grabs and holds onto both coupling ends then continues to follow Nozzle Person and assist in advancing the hose.
5. Engine Boss (Clamper) yells “Final 10”. Engine Boss places clamp to hose and prepare to clamp hose (This allows Nozzle Person time to stop moving forward thus allowing some slack to remain in line).
6. Nozzle Person, upon hearing the command of “Final 10” from the Engine Boss, stops their forward movement along the fire line. The Nozzle Person will begin to sweep ahead with the nozzle stream and wet down the area well ahead of and immediately in front of them.
7. Nozzle Person steps into the wetted area and yells to the Engine Officer “Clamp On”
8. Engine Boss (Clamper) now clamps hose and yells “Clamp On” back to the Nozzle Person and Hose Person.
9. Nozzle Person now removes nozzle and hands male coupling end to Hose Person. (Note: During clamping operations, it may become necessary to keep the nozzle open to reduce the pressure in the line making it easier for the Clamper to clamp the hose.
10. Hose Person now hands male coupling of new length of hose to Nozzle Person.
11. Nozzle Person attaches nozzle to new length of hose and yells “Nozzle Ready”.
12. Hose Person joins together male coupling of existing length of line to female coupling of new length of hose being added and yells “Hose Ready”.
13. Engine Boss (Clamper) removes clamp and yells “Clamp Off” (this indicates that water is coming and to resume the attack along the fire line).
This process repeats itself with each additional length of 100’ of hose line that is added. The next length (number 2) of hose to be dropped and added into the progressive hose lay will come from the Nozzle Person’s pack. The third length to be added will be from the Hose Person’s pack, and the final fourth length of hose to be dropped and added will be from the Nozzle Person’s pack.

SECTION 3. SUPPRESSION
3.9
Order of Dropping Donut Hose Rolls
Hose Person #1 (First 100’ Length of Hose with “Tee”) Nozzle Person #2 (Second 100’ Length of Hose) Hose Person #3 (Third 100’ Length of Hose with “Tee”) Nozzle Person #4 (Fourth100’ Length of Hose)
Engine Operator (Additional Duties)
Will deploy 100’ of “Red line” (OES 248) or second roll 100’ of 1-inch or 1½-inch line from engine to protect area around Engine from spotting and to protect first 100’ of progressive hose lay from any rekindle or flare-up. Maintain 100 gallons in tank for escape protection at all times, and to notify the officer of water status. They should ensure adequate supply to engine from other engines in “Strike Team” (Shuttle Operation or supply from Tender) and maintain Adequate Pressure. Ideal pump pressure is 100 psi for 60gpm at nozzle. Add 10 psi for each 100’ length of CJRL 1½-inch hose and add 5 psi for each 10’ (+) elevation rise or subtract 5 psi for each 10’ (-) elevation change down slope. They should maintain communications with Engine Boss and act as “Lookout” for Crew performing Progressive Hose Lay and direct any additional crews with “Hose Packs” and “Hand Tools” towards the fire line who will continue to advance the Progressive Hose Lay. Note: As a crew has depleted their supply of 1½-inch hose during a Progressive Hose Lay, they are responsible for maintaining the integrity of their portion of the line. Depending on the situation, they may get additional 1½-inch hose and advance back towards the head of the fire. They may also get hand tools and a backpack pump and help improve the line. The crew may also retrieve their 1-inch donut rolls dropped at the “Tee’s” in the progressive hose lay and deploy these lines by attaching them to the “Tee’s” and begin mop-up operations in their “Section” of the Progressive Hose Lay. Broken Hose: When a tear or broken hose line occurs in a progressive hose lay, a member of the crew should return to the coupling before the break and clamp the hose. Another member of the crew should remove a length of hose from a hose pack or return to the engine for a new length and unroll the new length leaving the female coupling next to female coupling to be replaced. Another member may need to perform a field clamp downstream by forming a “Z” with the hose and placing a knee on top of it to stop any more water from being lost on the broken length and/or reduce the pressure to aid disconnecting the coupling. The slack between lines left between each added length will facilitate adding additional replacement lengths in the middle of a Progressive Hose Lay. If the new length of hose is shorter than the length replaced, an additional length of hose may be required.

SECTION 3. SUPPRESSION
3.10
AIR RESOURCES Air resources consist of both fixed and rotary winged aircraft used to support ground operations. Air attack is most effective when used for initial attack. G enerally air tankers (fixed wing aircraft) drop a long-term retardant12 called Phos-Chek. The red dye it contains allows drop pattern and accuracy to be seen from the air. Helicopters (rotary winged aircraft) are used to drop water or retardant on hot spots or structures. They are also used for reconnaissance, firing operations, and transporting personnel and equipment.
SAFETY CONSIDERATIONS AROUND AIRCRAFT
Air Tankers
Move out of the drop zone but only if there is time to do so. Never stand up in the path of a drop. If there is no time to get out of the way lie face down, head toward the drop,
hard hat on, and hold tools away from the body. If possible get behind a large rock or shrub to help break the force of the drop
and lie face down. Stay away from large old trees. Limbs may break off.
Helicopters
When on the ground or hovering wear goggles to protect your eyes from rocks and debris thrown by rotor blast.
Always approach and leave the helicopter from the front so the pilot can see you. Do not approach the helicopter from higher ground than that which it is standing
or hovering. Carry all long-handled tools in such a manner that they will not be inadvertently
raised into the rotor. Wear your hard-hat with the chin strap in place.
SAFETY CONSIDERATIONS AROUND DOZERS Dozers are normally used as an initial attack tool to make a direct attack on the hottest flank while hand crews handle the cold flank. Because of their capability to construct a considerable amount of fire line they are also very useful on larger fires.
Keep at least a 50 foot distance from the dozer.
12 Long-term retardant refers to a retardant that uses a chemical base to treat the fuel in order to slow the combustion process. It has about a one-hour holding characteristic.

SECTION 3. SUPPRESSION
3.11
The rear and sides are natural blind spots. Assume the dozer always has the right of way. If the operator wants you to approach he will lower the blade and throttle then
signal you to approach. Because they can dislodge rocks never work below a dozer.
HAND TOOLS The SFFD carries different hand tools on wildland fire engines to assist in completing their operations. These operations could include:
1. Structure protection
• Structures that need clearing could become a defendable structure.
• Building or extending a safety zone. 2. Clearing egress routes for fire apparatus. 3. Progressive hose lays and mobile attack.
• Having personnel patrolling the fire line with hand tools to control flare ups or spot fires.
4. Safety • During any handline construction, lookouts need to be in
position and in communication with, their crew and adjoining forces.
The three main hand tools used in wildland firefighting are the Pulaski, the McLeod, and the Round Tip Shovel. The Pulaski combines an axe and a sharpened hoe- like grubbing end into one tool. When using the grubbing end to unearth roots or remove light ground fuels, use short shallow swings while holding the handle with both hands. Use the axe end to cut branches or lighter fuels or to cut roots after the dirt has been cleared with the hoe or grubbing end. The McLeod combines a sturdy rake on one side which may be used to remove thick duff or leaves or drag burnt or burning fuels into the black. The other side of a McLeod is the cutting end and is especially effective in cutting line in lighter flashy fuels such as grass. The McLeod is ineffective in rocky terrain and thick vegetation. This tool should be carried with the rake side away from the body to protect from possible puncture wounds. Shovels are best used is light soils and vegetation. When using a shovel for scraping, use your thigh as a fulcrum to push against the shovel. When using the shovel for digging, use your legs and not your back for lifting. It is important that personnel know the proper use, care, and safety of all hand tools. Personnel should carry tools at their balance point and on the downhill side keeping the cutting edge away from the body. Firefighters should always work and walk at least 10

SECTION 3. SUPPRESSION
3.12
feet apart and announce their presence and wait for other firefighter to stop working before proceeding. Firefighters should always establish secure footing prior to using a hand tools. Tools should be inspected before and after each operational period for cracked handles, loose heads, and sharpness. A dull tool makes any handline construction more difficult. Tools should be properly sharpened. Any damaged tools should be removed from service.
MOP-UP Mop-up is the process of putting out all fire in enough of the area around the perimeter so that no spot fires or slop-over can occur. It can be said that mop-up is to the wildland firefighter what overhaul is to the structural firefighter. More fires have been lost because of poor or incomplete mop-up than for any other reason.
Techniques of Mop-Up
The use of water in conjunction with hand tools is the best mop-up technique. It is not the amount of water that is used, but how effectively it is used. Burning material must be exposed and separated with the application of a fine light spray of water. There are some instances which may require the use of a straight stream but make each drop count. Drowning or drenching is ineffective. Wetting agents such as Class A foam are sometimes used because they break down the surface tension of water allowing it to penetrate fuel better than ordinary water. Another characteristic is its affinity for carbon. Foam concentrates are added to water to produce foam solution which, when aerated, produces finished foam. The introduction of air into the solution causes it to expand. Because of varying fuel characteristics and suppression objectives the foam solution can be expanded to meet these different needs. In other words different expansion ratios produce different results. For mop-up purposes Class A foam works best when it is in a very wet state with little introduction of air. Air- aspirating nozzles or Compressed Air Foam Systems (CAFS) are used to produce finished foam. Many fire departments are using this product and it is likely to be present on mutual aid incidents involving the wildland or urban interface. The use of dirt for mop-up may be used to cool the material so that it may be worked. Do not cover burning stumps, logs or chunks with dirt and expect them to go out. Dirt will eventually drop away with the smoldering material breaking out into flames. Stumps and logs that have not yet caught fire may be covered with dirt to prevent radiant heat from igniting the unburned fuel.
General Mop-Up Tips
Snags should be felled because they are easily ignited by flying embers. Once they ignite they give off embers like a Roman Candle. Felling snags requires special skill.
Only qualified personnel should be allowed to perform this operation.
SECTION 3. SUPPRESSION
3.13
Clear areas of fuel around stumps and other heavy fuel to prevent their possible ignition.
Burning stumps should be dug out completely with the roots cut off. Completely extinguish.
Remove roots across the line. Fire can travel underground along roots with fire breaking out on the surface many feet away as much as two weeks later.
When mopping up there is one sure way to know that no fire exists. Feel it with your hands. Reflexes are usually quick enough to prevent burning the hand.
REMEMBER, IN MOP-UP, DIG OUT, SEPARATE, CHOP OFF, ISOLATE AND BURN OUT OR EXTINGUISH ALL BURNING MATERIAL.


SECTION 4. INCIDENT MANAGEMENT
4.1
SECTION 4. INCIDENT MANAGEMENT
BACKGROUND In 1970, a series of wildland fires over a 13 day period burned more than 500,000 acres in a seven county area of Southern California destroying close to 800 structures, and killing 16 people. Analysis of the response to these fires indicated a need for a management system which could coordinate the resources from Federal, State and local jurisdictions. To address these needs the California Office of Emergency Services, California Department of Forestry, US Forest Service and a number of Southern California Fire Departments became joint partners in an organization called Firefighting Resources of Southern California Organized for Potential Emergencies (FIRESCOPE). They developed an emergency management organizational structure called the Incident Command System (ICS). It is designed to provide common and more effective procedures to diverse agencies who must work together under crisis conditions. The Incident Command System includes standard terminology, uniform procedures and organization, and improved communication techniques that can be adopted by urban and wildland fire agencies and other emergency services practitioners. Adoption of the Incident Command System was strictly voluntary. More recently, and as a result of the Tunnel Fire in Oakland, Senate Bill 1841 created the Standardized Emergency Management System (SEMS). Local governments must use SEMS in order to be eligible for state funding of response related costs. One of the basic components of SEMS is the Incident Command System.
INCIDENT COMMAND SYSTEM The Incident Command System has five primary management functions applicable to any emergency. Each position has a specific functional role to perform, however, they must work together to provide an overall team approach. The personnel performing these functions are known as the General Staff. These are:
• Incident Command • Operations • Planning & Intelligence • Logistics • Finance & Administration
Personnel performing the function of SAFETY OFFICER, LIAISON OFFICER, and PUBLIC INFORMATION OFFICER are known as the Command Staff and report directly to the Incident Commander.
SECTION 4. INCIDENT MANAGEMENT
4.2
Incident Command
Safety Liason
Operations Planning/Intelligence Logistics Finance/Administration
Liason
Public Information Officer
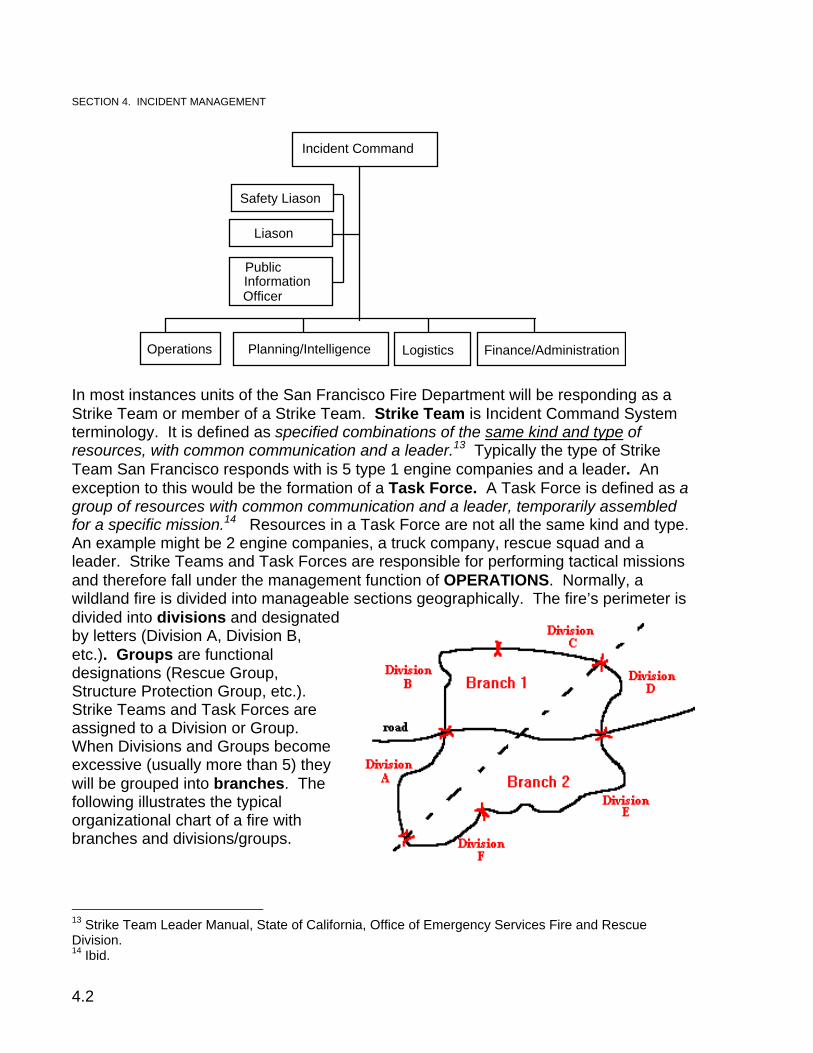
In most instances units of the San Francisco Fire Department will be responding as a Strike Team or member of a Strike Team. Strike Team is Incident Command System terminology. It is defined as specified combinations of the same kind and type of resources, with common communication and a leader.13 Typically the type of Strike Team San Francisco responds with is 5 type 1 engine companies and a leader. An exception to this would be the formation of a Task Force. A Task Force is defined as a group of resources with common communication and a leader, temporarily assembled for a specific mission.14 Resources in a Task Force are not all the same kind and type. An example might be 2 engine companies, a truck company, rescue squad and a leader. Strike Teams and Task Forces are responsible for performing tactical missions and therefore fall under the management function of OPERATIONS. Normally, a wildland fire is divided into manageable sections geographically. The fire’s perimeter is divided into divisions and designated by letters (Division A, Division B, etc.). Groups are functional designations (Rescue Group, Structure Protection Group, etc.). Strike Teams and Task Forces are assigned to a Division or Group. When Divisions and Groups become excessive (usually more than 5) they will be grouped into branches. The following illustrates the typical organizational chart of a fire with branches and divisions/groups.
13 Strike Team Leader Manual, State of California, Office of Emergency Services Fire and Rescue Division. 14 Ibid.

SECTION 4. INCIDENT MANAGEMENT
4.3
For the sake of brevity, it only illustrates the organization from OPERATIONS downward.
ORGANIZATIONAL STRUCTURE WITH BRANCHES AND DIVISIONS
OPERATIONS
Div A Div B Div C Div D Div E Div F
Engine Strike Team
Engine Strike Team
Dozer Strike Team
Rescue Group
Branch 1 Branch 2
Staging
SAFETY “The safety of everyone engaged in firefighting is the personal business of everyone, both for himself (herself) and his (her) fellows.15 In 1957 the US Forest Service appointed a task force to study 16 fatal fires that had occurred from 1936 to 1957. The purpose was to establish safety standards to prevent further fatalities. The task force developed what is known as the Ten Standard Firefighting Orders. Since then firefighting injuries and fatalities have indicated a need for further study to identify and define additional safety considerations. Eighteen situations were identified as having conditions that were dangerous and with potential fatal consequences for firefighters. They are known as the 18 Watch Out Situations. These are more specific and precautionary than the Standard Fire Orders and describe situations that expand the 10 points of the Firefighting Orders. If firefighters follow the 10 Standard Firefighting Orders and are alerted to the 18 Watch Out Situations, much of the risk of firefighting can be reduced. They were designed to help firefighters recognize and reduce risks. At the South Canyon Fire eight of the 10 Standard Firefighting Orders were compromised. Twelve of the 18 Watch Out Situations were either not recognized, or proper action was not taken.
15 Principles of Forest Fire Management, C. Raymond Clar and Leonard Chatten

SECTION 4. INCIDENT MANAGEMENT
4.4
Ten Standard Firefighting Orders
1. Keep informed of fire weather conditions and Forecasts. Weather is the major factor in fire behavior. Use your senses. Feel if the temperature is increasing or decreasing. Look if the wind is blowing. Observe movement of clouds, trees and smoke. Read the weather forecast in fire camp.
2. Know What Your Fire is doing at all Times Many firefighters have been killed because they did not observe the whole situation. Personally observe from a vantage point. Scout out ahead with reliable scouts.
3. Base All Actions on the Current and Expected Behavior of the Fire The action you take should be determined by everything that is happening and everything that you think might happen. Make an educated guess...
A few things to consider:
• What is the fire doing now? • What is the fire going to do later? • What action is being taken now? • What is the weather in the fire area? • What is the weather going to do? • What type of fuel is burning? • What type of fuel is the fire heading for?
4. Have Escape Routes for Everyone and Make Them Known. A good area to select is the burned area if it is close enough. Natural barriers to consider include rock ledges, streams, lakes and slide areas.
5. Post a Lookout when there is Possible Danger Lookouts should be in constant communication with workers or bosses. Some instances that warrant a lookout:
• When the head of the fire is not visible • When felling snags • When personnel and equipment are working close together • When there is a possibility of falling rocks or material striking
someone or starting a fire outside the control lines. • When there is an apparent hazard such as a snag that
cannot be felled.
6. Be Alert, Keep Calm, Think Clearly, Act Decisively. Panic can injure or kill you. Thoroughly evaluate the situation.

SECTION 4. INCIDENT MANAGEMENT
4.5
7. Maintain Prompt Communication with Your Personnel, Your supervisor, and Adjoining Forces. This is your link to any changes in conditions. It allows you to tell people of your status and the fire behavior in your area. Face to face communications is best.
8. Give Clear Instructions and Be Sure they are Understood. This is usually where a breakdown begins. People are in a hurry to get going, so instead of issuing concise, written instructions and directions, oral instructions are given. These oral instructions may not be complete and are easily misinterpreted or forgotten. Find out:
• What to do • Where to go • Where to finish • When to finish • Other pertinent information
9. Maintain Control of Personnel at All Times If you maintain control of yourself and those around you, you will decrease the chance of an accident.
10. Fight Fire Aggressively but Provide Safety First Aggressive action is the key to successful suppression but it must not violate any safety rules.
Eighteen Watch Out Situations
1. Fire not scouted or sized up. 2. Country not seen in the daylight 3. Safety zones and escape routes not identified. 4. Unfamiliar with local weather and local factors influencing fire behavior. 5. Uninformed on strategy, tactics and hazards. 6. Instructions and assignments not clear. 7. No communication link with crew members and supervisors. 8. Constructing a fire line without a safe anchor point. 9. Building a fire line downhill with fire below. 10. Attempting a frontal assault on the fire. 11. Unburned fuel between you and the fire. 12. Cannot see the main fire and are not in contact with anyone who can. 13. You are on a hillside where rolling material can ignite fuels below. 14. Weather is getting hotter and dryer. 15. Wind increase or changes direction. 16. Spot fires are frequently crossing the line. 17. Terrain and fuels make escape to safety zones difficult. 18. Taking a nap near the fire line.

SECTION 4. INCIDENT MANAGEMENT
4.6
The essential elements of wildland firefighting safety orders are included in the acronym L-A-C-E-S. LACES should be reviewed at every safety briefing at all levels. Information from the incident action plan should be incorporated when available. Lookouts Scouts need to be in a position where both the hazard and the
firefighters can be seen. Lookouts must be trained to observe the wildland environment and to recognize and anticipate changes in fire behavior. Each situation determines the number of lookouts that are needed. When the hazard becomes a danger the lookout relays the information to the firefighters so they can reposition to the safety zone.
Awareness You need to have an understanding of your assignment. You must be aware of the activities around you. Know what the terrain is. Know your travel routes.
Communications Communications is the vehicle which delivers the message to the firefighters, alerting of the approaching hazard. Communications must be prompt and clear.
Escape Routes Escape routes are the path the firefighter takes from their current location, exposed to danger, to an area free from danger. There must always be more than one escape route available to firefighters. The effectiveness of escape routes changes continuously as firefighters become fatigued and their separation from a safe area increases. The most common escape route is the fire line.
Safety Zones Safety zones are locations where the threatened firefighter may find refuge from danger. Unfortunately shelter deployment sites have been incorrectly called safety zones. Safety zones should be planned as a location where no shelter is needed.
A key concept is that LACES is identified prior to when it must be used. That is, lookouts must be posted with communications to firefighters and a minimum of two escape routes from the firefighter’s work location to a safety zone every time the firefighter is working around a hazard.

SECTION 4. INCIDENT MANAGEMENT
4.7
FIRE SHELTERS The fire shelter is a critical piece of firefighting safety equipment. The fire shelter protects you from radiant heat by deflecting the heat. Do not take more risks because you have your shelter. The shelter is a last resort effort to survive. If entrapment seems likely, attempt to escape, but only if you are certain you will make it to safety. If there is any doubt about a successful escape, deploy your shelter. The following actions will optimize survival chances of those who become entrapped by fire:
1. Fire shelters must be carried where they can be easily reached and removed. Shelters should never be carried inside a pack.
2. Once an entrapment becomes likely protecting your airway should dominate all your decisions while attempting to escape or deploy shelters.
3. When escape is questionable your first priority is to take your fire shelter out of the carrying case and remove the polyvinyl bag by pulling the red ring. Carry the folded shelter in your hands ready for quick use. While trying to escape it can be partially opened to use as a heat shield against radiant heat. It will not protect against hot gases or a flame front which would leave your airway unprotected. When extra speed is essential for escape get rid of all your tools, saws, packs, etc.
4. It is critical to leave sufficient time to get under your shelter before the hot gases or flame front arrives. It is more important to be on the ground before it arrives than to be in your shelter. If this happens, finish deployment on the ground as rapidly as possible but do not expose your airway. If you only get partially deployed protect your head and airway with your shelter as your top priority.
5. Prior to arrival of a flame front the air is often very turbulent. This results in longer deployment times and the necessity to hold your shelter very tightly, so it is not blown away or damaged.
6. Once you deploy stay under the shelter. No matter how bad it is under the shelter the heat can be 10 to 20 times worse outside the shelter.
7. If entrapped without a shelter stay lying face down with arms curled around your head no matter how bad your back is being burned. This is your best chance to survive. It is always hotter off the ground than at ground level, so keep your nose and body pressed to the ground and stay there.

SECTION 4. INCIDENT MANAGEMENT
4.8
8. If you are under the fire shelter and the inner layer of glass cloth starts to separate from the aluminum foil, the glass cloth may burn you but it will cool off rapidly. If this occurs it is critical that you remain under the shelter and keep movement to a minimum since the foil can now be torn easily. Even if the foil breaks open and the flames enter it is still worse outside the shelter.
FIRE SHELTERS—NEW GENERATION As of 2007 the yellow- cased shelters are still permitted, but they are being phased out and replaced with a new generation of fire shelter. The new generation shelter is easily recognizable by the larger blue case and thicker material. These new shelters have extra material added to the bottom side along as well as arm straps to help hold onto them in high winds. There are two sizes of new shelters: a standard size for people shorter than 6 feet tall and a large size (indicated on the red pull tab) for those over six feet tall.

SECTION 5. STRUCTURE PROTECTION
5.1
SECTION 5. STRUCTURE PROTECTION
STRUCTURE TRIAGE IN WILDLAND URBAN INTERFACE FIRES The safety of firefighters is the primary consideration when evaluating whether a structure can be protected. The goal is to protect and save as many structures as safely possible. There are three categories of structures in the urban interface: defendable, un-defendable, and those needing little or no protection. When a strike team leader or Engine Boss triages structures for protection, the following factors dictate if a home is not safe and should be abandoned and crews moved on to a new structure or out of the area.
• The fire is making sustained runs in live fuel and there is little or no clearance around the structure; the structure has combustible exterior materials.
• The fire behavior is extreme; spot fires are numerous and outpacing your ability to control them.
• The water supply will not last as long as the threat. • The fire’s intensity dictates you leave the area now or the escape route will
be unusable. • The roof is more than 1/4 involved. • There is fire inside the structure; windows are broken; windy conditions. • The fire behavior and fuel type will dictate the attack mode you will be able
to use.
ACTION PLAN You must develop an action plan, even if it is just a couple of notes on a slip of paper. Use the information that you have gathered during the size-up, the review of the structure protection problem and your knowledge of the firefighting resources committed to the incident. Develop a plan that predicts where the fire will be at certain times, and outline what the firefighting resources that are “at scene” will be assigned to do. Look at the big picture. Consider what you can do with the firefighting forces and water at hand. As a rule of thumb, you should assign one engine per structure in the “structure threat zone” with one additional engine for every four to be used to patrol the area and remain “flexible.” If the structures are close together (50 feet or less) one engine company may be able to protect two structures. Large commercial structures or structures already involved will require the assignment of additional engine companies.

SECTION 5. STRUCTURE PROTECTION
5.2
The time that will be required to actively protect the structure will depend on the fuel type and fire intensity. As a rule of thumb, in light fuel, such as grass and sagebrush, when flying firebrands are not too much of a problem, you may have to stay with the structure for 20 to 40 minutes. In brush, with passage of a single fire front, you may have to stay approximately 30 to 60 minutes. If the fuels are heavier and spot fires are a problem, the time will be increased. You may have to protect the structure for several hours in timbered areas, especially if the fuel buildup around the structure will expose the structure to radiated heat to firebrands for long periods of time. Water requirements depend on the fuel type, fire intensity and the number of flying brands. Personnel need to use water wisely and sparingly. A minimum of 100 gallons must be saved to protect firefighting personnel and equipment. Communicate the plan to the firefighting resources already on the fire. Outline the plan, the success, hazards, safety zones and escape routes. Identify the staging area, the location of the incident command post, and water sources. The key is to match your firefighting resources to the predicted fire problem. This includes the type of engine companies (Type 1 or 3), water tenders, adequate management, and supervisory and logistical support personnel to ensure the operation functions in an effective and efficient manner.
STRUCTURE TRIAGE Rescue If people are in a structure, the focus is on that structure first. Involvement If the structure is involved in fire and cannot be put out with a
tank of water, write it off Exposures Decide which exposure is dependable and go for that one.
By the time you try to defend an undefendable structure. you may lose an entire block
Roof covering If one structure has a wood shingle roof, try to save the one
that doesn’t Defensible space The structures that have a clearance around them can be
defended with less effort. If there is no separation of fuels, write it off.
Water Supply You need a mobile water supply. If you cannot defend the
structure with the water you carry on your apparatus, you will probably lose the structure.

SECTION 5. STRUCTURE PROTECTION
5.3
Personnel If you have the time and personnel, you can create a defensible space. Do not try to defend several structures at one time with an engine crew.
Strike Teams You may have to split up your strike team during the first
critical moments of the fire. Escape Routes Do not try to defend Structures in an area that will trap you.
Always have an escape route before committing crews. Topography Write off houses that are at the top of drainage’s, saddles,
chimneys or box canyons. Fuel Structures that are in heavy fuel are difficult to defend. If you
have a choice, try to save those structures in light fuels. Wind If the wind is over 30 miles per hour, and it is driving flames
directly into the structure, the building will be difficult to defend.
FACTORS TO CONSIDER DURING STRUCTURE TRIAGE Safety Do not put firefighters at undue risk to save a structure.
Safety first, The house can be rebuilt.
Proximity of Fuels If there are fuels right up to the structure there is no defensible space. If the fire is burning with any intensity at all, it will be difficult to save.
Flammability of Roofing and Siding
If the structure has flammable siding and it will be difficult to save, and if there us no clearance, it may be impossible to save.
Timing and Firefighting Resource Availability.
If you don't have time to set up or there are no available firefighting resources, you have very few options.
Safety—Fire Behavior and Intensity Spotting
The intensity of the fire will dictate how much defensible space will be necessary. The greater the intensity, the wider the break in fuel will have to be. If the fire is spotting, control all the spots within the "spotting zone".
Bridges and Road Access
Unfamiliar roads must be scouted out prior to committing engines to ensure adequate turnaround and egress. Bridge weight limits, and width must be observed.
SECTION 5. STRUCTURE PROTECTION
5.4
ENGINE COMPANY OPERATIONS
Engine Position and Setup
There are several key things to remember when making access to a structure and positioning the engine:
1. Note landmarks and hazards along the way. You may have to leave the area in a hurry and under very smoky conditions. Make note of any potential safety zones.
2. Back in from the last turnaround. If the driveway is short (less than 50
feet) you may want to park in the street. 3. Park the engine so that is not blocking other traffic. Be careful not to park
in flammable vegetation, under power lines, near sources of intense heat, or LPG tanks. Park close enough that you don’t have to lay extensive hose lines. Be sure to closer the doors and windows on the engine. Don’t leave flammable items (hose packs, personal gear, sleeping bags) exposed on top of the engine.
4. Survey the area for hazards like holes, drop-offs, septic tanks, wire
fences, low service drops or other wires, agitated or protective animals, fuel storage tanks, LPG tanks, or pesticides.
5. Locate a garden hose and place it in your tank filler. Seize every
opportunity to top off your tank. You will need every gallon of water you can find.

SECTION 5. STRUCTURE PROTECTION
5.5
Once the engine is positioned in a safe place, it is time to lay the protection lines. Walk around the structure and survey the situation. Check the clearance and condition of fuels. What is the vulnerability of the structure? Look for on-site resources, such as a water source, ladder, hoses, and other tools that can be used instead of taking them off your engine. Shut off the gas, but keep the electricity on so that any on site water pumps will continue to work, and so that the home can be easily found at night.

SECTION 5. STRUCTURE PROTECTION
5.6
Establish perimeter protection. Use 1 ½ inch lines. Smaller lines may be used in light fuels or in firing operations. Combination nozzles work best, though you may have to change to straight stream nozzles in high wind conditions. Use single jacketed hose if available. The most common hose lay is two lines, one on each side of the structure. If the structures are closely spaced, lay the two lines between the structures. If a portion of the perimeter is not exposed, use a single line on the threat side. Do not deploy more lines than you need or can effectively utilize. Cover the full perimeter. Attach all lines on the same side of the engine. This will facilitate quick disconnecting, and establish a rendezvous point for the crew during pick up and move out, if that becomes necessary. If roof protection is needed, ladder the structure and lay a line to the roof. Use the homeowner’s ladder if possible. Remember, even a roof constructed of a fire resistant material may need to be protected. Coil a protection line on the hose bed for crew and engine protection. Charge the line and check it. Place this line so it is easy to reach. Use it only for the protection of the crew or the engine. If it becomes necessary to attack an interior or roof fire, use the 1 3/4 inch lines. Don’t use larger lines unless you have the water and you are convinced they will provide a “quick knockdown”. If you don’t have the water, stay with the 1 ½ inch hose line.
THE FOUR STRUCTURE PROTECTION STANDARDS Situation
Conditions/Actions
Spotting Airborne firebrands are the immediate problem. This threat may last for hours. Remain mobile; survey all assigned areas (use lookouts or patrols) lay lines only when necessary; attack spots as quickly as possible (ensure they will not rekindle); under extreme conditions (many spots in heavy fuel) and not enough water, move out.
Full Control Perimeter control is possible; you pick the location for the control lines. Take action to stop the fire at the edge of the yard; construct a line that will hold and not rekindle; fire out the line if time is short connect your line with other control lines or anchor points.
Partial Control The location of control lines is not your choice. Time is limited or fire intensity prevents full control. Knock down the fire front moving at the structure; lead the fire around the structure with your hose lines; check the structure for ignition.

SECTION 5. STRUCTURE PROTECTION
5.7
No Control The fire has past you by or is too hot too control, protect the apparatus; attack fire in/on structure if it s safe; use breathing apparatus and hose lines as necessary; move to safety zone or retreat if necessary. All is not necessarily lost after the fire moves past a structure. Move back in and take action.
ENGINE POSITIONING HIGHLIGHTS Back in from last turnaround Leave the engine running Ladder structure, (use homeowners ladder if possible) Clear the roof and gutters of debris. Check under the tiles Close window and remove lightweight drapes. Fill tank at every opportunity Crew protection line in place Lay lines to protect structure Move woodpiles and vegetation away from structure
STRIKE TEAM DYNAMICS Working outside the City and County of San Francisco can present some unique and challenging situations. Good leadership and organizational skills can make the experience worthwhile and exciting. Remember, we are working on someone else’s turf, and we should respect the local tactics and strategies employed. The following suggestions should make the Strike Team work well:
1. Receive your information from dispatch. Included should be the order and request number, location and type of incident, route of travel, expected E.T.A., engines assigned to you etc.
2. Form-up with strike team at arranged location.
3. Conduct brief interviews with each of the engine company officers.
4. Establish a radio frequency for travel and Strike team operations. Insure good communications for the strike team with assurances that it will be monitored at all times in addition to and other frequencies assigned at the incident.
5. Go over engines and equipment complements and make a brief inventory.
6. Acquire a listing of all personnel and a brief biography of their background and experience. (Use the expertise that is on that Strike team)

SECTION 5. STRUCTURE PROTECTION
5.8
7. Discuss your particulars on operations and procedures.
8. Select an Assistant Strike Team Leader /Engine
9. Appoint a Logistics Officer to support the Strike Team
10. Proceed to incident. (Have engines ready to fight fire prior to actual arrival at the at the incident)
11. Check-in at incident and proceed to, or await assignment.
12. (Utilize staging time to prepare engines and personnel for the incident)
13. When possible inform the Resource unit of any special or additional equipment or capabilities your Strike team may have in excess of ICS specifications. a. Attend briefings and/or meet with the Division/Group Supervisor
ASAP. b. Be at assigned shift location on time!!! (Eat on the go if you have to.
Do your business at base and have the Strike team go ahead with the Assistant. You can catch up when possible. Use the Strike team to assist with getting lunches, ice, drinks, etc., while you’re conducting business elsewhere. (Just stay in communications at all times)
c. Meet with your Division/Group Supervisor on the line and do some “Brain Storming”.(Bring the Assistant Strike team Leader with you) 1) Get assignment instructions. 2) Assist Division Group Supervisor if needed. 3) Establish contingencies/tactics/strategies. 4) Establish logistical needs/locations. 5) Establish the tactical “envelope of operations” 6) Pass on this information to your engines and do a little “Brain
Storming” with them also. d. Proceed to the assignment. Travel the entire area of operation
around you. Familiarize yourself with surrounding terrain, location(s), roads, structures, turnouts, safe zones, etc.
14. Meet with, and /or communicate with your Division Group Supervisor on agreed upon increments to assess progress or changes in the fire or operations. Let your engines know of these changes.
15. At end of operational period, meet with the Group to debrief and discuss any problems or relevant information.
SECTION 5. STRUCTURE PROTECTION
5.9
16. Return to Base/Staging. Take care of your engines, personnel, yourself, and finally paperwork.
CATCH ALLS 1. If you are having problems, (i.e., food lines are so long we can’t eat and
get to our assignment on time; we left our hose on the line and supply doesn’t have any; we are having a real personality clash with our line supervisor, etc., etc.) first attempt to have problems resolved by your Division /Group. They are the people that have the direct link with the operations folks who are suffering if you cannot get your job done. As a second attempt, contact your Agency Rep. and attempt resolution that way.
2. If you find yourself and your Strike team on a line assignment and there is no Group that you have been able to find and/or make contact with, do not spend precious time in search of them with the Strike team. Work on what you feel needs to be done, and there is always something that needs to be done.
HOW TO PROPERLY REFUSE RISK Every individual has the right and obligation to report safety problems and contribute ideas regarding their safety Supervisors are expected to give these concerns and ideas serious consideration. When an individual feels an assignment is unsafe they also have the obligation to identify the degree of possible, safe alternatives for completing that assignment. Turning down an assignment is one possible outcome of managing risk. A “turn down” is a situation where an individual has determined they cannot undertake an assignment as given and they are unable to negotiate an alternative solution. The turn down of an assignment must be based on an assessment of risks and the ability of the individual or organization to control these risks. Individuals may turn down an assignment as unsafe when:
1. There is a violation of safe work practices. 2. Environmental conditions make the work unsafe. 3. They lack the necessary qualifications or experience. 4. Defective equipment is being used.
Individual will directly inform their supervisor that they are turning down the assignment as given. The most appropriate means to document the turn down is using the criteria (10 Standard Fire Orders, 18 Watch Out Situations, etc.) outlined in the Risk Management Process.

SECTION 5. STRUCTURE PROTECTION
5.10
Supervisor will notify the Safety Officer immediately upon being informed of the turn down. If there is no Safety Officer, notification shall go to the appropriate Section Chief or to the Incident Commander. This provides accountability for decisions and initiates communication of safety concerns within the incident organization. If the supervisor asks another resource to perform the assignment, they are responsible to inform the new resource that the assignment has been turned down and the reasons that it was turned down. If an unresolved safety hazard exists or an unsafe act was committed, the individual should also document the turn down by submitting a SAFENET(ground hazard) or SAFECOM(aviation hazard) form in a timely manner. These actions do not stop an operation from being carried out. This protocol is integral to the effective management of risk as it provides timely identification of hazards to the chain of command, raises risk awareness for both leaders and subordinates, and promotes accountability. Strike teams assigned to wildland fires with structures threatened are not ordered with the thought in mind that these engines will come to the fire and only protect structures. These Strike teams are expected to perform all aspects of wildland fire control within the limitations of their equipment. Remember that the objective of this type of incident is to stop the spread of the fire; apply production in excess of the fires spread until it is contained/controlled. Your production is needed to achieve that objective. Do not hesitate to make an offensive attack on the fire if you believe it could result in stopping or at least slowing the fires progress. This action may result in future structures not being threatened. If situations are such that you must take a defensive posture, once that situation has passed, look for an offensive attack again. Pick-up the spot fires you encounter. Do not assume the plan is to let them burn. No one will be there to give you a directive for every situation you encounter. Use your head and experience, and the experience of your crews.

SECTION 5. STRUCTURE PROTECTION
5.11
CODE OF CONDUCT FOR SFFD STRIKE TEAMS DO DO NOT
Do provide staffing of four firefighters to ride in cab. It is recommended that no personnel ride Tailboards. Personnel are to have full turnouts for structure and brush gear for wildland fire.
Do not take lawn chairs, hammocks, large TV’s or radios. You are going on an emergency, not a vacation. No pets or animals
Do call OES Headquarters by phone (916-427-4216) or radio if a mechanical problem occurs on the way to an assignment, or you come across another emergency. They will advise you how to handle the problem.
Do not attach any non fire related equipment on engines, such as mattresses chairs etc. If it doesn’t fit in the compartments, don’t take it.
Do notify your OES Operational Area when you are enroute and when you arrive back to your home station.
Do not take it upon yourself to get major repairs done to the apparatus without OES authorization. You may be paying the bill yourself. This includes tires and batteries.
Do treat all firefighters, officers and the public with respect. You might not always agree with the way things are being done. Keep your eyes open and learn.
Do not steal. All equipment must be returned before you are demobilized.
Do contact the SFFD Com Center once every 24 hours minimum, (at 415-558-3268). The officer in charge of the engine or strike team should report the following information: Condition of personnel Condition of Equipment Location- to whom you are assigned Length of stay or assignment if known Relay messages to be passed onto family or staff
Do not make it a vacation

SECTION 5. STRUCTURE PROTECTION
5.12
DO DO NOT
Do take a change of clothing, tooth brush, soap, towel, sleeping bag, and air mattress. Rations should be carried on the engines for emergencies. Take cash, credit cards and get receipts for all purchases. Take an Ice chest for food, to be stored in a compartment. Take some reading material, camera etc.
Do not allow alcohol or drugs to be transported or consumed.
Do use normal radio ethics. Radio traffic between units will be kept to a minimum
Do know who you are working for
Do limit the procurement of equipment to what is needed
Do have your crew maintain a state of readiness even when not assigned
Do have your engine fueled, watered and prepared at all times, never dump your water tank to travel quicker.
Do limit your recreation to unassigned hours.
Do maintain and wear all safety clothing
Do wear the proper uniform while in the incident base.
Your Actions are a Reflection on the San Francisco Fire Department

SECTION 5. STRUCTURE PROTECTION
5.13
SAN FRANCISCO FIRE DEPARTMENT STRIKE TEAM CHECK LIST
Prior To Departure
Type of Incident (Name if known) Incident order number Request number Reporting location (Get detailed information) Who to contact at the scene Get strike team number What type of strike team ( SFFD or multi-agency) Rendezvous point Communications channels & frequencies (Travel and base camp) Maps Bendix King Portable radios (16 channel) charger and extra batteries Cellular phone (Call CFAS each day) Credit cards for Petroleum and personal Money (Change for phone calls) Personal protective equipment Personal equipment - clothing, medication, glasses, etc. Pens, pencils, paper, compass, flashlight Markers to mark strike team Contact person if problems enroute (OES 24 hour phone 916-427-4216)
Rendezvous Point
Make introductions Inform strike team of what is known about the Incident and assignment
(Keep team informed through-out) Appoint an Assistant Strike Team Leader Determine common radio frequency Conduct an inspection of the strike team to determine:
1) Crew size and capability 2) Apparatus capability 3) Special equipment carried 4) Communication capability 5) Ensure that fuel and water tanks are full 6) Discuss Travel route and planned rest stops 7) Begin to fill out paperwork ASAP
Check-In
Keep road clear, pull off to side at Check-in Only strike team leader and assistant need to check team in

SECTION 5. STRUCTURE PROTECTION
5.14
Check in with OES Assistant Chief. Pick up strike team leader kit containing the following:
1) Operations Bulletin #8- (OES Activity Record) 2) Form 42 - OES Emergency Activity Record 3) Apparatus Inventory Forms - OES Form 157 4) ICS Form 214 - Unit Log 5) Strike Team Leader Control Record 6) Strike Team Leader Manual
Find out when and where daily briefings are held Make sure you get all supplies that the team needs - Food, water, fuel,
extra tools, radios, protective clothing, fire shelters
Active Line Assignment
Reporting location - get detailed information Communication frequency to use Name of person to report to and their radio call numbers Once the assignment is received, inform strike team what you expect of
them Escape route Where to deploy fire shelters if needed Rendezvous point
Demobilization and Check-Out
Make sure apparatus are ready for Demobilization: 1) Equipment lost or damaged must be replaced or repaired 2) Log books must be up to date 3) Vehicle repairs completed 4) Fuel and water tanks full
Have ICS 221 ( DEMOBILIZATION check list) signed off Determine planned stops and disassembly point Have OES Region/Operations notified of release, travel route, and E.T.A. Remind all units to notify OES Operations of their return home
RESPONSIBILITIES OF STRIKE TEAM LEADER 1. Obtain Briefing and Work Materials (Incident Action Plan) 2. Review Assignment with subordinates and assign tasks 3. Monitor Work progress and make changes where necessary

SECTION 5. STRUCTURE PROTECTION
5.15
4. Submit situation report and Resource status to Division or Group Supervisor a. Status in assigned work area b. Deviation on assignment c. Hazardous Conditions d. Effectiveness of Air Operations e. Property loss and Damage
1) Report Special events 2) Request Logistical Support
f. Identify g. Verify h. Notify
1) Brief Oncoming Relief 2) Maintain Unit Log
TAILGATE BRIEFING
Establish Chain of Command
1. Appoint an Assistant Strike Team Leader 2. Second Assistant Strike Team Leader 3. Explain their role. Procedures for Accidents and Emergencies enroute 4. Relay Dispatch and Incident Information 5. Establish Radio Frequencies, Check Radios Prior to leaving 6. Do Not empty Water Tanks 7. All Resources full of fuel 8. Discuss Travel procedures
a. Vehicle Positioning b. Slowest vehicle in front c. Communication problems in middle d. Spacing e. Legal speed limit f. Sight of resource ahead and behind g. Strike Team Leader Position (front or back) h. Special Road Hazards i. Travel Route Information
9. Schedule Fuel, Food and Rest Stops 10. Discuss Radio use and Discipline 11. Relief Schedule 12. Expected Levels of Performance 13. Professional Demeanor 14. Discipline 15. Supply Check out Procedure discussed

SECTION 5. STRUCTURE PROTECTION
5.16
SUGGESTED PERSONAL EQUIPMENT
Fire Line Equipment
SFFD wool pants- bring a spare pair, or SFFD-issued BDU’s Long sleeve cotton T-shirts 8-inch, SFFD-issued wildland boot—leather lace-up with non-steel toe or
shank
For the Fire Camp
Comfortable clothing (i.e., shorts, tee shirts, sweat pants. running shoes, Levi’s, light jacket)
Sun glasses Baseball cap
Other Items
Extra underwear and socks Towel and soap Shaving kit Tooth brush Bug repellent Sun screen AM/FM radio Sleeping bag Money Toilet Paper Camera Deck of cards Reading material
Optional Equipment
Can opener Matches Snacks Thermos Air mattress Small sewing kit

SECTION 5. STRUCTURE PROTECTION
5.17
SAFETY EQUIPMENT TO BE WORN BY PERSONNEL Wildland type helmet
Wildland gloves
Nomex jacket, pants, gloves
Belt, canteen
Emergency Fire Shelter


SECTION 6. OES ENGINE
6.1
SECTION 6. OES ENGINE OES Engine 248 is manufactured by SPARTAN and is powered by a 250 horse power Cummins diesel engine. The transmission is a six speed automatic but is programmed for the fire service to operate as a five speed only. While on the highway the driver may access the overdrive mode of the transmission by pushing the mode button and then the up-shift. The horsepower of this engine is less than our normal San Francisco Fire Department pumpers. It will not accelerate as fast nor will it slow down as quickly. Plan ahead, especially for stopping. The retarder switch is located on the upper left of the dash. It works on the exhaust system to assist with braking. The switch must be off while pumping. OES 248 carries 750 gallons of water in its tank which is capable of supplying both the main pump (1,000 gpm, single stage) and the booster pump (350 gpm at 150 psi). The booster pump has a “pump and roll” capability. That is, it will drive and pump at the same time. The booster pump will supply the two 1½-inch crosslays, the rear 1½-inch line and the tank line. Always keep the water tank full, even while in transit. Note that the tank valve is in the open position when pushed in towards the pump panel. OES 248 carries a chain saw and a float pump. Each is powered by an engine which requires a mixture of gasoline and two cycle oil. The generator carried on the engine requires straight gasoline, not a mix. Hose sizes found on the engine include 2 ½ inch, 1 ½ inch and 1 inch. The engine does not carry 3 inch hose as is found on the typical SFFD engine. You will also find miscellaneous nozzles and fittings which are specific to wildland firefighting. Behind the drivers seat is a metal box which contains several books. The information they provide should answer any questions you may have and assist you in completing your assignment in a competent and professional manner. Use your travel time to examine these books. Located in both the cab and jockey box are two locking metal boxes accessible with a firehouse key. They are for storage of personal equipment. Since space on the engine for personal gear is minimal take only what you need to get through the next few days.

6.2
EQUIPMENT FOR ENGINE STRIKE TEAMS The following equipment is in excess of the normal amount carries on an SFFD engine.
1. Personal protection equipment, one set for each member, total of 4 sets: Wildland pants 4Wildland coats 4Helmets, goggles, shrouds 4Wildland gloves, sets 4Fire shelter, belt with canteen 4
2. Equipment bag, with the following: Forest wye 1Hose line tee (11/2 to 1) 1Forestry hose clamp 1Sutter tip 11 inch SFFD nozzle 1Increasers (2 ½ inch to 3 inch) 2Decreasers (3 inch to 2 ½ inch) 2Adjustable spanner 1
3. Hand tools: Pulaski 2McLeod 2Shovels, round tip 2
4. Flares/Fusees 1 case
5. Fire shelters Spares for cab of apparatus—yellow old style still acceptable
2
6. Hose, single jacket forestry hose: 1½-inch 100 ft. length 4 to 61-inch 100 ft. length 3
Note: Each engine should carry a chain saw and two gallons of premix. If not equipped with one take the extra chain saw from a truck company.
7. One defibrillator per Strike Team shall be carried. The Strike Team Leader shall take personal protection equipment and a case of fuses.
8. One Wildland Medical Bag shall be carried for the exclusive use of Strike Team members

6.1
BIBLIOGRAPHY
Analysis of Escape Efforts and Personal Protective Equipment on the South Canyon Fire, Ted Putnam PhD, Equipment Specialist, USDA Forest Service California Fire Service and Rescue Emergency Mutual Aid System, Mutual Aid Plan, California Office of Emergency Services, Fire and Rescue Branch CDF Firing Operations, Basic Firing Methods, California State Fire Marshall S-234, 2002 Campbell Prediction System, A Wildland Fire Prediction System and Language, 2nd Edition, Doug Campbell Collapse of Decision Making and Organizational Structure on Storm King Mountain, Ted Putnam, PhD, Equipment Specialist, USDA Forest Service Exemplary Practices in Emergency Management: The California FIRESCOPE Program, Federal Emergency Management Agency, National Emergency Training Center, Emergency Management Institute Fighting Fire in the Wildland/Urban Interface, Phillip L. Queen Fire Operations in the Urban Interface, S-205, NFES 2170, National Wildfire Coordinating Group Fire Service Field Operations Guide, ICS 420-1, Incident Command System Publication Fire Weather, Agriculture Handbook 360, US Department of Agriculture, Forest Service Firefighter’s Guide, NFES 1571, National Wildfire Coordinating Group Firefighter’s Handbook on Wildland Firefighting, Strategy, Tactics and Safety, William C. Teie Foam Vs Fire, Class A Foam for Wildland Fires, NFES 2246, National Wildfire Coordinating Group Ground Cover Firefighting Practices, 2nd Edition, International Fire Service Training Association LCES and Other Thoughts, author unknown, USDA Forest Service Planning for Large Scale Disasters, Student Manual, 4th Edition, California Fire Service Training and Education System

6.2
Principles of Forest Fire Management, C. Raymond Clar and Leonard R. Chatten Report of the Interagency Management Review Team, South Canyon Fire, US Department of the Interior, Bureau of Land Management and USDA Forest Service Report of the South Canyon Fire Investigation Team, US Department of the Interior, Bureau of Land Management and USDA Forest Service Response to Thoughts After Reading the OSHA Report on South Canyon Fatalities, P. Shafer, USDA Forest Service Strike Team Leader-Engine, I-334, Student Manual, California Fire Service Training and Education System Strike Team Leader Manual, State of California, Office of Emergency Services, Fire and Rescue Division Tragedy on Storm King Mountain, Fire Engineering, January 1995 Wildland Firefighting, Bill Clayton, David Day, and Jim McFadden Wildland Firefighting, Fire Behavior, Tactics & Command, 2nd Edition, Donald G. Perry