Embed Size (px)
Citation preview
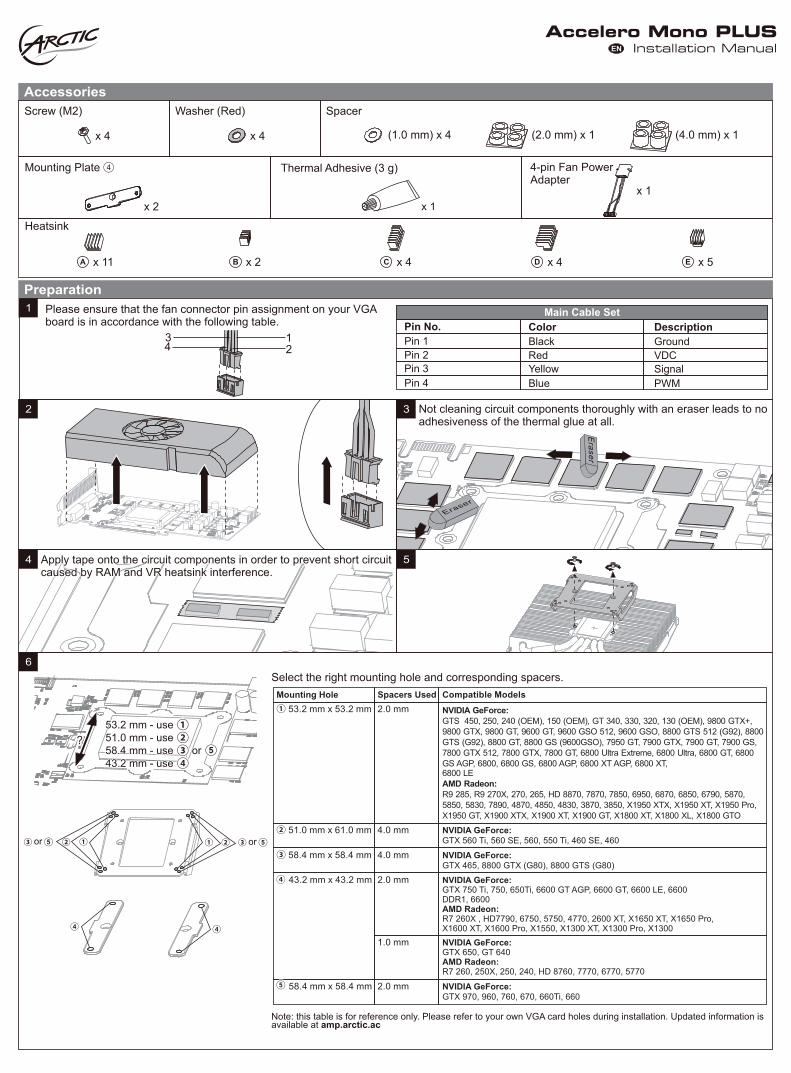
Mounting Hole Compatible ModelsSpacers Used
①① 53.2 mm x 53.2 mm
②② 51.0 mm x 61.0 mm
③③ 58.4 mm x 58.4 mm
2.0 mm
4.0 mm
4.0 mm
2.0 mm43.2 mm x 43.2 mm
NVIDIA GeForce: GTX 970, 960, 760, 670, 660Ti, 660
2.0 mm58.4 mm x 58.4 mm
NVIDIA GeForce:GTX 560 Ti, 560 SE, 560, 550 Ti, 460 SE, 460
NVIDIA GeForce: GTX 465, 8800 GTX (G80), 8800 GTS (G80)
NVIDIA GeForce:GTX 750 Ti, 750, 650Ti, 6600 GT AGP, 6600 GT, 6600 LE, 6600 DDR1, 6600AMD Radeon:R7 260X , HD7790, 6750, 5750, 4770, 2600 XT, X1650 XT, X1650 Pro, X1600 XT, X1600 Pro, X1550, X1300 XT, X1300 Pro, X1300
1.0 mm NVIDIA GeForce:GTX 650, GT 640AMD Radeon:R7 260, 250X, 250, 240, HD 8760, 7770, 6770, 5770
NVIDIA GeForce:GTS 450, 250, 240 (OEM), 150 (OEM), GT 340, 330, 320, 130 (OEM), 9800 GTX+, 9800 GTX, 9800 GT, 9600 GT, 9600 GSO 512, 9600 GSO, 8800 GTS 512 (G92), 8800 GTS (G92), 8800 GT, 8800 GS (9600GSO), 7950 GT, 7900 GTX, 7900 GT, 7900 GS, 7800 GTX 512, 7800 GTX, 7800 GT, 6800 Ultra Extreme, 6800 Ultra, 6800 GT, 6800 GS AGP, 6800, 6800 GS, 6800 AGP, 6800 XT AGP, 6800 XT, 6800 LEAMD Radeon:R9 285, R9 270X, 270, 265, HD 8870, 7870, 7850, 6950, 6870, 6850, 6790, 5870, 5850, 5830, 7890, 4870, 4850, 4830, 3870, 3850, X1950 XTX, X1950 XT, X1950 Pro, X1950 GT, X1900 XTX, X1900 XT, X1900 GT, X1800 XT, X1800 XL, X1800 GTO
43
21
Accelero Mono PLUSInstallation Manual
Select the right mounting hole and corresponding spacers.
6
Note: this table is for reference only. Please refer to your own VGA card holes during installation. Updated information is available at amp.arctic.ac
??
53.2 mm - use53.2 mm - use51.0 mm - use51.0 mm - use58.4 mm - use58.4 mm - use43.2 mm - use43.2 mm - use
oror
Accessories
Screw (M2)
Heatsink
A x 11 B x 2 C x 4 D x 4 E x 5
4-pin Fan PowerAdapter
x 1
x 4 x 4 (4.0 mm) x 1 (2.0 mm) x 1
Washer (Red) Spacer
Preparation
2 3 Not cleaning circuit components thoroughly with an eraser leads to noadhesiveness of the thermal glue at all.
Apply tape onto the circuit components in order to prevent short circuitcaused by RAM and VR heatsink interference.Apply tape onto the circuit components in order to prevent short circuitcaused by RAM and VR heatsink interference.
4
1 Please ensure that the fan connector pin assignment on your VGA board is in accordance with the following table.
Main Cable Set
Pin No. Color Description
Pin 1 Black Ground
Pin 2 Red VDCPin 3 Yellow Signal
Pin 4 Blue PWM
5
oror
(1.0 mm) x 4
Mounting Plate
x 2
Thermal Adhesive (3 g)
x 1
4
EN
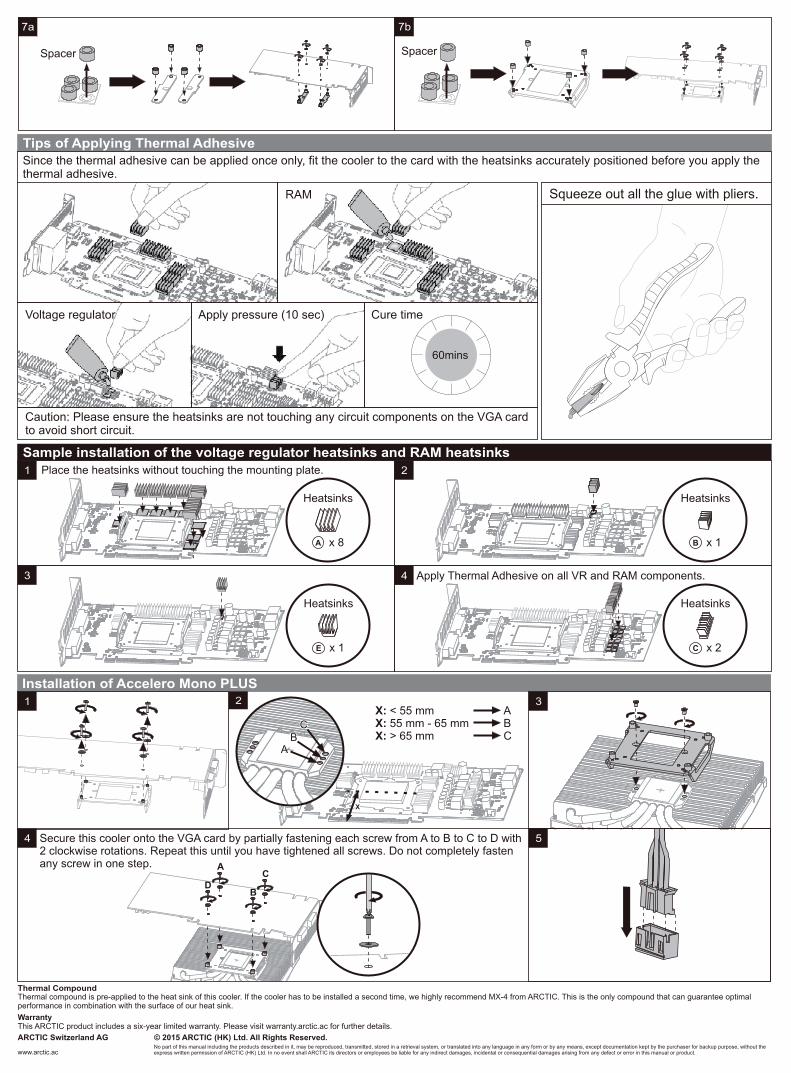
Tips of Applying Thermal Adhesive
Since the thermal adhesive can be applied once only, fit the cooler to the card with the heatsinks accurately positioned before you apply the thermal adhesive.
Squeeze out all the glue with pliers.
Cure time
60mins
Apply pressure (10 sec)Voltage regulator
RAM
Caution: Please ensure the heatsinks are not touching any circuit components on the VGA card to avoid short circuit.
7b
Spacer Spacer
1
Installation of Accelero Mono PLUS2
XX
X: < 55 mm X: 55 mm - 65 mm X: > 65 mm
ABC
3
Secure this cooler onto the VGA card by partially fastening each screw from A to B to C to D with 2 clockwise rotations. Repeat this until you have tightened all screws. Do not completely fasten any screw in one step. A
B
CD
4
Sample installation of the voltage regulator heatsinks and RAM heatsinks
1 2Place the heatsinks without touching the mounting plate.
B x 1
Heatsinks
A x 8
Heatsinks
3 Apply Thermal Adhesive on all VR and RAM components.4
C x 2
Heatsinks
E x 1
Heatsinks
WarrantyThis ARCTIC product includes a six-year limited warranty. Please visit warranty.arctic.ac for further details.
Thermal compound is pre-applied to the heat sink of this cooler. If the cooler has to be installed a second time, we highly recommend MX-4 from ARCTIC. This is the only compound that can guarantee optimal performance in combination with the surface of our heat sink.
Thermal Compound
© 2015 ARCTIC (HK) Ltd. All Rights Reserved.No part of this manual including the products described in it, may be reproduced, transmitted, stored in a retrieval system, or translated into any language in any form or by any means, except documentation kept by the purchaser for backup purpose, without the express written permission of ARCTIC (HK) Ltd. In no event shall ARCTIC its directors or employees be liable for any indirect damages, incidental or consequential damages arising from any defect or error in this manual or product.
ARCTIC Switzerland AG
www.arctic.ac
7a
5