Embed Size (px)
Citation preview

Vendor Portal - User Manual

Table of Contents
2
1. Key Features 2. Benefits on Adaptation to Vendor Portal 3. Login Page 4. PO/ASN Tab 5. SERVICES Tab 6. PO Dashboard 7. PO Confirmation 8. PO Rejection 9. PO Soft Copy10. Selection of PO lines and Create ASN 11. Create ASN Page12. Duplicate Invoice13. Save / Submit ASN 14. ASN Dashboard 15. Saved ASN details 16. Saved ASN Page

Table of Contents
3
17. Submitted ASN 18. Cancel ASN19. CN Dashboard20. CN Pending21. Create CN22. Home Page 23. Home Page -ASN Lookup 24. Home Page -ASN Dashboard 25. Unlock Account 26. Forgot Password 27. Change Password 28. Change Password - Contd.

Key Features
4
Accept/Reject PO
Submission
QR Code
Visibility
•Confirm PO/WO
•Deemed Acceptance
•ASN Creation
•Cancel ASN
•Generation of QR Code
•PO/WO
•GRN
• Invoice Status

Benefits on Adaptation to Vendor Portal
5
Electronic ASN
Real time dashboard
Automated vendor Onboarding
Auto Email notification
Complete Audit trail
24X7 Accessibility
Online FAQs and Training Videos
• Electronic Advance Shipment Note (ASN) through Vendor portal
• Tracking of invoice using QR Code
• Real time dashboard updating Vendor on status of his ASN / Invoice
• Automated Vendor Onboarding
• Auto Email notification to Vendor as well as Voltas team
• Data look up by search functionality
• Complete Audit trail history
• Vendor Portal can be accessed 24/7
• Easy to use FAQs and voice based Training Videos
Vendor Portal

Login Page
6
Business partner can login with the below credentials
USERNAME: Vendor codePassword: Password will be sent via email

PO/ASN Tab
7
Click on PO/ASN tab to access the Material ASN related data.
On PO/ASN page, below tabs can be accessed:
PO Dashboard – for access to POs
ASN Dashboard – for access to ASNs
CN Dashboard – for access to Credit Notes

SERVICES Tab
8
Click on SERVICES tab to access the Service related data.
On SERVICES page, below tabs can be accessed:
PO Service Dashboard – for access to POs
ASN Service Dashboard – for access to ASNs
CN Service Dashboard – for access to Credit Notes
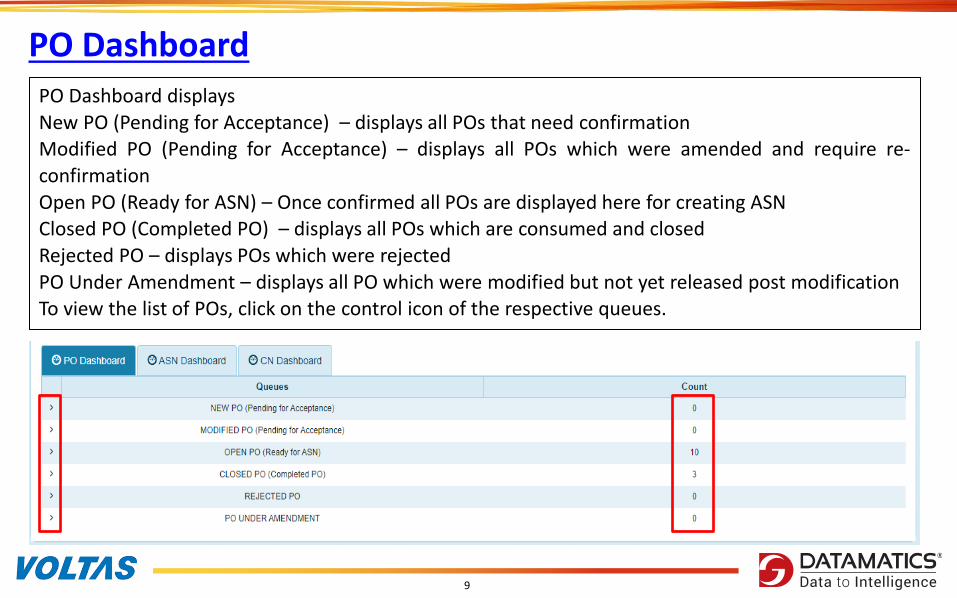
PO Dashboard
9
PO Dashboard displays
New PO (Pending for Acceptance) – displays all POs that need confirmation Modified PO (Pending for Acceptance) – displays all POs which were amended and require re-
confirmation
Open PO (Ready for ASN) – Once confirmed all POs are displayed here for creating ASNClosed PO (Completed PO) – displays all POs which are consumed and closed
Rejected PO – displays POs which were rejected
PO Under Amendment – displays all PO which were modified but not yet released post modificationTo view the list of POs, click on the control icon of the respective queues.

PO Confirmation
10
Purchase Order confirmation is mandatory. User can confirm or reject New/Modified POs assigned
from the PO list. Select the PO by clicking the check box and click on ‘ACTION’, a pop up message forconfirming the action would appear. Once confirmed, the PO will move to Open PO. Without PO
confirmation, ASN cannot be created. POs would be deemed confirmed if no action taken within 7
days of PO availability in Vendor Portal and an intimation mailer to the business partner would besent.

PO Rejection
11
User can reject the New/Modified POs assigned from the PO list. Select the PO by clicking the check
box and click on ‘ACTION’, then a Pop message for entering the reject remarks would appear. OnceRejected, the PO will move to Rejected PO. An auto mailer would be sent to the PO creator with the
reject reasons.

PO Soft Copy
12
PO Soft Copy can be accessed by click on the icon

Selection of PO lines and Create ASN
13
For ASN creation,1. PO and PO lines to be identified from Open POs for which ASN is to be created2. Click on the check box of line items (‘Select All’ option available).3. On selecting line item, ‘Create ASN’ icon would be appear.

Create ASN Page
14
Click on ‘Create ASN’ icon, ASN Page will populate.Fill all the mandatory items marked in asterisk (*)Upload the Tax Invoice.Enter quantity delivered against each line item in ASN Qty field. System will calculate invoice value asper PO and validate with total invoice amount.

Duplicate Invoice:
15
If same invoice number is used in multiple ASN by the same vendor, then below pop-up will bedisplayedInvoice date can’t be prior to 30 days from current date

16
User has the option to “Save” the ASN as Draft or “SUBMIT” ASN. On save or submitting the ASN,‘Unique Number’ would be generated as ASN Number.
Save / Submit ASN

ASN Dashboard
17
ASN Dashboard demonstrates different ASN statusesASN SAVED – are ASNs which were saved as Draft and not submitted.ASN SUBMITTED – are ASNs which were submitted. Once GRN is done, Print option will be availablefor the ASN.ASN CANCELLED – are ASNs which were cancelled. ASN can be cancelled before a GRN is booked.

Saved ASN Details
18
ASNs saved as draft can be accessed in ASN Dashboard under ‘ASN Saved’. There is complete historyavailable. Clicking on the icon ASN page can be accessed

Saved ASN Page
19
On accessing the Saved ASN, user has the below options:Save the ASN as draft if some details are pending.Submit the ASNDiscard ASN – user decides to cancel the shipment, saved ASN can be discarded.Close – will keep the ASN in draft version and system will come out of the page.

Submitted ASN
20
ASNs submitted can be accessed in ASN Dashboard under ‘ASN SUBMITTED’. There is a completehistory available. Clicking on the icon ASN page can be accessed.

Cancel ASN
21
1. ASN can be cancelled only if IBD is not booked in SAP. Submitted ASN can be accessed from ‘ASNDashboard’.
2. If the IBD is done, a pop up will appear ‘IBD Already done, cannot cancel ASN’.3. If the user cancels the ASN prior to IBD Posting in SAP, then system will send an intimation mail
of ASN cancellation to the Buyer/PO creator.4. PO Quantity of the cancelled ASN will now get open to create ASN for the same.

CN Dashboard
22
CN Dashboard demonstrates different ASN statusesCN Pending – are invoice which requires CN to be uploaded.CN SAVED – are CNs which were saved as Draft and not submitted.CN SUBMITTED – are CNs which were submitted.CN CANCELLED – are CNs which were cancelled.

CN Pending
23
Click on the arrow beside CN Pending to view the invoices pending for CN to be uploaded.Click on the check box of the invoice against which the CN needs to be created and click on CreateCredit Note.

Create CN
24
Insert CN Number consists of max 16 digits.Insert CN Amount.Upload the soft copy of Credit Note.Click on SUBMIT to submit the CN. Click on SAVE AS DRAFT to save the CN.

Home Page
25
Home Page constitutes the below tabs:ASN Lookup – lookup for status of particular ASNs submitted using search parameters provided.ASN Dashboard – provides status visibility to the user for all ASNs submitted

Home Page - ASN Lookup
26
Different search parameters are available for ASN lookup.

Home Page - ASN Dashboard
27
Provides status visibility to the user for all ASNs submitted

Unlock Account
28
If the user forgets the password, click on “Forgot Password”.
Enter USERNAME: Vendor/Partner codeClick on ‘Unlock’ button

Forgot Password
29
On attempting to access Vendor Portal and the account gets locked, then the user can unlock the
Enter USERNAME: Vendor code
Registered mail ID will auto populate. On ‘Submit’, password will be sent via email to the registeredemail ID.

Change Password
30
User can change password with the following steps:1. Click on Change Password2. Click on Send OTP, email will be sent to the registered mail ID3. On entering the OTP, change your password page would appear

Change Password – Contd.
31
4. Enter Old Password, then5. Enter New Password and6. Confirm Password and then7. Click on changeUser will be routed back to Login Page with a message ‘Password changed successfully.User can now login with New Password

32
Thank You!