Embed Size (px)
Citation preview
1
VENDOR PORTAL
User Guide
2
About the Vendor Portal
The Vendor Portal is a secure web-based application designed to support retail management in
the Washington State Women, Infants and Children (WIC) Nutrition Program. The application
provides vendors a way to apply for WIC authorization, update information about their stores,
register for training and more.
The portal is available from the SecureAccess Washington website. SecureAccess Washington
(SAW) allows internet access to a number of online government services through one website.
Important:
If you don’t currently have a SAW account, please see important instructions starting
on page 5. You must have a SAW account to access the Vendor Portal.
Make sure you use Internet Explorer for your internet browser.
This application will NOT work in Chrome, Firefox, Safari, or Microsoft Edge.
3
CONTENTS
Vendor Portal Registration 4
New Vendor Portal Users 5
New Vendor Portal Users Added By An Existing User 10
Existing Vendor Portal Users 14
Vendors Whose Portal Accounts Were Set Up by State WIC Office 15
How to Complete Vendor Applications 18
How Corporate Chains Apply to Add A New Store 24
How to Complete Price Surveys 28
Vendor Training – View upcoming events, register or cancel registration 35
How to Edit User Accounts 41
How to Add or Disable Users 42
4
Vendor Portal Registration
Make sure you use Internet Explorer for your internet browser.
This application will NOT work in Chrome, Firefox, Safari, or Microsoft Edge.
Follow the instructions on the following pages based on whether you are:
A New Vendor registering for the portal (start on page 5)
A New Vendor added by an existing user (start on page 9)
An Existing Vendor registering for the portal (start on page 13)
An Existing Vendor whose portal account was set up by the state WIC office (start on
page 14)
5
Information for New Vendor Portal Users
Make sure you use Internet Explorer for your internet browser.
This application will NOT work in Chrome, Firefox, Safari, or Microsoft Edge.
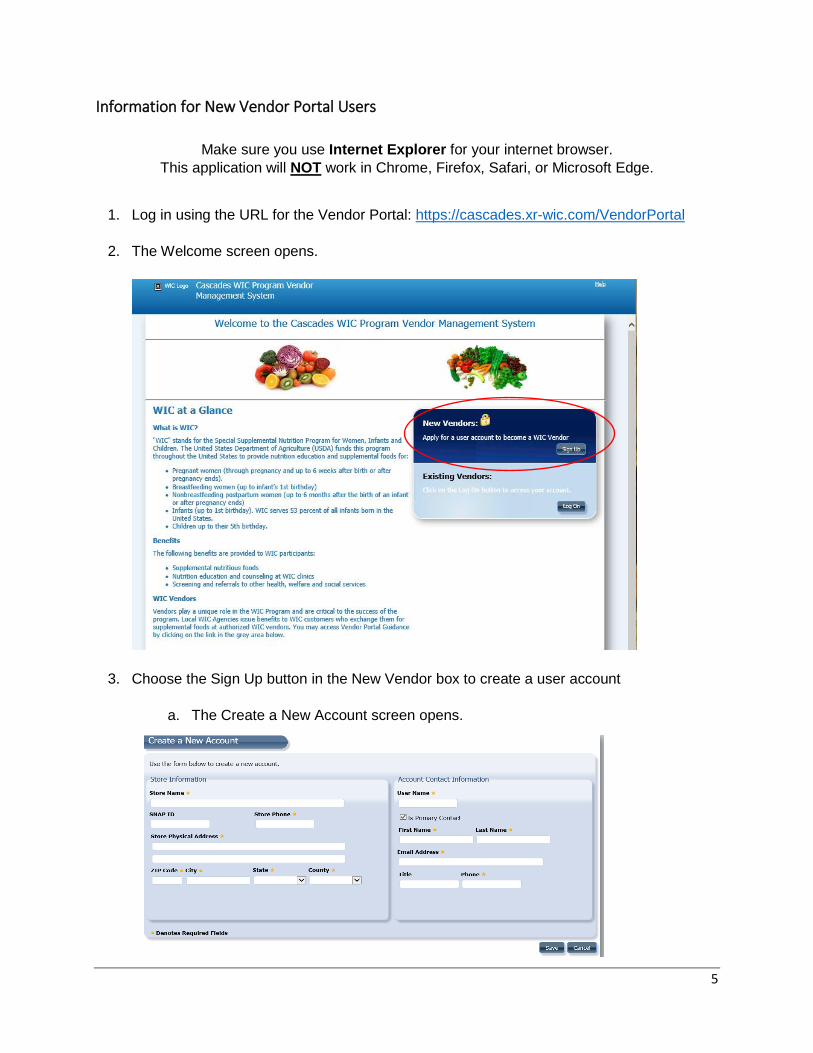
1. Log in using the URL for the Vendor Portal: https://cascades.xr-wic.com/VendorPortal
2. The Welcome screen opens.
3. Choose the Sign Up button in the New Vendor box to create a user account
a. The Create a New Account screen opens.
6
4. Complete all the required fields and Save.
a. Remember your user name.
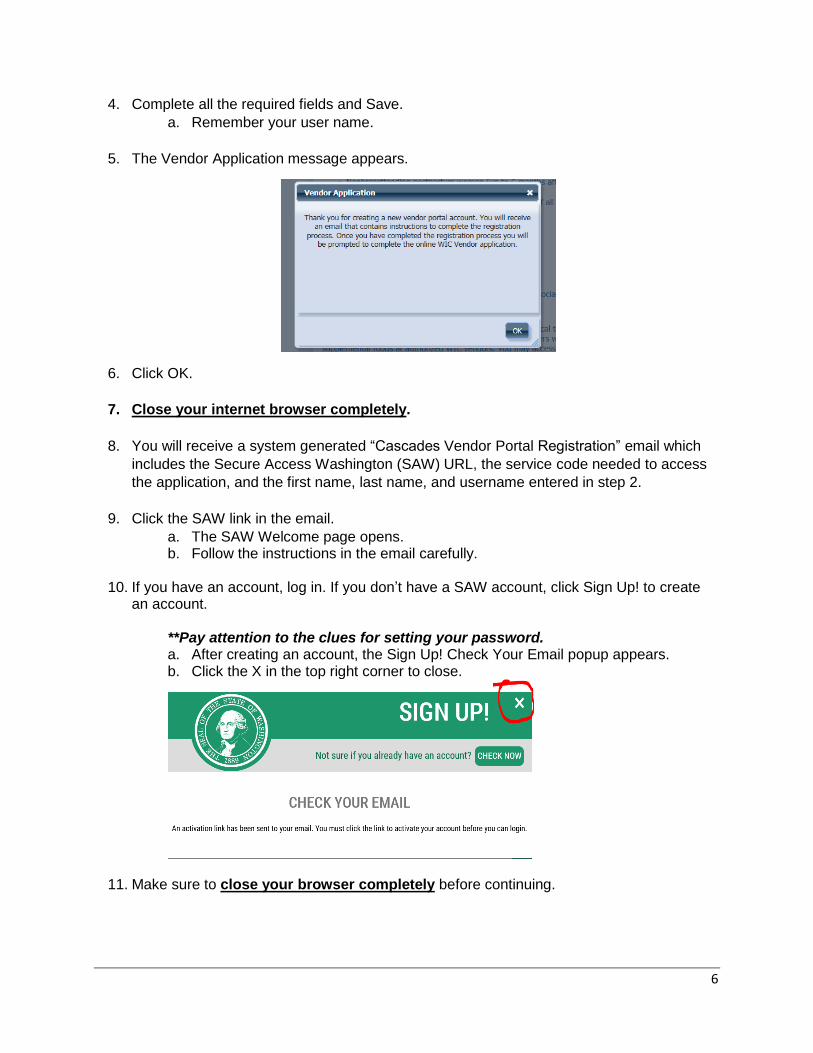
5. The Vendor Application message appears.
6. Click OK.
7. Close your internet browser completely.
8. You will receive a system generated “Cascades Vendor Portal Registration” email which
includes the Secure Access Washington (SAW) URL, the service code needed to access
the application, and the first name, last name, and username entered in step 2.
9. Click the SAW link in the email.
a. The SAW Welcome page opens. b. Follow the instructions in the email carefully.
10. If you have an account, log in. If you don’t have a SAW account, click Sign Up! to create an account.
**Pay attention to the clues for setting your password. a. After creating an account, the Sign Up! Check Your Email popup appears. b. Click the X in the top right corner to close.
11. Make sure to close your browser completely before continuing.
7
12. Secure Access Washington sends a system generated email “You are almost finished…” with a link to activate your account.
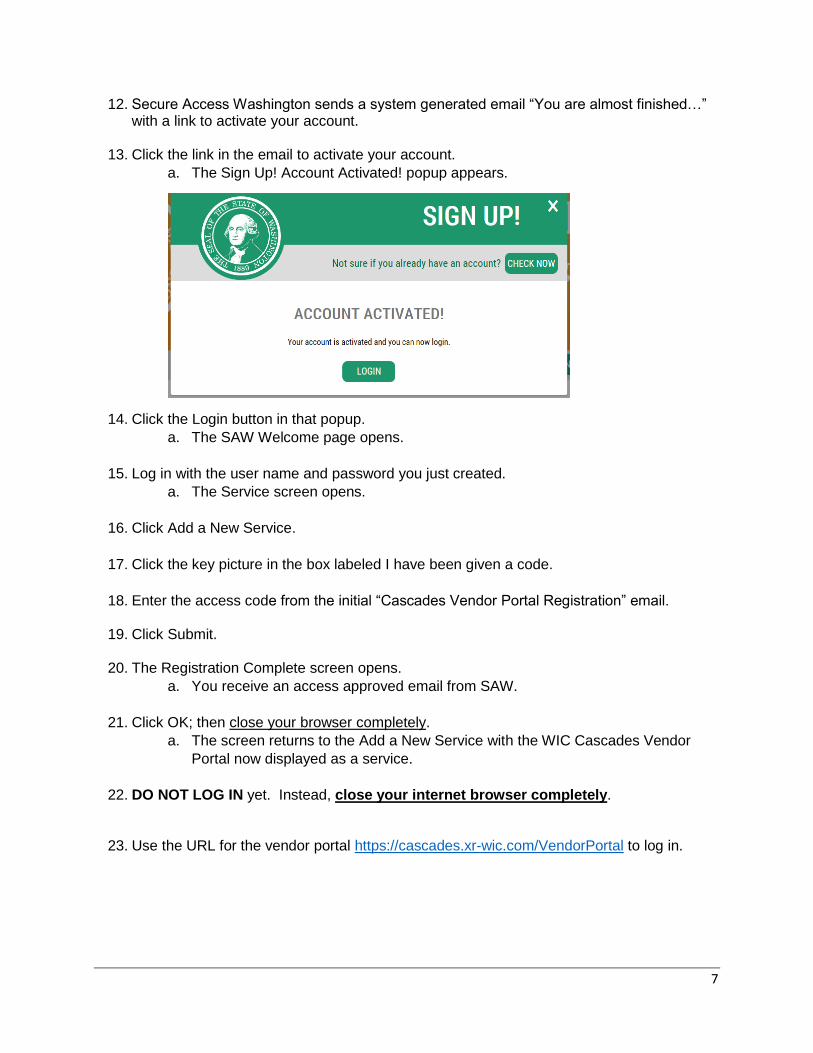
13. Click the link in the email to activate your account.
a. The Sign Up! Account Activated! popup appears.
14. Click the Login button in that popup.
a. The SAW Welcome page opens.
15. Log in with the user name and password you just created.
a. The Service screen opens.
16. Click Add a New Service.
17. Click the key picture in the box labeled I have been given a code.
18. Enter the access code from the initial “Cascades Vendor Portal Registration” email. 19. Click Submit.
20. The Registration Complete screen opens.
a. You receive an access approved email from SAW.
21. Click OK; then close your browser completely.
a. The screen returns to the Add a New Service with the WIC Cascades Vendor
Portal now displayed as a service.
22. DO NOT LOG IN yet. Instead, close your internet browser completely.
23. Use the URL for the vendor portal https://cascades.xr-wic.com/VendorPortal to log in.
8
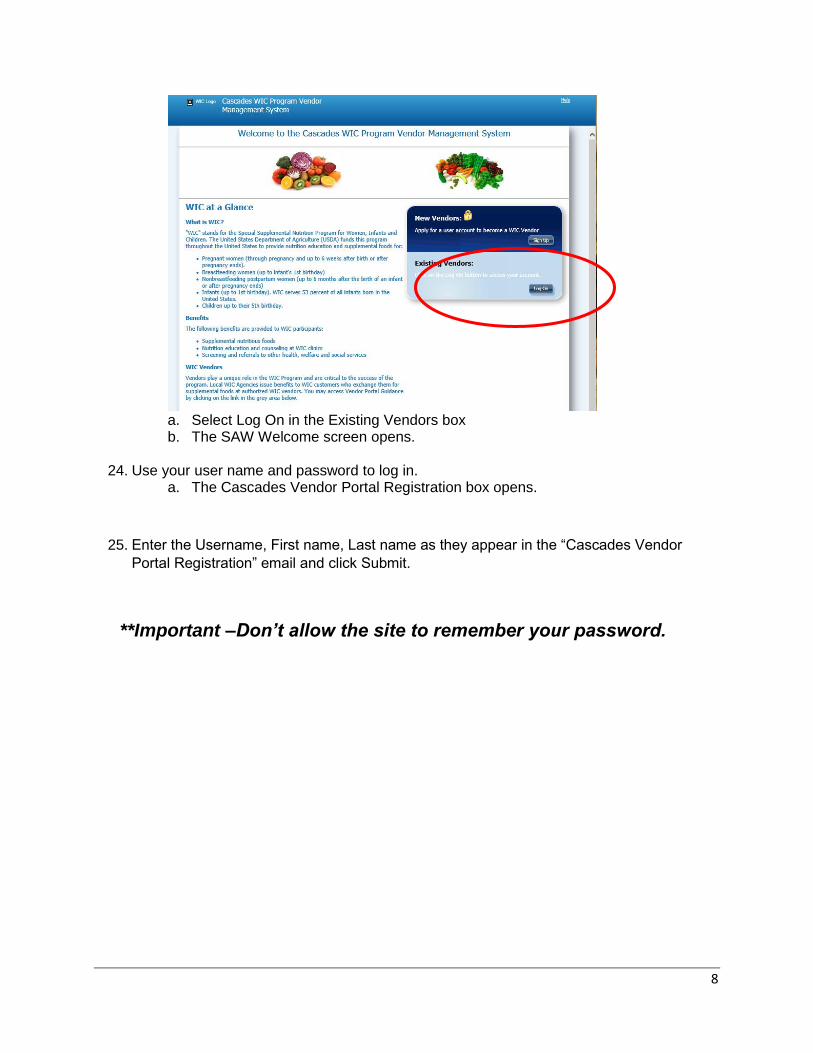
a. Select Log On in the Existing Vendors box b. The SAW Welcome screen opens.
24. Use your user name and password to log in.
a. The Cascades Vendor Portal Registration box opens.
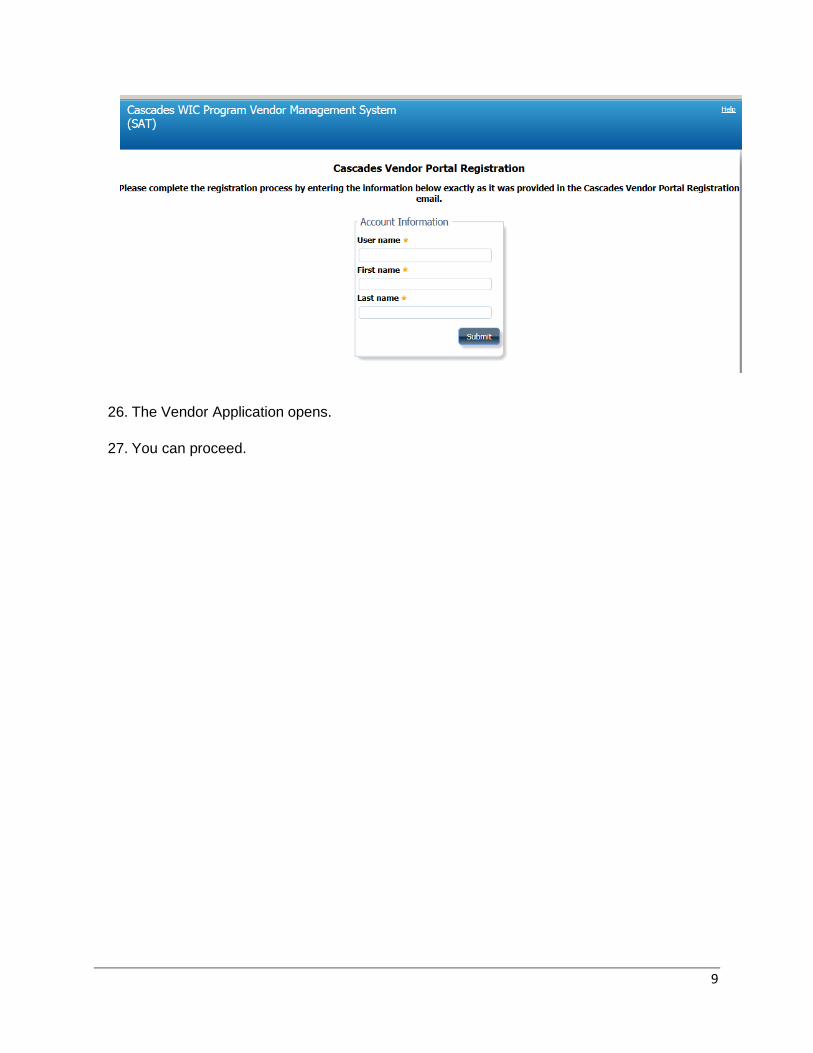
25. Enter the Username, First name, Last name as they appear in the “Cascades Vendor
Portal Registration” email and click Submit.
**Important –Don’t allow the site to remember your password.
9
26. The Vendor Application opens.
27. You can proceed.
10
Information for New Vendor Portal Users Added By An Existing User
Existing Cascades Vendor Portal users can login to the vendor portal and add new user(s).
Make sure you use Internet Explorer for your internet browser.
This application will NOT work in Chrome, Firefox, Safari, or Microsoft Edge.
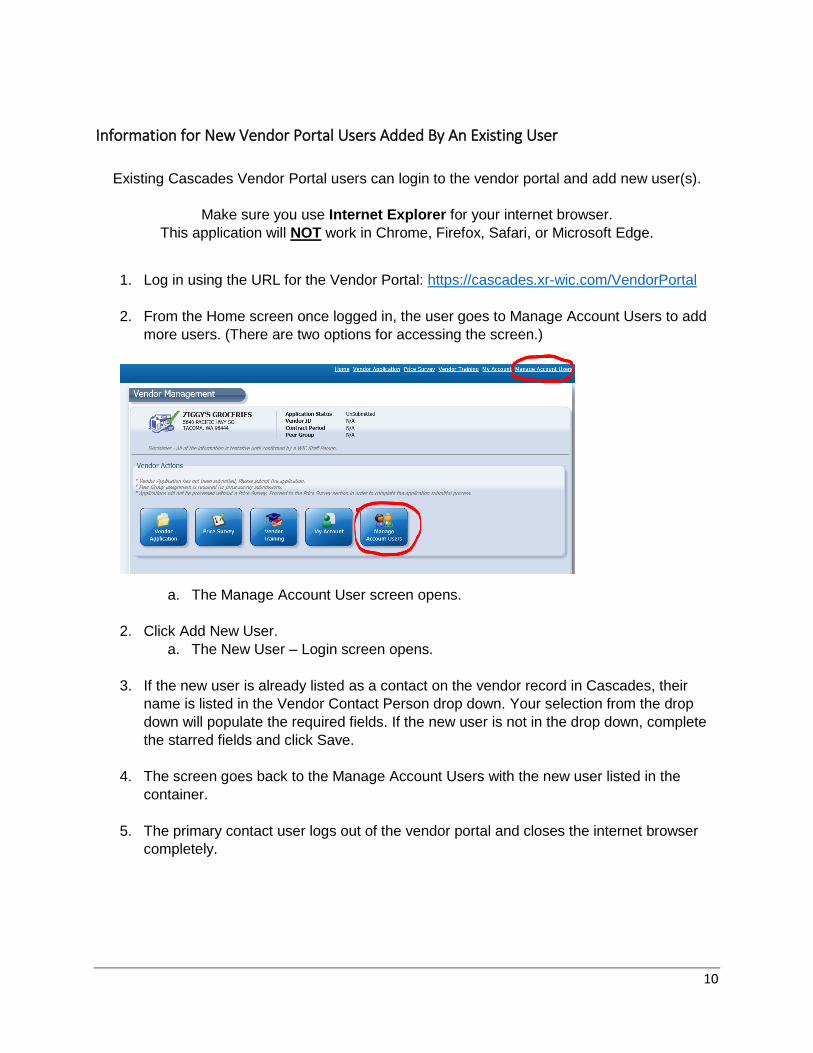
1. Log in using the URL for the Vendor Portal: https://cascades.xr-wic.com/VendorPortal
2. From the Home screen once logged in, the user goes to Manage Account Users to add
more users. (There are two options for accessing the screen.)
a. The Manage Account User screen opens.
2. Click Add New User.
a. The New User – Login screen opens.
3. If the new user is already listed as a contact on the vendor record in Cascades, their
name is listed in the Vendor Contact Person drop down. Your selection from the drop
down will populate the required fields. If the new user is not in the drop down, complete
the starred fields and click Save.
4. The screen goes back to the Manage Account Users with the new user listed in the
container.
5. The primary contact user logs out of the vendor portal and closes the internet browser
completely.

11
6. The new user receives the “Cascades Vendor Portal Registration” email which includes
the Secure Access Washington (SAW) URL, the service code needed to access the
application, and the first name, last name, and username entered by the primary contact
user.
7. The new user clicks the URL link in the email to navigate to Secure Access Washington.
8. The new user clicks Sign Up!.
9. User completes the SAW registration process and clicks Submit.
10. After creating an account, the Sign Up! Check Your Email popup appears. a. Click the X in the top right corner to close.
11. Make sure to close your browser completely before continuing.
12. Secure Access Washington sends a system generated email “You are almost finished…” with a link to activate your account.
13. Click the link in the email to activate your account.
a. The Sign Up! Account Activated! popup appears.
14. Click Login.
a. The screen returns to the SAW Welcome screen.
15. Log in with the user name and password just created.

12
a. The Add a New Service screen opens.
16. Click the Add a New Service button.
17. Click the key picture in the box labeled I have been given a code.
18. Enter the access code from the initial “Cascades Vendor Portal Registration” email.
19. Click Submit.
20. The Registration Complete screen opens. a. You receive an access approved email from SAW.
21. Click OK; then close your browser completely. a. The screen returns to the Add a New Service with the WIC Cascades Vendor
Portal now displayed as a service.
22. DO NOT LOG IN yet. Instead, close your internet browser completely.
23. Use the URL for the vendor portal https://cascades.xr-wic.com/VendorPortal to log in.
a. Select Log On in the Existing Vendors box b. The SAW Welcome screen opens.
24. Use your user name and password to log in.
a. The Cascades Vendor Portal Registration box opens.
25. Enter the Username, First name, Last name as they appear in the “Cascades Vendor
Portal Registration” email and click Submit.

13
**Important –Don’t allow the site to remember your password.
26. The vendor’s record opens in the portal.
14
Information for Existing Vendor Portal Users
Make sure you use Internet Explorer for your internet browser.
This application will NOT work in Chrome, Firefox, Safari, or Microsoft Edge.
1. User navigates to Cascades Vendor Portal URL https://cascades.xr-
wic.com/VendorPortal to log in.
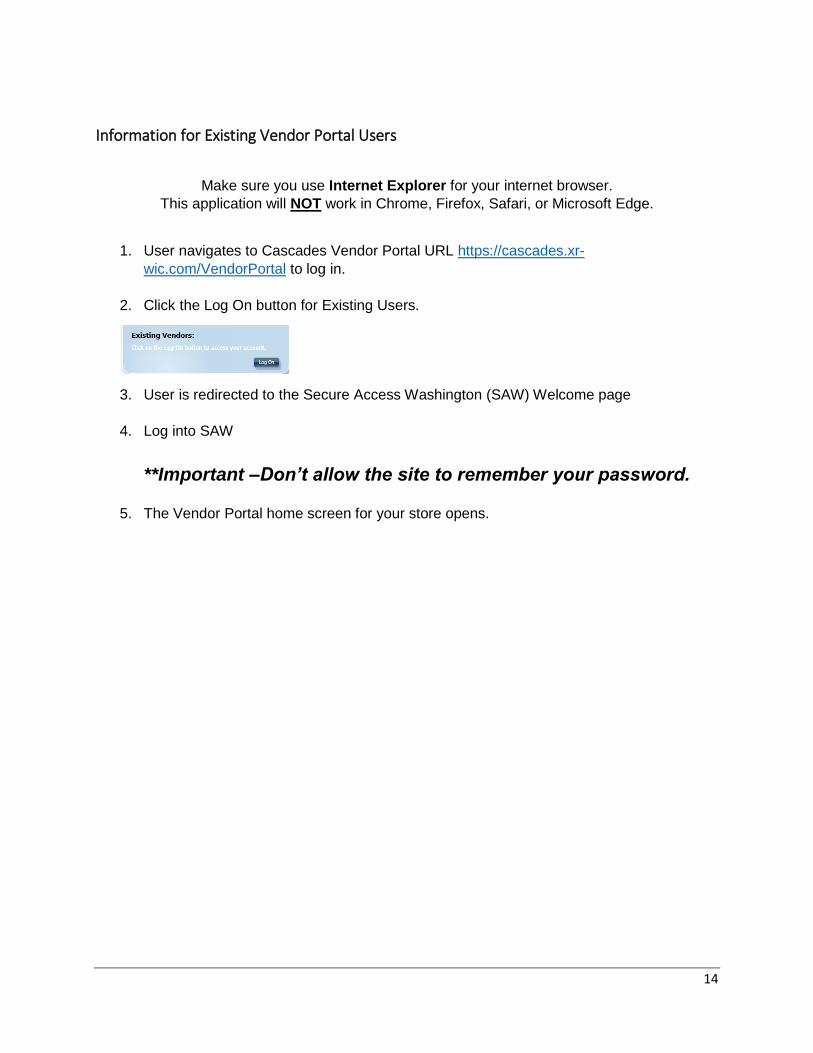
2. Click the Log On button for Existing Users.
3. User is redirected to the Secure Access Washington (SAW) Welcome page
4. Log into SAW
**Important –Don’t allow the site to remember your password.
5. The Vendor Portal home screen for your store opens.
15
Information for Vendors Whose Portal Accounts Were Set Up by State WIC Office
State WIC office staff set up the portal users in Cascades by using the Vendor Portal User
Management screen.
The Contact Person receives a Cascades Vendor Portal Registration email with the SAW link to
log in.
Make sure you use Internet Explorer for your internet browser.
This application will NOT work in Chrome, Firefox, Safari, or Microsoft Edge.
1. Click the link in the Cascades Vendor Portal Registration email
a. The SAW Welcome page opens.
2. Click Sign Up!
3. Complete the Sign up screen using the UserName listed in the Cascades Vendor Portal
Registration email and click Submit.
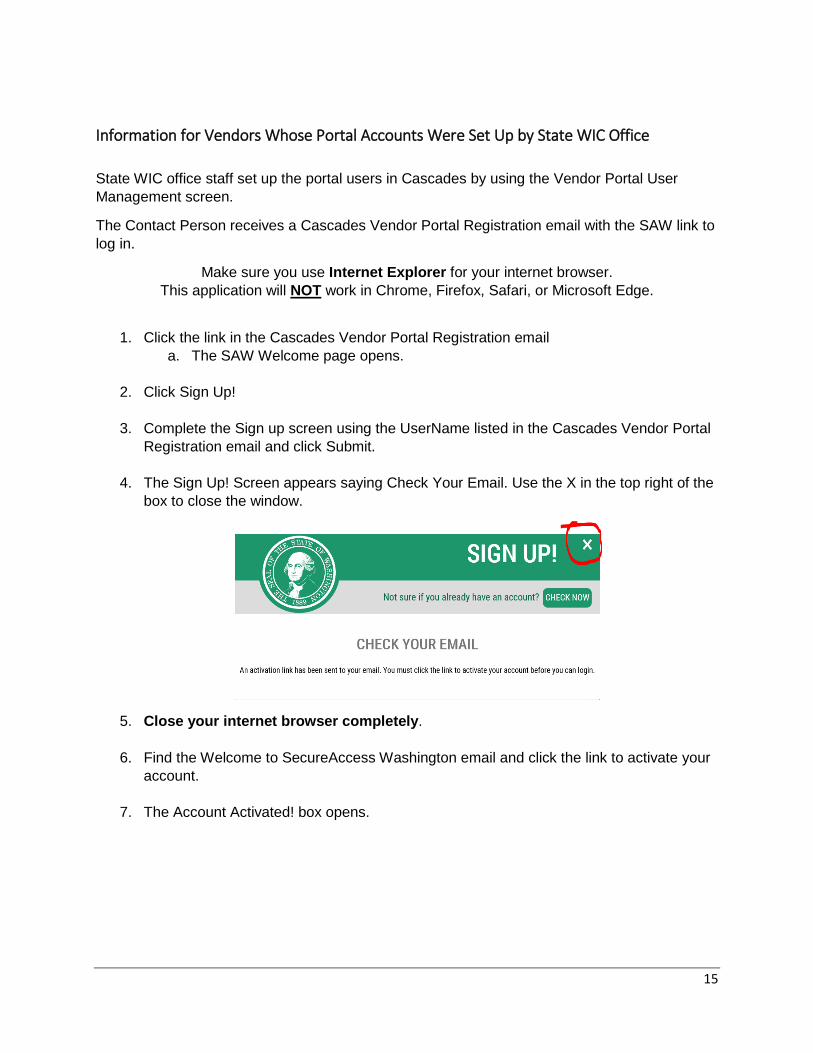
4. The Sign Up! Screen appears saying Check Your Email. Use the X in the top right of the
box to close the window.
5. Close your internet browser completely.
6. Find the Welcome to SecureAccess Washington email and click the link to activate your
account.
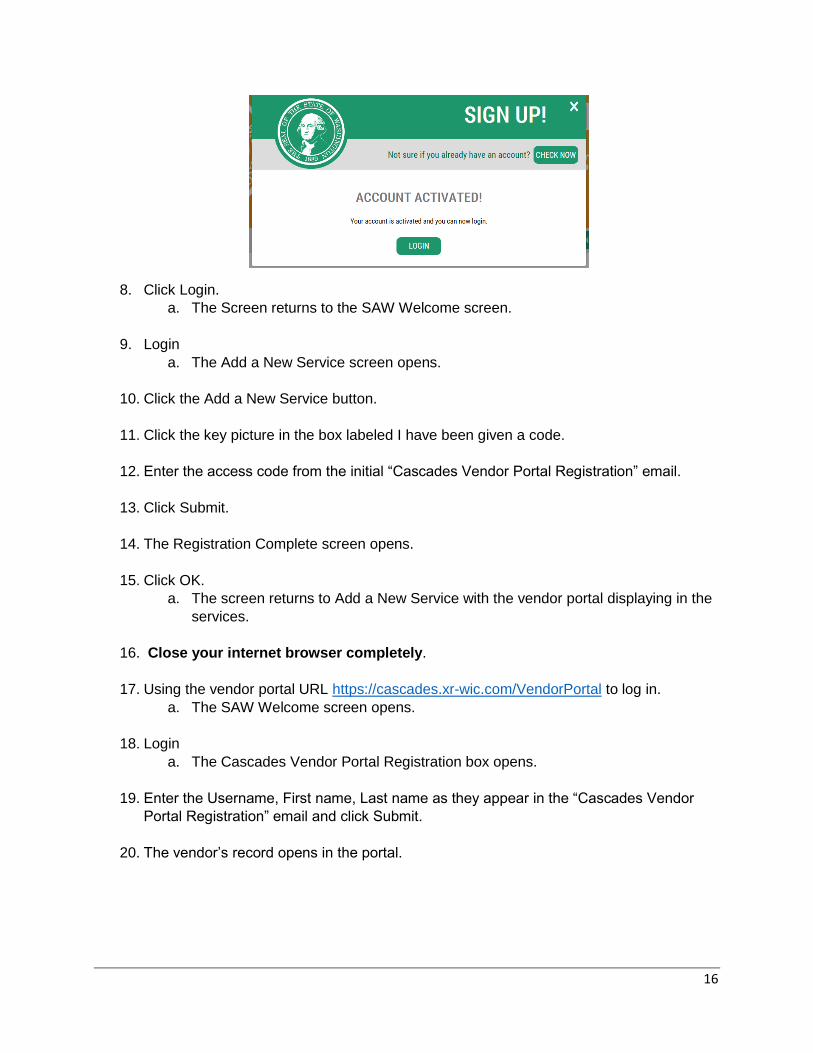
7. The Account Activated! box opens.
16
8. Click Login.
a. The Screen returns to the SAW Welcome screen.
9. Login
a. The Add a New Service screen opens.
10. Click the Add a New Service button.
11. Click the key picture in the box labeled I have been given a code.
12. Enter the access code from the initial “Cascades Vendor Portal Registration” email.
13. Click Submit.
14. The Registration Complete screen opens.
15. Click OK.
a. The screen returns to Add a New Service with the vendor portal displaying in the
services.
16. Close your internet browser completely.
17. Using the vendor portal URL https://cascades.xr-wic.com/VendorPortal to log in.
a. The SAW Welcome screen opens.
18. Login
a. The Cascades Vendor Portal Registration box opens.
19. Enter the Username, First name, Last name as they appear in the “Cascades Vendor
Portal Registration” email and click Submit.
20. The vendor’s record opens in the portal.
17
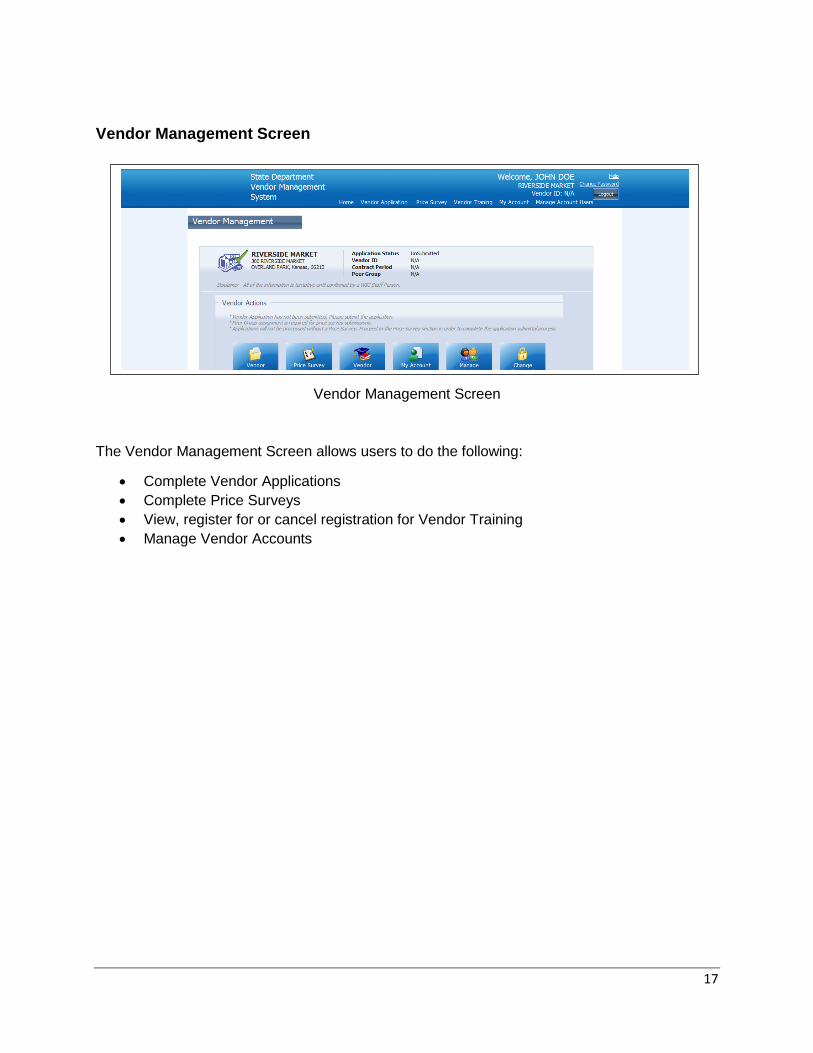
Vendor Management Screen
Vendor Management Screen
The Vendor Management Screen allows users to do the following:
Complete Vendor Applications
Complete Price Surveys
View, register for or cancel registration for Vendor Training
Manage Vendor Accounts
18
How to Complete Vendor Applications
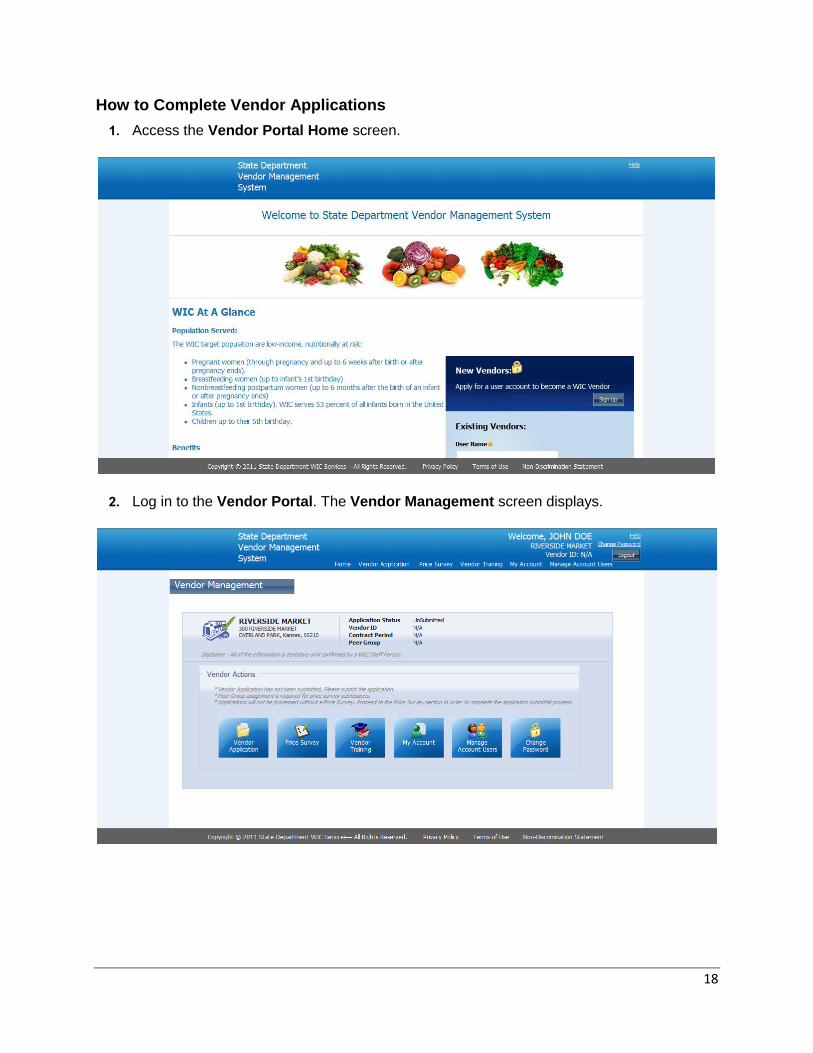
1. Access the Vendor Portal Home screen.
2. Log in to the Vendor Portal. The Vendor Management screen displays.
19
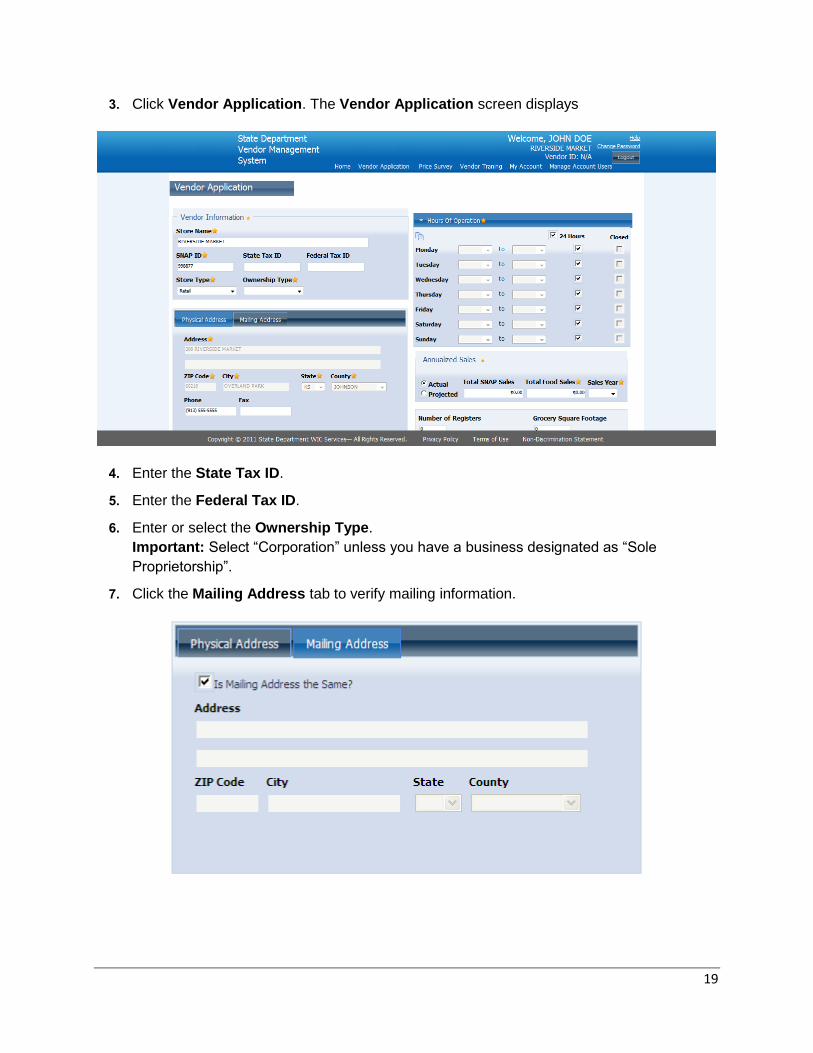
3. Click Vendor Application. The Vendor Application screen displays
4. Enter the State Tax ID.
5. Enter the Federal Tax ID.
6. Enter or select the Ownership Type.
Important: Select “Corporation” unless you have a business designated as “Sole
Proprietorship”.
7. Click the Mailing Address tab to verify mailing information.
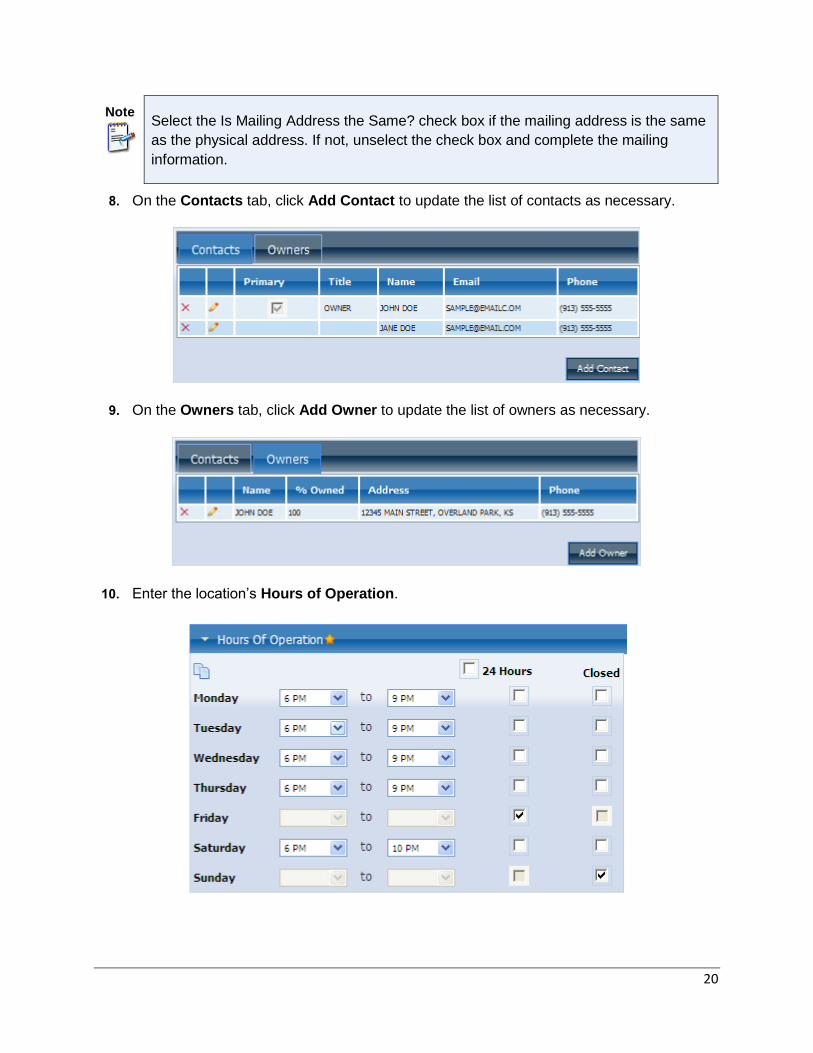
20
Note
Select the Is Mailing Address the Same? check box if the mailing address is the same
as the physical address. If not, unselect the check box and complete the mailing
information.
8. On the Contacts tab, click Add Contact to update the list of contacts as necessary.
9. On the Owners tab, click Add Owner to update the list of owners as necessary.
10. Enter the location’s Hours of Operation.
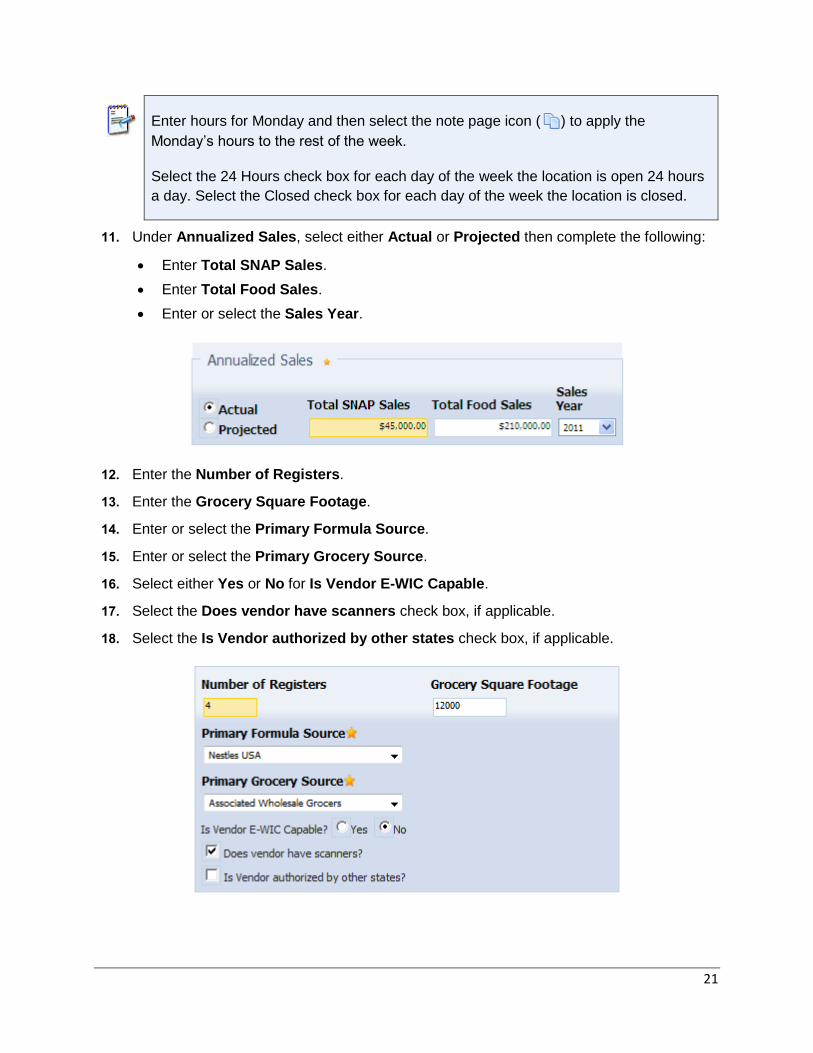
21
Enter hours for Monday and then select the note page icon ( ) to apply the
Monday’s hours to the rest of the week.
Select the 24 Hours check box for each day of the week the location is open 24 hours
a day. Select the Closed check box for each day of the week the location is closed.
11. Under Annualized Sales, select either Actual or Projected then complete the following:
Enter Total SNAP Sales.
Enter Total Food Sales.
Enter or select the Sales Year.
12. Enter the Number of Registers.
13. Enter the Grocery Square Footage.
14. Enter or select the Primary Formula Source.
15. Enter or select the Primary Grocery Source.
16. Select either Yes or No for Is Vendor E-WIC Capable.
17. Select the Does vendor have scanners check box, if applicable.
18. Select the Is Vendor authorized by other states check box, if applicable.
22
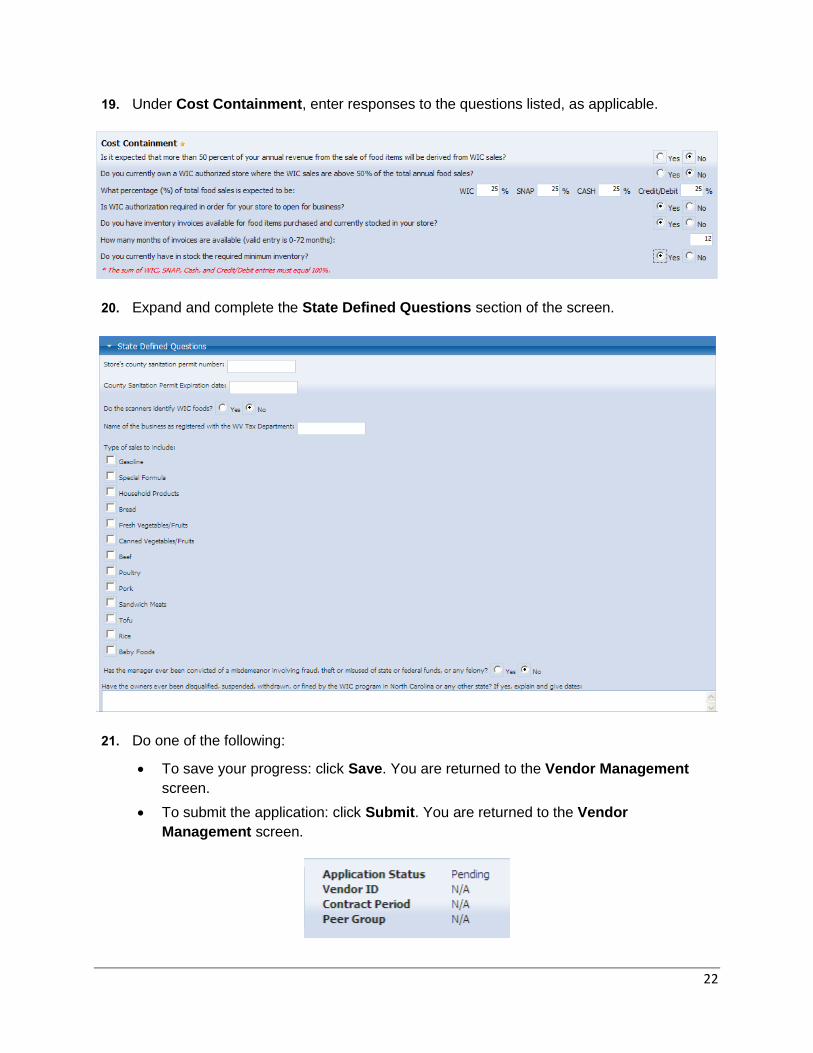
19. Under Cost Containment, enter responses to the questions listed, as applicable.
20. Expand and complete the State Defined Questions section of the screen.
21. Do one of the following:
To save your progress: click Save. You are returned to the Vendor Management
screen.
To submit the application: click Submit. You are returned to the Vendor
Management screen.
23
An application that has been submitted is assigned an Application Status of Pending.
Both the Vendor Application and the Price Survey must be completed and submitted
before an application can be processed.

How Corporate Chains Apply to Add A New Store
Assumption: Corporate contacts have accounts for portal access.
1. User signs into the portal.
a. The screen opens to the Vendor Management – Corporate home screen.
2. All current stores associated with the Owner display.
3. Click the New Vendor button.
a. The Vendor Application screen opens.
4. User completes the Vendor Application and clicks Save.
5. Click Print Application.
6. After printing, the user signs, dates and scans the application so it can be uploaded to
the portal.
7. Back in the Vendor Portal, the user clicks Upload Attestation.
8. Click Browse to find the document that was just scanned and saved.
9. Once the document is located, double click on the document name to enter the path into
the Upload Vendor Forms popup.
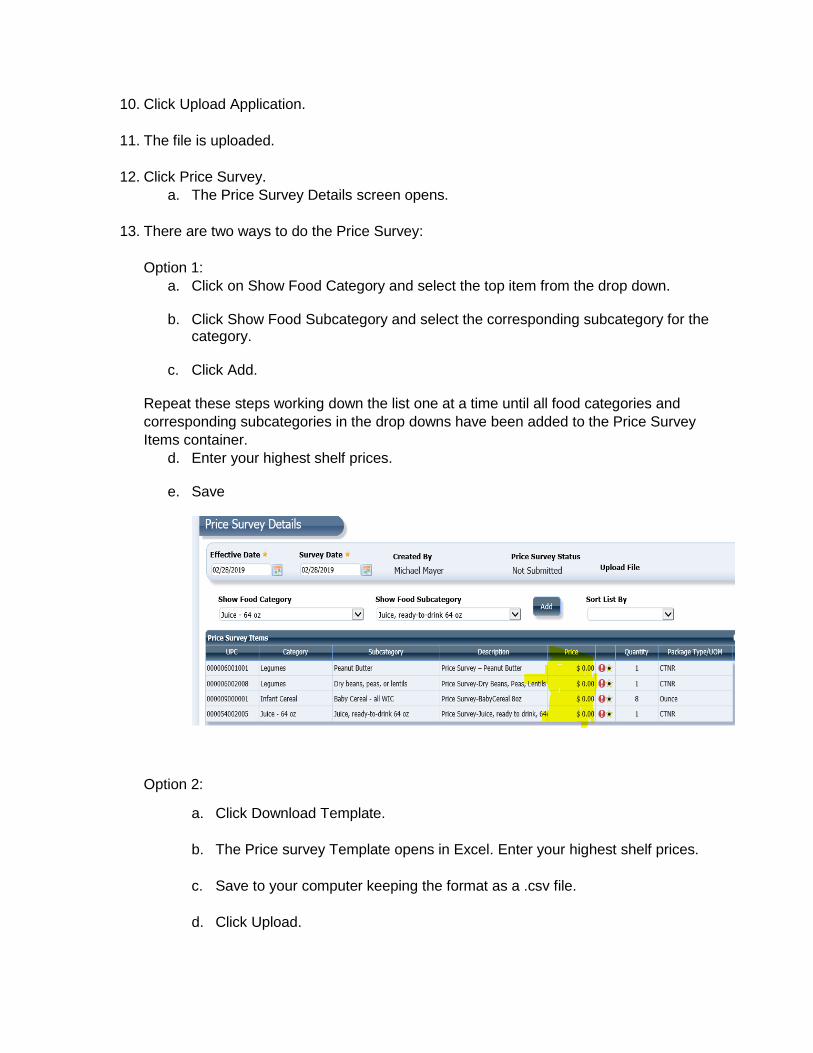
10. Click Upload Application.
11. The file is uploaded.
12. Click Price Survey.
a. The Price Survey Details screen opens.
13. There are two ways to do the Price Survey:
Option 1:
a. Click on Show Food Category and select the top item from the drop down.
b. Click Show Food Subcategory and select the corresponding subcategory for the category.
c. Click Add.
Repeat these steps working down the list one at a time until all food categories and
corresponding subcategories in the drop downs have been added to the Price Survey
Items container.
d. Enter your highest shelf prices.
e. Save
Option 2:
a. Click Download Template.
b. The Price survey Template opens in Excel. Enter your highest shelf prices.
c. Save to your computer keeping the format as a .csv file.
d. Click Upload.

e. The Upload Price Survey popup opens.
f. Click Browse.
g. The Choose File to Upload window opens.
h. Find the price survey just saved and double click on the file name.
i. Click Upload
j. The Validation Summary Appears with status messages for the upload.
14. Click Submit
a. The radio button defaults to Apply to this vendor only, but if the user has other
authorized stores in the same peer group, the user can click the radio button
Apply to other vendors below and select one, several or all from the vendors
listed to apply the prices to the other stores.
15. Make the desired selection and click OK.
16. Click Print. The Price Survey opens in .pdf.
17. On the Print Price Survey Documents popup, click Price Survey – All Items.
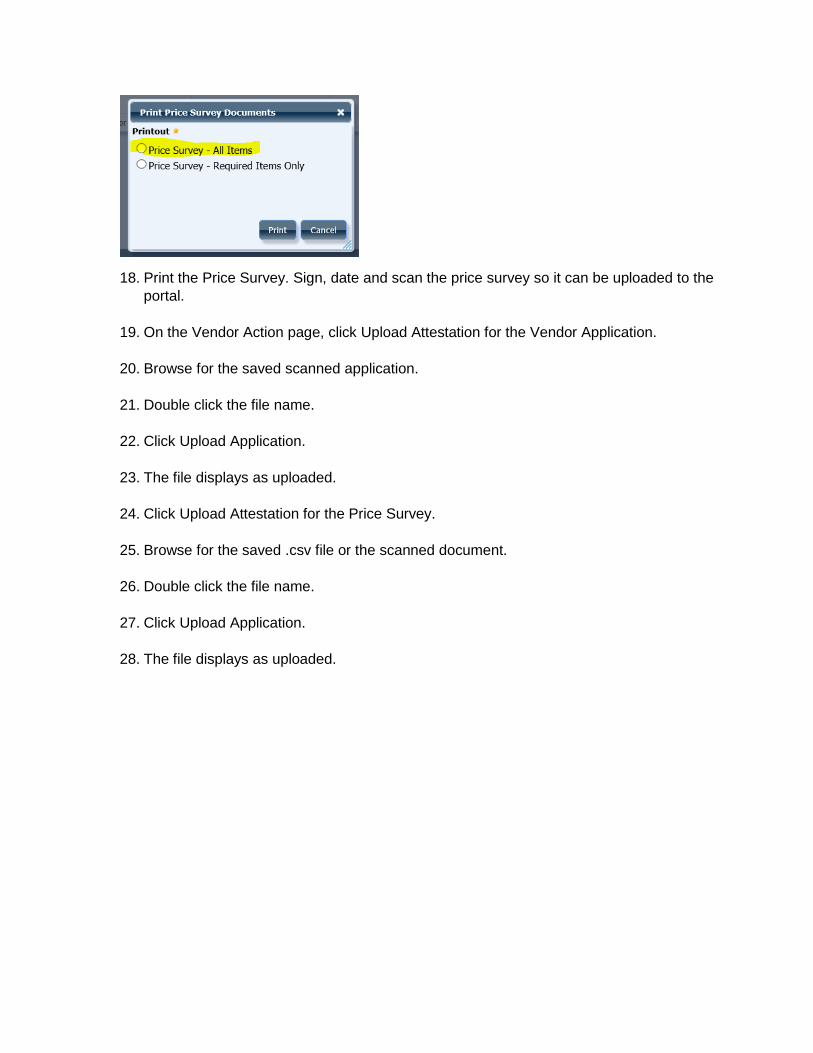
18. Print the Price Survey. Sign, date and scan the price survey so it can be uploaded to the
portal.
19. On the Vendor Action page, click Upload Attestation for the Vendor Application.
20. Browse for the saved scanned application.
21. Double click the file name.
22. Click Upload Application.
23. The file displays as uploaded.
24. Click Upload Attestation for the Price Survey.
25. Browse for the saved .csv file or the scanned document.
26. Double click the file name.
27. Click Upload Application.
28. The file displays as uploaded.
How to Complete Price Surveys
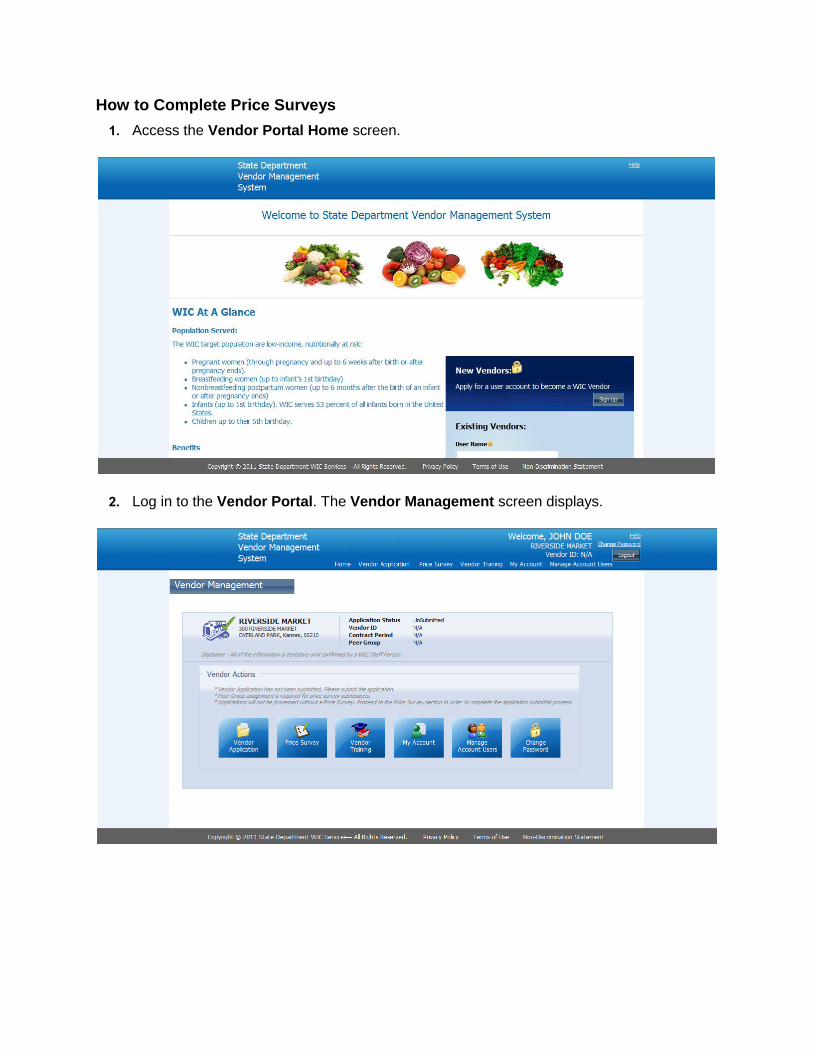
1. Access the Vendor Portal Home screen.
2. Log in to the Vendor Portal. The Vendor Management screen displays.
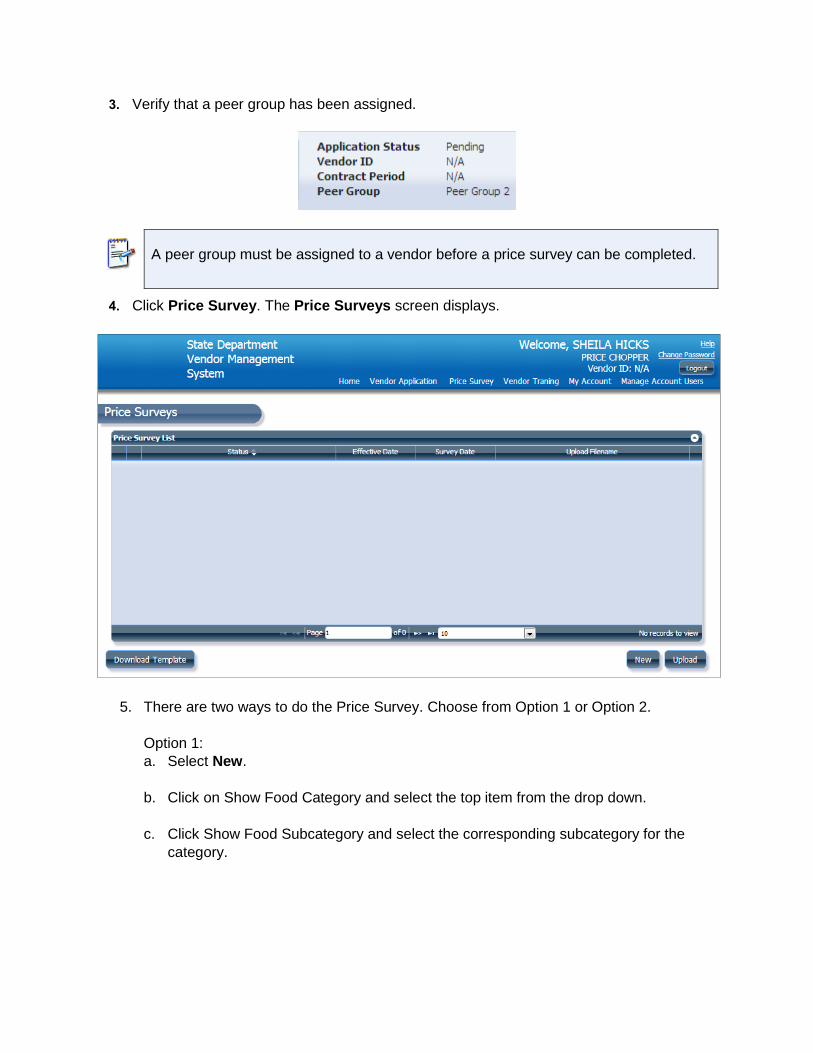
3. Verify that a peer group has been assigned.
A peer group must be assigned to a vendor before a price survey can be completed.
4. Click Price Survey. The Price Surveys screen displays.
5. There are two ways to do the Price Survey. Choose from Option 1 or Option 2.
Option 1:
a. Select New.
b. Click on Show Food Category and select the top item from the drop down.
c. Click Show Food Subcategory and select the corresponding subcategory for the
category.
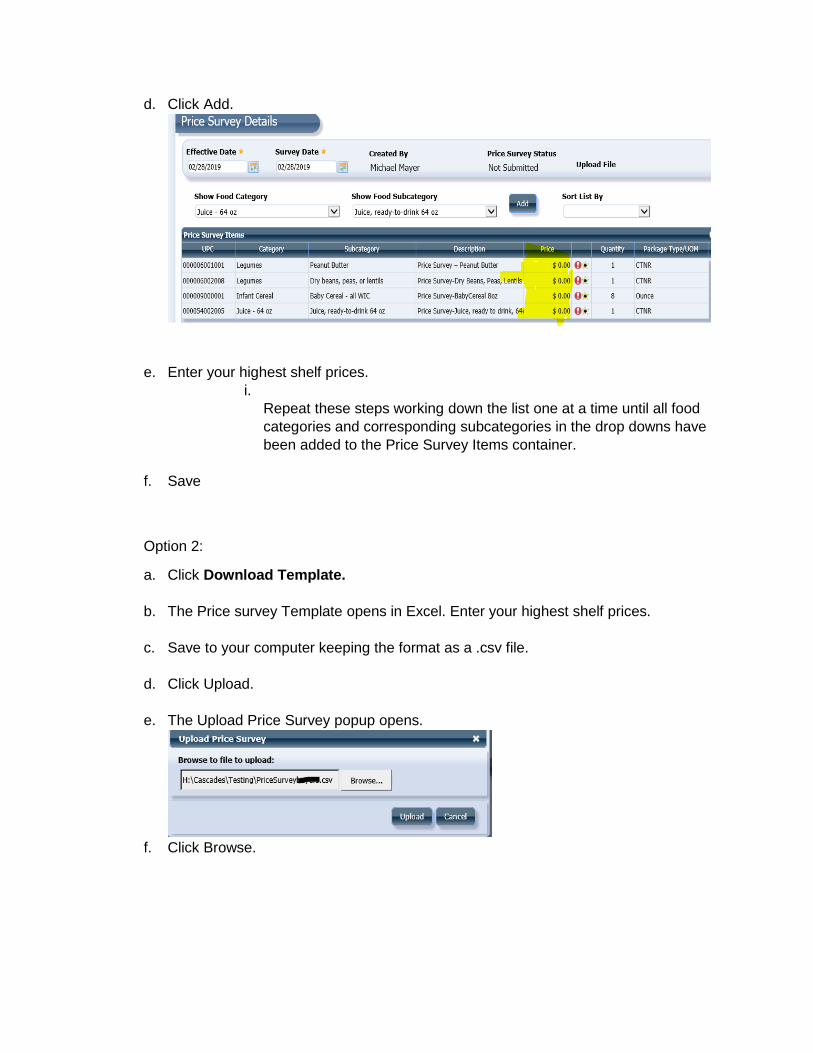
d. Click Add.
e. Enter your highest shelf prices.
i.
Repeat these steps working down the list one at a time until all food
categories and corresponding subcategories in the drop downs have
been added to the Price Survey Items container.
f. Save
Option 2:
a. Click Download Template.
b. The Price survey Template opens in Excel. Enter your highest shelf prices.
c. Save to your computer keeping the format as a .csv file.
d. Click Upload.
e. The Upload Price Survey popup opens.
f. Click Browse.

g. The Browse File to Upload window opens.
h. Find the price survey just saved and double click on the file name.
i. Click Upload
j. The Validation Summary Appears with status messages for the upload.
6. Click Submit
The radio button defaults to Apply to this vendor only, but if the user has other
authorized stores in the same peer group, the user can click the radio button
Apply to other vendors below and select one, several or all from the vendors
listed to apply the prices to the other stores.
7. Make the desired selection and click OK.
8. Click Print. The Price Survey opens in .pdf.
9. On the Print Price Survey Documents popup, click Price Survey – All Items.

10. Print the Price Survey. Sign, date and scan the price survey so it can be uploaded to the
portal.
11. On the Vendor Action page, click Upload Attestation for the Vendor Application.
12. Browse for the saved scanned application.
13. Double click the file name.
14. Click Upload Application.
15. The file displays as uploaded.
16. Click Upload Attestation for the Price Survey.
17. Browse for the saved .csv file or the scanned document.
18. Double click the file name.
19. Click Upload Application.
20. The file displays as uploaded.

The system will display a message that indicates the results of the upload.
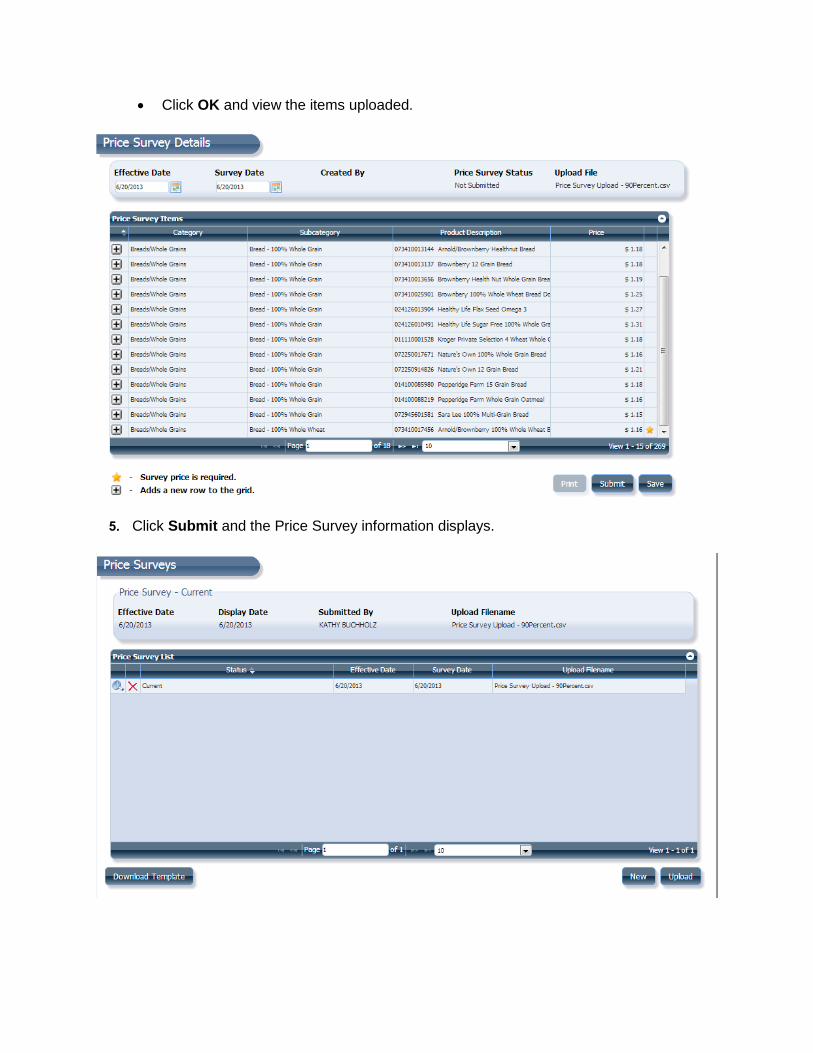
Click OK and view the items uploaded.
5. Click Submit and the Price Survey information displays.

Vendor Training – View upcoming events, register or cancel registration
1. Access the Vendor Portal Home screen.
2. Log in to the Vendor Portal. The Vendor Management screen displays.

The Upcoming Open Training Events grid displays events open to all vendors in the
state. Portal users can register for an event using this grid or by selecting the Vendor
Training menu option.
3. Click Vendor Training. The Vendor Training screen displays.
The grid lists the title, date, and location of each training event.
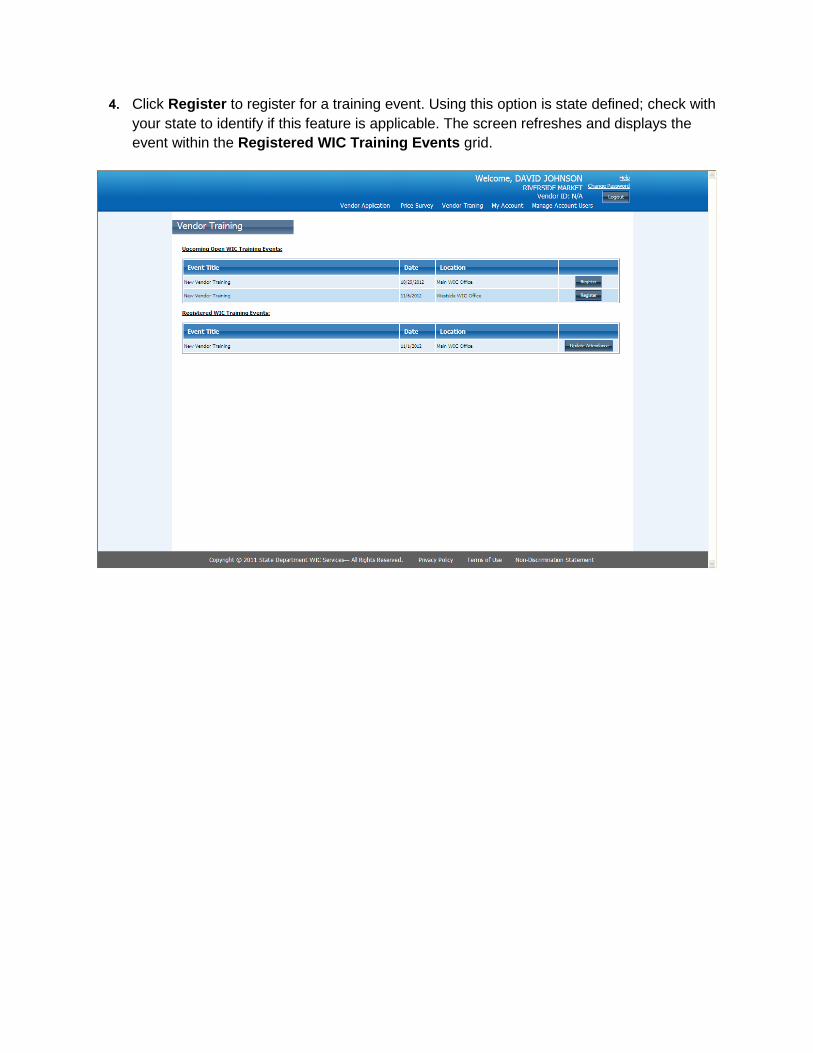
4. Click Register to register for a training event. Using this option is state defined; check with
your state to identify if this feature is applicable. The screen refreshes and displays the
event within the Registered WIC Training Events grid.

5. Click Update Attendance to update the list of individuals selected to attend the event or
to cancel the registration. The Training Event screen displays.
The Training Event screen displays the event’s type of training, the day, date, time,
and location of training including directions to the location.
The registration can be canceled from this screen as well.
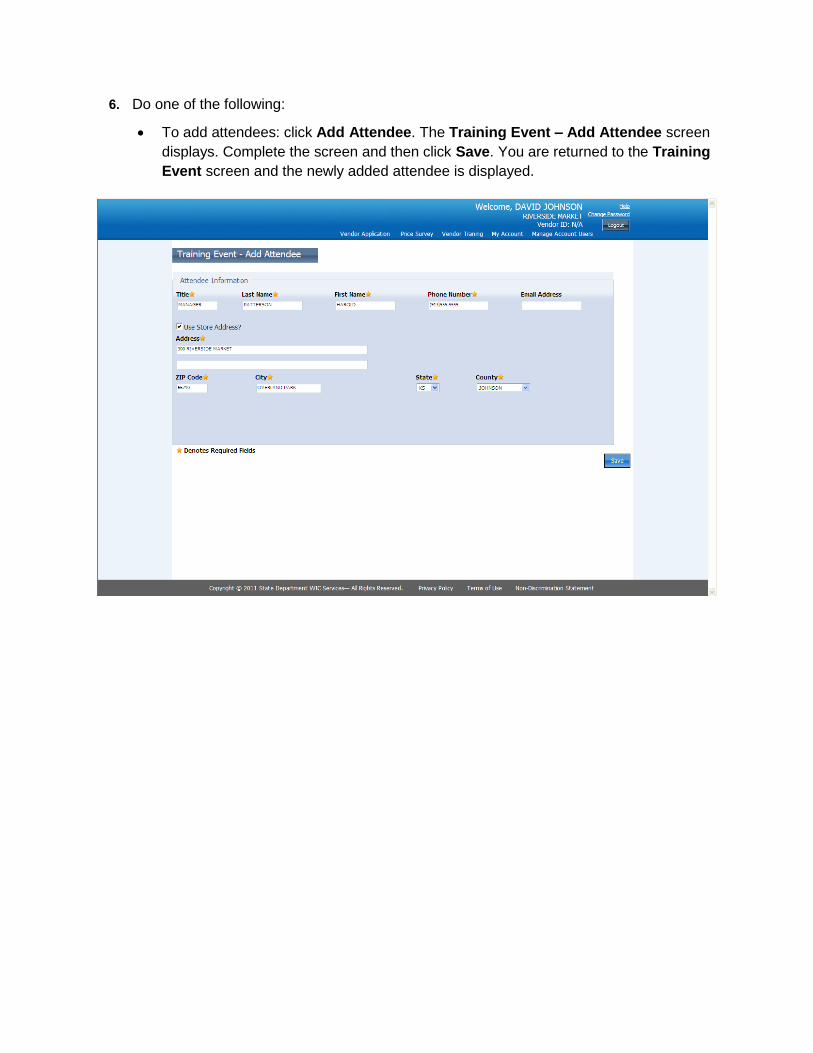
6. Do one of the following:
To add attendees: click Add Attendee. The Training Event – Add Attendee screen
displays. Complete the screen and then click Save. You are returned to the Training
Event screen and the newly added attendee is displayed.
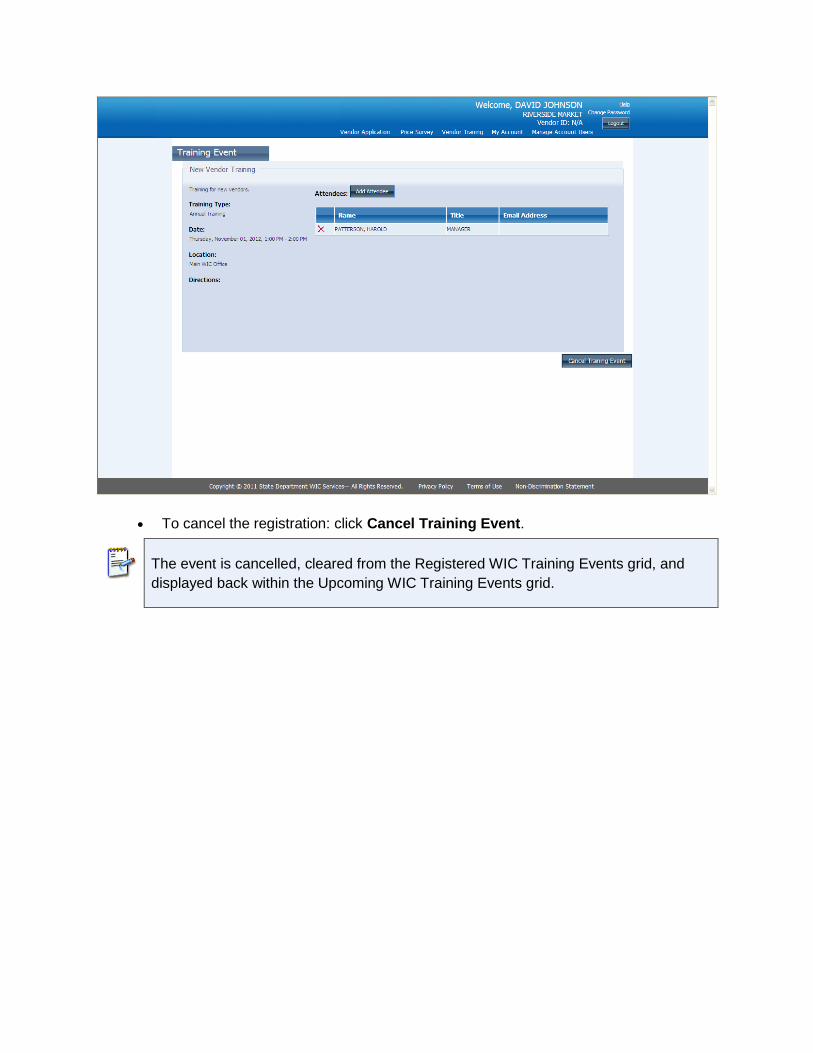
To cancel the registration: click Cancel Training Event.
The event is cancelled, cleared from the Registered WIC Training Events grid, and
displayed back within the Upcoming WIC Training Events grid.
How to Edit User Accounts
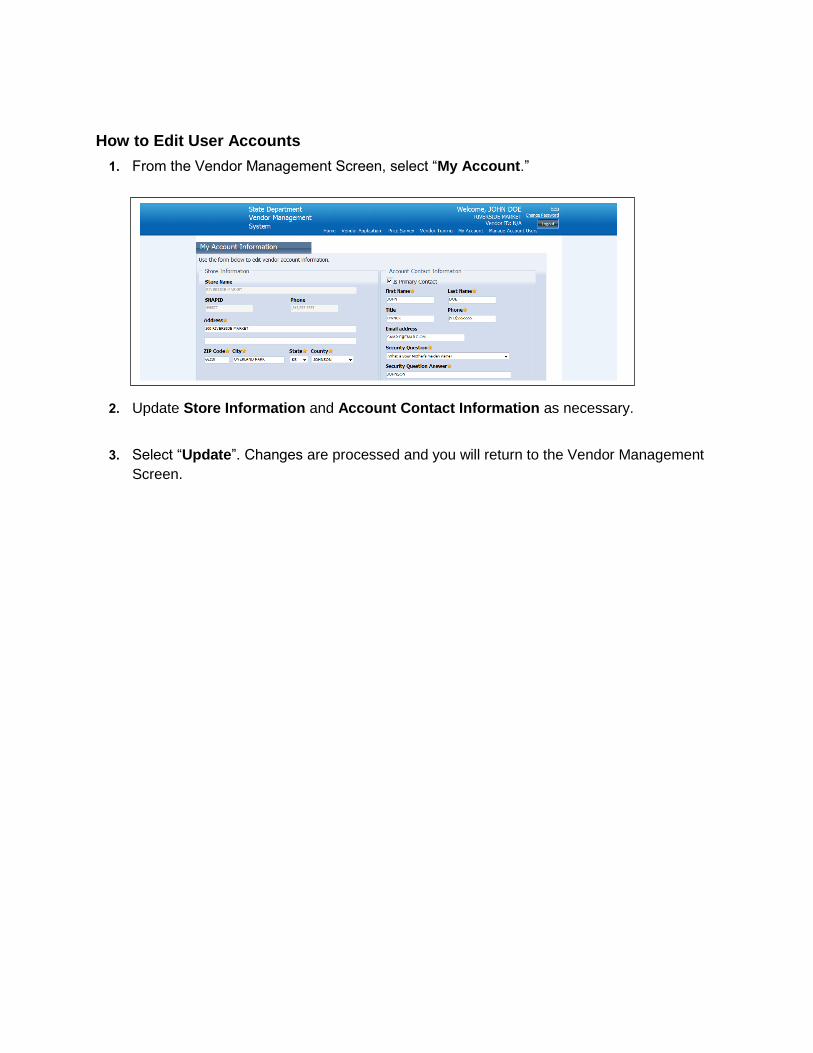
1. From the Vendor Management Screen, select “My Account.”
2. Update Store Information and Account Contact Information as necessary.
3. Select “Update”. Changes are processed and you will return to the Vendor Management
Screen.
How to Add or Disable Users
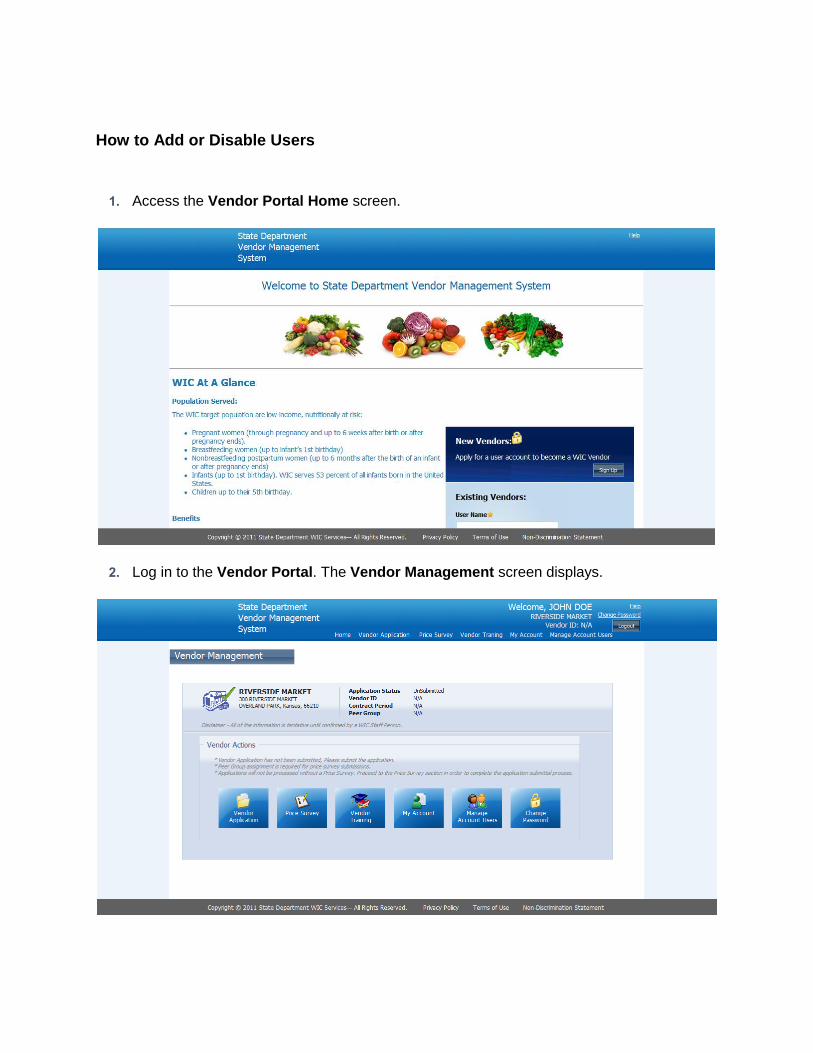
1. Access the Vendor Portal Home screen.
2. Log in to the Vendor Portal. The Vendor Management screen displays.
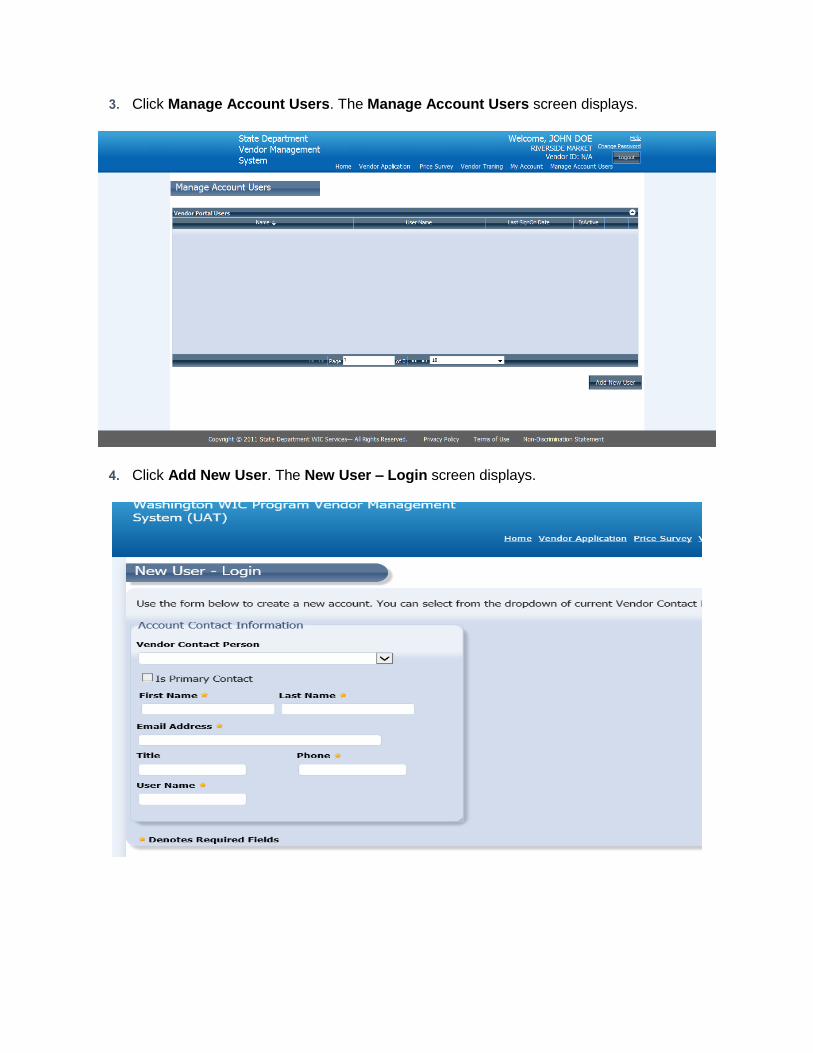
3. Click Manage Account Users. The Manage Account Users screen displays.
4. Click Add New User. The New User – Login screen displays.
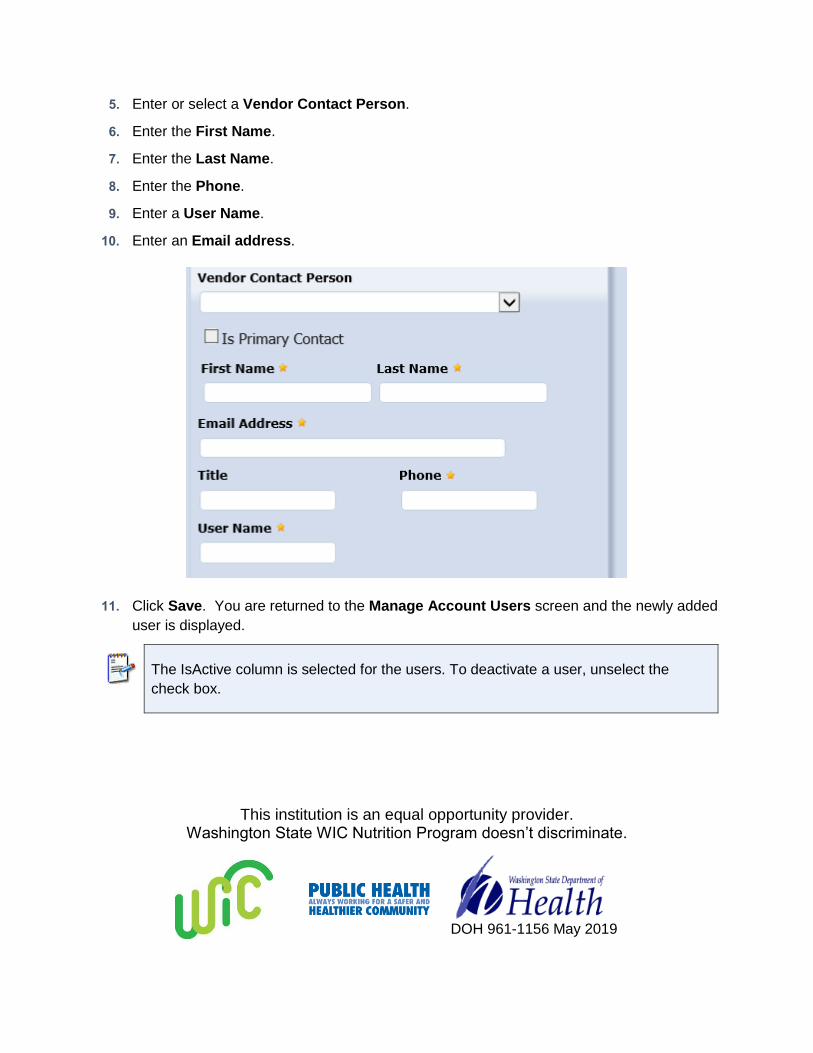
5. Enter or select a Vendor Contact Person.
6. Enter the First Name.
7. Enter the Last Name.
8. Enter the Phone.
9. Enter a User Name.
10. Enter an Email address.
11. Click Save. You are returned to the Manage Account Users screen and the newly added
user is displayed.
The IsActive column is selected for the users. To deactivate a user, unselect the
check box.
This institution is an equal opportunity provider. Washington State WIC Nutrition Program doesn’t discriminate.
DOH 961-1156 May 2019