Embed Size (px)
Citation preview

EMCé VNXé Series
Release 7.1
Using VNXé Replicator
P/N 300-013-441 Rev 02
EMC CorporationCorporate Headquarters:
Hopkinton, MA 01748-9103
1-508-435-1000
www.EMC.com

Copyright â 1998 - 2013 EMC Corporation. All rights reserved.
Published December 2013
EMC believes the information in this publication is accurate as of its publication date. Theinformation is subject to change without notice.
THE INFORMATION IN THIS PUBLICATION IS PROVIDED "AS IS." EMC CORPORATIONMAKES NO REPRESENTATIONS OR WARRANTIES OF ANY KIND WITH RESPECT TOTHE INFORMATION IN THIS PUBLICATION, AND SPECIFICALLY DISCLAIMS IMPLIEDWARRANTIES OF MERCHANTABILITY OR FITNESS FOR A PARTICULAR PURPOSE.
Use, copying, and distribution of any EMC software described in this publication requires anapplicable software license.
For the most up-to-date regulatory document for your product line, go to the TechnicalDocumentation and Advisories section on EMC Powerlink.
For the most up-to-date listing of EMC product names, see EMC Corporation Trademarks onEMC.com.
All other trademarks used herein are the property of their respective owners.
Corporate Headquarters: Hopkinton, MA 01748-9103
2 Using VNX Replicator

Contents
Preface.....................................................................................................9
Chapter 1: Introduction.........................................................................11
System requirements..................................................................................12
Restrictions..................................................................................................13
Cautions and warnings................................................................................16
User interface choices.................................................................................17
Related information.....................................................................................17
Chapter 2: Concepts.............................................................................19
VNX Replicator session behavior................................................................20
Replication destination options....................................................................20
Replication source objects..........................................................................21
Many-to-one replication configuration.........................................................26
One-to-many replication configurations.......................................................27
Cascade replication configurations.............................................................31
One-to-many and cascade replication configurations.................................34
Data Mover interconnect.............................................................................34
How ongoing replication sessions work......................................................40
How one-time file system copy sessions work............................................42
Updating the destination site with source changes.....................................43
Stopping a replication session.....................................................................44
Starting a replication session......................................................................45
Reversing a replication session...................................................................47
Switching over a replication session............................................................47
Failing over a replication session.................................................................50
When to use failover, switchover, and reverse.............................................52
Using VNX Replicator 3

Deleting a replication session......................................................................53
Performing an initial copy by using disk or tape..........................................54
Planning considerations..............................................................................57
Chapter 3: Upgrading from previous versions....................................63
Upgrade from a previous release................................................................64
Enable VNX Replicator................................................................................64
Chapter 4: Configuring communication between VNX systems......65
Prerequisites...............................................................................................66
Set up communication on the source..........................................................66
Set up communication on the destination...................................................67
Verify communication between VNX systems.............................................68
Chapter 5: Configuring communication between Data Movers......69
Prerequisites...............................................................................................70
Verify interface network connectivity...........................................................70
Set up one side of an interconnect..............................................................74
Set up the peer side of the interconnect......................................................76
Validate interconnect information................................................................77
Chapter 6: Configuring a file system replication session..................79
Prerequisites...............................................................................................80
Verify destination storage............................................................................81
Validate Data Mover communication...........................................................81
Create a file system replication session......................................................82
(Optional) Verify file system replication.......................................................85
Chapter 7: Configuring a VDM replication session............................87
Prerequisites...............................................................................................88
Verify the source VDM.................................................................................88
Verify available destination storage.............................................................88
Validate Data Mover communication...........................................................89
Create VDM replication session..................................................................90
Replicate the file system mounted to the VDM............................................91
(Optional) Verify VDM replication.................................................................92
Chapter 8: Configuring a one-time copy session..............................95
Prerequisites...............................................................................................96
4 Using VNX Replicator
Contents

Verify the source file system........................................................................96
Verify destination file system or storage......................................................97
Validate Data Mover communication...........................................................99
Create a file system copy session...............................................................99
(Optional) Monitor file system copy...........................................................102
Chapter 9: Configuring advanced replications...............................105
Configure a one-to-many replication.........................................................106
Configure a cascade replication................................................................106
Configure a one-to-many replication with common base checkpoints......107
Configure a cascading replication with common base checkpoints..........115
Configure the replication of a file system mounted on an Nested Mount
File System mountpoint........................................................................124
Chapter 10: Managing replication sessions.....................................127
Get information about replication sessions...............................................128
Modify replication properties.....................................................................131
Refresh the destination.............................................................................132
Delete a replication session......................................................................133
Stop a replication session.........................................................................134
Start a replication session.........................................................................136
Start a failed over or switched over replication..........................................138
Start a replication session that is involved in a one-to-many
configuration.........................................................................................139
Reverse the direction of a replication session...........................................140
Switch over a replication session..............................................................141
Fail over a replication session...................................................................144
Chapter 11: Managing replication tasks..........................................149
Monitor replication tasks............................................................................150
Abort a replication task..............................................................................152
Delete a replication task............................................................................156
Chapter 12: Managing Data Mover interconnects..........................159
View a list of Data Mover interconnects....................................................160
View Data Mover interconnect information................................................160
Modify Data Mover interconnect properties...............................................161
Change the interfaces associated with an interconnect ...........................163
Pause a Data Mover interconnect.............................................................168
Using VNX Replicator 5
Contents

Resume a paused Data Mover interconnect.............................................169
Validate a Data Mover interconnect...........................................................169
Delete a Data Mover interconnect.............................................................170
Chapter 13: Managing the replication environment.......................171
Monitor replication.....................................................................................172
View the passphrase.................................................................................172
Change the passphrase............................................................................173
Extend the size of a replicated file system................................................174
Change the percentage of system space allotted to SavVols...................174
Change replication parameters.................................................................175
Mount the source or destination file system on a different Data Mover.....176
Rename a Data Mover that has existing interconnects.............................176
Change the mount status of source or destination object.........................177
Perform an initial copy by using the disk transport method.......................178
Change Control Station IP addresses.......................................................180
Perform an initial copy by using the tape transport method......................183
Change the NDMP server_param value..........................................185
Recover from a corrupted file system using nas_fsck...............................185
Manage expected outages........................................................................186
Manage unexpected outages....................................................................188
Chapter 14: Troubleshooting..............................................................191
EMC E-Lab Interoperability Navigator.......................................................192
Error messages.........................................................................................192
Log files.....................................................................................................192
Return codes for nas_copy.......................................................................193
Interconnect validation failure....................................................................195
Replication fails with quota exceeded error...............................................195
Two active CIFS servers after failover or switchover.................................195
Network performance troubleshooting......................................................196
EMC Training and Professional Services..................................................197
Appendix A: Setting up the CIFS replication environment..............199
Verify IP infrastructure...............................................................................202
Configure an interface...............................................................................204
Set up DNS...............................................................................................206
Synchronize Data Mover and Control Station Time...................................207
Synchronize Data Mover source site time........................................207
6 Using VNX Replicator
Contents

Synchronize Data Mover destination site time.................................208
Synchronize Control Station source site time...................................208
Synchronize Control Station destination site time............................210
Configure user mapping............................................................................210
Prepare file systems for replication...........................................................211
Glossary................................................................................................213
Index.....................................................................................................221
Using VNX Replicator 7
Contents

8 Using VNX Replicator
Contents

Preface
As part of an effort to improve and enhance the performance and capabilities of its productlines, EMC periodically releases revisions of its hardware and software. Therefore, somefunctions described in this document may not be supported by all versions of the softwareor hardware currently in use. For the most up-to-date information on product features, referto your product release notes.
If a product does not function properly or does not function as described in this document,please contact your EMC representative.
Using VNX Replicator 9

Special notice conventions
EMC uses the following conventions for special notices:
Note: Emphasizes content that is of exceptional importance or interest but does not relate topersonal injury or business/data loss.
Identifies content that warns of potential business or data loss.
Indicates a hazardous situation which, if not avoided, could result in minor ormoderate injury.
Indicates a hazardous situation which, if not avoided, could result in death orserious injury.
Indicates a hazardous situation which, if not avoided, will result in death or seriousinjury.
Where to get help
EMC support, product, and licensing information can be obtained as follows:
Product information—For documentation, release notes, software updates, or forinformation about EMC products, licensing, and service, go to EMC Online Support(registration required) at http://Support.EMC.com.
Troubleshooting—Go to EMC Online Support at http://Support.EMC.com. After loggingin, locate the applicable Support by Product page.
Technical support—For technical support and service requests, go to EMC CustomerService on EMC Online Support at http://Support.EMC.com. After logging in, locatethe applicable Support by Product page, and choose either Live Chat or Create aservice request. To open a service request through EMC Online Support, you musthave a valid support agreement. Contact your EMC sales representative for detailsabout obtaining a valid support agreement or with questions about your account.
Note: Do not request a specific support representative unless one has already been assigned toyour particular system problem.
Your comments
Your suggestions will help us continue to improve the accuracy, organization, and overallquality of the user publications.
Please send your opinion of this document to:
10 Using VNX Replicator
Preface

1
Introduction
This document describes how to perform replication on EMC VNX by usingthe latest version of replication, EMC VNX Replicator. This version ofreplication enables you to create and manage replication sessions, eachproducing a read-only, point-in-time copy of a given source object at adesignated destination. VNX Replicator sessions, which can be createdby using the command line interface (CLI) or Unisphere, are characterizedby an architecture based on snapshot/checkpoint technology, asynchronoustransfer to the destination and support for file system and Virtual DataMover (VDM) source object types.
This document is part of the VNX information set and is intended for useby system administrators who are responsible for establishing replicationin the VNX environment. Before using VNX Replicator, systemadministrators establishing replication should understand NAS volumesand file systems.
This section discusses:
System requirements on page 12 Restrictions on page 13 Cautions and warnings on page 16 User interface choices on page 17 Related information on page 17
Using VNX Replicator 11

System requirements
This section details the EMCé VNXé Series software, hardware, network, storage, andnetwork settings to use EMC VNX Replicator.
Local or loopback replication
Table 1 on page 12 describes the VNX requirements for local or loopback replication.
Table 1. System requirements for local or loopback replication
Software
VNX version 7.1 or later.
Licenses for VNX Replicator, EMC SnapSure, and CIFS.
If an application-consistent copy of an iSCSI LUN or NFS shared file system is required,
you should use Replication Manager version 5.0 or later with the necessary patches.
The Replication Manager Release Notes provide the latest information.
One VNX for file-storage EMC Symmetrixé or EMC VNX for block pair.Hardware
IP addresses configured for the source and destination Data Movers.
Loopback replication always uses IP address 127.0.0.1.Network
Sufficient storage space available for the source and destination file systems.
Sufficient SavVol space available for use.Storage
Remote replication
Table 2 on page 12 describes the VNX requirements for remote replication.
Table 2. System requirements for remote replication
VNX version 7.1 or later.
Licenses for VNX Replicator, SnapSure, and CIFS.Software
Minimum of two VNX for File-storage Symmetrix or VNX for Block pairs.Hardware
12 Using VNX Replicator
Introduction

IP addresses configured for the source and destination Data Movers (port 8888 used
by replication for transferring data—contact EMC Customer Support to change this
setting).
HTTPS connection between the source and destination Data Movers (port
5085—cannot be changed).
HTTPS connection between the Control Station on the source site and the Control
Station on the destination site (port 443—cannot be changed).
Note: IP connection between the Control Station external IP address and the Data
Mover external IP address is not required.
Internet Control Message Protocol (ICMP) is required. ICMP ensures that a destination
VNX is accessible from a source VNX. The ICMP protocol reports errors and provides
control data about IP packet processing.
Network
Sufficient storage space available for the source and destination file systems.
Sufficient SavVol space available for use.Storage
The same VNX for File administrative user account with the nasadmin role must exist
on both the source and destination VNX for File systems.Security
Restrictions
The following restrictions apply to VNX Replicator.
General restrictions
VNX Replicator requires a license.
VNX Replicator is not supported with Network Address Translation (NAT).
To take advantage of a one-to-many configuration (one source to many destinations),you must create multiple replication sessions on the source. Each session associatesthe source with up to four different destinations.
For one-to-many configurations, EMC supports only one failed over replication sessionper source object. If you fail over more than one session for a given source object,you can only save the changes from one of the replication sessions.
To take advantage of a cascade configuration (where one destination also serves asthe source for another replication session), you must create a replication session oneach source in the path. Cascade is supported for two network hops.
The maximum number of active sessions is 256 per Data Mover. This limit includesall active replication sessions as well as copy sessions. Any additional sessions arequeued until one of the current sessions completes.
Restrictions 13
Introduction

The maximum number of initial copies that can be in progress at one time is 16. Thislimit includes all active replication sessions as well as copy sessions.
If you specify a name service interface name for an interconnect, the name mustresolve to a single IP address, for example by a DNS server. However, it is not requiredto be a fully qualified name.
After you configure an interconnect for a Data Mover, you cannot rename that DataMover without deleting and reconfiguring the interconnect and reestablishing replicationsessions.
VNX Replicator works with disaster recovery replication products such as EMCSRDFé/Synchronous (SRDF/S) and SRDF/Asynchronous (SRDF/A) or EMCMirrorView/Synchronous (MirrorView/S).You can run SRDF or MirrorView/S productsand VNX Replicator on the same data. However, if there is an SRDF or MirrorView/Ssite failover, you cannot manage VNX Replicator sessions on the SRDF orMirrorView/S failover site. Existing VNX Replicator sessions will continue to run onthe failed over Data Mover and data will still be replicated. On the primary site, youcan continue to manage your SRDF or MirrorView/S replication sessions after therestore.
If you plan to enable international character sets (Unicode) on your source anddestination sites, you must first set up translation files on both sites before startingUnicode conversion on the source site. Using International Character Sets on VNXfor File describes this action in detail.
VNX Replicator is not supported in a network environment that has Cisco Wide AreaApplication Services (WAAS) setup. If you use remote replication in a networkenvironment that has WAAS devices, the WAAS devices must be placed betweenControl Stations and configured in pass-through mode for all the ports used byreplication. Otherwise, the devices may interfere with replication. When configuredfor pass-through communication, traffic will pass through the network unoptimized,but it will allow the WAAS device to be used for replication traffic between the remotesites.
File system replication with user level checkpoints was introduced in Celerra NetworkServer version 6.0.41. It is not supported in VNX for file version 7.0, but is supportedin VNX for file version 7.0.28.0 and later. When performing an upgrade from CelerraNetwork Server version 6.0.41, you must upgrade to VNX for file version 7.0.28.0 orlater to continue replicating file systems by using user level checkpoints.
File system restrictions
A given source file system supports up to four replication sessions (one-time copy orongoing replication sessions).
For file systems with file-level retention (FLR):
• You cannot create a replication session or copy session unless both the sourceand destination file systems have the same FLR type, either off, enterprise, orcompliance. Also, when creating a file system replication, you cannot use anFLR-C-enabled destination file system that contains protected files.
14 Using VNX Replicator
Introduction

• You cannot start a replication session if an FLR-C-enabled destination file systemcontains protected files and updates have been made to the destination.
• You cannot start a switched over replication session in the reverse direction whenan FLR-C-enabled original source file system contains protected files and updateshave been made to the original source since the switchover.
File systems enabled for processing by VNX for File data deduplication may bereplicated by using VNX Replicator as long as the source and destination file systemformats are the same. For example, VNX for File can replicate deduplicated filesystems between systems running version 5.6.47 or later of the OperatingEnvironment.
File-level deduplication (compression) consumes remote replication network bandwidththat can impact WAN-connected sites by causing larger data transmissions. File-leveldeduplication of a file causes the original data blocks to be freed, making themavailable for reallocation and reuse by other files.
A copy-on-write replication operation is triggered during:
• Reuse of the freed data blocks.
• The file compression process which requires allocation and writing of the datablocks to store the compressed data.
If a network bandwidth that is allocated for geographically separate locations with aWAN is extremely limited, significant delays in transmission of the delta sets canoccur while compression is performed on a file system. Both file-level deduplicationand FileMover create a delta set equal to the number of blocks in the original file; thelargest number of files is processed on the first run.
FileMover consumes remote replication network bandwidth that can impactWAN-connected sites by causing larger data transmissions. File-level archiving ofindividual files causes the original data blocks to be freed, making them available forreallocation and reuse by other files.This operation triggers a copy-on-write replicationof blocks. If a network bandwidth that is allocated for geographically separate locationswith a WAN is extremely limited, significant delays in transmission of the delta setscan occur while archiving is performed on a file system.Both file-level deduplicationand FileMover create a delta set equal to the number of blocks in the original file; thelargest number of files is processed on the first run.
You cannot unmount a file system if replication is configured. Replication has to bestopped for an unmount of the file system to succeed. When the file system isunmounted, the internal checkpoints will be automatically unmounted and whenmounted, the internal checkpoints will be automatically mounted.
You cannot move a file system to another Data Mover if replication is configured onthe file system.You must stop replication before the file system is unmounted. Afterthe file system is mounted on the new Data Mover, start the replication session.
VNX File System Migration is unsupported (an mgfs file system cannot be replicated).
Restrictions 15
Introduction

EMC VNX Multi-Path File System (MPFS) is supported on the source file system, butnot on the destination file system.
For EMC TimeFinderé /FS:
• A file system cannot be used as a TimeFinder destination file system and as adestination file system for replication at the same time.
• Do not use the TimeFinder/FS -restore option for a file system involved inreplication.
When replicating databases, additional application-specific considerations may benecessary to bring the database to a consistent state (for example, quiescing thedatabase).
Replication failover is not supported for CIFS local users and local groups unless youuse Virtual Data Movers (VDMs). Configuring Virtual Data Movers on VNX describesVDM configuration.
Modifying properties of file systems that are replicated from legacy systems or VNXsystems to VNXe systems can result in the replication sessions not functioning asexpected. This is because the feature set for VNXe is limited when compared to thefeature set of VNX. Refer to the feature documentation to ensure that it is supportedon all products in the replication relationship.
VDM replication restrictions
A given VDM supports up to four replication sessions.
Replication of a physical Data Mover root file system is not supported. VDM root filesystems are supported.
Single domains on a VDM are supported. Multiple domains without a trust relationshipare not supported on a VDM. This restriction also applies to a physical Data Mover.
Do not load a VDM on the source and destination sites simultaneously. This ensuresthat the Active Directory and DNS do not contain conflicting information for CIFSserver name resolution.
A VDM replication session cannot be switched over, failed over, or reversed if theinternationalization settings of the source and destination Data Movers do not match.
The VDM for NFS solution allows configuration of an NFS server, also known as anNFS endpoint, per VDM. The NFS endpoint of a replicated VDM works only if theOperating Environments of the source and destination sites are version 7.0.50.0 orlater.
Cautions and warnings
If any of this information is unclear, contact your EMC Customer Support Representativefor assistance:
16 Using VNX Replicator
Introduction

Replicating file systems from a Unicode-enabled Data Mover to an ASCII-enabled DataMover is not supported. I18N mode (Unicode or ASCII) must be the same on both thesource and destination Data Movers.
VNX provides you with the ability to fail over a CIFS server and its associated file systemsto a remote location. In a disaster, because VNX Replicator is an asynchronous solution,there might be some data loss. However, the file systems will be consistent (fsck is notneeded). When using databases, additional application-specific considerations might benecessary to bring the database to a consistent state (for example, quiescing thedatabase).
User interface choices
VNX offers flexibility in managing networked storage based on the support environment andinterface preferences. This document describes how to set up and manage VNX Replicatorby using the CLI. With the VNX Replicator license enabled, you can also perform VNXReplicator tasks by using EMC Unisphere, available by selecting Data Protection > Mirrorsand Replication > Replications for File.
To enable the VNX Replicator license in Unisphere:
1. Select Settings.
2. Under More Settings, click Manage Licenses for File.
3. Select ReplicatorV2 Licensed from the options.
4. Click Apply.
5. Click OK to confirm that you have a license for this feature and you want to enable itsuse.
After the license is enabled, you have to restart the management application to see thischange take effect in the user interface.
For additional information about managing your VNX:
Unisphere online help
The EMC VNX Operating Environment for File Release Notes contain additional,late-breaking information about VNX management applications.
Related information
Specific information related to the features and functionality described in this document areincluded in the following documents:
Using VNX SnapSure
VNX Command Line Interface Reference for File
Online VNX man pages
User interface choices 17
Introduction

Parameters Guide for VNX for File
Configuring and Managing CIFS on VNX
Configuring Virtual Data Movers on VNX
VNX Glossary
EMC VNX Operating Environment for File Release Notes
Configuring Events and Notifications on VNX for File
VNX System Operations
Using VNX File-Level Retention
Managing Volumes and File Systems for VNX Manually
Managing Volumes and File Systems with VNX Automatic Volume Management
Celerra Network Server Error Messages Guide
Configuring and Managing Networking on VNX
Configuring and Managing Network High Availability on VNX
EMC VNX documentation on EMC Online Support
The complete set of EMC VNX series customer publications is available on EMC OnlineSupport. To search for technical documentation, go to http://Support.EMC.com. Afterlogging in to the website, click Support by Product and type VNX series in the Find aProduct text box. Then search for the specific feature required.
VNX wizards
Unisphere software provides wizards for performing setup and configuration tasks. TheUnisphere online help provides more details on the wizards.
18 Using VNX Replicator
Introduction

2
Concepts
The concepts and planning considerations to understand VNX Replicatorare:
VNX Replicator session behavior on page 20 Replication destination options on page 20 Replication source objects on page 21 Many-to-one replication configuration on page 26 One-to-many replication configurations on page 27 Cascade replication configurations on page 31 One-to-many and cascade replication configurations on page 34 Data Mover interconnect on page 34 How ongoing replication sessions work on page 40 How one-time file system copy sessions work on page 42 Updating the destination site with source changes on page 43 Stopping a replication session on page 44 Starting a replication session on page 45 Reversing a replication session on page 47 Switching over a replication session on page 47 Failing over a replication session on page 50 When to use failover, switchover, and reverse on page 52 Deleting a replication session on page 53 Performing an initial copy by using disk or tape on page 54 Planning considerations on page 57
Using VNX Replicator 19

VNX Replicator session behavior
The behavior for replication sessions and basic copy sessions can be summarized as follows:
The destination for any replication or basic copy session can be the local VNX (sameData Mover or different Data Mover) or a remote VNX. Any session with a remotedestination requires a trusted communication path between the local and remote VNXwith a common passphrase. If no established connection exists between the local andremote VNXs, you must first create it. Chapter 4 describes this procedure.
Any replication or basic copy session requires a configured connection between thesource object’s Data Mover and the destination Data Mover. This Data Mover-to-DataMover connection is called an interconnect.
Note: The interconnect between Data Movers is Hypertext Transfer Protocol over Secure SocketLayer (HTTPS) in anonymous mode.This HTTPS setting indicates a secure HTTP connection andcannot be configured by users
If no established interconnect exists between the source and destination Data Mover,you must first create it. When you create an interconnect (one per Data Mover pair), youlist the IP addresses that are available to sessions by using the interconnect, andoptionally, a bandwidth schedule that lets you control the bandwidth that is available tosessions during certain time periods.You create an interconnect between a given sourceand destination Data Mover pair on each VNX. Chapter 5 describes this procedure.
When you create a replication session, it automatically creates two internal checkpointson the source and destination, for example, file system checkpoints. Using thesecheckpoints, the replication session copies the changes found in the source object to thedestination object. How ongoing replication sessions work on page 40 provides moredetails.
Each replication session to a designated destination produces a point-in-time copy ofthe source object, and the transfer is performed asynchronously.
For each replication session, you can specify an update policy in which you specify amaximum amount of time that the source and destination can be out of synchronizationbefore an update is automatically performed, or you can update the destination at will byissuing a refresh request for the session.
You can create either multiple replication sessions or basic copy sessions that copy thesame source object to multiple destinations. This is called a one-to-many configuration.
You can set up a cascading replication configuration where a destination site can serveas a source for another replication session to another destination, up to two networkhops.
Replication destination options
There are three types of replication sessions:
20 Using VNX Replicator
Concepts

Loopback replication
Local replication
Remote replication
Loopback replication
Replication of a source object occurs on the same Data Mover in the cabinet.Communication is established by using a predefined Data Mover interconnect establishedautomatically for each Data Mover in the cabinet.
Local replication
Replication occurs between two Data Movers in the same VNX for file cabinet. Both DataMovers must be configured to communicate with one another by using a Data Moverinterconnect. After communication is established, a local replication session can be setup to produce a read-only copy of the source object for use by a Data Mover in the sameVNX for file cabinet. For file system replication, the source and destination file systemsare stored on separate volumes.
Remote replication
Replication occurs between a local Data Mover and a Data Mover on a remote VNXsystem. Both VNX for file cabinets must be configured to communicate with one anotherby using a common passphrase, and both Data Movers must be configured tocommunicate with one another by using a Data Mover interconnect. After communicationis established, a remote replication session can be set up to create and periodicallyupdate a source object at a remote destination site. The initial copy of the source filesystem can either be done over an IP network or by using the tape transport method.
After the initial copy, replication transfers changes made to the local source object to aremote destination object over the IP network. These transfers are automatic and arebased on definable replication session properties and update policy.
Replication source objects
VNX Replicator can replicate the following types of source objects:
File systems (ongoing)
File systems (one-time copy)
VDMs
Replication source objects 21
Concepts

File system replication
File system replication creates a read-only, point-in-time copy of a source productionfile system at a destination and periodically updates this copy, making it consistent withthe source file system.You can use this type of replication for content distribution, backup,reporting, and software testing.
You can create up to four replication sessions for a particular source file system.Therefore, one-to-many and cascade configurations are supported.
Replication and deduplication
Deduplicating the contents of a file system before it is replicated by using VNX Replicatorcan greatly reduce the amount of data that has to be sent over the network as part ofthe initial baseline copy process. After replication and deduplication are running together,the impact of deduplication on the amount of data transferred over the network will dependon the relative timing of replication updates and deduplication runs. In all but the mostextreme circumstances, replication updates will be more frequent than deduplicationscans of a file system. This means that new and changed data in the file system willalmost always be replicated in its nondeduplicated form first, and any subsequentdeduplication of that data will prompt additional replication traffic. This effect will be trueof any deduplication solution that post-processes data and updates remote replicas ofthe data set more frequently than the deduplication process is run.
Deduplication can add a maximum of 25 MB/s of write activity during processing. If youare using a lower bandwidth network, you should check to ensure that your replicationbandwidth can accommodate the additional load and that your SLAs are being met.
How ongoing replication sessions work on page 40 provides an example of how replicationworks by using file system as an example. Chapter 6 describes how to create a filesystem replication session.
One-time file system copy
Use file system one-time copy to perform a full copy of a file system mounted read-only,a file system writeable checkpoint mounted read-only, or a file system checkpoint. A filesystem checkpoint is by default a differential copy if an earlier checkpoint that serves asa common base exists; otherwise, it is a full copy.You perform a file system copy withthe nas_copy command.
During a copy session, the destination file system is mounted read-only on the DataMover. The read activity is redirected to the checkpoint at the start of the copy session.
Multiple copy sessions can run from the same source to multiple destinations, so aone-to-many configuration is allowed.
How one-time file system copy sessions work on page 42 explains how the copy processworks. Chapter 8 describes how to create a copy session.
22 Using VNX Replicator
Concepts

VDM replication
VDM replication supports only CIFS and NFS protocols. It accommodates the CIFSworking environment and replicates information contained in the root file system of aVDM. This form of replication produces a point-in-time copy of a VDM that re-createsthe CIFS environment at a destination. However, it does not replicate the file systemsmounted to a VDM.
In CIFS environments, for a CIFS object to be fully functional and accessible on a remoteVNX, you must copy the complete CIFS working environment, which includes localgroups, user mapping information, Kerberos objects, shares, event logs, and registryinformation to the destination site. This CIFS working environment information is in theroot file system of the VDM.
Note: The Internal Usermapper data is not stored in the VDM.
In addition to the environmental information, you must replicate the file systems associatedwith the CIFS server.
VDMs provide virtual partitioning of the physical resources and independently containall the information necessary to support the contained servers. Having the file systemsand the configuration information in one manageable container ensures that the dataand the configuration information that make the data usable can fail over together. Figure1 on page 23 shows this concept.
Eng_User
VDM on physicalData Mover (server_2)
Eng_Shared
System 1VDM rootfile system
\\eng_ne
eventlog
config
homedir
kerberos
shares
CNS-000697
Figure 1. VDM container and concepts
Replication source objects 23
Concepts

You replicate the VDM first, then replicate the file systems mounted to a VDM. Replicationprovides the data transport and a VDM stores the relevant CIFS configuration information.
Source VDMs can be involved in replicating up to four destination VDMs concurrently.A destination VDM must be the same size as the source and in the mounted read-onlystate. A destination VDM can be a source for up to three other replications. Since a givenVDM can act as both a source and destination for multiple replications, it supports aone-to-many and cascade configuration.
Appendix A provides information you should read before you create a VDM session.Chapter 7 describes how to create a VDM replication session.
The VDM for NFS multi-naming domain solution for the Data Mover in the UNIXenvironment is implemented by configuring an NFS server, also known as an NFSendpoint, per VDM. The VDM is used as a container for information including the filesystems that are exported by the NFS endpoint.The NFS exports of the VDM are visiblethrough a subset of the Data Mover network interfaces assigned for the VDM. The samenetwork interface can be shared by both CIFS and NFS protocols. However, only oneNFS endpoint and CIFS server is addressed through a particular logical network interface.
The exports configuration for this NFS end-point is stored in the vdm.cfg file located inthe VDM root file system. The VDM root file system is replicated as part of a VDMreplication session.
The VDM for NFS multi-naming domain solution is not supported by versions of theOperating Environment earlier than 7.0.50.0. Therefore, when you replicate a VDM froma source system that runs on version 7.0.50.0 and later of the VNX Operating Environmentto a destination system that runs on any version of the Operating Environment earlierthan 7.0.50.0, the file systems replicate correctly, but the NFS endpoint does not workon the system with the Operating Environment earlier than version 7.0.50.0.
Source objects and destination options
Table 3 on page 25 provides a summary of the type of source objects that can bereplicated, their corresponding destination options, and a brief description of when touse the object.
24 Using VNX Replicator
Concepts

Table 3. Summary of source objects and destination options
DescriptionDestination optionsSource object
Use file system replication to produce
a read-only, point-in-time copy of a
source production file system at a
destination and periodically update
this copy, making it consistent with the
source file system. Use this type of
replication for content distribution,
backup, and application testing.
You can create up to four replication
sessions for a given source file sys-
tem.
Same Data Mover
Different Data Mover in the same
VNX cabinet
Data Mover in a VNX cabinet at
a remote site, which protects
against a site failure
Multiple destinations each using
a different session, up to four
One destination serving as source
for another replication session
(cascade to two levels)
File system, for ongoing replication
(existing file system mounted
read/write)
Use file system one-time copy to per-
form a full copy of a file system
mounted read-only, a file system
writeable checkpoint mounted read-
only, or a copy of a checkpoint file
system. A file system checkpoint is by
default a differential copy if an earlier
checkpoint that serves as a common
base exists. Otherwise, it is a full copy.
You perform a file system copy with
the nas_copy command.
Same Data Mover
Different Data Mover in the same
VNX cabinet
Data Mover in a VNXcabinet at a
remote site
Multiple destinations each using
a different session
File system, for one-time copy
(existing file system mounted read-
only, writeable file system checkpoint
mounted read-only, or existing file
system checkpoint)
Use VDM replication to accommodate
the CIFS working environment and
replicate information contained in the
root file system of a VDM. This form
of replication produces a point-in-time
copy of a VDM that re-creates the
CIFS environment at a destination.
However, it does not replicate the file
systems mounted to a VDM.You
replicate the VDM first, then replicate
the file systems mounted to a VDM.
Replication provides the data transport
and a VDM stores the relevant CIFS
configuration information.
You can create up to four replication
sessions for a given source VDM.
Same Data Mover
Different Data Mover in the same
VNX cabinet
Data Mover in a VNX cabinet at
a remote site, which protects
against site failure
Multiple destinations each using
a different session, up to four
One destination serving as source
for other replication sessions
(cascade to two levels)
VDM in loaded state
Replication source objects 25
Concepts

Many-to-one replication configuration
A many-to-one configuration, also known as edge-to-core replication, is when multiple VNXsystems replicate to one centralized VNX.This configuration is equivalent to having multipleone-to-one replications sessions from multiple remote source VNX systems that share acommon target destination VNX storage platform. This configuration is typically used tosupport remote consolidated backups.
In this configuration you are not replicating multiple file systems to a single file system.Rather, you are replicating distinct file systems (fs1, fs2, and fs3), which may or may notexist on the same VNX, to distinct file systems that reside on a common target destinationVNX.
The number of inbound replications supported on the target VNX is limited only by the filesystem and replication session limits.
Note: Restrictions on page 13 describes specific replication session and file system limitations. Also,the EMC E-Lab Interoperability Navigator provides access to the EMC interoperability supportmatrices.
26 Using VNX Replicator
Concepts

Figure 2 on page 27 shows a basic many-to-one replication configuration for ongoingreplication of 10 different file systems from 5 remote source VNX systems to one commontarget destination VNX located in Chicago.
Figure 2. Many-to-one replication configuration
New York
FS1
FS1
FS2
FS3
FS2
FS3
FS4
FS5
FS6
FS7
FS4
FS5
FS6
FS7
FS8
FS9
FS10
FS8
FS9
FS10
Seattle
ChicagoDallas
London
Boston
Each replication session shares the same
target destination VNX storage platform VNX-000046
Source VNXs Target Destination VNX
WAN
One-to-many replication configurations
A one-to-many configuration is where a source object is used in one or multiple replicationssessions. This configuration requires a separate replication session for each destination.
One-to-many replication configurations 27
Concepts

Figure 3 on page 28 shows a basic one-to-many configuration for ongoing replication of agiven source file system to up to four multiple destinations.
Each session generatestwo internal checkpoints
on the source
Each session generatestwo internal checkpointson the destination
One to many configuration
Destination
Ckpt 2Ckpt 1
Ckpt 2
Ckpt 2
Ckpt 2
Ckpt 2
Ckpt 1
Ckpt 1
Ckpt 1
Ckpt 1
CNS-000888
Source
Ckpt 2Ckpt 1
Ckpt 2Ckpt 1
Ckpt 2Ckpt 1
Destinationobject
(Read only)
Destinationobject
(Read only)
Destinationobject
(Read only)
Destinationobject
(Read only)
Destinationobject
(Read write)
Session 1
Session 2
Session 3Session 4
Figure 3. One-to-many file system replication
Configure a one-to-many replication on page 106 provides details on how to configure thisenvironment.
You can create the maximum number of remote data copies (16) by using a one-to-manyconfiguration to four locations and then cascade from each location to three additional sites:
Source --> 1 --> 5, 6, 7
Source --> 2 --> 8, 9, 10
Source --> 3 --> 11, 12, 13
Source --> 4 --> 14, 15, 16
You can create the maximum number of remote data copies (12) with a copy session reservedat the source site by using a one-to-many configuration to three locations and then cascadefrom each location to three additional sites:
Source --> 1 --> 5, 6, 7
Source --> 2 --> 8, 9, 10
Source --> 3 --> 11, 12, 13
Source --> 4 (reserved for copy)
If you reverse a replication session that is involved in a one-to-many configuration, the sourceside goes into a cascading mode. The original destination side from one of the sessions
28 Using VNX Replicator
Concepts

becomes the source and the original source side becomes the destination and that sourcecascades out to the other destination sessions.
Reversing a replication session on page 47 explains how this works in a one-to-manyconfiguration.
Switching over a replication session on page 47 and Failing over a replication session onpage 50 explain how replication works with these operations in a one-to-many configuration.
When you delete replications, the internal checkpoints are also deleted. To create futurereplications for any two file systems from the original configuration, you have to perform afull data copy. To avoid this scenario, create one or more user specified checkpoints on thesource and destination file systems and refresh their replication by using these usercheckpoints. This process transfers data from the user checkpoint of the source file systemto the user checkpoint of the destination file system through the existing replication session.Consequently, the destination user checkpoint has the same view of the file system as thesource user checkpoint. Such user checkpoints on the source and destination file systems,which have the same content are called common base checkpoints.This process is repeatedfor each destination in the one-to-many configuration.
After this process, even if you delete the replication sessions, you can configure newreplication sessions between any two destinations because replication automatically identifiesthe common base checkpoints and avoids full data copy.You can create user checkpointsfor file system and VDM replications. For VDM replications, you can create the usercheckpoints on the root file system of the VDM.You cannot delete user checkpoints whenthey are being used by replication either for transfer or as an active common base.
Figure 4 on page 30 shows a one-to-many configuration for file system replication with theoptional user checkpoint and that you can replicate it to the other locations through theexisting replication sessions. After the user specified checkpoints become the commonbases for each destination location, if you delete any session, you can still configurereplication from one file system to another through their common bases.
One-to-many replication configurations 29
Concepts

For example, if you delete Session 2, you can configure new replication sessions betweenDestination 1 and Destination 2 by using user checkpoints A1 and A2 because replicationautomatically identifies the common base checkpoints and avoids full data copy.
One to many configuration
Destination
Ckpt 2
Ckpt 2
Ckpt 2
Ckpt 2
Ckpt 2
Ckpt 1
Ckpt 1
Ckpt 1
Ckpt 1
CNS-001883
Source
Ckpt 2Ckpt 1
Ckpt 2Ckpt 1
Ckpt 2Ckpt 1
Destinationobject
(Read only)
Destinationobject
(Read only)
Destinationobject
(Read only)
Destinationobject
(Read only)
Destinationobject
(Read write)
Session 1
Session 2
Session 3Session 4
User Ckpt A1
User Ckpt A2User Ckpt A
Each session generatestwo internal checkpointson the destination
Each session generatestwo internal checkpoints
on the source
Ckpt 1
User Ckpt A3
User Ckpt A4
Figure 4. One-to-many file system replication with user checkpoints
When you replace source or destination file systems, the replications and internal checkpointsare deleted. In such a scenario, you will have to perform a full data copy to create futurereplications with the original configurations. To avoid performing a time-consuming full datacopy over the WAN, create a local replica of the file system that you want to replace.Youcan then create one or more user specified checkpoints on the file system to be replaced,the local replica, and each of the other file systems involved in the replication.
After creating user specified checkpoints, you must refresh each replication by specifyingthe user checkpoint on the source and destination file system for that replication.Consequently, the user checkpoint of each destination file system (including local replica)has the same view of the file system as the user checkpoint on the source file system that
30 Using VNX Replicator
Concepts

will be replaced.You can now use the local replica for replications without performing a fulldata copy over the WAN.
One to many configuration
Destination
Ckpt 2
Ckpt 2
Ckpt 2
Ckpt 2
Ckpt 2
Ckpt 1
Ckpt 1
Ckpt 1
Ckpt 1
Source
CNS-001905
Ckpt 2Ckpt 1
Sourceobject
(Read write)
Session 1
Session 2
User Ckpt A2
User Ckpt A3User Ckpt A
Each session generatestwo internal checkpoints
on the destination
Each session generatestwo internal checkpoints
on the source
Ckpt 1
Ckpt 2
Ckpt 2
Ckpt 2
Ckpt 2
Ckpt 1
Ckpt 1
Ckpt 1
Ckpt 1
Local replica of source
Ses
sion
1
User Ckpt A1
Each session generatestwo internal checkpoints
on the source
Session
2
Sourceobject
(Read write)
Destinationobject
(Read only)
Destinationobject
(Read only)
Figure 5. One-to-many file system replication to avoid full data copy over the WAN
Figure 5 on page 31 shows a one-to-many configuration for file system replication in theevent that you want to replace the source file system and avoid a full data copy over theWAN.
Cascade replication configurations
A cascade configuration is where one destination serves as the source for another replicationsession. Cascade is supported for two network hops. That is, a destination site can serveas a source for another replication session to another destination, but the cascade ends
Cascade replication configurations 31
Concepts

there.You cannot configure that second destination as a source for yet another replicationsession. All source object types can be used in a cascade configuration.
How it works
A cascade configuration involves two replication sessions:
Session 1 runs replication from Source to Destination 1.
Session 2 runs replication from Destination 1 (serving as the source) to Destination2.
When you set up a cascade configuration:
1. Create a replication session between Source and Destination 1.
2. Create a second replication session between Destination 1 and Destination 2.
Figure 6 on page 32 shows a basic cascade configuration for a file system replication.In this cascade configuration, Destination 1 serves as the source for replication Session2.
Ckpt 1
Source
Destinationfile system(Read only)
Destination 1
Session 1 Session 2
Ckpt 2
Ckpt 1
Ckpt 2
Ckpt 1
Ckpt 2
Ckpt 1
Destination 2
Ckpt 2
Sourcefile system(Read write)
Destinationfile system(Read only)
Session 1generates
two internalcheckpoints
Session 2generatestwo internalcheckpoints
Session 1 generatestwo internal checkpoints
Session 2 generatestwo checkpoints CNS-000887
Cascade replication
Figure 6. One-level cascade configuration for file system replication
Configure a cascade replication on page 106 provides details on how to configure thisenvironment.
Figure 7 on page 33 shows a cascade configuration for file system replication with theoptional user checkpoint, and how it is replicated from the source to Destination 1 andDestination 2 through replication Session 1 and replication Session 2, respectively. Thisenables the user checkpoints between Source, Destination 1, and Destination 2 to be
32 Using VNX Replicator
Concepts

common bases for future replication. For a cascading replication, the replication mustbe refreshed for this first hop and then for the second hop.
Ckpt 1
Source
Destinationfile system(Read only)
Destination 1
Session 1 Session 2
Ckpt 2
Ckpt 1
Ckpt 2
Ckpt 1
Ckpt 2
Ckpt 1
Destination 2
Ckpt 2
Sourcefile system(Read write)
Destinationfile system(Read only)
CNS-001882
Cascade replication
User Ckpt A
User Ckpt A1
User Ckpt A2
Session 1generates
two internalcheckpoints
Session 2generatestwo internalcheckpoints
Session 1 generatestwo internal checkpoints
Session 2 generatestwo checkpoints
Figure 7. One-level cascade configuration for file system replication with user checkpoints
Cascade replication configurations 33
Concepts

One-to-many and cascade replication configurations
You can leverage one-to-many and cacade replication configurations to yield as many as16 point-in-time copies—one source, up to four sessions and cascading to three moresessions. Figure 8 on page 34 illustrates this concept.
Source Destination 1 Destination 2
Chicago
Shanghai
Sydney
Mumbai
Bangkok
London
Phoenix
Seattle
WAN
Moscow
Cairo
Brasilia
CNS-000906
MexicoCity
WAN
Figure 8. Combining a one-to-many and cascade replication configuration
Data Mover interconnect
Each VNX Replicator session must use an established Data Mover interconnect, whichdefines the communication path between a given Data Mover pair located in the samecabinet or different cabinets.You define only one interconnect between a given Data Moverpair on a given VNX.
After you configure an interconnect for a Data Mover, you cannot rename that Data Moverwithout deleting and reconfiguring the interconnect and reestablishing replication sessions.Chapter 13 provides more information about how to rename a Data Mover that has existinginterconnects.
Both sides of a Data Mover interconnect must be established in each direction before youcan create a replication session.This ensures communication between the Data Mover pairrepresenting your source and destination.
34 Using VNX Replicator
Concepts

Note: VNX Replicator uses a Cyclic Redundancy Check (CRC) method to perform additional errorchecking on the data sent over a Data Mover interconnect to ensure integrity and consistency. CRCis enabled automatically and cannot be disabled.
When you create the replication session, you specify the local side of an interconnect onwhich the source replication object resides, and this is the interconnect name displayed forthe replication session. If the replication direction changes for a loopback or local session(for example, after a reverse), the direction of the arrow displayed for the Data Moverinterconnect changes to indicate the new direction.
Figure 9 on page 35 shows an interconnect for a local replication.
VNX-000049
VNX Systems
Data Mover
server_2
Data Mover
server_3
Peer
s3_s2
Source side
s2_s3
CS:10.0.0.27
IP address:10.0.0.2810.0.0.29
IP address:10.0.0.3010.0.0.31
Figure 9. Interconnect for a local replication
Types of interconnects
VNX Replicator supports three types of interconnects:
Loopback interconnects — A loopback interconnect is automatically created for eachData Mover in the system.You cannot create, modify, or delete loopback interconnects.You simply select the loopback interconnect when setting up the replication session.
Data Mover interconnect 35
Concepts

Interconnects for local replication — These interconnects are created between a pairof Data Movers on the same system.You must create both sides of the interconnecton the local system before you can successfully create a local replication session.
When defining interconnects for a local replication, make the name meaningful byidentifying the Data Movers (servers), for example:
s2_s3 (local, or source side on the local system)
s3_s2 (peer side on the same system)
Interconnects for remote replication — These interconnects are created between alocal Data Mover and a peer Data Mover on another system.You must create bothsides of the interconnect, first on the local side and then on the peer side, before youcan successfully create a remote replication session.
When defining interconnects for remote replication, make the name meaningful byidentifying servers and VNX names or sites, for example:
s2CelA_s3CelB (local side on the local system)
s3CelB_s2CelA (peer side on the remote system)
or
NYs3_LAs4 (local side on the local system)
LAs4_NYs3 (peer side on the remote system)
Interconnect naming conventions
Figure 10 on page 37 shows an example of the local and remote interconnects definedfor a remote replication. In this sample configuration, the naming convention is basedon the VNX series model number followed by the Data Mover server number.
The local interconnects defined for site A are:
VNX3_s2
VNX3_s3
The local interconnects defined for site B are:
VNX5_s2
VNX5_s3
The remote interconnects defined for site A are:
VNX3_s2-VNX5_s2
VNX3_s2-VNX5_s3
VNX3_s3-VNX5_s2
VNX3_s3-VNX5_s3
The remote interconnects defined for site B are:
36 Using VNX Replicator
Concepts

VNX5_s2-VNX3_s2
VNX5_s2-VNX3_s3
VNX5_s3-VNX3_s2
VNX5_s3-VNX3_s3
Site A
VNX System VNX3CS: 10.0.0.27
Site B
VNX System VNX5CS: 10.0.0.12
Data Moverserver_2
IP address:10.0.0.2810.0.0.29
(VNX3_s2)
Data Moverserver_3
IP address:10.0.0.3010.0.0.31
(VNX3_s3)
Data Moverserver_3
IP address:10.0.0.2110.0.0.22
(VNX5_s3)
Data Moverserver_2
IP address:10.0.0.1910.0.0.20
(VNX5_s2)
VNX-000050
Interconnect (source)Interconnect (peer-side)
Figure 10. Interconnect for a remote replication
Interconnect configuration elements
For each side of an interconnect, you specify the following elements:
Source and destination interfaces — A list of source and destination network interfacesavailable to replication sessions.You define the interface list by using IP addressesIPv4 or IPv6) or name service interface names or a combination of both. But how youspecify an interface determines whether a replication session later specifies theinterface by interface name or IP address.
Data Mover interconnect 37
Concepts

If you define an interface using an IP address, ensure the corresponding destinationinterface list uses the same IPv4/IPv6 network protocol. An IPv4 interface cannotconnect to an IPv6 interface and vice versa. Both sides of the connection must usethe same protocol (IPv4/IPv6). In addition, for each network protocol type specifiedin the source interface list, at least one interface from the same type must be specifiedin the destination list and vice versa. For example, if the source interface list includesone or more IPv6 addresses, the destination interface list must also include at leastone IPv6 address.
The name service interface name is a fully qualified name given to a network interface.Name service interface names are not the same as VNX network device names (forexample, cge0). Name service interface names are names that are resolved througha naming service (local host file, DNS, NIS, or LDAP).
Bandwidth schedule — Allocates the interconnect bandwidth used on specific days,or specific times, or both, instead of by using all available bandwidth at all times. Abandwidth schedule applies to all replication sessions by using the interconnect. Bydefault, an interconnect provides all available bandwidth at all times for theinterconnect. Specifying bandwidth usage for a Data Mover interconnect on page 38provides more explanation and an example.
You can modify the name of an interconnect and the source and destination Data Moverinterfaces as long as the interconnect is not in use by a replication session. To modifythe peer side of an interconnect configured on a remote system, you must modify it fromthat system.You can also pause and resume data transmission over an interconnect.
Planning considerations on page 57 provides interconnect setup considerations to helpyou set up interconnects.
Specifying bandwidth usage for a Data Mover interconnect
When you define a bandwidth schedule, you do so for each side of a Data Moverinterconnect and it applies to all replication sessions that are using that interconnect.The bandwidth schedule allocates the interconnect bandwidth used on specific days, orspecific times, or both, instead of using all available bandwidth at all times. By default,an interconnect provides all available bandwidth at all times for the interconnect.Therefore, any periods not covered by any of the configured intervals will use all of thebandwidth.
Define each time period (bandwidth limit) in most-specific to least-specific order. Starttimes run from 00:00 to 23:00 and end times run from 01:00 to 24:00.You cannot specifyan end time lower than a start time. For example, a first entry ofMoTuWeThFr07:00-18:00/2000 and a second entry of /8000 means use a limit of 2000Kb/s from 7 A.M. to 6 P.M. Monday through Friday; otherwise, use 8000 Kb/s.
Note: The bandwidth schedule executes based on Data Mover time, not Control Station time.
To configure a bandwidth schedule for a specified interconnect, use the nas_cel-interconnect -bandwidth option. Use the nas_cel -interconnect -modify -bandwidth option
38 Using VNX Replicator
Concepts

to change an existing bandwidth schedule or specify a new schedule for an existinginterconnect.
Note: A bandwidth limit of 0 means no data is sent over the interconnect. Example 4 on page 40shows the syntax.
To reset an existing bandwidth schedule to use the default of all available bandwidth forall days, specify two single quotes or two double quotes. For example:
nas_cel -interconnect -modify s2_s3 -bandwidth ‘’
nas_cel -interconnect -modify s2_s3 -bandwidth ““
You can set overlapping bandwidth schedules to specify smaller time intervals first andbigger time intervals next. The limit set for the first applicable time period is taken intoaccount, so the order in which the schedule is created is important. For example, thefollowing schedule syntax means that Monday at 9:30 A.M., the limit is 5000 Kb/s butMonday at 8:00 A.M., the limit is 7000 Kb/s:
Mo09:00-12:00/5000,MoTu08:00-17:00/7000,MoTuWeThFr06:00-18:00/10000
Example 1
The following bandwidth schedule modifies interconnect s2_s3 to use a limit of 2000Kb/s from 7 A.M. to 6 P.M. Monday through Friday; otherwise use a bandwidth scheduleof 8000 Kb/s:
nas_cel -interconnect -modify s2_s3 -bandwidth
MoTuWeThFr07:00-18:00/2000,/8000
Example 2
The following bandwidth schedule modifies interconnect s2_s3 to use a limit of 2000Kb/s from 9 A.M. to 2 P.M. Monday and Tuesday; and a limit of 5000 Kb/s Wednesdaythrough Friday from 6 A.M. to 2 P.M.; otherwise use a bandwidth schedule of 8000 Kb/s:
nas_cel -interconnect -modify s2_s3 -bandwidth
MoTu09:00-14:00/2000,WeThFr06:00-14:00/5000,/8000
Example 3
The following bandwidth schedule modifies interconnect s2_s3 to use a limit of 2000Kb/s from 9 A.M. to 2 P.M. Monday and Tuesday; a limit of 5000 Kb/s Wednesday andThursday from 6 A.M. to 2 P.M.; a limit of 7000 Kb/s all day Friday; otherwise use abandwidth schedule of 8000 Kb/s:
nas_cel -interconnect -modify s2_s3 -bandwidth
MoTu09:00-14:00/2000,WeTh06:00-14:00/5000,Fr00:00-24:00/7000,/8000
Data Mover interconnect 39
Concepts

Example 4
The following bandwidth schedule modifies interconnect s2_s3 to use no bandwidth,which in effect stops all data transfer over the interconnect on Monday, Tuesday andFriday from 8 A.M. to 10 P.M.:
nas_cel -interconnect -modify s2_s3 -bandwidth MoTuFr08:00-22:00/0
How ongoing replication sessions work
VNX Replicator uses internal checkpoints to ensure availability of the most recent point-in-timecopy. These internal checkpoints are based on SnapSure technology and are visible toreplication users, but are not available for user management.This means you cannot performoperations on the checkpoint such as refresh, delete, and restore.
The replication session creation process involves the following steps, which are illustratedin Figure 11 on page 42:
1. Network clients read and write to the source object through a Data Mover at the sourcesite without interruption throughout this process. Network clients can read the destinationobject through a Data Mover at the destination site. However, in-process CIFS accesswill be interrupted during data transfer because the destination file system isunmounted/mounted as part of the synchronization operation. NFS clients should notexperience an interruption.
Note: To avoid interruption throughout this process, use a checkpoint of the destination file systemfor client access at the destination site. The destination checkpoint should be accessed throughits own share rather than by using the .ckpt virtual directory on the file system because access to.ckpt will be interrupted by the destination file system unmount/mount process.
2. A VNX administrator creates a replication session that supplies the information neededto set up and perform replication of a given source object. For example, the interconnectand an update policy.
Note: For remote replication, the same administrative user account with the nasadmin role mustexist on both the source and destination VNXsystems.
3. The source-side interconnect specified for the replication session establishes the pathbetween the source and destination. The session cannot be established unless bothsides of the interconnect, source-side and destination, are available.
4. Replication creates two checkpoints for the source object.
5. For file system and VDM replication, a read-only destination object that is the same sizeas the source is created automatically as long as the specified storage is available. If thereplication session identifies an existing destination object, the destination object, whichmust be the same size as the source and read-only, is reused.
6. Replication creates two checkpoints for the destination object.
40 Using VNX Replicator
Concepts

7. Replication verifies that there is no common base established between the source anddestination objects. For example, for file system or VDM replication, the destination filesystem or VDM does not exist.
8. A full (initial) copy is performed to transfer the data on the source to the destination object.If the user specifies a manual (on-demand) refresh, then data transfer will occur onlywhen the user performs the refresh operation.
9. At the destination, the first checkpoint ckpt 1 is refreshed from the destination object toestablish the common base with the source checkpoint.
10. After the common base is established, the second checkpoint ckpt 2 at the source isrefreshed to establish the difference (delta) between the original source checkpoint andthe latest point-in-time copy. Only the delta between the currently marked internalcheckpoint and the previously replicated internal checkpoint is transferred to thedestination by block ID. The transfer is called a differential copy.
11. After the data transfer is complete, replication uses the latest internal checkpoint takenon the destination to establish a new common base ckpt 2.The latest internal checkpointcontains the same data as the internal checkpoint on the source (ckpt 2) that was markedfor replication.
12. Replication monitors the max_time_out_of_sync value (if set) to determine how frequentlythe destination is updated with source changes. Without an update policy, the user canperform an on-demand refresh.
Note: A replication session automatically starts when it is created.
Chapter 6 and Chapter 7 provide detailed procedures on how to create replication sessions.
How ongoing replication sessions work 41
Concepts

Figure 11 on page 42 shows the basic elements of a single ongoing remote replicationsession, where the source and destination reside on different VNX systems.
VNX-000048
Destination site
11
8
Ckpt 2
Ckpt 1
5
6
Source site
1
2
User
10
7
Ckpt 2
Ckpt 1
4
Source-side
3 Interconnect
9
Network
Peer-side
Source storage unit Destination storage unit
Sourceobject
(Read write)
Destinationobject
(Read only)
Initial copy
Differential copy
VNX 1 VNX 2
SourceData
Mover
DestinationData
Mover
Figure 11. How ongoing replication sessions work
How one-time file system copy sessions work
You create a one-time copy of a file system by using the nas_copy command. The sourcefile system must be one of the following:
Mounted read-only
Checkpoint mounted read-only
Writeable checkpoint mounted read-only
42 Using VNX Replicator
Concepts

The basic steps in a copy session are as follows:
1. A user creates a one-time copy session by using the nas_copy command that suppliesthe information needed to set up and perform a copy of a given source file system.
2. The source-side interconnect specified for the copy session establishes the path betweenthe source and destination. The session cannot be established unless both sides of theinterconnect, source-side and destination (peer), are available.
3. For file system copy, replication creates an internal checkpoint for the source file system.No internal checkpoint is created for file system checkpoint or writeable checkpoint copy.
4. Replication creates the file system automatically on the read-only destination object thatis the same size as the source as long as the specified storage is available. If the sourceis a read-only file system, it also creates an internal checkpoint for the file system.
For file system checkpoint copy, if the file system that the checkpoint is using alreadyexists on the destination, it will create a new checkpoint with the naming convention<source checkpoint name_replica#>. If the file system does not exist yet, it will be createdalong with the checkpoint.
5. Copy begins:
• When a file system or writeable checkpoint is copied, replication performs a full copyof the source to the destination file system.
• When a file system checkpoint is copied, the copy is differential if an earlier checkpointthat serves as the common base exists (otherwise a full copy is performed) and thecheckpoint appears on the destination.
Note: A differential copy is the difference (delta) between the original source checkpoint and thelatest point-in-time copy. Only the delta between the file system checkpoint and the source filesystem is transferred to the destination. The transfer is called a differential copy.
6. After the data transfer is complete, replication deletes the session and the internalcheckpoints created on the source and destination. For a checkpoint copy, the internalcheckpoint created on the destination becomes a user checkpoint, which means it canbe managed by the user.
Note: You can update (refresh) an existing destination checkpoint that has the same name as thecopied checkpoint.You cannot refresh a loopback or local copy because the destination cannotcreate a checkpoint by the same name.
Chapter 8 describes how to configure a one-time copy session.
Updating the destination site with source changes
The update policy set for a replication session determines how frequently the destination isupdated with source changes.You can define a max_time_out_of_sync value for a replicationsession or you can perform on-demand, manual updates.
Updating the destination site with source changes 43
Concepts

The refresh operation handles on-demand updates of the destination side of a replicationsession based on changes to the source side. Alternatively, you can define an update policyfor a replication session that automatically updates the destination based on themax_time_out_of_sync specified number of minutes in which the source and destinationcan be out of synchronization.
Specifying a max_time_out_of_sync value
The max_time_out_of_sync value represents the elapsed time window within which thesystem attempts to keep the data on the destination synchronized with the data on thesource. For example, if the max_time_out_of_sync is set to 10 minutes, then the contentof, and latest checkpoint on, the destination should not be older than 10 minutes.
The destination could be updated sooner than this value. The source write rate, networklink speed, and the interconnect throttle, when set, determine when and how often datais sent. Large bursts of writes on any file system that is sharing an interconnect or physicalconnection, or network problems between the source and destination can cause themax_time_out_of_sync setting to be exceeded.
Manually updating the destination
The manual refresh option allows you to perform on-demand updates of the destinationwith the data on the source. When you change a replication session from amax_time_out_of_sync policy to a manual refresh, the system suspends the session.To resume the session, reset the max_time_out_of_sync value.
Refresh the destination on page 132 describes in detail how to perform the refresh task.
Stopping a replication session
You can temporarily stop an active replication session and leave replication in a conditionthat allows it to be started again. Stop allows you to temporarily stop a replication session,perform some action (mount a file system on a different Data Mover), and then start thereplication session again by using a differential copy rather than a full data copy.
You may want to stop a replication session to:
Mount the replication source or destination file system on a different Data Mover.
Change the IP addresses or interfaces the interconnect is using for this replication session.
How it works
The stop operation works as follows, depending on the type of session (local, remote,or loopback) and the stop -mode option selected.
To stop a local or remote replication session from the source VNX, select:
44 Using VNX Replicator
Concepts

Both — Stops both the source and destination sides of the session, when thedestination is available.
Source — Stops only the replication session on the source and ignores the other sideof the replication relationship.
For a loopback replication session, this automatically stops both sides of the session.
To stop a local or remote replication session from the destination VNX, select:
Destination — Stops the replication session on the destination side only.
For a loopback replication session, this automatically stops both sides of the session.
When you stop a replication session by using the Both or Destination mode options, anddata transfer is in progress, the system will perform an internal checkpoint restoreoperation of the latest checkpoint on the destination side. This will undo any changeswritten to the file system as part of the current data transfer and bring the file systemback to a consistent state. If the checkpoint restore fails, for example there was notenough SavVol space, the destination file system will remain in an inconsistent state andclient-based access should be avoided.
Stop a replication session on page 134 describes in detail how to perform this task.
Starting a replication session
After you stop a replication session, only the start option can restart it.There are two primaryuse cases when starting a replication session:
Start a session that was temporarily stopped and update the destination by using eithera differential copy or a full data copy. For example, you stop the session to performmaintenance on the destination side and when done restart the session. This session isin the stopped state.
Start a session that was automatically stopped due to a failover or switchover by usingeither a differential copy or a full data copy. This session was left in a failed over orswitched over state.
When you start a replication session, you can change the interconnect and interfaces (sourceand destination) used in the session.You can specify a source and destination interface orallow the system to select it for you. If you allow the system to select it, the system willautomatically verify that the source and destination interfaces can communicate. Otherwise,there is no check to verify communication.
You use the reverse option to start a replication session again after a failover or switchover.This will reverse the direction of the replication session, but not change the destination orsource mount status (read-only or read/write).
When you start a replication in reverse, replication will only reverse one session in aone-to-many configuration.
Starting a replication session 45
Concepts

How it works
The start operation works as follows when the replication session is in a stopped stateand not in a failed over or switched over state. Starting a session after failover on page51 describes how to start a replication session that is in a failed over state and Startinga session after switchover on page 48 describes how to start a session that is in aswitched over state:
1. A user starts the stopped replication session from the source side.
2. The local source-side Data Mover interconnect establishes the path to use betweenthe source and destination. Any source or destination (peer) interface defined for theinterconnect will be used unless the user specifies a specific source or destinationinterface to use for the replication session.
3. Replication verifies if there is an internal, common base checkpoint establishedbetween the source and destination objects. If there is a common base, replicationwill perform a restore on the destination from the common base and then start adifferential copy. This will transfer all of the changes made to the source object sincethe replication session was stopped.
4. The update policy set for the replication session determines how frequently thedestination is updated with the source changes.When you start a replication session,you can make changes to the policy. Otherwise, default values are used. For example,the max_time_out_of_sync default time is 10 minutes for file system replications, and5 minutes for VDM replications.
Start options
If you want to start a session and the destination object changed, you must specify eitherthe overwrite_destination or full_copy option:
overwrite_destination — Use this option when there is a common base establishedand the destination object changed. For example, you mounted the destination filesystem read/write, made changes, and you want to discard those changes.
full_copy — Use this option to perform a full data copy of the source object to thedestination object when there is no common base established. If there is no commonbase and you do not specify the full_copy option, the command will fail. If a commonbase exists, you do not have to specify the full_copy option unless you want thesystem to ignore the common base and perform a full copy.
If a common base exists and it contains different content than the destination, either:
• Specify both the overwrite_destination and full_copy options to discard thedestination content completely and perform a full copy of the source object to thedestination object.
or
• Specify the overwrite_destination option without the full_copy option to restore thedestination to the common base content and start a differential copy.
46 Using VNX Replicator
Concepts

Start a replication session on page 136 describes in detail how to perform this task.
Reversing a replication session
You perform a reverse operation from the source side of a replication without data loss.Thisoperation will reverse the direction of the replication session thereby making the destinationread/write and the source read-only.
How it works
This operation does the following:
1. Synchronizes the destination object with the source.
2. Mounts the source object read-only.
3. Stops replication.
4. Mounts the destination read/write.
5. Starts replication in reverse direction from a differential copy and with the sameconfiguration parameters.
Reverse in a one-to-many configuration
If you are running replication in a one-to-many configuration and you reverse one of thesessions, the source side goes into a cascading mode where the destination side fromone of the multiple sessions becomes the source and the original source side becomesthe destination and that source cascades out to other destination sessions.
Reversing a VDM session
If you used VDMs for replication in your CIFS environment, remember to reverse thereplication relationship of the VDM and user file systems in that VDM. Also, successfulaccess to CIFS servers after a reverse requires that you maintain DNS, Active Directory,user mapping, and network support of the data recovery destination site.The VNX systemdepends on the DNS, Active Directory, user mapping, and network systems at yourdestination site to function correctly upon a reverse operation.
Reverse the direction of a replication session on page 140 describes how to perform thistask.
Switching over a replication session
For test or migration purposes when the source is functioning and available, you can switchover the specified replication session to perform synchronization of the source and destinationwithout data loss.You perform this operation on the source VNX only.
Reversing a replication session 47
Concepts

How it works
The switchover operation does the following:
1. Synchronizes the destination object with the source.
2. Mounts the original source object as read-only.
3. Synchronizes the destination object with the source again.
4. Stops the replication.
5. Mounts the original destination object as read/write so that it can act as the newsource object.
The replication direction remains from the original source to the destination.
6. When the original source site becomes available, start the session from the currentdestination side with the -reverse option. This reverses the direction of the session,but does not change the destination or source mount status (read-only or read/write).
The -reverse option is different from the replication Reverse operation, which will reversethe direction of a replication session and make the destination read/write and the sourceread-only.When you start a replication in reverse, replication will only reverse one sessionin a one-to-many configuration.
Switching over a VDM session
Successful access to CIFS servers, when failed over, depends on the customer takingadequate actions to maintain DNS, Active Directory, user mapping, and network supportof the data recovery (destination) site.VNX system depends on the DNS, Active Directory,user mapping, and network systems at your destination site to function correctly uponfailover.
Starting a session after switchover
When a replication session is switched over, the original source object becomes read-only,the original destination object becomes read/write and the session is stopped. Thereplication direction remains from the original source to the destination.When the originalsource site becomes available, start the session from the current destination side withthe -reverse option to change the direction of the session and overwrite the originalsource with the data from the current source.Then perform a reverse operation to returnthe session to its original direction.
You can start a switched over replication from the source side, but before doing so youmust change the mount status of the source object to read/write and the destinationobject to read-only.
48 Using VNX Replicator
Concepts

Example
This example explains how to start a replication after a switchover occurs between sourcefile system fs1 and destination file system fs2:
1. After switchover, the fs1 file system becomes read-only and fs2 becomes read/write.The replication session is stopped and the replication direction remains as fs1 -->fs2.
2. The original fs2 destination is used as the source object until the original fs1 sourceis available.
3. When the original source becomes available, start the session from the destinationside as follows:
a. Use the -reverse option. This will change the session direction to fs1 <-- fs2 [theoriginal destination (the current source fs2) to the original source (the currentdestination fs1)].
b. (Optional) Use the overwrite_destination option to overwrite the original fs1 sourceobject with the current source fs2 object data if, after switchover occurred, you changedthe mount status of the original source object from read-only (which is the statereplication puts it in during switchover) to read-write and made modifications to theoriginal source.
4. Perform a replication Reverse operation to change the session back to the originaldirection fs1 --> fs2.
Start a failed over or switched over replication on page 138 describes how to perform thistask.
Switchover in a one-to-many configuration
To start switched-over sessions when the source object is used in multiple replicationsessions:
1. Select the replication session from which you want to resynchronize.
2. Start the replication session identified in step 1 from the original destination side andspecify the -reverse option.
3. Reverse that replication session by using nas_replicate -reverse command.
4. If you switched over multiple sessions at one time, change the mount status of thedestination objects in the remaining sessions. Change the mount status of source ordestination object on page 177 describes how to perform this task for each type ofsource object.
5. Start the remaining sessions from the original source side.When starting each session,ensure that you specify the -overwrite_destination option. Do not specify the -reverseoption.
Switch over a replication session on page 141 describes how to perform this task.
Switching over a replication session 49
Concepts

Failing over a replication session
In a failover scenario, the source site has experienced a disaster and is unavailable. Inresponse to this potential disaster scenario, you can perform a failover of the specifiedreplication session, and the failover occurs with possible data loss.You perform a failoveronly from the destination VNX.
How it works
The failover process works as follows:
1. Stops any data transfer that is in process.
2. Mounts the destination object as read/write so that it can serve as the new sourceobject.
3. When the original source Data Mover becomes reachable, the source file systemobject is changed to read-only, and a VDM is changed to a mounted state.
The execution of the failover operation is asynchronous and will result in data loss if allthe data is not transferred to the destination site prior to issuing the failover. After thesource site is restored to service, start the replication session with the -reverse optionto reverse the direction of the replication session but will not change the destination orsource mount status (read-only or read/write).
The -reverse option is different from the replication Reverse operation, which will reversethe direction of a replication session and make the destination read/write and the sourceread-only.
Note: When you start a replication in reverse, replication will only reverse one session in aone-to-many configuration.
Failing over VDM sessions
Successful access to CIFS servers, when failed over, depends on the customer takingadequate actions to maintain DNS, Active Directory, user mapping, and network supportof the data recovery (destination) site. The VNX system depends on the DNS, ActiveDirectory, user mapping, and network systems at your destination site to function correctlyupon failover.
If the replication relationship involves a VDM, perform the failover in this order:
1. Fail over the VDM.
The system changes the VDM state from mounted to loaded on the destination site.If the source site is still available, the system attempts to change the VDM on thesource site from loaded to mounted.
2. Fail over the user file system contained in that VDM.
50 Using VNX Replicator
Concepts

The VNX system provides you with the ability to fail over a CIFS server and itsassociated file systems to a remote location. In a disaster, since VNX Replicatoris an asynchronous solution, there might be some data loss. However, the filesystems will be consistent (fsck is not needed).When using databases, additionalapplication-specific considerations might be necessary to bring the database toa consistent state (for example, quiescing the database).
Fail over a replication session on page 144 describes how to perform this task.
Starting a session after failover
When a replication session fails over, the original source object becomes read-only, theoriginal destination object becomes read/write and the session is stopped.The replicationdirection remains from the original source to the destination. When the original sourcesite becomes available, start the session from the current destination side with the -reverseoption to change the direction of the session and overwrite the original source with thedata from the current source. Then perform a reverse operation to return the session toits original direction.
You can start a failed over replication from the source side, but before doing so you mustchange the mount status of the source object to read/write and the destination object toread-only.
Example
This example explains how to start a replication after a failover occurs between sourcefile system fs1 and destination file system fs2:
1. After failover, the fs1 file system becomes read-only and fs2 becomes read/write.Thereplication session is stopped and the replication direction remains as fs1 --> fs2.
2. The original fs2 destination is used as the source object until the original fs1 sourceis available.
3. When the original source becomes available, start the session from the destinationside as follows:
a. Use the -reverse option. This will change the session direction to fs1 <-- fs2 [theoriginal destination (the current source fs2) to the original source (the currentdestination fs1)].
b. Use the overwrite_destination option to overwrite the original fs1 source object withthe current source object data.
4. Perform a replication Reverse operation to change the session back to the originaldirection fs1 --> fs2.
Start a failed over or switched over replication on page 138 describes how to perform thistask.
Failing over a replication session 51
Concepts

Failover in a one-to-many configuration
EMC supports only one failed-over replication session per source object. If you fail overmore than one session for a given source object, you can save only the changes fromone of the failed-over replication sessions.
Before you start, ensure that the source site is now available.
To recover from this:
1. Select the failed over session from which you want to save the changes andresynchronize
2. Start that replication session and specify the -overwrite_destination and -reverseoption.
3. Reverse the replication session by using nas_replicate -reverse.
4. If you failed over multiple sessions, change the mount status of the destination objectsto read-only in the remaining sessions.
5. Start the remaining sessions from the original source side.When starting each session,ensure that you specify -overwrite_destination. Do not specify the -reverse option.
When to use failover, switchover, and reverse
Table 4 on page 52 summarizes when you should use the failover, switchover, and reverseoperations.
Table 4. Failover, switchover, and reverse operations
Site that must be availableWhat happensUse ifOperation
DestinationIn response to a potential
disaster scenario, performs a
failover of the specified repli-
cation session with data loss.
Run this command from the
destination VNX only.
This command cancels any
data transfer that is in pro-
cess and marks the destina-
tion object as read/write so
that it can serve as the new
source object. When the
original source Data Mover
becomes reachable, the
source object is changed to
read-only.
The source site is totally corrupt or
unavailable.
Failover
52 Using VNX Replicator
Concepts

Table 4. Failover, switchover, and reverse operations (continued)
Site that must be availableWhat happensUse ifOperation
Source and destinationFor test or migration purpos-
es, switches over the speci-
fied replication relationship
and performs synchronization
of the source and destination
without data loss. Use this
option if the source site is
available but you want to acti-
vate the destination file sys-
tem as read/write.
Execute this command from
the source VNX only. This
command stops replication,
mounts the source object as
read-only, and mounts the
destination object as
read/write so that it can act
as the new source object.
Unlike a reverse operation, a
switchover operation does
not start replication.
The source site is still available.Switchover
Source and destinationExecute this command from
the source VNX only.
This command synchronizes
the destination object with the
source, mounts the source
object read-only, stops the
replication, and mounts the
destination read/write. Then,
unlike switchover, starts
replication in reverse direc-
tion from a differential copy
by using the same configura-
tion parameters originally es-
tablished for the session.
The source site is still available.Reverse
Deleting a replication session
You would delete a replication session when you no longer want to replicate the file systemorVDM.
Note: Deleting replication does not delete the underlying source or destination objects. However, theinternal checkpoints are deleted as part of the operation.
Deleting a replication session 53
Concepts

The delete operation works as follows:
When deleting a local or remote replication session from the source VNX, select:
Both — Deletes both source and destination sides of the session, as long as thedestination is available.
Source — Deletes only the replication session on the source and ignores the other sideof the replication relationship.
For a loopback replication session, this automatically deletes both sides of the session.
When deleting a remote or local replication session from the destination VNX, select:
Destination — Deletes the replication session on the destination side only. Use this optionto delete a session from the destination side that could not be deleted using the -bothoption because the destination side was unavailable.
For a loopback replication session, this automatically deletes both sides of the session.
When you delete a replication session by using the Both or Destination mode options, anddata transfer is in progress, the system will perform an internal checkpoint restore operationof the latest checkpoint on the destination side. This will undo any changes written to thefile system as part of the current data transfer and bring the file system back to a consistentstate. If the checkpoint restore fails, for example there was not enough SavVol space, thedestination file system will remain in an inconsistent state and client-based access shouldbe avoided.
Delete a replication session on page 133 describes how to perform this task.
Performing an initial copy by using disk or tape
Copying the baseline source file system from the source to the destination site over the IPnetwork can be a time-consuming process.You can use an alternate method by copyingthe initial checkpoint of the source file system, backing it up to a disk array or tape drive,
54 Using VNX Replicator
Concepts

and transporting it to the destination site, as shown in Figure 12 on page 55. This methodis also known as silvering.
Destination site
Data Mover
Source site
VNX-000047
storage system storage system
SAN SAN
IPtransportData Mover
Truck
FileSystem
FileSystem
Disk or Tape
Disk or Tape
Figure 12. Physical transport of data
Note: EMC recommends that the initial copy of the root file system for a VDM to be performed overthe IP network.
Disk transport method
If the source file system holds a large amount of data, the initial copy of the source tothe destination file system can be time consuming to move over the IP network. Preferably,move the initial file system copy by disk, instead of over the network.
When using the disk transport method, note the following:
Three VNX systems are required:
Performing an initial copy by using disk or tape 55
Concepts

VNX A located at the source site•
• VNX B, a small swing VNX used to transport the baseline copy of the source filesystem to the destination site
• VNX C located at the destination site
You must set up communication between each VNX system (A to B and B to C) beforecreating replication sessions. Chapter 4 describes how to configure communicationbetween VNX systems.
You must set up communication between Data Movers on each VNX system (A toB, B to C, and A to C) before creating the copy sessions. Chapter 5 explains how tocreate communication between Data Movers.
You should ensure that there is enough disk space on all of the VNX systems.
Perform an initial copy by using the disk transport method on page 178 describes how toperform this task.
Tape transport method
If the source file system contains a large amount of data, the initial copy of the sourcefile system to the destination file system can be time consuming to move over the IPnetwork. Moving the initial copy of the file system by backing it up to tape, instead ofover the network, is preferable.
Note: This special backup is used only for transporting replication data.
This method is not supported for VDM replications.
Backing up file systems from a Unicode-enabled Data Mover and restoring to anASCII-enabled Data Mover is not supported. I18N mode (Unicode or ASCII) mustbe the same on both the source and destination Data Movers.
Before you begin
When using this transport method, note the following:
You must have a valid NDMP-compliant infrastructure on both source and destinationVNX systems.
At most, four NDMP backups can be active at any given time.
If failover occurs during backup or restore, the Data Management Application (DMA),such as EMC NetWorkeré, requires that the tape backup and restore process berestarted.
The replication signature is backed up for a tape backup, and after restore on thedestination side, this signature is automatically applied.
How tape transport works
56 Using VNX Replicator
Concepts

The tape transport process works as follows:
1. On the source site, create a file system replication session with the -tape_copy option.This option creates the replication session, and then stops it to enable an initial copyusing a physical tape.
2. From the NDMP DMA host, create a tape backup of the source file system.
3. The DMA sets up the tape and sends the information to start backup to the DataMover. The Data Mover begins the backup and starts copying data from disk to tape.
4. Move the tape and all relevant DMA catalogs to the destination.
Note: Be aware that changes accumulate in the checkpoint while the session is stopped. Ensurethat the high water mark and auto extend options are set appropriately.
5. Restore the backup image from the tape to the destination site:
• The DMA sets up the tape and sends the information to begin the restore to theData Mover. The Data Mover begins the restore. If any kind of tape managementis needed, such as a tape change, the Data Mover will signal the DMA.
• If an unrecoverable volume-write or tape-read error occurs or the destination filesystem specified is not valid, the restore fails and error messages are logged tothe server log and the DMA log file.
6. Start the replication session created in step 1.The system detects the common basecheckpoint created in step 1 and starts the differential data transfer.
Perform an initial copy by using the tape transport method on page 183 describes how toperform this task.
Planning considerations
These topics help you plan and implement VNX Replicator . The topics include:
Controlling replication sessions with replication policies on page 58
Interconnect setup considerations on page 58
Accommodating network bandwidth on page 59
Determining the number of replications per Data Mover on page 59
Using dual Control Stations on page 60
Infrastructure planning considerations on page 61
Configuring events for VNX Replicator on page 62
Planning considerations 57
Concepts

Controlling replication sessions with replication policies
You can set policies to control replication sessions. Most of these policies can beestablished for one replication session by using the nas_replicate command or allreplication sessions on a Data Mover by using nas_cel or a parameter. VNX Replicatorhas policies to:
Control how often the destination object is updated by using the max_time_out_of_syncsetting.
Control throttle bandwidth for a Data Mover interconnect by specifying bandwidthlimits on specific days, specific hours, or both.
Interconnect setup considerations
Before you set up interconnects, consider the following planning information:
To prevent potential errors during interface selection, especially after afailover/switchover, specify the same source and destination interface lists whenconfiguring each side of the interconnect.
When multiple subnets exist for a Data Mover, ensure that the network routing tablecontains a routing entry to the source Data Mover's routing table to the specifieddestination and gateway address for the subnet to be used. Otherwise, all networktraffic will go to the default router.
When defining a Data Mover interconnect, all of the source interfaces must be ableto communicate with all of the destination interfaces in both directions. Verify interfacenetwork connectivity on page 70 provides more details on how to verify networkconnectivity for interconnects.
If you plan to use IP addresses, make sure the corresponding destination interfacelist uses the same IPv4/IPv6 network protocol. An IPv4 interface cannot connect toan IPv6 interface and vice versa. Both sides of the connection must use the sameprotocol (IPv4/IPv6). For each network protocol type specified in the source interfacelist, at least one interface from the same type must be specified in the destination listand vice versa. For example, if the source interface list includes one or more IPv6addresses, the destination interface list must also include at least one IPv6 address.Validation fails for any interconnect that does not have interfaces from the sameprotocol in both source and destination lists.
If you plan to use name service interface names when defining an interconnect, theinterface name must already exist and the name must resolve to a single IP address(for example, by using a DNS server). In addition, name service interface namesshould, but are not required to be fully qualified names.
Note: Name service interface names are not the same as VNX network device names (forexample, cge0). They are names that are resolved through a naming service (local host file,DNS, NIS, or LDAP).
58 Using VNX Replicator
Concepts

When defining a bandwidth schedule for a Data Mover interconnect, note that theschedule executes based on Data Mover time, and not Control Station time.
Accommodating network bandwidth
Consider the following Quality of Service (QoS) and network suggestions suitable to yourbandwidth requirements:
Use dedicated network devices for replication to avoid an impact on users.
Apply QoS policy by creating a bandwidth schedule that matches the bandwidth ofone network to another. For instance, even if you have a 1 MB/s line from A to B andwant to fill the pipe, define a bandwidth schedule at 1 MB/s so the line will not flood,causing packets to drop. Bandwidth can be adjusted based on the number ofconcurrent transfers and available bandwidth.
Configure the bandwidth schedule to throttle bandwidth for a replication session (orbandwidths for different sessions) on a Data Mover using the nas_cel -interconnectcommand.The EMC VNX Command Line Interface for File further details the nas_cel-interconnect command.
If you do not expect significant packet loss and are in a high-window, high-latencyenvironment, use the fastRTO parameter. fastRTO determines which TCP timer touse when calculating retransmission time out. The TCP slow timer (500 ms) is thedefault, causing the first time-out retransmission to occur in 1–1.5 seconds. SettingfastRTO to 1 sets the TCP fast timer (200 ms) for use when calculating retransmissiontime out, causing the first time out to occur in 400–600 ms. Changing theretransmission time also affects the interval a connection stays open when no responseis heard from the remote link.
Use server_param <movername> -facility tcp fastRTO=1 to configure the setting.
Note: This setting may actually increase network traffic.Therefore, make the change cautiously,recognizing it might not improve performance.
The Parameters Guide for VNX for File provides more information.
Determining the number of replications per Data Mover
Determine the maximum number of replication sessions per Data Mover based on yourconfiguration, such as the WAN network bandwidth and the production I/O workload.This number is also affected by whether you are running both SnapSure and VNXReplicator on the same Data Mover. Both of these applications share the availablememory on a Data Mover.
Each internal checkpoint uses a file system ID, which will effect the file system limit eventhough these internal checkpoints do not count toward the user checkpoint limit.
Planning considerations 59
Concepts

For all configurations, there is an upper limit to the number of replications allowed perData Mover. Restrictions on page 13 details the current number of replications allowedper Data Mover.
If you plan to run loopback replications, keep in mind that each loopback replicationcounts as two replication sessions since each session encapsulates both outgoing andincoming replications.
You should verify that the Data Mover can handle all replication sessions and productionI/Os.You can also monitor memory usage and CPU usage by using the server_sysstatcommand. This command shows total memory utilization, not just VNX Replicator andSnapSure memory usage.
Note: Use Unisphere to monitor memory and CPU usage by creating a new notification on theMonitoring > Notifications > Data Mover Load tab.
Using dual Control Stations
If your VNX is configured with dual Control Stations you must use the IP aliasing feature.If you do not, replications will not work if the primary Control Station fails over to thesecondary Control Station.
IP aliasing
Configuring IP aliasing for the Control Station enables communication with the primaryControl Station using a single IP address regardless of whether the primary ControlStation is running in slot 0 or slot 1.
The following guidelines apply to this feature:
When using replication for the first time, or on new systems, configure IP alias first,then use IP alias in the nas_cel -create -ip <ipaddr> command.
For existing systems with existing replication sessions, the current slot_0 primaryControl Station IP address must be used. For example:
# nas_config -IPalias -create 0Do you want slot_0 IP address <10.6.52.154>as your alias? [yes or no]: yesPlease enter a new IP address for slot_0: 10.6.52.95Done#
If the Control Station fails over while a replication task is running, use nas_task tocheck the status of the task. If the task failed, re-issue the replication command.
When IP alias is deleted using the nas_config -IPalias -delete command, the IPaddress of the primary or the secondary Control Station is not changed. Changes tothe IP address of the primary or the secondary Control Station must be doneseparately. Replication depends on communication between the source ControlStation and the destination Control Station. When IP alias is used for replication,deleting the IP alias breaks the communication. The IP address which was used as
60 Using VNX Replicator
Concepts

the IP alias must be restored on the primary Control Station to restore thecommunication.
While performing a NAS code upgrade, do not use an IP alias to log in to the ControlStation.
VNX System Operations provides details for setting up IP aliasing.
EMC VNX Command Line Interface for File provides details on the nas_config command.
Infrastructure planning considerations
Note the following configuration considerations:
Carefully evaluate the infrastructure of the destination site by reviewing items suchas:
• Subnet addresses
• Unicode configuration
• Availability of name resolution services; for example, WINS, DNS, and NIS
• Availability of WINS/PDC/BDC/DC in the right Microsoft Windows NT, or WindowsServer domain
• Share names
• Availability of user mapping, such as the EMC Usermapper for VNX systems
The CIFS environment requires more preparation to set up a remote configurationbecause of the higher demands on its infrastructure than the Network File System(NFS) environment. For example, authentication is handled by the domain controller.For the CIFS environment, you must perform mappings between the usernames/groupsand UIDs/GIDs with the Usermapper or local group/password files on the Data Movers.Appendix A provides more details on setting up the CIFS replication environment.
The destination file system can only be mounted on one Data Mover, even though itis read-only.
At the application level, as well as the operating system level, some applications mayhave limitations on the read-only destination file system due to caching and locking.
If you are planning on enabling international Unicode character sets on your sourceand destination sites, you must first set up translation files on both sites before startingUnicode conversion on the source site. Using International Character Sets on VNXfor File covers this consideration.
VNX's FileMover feature supports replicated file systems. This is described in UsingVNX FileMover.
VNX file-level retention capability supports replicated file systems. Using VNXFile-Level Retention provides additional configuration information.
Planning considerations 61
Concepts

Configuring events for VNX Replicator
You can configure your VNX system to perform an action when specific replication eventsoccur. These are called notifications that originate from the system and can include, butare not limited to the following:
Logging the event in a log file
Sending an email
Generating a Simple Network Management Protocol (SNMP) trap
For example, if the max_time_out_of_sync value is set to 10 minutes and the data transferdoes not complete within this value, you can configure an email notification alerting youthat the SLA was not met.
System event traps and email notifications are configured by the user. Configuring Eventsand Notifications on VNX for File describes how to manage these notifications.
62 Using VNX Replicator
Concepts

3
Upgrading from previousversions
This section describes the upgrade process when upgrading from aprevious version of Celerra Network Server to VNX for file version 7.1when using VNX Replicator.
The tasks to upgrade from previous versions are:
Upgrade from a previous release on page 64 Enable VNX Replicator on page 64
Using VNX Replicator 63

Upgrade from a previous release
When performing an upgrade from Celerra Network Server 6.0 to VNX for file version 7.1,no action needs to be taken related to any existing VNX Replicator replication sessions.
Upgrading to manage remote replications with a global user account
You must upgrade both the source and destination systems to version 7.1 to configure andmanage remote replication sessions with a storage domain global user account. Tosynchronize local accounts between the source and destination, set up a global accountacross both systems to successfully replicate from one version 7.1 system to another.
Enable VNX Replicator
After you upgrade, you must enable the VNX Replicator license.
Action
To install the license for the VNX Replicator software feature, type:
$ nas_license -create replicatorv2
64 Using VNX Replicator
Upgrading from previous versions

4
Configuring communicationbetween VNX systems
The tasks to set up communication between VNX systems are:
Prerequisites on page 66 Set up communication on the source on page 66 Set up communication on the destination on page 67 Verify communication between VNX systems on page 68
Using VNX Replicator 65

Prerequisites
Before creating a replication session for remote replication, you must establish the trustedrelationship between the source and destination VNX systems in your configuration.
Note: The communication between VNX Control Stations uses HTTPS.
The procedures in this section require the following:
The systems are up and running and IP network connectivity exists between the ControlStations of both VNX systems. Verify whether a relationship exists by using the nas_cel-list command.
The source and destination Control Station system times must be within 10 minutes ofeach other. Take into account time zones and daylight savings time, if applicable.
The same 6–15 characters passphrase must be used for both VNX systems.
Replication sessions are supported between VNX systems that use version 7.0 and laterand legacy Celerra systems that use version 6.0 and later. For legacy Celerra systems thatuse version 5.6, only versions later than 5.6.47.0 are supported for replication with legacyCelerra systems that use version 6.0 and later, and VNX systems that use version 7.0 andlater.
Sample information
Table 5 on page 66 shows information about the source and destination sites used in theexamples in this section.
Table 5. Sample information
IP addressVNX system nameSite
192.168.168.114cs100Source site
192.168.168.102cs110Destination site
Set up communication on the source
This section describes the process of establishing communication between source anddestination sites.
Action
On a source VNX system, to establish the connection to the destination VNX system in the replication configuration, use
this command syntax:
$ nas_cel -create <cel_name> -ip <ip> -passphrase <passphrase>
where:
66 Using VNX Replicator
Configuring communication between VNX systems

Action
<cel_name> = name of the remote destination VNX system in the configuration
<ip> = IP address of the remote Control Station in slot 0
<passphrase> = the secure passphrase used for the connection, which must have 6–15 characters and be the same
on both sides of the connection
Example:
To add an entry for the Control Station of the destination VNX system, cs100, from the source VNX system cs100, type:
$ nas_cel -create cs110 -ip 192.168.168.10 -passphrase nasadmin
Output
operation in progress (not interruptible)...id = 1name = cs110owner = 0device =channel =net_path = 192.168.168.10celerra_id = APM000420008170000passphrase = nasadmin
Set up communication on the destination
This procedure describes how to set up communication on the destination VNX system tothe source VNX system.
Action
On a destination VNX system, to set up the connection to the source VNX system, use this command syntax:
$ nas_cel -create <cel_name> -ip <ip> -passphrase <passphrase>
where:
<cel_name> = name of the remote source VNX system in the configuration
<ip> = the IP address of the remote Control Station in slot 0
<passphrase> = the secure passphrase used for the connection, which must have 6–15 characters and be the same
on both sides of the connection
Example:
To add the Control Station entry of a source VNX system, cs100, from the destination VNX system cs110, type:
$ nas_cel -create cs100 -ip 192.168.168.12 -passphrase nasadmin
Set up communication on the destination 67
Configuring communication between VNX systems

Output
operation in progress (not interruptible)...id = 2name = cs100owner = 0device =channel =net_path = 192.168.168.12celerra_id = APM000417005490000passphrase = nasadmin
Verify communication between VNX systems
Perform this procedure at both the source and destination sites to check whether the VNXsystem can communicate with one another. Perform this task for remote replication only.
Action
To verify whether the source and destination sites can communicate with each other, at the source site, type:
$ nas_cel -list
Output
id name owner mount_dev channel net_path CMU0 cs100 0 192.168.168.114 APM0003400006800001 eng168123 201 192.168.168.123 APM0004370489400003 eng16853 501 192.168.168.53 APM0001835017370005 cs110 503 192.168.168.102 APM000446038450000
Note: The sample output shows that the source site can communicate with the destination site, cs110.
Action
To verify whether source and destination sites can communicate with each other, at the destination site, type:
$ nas_cel -list
Output
id name owner mount_dev channel net_path CMU0 cs110 0 192.168.168.10 APM0004460384500002 cs100 501 192.168.168.12 APM000340000680000
Note: The sample output shows that the destination site can communicate with the source site, cs100.
68 Using VNX Replicator
Configuring communication between VNX systems

5
Configuring communicationbetween Data Movers
The tasks to set up Data Mover-to-Data Mover communication are:
Prerequisites on page 70 Verify interface network connectivity on page 70 Set up one side of an interconnect on page 74 Set up the peer side of the interconnect on page 76 Validate interconnect information on page 77
Using VNX Replicator 69

Prerequisites
Before you set up Data Mover interconnects, review the following:
Data Mover interconnect on page 34
Interconnect setup considerations in Planning considerations on page 57
The tasks to initially set up Data Mover-to-Data Mover communication for VNX Replicatorinvolve the creation of a Data Mover interconnect.You must create an interconnect betweena given Data Mover on one VNX system and its peer Data Mover that may reside on thesame VNX system or a remote VNX system.The interconnect is only considered establishedafter you set it up from both sides.
These tasks are required for local and remote replication. A loopback interconnect isestablished and named automatically for each Data Mover on the local VNX system.
You configure only one interconnect between the same Data Mover pair.
The interconnect between Data Movers is HTTPS in anonymous mode.This HTTPS settingindicates a secure HTTP connection and cannot be configured by user.
After you configure an interconnect for a Data Mover, you cannot rename that Data Moverwithout deleting and reconfiguring the interconnect and reestablishing replication sessions.Chapter 13 provides more information about how to rename a Data Mover that has existinginterconnects.
Verify interface network connectivity
All source interfaces included in the interconnect for a Data Mover must be able tocommunicate to all interfaces on the destination Data Mover in both directions.
For example, if an interconnect is defined between local Data Mover server_2, which hastwo IP addresses listed for source interfaces (192.168.52.136 and 192.168.53.137), andpeer Data Mover server_3, which has two IP address listed for the destination interfaces(192.168.52.146 and 192.168.53.147), then all of the interfaces must be able to communicatein both directions as follows:
192.168.52.136 to 192.168.52.146
192.168.52.136 to 192.168.53.147
192.168.53.137 to 192.168.52.146
192.168.53.137 to 192.168.53.147
192.168.52.146 to 192.168.52.136
192.168.52.146 to 192.168.53.137
192.168.53.147 to 192.168.52.136
192.168.53.147 to 192.168.53.137
70 Using VNX Replicator
Configuring communication between Data Movers

You use the server_ping command with the -interface option to verify connectivity betweenevery interface you plan to include on the source and destination Data Movers.The -interfaceoption requires that the interface name be used instead of the IP address.
If no communication exists, use the Troubleshooting section of the Configuring and ManagingNetworking on VNX document to ensure that the interfaces are not down or that there areno other networking problems. If there are no other networking problems, create a statichost route entry to the Data Mover routing table.
Table 6 on page 71 contains the sample information used to demonstrate this procedure.
Table 6. Sample information
DeviceInterface nameInterface IPData MoverSystem
name
Site
cge0cs100-20192.168.52.136server_2 (local)cs100Source
cge1cs100-21192.168.53.137
cge2cs100-22192.168.168.138
cge0cs110-30192.168.52.146server_3 (peer)cs110Destination
cge1cs110-31192.168.53.147
cge2
cs110-32192.168.168.148
The naming convention used in this section for interface names is: < VNX systemname>-<server#><device#>. For example, the interface name for device cge0 on sourceData Mover server_2 with IP address 192.168.52.136 is cs100-20:
1. To verify that communication is established from the source and destination interfaces,use this command syntax:
# server_ping <movername> -interface <interface> <ip_addr>
where:
<movername> = source Data Mover name
<interface> = interface name on the source Data Mover
<ip_addr> = IP address of the interface on the destination Data Mover for which you areverifying network connectivity
Example:
To verify that 192.168.52.146 is accessible through interface cs100-20 on source DataMover server_2, type:
# server_ping server_2 -interface cs100-20 192.168.52.146
Output:
Verify interface network connectivity 71
Configuring communication between Data Movers

server_2 : 192.168.52.146 is alive, time= 0ms
The output shows that there is network connectivity from source interface cs100-20 withIP address 192.168.52.136 to IP address 192.168.52.146 on the destination.
2. Repeat step 1 to verify network connectivity between the remaining source and destinationinterfaces.
Example:
To verify network connectivity, between the remaining source and destination interfaces,type:
# server_ping server_2 -interface cs100-20 192.168.53.147
Output:
server_2 : 192.168.53.147 is alive, time= 3 ms
# server_ping server_2 -interface cs100-21 192.168.53.147
Output:
server_2 : 192.168.53.147 is alive, time= 0 ms
# server_ping server_2 -interface cs100-21 192.168.52.146
Output:
server_2 :Error 6: server_2 : No such device or addressno answer from 192.168.52.146
The output shows that there is no network connectivity from source interface cs100-21with IP address 192.168.53.137 to IP address 192.168.52.146 on the destination.
Note: Use the Troubleshooting section of the Configuring and Managing Networking onVNXdocument to ensure that the interfaces are not down or that there are no other networkingproblems. If there are no other networking problems, go to step 3 and create a static host routeentry to 192.168.52.146 by using gateway 192.168.53.1.
3. If no communication is established and you have verified that no other networkingproblems exist, add a routing entry to the source Data Mover's routing table to the specifieddestination and gateway address, using this command syntax:
# server_route <movername> -add host <dest> <gateway>
where:
<movername> = name of the Data Mover
<dest> = specific host for the routing entry
<gateway> = the network gateway to which packets should be addressed
Example:
72 Using VNX Replicator
Configuring communication between Data Movers

To add a static host route entry to 192.168.52.146 by using the network gateway192.168.53.1, type:
# server_route server_2 -add host 192.168.52.146 192.168.53.1
Output:
server_2 : done
To verify that the communication is now established, type:
# server_ping server_2 -interface cs100-21 192.168.52.146
Output:
server_2 : 192.168.52.146 is alive, time= 19ms
4. On the destination system, to verify that communication is established from the destinationto the source interfaces, use this command syntax:
# server_ping <movername> -interface <interface> <ip_addr>
where:
<movername> = destination Data Mover name
<interface> = interface name on the destination Data Mover
<ip_addr> = IP address of the interface on the source Data Mover for which you areverifying network connectivity
Example:
To verify that communication is established from destination interface cs110-30 with IPaddress 192.168.52.146 to IP address 192.168.52.136 on the source, type:
# server_ping server_3 -interface cs110-30 192.168.52.136
Output:
server_3 : 192.168.52.136 is alive, time= 0 ms
The output shows that there is network connectivity from destination interface cs110-30with IP address 192.168.52.146 to IP address 192.168.52.136 on the source.
5. Repeat step 4 to verify network connectivity from the remaining destination and sourceinterfaces.
Example:
To verify network connectivity from the remaining interfaces, type:
# server_ping server_3 -interface cs110-30 192.168.53.137
Output:
server_3 : 192.168.53.137 is alive, time= 0 ms
# server_ping server_3 -interface cs110-31 192.168.53.137
Output:
server_3 : 192.168.53.137 is alive, time= 0 ms
Verify interface network connectivity 73
Configuring communication between Data Movers

# server_ping server_3 -interface cs110-31 192.168.52.136
Output:
server_3 :Error 6: server_3 : No such device or addressno answer from 192.168.52.136
The output shows that there is no network connectivity from destination interface cs110-31with IP address 192.168.53.147 to IP address 192.168.52.136 on the source.
Note: Use the Troubleshooting section of the Configuring and Managing Networking on VNXdocument to ensure that the interfaces are not down or that there are no other networking problems.If there are no other networking problems, create a static host route entry to 192.168.52.136 byusing gateway 192.168.53.1.
6. If no communication is established and you have verified that no other networkingproblems exist, repeat step 3 and add a routing entry to the destination Data Mover'srouting table to the specified destination and gateway address by using this commandsyntax:
# server_route <movername> -add host <dest> <gateway>
where:
<movername> = name of the Data Mover
<dest> = specific host for the routing entry
<gateway> = the network gateway to which packets should be addressed
Example:
To add a static host entry to 192.168.52.136 using the network gateway 192.168.53.1,type:
# server_route server_3 -add host 192.168.52.136 192.168.53.1
Output:
server_3 : done
To verify that the host route entry resolved the communication problem, type:
# server_ping server_3 -interface cs110-31 192.168.52.136
Output:
server_3 : 192.168.52.136 is alive, time= 35 ms
You can now use all of the interfaces on the local system and the interconnect created onthe remote system. After you set up both sides of the interconnects, validate the interconnectsto further verify network connectivity.
Set up one side of an interconnect
Administrator privileges are required to execute this command.
74 Using VNX Replicator
Configuring communication between Data Movers

Action
To set up one side of the interconnect on a given VNX system, use this command syntax:
$ nas_cel -interconnect -create <name> -source_server <movername>
-destination_system <cel_name>]|id=<cel_id> -destination_server <movername>
-source_interfaces <name_service_interface_name>|ip=<ipaddr>
[,<name_service_interface_name>|ip=<ipaddr>,…]
-destination_interfaces <name_service_interface_name>|ip=<ipaddr>
[,<name_service_interface_name>|ip=<ipaddr>,…] [-bandwidth<bandwidthSched>]
where:
<name> = name of the interconnect
<movername> = name of the Data Mover, first for the source side of the interconnect and then for the destination (peer)
side of the interconnect
<cel_name> = name of the destination (peer) VNX system
<cel_id> = ID of the destination (peer) VNX system
<name_service_interface_name> = name of a network interface, source or destination, that can be resolved to
a single IP address (for example, by a DNS server)
<ipaddr> = the IP address (IPv4 or IPv6) of an interface, in dot notation
Note: Ensure that the destination interface list uses the same IPv4/IPv6 protocol. An IPv4 interface cannot connect to an
IPv6 interface and vise versa. Both sides of the connection must use the same protocol.
<bandwidthSched> = a schedule with one or more comma-separated entries to specify bandwidth limits on specific
days, specific hours, or both, listed most specific to least specific by using the syntax [Su|Mo|Tu|We|Th|Fr|Sa][HH:00-
HH:00][/Kb/s],[ <next_entry>],[...]
Note: If no bandwidth schedule is specified, all available bandwidth is used at all times.
Example:
To set up an interconnect between Data Mover 2 on system cs100 and destination Data Mover 3 on peer system cs110,
and specify a bandwidth schedule that limits bandwidth to 8000 Kb/s on Monday, Tuesday, and Wednesday from 7 A.M.
to 2 P.M., at the source site, type:
$ nas_cel -interconnect -create cs100_s2s3 -source_server server_2
-destination_system cs110 -destination_server server_3 -source_interfaces
ip=192.168.52.136,ip=192.168.53.137,ip=192.168.168.138 -destination_interfaces
ip=192.168.52.146,ip=192.168.53.147, ip=192.168.168.148 -bandwidth
MoTuWe07:00-14:00/8000
Set up one side of an interconnect 75
Configuring communication between Data Movers

Output
operation in progress (not interruptible)...id = 20005name = cs100_s2s3source_server = server_2source_interfaces = 192.168.52.136, 192.168.53.137,
192.168.168.138destination_system = cs110destination_server = server_3destination_interfaces = 192.168.52.146, 192.168.53.147,
192.168.168.148bandwidth schedule = MoTuWe07:00-14:00/8000crc enabled = yesnumber of configured replications = 0number of replications in transfer = 0status = The interconnect is OK.
Set up the peer side of the interconnect
Each site must be configured for external communication and be active.
Action
To set up the peer side of the interconnect from the remote VNX system or from the same system with a different Data
Mover for local replication, use this command syntax:
$ nas_cel -interconnect -create <name> -source_server <movername>
-destination_system <cel_name>|id=<cel_id> -destination_server <movername>
-source_interfaces <name_service_interface_name>|ip=<ipaddr>
[,<name_service_interface_name>|ip=<ipaddr>,…]
-destination_interfaces <name_service_interface_name>|ip=<ipaddr>
[,<name_service_interface_name>|ip=<ipaddr>,…] [-bandwidth<bandwidthSched>]
where:
<name> = name of the interconnect
<movername> = name of the Data Mover, first for the local side of the interconnect and then for the destination (peer)
side of the interconnect
<cel_name> = name of the destination (peer) VNX system
<cel_id> = ID of the destination (peer) VNX system
<name_service_interface_name> = name of a network interface, source or destination, that can be resolved to
a single IP address (for example, by a DNS server)
<ipaddr> = the IP address (IPv4 or IPv6) of an interface, in dot notation
Note: Ensure that the source interface list uses the same IPv4/IPv6 protocol. An IPv4 interface cannot connect to an IPv6
interface and vise versa. Both sides of the connection must use the same protocol.
76 Using VNX Replicator
Configuring communication between Data Movers

Action
<bandwidthSched> = a schedule with one or more comma-separated entries to specify bandwidth limits on specific
days, specific hours, or both, listed most specific to least specific by using the syntax [Su|Mo|Tu|We|Th|Fr|Sa][HH:00-
HH:00][/Kb/s],[ <next_entry>],[...]
Note: If no bandwidth schedule is specified, all available bandwidth is used at all times.
Example:
To set up an interconnect between Data Mover server_3 on system cs110 and its peer Data Mover server_2 on system
cs100, with a bandwidth schedule for weekdays from 7 A.M. to 4 P.M. at a bandwidth of 2000 Kb/s, at the destination site,
type:
$ nas_cel -interconnect -create cs110_s3s2 -source_server server_3
-destination_system cs100 -destination_server server_2 -source_interfaces
ip=192.168.52.146,ip=192.168.53.147,ip=192.168.168.148 -destination_interfaces
ip=192.168.52.136,ip=192.168.53.137,ip=192.168.168.138 -bandwidth MoTuWeThFr07:00
-16:00/2000
Note: Use the nas_cel -list command to learn the VNX system name. If the name is truncated or you find it difficult to
extract from the output, display the full name clearly by using the nas_cel -info command with the VNX system ID.
Output
operation in progress (not interruptible)...id = 20004name = cs110_s3s2source_server = server_3source_interfaces = 192.168.52.146, 192.168.53.147192.168.168.148destination_system = cs100destination_server = server_2destination_interfaces = 192.168.52.136, 192.168.53.137,192.168.168.138bandwidth schedule = MoTuWeThFr07:00-16:00/2000crc enabled = yesnumber of configured replications = 0number of replications in transfer = 0status = The interconnect is OK.
Validate interconnect information
At both source and destination sites, check whether the interconnect is established betweena given Data Mover and its peer:
1. To list the interconnects available on the local VNX system and view the interconnectname and ID, use this command syntax:
$ nas_cel -interconnect -list
Output:
Validate interconnect information 77
Configuring communication between Data Movers

id name source_server destination_system destination_server20001 loopback server_2 cs100 server_220004 172143to17343 server_2 cs100 server_220005 cs100_s2s3 server_2 cs110 server_320006 ics2148s2 server_2 cs100 server_2
Note: All loopback interconnects display “loopback" for the interconnect name. Use the interconnectID to specify a specific loopback interconnect.
2. To verify that both sides of the interconnect can communicate with each other, at eachsite, use this command syntax:
From either side:
$ nas_cel -interconnect -validate <name>|id=<interconnectId>
where:
<name> = name of the interconnect to validate (obtained from step 1)
<interconnectId> = ID of the interconnect to validate
Example:
To validate interconnect cs100_s2s3 on server_2, type:
$ nas_cel -interconnect -validate id=20005
Output:
validating...ok
Note: Validation fails if the peer interconnect is not set up, or for any interconnect that does nothave interfaces from the same protocol in both source and destination lists. For example, if thesource interface list includes an IPv6 address, the destination interface list must also include anIPv6 address.
78 Using VNX Replicator
Configuring communication between Data Movers

6
Configuring a file systemreplication session
You create a replication session for every file system you want to replicate.When you create a session, the system performs the following:
Verifies whether source and destination Data Movers can communicatewith each other
Starts replication
Begins tracking all changes made to the source file system
You set your replication policies when you establish the replicationrelationship. Planning considerations on page 57 describes how to controlreplication sessions with replication policies.
Note: To create a session for a one-time copy of a file system, follow the proceduresin Chapter 8.
The tasks to create an ongoing replication session for a file system are:
Prerequisites on page 80 Verify destination storage on page 81 Validate Data Mover communication on page 81 Create a file system replication session on page 82 (Optional) Verify file system replication on page 85
Using VNX Replicator 79

Prerequisites
You should have a functioning NFS or CIFS environment before you use VNX Replicator.
If you are using VDMs in a CIFS environment, ensure that the VDM where the file systemis located is replicated first.
Verify that both the source and destination file systems have the same FLR type, eitheroff, Enterprise, or Compliance. Also, when creating a file system replication, you cannotuse an FLR-C-enabled destination file system that contains protected files.
If you are using file systems enabled for data deduplication, verify that all destination filesystems support VNX data deduplication.
The procedures in this section assume the following:
• The source file system is created and mounted as read/write on a Data Mover.
• The destination file system may or may not be created.You can use an existingdestination file system, especially for remote replications where the remote destinationfile system has the same name as the source.
• The Data Mover interconnect is created.
If you want to choose a specific interface name or IP address for the replication session,specify it when you create the replication.You can specify a source and destination interfaceor allow the system to select it for you. If you allow the system to select it, the system willautomatically verify that the source and destination interfaces can communicate. If youspecify particular source and destination interfaces, there is no check to verify communication.
If you replicate a quotas-enabled file system from a system that runs on VNX for file version6.0.41.0 or later to a destination system that runs on a version of VNX for file earlier than6.0.41.0, the destination file system can become unusable.
Any future changes to this information requires stopping and starting replication, as detailedin Stop a replication session on page 134 and Start a replication session on page 136.
Sample information
Table 7 on page 80 lists information about the source and destination sites, Data Mover,and interconnects used in the examples in this section.
Table 7. Sample information
InterfacesInterconnectData MoverVNX system nameSite
192.168.52.136
192.168.53.137
192.168.168.138
cs100_s2s3server_2cs100Source
192.168.52.146
192.168.53.147
192.168.168.148
cs110_s3s2server_3cs110Destination
80 Using VNX Replicator
Configuring a file system replication session

Verify destination storage
There must be enough available storage on the destination side to create the destinationfile system.
Action
To verify whether there is available storage to create the destination file system, use this command syntax:
$ nas_pool -size <name>
where:
<name> = name of the storage pool
Note: Use the nas_pool -list command to obtain the name or ID of the storage pool.
Example:
To verify the size of storage pool clar_r1, type:
$ nas_pool -size clar_r1
Output
id = 3name = clar_r1used_mb = 11485avail_mb = 2008967total_mb = 2020452potential_mb = 0
Validate Data Mover communication
Before you create the replication session, verify that authentication is configured properlybetween the Data Mover pair and validate all the combinations between source anddestination IP addresses/interface names.
Action
To verify Data Mover communication, use this command syntax:
$ nas_cel -interconnect -validate <name>|id=<interconnectId>
where:
<name> = name of the interconnect to validate
<interconnectId> = ID of the interconnect to validate
Example:
To verify that authentication is configured properly for interconnect cs100_s2s3, type:
$ nas_cel -interconnect -validate cs100_s2s3
Verify destination storage 81
Configuring a file system replication session

Action
Note: To obtain the interconnect ID, use the nas_cel -interconnect -list command.
Output
validating...ok
Create a file system replication session
To create a file system replication session, see the examples below.
Action
To create a file system replication session that uses a storage pool, a system-selected local interface supporting the lowest
number of sessions, and specifies a time-out-of-sync value, use this command syntax:
$ nas_replicate -create <name> -source -fs <fsName>|id=<fsId>
-destination -pool id=<dstStoragePoolId>|<dstStoragePool>
-interconnect <name>|id=<interConnectId> -max_time_out_of_sync<maxTimeOutOfSync>
Note: If you are using an existing file system, use the -destination -fs option and specify the file system name or ID.
where:
<name> = name of the replication session.
<fsName> = name of the existing source file system to replicate. The source and destination file systems must have the
same FLR type, either off, Enterprise, or Compliance.
<fsId> = ID of the existing source file system to replicate.
<dstStoragePoolId> = ID of the storage pool to use to create the destination file system.
<dstStoragePool> = name of the storage pool to use to create the destination file system.
<name> = name of the local source side Data Mover interconnect.
<interConnectID> = ID of the local source-side Data Mover interconnect.
<maxTimeOutOfSync> = number of minutes that the source and destination can be out of synchronization before an
update occurs.
Example:
To create remote replication session rep1 for source file system src_ufs1 to a destination by using destination storage
pool clar_r1, and specifying a refresh update of 15 minutes, type:
$ nas_replicate -create rep1 -source -fs src_ufs1 -destination -pool clar_r1
-interconnect cs100_s2s3 -max_time_out_of_sync 15
Note: The system selects the interface if you do not specify one.
82 Using VNX Replicator
Configuring a file system replication session

Output
OK
Verification
To verify that the replication session was created, type:
$ nas_replicate -list
Output:
Name type Local Mover Interconnect Celerra Statusrep1 filesystem server_2 -->cs100_s2s3 cs_100 OK
The next example creates a replication session that uses specific source and destinationinterfaces and a manual update policy.
Action
To create a file system replication that has no existing destination file system, uses specific IP addresses, and a manual
update policy, use this command syntax:
$ nas_replicate -create <name> -source -fs <fsName> -destination
-pool id=<dstStoragePoolId>|<dstStoragePool>
-interconnect <name>|id=<interConnectId>]
-source_interface <name_service_interface_name>|ip=<ipaddr>]
-destination_interface <name_service_interface_name>|ip=<ipaddr>]
-manual_refresh
where:
<name> = name of the replication session.
<fsName> = name of existing source file system to replicate. The source and destination file systems must have the
same FLR type, either off, Enterprise, or Compliance.
<dstStoragePoolId> = ID of the storage pool to use to create the destination file system.
<dstStoragePool> = name of the storage pool to use to create the destination file system.
<name> = name of the local source side Data Mover interconnect.
<interConnectId> = ID of the local source side Data Mover interconnect.
<name_service_interface_name> = interface name to use first for the source interface interconnect and then the
destination interface. This network interface name must resolve to a single IP address (for example, by a DNS server. )
<ipaddr> = IP address (IPv4 or IPv6) to use first for the source interface interconnect and then the destination interface
interconnect.
Note: Ensure that the source and destination interface lists use the same IPv4/IPv6 protocol. An IPv4 interface cannot
connect to an IPv6 interface and vise versa. Both sides of the connection must use the same protocol.
Example:
To create a file system replication session named rep2 to replicate the source file system src_ufs1 specifying certain IP
addresses to use as interfaces and a manual update policy, type:
Create a file system replication session 83
Configuring a file system replication session

Action
$ nas_replicate -create rep2 -source -fs src_ufs1 -destination -pool=dst_pool1
-interconnect cs100_s2s3 -source_interface ip=192.168.52.136 -destination_interface
ip=192.168.52.146 -manual_refresh
Output
OK
The next example creates a replication session that uses an existing destination file systemand the default max_time_out_of_sync value of 10 minutes.
Note: When you create a replication session by using an existing, populated destination file system,it uses more of the destination file system SavVol space.Therefore, if the existing data on the destinationis not needed, delete the destination file system and recreate the session using the -pool option. TheSavVol space for a file system can easily exceed the total space of the primary file system. This isbecause the SavVol space can be 20 percent of the total storage space assigned to the system.
Action
To create a file system replication that has an existing destination file system, use this command syntax:
$ nas_replicate -create <name> -source -fs <fsName> -destination -fs
id=<dstFsId>|<existing_dstFsName> -interconnect <name>|id=<interConnectId>
where:
<name> = name of the replication session.
<fsName> = name of existing source file system to replicate. The source and destination file systems must have the
same FLR type, either off, Enterprise, or Compliance.
<dstFsId> = ID of the existing file system to use on the destination. The source and destination file systems must have
the same FLR type, either off, Enterprise, or Compliance.You cannot use an FLR-C-enabled destination file system that
contains protected files.
<existing_dstFsName> = name of the existing file system to use on the destination. The source and destination file
systems must have the same FLR type, either off, Enterprise, or Compliance.You cannot use an FLR-C-enabled destination
file system that contains protected files.
<name> = name of the local source side Data Mover interconnect.
<interConnectId> = ID of the local source side Data Mover interconnect.
Note: If you do not enter a max_time_out_of_sync value or specify manual refresh, the system will default to 10 minutes
for a file system session.
Example:
To create a file system replication session named rep2 to replicate the source file system src_ufs1 and specifying an ex-
isting destination file system, type:
$ nas_replicate -create rep2 -source -fs src_ufs1 -destination -fs src_ufs1_dst
-interconnect cs100_s2s3
84 Using VNX Replicator
Configuring a file system replication session

Output
OK
(Optional) Verify file system replication
Use the nas_replicate -info command at any time to view detailed information about areplication session on a VNX system. Get information about replication sessions on page128 provides more details about this command.
Action
To check the status of a specific replication session, use this command syntax:
$ nas_replicate -info <name>|id=<session_id>
where:
<name> = name of the replication session
<session_id> = ID of the replication session
Example:
To display the information about replication session rep2, which includes status information, type:
$ nas_replicate -info rep2
Note: Use the nas_task -list command to list all local tasks that are in progress, or completed tasks that have not been
deleted.
(Optional) Verify file system replication 85
Configuring a file system replication session

Output
ID =1106_APM00063501064_0024_2791_APM00063501064_0024Name = rep2Source Status = OKNetwork Status = OKDestination Status = OKLast Sync Time =Type = filesystemCelerra Network Server = cs100Dart Interconnect = cs100_s2s3Peer Dart Interconnect = cs110_s3s2Replication Role = sourceSource Filesystem = src_ufs1Source Data Mover = server_2Source Interface = 192.168.52.136Source Control Port = 0Destination Filesystem = src_ufs1_dstDestination Data Mover
= server_3Destination Interface = 192.168.52.146Destination Control Port = 5081Destination Data Port = 8888Max Out of Sync Time (minutes) = 20Next Transfer Size (KB) = 4680Current Transfer Size (KB) = 4680Current Transfer Remain (KB) = 4680Estimated Completion Time =Current Transfer is Full Copy = NoCurrent Transfer Rate (KB/s) = 0Current Read Rate (KB/s) = 0Current Write Rate (KB/s) = 0Previous Transfer Rate (KB/s) = 0Previous Read Rate (KB/s) = 0Previous Write Rate (KB/s) = 0Average Transfer Rate (KB/s) = 0Average Read Rate (KB/s) = 0Average Write Rate (KB/s) = 0
86 Using VNX Replicator
Configuring a file system replication session

7
Configuring a VDMreplication session
The VDM replication process consists of two main tasks: First, you createthe session to replicate the VDM and then you create a session to replicatethe file system mounted to the VDM. Replication source objects on page21 provides more information on replicating VDM source objects.
The tasks to create a VDM replication session are:
Prerequisites on page 88 Verify the source VDM on page 88 Verify available destination storage on page 88 Validate Data Mover communication on page 89 Create VDM replication session on page 90 Replicate the file system mounted to the VDM on page 91 (Optional) Verify VDM replication on page 92
Using VNX Replicator 87

Prerequisites
Before you create a VDM replication session note the following:
Review Appendix A to learn more about the CIFS replication environment.
The source and destination side interface names must be the same for CIFS serverstransition.You may need to change the interface name created by using Unisphere (bydefault it uses IP address) by creating a new interface name with the server_ifconfigcommand.
The source and destination side mount points must be the same for the share names toresolve correctly.This will ensure the CIFS share can recognize the full path to the sharedirectory and users will be able to access the replicated data after failover.
When the source replicated file system is mounted on a VDM, the destination file systemshould also be mounted on the VDM that is replicated from the same source VDM.
For the NFS endpoint of a replicated VDM to work correctly on the destination side, theOperating Environments of the source and destination sides must be version 7.0.50.0or later.
The local groups in the source VDM are replicated to the destination side in order to havecomplete access control lists (ACLs) on the destination file system. Configuring andManaging CIFS on VNX provides more information.
Verify the source VDM
The source VDM to be replicated must be in the loaded read/write or mounted read-onlystate.
Action
To display a list of all VDMs in the Data Mover server table, use this command syntax:
$ nas_server -list -vdm
Output
id acl server mountedfs rootfs name1 0 1 991 vdm12 0 2 993 vdm23 0 2 1000 vdm_1G4 0 2 1016 vdm3
Verify available destination storage
The destination VDM will be created automatically, the same size as the source and read-onlyas long as the specified storage is available.
88 Using VNX Replicator
Configuring a VDM replication session

Follow the procedure in Verify the source VDM on page 88 to verify a destination VDMexists.
Action
To verify the storage pool to use to create the destination VDM, use this command syntax:
$ nas_pool -size <name>
where:
<name> = name of the storage pool
Use the nas_pool -list command to obtain the name or ID of the storage pool.
Example:
To verify the size of storage pool vdmpool, type:
$ nas_pool -size vdmpool
Output
id = 17name = vdmpoolused_mb = 25404avail_mb = 508859total_mb = 534263potential_mb = 0
Validate Data Mover communication
Before you create the replication session, verify that authentication is configured properlybetween the Data Mover pair and validate all the combinations between source anddestination IP addresses/interface names.
Action
To verify Data Mover communication, use this command syntax:
$ nas_cel -interconnect -validate <name>|id=<interconnectId>
where:
<name> = name of the interconnect to validate
<interconnectId> = ID of the interconnect to validate
Example:
To verify that authentication is configured properly for interconnect cs100_s2s3, type:
$ nas_cel -interconnect -validate cs100_s2s3
Note: To obtain the interconnect ID, use the nas_cel -interconnect -list command.
Validate Data Mover communication 89
Configuring a VDM replication session

Output
validating...ok
Create VDM replication session
The VDM replication session replicates information contained in the root file system of aVDM. It produces a point-in-time copy of a VDM that re-creates the CIFS environment at adestination. It does not replicate the file systems mounted to the VDM.
A given source VDM can support up to four replication sessions.
Action
To create a VDM replication session, use this command syntax:
$ nas_replicate -create <name> -source -vdm <vdmName> -destination
-vdm <existing_dstVdmName> -interconnect <name>|id=<interConnectId>
[-max_time_out_of_sync <maxTimeOutOfSync>|-manual_refresh]
where:
<name> = name of the VDM replication session.
<vdmName> = name of the source VDM to replicate. VDM must be in the loaded or mounted state and can already be
the source or destination VDM of another replication.
<existing_dstVdmName> = name of the existing VDM on the destination. VDM must be in the mounted state. VDM
can be the source of another replication but cannot be the destination of another replication.
<name> = name of the local source side of the established Data Mover interconnect to use for this replication session.
<interConnectId> = ID of the local source side of the established Data Mover interconnect to use for this replication
session.
<maxTimeOutOfSync> = number of minutes that the source and destination can be out of synchronization before an
update occurs.
Note: If you specify a pool instead of an existing destination VDM, the pool is used to create the destination VDM auto-
matically as read-only and uses the same name and size as the source VDM.
Example:
To create VDM replication session rep_vdm1 by using the source vdm1 and with existing destination VDM dst_vdm with
a refresh rate of 10 minutes, type:
$ nas_replicate -create rep_vdm1 -source -vdm vdm1 -destination -vdm dst_vdm
-interconnect cs100_s2s3 -max_time_out_of_sync 10
Output
OK
Verification
To verify that rep_vdm1 was created, type:
90 Using VNX Replicator
Configuring a VDM replication session

Verification
$ nas_replicate -list
Name type Local Mover Interconnect Celerra Statusrep_vdm1 vdm server_2 -->cs100_s2s3 cs100 OK
Replicate the file system mounted to the VDM
After you have created the session to replicate the VDM, create a session to replicate thefile system mounted to the VDM.
Action
To create a file system replication session mounted to a VDM, use the following syntax:
$ nas_replicate -create <name> -source -fs <fsName>|id=<fsid>
-destination -pool id=<dstStoragePoolId>|<dstStoragePool>
-vdm <existing_dstVdmName>|id=<dstVdmId>
-interconnect <name>|id=<interConnectId>
[-max_time_out_of_sync <maxTimeOutOfSync>|-manual_refresh]
where:
<name> = name of the file system replication session
<fsName> = name of the source file system mounted to the VDM
<fsid> = ID of the source file system mounted to the VDM
<dstStoragePoolId> = ID of the storage pool to use to create the destination file system
<dstStoragePool> = name of the storage pool to use to create the destination file system
<existing_dstVdmName> = name of an existing destination VDM on which to mount the destination file system
<dstVdmId> = ID of the destination VDM on which to mount the destination file system
<interConnectId> = ID of the local side of an established Data Mover interconnect to use for this replication session
<name> = name of the local side of an established Data Mover interconnect to use for this replication session
<maxTimeOutOfSync> = number of minutes that the source and destination can be out of synchronization before an
update occurs
Example:
To create a file system replication session mounted to an existing VDM, type:
$ nas_replicate -create vdm_v2 -source -fs src_fs_vdm -destination -pool id=3 -vdm
Vdm_2 -interconnect cs100_s2s3
Note: Use the -vdm option used to indicate that the file system will be mounted on a VDM.
Output
OK
Replicate the file system mounted to the VDM 91
Configuring a VDM replication session

(Optional) Verify VDM replication
Use the nas_replicate -info command at any time to view detailed information about areplication session on a VNX system. Get information about replication sessions on page128 provides more details about this command.
Action
To verify the status of a specific replication session, use this command syntax:
$ nas_replicate -info <name>|id=<session_id>
where:
<name> = name of the replication session
<session_id> = ID of the replication session
Example:
To display the status of the VDM replication session, type:
$ nas_replicate -info vdm_v2
Note: You can also use the nas_task -list command to list all local tasks that are in progress, or completed tasks that
have not been deleted.
92 Using VNX Replicator
Configuring a VDM replication session

Output
ID = 10867_APM00063303672_0000_25708_APM00063303672_0000Name = vdm_v2Source Status = OKNetwork Status = OKDestination Status = OKLast Sync Time =Type = vdmCelerra Network Server = eng17343Dart Interconnect = loopbackPeer Dart Interconnect = loopbackReplication Role = loopbackSource VDM = srcvdm1_replica1Source Data Mover = server_2Source Interface = 127.0.0.1Source Control Port = 0Source Current Data Port = 0Destination VDM = srcvdm1Destination Data Mover = server_2Destination Interface = 127.0.0.1Destination Control Port = 5081Destination Data Port = 8888Max Out of Sync Time (minutes) = 2Next Transfer Size (KB) = 0Current Transfer Size (KB) = 0Current Transfer Remain (KB) = 0Estimated Completion Time =Current Transfer is Full Copy = NoCurrent Transfer Rate (KB/s) = 4000Current Read Rate (KB/s) = 40960Current Write Rate (KB/s) = 3461Previous Transfer Rate (KB/s) = 0Previous Read Rate (KB/s) = 0Previous Write Rate (KB/s) = 0Average Transfer Rate (KB/s) = 3585Average Read Rate (KB/s) = 0Average Write Rate (KB/s) = 0
(Optional) Verify VDM replication 93
Configuring a VDM replication session

94 Using VNX Replicator
Configuring a VDM replication session

8
Configuring a one-timecopy session
This section lists the tasks to create a session for a one-time copy of asource file system mounted read-only, a file system checkpoint mountedread-only, or a file system writable checkpoint mounted read-only to thesame or different VNX system.
The tasks to create a one-time file system copy session are:
Prerequisites on page 96 Verify the source file system on page 96 Verify destination file system or storage on page 97 Validate Data Mover communication on page 99 Create a file system copy session on page 99 (Optional) Monitor file system copy on page 102
Using VNX Replicator 95

Prerequisites
Using nas_copy constitutes a replication session. The command copies source data to thedestination and then deletes the session and all internal checkpoints created on the sourceand destination. How one-time file system copy sessions work on page 42 explains howone-time copy sessions work.
Multiple copy sessions can run from the same source. Each copy session counts towardsthe four replication sessions limit and the number of sessions limit per Data Mover.
Before creating a one-time copy session, note the following:
The source read-only file system or file system checkpoint must already exist.
The destination file system or the storage pool required to create the destination filesystem must exist.
The destination file system must be the same size as the source and is read-onlyaccessible.
You cannot create a copy session unless both the source and destination file systemshave the same FLR type, either off, Enterprise, or Compliance. Also, when creating afile system replication, you cannot use an FLR-C-enabled destination file system thatcontains protected files.
The Data Mover interconnect to use for the session must be set up.
nas_copy update options
The nas_copy update options work as follows:
Overwrite destination — For an existing destination file system, discards any changesmade to the destination file system and restores it from the established common base(differential copy). If you do not specify this option and an existing destination file systemcontains different content, the command returns an error.
Refresh — Updates a destination checkpoint that has the same name as the copiedcheckpoint. Use this option when copying an existing checkpoint, instead of creating anew checkpoint at the destination after the copy. If no checkpoint exists with the samename, the command returns an error.
Full copy — For an existing file system, if a common base checkpoint exists, performsa full copy of the source checkpoint to the destination instead of a differential copy.
Note: You must explicitly specify the full copy option when starting a copy session and no establishedcommon base exists. If full copy is not specified, the copy session will fail.
Verify the source file system
Before you create a copy session, verify that the source file system exists and that it ismounted read-only.
96 Using VNX Replicator
Configuring a one-time copy session

1. To verify that the source file system exists on the Data Mover, type:
$ nas_fs -list
Output:
id inuse type acl volume name server58 y 1 0 204 fs1 260 y 1 0 208 fs2 162 y 1 0 214 fs4 290 y 1 0 252 dxpfs 191 y 1 0 254 fs111 194 n 7 0 261 fs111_ckpt 198 y 1 0 272 fs113 2101 y 15 0 261 fs111_ckpt1_writeab 1
2. To verify that the source file system is mounted read-only, use this command syntax:
$ server_mount <movername>
where:
<movername> = name of the Data Mover where the source file system is mounted
Example:
To verify that source file system fs113 is mounted read-only, type:
$ server_mount server_2
Output:
server_2 :root_fs_2 on / uxfs,perm,rwroot_fs_common on /.etc_common uxfs,perm,rofs2 on /fs2 uxfs,perm,rwca1 on /ca1 uxfs,perm,rwca2 on /ca2 uxfs,perm,rwca3 on /ca3 uxfs,perm,roca3_replica1 on /ca3_replica1 uxfs,perm,roroot_fs_vdm_vdm_mkt on /root_vdm_1/.etc uxfs,perm,rwca3_replica2 on /ca3_replica2 uxfs,perm,rodxpfs on /dxpfs uxfs,perm,rwfs111 on /fs111 uxfs,perm,rwfs113 on /fs113 uxfs,perm,ro
Verify destination file system or storage
When there is no existing destination file system, you must verify that there is a storage poolavailable and that it includes enough storage for the copy. If you are copying to an existingdestination file system, verify that the file system exists, is the same size as the source, andthat it is mounted read-only.
1. If you are copying to an existing destination file system, verify that the destination filesystem exists on the Data Mover, type:
$ nas_fs -list
Verify destination file system or storage 97
Configuring a one-time copy session

Output:
id inuse type acl volume name server94 y 1 0 254 fs1_replica1 296 y 7 0 257 root_rep_ckpt_94_10 297 y 7 0 257 root_rep_ckpt_94_10 298 y 1 0 259 fs113 2
Note: The output shows that file system fs113 exists on destination Data Mover server _2.
2. To verify that the destination file system is mounted read-only, use this command syntax:
$ server_mount <movername>
where:
<movername> = name of the Data Mover where the destination file system is mounted
Example:
To verify that destination file system fs113 is mounted read-only, from the destinationside, type:
$ server_mount server_2
Output:
server_2 :root_fs_2 on / uxfs,perm,rw,<unmounted>root_fs_common on /.etc_common uxfs,perm,ro,<unmounted>fs3 on /fs3 uxfs,perm,rw,<unmounted>smm4_replica1 on /smm4_replica1 uxfs,perm,ro,<unmounted>smm4-silver on /smm4-silver ckpt,perm,ro,<unmounted>smm4_cascade on /smm4_cascade rawfs,perm,ro,<unmounted>smm1 on /smm1 uxfs,perm,ro,<unmounted>dxsfs on /dxsfs uxfs,perm,rw,<unmounted>fs113 on /fs113 uxfs,perm,ro,
3. If there is no existing destination file system, verify that there is a storage pool and thatit includes enough storage for the copy. To list the available storage pools for thedestination VNX system, from the destination side, type:
$ nas_pool -list
Output:
id inuse acl name storage_system2 y 0 clar_r1 N/A3 y 0 clar_r5_performance FCNTR074200038
Note: The output shows the storage pool IDs. Use the pool ID to view the available storage for thepool in step 4.
4. To view the available storage for a specific pool, use this command syntax:
$ nas_pool -size <name>|id=<id>|-all
98 Using VNX Replicator
Configuring a one-time copy session

Example:
To view the available storage for pool 3, type:
$ nas_pool -size id=3
Output:
id = 3name = clar_r5_performanceused_mb = 44114avail_mb = 1988626total_mb = 2032740potential_mb = 0
Note: The output shows the available storage in MBs (avail_mb).
Validate Data Mover communication
Before you create the replication session, verify that authentication is configured properlybetween the Data Mover pair and validate all the combinations between source anddestination IP addresses/interface names.
Action
To verify Data Mover communication, use this command syntax:
$ nas_cel -interconnect -validate <name>|id=<interconnectId>
where:
<name> = name of the interconnect to validate
<interconnectId> = ID of the interconnect to validate
Example:
To verify that authentication is configured properly for interconnect cs100_s2s3, type:
$ nas_cel -interconnect -validate cs100_s2s3
Note: To obtain the interconnect ID, use the nas_cel -interconnect -list command.
Output
validating...ok
Create a file system copy session
Execute the nas_copy command from the Control Station on the source side only.
Validate Data Mover communication 99
Configuring a one-time copy session

Action
To create a one-time copy session for a source read-only file system with no existing destination, use this command syntax:
$ nas_copy -name <sessionName> -source -fs <name>|id=<fsId>
-destination -pool id=<dstStoragePoolId>|<dstStoragePool>
-interconnect <name>|id=<interConnectId>
where:
<sessionName> = name of the one-time copy session
<name> = name of the existing source read-only file system to be copied
<fsId> = ID of the existing source read-only file system to be copied
<dstStoragePoolId> = ID of the storage pool to use to create the destination file system
<dstStoragePool> = name of the storage pool to use to create the destination file system
<name> = name of the interconnect configured between source and destination Data Movers
<interconnectId> = ID of the interconnect configured between source and destination (peer) Data Movers
Example:
To create a one-time copy session ca3_copy for source file system fs113 that has no existing destination file system, from
the source side, type:
$ nas_copy -name ca3_copy -source -fs fs113 -destination -pool id=3 -interconnect
id=20001
Output
OK
Notes
Once started, you can monitor the session by using the nas_task command. Chapter 11 provides more information.
Return codes for nas_copy on page 193 lists the return codes generated by the nas_copy command, and can be used for
error checking purposes.
Depending on the size of the data on the source, this command may take some time to complete.
This is an example of a file system copy with an existing destination file system.
Action
To create a one-time copy session for a source read-only file system when the file system already exists on the destination,
use this command syntax:
$ nas_copy -name <sessionName> -source -fs <name>|id=<fsId>
-destination -fs id=<dstFsId>|<existing_dstFsName>
-interconnect <name>|id=<interConnectId>-overwrite_destination -full_copy
where:
<sessionName> = name of the one-time copy session
<name> = name of the existing source read-only file system to be copied
100 Using VNX Replicator
Configuring a one-time copy session

Action
<fsId> = ID of the existing source read-only file system to be copied
<dstFsId> = ID of the existing destination file system
<existing_dstFsName> = name of the existing destination file system
<name> = name of the interconnect configured between source and destination Data Movers
<interConnectId> = ID of the interconnect configured between source and destination (peer) Data Movers
Example:
To create a copy session copy_src_fs for source file system src_fs when the file system dest_fs already exists on the
destination, type:
$ nas_copy -name copy_src_fs -source -fs src_fs -destination -fs dest_fs
-interconnect id=30002 -overwrite_destination -full_copy
Output
OK
Notes
This will overwrite the contents on the destination.
To verify that the file system was created on the destination, use the nas_fs -list command.
Once started, you can monitor the session by using the nas_task command. Chapter 11 provides more information.
Return codes for nas_copy on page 193 lists the return codes generated by the nas_copy command, and can be used for
error checking purposes.
This is an example of creating a copy session for a file system checkpoint.
Action
To create a one-time copy session for a file system checkpoint, use this command syntax:
$ nas_copy -name <sessionName> -source -ckpt <ckptName>|id=<ckptId>
-destination -pool id=<dstStoragePoolId>|<dstStoragePool>
-interconnect <name>|id=<interConnectId>
where:
<sessionName> = name of the one-time copy session
<ckptName> = name of the existing source read-only file system checkpoint to be copied
<ckptId> = ID of the existing source read-only file system checkpoint to be copied
<dstStoragePoolId> = ID of the storage pool to use to create the destination file system
<dstStoragePool> = name of the storage pool to use to create the destination file system
<name> = name of the interconnect configured between source and destination Data Movers
<interConnectId> = ID of the interconnect configured between source and destination Data Movers
Example:
Create a file system copy session 101
Configuring a one-time copy session

Action
To create one-time copy session copyrep6_copy for file system checkpoint rep5_ckpt1, type:
$ nas_copy -name copyrep6_copy -source -ckpt rep5_ckpt1 -destination -pool id=3
-interconnect id=20003
Output
OK
Notes
To verify that rep5_ckpt1 was created on the destination, use the nas_fs -list command.
Once started, you can monitor the session by using the nas_task command. Chapter 11 provides more information.
Return codes for nas_copy on page 193 lists the return codes generated by the nas_copy command, and can be used for
error checking purposes.
(Optional) Monitor file system copy
Once started, you can monitor the copy session by using the nas_task command. Thiscommand is used to get information about long-running tasks, such as a replication copytask.You can display the status of a specific copy session or all copy sessions. Chapter 11provides more information.
Action
To display detailed information about a task, use this command syntax:
$ nas_task -info -all|<taskId>
where:
<taskId> = ID of the replication copy session
Use the nas_task -list command to obtain the task ID for the copy session.
Example:
To display detailed information about rep5_copy, with task ID 9730, type:
$ nas_task -info 9730
102 Using VNX Replicator
Configuring a one-time copy session

Output
Task Id = 9730Celerra Network Server = Local SystemTask State = RunningCurrent Activity = Info 26045317613: Transfer doneMovers =Percent Complete = 94Description = Create Replication rep5_copy.Originator = [email protected] Time = Thu Jan 24 11:22:37 EST 2008Estimated End Time = Thu Jan 24 11:21:41 EST 2008Schedule = n/a
(Optional) Monitor file system copy 103
Configuring a one-time copy session

104 Using VNX Replicator
Configuring a one-time copy session

9
Configuring advancedreplications
With VNX Replicator, you can configure one-to-many and cascadereplication configurations.You can also replicate a file system mountedon a Nested Mount file system mount point
The tasks to configure these advanced replication configurations are:
Configure a one-to-many replication on page 106 Configure a cascade replication on page 106 Configure a one-to-many replication with common base checkpoints
on page 107 Configure a cascading replication with common base checkpoints
on page 115 Configure the replication of a file system mounted on an Nested
Mount File System mountpoint on page 124
Using VNX Replicator 105

Configure a one-to-many replication
To take advantage of a one-to-many configuration, where the source object is used in morethan one replication session, create multiple sessions on the source and associate the sourcefor each session with up to four different destinations. This configuration is actually aone-to-one created up to four times. All source object types can be used in a one-to-manyconfiguration.
One-to-many replication configurations on page 27 explains this configuration in more detail.
1. Create a replication session. Follow the appropriate procedure for the type of replicationsession for which you want to create the configuration:
• Chapter 6 for a file system replication session
• Chapter 7 for VDM replication
• Chapter 8 for a one-time copy session
2. Repeat step 1 up to three more times by using the same source object. If it is a remotereplication session, ensure to specify a remote interconnect.
Configure a cascade replication
To take advantage of a cascade configuration where one destination also serves as thesource for another replication session, create a replication session on each source in thepath. The first session runs replication from the Source to Destination 1, and the secondsession runs replication from Destination 1, serving as the source, to Destination 2.Replication sessions in a cascade configuration are supported up to two network hops. Allsource object types can be used in a cascade configuration.
Cascade replication configurations on page 31 explains this configuration in more detail.
1. Create a session for ongoing replication. Follow the appropriate procedure for the typeof replication session for which you want to create a cascade configuration:
• Chapter 6 for a file system replication session
• Chapter 7 for VDM replication
• Chapter 8 for a one-time copy session
2. Create a second session on the destination side and for the source object, select thename of the destination object replicated at destination 1 from step 1.
Note: Use nas_replicate -info to view the destination file system name.
106 Using VNX Replicator
Configuring advanced replications

Configure a one-to-many replication with common basecheckpoints
1. Create a user checkpoint for each file system by using the following command syntax:
# fs_ckpt <fs_name> -name <ckpt_name> -Create
where:
<fs_ name> = name of the file system
<ckpt_name> = name of the user checkpoint created for the file system
Note: The -name command is optional. If you do not use the –name command to customize thenames of the checkpoints, the system names the checkpoints. However, EMC recommends thatyou customize the names of the checkpoints for ease of management.
Example:
[root@cse17107 nasadmin]# fs_ckpt otm –name otm_ckptA –Create
Output:
Configure a one-to-many replication with common base checkpoints 107
Configuring advanced replications

operation in progress (not interruptible)...id = 107name = otmacl = 0in_use = Truetype = uxfsworm = offvolume = v245pool = clarata_archivemember_of = root_avm_fs_group_10rw_servers= server_2ro_servers=rw_vdms =ro_vdms =auto_ext = no,thin=nodeduplication = Offckpts = root_rep_ckpt_107_53052_2,root_rep_ckpt_107_53052_1,otm_ckptArep_sess = 245_FNM00103800639_2007_254_FNM00103800639_2007(ckpts:root_rep_ckpt_107_53052_1, root_rep_ckpt_107_53052_2)stor_devs = FNM00103800639-000Fdisks = d18disk=d18 stor_dev=FNM00103800639-000F addr=c16t1l11server=server_2disk=d18 stor_dev=FNM00103800639-000F addr=c0t1l11server=server_2id = 119name = otm_ckptAacl = 0in_use = Truetype = ckptworm = offvolume = vp252pool = clarata_archivemember_of =rw_servers=ro_servers= server_2rw_vdms =ro_vdms =checkpt_of= otm Wed Aug 24 11:11:52 EDT 2011deduplication = Offused = 8%full(mark)= 90%stor_devs = FNM00103800639-000Fdisks = d18disk=d18 stor_dev=FNM00103800639-000F addr=c16t1l11server=server_2disk=d18 stor_dev=FNM00103800639-000F addr=c0t1l11server=server_2
[root@cse17107 nasadmin]# fs_ckpt otm_replica1 –name otm_replica1_ckptB -Create
Output:
108 Using VNX Replicator
Configuring advanced replications

operation in progress (not interruptible)...id = 113name = otm_replica1acl = 0in_use = Truetype = uxfsworm = offvolume = v254pool = clarata_archivemember_of = root_avm_fs_group_10rw_servers=ro_servers= server_3rw_vdms =ro_vdms =auto_ext = no,thin=nodeduplication = Offckpts = root_rep_ckpt_113_53065_2,root_rep_ckpt_113_53065_1,
root_rep_ckpt_113_53280_2,root_rep_ckpt_113_53280_1,otm_replica1_ckptB
rep_sess = 245_FNM00103800639_2007_254_FNM00103800639_2007(ckpts:root_rep_ckpt_113_53065_1, root_rep_ckpt_113_53065_2),254_FNM00103800639_2007_129_FNM00103600044_2007(ckpts:root_rep_ckpt_113_53280_1, root_rep_ckpt_113_53280_2)stor_devs = FNM00103800639-0009disks = d12disk=d12 stor_dev=FNM00103800639-0009 addr=c16t1l5server=server_3disk=d12 stor_dev=FNM00103800639-0009 addr=c0t1l5server=server_3
id = 120name = otm_replica1_ckptBacl = 0in_use = Truetype = ckptworm = offvolume = vp257pool = clarata_archivemember_of =rw_servers=ro_servers= server_3rw_vdms =ro_vdms =checkpt_of= otm_replica1 Wed Aug 24 11:13:02 EDT 2011deduplication = Offused = 13%full(mark)= 90%stor_devs = FNM00103800639-000Ddisks = d16disk=d16 stor_dev=FNM00103800639-000D addr=c16t1l9server=server_3disk=d16 stor_dev=FNM00103800639-000D addr=c0t1l9server=server_3
Note: The following checkpoint creation is on the destination side. The name of the file system isthe same as the source because of replication.
[nasadmin@ENG19105 ~]$ fs_ckpt otm_replica1 –name otm_ ckptC -Create
Output:
Configure a one-to-many replication with common base checkpoints 109
Configuring advanced replications

operation in progress (not interruptible)...id = 113name = otmacl = 0in_use = Truetype = uxfsworm = offvolume = v129pool = clarsas_archivemember_of = root_avm_fs_group_32rw_servers=ro_servers= server_2rw_vdms =ro_vdms =auto_ext = no,thin=nodeduplication = Offckpts = root_rep_ckpt_113_9605_2,root_rep_ckpt_113_9605_1,otm_ ckptCrep_sess = 254_FNM00103800639_2007_129_FNM00103600044_2007(ckpts:root_rep_ckpt_113_9605_1, root_rep_ckpt_113_9605_2)stor_devs = FNM00103600044-0000disks = d8disk=d8 stor_dev=FNM00103600044-0000 addr=c16t1l0server=server_2disk=d8 stor_dev=FNM00103600044-0000 addr=c0t1l0server=server_2
id = 117name = otm _ckptCacl = 0in_use = Truetype = ckptworm = offvolume = vp132pool = clarsas_archivemember_of =rw_servers=ro_servers= server_2rw_vdms =ro_vdms =checkpt_of= otm Wed Aug 24 11:13:55 EDT 2011deduplication = Offused = 8%full(mark)= 90%stor_devs = FNM00103600044-0000disks = d8disk=d8 stor_dev=FNM00103600044-0000 addr=c16t1l0server=server_2disk=d8 stor_dev=FNM00103600044-0000 addr=c0t1l0server=server_2
2. On the source VNX, refresh the local replication session from A to B with the user-createdcheckpoints by using the following command syntax:
$ nas_replicate –refresh <rep_session_name_AtoB> –source <ckpt_name_A>
-destination <ckpt_name_B >
where:
<rep_session_name_AtoB> = name of the replication session between A and B
<ckpt_name_A> = name of the user checkpoint for source VNX A
<ckpt_name_B> = name of the user checkpoint for destination VNX B
110 Using VNX Replicator
Configuring advanced replications

After the refresh completes, the user-created checkpoints for VNX A and VNX B have acommon baseline for the replication pair.
Example:
[root@cse17107 nasadmin]# nas_replicate -refresh 17107s2-17107s3 -source otm_ckptA
-destination otm_replica1_ckptB
Output:
OK
3. On the source VNX, refresh the remote replication session from A to C with theuser-created checkpoints by using the following command syntax:
$ nas_replicate –refresh <rep_session_name_AtoC> –source <ckpt_name_A>
-destination <ckpt_name_C>
where:
<rep_session_name_AtoC> = name of the replication session between A and C
<ckpt_name_A> = name of the user checkpoint for source VNX A
<ckpt_name_C> = name of the user checkpoint for destination VNX C
After the refresh completes, the user-created checkpoints for VNX A and VNX C have acommon baseline for the replication pair. Essentially, now there is a common baselinebetween VNX A,VNX B, and VNX C.
Example:
[root@cse17107 nasadmin]# nas_replicate -refresh 17107s2-19105s2 -source otm_ckptA
-destination otm_ckptC
Output:
OK
4. To replace VNX A with VNX B in the replication topology, delete all replication sessionson A:
a. Delete the replication session between VNX A and VNX B by using the followingcommand syntax on the source:
# nas_replicate -delete <rep_session_name_AtoB> -mode both
where:
<rep_session_name_AtoB> = name of the replication session between VNX A and VNXB
Example:
[root@cse17107 nasadmin]# nas_replicate -delete 17107s2-17107s3 -mode both
Output:
OK
Configure a one-to-many replication with common base checkpoints 111
Configuring advanced replications

b. Delete the replication session between VNX A and VNX C by using the followingcommand syntax on the source:
# nas_replicate -delete <rep_session_name_AtoC> -mode both
where:
<rep_session_name_AtoC> = name of the replication session between VNX A and VNXC
Example:
[root@cse17107 nasadmin]# nas_replicate -delete 17107s2-19105s2 -mode both
Output:
OK
5. Create a replication session from VNX B to VNX C by creating source and peerinterconnects and then creating a replication session:
Note: You can also create interconnects by using Unisphere.
a. Ensure that you have created a trust relationship between Control Station B andControl Station C by using the following command syntax for each VNX:
$ nas_cel -create <cel_name> -ip <ipaddr> -passphrase <passphrase>
where:
<cel_name> = name of the remote VNX
<ipaddr> = IP address of the remote VNX’s primary Control Station (in slot 0)
<passphrase> = passphrase used to manage the remote VNX
Example:
$ nas_cel -create vx17107 -ip 172.24.102.240 -passphrase nasdocs
Output:
operation in progress (not interruptible)...id = 3name = vx17107owner = 0device =channel =net_path = 172.24.102.240VNX_id = APM000438070430000passphrase = nasdocs
Run the -create command twice to ensure communication from both sides, first onthe source VNX (to identify the destination VNX) and then on the destination VNX (toidentify the source VNX).
Note: The passphrase should be the same on both the source and destination VNX.
112 Using VNX Replicator
Configuring advanced replications

b. Create a Data Mover interconnect from B to C on the source VNX by using the followingcommand syntax:
# nas_cel -interconnect -create <name_sourcetodest> -source_server
<MoverName_src> -destination_system <Destination_Control_Station_name>
-destination_server <MoverName_dst> -source_interface <interface IP_src>
-destination_interface <interface IP_dst>
where:
<name_sourcetodest> = name of the interconnect for the source side
<MoverName_src> = name of an available Data Mover on the local side of theinterconnect
<Destination_Control_Station_name> = name of the destination Control Station
<MoverName_dst> = name of an available Data Mover on the peer side of theinterconnect
<interface IP_src>= IP address of an interface available on the local side of theinterconnect
<interface IP_dst>= IP address of an interface available on the peer side of theinterconnect
Example:
# nas_cel -interconnect -create 17107s2-19105s2 -source_server server_2
-destination_system eng19105 -destination_server server_2 -source_interface
ip=10.245.17.110 -destination_interface ip=10.245.19.108
Output:
OK
c. On the destination VNX, create the peer interconnect by using the following commandsyntax:
# nas_cel -interconnect –create <name_desttosource> -source_server
<MoverName_src> -destination_system <Source_Control_Station_name>
-destination_server <MoverName_dst> -source_interface <interface IP_src>
-destination_interface <interface IP_dst>
where:
<name_desttosource> = name of the interconnect for the destination side
<MoverName_src> = name of an available Data Mover on the local side of theinterconnect
<Source_Control_Station_name> = name of the source Control Station
<MoverName_dst> = name of an available Data Mover on the peer side of theinterconnect
<interface IP_src>= IP address of an interface available on the local side of theinterconnect
Configure a one-to-many replication with common base checkpoints 113
Configuring advanced replications

<interface IP_dst>= IP address of an interface available on the peer side of theinterconnect
Example:
# nas_cel -interconnect -create 19105s2-17107s2 -source_server server_2
-destination_system cse17107 -destination_server server_2 -source_interface
ip=10.245.19.108 -destination_interface ip=10.245.17.110
Output:
OK
d. On the source VNX, create the replication session from VNXB to VNXC by using thefollowing command syntax:
# nas_replicate -create <rep_session_name_BtoC> -source -fs <src_fs_name>
–destination -fs <dst_fs_name> -interconnect <name_sourcetodest>
-max_time_out_of_sync <maxTimeOutOfSync>
where:
<rep_session_name_BtoC> = name of the replication session between B and C
<src_fs_name> = name of the source file system on VNX B
<dst_fs_name> =name of the destination file system on VNX C
<name_sourcetodest> = name of the interconnect for the source side from VNX B toVNX C
<maxTimeOutOfSync>= maximum time in minutes that the source and destination canbe out of synchronization before an update occurs
The destination file system name should be the same as what was used in the previousreplication session.
Example:
# nas_replicate -create 17107s3-19105s2 -source -fs otm_replica1 -destination
-fs otm -interconnect 17107s2-19105s2 -max_time_out_of_sync 10
Output:
OK
6. Immediately after the command prompt returns, verify that the initial synchronization isnot performing a full copy by using the following command syntax on the source VNX:
$ nas_replicate -info <rep_session_name_BtoC>
where:
<rep_session_name_BtoC> = name of the replication session between VNX B and VNX C
Example:
[root@cse17107 nasadmin]# nas_replicate -info 17107s3-19105s2
Output:
114 Using VNX Replicator
Configuring advanced replications

ID =245_FNM00103800639_2007_134_FNM00103600044_2007Name = 17107s3-19105s2Source Status = OKNetwork Status = OKDestination Status = OKLast Sync Time = Wed Aug 24 13:23:37 EDT 2011Type = filesystemCelerra Network Server = eng19105Dart Interconnect = 17107s2-19105s2Peer Dart Interconnect = 19105s2-17107s2Replication Role = sourceSource Filesystem = otm_replica1Source Data Mover = server_2Source Interface = 10.245.17.110Source Control Port = 0Source Current Data Port = 0Destination Filesystem = otmDestination Data Mover = server_2Destination Interface = 10.245.19.108Destination Control Port = 5085Destination Data Port = 8888Max Out of Sync Time (minutes) = 10Current Transfer Size (KB) = 0Current Transfer Remain (KB) = 0Estimated Completion Time =Current Transfer is Full Copy = NoCurrent Transfer Rate (KB/s) = 0Current Read Rate (KB/s) = 0Current Write Rate (KB/s) = 0Previous Transfer Rate (KB/s) = 93Previous Read Rate (KB/s) = 57286Previous Write Rate (KB/s) = 3858Average Transfer Rate (KB/s) = 93Average Read Rate (KB/s) = 57286Average Write Rate (KB/s) = 3858
7. Verify that there is a current transfer taking place.The following fields should have valuesgreater than zero:
• Current Transfer Rate (KB/s)
• Current Read Rate (KB/s)
• Current Write Rate (KB/s)
8. Verify that the current transfer is not a full copy. The Current Transfer is Full Copy fieldshould have the value No.
Configure a cascading replication with common base checkpoints
1. Create a user checkpoint for each file system by using the following command syntax:
# fs_ckpt <fs_name> -name <ckpt_name> -Create
where:
<fs_ name> = name of the file system
Configure a cascading replication with common base checkpoints 115
Configuring advanced replications

<ckpt_name> = name of the user checkpoint created for the file system
Note: The -name command is optional. If you do not use the -name command to customize thenames of the checkpoints, the system names the checkpoints. However, EMC recommends thatyou customize the names of the checkpoints for ease of management.
Example:
To create one user checkpoint each for three file systems:
[root@cse17107 nasadmin]# fs_ckpt cascade -name cascade_ckptA -Create
Output:
116 Using VNX Replicator
Configuring advanced replications

operation in progress (not interruptible)...id = 107name = cascadeacl = 0in_use = Truetype = uxfsworm = offvolume = v245pool = clarata_archivemember_of = root_avm_fs_group_10rw_servers= server_2ro_servers=rw_vdms =ro_vdms =auto_ext = no,thin=nodeduplication = Offckpts =root_rep_ckpt_107_53052_2,root_rep_ckpt_107_53052_1,cascade_ckptArep_sess = 245_FNM00103800639_2007_254_FNM00103800639_2007(ckpts:root_rep_ckpt_107_53052_1, root_rep_ckpt_107_53052_2)stor_devs = FNM00103800639-000Fdisks = d18disk=d18 stor_dev=FNM00103800639-000F addr=c16t1l11server=server_2disk=d18 stor_dev=FNM00103800639-000F addr=c0t1l11server=server_2id = 119name = cascade_ckptAacl = 0in_use = Truetype = ckptworm = offvolume = vp252pool = clarata_archivemember_of =rw_servers=ro_servers= server_2rw_vdms =ro_vdms =checkpt_of= cascade Wed Aug 24 11:11:52 EDT 2011deduplication = Offused = 8%full(mark)= 90%stor_devs = FNM00103800639-000Fdisks = d18disk=d18 stor_dev=FNM00103800639-000F addr=c16t1l11server=server_2disk=d18 stor_dev=FNM00103800639-000F addr=c0t1l11server=server_2
[root@cse17107 nasadmin]# fs_ckpt cascade_replica1 -name cascade_replica1_ckptB
-Create
Output:
Configure a cascading replication with common base checkpoints 117
Configuring advanced replications

operation in progress (not interruptible)...id = 113name = cascade_replica1acl = 0in_use = Truetype = uxfsworm = offvolume = v254pool = clarata_archivemember_of = root_avm_fs_group_10rw_servers=ro_servers= server_3rw_vdms =ro_vdms =auto_ext = no,thin=nodeduplication = Offckpts = root_rep_ckpt_113_53065_2,root_rep_ckpt_113_53065_1,
root_rep_ckpt_113_53280_2,root_rep_ckpt_113_53280_1,cascade_replica1_ckptB
rep_sess = 245_FNM00103800639_2007_254_FNM00103800639_2007(ckpts:root_rep_ckpt_113_53065_1, root_rep_ckpt_113_53065_2),254_FNM00103800639_2007_129_FNM00103600044_2007(ckpts:root_rep_ckpt_113_53280_1, root_rep_ckpt_113_53280_2)stor_devs = FNM00103800639-0009disks = d12disk=d12 stor_dev=FNM00103800639-0009 addr=c16t1l5server=server_3disk=d12 stor_dev=FNM00103800639-0009 addr=c0t1l5server=server_3id = 120name = cascade_replica1_ckptBacl = 0in_use = Truetype = ckptworm = offvolume = vp257pool = clarata_archivemember_of =rw_servers=ro_servers= server_3rw_vdms =ro_vdms =checkpt_of= cascade_replica1 Wed Aug 24 11:13:02 EDT 2011deduplication = Offused = 13%full(mark)= 90%stor_devs = FNM00103800639-000Ddisks = d16disk=d16 stor_dev=FNM00103800639-000D addr=c16t1l9server=server_3disk=d16 stor_dev=FNM00103800639-000D addr=c0t1l9server=server_3
Note: The following checkpoint creation is on the destination side. The name of the file system isthe same as the source because of replication.
[nasadmin@ENG19105 ~]$ fs_ckpt cascade_replica1 –name cascade_replica1_ckptC
-Create
Output:
118 Using VNX Replicator
Configuring advanced replications

operation in progress (not interruptible)...id = 113name = cascade_replica1acl = 0in_use = Truetype = uxfsworm = offvolume = v129pool = clarsas_archivemember_of = root_avm_fs_group_32rw_servers=ro_servers= server_2rw_vdms =ro_vdms =auto_ext = no,thin=nodeduplication = Offckpts =root_rep_ckpt_113_9605_2,root_rep_ckpt_113_9605_1,cascade_replica1_ckptCrep_sess = 254_FNM00103800639_2007_129_FNM00103600044_2007(ckpts:root_rep_ckpt_113_9605_1, root_rep_ckpt_113_9605_2)stor_devs = FNM00103600044-0000disks = d8disk=d8 stor_dev=FNM00103600044-0000 addr=c16t1l0server=server_2disk=d8 stor_dev=FNM00103600044-0000 addr=c0t1l0server=server_2id = 117name = cascade_replica1_ckptCacl = 0in_use = Truetype = ckptworm = offvolume = vp132pool = clarsas_archivemember_of =rw_servers=ro_servers= server_2rw_vdms =ro_vdms =checkpt_of= cascade_replica1 Wed Aug 24 11:13:55 EDT 2011deduplication = Offused = 8%full(mark)= 90%stor_devs = FNM00103600044-0000disks = d8disk=d8 stor_dev=FNM00103600044-0000 addr=c16t1l0server=server_2disk=d8 stor_dev=FNM00103600044-0000 addr=c0t1l0server=server_2
2. On the source VNX, refresh the local replication session from VNX A to VNX B with theuser-created checkpoints by using the following command syntax:
# nas_replicate -refresh <rep_session_name_AtoB> –source <ckpt_name_A>
-destination <ckpt_name_B>
where:
<rep_session_name_AtoB> = name of the replication session between VNX A and VNX B
<ckpt_name_A> = name of the user checkpoint for source VNX A
<ckpt_name_B> = name of the user checkpoint for destination VNX B
Configure a cascading replication with common base checkpoints 119
Configuring advanced replications

After the refresh completes, the user-created checkpoints for VNX A and VNX B have acommon baseline for the replication pair.
Example:
[root@cse17107 nasadmin]# nas_replicate -refresh S2_107-S3_107 -source
cascade_ckptA -destination cascade_replica1_ckptB
Output:
OK
3. On the source VNX, refresh the remote replication session from VNX B to VNX C withthe user-created checkpoints by using the following command syntax:
# nas_replicate -refresh <rep_session_name_BtoC> -source <ckpt_name_B>
-destination <ckpt_name_C>
where:
<rep_session_name_BtoC> = name of the replication session between VNX B and VNX C
<ckpt_name_B> = name of the user checkpoint for source VNX B
<ckpt_name_C> = name of the user checkpoint for destination VNX C
After the refresh completes, the user-created checkpoints for VNX B and VNX C have acommon baseline for replication pair. Essentially, now there is a common baselinebetween VNX A, VNX B, and VNX C.
Example:
# nas_replicate -refresh S3_141-S219105 -source cascade_replica1_ckptB -destination
cascade_replica1_ckptC
Output:
OK
4. To replace VNX B with VNX C in the replication topology, delete all replication sessionson VNX B:
a. Delete the replication session between A and B by using the following commandsyntax on the source:
# nas_replicate -delete <rep_session_name_AtoB> -mode both
where:
<rep_session_name_AtoB> = name of the replication session between A and B
Example:
# nas_replicate -delete S2_107-S3_107 -mode both
Output:
OK
120 Using VNX Replicator
Configuring advanced replications

b. Delete the replication session between B and C by using the following commandsyntax on the source:
# nas_replicate -delete <rep_session_name_BtoC> -mode both
where:
<rep_session_name_BtoC> = name of the replication session between VNX B and VNXC
Example:
# nas_replicate -delete S3_141-S219105 -mode both
Output:
OK
5. Create a replication session from VNX A to VNX C by creating source and peerinterconnects and then creating a replication session:
Note: You can also create interconnects by using Unisphere.
a. Ensure that you have created a trust relationship between Control Station A andControl Station C by using the following command syntax for each VNX:
$ nas_cel -create <cel_name> -ip <ipaddr> -passphrase <passphrase>
where:
<cel_name> = name of the remote VNX
<ipaddr> = IP address of the remote VNX’s primary Control Station (in slot 0)
<passphrase> = passphrase used to manage the remote VNX
Example:
$ nas_cel -create vx17107 -ip 172.24.102.240 -passphrase nasdocs
Output:
operation in progress (not interruptible)...id = 3name = vx17107owner = 0device =channel =net_path = 172.24.102.240VNX_id = APM000438070430000passphrase = nasdocs
Run the -create command twice to ensure communication from both sides, first onthe source VNX (to identify the destination VNX) and then on the destination VNX (toidentify the source VNX).
Note: The passphrase should be the same on both the source and destination VNX.
Configure a cascading replication with common base checkpoints 121
Configuring advanced replications

b. Create a Data Mover interconnect from A to C on the source VNX by using the followingcommand syntax:
# nas_cel -interconnect -create <name_sourcetodest> -source_server
<MoverName_src> -destination_system <Destination_Control_Station_name>
-destination_server <MoverName_dst> -source_interface <interface IP_src>
-destination_interface <interface IP_dst>
where:
<name_sourcetodest> = name of the interconnect for the source side
<MoverName_src> = name of an available Data Mover on the local side of theinterconnect
<Destination_Control_Station_name> = name of the destination Control Station
<MoverName_dst> = name of an available Data Mover on the peer side of theinterconnect
<interface IP_src>= IP address of an interface available on the local side of theinterconnect
<interface IP_dst>= IP address of an interface available on the peer side of theinterconnect
Example:
# nas_cel -interconnect -create 17107s2-19105s2 -source_server server_2
-destination_system eng19105 -destination_server server_2 -source_interface
ip=10.245.17.110 -destination_interface ip=10.245.19.108
Output:
OK
c. On the destination VNX, create the peer interconnect by using the following commandsyntax:
# nas_cel -interconnect -create <name_desttosource> -source_server
<MoverName_src> -destination_system <Source_Control_Station_name>
-destination_server <MoverName_dst> -source_interface <interface IP_src>
-destination_interface <interface IP_dst>
where:
<name_desttosource> = name of the interconnect for the destination side
<MoverName_src> = name of an available Data Mover on the local side of theinterconnect
<Source_Control_Station_name> = name of the source Control Station
<MoverName_dst> = name of an available Data Mover on the peer side of theinterconnect
<interface IP_src>= IP address of an interface available on the local side of theinterconnect
122 Using VNX Replicator
Configuring advanced replications

<interface IP_dst>= IP address of an interface available on the peer side of theinterconnect
Example:
# nas_cel -interconnect -create 19105s2-17107s2 -source_server server_2
-destination_system cse17107 -destination_server server_2 -source_interface
ip=10.245.19.108 -destination_interface ip=10.245.17.110
Output:
OK
d. On the source VNX, create the replication session from A to C by using the followingcommand syntax:
# nas_replicate -create <rep_session_name_AtoC> -source -fs <src_fs_name>
-destination -fs <dst_fs_name> -interconnect <name_sourcetodest>
-max_time_out_of_sync <maxTimeOutOfSync>
where:
<rep_session_name_AtoC> = name of the replication session between A and C
<src_fs_name> = name of the source file system on A
<dst_fs_name> =name of the destination file system on C
<name_sourcetodest> = name of the interconnect for the source side from A to C
<maxTimeOutOfSync>= maximum time in minutes that the source and destination canbe out of synchronization before an update occurs
The destination file system name should be the same as what was used in the previousreplication session.
Example:
[root@cse17107 nasadmin]# nas_replicate -create cascade_17107s2-19105s2 -source
-fs cascade -destination -fs cascade_replica1 -interconnect 17107s2-19105s2
-max_time_out_of_sync 10
Output:
OK
6. Immediately after the command prompt returns, verify that the initial synchronization isnot performing a full copy by using the following command syntax on the source VNX:
$ nas_replicate -info <rep_session_name_AtoC>
where:
<rep_session_name_AtoC> = name of the replication session between A and C
Example:
[root@cse17107 nasadmin]# nas_replicate -i cascade_17107s2-19105s2
Output:
Configure a cascading replication with common base checkpoints 123
Configuring advanced replications

ID =245_FNM00103800639_2007_129_FNM00103600044_2007Name = cascade_17107s2-19105s2Source Status = OKNetwork Status = OKDestination Status = OKLast Sync Time = Wed Aug 24 12:31:11 EDT 2011Type = filesystemCelerra Network Server = eng19105Dart Interconnect = 17107s2-19105s2Peer Dart Interconnect = 19105s2-17107s2Replication Role = sourceSource Filesystem = cascadeSource Data Mover = server_2Source Interface = 10.245.17.110Source Control Port = 0Source Current Data Port = 0Destination Filesystem = cascade_replica1Destination Data Mover = server_2Destination Interface = 10.245.19.108Destination Control Port = 5085Destination Data Port = 8888Max Out of Sync Time (minutes) = 10Current Transfer Size (KB) = 0Current Transfer Remain (KB) = 0Estimated Completion Time =Current Transfer is Full Copy = NoCurrent Transfer Rate (KB/s) = 0Current Read Rate (KB/s) = 0Current Write Rate (KB/s) = 0Previous Transfer Rate (KB/s) = 42Previous Read Rate (KB/s) = 54613Previous Write Rate (KB/s) = 3831Average Transfer Rate (KB/s) = 42Average Read Rate (KB/s) = 54613Average Write Rate (KB/s) = 3831
7. Verify that there is a current transfer taking place.The following fields should have valuesgreater than zero:
• Current Transfer Rate (KB/s)
• Current Read Rate (KB/s)
• Current Write Rate (KB/s)
8. Verify that the current transfer is not a full copy. The Current Transfer is Full Copy fieldshould have the value No.
Configure the replication of a file system mounted on an NestedMount File System mountpoint
A Nested Mount File System (NMFS) allows you to manage a collection of component filesystems as a single file system. CIFS and NFS clients see component file systems as asingle share or single export.
To replicate a file system mounted on an NMFS mount point:
124 Using VNX Replicator
Configuring advanced replications

1. Create a replication session from source to destination.
2. Stop the replication session of the file system either by using the -stop mode option onboth the source and destination simultaneously, or by using the -stop mode option onthe source and destination separately.
3. Create the NMFS at the Disaster Recovery site.
4. Unmount the destination file system.
5. Mount the NMFS.
6. Remount the destination file system under the NMFS path as read only.
7. Start the replication session from the source while selecting the Discard the changes sincelast copy in Unisphere, or by using the -overwrite_destination option from thecommand line.
Configure the replication of a file system mounted on an Nested Mount File System 125mountpoint
Configuring advanced replications

126 Using VNX Replicator
Configuring advanced replications

10
Managing replicationsessions
After you have created a replication session, you can manage the session.
The online VNX for file man pages and the EMC VNX Command LineInterface Reference for File provide a detailed synopsis of the commandsand syntax conventions presented in this section.
The tasks to manage replication sessions are:
Get information about replication sessions on page 128 Modify replication properties on page 131 Refresh the destination on page 132 Delete a replication session on page 133 Stop a replication session on page 134 Start a replication session on page 136 Start a failed over or switched over replication on page 138 Start a replication session that is involved in a one-to-many
configuration on page 139 Reverse the direction of a replication session on page 140 Switch over a replication session on page 141 Fail over a replication session on page 144
Using VNX Replicator 127

Get information about replication sessions
You can view a list of all configured or stopped replication sessions on a Data Mover in theVNX for file cabinet and obtain detailed status information for a specific session or for allsessions.
Action
To view a list of replication sessions, use this command syntax:
$ nas_replicate -list
Output
Name type Local Mover Interconnect Celerra Status
fs1_12_13 filesystem server_2 -->20003 eng25213 OK
fs2_41 filesystem server_3 <--40s3-41s2 eng25241 OK
vdm2-to-41 vdm server_2 -->40s2-41s2 eng25241 OK
rep5_cpy copy server_2 -->40s2-41s2 eng25241 OK
f3-cpy-41 copy server_2 -->40s2-41s2 eng25241 OK
To view detailed status information on a specific replication session, use the -info command.
Action
To display detailed information on a specific replication session, use this command syntax:
$ nas_replicate -info id=<sessionId>|<name>
where:
<sessionId> = ID of the replication session
<name> = name of the replication session
Note: To obtain the session ID for the first time, run nas_replicate -info and specify the replication name.
Example:
To display information about file system replication session fs1_12_13, type:
$ nas_replicate -info fs1_12_13
128 Using VNX Replicator
Managing replication sessions

Output
Note: This output shows a file system replication.
ID =175_APM00061205365_0000_90_APM00064805756_0000Name = fs1_12_13Source Status = OKNetwork Status = OKDestination Status = OKLast Sync Time = Mon Oct 01 17:38:58 EDT 2007Type = filesystemCelerra Network Server = eng25213Dart Interconnect = 20003Peer Dart Interconnect = 20003Replication Role = sourceSource Filesystem = fs1Source Data Mover = server_2Source Interface = 172.24.252.26Source Control Port = 0Destination Filesystem = fs2Destination Data Mover = server_2Destination Interface = 172.24.252.27Destination Control Port = 5081Destination Data Port = 8888Max Out of Sync Time (minutes) = 20Next Transfer Size (KB) = 0Current Transfer Size (KB) = 0Current Transfer Remain (KB) = 0Estimated Completion Time =Current Transfer is Full Copy = NoCurrent Transfer Rate (KB/s) = 1Current Read Rate (KB/s) = 32251Current Write Rate (KB/s) = 303Previous Transfer Rate (KB/s) = 0Previous Read Rate (KB/s) = 0Previous Write Rate (KB/s) = 0Average Transfer Rate (KB/s) = 3Average Read Rate (KB/s) = 0Average Write Rate (KB/s) = 0
The system displays the appropriate output depending on the type of source object replicated.
Get information about replication sessions 129
Managing replication sessions

Output definitions
The definitions are:
ID — The fixed ID assigned to this replication session.
Name — Name assigned to this replication session.
Source Status — Indicates the source status of a replication relationship.
Network Status — Displays the network status for this replication session.
Destination Status — Indicates the destination status of a replication relationship.
Last Sync Time (GMT) — Indicates when data was copied to the destination file system. Time displays in GMT.
Type — Replication type. Displays file system, vdm, or copy.
Celerra Network Server — Displays the Control Station name of the destination system used in this replication relationship.
Dart Interconnect — Name of the interconnect used by the source in this replication session.
Peer Dart Interconnect — Name of the interconnect used by the other (peer) side in this replication.
Replication Role — Indicates whether the role is as source or destination.
Source File System — Source file system name.
Source Data Mover — Source Data Mover in the replication session.
Source Interface — Source site interface (IP address) used to transport this replication session data.
Source Control Port — Identifies the source Control Station port.
Source Current Data Port — Identifies the source data port used for the current transfer.
Destination File System — Destination file system name.
Destination Data Mover — Destination Data Mover in the replication session.
Destination Interface — Destination site interface (IP address) used to transport this replication session data.
Destination Control Port — Identifies the destination Control Station port.
Destination Data Port — Identifies the destination port receiving the data.
Source VDM — For VDM replication, source VDM for this replication session.
Max Out of Sync Time (minutes) — If the update policy is max_time_out_of_sync, then this field defines the time, in minutes,
before an update occurs.
Next Transfer Size (KB) — Identifies the size of the next transfer in kilobytes.
Current Transfer Size (KB) — Identifies the total size of the data to transfer in kilobytes.
Current Transfer Remain (KB) — Identifies how much data, in kilobytes, is left in the current transfer.
Estimated Completion Time — Estimates a time at which the current transfer completes.
130 Using VNX Replicator
Managing replication sessions

Output definitions
Current Transfer is a Full Copy — Indicates whether the current transfer is a full copy instead of a differential copy.
Current Transfer Rate (KB/s) — Identifies the current transfer rate in kilobytes per second.
Current Read Rate (KB/s) — Identifies the current read rate in kilobytes per second.
Current Write Rate (KB/s) — Identifies the current write rate in kilobytes per second.
Previous Transfer Rate (KB/s) — Identifies the rate of the previous transfer in kilobytes per second.
Previous Read Rate (KB/s) — Identifies the previous read rate in kilobytes per second.
Previous Write Rate (KB/s) — Identifies the previous write rate in kilobytes per second.
Average Transfer Rate (KB/s) — Identifies the average rate of transfer in kilobytes per second.
Average Read Rate (KB/s) — Identifies the average read rate in kilobytes per second.
Average Write Rate (KB/s) — Indicates the average write rate in kilobytes per second.
Modify replication properties
You can change the name of a replication session, the source and destination interfacesused, and the max_time_out_of_sync value.
Action
To change the name of a replication session, use this command syntax:
$ nas_replicate -modify <name>|id=<sessionId> -name <newName>
where:
<name> = name of the replication session to modify
<sessionId> = ID of the replication session to modify
<newName> = new name of the replication session
Example:
To change the name of replication session fs1_12_13 to Repl_from_12_13, type:
$ nas_replicate -modify fs1_12_13 -name Repl_from_12_to_13
Output
OK
Verification
To verify that the replication name was changed, type:
$ nas_replicate -list
Output:
Name type Local Mover Interconnect Celerra StatusRepl_from_12_to_13 filesystem server_2 -->20003 eng25213 OK
Modify replication properties 131
Managing replication sessions

Verification
To verify from the destination side, type:
$ nas_replicate -list
Output:
Name type Local Mover Interconnect Celerra StatusRepl_from_12_to_13 filesystem server_2 <--20003 eng25212 OK
Refresh the destination
From the source side of a replication session, you can perform a manual refresh of adestination object to capture updates made on a source object. Refreshing a replicationsession updates the destination side of the specified replication session based on changesto the source side. This has the same effect as reaching the max_time_out_of_sync value.
To update the destination object automatically, use the max_time_out_of_sync value.Updating the destination site with source changes on page 43 explains this option in detail.
Action
To update the destination side of a specific replication session manually, use this command syntax:
$ nas_replicate -refresh <name>|id=<sessionid> [-background]
where:
<name> = name of the replication session
<sessionid> = ID of the replication session
Example:
To refresh the destination side of session fs1_12_13, type:
$ nas_replicate -refresh fs1_12_13 -background
When data changes on the source are large, the -refresh command can take a long time to complete.This example shows
running this command in background mode.
Note: Execute this command from the Control Station on the source side only.
Output
Info [26843676673]: In Progress: Operation is stillrunning. Check task id 2663 on the Task Status screen for results.
Verification
To verify the progress of the refresh, use the nas_task command and type:
$ nas_task -info 2663
132 Using VNX Replicator
Managing replication sessions

Verification
Output:
Task Id = 2663Celerra Network Server = eng25212State = SucceededDescription = Refresh ReplicationNONE:id=181_APM00061205365_0000_108_APM00064805756_0000.Originator = [email protected] Time = Mon Oct 01 18:42:04 EDT 2007End Time = Mon Oct 01 18:42:09 EDT 2007Schedule = n/aResponse Statuses = OK
Delete a replication session
You would delete a session when you no longer want to replicate the file system or VDM.
If you delete a replication session by using the -both or -destination mode options, and datatransfer is in progress, the system will perform an internal checkpoint restore operation ofthe latest checkpoint on the destination side. This will undo any changes written to the filesystem as part of the current data transfer and bring the file system back to a consistentstate. If the checkpoint restore fails, for example there was not enough SavVol space, thedestination file system will remain in an inconsistent state and client-based access shouldbe avoided.
Note: Deleting a replication does not delete the underlying source objects. However, internal checkpointsthat are part of the session are deleted.
Action
To delete both sides of a remote replication session from the source side, use this command syntax:
$ nas_replicate -delete <name>|id=<sessionId> -mode both
where:
<name> = name of the replication session to delete
<sessionId> = ID of the replication session to delete
Example:
To delete both sides of replication session fs1_12_13, type:
$ nas_replicate -delete fs1_12_13 -mode both
Output
OK
When communication is down, use the source and destination mode options.
Delete a replication session 133
Managing replication sessions

Action
To delete the replication session from the source side only, use this command syntax:
$ nas_replicate -delete <name>|id=<sessionId> -modesource
where:
<name> = name of the replication session to delete
<sessionId> = ID of the replication session to delete
Example:
To delete the source side only of replication session fs1_12_13, type:
$ nas_replicate -delete fs1_12_13 -mode source
Output
OK
The destination mode option deletes the replication session from the destination side only.
Action
To delete the replication session from the destination side only, use this command syntax:
$ nas_replicate -delete <name>|id=<sessionId> -mode destination
where:
<name> = name of the replication session to delete
<sessionId> = ID of the replication session to delete
Example:
To delete the destination side only of replication session fs1_12_13, from the destination side, type:
$ nas_replicate -delete fs1_12_13 -mode destination
Output
OK
Stop a replication session
You cannot stop a session if -delete is already running for the session. After a stop operationis in progress, only -list and -info are permitted, as well as any nas_task command. Stoppinga replication session on page 44 describes how the stop operation works.
Note: While a session is stopped, data continues to accumulate in the SavVol. If you do not plan tostart the session again, consider deleting the session.
If you stop a replication session by using the -both or -destination mode options, and datatransfer is in progress, the system will perform an internal checkpoint restore operation ofthe latest checkpoint on the destination side. This will undo any changes written to the file
134 Using VNX Replicator
Managing replication sessions

system as part of the current data transfer and bring the file system back to a consistentstate. If the checkpoint restore fails, for example there was not enough SavVol space, thedestination file system will remain in an inconsistent state and client-based access shouldbe avoided.
Action
To stop replication on both source and destination file systems simultaneously, use this command syntax from the source
site:
$ nas_replicate -stop <name>|id=<session_id> -mode both
where:
<name> = name of the replication session to stop
<session_id> = ID of the replication session to stop
Example:
To stop replication fs1_12_13, type:
$ nas_replicate -stop fs1_12_13 -mode both
Output
OK
Verification
To verify that replication session fs1_12_13 is stopped, on the source side, type:
$ nas_replicate -list
Output:
Name type Local Mover Interconnect Celerra Statusfs1_12_13 filesystem server_2 -->20003 eng25212 Info26045317429: Replication session is stopped. Stopped replication sessionkeeps replication configuration information andinternal snaps.
To verify that the session is stopped on the destination side, type:
$ nas_replicate -list
Output:
Name type Local Mover Interconnect Celerra Statusfs1_12_13 filesystem server_2 <--20003 eng25212 OK
If communication is down, use the source and destination options to stop the session.
Action
To stop replication on either the source or destination file systems, use this command syntax from the source site:
$ nas_replicate -stop <name>|id=<session_id> -mode source|destination
where:
Stop a replication session 135
Managing replication sessions

Action
<name> = name of the replication session to stop
<session_id> = ID of the replication session to stop
Example:
To stop replication fs1_12_13 on the source side only, type:
$ nas_replicate -stop fs1_12_13 -mode source
To stop replication fs1_12_13 on the destination side only, type:
$ nas_replicate -stop fs1_12_13 -mode destination
Output
OK
Verification
To verify that replication session fs1_12_13 is stopped on the source side, type:
$ nas_replicate -list
Output:
Name type Local Mover Interconnect Celerra Statusfs1_12_13 filesystem server_2 -->20003 eng25212 Info26045317429: Replication session is stopped. Stoppedreplication session keeps replication configuration information andinternal snaps.
To verify that the session is stopped on the destination side, from the destination side, type:
$ nas_replicate -list
Output:
Name type Local Mover Interconnect Celerra Statusfs1_12_13 filesystem server_2 <--20003 eng25212 OK
Start a replication session
The -start option allows you to start a replication session again by using an incremental ora full data copy. Use the -start option to start a stopped, failed over, or switched overreplication session.
After you stop a replication session, only the -start option can start it again. This commandverifies whether replication is in a condition that allows it to start again. If you are using thisprocedure to change interconnect or interfaces, or to change the update policy, specify themwhen you start the replication relationship.
Action
To start a file system replication session, use this command syntax from the source site:
136 Using VNX Replicator
Managing replication sessions

Action
$ nas_replicate -start <name>|id=<sessionId>
where:
<name> = name of the replication session
<session_id> = session ID. This is required if a duplicate replication session is detected
Example:
To start replication fs1_12_13, type:
$ nas_replicate -start fs1_12_13
Output
OK
Verification
To verify that the session was started on the source side, type:
$ nas_replicate -list
Name type Local M Interconnect Celerra Statusfs1_12_13 filesystem server_2 -->20003 eng25213 OK
To verify that the session was started on the destination side, from the destination side, type:
$ nas_replicate -list
Output:
Name type Local M Interconnect Celerra Statusfs1_12_13 filesystem server_2 -->20003 eng25212 OK
This example changes the interconnect used for the replication session.
Action
To start a file system replication session and change the interconnect, use this command syntax from the source site:
$ nas_replicate -start <name>|id=<session_id> -interconnect
<name>|id=<interConnectId>
where:
<name> = replication session name
<session_id> = session ID. This is required if a duplicate replication session is detected
<name> = name of the established source-side Data Mover interconnect to use for the replication session
<interConnectID> = ID of the interconnect to use
Example:
To start replication session fs1_12_13 and change the interconnect, type:
$ nas_replicate -start fs1_12_13 -interconnect cs110_s3s2
Start a replication session 137
Managing replication sessions

Output
OK
This example changes the update policy for the session.
Action
To start a file system replication session and change the default time of out of sync value, use this command syntax:
$ nas_replicate -start <name>|id=<session_id> -max_time_out_of_sync
<max_time_out_of_sync>
where:
<name> = replication session name
<session_id> = session ID. This is required if a duplicate replication session is detected
<max_time_out_of_sync> = time, in 1–1440 minutes (up to 24 hours), that the source and destination can be out
of synchronization before an update occurs
Example:
To start replication session fs1_12_13 and set a max_time_out_of_sync of 10 minutes, type:
$ nas_replicate -start fs1_12_131 -max_time_out_of_sync 10
Output
OK
Start a failed over or switched over replication
Use the nas_replicate -start with -reverse option to start a replication session that has failedover or switched over.
Before starting a failed over replication that uses VDMs
If you are starting a failed over replication that uses VDMs in a CIFS environment, verifythat the source site is available.When you are ready to start the session, do so in the followingorder:
1. Start the failed over VDM replication session by using the -reverse option.
2. Start the replication session of the file system contained in the VDM by using the -reverseoption.
3. Reverse the direction of the VDM replication session. When the reverse completes, theVDM state on the source site changes from unloaded to loaded and on the destinationsite from loaded to mounted.
4. Reverse the file system replication session contained in the VDM.
Action
To start a replication session after failover or switchover, use this command syntax:
138 Using VNX Replicator
Managing replication sessions

Action
$ nas_replicate -start <name>|id=<session_id> -reverse
where:
<name> = replication session name
<session_id> = session ID. This is required if a duplicate replication session is detected
Example:
To start replication session fs1_12_13 and reverse the direction of the session, type:
$ nas_replicate -start fs1_12_13 -reverse -overwrite_destination
Output
OK
Start a replication session that is involved in a one-to-manyconfiguration
This section describes how to start switched over or failed over sessions when the sourceobject is used in more than one replication session.
Start a switched over session
To start a switched over replication session:
1. Select the replication session from which you want to resynchronize.
2. Start the replication session identified in step 1 from the original destination side andchoose the -reverse option. Start a failed over or switched over replication on page 138provides details on how to start the session.
3. Reverse that replication session. Reverse the direction of a replication session on page140 provides details on how to reverse the session.
4. If you switched over multiple sessions at one time, change the mount status of thedestination objects in the remaining sessions. Change the mount status of source ordestination object on page 177 provides details on how to change the mount status of thedestination objects.
5. Start the remaining sessions from the original source side. Start a replication session onpage 136 provides details on how to start each session. When starting each session,ensure you specify the -overwrite_ destination option. Do not specify the -reverse option.
Start a failed over session
You can keep changes from only one failed-over replication session per source object. Ifyou fail over multiple sessions for a given object, you can only save the changes from oneof the failed-over replication sessions.
Note: Before you start, ensure that the source site is now available.
Start a replication session that is involved in a one-to-many configuration 139
Managing replication sessions

To start the failed over replication session:
1. Select the replication session from which you want to resynchronize.
2. Start the replication session identified in step 1 from the original destination side andspecify the -reverse and overwrite_destination options. Start a failed over or switchedover replication on page 138 provides details on how to start the session.
3. Reverse that replication session. Reverse the direction of a replication session on page140 provides details on how to reverse the session.
4. If you failed over multiple sessions, change the mount status of the destination objectsto read-only in the remaining sessions. Change the mount status of source or destinationobject on page 177 provides details on how to change the mount status of objects.
5. Start the remaining sessions from the original source side. Start a replication session onpage 136 provides details on how to start each session. When starting each session,ensure you specify the -overwrite_destination option. Do not choose the -reverse option.
Reverse the direction of a replication session
Use a replication reversal to change the direction of replication.You may want to changethe direction of replication to perform maintenance on the source site or to do testing on thedestination site.
You can only reverse a replication from the source side.
If you reverse a replication session that is involved in a one-to-many configuration, the sourceside goes into cascade mode. The destination side from one of the one-to-many sessionsbecomes the source and the original source side becomes the destination and that sourcecascades out to other destination sessions.
Action
To change the direction of a remote replication session, use this command syntax:
$ nas_replicate -reverse <name>|id=<sessionId>
where:
<name> = name of the replication session to reverse
<sessionId> = ID of the replication session to reverse
Example:
For the current read/write file system, fs1_12_13, to become the read-only file system, type:
$ nas_replicate -reverse fs1_12_13
Output
OK
140 Using VNX Replicator
Managing replication sessions

Notes
When this command completes, the current read/write file system (fs1_12_13) becomes read-only and the current read-
only file system (dst_ufs1) becomes read/write.
If you tried to run this command from the incorrect side (read-only), the following error message appears:
Error 2247: this command must be issued on the currentsource site:cs100
Verification
To verify that the direction of the replication reversed, type:
$ nas_replicate -list
Before the reverse operation, type from the source side:
$ nas_replicate -list
Output:
Name type Local Mover Interconnect Celerra Statusfs1_12_13 filesystem server_2 -->20003 eng25213 OK
From the destination side, type:
$ nas_replicate -list
Output:
Name type Local Mover Interconnect Celerra Statusfs1_12_13 filesystem server_2 <--20003 eng25212 OK
After the reverse operation, from the source side type:
$ nas_replicate -list
Output:
Name type Local Mover Interconnect Celerra Statusfs1_12_13 filesystem server_2 <--20003 eng25213 OK
From the destination side, type:
$ nas_replicate -list
Output:
Name type Local Mover Interconnect Celerra Statusfs1_12_13 filesystem server_2 -->20003 eng25212 OK
Switch over a replication session
Perform a replication switchover from the source side only when both the source anddestination sides are available.
The switchover operation stops a replication session after synchronizing the destinationobject with the source object without data loss. The operation mounts the source object as
Switch over a replication session 141
Managing replication sessions

read-only, and marks the destination object as read/write so that it can act as the new sourceobject.
Before you execute this command
Note the following:
Ensure that clients have access to the destination Data Mover so clients can access thedestination object immediately.
Switchover does not change the defined role of the source and destination objects, onlythe mount status of the object (read-only and read/write) in the replication.
When the switchover completes, if you want to start the replication session again, youmust use the -start with -reverse option so that the defined role of the object matchesthe new mount status.
To return to the original replication configuration and start the session in the properdirection, perform a nas_replicate -reverse.
1. Before executing the switchover, verify replication session information on the source anddestination, by using this command syntax:
$ nas_replicate -list
Source output:
Name type Local Mover Interconnect Celerra Statusfs1_1213 filesystem server_2 -->20003 eng25213 OK
Destination output:
Name type Local Mover Interconnect Celerra Statusfs1_1213 filesystem server_2 <--20003 eng25212 OK
2. Perform a switchover by using this command syntax:
$ nas_replicate -switchover <name>|id=<session_id>
where:
<name> = name of the replication session to switchover
<session_id> = ID of the replication session to switchover
Example:
To perform a switchover of replication session fs1_1213, from the source, type:
$ nas_replicate -switchover fs1_1213
Output:
OK
Note: Execute this command from the Control Station on the source VNX only.
3. Verify the switchover, from the source side and destination side by using this commandsyntax:
142 Using VNX Replicator
Managing replication sessions

$ nas_replicate -list
Source output:
Name type Local Mover Interconnect Celerra Statusfs1_1213 filesystem server_2 -->20003 eng25212 Info26045317429: Replication session is stopped.Stopped replication session keeps replicationconfiguration information and internal snaps.
Destination output:
Name type Local Mover Interconnect Celerra Statusfs1_1213 filesystem server_2 <--20003 eng25212 Info26045317429: Replication session is stopped.Stopped replication session keeps replicationconfiguration information and internal snaps.
4. Optionally, verify the new mount status of the source object and destination object byusing this command syntax:
$ server_mount <movername>
where:
<movername> = the Data Mover where the file system is mounted
Example:
To display the mounted file systems on Data Mover server_2 and verify that the sourcefile system fs1 is mounted read-only and the destination file system fs2 is mountedread/write, from the source side, type:
$ server_mount server_2
Source output:
server_2 :root_fs_2 on / uxfs,perm,rwroot_fs_common on /.etc_common uxfs,perm,rofs2 on /fs2 uxfs,perm,rofs2_ckpt1 on /fs2_ckpt1 ckpt,perm,rofs1 on /fs1 uxfs,perm,roroot_rep_ckpt_53_2768_1 on /root_rep_ckpt_53_2768_1ckpt,perm,roroot_rep_ckpt_53_2768_2 on /root_rep_ckpt_53_2768_2ckpt,perm,ro
Note: You can no longer write to the source file system.
From the destination side, type:
$ server_mount server_2
Destination output:
Switch over a replication session 143
Managing replication sessions

server_2 :root_fs_2 on / uxfs,perm,rwroot_fs_common on /.etc_common uxfs,perm,rofs_ndmp2d on /fs_ndmp2d uxfs,perm,rwfs2 on /fs2_replica1 uxfs,perm,rwfs1_replica1 on /fs1_replica1 uxfs,perm,rwroot_rep_ckpt_72_2083_1 on /root_rep_ckpt_72_2083_1ckpt,perm,roroot_rep_ckpt_72_2083_2 on /root_rep_ckpt_72_2083_2ckpt,perm,ro
Note: You can now write to the destination file system.
5. To copy changes made on the secondary system back to the primary, use this commandsyntax:
$ nas_replicate -start <name>|id=<session_id> -reverse
-overwrite_destination
where:
<name> = name of the replication session to start
<session_id> = ID of the replication session to start
Example:
To start replication session fs1_1213, from the source side, type:
$ nas_replicate -start fs1_1213 -reverse -overwrite_destination
Note: This will reverse the direction of the replication to match the new mount status of the sourceand destination objects.
6. Optionally, to return to the original replication direction (primary system to secondarysystem), use this command syntax:
$ nas_replicate -reverse <name>|id=<session_id>
where:
<name> = name of the replication session to start
<session_id> = ID of the replication session to start
Example:
To start replication session fs1_1213, type:
$ nas_replicate -reverse fs1_1213
Fail over a replication session
You should perform a replication failover from the destination side only and when the sourceside is unavailable. The failover operation stops any data transfer in process and marks thedestination object as read/write so that it can serve as the new source object.
144 Using VNX Replicator
Managing replication sessions

This operation is executed asynchronously and results in data loss if all the data wasnot transferred to the destination side prior to issuing this command.
Before you execute this command, note the following:
EMC supports only one failed-over replication session per source object. If you fail overmultiple sessions for a given source object, you can only save the changes from one ofthe failed-over replication sessions.
Ensure that hosts have access to the destination Data Mover, so that they can accessthe destination object immediately.
Failover operations do not change the direction of the replication.
1. Perform a failover by using this command syntax:
$ nas_replicate -failover <name>|id=<session_id>
where:
<name> = name of the replication session to failover
<session_id> = ID of the replication session to failover
Example:
To perform a failover of replication session fs1_12_13, from the destination side, type:
$ nas_replicate -failover fs1_12_13
Output:
OK
Note: Execute this command from the Control Station on the destination VNX only.
2. Verify the failover from the destination side by using this command syntax:
$ nas_replicate -list
Output:
Name type Local Mover Interconnect Celerra Statusfs1_12_13 filesystem server_2 <--20003 eng25212 Info26045317429: Replication session is stopped.Stopped replication session keeps replication configurationinformation and internal snaps.
3. Optionally, verify the new mount status of the destination object by using this commandsyntax:
$ server_mount <movername>
where:
<movername> = the Data Mover where the file system is mounted
Example:
Fail over a replication session 145
Managing replication sessions

To display the mounted file systems on Data Mover server_2 and verify that the destinationfile system fs2 is mounted read/write, from the destination side, type:
$ server_mount server_2
Output on destination:
server_2 :
root_fs_2 on / uxfs,perm,rwroot_fs_common on /.etc_common uxfs,perm,rofs1 on /fs1 uxfs,perm,rwfs_ndmp2d on /fs_ndmp2d uxfs,perm,rwfs2 on /fs2_replica1 uxfs,perm,rwroot_rep_ckpt_59_1946_1 on /root_rep_ckpt_59_1946_1 ckpt,perm,roroot_rep_ckpt_59_1946_2 on /root_rep_ckpt_59_1946_2 ckpt,perm,ro
Source output (when available):
server_2 :root_fs_2 on / uxfs,perm,rwroot_fs_common on /.etc_common uxfs,perm,rofs1 on /fs1 uxfs,perm,rofs1_ckpt1 on /fs1_ckpt1 ckpt,perm,rofs2 on /fs2 uxfs,perm,rofs2_ckpt1 on /fs2_ckpt1 ckpt,perm,roroot_rep_ckpt_59_2635_1 on /root_rep_ckpt_59_2635_1 ckpt,perm,roroot_rep_ckpt_59_2635_2 on /root_rep_ckpt_59_2635_2 ckpt,perm,ro
4. When the source side becomes available, use the nas_replicate -start command withthe -reverse option to start copying changes made on the secondary system back to theprimary. Use this command syntax:
$ nas_replicate -start <name>|id=<session_id> -reverse
-overwrite_destination
where:
<name> = name of the replication session to start
<session_id> = ID of the replication session to start
Example:
To start replication session fs1_1213, type:
$ nas_replicate -start fs1_1213 -reverse -overwrite_destination
5. Optionally, to return to the original replication direction (primary system to secondarysystem), use this command syntax:
$ nas_replicate -reverse <name>|id=<session_id>
where:
<name> = name of the replication session to reverse
<session_id> = ID of the replication session to reverse
Example:
146 Using VNX Replicator
Managing replication sessions

To reverse replication session fs1_1213, type:
$ nas_replicate -reverse fs1_1213
Fail over a replication session 147
Managing replication sessions

148 Using VNX Replicator
Managing replication sessions

11
Managing replication tasks
The tasks to manage replication tasks are:
Monitor replication tasks on page 150 Abort a replication task on page 152 Delete a replication task on page 156
Using VNX Replicator 149

Monitor replication tasks
Use the nas_task command to monitor long-running tasks, such as a one-time copy inprogress and to find information about the progress or status of a replication command.Youcan also use nas_task to abort or delete replication tasks from the source or destinationside of a replication session.
All replication commands are executed as a task in either synchronous or asynchronousmode.When in synchronous mode (default), the system frequently reports the progress andstatus of the completion of a command. Asynchronous or background mode is invokedimmediately when the -background option is specified for a command.
A replication task can be in one of four states on a given VNX:
Running — Task is successfully running
Recovering — Task failed but has not yet completed
Succeeded — Task completed successfully
Failed — Task completed with errors
Each task is assigned a unique, numeric task ID per VNX which you can use to monitor thestatus of long-running tasks.
Use the nas_task -list command to list all running and completed tasks on a system.
Action
To list all local tasks that are in progress, or completed tasks that have not been deleted, use this command syntax:
$ nas_task -list
Output
ID Task State Originator Start Time Description ScheduleRemote System
4919 Running [email protected]+ Fri Jan 11 07:46:04 EST 2008 Create Repli-cationf 3-copy-41. Local System
You can filter the task listing by task status by using the UNIX grep utility.
Action
To use the UNIX grep utility to list only tasks with a specific task status, use this command syntax:
$ nas_task -list |grep <task status>
where:
<task status> = Status of the replication task: Running, Recovering, Succeeded, Failed
Example:
To list all tasks with a Running status on a system, type:
150 Using VNX Replicator
Managing replication tasks

Action
$ nas_task -list |grep Running
Note: Task status is case-sensitive.
Output
1844 Running nasadmin@cli+ Tue Jan 22 07:54:35 EST 2008 CreateReplication lp_fs2. eng19212
Use the nas_task -info option to obtain details about a task that was initiated on the localsystem.
Action
To get information about a replication task on the system that initiated the task, use this command syntax from the source
site:
$ nas_task -info <taskId>
where:
<taskId> = the unique task ID
Example:
To get detailed information about task 1844, type:
$ nas_task -info 1844
Output
Task Id = 1844Celerra Network Server = Local SystemTask State = RunningCurrent Activity = Info 26045317613: Transfer doneMovers = server_2Percent Complete = 96Description = Create Replication lp_fs2.Originator = [email protected] Time = Tue Jan 22 07:54:35 EST 2008Estimated End Time = Wed Jan 23 16:52:39 EST 2008Schedule = n/a
You can also use the -info option to get information on a task that is running locally but wasinitiated from a remote VNX.
Action
To get information about a replication task running on the local system but initiated from a remote system, use this command
syntax from the source site:
$ nas_task -info <taskId> -remote system <remoteSystemName>
where:
<taskId> = the unique task ID
Monitor replication tasks 151
Managing replication tasks

Action
<remoteSystemName> = name of the remote VNX from which the task was initiated
Example:
To get information about task running on the local system but initiated from remote VNX cs110, type:
$ nas_task -info 1234 -remote system cs110
Abort a replication task
You can abort a long-running task, such as a one-time copy in progress, from the sourceand destination sides of a replication. If you do, the VNX system attempts to return to thestate it was in before the task started by undoing the completed parts of the task. Someoperations cannot be aborted because they have reached a state where they cannot beundone. In this case, the system ignores the abort request. After you issue the abortcommand, you can monitor the progress of the abort. Monitor replication tasks on page 150provides details on monitoring replication tasks.
Note: Abort a task locally when a task is hung or you are experiencing network problems that cannotbe resolved.You should attempt to fix any network problems before aborting a task.
Full abort
Use the nas_task -abort command from the source side of a remote replication to abort atask running on the source and destination. This is a full abort and leaves the system in aconsistent state. However, a full abort may take a long time to complete.
To perform a full abort of a replication task:
1. Display the task ID for all the local tasks that are in progress, by using this commandsyntax:
$ nas_task -list
Note: You need the task ID to get task information about the task to abort.
Output:
ID Task State Originator Start Time Description ScheduleRemote System1637 Running nasadmin@cli+ Fri Jan 25 14:47:44 EST 2008 CreateReplication fs1_local.cs100
2. Get information about the replication task on the system that initiated the task by usingthis command syntax:
$ nas_task -info <taskId>
where:
152 Using VNX Replicator
Managing replication tasks

<taskId> = unique task ID
Example:
To get detailed information about task 1637, type:
$ nas_task -info 1637
Output:
Task Id = 1637
Celerra Network Server = cs100Task State = RunningCurrent Activity = Info 26045317581: Creating sessionMovers = server_2,server_3Percent Complete = 94Description = Create Replication fs1_local.Originator = [email protected] Time = Fri Jan 25 14:47:44 EST 2008Estimated End Time = Fri Jan 25 13:55:05 EST 2008Schedule = n/a
3. Abort the replication task on the system that initiated the task by using this commandsyntax:
$ nas_task -abort <taskId>
where:
<taskId> = ID of the task to abort
Example:
To abort task 1637, type:
$ nas_task -abort 1637
Output:
OK
Local abort
You can also abort a task on a specific local Data Mover. However, you should perform alocal abort with caution as the entire system will be left in an inconsistent state until the taskis aborted on all Data Movers running the task.
Use caution when using this option.
You must perform a local abort on both Data Movers on which the task is running.
Follow this procedure to abort a task on the VNX system that initiated the task:
1. Display the task ID for all the local tasks that are in progress by using this commandsyntax:
$ nas_task -list
You need the task ID to get task information about the task to abort.
Output:
Abort a replication task 153
Managing replication tasks

ID Task State Originator Start Time Description Schedule Remote System1689 Running nasadmin@cli+ Fri Jan 25 14:55:00 EST 2008 CreateReplication fs2_local. cs1001637 Failed nasadmin@cli+ Fri Jan 25 14:47:44 EST 2008 CreateReplication fs1_local. cs1001531 Succeed nasadmin@cli+ Fri Jan 25 14:18:30 EST 2008 CreateReplication rep1_v2. cs100
2. Get information about the replication task on the system that initiated the task by usingthis command syntax:
$ nas_task -info <taskId>
where:
<taskId> = the unique task ID
Example:
To get detailed information about task 1689, type:
$ nas_task -info 1689
Output:
Task Id = 1689Celerra Network Server = cs100Task State = RunningCurrent Activity = Info 26045317581: Creating sessionMovers = server_2,server_3Percent Complete = 94Description = Create Replication fs2_local.Originator = [email protected] Time = Fri Jan 25 14:55:00 EST 2008Estimated End Time = Fri Jan 25 14:02:55 EST 2008Schedule = n/a
3. Abort a replication task running locally on the VNX that initiated the task by using thiscommand syntax:
$ nas_task -abort <taskId> -mover <moverName>
where:
<taskId> = ID of the task to abort
<moverName> = Data Mover on which the task is running
Example:
To abort task 1689 running locally on Data Mover server_2, type:
$ nas_task -abort 1689 -mover server_2
Note: Run this command for each Data Mover on which the task is running. The system will be inan inconsistent state until the task is aborted on all Data Movers running the task.
Output:
OK
154 Using VNX Replicator
Managing replication tasks

4. Optionally, verify that the task is aborting and in Recovering state by using this commandsyntax:
$ nas_task -list
Output:
ID Task State Originator Start Time Description ScheduleRemote System1689 Recovering nasadmin@cli+ Fri Jan 25 14:55:00 EST 2008 CreateReplication fs2_local. cs1001637 Failed nasadmin@cli+ Fri Jan 25 14:47:44 EST 2008 CreateReplication fs1_local. cs1001531 Failed nasadmin@cli+ Fri Jan 25 14:18:30 EST 2008 CreateReplication rep1_v2. cs100
This procedure aborts a local task initiated by a remote VNX:
1. Display the task ID for the task to abort by using this command syntax:
$ nas_task -list
Output:
ID Task State Originator Start Time Description Schedule RemoteSystem3833 Running nasadmin@cli+ Wed Jan 30 15:15:13 EST 2008 CreateReplication rem1_v2.cs110
2. Get information about the task on the system that initiated the task by using this commandsyntax:
$ nas_task -info <taskId>
where:
<taskId> = the unique task ID
Example:
To get detailed information about task 3883 originated from VNX cs110, type:
$ nas_task -info 3833 -remote_system cs110
Output:
Task Id = 3833Celerra Network Server = cs110Task State = RunningCurrent Activity = Info 26045317587: Cleaning upMovers = server_2Description = Create Replication rem1_v2.Originator = [email protected] Time = Wed Jan 30 15:15:13 EST 2008Estimated End Time = Wed Dec 31 19:00:00 EST 1969Schedule = n/a
3. To abort a replication task initiated by a remote VNX and running locally, use thiscommand syntax:
$ nas_task -abort <taskId> -mover <moverName> -remote_system
Abort a replication task 155
Managing replication tasks

<remoteSystemName>|id=<id>
where:
<taskId> = ID of the task to abort
<moverName> = Data Mover on which the task is running
<remoteSystemName> = name of the remote VNX system
<id> = ID of the remote VNX system
Example:
To abort task 3833 running on Data Mover server _2 and initiated by remote VNX systemcs110, type:
$ nas_task -abort 3883 -mover server_2 -remote_system cs110
Output:
Info 26307199024: Abort request sent. Please check the task status to
see if task was successfully aborted.
4. Check the task status for task 3833 by using this command syntax:
$ nas_task -info <taskId> -remote_system <remoteSystemName>|id=<id>
where:
<taskId> = ID of the task to abort
<remoteSystemName> = name of the remote VNX system
<id> = ID of the remote VNX system
Example:
To check the status of task 3833, type:
$ nas_task -info 3833 -remote_system cs110
Output:
Error 13422297148: Task cs110:3833 not found.
Delete a replication task
After an asynchronous task completes, you can manually delete the task by using thenas_task -delete option, or you can wait 3 days for the system to delete the task automatically.You run the nas_task delete command from the system that initiated the replication.
1. Obtain the task ID for the task you want to delete, by using this command syntax:
$ nas_task -list
Note: You need the task ID to delete a task.
Output:
156 Using VNX Replicator
Managing replication tasks

ID Task State Originator Start Time Description Schedule RemoteSystem
1689 Failed nasadmin@cli+ Fri Jan 25 14:55:00 EST 2008 CreateReplication fs2_local. eng173101637 Failed nasadmin@cli+ Fri Jan 25 14:47:44 EST 2008 CreateReplication fs1_local. eng173101531 Failed nasadmin@cli+ Fri Jan 25 14:18:30 EST 2008 CreateReplication rep1_v2. eng17310
2. Delete a completed task from the system that initiated the task, by using this commandsyntax:
$ nas_task -delete <taskId>
where:
<taskId> = ID of the task to delete
Example:
To delete task 1531, type:
$ nas_task -delete 1531
Output:
OK
Delete a replication task 157
Managing replication tasks

158 Using VNX Replicator
Managing replication tasks

12
Managing Data Moverinterconnects
After you have established a Data Mover interconnect for replicationsessions to use, you can manage the interconnect.
The tasks to manage Data Mover interconnects are:
View a list of Data Mover interconnects on page 160 View Data Mover interconnect information on page 160 Modify Data Mover interconnect properties on page 161 Change the interfaces associated with an interconnect on page 163 Pause a Data Mover interconnect on page 168 Resume a paused Data Mover interconnect on page 169 Validate a Data Mover interconnect on page 169 Delete a Data Mover interconnect on page 170
Using VNX Replicator 159

View a list of Data Mover interconnects
You can list all interconnects available on the local VNX, and optionally list the interconnectson the local VNX that have peer interconnects on a specified destination VNX.
Action
To view a list of Data Mover interconnects on the local VNX cabinet, and optionally, the interconnects on a remote cabinet,
use this command syntax:
$ nas_cel -interconnect -list [-destination_system <cel_name>|id=<cel_id>]
where:
<cel_name> = name of a remote (destination) VNX
<cel_id> = ID of a remote VNX
Example:
To list the interconnects established on local VNX site NY, type:
$ nas_cel -interconnect -list
Output
id name source_server destination_system destination_server1 NYs2_LAs2 server_2 celerra_5 server_215 NYs2_LAs3 server_2 celerra_6 server_320 loopback server_2 celerra_5 server_2
Note: All loopback interconnects display “loopback" for the interconnect name. Use the interconnect ID to specify a spe-
cific loopback interconnect.
View Data Mover interconnect information
You can view interconnect information for a specific interconnect (identified by name or ID),or you can view information for all interconnects.
Action
To display detailed information about a Data Mover interconnect, use this command syntax:
$ nas_cel -interconnect -info <name>|id=<interConnectId>|-all
where:
<name> = name of a Data Mover interconnect
<interConnectId> = ID of Data Mover interconnect
Example:
To view detailed information about interconnect NYs2_LAs2 established on the local VNX site NY, type:
$ nas_cel -interconnect -info NYs2_LAs2
160 Using VNX Replicator
Managing Data Mover interconnects

Output
id = 1name = NYs2_LAs2source_server = server_2source_interfaces = 45.252.2.3destination_system = celerra_5destination_server = server_2destination_interfaces = 45.252.2.5bandwidth schedule =crc enabled = yesnumber of configured replications = 0number of replications in transfer = 0status = The interconnect is OK.
Modify Data Mover interconnect properties
You can modify the interconnect name, the list of interfaces available for use on the localor peer side of the interconnect, and the bandwidth schedule.
You cannot modify:
A loopback interconnect.
An interface in use by a replication session.
The peer side of an interconnect configured on a remote system.You must modify it fromthat system.
Before you make changes to an interconnect, review Interconnect setup considerations onpage 58.
Action
Modify the name of a Data Mover interconnect, using this command syntax:
$ nas_cel -interconnect -modify <name>|id=<interConnectId> -name <newName>
where:
<name> = name of the interconnect
<interConnectId> = ID of the interconnect
<newName> = new name for the interconnect
Example:
To rename interconnect ny2_ny3 to s2_s3, type:
$ nas_cel -interconnect -modify ny2_ny3 -name s2_s3
Modify Data Mover interconnect properties 161
Managing Data Mover interconnects

Output
operation in progress (not interruptible)...id = 30006name = NY-to-LAsource_server = server_3source_interfaces = 45.252.2.4destination_system = eng25212destination_server = server_3destination_interfaces = 45.252.0.71bandwidth schedule = use available bandwidthcrc enabled = yesnumber of configured replications = 0number of replications in transfer = 0status = The interconnect is OK.
This is an example of how to update the source interface list.
Action
To modify the list of Data Mover IP addresses available for use on the local side of the interconnect, use this command
syntax:
$ nas_cel -interconnect -modify <name>|id=<interConnectId>
-source_interfaces <name_service_interface_name>|ip=<ipaddr>,...]
-destination_interfaces <name_service_interface_name>|ip=<ipaddr>,...
where:
<name> = name of the interconnect
<interConnectId> = ID of the interconnect
<name_service_interface_name> = interface defined using a name service interface name that must resolve to
a single IP address
<ipaddr> = interface defined by an IP address
Example:
To modify the list of source interfaces available on interconnect s2_s3, type:
$ nas_cel -interconnect -modify s2_s3 -source_interfaces ip=172.24.102.0,
ip=172.24.103,ip=172.24.104
Note: To avoid problems with interface selection, any changes made to the interface lists should be reflected on both
sides of an interconnect.
Output
OK
This is an example of how to update the bandwidth schedule for a Data Mover interconnect.
Action
To modify the bandwidth schedule for a Data Mover interconnect, use this syntax:
162 Using VNX Replicator
Managing Data Mover interconnects

Action
$ nas_cel -interconnect -modify <name>|id=<interConnectId> -bandwidth
<bandwidth>
where:
<name> = name of the interconnect
<interConnectId> = ID of the interconnect
<bandwidth> = schedule with one or more comma-separated entries, most specific to least specific as follows:
[Su|Mo|Tu|We|Th|Fr|Sa][HH:00-HH:00][/Kbps]
,[ <next_entry>],[...]
Example:
To modify the bandwidth schedule for interconnect s2_s3 and set bandwidth limits to 2000 Kb/s from 7 A.M. to 6 P.M.
Monday through Friday, otherwise use 8000 Kb/s, type:
$ nas_cel -interconnect -modify s2_s3 -bandwidth MoTuWeThFr07:00-18:00/2000,/8000
Output
OK
Change the interfaces associated with an interconnect
Before you change the interface that is being used by an existing Data Mover interconnect,you must first stop the replication session, make the modification to the interconnect, andthen start the session again.
This is an example of how to change the interfaces associated with a Data Moverinterconnect. In this example, there are two interfaces on the source VNX (cge2 and cge0)and one interface on the destination VNX (cge0).
We will create Data Mover interconnects and then a file system replication that uses devicecge0 with source interface IP 45.252.1.42 and device cge0 with destination interface IP45.252.1.46. Then, we will stop the replication to modify the Data Mover interconnects touse source device cge2, instead of cge0 and restart the replication.
1. To display information for all interfaces on a Data Mover on the source VNX, type:
$ server_ifconfig server_3 -all
Output:
Change the interfaces associated with an interconnect 163
Managing Data Mover interconnects

server_3 :
cge2_52 protocol=IP device=cge2inet=45.252.1.52 netmask=255.255.255.0
broadcast=45.252.1.255UP, ethernet, mtu=1500, vlan=0, macaddr=0:60:16:1f:8a:b6
loop protocol=IP device=loopinet=127.0.0.1 netmask=255.0.0.0 broadcast=127.255.255.255UP, loopback, mtu=32768, vlan=0, macaddr=0:0:0:0:0:0
netname=localhostcge0_3 protocol=IP device=cge0
inet=45.252.1.42 netmask=255.255.255.0broadcast=45.252.1.255
...
2. To display information for all interfaces on a Data Mover on the destination VNX, type:
$ server_ifconfig server_3 -all
Output:
server_3 :loop protocol=IP device=loop
inet=127.0.0.1 netmask=255.0.0.0 broadcast=127.255.255.255UP, loopback, mtu=32768, vlan=0, macaddr=0:0:0:0:0:0
netname=localhostcge0-46 protocol=IP device=cge0
inet=45.252.1.46 netmask=255.255.255.0broadcast=45.252.1.255
UP, ethernet, mtu=1500, vlan=0, macaddr=0:60:16:25:fa:eel31 protocol=IP device=mge1inet=128.221.253.3 netmask=255.255.255.0
broadcast=128.221.253.255UP, ethernet, mtu=1500, vlan=0, macaddr=0:60:16:25:49:b3
netname=localhost...
3. To create the local interconnect 40s3-41s3 from the source to the destination VNX, type:
$ nas_cel -interconnect -create 40s3-41s3 -source_server server_3
-destination_system eng25241 -destination_server server_3 -source_interfaces
ip=45.252.1.42 -destination_interfaces ip=45.252.1.46
Output:
operation in progress (not interruptible)...id = 30003name = 40s3-41s3source_server = server_3source_interfaces = 45.252.1.42destination_system = eng25241destination_server = server_3destination_interfaces = 45.252.1.46bandwidth schedule = uses available bandwidthcrc enabled = yesnumber of configured replications = 0number of replications in transfer = 0status = The interconnect is OK.
164 Using VNX Replicator
Managing Data Mover interconnects

4. To create the peer interconnect 41s3-40s3 from the destination to the source, type:
$ nas_cel -interconnect -create 41s3-40s3 -source_server server_3
-destination_system eng25240 -destination_server server_3 -source_interfaces
ip=45.252.1.46 -destination_interfaces ip=45.252.1.42
Output:
operation in progress (not interruptible)...id = 30005name = 41s3-40s3source_server = server_3source_interfaces = 45.252.1.46destination_system = eng25240destination_server = server_3destination_interfaces = 45.252.1.42bandwidth schedule = uses available bandwidthcrc enabled = yesnumber of configured replications = 0number of replications in transfer = 0status = The interconnect is OK.
5. To create replication session ps1-40-41 to replicate file system ps1 from the source tothe destination, type:
$ nas_replicate -create ps1-40-41 -source -fs ps1 -destination -pool id=3
-interconnect 40s3-41s3
Output:
OK
6. To display information for replication ps1-40-41 on the source VNX, type:
$ nas_replicate -info ps1-40-41
Output:
Change the interfaces associated with an interconnect 165
Managing Data Mover interconnects

ID = 844_APM00083201400_0000_1012_APM00083400465_0000Name = ps1-40-41Source Status = OKNetwork Status = OKDestination Status = OKLast Sync Time = Tue Apr 21 07:44:27 EDT 2009Type = filesystemCelerra Network Server = eng25241Dart Interconnect = 40s3-41s3Peer Dart Interconnect = 41s3-40s3Replication Role = sourceSource Filesystem = ps1Source Data Mover = server_3Source Interface = 45.252.1.42Source Control Port = 0Source Current Data Port = 0Destination Filesystem = ps1Destination Data Mover = server_3Destination Interface = 45.252.1.46Destination Control Port = 5085Destination Data Port = 8888Max Out of Sync Time (minutes) = 10Next Transfer Size (KB) = 8664Current Transfer Size (KB) = 8664Current Transfer Remain (KB) = 86Estimated Completion Time =Current Transfer is Full Copy = NoCurrent Transfer Rate (KB/s) = 35219Current Read Rate (KB/s) = 11581Current Write Rate (KB/s) = 3528Previous Transfer Rate (KB/s) = 2801Previous Read Rate (KB/s) = 6230Previous Write Rate (KB/s) = 3528Average Transfer Rate (KB/s) = 2801Average Read Rate (KB/s) = 6230Average Write Rate (KB/s) = 1834
7. To change the interface on the Data Mover to use cge2, instead of cge0, stop thereplication session at the source VNX by typing:
# nas_replicate -stop ps1-40-41 -mode both
Output:
OK
8. To modify Data Mover interconnect 40s3-41s3 to use device cge2, which uses IP45.252.1.52, type:
$ nas_cel -interconnect -modify 40s3-41s3 -source_interfaces ip=45.252.1.52
Output:
166 Using VNX Replicator
Managing Data Mover interconnects

operation in progress (not interruptible)...id = 30003name = 40s3-41s3source_server = server_3source_interfaces = 45.252.1.52destination_system = eng25241destination_server = server_3destination_interfaces = 45.252.1.46bandwidth schedule = uses available bandwidthcrc enabled = yesnumber of configured replications = 0number of replications in transfer = 0status = The interconnect is OK.
9. To modify peer Data Mover interconnect 41s3-40s3 to use device cge2, type:
$ nas_cel -interconnect -modify 41s3-40s3 -destination_interfaces ip=45.252.1.52
Output:
operation in progress (not interruptible)...id = 30005name = 41s3-40s3source_server = server_3source_interfaces = 45.252.1.46destination_system = eng25240destination_server = server_3destination_interfaces = 45.252.1.52bandwidth schedule = uses available bandwidthcrc enabled = yesnumber of configured replications = 0number of replications in transfer = 0status = The interconnect is OK.
10. Optionally, to validate the Data Mover interconnect, type:
$ nas_cel -interconnect -validate 40s3-41s3
Output:
40s3-41s3: validating 1 interface pairs; please wait ... ok
11. To start the replication session ps1-40-41 and specify the Data Mover Interconnect, type:
$ nas_replicate -start ps1-40-41 -interconnect 40s3-41s3
Output:
OK
12. To display information for replication ps1-40-41on the source VNX and see that thesource interface has changed, type:
$ nas_replicate -info ps1-40-41
Output:
Change the interfaces associated with an interconnect 167
Managing Data Mover interconnects

ID = 844_APM00083201400_0000_1012_APM00083400465_0000 Name = ps1-40-41Source Status = OKNetwork Status = OKDestination Status = OKLast Sync Time = Tue Apr 21 07:52:51 EDT 2009Type = filesystemCelerra Network Server = eng25241Dart Interconnect = 40s3-41s3Peer Dart Interconnect = 41s3-40s3Replication Role = sourceSource Filesystem = ps1Source Data Mover = server_3Source Interface = 45.252.1.52Source Control Port = 0Source Current Data Port = 0Destination Filesystem = ps1Destination Data Mover = server_3Destination Interface = 45.252.1.46Destination Control Port = 5085Destination Data Port = 8888Max Out of Sync Time (minutes) = 10Next Transfer Size (KB) = 0Current Transfer Size (KB) = 0Current Transfer Remain (KB) = 0Estimated Completion Time =Current Transfer is Full Copy = NoCurrent Transfer Rate (KB/s) = 0Current Read Rate (KB/s) = 0Current Write Rate (KB/s) = 0Previous Transfer Rate (KB/s) = 0Previous Read Rate (KB/s) = 0Previous Write Rate (KB/s) = 0Average Transfer Rate (KB/s) = 0Average Read Rate (KB/s) = 0Average Write Rate (KB/s) = 0
Pause a Data Mover interconnect
When you pause a Data Mover interconnect, it temporarily stops all data transmission forall replication sessions that are using the specified interconnect. Data transmission remainspaused until you either resume transmission over the interconnect or delete the interconnect.
Note: Setting the throttle bandwidth value to 0 will also suspend data transfer.
Action
To pause a Data Mover interconnect, use this command syntax:
$ nas_cel -interconnect -pause <name>|id=<interConnectId>
where:
<name> = name of the interconnect
<interConnectId> = ID of the interconnect
Example:
168 Using VNX Replicator
Managing Data Mover interconnects

Action
To pause the Data Mover s3_s4, type:
$ nas_cel -interconnect -pause s3_s4
Output
done
Resume a paused Data Mover interconnect
Use the -resume command to resume data transmission over a Data Mover interconnectthat has been paused.
Action
To resume a paused Data Mover interconnect, use this command syntax:
$ nas_cel -interconnect -resume <name>|id=<interConnectId>
where:
<name> = name of the Data Mover interconnect
<interConnectId> = ID of the Data Mover interconnect
Example:
To resume data transmission over Data Mover s3_s4, type:
$ nas_cel -interconnect -resume s3_s4
Output
done
Validate a Data Mover interconnect
You can verify that authentication is configured properly between a given Data Mover pairand validate all the combinations between source and destination IP addresses/interfacename.
Action
To validate a Data Mover interconnect, use this command syntax:
$ nas_cel -interconnect -validate <name>|id=<interConnectId>
where:
<name> = name of the Data Mover interconnect
<interConnectId> = ID of the Data Mover interconnect
Example:
To validate Data Mover s3_s4, type:
Resume a paused Data Mover interconnect 169
Managing Data Mover interconnects

Action
$ nas_cel -interconnect -validate s3_s4
Output
validating...ok.
Delete a Data Mover interconnect
Follow this procedure to delete a Data Mover interconnect.
You cannot delete an interconnect that is in use by a replication session.
Action
To delete a Data Mover interconnect, use this command syntax:
$ nas_cel -interconnect -delete <name>|id=<interConnectId>
where:
<name> = name of the Data Mover interconnect to delete
<interConnectId> = ID of the Data Mover interconnect to delete
Example:
To delete Data Mover interconnect s3_s4, type:
$ nas_cel -interconnect -delete s3_s4
Output
done
170 Using VNX Replicator
Managing Data Mover interconnects

13
Managing the replicationenvironment
The tasks to manage the VNX Replicator environment are:
Monitor replication on page 172 View the passphrase on page 172 Change the passphrase on page 173 Extend the size of a replicated file system on page 174 Change the percentage of system space allotted to SavVols on page
174 Change replication parameters on page 175 Mount the source or destination file system on a different Data Mover
on page 176 Rename a Data Mover that has existing interconnects on page 176 Change the mount status of source or destination object on page 177 Perform an initial copy by using the disk transport method on page
178 Change Control Station IP addresses on page 180 Perform an initial copy by using the tape transport method on page
183 Recover from a corrupted file system using nas_fsck on page 185 Manage expected outages on page 186 Manage unexpected outages on page 188
Using VNX Replicator 171

Monitor replication
Table 8 on page 172 shows the commands to use to monitor different aspects of replication.You can also monitor replication by using Unisphere, which is described in the Unisphereonline help.
Table 8. Ways to monitor replication
CommandDescriptionMonitor
server_sysstatReturns information about available
memory and the CPU idle percentage.
Data Movers
server_dfReports the amount of used and avail-
able disk space for a file system and
reports the amount of a file system’s
total capacity that is used.
File systems
nas_fs -listReports the size of a filesystem and
the checkpoints used.
File systems
nas_fs -infoReports replication sessions that are
stopped or configured on a file system.
File systems
nas_replicate -listLists status information for all replication
sessions or a specific session, as de-
Replication
scribed in (Optional) Verify file system
replication on page 85.
nas_replicate -infoShows detailed information for an indi-
vidual replication session, as detailed
Replication
in (Optional) Verify file system replica-
tion on page 85.
nas_task -listLists task status information for an indi-
vidual replication task or for all replica-
Replication
tion tasks, as described in Monitor
replication tasks on page 150.
nas_task -infoShows detailed task information for an
individual replication task or for all
Replication
replication tasks, as described in Moni-
tor replication tasks on page 150.
View the passphrase
The passphrase is used to authenticate with a remote VNX system.
172 Using VNX Replicator
Managing the replication environment

Action
To view the passphrase of a remote VNX system, use this command syntax:
$ nas_cel -info <cel_name>|id=<cel_id>
where:
<cel_name> = ID of the remote VNX system
<cel_id> = name of the remote VNX system
The VNX system ID is assigned automatically. To view this ID for a remote system, use the nas_cel -list command.
Example:
To view the passphrase of the VNX system, type:
$ nas_cel -info id=5
Output
id = 5name = cs110owner = 503device =channel =net_path = 192.168.168.102celerra_id = APM000446038450000passphrase = nasadmin
Change the passphrase
Use this procedure to change the passphrase on a VNX system.
Note: The passphrase on both the local and remote systems must be identical.
1. At each site, review the passphrase, by using this command syntax:
$ nas_cel -info <cel_name>|id=<cel_id>
where:
<cel_name> = name of the VNX system
2. At each site, modify the passphrase, by using this command syntax:
$ nas_cel -modify <cel_name>|id=<cel_id> -passphrase <passphrase>
where:
<cel_name> = name of the VNX system
<cel_id> = ID of the VNX system
<passphrase> = current common passphrase
Change the passphrase 173
Managing the replication environment

Extend the size of a replicated file system
During normal replication operation, the source and destination file systems must be thesame size. If you want to extend the source file system, the destination file system musthave enough storage available, so that it can be extended as well. Only the source filesystem can be extended by the administrator. The extension of the destination file systemtakes place automatically and cannot be initiated by the VNX administrator.When the sourcefile system is extended by the administrator, the system will extend the source file systemfirst. The destination file system will be extended upon the next data transfer. If there is anerror during extension of the destination file system, then the replication data transfer willnot proceed until the situation is corrected.
VNX Replicator can create a destination file system for your virtually provisioned source filesystems. Since auto-extension is enabled for a virtually provisioned source file system, thedestination file system need not be virtually provisioned. When the virtually provisionedsource file system is automatically extended, VNX Replicator ensures that the destinationfile system is also extended by the same amount of disk space.
Managing Volumes and File Systems with VNX Automatic Volume Management providesmore details about Automatic File System Extension.
Recovering from replicated file system extension failure
An extension of a replicated source file system always extends the source file system first.If there is a failure during this extension, the administrator will know immediately about thisfailure. If the source file system extension fails, the destination file system will not beextended. If the source file system extension is successful, the next data transfer from thesource to the destination triggers an automatic destination file system extension.
A replication destination file system employs an internal script that extends the file systemto the required size. When an error occurs during the destination file system extension, thecause of the error is logged to the sys_log file.The administrator should view sys_log to findthe exact error, and then use nas_message -info command to obtain the detailed descriptionof the error and the recommended corrective actions.
Change the percentage of system space allotted to SavVols
To prevent the SavVol from running out of space for file systems with high change rates orfile systems with a high number of checkpoints, increase the percentage of system spaceallotted for SavVols. If you increase the SavVol space, you cannot decrease it.You canreclaim the space used by deleting all user checkpoints and replications on the system.
This setting applies to all SavVols for all checkpoints and not just VNX Replicator checkpoints.
Note: This setting will be overwritten by a code upgrade.Therefore, you will need to perform this actionagain.
Use this procedure to change the percentage of system space allotted to all SavVols.
174 Using VNX Replicator
Managing the replication environment

1. Log in to the Control Station.
2. Open /nas/sys/nas_param with a text editor.
A short list of configuration lines appears.
3. Locate this SnapSure configuration line in the file:
ckpt:10:100:20:
where:
10 = Control Station polling interval rate in seconds
100 = maximum rate at which a file system is written in MB/second
20 = percentage of the entire system’s volume allotted to the creation and extension ofall the SavVols used by VNX
Note: If this line does not exist, it means the SavVol-space-allotment parameter is currently set toits default value of 20, which means 20 percent of the system space can be used for SavVols. Tochange this setting, you must first add the line: ckpt:10:100:20:
4. Change the third parameter, which is the percent of entire system’s volume allotted toSavVols as needed. Values are the default 20 through 99.
Note: To ensure proper functionality, do not use a value below 20 percent for the third value.
Do not change the Control Station event polling interval rate, default =10, or the maximumrate to which a file system is written, default =100. Doing so will have a negative impacton system performance. Do not change any other lines in this file without a thoroughknowledge of the potential effects on the system. Contact your EMC Customer SupportRepresentative for more information.
5. Save and close the file.
Note: Changing this value does not require a Data Mover or Control Station restart.
The Parameters Guide for VNX for File provides more information on changing systemparameters.
Change replication parameters
If you choose to set these policies for all sessions on a Data Mover, you can change theseparameters:
nas_param — By default, the space used by SavVol cannot exceed 20 percent of thetotal space of the cabinet.You can increase the space by using the nas_param file.
Change replication parameters 175
Managing the replication environment

server_param — By default, .ts is the value used for the NDMP tapeSilveringStr parameter.You can specify a new value by using the server_param file.
The Parameters Guide for VNX for File describes all VNX system parameters.
Mount the source or destination file system on a different Data Mover
After you stop a replication, if you choose to move your source or destination file system toanother Data Mover, you must first unmount your file system and all associated checkpoints.Then, mount all the checkpoints and the file system on a different Data Mover.
To move your file system to another Data Mover:
1. Verify whether there is an interconnect set up between Data Movers. If not, create theinterconnect.
2. Ensure there is no client access to the file system.
3. Unmount any user-defined checkpoints associated with the file system if they exist.
4. Unmount the file system. Internal checkpoints are automatically unmounted.
5. Mount the file system on a different Data Mover.
6. Mount all the user-defined checkpoints on the same Data Mover where your file systemresides.
7. Start the replication session by using a new interconnect.
Rename a Data Mover that has existing interconnects
After you configure an interconnect for a Data Mover, you cannot rename that Data Moverwithout deleting and reconfiguring the interconnect and reestablishing replication sessions.
This procedure describes how to rename a Data Mover that has one or more existinginterconnects, other than a loopback interconnect, configured for it.
1. Stop all replications on the source and destination by using the Data Mover to be renamed.Follow the procedure, Stop a replication session on page 134.
2. Delete all interconnects on the Data Mover. Follow the procedure, Delete a Data Moverinterconnect on page 170.
3. Rename the Data Mover, using this command syntax:
$ server_name <movername> <new _name>
where:
<movername> = current hostname of the specified Data Mover
<new_name>= new hostname for the Data Mover
Example:
176 Using VNX Replicator
Managing the replication environment

To change the current hostname for a Data Mover, type:
$ server_name server_2 my_srv2
Output:
server_2 : my_srv2
4. Re-create all the interconnects on the newly named Data Mover. Follow the procedure,Set up one side of an interconnect on page 74.
5. Delete all the peer interconnects on the remote VNX system. Follow the procedure,Delete a Data Mover interconnect on page 170.
6. Re-create all the peer interconnects on the remote VNX system specifying the new DataMover name. Follow the procedure, Set up the peer side of the interconnect on page 76.
7. Validate the new interconnects and correct any configuration errors. Follow the procedure,Validate interconnect information on page 77.
8. Start the replication sessions specifying the new interconnect name. Follow the procedure,Start a replication session on page 136.
Change the mount status of source or destination object
This procedure describes how to change the mount status of a replication source ordestination object.
Use this procedure to change the mount status of a source object when starting one or morefailed over or switched over replication sessions in a one-to-many configuration.
If you are starting a replication session from the destination side and the source object isused in only one replication session, you need not change the mount status of the destinationobject. However, if the source object is used in multiple replication sessions, you may needto change the mount status of each of the source and destination objects involved in all ofthe replication sessions in the configuration to start each session successfully.
When you change the status of a replication object, you risk changing the contentsof the object, which can result in data being overwritten.
File system
To change the mount status of a file system, use the server_mount command.
Action
To change the mount status of a file system, use this command syntax:
$ server_mount <movername> -option [ro|rw] <fs_name>
where:
<movername> = name of the Data Mover where the file system resides
Change the mount status of source or destination object 177
Managing the replication environment

Action
ro|rw = the mount is read/write (default), or read-only
<fs_name> = name of the file system
Example:
To mount file system fs1 with read-only access, type:
$ server_mount server_2 -option ro fs1
Output
server_2 : done
VDM
To change the state of a VDM, use the nas_server command.
Action
To change the state of a VDM, use this command syntax:
$ nas_server -vdm <vdm_name> -setstate <state>
where:
<vdm_name> = name of the VDM whose state you want to change
<state> = VDM state, mounted for read-only or loaded for read/write
Example:
To set the state of vdm_1 from loaded to mounted, type:
$ nas_server -vdm vdm_1 -setstate mounted
Output
id = 3name = vdm_1acl = 0type = vdmserver = server_2rootfs = root_fs_vdm_1I18N mode = UNICODEmountedfs =member_of =status :defined = enabledactual = mountedInterfaces to services mapping:
Perform an initial copy by using the disk transport method
Follow this procedure to perform an initial copy of the file system by using the disk transportmethod. Performing an initial copy by using disk or tape on page 54 describes how the disktransport method works:
178 Using VNX Replicator
Managing the replication environment

1. Create a checkpoint of the source file system on VNX system A, by using this commandsyntax:
$ fs_ckpt <fsName> -name <ckptName> -create
where:
<fsName> = name of the source file system
<ckptName> = name of the source file system checkpoint
Example:
To create checkpoint ufs1_ckpt1 on VNX system A, type:
$ fs_ckpt ufs1 -name ufs1_ckpt1 -Create
2. Create a one-time copy session to copy the source file system checkpoint from VNXsystem A to VNX system B, by using this command syntax:
$ nas_copy -name <name> -source -ckpt <ckptName> -destination -pool
id= <dstStoragePoolId>|<dstStoragePool> -interconnect
<name>|id=<interConnectId>
where:
<name> = name of the copy session
<ckptName> = name of the existing source checkpoint to copy
<dstStoragePoolId> = ID of the storage pool to use to create the checkpoint on thedestination
<dstStoragePool> = name of the storage pool to use to create the checkpoint on thedestination
<name>= name of the Data Mover interconnect to use for this copy session
<interConnectId> = ID of the Data Mover interconnect to use for this copy session
Example:
To copy checkpoint ufs1_ckpt1 to VNX system B, type:
$ nas_copy -name rep1 -source -ckpt ufs1_ckpt1 -destination -pool id=3
-interconnect id=20005
After the copy, file system ufs1 and checkpoint ufs1_ckpt1 are created on VNX systemB.
3. Move VNX system B to the destination location.
4. Create a one-time copy session to copy the checkpoint from VNX system B to VNXsystem C by using this command syntax:
$ nas_copy -name <name> -source -ckpt <ckptName> -destination -pool
id=<dstStoragePoolId>|<dstStoragePool> -interconnect
<name>|id=<interConnectId>
where:
Perform an initial copy by using the disk transport method 179
Managing the replication environment

<name> = name of the copy session
<ckptName> = name of the existing source checkpoint to copy
<dstStoragePoolId> = ID of the storage pool to use to create the checkpoint on thedestination
<dstStoragePool> = name of the storage pool to use to create the checkpoint on thedestination
<name>= name of the Data Mover interconnect to use for this copy session
<interConnectId> = ID of the Data Mover interconnect to use for this copy session
Example:
To copy checkpoint ufs1_ckpt1 to VNX system C, type:
$ nas_copy -name rep1 -source -ckpt ufs1_ckpt1 -destination -pool id=3
-interconnect id=20006
After the copy, file system ufs1 and checkpoint ufs1_ckpt1 are created on VNX systemC.
5. Create a file system replication session for file system ufs1 from VNX system A to VNXsystem C by using this command syntax:
$ nas_replicate -name -create <name> -source -fs <fsName> -destination
-fs <existing_dstFsname> -interconnect id=<interConnectId>
where:
<name> = name of the replication session
<fsName> = name of the existing source file system
<existing_dstFsName> = name of the existing file system on the destination
<interConnectId> = ID of the Data Mover interconnect to use for this replication session
Example:
To create a file system replication session, type:
$ nas_replicate -name rep2 -source -fs ufs1 -destination -fs ufs2 -interconnect
id=20007
The common base (ufs1_ckpt1) is automatically identified and the transfer is started froma differential copy.
Change Control Station IP addresses
Use this procedure to change the IP address on the Control Station of the swing VNX systemthat is used to transport the baseline copy of a source file system to the new destinationlocation:
1. At the CLI, log in to the Control Station as the root user.
180 Using VNX Replicator
Managing the replication environment

2. Configure an interface for the Control Station’s IP address by using the command syntax:
# /usr/sbin/netconfig -d <device_name>
where:
<device_name> = name of the ethernet interface used by the Control Station for the publicLAN
Example:
To configure interface eth3, type:
# /usr/sbin/netconfig -d eth3
3. On the Configure TCP/IP screen, type the configuration information for the interface (IPaddress, Netmask IP, Default gateway IP, and Primary name server IP.)
When done, press Enter.
Note: Do not check the Use dynamic IP configuration (BOOTP/DHCP) box.
4. Reboot the Control Station by typing:
# reboot
5. At the CLI, log in to the Control Station as the root user.
6. Verify the settings for the interface by using this command syntax:
# sbin/ifconfig <device_name>
where:
<device_name> = name of the ethernet interface used by the Control Station for the publicLAN
Example:
To verify settings for interface eth3, type:
# /sbin/ifconfig eth3
Output:
eth3 Link encap:Ethernet HWaddr 00:15:17:7B:89:F6inet addr:172.24.252.49 Bcast:172.24.252.255
Mask:255.255.255.0inet6 addr: 2620:0:170:84f:215:17ff:fe7b:89f6/64 Scope:Globalinet6 addr: fe80::215:17ff:fe7b:89f6/64 Scope:LinkUP BROADCAST NOTRAILERS RUNNING MULTICAST MTU:1500 Metric:1RX packets:2686 errors:0 dropped:0 overruns:0 frame:0TX packets:62 errors:0 dropped:0 overruns:0 carrier:0collisions:0 txqueuelen:100RX bytes:222262 (217.0 KiB) TX bytes:4884 (4.7 KiB)Base address:0x2020 Memory:81a60000-81a80000
The output shows that the IP address was changed to 172.24.252.49.
7. Optionally, change the hostname, by using this command syntax:
Change Control Station IP addresses 181
Managing the replication environment

# Hostname <new_host_name>
where:
<new_host_name> = name of the new host
Example:
To change the hostname to cs49, type:
# Hostname cs49
8. Optionally, change the domain name by using this command syntax:
# Domainname <new_domain_name>
where:
<new_domain_name> = name of the new domain
Example:
To change the domain name to corp2, type:
# Domainname corp2
9. Optionally, change the host name by editing the HOSTNAME field in the network file bytyping:
# vi /etc/sysonfig/network
10. Optionally, change the host name by editing the hosts file by typing:
# vi /etc/hosts
11. Optionally, change the host name by editing the hostname file by typing:
# vi /proc/sys/kernel/hostname
12. Restart the network for the host name changes to take effect:
# /etc/init.d/network restart
13. Start the NAS services if it is not already running by typing:
# /sbin/service nas start
14. Optionally, you can change the IP addresses for SPA and SPB by using the clariion_mgmtcommand:
# /nasmcd/sbin/clariion_mgmt –start –spa_ip <SPA public IP address> -spb_ip
<SPB public IP address> -use_proxy_arp
This process will restart both the SPA and the SPB components.You may need to waitapproximately 15–20 minutes for this process to finish.
15. Verify that the IP addresses for SPA and SPB are correct by typing:
# /nasmcd/sbin/clariion_mgmt -info
If the SP’s public IP addresses were typed incorrectly, update the addresses by usingthe command syntax:
182 Using VNX Replicator
Managing the replication environment

# /nasmcd/sbin/clariion_mgmt –modify –spa_ip <SPA public IP address> -spb_ip
<SPB public IP address>
After an internal IP address has been changed to a public IP address, it cannot be revertedby using the previous command. An alternative method will have to be taken to revert(for example, connect to one of the SPs by using Ethernet or dial-in, change the networkinformation, restart the SP, and then repeat the process for the other SP).
16. Delete the cable check file:
# rm /etc/rc.d/rc3.d/S95_cable_check -f
If you do not see to the cable check file, repeat steps 14 and 15 and see if you can accessUnisphere.
17. Reboot the Control Station by typing:
# reboot
18. When the system comes back up, open a Web Browser and access Unisphere by usingthe Control Station IP address:
http://<Control Station IP Address>
Example
http:// 100.22.200.57
Note: You may see Hardware Status warnings once you log in. This is a due to the fact that thestandby power supply (SPS) is still charging. The messages should disappear in 30–60 seconds.
Perform an initial copy by using the tape transport method
Use this procedure to create a replication session and back up the primary file system fromthe source site by using the tape transport method.
Performing an initial copy by using disk or tape on page 54 describes how the tape transportmethod works and provides prerequisite information.
This method is not supported for VDM replications.
Note: This special backup is used only for transporting replication data.
To perform an initial copy by using the tape transport method:
1. From the source side, create a file system replication session with the tape copy optionby typing:
$ nas_replicate -create <name> -source -fs <fsName>
-destination -fs <dstFsName> -interconnect <name>|id=<InterConnectId>
-max_time_out_of_sync <maxTimeOutOfSync> -overwrite_destination -tape_copy
where:
Perform an initial copy by using the tape transport method 183
Managing the replication environment

<name> = name of replication session
<fsName> = name of source file system
<dstFsName> = name of the destination file system
<name> = name of the interconnect to use for this session
<InterConnectId> = ID of the interconnect to use for this session
<maxTimeOutofSync> = the max_time_out_of_sync in minutes
2. Use your normal backup procedure to back up the source file system as follows:
a. If the DMA supports NDMP environment variables, specify TS=Y as an environmentvariable. Otherwise, specify the mount point for the source file system in the backupdefinition with the prefix/.ts
For example, if the primary file system is mounted on mountpoint /replication_pfs,and the DMA supports NDMP environment variables, the backup definition appearsas:
• Environment variable: TS=Y
• Backup file system: /replication_pfs
b. If the DMA does not support NDMP environment variables, the backup definitionappears as:
Backup file system: /.ts/replication_pfs
Note: .ts is the default value for the server_param NDMP tapeSilveringStr.You can change thisvalue at any time.
Configuring NDMP Backups on VNX provides information about environment variables.For information about how to set variables, read your backup software vendor’sdocumentation.
Note: The source file system and checkpoints must be mounted on the NDMP Data Mover.
3. (Optional) For one-to-many configurations, use the environment variable REP_NAME tospecify the name of the replication session for tape transport. For example, the BackupSelections for NetBackup appear as follows:
SET TS=ySET REP_NAME=<replication_name>/replication_pfs
4. Transport the backup tapes to the destination site.
Move the backup catalog for the backup (of previous step) from the source site to thedestination site. Catalog move is dependent on the specific DMA used.The specific DMAvendor documentation provides details on how to move the catalog.
184 Using VNX Replicator
Managing the replication environment

5. At the destination site, use your normal restore procedure to restore the backup.
From the backup catalog, select the file-level entry that corresponds to the backed-upcheckpoint and perform a restore to the destination file system. Select the destinationfile system name in the restore definition by specifying:
/<replication_destination>
where:
<replication_destination> = mountpoint of the destination file system
Note: The file system must be restored to the NDMP Data Mover.
Note: After the restore, ensure the destination file system is mounted read-only (RO).
6. Start the replication session by typing:
$ nas_replicate -start <name>|id=<session_id> -overwrite_destination
where:
<name> =name of the replication session
<session_id> =ID of the replication session
Change the NDMP server_param value
The server_param NDMP tapeSilveringStr has the default value of ts. To change thisparameter, specify a new value up to eight, alpha-numeric characters, and then restart theData Mover for the value to take effect. For example, to change the parameter value fromts to abc, type:
server_param server_2 -f NDMP -modify tapeSilveringStr -value "abc"
After the parameter is changed, you can update the backup definition to the new value (abc).For example, the new backup definition would appear as:
/.abc/replication_pfs
Recover from a corrupted file system using nas_fsck
This section describes how to use the nas_fsck command to check and repair a file systemwhen replication is threatened.You run the command to check the source file system whilereplication is running. If nas_fsck detects inconsistencies in the primary file system, thechanges that occur as a result of using nas_fsck are replicated to the destination file systemlike any other file system modifications.
Perform an initial copy by using the tape transport method 185
Managing the replication environment

Note: You cannot use nas_fsck if the destination file system is corrupted as a result of an impropernas_copy operation.
If corruption occurred on the source file system, perform these steps on the source side.Alternatively, if the destination file system is unstable or possibly so corrupted it might failbefore the nas_fsck changes are replicated, perform these steps on the destination side:
1. Stop the replication by using this command syntax:
$ nas_replicate -stop <name>|id=<sessionId>
where:
<name> = name of the replication session
<sessionId> = ID of the replication session
2. Run nas_fsck using this command syntax:
$ nas_fsck -start <fs_name>|id=<fs_id>
where:
<fs_name> = source or destination file system name
<fs_id> = source or destination file system ID
Note: Running nas_fsck repairs corruption on the source file system, bringing it into a consistent,but not original, state.While nas_fsck runs, the file system is not mounted to avoid system instability.When the command is complete and inconsistencies addressed, the file system is brought backonline.
3. When nas_fsck completes, start the replication again by using this command syntax:
$ nas_replicate -start <name>|id=<session_id>
where:
<name> = name of the replication session
<session_id> = ID of the replication session
Manage expected outages
This section describes how to handle anticipated outages on the source and destinationVNX system or any network outages. When planning for an outage, for instance, to restarta secondary Data Mover or to conduct standard network maintenance involving the secondaryfile system, follow the steps in this section to protect replication.
Anticipated source site outages
If the outage is expected for a short period, you may choose to do nothing. In situations inwhich an outage is expected for a long period and the replication service continues running,
186 Using VNX Replicator
Managing the replication environment

the SavVol might become full that eventually leads to an inactive session. If this scenario islikely, before the outage, follow this procedure:
1. From the source site, perform a replication switchover by using this command syntax:
$ nas_replicate -switchover <name>|id=<session_id>
where:
<name> = name of the replication session
<session_id> = ID of the replication session
2. After the outage is over, start the replication session in the reverse direction by usingthis command syntax:
$ nas_replicate -start <name>|id=<session_id> -reverse
where:
<name> = name of the replication session
<session_id> = ID of the replication session
3. Reverse the replication session by using this command syntax:
$ nas_replicate -reverse <name>|id=<session_id>
where:
<name> = name of the replication session
<session_id> = ID of the replication session
Anticipated destination site outage
Begin by evaluating the outage period and whether the site can survive it. If the data queueseasily in the SavVol, nothing need be done. For example, if the planned outage period is 1day, the SavVol is 100 MB, the file system is 1 GB, and 200 MB of modifications occur daily,then survival is ensured for a half-day because the SavVol will fill in 12 hours. On the otherhand, if only 100 MB in modifications occur daily, a day’s worth of changes are protected.
If a short period could stretch into a longer outage, perform the following:
1. From the source site, stop the replication session by using this command syntax:
$ nas_replicate -stop <name>|id=<session_id>
where:
<name> = name of the replication session
<session_id> = ID of the replication session
2. After the outage is ceased and the destination side is available, start the replicationsession by using this command syntax:
$ nas_replicate -start <name>|id=<session_id>
where:
Manage expected outages 187
Managing the replication environment

<name> = name of the replication session
<session_id> = ID of the replication session
Note: In this case, the changes will still be accumulating on the source, but they will not attempt totransfer.
Manage unexpected outages
This section describes how to manage unplanned VNX system source outages such aspower interruptions or reboots and unanticipated VNX system destination platform or networkoutages.
Unanticipated source site outages
First, decide whether to activate the Data Recovery (DR) site. If you do, consider the following:
If the source resides on a VNX for block system that lost power, and replication is inactive,start the replication session.
If the source resides on a Symmetrix system that lost power—where replication shouldstill be active—no remediation is necessary.
If only the source is down and you do not want to activate the DR site, no remediation isnecessary.
If it is a short outage, you may choose to do nothing. If the administrator anticipates a longoutage, run failover from the destination side as directed by the following procedure:
1. Run a failover replication to activate the DR site by using this command syntax:
$ nas_replicate -failover <name>|id=<session_id>
where:
<name> = source file system name
<session_id> = destination file system name
2. After the outage is over, start the replication session in the reverse direction by usingthis command syntax:
$ nas_replicate -start <name>|id=<session_id> -reverse
where:
<name> = name of the replication session
<session_id> = ID of the replication session
3. Return to your original configuration with a reverse replication by using this commandsyntax:
$ nas_replicate -reverse <name>|id=<session_id>
188 Using VNX Replicator
Managing the replication environment

where:
<name> = name of the replication session
<session_id> = ID of the replication session
Unanticipated destination site or network outages
Most destination site outages require no action. For instance, if the VNX system restarts orgoes offline—and the system does not fall out of sync—no remediation is necessary. Considerthe following:
If nas_replicate -list shows that replication is still active after the unplanned destinationoutage is finished, nothing needs to be done.
If nas_replicate -list shows that replication is inactive and out of sync after the unplanneddestination outage is finished, start the replication.
When an outage strikes your secondary Data Mover or the network connection to yoursecondary file system is offline without notice, follow the steps described in Manage expectedoutages on page 186 for an anticipated destination site outage.
Manage unexpected outages 189
Managing the replication environment

190 Using VNX Replicator
Managing the replication environment

14
Troubleshooting
As part of an effort to continuously improve and enhance the performanceand capabilities of its product lines, EMC periodically releases new versionsof its hardware and software. Therefore, some functions described in thisdocument may not be supported by all versions of the software or hardwarecurrently in use. For the most up-to-date information on product features,refer to your product release notes.
If a product does not function properly or does not function as describedin this document, contact your EMC Customer Support Representative.
Problem Resolution Roadmap for VNX contains additional informationabout using EMC Online Support and resolving problems.
Topics included in this chapter are:
EMC E-Lab Interoperability Navigator on page 192 Error messages on page 192 Log files on page 192 Return codes for nas_copy on page 193 Interconnect validation failure on page 195 Replication fails with quota exceeded error on page 195 Two active CIFS servers after failover or switchover on page 195 Network performance troubleshooting on page 196 EMC Training and Professional Services on page 197
Using VNX Replicator 191

EMC E-Lab Interoperability Navigator
The EMC E-Lab Interoperability Navigator is a searchable, web-based application thatprovides access to EMC interoperability support matrices. It is available on EMC OnlineSupport at http://Support.EMC.com. After logging in, in the right pane under Product andSupport Tools, click E-Lab Navigator.
Error messages
All event, alert, and status messages provide detailed information and recommended actionsto help you troubleshoot the situation.
To view message details, use any of these methods:
Unisphere software:
• Right-click an event, alert, or status message and select to view Event Details, AlertDetails, or Status Details.
CLI:
• Type nas_message -info <MessageID>, where <MessageID> is the messageidentification number.
Celerra Error Messages Guide:
• Use this guide to locate information about messages that are in the earlier-releasemessage format.
EMC Online Support:
• Use the text from the error message's brief description or the message's ID to searchthe Knowledgebase on EMC Online Support. After logging in to EMC Online Support,locate the applicable Support by Product page, and search for the error message.
Log files
The following log files are available to help troubleshoot VNX Replicator. Additionally, youcan use the nas_replicate -info and nas_task -info commands to get more information aboutthe replication session:
server_log
sys_log
cli.log
192 Using VNX Replicator
Troubleshooting

nas_log.ai.mgmtd
server_log messages
The server_log contains messages generated by a Data Mover that performs replicationat the source site. To view server_log messages, type: server_log server_<x>, where<x> is the name of the Data Mover. For example, server_log server_2.
sys_log messages
Messages will be sent to the /nas/log/sys_log if the network goes down, a task goes intothe inactive state, or the SLA cannot be met. For example, if the max_time_out_of_syncvalue is set to 10 minutes and the data transfer does not complete within this value, amessage will be sent to the sys_log.
Use the nas_logviewer command to display the event log and other logs created bynas_eventlog. For example, to view the contents of the sys_log, type:
$ nas_logviewer /nas/log/sys_log|more
cli.log messages
The cli.log file contains start and end time log entries for a particular CLI replicationoperation. To view the cli.log messages navigate to: /nas/log/webui/cli.log.
nas_log.al.mgmtd
The mgmtd log contains runtime information associated with Command Service Daemon(mgmtd) activities.To view nas_log.al.mgmtd messages, go to nas/log/nas_log.al.mgmtd.
Return codes for nas_copy
Table 9 on page 193 lists the possible message IDs that can be returned when running thenas_copy command.This list can be helpful when error checking scripts that use nas_copy.To obtain detailed information about a particular error, use the nas_message -info <error_id>command.
Table 9. Return codes for nas_copy
DescriptionMessage ID
Command completed successfully.OK
The object to be accessed is currently in use by replication or by a task. It could
mean that the secondary dpinitis is not started.
13160415236
Some of the system components were not found.13160415237
Return codes for nas_copy 193
Troubleshooting

Table 9. Return codes for nas_copy (continued)
DescriptionMessage ID
This command cannot be executed because it is not supported.13160415238
The replication name is already in use.13160415247
An error occurred while accessing the replication database.13160415268
The file system is not mounted.13160415302
The specified Data Mover interconnect or its peer could not be found.13160415303
The file system is not found/mounted, or the VDM is unloaded/not found.13160415304
The file system size does not match.13160415305
The object is not in the correct state for replication.13160415307
The maximum number of allowed full copies is in progress. The maximum
number is 16.
13160415315
The destination object is not empty and a common base does not exist, or the
destination object is different from the common base.
13160415324
The destination is in use by another replication process.13160415635
The maximum replication session count has been reached. The maximum
number is 1024 per Data Mover.
13160415636
The destination file system is not a UNIX file system.13160415654
You attempted to perform an FS Copy from a writeable checkpoint. The from
base cannot be a writable checkpoint.
13160415655
The task has been aborted successfully.13160415657
The task has been aborted locally.13160415658
Destination file system or required snaps are missing.13160415742
Refresh copy on read only file system.13160415777
Copy check replica service return arguments.13160415778
Failure on getting file system object from file system ID.13160415779
Inconsistent type in processing copy abort replica request.13160415780
Stamping secondary response error.13160415781
No XML data in replica service response.13160415782
Replica service response does not have destination snap information.13160415783
Replica service response does not have file system ID information.13160415784
194 Using VNX Replicator
Troubleshooting

Table 9. Return codes for nas_copy (continued)
DescriptionMessage ID
The file system's FLR type on the Control Station does not match the file system's
FLR type on the source Data Mover.
13160415839
The FLR-C—enabled destination file system contains protected files.13160415840
The FLR type of the source file system does not match the FLR type of the
destination file system.
13160415841
The FLR type of the source file system does not match the FLR type of the
destination file system.
13160415842
The FLR-C—enabled destination file system or the original source file system
contains protected files.
13160415843
Interconnect validation failure
If you encounter the problem where replication creation sessions hang and interconnectvalidation fails with the following error, even though nas_cel -interconnect -info reports thestatus as OK, use the nas_cel -update command to recover:
Error 13160415446: DpRequest_dic_cannotAuthenticate
This command updates the local Data Mover-to-Data Mover authentication setup. For theremote VNX system, it updates all Data Movers that were down or experiencing errors duringthe -create, and restores them to service using the configuration required for Data Moverauthentication.
Replication fails with quota exceeded error
If you encounter the problem where replication fails with the following error, it means thatthere are too many checkpoints on the system causing the system to exceed the spaceallocated for the checkpoint SavVols:
RepV2 Failure. error: 13421840574: Disk space:quota exceeded
Change the percentage of system space allotted to SavVols on page 174 provides theprocedure to change the percentage of system space allotted to SavVols.
The Parameters Guide for VNX for File provides more detailed procedures for changing thepercentage of system space allotted to SavVols.
Two active CIFS servers after failover or switchover
Two active CIFS servers with the same server name and different IP addresses may resultif you perform a failover or switchover operation on the second session in a VDM cascadeconfiguration. In an A --> B --> C cascade, session 2 is the B --> C session.
Interconnect validation failure 195
Troubleshooting
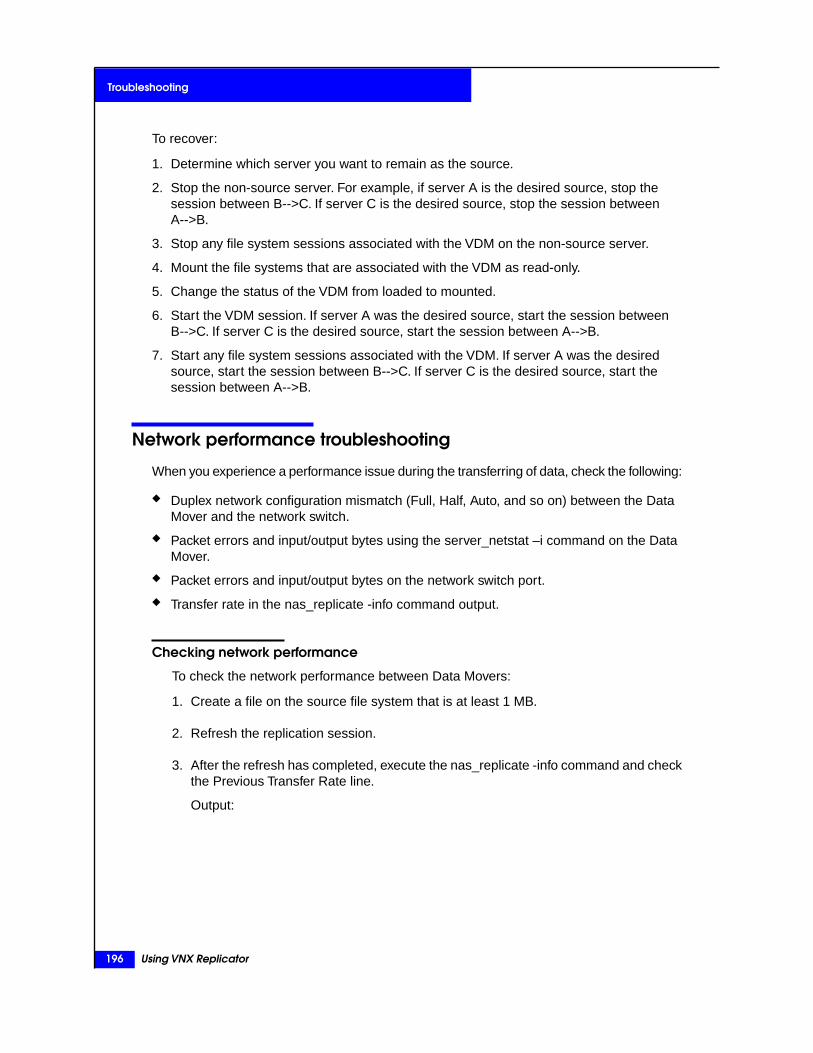
To recover:
1. Determine which server you want to remain as the source.
2. Stop the non-source server. For example, if server A is the desired source, stop thesession between B-->C. If server C is the desired source, stop the session betweenA-->B.
3. Stop any file system sessions associated with the VDM on the non-source server.
4. Mount the file systems that are associated with the VDM as read-only.
5. Change the status of the VDM from loaded to mounted.
6. Start the VDM session. If server A was the desired source, start the session betweenB-->C. If server C is the desired source, start the session between A-->B.
7. Start any file system sessions associated with the VDM. If server A was the desiredsource, start the session between B-->C. If server C is the desired source, start thesession between A-->B.
Network performance troubleshooting
When you experience a performance issue during the transferring of data, check the following:
Duplex network configuration mismatch (Full, Half, Auto, and so on) between the DataMover and the network switch.
Packet errors and input/output bytes using the server_netstat –i command on the DataMover.
Packet errors and input/output bytes on the network switch port.
Transfer rate in the nas_replicate -info command output.
Checking network performance
To check the network performance between Data Movers:
1. Create a file on the source file system that is at least 1 MB.
2. Refresh the replication session.
3. After the refresh has completed, execute the nas_replicate -info command and checkthe Previous Transfer Rate line.
Output:
196 Using VNX Replicator
Troubleshooting

ID =94_HK190807290035_0000_94_APM00062204462_0000Name = rep1Source Status = OKNetwork Status = OKDestination Status = OKLast Sync Time = Thu Jan 24 08:18:42 EST 2008Type = filesystemCelerra Network Server = reliantDart Interconnect = e2Peer Dart Interconnect = r2Replication Role = sourceSource Filesystem = ent_fs1Source Data Mover = server_2Source Interface = 172.24.188.141Source Control Port = 0Source Current Data Port = 0Destination Filesystem = ent_fs1Destination Data Mover = server_2Destination Interface = 172.24.188.153Destination Control Port = 5085Destination Data Port = 8888Max Out of Sync Time (minutes) = 10Next Transfer Size (KB) = 0Current Transfer Size (KB) = 0Current Transfer Remain (KB) = 0Estimated Completion Time =Current Transfer is Full Copy = NoCurrent Transfer Rate (KB/s) = 9891Current Read Rate (KB/s) = 2159Current Write Rate (KB/s) = 2602Previous Transfer Rate (KB/s) = 0Previous Read Rate (KB/s) = 0Previous Write Rate (KB/s) = 0Average Transfer Rate (KB/s) = 9891Average Read Rate (KB/s) = 0Average Write Rate (KB/s) = 0
EMC Training and Professional Services
EMC Customer Education courses help you learn how EMC storage products work togetherwithin your environment to maximize your entire infrastructure investment. EMC CustomerEducation features online and hands-on training in state-of-the-art labs conveniently locatedthroughout the world. EMC customer training courses are developed and delivered by EMCexperts. Go to EMC Online Support at http://Support.EMC.com for course and registrationinformation.
EMC Professional Services can help you implement your system efficiently. Consultantsevaluate your business, IT processes, and technology, and recommend ways that you canleverage your information for the most benefit. From business plan to implementation, youget the experience and expertise that you need without straining your IT staff or hiring andtraining new personnel. Contact your EMC Customer Support Representative for moreinformation.
EMC Training and Professional Services 197
Troubleshooting

198 Using VNX Replicator
Troubleshooting

Appendix A
Setting up the CIFSreplication environment
Setting up a CIFS replication environment means your source anddestination sites have an identical starting point. For CIFS data recoveryimplementation, a fully functional CIFS environment has to be availableat the source and destination sites. The environment includes:
Domain controllers
Name resolution service (for example, DNS or WINS)
Time service synchronized between the domain controllers and clients
Network interfaces
User mapping
Client access to the source and destination VNX systems
Note: You should have at least two DNS and NTP servers to avoid single point offailure.
Table 10 on page 199 lists the environment variables used in the examplesin this section.
Table 10. Environment variables for CIFS replication
DestinationSourceVariable
DR_Site (Miami)Prod_Site (Boston)Control Station
c1t1.pt1.c3lab.nsg-
prod.emc.com
c1t1.pt1.c3lab.nsgprod.emc.comDomain
172.24.101.222172.24.100.183Domain controller
172.24.101.222172.24.100.183DNS
172.24.101.222172.24.100.183NTP
Using VNX Replicator 199

Table 10. Environment variables for CIFS replication (continued)
DestinationSourceVariable
Primary: server_2SecondaryInternal Usermapper
EngineeringEngineeringVDMs
ENG_NEENG_NECIFS servers
Eng - 172.24.101.38Eng - 172.24.100.125Network interface for client
data access
S2_fsn2 - 172.24.106.145Ace0 - 172.24.106.21Network interface for
Replicator and Internal
Usermapper
Table 11 on page 200 lists the interfaces in a CIFS environment.
Table 11. Interfaces in a CIFS environment
Destination siteSource siteInterface
(Required)
Must be identical to the inter-
face names on the source site.
(Required)
Must be identical to the inter-
face names on the destination
site.
Interfaces for source CIFS
servers
If the interface names on the sites are not
identical, you will not be able to load the
VDM on the destination Data Mover after a
failover.
(Optional)
You can use separate inter-
faces to transmit the replication
data.
The names of these interfaces
do not have to be identical on
the source and destination
sites.
(Optional)
You can use different interfaces
to transmit the replication data.
The names of these Data
Mover interconnect interfaces
do not have to be identical on
the source and destination
sites.
Interconnect interfaces used for
replication
Note: For every CIFS server being replicated in a VDM, you must have that CIFS server’s interfaces
available and identically named on the destination site.
The tasks to configure a CIFS replication environment and to set up yourfile systems for replication are as follows. Configuring and Managing CIFSon VNX contains complete CIFS procedures:
200 Using VNX Replicator
Setting up the CIFS replication environment

Verify IP infrastructure on page 202 Configure an interface on page 204 Set up DNS on page 206 Synchronize Data Mover and Control Station Time on page 207 Configure user mapping on page 210 Prepare file systems for replication on page 211
201
Setting up the CIFS replication environment

Verify IP infrastructure
You should verify that the IP infrastructure has been set up correctly for CIFS data recovery.
1. Verify that there is communication between the source and destination VNX systems.
Chapter 4 provides details on how to set up and verify communication between VNXsystems.
2. Initialize interface connectivity.
The network connectivity to support replication and user access to the data in a failovermust be present on the destination site. IP connectivity is required for all network interfacesused in the replication relationship.
The interface names assigned to the CIFS servers on the source and destinationsites must be exactly the same to execute a successful failover.You can alsohave additional interfaces such as the interfaces on each site used by replicationfor transmission of changes.
3. Identify the interface names on the source site so that you can use them to set up thesame interface names on the destination site. Generate the following lists:
List the CIFS servers that exist on the VDM by using this command syntax:
$ server_cifs <movername>
where:
movername = name of the Data Mover on the source site
Output:
202 Using VNX Replicator
Setting up the CIFS replication environment

$ server_cifs server_2server_2 :256 Cifs threads startedSecurity mode = NTMax protocol = NT1I18N mode = UNICODEHome Directory Shares DISABLEDUsermapper auto broadcast enabledUsermapper[0] = [128.221.252.2] state:active port:12345(auto discovered)Usermapper[1] = [128.221.253.2] state:active (auto discovered)Enabled interfaces: (All interfaces are enabled)Disabled interfaces: (No interface disabled)Unused Interface(s):if=Ace0 l=172.24.106.21 b=172.24.106.255 mac=0:60:16:b:f8:11------------------------------------------------------------------CIFS service of VDM Engineering (state=loaded)Home Directory Shares DISABLED
DOMAIN C1T1 FQDN=c1t1.pt1.c3lab.nsgprod.emc.com SITE=Default-First-Site-Name RC=3SID=S-1-5-15-b23c567a-11dc6f47-d6c3b7d5-ffffffff>DC=C1T1-DC1(172.24.100.183) ref=3 time=1 ms (Closest Site)
CIFS Server ENG-NE[C1T1] RC=2Full computer name=eng-ne.c1t1.pt1.c3lab.nsgprod.emc.comrealm=C1T1.PT1.C3LAB.NSGPROD.EMC.COMComment='EMC-SNAS:T5.6.39.1'if=Eng l=172.24.100.125 b=172.24.100.255 mac=0:60:16:b:f8:11FQDN=eng-ne.c1t1.pt1.c3lab.nsgprod.emc.com (Updated to DNS)Password change interval: 720 minutesLast password change: Tue Sep 30 15:43:35 2008 GMTPassword versions: 2
Note: The output shows that Eng is the interface name that must be identical to the interface nameon the destination site.
4. List the interface names used by the CIFS servers on the VDM by using this commandsyntax:
$ server_ifconfig <movername> -all
Example:
$ server_ifconfig server_2 -all
Output:
Verify IP infrastructure 203
Setting up the CIFS replication environment

server_2 :Eng protocol=IP device=cge0inet=172.24.100.125
netmask=255.255.255.broadcast=172.24.100.255UP, ethernet, mtu=1500, vlan=0, macaddr=0:60:16:b:f8:11
Ace0 protocol=IP device=cge1inet=172.24.106.21 netmask=255.255.255.0 broadcast=172.24.106.255UP, ethernet, mtu=1500, vlan=0, macaddr=0:60:16:b:f8:11
loop protocol=IP device=loopinet=127.0.0.1 netmask=255.0.0.0 broadcast=127.255.255.255UP, loopback, mtu=32768, vlan=0, macaddr=0:0:0:0:0:0netname=localhost
el31 protocol=IP device=mge1inet=128.221.253.4 netmask=255.255.255.0 broadcast=128.221.253.255UP, ethernet, mtu=1500, vlan=0, macaddr=0:60:16:b:b7:1fnetname=localhost
el30 protocol=IP device=mge0inet=128.221.252.4 netmask=255.255.255.0 broadcast=128.221.252.255UP, ethernet, mtu=1500, vlan=0, macaddr=0:60:16:b:b7:1dnetname=localhost
After you finish
In most CIFS data-recovery configurations, your network addresses (IPs) change becauseyour data recovery site resides in a different subnet. Windows Server 2000 with dynamicDNS masks this change from your clients. Using UNC pathnames, when the VDM is loaded,the CIFS servers dynamically declare in the DNS and the records are updated as soon asthey start up on the destination site in a failover.The speed at which these changes propagatethrough the DNS servers used by your clients depends on your environment.
If you want to retain the same IP addresses on the destination site in a failover, you may doso, but you will need to configure your interfaces on the destination site and they must bedown until you are ready to activate the destination site.
Configuring and Managing Networking on VNX and Configuring and Managing NetworkHigh Availability on VNX describe network interface setup in detail.
Configure an interface
You can create one interface for data access by one group and a separate interface for VNXReplicator and Internal Usermapper.
Action
To configure an interface, use this command syntax:
$ server_ifconfig <movername> -create -Device <device_name> -name <if_name>
-protocol IP <ipaddr> <ip_mask> <ipbroadcast>
where:
204 Using VNX Replicator
Setting up the CIFS replication environment

Action
<movername> = name of the physical Data Mover
<device_name> = name of the device
<if_name> = name of the interface
<ipaddr> <ip_mask> <ipbroadcast> = IP protocol that includes IP address, subnet mask, and broadcast address
Example:
To configure a network interface to service clients on the source, type:
$ server_ifconfig server_2 -create -Device s2_trk1 -name Eng -protocol IP
172.24.100.125 255.255.255.0 172.24.100.255
To configure a network interface for the replication data, type:
$ server_ifconfig server_2 -create -Device ace0 -name ace0 -protocol IP 172.24.106.21
255.255.255.128 172.24.106.127
Next, configure an interface on the destination.
To configure a network interface to service clients on the destination, type:
$ server_ifconfig server_2 -create -Device s2_trk1 -name Eng -protocol IP
172.24.101.38 255.255.255.0 172.24.100.255
To configure a network interface for the replication data, type:
$ server_ifconfig server_2 -create -Device ace0 -name ace0 -protocol IP
172.24.106.145 255.255.255.128 172.24.106.127
Output
server_2 : done
Verification
To verify that the interface on the source site used for data transmission by VNX Replicator and Internal Usermapper can
communicate with the interface on the destination site, type:
$ server_ping server_2 -interface ace0 172.24.106.145
Output:
server_2 : 172.24.106.145 is alive, time= 3 ms
After you finish
You should verify that connectivity exists between the Data Movers used in the replicationsession. Validate Data Mover communication on page 99 explains how to verifycommunication between Data Movers. If no connectivity exists, Chapter 5 provides detailson how to set up communication between Data Movers.
Configure an interface 205
Setting up the CIFS replication environment

Set up DNS
Before you begin
Before setting up DNS, you must have a proper high-availability DNS architecture on bothsites of the environment.
Procedure
Set up DNS resolution on the source site and then on the destination site as follows:
1. Set up DNS on the source site by using this command syntax:
$ server_dns <movername> -protocol [tcp|udp] <domainname> <ip_addr>,...
where:
<movername> = name of the physical Data Mover
<domainname> = domain controller on the source site
<ip_addr> = IP address on the source site
Example:
To set up DNS on the source VNX system, type:
$ server_dns server_2 -protocol udp c1t1.pt1.c3lab.nsgprod.emc.com 172.24.100.183
Note: Using Active Directory integrated DNS services speeds the propagation of dynamic DNSupdates, but is unnecessary. Use any DNS framework compliant with Windows and VNX system.
Output
server_2 : done
2. To verify that DNS is running on the source site, type:
$ server_dns server_2
Output:
server_2 :DNS is running.c1t1.pt1.c3lab.nsgprod.emc.comproto:udp server(s):172.24.100.183
3. Set up DNS on the destination site by using this command syntax:
$ server_dns <movername> -protocol [tcp|udp] <domainname> <ip_addr>,...
where:
<movername> = name of the physical Data Mover
<domainname> = domain controller on the destination site
<ip_addr> = IP address on the destination site
206 Using VNX Replicator
Setting up the CIFS replication environment

Example:
To set up DNS on the destination VNX system, type:
$ server_dns server_2 -protocol udp c1t1.pt1.c3lab.nsgprod.emc.com 172.24.101.222
Note: You can have multiple DNS servers.
Output:
server_2 : done
4. To verify that DNS is running on the destination side, type:
$ server_dns server_2
Output:
server_2 :DNS is running.c1t1.pt1.c3lab.nsgprod.emc.comproto:udp server(s):172.24.101.222
Synchronize Data Mover and Control Station Time
The Data Movers and Control Stations in a replication relationship must have synchronizedtimes. The maximum allowable time skew is 10 minutes.
Synchronize Data Mover source site time
Action
To synchronize time services on the Data Mover at the source site, use this command syntax:
$ server_date <movername> timesvc start ntp <host>
where:
<movername> = name of the physical Data Mover
<host> = IP address of the source site domain controller
Example:
To synchronize time services for the source VNX system, type:
$ server_date server_2 timesvc start ntp 172.24.100.183
This example shows synchronization only for the Data Movers.
Note: Windows Server domain controllers automatically service time requests and also synchronize time between them.
You synchronize the two sites to their respective domain controllers.
Synchronize Data Mover and Control Station Time 207
Setting up the CIFS replication environment

Output
server_2 : done
Verification
To verify that the Data Mover contacted the NTP server, type:
$ server_date server_2 timesvc stats
server_2 :Time synchronization statistics since start:hits= 120, misses= 1, first poll hit= 1, miss= 2Last offset: 0 secs, -43507 usecsCurrent State: Running, connected, interval=60Time sync hosts:
0 1 172.24.100.183
Synchronize Data Mover destination site time
Action
To synchronize time services on the destination site, use this command syntax:
$ server_date <movername> timesvc start ntp <host>
where:
<movername> = name of the physical Data Mover
<host> = IP address of the destination site domain controller
Example:
To synchronize time services for the destination VNX system, type:
$ server_date server_2 timesvc start ntp 172.24.101.222
Note: Ensure that all time servers and clients accessing the domain controller within the domain are synchronized.
Output
server_2 : done
Synchronize Control Station source site time
You must set the source and destination Control Stations as NTP clients to Time Services.All Data Movers and Control Stations in the replication relationship must have synchronizedtimes. The maximum allowable time skew is 10 minutes.
To set the source Control Station as an NTP client to Time Services:
208 Using VNX Replicator
Setting up the CIFS replication environment

1. On the source Control Station, check if the NTP daemon is running by typing:
# /sbin/chkconfig ntpd --list
ntpd 0:off 1:off 2:off 3:off 4:off 5:off 6:off
2. On the source and destination Control Stations, start the NTP daemon by typing:
# /sbin/chkconfig --level 345 ntpd on
# /sbin/chkconfig ntpd --list
ntpd 0:off 1:off 2:off 3:on 4:on 5:on 6:off
3. On the source Control Station, edit the /etc/ntp.conf file to add the network NTP serverand comment out the other two lines, as shown below:
# server 192.168.10.21 local clock
# fudge 192.168.10.21 stratum 10 [Commented out so as not topoint to itself as the primary NTP Service]server 192.1.4.218 minpoll 8 ##NTP Server
4. On the source Control Station, add the IP address of the NTP servers to the/etc/ntp/step-tickers file:
192.1.4.218
5. On the source Control Station, restart the NTP daemon by typing:
a.
# /sbin/service ntpd restart
Output:
Shutting down ntpd: [ OK ]Synchronizing with time server: [ OK ]Starting ntpd:
b.
# ps -ef |grep ntp
Output:
ntp 15364 1 0 14:00 ? 00:00:00 ntpd -U ntproot 16098 9015 0 14:01 pts/1 00:00:00 grep ntp
c.
# /sbin/service ntpd status
Output:
ntpd (pid 28905) is running...
6. On the source Control Station, manually set the date and time by typing:
# date –s "4/09/03 16:15:15? # /usr/sbin/setclock
date à Wed Apr 9 16:15:30 MDT 2003
Synchronize Data Mover and Control Station Time 209
Setting up the CIFS replication environment

Synchronize Control Station destination site time
On the destination Control Station, repeat steps 1 through 6 in Synchronize Control Stationsource site time on page 208 to set the destination Control Station as an NTP client to TimeServices.
Configure user mapping
User mapping allows you to map a Windows user or group to a corresponding UNIX useror group. After a user is mapped through a Data Mover or a VDM, that mapping informationis remembered by the Data Mover and is not requested again.
It is not required that you use EMC Internal Usermapper. However, if not used, one of theother ways of using VNX to resolve Windows SID to UNIX UID/GID mappings is required,as explained in Configuring User Mapping on VNX.
Password and group files are not transferred in the VDM. Therefore, you must update fileson the destination site when you update files on the source site. If your CIFS environmentuses local password and group files, you must update the destination site whenever makingany changes to these files on the source site.
To configure user mapping:
1. Verify user mapping service on the destination site.
2. Enable secondary user mapping service on the source site.
3. Verify user mapping service on the source site.
Note: You only need to verify the user mapping service on the destination and source sites if you areusing EMC Internal Usermapper to do the mapping. If so, usermapping should be running as primaryon the destination site and secondary on the source site. If there are multiple VNX systems, only oneusermapping should be running as the primary.
Configure user mapping by doing the following:
1. To verify the user mapping service on the destination site (Miami), our core data center,and primary usermapper site, type:
$ server_usermapper server_2
Note: This task is required only if you are using EMC Internal Usermapper to do the mapping.
Output:
server_2 : Usrmapper service: EnabledService Class: Primary
2. Enable the secondary user mapping service on the source site (Boston) by typing:
210 Using VNX Replicator
Setting up the CIFS replication environment

$ server_usermapper server_2 -enable primary=172.24.106.145
Output:
server_2 : done
3. To verify the user mapping service on the source site (Boston), type:
$ server_usermapper server_2
Note: This task is required only if you are using EMC Internal Usermapper to do the mapping.
Output:
server_2 : Usrmapper service: EnabledService Class: SecondaryPrimary = 172.24.106.145 (c)
Prepare file systems for replication
The tasks involved in preparing file systems for replication are:
1. Create a VDM
2. Create source file systems
3. Mount source file systems on the VDM
4. Create CIFS servers in the VDM
5. Join CIFS servers in the VDM to the domain
6. Create shares for the CIFS servers in the VDM
Use the procedures in the following technical modules for the specific steps:
Managing Volumes and File Systems with VNX Automatic Volume Management describesAVM and creating volumes and file systems in detail.
Configuring Virtual Data Movers for VNX details VDMs in depth.
Prepare file systems for replication 211
Setting up the CIFS replication environment

212 Using VNX Replicator
Setting up the CIFS replication environment

Glossary
A
active replication session1¨∑≥∞™®ª∞∂µ ∫¨∫∫∞∂µ ªØ®ª ∞∫ ªπ®µ∫≠¨ππ∞µÆ ªØ¨ ´¨≥ª® ≠π∂¥ ∫∂ºπ™¨ ª∂ ´¨∫ª∞µ®ª∞∂µ ∫∞ª¨.
automatic file system extension"∂µ≠∞ƺπ®©≥¨ ≠∞≥¨ ∫¿∫ª¨¥ ≠¨®ªºπ¨ ªØ®ª ®ºª∂¥®ª∞™®≥≥¿ ¨øª¨µ´∫ ® ≠∞≥¨ ∫¿∫ª¨¥ ™π¨®ª¨´ ∂π ¨øª¨µ´¨´æ∞ªØ 5, æبµ ªØ¨ Ø∞ÆØ æ®ª¨π ¥®π≤ ('6,) ∞∫ π¨®™Ø¨´.
See also high water mark.
Automatic Volume Management (AVM)%¨®ªºπ¨ ∂≠ 5-7 ≠∂π %∞≥¨ ªØ®ª ™π¨®ª¨∫ ®µ´¥®µ®Æ¨∫ Ω∂≥º¥¨∫ ®ºª∂¥®ª∞™®≥≥¿æ∞ªØ∂ºª¥®µº®≥ Ω∂≥º¥¨¥®µ®Æ¨¥¨µª ©¿ ®µ ®´¥∞µ∞∫ªπ®ª∂π. 5, ∂πÆ®µ∞¡¨∫ Ω∂≥º¥¨∫ ∞µª∂ ∫ª∂π®Æ¨ ∑∂∂≥∫ ªØ®ª ™®µ ©¨®≥≥∂™®ª¨´ ª∂ ≠∞≥¨ ∫¿∫ª¨¥∫.
See also thin provisioning.
B
bandwidth,®ø∞¥º¥ ®¥∂ºµª ∂≠ ´®ª® ªØ®ª ™®µ ©¨ ªπ®µ∫¥∞ªª¨´ ªØπ∂ºÆØ ® ´®ª® ™Ø®µµ¨≥ ∑¨π ºµ∞ª ∂≠ ª∞¥¨.4∫º®≥≥¿ ¨ø∑π¨∫∫¨´ ∞µ ¥¨Æ®©¿ª¨∫ ∑¨π ∫¨™∂µ´.
bandwidth schedule+∞∫ª ∂≠ ª∞¥¨ ∑¨π∞∂´∫ (´®¿∫ ®µ´ Ø∂ºπ∫) ®µ´ ©®µ´æ∞´ªØ Ω®≥º¨∫ (∞µ *!/∫) ªØ®ª ™∂µªπ∂≥ ªØ¨ ®¥∂ºµª∂≠ ©®µ´æ∞´ªØ ®Ω®∞≥®©≥¨ ≠∂π ® Æ∞Ω¨µ #®ª® ,∂Ω¨π ∞µª¨π™∂µµ¨™ª.
C
checkpoint/∂∞µª-∞µ-ª∞¥¨, ≥∂Æ∞™®≥ ∞¥®Æ¨ ∂≠ ® /%2. ™Ø¨™≤∑∂∞µª ∞∫ ® ≠∞≥¨ ∫¿∫ª¨¥ ®µ´ ∞∫ ®≥∫∂ π¨≠¨ππ¨´ ª∂ ®∫ ®™Ø¨™≤∑∂∞µª ≠∞≥¨ ∫¿∫ª¨¥ ∂π ®µ $," 2µ®∑2ºπ¨ ≠∞≥¨ ∫¿∫ª¨¥.
See also Production File System.
CIFS2¨¨ "∂¥¥∂µ (µª¨πµ¨ª %∞≥¨ 2¿∫ª¨¥.
Using VNX Replicator 213

CIFS server+∂Æ∞™®≥ ∫¨πΩ¨π ªØ®ª º∫¨∫ ªØ¨ "(%2 ∑π∂ª∂™∂≥ ª∂ ªπ®µ∫≠¨π ≠∞≥¨∫. #®ª®,∂Ω¨π ™®µ Ø∂∫ª¥®µ¿ ∞µ∫ª®µ™¨∫∂≠ ® "(%2 ∫¨πΩ¨π. $®™Ø ∞µ∫ª®µ™¨ ∞∫ π¨≠¨ππ¨´ ª∂ ®∫ ® "(%2 ∫¨πΩ¨π.
CIFS service"(%2 ∫¨πΩ¨π ∑π∂™¨∫∫ ªØ®ª ∞∫ πºµµ∞µÆ ∂µ ªØ¨ #®ª® ,∂Ω¨π ®µ´ ∑π¨∫¨µª∫ ∫Ø®π¨∫ ∂µ ® µ¨ªæ∂π≤ ®∫æ¨≥≥ ®∫ ∂µ ,∞™π∂∫∂≠ª 6∞µ´∂æ∫-©®∫¨´ ™∂¥∑ºª¨π∫.
command line interface (CLI)(µª¨π≠®™¨ ≠∂π ª¿∑∞µÆ ™∂¥¥®µ´∫ ªØπ∂ºÆØ ªØ¨ "∂µªπ∂≥ 2ª®ª∞∂µ ª∂ ∑¨π≠∂π¥ ª®∫≤∫ ªØ®ª ∞µ™≥º´¨ ªØ¨¥®µ®Æ¨¥¨µª ®µ´ ™∂µ≠∞ƺπ®ª∞∂µ ∂≠ ªØ¨ ´®ª®©®∫¨ ®µ´#®ª®,∂Ω¨π∫ ®µ´ ªØ¨¥∂µ∞ª∂π∞µÆ ∂≠ ∫ª®ª∞∫ª∞™∫≠∂π 5-7 ≠∂π ≠∞≥¨ ™®©∞µ¨ª ™∂¥∑∂µ¨µª∫.
common base(µª¨πµ®≥ ™Ø¨™≤∑∂∞µª ªØ®ª ∞∫ ™∂¥¥∂µ ∂µ ©∂ªØ π¨∑≥∞™®ª∞∂µ ∫∂ºπ™¨ ®µ´ ´¨∫ª∞µ®ª∞∂µ ∫∞ª¨ ®µ´ ∞∫ º∫¨´®∫ ® ©®∫¨ ∞µ ªØ¨ µ¨øª ´∞≠≠¨π¨µª∞®≥ ´®ª® ªπ®µ∫≠¨π.
Common Internet File System (CIFS)%∞≥¨-∫Ø®π∞µÆ ∑π∂ª∂™∂≥ ©®∫¨´ ∂µ ªØ¨ ,∞™π∂∫∂≠ª 2¨πΩ¨π ,¨∫∫®Æ¨ !≥∂™≤ (2,!). (ª ®≥≥∂æ∫ º∫¨π∫ ª∂∫Ø®π¨ ≠∞≥¨ ∫¿∫ª¨¥∫ ∂Ω¨π ªØ¨ (µª¨πµ¨ª ®µ´ ∞µªπ®µ¨ª∫.
configured replication session1¨∑≥∞™®ª∞∂µ ∫¨∫∫∞∂µ ªØ®ª ∞∫ ∞´≥¨, ®™ª∞Ω¨, ∂π ∞µ®™ª∞Ω¨. ∫ª∂∑∑¨´ π¨∑≥∞™®ª∞∂µ ∫¨∫∫∞∂µ ∞∫ µ∂ª ®™∂µ≠∞Æºπ¨´ ∫¨∫∫∞∂µ.
Control Station'®π´æ®π¨ ®µ´ ∫∂≠ªæ®π¨ ™∂¥∑∂µ¨µª ∂≠ 5-7 ≠∂π ≠∞≥¨ ªØ®ª ¥®µ®Æ¨∫ ªØ¨ ∫¿∫ª¨¥ ®µ´ ∑π∂Ω∞´¨∫ ªØ¨º∫¨π ∞µª¨π≠®™¨ ª∂ ®≥≥ 5-7 ≠∂π ≠∞≥¨ ™∂¥∑∂µ¨µª∫.
Cyclic Redundancy Check (CRC),¨ªØ∂´ º∫¨´ ª∂ ∑¨π≠∂π¥ ®´´∞ª∞∂µ®≥ ¨ππ∂π ™Ø¨™≤∞µÆ ∂µ ªØ¨ ´®ª® ∫¨µª ∂Ω¨π ® #®ª® ,∂Ω¨π∞µª¨π™∂µµ¨™ª ª∂ ¨µ∫ºπ¨ ´®ª® ∞µª¨Æπ∞ª¿ ®µ´ ™∂µ∫∞∫ª¨µ™¿. "1" ∞∫ ® ª¿∑¨ ∂≠ Ø®∫Ø ≠ºµ™ª∞∂µ º∫¨´ ª∂∑π∂´º™¨ ® ™Ø¨™≤∫º¥, ® ∫¥®≥≥ ≠∞ø¨´ µº¥©¨π ∂≠ ©∞ª∫, ®Æ®∞µ∫ª ® ©≥∂™≤ ∂≠ ´®ª® ªπ®µ∫≠¨ππ¨´ ª∂ ® π¨¥∂ª¨∫∞ª¨. 3ب ™Ø¨™≤∫º¥ ∞∫ º∫¨´ ª∂ ´¨ª¨™ª ¨ππ∂π∫ ®≠ª¨π ªπ®µ∫¥∞∫∫∞∂µ. "1" ∞∫ ™∂¥∑ºª¨´ ®µ´ ®∑∑¨µ´¨´©¨≠∂π¨ ªπ®µ∫¥∞∫∫∞∂µ ®µ´ Ω¨π∞≠∞¨´ ®≠ª¨πæ®π´∫ ª∂ ™∂µ≠∞π¥ ªØ®ª µ∂ ™Ø®µÆ¨∫ ∂™™ºππ¨´ ∂µ ªπ®µ∫∞ª.
D
data access in real time (DART).µ 5-7 ≠∂π ≠∞≥¨, ªØ¨ ∂∑¨π®ª∞µÆ ∫¿∫ª¨¥ ∫∂≠ªæ®π¨ ªØ®ª πºµ∫ ∂µ ªØ¨ #®ª® ,∂Ω¨π. (ª ∞∫ ® π¨®≥ª∞¥¨,¥º≥ª∞ªØπ¨®´¨´ ∂∑¨π®ª∞µÆ ∫¿∫ª¨¥ ∂∑ª∞¥∞¡¨´ ≠∂π ≠∞≥¨ ®™™¨∫∫, æØ∞≥¨ ∑π∂Ω∞´∞µÆ ∫¨πΩ∞™¨ ≠∂π ∫ª®µ´®π´∑π∂ª∂™∂≥∫.
Data Mover(µ 5-7 ≠∂π ≠∞≥¨, ® ™®©∞µ¨ª ™∂¥∑∂µ¨µª ªØ®ª ∞∫ πºµµ∞µÆ ∞ª∫ ∂æµ ∂∑¨π®ª∞µÆ ∫¿∫ª¨¥ ªØ®ª π¨ªπ∞¨Ω¨∫´®ª® ≠π∂¥ ® ∫ª∂π®Æ¨ ´¨Ω∞™¨ ®µ´ ¥®≤¨∫ ∞ª ®Ω®∞≥®©≥¨ ª∂ ® µ¨ªæ∂π≤ ™≥∞¨µª. 3Ø∞∫ ∞∫ ®≥∫∂ π¨≠¨ππ¨´ ª∂ ®∫® ©≥®´¨.
deduplication/π∂™¨∫∫ º∫¨´ ª∂ ™∂¥∑π¨∫∫ π¨´ºµ´®µª ´®ª®, æØ∞™Ø ®≥≥∂æ∫ ∫∑®™¨ ª∂ ©¨ ∫®Ω¨´ ∂µ ® ≠∞≥¨ ∫¿∫ª¨¥.6بµ ¥º≥ª∞∑≥¨ ≠∞≥¨∫ Ø®Ω¨ ∞´¨µª∞™®≥ ´®ª®, ªØ¨ ≠∞≥¨ ∫¿∫ª¨¥ ∫ª∂π¨∫ ∂µ≥¿ ∂µ¨ ™∂∑¿ ∂≠ ªØ¨ ´®ª® ®µ´
214 Using VNX Replicator
Glossary

∫Ø®π¨∫ ªØ®ª ´®ª® ©¨ªæ¨¨µ ªØ¨ ¥º≥ª∞∑≥¨ ≠∞≥¨∫. #∞≠≠¨π¨µª ∞µ∫ª®µ™¨∫ ∂≠ ªØ¨ ≠∞≥¨ ™®µ Ø®Ω¨ ´∞≠≠¨π¨µªµ®¥¨∫, ∫¨™ºπ∞ª¿ ®ªªπ∞©ºª¨∫, ®µ´ ª∞¥¨∫ª®¥∑∫. -∂µ¨ ∂≠ ªØ¨ ¥¨ª®´®ª® ∞∫ ®≠≠¨™ª¨´ ©¿ ´¨´º∑≥∞™®ª∞∂µ.
delta%∂π 1¨∑≥∞™®ª∞∂µ (52), ©≥∂™≤ ™Ø®µÆ¨∫ ª∂ ªØ¨ ∫∂ºπ™¨ ∂©±¨™ª, ®∫ ™®≥™º≥®ª¨´ ©¿ ™∂¥∑®π∞µÆ ªØ¨ µ¨æ¨∫ª,™ºπ𨵪≥¿¥®π≤¨´ ∞µª¨πµ®≥ ™Ø¨™≤∑∂∞µª (∑∂∞µª-∞µ-ª∞¥¨ ∫µ®∑∫Ø∂ª) ®Æ®∞µ∫ª ªØ¨ ∑π¨Ω∞∂º∫≥¿ π¨∑≥∞™®ª¨´∞µª¨πµ®≥ ™Ø¨™≤∑∂∞µª. 1¨∑≥∞™®ª∞∂µ ªπ®µ∫≠¨π∫ ªØ¨∫¨ ™Ø®µÆ¨∫ ®µ´ ®∑∑≥∞¨∫ ªØ¨¥ ∞¥¥¨´∞®ª¨≥¿ ª∂ ªØ¨´¨∫ª∞µ®ª∞∂µ ∂©±¨™ª, ªØ¨µ π¨≠π¨∫ب∫ ªØ¨ ≥®ª¨∫ª ´¨∫ª∞µ®ª∞∂µ ∞µª¨πµ®≥ ™Ø¨™≤∑∂∞µª.
destination VNX for file3¨π¥ ≠∂π ªØ¨ π¨¥∂ª¨ (∫¨™∂µ´®π¿) 5-7 ≠∂π ≠∞≥¨ ∞µ ®µ 21#% ∂π ,∞ππ∂π5∞¨æ/2 ™∂µ≠∞ƺπ®ª∞∂µ. 3ب´¨∫ª∞µ®ª∞∂µ 5-7 ≠∂π ≠∞≥¨ ∞∫ ª¿∑∞™®≥≥¿ ªØ¨ ∫ª®µ´©¿ ∫∞´¨ ∂≠ ® ´∞∫®∫ª¨π π¨™∂Ω¨π¿ ™∂µ≠∞ƺπ®ª∞∂µ.2¿¥¥¨ªπ∞ø ™∂µ≠∞ƺπ®ª∞∂µ∫ ∂≠ª¨µ ™®≥≥ ªØ¨ ´¨∫ª∞µ®ª∞∂µ 5-7 ≠∂π ≠∞≥¨: ªØ¨ ª®πƨª 5-7 ≠∂π ≠∞≥¨.
differential copy3ب ´∞≠≠¨π¨µ™¨ ©¨ªæ¨¨µ ªØ¨ ™∂¥¥∂µ ©®∫¨ ®µ´ ªØ¨ ∂©±¨™ª ªØ®ª µ¨¨´∫ ª∂ ©¨ ™∂∑∞¨´. .µ≥¿ ªØ¨ ´¨≥ª®©¨ªæ¨¨µ ªØ¨ ™∂¥¥∂µ ©®∫¨ ®µ´ ªØ¨ ∫∂ºπ™¨ ∂©±¨™ª ∞∫ ªπ®µ∫≠¨ππ¨´ ª∂ ªØ¨ ´¨∫ª∞µ®ª∞∂µ.
domain+∂Æ∞™®≥ Æπ∂º∑∞µÆ ∂≠ ,∞™π∂∫∂≠ª 6∞µ´∂æ∫ 2¨πΩ¨π∫ ®µ´ ∂ªØ¨π ™∂¥∑ºª¨π∫ ªØ®ª ∫Ø®π¨ ™∂¥¥∂µ∫¨™ºπ∞ª¿ ®µ´ º∫¨π ®™™∂ºµª ∞µ≠∂𥮪∞∂µ. ≥≥ π¨∫∂ºπ™¨∫ ∫º™Ø ®∫ ™∂¥∑ºª¨π∫ ®µ´ º∫¨π∫ ®π¨ ´∂¥®∞µ¥¨¥©¨π∫ ®µ´ Ø®Ω¨ ®µ ®™™∂ºµª ∞µ ªØ¨ ´∂¥®∞µ ªØ®ª ºµ∞∏º¨≥¿ ∞´¨µª∞≠∞¨∫ ªØ¨¥. 3ب ´∂¥®∞µ®´¥∞µ∞∫ªπ®ª∂π ™π¨®ª¨∫ ∂µ¨ º∫¨π ®™™∂ºµª ≠∂𠨮™Ø º∫¨π ∞µ ªØ¨ ´∂¥®∞µ, ®µ´ ªØ¨ º∫¨π∫ ≥∂Æ ∞µ ª∂ ªØ¨´∂¥®∞µ ∂µ™¨. 4∫¨π∫ ´∂ µ∂ª ≥∂Æ ∞µ ª∂ ¨®™Ø ∞µ´∞Ω∞´º®≥ ∫¨πΩ¨π.
Domain Name System (DNS)-®¥¨ π¨∫∂≥ºª∞∂µ ∫∂≠ªæ®π¨ ªØ®ª ®≥≥∂æ∫ º∫¨π∫ ª∂ ≥∂™®ª¨ ™∂¥∑ºª¨π∫ ∂µ ® 4-(7 µ¨ªæ∂π≤ ∂π 3"//(/µ¨ªæ∂π≤ ©¿ ´∂¥®∞µ µ®¥¨. 3ب #-2 ∫¨πΩ¨π ¥®∞µª®∞µ∫ ® ´®ª®©®∫¨ ∂≠ ´∂¥®∞µ µ®¥¨∫, Ø∂∫ªµ®¥¨∫,®µ´ ªØ¨∞π ™∂ππ¨∫∑∂µ´∞µÆ (/ ®´´π¨∫∫¨∫, ®µ´ ∫¨πΩ∞™¨∫ ∑π∂Ω∞´¨´ ©¿ ªØ¨ ®∑∑≥∞™®ª∞∂µ ∫¨πΩ¨π∫.
See also ntxmap.
E
event2¿∫ª¨¥-ƨµ¨π®ª¨´¥¨∫∫®Æ¨ ™®º∫¨´ ©¿ ® ™∂¥¥®µ´, ®µ ¨ππ∂π, ∂π ∂ªØ¨π ™∂µ´∞ª∞∂µ ªØ®ª¥®¿ π¨∏º∞𨮙ª∞∂µ ©¿ ®µ ®´¥∞µ∞∫ªπ®ª∂π. $Ω¨µª∫ ®π¨ ª¿∑∞™®≥≥¿ æπ∞ªª¨µ ª∂ ®µ ¨Ω¨µª ≥∂Æ, ®µ´ ¥®¿ ªπ∞ÆÆ¨π ®µ¨Ω¨µª µ∂ª∞≠∞™®ª∞∂µ.
event log%∞≥¨ ∂≠ ∫¿∫ª¨¥-ƨµ¨π®ª¨´ ¥¨∫∫®Æ¨∫ ©®∫¨´ ∂µ ¥¨¨ª∞µÆ ® ™∂µ´∞ª∞∂µ ∂≠ ® ∑®πª∞™º≥®π ∫¨Ω¨π∞ª¿ ≥¨Ω¨≥.3Ø¨π¨ ®π¨ ∫¨∑®π®ª¨ ¨Ω¨µª ≥∂Æ∫ ≠∂π ªØ¨ "∂µªπ∂≥ 2ª®ª∞∂µ ®µ´ ≠∂𠨮™Ø ∑Ø¿∫∞™®≥ ®µ´ Ω∞πªº®≥ #®ª®,∂Ω¨π ∞µ ªØ¨ ∫¿∫ª¨¥.
F
failover/π∂™¨∫∫ ∂≠ ∞¥¥¨´∞®ª¨≥¿ π∂ºª∞µÆ ´®ª® ª∂ ®µ ®≥ª¨πµ®ª¨ ´®ª® ∑®ªØ ∂π ´¨Ω∞™¨ ª∂ ®Ω∂∞´ ∞µª¨ππº∑ª∞µÆ∫¨πΩ∞™¨∫ ∞µ ªØ¨ ¨Ω¨µª ∂≠ ® ≠®∞≥ºπ¨. 3ب ∞¥∑®™ª ª∂ ∫¨πΩ∞™¨ ∞∫ ´¨∑¨µ´¨µª ∂µ ªØ¨ ®∑∑≥∞™®ª∞∂µ∫ ®©∞≥∞ª¿ª∂ Ø®µ´≥¨ ªØ¨ ™Ø®µÆ¨ Æ𮙨≠º≥≥¿.
Using VNX Replicator 215
Glossary

file server"∂¥∑ºª¨π ∫¿∫ª¨¥ ªØ®ª ∞∫ ∂∑ª∞¥∞¡¨´ ª∂ ∫¨πΩ¨ ≠∞≥¨∫ ª∂ ™≥∞¨µª∫. ≠∞≥¨ ∫¨πΩ¨π ´∂¨∫ µ∂ª πºµ Æ¨µ¨π®≥∑ºπ∑∂∫¨ ®∑∑≥∞™®ª∞∂µ∫. 5-7 ≠∂π ≠∞≥¨ π¨≠¨π∫ ª∂ ªØ¨ ™∂¥∑≥¨ª¨ ∫¿∫ª¨¥, æØ∞™Ø ∞µ™≥º´¨∫ ∫¨Ω¨π®≥ #®ª®,∂Ω¨π∫ ®µ´ ∂ªØ¨π ™∂¥∑∂µ¨µª∫. 3ب ©≥∂™≤∫ ∂≠ ´®ª® ªØ®ª ¥®≤¨ º∑ ªØ¨ ≠∞≥¨∫ ∫¨πΩ¨´ ª∂ ™≥∞¨µª∫ ®π¨∫ª∂π¨´ ∂µ ªØ¨ ∫¿∫ª¨¥.
file storage object%∞≥¨ ™π¨®ª¨´ ∂µ ®µ 4ø%2 ≠∞≥¨ ∫¿∫ª¨¥ ªØ®ª ∑π∂Ω∞´¨∫ ªØ¨ ∫ª∂π®Æ¨ ∫∑®™¨ ≠∂π ®µ ∞2"2( +4-.
file system,¨ªØ∂´ ∂≠ ™®ª®≥∂Æ∞µÆ ®µ´ ¥®µ®Æ∞µÆ ªØ¨ ≠∞≥¨∫ ®µ´ ´∞𨙪∂π∞¨∫ ∂µ ® ∫¿∫ª¨¥.
file system name4µ∞∏º¨ ∞´¨µª∞≠∞¨π ≠∂π ® ≠∞≥¨ ∫¿∫ª¨¥ ∂µ 5-7 ≠∂π ≠∞≥¨. 3Ø¨π¨ ™®µ ©¨ ∂µ≥¿ ∂µ¨ ≠∞≥¨ ∫¿∫ª¨¥ æ∞ªØ ®∑®πª∞™º≥®π µ®¥¨ ®™π∂∫∫ ®≥≥ ªØ¨ #®ª® ,∂Ω¨π∫ ∂µ ªØ¨ ∫¿∫ª¨¥.
See also share name.
file-level retention (FLR)%+1 ≥¨ª∫ ¿∂º ∫ª∂π¨ ´®ª® ∂µ ∫ª®µ´®π´ π¨æπ∞ª®©≥¨ ¥®Æµ¨ª∞™ ´∞∫≤∫ ©¿ º∫∞µÆ-%2 ∂π "(%2 ∂∑¨π®ª∞∂µ∫ª∂ ™π¨®ª¨ ® ∑¨π¥®µ¨µª, ºµ®≥ª¨π®©≥¨ ∫¨ª ∂≠ ≠∞≥¨∫ ®µ´ ´∞𨙪∂π∞¨∫.
See also append-only state, expired state, locked state, not locked state, and retention date.
G
graphical user interface (GUI)2∂≠ªæ®π¨ ªØ®ª º∫¨∫ Æπ®∑Ø∞™®≥ ∂©±¨™ª∫ ∫º™Ø ®∫ ∑º≥≥-´∂æµ ¥¨µº∫ ®µ´ ∂∑¨π®ª∞∂µ∫ ∫º™Ø ®∫´π®Æ-®µ´-´π∂∑ ª∂ ®≥≥∂æ ªØ¨ º∫¨π ª∂ ¨µª¨π ™∂¥¥®µ´∫ ®µ´ ¨ø¨™ºª¨ ≠ºµ™ª∞∂µ∫.
H
Hypertext Transfer Protocol (HTTP)"∂¥¥ºµ∞™®ª∞∂µ∫ ∑π∂ª∂™∂≥ º∫¨´ ª∂ ™∂µµ¨™ª ª∂ ∫¨πΩ¨π∫ ∂µ ªØ¨ 6∂π≥´ 6∞´¨ 6¨©.
Hypertext Transfer Protocol Secured (HTTPS)'33/ ∂Ω¨π 22+. ≥≥ µ¨ªæ∂π≤ ªπ®≠≠∞™ ©¨ªæ¨¨µ ªØ¨ ™≥∞¨µª ®µ´ ∫¨πΩ¨π ∫¿∫ª¨¥ ∞∫ ¨µ™π¿∑ª¨´. (µ®´´∞ª∞∂µ, ªØ¨π¨ ∞∫ ªØ¨ ∂∑ª∞∂µ ª∂ Ω¨π∞≠¿ ∫¨πΩ¨π ®µ´ ™≥∞¨µª ∞´¨µª∞ª∞¨∫. 2¨πΩ¨π ∞´¨µª∞ª∞¨∫ ®π¨ ª¿∑∞™®≥≥¿Ω¨π∞≠∞¨´ ®µ´ ™≥∞¨µª ∞´¨µª∞ª∞¨∫ ®π¨ µ∂ª.
I
idle replication session1¨∑≥∞™®ª∞∂µ ∫¨∫∫∞∂µ ªØ®ª ∞∫ ™∂µ≠∞Æºπ¨´ ©ºª ∞∫ µ∂ª ªπ®µ∫≠¨ππ∞µÆ ´®ª® ≠π∂¥ ªØ¨ ∫∂ºπ™¨ ∫∞ª¨ ª∂ ªØ¨´¨∫ª∞µ®ª∞∂µ ∫∞ª¨.
inactive replication session1¨∑≥∞™®ª∞∂µ ∫¨∫∫∞∂µ ªØ®ª ¨ø∑¨π∞¨µ™¨∫ ® ≠®ª®≥ ¨ππ∂π. 4∫¨π¥º∫ª ∫ª∂∑ ∂π ´¨≥¨ª¨ ªØ¨ π¨∑≥∞™®ª∞∂µ ∫¨∫∫∞∂µª∂ ™∂µª∞µº¨.
initial copy%º≥≥ ™∂∑¿ ∂≠ ªØ¨ ∫∂ºπ™¨ ´®ª® ≠π∂¥ ªØ¨ ∫∂ºπ™¨ ∫∞ª¨ ª∂ ªØ¨ ´¨∫ª∞µ®ª∞∂µ ∫∞ª¨.
216 Using VNX Replicator
Glossary

initialization3ب ∑π∂™¨∫∫ ∂≠ ™π¨®ª∞µÆ ªØ¨ ∂π∞Æ∞µ®≥ ©®∫¨≥∞µ¨ ™∂∑¿ ∂≠ ® ∫∂ºπ™¨ ∂©±¨™ª ≠∂π ªØ¨ ∑ºπ∑∂∫¨ ∂≠ ¨∫ª®©≥∞∫Ø∞µÆ® π¨∑≥∞™®ª∞∂µ. 3ب ©®∫¨≥∞µ¨ ™∂∑¿ ∞∫ ªØ¨µ ¨∞ªØ¨π ªπ®µ∫∑∂πª¨´ ∂Ω¨π ªØ¨ µ¨ªæ∂π≤ (ªØ¨ ´¨≠®º≥ª ©¨Ø®Ω∞∂π)∂π ∑Ø¿∫∞™®≥≥¿ ©¿ ª®∑¨ ∂π ´∞∫≤ ≠π∂¥ ªØ¨ ∫∂ºπ™¨ ∫∞ª¨ ª∂ ªØ¨ ´¨∫ª∞µ®ª∞∂µ ∫∞ª¨.
See also silvering.
interconnect"∂¥¥ºµ∞™®ª∞∂µ ∑®ªØ ©¨ªæ¨¨µ ® Æ∞Ω¨µ#®ª®,∂Ω¨π ∑®∞π ≥∂™®ª¨´ ∂µ ªØ¨ ∫®¥¨5-7 ≠∂π ≠∞≥¨ ™®©∞µ¨ª∂π ´∞≠≠¨π¨µª ™®©∞µ¨ª∫.
interface (network)-®¥¨´ ≥∂Æ∞™®≥ ¨≥¨¥¨µª ¥®∑∑¨´ ª∂ ® ∑Ø¿∫∞™®≥ µ¨ªæ∂π≤ ™∂µµ¨™ª∞∂µ, ∂π ∑∂πª, ∂µ ® #®ª® ,∂Ω¨π.$®™Ø ∞µª¨π≠®™¨ ®∫∫∞Ƶ∫ ®µ (/ ®´´π¨∫∫ ª∂ ªØ¨ ∑∂πª.
internal checkpoint1¨®´-∂µ≥¿, ≥∂Æ∞™®≥ ∑∂∞µª-∞µ-ª∞¥¨ ∞¥®Æ¨ ∂≠ ® ∫∂ºπ™¨ ∂©±¨™ª ™π¨®ª¨´ ´ºπ∞µÆ π¨∑≥∞™®ª∞∂µ ∂µ ªØ¨∫∂ºπ™¨ ®µ´ ´¨∫ª∞µ®ª∞∂µ ∫∞´¨∫. (µª¨πµ®≥ ™Ø¨™≤∑∂∞µª∫ ™®µµ∂ª ©¨¥®µ®Æ¨´ ©¿ º∫¨π∫. 1¨∑≥∞™®ª∂π (52)∞µª¨πµ®≥ ™Ø¨™≤∑∂∞µª∫ ®π¨ ∞´¨µª∞≠∞¨´ ©¿ ªØ¨ ∑π¨≠∞ø π∂∂ª_π¨∑_™≤∑ª.
Internet Protocol (IP)-¨ªæ∂π≤ ≥®¿¨π ∑π∂ª∂™∂≥ ªØ®ª ∞∫ ∑®πª ∂≠ ªØ¨ .∑¨µ 2¿∫ª¨¥∫ (µª¨π™∂µµ¨™ª∞∂µ (.2() π¨≠¨π¨µ™¨¥∂´¨≥.(/ ∑π∂Ω∞´¨∫ ≥∂Æ∞™®≥ ®´´π¨∫∫∞µÆ ®µ´ ∫¨πΩ∞™¨ ≠∂𠨵´-ª∂-¨µ´ ´¨≥∞Ω¨π¿.
Internet Protocol address (IP address) ´´π¨∫∫ ºµ∞∏º¨≥¿ ∞´¨µª∞≠¿∞µÆ ® ´¨Ω∞™¨ ∂µ ®µ¿ 3"//(/ µ¨ªæ∂π≤. $®™Ø ®´´π¨∫∫ ™∂µ∫∞∫ª∫ ∂≠ ≠∂ºπ∂™ª¨ª∫ (32 ©∞ª∫), π¨∑π¨∫¨µª¨´ ®∫ ´¨™∞¥®≥ µº¥©¨π∫ ∫¨∑®π®ª¨´ ©¿ ∑¨π∞∂´∫. µ ®´´π¨∫∫ ∞∫ ¥®´¨ º∑∂≠ ® µ¨ªæ∂π≤ µº¥©¨π, ®µ ∂∑ª∞∂µ®≥ ∫º©µ¨ªæ∂π≤ µº¥©¨π, ®µ´ ® Ø∂∫ª µº¥©¨π.
Internet SCSI (iSCSI)/π∂ª∂™∂≥ ≠∂π ∫¨µ´∞µÆ 2"2( ∑®™≤¨ª∫ ∂Ω¨π 3"//(/ µ¨ªæ∂π≤∫.
Internet Storage Name Service (iSNS)#∞∫™∂Ω¨π¿ ®µ´ µ®¥∞µÆ ∑π∂ª∂™∂≥ ´¨∫∞Ƶ¨´ ª∂ ≠®™∞≥∞ª®ª¨ ªØ¨ ®ºª∂¥®ª¨´ ´∞∫™∂Ω¨π¿, ¥®µ®Æ¨¥¨µª,®µ´ ™∂µ≠∞ƺπ®ª∞∂µ ∂≠ ∞2"2( ®µ´ %∞©π¨ "Ø®µµ¨≥ /π∂ª∂™∂≥ (%"/) ´¨Ω∞™¨∫ ∂µ ® 3"//(/ µ¨ªæ∂π≤.
iSCSI host"∂¥∑ºª¨π Ø∂∫ª∞µÆ ®µ ∞2"2( ∞µ∞ª∞®ª∂π.
iSCSI initiator∞2"2( ¨µ´∑∂∞µª, ∞´¨µª∞≠∞¨´ ©¿ ® ºµ∞∏º¨ ∞2"2( µ®¥¨, æØ∞™Ø ©¨Æ∞µ∫ ®µ ∞2"2( ∫¨∫∫∞∂µ ©¿ ∞∫∫º∞µÆ ®™∂¥¥®µ´ ª∂ ªØ¨ ∂ªØ¨π ¨µ´∑∂∞µª (ªØ¨ ª®πƨª).
iSCSI qualified name (IQN)-®¥∞µÆ ∫ª®µ´®π´ ∫º∑∑∂πª¨´ ©¿ ªØ¨ ∞2"2( ∑π∂ª∂™∂≥. (0- µ®¥¨∫ ®π¨ Æ≥∂©®≥≥¿ ºµ∞∏º¨ ®µ´ ∞µ ªØ¨≠∂π¥ ∂≠ ∞∏µ, ≠∂≥≥∂樴 ©¿ ® ´®ª¨ ®µ´ ® π¨Ω¨π∫¨´ ´∂¥®∞µ µ®¥¨.
iSCSI target∞2"2( ¨µ´∑∂∞µª, ∞´¨µª∞≠∞¨´ ©¿ ® ºµ∞∏º¨ ∞2"2( µ®¥¨, æØ∞™Ø ¨ø¨™ºª¨∫ ™∂¥¥®µ´∫ ∞∫∫º¨´ ©¿ ªØ¨∞2"2( ∞µ∞ª∞®ª∂π.
Using VNX Replicator 217
Glossary

L
local replication1¨∑≥∞™®ª∞∂µ ∂≠ ® ≠∞≥¨ ∫¿∫ª¨¥ ∂µ ® ∫∞µÆ≥¨ 5-7 ≠∂π ≠∞≥¨ æ∞ªØ ªØ¨ ∫∂ºπ™¨ ≠∞≥¨ ∫¿∫ª¨¥ ∂µ ∂µ¨ #®ª®,∂Ω¨π ®µ´ ªØ¨ ´¨∫ª∞µ®ª∞∂µ ≠∞≥¨ ∫¿∫ª¨¥ ∂µ ®µ∂ªØ¨π #®ª® ,∂Ω¨π.
loopback replication1¨∑≥∞™®ª∞∂µ ∂≠ ® ≠∞≥¨ ∫¿∫ª¨¥ æ∞ªØ ªØ¨ ∫∂ºπ™¨ ®µ´ ´¨∫ª∞µ®ª∞∂µ ≠∞≥¨ ∫¿∫ª¨¥∫ π¨∫∞´∞µÆ ∂µ ªØ¨ ∫®¥¨#®ª® ,∂Ω¨π.
LUN mask2¨ª ∂≠ ®™™¨∫∫ ∑¨π¥∞∫∫∞∂µ∫ ªØ®ª ∞´¨µª∞≠¿æØ∞™Ø ∞2"2( ∞µ∞ª∞®ª∂π ™®µ ®™™¨∫∫ ∫∑¨™∞≠∞™ +4-∫ ∂µ ® ª®πƨª.
N
NDMP client ∑∑≥∞™®ª∞∂µ ªØ®ª ™∂µªπ∂≥∫ ªØ¨ -#,/ ∫¨∫∫∞∂µ. 3ب -#,/ ™≥∞¨µª πºµ∫ ®µ -#,/-™∂¥∑≥∞®µª©®™≤º∑ ®∑∑≥∞™®ª∞∂µ, ∫º™Ø ®∫ $," -¨ª6∂π≤¨πé.
NDMP host'∂∫ª ∫¿∫ª¨¥ (#®ª® ,∂Ω¨π) ªØ®ª ¨ø¨™ºª¨∫ ªØ¨ -#,/ ∫¨πΩ¨π ®∑∑≥∞™®ª∞∂µ. #®ª® ∞∫ ©®™≤¨´ º∑ ≠π∂¥ªØ¨ -#,/ Ø∂∫ª ª∂ ¨∞ªØ¨π ® ≥∂™®≥ ª®∑¨ ´π∞Ω¨ ∂π ª∂ ® ©®™≤º∑ ´¨Ω∞™¨ ∂µ ® π¨¥∂ª¨ -#,/ Ø∂∫ª.
NDMP server-#,/∑π∂™¨∫∫ ªØ®ª πºµ∫ ∂µ ®µ-#,/Ø∂∫ª,æØ∞™Ø ∞∫ ®#®ª®,∂Ω¨π ∞µ5-7 ≠∂π ≠∞≥¨ ¨µΩ∞π∂µ¥¨µª.
Network Data Management Protocol (NDMP).∑¨µ ∫ª®µ´®π´ µ¨ªæ∂π≤ ∑π∂ª∂™∂≥ ´¨∫∞Ƶ¨´ ≠∂𠨵ª¨π∑π∞∫¨-æ∞´¨ ©®™≤º∑ ®µ´ π¨™∂Ω¨π¿ ∂≠بª¨π∂ƨµ¨∂º∫ µ¨ªæ∂π≤-®ªª®™Ø¨´ ∫ª∂π®Æ¨.
network file system (NFS)-¨ªæ∂π≤ ≠∞≥¨ ∫¿∫ª¨¥ (-%2) ∞∫ ® µ¨ªæ∂π≤ ≠∞≥¨ ∫¿∫ª¨¥ ∑π∂ª∂™∂≥ ªØ®ª ®≥≥∂æ∫ ® º∫¨π ∂µ ® ™≥∞¨µª™∂¥∑ºª¨π ª∂ ®™™¨∫∫ ≠∞≥¨∫ ∂Ω¨π ® µ¨ªæ∂π≤ ®∫ ¨®∫∞≥¿ ®∫ ∞≠ ªØ¨ µ¨ªæ∂π≤ ´¨Ω∞™¨∫ æ¨π¨ ®ªª®™Ø¨´ ª∂ ∞ª∫≥∂™®≥ ´∞∫≤∫.
network-attached storage (NAS)2∑¨™∞®≥∞¡¨´ ≠∞≥¨ ∫¨πΩ¨π ªØ®ª ™∂µµ¨™ª∫ ª∂ ªØ¨ µ¨ªæ∂π≤. - 2´¨Ω∞™¨, ∫º™Ø ®∫ 5-7 ≠∂π ≠∞≥¨, ™∂µª®∞µ∫® ∫∑¨™∞®≥∞¡¨´ ∂∑¨π®ª∞µÆ ∫¿∫ª¨¥ ®µ´ ® ≠∞≥¨ ∫¿∫ª¨¥, ®µ´ ∑π∂™¨∫∫¨∫ ∂µ≥¿ (/. π¨∏º¨∫ª∫ ©¿ ∫º∑∑∂πª∞µÆ∑∂∑º≥®π ≠∞≥¨ ∫Ø®π∞µÆ ∑π∂ª∂™∂≥∫ ∫º™Ø ®∫ -%2 ®µ´ "(%2.
P
Production File System (PFS)/π∂´º™ª∞∂µ %∞≥¨ 2¿∫ª¨¥ ∂µ5-7 ≠∂π %∞≥¨. /%2 ∞∫ ©º∞≥ª ∂µ 2¿¥¥¨ªπ∞ø Ω∂≥º¥¨∫ ∂π 5-7 ≠∂π !≥∂™≤+4-∫ ®µ´ ¥∂ºµª¨´ ∂µ ® #®ª® ,∂Ω¨π ∞µ ªØ¨ 5-7 ≠∂π %∞≥¨.
R
recovery point objective (RPO)#¨∫™π∞©¨∫ ªØ¨ ®™™¨∑ª®©≥¨ ®¥∂ºµª ∂≠ ´®ª® ≥∂∫∫,¥¨®∫ºπ¨´ ∞µ ºµ∞ª∫ ∂≠ ª∞¥¨, ≠∂π ¨ø®¥∑≥¨, 12¥∞µºª¨∫,2 Ø∂ºπ∫, ∂π 1 ´®¿. 3Ø∞∫ π¨∑π¨∫¨µª∫ ® ª®πƨª ªØ®ª ∞∫ ´¨π∞Ω¨´ ≠π∂¥ ™∂µ´∞ª∞∂µ∫ ∫∑¨™∞≠∞¨´ ∞µ ®µ 2+ ,
218 Using VNX Replicator
Glossary

13., ®µ´ π¨≥¨Ω®µª ®µ®≥¿∫¨∫. 3ب 1/. ∞µ ™∂µ±ºµ™ª∞∂µ æ∞ªØ ªØ¨ π¨™∂Ω¨π¿ ª∞¥¨ ∂©±¨™ª∞Ω¨ (13.) ∞∫ªØ¨ ©®∫∞∫ ∂µ æØ∞™Ø ´®ª® ∑π∂ª¨™ª∞∂µ ∫ªπ®ª¨Æ¿ ∞∫ ´¨Ω¨≥∂∑¨´.
recovery time objective (RTO)'∂æ ≥∂µÆ ® ©º∫∞µ¨∫∫ ∑π∂™¨∫∫ ™®µ ©¨ ´∂浩¨≠∂π¨ ™∂µ∫¨∏º¨µ™¨∫ ®π¨ ºµ®™™¨∑ª®©≥¨. 3Ø∞∫ π¨∑π¨∫¨µª∫® ª®πƨª ªØ®ª ∞∫ ´¨π∞Ω¨´ ≠π∂¥ ™∂µ´∞ª∞∂µ∫ ∫∑¨™∞≠∞¨´ ∞µ ®µ 2+ ®µ´ ©º∫∞µ¨∫∫ ∞¥∑®™ª ®µ®≥¿∫∞∫.
remote replication1¨∑≥∞™®ª∞∂µ ∂≠ ® ≠∞≥¨ ∫¿∫ª¨¥ ≠π∂¥ ∂µ¨ 5-7 ≠∂π ≠∞≥¨ ª∂ ®µ∂ªØ¨π. 3ب ∫∂ºπ™¨ ≠∞≥¨ ∫¿∫ª¨¥ π¨∫∞´¨∫ ∂µ® ´∞≠≠¨π¨µª ∫¿∫ª¨¥ ≠π∂¥ ªØ¨ ´¨∫ª∞µ®ª∞∂µ ≠∞≥¨ ∫¿∫ª¨¥.
replication2¨πΩ∞™¨ ªØ®ª ∑π∂´º™¨∫ ® π¨®´-∂µ≥¿, ∑∂∞µª-∞µ-ª∞¥¨ ™∂∑¿ ∂≠ ® ∫∂ºπ™¨ ≠∞≥¨ ∫¿∫ª¨¥. 3ب ∫¨πΩ∞™¨∑¨π∞∂´∞™®≥≥¿ º∑´®ª¨∫ ªØ¨ ™∂∑¿, ¥®≤∞µÆ ∞ª ™∂µ∫∞∫ª¨µª æ∞ªØ ªØ¨ ∫∂ºπ™¨ ≠∞≥¨ ∫¿∫ª¨¥.
replication reversal/π∂™¨∫∫ ∂≠ π¨Ω¨π∫∞µÆ ªØ¨ ´∞𨙪∞∂µ ∂≠ π¨∑≥∞™®ª∞∂µ. 3ب ∫∂ºπ™¨ ≠∞≥¨ ∫¿∫ª¨¥ ©¨™∂¥¨∫ π¨®´-∂µ≥¿ ®µ´ªØ¨ ´¨∫ª∞µ®ª∞∂µ ≠∞≥¨ ∫¿∫ª¨¥ ©¨™∂¥¨∫ π¨®´/æπ∞ª¨.
S
service level agreement (SLA)"∂µªπ®™ª ∂π ®Æ𨨥¨µª ªØ®ª ≠∂π¥®≥≥¿ ´¨≠∞µ¨∫ ªØ¨ ≥¨Ω¨≥ ∂≠ ¨ø∑¨™ª¨´ ®Ω®∞≥®©∞≥∞ª¿, ∫¨πΩ∞™¨®©∞≥∞ª¿,∑¨π≠∂π¥®µ™¨, ∂∑¨π®ª∞∂µ, ∂π ∂ªØ¨π ®ªªπ∞©ºª¨∫ ∂≠ ∫¨πΩ∞™¨ ®µ´ ¨Ω¨µ ∑¨µ®≥ª∞¨∫ ∞µ ªØ¨ ™®∫¨ ∂≠ Ω∞∂≥®ª∞∂µ∂≠ ªØ¨ 2+ . µ 2+ ¥®¿ ∞µ™≥º´¨ ®™™¨∑ª®©≥¨ ´∂浪∞¥¨ ∂π ´∞∫®∫ª¨π π¨™∂Ω¨π¿ ª∞¥¨. (µ ªØ¨∂π¿, ®µ2+ ∞∫ ® ≠∂π¥®≥ ®Æ𨨥¨µª. '∂æ¨Ω¨π, ∞µ ∑𮙪∞™¨ ªØ¨ ®Æ𨨥¨µª ∞∫ ∂≠ª¨µ ∞µ≠∂π¥®≥ ∞µ æØ∞™Ø ™®∫¨∞ª ¥®¿ ©¨ ™®≥≥¨´ ® ∫¨πΩ∞™¨ ≥¨Ω¨≥ ¨ø∑¨™ª®ª∞∂µ (2+$).
share%∞≥¨ ∫¿∫ª¨¥, ´∞𨙪∂π¿, ∂π ∫¨πΩ∞™¨ ªØ®ª Ø®∫ ©¨¨µ ¥®´¨ ®Ω®∞≥®©≥¨ ª∂ "(%2 º∫¨π∫ ∂µ ªØ¨ µ¨ªæ∂π≤. ≥∫∂, ªØ¨ ∑π∂™¨∫∫ ∂≠ ¥®≤∞µÆ ® ≠∞≥¨ ∫¿∫ª¨¥, ´∞𨙪∂π¿, ∂π ∫¨πΩ∞™¨ ®Ω®∞≥®©≥¨ ª∂ "(%2 º∫¨π∫ ∂µ ªØ¨µ¨ªæ∂π≤.
share name-®¥¨ Æ∞Ω¨µ ª∂ ® ≠∞≥¨ ∫¿∫ª¨¥, ∂π π¨∫∂ºπ™¨ ∂µ ® ≠∞≥¨ ∫¿∫ª¨¥ ®Ω®∞≥®©≥¨ ≠π∂¥ ® ∑®πª∞™º≥®π "(%2 ∫¨πΩ¨πª∂ "(%2 º∫¨π∫. 3Ø¨π¨ ¥®¿ ©¨ ¥º≥ª∞∑≥¨ ∫Ø®π¨∫ æ∞ªØ ªØ¨ ∫®¥¨ µ®¥¨, ∫Ø®π¨´ ≠π∂¥ ´∞≠≠¨π¨µª "(%2∫¨πΩ¨π∫.
silvering
See initialization.
snapshot&¨µ¨π∞™ ª¨π¥ ≠∂π ® ∑∂∞µª-∞µ-ª∞¥¨ ™∂∑¿ ∂≠ ´®ª®.
source object3ب ∑π∂´º™ª∞∂µ ´®ª® ©¨∞µÆ ™∂∑∞¨´. ≥∫∂ ≤µ∂æµ ®∫ ªØ¨ /π∂´º™ª∞∂µ %∞≥¨ 2¿∫ª¨¥, ∑π∂´º™ª∞∂µ +4-,®µ´ ∑π∞¥®π¿ ≠∞≥¨ ∫¿∫ª¨¥. 1¨∑≥∞™®ª∂π ∫∂ºπ™¨ ∂©±¨™ª∫ ®π¨ ≠∞≥¨ ∫¿∫ª¨¥∫, ∞2"2( +4-2, ®µ´ 5∞πªº®≥#®ª® ,∂Ω¨π∫ (5#,).
Using VNX Replicator 219
Glossary

source VNX for file3¨π¥ ≠∂π ªØ¨ ≥∂™®≥ (∑π∞¥®π¿) 5-7 ≠∂π %∞≥¨. ∫∂ºπ™¨ 5-7 ≠∂π ≠∞≥¨ ∞∫ ª¿∑∞™®≥≥¿ ªØ¨ ∑π∂´º™ª∞∂µ∫∞´¨ ∂≠ ® ´∞∫®∫ª¨π π¨™∂Ω¨π¿ 21#%/2 ∂π ,∞ππ∂π5∞¨æ/2 ™∂µ≠∞ƺπ®ª∞∂µ.
storage pool&π∂º∑∫ ∂≠ ®Ω®∞≥®©≥¨ ´∞∫≤ Ω∂≥º¥¨∫ ∂πÆ®µ∞¡¨´ ©¿ 5, ªØ®ª ®π¨ º∫¨´ ª∂ ®≥≥∂™®ª¨ ®Ω®∞≥®©≥¨ ∫ª∂π®Æ¨ª∂ ≠∞≥¨ ∫¿∫ª¨¥∫. 3ب¿ ™®µ ©¨ ™π¨®ª¨´ ®ºª∂¥®ª∞™®≥≥¿ ©¿ 5, ∂π ¥®µº®≥≥¿ ©¿ ªØ¨ º∫¨π.
See also Automatic volume management (AVM)
switchover1¨∑≥∞™®ª∞∂µ ∂∑¨π®ª∞∂µ ªØ®ª ∫µ¿™Øπ∂µ∞¡¨∫ ªØ¨ ´¨∫ª∞µ®ª∞∂µ ∂©±¨™ª æ∞ªØ ªØ¨ ∫∂ºπ™¨, ∫ª∂∑∫ ªØ¨π¨∑≥∞™®ª∞∂µ æ∞ªØ µ∂ ´®ª® ≥∂∫∫, ®µ´ ªØ¨µ ¥∂ºµª∫ ªØ¨ ´¨∫ª∞µ®ª∞∂µ ∂©±¨™ª π¨®´/æπ∞ª¨ ®µ´ ªØ¨ ∫∂ºπ™¨∂©±¨™ª π¨®´-∂µ≥¿.
T
thin provisioning"∂µ≠∞ƺπ®©≥¨ 5-7 ≠∂π %∞≥¨ ≠¨®ªºπ¨ ªØ®ª ≥¨ª∫ ¿∂º ®≥≥∂™®ª¨ ∫ª∂π®Æ¨ ©®∫¨´ ∂µ ≥∂µÆ-ª¨π¥ ∑π∂±¨™ª∞∂µ∫,æØ∞≥¨ ¿∂º ´¨´∞™®ª¨ ∂µ≥¿ ªØ¨ ≠∞≥¨ ∫¿∫ª¨¥ π¨∫∂ºπ™¨∫ ªØ®ª ¿∂º ™ºπ𨵪≥¿ µ¨¨´. -%2 ∂π "(%2 ™≥∞¨µª∫®µ´ ®∑∑≥∞™®ª∞∂µ∫ ∫¨¨ ªØ¨ Ω∞πªº®≥ ¥®ø∞¥º¥ ∫∞¡¨ ∂≠ ªØ¨ ≠∞≥¨ ∫¿∫ª¨¥ ∂≠ æØ∞™Ø ∂µ≥¿ ® ∑∂πª∞∂µ ∞∫∑Ø¿∫∞™®≥≥¿ ®≥≥∂™®ª¨´.
See also Automatic Volume Management.
throttle schedule2¨¨ ©®µ´æ∞´ªØ ∫™Ø¨´º≥¨.
time out of sync,®ø∞¥º¥®¥∂ºµª ∂≠ ª∞¥¨ ∞µ¥∞µºª¨∫ (11440), ∂π Ø∂ºπ∫ ªØ®ª ªØ¨ ∫∂ºπ™¨ ∂©±¨™ª ®µ´ ªØ¨ ´¨∫ª∞µ®ª∞∂µ∂©±¨™ª ∞µ ® π¨∑≥∞™®ª∞∂µ ∫¨∫∫∞∂µ ™®µ ©¨ ∂ºª ∂≠ ∫¿µ™Øπ∂µ∞¡®ª∞∂µ ©¨≠∂π¨ ®µ º∑´®ª¨ ∞∫ ∑¨π≠∂π¥¨´.
V
Virtual Data Mover (VDM)5-7 ≠∂π ≠∞≥¨ ∫∂≠ªæ®π¨ ≠¨®ªºπ¨ ªØ®ª ¨µ®©≥¨∫ º∫¨π∫ ª∂ ®´¥∞µ∞∫ªπ®ª∞Ω¨≥¿ ∫¨∑®π®ª¨ "(%2 ∫¨πΩ¨π∫,π¨∑≥∞™®ª¨ "(%2 ¨µΩ∞π∂µ¥¨µª∫, ®µ´ ¥∂Ω¨ "(%2 ∫¨πΩ¨π∫ ≠π∂¥ ∂µ¨ #®ª® ,∂Ω¨π ª∂ ®µ∂ªØ¨π.
W
writeable snapshot1¨®´-æπ∞ª¨, ∑∂∞µª-∞µ-ª∞¥¨, ≥∂Æ∞™®≥ ∞¥®Æ¨ ∂≠ ® /%2 ™π¨®ª¨´ ≠π∂¥ ® π¨®´-∂µ≥¿ (©®∫¨≥∞µ¨) ∫µ®∑∫Ø∂ª.
See also Production File System.
220 Using VNX Replicator
Glossary

Index
C
cautionsUnicode to ASCII replication 17
commandsnas_cel, resuming interconnect 169nas_replicate, deleting 133, 134nas_replicate, refreshing 132nas_replicate, reversing 140nas_replicate, starting 136, 137, 138, 139nas_replicate, starting in the reverse direction138nas_replicate, stopping 135server_sysstat, monitor memory usage 60
D
deleting replication 133, 134
E
EMC E-Lab Navigator 192error messages 192
F
file system copy 22replication 22
file system replication 22
I
interconnectconfiguration elements 37resuming data transmission 169using name service interface names 58validating 169
interfacelisting 37
IP aliasing 60
L
local replication 12, 21log files 192loopback replication 21
M
manual refresh 43max_time_out_of_sync
using 132messages, error 192
N
nas_copy 22, 42nas_fs, monitoring file systems 172nas_replicate
monitoring replication sessions 172
O
one-to-many replication configuration 27outages
managing 188
R
refresh policy 43remote replication 12, 21
system requirements 12replication 22, 23, 27, 45, 132, 133, 134, 140
deleting 133, 134
Using VNX Replicator 221

replication (continued)file system 22one-to-many 27refreshing 132reversing 140starting a replication session 45VDM 23
replication types 20, 21local replication 21loopback replication 21remote replication 21
replicationsreplication types 20source objects 21
restrictionssystem 13
reversing replicationmaintenance procedure 140
S
server_df, monitoring file systems 172server_sysstat, monitoring replication 172source objects 24start
start (continued)stopped replication 45
systemrequirements 12restrictions 13
system requirements 12
T
troubleshooting 191
U
update policymanual 44max_time_out_of_sync 44
updating the destination 43
V
VDM replication 23VNX Replicator 12, 13, 59, 192
log files 192planning 59restrictions 13
222 Using VNX Replicator
Index